VxWorks Research Project Setup Overview Ngan Tom Nguyen Huynh Project mentor: Dr. J. Zalewski Florida Gulf Coast University Fort Myers, Florida May 31, 2013

Welcome message from author
This document is posted to help you gain knowledge. Please leave a comment to let me know what you think about it! Share it to your friends and learn new things together.
Transcript

VxWorks Research Project
Setup Overview
Ngan Tom Nguyen Huynh
Project mentor: Dr. J. Zalewski
Florida Gulf Coast University
Fort Myers, Florida
May 31, 2013
N g u y e n H u y n h | 2
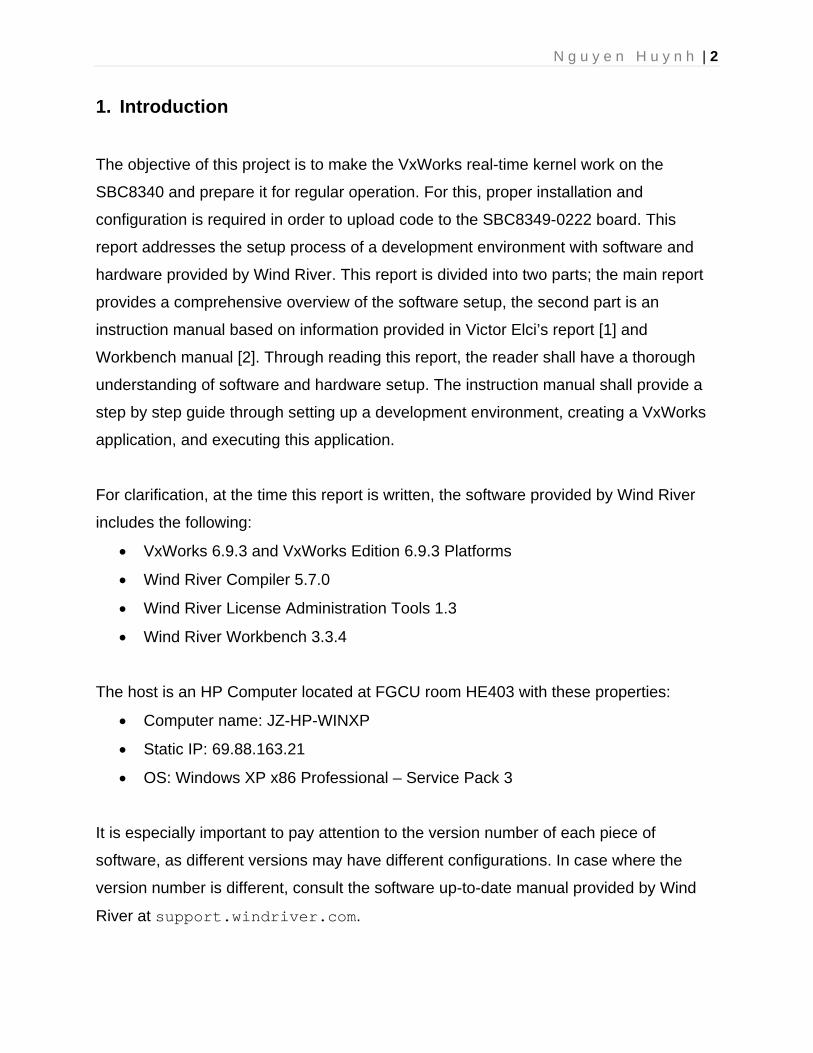
1. Introduction
The objective of this project is to make the VxWorks real-time kernel work on the
SBC8340 and prepare it for regular operation. For this, proper installation and
configuration is required in order to upload code to the SBC8349-0222 board. This
report addresses the setup process of a development environment with software and
hardware provided by Wind River. This report is divided into two parts; the main report
provides a comprehensive overview of the software setup, the second part is an
instruction manual based on information provided in Victor Elci’s report [1] and
Workbench manual [2]. Through reading this report, the reader shall have a thorough
understanding of software and hardware setup. The instruction manual shall provide a
step by step guide through setting up a development environment, creating a VxWorks
application, and executing this application.
For clarification, at the time this report is written, the software provided by Wind River
includes the following:
VxWorks 6.9.3 and VxWorks Edition 6.9.3 Platforms
Wind River Compiler 5.7.0
Wind River License Administration Tools 1.3
Wind River Workbench 3.3.4
The host is an HP Computer located at FGCU room HE403 with these properties:
Computer name: JZ-HP-WINXP
Static IP: 69.88.163.21
OS: Windows XP x86 Professional – Service Pack 3
It is especially important to pay attention to the version number of each piece of
software, as different versions may have different configurations. In case where the
version number is different, consult the software up-to-date manual provided by Wind
River at support.windriver.com.

N g u y e n H u y n h | 3
2. Hardware Configuration and Software Setup
First, it is important to understand the general hardware configuration. Figure 1 provides
the graphical view of the hardware setup. License Administrator and Developer Machine
could be the same computer.
Wind River enforces a strict licensing policy. License information must be verified before
software installation or software usage. The licensing verification and product key
verification during software installation is summarized in Figure 2. License verification
during software usage is summarized in Figure 3. WRSLicense.lic and
install.txt are located in the installation directory of Wind River software.
Figure 1 - Hardware Configuration
License Administrator
Developer Machine
SBC8349-0222
Serial connection
Internet
Ethernet connection

N g u y e n H u y n h | 4
Figure 2 - License and Product Key Verification during Installation of Wind River software
Developer Machine
transfer
Wind River Developer’s Applications
verify Product Key
install.txt
install
verify license
www.windriver.com/licensing License Administrator
WRSLicense.lic
install
download
generate
License Admin. Toolinstall.txt
N g u y e n H u y n h | 5
Before uploading code to device SBC8349-0222, proper connections must be
configured. Figure 4 summarizes the connections required between the “host” and the
“target”. A serial connection, COM1, is used to communicate with the SBC8349-0222
board. Through COM1, the host can send commands and receive feedback. COM1 and
the Ethernet connection are independent of each other.
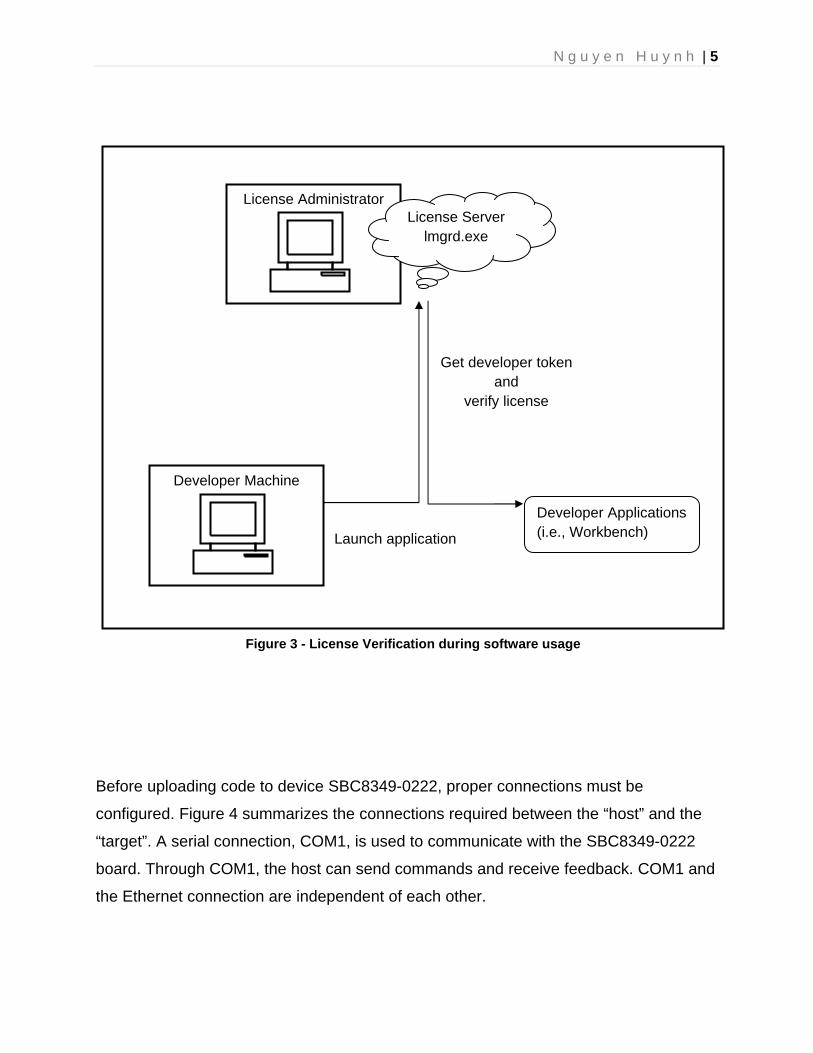
License Administrator License Server
lmgrd.exe
Get developer token and
verify license
Developer Applications (i.e., Workbench) Launch application
Developer Machine
Figure 3 - License Verification during software usage

N g u y e n H u y n h | 6
SBC8349-0222
Internet
Host Target
Ethernet
Serial (COM1)
Figure 4 - Actual Host – Target Setup
Developer Machine
IP - 69.88.163.21 IP - 69.88.163.22
FTP Server - wftpd.exe VxWorks boot image
N g u y e n H u y n h | 7
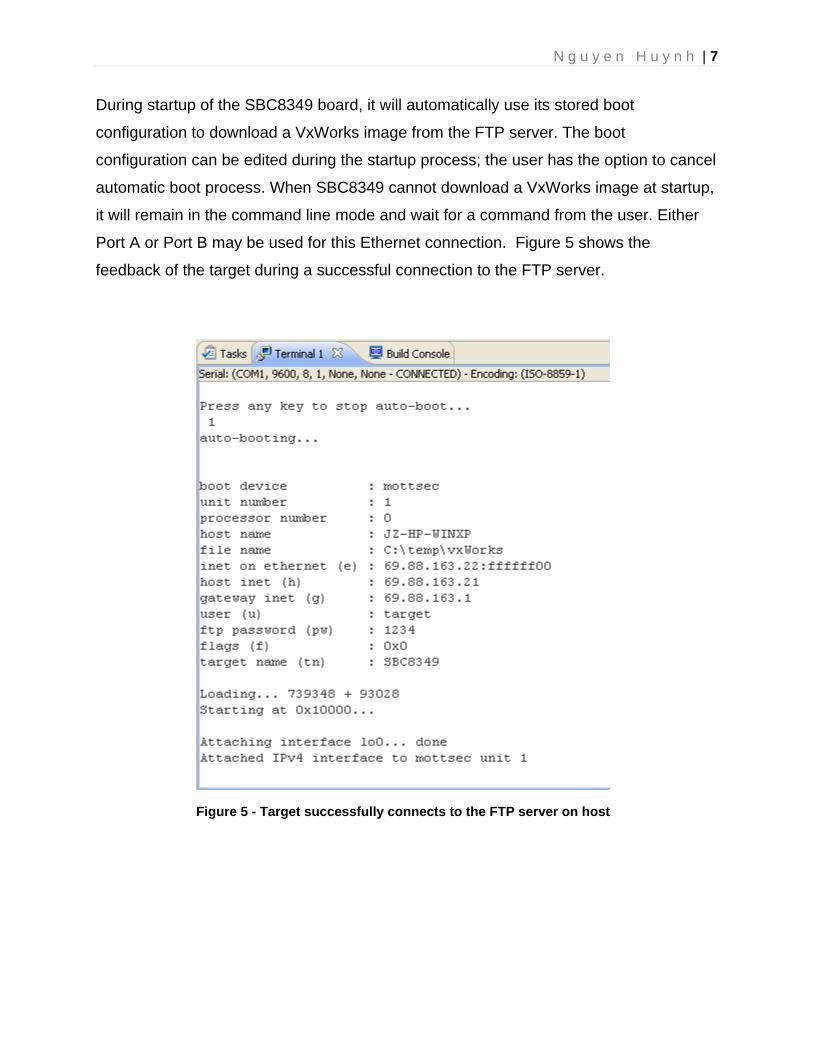
During startup of the SBC8349 board, it will automatically use its stored boot
configuration to download a VxWorks image from the FTP server. The boot
configuration can be edited during the startup process; the user has the option to cancel
automatic boot process. When SBC8349 cannot download a VxWorks image at startup,
it will remain in the command line mode and wait for a command from the user. Either
Port A or Port B may be used for this Ethernet connection. Figure 5 shows the
feedback of the target during a successful connection to the FTP server.
Figure 5 - Target successfully connects to the FTP server on host

N g u y e n H u y n h | 8
Once the connection to the FTP server is made, the VxWorks image will be flashed onto
SBC8349 board. Figure 6 shows the feedback of the SBC8349 after the VxWorks
image is flashed and VxWorks Kernel is ready to run VxWorks application.
Figure 6 - VxWorks Kernel is ready to run applications

N g u y e n H u y n h | 9
In case where the target failed to connect to the server, the target will provide a
reference error number. Figure 7 shows one of the possible errors; this error was
caused by the target’s Ethernet connection failed. When this fail connection occurs, the
target stays at “Loading…” for minutes before sending the error message. In this
particular case, Error 0x33 was resolved after the connection was switched to the
second Ethernet port.
To verify the Ethernet connection, the ping command in Windows’ Command
Prompt may be used. The connection could fail even if the wire is properly
connected to its port. Try both ports to ensure it is not a network error.
Figure 7 - Target failed to connect to the FTP server
N g u y e n H u y n h | 10
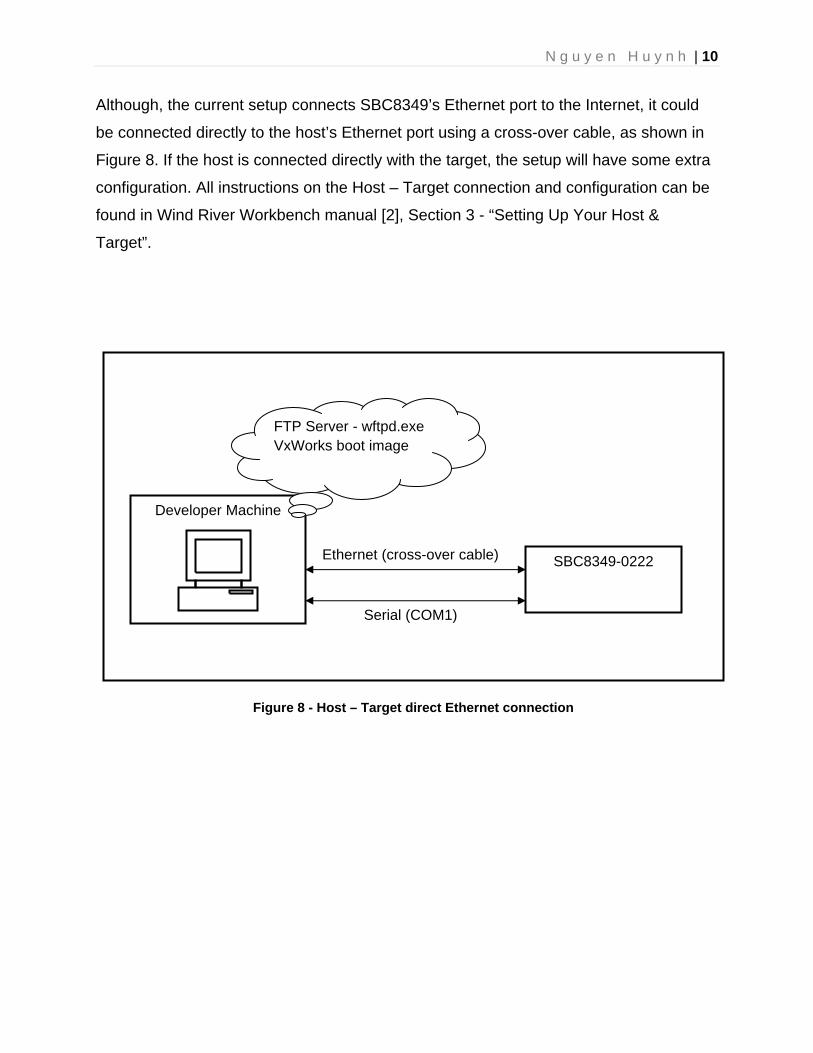
Although, the current setup connects SBC8349’s Ethernet port to the Internet, it could
be connected directly to the host’s Ethernet port using a cross-over cable, as shown in
Figure 8. If the host is connected directly with the target, the setup will have some extra
configuration. All instructions on the Host – Target connection and configuration can be
found in Wind River Workbench manual [2], Section 3 - “Setting Up Your Host &
Target”.
Serial (COM1)
Developer Machine
Ethernet (cross-over cable) SBC8349-0222
FTP Server - wftpd.exe VxWorks boot image
Figure 8 - Host – Target direct Ethernet connection

N g u y e n H u y n h | 11
Once setup has been completed, the process of running a VxWorks application from
Wind River Workbench can be visualized through the flowchart shown in Figure 9.
Yes
No No
Yes
No
Start
Run Workbench
Launch VxWork Application
Flash VxWorks Image
Connect to FTP Server
Connect to SBC8349
Is License Valid?
Is License Server
running?
Yes
Figure 9 - Processes of launching a VxWorks Application
Fix the License
Fix the connection
Is COM1 connection
established?
End
Fix the connection
Yes No Is Ethernet connection
established?
No
Yes
Is VxWorks Kernel
running?

N g u y e n H u y n h | 12
3. Troubleshooting
At the time of setup, especially during reinstallation or software upgrade, several
errors may occur. Two typical errors are described below.
3.1. ProvisionException
Condition:
1) Start Workbench 3.3.4
2) Program crashed and an error log was created at $(HOME), or
C:\Document and Settings\youraccountname\.workbench*
Within the log file, many eclipse plugin cannot be found causing Eclipse
component p2 to throws the ProvisionException. This exception was caused by
improper setup of license server. The Developer Machine was not able to verify
the license.
Solution:
1) In the Appendix section, locate Section 1. Installation and Configuration of the
License Server on the License Administrator machine and double check each
instruction was performed correctly.
2) In the Appendix section, locate Section 2. Installation and Configuration on
the Developer machine, step 4, and ensure it was performed correctly.
3) Ensure the License Server is running
4) If no problem can be detected, reinstall the License Server.
3.2. Runtime exception - com.windriver.ide.UnifiedSWTSwingApplication
Condition:
1) Start Workbench 3.3.4
2) Program crashed and an error log was created at $(HOME), or
C:\Document and Settings\youraccountname\.workbench*
N g u y e n H u y n h | 13
Within the log file, a run time exception was thrown because Eclipse could not
find com.windriver.ide.UnifiedSWTSwingApplication.
Solution: Reinstall Workbench
1) Open Product Maintenance at:
Start > All Programs > Wind River > Product Maintenance
2) Choose option Remove (this is equivalent to Uninstall)
3) Unselect ALL checkboxes
4) Manually check all components under Wind River Workbench
(Some content are “shared” with other Wind River software, manually
selecting checkboxes, ensure the shared component will be selected under
linked software)
5) Return to the homepage of Product Maintenance.
6) Choose option Online Content
7) Follow onscreen instruction and install the latest Workbench version.
Exceptions and errors condition can be generally looked in the Wind River VxWorks
Knowledge Base at support.windriver.com.

N g u y e n H u y n h | 14
4. Conclusion
Wind River provides thorough documentation of their software. It is advantageous to
understand how they organized and structured their manuals. Since VxWorks have a
small user base, it may be difficult to find solutions through Google. Also, with Wind
River provided proprietary software, the Wind River VxWorks user base is even smaller.
Problem arising from setup may be best solved by consulting corresponding software
manual.
One advantage of having an active Wind River license is their customer support. Wind
River provides support for their active contractor at support.windriver.com. At
their support site, there is a database containing software issues, a knowledge forum for
questions, and a Technical Support Manager. If problems arise during setup, a
Technical Support Request (TSR) may be submitted.

N g u y e n H u y n h | 15
5. References
[1] Elci, Victor. 2008. SBC 8349E Web Access For vxWorks Development via Wind
River WorkBench 3.0. Florida Gulf Coast University. Fort Myers, FL. April 25, 2008.
[2] Wind River. Workbench by Example 3.3.
https://support.windriver.com/olsPortal/download?docId=42618 (May 21, 2013)

N g u y e n H u y n h | 16
Appendix
Instruction Manual of Setup Wind River Development Software and Create
and Execute VxWorks 6.9 Application
Ngan Tam Nguyen Huynh
Project mentor: Dr. J. Zalewski
Florida Gulf Coast University
Fort Myers, Florida
May 31, 2013
N g u y e n H u y n h | 17
1. Installation and Configuration of the License Server on the License Administrator
machine (if not done already)
Before using Wind River development software, the License Server must be installed and
configured.
1.1. Obtain a License File:
1) Navigate to website http://www.windriver.com/licensing/
2) Login with User ID and Password provide by Dr. Zalewski
3) Click Manage License on the webpage header
4) Find an option to generate a license file. If the product has never been registered,
License Administrator Token (LAT) and License Authorization Code (LAC) will
be needed. It is located inside the License Administration Kit from the original
shipping package.
5) Download the generated license file.
6) Follow the instruction at the provided website to store this generated license file.
https://support.windriver.com/ols/license/faqs.php?topic=setup
#1
1.2. Install License Administration Tools:
1) Obtain the License Administrator Kit – this kit came with the original shipping
package
2) Follow the License Administrator Install Guide
After installation, the License Server can be found at
$(WindRiver Installation Directory)/licadmintools*
Inside this directory, there should be an executable file lmtools.exe; it is a program
written to manage the License Server configuration. In the same location, another file
called lmgrd.exe can be found; this file is the license server.

N g u y e n H u y n h | 18
1.3. License Server Configuration
1) Run lmtools.exe.
a. On the keyboard, enter command WinKey + R.
b. Type in lmtools.exe.
c. Click OK
Note: If Windows Run cannot failed to find the find, check for the file at
$(WindRiver Installation Directory)/licadmintools*/
2) On the Server/License File tab, make sure Configuration using Services is
selected.
3) On the Config Services tab, set the path to the lmgrd.exe file (usually something
like “C:\WindRiver\licadmintools-1.2\license\x86-win32\bin\lmgrd.exe”)
4) On the Config Services tab, set the path to where the license file generated from
section 2.1 is stored.
5) On the System Settings tab, fill in Computer/Hostname, Username, IP Address,
Ethernet Address, and Disk Volume Serial Number if they have not already been
filled in.
6) On the Start/Stop/Reread tab, click Start Server.
Note: Once the License Server is installed and configured, lmgrd.exe run
automatically when the License Administrator computer starts

N g u y e n H u y n h | 19
2. Installation and Configuration on the Developer machine (if not done already)
1) Obtain the Developer Kit – this kit came with the original shipping package
2) Obtain file install.txt from the License Adminstrator Machine; this file was
generated after completion of section 2.2.
3) Use the Developer Install Guide as a reference; install Workbench, VxWorks, and
Wind River Compiler.
4) After Wind River software installation complete, follow the link provided to ensure this
Developer machine has access to the License File on the License Administrator
machine.
https://support.windriver.com/ols/license/faqs.php?topic=setup#1
Step 4 is extremely important. Wind River software will not operate properly unless the
Developer has access to the License File generated in section 2.1. For developing VxWorks
application, it is recommended that the “C Development Toolkit” for Eclipse is also installed.
3. Turn on SBC8349 and connect wires
1) Ensure SBC8349 receive power. There are two power buttons. The main switch is
located on the side control the power adapter. In front, there is a power button which
control the power feed to the SBC board.
2) Connect one end of the Ethernet cable to SBC8349 Port A, and the other end to the
Internet port (i.e. router or in case of HE403 Lab, a wall port)
Note: the developer computer can act as a License and FTP server which means the
SBC board can connect the developer computer directly. This would require a cross-
over Ethernet cable. It is recommended to connect the SBC8349 to the Internet, and
use the license server and FTP server located at 69.88.163.21.
3) Connect serial cable to SBC8349’s COM1 port and the developer computer serial
port.
N g u y e n H u y n h | 20
4. Configure FTP server and user access
1) Start up a FTP server on your computer. It should be installed along with Wind River
VxWorks 6.9 and Platform tools. Click Start > All Programs > Wind River > VxWorks
6.9 * > FTP Server.
2) Go to Security -> Users/Rights to set up an account for the SBC to access the FTP
server.
3) A previous user account may be used, or create a new one. To create new user, click
New User, and input the user name. For example, I entered “target”.
4) Home Directory should be where the VxWorks image is located. The vxWorks image
should be available off the CD that comes with the board. If that has been lost, then
they should also be available off the Wind River website.
Note: In HE403 computer JZ-HP-WINXP has a vxWorks image available inside
C:\Temp.
5) Set a password.
Note: In HE403 computer JZ-HP-WINXP , the current password for username “target” is
“1234”. This may not be reliable since the host computer is used by multiple users with
admin access.
6) Next go to Logging -> Log Options and check everything except “Winsock Calls”. This
will help debugging connection problems later on.
N g u y e n H u y n h | 21
5. Configure the target board settings and load the VxWorks image onto it using the
terminal (via the serial port)
1) Start up the Workbench software
2) Ensure the computer in use has a serial connection to SBC8349.
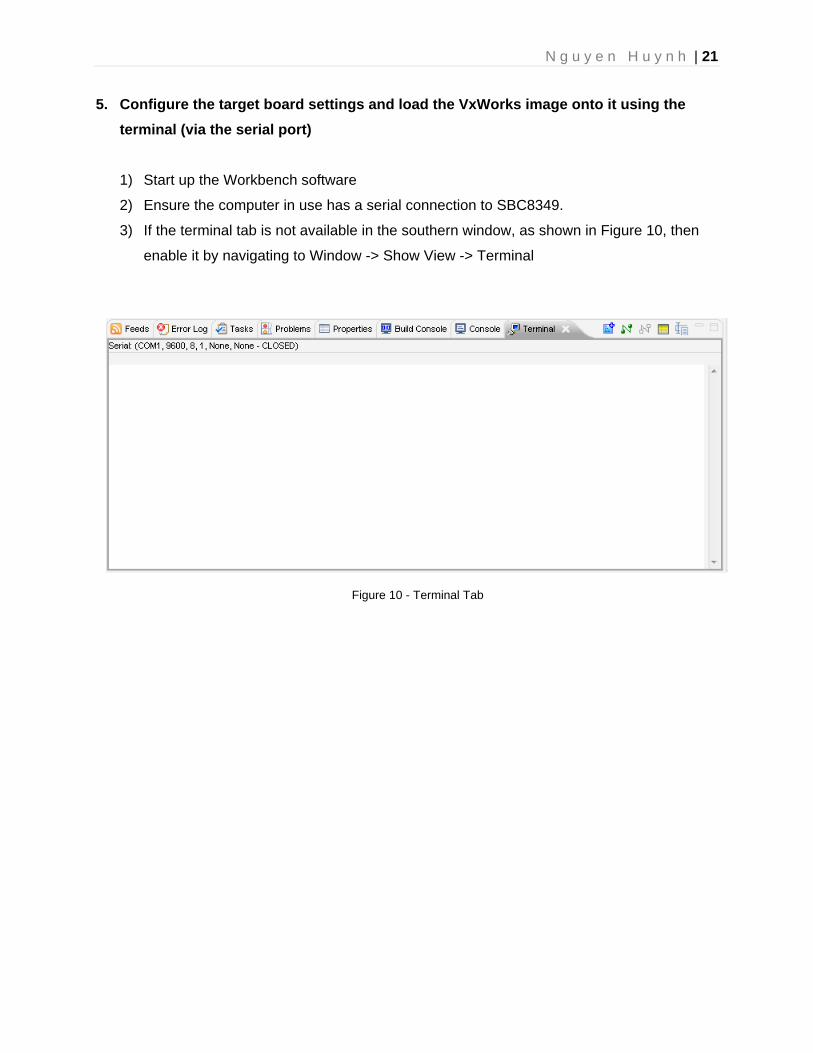
3) If the terminal tab is not available in the southern window, as shown in Figure 10, then
enable it by navigating to Window -> Show View -> Terminal
Figure 10 - Terminal Tab
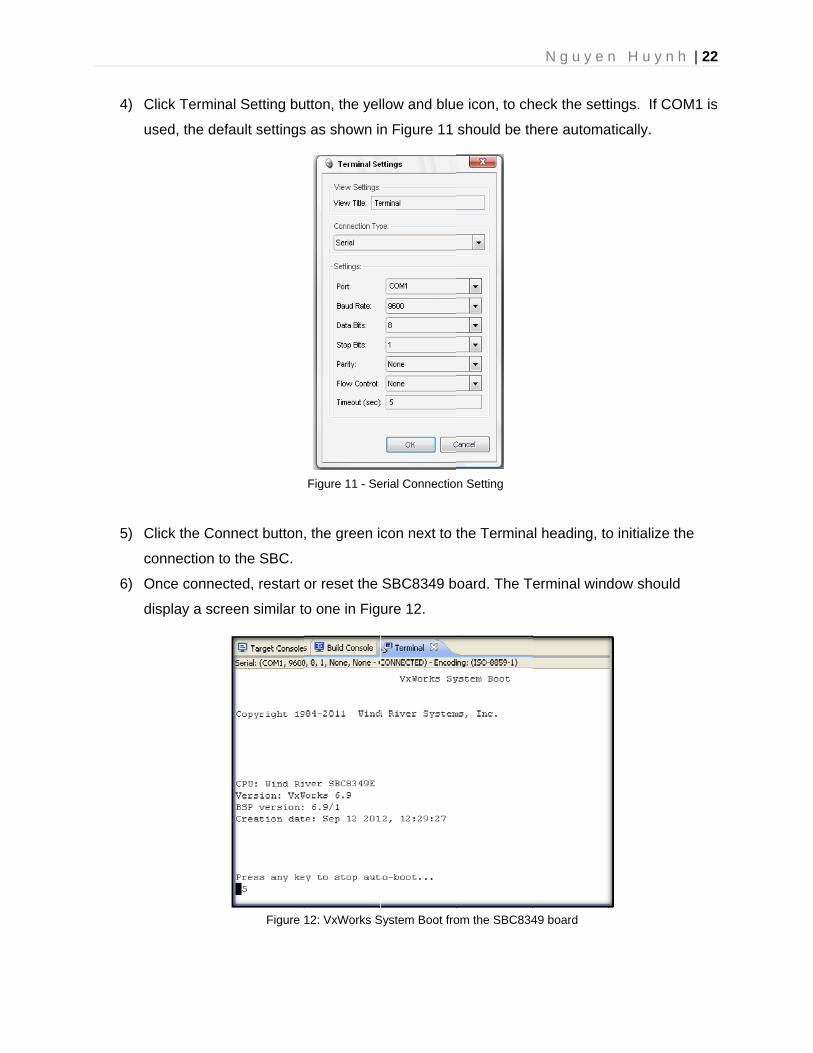
4) C
u
5) C
co
6) O
d
Click Termina
sed, the def
Click the Con
onnection to
Once connec
isplay a scre
al Setting bu
fault settings
nnect button
o the SBC.
cted, restart
een similar t
Figure
utton, the yel
s as shown i
, the green i
or reset the
o one in Fig
12: VxWorks S
Figure 11 - Se
llow and blu
n Figure 11
con next to t
SBC8349 b
ure 12.
System Boot fro
erial Connectio
e icon, to ch
should be th
the Termina
oard. The T
om the SBC834
n Setting
N g u y e
heck the sett
here automa
al heading, to
erminal wind
49 board
n H u y n h
tings. If COM
atically.
o initialize th
dow should
h | 22
M1 is
he

N g u y e n H u y n h | 23
6. Boot Menu Configuration
The SBC8349 board needs to download a VxWorks image each time it is powered on; it will
connect to an FTP server to download this VxWorks image. The boot configuration contains
the network setting for this FTP server. During startup, either a previous configuration will be
automatically loaded, or the user can cancel the automation process to set a new
configuration. A few useful commands to know are in Figure 13. Within the terminal, a more
detailed list of command can be obtained by typing command “?” or “h” without the quotation
marks.
1) Type command “h” in the terminal and press enter. Check available boot devices.
Note: the SBC listed mottsec0 and mottsec1, at the time this documentation is written.
Each device has its own MAC Address.
2) Type c in the terminal to modify the boot parameters.
a. Boot device: mottsec0 or mottsec1
b. Host name: name of the computer hosting the vxWorks image (i.e. JZ-HP-WINXP)
c. File name: complete filepath to the the vxWorks image including the file name (i.e.
from Section 4. - C:\Temp\ vxWorks)
d. Inet on Ethernet: the IP address of the SBC board.
Note: Depends on the hardware setup, the primary goal of this IP Address is to
allow the SBC8349 board to communicate with the Developer machine. IP Address
is different when the two devices is connected within a LAN as oppose to the
Internet. In Lab HE 403, this SBC8349 board use IP: 69.88.163.22:ffffff00
e. Inet on Backplane: not used unless the SBC is mounted on a rack.
? – print the list of commands h – print a detailed list of commands p – print boot parameters c – change boot parameters @ – load vxWorks image and boot
Figure 13 - Common Boot Menu Commands

f
g
h
i
j
3) T
va
fla
N
a
u
f. Host Ine
g. Gateway
Start > R
h. User: the
. FTP pas
. The rest
the targe
HP-WINX
Type in @ the
alues. If corr
ashed, Term
Note: At this s
s shown in F
sername an
et: the IP add
y Inet: the D
Run… > Ope
e username
ssword: the
of the fields
et is arbitrary
XP”.
e terminal to
rect parame
minal window
stage, there
Figure 7. Ma
nd password
dress of the
Default Gatew
en “cmd” > ex
of the ftp ac
password fo
s may be left
y. Figure 14
o load and bo
ter values a
w should disp
e may be loa
ake sure the
d combination
Figure 14
computer ho
way of the D
xecute comm
ccount set up
or the User a
t blank/old va
shows the v
oot vxWorks
re entered a
play feedbac
ding errors d
FTP server
n is used.
4 - Boot Config
osting the vx
Developer ma
mand ipcon
p in Section
account in S
alues; press
values entere
s. This will va
and VxWorks
cks shown in
due to failure
r is running o
guration Details
N g u y e
xWorks imag
achine. It ca
nfig.
4.
Section 4.
s Enter to sk
ed for HE40
alidate all th
s image is s
n Figure 6.
e to connect
on the host,
s
n H u y n h
ge.
an be found b
ip. The nam
3 computer
e parameter
uccessfully
t to FTP serv
and correct
h | 24
by
e of
“JZ-
r
ver,
N g u y e n H u y n h | 25
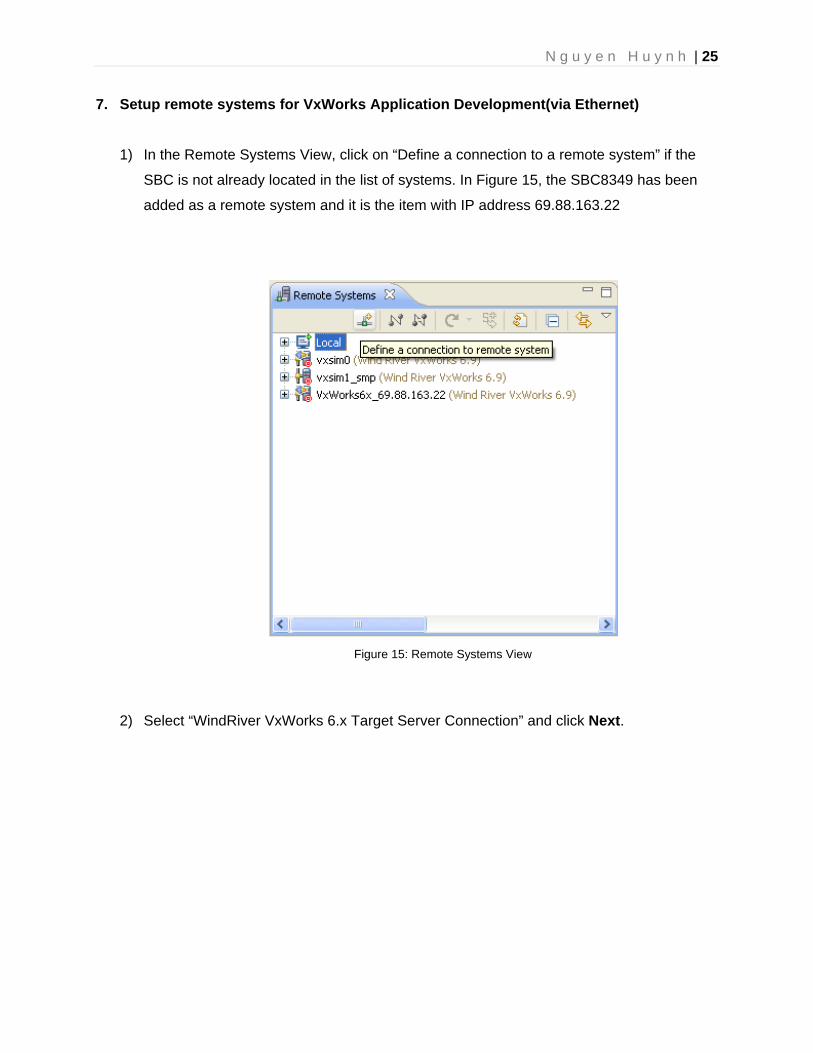
7. Setup remote systems for VxWorks Application Development(via Ethernet)
1) In the Remote Systems View, click on “Define a connection to a remote system” if the
SBC is not already located in the list of systems. In Figure 15, the SBC8349 has been
added as a remote system and it is the item with IP address 69.88.163.22
2) Select “WindRiver VxWorks 6.x Target Server Connection” and click Next.
Figure 15: Remote Systems View
N g u y e n H u y n h | 26
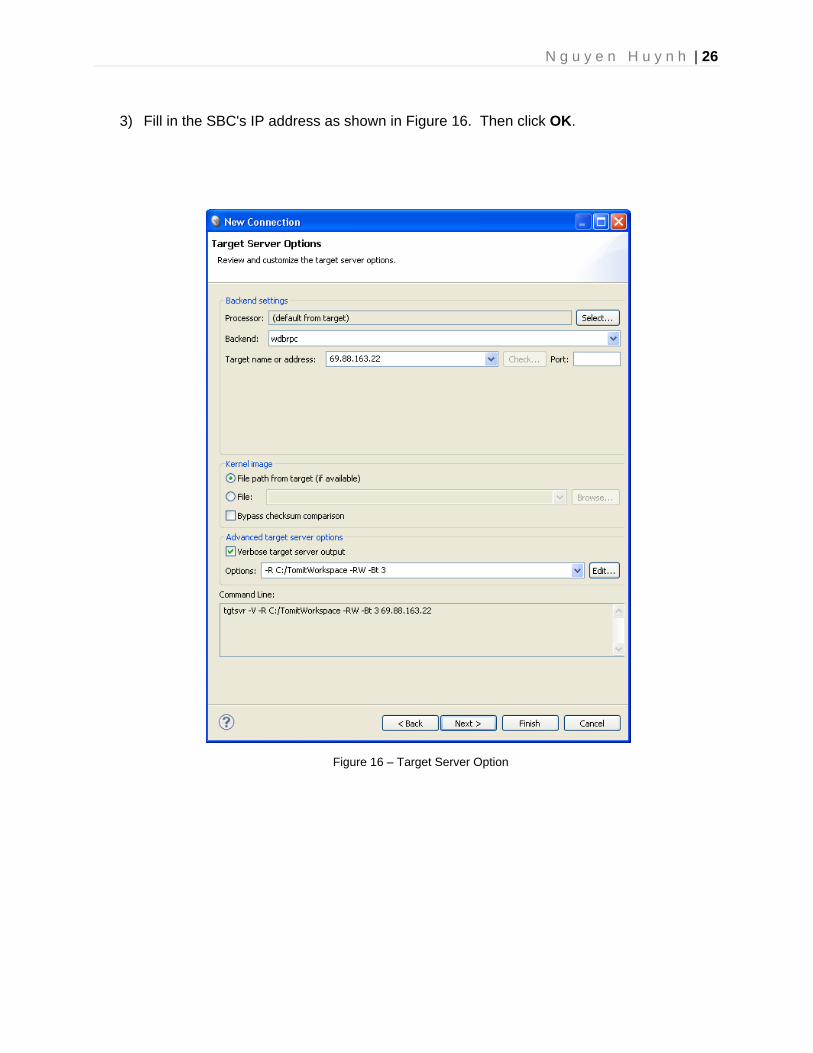
3) Fill in the SBC's IP address as shown in Figure 16. Then click OK.
Figure 16 – Target Server Option

N g u y e n H u y n h | 27
4) Once the remote system is added, and VxWorks image flashed to SBC8349, a Kernel
will be running as shown in Figure 17
Figure 17 - VxWorks Kernel running

8. Crea
1) In
2) In
th
3) E
4) C
D
5) A
kn
a
F
N
fo
o
h
te and com
n Workbench
n VxWorks 6
hen click Nex
Enter a proje
Continue to c
Defaults, Buil
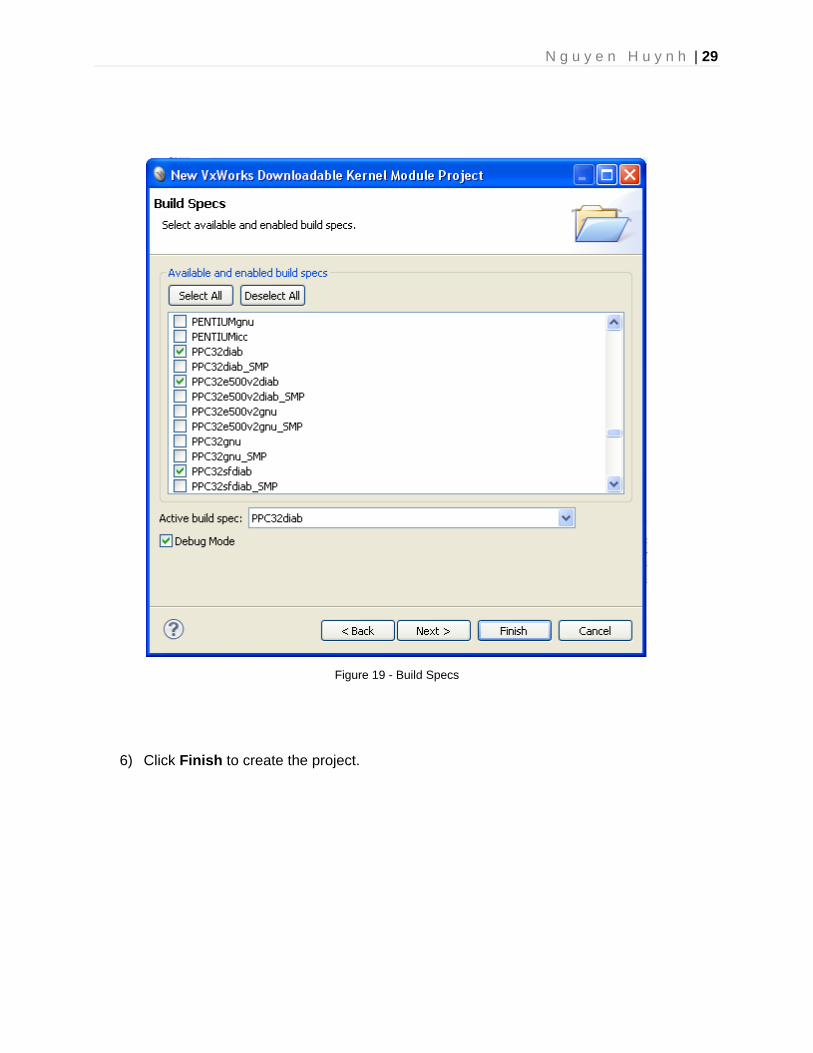
At Build Spe
nowledge in
pplication, c
igure 19.
Note: In new
or appropriat
n SBC8349.
as the build
mpile a VxWo
h, click File
6.x folder, ch
xt.
ect name (i.e
click Next lea
ld Support.
ecs, the targe
computer a
choose PPC3
workspace,
te plugins. W
. A workarou
specs varie
orks Applic
> New > Pro
hoose VxWo
e., “TimingEx
aving all sett
eted comput
architecture s
32diab, PPC
not all archi
Without the r
und is to rep
ety available.
Figure 18 - C
cation
oject... as s
orks Downlo
xample”), an
tings with de
ter architect
systems. Cli
C32sfdiab, a
itectures wil
right architec
place new wo
. Resolve to
Create new pro
hown in Figu
oadable Ker
nd click Next
efault value f
ure must be
ick Deselect
and PPC32e
ll be availabl
cture selecte
orkspace .pl
Workbench
oject
N g u y e
ure 18.
rnel Module
t
for Project S
e specified. T
t All. For mo
e500v2diab
le. Check the
ed, compiled
lugin with a
h manual for
n H u y n h
e Project, an
Structure, Bu
This requires
ost VxWorks
as shown in
e .plugin fol
d code can’t
workspace
more details
h | 28
nd
uild
s
s
n
lder
run
that
s
N g u y e n H u y n h | 29
6) Click Finish to create the project.
Figure 19 - Build Specs

7) R
a
8) G
9) D
10) B
2
N
G
Right click the
s shown in F
Give the file a
Develop code
Build/Compile
1. If build wa
Note: On the
Generate Inc
e folder of th
Figure 20.
a name (i.e.
e. A sample
e codes by r
as successfu
first build/co
clude > Next
he new proje
, “Timing.c”)
is provided
right click pro
ul, the VxWo
ompilation, W
> Next > Fin
Figur
Fig
ect in the Pro
), and click F
in Code Ref
oject folder,
orks applicat
Workbench a
nish.
re 20 - New File
ure 21 - Build P
oject Explore
Finish
ference at th
select Build
tion may be
asks to Gen
e
Project
N g u y e
er and then
he end of thi
d Project, as
executed.
erate Includ
n H u y n h
click New >
s Appendix.
shown in Fi
des. Click
h | 30
File
gure
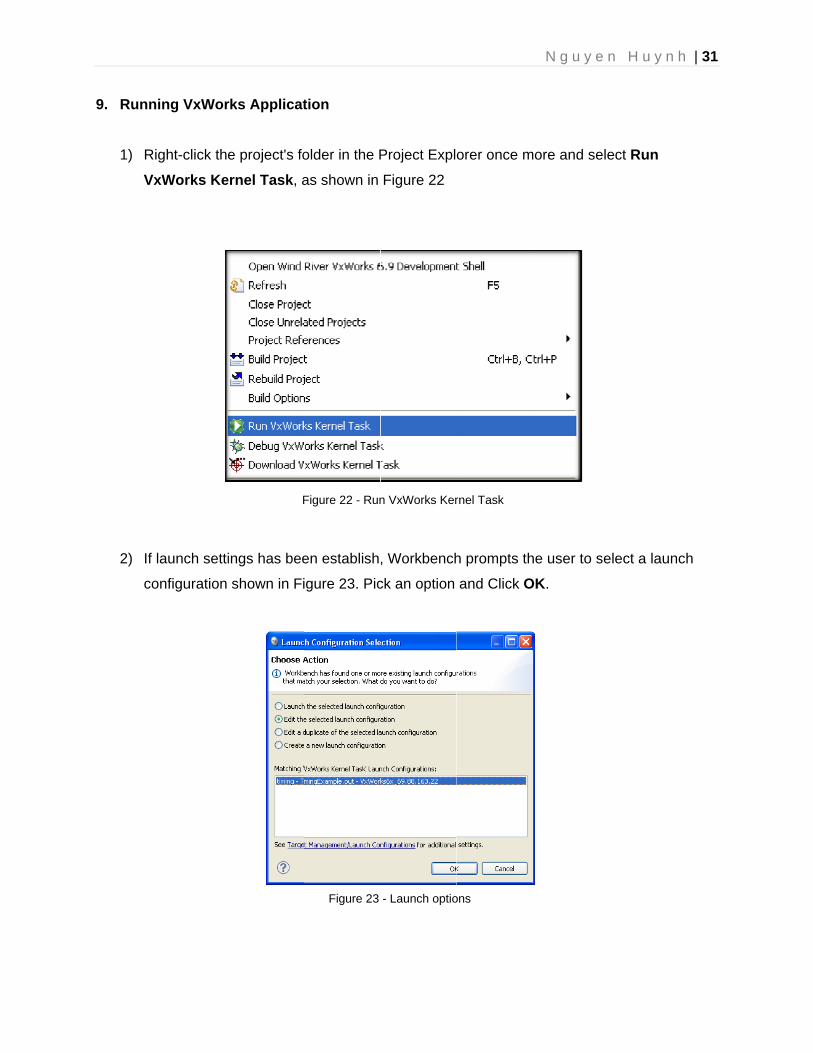
9. Runn
1) R
V
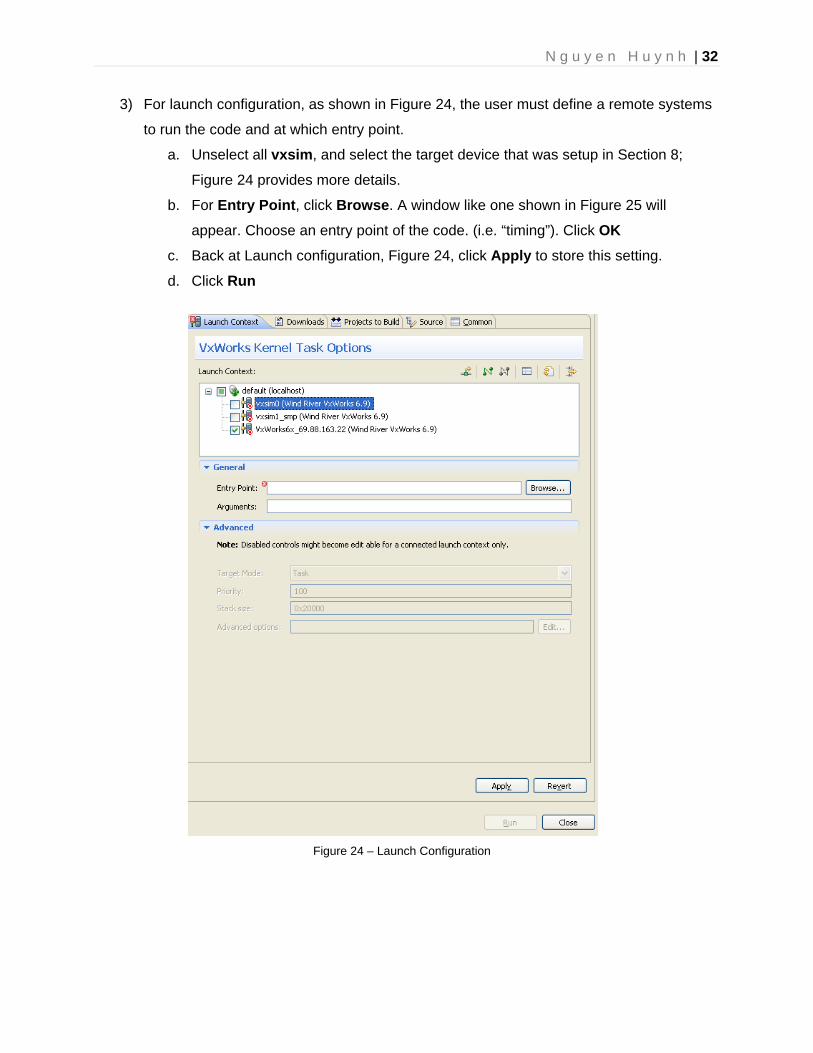
2) If
co
ning VxWor
Right-click the
VxWorks Ke
f launch setti
onfiguration
rks Applicat
e project's fo
ernel Task, a
ings has bee
shown in Fi
F
tion
older in the P
as shown in
en establish
igure 23. Pic
Figure 22 - Run
Figure 23
Project Expl
Figure 22
, Workbench
ck an option
n VxWorks Ker
- Launch optio
orer once m
h prompts th
and Click O
rnel Task
ons
N g u y e
more and sele
he user to se
OK.
n H u y n h
ect Run
elect a launc
h | 31
ch
N g u y e n H u y n h | 32
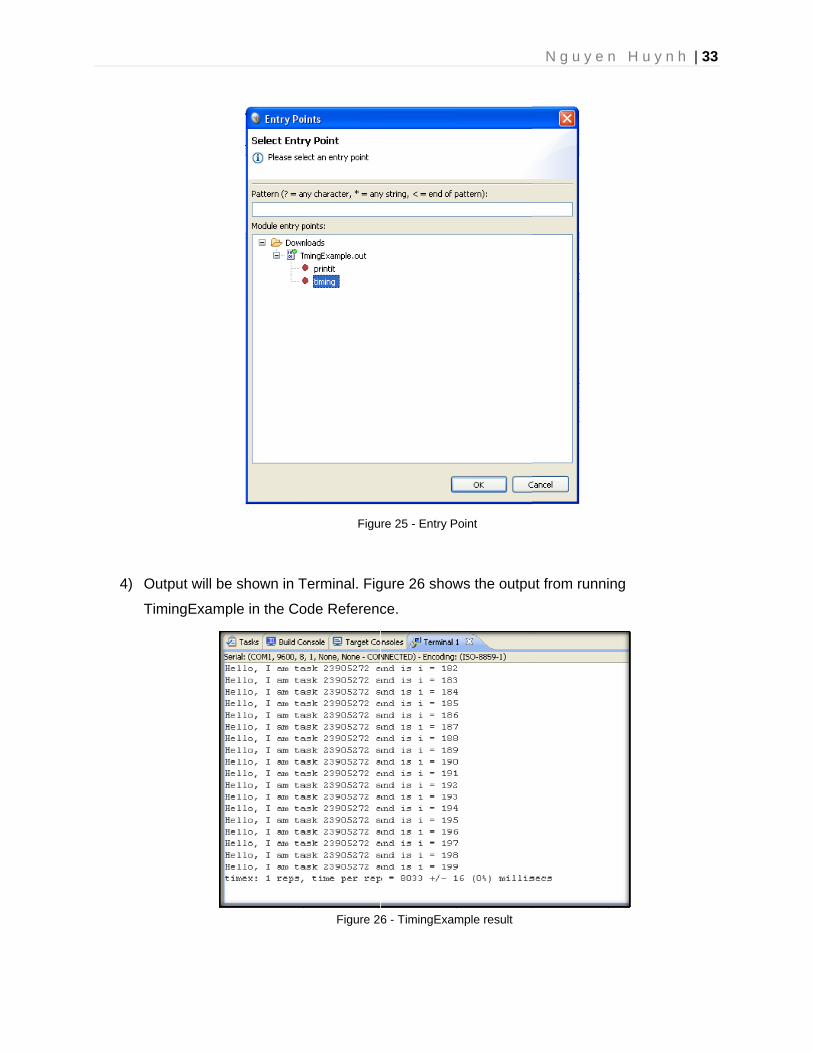
3) For launch configuration, as shown in Figure 24, the user must define a remote systems
to run the code and at which entry point.
a. Unselect all vxsim, and select the target device that was setup in Section 8;
Figure 24 provides more details.
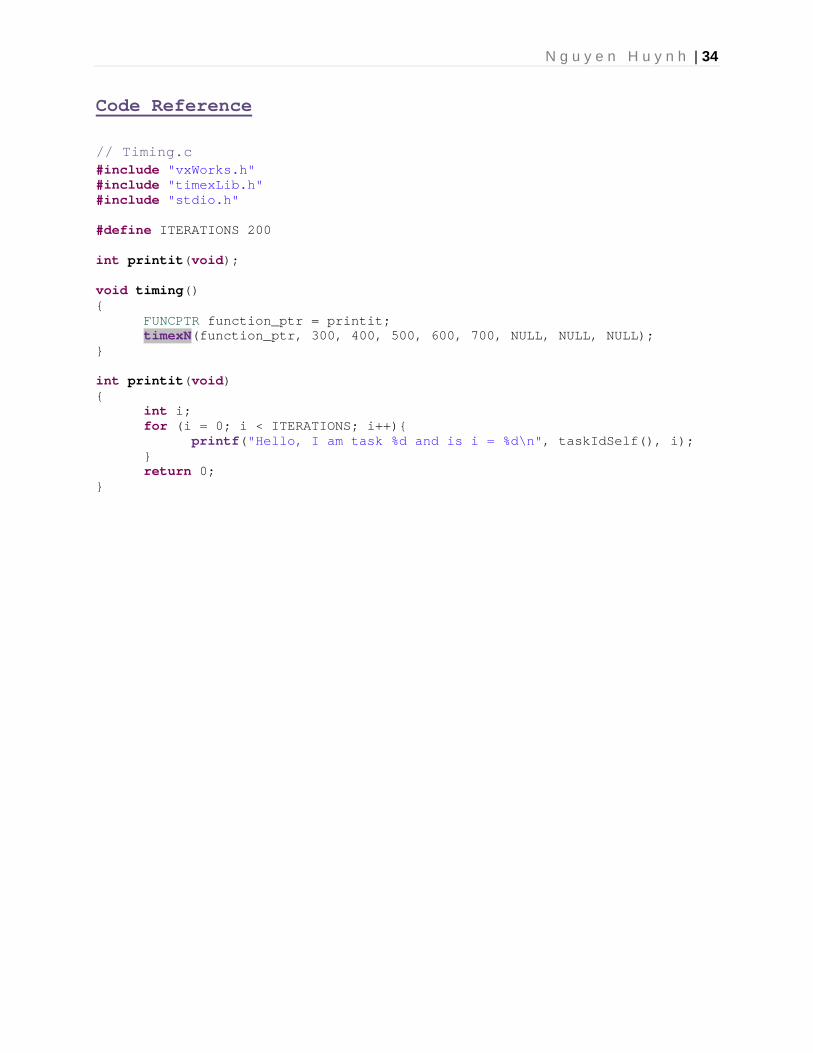
b. For Entry Point, click Browse. A window like one shown in Figure 25 will
appear. Choose an entry point of the code. (i.e. “timing”). Click OK
c. Back at Launch configuration, Figure 24, click Apply to store this setting.
d. Click Run
Figure 24 – Launch Configuration
4) O
T
Output will be
TimingExamp
e shown in T
ple in the Co
Terminal. Fig
ode Referenc
Figu
Figure 2
gure 26 show
ce.
re 25 - Entry P
6 - TimingExam
ws the outpu
Point
mple result
N g u y e
ut from runni
n H u y n h
ing
h | 33
N g u y e n H u y n h | 34
Code Reference
// Timing.c #include "vxWorks.h" #include "timexLib.h" #include "stdio.h" #define ITERATIONS 200 int printit(void); void timing() { FUNCPTR function_ptr = printit; timexN(function_ptr, 300, 400, 500, 600, 700, NULL, NULL, NULL); } int printit(void) { int i; for (i = 0; i < ITERATIONS; i++){ printf("Hello, I am task %d and is i = %d\n", taskIdSelf(), i); } return 0; }
Related Documents
![[PPT]Speed Control of a DC Motor Using Pulse-Width …itech.fgcu.edu/faculty/zalewski/CDA4170/files/Module9.ppt · Web viewTitle Speed Control of a DC Motor Using Pulse-Width Modulation](https://static.cupdf.com/doc/110x72/5add0e697f8b9a4a268d00ab/pptspeed-control-of-a-dc-motor-using-pulse-width-itechfgcuedufacultyzalewskicda4170files.jpg)