Read this manual carefully before operating this watercraft. OWNER’S/OPERATOR’S MANUAL 2017 WaveRunner VX / VX Deluxe VX Cruiser VX Limited F4G-F8199-71-E0

Welcome message from author
This document is posted to help you gain knowledge. Please leave a comment to let me know what you think about it! Share it to your friends and learn new things together.
Transcript
Read this manual carefully before operating this watercraft.
OWNER’S/OPERATOR’S MANUAL
2017 WaveRunnerVX / VX Deluxe
VX CruiserVX Limited
F4G-F8199-71-E0
UF4G71E0.book Page 1 Wednesday, July 27, 2016 9:32 AM

Read this manual carefully before operating this watercraft. This manual should stay with the WaveRunner if it is sold.
UF4G71E0.book Page 1 Wednesday, July 27, 2016 9:32 AM
Important manual informationEJU44201
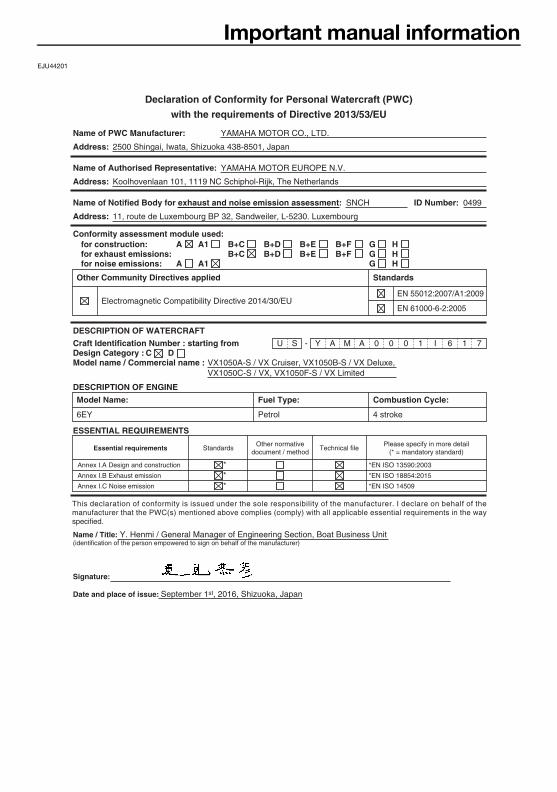
Declaration of Conformity for Personal Watercraft (PWC)
with the requirements of Directive 2013/53/EU
Name of PWC Manufacturer: YAMAHA MOTOR CO., LTD.
Address: 2500 Shingai, Iwata, Shizuoka 438-8501, Japan
Name of Authorised Representative: YAMAHA MOTOR EUROPE N.V.
Address: Koolhovenlaan 101, 1119 NC Schiphol-Rijk, The Netherlands
Name of Notified Body for exhaust and noise emission assessment: SNCH
VX1050A-S / VX Cruiser, VX1050B-S / VX Deluxe, VX1050C-S / VX, VX1050F-S / VX Limited
0499ID Number:
Address: 11, route de Luxembourg BP 32, Sandweiler, L-5230. Luxembourg
U S - Y A M A 0 0 0 1 I 6 1 7
Conformity assessment module used:for construction:for exhaust emissions:for noise emissions:
DESCRIPTION OF WATERCRAFT
DESCRIPTION OF ENGINE
A
A
Craft Identification Number : starting from
Model name / Commercial name :CDesign Category :
Other Community Directives applied
Electromagnetic Compatibility Directive 2014/30/EUEN 55012:2007/A1:2009
Standards
EN 61000-6-2:2005
D
A1
A1
B+CB+C
B+DB+D
B+EB+E
B+FB+F
GGG
HHH
Model Name:
6EY
Combustion Cycle:
4 stroke
Fuel Type:
Petrol
ESSENTIAL REQUIREMENTS
Essential requirements StandardsOther normative
document / methodTechnical file
Please specify in more detail(* = mandatory standard)
Annex I.A Design and construction *EN ISO 13590:2003
Annex I.B Exhaust emission *EN ISO 18854:2015
Annex I.C Noise emission *EN ISO 14509
**
*
This declaration of conformity is issued under the sole responsibility of the manufacturer. I declare on behalf of the manufacturer that the PWC(s) mentioned above complies (comply) with all applicable essential requirements in the way specified.
Name / Title: Y. Henmi / General Manager of Engineering Section, Boat Business Unit(identification of the person empowered to sign on behalf of the manufacturer)
Signature:
Date and place of issue: September 1st, 2016, Shizuoka, Japan
UF4G71E0.book Page 1 Wednesday, July 27, 2016 9:32 AM
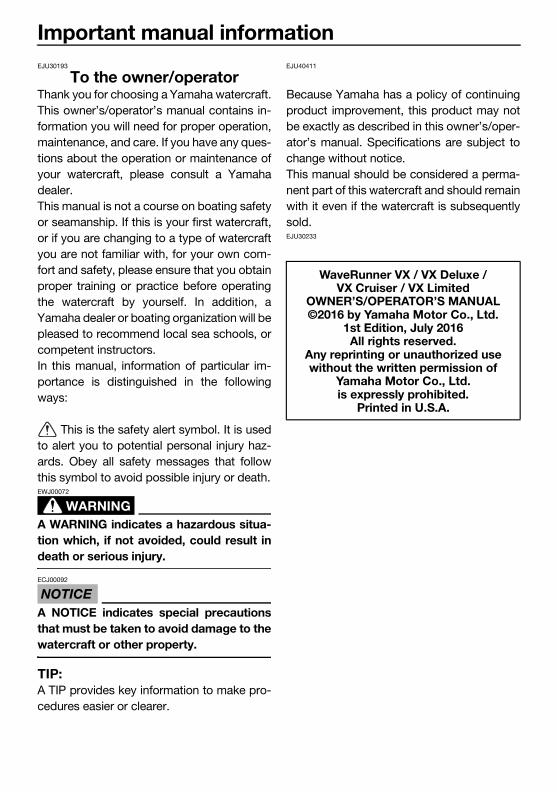
Important manual informationEJU30193
To the owner/operatorThank you for choosing a Yamaha watercraft.This owner’s/operator’s manual contains in-formation you will need for proper operation,maintenance, and care. If you have any ques-tions about the operation or maintenance ofyour watercraft, please consult a Yamahadealer.This manual is not a course on boating safetyor seamanship. If this is your first watercraft,or if you are changing to a type of watercraftyou are not familiar with, for your own com-fort and safety, please ensure that you obtainproper training or practice before operatingthe watercraft by yourself. In addition, aYamaha dealer or boating organization will bepleased to recommend local sea schools, orcompetent instructors.In this manual, information of particular im-portance is distinguished in the followingways:
This is the safety alert symbol. It is usedto alert you to potential personal injury haz-ards. Obey all safety messages that followthis symbol to avoid possible injury or death.
WARNINGEWJ00072
A WARNING indicates a hazardous situa-tion which, if not avoided, could result indeath or serious injury.
NOTICEECJ00092
A NOTICE indicates special precautionsthat must be taken to avoid damage to thewatercraft or other property.
TIP:A TIP provides key information to make pro-cedures easier or clearer.
EJU40411
Because Yamaha has a policy of continuingproduct improvement, this product may notbe exactly as described in this owner’s/oper-ator’s manual. Specifications are subject tochange without notice.This manual should be considered a perma-nent part of this watercraft and should remainwith it even if the watercraft is subsequentlysold.EJU30233
WaveRunner VX / VX Deluxe / VX Cruiser / VX Limited
OWNER’S/OPERATOR’S MANUAL©2016 by Yamaha Motor Co., Ltd.
1st Edition, July 2016All rights reserved.
Any reprinting or unauthorized use without the written permission of
Yamaha Motor Co., Ltd. is expressly prohibited.
Printed in U.S.A.
UF4G71E0.book Page 2 Wednesday, July 27, 2016 9:32 AM
Table of contents
General and important labels...........1Identification numbers .................... 1
Primary Identification (PRI-ID) number............................................ 1
Craft Identification Number (CIN)....... 1Engine serial number.......................... 1Manufactured date label .................... 2
Model information ........................... 2Builder’s plate .................................... 2
Important labels .............................. 4Warning labels.................................... 5Other labels ........................................ 8
Safety information........................... 10Limitations on who may operate
the watercraft ............................. 10Cruising limitations........................ 11Operation requirements ................ 12Recommended equipment ........... 14Hazard information........................ 15Watercraft characteristics ............. 15Wakeboarding and water-skiing ... 17Safe boating rules ......................... 18Enjoy your watercraft
responsibly................................. 19
Description.......................................20Watercraft glossary ....................... 20Location of main components ...... 21
Control function operation .............25Watercraft control functions ......... 25
Remote control transmitter (VX Deluxe / VX Cruiser / VX Limited).................................... 25
Yamaha Security System (VX Deluxe / VX Cruiser / VX Limited).................................... 26
Engine stop switch .......................... 27Engine shut-off switch .................... 27Start switch ..................................... 27Throttle lever .................................... 28RiDE lever ........................................ 28
Steering system................................ 28Cooling water pilot outlet ................. 29Water separator................................ 29
Watercraft operation ...................... 31Watercraft operation functions ..... 31
Shift system ..................................... 31Watercraft operation modes......... 33
Low RPM Mode (VX Deluxe / VX Cruiser / VX Limited)................ 33
No-wake mode (VX Deluxe / VX Cruiser / VX Limited)................ 34
Cruise assist (VX Deluxe / VX Cruiser / VX Limited)................ 36
Instrument operation...................... 38Multifunction information center... 38
Information display........................... 38Hour meter ....................................... 42Voltmeter .......................................... 42
Equipment operation ...................... 43Equipment..................................... 43
Seats ................................................ 43Handgrip........................................... 44Reboarding step............................... 44Bow eye............................................ 45Stern eyes ........................................ 45Cleat ................................................. 45Pull-up cleats (VX Limited) ............... 46Storage compartments .................... 46Fire extinguisher holder and cover ... 48
Operation and handling requirements ................................... 50
Fuel requirements ......................... 50Fuel................................................... 50
Engine oil requirements ................ 52Engine oil.......................................... 52
Draining the bilge water................ 54Draining the bilge water on land....... 54Draining the bilge water on water .... 54
UF4G71E0.book Page 1 Wednesday, July 27, 2016 9:32 AM
Table of contents
Transporting on a trailer ................ 55
First-time operation ........................ 56Engine break-in ............................. 56
Pre-operation checks ..................... 57Pre-operation checklist .................... 57
Pre-operation check points........... 59Pre-launch checks ........................... 59Post-launch checks ......................... 65
Operation ......................................... 67Operating your watercraft ............. 67
Getting to know your watercraft ...... 67Learning to operate your
watercraft...................................... 67Riding position ................................. 68Launching the watercraft ................. 68Starting the engine on water ............ 68Stopping the engine......................... 69Leaving the watercraft...................... 69Operating the watercraft .................. 69Turning the watercraft ...................... 70Stopping the watercraft ................... 71Operating the watercraft in reverse
or neutral....................................... 72Boarding the watercraft ................... 73Starting off........................................ 75Capsized watercraft ......................... 76Beaching and docking the
watercraft...................................... 77Operating in weeded areas .............. 77After removing the watercraft from
the water ....................................... 78
Care and storage............................. 79Post-operation care ...................... 79
Flushing the cooling water passages....................................... 79
Cleaning the watercraft .................... 80Battery care...................................... 80
Long-term storage ........................ 83Cleaning ........................................... 83Lubrication ....................................... 83
Rustproofing..................................... 83
Maintenance.................................... 85Maintenance ................................. 85
Tool kit.............................................. 85Periodic maintenance chart ............. 86Engine oil and oil filter ...................... 88
Specifications.................................. 89Specifications ............................... 89
Trouble recovery ............................. 90Troubleshooting............................ 90
Troubleshooting chart ...................... 90Emergency procedures ................ 93
Cleaning the jet intake and impeller ......................................... 93
Raising the reverse gate .................. 94Jumping the battery ......................... 94Towing the watercraft....................... 95Submerged watercraft ..................... 95
Index................................................. 97
UF4G71E0.book Page 2 Wednesday, July 27, 2016 9:32 AM
General and important labels
1
EJU36452
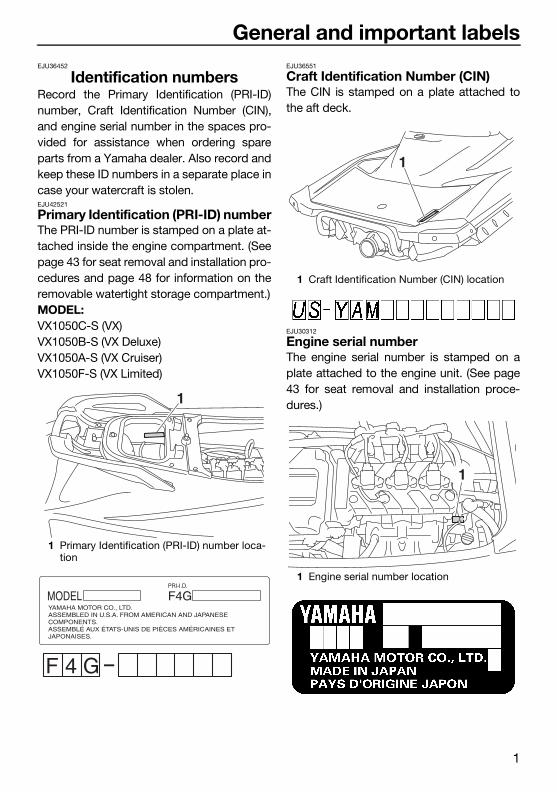
Identification numbersRecord the Primary Identification (PRI-ID)number, Craft Identification Number (CIN),and engine serial number in the spaces pro-vided for assistance when ordering spareparts from a Yamaha dealer. Also record andkeep these ID numbers in a separate place incase your watercraft is stolen.EJU42521
Primary Identification (PRI-ID) numberThe PRI-ID number is stamped on a plate at-tached inside the engine compartment. (Seepage 43 for seat removal and installation pro-cedures and page 48 for information on theremovable watertight storage compartment.)MODEL:VX1050C-S (VX)VX1050B-S (VX Deluxe)VX1050A-S (VX Cruiser)VX1050F-S (VX Limited)
EJU36551
Craft Identification Number (CIN)The CIN is stamped on a plate attached tothe aft deck.
EJU30312
Engine serial numberThe engine serial number is stamped on aplate attached to the engine unit. (See page43 for seat removal and installation proce-dures.)
1 Primary Identification (PRI-ID) number loca-tion
1
MODEL F4G
F
PRI-I.D.
YAMAHA MOTOR CO., LTD. ASSEMBLED IN U.S.A. FROM AMERICAN AND JAPANESECOMPONENTS.ASSEMBLÉ AUX ÉTATS-UNIS DE PIÈCES AMÉRICAINES ETJAPONAISES.
4 G
1 Craft Identification Number (CIN) location
1 Engine serial number location
1
1
UF4G71E0.book Page 1 Wednesday, July 27, 2016 9:32 AM
General and important labels
2
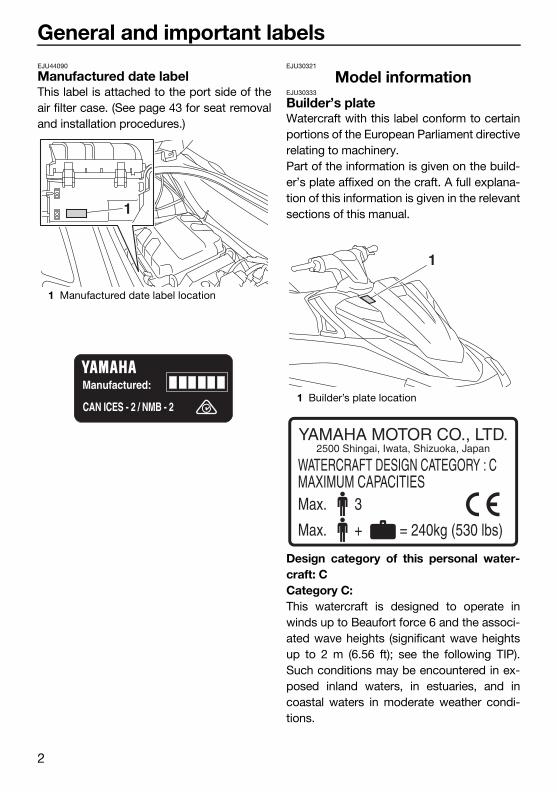
EJU44090
Manufactured date labelThis label is attached to the port side of theair filter case. (See page 43 for seat removaland installation procedures.)
EJU30321
Model informationEJU30333
Builder’s plateWatercraft with this label conform to certainportions of the European Parliament directiverelating to machinery.Part of the information is given on the build-er’s plate affixed on the craft. A full explana-tion of this information is given in the relevantsections of this manual.
Design category of this personal water-craft: CCategory C:This watercraft is designed to operate inwinds up to Beaufort force 6 and the associ-ated wave heights (significant wave heightsup to 2 m (6.56 ft); see the following TIP).Such conditions may be encountered in ex-posed inland waters, in estuaries, and incoastal waters in moderate weather condi-tions.
1 Manufactured date label location
1
1 Builder’s plate location
1
YAMAHA MOTOR CO., LTD.
WATERCRAFT DESIGN CATEGORY : CMAXIMUM CAPACITIES
2500 Shingai, Iwata, Shizuoka, Japan
Max. 3
Max. + = 240kg (530 lbs)
UF4G71E0.book Page 2 Wednesday, July 27, 2016 9:32 AM

General and important labels
3
TIP:The significant wave height is the meanheight of the highest one-third of the waves,which approximately corresponds to thewave height estimated by an experiencedobserver. However, some waves will be dou-ble this height.
UF4G71E0.book Page 3 Wednesday, July 27, 2016 9:32 AM
General and important labels
4
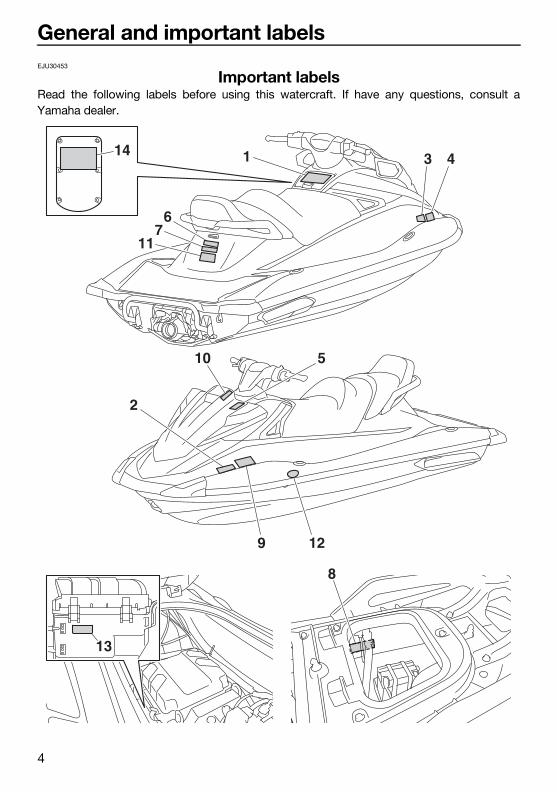
EJU30453
Important labelsRead the following labels before using this watercraft. If have any questions, consult aYamaha dealer.
2
10
1
67
11
3 4
5
9 12
14
8
13
UF4G71E0.book Page 4 Wednesday, July 27, 2016 9:32 AM
General and important labels
5
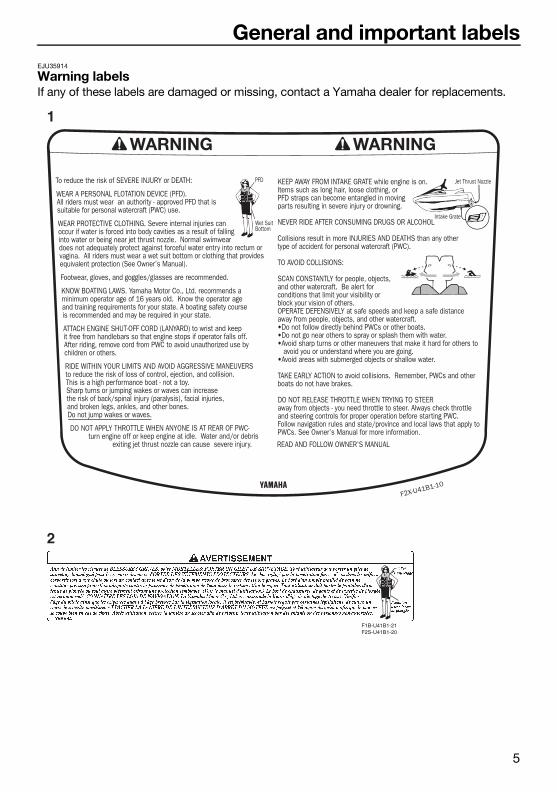
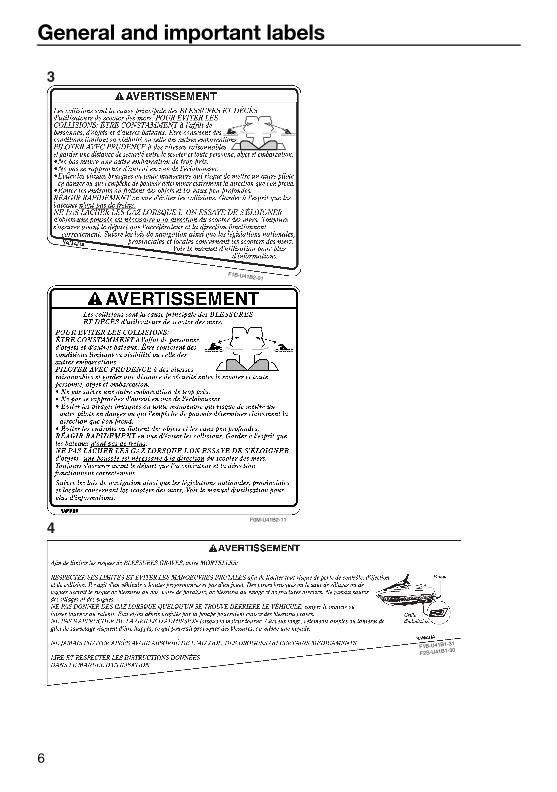
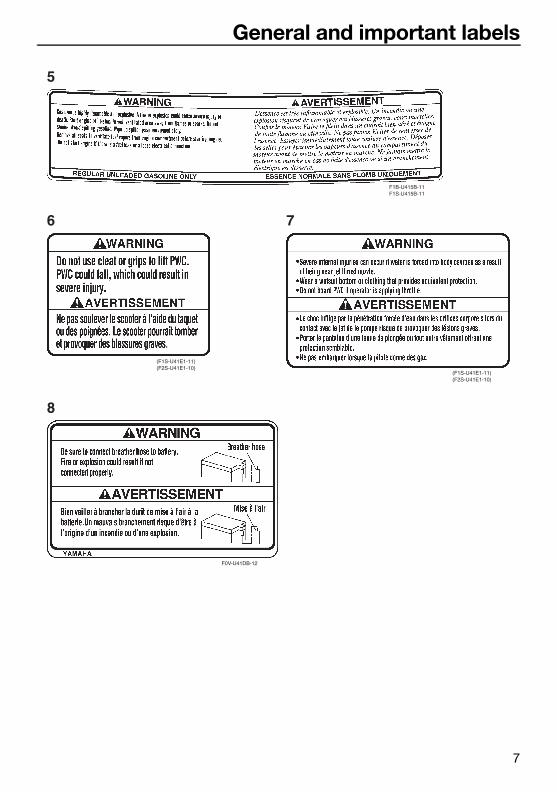
EJU35914
Warning labelsIf any of these labels are damaged or missing, contact a Yamaha dealer for replacements.
F1B-U41B1-21 F2S-U41B1-20
1
2
UF4G71E0.book Page 5 Wednesday, July 27, 2016 9:32 AM
General and important labels
6
F0M-U41B2-11
F1B-U41B2-01
F1B-U41B1-31
F2S-U41B1-30
3
4
UF4G71E0.book Page 6 Wednesday, July 27, 2016 9:32 AM
General and important labels
7
(F1S-U41E1-11) (F2S-U41E1-10)
F0V-U41DB-12
(F1S-U41E1-11) (F2S-U41E1-10)
F1B-U415B-11F1S-U415B-11
6
8
7
5
UF4G71E0.book Page 7 Wednesday, July 27, 2016 9:32 AM

General and important labels
8
EJU44231
Other labels
GP8-U416H-01 GJ3-U416H-01
9
F1B-U41F5-11 F1B-U41F5-21
(F1S-U41E1-11) (F2S-U41E1-10)
10
11
UF4G71E0.book Page 8 Wednesday, July 27, 2016 9:32 AM
General and important labels
9
VX Deluxe / VX Cruiser / VX Limited: The following CE marking is located on the back of the remote control transmitter.
6EY-43394-00
12 13
UF4G71E0.book Page 9 Wednesday, July 27, 2016 9:32 AM
Safety information
10
EJU30683
The safe use and operation of this water-craft is dependent upon the use of properriding techniques, as well as upon thecommon sense, good judgment, and ex-pertise of the operator. Before using thiswatercraft, make sure that its use is per-mitted under local laws, bylaws, and regu-lations, and always operate the watercraftin full conformity with any requirementsand limitations imposed. Every operatorshould know the following requirementsbefore riding the watercraft. Before operating the watercraft, read this
owner’s/operator’s manual, the RidingPractice Guide, the Riding Instruction card,and all labels on the watercraft. These ma-terials should give you an understanding ofthe watercraft and its operation.
Never allow anyone to operate this water-craft until they too have read this own-er’s/operator’s manual, the Riding PracticeGuide, the Riding Instruction card, and alllabels.
EJU30742
Limitations on who may operate the watercraft
Yamaha recommends a minimum operatorage of 16 years old.Adults must supervise use by minors.Know your local operator age and trainingrequirements.
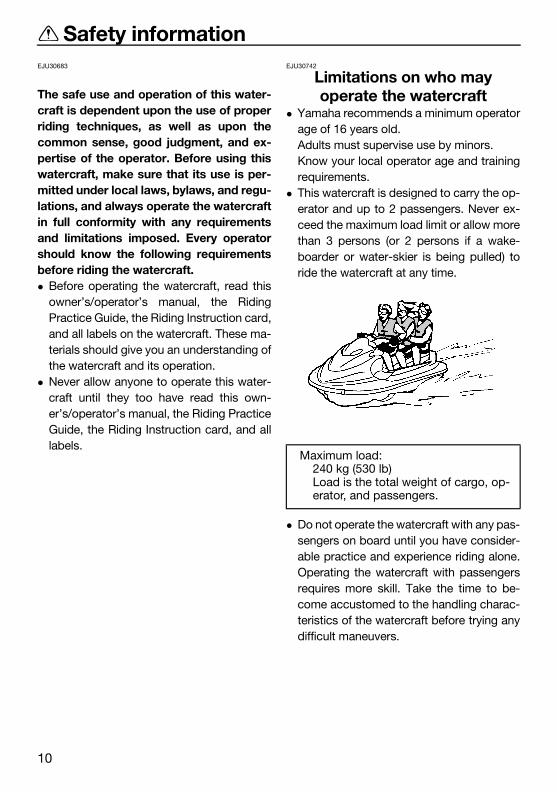
This watercraft is designed to carry the op-erator and up to 2 passengers. Never ex-ceed the maximum load limit or allow morethan 3 persons (or 2 persons if a wake-boarder or water-skier is being pulled) toride the watercraft at any time.
Do not operate the watercraft with any pas-sengers on board until you have consider-able practice and experience riding alone.Operating the watercraft with passengersrequires more skill. Take the time to be-come accustomed to the handling charac-teristics of the watercraft before trying anydifficult maneuvers.
Maximum load:240 kg (530 lb)Load is the total weight of cargo, op-erator, and passengers.
UF4G71E0.book Page 10 Wednesday, July 27, 2016 9:32 AM
Safety information
11
EJU43321
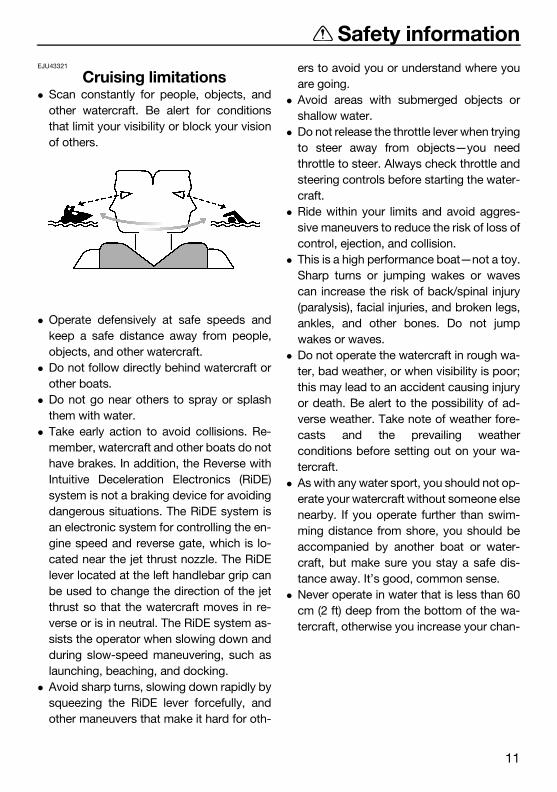
Cruising limitations Scan constantly for people, objects, and
other watercraft. Be alert for conditionsthat limit your visibility or block your visionof others.
Operate defensively at safe speeds andkeep a safe distance away from people,objects, and other watercraft.
Do not follow directly behind watercraft orother boats.
Do not go near others to spray or splashthem with water.
Take early action to avoid collisions. Re-member, watercraft and other boats do nothave brakes. In addition, the Reverse withIntuitive Deceleration Electronics (RiDE)system is not a braking device for avoidingdangerous situations. The RiDE system isan electronic system for controlling the en-gine speed and reverse gate, which is lo-cated near the jet thrust nozzle. The RiDElever located at the left handlebar grip canbe used to change the direction of the jetthrust so that the watercraft moves in re-verse or is in neutral. The RiDE system as-sists the operator when slowing down andduring slow-speed maneuvering, such aslaunching, beaching, and docking.
Avoid sharp turns, slowing down rapidly bysqueezing the RiDE lever forcefully, andother maneuvers that make it hard for oth-
ers to avoid you or understand where youare going.
Avoid areas with submerged objects orshallow water.
Do not release the throttle lever when tryingto steer away from objects—you needthrottle to steer. Always check throttle andsteering controls before starting the water-craft.
Ride within your limits and avoid aggres-sive maneuvers to reduce the risk of loss ofcontrol, ejection, and collision.
This is a high performance boat—not a toy.Sharp turns or jumping wakes or wavescan increase the risk of back/spinal injury(paralysis), facial injuries, and broken legs,ankles, and other bones. Do not jumpwakes or waves.
Do not operate the watercraft in rough wa-ter, bad weather, or when visibility is poor;this may lead to an accident causing injuryor death. Be alert to the possibility of ad-verse weather. Take note of weather fore-casts and the prevailing weatherconditions before setting out on your wa-tercraft.
As with any water sport, you should not op-erate your watercraft without someone elsenearby. If you operate further than swim-ming distance from shore, you should beaccompanied by another boat or water-craft, but make sure you stay a safe dis-tance away. It’s good, common sense.
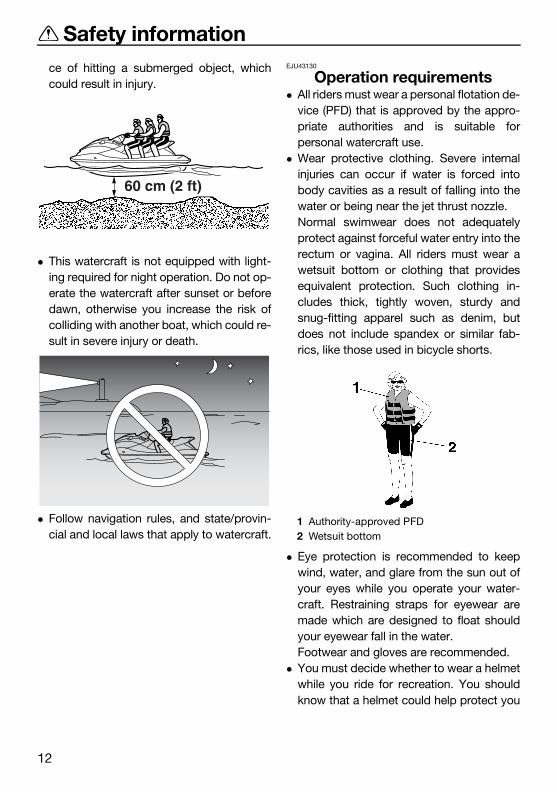
Never operate in water that is less than 60cm (2 ft) deep from the bottom of the wa-tercraft, otherwise you increase your chan-
UF4G71E0.book Page 11 Wednesday, July 27, 2016 9:32 AM
Safety information
12
ce of hitting a submerged object, whichcould result in injury.
This watercraft is not equipped with light-ing required for night operation. Do not op-erate the watercraft after sunset or beforedawn, otherwise you increase the risk ofcolliding with another boat, which could re-sult in severe injury or death.
Follow navigation rules, and state/provin-cial and local laws that apply to watercraft.
EJU43130
Operation requirements All riders must wear a personal flotation de-
vice (PFD) that is approved by the appro-priate authorities and is suitable forpersonal watercraft use.
Wear protective clothing. Severe internalinjuries can occur if water is forced intobody cavities as a result of falling into thewater or being near the jet thrust nozzle.Normal swimwear does not adequatelyprotect against forceful water entry into therectum or vagina. All riders must wear awetsuit bottom or clothing that providesequivalent protection. Such clothing in-cludes thick, tightly woven, sturdy andsnug-fitting apparel such as denim, butdoes not include spandex or similar fab-rics, like those used in bicycle shorts.
Eye protection is recommended to keepwind, water, and glare from the sun out ofyour eyes while you operate your water-craft. Restraining straps for eyewear aremade which are designed to float shouldyour eyewear fall in the water.Footwear and gloves are recommended.
You must decide whether to wear a helmetwhile you ride for recreation. You shouldknow that a helmet could help protect you
60 cm (2 ft)
1 Authority-approved PFD2 Wetsuit bottom
UF4G71E0.book Page 12 Wednesday, July 27, 2016 9:32 AM
Safety information
13
in certain kinds of accidents and that itcould injure you in others.A helmet is designed to provide some headprotection. Although helmets cannot pro-tect against all foreseeable impacts, a hel-met might reduce your injuries in a collisionwith a boat or other obstacle.A helmet may have potential safety haz-ards, as well. Falling into the water couldrisk the chance of the helmet catching wa-ter, commonly known as “bucketing”, andthe resulting strain on your neck could cau-se choking, severe and permanent neck in-juries, or death. A helmet could alsoincrease the risk of an accident if it reducesyour vision or hearing, or if it distracts youor increases your fatigue.How should you decide if a helmet’s poten-tial safety benefits outweigh its potentialrisks for you? Consider your particular rid-ing conditions. Consider factors such asyour riding environment and your ridingstyle and ability. Also consider the likeli-hood of traffic congestion, and the watersurface conditions.If you decide to wear a helmet based uponyour riding circumstances, choose onecarefully. Look for a helmet designed forpersonal watercraft use, if possible. If youwill be engaging in closed-course competi-tion, follow the helmet requirements of thesanctioning organization.
Never operate the watercraft after consum-ing alcohol or taking other drugs.
For reasons of safety and proper care ofthe watercraft, always perform the pre-op-eration checks listed on page 57 before op-erating the watercraft.
The operator should grip the handlebarsfirmly with both hands and the passengersshould hold on firmly, either to the person
in front of them or to the handgrip provid-ed.
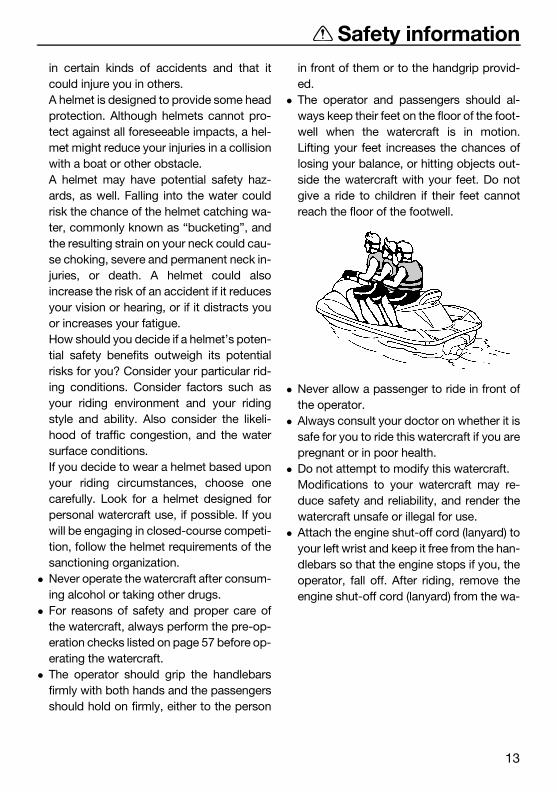
The operator and passengers should al-ways keep their feet on the floor of the foot-well when the watercraft is in motion.Lifting your feet increases the chances oflosing your balance, or hitting objects out-side the watercraft with your feet. Do notgive a ride to children if their feet cannotreach the floor of the footwell.
Never allow a passenger to ride in front ofthe operator.
Always consult your doctor on whether it issafe for you to ride this watercraft if you arepregnant or in poor health.
Do not attempt to modify this watercraft.Modifications to your watercraft may re-duce safety and reliability, and render thewatercraft unsafe or illegal for use.
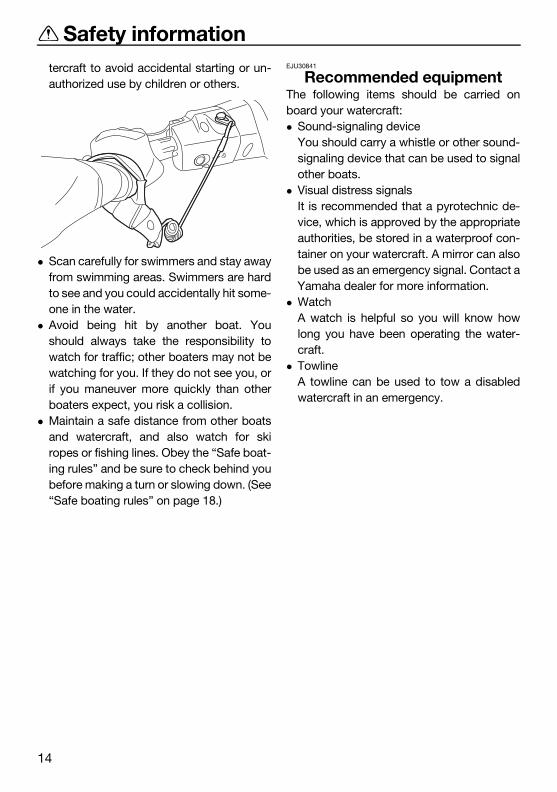
Attach the engine shut-off cord (lanyard) toyour left wrist and keep it free from the han-dlebars so that the engine stops if you, theoperator, fall off. After riding, remove theengine shut-off cord (lanyard) from the wa-
UF4G71E0.book Page 13 Wednesday, July 27, 2016 9:32 AM
Safety information
14
tercraft to avoid accidental starting or un-authorized use by children or others.
Scan carefully for swimmers and stay awayfrom swimming areas. Swimmers are hardto see and you could accidentally hit some-one in the water.
Avoid being hit by another boat. Youshould always take the responsibility towatch for traffic; other boaters may not bewatching for you. If they do not see you, orif you maneuver more quickly than otherboaters expect, you risk a collision.
Maintain a safe distance from other boatsand watercraft, and also watch for skiropes or fishing lines. Obey the “Safe boat-ing rules” and be sure to check behind youbefore making a turn or slowing down. (See“Safe boating rules” on page 18.)
EJU30841
Recommended equipmentThe following items should be carried onboard your watercraft: Sound-signaling device
You should carry a whistle or other sound-signaling device that can be used to signalother boats.
Visual distress signalsIt is recommended that a pyrotechnic de-vice, which is approved by the appropriateauthorities, be stored in a waterproof con-tainer on your watercraft. A mirror can alsobe used as an emergency signal. Contact aYamaha dealer for more information.
WatchA watch is helpful so you will know howlong you have been operating the water-craft.
TowlineA towline can be used to tow a disabledwatercraft in an emergency.
UF4G71E0.book Page 14 Wednesday, July 27, 2016 9:32 AM
Safety information
15
EJU43620
Hazard information Never start the engine or let it run for any
length of time in an enclosed area. Exhaustfumes contain carbon monoxide, a color-less, odorless gas that may cause loss ofconsciousness and death within a shorttime. Always operate the watercraft in anopen area.
Do not touch the hot oil tank, muffler, or en-gine during or immediately after engine op-eration; they can cause serious burns.
Do not place magnets or objects with astrong magnetic force near the throttle le-ver or RiDE lever. The electronic throttlemechanism of the levers can be adverselyaffected, which could cause loss of control.In addition, do not place objects suscepti-ble to magnetic forces (i.e., credit cards,watches, etc.) close to the throttle lever orRiDE lever.
EJU42414
Watercraft characteristics Jet thrust turns the watercraft. Releasing
the throttle lever completely produces onlyminimum thrust. If you are traveling atspeeds above trolling, you will have rapidlydecreasing ability to steer without throttle.This model is equipped with the YamahaEngine Management System (YEMS) thatincludes an off-throttle steering (OTS) sys-tem. It will activate at planing speedsshould you attempt to steer the watercraftafter releasing the throttle lever. The OTSsystem assists in turning by continuing tosupply some thrust while the watercraft isdecelerating, but you can turn more sharp-ly if you apply throttle while turning the han-dlebars.The OTS system does not function belowplaning speeds or when the engine is off.Once the engine slows down, the water-craft will no longer turn in response to han-dlebar input until you apply throttle again oryou reach trolling speed.Practice turning in an open area withoutobstacles until you have a good feel for thismaneuver.
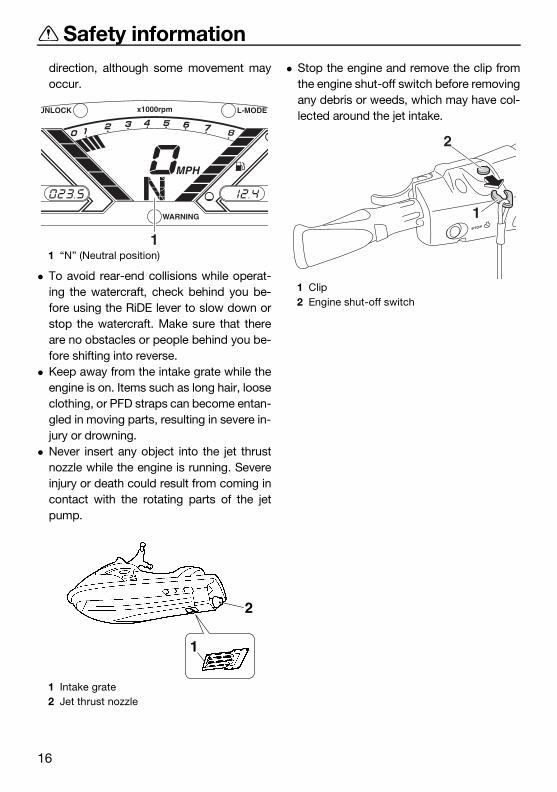
This watercraft is water-jet propelled. Thejet pump is directly connected to the en-gine. This means that jet thrust will producesome movement whenever the engine isrunning and the “F” (forward) or “R” (re-verse) shift indicator is displayed in themultifunction display. When the “N” (neu-tral) shift indicator is displayed, the forwardand reverse thrust are balanced to helpkeep the watercraft from moving in either
UF4G71E0.book Page 15 Wednesday, July 27, 2016 9:32 AM
Safety information
16
direction, although some movement mayoccur.
To avoid rear-end collisions while operat-ing the watercraft, check behind you be-fore using the RiDE lever to slow down orstop the watercraft. Make sure that thereare no obstacles or people behind you be-fore shifting into reverse.
Keep away from the intake grate while theengine is on. Items such as long hair, looseclothing, or PFD straps can become entan-gled in moving parts, resulting in severe in-jury or drowning.
Never insert any object into the jet thrustnozzle while the engine is running. Severeinjury or death could result from coming incontact with the rotating parts of the jetpump.
Stop the engine and remove the clip fromthe engine shut-off switch before removingany debris or weeds, which may have col-lected around the jet intake.
1 “N” (Neutral position)
1 Intake grate2 Jet thrust nozzle
1
1
2
1 Clip2 Engine shut-off switch
2
1
UF4G71E0.book Page 16 Wednesday, July 27, 2016 9:32 AM
Safety information
17
EJU30957
Wakeboarding and water-skiing
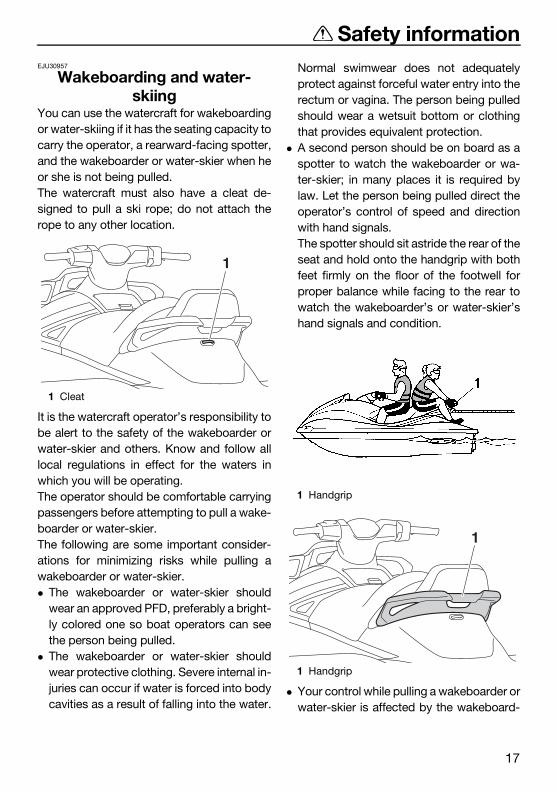
You can use the watercraft for wakeboardingor water-skiing if it has the seating capacity tocarry the operator, a rearward-facing spotter,and the wakeboarder or water-skier when heor she is not being pulled.The watercraft must also have a cleat de-signed to pull a ski rope; do not attach therope to any other location.
It is the watercraft operator’s responsibility tobe alert to the safety of the wakeboarder orwater-skier and others. Know and follow alllocal regulations in effect for the waters inwhich you will be operating.The operator should be comfortable carryingpassengers before attempting to pull a wake-boarder or water-skier.The following are some important consider-ations for minimizing risks while pulling awakeboarder or water-skier. The wakeboarder or water-skier should
wear an approved PFD, preferably a bright-ly colored one so boat operators can seethe person being pulled.
The wakeboarder or water-skier shouldwear protective clothing. Severe internal in-juries can occur if water is forced into bodycavities as a result of falling into the water.
Normal swimwear does not adequatelyprotect against forceful water entry into therectum or vagina. The person being pulledshould wear a wetsuit bottom or clothingthat provides equivalent protection.
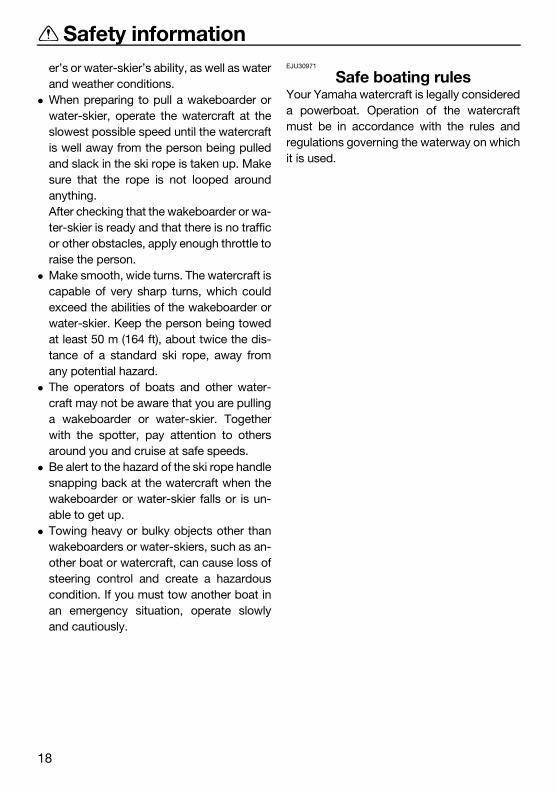
A second person should be on board as aspotter to watch the wakeboarder or wa-ter-skier; in many places it is required bylaw. Let the person being pulled direct theoperator’s control of speed and directionwith hand signals.The spotter should sit astride the rear of theseat and hold onto the handgrip with bothfeet firmly on the floor of the footwell forproper balance while facing to the rear towatch the wakeboarder’s or water-skier’shand signals and condition.
Your control while pulling a wakeboarder orwater-skier is affected by the wakeboard-
1 Cleat
1
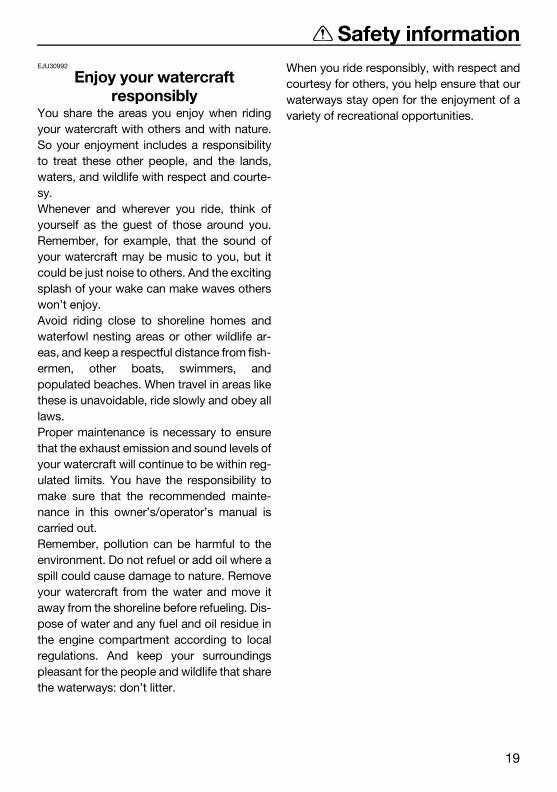
1 Handgrip
1 Handgrip
1
UF4G71E0.book Page 17 Wednesday, July 27, 2016 9:32 AM
Safety information
18
er’s or water-skier’s ability, as well as waterand weather conditions.
When preparing to pull a wakeboarder orwater-skier, operate the watercraft at theslowest possible speed until the watercraftis well away from the person being pulledand slack in the ski rope is taken up. Makesure that the rope is not looped aroundanything.After checking that the wakeboarder or wa-ter-skier is ready and that there is no trafficor other obstacles, apply enough throttle toraise the person.
Make smooth, wide turns. The watercraft iscapable of very sharp turns, which couldexceed the abilities of the wakeboarder orwater-skier. Keep the person being towedat least 50 m (164 ft), about twice the dis-tance of a standard ski rope, away fromany potential hazard.
The operators of boats and other water-craft may not be aware that you are pullinga wakeboarder or water-skier. Togetherwith the spotter, pay attention to othersaround you and cruise at safe speeds.
Be alert to the hazard of the ski rope handlesnapping back at the watercraft when thewakeboarder or water-skier falls or is un-able to get up.
Towing heavy or bulky objects other thanwakeboarders or water-skiers, such as an-other boat or watercraft, can cause loss ofsteering control and create a hazardouscondition. If you must tow another boat inan emergency situation, operate slowlyand cautiously.
EJU30971
Safe boating rulesYour Yamaha watercraft is legally considereda powerboat. Operation of the watercraftmust be in accordance with the rules andregulations governing the waterway on whichit is used.
UF4G71E0.book Page 18 Wednesday, July 27, 2016 9:32 AM
Safety information
19
EJU30992
Enjoy your watercraft responsibly
You share the areas you enjoy when ridingyour watercraft with others and with nature.So your enjoyment includes a responsibilityto treat these other people, and the lands,waters, and wildlife with respect and courte-sy.Whenever and wherever you ride, think ofyourself as the guest of those around you.Remember, for example, that the sound ofyour watercraft may be music to you, but itcould be just noise to others. And the excitingsplash of your wake can make waves otherswon’t enjoy.Avoid riding close to shoreline homes andwaterfowl nesting areas or other wildlife ar-eas, and keep a respectful distance from fish-ermen, other boats, swimmers, andpopulated beaches. When travel in areas likethese is unavoidable, ride slowly and obey alllaws.Proper maintenance is necessary to ensurethat the exhaust emission and sound levels ofyour watercraft will continue to be within reg-ulated limits. You have the responsibility tomake sure that the recommended mainte-nance in this owner’s/operator’s manual iscarried out.Remember, pollution can be harmful to theenvironment. Do not refuel or add oil where aspill could cause damage to nature. Removeyour watercraft from the water and move itaway from the shoreline before refueling. Dis-pose of water and any fuel and oil residue inthe engine compartment according to localregulations. And keep your surroundingspleasant for the people and wildlife that sharethe waterways: don’t litter.
When you ride responsibly, with respect andcourtesy for others, you help ensure that ourwaterways stay open for the enjoyment of avariety of recreational opportunities.
UF4G71E0.book Page 19 Wednesday, July 27, 2016 9:32 AM
Description
20
EJU43331
Watercraft glossaryTrolling speed“Trolling” is the lowest maneuvering speed. You are applying little or no throttle. The water-craft is down in the water, and there is no wake.Sub-planing speed“Sub-planing” is a medium speed. The bow of the watercraft is slightly up from the water sur-face, but you are still traveling through the water. There is a wake.Planing speed“Planing” is a faster speed. The watercraft is more level and is skimming on top of the water.There is a wake.BowThe front end of the watercraft.SternThe rear end of the watercraft.StarboardThe right side of the watercraft when facing forward.PortThe left side of the watercraft when facing forward.Bilge waterWater that has collected in the engine compartment.Yamaha Engine Management System (YEMS)YEMS is an integrated, computerized management system that controls and adjusts ignitiontiming, fuel injection, engine diagnostics, and the off-throttle steering (OTS) system.Reverse with Intuitive Deceleration Electronics (RiDE)RiDE is an electronic system that controls the reverse, neutral, and deceleration operations ofthe watercraft.
UF4G71E0.book Page 20 Wednesday, July 27, 2016 9:32 AM
Description
21
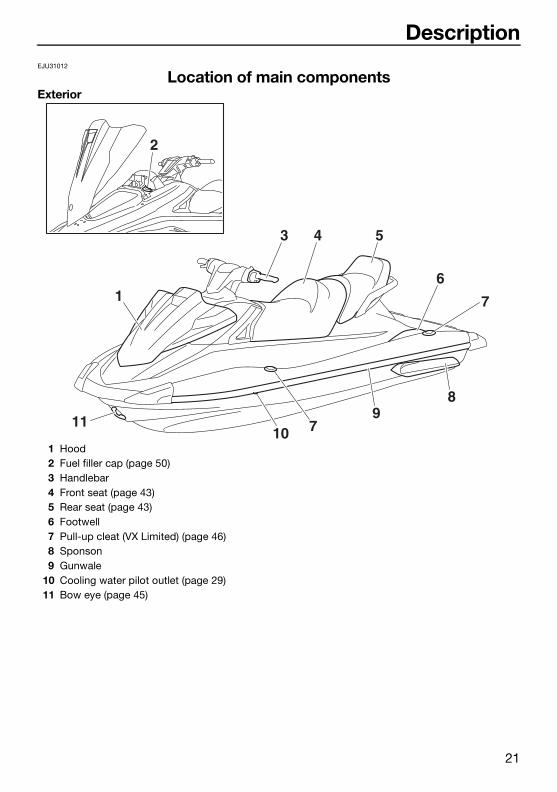
EJU31012
Location of main componentsExterior
1
11
2
3 4 5
6
7
89
10 71 Hood2 Fuel filler cap (page 50)3 Handlebar4 Front seat (page 43)5 Rear seat (page 43)6 Footwell7 Pull-up cleat (VX Limited) (page 46)8 Sponson9 Gunwale
10 Cooling water pilot outlet (page 29)11 Bow eye (page 45)
UF4G71E0.book Page 21 Wednesday, July 27, 2016 9:32 AM

Description
22
1
1011
4 5 6 7 8 9 5 4
2
3
1 Boarding platform2 Cleat (page 45)3 Handgrip (page 44)4 Stern eye (page 45)5 Stern drain plug (page 54)6 Reverse gate (page 31)7 Jet thrust nozzle8 Ride plate9 Reboarding step (page 44)
10 Speed sensor11 Intake grate
UF4G71E0.book Page 22 Wednesday, July 27, 2016 9:32 AM
Description
23
6
5
1 2 3 4 9 1110 12 9
78 15 14 13
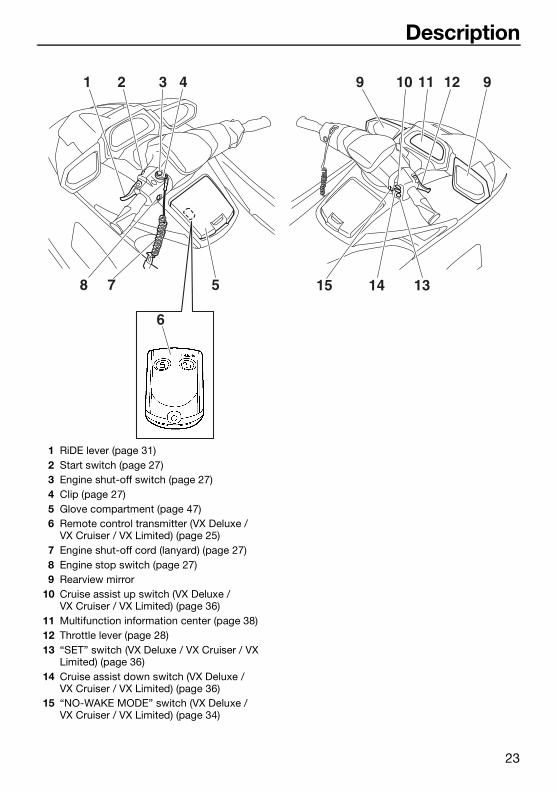
1 RiDE lever (page 31)2 Start switch (page 27)3 Engine shut-off switch (page 27)4 Clip (page 27)5 Glove compartment (page 47)6 Remote control transmitter (VX Deluxe /
VX Cruiser / VX Limited) (page 25)7 Engine shut-off cord (lanyard) (page 27)8 Engine stop switch (page 27)9 Rearview mirror
10 Cruise assist up switch (VX Deluxe / VX Cruiser / VX Limited) (page 36)
11 Multifunction information center (page 38)12 Throttle lever (page 28)13 “SET” switch (VX Deluxe / VX Cruiser / VX
Limited) (page 36)14 Cruise assist down switch (VX Deluxe /
VX Cruiser / VX Limited) (page 36)15 “NO-WAKE MODE” switch (VX Deluxe /
VX Cruiser / VX Limited) (page 34)
UF4G71E0.book Page 23 Wednesday, July 27, 2016 9:32 AM
Description
24
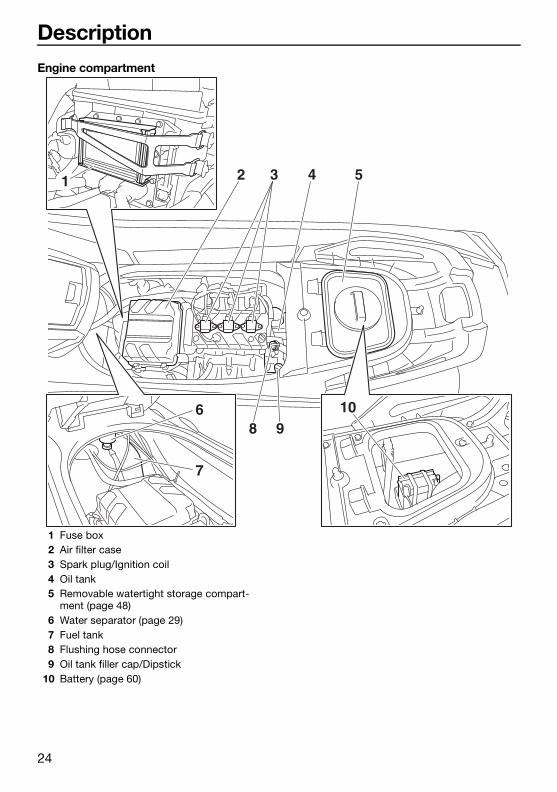
Engine compartment
1
6
7
10
2 3 4 5
8 9
1 Fuse box2 Air filter case3 Spark plug/Ignition coil4 Oil tank5 Removable watertight storage compart-
ment (page 48)6 Water separator (page 29)7 Fuel tank8 Flushing hose connector9 Oil tank filler cap/Dipstick
10 Battery (page 60)
UF4G71E0.book Page 24 Wednesday, July 27, 2016 9:32 AM
Control function operation
25
EJU31026
Watercraft control functionsEJU43690
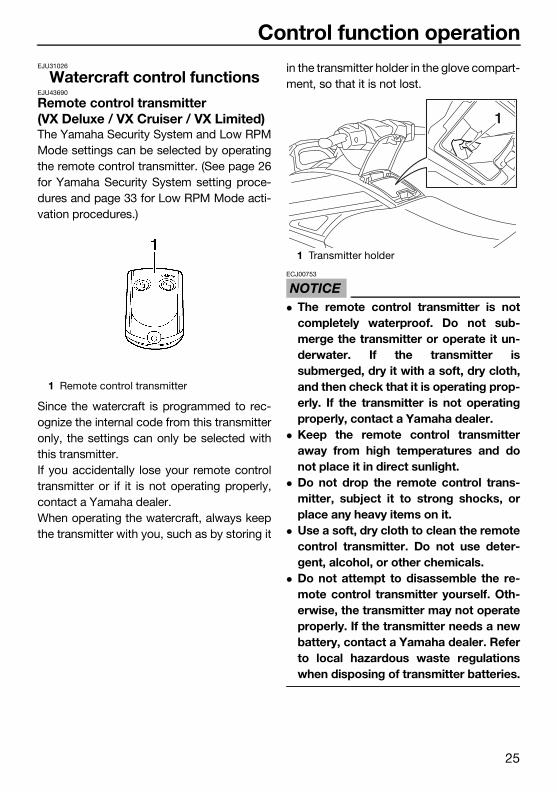
Remote control transmitter (VX Deluxe / VX Cruiser / VX Limited)The Yamaha Security System and Low RPMMode settings can be selected by operatingthe remote control transmitter. (See page 26for Yamaha Security System setting proce-dures and page 33 for Low RPM Mode acti-vation procedures.)
Since the watercraft is programmed to rec-ognize the internal code from this transmitteronly, the settings can only be selected withthis transmitter.If you accidentally lose your remote controltransmitter or if it is not operating properly,contact a Yamaha dealer.When operating the watercraft, always keepthe transmitter with you, such as by storing it
in the transmitter holder in the glove compart-ment, so that it is not lost.
NOTICEECJ00753
The remote control transmitter is notcompletely waterproof. Do not sub-merge the transmitter or operate it un-derwater. If the transmitter issubmerged, dry it with a soft, dry cloth,and then check that it is operating prop-erly. If the transmitter is not operatingproperly, contact a Yamaha dealer.
Keep the remote control transmitteraway from high temperatures and donot place it in direct sunlight.
Do not drop the remote control trans-mitter, subject it to strong shocks, orplace any heavy items on it.
Use a soft, dry cloth to clean the remotecontrol transmitter. Do not use deter-gent, alcohol, or other chemicals.
Do not attempt to disassemble the re-mote control transmitter yourself. Oth-erwise, the transmitter may not operateproperly. If the transmitter needs a newbattery, contact a Yamaha dealer. Referto local hazardous waste regulationswhen disposing of transmitter batteries.
1 Remote control transmitter
1 Transmitter holder
1
UF4G71E0.book Page 25 Wednesday, July 27, 2016 9:32 AM

Control function operation
26
EJU31385
Yamaha Security System (VX Deluxe / VX Cruiser / VX Limited)The Yamaha Security System functions tohelp prevent unauthorized use or theft of thewatercraft. The lock and unlock modes of thesecurity system can be selected by operatingthe remote control transmitter that is includedwith this watercraft. The engine cannot bestarted if the lock mode of the security sys-tem is selected. The engine can only be start-ed if the unlock mode is selected. (See page25 for information on the remote controltransmitter.)
TIP:The Yamaha Security System settings canonly be selected while the engine is stopped.EJU36776
Yamaha Security System settingsThe Yamaha Security System settings will beconfirmed by the number of beeps when theremote control transmitter is operated, andby the “UNLOCK” indicator light of the multi-function information center. (See page 38 forinformation on the multifunction informationcenter.)
TIP: The beeper sounds two times for the nor-
mal operation mode or three times for theLow RPM Mode. (See page 33 for LowRPM Mode activation procedures.)
If the remote control transmitter is operatedwhile the multifunction information centeris in the standby state, the center will per-form the initial operation, and then the set-ting is selected.
To select the lock mode:Push the lock button on the remote controltransmitter briefly. The beeper sounds onceand the “UNLOCK” indicator light blinksonce, then goes off. This indicates the lockmode is selected.
To select the unlock mode:Push the “L-Mode” (unlock) button on the re-mote control transmitter briefly. The beepersounds two or three times and the “UN-LOCK” indicator light blinks two or threetimes, then comes on. This indicates the un-lock mode is selected.
Number of beeps
Yamaha Security System mode
“UN-LOCK” in-
dicator light
Lock Goes off
Unlock (normal operation
mode)
Comes on
Unlock (Low RPM Mode)
Comes on
1 Lock button2 “UNLOCK” indicator light
1 “L-Mode” (unlock) button2 “UNLOCK” indicator light
21
2L-Mode1
UF4G71E0.book Page 26 Wednesday, July 27, 2016 9:32 AM
Control function operation
27
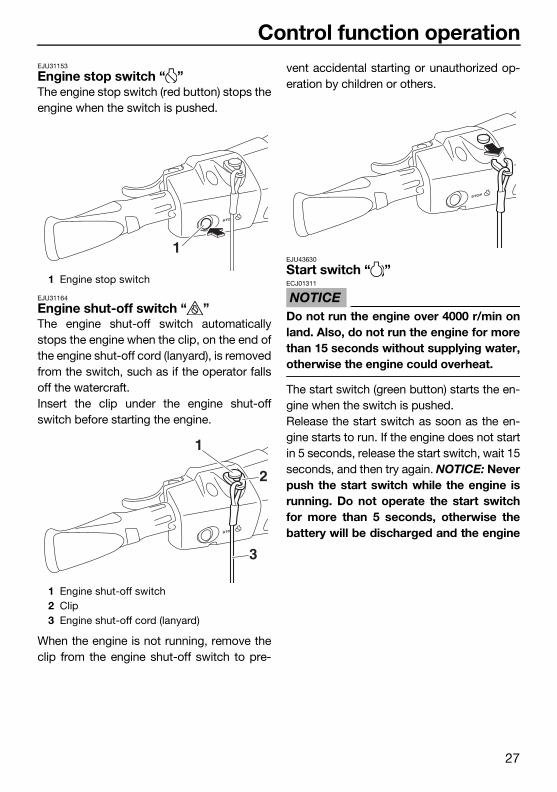
EJU31153
Engine stop switch “ ”The engine stop switch (red button) stops theengine when the switch is pushed.
EJU31164
Engine shut-off switch “ ”The engine shut-off switch automaticallystops the engine when the clip, on the end ofthe engine shut-off cord (lanyard), is removedfrom the switch, such as if the operator fallsoff the watercraft.Insert the clip under the engine shut-offswitch before starting the engine.
When the engine is not running, remove theclip from the engine shut-off switch to pre-
vent accidental starting or unauthorized op-eration by children or others.
EJU43630
Start switch “ ”
NOTICEECJ01311
Do not run the engine over 4000 r/min onland. Also, do not run the engine for morethan 15 seconds without supplying water,otherwise the engine could overheat.
The start switch (green button) starts the en-gine when the switch is pushed.Release the start switch as soon as the en-gine starts to run. If the engine does not startin 5 seconds, release the start switch, wait 15seconds, and then try again. NOTICE: Neverpush the start switch while the engine isrunning. Do not operate the start switchfor more than 5 seconds, otherwise thebattery will be discharged and the engine
1 Engine stop switch
1 Engine shut-off switch2 Clip3 Engine shut-off cord (lanyard)
1
1
2
3
UF4G71E0.book Page 27 Wednesday, July 27, 2016 9:32 AM
Control function operation
28
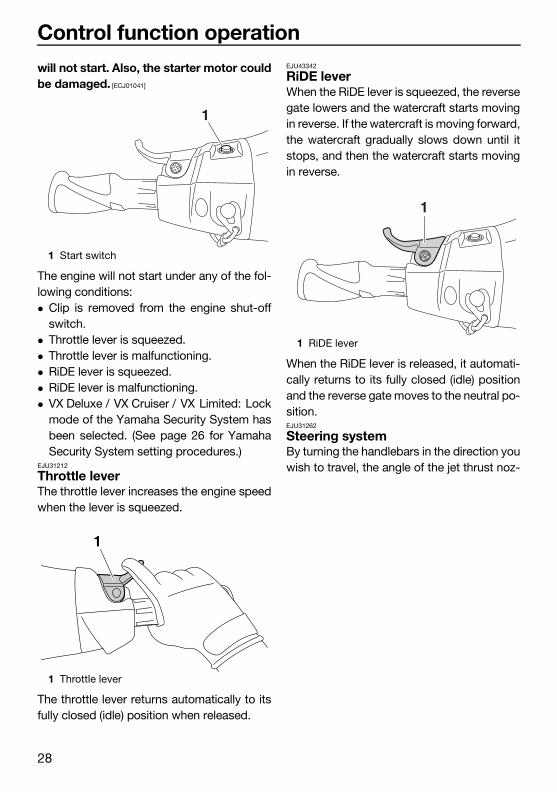
will not start. Also, the starter motor couldbe damaged. [ECJ01041]
The engine will not start under any of the fol-lowing conditions: Clip is removed from the engine shut-off
switch. Throttle lever is squeezed. Throttle lever is malfunctioning. RiDE lever is squeezed. RiDE lever is malfunctioning. VX Deluxe / VX Cruiser / VX Limited: Lock
mode of the Yamaha Security System hasbeen selected. (See page 26 for YamahaSecurity System setting procedures.)
EJU31212
Throttle leverThe throttle lever increases the engine speedwhen the lever is squeezed.
The throttle lever returns automatically to itsfully closed (idle) position when released.
EJU43342
RiDE lever When the RiDE lever is squeezed, the reversegate lowers and the watercraft starts movingin reverse. If the watercraft is moving forward,the watercraft gradually slows down until itstops, and then the watercraft starts movingin reverse.
When the RiDE lever is released, it automati-cally returns to its fully closed (idle) positionand the reverse gate moves to the neutral po-sition.EJU31262
Steering systemBy turning the handlebars in the direction youwish to travel, the angle of the jet thrust noz-
1 Start switch
1 Throttle lever
1
1
1 RiDE lever
1
UF4G71E0.book Page 28 Wednesday, July 27, 2016 9:32 AM
Control function operation
29
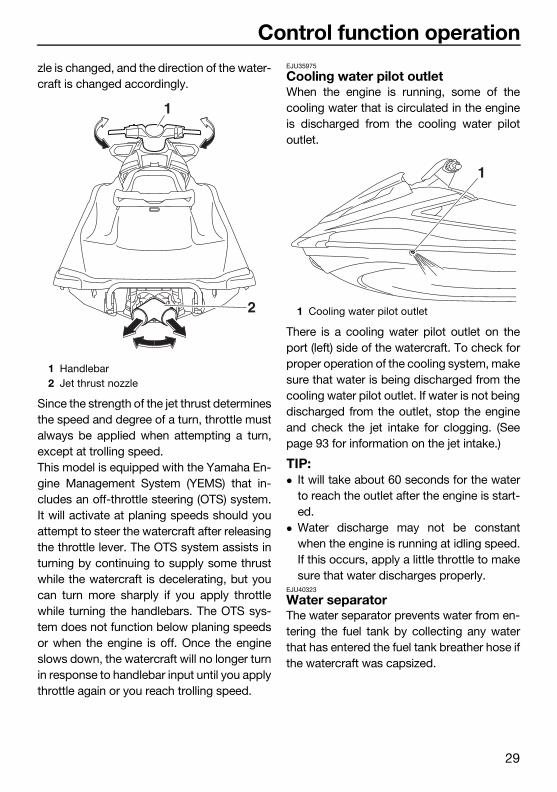
zle is changed, and the direction of the water-craft is changed accordingly.
Since the strength of the jet thrust determinesthe speed and degree of a turn, throttle mustalways be applied when attempting a turn,except at trolling speed.This model is equipped with the Yamaha En-gine Management System (YEMS) that in-cludes an off-throttle steering (OTS) system.It will activate at planing speeds should youattempt to steer the watercraft after releasingthe throttle lever. The OTS system assists inturning by continuing to supply some thrustwhile the watercraft is decelerating, but youcan turn more sharply if you apply throttlewhile turning the handlebars. The OTS sys-tem does not function below planing speedsor when the engine is off. Once the engineslows down, the watercraft will no longer turnin response to handlebar input until you applythrottle again or you reach trolling speed.
EJU35975
Cooling water pilot outletWhen the engine is running, some of thecooling water that is circulated in the engineis discharged from the cooling water pilotoutlet.
There is a cooling water pilot outlet on theport (left) side of the watercraft. To check forproper operation of the cooling system, makesure that water is being discharged from thecooling water pilot outlet. If water is not beingdischarged from the outlet, stop the engineand check the jet intake for clogging. (Seepage 93 for information on the jet intake.)
TIP: It will take about 60 seconds for the water
to reach the outlet after the engine is start-ed.
Water discharge may not be constantwhen the engine is running at idling speed.If this occurs, apply a little throttle to makesure that water discharges properly.
EJU40323
Water separatorThe water separator prevents water from en-tering the fuel tank by collecting any waterthat has entered the fuel tank breather hose ifthe watercraft was capsized.
1 Handlebar2 Jet thrust nozzle
1
2 1 Cooling water pilot outlet
1
UF4G71E0.book Page 29 Wednesday, July 27, 2016 9:32 AM
Control function operation
30
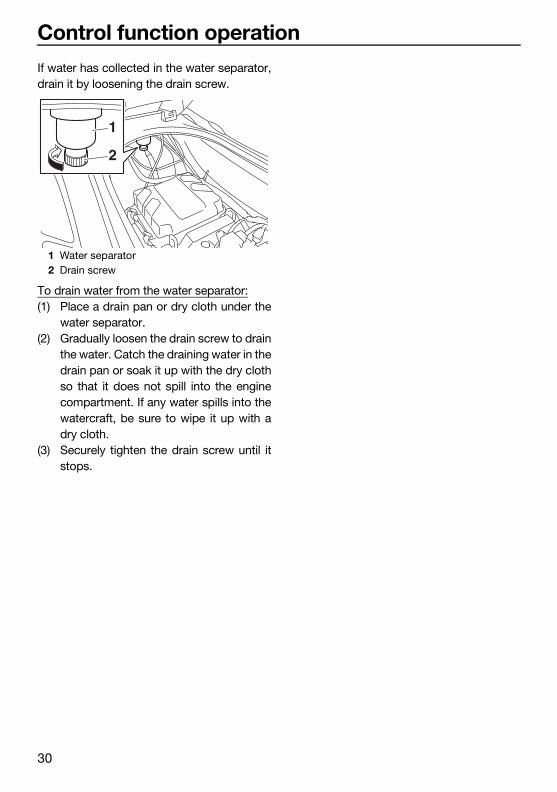
If water has collected in the water separator,drain it by loosening the drain screw.
To drain water from the water separator:(1) Place a drain pan or dry cloth under the
water separator.(2) Gradually loosen the drain screw to drain
the water. Catch the draining water in thedrain pan or soak it up with the dry clothso that it does not spill into the enginecompartment. If any water spills into thewatercraft, be sure to wipe it up with adry cloth.
(3) Securely tighten the drain screw until itstops.
1 Water separator2 Drain screw
2
1
UF4G71E0.book Page 30 Wednesday, July 27, 2016 9:32 AM
Watercraft operation
31
EJU40014
Watercraft operation functions
EJU43154
Shift system
WARNINGEWJ01773
Make sure that there are no obstacles orpeople behind you before shifting intoreverse.
Do not touch the reverse gate while theRiDE lever is being operated, otherwiseyou could be pinched.
If the RiDE lever and throttle lever arebeing operated at the same time, do notrelease only the RiDE lever. Otherwise,the watercraft could accelerate morequickly than expected, which may leadto an accident.
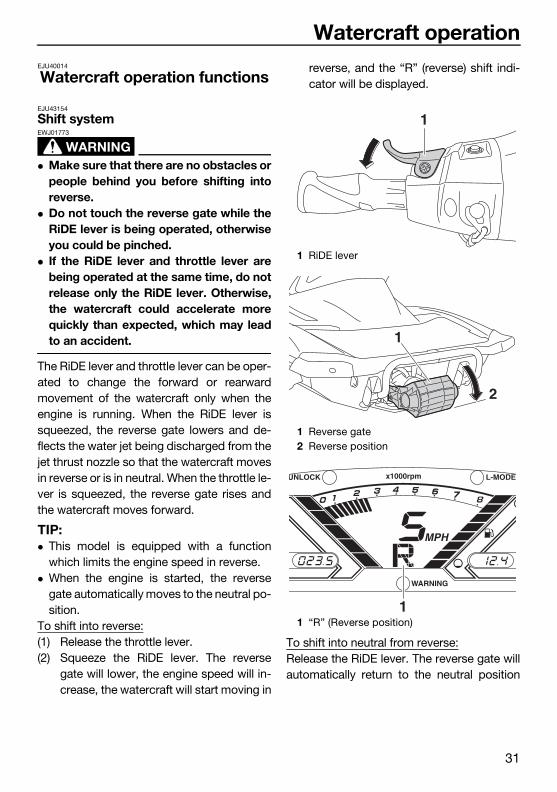
The RiDE lever and throttle lever can be oper-ated to change the forward or rearwardmovement of the watercraft only when theengine is running. When the RiDE lever issqueezed, the reverse gate lowers and de-flects the water jet being discharged from thejet thrust nozzle so that the watercraft movesin reverse or is in neutral. When the throttle le-ver is squeezed, the reverse gate rises andthe watercraft moves forward.
TIP: This model is equipped with a function
which limits the engine speed in reverse. When the engine is started, the reverse
gate automatically moves to the neutral po-sition.
To shift into reverse:(1) Release the throttle lever.(2) Squeeze the RiDE lever. The reverse
gate will lower, the engine speed will in-crease, the watercraft will start moving in
reverse, and the “R” (reverse) shift indi-cator will be displayed.
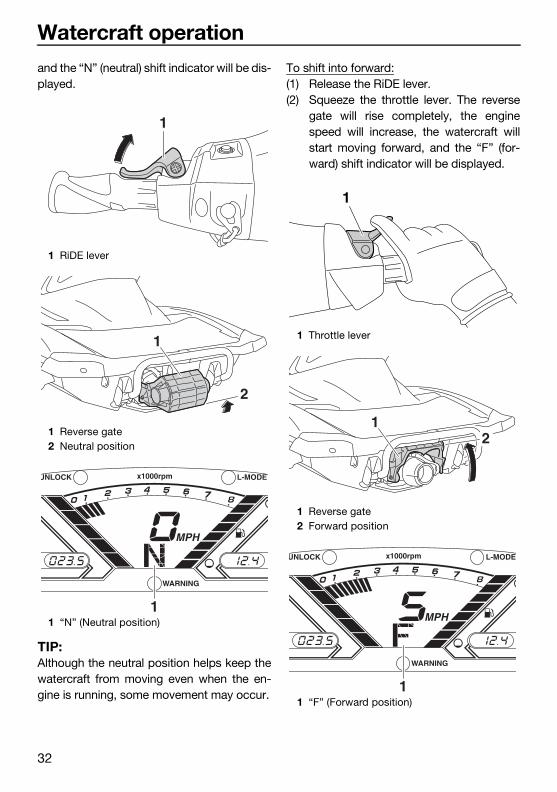
To shift into neutral from reverse:Release the RiDE lever. The reverse gate willautomatically return to the neutral position
1 RiDE lever
1 Reverse gate2 Reverse position
1 “R” (Reverse position)
1
1
2
1
UF4G71E0.book Page 31 Wednesday, July 27, 2016 9:32 AM
Watercraft operation
32
and the “N” (neutral) shift indicator will be dis-played.
TIP:Although the neutral position helps keep thewatercraft from moving even when the en-gine is running, some movement may occur.
To shift into forward:(1) Release the RiDE lever.(2) Squeeze the throttle lever. The reverse
gate will rise completely, the enginespeed will increase, the watercraft willstart moving forward, and the “F” (for-ward) shift indicator will be displayed.
1 RiDE lever
1 Reverse gate2 Neutral position
1 “N” (Neutral position)
1
1
2
1
1 Throttle lever
1 Reverse gate2 Forward position
1 “F” (Forward position)
1
12
1
UF4G71E0.book Page 32 Wednesday, July 27, 2016 9:32 AM
Watercraft operation
33
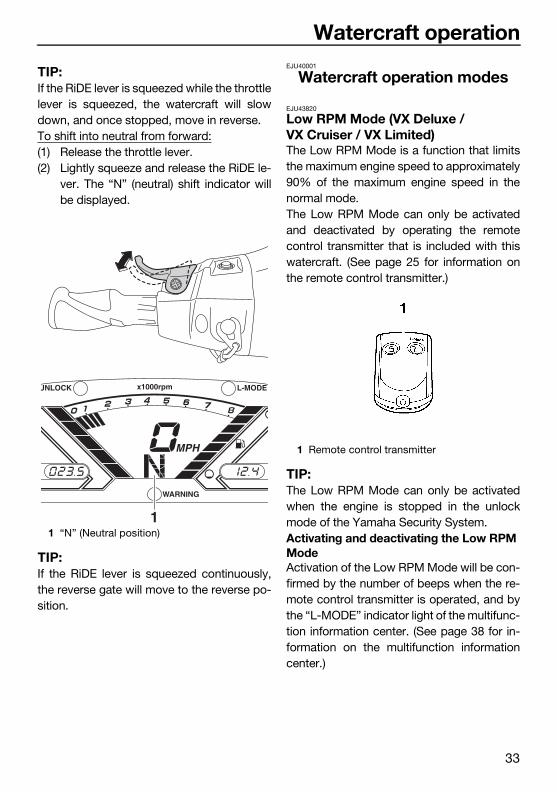
TIP:If the RiDE lever is squeezed while the throttlelever is squeezed, the watercraft will slowdown, and once stopped, move in reverse.To shift into neutral from forward:(1) Release the throttle lever.(2) Lightly squeeze and release the RiDE le-
ver. The “N” (neutral) shift indicator willbe displayed.
TIP:If the RiDE lever is squeezed continuously,the reverse gate will move to the reverse po-sition.
EJU40001
Watercraft operation modes
EJU43820
Low RPM Mode (VX Deluxe / VX Cruiser / VX Limited)The Low RPM Mode is a function that limitsthe maximum engine speed to approximately90% of the maximum engine speed in thenormal mode.The Low RPM Mode can only be activatedand deactivated by operating the remotecontrol transmitter that is included with thiswatercraft. (See page 25 for information onthe remote control transmitter.)
TIP:The Low RPM Mode can only be activatedwhen the engine is stopped in the unlockmode of the Yamaha Security System.Activating and deactivating the Low RPM ModeActivation of the Low RPM Mode will be con-firmed by the number of beeps when the re-mote control transmitter is operated, and bythe “L-MODE” indicator light of the multifunc-tion information center. (See page 38 for in-formation on the multifunction informationcenter.)
1 “N” (Neutral position)1
1 Remote control transmitter
UF4G71E0.book Page 33 Wednesday, July 27, 2016 9:32 AM
Watercraft operation
34
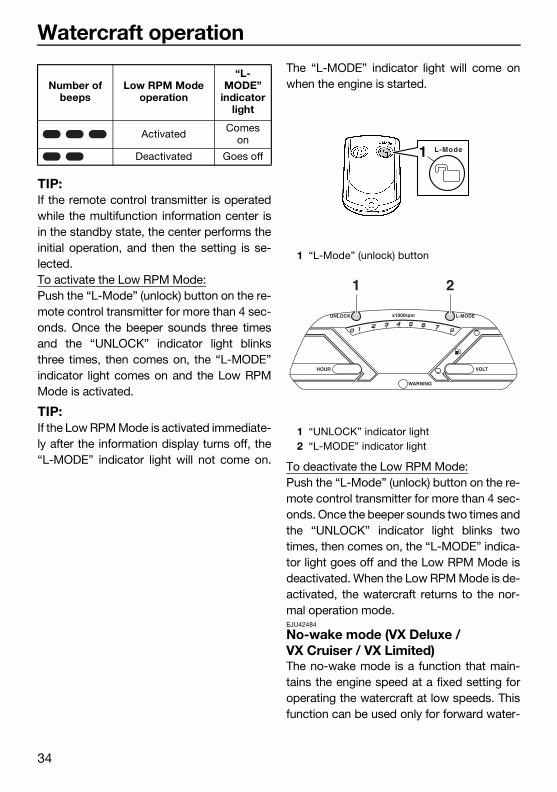
TIP:If the remote control transmitter is operatedwhile the multifunction information center isin the standby state, the center performs theinitial operation, and then the setting is se-lected.To activate the Low RPM Mode:Push the “L-Mode” (unlock) button on the re-mote control transmitter for more than 4 sec-onds. Once the beeper sounds three timesand the “UNLOCK” indicator light blinksthree times, then comes on, the “L-MODE”indicator light comes on and the Low RPMMode is activated.
TIP:If the Low RPM Mode is activated immediate-ly after the information display turns off, the“L-MODE” indicator light will not come on.
The “L-MODE” indicator light will come onwhen the engine is started.
To deactivate the Low RPM Mode:Push the “L-Mode” (unlock) button on the re-mote control transmitter for more than 4 sec-onds. Once the beeper sounds two times andthe “UNLOCK” indicator light blinks twotimes, then comes on, the “L-MODE” indica-tor light goes off and the Low RPM Mode isdeactivated. When the Low RPM Mode is de-activated, the watercraft returns to the nor-mal operation mode.EJU42484
No-wake mode (VX Deluxe / VX Cruiser / VX Limited)The no-wake mode is a function that main-tains the engine speed at a fixed setting foroperating the watercraft at low speeds. Thisfunction can be used only for forward water-
Number of beeps
Low RPM Mode operation
“L-MODE”
indicator light
Activated Comes on
Deactivated Goes off
1 “L-Mode” (unlock) button
1 “UNLOCK” indicator light2 “L-MODE” indicator light
L-Mode1
1 2
UF4G71E0.book Page 34 Wednesday, July 27, 2016 9:32 AM
Watercraft operation
35
craft operation or when the watercraft is inneutral.
TIP: The no-wake mode can only be activated
after 5 seconds have elapsed since startingthe engine.
If the no-wake mode is activated when thewatercraft is operating in neutral, the re-verse gate will move to the forward posi-tion.
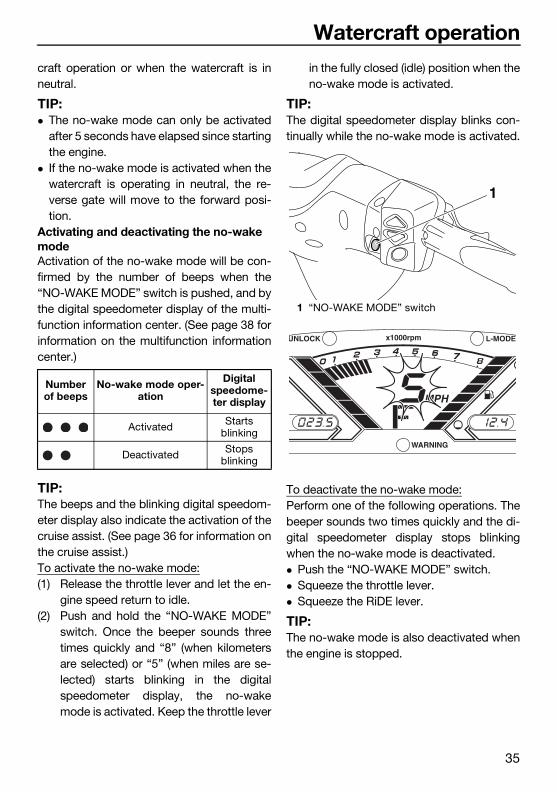
Activating and deactivating the no-wake modeActivation of the no-wake mode will be con-firmed by the number of beeps when the“NO-WAKE MODE” switch is pushed, and bythe digital speedometer display of the multi-function information center. (See page 38 forinformation on the multifunction informationcenter.)
TIP:The beeps and the blinking digital speedom-eter display also indicate the activation of thecruise assist. (See page 36 for information onthe cruise assist.)To activate the no-wake mode:(1) Release the throttle lever and let the en-
gine speed return to idle.(2) Push and hold the “NO-WAKE MODE”
switch. Once the beeper sounds threetimes quickly and “8” (when kilometersare selected) or “5” (when miles are se-lected) starts blinking in the digitalspeedometer display, the no-wakemode is activated. Keep the throttle lever
in the fully closed (idle) position when theno-wake mode is activated.
TIP:The digital speedometer display blinks con-tinually while the no-wake mode is activated.
To deactivate the no-wake mode:Perform one of the following operations. Thebeeper sounds two times quickly and the di-gital speedometer display stops blinkingwhen the no-wake mode is deactivated. Push the “NO-WAKE MODE” switch. Squeeze the throttle lever. Squeeze the RiDE lever.
TIP:The no-wake mode is also deactivated whenthe engine is stopped.
Number of beeps
No-wake mode oper-ation
Digital speedome-ter display
Activated Starts blinking
Deactivated Stops blinking
1 “NO-WAKE MODE” switch
1
UF4G71E0.book Page 35 Wednesday, July 27, 2016 9:32 AM

Watercraft operation
36
EJU43980
Cruise assist (VX Deluxe / VX Cruiser / VX Limited)The cruise assist is a function for maintaininga desired engine speed within a fixed rangewhile operating the watercraft.
TIP: The cruise assist can only be set between
engine speeds of approximately 4000r/min and approximately 7000 r/min.
The cruise assist cannot be activated in theLow RPM Mode. (See page 33 for LowRPM Mode activation procedures.)
Activating and deactivating the cruise as-sistActivation of the cruise assist will be con-firmed by the number of beeps when the“SET” switch, cruise assist up switch, orcruise assist down switch is pushed, and bythe digital speedometer display of the multi-function information center. (See page 38 forinformation on the multifunction informationcenter.)
TIP:The beeps and the blinking digital speedom-eter display also indicate the activation of theno-wake mode. (See page 34 for informationon the no-wake mode.)To activate the cruise assist:(1) Operate the throttle lever until the de-
sired engine speed is reached.(2) When the engine speed reaches the de-
sired cruise assist setting, push the
“SET” switch. Once the beeper soundsthree times quickly and the digital speed-ometer display starts blinking, the cruiseassist is activated. When the cruise as-sist is activated, slowly squeeze thethrottle lever to keep it squeezed furtherthan the position at which the cruise as-sist was set; releasing the throttle leverwill deactivate the cruise assist.
TIP:The digital speedometer display blinks con-tinually while the cruise assist is activated.Make sure that the beeper has sounded andthe digital speedometer display is blinkingbefore squeezing the throttle lever to the fullthrottle position. If the speedometer display isnot blinking, the cruise assist is not activated
Number of beeps
Cruise assist opera-tion
Digital speedome-ter display
Activated Starts blinking
Deactivated Stops blinking
Set engine speed in-creases or decreases
Continues blinking
UF4G71E0.book Page 36 Wednesday, July 27, 2016 9:32 AM
Watercraft operation
37
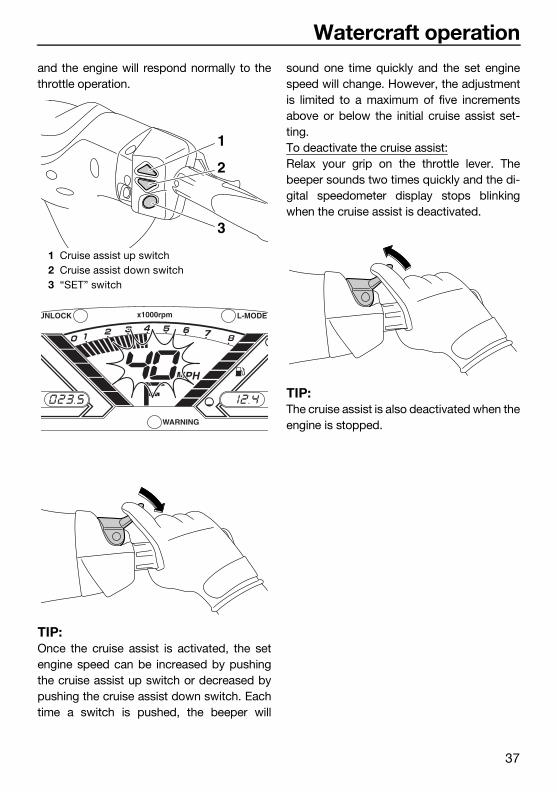
and the engine will respond normally to thethrottle operation.
TIP:Once the cruise assist is activated, the setengine speed can be increased by pushingthe cruise assist up switch or decreased bypushing the cruise assist down switch. Eachtime a switch is pushed, the beeper will
sound one time quickly and the set enginespeed will change. However, the adjustmentis limited to a maximum of five incrementsabove or below the initial cruise assist set-ting.To deactivate the cruise assist:Relax your grip on the throttle lever. Thebeeper sounds two times quickly and the di-gital speedometer display stops blinkingwhen the cruise assist is deactivated.
TIP:The cruise assist is also deactivated when theengine is stopped.
1 Cruise assist up switch2 Cruise assist down switch3 “SET” switch
1
2
3
UF4G71E0.book Page 37 Wednesday, July 27, 2016 9:32 AM
Instrument operation
38
EJU43760
Multifunction information center
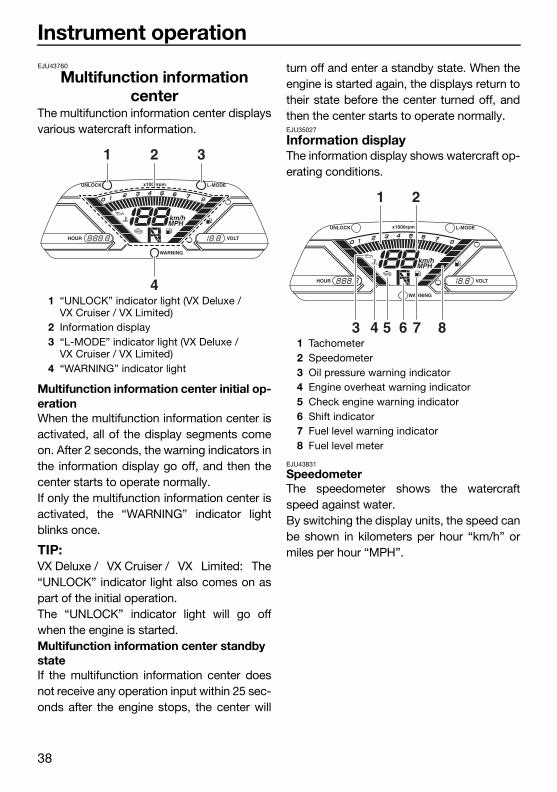
The multifunction information center displaysvarious watercraft information.
Multifunction information center initial op-erationWhen the multifunction information center isactivated, all of the display segments comeon. After 2 seconds, the warning indicators inthe information display go off, and then thecenter starts to operate normally.If only the multifunction information center isactivated, the “WARNING” indicator lightblinks once.
TIP:VX Deluxe / VX Cruiser / VX Limited: The“UNLOCK” indicator light also comes on aspart of the initial operation.The “UNLOCK” indicator light will go offwhen the engine is started.Multifunction information center standby stateIf the multifunction information center doesnot receive any operation input within 25 sec-onds after the engine stops, the center will
turn off and enter a standby state. When theengine is started again, the displays return totheir state before the center turned off, andthen the center starts to operate normally.EJU35027
Information displayThe information display shows watercraft op-erating conditions.
EJU43831
SpeedometerThe speedometer shows the watercraftspeed against water.By switching the display units, the speed canbe shown in kilometers per hour “km/h” ormiles per hour “MPH”.
1 “UNLOCK” indicator light (VX Deluxe / VX Cruiser / VX Limited)
2 Information display3 “L-MODE” indicator light (VX Deluxe /
VX Cruiser / VX Limited)4 “WARNING” indicator light
1 2 3
4
1 Tachometer2 Speedometer3 Oil pressure warning indicator4 Engine overheat warning indicator5 Check engine warning indicator6 Shift indicator7 Fuel level warning indicator8 Fuel level meter
1 2
3 4 5 76 8
UF4G71E0.book Page 38 Wednesday, July 27, 2016 9:32 AM
Instrument operation
39
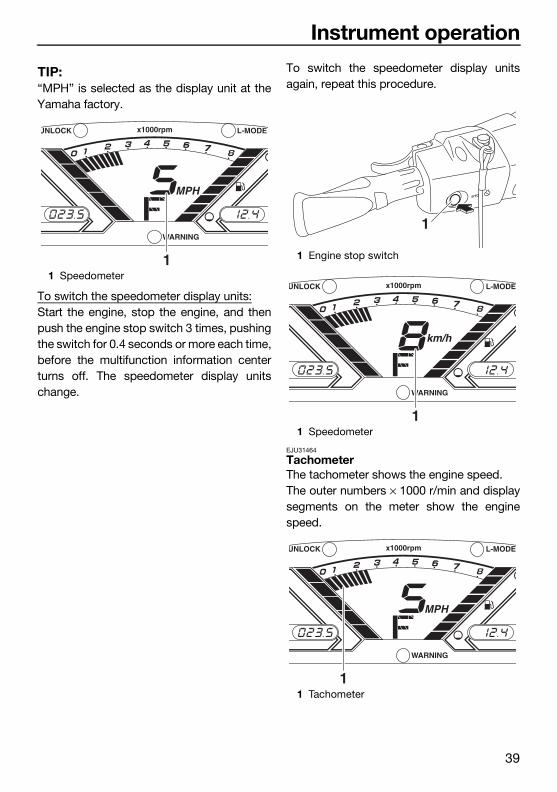
TIP:“MPH” is selected as the display unit at theYamaha factory.
To switch the speedometer display units:Start the engine, stop the engine, and thenpush the engine stop switch 3 times, pushingthe switch for 0.4 seconds or more each time,before the multifunction information centerturns off. The speedometer display unitschange.
To switch the speedometer display unitsagain, repeat this procedure.
EJU31464
TachometerThe tachometer shows the engine speed.The outer numbers × 1000 r/min and displaysegments on the meter show the enginespeed.
1 Speedometer1 1 Engine stop switch
1 Speedometer
1 Tachometer
1
1
1
UF4G71E0.book Page 39 Wednesday, July 27, 2016 9:32 AM
Instrument operation
40
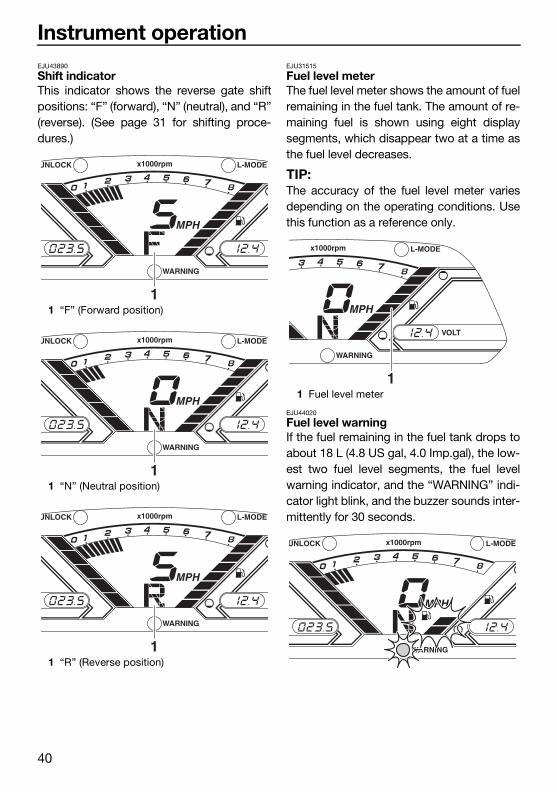
EJU43890
Shift indicatorThis indicator shows the reverse gate shiftpositions: “F” (forward), “N” (neutral), and “R”(reverse). (See page 31 for shifting proce-dures.)
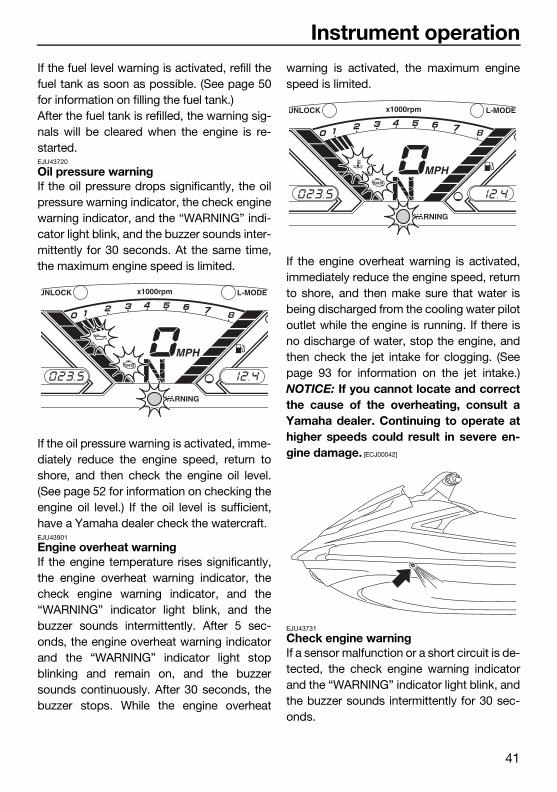
EJU31515
Fuel level meterThe fuel level meter shows the amount of fuelremaining in the fuel tank. The amount of re-maining fuel is shown using eight displaysegments, which disappear two at a time asthe fuel level decreases.
TIP:The accuracy of the fuel level meter variesdepending on the operating conditions. Usethis function as a reference only.
EJU44020
Fuel level warningIf the fuel remaining in the fuel tank drops toabout 18 L (4.8 US gal, 4.0 Imp.gal), the low-est two fuel level segments, the fuel levelwarning indicator, and the “WARNING” indi-cator light blink, and the buzzer sounds inter-mittently for 30 seconds.
1 “F” (Forward position)
1 “N” (Neutral position)
1 “R” (Reverse position)
1
1
1
1 Fuel level meter1
UF4G71E0.book Page 40 Wednesday, July 27, 2016 9:32 AM
Instrument operation
41
If the fuel level warning is activated, refill thefuel tank as soon as possible. (See page 50for information on filling the fuel tank.)After the fuel tank is refilled, the warning sig-nals will be cleared when the engine is re-started.EJU43720
Oil pressure warningIf the oil pressure drops significantly, the oilpressure warning indicator, the check enginewarning indicator, and the “WARNING” indi-cator light blink, and the buzzer sounds inter-mittently for 30 seconds. At the same time,the maximum engine speed is limited.
If the oil pressure warning is activated, imme-diately reduce the engine speed, return toshore, and then check the engine oil level.(See page 52 for information on checking theengine oil level.) If the oil level is sufficient,have a Yamaha dealer check the watercraft.EJU43901
Engine overheat warningIf the engine temperature rises significantly,the engine overheat warning indicator, thecheck engine warning indicator, and the“WARNING” indicator light blink, and thebuzzer sounds intermittently. After 5 sec-onds, the engine overheat warning indicatorand the “WARNING” indicator light stopblinking and remain on, and the buzzersounds continuously. After 30 seconds, thebuzzer stops. While the engine overheat
warning is activated, the maximum enginespeed is limited.
If the engine overheat warning is activated,immediately reduce the engine speed, returnto shore, and then make sure that water isbeing discharged from the cooling water pilotoutlet while the engine is running. If there isno discharge of water, stop the engine, andthen check the jet intake for clogging. (Seepage 93 for information on the jet intake.)NOTICE: If you cannot locate and correctthe cause of the overheating, consult aYamaha dealer. Continuing to operate athigher speeds could result in severe en-gine damage. [ECJ00042]
EJU43731
Check engine warningIf a sensor malfunction or a short circuit is de-tected, the check engine warning indicatorand the “WARNING” indicator light blink, andthe buzzer sounds intermittently for 30 sec-onds.
UF4G71E0.book Page 41 Wednesday, July 27, 2016 9:32 AM
Instrument operation
42
If the engine is stopped after the check en-gine warning is activated, the information dis-play will indicate an error code.
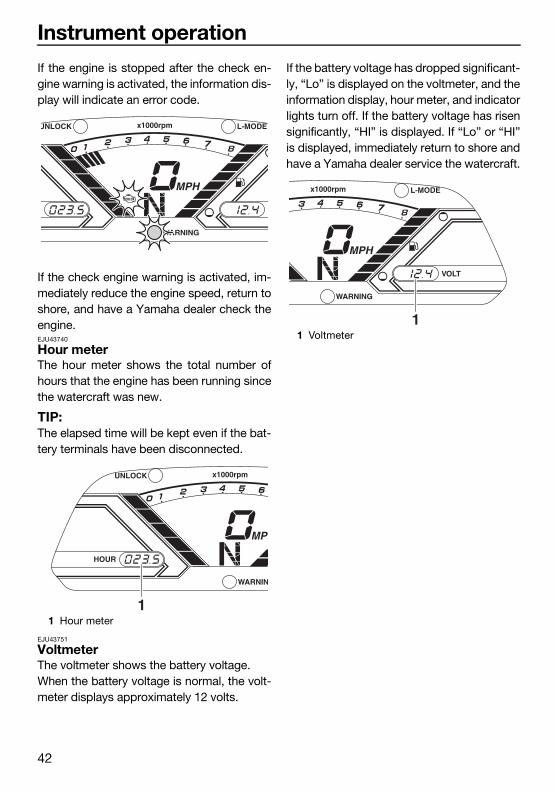
If the check engine warning is activated, im-mediately reduce the engine speed, return toshore, and have a Yamaha dealer check theengine.EJU43740
Hour meterThe hour meter shows the total number ofhours that the engine has been running sincethe watercraft was new.
TIP:The elapsed time will be kept even if the bat-tery terminals have been disconnected.
EJU43751
VoltmeterThe voltmeter shows the battery voltage.When the battery voltage is normal, the volt-meter displays approximately 12 volts.
If the battery voltage has dropped significant-ly, “Lo” is displayed on the voltmeter, and theinformation display, hour meter, and indicatorlights turn off. If the battery voltage has risensignificantly, “HI” is displayed. If “Lo” or “HI”is displayed, immediately return to shore andhave a Yamaha dealer service the watercraft.
1 Hour meter1
1 Voltmeter1
UF4G71E0.book Page 42 Wednesday, July 27, 2016 9:32 AM
Equipment operation
43
EJU40334
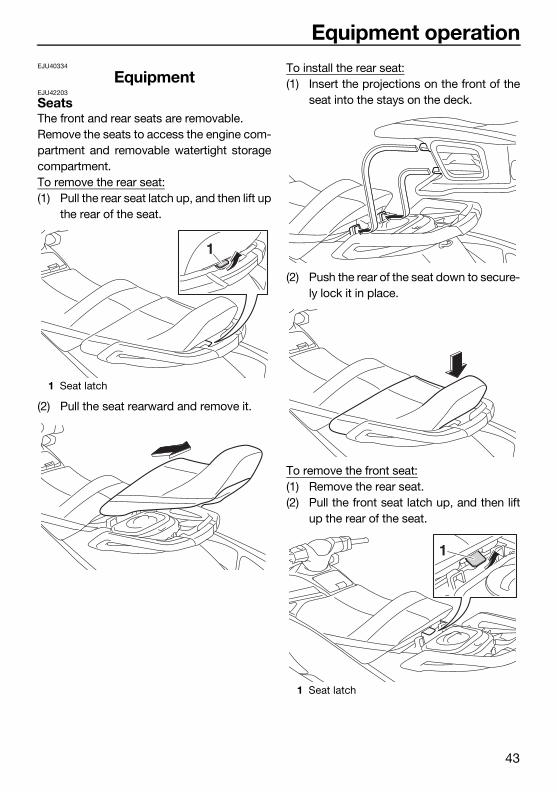
EquipmentEJU42203
SeatsThe front and rear seats are removable.Remove the seats to access the engine com-partment and removable watertight storagecompartment.To remove the rear seat:(1) Pull the rear seat latch up, and then lift up
the rear of the seat.
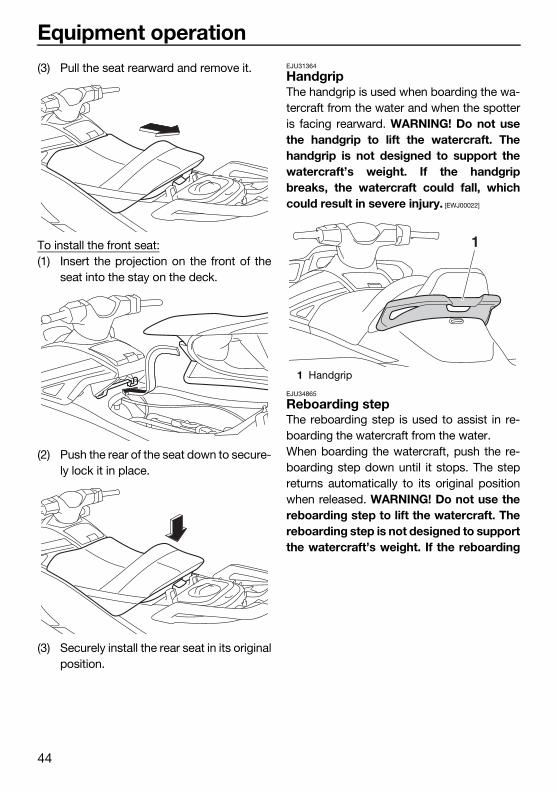
(2) Pull the seat rearward and remove it.
To install the rear seat:(1) Insert the projections on the front of the
seat into the stays on the deck.
(2) Push the rear of the seat down to secure-ly lock it in place.
To remove the front seat:(1) Remove the rear seat.(2) Pull the front seat latch up, and then lift
up the rear of the seat.
1 Seat latch
1
1 Seat latch
1
UF4G71E0.book Page 43 Wednesday, July 27, 2016 9:32 AM
Equipment operation
44
(3) Pull the seat rearward and remove it.
To install the front seat:(1) Insert the projection on the front of the
seat into the stay on the deck.
(2) Push the rear of the seat down to secure-ly lock it in place.
(3) Securely install the rear seat in its originalposition.
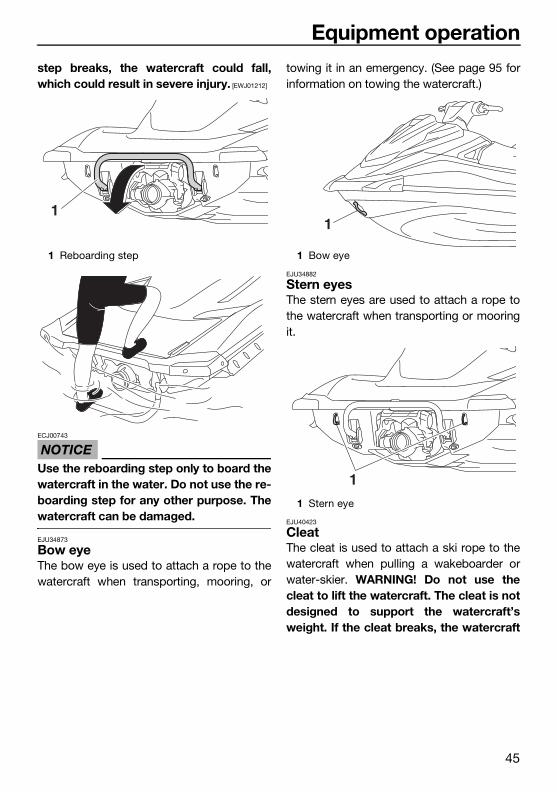
EJU31364
HandgripThe handgrip is used when boarding the wa-tercraft from the water and when the spotteris facing rearward. WARNING! Do not usethe handgrip to lift the watercraft. Thehandgrip is not designed to support thewatercraft’s weight. If the handgripbreaks, the watercraft could fall, whichcould result in severe injury. [EWJ00022]
EJU34865
Reboarding stepThe reboarding step is used to assist in re-boarding the watercraft from the water.When boarding the watercraft, push the re-boarding step down until it stops. The stepreturns automatically to its original positionwhen released. WARNING! Do not use thereboarding step to lift the watercraft. Thereboarding step is not designed to supportthe watercraft’s weight. If the reboarding
1 Handgrip
1
UF4G71E0.book Page 44 Wednesday, July 27, 2016 9:32 AM
Equipment operation
45
step breaks, the watercraft could fall,which could result in severe injury. [EWJ01212]
NOTICEECJ00743
Use the reboarding step only to board thewatercraft in the water. Do not use the re-boarding step for any other purpose. Thewatercraft can be damaged.
EJU34873
Bow eyeThe bow eye is used to attach a rope to thewatercraft when transporting, mooring, or
towing it in an emergency. (See page 95 forinformation on towing the watercraft.)
EJU34882
Stern eyesThe stern eyes are used to attach a rope tothe watercraft when transporting or mooringit.
EJU40423
CleatThe cleat is used to attach a ski rope to thewatercraft when pulling a wakeboarder orwater-skier. WARNING! Do not use thecleat to lift the watercraft. The cleat is notdesigned to support the watercraft’sweight. If the cleat breaks, the watercraft
1 Reboarding step
1
1 Bow eye
1 Stern eye
1
1
UF4G71E0.book Page 45 Wednesday, July 27, 2016 9:32 AM
Equipment operation
46
could fall, which could result in severe in-jury. [EWJ01511]
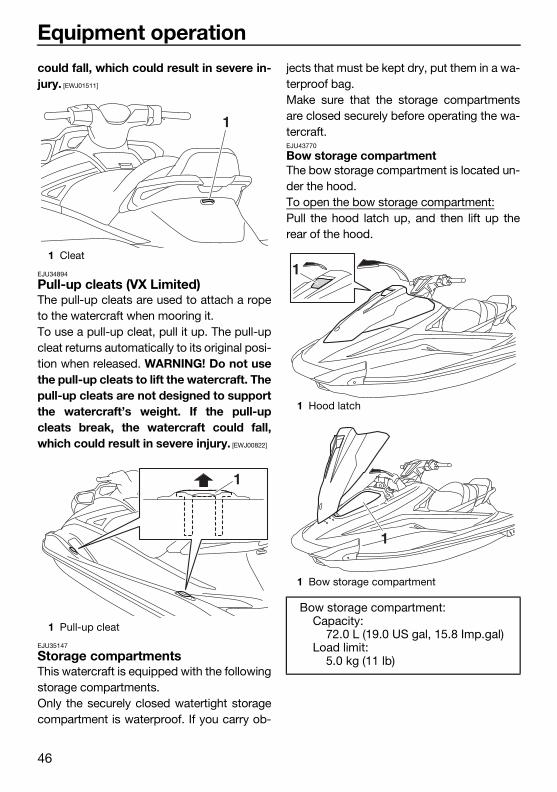
EJU34894
Pull-up cleats (VX Limited)The pull-up cleats are used to attach a ropeto the watercraft when mooring it.To use a pull-up cleat, pull it up. The pull-upcleat returns automatically to its original posi-tion when released. WARNING! Do not usethe pull-up cleats to lift the watercraft. Thepull-up cleats are not designed to supportthe watercraft’s weight. If the pull-upcleats break, the watercraft could fall,which could result in severe injury. [EWJ00822]
EJU35147
Storage compartmentsThis watercraft is equipped with the followingstorage compartments.Only the securely closed watertight storagecompartment is waterproof. If you carry ob-
jects that must be kept dry, put them in a wa-terproof bag.Make sure that the storage compartmentsare closed securely before operating the wa-tercraft.EJU43770
Bow storage compartmentThe bow storage compartment is located un-der the hood.To open the bow storage compartment:Pull the hood latch up, and then lift up therear of the hood.
1 Cleat
1 Pull-up cleat
1
1
1 Hood latch
1 Bow storage compartment
Bow storage compartment:Capacity:
72.0 L (19.0 US gal, 15.8 Imp.gal)Load limit:
5.0 kg (11 lb)
1
11
UF4G71E0.book Page 46 Wednesday, July 27, 2016 9:32 AM
Equipment operation
47
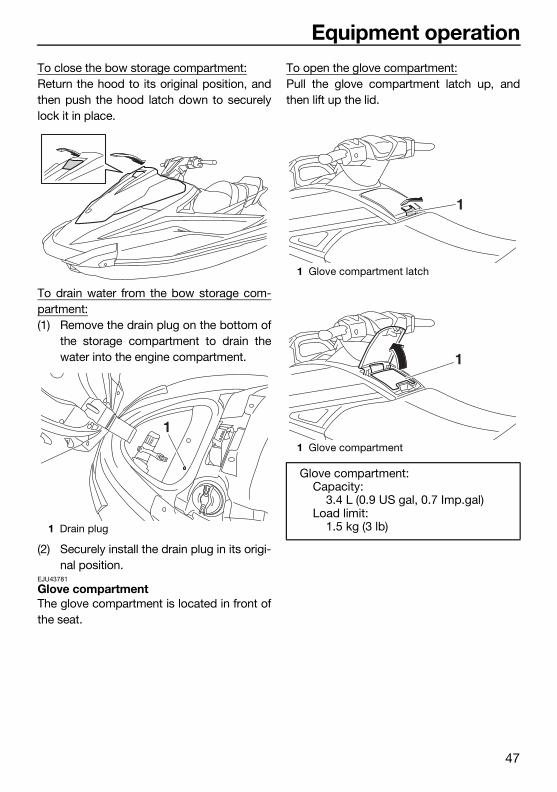
To close the bow storage compartment:Return the hood to its original position, andthen push the hood latch down to securelylock it in place.
To drain water from the bow storage com-partment:(1) Remove the drain plug on the bottom of
the storage compartment to drain thewater into the engine compartment.
(2) Securely install the drain plug in its origi-nal position.
EJU43781
Glove compartmentThe glove compartment is located in front ofthe seat.
To open the glove compartment:Pull the glove compartment latch up, andthen lift up the lid.
1 Drain plug
1
1 Glove compartment latch
1 Glove compartment
Glove compartment:Capacity:
3.4 L (0.9 US gal, 0.7 Imp.gal)Load limit:
1.5 kg (3 lb)
1
1
UF4G71E0.book Page 47 Wednesday, July 27, 2016 9:32 AM
Equipment operation
48
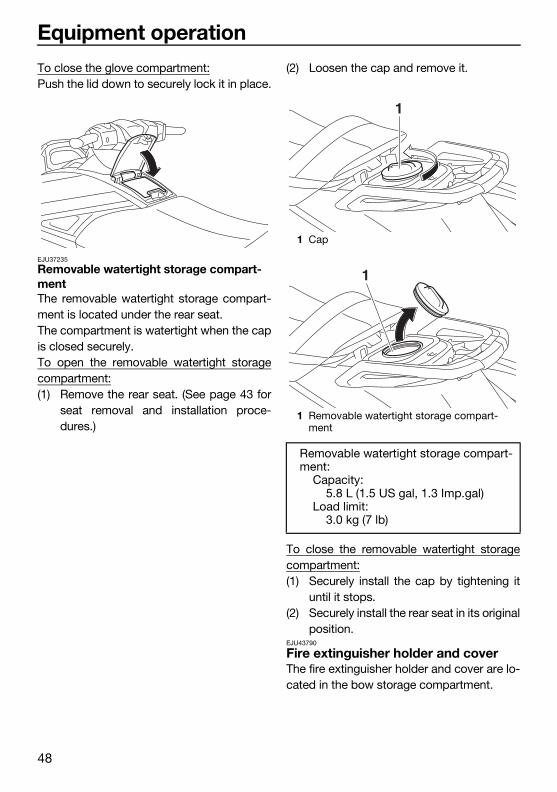
To close the glove compartment:Push the lid down to securely lock it in place.
EJU37235
Removable watertight storage compart-mentThe removable watertight storage compart-ment is located under the rear seat.The compartment is watertight when the capis closed securely.To open the removable watertight storagecompartment:(1) Remove the rear seat. (See page 43 for
seat removal and installation proce-dures.)
(2) Loosen the cap and remove it.
To close the removable watertight storagecompartment:(1) Securely install the cap by tightening it
until it stops.(2) Securely install the rear seat in its original
position.EJU43790
Fire extinguisher holder and coverThe fire extinguisher holder and cover are lo-cated in the bow storage compartment.
1 Cap
1 Removable watertight storage compart-ment
Removable watertight storage compart-ment:
Capacity:5.8 L (1.5 US gal, 1.3 Imp.gal)
Load limit:3.0 kg (7 lb)
1
1
UF4G71E0.book Page 48 Wednesday, July 27, 2016 9:32 AM
Equipment operation
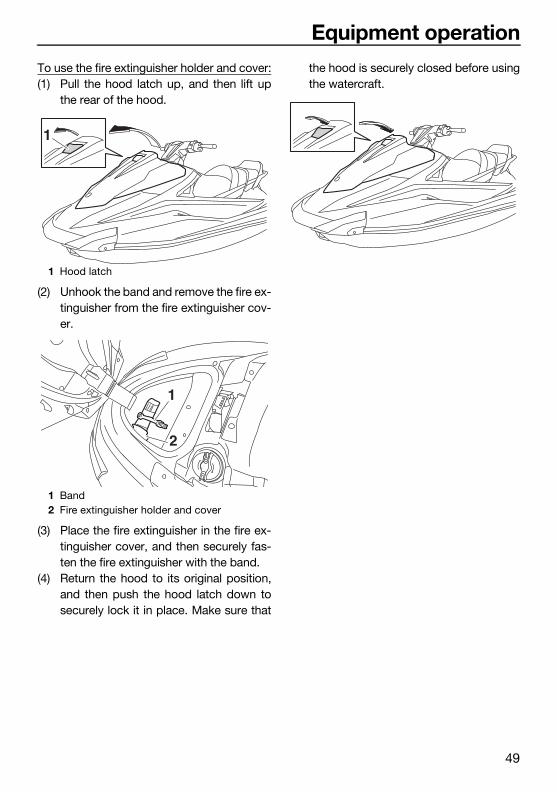
49
To use the fire extinguisher holder and cover:(1) Pull the hood latch up, and then lift up
the rear of the hood.
(2) Unhook the band and remove the fire ex-tinguisher from the fire extinguisher cov-er.
(3) Place the fire extinguisher in the fire ex-tinguisher cover, and then securely fas-ten the fire extinguisher with the band.
(4) Return the hood to its original position,and then push the hood latch down tosecurely lock it in place. Make sure that
the hood is securely closed before usingthe watercraft.
1 Hood latch
1 Band2 Fire extinguisher holder and cover
1
1
2
UF4G71E0.book Page 49 Wednesday, July 27, 2016 9:32 AM
Operation and handling requirements
50
EJU31823
Fuel requirementsEJU43641
Fuel
WARNINGEWJ00283
Gasoline and gasoline vapors are ex-tremely flammable. To avoid fires andexplosions and to reduce the risk of in-jury when refueling, follow these in-structions.
Gasoline is poisonous and can cause in-jury or death. Handle gasoline with care.Never siphon gasoline by mouth. If youshould swallow some gasoline, inhale alot of gasoline vapor, or get some gaso-line in your eyes, see your doctor imme-diately. If gasoline spills on your skin,wash with soap and water. If gasolinespills on your clothing, change yourclothes.
NOTICEECJ00322
Do not use leaded gasoline. Leadedgasoline can seriously damage the en-gine.
Avoid getting water and contaminants inthe fuel tank. Contaminated fuel cancause poor performance and enginedamage. Use only fresh gasoline thathas been stored in clean containers.
GasoholThere are two types of gasohol: gasohol con-taining ethanol and that containing methanol.
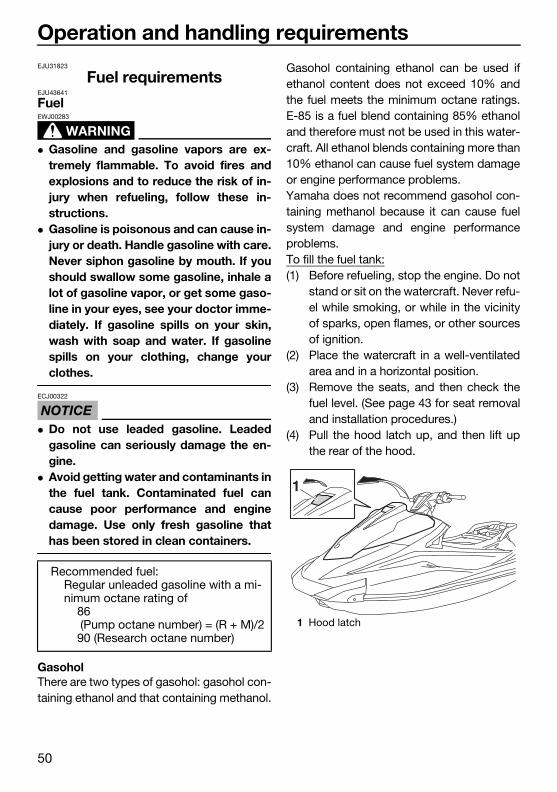
Gasohol containing ethanol can be used ifethanol content does not exceed 10% andthe fuel meets the minimum octane ratings.E-85 is a fuel blend containing 85% ethanoland therefore must not be used in this water-craft. All ethanol blends containing more than10% ethanol can cause fuel system damageor engine performance problems.Yamaha does not recommend gasohol con-taining methanol because it can cause fuelsystem damage and engine performanceproblems.To fill the fuel tank:(1) Before refueling, stop the engine. Do not
stand or sit on the watercraft. Never refu-el while smoking, or while in the vicinityof sparks, open flames, or other sourcesof ignition.
(2) Place the watercraft in a well-ventilatedarea and in a horizontal position.
(3) Remove the seats, and then check thefuel level. (See page 43 for seat removaland installation procedures.)
(4) Pull the hood latch up, and then lift upthe rear of the hood.
Recommended fuel:Regular unleaded gasoline with a mi-nimum octane rating of
86 (Pump octane number) = (R + M)/290 (Research octane number)
1 Hood latch
1
UF4G71E0.book Page 50 Wednesday, July 27, 2016 9:32 AM
Operation and handling requirements
51
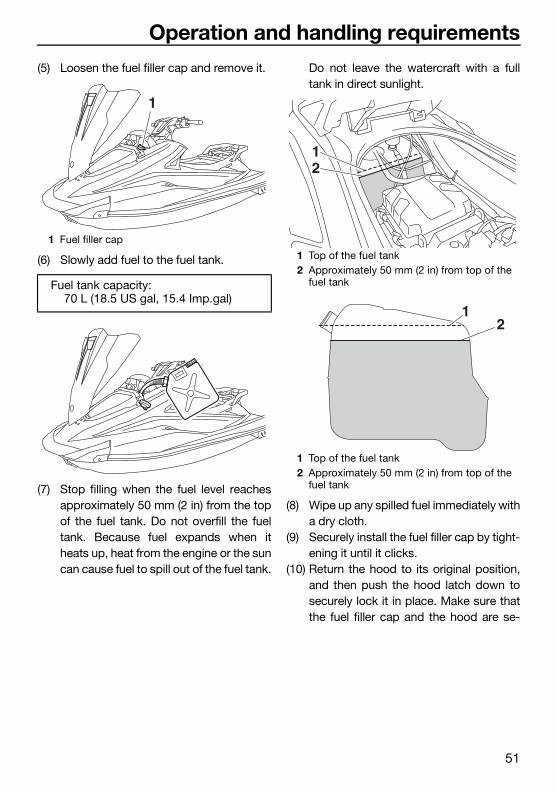
(5) Loosen the fuel filler cap and remove it.
(6) Slowly add fuel to the fuel tank.
(7) Stop filling when the fuel level reachesapproximately 50 mm (2 in) from the topof the fuel tank. Do not overfill the fueltank. Because fuel expands when itheats up, heat from the engine or the suncan cause fuel to spill out of the fuel tank.
Do not leave the watercraft with a fulltank in direct sunlight.
(8) Wipe up any spilled fuel immediately witha dry cloth.
(9) Securely install the fuel filler cap by tight-ening it until it clicks.
(10) Return the hood to its original position,and then push the hood latch down tosecurely lock it in place. Make sure thatthe fuel filler cap and the hood are se-
1 Fuel filler cap
Fuel tank capacity:70 L (18.5 US gal, 15.4 Imp.gal)
1
1 Top of the fuel tank2 Approximately 50 mm (2 in) from top of the
fuel tank
1 Top of the fuel tank2 Approximately 50 mm (2 in) from top of the
fuel tank
12
21
UF4G71E0.book Page 51 Wednesday, July 27, 2016 9:32 AM
Operation and handling requirements
52
curely closed before using the water-craft.
(11) Securely install the seats in their originalpositions.
EJU40291
Engine oil requirementsEJU43950
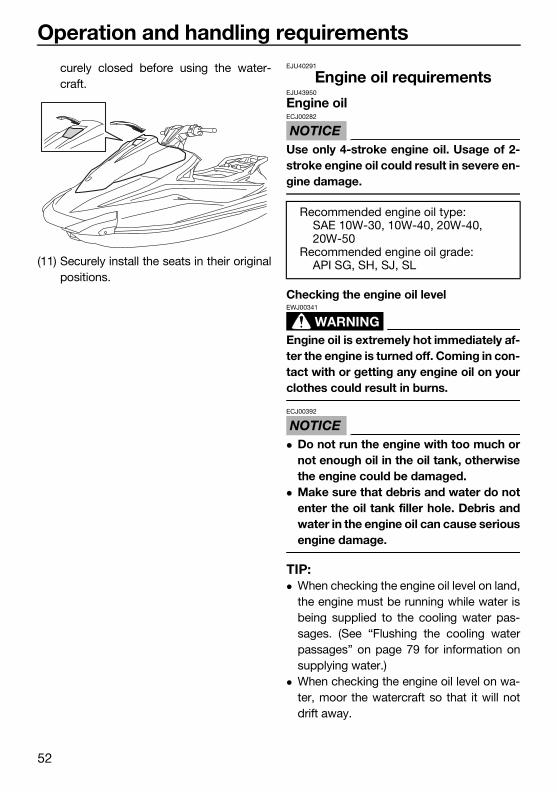
Engine oil
NOTICEECJ00282
Use only 4-stroke engine oil. Usage of 2-stroke engine oil could result in severe en-gine damage.
Checking the engine oil level
WARNINGEWJ00341
Engine oil is extremely hot immediately af-ter the engine is turned off. Coming in con-tact with or getting any engine oil on yourclothes could result in burns.
NOTICEECJ00392
Do not run the engine with too much ornot enough oil in the oil tank, otherwisethe engine could be damaged.
Make sure that debris and water do notenter the oil tank filler hole. Debris andwater in the engine oil can cause seriousengine damage.
TIP: When checking the engine oil level on land,
the engine must be running while water isbeing supplied to the cooling water pas-sages. (See “Flushing the cooling waterpassages” on page 79 for information onsupplying water.)
When checking the engine oil level on wa-ter, moor the watercraft so that it will notdrift away.
Recommended engine oil type:SAE 10W-30, 10W-40, 20W-40, 20W-50
Recommended engine oil grade:API SG, SH, SJ, SL
UF4G71E0.book Page 52 Wednesday, July 27, 2016 9:32 AM
Operation and handling requirements
53
To check the engine oil level:(1) With the engine stopped, place the wa-
tercraft in a precisely level position onland or launch the watercraft.
(2) Look in all directions, and then start theengine. (See page 68 for information onstarting the engine.)
(3) Run the engine at idling speed for 6 mi-nutes or more. Run the engine an addi-tional 5 minutes if the ambienttemperature is 20 °C (68 °F) or less.
(4) Stop the engine.(5) Remove the seats. (See page 43 for seat
removal and installation procedures.)(6) Loosen the oil tank filler cap and remove
it, and then wipe the attached dipstickclean.
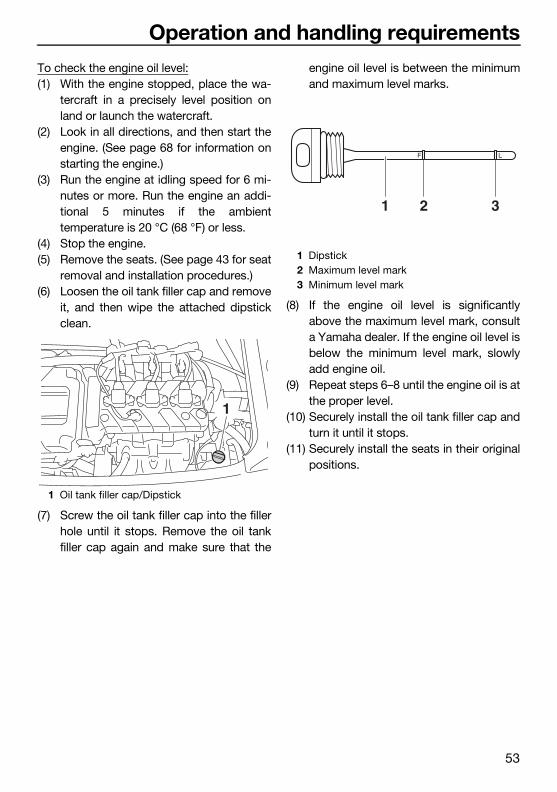
(7) Screw the oil tank filler cap into the fillerhole until it stops. Remove the oil tankfiller cap again and make sure that the
engine oil level is between the minimumand maximum level marks.
(8) If the engine oil level is significantlyabove the maximum level mark, consulta Yamaha dealer. If the engine oil level isbelow the minimum level mark, slowlyadd engine oil.
(9) Repeat steps 6–8 until the engine oil is atthe proper level.
(10) Securely install the oil tank filler cap andturn it until it stops.
(11) Securely install the seats in their originalpositions.
1 Oil tank filler cap/Dipstick
1
1 Dipstick2 Maximum level mark3 Minimum level mark
F L
21 3
UF4G71E0.book Page 53 Wednesday, July 27, 2016 9:32 AM
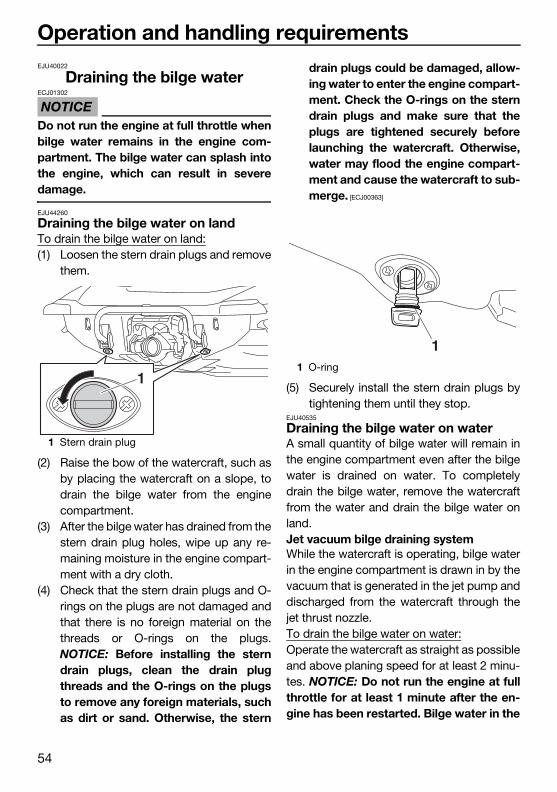
Operation and handling requirements
54
EJU40022
Draining the bilge water
NOTICEECJ01302
Do not run the engine at full throttle whenbilge water remains in the engine com-partment. The bilge water can splash intothe engine, which can result in severedamage.
EJU44260
Draining the bilge water on landTo drain the bilge water on land:(1) Loosen the stern drain plugs and remove
them.
(2) Raise the bow of the watercraft, such asby placing the watercraft on a slope, todrain the bilge water from the enginecompartment.
(3) After the bilge water has drained from thestern drain plug holes, wipe up any re-maining moisture in the engine compart-ment with a dry cloth.
(4) Check that the stern drain plugs and O-rings on the plugs are not damaged andthat there is no foreign material on thethreads or O-rings on the plugs.NOTICE: Before installing the sterndrain plugs, clean the drain plugthreads and the O-rings on the plugsto remove any foreign materials, suchas dirt or sand. Otherwise, the stern
drain plugs could be damaged, allow-ing water to enter the engine compart-ment. Check the O-rings on the sterndrain plugs and make sure that theplugs are tightened securely beforelaunching the watercraft. Otherwise,water may flood the engine compart-ment and cause the watercraft to sub-merge. [ECJ00363]
(5) Securely install the stern drain plugs bytightening them until they stop.
EJU40535
Draining the bilge water on waterA small quantity of bilge water will remain inthe engine compartment even after the bilgewater is drained on water. To completelydrain the bilge water, remove the watercraftfrom the water and drain the bilge water onland.Jet vacuum bilge draining systemWhile the watercraft is operating, bilge waterin the engine compartment is drawn in by thevacuum that is generated in the jet pump anddischarged from the watercraft through thejet thrust nozzle.To drain the bilge water on water:Operate the watercraft as straight as possibleand above planing speed for at least 2 minu-tes. NOTICE: Do not run the engine at fullthrottle for at least 1 minute after the en-gine has been restarted. Bilge water in the
1 Stern drain plug
11 O-ring
1
UF4G71E0.book Page 54 Wednesday, July 27, 2016 9:32 AM
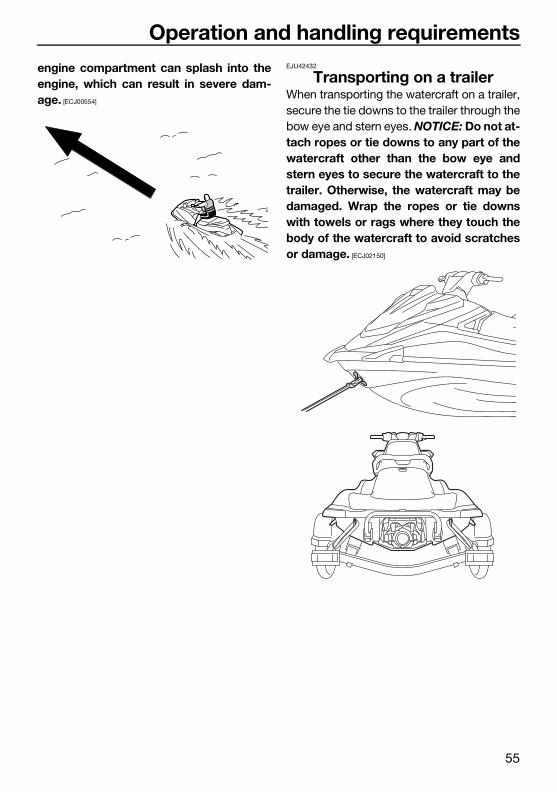
Operation and handling requirements
55
engine compartment can splash into theengine, which can result in severe dam-age. [ECJ00554]
EJU42432
Transporting on a trailerWhen transporting the watercraft on a trailer,secure the tie downs to the trailer through thebow eye and stern eyes. NOTICE: Do not at-tach ropes or tie downs to any part of thewatercraft other than the bow eye andstern eyes to secure the watercraft to thetrailer. Otherwise, the watercraft may bedamaged. Wrap the ropes or tie downswith towels or rags where they touch thebody of the watercraft to avoid scratchesor damage. [ECJ02150]
UF4G71E0.book Page 55 Wednesday, July 27, 2016 9:32 AM
First-time operation
56
EJU32786
Engine break-in
NOTICEECJ00432
Failure to perform the engine break-incould result in reduced engine life or evensevere engine damage.
The engine break-in is essential to allow thevarious components of the engine to wearand polish themselves to the correct operat-ing clearances. This ensures proper perfor-mance and promotes longer component life.To perform the engine break-in:(1) Check the engine oil level. (See page 52
for information on checking the engineoil level.)
(2) Launch the watercraft and start the en-gine. (See page 68 for information onstarting the engine.)
(3) For the first 5 minutes, operate with theengine at idling speed.
(4) For the next 30 minutes, operate with theengine speed below 5000 r/min.
(5) For the next 1 hour, operate with the en-gine speed below 6500 r/min.
After the engine break-in is complete, the wa-tercraft can be operated normally.
UF4G71E0.book Page 56 Wednesday, July 27, 2016 9:32 AM
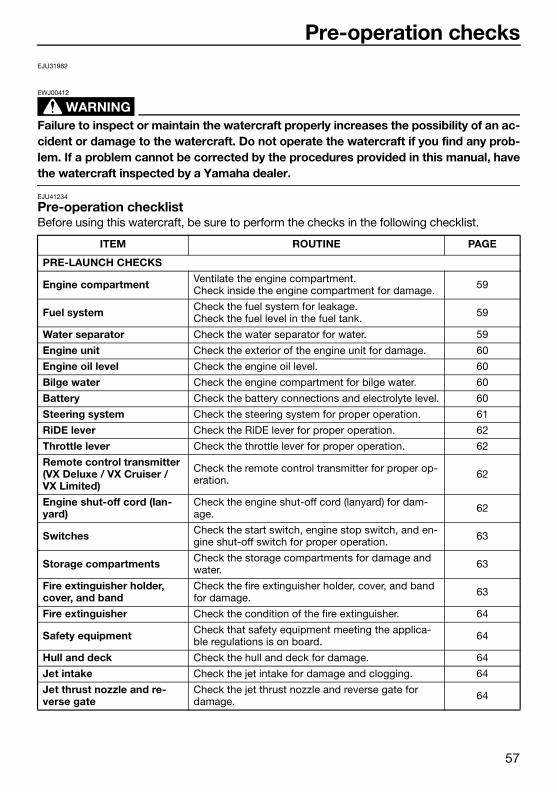
Pre-operation checks
57
EJU31982
WARNINGEWJ00412
Failure to inspect or maintain the watercraft properly increases the possibility of an ac-cident or damage to the watercraft. Do not operate the watercraft if you find any prob-lem. If a problem cannot be corrected by the procedures provided in this manual, havethe watercraft inspected by a Yamaha dealer.
EJU41234
Pre-operation checklistBefore using this watercraft, be sure to perform the checks in the following checklist.
ITEM ROUTINE PAGE
PRE-LAUNCH CHECKS
Engine compartment Ventilate the engine compartment.Check inside the engine compartment for damage. 59
Fuel system Check the fuel system for leakage.Check the fuel level in the fuel tank. 59
Water separator Check the water separator for water. 59
Engine unit Check the exterior of the engine unit for damage. 60
Engine oil level Check the engine oil level. 60
Bilge water Check the engine compartment for bilge water. 60
Battery Check the battery connections and electrolyte level. 60
Steering system Check the steering system for proper operation. 61
RiDE lever Check the RiDE lever for proper operation. 62
Throttle lever Check the throttle lever for proper operation. 62
Remote control transmitter (VX Deluxe / VX Cruiser / VX Limited)
Check the remote control transmitter for proper op-eration. 62
Engine shut-off cord (lan-yard)
Check the engine shut-off cord (lanyard) for dam-age. 62
Switches Check the start switch, engine stop switch, and en-gine shut-off switch for proper operation. 63
Storage compartments Check the storage compartments for damage and water. 63
Fire extinguisher holder, cover, and band
Check the fire extinguisher holder, cover, and band for damage. 63
Fire extinguisher Check the condition of the fire extinguisher. 64
Safety equipment Check that safety equipment meeting the applica-ble regulations is on board. 64
Hull and deck Check the hull and deck for damage. 64
Jet intake Check the jet intake for damage and clogging. 64
Jet thrust nozzle and re-verse gate
Check the jet thrust nozzle and reverse gate for damage. 64
UF4G71E0.book Page 57 Wednesday, July 27, 2016 9:32 AM
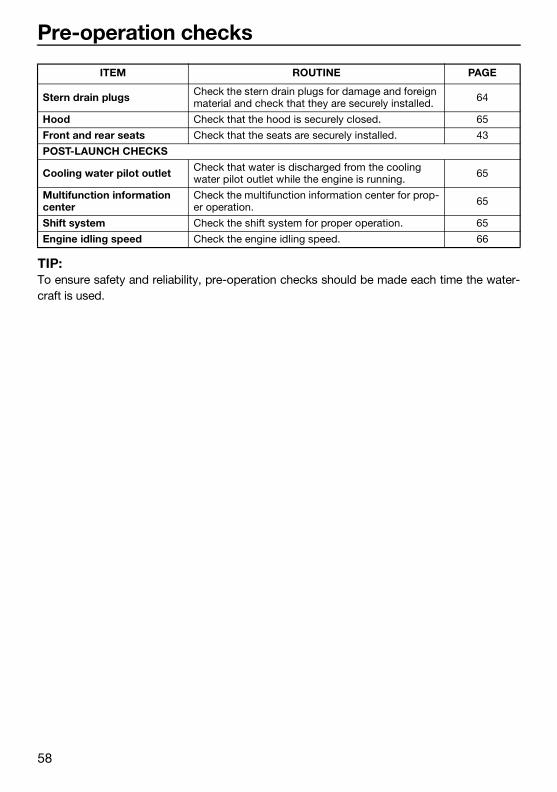
Pre-operation checks
58
TIP:To ensure safety and reliability, pre-operation checks should be made each time the water-craft is used.
Stern drain plugs Check the stern drain plugs for damage and foreign material and check that they are securely installed. 64
Hood Check that the hood is securely closed. 65
Front and rear seats Check that the seats are securely installed. 43
POST-LAUNCH CHECKS
Cooling water pilot outlet Check that water is discharged from the cooling water pilot outlet while the engine is running. 65
Multifunction information center
Check the multifunction information center for prop-er operation. 65
Shift system Check the shift system for proper operation. 65
Engine idling speed Check the engine idling speed. 66
ITEM ROUTINE PAGE
UF4G71E0.book Page 58 Wednesday, July 27, 2016 9:32 AM
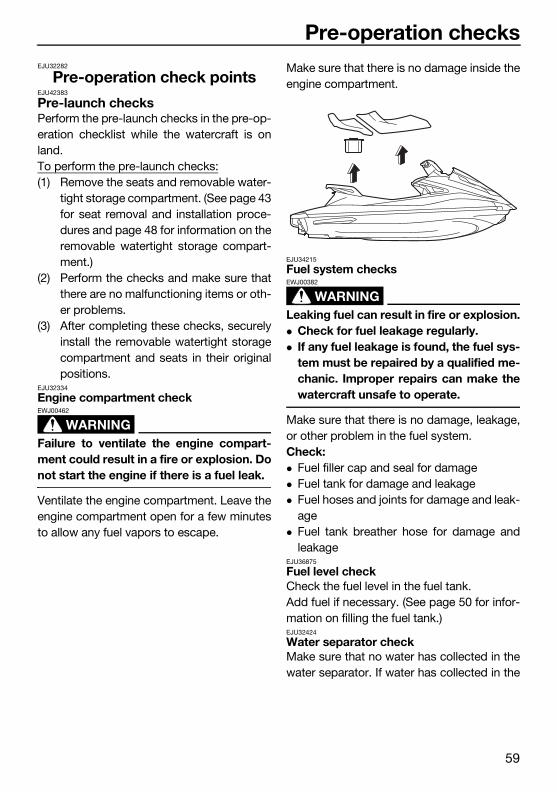
Pre-operation checks
59
EJU32282
Pre-operation check pointsEJU42383
Pre-launch checksPerform the pre-launch checks in the pre-op-eration checklist while the watercraft is onland.To perform the pre-launch checks:(1) Remove the seats and removable water-
tight storage compartment. (See page 43for seat removal and installation proce-dures and page 48 for information on theremovable watertight storage compart-ment.)
(2) Perform the checks and make sure thatthere are no malfunctioning items or oth-er problems.
(3) After completing these checks, securelyinstall the removable watertight storagecompartment and seats in their originalpositions.
EJU32334
Engine compartment check
WARNINGEWJ00462
Failure to ventilate the engine compart-ment could result in a fire or explosion. Donot start the engine if there is a fuel leak.
Ventilate the engine compartment. Leave theengine compartment open for a few minutesto allow any fuel vapors to escape.
Make sure that there is no damage inside theengine compartment.
EJU34215
Fuel system checks
WARNINGEWJ00382
Leaking fuel can result in fire or explosion. Check for fuel leakage regularly. If any fuel leakage is found, the fuel sys-
tem must be repaired by a qualified me-chanic. Improper repairs can make thewatercraft unsafe to operate.
Make sure that there is no damage, leakage,or other problem in the fuel system.Check: Fuel filler cap and seal for damage Fuel tank for damage and leakage Fuel hoses and joints for damage and leak-
age Fuel tank breather hose for damage and
leakageEJU36875
Fuel level checkCheck the fuel level in the fuel tank.Add fuel if necessary. (See page 50 for infor-mation on filling the fuel tank.)EJU32424
Water separator checkMake sure that no water has collected in thewater separator. If water has collected in the
UF4G71E0.book Page 59 Wednesday, July 27, 2016 9:32 AM
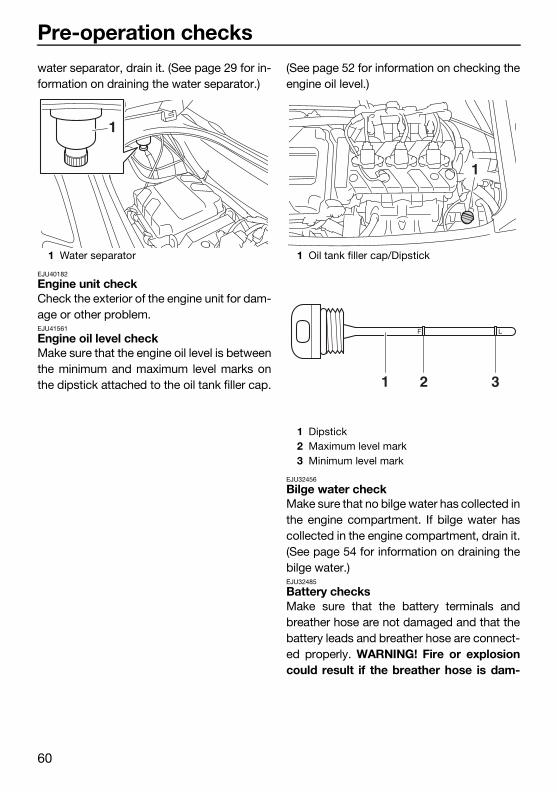
Pre-operation checks
60
water separator, drain it. (See page 29 for in-formation on draining the water separator.)
EJU40182
Engine unit checkCheck the exterior of the engine unit for dam-age or other problem.EJU41561
Engine oil level checkMake sure that the engine oil level is betweenthe minimum and maximum level marks onthe dipstick attached to the oil tank filler cap.
(See page 52 for information on checking theengine oil level.)
EJU32456
Bilge water checkMake sure that no bilge water has collected inthe engine compartment. If bilge water hascollected in the engine compartment, drain it.(See page 54 for information on draining thebilge water.)EJU32485
Battery checksMake sure that the battery terminals andbreather hose are not damaged and that thebattery leads and breather hose are connect-ed properly. WARNING! Fire or explosioncould result if the breather hose is dam-
1 Water separator
1
1 Oil tank filler cap/Dipstick
1 Dipstick2 Maximum level mark3 Minimum level mark
1
F L
21 3
UF4G71E0.book Page 60 Wednesday, July 27, 2016 9:32 AM
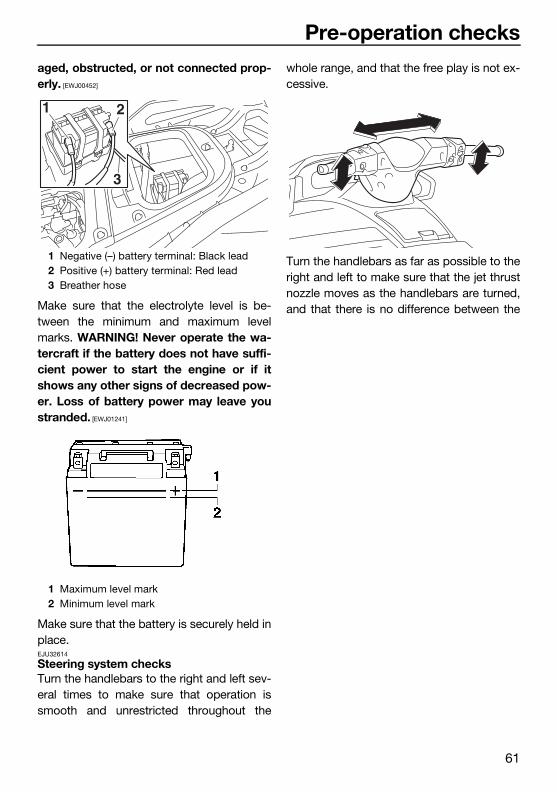
Pre-operation checks
61
aged, obstructed, or not connected prop-erly. [EWJ00452]
Make sure that the electrolyte level is be-tween the minimum and maximum levelmarks. WARNING! Never operate the wa-tercraft if the battery does not have suffi-cient power to start the engine or if itshows any other signs of decreased pow-er. Loss of battery power may leave youstranded. [EWJ01241]
Make sure that the battery is securely held inplace.EJU32614
Steering system checksTurn the handlebars to the right and left sev-eral times to make sure that operation issmooth and unrestricted throughout the
whole range, and that the free play is not ex-cessive.
Turn the handlebars as far as possible to theright and left to make sure that the jet thrustnozzle moves as the handlebars are turned,and that there is no difference between the
1 Negative (–) battery terminal: Black lead2 Positive (+) battery terminal: Red lead3 Breather hose
1 Maximum level mark2 Minimum level mark
1
3
2
UF4G71E0.book Page 61 Wednesday, July 27, 2016 9:32 AM
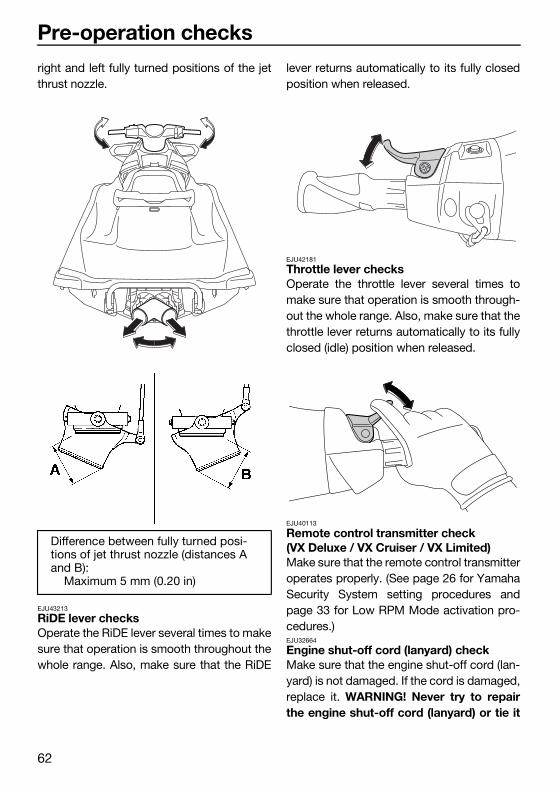
Pre-operation checks
62
right and left fully turned positions of the jetthrust nozzle.
EJU43213
RiDE lever checks Operate the RiDE lever several times to makesure that operation is smooth throughout thewhole range. Also, make sure that the RiDE
lever returns automatically to its fully closedposition when released.
EJU42181
Throttle lever checksOperate the throttle lever several times tomake sure that operation is smooth through-out the whole range. Also, make sure that thethrottle lever returns automatically to its fullyclosed (idle) position when released.
EJU40113
Remote control transmitter check (VX Deluxe / VX Cruiser / VX Limited)Make sure that the remote control transmitteroperates properly. (See page 26 for YamahaSecurity System setting procedures andpage 33 for Low RPM Mode activation pro-cedures.)EJU32664
Engine shut-off cord (lanyard) checkMake sure that the engine shut-off cord (lan-yard) is not damaged. If the cord is damaged,replace it. WARNING! Never try to repairthe engine shut-off cord (lanyard) or tie it
Difference between fully turned posi-tions of jet thrust nozzle (distances A and B):
Maximum 5 mm (0.20 in)
UF4G71E0.book Page 62 Wednesday, July 27, 2016 9:32 AM
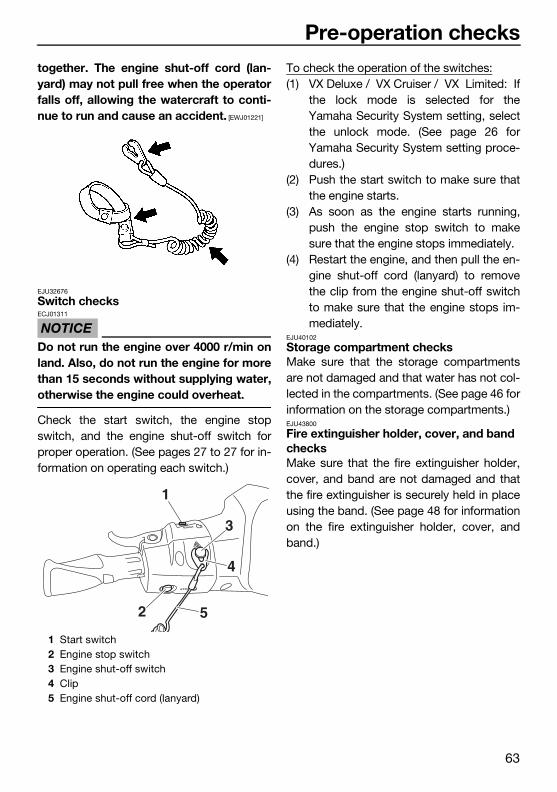
Pre-operation checks
63
together. The engine shut-off cord (lan-yard) may not pull free when the operatorfalls off, allowing the watercraft to conti-nue to run and cause an accident. [EWJ01221]
EJU32676
Switch checks
NOTICEECJ01311
Do not run the engine over 4000 r/min onland. Also, do not run the engine for morethan 15 seconds without supplying water,otherwise the engine could overheat.
Check the start switch, the engine stopswitch, and the engine shut-off switch forproper operation. (See pages 27 to 27 for in-formation on operating each switch.)
To check the operation of the switches:(1) VX Deluxe / VX Cruiser / VX Limited: If
the lock mode is selected for theYamaha Security System setting, selectthe unlock mode. (See page 26 forYamaha Security System setting proce-dures.)
(2) Push the start switch to make sure thatthe engine starts.
(3) As soon as the engine starts running,push the engine stop switch to makesure that the engine stops immediately.
(4) Restart the engine, and then pull the en-gine shut-off cord (lanyard) to removethe clip from the engine shut-off switchto make sure that the engine stops im-mediately.
EJU40102
Storage compartment checksMake sure that the storage compartmentsare not damaged and that water has not col-lected in the compartments. (See page 46 forinformation on the storage compartments.)EJU43800
Fire extinguisher holder, cover, and band checksMake sure that the fire extinguisher holder,cover, and band are not damaged and thatthe fire extinguisher is securely held in placeusing the band. (See page 48 for informationon the fire extinguisher holder, cover, andband.)
1 Start switch2 Engine stop switch3 Engine shut-off switch4 Clip5 Engine shut-off cord (lanyard)
1
3
4
2 5
UF4G71E0.book Page 63 Wednesday, July 27, 2016 9:32 AM

Pre-operation checks
64
EJU32544
Fire extinguisher checkCheck that there is a full fire extinguisher onboard.
To check the fire extinguisher, see the in-structions supplied by the fire extinguishermanufacturer. Always keep the fire extin-guisher secured in the holder with its cover inplace.Always carry a fire extinguisher on board. Afire extinguisher is not standard equipmentwith this watercraft. If you do not have one,contact a Yamaha dealer or a fire extinguish-er dealer to obtain one meeting the properspecifications.EJU40122
Safety equipment checkCheck that safety equipment meeting the ap-plicable regulations is on board.EJU32353
Hull and deck checkCheck the hull and deck for damage or otherproblem.EJU32657
Jet intake checksMake sure that the jet intake is not damagedor clogged with weeds or debris. If the jet in-take is clogged, clean it. (See page 93 for in-formation on the jet intake.)EJU43221
Jet thrust nozzle and reverse gate check Check the jet thrust nozzle and reverse gatefor damage or other problem.
EJU44250
Stern drain plug checksLoosen the stern drain plugs and removethem, and then make sure that the plugs andO-rings on the plugs are not damaged andthat there is no foreign material on thethreads or O-rings on the plugs. NOTICE:Before installing the stern drain plugs,clean the drain plug threads and the O-rings on the plugs to remove any foreignmaterials, such as dirt or sand. Otherwise,the stern drain plugs could be damaged,allowing water to enter the engine com-partment. Check the O-rings on the sterndrain plugs and make sure that the plugsare tightened securely before launchingthe watercraft. Otherwise, water mayflood the engine compartment and causethe watercraft to submerge. [ECJ00363]
1 Stern drain plug2 O-ring
21
UF4G71E0.book Page 64 Wednesday, July 27, 2016 9:32 AM
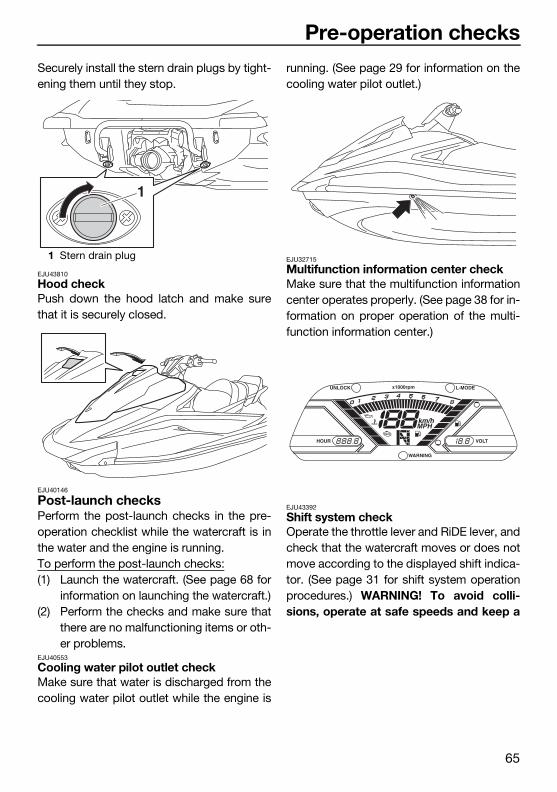
Pre-operation checks
65
Securely install the stern drain plugs by tight-ening them until they stop.
EJU43810
Hood checkPush down the hood latch and make surethat it is securely closed.
EJU40146
Post-launch checksPerform the post-launch checks in the pre-operation checklist while the watercraft is inthe water and the engine is running.To perform the post-launch checks:(1) Launch the watercraft. (See page 68 for
information on launching the watercraft.)(2) Perform the checks and make sure that
there are no malfunctioning items or oth-er problems.
EJU40553
Cooling water pilot outlet checkMake sure that water is discharged from thecooling water pilot outlet while the engine is
running. (See page 29 for information on thecooling water pilot outlet.)
EJU32715
Multifunction information center checkMake sure that the multifunction informationcenter operates properly. (See page 38 for in-formation on proper operation of the multi-function information center.)
EJU43392
Shift system check Operate the throttle lever and RiDE lever, andcheck that the watercraft moves or does notmove according to the displayed shift indica-tor. (See page 31 for shift system operationprocedures.) WARNING! To avoid colli-sions, operate at safe speeds and keep a
1 Stern drain plug
1
UF4G71E0.book Page 65 Wednesday, July 27, 2016 9:32 AM

Pre-operation checks
66
safe distance away from people, objects,and other watercraft. [EWJ01860]
EJU40172
Engine idling speed checkStart the engine and warm it up. Use the ta-chometer in the multifunction informationcenter to make sure that the engine idlingspeed is not significantly above or below thespecified range.
1 “F” (Forward position)
1 “N” (Neutral position)
1 “R” (Reverse position)
1
1
1
Engine idling speed:1500 ±100 r/min
UF4G71E0.book Page 66 Wednesday, July 27, 2016 9:32 AM
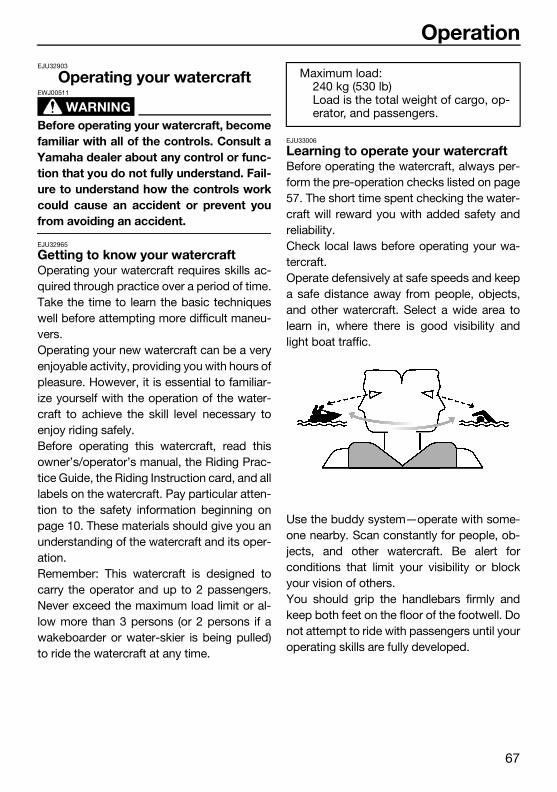
Operation
67
EJU32903
Operating your watercraft
WARNINGEWJ00511
Before operating your watercraft, becomefamiliar with all of the controls. Consult aYamaha dealer about any control or func-tion that you do not fully understand. Fail-ure to understand how the controls workcould cause an accident or prevent youfrom avoiding an accident.
EJU32965
Getting to know your watercraftOperating your watercraft requires skills ac-quired through practice over a period of time.Take the time to learn the basic techniqueswell before attempting more difficult maneu-vers.Operating your new watercraft can be a veryenjoyable activity, providing you with hours ofpleasure. However, it is essential to familiar-ize yourself with the operation of the water-craft to achieve the skill level necessary toenjoy riding safely.Before operating this watercraft, read thisowner’s/operator’s manual, the Riding Prac-tice Guide, the Riding Instruction card, and alllabels on the watercraft. Pay particular atten-tion to the safety information beginning onpage 10. These materials should give you anunderstanding of the watercraft and its oper-ation.Remember: This watercraft is designed tocarry the operator and up to 2 passengers.Never exceed the maximum load limit or al-low more than 3 persons (or 2 persons if awakeboarder or water-skier is being pulled)to ride the watercraft at any time.
EJU33006
Learning to operate your watercraftBefore operating the watercraft, always per-form the pre-operation checks listed on page57. The short time spent checking the water-craft will reward you with added safety andreliability.Check local laws before operating your wa-tercraft.Operate defensively at safe speeds and keepa safe distance away from people, objects,and other watercraft. Select a wide area tolearn in, where there is good visibility andlight boat traffic.
Use the buddy system—operate with some-one nearby. Scan constantly for people, ob-jects, and other watercraft. Be alert forconditions that limit your visibility or blockyour vision of others.You should grip the handlebars firmly andkeep both feet on the floor of the footwell. Donot attempt to ride with passengers until youroperating skills are fully developed.
Maximum load:240 kg (530 lb)Load is the total weight of cargo, op-erator, and passengers.
UF4G71E0.book Page 67 Wednesday, July 27, 2016 9:32 AM
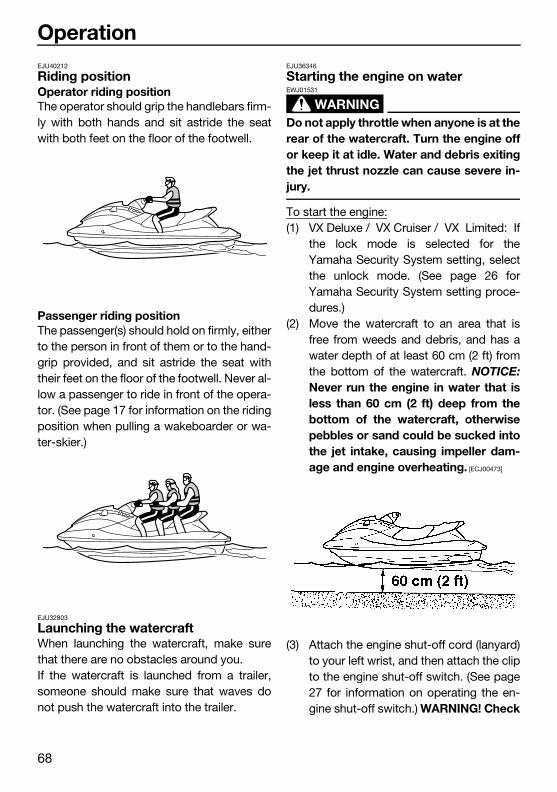
Operation
68
EJU40212
Riding positionOperator riding positionThe operator should grip the handlebars firm-ly with both hands and sit astride the seatwith both feet on the floor of the footwell.
Passenger riding positionThe passenger(s) should hold on firmly, eitherto the person in front of them or to the hand-grip provided, and sit astride the seat withtheir feet on the floor of the footwell. Never al-low a passenger to ride in front of the opera-tor. (See page 17 for information on the ridingposition when pulling a wakeboarder or wa-ter-skier.)
EJU32803
Launching the watercraftWhen launching the watercraft, make surethat there are no obstacles around you.If the watercraft is launched from a trailer,someone should make sure that waves donot push the watercraft into the trailer.
EJU36346
Starting the engine on water
WARNINGEWJ01531
Do not apply throttle when anyone is at therear of the watercraft. Turn the engine offor keep it at idle. Water and debris exitingthe jet thrust nozzle can cause severe in-jury.
To start the engine:(1) VX Deluxe / VX Cruiser / VX Limited: If
the lock mode is selected for theYamaha Security System setting, selectthe unlock mode. (See page 26 forYamaha Security System setting proce-dures.)
(2) Move the watercraft to an area that isfree from weeds and debris, and has awater depth of at least 60 cm (2 ft) fromthe bottom of the watercraft. NOTICE:Never run the engine in water that isless than 60 cm (2 ft) deep from thebottom of the watercraft, otherwisepebbles or sand could be sucked intothe jet intake, causing impeller dam-age and engine overheating. [ECJ00473]
(3) Attach the engine shut-off cord (lanyard)to your left wrist, and then attach the clipto the engine shut-off switch. (See page27 for information on operating the en-gine shut-off switch.) WARNING! Check
UF4G71E0.book Page 68 Wednesday, July 27, 2016 9:32 AM
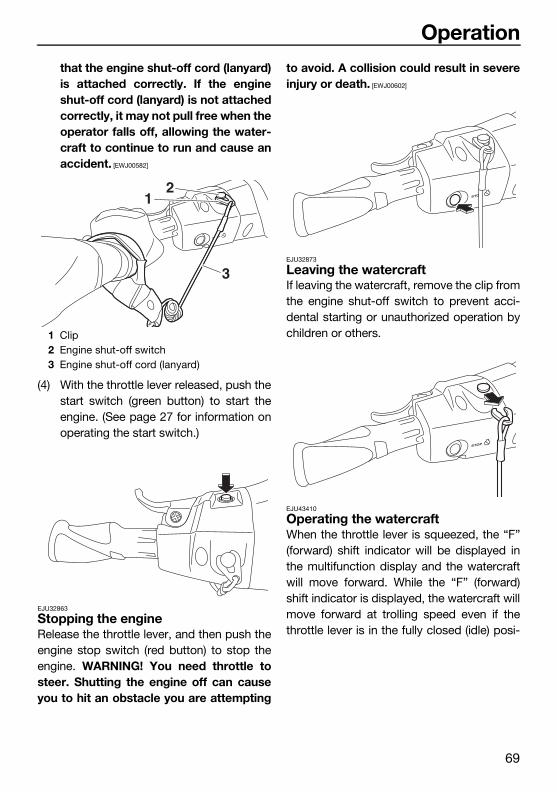
Operation
69
that the engine shut-off cord (lanyard)is attached correctly. If the engineshut-off cord (lanyard) is not attachedcorrectly, it may not pull free when theoperator falls off, allowing the water-craft to continue to run and cause anaccident. [EWJ00582]
(4) With the throttle lever released, push thestart switch (green button) to start theengine. (See page 27 for information onoperating the start switch.)
EJU32863
Stopping the engineRelease the throttle lever, and then push theengine stop switch (red button) to stop theengine. WARNING! You need throttle tosteer. Shutting the engine off can causeyou to hit an obstacle you are attempting
to avoid. A collision could result in severeinjury or death. [EWJ00602]
EJU32873
Leaving the watercraftIf leaving the watercraft, remove the clip fromthe engine shut-off switch to prevent acci-dental starting or unauthorized operation bychildren or others.
EJU43410
Operating the watercraftWhen the throttle lever is squeezed, the “F”(forward) shift indicator will be displayed inthe multifunction display and the watercraftwill move forward. While the “F” (forward)shift indicator is displayed, the watercraft willmove forward at trolling speed even if thethrottle lever is in the fully closed (idle) posi-
1 Clip2 Engine shut-off switch3 Engine shut-off cord (lanyard)
12
3
UF4G71E0.book Page 69 Wednesday, July 27, 2016 9:32 AM
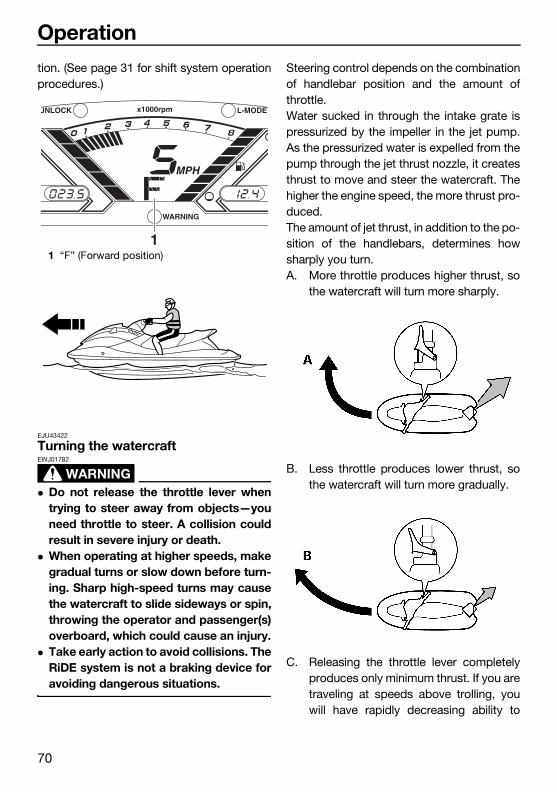
Operation
70
tion. (See page 31 for shift system operationprocedures.)
EJU43422
Turning the watercraft
WARNINGEWJ01782
Do not release the throttle lever whentrying to steer away from objects—youneed throttle to steer. A collision couldresult in severe injury or death.
When operating at higher speeds, makegradual turns or slow down before turn-ing. Sharp high-speed turns may causethe watercraft to slide sideways or spin,throwing the operator and passenger(s)overboard, which could cause an injury.
Take early action to avoid collisions. TheRiDE system is not a braking device foravoiding dangerous situations.
Steering control depends on the combinationof handlebar position and the amount ofthrottle.Water sucked in through the intake grate ispressurized by the impeller in the jet pump.As the pressurized water is expelled from thepump through the jet thrust nozzle, it createsthrust to move and steer the watercraft. Thehigher the engine speed, the more thrust pro-duced.The amount of jet thrust, in addition to the po-sition of the handlebars, determines howsharply you turn.A. More throttle produces higher thrust, so
the watercraft will turn more sharply.
B. Less throttle produces lower thrust, sothe watercraft will turn more gradually.
C. Releasing the throttle lever completelyproduces only minimum thrust. If you aretraveling at speeds above trolling, youwill have rapidly decreasing ability to
1 “F” (Forward position)1
UF4G71E0.book Page 70 Wednesday, July 27, 2016 9:32 AM

Operation
71
steer without throttle. You may still havesome turning ability immediately after re-leasing the throttle lever, but once theengine slows down, the watercraft will nolonger respond to handlebar input untilyou apply throttle again or you reachtrolling speed.At trolling speed, the watercraft can beturned gradually by handlebar positionalone using just the amount of thrustavailable at idle.
D. If the engine is stopped while riding,there is no thrust. The watercraft will gostraight even though the handlebars areturned.
You need throttle to steer.
E. If the RiDE lever is squeezed and thehandlebars are turned when the water-craft is cruising at planing speed, the wa-
tercraft will turn gradually while slowingdown.
This model is equipped with the Yamaha En-gine Management System (YEMS) that in-cludes an off-throttle steering (OTS) system.It will activate at planing speeds should youattempt to steer the watercraft after releasingthe throttle lever (see condition C above).The OTS system assists in turning by con-tinuing to supply some thrust while the water-craft is decelerating, but you can turn moresharply if you apply throttle while turning thehandlebars. The OTS system does not func-tion below planing speeds or when the en-gine is off. Once the engine slows down, thewatercraft will no longer turn in response tohandlebar input until you apply throttle againor you reach trolling speed.EJU43251
Stopping the watercraftThe watercraft is not equipped with a sepa-rate braking system. The watercraft slowsdown by water resistance or, when operatingin reverse, by the water jet. The watercraftslows down as soon as the throttle lever is re-leased, but will coast for a distance beforefully stopping. If you are not sure you canstop in time before hitting an obstacle, applythrottle and turn in another direction.From full speed, the watercraft comes to acomplete stop due to water resistance in ap-
1 Reverse gate
E
1
UF4G71E0.book Page 71 Wednesday, July 27, 2016 9:32 AM
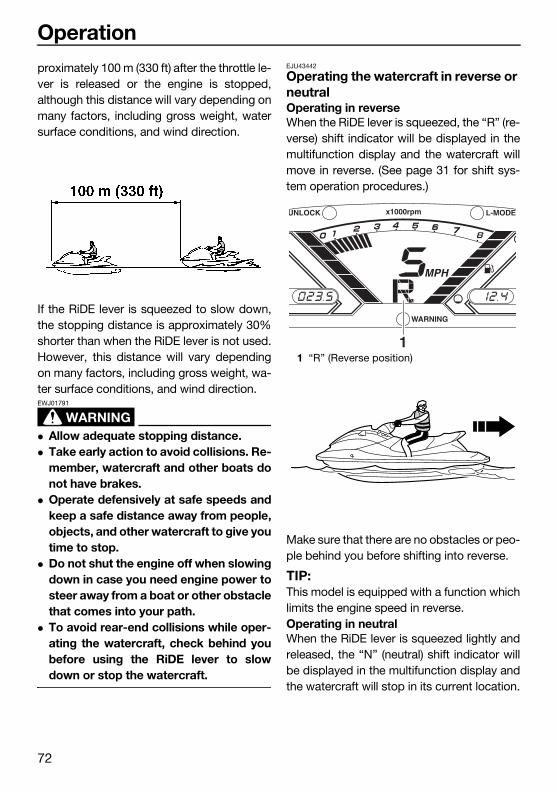
Operation
72
proximately 100 m (330 ft) after the throttle le-ver is released or the engine is stopped,although this distance will vary depending onmany factors, including gross weight, watersurface conditions, and wind direction.
If the RiDE lever is squeezed to slow down,the stopping distance is approximately 30%shorter than when the RiDE lever is not used.However, this distance will vary dependingon many factors, including gross weight, wa-ter surface conditions, and wind direction.
WARNINGEWJ01791
Allow adequate stopping distance. Take early action to avoid collisions. Re-
member, watercraft and other boats donot have brakes.
Operate defensively at safe speeds andkeep a safe distance away from people,objects, and other watercraft to give youtime to stop.
Do not shut the engine off when slowingdown in case you need engine power tosteer away from a boat or other obstaclethat comes into your path.
To avoid rear-end collisions while oper-ating the watercraft, check behind youbefore using the RiDE lever to slowdown or stop the watercraft.
EJU43442
Operating the watercraft in reverse or neutralOperating in reverseWhen the RiDE lever is squeezed, the “R” (re-verse) shift indicator will be displayed in themultifunction display and the watercraft willmove in reverse. (See page 31 for shift sys-tem operation procedures.)
Make sure that there are no obstacles or peo-ple behind you before shifting into reverse.
TIP:This model is equipped with a function whichlimits the engine speed in reverse.Operating in neutralWhen the RiDE lever is squeezed lightly andreleased, the “N” (neutral) shift indicator willbe displayed in the multifunction display andthe watercraft will stop in its current location.
1 “R” (Reverse position)1
UF4G71E0.book Page 72 Wednesday, July 27, 2016 9:32 AM
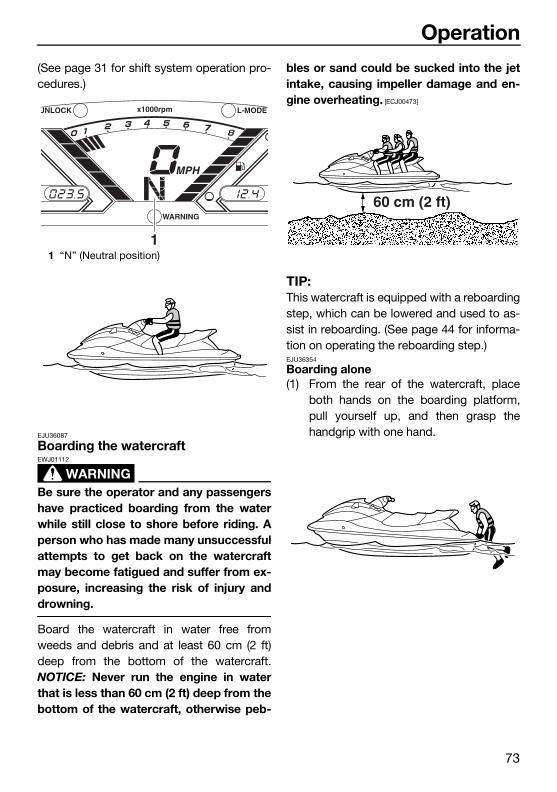
Operation
73
(See page 31 for shift system operation pro-cedures.)
EJU36087
Boarding the watercraft
WARNINGEWJ01112
Be sure the operator and any passengershave practiced boarding from the waterwhile still close to shore before riding. Aperson who has made many unsuccessfulattempts to get back on the watercraftmay become fatigued and suffer from ex-posure, increasing the risk of injury anddrowning.
Board the watercraft in water free fromweeds and debris and at least 60 cm (2 ft)deep from the bottom of the watercraft.NOTICE: Never run the engine in waterthat is less than 60 cm (2 ft) deep from thebottom of the watercraft, otherwise peb-
bles or sand could be sucked into the jetintake, causing impeller damage and en-gine overheating. [ECJ00473]
TIP:This watercraft is equipped with a reboardingstep, which can be lowered and used to as-sist in reboarding. (See page 44 for informa-tion on operating the reboarding step.)EJU36354
Boarding alone(1) From the rear of the watercraft, place
both hands on the boarding platform,pull yourself up, and then grasp thehandgrip with one hand.
1 “N” (Neutral position)1
60 cm (2 ft)
UF4G71E0.book Page 73 Wednesday, July 27, 2016 9:32 AM
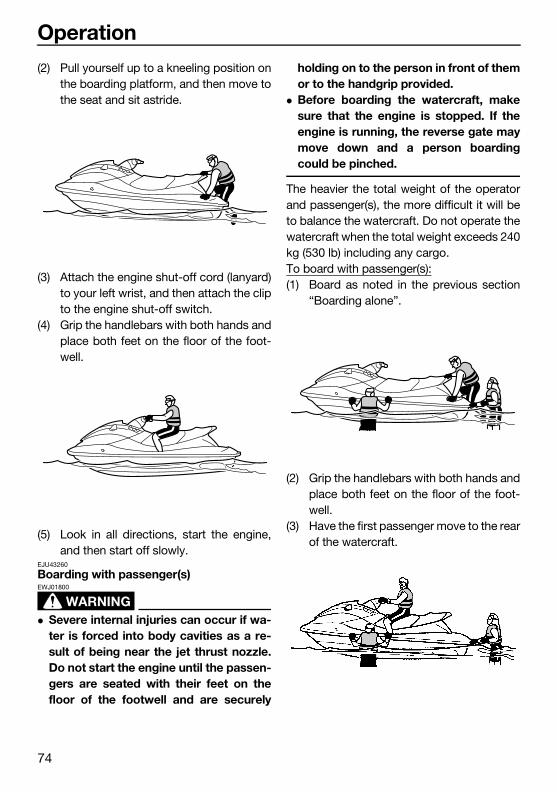
Operation
74
(2) Pull yourself up to a kneeling position onthe boarding platform, and then move tothe seat and sit astride.
(3) Attach the engine shut-off cord (lanyard)to your left wrist, and then attach the clipto the engine shut-off switch.
(4) Grip the handlebars with both hands andplace both feet on the floor of the foot-well.
(5) Look in all directions, start the engine,and then start off slowly.
EJU43260
Boarding with passenger(s)
WARNINGEWJ01800
Severe internal injuries can occur if wa-ter is forced into body cavities as a re-sult of being near the jet thrust nozzle.Do not start the engine until the passen-gers are seated with their feet on thefloor of the footwell and are securely
holding on to the person in front of themor to the handgrip provided.
Before boarding the watercraft, makesure that the engine is stopped. If theengine is running, the reverse gate maymove down and a person boardingcould be pinched.
The heavier the total weight of the operatorand passenger(s), the more difficult it will beto balance the watercraft. Do not operate thewatercraft when the total weight exceeds 240kg (530 lb) including any cargo.To board with passenger(s):(1) Board as noted in the previous section
“Boarding alone”.
(2) Grip the handlebars with both hands andplace both feet on the floor of the foot-well.
(3) Have the first passenger move to the rearof the watercraft.
UF4G71E0.book Page 74 Wednesday, July 27, 2016 9:32 AM
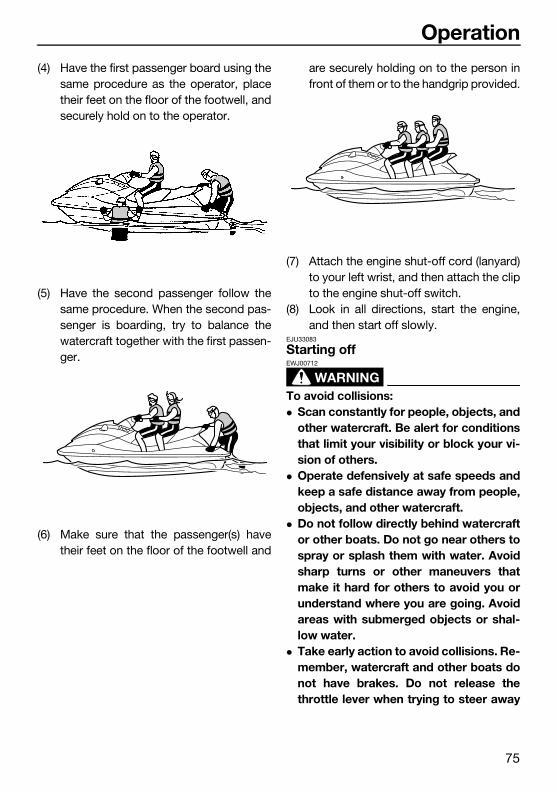
Operation
75
(4) Have the first passenger board using thesame procedure as the operator, placetheir feet on the floor of the footwell, andsecurely hold on to the operator.
(5) Have the second passenger follow thesame procedure. When the second pas-senger is boarding, try to balance thewatercraft together with the first passen-ger.
(6) Make sure that the passenger(s) havetheir feet on the floor of the footwell and
are securely holding on to the person infront of them or to the handgrip provided.
(7) Attach the engine shut-off cord (lanyard)to your left wrist, and then attach the clipto the engine shut-off switch.
(8) Look in all directions, start the engine,and then start off slowly.
EJU33083
Starting off
WARNINGEWJ00712
To avoid collisions: Scan constantly for people, objects, and
other watercraft. Be alert for conditionsthat limit your visibility or block your vi-sion of others.
Operate defensively at safe speeds andkeep a safe distance away from people,objects, and other watercraft.
Do not follow directly behind watercraftor other boats. Do not go near others tospray or splash them with water. Avoidsharp turns or other maneuvers thatmake it hard for others to avoid you orunderstand where you are going. Avoidareas with submerged objects or shal-low water.
Take early action to avoid collisions. Re-member, watercraft and other boats donot have brakes. Do not release thethrottle lever when trying to steer away
UF4G71E0.book Page 75 Wednesday, July 27, 2016 9:32 AM
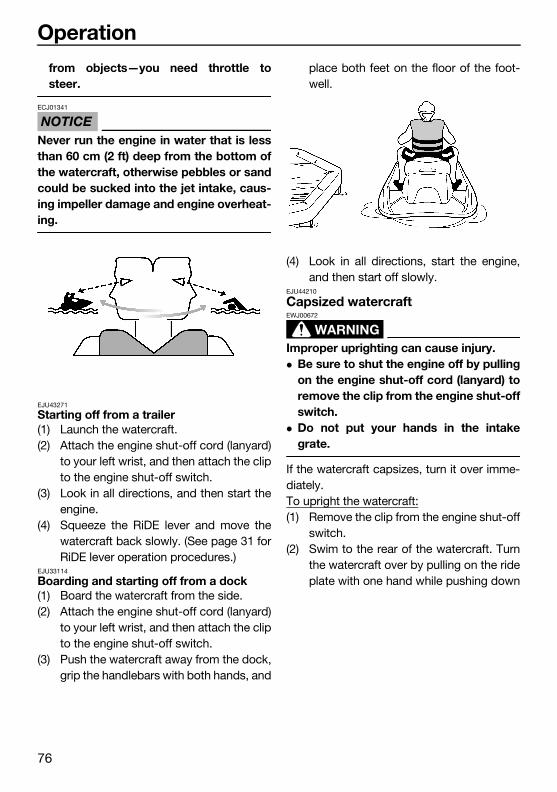
Operation
76
from objects—you need throttle tosteer.
NOTICEECJ01341
Never run the engine in water that is lessthan 60 cm (2 ft) deep from the bottom ofthe watercraft, otherwise pebbles or sandcould be sucked into the jet intake, caus-ing impeller damage and engine overheat-ing.
EJU43271
Starting off from a trailer(1) Launch the watercraft.(2) Attach the engine shut-off cord (lanyard)
to your left wrist, and then attach the clipto the engine shut-off switch.
(3) Look in all directions, and then start theengine.
(4) Squeeze the RiDE lever and move thewatercraft back slowly. (See page 31 forRiDE lever operation procedures.)
EJU33114
Boarding and starting off from a dock(1) Board the watercraft from the side.(2) Attach the engine shut-off cord (lanyard)
to your left wrist, and then attach the clipto the engine shut-off switch.
(3) Push the watercraft away from the dock,grip the handlebars with both hands, and
place both feet on the floor of the foot-well.
(4) Look in all directions, start the engine,and then start off slowly.
EJU44210
Capsized watercraft
WARNINGEWJ00672
Improper uprighting can cause injury. Be sure to shut the engine off by pulling
on the engine shut-off cord (lanyard) toremove the clip from the engine shut-offswitch.
Do not put your hands in the intakegrate.
If the watercraft capsizes, turn it over imme-diately.To upright the watercraft:(1) Remove the clip from the engine shut-off
switch.(2) Swim to the rear of the watercraft. Turn
the watercraft over by pulling on the rideplate with one hand while pushing down
UF4G71E0.book Page 76 Wednesday, July 27, 2016 9:32 AM
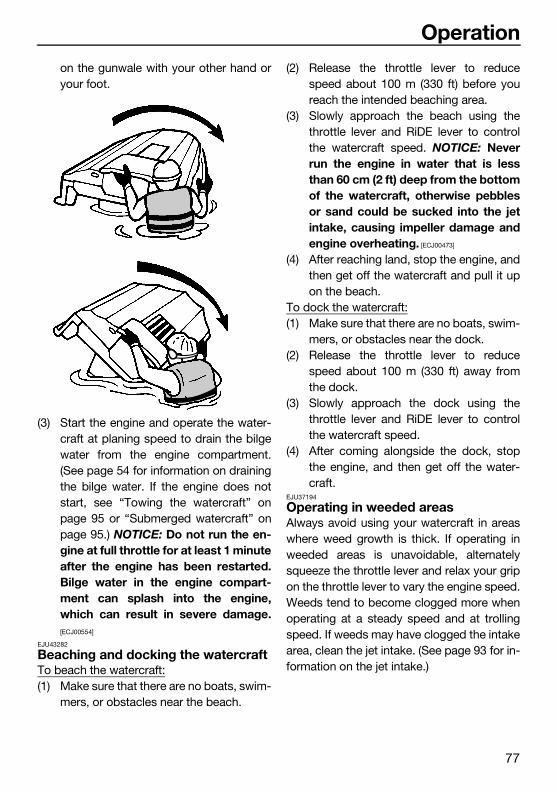
Operation
77
on the gunwale with your other hand oryour foot.
(3) Start the engine and operate the water-craft at planing speed to drain the bilgewater from the engine compartment.(See page 54 for information on drainingthe bilge water. If the engine does notstart, see “Towing the watercraft” onpage 95 or “Submerged watercraft” onpage 95.) NOTICE: Do not run the en-gine at full throttle for at least 1 minuteafter the engine has been restarted.Bilge water in the engine compart-ment can splash into the engine,which can result in severe damage.[ECJ00554]
EJU43282
Beaching and docking the watercraftTo beach the watercraft:(1) Make sure that there are no boats, swim-
mers, or obstacles near the beach.
(2) Release the throttle lever to reducespeed about 100 m (330 ft) before youreach the intended beaching area.
(3) Slowly approach the beach using thethrottle lever and RiDE lever to controlthe watercraft speed. NOTICE: Neverrun the engine in water that is lessthan 60 cm (2 ft) deep from the bottomof the watercraft, otherwise pebblesor sand could be sucked into the jetintake, causing impeller damage andengine overheating. [ECJ00473]
(4) After reaching land, stop the engine, andthen get off the watercraft and pull it upon the beach.
To dock the watercraft:(1) Make sure that there are no boats, swim-
mers, or obstacles near the dock.(2) Release the throttle lever to reduce
speed about 100 m (330 ft) away fromthe dock.
(3) Slowly approach the dock using thethrottle lever and RiDE lever to controlthe watercraft speed.
(4) After coming alongside the dock, stopthe engine, and then get off the water-craft.
EJU37194
Operating in weeded areasAlways avoid using your watercraft in areaswhere weed growth is thick. If operating inweeded areas is unavoidable, alternatelysqueeze the throttle lever and relax your gripon the throttle lever to vary the engine speed.Weeds tend to become clogged more whenoperating at a steady speed and at trollingspeed. If weeds may have clogged the intakearea, clean the jet intake. (See page 93 for in-formation on the jet intake.)
UF4G71E0.book Page 77 Wednesday, July 27, 2016 9:32 AM
Operation
78
EJU40242
After removing the watercraft from the water
NOTICEECJ01311
Do not run the engine over 4000 r/min onland. Also, do not run the engine for morethan 15 seconds without supplying water,otherwise the engine could overheat.
After operating and removing the watercraftfrom the water, promptly discharge the re-maining water from the cooling water pas-sages.To discharge water from the cooling waterpassages:(1) Make sure that the area around the wa-
tercraft is clear, and then start the en-gine.
(2) Discharge the remaining water out of thecooling water passages by alternatelysqueezing and releasing the throttle leverquickly for 10 to 15 seconds.
(3) Stop the engine.
UF4G71E0.book Page 78 Wednesday, July 27, 2016 9:32 AM
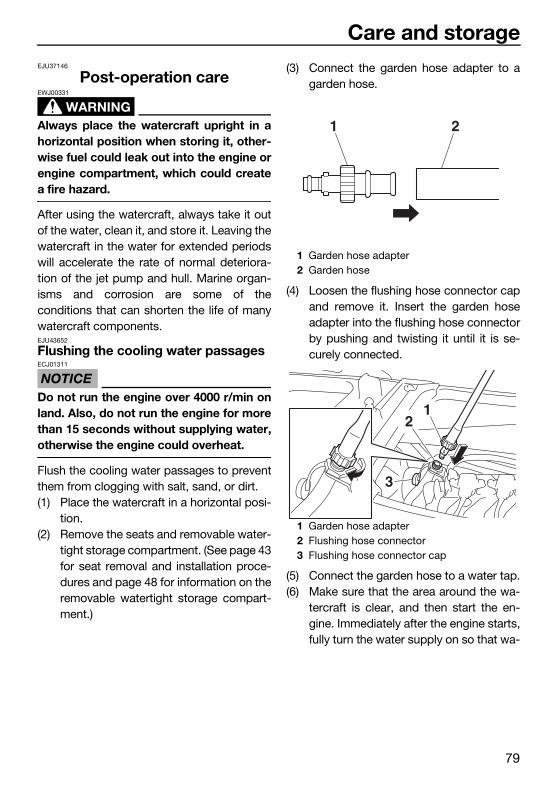
Care and storage
79
EJU37146
Post-operation care
WARNINGEWJ00331
Always place the watercraft upright in ahorizontal position when storing it, other-wise fuel could leak out into the engine orengine compartment, which could createa fire hazard.
After using the watercraft, always take it outof the water, clean it, and store it. Leaving thewatercraft in the water for extended periodswill accelerate the rate of normal deteriora-tion of the jet pump and hull. Marine organ-isms and corrosion are some of theconditions that can shorten the life of manywatercraft components.EJU43652
Flushing the cooling water passages
NOTICEECJ01311
Do not run the engine over 4000 r/min onland. Also, do not run the engine for morethan 15 seconds without supplying water,otherwise the engine could overheat.
Flush the cooling water passages to preventthem from clogging with salt, sand, or dirt.(1) Place the watercraft in a horizontal posi-
tion.(2) Remove the seats and removable water-
tight storage compartment. (See page 43for seat removal and installation proce-dures and page 48 for information on theremovable watertight storage compart-ment.)
(3) Connect the garden hose adapter to agarden hose.
(4) Loosen the flushing hose connector capand remove it. Insert the garden hoseadapter into the flushing hose connectorby pushing and twisting it until it is se-curely connected.
(5) Connect the garden hose to a water tap.(6) Make sure that the area around the wa-
tercraft is clear, and then start the en-gine. Immediately after the engine starts,fully turn the water supply on so that wa-
1 Garden hose adapter2 Garden hose
1 Garden hose adapter2 Flushing hose connector3 Flushing hose connector cap
1 2
12
3
UF4G71E0.book Page 79 Wednesday, July 27, 2016 9:32 AM
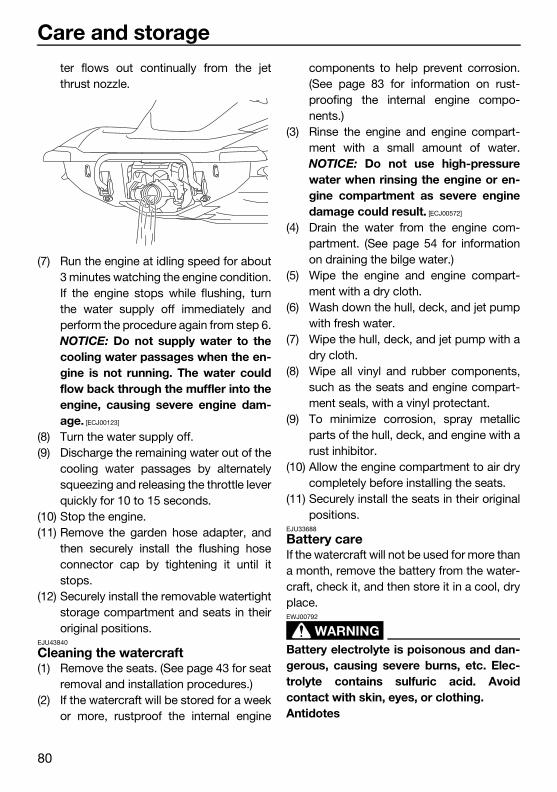
Care and storage
80
ter flows out continually from the jetthrust nozzle.
(7) Run the engine at idling speed for about3 minutes watching the engine condition.If the engine stops while flushing, turnthe water supply off immediately andperform the procedure again from step 6.NOTICE: Do not supply water to thecooling water passages when the en-gine is not running. The water couldflow back through the muffler into theengine, causing severe engine dam-age. [ECJ00123]
(8) Turn the water supply off.(9) Discharge the remaining water out of the
cooling water passages by alternatelysqueezing and releasing the throttle leverquickly for 10 to 15 seconds.
(10) Stop the engine.(11) Remove the garden hose adapter, and
then securely install the flushing hoseconnector cap by tightening it until itstops.
(12) Securely install the removable watertightstorage compartment and seats in theiroriginal positions.
EJU43840
Cleaning the watercraft(1) Remove the seats. (See page 43 for seat
removal and installation procedures.)(2) If the watercraft will be stored for a week
or more, rustproof the internal engine
components to help prevent corrosion.(See page 83 for information on rust-proofing the internal engine compo-nents.)
(3) Rinse the engine and engine compart-ment with a small amount of water.NOTICE: Do not use high-pressurewater when rinsing the engine or en-gine compartment as severe enginedamage could result. [ECJ00572]
(4) Drain the water from the engine com-partment. (See page 54 for informationon draining the bilge water.)
(5) Wipe the engine and engine compart-ment with a dry cloth.
(6) Wash down the hull, deck, and jet pumpwith fresh water.
(7) Wipe the hull, deck, and jet pump with adry cloth.
(8) Wipe all vinyl and rubber components,such as the seats and engine compart-ment seals, with a vinyl protectant.
(9) To minimize corrosion, spray metallicparts of the hull, deck, and engine with arust inhibitor.
(10) Allow the engine compartment to air drycompletely before installing the seats.
(11) Securely install the seats in their originalpositions.
EJU33688
Battery careIf the watercraft will not be used for more thana month, remove the battery from the water-craft, check it, and then store it in a cool, dryplace.
WARNINGEWJ00792
Battery electrolyte is poisonous and dan-gerous, causing severe burns, etc. Elec-trolyte contains sulfuric acid. Avoidcontact with skin, eyes, or clothing.Antidotes
UF4G71E0.book Page 80 Wednesday, July 27, 2016 9:32 AM

Care and storage
81
External: Flush with water.Internal: Drink large quantities of water ormilk. Follow with milk of magnesia, beatenegg, or vegetable oil. Call a physician im-mediately.Eyes: Flush with water for 15 minutes andget prompt medical attention.Batteries produce explosive gases. Keepsparks, flames, cigarettes, etc., well away.If using or charging the battery in an en-closed space, make sure that it is wellventilated. Always shield your eyes whenworking near batteries.Keep out of the reach of children.
To remove the battery:(1) Disconnect the negative (–) battery lead.(2) Disconnect the positive (+) battery lead.(3) Disconnect the breather hose.(4) Unhook the battery bands, and then re-
move the battery from the watercraft.
Checking the battery Make sure that the battery case is not dam-
aged. Make sure that the battery terminals are
not corroded or damaged. Make sure that the breather hose is not
clogged or damaged.
Checking the electrolyte levelMake sure that the electrolyte level is be-tween the maximum and minimum levelmarks.If the electrolyte level is low, add distilled wa-ter to raise it to the specified level. NOTICE:Use only distilled water for replenishingthe battery, otherwise battery life could beshortened. [ECJ00242]
If distilled water was added, check the bat-tery voltage.It is recommended to have a Yamaha dealercheck the battery voltage and charge the bat-tery. If you charge the battery yourself, besure to read and follow the instructions pro-vided with the battery tester and charger youuse. NOTICE: Do not attempt to charge abattery hastily. Battery life could be short-ened. [ECJ00252]
1 Negative (–) battery terminal: Black lead2 Battery band3 Positive (+) battery terminal: Red lead4 Breather hose
1 2 3
4
1 Maximum level mark2 Minimum level mark
UF4G71E0.book Page 81 Wednesday, July 27, 2016 9:32 AM
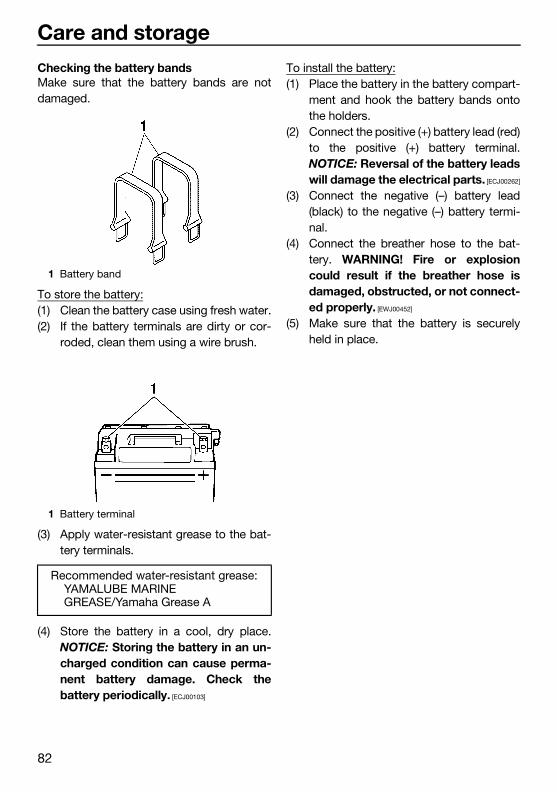
Care and storage
82
Checking the battery bandsMake sure that the battery bands are notdamaged.
To store the battery:(1) Clean the battery case using fresh water.(2) If the battery terminals are dirty or cor-
roded, clean them using a wire brush.
(3) Apply water-resistant grease to the bat-tery terminals.
(4) Store the battery in a cool, dry place.NOTICE: Storing the battery in an un-charged condition can cause perma-nent battery damage. Check thebattery periodically. [ECJ00103]
To install the battery:(1) Place the battery in the battery compart-
ment and hook the battery bands ontothe holders.
(2) Connect the positive (+) battery lead (red)to the positive (+) battery terminal.NOTICE: Reversal of the battery leadswill damage the electrical parts. [ECJ00262]
(3) Connect the negative (–) battery lead(black) to the negative (–) battery termi-nal.
(4) Connect the breather hose to the bat-tery. WARNING! Fire or explosioncould result if the breather hose isdamaged, obstructed, or not connect-ed properly. [EWJ00452]
(5) Make sure that the battery is securelyheld in place.
1 Battery band
1 Battery terminal
Recommended water-resistant grease:YAMALUBE MARINE GREASE/Yamaha Grease A
UF4G71E0.book Page 82 Wednesday, July 27, 2016 9:32 AM
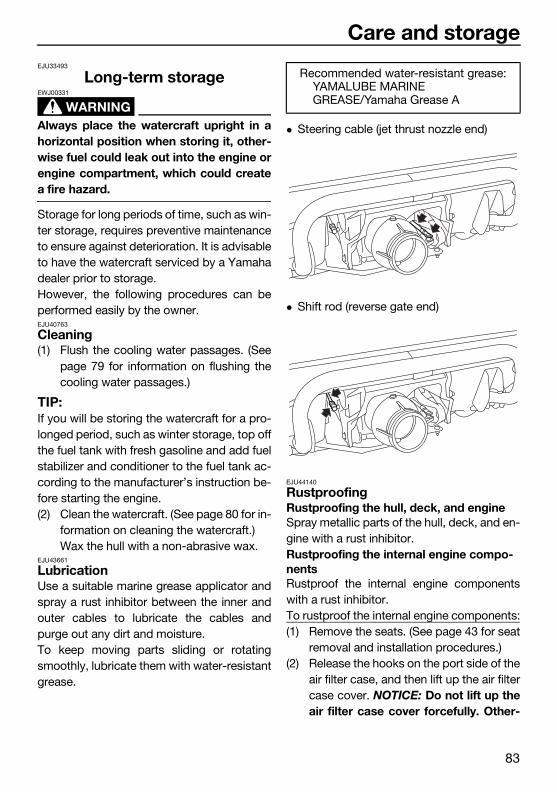
Care and storage
83
EJU33493
Long-term storage
WARNINGEWJ00331
Always place the watercraft upright in ahorizontal position when storing it, other-wise fuel could leak out into the engine orengine compartment, which could createa fire hazard.
Storage for long periods of time, such as win-ter storage, requires preventive maintenanceto ensure against deterioration. It is advisableto have the watercraft serviced by a Yamahadealer prior to storage.However, the following procedures can beperformed easily by the owner.EJU40763
Cleaning(1) Flush the cooling water passages. (See
page 79 for information on flushing thecooling water passages.)
TIP:If you will be storing the watercraft for a pro-longed period, such as winter storage, top offthe fuel tank with fresh gasoline and add fuelstabilizer and conditioner to the fuel tank ac-cording to the manufacturer’s instruction be-fore starting the engine.(2) Clean the watercraft. (See page 80 for in-
formation on cleaning the watercraft.)Wax the hull with a non-abrasive wax.
EJU43661
LubricationUse a suitable marine grease applicator andspray a rust inhibitor between the inner andouter cables to lubricate the cables andpurge out any dirt and moisture.To keep moving parts sliding or rotatingsmoothly, lubricate them with water-resistantgrease.
Steering cable (jet thrust nozzle end)
Shift rod (reverse gate end)
EJU44140
RustproofingRustproofing the hull, deck, and engineSpray metallic parts of the hull, deck, and en-gine with a rust inhibitor.Rustproofing the internal engine compo-nentsRustproof the internal engine componentswith a rust inhibitor.To rustproof the internal engine components:(1) Remove the seats. (See page 43 for seat
removal and installation procedures.)(2) Release the hooks on the port side of the
air filter case, and then lift up the air filtercase cover. NOTICE: Do not lift up theair filter case cover forcefully. Other-
Recommended water-resistant grease:YAMALUBE MARINE GREASE/Yamaha Grease A
UF4G71E0.book Page 83 Wednesday, July 27, 2016 9:32 AM
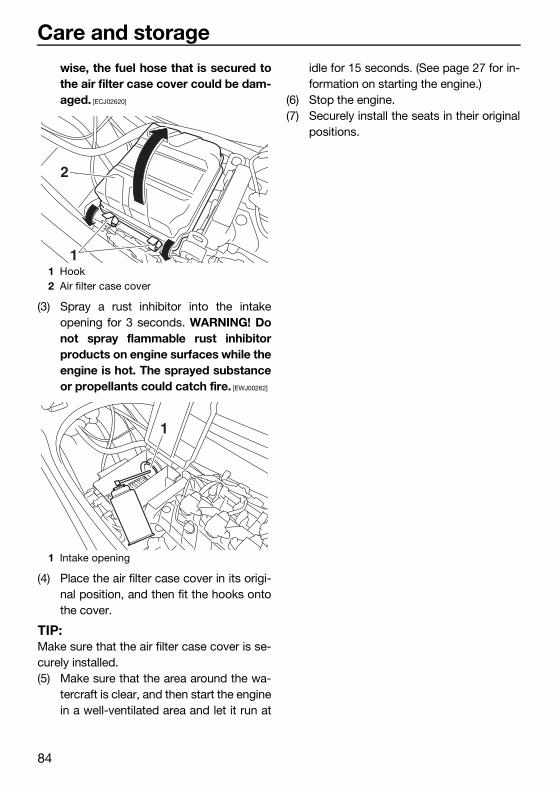
Care and storage
84
wise, the fuel hose that is secured tothe air filter case cover could be dam-aged. [ECJ02620]
(3) Spray a rust inhibitor into the intakeopening for 3 seconds. WARNING! Donot spray flammable rust inhibitorproducts on engine surfaces while theengine is hot. The sprayed substanceor propellants could catch fire. [EWJ00262]
(4) Place the air filter case cover in its origi-nal position, and then fit the hooks ontothe cover.
TIP:Make sure that the air filter case cover is se-curely installed.(5) Make sure that the area around the wa-
tercraft is clear, and then start the enginein a well-ventilated area and let it run at
idle for 15 seconds. (See page 27 for in-formation on starting the engine.)
(6) Stop the engine.(7) Securely install the seats in their original
positions.
1 Hook2 Air filter case cover
1 Intake opening
2
1
1
UF4G71E0.book Page 84 Wednesday, July 27, 2016 9:32 AM
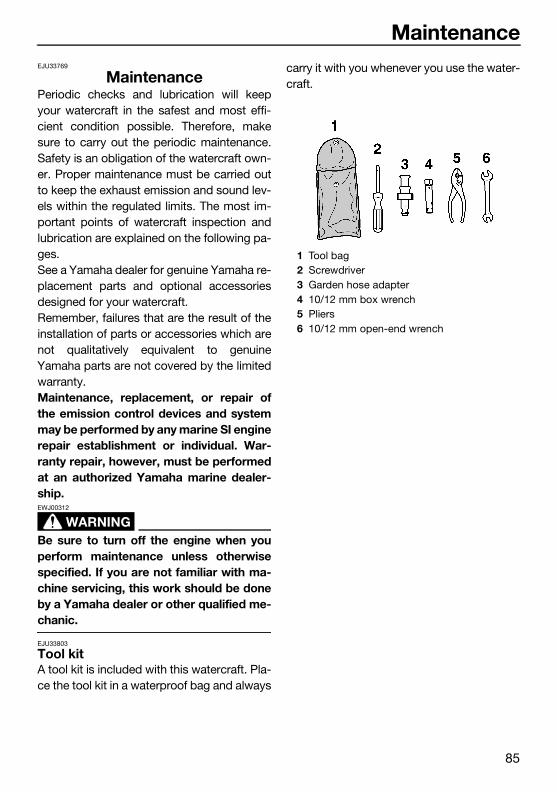
Maintenance
85
EJU33769
MaintenancePeriodic checks and lubrication will keepyour watercraft in the safest and most effi-cient condition possible. Therefore, makesure to carry out the periodic maintenance.Safety is an obligation of the watercraft own-er. Proper maintenance must be carried outto keep the exhaust emission and sound lev-els within the regulated limits. The most im-portant points of watercraft inspection andlubrication are explained on the following pa-ges.See a Yamaha dealer for genuine Yamaha re-placement parts and optional accessoriesdesigned for your watercraft.Remember, failures that are the result of theinstallation of parts or accessories which arenot qualitatively equivalent to genuineYamaha parts are not covered by the limitedwarranty.Maintenance, replacement, or repair ofthe emission control devices and systemmay be performed by any marine SI enginerepair establishment or individual. War-ranty repair, however, must be performedat an authorized Yamaha marine dealer-ship.
WARNINGEWJ00312
Be sure to turn off the engine when youperform maintenance unless otherwisespecified. If you are not familiar with ma-chine servicing, this work should be doneby a Yamaha dealer or other qualified me-chanic.
EJU33803
Tool kitA tool kit is included with this watercraft. Pla-ce the tool kit in a waterproof bag and always
carry it with you whenever you use the water-craft.
1 Tool bag2 Screwdriver3 Garden hose adapter4 10/12 mm box wrench5 Pliers6 10/12 mm open-end wrench
UF4G71E0.book Page 85 Wednesday, July 27, 2016 9:32 AM
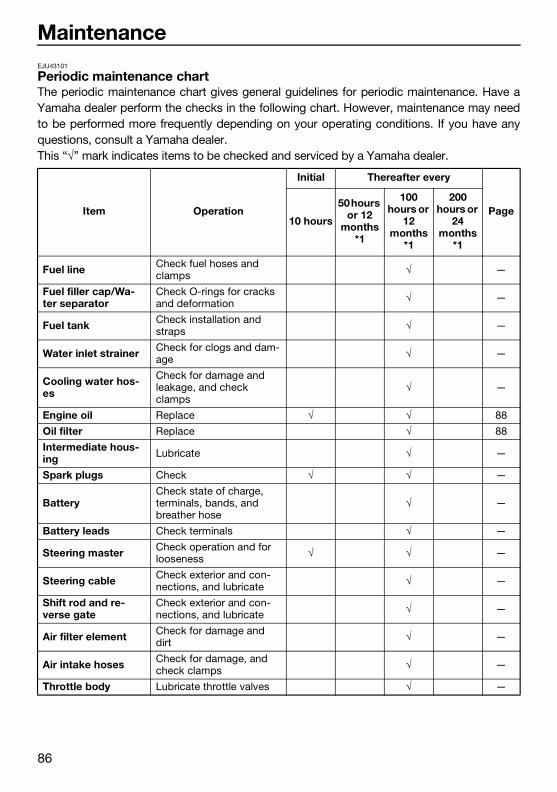
Maintenance
86
EJU43101
Periodic maintenance chartThe periodic maintenance chart gives general guidelines for periodic maintenance. Have aYamaha dealer perform the checks in the following chart. However, maintenance may needto be performed more frequently depending on your operating conditions. If you have anyquestions, consult a Yamaha dealer.This “√” mark indicates items to be checked and serviced by a Yamaha dealer.
Item Operation
Initial Thereafter every
Page10 hours
50 hours or 12
months *1
100 hours or
12 months
*1
200 hours or
24 months
*1
Fuel line Check fuel hoses and clamps √ —
Fuel filler cap/Wa-ter separator
Check O-rings for cracks and deformation √ —
Fuel tank Check installation and straps √ —
Water inlet strainer Check for clogs and dam-age √ —
Cooling water hos-es
Check for damage and leakage, and check clamps
√ —
Engine oil Replace √ √ 88
Oil filter Replace √ 88
Intermediate hous-ing Lubricate √ —
Spark plugs Check √ √ —
BatteryCheck state of charge, terminals, bands, and breather hose
√ —
Battery leads Check terminals √ —
Steering master Check operation and for looseness √ √ —
Steering cable Check exterior and con-nections, and lubricate √ —
Shift rod and re-verse gate
Check exterior and con-nections, and lubricate √ —
Air filter element Check for damage and dirt √ —
Air intake hoses Check for damage, and check clamps √ —
Throttle body Lubricate throttle valves √ —
UF4G71E0.book Page 86 Wednesday, July 27, 2016 9:32 AM
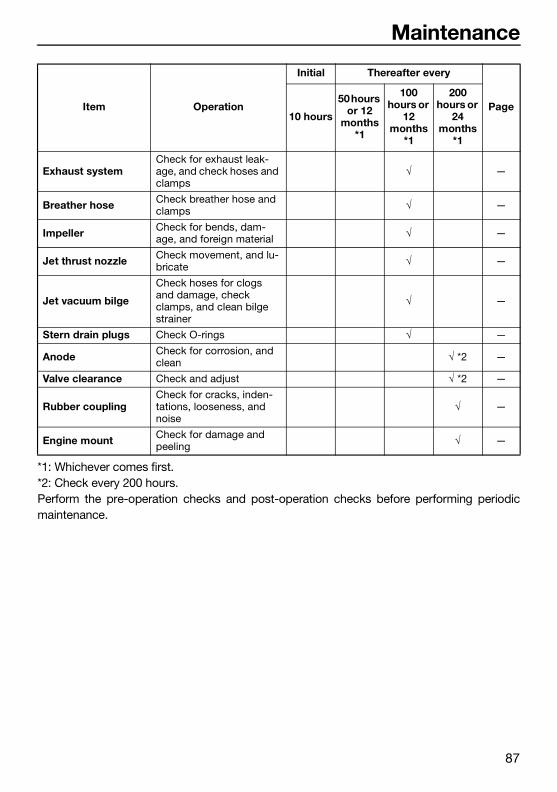
Maintenance
87
*1: Whichever comes first.*2: Check every 200 hours.Perform the pre-operation checks and post-operation checks before performing periodicmaintenance.
Exhaust systemCheck for exhaust leak-age, and check hoses and clamps
√ —
Breather hose Check breather hose and clamps √ —
Impeller Check for bends, dam-age, and foreign material √ —
Jet thrust nozzle Check movement, and lu-bricate √ —
Jet vacuum bilge
Check hoses for clogs and damage, check clamps, and clean bilge strainer
√ —
Stern drain plugs Check O-rings √ —
Anode Check for corrosion, and clean √ *2 —
Valve clearance Check and adjust √ *2 —
Rubber couplingCheck for cracks, inden-tations, looseness, and noise
√ —
Engine mount Check for damage and peeling √ —
Item Operation
Initial Thereafter every
Page10 hours
50 hours or 12
months *1
100 hours or
12 months
*1
200 hours or
24 months
*1
UF4G71E0.book Page 87 Wednesday, July 27, 2016 9:32 AM
Maintenance
88
EJU36943
Engine oil and oil filter
WARNINGEWJ00341
Engine oil is extremely hot immediately af-ter the engine is turned off. Coming in con-tact with or getting any engine oil on yourclothes could result in burns.
NOTICEECJ00992
Do not run the engine with too much or notenough oil in the engine, otherwise the en-gine could be damaged.
It is recommended to have a Yamaha dealerchange the engine oil and the engine oil filter.However, if you choose to change the oil andfilter on your own, consult a Yamaha dealer.
UF4G71E0.book Page 88 Wednesday, July 27, 2016 9:32 AM
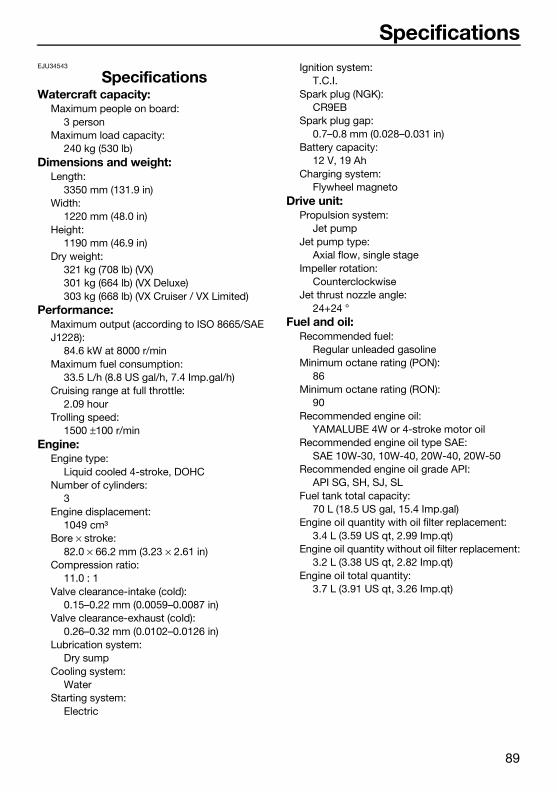
Specifications
89
EJU34543
SpecificationsWatercraft capacity:
Maximum people on board:3 person
Maximum load capacity:240 kg (530 lb)
Dimensions and weight:Length:
3350 mm (131.9 in)Width:
1220 mm (48.0 in)Height:
1190 mm (46.9 in)Dry weight:
321 kg (708 lb) (VX)301 kg (664 lb) (VX Deluxe)303 kg (668 lb) (VX Cruiser / VX Limited)
Performance:Maximum output (according to ISO 8665/SAE J1228):
84.6 kW at 8000 r/minMaximum fuel consumption:
33.5 L/h (8.8 US gal/h, 7.4 Imp.gal/h)Cruising range at full throttle:
2.09 hourTrolling speed:
1500 ±100 r/minEngine:
Engine type:Liquid cooled 4-stroke, DOHC
Number of cylinders:3
Engine displacement:1049 cm³
Bore × stroke:82.0 × 66.2 mm (3.23 × 2.61 in)
Compression ratio:11.0 : 1
Valve clearance-intake (cold):0.15–0.22 mm (0.0059–0.0087 in)
Valve clearance-exhaust (cold):0.26–0.32 mm (0.0102–0.0126 in)
Lubrication system:Dry sump
Cooling system:Water
Starting system:Electric
Ignition system:T.C.I.
Spark plug (NGK):CR9EB
Spark plug gap:0.7–0.8 mm (0.028–0.031 in)
Battery capacity:12 V, 19 Ah
Charging system:Flywheel magneto
Drive unit:Propulsion system:
Jet pumpJet pump type:
Axial flow, single stageImpeller rotation:
CounterclockwiseJet thrust nozzle angle:
24+24 °Fuel and oil:
Recommended fuel:Regular unleaded gasoline
Minimum octane rating (PON):86
Minimum octane rating (RON):90
Recommended engine oil:YAMALUBE 4W or 4-stroke motor oil
Recommended engine oil type SAE:SAE 10W-30, 10W-40, 20W-40, 20W-50
Recommended engine oil grade API:API SG, SH, SJ, SL
Fuel tank total capacity:70 L (18.5 US gal, 15.4 Imp.gal)
Engine oil quantity with oil filter replacement:3.4 L (3.59 US qt, 2.99 Imp.qt)
Engine oil quantity without oil filter replacement:3.2 L (3.38 US qt, 2.82 Imp.qt)
Engine oil total quantity:3.7 L (3.91 US qt, 3.26 Imp.qt)
UF4G71E0.book Page 89 Wednesday, July 27, 2016 9:32 AM
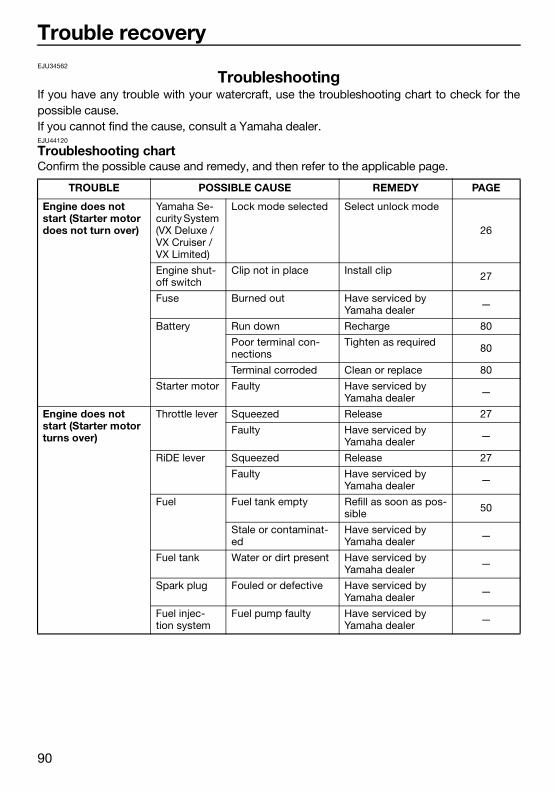
Trouble recovery
90
EJU34562
TroubleshootingIf you have any trouble with your watercraft, use the troubleshooting chart to check for thepossible cause.If you cannot find the cause, consult a Yamaha dealer.EJU44120
Troubleshooting chartConfirm the possible cause and remedy, and then refer to the applicable page.
TROUBLE POSSIBLE CAUSE REMEDY PAGE
Engine does not start (Starter motor does not turn over)
Yamaha Se-curity System (VX Deluxe / VX Cruiser / VX Limited)
Lock mode selected Select unlock mode
26
Engine shut-off switch
Clip not in place Install clip 27
Fuse Burned out Have serviced by Yamaha dealer —
Battery Run down Recharge 80
Poor terminal con-nections
Tighten as required 80
Terminal corroded Clean or replace 80
Starter motor Faulty Have serviced by Yamaha dealer —
Engine does not start (Starter motor turns over)
Throttle lever Squeezed Release 27
Faulty Have serviced by Yamaha dealer —
RiDE lever Squeezed Release 27
Faulty Have serviced by Yamaha dealer —
Fuel Fuel tank empty Refill as soon as pos-sible 50
Stale or contaminat-ed
Have serviced by Yamaha dealer —
Fuel tank Water or dirt present Have serviced by Yamaha dealer —
Spark plug Fouled or defective Have serviced by Yamaha dealer —
Fuel injec-tion system
Fuel pump faulty Have serviced by Yamaha dealer —
UF4G71E0.book Page 90 Wednesday, July 27, 2016 9:32 AM
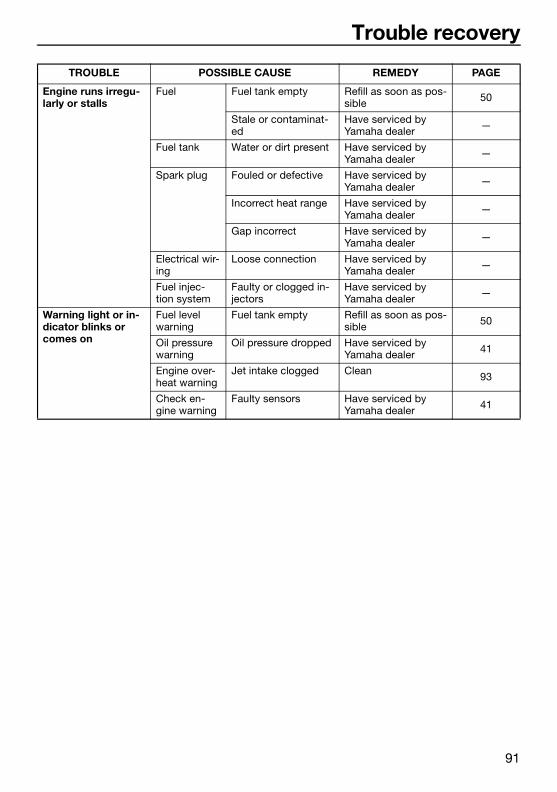
Trouble recovery
91
Engine runs irregu-larly or stalls
Fuel Fuel tank empty Refill as soon as pos-sible 50
Stale or contaminat-ed
Have serviced by Yamaha dealer —
Fuel tank Water or dirt present Have serviced by Yamaha dealer —
Spark plug Fouled or defective Have serviced by Yamaha dealer —
Incorrect heat range Have serviced by Yamaha dealer —
Gap incorrect Have serviced by Yamaha dealer —
Electrical wir-ing
Loose connection Have serviced by Yamaha dealer —
Fuel injec-tion system
Faulty or clogged in-jectors
Have serviced by Yamaha dealer —
Warning light or in-dicator blinks or comes on
Fuel level warning
Fuel tank empty Refill as soon as pos-sible 50
Oil pressure warning
Oil pressure dropped Have serviced by Yamaha dealer 41
Engine over-heat warning
Jet intake clogged Clean 93
Check en-gine warning
Faulty sensors Have serviced by Yamaha dealer 41
TROUBLE POSSIBLE CAUSE REMEDY PAGE
UF4G71E0.book Page 91 Wednesday, July 27, 2016 9:32 AM
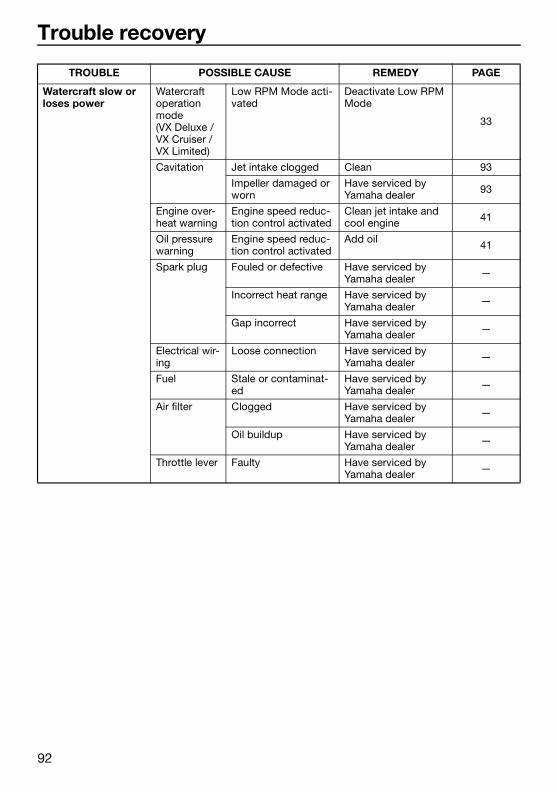
Trouble recovery
92
Watercraft slow or loses power
Watercraft operation mode (VX Deluxe / VX Cruiser / VX Limited)
Low RPM Mode acti-vated
Deactivate Low RPM Mode
33
Cavitation Jet intake clogged Clean 93
Impeller damaged or worn
Have serviced by Yamaha dealer 93
Engine over-heat warning
Engine speed reduc-tion control activated
Clean jet intake and cool engine 41
Oil pressure warning
Engine speed reduc-tion control activated
Add oil 41
Spark plug Fouled or defective Have serviced by Yamaha dealer —
Incorrect heat range Have serviced by Yamaha dealer —
Gap incorrect Have serviced by Yamaha dealer —
Electrical wir-ing
Loose connection Have serviced by Yamaha dealer —
Fuel Stale or contaminat-ed
Have serviced by Yamaha dealer —
Air filter Clogged Have serviced by Yamaha dealer —
Oil buildup Have serviced by Yamaha dealer —
Throttle lever Faulty Have serviced by Yamaha dealer —
TROUBLE POSSIBLE CAUSE REMEDY PAGE
UF4G71E0.book Page 92 Wednesday, July 27, 2016 9:32 AM

Trouble recovery
93
EJU34625
Emergency proceduresEJU34635
Cleaning the jet intake and impeller
WARNINGEWJ00783
Before attempting to remove weeds or de-bris from the jet intake or impeller area,shut the engine off and remove the clipfrom the engine shut-off switch. Severe in-jury or death could result from coming incontact with the rotating parts of the jetpump.
If weeds or debris gets caught in the jet intakeor impeller, cavitation can occur, causing jetthrust to decrease even though engine speedrises. If this condition is allowed to continue,the engine will overheat and may seize.NOTICE: If weeds or debris gets caught inthe jet intake, do not operate the water-craft above trolling speed until they havebeen removed. [ECJ00654]
If there is any sign that the jet intake or impel-ler is clogged with weeds or debris, return toshore and check the intake and impeller. Al-
ways stop the engine before beaching thewatercraft.
(1) Place a suitable clean cloth or carpetingunderneath the watercraft to protect itfrom abrasions and scratches. Turn thewatercraft on its side as shown.NOTICE: Always turn the watercraftover onto its port (left) side. Whenturning the watercraft on its side, sup-port the bow so that the handlebarsare not bent or damaged. [ECJ00662]
UF4G71E0.book Page 93 Wednesday, July 27, 2016 9:32 AM
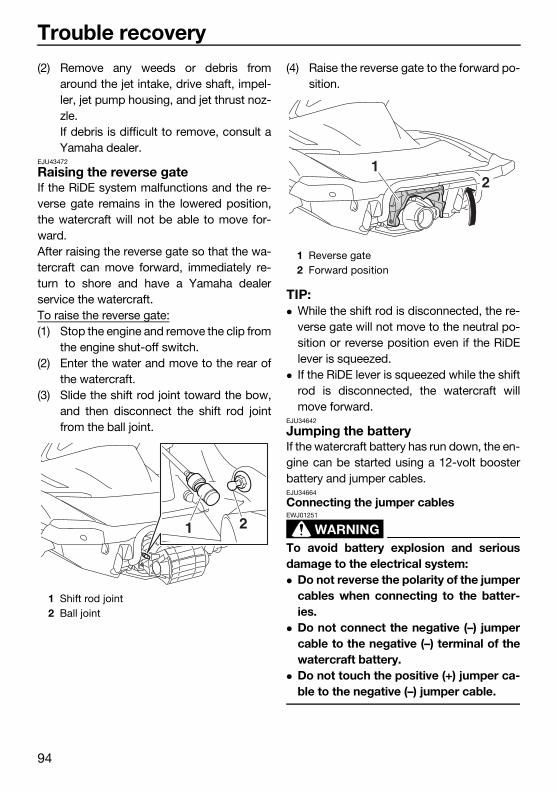
Trouble recovery
94
(2) Remove any weeds or debris fromaround the jet intake, drive shaft, impel-ler, jet pump housing, and jet thrust noz-zle.If debris is difficult to remove, consult aYamaha dealer.
EJU43472
Raising the reverse gate If the RiDE system malfunctions and the re-verse gate remains in the lowered position,the watercraft will not be able to move for-ward.After raising the reverse gate so that the wa-tercraft can move forward, immediately re-turn to shore and have a Yamaha dealerservice the watercraft.To raise the reverse gate:(1) Stop the engine and remove the clip from
the engine shut-off switch.(2) Enter the water and move to the rear of
the watercraft.(3) Slide the shift rod joint toward the bow,
and then disconnect the shift rod jointfrom the ball joint.
(4) Raise the reverse gate to the forward po-sition.
TIP: While the shift rod is disconnected, the re-
verse gate will not move to the neutral po-sition or reverse position even if the RiDElever is squeezed.
If the RiDE lever is squeezed while the shiftrod is disconnected, the watercraft willmove forward.
EJU34642
Jumping the batteryIf the watercraft battery has run down, the en-gine can be started using a 12-volt boosterbattery and jumper cables.EJU34664
Connecting the jumper cables
WARNINGEWJ01251
To avoid battery explosion and seriousdamage to the electrical system: Do not reverse the polarity of the jumper
cables when connecting to the batter-ies.
Do not connect the negative (–) jumpercable to the negative (–) terminal of thewatercraft battery.
Do not touch the positive (+) jumper ca-ble to the negative (–) jumper cable.
1 Shift rod joint2 Ball joint
1 2
1 Reverse gate2 Forward position
12
UF4G71E0.book Page 94 Wednesday, July 27, 2016 9:32 AM
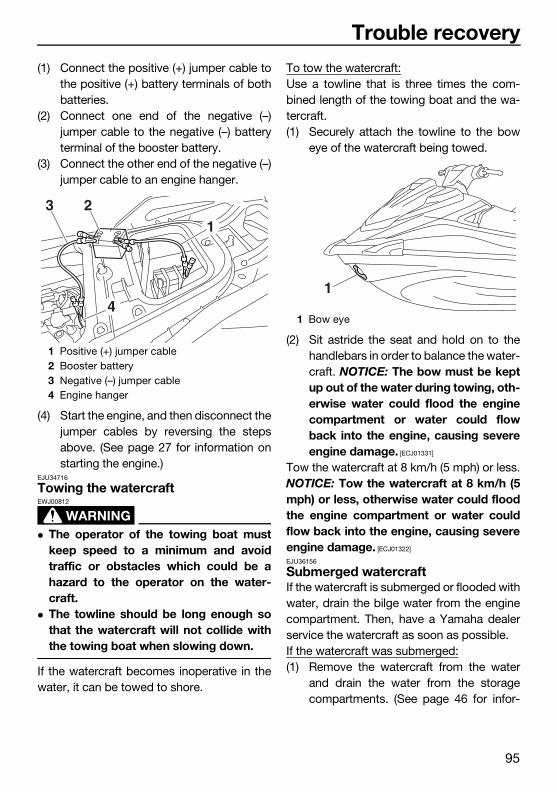
Trouble recovery
95
(1) Connect the positive (+) jumper cable tothe positive (+) battery terminals of bothbatteries.
(2) Connect one end of the negative (–)jumper cable to the negative (–) batteryterminal of the booster battery.
(3) Connect the other end of the negative (–)jumper cable to an engine hanger.
(4) Start the engine, and then disconnect thejumper cables by reversing the stepsabove. (See page 27 for information onstarting the engine.)
EJU34716
Towing the watercraft
WARNINGEWJ00812
The operator of the towing boat mustkeep speed to a minimum and avoidtraffic or obstacles which could be ahazard to the operator on the water-craft.
The towline should be long enough sothat the watercraft will not collide withthe towing boat when slowing down.
If the watercraft becomes inoperative in thewater, it can be towed to shore.
To tow the watercraft:Use a towline that is three times the com-bined length of the towing boat and the wa-tercraft.(1) Securely attach the towline to the bow
eye of the watercraft being towed.
(2) Sit astride the seat and hold on to thehandlebars in order to balance the water-craft. NOTICE: The bow must be keptup out of the water during towing, oth-erwise water could flood the enginecompartment or water could flowback into the engine, causing severeengine damage. [ECJ01331]
Tow the watercraft at 8 km/h (5 mph) or less.NOTICE: Tow the watercraft at 8 km/h (5mph) or less, otherwise water could floodthe engine compartment or water couldflow back into the engine, causing severeengine damage. [ECJ01322]
EJU36156
Submerged watercraftIf the watercraft is submerged or flooded withwater, drain the bilge water from the enginecompartment. Then, have a Yamaha dealerservice the watercraft as soon as possible.If the watercraft was submerged:(1) Remove the watercraft from the water
and drain the water from the storagecompartments. (See page 46 for infor-
1 Positive (+) jumper cable2 Booster battery3 Negative (–) jumper cable4 Engine hanger
123
41 Bow eye
1
UF4G71E0.book Page 95 Wednesday, July 27, 2016 9:32 AM
Trouble recovery
96
mation on draining the storage compart-ments.)
(2) Drain the bilge water from the enginecompartment. (See page 54 for informa-tion on draining the bilge water.)
(3) Have the watercraft serviced by aYamaha dealer as soon as possible.NOTICE: Be sure to have a Yamahadealer inspect the watercraft. Other-wise, serious engine damage couldresult. [ECJ00792]
UF4G71E0.book Page 96 Wednesday, July 27, 2016 9:32 AM
97
Index
AAfter removing the watercraft from the
water..................................................... 78BBattery care.............................................. 80Battery checks ......................................... 60Battery, jumping....................................... 94Beaching and docking the watercraft ...... 77Bilge water check..................................... 60Bilge water, draining ................................ 54Bilge water, draining on land ................... 54Bilge water, draining on water ................. 54Boarding alone......................................... 73Boarding and starting off from a dock..... 76Boarding the watercraft ........................... 73Boarding with passenger(s) ..................... 74Bow eye ................................................... 45Bow storage compartment ...................... 46Builder’s plate ............................................ 2CCapsized watercraft ................................. 76Check engine warning ............................. 41Cleaning ................................................... 83Cleaning the watercraft............................ 80Cleat......................................................... 45Cooling water pilot outlet ......................... 29Cooling water pilot outlet check .............. 65Craft Identification Number (CIN)............... 1Cruise assist
(VX Deluxe / VX Cruiser / VX Limited) ... 36Cruising limitations................................... 11EEmergency procedures............................ 93Engine break-in ........................................ 56Engine compartment check ..................... 59Engine idling speed check ....................... 66Engine oil ................................................. 52Engine oil and oil filter .............................. 88Engine oil level check............................... 60Engine oil requirements ........................... 52Engine overheat warning ......................... 41Engine serial number ................................. 1Engine shut-off cord (lanyard) check ....... 62Engine shut-off switch ............................. 27Engine stop switch................................... 27
Engine unit check..................................... 60Enjoy your watercraft responsibly............ 19Equipment................................................ 43FFire extinguisher check ............................ 64Fire extinguisher holder and cover........... 48Fire extinguisher holder, cover, and
band checks ......................................... 63Flushing the cooling water passages....... 79Fuel .......................................................... 50Fuel level check........................................ 59Fuel level meter ........................................ 40Fuel level warning..................................... 40Fuel requirements .................................... 50Fuel system checks ................................. 59GGetting to know your watercraft .............. 67Glossary, watercraft ................................. 20Glove compartment ................................. 47HHandgrip .................................................. 44Hazard information................................... 15Hood check.............................................. 65Hour meter ............................................... 42Hull and deck check ................................ 64IIdentification numbers ............................... 1Information display................................... 38JJet intake and impeller, cleaning.............. 93Jet intake checks ..................................... 64Jet thrust nozzle and reverse gate
check .................................................... 64Jumper cables, connecting...................... 94LLabels, important ....................................... 4Labels, other .............................................. 8Labels, warning .......................................... 5Launching the watercraft ......................... 68Learning to operate your watercraft......... 67Leaving the watercraft.............................. 69Limitations on who may operate the
watercraft.............................................. 10Long-term storage ................................... 83
UF4G71E0.book Page 97 Wednesday, July 27, 2016 9:32 AM
Index
98
Low RPM Mode (VX Deluxe / VX Cruiser / VX Limited) ... 33
Lubrication ............................................... 83MMain components, location of ................. 21Maintenance ............................................ 85Manufactured date label ............................ 2Model information ...................................... 2Multifunction information center .............. 38Multifunction information center check ... 65NNo-wake mode
(VX Deluxe / VX Cruiser / VX Limited) ... 34OOil pressure warning ................................ 41Operating in weeded areas...................... 77Operating the watercraft .......................... 69Operating the watercraft in reverse or
neutral................................................... 72Operating your watercraft ........................ 67Operation requirements ........................... 12PPeriodic maintenance chart ..................... 86Post-launch checks ................................. 65Post-operation care ................................. 79Pre-launch checks ................................... 59Pre-operation check points ..................... 59Pre-operation checklist ............................ 57Primary Identification (PRI-ID) number ...... 1Pull-up cleats (VX Limited) ....................... 46RRaising the reverse gate .......................... 94Reboarding step ...................................... 44Recommended equipment ...................... 14Remote control transmitter check
(VX Deluxe / VX Cruiser / VX Limited) ... 62Remote control transmitter
(VX Deluxe / VX Cruiser / VX Limited) ... 25Removable watertight storage
compartment ........................................ 48RiDE lever................................................. 28RiDE lever checks .................................... 62Riding position ......................................... 68Rustproofing ............................................ 83
SSafe boating rules .................................... 18Safety equipment check .......................... 64Seats ........................................................ 43Shift indicator ........................................... 40Shift system ............................................. 31Shift system check................................... 65Speedometer ........................................... 38Start switch .............................................. 27Starting off ............................................... 75Starting off from a trailer .......................... 76Starting the engine on water .................... 68Steering system ....................................... 28Steering system checks........................... 61Stern drain plug checks ........................... 64Stern eyes ................................................ 45Stopping the engine................................. 69Stopping the watercraft ........................... 71Storage compartment checks.................. 63Storage compartments ............................ 46Submerged watercraft ............................. 95Switch checks.......................................... 63TTachometer .............................................. 39Throttle lever ............................................ 28Throttle lever checks................................ 62Tool kit ..................................................... 85Towing the watercraft .............................. 95Transporting on a trailer ........................... 55Troubleshooting ....................................... 90Troubleshooting chart .............................. 90Turning the watercraft .............................. 70VVoltmeter.................................................. 42WWakeboarding and water-skiing .............. 17Water separator ....................................... 29Water separator check............................. 59Watercraft characteristics ........................ 15Watercraft control functions..................... 25Watercraft operation functions ................ 31Watercraft operation modes .................... 33YYamaha Security System settings ........... 26
UF4G71E0.book Page 98 Wednesday, July 27, 2016 9:32 AM
Index
99
Yamaha Security System (VX Deluxe / VX Cruiser / VX Limited) ... 26
UF4G71E0.book Page 99 Wednesday, July 27, 2016 9:32 AM

Printed in U.S.A.August 2016–0.4 × 1 CR
UF4G71E0.book Page 1 Wednesday, July 27, 2016 9:32 AM
Related Documents