VT Oil-Free Range Operators Handbook Covering Models:- VT75 / VT75D VT150 / VT150D VT200 / VT200D VT300 / VT300D VT400 / VT400D BAMBI AIR COMPRESSORS LTD 152 Thimble Mill Lane Heartlands Birmingham B7 5HT Tel: 0121 322 2299 Fax: 0121 322 2297 Email: [email protected] www.bambi-air.co.uk

Welcome message from author
This document is posted to help you gain knowledge. Please leave a comment to let me know what you think about it! Share it to your friends and learn new things together.
Transcript

VT Oil-Free Range Operators Handbook
Covering Models:-
VT75 / VT75D VT150 / VT150D VT200 / VT200D VT300 / VT300DVT400 / VT400D
BAMBI AIR COMPRESSORS LTD
152 Thimble Mill LaneHeartlandsBirminghamB7 5HTTel: 0121 322 2299Fax: 0121 322 2297
Email: [email protected]

Operating Manual
Your Bambi Air Compressor is a precision engineered product. By following these simple steps you will ensure years of trouble free use.
Parts & Service are available from your Bambi dealerIt is important to quote Model, Type & Serial Number in all communications.The substitution of parts not manufactured nor approved by Bambi can impair performance, service life and create potential mechanical or personnel hazards and will invalidate your warranty. Bambi reserves the right to modify the contents of this operating booklet without notice and the information is in no way binding on the company.
Warranty
Provided the operating instructions have been followed and the compressor has been properly maintained Bambi compressors are guaranteed against faulty workmanship for a period of 1 year.The air receiver is guaranteed for 5 years.The guarantee does not cover damage by misuse, incorrect parts or service.Contact Bambi Air Compressors or your retailer for further information.

1
Safety Precautions
What you must doRead these instructions before using your air compressorEnsure the compressor has been installed, electrically connected and piped in by a properly qualified person.Ensure the compressor is kept upright at all times
What you must not doDo not attempt any maintenance on the compressor until it has been isolated from the power supplyDo not attempt any work on the compressor until the air receiver and pipe work systems are depressurised. Compressed air is dangerous if misused and can prove fatal. Avoid any bodily contact with compressed airDuring operation the motor will become quite hot to the touch. Avoid contact to prevent burns. Never tamper with the pressure relief valveNever lubricate the oil free motor or pump assembly, this will cause severe damage.Never obstruct cooling fans or outlet vents
•
•
•
•
•
•
•
•
•
•
Siting The Compressor
What you must doProvide adequate protection from the weatherSite the compressor level in both plainsLarger models are heavy, ensure the surface has sufficient load bearing capacityAllow access for maintenance all around the compressorSite in a dry area, avoiding damp or humid conditions. The site must be dust free, well ventilated and have a cool ambient temperature. 40 C should be regarded as the maximum allowable ambient
What you must not doEnclose the compressor or allow hot air generated by the motor to re-circulate around the compressor. Ensure there is 30cm clearance around the compressorRestrict air flow around the after cooler or after cooler fan unit
•
•
•
•
•
•
•
Electrical Connections
Where applicable, compressors are supplied with a moulded plug in accordance with national standards. Never remove the moulded plug.
Note ! Duplex models VT300/300D, VT400/400D must be connected to a dedicated fused 20 amp supply.
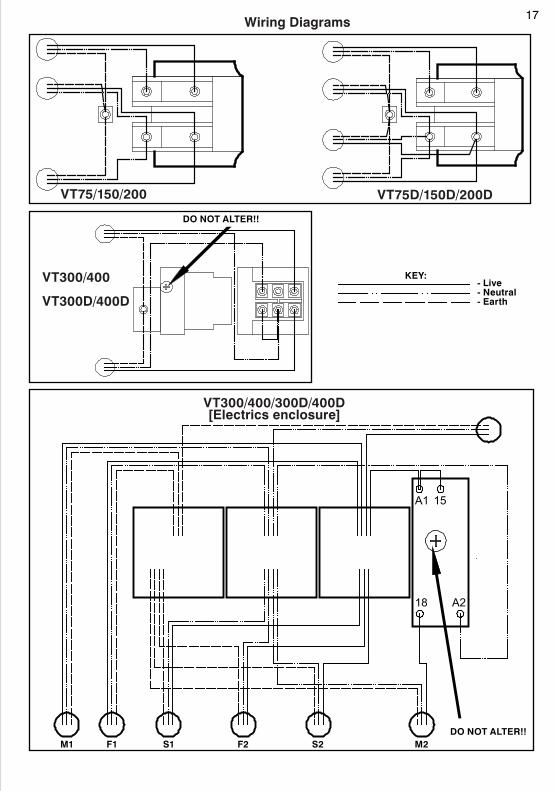
Wired in accordance with European Standard –Blue = neutral Brown = live Yellow & Green Stripe = earth
2
Operation
Refer to exploded parts diagrams and illustrations when reading this section.
Starting & Stopping
Plug the compressor into an outlet socket of nominal voltage and fitted with the correct fuse as shown in section Electrical Connections.
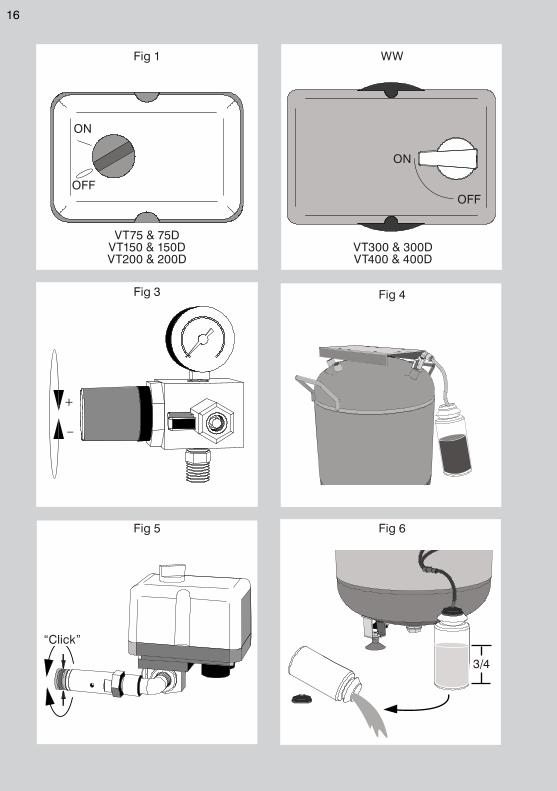
Switch the compressor on using the O/l switch located on the pressure switch - see figs 1&2.
The compressor will start running and automatically switch off at the preset pressure.
Note ! Duplex models VT300/300D, VT400/400D are fitted with a sequential start system to reduce electrical loading. You will notice one motor starting a few seconds after the other. This is normal.
As air is used the pressure drops and the motor will restart at the preset pressure. Approx 2 Bar differential.
Note ! Each time the compressor switches off or the power supply is interrupted, you will hear a short hiss of air. You are hearing the unloader valve discharging the residual delivery pipe pressure. This is normal.

3
Operation – Dryer Models
When equipped with an air dryer unit, the compressor will automatically dry the compressed air before it is stored in the air receiver. This happens automatically and requires no additional maintenance.
This eliminates the need to manually drain the air receiver.
Operation is similar to standard versions with the following change :-
Each time the compressor switches off or the power supply is interrupted, the dryer purge valve opens and automatically activates the drain valve on the after cooler filter allowing the dryer tower to regenerate. All accumulated moisture will discharge into the condensate tank. This should be emptied when it reaches ¾ full. See fig 6.
Note !Waste condensate must be handled in accordance with national environmental rules.
Do not exceed the recommended 50% duty cycle, otherwise the dryer will not activate and the humidity of the air will increase.
Ensure the after cooler fins are kept clean of accumulated dust.
Adjusting Outlet Pressure
Use the pressure regulator to adjust the outlet pressure. The 40mm pressure gauge indicates the selected pressure. To increase line pressure rotate the black knob on top of the filter regulator in a clockwise manner, to decrease turn anti clockwise. It is possible to lock the setting by pushing the knob down until it “clicks” home – see fig 3.

4
Routine Maintenance
Draining the Air Receiver
Drain condensate from air receiver at a pressure of no more than 2 Bar. Slowly open the drain tap provided to allow water to flow out – see fig 4.Close drain tap when all water has drained off.
Automatic drains where fitted do not require draining, however the condensate tank will require emptying – see previous section “Operation Dryer Models”.
Check Pressure Relief Valve
Ensure the air receiver is not pressurised. Unscrew the knurled end of the pressure relief valve until an audible “click” is heard. Retighten without using excessive force - see fig 5.
5
You must find the cause of the overload and rectify this before continuing to use the compressor.
Check for -Drain tap not closed properlyAir leaks on the pneumatic fittings Compressor not the correct size for the work load
If problems persist contact your dealer.
•••
Technical
We recommend the compressor has a maximum 50% duty cycle to prolong pump life. The motor must never be allowed to run continuously otherwise it will overheat and may become damaged
Do not ignore air leaks. All air connections must be leak free to prevent the compressor from over heating.
The compressor is fitted with a thermal overload. In the event of excessive temperature the motor will switch off. To re-set the overload follow the procedure below :-
Models VT75/75D, VT150/150D, VT200/200DMotor Sizes 0.75Hp, 1.5Hp, 2.0Hp Switch off at the pressure switch.Allow 50 minutes for the motor to cool down.Switch on at the pressure switch.
Models VT300/300D, VT400/400DMotor Size 2x1.5Hp – 2x2.0Hp The re-set is integral with the pressure switch. The pressure switch will automatically turn off (O) in the event of motor overload.Turn the pressure switch to the on position (I).
6
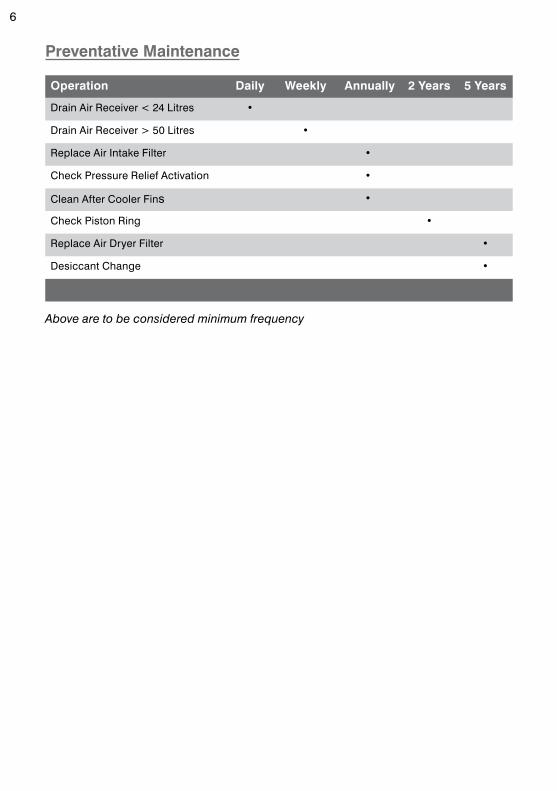
Preventative Maintenance
Operation Daily Weekly Annually 2 Years 5 Years
Drain Air Receiver < 24 Litres •
Drain Air Receiver > 50 Litres •
Replace Air Intake Filter •
Check Pressure Relief Activation •
Clean After Cooler Fins •
Check Piston Ring •
Replace Air Dryer Filter •
Desiccant Change •
Above are to be considered minimum frequency

7
Technical Specification
VT 0.75Hp Pump Specification
Motor Kw / Hp 0.55 / 0.75
Voltage 220/240
Frequency Hz 50
Amps 3.9
Displacement l/min 120
VT 1.50Hp Pump Specification
Motor Kw / Hp 1.1 / 1.5
Voltage 220/240
Frequency Hz 50
Amps 6.8
Displacement l/min 175
VT 2.0Hp Pump Specification
Motor Kw / Hp 1.5 / 2.0
Voltage 220/240
Frequency Hz 50
Amps 8.6
Displacement l/min 220

1
3
5
6
78
9
10
11
1312
14 15
16
17
181920
21
2223
24
25
26
27
2
4
5
9
8
VT75
Ref No. Description Part no.
1 Rubber foot BPB0601
2 Inspection plug BPB0243
3 Inspection plug seal BPB0502
4 24 litre tank BPB0260
5 40mm rubber mounting BPB0272
6 Motor mounting bracket BPB0321
7 Solenoid c/w cable BPB0545
8 1/8 x 6mm push fitting BPB0711
9 6mm black nylon tube BPB0203
10 Crankcase mounting bracket BPB0347
11 20mm rubber mounting BPB0273
12 Drain valve tap BPB0281
13 3/8 x 10mm tube elbow BPB0280
14 Red nylon drain tube BPB0284
15 50mm tank pressure gauge BPB0658
Ref No. Description Part no.
16 Pressure switch BPB0550
17 40mm line pressure gauge BPB0657
18 Pressure regulator BPB0510
19 1/4 x 1/4 male adaptor BPB1078
20 1/4 on-off tap BPB1079
21 Safety valve BPB1084
22 1/4 male/female elbow BPB1139
23 3/8 male adaptor BPB0283
24 Delivery pipe BPB0508
25 1/8 x 6mm elbow bush fitting BPB0044
26 3/8 male - female elbow BPB0282
27 Non-return valve BPB0656
28
29
30

13
56
7
89
10
11
13
12
14
15
16
1718
19 20
21
22
23
24
25
2627
28
29
30
3132
33
34
3536
37
38
39
40
2
4
40
41
42
3210
4
6
4
10
10
43
17
9
VT75D
Ref No. Description Part no.
1 Condensate diffuser BPB0588
2 1/8 x 6mm push tube fitting BPB0154
3 Condensate bottle - complete BPB0058
4 1.3m 6mm nylon tube BPB0203
5 6mm tube divider BPB0279
6 1/8 x 6mm elbow tube fitting BPB0044
7 Solenoid valve c/w cable BPB0545
8 Dryer assembly BPB0548
9 1/4 x 10mm push tube fitting BPB0552
10 0.65m 10mm black nylon tube BPB0551
11 3/8 x 10mm tube swivel elbow BPB0277
12 Coalescing filter BPB0258
13 Coalescing filter element BPB0655
14 3/8 male/female elbow BPB0282
15 Aftercooler - complete BPB0560
16 Aftercooler mounting bracket BPB0558
17 40mm mounting rubber BPB0272
18 Motor mounting bracket BPB0321
19 Crankcase mounting bracket BPB0347
20 20mm mounting rubber BPB0273
21 Drain valve tap BPB0281
22 Red nylon drain tube BPB0284
Ref No. Description Part no.
23 3/8 x 10mm tube stud elbow BPB0280
24 3/8 male adaptor BPB0283
25 50mm tank pressure gauge BPB0658
26 Pressure switch BPB0550
27 1/4 On-off tapClosing ring BPB1079
28 40mm line pressure gauge BPB0657
29 Pressure regulator BPB0510
30 1/4 male adaptor BPB1078
31 Safety valve BPB1084
32 1/4 male/female elbow BPB1139
33 Non-return valve BPB0656
34 3/8 x 10mm strainght tube conn. BPB0275
35 Rubber foot BPB0601
36 Inspection plug BPB0243
37 Inspection plug seal BPB0502
38 24 litre tank BPB0260
39 1/4 x 10mm Tube swivel elbow BPB0276
40 Dryer mounting clamp BPB0503
41 Purge tank bleed pipe BPB0285
42 Delivery pipe BPB0508
43 Purge tank BPB0404

1
3
5
6
78
9
10
11
13
12
14
15
16
17
18
1920
21
2223
24
25
26
27
4
5
6
9
2
10
VT150 / VT200
Ref No. Description Part no.
1 Rubber foot BPB0601
2 Inspection plug BPB0243
3 Inspection plug seal BPB0502
4 50 litre tank BPB0261
5 40mm mounting rubber BPB0272
6 Motor mounting bracket [VT150] BPB0321
6 Motor mounting bracket [VT200] BPB0516
7 Solenoid valve c/w cable BPB0545
8 1/8 x 6mm push fitting BPB0711
9 0.4m 6mm nylon tubing BPB0203
10 20mm mounting rubber BPB0273
11 Crankcase mounting bracket [VT150] BPB0347
11 Crankcase mounting bracket [VT200] BPB0517
12 3/8 drain tap BPB0281
13 3/8 x 10mm tube elbow BPB0280
14 0.6m draiin tube BPB0284
Ref No. Description Part no.
15 50mm tank pressure gauge BPB0658
16 Pressure switch BPB0550
17 40mm line pressure gauge BPB0657
18 Pressure regulator BPB0510
19 1/4 Male adaptor BPB1078
20 On-off tap BPB1079
21 Safety valve BPB1084
22 1/4 Male/female elbow BPB1139
23 3/8 Male adaptor BPB0283
24 400mm Delivery pipe BPB0508
25 1/8 x 6mm elbow tube fitting BPB0044
26 3/8 Male/female elbow BPB0282
27 Non-return valve BPB0656

1
3
5
6
7
8 9
10
11
13
12
14
15
16
1718
19
20 2122
23
24
27
28
29
30
3132
33
34
35
36
37
39
2
4
44
4
12
17
26
25
1238
40
41
4243
32
44
40
12
46
11
VT150D / VT200DRef No. Description Part no.
1 Condensate diffuser BPB0588
2 1/8 x 6mm Push fitting BPB0154
3 Condensate bottle complete BPB0088
4 1.1m 6mm nylon tube BPB0203
5 6mm Divider BPB0279
6 1/8 x 6mm Elbow tube fitting BPB0044
7 Solenoid valve c/w cable BPB0545
8 Coalescing filter BPB0258
9 Coalescing filter element BPB0655
10 1/4 x 3/8 adaptor BPB0591
11 3/8 x 10mm Tube connector BPB0592
12 0.65m 10mm Nylon tube BPB0551
13 3/8 x 10mm Swivel elbow BPB0593
14 3/8 Male/female elbow BPB0282
15 Aftercooler BPB0561
16 Aftercooler bracket BPB0557
17 40mm Rubber mounting BPB0272
18 Motor mounting bracket [VT150D] BPB0321
18 Motor mounting bracket [VT200D] BPB0516
19 Crankcase mounting bracket [VT150D] BPB0307
19 Crankcase mounting bracket [VT200D] BPB0517
20 20mm Rubber mounting BPB0273
21 3/8 Drain tap BPB0281
Ref No. Description Part no.
22 0.6m 10mm Drain tube BPB0284
23 3/8 x 10mm Elbow BPB0280
24 3/8 Male adaptor BPB0283
25 50mm Tank pressure gauge BPB0658
26 Pressure switch BPB0550
27 40mm Line pressure gauge BPB0657
28 Pressure regulator BPB0510
29 1/4 Male adaptor BPB1078
30 On/off tap BPB1079
31 Safety valve BPB1084
32 1/4 Male/female elbow BPB1139
33 Non-return valve BPB0656
34 50 Litre tank BPB0261
35 3/8 x 10mm Connector BPB0275
36 Rubber foot BPB0601
37 Inspection plug BPB0243
38 Inspection plug seal BPB0502
39 /4 x 10mm Swivel elbow BPB0276
40 Dryer mounting bracket BPB0503
41 Dryer assembly BPB0548
42 400mm Delivery pipe BPB0508
43 Purge tank bleed valve BPB0285
44 Purge tank BPB0484

1
3
56
7
8
910
11
13
12
14
15
16
171819
20
21
22
23
24
25
26
27
28
12
2
4
5
14
212827
26
25
2121
22
17
18 19 20
VT300 / VT400
Ref No. Description Part no.
1 Inspection plug seal BPB0502
2 Inspection plug BPB0243
3 100 Litre tank BPB0262
4 Rubber foot BPB0605
5 3/8 Male adaptor BPB0283
6 1/4 Male/female elbow BPB1139
7 Safety valve BPB1084
8 Tank pressure gauge BPB0658
9 Pressure switch BPB0549
10 3/8 On/off tap ATP661
11 Regulator BPB0511
12 Line pressure gauge BPB0657
13 3/8 Male/female elbow BPB0282
14 Drain tube BPB0199
15 3/8 x 1/4 Hose tail BPB0652
Ref No. Description Part no.
16 Drain valve BPB0281
17 Solenoid c/w cable BPB0545
18 1/8 x 6mm Push fitting BPB0711
19 Crankcase mounting bracket [VT300] BPB0347
19 Crankcase mounting bracket [VT400] BPB0517
20 20mm Rubber mounting BPB0273
21 40mm Rubber mounting BPB0272
22 Motor mounting bracket [VT300] BPB0321
22 Motor mounting bracket [VT400] BPB0516
23 Electrics enclosure BPB0513
24 Sequential timer BPB0512
25 6mm Nylon tube BPB0203
26 1/8 x 6mm Elbow push fitting BPB0044
27 Delivery hose BPB0508
28 Non return valve BPB0656

1
3
5
67
8
9 10
11
1312
14
15 1617
18
1920
21
2223 24
2526
27
28
2930
32
33
34
3536
2
4 5
15
23
1
2224
18
3518
631
1829
2422
2322
3738
39 40
4142
4344
45
18
4241
43
40
4614
22
23
24
25
22
26
2718
13
20
30
18
3332
316
21
19
34 24
2228
13
VT300D / VT400D
Ref No. Description Part no.
1 Aftercooler mounting bracket BPB0557
2 Inspection plug BPB0243
3 Inspection plug seal BPB0502
4 Rubber foot BPB0605
5 3/8 Male adaptor BPB0283
6 1/4 Male elbow BPB1139
7 Safety valve BPB1084
8 50mm Tank pressure gauge BPB0658
9 Pressure switch BPB0549
10 3/8 on/off tap ATP661
11 Pressure regulator BPB0551
12 40mm Line pressure gauge BPB0657
13 3/8 Male/female elbow BPB0282
14 3/8 x 1/4 Hose tail BPB0652
15 Drain tube BPB0199
16 Drain tube clamp BPB0119
17 Drain valve BPB0281
18 1.25m x 10mm Tube BPB0551
19 Aftercooler BPB0561
20 3/8 x 10mm Swivel elbow BPB0593
21 Delivery tube BPB0508
22 1m 6mm Nylon tube BPB0203
23 6mm Tube divider BPB0279
24 1/8 x 6mm Elbow BPB0044
Ref No. Description Part no.
25 Coalescing filter BPB0044
26 Coalescing filter element BPB0655
27 3/8 x 10mm Connector BPB0592
28 1/4 x 3/8 Adaptor BPB0591
29 Dryer mounting clamp BPB0503
30 Purge tank BPB0484
31 Purge tank bleed pipe BPB0285
32 Dryer assembly BPB0548
33 1/4 x 10mm Swivel elbow BPB0276
34 Solenoid valve c/w cable BPB0545
35 3/8 x 10mm Connector BPB0275
36 Non return valve BPB0656
37 1/8 x 6mm Push fitting BPB0154
38 Condensate diffuser BPB0588
39 Condensate bottle BPB0587
40 Motor mounting bracket [VT300D] BPB0321
40 Motor mounting bracket [VT400D] BPB0516
41 40mm Rubber mounting BPB0272
42 Crankcase mounting bracket [VT300D] BPB0347
42 Crankcase mounting bracket [VT400D] BPB0517
43 20mm Rubber mounting BPB0273
44 Electrics enclosure BPB0513
45 Sequential timer BPB0512
46 100 Litre tank

37a / 37b
2
3
45
6 7
89
1011
14 15
1617
18
19
20
21
2223
2425
26
27
2830
31
32a/32b
33
3435
36
6
13
7
1a / 1b
12
29
14Motor / Pump Parts:
VT75 / VT75D / VT150 / VT150D / VT300/VT300DRef No. Description Part no.
1a Motor VT75 BPB0663
1b Motor VT150 BPB0664
2 3/8 Elbow BPB0629
3 Block fixing BPB0665
4 Block motor side BPB0666
5 Block screw BPB0667
6 Block bearing BPB0668
7 Short spacer BPB0669
8 Con rod BPB0670
9 Con rod bearing BPB0671
10 Eccentric BPB0672
11 Large spacer BPB0673
12 Block “O” ring BPB0674
13 Block fan side BPB0675
14 Stud bolt BPB0676
15 16mm washer BPB0677
16 M16 Nut BPB0678
17 Fan BPB0625
18 M16 Fan nut BPB0679
19 Fan cowling BPB0626
20 Cylinder head bolt BPB0680
Ref No. Description Part no.
21 Cylinder head BPB0681
22 Intake filter BPB0682
23 Cylinder head gasket BPB0620
24 Valve plate nut BPB0683
25 Valve plate washer BPB0684
26 Outlet valve strip BPB0685
27 Valve plate BPB0686
28 Inlet valve strip BPB0685
29 Valve strip bolt BPB0687
30 Valve plate gasket BPB0621
31 Cylinder bolt BPB0688
32a Cylinder VT75 BPB0689
32b Cylinder VT150 BPB0690
33 Cylinder “O” ring BPB0691
34 Top washer bolt BPB0692
35 Top washer BPB0693
36 Piston seal BPB0694
37a Capacitor VT75 BPB0695
37b Capacitor VT150 BPB0696

12
1
2
3
4
5
6 7
89
10 11
14 1516
171819
20
21
22
23
2425
26
2728
2930
3132
33
34
3536
3738
39
40
6
13
7
15Motor / Pump Parts:
VT200 / VT200D / VT400 / VT400DRef No. Description Part no.
1 Motor VT200 BPB0697
2 3/8 Elbow BPB0698
3 Block fixing BPB0665
4 VT200 Block motor side BPB0699
5 Block screw BPB0667
6 Block bearing BPB0668
7 Short spacer BPB0669
8 VT200 Con rod BPB0700
9 Con rod bearing BPB0671
10 Eccentric BPB0672
11 Large spacer BPB0673
12 VT200 Capacitor BPB0701
13 Block “O” ring BPB0674
14 VT200 Block fan side BPB0702
15 Stud bolt BPB0676
16 16mm washer BPB0677
17 M16 Nut BPB0678
18 Inner fan cover BPB0703
19 Fan BPB0704
20 M16 Fan nut BPB0679
Ref No. Description Part no.
21 Fan ring BPB0705
22 Fan cover fixing BPB0706
23 Cylinder head bolt BPB0680
24 Cylinder head BPB0681
25 Intake filter BPB0682
26 Cylinder head gasket BPB0620
27 Valve plate nut BPB0683
28 Valve plate washer BPB0684
29 Outlet valve strip BPB0685
30 Valve plate BPB0686
31 Inlet valve strip BPB0685
32 Valve strip bolt BPB0687
33 Valve plate gasket BPB0707
34 Cylinder bolt BPB0688
35 Cylinder VT200 BPB0708
36 Cylinder “O” ring BPB0691
37 Top washer bolt BPB0692
38 Top washer BPB0709
39 Piston seal BPB0710
40 Outer fan cover BPB0716
VT75 & 75DVT150 & 150DVT200 & 200D
ON
OFF
ON
OFF
Fig 1 WW
Fig 3 Fig 4
Fig 5 Fig 6
VT300 & 300DVT400 & 400D
+
_
3/4
16
“Click”
A1 15
18 A2
VT75/150/200 VT75D/150D/200D
VT300/400
VT300D/400D
DO NOT ALTER!!
DO NOT ALTER!!
Wiring Diagrams
VT300/400/300D/400D [Electrics enclosure]
K- Live- Neutral - Earth
KKEY:
17
M1 F1 S1 F2 S2 M2

Issue 1: 06/06
Related Documents