Voyager 7.0 Release Handbook 30 June 2008 © Ex Libris, 2008 Proprietary & Confidential Page 1 of 66 Voyager ® 7.0.1 Release Handbook Provided by Ex Libris USA Professional Services

Welcome message from author
This document is posted to help you gain knowledge. Please leave a comment to let me know what you think about it! Share it to your friends and learn new things together.
Transcript

Voyager 7.0 Release Handbook 30 June 2008 © Ex Libris, 2008 Proprietary & Confidential Page 1 of 66
Voyager® 7.0.1
Release Handbook
Provided by Ex Libris USA Professional Services

Voyager 7.0 Release Handbook 30 June 2008 © Ex Libris, 2008 Proprietary & Confidential Page 2 of 66
Table of Contents
Introduction …………………………………………………………………………… Page 3 Part A: WebVoyáge ……………………………………………………………... Page 4 Part B: New Features Common to the staff modules …………… Page 16 Part C: New Features in the Cataloging module ………………….. Page 27 Part D: New Features in Acquisitions/Serials ………………….……. Page 37 Part E: New Features in the Circulation Module …………………… Page 51 Part F: Miscellaneous Features/Notes.…………………………………… Page 62 Appendix: Additional Voyager 7.0 Resources ……………………… Page 64

Voyager 7.0 Release Handbook 30 June 2008 © Ex Libris, 2008 Proprietary & Confidential Page 3 of 66
Introduction This document provides specific information on the new features and enhancements in Voyager 7.0 for customers upgrading from the Voyager 6.5 major release. The audience for this document is anyone with prior Voyager experience who would like a detailed description of the new features available in Voyager 7. This handbook should be used in conjunction with the other documents that Ex Libris is providing for Voyager 7:
• Road To Voyager 7.0 page • Introduction to WebVoyáge for Voyager 7.0 • The Voyager 7.0 User Guides.
These, and other resources, are all listed in the Appendix. Please consult all of the available resources to plan your institution's upgrade to Voyager 7. If you are upgrading from a release earlier than Voyager 6.5, we recommend also reading the corresponding documentation for each intervening release. These are available on the Release Notes page on SupportWeb. There are no plans to update this handbook as new information about the release becomes available. The Road To Voyager 7.0 pages should be consulted for up-to-date information.
* * * * * * * * * *

Voyager 7.0 Release Handbook 30 June 2008 © Ex Libris, 2008 Proprietary & Confidential Page 4 of 66
Part A: WebVoyáge
A.1 Redesigned User Interface In Voyager 7.0, WebVoyáge has a redesigned user interface. It has been designed to be clean, intuitive, and easy-to-navigate. The new user interface is the result of a rigorous development process that incorporated several rounds of usability testing, focus groups, and accessibility labs. The result takes into account the needs of different user types (such as college students, faculty, and library staff), of institutions of varying sizes, and of staff with differing levels of web development experience. Ex Libris has designed this release to support the needs of a range of users, from beginner to expert. Voyager 7.0 WebVoyáge is delivered so that a minimum of work is necessary for the institution to release the new user interface to users. This out-of-the box WebVoyáge configuration has been thoroughly tested to be usable and accessible. Usability testing and focus groups confirmed that the most asked-for searches were for subject, keyword anywhere, and title searches. Searches for numbers (such as ISBN) and authors’ names occur, of course, but less frequently. Users also want an interface that makes it easy to select or filter search results, as well as to take actions on specific records (such as print or download them). For this reason, the out-of-the-box version of WebVoyáge places an emphasis on these primary user activities. See Figures A1a-d for sample screen shots from the out-of-the-box version.

Voyager 7.0 Release Handbook 30 June 2008 © Ex Libris, 2008 Proprietary & Confidential Page 5 of 66
Figure A1-a: Basic Search Screen
As Figure A1-a shows, the basic search screen has been redesigned, but the same functionality is available. The various search options have all been moved into one file (webvoyage.properties) to make customization easier. The default search tabs now include separate, dedicated tabs for Author and Subject searches. Both the subject and author search tabs can be configured by the institution to use either browse or keyword searches.

Voyager 7.0 Release Handbook 30 June 2008 © Ex Libris, 2008 Proprietary & Confidential Page 6 of 66
Figure A1-b: Advanced Search Screen
The advanced search page contains the keyword searches that were on the Builder search page in WebVoyáge Classic. The available indexes are set up as they were in the Classic interface – through the System Administration client – and the search options and labels are customized mainly through one file (webvoyage.properties). Now, however, full limit options are available through the Advanced search page without clicking through to an additional page. These limit options are the same options that were available in WebVoyáge Classic.
Voyager 7.0 Release Handbook 30 June 2008 © Ex Libris, 2008 Proprietary & Confidential Page 7 of 66
Figure A1-c: Search results
On the titles list, individual record displays are more readable and distinct; the action buttons (Print, Export, and Add to List) are visually connected to the records they affect. Figure A1-c also shows the new filter box to the right of the results list – the filter box contains the same limits as the quick limit box from the basic search page. After the search, users can apply one or multiple filters to narrow the results by date, location, medium, or any of the other standard limiting options. The filters box is configured with the same options that configure the quick limits for the basic search page.

Voyager 7.0 Release Handbook 30 June 2008 © Ex Libris, 2008 Proprietary & Confidential Page 8 of 66
Figure A1-d: Record display with actions box on right
As Figure A1-d shows, record display now features an “actions box”, which brings together the actions that a user can perform on the record in a prominent, obvious place. For staff familiar with the technology, this box is a good location for additional features (such as links to searches in other systems, bookmarking sites, etc.). The bibliographic and holdings information is displayed according to the same logic as in WebVoyáge Classic – institutions can set the label, tag field, indicator, and subfield combinations of their choice. Additionally, session management in WebVoyáge has been redesigned. Users can now use the browser’s “back” and “forward” buttons without losing their session. URLs no longer contain session information, so plugging a URL into the browser’s location bar will no longer lead to the “session expired” error from WebVoyáge Classic. The URL for a specific record’s page is static – you can create links to specific records or searches simply by taking the URL for any given titles list or record display.

Voyager 7.0 Release Handbook 30 June 2008 © Ex Libris, 2008 Proprietary & Confidential Page 9 of 66
A.2. Underlying (Base) OPAC Functionality Unchanged In Voyager 7.0, there are no changes to the underlying Voyager indexes and the many configurable choices available in prior versions of the Systems Administration. Indexing, relevancy searching, remote searching, request forms, and other configured options remain unchanged and are managed via the Systems Administration client. Though the design of the individual pages has changed, the data displayed about records remains unchanged – multiple holdings will be indicated with a message, the same logic for item status display is used, the same options for configuring bibliographic and holdings information are available. The interface has been streamlined, but the same information is shown. As in previous releases, it is possible to authenticate patrons using either their WebVoyáge account information or an external authentication system (e.g. LDAP). External authentication is implemented essentially the same as in previous releases.

Voyager 7.0 Release Handbook 30 June 2008 © Ex Libris, 2008 Proprietary & Confidential Page 10 of 66
A.3 WebVoyáge Configurability With the appropriate expertise, any Voyager institution can make sophisticated changes to the out-of-the-box user interface. In fact, the new WebVoyáge is highly configurable and many advanced customizations are feasible that have, in the past, been impossible. The process of customization has been streamlined by reducing the number of files that need to be edited on the server. Messages, labels, and display options have been collocated to minimize the number of places that need to be edited for basic configuration. A handful of files now contain the settings that were establishes through dozens of server files in WebVoyáge Classic. Most labels are established in two files: webvoyage.properties and pageProperties.xml. See the WebVoyáge Basic User’s Guide and Support’s Introduction to WebVoyáge for more information about these files. Each page of WebVoyáge is built using files formatted according to open web standards. Staff with knowledge of CSS, Javascript, XML, and XSLT can create advanced customizations to dramatically alter the look and functionality of WebVoyáge. By using open standards, Ex Libris allows staff members to use their existing knowledge of web technologies to make sophisticated customizations that match their institutions’ user needs and service offerings. This expertise is not necessary for basic changes, however, and training classes and documentation are available to help bring staff up to speed on the new system. See Appendix A for further resources. An exciting advance in customizing WebVoyáge is the opportunity to create an unlimited number of “skins” for WebVoyáge. Each skin is a distinct interface that can be customized independently. These can be created to support different languages, user groups, subject domains, etc. A library in Canada might create separate English and French user interfaces. For a college library with distinct user populations, one skin for undergraduate student and another for graduate students and faculty may be appropriate. A law or medical library on a university campus might find it helpful to offer a specialized user interface for its subject domain. Users can move easily between skins by changing the URL in the Web browser, and institutions can create static links to each skin from any web page.

Voyager 7.0 Release Handbook 30 June 2008 © Ex Libris, 2008 Proprietary & Confidential Page 11 of 66
Here are some examples of customizations, some requiring only basic knowledge/skill and others requiring higher level knowledge/skill: Requires
Basic Skill and Knowledge
Requires Intermediate or Advanced Skill/Knowledge
Branding and otherwise adding local information
Change logos and colors using existing page layout.
Re-design page layouts incorporating different logos, color schemes, etc.
Change the link in the footer of each page to the library’s home page.
Add a link to a campus map specific to the cataloging location.
Customize Search Options
Change the label of the “Advanced” search tab to “Guided Search” tab
Add a Journals Search tab with accompanying Journals search box.
Change the search indexes available via Basic Search by enabling or disabling; modify the search index labels to preferred search names.
Add a search tab for traditional left-anchored searches or a search tab for Call Number browse search.
Modify the user tips or search examples presented on each page following existing page layout.
Modify the search tips dynamically based on the selected search index.
Change the order and options for quick limits and post-search filters.
Disable search limits dynamically based on the selected search index.
Customize Search Results
Change wording or labels for the titles list or record display.
Build a separate display for serials.
Modify the Actions Box Add an interlibrary loan request option.
Suppress actions based on specific database situations. For instance, suppress hold/recall option based upon item status.
My Account Change the label “Borrower Blocks” to something more appealing.
Rearrange the sections on the page.
Change “My List” to the original “My Bookbag”
Remove the Item Type column from the Charged Items table.
Additional Skins or User Interfaces
-- Multi-lingual catalogs -- By user type -- By subject domain or type of library -- By library privileges
To get started configuring the interface, refer to Support’s Introduction to WebVoyáge for Voyager 7. This document introduces the files to edit for some of the most popular changes and contains tips and best practices for further customization.

Voyager 7.0 Release Handbook 30 June 2008 © Ex Libris, 2008 Proprietary & Confidential Page 12 of 66
For more advanced changes, refer to the Voyager 7.0 WebVoyáge Architecture Overview and Configuration Models. This document begins by outlining the way the system builds the pages in WebVoyáge and contains an example of all of the files that are called to create a page. It also features step-by-step instructions for specific advanced customization projects.

Voyager 7.0 Release Handbook 30 June 2008 © Ex Libris, 2008 Proprietary & Confidential Page 13 of 66
A.4 Rapid Start-Up of WebVoyáge vs Using WebVoyáge Classic For many Voyager institutions, Ex Libris recommends deploying the re-designed user interface as part of or shortly after the upgrade to Voyager 7. This is not a requirement of the upgrade, however. WebVoyáge Classic (the WebVoyáge interface delivered as part of the 6.5 release) is also delivered with Voyager 7.0. Depending on your server specifications, the two interfaces can be deployed side-by-side initially. They can be accessed through different ports on the same domain. A Voyager institution can initially deploy WebVoyáge Classic to give itself time to customize the new interface. This will allow the institution to brand and test WebVoyáge, prepare public services staff, and update bibliographic instruction materials for the new interface. During this preparation, the institution can take advantage of the many Voyager 7 enhancements available in the staff modules. If you desire to use WebVoyáge Classic upon upgrading to Voyager 7.0, customizations can be migrated from your previous version of Voyager. Full success is dependent upon the complexity of local customization. When selecting the new WebVoyáge interface during your upgrade, a different migration can occur to configure the new interface to use basic customizations from WebVoyáge Classic (from your previous version of Voyager). As above, full success is dependent upon the complexity of local customization. Either or both of these options are available upon request when scheduling the upgrade with Ex Libris Product Integration Department.
Ex Libris plans to provide both WebVoyáge and WebVoyáge Classic interfaces through version 7.x. Ex Libris will no longer deliver the Classic interface after the release of Voyager 8.0.

Voyager 7.0 Release Handbook 30 June 2008 © Ex Libris, 2008 Proprietary & Confidential Page 14 of 66
A.5 Functional Accessibility Accessibility was a critical requirement in the development of the new interface for WebVoyáge. Ex Libris worked in close collaboration with the Consortium of Academic and Research Libraries in Illinois (CARLI) (http://www.carli.illinois.edu/) and the University of Illinois at Urbana-Champaign (UIUC) as part of the IBHE Web Accessibility Consortium (http://cita.disability.uiuc.edu/collaborate/illinois/) using the ICITA HTML Best Practices guidelines for accessible design (http://html.cita.uiuc.edu). The CARLI and IBHE Web Accessibility teams provided Ex Libris with feedback throughout the Voyager 7.0 development process. They also provided access to the Functional Accessibility Evaluator (http://fae.cita.uiuc.edu/) and Firefox Accessibility Extension (http://firefox.cita.uiuc.edu/) testing tools developed by UIUC to support the implementation of the iCITA HTML Best Practices guidelines. In addition, the IBHE Web Accessibility Consortium provided feedback on usability for screen readers that was incorporated into the design. The result is a highly accessible interface. Screen-readable tags have been applied to all non-textual elements, functional descriptions have been added to every page, scripting languages are not required for the page to function—a whole host of design choices realize the goal of making a fully accessible OPAC.

Voyager 7.0 Release Handbook 30 June 2008 © Ex Libris, 2008 Proprietary & Confidential Page 15 of 66
A.6 WebVoyáge Resources See the Appendix for a list of resources to help you get started with Voyager 7.0 WebVoyáge. Ex Libris Professional Services plans to offer the following classes on WebVoyáge, to suit various needs and skill levels. Classes will be made available over the Web and face-to-face in traditional classrooms. o WebVoyáge: Behind-the-Scenes (3-hour upgrade WebCast)
o WebVoyáge: Configuration Instruction (15-hour foundation class
providing extensive instruction on configuration options and techniques)
o Certification 115 and 215 (hands-on instruction teaching skills such
as moving files from PC to server, recognizing and editing HTML, CSS, and XML files appropriately; using sophisticated web-design tools such as Firebug, etc.)
* * * * * * * * * *

Voyager 7.0 Release Handbook 30 June 2008 © Ex Libris, 2008 Proprietary & Confidential Page 16 of 66
Part B: New Features Common to Staff Modules
B.1. Searching via the clients -- Default settings (Applies to the Cataloging, Acquisitions, Circulation, and Media Scheduling modules)
In Voyager 7, the following options can be set to a default value:
• Default Search tab
• Index Selection: Non-keyword index
• Builder: Search index and term connector (any of these, all of these, as a phrase)
To set the defaults, Default Search and Save Settings buttons have been added to the search tabs. Only the Default Search button is available on the Keyword tab. Upon selecting the Default Tab button, the current tab is set as the default search tab and it is grayed out to indicate that it is selected.
Note: The two buttons to set default search settings are not available when Retain Last Search is selected in Work Flow tab of Session Defaults and Preferences.

Voyager 7.0 Release Handbook 30 June 2008 © Ex Libris, 2008 Proprietary & Confidential Page 17 of 66
Figure B1-a: Search defaults and Save Settings Buttons on Builder Tab
(The two new buttons do not appear on this screen if Retain Last Search is enabled.)

Voyager 7.0 Release Handbook 30 June 2008 © Ex Libris, 2008 Proprietary & Confidential Page 18 of 66
B.2 Suppressed Record Indicator in Search Results (Applies to the Cataloging, Acquisitions, Circulation, and Media Scheduling modules)
In Voyager 7.0, staff users are able to set a preference in the staff clients to differentiate OPAC-suppressed titles when the titles display in a search results list. This customizable and time-saving setting allows staff to recognize instantly when a specific title is suppressed from public view in WebVoyáge, without having to view individual records. See Figure B2-a.
Figure B2-a: OPAC-Suppressed Title display with red font on a grey background The Suppress Indicator preferences are saved per operator login. In Cataloging, the indicator is set in the Colors/Fonts tab of the Session Defaults and Preferences, a new box has been added, Search Result Colors. Click on the Suppressed Records button to edit the text or background colors or reset the default colors. See Figure B2-b.

Voyager 7.0 Release Handbook 30 June 2008 © Ex Libris, 2008 Proprietary & Confidential Page 19 of 66
Figure B2-b: Suppress Record Setting on Colors/Fonts tab in Cataloging In the Acquisitions, Circulation, and Media Scheduling modules, a Search Results Colors box has been added with buttons for the text and background colors. In Acquisitions, the box is in the Colors and Fonts tab of Preferences. See Figure B2-c. In Circulation, it is found in the session preferences. See Figure B2-d. In Media Scheduling, it is found in the Search tab of Options. See Figure B2-e.

Voyager 7.0 Release Handbook 30 June 2008 © Ex Libris, 2008 Proprietary & Confidential Page 20 of 66
Figure B2-c: Suppress Record Setting on Colors/Fonts tab in Acquisitions
Figure B2-d: Suppress Record Setting on Colors/Fonts tab in Circulation

Voyager 7.0 Release Handbook 30 June 2008 © Ex Libris, 2008 Proprietary & Confidential Page 21 of 66
Figure B2-e: Suppress Record Setting on Colors/Fonts tab in Media scheduling
It is anticipated that Voyager libraries will make more active use of the suppress/unsuppress feature, as maintenance of records will become easier with this feature and the complementary Pick and Scan enhancement described in Section B.4.

Voyager 7.0 Release Handbook 30 June 2008 © Ex Libris, 2008 Proprietary & Confidential Page 22 of 66
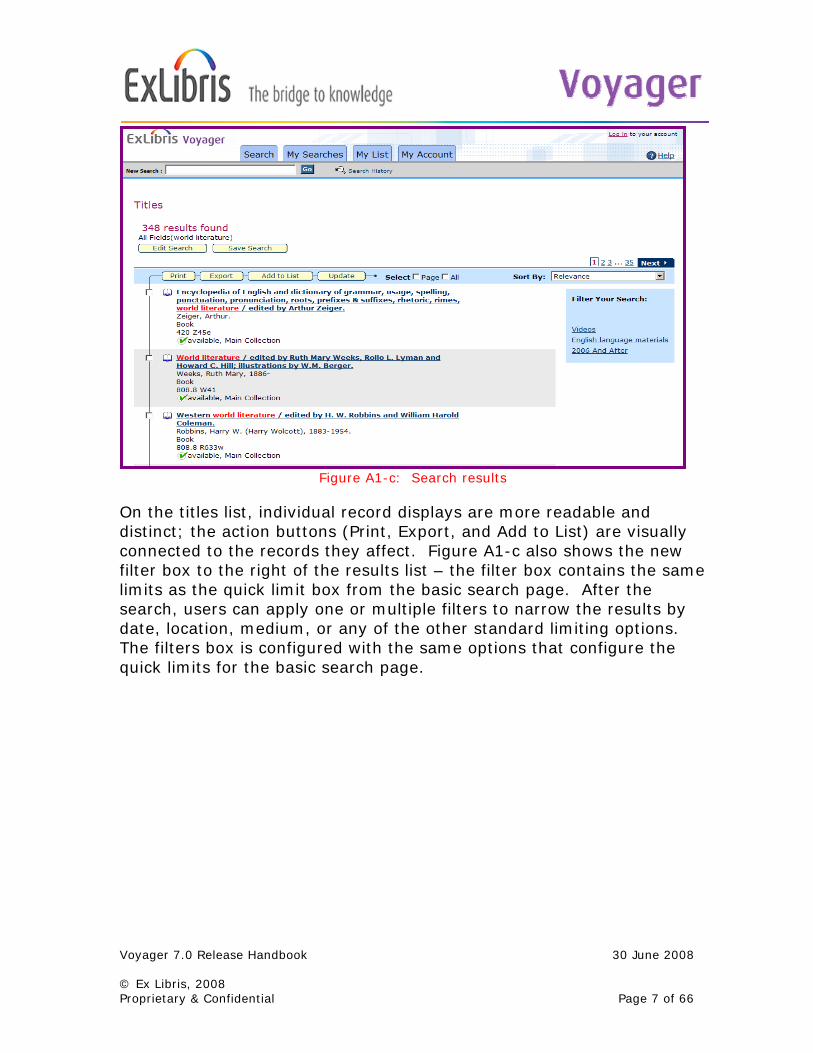
B.3 Validating ISBN and ISSN numbers (Applies to the Cataloging, Acquisitions, and Circulation modules.) In Voyager 7, the Cataloging, Acquisitions, and Circulation modules will validate 10- and 13-digit ISBN numbers, as well as ISSN numbers, whenever a bibliographic record is saved to the database, unless “bypass validation” is selected in the client preferences. If this preference is established in the client, a user can alternately pull down the Record Menu to validate the highlighted 020 field. A validation algorithm is employed to ensure that correct format is observed. ISBN validation will occur for 020‡a and 024‡a (with first indicator 3); ISSN validation will occur for 022‡a or 022‡z. The validation process will handle numbers with and without embedded hyphens and suffixes. Subfields that fail validation will be presented to the operator for review and correction, since most validation errors are caused by simple typos. To validate a standard number, go to the Record menu and select Validate ISBNs or Validate ISSNs. You will receive a message confirming the standard number was validated or an error report. See Figures B3-a and B3-b. You will receive the same messages when validation occurs when saving a record to the database.
Figure B3-a: ISBN in 020 field validated by Cataloger.
Voyager 7.0 Release Handbook 30 June 2008 © Ex Libris, 2008 Proprietary & Confidential Page 23 of 66
Figure B3-b: ISBN in 020 field contains input error; Cataloger receives error report and can correct.
In the cases where a cataloger is processing an item that has an invalid or cancelled ISBN or ISSN printed on the physical piece, the cataloger can opt to store the number in the ‡z MARC subfield, following MARC 21 definitions and input guidelines.
In the Circulation module, the option to enable or bypass ISBN or ISSN validation is available in the Session Preferences.

Voyager 7.0 Release Handbook 30 June 2008 © Ex Libris, 2008 Proprietary & Confidential Page 24 of 66
Figure B3-c: ISBN error report supplied to a circ operator
In the Acquisitions module, the same enable/bypass preference is available.

Voyager 7.0 Release Handbook 30 June 2008 © Ex Libris, 2008 Proprietary & Confidential Page 25 of 66
B.4 Use Pick and Scan function to suppress/unsuppress bibs and holding records
(Applies to Cataloging and Circulation modules.) The Pick and Scan functionality allows operators to make the same change to a group of item records in a single pass after supplying a list of item barcodes. With this enhancement, operators can mark bib and holdings records for OPAC suppression, or can un-suppress the group of records when this is appropriate. Here are some examples of usage: o Moving items to a temporary storage facility. o Placing items on a display shelf and then removing afterwards. o Placing a group of books in a library exhibit and then removing
afterwards.
Figure B4-a: Pick and Scan routine showing Suppress from OPAC options

Voyager 7.0 Release Handbook 30 June 2008 © Ex Libris, 2008 Proprietary & Confidential Page 26 of 66
B.4 Additional Resources Voyager 7.0 User Guides (per module) Ex Libris Professional Services will offer training upgrade sessions organized by module: o Voyager 7.0 Cataloging Opportunities (3-hour WebCast) o Voyager 7.0 Acquisitions/Serials Developments (3-hour WebCast) o Voyager 7.0 Circulation Improvements (3-hour WebCast)
* * * * * * * * * *

Voyager 7.0 Release Handbook 30 June 2008 © Ex Libris, 2008 Proprietary & Confidential Page 27 of 66
Part C: New Features in the Cataloging Module
C.1 Updated MARC Tag Tables The MARC21 tag tables to be distributed with Voyager 7 are updated to match current library standards, as follows: 1) Library of Congress – Network Development and MARC Standards Office Through Update No. 8 (2007): http://www.loc.gov/marc/marcdocz.html Through MARC proposal 2008-03: http://www.loc.gov/marc/marbi/list-p.html 2) OCLC, Inc. The OCLC tag tables have been updated through OCLC-MARC Format Update (2008). This information is located in OCLC Technical Bulletin 255 (May 2008). http://www.oclc.org/us/en/support/documentation/worldcat/tb/255/ More updates to the Voyager Cataloging Tag Tables are scheduled to be made in all subsequent major and minor releases of Voyager. Please note that, if your library makes use of local 9xx MARC tags, these fields will need to be added by your site to the new tag tables post upgrade to Voyager 7. This is the standard procedure whenever new tag tables are distributed.

Voyager 7.0 Release Handbook 30 June 2008 © Ex Libris, 2008 Proprietary & Confidential Page 28 of 66
C.2 Navigation from Item to Bibliographic Record This feature provides an easy and direct way to move from an open item record to the bibliographic record. Three navigation methods have been provided in Voyager 7.0. They also apply when navigating from the open MFHD record to the bibliographic record.
1) Toolbar icon (see Figure C2-a) appears on ‘Get items” and ‘Get Hldgs” displays.
Figure C2-a:
Navigating from an open item record to the bibliographic record using the toolbar’s “Get Bib” icon.
2) ‘Retrieve Bibliographic Record’ function available on the Record drop-down menu.
3) Keyboard shortcut (Ctrl + J)

Voyager 7.0 Release Handbook 30 June 2008 © Ex Libris, 2008 Proprietary & Confidential Page 29 of 66
C.3 Merge Existing Bibliographic Records in Database Prior functionality allowed catalogers to overlay/merge bibliographic records from outside the database (using incoming records) with those bibliographic records currently inside the database (over existing records) when there is a match. New functionality in Voyager 7 now allows catalogers to overlay or merge two bibliographic records within the same database, the cataloger making the match as part of the online transaction. This new capability will be a powerful tool in improving database maintenance and quality. The online feature makes use of overlay/merge profiles already in use by catalogers, set up in Systems Administration, with the difference that a cataloger determines which online record takes precedence. Possible scenarios for use with this feature: • To correct duplicate cataloging records. • To replace a brief bib record created by acquisitions with a full
bibliographic record. See figures C3-a and C3-b. • To replace a brief bibliographic record created by circulation staff who
charged out an item to a patron and the item required barcoding on-the-fly at the circulation desk.

Voyager 7.0 Release Handbook 30 June 2008 © Ex Libris, 2008 Proprietary & Confidential Page 30 of 66
Figure C3-a: Illustration of two duplicate records in the database, one a full cataloging record (#58283) and the other a brief bib (#58759).

Voyager 7.0 Release Handbook 30 June 2008 © Ex Libris, 2008 Proprietary & Confidential Page 31 of 66
Figure C3-b: The full cataloging information from #58283 has been overlaid on top of
#58759 after use of the new feature. The two bibliographic records involved in the procedure are identified as target bibliographic records and source bibliographic records. Target Record
• This is the record whose contents are replaced or supplemented. • This record always remains in the database. • The overlay/merge procedure will start with this record in the
Cataloging module. Source Record
• This is the bibliographic record whose contents are copied to the target record.

Voyager 7.0 Release Handbook 30 June 2008 © Ex Libris, 2008 Proprietary & Confidential Page 32 of 66
• Optionally, the source record may be deleted from the database when the overlay/merge is executed.
• Associated MFHDs and items may be re-linked to the target bibliographic record.
Figure C3-c: Illustration of Source and Target Records before the merge.
The Target Record is active or prominent in the Windows display. More on Merge and Overlay With Overlay, one bibliographic record is copied into another. The target bibliographic record’s contents are then completely replaced. With Merge, one bibliographic record is merged with another utilizing the existing merge profiles as defined in Voyager System Administration. Specifically, the fields in the target record that are identified in the merge profile are preserved when the source record’s fields are copied to the target record. The merge/overlay feature makes use of the pre-existing Voyager privileges to overlay or merge bibliographic records, update and delete records. Thus, System Administration security profiles control access to this feature: • The cataloger must have “Bibliographic Update” privileges to perform
the overlay/merge;
Source Target
Active Record

Voyager 7.0 Release Handbook 30 June 2008 © Ex Libris, 2008 Proprietary & Confidential Page 33 of 66
• The cataloger must have “Bibliographic Delete” privileges to delete the source bibliographic record;
• The cataloger must have “Attach Holdings to any Bib Record” privileges to re-link MFHDs and items.
Decisions on the Transaction Window The Merge Profile is selected by the cataloger as part of the transaction. See Figure C3-d. Depending upon what is appropriate in the particular situation, the cataloger can opt to move (or re-link) holdings and item records from the source to the target. A single checkmark in the box that is presented by Voyager will move both attached holding record(s) and item(s). See Figure C3-d. Another checkmark is used to indicate if the source record should be deleted. See Figure C3-d.
Figure C3-d: Cataloger makes three decisions on this transaction screen. Cataloger cannot “undo” once YES is clicked on the screen.

Voyager 7.0 Release Handbook 30 June 2008 © Ex Libris, 2008 Proprietary & Confidential Page 34 of 66
Cataloger Tips when using this feature: • Be familiar in advance with your cataloging overlay/merge profiles,
since a selection must be made as part of the command. • Establish in advance if the source record has an attached purchase
order. Coordinate with acquisitions staff as needed.
o If the source record has a purchase order and even attached invoices, it may be necessary to retain this bibliographic record in the database depending upon your audit requirements. Consult with acquisitions staff. If necessary to retain the bibliographic record created by acquisitions staff, the source record can be suppressed from the OPAC so that it remains in the database for audit trail purposes only.
o If there is no problem moving the purchase order to the
preferred (target) cataloging record, the feature described can be used. However, it is probably more efficient to re-link the purchase order to the preferred bibliographic record via the Acquisitions Module in advance of merging the two bibliographic records in Cataloging. See Section D.1 for details.
• Establish in advance if the source record has attached holdings and
item records. If yes, decide if you should re-link these holdings and item records to the target bib. You will probably want to do this if you plan to delete the source record unless the target already has duplicate holdings and items records.
• Decide in advance if the source record will be deleted as part of this
transaction. • The “source” record can be selected during a bibliographic search, by
bib ID, or by selecting a record already retrieved in the cataloging client. If you display both source and target records in Windows, click in the “target” record to make it the active Window.
• Refer to Procedure 4-5 in the Cataloging User’s Guide for step-by-
step instruction.

Voyager 7.0 Release Handbook 30 June 2008 © Ex Libris, 2008 Proprietary & Confidential Page 35 of 66
C.4 Specify a Default Copy Number Parameter when Using Bulk Import In previous versions of Voyager, any item record created via the Bulk Import program had a copy number of 0 automatically assigned to it. Only when using the Cataloging client, could library personnel assign copy numbers different from 0 to an item record. New to Voyager 7.0, the Bulk Import feature will allow Voyager systems personnel to specify a default copy number to be applied to items created during Bulk Import processing. -p With this new functionality comes the new –p parameter for the Bulk Import command line used to specify copy numbers during the creation of item records. The –p parameter is used in conjunction with a positive number of up to five places, so 0 – 99999. The number after the –p parameter will be assigned as the copy number to every new item record created by the job. For example, if –p5 is used within the command line, every item record that is created by the Bulk Import will have a copy number of 5. Typically, libraries will use either –p0 or –p1. Please note that if the –p parameter is not used in the command line of the bulk import job, the program will use zero as the copy number default. For more information about Bulk Import, please refer to Chapter 12 of the Voyager 7.0 Technical User’s Guide.

Voyager 7.0 Release Handbook 30 June 2008 © Ex Libris, 2008 Proprietary & Confidential Page 36 of 66
C.5 Additional Resources on Cataloging Changes User Guides:
• Voyager 7.0 Cataloging User’s Guide • Voyager 7.0 System Administration User’s Guide • Voyager 7.0 Technical User’s Guide
Ex Libris Professional Services will offer an upgrade webcast on the new cataloging features.
• Voyager 7.0 Cataloging Opportunities (3-hour upgrade WebCast)
* * * * * * * * * *

Voyager 7.0 Release Handbook 30 June 2008 © Ex Libris, 2008 Proprietary & Confidential Page 37 of 66
Part D: New Features in Acquisitions/Serials
D.1 Re-link bibliographic or holdings information on Purchase Order Line items may be linked to an incorrect bibliographic and/or holdings record for a variety of reasons, such as serial title changes, various editions of the same title, multiple standard numbers, different formats, or duplicate records existing in the database. The linkage may have been correct initially but, due to unknowns in the publication or cataloging processes, changes may become necessary over time.
Voyager 7 now provides users with the ability to change which bibliographic record (and subsequently, holdings record attached to the new bib record) is associated with a particular line item. Any item record created through the line item association will automatically be re-linked to the new bib and holdings records as well.
An operator will also have the option to retain the bib record currently linked to the line item, but to link to a different holdings record associated with this bib record.
An audit trail of record linking will be retained in the database. To link a line item to a different bib, highlight the line item on the purchase order, click the Detailed Line Item button, and go to the Bib Record tab in the line item details. On the bottom of the window is a new Change Bib Record button (see Figure D1-a). NOTE: The Change Bib Record button will only be available if the operator’s security profile has the “Change Line Item Bib Record” box checked in: System Administration>Security>Acquisitions/Serials Profiles>Profile Values This box will not be checked upon upgrade. As part of the 7.0 upgrade follow-up, the Voyager Systems Administrator should consider adding this capability for appropriate profiles.

Voyager 7.0 Release Handbook 30 June 2008 © Ex Libris, 2008 Proprietary & Confidential Page 38 of 66
Figure D1-a: Change Bib Record button on line item details Bib Record tab To proceed, click the Change Bib Record button. The traditional search grid will appear, allowing you to find the new bibliographic record you wish to select. When you’ve selected the correct bib record and clicked OK, you’ll see the Change Holdings Records for Line Item Copies window (Figure D1-b). NOTE: If you wish to retain the current bib record but link the line item to a different holdings record associated with that bib, bring up either the Quick Line Item details or Edit Approved Line Item options to edit the Link to Holdings information there.

Voyager 7.0 Release Handbook 30 June 2008 © Ex Libris, 2008 Proprietary & Confidential Page 39 of 66
Figure D1-b: Change Holdings Records for Line Item Copies screen To display the new holdings options that are available to you, click in the far right of the New Holdings column to show the ellipsis button, then click the ellipsis. You’ll get a Link to Holdings window similar to the one displayed when you’re initially linking a line item to a holdings record (Figure D1-c).
Figure D1-c: Link to Holdings Window Now you’ll see the available holdings linked to your newly selected bibliographic record. Select the correct holdings record, click the Re-Link button, and your selection will display in the Change Holdings Records for Line Item Copies window (Figure D1-d).

Voyager 7.0 Release Handbook 30 June 2008 © Ex Libris, 2008 Proprietary & Confidential Page 40 of 66
Figure D1-d: Change Holdings Records for Line Item Copies window with New Holdings information selected
Finally, if you wish to delete the holdings record currently linked to the line item, check the Delete Current Holdings checkbox (before selecting this option, it is advisable to view the current holdings in the Cataloging client). You’ll receive a verification pop-up message (Figure D1-e), and if you wish to proceed, click OK.
Figure D1-e: Verification message

Voyager 7.0 Release Handbook 30 June 2008 © Ex Libris, 2008 Proprietary & Confidential Page 41 of 66
D.2 Change Intended Location without Losing Receipt History
Serial receipt history is linked directly to the intended location of the line item in the purchase order. In earlier releases, if the intended location in the line item was changed such that it no longer matched the location of a previously received issue, that issue could no longer be viewed in the Serials Check-In History.
Beginning with Voyager 7, when the intended location of an approved line item is updated, the change in location is propagated down to all previously received issues and any new issues, items or bindery volumes that are subsequently created. In Serials Check-In, there will be no visible evidence that a change was made.
NOTE: This functionality only applies to line items on purchase orders with a status of Approved.
The update to the location will still be made using the Intended Location dropdown in the Edit Approved Line Item Data window, just as in previous releases. See Figure D2-a.
Figure D2-a: Edit Approved Line Item window for changing intended location

Voyager 7.0 Release Handbook 30 June 2008 © Ex Libris, 2008 Proprietary & Confidential Page 42 of 66
NOTE: Editing the intended location of the line item does not affect the location display in WebVoyáge; if you wish to have your issues display with the new location in the OPAC, you can use the new re-link holdings functionality described in section D.1 (Re-link bibliographic or holdings information on Purchase Order).

Voyager 7.0 Release Handbook 30 June 2008 © Ex Libris, 2008 Proprietary & Confidential Page 43 of 66
D.3 Close Non-Predictive Pattern and Convert to a Predictive Pattern Voyager 7.0 allows a serials operator to close a non-predictive serials pattern and open a predictive pattern for the component, without losing past serials receipt history. This enhancement provides a more complete picture of the holdings/receipts for a specific serial title, and streamlines the check-in workflow when the publication schedule of a serial subscription changes. In Subscription Maintenance, retrieve the title for which there has been a change in the publication pattern. On the Non-Predictive Component Pattern tab, click on the Start Prediction button to use this feature. You’ll receive a message asking if you’re sure you’d like to take this action (see Figure D3-a); click Yes and you’ll be able to select a new pattern from the Predictive Component Pattern tab.
Figure D3-a: Helpful message to serials operator after clicking the Start Prediction button.

Voyager 7.0 Release Handbook 30 June 2008 © Ex Libris, 2008 Proprietary & Confidential Page 44 of 66
The serials operator should be trained in setting up Voyager prediction patterns in order to continue on with the next steps. Refer to Chapter 8 in the Voyager 7.0 Acquisitions User’s Guide for more information.

Voyager 7.0 Release Handbook 30 June 2008 © Ex Libris, 2008 Proprietary & Confidential Page 45 of 66
D.4 Selecting Multiple Issues using Windows conventions In Voyager 7.0, staff will be able to use standard Windows keyboarding functionality when selecting issues in Serials Check-In History. This change reduces keystrokes for serials staff, is more intuitive for individuals familiar with Windows conventions, and produces faster overall results in serials control. Standard Windows Conventions: SHIFT key – use to select consecutive issues in the list CTRL key – use to select non-consecutive issues in the list
Figure D4-a: Operator uses the SHIFT key to select consecutive issues for the title Live Design. Once the issues are highlighted, the operator will select an appropriate maintenance action, such as Collapse.

Voyager 7.0 Release Handbook 30 June 2008 © Ex Libris, 2008 Proprietary & Confidential Page 46 of 66
D.5 Unreceive Multiple Serials Issues In Voyager 7.0, operators will have the ability to Unreceive multiple issues simultaneously. If you select multiple issues in the Serials Check-In History, the Unreceive button will now remain active (Figure D5-a).
Figure D5-a: Unreceive option is still accessible with multiple issues selected. If you click Unreceive, you will see a message confirming that you wish to proceed. Click Yes to this message, and Voyager will unreceive any eligible issues in the selected group.

Voyager 7.0 Release Handbook 30 June 2008 © Ex Libris, 2008 Proprietary & Confidential Page 47 of 66
NOTE: Issues previously ineligible for the Unreceive option (issues that have already been collapsed and issues have attached item records) can be selected as part of a group, but will not be unreceived. The serials operator will be warned if any such issues exist (Figure D5-b), and only eligible issues will be unreceived and added back into the Issues in Hand dropdown.
Figure D5-b: Warning that some selected issues cannot be received

Voyager 7.0 Release Handbook 30 June 2008 © Ex Libris, 2008 Proprietary & Confidential Page 48 of 66
D.6 Remove Multiple Issues from Issues in Hand This enhancement to Voyager 7.0 allows a serials operator to remove a range of issues from the Issue box on the Predictive Component tab in Subscription Maintenance. To remove several issues simultaneously, click on the new Remove Multiple Issues button on the Predictive Component tab (see figure D6-a).
Figure D6-a: Remove Multiple Issues button This will bring up the Select One or more Issues to Remove box (Figure D6-b), where you can use standard Windows functionality to select multiple issues to remove. When you’ve made your selection, click the Remove Issues button.

Voyager 7.0 Release Handbook 30 June 2008 © Ex Libris, 2008 Proprietary & Confidential Page 49 of 66
Figure D6-b: Select One or more Issues to Remove box You will now receive a message asking if you’re certain you would like to remove the selected issues from this pattern. Click Yes to proceed, and the issues will be removed from the Issue box.
Voyager 7.0 Release Handbook 30 June 2008 © Ex Libris, 2008 Proprietary & Confidential Page 50 of 66
D.7 Additional Resources on Acquisitions/Serials
• Voyager 7.0 Acquisitions User’s Guide
• Ex Libris Professional Services plans to offer the following upgrade class over the Web.
o Voyager 7.0 Acquisitions/Serials Developments (3-hour training WebCast)
* * * * * * * * * *

Voyager 7.0 Release Handbook 30 June 2008 © Ex Libris, 2008 Proprietary & Confidential Page 51 of 66
Part E: New Features in the Circulation Module
E.1 Edit a Hold/Recall Request Library staff are sometimes called upon by patrons to edit Patron hold or recall requests. With this release, circulation operators will be able to edit the following fields through the Circulation client.
• Request level • Request Group • Pick-Up Location • Expiration Date • Add or change a comment
Figure E1-a: Circulation operator selects a hold request for patron in the item queue and then clicks on Edit.

Voyager 7.0 Release Handbook 30 June 2008 © Ex Libris, 2008 Proprietary & Confidential Page 52 of 66
Figure E1-b: Circulation operator changes the Pick-Up Location, adds a comment, and then clicks OK.
Note that it is not possible at this stage to convert a request from a hold to a recall. For this reason, the Hold radio button in Figure E1-b is filled in but displays in gray. If a patron requests a change from a Hold to a Recall and vice versa, the recommended procedure is to cancel the first request, create the second request, and adjust the queue accordingly. For convenience, Circulation operators can begin this change process from the patron record or from the item record, depending upon what information is supplied by the patron. Compare Figures E1-a and E1-c. In both cases, the request is selected and the Edit button is clicked.

Voyager 7.0 Release Handbook 30 June 2008 © Ex Libris, 2008 Proprietary & Confidential Page 53 of 66
Figure E1-c: Select a hold request from the patron record and click Edit.

Voyager 7.0 Release Handbook 30 June 2008 © Ex Libris, 2008 Proprietary & Confidential Page 54 of 66
E.2 Copy and Paste Barcodes Efficiently Circulation staff often navigate between several records and transaction screens. To bring efficiency and reduce input errors, library staff members are able, with this release, to copy and paste barcodes from one Windows screen to another. The circulation operator has multiple ways to make use of the function, to fit different keyboarding styles.
• Right-click and then select Copy/Paste Barcode. See Figures E2-a and E-2b.
• Pull down the Patron or Item menus and select Copy Barcode • Use a keyboard shortcut:
o Ctrl+Y = Copy item or patron barcode o Ctrl+A = Paste item barcode o Ctrl+T = Paste patron barcode

Voyager 7.0 Release Handbook 30 June 2008 © Ex Libris, 2008 Proprietary & Confidential Page 55 of 66
Figure E2-a: The right click menu now displays the Copy Barcode choice.

Voyager 7.0 Release Handbook 30 June 2008 © Ex Libris, 2008 Proprietary & Confidential Page 56 of 66
Figure E2-b: On a charge transaction screen,
right click on top of barcode field to use the Paste Barcode function.

Voyager 7.0 Release Handbook 30 June 2008 © Ex Libris, 2008 Proprietary & Confidential Page 57 of 66
E.3 Universal Borrowing There is an additional circulation job available to our Universal Borrowing (UB) and Circulation Clusters customers. This is a fix to CF Problem 132098, eService KB Item 16384-713.
Figure E3-a: Shows addition of Circjob 43 on the server display
Purpose At sites with heavy UB usage, there exist data discrepancies between what is recorded as UB activity at the patron’s home database/cluster and the database/clusters where the transactions actually belong. This includes the UB_* tables not being updated appropriately and the UB counters in the PATRON table getting out of sync with reality. In some cases, inaccurate data prevents eligible users from performing UB transactions. To address this issue, a new circulation job (circjob #43, Synchronize Patron Counters for Universal Borrowing) has been created to systematically update all the counters and home UB_* tables at the parent patron record’s cluster; that is, it ensures that the UB data in the home cluster is the most up-to-date by reading the currently available data from remote clusters. The job can be run by the library at any time, and as often as needed. Please note: if the job cannot connect to a remote database, the UB data already stored for it will be left alone. Because of this, it may be best to coordinate at the consortial level. Parameters Test mode (-t): If “-t” is specified on the Pcircjob command line, or if test mode is selected in WebAdmin, the job will be run in test mode. All changes that would occur in the database are written to a log file, but

Voyager 7.0 Release Handbook 30 June 2008 © Ex Libris, 2008 Proprietary & Confidential Page 58 of 66
no updates to the data occur. Test mode must be selected on the command line or from WebAdmin; if it is not specified, the circjob will not prompt for it and the job will update any eligible data. Circulation Cluster Code (-C): If the local database has Circulation Clusters enabled, and has multiple clusters, you may select the one for which you plan to run the job by specifying “-C” followed by the appropriate Circulation Cluster Code. If there are multiple clusters in the current database, and you do not specify “-C”, the circulation job will prompt you to select a cluster. Please note: If the local database does not have Circulation Clusters enabled, no other parameters are required and the –C parameter should not be specified. Circulation Job Logging General status reports and error messages are written to the console and appended to circjob.log (in /m1/voyager/yyydb/rpt) as usual. For example: Process Job #? 43 Synchronizing UB counters ... ... for circulation cluster [1TEST654] 1TEST654 Collecting patron stubs from 2TEST654: Test db2 6.5.4 Collecting patron stubs from 3TEST654: Test db3 6.5.4 Updating local patron records ... ## 51 patron records processed. ...COMPLETED And from the circjob.log: Writing to log file: /m1/voyager/2006.5.4/1test654db/rpt/log.ubsynch.20080204.1620 Mon Feb 4 16:20:13 2008 Collecting patron stubs from 2TEST654: Test db2 6.5.4 ... 49 patron stubs found in Test db2 6.5.4 Mon Feb 4 16:20:16 2008 Collecting patron stubs from 3TEST654: Test db3 6.5.4 Mon Feb 4 16:20:18 2008 Updating local patron records ...

Voyager 7.0 Release Handbook 30 June 2008 © Ex Libris, 2008 Proprietary & Confidential Page 59 of 66
Mon Feb 4 16:20:27 2008 51 patron records processed. Mon Feb 4 16:20:27 2008 ...COMPLETED Circjob –j43 also produces its own log file in the /rpt directory, named log.ubsynch.yyyymmdd.hhmm (where yyyymmdd.hhmm is the date and time the job was run). The log has a section for each local patron that has any UB activity anywhere in the consortium. For each patron, we list the known UB activity, broken down by remote library where the activity occurs. The entries are listed by patron id, in increasing order (note: in test mode, this order will be modified slightly such that a local patron for which remote libraries report some UB activity for which the local library has no data, that patron will appear at the end of the log). For example: ========== Patron ID 257 ========== Patron 257 has 1 stub records to be checked. Patron 257: stub patron 223 at 2TEST654: 1 UB lost items reported. ========== Patron ID 272 ========== Patron 272 has 1 stub records to be checked. Patron 272: stub patron 235 at 2TEST654: * Removed a local ub_hold record (hold/recall ID 8) that did not match remote data. (the above update was made at the holding library: 2TEST654) * Removed a local ub_hold record (hold/recall ID 15) that did not match remote data. (the above update was made at the holding library: 2TEST654) 3 active UB circulation transactions found. Error Conditions The job will not run and will report an error if:
1) There is a parameter error that prevents access to the local database
2) The –C option specifies an invalid cluster code 3) There is an error opening the log file

Voyager 7.0 Release Handbook 30 June 2008 © Ex Libris, 2008 Proprietary & Confidential Page 60 of 66
4) The local database is not enabled for either Universal Borrowing, Circulation Clusters, or both
If there is a failure to connect to a particular remote database, any data depending on a stub record in that database will be assumed to be correct and left as is. More information about circulation job #43 is available in Chapter 8 of the Voyager 7.0 Technical User’s Guide.

Voyager 7.0 Release Handbook 30 June 2008 © Ex Libris, 2008 Proprietary & Confidential Page 61 of 66
E.6 Additional Resources on Circulation Changes
• Voyager 7.0 Circulation User’s Guide. • Voyager 7.0 Technical User’s Guide
• Ex Libris Professional Services plans to offer the following upgrade
class over the Web. o Voyager 7.0 Circulation Improvements (3-hour upgrade Webcast)
* * * * * * * * * *

Voyager 7.0 Release Handbook 30 June 2008 © Ex Libris, 2008 Proprietary & Confidential Page 62 of 66
Part F: Miscellaneous Changes
F.1 New Client Distribution Option New with the Voyager 7.0 release, you have the option to install the client software using the traditional method or using an automated method to push the clients to users. The Voyager 7 client installation package comes in two formats: the standard installer (.exe) and the new Windows Installer (.msi). The .msi file can be manually installed by local systems staff as usual, or it can be pushed to selected PCs with Windows Active Directory Group Policy or a third-party push service. Client installations on Windows® XP no longer require administrative privileges at the desktop level. Windows® Vista installations still require administrative privileges due to an issue with the ActiveX installation component. Ex Libris is investigating this issue and hopes to resolve it for an upcoming release. Refer to chapter 4 of the Voyager 7.0 Technical User’s Guide for more information.
F.2 Recommended Web Browsers for WebVoyáge WebVoyáge is supported on Microsoft Internet Explorer 7 and Firefox 2. Diacritics and accent marks should display properly in both browsers, but are sometimes dependent on font and character settings in the browsers themselves. SupportWeb provides information on our supported Web browsers and PC operating systems: http://supportweb.exlibrisgroup.com/cust/voy/cust_supp/tech/clientplatform.html
F.3 Oracle 10g Voyager 7.0 requires Oracle 10g as the database software on the server. If your server is still using Oracle 9i, the upgrade process will require an additional day to upgrade Oracle.

Voyager 7.0 Release Handbook 30 June 2008 © Ex Libris, 2008 Proprietary & Confidential Page 63 of 66
F.4 ODBC Drivers Each PC that runs Prepackaged Reports will have to have the Oracle 10g ODBC drivers installed. The new driver installation package is available from the client download page of SupportWeb. The 10g ODBC drivers are backward compatible with Oracle 9i on the server, so you may upgrade them at any time.
F.5 Support for MS Access 2007 MS Access 2007 can be used with Reporter, Prepackaged Reports, and the Interlibrary Loan extension module.
F.6 Voyager Analyzer Voyager Analyzer can be licensed as an extension to Voyager, for institutions seeking a web-based reporting tool. The Cognos® software will be upgraded to Cognos® 8.2 and the Voyager 7.0.1 package will be installed as part of the upgrade to Voyager 7. Also, if Analyzer runs on a different server than Voyager, its Oracle installation will have to be upgraded to 10g as well.
* * * * * * * * * *

Voyager 7.0 Release Handbook 30 June 2008 © Ex Libris, 2008 Proprietary & Confidential Page 64 of 66
Appendix: Voyager 7 Upgrade Resources
Road to Voyager 7.0 http://supportweb.exlibrisgroup.com/cust/voy/upgrade/7.0.1/index.html
The Road to Voyager 7.0 page is the main practical guide to planning and preparing for the upgrade process.
Voyager 7.0 User Guides http://supportweb.exlibrisgroup.com/cust/voy/doc/user_guides/user-guide.html
The standard Voyager User Guides have been carefully updated for Voyager 7.
Support's Introduction to WebVoyáge for Voyager 7.0 http://supportweb.exlibrisgroup.com/cust/voy/downloads/pdf/7.0/WV_CSPrimer.pdf
Support wrote the Introduction to get customers up to speed on the biggest change in Voyager 7: the new WebVoyáge interface. It covers the technology, structure and basic configuration of WebVoyáge. It also includes best practices, Support's experiences, and helpful external resources. Support Policy for Customizing Voyager 7 WebVoyáge http://supportweb.exlibrisgroup.com/cust/voy/downloads/pdf/7.0/WV_CSPolicy.pdf This expanded support policy is now available due to the major degree of local customizations possible.
Voyager 7.0 WebVoyáge Architecture Overview and Configuration Models http://supportweb.exlibrisgroup.com/cust/voy/downloads/pdf/7.0/V_WebArchConfig_7.pdf
This document provides individual customization instructions for adding specific features to WebVoyáge. The recipes range from simple to complex, but introduce you to the concepts that allow unlimited customizations.
Voyager 7.0 Feature List http://supportweb.exlibrisgroup.com/cust/voy/downloads/pdf/7.0/relnotes.pdf
A brief list of the new features.
Voyager 7.0 Webinar and FAQ PDFs http://support.exlibrisgroup.com/ | Knowledge Base | Search for "Voyager 7.0"

Voyager 7.0 Release Handbook 30 June 2008 © Ex Libris, 2008 Proprietary & Confidential Page 65 of 66
The slideshow from a webinar of new features given by Voyager Product Manager Mike Dicus. There is also a series of questions asked during and following the webinar, with accompanying answers.
Preview Server http://supportweb.exlibrisgroup.com/cust/voy/services/preserver.html
The Preview Server is an example server running the latest release of Voyager. It allows you to connect the new clients and/or interact with WebVoyáge. Fixed Bug List http://supportweb.exlibrisgroup.com/cust/voy/downloads/pdf/7.0/bugfix.pdf
Training Opportunities Professional Services plans to offer a full array of Voyager 7.0 training classes during the life of this release. The current training calendar is located at the following URL: http://supportweb.exlibrisgroup.com/cust/voy/services/training/training_course_offerings.html
The training curriculum is organized into three areas as follows; most classes can be delivered over the Web or in a traditional classroom style.
• Upgrade Classes o Organized by Voyager module o Assume trainee has prior knowledge of Voyager in the
relevant module o Reviews the functions that have changed or been added
with the new release. Upgrade classes do not teach base functionality, only what is different.
• Foundation Courses
o Do not focus on what has changed with a recent software release. Teaches the subject from the ground up, so that the trainee acquires a solid baseline of knowledge.
o Most foundation courses do not assume the trainee has prior Voyager knowledge.
• Certification Courses
o Technical classes designed for Voyager system managers, system librarians, and other technical staff.
o Re-certification is recommended with this major release.
Voyager 7.0 Release Handbook 30 June 2008 © Ex Libris, 2008 Proprietary & Confidential Page 66 of 66
* * * * * * * * * *
Related Documents