VIVA E53 Router Quick Start Guide

Welcome message from author
This document is posted to help you gain knowledge. Please leave a comment to let me know what you think about it! Share it to your friends and learn new things together.
Transcript

VIVA E53 RouterQuick Start Guide


Thank you for choosing VIVA 4G LTE Mini Router (here-in-after referred
to as the E53)
• The supported functions and actual appearance are subject to the product purchased. The following pictures are displayed for illustration purposes only. For details for the product selection, consult VIVA.
• This guide briefly describes the functions of the E53. For details about how to set the management parameters, see the Help on the Web Management page.
• If the E53 is placed in an environment with poor ventilation it will get heated after use for a long time. Subsequently, the E53 may switch off or disconnect from the network automatically to protect itself. In this case please place the E53 in a well ventilated place for heat dissipation and then restart the router.
1

2
Application Scenarios
Multiple Wi-Fi devices or computers can be used to connect to the Internet through the E53. The actual connecting procedure depends on the operating system of the user.
Scenario 1: Connecting multiple devices through Wi-Fi
Scenario 2: Connecting a single device through USB

3
Scenario 3: Multi-device access via Wi-Fi and USB at the same time

4
Appearance
1. Power Button
2. Screen
3. Micro USB Port
4. Menu Button
5. Lanyard Hole
5
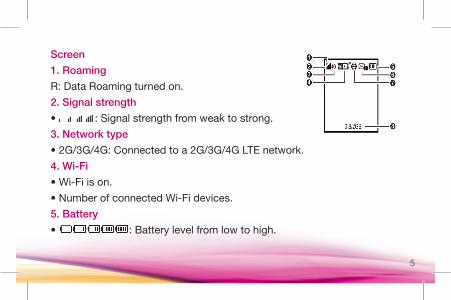
Screen
1. Roaming
R: Data Roaming turned on.
2. Signal strength
• : Signal strength from weak to strong.
3. Network type
• 2G/3G/4G: Connected to a 2G/3G/4G LTE network.
4. Wi-Fi
• Wi-Fi is on.
• Number of connected Wi-Fi devices.
5. Battery
• : Battery level from low to high.
6
6. SMS
• New messages.• Number of new messages.
7. Network connection status• Internet connection is set up.
8. Traffic statistics• Data traffic information.

7
Note:Data traffic information is for your reference only. For more accurate data traffic information, please consult VIVA by contacting our customer care.
8
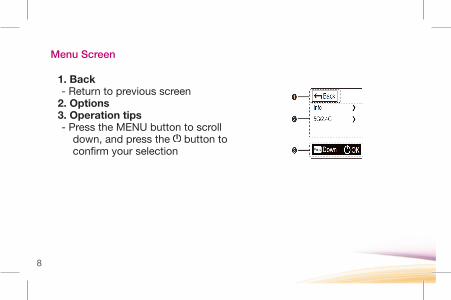
Menu Screen
1. Back- Return to previous screen
2. Options3. Operation tips- Press the MENU button to scroll
down, and press the button to confirm your selection

9
Update Screen
1. New Software-Updates are available
2. Update-Press button to start the update
3. Cancel-Press the MENU button to ignore the
update
10
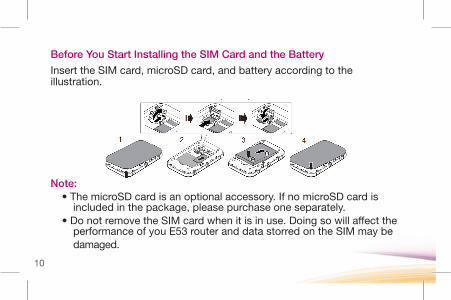
Before You Start Installing the SIM Card and the Battery
Insert the SIM card, microSD card, and battery according to the illustration.
Note:• The microSD card is an optional accessory. If no microSD card is
included in the package, please purchase one separately.• Do not remove the SIM card when it is in use. Doing so will affect the
performance of you E53 router and data storred on the SIM may be damaged.

11
Charging the Battery
Note:
If the battery has not been used for a long time, it must be charged first.
Method 1: Using the charger
Caution: Only use the charger compatible with the E53 and provided by the designated manufacturer. If a charger is incompatible with the device model or provided by other manufacturers or vendors, the E53 may fail to work and damages may occur. At the same time, any national regulations on terminal products or warranty applicable to the E53 will be canceled.

12
Method 2: Connecting to a PC for charging
Connect the E53 to a PC using a compatible data cable.

13
Accessing the Internet via Wi-Fi Connection
Note:
By default, management parameters are preset to default on the E53. You may follow the steps below to quickly access the Internet. For details about how to set management parameters, see help on the Web Management page.
14
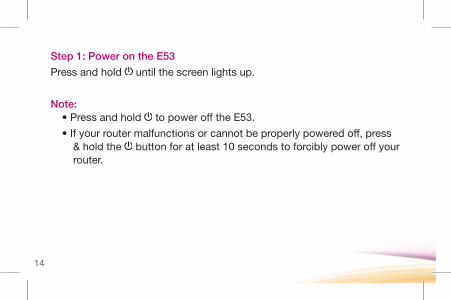
Step 1: Power on the E53
Press and hold until the screen lights up.
Note:• Press and hold to power off the E53.
• If your router malfunctions or cannot be properly powered off, press & hold the button for at least 10 seconds to forcibly power off your router.

15
Step 2: Establish a Wi-Fi Connection (take a computer with Windows®
7 operating system as an example)
1. Make sure that the E53 is powered on.
2. Select Start > Control Panel > Network Connections > Wireless
Network Connection.
Note:
To set up a Wi-Fi connection, the PC must have a wireless network adapter installed. If Wireless Network Connection is displayed, a wireless network adapter is available. Otherwise, check to make sure you have a wireless network adapter installed.
3. Click View Available Wireless Networks to display a list of wireless networks available.

16
Note:• If the encryption parameter is already set for the E53, the Wireless
Network Connection dialog box is displayed. Enter the network key in the dialog box.
• The SSID and network key label are affixed to your E53. Press the WPS button twice to view the current SSID and wireless network encryption key on the screen.
• Wait until the wireless connection icon is displayed in the status area in the lower right corner of the PC screen.

17
Step 3: Access the Internet
After you establish a Wi-Fi connection successfully, you can access the Internet using the following modes. By default, the mode is Auto.
Mode Operations
Auto
After the E53 is powered on, it can automatically connect to the Internet when data transmission is required. If data transmission is not performed over a period of time, the E53 automatically disconnects from the Internet connection.
Manual Launch the Web Management page and follow the prompts to connect to or disconnect from the network.
18
Note:
• Launch the Web Management page to select the mode for accessing the Internet.
• If the E53 accesses the roaming network, the E53 automatically disconnects from the established network connection. If you need to access the Internet from the new network, you must re-establish a network connection.

Accessing the Web Management Page
1. Make sure that the connection between the E53 and the client is a proper one.
2. Start the Internet browser and enter http://192.168.8.1 or http://viva.router in the address bar.
3. Enter the password and log in to the Web Management page.
Note:
The default user name and password are: admin
19

Create a Secure Connection
1. Launch the web browser and enter http://192.168.8.1 or http://viva.router in the address bar.
2. Enter the password and click login. The default password is admin.3. Click on “Settings”.4. Click on “Quick Setup”. A message “welcome to the quick setup
wizard” will be shown.5. Click on “Next”. A message “Configure Profile Settings” will be
shown.6. Click on “Next”. A message “Configure Dial-up Settings” will be
shown.7. Click on “Next”. A message “Configure WLAN settings” will be
shown. Insert the desired router name in the “Name (SSID)” space.
20

8. Click on “Next”. For the “Authentication” select “WPA2-PSK”, for the “encryption mode” select “AES+TKIP”. Enter the desired network key in the “Network Key 1” space. This key will be requested every time a user tries to access this connection for the first time.
9. Click on “Next”.10. Click on “Finish”. A message “the action will disconnect your
connection, are you sure to proceed?” will be shown.11. Click on “Ok”.
21

Daily UsePower Saving Mode
If no operation is performed on the E53 for a while, the screen will turn off. Press any key to light up the screen.
If the E53 is powered by the battery only, choose whether to enable the E53 to turn off Wi-Fi automatically. If this function is enabled and no Wi-Fi devices access the E53 for a preset period, the E53 turns off Wi-Fi automatically. You can press any key to turn on Wi-Fi again.
22

Restoring Factory Defaults
If you forget the changes you have made to some parameters, you may restore factory defaults and reconfigure the E53. To restore the factory defaults, press and hold the RESET button until the screen turns off. All factory default settings are successfully restored.
Note: Restoring factory defaults deletes all personal configuration settings and restores all web-based management settings and parameters to their default values.
23

Tips
If you are experiencing difficulties using the E53, try the following:
• See help on the Web Management page.
• Restart the E53.
• Restore the factory defaults.
• Contact your service provider.
24
Related Documents