Part Number: DS14001002 VisualWorks Cookbook

Welcome message from author
This document is posted to help you gain knowledge. Please leave a comment to let me know what you think about it! Share it to your friends and learn new things together.
Transcript
Part Number: DS14001002
VisualWorks
Cookbook
ParcPlace-Digitalk, Inc., 999 E. Arques Avenue, Sunnyvale, CA 94086-4593
Copyright © 1995 by ParcPlace-Digitalk, Inc. All rights reserved.
Part Number: DS14001002
Revision 2.0, October 1995 (Software Release 2.5)
This document is subject to change without notice.
RESTRICTED RIGHTS LEGEND:
Use, duplication, or disclosure by the Government is subject to restrictions asset forth in subparagraph (c)(1)(ii) of the Rights in Technical Data andComputer Software clause at DFARS 252.227-7013.
Trademark acknowledgments:
ObjectKit, ObjectWorks, ParcBench, ParcPlace, and VisualWorks aretrademarks of ParcPlace Systems, Inc., its subsidiaries, or successors and areregistered in the United States and other countries. DataForms, MethodWorks,ObjectLens, ObjectSupport, ParcPlace Smalltalk, Visual Data Modeler,VisualWorks Advanced Tools, VisualWorks Business Graphics, VisualWorksDatabase Connect, VisualWorks DLL and C Connect, and VisualWorksReportWriter are trademarks of ParcPlace Systems, Inc., its subsidiaries, orsuccessors. ENVY is a registered trademark of Object Technology International,Inc. All other products or services mentioned herein are trademarks of theirrespective companies. Specifications subject to change without notice.
The following copyright notices apply to software that accompaniesthis documentation:
VisualWorks is furnished under a license and may not be used, copied,disclosed, and/or distributed except in accordance with the terms of saidlicense. No class names, hierarchies, or protocols may be copied forimplementation in other systems.
This manual set and online system documentation copyright © 1995 byParcPlace-Digitalk, Inc. All rights reserved. No part of it may be copied,photocopied, reproduced, translated, or reduced to any electronic medium ormachine-readable form without prior written consent from ParcPlace-Digitalk.
VisualWorks Cookbook, Rev. 2.0 iii
Contents
About This Book xiiiAudience xiiiOrganization xiiiConventions xivAdditional Sources of Information xviiiObtaining Technical Support xix
Part I Programming Fundamentals 1
Chapter 1 Smalltalk Basics 3Constructing a Message 4Combining Messages 7Deciding which Type of Variable to Use 10Declaring a Variable 13Removing a Variable 16Creating a Method 18Returning from a Method 20Creating an Instance of a Class 22Initializing an Object 24Creating a Class (Subclassing) 26Grouping Related Classes 29Grouping Related Methods 31Creating a Branch 33Creating a Loop 34Creating Complex True/False Tests 38
Chapter 2 Building Applications 41Designing the Application 42Painting the User Interface 43Creating the Domain Models 45

Contents
iv VisualWorks Cookbook, Rev. 2.0
Connecting the Interface to the Models 47Connecting the Widgets to Each Other 50
Part II User Interface 51
Chapter 3 Widget Basics 53Accessing a Widget Programmatically 54Sizing a Widget 56Positioning a Widget 60Aligning a Group of Widgets 65Spacing a Group of Widgets 66Bordering a Widget 67Changing a Widget’s Font 68Hiding a Widget 70Disabling a Widget 72Changing the Tabbing Order 74Coloring a Widget 75Adding and Removing Dependencies 78
Chapter 4 Windows 81Opening a Window 82Getting a Window from a Builder 85Sizing a Window 86Moving a Window 90Changing a Window’s Label 92Refreshing a Window’s Display 93Coloring a Window 94Adding and Removing Scroll Bars 96Adding a Menu Bar 98Getting the Active Window 99Getting the Window at a Specific Location 100Closing a Window 101Expanding and Collapsing a Window 103Hiding a Window 104Making a Window a Slave 105Setting a Window’s Icon 108
Chapter 5 Labels 109Creating a Textual Label 110Creating a Graphic Label 111
Contents
VisualWorks Cookbook, Rev. 2.0 v
Supplying the Label at Run Time 113Changing Font, Emphasis, and Color 116Building a Registry of Labels 118
Chapter 6 Input Fields 121Creating an Input Field 122Restricting the Type of Input 125Formatting Displayed Data 129Validating the Input 132Modifying a Field’s Pop-Up Menu 139Connecting a Field to Another Field 143Restricting Entries in a Field (Combo Box) 146Moving the Insertion Point 150
Chapter 7 Lines, Boxes, and Ovals 153Separating Widgets with a Line 154Grouping Widgets with a Box 156Grouping Widgets with an Ellipse 158
Chapter 8 Buttons 159Adding a Set of Radio Buttons 160Adding a Check Box 162Adding an Action Button 164Giving a Button a Graphic Label 167Turning Off Highlighting 168
Chapter 9 Text Editors 171Adding a Text Editor 172Accessing the Selected Text 174Highlighting Text Programmatically 176Aligning Text 178Making an Editor Read-Only 180Modifying an Editor’s Menu 182
Chapter 10 Lists 183Adding a List 184Editing the List of Elements 187Allowing for Multiple Selections 189Finding Out What Is Selected 191Adding a Menu to a List 194Changing the Highlighting Style 196
Contents
vi VisualWorks Cookbook, Rev. 2.0
Connecting Two Lists 198Connecting a List to a Text Editor 200
Chapter 11 Datasets 203Adding a Dataset 204Selecting Columns While Painting 209Adding a Row 210Connecting Data to a Dataset 212Enhancing Column Labels 213
Chapter 12 Tables 215Using TableInterface 216Adding a Table 217Connecting a Table to an Input Field 221Labeling Columns and Rows 223
Chapter 13 Menus 225Creating a Menu 226Creating a Submenu 231Adding a Menu Bar 233Adding a Menu Button 236Adding a Pop-Up Menu 240Modifying a Menu Dynamically 243Disabling a Menu Item 248Adding a Divider to a Menu 250Adding a Shortcut Key 252Displaying an Icon in a Menu 254Changing Menu Colors 257Using a Menu Editor 259
Chapter 14 Sliders 263Adding a Slider 264Connecting a Slider to a Field 267Changing the Range Dynamically 270Changing the Length of the Marker 273Making a Slider Two-Dimensional 274
Chapter 15 Dialogs 277Displaying a Warning 278Asking a Yes/No Question 280Asking a Multiple-Choice Question 282

Contents
VisualWorks Cookbook, Rev. 2.0 vii
Requesting a Textual Response 284Requesting a Filename 286Choosing from a List of Items 289Linking a Dialog to a Master Window 292Creating a Custom Launcher 294Creating a Custom Dialog 296
Chapter 16 Subcanvases 301Inheriting an Application’s Capabilities 302Nesting One Application in Another 305Reusing an Interface Only 308Swapping Interfaces at Run Time 310Accessing an Embedded Widget 313
Chapter 17 Notebooks 315Adding a Notebook 316Determining Which Tab Is Selected 319Changing the Binding’s Appearance 322Changing the Size and Axis of the Tabs 324Setting the Starting Page 326Adding Secondary Tabs (Minor Keys) 328Connecting Minor Tabs to Major Tabs 331Changing the Page Layout (Subcanvas) 334Connecting a Notebook to a Text Editor 336
Chapter 18 Drag and Drop 339About Drag and Drop 340Adding a Drop Source 343Adding a Drop Target (General) 348Providing Visual Feedback During a Drag 350Responding to a Drop 359Examining the Drag Context 365Responding to Modifier Keys 366Defining Custom Effect Symbols 371
Chapter 19 Custom Views 375Creating a View Class 376Connecting a View to a Domain Model 378Defining What a View Displays 380Updating a View When Its Model Changes 382Connecting a View to a Controller 385
Contents
viii VisualWorks Cookbook, Rev. 2.0
Redisplaying All or Part of a View 387Integrating a View into an Interface 389
Chapter 20 Custom Controllers 391Choosing an Input Architecture 392Creating a Controller Class 395Connecting a Controller to a Model 399Connecting a Controller to a View 400Defining When a Controller Has Control 402Defining What a Controller Does 405Equipping a Controller with a Menu 409Shifting Control to a Different Controller 411Sensing Mouse Activity 412Sensing Keyboard Activity 416Getting the Cursor’s Location 419
Part III Data Structures 423
Chapter 21 Numbers 425Creating a Number 426Adding and Subtracting 431Multiplying and Dividing 432Rounding 434Getting Squares and Roots 436Comparing Two Numbers 438Getting the Minimum and Maximum 441Performing Trigonometric Functions 442Performing Logarithmic Functions 444Testing Numberness, Evenness, Zeroness 445Accessing and Converting the Sign 447Converting a Number to Another Form 449Factoring 453Generating a Random Number 454Accessing Numeric Constants 458
Chapter 22 Dates 461Creating a Date 462Getting Information about a Day 465Getting Information about a Month 467Getting Information about a Year 469
Contents
VisualWorks Cookbook, Rev. 2.0 ix
Adding and Subtracting with Dates 471Comparing Dates 473Formatting a Date 475
Chapter 23 Times 477Creating a Time 478Getting the Seconds, Minutes, and Hours 480Adding and Subtracting Times 482Creating a Time Stamp 483Timing a Block of Code 484Changing the Time Zone 486
Chapter 24 Collections 489Choosing the Right Collection 490Creating a Collection 491Getting the Size 495Adding Elements 497Removing Elements 500Replacing Elements 505Copying Elements 508Combining Two Collections 510Finding Elements 511Comparing Collections 517Sorting a Collection 519Converting to a Different Type of Collection 522Looping through the Elements (Iterating) 524
Chapter 25 Characters and Strings 529Creating a Character 530Creating a String 532Distinguishing Types of Characters 534Changing the Case 537Getting a String’s Length and Width 539Comparing 540Searching 543Combining Two Strings 545Extracting a Substring 547Removing or Replacing a Substring 549Abbreviating a String 551Inserting Line-End Characters 553
Contents
x VisualWorks Cookbook, Rev. 2.0
Chapter 26 Text and Fonts 555Creating a Text Object 556Displaying a Text Object 558Setting the Line Length 559Disabling Word Wrapping 560Controlling Alignment 561Setting Indents and Tabs 562Counting the Characters 564Printing a Text Object 565Searching for Strings 566Replacing a Range of Text 567Comparing Text Objects 568Copying a Range of Text 569Changing Case 571Applying Boldfacing and Other Emphases 572Using the Platform’s Default Font 575Creating a Custom Text Style 576Changing Font Size 578Setting Font Family or Name 582Setting Text Color 585Changing the Fonts Menu 587Changing the Default Font 588Listing Platform Fonts 589
Chapter 27 Text Files 591Creating a File or Directory 592Getting Information about a File 594Getting File or Directory Contents 597Storing Text in a File 598Opening an Editor on a File 601Deleting a File or Directory 602Copying or Moving a File 603Comparing Two Files or Directories 605Printing a File 607Scanning Fields in a File (Stream) 609Setting File Permissions 611
Chapter 28 Object Files (BOSS) 613Storing Objects in a BOSS File 614Getting Objects from a BOSS File 617Storing and Getting a Class 621
Contents
VisualWorks Cookbook, Rev. 2.0 xi
Converting Data After Changing a Class 624Customizing the Storage Representation 626
Chapter 29 Geometrics 629Displaying a Point 630Displaying a Straight or Jointed Line 631Displaying a Curved Line 634Displaying a Polygon 637Displaying an Arc, Circle, or Ellipse 640Changing the Line Thickness 644Changing the Line Cap Style 645Changing the Line Join Style 647Coloring a Geometric 649Integrating a Graphic into an Application 652
Chapter 30 Images, Cursors, and Icons 657Creating a Graphic Image 658Displaying an Image 662Coloring Pixels in an Image 664Masking Part of an Image 666Expanding or Shrinking an Image 668Flopping an Image 669Rotating an Image 670Layering Two Images 672Caching an Image 674Animating an Image 675Creating a Cursor 678Changing the Current Cursor 681Creating an Icon 682Associating an Icon with a Window 683
Chapter 31 Color 685Creating a Color 686Creating a Coverage 690Creating a Tiled Pattern 692Applying a Color or Pattern 694Changing an Image’s Color Palette 696Changing the Policy for Rendering Colors 698
Chapter 32 Adapting Domain Models to Widgets 703Setting up Simple Value Models (ValueHolder) 704

Contents
xii VisualWorks Cookbook, Rev. 2.0
Adapting Part of a Domain Model (AspectAdaptor) 706Synchronizing Updates (Buffering) 710Adapting a Collection (SelectionInList) 713Adapting a Collection Element 715Creating a Custom Adaptor (PluggableAdaptor) 717
Index 719
VisualWorks Cookbook, Rev. 2.0 xiii
About This Book
The VisualWorks Cookbook provides step-by-step instructionsfor performing hundreds of common tasks with VisualWorks®.VisualWorks is a fully object-oriented environment forconstructing applications using the ParcPlace Smalltalk™programming language.
Audience
This Cookbook is designed to help both new and experienceddevelopers find and use the rich capabilities of the VisualWorksextensive class library.
This Cookbook assumes that you have a beginning familiaritywith VisualWorks tools and Smalltalk syntax. It also assumesthat you are familiar with the VisualWorks graphical user-interface application architecture. You can obtain that famil-iarity by using the VisualWorks Tutorial. In addition, ParcPlace-Digitalk and some of its partners provide VisualWorks trainingclasses.
Organization
This Cookbook is organized around the set of tasks andsubtasks that await the application developer—creating inter-faces, storing data, and so on. Cookbook topics normallycontain the following sections:
■ Strategy: Explains concepts for understanding a task andchoosing among alternative ways of performing the sametask.

About This Book
xiv VisualWorks Cookbook, Rev. 2.0
■ Basic Steps: Describes the simplest way to accomplish thetask and then provides example code. In some cases, theexample can be executed by itself in a Workspace.
■ Variants: Describes other ways to perform the same task orways to perform closely related tasks. The “Variants”section also provides example code.
■ See Also: Refers to related material, most often anothertask in the Cookbook.
The Cookbook uses a set of example classes to demonstratevarious techniques. The example classes are contained in a setof files in the online/examples subdirectory of the productdirectory. The Online Documentation tool provides a conve-nient means of loading (if necessary) and browsing exampleclasses using the File➞Browse Example Class command. Filing inthe example classes by other means, such as a File List tool, isnot recommended because certain files rely on others.
Conventions
This section describes the notational conventions used toidentify technical terms, computer-language constructs,mouse buttons, and mouse and keyboard operations.
Typographic Conventions
This book uses the following fonts to designate special terms:
Example Description
template Indicates new terms where they are defined,emphasized words, book titles, and words aswords.
cover.doc Indicates filenames, pathnames, commands,and other C++, UNIX, or DOS constructs to beentered outside VisualWorks (for example, at acommand line).
Conventions
VisualWorks Cookbook, Rev. 2.0 xv
Special Symbols
This book uses the following symbols to designate certain itemsor relationships:
filename .xwd Indicates a variable element for which youmust substitute a value.
windowSpec Indicates Smalltalk constructs; it also indicatesany other information that you enter throughthe VisualWorks graphical user interface.
Edit menu Indicates VisualWorks user-interface labels formenu names, dialog-box fields, and buttons; italso indicates emphasis in Smalltalk codesamples.
Examples Description
File➞New command Indicates the name of an item on amenu.
<Return> key<Select> button<Operate> menu
Indicates the name of a keyboard keyor mouse button; it also indicates thepop-up menu that is displayed bypressing the mouse button of the samename.
<Control>-<g> Indicates two keys that must bepressed simultaneously.
<Escape> <c> Indicates two keys that must bepressed sequentially.
Integer>>asCharacter Indicates an instance method definedin a class.
Float class>>pi Indicates a class method defined in aclass.
Caution: Indicates information that, if ignored,could cause loss of data.
Warning: Indicates information that, if ignored,could damage the system.
Example Description
About This Book
xvi VisualWorks Cookbook, Rev. 2.0
Screen Conventions
This book contains a number of sample screens that illustratethe results of various tasks. The windows in these samplescreens are shown in the default Smalltalk look, rather thanthe look of any particular platform. Consequently, the windowson your screen will differ slightly from those in the samplescreens.
Mouse Buttons
Many hardware configurations supported by VisualWorks havea three-button mouse, but a one-button mouse is the standardfor Macintosh users, and a two-button mouse is common forOS/2 and Windows users. To avoid the confusion that wouldresult from referring to <Left>, <Middle>, and <Right> mousebuttons, this book instead employs the logical names <Select>,<Operate>, and <Window>.
The mouse buttons perform the following interactions:
Three-Button Mouse
VisualWorks uses the three-button mouse as the default:
■ The left button is the <Select> button.
■ The middle button is the <Operate> button.
■ The right button is the <Window> button.
<Select> button Select (or choose) a window location or a menuitem, position the text cursor, or highlighttext.
<Operate> button Bring up a menu of operations that are appro-priate for the current view or selection. Themenu that is displayed is referred to as the<Operate> menu.
<Window> button Bring up the menu of actions that can be per-formed on any VisualWorks window (exceptdialogs), such as move and close. The menuthat is displayed is referred to as the<Window> menu.
Conventions
VisualWorks Cookbook, Rev. 2.0 xvii
Two-Button Mouse
On a two-button mouse:
■ The left button is the <Select> button.
■ The right button is the <Operate> button.
■ To access the <Window> menu, you press the <Control>key and the <Operate> button together.
One-Button Mouse
On a one-button mouse:
■ The unmodified button is the <Select> button.
■ To access the <Operate> menu, you press the <Option> keyand the <Select> button together.
■ To access the <Window> menu, you press the <Command>key and the <Select> button together.
Mouse Operations
The following table explains the terminology used to describeactions that you perform with mouse buttons.
When you see: Do this:
click Press and release the <Select>mouse button.
double-click Press and release the <Select>mouse button twice withoutmoving the pointer.
<Shift>-click While holding down the <Shift>key, press and release the <Select>mouse button.
<Control>-click While holding down the <Control>key, press and release the <Select>mouse button.
<Meta>-click While holding down the <Meta> or<Alt> key, press and release the<Select> mouse button.
About This Book
xviii VisualWorks Cookbook, Rev. 2.0
Additional Sources of Information
Printed Documentation
In addition to this Cookbook, the core VisualWorks documenta-tion includes the following documents:
■ Installation Guide: Provides instructions for the installationand testing of VisualWorks on your combination ofhardware and operating system.
■ Release Notes: Describes the new features of the currentrelease of VisualWorks.
■ Tutorial: Introduces the VisualWorks tools, class library,and approach to application design. It also introduces basicobject-oriented concepts and the Smalltalk language.
■ User’s Guide: Provides an overview of object-orientedprogramming, a description of the Smalltalk language, aVisualWorks tools reference, and a description of variousreusable software modules that are available in Visual-Works.
■ International User’s Guide: Describes the VisualWorks facil-ities that support the creation of nonEnglish and cross-cultural applications.
■ Object Reference: Provides detailed information about theVisualWorks class library.
The documentation for the VisualWorks database tools consistsof the following documents:
■ VisualWorks’ Database Tools Tutorial and Cookbook: Intro-duces the process and tools for creating applications thataccess relational databases. The “Cookbook” chapterdescribes how to programmatically customize variousaspects of a database application.
■ Database Connect User’s Guide: Provides information aboutthe external database interface. Versions of it exist forORACLE7, SYBASE, and DB2 databases.
Obtaining Technical Support
VisualWorks Cookbook, Rev. 2.0 xix
Online Documentation
To display the online documentation browser, open the Helppull-down menu from the VisualWorks main menu bar andselect Open Online Documentation. Your choice of online booksincludes:
■ Database Cookbook: Online version of the “Cookbook” partof the VisualWorks’ Database Tools Tutorial and Cookbookdescribed above.
■ Database Quick Start Guides: Describes how to builddatabase applications. It covers such topics as data models,single- and multiwindow applications, and reusable dataforms.
■ International User’s Guide: Online version of the Interna-tional User’s Guide described above.
■ VisualWorks Cookbook: Online version of this book.
■ VisualWorks DLL and C Connect Reference: Describes Cdata classes, object engine access functions, and user-primitive functions.
Obtaining Technical Support
If, after reading the documentation, you find that you needadditional help, you can contact ParcPlace-Digitalk TechnicalSupport. ParcPlace-Digitalk provides all customers with helpon product installation. ParcPlace-Digitalk provides additionaltechnical support to customers who have purchased theObjectSupport package. VisualWorks distributors often providesimilar services.
Before Contacting Technical Support
When you need to contact a technical support representative,please be prepared to provide the following information:
■ The version id, which indicates the version of the productyou are using. Choose Help➞About VisualWorks in the Visual-Works main window. The version number can be found inthe resulting dialog under Version Id:.
About This Book
xx VisualWorks Cookbook, Rev. 2.0
■ Any modifications (patch files) distributed by ParcPlace-Digitalk that you have imported into the standard image.Choose Help➞About VisualWorks in the VisualWorks mainwindow. All installed patches can be found in the resultingdialog under Patches:.
■ The complete error message and stack trace, if an errornotifier is the symptom of the problem. To do so, select copystack in the error notifier window (or in the stack view of thespawned Debugger). Then paste the text into a file that youcan send to technical support.
How to Contact Technical Support
ParcPlace-Digitalk Technical Support provides assistance by:
■ Electronic mail
■ Electronic bulletin boards
■ World Wide Web
■ Telephone and fax
Electronic Mail
To get technical assistance on the VisualWorks line of products,send electronic mail to [email protected] .
Electronic Bulletin Boards
Information is available at any time through the electronicbulletin board CompuServe. If you have a CompuServeaccount, enter the ParcPlace-Digitalk forum by typinggo ppdforum at the prompt.
World Wide Web
In addition to product and company information, technicalsupport information is available via the World Wide Web:
1. In your Web browser, open this location (URL):
http://www.parcplace.com
2. Click the link labeled “Tech Support.”
Obtaining Technical Support
VisualWorks Cookbook, Rev. 2.0 xxi
Telephone and Fax
Within North America, you can:
■ Call ParcPlace-Digitalk Technical Support at 408-773-7474or 800-727-2555.
■ Send questions and information via fax at 408-481-9096.
Operating hours are Monday through Thursday from 6:00a.m. to 5:00 p.m., and Friday from 6:00 a.m. to 2:00 p.m.,Pacific time.
Outside North America, you must contact the local authorizedreseller of ParcPlace-Digitalk products to find out the telephonenumbers and hours for technical support.


VisualWorks Cookbook, Rev. 2.0 1
Part I
Programming Fundamentals
Chapter 1: Smalltalk Basics 3Chapter 2: Building Applications 41

VisualWorks Cookbook, Rev. 2.0 3
Chapter 1
Smalltalk Basics
This chapter shows how to perform fundamentalprogramming tasks, including:
Constructing a Message 4Combining Messages 7Deciding which Type of Variable to Use 10Declaring a Variable 13Removing a Variable 16Creating a Method 18Returning from a Method 20Creating an Instance of a Class 22Initializing an Object 24Creating a Class (Subclassing) 26Grouping Related Classes 29Grouping Related Methods 31Creating a Branch 33Creating a Loop 34Creating Complex True/False Tests 38
Chapter 1 Smalltalk Basics
4 VisualWorks Cookbook, Rev. 2.0
Constructing a Message
Strategy
A message expression is made up of two parts: a receiver and amessage. The receiver is the object from which you desire aservice. The message is the name of the receiver’s method thatprovides the service, along with any necessary arguments.
Basic Steps➤ Name the receiver (1.0) and then supply the message (sin).
"Print it"1.0 sin "Basic Step"
Variants
V1. Storing the Result in a Variable
Every time a message is sent, the receiver sends an answerback. The answer itself is an object, perhaps the result of acomputation. When this answer object is needed, you canassign it to a variable.
➤ Send a message to an object and store the result in avariable named sine.
"Print it"| sine |sine := 1.0 sin. "V1 Step"^sine
V2. Naming a Variable as the Receiver
In variant 1, the receiver is a literal object, specifically afloating-point number. You can also send a message to anobject that is stored in a variable, by naming the variable as thereceiver.
Constructing a Message
VisualWorks Cookbook, Rev. 2.0 5
➤ Send a message (squared) to the number held by a variablenamed sine.
"Print it"| sine |sine := 1.0 sin.sine squared. "V2 Step"
V3. Naming a Class as the Receiver
You can also name a class as the receiver of a message. This ismost often done when you are creating an instance of a class,as in the following example.
➤ Send a message (today) to the Date class.
"Print it"Date today "V3 Step"
V4. Including One or More Arguments (KeywordMessage)
When the message requires an argument, the message nameends in a colon. This is called a keyword message. For eachargument, the message contains a separate keyword endingwith a colon. By convention, each keyword and argument areindented on a new line below the receiver, if this improves read-ability of the code.
➤ Send a message that requires two arguments. Specifically,when copying a substring, you must specify the startingindex and ending index of the desired substring.
"Print it"'9942-Steering wheel' "V4 Step"
copyFrom: 1to: 4
Chapter 1 Smalltalk Basics
6 VisualWorks Cookbook, Rev. 2.0
V5. Using a Special Symbol (Binary Message)
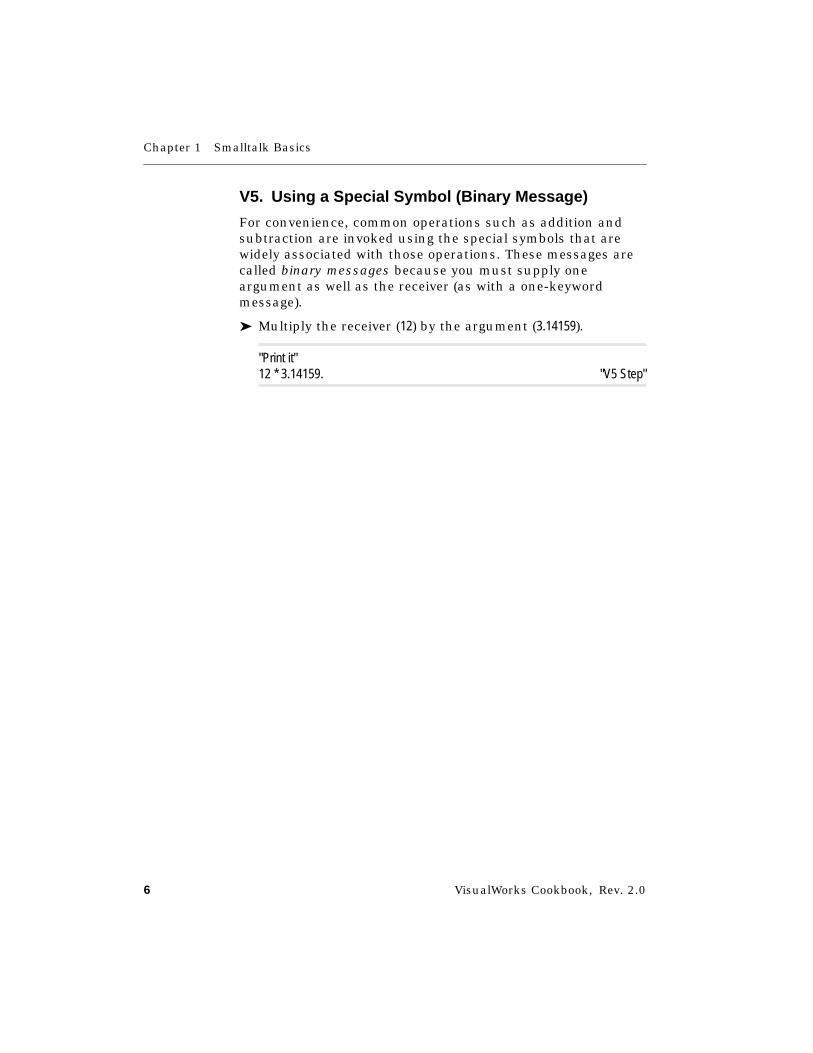
For convenience, common operations such as addition andsubtraction are invoked using the special symbols that arewidely associated with those operations. These messages arecalled binary messages because you must supply oneargument as well as the receiver (as with a one-keywordmessage).
➤ Multiply the receiver (12) by the argument (3.14159).
"Print it"12 * 3.14159. "V5 Step"
Combining Messages
VisualWorks Cookbook, Rev. 2.0 7
Combining Messages
Strategy
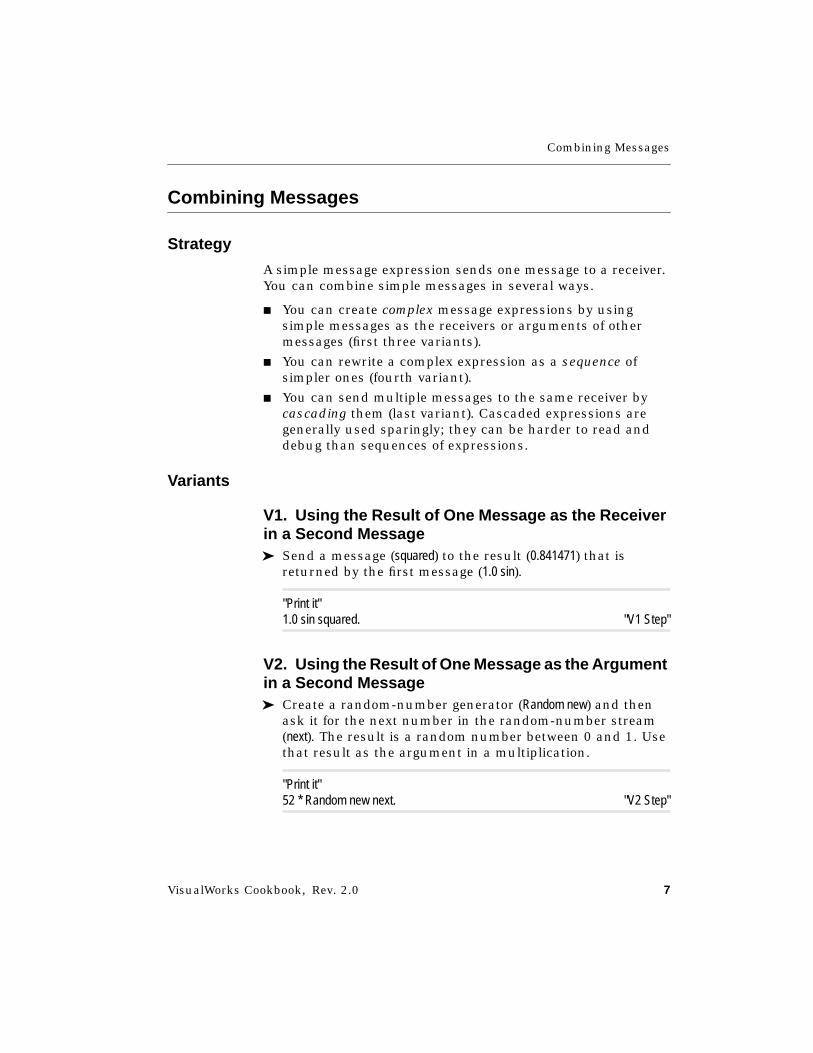
A simple message expression sends one message to a receiver.You can combine simple messages in several ways.
■ You can create complex message expressions by usingsimple messages as the receivers or arguments of othermessages (first three variants).
■ You can rewrite a complex expression as a sequence ofsimpler ones (fourth variant).
■ You can send multiple messages to the same receiver bycascading them (last variant). Cascaded expressions aregenerally used sparingly; they can be harder to read anddebug than sequences of expressions.
Variants
V1. Using the Result of One Message as the Receiverin a Second Message➤ Send a message (squared) to the result (0.841471) that is
returned by the first message (1.0 sin).
"Print it"1.0 sin squared. "V1 Step"
V2. Using the Result of One Message as the Argumentin a Second Message➤ Create a random-number generator (Random new) and then
ask it for the next number in the random-number stream(next). The result is a random number between 0 and 1. Usethat result as the argument in a multiplication.
"Print it"52 * Random new next. "V2 Step"
Chapter 1 Smalltalk Basics
8 VisualWorks Cookbook, Rev. 2.0
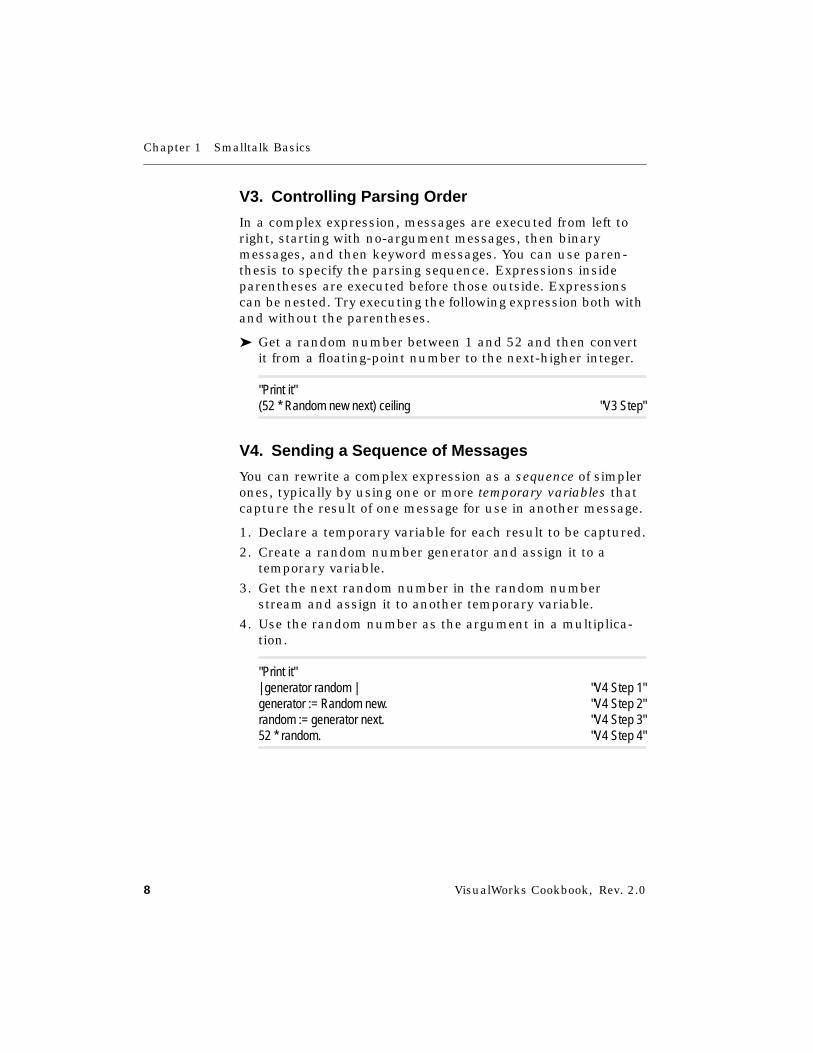
V3. Controlling Parsing Order
In a complex expression, messages are executed from left toright, starting with no-argument messages, then binarymessages, and then keyword messages. You can use paren-thesis to specify the parsing sequence. Expressions insideparentheses are executed before those outside. Expressionscan be nested. Try executing the following expression both withand without the parentheses.
➤ Get a random number between 1 and 52 and then convertit from a floating-point number to the next-higher integer.
"Print it"(52 * Random new next) ceiling "V3 Step"
V4. Sending a Sequence of Messages
You can rewrite a complex expression as a sequence of simplerones, typically by using one or more temporary variables thatcapture the result of one message for use in another message.
1. Declare a temporary variable for each result to be captured.
2. Create a random number generator and assign it to atemporary variable.
3. Get the next random number in the random numberstream and assign it to another temporary variable.
4. Use the random number as the argument in a multiplica-tion.
"Print it"| generator random | "V4 Step 1"generator := Random new. "V4 Step 2"random := generator next. "V4 Step 3"52 * random. "V4 Step 4"
Combining Messages
VisualWorks Cookbook, Rev. 2.0 9
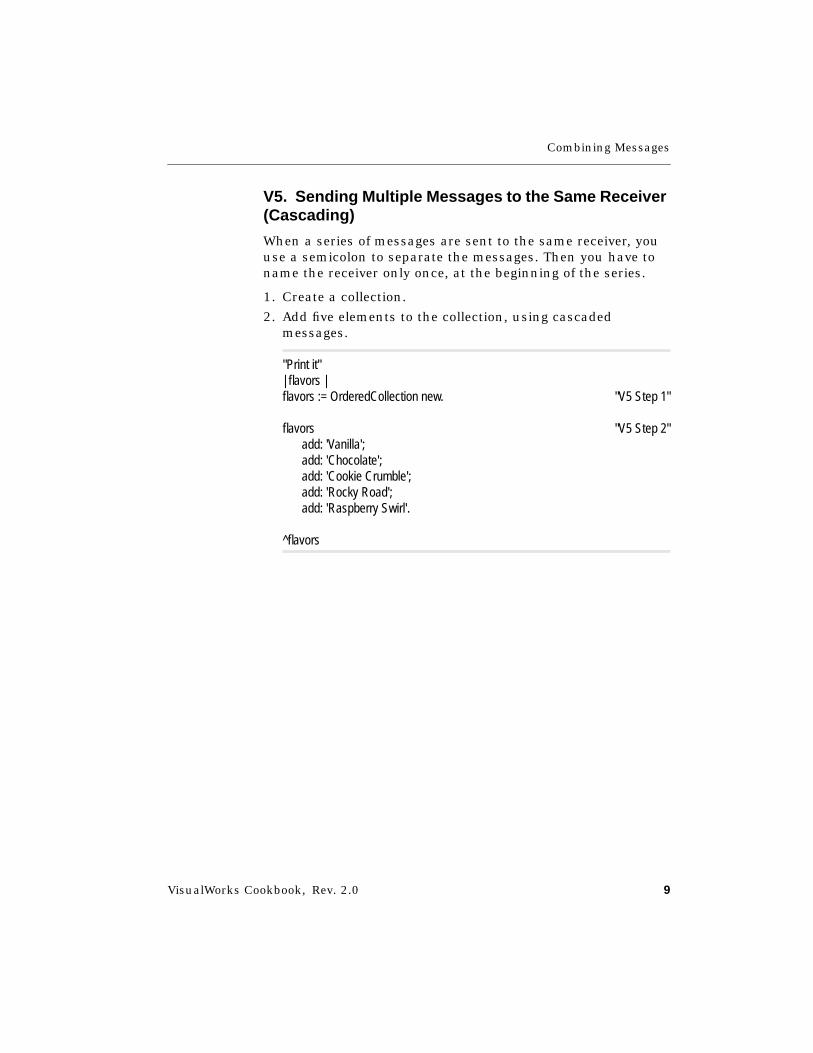
V5. Sending Multiple Messages to the Same Receiver(Cascading)
When a series of messages are sent to the same receiver, youuse a semicolon to separate the messages. Then you have toname the receiver only once, at the beginning of the series.
1. Create a collection.
2. Add five elements to the collection, using cascadedmessages.
"Print it"| flavors |flavors := OrderedCollection new. "V5 Step 1"
flavors "V5 Step 2"add: 'Vanilla';add: 'Chocolate';add: 'Cookie Crumble';add: 'Rocky Road';add: 'Raspberry Swirl'.
^flavors
Chapter 1 Smalltalk Basics
10 VisualWorks Cookbook, Rev. 2.0
Deciding which Type of Variable to Use
Strategy
There are six types of variables:
■ Temporary variables
■ Instance variables
■ Class instance variables
■ Class variables
■ Pool dictionaries
■ Global variables
Scope: Each type of variable has a different scope—that is, itis available to a different range of methods. The list above issorted from narrowest to widest scope.
In general, use the narrowest scope that suits your purpose.
Use Temporary Variables Freely
A temporary variable has the narrowest scope (a single methodor Workspace do it). Use temporary variables freely.
Avoid Use of Global Variables
A global variable has the broadest scope—it can be referencedanywhere. This makes it hazardous to use, mainly becauseclass names are also global in scope. The danger is that youmay accidentally erase a class that happens to have the samename as your global, by associating a new value with the name.For this reason, you must be very careful when naming a globalvariable. A carefully named global can be useful in casualWorkspace code, when you want to hold onto the result of onedo it for use in a later do it.
Use an Accessing Method to Boost the Scope
Frequently, you can use an accessing method to give a variablewider scope. This is especially useful when you need to createa systemwide default that is accessed by a variety of objects.For example, the LookPreferences class implements a defaultBorder
Deciding which Type of Variable to Use
VisualWorks Cookbook, Rev. 2.0 11
method. Clients can ask for this default border by asking theLookPreferences class for it, instead of relying on a global variable.
Use Instance Variables to Hold Object Data andPersistent Parameters
An instance variable is the primary means of associating datawith an object, and it can be used freely. It is directly availableto any instance method in the defining class and in anyinstance method of a subclass (that is, it is inherited).
A secondary role for the instance variable is as a persistentparameter. That is, if you are passing the same object as anargument to several methods within the same receiver, it maybe helpful to create an instance variable as a central holder forthat object.
Use Class Variables to Hold Defaults and StaticResources
A class variable is available to both class methods and instancemethods, in the defining class and any subclasses. Because itsvalue can be changed by multiple objects, a class variable isused mainly to hold a nonchanging or rarely changing value.For example, the Date class holds a collection of MonthNames as aclass variable and makes that collection available to several ofits methods.
Compared with instance variable: An alternative is to createan instance variable and initialize its value each time you createa new instance. The first advantage of a class variable is thatyou have to initialize it only once. The second advantage is thatyou need to have only one copy of the data, even when manyinstances of the class are accessing it.
Use Class Instance Variables within a Class Hierarchy
A class instance variable is rarely used. It is declared once, ina parent class. Each subclass then has its own copy of thevariable and can assign to it independently.
Compared with class variable: One alternative is to declare aseparate class variable in each subclass. Since each subclasswould have to name its variable differently, each subclass

Chapter 1 Smalltalk Basics
12 VisualWorks Cookbook, Rev. 2.0
would need its own versions of the methods that accessed thevariable. Thus, the advantage of the class instance variable isthat all subclasses can use the same name for the variable andstill be able to assign to it independently.
Compared with instance variable: Another alternative is todeclare the variable as a regular instance variable in the parentclass. This requires that you initialize the variable each time anew instance is created. Thus, the class instance variable isusually reserved for nonchanging resources whose initializa-tion is too costly to repeat.
Use Pool Dictionaries to Create a Shared Lexiconamong Classes
A pool dictionary is a lookup table shared by a related set ofclasses. The dictionary itself must first be declared as a globalvariable and initialized as a Dictionary. Each entry in the dictio-nary is then available directly to all class and instance methodsin any class that declares the dictionary as its pool.
For example, the classes that manipulate text objects share adictionary named TextConstants. This dictionary associates namessuch as “Space” and “Tab” with their character equivalents. Asa result, the text classes can use the names for keyboard keysrather than the more obscure character codes.
Because the dictionary must be declared first as a global vari-able, pool dictionaries should be used very sparingly. Anothernegative for pool dictionaries is that, like globals, they are notautomatically recreated when you file in the code that dependson them.
Compared with class variable: One alternative is to store alookup dictionary in a class variable. The first disadvantage ofthis approach is that only instances of that class can access thedictionary directly. The second disadvantage is that lookupsmust be performed explicitly. With a pool dictionary, bycontrast, naming the key is sufficient to summon its associatedvalue. For example, instead of TextConstants at: Space you cansimply use Space. Neither of these disadvantages is critical inmost situations.
Declaring a Variable
VisualWorks Cookbook, Rev. 2.0 13
Declaring a Variable
Strategy
Data type: Any object can be assigned to any type of variable.In Smalltalk, variables are not declared as having a particulardata type.
Default value: The value of any variable is nil until you assigna new value to it.
Naming: The name of a variable describes its purpose andsometimes also its intended data type. By convention, variablenames are quite descriptive and rarely abbreviated except incasual usage. When multiple words are combined to form aname, each embedded initial is capitalized. Variable namesmay contain letters, numbers, and underscores, and may notbegin with a number. By convention, the first letter is lowercasefor local variables and uppercase for nonlocal variables.
Separating multiple declarations: When you are declaringtwo or more variables at the same time, use a space to separatethem.
Undeclared variables: When a variable is referenced withoutbeing declared, it is entered in a system dictionary named Unde-clared. If it is later declared, the entry in Undeclared remains andshould be removed before you deploy your application. To doso, open an inspector on the dictionary by highlighting the wordUndeclared and using the inspect command. You can use thedictionary inspector to check for references to each entry andto remove each entry that has no entries.
Variants
V1. Declaring a Temporary Variable
A temporary variable must be declared at the beginning of themethod or Workspace do it in which it is used. To do so, placeits name between vertical bars.
Naming. A temporary variable’s name should begin with alowercase letter, indicating its local scope.

Chapter 1 Smalltalk Basics
14 VisualWorks Cookbook, Rev. 2.0
Automated declarations: In practice, many Smalltalkprogrammers postpone declaring temporaries. They freelyinsert new variable names and rely on the system to promptthem when it encounters each undeclared variable name. Theycan then indicate its scope as “temporary” and the system willcreate the declaration.
➤ Declare temporary variables by enclosing them withinvertical bars.
| numberOfDays date | "V1 Step"numberOfDays := 7.date := Date today addDays: numberOfDays.Transcript show: date printString.
V2. Declaring an Instance Variable
Naming. An instance variable’s name should begin with alowercase letter.
1. In a System Browser, select the class.
2. Choose the definition command in the class view to displaythe class definition.
3. Add the desired instance variable name to the list ofinstance variables and then accept the new definition.
V3. Declaring a Class Instance Variable
Naming. A class instance variable’s should must begin with anuppercase letter.
1. In a System Browser, select the class and make sure theclass switch is on.
2. In the pop-up menu provided by the class view, select thedefinition command to display the metaclass definition.
3. Add the desired variable name to the list of class instancevariables and then accept the new definition.
V4. Declaring a Class Variable
Naming. A class variable’s name should begin with an upper-case letter.
Declaring a Variable
VisualWorks Cookbook, Rev. 2.0 15
1. In a System Browser, select the class.
2. Choose the definition command in the class view to displaythe class definition.
3. Add the desired class variable name to the list of class vari-ables and then accept the new definition.
V5. Declaring a Pool Dictionary
When a group of related constants is to be made available to aclass, a pool dictionary is an alternative to creating a separateclass variable for each constant. Multiple classes can declareand use the same pool dictionary. For example, the text-relatedclasses such as Text store constants such as the tab characterin a pool dictionary, so they don’t have to instantiate that char-acter in their text-handling methods.
Naming: A pool dictionary’s name should begin with an upper-case letter. The key in each element of the dictionary must alsobegin with an uppercase letter.
Creating the dictionary: The dictionary itself is a globalvariable and must be declared and initialized before you candeclare it as a pool dictionary.
1. In a Workspace, verify that the global name you intend togive a new pool dictionary is not already in use as a globalvariable name by sending an includesKey: message to Smalltalk.The argument is the global name, expressed as a symbol(prefixed by a number sign).
2. In a Workspace, create a new dictionary by sending a newmessage to the Dictionary class. Add the desired constantsand their lookup keys to the dictionary (now or later).
3. Create a global variable to hold the dictionary by sendingan at:put: message to Smalltalk. The first argument is the globalname, expressed as a symbol. The second argument is thedictionary.
4. For each class that will use the pool dictionary, display theclass definition in a System Browser and add the global tothe list of pool variables. Note that pool dictionaries are notinherited, so you must add them to each class that is to usethem, even if they are declared in its superclass.
Chapter 1 Smalltalk Basics
16 VisualWorks Cookbook, Rev. 2.0
Removing a Variable
Strategy
Before you remove a variable, find and delete all references tothat variable. For most types of variables, it’s easier to findreferences before you remove the variable.
Variants
V1. Removing a Temporary Variable and ItsReferences
Since a temporary variable can be referenced only in a singlemethod or Workspace do it, you need to scan only that methodfor references. For a long method, use the find command to findeach occurrence of that variable in the code. Rewrite the codeas needed to remove each reference.
After you have removed all references, delete the variabledeclaration.
V2. Removing an Instance Variable and Its References1. In a System Browser, select the class in which the variable
is declared.
2. Select the inst var refs command in the class view.
3. In the resulting menu of instance variables, select thevariable that you intend to remove.
4. In the resulting browser of all methods that reference thevariable, edit the methods to remove the references.
5. In the class definition, delete the variable name and thenaccept the definition.
V3. Removing a Class Variable and Its References
Do steps 1 through 5 as above, except in step 2 use the class varrefs command.
Removing a Variable
VisualWorks Cookbook, Rev. 2.0 17
V4. Removing a Class Instance Variable and ItsReferences
Do steps 1 through 5 as above, except in step 1 also turn on theSystem Browser’s class switch.
V5. Removing a Pool Dictionary1. For each entry in the pool dictionary, open a browser on all
references to that pool variable by sending a browseAllCallsOn:message to the Browser class. The argument is the dictio-nary’s entry, which is accessed by sending an associationAt:message to the global name of the dictionary; the argumentis the lookup key for the dictionary entry.
Browser browseAllCallsOn: (TextConstants associationAt: #Centered). "V3 Step 1"
2. In each browser, edit each method, removing all referencesto the pool constants.
3. Use a System Browser to change the class definition of eachclass that declares the pool dictionary, removing the globaldictionary from the definition.
4. Open a browser on all references to the global variable thatholds the pool dictionary by sending a browseAllCallsOn:message to the Browser class. The argument is the Smalltalkdictionary’s entry for the global, which is accessed bysending an associationAt: message to Smalltalk; the argument isthe name of the global dictionary.
Browser browseAllCallsOn: (Smalltalk associationAt: #TextConstants). "V3 Step 4"
5. In the resulting browser, edit each method, removing allreferences to the global variable.
6. Remove the global variable from the global dictionarynamed Smalltalk by sending a removeKey: message to Smalltalk.The argument is the name of the global dictionary,expressed as a symbol.
V6. Removing a Global Variable
Do Steps 4 through 6 above.
Chapter 1 Smalltalk Basics
18 VisualWorks Cookbook, Rev. 2.0
Creating a Method
Strategy
The System Browser provides a template to help you create anew method. You can also use an existing method as yourstarting point.
Instance vs. class methods: An instance method is availableto any instance of the defining class, whereas a class method isavailable only to the class itself. For that reason, instancemethods outnumber class methods. Class methods are mostoften used for creating an instance of the class and for initial-izing and accessing class variables.
When to subdivide a large method: To promote reusability,keep Smalltalk methods short. For example, you can usuallybreak a long method into smaller methods to isolate individualservices that other clients may want to use. Similarly, when asubset of the code is repeated in a large method with only minorvariations, you can usually make that subset into a separatemethod.
Naming. Method names may contain letters, numbers, andunderscores, but may not begin with a number. The first lettershould be lowercase.
Variants
V1. Creating an Instance Method1. In a System Browser, turn on the instance switch.
2. Select the class.
3. Select the message category or add a new one.
4. Fill in the method template and then use the acceptcommand in the code view.
V2. Creating a Class Method
In a System Browser, turn on the class switch and then do steps2 through 4 above.

Creating a Method
VisualWorks Cookbook, Rev. 2.0 19
V3. Fixing Common Errors at Compile Time
Undeclared temporary variables: This is an “error” that youcan commit on purpose, because the system will prompt youwith a menu of variable types with which you can quickly andeasily declare each of the temporary variables.
Undeclared class and instance variables: When you areprompted to declare an instance or class variable, it’s best toselect abort in the menu and declare the variables beforecontinuing. To save your uncompiled method while you use theSystem Browser to redefine the class, select spawn in the codeview. This opens a new browser on the uncompiled code.
Missing period: When you have omitted a period, the systemtreats what should be two statements as though they were asingle message expression. As a result, the error description isusually “Nothing more expected.”
Missing delimiters: When you have omitted a parenthesis orbracket, the error description is “Right parenthesis expected” or“Period or right bracket expected.”
Chapter 1 Smalltalk Basics
20 VisualWorks Cookbook, Rev. 2.0
Returning from a Method
Strategy
Every method returns a single object, which can be a collectionof other objects.
By default, a method returns the object that received themessage. This return object is simply ignored by clients thatare interested in the effect of the method and not the returnvalue.
When the return object is significant, you can specify thatobject by using a caret symbol ( ^ ).
Returning from a block—When a return character is enclosedwithin a block, it forces a return from the entire method. Thatis, it does not act as a return from the block back to thecontaining method.
Basic Steps
Online example: Customer1Example
➤ In a method, place the name of the return object after acaret.
accountID "Basic Step"^accountID
Variants
V1. Returning the Result of a Message
A return character that is followed by a message causes theresult of that message to be returned. This approach oftencircumvents the need to create a temporary variable for themessage result.
➤ Place a caret in front of the message receiver.

Returning from a Method
VisualWorks Cookbook, Rev. 2.0 21
displayString "V1 Step"
^accountID printString, '--', name
V2. Returning a Conditional Value
Frequently, a method performs a test and returns one value ifthe test result is true and a second value if the test result isfalse. Relying on the fact that a return character that is followedby a message returns the result of the message, you can use asingle return caret to serve both forks of the branch, ratherthan placing a caret inside each block.
This approach has the advantage of combining two exit pointsinto a single exit point, which is better programming style. Italso makes the ifTrue: and ifFalse: blocks clean blocks—that is,blocks that do not contain a hard return character.
➤ Place a caret in front of the conditional expression. (Theexample is a hypothetical method that could be added toCustomer1Example.)
accountPrefix "V2 Step""Answer the first four characters of the accountID,or an empty string if the accountID is empty."
| id |id := self accountID.
^id isEmptyifTrue: [String new]ifFalse: [id
copyFrom: 1to: 4].
Chapter 1 Smalltalk Basics
22 VisualWorks Cookbook, Rev. 2.0
Creating an Instance of a Class
Strategy
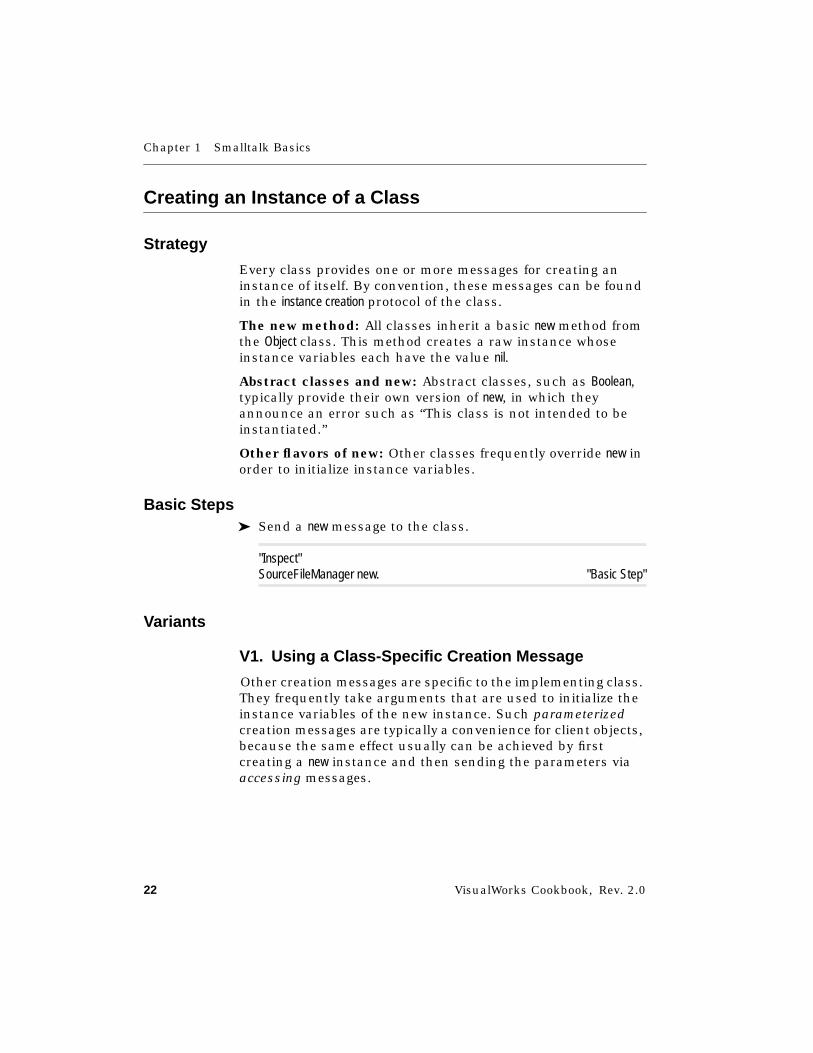
Every class provides one or more messages for creating aninstance of itself. By convention, these messages can be foundin the instance creation protocol of the class.
The new method: All classes inherit a basic new method fromthe Object class. This method creates a raw instance whoseinstance variables each have the value nil.
Abstract classes and new: Abstract classes, such as Boolean,typically provide their own version of new, in which theyannounce an error such as “This class is not intended to beinstantiated.”
Other flavors of new: Other classes frequently override new inorder to initialize instance variables.
Basic Steps➤ Send a new message to the class.
"Inspect"SourceFileManager new. "Basic Step"
Variants
V1. Using a Class-Specific Creation Message
Other creation messages are specific to the implementing class.They frequently take arguments that are used to initialize theinstance variables of the new instance. Such parameterizedcreation messages are typically a convenience for client objects,because the same effect usually can be achieved by firstcreating a new instance and then sending the parameters viaaccessing messages.
Creating an Instance of a Class
VisualWorks Cookbook, Rev. 2.0 23
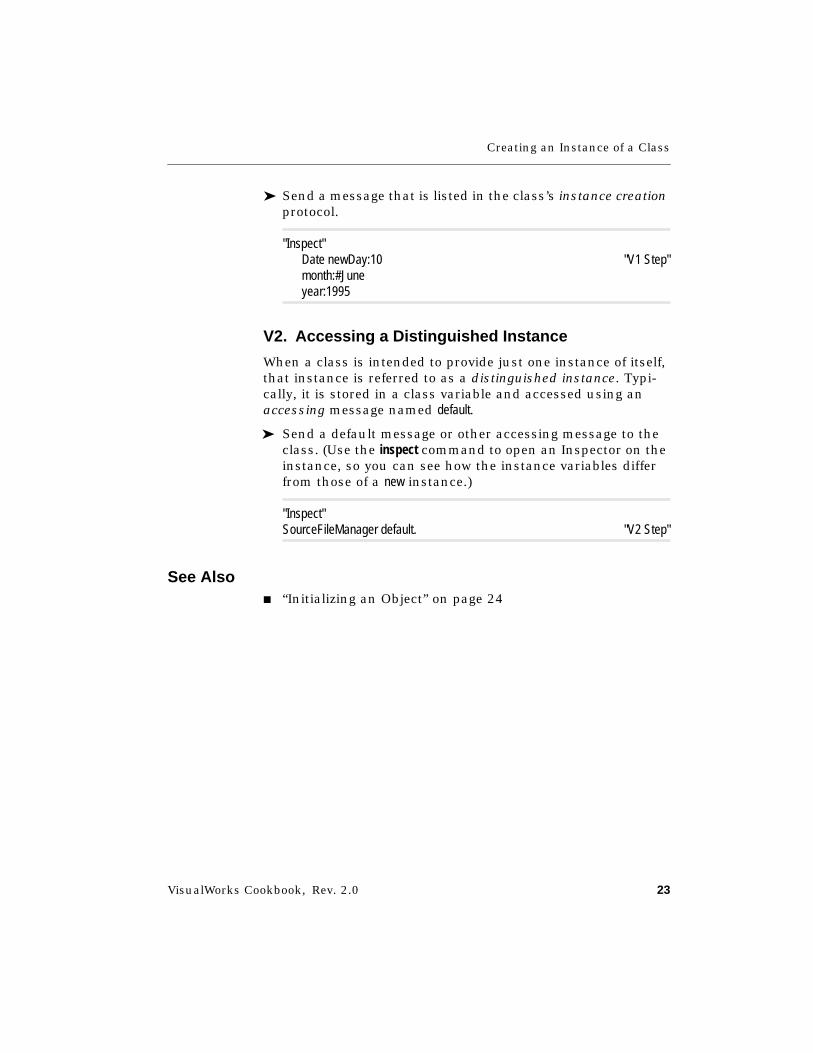
➤ Send a message that is listed in the class’s instance creationprotocol.
"Inspect"Date newDay:10 "V1 Step"month:#Juneyear:1995
V2. Accessing a Distinguished Instance
When a class is intended to provide just one instance of itself,that instance is referred to as a distinguished instance. Typi-cally, it is stored in a class variable and accessed using anaccessing message named default.
➤ Send a default message or other accessing message to theclass. (Use the inspect command to open an Inspector on theinstance, so you can see how the instance variables differfrom those of a new instance.)
"Inspect"SourceFileManager default. "V2 Step"
See Also■ “Initializing an Object” on page 24

Chapter 1 Smalltalk Basics
24 VisualWorks Cookbook, Rev. 2.0
Initializing an Object
Strategy
When you want a new instance to provide default values otherthan nil, create an initialize method in a protocol named initialize-release. The main advantage in doing so is that you prevent theerrors that result when client methods send messages to theuninitialized instance variables.
Classes other than ApplicationModel and its subclasses must takethe added step of invoking the initialize method in the instance-creation methods. (ApplicationModel already does so, becauseinitialization is routinely used by its subclasses.)
Basic Steps
Online example: Customer1Example
1. Create an instance method named initialize in an initialize-release protocol. The method is responsible for assigningvalues to some or all of the instance variables.
initialize "Basic Step 1"
accountID := 0.name := String new.address := String new.phoneNumber := String new.
2. Create a class method named new in an instance creationprotocol. The method is responsible for creating a newinstance and then sending initialize to it.
new "Basic Step 2"^super new initialize

Initializing an Object
VisualWorks Cookbook, Rev. 2.0 25
Variants
Including a Parent Class’s Initialization
Online example: PreferredCustomerExample
When implementing an initialize method, be aware that a parentclass may also have an initialize method. If so, invoke the parentclass’s initialize as a first step in the subclass’s initialize.
➤ In the subclass’s initialize method, send initialize to super, usuallyas the first step in the method.
initialize "Variant Step"
super initialize.yearsOfPatronage := 3.

Chapter 1 Smalltalk Basics
26 VisualWorks Cookbook, Rev. 2.0
Creating a Class (Subclassing)
Strategy
Every new class is a child of an existing class, so creating a newclass consists of sending a subclassing message to the parentclass. The System Browser provides a template for the mostcommon subclassing message.
Choosing a parent class: Use the Object Reference to findexisting classes that relate to the new class’s behavior. Chooseas a parent the class that you would need to modify the least inorder to convert it to your purposes. Typically, this will be theObject class or a class in one of your own application-specifichierarchies.
Naming: A class name can contain letters, numbers andunderscores, but cannot begin with a number. Because classnames are Smalltalk global variables, they should begin with acapital letter.
Basic Steps
Online example: Customer1Example
1. In a System Browser, select the class category, and makesure no class is selected.
2. Modify the resulting class-creation template, entering atleast the name of the parent class and the name of the newsubclass.
Object subclass: #Customer1Example "Basic Step 2"instanceVariableNames: 'accountID name address phoneNumber 'classVariableNames: ''poolDictionaries: ''category: 'Examples-Cookbook'
3. Select the accept command in the code view.
Creating a Class (Subclassing)
VisualWorks Cookbook, Rev. 2.0 27
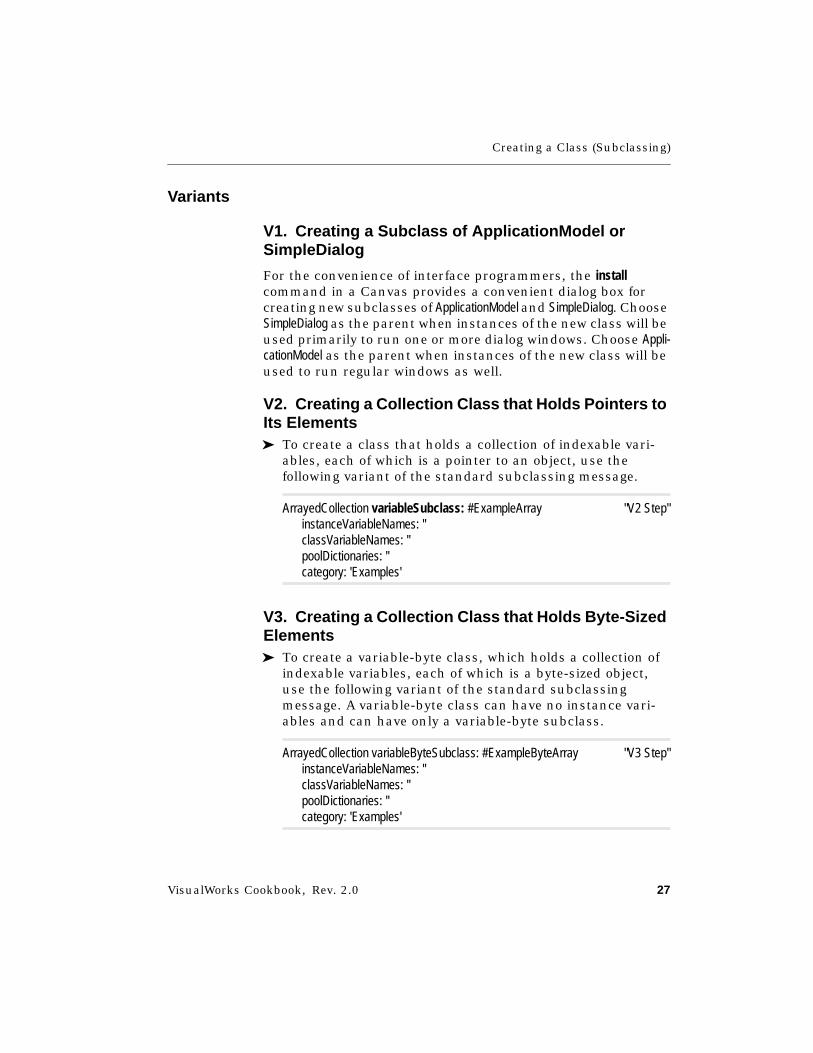
Variants
V1. Creating a Subclass of ApplicationModel orSimpleDialog
For the convenience of interface programmers, the installcommand in a Canvas provides a convenient dialog box forcreating new subclasses of ApplicationModel and SimpleDialog. ChooseSimpleDialog as the parent when instances of the new class will beused primarily to run one or more dialog windows. Choose Appli-cationModel as the parent when instances of the new class will beused to run regular windows as well.
V2. Creating a Collection Class that Holds Pointers toIts Elements➤ To create a class that holds a collection of indexable vari-
ables, each of which is a pointer to an object, use thefollowing variant of the standard subclassing message.
ArrayedCollection variableSubclass: #ExampleArray "V2 Step"instanceVariableNames: ''classVariableNames: ''poolDictionaries: ''category: 'Examples'
V3. Creating a Collection Class that Holds Byte-SizedElements➤ To create a variable-byte class, which holds a collection of
indexable variables, each of which is a byte-sized object,use the following variant of the standard subclassingmessage. A variable-byte class can have no instance vari-ables and can have only a variable-byte subclass.
ArrayedCollection variableByteSubclass: #ExampleByteArray "V3 Step"instanceVariableNames: ''classVariableNames: ''poolDictionaries: ''category: 'Examples'
Chapter 1 Smalltalk Basics
28 VisualWorks Cookbook, Rev. 2.0
See Also■ “Declaring a Variable” on page 13
■ “Grouping Related Classes” on page 29
Grouping Related Classes
VisualWorks Cookbook, Rev. 2.0 29
Grouping Related Classes
Strategy
It is frequently useful to treat a group of classes as a singleentity, known as a class category. The main advantage is thatyou can file out all of the classes in the category at once, forbacking up your work or sharing it with another user. It alsomakes browsing the related code easier.
Keeping an application together: A common usage of classcategories is to group all of the classes used by an applicationor by a module within a larger application.
Keeping support classes separate: Because a class cannotbelong to multiple categories, support classes used in multipleapplications are usually grouped in separate support catego-ries. This allows you to easily create a set of files containing justthe code needed for any given application.
Basic Steps
B1. Adding a Class Category1. In a System Browser, select the add command in the class-
category view.
2. In the resulting dialog, supply the name of the category (noharm is done if it already exists). Type a blank space tocancel the operation.
The new class category is inserted in the list above the categorythat was previously selected. To insert it at the bottom of thelist, make sure no category is selected when you begin step 1.
B2. Removing a Class Category
If you remove a class category that still has classes in it, theclasses will be removed also.
1. In a System Browser, select the category.
2. Select the remove command in the class-category view.
3. If the category contains classes, you will be asked toconfirm the removal.

Chapter 1 Smalltalk Basics
30 VisualWorks Cookbook, Rev. 2.0
B3. Renaming a Class Category
When you rename a class category, the new name appearsautomatically in the definition of each class in that category.
1. In a System Browser, select the category.
2. Select the rename as command in the class-category view.
3. In the resulting dialog, supply the new name. Type a blankspace to cancel the operation.
B4. Moving a Class to a Different Category1. In a System Browser, select the class.
2. Select the move to command in the class view.
3. In the resulting dialog, supply the name of the destinationcategory. If the category does not exist, it will be created.
B5. Changing the Order of Class Categories1. In a System Browser, select the edit all command in the
class-category view.
2. The categories and their members will be listed in the codeview. Carefully cut and paste the listing to achieve thedesired ordering.
3. Select the accept command in the code view. (To cancel theoperation, select the cancel command in the code view.)
Grouping Related Methods
VisualWorks Cookbook, Rev. 2.0 31
Grouping Related Methods
Strategy
Placing related methods in a message category, also known asa protocol, helps to document your code and makes it easier tofind with a System Browser. Your choice of protocol name hasno effect on your code’s operation.
Public vs. private protocols: By convention, methods that areintended for use only by other methods of the current class areplaced in a protocol named private. Some programmers use abroader definition of private, choosing to include any methodthat has a restricted set of intended clients. Some programmersalso create multiple private protocols, each having a second partto its name that describes its contents (such as private-accessing).
Standard protocols: Because most methods fit into certaincategories, a set of standard protocol names has come into use.Appendix A of the VisualWorks User’s Guide lists theseprotocols.
Basic Steps
B1. Adding a Protocol1. In a System Browser, select the class.
2. Select the add command in the protocol view.
3. In the resulting dialog, supply the name of the protocol (noharm is done if it already exists). Type a blank space tocancel the operation.
The new protocol is inserted in the list above the protocol thatwas previously selected. To insert it at the bottom of the list,make sure no protocol is selected when you begin step 1.
B2. Removing a Protocol
If you remove a protocol that still has methods in it, themethods will be removed also.
1. In a System Browser, select the protocol.
2. Select the remove command in the protocol view.

Chapter 1 Smalltalk Basics
32 VisualWorks Cookbook, Rev. 2.0
3. If the protocol contains methods, you will be asked toconfirm the removal.
B3. Renaming a Protocol1. In a System Browser, select the protocol.
2. Select the rename as command in the protocol view.
3. In the resulting dialog, supply the new name. Type a blankspace to cancel the operation.
B4. Moving a Method to a Different Protocol1. In a System Browser, select the method.
2. Select the move to command in the method view.
3. In the resulting dialog, supply the name of the destinationprotocol. If the protocol does not exist, it will be created.Type a blank space to cancel the operation.
B5. Copying a Method to a Different Class1. In a System Browser, select the method.
2. Select the move to command in the method view.
3. In the resulting dialog, enter the name of the destinationclass, a greater-than symbol (>), and the name of the desti-nation protocol. To copy the method to the class side ratherthan the instance side, insert “class” after the class name.
B6. Changing the Order of Protocols1. In a System Browser, select the edit all command in the
protocol view.
2. The protocols and their members will be listed in the codeview. Carefully cut and paste the listing to achieve thedesired ordering.
3. Select the accept command in the code view. (To cancel theoperation, select the cancel command in the code view.)
Creating a Branch
VisualWorks Cookbook, Rev. 2.0 33
Creating a Branch
Strategy
Branching, or conditional processing, is accomplished bysending a variant of the ifTrue: message to the result of atrue/false test. The conditional statements are enclosed in ablock.
Basic Steps1. Get the width of the screen.
2. Test whether the screen’s width is less than 1280 pixels.
3. If true, ring the bell.
| screenWidth |screenWidth := Screen default bounds width. "Basic Step 1"
screenWidth < 1280 "Basic Step 2"ifTrue: [Screen default ringBell] "Basic Step 3"
Variants
The full set of variants is:
ifTrue:ifFalse:ifTrue: ifFalse:ifFalse:ifTrue:
Chapter 1 Smalltalk Basics
34 VisualWorks Cookbook, Rev. 2.0
Creating a Loop
Strategy
Several ways of looping are provided in Smalltalk. They fall intothe following categories:
■ Simple repetition
■ Conditional looping
■ Processing each element in a collection (iteration)
In each case, a block is used to contain the statements that arerepeated.
Use simple repetition when the block is to be repeated a certainnumber of times. Use conditional looping when the block is tobe repeated only while a test condition is met. Use collectioniteration when the block is to be repeated for each element in acollection.
Variants
V1. Looping a Fixed Number of Times (timesRepeat:)➤ Send a message to the Transcript 10 times.
10 timesRepeat: [Transcript show: 'Testing!'; cr.]] "V1 Step"
V2. Looping with an Index Argument (to:do:)➤ Repeat a block using each number in the interval from 65
to 122. This block includes a block argument (:asciiNbr),which is specified by an identifier preceded by a colon andseparated from the block’s expressions by a vertical bar. Ineach loop, a successive number in the interval is passedinto the block and used where the block argument appears.
65 to: 122 do: [ :asciiNbr | "V2Step"Transcript show: asciiNbr asCharacter printString]
Creating a Loop
VisualWorks Cookbook, Rev. 2.0 35
V3. Looping with an Index and Steps (to:by:do:)➤ Repeat a block using each number in the interval from 10
to 65, counting by 5s.
10 to: 65 by: 5 do: [ :marker | "V3 Step"Transcript
show: marker printString;show: '---' ].
V4. Looping until the Block Exits (repeat)1. For each repetition of the block, increase a counter.
2. Test whether the counter is greater than 10. If so, exit fromthe loop.
| counter |counter := 0.
[counter := counter + 1. "V4 Step 1"counter > 10 ifTrue: [^true] "V4 Step 2"
] repeat.
V5. Looping while a Condition is True or False(whileTrue: and whileFalse:)1. Create an instance of Time that is 3 seconds from now.
2. Before each repetition of the block, test whether the endTimehas been reached.
3. For each repetition, show the current time in the transcript.
| endTime |endTime := Time now addTime: (Time fromSeconds: 3). "V5 Step 1"
[Time now <= endTime] whileTrue: [ "V5 Step 2"Transcript show: Time now printString; cr]. "V5 Step 3"
V6. Processing Each Element of a Collection (do:)1. Get an array containing the standard color names.
2. Print each color name in the Transcript.

Chapter 1 Smalltalk Basics
36 VisualWorks Cookbook, Rev. 2.0
| colors |colors := ColorValue constantNames. "V6 Step 1"
colors do: [ :colorName |Transcript show: colorName printString; cr] "V6 Step 2"
V7. Detecting the First Element that Meets a Test(detect:)1. Get the color names.
2. Detect the first color that begins with the letter m.
3. Show that color name in the Transcript.
| colors mColor |colors := ColorValue constantNames. "V7 Step 1"
mColor := colors detect: [ :colorName | "V7 Step 2"colorName first = $m].
Transcript show: mColor printString; cr. "V7 Step 3"
V8. Selecting Elements that Meet a Test (select:)1. Get the color names.
2. Get the subcollection of names beginning with the letter d.
3. Show each element of the subcollection in the Transcript.
| colors dColors |colors := ColorValue constantNames. "V8 Step 1"
dColors := colors select: [ :colorName | "V8 Step 2"colorName first = $d].
dColors do: [ :dColor | "V8 Step 3"Transcript show: dColor printString; cr].
V9. Selecting Elements that Fail a Test (reject:)1. Get the color names.

Creating a Loop
VisualWorks Cookbook, Rev. 2.0 37
2. Get the subcollection of names that do not begin with d.
3. Show each element of the subcollection in the Transcript.
| colors nonDColors |colors := ColorValue constantNames. "V9 Step 1"
nonDColors := colors reject: [ :colorName | "V9 Step 2"colorName first = $d].
nonDColors do: [ :nonDColor | "V9 Step 3"Transcript show: nonDColor printString; cr].
V10. Operating on Each Element and Collecting theResults (collect:)1. Get the color names.
2. For each color name, create a string equivalent and capi-talize its initial.
3. Show each element of the resulting collection in theTranscript.
| colors colorsAsStrings string |colors := ColorValue constantNames. "V10 Step 1"
colorsAsStrings := colors collect: [ :colorName | "V10 Step 2"string := colorName asString.string at: 1 put: (string first asUppercase).string].
colorsAsStrings do: [ :color | "V10 Step 3"Transcript show: color; cr].
Chapter 1 Smalltalk Basics
38 VisualWorks Cookbook, Rev. 2.0
Creating Complex True/False Tests
Strategy
When two or more conditions need to be tested, use the logicaland and or messages to combine the tests in a series. Thesemessages come in two forms:
■ & and | (vertical bar, not the letter L)
■ and: and or: (the argument is a block containing the secondtest)
Use the second pair of messages when the second test dependson the first test. In a common situation involving such a depen-dency, the first test checks the data type of a variable and thesecond test sends a message that is appropriate only for thedesired data type.
Using the second form, involving block arguments, is alsoappropriate when the second test is costly, because the secondtest is executed only when needed.
Variants
V1. Answering True Only When Both Tests are Met(Logical And)1. Ask the user for a password.
2. Test the length of the response and respond appropriately.
| response message |response := Dialog request: 'What is your password'. "V1 Step 1"
(response size > 0) & (response size <= 8) "V1 Step 2"ifTrue: [message := 'Thank you. Have a safe journey']ifFalse: [message := 'Sorry, I cannot let you pass'].
Transcript show: message; cr.
V2. Ignoring the Second Test, When Possible1. Ask for a password.
Creating Complex True/False Tests
VisualWorks Cookbook, Rev. 2.0 39
2. Test whether the response has four or more letters. If itdoes, test whether the fourth character is a percent sign.
| response message |response := Dialog request: 'What is your password'. "V2 Step 1"
((response size >= 4) and: [(response at: 4) = $%]) "V2 Step 2"ifTrue: [message := 'Thank you. Have a safe journey']ifFalse: [message := 'Sorry, I cannot let you pass'].
Transcript show: message; cr.


VisualWorks Cookbook, Rev. 2.0 41
Chapter 2
Building Applications
This chapter provides an overview of the major stepsinvolved in building an application. You can use thischapter as a checklist as you create your first applica-tions.
In keeping with its role as a checklist, this chapterdoes not go into detail about any given step. Othersections in the Cookbook supply the detail that ismissing here, and those sections are referred to in the“See Also” notes. For in-depth explanations of thevarious application-building steps outlined here, seethe VisualWorks Tutorial.
Designing the Application 42Painting the User Interface 43Creating the Domain Models 45Connecting the Interface to the Models 47Connecting the Widgets to Each Other 50

Chapter 2 Building Applications
42 VisualWorks Cookbook, Rev. 2.0
Designing the Application
Strategy
For simple applications, you can often “design” by painting theuser interface. Even fairly complex applications that are heavyon interface and light on processing can be created this way.
For complicated applications, involving a complex informationmodel and many windows, a formal design phase is usuallyhelpful. Various methodologies have been proposed foranalyzing and designing object-oriented applications.
ParcPlace-Digitalk offers training and consulting for a method-ology called Object Behavior Analysis and Design (OBA/D). Youcan use this methodology to guide you through the process of:
■ Creating an object-oriented requirements specification,based on the behaviors inherent in the system
■ Creating an architectural design
■ Defining reusable subsystems
■ Creating a detailed design
■ Choosing data-structure classes and supporting objects
■ Evaluating trade-offs with respect to performance andunderstandability
interface
applicationmodel
domainmodels
Painting the User Interface
VisualWorks Cookbook, Rev. 2.0 43
Painting the User Interface
Strategy
Creating the user interface helps you understand the high-leveldata and processing requirements of your application. Usingthe ability of VisualWorks to define placeholder methods for theinterface widgets (described later) you can even use the inter-face to demonstrate your concept to users and get valuableearly feedback.
Basic Steps1. For each window in your interface, open a blank canvas or
an existing canvas that you want to extend.
2. For each desired widget, select it in the Palette and click tolocate it on the desired canvas.
3. Click the Install button on the Canvas Tool to install eachcanvas in an application model (a new or existing subclassof ApplicationModel).
4. Click the Open button on the Canvas Tool to see the inter-face in action.
About the Application Model
Step 4 creates a bare-bones application model. This is theportion of your application that knows how to turn an installedcanvas into an operational interface. It does this invoking aninterface builder, which in turn invokes various windows andwidgets, according to the interface specification provided by theinstalled canvas.
An application model is where you define the application-specific behavior of the widgets in the interface. That is, you
Chapter 2 Building Applications
44 VisualWorks Cookbook, Rev. 2.0
program an application model to establish the connectionbetween each widget and the data or action it represents (insome cases, implementing the action, as well). You can alsoprogram an application model to set up interactions amongmultiple widgets in the interface. VisualWorks provides anumber of tools that accelerate this level of programming, asyou will see in later sections.
An application model typically binds widgets to data andactions that are defined in one or more domain models.
See Also■ “Creating the Domain Models” on page 45
■ “Connecting the Interface to the Models” on page 47
Creating the Domain Models
VisualWorks Cookbook, Rev. 2.0 45
Creating the Domain Models
Strategy
A domain model is an object that represents an entity in theapplication’s domain. In a simple application, the entire appli-cation domain can often be represented by a single model. Forexample, a hypothetical class named RolodexCard could be theentire domain model for a small address-lookup application.
As the application domain becomes more complex, you will findthat multiple domain models are necessary, each representingan entity that interacts with other models in the application. Ina banking application, for example, the domain would bedivided among model classes such as Bank, Customer,FederalReserve, and MonetaryUnit.
Role of the domain model: A domain model is intended toremain free of user-interface code. Any instance variables ormethods that are necessary purely to support the mechanics ofthe user interface belong in the application model. This separa-tion of responsibilities makes it easier to reuse your domainmodels with other interfaces.
Basic Steps1. In a System Browser, define a domain model class (typi-
cally, a subclass of Object).
2. Create an initialize method to set default values for theinstance variables.
3. Create accessing methods for accessing the instancevariables.
4. Create actions methods defining the services that clients canrequest.
Chapter 2 Building Applications
46 VisualWorks Cookbook, Rev. 2.0
5. Create private methods, if necessary, to provide supportingmechanisms for the actions methods.
Variant
Combining Domain and Application Models
For simple applications in which the domain model is unlikelyto be reused with a different interface, it is simpler to merge theresponsibilities of the domain model and the application modelin a single class. This is the approach taken in some of thesample applications, such as List1Example. For a merged model,define it as a subclass of ApplicationModel rather than of Object.
Connecting the Interface to the Models
VisualWorks Cookbook, Rev. 2.0 47
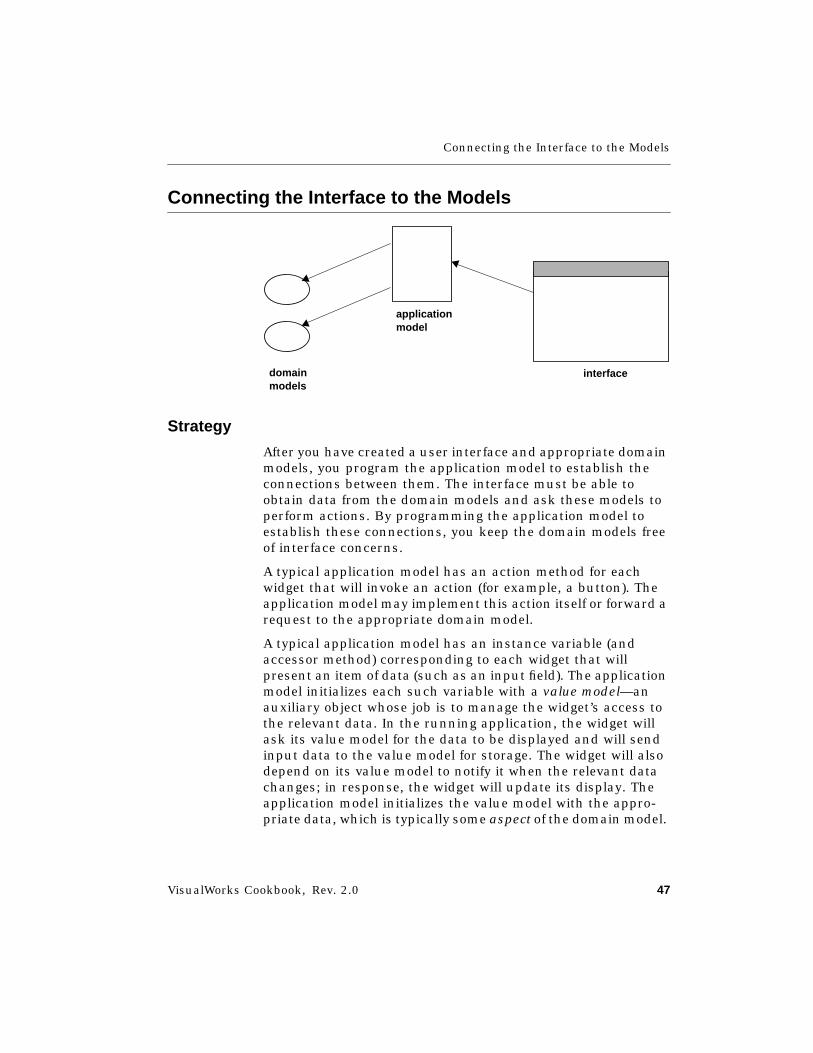
Connecting the Interface to the Models
Strategy
After you have created a user interface and appropriate domainmodels, you program the application model to establish theconnections between them. The interface must be able toobtain data from the domain models and ask these models toperform actions. By programming the application model toestablish these connections, you keep the domain models freeof interface concerns.
A typical application model has an action method for eachwidget that will invoke an action (for example, a button). Theapplication model may implement this action itself or forward arequest to the appropriate domain model.
A typical application model has an instance variable (andaccessor method) corresponding to each widget that willpresent an item of data (such as an input field). The applicationmodel initializes each such variable with a value model—anauxiliary object whose job is to manage the widget’s access tothe relevant data. In the running application, the widget willask its value model for the data to be displayed and will sendinput data to the value model for storage. The widget will alsodepend on its value model to notify it when the relevant datachanges; in response, the widget will update its display. Theapplication model initializes the value model with the appro-priate data, which is typically some aspect of the domain model.
interface
applicationmodel
domainmodels
Chapter 2 Building Applications
48 VisualWorks Cookbook, Rev. 2.0
Basic Steps1. Open a Properties Tool for the canvas.
2. For each data widget, select the widget in the canvas and fillin its Aspect property with the name of the method that willreturn a value model for the widget. Apply the propertysettings to the canvas.
3. For each action button, select the button in the canvas andfill in its Action property with the name of the method thatwill implement the button’s action. Apply the properties.
4. For each widget that is to supply a menu of actions, selectthe widget and fill in its Menu property with the name of amethod that will supply the menu. Apply the properties.
5. Install the canvas in the application model when all proper-ties are applied.
6. In the application model in which the canvas is installed,use the canvas’s define command to create an instancevariable for each data aspect that is named by a widget.Alternatively, you can use a System Browser.
7. Use the canvas’s define command or a System Browser tocreate aspects methods in the application model. Each aspectmethod returns the value of the corresponding aspect vari-able.
8. Use a System Browser to create an initialize method in theapplication model. This method creates and assigns a valuemodel to each aspect variable, initializing each value modelwith the appropriate data from a domain model. (Alterna-tively, you can use the aspect methods to initialize theirrespective aspect variables.)
You can choose from among several kinds of value models,depending on your application’s needs (see the chapterlisted under “See Also”).
9. Use the canvas’s define command or a System Browser tocreate actions methods in the application model. Each actionmethod either implements an action itself or requests anaction from the appropriate domain model.
10. Use the Menu Editor to create and install each menu thatwas specified in a widget’s properties.

Connecting the Interface to the Models
VisualWorks Cookbook, Rev. 2.0 49
See Also■ “Adapting Domain Models to Widgets” on page 703

Chapter 2 Building Applications
50 VisualWorks Cookbook, Rev. 2.0
Connecting the Widgets to Each Other
Strategy
Interface widgets frequently interact, so that when the userchanges the data in one widget, it triggers a change in anotherwidget. For example, when the user selects a customer name ina list, various field widgets might be updated to display detailsabout the newly selected customer.
Arranging for such interactions is known as defining dependen-cies. VisualWorks provides a sophisticated dependency mecha-nism that makes it easy to accomplish this.
Basic Steps1. In a System Browser, create or edit the initialize method of the
application model.
2. For each data aspect whose change is intended to trigger asecondary effect, register an interest in the correspondingvalue model. Registering an interest tells the value modelwhat message to send, and to which object, when its valueis changed.
3. In a protocol named change messages, create a method foreach message that was named in step 2. These methodsimplement the desired side effects that you want to asso-ciate with changes in the data.
See Also■ “Adding and Removing Dependencies” on page 78
initializelistSelection
onChangeSend: #changedSelto: self

VisualWorks Cookbook, Rev. 2.0 51
Part II
User Interface
Chapter 3: Widget Basics 53Chapter 4: Windows 81Chapter 5: Labels 109Chapter 6: Input Fields 121Chapter 7: Lines, Boxes, and Ovals 153Chapter 8: Buttons 159Chapter 9: Text Editors 171Chapter 10: Lists 183Chapter 11: Datasets 203Chapter 12: Tables 215Chapter 13: Menus 225Chapter 14: Sliders 263Chapter 15: Dialogs 277Chapter 16: Subcanvases 301Chapter 17: Notebooks 315Chapter 18: Drag and Drop 339Chapter 19: Custom Views 375Chapter 20: Custom Controllers 391


VisualWorks Cookbook, Rev. 2.0 53
Chapter 3
Widget Basics
Accessing a Widget Programmatically 54Sizing a Widget 56Positioning a Widget 60Aligning a Group of Widgets 65Spacing a Group of Widgets 66Bordering a Widget 67Changing a Widget’s Font 68Hiding a Widget 70Disabling a Widget 72Changing the Tabbing Order 74Coloring a Widget 75Adding and Removing Dependencies 78
Chapter 3 Widget Basics
54 VisualWorks Cookbook, Rev. 2.0
Accessing a Widget Programmatically
Strategy
In a variety of situations, it is useful to program an applicationmodel to send messages to a widget while your application isrunning. For example, you can program the application modelto send messages to a text editor to change the alignment of thedisplayed text, as shown in the basic steps.
In some cases, the application model must send messages tothe wrapper that surrounds the widget. A wrapper is aninstance of WidgetWrapper, which controls various aspects of thewidget’s appearance, such as visibility, enablement, andlayout. The variant shows how to access a widget’s wrapper toenable, disable, hide, and redisplay the widget.
Basic Steps
Online example: Editor1Example
1. In a canvas, select the widget to be accessed. In the widget’sID property, enter an identifying name for the widget (in thiscase, #comment). Apply the properties and install the canvas.
2. In a System Browser, edit a method in the applicationmodel (in this example, alignCenter) so that it sends a
These buttons . . .
. . . cause the applicationmodel to access thiswidget
Accessing a Widget Programmatically
VisualWorks Cookbook, Rev. 2.0 55
componentAt: message to the application model’s builder. Theargument is the ID.
3. Send a widget message to the object returned by step 2.
alignCenter| widget style |widget := (self builder componentAt: #comment) widget. "Basic Steps 2, 3"style := widget textStyle copy.style alignment: 2.widget textStyle: style.widget invalidate.
Variants
V1. Accessing the Widget’s Wrapper
Online example: HideExample
1. In a canvas, select the widget to be accessed. In the widget’sID property, enter an identifying name for the widget. Applythe properties and install the canvas.
2. In a System Browser, edit a method in the applicationmodel (in this example, changedListVisibility) so that it sends acomponentAt: message to the application model’s builder. Theargument is the ID.
changedListVisibility| wrapper desiredState |wrapper := self builder componentAt: #colorList. "V1 Step 2"desiredState := self listVisibility value.
desiredState == #hiddenifTrue: [wrapper beInvisible].
desiredState == #disabledifTrue: [
wrapper beVisible.wrapper disable].
desiredState == #normalifTrue: [wrapper enable; beVisible].
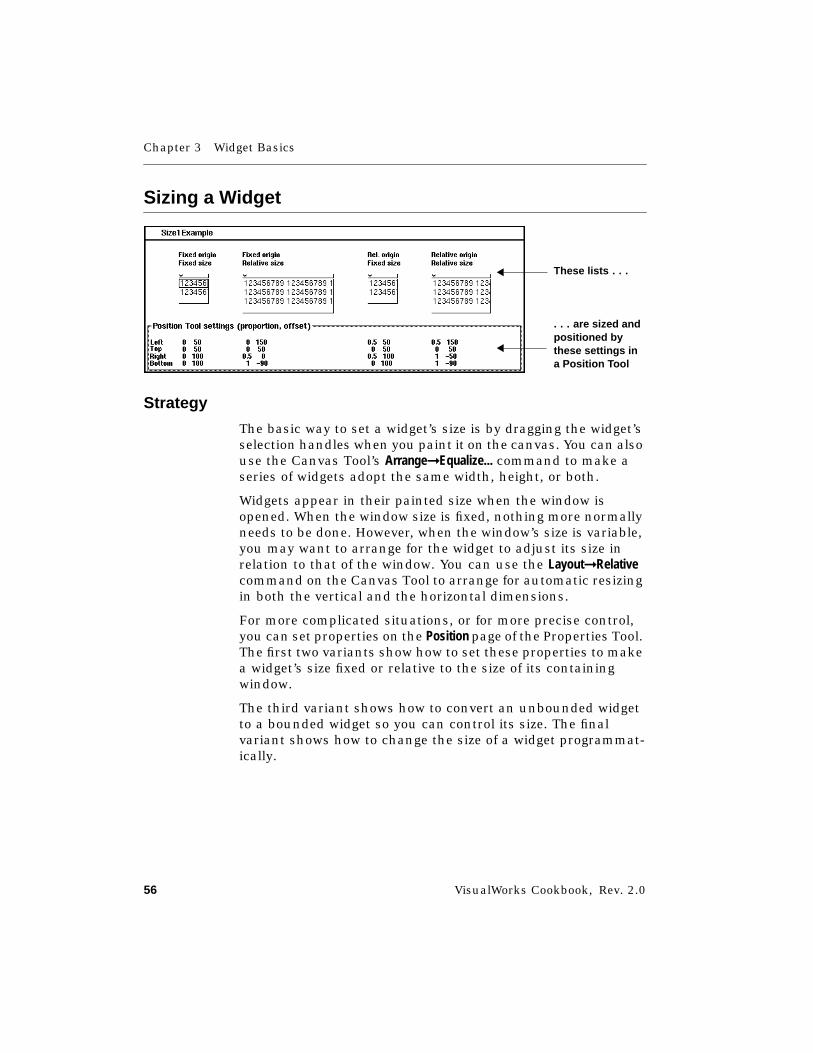
Chapter 3 Widget Basics
56 VisualWorks Cookbook, Rev. 2.0
Sizing a Widget
Strategy
The basic way to set a widget’s size is by dragging the widget’sselection handles when you paint it on the canvas. You can alsouse the Canvas Tool’s Arrange➞Equalize... command to make aseries of widgets adopt the same width, height, or both.
Widgets appear in their painted size when the window isopened. When the window size is fixed, nothing more normallyneeds to be done. However, when the window’s size is variable,you may want to arrange for the widget to adjust its size inrelation to that of the window. You can use the Layout➞Relativecommand on the Canvas Tool to arrange for automatic resizingin both the vertical and the horizontal dimensions.
For more complicated situations, or for more precise control,you can set properties on the Position page of the Properties Tool.The first two variants show how to set these properties to makea widget’s size fixed or relative to the size of its containingwindow.
The third variant shows how to convert an unbounded widgetto a bounded widget so you can control its size. The finalvariant shows how to change the size of a widget programmat-ically.
These list s . . .
. . . are sized andpositioned bythese settings ina Position Tool
Sizing a Widget
VisualWorks Cookbook, Rev. 2.0 57
Variants
V1. Making a Widget’s Size Fixed
A widget’s origin is controlled by the Left (L) and Top (T) propertysettings; its size is controlled by the Right (R) and Bottom (B)property settings. A fixed size is commonly used for buttonsand labels.
Online example: Size1Example
1. In a canvas, select the widget whose size is to be fixed.
2. In a Properties Tool (Position page), set the Right Proportionto be equal to the Left Proportion (in this example, 0 and 0).Since proportions control variability, identical left and rightproportions keep the right edge of the widget a fixeddistance from the left edge.
3. Set the Right Offset to the width of the widget added to theLeft Offset.
4. Set the Bottom Proportion equal to the Top Proportion.
5. Set the Bottom Offset to the height of the widget added tothe Top Offset.
6. Apply the properties and install the canvas.
V2. Making a Widget’s Size Relative
You can cause a widget to expand or shrink in concert with thewindow by setting its Right Proportion to be different from theLeft Proportion, or by setting the Bottom Proportion to bedifferent from the Top Proportion. This is especially useful forwidgets that can use additional space, such as text editors,lists, and tables. Input fields are often made relative in the hori-zontal dimension only.
Online example: Size1Example
1. In a canvas, select the widget whose size is to be relative.
2. In a Properties Tool (Position page), set the Right Proportionto a value that is larger than the Left Proportion. (A rightproportion of 0.5 keeps the right edge anchored at thewindow’s midline while the left edge is anchored to thewindow’s left edge.)
Chapter 3 Widget Basics
58 VisualWorks Cookbook, Rev. 2.0
3. Set the Right Offset to the distance you want between thewidget’s right edge and the imaginary line identified by theRight Proportion.
4. Set the Bottom Proportion to a value that is larger than theTop Proportion.
5. Set the Bottom Offset to the distance between the widget’sbottom edge and the imaginary line representing theBottom Proportion.
6. Apply the properties and install the canvas.
V3. Applying Explicit Boundariesto an Unbounded Widget
Four widgets are inherently variable in size: labels, actionbuttons, radio buttons, and check boxes. These widgets changein size to accommodate their textual labels, which expand andshrink on different platforms because of font differences.Unlike most widgets, which have four boundaries, the variable-size widgets are said to be unbounded.
Sometimes it is preferable to convert an unbounded widget soit is bounded like other widgets. As shown in Size2Example, theadvantage is that you can make a series of buttons have equaldimensions, for example. There is a slight hazard in convertingan unbounded widget, however: on a different platform, a fontchange in the widget’s label may cause the label to expandbeyond the widget’s unyielding boundaries.
Online example: Size2Example
1. In a canvas, select an unbounded widget such as a label.
2. In the Canvas Tool, select Layout➞Be Bounded. Alternatively,select the Bounded button in the Properties Tool (Positionpage). The icon on the Bounded button shows a rectanglewith solid lines on all four sides.
3. Apply the properties, if necessary, and install the canvas.
4. To reverse the operation, select Layout➞Unbounded, or selectthe Unbounded button in the Properties Tool. Apply theproperties, if necessary, and install the canvas.

Sizing a Widget
VisualWorks Cookbook, Rev. 2.0 59
V4. Changing a Widget’s Size Programmatically
In some circumstances, your application may need to resize awidget while the application is running. In Size3Example, a coloredregion is resized in response to Expand and Shrink buttons.
Online example: Size3Example
1. Get the widget’s wrapper from the application model’sbuilder.
2. Send a bounds message to the wrapper to get the widget’sexisting size.
3. Create a rectangle having the desired origin and extent,using the widget’s bounding rectangle to derive the newvalues.
4. Send a newBounds: message to the wrapper. The argument isthe new bounding rectangle.
expandBox| wrapper oldSize newSize |wrapper := self builder componentAt: #box. "V4 Step 1"oldSize := wrapper bounds. "V4 Step 2"
"If the box is bigger than the window already, do nothing."oldSize origin x < 0
ifTrue: [^nil].
"Expand the bounding rectangle by 10 pixels on each side."newSize := Rectangle "V4 Step 3"
origin: oldSize origin - 10corner: oldSize corner + 10.
"Assign the new bounding rectangle to the widget wrapper."wrapper newBounds: newSize. "V4 Step 4"
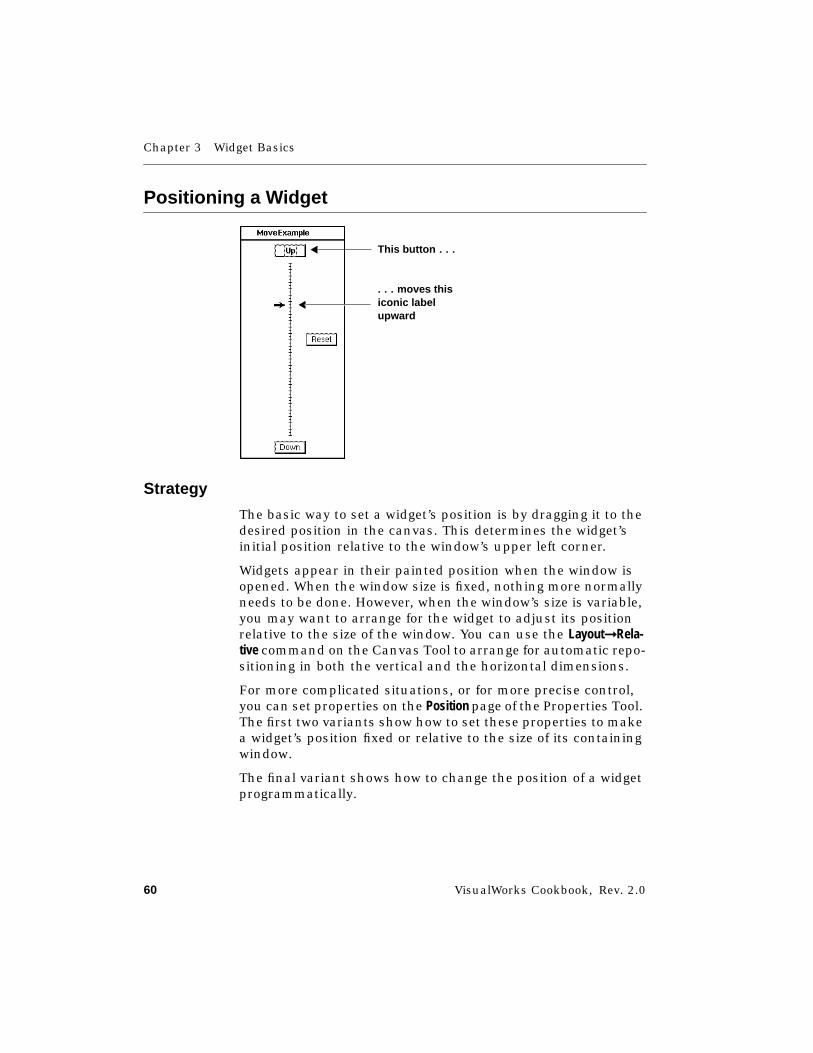
Chapter 3 Widget Basics
60 VisualWorks Cookbook, Rev. 2.0
Positioning a Widget
Strategy
The basic way to set a widget’s position is by dragging it to thedesired position in the canvas. This determines the widget’sinitial position relative to the window’s upper left corner.
Widgets appear in their painted position when the window isopened. When the window size is fixed, nothing more normallyneeds to be done. However, when the window’s size is variable,you may want to arrange for the widget to adjust its positionrelative to the size of the window. You can use the Layout➞Rela-tive command on the Canvas Tool to arrange for automatic repo-sitioning in both the vertical and the horizontal dimensions.
For more complicated situations, or for more precise control,you can set properties on the Position page of the Properties Tool.The first two variants show how to set these properties to makea widget’s position fixed or relative to the size of its containingwindow.
The final variant shows how to change the position of a widgetprogrammatically.
This butto n . . .
. . . moves thisiconic labelupward
Positioning a Widget
VisualWorks Cookbook, Rev. 2.0 61
Variants
V1. Making a Widget’s Origin Fixed
Making a widget fixed is useful when the window’s size is fixed.When the window’s size is variable, this approach works bestfor a button or other fixed-size widget that is located along theleft or top edges of the window.
Online example: Size1Example (start it and then resize thewindow to see the effect)
1. In a canvas, select the widget whose position is to be fixed.
2. In a Properties Tool (Position page), set the Left and TopProportions to 0. These proportions control whether awidget moves relative to the window size. Setting theseproperties to 0 causes the widget’s origin to remain fixed inplace.
3. Set the Left Offset to the desired distance between thewindow’s left edge and the widget’s left edge (in theexample, 50 pixels).
4. Set the Top Offset to the desired distance between thewindow’s top edge and the widget’s top edge (50).
5. Apply the properties and install the canvas.
V2. Making a Widget’s Origin Relative
A relative origin causes the widget to move farther away fromthe left and top edges of the window when the window growsand closer when the window shrinks. This is useful for keepingan object centered in the window and for shifting one widgetthat is placed below or to the right of another widget thatexpands and shrinks in size.
You can also make the origin relative in only one dimension. Inthe example, the origin shifts horizontally as the window isresized, but it maintains a stable offset from the window’s topedge.
Online example: Size1Example
1. In a canvas, select the widget whose position is to be rela-tive.
Chapter 3 Widget Basics
62 VisualWorks Cookbook, Rev. 2.0
2. In a Properties Tool (Position page), set the Left Proportion tothe fraction of the window’s width from which the LeftOffset is to be measured. (In the example, a left proportionof 0.5 causes the widget to remain anchored at the window’smidline.)
3. Set the Left Offset to the distance you want between thewidget’s left edge and the imaginary line identified by theLeft Proportion (50 pixels).
4. Set the Top Proportion to the fraction of the window’sheight from which the Top Offset is to be measured. (In theexample, a top proportion of 0 anchors the widget’s top edgeat the top edge of the window, which is the same as keepingthe origin fixed in the vertical dimension.)
5. Set the Top Offset to the distance you want between thewidget’s top edge and the imaginary line identified by theTop Proportion (50 pixels).
6. Apply the properties and install the canvas.
V3. Giving an Unbounded Widget a Fixed Position
An unbounded widget has no left, right, top, and bottom sidesbecause its boundaries are not fixed. However, it does have areference point that can be positioned in either a fixed orrelative location in the window. By default, the reference pointis the origin of the widget (the top-left corner).
1. In a canvas, select an unbounded widget such as a label.
2. In the Properties Tool (Position page), set all of the Propor-tions to 0.
3. Set the X and Y Offsets to the coordinates of the widget’stop-left corner relative to the top-left corner of the window.
4. Apply the properties and install the canvas.
V4. Giving an Unbounded Widget a Relative Position
Online example: Size2Example
1. In a canvas, select an unbounded widget (in the example,select one of the unbounded buttons on the left to examineits properties).
Positioning a Widget
VisualWorks Cookbook, Rev. 2.0 63
2. In a Properties Tool (Position page), set the x Proportion tothe fraction of the widget’s width at which the referencepoint is to be positioned (0.5).
3. Set the y Proportion to the fraction of the widget’s height atwhich the reference point is to be positioned (0).
4. Set the X Proportion to the fraction of the window’s width atwhich the widget’s reference point is to be anchored. (In theexample, an X Proportion of 0.25 keeps the widget’s referencepoint anchored one-fourth of the way across the window.)
5. Set the X Offset to the distance you want between thewidget’s reference point and the imaginary line identified bythe X proportion (0).
6. Set the Y Offset to the fraction of the window’s height atwhich the widget’s reference point is to be anchored. (In theexample, a Y proportion of 0 keeps the widget’s referencepoint a fixed distance from the window’s top edge.)
7. Apply the properties and install the canvas.
V5. Positioning a Widget Programmatically
Although it is unusual for an application to need explicitcontrol over a widget’s location, it is possible to do so. InMoveExample, a graphic label is repositioned by three buttons,giving the effect of a pointer on a meter. The Up and Downbuttons shift the position relative to the prior position, whilethe Reset button moves the widget to an absolute position.
Online example: MoveExample
1. Get the widget’s wrapper from the application model’sbuilder.
2. For a relative shift in position, send a moveBy: message to thewrapper. The argument is a Point whose x and y valuesindicate the number of pixels by which the widget is to beshifted.
moveArrowUp| wrapper |wrapper := (self builder componentAt: #arrow). "V5 Step 1"
"If the arrow is not too high, raise it another notch."
Chapter 3 Widget Basics
64 VisualWorks Cookbook, Rev. 2.0
wrapper bounds origin y > 30ifTrue: [wrapper moveBy: 0@-5] "V5 Step 2"
3. To apply an absolute position, send a moveTo: message to thewrapper. The argument is a Point whose coordinates are thedesired position of the widget.
resetArrow| wrapper |wrapper := (self builder componentAt: #arrow).wrapper moveTo: self arrowOrigin "V5 Step 3"
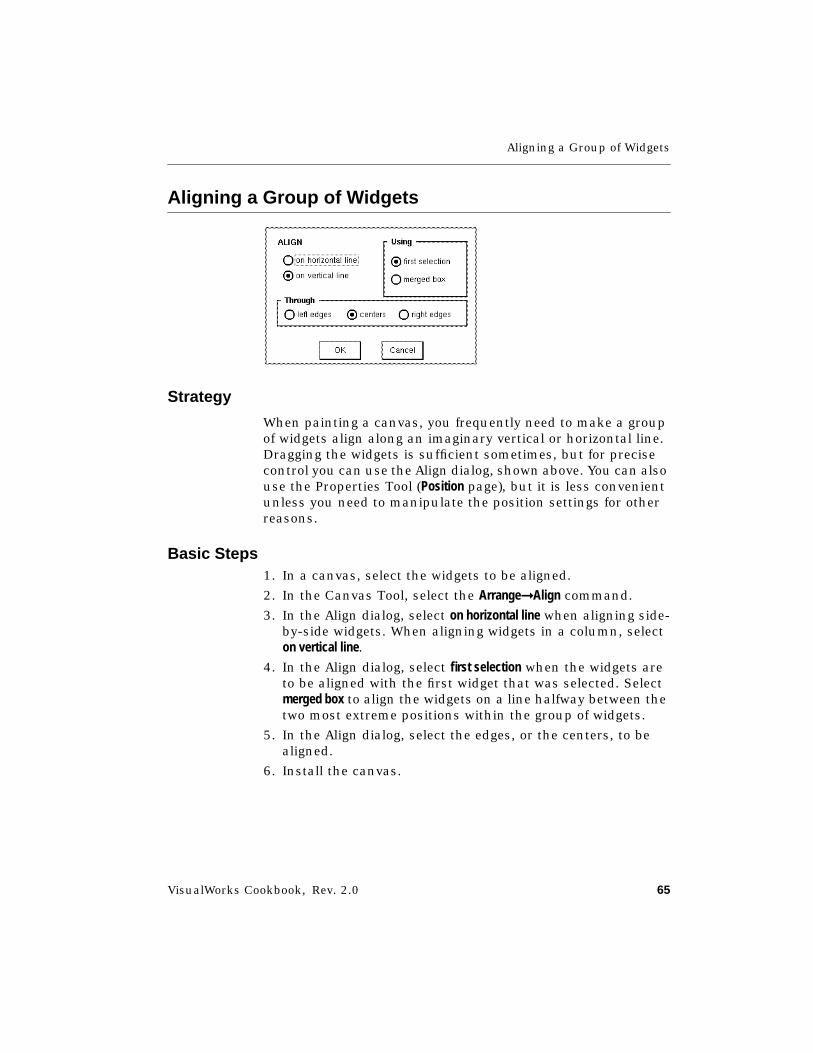
Aligning a Group of Widgets
VisualWorks Cookbook, Rev. 2.0 65
Aligning a Group of Widgets
Strategy
When painting a canvas, you frequently need to make a groupof widgets align along an imaginary vertical or horizontal line.Dragging the widgets is sufficient sometimes, but for precisecontrol you can use the Align dialog, shown above. You can alsouse the Properties Tool (Position page), but it is less convenientunless you need to manipulate the position settings for otherreasons.
Basic Steps1. In a canvas, select the widgets to be aligned.
2. In the Canvas Tool, select the Arrange➞Align command.
3. In the Align dialog, select on horizontal line when aligning side-by-side widgets. When aligning widgets in a column, selecton vertical line.
4. In the Align dialog, select first selection when the widgets areto be aligned with the first widget that was selected. Selectmerged box to align the widgets on a line halfway between thetwo most extreme positions within the group of widgets.
5. In the Align dialog, select the edges, or the centers, to bealigned.
6. Install the canvas.
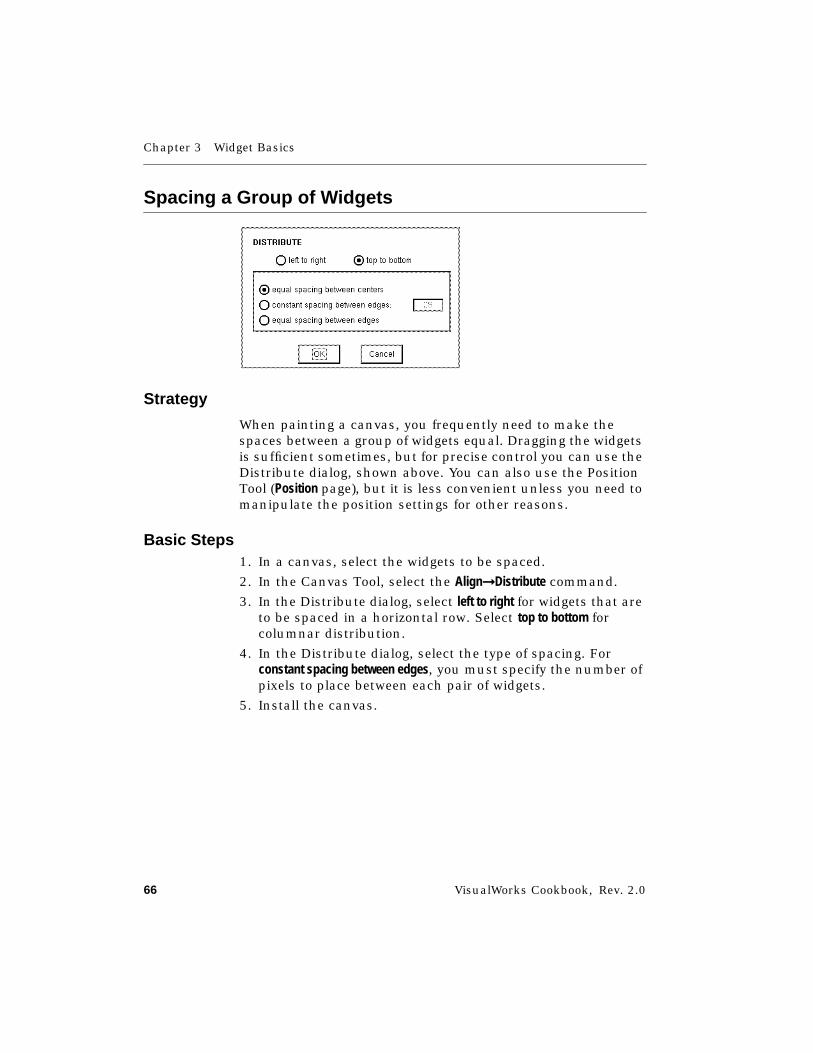
Chapter 3 Widget Basics
66 VisualWorks Cookbook, Rev. 2.0
Spacing a Group of Widgets
Strategy
When painting a canvas, you frequently need to make thespaces between a group of widgets equal. Dragging the widgetsis sufficient sometimes, but for precise control you can use theDistribute dialog, shown above. You can also use the PositionTool (Position page), but it is less convenient unless you need tomanipulate the position settings for other reasons.
Basic Steps1. In a canvas, select the widgets to be spaced.
2. In the Canvas Tool, select the Align➞Distribute command.
3. In the Distribute dialog, select left to right for widgets that areto be spaced in a horizontal row. Select top to bottom forcolumnar distribution.
4. In the Distribute dialog, select the type of spacing. Forconstant spacing between edges, you must specify the number ofpixels to place between each pair of widgets.
5. Install the canvas.

Bordering a Widget
VisualWorks Cookbook, Rev. 2.0 67
Bordering a Widget
Strategy
Most widgets have a border by default. The appearance of theborder changes according to the selected UILook.
Basic Steps1. Select a widget in a canvas.
2. To apply a border to the widget, turn on its Border property.
3. To remove the border, turn off the Border property.
4. Apply the properties and install the canvas.
bordered unbordered
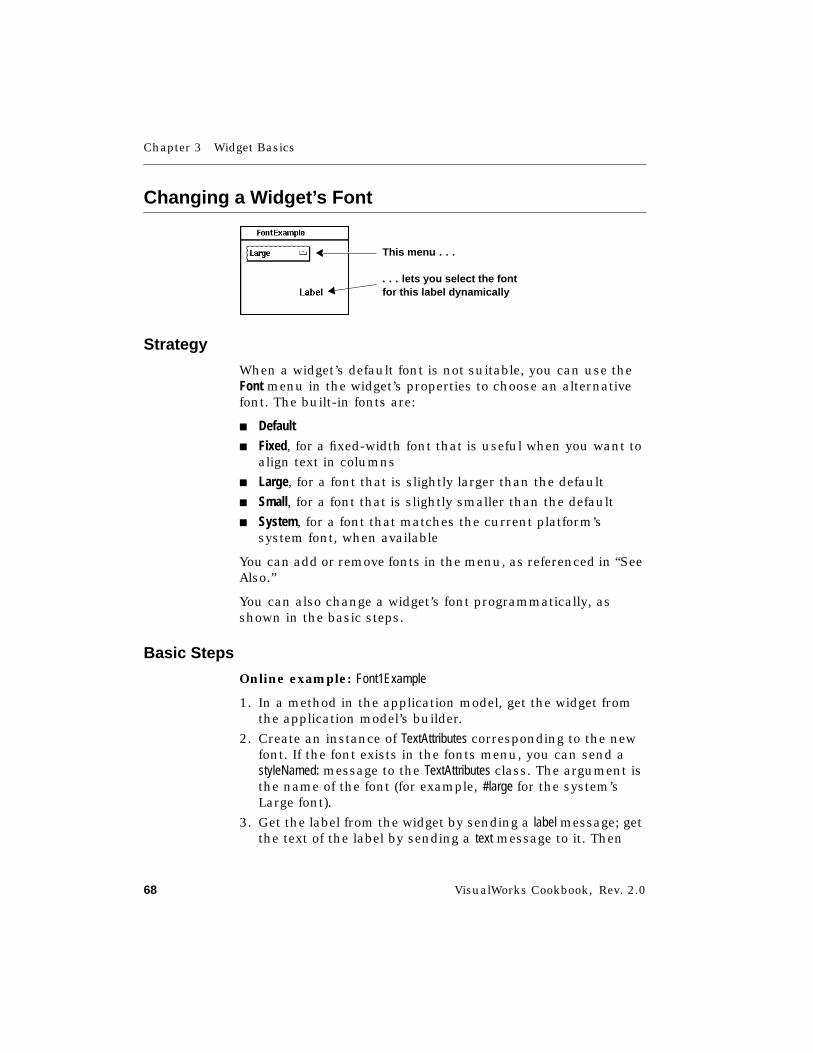
Chapter 3 Widget Basics
68 VisualWorks Cookbook, Rev. 2.0
Changing a Widget’s Font
Strategy
When a widget’s default font is not suitable, you can use theFont menu in the widget’s properties to choose an alternativefont. The built-in fonts are:
■ Default
■ Fixed, for a fixed-width font that is useful when you want toalign text in columns
■ Large, for a font that is slightly larger than the default
■ Small, for a font that is slightly smaller than the default
■ System, for a font that matches the current platform’ssystem font, when available
You can add or remove fonts in the menu, as referenced in “SeeAlso.”
You can also change a widget’s font programmatically, asshown in the basic steps.
Basic Steps
Online example: Font1Example
1. In a method in the application model, get the widget fromthe application model’s builder.
2. Create an instance of TextAttributes corresponding to the newfont. If the font exists in the fonts menu, you can send astyleNamed: message to the TextAttributes class. The argument isthe name of the font (for example, #large for the system’sLarge font).
3. Get the label from the widget by sending a label message; getthe text of the label by sending a text message to it. Then
This menu . . .
. . . lets you select the fontfor this label dynamically
Changing a Widget’s Font
VisualWorks Cookbook, Rev. 2.0 69
install a blank text temporarily as a means of erasing theold label if the new font is smaller.
4. Install the new font in the widget by sending a textStyle:message to the widget. The argument is the TextAttributes youcreated in step 2.
5. Reinstate the original label by sending a labelString: messageto the widget.
changedFont| widget newStyle oldLabel |widget := (self builder componentAt: #label) widget. "Basic Step 1"newStyle := TextAttributes styleNamed: (self labelFont value). "Basic Step 2"
"Erase the existing label in case its font is larger than the new one."oldLabel := widget label text. "Basic Step 3"widget labelString: ''.
"Install the new font."widget textStyle: newStyle. "Basic Step 4"
"Reinstate the original label."widget labelString: oldLabel. "Basic Step 5"
See Also■ “Creating a Custom Text Style” on page 576
■ “Changing the Fonts Menu” on page 587
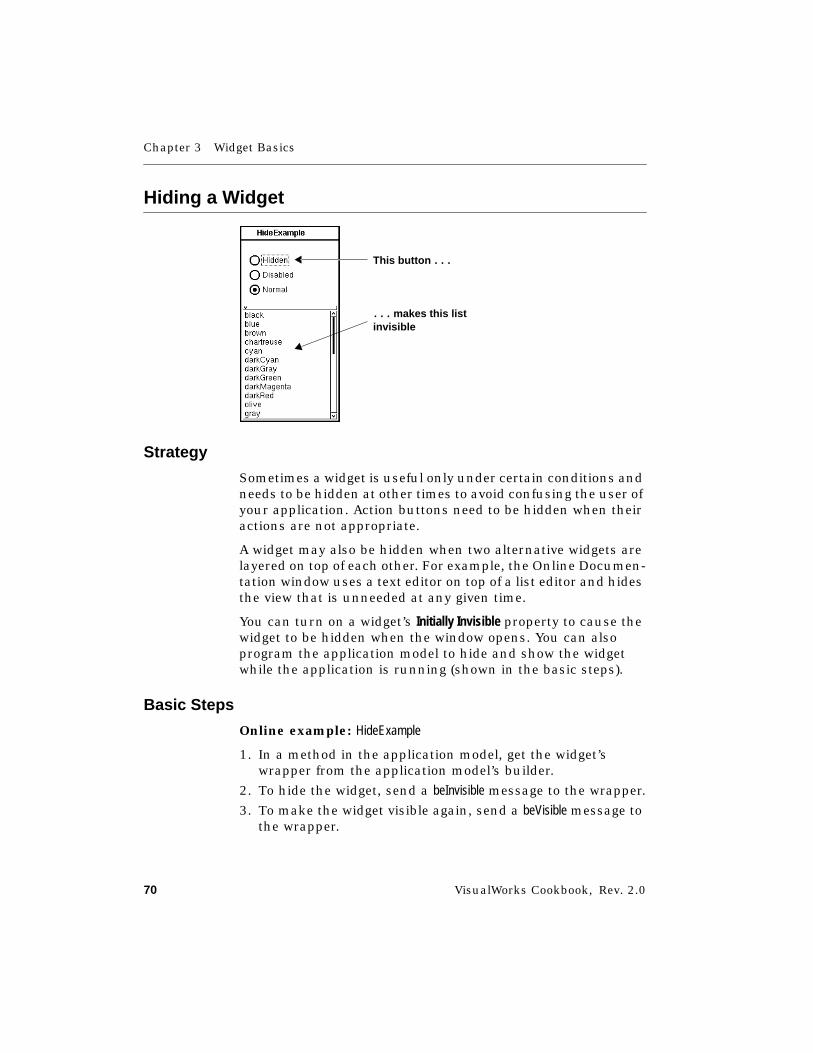
Chapter 3 Widget Basics
70 VisualWorks Cookbook, Rev. 2.0
Hiding a Widget
Strategy
Sometimes a widget is useful only under certain conditions andneeds to be hidden at other times to avoid confusing the user ofyour application. Action buttons need to be hidden when theiractions are not appropriate.
A widget may also be hidden when two alternative widgets arelayered on top of each other. For example, the Online Documen-tation window uses a text editor on top of a list editor and hidesthe view that is unneeded at any given time.
You can turn on a widget’s Initially Invisible property to cause thewidget to be hidden when the window opens. You can alsoprogram the application model to hide and show the widgetwhile the application is running (shown in the basic steps).
Basic Steps
Online example: HideExample
1. In a method in the application model, get the widget’swrapper from the application model’s builder.
2. To hide the widget, send a beInvisible message to the wrapper.
3. To make the widget visible again, send a beVisible message tothe wrapper.
This butto n . . .
. . . makes this listinvisible
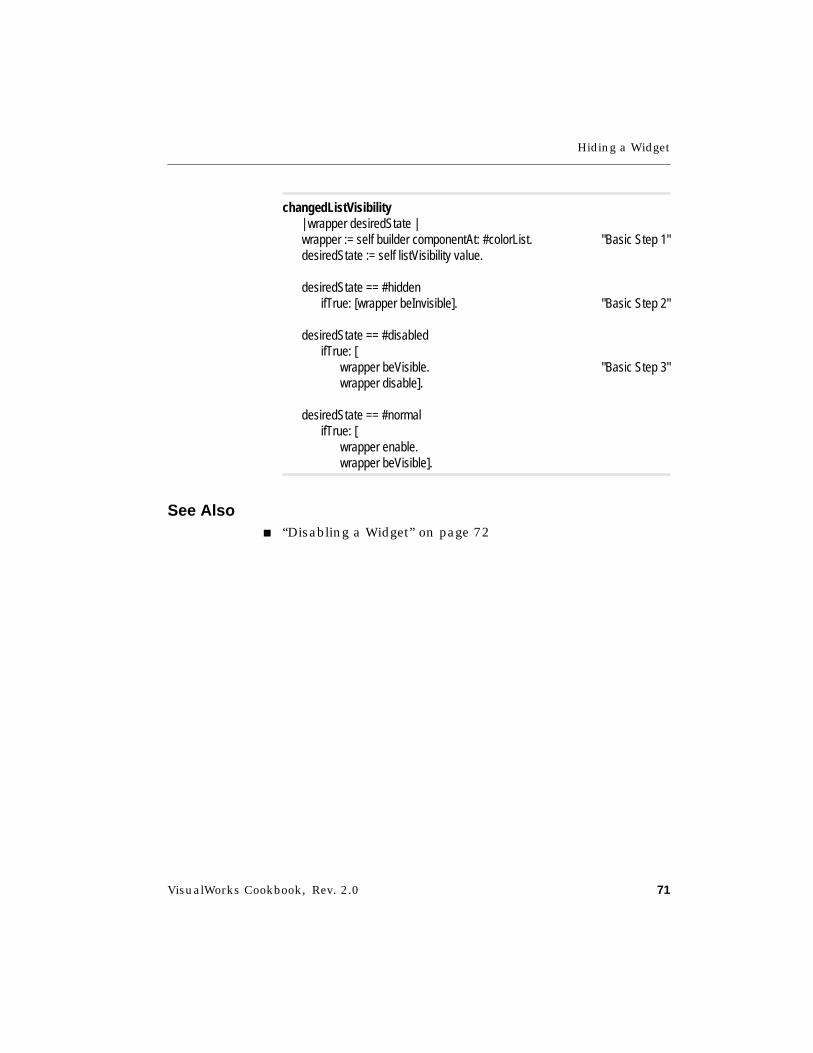
Hiding a Widget
VisualWorks Cookbook, Rev. 2.0 71
changedListVisibility| wrapper desiredState |wrapper := self builder componentAt: #colorList. "Basic Step 1"desiredState := self listVisibility value.
desiredState == #hiddenifTrue: [wrapper beInvisible]. "Basic Step 2"
desiredState == #disabledifTrue: [
wrapper beVisible. "Basic Step 3"wrapper disable].
desiredState == #normalifTrue: [
wrapper enable.wrapper beVisible].
See Also■ “Disabling a Widget” on page 72
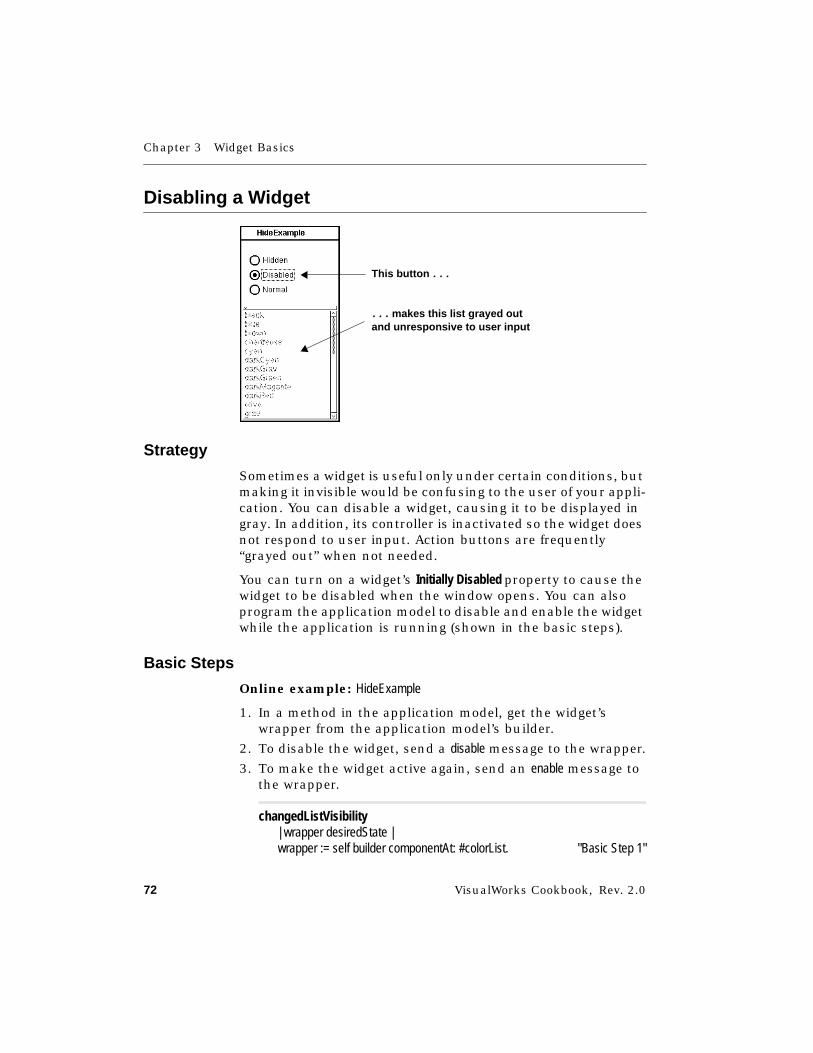
Chapter 3 Widget Basics
72 VisualWorks Cookbook, Rev. 2.0
Disabling a Widget
Strategy
Sometimes a widget is useful only under certain conditions, butmaking it invisible would be confusing to the user of your appli-cation. You can disable a widget, causing it to be displayed ingray. In addition, its controller is inactivated so the widget doesnot respond to user input. Action buttons are frequently“grayed out” when not needed.
You can turn on a widget’s Initially Disabled property to cause thewidget to be disabled when the window opens. You can alsoprogram the application model to disable and enable the widgetwhile the application is running (shown in the basic steps).
Basic Steps
Online example: HideExample
1. In a method in the application model, get the widget’swrapper from the application model’s builder.
2. To disable the widget, send a disable message to the wrapper.
3. To make the widget active again, send an enable message tothe wrapper.
changedListVisibility| wrapper desiredState |wrapper := self builder componentAt: #colorList. "Basic Step 1"
This butto n . . .
. . . makes this list grayed outand unresponsive to user input
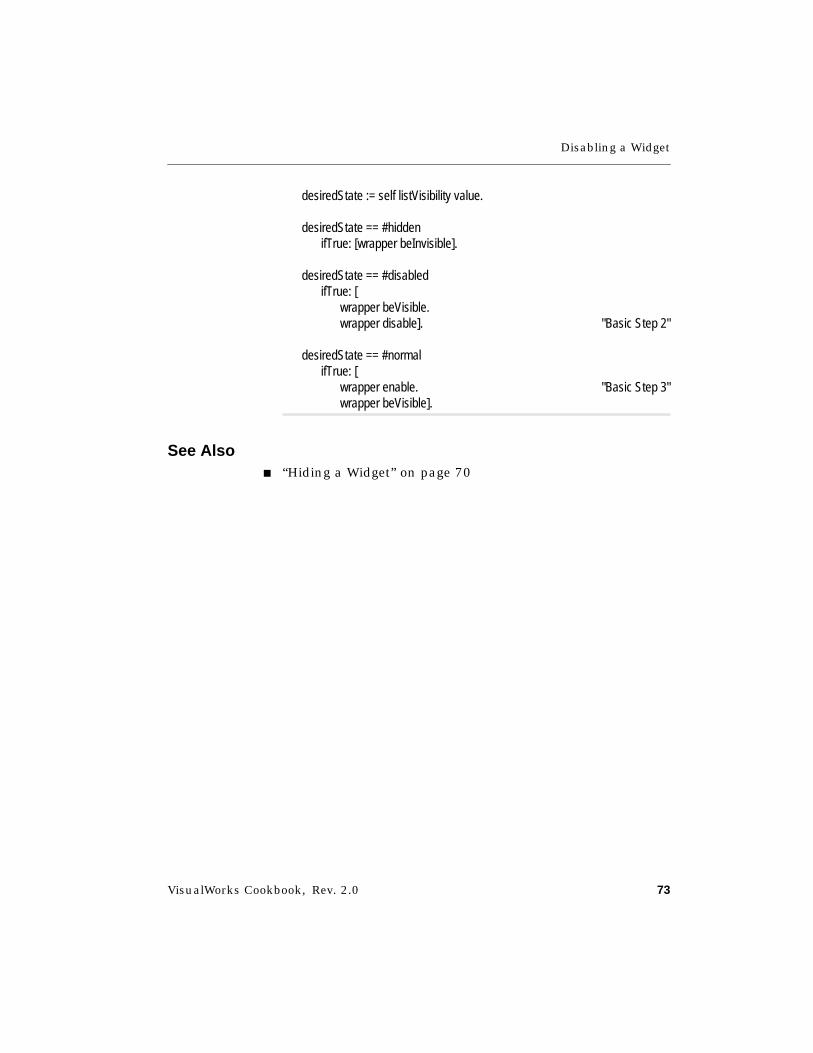
Disabling a Widget
VisualWorks Cookbook, Rev. 2.0 73
desiredState := self listVisibility value.
desiredState == #hiddenifTrue: [wrapper beInvisible].
desiredState == #disabledifTrue: [
wrapper beVisible.wrapper disable]. "Basic Step 2"
desiredState == #normalifTrue: [
wrapper enable. "Basic Step 3"wrapper beVisible].
See Also■ “Hiding a Widget” on page 70
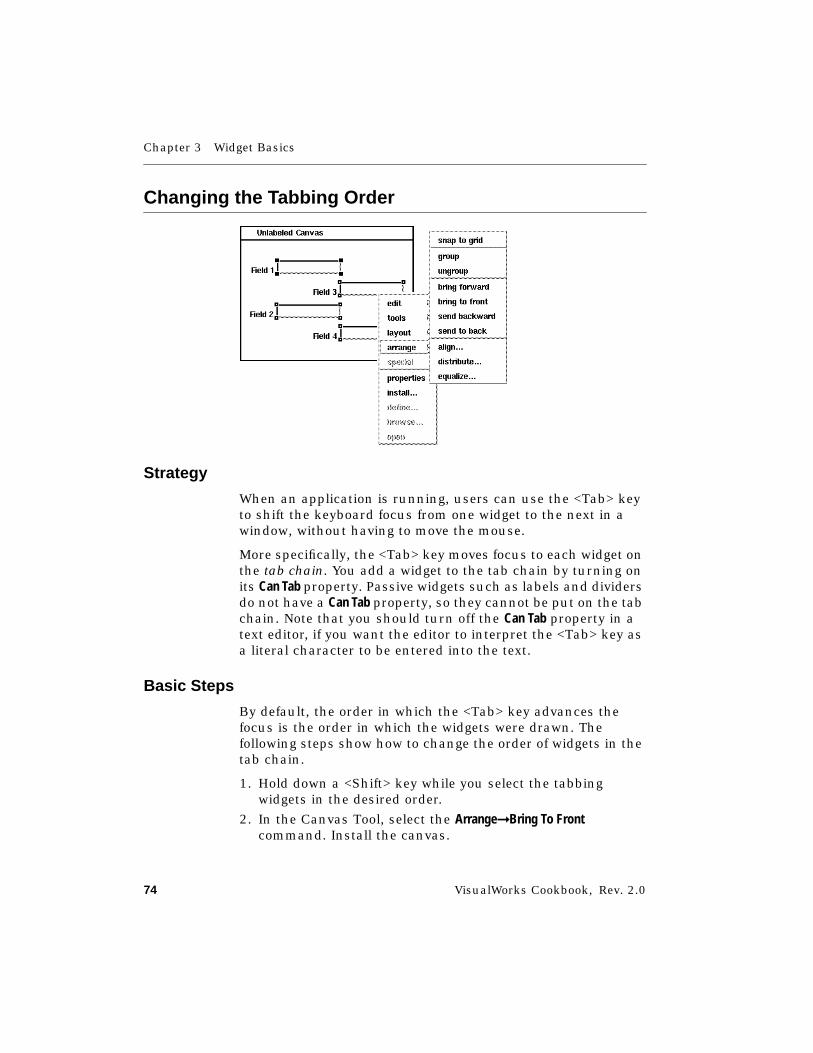
Chapter 3 Widget Basics
74 VisualWorks Cookbook, Rev. 2.0
Changing the Tabbing Order
Strategy
When an application is running, users can use the <Tab> keyto shift the keyboard focus from one widget to the next in awindow, without having to move the mouse.
More specifically, the <Tab> key moves focus to each widget onthe tab chain. You add a widget to the tab chain by turning onits Can Tab property. Passive widgets such as labels and dividersdo not have a Can Tab property, so they cannot be put on the tabchain. Note that you should turn off the Can Tab property in atext editor, if you want the editor to interpret the <Tab> key asa literal character to be entered into the text.
Basic Steps
By default, the order in which the <Tab> key advances thefocus is the order in which the widgets were drawn. Thefollowing steps show how to change the order of widgets in thetab chain.
1. Hold down a <Shift> key while you select the tabbingwidgets in the desired order.
2. In the Canvas Tool, select the Arrange➞Bring To Frontcommand. Install the canvas.
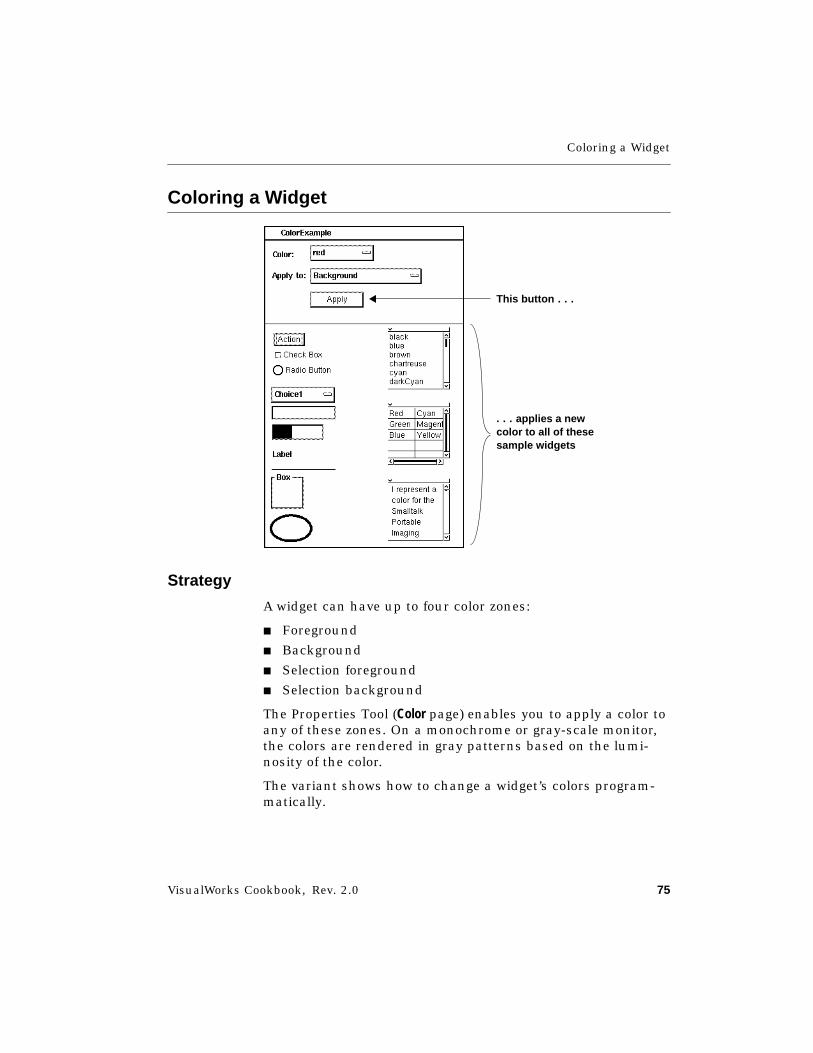
Coloring a Widget
VisualWorks Cookbook, Rev. 2.0 75
Coloring a Widget
Strategy
A widget can have up to four color zones:
■ Foreground
■ Background
■ Selection foreground
■ Selection background
The Properties Tool (Color page) enables you to apply a color toany of these zones. On a monochrome or gray-scale monitor,the colors are rendered in gray patterns based on the lumi-nosity of the color.
The variant shows how to change a widget’s colors program-matically.
This butto n . . .
. . . applies a newcolor to all of thesesample widgets
Chapter 3 Widget Basics
76 VisualWorks Cookbook, Rev. 2.0
Basic Steps1. In a canvas, select the widget whose color you want to set.
1. In a Properties Tool (Color page), select the desired colorfrom the color chart. Alternatively, you can access one ofthe standard, named color constants from a pull-downmenu in the color box of the Properties Tool. You can alsorevert to the widget’s default colors through the policy colorssubmenu in the same pull-down menu.
2. Select the color zone in the Properties Tool.
3. Apply the properties and install the canvas.
Variant
Changing a Widget’s Colors Programmatically
Online example: ColorExample
1. In a method in the application model, get the widget’swrapper from the application model’s builder.
2. Get the LookPreferences from the wrapper and create a copywith the desired color. The copy is created when a color-zone message is sent: foregroundColor:, backgroundColor:,selectionForegroundColor:, or selectionBackgroundColor:. The argumentis the desired new color.
3. Install the new LookPreferences by sending a lookPreferences:message to the wrapper. The argument is the newLookPreferences.
foregroundColor: aColor"For each sample widget, change the indicated color layer."
| wrapper lookPref |self sampleWidgets do: [ :widgetID |
wrapper := (self builder componentAt: widgetID). "Variant Step 1"lookPref := wrapper
lookPreferences foregroundColor: aColor. "Variant Step 2"wrapper lookPreferences: lookPref]. "Variant Step 3"

Coloring a Widget
VisualWorks Cookbook, Rev. 2.0 77
See Also■ “Creating a Color” on page 686

Chapter 3 Widget Basics
78 VisualWorks Cookbook, Rev. 2.0
Adding and Removing Dependencies
Strategy
When a widget’s value is changed, such as when an item isselected from a list, the application often needs to react in someway. A common reaction is to update other widgets based onthe new value. You can arrange for such a reaction, typically aspart of the initialization process. This is known as setting up adependency or registering an interest.
You can also bypass the dependency when unusual circum-stances arise. For example, when two widgets depend on eachother, one of them must bypass the dependency mechanism toavoid infinite recursion. The variants show two ways ofbypassing a dependency.
The first variant removes the dependency and relies on theapplication to reestablish it after the value has been changed.
The second variant bypasses all dependencies, including that ofthe widget’s view. Thus, you must ask the widget to update itsview programmatically. This variant also bypasses any depen-dencies that may have been established by objects other thanthe application model and the widget, but that is not a commonsituation.
This check box . . .
. . . controls whether thelist selection is echoed inthe field below the list

Adding and Removing Dependencies
VisualWorks Cookbook, Rev. 2.0 79
Basic Step
Adding a Dependency
Online example: DependencyExample
➤ In the application model’s initialize method (typically), send anonChangeSend:to: message to the widget’s value holder. Thefirst argument is a message, which will be sent to thesecond argument. The second argument is typically theapplication model itself.
initializecolorNames := SelectionInList with: ColorValue constantNames.selectedColor := String new asValue.fieldIsDependent := false asValue.
"Arrange for the application model to take action when thecheck box is turned on or off."fieldIsDependent
onChangeSend: #changedDependency to: self. "Basic Step"
Variants
V1. Removing a Dependency by Retracting theInterest
Online example: DependencyExample
1. Send a retractInterestsFor: message to the widget’s value holder.The argument is the object that registered the interest, typi-cally the application model itself.
2. After the value has been changed, register the interestagain as shown in the basic step.
changedDependency"Turn on or off the dependency link between the list andthe input field, depending on the value of the check box."
| valueModel |valueModel := self colorNames selectionIndexHolder.
Chapter 3 Widget Basics
80 VisualWorks Cookbook, Rev. 2.0
self fieldIsDependent valueifTrue:
[valueModel onChangeSend: #changedSelection to: self]"V1 Step 2"ifFalse:
[valueModel retractInterestsFor: self]. "V1 Step 1"
V2. Bypassing All Dependencies
Online example: FieldConnectionExample
1. Send a setValue: message to the widget’s value holder insteadof the usual value: message. The argument is the widget’snew value.
2. Get the widget from the application model’s builder and askthe widget to update itself with the new value.
changedB"Use setValue: to bypass dependents, thus avoiding circularity."self bSquared setValue: (self b value raisedTo: 2). "V2 Step 1"
"Since dependents were bypassed when the model was updated,update the view manually."(self builder componentAt: #b2) widget update: #value. "V2 Step 2"
VisualWorks Cookbook, Rev. 2.0 81
Chapter 4
Windows
Opening a Window 82Getting a Window from a Builder 85Sizing a Window 86Moving a Window 90Changing a Window’s Label 92Refreshing a Window’s Display 93Coloring a Window 94Adding and Removing Scroll Bars 96Adding a Menu Bar 98Getting the Active Window 99Getting the Window at a Specific Location 100Closing a Window 101Expanding and Collapsing a Window 103Hiding a Window 104Making a Window a Slave 105Setting a Window’s Icon 108
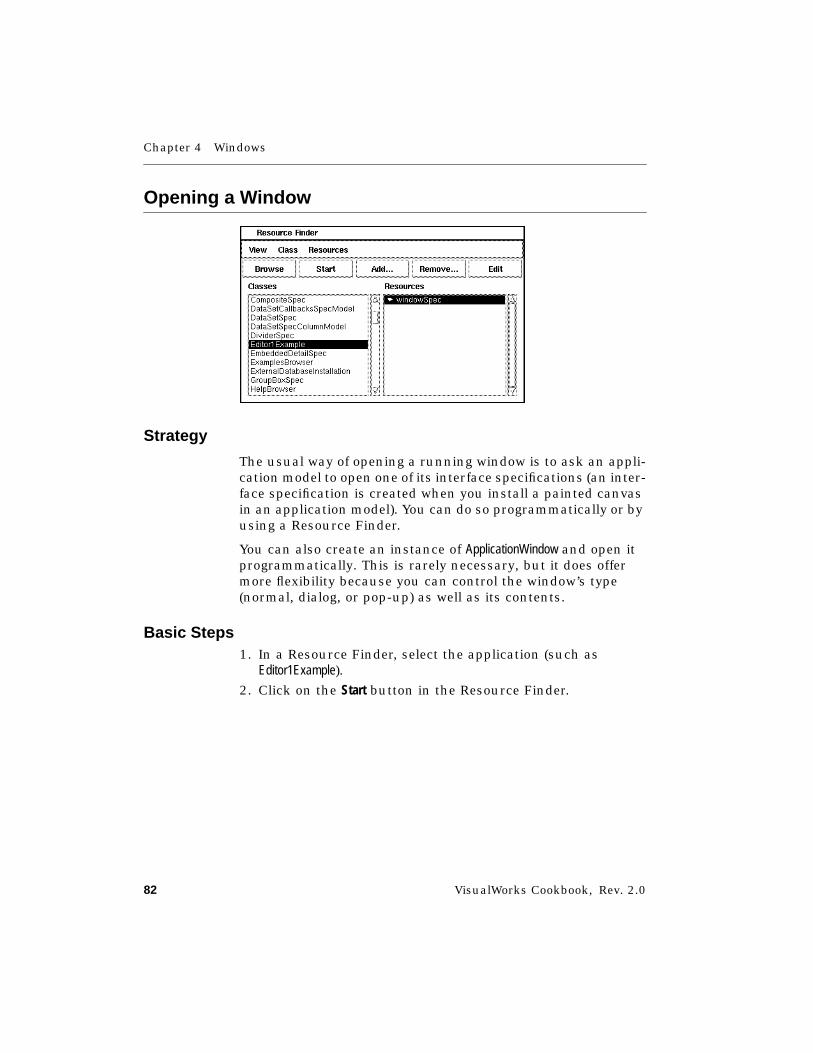
Chapter 4 Windows
82 VisualWorks Cookbook, Rev. 2.0
Opening a Window
Strategy
The usual way of opening a running window is to ask an appli-cation model to open one of its interface specifications (an inter-face specification is created when you install a painted canvasin an application model). You can do so programmatically or byusing a Resource Finder.
You can also create an instance of ApplicationWindow and open itprogrammatically. This is rarely necessary, but it does offermore flexibility because you can control the window’s type(normal, dialog, or pop-up) as well as its contents.
Basic Steps1. In a Resource Finder, select the application (such as
Editor1Example).
2. Click on the Start button in the Resource Finder.
Opening a Window
VisualWorks Cookbook, Rev. 2.0 83
Variants
V1. Opening a Default Canvas Programmatically
This is the programmatic equivalent of basic steps 1 and 2.
➤ Send an open message to the application model.
Editor1Example open "V1 Step"
V2. Opening a Main Canvas by Spec Name
When the spec name is #windowSpec, you can just send open as inthe variant above. When you want to open a different spec on anew instance of an application, use this variant.
Some specs are meant to be opened only after the applicationhas reached a certain state—that is, after the variables onwhich the widgets depend have been properly initialized. Inthose situations, use step 1 in variant 3. This variant isprovided for situations when your main window’s spec has tobe named other than #windowSpec.
➤ Send openWithSpec: to the application class.
Editor1Example openWithSpec: #windowSpec "V2 Step"
V3. Opening a Secondary Canvas by Spec Name
When the same application model serves one or moresecondary canvases in addition to the main canvas, you canopen a secondary canvas with this variant. The example is theopenFinder method implemented by the class named HelpBrowser.
A “secondary” canvas implies that the application has reachedthe proper state—that is, the instance variables required by theinterface have been initialized. In the HelpBrowser, the mainwindow must be opened before the secondary canvas named#finderSpec is opened.
This example creates a new UIBuilder the first time it isinvoked, and it stores that builder in an instance variable.When your application needs to access widgets on the

Chapter 4 Windows
84 VisualWorks Cookbook, Rev. 2.0
secondary canvas later, storing this second builder assures youwill have a means of accessing the widgets.
1. In a method in the application model, create a new UIBuilder.
2. Tell the builder which object will supply its menus, aspects,and other resources by sending it a source: message. Theargument is typically the application model itself. (Alterna-tively, you can send a series of aspectAt:put: messages toinstall the resources directly.)
3. Create the spec object and add the spec to the builder.
4. Open the window.
openFinder"Open the Search window. If already open, raise to top."
| bldr |(self finderBuilder notNil and: [self finderBuilder window isOpen])
ifTrue: [self finderBuilder window raise]ifFalse: [
self finderBuilder: (bldr := UIBuilder new). "V3 Step 1"bldr source: self. "V3 Step 2"bldr add: (self class
interfaceSpecFor: #finderSpec). "V3 Step 3"bldr window
application: self;beSlave.
self adjustSearchScope.self searchStatus value: 0.(bldr componentAt: #searchStatus) widget
setMarkerLength: 5.
bldr openAt: (self "V3 Step 4"originFor: bldr windownextTo: #findButton)].
(self builder componentAt: #listView) takeKeyboardFocus.
See Also■ “Getting a Window from a Builder” on page 85
■ “Dialogs” on page 277
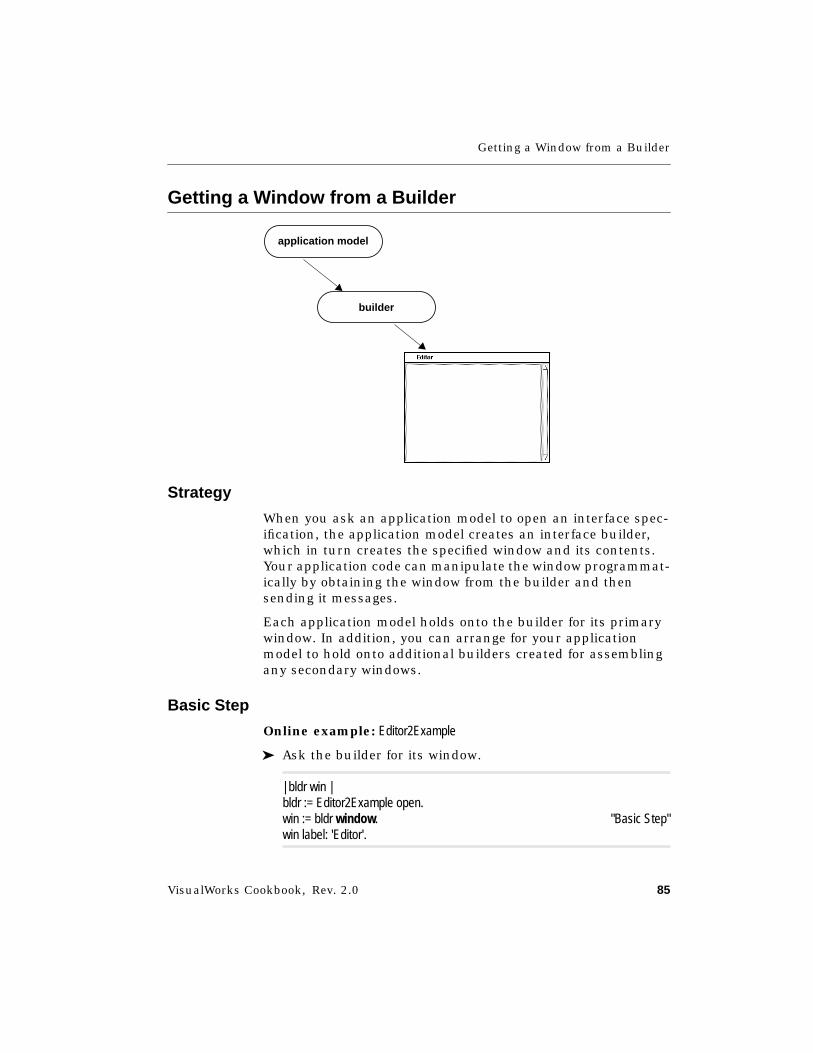
Getting a Window from a Builder
VisualWorks Cookbook, Rev. 2.0 85
Getting a Window from a Builder
Strategy
When you ask an application model to open an interface spec-ification, the application model creates an interface builder,which in turn creates the specified window and its contents.Your application code can manipulate the window programmat-ically by obtaining the window from the builder and thensending it messages.
Each application model holds onto the builder for its primarywindow. In addition, you can arrange for your applicationmodel to hold onto additional builders created for assemblingany secondary windows.
Basic Step
Online example: Editor2Example
➤ Ask the builder for its window.
| bldr win |bldr := Editor2Example open.win := bldr window. "Basic Step"win label: 'Editor'.
application model
builder
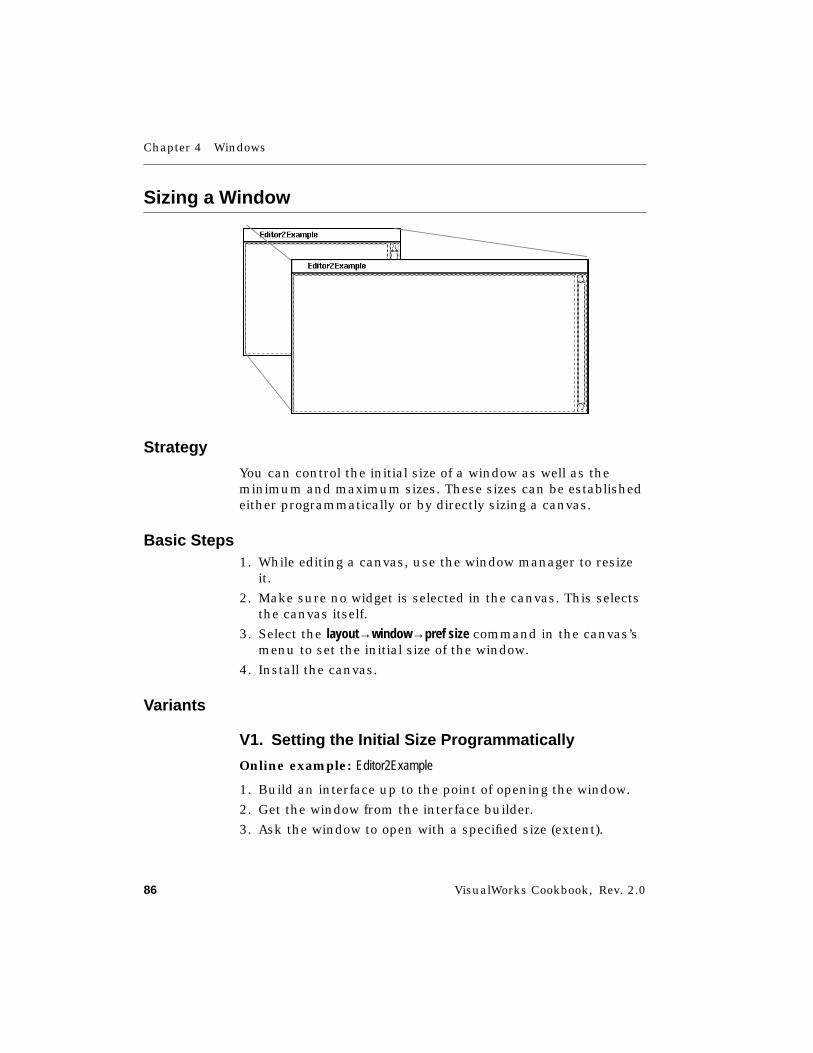
Chapter 4 Windows
86 VisualWorks Cookbook, Rev. 2.0
Sizing a Window
Strategy
You can control the initial size of a window as well as theminimum and maximum sizes. These sizes can be establishedeither programmatically or by directly sizing a canvas.
Basic Steps1. While editing a canvas, use the window manager to resize
it.
2. Make sure no widget is selected in the canvas. This selectsthe canvas itself.
3. Select the layout→window→pref size command in the canvas’smenu to set the initial size of the window.
4. Install the canvas.
Variants
V1. Setting the Initial Size Programmatically
Online example: Editor2Example
1. Build an interface up to the point of opening the window.
2. Get the window from the interface builder.
3. Ask the window to open with a specified size (extent).
Sizing a Window
VisualWorks Cookbook, Rev. 2.0 87
| bldr win |bldr := Editor2Example new allButOpenInterface: #windowSpec.win := bldr window.win openWithExtent: 500@220. "V1 Step 3"
V2. Constraining the Size Using the Canvas
When the interface becomes unusable below a certainminimum size, or when larger than a certain maximum size,you can impose limits on the size. Then when the user tries tomake the window larger or smaller than is reasonable, thewindow maintains a useful size.
1. While editing the canvas, use the window manager to resizethe canvas to its intended minimum size.
2. Make sure no widget is selected in the canvas.
3. Select the layout→window→min size command in the canvas’smenu.
4. Install the canvas.
For maximum size, in step 3 use the layout→window→max sizecommand.
V3. Constraining the Size Programmatically1. Give the window a minimum size and/or a maximum size.
2. Open the window. Then try to resize the window beyond itsminimum or maximum size.
| bldr win |bldr := Editor2Example new allButOpenInterface: #windowSpec.win := bldr window.win minimumSize: 100@100; "V3 Step 1"
maximumSize: 500@300;open. "V3 Step 2"
V4. Making the Size Unchangeable (Fixed)
In step 3 of variant 2, use the layout→window→fixed size command.To accomplish the same thing programmatically, in step 1 ofvariant 3 set the minimum size equal to the maximum size.
Chapter 4 Windows
88 VisualWorks Cookbook, Rev. 2.0
V5. Changing the Size of an Open Window➤ Give the window a new display box, which is the rectangle
within which it displays itself, using screen coordinates.
| bldr win |bldr := Editor2Example open.win := bldr window.win displayBox: (100@100 extent: 400@220). "V5 Step"
V6. Clearing All Size Constraints on a Canvas1. In the window’s canvas, make sure no widget is selected.
2. Select the layout→window→clear all command in the canvas’smenu. Install the canvas.
V7. Determining a Window’s Dimensions1. Ask the window for its minimum size.
2. Ask for its maximum size.
3. Ask for its display box.
4. Ask the display box for its width.
5. Ask the display box for its height.
6. Display the parameters in the Transcript.
| win min max box width height |win := (Editor2Example open) window.
min := win minimumSize. "V7 Step 1"max := win maximumSize. "V7 Step 2"box := win displayBox. "V7 Step 3"width := box width. "V7 Step 4"height := box height. "V7 Step 5"
Transcript "V7 Step 6"show: 'Min: ', min printString; cr;show: 'Max: ', max printString; cr;show: 'Box: ', box printString; cr;show: 'Width: ', width printString; cr;show: 'Height: ', height printString; cr

Sizing a Window
VisualWorks Cookbook, Rev. 2.0 89
See Also■ “Moving a Window” on page 90
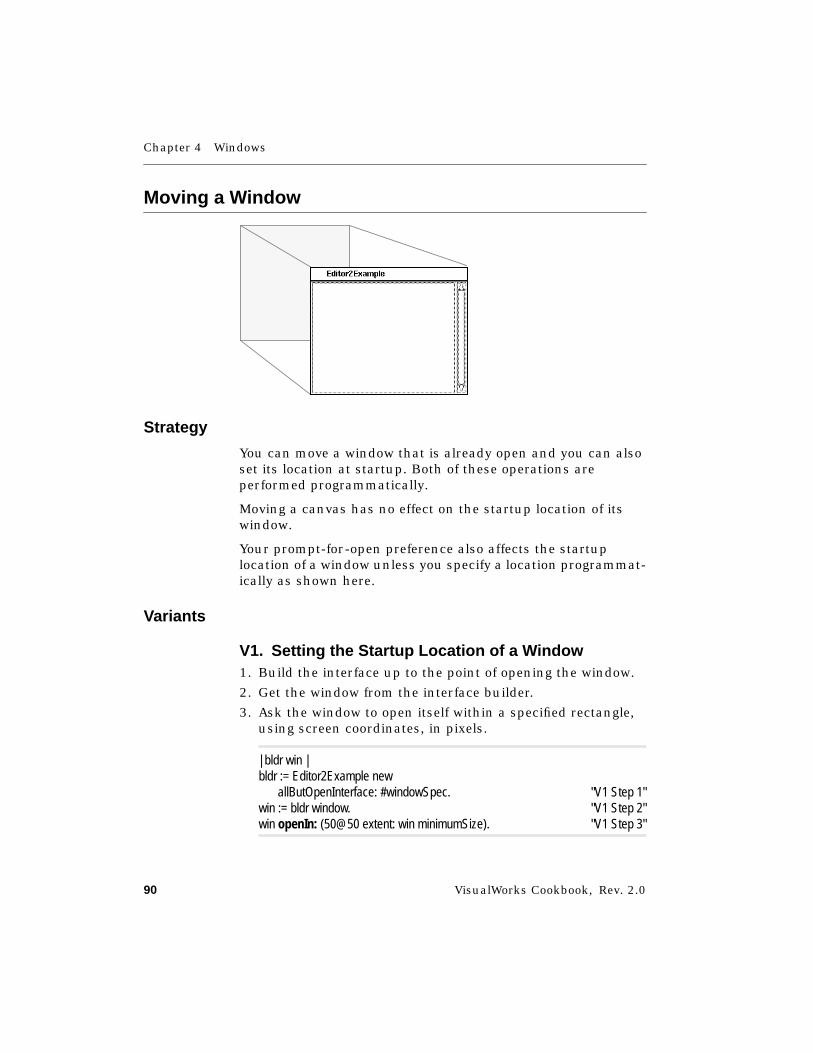
Chapter 4 Windows
90 VisualWorks Cookbook, Rev. 2.0
Moving a Window
Strategy
You can move a window that is already open and you can alsoset its location at startup. Both of these operations areperformed programmatically.
Moving a canvas has no effect on the startup location of itswindow.
Your prompt-for-open preference also affects the startuplocation of a window unless you specify a location programmat-ically as shown here.
Variants
V1. Setting the Startup Location of a Window1. Build the interface up to the point of opening the window.
2. Get the window from the interface builder.
3. Ask the window to open itself within a specified rectangle,using screen coordinates, in pixels.
| bldr win |bldr := Editor2Example new
allButOpenInterface: #windowSpec. "V1 Step 1"win := bldr window. "V1 Step 2"win openIn: (50@50 extent: win minimumSize). "V1 Step 3"
Moving a Window
VisualWorks Cookbook, Rev. 2.0 91
V2. Moving an Open Window➤ Ask the window to relocate its origin (upper-left corner) to a
specified point, using screen coordinates.
| win |win := (Editor2Example open) window.(Delay forSeconds: 1) wait.win moveTo: 300@50. "V2 Step"
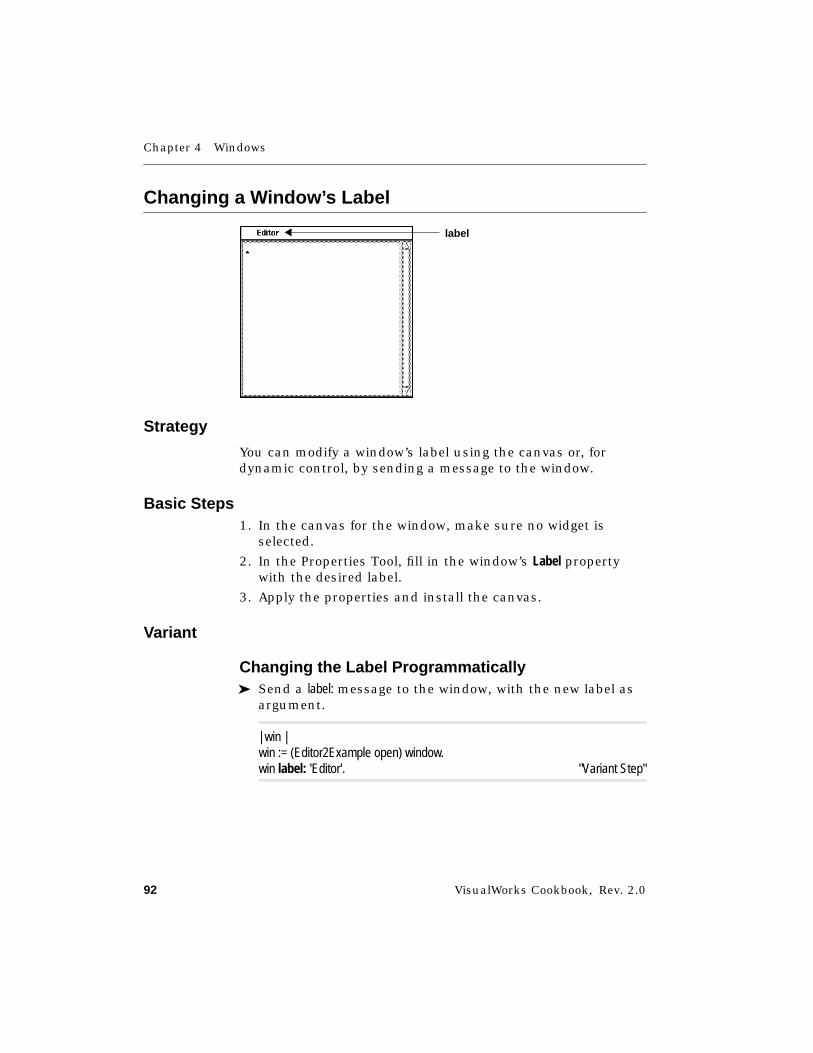
Chapter 4 Windows
92 VisualWorks Cookbook, Rev. 2.0
Changing a Window’s Label
Strategy
You can modify a window’s label using the canvas or, fordynamic control, by sending a message to the window.
Basic Steps1. In the canvas for the window, make sure no widget is
selected.
2. In the Properties Tool, fill in the window’s Label propertywith the desired label.
3. Apply the properties and install the canvas.
Variant
Changing the Label Programmatically➤ Send a label: message to the window, with the new label as
argument.
| win |win := (Editor2Example open) window.win label: 'Editor'. "Variant Step"
label
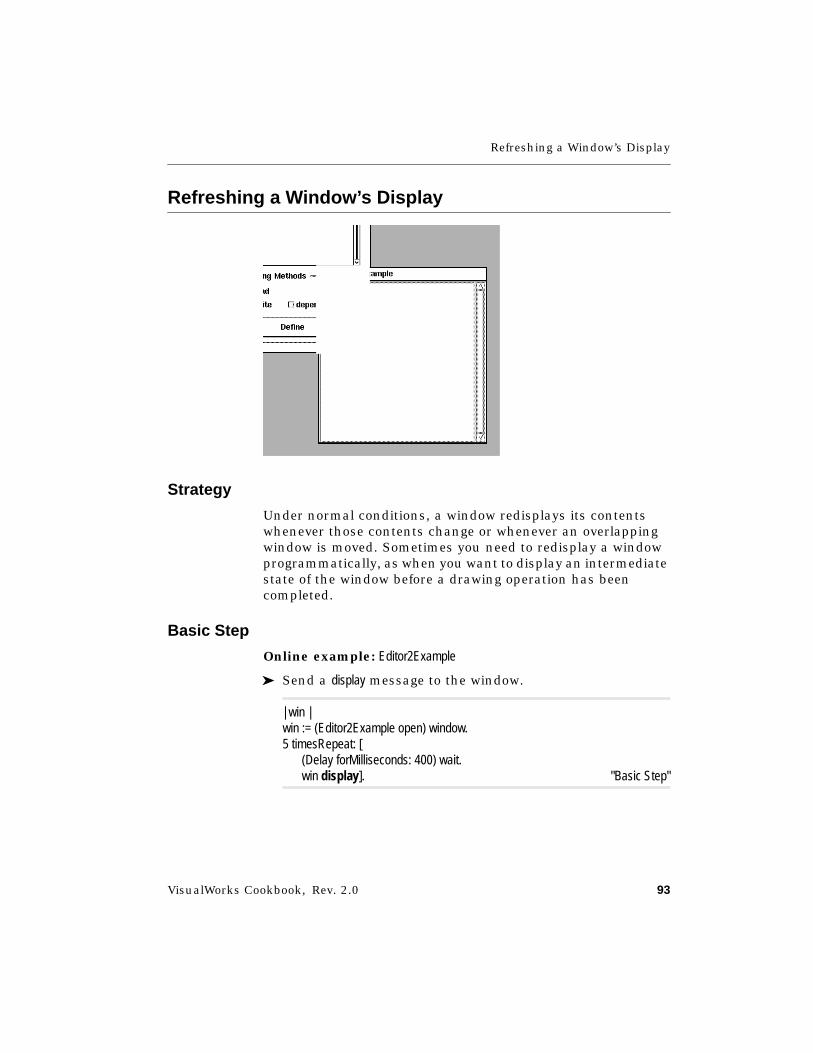
Refreshing a Window’s Display
VisualWorks Cookbook, Rev. 2.0 93
Refreshing a Window’s Display
Strategy
Under normal conditions, a window redisplays its contentswhenever those contents change or whenever an overlappingwindow is moved. Sometimes you need to redisplay a windowprogrammatically, as when you want to display an intermediatestate of the window before a drawing operation has beencompleted.
Basic Step
Online example: Editor2Example
➤ Send a display message to the window.
| win |win := (Editor2Example open) window.5 timesRepeat: [
(Delay forMilliseconds: 400) wait.win display]. "Basic Step"
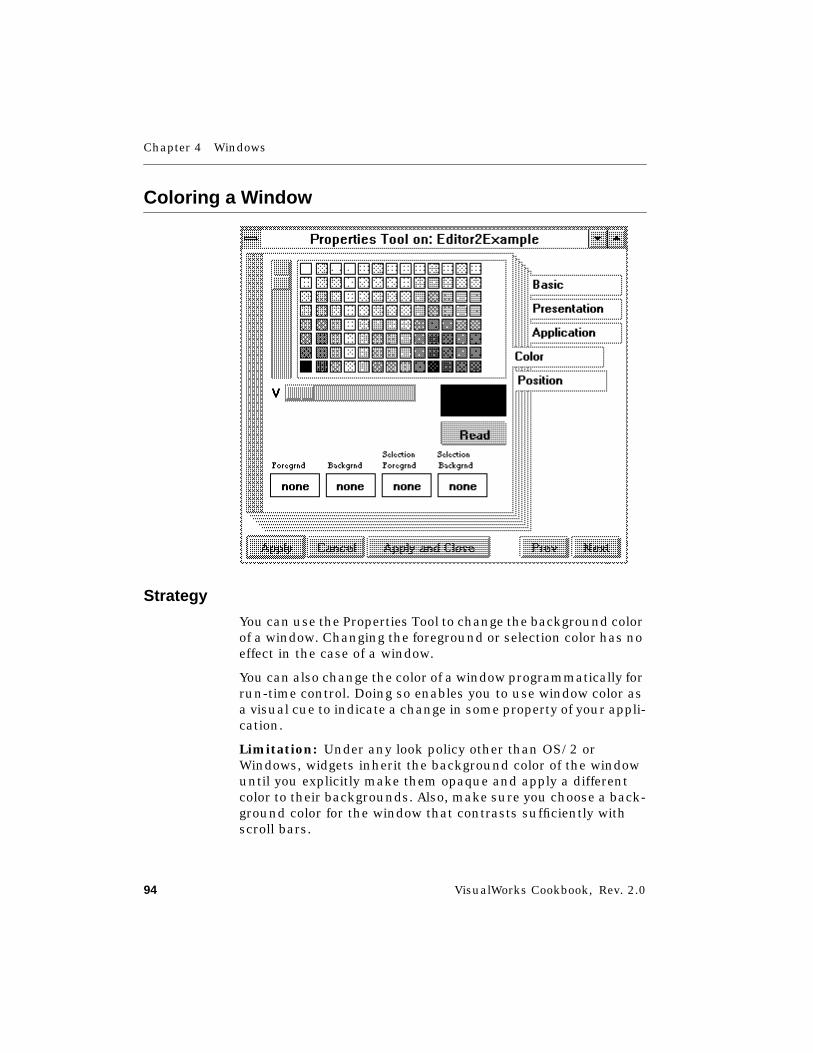
Chapter 4 Windows
94 VisualWorks Cookbook, Rev. 2.0
Coloring a Window
Strategy
You can use the Properties Tool to change the background colorof a window. Changing the foreground or selection color has noeffect in the case of a window.
You can also change the color of a window programmatically forrun-time control. Doing so enables you to use window color asa visual cue to indicate a change in some property of your appli-cation.
Limitation: Under any look policy other than OS/2 orWindows, widgets inherit the background color of the windowuntil you explicitly make them opaque and apply a differentcolor to their backgrounds. Also, make sure you choose a back-ground color for the window that contrasts sufficiently withscroll bars.
Coloring a Window
VisualWorks Cookbook, Rev. 2.0 95
Basic Steps1. In the canvas for the window, make sure no widget is
selected.
2. In a Properties Tool (Color page), select the color for thebackground.
3. Apply the properties and install the canvas.
Variant
Changing the Color Programmatically
Online example: Editor2Example
In the following example, we create a loop that is repeated foreach of the color constants. For each color, the window back-ground is changed and the window is redisplayed.
➤ Send a background: message to the window, with the color asargument.
| win color |win := (Editor2Example open) window.
ColorValue constantNames do: [ :colorName |(Delay forMilliseconds: 200) wait.color := ColorValue perform: colorName.win background: color. "Variant Step"win display]
See Also■ “Creating a Color” on page 686
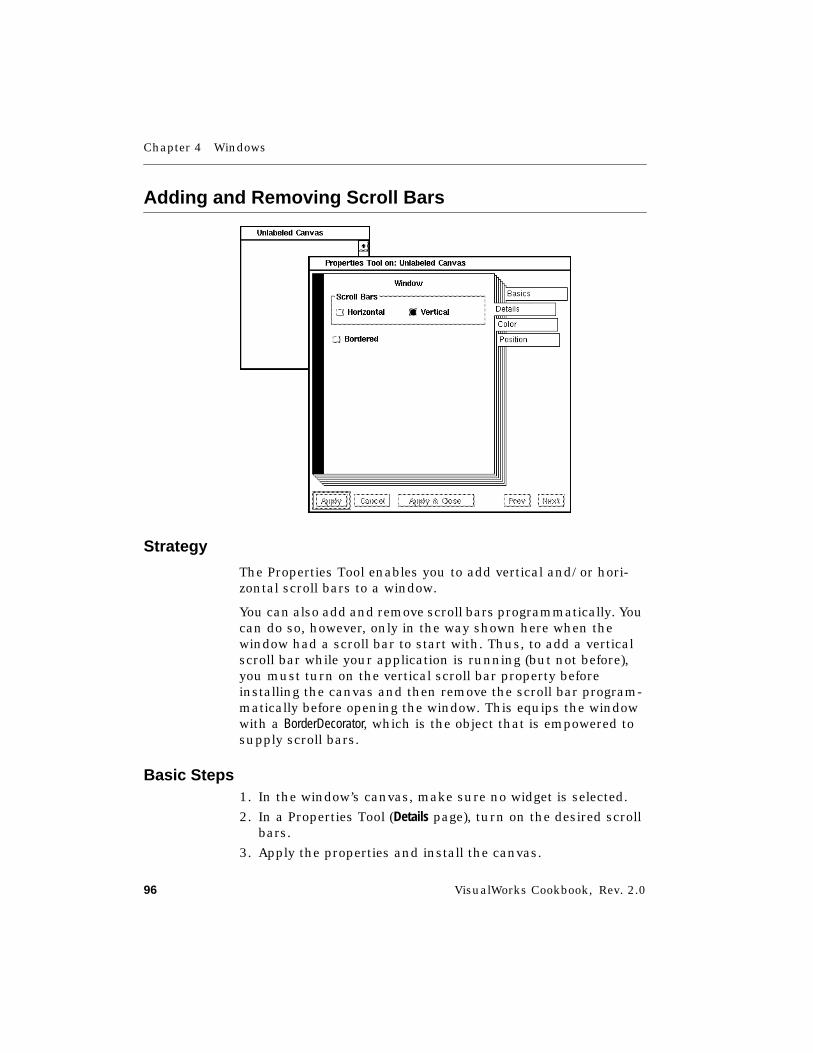
Chapter 4 Windows
96 VisualWorks Cookbook, Rev. 2.0
Adding and Removing Scroll Bars
Strategy
The Properties Tool enables you to add vertical and/or hori-zontal scroll bars to a window.
You can also add and remove scroll bars programmatically. Youcan do so, however, only in the way shown here when thewindow had a scroll bar to start with. Thus, to add a verticalscroll bar while your application is running (but not before),you must turn on the vertical scroll bar property beforeinstalling the canvas and then remove the scroll bar program-matically before opening the window. This equips the windowwith a BorderDecorator, which is the object that is empowered tosupply scroll bars.
Basic Steps1. In the window’s canvas, make sure no widget is selected.
2. In a Properties Tool (Details page), turn on the desired scrollbars.
3. Apply the properties and install the canvas.
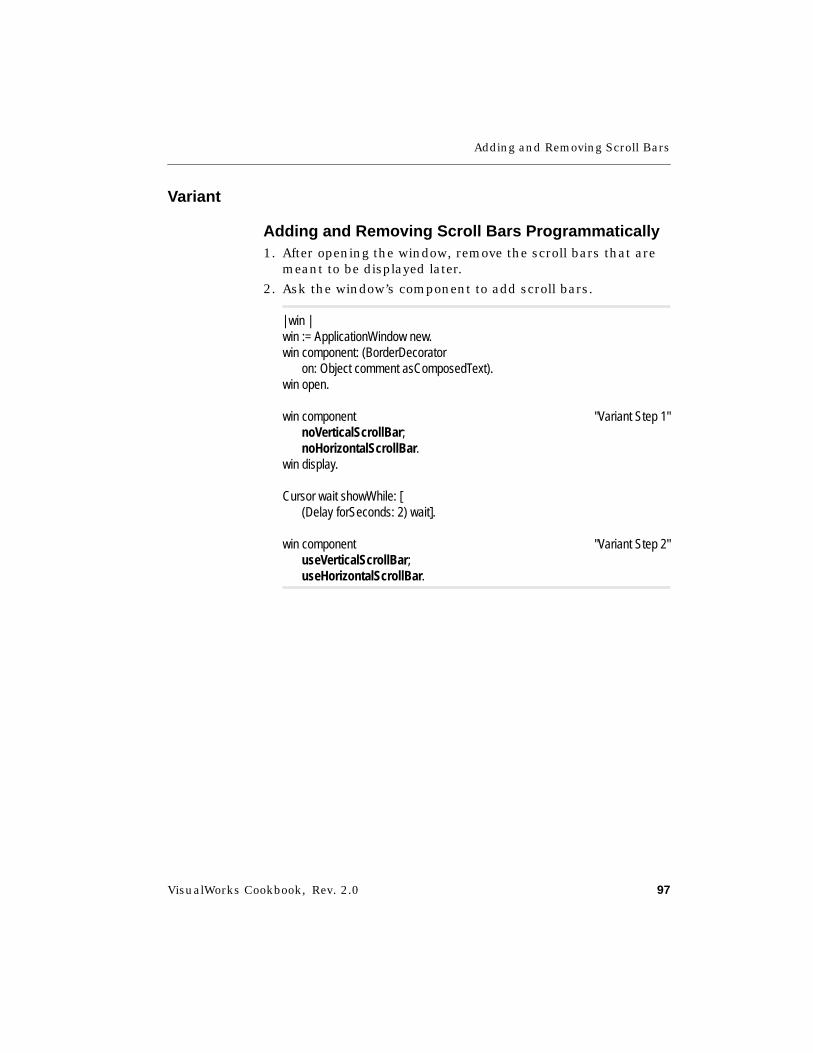
Adding and Removing Scroll Bars
VisualWorks Cookbook, Rev. 2.0 97
Variant
Adding and Removing Scroll Bars Programmatically1. After opening the window, remove the scroll bars that are
meant to be displayed later.
2. Ask the window’s component to add scroll bars.
| win |win := ApplicationWindow new.win component: (BorderDecorator
on: Object comment asComposedText).win open.
win component "Variant Step 1"noVerticalScrollBar;noHorizontalScrollBar.
win display.
Cursor wait showWhile: [(Delay forSeconds: 2) wait].
win component "Variant Step 2"useVerticalScrollBar;useHorizontalScrollBar.
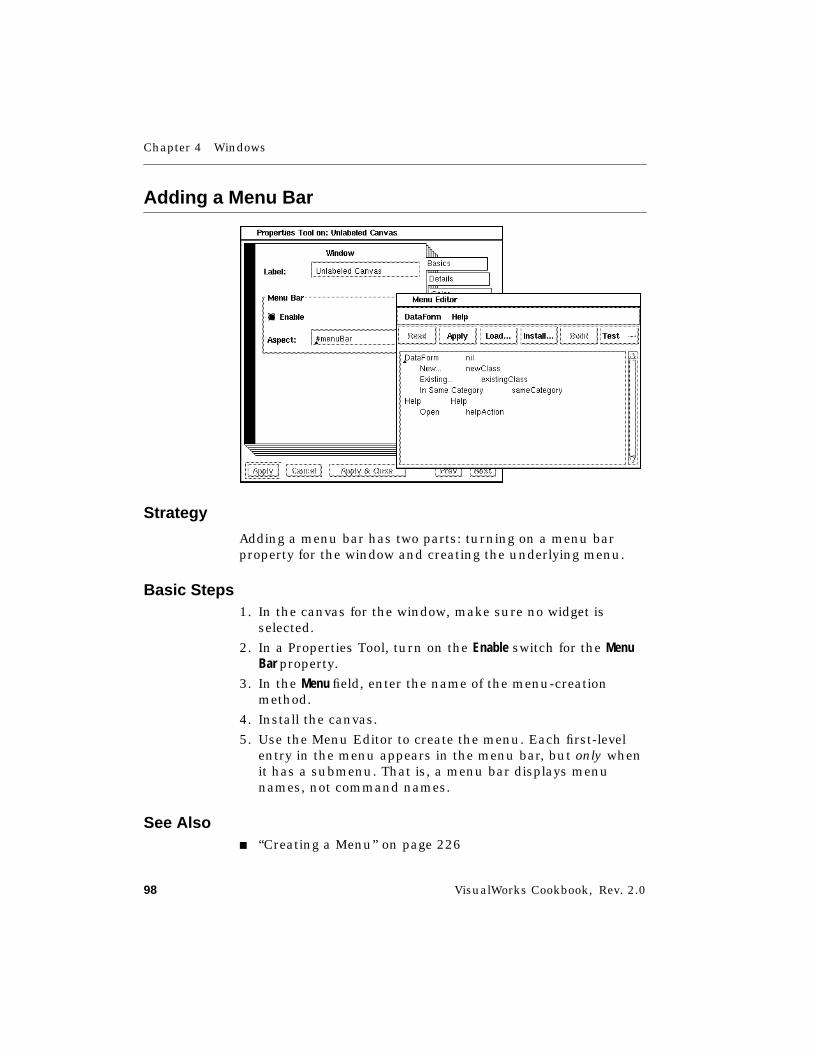
Chapter 4 Windows
98 VisualWorks Cookbook, Rev. 2.0
Adding a Menu Bar
Strategy
Adding a menu bar has two parts: turning on a menu barproperty for the window and creating the underlying menu.
Basic Steps1. In the canvas for the window, make sure no widget is
selected.
2. In a Properties Tool, turn on the Enable switch for the MenuBar property.
3. In the Menu field, enter the name of the menu-creationmethod.
4. Install the canvas.
5. Use the Menu Editor to create the menu. Each first-levelentry in the menu appears in the menu bar, but only whenit has a submenu. That is, a menu bar displays menunames, not command names.
See Also■ “Creating a Menu” on page 226
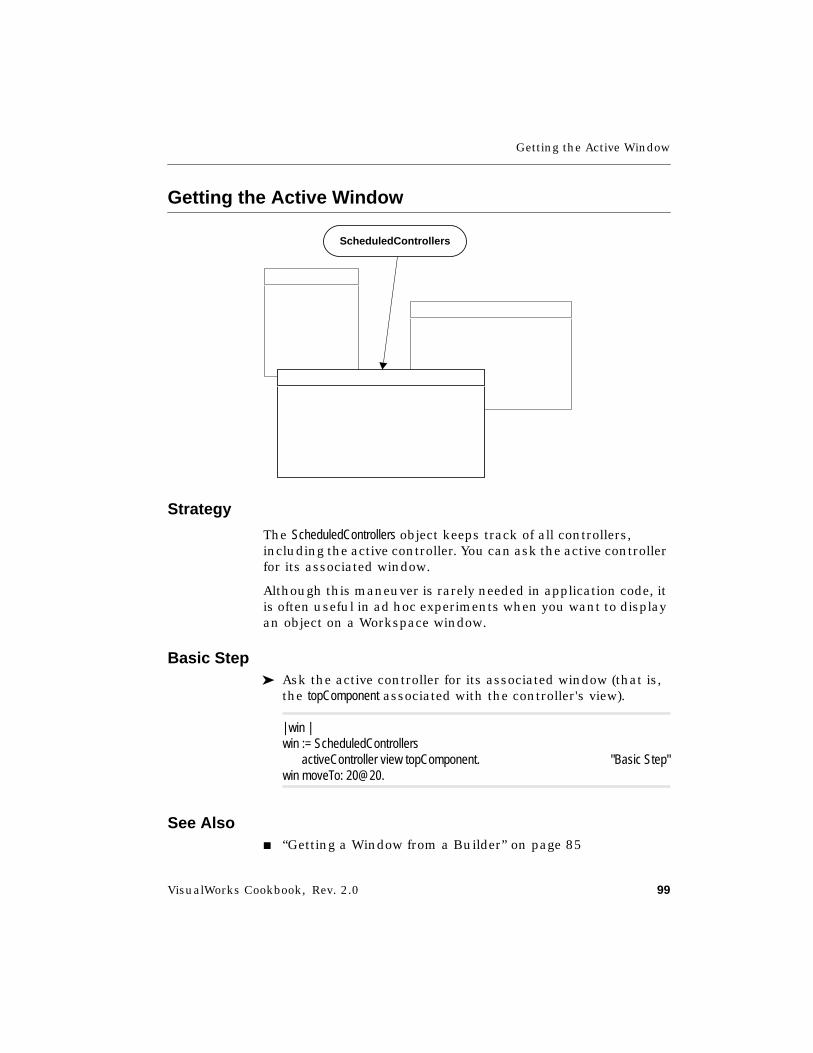
Getting the Active Window
VisualWorks Cookbook, Rev. 2.0 99
Getting the Active Window
Strategy
The ScheduledControllers object keeps track of all controllers,including the active controller. You can ask the active controllerfor its associated window.
Although this maneuver is rarely needed in application code, itis often useful in ad hoc experiments when you want to displayan object on a Workspace window.
Basic Step➤ Ask the active controller for its associated window (that is,
the topComponent associated with the controller's view).
| win |win := ScheduledControllers
activeController view topComponent. "Basic Step"win moveTo: 20@20.
See Also■ “Getting a Window from a Builder” on page 85
ScheduledControllers
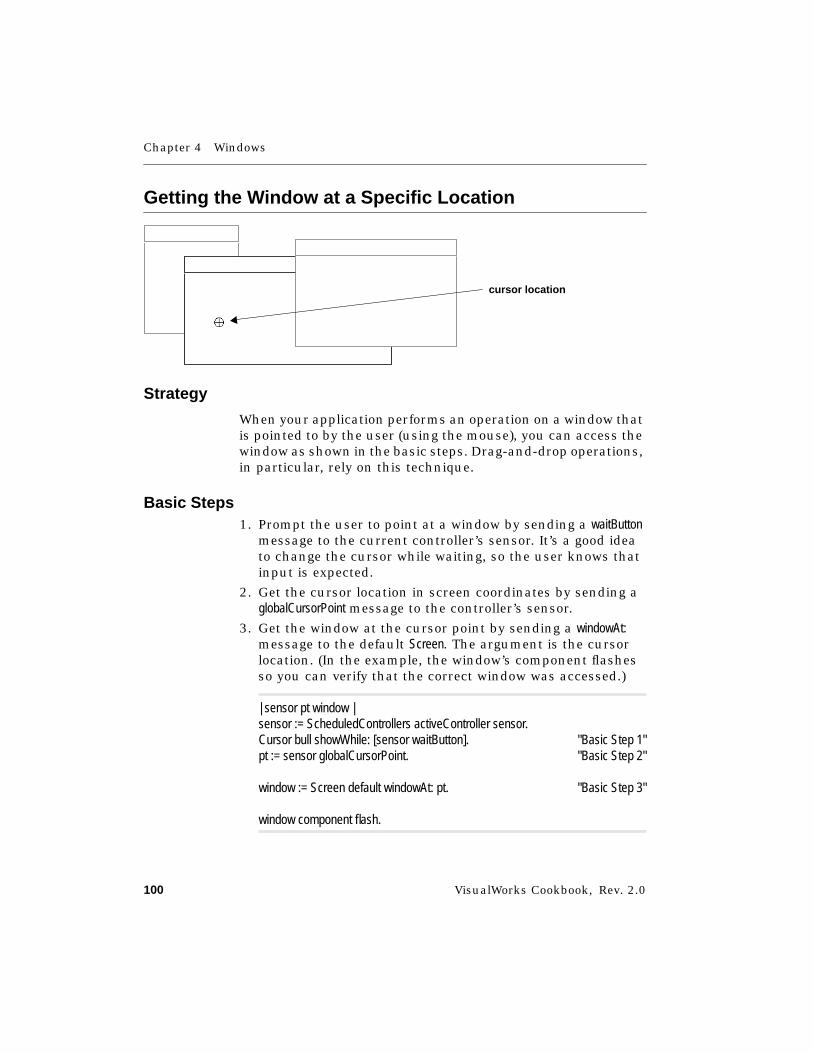
Chapter 4 Windows
100 VisualWorks Cookbook, Rev. 2.0
Getting the Window at a Specific Location
Strategy
When your application performs an operation on a window thatis pointed to by the user (using the mouse), you can access thewindow as shown in the basic steps. Drag-and-drop operations,in particular, rely on this technique.
Basic Steps1. Prompt the user to point at a window by sending a waitButton
message to the current controller’s sensor. It’s a good ideato change the cursor while waiting, so the user knows thatinput is expected.
2. Get the cursor location in screen coordinates by sending aglobalCursorPoint message to the controller’s sensor.
3. Get the window at the cursor point by sending a windowAt:message to the default Screen. The argument is the cursorlocation. (In the example, the window’s component flashesso you can verify that the correct window was accessed.)
| sensor pt window |sensor := ScheduledControllers activeController sensor.Cursor bull showWhile: [sensor waitButton]. "Basic Step 1"pt := sensor globalCursorPoint. "Basic Step 2"
window := Screen default windowAt: pt. "Basic Step 3"
window component flash.
cursor location
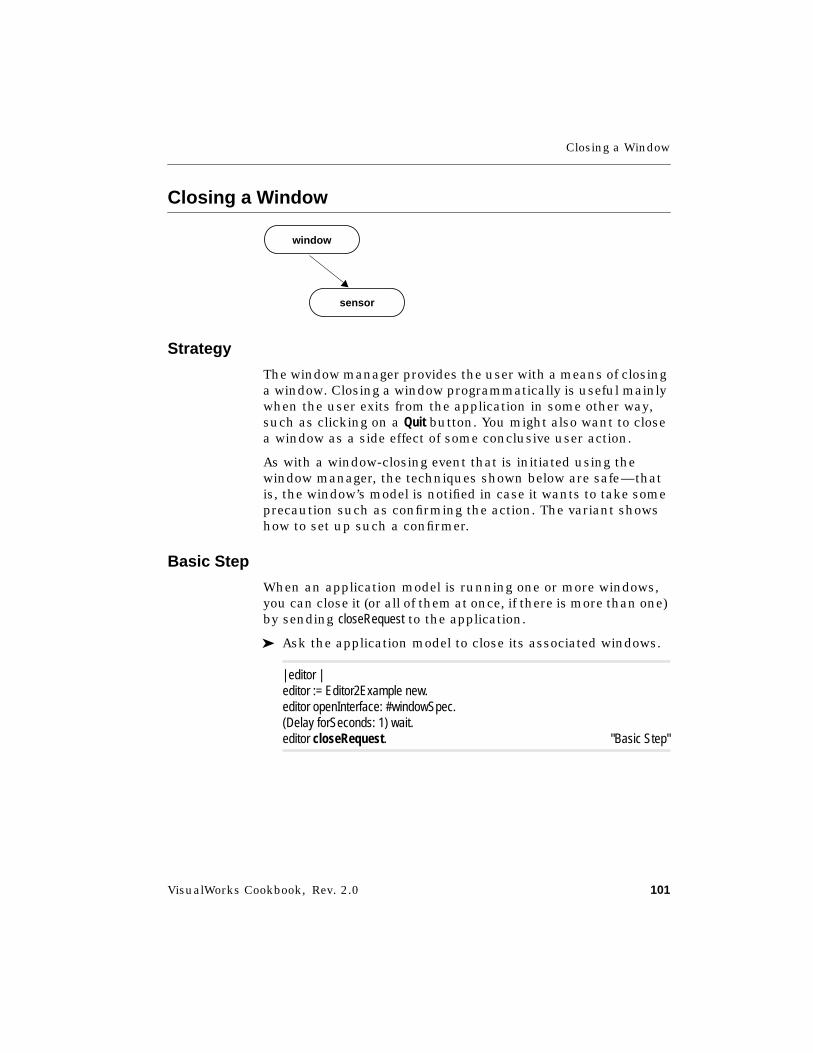
Closing a Window
VisualWorks Cookbook, Rev. 2.0 101
Closing a Window
Strategy
The window manager provides the user with a means of closinga window. Closing a window programmatically is useful mainlywhen the user exits from the application in some other way,such as clicking on a Quit button. You might also want to closea window as a side effect of some conclusive user action.
As with a window-closing event that is initiated using thewindow manager, the techniques shown below are safe—thatis, the window’s model is notified in case it wants to take someprecaution such as confirming the action. The variant showshow to set up such a confirmer.
Basic Step
When an application model is running one or more windows,you can close it (or all of them at once, if there is more than one)by sending closeRequest to the application.
➤ Ask the application model to close its associated windows.
| editor |editor := Editor2Example new.editor openInterface: #windowSpec.(Delay forSeconds: 1) wait.editor closeRequest. "Basic Step"
window
sensor
Chapter 4 Windows
102 VisualWorks Cookbook, Rev. 2.0
Variant
Arranging for Final Actions When Closing a Window
When an application window has been asked to close, it firstsends a changeRequest message to its application model. If themodel answers false, the window won’t close; if it answers true,the window proceeds to close itself. Thus, the model has achance to verify that no damage will be done if the window isclosed.
For example, as shown below, the Image Editor (UIMaskEditor)uses a changeRequest method to confirm the user’s intent toabandon any unsaved changes in the image.
➤ Implement a changeRequest method in your application model,which answers true when the window can close and falseotherwise.
changeRequest "Variant Step"^super changeRequest
ifFalse: [false]ifTrue: [(self modified or: [self magnifiedBitView controller
updateRequest not])ifTrue:
[Dialog confirm: 'The image has been altered, but not installed.Do you wish to discard the changes?']
ifFalse: [true]]
Notice also in the example above that the inherited version ofchangeRequest is first invoked to preserve any precautions that aparent class may have implemented.
See Also■ “Making a Window a Slave” on page 105

Expanding and Collapsing a Window
VisualWorks Cookbook, Rev. 2.0 103
Expanding and Collapsing a Window
Strategy
Window managers typically provide a means of collapsing (icon-ifying) a window and expanding it back to its normal state. Youcan also control that behavior programmatically.
Basic Steps1. Send a collapse message to the window.
2. Send an expand message to the window.
| win |win := (Editor2Example open) window.win display.(Delay forSeconds: 1) wait.win collapse. "Basic Step 1"(Delay forSeconds: 1) wait.win expand. "Basic Step 2"
See Also■ “Hiding a Window” on page 104
■ “Making a Window a Slave” on page 105
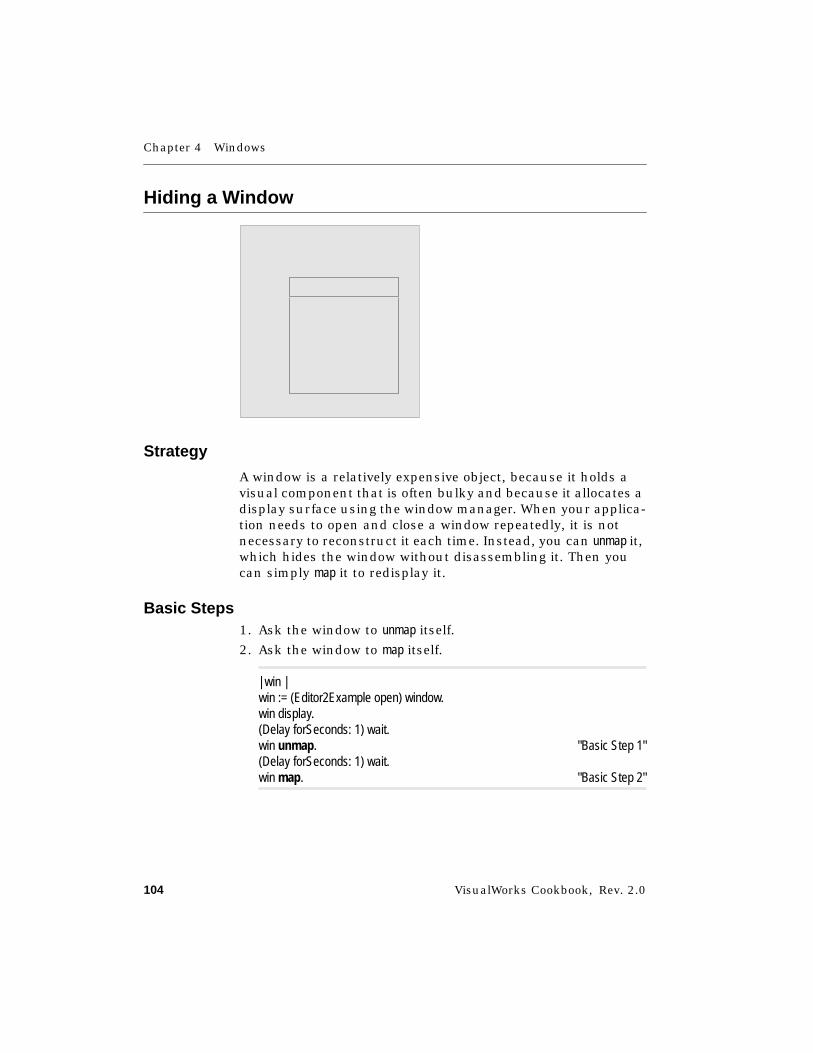
Chapter 4 Windows
104 VisualWorks Cookbook, Rev. 2.0
Hiding a Window
Strategy
A window is a relatively expensive object, because it holds avisual component that is often bulky and because it allocates adisplay surface using the window manager. When your applica-tion needs to open and close a window repeatedly, it is notnecessary to reconstruct it each time. Instead, you can unmap it,which hides the window without disassembling it. Then youcan simply map it to redisplay it.
Basic Steps1. Ask the window to unmap itself.
2. Ask the window to map itself.
| win |win := (Editor2Example open) window.win display.(Delay forSeconds: 1) wait.win unmap. "Basic Step 1"(Delay forSeconds: 1) wait.win map. "Basic Step 2"

Making a Window a Slave
VisualWorks Cookbook, Rev. 2.0 105
Making a Window a Slave
Strategy
In a multiwindow application, it is often helpful to close allsecondary windows automatically when the user closes themain window. In this situation, the main window is called themaster window and the secondary windows are called slavewindows.
Basic Steps1. Tell the master window which application model to inform
of its events.
2. Tell the master window to be a master.
3. Tell the slave window which application model will relayevents from the master window.
4. Tell the slave window to be a slave.
| app masterWin slaveWin |app := Editor1Example new.masterWin := (app openInterface) window.masterWin
label: 'Master';application: app; "Basic Step 1"beMaster. "Basic Step 2"
Chapter 4 Windows
106 VisualWorks Cookbook, Rev. 2.0
slaveWin := (Editor2Example open) window.slaveWin
label: 'Slave';application: app; "Basic Step 3"beSlave. "Basic Step 4"
Variants
V1. Make Windows Equal Partners
When you want to be able to close all of your application’swindows by closing any one of them, make them partnersinstead of master and slaves.
➤ Tell the windows to be partners.
| app win1 win2|app:= Editor1Example new.
win1 := (app openInterface) window.win1
label: 'Partner 1';application: app;bePartner. "V1 Step"
win2 := (Editor2Example open) window.win2
label: 'Partner 2';application: app;bePartner. "V1 Step"
V2. Choosing the Events That Are Sent
By default, master and partner windows broadcast thefollowing events: #close, #collapse, and #expand. You can remove anyof those events, and you can add any of the following: #bounds,#enter, #exit, #hibernate, #reopen, and #release.
➤ Tell the master or partner window which events tobroadcast.
Making a Window a Slave
VisualWorks Cookbook, Rev. 2.0 107
| app masterWin slaveWin |app := Editor1Example new.
masterWin := (app openInterface) window.masterWin
label: 'Master';application: app;beMaster;sendWindowEvents: #( #close #collapse
#expand #hibernate #reopen). "V2 Step"
slaveWin := (Editor2Example open) window.slaveWin
label: 'Slave';application: app;beSlave.
V3. Choosing the Events That Are Received
By default, slave and partner windows mimic the followingevents: #close, #collapse, and #expand. Controlling the events thatare received lets each slave be selective according to its needs.
➤ Tell the slave or partner window which events to receive.
| app masterWin slaveWin |app := Editor1Example new.
masterWin := (app openInterface) window.masterWin
label: 'Master';application: app;beMaster.
slaveWin := (Editor2Example open) window.slaveWin
label: 'Slave';application: app;beSlave;receiveWindowEvents: #( #close). "V3 Step"
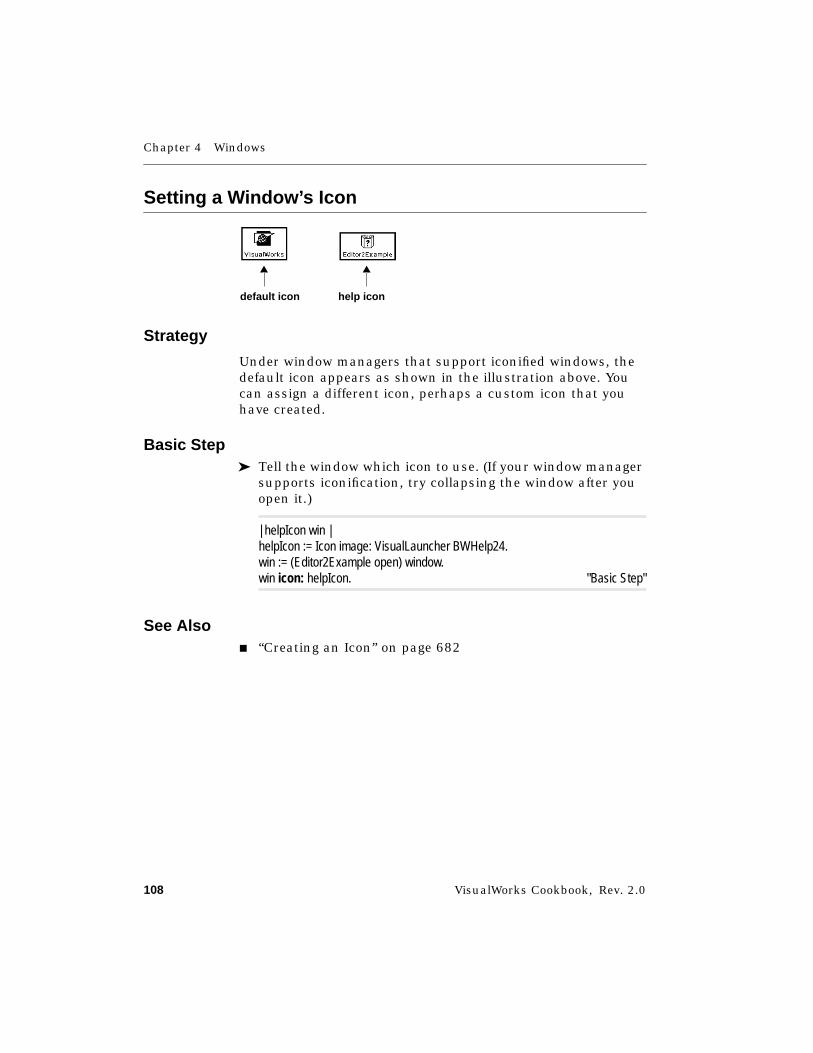
Chapter 4 Windows
108 VisualWorks Cookbook, Rev. 2.0
Setting a Window’s Icon
Strategy
Under window managers that support iconified windows, thedefault icon appears as shown in the illustration above. Youcan assign a different icon, perhaps a custom icon that youhave created.
Basic Step➤ Tell the window which icon to use. (If your window manager
supports iconification, try collapsing the window after youopen it.)
| helpIcon win |helpIcon := Icon image: VisualLauncher BWHelp24.win := (Editor2Example open) window.win icon: helpIcon. "Basic Step"
See Also■ “Creating an Icon” on page 682
default icon help icon
VisualWorks Cookbook, Rev. 2.0 109
Chapter 5
Labels
Creating a Textual Label 110Creating a Graphic Label 111Supplying the Label at Run Time 113Changing Font, Emphasis, and Color 116Building a Registry of Labels 118
See Also■ “Widget Basics” on page 53
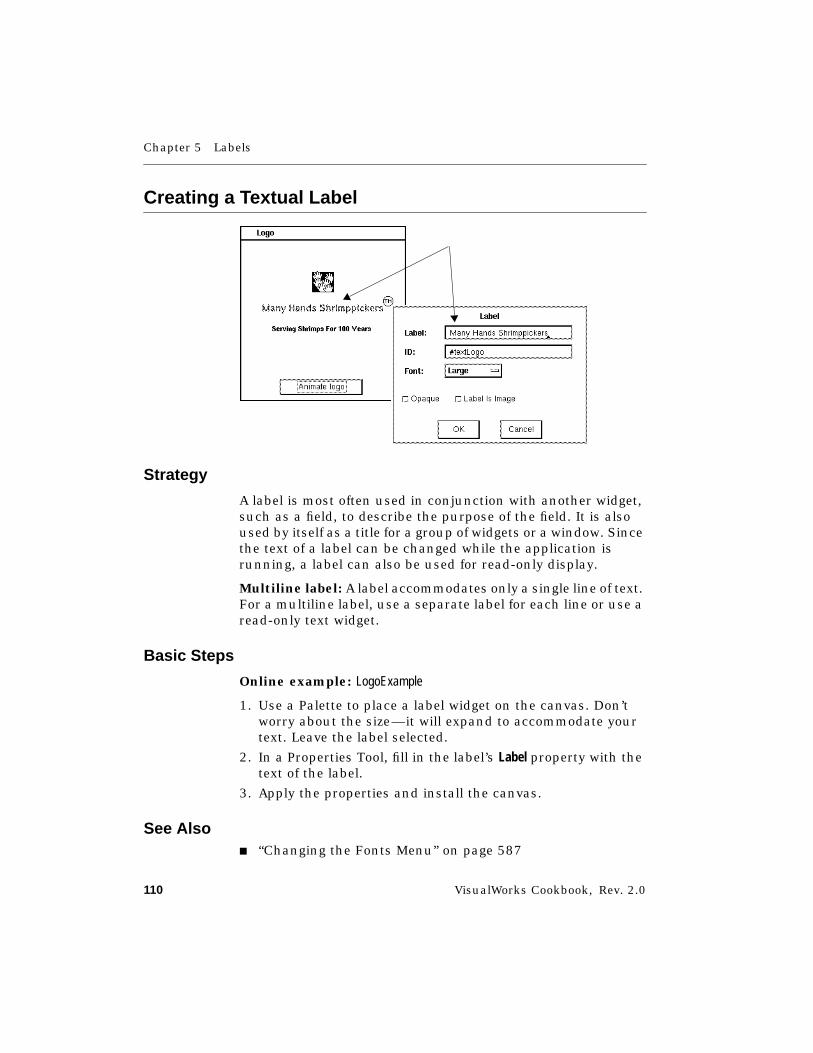
Chapter 5 Labels
110 VisualWorks Cookbook, Rev. 2.0
Creating a Textual Label
Strategy
A label is most often used in conjunction with another widget,such as a field, to describe the purpose of the field. It is alsoused by itself as a title for a group of widgets or a window. Sincethe text of a label can be changed while the application isrunning, a label can also be used for read-only display.
Multiline label: A label accommodates only a single line of text.For a multiline label, use a separate label for each line or use aread-only text widget.
Basic Steps
Online example: LogoExample
1. Use a Palette to place a label widget on the canvas. Don’tworry about the size—it will expand to accommodate yourtext. Leave the label selected.
2. In a Properties Tool, fill in the label’s Label property with thetext of the label.
3. Apply the properties and install the canvas.
See Also■ “Changing the Fonts Menu” on page 587
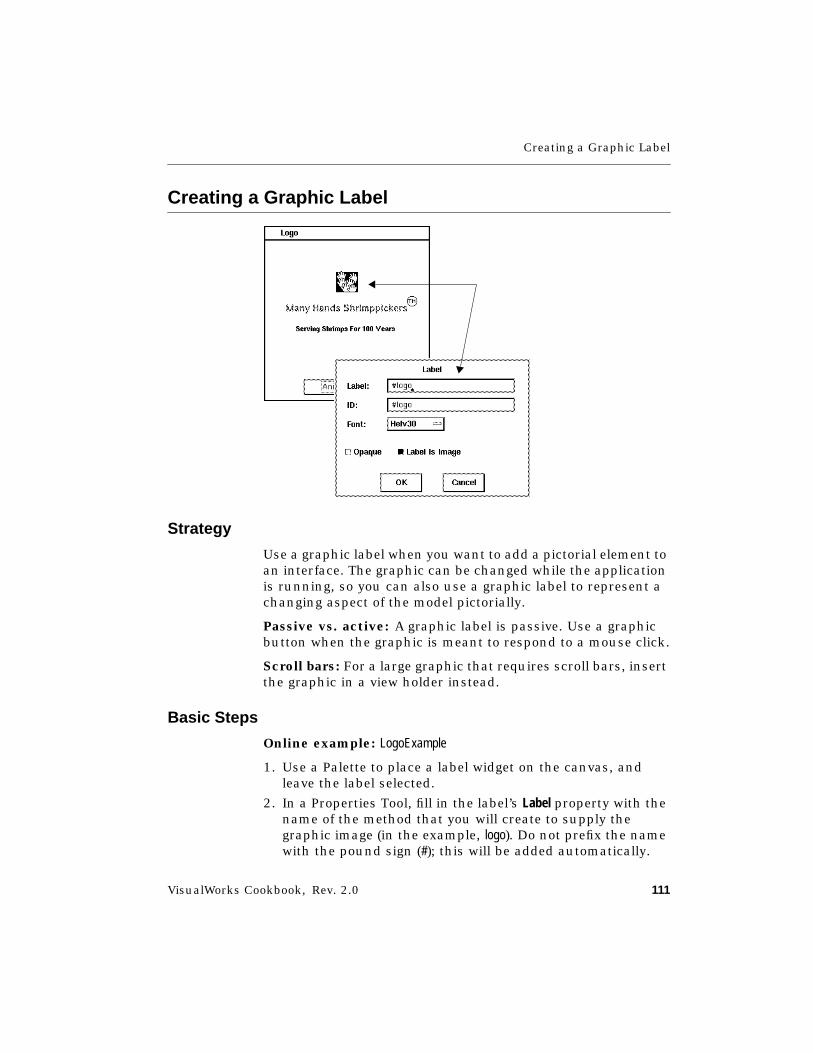
Creating a Graphic Label
VisualWorks Cookbook, Rev. 2.0 111
Creating a Graphic Label
Strategy
Use a graphic label when you want to add a pictorial element toan interface. The graphic can be changed while the applicationis running, so you can also use a graphic label to represent achanging aspect of the model pictorially.
Passive vs. active: A graphic label is passive. Use a graphicbutton when the graphic is meant to respond to a mouse click.
Scroll bars: For a large graphic that requires scroll bars, insertthe graphic in a view holder instead.
Basic Steps
Online example: LogoExample
1. Use a Palette to place a label widget on the canvas, andleave the label selected.
2. In a Properties Tool, fill in the label’s Label property with thename of the method that you will create to supply thegraphic image (in the example, logo). Do not prefix the namewith the pound sign (#); this will be added automatically.
Chapter 5 Labels
112 VisualWorks Cookbook, Rev. 2.0
3. In Properties Tool, turn on the Label is Image property.
4. Apply the properties and install the canvas.
5. Use the Image Editor or other means to create the graphicimage and install it in the application model, using themethod name from step 2. Put the method in a classprotocol named resources.
Hint: The graphic will appear in the running application. Youcan see the graphic in the canvas if you install the imageresource before you fill in and apply the label’s properties.
See Also■ “Giving a Button a Graphic Label” on page 167
■ “Integrating a View into an Interface” on page 389
■ “Creating a Graphic Image” on page 658
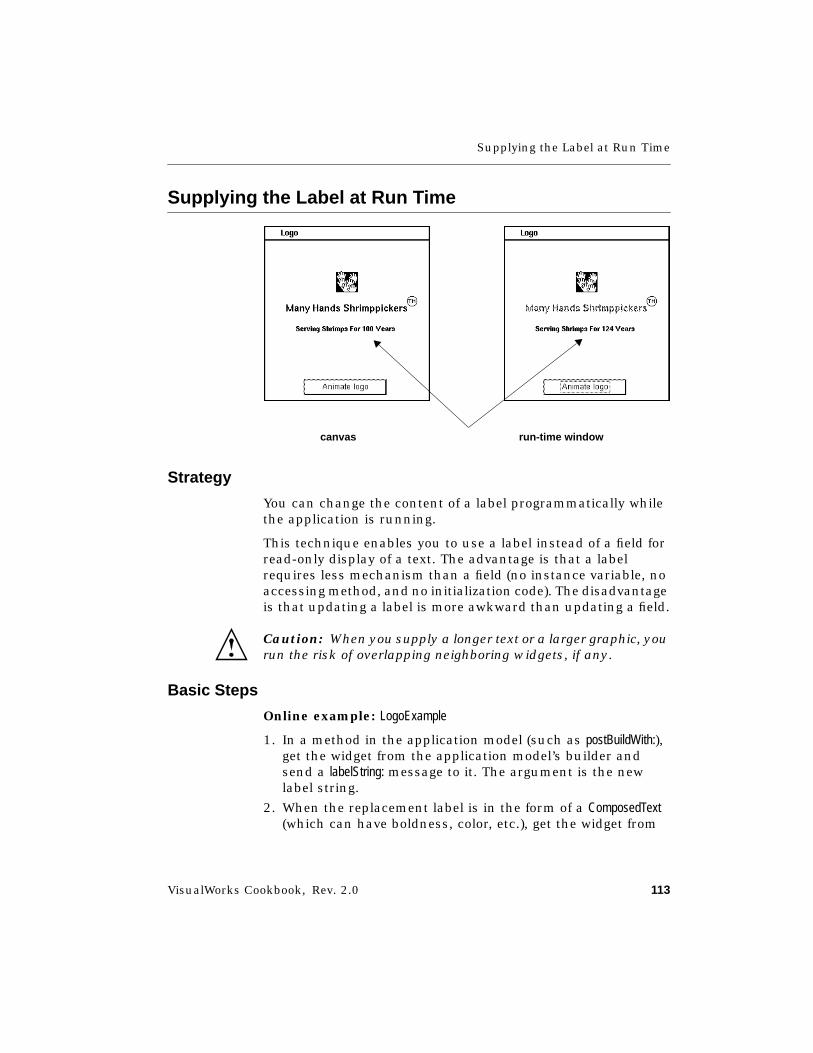
Supplying the Label at Run Time
VisualWorks Cookbook, Rev. 2.0 113
Supplying the Label at Run Time
Strategy
You can change the content of a label programmatically whilethe application is running.
This technique enables you to use a label instead of a field forread-only display of a text. The advantage is that a labelrequires less mechanism than a field (no instance variable, noaccessing method, and no initialization code). The disadvantageis that updating a label is more awkward than updating a field.
Caution: When you supply a longer text or a larger graphic, yourun the risk of overlapping neighboring widgets, if any.
Basic Steps
Online example: LogoExample
1. In a method in the application model (such as postBuildWith:),get the widget from the application model’s builder andsend a labelString: message to it. The argument is the newlabel string.
2. When the replacement label is in the form of a ComposedText(which can have boldness, color, etc.), get the widget from
canvas run-time window
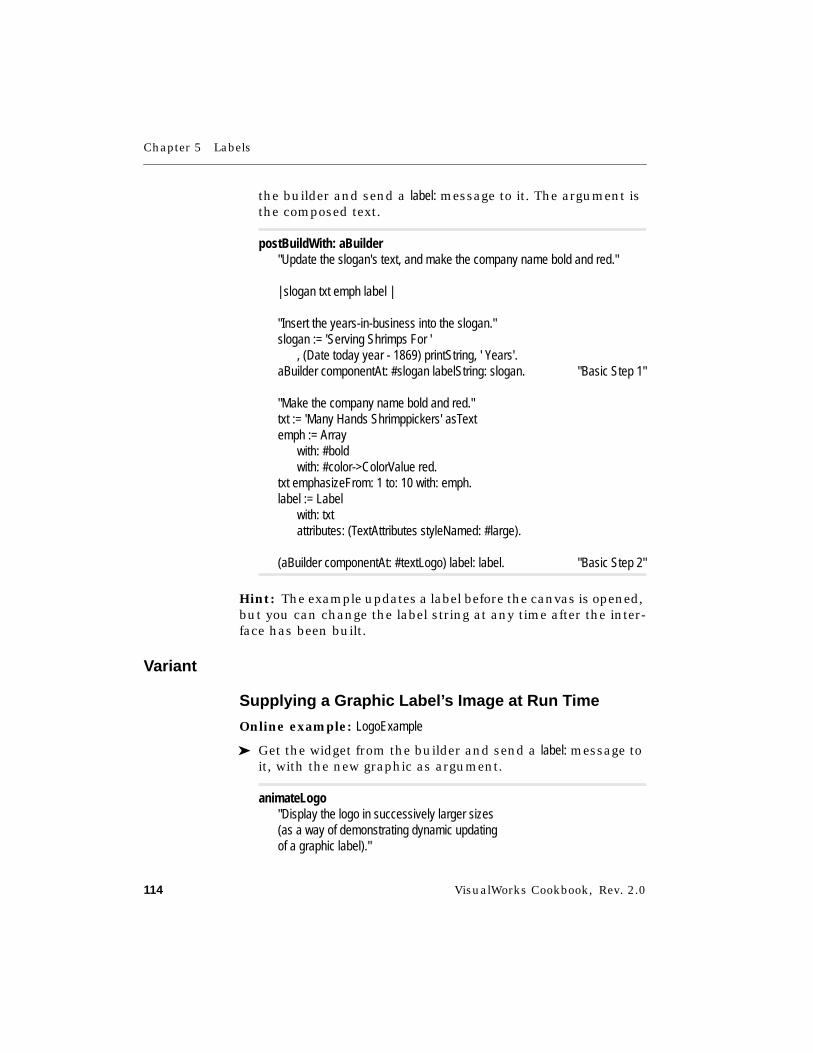
Chapter 5 Labels
114 VisualWorks Cookbook, Rev. 2.0
the builder and send a label: message to it. The argument isthe composed text.
postBuildWith: aBuilder"Update the slogan's text, and make the company name bold and red."
| slogan txt emph label |
"Insert the years-in-business into the slogan."slogan := 'Serving Shrimps For '
, (Date today year - 1869) printString, ' Years'.aBuilder componentAt: #slogan labelString: slogan. "Basic Step 1"
"Make the company name bold and red."txt := 'Many Hands Shrimppickers' asTextemph := Array
with: #boldwith: #color->ColorValue red.
txt emphasizeFrom: 1 to: 10 with: emph.label := Label
with: txtattributes: (TextAttributes styleNamed: #large).
(aBuilder componentAt: #textLogo) label: label. "Basic Step 2"
Hint: The example updates a label before the canvas is opened,but you can change the label string at any time after the inter-face has been built.
Variant
Supplying a Graphic Label’s Image at Run Time
Online example: LogoExample
➤ Get the widget from the builder and send a label: message toit, with the new graphic as argument.
animateLogo"Display the logo in successively larger sizes(as a way of demonstrating dynamic updatingof a graphic label)."
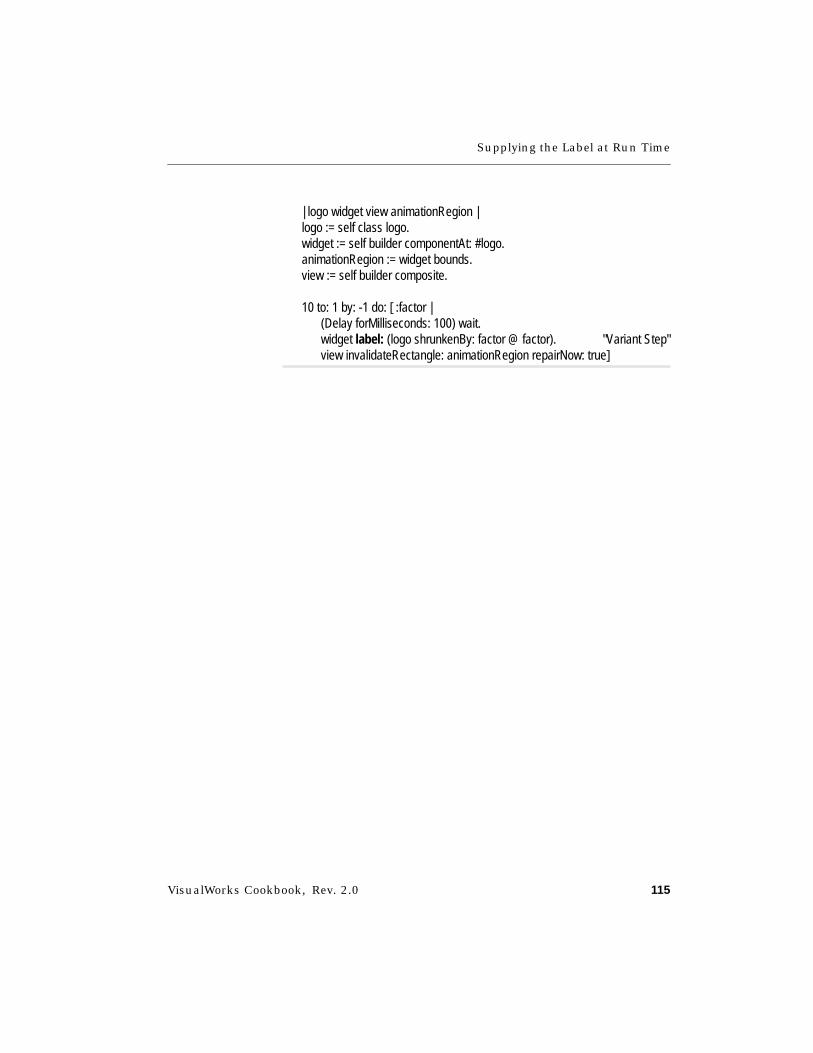
Supplying the Label at Run Time
VisualWorks Cookbook, Rev. 2.0 115
| logo widget view animationRegion |logo := self class logo.widget := self builder componentAt: #logo.animationRegion := widget bounds.view := self builder composite.
10 to: 1 by: -1 do: [ :factor |(Delay forMilliseconds: 100) wait.widget label: (logo shrunkenBy: factor @ factor). "Variant Step"view invalidateRectangle: animationRegion repairNow: true]

Chapter 5 Labels
116 VisualWorks Cookbook, Rev. 2.0
Changing Font, Emphasis, and Color
Strategy
You specify a label’s font by choosing the font in the label’sproperties. The chosen font applies to the entire label. Alterna-tively, you can change the font programmatically or mixemphases (bold, italic, etc.) and colors.
The advantage of mixing font emphases within a single labelrather than creating multiple labels is that the spacing betweenthe parts of the label will be preserved even when you run theimage on a platform that supplies different fonts.
Mixing fonts: Although you can mix font families in the samelabel to the limited extent that you can apply or remove serifsfrom a portion of the text, generally you must create a separatelabel for each font family.
Basic Steps
Online example: LogoExample
1. In a method in the application model (such as postBuildWith:),create a Text by sending an asText message to the label string.
2. Add the desired emphases to the text.
3. Create a Label with the text and the desired font.
4. Get the widget wrapper from the builder (with componentAt:)and install the new label with label:.
bold, red font
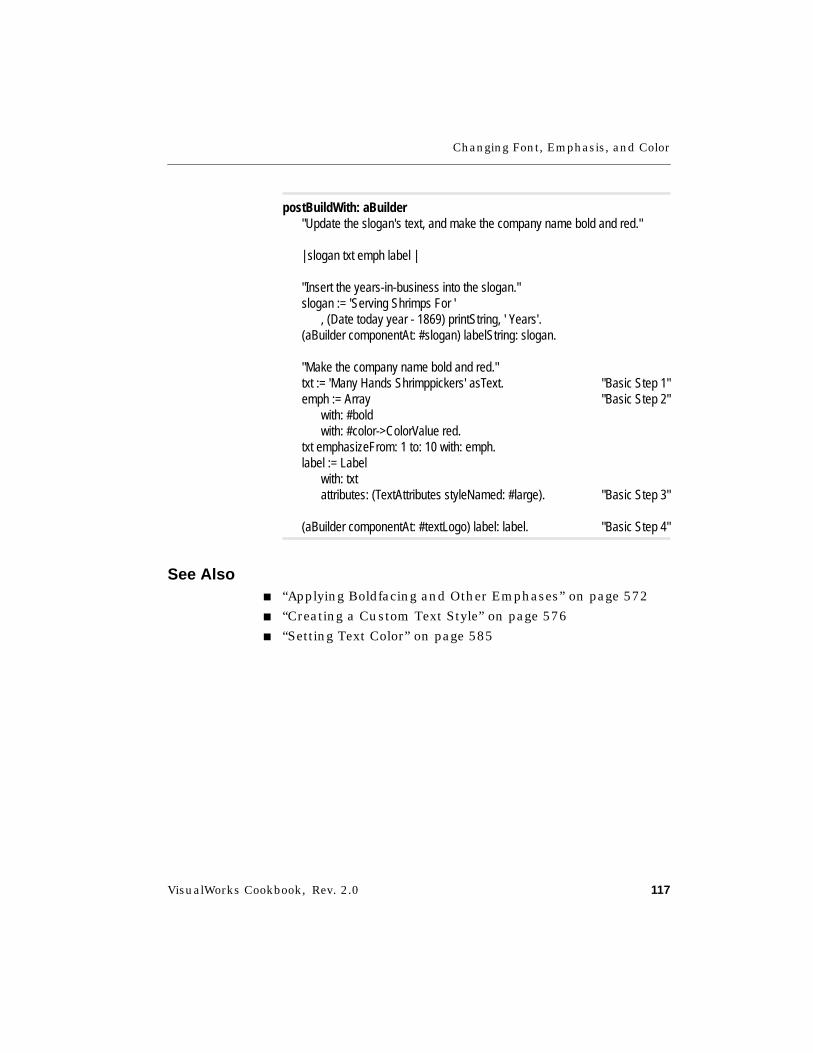
Changing Font, Emphasis, and Color
VisualWorks Cookbook, Rev. 2.0 117
postBuildWith: aBuilder"Update the slogan's text, and make the company name bold and red."
| slogan txt emph label |
"Insert the years-in-business into the slogan."slogan := 'Serving Shrimps For '
, (Date today year - 1869) printString, ' Years'.(aBuilder componentAt: #slogan) labelString: slogan.
"Make the company name bold and red."txt := 'Many Hands Shrimppickers' asText. "Basic Step 1"emph := Array "Basic Step 2"
with: #boldwith: #color->ColorValue red.
txt emphasizeFrom: 1 to: 10 with: emph.label := Label
with: txtattributes: (TextAttributes styleNamed: #large). "Basic Step 3"
(aBuilder componentAt: #textLogo) label: label. "Basic Step 4"
See Also■ “Applying Boldfacing and Other Emphases” on page 572
■ “Creating a Custom Text Style” on page 576
■ “Setting Text Color” on page 585
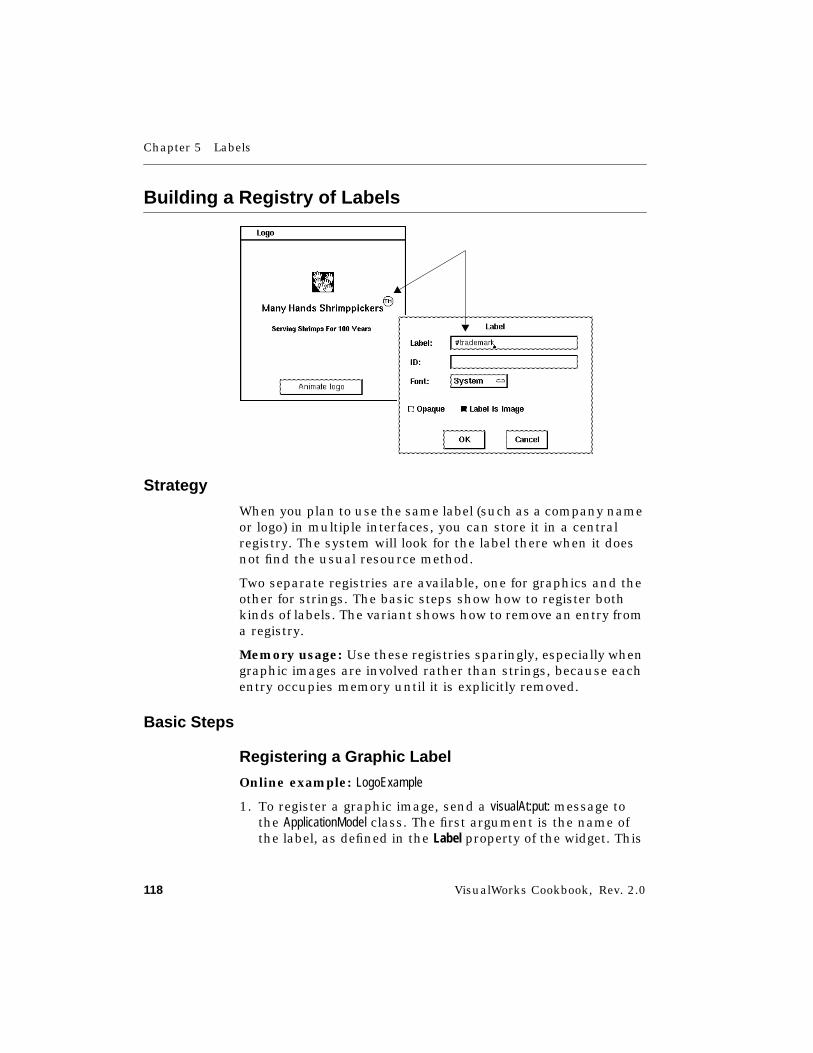
Chapter 5 Labels
118 VisualWorks Cookbook, Rev. 2.0
Building a Registry of Labels
Strategy
When you plan to use the same label (such as a company nameor logo) in multiple interfaces, you can store it in a centralregistry. The system will look for the label there when it doesnot find the usual resource method.
Two separate registries are available, one for graphics and theother for strings. The basic steps show how to register bothkinds of labels. The variant shows how to remove an entry froma registry.
Memory usage: Use these registries sparingly, especially whengraphic images are involved rather than strings, because eachentry occupies memory until it is explicitly removed.
Basic Steps
Registering a Graphic Label
Online example: LogoExample
1. To register a graphic image, send a visualAt:put: message tothe ApplicationModel class. The first argument is the name ofthe label, as defined in the Label property of the widget. This

Building a Registry of Labels
VisualWorks Cookbook, Rev. 2.0 119
is usually done in a class-initialization method, so theregistration will occur whenever the class is filed into a newimage.
2. To register a string label, send a labelAt:put: message to theApplicationModel class. The first argument is the name of thelabel as defined in the Label property of the widget.
initialize"LogoExample initialize"
"Register the graphic image for the trademark symbol."ApplicationModel "Basic Step 1"
visualAt: #trademarkput: self trademark.
"Register the textual version of the trademark symbol."ApplicationModel "Basic Step 2"
labelAt: #tmput: '(TM)'.
3. Execute the initialization method.
Variant
Removing an Entry from a Registry1. To get the graphic labels registry, send a visuals message to
the ApplicationModel class. To get the string labels registry,send a labels message.
2. The registry is a dictionary, so use the standard message(removeKey:ifAbsent:) for removing an entry from a dictionary.The first argument is the name of the label, as identified inthe Label property of the widget. The second argument is ablock containing the action to be taken if the label is notfound, frequently an empty block for no action.
"Visual registry"| registry |registry := ApplicationModel visuals. "Variant Step 1"registry removeKey: #trademark ifAbsent: []. "Variant Step 2"
Chapter 5 Labels
120 VisualWorks Cookbook, Rev. 2.0
"Labels registry"registry := ApplicationModel labels. "Variant Step 1"registry removeKey: #tm ifAbsent: []. "Variant Step 2"

VisualWorks Cookbook, Rev. 2.0 121
Chapter 6
Input Fields
Creating an Input Field 122Restricting the Type of Input 125Formatting Displayed Data 129Validating the Input 132Modifying a Field’s Pop-Up Menu 139Connecting a Field to Another Field 143Restricting Entries in a Field (Combo Box) 146Moving the Insertion Point 150
See Also■ “Widget Basics” on page 53
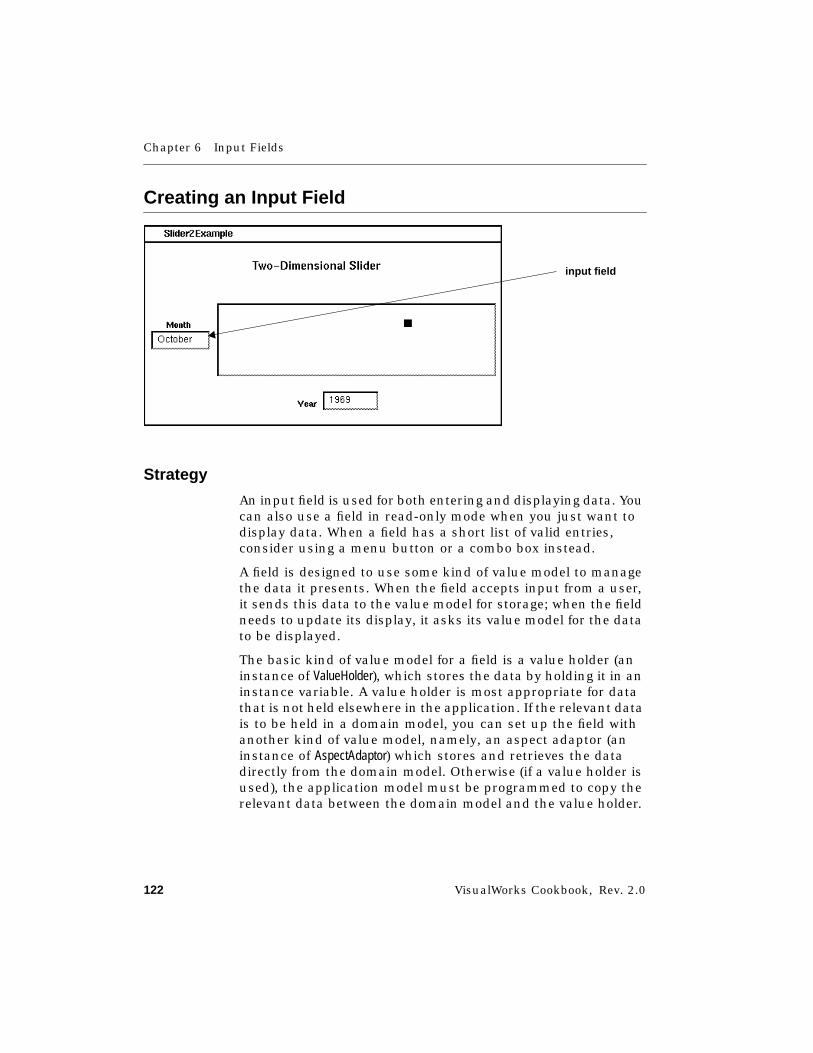
Chapter 6 Input Fields
122 VisualWorks Cookbook, Rev. 2.0
Creating an Input Field
Strategy
An input field is used for both entering and displaying data. Youcan also use a field in read-only mode when you just want todisplay data. When a field has a short list of valid entries,consider using a menu button or a combo box instead.
A field is designed to use some kind of value model to managethe data it presents. When the field accepts input from a user,it sends this data to the value model for storage; when the fieldneeds to update its display, it asks its value model for the datato be displayed.
The basic kind of value model for a field is a value holder (aninstance of ValueHolder), which stores the data by holding it in aninstance variable. A value holder is most appropriate for datathat is not held elsewhere in the application. If the relevant datais to be held in a domain model, you can set up the field withanother kind of value model, namely, an aspect adaptor (aninstance of AspectAdaptor) which stores and retrieves the datadirectly from the domain model. Otherwise (if a value holder isused), the application model must be programmed to copy therelevant data between the domain model and the value holder.
input field
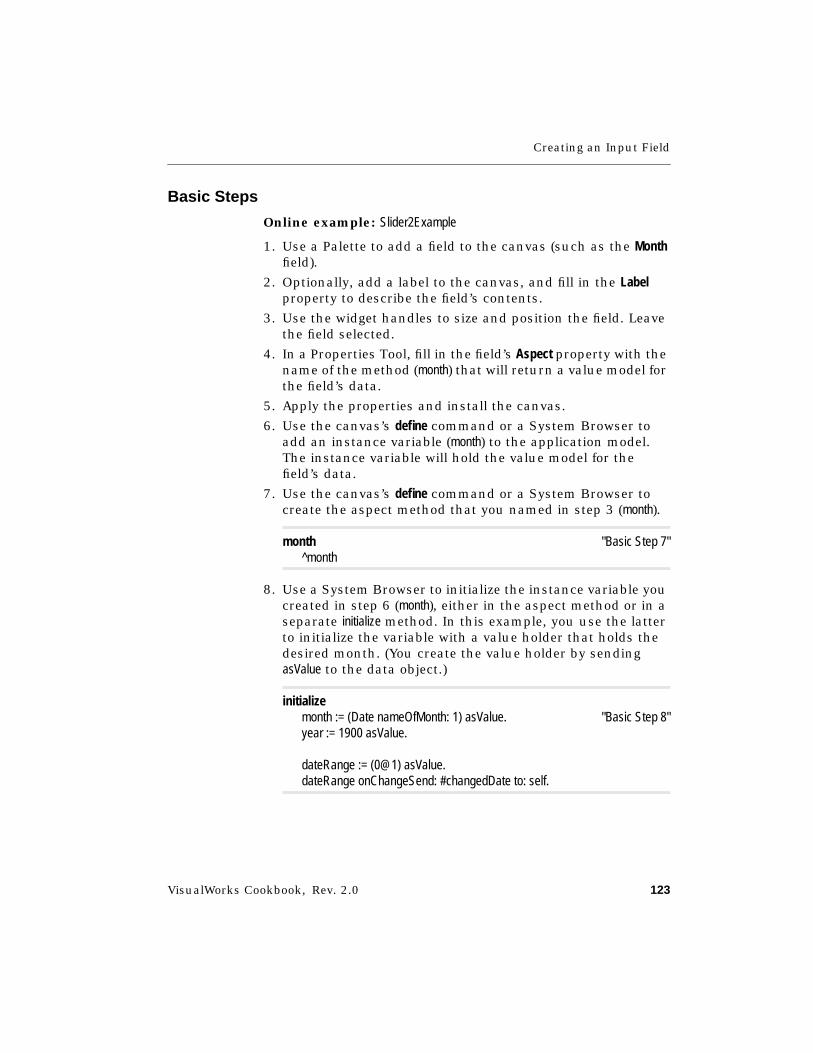
Creating an Input Field
VisualWorks Cookbook, Rev. 2.0 123
Basic Steps
Online example: Slider2Example
1. Use a Palette to add a field to the canvas (such as the Monthfield).
2. Optionally, add a label to the canvas, and fill in the Labelproperty to describe the field’s contents.
3. Use the widget handles to size and position the field. Leavethe field selected.
4. In a Properties Tool, fill in the field’s Aspect property with thename of the method (month) that will return a value model forthe field’s data.
5. Apply the properties and install the canvas.
6. Use the canvas’s define command or a System Browser toadd an instance variable (month) to the application model.The instance variable will hold the value model for thefield’s data.
7. Use the canvas’s define command or a System Browser tocreate the aspect method that you named in step 3 (month).
month "Basic Step 7"^month
8. Use a System Browser to initialize the instance variable youcreated in step 6 (month), either in the aspect method or in aseparate initialize method. In this example, you use the latterto initialize the variable with a value holder that holds thedesired month. (You create the value holder by sendingasValue to the data object.)
initializemonth := (Date nameOfMonth: 1) asValue. "Basic Step 8"year := 1900 asValue.
dateRange := (0@1) asValue.dateRange onChangeSend: #changedDate to: self.
Chapter 6 Input Fields
124 VisualWorks Cookbook, Rev. 2.0
Variants
V1. Aligning a Field’s Contents➤ Set the field’s Align property to Left (to start the data at the
left side of the field), Center (to center the data), or Right (toplace the data against the right margin).
V2. Creating a Read-Only Field➤ Turn on the field’s Read Only property.
V3. Restricting the Size of User Input➤ In the field’s Size property, enter the number of characters
that you want to allow. (When the user tries to enter char-acters beyond that limit, they are ignored.)
See Also■ “Adding a Menu Button” on page 236
■ “Adapting Domain Models to Widgets” on page 703
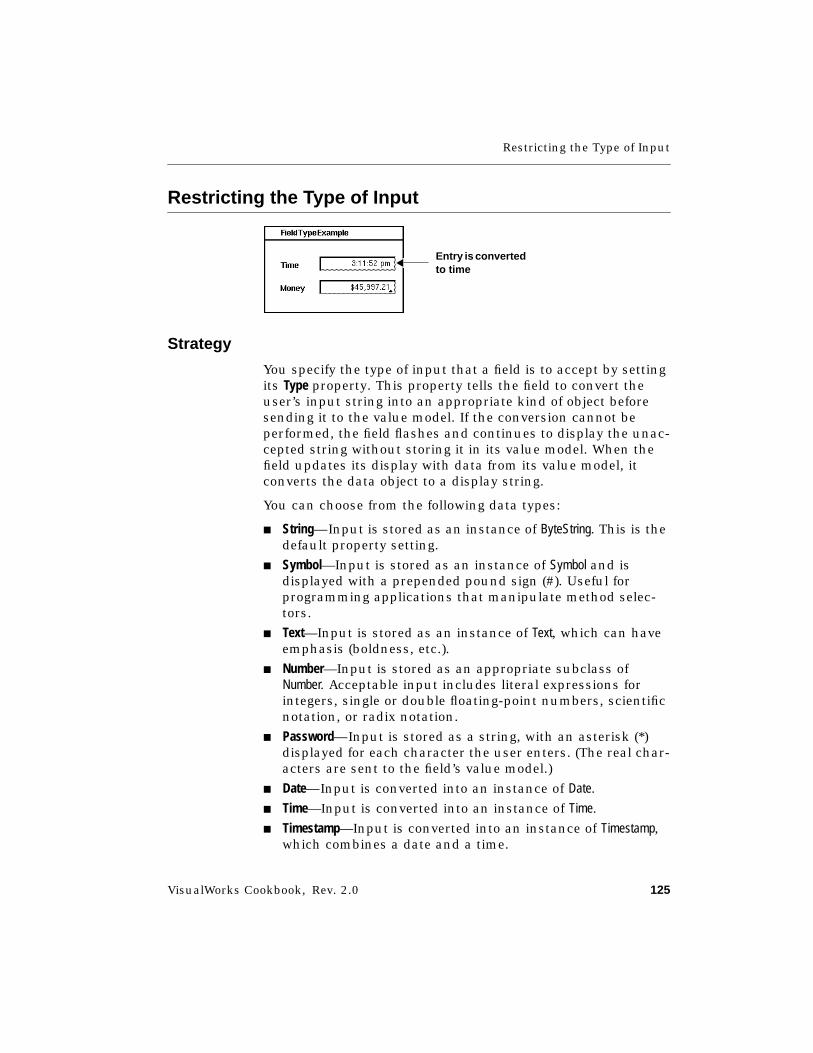
Restricting the Type of Input
VisualWorks Cookbook, Rev. 2.0 125
Restricting the Type of Input
Strategy
You specify the type of input that a field is to accept by settingits Type property. This property tells the field to convert theuser’s input string into an appropriate kind of object beforesending it to the value model. If the conversion cannot beperformed, the field flashes and continues to display the unac-cepted string without storing it in its value model. When thefield updates its display with data from its value model, itconverts the data object to a display string.
You can choose from the following data types:
■ String—Input is stored as an instance of ByteString. This is thedefault property setting.
■ Symbol—Input is stored as an instance of Symbol and isdisplayed with a prepended pound sign (#). Useful forprogramming applications that manipulate method selec-tors.
■ Text—Input is stored as an instance of Text, which can haveemphasis (boldness, etc.).
■ Number—Input is stored as an appropriate subclass ofNumber. Acceptable input includes literal expressions forintegers, single or double floating-point numbers, scientificnotation, or radix notation.
■ Password—Input is stored as a string, with an asterisk (*)displayed for each character the user enters. (The real char-acters are sent to the field’s value model.)
■ Date—Input is converted into an instance of Date.
■ Time—Input is converted into an instance of Time.
■ Timestamp—Input is converted into an instance of Timestamp,which combines a date and a time.
Entry is convertedto time
Chapter 6 Input Fields
126 VisualWorks Cookbook, Rev. 2.0
■ FixedPoint(2)—Input is converted to an instance of FixedPointthat represents a fixed point number with two decimalplaces. Useful for applications that manipulate monetaryamounts.
■ Boolean—Input is stored as an instance of Boolean. Acceptablevalues are true and false.
■ ByteArray—Input is stored as an instance of ByteArray.
■ Object—Input is evaluated as a Smalltalk expression; theresulting object is stored as the field’s value. The field redis-plays this object using the object’s printString method.
The Format property provides predefined formatting alternativesfor some of these types.
You can also add a custom data type to the list, as described inthe variant below.
Basic Steps1. Select the field in the canvas.
2. In the Properties Tool, set the field’s Type property to thedesired data type.
Hint: Ensure that the field is initialized with the appro-priate type of data.
3. Apply the properties and install the canvas.
Variant
Creating a Custom Data Converter
Online example: FieldTypeExample
This example shows how to create a data converter for handlingan instance of Time. Note this converter, as given below, isunnecessary, because you can set the Type property to Time.However, you can use it as a model for building converters forother kinds of objects.
1. Use a Palette to add a field to the canvas. Leave the fieldselected.
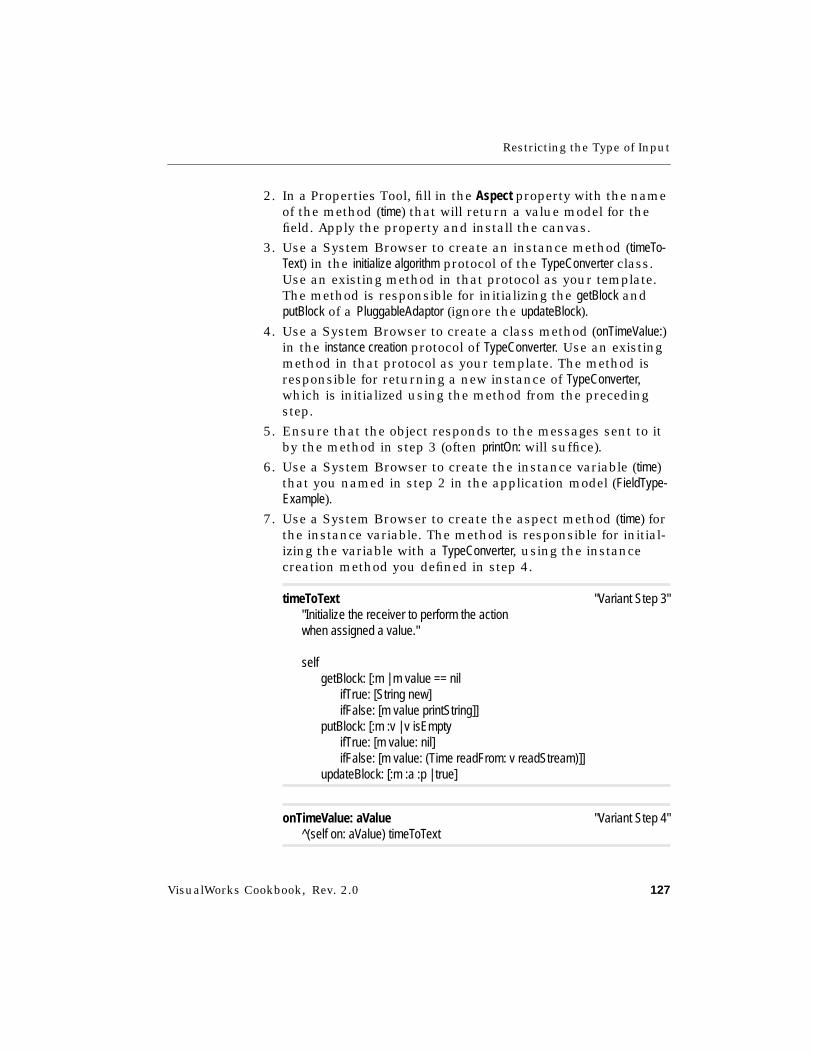
Restricting the Type of Input
VisualWorks Cookbook, Rev. 2.0 127
2. In a Properties Tool, fill in the Aspect property with the nameof the method (time) that will return a value model for thefield. Apply the property and install the canvas.
3. Use a System Browser to create an instance method (timeTo-Text) in the initialize algorithm protocol of the TypeConverter class.Use an existing method in that protocol as your template.The method is responsible for initializing the getBlock andputBlock of a PluggableAdaptor (ignore the updateBlock).
4. Use a System Browser to create a class method (onTimeValue:)in the instance creation protocol of TypeConverter. Use an existingmethod in that protocol as your template. The method isresponsible for returning a new instance of TypeConverter,which is initialized using the method from the precedingstep.
5. Ensure that the object responds to the messages sent to itby the method in step 3 (often printOn: will suffice).
6. Use a System Browser to create the instance variable (time)that you named in step 2 in the application model (FieldType-Example).
7. Use a System Browser to create the aspect method (time) forthe instance variable. The method is responsible for initial-izing the variable with a TypeConverter, using the instancecreation method you defined in step 4.
timeToText "Variant Step 3""Initialize the receiver to perform the actionwhen assigned a value."
selfgetBlock: [:m | m value == nil
ifTrue: [String new]ifFalse: [m value printString]]
putBlock: [:m :v | v isEmptyifTrue: [m value: nil]ifFalse: [m value: (Time readFrom: v readStream)]]
updateBlock: [:m :a :p | true]
onTimeValue: aValue "Variant Step 4"^(self on: aValue) timeToText
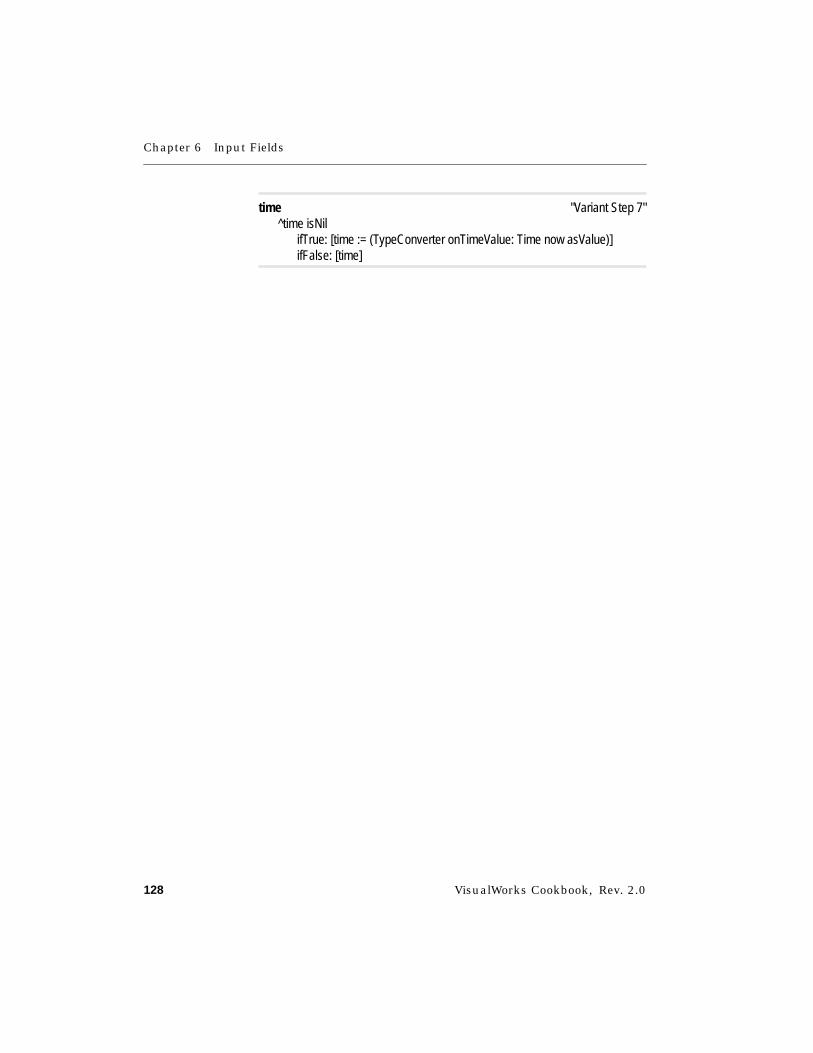
Chapter 6 Input Fields
128 VisualWorks Cookbook, Rev. 2.0
time "Variant Step 7"^time isNil
ifTrue: [time := (TypeConverter onTimeValue: Time now asValue)]ifFalse: [time]
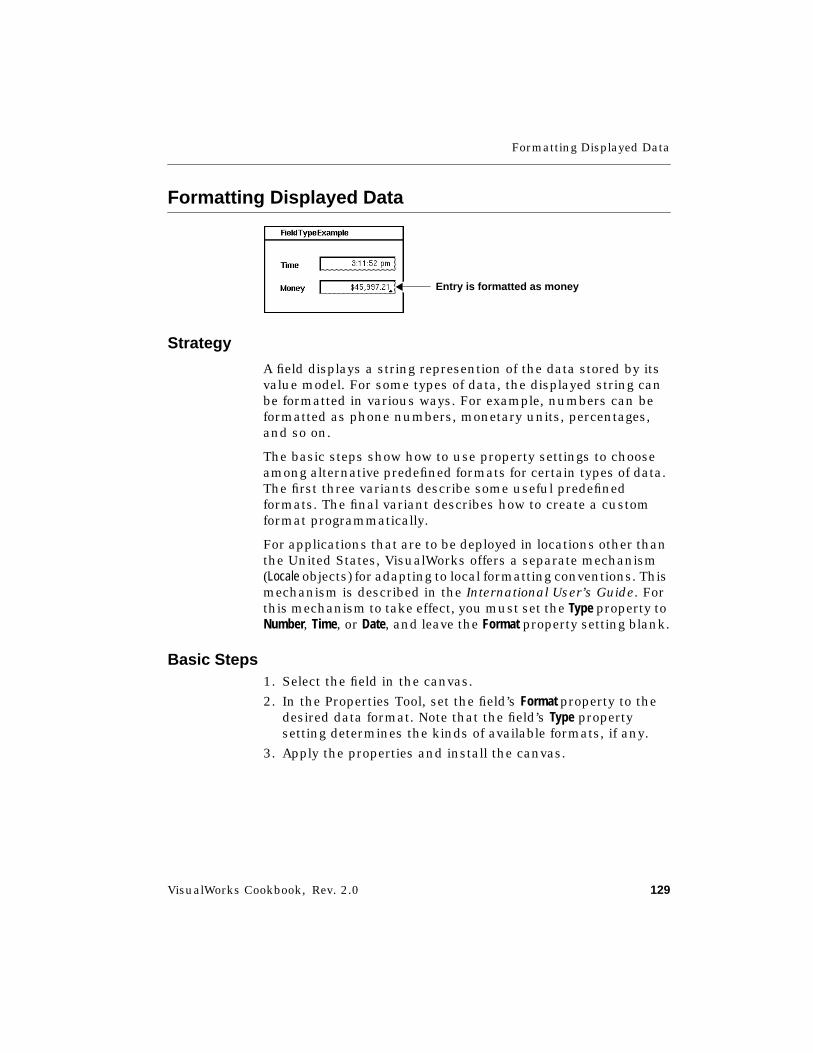
Formatting Displayed Data
VisualWorks Cookbook, Rev. 2.0 129
Formatting Displayed Data
Strategy
A field displays a string represention of the data stored by itsvalue model. For some types of data, the displayed string canbe formatted in various ways. For example, numbers can beformatted as phone numbers, monetary units, percentages,and so on.
The basic steps show how to use property settings to chooseamong alternative predefined formats for certain types of data.The first three variants describe some useful predefinedformats. The final variant describes how to create a customformat programmatically.
For applications that are to be deployed in locations other thanthe United States, VisualWorks offers a separate mechanism(Locale objects) for adapting to local formatting conventions. Thismechanism is described in the International User’s Guide. Forthis mechanism to take effect, you must set the Type property toNumber, Time, or Date, and leave the Format property setting blank.
Basic Steps1. Select the field in the canvas.
2. In the Properties Tool, set the field’s Format property to thedesired data format. Note that the field’s Type propertysetting determines the kinds of available formats, if any.
3. Apply the properties and install the canvas.
Entry is formatted as money
Chapter 6 Input Fields
130 VisualWorks Cookbook, Rev. 2.0
Variants
V1. Displaying a U.S. Phone Number1. Select the field in the canvas.
2. In the Properties Tool, set the field’s Type property byselecting either String or Number, as desired.
3. In the Properties Tool, set the field’s Format property byselecting either (@@@) @@@-@@@@ (for type String) or(000) 000-0000 (for type Number). In a String format, the @ standsfor a single character. In a Number format, the 0 stands forexactly one digit.
V2. Displaying a U.S. Dollar Amount1. Select the field in the canvas.
2. In the Properties Tool, set the field’s Type property byselecting either Number or FixedPoint(2), as desired.
3. In the Properties Tool, set the field’s Format property byselecting any of the formats that begin with $—for example,$#,##0.00;[Red]($#,##0.00)
In formats such as this, the 0 stands for exactly one digit,and the # stands for zero or one digit. This example alsospecifies that negative numbers be displayed in red andenclosed in parentheses.
V3. Displaying a Date1. Select the field in the canvas.
2. In the Properties Tool, set the field’s Type property byselecting Date.
3. In the Properties Tool, set the field’s Format property byselecting a date format such as d-mmm-yy.
In formats such as this, the symbol d stands for theminimum number of digits representing the day, mmmstands for a three-letter abbreviation of the month name,and yy stands for the two-digit year number.
Formatting Displayed Data
VisualWorks Cookbook, Rev. 2.0 131
V4. Creating a Custom Format
Online example: FieldTypeExample
A TypeConverter enables a field to display a number in a specialformat, such as a monetary format. You define the format as astring that uses the same conventions as the predefinedformats. For more information about format conventions, use aSystem Browser to read the class comments for the NumberPrint-Policy, TimestampPrintPolicy, and StringPrintPolicy classes.
This example shows how to create a format for a monetaryamount. Note this format, as given below, is unnecessary,because you can set the Format property to a predefined format.However, you can use it as a model for building other kinds offormats.
1. Use a Palette to add a field to the canvas.
2. Fill in the Aspect property, naming the method (price) thatreturns a value model for the field. Apply the property andinstall the canvas.
3. Use a System Browser to create the instance variable (price)in the application model.
4. Use a System Browser to create the aspect method (price), inwhich you initialize the value to a TypeConverter that uses thedesired format string.
price "V4 Step 4"^price isNil
ifTrue: [price := (TypeConverteronNumberValue: 0 asValueformat: '$###,###,###.##')]
ifFalse: [price]
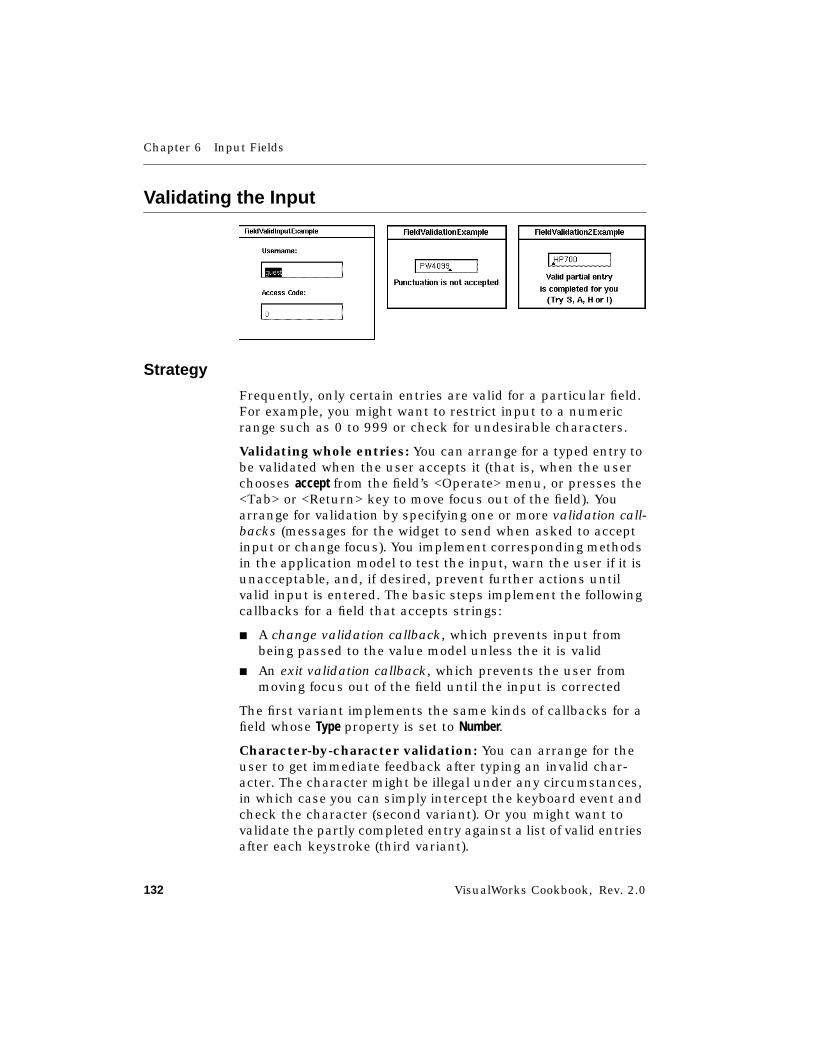
Chapter 6 Input Fields
132 VisualWorks Cookbook, Rev. 2.0
Validating the Input
Strategy
Frequently, only certain entries are valid for a particular field.For example, you might want to restrict input to a numericrange such as 0 to 999 or check for undesirable characters.
Validating whole entries: You can arrange for a typed entry tobe validated when the user accepts it (that is, when the userchooses accept from the field’s <Operate> menu, or presses the<Tab> or <Return> key to move focus out of the field). Youarrange for validation by specifying one or more validation call-backs (messages for the widget to send when asked to acceptinput or change focus). You implement corresponding methodsin the application model to test the input, warn the user if it isunacceptable, and, if desired, prevent further actions untilvalid input is entered. The basic steps implement the followingcallbacks for a field that accepts strings:
■ A change validation callback, which prevents input frombeing passed to the value model unless the it is valid
■ An exit validation callback, which prevents the user frommoving focus out of the field until the input is corrected
The first variant implements the same kinds of callbacks for afield whose Type property is set to Number.
Character-by-character validation: You can arrange for theuser to get immediate feedback after typing an invalid char-acter. The character might be illegal under any circumstances,in which case you can simply intercept the keyboard event andcheck the character (second variant). Or you might want tovalidate the partly completed entry against a list of valid entriesafter each keystroke (third variant).
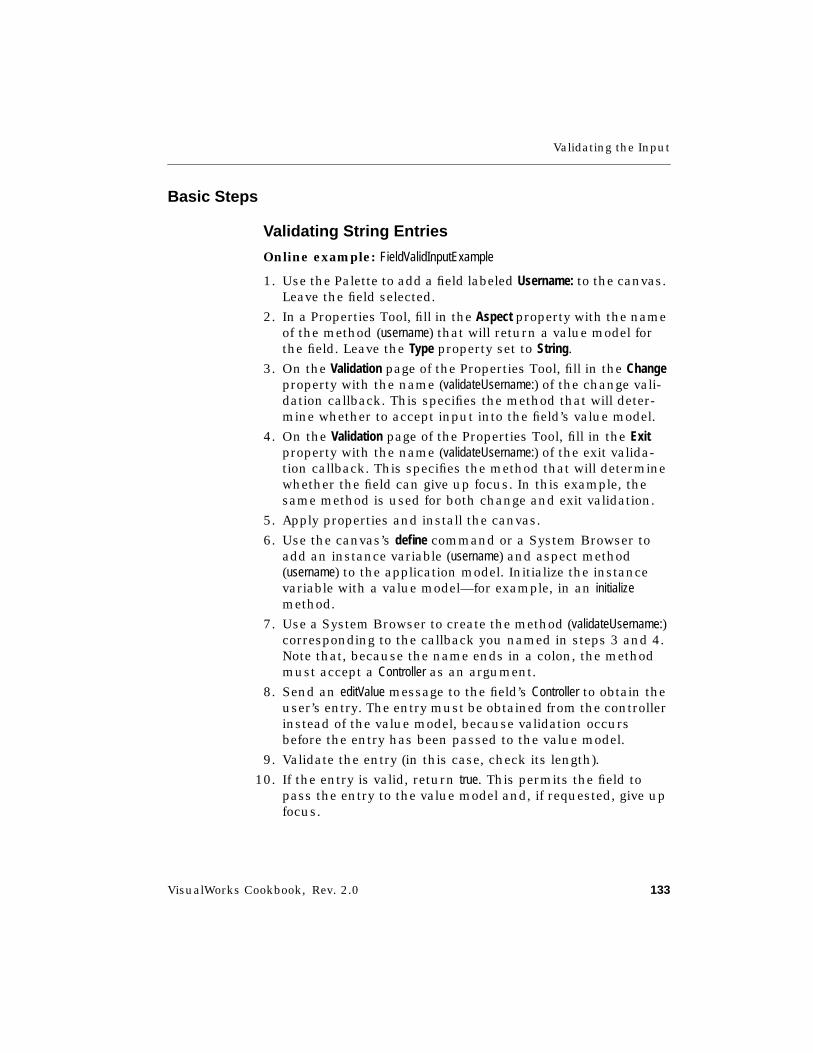
Validating the Input
VisualWorks Cookbook, Rev. 2.0 133
Basic Steps
Validating String Entries
Online example: FieldValidInputExample
1. Use the Palette to add a field labeled Username: to the canvas.Leave the field selected.
2. In a Properties Tool, fill in the Aspect property with the nameof the method (username) that will return a value model forthe field. Leave the Type property set to String.
3. On the Validation page of the Properties Tool, fill in the Changeproperty with the name (validateUsername:) of the change vali-dation callback. This specifies the method that will deter-mine whether to accept input into the field’s value model.
4. On the Validation page of the Properties Tool, fill in the Exitproperty with the name (validateUsername:) of the exit valida-tion callback. This specifies the method that will determinewhether the field can give up focus. In this example, thesame method is used for both change and exit validation.
5. Apply properties and install the canvas.
6. Use the canvas’s define command or a System Browser toadd an instance variable (username) and aspect method(username) to the application model. Initialize the instancevariable with a value model—for example, in an initializemethod.
7. Use a System Browser to create the method (validateUsername:)corresponding to the callback you named in steps 3 and 4.Note that, because the name ends in a colon, the methodmust accept a Controller as an argument.
8. Send an editValue message to the field’s Controller to obtain theuser’s entry. The entry must be obtained from the controllerinstead of the value model, because validation occursbefore the entry has been passed to the value model.
9. Validate the entry (in this case, check its length).
10. If the entry is valid, return true. This permits the field topass the entry to the value model and, if requested, give upfocus.
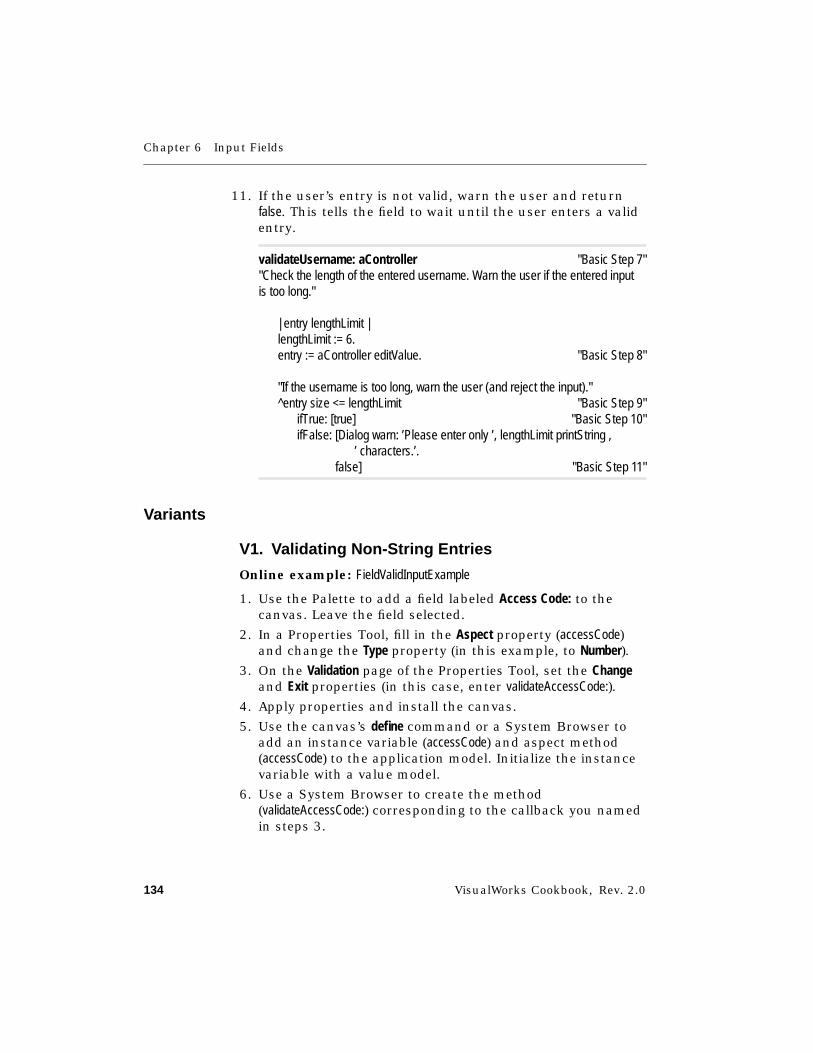
Chapter 6 Input Fields
134 VisualWorks Cookbook, Rev. 2.0
11. If the user’s entry is not valid, warn the user and returnfalse. This tells the field to wait until the user enters a validentry.
validateUsername: aController "Basic Step 7""Check the length of the entered username. Warn the user if the entered inputis too long."
| entry lengthLimit |lengthLimit := 6.entry := aController editValue. "Basic Step 8"
"If the username is too long, warn the user (and reject the input)."^entry size <= lengthLimit "Basic Step 9"
ifTrue: [true] "Basic Step 10"ifFalse: [Dialog warn: ’Please enter only ’, lengthLimit printString ,
’ characters.’.false] "Basic Step 11"
Variants
V1. Validating Non-String Entries
Online example: FieldValidInputExample
1. Use the Palette to add a field labeled Access Code: to thecanvas. Leave the field selected.
2. In a Properties Tool, fill in the Aspect property (accessCode)and change the Type property (in this example, to Number).
3. On the Validation page of the Properties Tool, set the Changeand Exit properties (in this case, enter validateAccessCode:).
4. Apply properties and install the canvas.
5. Use the canvas’s define command or a System Browser toadd an instance variable (accessCode) and aspect method(accessCode) to the application model. Initialize the instancevariable with a value model.
6. Use a System Browser to create the method(validateAccessCode:) corresponding to the callback you namedin steps 3.
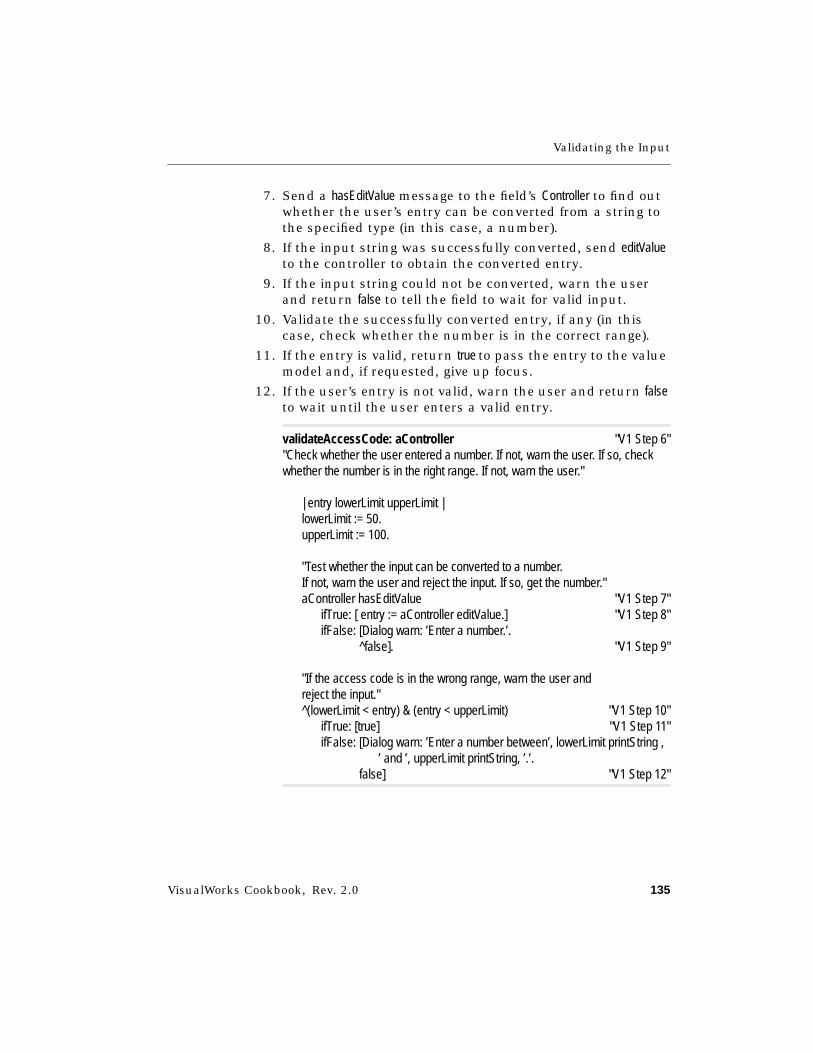
Validating the Input
VisualWorks Cookbook, Rev. 2.0 135
7. Send a hasEditValue message to the field’s Controller to find outwhether the user’s entry can be converted from a string tothe specified type (in this case, a number).
8. If the input string was successfully converted, send editValueto the controller to obtain the converted entry.
9. If the input string could not be converted, warn the userand return false to tell the field to wait for valid input.
10. Validate the successfully converted entry, if any (in thiscase, check whether the number is in the correct range).
11. If the entry is valid, return true to pass the entry to the valuemodel and, if requested, give up focus.
12. If the user’s entry is not valid, warn the user and return falseto wait until the user enters a valid entry.
validateAccessCode: aController "V1 Step 6""Check whether the user entered a number. If not, warn the user. If so, checkwhether the number is in the right range. If not, warn the user."
| entry lowerLimit upperLimit |lowerLimit := 50.upperLimit := 100.
"Test whether the input can be converted to a number.If not, warn the user and reject the input. If so, get the number."aController hasEditValue "V1 Step 7"
ifTrue: [ entry := aController editValue.] "V1 Step 8"ifFalse: [Dialog warn: ’Enter a number.’.
^false]. "V1 Step 9"
"If the access code is in the wrong range, warn the user andreject the input."^(lowerLimit < entry) & (entry < upperLimit) "V1 Step 10"
ifTrue: [true] "V1 Step 11"ifFalse: [Dialog warn: ’Enter a number between’, lowerLimit printString ,
’ and ’, upperLimit printString, ’.’.false] "V1 Step 12"

Chapter 6 Input Fields
136 VisualWorks Cookbook, Rev. 2.0
V2. Validating Each Keystroke
Online example: FieldValidation1Example
1. In a Properties Tool, give the field an ID property (in theexample, the ID is codeField). Apply the property and installthe canvas.
2. Use a System Browser to add a postBuildWith: instance methodto the application model (FieldValidation1Example), in which thefirst task is to get the controller from the field.
3. In the postBuildWith: method, send a keyboardHook: message tothe controller. The argument to keyboardHook: is a block thattakes two arguments: the keyboard event and thecontroller.
4. Inside the block, invoke the method (keyPress:) that you willcreate to validate the keystroke. (You can also put the vali-dation code directly inside the block.)
postBuildWith: aBuilder "V2 Step 2"| ctrlr |ctrlr := (aBuilder componentAt: #codeField) widget controller.ctrlr keyboardHook: [ :ev :c | "V2 Step 3"
self keyPress: ev]. "V2 Step 4"
5. Use a System Browser to create the keyPress: method, whichtakes the keyboard event as its argument, extracts thecharacter, and validates it.
6. As the last step in the keyPress: method, return the eventwhen you want to forward the keyboard event for normalprocessing. Return nil to bypass normal processing.
keyPress: ev "V2 Step 5""Validate the character."
| ch ascii |ch := ev keyValue.
"Allow tab and cr."ascii := ch asInteger.(ascii == 9 or: [ascii == 13])
ifTrue: [^ev].

Validating the Input
VisualWorks Cookbook, Rev. 2.0 137
ch isAlphaNumericifFalse: [
Dialog warn: 'Please enter only letters and digits'.^nil].
^ev "V2 Step 6"
V3. Validating a Partial Entry After Each Keystroke
Online example: FieldValidation2Example
1. Use a System Browser to add a postBuildWith: method to theapplication model (FieldValidation2Example) in an interface openingprotocol.
2. In the postBuildWith: method, register an interest in the field’svalue holder (productCode).
3. In the postBuildWith: method, send a continuousAccept: message tothe field’s controller, with an argument of true.
4. Use a System Browser to add the change method that wasnamed in step 2 (codeChanged), in a change messages protocol.This method is responsible for performing the validation.
postBuildWith: aBuilder "V3 Step 1""Ask the field's controller to accept continuously -- that is, toreturn the entry to the model after each keystroke."| ctrlr |self productCode onChangeSend: #codeChanged to: self. "V3 Step 2"
ctrlr := (aBuilder componentAt: #codeField) widget controller.ctrlr continuousAccept: true. "V3 Step 3"
codeChanged "V3 Step 4""The code entry was changed -- if the (partial) entryuniquely identifies a valid product code, fill in the restof the code for the user."
| entry qualifiedCodes holder |holder := self productCode.entry := holder value.
"If the partial entry uniquely identifies a valid product code,
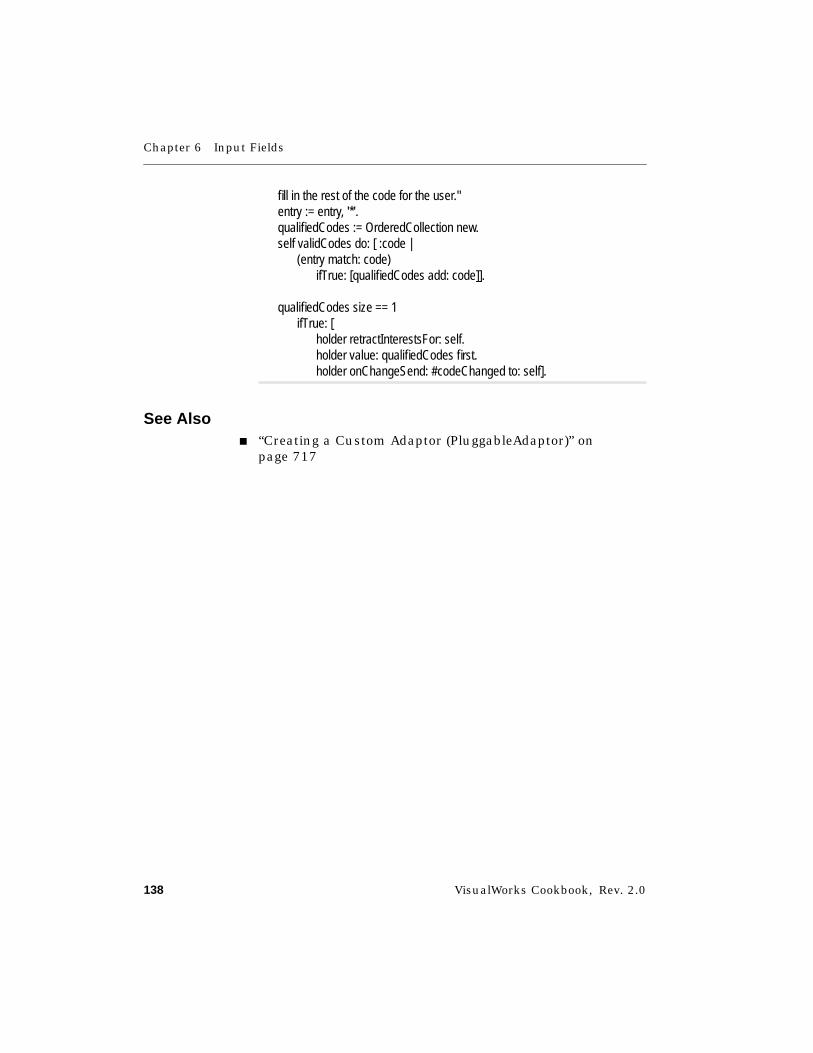
Chapter 6 Input Fields
138 VisualWorks Cookbook, Rev. 2.0
fill in the rest of the code for the user."entry := entry, '*'.qualifiedCodes := OrderedCollection new.self validCodes do: [ :code |
(entry match: code)ifTrue: [qualifiedCodes add: code]].
qualifiedCodes size == 1ifTrue: [
holder retractInterestsFor: self.holder value: qualifiedCodes first.holder onChangeSend: #codeChanged to: self].
See Also■ “Creating a Custom Adaptor (PluggableAdaptor)” on
page 717
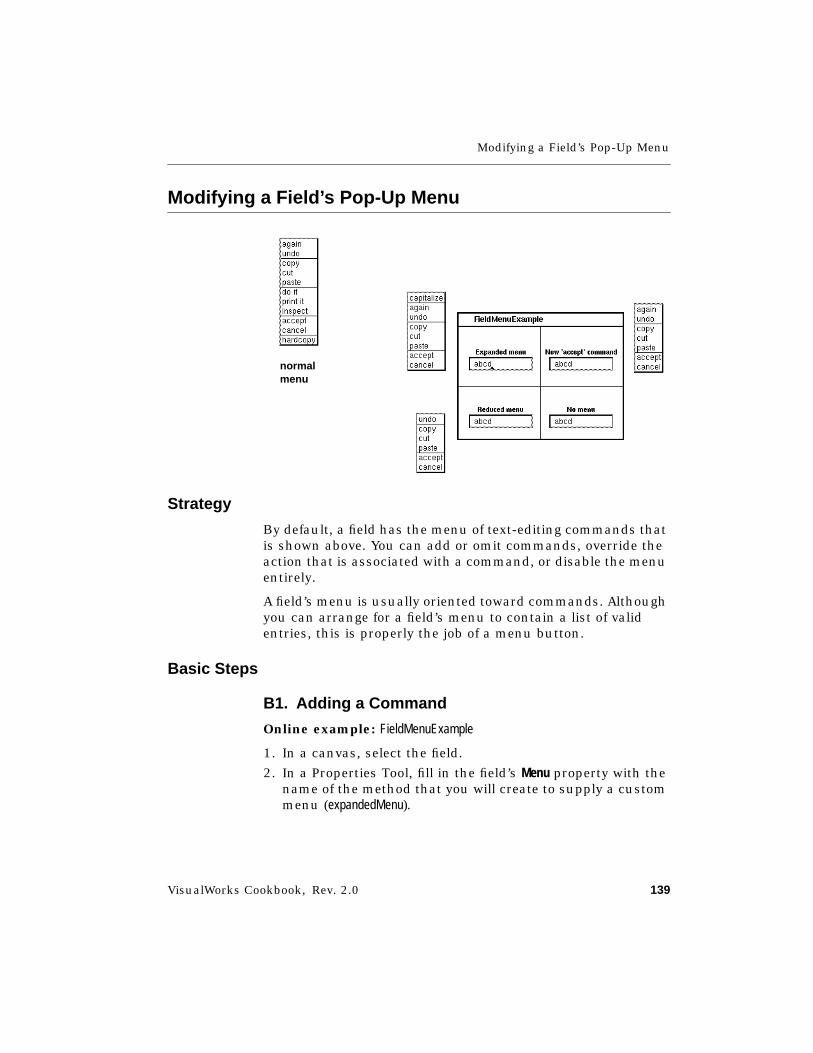
Modifying a Field’s Pop-Up Menu
VisualWorks Cookbook, Rev. 2.0 139
Modifying a Field’s Pop-Up Menu
Strategy
By default, a field has the menu of text-editing commands thatis shown above. You can add or omit commands, override theaction that is associated with a command, or disable the menuentirely.
A field’s menu is usually oriented toward commands. Althoughyou can arrange for a field’s menu to contain a list of validentries, this is properly the job of a menu button.
Basic Steps
B1. Adding a Command
Online example: FieldMenuExample
1. In a canvas, select the field.
2. In a Properties Tool, fill in the field’s Menu property with thename of the method that you will create to supply a custommenu (expandedMenu).
normalmenu
Chapter 6 Input Fields
140 VisualWorks Cookbook, Rev. 2.0
3. Use a System Browser to add the menu-creating method(expandedMenu) to the application model in a menu messagesprotocol.
expandedMenu "B1 Step 3""Add a command to the default text-editing menu."
| mb |mb := MenuBuilder new.mb
add: 'capitalize'->#capitalize;line;addDefaultTextMenu.
^mb menu
4. Use a System Browser to add the method (capitalize) that isinvoked by the newly added command. Put the method inthe menu messages protocol.
capitalize "B1 Step 4""Capitalize the field's contents."
self field1 value: (self field1 valuecollect: [ :ch | ch asUppercase]).
B2. Omitting a Command
Do basic steps 1 through 3 above (substituting reducedMenu forexpandedMenu).
➤ In the menu-creating method, build the default menu fromits parts, omitting the command that you don’t want toinclude.
reducedMenu"Omit one of the commands (#again) from the default text-editing menu."
| mb |mb := MenuBuilder new.mb "B2 Step"
add: 'undo'->#undo;
Modifying a Field’s Pop-Up Menu
VisualWorks Cookbook, Rev. 2.0 141
line;addCopyCutPaste;line;addAcceptCancel.
^mb menu
Variants
V1. Overriding a Default Command
Do basic steps 1 through 3 above (substituting newAcceptMenu forexpandedMenu).
1. In the menu-creating method, build the default menu fromits parts. For the command that you want to override,provide the name of your overriding method as the value(#newAccept).
newAcceptMenu"Redefine the 'accept' command by invoking a local alternate."
| mb |mb := MenuBuilder new.mb
addFindReplaceUndo;line;addCopyCutPaste;line;add: 'accept'->#newAccept; "V1 Step 1"add: 'cancel'->#cancel.
^mb menu
2. Use a System Browser to create the overriding method(newAccept).
newAccept V1 Step 2"Transcript show: self field3 value; cr.

Chapter 6 Input Fields
142 VisualWorks Cookbook, Rev. 2.0
V2. Disabling a Field’s Menu
Do basic steps 1 through 3 (substituting noMenu for expanded-Menu).
➤ In the menu-creating method (noMenu), return a blockcontaining nil. When asked for its menu, the field willevaluate this block, and no menu is displayed.
noMenu^[nil] "V2 Step"
See Also■ “Creating a Menu” on page 226
■ “Adding a Menu Button” on page 236
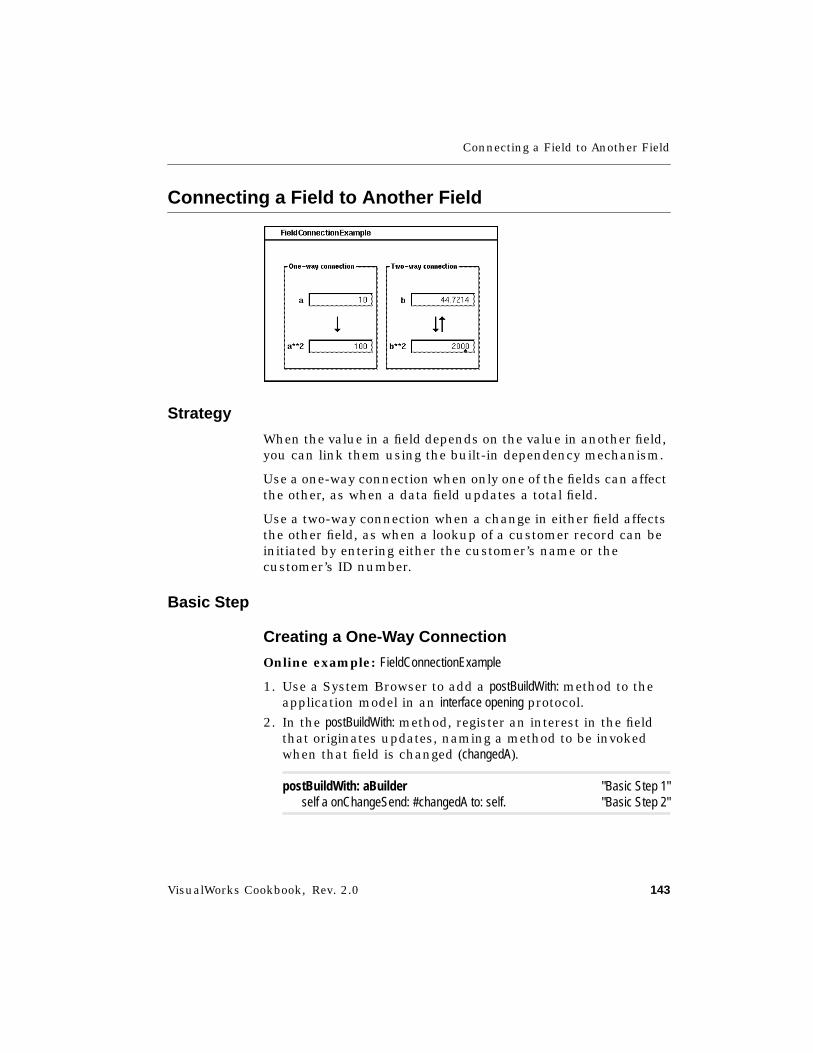
Connecting a Field to Another Field
VisualWorks Cookbook, Rev. 2.0 143
Connecting a Field to Another Field
Strategy
When the value in a field depends on the value in another field,you can link them using the built-in dependency mechanism.
Use a one-way connection when only one of the fields can affectthe other, as when a data field updates a total field.
Use a two-way connection when a change in either field affectsthe other field, as when a lookup of a customer record can beinitiated by entering either the customer’s name or thecustomer’s ID number.
Basic Step
Creating a One-Way Connection
Online example: FieldConnectionExample
1. Use a System Browser to add a postBuildWith: method to theapplication model in an interface opening protocol.
2. In the postBuildWith: method, register an interest in the fieldthat originates updates, naming a method to be invokedwhen that field is changed (changedA).
postBuildWith: aBuilder "Basic Step 1"self a onChangeSend: #changedA to: self. "Basic Step 2"
Chapter 6 Input Fields
144 VisualWorks Cookbook, Rev. 2.0
3. Use a System Browser to add the change method (changedA)to the application model in a change messages protocol. Thatmethod updates the dependent field’s model.
changedA "Basic Step 3"self aSquared value: (self a value raisedTo: 2).
Variant
Creating a Two-Way Connection
Online example: FieldConnectionExample
1. Use a System Browser to add a postBuildWith: method to theapplication model (FieldConnectionExample) in an interface openingprotocol.
2. In the postBuildWith: method, register interests in both fields,naming the method to be invoked when each field ischanged (changedB, changedBSquared).
postBuildWith: aBuilder "Variant Step 1"self b onChangeSend: #changedB to: self. "Variant Step 2"self bSquared onChangeSend: #changedBSquared to: self.
3. Use a System Browser to add the change methods (changedB,changedBSquared) to the application model in a change messagesprotocol. Those methods update the dependent field’smodel in a way that avoids circularity.
changedB "Variant Step 3""Use setValue: to bypass dependents, thus avoiding circularity."self bSquared setValue: (self b value raisedTo: 2).
"Since dependents were bypassed when the model was updated,update the view manually."(self builder componentAt: #b2) widget update: #value.
changedBSquared "Variant Step 3""Use setValue: to bypass dependents, thus avoiding circularity."self b setValue: (self bSquared value raisedTo: (1/2)).

Connecting a Field to Another Field
VisualWorks Cookbook, Rev. 2.0 145
"Since dependents were bypassed when the model was updated,update the view manually."(self builder componentAt: #b) widget update: #value.
See Also■ “Connecting a Slider to a Field” on page 267
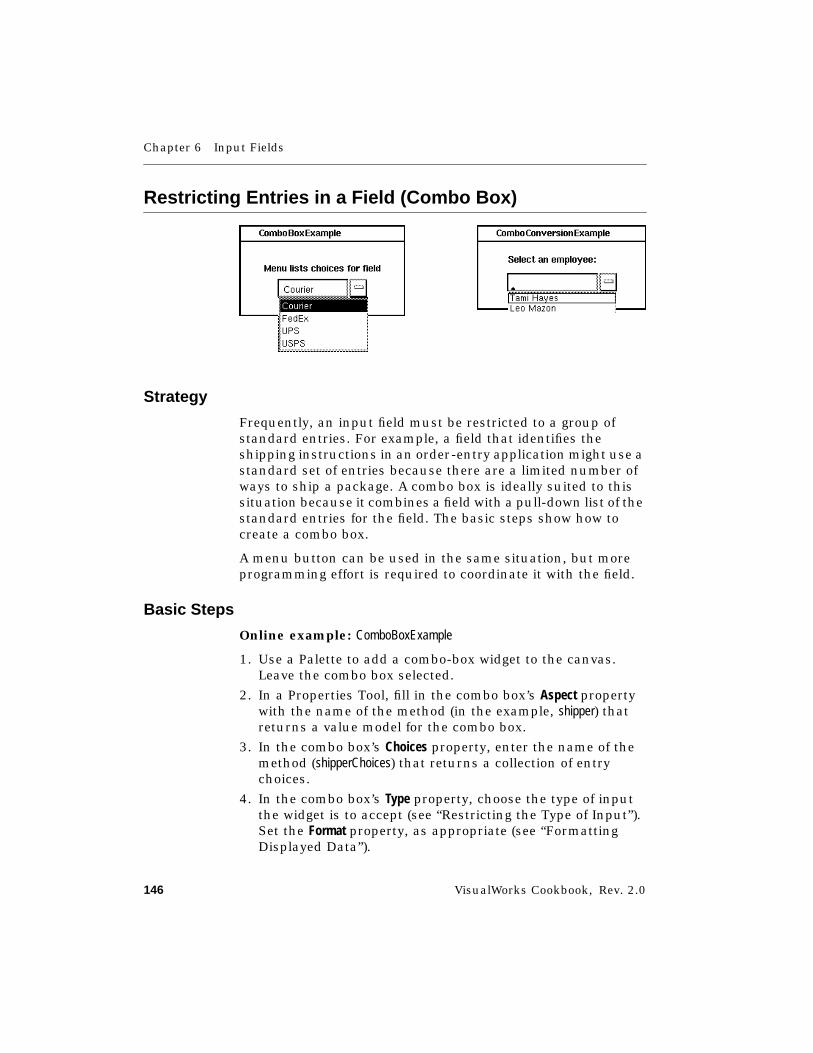
Chapter 6 Input Fields
146 VisualWorks Cookbook, Rev. 2.0
Restricting Entries in a Field (Combo Box)
Strategy
Frequently, an input field must be restricted to a group ofstandard entries. For example, a field that identifies theshipping instructions in an order-entry application might use astandard set of entries because there are a limited number ofways to ship a package. A combo box is ideally suited to thissituation because it combines a field with a pull-down list of thestandard entries for the field. The basic steps show how tocreate a combo box.
A menu button can be used in the same situation, but moreprogramming effort is required to coordinate it with the field.
Basic Steps
Online example: ComboBoxExample
1. Use a Palette to add a combo-box widget to the canvas.Leave the combo box selected.
2. In a Properties Tool, fill in the combo box’s Aspect propertywith the name of the method (in the example, shipper) thatreturns a value model for the combo box.
3. In the combo box’s Choices property, enter the name of themethod (shipperChoices) that returns a collection of entrychoices.
4. In the combo box’s Type property, choose the type of inputthe widget is to accept (see “Restricting the Type of Input”).Set the Format property, as appropriate (see “FormattingDisplayed Data”).
Restricting Entries in a Field (Combo Box)
VisualWorks Cookbook, Rev. 2.0 147
5. Apply the properties and install the canvas.
6. Use a System Browser or the Define button to create theinstance variable (shipper) and accessing method (shipper) forthe aspect.
shipper "Basic Step 6"^shipper
7. Use a System Browser to create the method that you namedin step 3 (shipperChoices). The method returns a value holdercontaining the list of valid entries. The value holder can beheld in an instance variable (as in the example).
shipperChoices "Basic Step 7"^shipperChoices
8. Initialize the field’s aspect variable, typically in an initializemethod. Initialize the variable with a value modelcontaining data of the type specified in step 4.
9. Initialize the choices variable with a value holder containingthe list of valid entries. Initialize this list with data of thetype specified in step 4.
initialize
| list |shipper := 'Courier' asValue. "Basic Step 8"
list := List new.list add: 'Courier'; "Basic Step 9"
add: 'FedEx';add: 'UPS';add: 'USPS'.
shipperChoices := list asValue. "Basic Step 9"
Variant
You can arrange for a combo box to display a list of choices thatare arbitrary objects (for example, a list of Employee objects). Youdo this by supplying a print method and a read method thattranslate the relevant objects into displayable elements (for
Chapter 6 Input Fields
148 VisualWorks Cookbook, Rev. 2.0
example, Strings or graphical images) and back. For example, inComboCoversionExample, the print method enables the combo box todisplay Employee names in the pull-down list and, when anEmployee is selected, to display that Employee’s name in the field.The read method enables the combo box to interpret the user’sinput as an Employee name, which can be matched with anexisting Employee, or used to create a new one.
Online example: ComboConversionExample
1. In the Properties Tool, set the Type property of the combobox to Object.
2. Fill in the Print property with the name of a method forconverting the relevant objects to strings (in this example,employeeToString:). The name must end with a colon.
3. Fill in the Read property with the name of a method forconverting strings to objects of the desired type (in thisexample, stringToEmployee:). The name must end with a colon.
4. In the application model, create a print method with thename you specified in step 2 (employeeToString:). This methodaccepts an object from the choices list as an argument (inthis case, an instance of Employee).
5. In the print method, return a String that represents theobject from the choices list. In this example, display thename of the Employee. The string is displayed in the combobox’s pull-down list and also in the combo box’s field whenthe choice is selected.
employeeToString: anEmployee "Variant Step 4""Return a String for representing the Employee in the combo box’s list and field."
^anEmployee name. "Variant Step 5"
6. Create a read method with the name you specified in step 3(stringToEmployee:). This method accepts a String argument.
7. In the read method, return an object for the given String. Inthis example, determine whether the String is the name of anEmployee in the choices list; if so return that Employee. Other-wise, create a new Employee and add it to the choices list.
Restricting Entries in a Field (Combo Box)
VisualWorks Cookbook, Rev. 2.0 149
stringToEmployee: aString "Variant Step 6""Return an Employee corresponding to the given String. If the Stringcorresponds to the name of an Employee on the choices list, return thatEmployee. Otherwise, create a new Employee and add it to the list."
| theEmp |theEmp := self employeeChoices value "Variant Step 7"
detect: [:each | each name = aString]ifNone: [nil].
theEmp isNilifTrue:
[theEmp := Employee new name: aString.self employeeChoices value addLast: theEmp].
^theEmp
See Also■ “Restricting the Type of Input” on page 125
■ “Formatting Displayed Data” on page 129
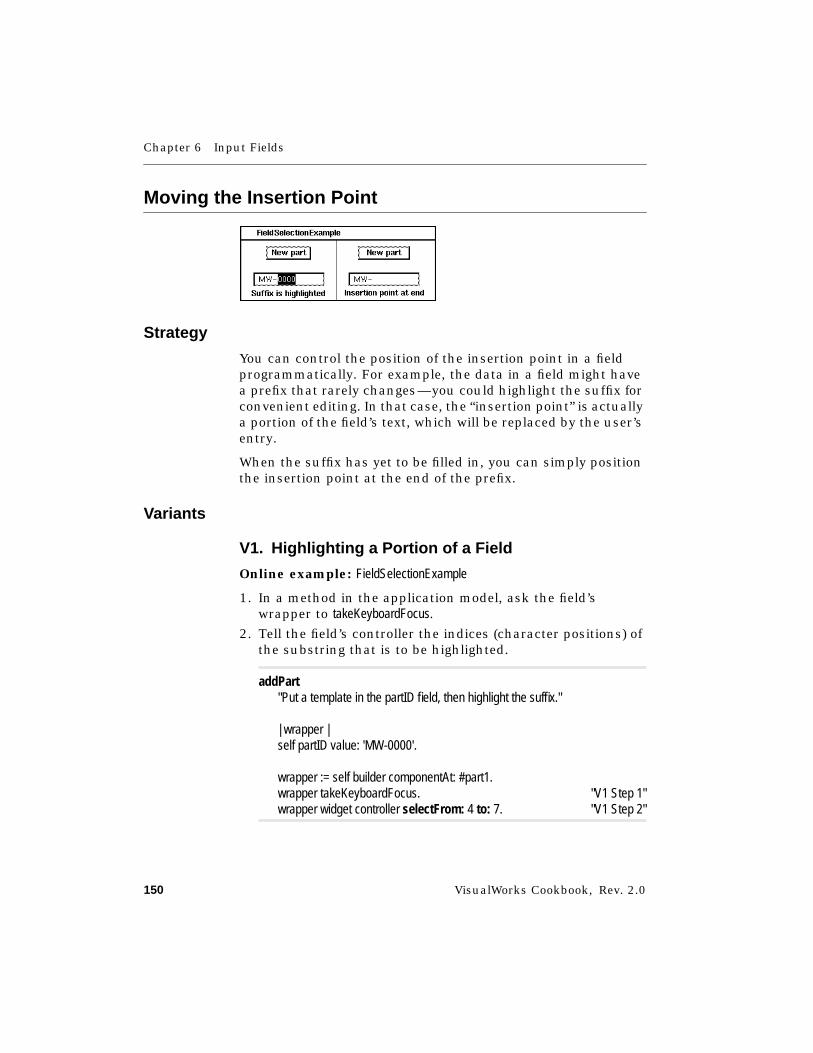
Chapter 6 Input Fields
150 VisualWorks Cookbook, Rev. 2.0
Moving the Insertion Point
Strategy
You can control the position of the insertion point in a fieldprogrammatically. For example, the data in a field might havea prefix that rarely changes—you could highlight the suffix forconvenient editing. In that case, the “insertion point” is actuallya portion of the field’s text, which will be replaced by the user’sentry.
When the suffix has yet to be filled in, you can simply positionthe insertion point at the end of the prefix.
Variants
V1. Highlighting a Portion of a Field
Online example: FieldSelectionExample
1. In a method in the application model, ask the field’swrapper to takeKeyboardFocus.
2. Tell the field’s controller the indices (character positions) ofthe substring that is to be highlighted.
addPart"Put a template in the partID field, then highlight the suffix."
| wrapper |self partID value: 'MW-0000'.
wrapper := self builder componentAt: #part1.wrapper takeKeyboardFocus. "V1 Step 1"wrapper widget controller selectFrom: 4 to: 7. "V1 Step 2"
Moving the Insertion Point
VisualWorks Cookbook, Rev. 2.0 151
Hint: When you want to select the entire contents of the field,just do step 1.
V2. Positioning the Insertion Point1. In a method in the application model, ask the field’s
wrapper to takeKeyboardFocus.
2. Tell the field’s controller the character position at which toplace the insertion point.
addPart2"Put a template in the partID2 field, then position the insertion point."
| wrapper |self partID2 value: 'MW-'.
wrapper := self builder componentAt: #part2.wrapper takeKeyboardFocus. "V2 Step 1"wrapper widget controller selectAt: 4. "V2 Step 2"

VisualWorks Cookbook, Rev. 2.0 153
Chapter 7
Lines, Boxes, and Ovals
Separating Widgets with a Line 154Grouping Widgets with a Box 156Grouping Widgets with an Ellipse 158
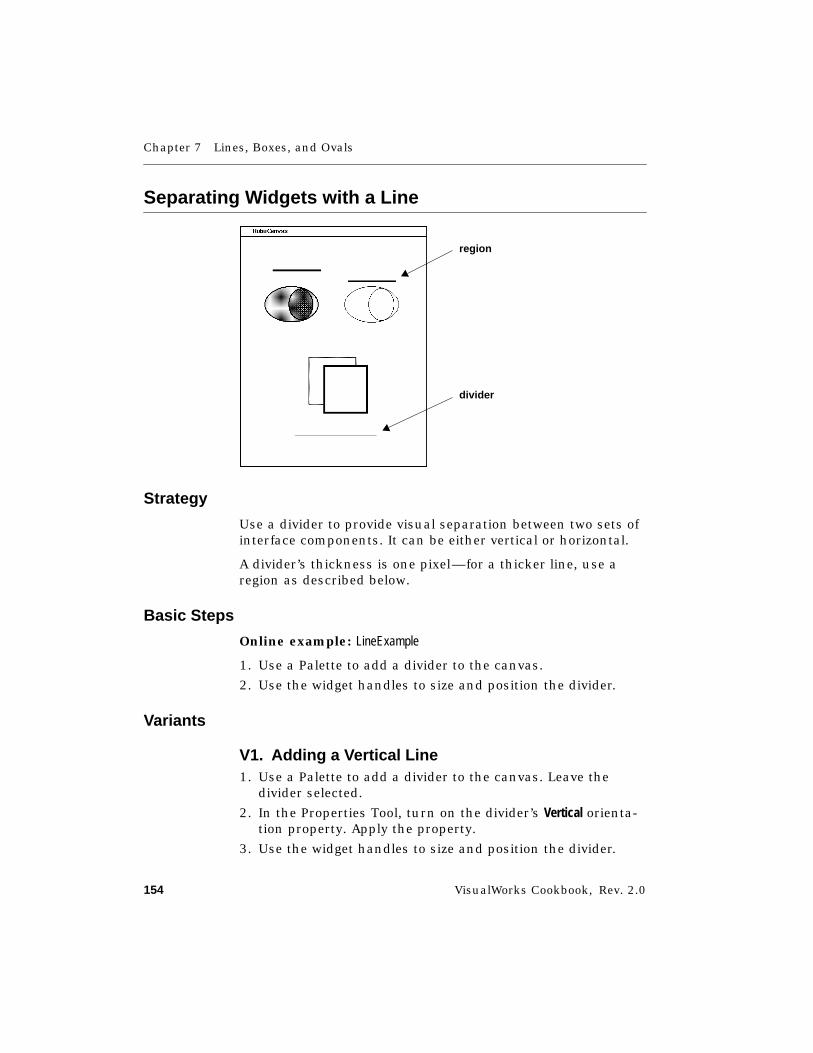
Chapter 7 Lines, Boxes, and Ovals
154 VisualWorks Cookbook, Rev. 2.0
Separating Widgets with a Line
Strategy
Use a divider to provide visual separation between two sets ofinterface components. It can be either vertical or horizontal.
A divider’s thickness is one pixel—for a thicker line, use aregion as described below.
Basic Steps
Online example: LineExample
1. Use a Palette to add a divider to the canvas.
2. Use the widget handles to size and position the divider.
Variants
V1. Adding a Vertical Line1. Use a Palette to add a divider to the canvas. Leave the
divider selected.
2. In the Properties Tool, turn on the divider’s Vertical orienta-tion property. Apply the property.
3. Use the widget handles to size and position the divider.
region
divider
Separating Widgets with a Line
VisualWorks Cookbook, Rev. 2.0 155
4. Install the canvas.
V2. Simulating a Thicker Line1. Use a Palette to add a region to the canvas. Leave the region
selected.
2. Turn on the Thick property. Apply the property.
3. Use the widget handles to radically elongate the region,merging two opposite sides and making it appear to be athick line.
4. Install the canvas.
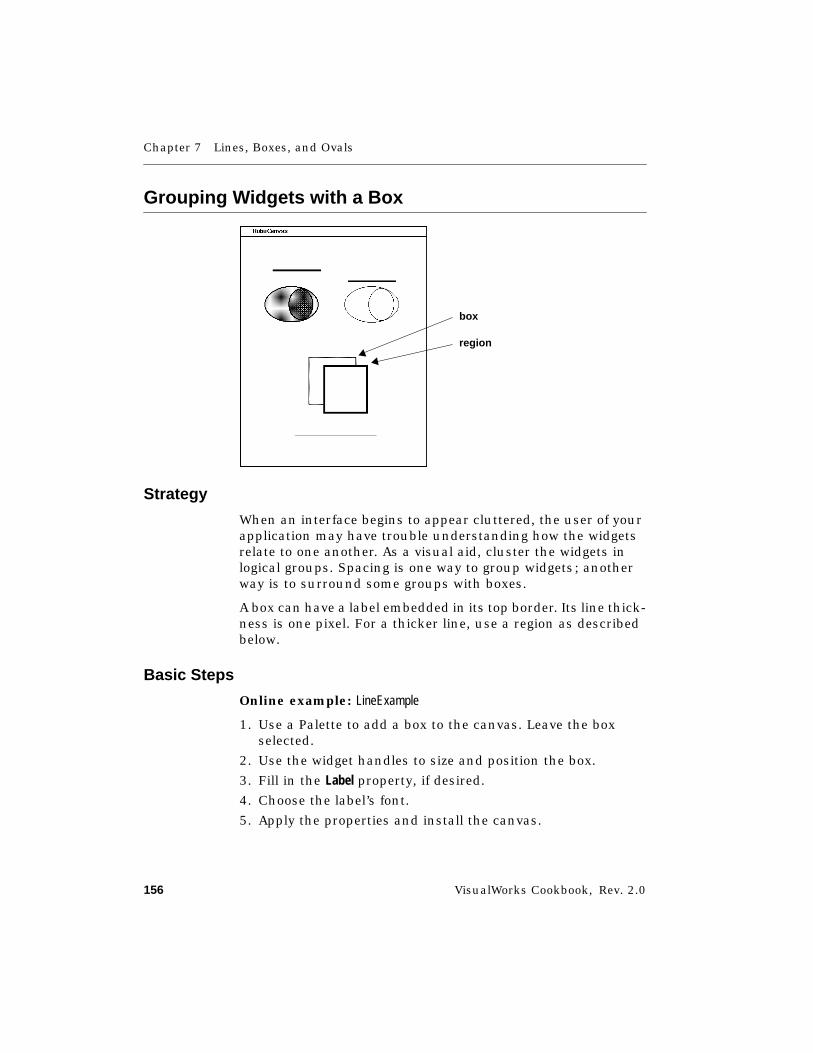
Chapter 7 Lines, Boxes, and Ovals
156 VisualWorks Cookbook, Rev. 2.0
Grouping Widgets with a Box
Strategy
When an interface begins to appear cluttered, the user of yourapplication may have trouble understanding how the widgetsrelate to one another. As a visual aid, cluster the widgets inlogical groups. Spacing is one way to group widgets; anotherway is to surround some groups with boxes.
A box can have a label embedded in its top border. Its line thick-ness is one pixel. For a thicker line, use a region as describedbelow.
Basic Steps
Online example: LineExample
1. Use a Palette to add a box to the canvas. Leave the boxselected.
2. Use the widget handles to size and position the box.
3. Fill in the Label property, if desired.
4. Choose the label’s font.
5. Apply the properties and install the canvas.
box
region
Grouping Widgets with a Box
VisualWorks Cookbook, Rev. 2.0 157
Variants
V1. Adding a Box with Thicker Lines1. Use a Palette to add a region to the canvas. Leave the region
selected.
2. Turn on the desired Border thickness property.
3. Use the widget handles to size and position the region.
4. If you want the region to have a label, use a Palette to add alabel widget. Turn on the label’s opaque property, fill in itsLabel property, and then position it as desired.
5. Apply the properties and install the canvas.
V2. Changing a Box’s Colors
A box widget has no interior surface to color, so use a regionwhen you want a filled box.
■ To change the label color of a box, use a Properties Tool toapply foreground color.
■ To change only the background color of the label, applybackground color.
■ To change the border color of a region, apply foregroundcolor.
■ To change the interior color of a region, apply backgroundcolor.
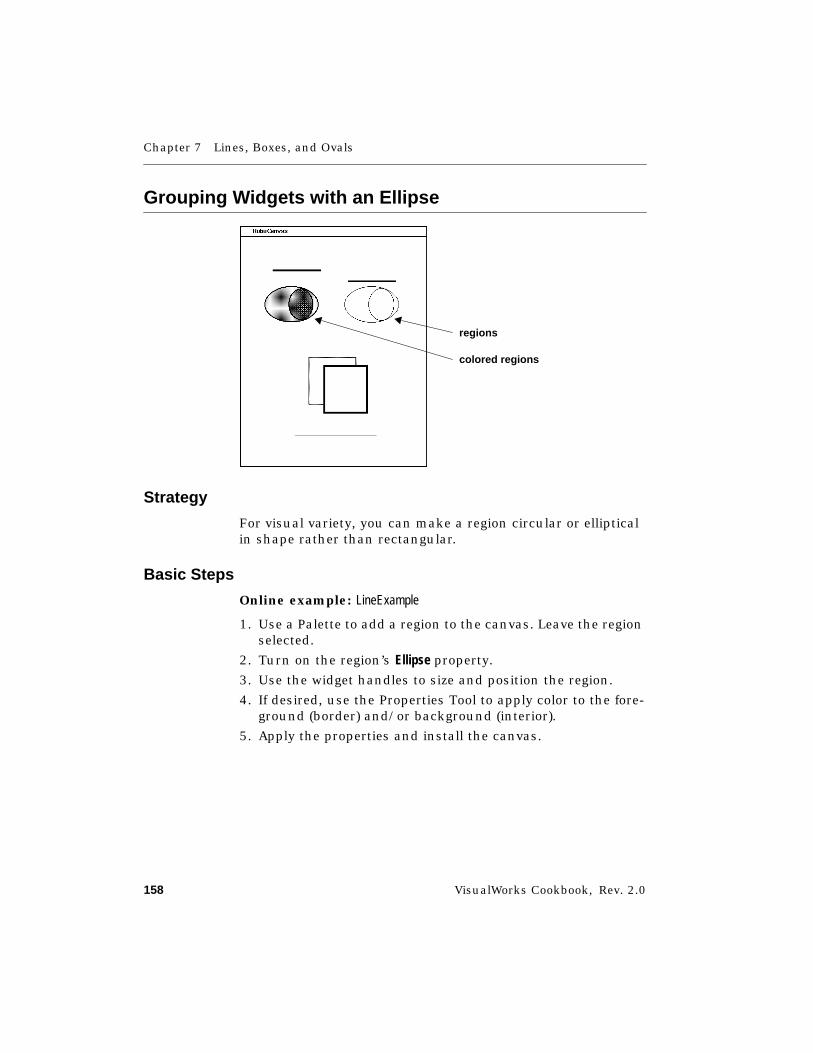
Chapter 7 Lines, Boxes, and Ovals
158 VisualWorks Cookbook, Rev. 2.0
Grouping Widgets with an Ellipse
Strategy
For visual variety, you can make a region circular or ellipticalin shape rather than rectangular.
Basic Steps
Online example: LineExample
1. Use a Palette to add a region to the canvas. Leave the regionselected.
2. Turn on the region’s Ellipse property.
3. Use the widget handles to size and position the region.
4. If desired, use the Properties Tool to apply color to the fore-ground (border) and/or background (interior).
5. Apply the properties and install the canvas.
regions
colored regions
VisualWorks Cookbook, Rev. 2.0 159
Chapter 8
Buttons
Adding a Set of Radio Buttons 160Adding a Check Box 162Adding an Action Button 164Giving a Button a Graphic Label 167Turning Off Highlighting 168
See Also■ “Widget Basics” on page 53
■ “Adding a Menu Button” on page 236
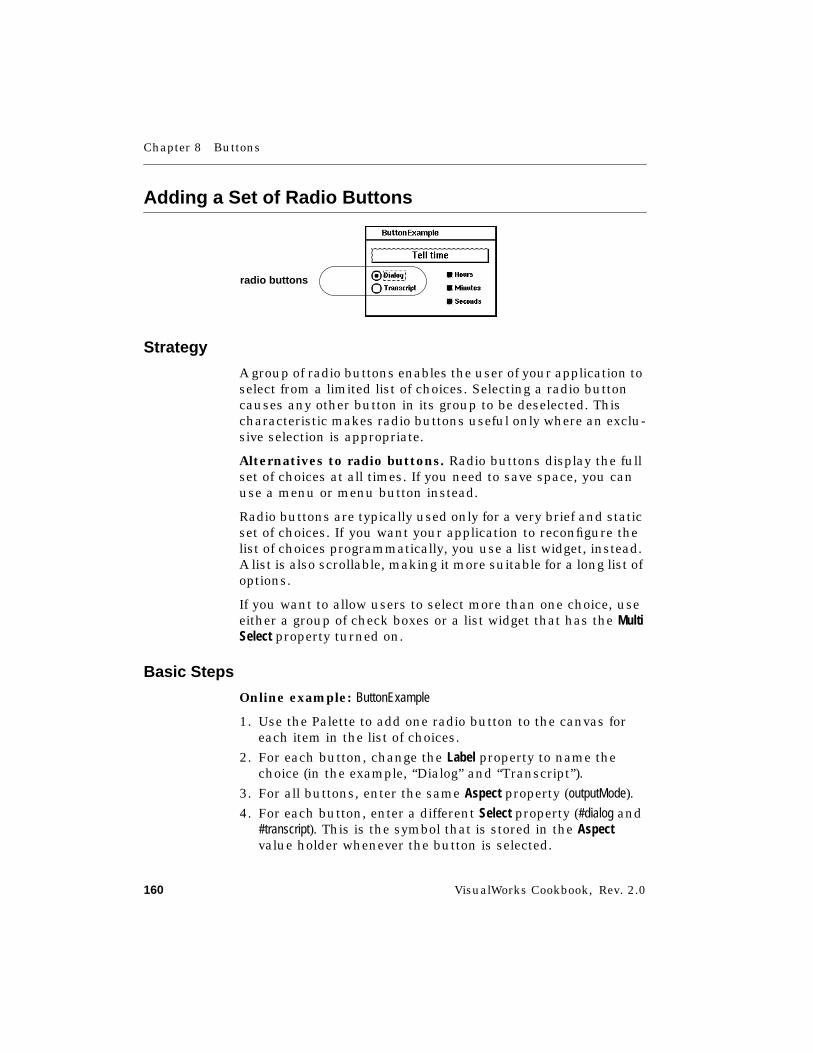
Chapter 8 Buttons
160 VisualWorks Cookbook, Rev. 2.0
Adding a Set of Radio Buttons
Strategy
A group of radio buttons enables the user of your application toselect from a limited list of choices. Selecting a radio buttoncauses any other button in its group to be deselected. Thischaracteristic makes radio buttons useful only where an exclu-sive selection is appropriate.
Alternatives to radio buttons. Radio buttons display the fullset of choices at all times. If you need to save space, you canuse a menu or menu button instead.
Radio buttons are typically used only for a very brief and staticset of choices. If you want your application to reconfigure thelist of choices programmatically, you use a list widget, instead.A list is also scrollable, making it more suitable for a long list ofoptions.
If you want to allow users to select more than one choice, useeither a group of check boxes or a list widget that has the MultiSelect property turned on.
Basic Steps
Online example: ButtonExample
1. Use the Palette to add one radio button to the canvas foreach item in the list of choices.
2. For each button, change the Label property to name thechoice (in the example, “Dialog” and “Transcript”).
3. For all buttons, enter the same Aspect property (outputMode).
4. For each button, enter a different Select property (#dialog and#transcript). This is the symbol that is stored in the Aspectvalue holder whenever the button is selected.
radio buttons
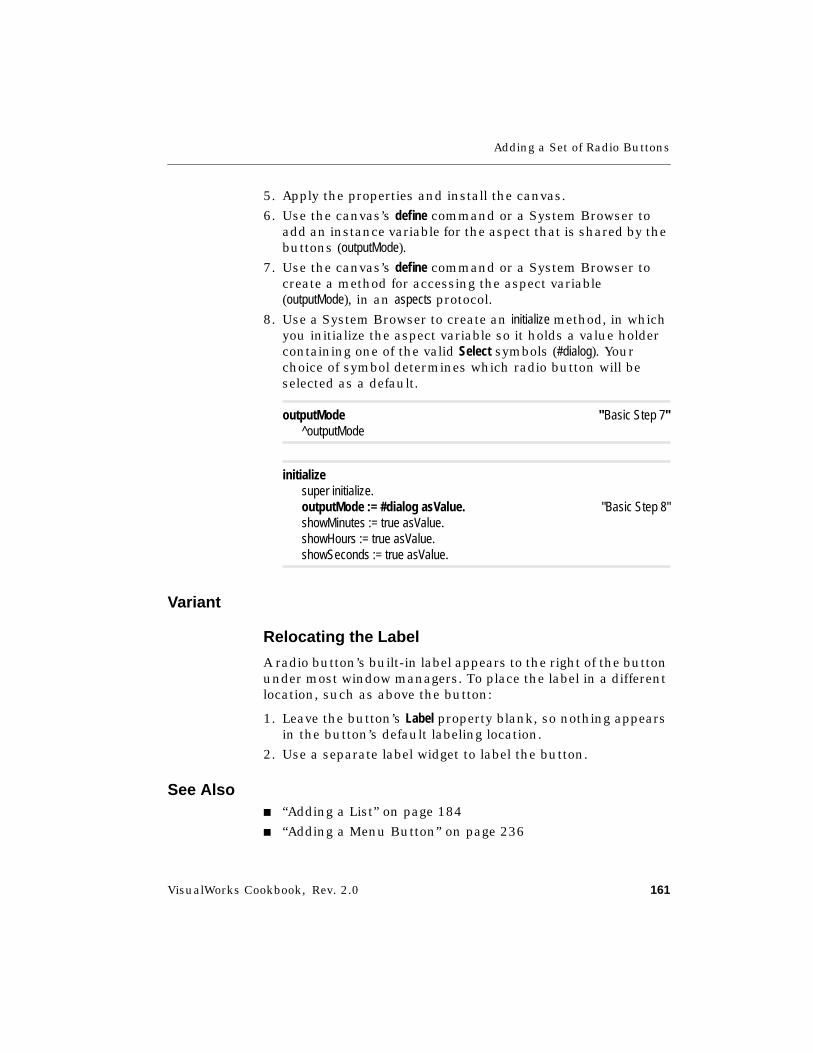
Adding a Set of Radio Buttons
VisualWorks Cookbook, Rev. 2.0 161
5. Apply the properties and install the canvas.
6. Use the canvas’s define command or a System Browser toadd an instance variable for the aspect that is shared by thebuttons (outputMode).
7. Use the canvas’s define command or a System Browser tocreate a method for accessing the aspect variable(outputMode), in an aspects protocol.
8. Use a System Browser to create an initialize method, in whichyou initialize the aspect variable so it holds a value holdercontaining one of the valid Select symbols (#dialog). Yourchoice of symbol determines which radio button will beselected as a default.
outputMode "Basic Step 7"^outputMode
initializesuper initialize.outputMode := #dialog asValue. "Basic Step 8"showMinutes := true asValue.showHours := true asValue.showSeconds := true asValue.
Variant
Relocating the Label
A radio button’s built-in label appears to the right of the buttonunder most window managers. To place the label in a differentlocation, such as above the button:
1. Leave the button’s Label property blank, so nothing appearsin the button’s default labeling location.
2. Use a separate label widget to label the button.
See Also■ “Adding a List” on page 184
■ “Adding a Menu Button” on page 236
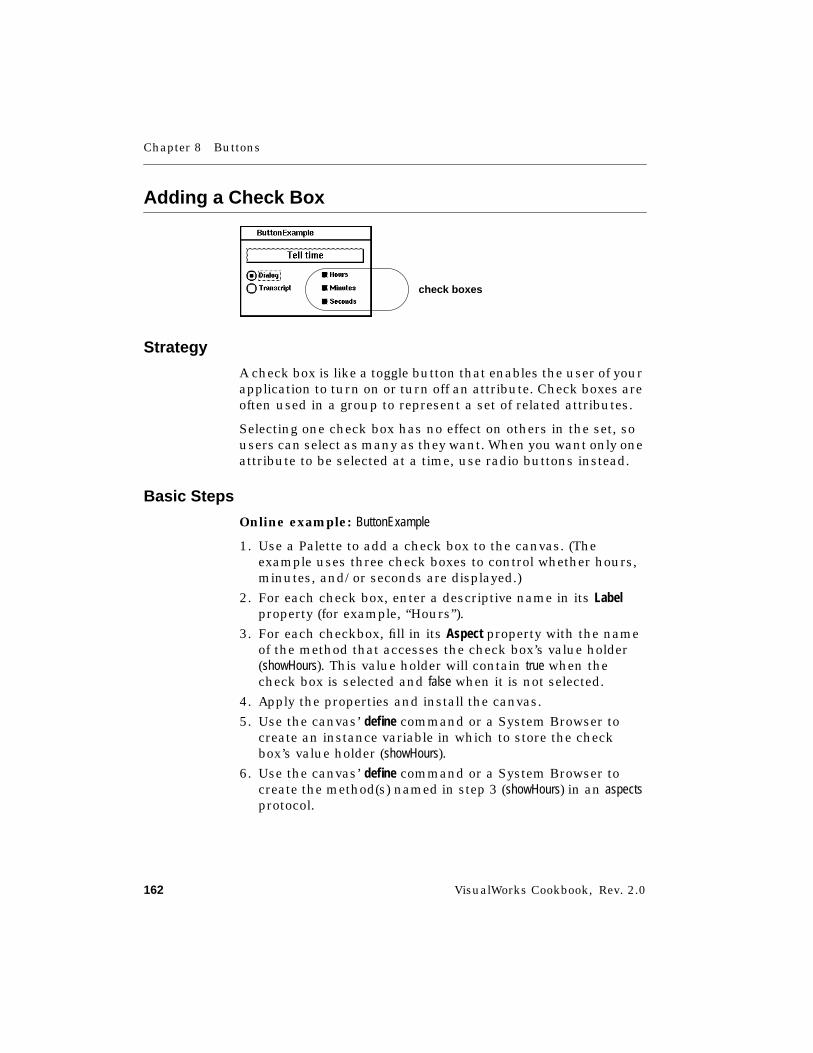
Chapter 8 Buttons
162 VisualWorks Cookbook, Rev. 2.0
Adding a Check Box
Strategy
A check box is like a toggle button that enables the user of yourapplication to turn on or turn off an attribute. Check boxes areoften used in a group to represent a set of related attributes.
Selecting one check box has no effect on others in the set, sousers can select as many as they want. When you want only oneattribute to be selected at a time, use radio buttons instead.
Basic Steps
Online example: ButtonExample
1. Use a Palette to add a check box to the canvas. (Theexample uses three check boxes to control whether hours,minutes, and/or seconds are displayed.)
2. For each check box, enter a descriptive name in its Labelproperty (for example, “Hours”).
3. For each checkbox, fill in its Aspect property with the nameof the method that accesses the check box’s value holder(showHours). This value holder will contain true when thecheck box is selected and false when it is not selected.
4. Apply the properties and install the canvas.
5. Use the canvas’ define command or a System Browser tocreate an instance variable in which to store the checkbox’s value holder (showHours).
6. Use the canvas’ define command or a System Browser tocreate the method(s) named in step 3 (showHours) in an aspectsprotocol.
check boxes
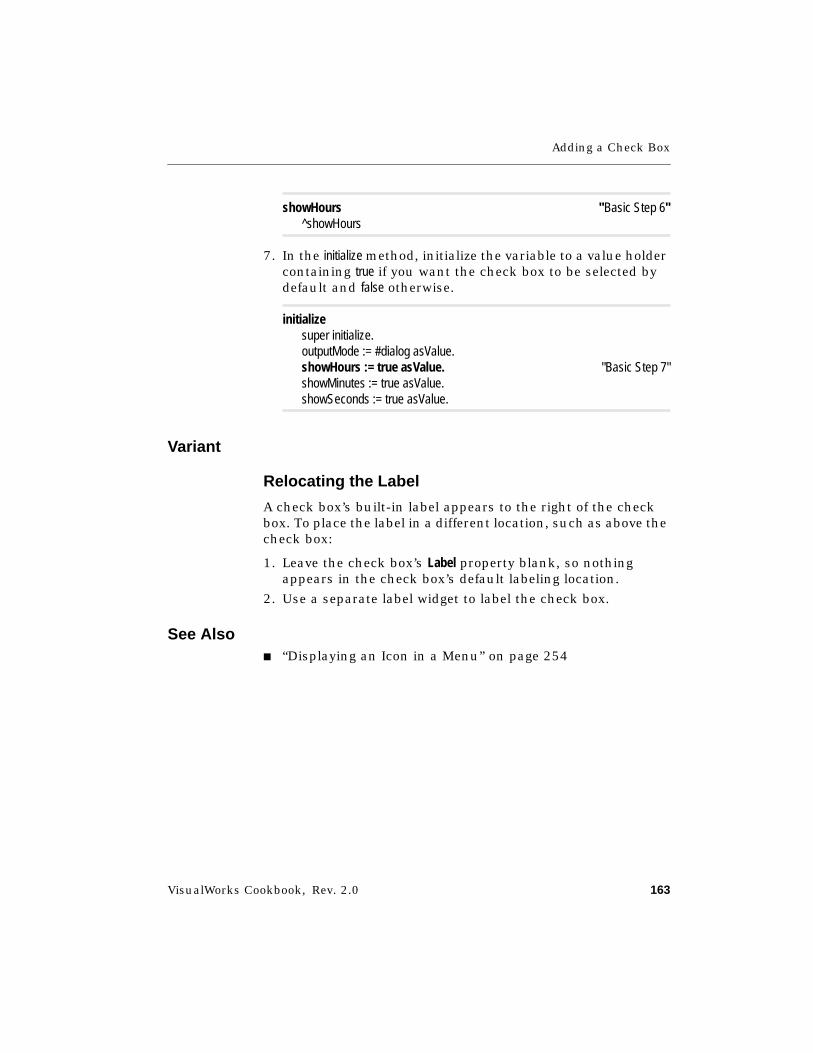
Adding a Check Box
VisualWorks Cookbook, Rev. 2.0 163
showHours "Basic Step 6"^showHours
7. In the initialize method, initialize the variable to a value holdercontaining true if you want the check box to be selected bydefault and false otherwise.
initializesuper initialize.outputMode := #dialog asValue.showHours := true asValue. "Basic Step 7"showMinutes := true asValue.showSeconds := true asValue.
Variant
Relocating the Label
A check box’s built-in label appears to the right of the checkbox. To place the label in a different location, such as above thecheck box:
1. Leave the check box’s Label property blank, so nothingappears in the check box’s default labeling location.
2. Use a separate label widget to label the check box.
See Also■ “Displaying an Icon in a Menu” on page 254

Chapter 8 Buttons
164 VisualWorks Cookbook, Rev. 2.0
Adding an Action Button
Strategy
An action button triggers an action, such as opening a dialogwindow. If you want to save space in an interface, considerusing a menu instead of multiple buttons.
Basic Steps
Online example: ButtonExample
1. Use a Palette to add an action button to the canvas. Leavethe button selected.
2. In a Properties Tool, fill in the button’s Label property with adescriptive label (in the example, “Tell time”).
3. Fill in the button’s Action property with the name of themethod that performs the action (#tellTime).
4. Apply the properties and install the canvas.
5. Use a System Browser to create the method named in step3 (tellTime) in an actions protocol.
tellTime "Basic Step 5" | t tString |t := Time now.tString := String new.
"Assemble the time string based on the check boxes."self showHours value
ifTrue: [tString := tString, t hours printString].self showMinutes value
ifTrue: [tString := tString, ':', t minutes printString, ':']ifFalse: [tString := tString, '::'].
self showSeconds value
action button
Adding an Action Button
VisualWorks Cookbook, Rev. 2.0 165
ifTrue: [tString := tString, t seconds printString].
"Send the time string to the output channel set by the radio buttons."self outputMode value == #transcript
ifTrue: [Transcript show: tString; cr]ifFalse: [DialogView warn: tString]
Variants
V1. Using a Placeholder Action
Sometimes it is convenient to add a button to a canvas beforeyou are ready to implement the action method. If you leave theAction property blank, the button will have no effect in therunning interface, which can be disconcerting. This variantcauses the button to display a dialog reminding you that themethod has not yet been implemented.
➤ In the button’s Action property, enter unimplemented.
V2. Designating a Default Button
In a canvas that is to be used as a dialog, it is common to enablethe user to signify completion either by clicking on a particularbutton (such as OK or Done) or by pressing <Return> on thekeyboard. To arrange for <Return> to activate a particularbutton (before the focus is shifted manually):
➤ Turn on the button’s Be Default property.
V3. Sizing a Button as If It Were the Default Button
With some window managers, such as Windows and OSF Motif,a default button has a different appearance and the differencemay affect the dimensions of the button’s border. This cancomplicate matters when you try to align nondefault buttonswith the default button, even after you have equalized theirheights and widths. To make a nondefault button take on thesizing characteristics of a default button:
➤ Turn on the button’s Size as Default property.
Chapter 8 Buttons
166 VisualWorks Cookbook, Rev. 2.0
See Also■ “Adding a Menu Bar” on page 233
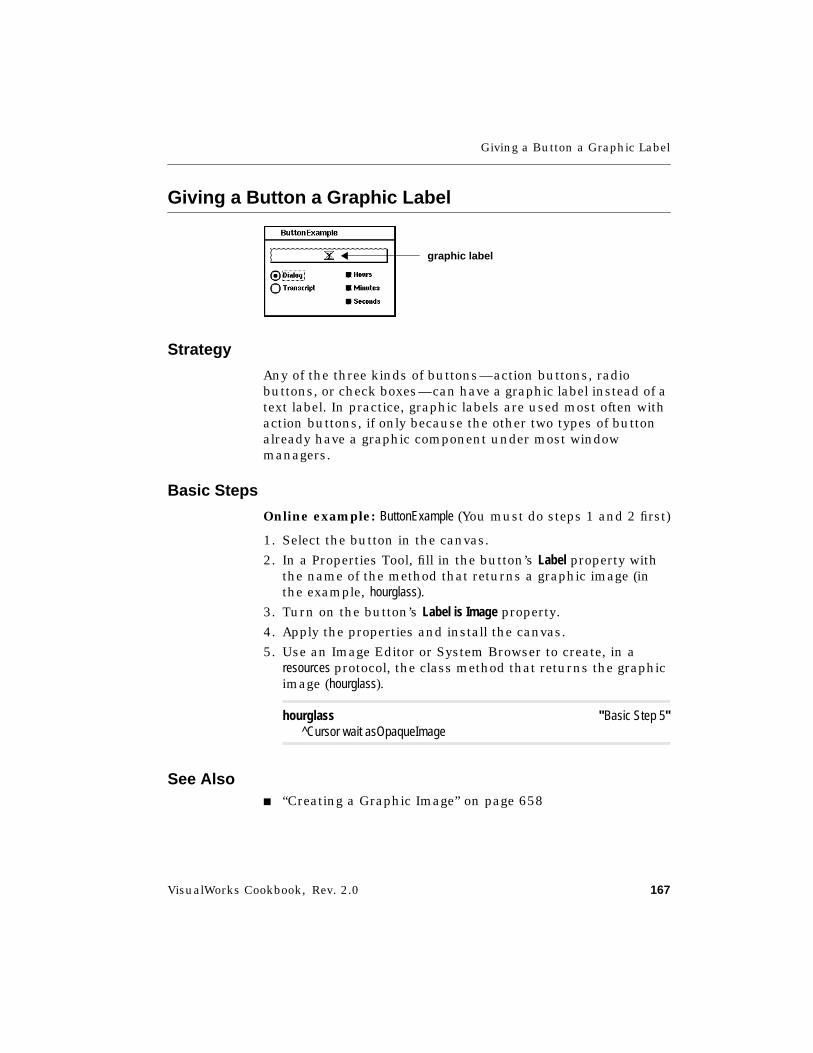
Giving a Button a Graphic Label
VisualWorks Cookbook, Rev. 2.0 167
Giving a Button a Graphic Label
Strategy
Any of the three kinds of buttons—action buttons, radiobuttons, or check boxes—can have a graphic label instead of atext label. In practice, graphic labels are used most often withaction buttons, if only because the other two types of buttonalready have a graphic component under most windowmanagers.
Basic Steps
Online example: ButtonExample (You must do steps 1 and 2 first)
1. Select the button in the canvas.
2. In a Properties Tool, fill in the button’s Label property withthe name of the method that returns a graphic image (inthe example, hourglass).
3. Turn on the button’s Label is Image property.
4. Apply the properties and install the canvas.
5. Use an Image Editor or System Browser to create, in aresources protocol, the class method that returns the graphicimage (hourglass).
hourglass "Basic Step 5"^Cursor wait asOpaqueImage
See Also■ “Creating a Graphic Image” on page 658
graphic label
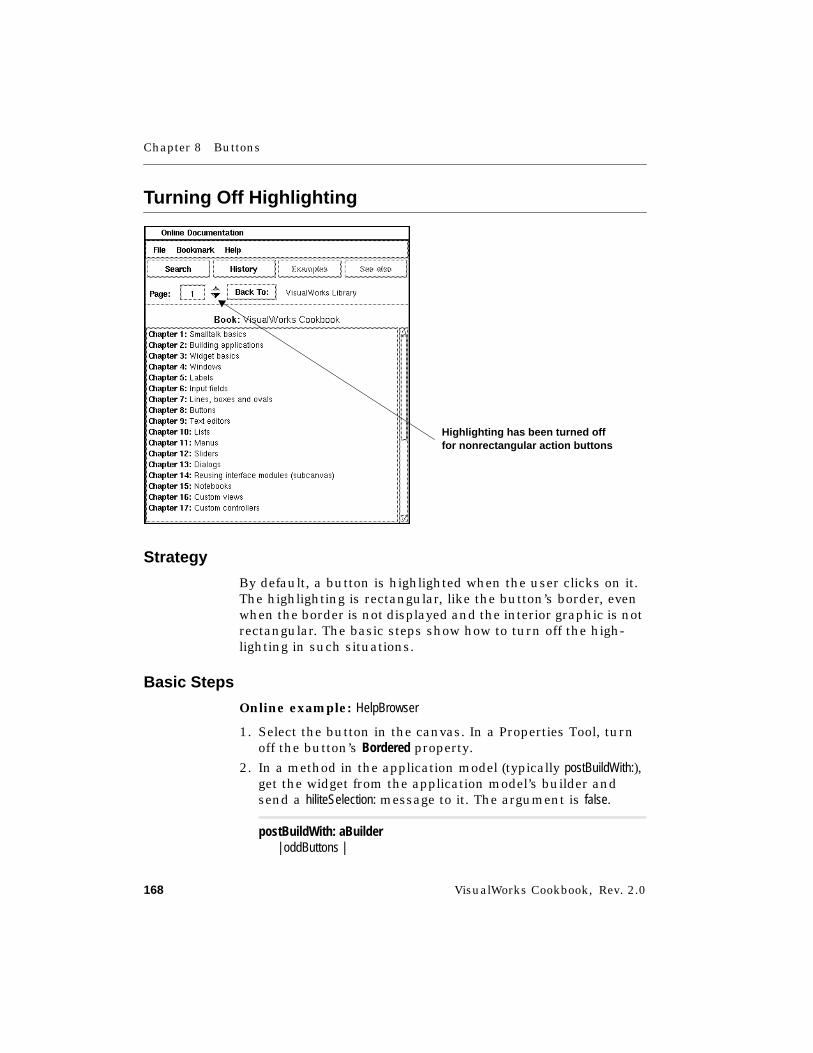
Chapter 8 Buttons
168 VisualWorks Cookbook, Rev. 2.0
Turning Off Highlighting
Strategy
By default, a button is highlighted when the user clicks on it.The highlighting is rectangular, like the button’s border, evenwhen the border is not displayed and the interior graphic is notrectangular. The basic steps show how to turn off the high-lighting in such situations.
Basic Steps
Online example: HelpBrowser
1. Select the button in the canvas. In a Properties Tool, turnoff the button’s Bordered property.
2. In a method in the application model (typically postBuildWith:),get the widget from the application model’s builder andsend a hiliteSelection: message to it. The argument is false.
postBuildWith: aBuilder| oddButtons |
Highlighting has been turned offfor nonrectangular action buttons
Turning Off Highlighting
VisualWorks Cookbook, Rev. 2.0 169
"Make the main window a master window."aBuilder window
application: self;beMaster.
"Turn off highlighting for the nonrectangular buttons."oddButtons := #( #prevPageButton #nextPageButton ).oddButtons do: [ :buttonName |
(aBuilder componentAt: buttonName)widget hiliteSelection: false]. "Basic Step 2"
"Disable the appropriate buttons."self adjustButtons.
"Set keyboard hook for special shortcut keys."aBuilder keyboardProcessor keyboardHook: [ :ev :ctrl |
self keyPress: ev].


VisualWorks Cookbook, Rev. 2.0 171
Chapter 9
Text Editors
Adding a Text Editor 172Accessing the Selected Text 174Highlighting Text Programmatically 176Aligning Text 178Making an Editor Read-Only 180Modifying an Editor’s Menu 182
See Also■ “Characters and Strings” on page 529
■ “Text and Fonts” on page 555
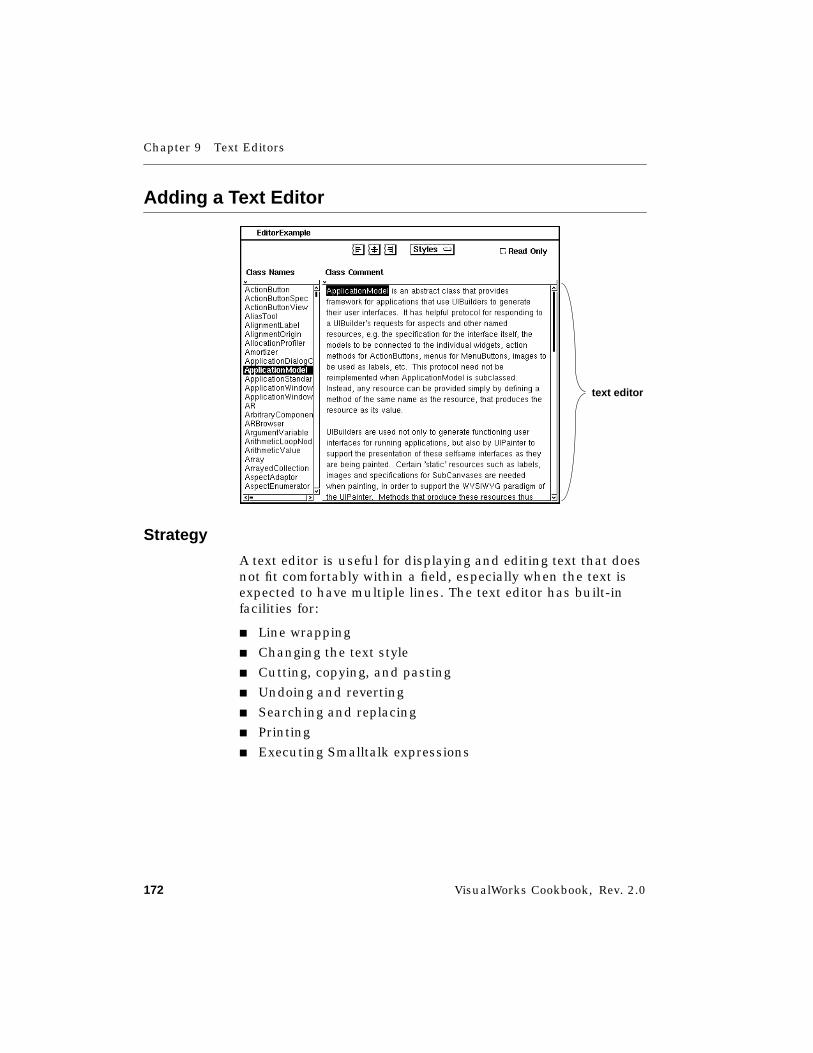
Chapter 9 Text Editors
172 VisualWorks Cookbook, Rev. 2.0
Adding a Text Editor
Strategy
A text editor is useful for displaying and editing text that doesnot fit comfortably within a field, especially when the text isexpected to have multiple lines. The text editor has built-infacilities for:
■ Line wrapping
■ Changing the text style
■ Cutting, copying, and pasting
■ Undoing and reverting
■ Searching and replacing
■ Printing
■ Executing Smalltalk expressions
text editor
Adding a Text Editor
VisualWorks Cookbook, Rev. 2.0 173
Basic Steps
Online example: Editor1Example
1. Use a Palette to add a text editor to the canvas. Leave thetext editor selected.
2. In a Properties Tool, fill in the editor’s Aspect property withthe name of the method (comment) that will return the valuemodel for the text editor.
3. Use the define command or a System Browser to add aninstance variable (comment) to the application model forstoring the text editor’s value model.
4. Use a System Browser to add, in an aspects protocol, amethod (comment) that returns the contents of the instancevariable.
comment "Basic Step 4"^comment
5. Use a System Browser to create an initialize method thatinitializes the aspect variable (comment) with a value holdercontaining the initial text to be displayed (an empty string).
initializesuper initialize.
comment := '' asValue. "Basic Step 5"
classes := SelectionInList with: Smalltalk classNames.classes selectionIndexHolder
onChangeSend: #changedClass to: self.
textStyle := #plain asValue.textStyle onChangeSend: #changedStyle to: self.
readOnly := false asValue.readOnly onChangeSend: #changedReadOnly to: self

Chapter 9 Text Editors
174 VisualWorks Cookbook, Rev. 2.0
Accessing the Selected Text
Strategy
When the user highlights a portion of the text in an editor, yourapplication can find out what is highlighted. This is usefulwhen the application needs to use the selected text in someway—as a parameter in a message send, for example.
Sometimes you need to modify the text in some way (in theexample, we change the font) and then insert the new versioninto the main text. The variant shows how to do this.
Basic Steps
Online example: Editor1Example
1. In a method in the application model, get the controllerfrom the widget.
2. Ask the controller for the selected text.
changedStyle"A text style was selected -- apply it to the current selection in the
comment."
selectedtext

Accessing the Selected Text
VisualWorks Cookbook, Rev. 2.0 175
| c selectedText style |
"Get the selected text."c := (builder componentAt: #comment) widget controller. "Basic Step 1"selectedText := c selection. "Basic Step 2"
"If nothing is selected, take no action."selectedText isEmpty ifTrue: [^self].
"If 'Plain' was selected, remove all emphases;otherwise add the new emphasis."style := self textStyle value.style == #plain
ifTrue: [selectedText emphasizeAllWith: nil]ifFalse: [
selectedText addEmphasis: (Array with: style)removeEmphasis: nilallowDuplicates: false].
"Ask the controller to insert the modified text, then update the view."c replaceSelectionWith: selectedText. "Variant Step 1"c view resetSelections. "Variant Step 2"c view invalidate. "Variant Step 3"
Variant
Replacing the Selected Text
(See example method above.)
1. Ask the controller to replace the selection with a new text.
2. Ask the controller’s view to reset its selections (to adjust fora possible width change in the selection).
3. Ask the view to redisplay itself.
See Also■ “Replacing a Range of Text” on page 567
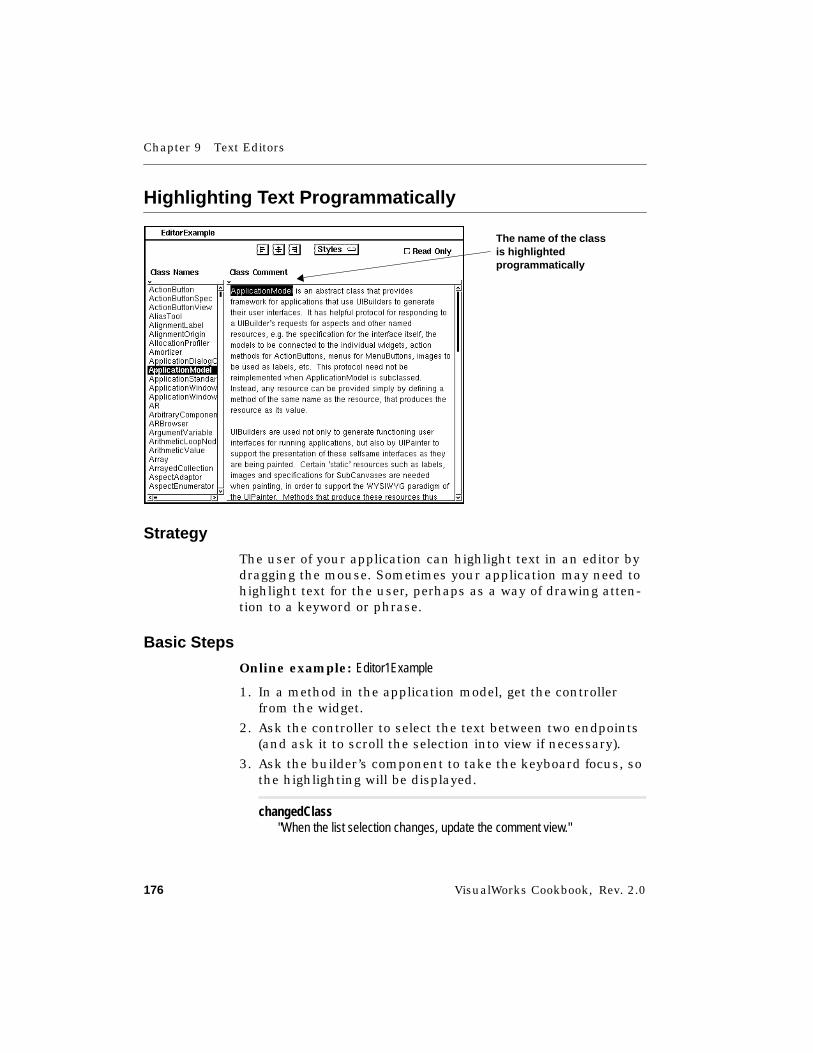
Chapter 9 Text Editors
176 VisualWorks Cookbook, Rev. 2.0
Highlighting Text Programmatically
Strategy
The user of your application can highlight text in an editor bydragging the mouse. Sometimes your application may need tohighlight text for the user, perhaps as a way of drawing atten-tion to a keyword or phrase.
Basic Steps
Online example: Editor1Example
1. In a method in the application model, get the controllerfrom the widget.
2. Ask the controller to select the text between two endpoints(and ask it to scroll the selection into view if necessary).
3. Ask the builder’s component to take the keyboard focus, sothe highlighting will be displayed.
changedClass"When the list selection changes, update the comment view."
The name of the classis highlightedprogrammatically
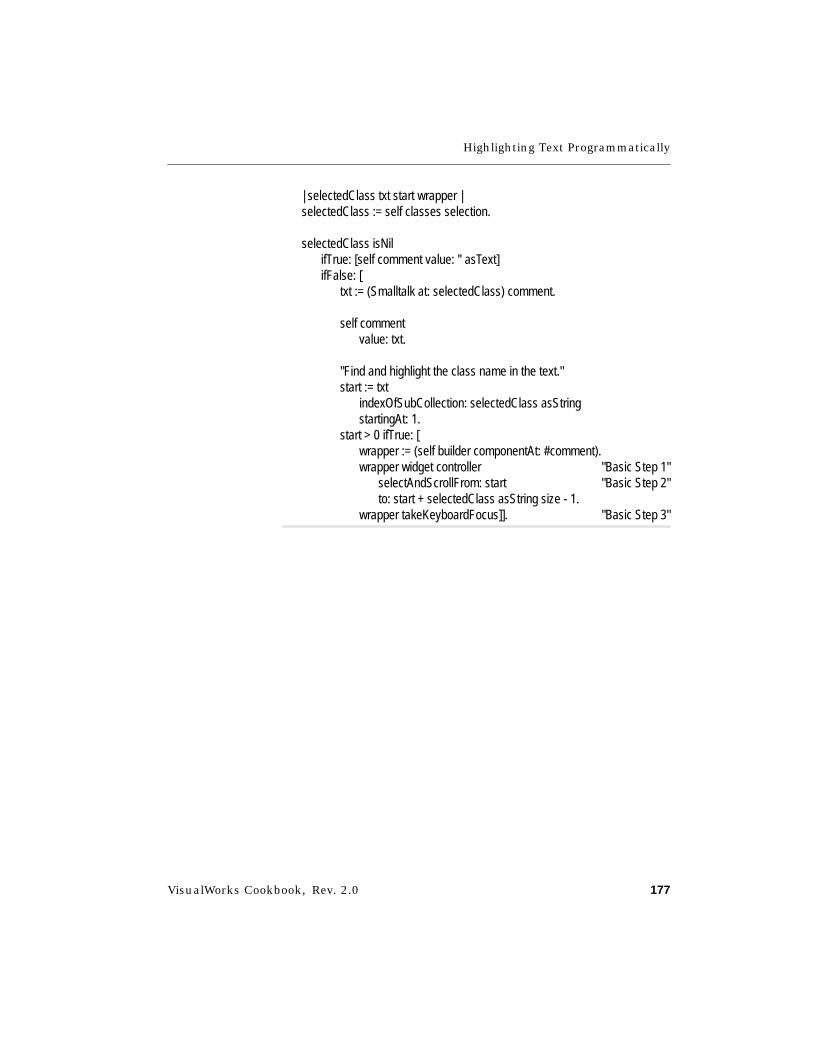
Highlighting Text Programmatically
VisualWorks Cookbook, Rev. 2.0 177
| selectedClass txt start wrapper |selectedClass := self classes selection.
selectedClass isNilifTrue: [self comment value: '' asText]ifFalse: [
txt := (Smalltalk at: selectedClass) comment.
self commentvalue: txt.
"Find and highlight the class name in the text."start := txt
indexOfSubCollection: selectedClass asStringstartingAt: 1.
start > 0 ifTrue: [wrapper := (self builder componentAt: #comment).wrapper widget controller "Basic Step 1"
selectAndScrollFrom: start "Basic Step 2"to: start + selectedClass asString size - 1.
wrapper takeKeyboardFocus]]. "Basic Step 3"
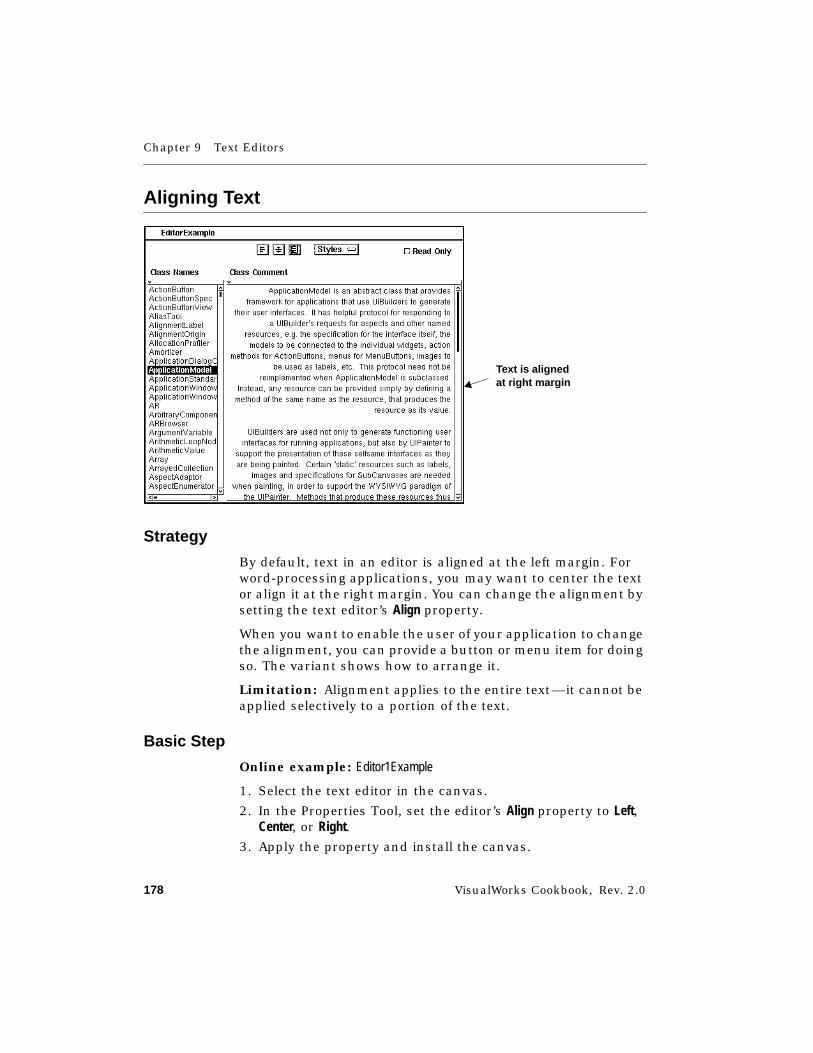
Chapter 9 Text Editors
178 VisualWorks Cookbook, Rev. 2.0
Aligning Text
Strategy
By default, text in an editor is aligned at the left margin. Forword-processing applications, you may want to center the textor align it at the right margin. You can change the alignment bysetting the text editor’s Align property.
When you want to enable the user of your application to changethe alignment, you can provide a button or menu item for doingso. The variant shows how to arrange it.
Limitation: Alignment applies to the entire text—it cannot beapplied selectively to a portion of the text.
Basic Step
Online example: Editor1Example
1. Select the text editor in the canvas.
2. In the Properties Tool, set the editor’s Align property to Left,Center, or Right.
3. Apply the property and install the canvas.
Text is alignedat right margin
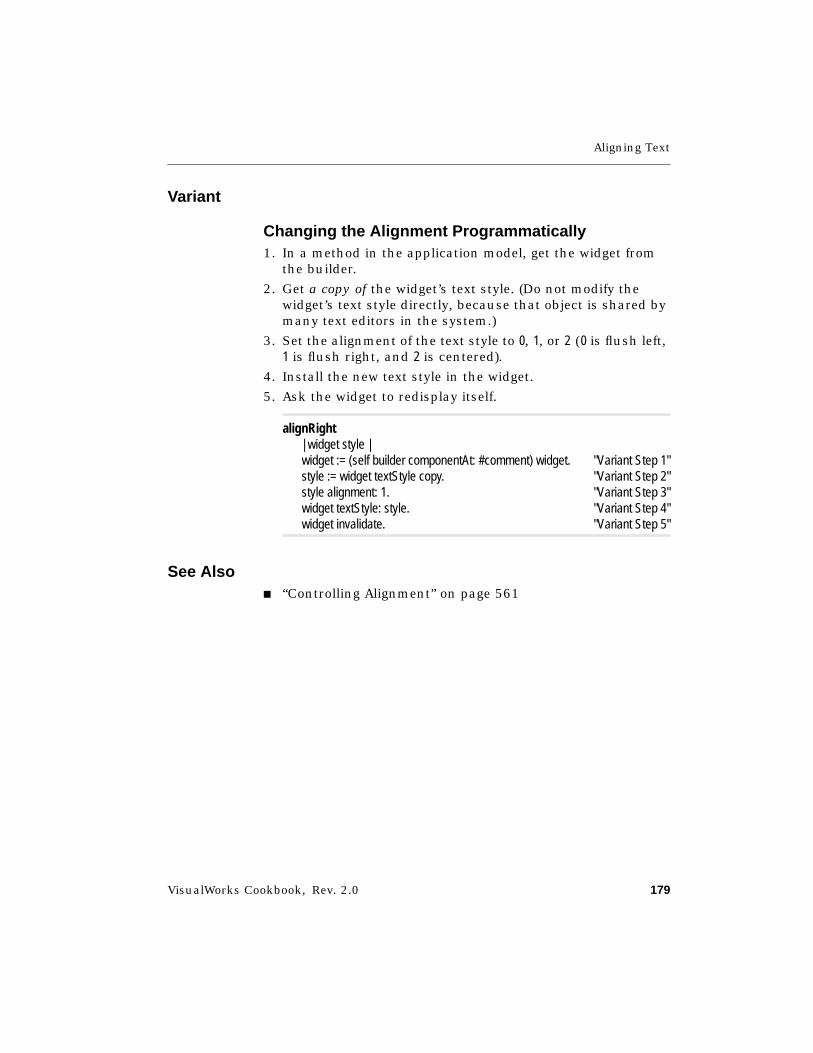
Aligning Text
VisualWorks Cookbook, Rev. 2.0 179
Variant
Changing the Alignment Programmatically1. In a method in the application model, get the widget from
the builder.
2. Get a copy of the widget’s text style. (Do not modify thewidget’s text style directly, because that object is shared bymany text editors in the system.)
3. Set the alignment of the text style to 0, 1, or 2 (0 is flush left,1 is flush right, and 2 is centered).
4. Install the new text style in the widget.
5. Ask the widget to redisplay itself.
alignRight| widget style |widget := (self builder componentAt: #comment) widget. "Variant Step 1"style := widget textStyle copy. "Variant Step 2"style alignment: 1. "Variant Step 3"widget textStyle: style. "Variant Step 4"widget invalidate. "Variant Step 5"
See Also■ “Controlling Alignment” on page 561
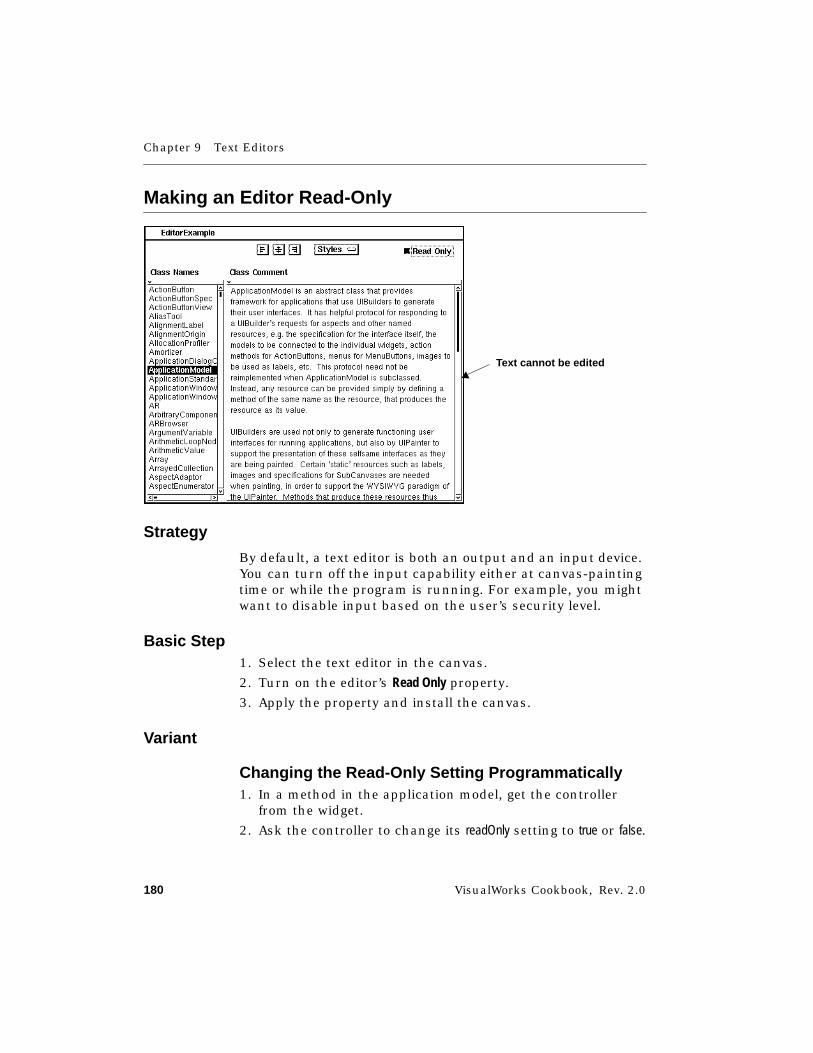
Chapter 9 Text Editors
180 VisualWorks Cookbook, Rev. 2.0
Making an Editor Read-Only
Strategy
By default, a text editor is both an output and an input device.You can turn off the input capability either at canvas-paintingtime or while the program is running. For example, you mightwant to disable input based on the user’s security level.
Basic Step1. Select the text editor in the canvas.
2. Turn on the editor’s Read Only property.
3. Apply the property and install the canvas.
Variant
Changing the Read-Only Setting Programmatically1. In a method in the application model, get the controller
from the widget.
2. Ask the controller to change its readOnly setting to true or false.
Text cannot be edited

Making an Editor Read-Only
VisualWorks Cookbook, Rev. 2.0 181
changedReadOnly| c |c := (self builder componentAt: #comment) widget controller. "Variant Step 1"c readOnly: (self readOnly value). "Variant Step 2"
Chapter 9 Text Editors
182 VisualWorks Cookbook, Rev. 2.0
Modifying an Editor’s Menu
Strategy
By default, a text editor has the same menu of text-editingcommands that the system tools have. You can add or removecommands, override the action that is associated with acommand, or disable the menu entirely.
Detailed steps for modifying an editor’s menu are the same asthose for modifying an input field’s menu.
See Also■ “Modifying a Field’s Pop-Up Menu” on page 139
normal menu

VisualWorks Cookbook, Rev. 2.0 183
Chapter 10
Lists
Adding a List 184Editing the List of Elements 187Allowing for Multiple Selections 189Finding Out What Is Selected 191Adding a Menu to a List 194Changing the Highlighting Style 196Connecting Two Lists 198Connecting a List to a Text Editor 200
See Also■ “Widget Basics” on page 53
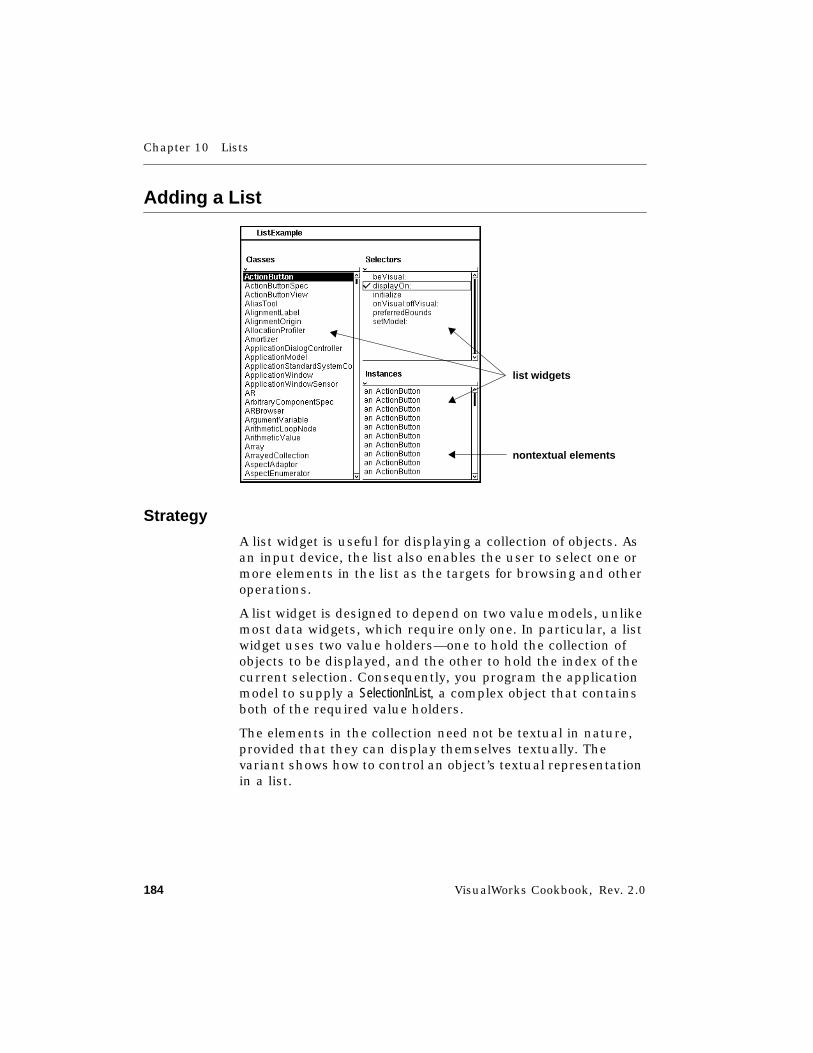
Chapter 10 Lists
184 VisualWorks Cookbook, Rev. 2.0
Adding a List
Strategy
A list widget is useful for displaying a collection of objects. Asan input device, the list also enables the user to select one ormore elements in the list as the targets for browsing and otheroperations.
A list widget is designed to depend on two value models, unlikemost data widgets, which require only one. In particular, a listwidget uses two value holders—one to hold the collection ofobjects to be displayed, and the other to hold the index of thecurrent selection. Consequently, you program the applicationmodel to supply a SelectionInList, a complex object that containsboth of the required value holders.
The elements in the collection need not be textual in nature,provided that they can display themselves textually. Thevariant shows how to control an object’s textual representationin a list.
list widgets
nontextual elements

Adding a List
VisualWorks Cookbook, Rev. 2.0 185
Basic Steps
Online example: List1Example
1. Use a Palette to add a list widget to the canvas. Leave thelist selected.
2. In the Properties Tool, fill in the list’s Aspect property withthe name of the method that will return an instance ofSelectionInList.
3. Use the canvas’s define command or a System Browser toadd an instance variable (classes) to the application model.This instance variable will hold the SelectionInList.
4. Use the canvas’s define command or a System Browser tocreate the aspect method you named in step 2 (classes).
5. Use a System Browser to initialize the instance variable youcreated in step 3 (classes), usually in an initialize method. Youinitialize the variable with an instance of SelectionInList that isitself initialized with a list of Smalltalk class names.
classes "Basic Step 4"^classes
initializesuper initialize.classes := SelectionInList with: Smalltalk classNames. "Basic Step 5"classes selectionIndexHolder onChangeSend: #changedClass to: self.
methodNames := MultiSelectionInList new.
instances := SelectionInList new.
Variant
Controlling the Textual Display of List Elements
Online example: List1Example
A list sends a displayString message to its elements at display time.Every object responds to this message, because it is inheritedfrom the Object class. However, the default implementation ofdisplayString, which simply sends printString to the object, may not
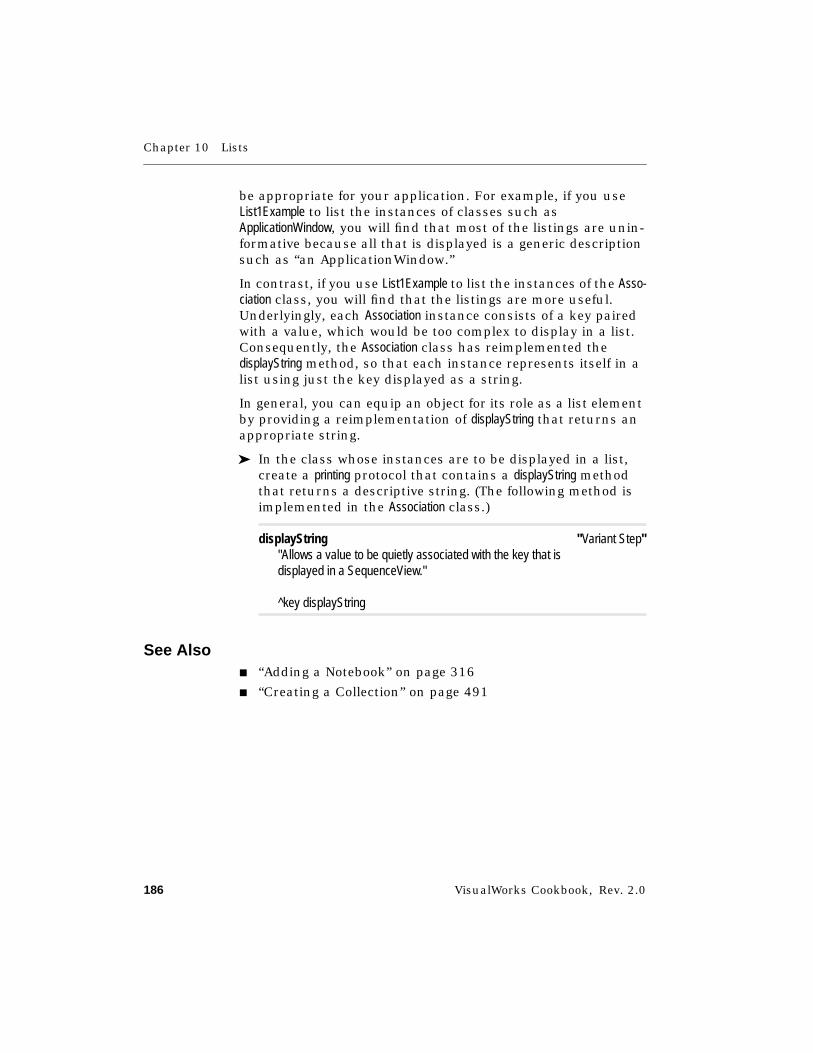
Chapter 10 Lists
186 VisualWorks Cookbook, Rev. 2.0
be appropriate for your application. For example, if you useList1Example to list the instances of classes such asApplicationWindow, you will find that most of the listings are unin-formative because all that is displayed is a generic descriptionsuch as “an ApplicationWindow.”
In contrast, if you use List1Example to list the instances of the Asso-ciation class, you will find that the listings are more useful.Underlyingly, each Association instance consists of a key pairedwith a value, which would be too complex to display in a list.Consequently, the Association class has reimplemented thedisplayString method, so that each instance represents itself in alist using just the key displayed as a string.
In general, you can equip an object for its role as a list elementby providing a reimplementation of displayString that returns anappropriate string.
➤ In the class whose instances are to be displayed in a list,create a printing protocol that contains a displayString methodthat returns a descriptive string. (The following method isimplemented in the Association class.)
displayString "Variant Step""Allows a value to be quietly associated with the key that isdisplayed in a SequenceView."
^key displayString
See Also■ “Adding a Notebook” on page 316
■ “Creating a Collection” on page 491
Editing the List of Elements
VisualWorks Cookbook, Rev. 2.0 187
Editing the List of Elements
Strategy
The contents of a list often change frequently, depending onother parts of the interface. In List1Example, both the Selectorsview and the Instances view change whenever the selection inthe Classes view is changed.
Changing the list is accomplished by giving the SelectionInList anew collection of elements. Note that this is not the same asinstalling an entirely new SelectionInList, which would have theeffect of breaking the link with the list widget.
Basic Step
Online example: List1Example
➤ In the method that is responsible for updating the list, getthe SelectionInList from the application model and send a list:message to it, with the new collection as the argument.
changedClass| cls |self classes selection isNil
Changing the selection inthis list . . .
. . . causes these lists toget modified collections
Chapter 10 Lists
188 VisualWorks Cookbook, Rev. 2.0
"No class is selected -- empty the selector list."ifTrue: [
self methodNames list: List new. "Basic Step"self instances list: List new]
"A class is selected"ifFalse: [
cls := Smalltalk at: self classes selection.
"Update the selectors list."self methodNames list: cls selectors asSortedCollection.
"Update the instances list."self instances list: cls allInstances].
See Also■ “Creating a Collection” on page 491
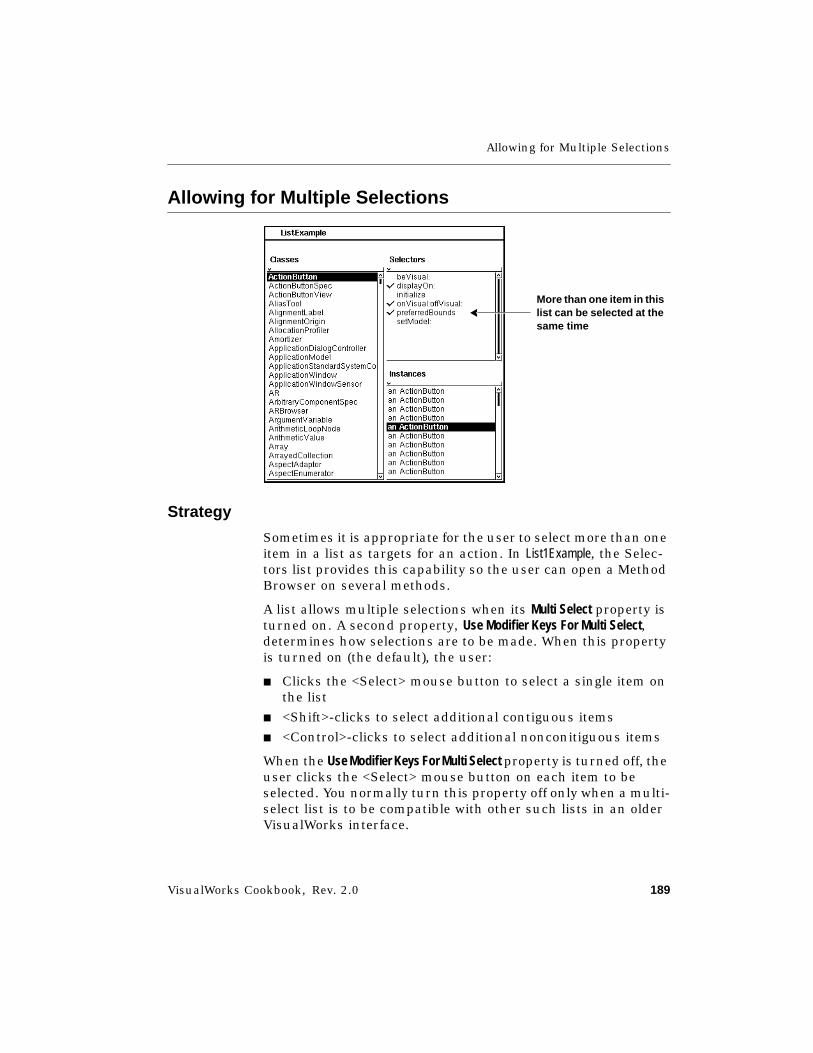
Allowing for Multiple Selections
VisualWorks Cookbook, Rev. 2.0 189
Allowing for Multiple Selections
Strategy
Sometimes it is appropriate for the user to select more than oneitem in a list as targets for an action. In List1Example, the Selec-tors list provides this capability so the user can open a MethodBrowser on several methods.
A list allows multiple selections when its Multi Select property isturned on. A second property, Use Modifier Keys For Multi Select,determines how selections are to be made. When this propertyis turned on (the default), the user:
■ Clicks the <Select> mouse button to select a single item onthe list
■ <Shift>-clicks to select additional contiguous items
■ <Control>-clicks to select additional nonconitiguous items
When the Use Modifier Keys For Multi Select property is turned off, theuser clicks the <Select> mouse button on each item to beselected. You normally turn this property off only when a multi-select list is to be compatible with other such lists in an olderVisualWorks interface.
More than one item in thislist can be selected at thesame time
Chapter 10 Lists
190 VisualWorks Cookbook, Rev. 2.0
Basic Steps
Online example: List1Example
1. Select the list widget in the canvas.
2. In a Properties Tool, turn on the list widget’s Multi Selectproperty. (Leave the Use Modifier Keys For Multi Select propertyturned on.) Apply properties and install the canvas.
3. In the application model’s initialize method, initialize the listwidget’s aspect variable to hold a MultiSelectionInList (instead ofa SelectionInList).
initializesuper initialize.classes := SelectionInList with: Smalltalk classNames.classes selectionIndexHolder onChangeSend: #changedClass to: self.
methodNames := MultiSelectionInList new. "Basic Step 3"instances := SelectionInList new.
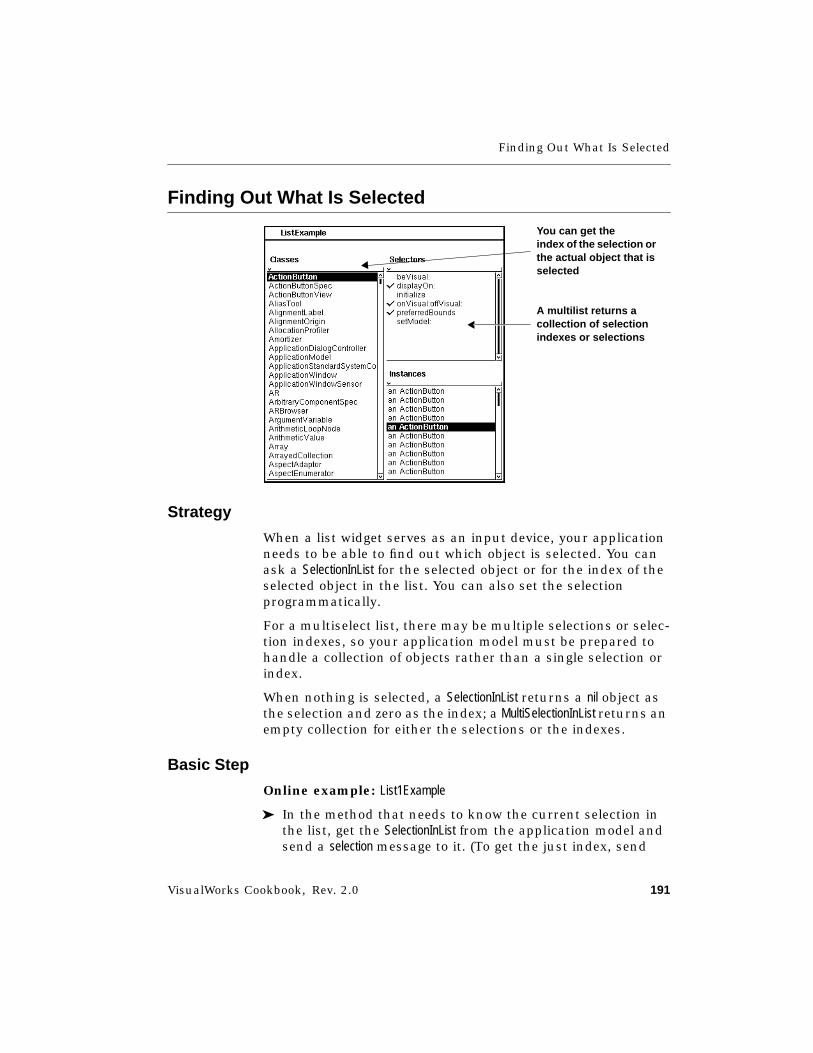
Finding Out What Is Selected
VisualWorks Cookbook, Rev. 2.0 191
Finding Out What Is Selected
Strategy
When a list widget serves as an input device, your applicationneeds to be able to find out which object is selected. You canask a SelectionInList for the selected object or for the index of theselected object in the list. You can also set the selectionprogrammatically.
For a multiselect list, there may be multiple selections or selec-tion indexes, so your application model must be prepared tohandle a collection of objects rather than a single selection orindex.
When nothing is selected, a SelectionInList returns a nil object asthe selection and zero as the index; a MultiSelectionInList returns anempty collection for either the selections or the indexes.
Basic Step
Online example: List1Example
➤ In the method that needs to know the current selection inthe list, get the SelectionInList from the application model andsend a selection message to it. (To get the just index, send
You can get theindex of the selection orthe actual object that isselected
A multilist returns acollection of selectionindexes or selections
Chapter 10 Lists
192 VisualWorks Cookbook, Rev. 2.0
selectionIndex. For a MultiSelectionInList, use a selections or selectionIn-dexes message.)
changedClass| cls |self classes selection isNil "Basic Step"
"No class is selected -- empty the selector list."ifTrue: [
self methodNames list: List new.self instances list: List new]
"A class is selected"ifFalse: [
cls := Smalltalk at: self classes selection.
"Update the selectors list."self methodNames list: cls selectors asSortedCollection.
"Update the instances list."self instances list: cls allInstances].
Variants
V1. Setting the Selection Programmatically
Online example: List1Example
➤ In the method that is to change the selection programmati-cally, get the SelectionInList from the application model andsend it a selectionIndex: message with the desired indexnumber as the argument.
Alternatively, send a selection: message with the desiredobject itself as the argument.
postOpenWith: aBuilder
super postOpenWith: aBuilder.
"Uncomment the line below to auto-select the first class."self classes selectionIndex: 1. "V1 Step"
Finding Out What Is Selected
VisualWorks Cookbook, Rev. 2.0 193
"Uncomment the lines below to auto-select the last class.""self classes selection: self classes list last.(aBuilder componentAt: #classes) widget controller
cursorPointWithScrolling."
"In the classes list, use boxed highlighting instead of reverse-video."(aBuilder componentAt: #classes) widget strokedSelection.
Note that, for a MultiSelectionInList, send selectionIndexes: or selec-tions:, supplying as argument a collection of indexes or acollection of objects in the list.
V2. Selecting All Objects in a Multiple-Selection List➤ Get the MultiSelectionInList from the application model and send
a selectAll message to it.
selectAllself methodNames selectAll. "V2 Step"
V3. Clearing All Selections in a Multiple-Selection List➤ Get the MultiSelectionInList from the application model and send
a clearAll message to it.
clearAllself methodNames clearAll. "V3 Step"
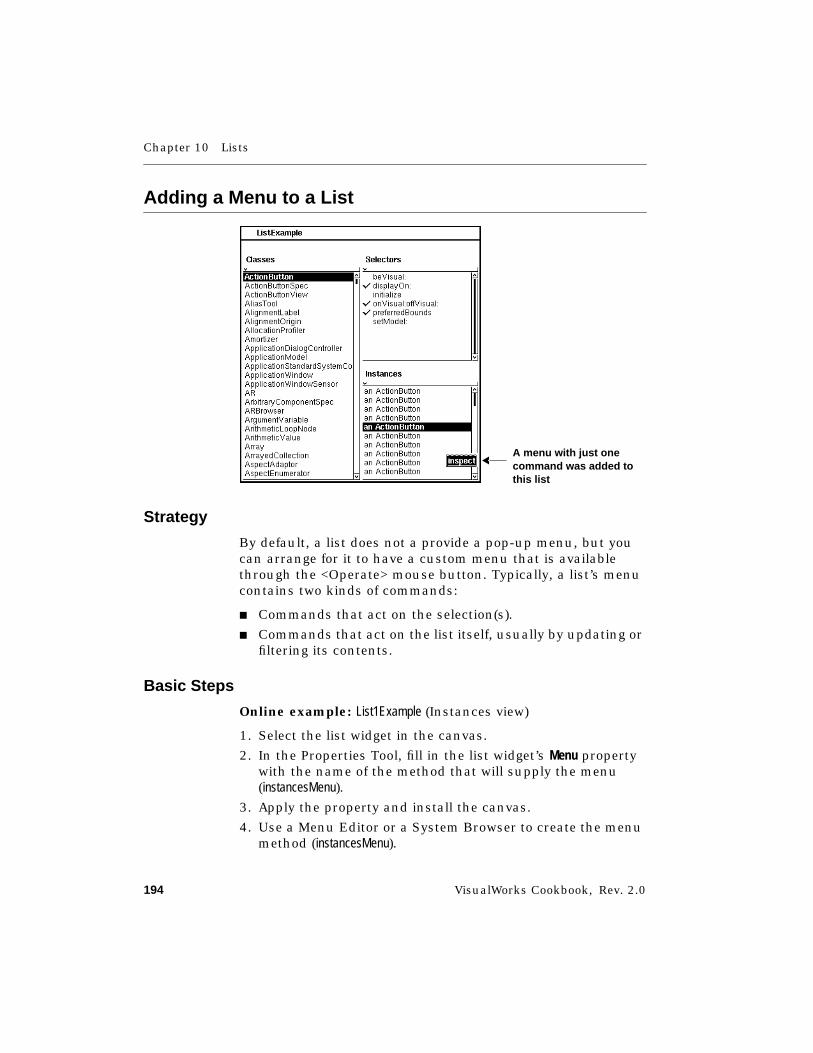
Chapter 10 Lists
194 VisualWorks Cookbook, Rev. 2.0
Adding a Menu to a List
Strategy
By default, a list does not a provide a pop-up menu, but youcan arrange for it to have a custom menu that is availablethrough the <Operate> mouse button. Typically, a list’s menucontains two kinds of commands:
■ Commands that act on the selection(s).
■ Commands that act on the list itself, usually by updating orfiltering its contents.
Basic Steps
Online example: List1Example (Instances view)
1. Select the list widget in the canvas.
2. In the Properties Tool, fill in the list widget’s Menu propertywith the name of the method that will supply the menu(instancesMenu).
3. Apply the property and install the canvas.
4. Use a Menu Editor or a System Browser to create the menumethod (instancesMenu).
A menu with just onecommand was added tothis list
Adding a Menu to a List
VisualWorks Cookbook, Rev. 2.0 195
5. Use a System Browser to write the methods that areinvoked by the menu (inspectInstance).
inspectInstance "Basic Step 5""Open an inspector on the selected instance."
| inst |inst := self instances selection.inst isNil ifFalse: [inst inspect].
See Also■ “Creating a Menu” on page 226

Chapter 10 Lists
196 VisualWorks Cookbook, Rev. 2.0
Changing the Highlighting Style
Strategy
By default, the selected item in a list is highlighted throughreverse video. You can use the list’s Selection Type property tocause selected items to be indicated by check marks (basicstep).
You can also arrange for selected items to be surrounded by arectangular border (variant).
Basic Step
Online example: List1Example
1. In the canvas, select the list widget whose selection styleyou want to change. (In the example, this is the Selectorslist.)
2. In a Properties Tool, set the list’s Selection Type property toCheck Mark. Apply the property and install the canvas.
stroked selection
normal selection
Changing the Highlighting Style
VisualWorks Cookbook, Rev. 2.0 197
Variant
Online example: List1Example
➤ In a method in the application model (typically postBuildWith:or postOpenWith:), get the list widget from the applicationmodel’s builder and send a strokedSelection message to it. (AnormalSelection message causes the list to revert to normalhighlighting.)
postOpenWith: aBuilder
super postOpenWith: aBuilder.
"Uncomment the line below to auto-select the first class."self classes selectionIndex: 1.
"Uncomment the lines below to auto-select the last class.""self classes selection: self classes list last.(aBuilder componentAt: #classes) widget controller
cursorPointWithScrolling."
"In the classes list, use boxed highlighting instead of reverse-video."(aBuilder componentAt: #classes) widget strokedSelection. "Basic Step"
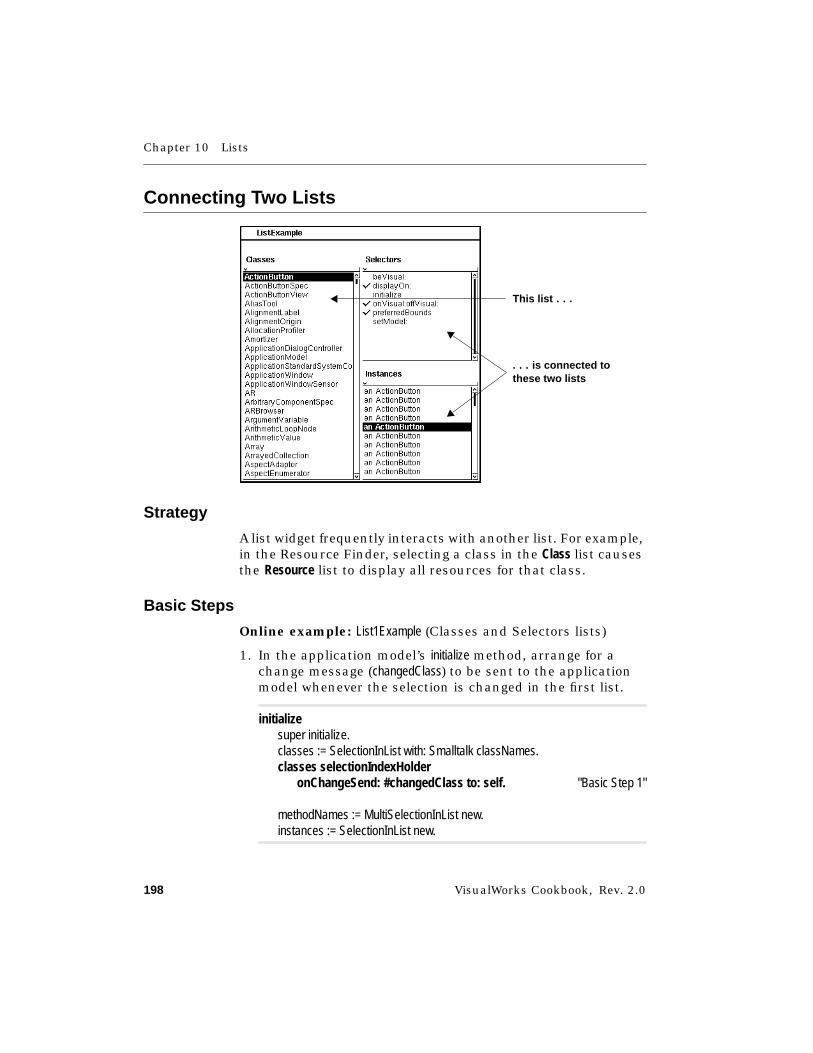
Chapter 10 Lists
198 VisualWorks Cookbook, Rev. 2.0
Connecting Two Lists
Strategy
A list widget frequently interacts with another list. For example,in the Resource Finder, selecting a class in the Class list causesthe Resource list to display all resources for that class.
Basic Steps
Online example: List1Example (Classes and Selectors lists)
1. In the application model’s initialize method, arrange for achange message (changedClass) to be sent to the applicationmodel whenever the selection is changed in the first list.
initializesuper initialize.classes := SelectionInList with: Smalltalk classNames.classes selectionIndexHolder
onChangeSend: #changedClass to: self. "Basic Step 1"
methodNames := MultiSelectionInList new.instances := SelectionInList new.
This lis t . . .
. . . is connected tothese two lists
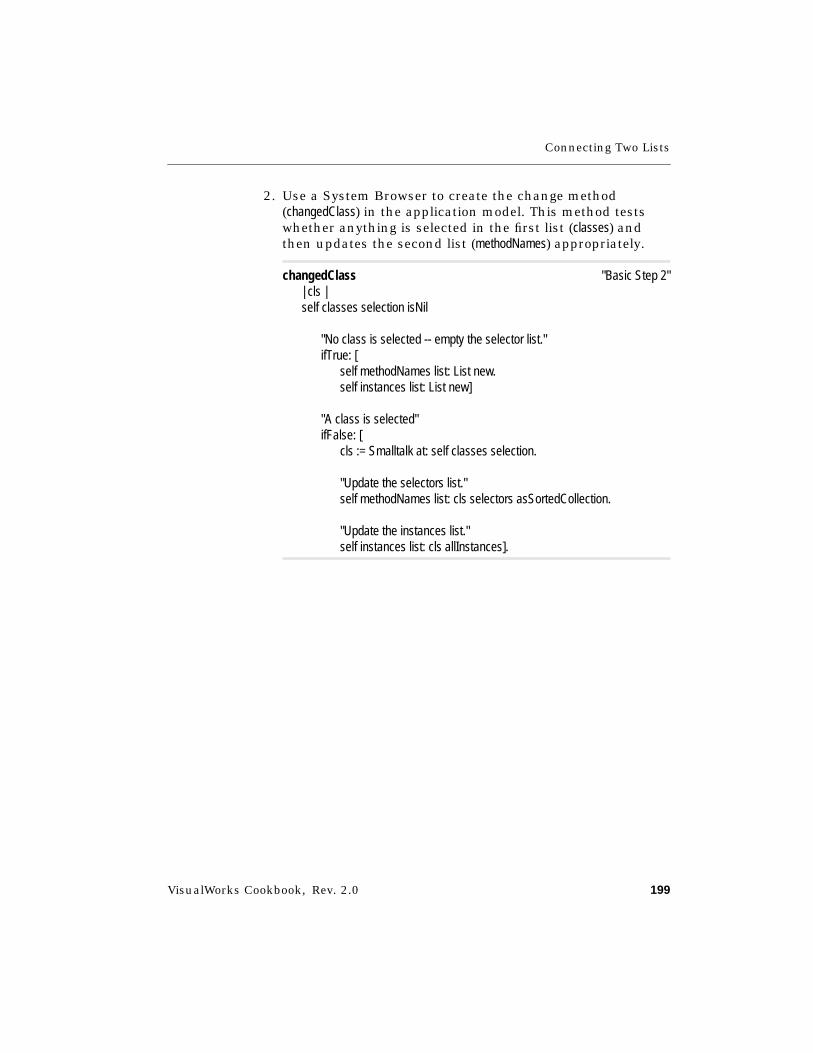
Connecting Two Lists
VisualWorks Cookbook, Rev. 2.0 199
2. Use a System Browser to create the change method(changedClass) in the application model. This method testswhether anything is selected in the first list (classes) andthen updates the second list (methodNames) appropriately.
changedClass "Basic Step 2"| cls |self classes selection isNil
"No class is selected -- empty the selector list."ifTrue: [
self methodNames list: List new.self instances list: List new]
"A class is selected"ifFalse: [
cls := Smalltalk at: self classes selection.
"Update the selectors list."self methodNames list: cls selectors asSortedCollection.
"Update the instances list."self instances list: cls allInstances].
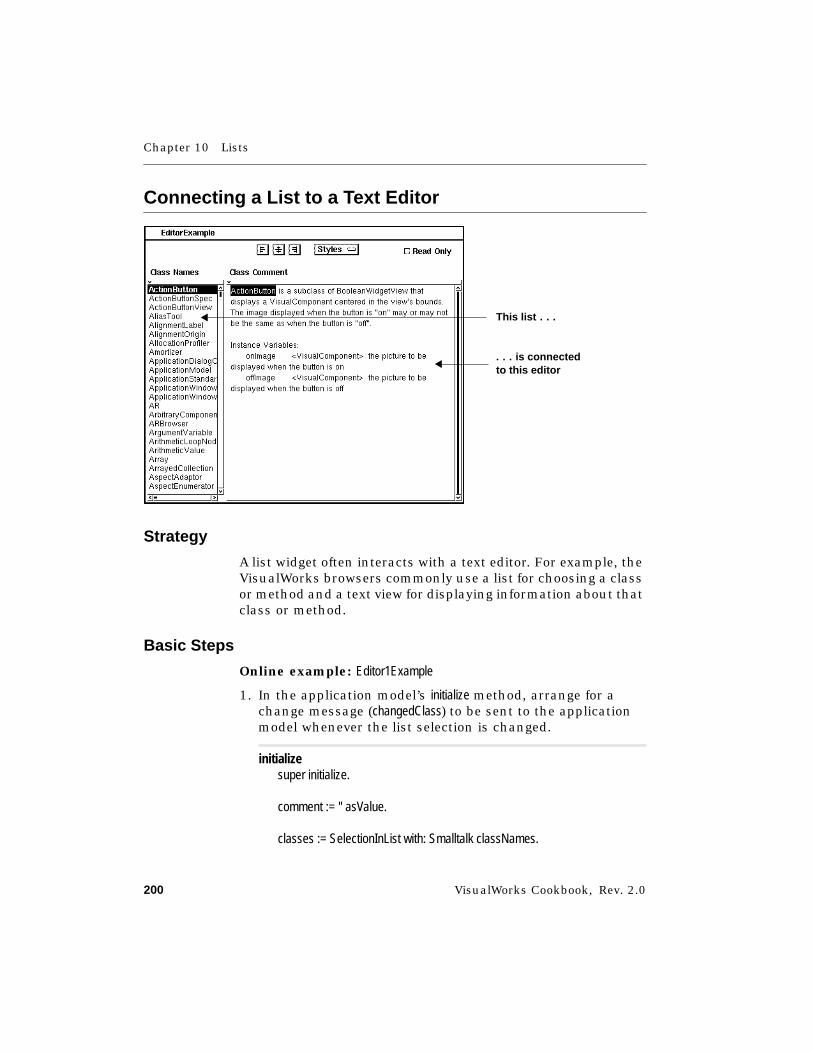
Chapter 10 Lists
200 VisualWorks Cookbook, Rev. 2.0
Connecting a List to a Text Editor
Strategy
A list widget often interacts with a text editor. For example, theVisualWorks browsers commonly use a list for choosing a classor method and a text view for displaying information about thatclass or method.
Basic Steps
Online example: Editor1Example
1. In the application model’s initialize method, arrange for achange message (changedClass) to be sent to the applicationmodel whenever the list selection is changed.
initializesuper initialize.
comment := '' asValue.
classes := SelectionInList with: Smalltalk classNames.
This lis t . . .
. . . is connectedto this editor

Connecting a List to a Text Editor
VisualWorks Cookbook, Rev. 2.0 201
classes selectionIndexHolderonChangeSend: #changedClass to: self. "Basic Step 1"
textStyle := #plain asValue.textStyle onChangeSend: #changedStyle to: self.
readOnly := false asValue.readOnly onChangeSend: #changedReadOnly to: self.
2. Use a System Browser to create the change method (changed-Class) in the application model. This method tests whetheranything is selected in the list (classes) and then updates thetext editor’s value holder (comment) appropriately.
changedClass "Basic Step 2""When the list selection changes, update the comment view."
| selectedClass txt start wrapper |selectedClass := self classes selection.
selectedClass isNilifTrue: [self comment value: '' asText]ifFalse: [
txt := (Smalltalk at: selectedClass) comment.
self commentvalue: txt.
"Find and highlight the class name in the text."start := txt
indexOfSubCollection: selectedClass asStringstartingAt: 1.
start > 0ifTrue: [
wrapper := (self builder componentAt: #comment).wrapper widget controller
selectAndScrollFrom: startto: start + selectedClass asString size - 1.
wrapper takeKeyboardFocus]].
Chapter 10 Lists
202 VisualWorks Cookbook, Rev. 2.0
See Also■ “Adding a Text Editor” on page 172

VisualWorks Cookbook, Rev. 2.0 203
Chapter 11
Datasets
Adding a Dataset 204Selecting Columns While Painting 209Adding a Row 210Connecting Data to a Dataset 212Enhancing Column Labels 213
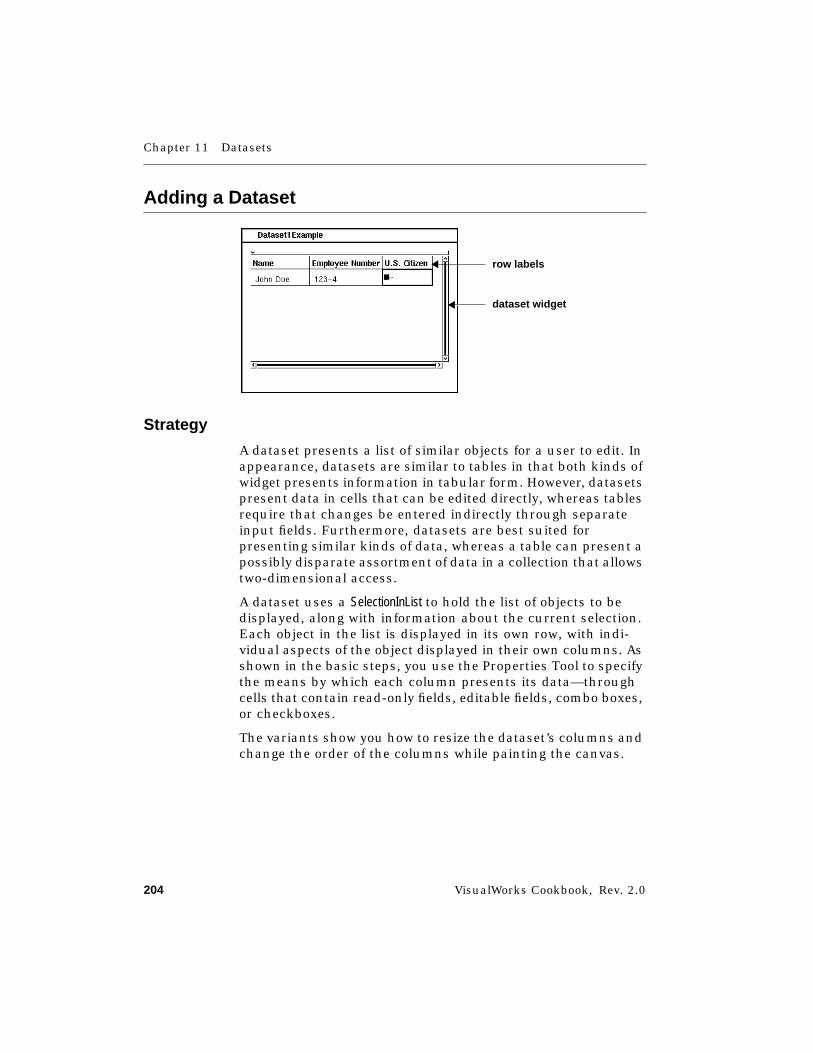
Chapter 11 Datasets
204 VisualWorks Cookbook, Rev. 2.0
Adding a Dataset
Strategy
A dataset presents a list of similar objects for a user to edit. Inappearance, datasets are similar to tables in that both kinds ofwidget presents information in tabular form. However, datasetspresent data in cells that can be edited directly, whereas tablesrequire that changes be entered indirectly through separateinput fields. Furthermore, datasets are best suited forpresenting similar kinds of data, whereas a table can present apossibly disparate assortment of data in a collection that allowstwo-dimensional access.
A dataset uses a SelectionInList to hold the list of objects to bedisplayed, along with information about the current selection.Each object in the list is displayed in its own row, with indi-vidual aspects of the object displayed in their own columns. Asshown in the basic steps, you use the Properties Tool to specifythe means by which each column presents its data—throughcells that contain read-only fields, editable fields, combo boxes,or checkboxes.
The variants show you how to resize the dataset’s columns andchange the order of the columns while painting the canvas.
row labels
dataset widget
Adding a Dataset
VisualWorks Cookbook, Rev. 2.0 205
Basic Steps
Online example: Dataset1Example
In this example, you create a dataset that displays instances ofan Employee class. An Employee consists of three objects (name,empNo, and citizen), which are to be presented in three datasetcolumns.
1. Use the Palette to add the dataset widget to the canvas.Leave the dataset selected.
2. In the Properties Tool, fill in the dataset’s Aspect propertywith the name of the method (dsvList) that will supply aninstance of SelectionInList. Apply the property.
3. Use the define command to add the dsvList instance variableto the application model and to create the dsvList method inan aspects protocol.
The dsvList method returns a SelectionInList object that willeventually hold the list to be displayed. This method alsosets up the SelectionInList so it will cause a user’s selection tobe put in a separate value holder (selectedRow).
4. In the dataset’s properties, click the New Column button foreach column you want in the dataset. In this example, clickthe button three times to add three columns to the canvas.
5. In the canvas, <Control>-click in the leftmost column toselect it.
6. In the Properties Tool, display the dataset’s Column propertypage. The properties you set on this page will apply to thecurrently selected column.
7. On the Column page, enter Name as the Label property. Thiscreates a visual label above the selected column, which is todisplay employee names.
8. On the Column page, enter selectedRow name in the Aspect field.selectedRow refers to the value holder that will hold the object(the Employee) selected by the user. name refers to the aspectof Employee that is displayed in this column.
9. On the Column page, select Input Field as the Type. This causeseach cell in the selected column to display its data in aneditable input field. Note that you can optionally specifynondefault characteristics for these input fields by filling inproperties on the Column Type page.
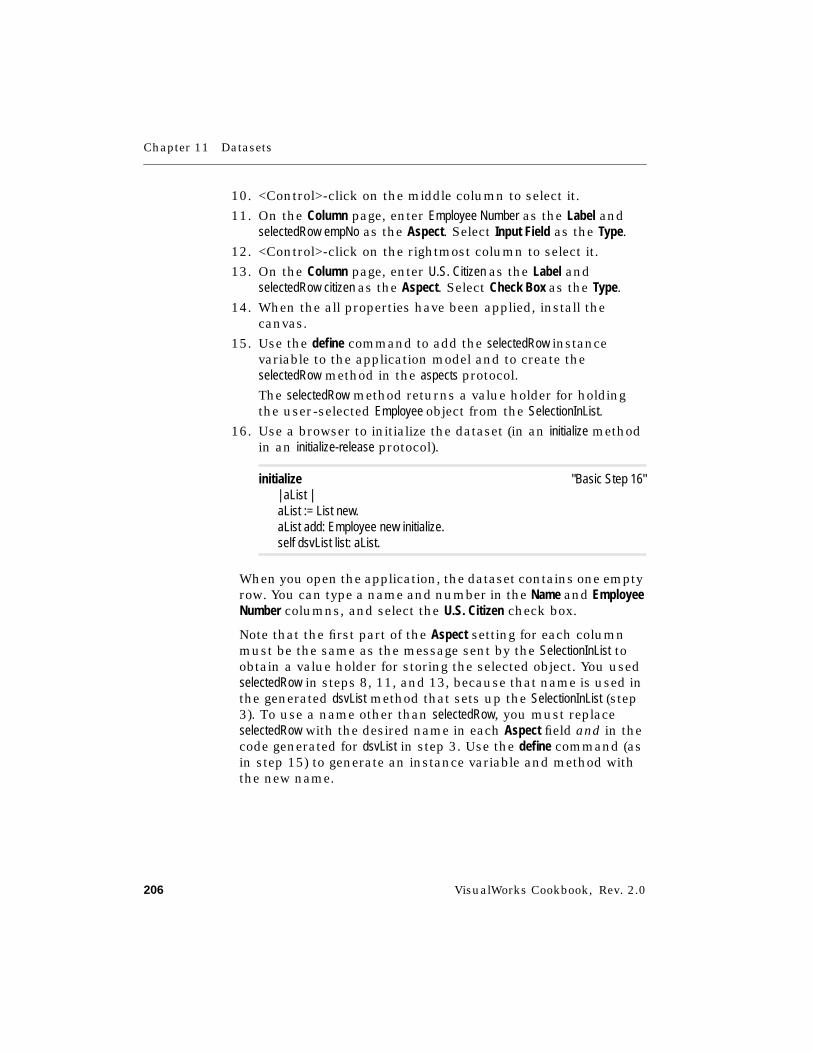
Chapter 11 Datasets
206 VisualWorks Cookbook, Rev. 2.0
10. <Control>-click on the middle column to select it.
11. On the Column page, enter Employee Number as the Label andselectedRow empNo as the Aspect. Select Input Field as the Type.
12. <Control>-click on the rightmost column to select it.
13. On the Column page, enter U.S. Citizen as the Label andselectedRow citizen as the Aspect. Select Check Box as the Type.
14. When the all properties have been applied, install thecanvas.
15. Use the define command to add the selectedRow instancevariable to the application model and to create theselectedRow method in the aspects protocol.
The selectedRow method returns a value holder for holdingthe user-selected Employee object from the SelectionInList.
16. Use a browser to initialize the dataset (in an initialize methodin an initialize-release protocol).
initialize "Basic Step 16"| aList |aList := List new.aList add: Employee new initialize.self dsvList list: aList.
When you open the application, the dataset contains one emptyrow. You can type a name and number in the Name and EmployeeNumber columns, and select the U.S. Citizen check box.
Note that the first part of the Aspect setting for each columnmust be the same as the message sent by the SelectionInList toobtain a value holder for storing the selected object. You usedselectedRow in steps 8, 11, and 13, because that name is used inthe generated dsvList method that sets up the SelectionInList (step3). To use a name other than selectedRow, you must replaceselectedRow with the desired name in each Aspect field and in thecode generated for dsvList in step 3. Use the define command (asin step 15) to generate an instance variable and method withthe new name.
Adding a Dataset
VisualWorks Cookbook, Rev. 2.0 207
Variants
V1. Changing Column Widths
By default, all columns have a width of 80 pixels. You can setspecific widths in the dataset’s Column properties. You can alsochange the column widths by editing the dataset in the canvas.For example, to resize the Employee Number column:
1. In the canvas, <Control>-click in the Employee Number columnto select it.
2. Place the cursor near the right margin of the column.
3. <Control>-click and hold down the mouse button. If neces-sary, move the pointer toward the right margin of theselected column until the cursor changes appearance.
4. Drag the cursor to the right to widen the column; drag thecursor to the left to make the column narrower.
5. Install the canvas.
V2. Changing the Column Order
You can switch the order of a dataset’s columns by editing it inthe canvas. For example, to switch the order of the EmployeeNumber and U.S. Citizen columns:
1. In the canvas, <Control>-click in the Employee Number columnto select it.
2. Place the cursor on the drag handle within the selectedcolumn.
3. Click on the handle and drag it toward the U.S. Citizencolumn.
4. Install the canvas.
V3. Disabling Column Scrolling
You can set a dataset’s columns so that they cannot be scrolledhorizontally. This is useful if you want to keep one or morecolumns displayed on the dataset at all times, while the otherscontinue to scroll.
Chapter 11 Datasets
208 VisualWorks Cookbook, Rev. 2.0
1. To disable scrolling for a column (and all columns to the leftof it), select that column and click the Fixed check box in theColumn properties.
2. Apply the property and install the canvas.
See Also■ “Selecting Columns While Painting” on page 209
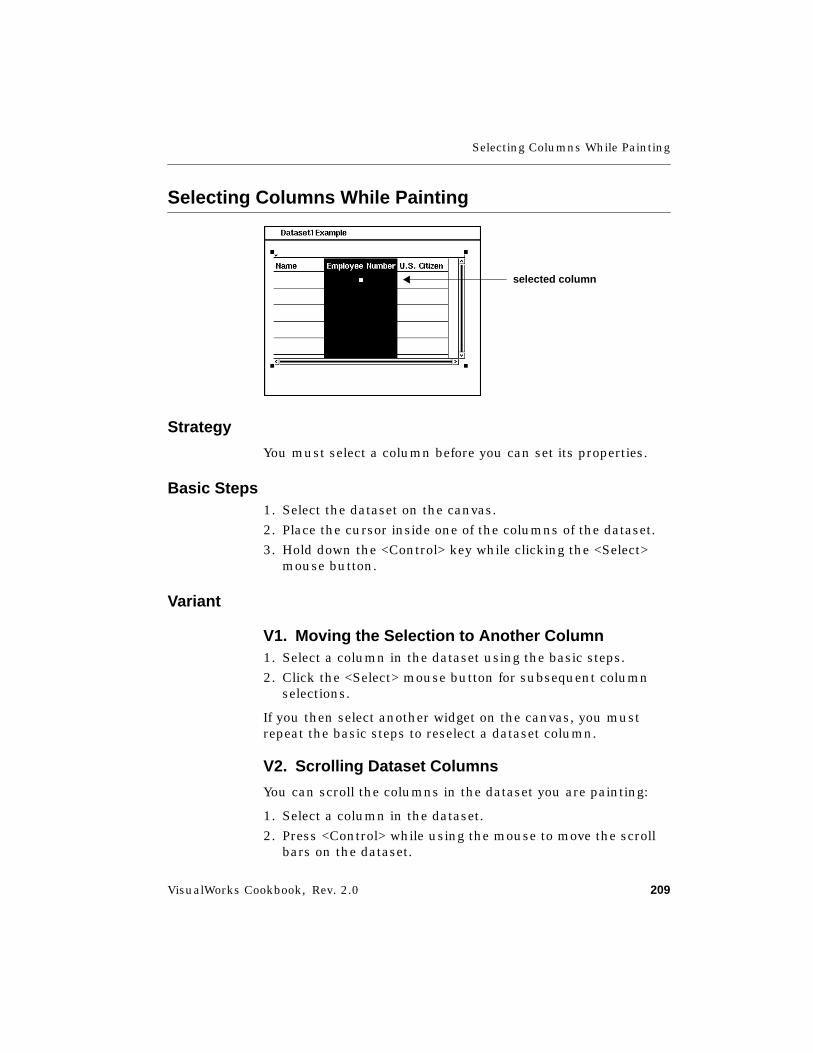
Selecting Columns While Painting
VisualWorks Cookbook, Rev. 2.0 209
Selecting Columns While Painting
Strategy
You must select a column before you can set its properties.
Basic Steps1. Select the dataset on the canvas.
2. Place the cursor inside one of the columns of the dataset.
3. Hold down the <Control> key while clicking the <Select>mouse button.
Variant
V1. Moving the Selection to Another Column1. Select a column in the dataset using the basic steps.
2. Click the <Select> mouse button for subsequent columnselections.
If you then select another widget on the canvas, you mustrepeat the basic steps to reselect a dataset column.
V2. Scrolling Dataset Columns
You can scroll the columns in the dataset you are painting:
1. Select a column in the dataset.
2. Press <Control> while using the mouse to move the scrollbars on the dataset.
selected column
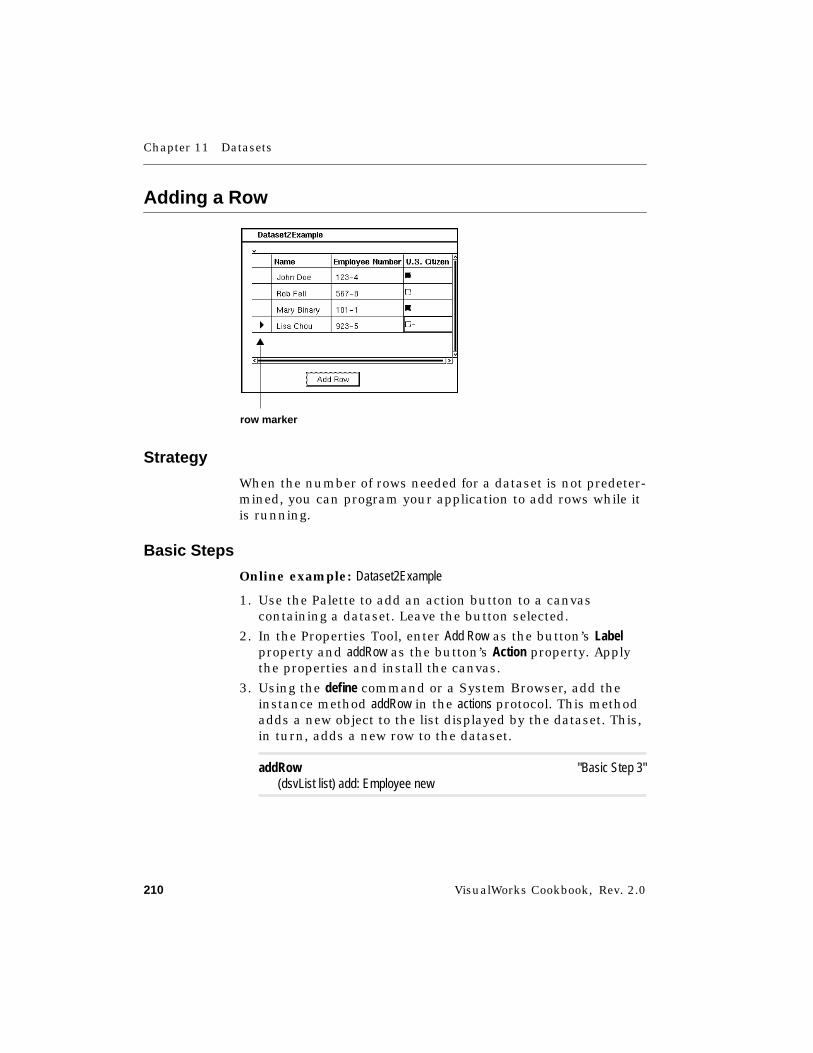
Chapter 11 Datasets
210 VisualWorks Cookbook, Rev. 2.0
Adding a Row
Strategy
When the number of rows needed for a dataset is not predeter-mined, you can program your application to add rows while itis running.
Basic Steps
Online example: Dataset2Example
1. Use the Palette to add an action button to a canvascontaining a dataset. Leave the button selected.
2. In the Properties Tool, enter Add Row as the button’s Labelproperty and addRow as the button’s Action property. Applythe properties and install the canvas.
3. Using the define command or a System Browser, add theinstance method addRow in the actions protocol. This methodadds a new object to the list displayed by the dataset. This,in turn, adds a new row to the dataset.
addRow "Basic Step 3"(dsvList list) add: Employee new
row marker
Adding a Row
VisualWorks Cookbook, Rev. 2.0 211
Variant
Adding a Row Marker
A row marker indicates which row is selected within a dataset.It is used in place of row highlighting. To add a row marker,select Row Selector on the dataset’s Details properties. The markerappears as the first column within the dataset.
Chapter 11 Datasets
212 VisualWorks Cookbook, Rev. 2.0
Connecting Data to a Dataset
Strategy
An initially empty dataset is sufficient if you want users toinput the data after the application is open. However, someapplications require their datasets to display data initially.
Basic Step
Online example: Dataset3Example
➤ In the application model, create an initialize method thatprovides the data for your dataset.
initialize| aList anEmp |aList := List new.
"The aspect for the dataset should be a list of Employee instances.Create an employee to put in the list."anEmp := Employee new initialize.anEmp name: 'Tami Hayes'; empNo: '341-2'; citizen: true.aList add: anEmp.
"Create an employee to put in the list."anEmp := Employee new initialize.anEmp name: 'Leo Mazon'; empNo: '786-9'; citizen: false.aList add: anEmp.
"Set the list for the dataset aspect. This list appears when you start."self dsvList list: aList.super initialize.
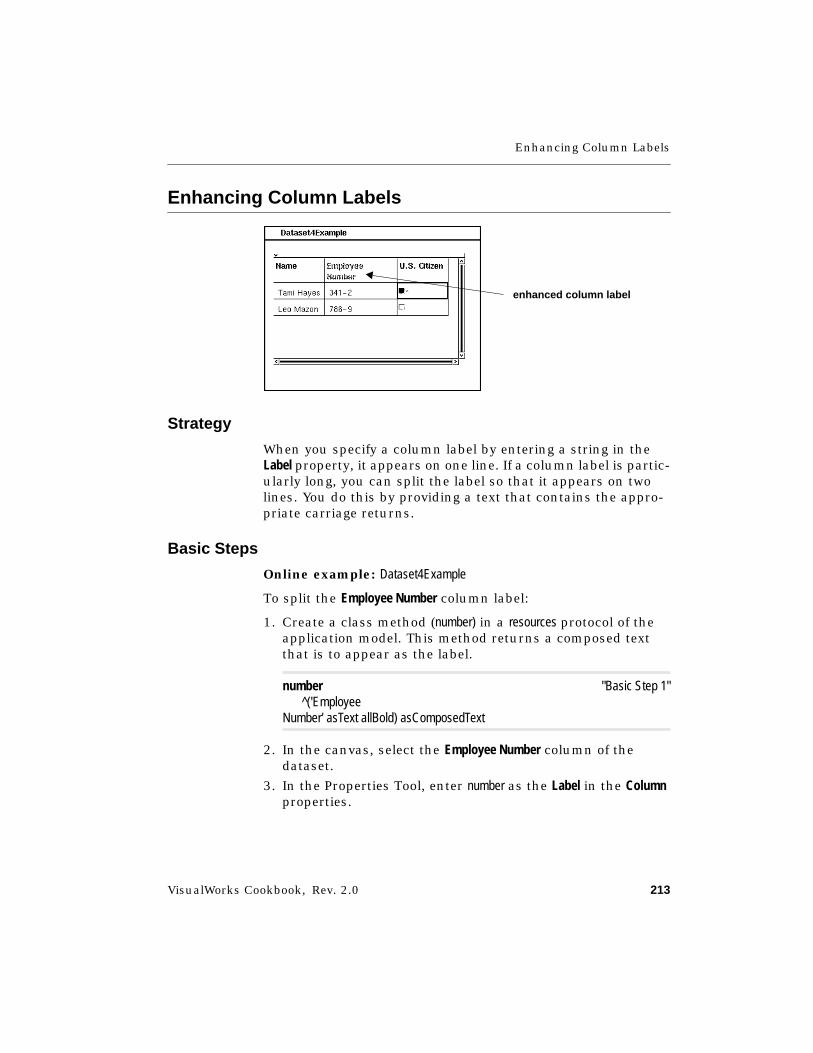
Enhancing Column Labels
VisualWorks Cookbook, Rev. 2.0 213
Enhancing Column Labels
Strategy
When you specify a column label by entering a string in theLabel property, it appears on one line. If a column label is partic-ularly long, you can split the label so that it appears on twolines. You do this by providing a text that contains the appro-priate carriage returns.
Basic Steps
Online example: Dataset4Example
To split the Employee Number column label:
1. Create a class method (number) in a resources protocol of theapplication model. This method returns a composed textthat is to appear as the label.
number "Basic Step 1"^('Employee
Number' asText allBold) asComposedText
2. In the canvas, select the Employee Number column of thedataset.
3. In the Properties Tool, enter number as the Label in the Columnproperties.
enhanced column label
Chapter 11 Datasets
214 VisualWorks Cookbook, Rev. 2.0
4. Select the Image check box next to Label. This specifies thatthe column label will come from the resource methodnamed in the Label property.
5. Apply the properties and install the canvas.
Variant
Changing label colors➤ To change the color of the column label, follow the basic
steps, and then edit the number method to set the desiredcolor.
number "Variant Step"^('EmployeeNumber' asText emphasizeAllWith: (Array
with: #bold with: #color->ColorValue red)) asComposedText

VisualWorks Cookbook, Rev. 2.0 215
Chapter 12
Tables
Using TableInterface 216Adding a Table 217Connecting a Table to an Input Field 221Labeling Columns and Rows 223
Chapter 12 Tables
216 VisualWorks Cookbook, Rev. 2.0
Using TableInterface
Strategy
Each basic widget, such as a field or label, requires only asimple value model for managing its data, which is usually justa single object such as a text, a number, and so on. In contrast,a table requires a relatively complex auxiliary object. Thisobject, which is an instance of TableInterface, holds informationabout row and column labeling and formatting in addition tothe table data itself.
Within a TableInterface, the table data is held by a compositeobject, an instance of SelectionInTable. This object holds the collec-tion of cell contents and the selection index. The collection isexpected to be a TwoDList (two-dimensional list), which convertsa flat collection such as an array into a matrix of rows andcolumns. Alternatively, you can use a TableAdaptor to adapt acollection.
All of this interface machinery can be held by a single instancevariable in the application model, and you can simply sendmessages to that object to fetch the table or the selection or anyother aspect of it. However, you may find it economical to createinstance variables to hold onto various aspects of the tableinterface. For example, the SelectionInTable is useful when yourapplication model will need to access the contents of the tableat run time.
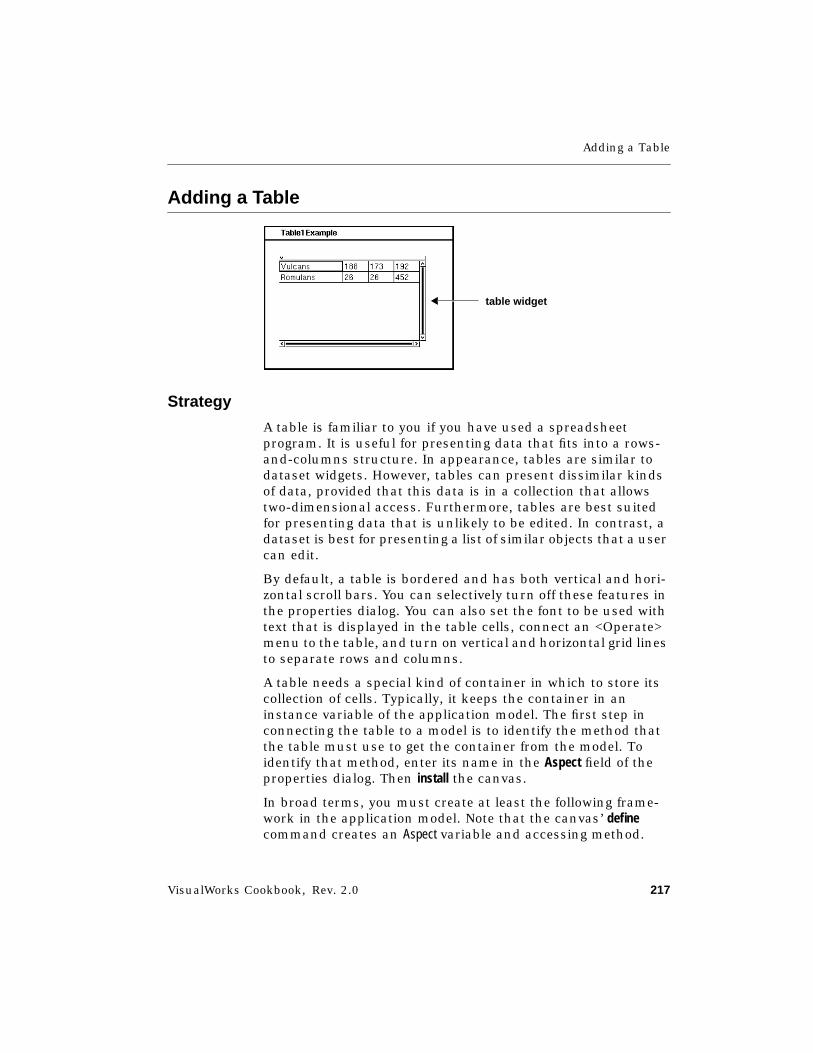
Adding a Table
VisualWorks Cookbook, Rev. 2.0 217
Adding a Table
Strategy
A table is familiar to you if you have used a spreadsheetprogram. It is useful for presenting data that fits into a rows-and-columns structure. In appearance, tables are similar todataset widgets. However, tables can present dissimilar kindsof data, provided that this data is in a collection that allowstwo-dimensional access. Furthermore, tables are best suitedfor presenting data that is unlikely to be edited. In contrast, adataset is best for presenting a list of similar objects that a usercan edit.
By default, a table is bordered and has both vertical and hori-zontal scroll bars. You can selectively turn off these features inthe properties dialog. You can also set the font to be used withtext that is displayed in the table cells, connect an <Operate>menu to the table, and turn on vertical and horizontal grid linesto separate rows and columns.
A table needs a special kind of container in which to store itscollection of cells. Typically, it keeps the container in aninstance variable of the application model. The first step inconnecting the table to a model is to identify the method thatthe table must use to get the container from the model. Toidentify that method, enter its name in the Aspect field of theproperties dialog. Then install the canvas.
In broad terms, you must create at least the following frame-work in the application model. Note that the canvas’ definecommand creates an Aspect variable and accessing method.
table widget
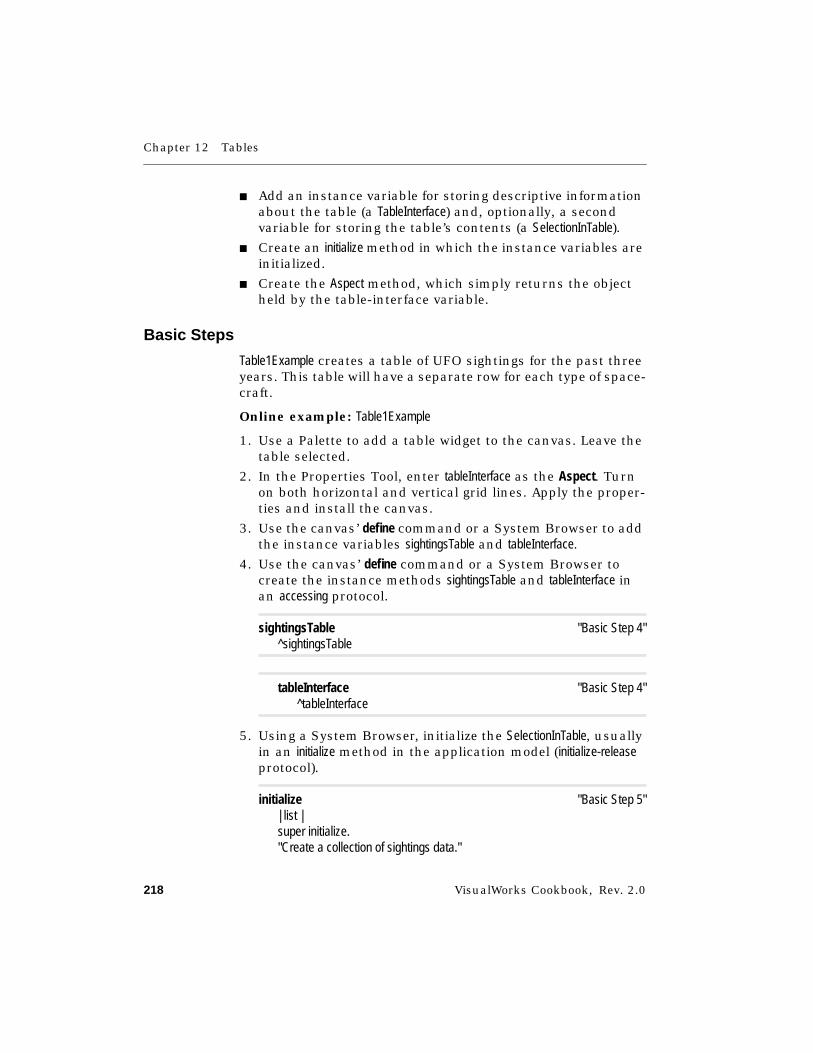
Chapter 12 Tables
218 VisualWorks Cookbook, Rev. 2.0
■ Add an instance variable for storing descriptive informationabout the table (a TableInterface) and, optionally, a secondvariable for storing the table’s contents (a SelectionInTable).
■ Create an initialize method in which the instance variables areinitialized.
■ Create the Aspect method, which simply returns the objectheld by the table-interface variable.
Basic Steps
Table1Example creates a table of UFO sightings for the past threeyears. This table will have a separate row for each type of space-craft.
Online example: Table1Example
1. Use a Palette to add a table widget to the canvas. Leave thetable selected.
2. In the Properties Tool, enter tableInterface as the Aspect. Turnon both horizontal and vertical grid lines. Apply the proper-ties and install the canvas.
3. Use the canvas’ define command or a System Browser to addthe instance variables sightingsTable and tableInterface.
4. Use the canvas’ define command or a System Browser tocreate the instance methods sightingsTable and tableInterface inan accessing protocol.
sightingsTable "Basic Step 4"^sightingsTable
tableInterface "Basic Step 4"^tableInterface
5. Using a System Browser, initialize the SelectionInTable, usuallyin an initialize method in the application model (initialize-releaseprotocol).
initialize "Basic Step 5"| list |super initialize."Create a collection of sightings data."
Adding a Table
VisualWorks Cookbook, Rev. 2.0 219
list := TwoDListon: #('Vulcans' 188 173 192 'Romulans' 26 26 452) copycolumns: 4rows: 2.
sightingsTable := SelectionInTable with: list."Create a table interface and load it with the sightings."tableInterface := TableInterface new
selectionInTable: sightingsTable.
Open the table interface. Although the data in a table cannot beedited directly, the next topic will describe how to use an inputfield to edit the highlighted cell.
Normally, of course, you wouldn’t initialize the table with ahard-coded collection—the table data would be gathered froma database or some other source.
Variants
V1. Controlling Column Widths
By default, all columns have an equal width that is determinedby the space available in the table. If the table expands with thewindow, the column widths will also expand. To set specificwidths for the columns, send a columnWidths: message to the tableinterface. The argument is an array containing one number foreach column. The number is the width in pixels. Any columnfor which no width is specified gets the width of the last entryin the array.
➤ Reset the widths at any time by adding to the initializemethod.
tableInterface columnWidths: #(100 40). "V1 Step"
In the above example, the first column has been changed sothat it is wide enough to show the entire name of the alien race.These widths will remain in effect even if the window isexpanded.
Chapter 12 Tables
220 VisualWorks Cookbook, Rev. 2.0
V2. Selecting by Row or Column
By default, a single cell in the table is highlighted when the userclicks in it. In some applications, it is more appropriate to high-light the entire row or column in which the cell is located. Toarrange for this, simply turn on row or column Selection in thetable’s properties.
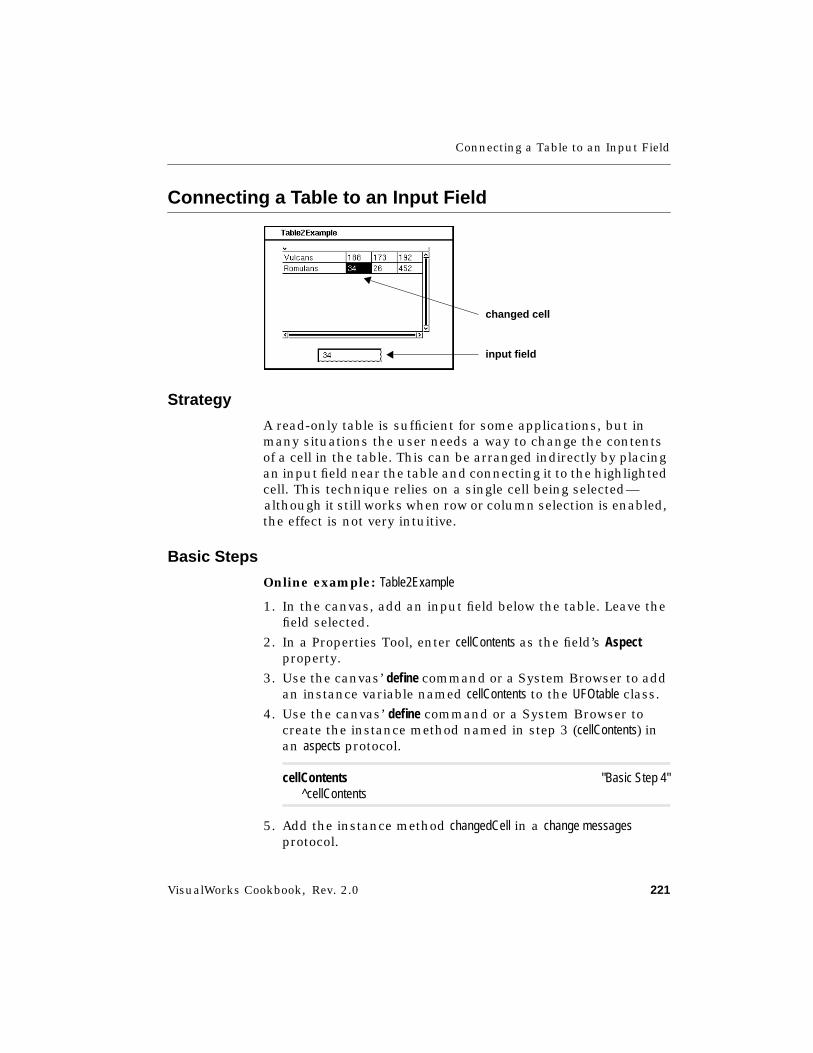
Connecting a Table to an Input Field
VisualWorks Cookbook, Rev. 2.0 221
Connecting a Table to an Input Field
Strategy
A read-only table is sufficient for some applications, but inmany situations the user needs a way to change the contentsof a cell in the table. This can be arranged indirectly by placingan input field near the table and connecting it to the highlightedcell. This technique relies on a single cell being selected—although it still works when row or column selection is enabled,the effect is not very intuitive.
Basic Steps
Online example: Table2Example
1. In the canvas, add an input field below the table. Leave thefield selected.
2. In a Properties Tool, enter cellContents as the field’s Aspectproperty.
3. Use the canvas’ define command or a System Browser to addan instance variable named cellContents to the UFOtable class.
4. Use the canvas’ define command or a System Browser tocreate the instance method named in step 3 (cellContents) inan aspects protocol.
cellContents "Basic Step 4"^cellContents
5. Add the instance method changedCell in a change messagesprotocol.
changed cell
input field
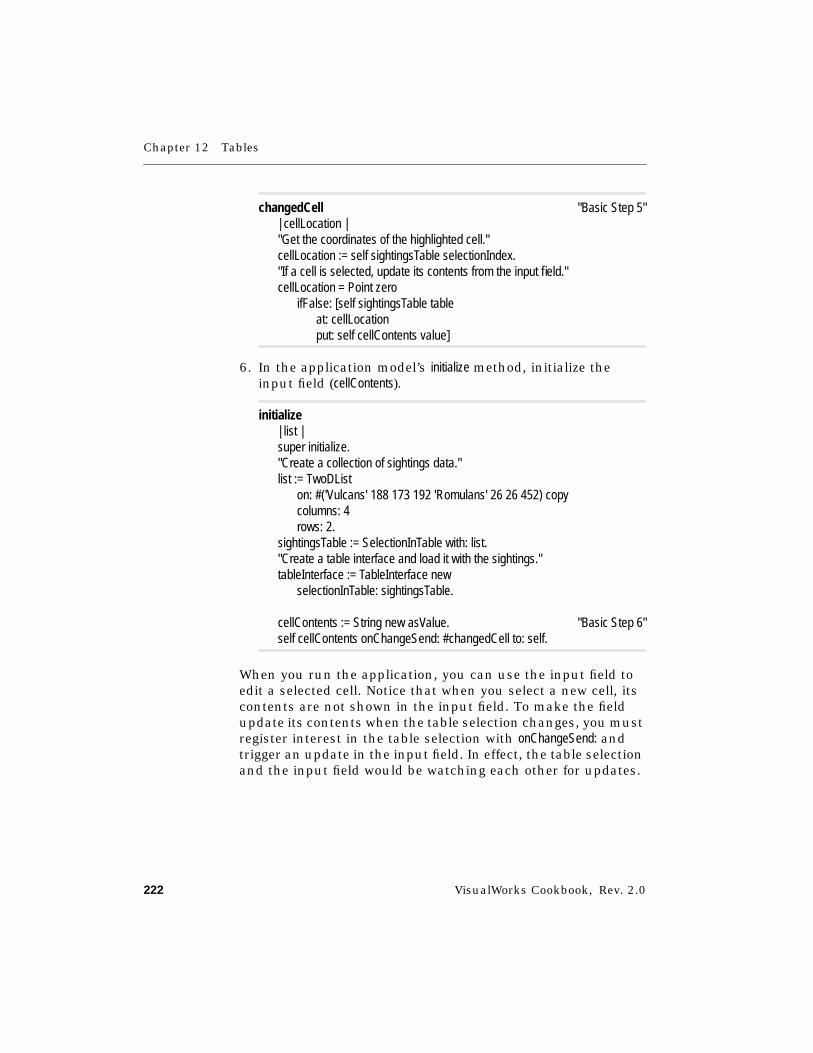
Chapter 12 Tables
222 VisualWorks Cookbook, Rev. 2.0
changedCell "Basic Step 5"| cellLocation |"Get the coordinates of the highlighted cell."cellLocation := self sightingsTable selectionIndex."If a cell is selected, update its contents from the input field."cellLocation = Point zero
ifFalse: [self sightingsTable tableat: cellLocationput: self cellContents value]
6. In the application model’s initialize method, initialize theinput field (cellContents).
initialize| list |super initialize."Create a collection of sightings data."list := TwoDList
on: #('Vulcans' 188 173 192 'Romulans' 26 26 452) copycolumns: 4rows: 2.
sightingsTable := SelectionInTable with: list."Create a table interface and load it with the sightings."tableInterface := TableInterface new
selectionInTable: sightingsTable.
cellContents := String new asValue. "Basic Step 6"self cellContents onChangeSend: #changedCell to: self.
When you run the application, you can use the input field toedit a selected cell. Notice that when you select a new cell, itscontents are not shown in the input field. To make the fieldupdate its contents when the table selection changes, you mustregister interest in the table selection with onChangeSend: andtrigger an update in the input field. In effect, the table selectionand the input field would be watching each other for updates.
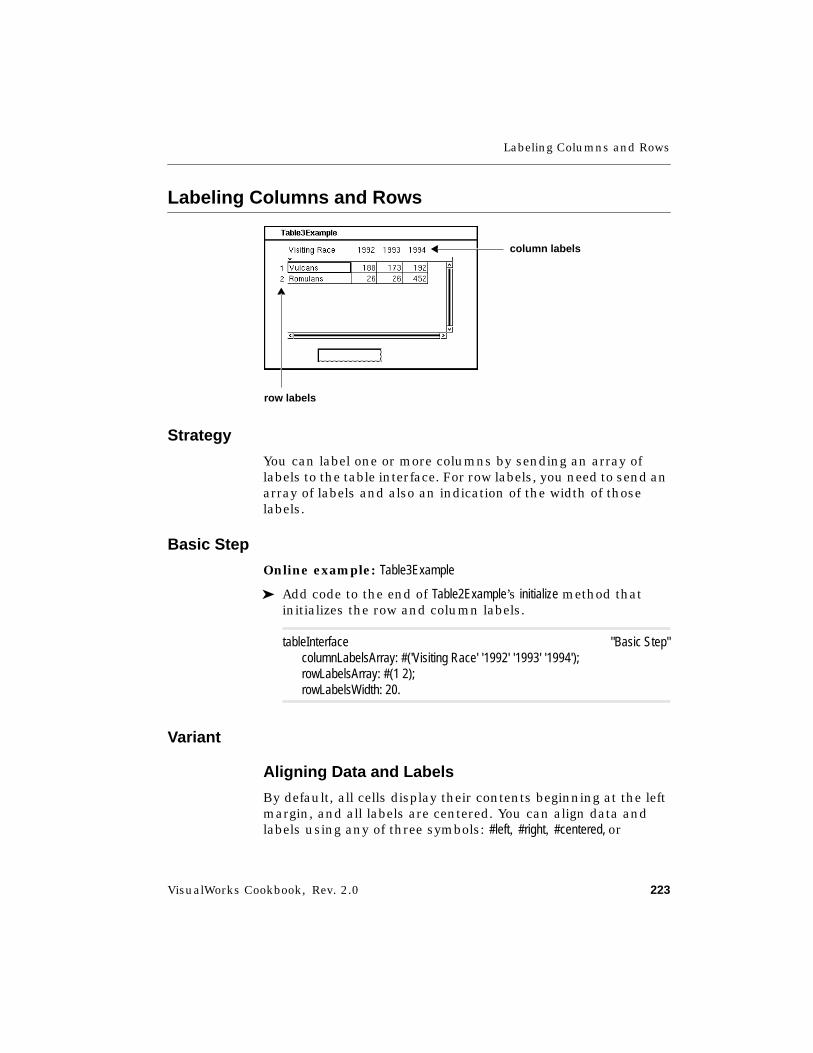
Labeling Columns and Rows
VisualWorks Cookbook, Rev. 2.0 223
Labeling Columns and Rows
Strategy
You can label one or more columns by sending an array oflabels to the table interface. For row labels, you need to send anarray of labels and also an indication of the width of thoselabels.
Basic Step
Online example: Table3Example
➤ Add code to the end of Table2Example’s initialize method thatinitializes the row and column labels.
tableInterface "Basic Step"columnLabelsArray: #('Visiting Race' '1992' '1993' '1994');rowLabelsArray: #(1 2);rowLabelsWidth: 20.
Variant
Aligning Data and Labels
By default, all cells display their contents beginning at the leftmargin, and all labels are centered. You can align data andlabels using any of three symbols: #left, #right, #centered, or
column labels
row labels
Chapter 12 Tables
224 VisualWorks Cookbook, Rev. 2.0
#leftWrapped. Using these symbols, you can control the alignmentof a column’s data, a column’s labels, or a row’s labels.
➤ Add code to the initialize method that initializes the labelalignments.
tableInterface "Variant Step"columnFormats: #(#left #right #right #right);columnLabelsFormats: #(#left #right #right #right);rowLabelsFormat: #right.
As the example shows, you can set row labels to the same align-ment by passing a single symbol as argument, and the sameapplies to the column alignments. For column data and labels,however, you also have the option of setting each column’salignment individually, as we have done, by passing an array ofsymbols.
VisualWorks Cookbook, Rev. 2.0 225
Chapter 13
Menus
Creating a Menu 226Creating a Submenu 231Adding a Menu Bar 233Adding a Menu Button 236Adding a Pop-Up Menu 240Modifying a Menu Dynamically 243Disabling a Menu Item 248Adding a Divider to a Menu 250Adding a Shortcut Key 252Displaying an Icon in a Menu 254Changing Menu Colors 257Using a Menu Editor 259
See Also■ “Widget Basics” on page 53
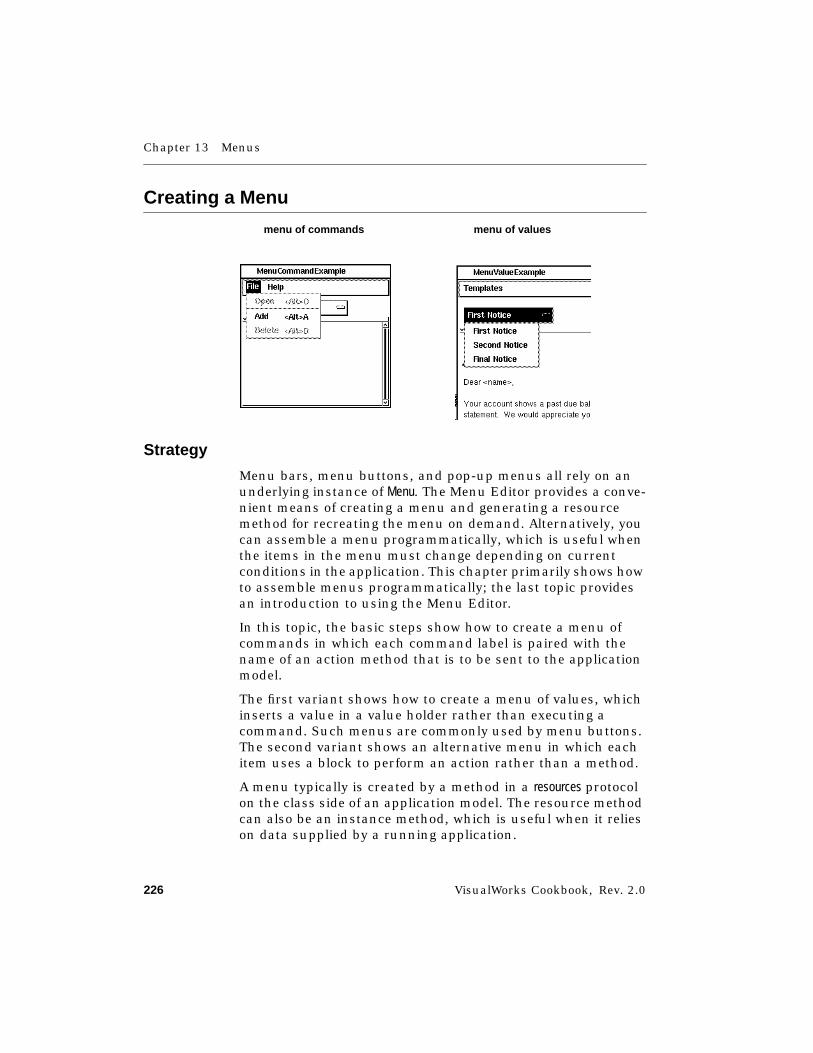
Chapter 13 Menus
226 VisualWorks Cookbook, Rev. 2.0
Creating a Menu
Strategy
Menu bars, menu buttons, and pop-up menus all rely on anunderlying instance of Menu. The Menu Editor provides a conve-nient means of creating a menu and generating a resourcemethod for recreating the menu on demand. Alternatively, youcan assemble a menu programmatically, which is useful whenthe items in the menu must change depending on currentconditions in the application. This chapter primarily shows howto assemble menus programmatically; the last topic providesan introduction to using the Menu Editor.
In this topic, the basic steps show how to create a menu ofcommands in which each command label is paired with thename of an action method that is to be sent to the applicationmodel.
The first variant shows how to create a menu of values, whichinserts a value in a value holder rather than executing acommand. Such menus are commonly used by menu buttons.The second variant shows an alternative menu in which eachitem uses a block to perform an action rather than a method.
A menu typically is created by a method in a resources protocolon the class side of an application model. The resource methodcan also be an instance method, which is useful when it relieson data supplied by a running application.
menu of commands menu of values

Creating a Menu
VisualWorks Cookbook, Rev. 2.0 227
Basic Steps
Creating a Menu of Commands
This type of menu is typically used with a menu bar or popupmenu. In such menus, selecting a menu item causes the asso-ciated symbol to be sent as a message to the application model.
Online example: MenuCommandExample
1. In a resource method that is responsible for creating themenu (in the example, fileMenu), create a MenuBuilder bysending a new message to that class.
2. For each item in the menu, send an add: message to themenu builder. The argument is an association in which thelabel string is paired with the name of an action methoddefined in the application model.
3. Get the menu by sending a menu message to the menubuilder. Return that menu as the result of the method.
fileMenu| mb menu submenu |mb := MenuBuilder new. "Basic Step 1"
mbbeginSubMenuLabeled: 'File';add: 'Open' -> #openFile; "Basic Step 2"line;add: 'Add' -> #addFile;add: 'Delete' -> #deleteFile;endSubMenu.
mbbeginSubMenuLabeled: 'Help';add: 'Usage' -> #explainUsage;endSubMenu.
"Add shortcut keys."menu := mb menu. "Basic Step 3"submenu := (menu menuItemLabeled: 'File') submenu.(submenu menuItemLabeled: 'Open') shortcutKeyCharacter: $O.(submenu menuItemLabeled: 'Add') shortcutKeyCharacter: $A.
Chapter 13 Menus
228 VisualWorks Cookbook, Rev. 2.0
(submenu menuItemLabeled: 'Delete') shortcutKeyCharacter: $D.
^menu "Basic Step 3"
Variants
V1. Creating a Menu of Values
This type of menu is typically used with a menu button. In suchmenus, selecting a menu item causes the associated value to besent to a value holder (see “Adding a Menu Button” in thischapter).
Online example: MenuValueExample
1. In a menu-creating instance method (in this example,templatesMenuForMenuButton), create a MenuBuilder by sending a newmessage to that class.
2. For each menu item, send an add: message to the menubuilder. The argument is an association between the item’slabel string and the value to be sent to a value holder. Inthis case, the value is a textual template that the menubutton puts into its value holder.
3. Get the menu from the menu builder by sending a menumessage to the menu builder, and return the menu as theresult of the method.
templatesMenuForMenuButton| mb |mb := MenuBuilder new. "V1 Step 1"
mbadd: 'First Notice' -> self class firstNotice; "V1 Step 2"add: 'Second Notice' -> self class secondNotice;add: 'Final Notice' -> self class finalNotice.
^mb menu "V1 Step 3"
Creating a Menu
VisualWorks Cookbook, Rev. 2.0 229
V2. Creating a Menu of Action Blocks
You can use a menu of action blocks to provide a menu ofvalues for a menu bar or pop-up menu. Each block causes themenu item to put a particular value in a value holder inresponse to the user’s selection.
Online example: MenuValueExample
1. In a menu-creating instance method (templatesMenuForMenuBar),create a menu builder by sending a new message to theMenuBuilder class. An instance method is used here becauseinformation is needed from the application model instance.
2. For each menu item, send an add: message to the menubuilder. The argument is an association between the item’slabel string and the block that is to perform the desiredaction. In this case, the block inserts a textual template inthe value holder for a text editor.
3. Get the menu from the menu builder using a menu messageand return it as the result of the menu-creating method.
templatesMenuForMenuBar| mb menu submenu |mb := MenuBuilder new. "V2 Step 1"
mbbeginSubMenuLabeled: 'Templates';add: ' ' -> [self letter value: self class firstNotice]; "V2 Step 2"add: ' ' -> [self letter value: self class secondNotice];add: ' ' -> [self letter value: self class finalNotice];endSubMenu.
"Add graphic labels."menu := mb menu. "V2 Step 3"submenu := (menu menuItemLabeled: 'Templates') submenu.(submenu menuItemAt: 1)
labelImage: (self class oneImage).(submenu menuItemAt: 2)
labelImage: (self class twoImage).(submenu menuItemAt: 3)
labelImage: (self class threeImage).
"Set the background color."
Chapter 13 Menus
230 VisualWorks Cookbook, Rev. 2.0
submenu backgroundColor: ColorValue chartreuse.
^menu "V2 Step 3"
See Also■ “Adding a Menu Bar” on page 233
■ “Adding a Menu Button” on page 236
■ “Adding a Pop-Up Menu” on page 240
■ “Using a Menu Editor” on page 259
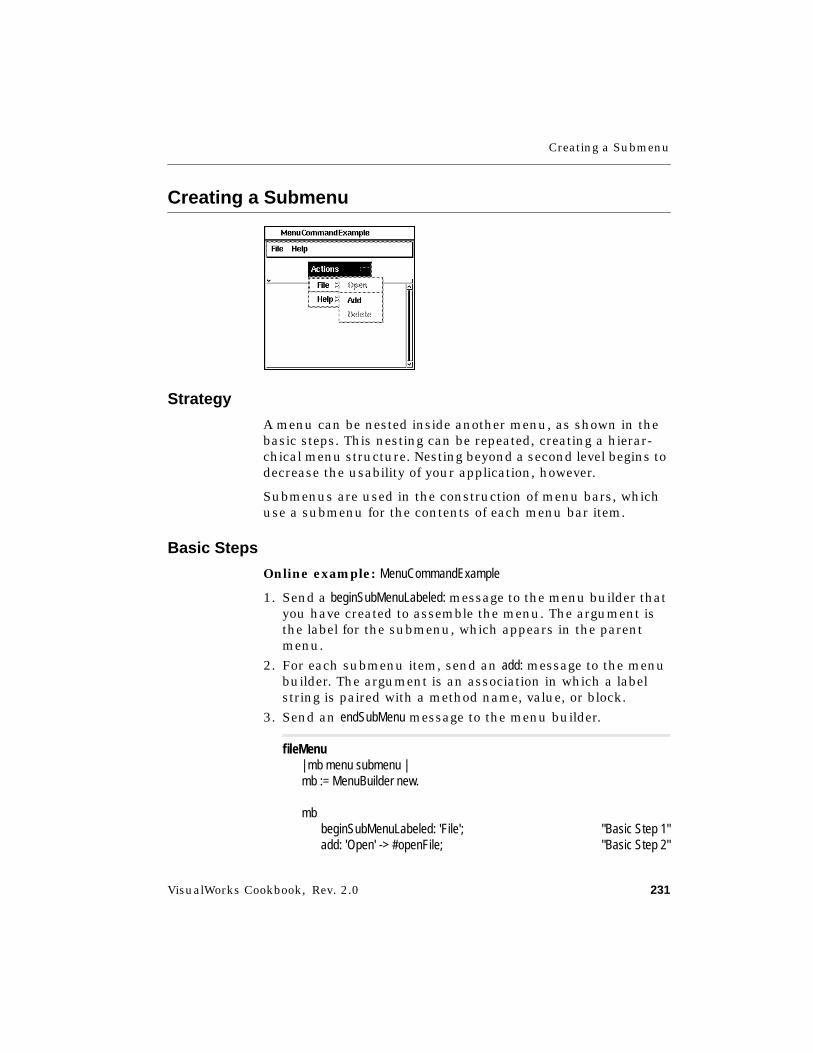
Creating a Submenu
VisualWorks Cookbook, Rev. 2.0 231
Creating a Submenu
Strategy
A menu can be nested inside another menu, as shown in thebasic steps. This nesting can be repeated, creating a hierar-chical menu structure. Nesting beyond a second level begins todecrease the usability of your application, however.
Submenus are used in the construction of menu bars, whichuse a submenu for the contents of each menu bar item.
Basic Steps
Online example: MenuCommandExample
1. Send a beginSubMenuLabeled: message to the menu builder thatyou have created to assemble the menu. The argument isthe label for the submenu, which appears in the parentmenu.
2. For each submenu item, send an add: message to the menubuilder. The argument is an association in which a labelstring is paired with a method name, value, or block.
3. Send an endSubMenu message to the menu builder.
fileMenu| mb menu submenu |mb := MenuBuilder new.
mbbeginSubMenuLabeled: 'File'; "Basic Step 1"add: 'Open' -> #openFile; "Basic Step 2"
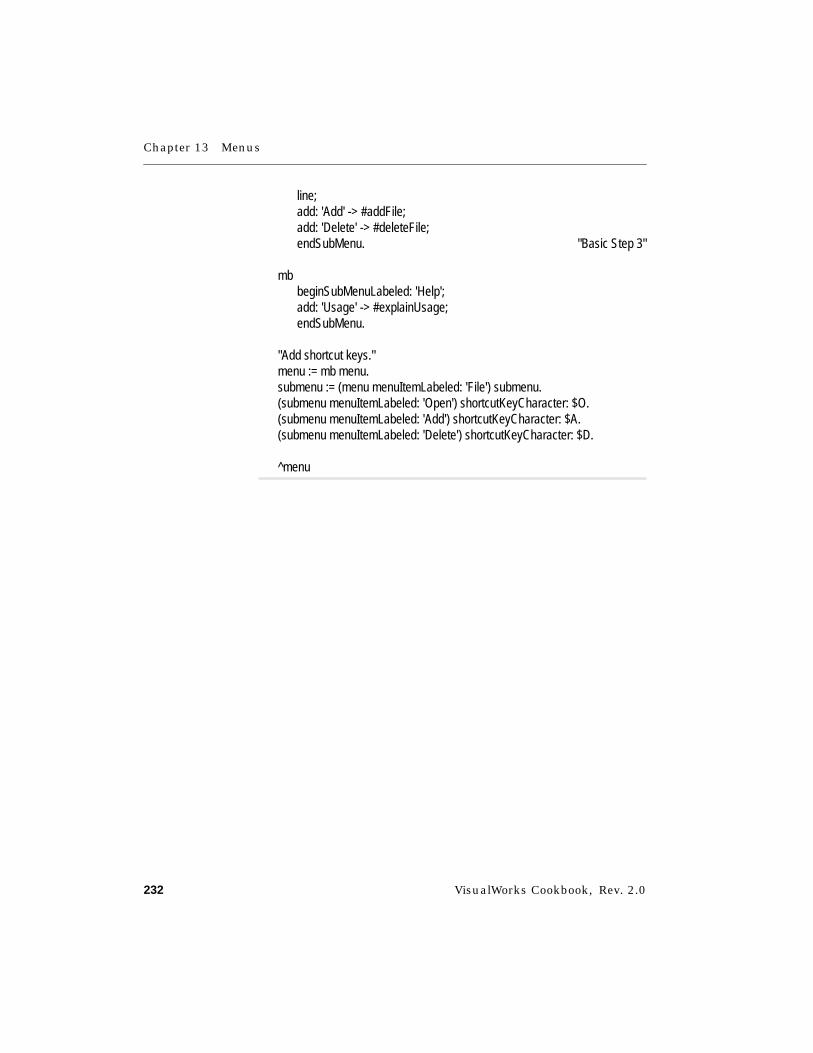
Chapter 13 Menus
232 VisualWorks Cookbook, Rev. 2.0
line;add: 'Add' -> #addFile;add: 'Delete' -> #deleteFile;endSubMenu. "Basic Step 3"
mbbeginSubMenuLabeled: 'Help';add: 'Usage' -> #explainUsage;endSubMenu.
"Add shortcut keys."menu := mb menu.submenu := (menu menuItemLabeled: 'File') submenu.(submenu menuItemLabeled: 'Open') shortcutKeyCharacter: $O.(submenu menuItemLabeled: 'Add') shortcutKeyCharacter: $A.(submenu menuItemLabeled: 'Delete') shortcutKeyCharacter: $D.
^menu

Adding a Menu Bar
VisualWorks Cookbook, Rev. 2.0 233
Adding a Menu Bar
Strategy
A menu bar appears to the user as a set of separate menusacross the top edge of a window. The items in these menus typi-cally give the user access to the commands that are available inthe application window.
A menu bar is actually implemented with a single menu object.The menu labels displayed across the menu bar are top-levelmenu items in the menu object. The contents of the apparentlyseparate menus are actually submenus associated with thetop-level menu items.
A menu bar is normally a menu of commands, although youcan implement it to behave like a menu of values. As a menu ofcommands (basic steps), the menu bar responds to the selec-tion of a menu item by sending the associated symbol as amessage to the application model. To implement a menu ofvalues (variant), you program each menu item to put a valueinto a value holder.
Basic Steps
Online example: MenuCommandExample
1. In the canvas for the window, make sure no widget isselected.
2. In a Properties Tool, turn on the Enable switch for the MenuBar property.
menu bar
Chapter 13 Menus
234 VisualWorks Cookbook, Rev. 2.0
3. In the Menu field, enter the name of the menu-creationmethod (in the example, fileMenu).
4. Create the resource method that you named in step 3(fileMenu). This method must return an instance of Menu inwhich each top-level label is associated with a submenu.
fileMenu "Basic Step 4"| mb menu submenu |mb := MenuBuilder new.
mbbeginSubMenuLabeled: 'File';add: 'Open' -> #openFile;line;add: 'Add' -> #addFile;add: 'Delete' -> #deleteFile;endSubMenu.
mbbeginSubMenuLabeled: 'Help';add: 'Usage' -> #explainUsage;endSubMenu.
"Add shortcut keys."menu := mb menu.submenu := (menu menuItemLabeled: 'File') submenu.(submenu menuItemLabeled: 'Open') shortcutKeyCharacter: $O.(submenu menuItemLabeled: 'Add') shortcutKeyCharacter: $A.(submenu menuItemLabeled: 'Delete') shortcutKeyCharacter: $D.
^menu
5. Create the action methods that are invoked by the menuitems.
Adding a Menu Bar
VisualWorks Cookbook, Rev. 2.0 235
Variant
Creating a Menu Bar That Inserts a Value
Online example: MenuValueExample
➤ In the method that is responsible for creating the menu(templatesMenuForMenuBar), send an add: message to the menubuilder for each item in the menu. The argument is anassociation in which a label string is paired with a block.The block is responsible for inserting the desired value inthe desired value holder.
templatesMenuForMenuBar| mb menu submenu |mb := MenuBuilder new.
mbbeginSubMenuLabeled: 'Templates';add: ' ' -> [self letter value: self class firstNotice]; "Variant Step"add: ' ' -> [self letter value: self class secondNotice];add: ' ' -> [self letter value: self class finalNotice];endSubMenu.
"Add graphic labels."menu := mb menu.submenu := (menu menuItemLabeled: 'Templates') submenu.(submenu menuItemAt: 1)
labelImage: (self class oneImage).(submenu menuItemAt: 2)
labelImage: (self class twoImage).(submenu menuItemAt: 3)
labelImage: (self class threeImage).
"Set the background color."submenu backgroundColor: ColorValue chartreuse.
^menu
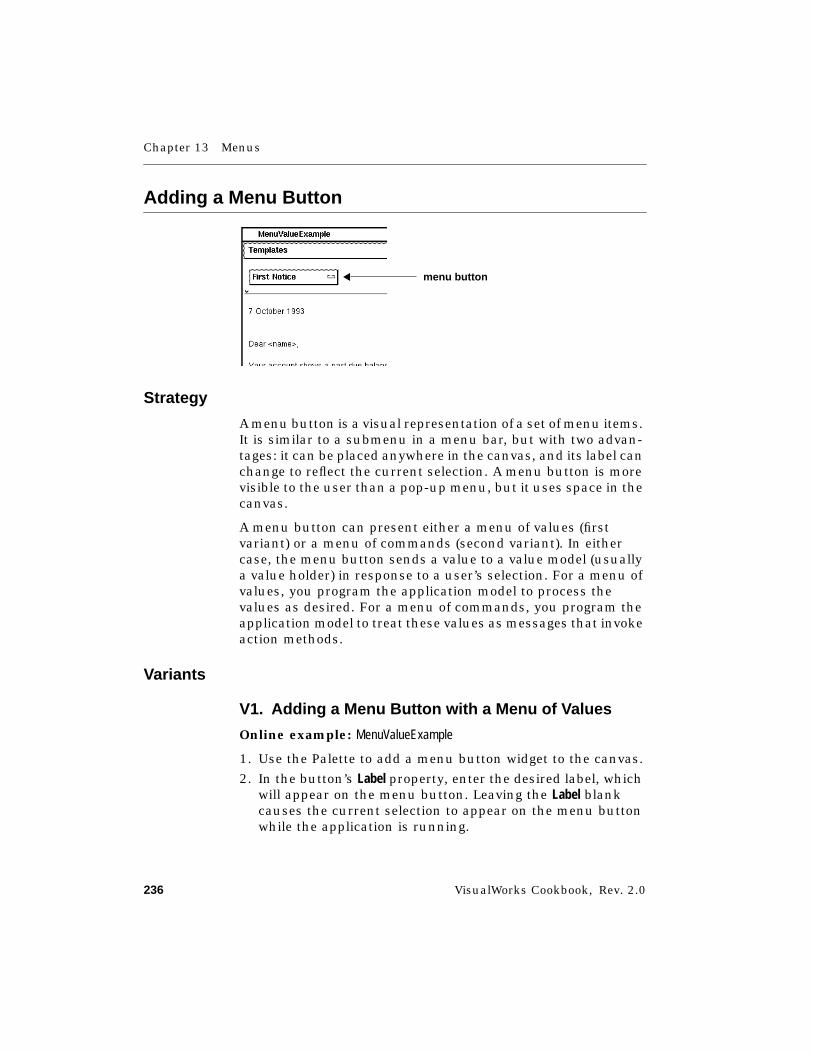
Chapter 13 Menus
236 VisualWorks Cookbook, Rev. 2.0
Adding a Menu Button
Strategy
A menu button is a visual representation of a set of menu items.It is similar to a submenu in a menu bar, but with two advan-tages: it can be placed anywhere in the canvas, and its label canchange to reflect the current selection. A menu button is morevisible to the user than a pop-up menu, but it uses space in thecanvas.
A menu button can present either a menu of values (firstvariant) or a menu of commands (second variant). In eithercase, the menu button sends a value to a value model (usuallya value holder) in response to a user’s selection. For a menu ofvalues, you program the application model to process thevalues as desired. For a menu of commands, you program theapplication model to treat these values as messages that invokeaction methods.
Variants
V1. Adding a Menu Button with a Menu of Values
Online example: MenuValueExample
1. Use the Palette to add a menu button widget to the canvas.
2. In the button’s Label property, enter the desired label, whichwill appear on the menu button. Leaving the Label blankcauses the current selection to appear on the menu buttonwhile the application is running.
menu button
Adding a Menu Button
VisualWorks Cookbook, Rev. 2.0 237
3. In the button’s Aspect property, enter the name of themethod that returns the value holder (in the example, letter).
4. In the menu button’s Menu property, enter the name of theresource method that returns a menu of values (templates-MenuForMenuButton).
5. Use the define command or a System Browser to add aninstance variable (letter) to the application model(MenuValueExample).
6. Use a System Browser to add a method (letter), in an aspectsprotocol, that returns the contents of the instance variable.
letter "V1 Step 6"^letter
7. Use a System Browser to create an initialize method, in aninitialize-release protocol, that initializes the aspect variable .
initialize "V1 Step 7"letter := self class firstNotice asValue.letter onChangeSend: #setCheckMark to: self.
8. Use a Menu Editor or a System Browser to create aresource method (templatesMenuForMenuButton) that creates amenu of values.
templatesMenuForMenuButton "V1 Step 8"| mb |mb := MenuBuilder new.
mbadd: 'First Notice' -> self class firstNotice;add: 'Second Notice' -> self class secondNotice;add: 'Final Notice' -> self class finalNotice.
^mb menu
Chapter 13 Menus
238 VisualWorks Cookbook, Rev. 2.0
V2. Adding a Menu Button with a Menu of Commands
Online example: MenuCommandExample
1. Use the Palette to add a menu-button widget to the canvas.
2. In the button’s Label property, enter the desired label, whichwill appear on the menu button. Leaving the Label blankcauses the current selection to appear on the menu buttonwhile the application is running.
3. In the button’s Aspect property, enter the name of themethod that returns a value holder (in the example, action).
4. In the menu button’s Menu property, enter the name of theresource method that returns a menu of commands(templatesMenuForMenuButton).
5. Use the define command or a System Browser to add aninstance variable (action) to the application model(MenuCommandExample).
6. Use a System Browser to add a method (action), in an aspectsprotocol, that returns the contents of the instance variable .
action "V2 Step 6"^action
7. Use a System Browser to create an initialize method, in aninitialize-release protocol, that initializes the aspect variable.Also in the initialize method, send an onChangeSend:to: messageto the value holder (action); the first argument is the name ofa method that performs the command (performAction), and thesecond argument is typically the application model.
initialize "V2 Step 7"files := SelectionInList new.files selectionIndexHolder onChangeSend: #configureMenu to: self.
action := nil asValue.action onChangeSend: #performAction to: self.
8. Use a System Browser to add a method that performs thecurrently selected action (performAction).
Adding a Menu Button
VisualWorks Cookbook, Rev. 2.0 239
performAction "V2 Step 8"self perform: self action value.
9. Use a Menu Editor or a System Browser to create aresource method (fileMenu) that creates a menu ofcommands.
fileMenu "V2 Step 9"| mb menu submenu |mb := MenuBuilder new.
mbbeginSubMenuLabeled: 'File';add: 'Open' -> #openFile;line;add: 'Add' -> #addFile;add: 'Delete' -> #deleteFile;endSubMenu.
mbbeginSubMenuLabeled: 'Help';add: 'Usage' -> #explainUsage;endSubMenu.
"Add shortcut keys."menu := mb menu.submenu := (menu menuItemLabeled: 'File') submenu.(submenu menuItemLabeled: 'Open') shortcutKeyCharacter: $O.(submenu menuItemLabeled: 'Add') shortcutKeyCharacter: $A.(submenu menuItemLabeled: 'Delete') shortcutKeyCharacter: $D.
^menu
10. Use a System Browser to create each of the action methods.
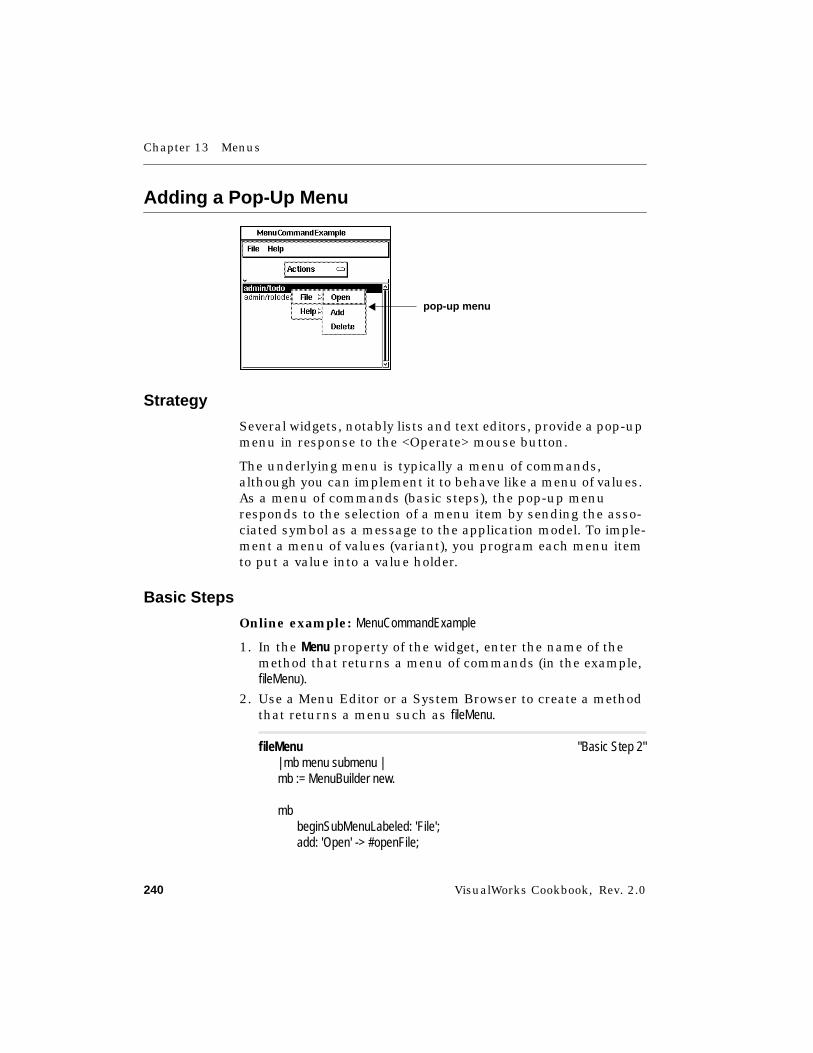
Chapter 13 Menus
240 VisualWorks Cookbook, Rev. 2.0
Adding a Pop-Up Menu
Strategy
Several widgets, notably lists and text editors, provide a pop-upmenu in response to the <Operate> mouse button.
The underlying menu is typically a menu of commands,although you can implement it to behave like a menu of values.As a menu of commands (basic steps), the pop-up menuresponds to the selection of a menu item by sending the asso-ciated symbol as a message to the application model. To imple-ment a menu of values (variant), you program each menu itemto put a value into a value holder.
Basic Steps
Online example: MenuCommandExample
1. In the Menu property of the widget, enter the name of themethod that returns a menu of commands (in the example,fileMenu).
2. Use a Menu Editor or a System Browser to create a methodthat returns a menu such as fileMenu.
fileMenu "Basic Step 2"| mb menu submenu |mb := MenuBuilder new.
mbbeginSubMenuLabeled: 'File';add: 'Open' -> #openFile;
pop-up menu
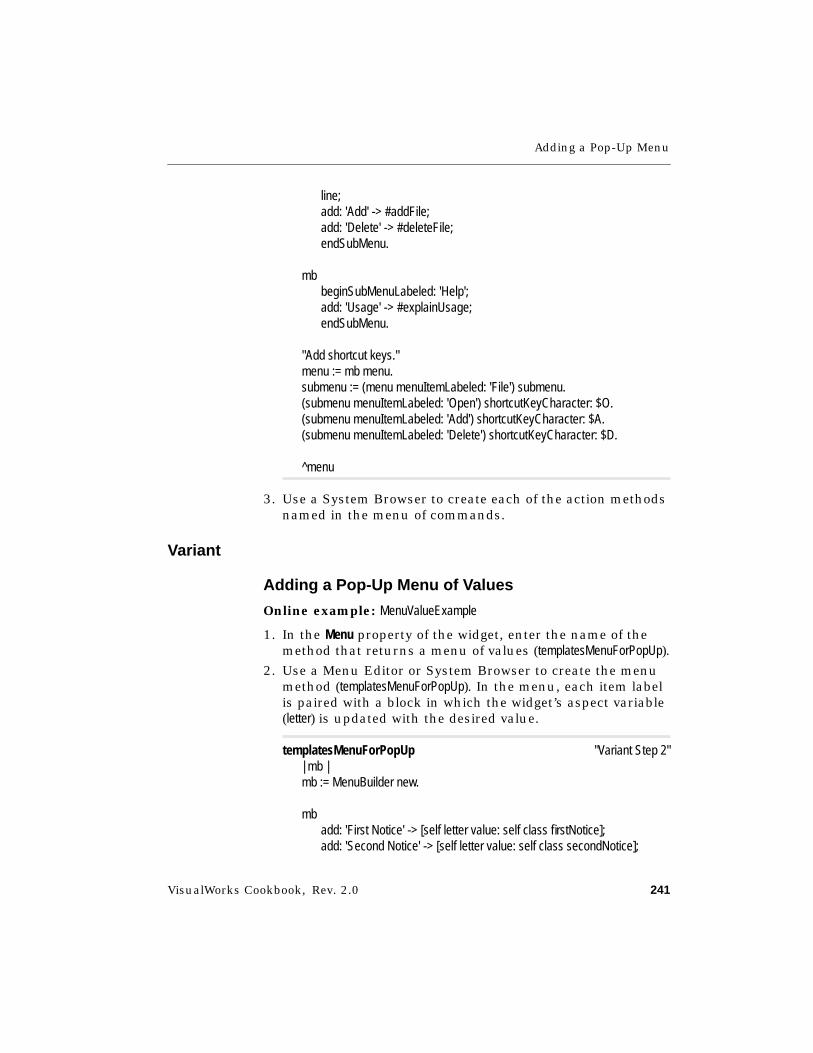
Adding a Pop-Up Menu
VisualWorks Cookbook, Rev. 2.0 241
line;add: 'Add' -> #addFile;add: 'Delete' -> #deleteFile;endSubMenu.
mbbeginSubMenuLabeled: 'Help';add: 'Usage' -> #explainUsage;endSubMenu.
"Add shortcut keys."menu := mb menu.submenu := (menu menuItemLabeled: 'File') submenu.(submenu menuItemLabeled: 'Open') shortcutKeyCharacter: $O.(submenu menuItemLabeled: 'Add') shortcutKeyCharacter: $A.(submenu menuItemLabeled: 'Delete') shortcutKeyCharacter: $D.
^menu
3. Use a System Browser to create each of the action methodsnamed in the menu of commands.
Variant
Adding a Pop-Up Menu of Values
Online example: MenuValueExample
1. In the Menu property of the widget, enter the name of themethod that returns a menu of values (templatesMenuForPopUp).
2. Use a Menu Editor or System Browser to create the menumethod (templatesMenuForPopUp). In the menu, each item labelis paired with a block in which the widget’s aspect variable(letter) is updated with the desired value.
templatesMenuForPopUp "Variant Step 2"| mb |mb := MenuBuilder new.
mbadd: 'First Notice' -> [self letter value: self class firstNotice];add: 'Second Notice' -> [self letter value: self class secondNotice];
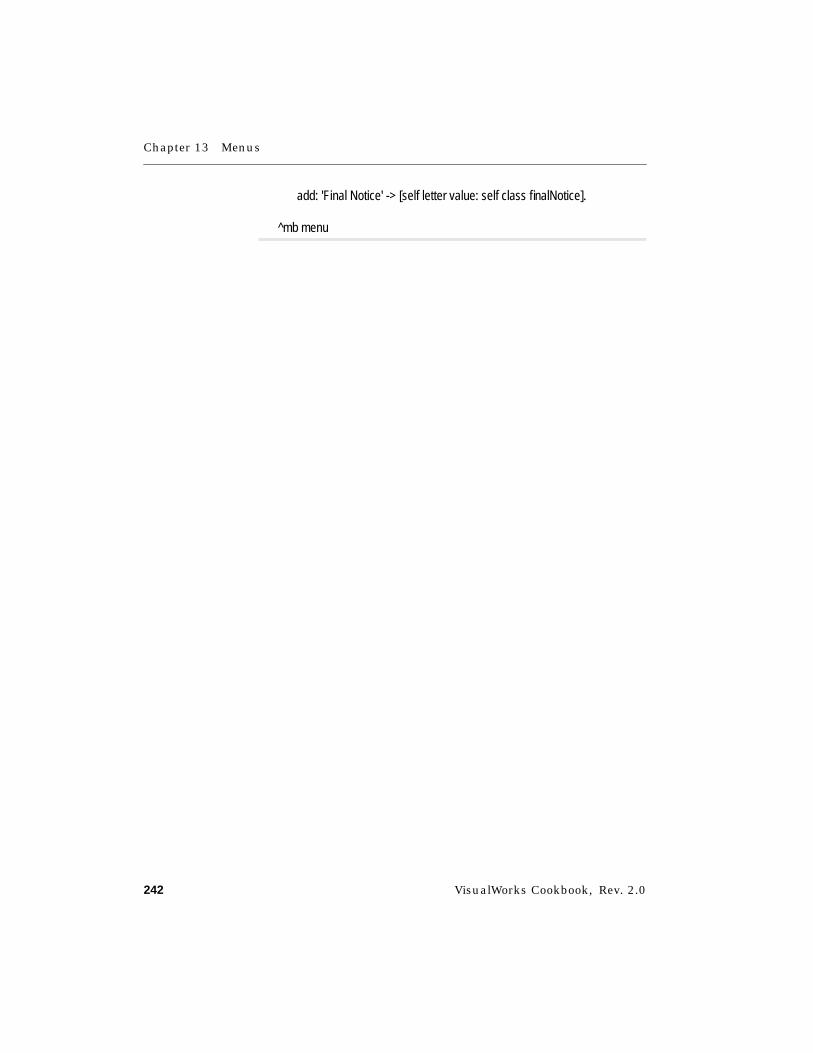
Chapter 13 Menus
242 VisualWorks Cookbook, Rev. 2.0
add: 'Final Notice' -> [self letter value: self class finalNotice].
^mb menu
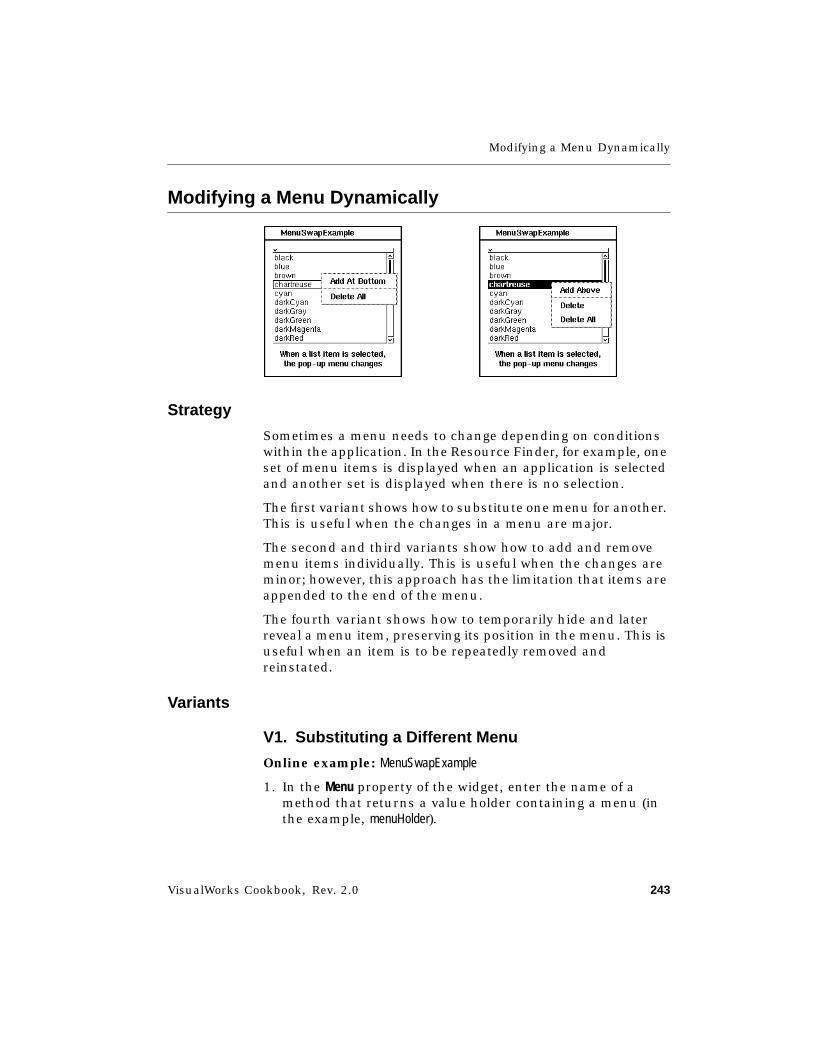
Modifying a Menu Dynamically
VisualWorks Cookbook, Rev. 2.0 243
Modifying a Menu Dynamically
Strategy
Sometimes a menu needs to change depending on conditionswithin the application. In the Resource Finder, for example, oneset of menu items is displayed when an application is selectedand another set is displayed when there is no selection.
The first variant shows how to substitute one menu for another.This is useful when the changes in a menu are major.
The second and third variants show how to add and removemenu items individually. This is useful when the changes areminor; however, this approach has the limitation that items areappended to the end of the menu.
The fourth variant shows how to temporarily hide and laterreveal a menu item, preserving its position in the menu. This isuseful when an item is to be repeatedly removed andreinstated.
Variants
V1. Substituting a Different Menu
Online example: MenuSwapExample
1. In the Menu property of the widget, enter the name of amethod that returns a value holder containing a menu (inthe example, menuHolder).

Chapter 13 Menus
244 VisualWorks Cookbook, Rev. 2.0
2. In the application model, create an instance variable to holdthe menu in a value holder (menuHolder).
3. Use a System Browser to create a method (menuHolder) thatreturns the value of the instance variable.
menuHolder "V1 Step3"^menuHolder
4. Use a Menu Editor or System Browser to create the startingmenu (nothingSelectedMenu) and the alternate menu(colorSelectedMenu).
nothingSelectedMenu "V1 Step 4"| mb |mb := MenuBuilder new.mb add: 'Add At Bottom' -> #unimplemented;
line;add: 'Delete All' -> #unimplemented.
^mb menu
colorSelectedMenu "V1 Step 4"| mb |mb := MenuBuilder new.mb add: 'Add Above' -> #unimplemented;
line;add: 'Delete' -> #unimplemented;add: 'Delete All' -> #unimplemented.
^mb menu
5. Use a System Browser to create an initialize method that getsthe starting menu, puts it in a value holder, and assigns theholder to the instance variable.
initializecolors := SelectionInList with: ColorValue constantNames.colors selectionIndexHolder onChangeSend: #selectionChanged to: self.
menuHolder := self nothingSelectedMenu asValue. "V1 Step 5"
Modifying a Menu Dynamically
VisualWorks Cookbook, Rev. 2.0 245
6. Create a method (selectionChanged) that tests to see whichmenu should be used and then puts the correct menu inthe menu holder.
selectionChanged "V1 Step 6"self colors selection isNil
ifTrue: [self menuHolder value: self nothingSelectedMenu]ifFalse: [self menuHolder value: self colorSelectedMenu]
7. Arrange for the menu-changing method to be invoked whenthe relevant condition changes in the application. (In theexample, an onChangeSend:to: message in the initialize methodaccomplishes this.)
V2. Adding an Item to a Menu
Online example: MenuModifyExample
1. Get the menu by sending a menuAt: message to the applica-tion model’s builder. The argument is the name of the menuas identified in the Menu property.
2. Send an addItemLabel:value: message to the menu. The firstargument is the label string and the second argument is acommand, a value, or an action block.
addTitle"Prompt for a new job title and add it to the list."
| newTitle jMenu |newTitle := Dialog request: 'New title?'.newTitle isEmpty ifTrue: [^self].
jMenu := self builder menuAt: #jobTitlesMenu. "V2 Step 1"jMenu addItemLabel: newTitle value: newTitle asSymbol. "V2 Step 2"
self jobTitle value: newTitle asSymbol.
Chapter 13 Menus
246 VisualWorks Cookbook, Rev. 2.0
V3. Removing an Item from a Menu
Online example: MenuModifyExample
1. Get the menu by sending a menuAt: message to the applica-tion model’s builder. The argument is the name of the menuas specified in the Menu property.
2. Get the item to be deleted by sending a menuItemLabeled:message to the menu. The argument is the label string ofthe menu item. (If the item is in a submenu, you must firstaccess the submenu and get the item from it.)
3. Send a removeItem: message to the menu. The argument is themenu item from the previous step.
4. In the case of a menu button in which the current selectionis displayed (that is, a menu button whose Label property isblank), make sure the button’s value holder has a validvalue. If necessary, choose a new value to displace thedeleted menu item’s value.
deleteTitle"Prompt for a title and remove it from the list."
| jMenu removableTitles title item |jMenu := self builder menuAt: #jobTitlesMenu. "V3 Step 1"
"Don't permit the president to be overthrown."removableTitles := jMenu labels
reject: [ :nextTitle | nextTitle = 'President'].
title := Dialogchoose: 'Delete Title'fromList: removableTitlesvalues: removableTitleslines: 8cancel: [^nil]for: ScheduledControllers activeController view.
item := jMenu menuItemLabeled: title. "V3 Step 2"jMenu removeItem: item. "V3 Step 3"
"If the deleted title is showing, pick the first title."
Modifying a Menu Dynamically
VisualWorks Cookbook, Rev. 2.0 247
self jobTitle value == title asSymbolifTrue: [self jobTitle value: #President]. "V3 Step 4"
V4. Hiding a Menu Item
Online example: MenuModifyExample
1. Get the menu by sending a menuAt: message to the applica-tion model’s builder. The argument is the name of the menuas specified in the Menu property.
2. Get the item to be deleted by sending a menuItemLabeled:message to the menu. The argument is the label string ofthe menu item. (If the item is in a submenu, you must firstaccess the submenu and get the item from it.)
3. To hide the item, send a hideItem: message to the menu. Theargument is the menu item from the previous step. If theitem is already hidden, no error occurs.
4. To reveal an item, send an unhideItem: message to the menu.The argument is the menu item from the previous step. Ifthe item is already revealed, no error occurs.
adjustBenefitList"Hide benefit items that are not available to the currentlyselected job title."
| bMenu item |bMenu := self builder menuAt: #benefitsMenu. "V4 Step 1"item := bMenu menuItemLabeled: 'Golden Parachute'. "V4 Step 2"
"Only the President gets the Golden Parachute."self jobTitle value == #President
ifTrue: [bMenu unhideItem: item] "V4 Step 4"ifFalse: [bMenu hideItem: item]. "V4 Step 3"
See Also■ “Disabling a Menu Item” on page 248

Chapter 13 Menus
248 VisualWorks Cookbook, Rev. 2.0
Disabling a Menu Item
Strategy
Rather than removing a menu item when it is not appropriatefor the user to select it, you can disable it. When disabled, itappears in a different color in the menu as a visual cue to theuser, and it does nothing when the user tries to select it.Disabling a menu item is usually preferable to removing it,especially when the item is likely to be reinstated later.
In MenuCommandExample, menu items are enabled and disableddepending on whether a file name in a list is selected. Themethod that performs this service (configureMenu) is invoked attwo different times: by a postBuildWith: method (to configure themenu at startup) and whenever the selection changes in the list(as arranged in the initialize method).
Basic Steps
Online example: MenuCommandExample
1. To disable a menu item, send a disable message to it. This istypically done after testing some condition in the applica-tion (in the example, after testing whether anything isselected in the list).
2. To enable a menu item, send an enable message to it.
configureMenu"Disable or enable the menu items depending on whethera file is selected."
disabled item

Disabling a Menu Item
VisualWorks Cookbook, Rev. 2.0 249
| menu submenu |menu := self builder menuAt: #fileMenu.submenu := (menu menuItemLabeled: 'File') submenu.
self files selection isNilifTrue: [
(submenu menuItemLabeled: 'Open') disable. "Basic Step 1"(submenu menuItemLabeled: 'Delete') disable]
ifFalse: [(submenu menuItemLabeled: 'Open') enable. "Basic Step 2"(submenu menuItemLabeled: 'Delete') enable]
See Also■ “Modifying a Menu Dynamically” on page 243
■ “Using a Menu Editor” on page 259
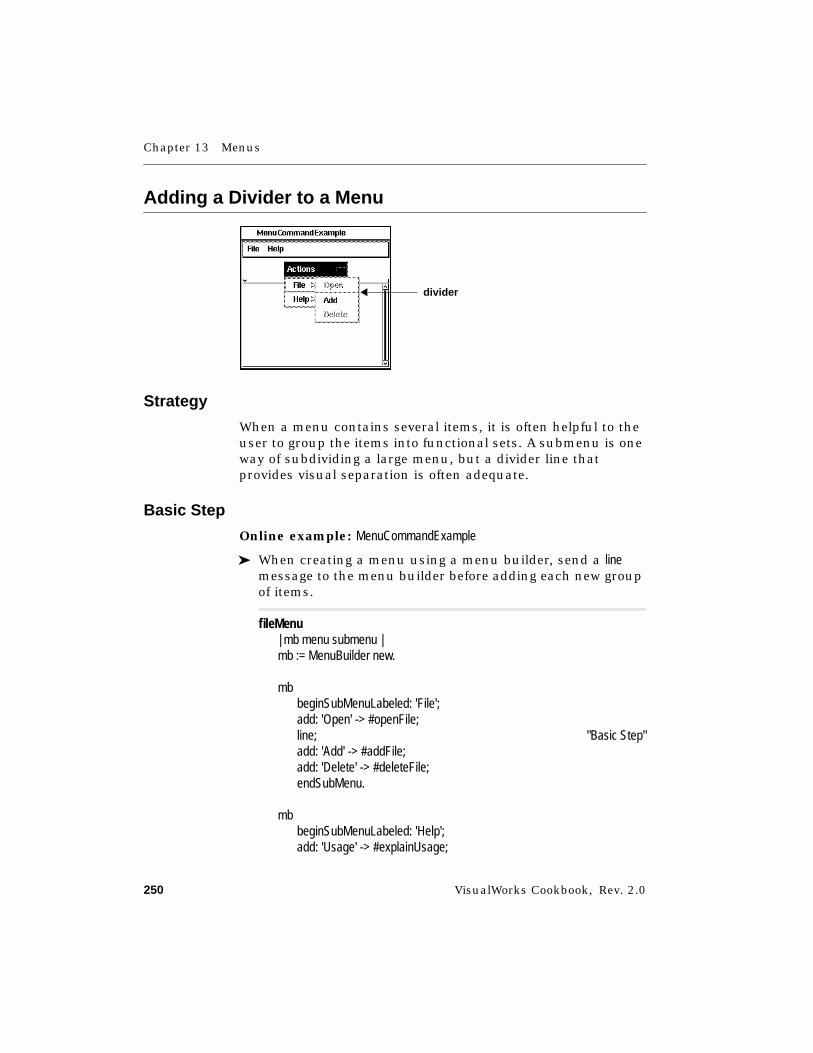
Chapter 13 Menus
250 VisualWorks Cookbook, Rev. 2.0
Adding a Divider to a Menu
Strategy
When a menu contains several items, it is often helpful to theuser to group the items into functional sets. A submenu is oneway of subdividing a large menu, but a divider line thatprovides visual separation is often adequate.
Basic Step
Online example: MenuCommandExample
➤ When creating a menu using a menu builder, send a linemessage to the menu builder before adding each new groupof items.
fileMenu| mb menu submenu |mb := MenuBuilder new.
mbbeginSubMenuLabeled: 'File';add: 'Open' -> #openFile;line; "Basic Step"add: 'Add' -> #addFile;add: 'Delete' -> #deleteFile;endSubMenu.
mbbeginSubMenuLabeled: 'Help';add: 'Usage' -> #explainUsage;
divider
Adding a Divider to a Menu
VisualWorks Cookbook, Rev. 2.0 251
endSubMenu.
"Add shortcut keys."menu := mb menu.submenu := (menu menuItemLabeled: 'File') submenu.(submenu menuItemLabeled: 'Open') shortcutKeyCharacter: $O.(submenu menuItemLabeled: 'Add') shortcutKeyCharacter: $A.(submenu menuItemLabeled: 'Delete') shortcutKeyCharacter: $D.
^menu
See Also■ “Using a Menu Editor” on page 259
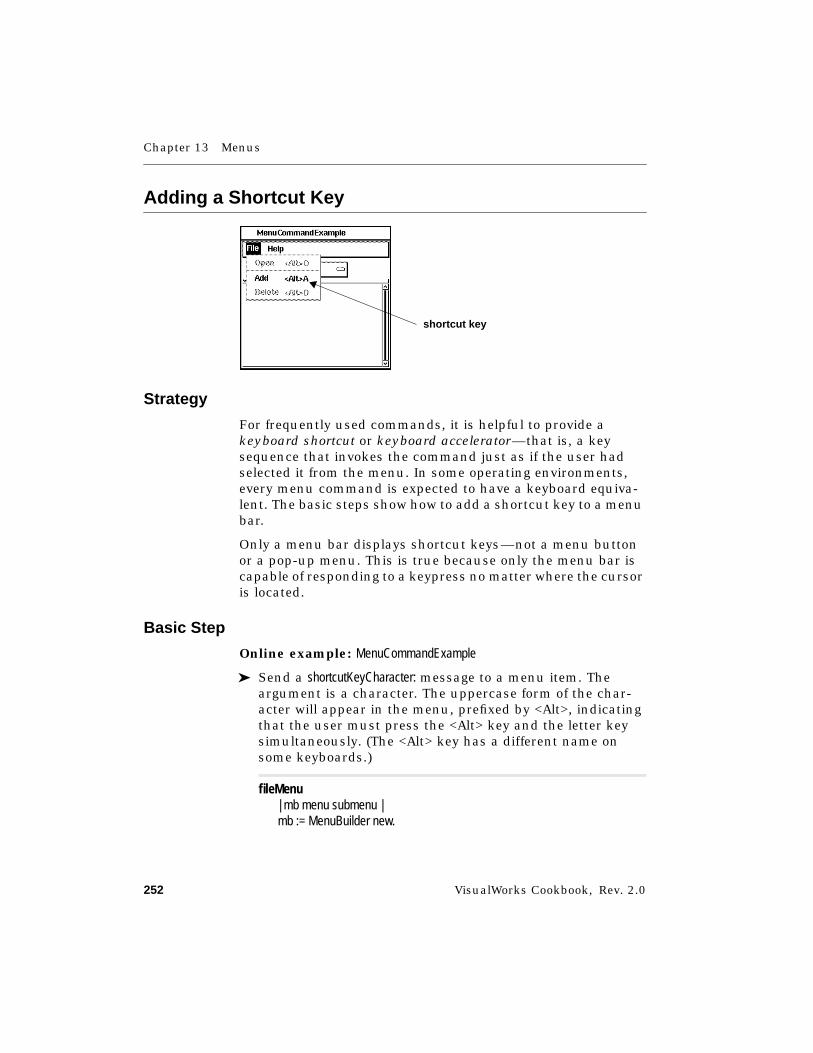
Chapter 13 Menus
252 VisualWorks Cookbook, Rev. 2.0
Adding a Shortcut Key
Strategy
For frequently used commands, it is helpful to provide akeyboard shortcut or keyboard accelerator—that is, a keysequence that invokes the command just as if the user hadselected it from the menu. In some operating environments,every menu command is expected to have a keyboard equiva-lent. The basic steps show how to add a shortcut key to a menubar.
Only a menu bar displays shortcut keys—not a menu buttonor a pop-up menu. This is true because only the menu bar iscapable of responding to a keypress no matter where the cursoris located.
Basic Step
Online example: MenuCommandExample
➤ Send a shortcutKeyCharacter: message to a menu item. Theargument is a character. The uppercase form of the char-acter will appear in the menu, prefixed by <Alt>, indicatingthat the user must press the <Alt> key and the letter keysimultaneously. (The <Alt> key has a different name onsome keyboards.)
fileMenu| mb menu submenu |mb := MenuBuilder new.
shortcut key
Adding a Shortcut Key
VisualWorks Cookbook, Rev. 2.0 253
mbbeginSubMenuLabeled: 'File';add: 'Open' -> #openFile;line;add: 'Add' -> #addFile;add: 'Delete' -> #deleteFile;endSubMenu.
mbbeginSubMenuLabeled: 'Help';add: 'Usage' -> #explainUsage;endSubMenu.
"Add shortcut keys."menu := mb menu.submenu := (menu menuItemLabeled: 'File') submenu.(submenu menuItemLabeled: 'Open')
shortcutKeyCharacter: $O. "Basic Step"(submenu menuItemLabeled: 'Add')
shortcutKeyCharacter: $A.(submenu menuItemLabeled: 'Delete')
shortcutKeyCharacter: $D.
^menu
See Also■ “Sensing Keyboard Activity” on page 416
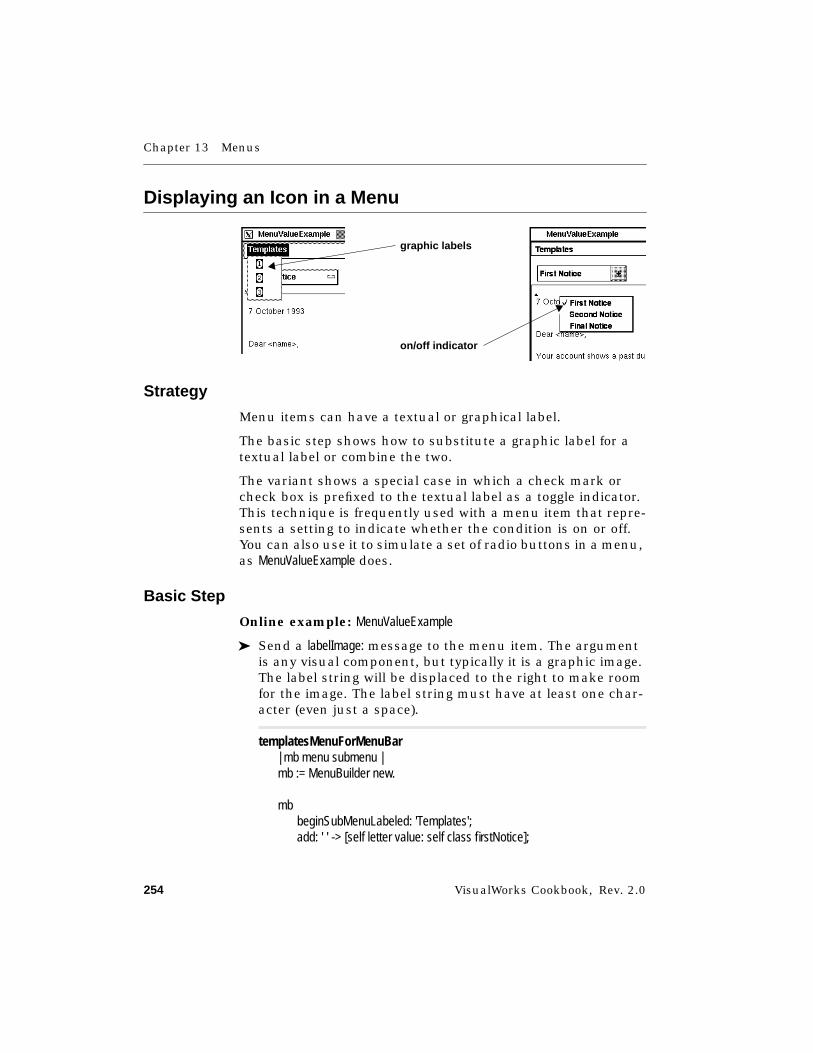
Chapter 13 Menus
254 VisualWorks Cookbook, Rev. 2.0
Displaying an Icon in a Menu
Strategy
Menu items can have a textual or graphical label.
The basic step shows how to substitute a graphic label for atextual label or combine the two.
The variant shows a special case in which a check mark orcheck box is prefixed to the textual label as a toggle indicator.This technique is frequently used with a menu item that repre-sents a setting to indicate whether the condition is on or off.You can also use it to simulate a set of radio buttons in a menu,as MenuValueExample does.
Basic Step
Online example: MenuValueExample
➤ Send a labelImage: message to the menu item. The argumentis any visual component, but typically it is a graphic image.The label string will be displaced to the right to make roomfor the image. The label string must have at least one char-acter (even just a space).
templatesMenuForMenuBar| mb menu submenu |mb := MenuBuilder new.
mbbeginSubMenuLabeled: 'Templates';add: ' ' -> [self letter value: self class firstNotice];
graphic labels
on/off indicator
Displaying an Icon in a Menu
VisualWorks Cookbook, Rev. 2.0 255
add: ' ' -> [self letter value: self class secondNotice];add: ' ' -> [self letter value: self class finalNotice];endSubMenu.
"Add graphic labels."menu := mb menu.submenu := (menu menuItemLabeled: 'Templates') submenu.(submenu menuItemAt: 1) "Basic Step"
labelImage: (self class oneImage).(submenu menuItemAt: 2)
labelImage: (self class twoImage).(submenu menuItemAt: 3)
labelImage: (self class threeImage).
"Set the background color."submenu backgroundColor: ColorValue chartreuse.
^menu
Variant
Displaying an On/Off Indicator
Online example: MenuValueExample
1. To display an “on” indicator, send a beOn message to themenu item. The indicator is a check mark in some looksand a box in others.
2. To display an “off” indicator, send a beOff message. In somelooks, beOff simply removes the “on” indicator; in others itdisplays a different image.
setCheckMark"In the pop-up menu, set the check box to indicate the currentlydisplayed template."
| menu item |menu := self builder menuAt: #templatesMenuForPopUp.
item := menu menuItemAt: 1.self letter value = self class firstNotice
Chapter 13 Menus
256 VisualWorks Cookbook, Rev. 2.0
ifTrue: [item beOn] "Variant Step 1"ifFalse: [item beOff]. "Variant Step 2"
item := menu menuItemAt: 2.self letter value = self class secondNotice
ifTrue: [item beOn]ifFalse: [item beOff].
item := menu menuItemAt: 3.self letter value = self class finalNotice
ifTrue: [item beOn]ifFalse: [item beOff].
See Also■ “Creating a Graphic Image” on page 658
■ “Using a Menu Editor” on page 259
Changing Menu Colors
VisualWorks Cookbook, Rev. 2.0 257
Changing Menu Colors
Strategy
You can modify the background color of a menu, as shown inthe basic steps. This technique can be used to make all menusof a particular type appear similar. For example, you mightmake the Help menu a distinctive color wherever it occurs.
You can also group related items in a menu by applying a colorto their labels, as shown in the basic steps. This approach isespecially effective when you want to bring attention to the rela-tionship among items that are not adjacent to one another.
Basic Steps
Online example: MenuModifyExample
1. To color a menu’s background, send a backgroundColor:message to the menu. The argument is a paint, typically aninstance of ColorValue.
2. To color a menu item’s label, send a color: message to themenu item. The argument is a paint, typically a ColorValue.
benefitsMenu| mb menu |mb := MenuBuilder new.mb add: 'Health Insurance' -> #health;
add: 'Retirement Fund' -> #retirement;add: 'Life Insurance' -> #life;add: 'Stock Options' -> #stock;add: 'Golden Parachute' -> #parachute.
menu := mb menu.menu backgroundColor: ColorValue chartreuse. "Basic Step 1"(menu menuItemLabeled: 'Golden Parachute')
color: ColorValue red. "Basic Step 2"
^menu

Chapter 13 Menus
258 VisualWorks Cookbook, Rev. 2.0
See Also■ “Creating a Color” on page 686
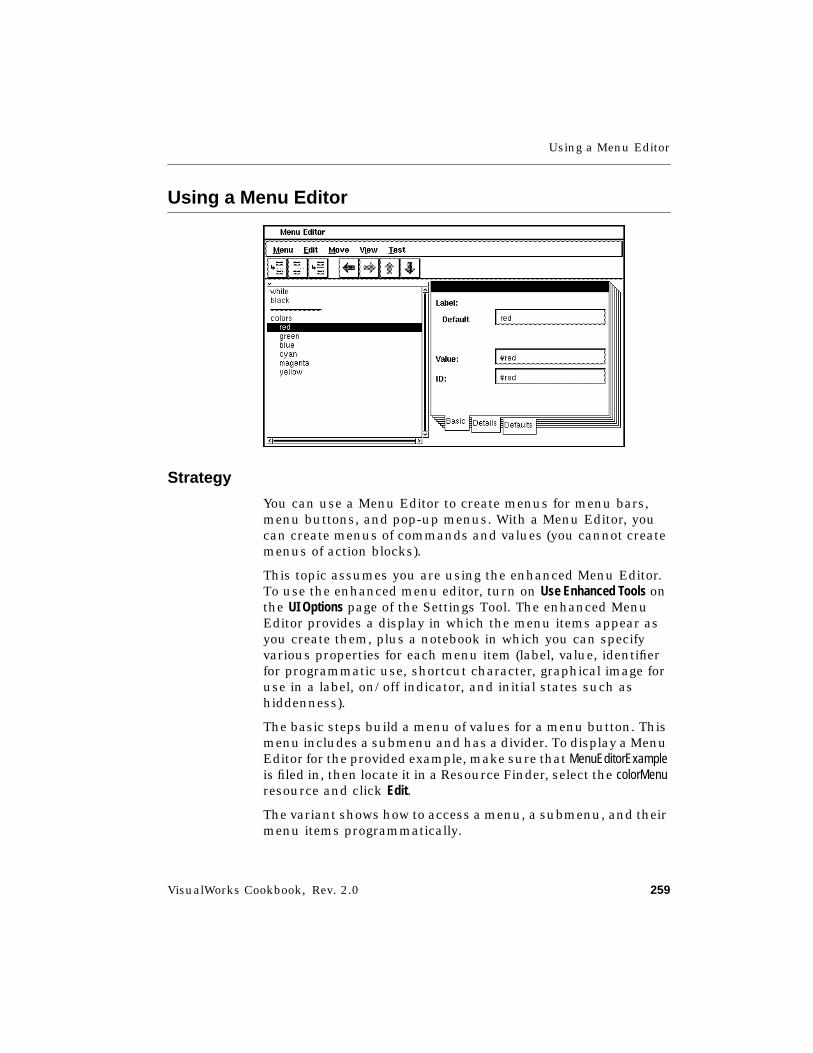
Using a Menu Editor
VisualWorks Cookbook, Rev. 2.0 259
Using a Menu Editor
Strategy
You can use a Menu Editor to create menus for menu bars,menu buttons, and pop-up menus. With a Menu Editor, youcan create menus of commands and values (you cannot createmenus of action blocks).
This topic assumes you are using the enhanced Menu Editor.To use the enhanced menu editor, turn on Use Enhanced Tools onthe UI Options page of the Settings Tool. The enhanced MenuEditor provides a display in which the menu items appear asyou create them, plus a notebook in which you can specifyvarious properties for each menu item (label, value, identifierfor programmatic use, shortcut character, graphical image foruse in a label, on/off indicator, and initial states such ashiddenness).
The basic steps build a menu of values for a menu button. Thismenu includes a submenu and has a divider. To display a MenuEditor for the provided example, make sure that MenuEditorExampleis filed in, then locate it in a Resource Finder, select the colorMenuresource and click Edit.
The variant shows how to access a menu, a submenu, and theirmenu items programmatically.
Chapter 13 Menus
260 VisualWorks Cookbook, Rev. 2.0
Basic Steps
Online example: MenuEditorExample
1. Open an enhanced Menu Editor (for example, from aCanvas Tool, choose Tools➞Menu Editor).
2. Create the top-level menu. For each item that is to appearin it, choose Edit➞New Item to create an empty item labeled<new item>.
3. Select each top-level <new item> and enter its string label inthe Label Default property. Each label appears in the text areaas soon as you accept input in the field (for example, bytabbing to the next field or pressing the <Return> key). Inthe example, create items labeled white, black, and colors.
4. Select each top-level item and enter its value in the Valueproperty. Each value is turned into a symbol (with aprepended pound sign #) when you accept input in the field.In the example, enter values white and black for the first twoitems (colors does not need a value because it is the label fora submenu).
5. Create the submenu. Select the label for the submenu(colors) and choose Edit➞New Submenu Item to create the firstitem in the submenu. Then, choose Edit➞New Item once foreach subsequent submenu item. In this example, create sixitems labeled <new item>, all at the same indentation levelunder the submenu label.
6. Select each indented <new item> and enter its string label inthe Label property. In this example, create items labeled red,green, blue, cyan, magenta, and yellow.
7. Select each labeled submenu item and enter its value in theValue property. In this sample, enter values red, green, blue,cyan, magenta, and yellow.
8. Add a divider line below an item by selecting that item andchoosing Edit➞Add Line. In the example, add a divider linebelow the item labeled black.
9. Pull down the Test menu in the menu bar of the MenuEditor to test the menu you have created. Adjust any menuitems as needed—for example, use Move➞Left and Move➞Rightto change the level of indentation of the items; use Move➞Upand Move➞Down to change the order of items.
Using a Menu Editor
VisualWorks Cookbook, Rev. 2.0 261
10. Choose Menu➞Install... to install a specification for the menuin a resource method of the application model. In thisexample, install the menu specification in a colorMenu classmethod in MenuEditorExample.
11. In the canvas, select the menu button to which you want toapply the menu.
12. In a Properties tool, fill in the menu button’s Menu propertywith the name of the menu resource (colorMenu). Apply prop-erties and install the canvas.
Variant
Accessing Menus Programmatically
Online example: MenuEditorExample
1. In an enhanced Menu Editor, select the menu item to beaccessed and fill in its ID: property with an identifying namekey. In the example, use the corresponding color name asthe name key for each item. Install the menu.
2. In a System Browser, create the method that is to accessthe menu programmatically (in this example,disableDarkColors). Get the menu by sending a menuAt: messageto the builder. The argument is the name of the menu’sresource method (#colorMenu).
3. Get the menu’s collection of menu items by sending amenuItems message to the menu.
4. Send a nameKey message to each menu item to obtain itsname key. In this example, disable each menu item whosename key is in the darkColors array.
5. Get the menu item that serves as the label for the submenu(in this example, get the menu item whose name key is#colors). To do this, send an atNameKey: message to the menu,specifying the desired name key (#colors) as the argument.
6. Get the submenu by sending a submenu message to the menuitem returned in step 5.
7. Get the submenu’s menu items by sending a menuItemsmessage to the submenu. In this example, disable eachsubmenu item whose name key is in the darkColors array.
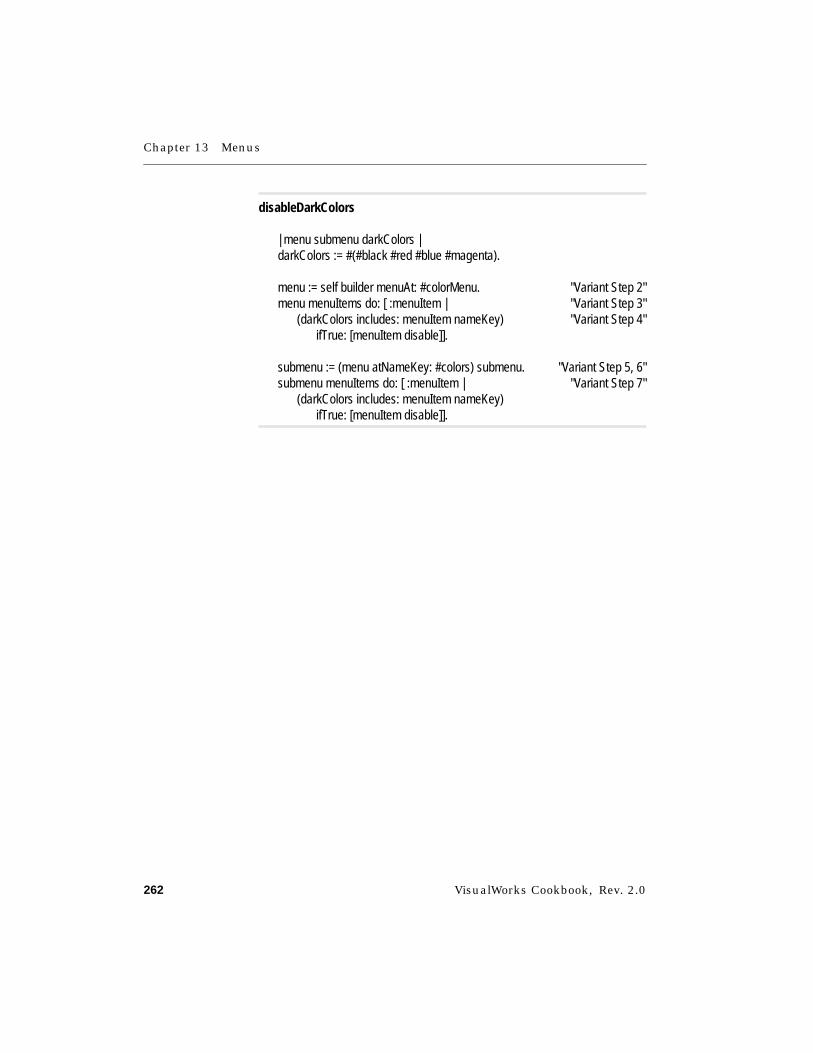
Chapter 13 Menus
262 VisualWorks Cookbook, Rev. 2.0
disableDarkColors
| menu submenu darkColors |darkColors := #(#black #red #blue #magenta).
menu := self builder menuAt: #colorMenu. "Variant Step 2"menu menuItems do: [ :menuItem | "Variant Step 3"
(darkColors includes: menuItem nameKey) "Variant Step 4"ifTrue: [menuItem disable]].
submenu := (menu atNameKey: #colors) submenu. "Variant Step 5, 6"submenu menuItems do: [ :menuItem | "Variant Step 7"
(darkColors includes: menuItem nameKey)ifTrue: [menuItem disable]].

VisualWorks Cookbook, Rev. 2.0 263
Chapter 14
Sliders
Adding a Slider 264Connecting a Slider to a Field 267Changing the Range Dynamically 270Changing the Length of the Marker 273Making a Slider Two-Dimensional 274
See Also■ “Widget Basics” on page 53
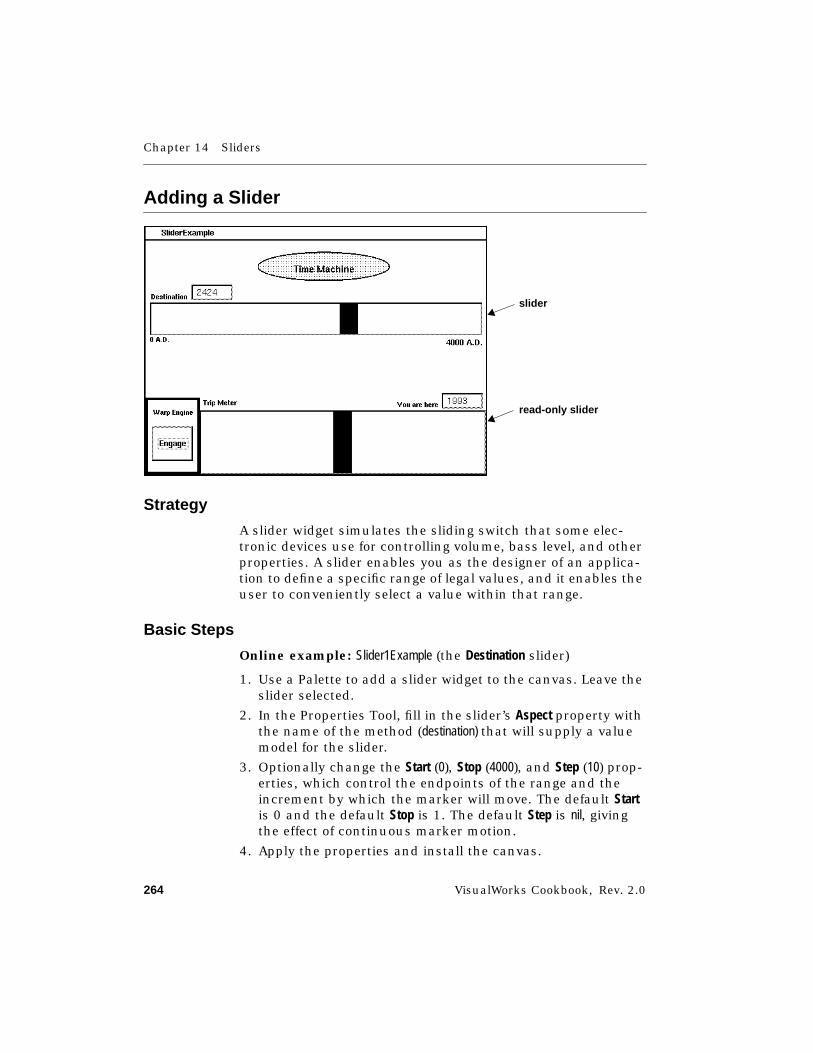
Chapter 14 Sliders
264 VisualWorks Cookbook, Rev. 2.0
Adding a Slider
Strategy
A slider widget simulates the sliding switch that some elec-tronic devices use for controlling volume, bass level, and otherproperties. A slider enables you as the designer of an applica-tion to define a specific range of legal values, and it enables theuser to conveniently select a value within that range.
Basic Steps
Online example: Slider1Example (the Destination slider)
1. Use a Palette to add a slider widget to the canvas. Leave theslider selected.
2. In the Properties Tool, fill in the slider’s Aspect property withthe name of the method (destination) that will supply a valuemodel for the slider.
3. Optionally change the Start (0), Stop (4000), and Step (10) prop-erties, which control the endpoints of the range and theincrement by which the marker will move. The default Startis 0 and the default Stop is 1. The default Step is nil, givingthe effect of continuous marker motion.
4. Apply the properties and install the canvas.
slider
read-only slider
Adding a Slider
VisualWorks Cookbook, Rev. 2.0 265
5. Use the canvas’s define command or a System Browser tocreate an instance variable to hold the slider’s value model(destination).
6. Use the canvas’s define command or a System Browser tocreate a method, in an aspects protocol, for accessing theinstance variable (destination).
destination "Basic Step 6"^destination
7. Use a System Browser to initialize the variable, usually inan initialize method, in an initialize release protocol. Initialize thevariable with a value holder whose initial value is thecurrent year.
initialize"Destination"destination := Date today year asValue. "Basic Step 7"
"Current year"currentYear := Date today year asValue.
"Trip meter"tripRange := RangeAdaptor
on: currentYearstop: 4000grid: 1.
Variants
V1. Making a Slider Vertical
By default, a slider is horizontal in shape, and the markermoves horizontally as well.
1. To alter the shape of a slider, drag the selection handles ofthe widget.
2. To alter the marker’s direction of movement, select theslider’s Vertical or Horizontal property.
3. Apply the properties and install the canvas.

Chapter 14 Sliders
266 VisualWorks Cookbook, Rev. 2.0
Note that it is possible to have a slider that is horizontal inshape but vertical in operation.
V2. Making a Slider Read-Only
Although it is normally an input device, a slider can be usedpurely as an output device. In Slider1Example, we use a read-onlyslider as a meter to display the progress of the user’s time-trav-eling adventure.
1. Select the slider in the canvas.
2. In a Properties Tool, fill in the slider’s ID property with anidentifying name (tripRange).
3. In a method in the application model (typically postBuildWith:),get the slider component from the builder and disable it.
postBuildWith: aBuilder"Disable the trip meter, making it read-only."(aBuilder componentAt: #tripRange) disable. "V2 Step 3"
Connecting a Slider to a Field
VisualWorks Cookbook, Rev. 2.0 267
Connecting a Slider to a Field
Strategy
Although a slider is both an input and an output device, it typi-cally gives the user only a rough idea of the current value.Frequently, a field is used to display the same value precisely.
For example, the Slider1Example uses a field to display the desti-nation year, because the slider covers such a large range (zeroto 4000) that the user can only guess at its current value.
Unless you make the field read-only, the user has the option ofchanging the value by using either the slider or the field.
Nonnumeric slider: By its nature, a slider always manipulatesa numeric value. You can make it appear to manipulate anonnumeric value, however, by using a field to display thetransformed value. The variant shows how to do so.
Basic Steps
Online example: Slider1Example (the Destination slider and field)
1. Use a Palette to add a field to the canvas. Leave the fieldselected.
field
slider
Chapter 14 Sliders
268 VisualWorks Cookbook, Rev. 2.0
2. In the Properties Tool, fill in the field’s Aspect property withthe same name that the slider uses for its Aspect (destination).
3. In the field’s Type property, select Number.
4. Apply the properties and install the canvas.
Variant
Displaying a Transformed Value in the Field
Online example: Slider2Example (the Month field)
1. In the field’s Aspect property, enter a different method namethan the slider’s Aspect (in the example, the slider’s Aspect isdateRange while the field’s Aspect is month).
2. In the field’s Type property, select the type that correspondsto the transformed value (in the example, a month namewill be displayed, so we use a String type field).
3. Use the canvas’ define command or a System Browser tocreate the field’s instance variable (month) and accessingmethod (month).
month "Variant Step 3"^month
4. In a method in the application model (typically initialize),initialize the field’s variable.
5. In the initialize method, arrange for a change message(changedDate) to be sent to the application model when theslider’s value changes.
initializemonth :=(Date nameOfMonth: 1) asValue. "Variant Step 4"year := 1900 asValue.
dateRange := (0@1) asValue.dateRange onChangeSend: #changedDate to: self. "Variant Step 5"
6. Use a System Browser to create the change method(changedDate) in the application model. This method isresponsible for changing the field’s value based on theslider’s new value.

Connecting a Slider to a Field
VisualWorks Cookbook, Rev. 2.0 269
changedDate"Convert the y-axis value to a month." "Variant Step 6"| y x |y := self dateRange value y.y := (12 - (y * 12) asInteger) max: 1. "(12 months)"self month value: (Date nameOfMonth: y).
"Convert the x-axis value to a year."x := self dateRange value x.x := 1900 + (x * 100) asInteger. "(100 years)"self year value: x.
See Also■ “Creating an Input Field” on page 122

Chapter 14 Sliders
270 VisualWorks Cookbook, Rev. 2.0
Changing the Range Dynamically
Strategy
When the slider’s range is unchanging, you can use the slider’sStart, Stop, and Step properties to set the range and the stepvalue. When the range or step varies, however, this approach isnot sufficient.
A RangeAdaptor provides the required flexibility. It is a specializedvalue model that also keeps track of the range and step values.You can change those values by sending messages to theadaptor. This can be done anytime—in the Slider1Example, the tripmeter’s range is modified every time the Engage button ispressed.
Basic Steps
Online example: Slider1Example (the Trip Meter slider)
1. In a method in the application model (typically in an initializemethod), initialize the slider’s aspect variable with aRangeAdaptor by sending the instance creation message(on:start:stop:grid:). The first argument (currentYear) is a valueholder containing the number that the slider manipulates.(When a field is connected to the slider, as in the example,
Range is resetwhen trip begins.New range is theyears to be traversed
Changing the Range Dynamically
VisualWorks Cookbook, Rev. 2.0 271
this argument is the field’s aspect variable.) The gridargument is the step value.
initialize"Destination"destination := Date today year asValue.
"Current year"currentYear := Date today year asValue.
"Trip meter"tripRange := RangeAdaptor "Basic Step 1"
on: currentYearstart: 0stop: 4000grid: 1.
2. Whenever the range or step must change, send a rangeStart:,rangeStop:, or grid: message to the adaptor. (In the example,this is done in the engage method.)
engage"Start the time trip."
| startingYear destinationYear direction |startingYear := self currentYear value.destinationYear := self destination value.
destinationYear == startingYearifTrue: [^Dialog warn: 'Please select a new destination.'].
"Set the endpoints on the trip meter."self tripRange "Basic Step 2"
rangeStart: startingYear;rangeStop: destinationYear;grid: 1.
"Reset the meter to the starting position."currentYear value: startingYear.
"Set up a step value for the loop that follows (-1 = backward in time)."destinationYear > startingYear

Chapter 14 Sliders
272 VisualWorks Cookbook, Rev. 2.0
ifTrue: [direction := 1]ifFalse: [direction := -1].
"For each year of time travel, update the current year."startingYear to: destinationYear by: direction do: [ :yr |
currentYear value: yr].
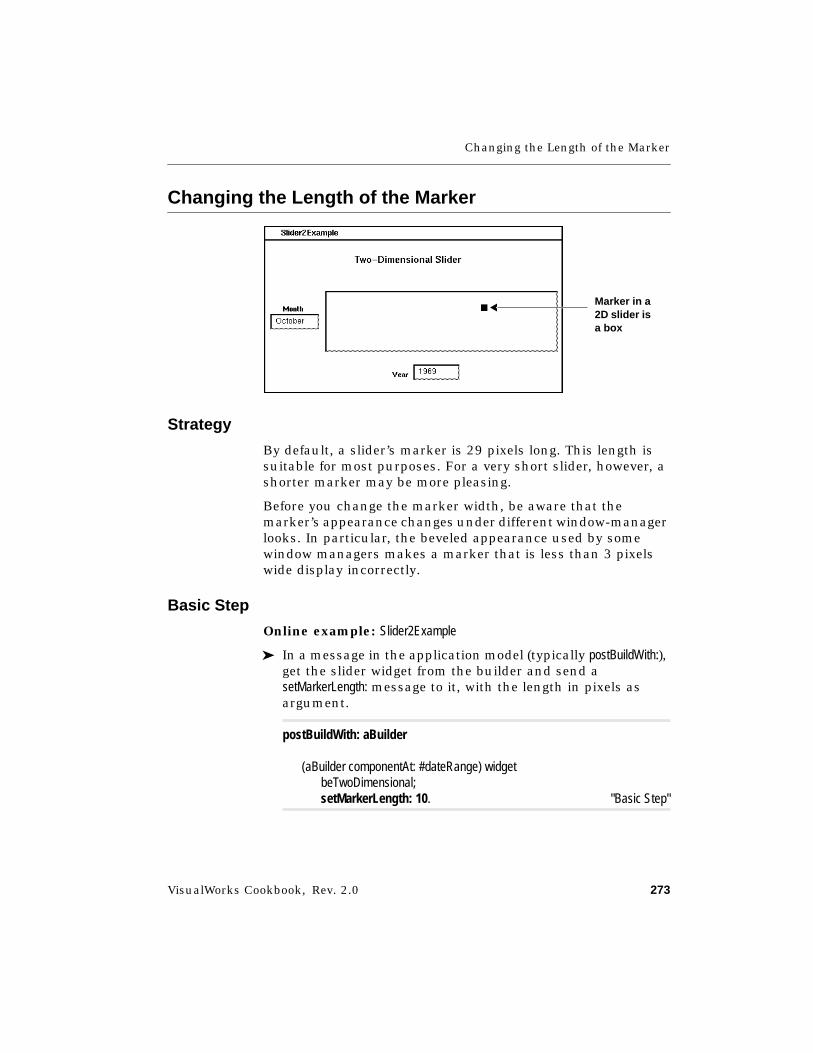
Changing the Length of the Marker
VisualWorks Cookbook, Rev. 2.0 273
Changing the Length of the Marker
Strategy
By default, a slider’s marker is 29 pixels long. This length issuitable for most purposes. For a very short slider, however, ashorter marker may be more pleasing.
Before you change the marker width, be aware that themarker’s appearance changes under different window-managerlooks. In particular, the beveled appearance used by somewindow managers makes a marker that is less than 3 pixelswide display incorrectly.
Basic Step
Online example: Slider2Example
➤ In a message in the application model (typically postBuildWith:),get the slider widget from the builder and send asetMarkerLength: message to it, with the length in pixels asargument.
postBuildWith: aBuilder
(aBuilder componentAt: #dateRange) widgetbeTwoDimensional;setMarkerLength: 10. "Basic Step"
Marker in a2D slider isa box
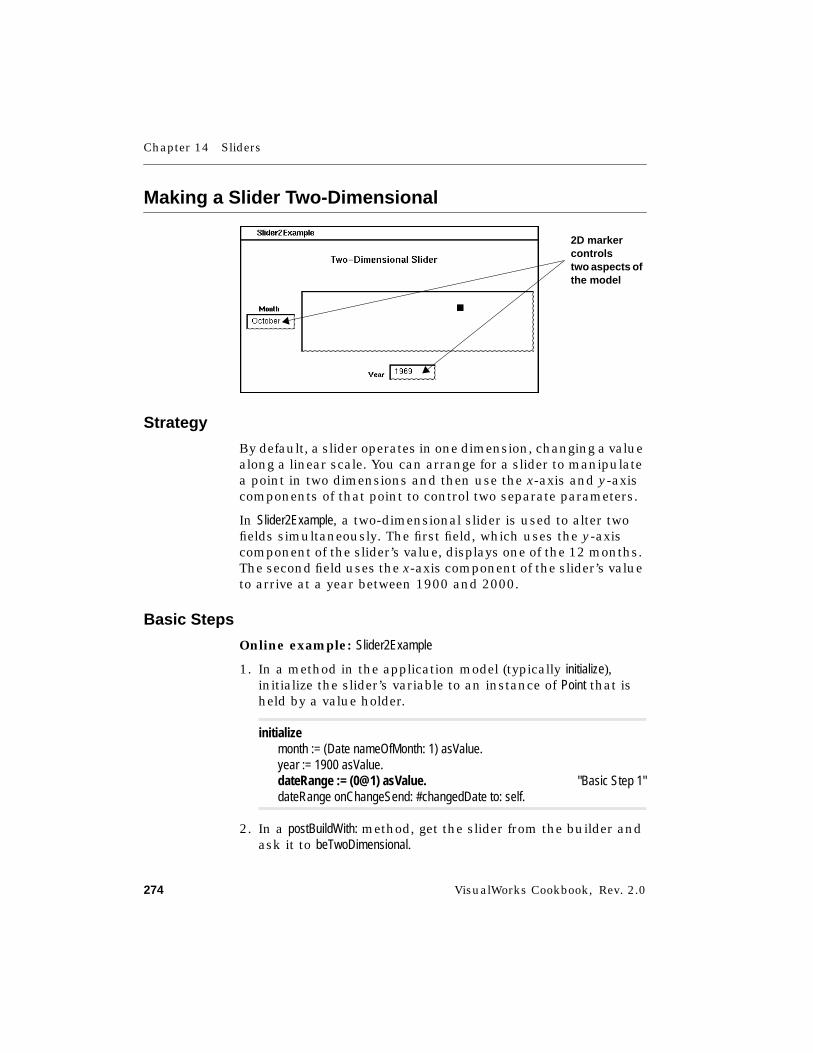
Chapter 14 Sliders
274 VisualWorks Cookbook, Rev. 2.0
Making a Slider Two-Dimensional
Strategy
By default, a slider operates in one dimension, changing a valuealong a linear scale. You can arrange for a slider to manipulatea point in two dimensions and then use the x-axis and y-axiscomponents of that point to control two separate parameters.
In Slider2Example, a two-dimensional slider is used to alter twofields simultaneously. The first field, which uses the y-axiscomponent of the slider’s value, displays one of the 12 months.The second field uses the x-axis component of the slider’s valueto arrive at a year between 1900 and 2000.
Basic Steps
Online example: Slider2Example
1. In a method in the application model (typically initialize),initialize the slider’s variable to an instance of Point that isheld by a value holder.
initializemonth := (Date nameOfMonth: 1) asValue.year := 1900 asValue.dateRange := (0@1) asValue. "Basic Step 1"dateRange onChangeSend: #changedDate to: self.
2. In a postBuildWith: method, get the slider from the builder andask it to beTwoDimensional.
2D markercontrolstwo aspects ofthe model
Making a Slider Two-Dimensional
VisualWorks Cookbook, Rev. 2.0 275
postBuildWith: aBuilder
(aBuilder componentAt: #dateRange) widgetbeTwoDimensional; "Basic Step 2"setMarkerLength: 10.
Variant
Connecting a Two-Dimensional Slider to Two Fields1. In a method in the application model (typically initialize),
arrange for a change message (changedDate) to be sent to theapplication model when the slider’s value changes.
initializemonth :=(Date nameOfMonth: 1) asValue.year := 1900 asValue.
dateRange := (0@1) asValue.dateRange onChangeSend: #changedDate to: self. "Variant Step 1"
2. Use a System Browser to create the change method(changedDate) in the application model. This method splits theslider’s value into its x-axis and y-axis components. Eachcomponent is a value between 0 and 1 and is transformedas needed to produce a suitable value for the related field.
changedDate "Variant Step 2""Convert the y-axis value to a month."| y x |y := self dateRange value y.y := (12 - (y * 12) asInteger) max: 1."12 months"self month value: (Date nameOfMonth: y).
"Convert the x-axis value to a year."x := self dateRange value x.x := 1900 + (x * 100) asInteger. "(100 years)"self year value: x.

Chapter 14 Sliders
276 VisualWorks Cookbook, Rev. 2.0
See Also■ “Creating an Input Field” on page 122
VisualWorks Cookbook, Rev. 2.0 277
Chapter 15
Dialogs
Displaying a Warning 278Asking a Yes/No Question 280Asking a Multiple-Choice Question 282Requesting a Textual Response 284Requesting a Filename 286Choosing from a List of Items 289Linking a Dialog to a Master Window 292Creating a Custom Launcher 294Creating a Custom Dialog 296
See Also■ “Widget Basics” on page 53
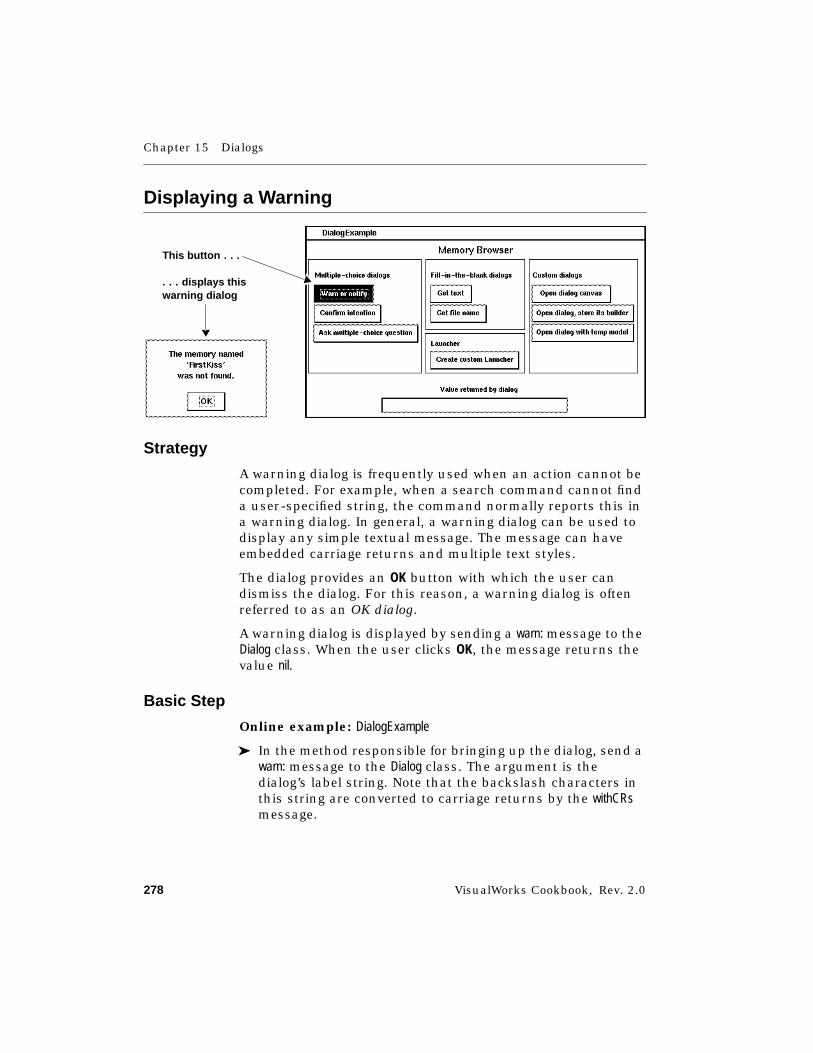
Chapter 15 Dialogs
278 VisualWorks Cookbook, Rev. 2.0
Displaying a Warning
Strategy
A warning dialog is frequently used when an action cannot becompleted. For example, when a search command cannot finda user-specified string, the command normally reports this ina warning dialog. In general, a warning dialog can be used todisplay any simple textual message. The message can haveembedded carriage returns and multiple text styles.
The dialog provides an OK button with which the user candismiss the dialog. For this reason, a warning dialog is oftenreferred to as an OK dialog.
A warning dialog is displayed by sending a warn: message to theDialog class. When the user clicks OK, the message returns thevalue nil.
Basic Step
Online example: DialogExample
➤ In the method responsible for bringing up the dialog, send awarn: message to the Dialog class. The argument is thedialog’s label string. Note that the backslash characters inthis string are converted to carriage returns by the withCRsmessage.
This butto n . . .
. . . displays thiswarning dialog
Displaying a Warning
VisualWorks Cookbook, Rev. 2.0 279
warn| returnVal |returnVal := Dialog
warn: ’The memory named\’’FirstKiss’’\was not found.\’withCRs. "Basic Step"
"Update the text field in the main window."self returnedValue value: returnVal printString.
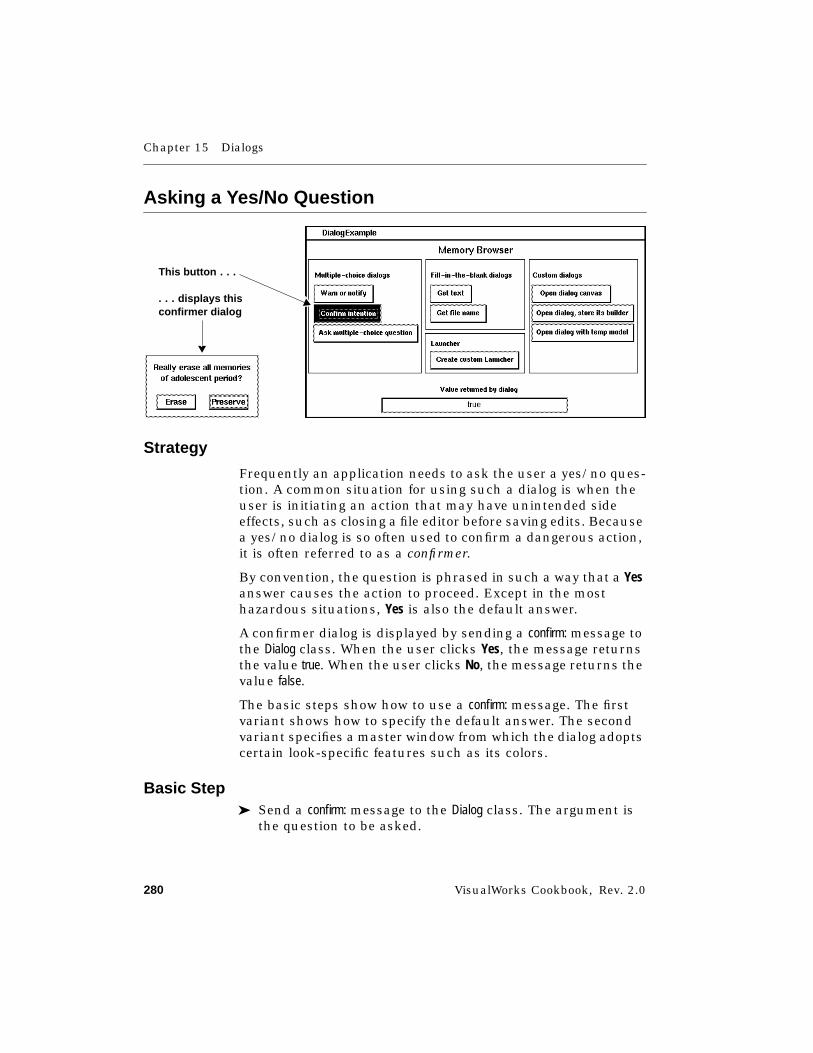
Chapter 15 Dialogs
280 VisualWorks Cookbook, Rev. 2.0
Asking a Yes/No Question
Strategy
Frequently an application needs to ask the user a yes/no ques-tion. A common situation for using such a dialog is when theuser is initiating an action that may have unintended sideeffects, such as closing a file editor before saving edits. Becausea yes/no dialog is so often used to confirm a dangerous action,it is often referred to as a confirmer.
By convention, the question is phrased in such a way that a Yesanswer causes the action to proceed. Except in the mosthazardous situations, Yes is also the default answer.
A confirmer dialog is displayed by sending a confirm: message tothe Dialog class. When the user clicks Yes, the message returnsthe value true. When the user clicks No, the message returns thevalue false.
The basic steps show how to use a confirm: message. The firstvariant shows how to specify the default answer. The secondvariant specifies a master window from which the dialog adoptscertain look-specific features such as its colors.
Basic Step➤ Send a confirm: message to the Dialog class. The argument is
the question to be asked.
This butto n . . .
. . . displays thisconfirmer dialog
Asking a Yes/No Question
VisualWorks Cookbook, Rev. 2.0 281
Dialog confirm: 'Really erase all memories\of adolescent period?\'withCRs. "Basic Step"
Variants
V1. Supplying a Default Answer➤ Send a confirm:initialAnswer: message to Dialog. The second
argument is either true or false.
Dialog "V1 Step"confirm: 'Really erase all memories\of adolescent period?' withCRsinitialAnswer: false
V2. Adopting the Look of a Master Window
Online example: DialogExample
➤ Send a confirm:initialAnswer:for: message to Dialog. The thirdargument is the master window, typically the currentlyactive window.
confirm| returnVal |returnVal := Dialog "V2 Step"
confirm: 'Really erase all memories\of adolescent period?' withCRsinitialAnswer: falsefor: ScheduledControllers activeController view.
"Update the text field in the main window."self returnedValue value: returnVal printString.
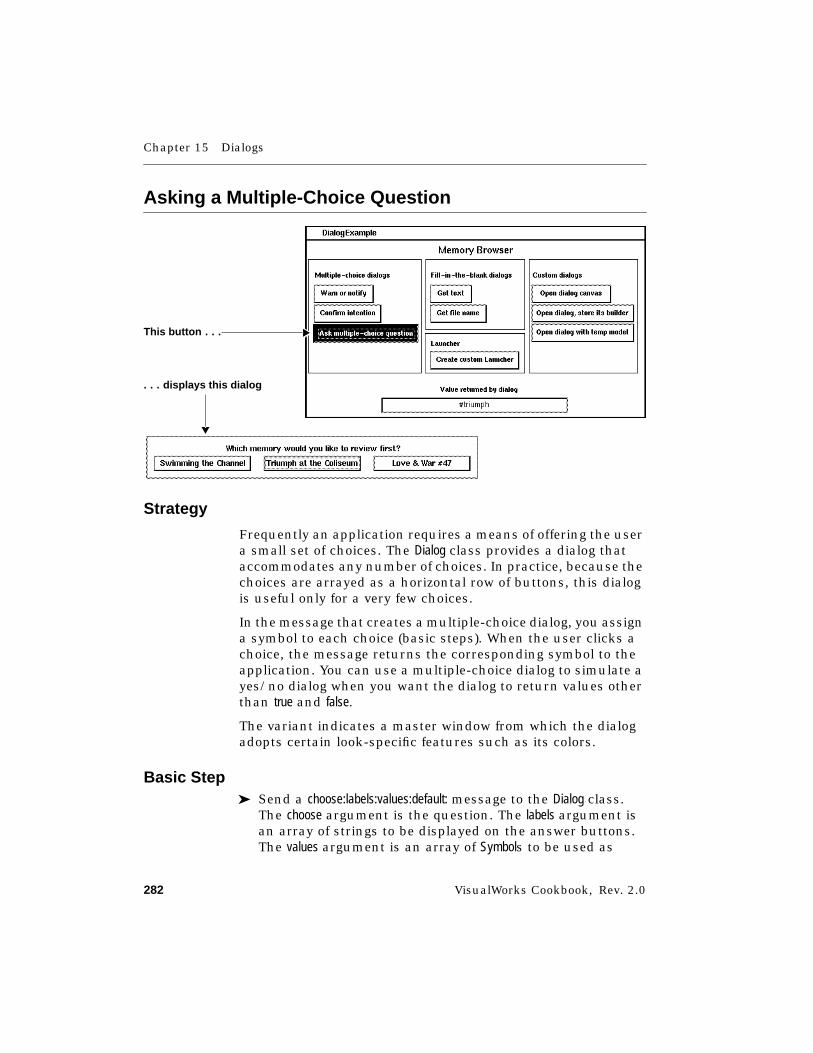
Chapter 15 Dialogs
282 VisualWorks Cookbook, Rev. 2.0
Asking a Multiple-Choice Question
Strategy
Frequently an application requires a means of offering the usera small set of choices. The Dialog class provides a dialog thataccommodates any number of choices. In practice, because thechoices are arrayed as a horizontal row of buttons, this dialogis useful only for a very few choices.
In the message that creates a multiple-choice dialog, you assigna symbol to each choice (basic steps). When the user clicks achoice, the message returns the corresponding symbol to theapplication. You can use a multiple-choice dialog to simulate ayes/no dialog when you want the dialog to return values otherthan true and false.
The variant indicates a master window from which the dialogadopts certain look-specific features such as its colors.
Basic Step➤ Send a choose:labels:values:default: message to the Dialog class.
The choose argument is the question. The labels argument isan array of strings to be displayed on the answer buttons.The values argument is an array of Symbols to be used as
This butto n . . .
. . . displays this dialog
Asking a Multiple-Choice Question
VisualWorks Cookbook, Rev. 2.0 283
return values by the answer buttons. The default argument isthe Symbol that is associated with the desired defaultanswer.
Dialog "Basic Step"choose: 'Which memory would you like to review first?'labels: #( 'Swimming the Channel'
'Triumph at the Coliseum''Love & War #47')
values: #(#swim #triumph #love47)default: #triumph
Variant
Adopting the Look of a Master Window
Online example: DialogExample
➤ Send a choose:labels:values:default:for: message to Dialog. The firstfour arguments are as described above. The for: argument istypically the active window.
askMultiChoice| returnVal |returnVal := Dialog "Variant Step"
choose: 'Which memory would you like to review first?'labels: #( 'Swimming the Channel'
'Triumph at the Coliseum''Love & War #47')
values: #(#swim #triumph #love47)default: #triumphfor: ScheduledControllers activeController view.
self returnedValue value: returnVal printString.
See Also■ “Choosing from a List of Items” on page 289

Chapter 15 Dialogs
284 VisualWorks Cookbook, Rev. 2.0
Requesting a Textual Response
Strategy
A fill-in-the-blank dialog contains an input field and a label. Itis commonly used to prompt for a string, such as a searchstring. By default, an empty string appears in the input field(basic steps). The first variant shows how to supply a differentdefault.
When the user fills in a string and clicks OK, the message thatcreates the dialog returns the user-specified string. When theuser clicks Cancel, an empty string is returned by default. Thesecond variant shows how to arrange for a different value to bereturned for canceling. The block that is used to return acanceling value can also be used to take other action, such asprompting the user for a nonblank response.
Basic Step➤ Send a request: message to the Dialog class, with the question
as the argument.
Dialog request: 'Find all memories associated with...' "Basic Step"
This butto n . . .
. . . displays this dialog
Requesting a Textual Response
VisualWorks Cookbook, Rev. 2.0 285
Variants
V1. Supplying a Default Answer➤ Send a request:initialAnswer: message to Dialog. The second
argument is the default answer string.
Dialogrequest: 'Find all memories associated with...'initialAnswer: 'friend' "V1 Step"
V2. Supplying a Cancel Block
Online example: DialogExample
➤ Send a request:initialAnswer:onCancel: message to Dialog. The thirdargument is a block containing the action to be taken, thevalue to be returned, or both.
getText| returnVal |returnVal := Dialog
request: 'Find all memories associated with...'initialAnswer: 'friend'onCancel: [self defaultRuminationTopic]. "V2 Step"
"Update the text field in the main window."self returnedValue value: returnVal printString.
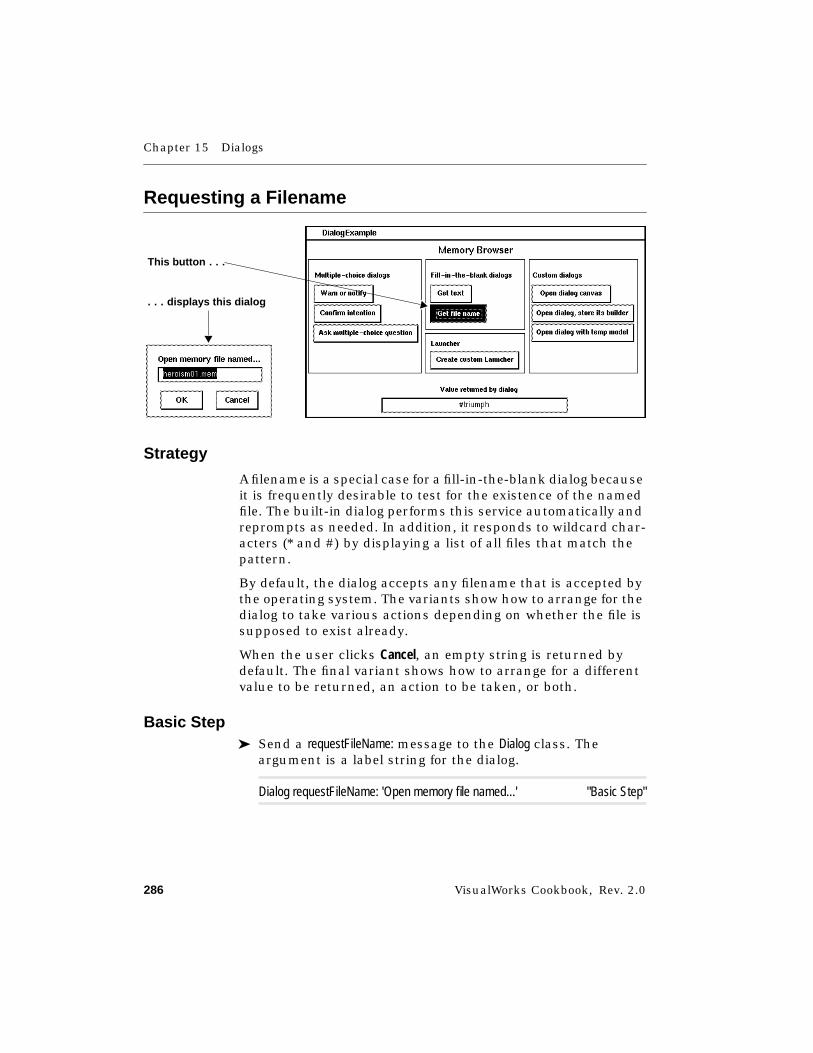
Chapter 15 Dialogs
286 VisualWorks Cookbook, Rev. 2.0
Requesting a Filename
Strategy
A filename is a special case for a fill-in-the-blank dialog becauseit is frequently desirable to test for the existence of the namedfile. The built-in dialog performs this service automatically andreprompts as needed. In addition, it responds to wildcard char-acters (* and #) by displaying a list of all files that match thepattern.
By default, the dialog accepts any filename that is accepted bythe operating system. The variants show how to arrange for thedialog to take various actions depending on whether the file issupposed to exist already.
When the user clicks Cancel, an empty string is returned bydefault. The final variant shows how to arrange for a differentvalue to be returned, an action to be taken, or both.
Basic Step➤ Send a requestFileName: message to the Dialog class. The
argument is a label string for the dialog.
Dialog requestFileName: 'Open memory file named...' "Basic Step"
This butto n . . .
. . . displays this dialog
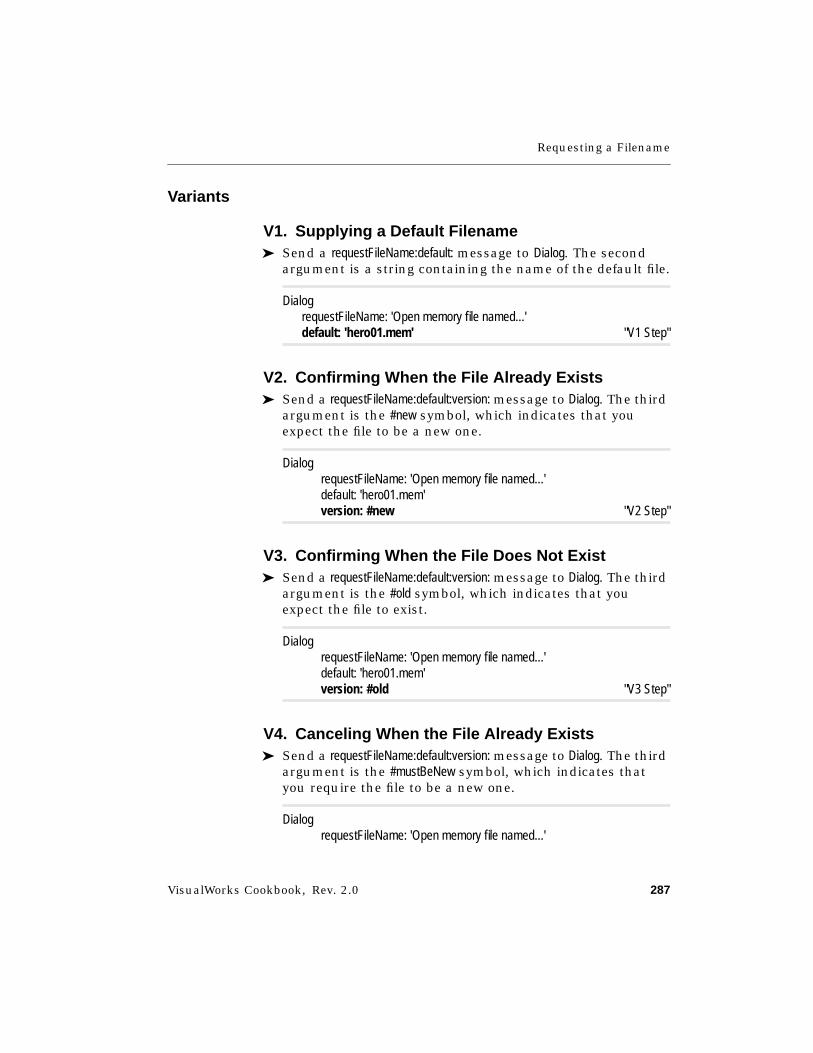
Requesting a Filename
VisualWorks Cookbook, Rev. 2.0 287
Variants
V1. Supplying a Default Filename➤ Send a requestFileName:default: message to Dialog. The second
argument is a string containing the name of the default file.
DialogrequestFileName: 'Open memory file named...'default: 'hero01.mem' "V1 Step"
V2. Confirming When the File Already Exists➤ Send a requestFileName:default:version: message to Dialog. The third
argument is the #new symbol, which indicates that youexpect the file to be a new one.
DialogrequestFileName: 'Open memory file named...'default: 'hero01.mem'version: #new "V2 Step"
V3. Confirming When the File Does Not Exist➤ Send a requestFileName:default:version: message to Dialog. The third
argument is the #old symbol, which indicates that youexpect the file to exist.
DialogrequestFileName: 'Open memory file named...'default: 'hero01.mem'version: #old "V3 Step"
V4. Canceling When the File Already Exists➤ Send a requestFileName:default:version: message to Dialog. The third
argument is the #mustBeNew symbol, which indicates thatyou require the file to be a new one.
DialogrequestFileName: 'Open memory file named...'
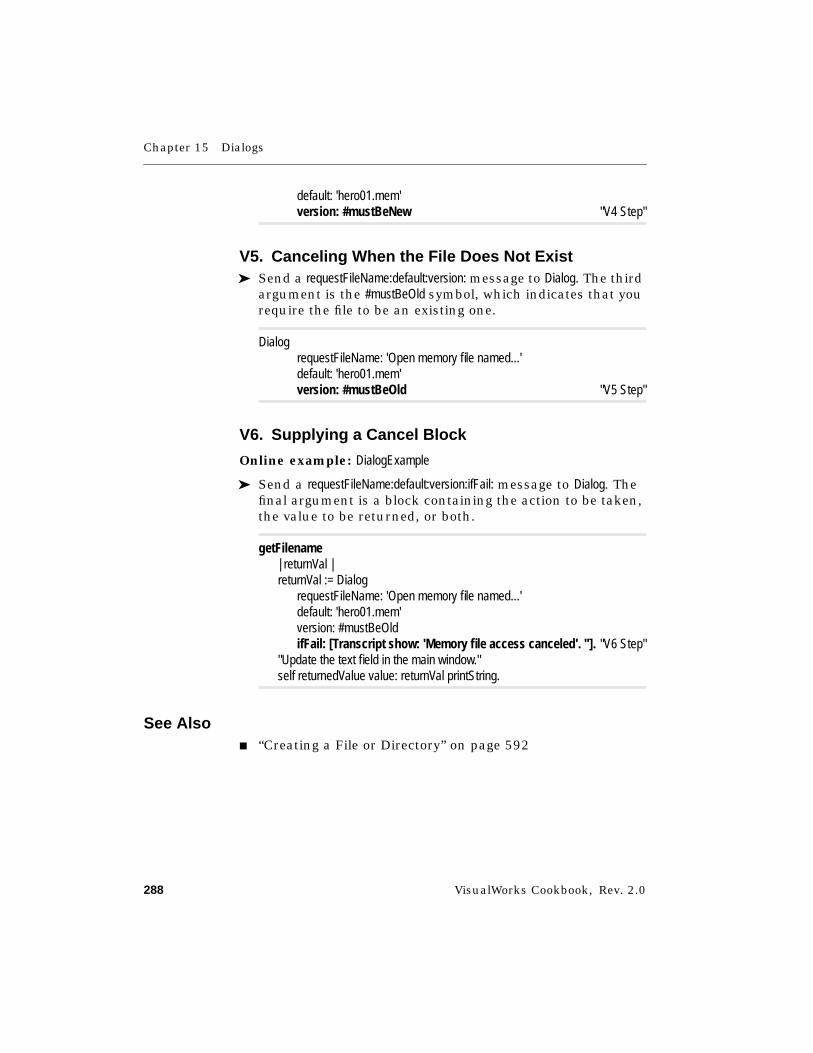
Chapter 15 Dialogs
288 VisualWorks Cookbook, Rev. 2.0
default: 'hero01.mem'version: #mustBeNew "V4 Step"
V5. Canceling When the File Does Not Exist➤ Send a requestFileName:default:version: message to Dialog. The third
argument is the #mustBeOld symbol, which indicates that yourequire the file to be an existing one.
DialogrequestFileName: 'Open memory file named...'default: 'hero01.mem'version: #mustBeOld "V5 Step"
V6. Supplying a Cancel Block
Online example: DialogExample
➤ Send a requestFileName:default:version:ifFail: message to Dialog. Thefinal argument is a block containing the action to be taken,the value to be returned, or both.
getFilename| returnVal |returnVal := Dialog
requestFileName: 'Open memory file named...'default: 'hero01.mem'version: #mustBeOldifFail: [Transcript show: 'Memory file access canceled'. '']. "V6 Step"
"Update the text field in the main window."self returnedValue value: returnVal printString.
See Also■ “Creating a File or Directory” on page 592
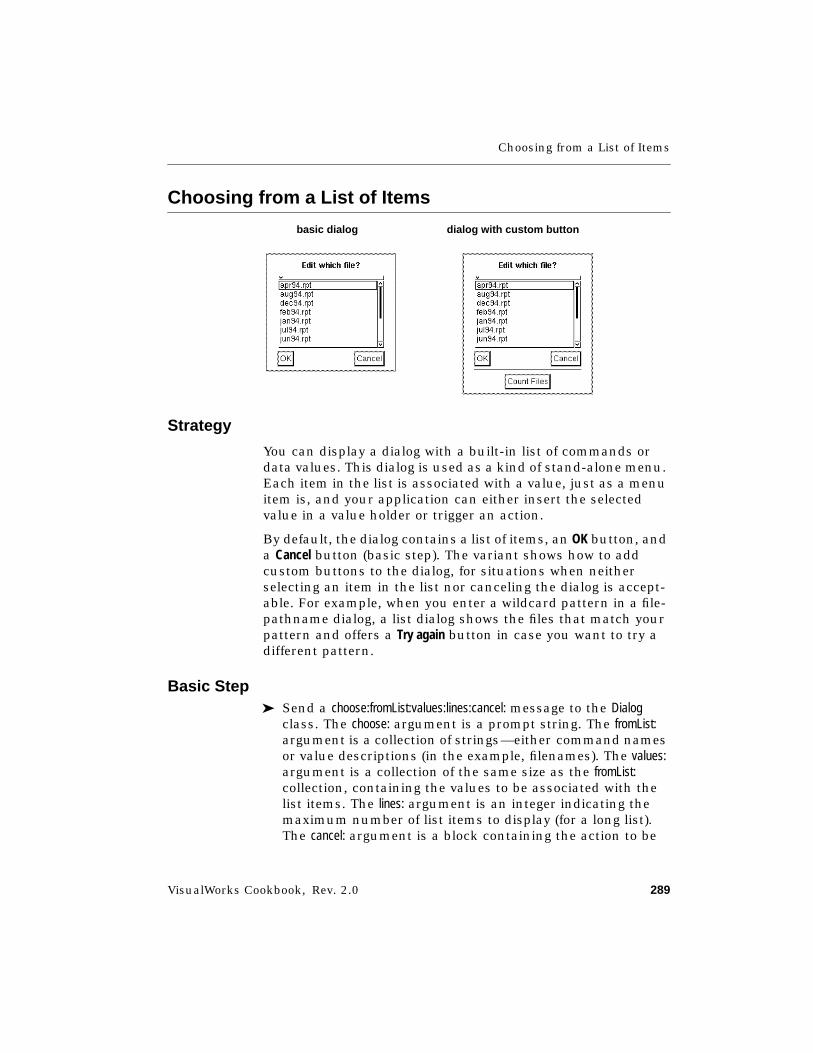
Choosing from a List of Items
VisualWorks Cookbook, Rev. 2.0 289
Choosing from a List of Items
Strategy
You can display a dialog with a built-in list of commands ordata values. This dialog is used as a kind of stand-alone menu.Each item in the list is associated with a value, just as a menuitem is, and your application can either insert the selectedvalue in a value holder or trigger an action.
By default, the dialog contains a list of items, an OK button, anda Cancel button (basic step). The variant shows how to addcustom buttons to the dialog, for situations when neitherselecting an item in the list nor canceling the dialog is accept-able. For example, when you enter a wildcard pattern in a file-pathname dialog, a list dialog shows the files that match yourpattern and offers a Try again button in case you want to try adifferent pattern.
Basic Step➤ Send a choose:fromList:values:lines:cancel: message to the Dialog
class. The choose: argument is a prompt string. The fromList:argument is a collection of strings—either command namesor value descriptions (in the example, filenames). The values:argument is a collection of the same size as the fromList:collection, containing the values to be associated with thelist items. The lines: argument is an integer indicating themaximum number of list items to display (for a long list).The cancel: argument is a block containing the action to be
basic dialog dialog with custom button
Chapter 15 Dialogs
290 VisualWorks Cookbook, Rev. 2.0
taken or the value to be supplied when the Cancel button isselected by the user.
| files response |files := Filename defaultDirectory directoryContents
reject: [ :name | name asFilename isDirectory].
response := Dialog "Basic Step"choose: 'Edit which file?'fromList: filesvalues: fileslines: 8cancel: [^nil].
response asFilename edit.
Variant
Supplying Extra Action Buttons Below the List➤ Send a choose:fromList:values:buttons:values:lines:cancel: message to
the Dialog class. The arguments are the same as in the basicstep, with the addition of buttons: and values:. The buttons:argument is a collection of strings to be used as buttonlabels. The values: argument is a collection of values to beassociated with the button labels.
| files response |files := Filename defaultDirectory directoryContents
reject: [ :name | name asFilename isDirectory].
response := Dialogchoose: 'Edit which file?'fromList: filesvalues: filesbuttons: #('Count Files') "Variant Step"values: #(#count)lines: 12cancel: [^nil].
Choosing from a List of Items
VisualWorks Cookbook, Rev. 2.0 291
response == #countifTrue: [Dialog warn: files size printString]ifFalse: [response asFilename edit]
See Also■ “Asking a Multiple-Choice Question” on page 282

Chapter 15 Dialogs
292 VisualWorks Cookbook, Rev. 2.0
Linking a Dialog to a Master Window
Strategy
By default, the built-in dialogs use system defaults for theircolors and UI Look. When your application employs a specialset of colors or a nondefault UI Look, you can arrange fordialogs to mimic the colors and UI Look of a master window. Inaddition, some window systems create a visual connectionbetween a dialog and its master window.
The basic steps shows how to link a warning dialog to thecurrently active window with a warn:for: message. A masterwindow with a yellow background color is opened. You can adda for: argument to other dialog-creation messages. The masterwindow is typically the main application window, which anapplication model can access through self builder window.
Basic Steps1. Send a useColorOveridesFromParent: message to the SimpleDialog
class. The argument true causes subsequently openeddialogs to adopt the colors of their master window, inaddition to the UI look. By default, instances of SimpleDialogand its subclasses adopt only the UI look of the masterwindow. (Note that ‘Overides’ is misspelled in the methodname and must therefore be misspelled here.)
2. Send a warn:for: message to the Dialog class. The firstargument is the message string, and the second argumentis the master window.
| masterWindow |SimpleDialog useColorOveridesFromParent: true. "Basic Step 1"masterWindow := ScheduledWindow new.masterWindow background: ColorValue yellow.masterWindow open.
Dialog "Basic Step 2"warn: 'This dialog has a yellow background, too.'for: masterWindow.
Linking a Dialog to a Master Window
VisualWorks Cookbook, Rev. 2.0 293
masterWindow sensor eventQuit: nil.
Note that you may want to reset the SimpleDialog class to itsdefault behavior by sending it the useColorOveridesFromParent:message with the argument false.
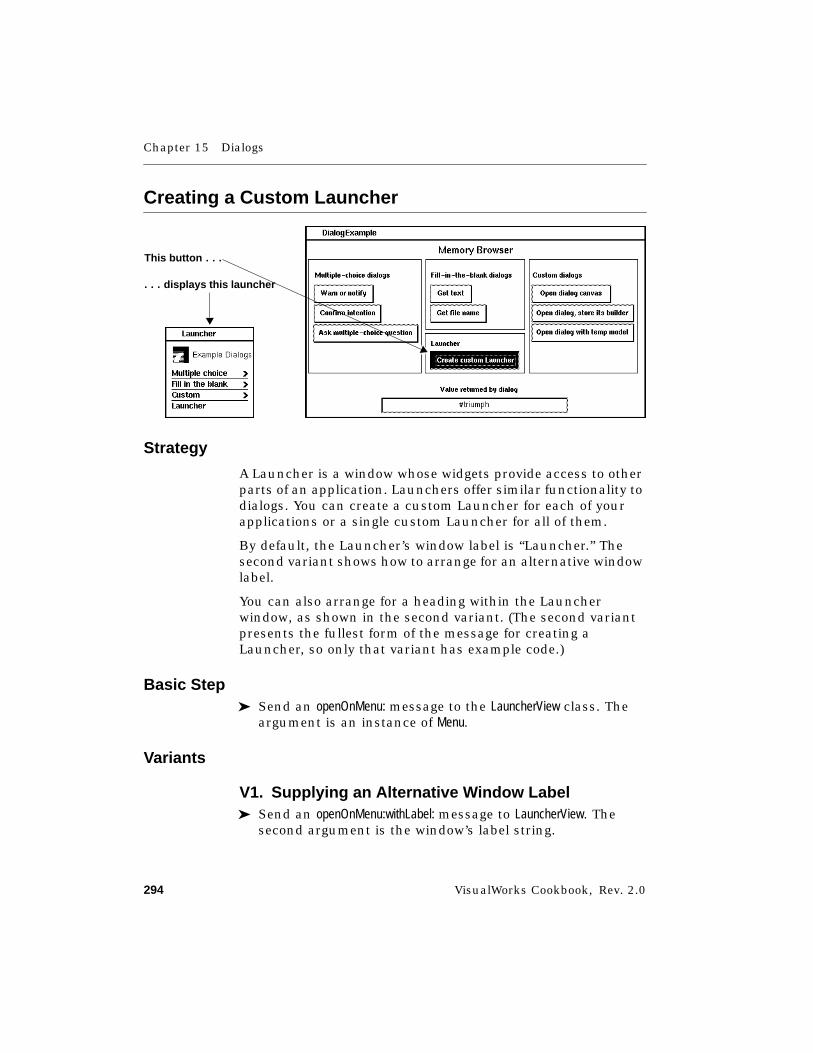
Chapter 15 Dialogs
294 VisualWorks Cookbook, Rev. 2.0
Creating a Custom Launcher
Strategy
A Launcher is a window whose widgets provide access to otherparts of an application. Launchers offer similar functionality todialogs. You can create a custom Launcher for each of yourapplications or a single custom Launcher for all of them.
By default, the Launcher’s window label is “Launcher.” Thesecond variant shows how to arrange for an alternative windowlabel.
You can also arrange for a heading within the Launcherwindow, as shown in the second variant. (The second variantpresents the fullest form of the message for creating aLauncher, so only that variant has example code.)
Basic Step➤ Send an openOnMenu: message to the LauncherView class. The
argument is an instance of Menu.
Variants
V1. Supplying an Alternative Window Label➤ Send an openOnMenu:withLabel: message to LauncherView. The
second argument is the window’s label string.
This butto n . . .
. . . displays this launcher
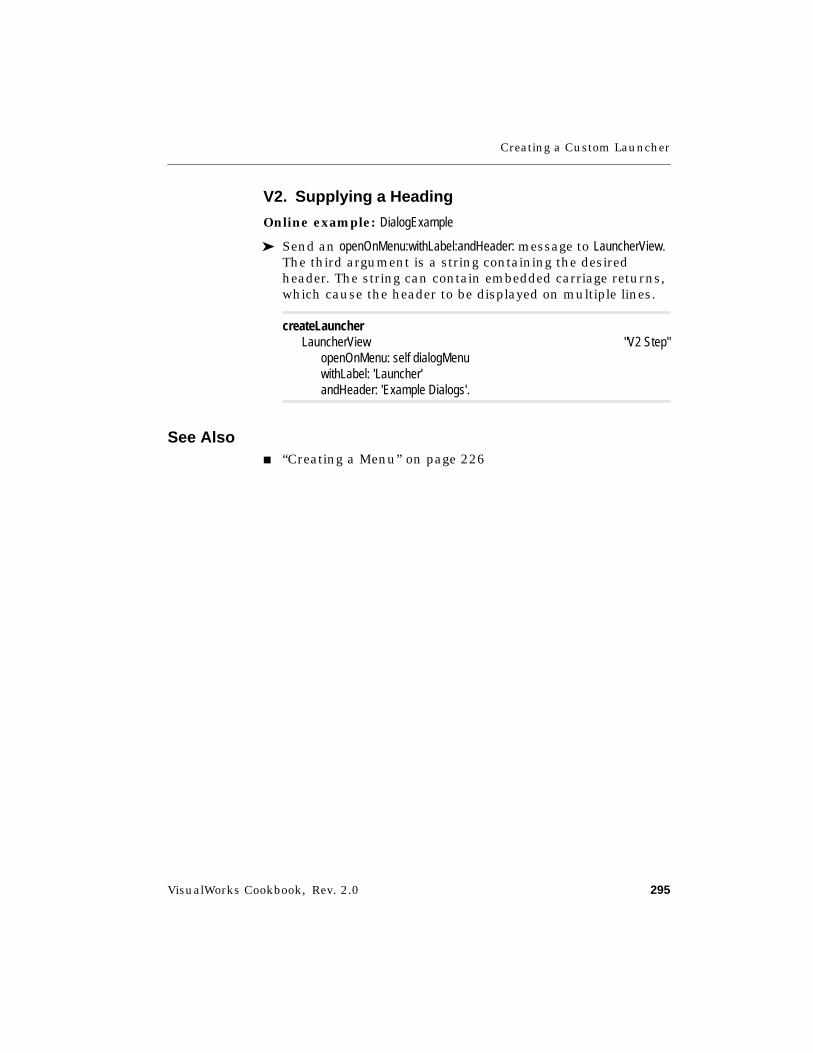
Creating a Custom Launcher
VisualWorks Cookbook, Rev. 2.0 295
V2. Supplying a Heading
Online example: DialogExample
➤ Send an openOnMenu:withLabel:andHeader: message to LauncherView.The third argument is a string containing the desiredheader. The string can contain embedded carriage returns,which cause the header to be displayed on multiple lines.
createLauncherLauncherView "V2 Step"
openOnMenu: self dialogMenuwithLabel: 'Launcher'andHeader: 'Example Dialogs'.
See Also■ “Creating a Menu” on page 226
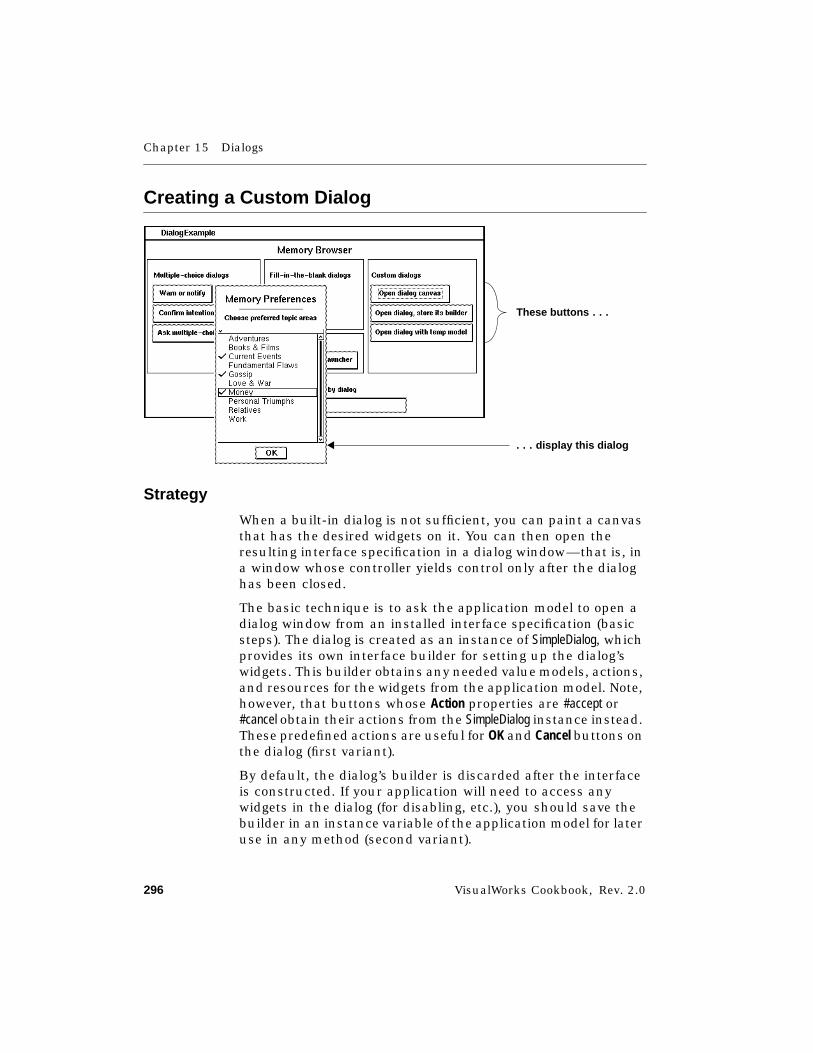
Chapter 15 Dialogs
296 VisualWorks Cookbook, Rev. 2.0
Creating a Custom Dialog
Strategy
When a built-in dialog is not sufficient, you can paint a canvasthat has the desired widgets on it. You can then open theresulting interface specification in a dialog window—that is, ina window whose controller yields control only after the dialoghas been closed.
The basic technique is to ask the application model to open adialog window from an installed interface specification (basicsteps). The dialog is created as an instance of SimpleDialog, whichprovides its own interface builder for setting up the dialog’swidgets. This builder obtains any needed value models, actions,and resources for the widgets from the application model. Note,however, that buttons whose Action properties are #accept or#cancel obtain their actions from the SimpleDialog instance instead.These predefined actions are useful for OK and Cancel buttons onthe dialog (first variant).
By default, the dialog’s builder is discarded after the interfaceis constructed. If your application will need to access anywidgets in the dialog (for disabling, etc.), you should save thebuilder in an instance variable of the application model for lateruse in any method (second variant).
These button s . . .
. . . display this dialog
Creating a Custom Dialog
VisualWorks Cookbook, Rev. 2.0 297
A second technique for creating a custom dialog (not illustratedhere) is to create a separate model for the dialog (typically, asubclass of SimpleDialog). You install the dialog’s canvas in thissubclass and then program the subclass to provide the valuemodels, actions, and resources needed by the dialog’s widgets.A method in the main application model asks the dialog’s modelto open itself and use itself as the source of value models,actions, and resources. This technique enables you to reuse thedialog more easily in further applications.
A third technique for creating a custom dialog is to program theapplication model to create an instance of SimpleDialog andconfigure its interface builder dynamically (third variant). Thishas the effect of creating a temporary model for the dialog,which is useful when the value models for the dialog’s widgetsare not needed beyond the lifetime of the dialog. For example, afile-finding dialog might employ several widgets, each requiringa value model, but only the ultimate filename is of interest tothe application.
Basic Step
Online example: DialogExample
➤ In the method that is to open the dialog, send anopenDialogInterface: message to the application model. Theargument is the symbol that identifies the dialog’s interfacespecification.
openDialogCanvas| returnVal |returnVal := self openDialogInterface: #memoryZonesDialog. "Basic Step""Update the text field in the main window."self returnedValue value: returnVal printString.
Chapter 15 Dialogs
298 VisualWorks Cookbook, Rev. 2.0
Variants
V1. Requesting Actions for OK and Cancel Buttons
Online example: DialogExample
When a custom dialog has OK and Cancel buttons, you canarrange for them to invoke predefined methods that close thedialog and return the appropriate value (true or false).
1. In the canvas for the dialog, select the action button that isto accept the dialog (typically labeled OK).
2. In the Properties Tool, enter accept in the button’s Actionproperty.
3. In the canvas, select the button that is to cancel the dialog(typically labeled Cancel).
4. In the Properties Tool, enter cancel in the button’s Actionproperty.
5. Apply the properties and install the canvas.
These Action settings cause the buttons to send accept and cancelmessages to the SimpleDialog instance. Consequently, if youdefine methods named accept or cancel in the application model,they will be ignored. (Other dialog buttons with other Actionsettings do rely on the application model for their actionmethods, however.)
V2. Storing the Dialog’s Builder for Later Use
Online example: DialogExample
1. In the method that is to open the dialog, create an instanceof SimpleDialog.
2. Get the builder from the SimpleDialog and store it, typically inan instance variable of the application model (dialogBuilder).
3. Send an openFor:interface: message to the SimpleDialog. The firstargument is the application model so that the dialog’swidgets can obtain their value models, actions, andresources from it. The second argument is the name of thedialog’s interface specification.
Creating a Custom Dialog
VisualWorks Cookbook, Rev. 2.0 299
openDialogStoreBuilder| returnVal dialogModel |dialogModel := SimpleDialog new. "V2 Step 1"self dialogBuilder: dialogModel builder. "V2 Step 2"
returnVal := dialogModel "V2 Step 3"openFor: selfinterface: #memoryZonesDialog.
"Update the text field in the main window."self returnedValue value: returnVal printString.
V3. Providing a Temporary Model for the Dialog
Online example: DialogExample
In the example, the properties you set for the dialog’s list widgettell the dialog’s builder that the list widget needs aMultiSelectionInList to supply its value holders. In the other vari-ants, the builder obtains the required MultiSelectionInList bysending the memoryZones aspect message to the applicationmodel. In this variant, the builder does not need to send thismessage, because it has been preconfigured with the requiredMultiSelectionInList through an aspectAt:put: message.
1. In the method that is to open the dialog, create an instanceof SimpleDialog.
2. Get the builder from the SimpleModel and preload it with onebinding for each active widget. The aspectAt: argument is thesymbol you specified in the widget’s Aspect property. The put:argument is an appropriate value model.
3. Ask the SimpleDialog to open the interface.
openTempModelDialog| returnVal dialogModel list |dialogModel := SimpleDialog new. "V3 Step 1"dialogBuilder := dialogModel builder.
"Since the simple model does not respond to a #memoryZones message,its builder must be preloaded with a multilist."list := MultiSelectionInList new
Chapter 15 Dialogs
300 VisualWorks Cookbook, Rev. 2.0
list: self memoryZones list copy.dialogBuilder aspectAt: #memoryZones put: list. "V3 Step 2"
"Open the interface."returnVal := dialogModel
openFor: selfinterface: #memoryZonesDialog. "V3 Step 3"
"Update the text field in the main window."self returnedValue value: returnVal printString.
VisualWorks Cookbook, Rev. 2.0 301
Chapter 16
Subcanvases
Inheriting an Application’s Capabilities 302Nesting One Application in Another 305Reusing an Interface Only 308Swapping Interfaces at Run Time 310Accessing an Embedded Widget 313
See Also■ “Widget Basics” on page 53
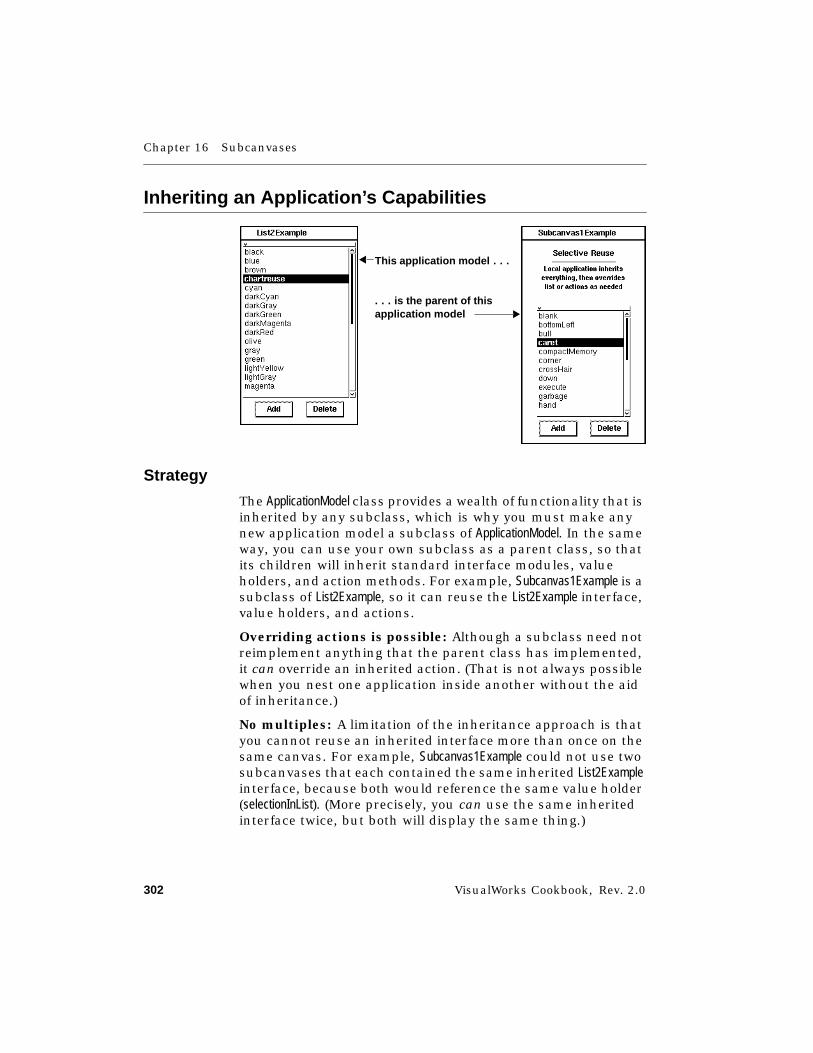
Chapter 16 Subcanvases
302 VisualWorks Cookbook, Rev. 2.0
Inheriting an Application’s Capabilities
Strategy
The ApplicationModel class provides a wealth of functionality that isinherited by any subclass, which is why you must make anynew application model a subclass of ApplicationModel. In the sameway, you can use your own subclass as a parent class, so thatits children will inherit standard interface modules, valueholders, and action methods. For example, Subcanvas1Example is asubclass of List2Example, so it can reuse the List2Example interface,value holders, and actions.
Overriding actions is possible: Although a subclass need notreimplement anything that the parent class has implemented,it can override an inherited action. (That is not always possiblewhen you nest one application inside another without the aidof inheritance.)
No multiples: A limitation of the inheritance approach is thatyou cannot reuse an inherited interface more than once on thesame canvas. For example, Subcanvas1Example could not use twosubcanvases that each contained the same inherited List2Exampleinterface, because both would reference the same value holder(selectionInList). (More precisely, you can use the same inheritedinterface twice, but both will display the same thing.)
This application mode l . . .
. . . is the parent of thisapplication model

Inheriting an Application’s Capabilities
VisualWorks Cookbook, Rev. 2.0 303
Basic Steps
Online example: List2Example (parent) and Subcanvas1Example
1. Use a System Browser to create a new application model(Subcanvas1Example) as a subclass of the application modelfrom which it is to inherit (List2Example).
2. Use a Palette to place a subcanvas widget on the inheritingcanvas (the canvas for Subcanvas1Example). Leave thesubcanvas widget selected.
3. In the subcanvas’s Canvas property, enter the name of theinherited interface specification to be used by thesubcanvas (listSpec). This name must be unique within theinheritance chain—for example, you could not embed aninherited canvas named windowSpec in a local canvas namedwindowSpec.
4. Apply the property and install the inheriting canvas in itsapplication model (Subcanvas1Example).
Variants
V1. Installing a Different Value in an Inherited Widget
The power of reuse is fully realized when you provide localvalues for the inherited widgets. For example, List2Example initial-izes its list to display a collection of color names. Now the inher-iting application, Subcanvas1Example, provides its own collection,causing the reused list to display cursor names instead.
1. Use a System Browser to create an initialize method in theinheriting application model (Subcanvas1Example).
2. In the initialize method, invoke the inherited initialize method.
3. In the initialize method, use the inherited aspect message(selectionInList) to access the desired valued model. Then sendan accessing message (in this case, list:) to the value modelto install the desired value (cursorNames).
initialize"Install a different list (cursor names) thanthe inherited default (color names)."| cursorNames |super initialize. "V1 Step 2"
Chapter 16 Subcanvases
304 VisualWorks Cookbook, Rev. 2.0
cursorNames := Cursor class organizationlistAtCategoryNamed: #constants.
self selectionInList list: cursorNames. "V1 Step 3"
V2. Overriding an Inherited Action Method➤ In the inheriting application model (Subcanvas1Example), create
a method with the same name as the inherited method thatyou want to override (add).
add "V2Step""Override the inherited implementation of this method,refining the prompt in the dialog."
| entry newList |
"Prompt for the name to add."entry := Dialog request: 'Add cursor name'.
"If the entry is blank, exit."entry isEmpty
ifTrue: [^nil].
"Update the list."newList := SortedCollection withAll: self selectionInList list.newList add: entry.self selectionInList list: newList.
See Also■ “Creating a Class (Subclassing)” on page 26
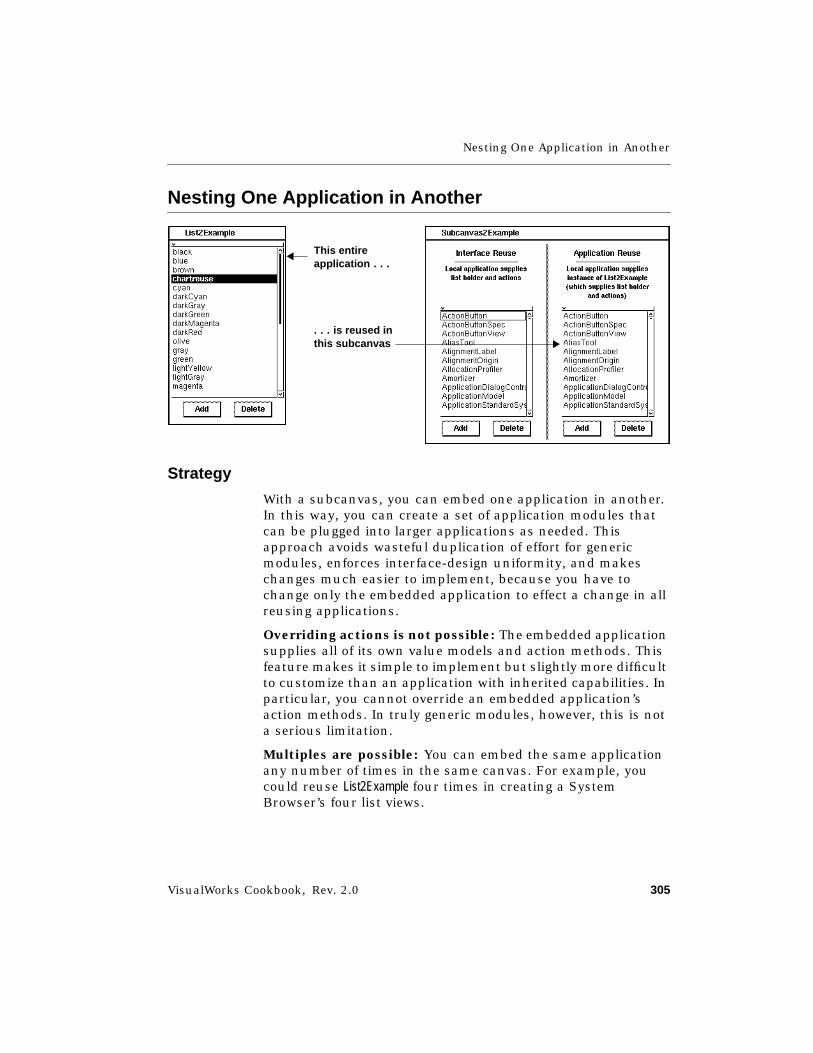
Nesting One Application in Another
VisualWorks Cookbook, Rev. 2.0 305
Nesting One Application in Another
Strategy
With a subcanvas, you can embed one application in another.In this way, you can create a set of application modules thatcan be plugged into larger applications as needed. Thisapproach avoids wasteful duplication of effort for genericmodules, enforces interface-design uniformity, and makeschanges much easier to implement, because you have tochange only the embedded application to effect a change in allreusing applications.
Overriding actions is not possible: The embedded applicationsupplies all of its own value models and action methods. Thisfeature makes it simple to implement but slightly more difficultto customize than an application with inherited capabilities. Inparticular, you cannot override an embedded application’saction methods. In truly generic modules, however, this is nota serious limitation.
Multiples are possible: You can embed the same applicationany number of times in the same canvas. For example, youcould reuse List2Example four times in creating a SystemBrowser’s four list views.
This entireapplicatio n . . .
. . . is reused inthis subcanvas
Chapter 16 Subcanvases
306 VisualWorks Cookbook, Rev. 2.0
Basic Steps
Online example: List2Example embedded in Subcanvas2Example
1. Use a Palette to place a subcanvas in the reusing canvas(the canvas for Subcanvas2Example). Leave the subcanvasselected.
2. In the subcanvas’s Name property, enter the name of themethod (classNames) that will supply an instance of theembedded application.
3. In the subcanvas’s Class property, enter the name of theapplication (List2Example) that you are embedding.
4. In the subcanvas’s Canvas property, enter the name of theinterface specification (listSpec) that you are using from theembedded application (List2Example).
5. Apply the properties and install the reusing canvas in itsapplication model (Subcanvas2Example).
6. Use a System Browser to create an instance variable(classNames) in the reusing application model(Subcanvas2Example), for holding onto the embedded applica-tion.
7. Use a System Browser to create an initialize method in thereusing application model, in which the embedded applica-tion is created and assigned to the variable that you createdin step 6.
initialize"Reusing List2Example's interface only -- initialize the list holder."selectionInList := SelectionInList with: Smalltalk classNames.
"Reusing List2Example application -- initialize the application instance."classNames := List2Example new. "Basic Step 7"classNames list: Smalltalk classNames.
Nesting One Application in Another
VisualWorks Cookbook, Rev. 2.0 307
Variant
Installing a Different Value in an Embedded Widget
An embedded widget uses the value with which its host appli-cation initializes it.
1. In the initialize method of basic step 7, send a message (list:) tothe embedded application, installing the desired value.
initialize"Reusing List2Example's interface only -- initialize the list holder."selectionInList := SelectionInList with: Smalltalk classNames.
"Reusing List2Example application -- initialize the application instance."classNames := List2Example new.classNames list: Smalltalk classNames. "Variant Step 1"
2. In some situations, as in the example, you will have tocreate a method (list:) in the embedded application modelthat enables an outside application to supply a new value.
list: aCollection "Variant Step 2""Install aCollection in the list. This message is provided so reuserscan install a list that is different than the default list (color names)."
self selectionInList list: aCollection.
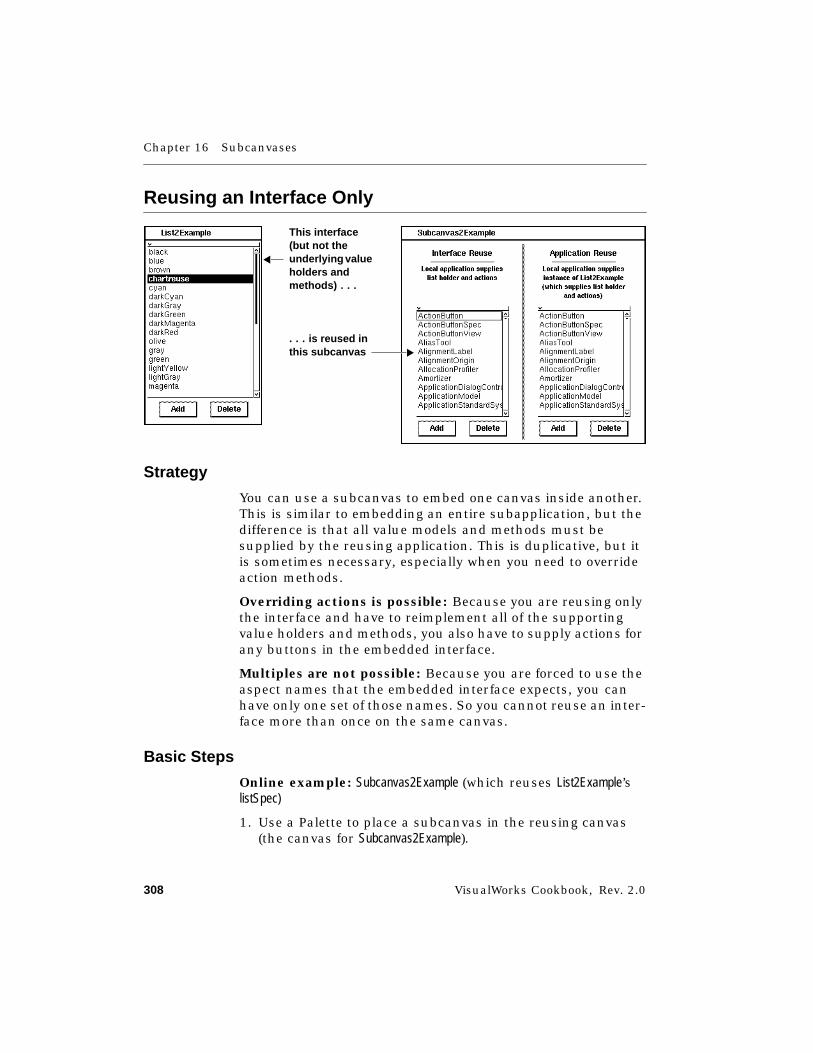
Chapter 16 Subcanvases
308 VisualWorks Cookbook, Rev. 2.0
Reusing an Interface Only
Strategy
You can use a subcanvas to embed one canvas inside another.This is similar to embedding an entire subapplication, but thedifference is that all value models and methods must besupplied by the reusing application. This is duplicative, but itis sometimes necessary, especially when you need to overrideaction methods.
Overriding actions is possible: Because you are reusing onlythe interface and have to reimplement all of the supportingvalue holders and methods, you also have to supply actions forany buttons in the embedded interface.
Multiples are not possible: Because you are forced to use theaspect names that the embedded interface expects, you canhave only one set of those names. So you cannot reuse an inter-face more than once on the same canvas.
Basic Steps
Online example: Subcanvas2Example (which reuses List2Example’slistSpec)
1. Use a Palette to place a subcanvas in the reusing canvas(the canvas for Subcanvas2Example).
This interface(but not theunderlying valueholders andmethods) . . .
. . . is reused inthis subcanvas
Reusing an Interface Only
VisualWorks Cookbook, Rev. 2.0 309
2. In the subcanvas’s Class property, enter the name of theapplication (List2Example) that defines the interface to beembedded.
3. In the subcanvas’s Canvas property, enter the name of theinterface specification (listSpec) to be embedded.
4. Apply the properties and install the reusing canvas in itsapplication model (Subcanvas2Example).
5. Use a System Browser to edit the reusing application model(Subcanvas2Example), creating instance variables (selectionInList)and methods (selectionInList, initialize, add, and delete) to supportthe embedded interface. These instance variables andmethods must have the same names as the correspondingones in the reused class (List2Example). Modify values andaction methods as desired.
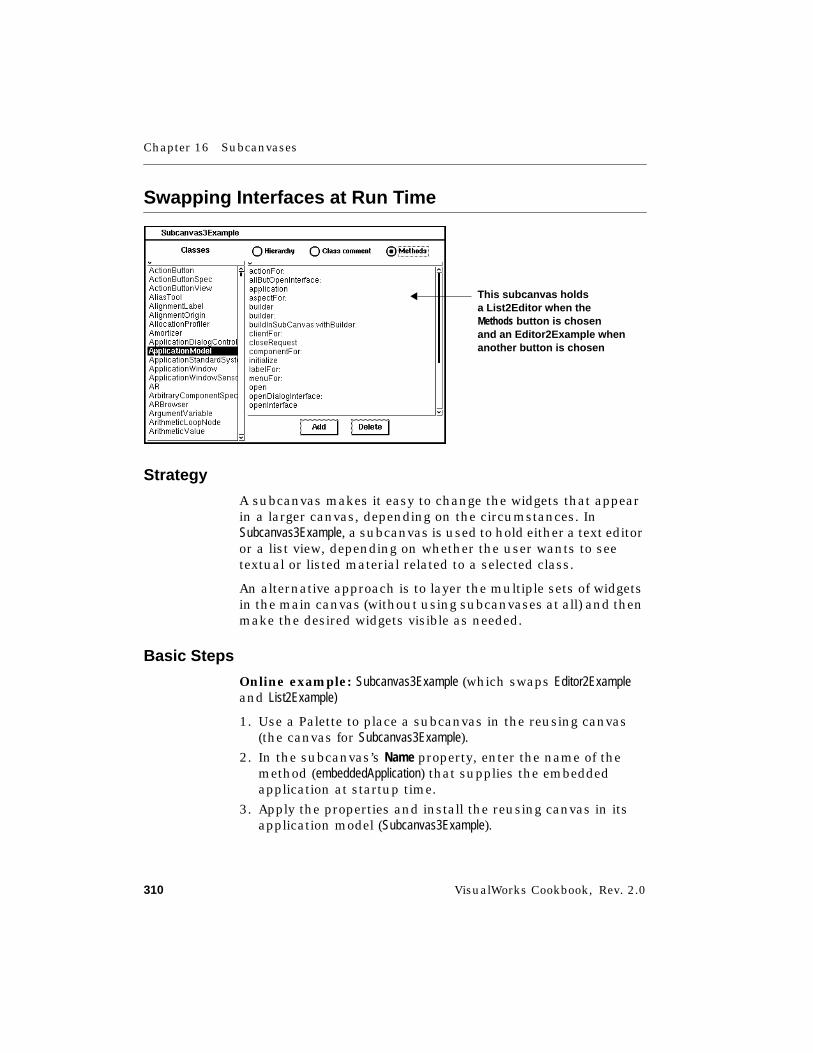
Chapter 16 Subcanvases
310 VisualWorks Cookbook, Rev. 2.0
Swapping Interfaces at Run Time
Strategy
A subcanvas makes it easy to change the widgets that appearin a larger canvas, depending on the circumstances. InSubcanvas3Example, a subcanvas is used to hold either a text editoror a list view, depending on whether the user wants to seetextual or listed material related to a selected class.
An alternative approach is to layer the multiple sets of widgetsin the main canvas (without using subcanvases at all) and thenmake the desired widgets visible as needed.
Basic Steps
Online example: Subcanvas3Example (which swaps Editor2Exampleand List2Example)
1. Use a Palette to place a subcanvas in the reusing canvas(the canvas for Subcanvas3Example).
2. In the subcanvas’s Name property, enter the name of themethod (embeddedApplication) that supplies the embeddedapplication at startup time.
3. Apply the properties and install the reusing canvas in itsapplication model (Subcanvas3Example).
This subcanvas holdsa List2Editor when theMethods button is chosenand an Editor2Example whenanother button is chosen
Swapping Interfaces at Run Time
VisualWorks Cookbook, Rev. 2.0 311
4. Use a System Browser to create the method(embeddedApplication) that you named in step 2. You create thismethod in the reusing application model (Subcanvas3Example).This method can supply either a nil value (for a blanksubcanvas) or one of the subapplications.
embeddedApplication "Basic Step 4"^nil asValue
5. In a change message (presumably triggered by a change insome other widget such as a button), create an instance ofthe desired application model (Editor2Example) and initialize it.(Or you can create and initialize the application model onceat startup and store it in an instance variable.)
6. Continuing in the change message, get the spec object forthe interface you want to use by sending an interfaceSpecFor:message to the embedded application model’s class(Editor2Example). The argument is the name of the interfacespecification (#windowSpec).
7. Continuing in the change message, get the subcanvas fromthe builder and send a client:spec: message to it. The firstargument is the application you created in step 5. Thesecond argument is the spec object you obtained in step 6.
showComment| selectedClass subcanvas spec application |selectedClass := Smalltalk at: self classNames selection.
"Create the subapplication and initialize it." "Basic Step 5"application := Editor2Example new.application text value: selectedClass comment.
"Get the spec object for the embedded canvas."spec := Editor2Example interfaceSpecFor: #windowSpec. "Basic Step 6"
"Get the subcanvas and install the editing application." "Basic Step 7"subcanvas := (self builder componentAt: #subcanvas) widget.subcanvas client: application spec: spec.
Chapter 16 Subcanvases
312 VisualWorks Cookbook, Rev. 2.0
Variants
Blanking the Subcanvas
In Subcanvas3Example, the subcanvas goes blank when no class isselected. You may encounter a similar situation that requiresyou to empty a subcanvas at run time.
➤ Get the subcanvas from the builder and send a client:message to it. The argument is nil.
showNothing| subcanvas |subcanvas := (self builder componentAt: #subcanvas) widget. "Variant Step"subcanvas client: nil.
See Also■ “Hiding a Widget” on page 70
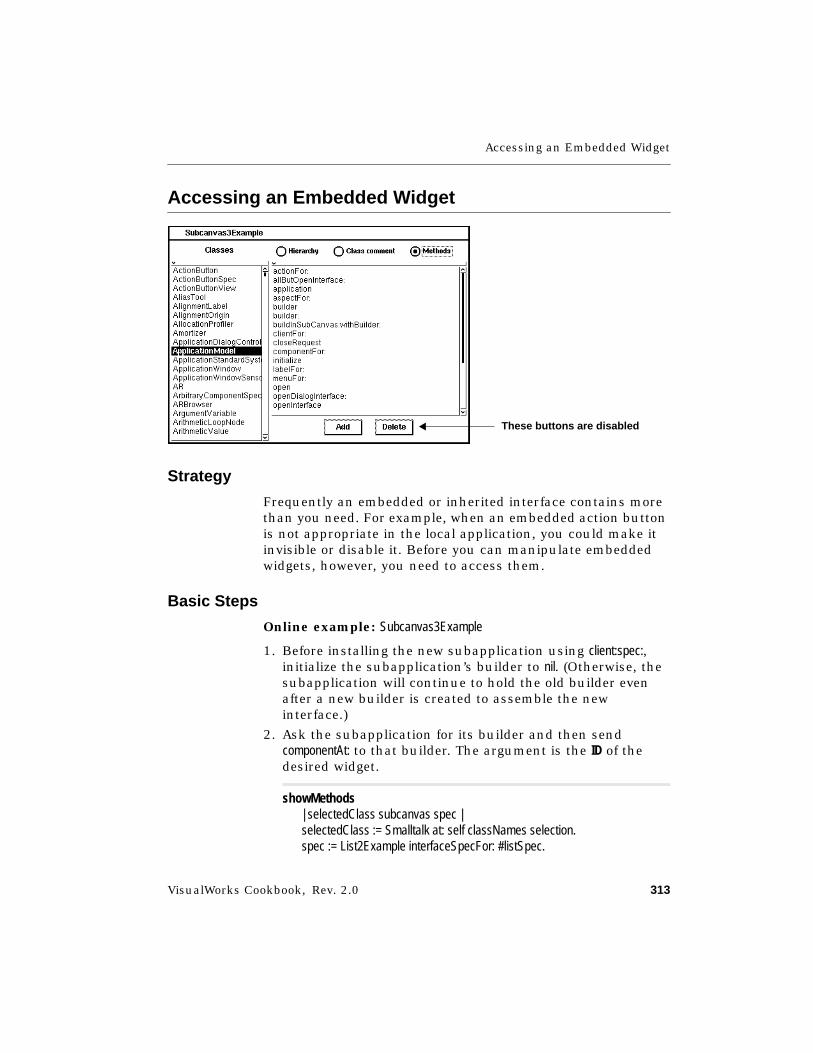
Accessing an Embedded Widget
VisualWorks Cookbook, Rev. 2.0 313
Accessing an Embedded Widget
Strategy
Frequently an embedded or inherited interface contains morethan you need. For example, when an embedded action buttonis not appropriate in the local application, you could make itinvisible or disable it. Before you can manipulate embeddedwidgets, however, you need to access them.
Basic Steps
Online example: Subcanvas3Example
1. Before installing the new subapplication using client:spec:,initialize the subapplication’s builder to nil. (Otherwise, thesubapplication will continue to hold the old builder evenafter a new builder is created to assemble the newinterface.)
2. Ask the subapplication for its builder and then sendcomponentAt: to that builder. The argument is the ID of thedesired widget.
showMethods| selectedClass subcanvas spec |selectedClass := Smalltalk at: self classNames selection.spec := List2Example interfaceSpecFor: #listSpec.
These buttons are disabled
Chapter 16 Subcanvases
314 VisualWorks Cookbook, Rev. 2.0
"Install the method names as the collection in the list application."self listApplication list: selectedClass selectors asSortedCollection.
"Set the subbuilder to nil to discard the old builder. This is onlynecessary when the application uses the builder later to access widgets."listApplication builder: nil. "Basic Step 1"
"Get the subcanvas and install the list application."subcanvas := (self builder componentAt: #subcanvas) widget.subcanvas client: listApplication spec: spec.
"Disable the embedded buttons (just to show that we can)."(listApplication builder componentAt: #addButton) disable.
"Basic Step 2"(listApplication builder componentAt: #deleteButton) disable.
VisualWorks Cookbook, Rev. 2.0 315
Chapter 17
Notebooks
Adding a Notebook 316Determining Which Tab Is Selected 319Changing the Binding’s Appearance 322Changing the Size and Axis of the Tabs 324Setting the Starting Page 326Adding Secondary Tabs (Minor Keys) 328Connecting Minor Tabs to Major Tabs 331Changing the Page Layout (Subcanvas) 334Connecting a Notebook to a Text Editor 336
See Also■ “Widget Basics” on page 53
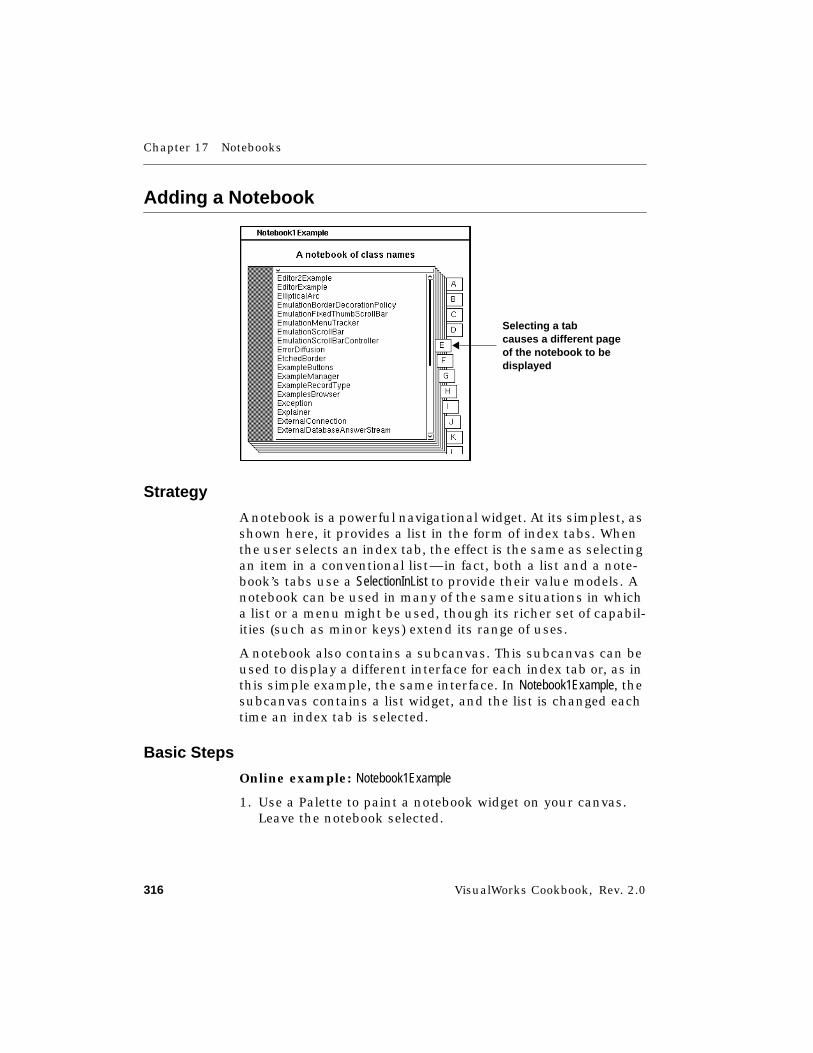
Chapter 17 Notebooks
316 VisualWorks Cookbook, Rev. 2.0
Adding a Notebook
Strategy
A notebook is a powerful navigational widget. At its simplest, asshown here, it provides a list in the form of index tabs. Whenthe user selects an index tab, the effect is the same as selectingan item in a conventional list—in fact, both a list and a note-book’s tabs use a SelectionInList to provide their value models. Anotebook can be used in many of the same situations in whicha list or a menu might be used, though its richer set of capabil-ities (such as minor keys) extend its range of uses.
A notebook also contains a subcanvas. This subcanvas can beused to display a different interface for each index tab or, as inthis simple example, the same interface. In Notebook1Example, thesubcanvas contains a list widget, and the list is changed eachtime an index tab is selected.
Basic Steps
Online example: Notebook1Example
1. Use a Palette to paint a notebook widget on your canvas.Leave the notebook selected.
Selecting a tabcauses a different pageof the notebook to bedisplayed
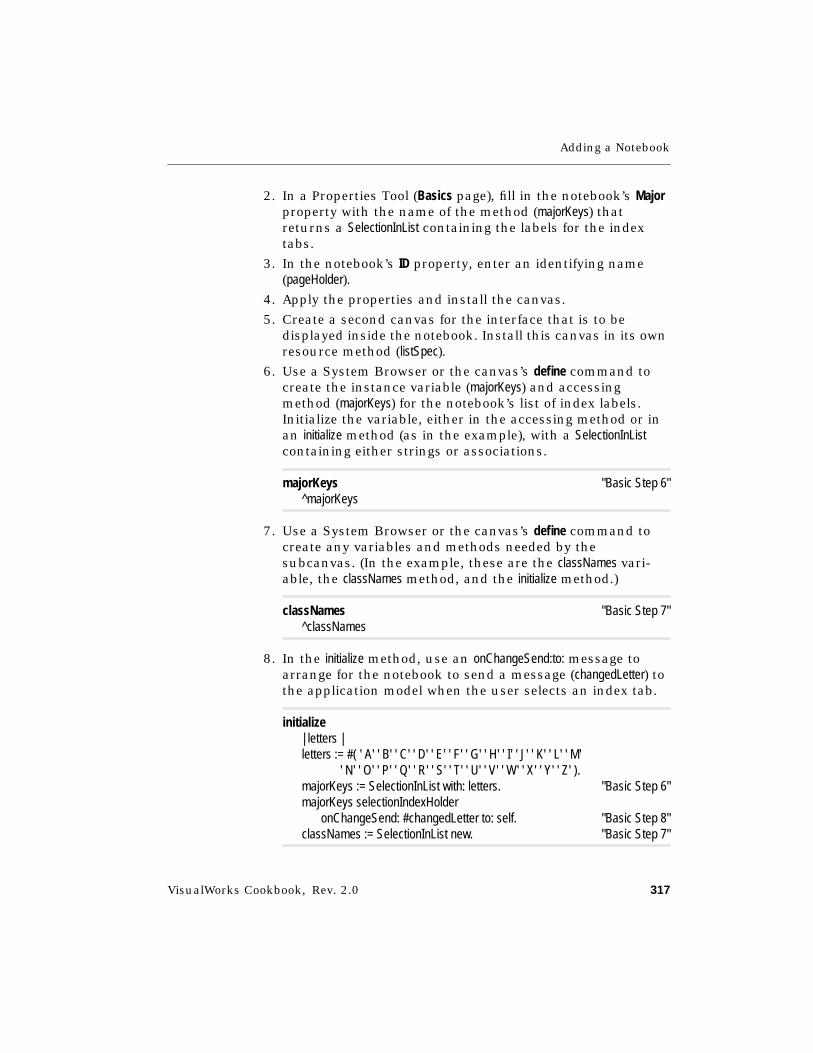
Adding a Notebook
VisualWorks Cookbook, Rev. 2.0 317
2. In a Properties Tool (Basics page), fill in the notebook’s Majorproperty with the name of the method (majorKeys) thatreturns a SelectionInList containing the labels for the indextabs.
3. In the notebook’s ID property, enter an identifying name(pageHolder).
4. Apply the properties and install the canvas.
5. Create a second canvas for the interface that is to bedisplayed inside the notebook. Install this canvas in its ownresource method (listSpec).
6. Use a System Browser or the canvas’s define command tocreate the instance variable (majorKeys) and accessingmethod (majorKeys) for the notebook’s list of index labels.Initialize the variable, either in the accessing method or inan initialize method (as in the example), with a SelectionInListcontaining either strings or associations.
majorKeys "Basic Step 6"^majorKeys
7. Use a System Browser or the canvas’s define command tocreate any variables and methods needed by thesubcanvas. (In the example, these are the classNames vari-able, the classNames method, and the initialize method.)
classNames "Basic Step 7"^classNames
8. In the initialize method, use an onChangeSend:to: message toarrange for the notebook to send a message (changedLetter) tothe application model when the user selects an index tab.
initialize| letters |letters := #( ' A' ' B' ' C' ' D' ' E' ' F' ' G' ' H' ' I' ' J' ' K' ' L' ' M'
' N' ' O' ' P' ' Q' ' R' ' S' ' T' ' U' ' V' ' W' ' X' ' Y' ' Z' ).majorKeys := SelectionInList with: letters. "Basic Step 6"majorKeys selectionIndexHolder
onChangeSend: #changedLetter to: self. "Basic Step 8"classNames := SelectionInList new. "Basic Step 7"
Chapter 17 Notebooks
318 VisualWorks Cookbook, Rev. 2.0
9. Create the change message (changedLetter) in which thesubcanvas is updated based on the index tab that has beenselected. (In the example, the classNames list is updated withclasses beginning with the letter on the index tab.)
changedLetter "Basic Step 9"| chosenLetter list |chosenLetter := self majorKeys selection last.list := Smalltalk classNames select: [ :name | name first == chosenLetter].self classNames list: list.
10. Create a postOpenWith: method. In this method, first get thenotebook from the application model’s builder, using thenotebook’s ID (pageHolder). Then install the subcanvas bysending a client:spec: message to the notebook. The firstargument is the subapplication’s application model (in theexample, self). The second argument is the name of the specmethod (listSpec) that defines the desired canvas.
postOpenWith: aBuilder "Basic Step 10"(aBuilder componentAt: #pageHolder) widget
client: selfspec: #listSpec.
majorKeys selectionIndex: 1.
See Also■ “Adding a List” on page 184
■ “Creating a Collection” on page 491
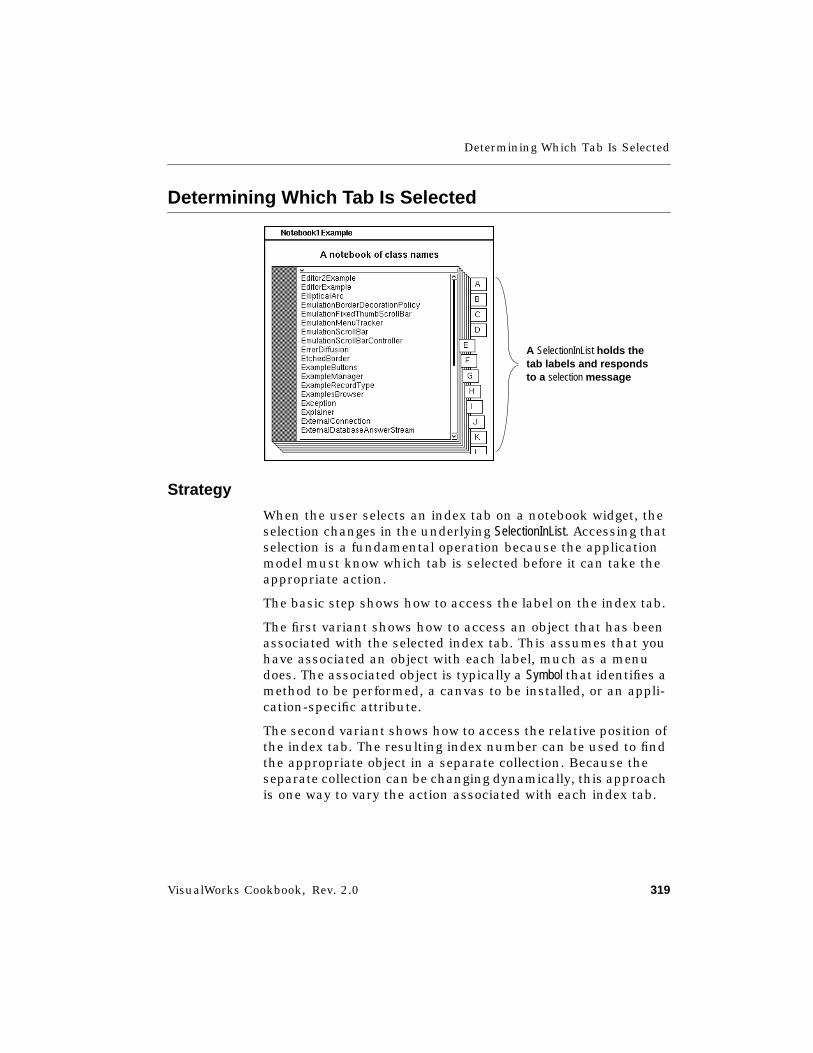
Determining Which Tab Is Selected
VisualWorks Cookbook, Rev. 2.0 319
Determining Which Tab Is Selected
Strategy
When the user selects an index tab on a notebook widget, theselection changes in the underlying SelectionInList. Accessing thatselection is a fundamental operation because the applicationmodel must know which tab is selected before it can take theappropriate action.
The basic step shows how to access the label on the index tab.
The first variant shows how to access an object that has beenassociated with the selected index tab. This assumes that youhave associated an object with each label, much as a menudoes. The associated object is typically a Symbol that identifies amethod to be performed, a canvas to be installed, or an appli-cation-specific attribute.
The second variant shows how to access the relative position ofthe index tab. The resulting index number can be used to findthe appropriate object in a separate collection. Because theseparate collection can be changing dynamically, this approachis one way to vary the action associated with each index tab.
A SelectionInList holds thetab labels and respondsto a selection message
Chapter 17 Notebooks
320 VisualWorks Cookbook, Rev. 2.0
Basic Step
Online example: Notebook1Example
➤ In a method in the application model, get the selected indextab’s string or association by sending a selection message tothe notebook’s major SelectionInList. (In the example, theresulting string contains a leading space, so a last messageis sent to get the index letter that follows the space).
changedLetter| chosenLetter list |chosenLetter := self majorKeys selection last. "Basic Step"list := Smalltalk classNames
select: [ :name | name first == chosenLetter].self classNames list: list.
Variants
V1. Getting a Value Associated with an Index Tab
Online example: Notebook2Example
1. In a method in the application model, get the selected tab’sassociation by sending a selection message to the SelectionInList(in the example, minorKeys, to which the initialize methodassigned a SelectionInList with a collection of associations.)
2. Send a value message to the resulting association. (In theexample, the value is a Symbol—#all or #examples—which isused to filter the list of class names.)
changedPage| chosenLetter list filter filteredList |chosenLetter := self majorKeys selection last.filter := self minorKeys selection value. "V1 Step 2"
list := Smalltalk classNamesselect: [ :name | name first == chosenLetter].
filter == #allifTrue: [filteredList := list]ifFalse: [filteredList := list
Determining Which Tab Is Selected
VisualWorks Cookbook, Rev. 2.0 321
select: [ :name | '*Example' match: name]].
self classNames list: filteredList.
V2. Getting the Index Number of the Tab➤ Send selectionIndex to the SelectionInList (instead of a selection
message).
Chapter 17 Notebooks
322 VisualWorks Cookbook, Rev. 2.0
Changing the Binding’s Appearance
Strategy
A solid color strip at the left or top edge of a notebook is usedto simulate the appearance of a book binding. By default, thebinding is along the left edge—the first variant shows how tomove it to the top edge.
By default, the binding strip is 18 pixels wide. The variantshows how to change the width of the binding. A width of zerocan be used to eliminate the binding strip altogether.
Basic Step
Changing the Location
Online example: Notebook3Example
1. Select the notebook in the canvas.
2. In Properties Tool, go to the notebook’s Binding property andselect top. This moves the binding to the top edge. (To moveit back, select left.)
3. Apply properties and install the canvas.
A color strip simulatesa book binding
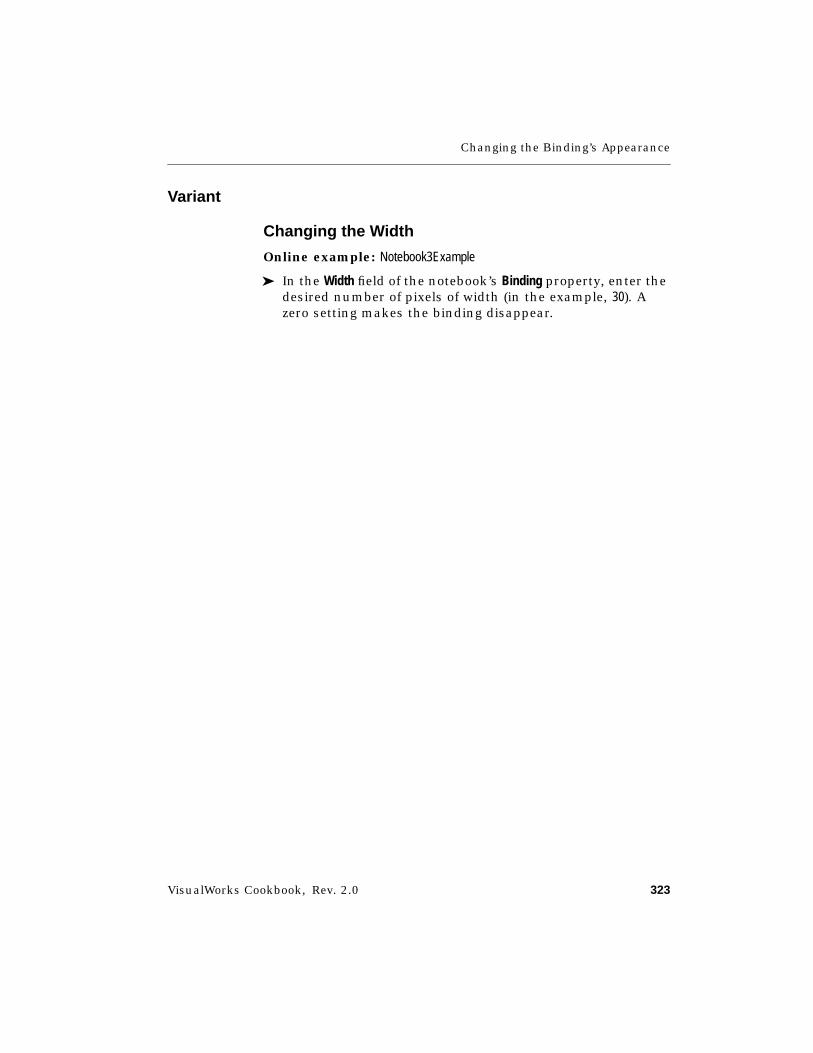
Changing the Binding’s Appearance
VisualWorks Cookbook, Rev. 2.0 323
Variant
Changing the Width
Online example: Notebook3Example
➤ In the Width field of the notebook’s Binding property, enter thedesired number of pixels of width (in the example, 30). Azero setting makes the binding disappear.
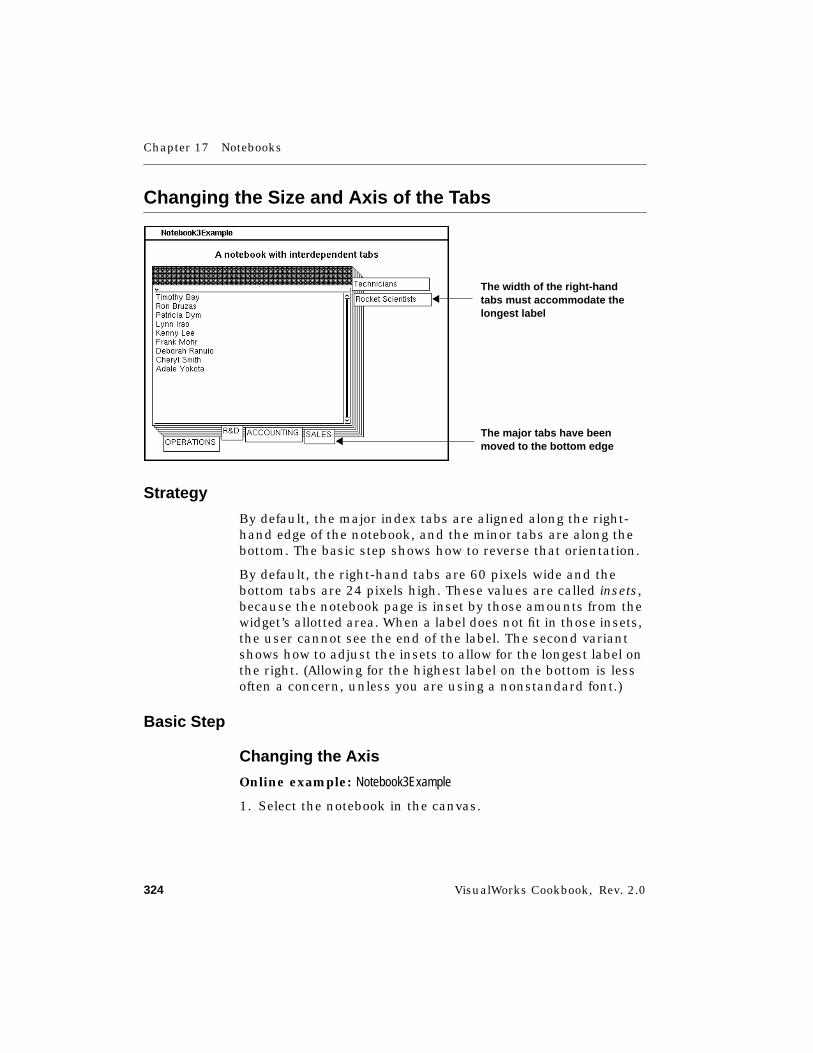
Chapter 17 Notebooks
324 VisualWorks Cookbook, Rev. 2.0
Changing the Size and Axis of the Tabs
Strategy
By default, the major index tabs are aligned along the right-hand edge of the notebook, and the minor tabs are along thebottom. The basic step shows how to reverse that orientation.
By default, the right-hand tabs are 60 pixels wide and thebottom tabs are 24 pixels high. These values are called insets,because the notebook page is inset by those amounts from thewidget’s allotted area. When a label does not fit in those insets,the user cannot see the end of the label. The second variantshows how to adjust the insets to allow for the longest label onthe right. (Allowing for the highest label on the bottom is lessoften a concern, unless you are using a nonstandard font.)
Basic Step
Changing the Axis
Online example: Notebook3Example
1. Select the notebook in the canvas.
The width of the right-handtabs must accommodate thelongest label
The major tabs have beenmoved to the bottom edge

Changing the Size and Axis of the Tabs
VisualWorks Cookbook, Rev. 2.0 325
2. In the Properties Tool, go to the notebook’s Major Tabsproperty and select bottom. (The minor tabs, if any, will moveto the right-hand edge.)
3. Apply the property and install the canvas.
Variant
Setting the Size
Online example: Notebook3Example
1. In Right field of the notebook’s Insets property, enter thenumber of pixels of width for the right-hand index tabs.(The height adjusts automatically to fit the label font).
2. In Bottom field of the notebook’s Insets property, enter thenumber of pixels of height for the bottom tabs. (The widthadjusts to fit each tab’s label.)
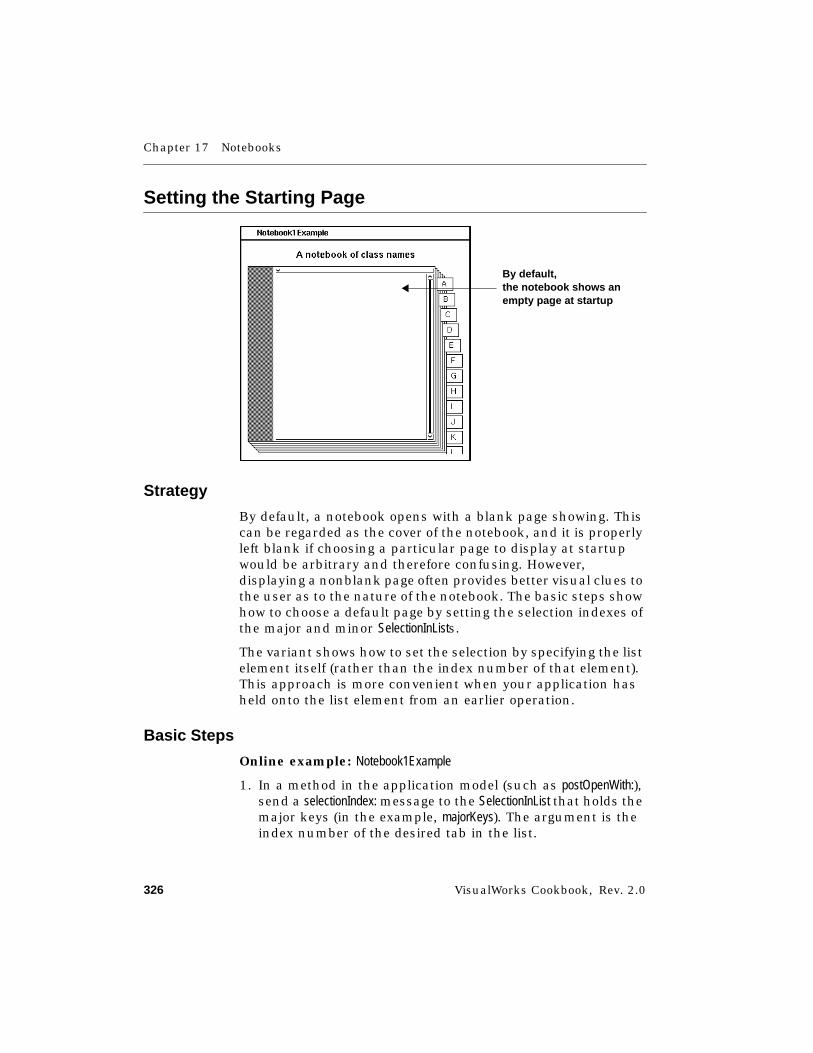
Chapter 17 Notebooks
326 VisualWorks Cookbook, Rev. 2.0
Setting the Starting Page
Strategy
By default, a notebook opens with a blank page showing. Thiscan be regarded as the cover of the notebook, and it is properlyleft blank if choosing a particular page to display at startupwould be arbitrary and therefore confusing. However,displaying a nonblank page often provides better visual clues tothe user as to the nature of the notebook. The basic steps showhow to choose a default page by setting the selection indexes ofthe major and minor SelectionInLists.
The variant shows how to set the selection by specifying the listelement itself (rather than the index number of that element).This approach is more convenient when your application hasheld onto the list element from an earlier operation.
Basic Steps
Online example: Notebook1Example
1. In a method in the application model (such as postOpenWith:),send a selectionIndex: message to the SelectionInList that holds themajor keys (in the example, majorKeys). The argument is theindex number of the desired tab in the list.
By default,the notebook shows anempty page at startup
Setting the Starting Page
VisualWorks Cookbook, Rev. 2.0 327
postOpenWith: aBuilder(aBuilder componentAt: #pageHolder) widget
client: selfspec: #listSpec.
majorKeys selectionIndex: 1. "Basic Step 1"
2. If the notebook has minor keys, also set the selection indexin the SelectionInList that contains the minor keys.
Variant
Setting the Page by Specifying the List Element➤ Send a selection: message to the SelectionInList that holds the
major keys and, if applicable, another such message to theminor list. The argument is the desired element in the list.
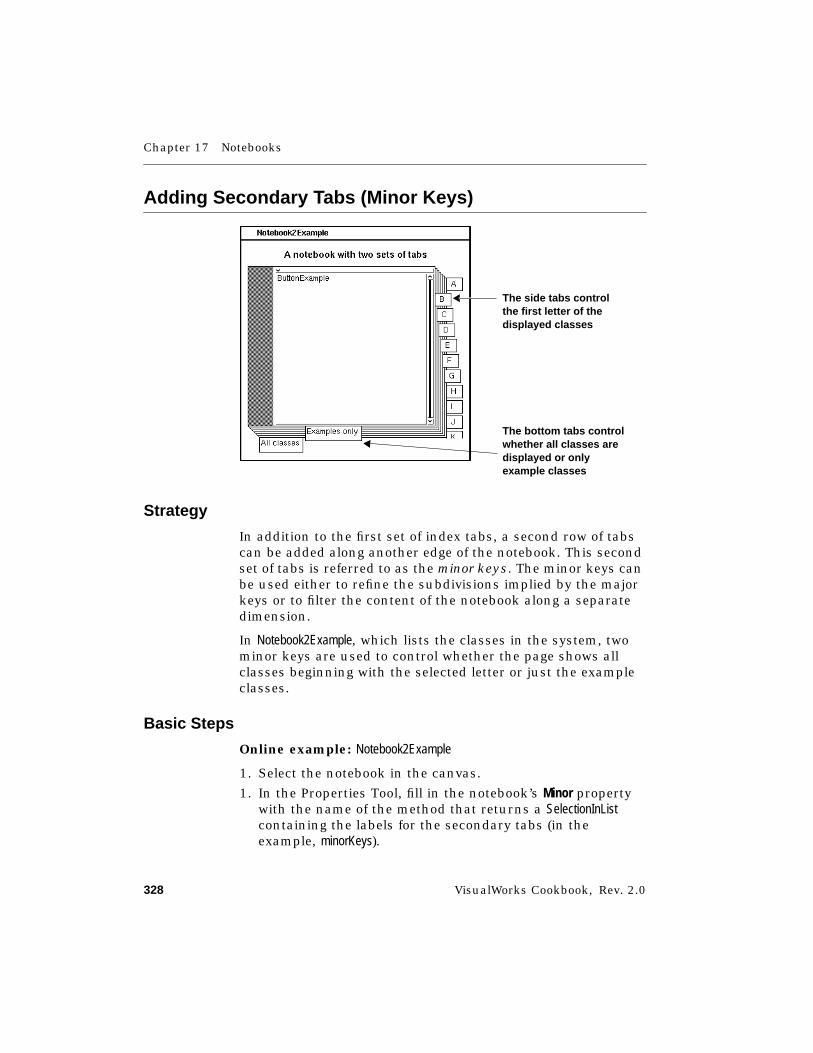
Chapter 17 Notebooks
328 VisualWorks Cookbook, Rev. 2.0
Adding Secondary Tabs (Minor Keys)
Strategy
In addition to the first set of index tabs, a second row of tabscan be added along another edge of the notebook. This secondset of tabs is referred to as the minor keys. The minor keys canbe used either to refine the subdivisions implied by the majorkeys or to filter the content of the notebook along a separatedimension.
In Notebook2Example, which lists the classes in the system, twominor keys are used to control whether the page shows allclasses beginning with the selected letter or just the exampleclasses.
Basic Steps
Online example: Notebook2Example
1. Select the notebook in the canvas.
1. In the Properties Tool, fill in the notebook’s Minor propertywith the name of the method that returns a SelectionInListcontaining the labels for the secondary tabs (in theexample, minorKeys).
The side tabs controlthe first letter of thedisplayed classes
The bottom tabs controlwhether all classes aredisplayed or onlyexample classes
Adding Secondary Tabs (Minor Keys)
VisualWorks Cookbook, Rev. 2.0 329
2. Use a System Browser or the canvas’s define command tocreate the instance variable (minorKeys) and accessingmethod (minorKeys) for the notebook’s list of index labels.
minorKeys "Basic Step 2"^minorKeys
3. Initialize the variable, either in the accessing method or inan initialize method (as in the example), with a SelectionInListcontaining either strings or associations (the example usesassociations).
4. In the initialize method, use an onChangeSend:to: message toarrange for the notebook to send a message (changedPage) tothe application model when the user selects a secondarytab. (In the example, both the major and minor tabs triggerthe same message: changedPage.)
initialize| letters |letters := #( ' A' ' B' ' C' ' D' ' E' ' F' ' G' ' H' ' I' ' J' ' K' ' L' ' M'
' N' ' O' ' P' ' Q' ' R' ' S' ' T' ' U' ' V' ' W' ' X' ' Y' ' Z' ).majorKeys := SelectionInList with: letters.majorKeys selectionIndexHolder
onChangeSend: #changedPage to: self.
minorKeys := SelectionInList with: (Array "Basic Step 3"with: 'All classes'-> #allwith: 'Examples only' -> #examples).
minorKeys selectionIndexHolderonChangeSend: #changedPage to: self. "Basic Step 4"
classNames := SelectionInList new.
5. Create the change message (changedPage) in which thesubcanvas is updated based on the selected index tab. (Inthe example, the classNames list is updated with all classnames or only example classes, based on the minor key.)
changedPage| chosenLetter list filter filteredList |
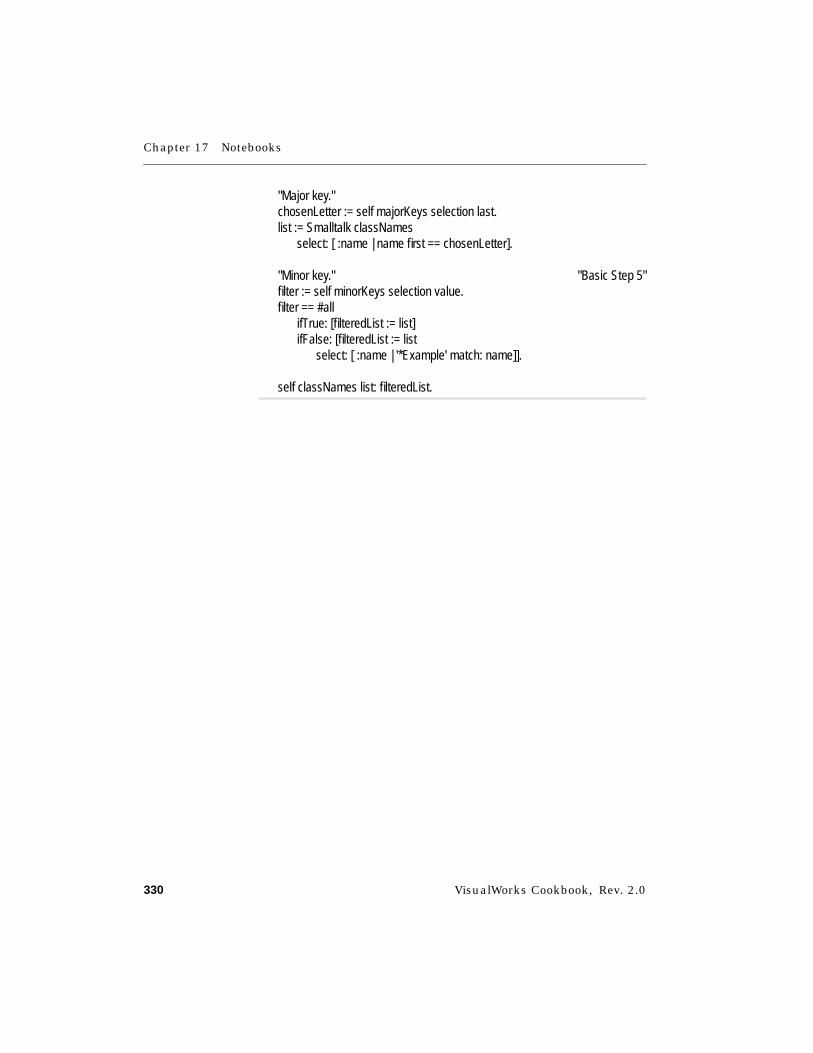
Chapter 17 Notebooks
330 VisualWorks Cookbook, Rev. 2.0
"Major key."chosenLetter := self majorKeys selection last.list := Smalltalk classNames
select: [ :name | name first == chosenLetter].
"Minor key." "Basic Step 5"filter := self minorKeys selection value.filter == #all
ifTrue: [filteredList := list]ifFalse: [filteredList := list
select: [ :name | '*Example' match: name]].
self classNames list: filteredList.

Connecting Minor Tabs to Major Tabs
VisualWorks Cookbook, Rev. 2.0 331
Connecting Minor Tabs to Major Tabs
Strategy
The major and minor keys of a notebook can be used tonavigate through a two-tiered hierarchy of information. Theminor keys depend on the major keys—that is, when the userselects a different major key, a different set of minor keys ispresented.
In Notebook3Example, the major keys represent departments in acompany. The minor keys represent subdepartments, and theychange depending on which department is selected. (Comparethis with Notebook2Example, in which the minor keys remainunchanged when a new major key is selected.)
Basic Steps
Online example: Notebook3Example
1. In the application model’s initialize method, use onChangeSend:to:messages to arrange for the two SelectionInLists to notify theapplication model when their selections are changed.
The minor tab chooses thesecond level of a hierarchy(a subdepartment)
The major tab chooses thefirst level of a hierarchy(department)
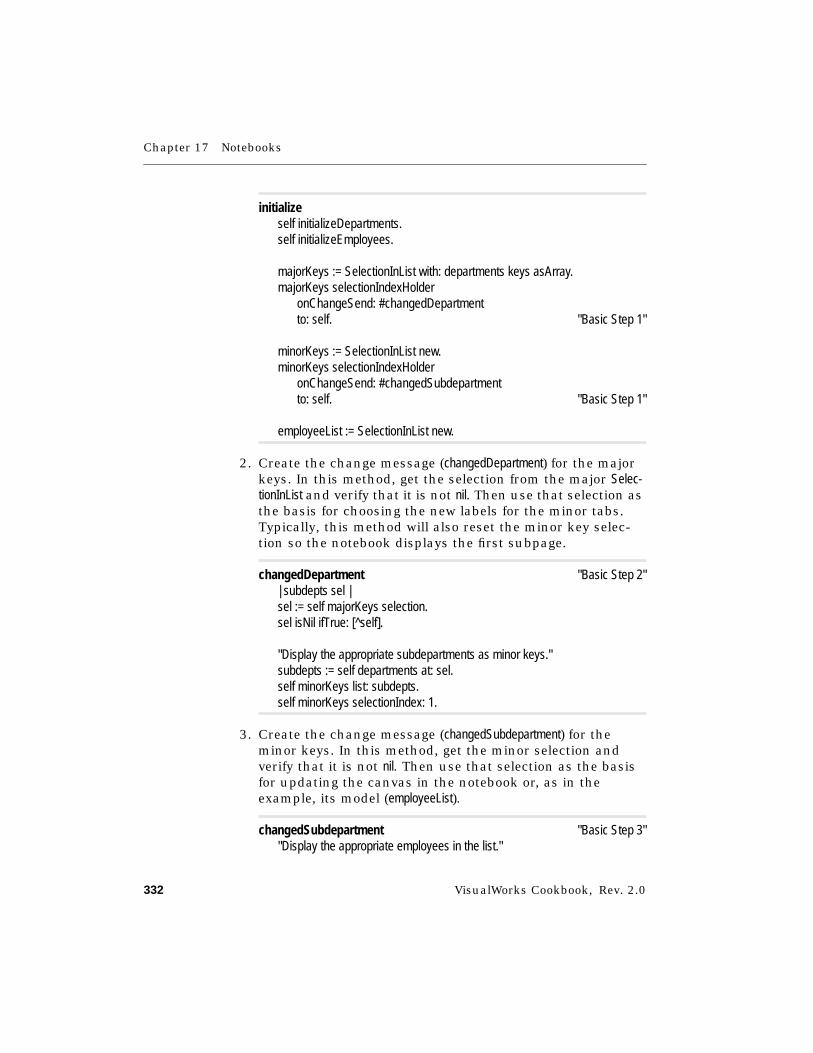
Chapter 17 Notebooks
332 VisualWorks Cookbook, Rev. 2.0
initializeself initializeDepartments.self initializeEmployees.
majorKeys := SelectionInList with: departments keys asArray.majorKeys selectionIndexHolder
onChangeSend: #changedDepartmentto: self. "Basic Step 1"
minorKeys := SelectionInList new.minorKeys selectionIndexHolder
onChangeSend: #changedSubdepartmentto: self. "Basic Step 1"
employeeList := SelectionInList new.
2. Create the change message (changedDepartment) for the majorkeys. In this method, get the selection from the major Selec-tionInList and verify that it is not nil. Then use that selection asthe basis for choosing the new labels for the minor tabs.Typically, this method will also reset the minor key selec-tion so the notebook displays the first subpage.
changedDepartment "Basic Step 2"| subdepts sel |sel := self majorKeys selection.sel isNil ifTrue: [^self].
"Display the appropriate subdepartments as minor keys."subdepts := self departments at: sel.self minorKeys list: subdepts.self minorKeys selectionIndex: 1.
3. Create the change message (changedSubdepartment) for theminor keys. In this method, get the minor selection andverify that it is not nil. Then use that selection as the basisfor updating the canvas in the notebook or, as in theexample, its model (employeeList).
changedSubdepartment "Basic Step 3""Display the appropriate employees in the list."
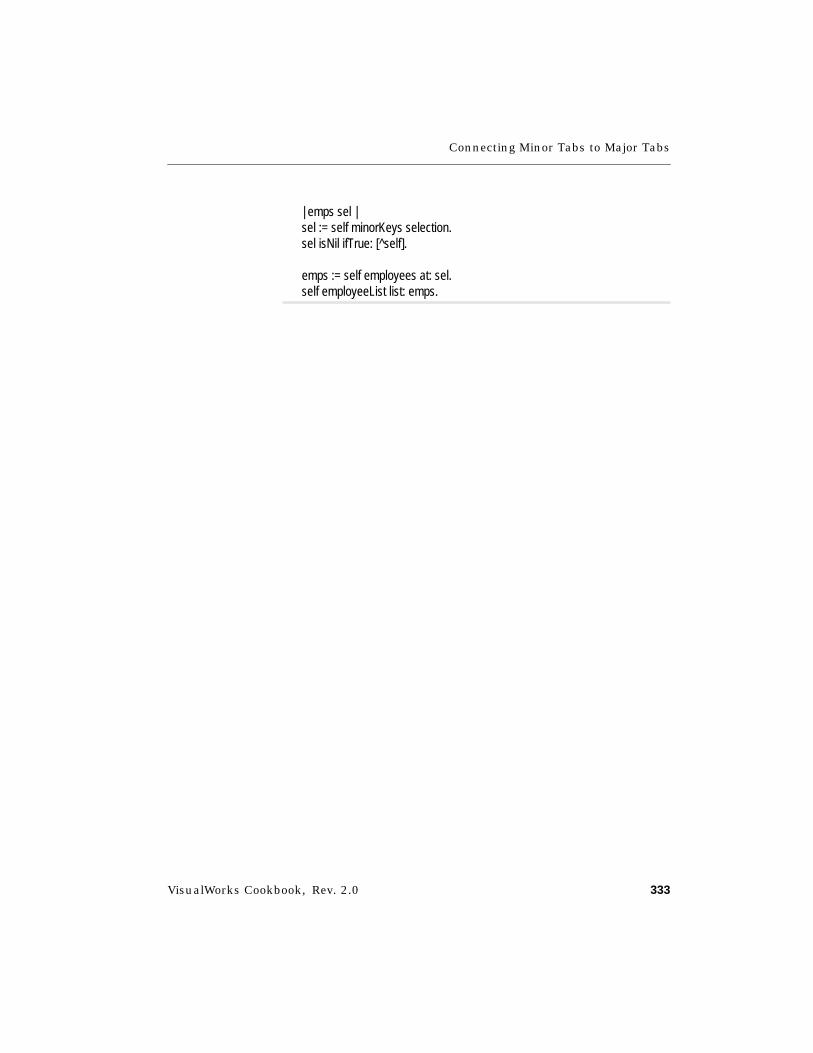
Connecting Minor Tabs to Major Tabs
VisualWorks Cookbook, Rev. 2.0 333
| emps sel |sel := self minorKeys selection.sel isNil ifTrue: [^self].
emps := self employees at: sel.self employeeList list: emps.
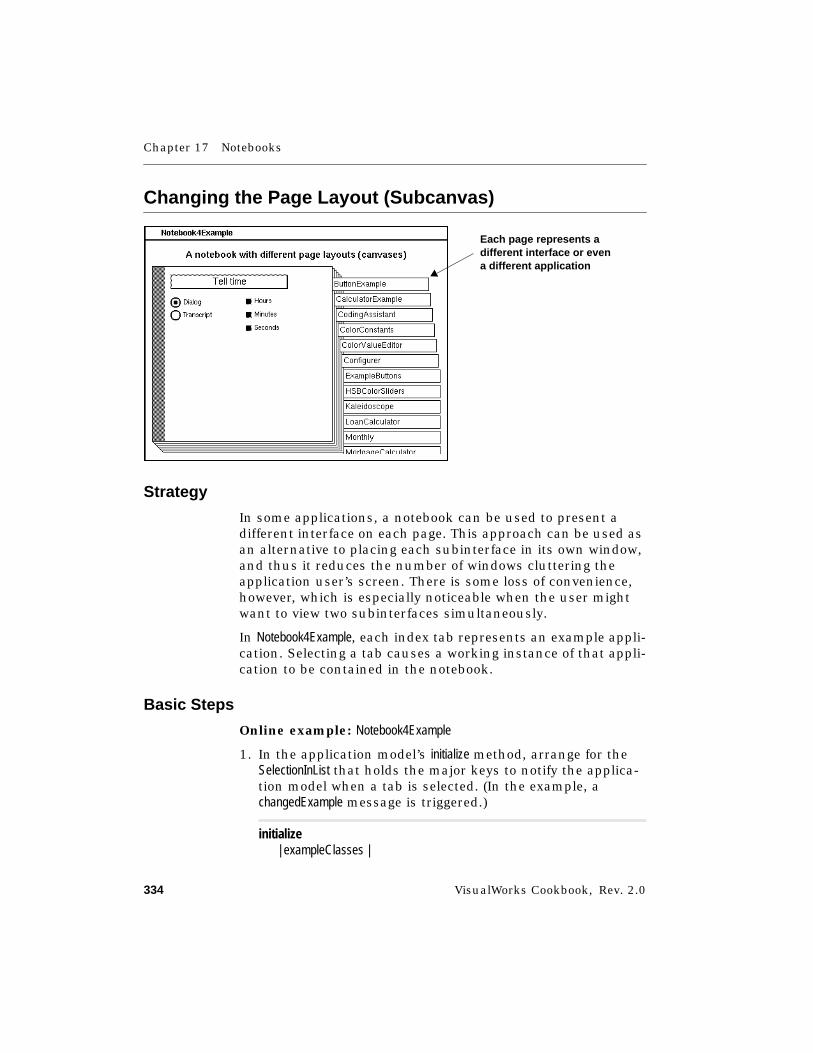
Chapter 17 Notebooks
334 VisualWorks Cookbook, Rev. 2.0
Changing the Page Layout (Subcanvas)
Strategy
In some applications, a notebook can be used to present adifferent interface on each page. This approach can be used asan alternative to placing each subinterface in its own window,and thus it reduces the number of windows cluttering theapplication user’s screen. There is some loss of convenience,however, which is especially noticeable when the user mightwant to view two subinterfaces simultaneously.
In Notebook4Example, each index tab represents an example appli-cation. Selecting a tab causes a working instance of that appli-cation to be contained in the notebook.
Basic Steps
Online example: Notebook4Example
1. In the application model’s initialize method, arrange for theSelectionInList that holds the major keys to notify the applica-tion model when a tab is selected. (In the example, achangedExample message is triggered.)
initialize| exampleClasses |
Each page represents adifferent interface or evena different application
Changing the Page Layout (Subcanvas)
VisualWorks Cookbook, Rev. 2.0 335
exampleClasses := OrderedCollection new.exampleClasses := Smalltalk keys select: [ :c |
(('*Example' match: c)and: [(Smalltalk at: c) isVisualStartable])and: [('Notebook*' match: c) not]].
majorKeys := SelectionInListwith: exampleClasses asSortedCollection.
majorKeys selectionIndexHolderonChangeSend: #changedExample to: self. "Basic Step 1"
2. In the change method (changedExample), get the notebookwidget from the application model’s builder by sending acomponentAt: message.
3. Still in the change method, send a client:spec: message to thenotebook. The first argument is an instance of the desiredapplication model (in the example, exampleClass). The secondargument is the name of the desired canvas (in theexample, each example class’s windowSpec is used).
changedExample| sel exampleClass |sel := self majorKeys selection.sel isNil ifTrue: [^self].
exampleClass := Smalltalk at: sel value.
(self builder componentAt: #pageHolder) widget "Basic Step 2"client: exampleClass new "Basic Step 3"spec: #windowSpec.
See Also■ “Nesting One Application in Another” on page 305
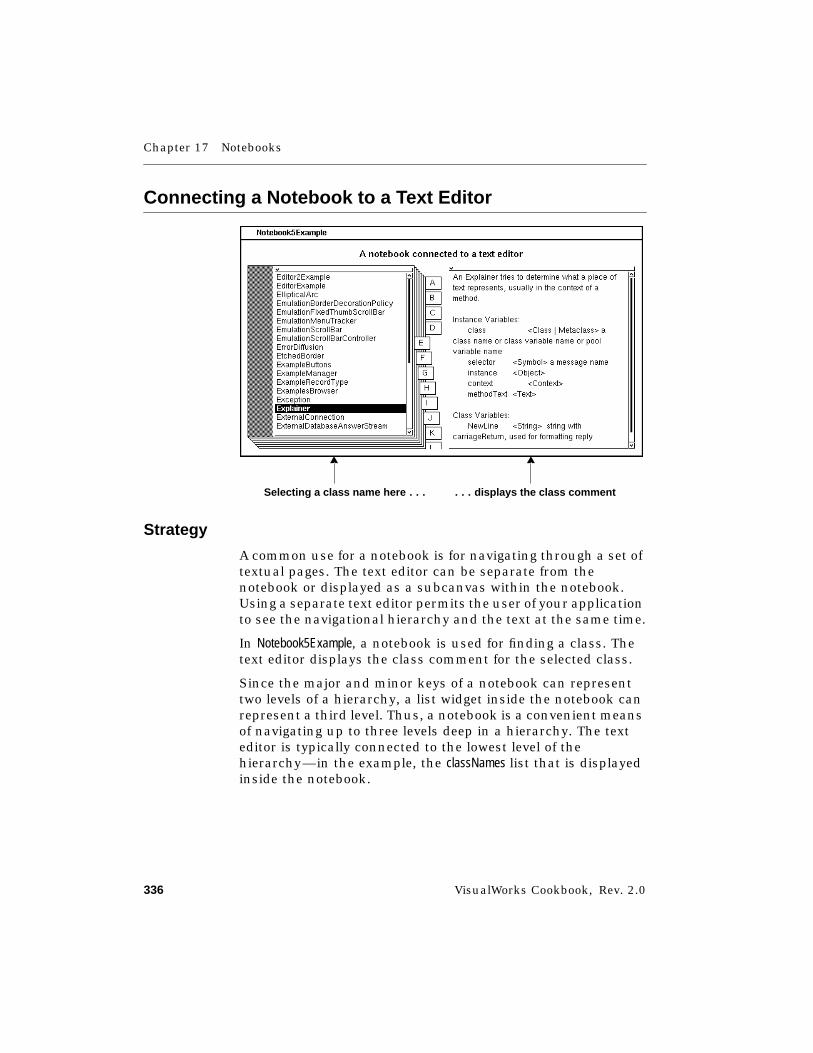
Chapter 17 Notebooks
336 VisualWorks Cookbook, Rev. 2.0
Connecting a Notebook to a Text Editor
Strategy
A common use for a notebook is for navigating through a set oftextual pages. The text editor can be separate from thenotebook or displayed as a subcanvas within the notebook.Using a separate text editor permits the user of your applicationto see the navigational hierarchy and the text at the same time.
In Notebook5Example, a notebook is used for finding a class. Thetext editor displays the class comment for the selected class.
Since the major and minor keys of a notebook can representtwo levels of a hierarchy, a list widget inside the notebook canrepresent a third level. Thus, a notebook is a convenient meansof navigating up to three levels deep in a hierarchy. The texteditor is typically connected to the lowest level of thehierarchy—in the example, the classNames list that is displayedinside the notebook.
Selecting a class name here . . . . . . displays the class comment
Connecting a Notebook to a Text Editor
VisualWorks Cookbook, Rev. 2.0 337
Basic Steps
Online example: Notebook5Example
1. In the application model’s initialize method, arrange for theSelectionInList that holds the lowest level of selections to notifythe application model when a text is selected. (In theexample, a changedClass message is triggered by a selection inthe classNames list.)
initialize| letters |letters := #( ' A' ' B' ' C' ' D' ' E' ' F' ' G' ' H' ' I' ' J' ' K' ' L' ' M'
' N' ' O' ' P' ' Q' ' R' ' S' ' T' ' U' ' V' ' W' ' X' ' Y' ' Z' ).majorKeys := SelectionInList with: letters.majorKeys selectionIndexHolder
onChangeSend: #changedLetter to: self.
classNames := SelectionInList new.classNames selectionIndexHolder
onChangeSend: #changedClass to: self. "Basic Step 1"
classComment := '' asValue.
2. In the change method (changedClass), get the selection fromthe lowest-level SelectionInList (classNames). Then use that selec-tion as the basis for choosing the text and install the newtext in the text holder (classComment).
changedClass| chosenClass newText |chosenClass := self classNames selection. "Basic Step 2"
newText := chosenClass isNilifTrue: ['']ifFalse: [(Smalltalk at: chosenClass) comment].
self classComment value: newText.
See Also■ “Adding a Text Editor” on page 172

VisualWorks Cookbook, Rev. 2.0 339
Chapter 18
Drag and Drop
About Drag and Drop 340Adding a Drop Source 343Adding a Drop Target (General) 348Providing Visual Feedback During a Drag 350Responding to a Drop 359Examining the Drag Context 365Responding to Modifier Keys 366Defining Custom Effect Symbols 371
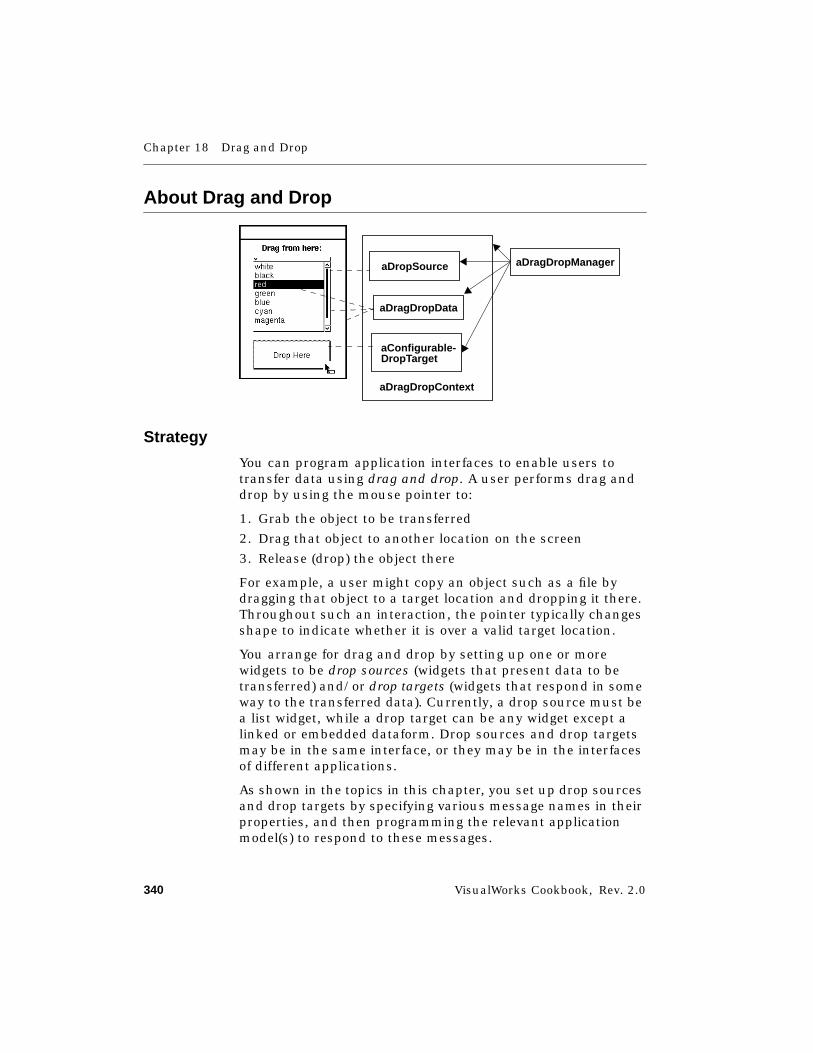
Chapter 18 Drag and Drop
340 VisualWorks Cookbook, Rev. 2.0
About Drag and Drop
Strategy
You can program application interfaces to enable users totransfer data using drag and drop. A user performs drag anddrop by using the mouse pointer to:
1. Grab the object to be transferred
2. Drag that object to another location on the screen
3. Release (drop) the object there
For example, a user might copy an object such as a file bydragging that object to a target location and dropping it there.Throughout such an interaction, the pointer typically changesshape to indicate whether it is over a valid target location.
You arrange for drag and drop by setting up one or morewidgets to be drop sources (widgets that present data to betransferred) and/or drop targets (widgets that respond in someway to the transferred data). Currently, a drop source must bea list widget, while a drop target can be any widget except alinked or embedded dataform. Drop sources and drop targetsmay be in the same interface, or they may be in the interfacesof different applications.
As shown in the topics in this chapter, you set up drop sourcesand drop targets by specifying various message names in theirproperties, and then programming the relevant applicationmodel(s) to respond to these messages.
aDragDropData
aDropSource
aConfigurable-DropTarget
aDragDropManager
aDragDropContext
About Drag and Drop
VisualWorks Cookbook, Rev. 2.0 341
Drag and drop framework classes. In a running application, adrag-and-drop interaction is carried out by instances of severalframework classes. Some of these instances are created as aresult of the code you write, while others are created automat-ically when the interface is built or when drag and drop isunderway. Each drag-and-drop interaction involves:
■ An instance of DragDropData, which holds the data to betransferred, plus information about where the drag origi-nated (the widget’s controller, the containing window, andthe associated application model).
■ An instance of DropSource, which defines the shapes that thepointer can have during a drag originating from this dropsource. By default, the DropSource defines pointer shapes forsignaling whether a move, a copy, or no transfer would takeplace if a drop were to occur at any point during the drag.
■ An instance of DragDropManager, which tracks the mousepointer throughout the drag. When the pointer encountersa potential drop target, the DragDropManager sends messagesto find out whether the dragged data can be dropped there;the DragDropManager asks the DropSource to set the pointer’sshape based on the response. When a drop occurs in a droptarget, the DragDropManager sends a message to process thetransferred data.
■ Instances of ConfigurableDropTarget, which identify the widgetsthat have been set up as drop targets. When the pointermoves to a particular drop target, the associatedConfigurableDropTarget receives the messages that are sent bythe DragDropManager and forwards them to the associatedapplication model, which provides the actual response.
■ An instance of DragDropContext, in which the DragDropManagercombines the DragDropData, the DropSource, and theConfigurableDropTarget to create a convenient object for passingas an argument in various messages. The DragDropManageralso adds other information to the DragDropContext during adrag, such as the current pointer position and modifier keystate.
Extended example. You can obtain an example of an extendeddrag and drop implementation by filing in tooldd.st from theextras subdirectory of your VisualWorks installation directory
Chapter 18 Drag and Drop
342 VisualWorks Cookbook, Rev. 2.0
or folder. This example modifies the Browser, UIPropertiesTool, andVisualLauncher classes so that you can:
■ Drag a selector to move it to a different protocol in abrowser.
■ Drag a class to move it to a different category in a browser.
■ Drag a category, class, protocol, or selector to the SystemBrowser button on the toolbar of the VisualWorks mainwindow. This opens a System Browser on the draggedobject.
■ Drag a category, class, protocol, or selector to the File Listbutton on the toolbar of the VisualWorks main window.This files out the dragged object.
■ Drag a selector for an interface specification (for example,windowSpec) to the Canvas button on the toolbar of theVisualWorks main window. This opens the canvas forediting.
■ Drag a selector from a browser to a Properties Tool to copyit into a field that accepts selectors.
After filing in tooldd.st , close any open browsers and Proper-ties Tools. You must also rebuild the VisualWorks mainwindow, for example, by exiting and restarting VisualWorks.

Adding a Drop Source
VisualWorks Cookbook, Rev. 2.0 343
Adding a Drop Source
Strategy
A drop source is a widget from which a drag can originate; itdisplays the data that is to be transferred. Currently, only a listcan serve as a drop source.
You set up a drop source by filling in the Drag OK and Drag Startproperties on the Drop Source page of the Properties Tool. Theseproperties specify the names of the messages that the widgetwill send whenever the user presses a mouse button down andstarts to move the pointer within the widget’s bounds. Youprogram the widget’s application model to respond to thesemessages as follows:
■ The drag-ok method must return a Boolean to indicatewhether-drag and drop is appropriate from this dropsource.
■ The drag-start method must create DragDropData, DropSource,and DragDropManager instances and set them to work.
The basic steps show how to set up a list of colors from whicha single color can be dragged. The variant outlines steps forsetting up a multi-selection list as a drop source.
drop source
drop data
"no-drop" pointer
Chapter 18 Drag and Drop
344 VisualWorks Cookbook, Rev. 2.0
Basic Steps
Online example: ColorDDExample
1. Add a list widget to the canvas and set its Aspect and IDproperties (in this example, enter color and colorList, respec-tively). Apply the properties and install the canvas.
2. Use the canvas’ define command or a System Browser to addan instance variable (color) to the application model to holdthe list’s SelectionInList.
3. Use the canvas’ define command or a System Browser tocreate an aspect method (color) in an aspects protocol.
color "Basic Step 3"^color
4. Using a System Browser, initialize the SelectionInList in aninitialize method in the application model (initialize-releaseprotocol).
initialize| tableList |
color := SelectionInListwith: #(#white #black #red #green #blue
#cyan #magenta #yellow ) asList. "Basic Step 4"
colorLayer := SelectionInListwith: #('Foreground' 'Background' 'Selection Foreground'
'Selection Background' ) asList.
"Sample data for demonstration widgets"sampleList := SelectionInList with: ColorValue constantNames asList.tableList := TwoDList
on: #( 'Red' 'Cyan' 'Green' 'Magenta' 'Blue' 'Yellow' )columns: 2rows: 3.
sampleTable := TableInterface newselectionInTable: (SelectionInTable with: tableList).
sampleText := ColorValue comment asValue.
Adding a Drop Source
VisualWorks Cookbook, Rev. 2.0 345
5. In a Properties Tool, fill in the list’s Drag OK property with thename of the method that will determine whether a drag canproceed from this list. In this example, enter colorWantToDrag:(the selector must end with a colon).
6. In a Properties Tool, fill in the list’s Drag Start property withthe name of the method that will initiate drag and drop. Inthis example, enter colorDrag: (the selector must end with acolon).
7. Leave the Select On Down property selected. This causes aselection to occur when the mouse is pressed down to startthe drag (rather than waiting for the mouse to be released).Apply the properties and install the canvas.
8. In a System Browser, add a drag-ok method (colorWantToDrag:)in a suitable protocol (drag source). This method must returna Boolean (true to permit drag and drop, false to prevent it).Note that this method must accept a Controller as an argu-ment, even if that controller isn’t used.
colorWantToDrag: aController "Basic Step 8""Determine whether to permit a drag to start from this widget. In this case,make sure that there is data to drag and that the drag starts a selection."
^self color list size > 0 and: [self color selection notNil]
9. In a System Browser, add a drag-start method (colorDrag:) inthe drag source protocol. Note that this method must accept aController as an argument.
10. In the drag-start method, create a DragDropData instance. Thisinstance will hold various pieces of information about thedragged data and where it came from.
11. Send a key: message to the DragDropData instance to specify asymbol (#colorChoice) that identifies the kind of data beingstored. A drop target can use this key to filter out inappro-priate kinds of data (for example, data being dragged froman unrelated drop source).
12. Send messages to the DragDropData instance to specify anyfurther information that a drop target might use when eval-uating this drag. Typically, you send a contextWindow: messagespecifying the containing window, a contextWidget: message
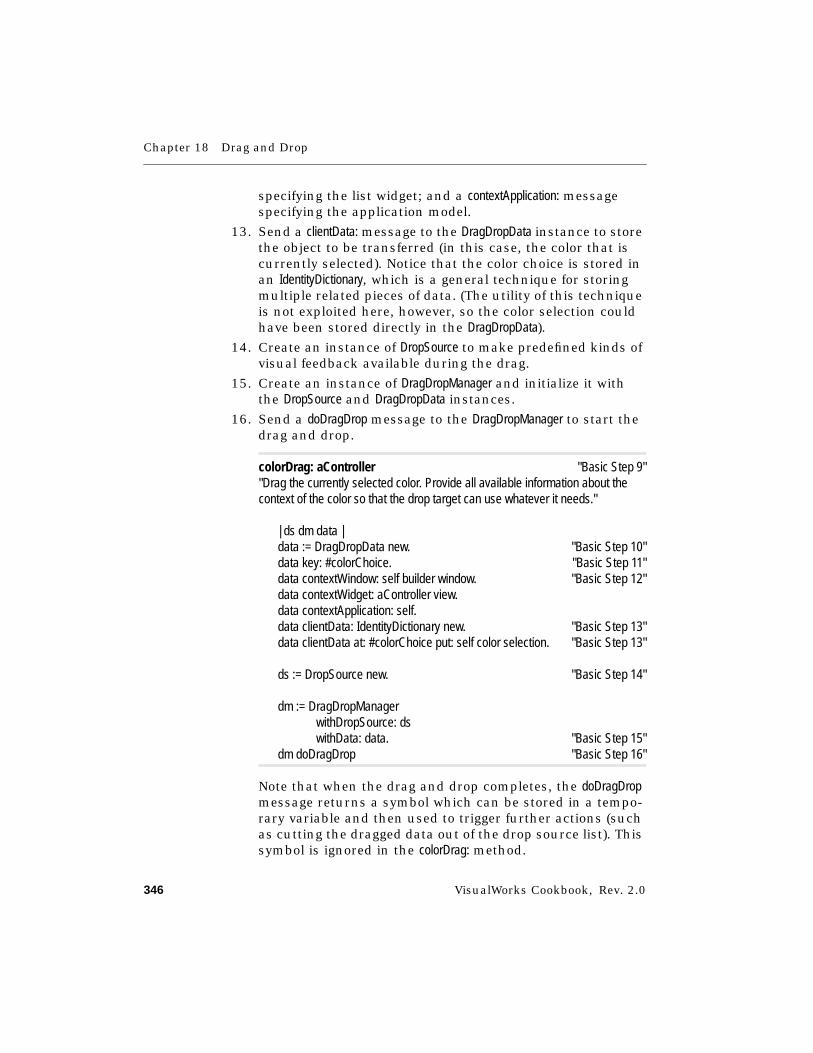
Chapter 18 Drag and Drop
346 VisualWorks Cookbook, Rev. 2.0
specifying the list widget; and a contextApplication: messagespecifying the application model.
13. Send a clientData: message to the DragDropData instance to storethe object to be transferred (in this case, the color that iscurrently selected). Notice that the color choice is stored inan IdentityDictionary, which is a general technique for storingmultiple related pieces of data. (The utility of this techniqueis not exploited here, however, so the color selection couldhave been stored directly in the DragDropData).
14. Create an instance of DropSource to make predefined kinds ofvisual feedback available during the drag.
15. Create an instance of DragDropManager and initialize it withthe DropSource and DragDropData instances.
16. Send a doDragDrop message to the DragDropManager to start thedrag and drop.
colorDrag: aController "Basic Step 9""Drag the currently selected color. Provide all available information about thecontext of the color so that the drop target can use whatever it needs."
| ds dm data |data := DragDropData new. "Basic Step 10"data key: #colorChoice. "Basic Step 11"data contextWindow: self builder window. "Basic Step 12"data contextWidget: aController view.data contextApplication: self.data clientData: IdentityDictionary new. "Basic Step 13"data clientData at: #colorChoice put: self color selection. "Basic Step 13"
ds := DropSource new. "Basic Step 14"
dm := DragDropManagerwithDropSource: dswithData: data. "Basic Step 15"
dm doDragDrop "Basic Step 16"
Note that when the drag and drop completes, the doDragDropmessage returns a symbol which can be stored in a tempo-rary variable and then used to trigger further actions (suchas cutting the dragged data out of the drop source list). Thissymbol is ignored in the colorDrag: method.
Adding a Drop Source
VisualWorks Cookbook, Rev. 2.0 347
Variants
V1. Dragging Multiple Selections
You can use most of the same basic steps to set up a dropsource so that multiple selected items can be dragged from it.The exceptions are listed below:
1. In Basic Step 1, click the list’s Multi Select property.
2. In Basic Step 4, initialize the list’s aspect variable with aMultiSelectionInList instead of a SelectionInList.
3. In Basic Step 13, send the selections message (instead of selec-tion) to obtain the selected data to store in the DragDropDatainstance. The selections message returns an ordered collec-tion of objects. You may want to store individual membersof this collection as separate elements of an IdentityDictionary.
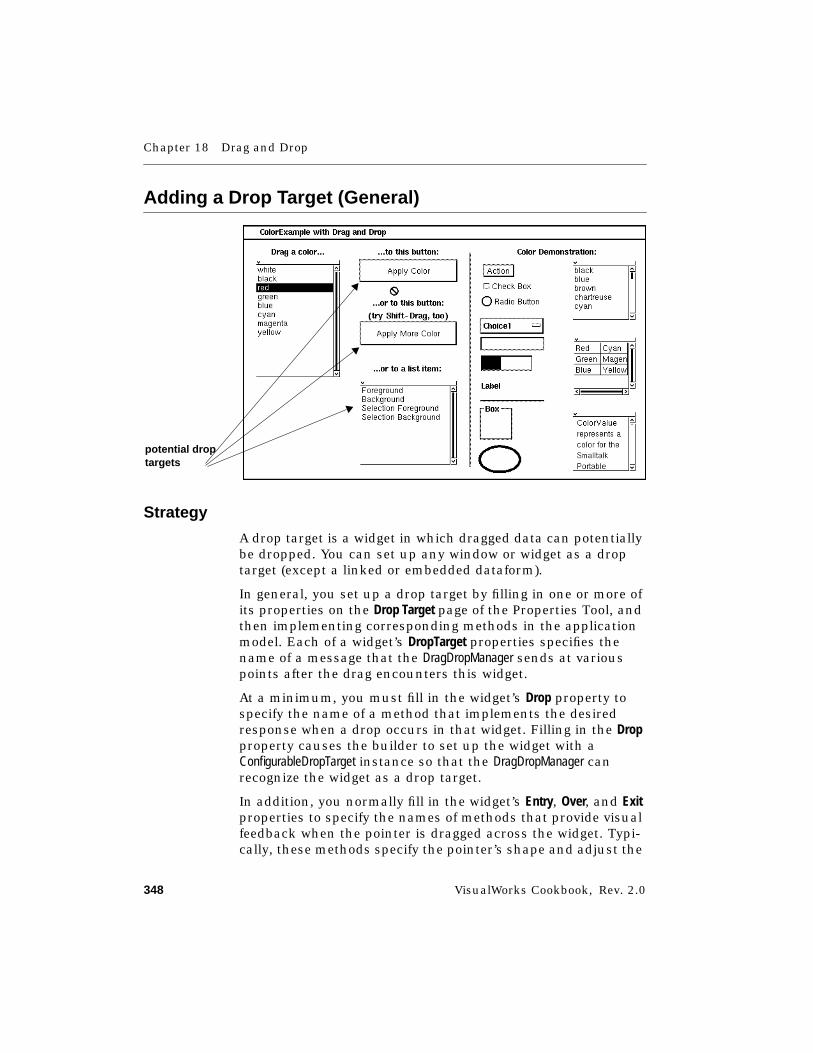
Chapter 18 Drag and Drop
348 VisualWorks Cookbook, Rev. 2.0
Adding a Drop Target (General)
Strategy
A drop target is a widget in which dragged data can potentiallybe dropped. You can set up any window or widget as a droptarget (except a linked or embedded dataform).
In general, you set up a drop target by filling in one or more ofits properties on the Drop Target page of the Properties Tool, andthen implementing corresponding methods in the applicationmodel. Each of a widget’s DropTarget properties specifies thename of a message that the DragDropManager sends at variouspoints after the drag encounters this widget.
At a minimum, you must fill in the widget’s Drop property tospecify the name of a method that implements the desiredresponse when a drop occurs in that widget. Filling in the Dropproperty causes the builder to set up the widget with aConfigurableDropTarget instance so that the DragDropManager canrecognize the widget as a drop target.
In addition, you normally fill in the widget’s Entry, Over, and Exitproperties to specify the names of methods that provide visualfeedback when the pointer is dragged across the widget. Typi-cally, these methods specify the pointer’s shape and adjust the
potential droptargets
Adding a Drop Target (General)
VisualWorks Cookbook, Rev. 2.0 349
drop target’s appearance to signal whether the drop target canaccept a drop from this particular drag. Strictly speaking, theseproperties are optional, in that drag and drop can functionwithout them. However, providing visual feedback is normallyrequired by user interface design guidelines.
Specific steps are given in the topics listed under See Also.
See Also■ “Providing Visual Feedback During a Drag” on page 350
■ “Responding to a Drop” on page 359
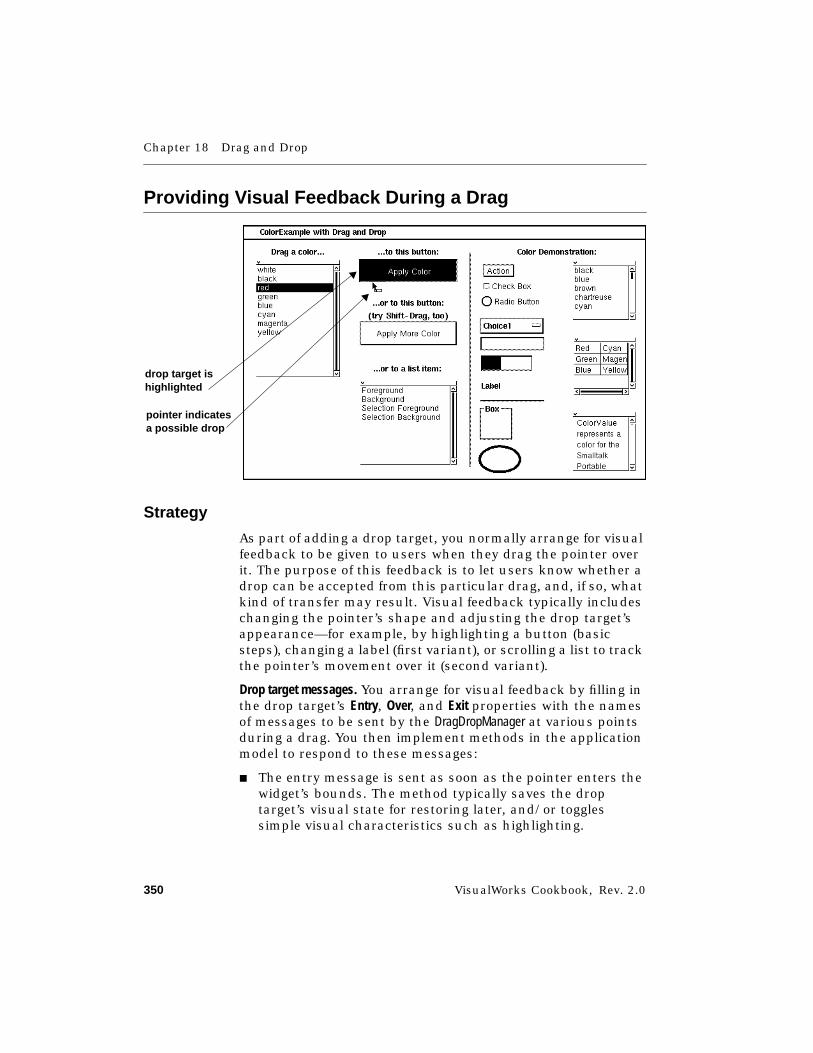
Chapter 18 Drag and Drop
350 VisualWorks Cookbook, Rev. 2.0
Providing Visual Feedback During a Drag
Strategy
As part of adding a drop target, you normally arrange for visualfeedback to be given to users when they drag the pointer overit. The purpose of this feedback is to let users know whether adrop can be accepted from this particular drag, and, if so, whatkind of transfer may result. Visual feedback typically includeschanging the pointer’s shape and adjusting the drop target’sappearance—for example, by highlighting a button (basicsteps), changing a label (first variant), or scrolling a list to trackthe pointer’s movement over it (second variant).
Drop target messages. You arrange for visual feedback by filling inthe drop target’s Entry, Over, and Exit properties with the namesof messages to be sent by the DragDropManager at various pointsduring a drag. You then implement methods in the applicationmodel to respond to these messages:
■ The entry message is sent as soon as the pointer enters thewidget’s bounds. The method typically saves the droptarget’s visual state for restoring later, and/or togglessimple visual characteristics such as highlighting.
drop target ishighlighted
pointer indicatesa possible drop
Providing Visual Feedback During a Drag
VisualWorks Cookbook, Rev. 2.0 351
■ The over message is sent immediately after the entrymessage, and then every time the pointer moves within thewidget’s bounds. The method typically adjusts the droptarget’s appearance in response to pointer location or amodifier key press.
■ The exit message is sent wherever the pointer is draggedout of the widget’s bounds before the mouse button isreleased. The method typically restores the widget’s originalappearance.
Each method has access to the dragged data through theDragDropContext instance that is passed to it by the DragDropManager.The methods query the DragDropContext to decide what kind ofvisual feedback to provide. Furthermore, these methods usethe DragDropContext to save and restore drop target characteristics(both variants).
Note that no changes are made to a drop target’s appearanceunless you implement them in these methods. Programmatictechniques for changing widget appearance are described in thespecific widget chapters of this book.
Pointer shapes. Each of the entry, over, and exit methodscontrol the pointer shape by returning an effect symbol. TheDragDropManager passes each effect symbol to the operation’sDropSource instance, which sets the pointer shape accordingly. Astandard DropSource recognizes these basic effect symbols:
■ #dropEffectNone—produces a pointer shaped like a circle with aslash through it; usually indicates that no transfer ispossible in the pointer’s current location.
■ #dropEffectMove—produces an arrow-shaped pointer with anopen box below it; usually indicates a simple transfer suchas a move (data is cut from the source after the transfer).
■ #dropEffectCopy—produces the same pointer as #dropEffectMove,but with a plus sign; usually indicates a modified transfersuch as a copy (data is left in the source after the transfer).
Basic Steps
Online example: ColorDDExample
This example highlights the Apply Color button and changes thepointer’s shape while the pointer is in the button.
Chapter 18 Drag and Drop
352 VisualWorks Cookbook, Rev. 2.0
1. In the canvas, select the Apply Color button, and set its IDproperty (in this case, enter #applyColorButton).
2. On the Drop Target page of a Properties Tool, fill in thewidget’s Entry, Over, and Exit properties with the names of themessages to be sent during the drag (applyColorEnter:,applyColorOver:, and applyColorExit:, respectively). Each selectormust end with a colon. Apply the properties and install thecanvas.
3. In a System Browser, add an entry method (applyColorEnter:) inan appropriate protocol (in this case, drop target - button1). Themethod must accept a DragDropContext instance as an argu-ment.
4. In the entry method, test the dragged data to determinewhat kind of feedback to provide (positive feedback if thedata is a color choice, and negative feedback otherwise).Send a key message to the DragDropContext instance to obtainthe identifying symbol that was assigned when the dragstarted. If the data’s key is not #colorChoice, return an effectsymbol (#dropEffectNone) to signal that a drop is not allowed.
5. If the dragged data is acceptable, highlight the button as ifit were pressed and return an effect symbol (#dropEffectMove)that signals permission to drop.
applyColorEnter: aDragContext "Basic Step 3""A drag has entered the bounds of the Apply Color button. Test whether a dropwould be permitted here with this data. If so, cause the button to be highlightedas if it were pressed, and return a symbol that indicates the feedback to begiven to the user."
aDragContext key == #colorChoiceifFalse: [^#dropEffectNone]. "Basic Step 4"
(self builder componentAt: #applyColorButton) widgetisInTransition: true. "Basic Step 5"
^#dropEffectMove. "Basic Step 5"
6. Add an over method (applyColorOver:) that accepts a DragDrop-Context instance as an argument.
Providing Visual Feedback During a Drag
VisualWorks Cookbook, Rev. 2.0 353
7. In the over method, test the dragged data and return theappropriate effect symbols. No other processing is neces-sary in this method because the button’s highlighting doesnot vary with the pointer’s movement.
applyColorOver: aDragContext "Basic Step 6""A drag is over the Apply Color button. Test whether a drop would be permittedhere with this data. If so, return a symbol that indicates the feedback to begiven to the user. The DragDropManager uses this symbol to determine thepointer shape."
aDragContext key == #colorChoiceifFalse: [^#dropEffectNone]. "Basic Step 7"
^#dropEffectMove "Basic Step 7"
8. Add an exit method (applyColorExit:) that accepts aDragDropContext instance as an argument.
9. In the exit method, test the dragged data and return#dropEffectNone if the dragged data is not a color choice.
10. If the dragged data is acceptable, reverse any visual effectthat was set in the entry method (in this case, unhighlightthe button).
11. Return #dropEffectNone, to signal that no drop has occurred(this method executes only if the pointer leaves the widgetwithout dropping).
applyColorExit: aDragContext "Basic Step 8""A drag has exited the Apply Color button without dropping. Test whether a dropwould have been permitted here with this data. If so, restore the button to itsformer state, and return a symbol that indicates the feedback to be given to theuser."
aDragContext key == #colorChoice "Basic Step 9"ifFalse: [^#dropEffectNone].
(self builder componentAt: #applyColorButton) widgetisInTransition: false. "Basic Step 10"
^#dropEffectNone "Basic Step 11"

Chapter 18 Drag and Drop
354 VisualWorks Cookbook, Rev. 2.0
Variant
V1. Changing a Button Label During a Drag
Online example: ColorDDExample
This example saves and changes the label of the Apply More Colorbutton when the pointer enters the button, restoring theoriginal label when the pointer exits.
1. In the canvas, select the Apply More Color button, and set its IDproperty (in this case, enter #applyMoreColorButton).
2. On the Drop Target page of a Properties Tool, set the widget’sEntry, Over, and Exit properties (enter applyMoreColorEnter:,applyMoreColorOver:, and applyMoreColorExit:).
3. In an entry method (applyMoreColorEnter:), create anIdentityDictionary in which to save the drop target’s originalstate.
4. Save any button characteristics in the IdentityDictionary thatare to be restored later. In this case, store the widget and itslabel. (Storing the widget is a stylistic option that enablesthe widget to be accessed later through the DragDropContextrather than through the builder.)
5. Get the widget’s ConfigurableDropTarget instance from theDragDropContext, and set the IdentityDictionary as its client data.
6. Change the button’s label by sending the labelString: messageto the button. The message argument is the string to bedisplayed. Note that a different string is specified dependingon the state of the shift key.
applyMoreColorEnter: aDragContext"A drag has entered the bounds of the Apply More Color button. Test whether adrop would be permitted here with this data. If so, store the current label of thebutton. Then test whether the shift key is down. Based on this test, change thebutton's label and return a symbol that indicates the feedback to be given to theuser."
| widget dict |aDragContext key == #colorChoice
ifFalse: [^#dropEffectNone].
widget := (self builder componentAt: #applyMoreColorButton) widget.
Providing Visual Feedback During a Drag
VisualWorks Cookbook, Rev. 2.0 355
dict := IdentityDictionary new. "V1 Step 3"dict at: #widget put: widget. "V1 Step 4"dict at: #label put: widget label. "V1 Step 4"aDragContext dropTarget clientData: dict. "V1 Step 5"
aDragContext shiftDownifTrue:
[widget labelString: 'Background'. "V1 Step 6"^#dropEffectCopy].
widget labelString: 'Foreground'. "V1 Step 6"^#dropEffectMove.
7. In an exit method (applyMoreColorExit:), get the drop target’sIdentityDictionary from the DragDropContext.
8. Retrieve the button from the IdentityDictionary. (Alternatively,you could obtain the button from the builder.)
9. Retrieve the original label from the IdentityDictionary and put itback on the button. (Note that argument of the label:message is a label object, not a string.)
10. Remove the drop target data from the DragDropContext. Thisprepares the DragDropContext for the next drop target thepointer may encounter.
applyMoreColorExit: aDragContext"A drag has exited the Apply More Color button without dropping. Test whethera drop would have been permitted here with this data. If so, restore the buttonto its former state, and return a symbol that indicates the feedback to be givento the user."
| dict widget |aDragContext key == #colorChoice
ifFalse: [^#dropEffectNone].
dict := aDragContext dropTarget clientData. "V1 Step 7"widget := dict at: #widget. "V1 Step 8"widget label: (dict at: #label). "V1 Step 9"aDragContext dropTarget clientData: nil. "V1 Step 10"
^#dropEffectNone.
Chapter 18 Drag and Drop
356 VisualWorks Cookbook, Rev. 2.0
V2. Tracking a Targeted List Item
Online example: ColorDDExample
This example provides visual feedback for a list in which a dropis intended for a particular item rather than the list as a whole.The steps cause the pointer’s location to be indicated by targetemphasis, a rectangular border around the item containing thepointer. The target emphasis tracks the pointer, scrolling ifnecessary. (Target emphasis is also used in keyboard traversalof lists to indicate the target for selection.)
1. In the canvas, select the list of color layers and set its IDproperty (in this case, enter #colorLayerList).
2. On the Drop Target page of a Properties Tool, set the widget’sEntry, Over, and Exit properties (enter colorLayerEnter:,colorLayerOver:, and colorLayerExit:).
3. In an entry method (colorLayerEnter:), create an IdentityDictionary inwhich to save the drop target’s original state.
4. Save any characteristics into the IdentityDictionary that are tobe restored later. In this case, store the widget, the locationof any target emphasis resulting from keyboard traversal,and a Boolean indicating whether the list has focus.
5. Get the widget’s ConfigurableDropTarget instance from theDragDropContext. Store the IdentityDictionary as its client data.
6. Give focus to the list to prepare it for tracking the pointerwith target emphasis.
colorLayerEnter: aDragContext"A drag has entered the bounds of the list of color layers. Test whether a dropwould be permitted here with this data. If so, save the initial state of the colorlayer list, give focus to the list, and return a symbol that indicates the feedbackto be given to the user."
| dict widget |aDragContext key == #colorChoice
ifFalse: [^#dropEffectNone].
widget := (self builder componentAt: #colorLayerList) widget.dict := IdentityDictionary new. "V2 Step 3"dict at: #widget put: widget. "V2 Step 4"dict at: #targetIndex put: widget targetIndex. "V2 Step 4"

Providing Visual Feedback During a Drag
VisualWorks Cookbook, Rev. 2.0 357
dict at: #hasFocus put: widget hasFocus. "V2 Step 4"aDragContext dropTarget clientData: dict. "V2 Step 5"
widget hasFocus: true. "V2 Step 6"^#dropEffectMove
7. In an over method (colorLayerOver:), retrieve the list widgetfrom the DragDropContext.
8. Send the showDropFeedbackIn:allowScrolling: message to the list todisplay target emphasis at the pointer’s current position,scrolling, if necessary. (Remember, this message gets senteach time the pointer moves in the list).
colorLayerOver: aDragContext"A drag is over the list of color layers. Test whether a drop would be permittedhere with this data. If so, tell the list to scroll the target emphasis when thepointer moves. Return a symbol that indicates the feedback to be given to theuser. The DragDropManager uses this symbol to determine the pointer shape."
| list |aDragContext key == #colorChoice
ifFalse: [^#dropEffectNone].
list := aDragContext dropTarget clientData at: #widget. "V2 Step 7"list
showDropFeedbackIn: aDragContextallowScrolling: true. "V2 Step 8"
^#dropEffectMove
9. In an exit method (colorLayerExit:), get the drop target’sIdentityDictionary from the DragDropContext and retrieve the listwidget.
10. Restore the list’s original target emphasis and focus state.
11. Remove the drop target data from the DragDropContext. Thisprepares the DragDropContext for the next drop target thepointer may encounter.
colorLayerExit: aDragContext"A drag has exited the list of color layers without dropping. Test whether a dropwould have been permitted here with this data. If so, restore the initial state of
Chapter 18 Drag and Drop
358 VisualWorks Cookbook, Rev. 2.0
the color layer list, and return a symbol that indicates the feedback to be givento the user."
| dict widget |aDragContext key == #colorChoice
ifFalse: [^#dropEffectNone].
dict := aDragContext dropTarget clientData. "V2 Step 9"widget := dict at: #widget. "V2 Step 9"widget targetIndex: (dict at: #targetIndex). "V2 Step 10"widget hasFocus: (dict at: #hasFocus). "V2 Step 10"
aDragContext dropTarget clientData: nil. "V2 Step 11"^#dropEffectNone
See Also■ “Adding a Drop Target (General)” on page 348
■ “Examining the Drag Context” on page 365
■ “Responding to Modifier Keys” on page 366
■ “Defining Custom Effect Symbols” on page 371
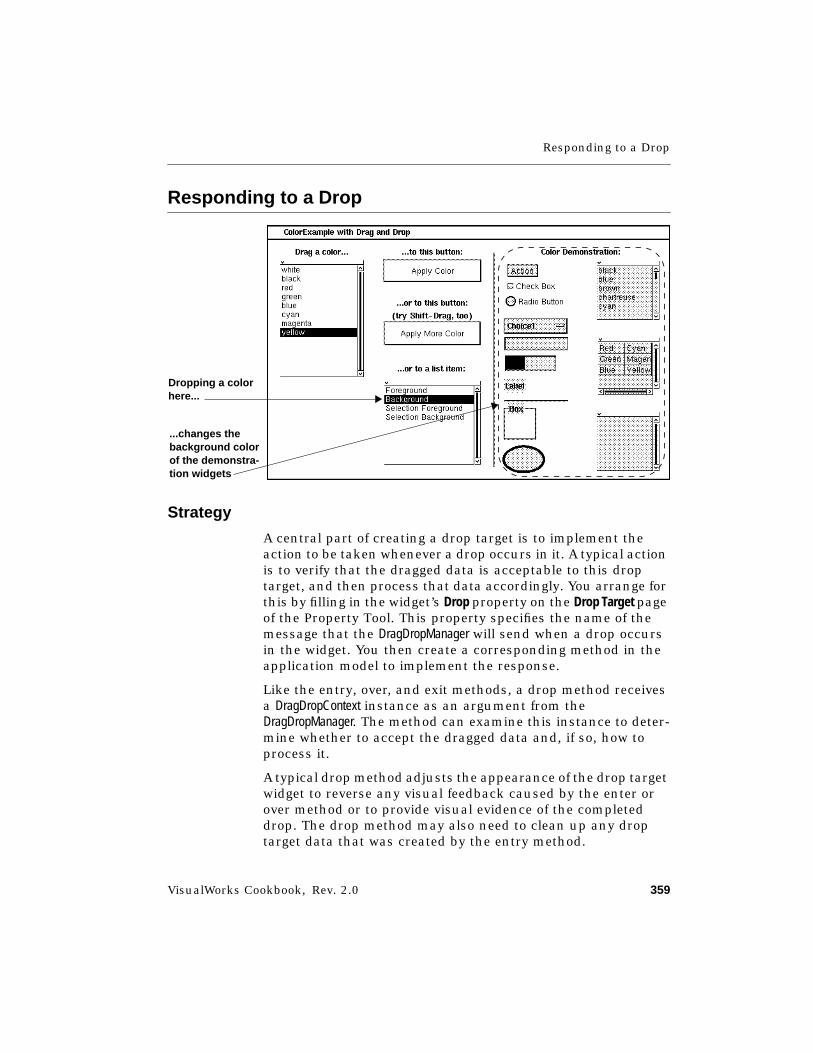
Responding to a Drop
VisualWorks Cookbook, Rev. 2.0 359
Responding to a Drop
Strategy
A central part of creating a drop target is to implement theaction to be taken whenever a drop occurs in it. A typical actionis to verify that the dragged data is acceptable to this droptarget, and then process that data accordingly. You arrange forthis by filling in the widget’s Drop property on the Drop Target pageof the Property Tool. This property specifies the name of themessage that the DragDropManager will send when a drop occursin the widget. You then create a corresponding method in theapplication model to implement the response.
Like the entry, over, and exit methods, a drop method receivesa DragDropContext instance as an argument from theDragDropManager. The method can examine this instance to deter-mine whether to accept the dragged data and, if so, how toprocess it.
A typical drop method adjusts the appearance of the drop targetwidget to reverse any visual feedback caused by the enter orover method or to provide visual evidence of the completeddrop. The drop method may also need to clean up any droptarget data that was created by the entry method.
Dropping a colorhere...
...changes thebackground colorof the demonstra-tion widgets
Chapter 18 Drag and Drop
360 VisualWorks Cookbook, Rev. 2.0
A drop method returns an effect symbol for the DragDropManagerto return to the drag-start method that initiated the drag.
The basic steps set up the Apply Color button in ColorDDExample sothat dropping a color on this button applies that color to theforeground layer of the demonstration widgets. The variant setsup the color layer list so that dropping a color on a targetedlayer applies the dragged color to that layer.
Basic Steps
Online example: ColorDDExample
1. In the canvas, select the widget you want to use as a droptarget. In this case, select the Apply Color button.
2. On the Drop Target page of a Properties Tool, set the widget’sDrop property (applyColorDrop:). The selector must end with acolon. Apply properties and install the canvas.
3. In a System Browser, add a drop method (applyColorDrop:) inan appropriate protocol (in this case, drop target - button 1). Themethod must accept a DragDropContext instance as an argu-ment.
4. In the drop method, determine whether the dragged datashould be accepted for processing (that is, whether it is acolor choice). To do this, send a key message to theDragDropContext instance to obtain the identifying symbol thatwas assigned when the drag started. If the key is not#colorChoice, return an effect symbol (#dropEffectNone) to signalthat no drop is allowed.
5. If the dragged data is acceptable, perform the processingthat is to result from the drop. In this example, send asourceData message to the DragDropContext to obtain theDragDropData; then send this object a clientData message toobtain the selected color. Turn the selected color into acolor value and set it as the foreground color of the demon-stration widgets.
6. Restore the widget’s original appearance (turn off the high-lighting that was turned on by the applyColorEnter: method).
7. Return an effect symbol indicating the result of the drop.This symbol is passed to the drag-start method (colorDrag:),
Responding to a Drop
VisualWorks Cookbook, Rev. 2.0 361
where it can be used to trigger further actions at the dropsource.
applyColorDrop: aDragContext "Basic Step 3""A drop has occurred in the Apply Color button. If the drop is permitted, set theforeground color of the demonstration widgets to be the dragged color choice.Restore the button to its former visual state and return an effect symbol forpossible use in the colorDrag method."
| dict aColor |aDragContext key == #colorChoice
ifFalse: [^#dropEffectNone]. "Basic Step 4"
dict := aDragContext sourceData clientData. "Basic Step 5"aColor := ColorValue perform: (dict at: #colorChoice).
(self builder componentAt: #applyColorButton) widgetisInTransition: false. "Basic Step 6"
self foregroundColor: aColor. "Basic Step 5"
^#dropEffectMove. "Basic Step 7"
Variant
Dropping data on a particular list item requires that you enabletarget emphasis in the list through the entry and over methods.Target emphasis tracks the location of the pointer, displaying arectangular border around the currently targeted list item.
Online example: ColorDDExample
1. In the canvas, select the list of color layers and set its IDproperty (in this case, enter #colorLayerList).
2. On the Drop Target page of a Properties Tool, set the widget’sEntry, Over and Drop properties (colorLayerEnter:, colorLayerOver: andcolorLayerDrop:).
3. In an entry method (colorLayerEnter:), give focus to the list toprepare it for displaying target emphasis.
Chapter 18 Drag and Drop
362 VisualWorks Cookbook, Rev. 2.0
colorLayerEnter: aDragContext"A drag has entered the bounds of the list of color layers. Test whether a dropwould be permitted here with this data. If so, save the initial state of the colorlayer list, give focus to the list, and return a symbol that indicates the feedbackto be given to the user."
| dict widget |aDragContext key == #colorChoice
ifFalse: [^#dropEffectNone].
widget := (self builder componentAt: #colorLayerList) widget.dict := IdentityDictionary new.dict at: #widget put: widget.dict at: #targetIndex put: widget targetIndex.dict at: #hasFocus put: widget hasFocus.aDragContext dropTarget clientData: dict.
widget hasFocus: true. "Variant Step 3"^#dropEffectMove
4. In an over method (colorLayerOver:), retrieve the list widgetfrom the DragDropContext and send it the showDropFeed-backIn:allowScrolling: message to display target emphasis at thepointer’s current position.
colorLayerOver: aDragContext"A drag is over the list of color layers. Test whether a drop would be permittedhere with this data. If so, tell the list to scroll the target emphasis when thepointer moves. Return a symbol that indicates the feedback to be given to theuser. The DragDropManager uses this symbol to determine the pointer shape."
| list |aDragContext key == #colorChoice
ifFalse: [^#dropEffectNone].
list := aDragContext dropTarget clientData at: #widget. "Variant Step 4"list
showDropFeedbackIn: aDragContextallowScrolling: true. "Variant Step 4"

Responding to a Drop
VisualWorks Cookbook, Rev. 2.0 363
^#dropEffectMove
5. In a drop method (colorLayerDrop:), test whether the draggeddata is a color choice; if so, obtain the selected color fromthe dragged data and turn it into a color value.
6. Send a targetIndex message to the list to get the index of thetargeted list item (the item containing the pointer when thedrop occurs).
7. Get the color layer that is shown in the list at the targetedindex.
8. Give visual feedback to indicate a successful drop. In thiscase, cause the targeted list item to appear selected (set thelist’s selection index to be the targeted index). Alternatively,you could restore the list to its original visual state, as isdone in the colorLayerExit: method.
9. Use the targeted color layer to choose the appropriatemessage for changing the color of the demonstrationwidgets.
colorLayerDrop: aDragContext"A drop has occur in the list of color layers. If the drop is permitted, combine thedragged color choice and the targeted color layer to change the color of theappropriate parts of the demonstration widgets. Return an effect symbol forpossible use in the colorDrag method."
| dict aColor widget idx aLayer |aDragContext key == #colorChoice
ifFalse: [^#dropEffectNone]. "Variant Step 5"
dict := aDragContext sourceData clientData. "Variant Step 5"aColor := ColorValue perform: (dict at: #colorChoice).
widget := aDragContext dropTarget clientData at: #widget.idx := widget targetIndex. "Variant Step 6"idx = 0 ifTrue: [^#dropEffectNone].aLayer := self colorLayer listHolder value at: idx. "Variant Step 7"
self colorLayer selectionIndexHolder value: idx. "Variant Step 8"
aDragContext dropTarget clientData: nil.
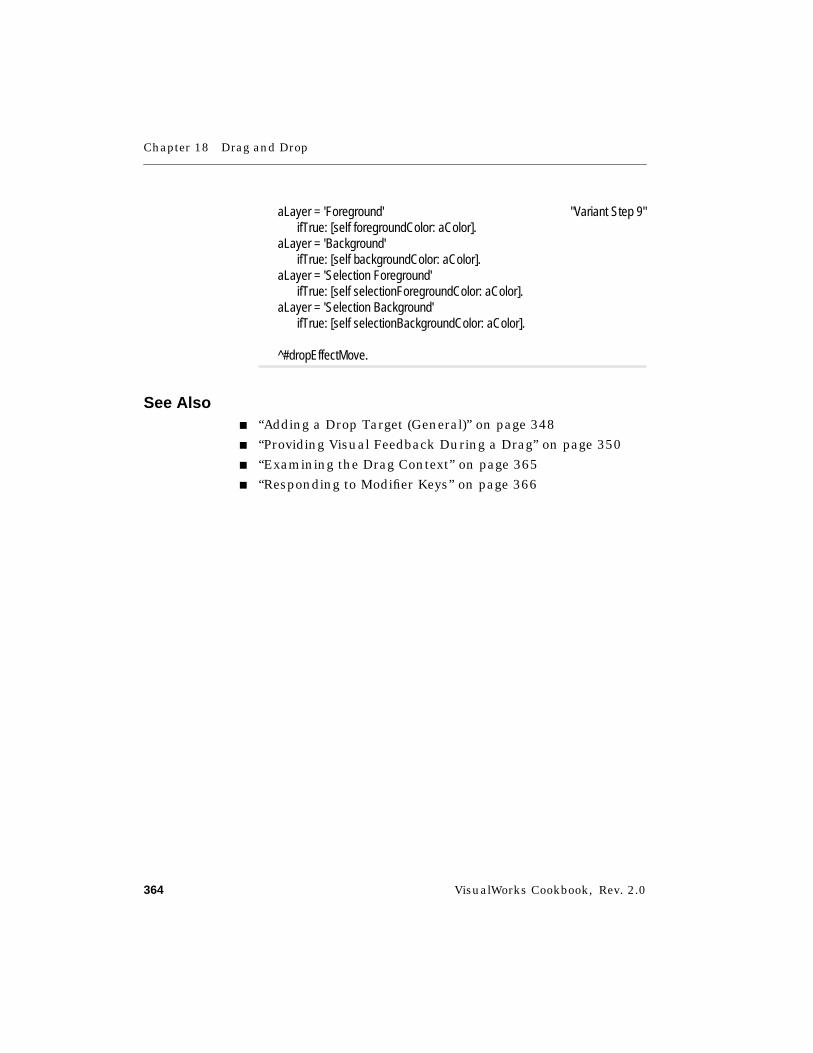
Chapter 18 Drag and Drop
364 VisualWorks Cookbook, Rev. 2.0
aLayer = 'Foreground' "Variant Step 9"ifTrue: [self foregroundColor: aColor].
aLayer = 'Background'ifTrue: [self backgroundColor: aColor].
aLayer = 'Selection Foreground'ifTrue: [self selectionForegroundColor: aColor].
aLayer = 'Selection Background'ifTrue: [self selectionBackgroundColor: aColor].
^#dropEffectMove.
See Also■ “Adding a Drop Target (General)” on page 348
■ “Providing Visual Feedback During a Drag” on page 350
■ “Examining the Drag Context” on page 365
■ “Responding to Modifier Keys” on page 366
Examining the Drag Context
VisualWorks Cookbook, Rev. 2.0 365
Examining the Drag Context
Strategy
In ColorDDExample, the various Entry, Over, Exit, and Drop methodsdetermine what kind of action or visual feedback to provide byexamining the dragged data. Specifically, these methods testthe key symbol that was assigned to the dragged data in theDrag Start method.
In general, drop target methods can examine a variety of infor-mation by querying the DragDropContext instance that is passed tothem by the DragDropManager. Among other things, theDragDropContext instance contains the DragDropData you created inthe Drag Start method, plus the current pointer location andmodifier key states.
Basic Steps➤ In a drop target method, obtain information about the drag
from the DragDropContext instance that is passed to themethod (assume the argument name is aDragContext).
"Get the key that was assigned to the dragged data."
aDragContext key.
"Get the application model from which the drag originated."
aDragContext sourceData contextApplication.
"Get the window from which the drag originated."
aDragContext sourceData contextWindow.
"Get the current pointer location."
aDragContext mousePoint.
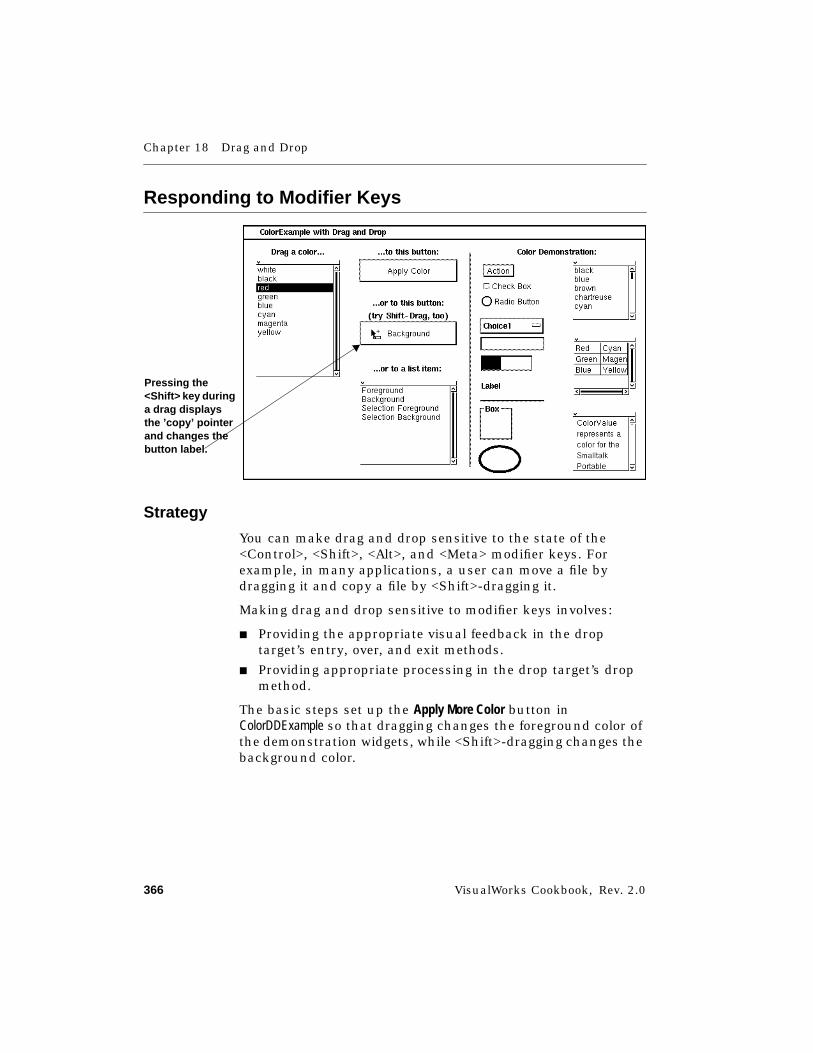
Chapter 18 Drag and Drop
366 VisualWorks Cookbook, Rev. 2.0
Responding to Modifier Keys
Strategy
You can make drag and drop sensitive to the state of the<Control>, <Shift>, <Alt>, and <Meta> modifier keys. Forexample, in many applications, a user can move a file bydragging it and copy a file by <Shift>-dragging it.
Making drag and drop sensitive to modifier keys involves:
■ Providing the appropriate visual feedback in the droptarget’s entry, over, and exit methods.
■ Providing appropriate processing in the drop target’s dropmethod.
The basic steps set up the Apply More Color button inColorDDExample so that dragging changes the foreground color ofthe demonstration widgets, while <Shift>-dragging changes thebackground color.
Pressing the<Shift> key duringa drag displaysthe ’copy’ pointerand changes thebutton label.
Responding to Modifier Keys
VisualWorks Cookbook, Rev. 2.0 367
Basic Steps
Online example: ColorDDExample
1. In the canvas, select the list of color layers and set its IDproperty (in this case, enter #applyMoreColorButton).
2. On the Drop Target page of a Properties Tool, set the widget’sEntry, Over, Exit and Drop properties (applyMoreColorEnter:,applyMoreColorOver:, applyMoreColorExit:, and applyMoreColorDrop:).Apply properties and install the canvas.
3. In an entry method (applyMoreColorEnter:), send a shiftDownmessage to the DragDropContext instance to find out whetherthe user is pressing the <Shift> key down.
4. If the <Shift> key is down, provide appropriate visual feed-back. In this case, change the button’s label to indicate thatbackground colors will be set, and return an effect symbol(#dropEffectCopy) to signal a modified transfer.
5. If the <Shift> key is not down, change the button’s label toindicate that foreground colors will be set, and return aneffect symbol (#dropEffectMove) to signal a regular transfer.
applyMoreColorEnter: aDragContext"A drag has entered the bounds of the Apply More Color button. Test whether adrop would be permitted here with this data. If so, store the current label of thebutton. Then test whether the shift key is down. Based on this test, change thebutton's label and return a symbol that indicates the feedback to be given to theuser."
| widget dict |aDragContext key == #colorChoice
ifFalse: [^#dropEffectNone].
widget := (self builder componentAt: #applyMoreColorButton) widget.dict := IdentityDictionary new.dict at: #widget put: widget.dict at: #label put: widget label.aDragContext dropTarget clientData: dict.
aDragContext shiftDown "Basic Steps 3"ifTrue:
[widget labelString: 'Background'.^#dropEffectCopy]. "Basic Steps 4"

Chapter 18 Drag and Drop
368 VisualWorks Cookbook, Rev. 2.0
widget labelString: 'Foreground'. "Basic Steps 5"^#dropEffectMove.
6. In an over method (applyMoreColorOver:), find out whether theuser has changed the <Shift> key state while dragging thepointer within the widget. (Remember, this method executeseach time the pointer moves in the widget.) If the <Shift>key is down, test whether the button’s label needs tochange; if so, change it. Return the #dropEffectCopy symbol.
7. If the <Shift> key is not down, test whether the button’slabel needs to change; if so, change it. Return the#dropEffectMove symbol.
applyMoreColorOver: aDragContext"A drag is over the Apply More Color button. Test whether a drop would bepermitted here with this data. If so, test whether the shift key is down. Based onthis test, return a symbol that indicates the feedback to be given to the user.The DragDropManager uses this symbol to determine the pointer shape."
| widget |aDragContext key == #colorChoice
ifFalse: [^#dropEffectNone].
widget := aDragContext dropTarget clientData at: #widget.
aDragContext shiftDownifTrue: "Basic Step 6"
[widget label text string = 'Background'ifFalse: [widget labelString: 'Background'].
^#dropEffectCopy].
widget label text string = 'Foreground’ifFalse: [widget labelString: 'Foreground'].
^#dropEffectMove. "Basic Step 7"
8. In an exit method (applyMoreColorExit:), restore the button’soriginal label. In this example, the same label is restored,regardless of the <Shift> key’s state.
Responding to Modifier Keys
VisualWorks Cookbook, Rev. 2.0 369
applyMoreColorExit: aDragContext"A drag has exited the Apply More Color button without dropping. Test whethera drop would have been permitted here with this data. If so, restore the buttonto its former state, and return a symbol that indicates the feedback to be givento the user."
| dict widget |aDragContext key == #colorChoice
ifFalse: [^#dropEffectNone].
dict := aDragContext dropTarget clientData.widget := dict at: #widget.widget label: (dict at: #label). "Basic Steps 8"aDragContext dropTarget clientData: nil.
^#dropEffectNone.
9. In a drop method (applyMoreColorDrop:), test whether the<Shift> key is down.
10. If the <Shift> key is down, apply the dragged color choice tothe background color layer of the demonstration widgets.Return #dropEffectCopy to signal a modified transfer.
11. If the <Shift> key is not down, apply the dragged colorchoice to the foreground color layer. Return #dropEffectMove tosignal a regular transfer. Note that a drag-start methodcould respond differently depending on which symbol isreturned.
applyMoreColorDrop: aDragContext"A drop has occured in the Apply More Color button. If the drop is permitted,obtain the dragged color. Then test whether the shift key is down. If so, set thebackground color of the demonstration widgets. If not, set their foregroundcolor. Restore the button to its former visual state and return an effect symbolfor possible use in the colorDrag method."
| dict widget aColor |
aDragContext key == #colorChoiceifFalse: [^#dropEffectNone].
Chapter 18 Drag and Drop
370 VisualWorks Cookbook, Rev. 2.0
dict := aDragContext sourceData clientData.aColor := ColorValue perform: (dict at: #colorChoice).
dict := aDragContext dropTarget clientData.widget := dict at: #widget.widget label: (dict at: #label).aDragContext dropTarget clientData: nil.
aDragContext shiftDown "Basic Steps 9"ifTrue:
[self backgroundColor: aColor.^#dropEffectCopy]. "Basic Steps 10"
self foregroundColor: aColor.^#dropEffectMove. "Basic Steps 11"
See Also■ “Adding a Drop Target (General)” on page 348
■ “Providing Visual Feedback During a Drag” on page 350
■ “Responding to a Drop” on page 359
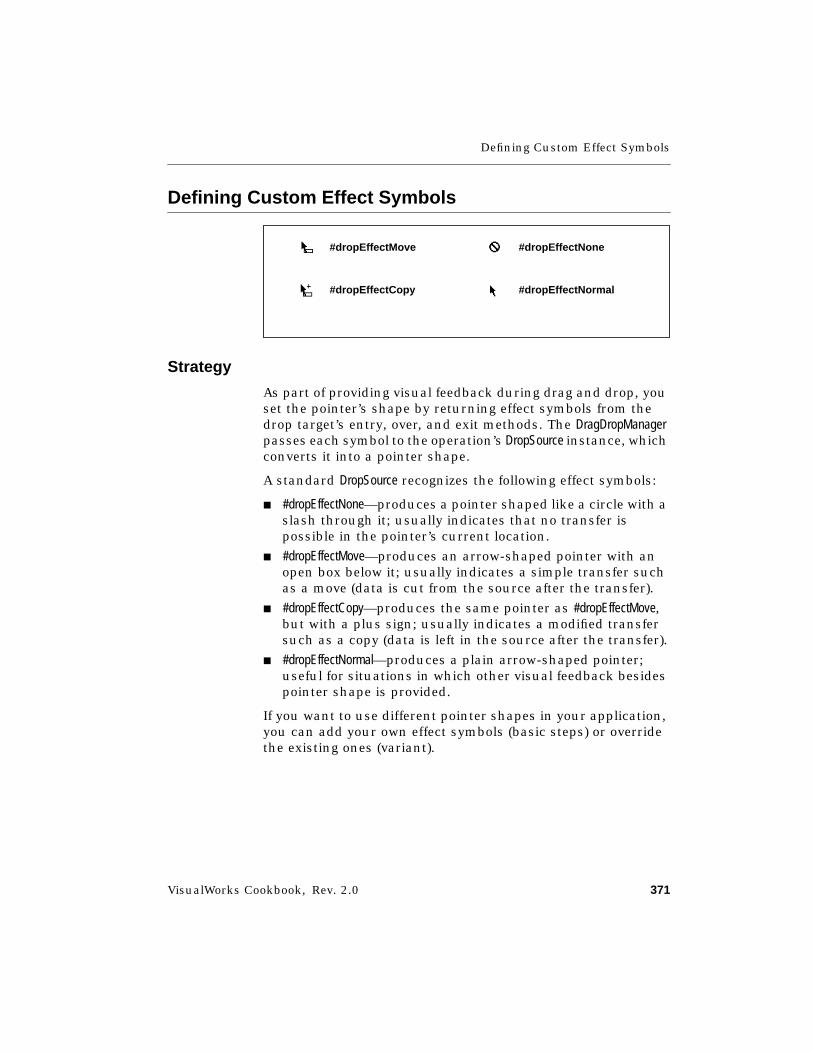
Defining Custom Effect Symbols
VisualWorks Cookbook, Rev. 2.0 371
Defining Custom Effect Symbols
Strategy
As part of providing visual feedback during drag and drop, youset the pointer’s shape by returning effect symbols from thedrop target’s entry, over, and exit methods. The DragDropManagerpasses each symbol to the operation’s DropSource instance, whichconverts it into a pointer shape.
A standard DropSource recognizes the following effect symbols:
■ #dropEffectNone—produces a pointer shaped like a circle with aslash through it; usually indicates that no transfer ispossible in the pointer’s current location.
■ #dropEffectMove—produces an arrow-shaped pointer with anopen box below it; usually indicates a simple transfer suchas a move (data is cut from the source after the transfer).
■ #dropEffectCopy—produces the same pointer as #dropEffectMove,but with a plus sign; usually indicates a modified transfersuch as a copy (data is left in the source after the transfer).
■ #dropEffectNormal—produces a plain arrow-shaped pointer;useful for situations in which other visual feedback besidespointer shape is provided.
If you want to use different pointer shapes in your application,you can add your own effect symbols (basic steps) or overridethe existing ones (variant).
#dropEffectNormal
#dropEffectNone#dropEffectMove
#dropEffectCopy
Chapter 18 Drag and Drop
372 VisualWorks Cookbook, Rev. 2.0
Basic Steps
Adding a New Effect Symbol1. In the application model, create a ConfigurableDropSource
instance (instead of a DropSource instance) in a drag-startmethod.
2. Initialize the ConfigurableDropSource instance with the name ofthe message to be sent to convert an effect symbol into apointer shape. In this example, specify giveFeedback:for:. Notethat the message name must consist of two keywords.
3. Initialize the ConfigurableDropSource instance with the objectthat is to receive the message specified in step 2. In thiscase, specify the application model itself.
4. Initialize the DragDropManager with the ConfigurableDropSourceinstance.
someDragStartMethod: aController"This is a hypothetical method that doesn’t really exist in any example."
| ds dm data |data := DragDropData new.data key: #someKindOfData.data contextWindow: self builder window.data contextWidget: aController.data contextApplication: self.data clientData: IdentityDictionary new.data clientData at: #someKindOfData put: self someData selection.
ds := ConfigurableDropSource new. "Basic Step 1"ds giveFeedbackSelector: #giveFeedback:for: . "Basic Step 2"ds receiver: self. "Basic Step 3"
dm := DragDropManagerwithDropSource: dswithData: data. "Basic Step 4"
dm doDragDrop.
Defining Custom Effect Symbols
VisualWorks Cookbook, Rev. 2.0 373
5. In the application model, create a giveFeedback:for: methodthat accepts an effect symbol and a ConfigurableDropSourceinstance as its arguments.
6. In the giveFeedback:for: method, define the desired new effectsymbols. In this case, the symbol #dropEffectDelete results in apointer shaped like a garbage can.
7. Return true to preserve the standard interpretation for theeffect symbols #dropEffectNone, #dropEffectMove, #dropEffectCopy,and #dropEffectNormal.
giveFeedBack: anEffect for: aDropSource "Basic Step 5"anEffect == #dropEffectDelete
ifTrue: [Cursor garbage show]. "Basic Step 6"^true "Basic Step 7"
Variant
Redefining a Standard Effect Symbol1. Repeat Basic Steps 1-5 to create and initialize a
ConfigurableDropTarget instance in the drag-start method.
2. In the giveFeedback:for: method, define all of the effectsymbol(s) you plan to use. In this case, cause the#dropEffectMove symbol to result in a pointer shaped like ahand, but keep the standard shapes for the other standardsymbols.
3. Return false to prevent your custom definitions from beingoverridden by the standard definitions.
giveFeedBack: anEffect for: aDropSource "Variant Step 2"anEffect == #dropEffectMove ifTrue: [Cursor hand show].anEffect == #dropEffectCopy ifTrue: [Cursor standardDragCopy show].anEffect == #dropEffectNone ifTrue: [Cursor dropNotOK show].anEffect == #dropEffectNormal ifTrue: [Cursor normal show].^false "Variant Step 3"
See Also■ “Providing Visual Feedback During a Drag” on page 350


VisualWorks Cookbook, Rev. 2.0 375
Chapter 19
Custom Views
Creating a View Class 376Connecting a View to a Domain Model 378Defining What a View Displays 380Updating a View When Its Model Changes 382Connecting a View to a Controller 385Redisplaying All or Part of a View 387Integrating a View into an Interface 389
See Also■ “Creating a Custom Dialog” on page 296
■ “Custom Controllers” on page 391
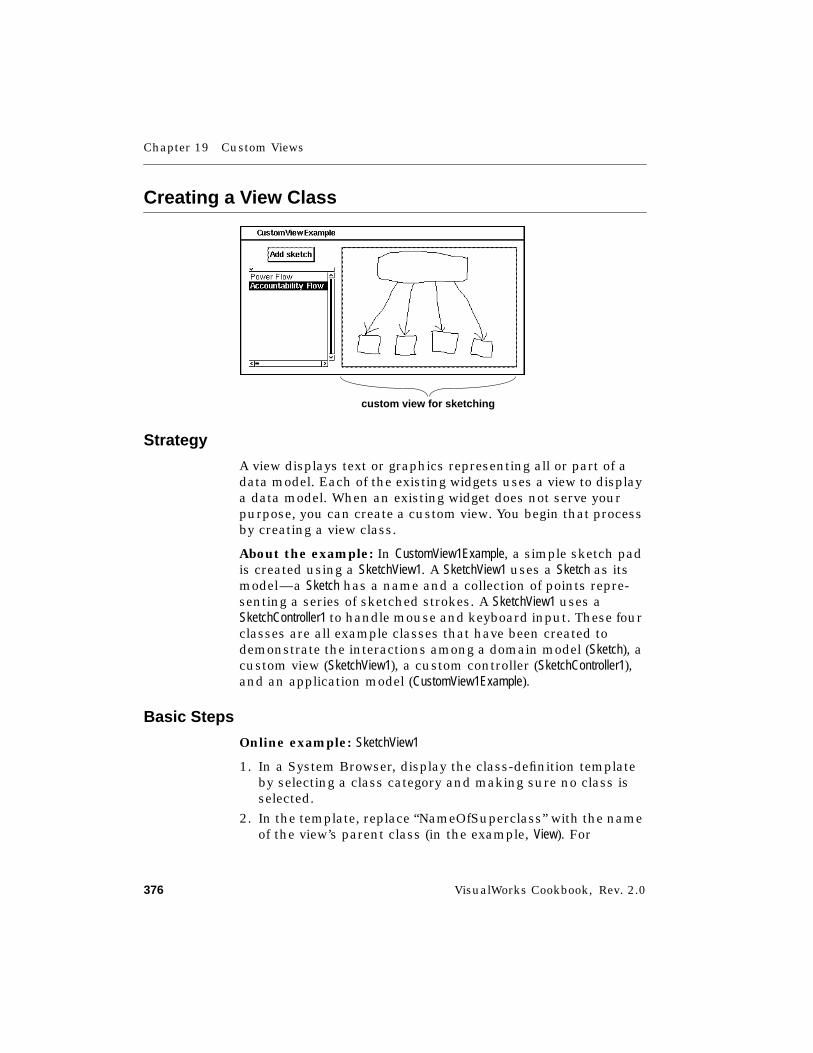
Chapter 19 Custom Views
376 VisualWorks Cookbook, Rev. 2.0
Creating a View Class
Strategy
A view displays text or graphics representing all or part of adata model. Each of the existing widgets uses a view to displaya data model. When an existing widget does not serve yourpurpose, you can create a custom view. You begin that processby creating a view class.
About the example: In CustomView1Example, a simple sketch padis created using a SketchView1. A SketchView1 uses a Sketch as itsmodel—a Sketch has a name and a collection of points repre-senting a series of sketched strokes. A SketchView1 uses aSketchController1 to handle mouse and keyboard input. These fourclasses are all example classes that have been created todemonstrate the interactions among a domain model (Sketch), acustom view (SketchView1), a custom controller (SketchController1),and an application model (CustomView1Example).
Basic Steps
Online example: SketchView1
1. In a System Browser, display the class-definition templateby selecting a class category and making sure no class isselected.
2. In the template, replace “NameOfSuperclass” with the nameof the view’s parent class (in the example, View). For
custom view for sketching
Creating a View Class
VisualWorks Cookbook, Rev. 2.0 377
guidance in choosing a superclass, refer to the View class inthe VisualWorks Object Reference.
3. Replace “NameOfClass” with the new class’s name(SketchView1).
4. Supply variable names, if any, and then accept thedefinition.
View subclass: #SketchView1instanceVariableNames: ''classVariableNames: ''poolDictionaries: ''category: 'Examples-Cookbook'
See Also■ “Creating a Class (Subclassing)” on page 26
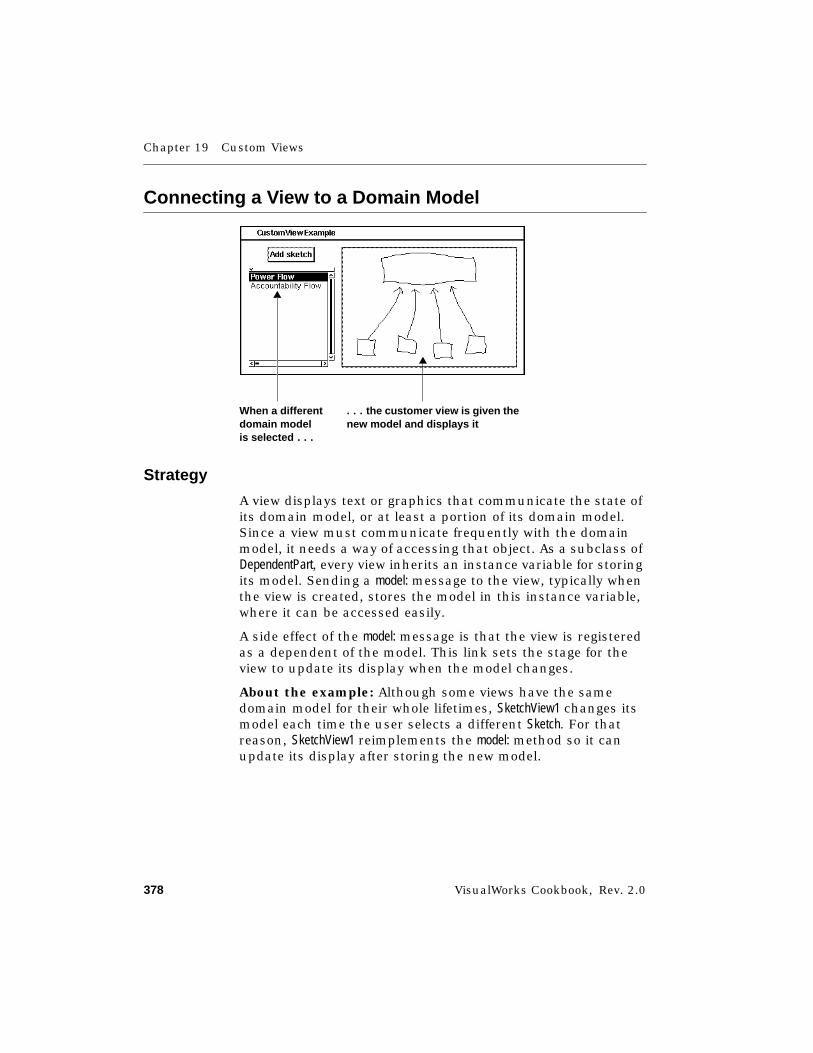
Chapter 19 Custom Views
378 VisualWorks Cookbook, Rev. 2.0
Connecting a View to a Domain Model
Strategy
A view displays text or graphics that communicate the state ofits domain model, or at least a portion of its domain model.Since a view must communicate frequently with the domainmodel, it needs a way of accessing that object. As a subclass ofDependentPart, every view inherits an instance variable for storingits model. Sending a model: message to the view, typically whenthe view is created, stores the model in this instance variable,where it can be accessed easily.
A side effect of the model: message is that the view is registeredas a dependent of the model. This link sets the stage for theview to update its display when the model changes.
About the example: Although some views have the samedomain model for their whole lifetimes, SketchView1 changes itsmodel each time the user selects a different Sketch. For thatreason, SketchView1 reimplements the model: method so it canupdate its display after storing the new model.
When a differentdomain modelis selecte d . . .
. . . the customer view is given thenew model and displays it
Connecting a View to a Domain Model
VisualWorks Cookbook, Rev. 2.0 379
Basic Steps
Online example: CustomView1Example, SketchView1
1. Tell the view which object to use as its domain model. Thisis done in an initialization method or, as in the example, theapplication model (CustomView1Example) can notify the viewwhenever the domain model changes.
changedSketchself sketchView model: self sketches selection. "Basic Step 1"
2. If the view needs to take action when its model is changed,such as redisplaying itself, override the inherited model:method (as in SketchView1).
model: aModel "Basic Step 2"super model: aModel.self invalidate.
"Tell the controller where to send menu messages."self controller performer: aModel.
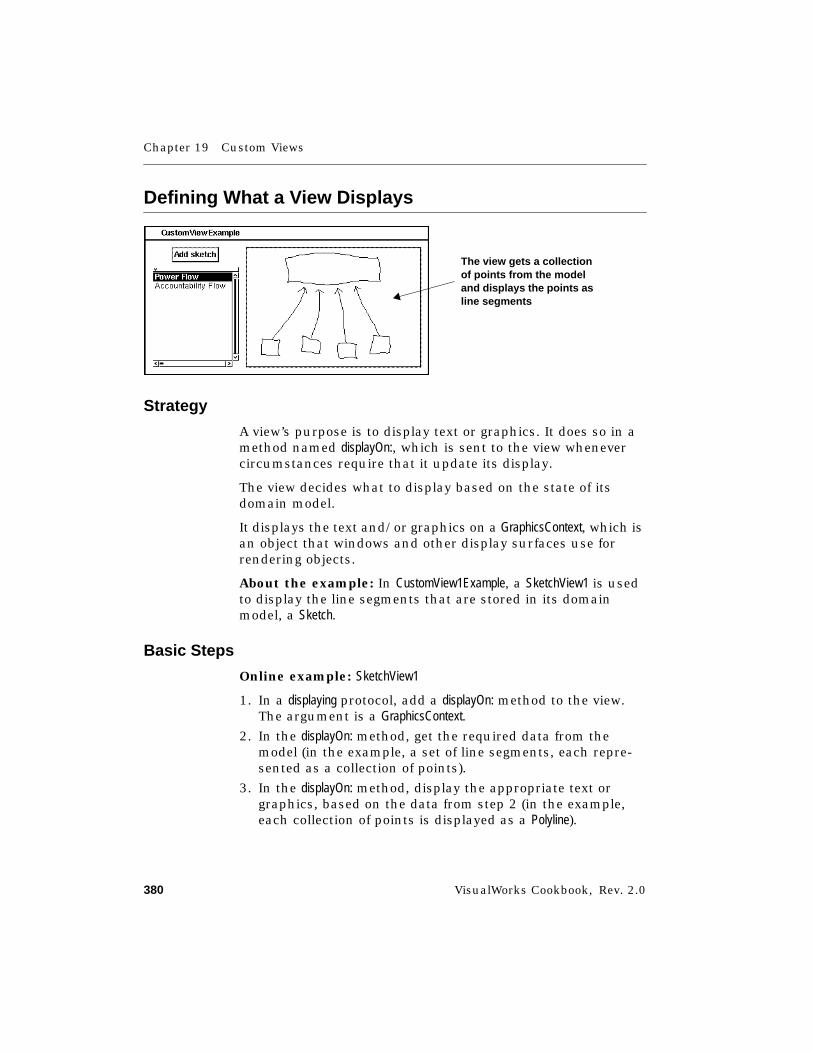
Chapter 19 Custom Views
380 VisualWorks Cookbook, Rev. 2.0
Defining What a View Displays
Strategy
A view’s purpose is to display text or graphics. It does so in amethod named displayOn:, which is sent to the view whenevercircumstances require that it update its display.
The view decides what to display based on the state of itsdomain model.
It displays the text and/or graphics on a GraphicsContext, which isan object that windows and other display surfaces use forrendering objects.
About the example: In CustomView1Example, a SketchView1 is usedto display the line segments that are stored in its domainmodel, a Sketch.
Basic Steps
Online example: SketchView1
1. In a displaying protocol, add a displayOn: method to the view.The argument is a GraphicsContext.
2. In the displayOn: method, get the required data from themodel (in the example, a set of line segments, each repre-sented as a collection of points).
3. In the displayOn: method, display the appropriate text orgraphics, based on the data from step 2 (in the example,each collection of points is displayed as a Polyline).
The view gets a collectionof points from the modeland displays the points asline segments
Defining What a View Displays
VisualWorks Cookbook, Rev. 2.0 381
displayOn: aGraphicsContext "Basic Step 1"self model isNil ifTrue: [^self].
self model strokes do: [ :stroke | "Basic Step 2"aGraphicsContext displayPolyline: stroke]. "Basic Step 3"
See Also■ “Displaying a Text Object” on page 558
■ “Integrating a Graphic into an Application” on page 652

Chapter 19 Custom Views
382 VisualWorks Cookbook, Rev. 2.0
Updating a View When Its Model Changes
Strategy
Since the purpose of a view is to display some aspect of itsdomain model, it must be prepared to change its display whenthe model is changed.
When the domain model changes its state, it is responsible fornotifying all of its dependents. It does so by sending a variantof the changed:with: message to itself. The first argument is a Symbolindicating what was changed, and the second argument is thenew value.
The changed:with: message is inherited, and it sends an update:with:message to each dependent, passing along the same two argu-ments. Thus, the view must implement an update:with: method inwhich it gets the new data from the model and displays it.
Basic Steps
Online example: Sketch, SketchView1
1. In any method in the domain model that changes the modelin a way that affects the view, send a variant of thechanged:with: message to the model. (In the example, Sketchsends three such messages, one when it adds a point andthe others when it erases some or all of its contents.)
add: aPoint"Add aPoint to the current stroke."
self
aModel
changed
update
update
dependents
view1 view2
Updating a View When Its Model Changes
VisualWorks Cookbook, Rev. 2.0 383
self strokes last add: aPoint.self changed: #stroke with: self currentLineSegment. "Basic Step 1"
eraseLine"Erase the last stroke that was drawn."
self strokes isEmptyifFalse: [
self strokes removeLast.self changed: #erase with: nil]. "Basic Step 1"
eraseAll"Erase my contents."
self strokes removeAll: self strokes copy.self changed: #erase with: nil. "Basic Step 1"
2. In the view, implement a variant of the update:with: method totake the appropriate action in response to a change in themodel. (In the example, the same update:with: methodresponds to either of the changed:with: messages sent by themodel.)
update: anAspect with: anObject "Basic Step 2""When a point is added to the model..."anAspect == #stroke
ifTrue: [anObject asStroker displayOn: self graphicsContext].
"When the model erases its contents..."anAspect == #erase
ifTrue: [self invalidate].
Chapter 19 Custom Views
384 VisualWorks Cookbook, Rev. 2.0
Variant
Using Shorter Forms of the changed:with: Message
The changed:with: message sent by the model can be shortened tochanged: when it only needs to tell dependents what changedwithout sending a new value.
The message can be further shortened to changed when it simplywants dependents to know that it has changed without tellingthem what aspect of itself has changed.
When two different forms are to be sent, send the fuller form inboth places. Otherwise, the simpler message is ignored. In theexample, the erase method uses nil as the second argument inchanged:with:. That makes it conform with the changed:with: messagesent by the add: method—otherwise, the erase method couldhave sent changed:.
The view must implement the corresponding form of theupdate:with: message.
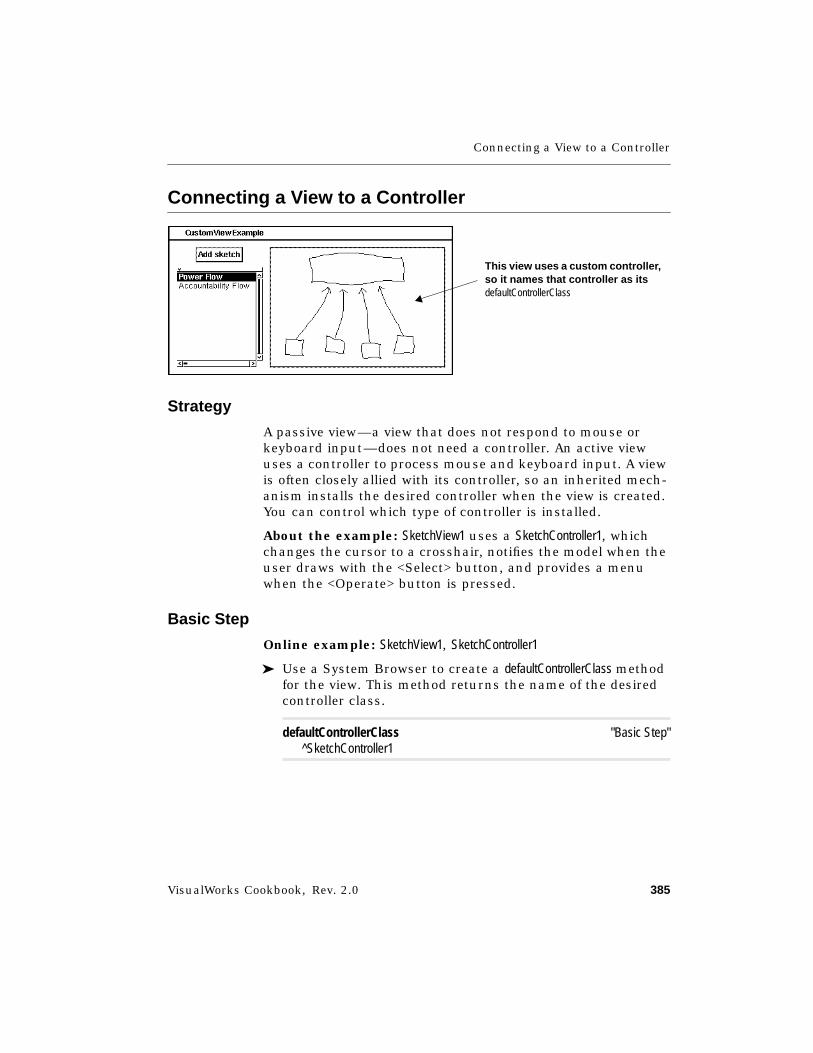
Connecting a View to a Controller
VisualWorks Cookbook, Rev. 2.0 385
Connecting a View to a Controller
Strategy
A passive view—a view that does not respond to mouse orkeyboard input—does not need a controller. An active viewuses a controller to process mouse and keyboard input. A viewis often closely allied with its controller, so an inherited mech-anism installs the desired controller when the view is created.You can control which type of controller is installed.
About the example: SketchView1 uses a SketchController1, whichchanges the cursor to a crosshair, notifies the model when theuser draws with the <Select> button, and provides a menuwhen the <Operate> button is pressed.
Basic Step
Online example: SketchView1, SketchController1
➤ Use a System Browser to create a defaultControllerClass methodfor the view. This method returns the name of the desiredcontroller class.
defaultControllerClass "Basic Step"^SketchController1
This view uses a custom controller,so it names that controller as itsdefaultControllerClass

Chapter 19 Custom Views
386 VisualWorks Cookbook, Rev. 2.0
Variants
V1. Making a View Passive1. Do the basic step.
2. Return NoController from the defaultControllerClass method.
V2. Connecting a Composite View to a Controller
When multiple views inhabit the same window, normally theyhave separate controllers. In some situations, the compositeobject that groups them needs its own controller, either insteadof the individual controllers or in addition to them. ACompositeView is intended for grouping views that need a commoncontroller. To initialize its controller:
➤ Send a controller: message to the composite that groups theviews. The argument is an instance of the desired type ofcontroller (not the class name as with defaultControllerClass).
See Also■ “Creating a Controller Class” on page 395
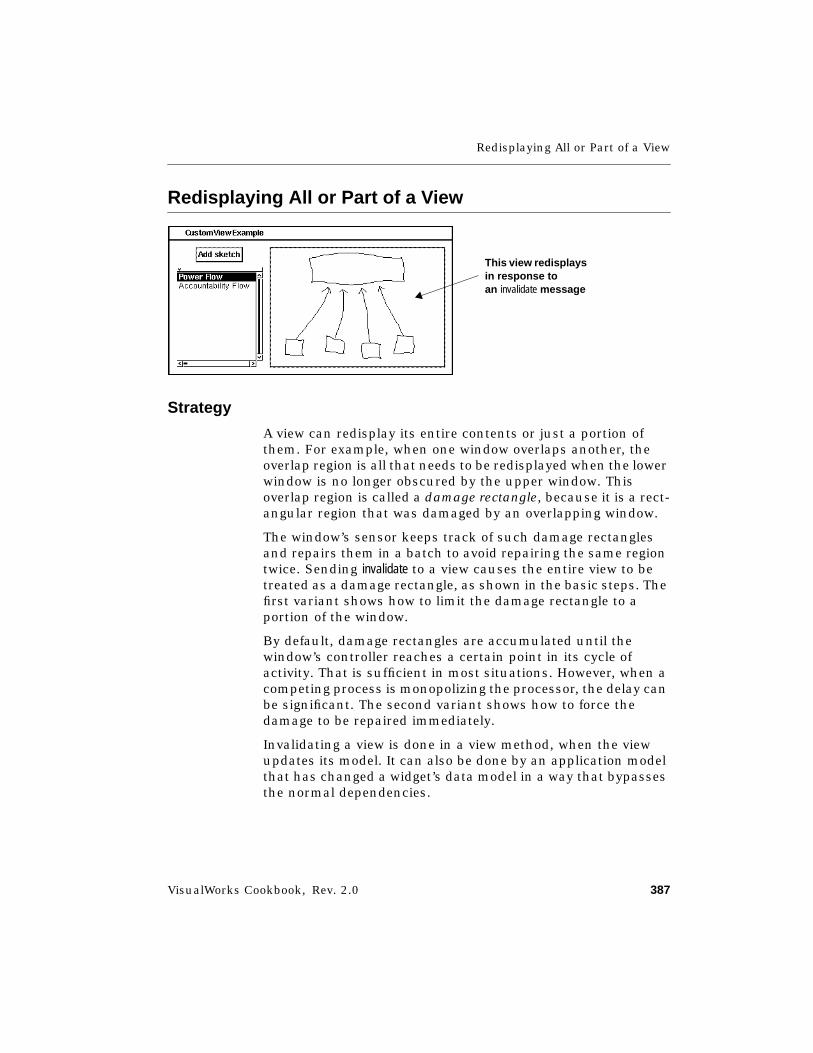
Redisplaying All or Part of a View
VisualWorks Cookbook, Rev. 2.0 387
Redisplaying All or Part of a View
Strategy
A view can redisplay its entire contents or just a portion ofthem. For example, when one window overlaps another, theoverlap region is all that needs to be redisplayed when the lowerwindow is no longer obscured by the upper window. Thisoverlap region is called a damage rectangle, because it is a rect-angular region that was damaged by an overlapping window.
The window’s sensor keeps track of such damage rectanglesand repairs them in a batch to avoid repairing the same regiontwice. Sending invalidate to a view causes the entire view to betreated as a damage rectangle, as shown in the basic steps. Thefirst variant shows how to limit the damage rectangle to aportion of the window.
By default, damage rectangles are accumulated until thewindow’s controller reaches a certain point in its cycle ofactivity. That is sufficient in most situations. However, when acompeting process is monopolizing the processor, the delay canbe significant. The second variant shows how to force thedamage to be repaired immediately.
Invalidating a view is done in a view method, when the viewupdates its model. It can also be done by an application modelthat has changed a widget’s data model in a way that bypassesthe normal dependencies.
This view redisplaysin response toan invalidate message
Chapter 19 Custom Views
388 VisualWorks Cookbook, Rev. 2.0
Basic Step
Online example: SketchView1
➤ Send invalidate to the view. This is typically done in a viewmethod that changes the model (as in the example).
model: aModelsuper model: aModel.self invalidate. "Basic Step"
"Tell the controller where to send menu messages."self controller performer: aModel.
Variants
V1. Redisplaying Part of a View➤ Send invalidateRectangle: to the view. The argument is a rect-
angle that represents all or part of the view’s bounding box.The bounding box can be accessed by sending bounds to theview.
V2. Arranging for Immediate Redisplay➤ Send invalidateRectangle:repairNow: to the view. The first
argument is a rectangle that represents all or part of aview’s bounding box. The second argument is true whenimmediate redisplay is desired, and false for the defaultbehavior.

Integrating a View into an Interface
VisualWorks Cookbook, Rev. 2.0 389
Integrating a View into an Interface
Strategy
A view-holder widget is provided on the Palette for integrating acustom view into a canvas. This view holder enables you totreat your custom view like a standard widget in that you canpaint its layout and apply borders and scroll bars. However,your application is responsible for connecting the view to adomain model.
Basic Steps
Online example: CustomView1Example, SketchView1
1. Use a Palette to place a view-holder widget on the canvas.
2. In the view holder’s View property, enter the name of theapplication-model method that supplies an instance of thedesired view (sketchView).
3. If the application model will need to access the custom viewwhile the application is running, use a System Browser tocreate an instance variable (sketchView) in which to store thecustom view.
4. Use a System Browser to create the application-modelmethod that you named in step 2 (sketchView). This methodtypically answers the contents of the instance variable thatyou created in step 3.
sketchView "Basic Step 4"^sketchView
This view is contained ina view-holder widget

Chapter 19 Custom Views
390 VisualWorks Cookbook, Rev. 2.0
5. In an initialize method in the application model, create aninstance of the custom view. If appropriate, connect thecustom view to a data model. (In the example, there is nomodel to be connected until the user adds the first Sketchobject.)
initializesketches := SelectionInList with: OrderedCollection new.sketches selectionIndexHolder onChangeSend: #changedSketch to: self.
sketchView := SketchView1 new. "Basic Step 5"
VisualWorks Cookbook, Rev. 2.0 391
Chapter 20
Custom Controllers
Choosing an Input Architecture 392Creating a Controller Class 395Connecting a Controller to a Model 399Connecting a Controller to a View 400Defining When a Controller Has Control 402Defining What a Controller Does 405Equipping a Controller with a Menu 409Shifting Control to a Different Controller 411Sensing Mouse Activity 412Sensing Keyboard Activity 416Getting the Cursor’s Location 419
See Also■ “Custom Views” on page 375
Chapter 20 Custom Controllers
392 VisualWorks Cookbook, Rev. 2.0
Choosing an Input Architecture
Strategy
An input controller is the part of a user interface that respondsto user-input events, typically mouse actions and keyboardactivity. VisualWorks supports one type of input controller thatuses a polling architecture and another type that uses anevent-driven architecture. Within a given user-interfacecanvas, all views must employ the same input architecture. Thebasic steps show how to specify the desired input architecturefor a canvas.
Polling controller: One type of input controller uses a loop torepeatedly check for input events, for as long as the controllerretains control. (Typically, a controller retains control while themouse cursor is within the boundaries of the associated view.)Each time the controller asks for events that have occurredsince the previous iteration, it is said to be polling for events,hence the name polling controller.
Event-driven controller: The second type of input controllerdoes not use a loop to poll for input events. Instead, it relies onthe ControlManager to notify it whenever an input event occurs. Itthen decides whether the event is of interest—for example, abutton widget’s controller cares about mouse-button eventsbut ignores most keyboard events. Because this type ofcontroller is inactive except when there is a relevant input eventfor it to process, it is said to be driven by events, or event-driven.While the flow of control is dispatched to a polling controller,individual events are dispatched to an event-driven controller.
Missed mouse events: When a mouse button is pressed andreleased rapidly while the controller is busy processing anearlier event, the button-pressing event can be displaced in theobject that stores button states (an InputState) before a pollingcontroller has a chance to poll for events. As a result, a pollingcontroller can miss some events and thus appear unresponsive.This phenomenon is usually associated with single-clickingand double-clicking maneuvers, and is often referred to asmissed mouse events. An event-driven controller captures allevents faithfully. This is considered the primary advantage ofan event-driven controller.
Choosing an Input Architecture
VisualWorks Cookbook, Rev. 2.0 393
Processor burden: Because a polling controller runs its pollingloop even when there are no events to process, it places agreater burden on the processor. In practice, VisualWorks mini-mizes this difference by putting a polling controller to sleepafter a brief period of fruitless polling, then awakening it whenfresh input arrives.
Cross-platform portability: An event-driven controller is moresensitive to differences in event sequences across platforms,which requires more care in multi-platform applications. If youonly want to be faithful to a single platform, an event-drivencontroller is generally preferred because the host windowmanager’s sequence of input events is preserved.
Filing in the input events code: By default, all canvases usethe polling architecture because that is the only architecturethat is available in the standard VisualWorks environment. Afile named events.st in the extras directory contains thecode for the event-driven architecture. After you file in thatcode, all canvases use the event-driven architecture by default.Canvases that use a standard VisualWorks controller can useeither type of input architecture, but canvases that use customcontrollers will usually need to have the architecture set indi-vidually, as shown in the basic steps.
Dual-architecture controllers: A given controller class can beequipped for both input architectures. After you file in the inputevents code, standard VisualWorks controllers are capable ofservicing either a polling or an event-driven canvas. A customcontroller class also inherits from Controller most of themachinery for fitting into either architecture, though you willtypically need to add custom protocol for each architecture.Thus, for example, you can continue to use a custom controllerwithin the older polling style while you layer on the event-handling methods, then you can switch any canvases that usethe controller to the event-driven architecture. The remainingtopics in this chapter discuss the functional customizationsneeded to suit each input architecture.
Basic Steps1. If necessary, file in the input events code that is supplied
with VisualWorks, as described above.
Chapter 20 Custom Controllers
394 VisualWorks Cookbook, Rev. 2.0
2. If a Resource Finder is not already open, open one bychoosing Browse➞Resources from the VisualWorks mainwindow.
3. In the Resource Finder, select the application class and theinterface spec whose input architecture you want to set,then click on the Edit button. The canvas will be opened inedit mode.
4. In the Canvas Tool, click on the Properties button. A Proper-ties Tool will be opened. Make sure no widget is selected inthe canvas, so the Properties Tool is displaying the windowproperties.
5. In the Properties Tool, turn on the Event Driven check box ifyou want to use the event-driven input architecture for thiscanvas. Turn it off to use the polling architecture.
6. Save the change by clicking on Install in the Canvas Tool.
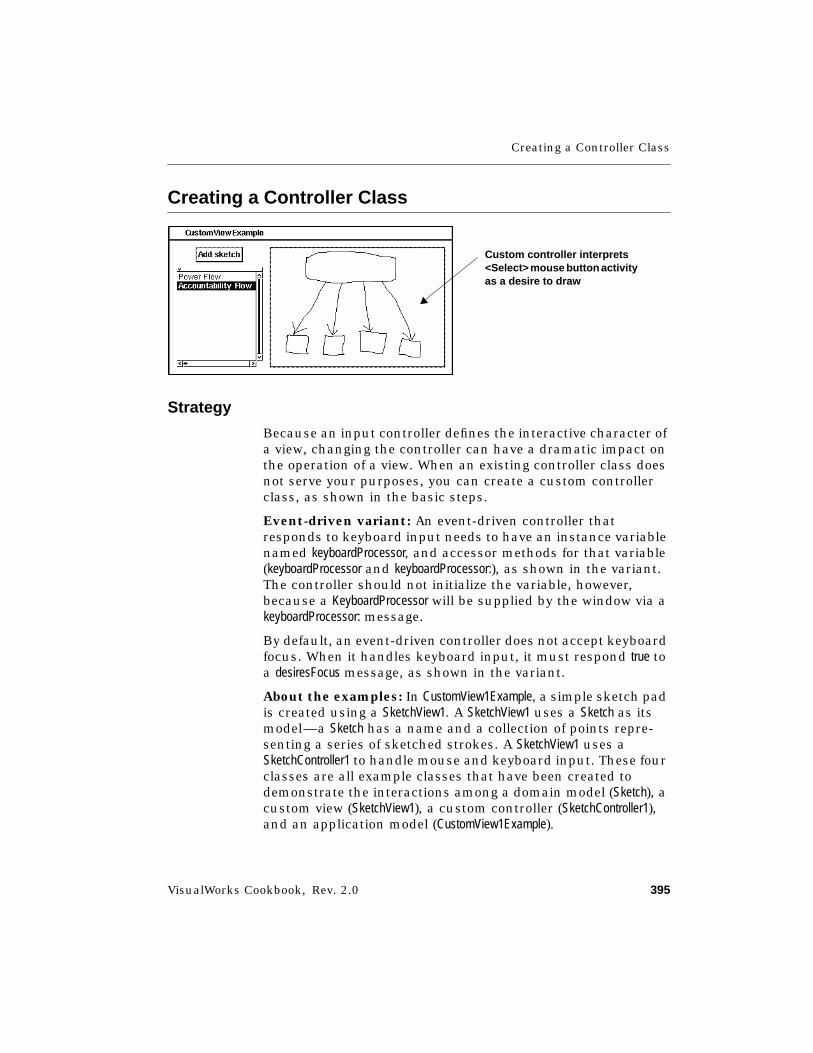
Creating a Controller Class
VisualWorks Cookbook, Rev. 2.0 395
Creating a Controller Class
Strategy
Because an input controller defines the interactive character ofa view, changing the controller can have a dramatic impact onthe operation of a view. When an existing controller class doesnot serve your purposes, you can create a custom controllerclass, as shown in the basic steps.
Event-driven variant: An event-driven controller thatresponds to keyboard input needs to have an instance variablenamed keyboardProcessor, and accessor methods for that variable(keyboardProcessor and keyboardProcessor:), as shown in the variant.The controller should not initialize the variable, however,because a KeyboardProcessor will be supplied by the window via akeyboardProcessor: message.
By default, an event-driven controller does not accept keyboardfocus. When it handles keyboard input, it must respond true toa desiresFocus message, as shown in the variant.
About the examples: In CustomView1Example, a simple sketch padis created using a SketchView1. A SketchView1 uses a Sketch as itsmodel—a Sketch has a name and a collection of points repre-senting a series of sketched strokes. A SketchView1 uses aSketchController1 to handle mouse and keyboard input. These fourclasses are all example classes that have been created todemonstrate the interactions among a domain model (Sketch), acustom view (SketchView1), a custom controller (SketchController1),and an application model (CustomView1Example).
Custom controller interprets<Select> mouse button activityas a desire to draw

Chapter 20 Custom Controllers
396 VisualWorks Cookbook, Rev. 2.0
A parallel set of example classes demonstrates the event-drivenway of doing things. CustomView2Example is identical toCustomView1Example, except that its canvas has the Event Drivenproperty turned on. SketchView2 is identical to SketchView1, exceptthat its defaultControllerClass is SketchController2 instead ofSketchController1. SketchController2 has the event-specific methodsneeded to service an event-driven canvas. (Separate exampleclasses have been used for clarity — a single controller classcan easily have both polling and event-driven protocol.)
To file in these classes, choose File➞Browse Example Class from theOnline Documentation browser and select CustomView1Example orCustomView2Example, or both.
Basic Steps
Online example: SketchController1
1. In a System Browser, display the class-definition templateby selecting a class category and making sure no class isselected.
2. In the template, replace “NameOfSuperclass” with the nameof the controller’s parent class (in the example,ControllerWithMenu). For guidance in choosing a superclass,consult the entry for Controller in the VisualWorks ObjectReference.
3. Replace “NameOfClass” with the new class’s name(SketchController1).
4. Supply variable names, if any, and then accept the defini-tion. (In the example, a variable named strokeInProgress iscreated to store a true/false indication of whether the useris actively sketching.)
ControllerWithMenu subclass: #SketchController1 "Basic Steps 1-4"instanceVariableNames: 'strokeInProgress 'classVariableNames: ''poolDictionaries: ''category: 'Examples-Cookbook'
5. Add an initialize method in an instance protocol namedinitialize-release. The method is responsible for assigningan initial value to the instance variables.
Creating a Controller Class
VisualWorks Cookbook, Rev. 2.0 397
initialize "Basic Step 5"
super initialize.strokeInProgress := false.
6. Add accessor methods in an instance protocol namedaccessing. The methods are responsible for getting andsetting the value of each instance variable.
strokeInProgress "Basic Step 6"^strokeInProgress
strokeInProgress: aBoolean "Basic Step 6"strokeInProgress := aBoolean
Variant
Creating an Event-Driven Controller Class
Online example: SketchController2
1. Do the basic steps, adding an instance variable namedkeyboardProcessor as well as accessor methods for that variable(when keyboard input is to be handled).
ControllerWithMenu subclass: #SketchController2 "Variant Step 1"instanceVariableNames: 'keyboardProcessor strokeInProgress 'classVariableNames: ''poolDictionaries: ''category: 'Examples-Cookbook'
keyboardProcessor "Variant Step 1"^keyboardProcessor
keyboardProcessor: kp "Variant Step 1"keyboardProcessor := kp
Chapter 20 Custom Controllers
398 VisualWorks Cookbook, Rev. 2.0
2. When keyboard input is to be handled, add a desiresFocusmessage to the controller, in a protocol named event driven.The method simply returns true, overriding the inheritedmethod, which returns false.
desiresFocus "Variant Step 2"^true
See Also■ “Creating a Class (Subclassing)” on page 26
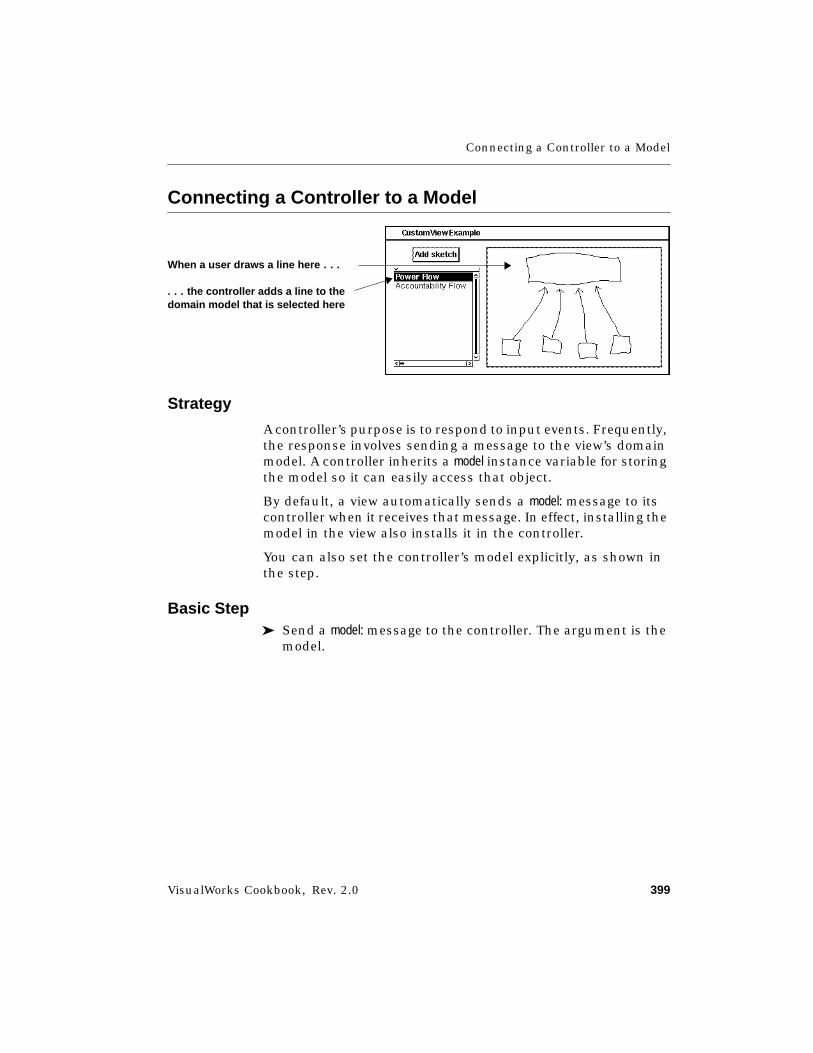
Connecting a Controller to a Model
VisualWorks Cookbook, Rev. 2.0 399
Connecting a Controller to a Model
Strategy
A controller’s purpose is to respond to input events. Frequently,the response involves sending a message to the view’s domainmodel. A controller inherits a model instance variable for storingthe model so it can easily access that object.
By default, a view automatically sends a model: message to itscontroller when it receives that message. In effect, installing themodel in the view also installs it in the controller.
You can also set the controller’s model explicitly, as shown inthe step.
Basic Step➤ Send a model: message to the controller. The argument is the
model.
When a user draws a line her e . . .
. . . the controller adds a line to thedomain model that is selected here
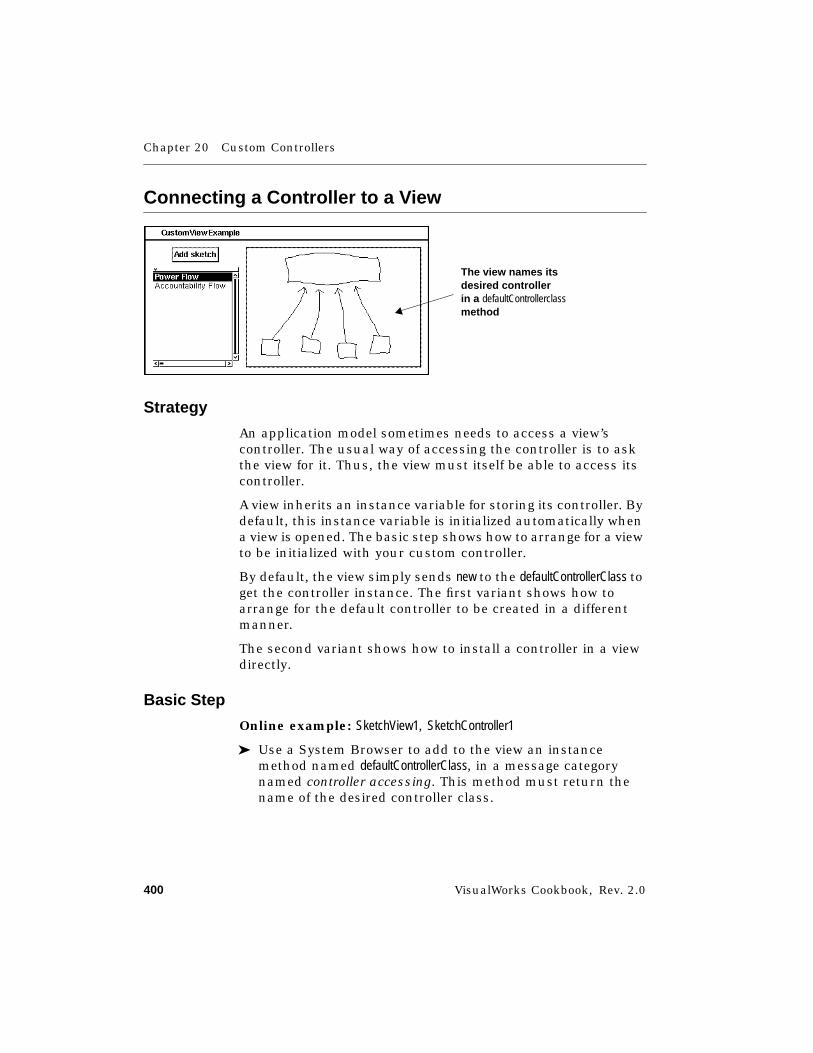
Chapter 20 Custom Controllers
400 VisualWorks Cookbook, Rev. 2.0
Connecting a Controller to a View
Strategy
An application model sometimes needs to access a view’scontroller. The usual way of accessing the controller is to askthe view for it. Thus, the view must itself be able to access itscontroller.
A view inherits an instance variable for storing its controller. Bydefault, this instance variable is initialized automatically whena view is opened. The basic step shows how to arrange for a viewto be initialized with your custom controller.
By default, the view simply sends new to the defaultControllerClass toget the controller instance. The first variant shows how toarrange for the default controller to be created in a differentmanner.
The second variant shows how to install a controller in a viewdirectly.
Basic Step
Online example: SketchView1, SketchController1
➤ Use a System Browser to add to the view an instancemethod named defaultControllerClass, in a message categorynamed controller accessing. This method must return thename of the desired controller class.
The view names itsdesired controllerin a defaultControllerclassmethod
Connecting a Controller to a View
VisualWorks Cookbook, Rev. 2.0 401
defaultControllerClass "Basic Step"^SketchController1
Variants
V1. Initializing the Controller in a Nonstandard Way
Online example: CUARadioButtonView (not an example class)
➤ Use a System Browser to add to the view an instancemethod named defaultController, in a message category namedcontroller accessing. This method must return a properlyinitialized instance of the desired controller class.
defaultController "V1 Step"^super defaultController beTriggerOnUp
V2. Setting the View’s Controller Directly➤ Send a controller: message to the view, typically within the
view’s initialize method. The argument is an instance of thedesired controller class.
See Also■ “Creating a View Class” on page 376

Chapter 20 Custom Controllers
402 VisualWorks Cookbook, Rev. 2.0
Defining When a Controller Has Control
Strategy
Taking control: By default, a polling controller takes controland an event-driven controller accepts mouse events wheneverthe mouse cursor enters the boundaries of the view. (Windowand keyboard events are directed to the active widget in theactive window, regardless of where the cursor is located.) Thisis inherited behavior, which may differ depending on the super-class you choose for your custom controller. The B1 step showshow to override that inherited behavior for a polling controller,and the B2 step shows how to override it for an event-drivencontroller.
Each of the example controllers, SketchController1 andSketchController2, adds a stipulation that a Sketch must be selectedin the neighboring list of sketches. It tests this by verifying thatits model is not nil.
Yielding control: During its cycle of activity, a pollingcontroller continually tests whether it should yield control. Bydefault, it yields when the cursor goes outside the view’sboundaries or when the window menu button is pressed. Thevariant shows how to redefine the test for yielding control. Anevent-driven controller needs no such test because it yieldscontrol whenever there are no events for it to process.
control manager
isControlWanted
isControlActivepolling controller
event-driven controller
handlerForMouseEvent:

Defining When a Controller Has Control
VisualWorks Cookbook, Rev. 2.0 403
Basic Steps
B1. Taking Control (Polling Controller)
Online example: SketchController1
➤ Use a System Browser to create an isControlWanted method inthe controller. This method must answer true when itsconditions for taking control are met, and false otherwise.
isControlWanted "B1 Step""Answer true when the cursor is inside the view and the model is not nil."
^self viewHasCursor and: [self model notNil].
B2. Taking Control (Event-Driven Controller)
Online example: SketchController2
➤ Use a System Browser to create a handlerForMouseEvent:method in the controller. The argument is a mouse event.This method must return the controller when its conditionsfor handling the mouse event are met, and false otherwise.Note that this method uses viewHasCursorWithEvent: instead ofthe polling variant, viewHasCursor.
handlerForMouseEvent: aMouseEvent "B2 Step""Answer true when the cursor is inside the view and the model is not nil."
^((self viewHasCursorWithEvent: event)and: [self model notNil])
ifTrue: [self]ifFalse: [nil]
Variant
Defining the Test for Yielding Control
Online example: ParagraphEditor (not an example class)
➤ Use a System Browser to create an isControlActive method inthe controller. This method must answer true when its
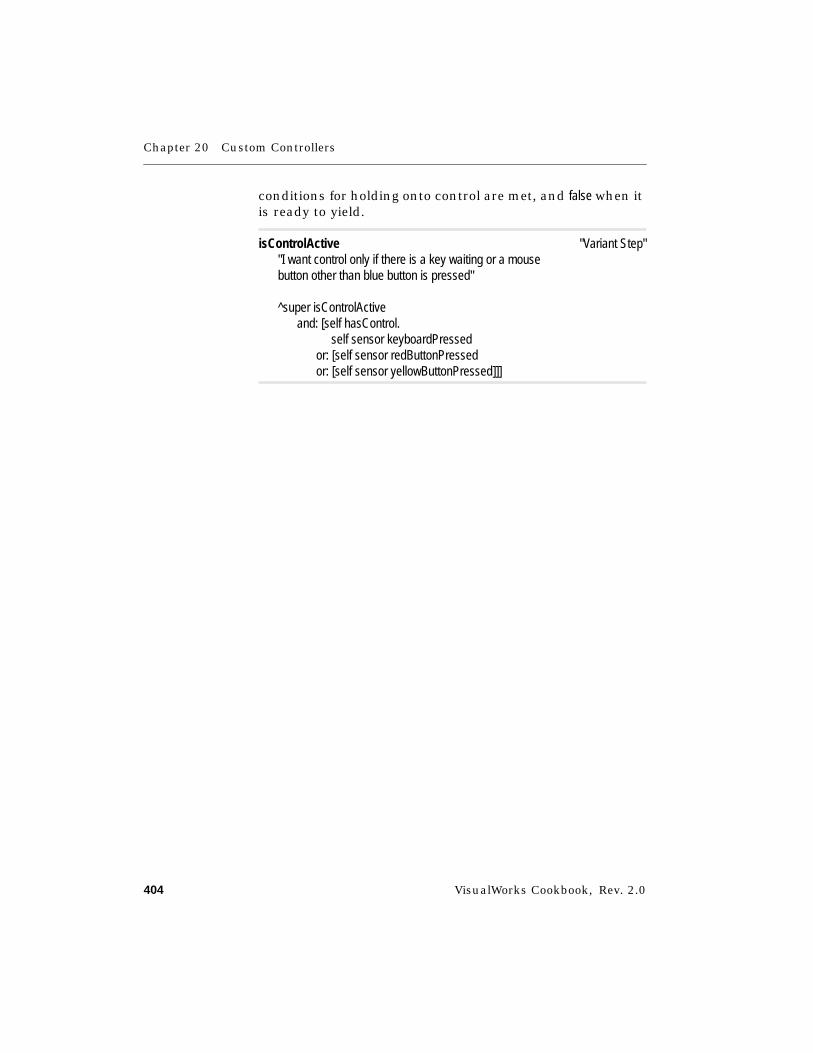
Chapter 20 Custom Controllers
404 VisualWorks Cookbook, Rev. 2.0
conditions for holding onto control are met, and false when itis ready to yield.
isControlActive "Variant Step""I want control only if there is a key waiting or a mousebutton other than blue button is pressed"
^super isControlActiveand: [self hasControl.
self sensor keyboardPressedor: [self sensor redButtonPressedor: [self sensor yellowButtonPressed]]]
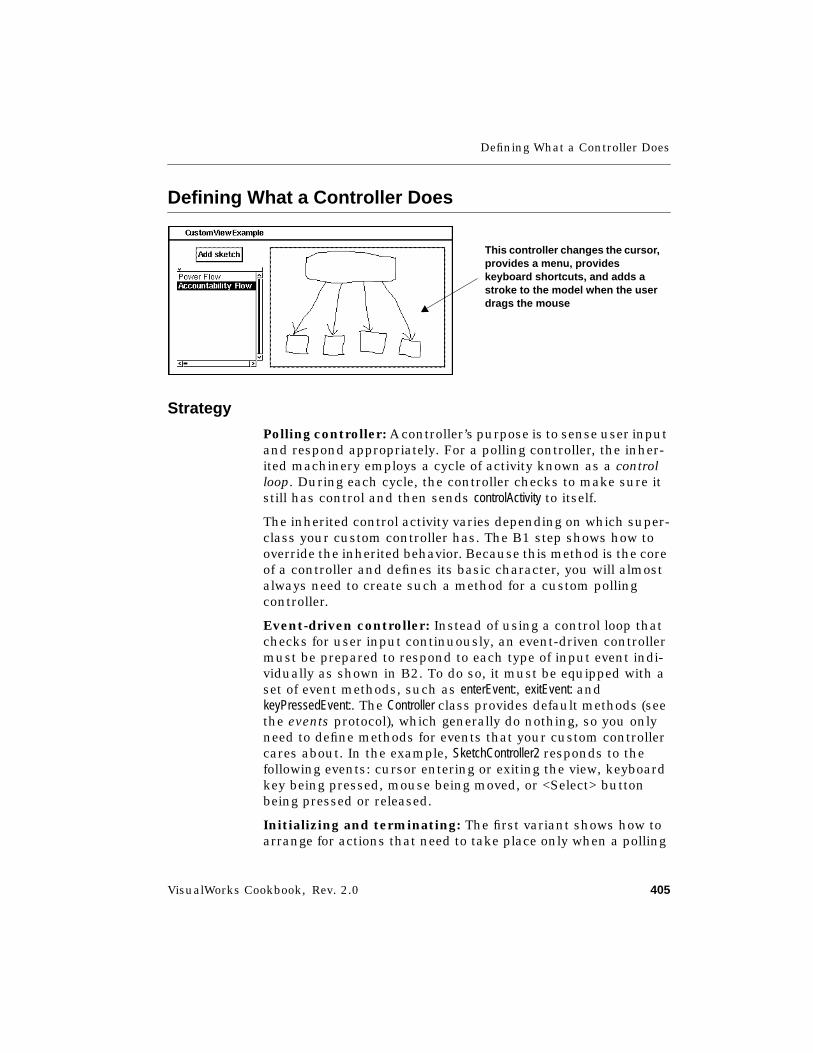
Defining What a Controller Does
VisualWorks Cookbook, Rev. 2.0 405
Defining What a Controller Does
Strategy
Polling controller: A controller’s purpose is to sense user inputand respond appropriately. For a polling controller, the inher-ited machinery employs a cycle of activity known as a controlloop. During each cycle, the controller checks to make sure itstill has control and then sends controlActivity to itself.
The inherited control activity varies depending on which super-class your custom controller has. The B1 step shows how tooverride the inherited behavior. Because this method is the coreof a controller and defines its basic character, you will almostalways need to create such a method for a custom pollingcontroller.
Event-driven controller: Instead of using a control loop thatchecks for user input continuously, an event-driven controllermust be prepared to respond to each type of input event indi-vidually as shown in B2. To do so, it must be equipped with aset of event methods, such as enterEvent:, exitEvent: andkeyPressedEvent:. The Controller class provides default methods (seethe events protocol), which generally do nothing, so you onlyneed to define methods for events that your custom controllercares about. In the example, SketchController2 responds to thefollowing events: cursor entering or exiting the view, keyboardkey being pressed, mouse being moved, or <Select> buttonbeing pressed or released.
Initializing and terminating: The first variant shows how toarrange for actions that need to take place only when a polling
This controller changes the cursor,provides a menu, provideskeyboard shortcuts, and adds astroke to the model when the userdrags the mouse
Chapter 20 Custom Controllers
406 VisualWorks Cookbook, Rev. 2.0
controller accepts or yields control. An event-driven controllerperforms such actions in its enterEvent: and exitEvent: methods.
Changing the cursor: The second variant shows how tooverride the inherited control loop for a polling controller. As inthe example, this technique is used mainly for adding to thebasic loop by displaying a different cursor while the controllerhas control. The SketchController1 displays a cross-hair cursor toindicate to the user that drawing is enabled. An event-drivencontroller implements a cursor change in the enterEvent: andexitEvent: methods, as shown in B2.
Event consumption: When an event-driven controller receivesan event, it has the choice of passing the event on to subordi-nate controllers or consuming the event. An event-handlingmethod consumes the event by returning nil, and passes theevent on by returning the event.
Basic Steps
B1. Control Loop (Polling Controller)
Online example: SketchController1
➤ Use a System Browser to create a controlActivity method in thecontroller. This method must find out what user input eventhas occurred, if any, and take the appropriate action. Userinput is sensed by the controller’s sensor.
controlActivity "B1 Step""Check for mouse button and keyboard activity."
"If the <Select> mouse button is being pressed, draw."self sensor redButtonPressed
ifTrue: [^self redButtonActivity].
"When not drawing, end the stroke."self strokeInProgress: false.
"If the <Operate> button is being pressed, display the menu."self sensor yellowButtonPressed
ifTrue: [^self yellowButtonActivity].
Defining What a Controller Does
VisualWorks Cookbook, Rev. 2.0 407
"Check for keyboard input (specifically, the shortcut keys)."self checkForAccelerators.
B2. Event Methods (Event-Driven Controller)
Online example: SketchController2
➤ Use a System Browser to create an event-handling methodfor each type of event that needs custom handling. See theevents protocol in the Controller class for the names of eventmethods. (The example methods define what happens whenthe cursor enters or exits the controller’s view; other eventmethods are discussed later in this chapter.)
enterEvent: anEnterEvent "B2 Step""Change the cursor and request keyboard focus."
self keyboardProcessor requestActivationFor: self.Cursor crossHair show.
exitEvent: anExitEvent "B2 Step""Change the cursor shape back to normal.Also end current stroke in case red button is still being pressed."
Cursor normal show.self strokeInProgress: false.
Variants
V1. Initializing and Terminating (Polling Controller)
Online example: ApplicationDialogController (not an example class)
1. Use a System Browser to create a controlInitialize method in thecontroller. This method has no typical usage—it can takeany action that is appropriate when the view becomesactive.
Chapter 20 Custom Controllers
408 VisualWorks Cookbook, Rev. 2.0
controlInitialize "V1 Step 1"self locked: false.super controlInitialize
2. Create a matching controlTerminate method in the controller.This method is a convenient place to reverse whateveractions are invoked by controlInitialize.
controlTerminate "V1 Step 2"self locked: true.super controlTerminate
V2. Displaying a Different Cursor (Polling Controller)
Online example: SketchController1
➤ Use a System Browser to create a controlLoop method in thecontroller. This method typically displays an alternatecursor while it invokes the inherited implementation.
controlLoop "V2 Step""Change the cursor to a cross-hair for drawing."
Cursor crossHair showWhile: [super controlLoop].
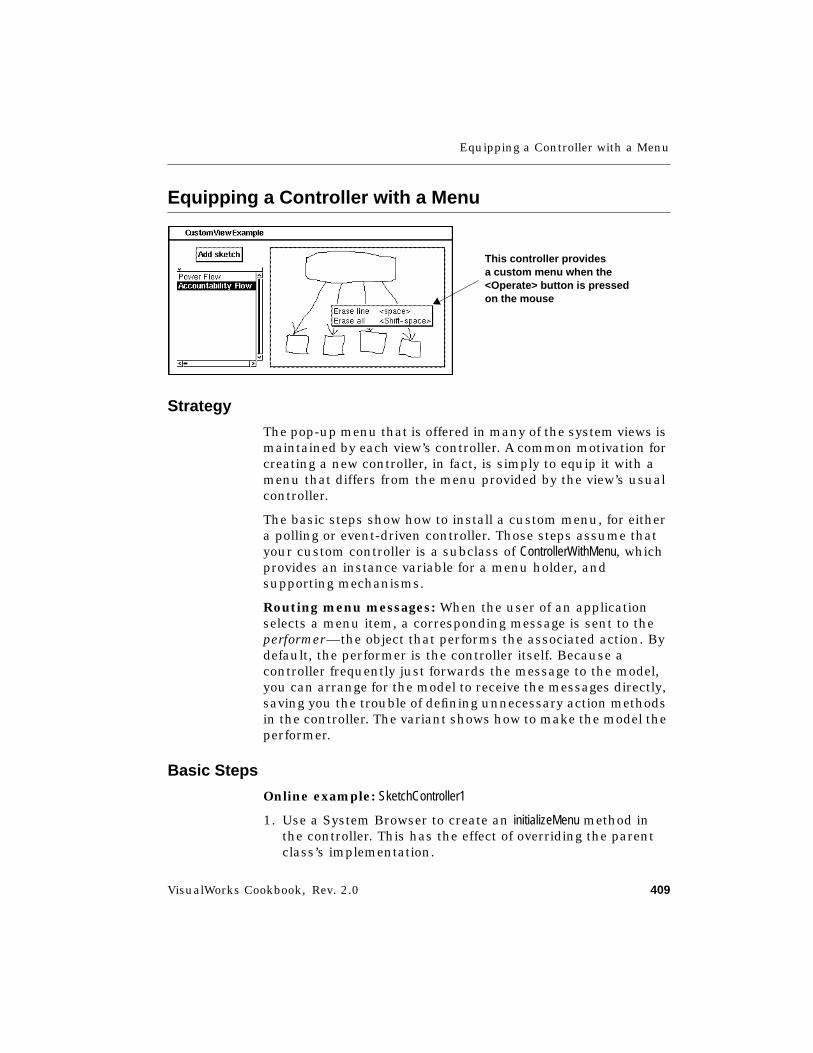
Equipping a Controller with a Menu
VisualWorks Cookbook, Rev. 2.0 409
Equipping a Controller with a Menu
Strategy
The pop-up menu that is offered in many of the system views ismaintained by each view’s controller. A common motivation forcreating a new controller, in fact, is simply to equip it with amenu that differs from the menu provided by the view’s usualcontroller.
The basic steps show how to install a custom menu, for eithera polling or event-driven controller. Those steps assume thatyour custom controller is a subclass of ControllerWithMenu, whichprovides an instance variable for a menu holder, andsupporting mechanisms.
Routing menu messages: When the user of an applicationselects a menu item, a corresponding message is sent to theperformer—the object that performs the associated action. Bydefault, the performer is the controller itself. Because acontroller frequently just forwards the message to the model,you can arrange for the model to receive the messages directly,saving you the trouble of defining unnecessary action methodsin the controller. The variant shows how to make the model theperformer.
Basic Steps
Online example: SketchController1
1. Use a System Browser to create an initializeMenu method inthe controller. This has the effect of overriding the parentclass’s implementation.
This controller providesa custom menu when the<Operate> button is pressedon the mouse
Chapter 20 Custom Controllers
410 VisualWorks Cookbook, Rev. 2.0
2. In the initializeMenu method, send a menuHolder: message to thecontroller. The argument is a value holder containing aninstance of Menu.
initializeMenu "Basic Step 1"| mb |
"Build the menu."mb := MenuBuilder new.mb add: 'Erase line <space>' -> #eraseLine.mb add: 'Erase all <Shift-space>' -> #eraseAll.
"Install the menu."self menuHolder: mb menu asValue. "Basic Step 2"
Variant
Routing Menu Messages
Online example: SketchView1
➤ Send a performer: message to the controller. The argument isthe object to which menu messages should be sent—typically, the domain model. This message is typically sentby either the application model or the view. (In the example,the view updates the controller’s performer whenever itsmodel changes.)
model: aModelsuper model: aModel.self invalidate.
"Tell the controller where to send menu messages."self controller performer: aModel. "Variant Step"
See Also■ “Creating a Menu” on page 226
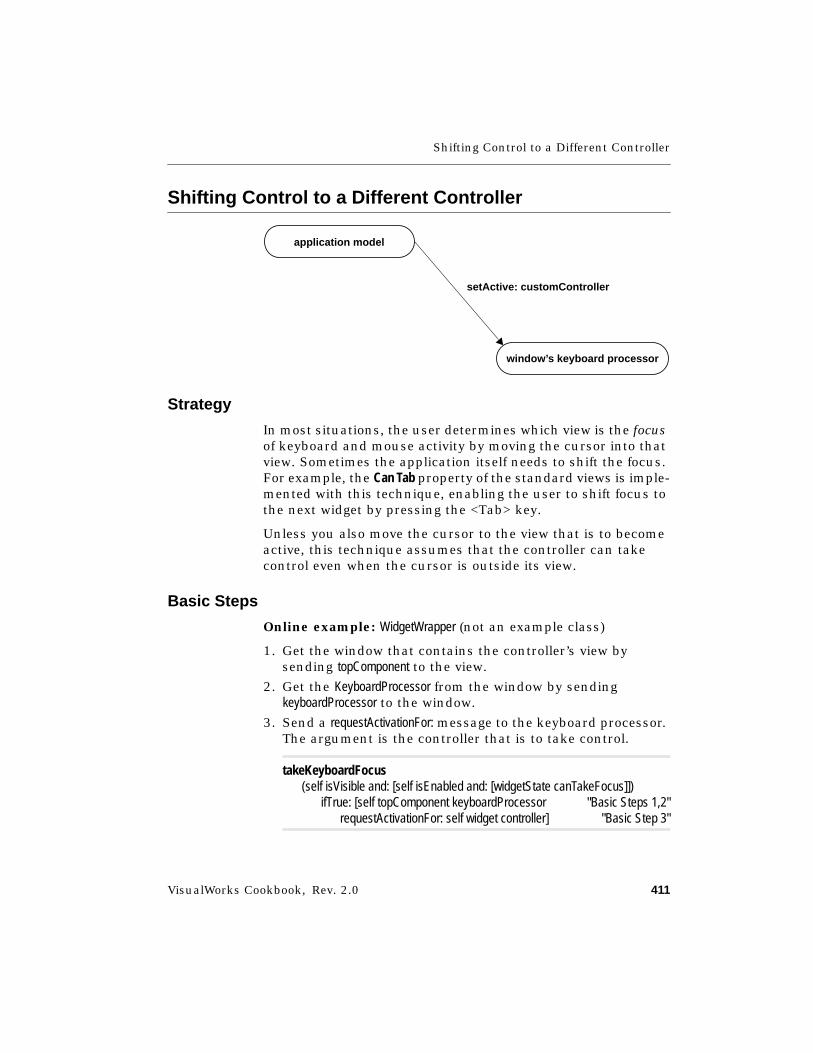
Shifting Control to a Different Controller
VisualWorks Cookbook, Rev. 2.0 411
Shifting Control to a Different Controller
Strategy
In most situations, the user determines which view is the focusof keyboard and mouse activity by moving the cursor into thatview. Sometimes the application itself needs to shift the focus.For example, the Can Tab property of the standard views is imple-mented with this technique, enabling the user to shift focus tothe next widget by pressing the <Tab> key.
Unless you also move the cursor to the view that is to becomeactive, this technique assumes that the controller can takecontrol even when the cursor is outside its view.
Basic Steps
Online example: WidgetWrapper (not an example class)
1. Get the window that contains the controller’s view bysending topComponent to the view.
2. Get the KeyboardProcessor from the window by sendingkeyboardProcessor to the window.
3. Send a requestActivationFor: message to the keyboard processor.The argument is the controller that is to take control.
takeKeyboardFocus(self isVisible and: [self isEnabled and: [widgetState canTakeFocus]])
ifTrue: [self topComponent keyboardProcessor "Basic Steps 1,2"requestActivationFor: self widget controller] "Basic Step 3"
application model
setActive: customController
window’s keyboard processor

Chapter 20 Custom Controllers
412 VisualWorks Cookbook, Rev. 2.0
Sensing Mouse Activity
Strategy
Polling controller: As part of its controlActivity loop, a pollingcontroller asks its sensor whether a mouse button has beenpressed. It must inquire separately for each mouse button (red,yellow or blue) that it cares about. If a button has been pressed,the controller responds appropriately, typically by invoking ared-, yellow- or blueButtonActivity method, as shown in B1.
Mouse movement is detected by caching the cursor location oneach pass through the controlActivity loop and comparing thatcached location with the cursor location on the next passthrough the loop.
Event-driven controller: While a polling controller must askits sensor whether each mouse button was pressed, an event-driven controller is notified directly when the control managersends a red-, yellow- or blueButtonPressedEvent: message, as shown inB2. Similarly messages notify the controller of button-releasedevents and mouse-moved events.
Button names: For both polling and event-driven controllers,the mouse buttons are identified as redButton (the <Select>button), yellowButton (the <Operate> menu button), and blue-Button (the <Window> menu button). These colors correspondto colors that were on the mouse buttons on the developmentmachine that was used by the original Smalltalk developers.
redButtonPressed <Select>yellowButtonPressed <Operate>blueButtonPressed <Window>
polling controller sensor
event-driven controllercontrol managerredButtonPressedEvent: anEventyellowButtonPressedEvent: anEventblueButtonPressedEvent: anEvent
Sensing Mouse Activity
VisualWorks Cookbook, Rev. 2.0 413
Other polling sensor messages: The variants show other teststhat are available to a polling controller when asking its sensorabout mouse-button activity.
Basic Steps
B1. Mouse Activity (Polling Controller)
Online example: SketchController1
1. Get the sensor from the controller.
2. Send a redButtonPressed message to the sensor. If true isreturned, the user pressed the <Select> button on themouse. Send yellowButtonPressed to find out about the<Operate> button, and blueButtonPressed to find out about the<Window> button.
controlActivity"Check for mouse button and keyboard activity."
"If the <Select> mouse button is being pressed, draw."self sensor redButtonPressed "B1 Steps 1, 2"
ifTrue: [^self redButtonActivity].
"When not drawing, end the stroke."self strokeInProgress: false.
"If the <Operate> button is being pressed, display the menu."self sensor yellowButtonPressed
ifTrue: [^self yellowButtonActivity].
"Check for keyboard input (specifically, the shortcut keys)."self checkForAccelerators.
B2. Mouse Activity (Event-Driven Controller)
Online example: SketchController2
1. Use a System Browser to add red-, yellow- andblueButtonPressedEvent: methods to the controller (assuming thecontroller has a separate response for each of the threemouse buttons), in an instance protocol named events. The
Chapter 20 Custom Controllers
414 VisualWorks Cookbook, Rev. 2.0
method is responsible for taking the appropriate action. (Inthe example, a new stroke is initiated in the sketch whenthe red button is pressed.)
redButtonPressedEvent: aRedButtonPressedEvent "B2 Step 1""Start drawing a new line when the <Select> button is pressed."
self model beginStroke.self strokeInProgress: true.
self model add: (self sensor cursorPointFor: aRedButtonPressedEvent)
2. Add similar red-, yellow- or blueButtonReleasedEvent: methods if thecontroller takes separate actions when the buttons arereleased. (In the example, the current stroke in the sketchis ended when the red button is released.)
redButtonReleasedEvent: aRedButtonReleasedEvent "B2 Step 2""Stop drawing when the <Select> button is released."
self strokeInProgress: false.
3. Add a similar mouseMovedEvent: method if the controller takesa separate action each time the mouse is moved. (In theexample, the controller tests whether a stroke is in progressand, if so, it records the cursor location as a new point onthe current stroke.)
mouseMovedEvent: aMouseMovedEvent "B2 Step 3""Add a new point for every mouse movement when drawing is in progress."
self strokeInProgressifTrue: [self model
add: (self sensor cursorPointFor: aMouseMovedEvent)]
Variants
V1. Any Mouse Button (Polling Controller)➤ Send anyButtonPressed to the controller’s sensor. If true is
returned, one of the mouse buttons was pressed.
Sensing Mouse Activity
VisualWorks Cookbook, Rev. 2.0 415
V2. No Mouse Button (Polling Controller)➤ Send noButtonPressed to the controller’s sensor. If true is
returned, none of the mouse buttons was pressed.
V3. Non-<Window> Button (Polling Controller)➤ Send nonBlueButtonPressed to the controller’s sensor. Because a
view’s controller rarely responds to the <Window> button,this is used to distinguish window-related events from view-related events.
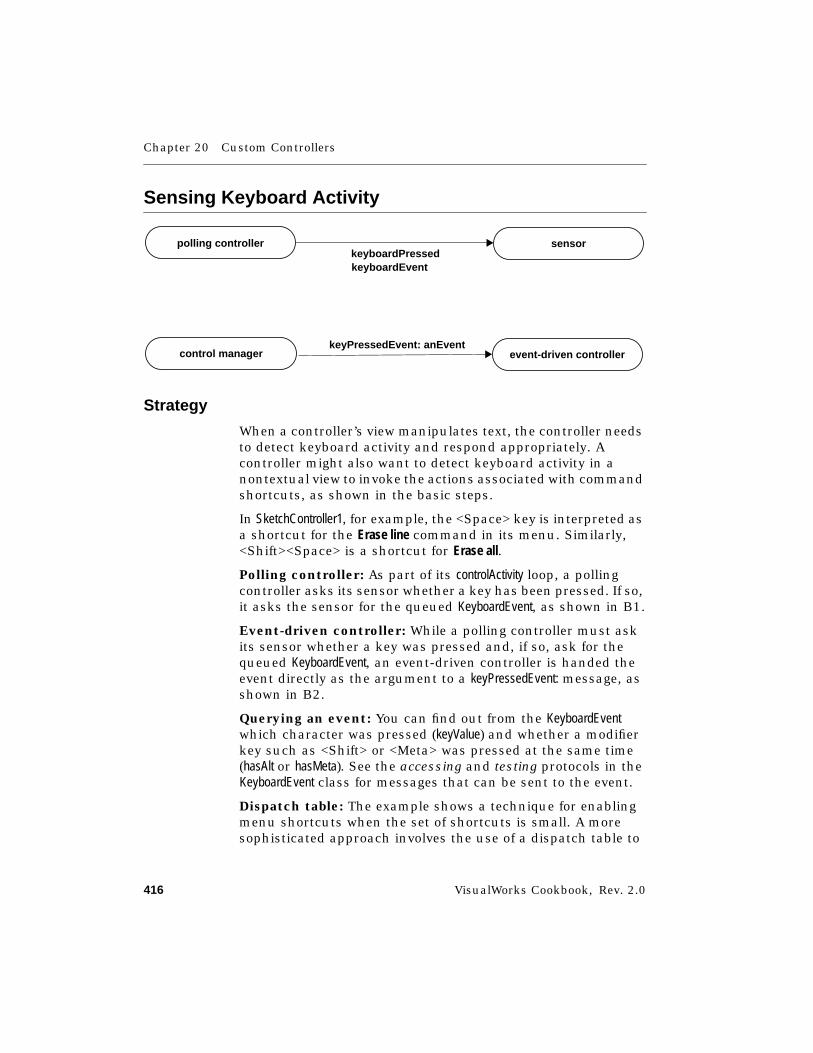
Chapter 20 Custom Controllers
416 VisualWorks Cookbook, Rev. 2.0
Sensing Keyboard Activity
Strategy
When a controller’s view manipulates text, the controller needsto detect keyboard activity and respond appropriately. Acontroller might also want to detect keyboard activity in anontextual view to invoke the actions associated with commandshortcuts, as shown in the basic steps.
In SketchController1, for example, the <Space> key is interpreted asa shortcut for the Erase line command in its menu. Similarly,<Shift><Space> is a shortcut for Erase all.
Polling controller: As part of its controlActivity loop, a pollingcontroller asks its sensor whether a key has been pressed. If so,it asks the sensor for the queued KeyboardEvent, as shown in B1.
Event-driven controller: While a polling controller must askits sensor whether a key was pressed and, if so, ask for thequeued KeyboardEvent, an event-driven controller is handed theevent directly as the argument to a keyPressedEvent: message, asshown in B2.
Querying an event: You can find out from the KeyboardEventwhich character was pressed (keyValue) and whether a modifierkey such as <Shift> or <Meta> was pressed at the same time(hasAlt or hasMeta). See the accessing and testing protocols in theKeyboardEvent class for messages that can be sent to the event.
Dispatch table: The example shows a technique for enablingmenu shortcuts when the set of shortcuts is small. A moresophisticated approach involves the use of a dispatch table to
polling controllerkeyboardPressed
sensor
keyboardEvent
event-driven controllercontrol managerkeyPressedEvent: anEvent

Sensing Keyboard Activity
VisualWorks Cookbook, Rev. 2.0 417
associate actions with keyboard keys. That approach is used byParagraphEditor and its subclasses, which are used by the textviews in the system. For an example of that approach, see theclass method named initializeDispatchTable in ParagraphEditor.
Basic Steps
B1. Keyboard Input (Polling Controller)
Online example: SketchController1
1. Get the sensor by sending sensor to the controller. This istypically done in the controller’s controlActivity method or, as inthe example, a method invoked by controlActivity.
2. Find out whether a key was pressed by sending a keyboard-Pressed message to the sensor. If true is returned, a keyboardkey was pressed since the last time the controller checked.
3. Get the keyboard event by sending keyboardEvent to thesensor. (To get the event without removing it from the eventqueue, send a keyboardPeek message.)
4. Get the character by sending keyValue to the keyboard event.If a known character was pressed, that character isreturned. If a known special key was pressed, such as<Help>, a symbol naming that key (#Help) is returned. Other-wise, an integer is returned that identifies the key in aplatform-dependent way.
5. Find out whether a modifier key was pressed at the sametime. Valid messages for testing the state of modifier keysare: hasAlt, hasCtrl, hasLock, hasMeta, and hasShift.
checkForAccelerators"If a keyboard shortcut was used,tell the model to take the appropriate action."
| event char |self sensor keyboardPressed "B1 Step 2"
"A keyboard key was pressed -- check for <Space>."ifTrue: [
event := self sensor keyboardEvent. "B1 Step 3"char := event keyValue. "B1 Step 4"
Chapter 20 Custom Controllers
418 VisualWorks Cookbook, Rev. 2.0
(char == Character space)
"<Space> was pressed -- check for <Shift> key."ifTrue: [event hasShift "B1 Step 5"
"<Shift> was pressed -- erase all."ifTrue: [self model eraseAll]
"<Shift> was not pressed -- erase line."ifFalse: [self model eraseLine]]].
B2. Keyboard Input (Event-Driven Controller)
Online example: SketchController2
➤ Use a System Browser to add a keyPressedEvent: method to thecontroller, in an instance protocol named events. Themethod is responsible for testing the given KeyPressedEvent forconditions that the controller cares about, and then takingthe appropriate action. (In the example, a space charactercauses the most recent stroke to be erased from the sketch,and a shifted space erases the entire sketch.)
keyPressedEvent: aKeyPressedEvent "B2 Step""Respond to the <Space> key."
| char |self model == nil ifTrue: [^nil].
char := aKeyPressedEvent keyValue.(char == Character space)
ifTrue: [aKeyPressedEvent hasShiftifTrue: [self model eraseAll]ifFalse: [self model eraseLine]].
See Also■ “Adding a Shortcut Key” on page 252
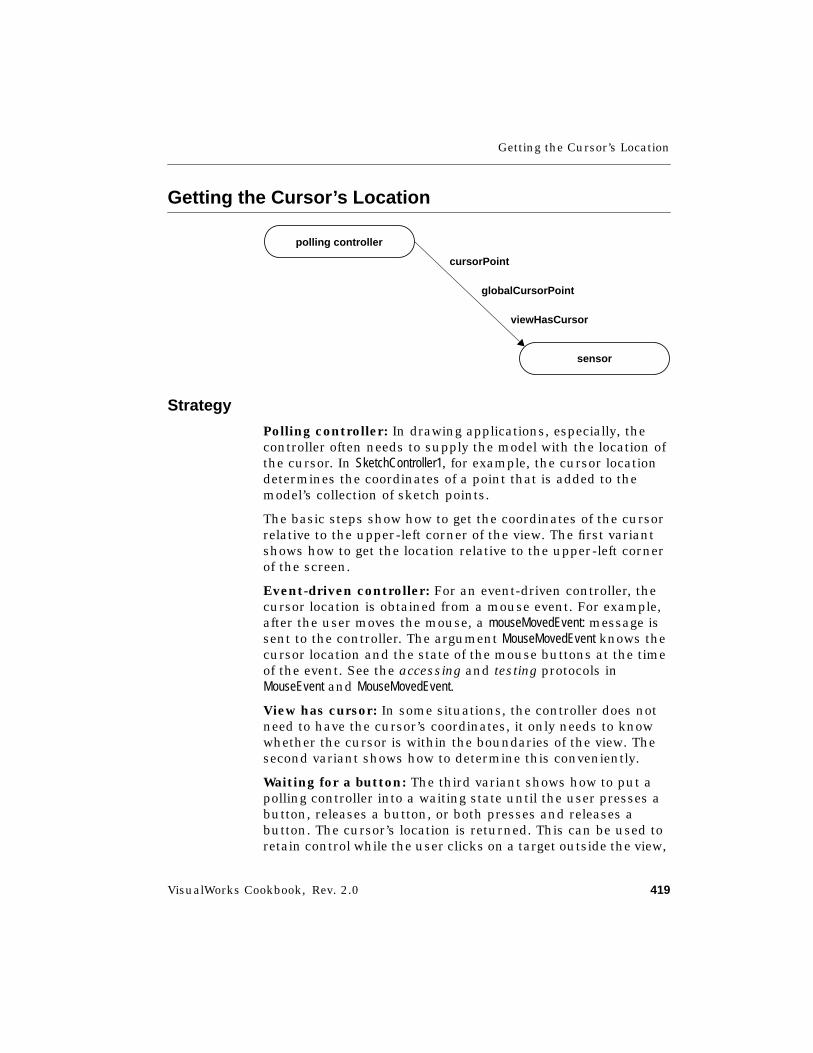
Getting the Cursor’s Location
VisualWorks Cookbook, Rev. 2.0 419
Getting the Cursor’s Location
Strategy
Polling controller: In drawing applications, especially, thecontroller often needs to supply the model with the location ofthe cursor. In SketchController1, for example, the cursor locationdetermines the coordinates of a point that is added to themodel’s collection of sketch points.
The basic steps show how to get the coordinates of the cursorrelative to the upper-left corner of the view. The first variantshows how to get the location relative to the upper-left cornerof the screen.
Event-driven controller: For an event-driven controller, thecursor location is obtained from a mouse event. For example,after the user moves the mouse, a mouseMovedEvent: message issent to the controller. The argument MouseMovedEvent knows thecursor location and the state of the mouse buttons at the timeof the event. See the accessing and testing protocols inMouseEvent and MouseMovedEvent.
View has cursor: In some situations, the controller does notneed to have the cursor’s coordinates, it only needs to knowwhether the cursor is within the boundaries of the view. Thesecond variant shows how to determine this conveniently.
Waiting for a button: The third variant shows how to put apolling controller into a waiting state until the user presses abutton, releases a button, or both presses and releases abutton. The cursor’s location is returned. This can be used toretain control while the user clicks on a target outside the view,
polling controller
cursorPoint
sensor
globalCursorPoint
viewHasCursor

Chapter 20 Custom Controllers
420 VisualWorks Cookbook, Rev. 2.0
such as another window. An event-driven controller canachieve the equivalent
Basic Steps
B1. Cursor Location (Polling Controller)
Online example: SketchController1
1. Get the sensor by sending sensor to the controller.
2. Send a cursorPoint message to the sensor. An instance of Pointis returned, containing the coordinates of the cursorrelative to the origin of the view.
redButtonActivity"If necessary, begin a new stroke."self strokeInProgress
ifFalse: [self model beginStroke.self strokeInProgress: true].
"Give the cursor's location to the model."self model add: self sensor cursorPoint. "B1 Step 2"
B2. Cursor Location (Event-Driven Controller)
Online example: SketchController2
1. Get the sensor by sending sensor to the controller.
2. Send a cursorPointFor: message to the sensor, with a mouseevent as the argument. An instance of Point is returned,containing the coordinates of the cursor relative to theorigin of the view.
mouseMovedEvent: aMouseMovedEvent"Add a new point for every mouse movementwhen drawing is in progress."
self strokeInProgressifTrue: [self model
add: (self sensor cursorPointFor: aMouseMovedEvent)] "B2 Step 2"
Getting the Cursor’s Location
VisualWorks Cookbook, Rev. 2.0 421
Variants
V1. Getting the Global Cursor Location➤ For a polling controller, send a globalCursorPoint message to the
controller’s sensor to get the cursor location relative to thescreen’s origin. For an event-driven controller, send aglobalPoint message to the mouse event. (To get the cursorlocation relative to the containing window, send a pointmessage to the mouse event.)
V2. Testing Whether the Cursor Is Within the View➤ For a polling controller, send a viewHasCursor message to the
controller. If true is returned, the cursor is inside the view’sboundaries. For an event-driven controller, send aviewHasCursorWithEvent: message to the controller, with theinput event as the argument.
V3. Waiting for a Mouse Button➤ Send a waitButton message to the controller’s sensor. The user
can then move the cursor anywhere, including beyond thecontroller’s view, without disrupting the current controller’sfocus. When the user depresses any mouse button, thecursor’s location is returned, relative to the view’s origin. Ifa button is already depressed, send waitNoButton to wait untilthe button is released. Send waitClickButton to wait until abutton is both pressed and released.
"Inspect"| sensor window |sensor := ScheduledControllers activeController sensor.
Cursor bull showWhile: [sensor waitButton]. "V3 Step"window := Screen default
windowAt: sensor globalCursorPoint.^window
See Also■ “Creating a Cursor” on page 678
■ “Changing the Current Cursor” on page 681


VisualWorks Cookbook, Rev. 2.0 423
Part III
Data Structures
Chapter 21: Numbers 425Chapter 22: Dates 461Chapter 23: Times 477Chapter 24: Collections 489Chapter 25: Characters and Strings 529Chapter 26: Text and Fonts 555Chapter 27: Text Files 591Chapter 28: Object Files (BOSS) 613Chapter 29: Geometrics 629Chapter 30: Images, Cursors, and Icons 657Chapter 31: Color 685Chapter 32:
Adapting Domain Models to Widgets 703

VisualWorks Cookbook, Rev. 2.0 425
Chapter 21
Numbers
Creating a Number 426Adding and Subtracting 431Multiplying and Dividing 432Rounding 434Getting Squares and Roots 436Comparing Two Numbers 438Getting the Minimum and Maximum 441Performing Trigonometric Functions 442Performing Logarithmic Functions 444Testing Numberness, Evenness, Zeroness 445Accessing and Converting the Sign 447Converting a Number to Another Form 449Factoring 453Generating a Random Number 454Accessing Numeric Constants 458
See Also■ “Formatting Displayed Data” on page 129
Chapter 21 Numbers
426 VisualWorks Cookbook, Rev. 2.0
Creating a Number
Strategy
VisualWorks provides classes for integers, floating-pointnumbers, fractions, and fixed-point numbers.
Integers come in three varieties: SmallInteger, LargePositiveInteger, andLargeNegativeInteger. In practice, only the most demanding numericapplications need to be aware of the distinctions among thethree types of integer. VisualWorks converts a value from oneform to another as needed.
A floating-point number has a decimal point and at least onedigit before the decimal and at least one digit after the decimal.A Float is a single-precision number, with six to seven digits ofprecision. A Double is a double-precision number having 14 to 15digits of precision.
A Fraction has an integral numerator and an integral denomi-nator, separated by a division slash. Fractions are alwaysreduced to lowest terms—for example, 4/6 is reduced to 2/3.
A fixed-point number (an instance of FixedPoint) is useful forbusiness applications in which a fixed number of decimalplaces is required.
Basic Steps
Creating an Integer
You can create integers as numeric literals or as the result ofarithmetic operations involving one or more integers.
1. Create an integer using a literal expression.
2. Create another integer as a result of the arithmetic opera-tion +.
"Print it"| x y |x := 100. "Basic Step 1"y := 5.^x + y "Basic Step 2"
Creating a Number
VisualWorks Cookbook, Rev. 2.0 427
Variants
V1. Creating a Floating-Point Number
You can create floating-point numbers (instances of Float) asnumeric literals or as the result of arithmetic operationsinvolving one or more instances of Float. Note that after youcreate a floating-point number, you can use integerPart andfractionPart to access its parts separately.
1. Create a floating-point number using a literal expressionthat includes the predecimal digits, the decimal point, andthe postdecimal digits.
2. Create another floating-point number as a result of thearithmetic operation +.
"Print it"| x y |x := 100.2. "V1 Step 1"y := 5.3.^x + y "V1 Step 2"
V2. Creating a Double-Precision Floating-PointNumber
You can create double-precision floating-point numbers(instances of Double) as numeric literals or as the result of arith-metic operations involving one or more instances of Double.
1. Create a double-precision floating-point number by placingthe letter d after a floating-point number.
2. Create another Double as the result of the arithmetic opera-tion +.
"Print it"| x y |x := 5.5d. "V2 Step 1"y := 5555.5555d.^x + y "V2 Step 2"
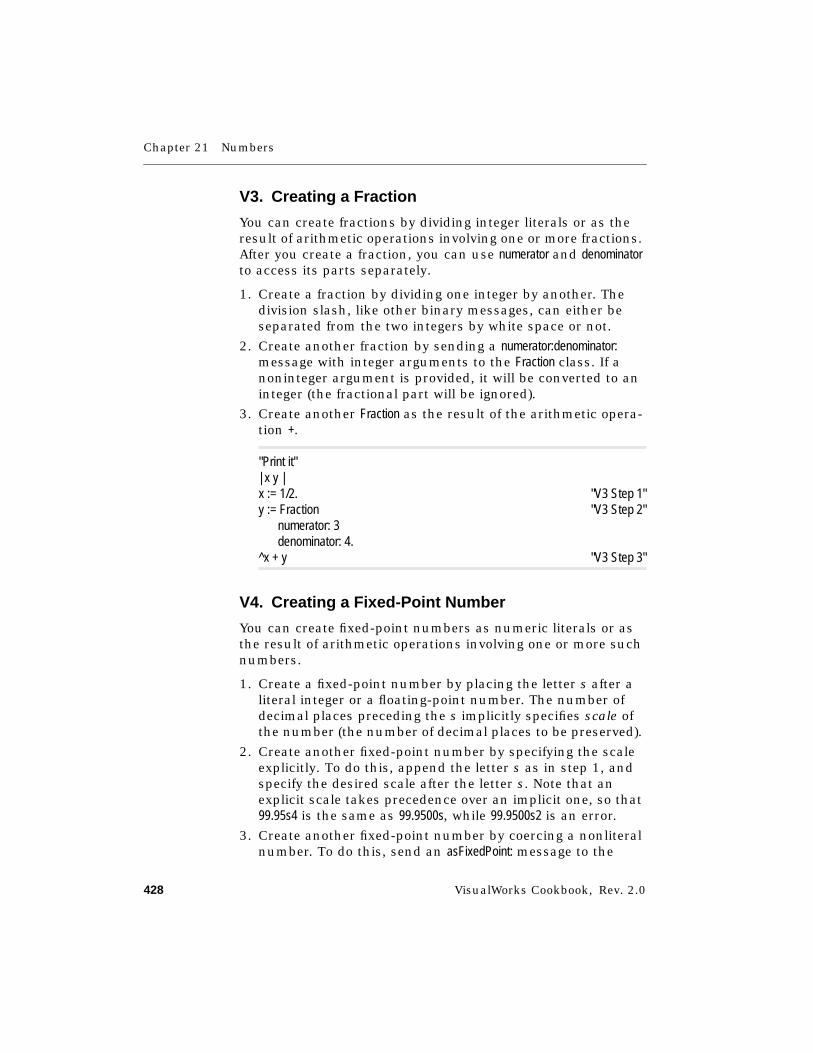
Chapter 21 Numbers
428 VisualWorks Cookbook, Rev. 2.0
V3. Creating a Fraction
You can create fractions by dividing integer literals or as theresult of arithmetic operations involving one or more fractions.After you create a fraction, you can use numerator and denominatorto access its parts separately.
1. Create a fraction by dividing one integer by another. Thedivision slash, like other binary messages, can either beseparated from the two integers by white space or not.
2. Create another fraction by sending a numerator:denominator:message with integer arguments to the Fraction class. If anoninteger argument is provided, it will be converted to aninteger (the fractional part will be ignored).
3. Create another Fraction as the result of the arithmetic opera-tion +.
"Print it"| x y |x := 1/2. "V3 Step 1"y := Fraction "V3 Step 2"
numerator: 3denominator: 4.
^x + y "V3 Step 3"
V4. Creating a Fixed-Point Number
You can create fixed-point numbers as numeric literals or asthe result of arithmetic operations involving one or more suchnumbers.
1. Create a fixed-point number by placing the letter s after aliteral integer or a floating-point number. The number ofdecimal places preceding the s implicitly specifies scale ofthe number (the number of decimal places to be preserved).
2. Create another fixed-point number by specifying the scaleexplicitly. To do this, append the letter s as in step 1, andspecify the desired scale after the letter s. Note that anexplicit scale takes precedence over an implicit one, so that99.95s4 is the same as 99.9500s, while 99.9500s2 is an error.
3. Create another fixed-point number by coercing a nonliteralnumber. To do this, send an asFixedPoint: message to the
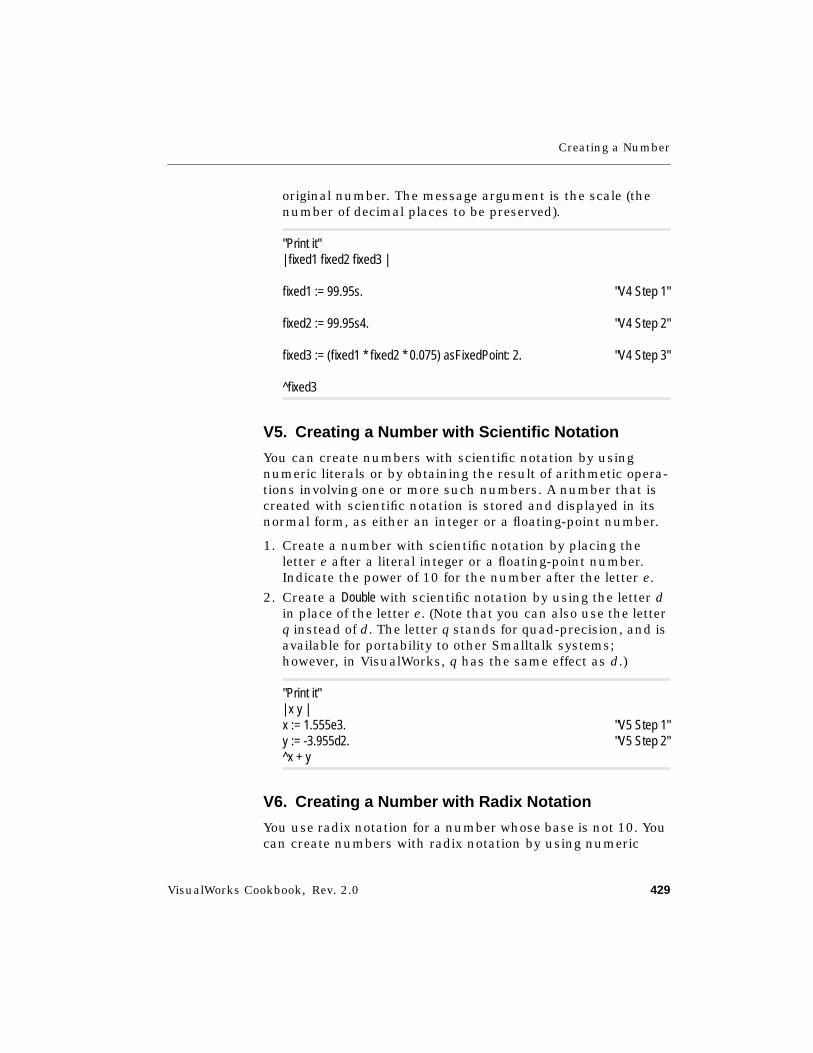
Creating a Number
VisualWorks Cookbook, Rev. 2.0 429
original number. The message argument is the scale (thenumber of decimal places to be preserved).
"Print it"| fixed1 fixed2 fixed3 |
fixed1 := 99.95s. "V4 Step 1"
fixed2 := 99.95s4. "V4 Step 2"
fixed3 := (fixed1 * fixed2 * 0.075) asFixedPoint: 2. "V4 Step 3"
^fixed3
V5. Creating a Number with Scientific Notation
You can create numbers with scientific notation by usingnumeric literals or by obtaining the result of arithmetic opera-tions involving one or more such numbers. A number that iscreated with scientific notation is stored and displayed in itsnormal form, as either an integer or a floating-point number.
1. Create a number with scientific notation by placing theletter e after a literal integer or a floating-point number.Indicate the power of 10 for the number after the letter e.
2. Create a Double with scientific notation by using the letter din place of the letter e. (Note that you can also use the letterq instead of d. The letter q stands for quad-precision, and isavailable for portability to other Smalltalk systems;however, in VisualWorks, q has the same effect as d.)
"Print it"| x y |x := 1.555e3. "V5 Step 1"y := -3.955d2. "V5 Step 2"^x + y
V6. Creating a Number with Radix Notation
You use radix notation for a number whose base is not 10. Youcan create numbers with radix notation by using numeric
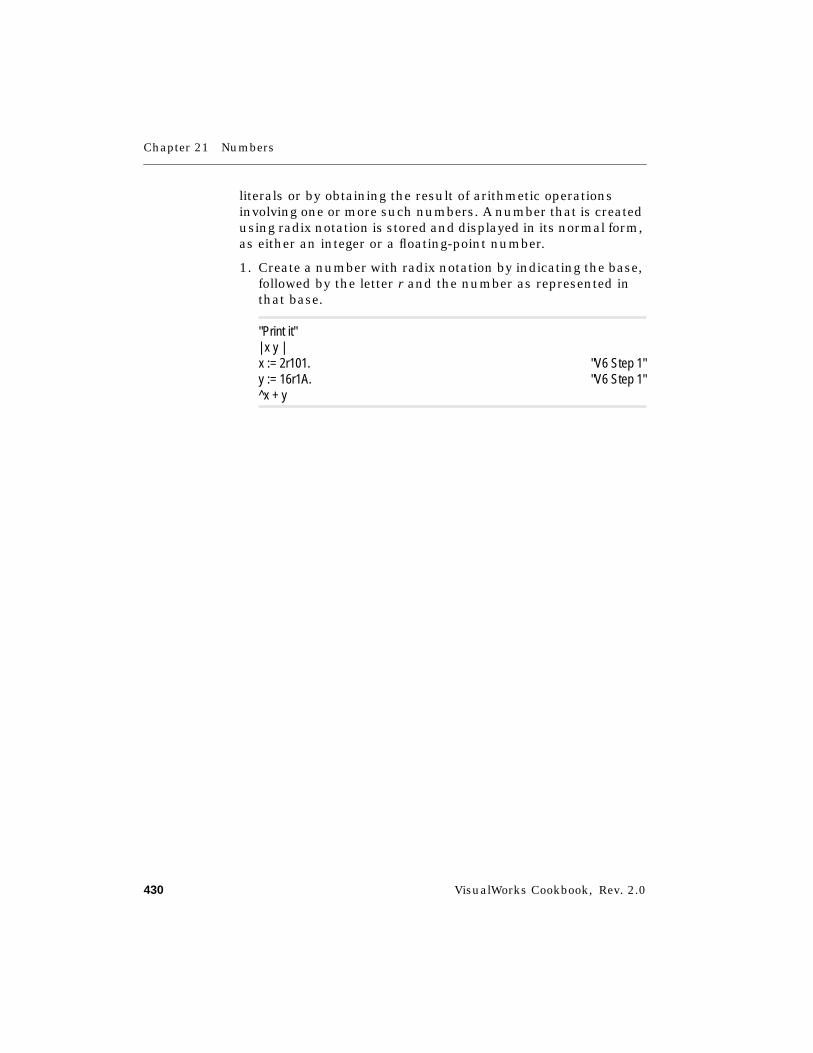
Chapter 21 Numbers
430 VisualWorks Cookbook, Rev. 2.0
literals or by obtaining the result of arithmetic operationsinvolving one or more such numbers. A number that is createdusing radix notation is stored and displayed in its normal form,as either an integer or a floating-point number.
1. Create a number with radix notation by indicating the base,followed by the letter r and the number as represented inthat base.
"Print it"| x y |x := 2r101. "V6 Step 1"y := 16r1A. "V6 Step 1"^x + y
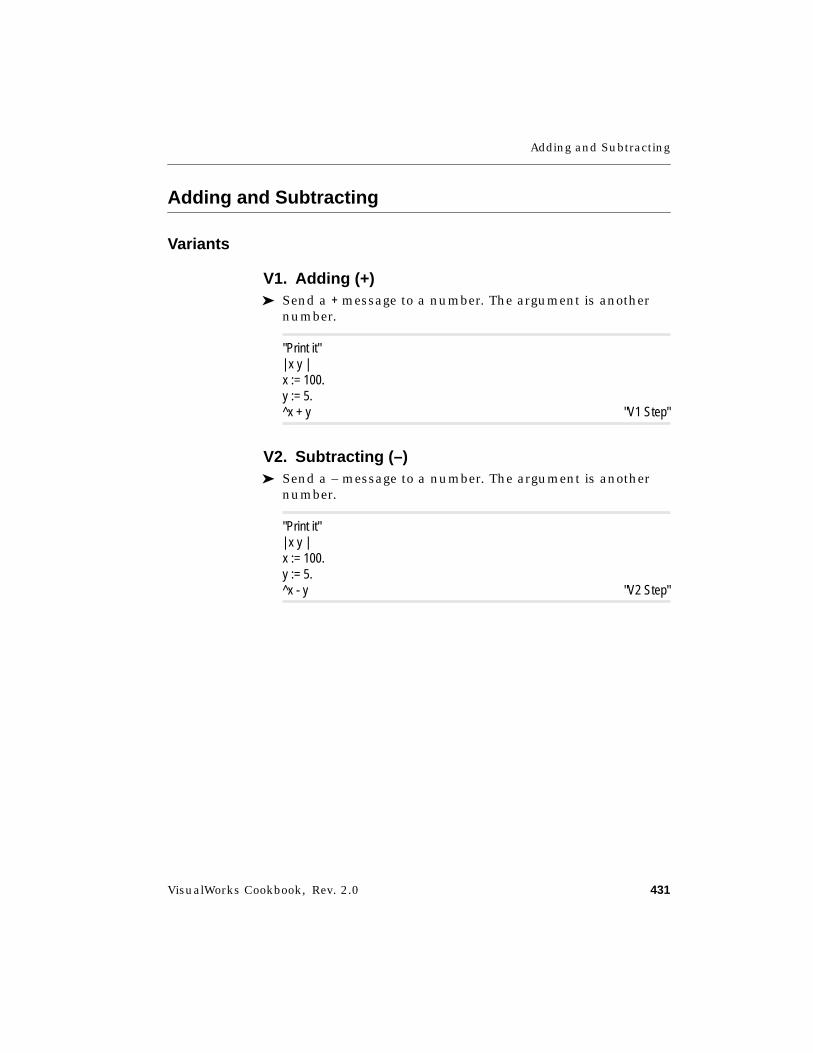
Adding and Subtracting
VisualWorks Cookbook, Rev. 2.0 431
Adding and Subtracting
Variants
V1. Adding (+)➤ Send a + message to a number. The argument is another
number.
"Print it"| x y |x := 100.y := 5.^x + y "V1 Step"
V2. Subtracting (–)➤ Send a – message to a number. The argument is another
number.
"Print it"| x y |x := 100.y := 5.^x - y "V2 Step"
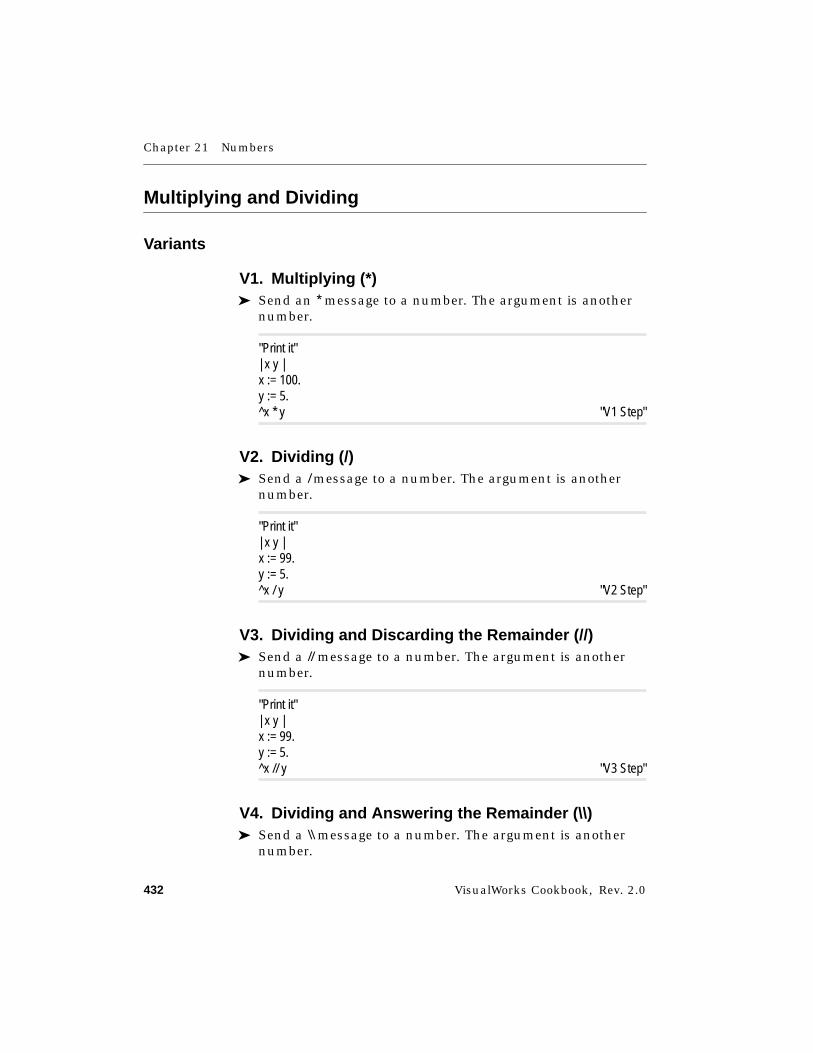
Chapter 21 Numbers
432 VisualWorks Cookbook, Rev. 2.0
Multiplying and Dividing
Variants
V1. Multiplying (*)➤ Send an * message to a number. The argument is another
number.
"Print it"| x y |x := 100.y := 5.^x * y "V1 Step"
V2. Dividing (/)➤ Send a / message to a number. The argument is another
number.
"Print it"| x y |x := 99.y := 5.^x / y "V2 Step"
V3. Dividing and Discarding the Remainder (//)➤ Send a // message to a number. The argument is another
number.
"Print it"| x y |x := 99.y := 5.^x // y "V3 Step"
V4. Dividing and Answering the Remainder (\\)➤ Send a \\ message to a number. The argument is another
number.
Multiplying and Dividing
VisualWorks Cookbook, Rev. 2.0 433
"Print it"| x y |x := 99.y := 5.^x \\ y "V4 Step"
Chapter 21 Numbers
434 VisualWorks Cookbook, Rev. 2.0
Rounding
Variants
V1. Rounding to the Nearest Integer➤ Send a rounded message to the number.
"Print it"| x |x := -5.5.^x rounded "V1 Step"
V2. Rounding Down (toward Negative Infinity)➤ Send a floor message to the number.
"Print it"| x |x := 5.8.^x floor "V2 Step"
V3. Rounding Up (toward Positive Infinity)➤ Send a ceiling message to the number.
"Print it"| x |x := 5.2.^x ceiling "V3 Step"
V4. Rounding Toward Zero➤ Send a truncated message to the number.
"Print it"| x |x := -5.8.^x truncated "V4 Step"
Rounding
VisualWorks Cookbook, Rev. 2.0 435
V5. Rounding to the Nearest Multiple of a Value➤ Send a roundTo: message to the number. The argument is a
number indicating the desired granularity. (In the example,x is rounded to the nearest hundredth.)
"Print it"| x |x := 5555.55555.^x roundTo: 0.01 "V5 Step"
V6. Truncating to the Nearest Multiple of a Value➤ Send a truncateTo: message to the number. The argument is a
number indicating the desired granularity. In the example,x is truncated (rounded toward zero) to the nearesthundredth.
"Print it"| x |x := 5555.55555.^x truncateTo: 0.01 "V6 Step"
See Also■ “Formatting Displayed Data” on page 129
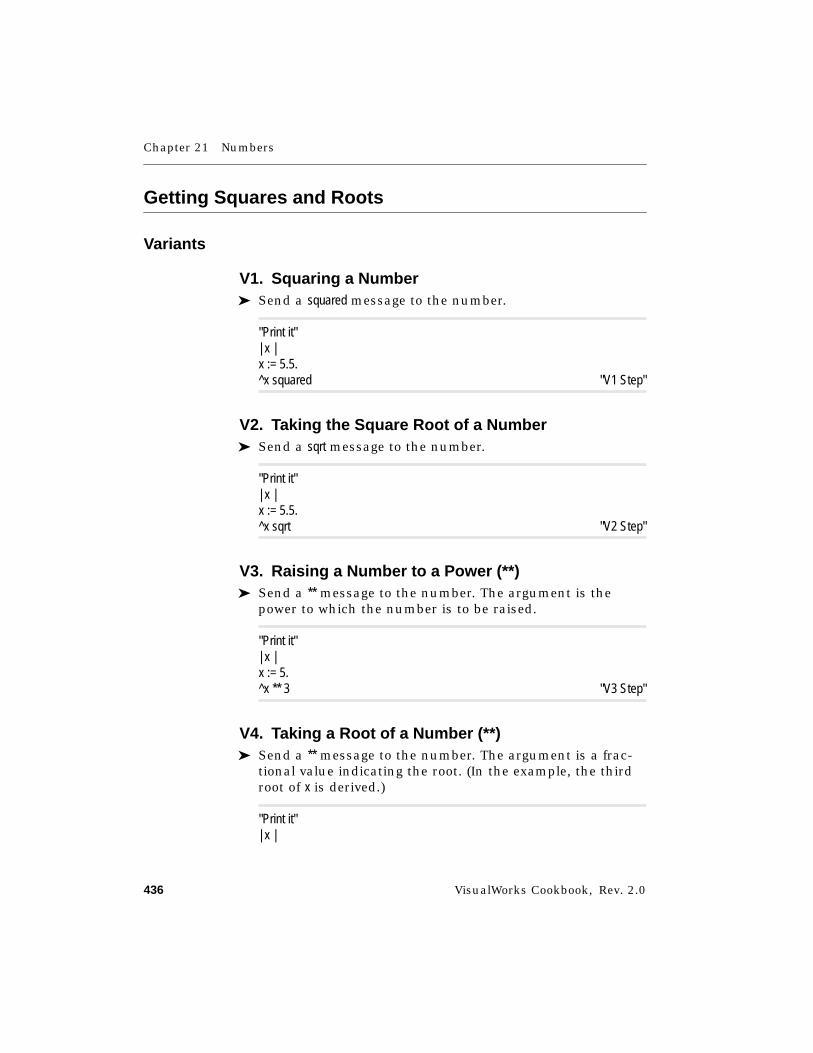
Chapter 21 Numbers
436 VisualWorks Cookbook, Rev. 2.0
Getting Squares and Roots
Variants
V1. Squaring a Number➤ Send a squared message to the number.
"Print it"| x |x := 5.5.^x squared "V1 Step"
V2. Taking the Square Root of a Number➤ Send a sqrt message to the number.
"Print it"| x |x := 5.5.^x sqrt "V2 Step"
V3. Raising a Number to a Power (**)➤ Send a ** message to the number. The argument is the
power to which the number is to be raised.
"Print it"| x |x := 5.^x ** 3 "V3 Step"
V4. Taking a Root of a Number (**)➤ Send a ** message to the number. The argument is a frac-
tional value indicating the root. (In the example, the thirdroot of x is derived.)
"Print it"| x |

Getting Squares and Roots
VisualWorks Cookbook, Rev. 2.0 437
x := 125.^x ** (1/3) "V4 Step"
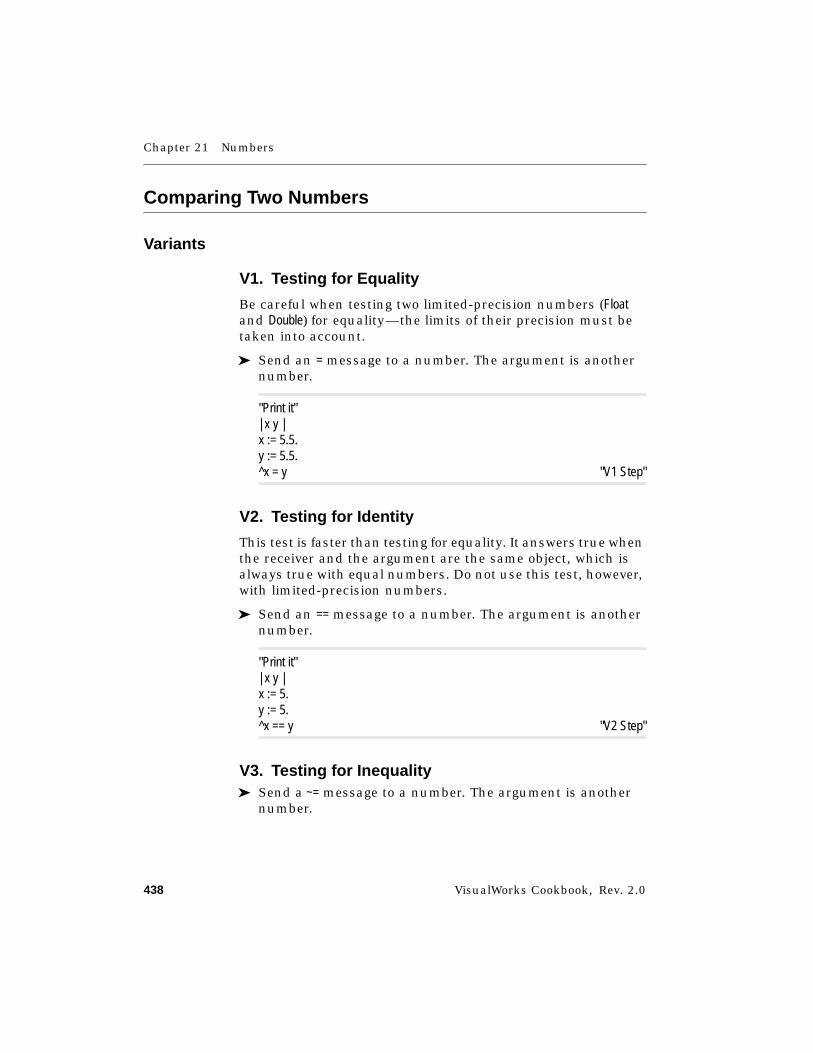
Chapter 21 Numbers
438 VisualWorks Cookbook, Rev. 2.0
Comparing Two Numbers
Variants
V1. Testing for Equality
Be careful when testing two limited-precision numbers (Floatand Double) for equality—the limits of their precision must betaken into account.
➤ Send an = message to a number. The argument is anothernumber.
"Print it"| x y |x := 5.5.y := 5.5.^x = y "V1 Step"
V2. Testing for Identity
This test is faster than testing for equality. It answers true whenthe receiver and the argument are the same object, which isalways true with equal numbers. Do not use this test, however,with limited-precision numbers.
➤ Send an == message to a number. The argument is anothernumber.
"Print it"| x y |x := 5.y := 5.^x == y "V2 Step"
V3. Testing for Inequality➤ Send a ~= message to a number. The argument is another
number.

Comparing Two Numbers
VisualWorks Cookbook, Rev. 2.0 439
"Print it"| x y |x := 5.5.y := 5.6.^x ~= y "V3 Step"
V4. Testing for Nonidentity
This test is faster than testing for inequality, but it should notbe used with limited-precision numbers (Float and Double).
➤ Send a ~~ message to a number. The argument is anothernumber.
"Print it"| x y |x := 5.y := 6.^x ~~ y "V4 Step"
V5. Testing for “Less Than”➤ Send a < message to a number. The argument is another
number.
"Print it"| x y |x := 5.y := 6.^x < y "V5 Step"
V6. Testing for “Less Than or Equal To”➤ Send a <= message to a number. The argument is another
number.
"Print it"| x y |x := 5.

Chapter 21 Numbers
440 VisualWorks Cookbook, Rev. 2.0
y := 5.^x <= y "V6 Step"
V7. Testing for “Greater Than”➤ Send a > message to a number. The argument is another
number.
"Print it"| x y |x := 6.y := 5.^x > y "V7 Step"
V8. Testing for “Greater Than or Equal To”➤ Send a >= message to a number. The argument is another
number.
"Print it"| x y |x := 5.y := 5.^x >= y "V8 Step"
V9. Testing for Inclusion in a Range➤ Send a between:and: message to a number. The first argument
is a number indicating the beginning of the range. Thesecond argument is a number indicating the end of therange. The arguments are included in the range.
"Print it"| x y z |x := 50.y := 1.z := 100.^x between: y and: z "V9 Step"

Getting the Minimum and Maximum
VisualWorks Cookbook, Rev. 2.0 441
Getting the Minimum and Maximum
Variants
V1. Getting the Minimum of Two Numbers➤ Send a min: message to one of the numbers to be compared.
The argument is the second number to be compared. Thelesser number is returned.
"Print it"| x y |x := 5.5.y := 6.5.^x min: y "V1 Step"
V2. Getting the Maximum of Two Numbers➤ Send a max: message to one of the numbers to be compared.
The argument is the second number to be compared. Thegreater number is returned.
"Print it"| x y |x := 5.5.y := 6.5.^x max: y "V2 Step"
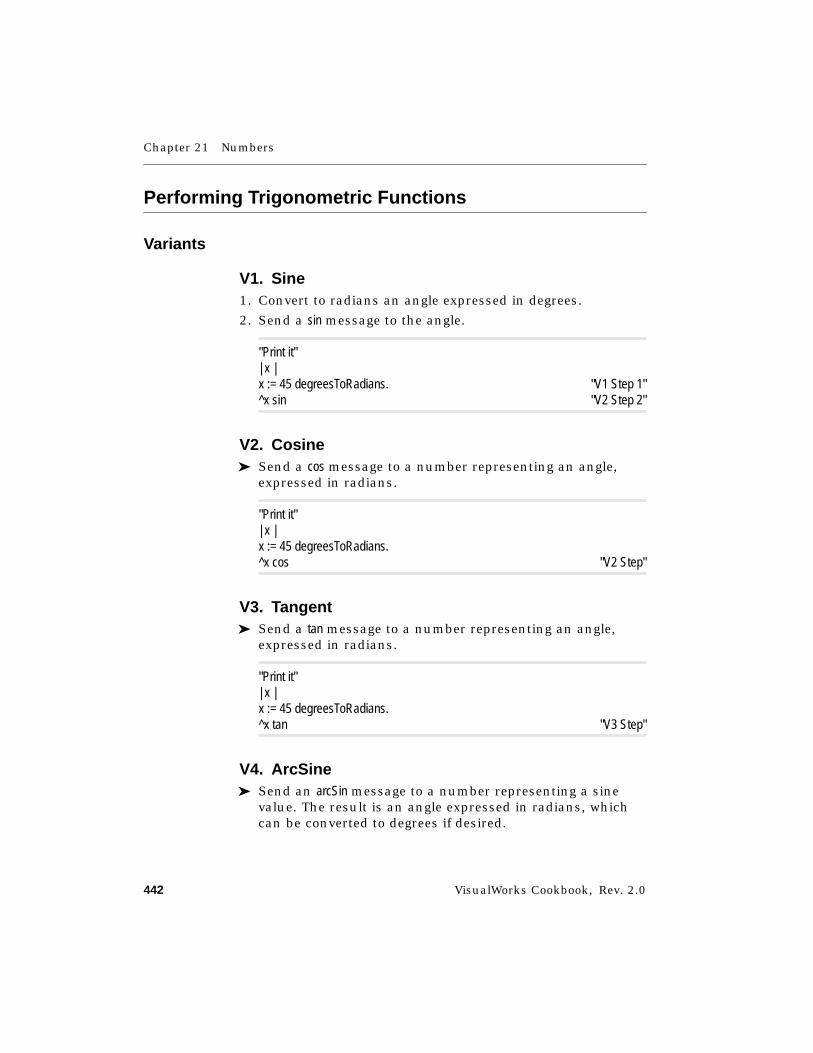
Chapter 21 Numbers
442 VisualWorks Cookbook, Rev. 2.0
Performing Trigonometric Functions
Variants
V1. Sine1. Convert to radians an angle expressed in degrees.
2. Send a sin message to the angle.
"Print it"| x |x := 45 degreesToRadians. "V1 Step 1"^x sin "V2 Step 2"
V2. Cosine➤ Send a cos message to a number representing an angle,
expressed in radians.
"Print it"| x |x := 45 degreesToRadians.^x cos "V2 Step"
V3. Tangent➤ Send a tan message to a number representing an angle,
expressed in radians.
"Print it"| x |x := 45 degreesToRadians.^x tan "V3 Step"
V4. ArcSine➤ Send an arcSin message to a number representing a sine
value. The result is an angle expressed in radians, whichcan be converted to degrees if desired.
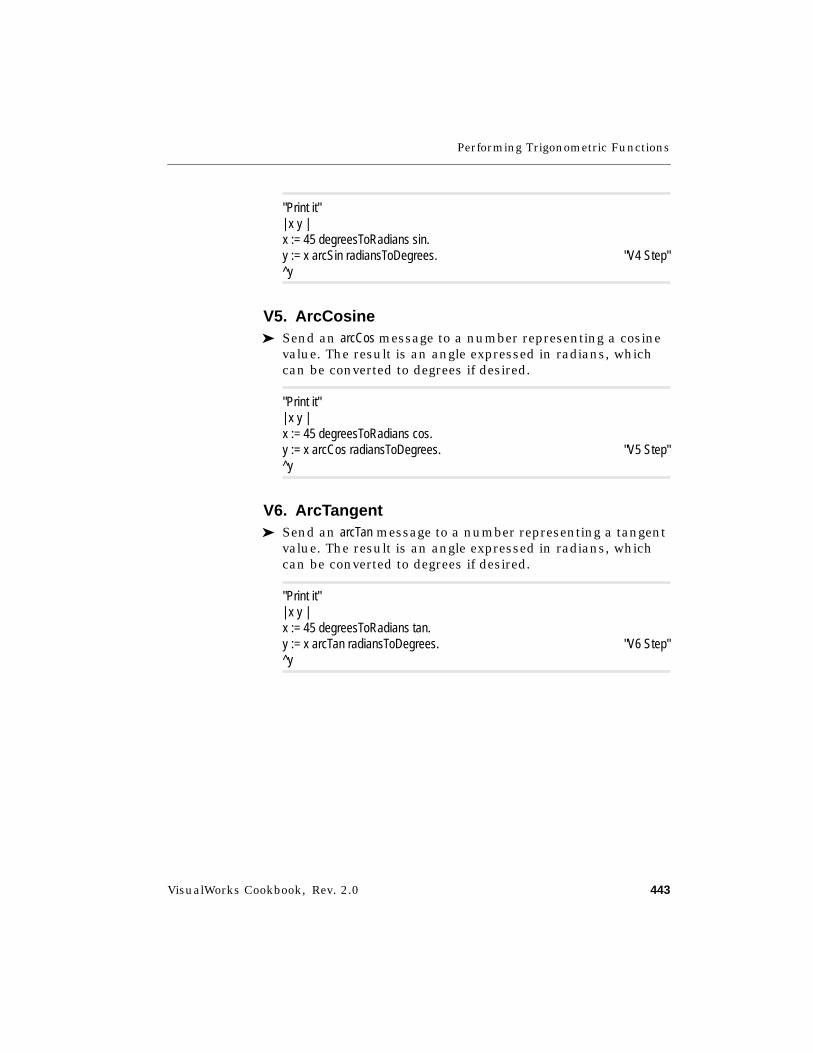
Performing Trigonometric Functions
VisualWorks Cookbook, Rev. 2.0 443
"Print it"| x y |x := 45 degreesToRadians sin.y := x arcSin radiansToDegrees. "V4 Step"^y
V5. ArcCosine➤ Send an arcCos message to a number representing a cosine
value. The result is an angle expressed in radians, whichcan be converted to degrees if desired.
"Print it"| x y |x := 45 degreesToRadians cos.y := x arcCos radiansToDegrees. "V5 Step"^y
V6. ArcTangent➤ Send an arcTan message to a number representing a tangent
value. The result is an angle expressed in radians, whichcan be converted to degrees if desired.
"Print it"| x y |x := 45 degreesToRadians tan.y := x arcTan radiansToDegrees. "V6 Step"^y
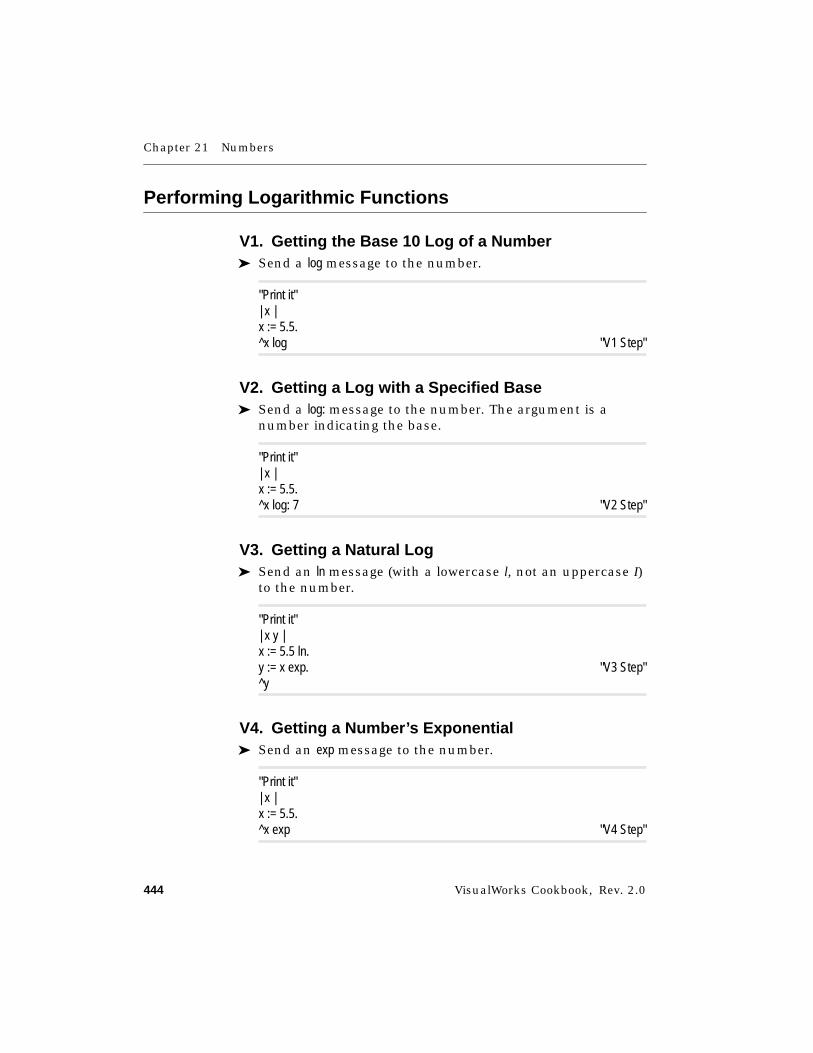
Chapter 21 Numbers
444 VisualWorks Cookbook, Rev. 2.0
Performing Logarithmic Functions
V1. Getting the Base 10 Log of a Number➤ Send a log message to the number.
"Print it"| x |x := 5.5.^x log "V1 Step"
V2. Getting a Log with a Specified Base➤ Send a log: message to the number. The argument is a
number indicating the base.
"Print it"| x |x := 5.5.^x log: 7 "V2 Step"
V3. Getting a Natural Log➤ Send an ln message (with a lowercase l, not an uppercase I)
to the number.
"Print it"| x y |x := 5.5 ln.y := x exp. "V3 Step"^y
V4. Getting a Number’s Exponential➤ Send an exp message to the number.
"Print it"| x |x := 5.5.^x exp "V4 Step"
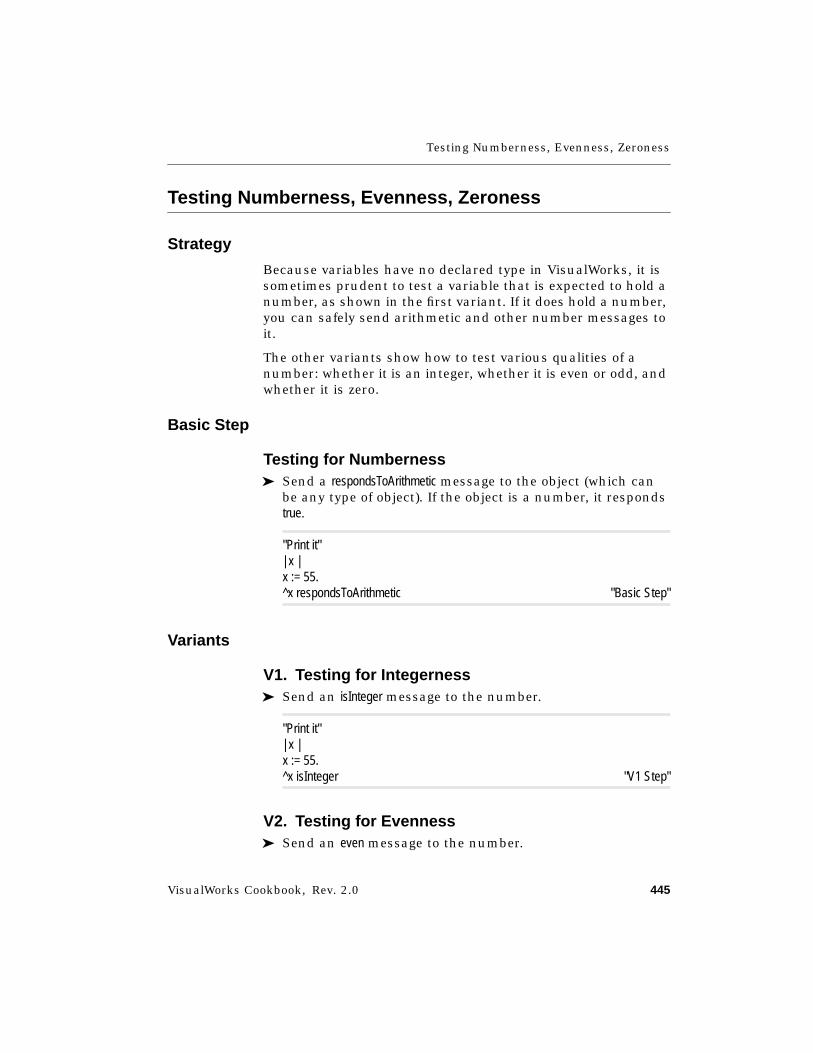
Testing Numberness, Evenness, Zeroness
VisualWorks Cookbook, Rev. 2.0 445
Testing Numberness, Evenness, Zeroness
Strategy
Because variables have no declared type in VisualWorks, it issometimes prudent to test a variable that is expected to hold anumber, as shown in the first variant. If it does hold a number,you can safely send arithmetic and other number messages toit.
The other variants show how to test various qualities of anumber: whether it is an integer, whether it is even or odd, andwhether it is zero.
Basic Step
Testing for Numberness➤ Send a respondsToArithmetic message to the object (which can
be any type of object). If the object is a number, it respondstrue.
"Print it"| x |x := 55.^x respondsToArithmetic "Basic Step"
Variants
V1. Testing for Integerness➤ Send an isInteger message to the number.
"Print it"| x |x := 55.^x isInteger "V1 Step"
V2. Testing for Evenness➤ Send an even message to the number.
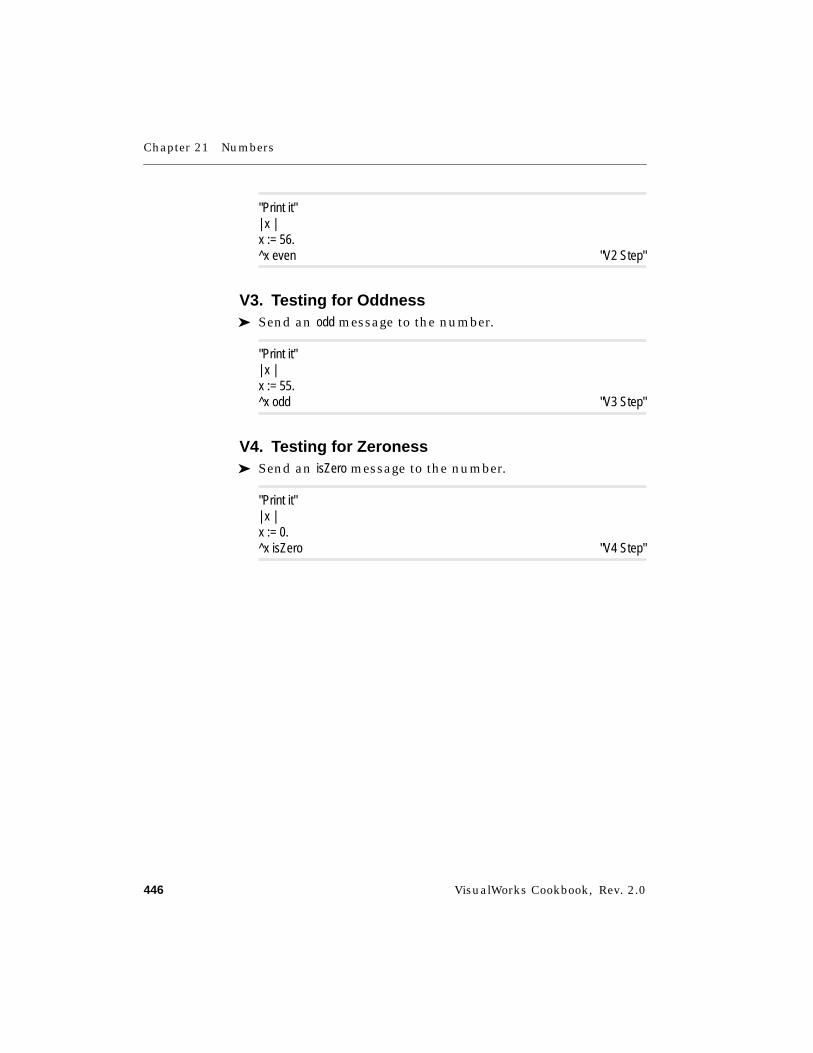
Chapter 21 Numbers
446 VisualWorks Cookbook, Rev. 2.0
"Print it"| x |x := 56.^x even "V2 Step"
V3. Testing for Oddness➤ Send an odd message to the number.
"Print it"| x |x := 55.^x odd "V3 Step"
V4. Testing for Zeroness➤ Send an isZero message to the number.
"Print it"| x |x := 0.^x isZero "V4 Step"
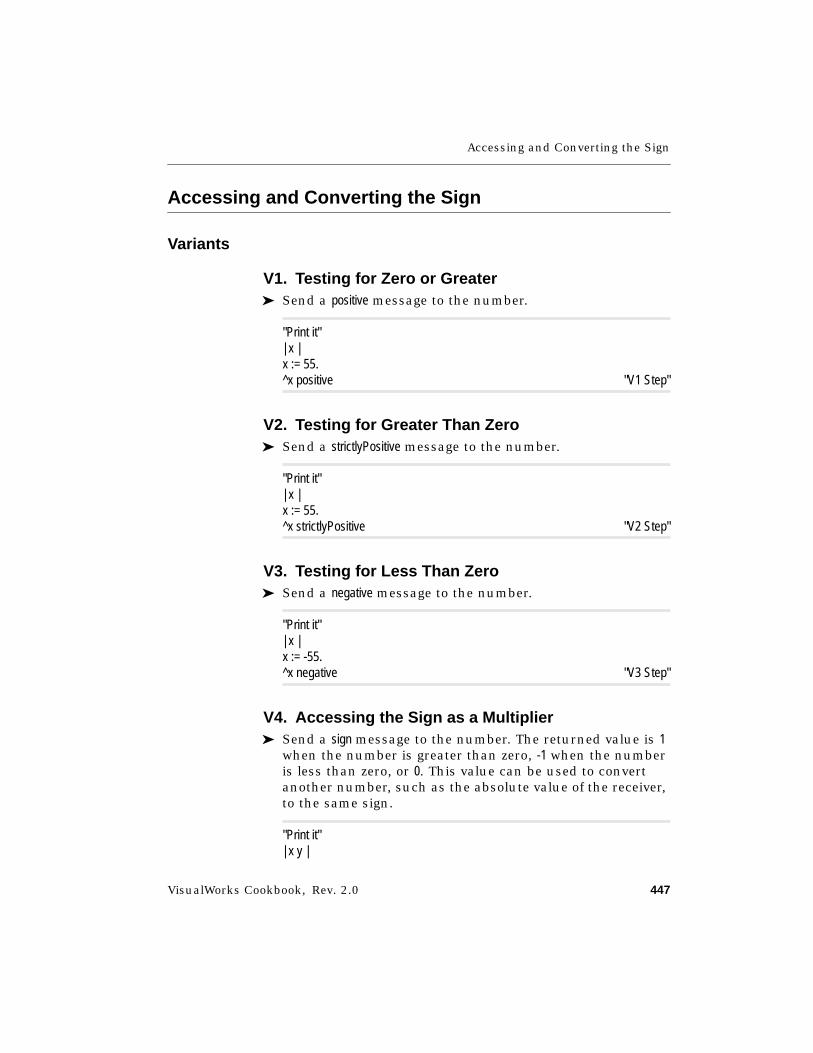
Accessing and Converting the Sign
VisualWorks Cookbook, Rev. 2.0 447
Accessing and Converting the Sign
Variants
V1. Testing for Zero or Greater➤ Send a positive message to the number.
"Print it"| x |x := 55.^x positive "V1 Step"
V2. Testing for Greater Than Zero➤ Send a strictlyPositive message to the number.
"Print it"| x |x := 55.^x strictlyPositive "V2 Step"
V3. Testing for Less Than Zero➤ Send a negative message to the number.
"Print it"| x |x := -55.^x negative "V3 Step"
V4. Accessing the Sign as a Multiplier➤ Send a sign message to the number. The returned value is 1
when the number is greater than zero, -1 when the numberis less than zero, or 0. This value can be used to convertanother number, such as the absolute value of the receiver,to the same sign.
"Print it"| x y |
Chapter 21 Numbers
448 VisualWorks Cookbook, Rev. 2.0
x := -55.y := x abs.^y * (x sign) "V4 Step"
V5. Reversing the Sign➤ Send a negated message to the number.
"Print it"| x |x := -55.^x negated "V5 Step"
Converting a Number to Another Form
VisualWorks Cookbook, Rev. 2.0 449
Converting a Number to Another Form
Variants
V1. Converting to Fixed Point➤ Send an asFixedPoint: message to the number; the argument
is the number of decimal places.
"Print it"| x |x := 99.95 asFixedPoint: 2. "V1 Step"^x
V2. Converting to Single-Precision Float➤ Send an asFloat message to the number.
"Print it"| x |x := 55.^x asFloat "V2 Step"
V3. Converting to Double-Precision Float➤ Send an asDouble message to the number.
"Print it"| x |x := 55.^x asDouble "V3 Step"
V4. Converting to Integer or Fraction(Rational Number)➤ Send an asRational message to the number.
"Print it"| x |

Chapter 21 Numbers
450 VisualWorks Cookbook, Rev. 2.0
x := 55.5.^x asRational "V4 Step"
V5. Converting to Absolute Number➤ Send an abs message to the number.
"Print it"| x |x := -55.5.^x abs "V5 Step"
V6. Converting to Reciprocal➤ Send a reciprocal message to the number.
"Print it"| x |x := 0.5.^x reciprocal "V6 Step"
V7. Converting from Degrees to Radians➤ Send a degreesToRadians message to the number.
"Print it"| x |x := 90.^x degreesToRadians "V7 Step"
V8. Converting from Radians to Degrees➤ Send a radiansToDegrees message to the number.
"Print it"| x |x := 1.5.^x radiansToDegrees "V8 Step"
Converting a Number to Another Form
VisualWorks Cookbook, Rev. 2.0 451
V9. Converting to Symmetric Point➤ Send an asPoint message to the number. The point that is
returned has the number as both its x and y coordinates.
"Print it"| x |x := 55.^x asPoint "V9 Step"
V10. Converting to One Axis of a Point➤ Send an @ message to the number. The receiver is the x
coordinate and the argument is the y coordinate of theresulting point. Like other binary messages, the @ messagecan either have white space before and after it or not.
"Print it"| x y |x := 55.y := 100.^x @ y "V10 Step"
V11. Converting to Character➤ Send an asCharacter message to an integer. If the receiver is
the numeric representation of a valid character, the char-acter is returned; otherwise, an error results.
"Print it"| x |x := 55.^x asCharacter "V11 Step"
V12. Converting to String➤ Send a printString message to the number.
"Print it"| x |
Chapter 21 Numbers
452 VisualWorks Cookbook, Rev. 2.0
x := 55.^x printString "V12 Step"
V13. Converting to String, Using a BaseOther Than 10➤ Send a printStringRadix: message to the number. The argument
is a number indicating the base.
"Print it"| x |x := 55.^x printStringRadix: 16 "V13 Step"
See Also■ “Formatting Displayed Data” on page 129
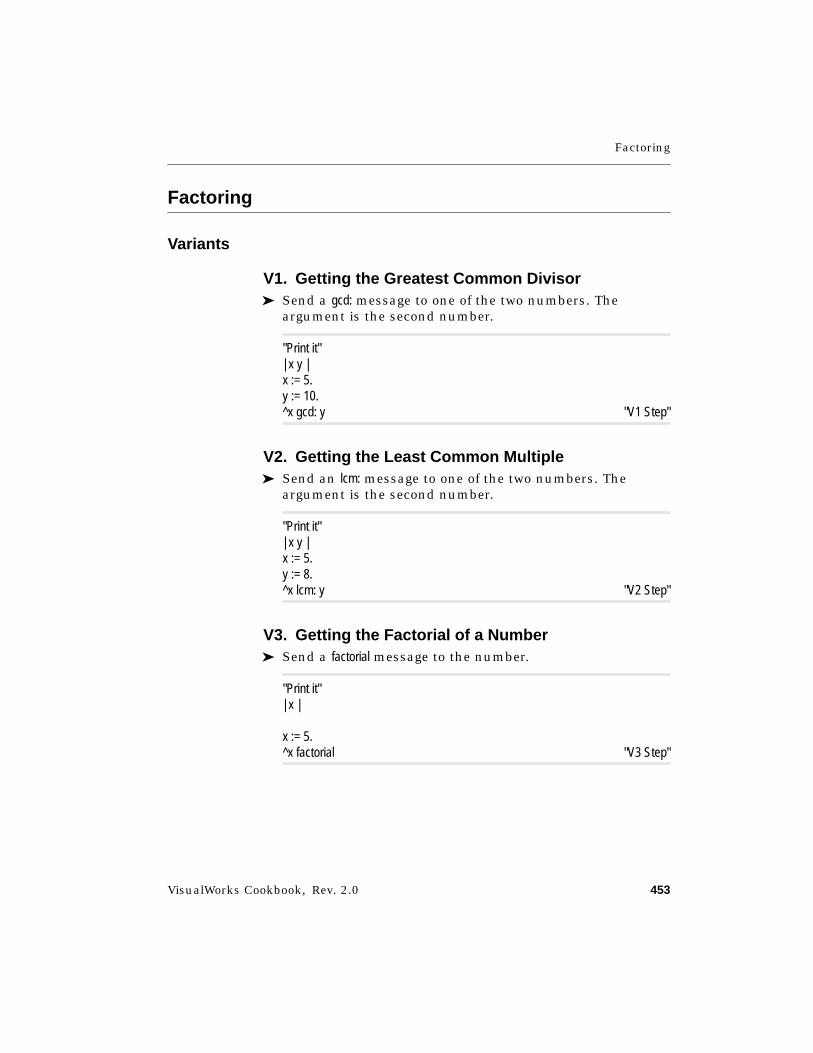
Factoring
VisualWorks Cookbook, Rev. 2.0 453
Factoring
Variants
V1. Getting the Greatest Common Divisor➤ Send a gcd: message to one of the two numbers. The
argument is the second number.
"Print it"| x y |x := 5.y := 10.^x gcd: y "V1 Step"
V2. Getting the Least Common Multiple➤ Send an lcm: message to one of the two numbers. The
argument is the second number.
"Print it"| x y |x := 5.y := 8.^x lcm: y "V2 Step"
V3. Getting the Factorial of a Number➤ Send a factorial message to the number.
"Print it"| x |
x := 5.^x factorial "V3 Step"
Chapter 21 Numbers
454 VisualWorks Cookbook, Rev. 2.0
Generating a Random Number
Strategy
A random number can be generated by an instance of Random.This object is a kind of stream, so it responds to streammessages—in particular, the next message gets the next numberin the sequence, as shown in the basic steps.
By default, a random stream returns fractional values between0 and 1. The first variant shows how to convert those values toa range, in effect generating a value between, say, 1 and 52.
VisualWorks provides seven different streams of randomnumbers, identified as generators 1 through 7. You can alsochoose a position in the stream by supplying a seed value—often, Time millisecondClockValue is used for this purpose because itis a value that varies with time. By default, a different seedvalue is used each time you send a new message to the Randomclass.
The second variant shows how to use the same generator andseed value when you want a reproducible sequence of “random”numbers. The third variant shows how to ensure that a secondsequence of numbers is not the same as the first by changingthe generator, the seed value, or both.
Basic Steps
Generating a Random Number between 0 and 11. Create a random stream of numbers by sending new to the
Random class.
2. Get the next number in the stream by sending new to therandom stream.
"Print it"| randomStream x |randomStream := Random new. "Basic Step 1"x := randomStream next. "Basic Step 2"^x
Generating a Random Number
VisualWorks Cookbook, Rev. 2.0 455
Variants
V1. Generating a Random Integerin a Specified Range1. Create a random stream of numbers by sending new to
Random.
2. Define the beginning and ending values of the range.
3. Derive the extent of the range.
4. Get the next value from the random stream, then multiply itby the extent of the range, add the range’s beginning value,and round the result.
"Print it"| randomStream rangeStart rangeEnd rangeExtent x |randomStream := Random new. "V1 Step 1"rangeStart := 1. "V1 Step 2"rangeEnd := 52.rangeExtent := rangeEnd - rangeStart. "V1 Step 3"x := (randomStream next * rangeExtent + rangeStart) rounded. "V1 Step 4"^x
V2. Reproducing a Sequence of Random Numbers1. Create the first random stream by sending a
fromGenerator:seededWith: message to the Random class. The firstargument is an integer from 1 to 7, identifying one of theseven streams that VisualWorks provides. The secondargument is a number that is used to select a position inthe stream.
2. Create the second random stream exactly the same way asin step 1—that is, use the same two values for the argu-ments to assure that the same generator and the same seedvalue are used.
"Print it"| rangeStart rangeEnd rangeExtent randomStream1 randomStream2firstSequence secondSequence |rangeStart := 1.rangeEnd := 52.rangeExtent := rangeEnd - rangeStart.
Chapter 21 Numbers
456 VisualWorks Cookbook, Rev. 2.0
"Create the two equivalent generators."randomStream1 := Random "V2 Step 1"
fromGenerator: 1seededWith: 1.
randomStream2 := Random "V2 Step 2"fromGenerator: 1seededWith: 1.
"Collect the first 1000 numbers from generator 1."firstSequence := OrderedCollection new.1000 timesRepeat: [
firstSequenceadd: (randomStream1 next * rangeExtent + rangeStart) rounded].
"Collect the first 1000 numbers from generator 2."secondSequence := OrderedCollection new.1000 timesRepeat: [
secondSequenceadd: (randomStream2 next * rangeExtent + rangeStart) rounded].
"Answer whether the two collections are the same."^firstSequence = secondSequence
V3. Encouraging Randomnessin Multiple Sequences1. Create the first random stream by sending a
fromGenerator:seededWith: message to the Random class. The firstargument is an integer from 1 to 7, identifying one of theseven streams that VisualWorks provides. The secondargument is a number that is used to select a position inthe stream.
2. Create each of the other random streams in the same way,but use a different value for the generator, the seed value,or both.
"Print it"| rangeStart rangeEnd rangeExtent randomStream1 randomStream2randomStream3 numbers outStream |rangeStart := 1.

Generating a Random Number
VisualWorks Cookbook, Rev. 2.0 457
rangeEnd := 52.rangeExtent := rangeEnd - rangeStart.
"Create three nonequivalent generators."randomStream1 := Random "V3 Step 1"
fromGenerator: 1seededWith: 1.
randomStream2 := Random "V3 Step 2"fromGenerator: 2seededWith: 1.
randomStream3 := Random "V3 Step 2"fromGenerator: 1seededWith: Time millisecondClockValue.
"Collect the first 10 numbers from each generator."numbers := OrderedCollection new.10 timesRepeat: [
numbers add: (randomStream1 next * rangeExtent + rangeStart) rounded.numbers add: (randomStream2 next * rangeExtent + rangeStart) rounded.numbers add: (randomStream3 next * rangeExtent + rangeStart) rounded].
"Arrange the random numbers in columns."outStream := ('' writeStream) cr.1 to: 30 do: [:i |
outStream nextPutAll: (numbers at: i) printString; tab.(i \\ 3) isZero ifTrue: [outStream cr]].
^outStream contents
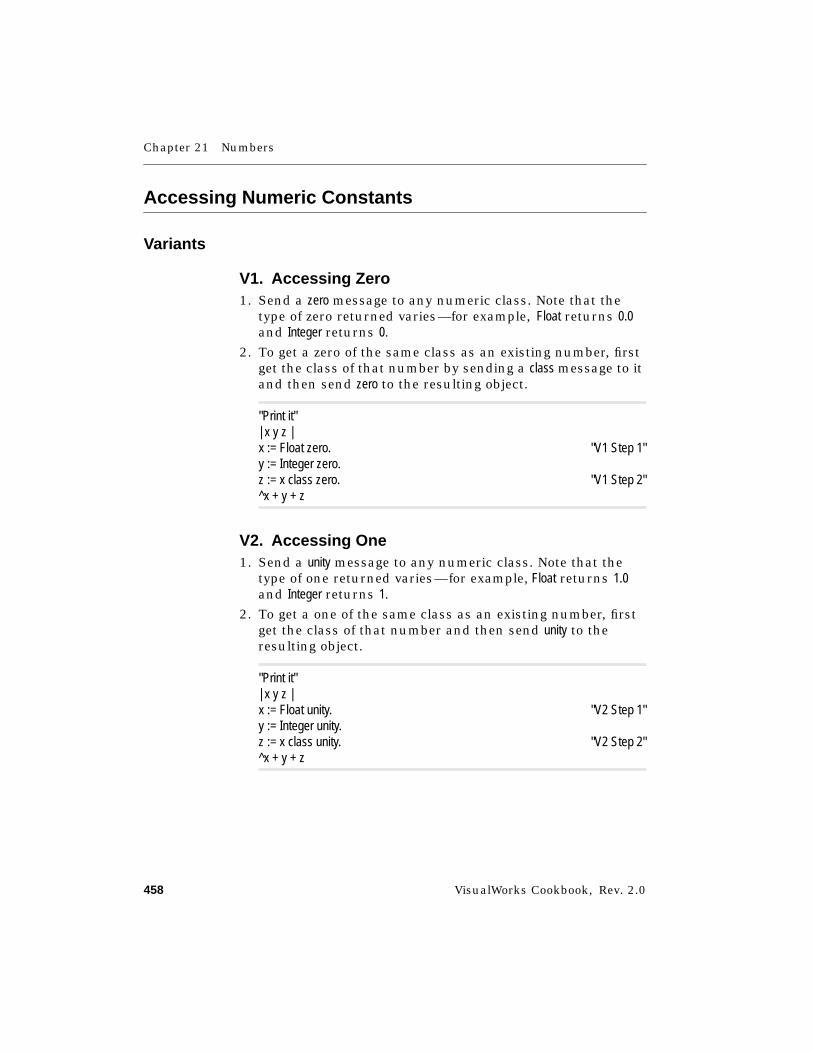
Chapter 21 Numbers
458 VisualWorks Cookbook, Rev. 2.0
Accessing Numeric Constants
Variants
V1. Accessing Zero1. Send a zero message to any numeric class. Note that the
type of zero returned varies—for example, Float returns 0.0and Integer returns 0.
2. To get a zero of the same class as an existing number, firstget the class of that number by sending a class message to itand then send zero to the resulting object.
"Print it"| x y z |x := Float zero. "V1 Step 1"y := Integer zero.z := x class zero. "V1 Step 2"^x + y + z
V2. Accessing One1. Send a unity message to any numeric class. Note that the
type of one returned varies—for example, Float returns 1.0and Integer returns 1.
2. To get a one of the same class as an existing number, firstget the class of that number and then send unity to theresulting object.
"Print it"| x y z |x := Float unity. "V2 Step 1"y := Integer unity.z := x class unity. "V2 Step 2"^x + y + z
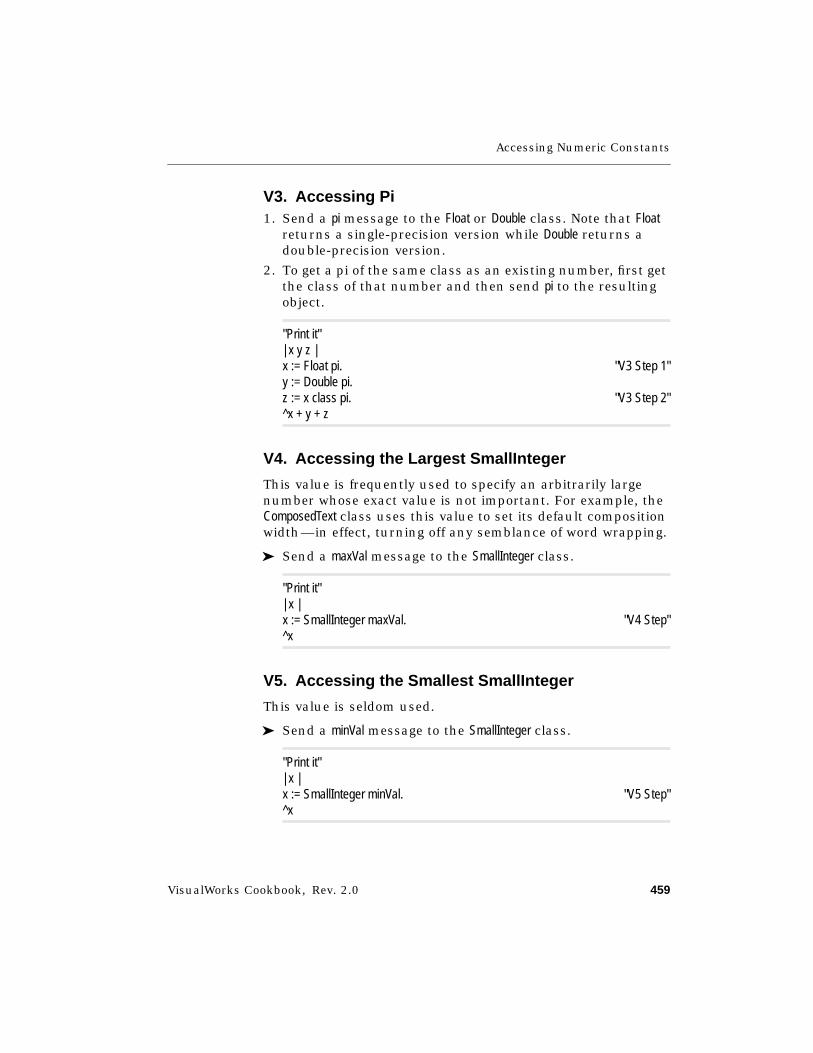
Accessing Numeric Constants
VisualWorks Cookbook, Rev. 2.0 459
V3. Accessing Pi1. Send a pi message to the Float or Double class. Note that Float
returns a single-precision version while Double returns adouble-precision version.
2. To get a pi of the same class as an existing number, first getthe class of that number and then send pi to the resultingobject.
"Print it"| x y z |x := Float pi. "V3 Step 1"y := Double pi.z := x class pi. "V3 Step 2"^x + y + z
V4. Accessing the Largest SmallInteger
This value is frequently used to specify an arbitrarily largenumber whose exact value is not important. For example, theComposedText class uses this value to set its default compositionwidth—in effect, turning off any semblance of word wrapping.
➤ Send a maxVal message to the SmallInteger class.
"Print it"| x |x := SmallInteger maxVal. "V4 Step"^x
V5. Accessing the Smallest SmallInteger
This value is seldom used.
➤ Send a minVal message to the SmallInteger class.
"Print it"| x |x := SmallInteger minVal. "V5 Step"^x


VisualWorks Cookbook, Rev. 2.0 461
Chapter 22
Dates
Creating a Date 462Getting Information about a Day 465Getting Information about a Month 467Getting Information about a Year 469Adding and Subtracting with Dates 471Comparing Dates 473Formatting a Date 475
See Also■ “Times” on page 477
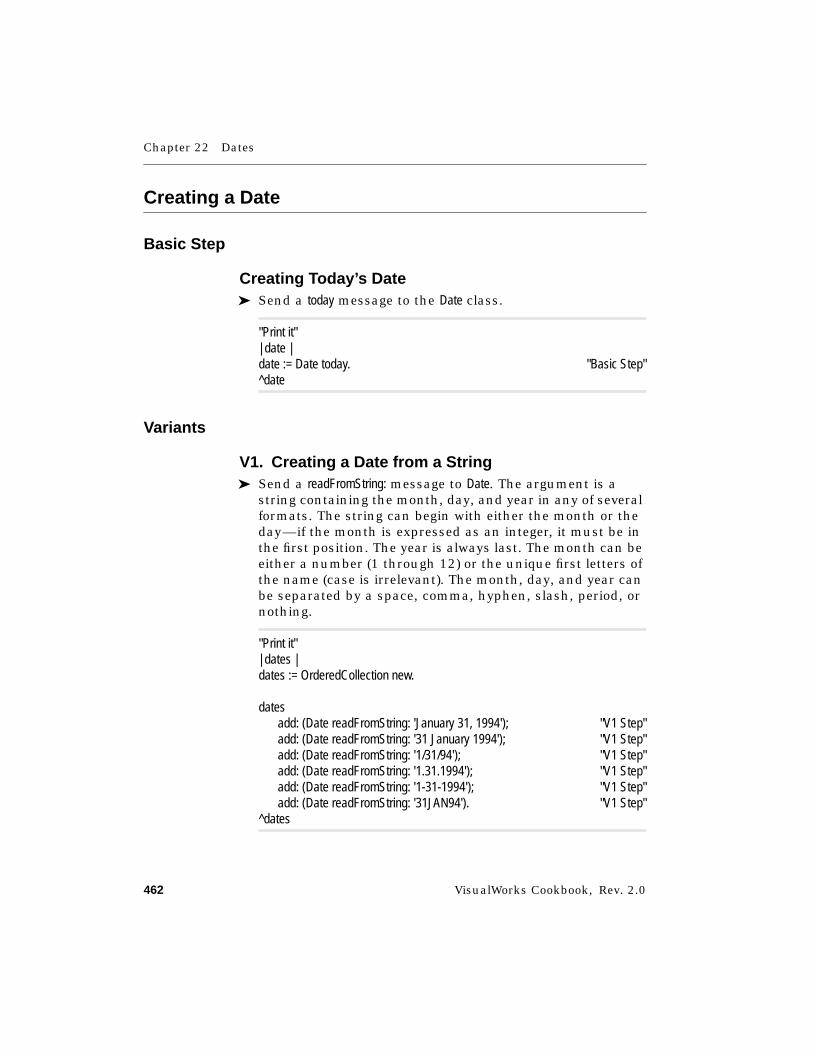
Chapter 22 Dates
462 VisualWorks Cookbook, Rev. 2.0
Creating a Date
Basic Step
Creating Today’s Date➤ Send a today message to the Date class.
"Print it"| date |date := Date today. "Basic Step"^date
Variants
V1. Creating a Date from a String➤ Send a readFromString: message to Date. The argument is a
string containing the month, day, and year in any of severalformats. The string can begin with either the month or theday—if the month is expressed as an integer, it must be inthe first position. The year is always last. The month can beeither a number (1 through 12) or the unique first letters ofthe name (case is irrelevant). The month, day, and year canbe separated by a space, comma, hyphen, slash, period, ornothing.
"Print it"| dates |dates := OrderedCollection new.
datesadd: (Date readFromString: 'January 31, 1994'); "V1 Step"add: (Date readFromString: '31 January 1994'); "V1 Step"add: (Date readFromString: '1/31/94'); "V1 Step"add: (Date readFromString: '1.31.1994'); "V1 Step"add: (Date readFromString: '1-31-1994'); "V1 Step"add: (Date readFromString: '31JAN94'). "V1 Step"
^dates
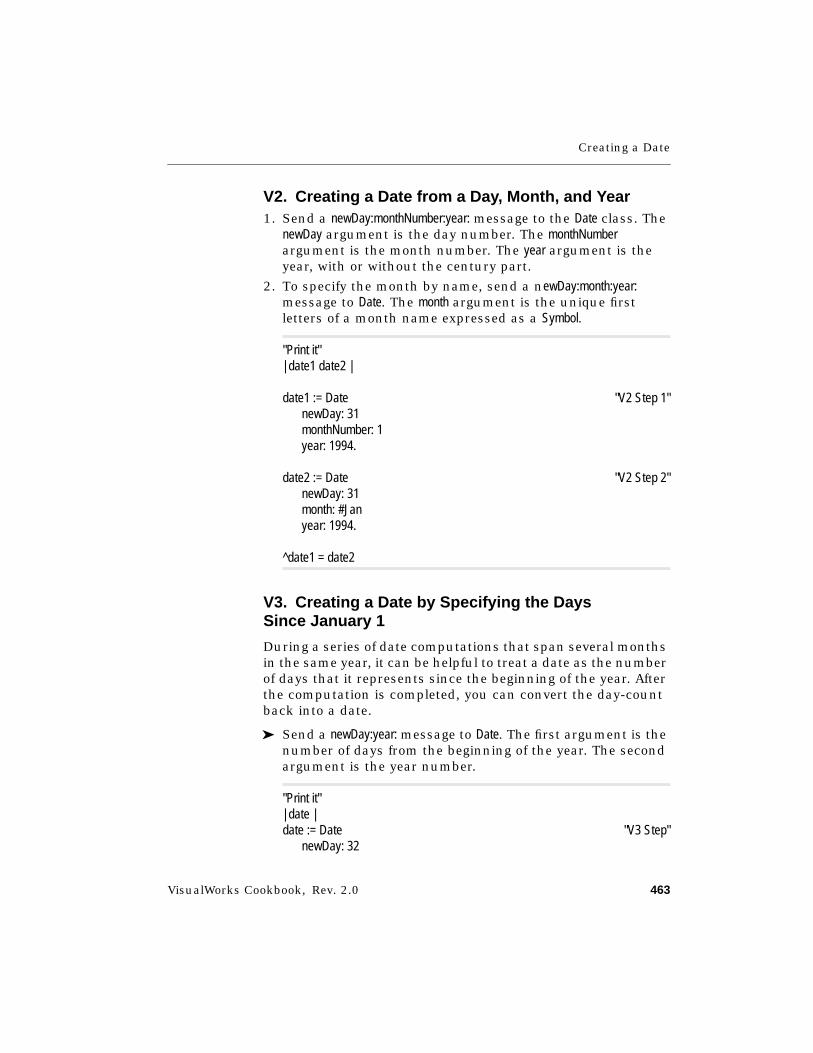
Creating a Date
VisualWorks Cookbook, Rev. 2.0 463
V2. Creating a Date from a Day, Month, and Year1. Send a newDay:monthNumber:year: message to the Date class. The
newDay argument is the day number. The monthNumberargument is the month number. The year argument is theyear, with or without the century part.
2. To specify the month by name, send a newDay:month:year:message to Date. The month argument is the unique firstletters of a month name expressed as a Symbol.
"Print it"| date1 date2 |
date1 := Date "V2 Step 1"newDay: 31monthNumber: 1year: 1994.
date2 := Date "V2 Step 2"newDay: 31month: #Janyear: 1994.
^date1 = date2
V3. Creating a Date by Specifying the DaysSince January 1
During a series of date computations that span several monthsin the same year, it can be helpful to treat a date as the numberof days that it represents since the beginning of the year. Afterthe computation is completed, you can convert the day-countback into a date.
➤ Send a newDay:year: message to Date. The first argument is thenumber of days from the beginning of the year. The secondargument is the year number.
"Print it"| date |date := Date "V3 Step"
newDay: 32

Chapter 22 Dates
464 VisualWorks Cookbook, Rev. 2.0
year: 1994.^date
V4. Creating a Date by Specifying the DaysSince 1901
During a series of date computations that span multiple years,it can be helpful to treat a date as the number of days that itrepresents since 1901 (in effect, the beginning of recordedtime). After the computation is completed, you can convert theday-count back into a date.
➤ Send a fromDays: message to Date. The argument is thenumber of days from the beginning of 1901.
"Print it"| date |date := Date "V4 Step"
fromDays: (94 * 366).^date
See Also■ “Creating a Time” on page 478
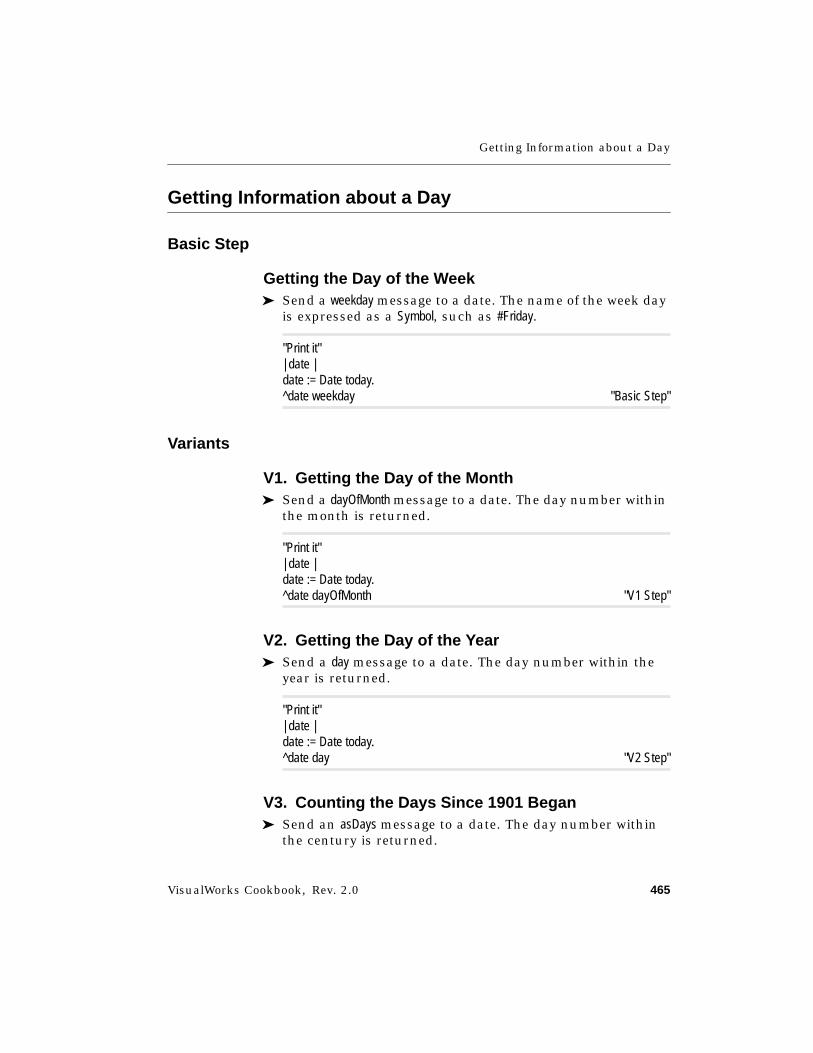
Getting Information about a Day
VisualWorks Cookbook, Rev. 2.0 465
Getting Information about a Day
Basic Step
Getting the Day of the Week➤ Send a weekday message to a date. The name of the week day
is expressed as a Symbol, such as #Friday.
"Print it"| date |date := Date today.^date weekday "Basic Step"
Variants
V1. Getting the Day of the Month➤ Send a dayOfMonth message to a date. The day number within
the month is returned.
"Print it"| date |date := Date today.^date dayOfMonth "V1 Step"
V2. Getting the Day of the Year➤ Send a day message to a date. The day number within the
year is returned.
"Print it"| date |date := Date today.^date day "V2 Step"
V3. Counting the Days Since 1901 Began➤ Send an asDays message to a date. The day number within
the century is returned.
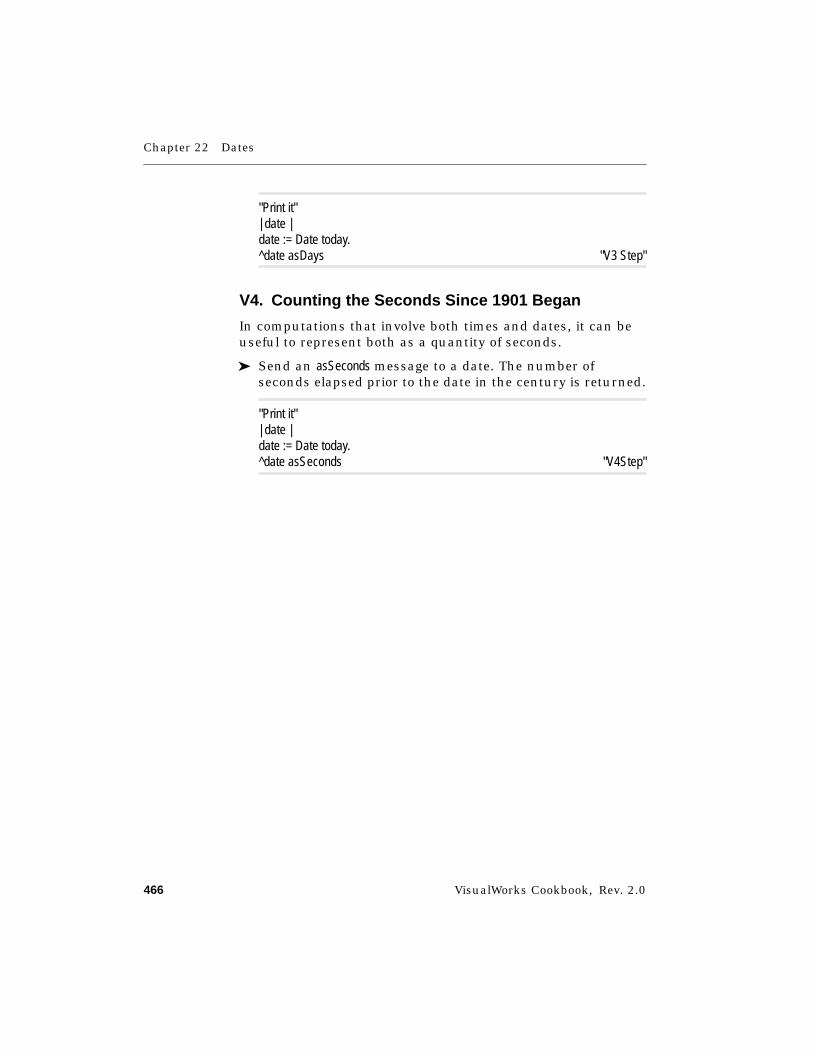
Chapter 22 Dates
466 VisualWorks Cookbook, Rev. 2.0
"Print it"| date |date := Date today.^date asDays "V3 Step"
V4. Counting the Seconds Since 1901 Began
In computations that involve both times and dates, it can beuseful to represent both as a quantity of seconds.
➤ Send an asSeconds message to a date. The number ofseconds elapsed prior to the date in the century is returned.
"Print it"| date |date := Date today.^date asSeconds "V4Step"
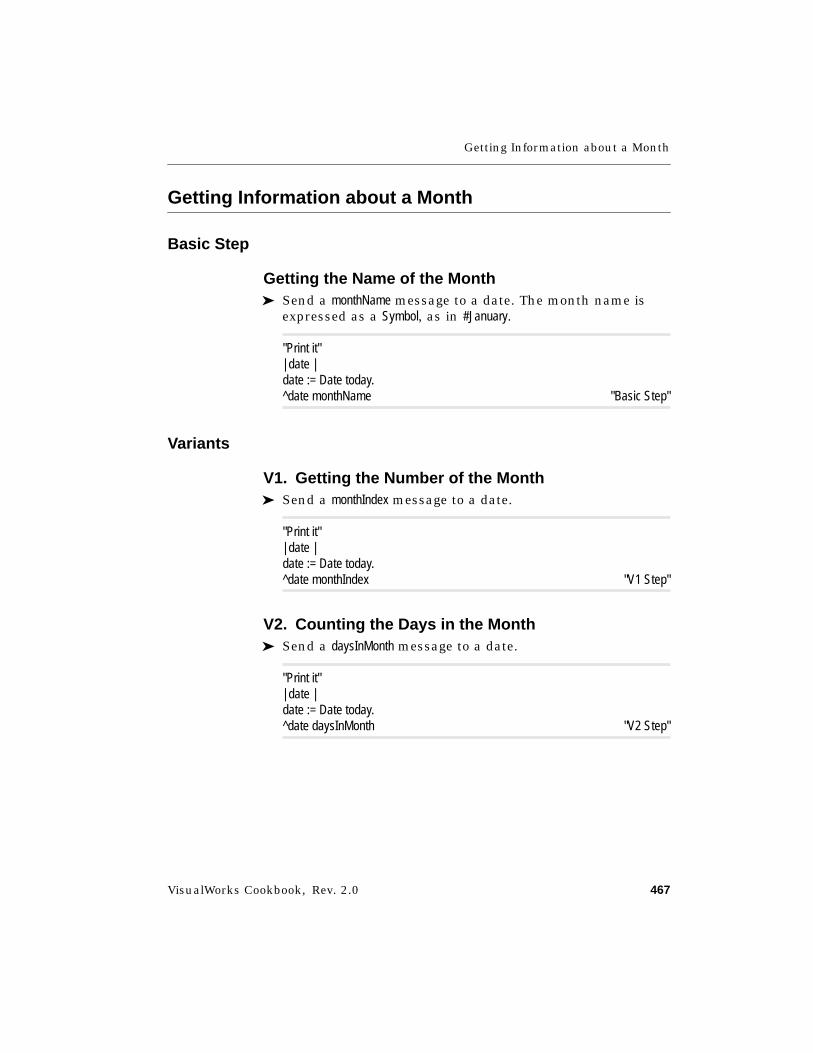
Getting Information about a Month
VisualWorks Cookbook, Rev. 2.0 467
Getting Information about a Month
Basic Step
Getting the Name of the Month➤ Send a monthName message to a date. The month name is
expressed as a Symbol, as in #January.
"Print it"| date |date := Date today.^date monthName "Basic Step"
Variants
V1. Getting the Number of the Month➤ Send a monthIndex message to a date.
"Print it"| date |date := Date today.^date monthIndex "V1 Step"
V2. Counting the Days in the Month➤ Send a daysInMonth message to a date.
"Print it"| date |date := Date today.^date daysInMonth "V2 Step"
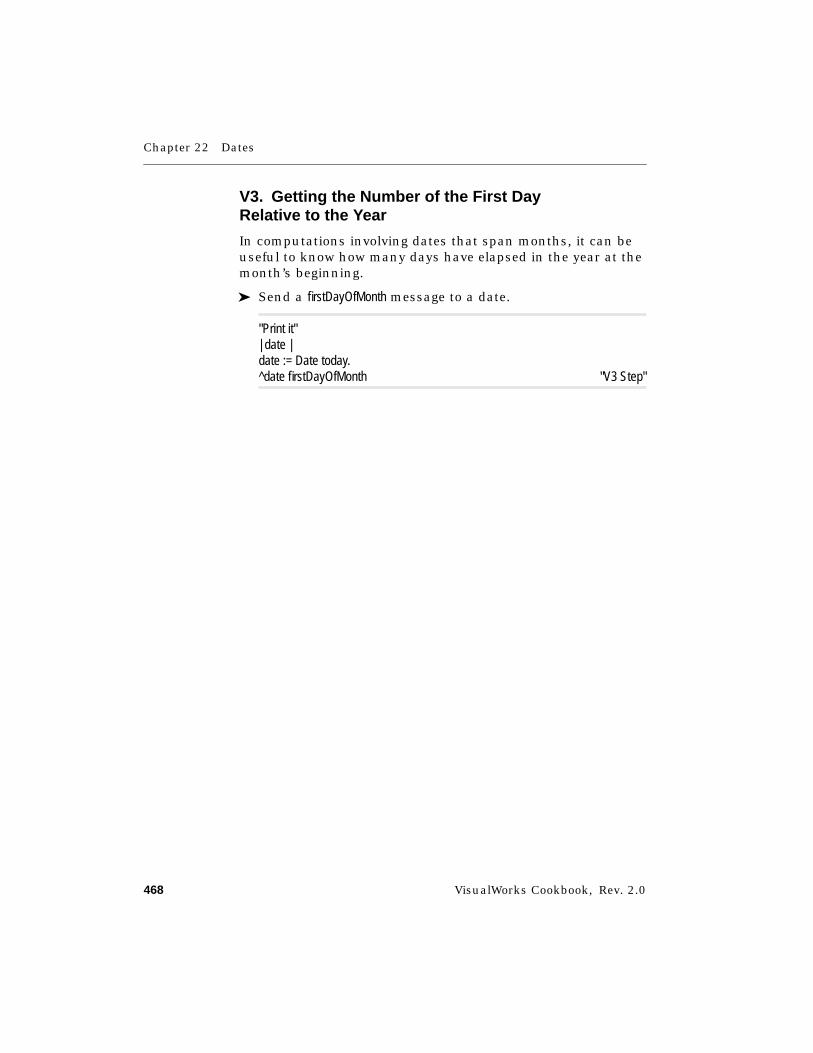
Chapter 22 Dates
468 VisualWorks Cookbook, Rev. 2.0
V3. Getting the Number of the First DayRelative to the Year
In computations involving dates that span months, it can beuseful to know how many days have elapsed in the year at themonth’s beginning.
➤ Send a firstDayOfMonth message to a date.
"Print it"| date |date := Date today.^date firstDayOfMonth "V3 Step"
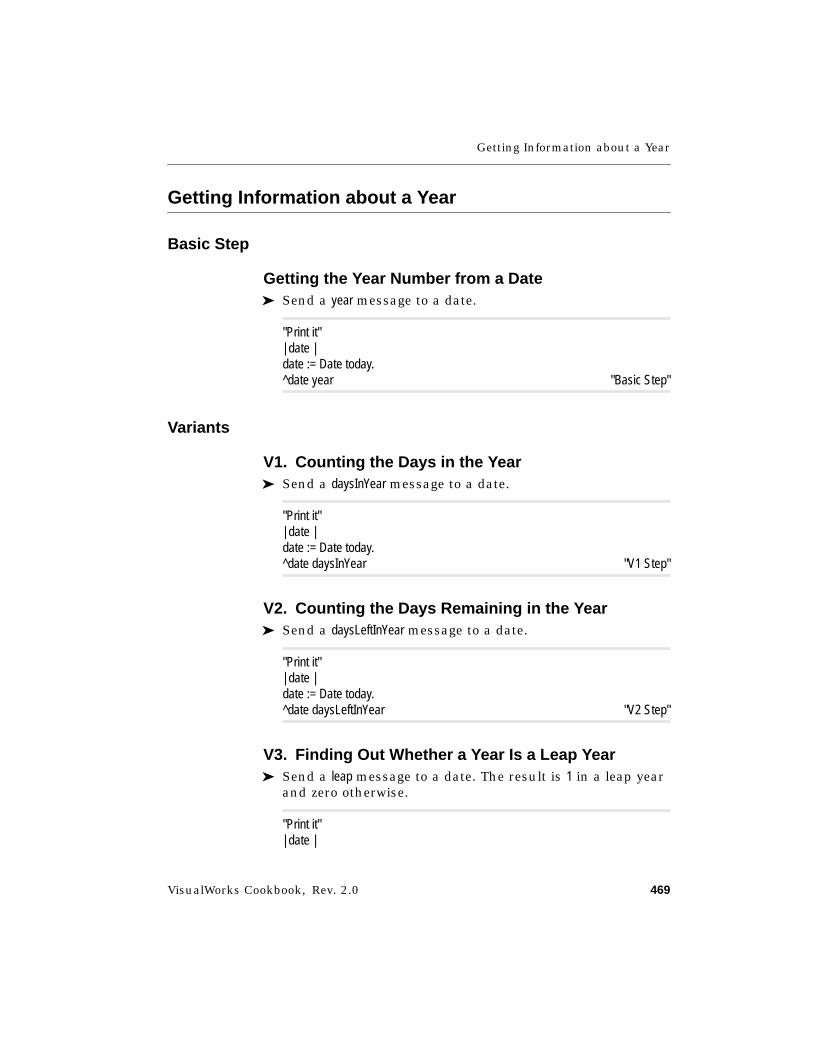
Getting Information about a Year
VisualWorks Cookbook, Rev. 2.0 469
Getting Information about a Year
Basic Step
Getting the Year Number from a Date➤ Send a year message to a date.
"Print it"| date |date := Date today.^date year "Basic Step"
Variants
V1. Counting the Days in the Year➤ Send a daysInYear message to a date.
"Print it"| date |date := Date today.^date daysInYear "V1 Step"
V2. Counting the Days Remaining in the Year➤ Send a daysLeftInYear message to a date.
"Print it"| date |date := Date today.^date daysLeftInYear "V2 Step"
V3. Finding Out Whether a Year Is a Leap Year➤ Send a leap message to a date. The result is 1 in a leap year
and zero otherwise.
"Print it"| date |

Chapter 22 Dates
470 VisualWorks Cookbook, Rev. 2.0
date := Date today.^date leap "V3 Step"
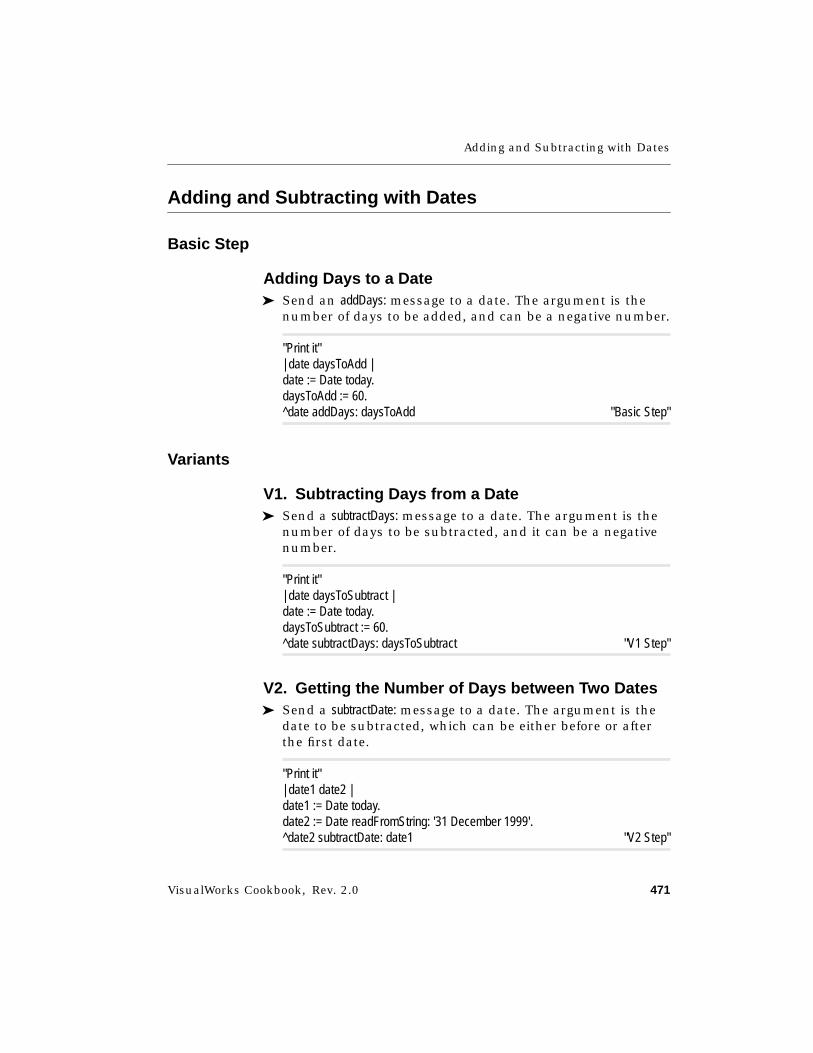
Adding and Subtracting with Dates
VisualWorks Cookbook, Rev. 2.0 471
Adding and Subtracting with Dates
Basic Step
Adding Days to a Date➤ Send an addDays: message to a date. The argument is the
number of days to be added, and can be a negative number.
"Print it"| date daysToAdd |date := Date today.daysToAdd := 60.^date addDays: daysToAdd "Basic Step"
Variants
V1. Subtracting Days from a Date➤ Send a subtractDays: message to a date. The argument is the
number of days to be subtracted, and it can be a negativenumber.
"Print it"| date daysToSubtract |date := Date today.daysToSubtract := 60.^date subtractDays: daysToSubtract "V1 Step"
V2. Getting the Number of Days between Two Dates➤ Send a subtractDate: message to a date. The argument is the
date to be subtracted, which can be either before or afterthe first date.
"Print it"| date1 date2 |date1 := Date today.date2 := Date readFromString: '31 December 1999'.^date2 subtractDate: date1 "V2 Step"
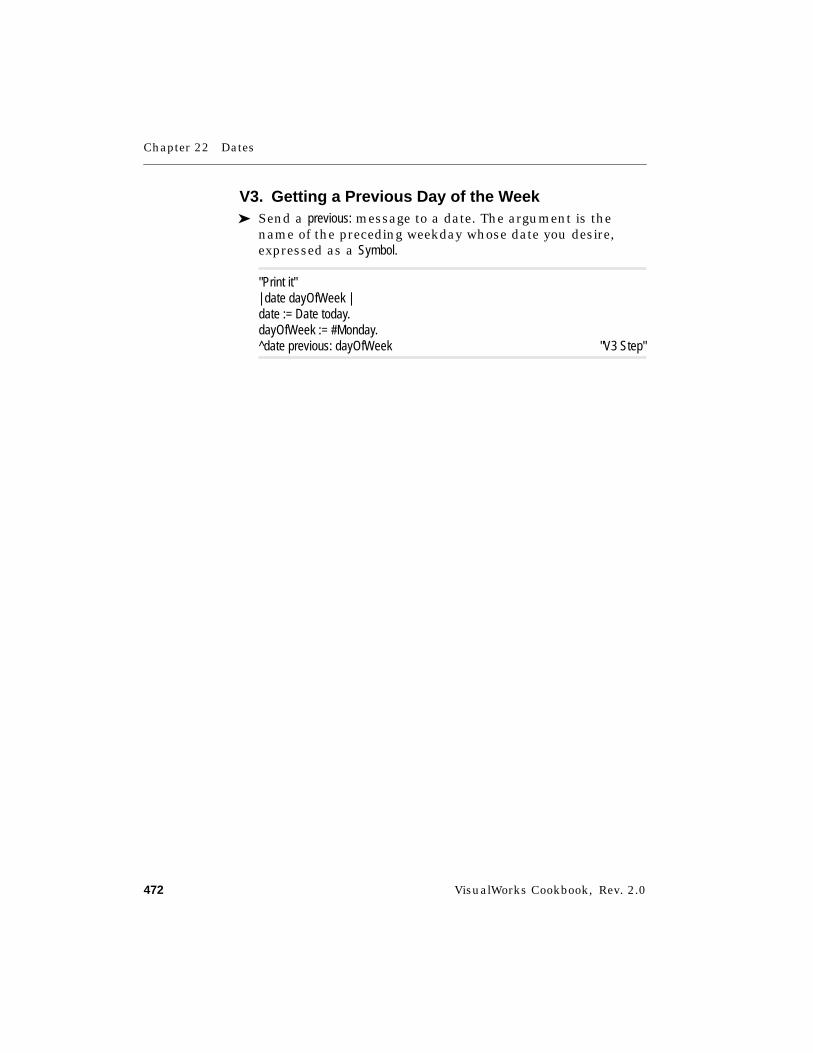
Chapter 22 Dates
472 VisualWorks Cookbook, Rev. 2.0
V3. Getting a Previous Day of the Week➤ Send a previous: message to a date. The argument is the
name of the preceding weekday whose date you desire,expressed as a Symbol.
"Print it"| date dayOfWeek |date := Date today.dayOfWeek := #Monday.^date previous: dayOfWeek "V3 Step"

Comparing Dates
VisualWorks Cookbook, Rev. 2.0 473
Comparing Dates
Basic Step
Testing Whether Two Dates Are Equal➤ Send an = message to a date. The argument is the date to be
compared. If the dates are equal, true is returned; otherwise,false is returned.
"Print it"| date1 date2 |date1 := Date today.date2 := Date fromDays: 1.^date1 = date2 "Basic Step"
Variants
V1. Testing Whether Two Dates Are Unequal➤ Send a ~= message to a date. The argument is the date to be
compared. If the dates are unequal, true is returned; other-wise, false is returned.
"Print it"| date1 date2 |date1 := Date today.date2 := Date fromDays: 1.^date1 ~= date2 "V1 Step"
V2. Testing for “Less Than”➤ Send a < message to a date. The argument is the date to be
compared. If the first date is earlier, true is returned; other-wise, false is returned.
"Print it"| date1 date2 |date1 := Date today.
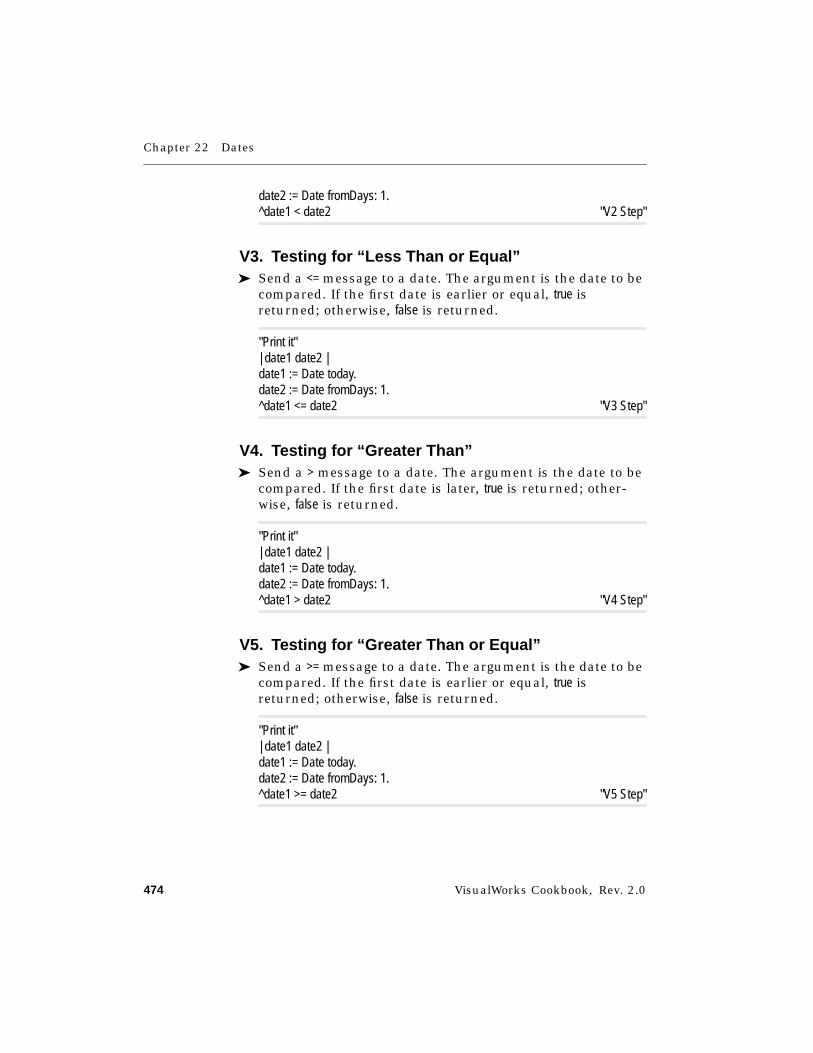
Chapter 22 Dates
474 VisualWorks Cookbook, Rev. 2.0
date2 := Date fromDays: 1.^date1 < date2 "V2 Step"
V3. Testing for “Less Than or Equal”➤ Send a <= message to a date. The argument is the date to be
compared. If the first date is earlier or equal, true isreturned; otherwise, false is returned.
"Print it"| date1 date2 |date1 := Date today.date2 := Date fromDays: 1.^date1 <= date2 "V3 Step"
V4. Testing for “Greater Than”➤ Send a > message to a date. The argument is the date to be
compared. If the first date is later, true is returned; other-wise, false is returned.
"Print it"| date1 date2 |date1 := Date today.date2 := Date fromDays: 1.^date1 > date2 "V4 Step"
V5. Testing for “Greater Than or Equal”➤ Send a >= message to a date. The argument is the date to be
compared. If the first date is earlier or equal, true isreturned; otherwise, false is returned.
"Print it"| date1 date2 |date1 := Date today.date2 := Date fromDays: 1.^date1 >= date2 "V5 Step"
Formatting a Date
VisualWorks Cookbook, Rev. 2.0 475
Formatting a Date
Strategy
A date can describe itself in a string having a variety of formats.The printFormat: message takes as its argument an arraycontaining six elements. The six elements are interpreted asfollows:
■ Day’s position in the string (1, 2, or 3)
■ Month’s position in the string (1, 2, or 3)
■ Year’s position in the string (1, 2, or 3)
■ The separator character
■ Month’s format: 1 (numeric), 2 (abbreviation), or 3 (fullname)
■ Year’s format: 1 (with century) or 2 (without century)
Basic Step➤ Send a printFormat: message to the date. The argument is an
array of six elements.
"Print it"| date |date := Date today.^date printFormat: #(2 1 3 $- 3 1) "Basic Step"
See Also■ “Restricting the Type of Input” on page 125

VisualWorks Cookbook, Rev. 2.0 477
Chapter 23
Times
Creating a Time 478Getting the Seconds, Minutes, and Hours 480Adding and Subtracting Times 482Creating a Time Stamp 483Timing a Block of Code 484Changing the Time Zone 486
See Also■ “Dates” on page 461
Chapter 23 Times
478 VisualWorks Cookbook, Rev. 2.0
Creating a Time
Basic Step
Creating the Current Time➤ Send a now message to the Time class.
"Print it"| time |time := Time now. "Basic Step"^time
Variants
V1. Creating a Time from a String➤ Send a readFromString: message to Time. The argument is a
string containing the hours, minutes, and seconds, sepa-rated by colons. The minutes and/or seconds can beomitted. The “am/pm” designation can be omitted (“am” isthe default) and can be in upper- or lowercase.
"Print it"| times |times := OrderedCollection new.
timesadd: (Time readFromString: '3:47:26 pm'); "V1 Step"add: (Time readFromString: '03:47'); "V1 Step"add: (Time readFromString: '::26 PM'). "V1 Step"
^times
V2. Creating a Time by Specifying the SecondsSince Midnight
In computations involving times on different dates, it is some-times useful to represent each time as a number of seconds
Creating a Time
VisualWorks Cookbook, Rev. 2.0 479
since midnight. At the end of the computation, you can convertthe number of seconds back into an instance of Time.
➤ Send a fromSeconds: message to Time. The argument is thenumber of seconds that have elapsed since midnight.
"Print it"| time |time := Time fromSeconds: (60 * 60 * 4). "V2 Step"^time
See Also■ “Creating a Date” on page 462
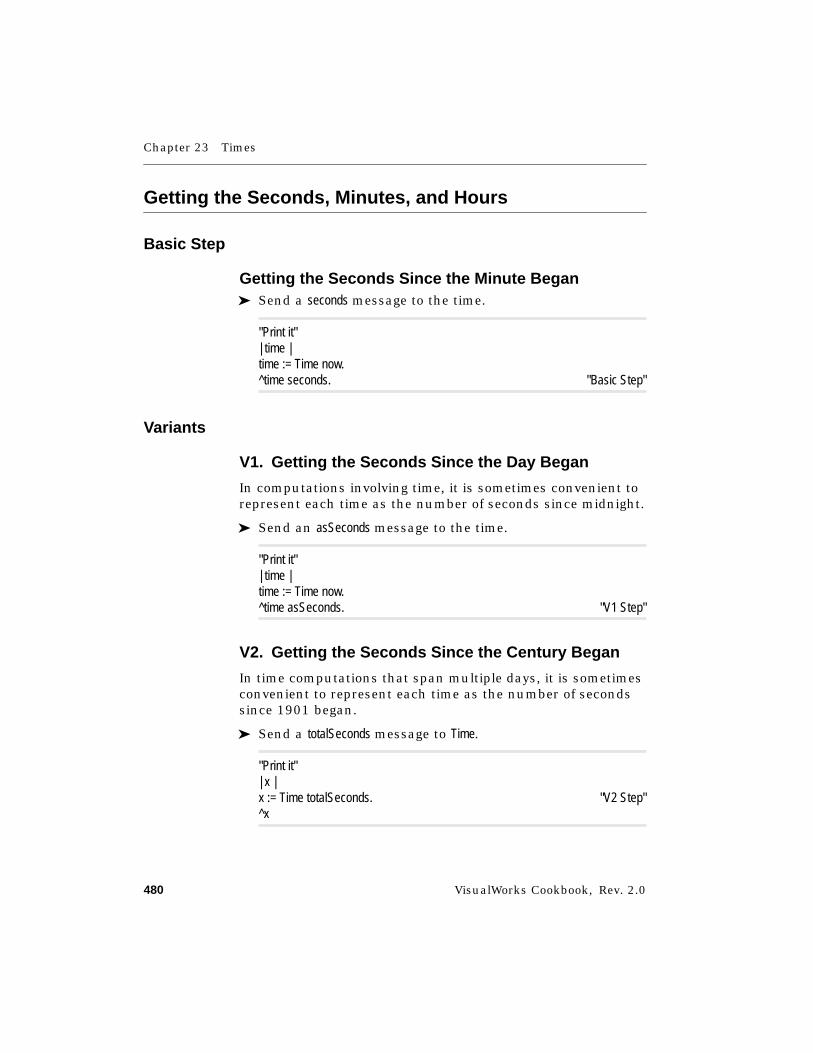
Chapter 23 Times
480 VisualWorks Cookbook, Rev. 2.0
Getting the Seconds, Minutes, and Hours
Basic Step
Getting the Seconds Since the Minute Began➤ Send a seconds message to the time.
"Print it"| time |time := Time now.^time seconds. "Basic Step"
Variants
V1. Getting the Seconds Since the Day Began
In computations involving time, it is sometimes convenient torepresent each time as the number of seconds since midnight.
➤ Send an asSeconds message to the time.
"Print it"| time |time := Time now.^time asSeconds. "V1 Step"
V2. Getting the Seconds Since the Century Began
In time computations that span multiple days, it is sometimesconvenient to represent each time as the number of secondssince 1901 began.
➤ Send a totalSeconds message to Time.
"Print it"| x |x := Time totalSeconds. "V2 Step"^x
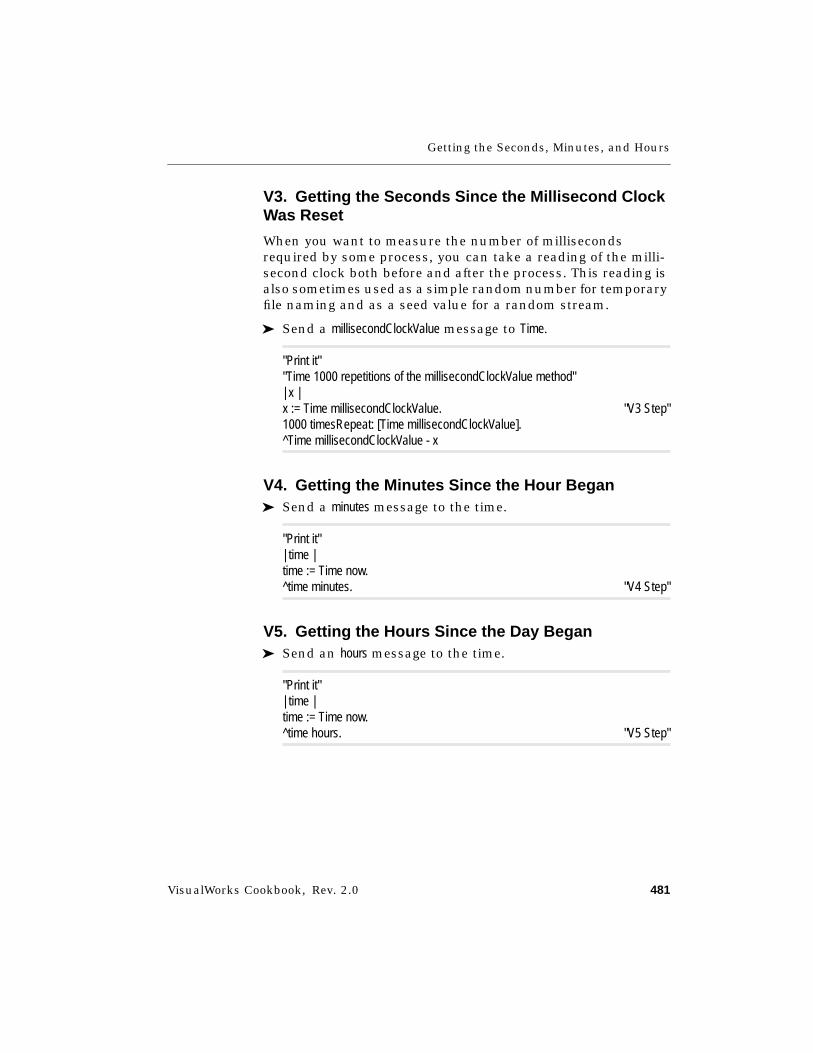
Getting the Seconds, Minutes, and Hours
VisualWorks Cookbook, Rev. 2.0 481
V3. Getting the Seconds Since the Millisecond ClockWas Reset
When you want to measure the number of millisecondsrequired by some process, you can take a reading of the milli-second clock both before and after the process. This reading isalso sometimes used as a simple random number for temporaryfile naming and as a seed value for a random stream.
➤ Send a millisecondClockValue message to Time.
"Print it""Time 1000 repetitions of the millisecondClockValue method"| x |x := Time millisecondClockValue. "V3 Step"1000 timesRepeat: [Time millisecondClockValue].^Time millisecondClockValue - x
V4. Getting the Minutes Since the Hour Began➤ Send a minutes message to the time.
"Print it"| time |time := Time now.^time minutes. "V4 Step"
V5. Getting the Hours Since the Day Began➤ Send an hours message to the time.
"Print it"| time |time := Time now.^time hours. "V5 Step"
Chapter 23 Times
482 VisualWorks Cookbook, Rev. 2.0
Adding and Subtracting Times
Variants
V1. Adding Times (and Dates)➤ Send an addTime: message to a time. The argument is either a
time or a date.
"Print it"| time1 time2 |time1 := Time readFromString: '5'.time2 := Time readFromString: '8:51:39 am'.^time1 addTime: time2 "V1 Step"
V2. Subtracting Times (and Dates)➤ Send a subtractTime: message to a time. The argument is
either a time or a date.
"Print it"| time1 time2 |time1 := Time readFromString: '5'.time2 := Time readFromString: '8:51:39 am'.^time2 subtractTime: time1 "V2 Step"
Creating a Time Stamp
VisualWorks Cookbook, Rev. 2.0 483
Creating a Time Stamp
Strategy
When an application needs to record the date and time that anevent occurred, the Time class provides a dateAndTimeNow methodfor that purpose. It returns an array containing two elements:the current date and the present time. You can store the arrayitself as a time stamp, or you can convert it to a string as shownin the basic steps.
You can achieve the same result by using Date today and Time nowseparately to obtain the current date and the present time.However, since each of those methods invokes dateAndTimeNow,the cost is an extra invocation of dateAndTimeNow.
Basic Steps1. Send a dateAndTimeNow message to the Time class.
2. If desired, convert the resulting array to a string.
"Print it"| dateTime |dateTime := Time dateAndTimeNow. "Basic Step 1"^(dateTime at: 1) printString, ' ', (dateTime at: 2) printString. "Basic Step 2"
Chapter 23 Times
484 VisualWorks Cookbook, Rev. 2.0
Timing a Block of Code
Strategy
During the optimization phase of application development, it isfrequently useful to compare the running time of alternateversions of the same code. The Advanced ProgrammingObjectKit, which is available as an add-on to VisualWorks,provides a Profiler tool for measuring execution times andreporting the consumption in a detailed breakdown by method.That tool helps you isolate the methods that consume suspi-cious amounts of execution time, so you can focus your opti-mizing efforts.
In simple circumstances, when you already know whichmethod you want to test, you can use a utility provided by theTime class. That class provides a millisecondsToRun: method, whichreports the number of milliseconds it takes to execute a blockcontaining one or more Smalltalk expressions.
Basic Steps1. Create a BlockClosure containing one or more expressions to
be tested. Repeating the expressions through timesRepeat:usually improves the validity of the comparison.
2. Send a millisecondsToRun: message to the Time class. Theargument is the block you created in step 1.
3. Repeat steps 1 and 2 for the second version of the code. Ifthe second version is not ready yet, you can simply recordthe value from step 2 for later comparison.
"Print it"| block1 block2 ms1 ms2 |
"Test the speed of Time now and Date today."block1 := [100 timesRepeat: [Time now. Date today]]. "Basic Step 1"ms1 := Time "Basic Step 2"
millisecondsToRun: block1.
"Test the speed of dateAndTimeNow, which does the same thing."block2 := [100 timesRepeat: [Time dateAndTimeNow]]. "Basic Step 3"

Timing a Block of Code
VisualWorks Cookbook, Rev. 2.0 485
ms2 := TimemillisecondsToRun: block2.
^ms1 printString, '', ms2 printString
Chapter 23 Times
486 VisualWorks Cookbook, Rev. 2.0
Changing the Time Zone
Strategy
On machines that report Greenwich Mean Time (GMT) ratherthan local time, the Time class converts GMT to local time withthe aid of another class, TimeZone. A TimeZone stores an offset fromGMT for local time. In some parts of the world, this offset is anintegral number of hours; in other places it is not. Both kindsof offset are handled by TimeZone.
TimeZone provides an algorithm for determining whetherDaylight Saving Time (DST) is in effect. The algorithm relies onparameters that you can change to suit your needs. By default,DST is in effect from 2 a.m. on the Sunday preceding April 7 to2 a.m. on the Sunday preceding October 31.
The basic steps show how to change the day of the week onwhich DST begins and ends.
The first variant shows how to create a new TimeZone and installit as the system default.
The second variant shows how to install a null time zone, formachines that return local time rather than GMT.
In a few locations, the algorithm for determining the beginningand ending of DST is different from the algorithm that TimeZoneuses. To accommodate such a time zone, you will need tomodify the instance method named convertGMT:do: in TimeZone.
Basic Steps1. Get the default time zone by sending a default message to the
TimeZone class.
2. Send a weekDayToStartDST message to the default time zone.The argument is the name of the day on which DST is tobegin and end, in the form of a Symbol.
3. Use the File→Save As command to save your image.
| zone |zone := TimeZone default. "Basic Step 1"zone weekDayToStartDST: #Saturday. "Basic Step 2"
Changing the Time Zone
VisualWorks Cookbook, Rev. 2.0 487
Variants
V1. Installing a New Time Zoneas the System Default
The example shows the parameters for California (the defaultsettings in the delivered product).
1. Create a new instance of TimeZone by sending atimeDifference:DST:at:from:to:startDay: message to the TimeZone class.The arguments are:
■ timeDifference is the offset in hours from GMT.
■ DST is the number of hours by which DST differs.
■ at is the number of hours after midnight at which DSTbegins and ends.
■ from is the number of the day on which DST begins in anonleap year (it will be adjusted automatically duringleap years).
■ to is the number of the day on which DST ends in anonleap year.
■ startDay is the day of the week on which DST begins andends.
2. Send a setDefaultTimeZone: message to the TimeZone class. Theargument is the time zone you created in step 1.
3. Use the File→Save As command to save your image.
| newZone |newZone := TimeZone "V1 Step 1"
timeDifference: -8DST: 1at: 2from: 97to: 304startDay: #Sunday.
TimeZone setDefaultTimeZone: newZone. "V1 Step 2"
Chapter 23 Times
488 VisualWorks Cookbook, Rev. 2.0
V2. Installing a Null TimeZone1. Create a null time zone—one that does not alter the time
returned by your computer—by sending a null message tothe TimeZone class.
2. Send a setDefaultTimeZone: message to the TimeZone class. Theargument is the time zone you created in step 1.
3. Use the File→Save As command to save your image.
| nullZone |nullZone := TimeZone null. "V2 Step 1"TimeZone setDefaultTimeZone: nullZone. "V2 Step 2"

VisualWorks Cookbook, Rev. 2.0 489
Chapter 24
Collections
Choosing the Right Collection 490Creating a Collection 491Getting the Size 495Adding Elements 497Removing Elements 500Replacing Elements 505Copying Elements 508Combining Two Collections 510Finding Elements 511Comparing Collections 517Sorting a Collection 519Converting to a Different Type of Collection 522Looping through the Elements (Iterating) 524
See Also■ “Characters and Strings” on page 529
■ “Lists” on page 183
Chapter 24 Collections
490 VisualWorks Cookbook, Rev. 2.0
Choosing the Right Collection
Strategy
VisualWorks contains a wealth of specialized collection classes,as described in the VisualWorks Object Reference. For mostsituations, however, one of four types of collection will suffice:
■ List
■ Array
■ Set
■ Dictionary
A List is the most flexible type of collection and the mostcommonly used. It keeps elements in the order in which theywere added. You can add a single element or a collection ofelements, and the additions can be inserted anywhere. A Listcan also be sorted. A List is typically the collection that is heldby a SelectionInList or MultiSelectionInList, as the model for a list ornotebook widget. (List supersedes the older OrderedCollection andSortedCollection.)
An Array is a very simple collection that is efficient in situationsthat do not require adding, removing, or sorting elements.However, an array does support replacing of elements.
A Set is another simple collection whose main distinguishingfeature is that it discards duplicate elements. This is usefulwhen you want to be able to add an element without first havingto make sure that element was not added previously. Unlike theother three types of collections, a set does not support replacingof elements, so it is not useful in situations requiring suchchanges.
A Dictionary is useful for lookup tables and similar collections.Each element in a Dictionary is an Association, which is a lookup key(usually a Symbol) paired with a value (any type of object).
Creating a Collection
VisualWorks Cookbook, Rev. 2.0 491
Creating a Collection
Strategy
Typically, you create an empty collection, as shown in the basicstep.
For an Array, which cannot add elements, the equivalent is tospecify the size of the array, as shown in the first variant. Eachelement will be nil until your application replaces it with anotherobject. The second variant shows how to specify an alternateobject with which to initialize the new collection. These tech-niques can be used for collection classes other than Array also.
You can also create a collection by specifying up to fourelements, as shown in the third variant. This approach is typi-cally used to create a small array, because it is less cumber-some than creating a nil array and then replacing the elements.
When an array contains only literal elements, such as numbersand strings, you can also create the array using its literal form,as shown in the fourth variant.
Sometimes a new collection needs to be created from anexisting collection. For example, a nongrowing array mightneed to be expanded to accommodate more elements. Or adictionary’s keys might be placed in a list for sorting. The fifthvariant shows how to create a new collection that has theelements of an existing collection.
The sixth variant shows how to create a new collection from anexisting collection, but with a starting size that is larger thanthe existing set. This is mainly useful as a means of expandingan array (which cannot grow to accept new elements).
Basic Step➤ Send a new message to the desired collection class (in the
example, List).
"Inspect"| list |list := List new. "Basic Step"
Chapter 24 Collections
492 VisualWorks Cookbook, Rev. 2.0
list add: 'Leonardo';add: 'Michelangelo';add: 'Donatello';add: 'Raphael'.
^list.
Variants
V1. Creating a Collection of a Certain Size➤ Send a new: message to the desired collection class (typically
Array, but useful with other types of collections to avoidtime-consuming grow operations as elements are added).
"Inspect"| array |array := Array new: 4. "V1 Step"
array at: 1 put: 'Leonardo';at: 2 put: 'Michelangelo';at: 3 put: 'Donatello';at: 4 put: 'Raphael'.
^array.
V2. Creating an Initialized Collectionof a Certain Size➤ Send a new:withAll: message to the desired collection class (in
the example, Array).
"Inspect"^Array new: 16 withAll: 0. "V2 Step"
V3. Creating an Array with Up to Four Elements➤ Send a with:with:with:with: message to the Array class, or a variant
of that message containing as many with: keywords asneeded, up to four. The argument of each with: keyword canbe any object. (This variant can be used with any collectionclass but is most often used with arrays.)
Creating a Collection
VisualWorks Cookbook, Rev. 2.0 493
"Inspect"| array1 array2 array3 array4 |array1 := Array with: 'Leonardo'. "V3 Step"
array2 := Array "V3 Step"with: 'Leonardo'with: 'Michelangelo'.
array3 := Array "V3 Step"with: 'Leonardo'with: 'Michelangelo'with: 'Donatello'.
array4 := Array "V3 Step"with: 'Leonardo'with: 'Michelangelo'with: 'Donatello'with: 'Raphael'.
^Array "V3 Step"with: array1with: array2with: array3with: array4.
V4. Creating a Literal Array➤ Enclose the list of literal elements in parentheses, with a
number-sign prefix. Any white-space character can be usedto separate the elements.
"Inspect"^#( 'Leonardo' 'Michelangelo' 'Donatello' 'Raphael' ) "V4 Step"
V5. Creating a New Collectionfrom an Old Collection➤ Send a withAll: message to the desired collection class (List).
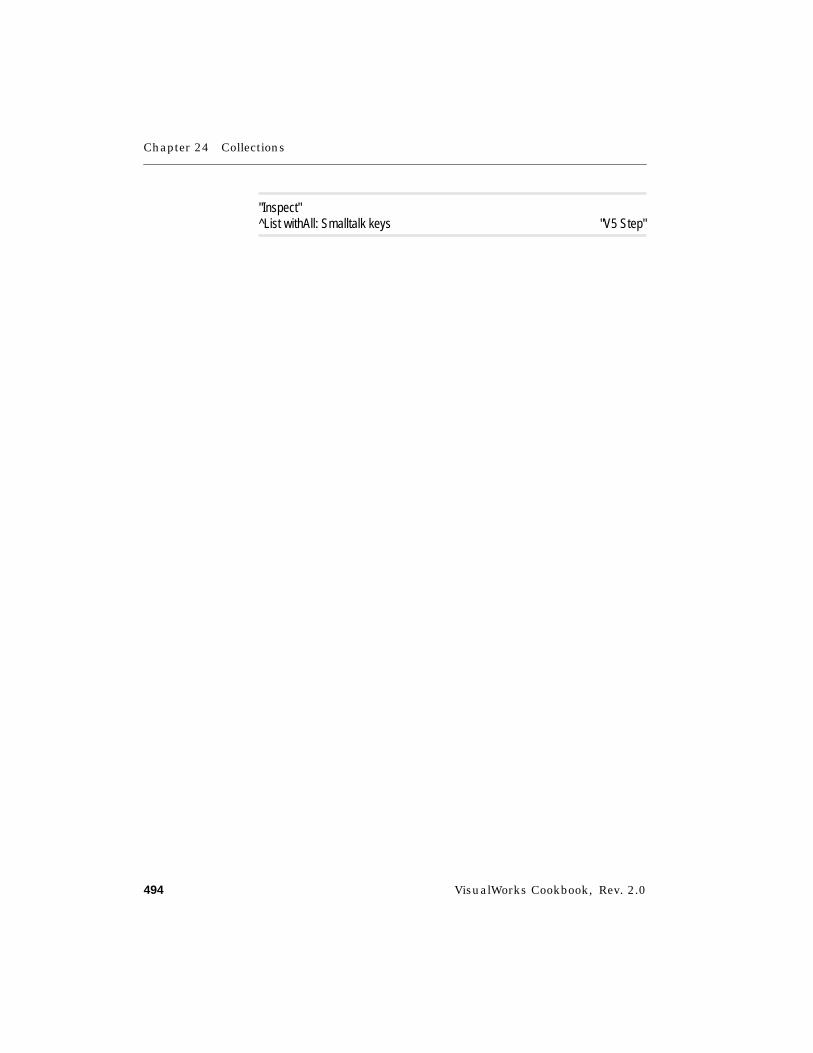
Chapter 24 Collections
494 VisualWorks Cookbook, Rev. 2.0
"Inspect"^List withAll: Smalltalk keys "V5 Step"

Getting the Size
VisualWorks Cookbook, Rev. 2.0 495
Getting the Size
Strategy
The basic step shows how to count the elements in a collection.
Each position in which an element can be stored is known as aslot. A collection often has more slots than elements to avoidhaving to expand the collection each time a new element isadded. The first variant shows how to count the slots in acollection.
Frequently, it is useful to know whether a collection is empty ofelements, as shown in the second variant.
Basic Step➤ Send a size message to the collection. The response is an
integer (in the example, 31).
"Print it"| array |array := ColorValue constantNames.^array size "Basic Step"
Variants
V1. Getting the Capacity➤ Send a capacity message to the collection. The response is an
integer (47).
"Print it"| set |set := Set withAll: ColorValue constantNames.^set capacity "V1 Step"
V2. Testing for Emptiness➤ Send an isEmpty message to the collection. The response is
true when the collection has no elements and false otherwise.

Chapter 24 Collections
496 VisualWorks Cookbook, Rev. 2.0
| list |list := List allInstances.
list isEmpty "V2 Step"ifFalse: [^list first]
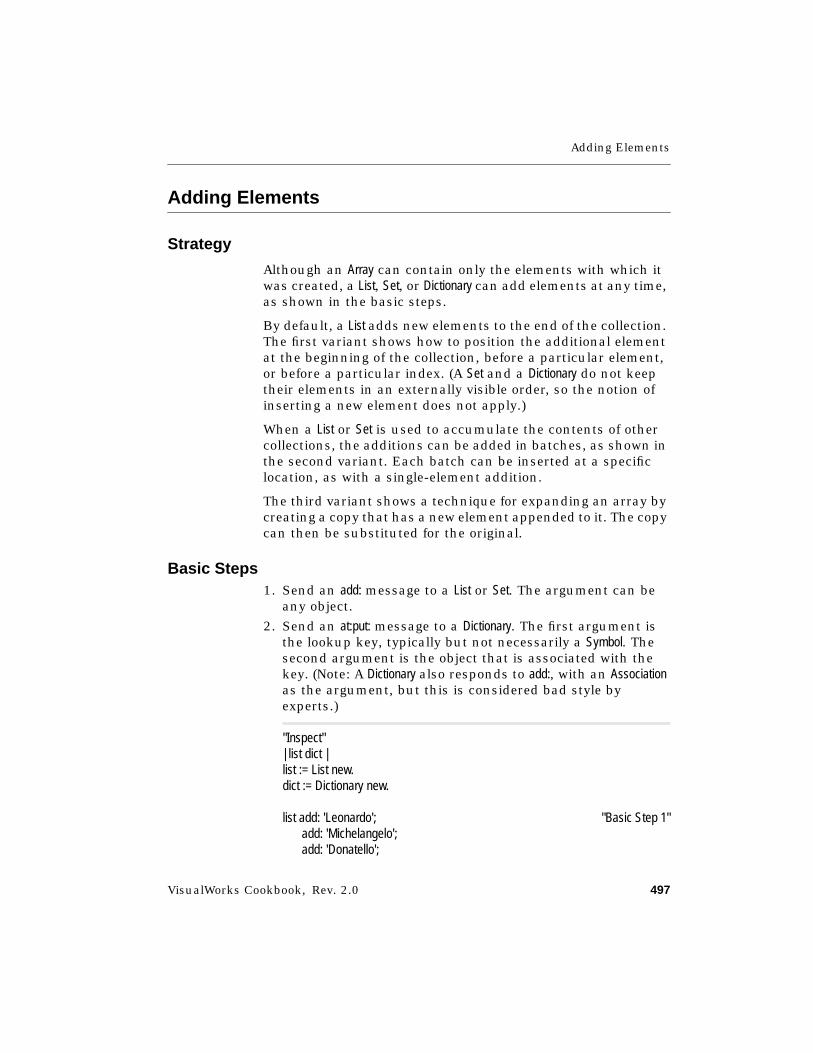
Adding Elements
VisualWorks Cookbook, Rev. 2.0 497
Adding Elements
Strategy
Although an Array can contain only the elements with which itwas created, a List, Set, or Dictionary can add elements at any time,as shown in the basic steps.
By default, a List adds new elements to the end of the collection.The first variant shows how to position the additional elementat the beginning of the collection, before a particular element,or before a particular index. (A Set and a Dictionary do not keeptheir elements in an externally visible order, so the notion ofinserting a new element does not apply.)
When a List or Set is used to accumulate the contents of othercollections, the additions can be added in batches, as shown inthe second variant. Each batch can be inserted at a specificlocation, as with a single-element addition.
The third variant shows a technique for expanding an array bycreating a copy that has a new element appended to it. The copycan then be substituted for the original.
Basic Steps1. Send an add: message to a List or Set. The argument can be
any object.
2. Send an at:put: message to a Dictionary. The first argument isthe lookup key, typically but not necessarily a Symbol. Thesecond argument is the object that is associated with thekey. (Note: A Dictionary also responds to add:, with an Associationas the argument, but this is considered bad style byexperts.)
"Inspect"| list dict |list := List new.dict := Dictionary new.
list add: 'Leonardo'; "Basic Step 1"add: 'Michelangelo';add: 'Donatello';
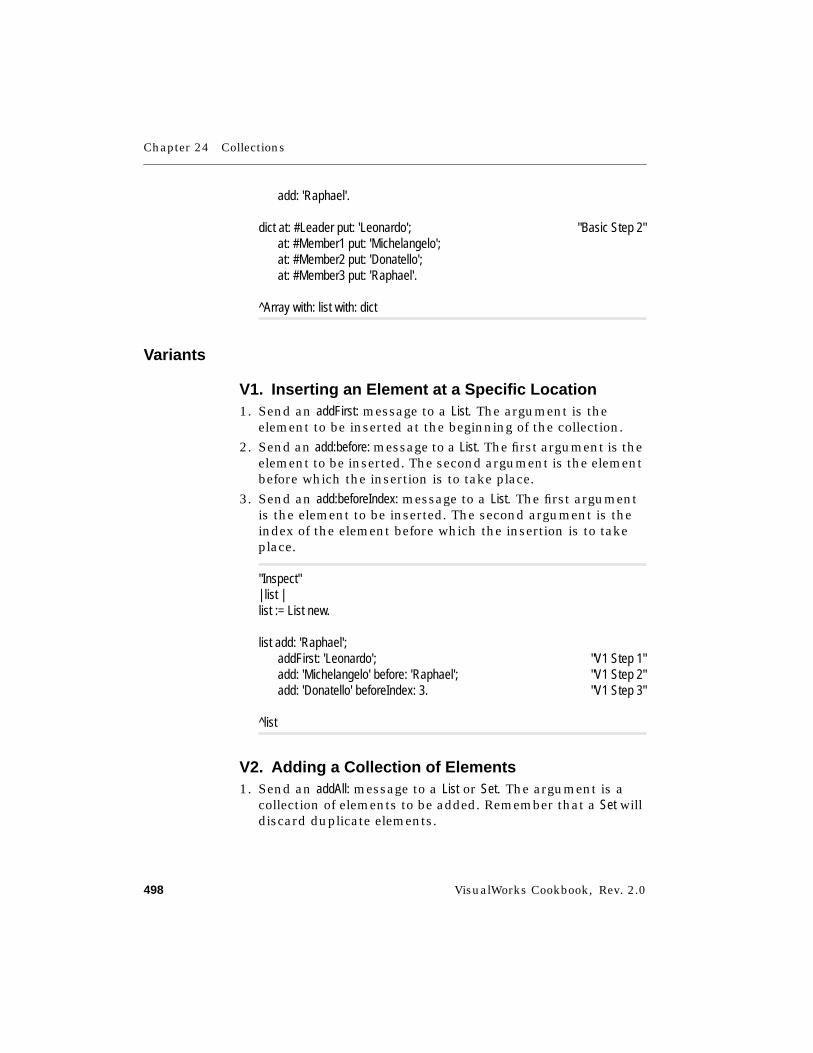
Chapter 24 Collections
498 VisualWorks Cookbook, Rev. 2.0
add: 'Raphael'.
dict at: #Leader put: 'Leonardo'; "Basic Step 2"at: #Member1 put: 'Michelangelo';at: #Member2 put: 'Donatello';at: #Member3 put: 'Raphael'.
^Array with: list with: dict
Variants
V1. Inserting an Element at a Specific Location1. Send an addFirst: message to a List. The argument is the
element to be inserted at the beginning of the collection.
2. Send an add:before: message to a List. The first argument is theelement to be inserted. The second argument is the elementbefore which the insertion is to take place.
3. Send an add:beforeIndex: message to a List. The first argumentis the element to be inserted. The second argument is theindex of the element before which the insertion is to takeplace.
"Inspect"| list |list := List new.
list add: 'Raphael';addFirst: 'Leonardo'; "V1 Step 1"add: 'Michelangelo' before: 'Raphael'; "V1 Step 2"add: 'Donatello' beforeIndex: 3. "V1 Step 3"
^list
V2. Adding a Collection of Elements1. Send an addAll: message to a List or Set. The argument is a
collection of elements to be added. Remember that a Set willdiscard duplicate elements.
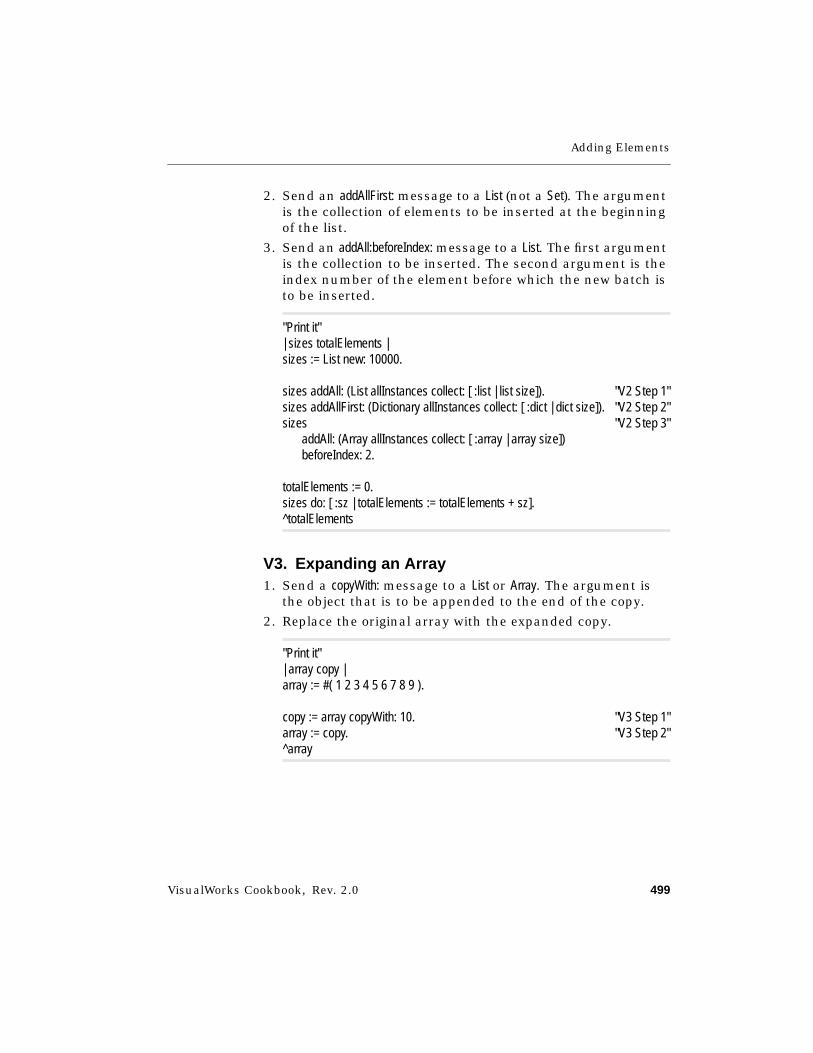
Adding Elements
VisualWorks Cookbook, Rev. 2.0 499
2. Send an addAllFirst: message to a List (not a Set). The argumentis the collection of elements to be inserted at the beginningof the list.
3. Send an addAll:beforeIndex: message to a List. The first argumentis the collection to be inserted. The second argument is theindex number of the element before which the new batch isto be inserted.
"Print it"| sizes totalElements |sizes := List new: 10000.
sizes addAll: (List allInstances collect: [ :list | list size]). "V2 Step 1"sizes addAllFirst: (Dictionary allInstances collect: [ :dict | dict size]). "V2 Step 2"sizes "V2 Step 3"
addAll: (Array allInstances collect: [ :array | array size])beforeIndex: 2.
totalElements := 0.sizes do: [ :sz | totalElements := totalElements + sz].^totalElements
V3. Expanding an Array1. Send a copyWith: message to a List or Array. The argument is
the object that is to be appended to the end of the copy.
2. Replace the original array with the expanded copy.
"Print it"| array copy |array := #( 1 2 3 4 5 6 7 8 9 ).
copy := array copyWith: 10. "V3 Step 1"array := copy. "V3 Step 2"^array
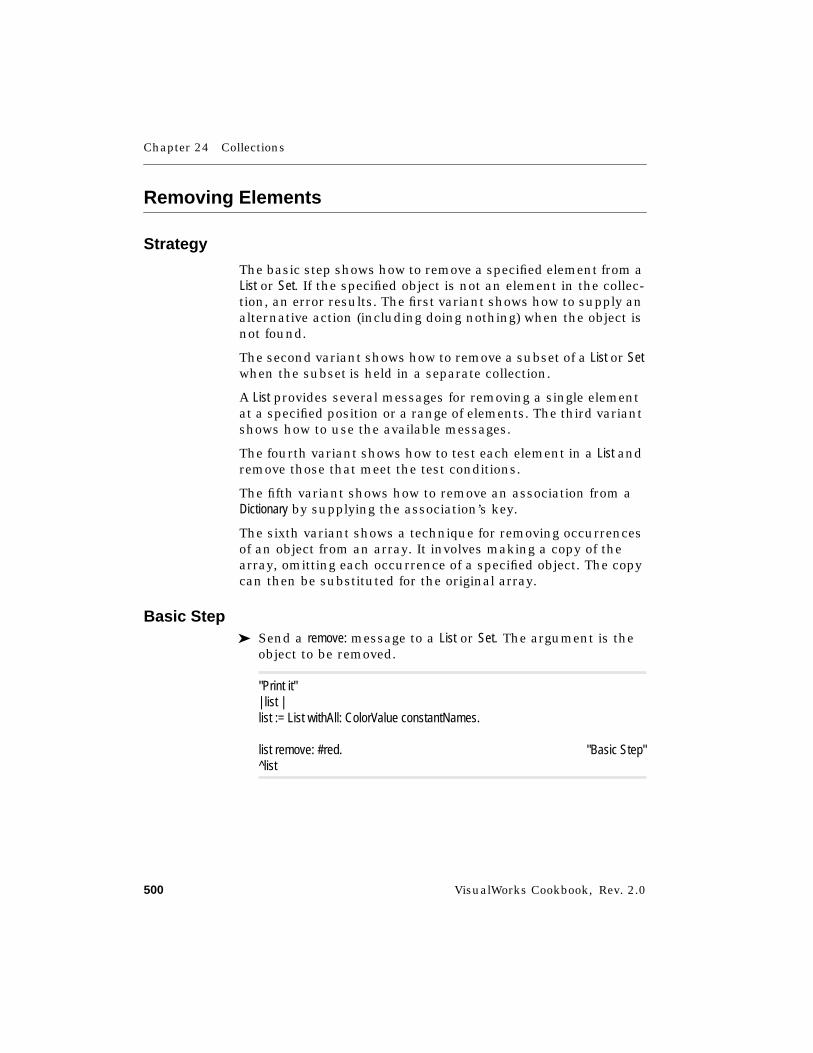
Chapter 24 Collections
500 VisualWorks Cookbook, Rev. 2.0
Removing Elements
Strategy
The basic step shows how to remove a specified element from aList or Set. If the specified object is not an element in the collec-tion, an error results. The first variant shows how to supply analternative action (including doing nothing) when the object isnot found.
The second variant shows how to remove a subset of a List or Setwhen the subset is held in a separate collection.
A List provides several messages for removing a single elementat a specified position or a range of elements. The third variantshows how to use the available messages.
The fourth variant shows how to test each element in a List andremove those that meet the test conditions.
The fifth variant shows how to remove an association from aDictionary by supplying the association’s key.
The sixth variant shows a technique for removing occurrencesof an object from an array. It involves making a copy of thearray, omitting each occurrence of a specified object. The copycan then be substituted for the original array.
Basic Step➤ Send a remove: message to a List or Set. The argument is the
object to be removed.
"Print it"| list |list := List withAll: ColorValue constantNames.
list remove: #red. "Basic Step"^list
Removing Elements
VisualWorks Cookbook, Rev. 2.0 501
Variants
V1. Supplying an Alternative Element-Not-FoundResponse➤ Send a remove:ifAbsent: message to a List or Set. The first
argument is the object to be removed. The second argumentis a block containing the action or actions.
An empty block is an effective means of taking no action—that is, simply shutting off the error notifier that isdisplayed by default.
| list |list := List withAll: ColorValue constantNames.
list remove: #brickRed "V1 Step"ifAbsent: [Dialog warn: 'You must be kidding -- brickRed?'].
list remove: #moonbeam "V1 Step"ifAbsent: [ ].
^list
V2. Removing a Subset➤ Send a removeAll: message to a List or Set. The argument is a
collection containing the elements to be removed. If anelement is not found, an error results. The subset can becontained in a different type of collection.
"Print it"| list |list := List withAll: ColorValue constantNames.
list removeAll: #( #red #green #blue ). "V2 Step"^list
Chapter 24 Collections
502 VisualWorks Cookbook, Rev. 2.0
V3. Removing an Element or Range of Elementsby Index1. Send a removeFirst message to a List (but not a Set, Array, or
Dictionary). The first element in the list will be removed. If thelist is empty, an error results.
2. Send a removeFirst: message to a List. The argument is thenumber of elements to be removed from the front of the list.
3. Send a removeLast message to remove the last element.
4. Send a removeLast: message. The argument is the number ofelements to be removed from the end of the list.
5. Send a removeFrom:to: message to a List. The first argument isthe starting index of the range and the second argument isthe ending index. An array containing the deleted elementsis returned.
6. Send a removeFrom:to:returnElements: message to a List. The firstand second arguments are index numbers identifying therange to be removed. The third argument is false when youwant nil to be returned instead of an array containing thedeleted elements—for large removal operations, this ismore efficient.
"Print it"| list |list := List new: 25.1 to: 25 do: [ :i | list add: i].
"Removes 1"list removeFirst. "V3 Step 1"
"Removes 2 3 4 5 6"list removeFirst: 5. "V3 Step 2"
"Removes 25"list removeLast. "V3 Step 3"
"Removes 20 21 22 23 24"list removeLast: 5. "V3 Step 4"
"Removes 14 15 16 17 18"list removeFrom: 8 to: 12. "V3 Step 5"
Removing Elements
VisualWorks Cookbook, Rev. 2.0 503
"Removes 9 10 11 12 13"list removeFrom: 3 to: 7 returnElements: false. "V3 Step 6"
^list
V4. Removing All Elements That Pass a Test➤ Send a removeAllSuchThat: message to a List. The argument is a
block containing the test. The block must declare oneargument variable for the element to be tested. (In theexample, all color names beginning with the letter r areremoved.)
| list |list := List withAll: ColorValue constantNames.
list removeAllSuchThat: [ :name | name first == $r]. "V4 Step"^list
V5. Removing an Association from a Dictionary1. Send a removeKey: message to the dictionary. The argument
is the key of the association that you want to remove. Theremoved value is returned. If the key is not found, an errorresults.
2. To provide an alternative response to the key-not-foundcondition, send a removeKey:ifAbsent: message to the dictio-nary. The first argument is the key to be removed and thesecond argument is a block that specifies the action to takeif the key is not found. An empty block causes no action,which is the same as silently ignoring the condition.
"Inspect"| dict |dict := Dictionary new.dict at: #Leader put: 'Leonardo';
at: #Member1 put: 'Michelangelo';at: #Member2 put: 'Donatello';at: #Member3 put: 'Raphael'.

Chapter 24 Collections
504 VisualWorks Cookbook, Rev. 2.0
dict removeKey: #Member2. "V5 Step 1"
dict removeKey: #Villain ifAbsent: [ ]. "V5 Step 2"^dict
V6. Removing an Element from an Array1. Send a copyWithout: message to an Array (or a List). The
argument is the object to be removed. Every occurrence ofthat object will be removed from the copy.
2. Replace the original array with the copy.
"Print it"| array copy |array := #( 1 8 3 4 5 6 7 8 9 ).
copy := array copyWithout: 8. "V6 Step 1"array := copy. "V6 Step 2"^array

Replacing Elements
VisualWorks Cookbook, Rev. 2.0 505
Replacing Elements
Strategy
A Set does not support replacing of elements, because there isno index number or key for specifying which element to replace.A Dictionary supports a single form of replacement, in which youspecify the lookup key and provide a new value, as shown in thebasic steps. List and Array support a similar form of replacement,but the lookup key is the index number of the element you wantto replace, as shown in the basic steps.
When you want to replace all elements of a List or Array with aparticular object, use the technique shown in the first variant.To replace only those elements with specified index numbers,use the second variant.
To replace all occurrences of a specified object with a newobject, use the third variant.
To replace a subset of a List or Array with a new set of elements,use the fourth variant.
Basic Steps1. Send an at:put: message to a Dictionary. The first argument is
the lookup key. The second argument is the value to beplaced at that key. If the key does not exist, it will be added.
2. Send an at:put: message to a List or Array. The first argument isthe index number of the element to be replaced. The secondargument is the object that is to replace the old element.
"Inspect"| list dict |dict := Dictionary new.dict at: #Leader put: 'Leonardo';
at: #Member1 put: 'Michelangelo';at: #Member2 put: 'Donatello';at: #Member3 put: 'Raphael'.
list := List withAll: dict values.list sort.
dict at: #Leader put: 'Rembrandt'. "Basic Step 1"
Chapter 24 Collections
506 VisualWorks Cookbook, Rev. 2.0
list at: 1 put: 'Rembrandt'. "Basic Step 2"
^Array with: list with: dict.
Variants
V7. Replacing All Elements➤ Send an atAllPut: message to a List or Array. The argument is
the object that is to replace all existing elements.
"Print it"| list |list := List new.1 to: 10 do: [ :number | list add: number ].
list atAllPut: 0. "V7 Step"^list
V8. Replacing Specified Elements➤ Send an atAll:put: message to a List or Array. The first argument
is a collection containing the index numbers of theelements to be replaced. The second argument is the objectto be placed in those slots.
"Print it"| list |list := List new.list
add: 'red';add: 'ghoulishGreen';add: 'red';add: 'blackAndBlue'.
list atAll: #( 1 3) put: 'bloodRed'. "V8 Step"^list
Replacing Elements
VisualWorks Cookbook, Rev. 2.0 507
V9. Replacing All Occurrences of an Object➤ Send a replaceAll:with: message to a List or Array. The first
argument is the object whose occurrences you want toreplace. The second argument is the replacement object.
"Print it"| list |list := List new.list
add: 'red';add: 'ghoulishGreen';add: 'red';add: 'blackAndBlue'.
list replaceAll: 'red' with: 'bloodRed'. "V9 Step"^list
V10. Replacing a Subset with a New Subset➤ Send a replaceFrom:to:with:startingAt: message to a List or Array. The
first and second arguments are index numbers identifyingthe replacement range. The with: argument is a collectioncontaining the new elements. The startingAt: argument is theindex number in the new collection at which to begincopying the replacement elements.
"Print it"| mainList replacements |mainList := #( 1 2 3 4 5 6 7 8 9 ).replacements := #( 15 14 13 12 11 10 9 8 7 6 5 4 3 2 1 ).
mainList "V10 Step"replaceFrom: 1to: mainList sizewith: replacementsstartingAt: 7.
^mainList

Chapter 24 Collections
508 VisualWorks Cookbook, Rev. 2.0
Copying Elements
Strategy
A collection, like any other object, can provide a copy of itself,as shown in the basic step. You can modify literal elementssuch as numbers and strings without affecting the copy. For anonliteral element, however, the copied collection holds ontothe same object rather than a copy and will reflect any changesyou make to that object. One way around this problem is toreplace the element with a copy of itself—you can modify thiscopied object freely without affecting the similar element in thecopied collection. In the case of a Dictionary, you must remove thekey and then add it with the new value to avoid affecting thecopied association, as shown in the basic step.
To copy a subset of a List or Array, use the technique shown in thevariant.
Basic Step➤ Send a copy message to the collection.
"Inspect"| dict1 dict2 |dict1 := Dictionary new.dict1 at: #Leader put: 'Leonardo';
at: #Member1 put: 'Michelangelo';at: #Member2 put: 'Donatello';at: #Member3 put: 'Raphael'.
dict2 := dict1 copy. "Basic Step"
"Change the original without changing the copy."dict1 removeKey: #Leader.dict1 at: #Leader put: 'Rembrandt'.
^Array with: dict1 with: dict2

Copying Elements
VisualWorks Cookbook, Rev. 2.0 509
Variants
V1. Copying a Subset➤ Send a copyFrom:to: message to a List or Array. The first
argument is the starting index of the range you want tocopy, and the second argument is the ending index.
"Print it"| list copy |list := List new.1 to: 10 do: [ :number | list add: number ].
copy := list copyFrom: 1 to: 3. "V1 Step"^copy
Chapter 24 Collections
510 VisualWorks Cookbook, Rev. 2.0
Combining Two Collections
Strategy
Two ordered collections, such as a List and an Array, can becombined, as shown in the basic step. This technique is widelyused with strings (which are ordered collections of characters),but it can also be used with other kinds of ordered collections.
Basic Step➤ Send a comma (,) message to a List or Array. The argument is
another ordered collection. A new collection will bereturned, of the same type as the first collection, containingthe elements of both collections.
"Print it"| list array combinedList |list := List withAll: ColorValue constantNames.array := #( #bloodRed #ghoulishGreen #blackAndBlue ).
combinedList := list, array.^combinedList
Finding Elements
VisualWorks Cookbook, Rev. 2.0 511
Finding Elements
Strategy
Given an index location, a List or Array can supply the corre-sponding element, as shown in the basic step.
A Dictionary can find the value for a specified lookup key, as thefirst variant shows. By default, an error results if the key doesnot exist, so using an alternate not-found action is also shown.
A Dictionary can also find the key corresponding to a given value(that is, a reverse lookup), also shown in the first variant.
A List or Array can also do a reverse lookup, returning the indexnumber that corresponds to a given element, as shown in thesecond variant. The search can be initiated at the beginning ofthe collection or later, or it can go backward from the end.
Any collection can tell you whether it includes a specific object,as shown in the third variant. It can either answer true when itfinds the object, or it can count the occurrences.
A List can find the element that is either before or after a speci-fied object, as shown in the fourth variant.
A List or Array can return the first or last element, as shown inthe fifth variant.
To find the starting index of a subset in a List or Array, use thesixth variant.
To find elements that meet your custom conditions in anycollection, use the seventh variant.
Basic Step➤ Send an at: message to a List or Array. The argument is an
index number. If the object is not found, zero is returned.
"Print it"| list |list := List withAll: Smalltalk classNames.
^list at: 1 "Basic Step"
Chapter 24 Collections
512 VisualWorks Cookbook, Rev. 2.0
Variants
V1. Searching a Dictionary1. Send an at: message to the dictionary. The argument is the
lookup key. If the key does not exist, an error results.
2. To avoid the key-not-found error, send an at:ifAbsent:message. The second argument is an empty block (for noaction) or a block containing actions to be taken if the keydoes not exist.
3. To find the key that corresponds to a value, send akeyAtValue:ifAbsent: message to the dictionary. The firstargument is the object whose key is to be found. Thesecond argument is a block containing the value-not-foundaction.
"Print it"| dict found1 found2 found3 |dict := Smalltalk.
found1 := dict at: #List. "V1 Step 1"found2 := dict at: #UnlikelyClassName ifAbsent: [nil]. "V1 Step 2"found3 := dict keyAtValue: List ifAbsent: [nil]. "V1 Step 3"
^Array with: found1 with: found2 with: found3
V2. Finding the Index of an Object1. Send an indexOf: message to a List or Array. The argument is
the object to be found. If the object is not an element, zerois returned.
2. To search a subset of the List or Array, send a nextIndexOf:from:to:message. The first argument is the object to be found. Thesecond and third arguments are indexes that define thesearch range. The returned index is relative to the begin-ning of the collection.
3. To search backward from the end, send a lastIndexOf:message. The index of the last occurrence is returned, orzero if none exists. The returned index is relative to thebeginning of the collection.
Finding Elements
VisualWorks Cookbook, Rev. 2.0 513
"Print it"| list found1 found2 found3 |list := List withAll: #( #red #green #blue #red #yellow #blue).
found1 := list indexOf: #red. "V2 Step 1"found2 := list nextIndexOf: #red from: 2 to: 6. "V2 Step 2"found3 := list lastIndexOf: #red. "V2 Step 3"
^Array with: found1 with: found2 with: found3
V3. Learning Whether an Object Is in a Collection1. Send an includes: message to the collection. The argument is
the object to be found. The response is true if the collectioncontains at least one matching object, and false otherwise. (ADictionary can also be sent includesKey: and includesAssociation:messages.)
2. Send an occurrencesOf: message to the collection. Theargument is the object whose matching instances amongthe elements are to be counted. If the object is not found,zero is returned.
"Print it"| list found1 found2 |list := List withAll: #( #red #green #blue #red #yellow #blue).
found1 := list includes: #red. "V3 Step 1"found2 := list occurrencesOf: #red. "V3 Step 2"
^Array with: found1 with: found2
V4. Finding the Element Before or After an Object1. Send a before: message to a List. The argument is the element
before which the desired element is located. If the argumentmatches the first element, an error results.
2. Send an after: message to a List. The argument is the elementafter which the desired element is located. If the argumentmatches only the last element, an error results.
Chapter 24 Collections
514 VisualWorks Cookbook, Rev. 2.0
"Print it"| list found1 found2 |list := List withAll: #( #red #green #blue #red #yellow #blue).
found1 := list before: #blue. "V4 Step 1"found2 := list after: #yellow. "V4 Step 2"
^Array with: found1 with: found2
V5. Finding the First or Last Element1. To get the first element, send a first message to a List or Array.
If the collection is empty, an error results.
2. To get the last element, send a last message to a List or Array.If the collection is empty, an error results.
"Print it"| list found1 found2 |list := List withAll: #( #red #green #blue).
found1 := list first. "V5 Step 1"found2 := list last. "V5 Step 2"
^Array with: found1 with: found2
V6. Finding a Subset➤ Send an indexOfSubCollection:startingAt: message to a List or Array.
The first argument is the subset to be found, which neednot be the same type of collection. The second argument isthe index number at which the search is to begin. Thereturned index number is relative to the beginning of thecollection. If the subset is not found, zero is returned.
"Print it"| list subset found |list := List withAll: #( #red #green #blue #red #yellow #blue).subset := #( #red #yellow #blue).
Finding Elements
VisualWorks Cookbook, Rev. 2.0 515
found := list indexOfSubCollection: subset startingAt: 1. "V6 Step"^found
V7. Finding Elements That Pass or Fail a Test1. To find all elements that pass a test, send a select: message
to any type of collection. The argument is a blockcontaining a test to determine whether each element is tobe selected. The block is expected to declare one argumentfor the next collection element to be tested. A collectioncontaining the elements that passed the test is returned.
2. To find all elements that fail a test, send a reject: message toany type of collection. The argument is a block containing atest to determine whether each element is to be rejected.The block is expected to declare one argument for the nextcollection element to be tested. A collection containing theelements that failed the test is returned.
3. To find the first element that passes a test, send adetect:ifNone: message to any type of collection. The firstargument is a block containing the test. The block mustdeclare one argument for the next collection element to betested. The second argument is a no-argument blockcontaining the action to take if no element passes the test.
"Inspect"| list found1 found2 found3 |list := List withAll: Smalltalk classNames.
"Select classes with 'Example' in their names."found1 := list "V7 Step 1"
select: [ :nextElement |(nextElement indexOfSubCollection: 'Example'
startingAt: 1) > 0].
"Reject classes with 'Example' in their names."found2 := list "V7 Step 2"
reject: [ :nextElement |(nextElement indexOfSubCollection: 'Example'
startingAt: 1) > 0].
"Detect the first class beginning with 'R'."
Chapter 24 Collections
516 VisualWorks Cookbook, Rev. 2.0
found3 := list "V7 Step 3"detect: [ :nextElement | nextElement first == $R]ifNone: [0].
^Array with: found1 with: found2 with: found3
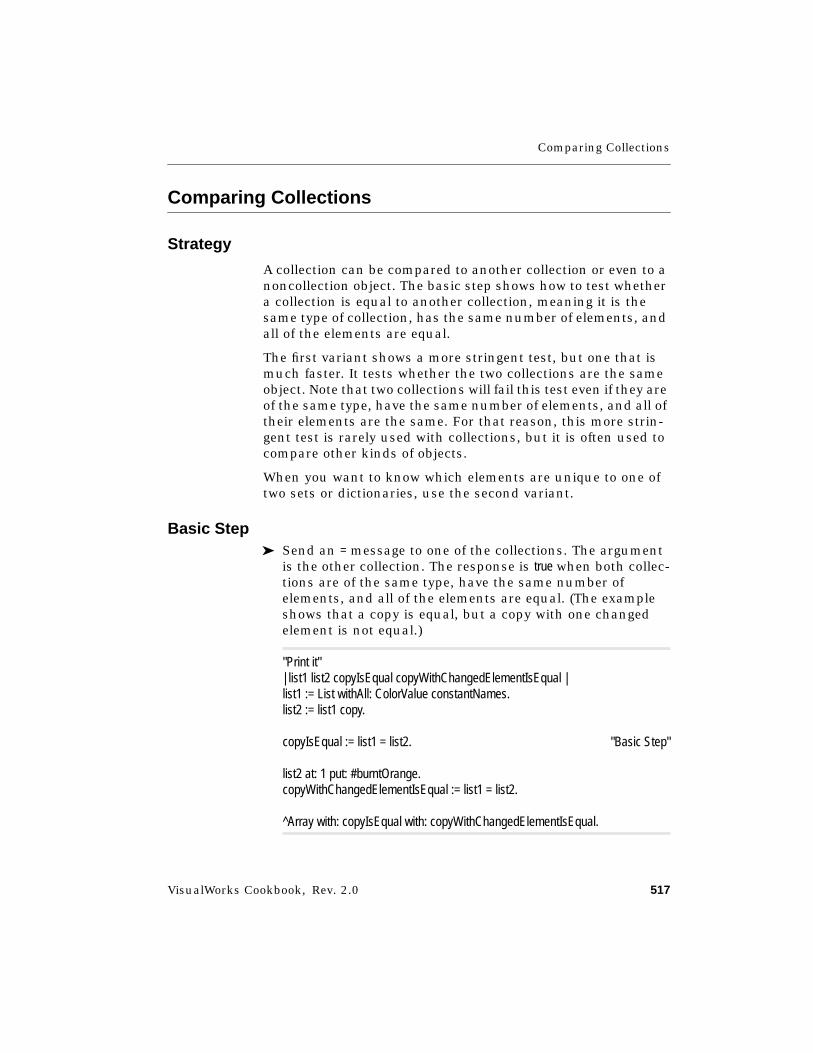
Comparing Collections
VisualWorks Cookbook, Rev. 2.0 517
Comparing Collections
Strategy
A collection can be compared to another collection or even to anoncollection object. The basic step shows how to test whethera collection is equal to another collection, meaning it is thesame type of collection, has the same number of elements, andall of the elements are equal.
The first variant shows a more stringent test, but one that ismuch faster. It tests whether the two collections are the sameobject. Note that two collections will fail this test even if they areof the same type, have the same number of elements, and all oftheir elements are the same. For that reason, this more strin-gent test is rarely used with collections, but it is often used tocompare other kinds of objects.
When you want to know which elements are unique to one oftwo sets or dictionaries, use the second variant.
Basic Step➤ Send an = message to one of the collections. The argument
is the other collection. The response is true when both collec-tions are of the same type, have the same number ofelements, and all of the elements are equal. (The exampleshows that a copy is equal, but a copy with one changedelement is not equal.)
"Print it"| list1 list2 copyIsEqual copyWithChangedElementIsEqual |list1 := List withAll: ColorValue constantNames.list2 := list1 copy.
copyIsEqual := list1 = list2. "Basic Step"
list2 at: 1 put: #burntOrange.copyWithChangedElementIsEqual := list1 = list2.
^Array with: copyIsEqual with: copyWithChangedElementIsEqual.

Chapter 24 Collections
518 VisualWorks Cookbook, Rev. 2.0
Variants
V1. Comparing with the Same-Object Test➤ Send an == message to one of the collections. The argument
is the other collection (typically, another variable, whichmay be holding the same collection as the receiver). Theresponse is true when the argument is the same object asthe receiver. (The example shows that a copy is not thesame, nor, of course, is a copy with a changed value.)
"Print it"| list1 list2 copyIsSame copyWithChangedElementIsSame |list1 := List withAll: ColorValue constantNames.list2 := list1 copy.
copyIsSame := list1 == list2. "V1 Step"
list2 at: 1 put: #burntOrange.copyWithChangedElementIsSame := list1 == list2.
^Array with: copyIsSame with: copyWithChangedElementIsSame.
V2. Subtracting One Set from Another➤ Send a – (minus) message to a Set or Dictionary. The argument
is another set or dictionary. A similar type of collection isreturned, containing the elements that occur in the first setbut not the second.
"Print it"| set1 set2 |set1 := Set withAll: ColorValue constantNames.set2 := set1 select: [ :name |
(name indexOfSubCollection: 'light' startingAt: 1) > 0].
^set1 - set2 "V2 Step"
Sorting a Collection
VisualWorks Cookbook, Rev. 2.0 519
Sorting a Collection
Strategy
A List can be asked to rearrange its elements in ascending order,as shown in the basic step. It is assumed that the elementsrespond to < and = messages, which are used to compareelements during the sorting.
You can customize the sorting order by supplying a blockcontaining the test for determining whether one element comesbefore another, as shown in the first variant. The block is giventwo elements to compare, and is expected to answer true whenthe first element should precede the second element.
Any collection can be sorted by converting it to an instance ofSortedCollection, as shown in the second variant. Again, the defaultsort order is ascending, and you can supply a block tocustomize the sort order.
A List or Array can be inverted by creating a copy with its elementsin reverse order, as shown in the third variant. No sorting isimplied by this operation—when the elements are unsorted tobegin with, they will remain unsorted in the reversed copy, buttheir order will be inverted.
Basic Step➤ Send a sort message to a List. Its elements are rearranged in
ascending order.
"Print it"| list |list := List withAll: #( 'Leonardo' 'Michelangelo' 'Donatello' 'Raphael').
list sort. "Basic Step"^list
Chapter 24 Collections
520 VisualWorks Cookbook, Rev. 2.0
Variants
V1. Customizing the Sort Order➤ Send a sortWith: message to a List. The argument is a block
containing the test for determining whether one elementprecedes another. The block must declare two arguments tocontain the two elements being compared. (In the example,the test causes the elements to be sorted in descendingorder.)
"Print it"| list |list := List withAll: #( 'Leonardo' 'Michelangelo' 'Donatello' 'Raphael').
list sortWith: [ :element1 :element2 | element1 > element2]. "V1 Step"^list
V2. Sorting a nonList Collection1. Send an asSortedCollection message to the collection. A SortedCol-
lection is returned, with the collection’s elements inascending order.
2. To customize the sort order, send an asSortedCollection:message to the collection. The argument is a block thatcompares two elements and answers true when the firstelement is to precede the second element.
"Inspect"| array1 sort1 array2 sort2 |
array1 := #( 'Leonardo' 'Michelangelo' 'Donatello' 'Raphael').sort1 := array1 asSortedCollection. "V2 Step 1"
array2 := #( 'Leonardo' 'Michelangelo' 'Donatello' 'Raphael').sort2 := array2 asSortedCollection: [ :name1 :name2 | name1 > name2].
"V2 Step 2"
^Array with: sort1 with: sort2.
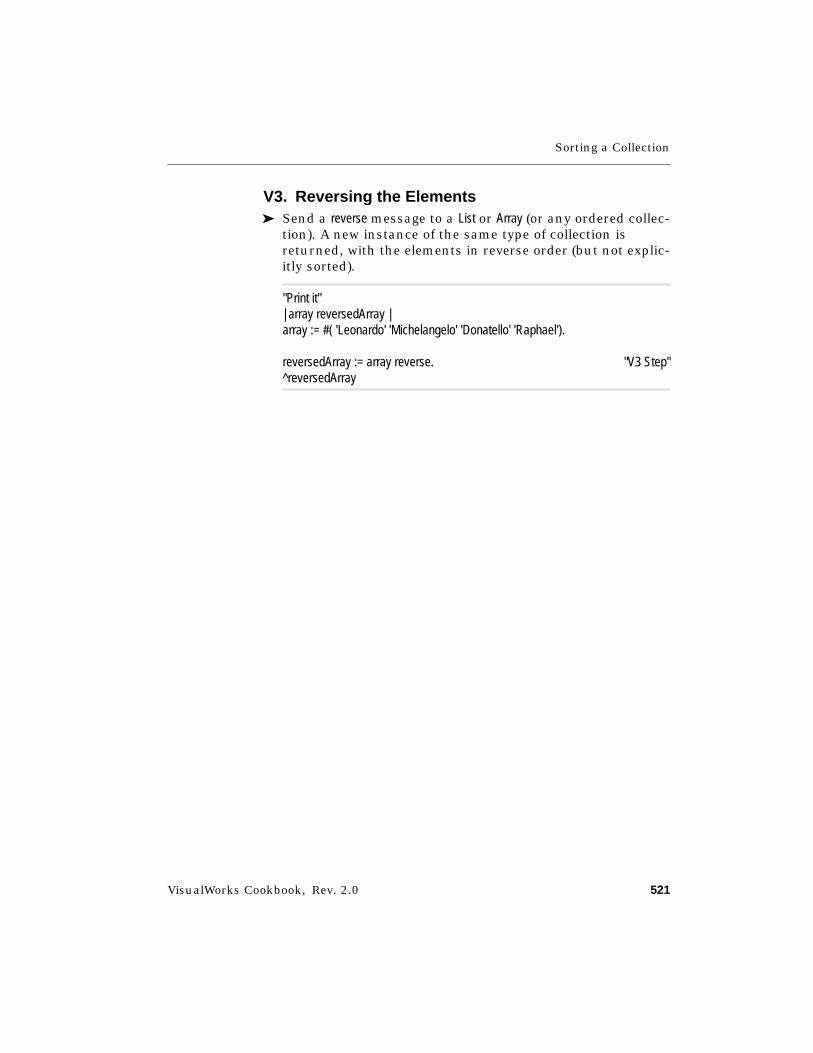
Sorting a Collection
VisualWorks Cookbook, Rev. 2.0 521
V3. Reversing the Elements➤ Send a reverse message to a List or Array (or any ordered collec-
tion). A new instance of the same type of collection isreturned, with the elements in reverse order (but not explic-itly sorted).
"Print it"| array reversedArray |array := #( 'Leonardo' 'Michelangelo' 'Donatello' 'Raphael').
reversedArray := array reverse. "V3 Step"^reversedArray
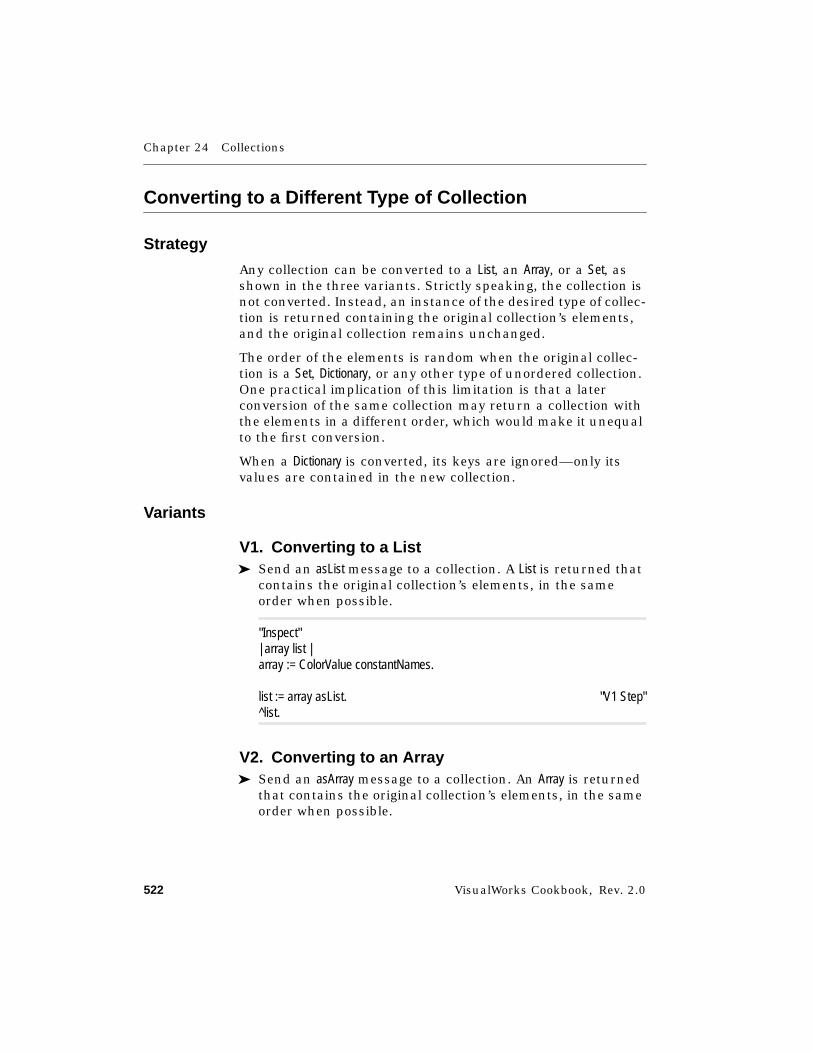
Chapter 24 Collections
522 VisualWorks Cookbook, Rev. 2.0
Converting to a Different Type of Collection
Strategy
Any collection can be converted to a List, an Array, or a Set, asshown in the three variants. Strictly speaking, the collection isnot converted. Instead, an instance of the desired type of collec-tion is returned containing the original collection’s elements,and the original collection remains unchanged.
The order of the elements is random when the original collec-tion is a Set, Dictionary, or any other type of unordered collection.One practical implication of this limitation is that a laterconversion of the same collection may return a collection withthe elements in a different order, which would make it unequalto the first conversion.
When a Dictionary is converted, its keys are ignored—only itsvalues are contained in the new collection.
Variants
V1. Converting to a List➤ Send an asList message to a collection. A List is returned that
contains the original collection’s elements, in the sameorder when possible.
"Inspect"| array list |array := ColorValue constantNames.
list := array asList. "V1 Step"^list.
V2. Converting to an Array➤ Send an asArray message to a collection. An Array is returned
that contains the original collection’s elements, in the sameorder when possible.
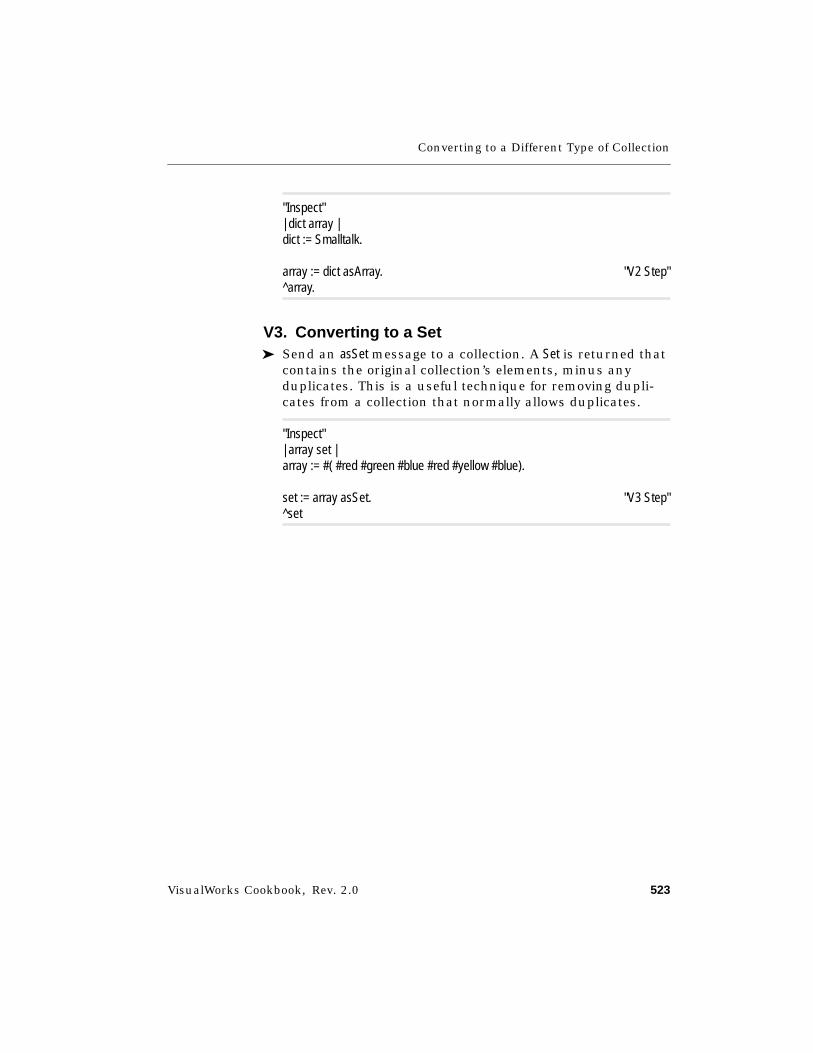
Converting to a Different Type of Collection
VisualWorks Cookbook, Rev. 2.0 523
"Inspect"| dict array |dict := Smalltalk.
array := dict asArray. "V2 Step"^array.
V3. Converting to a Set➤ Send an asSet message to a collection. A Set is returned that
contains the original collection’s elements, minus anyduplicates. This is a useful technique for removing dupli-cates from a collection that normally allows duplicates.
"Inspect"| array set |array := #( #red #green #blue #red #yellow #blue).
set := array asSet. "V3 Step"^set

Chapter 24 Collections
524 VisualWorks Cookbook, Rev. 2.0
Looping through the Elements (Iterating)
Strategy
Frequently an application needs to perform a set of actions foreach element in a collection. For example, a sales processingapplication might want to generate a packing slip for eachelement in a list of sales orders. The basic step shows how tocreate a loop that repeats a series of steps for each element ina collection.
Occasionally the elements in a collection need to be processedin reverse order, starting with the final element and proceedingtoward the first element, as shown in the first variant.
For collections that provide an index number (List, Array) or otherlookup key (Dictionary) for accessing the elements, the secondvariant shows how to loop through the keys instead of thevalues, or both the keys and values. This is especially usefulwith dictionaries, whose values are sometimes meaninglesswithout the associated keys.
Frequently the actions inside a block transform the element orcreate a related object, and the new object is then added to aseparate collection. The third variant shows a shortcut forcollecting the objects that result from the processing withouthaving to explicitly create the separate collection and add theobjects to it.
Often two collections need to be processed in tandem. Thefourth variant shows how to pass corresponding elements fromtwo ordered collections into a two-argument block.
Basic Step➤ Send a do: message to a collection. The argument is a block
that performs a series of operations on an element. Theblock is repeated for each element in the collection, and it isexpected to declare one argument variable to hold the nextelement to be processed.
| list color |list := List withAll: ColorValue constantNames.
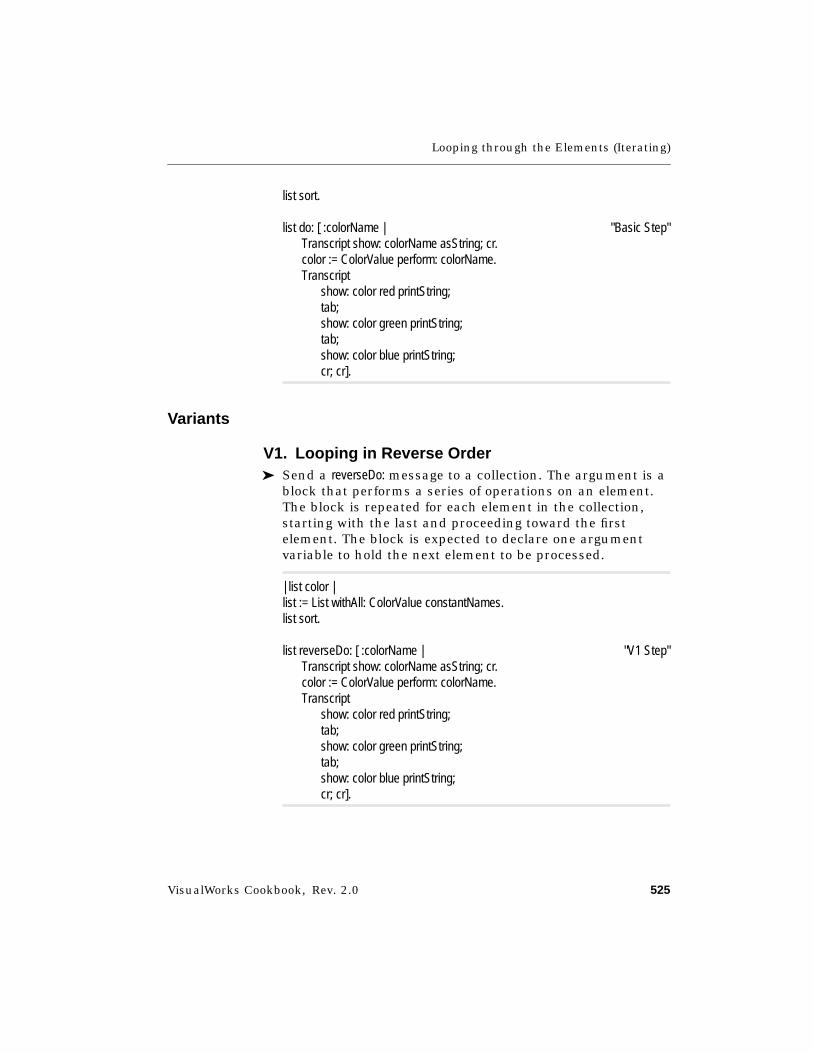
Looping through the Elements (Iterating)
VisualWorks Cookbook, Rev. 2.0 525
list sort.
list do: [ :colorName | "Basic Step"Transcript show: colorName asString; cr.color := ColorValue perform: colorName.Transcript
show: color red printString;tab;show: color green printString;tab;show: color blue printString;cr; cr].
Variants
V1. Looping in Reverse Order➤ Send a reverseDo: message to a collection. The argument is a
block that performs a series of operations on an element.The block is repeated for each element in the collection,starting with the last and proceeding toward the firstelement. The block is expected to declare one argumentvariable to hold the next element to be processed.
| list color |list := List withAll: ColorValue constantNames.list sort.
list reverseDo: [ :colorName | "V1 Step"Transcript show: colorName asString; cr.color := ColorValue perform: colorName.Transcript
show: color red printString;tab;show: color green printString;tab;show: color blue printString;cr; cr].
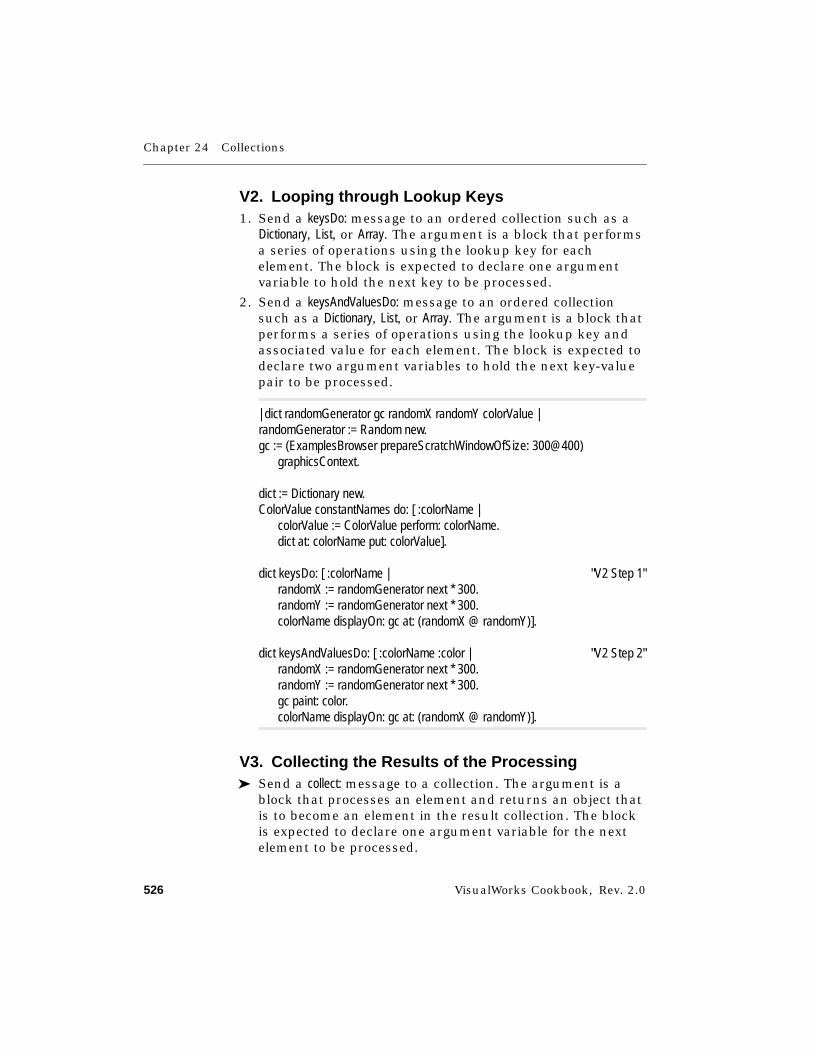
Chapter 24 Collections
526 VisualWorks Cookbook, Rev. 2.0
V2. Looping through Lookup Keys1. Send a keysDo: message to an ordered collection such as a
Dictionary, List, or Array. The argument is a block that performsa series of operations using the lookup key for eachelement. The block is expected to declare one argumentvariable to hold the next key to be processed.
2. Send a keysAndValuesDo: message to an ordered collectionsuch as a Dictionary, List, or Array. The argument is a block thatperforms a series of operations using the lookup key andassociated value for each element. The block is expected todeclare two argument variables to hold the next key-valuepair to be processed.
| dict randomGenerator gc randomX randomY colorValue |randomGenerator := Random new.gc := (ExamplesBrowser prepareScratchWindowOfSize: 300@400)
graphicsContext.
dict := Dictionary new.ColorValue constantNames do: [ :colorName |
colorValue := ColorValue perform: colorName.dict at: colorName put: colorValue].
dict keysDo: [ :colorName | "V2 Step 1"randomX := randomGenerator next * 300.randomY := randomGenerator next * 300.colorName displayOn: gc at: (randomX @ randomY)].
dict keysAndValuesDo: [ :colorName :color | "V2 Step 2"randomX := randomGenerator next * 300.randomY := randomGenerator next * 300.gc paint: color.colorName displayOn: gc at: (randomX @ randomY)].
V3. Collecting the Results of the Processing➤ Send a collect: message to a collection. The argument is a
block that processes an element and returns an object thatis to become an element in the result collection. The blockis expected to declare one argument variable for the nextelement to be processed.
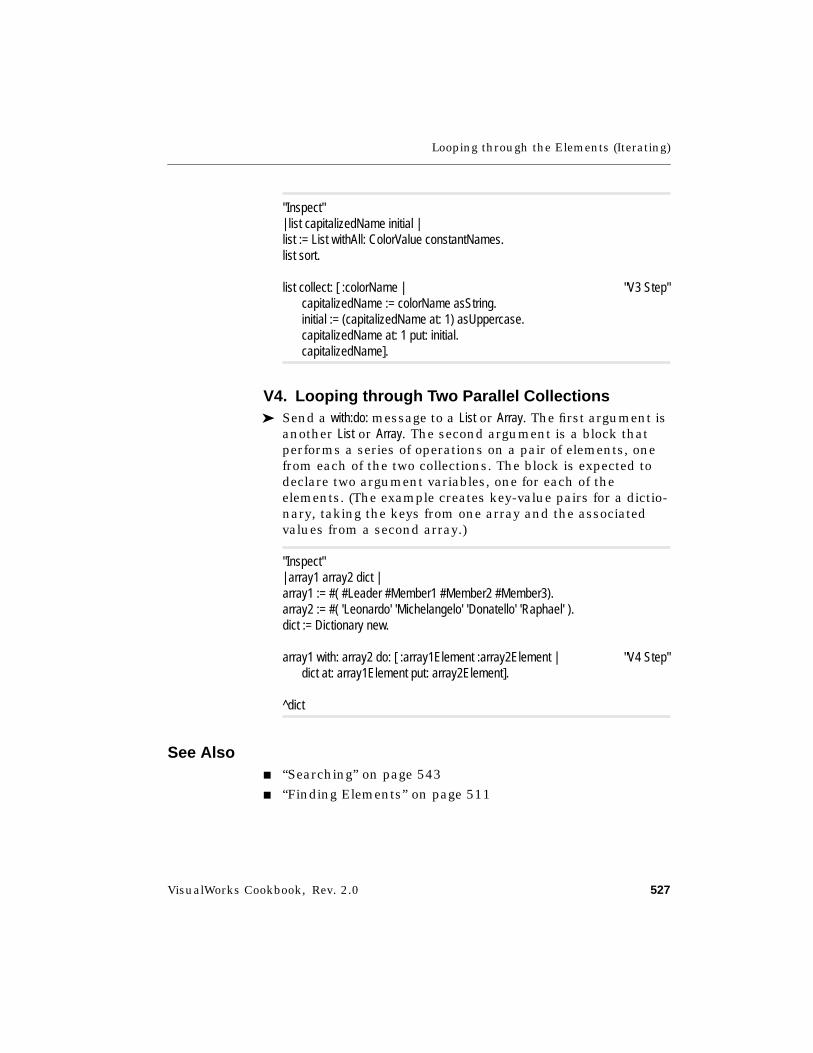
Looping through the Elements (Iterating)
VisualWorks Cookbook, Rev. 2.0 527
"Inspect"| list capitalizedName initial |list := List withAll: ColorValue constantNames.list sort.
list collect: [ :colorName | "V3 Step"capitalizedName := colorName asString.initial := (capitalizedName at: 1) asUppercase.capitalizedName at: 1 put: initial.capitalizedName].
V4. Looping through Two Parallel Collections➤ Send a with:do: message to a List or Array. The first argument is
another List or Array. The second argument is a block thatperforms a series of operations on a pair of elements, onefrom each of the two collections. The block is expected todeclare two argument variables, one for each of theelements. (The example creates key-value pairs for a dictio-nary, taking the keys from one array and the associatedvalues from a second array.)
"Inspect"| array1 array2 dict |array1 := #( #Leader #Member1 #Member2 #Member3).array2 := #( 'Leonardo' 'Michelangelo' 'Donatello' 'Raphael' ).dict := Dictionary new.
array1 with: array2 do: [ :array1Element :array2Element | "V4 Step"dict at: array1Element put: array2Element].
^dict
See Also■ “Searching” on page 543
■ “Finding Elements” on page 511


VisualWorks Cookbook, Rev. 2.0 529
Chapter 25
Characters and Strings
Creating a Character 530Creating a String 532Distinguishing Types of Characters 534Changing the Case 537Getting a String’s Length and Width 539Comparing 540Searching 543Combining Two Strings 545Extracting a Substring 547Removing or Replacing a Substring 549Abbreviating a String 551Inserting Line-End Characters 553
See Also■ “Collections” on page 489
■ “Text and Fonts” on page 555
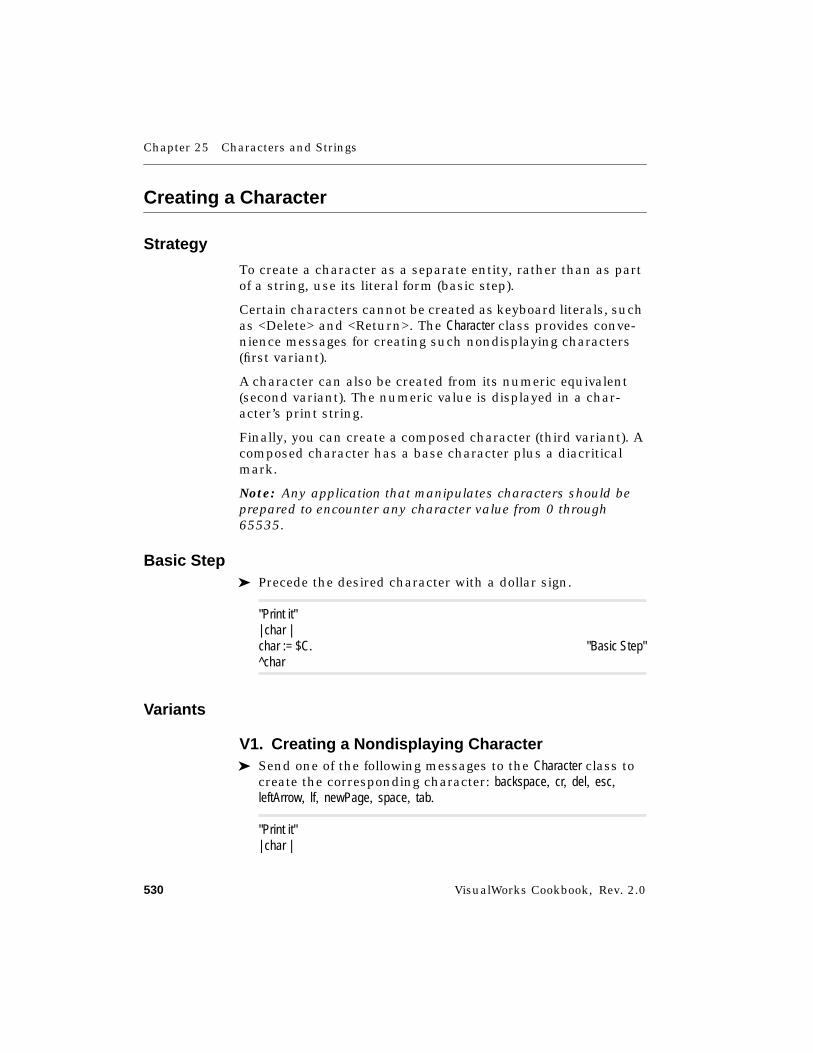
Chapter 25 Characters and Strings
530 VisualWorks Cookbook, Rev. 2.0
Creating a Character
Strategy
To create a character as a separate entity, rather than as partof a string, use its literal form (basic step).
Certain characters cannot be created as keyboard literals, suchas <Delete> and <Return>. The Character class provides conve-nience messages for creating such nondisplaying characters(first variant).
A character can also be created from its numeric equivalent(second variant). The numeric value is displayed in a char-acter’s print string.
Finally, you can create a composed character (third variant). Acomposed character has a base character plus a diacriticalmark.
Note: Any application that manipulates characters should beprepared to encounter any character value from 0 through65535.
Basic Step➤ Precede the desired character with a dollar sign.
"Print it"| char |char := $C. "Basic Step"^char
Variants
V1. Creating a Nondisplaying Character➤ Send one of the following messages to the Character class to
create the corresponding character: backspace, cr, del, esc,leftArrow, lf, newPage, space, tab.
"Print it"| char |

Creating a Character
VisualWorks Cookbook, Rev. 2.0 531
char := Character cr. "V1 Step"^char
V2. Creating a Character from a Numeric Code➤ Send a value: message to the Character class. The argument is
the numeric Unicode representation for the character.
"Print it"| char |char := Character value: 67. "V2 Step"^char
V3. Creating a Composed Character➤ Send a composeDiacritical: message to a character. The
argument is a diacritical character, which can be obtainedby sending diacriticalNamed: to the Character class. The argumentis a symbol naming a diacritical character—see the methodcomment for the list of valid names.
"Print it"| baseChar diacrit composedChar |baseChar := $a.diacrit := Character diacriticalNamed: #grave.composedChar := baseChar composeDiacritical: diacrit. "V3 Step"^composedChar
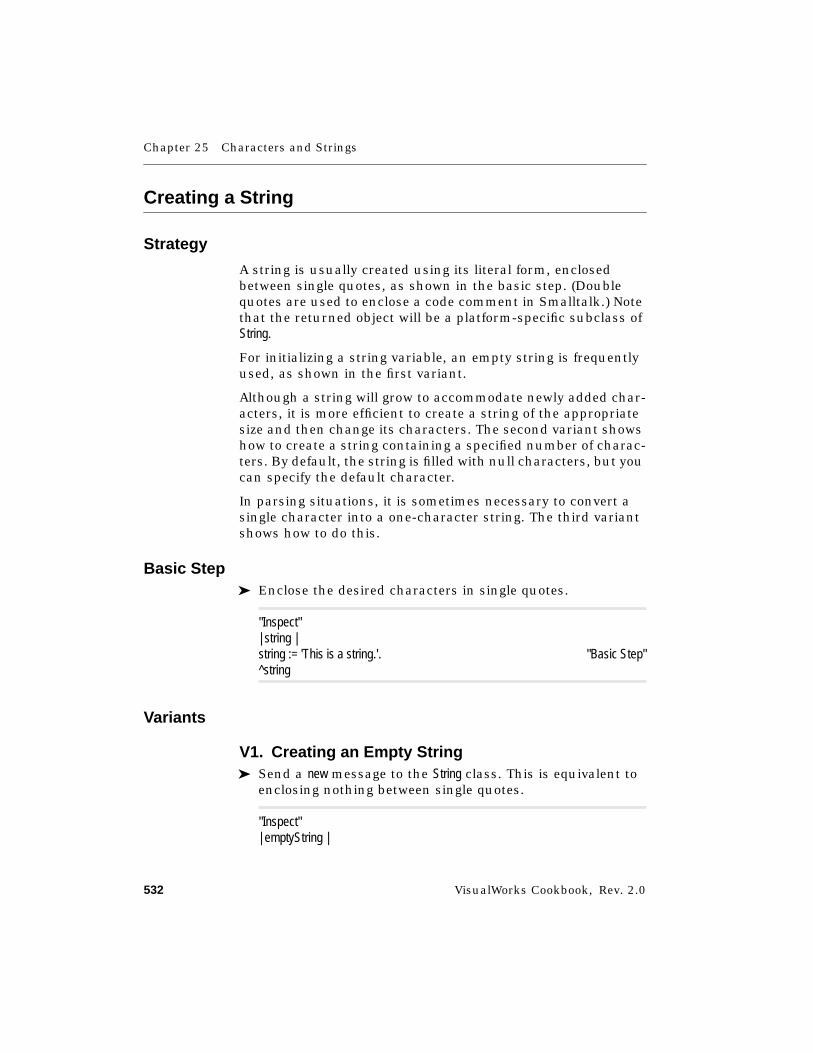
Chapter 25 Characters and Strings
532 VisualWorks Cookbook, Rev. 2.0
Creating a String
Strategy
A string is usually created using its literal form, enclosedbetween single quotes, as shown in the basic step. (Doublequotes are used to enclose a code comment in Smalltalk.) Notethat the returned object will be a platform-specific subclass ofString.
For initializing a string variable, an empty string is frequentlyused, as shown in the first variant.
Although a string will grow to accommodate newly added char-acters, it is more efficient to create a string of the appropriatesize and then change its characters. The second variant showshow to create a string containing a specified number of charac-ters. By default, the string is filled with null characters, but youcan specify the default character.
In parsing situations, it is sometimes necessary to convert asingle character into a one-character string. The third variantshows how to do this.
Basic Step➤ Enclose the desired characters in single quotes.
"Inspect"| string |string := 'This is a string.'. "Basic Step"^string
Variants
V1. Creating an Empty String➤ Send a new message to the String class. This is equivalent to
enclosing nothing between single quotes.
"Inspect"| emptyString |
Creating a String
VisualWorks Cookbook, Rev. 2.0 533
emptyString := String new. "V1 Step"^emptyString
V2. Creating a String of a Certain Size1. Send a new: message to the String class. The argument is an
integer indicating how many characters are to be in thestring. Each character is a null, which you can replace withanother character as a separate operation.
2. To supply a default character, send a new:withAll: message tothe String class. The first argument is the number of charac-ters. The second argument is the default character that isto fill all of the string’s slots.
"Inspect"| nullString zeroString |
nullString := String new: 10. "V2 Step 1"
zeroString := String new: 10 withAll: $0. "V2 Step 2"
^Array with: nullString with: zeroString
V3. Creating a String from a Character➤ Send a with: message to the String class. The argument is the
character that is to be the sole element of the string.
"Print it"| oneCharString |oneCharString := String with: Character tab. "V3 Step"^oneCharString
Chapter 25 Characters and Strings
534 VisualWorks Cookbook, Rev. 2.0
Distinguishing Types of Characters
Strategy
VisualWorks uses one encoding internally (Unicode) to repre-sent characters, allowing you to translate to other characterencodings as needed (see the International User’s Guide).Unicode supports characters from nearly all modern and clas-sical alphabets, as well as other special characters such asmath operators and monetary symbols.
Within this extended character set, VisualWorks distinguishesseveral subsets, and applications that manipulate characterssometimes need to know whether a specific character belongsto a particular subset. For example, a numeric applicationmight want to verify that a character is numeric. Charactersprovide a series of testing methods that conveniently answerthe common queries regarding group membership.
Variants
V1. Testing for Letterness1. Send an isAlphabetic message to a character. The response is
true when the character is a–z or A–Z in the Englishalphabet.
2. Send an isAlphaNumeric message to a character. The responseis true when the character is in a–z, A–Z, or 0–9.
3. Send an isLetter message to a character. The response is truewhen the character is in a–z, A–Z, or the set of non-Englishletters.
4. Send an isVowel message to a character. The response is truewhen the character is in aeiou or AEIOU, with or withoutdiacritical marks.
"Print it"| char responses |char := $a.responses := Array new: 4.
responses
Distinguishing Types of Characters
VisualWorks Cookbook, Rev. 2.0 535
at: 1 put: char isAlphabetic; "V1 Step 1"at: 2 put: char isAlphaNumeric; "V1 Step 2"at: 3 put: char isLetter; "V1 Step 3"at: 4 put: char isVowel. "V1 Step 4"
^responses
V2. Testing for Numberness➤ Send an isDigit message to a character. The response is true
when the character is in the range 0–9.
"Print it"| char |char := $5.^char isDigit "V2 Step"
V3. Testing for Case1. Send an isLowercase message to the character. The response
is true when the character is a lowercase letter.
2. Send an isUppercase message to find out whether the char-acter is an uppercase letter.
"Print it"| char isLower isUpper |char := $C.
isLower := char isLowercase. "V3 Step 1"isUpper := char isUppercase. "V3 Step 2"
^Array with: isLower with: isUpper.
V4. Testing for White Spaceness➤ Send an isSeparator message to the character. The response is
true when the character is a space, tab, carriage return, linefeed, form feed, or null.
"Print it"| char |

Chapter 25 Characters and Strings
536 VisualWorks Cookbook, Rev. 2.0
char := Character cr.^char isSeparator "V4 Step"
V5. Testing for Composedness1. Send an isComposed message to the character. The response
is true when the character is composed of a base characterplus a diacritical mark.
2. To find out whether a character is a diacritical mark (alone),send an isDiacritical message.
"Print it"| char |char := Character diacriticalNamed: #grave.^Array
with: char isComposed "V5 Step 1"with: char isDiacritical "V5 Step 2"
Changing the Case
VisualWorks Cookbook, Rev. 2.0 537
Changing the Case
Strategy
Applications that manipulate strings sometimes need toconvert one or more lowercase letters to uppercase, or viceversa. You can change the case of an entire string (basic steps).You can also change the case of a selected letter (variant)—forexample, in a loop that capitalizes the initial letter in each wordin a string.
Do not use case-changing protocol with strings whose charac-ters are caseless (for example, Japanese Katakana characters).
Basic Steps1. To convert a string to all lowercase letters, send an
asLowercase message to the string.
2. To convert a string to all uppercase, send an asUppercasemessage.
"Print it"| string |string := 'North American Fertilizer Company'.
^string asUppercase "Basic Step 2"
Variant
Changing the Case of a Selected Letter1. Send an asUppercase message to the character. An uppercase
equivalent will be returned.
2. Send an asLowercase message to get the lowercase equivalent.
"Print it"| string prevCharIsSeparator newChar |string := 'NORTH AMERICAN FERTILIZER COMPANY'.prevCharIsSeparator := true.
string keysAndValuesDo: [ :index :char |
Chapter 25 Characters and Strings
538 VisualWorks Cookbook, Rev. 2.0
prevCharIsSeparatorifTrue: [newChar := char asUppercase] "Variant Step 1"ifFalse: [newChar := char asLowercase]. "Variant Step 2"
string at: index put: newChar.prevCharIsSeparator := char isSeparator].
^string
Some character sets contain single lowercase charactersthat become multiple characters in their uppercase form. Ifyou are working with such a character set, your codeshould handle the results of asUppercase accordingly.
Getting a String’s Length and Width
VisualWorks Cookbook, Rev. 2.0 539
Getting a String’s Length and Width
Strategy
A String is a kind of Collection. Its elements are characters.Counting the characters in a string is accomplished by gettingthe size of the collection, as shown in the first variant.
The width of a string changes depending on the font that isused to display it. Because the font choice is controlled by thegraphics context of the display surface, that object cancompute the width of a string, in pixels, as shown in the secondvariant.
Variants
V1. Counting the Characters➤ Send a size message to the string.
"Print it"| string |string := '123456789'.^string size "V1 Step"
V2. Getting the Width in Pixels➤ Send a widthOfString: message to the graphics context of the
display surface on which the string will be displayed. Theargument is the string. The width in pixels is returned.
"Print it"| window string width |window := ScheduledWindow new.string := 'Hello, world'.
width := window graphicsContextwidthOfString: string. "V2 Step"
^width
Chapter 25 Characters and Strings
540 VisualWorks Cookbook, Rev. 2.0
Comparing
Strategy
Characters and strings respond to the same comparisonmessages as most objects: =, ==, <, >, and so on (basic step andfirst two variants).
Characters are compared based on their numeric equivalents.Thus, $a is greater than $A.
Strings are compared as other collections are compared. Theyare equal when both are strings, both have the same number ofcharacters, and both have the same characters in the sameorder.
Case difference makes two strings unequal but does not makeone string greater than the other. For example, 'abc' is not lessthan, equal to, or greater than 'ABC'. You can treat two stringsas being equal in spite of case difference (third variant).
To find out how similar two strings are, you can either countthe number of leading characters that are the same, or you canderive a similarity rating on a scale of 100 (fourth variant).
Basic Step➤ Send an = or ~= (not equal) message to the object (character
or string). The argument is a similar object.
"Print it"| char1 char2 |char1 := $a.char2 := $A.^char1 = char2 "Basic Step"
Variants
V1. Comparing Identities➤ To compare based on identity, send an == or ~~ (not iden-
tical) message to the object. The argument is a similar
Comparing
VisualWorks Cookbook, Rev. 2.0 541
object. Two different strings cannot be identical, though twovariables that refer to the same string are identical.
"Print it"| str1 str2 str3 |str1 := 'Excellent'.str2 := 'Excellent'.str3 := str1.
^Arraywith: (str1 == str2) "V1 Step"with: (str1 == str3)
V2. Comparing by Sorting Order1. Send a < (less than) or <= (less than or equal to) message to
the object. The argument is a similar object. Remember thatcase differences make two strings unequal but not lessthan or greater than each other.
2. Send a > or >= message to compare for greater than.
"Print it"| str1 str2 str3 |str1 := 'north'.str2 := 'North'.str3 := 'northwest'.
^Arraywith: (str1 < str2) "V2 Step 1"with: (str1 < str3)with: (str2 < str3)
V3. Comparing Strings While IgnoringCase Differences➤ Send a sameAs: message to one of the strings. The argument
is the second string.
"Print it"| str1 str2 str3 |str1 := 'north'.
Chapter 25 Characters and Strings
542 VisualWorks Cookbook, Rev. 2.0
str2 := 'North'.str3 := 'northwest'.
^Arraywith: (str1 sameAs: str2) "V3 Step"with: (str1 sameAs: str3)with: (str2 sameAs: str3)
V4. Rating the Similarity of Two Strings1. Send a sameCharacters: message to one of the strings. The
argument is the second string. An integer is returned, indi-cating how many of the beginning characters are the same(including case) in the two strings.
2. Send a spellAgainst: message to one of the strings, with thesecond string as argument. An integer from 1 (entirelydifferent) through 100 (equal) is returned.
"Print it"| str1 str2 str3 |str1 := 'north'.str2 := 'North'.str3 := 'northwest'.
^Arraywith: (str1 sameCharacters: str2) "V4 Step 1"with: (str1 sameCharacters: str3)with: (str1 spellAgainst: str2) "V4 Step 2"with: (str1 spellAgainst: str3)
Searching
VisualWorks Cookbook, Rev. 2.0 543
Searching
Strategy
The ability to find a specific character or substring is essentialin applications that parse strings. Often a special character orseries of characters identifies a field within a string, especiallywhen the string represents the contents of a structured text file.The basic steps show how to find either a character (a less-thancharacter) or a substring ('Class Variables:') within the classcomment for the String class.
By default, searching is case-sensitive. The variant shows howto ignore case during a search.
The variant also shows how to use wildcard characters duringa search. A pound sign (#) takes the place of any single char-acter, and an asterisk (*) takes the place of zero or more char-acters.
Basic Steps1. To get the index of a character, send an indexOf: message to
the string. The argument is the search character. If it is notfound, zero is returned.
2. To find the starting index of a substring, send afindString:startingAt:ifAbsent: message to the string. The firstargument is the substring to be found. The secondargument is the character position at which the search is tobegin. The third argument is a block containing actions tobe taken if the substring is not found (often an empty block,to avoid the default error).
"Print it"| classComment searchChar searchString index1 index2 |classComment := String comment.searchChar := $<.searchString := 'Class Variables:'.
index1 := classComment indexOf: searchChar. "Basic Step 1"index2 := classComment "Basic Step 2"
findString: searchString
Chapter 25 Characters and Strings
544 VisualWorks Cookbook, Rev. 2.0
startingAt: 1ifAbsent: [ ].
^Array with: index1 with: index2
Variant
Searching While Ignoring Case Difference➤ Send a findString:ignoreCase:useWildcards: message to the string.
The findString argument is the substring to be found. TheignoreCase argument is true when case difference is to beignored. The useWildcards argument is true when the numbersign and asterisk are to be interpreted as wildcard charac-ters rather than literal characters. Because the presence ofan asterisk wildcard affects the endpoint of the foundstring, this variant returns an Interval identifying the indexrange of the found string. A zero interval is returned whenthe search string is not found.
"Print it"| classComment searchString interval |classComment := String comment.searchString := 'Var*:'.
interval := classComment "Variant Step"findString: searchStringstartingAt: 1ignoreCase: trueuseWildcards: true.
^classCommentcopyFrom: interval firstto: interval last
See Also■ “Scanning Fields in a File (Stream)” on page 609
Combining Two Strings
VisualWorks Cookbook, Rev. 2.0 545
Combining Two Strings
Strategy
In simple situations, you can combine two strings using acomma (basic step). For situations involving a large number ofsuch concatenations, it is more efficient to use a stream, asshown in the variant. For example, when assembling a series ofstrings for a report, the variant would be preferable.
For cross-cultural applications, use the string expansionfacility described in the International User’s Guide.
Basic Step➤ Send a , (comma) message to the first string. The argument
is the second string. A new string is returned, containingthe first string followed by the second string.
"Print it"| firstName lastName fullName space |firstName := 'Bill'.lastName := 'Clinton'.space := String with: Character space.
fullName := firstName, space, lastName. "Basic Step"^fullName
Variant
Combining Strings Using a Stream1. Create a stream by sending an on: message to the WriteStream
class. The argument is typically an empty string, but itcould be any string, such as a preassembled reportheading.
2. Append each string in the series to the stream by sending anextPutAll: message to the stream, with the string as argu-ment.
3. Get the stream contents in the form of a string by sending acontents message to the stream.
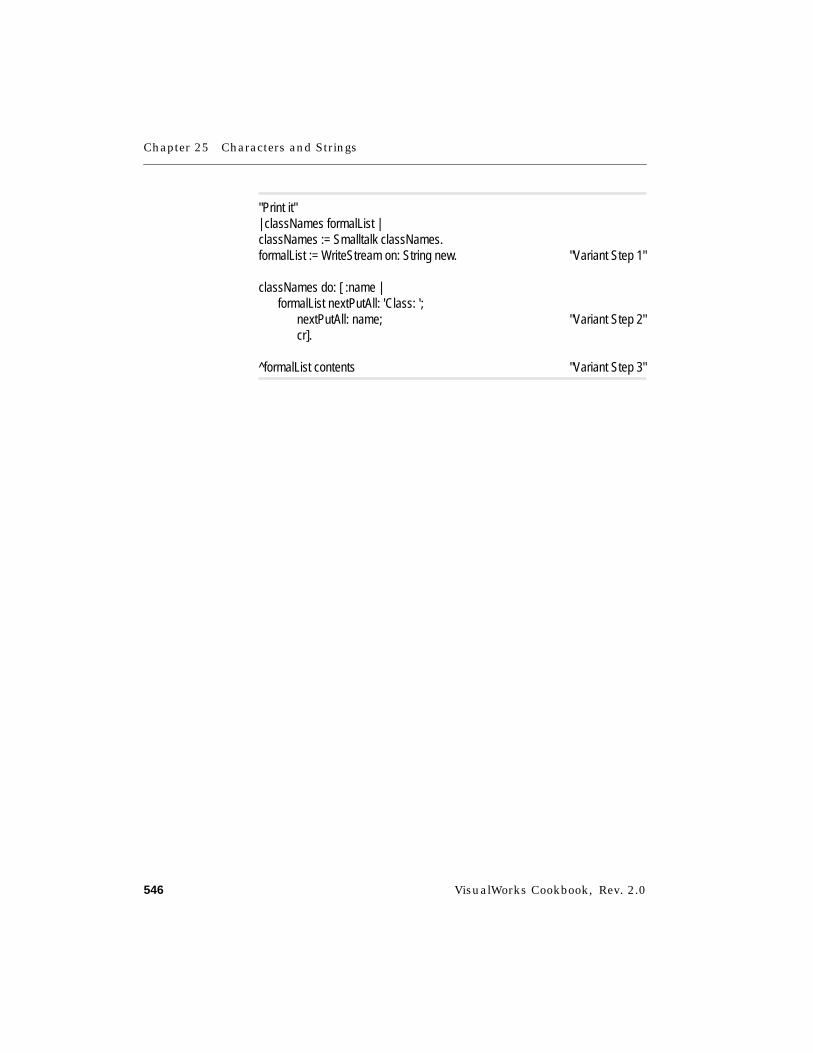
Chapter 25 Characters and Strings
546 VisualWorks Cookbook, Rev. 2.0
"Print it"| classNames formalList |classNames := Smalltalk classNames.formalList := WriteStream on: String new. "Variant Step 1"
classNames do: [ :name |formalList nextPutAll: 'Class: ';
nextPutAll: name; "Variant Step 2"cr].
^formalList contents "Variant Step 3"
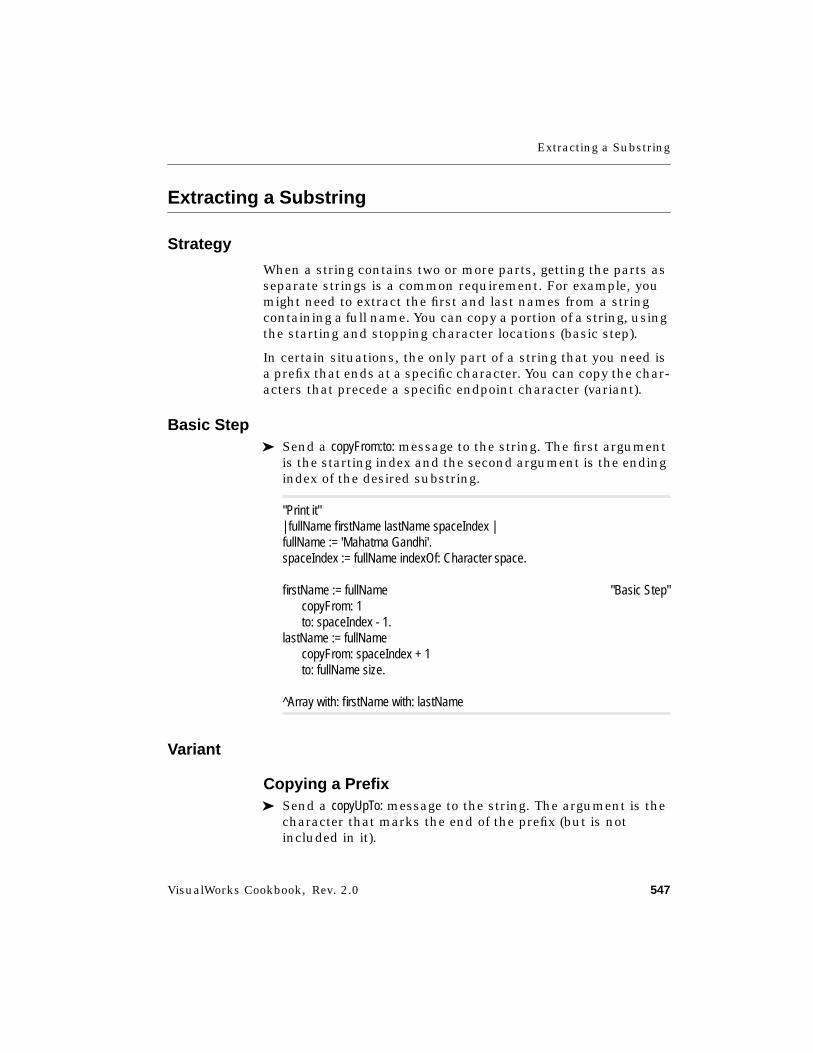
Extracting a Substring
VisualWorks Cookbook, Rev. 2.0 547
Extracting a Substring
Strategy
When a string contains two or more parts, getting the parts asseparate strings is a common requirement. For example, youmight need to extract the first and last names from a stringcontaining a full name. You can copy a portion of a string, usingthe starting and stopping character locations (basic step).
In certain situations, the only part of a string that you need isa prefix that ends at a specific character. You can copy the char-acters that precede a specific endpoint character (variant).
Basic Step➤ Send a copyFrom:to: message to the string. The first argument
is the starting index and the second argument is the endingindex of the desired substring.
"Print it"| fullName firstName lastName spaceIndex |fullName := 'Mahatma Gandhi'.spaceIndex := fullName indexOf: Character space.
firstName := fullName "Basic Step"copyFrom: 1to: spaceIndex - 1.
lastName := fullNamecopyFrom: spaceIndex + 1to: fullName size.
^Array with: firstName with: lastName
Variant
Copying a Prefix➤ Send a copyUpTo: message to the string. The argument is the
character that marks the end of the prefix (but is notincluded in it).

Chapter 25 Characters and Strings
548 VisualWorks Cookbook, Rev. 2.0
"Print it"| fullName firstName |fullName := 'Boris Yeltsin'.
firstName := fullName copyUpTo: Character space. "Variant Step"^firstName
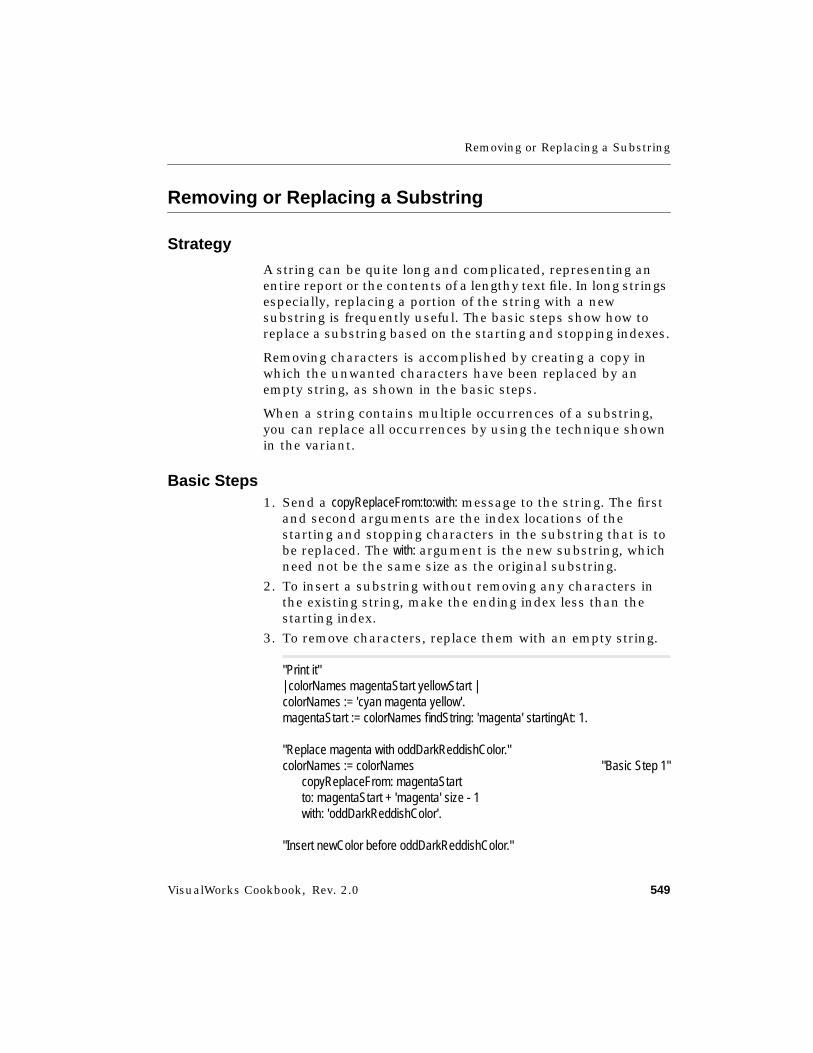
Removing or Replacing a Substring
VisualWorks Cookbook, Rev. 2.0 549
Removing or Replacing a Substring
Strategy
A string can be quite long and complicated, representing anentire report or the contents of a lengthy text file. In long stringsespecially, replacing a portion of the string with a newsubstring is frequently useful. The basic steps show how toreplace a substring based on the starting and stopping indexes.
Removing characters is accomplished by creating a copy inwhich the unwanted characters have been replaced by anempty string, as shown in the basic steps.
When a string contains multiple occurrences of a substring,you can replace all occurrences by using the technique shownin the variant.
Basic Steps1. Send a copyReplaceFrom:to:with: message to the string. The first
and second arguments are the index locations of thestarting and stopping characters in the substring that is tobe replaced. The with: argument is the new substring, whichneed not be the same size as the original substring.
2. To insert a substring without removing any characters inthe existing string, make the ending index less than thestarting index.
3. To remove characters, replace them with an empty string.
"Print it"| colorNames magentaStart yellowStart |colorNames := 'cyan magenta yellow'.magentaStart := colorNames findString: 'magenta' startingAt: 1.
"Replace magenta with oddDarkReddishColor."colorNames := colorNames "Basic Step 1"
copyReplaceFrom: magentaStartto: magentaStart + 'magenta' size - 1with: 'oddDarkReddishColor'.
"Insert newColor before oddDarkReddishColor."
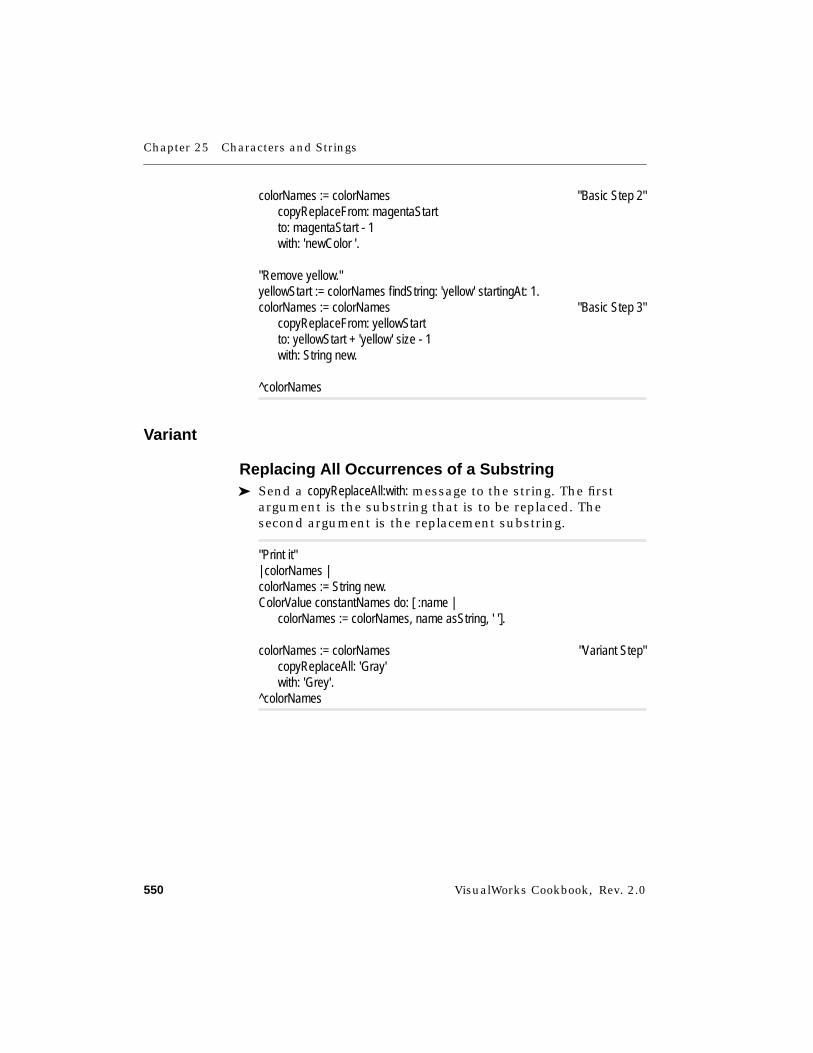
Chapter 25 Characters and Strings
550 VisualWorks Cookbook, Rev. 2.0
colorNames := colorNames "Basic Step 2"copyReplaceFrom: magentaStartto: magentaStart - 1with: 'newColor '.
"Remove yellow."yellowStart := colorNames findString: 'yellow' startingAt: 1.colorNames := colorNames "Basic Step 3"
copyReplaceFrom: yellowStartto: yellowStart + 'yellow' size - 1with: String new.
^colorNames
Variant
Replacing All Occurrences of a Substring➤ Send a copyReplaceAll:with: message to the string. The first
argument is the substring that is to be replaced. Thesecond argument is the replacement substring.
"Print it"| colorNames |colorNames := String new.ColorValue constantNames do: [ :name |
colorNames := colorNames, name asString, ' '].
colorNames := colorNames "Variant Step"copyReplaceAll: 'Gray'with: 'Grey'.
^colorNames
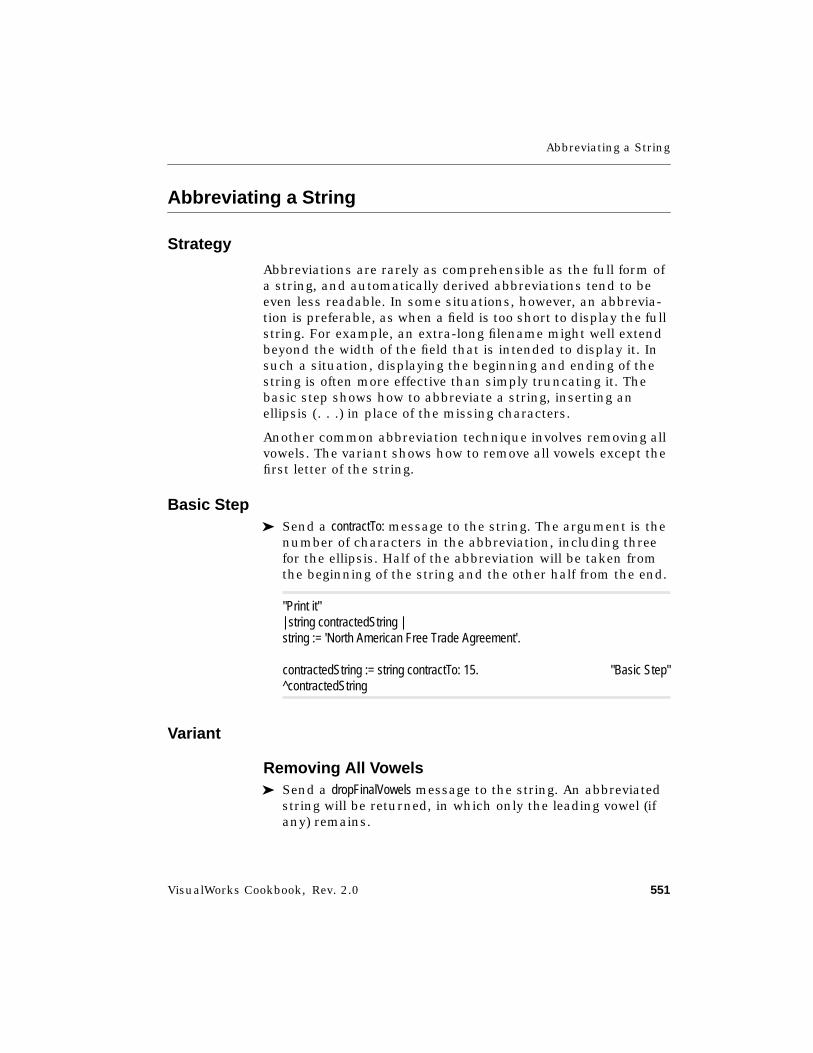
Abbreviating a String
VisualWorks Cookbook, Rev. 2.0 551
Abbreviating a String
Strategy
Abbreviations are rarely as comprehensible as the full form ofa string, and automatically derived abbreviations tend to beeven less readable. In some situations, however, an abbrevia-tion is preferable, as when a field is too short to display the fullstring. For example, an extra-long filename might well extendbeyond the width of the field that is intended to display it. Insuch a situation, displaying the beginning and ending of thestring is often more effective than simply truncating it. Thebasic step shows how to abbreviate a string, inserting anellipsis (. . .) in place of the missing characters.
Another common abbreviation technique involves removing allvowels. The variant shows how to remove all vowels except thefirst letter of the string.
Basic Step➤ Send a contractTo: message to the string. The argument is the
number of characters in the abbreviation, including threefor the ellipsis. Half of the abbreviation will be taken fromthe beginning of the string and the other half from the end.
"Print it"| string contractedString |string := 'North American Free Trade Agreement'.
contractedString := string contractTo: 15. "Basic Step"^contractedString
Variant
Removing All Vowels➤ Send a dropFinalVowels message to the string. An abbreviated
string will be returned, in which only the leading vowel (ifany) remains.
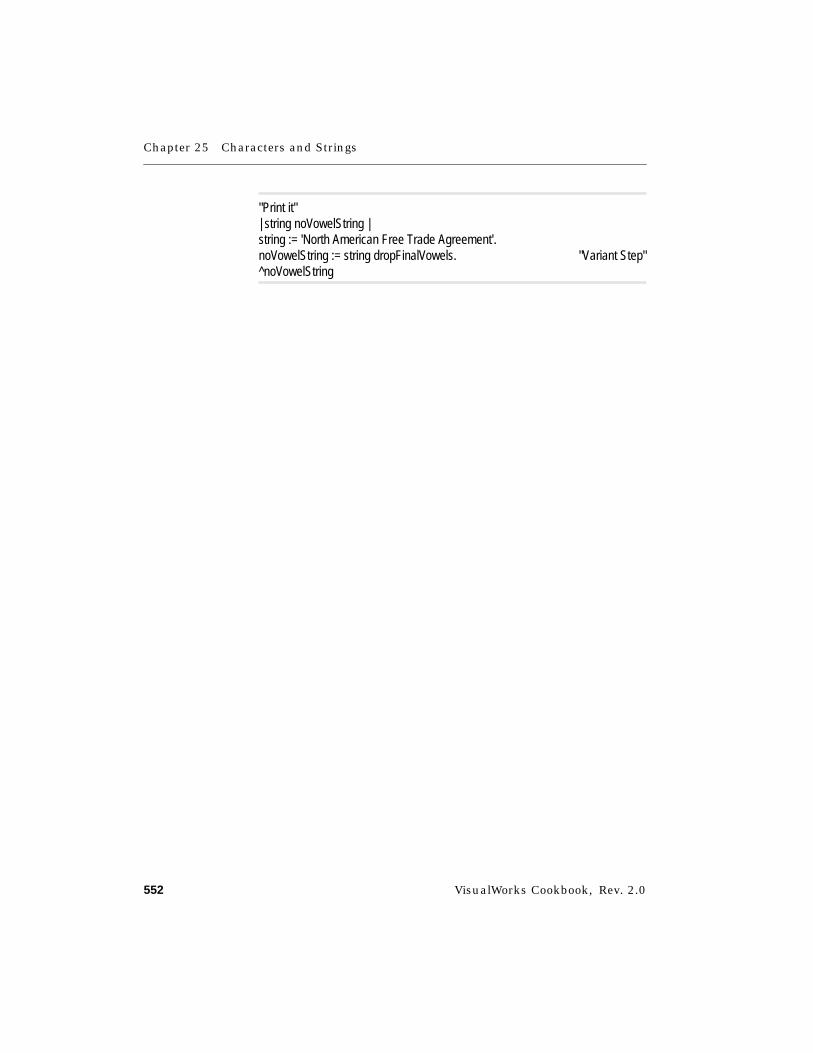
Chapter 25 Characters and Strings
552 VisualWorks Cookbook, Rev. 2.0
"Print it"| string noVowelString |string := 'North American Free Trade Agreement'.noVowelString := string dropFinalVowels. "Variant Step"^noVowelString

Inserting Line-End Characters
VisualWorks Cookbook, Rev. 2.0 553
Inserting Line-End Characters
Strategy
In Smalltalk methods, certain conventions of indentation andline wrapping make the code more readable. Sometimes astring disrupts the readability of the code because it containsembedded carriage returns. The basic steps show how to keepthe entire string on one line without sacrificing the embeddedreturns.
Basic Steps1. For each embedded carriage return in the string, substitute
a backslash character (\).
2. Send a withCRs message to the string to convert the back-slashes back to carriage returns.
Dialogrequest: 'This string\has 3 lines\when displayed.' withCRs
"Basic Steps 1, 2"initialAnswer: 'No response needed'.
This technique is not recommended for cross-culturalapplications, because it interferes with text lookup inmessage catalogs. Instead, use separate strings and recom-bine them with literal line-end characters (use the stringexpansion facility described in the International User’sGuide).

VisualWorks Cookbook, Rev. 2.0 555
Chapter 26
Text and Fonts
Creating a Text Object 556Displaying a Text Object 558Setting the Line Length 559Disabling Word Wrapping 560Controlling Alignment 561Setting Indents and Tabs 562Counting the Characters 564Printing a Text Object 565Searching for Strings 566Replacing a Range of Text 567Comparing Text Objects 568Copying a Range of Text 569Changing Case 571Applying Boldfacing and Other Emphases 572Using the Platform’s Default Font 575Creating a Custom Text Style 576Changing Font Size 578Setting Font Family or Name 582Setting Text Color 585Changing the Fonts Menu 587Changing the Default Font 588Listing Platform Fonts 589
See Also■ “Characters and Strings” on page 529
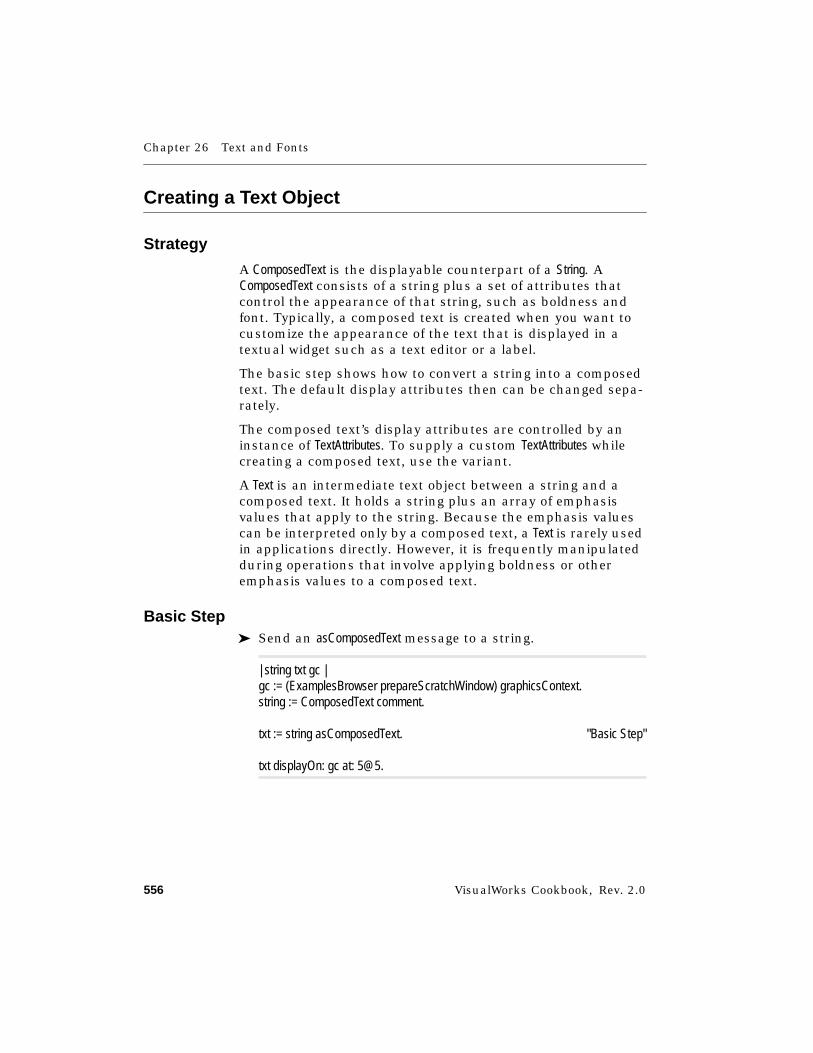
Chapter 26 Text and Fonts
556 VisualWorks Cookbook, Rev. 2.0
Creating a Text Object
Strategy
A ComposedText is the displayable counterpart of a String. AComposedText consists of a string plus a set of attributes thatcontrol the appearance of that string, such as boldness andfont. Typically, a composed text is created when you want tocustomize the appearance of the text that is displayed in atextual widget such as a text editor or a label.
The basic step shows how to convert a string into a composedtext. The default display attributes then can be changed sepa-rately.
The composed text’s display attributes are controlled by aninstance of TextAttributes. To supply a custom TextAttributes whilecreating a composed text, use the variant.
A Text is an intermediate text object between a string and acomposed text. It holds a string plus an array of emphasisvalues that apply to the string. Because the emphasis valuescan be interpreted only by a composed text, a Text is rarely usedin applications directly. However, it is frequently manipulatedduring operations that involve applying boldness or otheremphasis values to a composed text.
Basic Step➤ Send an asComposedText message to a string.
| string txt gc |gc := (ExamplesBrowser prepareScratchWindow) graphicsContext.string := ComposedText comment.
txt := string asComposedText. "Basic Step"
txt displayOn: gc at: 5@5.
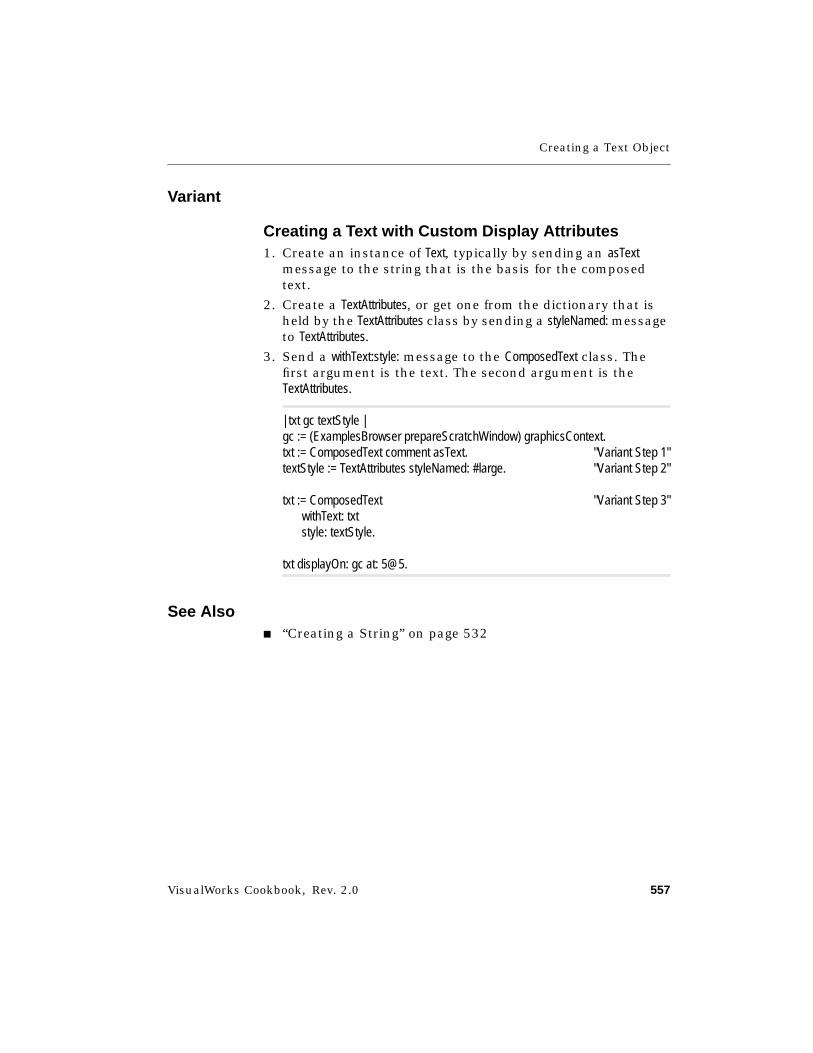
Creating a Text Object
VisualWorks Cookbook, Rev. 2.0 557
Variant
Creating a Text with Custom Display Attributes1. Create an instance of Text, typically by sending an asText
message to the string that is the basis for the composedtext.
2. Create a TextAttributes, or get one from the dictionary that isheld by the TextAttributes class by sending a styleNamed: messageto TextAttributes.
3. Send a withText:style: message to the ComposedText class. Thefirst argument is the text. The second argument is theTextAttributes.
| txt gc textStyle |gc := (ExamplesBrowser prepareScratchWindow) graphicsContext.txt := ComposedText comment asText. "Variant Step 1"textStyle := TextAttributes styleNamed: #large. "Variant Step 2"
txt := ComposedText "Variant Step 3"withText: txtstyle: textStyle.
txt displayOn: gc at: 5@5.
See Also■ “Creating a String” on page 532
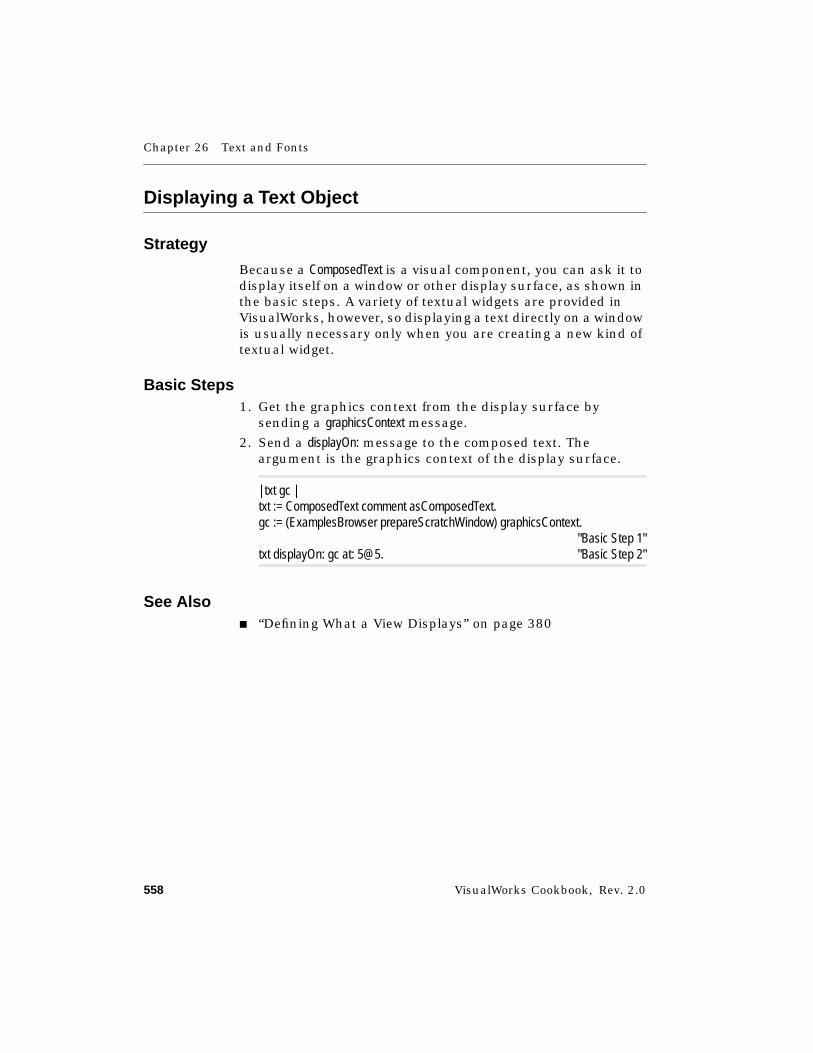
Chapter 26 Text and Fonts
558 VisualWorks Cookbook, Rev. 2.0
Displaying a Text Object
Strategy
Because a ComposedText is a visual component, you can ask it todisplay itself on a window or other display surface, as shown inthe basic steps. A variety of textual widgets are provided inVisualWorks, however, so displaying a text directly on a windowis usually necessary only when you are creating a new kind oftextual widget.
Basic Steps1. Get the graphics context from the display surface by
sending a graphicsContext message.
2. Send a displayOn: message to the composed text. Theargument is the graphics context of the display surface.
| txt gc |txt := ComposedText comment asComposedText.gc := (ExamplesBrowser prepareScratchWindow) graphicsContext.
"Basic Step 1"txt displayOn: gc at: 5@5. "Basic Step 2"
See Also■ “Defining What a View Displays” on page 380
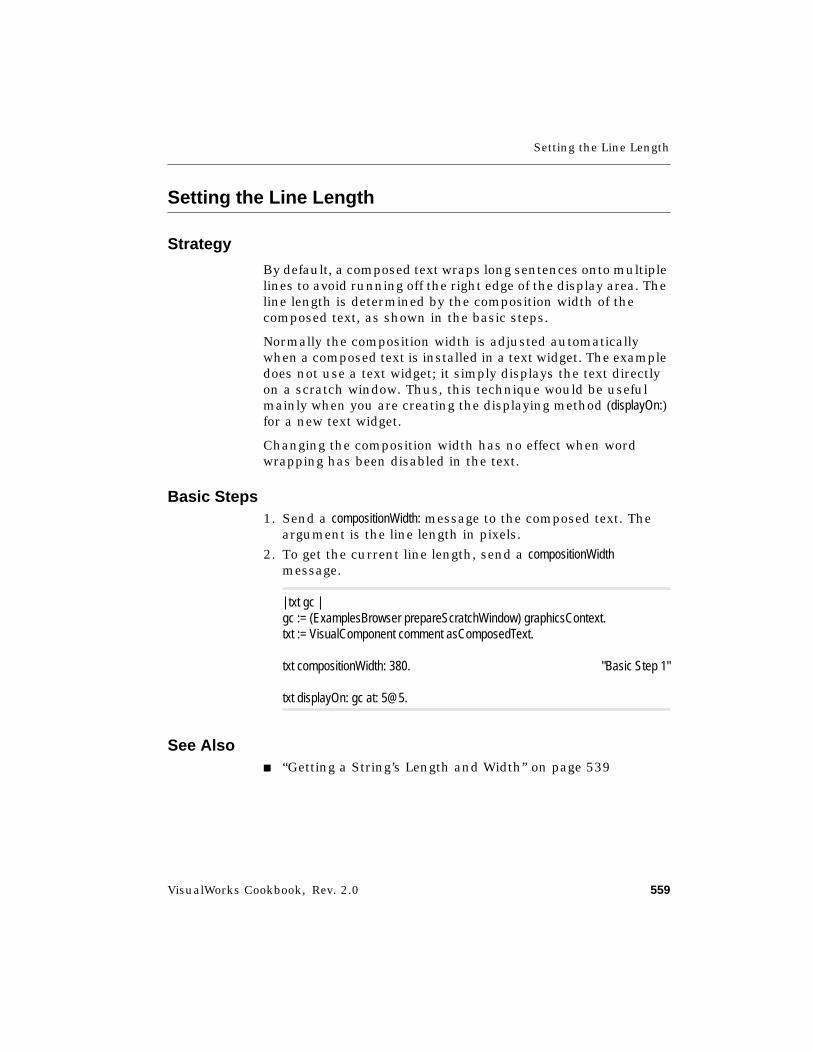
Setting the Line Length
VisualWorks Cookbook, Rev. 2.0 559
Setting the Line Length
Strategy
By default, a composed text wraps long sentences onto multiplelines to avoid running off the right edge of the display area. Theline length is determined by the composition width of thecomposed text, as shown in the basic steps.
Normally the composition width is adjusted automaticallywhen a composed text is installed in a text widget. The exampledoes not use a text widget; it simply displays the text directlyon a scratch window. Thus, this technique would be usefulmainly when you are creating the displaying method (displayOn:)for a new text widget.
Changing the composition width has no effect when wordwrapping has been disabled in the text.
Basic Steps1. Send a compositionWidth: message to the composed text. The
argument is the line length in pixels.
2. To get the current line length, send a compositionWidthmessage.
| txt gc |gc := (ExamplesBrowser prepareScratchWindow) graphicsContext.txt := VisualComponent comment asComposedText.
txt compositionWidth: 380. "Basic Step 1"
txt displayOn: gc at: 5@5.
See Also■ “Getting a String’s Length and Width” on page 539
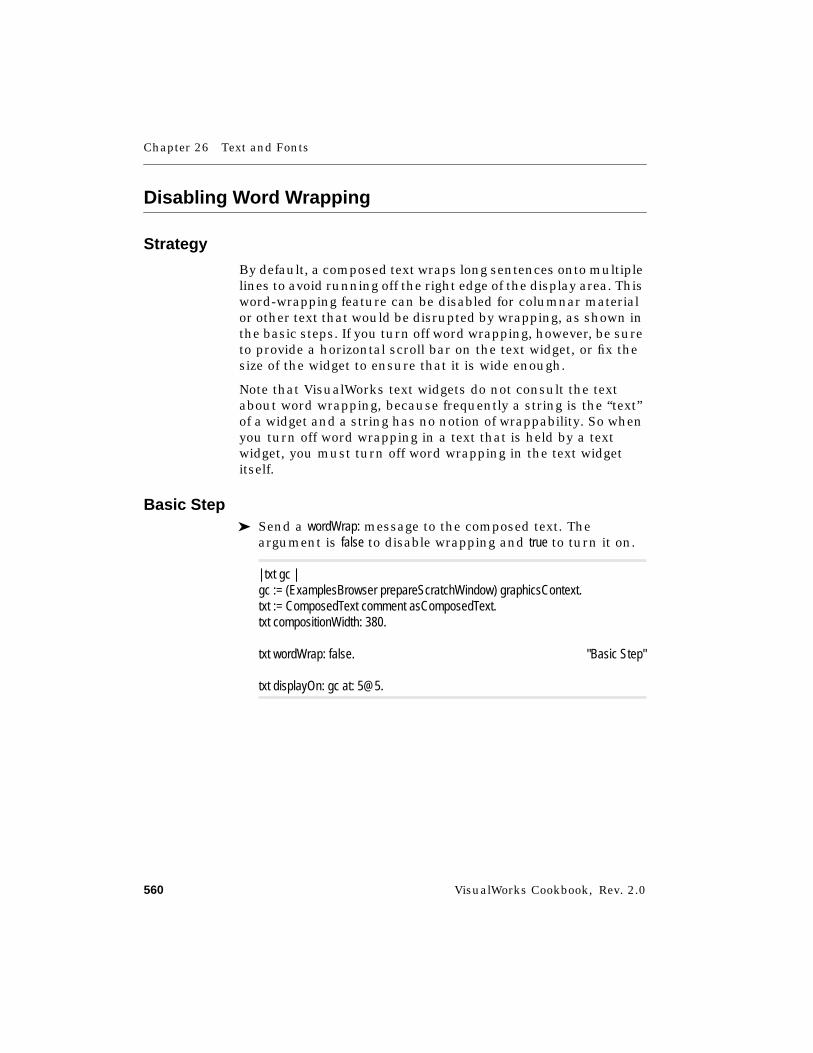
Chapter 26 Text and Fonts
560 VisualWorks Cookbook, Rev. 2.0
Disabling Word Wrapping
Strategy
By default, a composed text wraps long sentences onto multiplelines to avoid running off the right edge of the display area. Thisword-wrapping feature can be disabled for columnar materialor other text that would be disrupted by wrapping, as shown inthe basic steps. If you turn off word wrapping, however, be sureto provide a horizontal scroll bar on the text widget, or fix thesize of the widget to ensure that it is wide enough.
Note that VisualWorks text widgets do not consult the textabout word wrapping, because frequently a string is the “text”of a widget and a string has no notion of wrappability. So whenyou turn off word wrapping in a text that is held by a textwidget, you must turn off word wrapping in the text widgetitself.
Basic Step➤ Send a wordWrap: message to the composed text. The
argument is false to disable wrapping and true to turn it on.
| txt gc |gc := (ExamplesBrowser prepareScratchWindow) graphicsContext.txt := ComposedText comment asComposedText.txt compositionWidth: 380.
txt wordWrap: false. "Basic Step"
txt displayOn: gc at: 5@5.
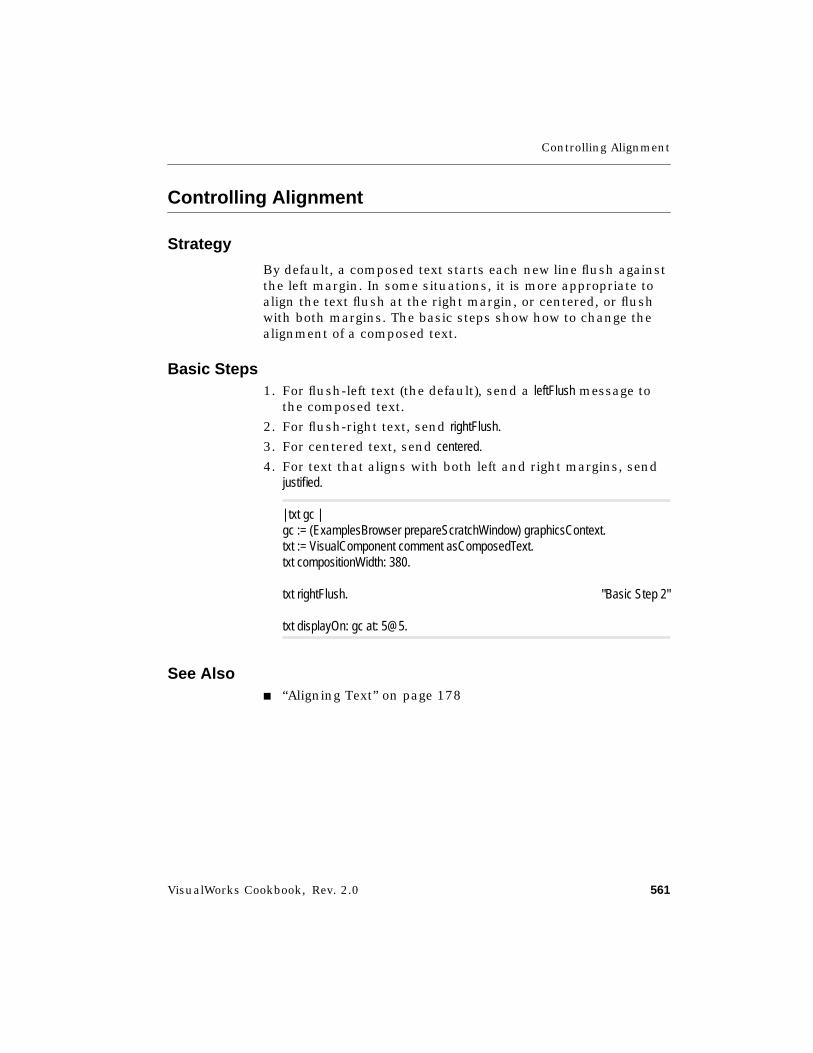
Controlling Alignment
VisualWorks Cookbook, Rev. 2.0 561
Controlling Alignment
Strategy
By default, a composed text starts each new line flush againstthe left margin. In some situations, it is more appropriate toalign the text flush at the right margin, or centered, or flushwith both margins. The basic steps show how to change thealignment of a composed text.
Basic Steps1. For flush-left text (the default), send a leftFlush message to
the composed text.
2. For flush-right text, send rightFlush.
3. For centered text, send centered.
4. For text that aligns with both left and right margins, sendjustified.
| txt gc |gc := (ExamplesBrowser prepareScratchWindow) graphicsContext.txt := VisualComponent comment asComposedText.txt compositionWidth: 380.
txt rightFlush. "Basic Step 2"
txt displayOn: gc at: 5@5.
See Also■ “Aligning Text” on page 178
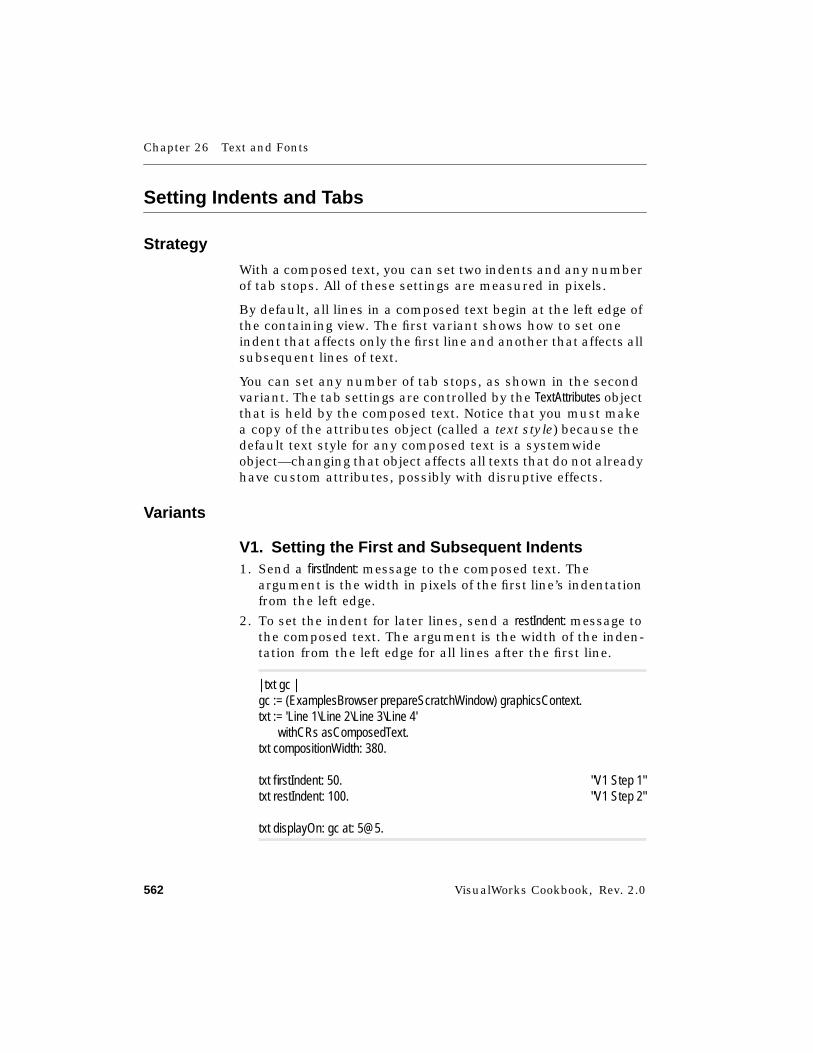
Chapter 26 Text and Fonts
562 VisualWorks Cookbook, Rev. 2.0
Setting Indents and Tabs
Strategy
With a composed text, you can set two indents and any numberof tab stops. All of these settings are measured in pixels.
By default, all lines in a composed text begin at the left edge ofthe containing view. The first variant shows how to set oneindent that affects only the first line and another that affects allsubsequent lines of text.
You can set any number of tab stops, as shown in the secondvariant. The tab settings are controlled by the TextAttributes objectthat is held by the composed text. Notice that you must makea copy of the attributes object (called a text style) because thedefault text style for any composed text is a systemwideobject—changing that object affects all texts that do not alreadyhave custom attributes, possibly with disruptive effects.
Variants
V1. Setting the First and Subsequent Indents1. Send a firstIndent: message to the composed text. The
argument is the width in pixels of the first line’s indentationfrom the left edge.
2. To set the indent for later lines, send a restIndent: message tothe composed text. The argument is the width of the inden-tation from the left edge for all lines after the first line.
| txt gc |gc := (ExamplesBrowser prepareScratchWindow) graphicsContext.txt := 'Line 1\Line 2\Line 3\Line 4'
withCRs asComposedText.txt compositionWidth: 380.
txt firstIndent: 50. "V1 Step 1"txt restIndent: 100. "V1 Step 2"
txt displayOn: gc at: 5@5.
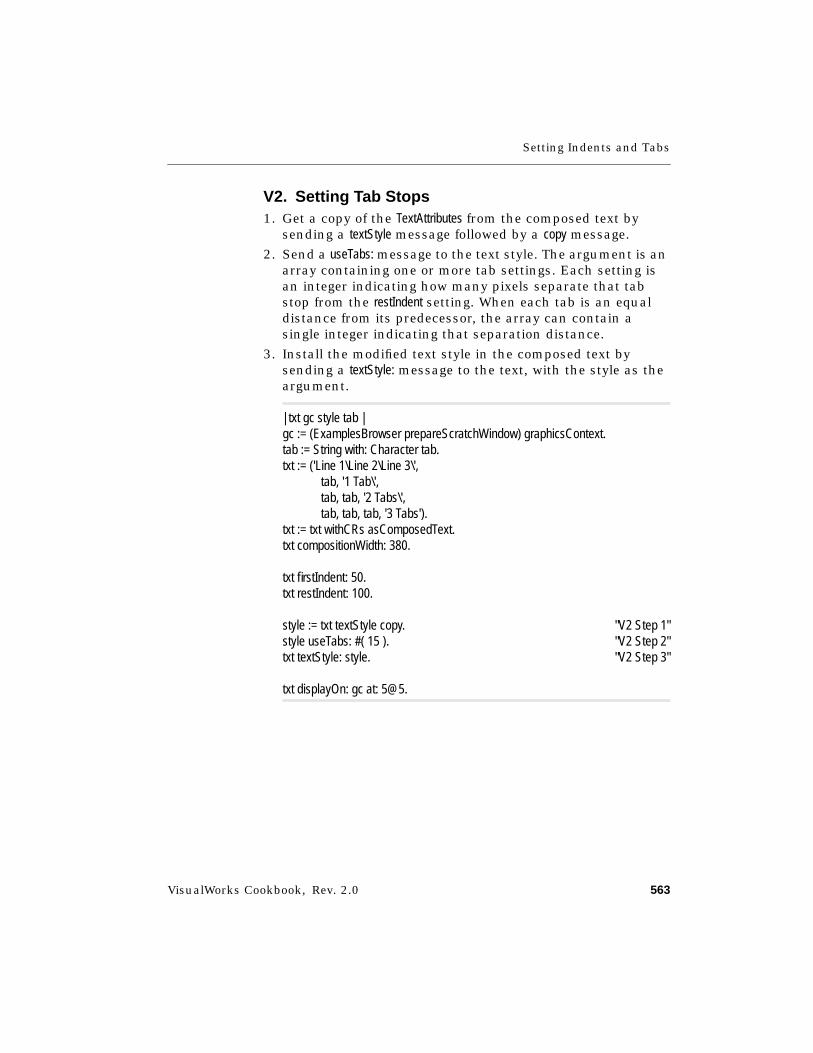
Setting Indents and Tabs
VisualWorks Cookbook, Rev. 2.0 563
V2. Setting Tab Stops1. Get a copy of the TextAttributes from the composed text by
sending a textStyle message followed by a copy message.
2. Send a useTabs: message to the text style. The argument is anarray containing one or more tab settings. Each setting isan integer indicating how many pixels separate that tabstop from the restIndent setting. When each tab is an equaldistance from its predecessor, the array can contain asingle integer indicating that separation distance.
3. Install the modified text style in the composed text bysending a textStyle: message to the text, with the style as theargument.
| txt gc style tab |gc := (ExamplesBrowser prepareScratchWindow) graphicsContext.tab := String with: Character tab.txt := ('Line 1\Line 2\Line 3\',
tab, '1 Tab\',tab, tab, '2 Tabs\',tab, tab, tab, '3 Tabs').
txt := txt withCRs asComposedText.txt compositionWidth: 380.
txt firstIndent: 50.txt restIndent: 100.
style := txt textStyle copy. "V2 Step 1"style useTabs: #( 15 ). "V2 Step 2"txt textStyle: style. "V2 Step 3"
txt displayOn: gc at: 5@5.
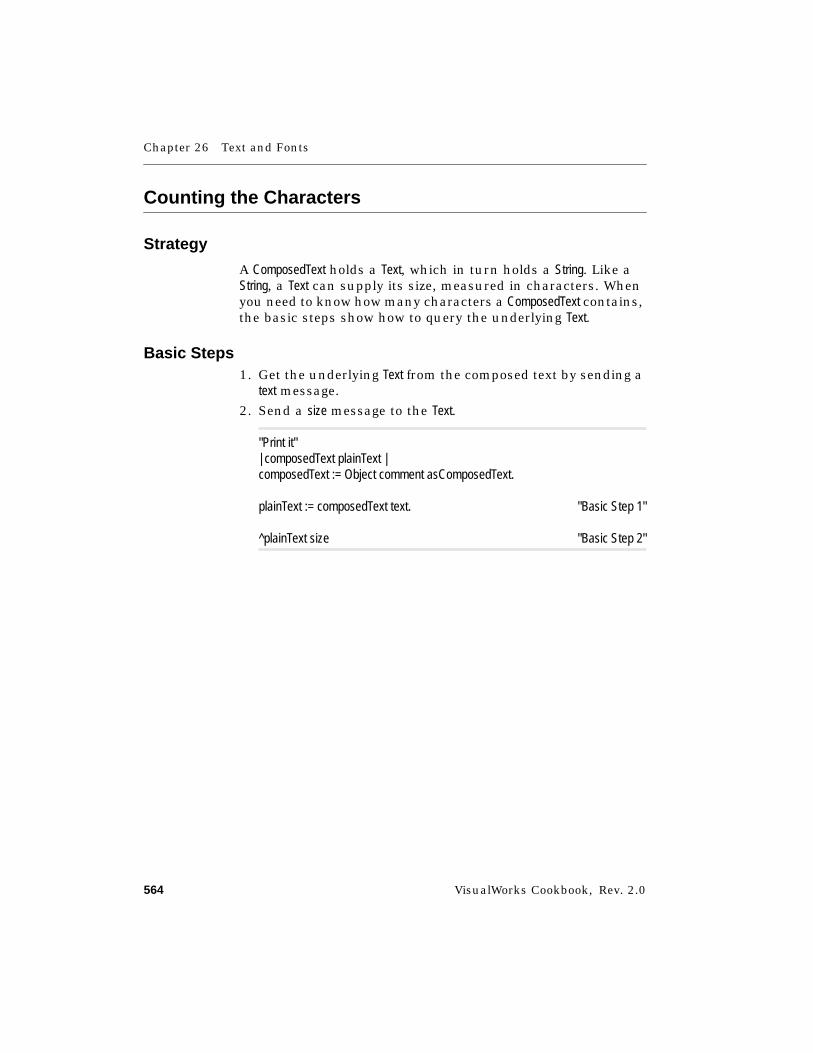
Chapter 26 Text and Fonts
564 VisualWorks Cookbook, Rev. 2.0
Counting the Characters
Strategy
A ComposedText holds a Text, which in turn holds a String. Like aString, a Text can supply its size, measured in characters. Whenyou need to know how many characters a ComposedText contains,the basic steps show how to query the underlying Text.
Basic Steps1. Get the underlying Text from the composed text by sending a
text message.
2. Send a size message to the Text.
"Print it"| composedText plainText |composedText := Object comment asComposedText.
plainText := composedText text. "Basic Step 1"
^plainText size "Basic Step 2"
Printing a Text Object
VisualWorks Cookbook, Rev. 2.0 565
Printing a Text Object
Strategy
A composed text can be printed on paper very simply, as shownin the basic step. This technique assumes that you have config-ured your system to send output to a printer. If you cansuccessfully print by using the hardcopy command in a SystemBrowser, you can also print a composed text as shown here.
Basic Step➤ Send a hardcopy message to a composed text.
| txt |txt := Object comment asComposedText.
txt hardcopy. "Basic Step"
See Also■ “Printing a File” on page 607

Chapter 26 Text and Fonts
566 VisualWorks Cookbook, Rev. 2.0
Searching for Strings
Strategy
A ComposedText has a Text, which has a String. Strings support avariety of flexible searching techniques. The basic steps showthe fullest form of the string searching message.
Basic Steps1. Get the string from the composed text by sending a string
message to the text.
2. Send a findString:startingAt:ignoreCase:useWildcards: message to thestring. The findString argument is the substring to be found.The startingAt argument is the index position at which thesearch is to begin. The ignoreCase argument is true when casedifference is to be disregarded. The useWildcards argument istrue when the pound sign (#) and asterisk (*) are to be treatedas wildcard characters, with the pound sign taking theplace of any single character and the asterisk taking theplace of zero or more characters.
"Print it"| composedText string |composedText := Object comment asComposedText.
string := composedText string. "Basic Step 1"
^string "Basic Step 2" findString: 'Var*:'startingAt: 1ignoreCase: trueuseWildcards: true.
See Also■ “Searching” on page 543
Replacing a Range of Text
VisualWorks Cookbook, Rev. 2.0 567
Replacing a Range of Text
Strategy
Replacing part of a ComposedText is done very much as with astring. Either a string or a text can be substituted for part of anexisting text. If the replacement text has boldfacing or otheremphasis values, they will be preserved.
Basic Step➤ Send a replaceFrom:to:with: message to the composed text. The
first and second arguments are integers indicating therange of text to be replaced. The third argument is thereplacement text, which can be either a string or a text.
| txt gc |gc := (ExamplesBrowser prepareScratchWindow) graphicsContext.txt := 'Red Green Blue' asComposedText.txt compositionWidth: 300.
txt replaceFrom: 1 "Basic Step"to: 3with: 'BloodRed' asText allBold.
txt displayOn: gc at: 5@5.
See Also■ “Removing or Replacing a Substring” on page 549
Chapter 26 Text and Fonts
568 VisualWorks Cookbook, Rev. 2.0
Comparing Text Objects
Strategy
A ComposedText can only tell whether it is the same object asanother text. In technical terms, the = comparison has the sameeffect as an == comparison. In many situations, it is more usefulto test the underlying Text objects, which compare their under-lying strings.
Basic Steps1. To test whether two variables reference the same
ComposedText object, send an = message to one variable, withthe second variable as the argument.
2. To test whether two different instances of ComposedText haveequal Text objects and hence equal strings, get the text fromeach composed text and compare using an = message.
"Print it"| txt1 txt2 equal equivalent |txt1 := Object comment asComposedText.txt2 := Object comment asComposedText.
equal := txt1 = txt2. "Basic Step"equivalent := txt1 text = txt2 text. "Basic Step"
^Array with: equal with: equivalent
See Also■ “Comparing” on page 540
Copying a Range of Text
VisualWorks Cookbook, Rev. 2.0 569
Copying a Range of Text
Strategy
A ComposedText does not directly support copying a range of it.The basic steps demonstrate a technique that is based oncopying a range of its underlying Text and then creating a newcomposed text with that range. The text style is also transferredto the new composed text.
The composition width and word-wrap setting are not copied inthis approach. That is rarely necessary because the width isoften set by a text view, and word wrap typically remains in thedefault “on” condition. The variant shows how to preserve thosesettings, just in case.
Basic Steps1. Get the underlying Text by sending a text message to the
composed text.
2. Copy the desired range of text by sending a copyFrom:to:message. The first argument is the beginning index and thesecond argument is the ending index.
3. Convert the text to a composed text by sending anasComposedText message.
| composedText plainText descriptionEnd copy gc |gc := (ExamplesBrowser prepareScratchWindow) graphicsContext.composedText := Object comment asComposedText.composedText compositionWidth: 300.
plainText := composedText text. "Basic Step 1"descriptionEnd := plainText
findString: 'Class Variables'startingAt: 1.
descriptionEnd := descriptionEnd - 1.
copy := plainText copyFrom: 1 to: descriptionEnd. "Basic Step 2"copy asComposedText displayOn: gc at: 5@15. "Basic Step 3"
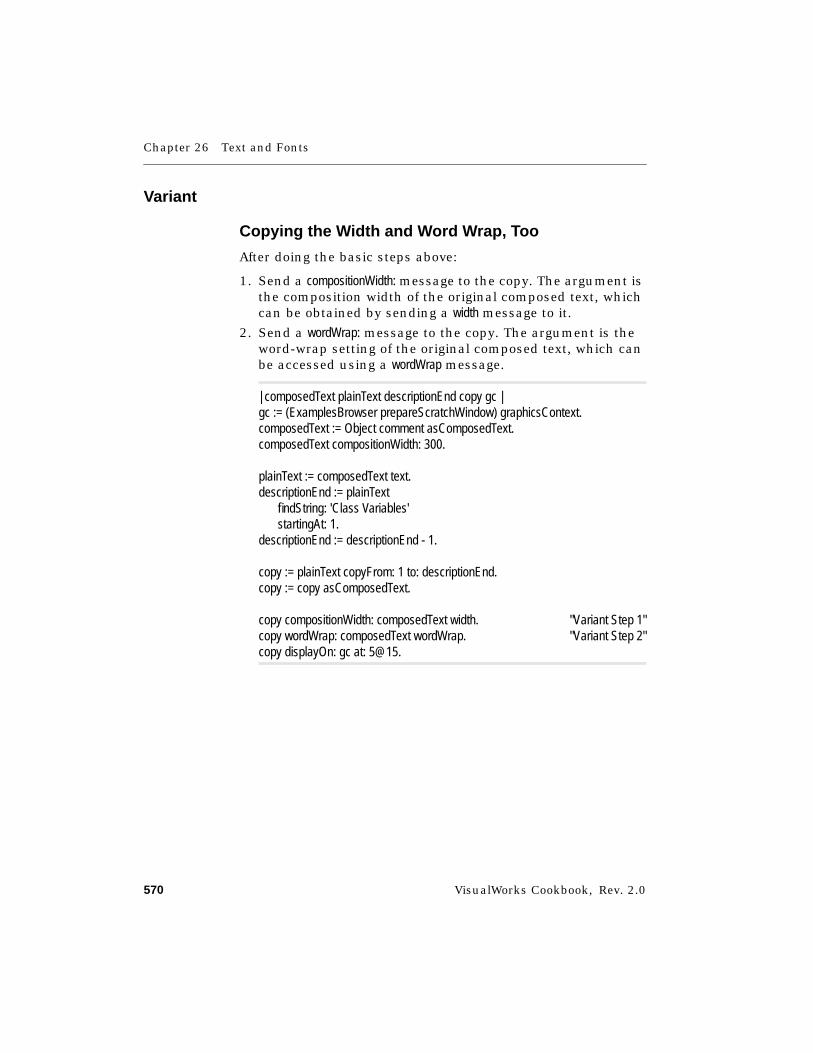
Chapter 26 Text and Fonts
570 VisualWorks Cookbook, Rev. 2.0
Variant
Copying the Width and Word Wrap, Too
After doing the basic steps above:
1. Send a compositionWidth: message to the copy. The argument isthe composition width of the original composed text, whichcan be obtained by sending a width message to it.
2. Send a wordWrap: message to the copy. The argument is theword-wrap setting of the original composed text, which canbe accessed using a wordWrap message.
| composedText plainText descriptionEnd copy gc |gc := (ExamplesBrowser prepareScratchWindow) graphicsContext.composedText := Object comment asComposedText.composedText compositionWidth: 300.
plainText := composedText text.descriptionEnd := plainText
findString: 'Class Variables'startingAt: 1.
descriptionEnd := descriptionEnd - 1.
copy := plainText copyFrom: 1 to: descriptionEnd.copy := copy asComposedText.
copy compositionWidth: composedText width. "Variant Step 1"copy wordWrap: composedText wordWrap. "Variant Step 2"copy displayOn: gc at: 5@15.

Changing Case
VisualWorks Cookbook, Rev. 2.0 571
Changing Case
Strategy
The underlying Text that is held by a composed text can beconverted to uppercase or lowercase. The basic steps show howto extract the underlying text, change its case, and insert themodified text back into the composed text.
In the example, the “HELLO, WORLD” text retains the compo-sition width of the shorter “Hello, World” text. As a result, thecapitalized version is displayed on two lines because it nolonger fits on a single line. You can adjust the compositionwidth to compensate for the increased size of the text, butnormally this is handled automatically by the text widget thatis responsible for displaying the text.
Basic Steps1. Get the underlying Text from the composed text by sending a
text message, and then change the case by sending either anasUppercase or asLowercase message.
2. Install the changed text by sending a text: message to thecomposed text. The argument is the changed text.
| composedText capText gc |gc := (ExamplesBrowser prepareScratchWindow) graphicsContext.composedText := 'Hello, World' asComposedText.
capText := composedText text asUppercase. "Basic Step 1"composedText text: capText. "Basic Step 2"
composedText displayOn: gc at: 5@5.
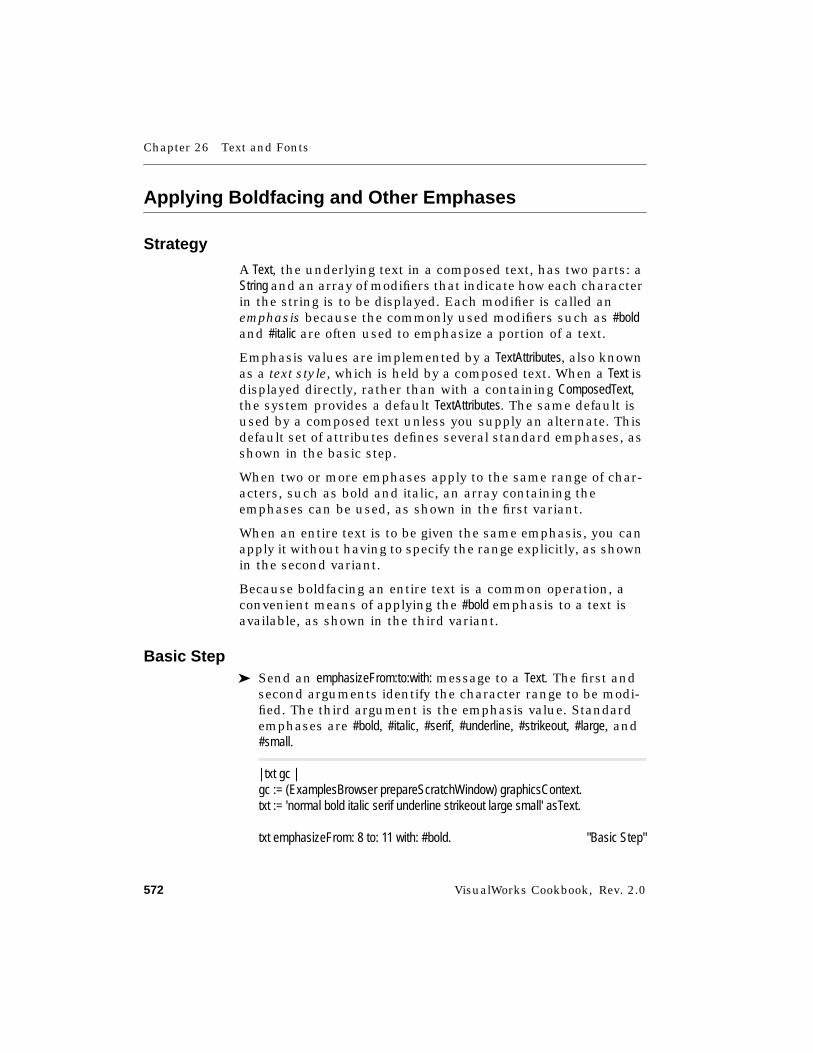
Chapter 26 Text and Fonts
572 VisualWorks Cookbook, Rev. 2.0
Applying Boldfacing and Other Emphases
Strategy
A Text, the underlying text in a composed text, has two parts: aString and an array of modifiers that indicate how each characterin the string is to be displayed. Each modifier is called anemphasis because the commonly used modifiers such as #boldand #italic are often used to emphasize a portion of a text.
Emphasis values are implemented by a TextAttributes, also knownas a text style, which is held by a composed text. When a Text isdisplayed directly, rather than with a containing ComposedText,the system provides a default TextAttributes. The same default isused by a composed text unless you supply an alternate. Thisdefault set of attributes defines several standard emphases, asshown in the basic step.
When two or more emphases apply to the same range of char-acters, such as bold and italic, an array containing theemphases can be used, as shown in the first variant.
When an entire text is to be given the same emphasis, you canapply it without having to specify the range explicitly, as shownin the second variant.
Because boldfacing an entire text is a common operation, aconvenient means of applying the #bold emphasis to a text isavailable, as shown in the third variant.
Basic Step➤ Send an emphasizeFrom:to:with: message to a Text. The first and
second arguments identify the character range to be modi-fied. The third argument is the emphasis value. Standardemphases are #bold, #italic, #serif, #underline, #strikeout, #large, and#small.
| txt gc |gc := (ExamplesBrowser prepareScratchWindow) graphicsContext.txt := 'normal bold italic serif underline strikeout large small' asText.
txt emphasizeFrom: 8 to: 11 with: #bold. "Basic Step"

Applying Boldfacing and Other Emphases
VisualWorks Cookbook, Rev. 2.0 573
txt emphasizeFrom: 13 to: 18 with: #italic.txt emphasizeFrom: 20 to: 24 with: #serif.txt emphasizeFrom: 26 to: 34 with: #underline.txt emphasizeFrom: 36 to: 44 with: #strikeout.txt emphasizeFrom: 46 to: 50 with: #large.txt emphasizeFrom: 52 to: 56 with: #small.
txt displayOn: gc at: 5@25.
Variants
V1. Applying Multiple Emphasesto the Same Characters➤ Send an emphasizeFrom:to:with: message to a Text. The first and
second arguments identify the character range. The thirdargument is an array containing the emphasis values.
| txt gc |gc := (ExamplesBrowser prepareScratchWindow) graphicsContext.txt := 'normal bold&italic large&bold&italic&underline' asText.
txt emphasizeFrom: 8 to: 18 with: #( #bold #italic). "V1 Step"txt emphasizeFrom: 20 to: txt size with: #( #large #bold #italic #underline).
txt displayOn: gc at: 5@25.
V2. Applying Emphasis to an Entire Text➤ Send an emphasizeAllWith: message to a Text. The argument is
the emphasis value or an array containing multipleemphasis values.
| txt gc |gc := (ExamplesBrowser prepareScratchWindow) graphicsContext.txt := 'Hello, World' asText.
txt emphasizeAllWith: #( #bold #italic). "V2 Step"
txt displayOn: gc at: 5@25.
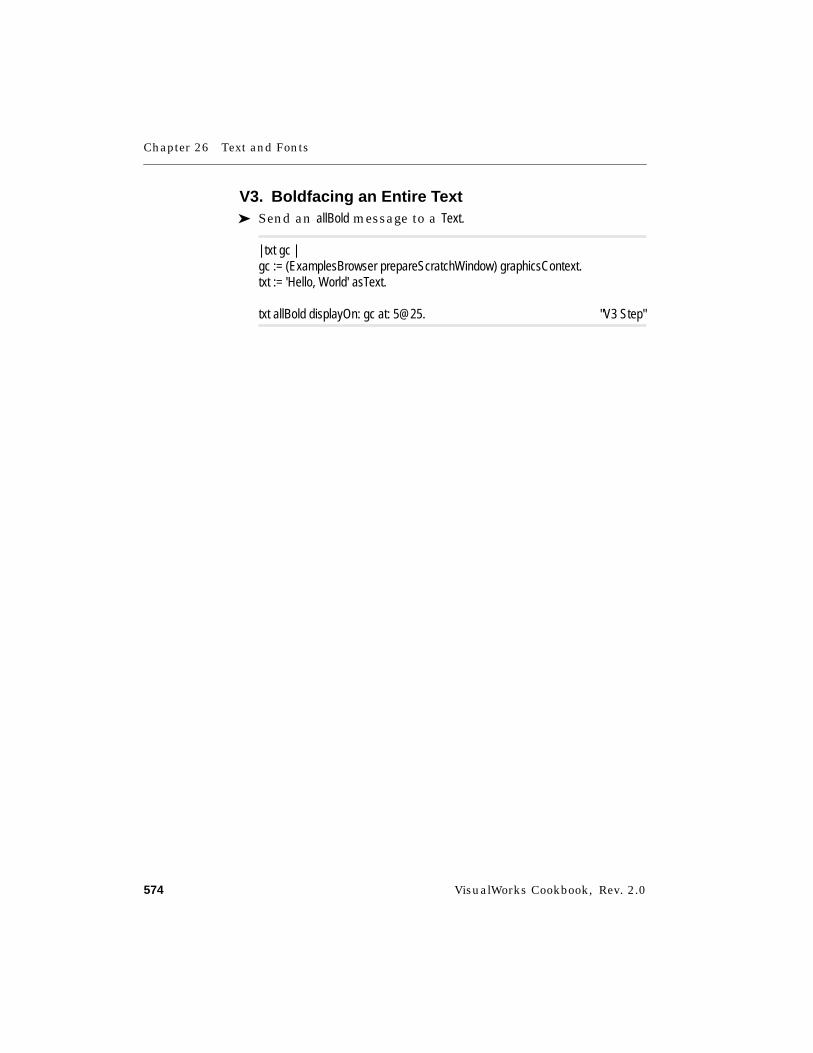
Chapter 26 Text and Fonts
574 VisualWorks Cookbook, Rev. 2.0
V3. Boldfacing an Entire Text➤ Send an allBold message to a Text.
| txt gc |gc := (ExamplesBrowser prepareScratchWindow) graphicsContext.txt := 'Hello, World' asText.
txt allBold displayOn: gc at: 5@25. "V3 Step"
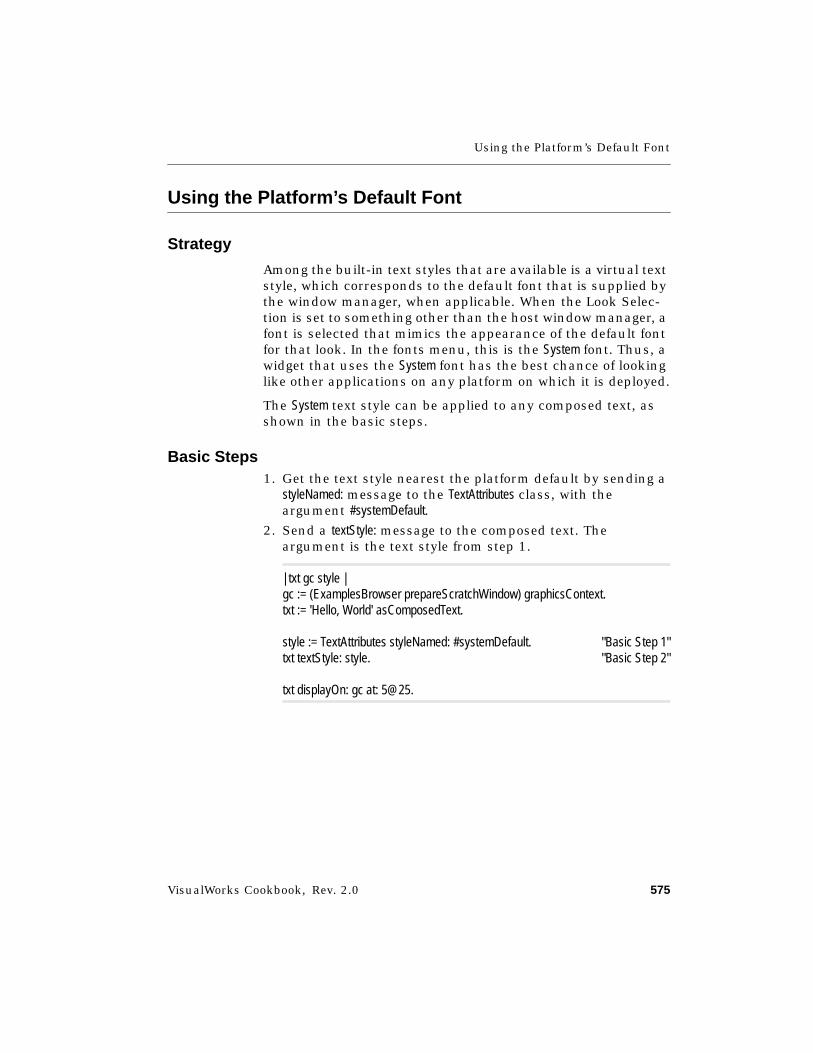
Using the Platform’s Default Font
VisualWorks Cookbook, Rev. 2.0 575
Using the Platform’s Default Font
Strategy
Among the built-in text styles that are available is a virtual textstyle, which corresponds to the default font that is supplied bythe window manager, when applicable. When the Look Selec-tion is set to something other than the host window manager, afont is selected that mimics the appearance of the default fontfor that look. In the fonts menu, this is the System font. Thus, awidget that uses the System font has the best chance of lookinglike other applications on any platform on which it is deployed.
The System text style can be applied to any composed text, asshown in the basic steps.
Basic Steps1. Get the text style nearest the platform default by sending a
styleNamed: message to the TextAttributes class, with theargument #systemDefault.
2. Send a textStyle: message to the composed text. Theargument is the text style from step 1.
| txt gc style |gc := (ExamplesBrowser prepareScratchWindow) graphicsContext.txt := 'Hello, World' asComposedText.
style := TextAttributes styleNamed: #systemDefault. "Basic Step 1"txt textStyle: style. "Basic Step 2"
txt displayOn: gc at: 5@25.

Chapter 26 Text and Fonts
576 VisualWorks Cookbook, Rev. 2.0
Creating a Custom Text Style
Strategy
A composed text uses an instance of TextAttributes to controlvarious properties of its text: line spacing, alignment, indents,tabs, and font properties. The TextAttributes in turn holds aninstance of CharacterAttributes, which defines the emphases thatare available to the text. Associated with each emphasis symbolis a block that operates on a FontDescription. The font descriptionis also held by the CharacterAttributes and controls font selection byspecifying the font size, family, boldness, and so on. Thus,creating a custom text style, although not a simple task, givesyou great flexibility in controlling font selection. The basic stepsshow how to assemble a custom text style that is equipped toprovide a large (24-pixel) font.
A limitation to bear in mind is that a composed text applies thesame line spacing to its entire text, so mixing font sizes is effec-tive within only a narrow range for each composed text.Separate instances of ComposedText are recommended in suchsituations.
Basic Steps1. Create a new instance of CharacterAttributes by sending a
newWithDefaultAttributes message to the CharacterAttributes class.This message initializes the CharacterAttributes with thestandard emphases such as #bold and #italic, so you don’thave to redefine them.
2. Install an instance of FontDescription in the new CharacterAttributesby sending a setDefaultQuery: message. The argument can beeither a new instance of FontDescription or, as in the example, acopy of the default font description from an existing textstyle’s character attributes. The advantage of copying anexisting font description is that you retain the existingsettings.
3. Customize the CharacterAttributes as desired. The exampledefines a new emphasis called #title, which specifies that thefont must be 24 pixels in height.

Creating a Custom Text Style
VisualWorks Cookbook, Rev. 2.0 577
4. Create a new TextAttributes by sending a characterAttributes:message to the TextAttributes class. The argument is theCharacterAttributes that you customized in step 3.
5. If you intend to display unusually large or small text, as inthe example, adjust the line spacing and baseline of the textstyle. The line spacing is set by sending a lineGrid: message tothe text style, with an argument at least a few pixels largerthan the largest font size. To set the baseline, which is thedistance between the top of the line and the imaginary lineon which capital letters rest, send a baseline: message to thetext style; the argument is the distance in pixels.
6. Install the custom text style by sending a textStyle: messageto the composed text. The argument is the customTextAttributes from step 5.
7. Apply the new emphasis to the desired portions of thecomposed text’s underlying Text.
| txt gc ca ta |gc := (ExamplesBrowser prepareScratchWindow) graphicsContext.txt := Object comment asComposedText.txt compositionWidth: 300.
"Create and install a custom text style."ca := CharacterAttributes newWithDefaultAttributes. "Basic Step 1"ca setDefaultQuery: txt textStyle defaultFont. "Basic Step 2"ca at: #title put: [ :fontDesc | fontDesc pixelSize: 24]. "Basic Step 3"ta := TextAttributes characterAttributes: ca. "Basic Step 4"ta lineGrid: 27; baseline: 18. "Basic Step 5"txt textStyle: ta. "Basic Step 6"
txt text emphasizeAllWith: #title. "Basic Step 7"txt displayOn: gc at: 5@25.
See Also■ “Changing Font Size” on page 578
■ “Setting Font Family or Name” on page 582
Chapter 26 Text and Fonts
578 VisualWorks Cookbook, Rev. 2.0
Changing Font Size
Strategy
Two of the standard text emphases, #small and #large, give youcontrol over the font size within a narrow range, as shown inthe basic steps.
Because fonts are supplied by the operating system, and Visu-alWorks runs on several different operating systems, fonts arespecified flexibly by describing the desired properties. This fontdescription is held by a CharacterAttributes, which in turn is held bya composed text’s text style. Font size is just one of the proper-ties you can set by modifying the font description.
The first variant shows how to define a #title emphasis, whichmodifies the pixel size in the font description for any parts of thetext that have the #title emphasis.
When mixing font sizes in the same composed text, bear inmind that a single text can have only one setting for linespacing. The second variant shows how to adjust the linespacing and the baseline to suit the largest font you are using.When this produces unsatisfactory results for smaller text, putthe smaller text in its own ComposedText, with appropriate linespacing.
The built-in text styles (#large and #small, for example) automati-cally adjust their pixel sizes to suit the pixel density of thedisplay device. This resizing feature is especially useful whendeploying your application on different types of hardware. Toincorporate it into your custom text style, useVariableSizeTextAttributes instead of its parent class, TextAttributes, inthe following examples.
Basic Steps1. Send an emphasizeFrom:to:with: message to the composed text’s
underlying Text. The first and second arguments define thecharacter range by specifying the starting and stoppingindexes. The third argument is #small or #large, depending onwhether you want the font size to be slightly smaller orslightly larger than normal. The actual size depends on the
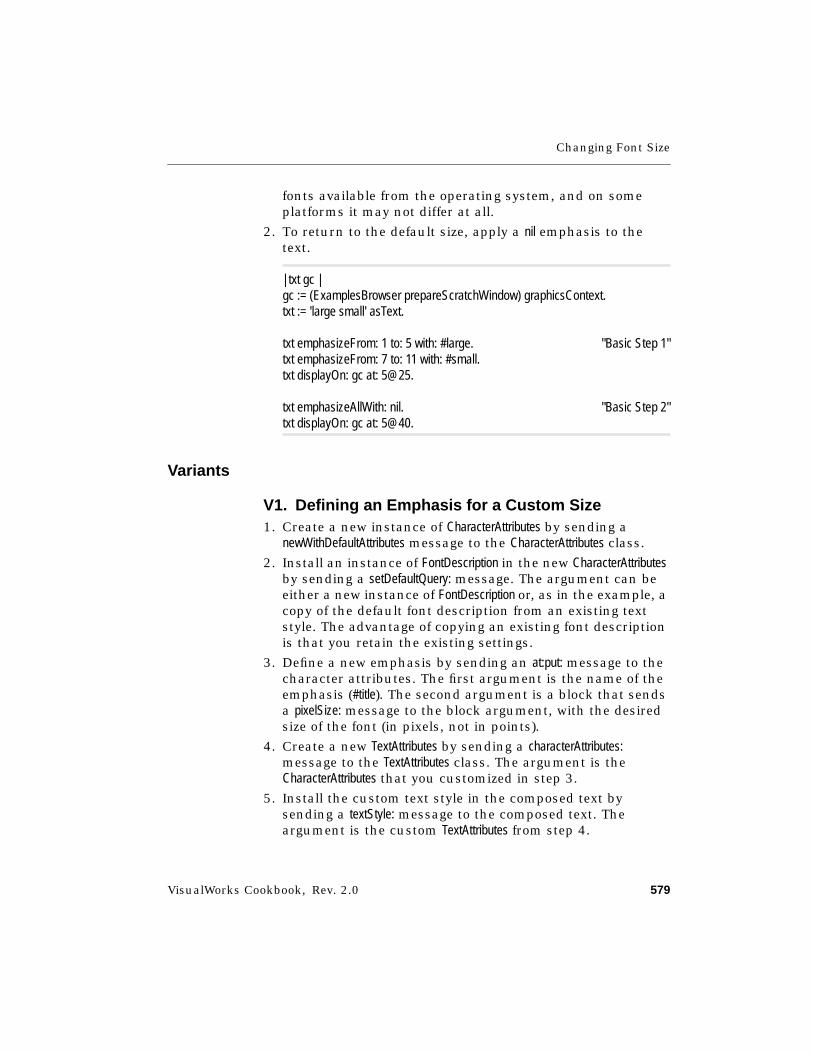
Changing Font Size
VisualWorks Cookbook, Rev. 2.0 579
fonts available from the operating system, and on someplatforms it may not differ at all.
2. To return to the default size, apply a nil emphasis to thetext.
| txt gc |gc := (ExamplesBrowser prepareScratchWindow) graphicsContext.txt := 'large small' asText.
txt emphasizeFrom: 1 to: 5 with: #large. "Basic Step 1"txt emphasizeFrom: 7 to: 11 with: #small.txt displayOn: gc at: 5@25.
txt emphasizeAllWith: nil. "Basic Step 2"txt displayOn: gc at: 5@40.
Variants
V1. Defining an Emphasis for a Custom Size1. Create a new instance of CharacterAttributes by sending a
newWithDefaultAttributes message to the CharacterAttributes class.
2. Install an instance of FontDescription in the new CharacterAttributesby sending a setDefaultQuery: message. The argument can beeither a new instance of FontDescription or, as in the example, acopy of the default font description from an existing textstyle. The advantage of copying an existing font descriptionis that you retain the existing settings.
3. Define a new emphasis by sending an at:put: message to thecharacter attributes. The first argument is the name of theemphasis (#title). The second argument is a block that sendsa pixelSize: message to the block argument, with the desiredsize of the font (in pixels, not in points).
4. Create a new TextAttributes by sending a characterAttributes:message to the TextAttributes class. The argument is theCharacterAttributes that you customized in step 3.
5. Install the custom text style in the composed text bysending a textStyle: message to the composed text. Theargument is the custom TextAttributes from step 4.
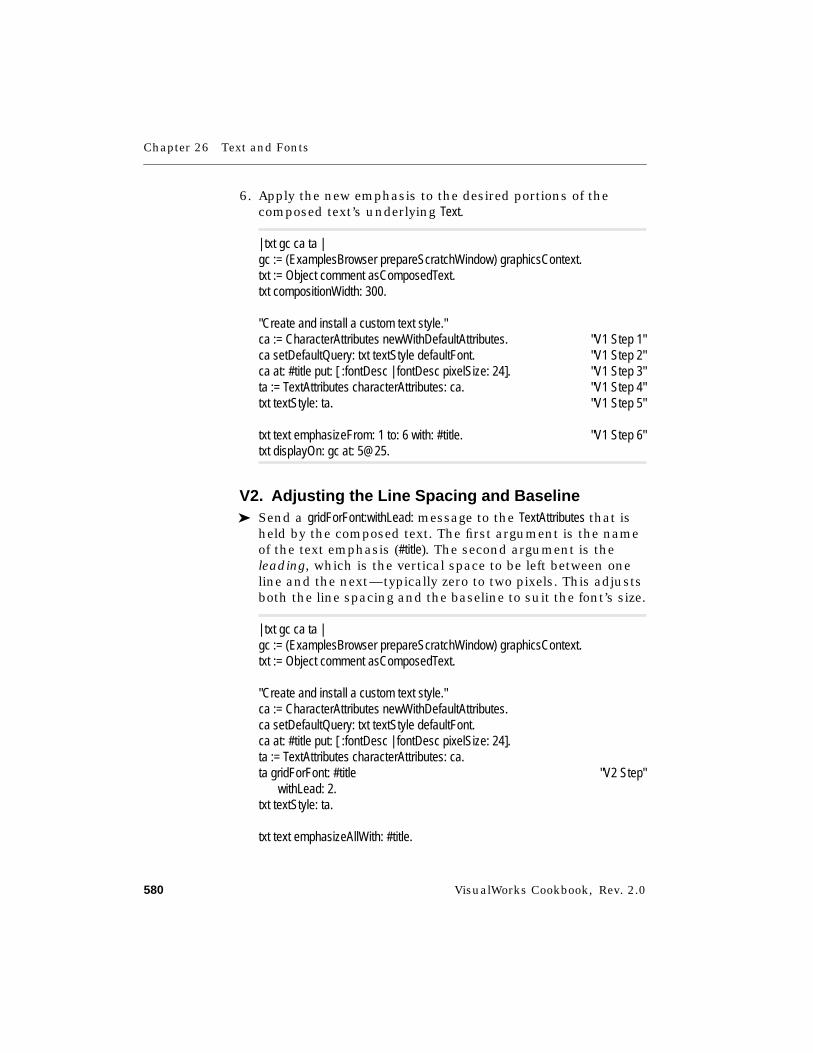
Chapter 26 Text and Fonts
580 VisualWorks Cookbook, Rev. 2.0
6. Apply the new emphasis to the desired portions of thecomposed text’s underlying Text.
| txt gc ca ta |gc := (ExamplesBrowser prepareScratchWindow) graphicsContext.txt := Object comment asComposedText.txt compositionWidth: 300.
"Create and install a custom text style."ca := CharacterAttributes newWithDefaultAttributes. "V1 Step 1"ca setDefaultQuery: txt textStyle defaultFont. "V1 Step 2"ca at: #title put: [ :fontDesc | fontDesc pixelSize: 24]. "V1 Step 3"ta := TextAttributes characterAttributes: ca. "V1 Step 4"txt textStyle: ta. "V1 Step 5"
txt text emphasizeFrom: 1 to: 6 with: #title. "V1 Step 6"txt displayOn: gc at: 5@25.
V2. Adjusting the Line Spacing and Baseline➤ Send a gridForFont:withLead: message to the TextAttributes that is
held by the composed text. The first argument is the nameof the text emphasis (#title). The second argument is theleading, which is the vertical space to be left between oneline and the next—typically zero to two pixels. This adjustsboth the line spacing and the baseline to suit the font’s size.
| txt gc ca ta |gc := (ExamplesBrowser prepareScratchWindow) graphicsContext.txt := Object comment asComposedText.
"Create and install a custom text style."ca := CharacterAttributes newWithDefaultAttributes.ca setDefaultQuery: txt textStyle defaultFont.ca at: #title put: [ :fontDesc | fontDesc pixelSize: 24].ta := TextAttributes characterAttributes: ca.ta gridForFont: #title "V2 Step"
withLead: 2.txt textStyle: ta.
txt text emphasizeAllWith: #title.
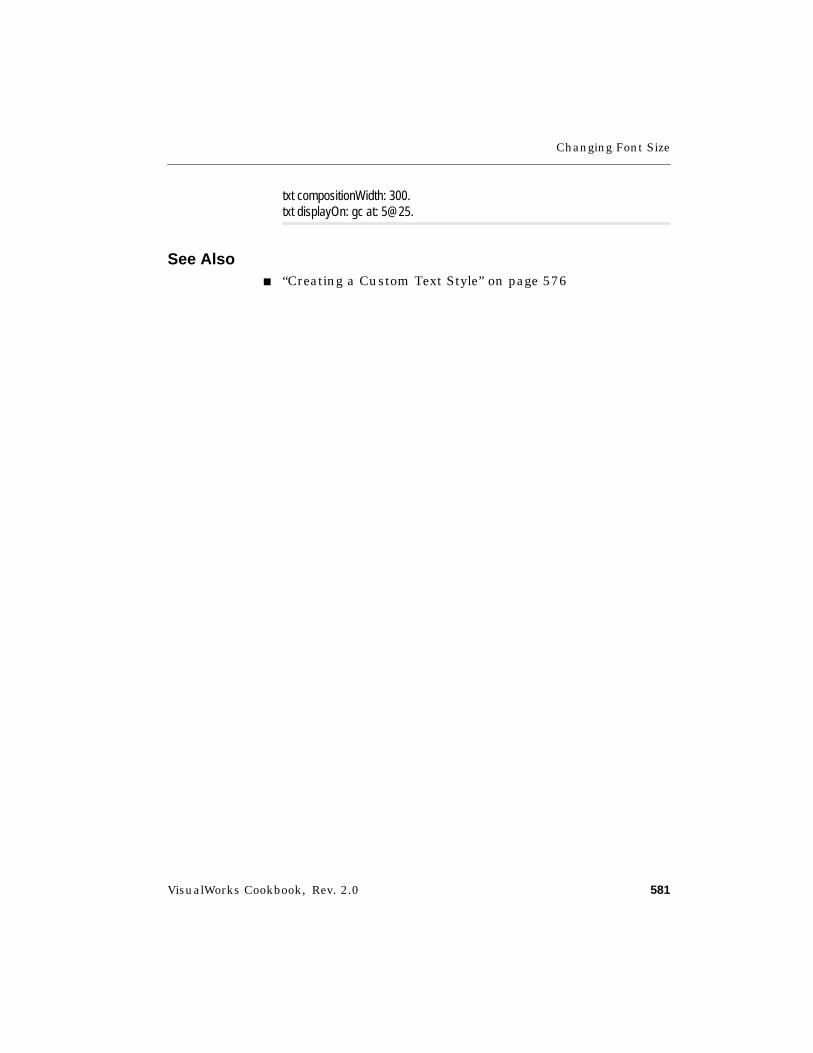
Changing Font Size
VisualWorks Cookbook, Rev. 2.0 581
txt compositionWidth: 300.txt displayOn: gc at: 5@25.
See Also■ “Creating a Custom Text Style” on page 576
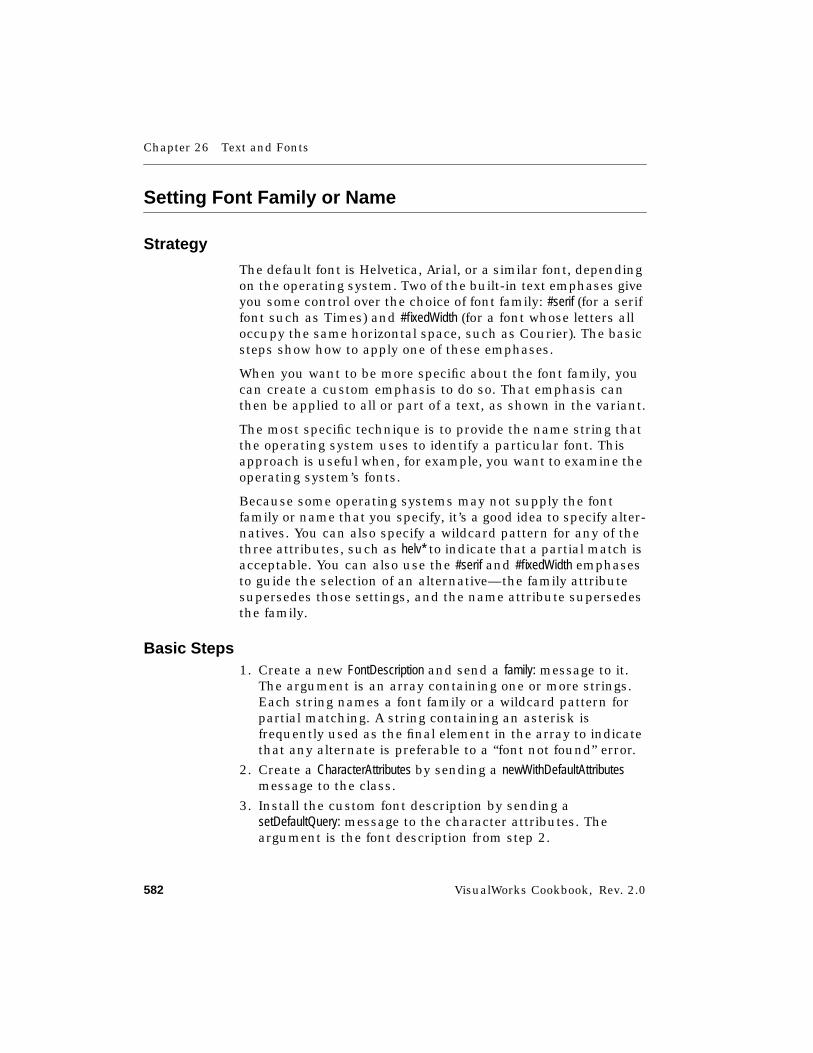
Chapter 26 Text and Fonts
582 VisualWorks Cookbook, Rev. 2.0
Setting Font Family or Name
Strategy
The default font is Helvetica, Arial, or a similar font, dependingon the operating system. Two of the built-in text emphases giveyou some control over the choice of font family: #serif (for a seriffont such as Times) and #fixedWidth (for a font whose letters alloccupy the same horizontal space, such as Courier). The basicsteps show how to apply one of these emphases.
When you want to be more specific about the font family, youcan create a custom emphasis to do so. That emphasis canthen be applied to all or part of a text, as shown in the variant.
The most specific technique is to provide the name string thatthe operating system uses to identify a particular font. Thisapproach is useful when, for example, you want to examine theoperating system’s fonts.
Because some operating systems may not supply the fontfamily or name that you specify, it’s a good idea to specify alter-natives. You can also specify a wildcard pattern for any of thethree attributes, such as helv* to indicate that a partial match isacceptable. You can also use the #serif and #fixedWidth emphasesto guide the selection of an alternative—the family attributesupersedes those settings, and the name attribute supersedesthe family.
Basic Steps1. Create a new FontDescription and send a family: message to it.
The argument is an array containing one or more strings.Each string names a font family or a wildcard pattern forpartial matching. A string containing an asterisk isfrequently used as the final element in the array to indicatethat any alternate is preferable to a “font not found” error.
2. Create a CharacterAttributes by sending a newWithDefaultAttributesmessage to the class.
3. Install the custom font description by sending asetDefaultQuery: message to the character attributes. Theargument is the font description from step 2.
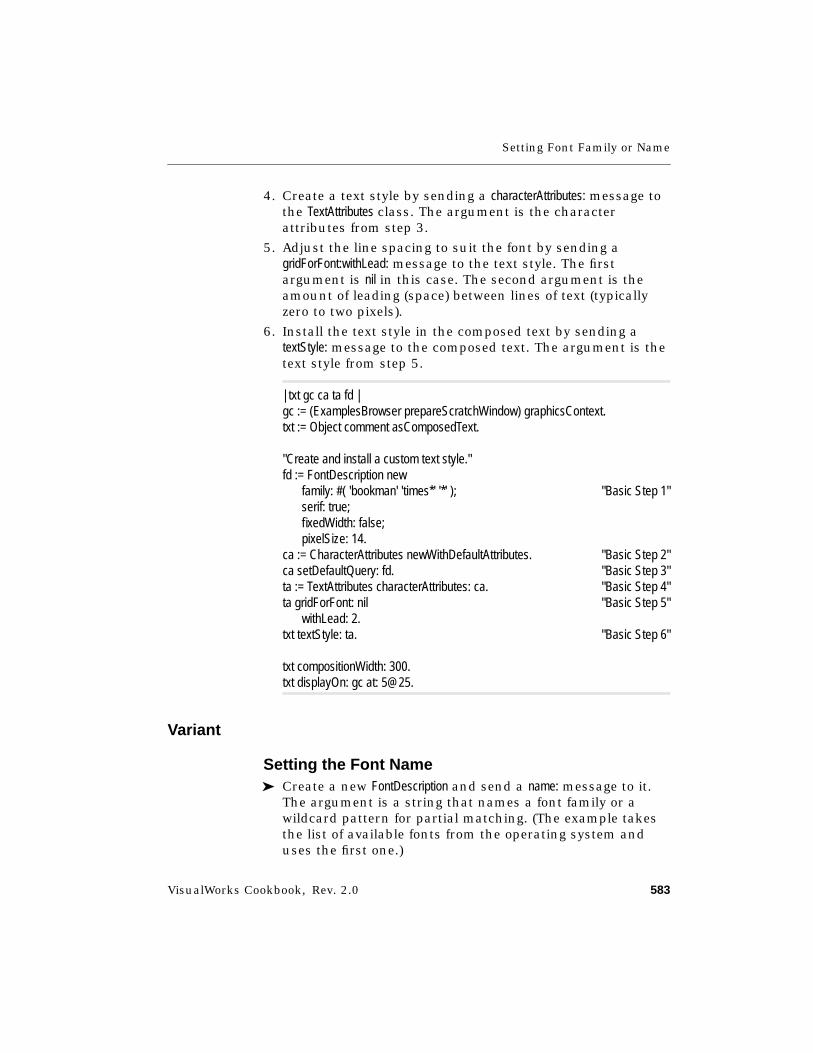
Setting Font Family or Name
VisualWorks Cookbook, Rev. 2.0 583
4. Create a text style by sending a characterAttributes: message tothe TextAttributes class. The argument is the characterattributes from step 3.
5. Adjust the line spacing to suit the font by sending agridForFont:withLead: message to the text style. The firstargument is nil in this case. The second argument is theamount of leading (space) between lines of text (typicallyzero to two pixels).
6. Install the text style in the composed text by sending atextStyle: message to the composed text. The argument is thetext style from step 5.
| txt gc ca ta fd |gc := (ExamplesBrowser prepareScratchWindow) graphicsContext.txt := Object comment asComposedText.
"Create and install a custom text style."fd := FontDescription new
family: #( 'bookman' 'times*' '*' ); "Basic Step 1"serif: true;fixedWidth: false;pixelSize: 14.
ca := CharacterAttributes newWithDefaultAttributes. "Basic Step 2"ca setDefaultQuery: fd. "Basic Step 3"ta := TextAttributes characterAttributes: ca. "Basic Step 4"ta gridForFont: nil "Basic Step 5"
withLead: 2.txt textStyle: ta. "Basic Step 6"
txt compositionWidth: 300.txt displayOn: gc at: 5@25.
Variant
Setting the Font Name➤ Create a new FontDescription and send a name: message to it.
The argument is a string that names a font family or awildcard pattern for partial matching. (The example takesthe list of available fonts from the operating system anduses the first one.)
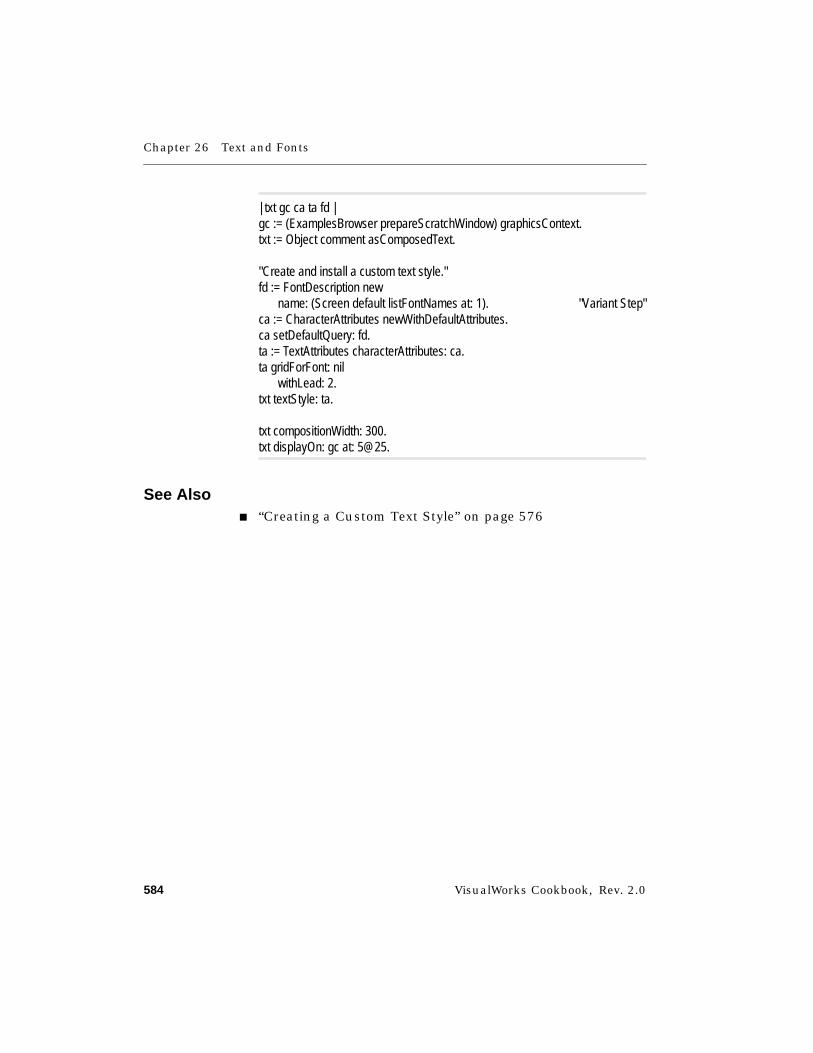
Chapter 26 Text and Fonts
584 VisualWorks Cookbook, Rev. 2.0
| txt gc ca ta fd |gc := (ExamplesBrowser prepareScratchWindow) graphicsContext.txt := Object comment asComposedText.
"Create and install a custom text style."fd := FontDescription new
name: (Screen default listFontNames at: 1). "Variant Step"ca := CharacterAttributes newWithDefaultAttributes.ca setDefaultQuery: fd.ta := TextAttributes characterAttributes: ca.ta gridForFont: nil
withLead: 2.txt textStyle: ta.
txt compositionWidth: 300.txt displayOn: gc at: 5@25.
See Also■ “Creating a Custom Text Style” on page 576
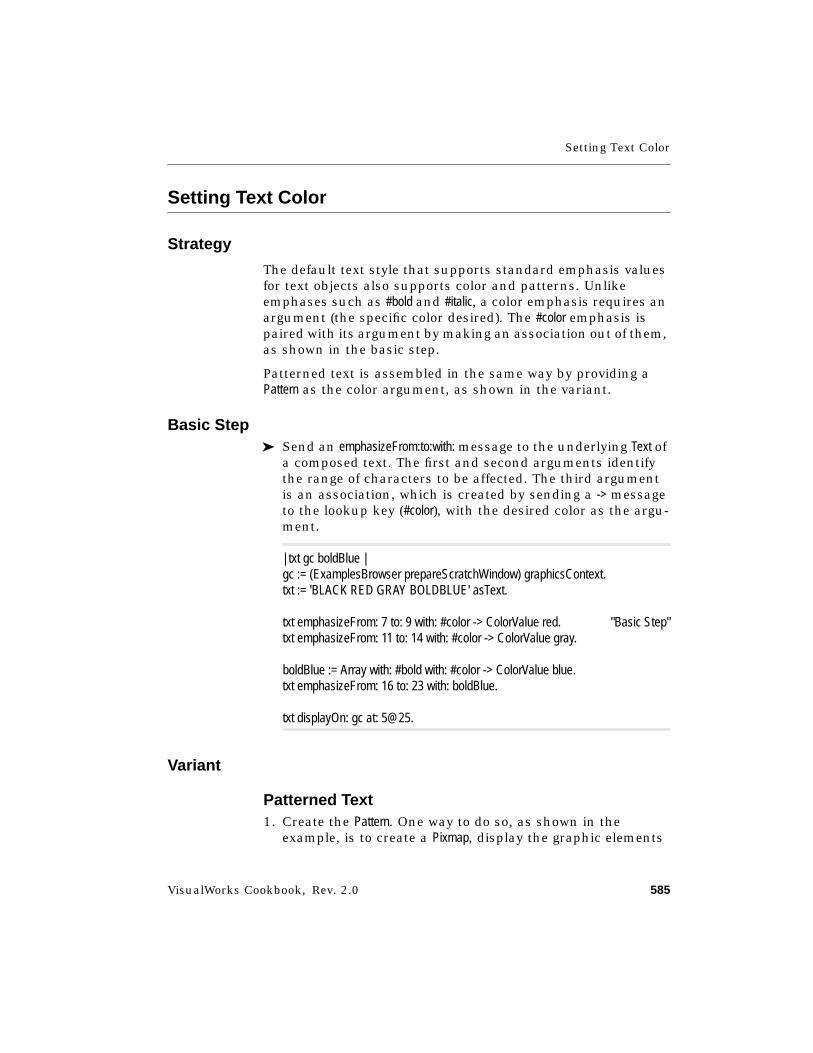
Setting Text Color
VisualWorks Cookbook, Rev. 2.0 585
Setting Text Color
Strategy
The default text style that supports standard emphasis valuesfor text objects also supports color and patterns. Unlikeemphases such as #bold and #italic, a color emphasis requires anargument (the specific color desired). The #color emphasis ispaired with its argument by making an association out of them,as shown in the basic step.
Patterned text is assembled in the same way by providing aPattern as the color argument, as shown in the variant.
Basic Step➤ Send an emphasizeFrom:to:with: message to the underlying Text of
a composed text. The first and second arguments identifythe range of characters to be affected. The third argumentis an association, which is created by sending a -> messageto the lookup key (#color), with the desired color as the argu-ment.
| txt gc boldBlue |gc := (ExamplesBrowser prepareScratchWindow) graphicsContext.txt := 'BLACK RED GRAY BOLDBLUE' asText.
txt emphasizeFrom: 7 to: 9 with: #color -> ColorValue red. "Basic Step"txt emphasizeFrom: 11 to: 14 with: #color -> ColorValue gray.
boldBlue := Array with: #bold with: #color -> ColorValue blue.txt emphasizeFrom: 16 to: 23 with: boldBlue.
txt displayOn: gc at: 5@25.
Variant
Patterned Text1. Create the Pattern. One way to do so, as shown in the
example, is to create a Pixmap, display the graphic elements

Chapter 26 Text and Fonts
586 VisualWorks Cookbook, Rev. 2.0
that make up a tile in the pattern, and then convert thePixmap to a Pattern by sending an asPattern message to it.
2. Send an emphasizeAllWith: message to the underlying Text of thecomposed text, or a more selective emphasizeFrom:to:with:message. The with argument is an association between thelookup key (#color) and the pattern. (In the example, a largefont is used, so the pattern will be more visible.)
| txt gc fd ca ta dotTile dotPattern |gc := (ExamplesBrowser prepareScratchWindow) graphicsContext.txt := Object comment asComposedText.
"Create a 48-pixel font description."fd := FontDescription new
pixelSize: 48.ca := CharacterAttributes newWithDefaultAttributes.ca setDefaultQuery: fd.ta := TextAttributes characterAttributes: ca.ta gridForFont: fd withLead: 2.txt textStyle: ta.
"Create a dotted pattern."dotTile := Pixmap extent: 6@6. "Variant Step 1"dotTile graphicsContext
displayDotOfDiameter: 5 at: [email protected] := dotTile asPattern.
txt text emphasizeAllWith: #color->dotPattern. "Variant Step 2"
txt compositionWidth: 300.txt displayOn: gc at: 5@25.
See Also■ “Creating a Color” on page 686
Changing the Fonts Menu
VisualWorks Cookbook, Rev. 2.0 587
Changing the Fonts Menu
Strategy
Each of the textual widgets, such as label and field, provides amenu of fonts in its property sheet. You can expand the menuto include a custom font, as shown in the basic steps. The tech-nique involves adding a new TextAttributes to the system’s dictio-nary of text styles.
Removing a text style from the system’s dictionary can be trou-blesome when existing widgets specify that font. For thatreason, no supported mechanism for removing a font exists.The best you can do is to replace the text style that is associatedwith a particular name, in the same way that you added theoriginal text style. For this reason, we recommend that youexpand the fonts menu with caution.
Basic Steps1. Create the desired text style. In the example, a 24-pixel font
is created.
2. Install the text style in the system’s dictionary of styles bysending a styleNamed:put: message to the TextAttributes class. Thefirst argument is a lookup name, specified as a Symbol—acapitalized version of the name will appear in the fontsmenu. The second argument is the custom text style.
| fd ca ta |fd := FontDescription new
pixelSize: 24.ca := CharacterAttributes newWithDefaultAttributes.ca setDefaultQuery: fd.ta := TextAttributes characterAttributes: ca. "Basic Step 1"ta gridForFont: fd withLead: 2.
TextAttributes styleNamed: #title put: ta. "Basic Step 2"
Chapter 26 Text and Fonts
588 VisualWorks Cookbook, Rev. 2.0
Changing the Default Font
Strategy
The default font that is used by VisualWorks tools to displaytextual information can be changed as shown in the basicsteps. Widgets in which the Default font has been selected, bothin system tools and in your applications, will also be affected.Because many of the widgets use the System font by default, theywill not be affected unless you change their font property toDefault.
Basic Steps1. Send a setDefaultTo: message to the TextAttributes class. The
argument is the Symbol that names the desired text style.The text style must have been defined and installed in thefonts menu previously.
2. Refresh the windows that are already open by sending aresetViews message to the TextAttributes class. When they areredisplayed, they will use the new default.
TextAttributes setDefaultTo: #default. "Basic Step 1"TextAttributes resetViews. "Basic Step 2"
Listing Platform Fonts
VisualWorks Cookbook, Rev. 2.0 589
Listing Platform Fonts
Strategy
In VisualWorks, fonts are usually described in general termsthat allow the system to choose a matching font from thoseprovided by the operating system. This approach enables youto move an application to a different operating system, possiblywith a different set of fonts, without having to adjust fontsmanually. When you are developing an application for a singleplatform, however, specifying a platform-specific font directlygives you the greatest control over font selection. The basicsteps show how to obtain a list of the platform’s font names inthe form of encoded strings. The font name can be used to setthe font for a text style.
Basic Steps
Online example: Font2Example
1. Get the default Screen by sending a default message to thatclass.
2. Get the list of platform font names by sending alistPlatformFonts message to the default screen.
initializeplatformFonts := SelectionInList
with: Screen default listFontNames. "Basic Steps 1, 2"
platformFonts selectionIndexHolder onChangeSend: #changedFont to: self.

VisualWorks Cookbook, Rev. 2.0 591
Chapter 27
Text Files
Creating a File or Directory 592Getting Information about a File 594Getting File or Directory Contents 597Storing Text in a File 598Opening an Editor on a File 601Deleting a File or Directory 602Copying or Moving a File 603Comparing Two Files or Directories 605Printing a File 607Scanning Fields in a File (Stream) 609Setting File Permissions 611
See Also■ “Requesting a Filename” on page 286
■ “Characters and Strings” on page 529
■ “Object Files (BOSS)” on page 613
Chapter 27 Text Files
592 VisualWorks Cookbook, Rev. 2.0
Creating a File or Directory
Strategy
The File List and File Editor provide convenient ways of creatingfiles and directories interactively. This chapter describes theprogrammatic means of doing so.
The Filename class supports operations involving disk files anddirectories. Although Filename is an abstract class—the realwork is done by its platform-specific subclasses—it directs thecreation message to the appropriate subclass. This enables youto keep your file-creating code general enough to run on any ofthe supported platforms. A Filename can represent either a direc-tory or a file (basic step).
When the disk file does not already exist, it is created when thefirst character is written to it. A directory must be explicitlycreated (first variant).
The technique shown in the basic step works well for creatinga file in the working directory. You can also use that approachwith a full pathname that includes directory separators, but theseparator character differs across platforms, so you would becompromising the portability of your application. You canpreserve portability (second variant) by using a technique thatnever mentions the separator character explicitly but insteadsupplies it through the platform-specific subclass of Filename.
Basic Step➤ Send an asFilename message to the string identifying the
desired file or directory. The disk file or directory is notaffected by the mere creation of a Filename object. Because noexplicit link exists to the disk file or directory, you need notdo anything explicit to release the external resource whenyou are finished with it.
"Inspect"| name filename |name := 'test.tmp'.
Creating a File or Directory
VisualWorks Cookbook, Rev. 2.0 593
filename := name asFilename. "Basic Step"^filename
Variants
V1. Creating a New Disk Directory➤ Send a makeDirectory message to the Filename representing the
desired directory. If the disk directory already exists, anerror results.
"Print it"| directory |directory := 'test' asFilename.directory makeDirectory. "V1 Step"^directory exists
V2. Constructing a Filename in a Portable Way➤ Send a construct: message to the Filename representing the
parent directory. When a pathname is to represent a hier-archy of nested parent directories, use a series of suchconstruct: messages.
| unixDir portableDir |unixDir := 'visual/utils' asFilename.
portableDir := 'visual' asFilename "V2 Step"construct: 'utils'.
unixDir inspect.portableDir inspect.

Chapter 27 Text Files
594 VisualWorks Cookbook, Rev. 2.0
Getting Information about a File
Basic Step
Finding Out Whether a File or Directory Exists➤ Send an exists message to the Filename. If the disk file or direc-
tory exists, true is returned.
"Print it"| unlikelyFile |unlikelyFile := 'qqqqzzzz' asFilename.^unlikelyFile exists "Basic Step"
Variants
V1. Counting the Characters in a File➤ Send a fileSize message to the Filename. If the file exists, the
number of characters it contains is returned. If the file doesnot exist, an error results. If the Filename represents a diskdirectory rather than a disk file, zero is returned.
"Print it"| newFile stream |newFile := 'testFile' asFilename.stream := newFile writeStream.stream nextPutAll: Object comment.stream close.
^newFile fileSize. "V1 Step"
V2. Getting the Working Directory➤ Send a defaultDirectory message to the Filename class. A Filename
representing the working directory is returned.
"Inspect"| workingDir |
Getting Information about a File
VisualWorks Cookbook, Rev. 2.0 595
workingDir := Filename defaultDirectory. "V2 Step"^workingDir
V3. Getting the Parent Directory➤ Send a directory message to the Filename. A Filename repre-
senting the parent directory is returned.
"Print it"| dir parentDir |dir := Filename defaultDirectory.
parentDir := dir directory. "V3 Step"^parentDir
V4. Getting the Parts of a Pathname1. To get the entire pathname as a string, send an asString
message to the Filename.
2. To get the directory part of a pathname, send a headmessage to the Filename. A string containing the directory’spathname is returned.
3. To get the file part of the pathname, send a tail message. Astring containing the file’s name is returned.
"Print it"| filename pathString dirString fileString |filename := Filename defaultDirectory.
pathString := filename asString. "V4 Step 1"dirString := filename head. "V4 Step 2"fileString := filename tail. "V4 Step 3"
^'PATH: ', pathString, 'DIRECTORY: ', dirString, 'FILE: ', fileString
Chapter 27 Text Files
596 VisualWorks Cookbook, Rev. 2.0
V5. Distinguishing a File from a Directory➤ Send an isDirectory message to the Filename. If the Filename
represents a disk directory, true is returned. If it representsa disk file, false is returned. If neither a file nor a directorywith a matching name exists, an error results.
"Print it"| dir |dir := Filename defaultDirectory.^dir isDirectory "V5 Step"
V6. Getting the Access and Modification Times1. Get a dictionary containing dates and times associated with
a file or directory by sending a dates message to the Filename.
2. Get the desired date-time pair by sending an at: message tothe dictionary. The argument is #accessed for the time atwhich the file’s contents were most recently accessed. Theargument is #modified for the time of the most recent modifi-cation to the file’s contents. The argument is #statusChangedfor the time of the most recent change in external attributesof the file, such as ownership and permissions.
If the operating system does not support the requested typeof information, nil is returned; otherwise, an arraycontaining a date and a time is returned.
"Print it"| newFile stream datesDict modifyDates modifyDate modifyTime |newFile := 'testFile' asFilename.stream := newFile writeStream.stream nextPutAll: Object comment.stream close.datesDict := newFile dates. "V6 Step 1"modifyDates := datesDict at: #modified. "V6 Step 2"modifyDates isNil
ifFalse: [modifyDate := modifyDates first.modifyTime := modifyDates last].
^'MODIFIED: ', modifyDate printString, ' at ', modifyTime printString
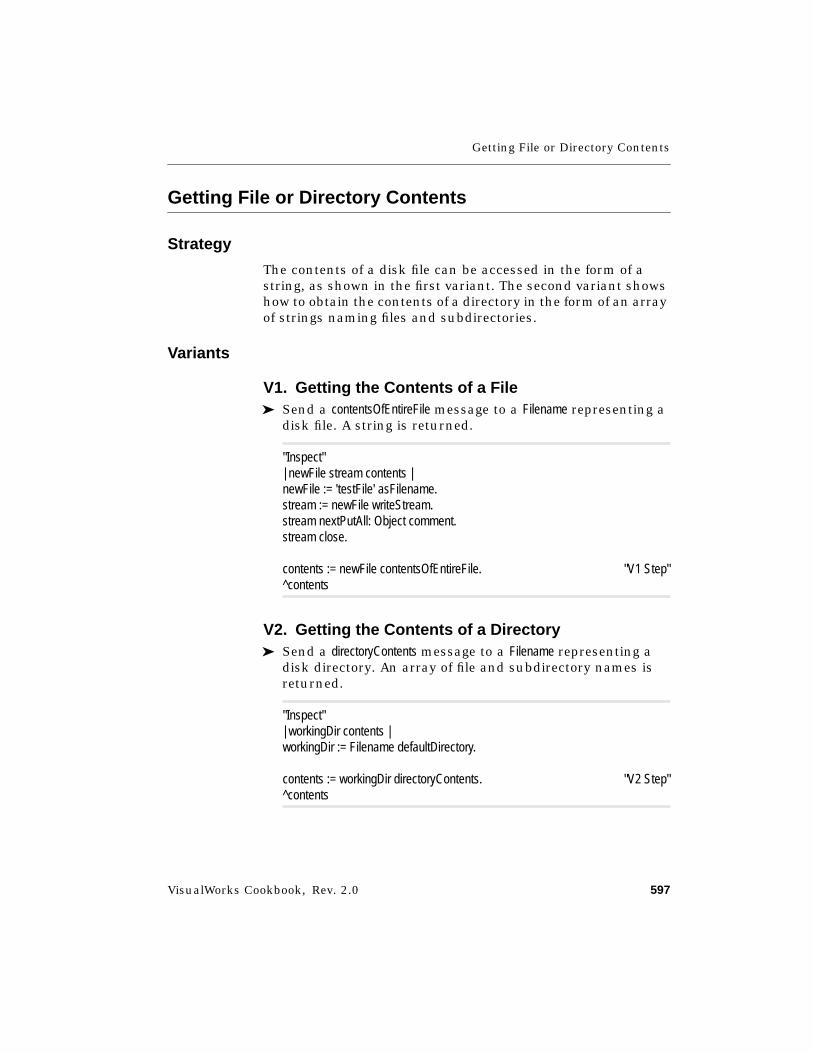
Getting File or Directory Contents
VisualWorks Cookbook, Rev. 2.0 597
Getting File or Directory Contents
Strategy
The contents of a disk file can be accessed in the form of astring, as shown in the first variant. The second variant showshow to obtain the contents of a directory in the form of an arrayof strings naming files and subdirectories.
Variants
V1. Getting the Contents of a File➤ Send a contentsOfEntireFile message to a Filename representing a
disk file. A string is returned.
"Inspect"| newFile stream contents |newFile := 'testFile' asFilename.stream := newFile writeStream.stream nextPutAll: Object comment.stream close.
contents := newFile contentsOfEntireFile. "V1 Step"^contents
V2. Getting the Contents of a Directory➤ Send a directoryContents message to a Filename representing a
disk directory. An array of file and subdirectory names isreturned.
"Inspect"| workingDir contents |workingDir := Filename defaultDirectory.
contents := workingDir directoryContents. "V2 Step"^contents
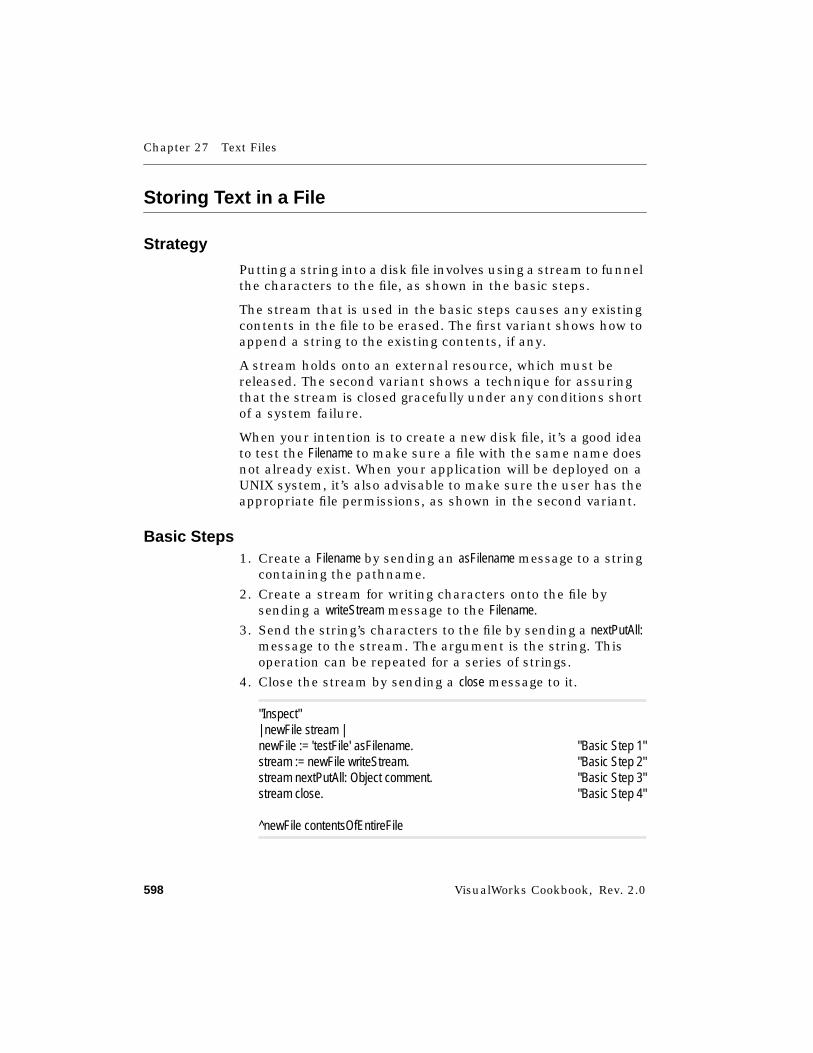
Chapter 27 Text Files
598 VisualWorks Cookbook, Rev. 2.0
Storing Text in a File
Strategy
Putting a string into a disk file involves using a stream to funnelthe characters to the file, as shown in the basic steps.
The stream that is used in the basic steps causes any existingcontents in the file to be erased. The first variant shows how toappend a string to the existing contents, if any.
A stream holds onto an external resource, which must bereleased. The second variant shows a technique for assuringthat the stream is closed gracefully under any conditions shortof a system failure.
When your intention is to create a new disk file, it’s a good ideato test the Filename to make sure a file with the same name doesnot already exist. When your application will be deployed on aUNIX system, it’s also advisable to make sure the user has theappropriate file permissions, as shown in the second variant.
Basic Steps1. Create a Filename by sending an asFilename message to a string
containing the pathname.
2. Create a stream for writing characters onto the file bysending a writeStream message to the Filename.
3. Send the string’s characters to the file by sending a nextPutAll:message to the stream. The argument is the string. Thisoperation can be repeated for a series of strings.
4. Close the stream by sending a close message to it.
"Inspect"| newFile stream |newFile := 'testFile' asFilename. "Basic Step 1"stream := newFile writeStream. "Basic Step 2"stream nextPutAll: Object comment. "Basic Step 3"stream close. "Basic Step 4"
^newFile contentsOfEntireFile

Storing Text in a File
VisualWorks Cookbook, Rev. 2.0 599
Variants
V1. Appending Text to a File➤ When creating the stream, send an appendStream message to
the Filename.
"Print it"| filename stream |filename := 'testFile' asFilename.
"Creating the file."stream := filename writeStream.stream nextPutAll: 'FIRST STRING'.stream close.
"Appending"stream := filename appendStream. "V1 Step"stream nextPutAll: ' -- SECOND STRING'.stream close.
^filename contentsOfEntireFile
V2. Storing Text with Safeguards1. After creating the Filename, test whether a disk file or direc-
tory with a matching name already exists by sending anexists message to it.
2. If the Filename already exists, test whether it is a directory bysending an isDirectory message to it.
3. If the Filename represents a directory, warn the user andcancel the operation.
4. If the Filename represents a file, warn the user that theexisting contents of the file will be overwritten (this is notalways necessary).
5. Test whether the user has permission to write onto the file(especially when your application will be deployed on UNIXsystems) by sending a canBeWritten message to the Filename.
6. If the user does not have write permission on the file, warnthe user and cancel the operation.
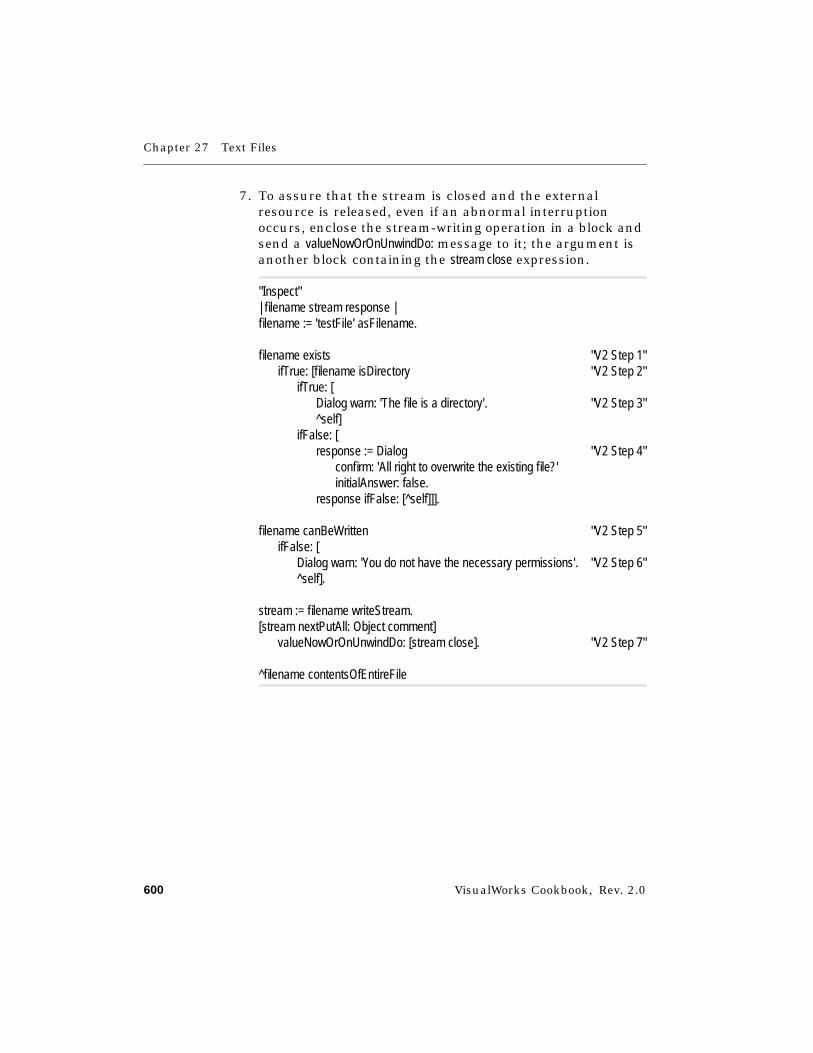
Chapter 27 Text Files
600 VisualWorks Cookbook, Rev. 2.0
7. To assure that the stream is closed and the externalresource is released, even if an abnormal interruptionoccurs, enclose the stream-writing operation in a block andsend a valueNowOrOnUnwindDo: message to it; the argument isanother block containing the stream close expression.
"Inspect"| filename stream response |filename := 'testFile' asFilename.
filename exists "V2 Step 1"ifTrue: [filename isDirectory "V2 Step 2"
ifTrue: [Dialog warn: 'The file is a directory'. "V2 Step 3"^self]
ifFalse: [response := Dialog "V2 Step 4"
confirm: 'All right to overwrite the existing file?'initialAnswer: false.
response ifFalse: [^self]]].
filename canBeWritten "V2 Step 5"ifFalse: [
Dialog warn: 'You do not have the necessary permissions'. "V2 Step 6"^self].
stream := filename writeStream.[stream nextPutAll: Object comment]
valueNowOrOnUnwindDo: [stream close]. "V2 Step 7"
^filename contentsOfEntireFile

Opening an Editor on a File
VisualWorks Cookbook, Rev. 2.0 601
Opening an Editor on a File
Strategy
The main VisualWorks window provides a convenient means ofopening a File Editor. The basic step shows how to open aneditor programmatically. The editor gives the user of your appli-cation the ability to alter the contents of the file. For read-onlyaccess to the file, create a canvas containing a read-only texteditor or a text editor with a limited menu.
Basic Step➤ Send an edit message to the Filename. If the Filename represents
a disk directory, an error results. If the Filename represents anonexistent file, an editor is opened with which the usercan create the contents of the file.
| newFile stream |newFile := 'testFile' asFilename.stream := newFile writeStream.stream nextPutAll: Object comment.stream close.
newFile edit. "Basic Step"
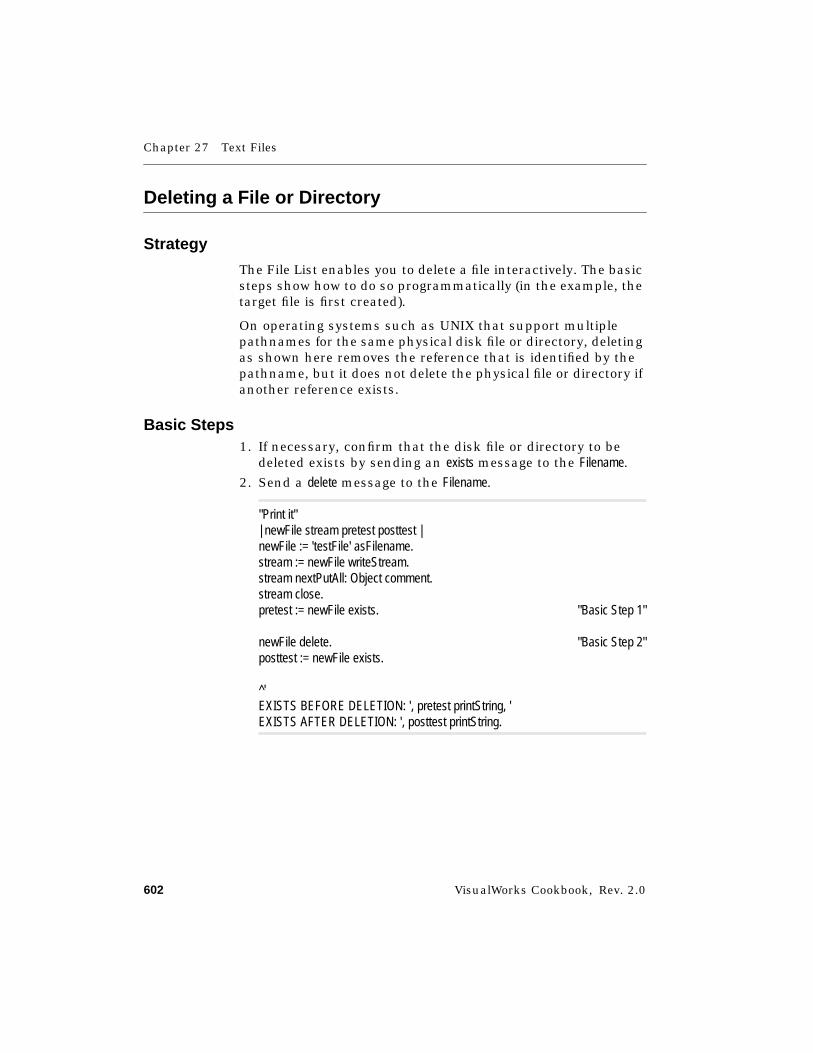
Chapter 27 Text Files
602 VisualWorks Cookbook, Rev. 2.0
Deleting a File or Directory
Strategy
The File List enables you to delete a file interactively. The basicsteps show how to do so programmatically (in the example, thetarget file is first created).
On operating systems such as UNIX that support multiplepathnames for the same physical disk file or directory, deletingas shown here removes the reference that is identified by thepathname, but it does not delete the physical file or directory ifanother reference exists.
Basic Steps1. If necessary, confirm that the disk file or directory to be
deleted exists by sending an exists message to the Filename.
2. Send a delete message to the Filename.
"Print it"| newFile stream pretest posttest |newFile := 'testFile' asFilename.stream := newFile writeStream.stream nextPutAll: Object comment.stream close.pretest := newFile exists. "Basic Step 1"
newFile delete. "Basic Step 2"posttest := newFile exists.
^'EXISTS BEFORE DELETION: ', pretest printString, 'EXISTS AFTER DELETION: ', posttest printString.
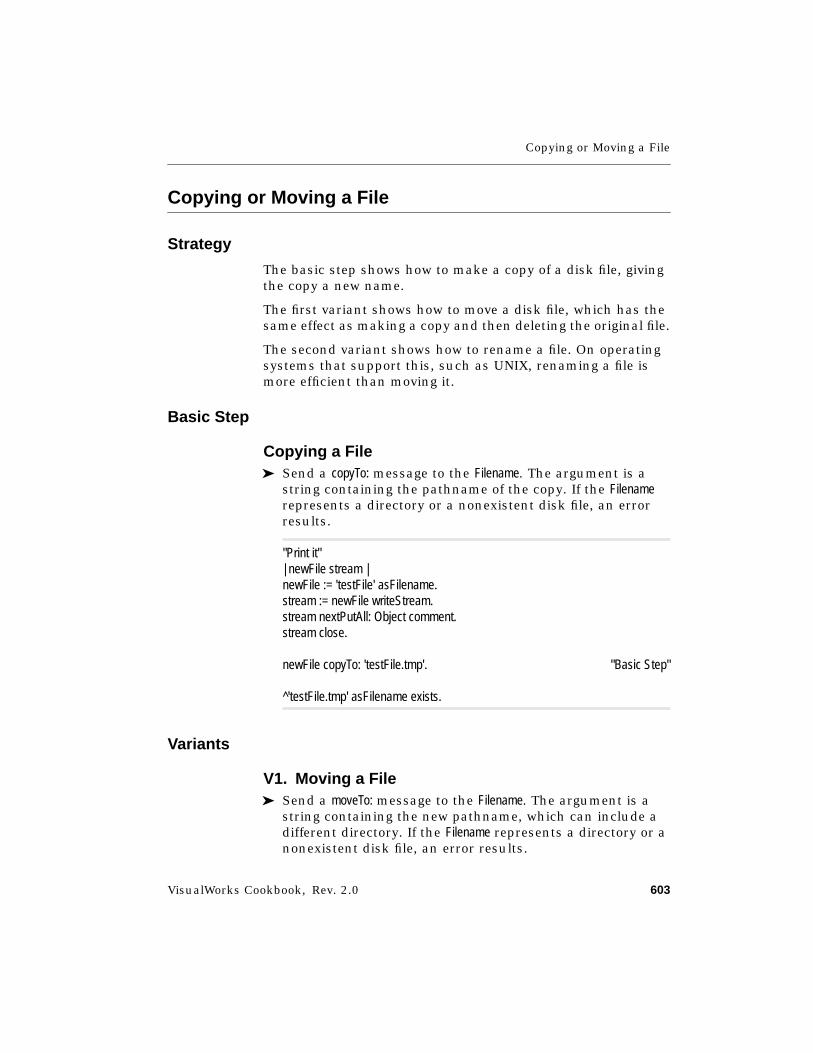
Copying or Moving a File
VisualWorks Cookbook, Rev. 2.0 603
Copying or Moving a File
Strategy
The basic step shows how to make a copy of a disk file, givingthe copy a new name.
The first variant shows how to move a disk file, which has thesame effect as making a copy and then deleting the original file.
The second variant shows how to rename a file. On operatingsystems that support this, such as UNIX, renaming a file ismore efficient than moving it.
Basic Step
Copying a File➤ Send a copyTo: message to the Filename. The argument is a
string containing the pathname of the copy. If the Filenamerepresents a directory or a nonexistent disk file, an errorresults.
"Print it"| newFile stream |newFile := 'testFile' asFilename.stream := newFile writeStream.stream nextPutAll: Object comment.stream close.
newFile copyTo: 'testFile.tmp'. "Basic Step"
^'testFile.tmp' asFilename exists.
Variants
V1. Moving a File➤ Send a moveTo: message to the Filename. The argument is a
string containing the new pathname, which can include adifferent directory. If the Filename represents a directory or anonexistent disk file, an error results.
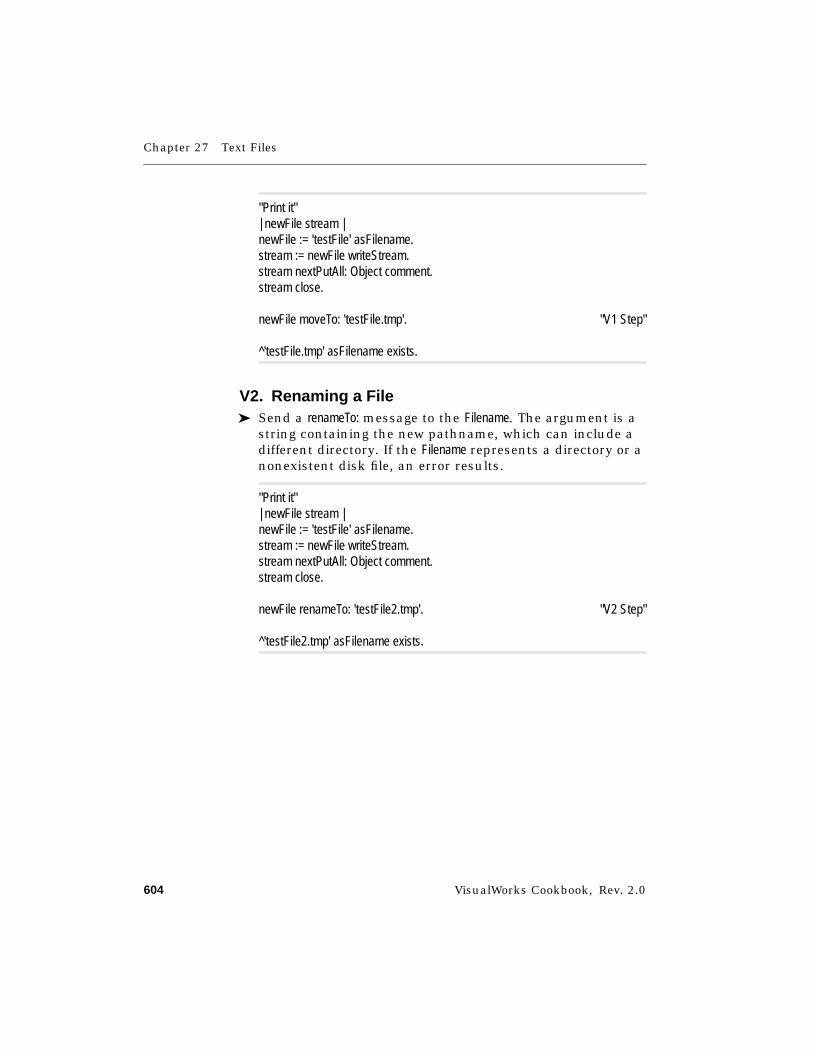
Chapter 27 Text Files
604 VisualWorks Cookbook, Rev. 2.0
"Print it"| newFile stream |newFile := 'testFile' asFilename.stream := newFile writeStream.stream nextPutAll: Object comment.stream close.
newFile moveTo: 'testFile.tmp'. "V1 Step"
^'testFile.tmp' asFilename exists.
V2. Renaming a File➤ Send a renameTo: message to the Filename. The argument is a
string containing the new pathname, which can include adifferent directory. If the Filename represents a directory or anonexistent disk file, an error results.
"Print it"| newFile stream |newFile := 'testFile' asFilename.stream := newFile writeStream.stream nextPutAll: Object comment.stream close.
newFile renameTo: 'testFile2.tmp'. "V2 Step"
^'testFile2.tmp' asFilename exists.

Comparing Two Files or Directories
VisualWorks Cookbook, Rev. 2.0 605
Comparing Two Files or Directories
Strategy
When comparing two files or directories, it is important toremember the distinction between a Filename and the disk objectthat it represents. Two Filenames are equal when they have thesame pathname and not equal when their pathnames differ.When you want to know whether the contents of two disk filesor two directories are the same, you must explicitly comparethe contents. The basic steps show both types of comparison forfiles, and the first variant does the same for directories.
Basic Steps
Comparing Two Filenames or Two Files1. To compare two filenames, send an = message to one File-
name. The argument is the second Filename. If they have thesame pathname (that is, they point to the same physicaldisk file), true is returned.
2. To compare the contents of two disk files, get the contentsof each file by sending contentsOfEntireFile messages to theFilenames. Then send an = message to one of the resultingstrings, with the other string as the argument.
"Print it"| file1 file2 stream pathsAreEqual contentsAreEqual |file1 := 'fileOne' asFilename.file2 := 'fileTwo' asFilename.stream := file1 writeStream.stream nextPutAll: Object comment.stream close.file1 copyTo: file2 asString.
pathsAreEqual := (file1 = file2). "Basic Step 1"
contentsAreEqual := (file1 contentsOfEntireFile = file2 contentsOfEntireFile). "Basic Step 2"
^'
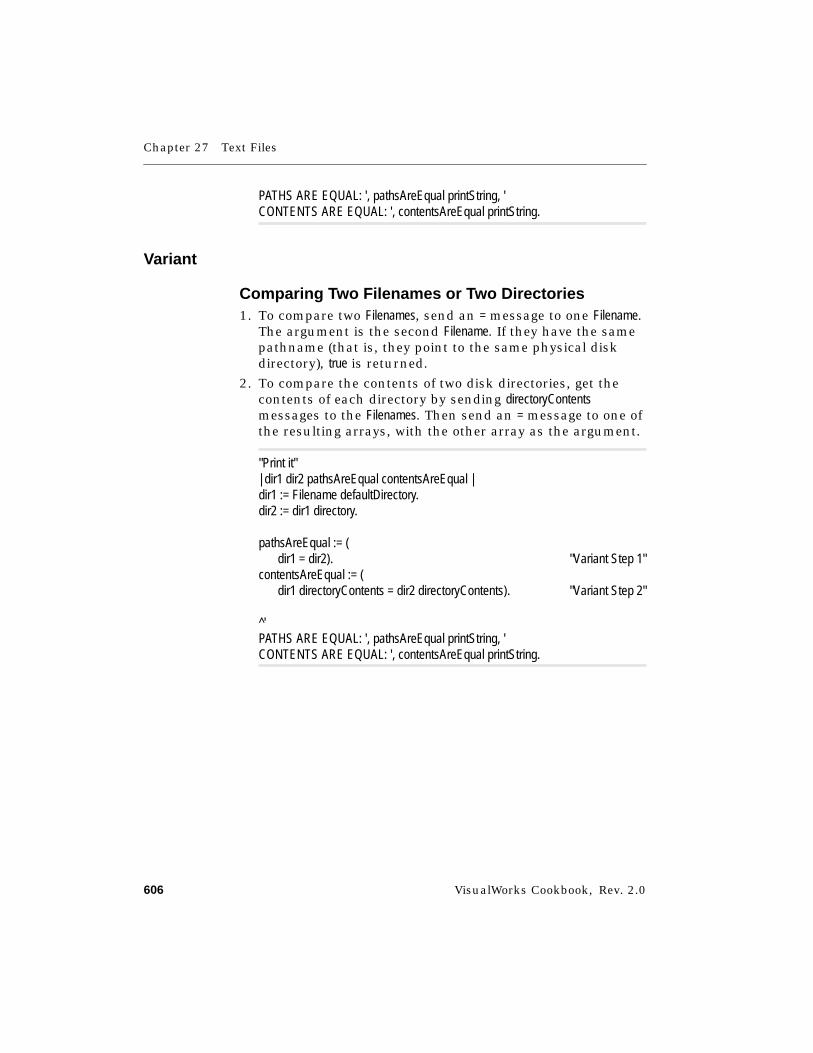
Chapter 27 Text Files
606 VisualWorks Cookbook, Rev. 2.0
PATHS ARE EQUAL: ', pathsAreEqual printString, 'CONTENTS ARE EQUAL: ', contentsAreEqual printString.
Variant
Comparing Two Filenames or Two Directories1. To compare two Filenames, send an = message to one Filename.
The argument is the second Filename. If they have the samepathname (that is, they point to the same physical diskdirectory), true is returned.
2. To compare the contents of two disk directories, get thecontents of each directory by sending directoryContentsmessages to the Filenames. Then send an = message to one ofthe resulting arrays, with the other array as the argument.
"Print it"| dir1 dir2 pathsAreEqual contentsAreEqual |dir1 := Filename defaultDirectory.dir2 := dir1 directory.
pathsAreEqual := (dir1 = dir2). "Variant Step 1"
contentsAreEqual := (dir1 directoryContents = dir2 directoryContents). "Variant Step 2"
^'PATHS ARE EQUAL: ', pathsAreEqual printString, 'CONTENTS ARE EQUAL: ', contentsAreEqual printString.
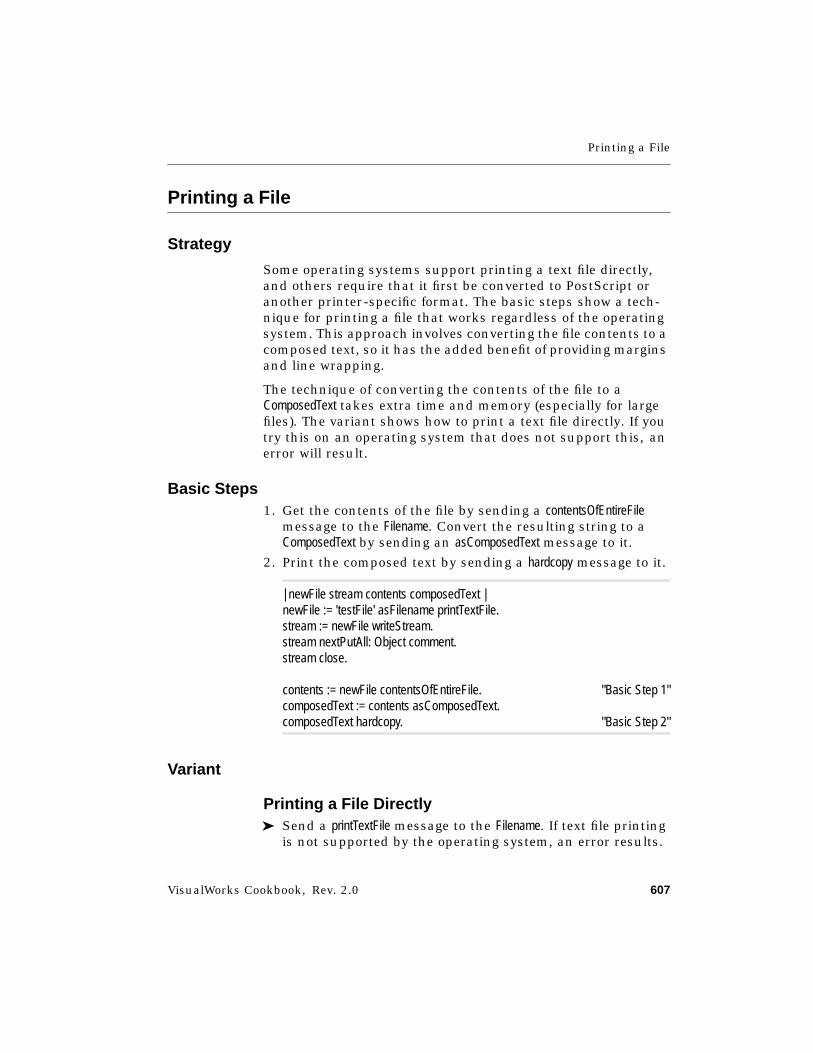
Printing a File
VisualWorks Cookbook, Rev. 2.0 607
Printing a File
Strategy
Some operating systems support printing a text file directly,and others require that it first be converted to PostScript oranother printer-specific format. The basic steps show a tech-nique for printing a file that works regardless of the operatingsystem. This approach involves converting the file contents to acomposed text, so it has the added benefit of providing marginsand line wrapping.
The technique of converting the contents of the file to aComposedText takes extra time and memory (especially for largefiles). The variant shows how to print a text file directly. If youtry this on an operating system that does not support this, anerror will result.
Basic Steps1. Get the contents of the file by sending a contentsOfEntireFile
message to the Filename. Convert the resulting string to aComposedText by sending an asComposedText message to it.
2. Print the composed text by sending a hardcopy message to it.
| newFile stream contents composedText |newFile := 'testFile' asFilename printTextFile.stream := newFile writeStream.stream nextPutAll: Object comment.stream close.
contents := newFile contentsOfEntireFile. "Basic Step 1"composedText := contents asComposedText.composedText hardcopy. "Basic Step 2"
Variant
Printing a File Directly➤ Send a printTextFile message to the Filename. If text file printing
is not supported by the operating system, an error results.

Chapter 27 Text Files
608 VisualWorks Cookbook, Rev. 2.0
| newFile stream |newFile := 'testFile' asFilename printTextFile.stream := newFile writeStream.stream nextPutAll: Object comment.stream close.
newFile printTextFile "Variant Step"
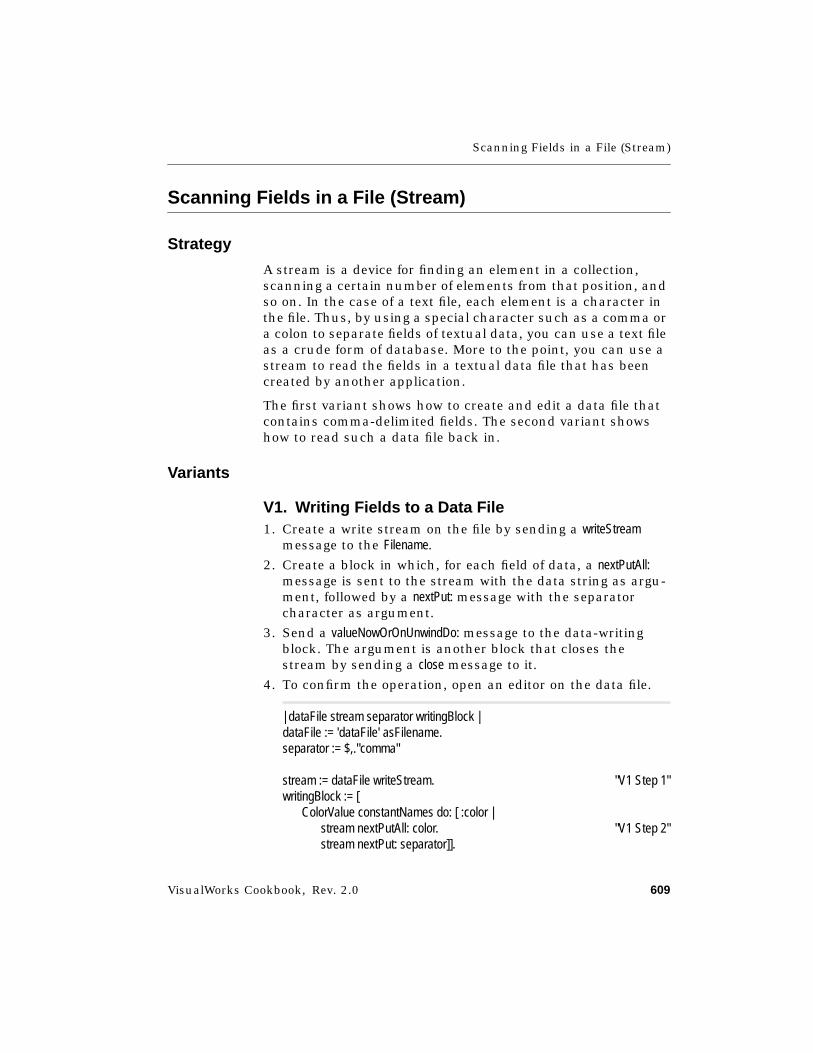
Scanning Fields in a File (Stream)
VisualWorks Cookbook, Rev. 2.0 609
Scanning Fields in a File (Stream)
Strategy
A stream is a device for finding an element in a collection,scanning a certain number of elements from that position, andso on. In the case of a text file, each element is a character inthe file. Thus, by using a special character such as a comma ora colon to separate fields of textual data, you can use a text fileas a crude form of database. More to the point, you can use astream to read the fields in a textual data file that has beencreated by another application.
The first variant shows how to create and edit a data file thatcontains comma-delimited fields. The second variant showshow to read such a data file back in.
Variants
V1. Writing Fields to a Data File1. Create a write stream on the file by sending a writeStream
message to the Filename.
2. Create a block in which, for each field of data, a nextPutAll:message is sent to the stream with the data string as argu-ment, followed by a nextPut: message with the separatorcharacter as argument.
3. Send a valueNowOrOnUnwindDo: message to the data-writingblock. The argument is another block that closes thestream by sending a close message to it.
4. To confirm the operation, open an editor on the data file.
| dataFile stream separator writingBlock |dataFile := 'dataFile' asFilename.separator := $,."comma"
stream := dataFile writeStream. "V1 Step 1"writingBlock := [
ColorValue constantNames do: [ :color |stream nextPutAll: color. "V1 Step 2"stream nextPut: separator]].

Chapter 27 Text Files
610 VisualWorks Cookbook, Rev. 2.0
writingBlock valueNowOrOnUnwindDo: [stream close]. "V1 Step 3"
dataFile edit. "V1 Step 4"
V2. Reading Fields in a Data File1. Create a read stream on the file by sending a readStream
message to the Filename.
2. Create a block in which the next field of data is fetched bysending an upTo: message to the stream, with the separatorcharacter as the argument. This is repeated by placing itwithin an inner block that is repeated until the end of thestream is encountered.
3. Send a valueNowOrOnUnwindDo: message to the data-readingblock. The argument is another block that closes thestream by sending a close message to it.
"Inspect"| dataFile stream separator writingBlock colorNames readingBlock |dataFile := 'dataFile' asFilename.separator := $,."comma"
"Write data"stream := dataFile writeStream.writingBlock := [
ColorValue constantNames do: [ :color |stream nextPutAll: color.stream nextPut: separator]].
writingBlock valueNowOrOnUnwindDo: [stream close].
"Read data"stream := dataFile readStream. "V2 Step 1"colorNames := OrderedCollection new.readingBlock := [
[stream atEnd] whileFalse: [colorNames add: (stream upTo: separator)]]. "V2 Step 2"
readingBlock valueNowOrOnUnwindDo: [stream close]. "V2 Step 3"
^colorNames
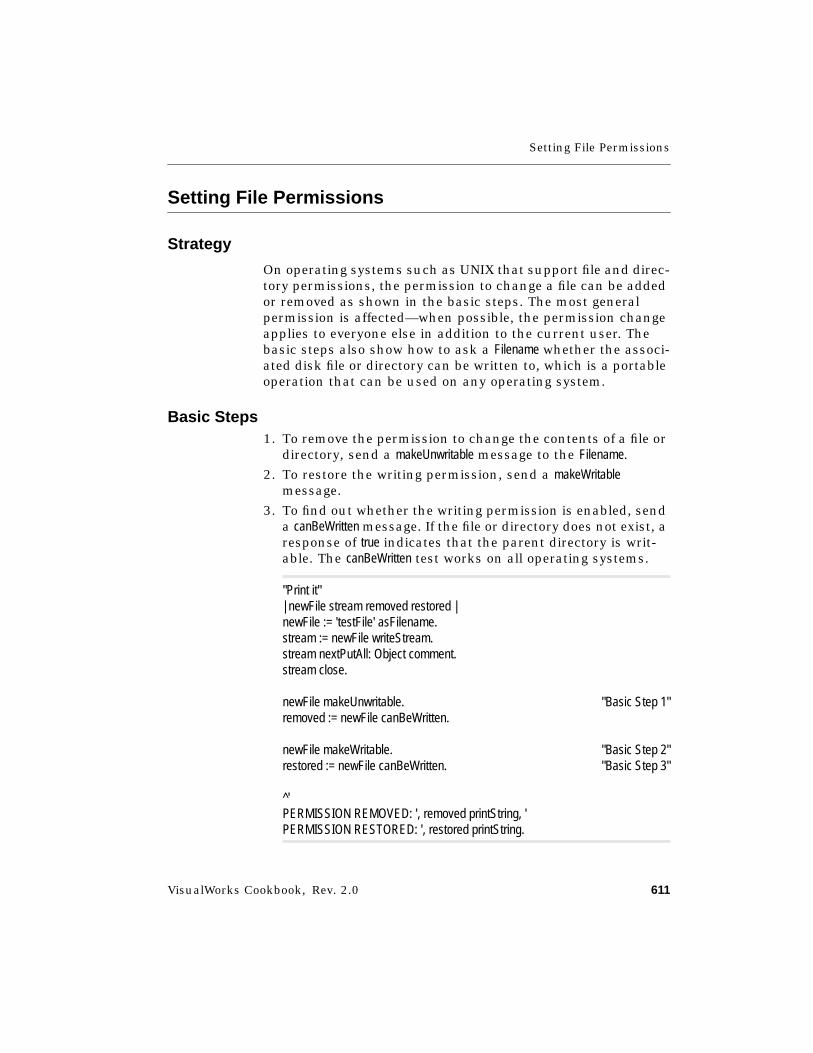
Setting File Permissions
VisualWorks Cookbook, Rev. 2.0 611
Setting File Permissions
Strategy
On operating systems such as UNIX that support file and direc-tory permissions, the permission to change a file can be addedor removed as shown in the basic steps. The most generalpermission is affected—when possible, the permission changeapplies to everyone else in addition to the current user. Thebasic steps also show how to ask a Filename whether the associ-ated disk file or directory can be written to, which is a portableoperation that can be used on any operating system.
Basic Steps1. To remove the permission to change the contents of a file or
directory, send a makeUnwritable message to the Filename.
2. To restore the writing permission, send a makeWritablemessage.
3. To find out whether the writing permission is enabled, senda canBeWritten message. If the file or directory does not exist, aresponse of true indicates that the parent directory is writ-able. The canBeWritten test works on all operating systems.
"Print it"| newFile stream removed restored |newFile := 'testFile' asFilename.stream := newFile writeStream.stream nextPutAll: Object comment.stream close.
newFile makeUnwritable. "Basic Step 1"removed := newFile canBeWritten.
newFile makeWritable. "Basic Step 2"restored := newFile canBeWritten. "Basic Step 3"
^'PERMISSION REMOVED: ', removed printString, 'PERMISSION RESTORED: ', restored printString.


VisualWorks Cookbook, Rev. 2.0 613
Chapter 28
Object Files (BOSS)
Storing Objects in a BOSS File 614Getting Objects from a BOSS File 617Storing and Getting a Class 621Converting Data After Changing a Class 624Customizing the Storage Representation 626
See Also■ “Text Files” on page 591
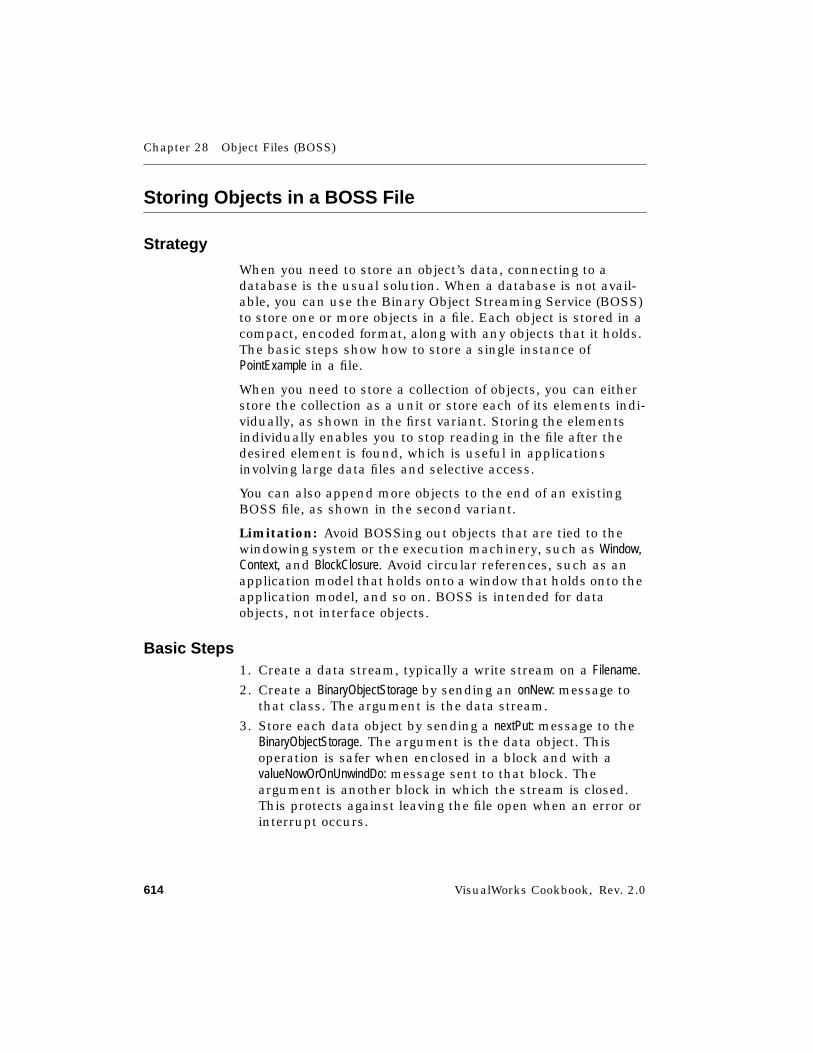
Chapter 28 Object Files (BOSS)
614 VisualWorks Cookbook, Rev. 2.0
Storing Objects in a BOSS File
Strategy
When you need to store an object’s data, connecting to adatabase is the usual solution. When a database is not avail-able, you can use the Binary Object Streaming Service (BOSS)to store one or more objects in a file. Each object is stored in acompact, encoded format, along with any objects that it holds.The basic steps show how to store a single instance ofPointExample in a file.
When you need to store a collection of objects, you can eitherstore the collection as a unit or store each of its elements indi-vidually, as shown in the first variant. Storing the elementsindividually enables you to stop reading in the file after thedesired element is found, which is useful in applicationsinvolving large data files and selective access.
You can also append more objects to the end of an existingBOSS file, as shown in the second variant.
Limitation: Avoid BOSSing out objects that are tied to thewindowing system or the execution machinery, such as Window,Context, and BlockClosure. Avoid circular references, such as anapplication model that holds onto a window that holds onto theapplication model, and so on. BOSS is intended for dataobjects, not interface objects.
Basic Steps1. Create a data stream, typically a write stream on a Filename.
2. Create a BinaryObjectStorage by sending an onNew: message tothat class. The argument is the data stream.
3. Store each data object by sending a nextPut: message to theBinaryObjectStorage. The argument is the data object. Thisoperation is safer when enclosed in a block and with avalueNowOrOnUnwindDo: message sent to that block. Theargument is another block in which the stream is closed.This protects against leaving the file open when an error orinterrupt occurs.
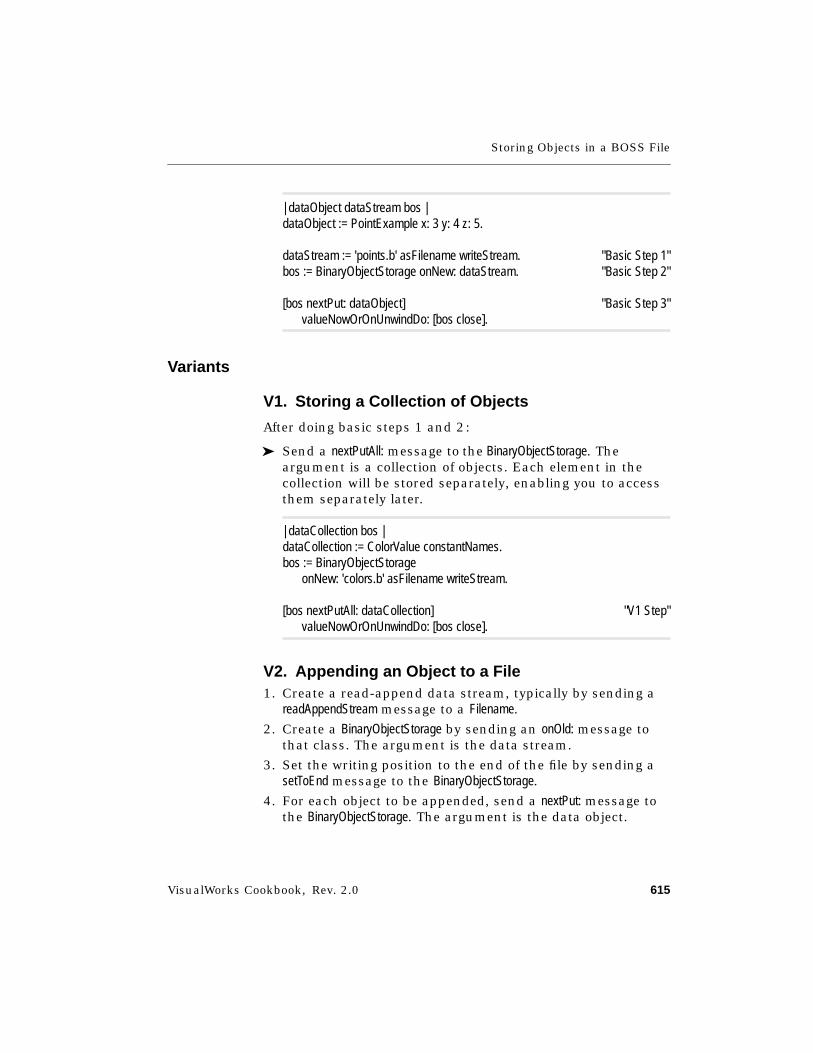
Storing Objects in a BOSS File
VisualWorks Cookbook, Rev. 2.0 615
| dataObject dataStream bos |dataObject := PointExample x: 3 y: 4 z: 5.
dataStream := 'points.b' asFilename writeStream. "Basic Step 1"bos := BinaryObjectStorage onNew: dataStream. "Basic Step 2"
[bos nextPut: dataObject] "Basic Step 3"valueNowOrOnUnwindDo: [bos close].
Variants
V1. Storing a Collection of Objects
After doing basic steps 1 and 2:
➤ Send a nextPutAll: message to the BinaryObjectStorage. Theargument is a collection of objects. Each element in thecollection will be stored separately, enabling you to accessthem separately later.
| dataCollection bos |dataCollection := ColorValue constantNames.bos := BinaryObjectStorage
onNew: 'colors.b' asFilename writeStream.
[bos nextPutAll: dataCollection] "V1 Step"valueNowOrOnUnwindDo: [bos close].
V2. Appending an Object to a File1. Create a read-append data stream, typically by sending a
readAppendStream message to a Filename.
2. Create a BinaryObjectStorage by sending an onOld: message tothat class. The argument is the data stream.
3. Set the writing position to the end of the file by sending asetToEnd message to the BinaryObjectStorage.
4. For each object to be appended, send a nextPut: message tothe BinaryObjectStorage. The argument is the data object.
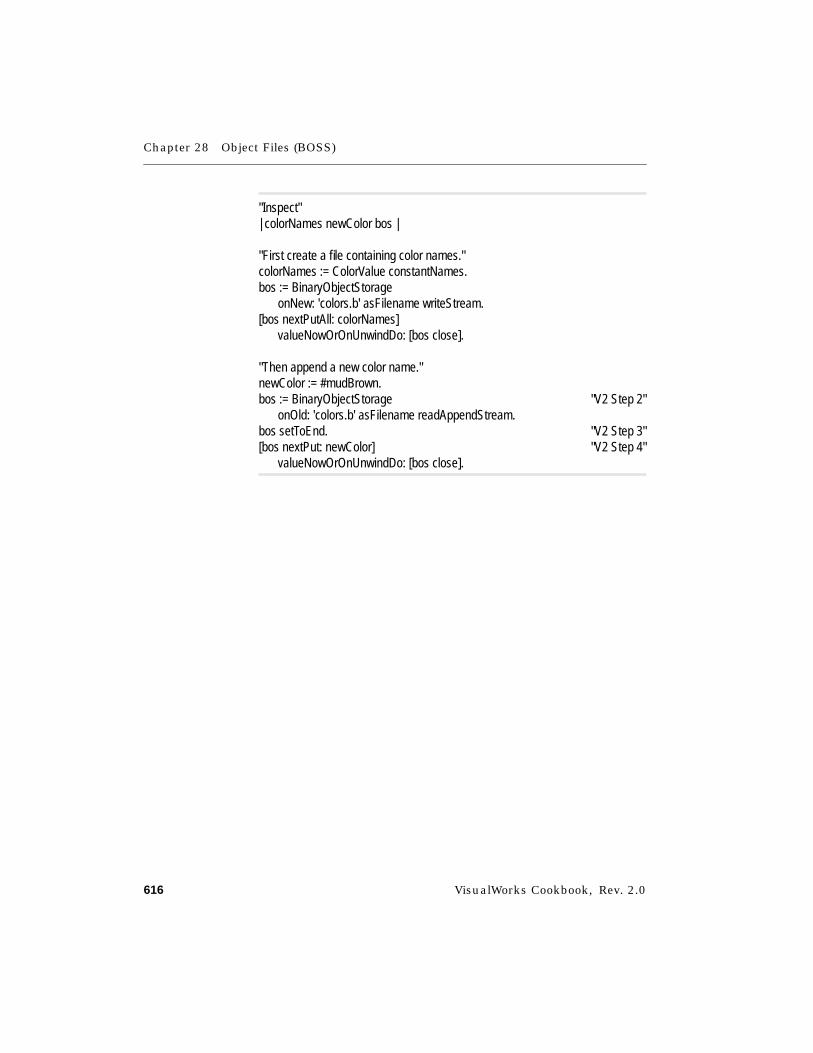
Chapter 28 Object Files (BOSS)
616 VisualWorks Cookbook, Rev. 2.0
"Inspect"| colorNames newColor bos |
"First create a file containing color names."colorNames := ColorValue constantNames.bos := BinaryObjectStorage
onNew: 'colors.b' asFilename writeStream.[bos nextPutAll: colorNames]
valueNowOrOnUnwindDo: [bos close].
"Then append a new color name."newColor := #mudBrown.bos := BinaryObjectStorage "V2 Step 2"
onOld: 'colors.b' asFilename readAppendStream.bos setToEnd. "V2 Step 3"[bos nextPut: newColor] "V2 Step 4"
valueNowOrOnUnwindDo: [bos close].

Getting Objects from a BOSS File
VisualWorks Cookbook, Rev. 2.0 617
Getting Objects from a BOSS File
Strategy
The basic steps show how to get the entire contents of a BOSSfile, with each stored object as an element in an array. (In theexample, a BOSS file is created first.)
For selective access to the objects in the data stream, you canread them sequentially until you find the desired object, asshown in the first variant.
Another selective approach is to position the stream at thebeginning of the desired object, as shown in the second variant.This technique, although swifter than reading each objectsequentially, assumes that your application keeps a positionindex for each object in the file when the objects are stored.
Basic Steps1. Create a data stream, typically by sending a readStream
message to a Filename that represents the data file.
2. Create a BinaryObjectStorage by sending an onOld: message tothat class, with the data stream as argument. (When you donot intend to write new objects onto the file, send anonOldNoScan: message instead; this is faster because it doesnot scan the data file as it must before writing more data.)
3. Get the objects in the file by sending a contents message tothe BinaryObjectStorage. An array containing the stored objectswill be returned.
4. Close the BinaryObjectStorage (which also closes the datastream).
"Inspect"| colorNames bos array |
"First create a file containing color names."colorNames := ColorValue constantNames.bos := BinaryObjectStorage
onNew: 'colors.b' asFilename writeStream.[bos nextPutAll: colorNames]
valueNowOrOnUnwindDo: [bos close].
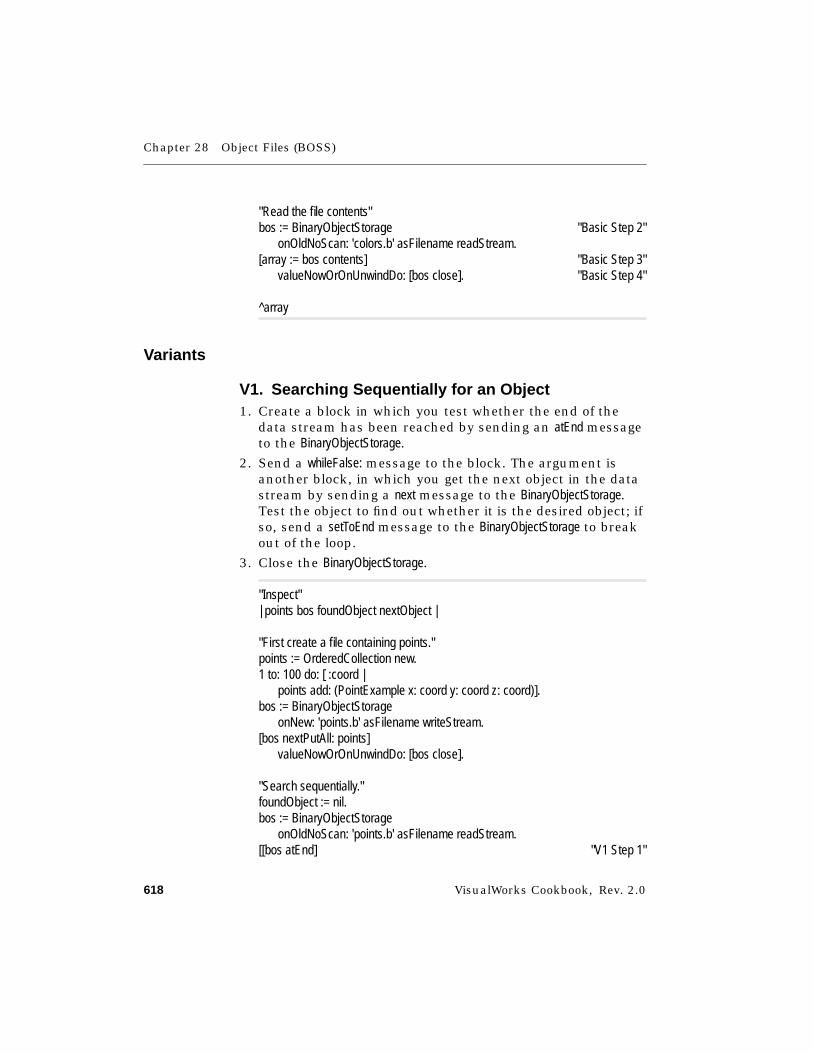
Chapter 28 Object Files (BOSS)
618 VisualWorks Cookbook, Rev. 2.0
"Read the file contents"bos := BinaryObjectStorage "Basic Step 2"
onOldNoScan: 'colors.b' asFilename readStream.[array := bos contents] "Basic Step 3"
valueNowOrOnUnwindDo: [bos close]. "Basic Step 4"
^array
Variants
V1. Searching Sequentially for an Object1. Create a block in which you test whether the end of the
data stream has been reached by sending an atEnd messageto the BinaryObjectStorage.
2. Send a whileFalse: message to the block. The argument isanother block, in which you get the next object in the datastream by sending a next message to the BinaryObjectStorage.Test the object to find out whether it is the desired object; ifso, send a setToEnd message to the BinaryObjectStorage to breakout of the loop.
3. Close the BinaryObjectStorage.
"Inspect"| points bos foundObject nextObject |
"First create a file containing points."points := OrderedCollection new.1 to: 100 do: [ :coord |
points add: (PointExample x: coord y: coord z: coord)].bos := BinaryObjectStorage
onNew: 'points.b' asFilename writeStream.[bos nextPutAll: points]
valueNowOrOnUnwindDo: [bos close].
"Search sequentially."foundObject := nil.bos := BinaryObjectStorage
onOldNoScan: 'points.b' asFilename readStream.[[bos atEnd] "V1 Step 1"
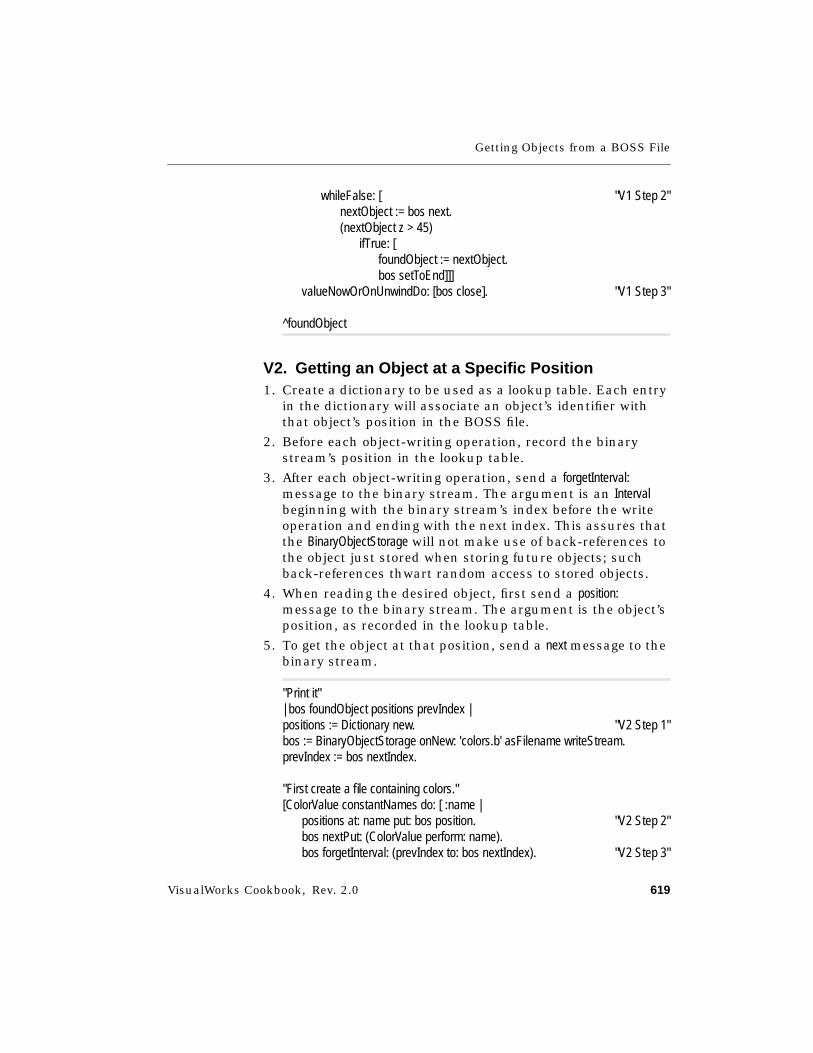
Getting Objects from a BOSS File
VisualWorks Cookbook, Rev. 2.0 619
whileFalse: [ "V1 Step 2"nextObject := bos next.(nextObject z > 45)
ifTrue: [foundObject := nextObject.bos setToEnd]]]
valueNowOrOnUnwindDo: [bos close]. "V1 Step 3"
^foundObject
V2. Getting an Object at a Specific Position1. Create a dictionary to be used as a lookup table. Each entry
in the dictionary will associate an object’s identifier withthat object’s position in the BOSS file.
2. Before each object-writing operation, record the binarystream’s position in the lookup table.
3. After each object-writing operation, send a forgetInterval:message to the binary stream. The argument is an Intervalbeginning with the binary stream’s index before the writeoperation and ending with the next index. This assures thatthe BinaryObjectStorage will not make use of back-references tothe object just stored when storing future objects; suchback-references thwart random access to stored objects.
4. When reading the desired object, first send a position:message to the binary stream. The argument is the object’sposition, as recorded in the lookup table.
5. To get the object at that position, send a next message to thebinary stream.
"Print it"| bos foundObject positions prevIndex |positions := Dictionary new. "V2 Step 1"bos := BinaryObjectStorage onNew: 'colors.b' asFilename writeStream.prevIndex := bos nextIndex.
"First create a file containing colors."[ColorValue constantNames do: [ :name |
positions at: name put: bos position. "V2 Step 2"bos nextPut: (ColorValue perform: name).bos forgetInterval: (prevIndex to: bos nextIndex). "V2 Step 3"
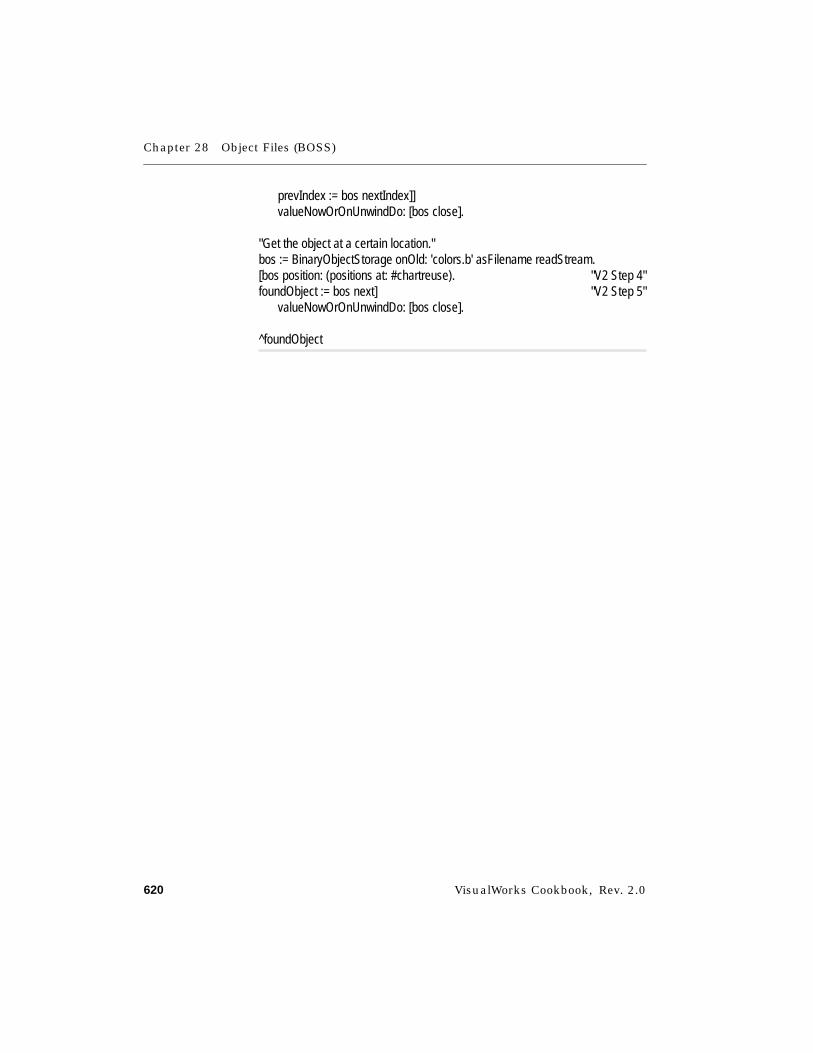
Chapter 28 Object Files (BOSS)
620 VisualWorks Cookbook, Rev. 2.0
prevIndex := bos nextIndex]]valueNowOrOnUnwindDo: [bos close].
"Get the object at a certain location."bos := BinaryObjectStorage onOld: 'colors.b' asFilename readStream.[bos position: (positions at: #chartreuse). "V2 Step 4"foundObject := bos next] "V2 Step 5"
valueNowOrOnUnwindDo: [bos close].
^foundObject
Storing and Getting a Class
VisualWorks Cookbook, Rev. 2.0 621
Storing and Getting a Class
Strategy
A BinaryObjectStorage is most often used to store instances ratherthan classes, relying on the virtual image to contain the classdefinitions. When the virtual image that is to read a BOSS filedoes not contain the necessary classes, you can use BOSS,parcels, or the conventional file-out/file-in procedure totransfer the necessary class definitions.
Unlike the file-in procedure, the BOSS technique does notnormally require the presence of any compilers in the receivingimage. Thus, you can use BOSS to introduce a new or redefinedclass into a deployment image, perhaps as a means of deliv-ering a patch that fixes a bug.
Note, however, that BOSSing in a class requires the Smalltalkcompiler to be present when any superclass of that class variesin structure between the receiving image and the original image(the image from which the class was originally BOSSed out). Inparticular, if any superclass varies between these two imageswith respect to the number or order of its instance variables,BOSS will attempt to invoke the Smalltalk compiler to recom-pile the class’s methods.When a collection of classes is storedusing BOSS, they are automatically sorted into superclassorder. BOSS writes the same information that fileOut does: theclass definition, method definitions, and an expression thatinitializes the class if a class initialize method is present.
By default, BOSS stores the source code for methods, the classcomment, and the protocols. The variant shows how to arrangefor BOSS to omit the source code, which is useful when youwant to discourage users of your application from modifying it.For this reason, even classes that have nothing to do with BOSSdata are sometimes transferred from one image to anotherusing BOSS.
Basic Steps1. To store a collection of classes in a BOSS file, send a
nextPutClasses: message to a binary stream. The argument is acollection containing the desired classes.
Chapter 28 Object Files (BOSS)
622 VisualWorks Cookbook, Rev. 2.0
2. To load a collection of classes from a BOSS file, send a next-Classes message to a binary stream on the file. (In theexample, loading the Date class has no effect because theimage already contains the same definition of that class.)
"Print it"| file bos |file := 'date.b' asFilename.bos := BinaryObjectStorage onNew: file writeStream.
"Write the Date class to a file."[bos nextPutClasses: (Array with: Date)] "Basic Step 1"
valueNowOrOnUnwindDo: [bos close].
"Read the file contents"bos := BinaryObjectStorage onOldNoScan: file readStream.[bos nextClasses] "Basic Step 2"
valueNowOrOnUnwindDo: [bos close].
^file fileSize
Variant
Omitting the Source Code➤ Before storing the classes, send a sourceMode: message to the
binary stream. The argument is #discard. (An argument of#keep causes sources to be stored, which is the default.)
"Print it"| file bos |file := 'date.b' asFilename.bos := BinaryObjectStorage onNew: file writeStream.
"Write the Date class to a file."[bos sourceMode: #discard. "Variant Step"bos nextPutClasses: (Array with: Date)]
valueNowOrOnUnwindDo: [bos close].
"Read the file contents"bos := BinaryObjectStorage onOldNoScan: file readStream.
Storing and Getting a Class
VisualWorks Cookbook, Rev. 2.0 623
[bos nextClasses]valueNowOrOnUnwindDo: [bos close].
^file fileSize
Chapter 28 Object Files (BOSS)
624 VisualWorks Cookbook, Rev. 2.0
Converting Data After Changing a Class
Strategy
When you store instances of an object in a BOSS file and thenadd an instance variable or otherwise change the definition ofthat object’s class, BOSS detects the incompatibility when ittries to read the old data file. For example, suppose thePointExample class began its life representing a two-dimensionalpoint; later you extend it to represent three-dimensional pointsby adding a z instance variable in addition to the x and yvariables. The basic steps show how to arrange for old filescontaining two-dimensional instances of PointExample to be readwithout error.
Basic Steps
Online example: PointExample
1. In the class whose definition has been changed, create aclass method named binaryRepresentationVersion. This method isresponsible for returning a version identifier, commonly asequential number or a descriptive string. (The methodmust be rewritten each time the class definition is changed,assuming BOSS files relying on the prior version of theclass definition will need to be read.)
2. Create a class method named binaryReaderBlockForVersion:format:.This method must return a block that converts the oldobject to a new instance. The block takes one argument, anarray of the instance variables (for pointer-type objects) or aByteString (for byte-type objects). The block typically assignsthe data values from the old instance variables and thensends a become: message to the old object; the argument isthe new instance. The first method argument (oldVersion)identifies the version (nil, by default, and later defined by themethod you created in the preceding step) and enables youto distinguish between old data and current data. Thesecond method argument (oldFormat) is typically ignoredexcept for internal system purposes.
Converting Data After Changing a Class
VisualWorks Cookbook, Rev. 2.0 625
binaryRepresentationVersion "Basic Step 1""First version (nil) had x and y coordinates.Second version (2) added a z coordinate."
^2
binaryReaderBlockForVersion: oldVersion format: oldFormat "Basic Step 2"| newPoint |oldVersion isNil ifTrue: [
^[ :oldPoint |newPoint := PointExample new.
"Each oldPoint obtained from the BOSS file is an Arraythat contains the state of an old instance of PointExample.The array elements are the values of the old instance’svariables, in the order in which the old version of PointExampledefined them."
newPoint x: (oldPoint at: 1).newPoint y: (oldPoint at: 2).newPoint z: 0. "oldPoint has no z"
oldPoint become: newPoint]].
Chapter 28 Object Files (BOSS)
626 VisualWorks Cookbook, Rev. 2.0
Customizing the Storage Representation
Strategy
By default, BOSS stores the entire contents of an object,including its dependents and the dependents of its variables.Although this default is appropriate for most data objects, itresults in a BOSS error when an interface object is a dependentof a data object that is being BOSSed out. This kind of depen-dency is often encountered in the case of an instance variablethat holds onto a collection when the collection is displayed ina list widget. BOSSing a copy of the collection is one way toremove the dependency.
The basic step shows how to control which parts of an objectare BOSSed out. This technique is also useful when aninstance variable holds an object that points back to theoriginal object, creating a circular reference that causesendless repetition when BOSS attempts to store either object.
In the example, the custom storage representation contains allof the instance variables, but it nevertheless shows the tech-nique for customizing.
Basic Step➤ Create an instance method named representBinaryOn: in the
class whose BOSS representation you want to customize.The method typically returns a MessageSend, which is createdby sending a receiver:selector:arguments: message to that class.The receiver argument identifies the class that is to create aninstance, typically the object’s class. The selector argument isthe name of the instance-creation method that is to be usedwhen the data is read by BOSS. The arguments argument is acollection of data values, typically the values of the object’sinstance variables.
representBinaryOn: bos "Basic Step""Represent a PointExample by its x, y and z coordinatesplus the message and receiver for creating an instance fromthose coordinates."
Customizing the Storage Representation
VisualWorks Cookbook, Rev. 2.0 627
^MessageSendreceiver: self classselector: #x:y:z:arguments: (Array with: x with: y with: z).


VisualWorks Cookbook, Rev. 2.0 629
Chapter 29
Geometrics
Displaying a Point 630Displaying a Straight or Jointed Line 631Displaying a Curved Line 634Displaying a Polygon 637Displaying an Arc, Circle, or Ellipse 640Changing the Line Thickness 644Changing the Line Cap Style 645Changing the Line Join Style 647Coloring a Geometric 649Integrating a Graphic into an Application 652
See Also■ “Images, Cursors, and Icons” on page 657
■ “Color” on page 685
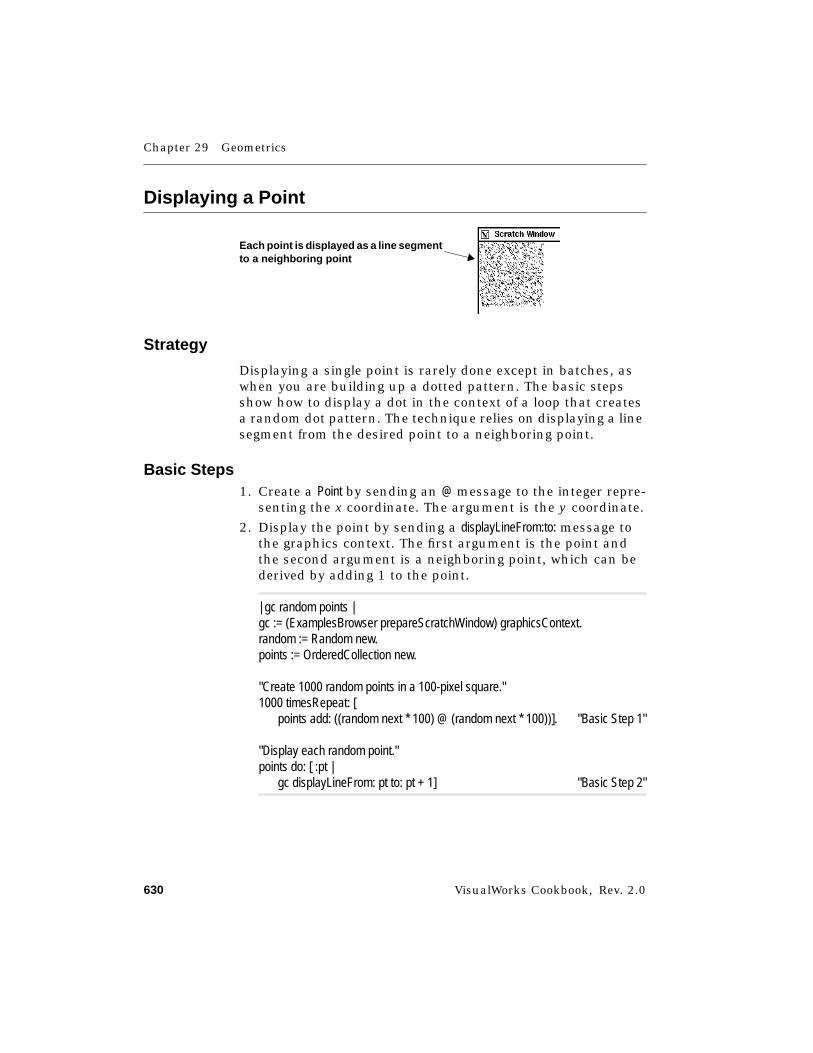
Chapter 29 Geometrics
630 VisualWorks Cookbook, Rev. 2.0
Displaying a Point
Strategy
Displaying a single point is rarely done except in batches, aswhen you are building up a dotted pattern. The basic stepsshow how to display a dot in the context of a loop that createsa random dot pattern. The technique relies on displaying a linesegment from the desired point to a neighboring point.
Basic Steps1. Create a Point by sending an @ message to the integer repre-
senting the x coordinate. The argument is the y coordinate.
2. Display the point by sending a displayLineFrom:to: message tothe graphics context. The first argument is the point andthe second argument is a neighboring point, which can bederived by adding 1 to the point.
| gc random points |gc := (ExamplesBrowser prepareScratchWindow) graphicsContext.random := Random new.points := OrderedCollection new.
"Create 1000 random points in a 100-pixel square."1000 timesRepeat: [
points add: ((random next * 100) @ (random next * 100))]. "Basic Step 1"
"Display each random point."points do: [ :pt |
gc displayLineFrom: pt to: pt + 1] "Basic Step 2"
Each point is displayed as a line segmentto a neighboring point
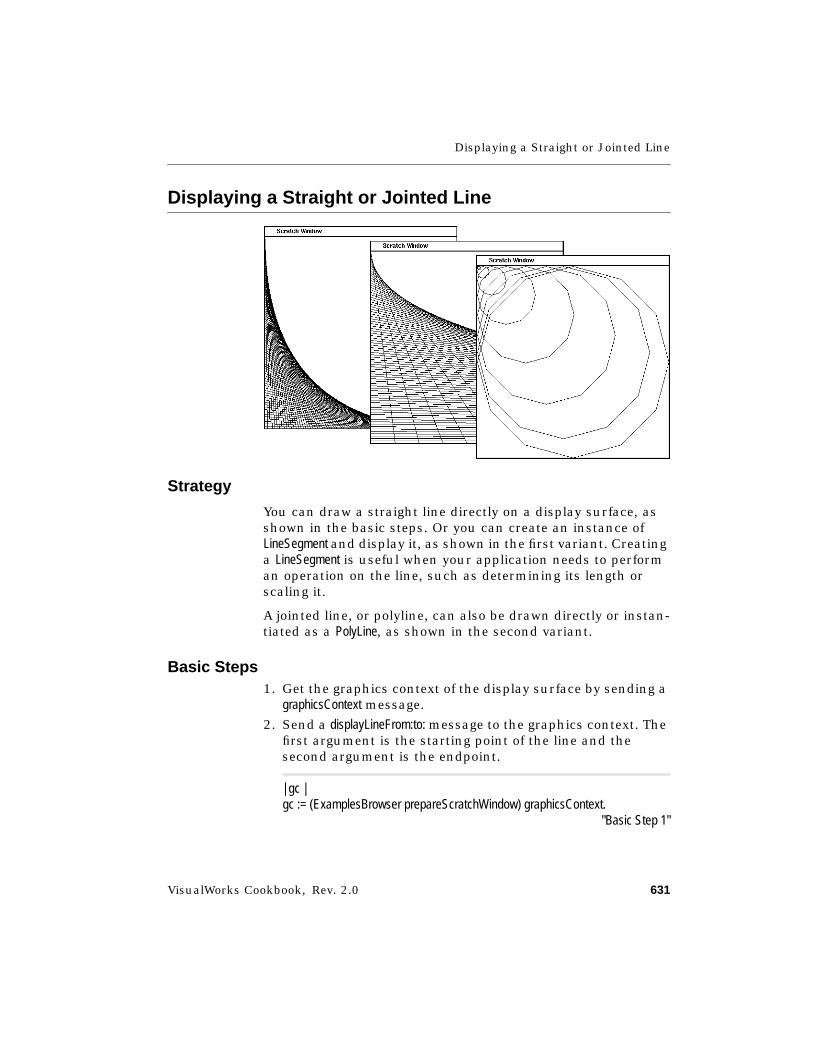
Displaying a Straight or Jointed Line
VisualWorks Cookbook, Rev. 2.0 631
Displaying a Straight or Jointed Line
Strategy
You can draw a straight line directly on a display surface, asshown in the basic steps. Or you can create an instance ofLineSegment and display it, as shown in the first variant. Creatinga LineSegment is useful when your application needs to performan operation on the line, such as determining its length orscaling it.
A jointed line, or polyline, can also be drawn directly or instan-tiated as a PolyLine, as shown in the second variant.
Basic Steps1. Get the graphics context of the display surface by sending a
graphicsContext message.
2. Send a displayLineFrom:to: message to the graphics context. Thefirst argument is the starting point of the line and thesecond argument is the endpoint.
| gc |gc := (ExamplesBrowser prepareScratchWindow) graphicsContext.
"Basic Step 1"

Chapter 29 Geometrics
632 VisualWorks Cookbook, Rev. 2.0
5 to: 400 by: 5 do: [ :i |gc displayLineFrom: 0@i to: i@400]. "Basic Step 2"
Variants
V1. Creating and Displaying a Line Segment1. Create a line segment by sending a from:to: message to the
LineSegment class. The first argument is the starting point ofthe line and the second argument is the endpoint.
2. Perform any desired operations on the line (in the example,the x dimension is exaggerated by a factor of 10).
3. Wrap the line segment in a stroking wrapper by sending anasStroker message to it. This equips the line with the ability torender itself.
4. Display the wrapped line segment by sending a displayOn:message to its stroking wrapper. The argument is thegraphics context of the display surface.
| gc line scaleFactor |gc := (ExamplesBrowser prepareScratchWindow) graphicsContext.scaleFactor := 10@1.
5 to: 400 by: 5 do: [ :i |line := LineSegment from: 0@i to: i@400. "V1 Step 1"line := line scaledBy: scaleFactor.line asStroker displayOn: gc]. "V1 Steps 3, 4"
V2. Displaying a Polyline1. Send a displayPolyLine: message to the graphics context. The
argument is a collection of points defining the endpointsand vertices of the polyline.
2. Alternatively, create a Polyline by sending a vertices: messageto the Polyline class. The argument is the collection ofvertices. Then wrap the polyline in a stroking wrapper(using asStroker) and display it on the graphics context (usingdisplayOn:).
Displaying a Straight or Jointed Line
VisualWorks Cookbook, Rev. 2.0 633
| gc points x y radians polyline |gc := (ExamplesBrowser prepareScratchWindow) graphicsContext.points := OrderedCollection new.0 to: 360 by: 30 do: [ :angle |
radians := angle degreesToRadians.x := 200 - (200 * radians cos).y := 200 - (200 * radians sin).points add: x@y].
gc displayPolyline: points. "V2 Step 1"
polyline := Polyline vertices: points. "V2 Step 2"0.9 to: 0.1 by: -0.1 do: [ :scale |
polyline := polyline scaledBy: scale.polyline asStroker displayOn: gc].
See Also■ “Changing the Line Thickness” on page 644
■ “Changing the Line Cap Style” on page 645
■ “Changing the Line Join Style” on page 647
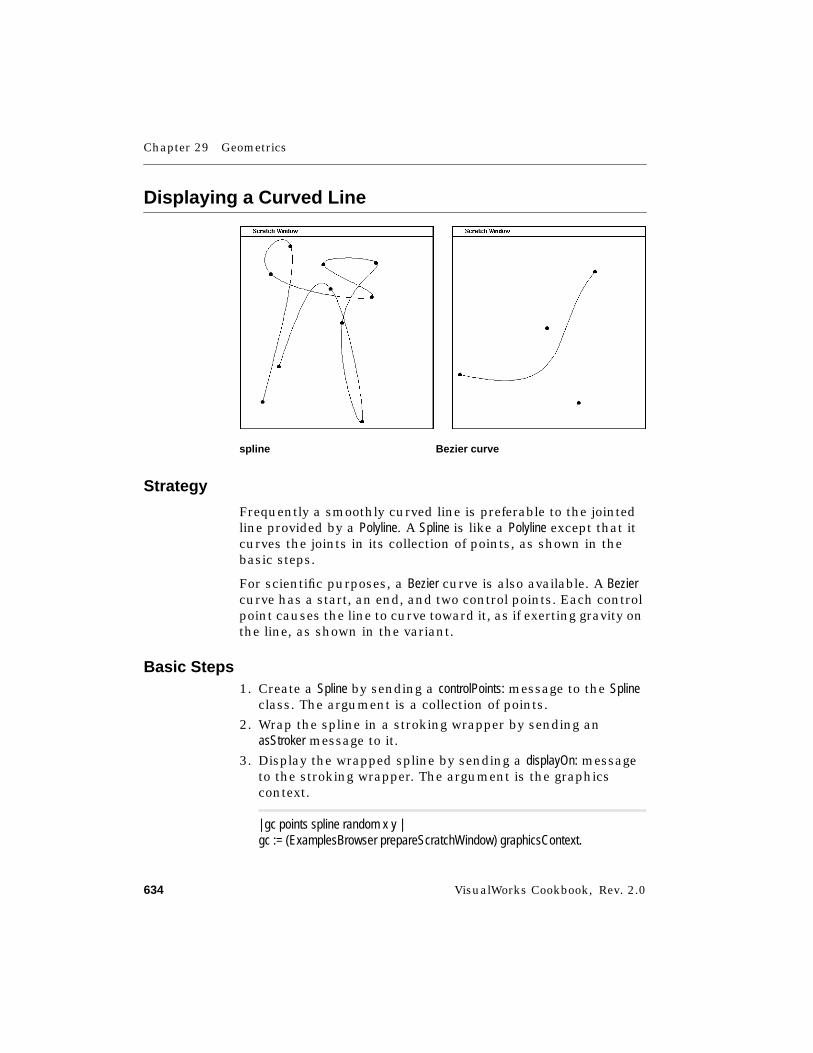
Chapter 29 Geometrics
634 VisualWorks Cookbook, Rev. 2.0
Displaying a Curved Line
Strategy
Frequently a smoothly curved line is preferable to the jointedline provided by a Polyline. A Spline is like a Polyline except that itcurves the joints in its collection of points, as shown in thebasic steps.
For scientific purposes, a Bezier curve is also available. A Beziercurve has a start, an end, and two control points. Each controlpoint causes the line to curve toward it, as if exerting gravity onthe line, as shown in the variant.
Basic Steps1. Create a Spline by sending a controlPoints: message to the Spline
class. The argument is a collection of points.
2. Wrap the spline in a stroking wrapper by sending anasStroker message to it.
3. Display the wrapped spline by sending a displayOn: messageto the stroking wrapper. The argument is the graphicscontext.
| gc points spline random x y |gc := (ExamplesBrowser prepareScratchWindow) graphicsContext.
spline Bezier curve
Displaying a Curved Line
VisualWorks Cookbook, Rev. 2.0 635
points := OrderedCollection new.random := Random new.
"Collect 10 random points."10 timesRepeat: [
x := random next * 400.y := random next * 400.points add: [email protected] displayDotOfDiameter: 8 at: points last].
spline := Spline controlPoints: points. "Basic Step 1"spline asStroker displayOn: gc. "Basic Steps 2, 3"
Variant
Displaying a Bezier Curve1. Create a Bezier by sending a start:end:controlPoint1:controlPoint2:
message to the Bezier class. Each of the arguments is apoint.
2. Wrap the Bezier curve in a stroking wrapper by sending anasStroker message to it.
3. Display the wrapped spline by sending a displayOn: messageto the stroking wrapper. The argument is the graphicscontext.
| gc points bezier random x y |gc := (ExamplesBrowser prepareScratchWindow) graphicsContext.points := OrderedCollection new.random := Random new.
"Collect 10 random points."4 timesRepeat: [
x := random next * 400.y := random next * 400.points add: [email protected] displayDotOfDiameter: 8 at: points last].
bezier := Bezier "Variant Step 1"start: (points at: 1)end: (points at: 2)
Chapter 29 Geometrics
636 VisualWorks Cookbook, Rev. 2.0
controlPoint1: (points at: 3)controlPoint2: (points at: 4).
bezier asStroker displayOn: gc. "Variant Steps 2, 3"
See Also■ “Changing the Line Thickness” on page 644
■ “Changing the Line Cap Style” on page 645
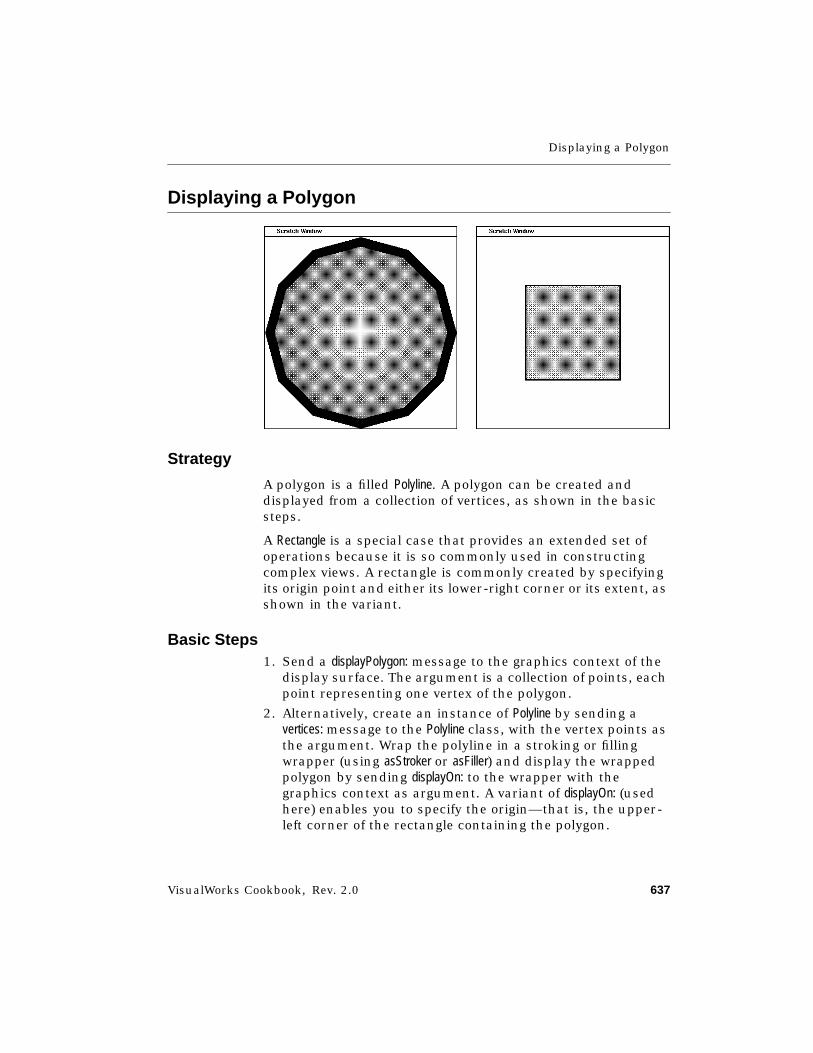
Displaying a Polygon
VisualWorks Cookbook, Rev. 2.0 637
Displaying a Polygon
Strategy
A polygon is a filled Polyline. A polygon can be created anddisplayed from a collection of vertices, as shown in the basicsteps.
A Rectangle is a special case that provides an extended set ofoperations because it is so commonly used in constructingcomplex views. A rectangle is commonly created by specifyingits origin point and either its lower-right corner or its extent, asshown in the variant.
Basic Steps1. Send a displayPolygon: message to the graphics context of the
display surface. The argument is a collection of points, eachpoint representing one vertex of the polygon.
2. Alternatively, create an instance of Polyline by sending avertices: message to the Polyline class, with the vertex points asthe argument. Wrap the polyline in a stroking or fillingwrapper (using asStroker or asFiller) and display the wrappedpolygon by sending displayOn: to the wrapper with thegraphics context as argument. A variant of displayOn: (usedhere) enables you to specify the origin—that is, the upper-left corner of the rectangle containing the polygon.
Chapter 29 Geometrics
638 VisualWorks Cookbook, Rev. 2.0
| gc points x y radians polyline origin |gc := (ExamplesBrowser prepareScratchWindow) graphicsContext.points := OrderedCollection new.0 to: 360 by: 30 do: [ :angle |
radians := angle degreesToRadians.x := 200 - (200 * radians cos).y := 200 - (200 * radians sin).points add: x@y].
gc displayPolygon: points. "Basic Step 1"
polyline := Polyline vertices: points. "Basic Step 2"0.9 to: 0.1 by: -0.1 do: [ :scale |
gc paint: (ColorValue brightness: 1 - scale).polyline := polyline scaledBy: scale.origin := 200@200 - (polyline bounds width / 2).polyline asFiller displayOn: gc at: origin].
Variant
Displaying a Rectangle1. Create a rectangle (in the example, rect1) by sending an extent:
message to the point representing the origin. The argumentis a point whose x value indicates the width of the rectangleand whose y value indicates the height.
2. Alternatively, create a rectangle (rect2) by sending a corner:message to the origin point. The argument is the lower-right corner point.
3. Wrap the rectangle in a stroking or filling wrapper (usingasStroker or asFiller) and display the resulting wrapper on agraphics context.
| gc rect1 rect2 border |gc := (ExamplesBrowser prepareScratchWindow) graphicsContext.
"Black rectangle"rect1 := 100@100 extent: 200@200. "Variant Step 1"rect1 asFiller displayOn: gc. "Variant Step 3"
Displaying a Polygon
VisualWorks Cookbook, Rev. 2.0 639
"Gray rectangle"border := 3.rect2 := (rect1 origin + border) corner: (rect1 corner - border). "Variant Step 2"rect2 asFiller displayOn: (gc paint: ColorValue gray). "Variant Step 3"
See Also■ “Changing the Line Thickness” on page 644
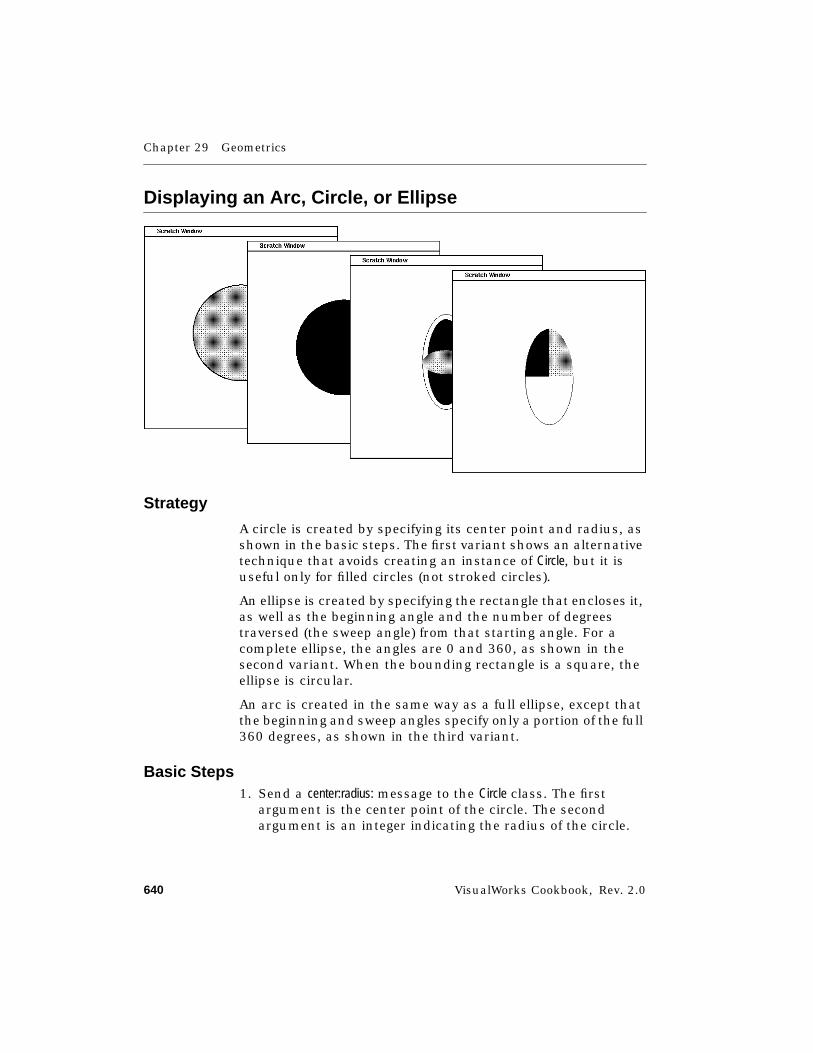
Chapter 29 Geometrics
640 VisualWorks Cookbook, Rev. 2.0
Displaying an Arc, Circle, or Ellipse
Strategy
A circle is created by specifying its center point and radius, asshown in the basic steps. The first variant shows an alternativetechnique that avoids creating an instance of Circle, but it isuseful only for filled circles (not stroked circles).
An ellipse is created by specifying the rectangle that encloses it,as well as the beginning angle and the number of degreestraversed (the sweep angle) from that starting angle. For acomplete ellipse, the angles are 0 and 360, as shown in thesecond variant. When the bounding rectangle is a square, theellipse is circular.
An arc is created in the same way as a full ellipse, except thatthe beginning and sweep angles specify only a portion of the full360 degrees, as shown in the third variant.
Basic Steps1. Send a center:radius: message to the Circle class. The first
argument is the center point of the circle. The secondargument is an integer indicating the radius of the circle.
Displaying an Arc, Circle, or Ellipse
VisualWorks Cookbook, Rev. 2.0 641
2. Wrap the circle in a stroking or filling wrapper by sendingasStroker or asFiller to it.
3. Display the wrapped circle by sending displayOn: to it, withthe graphics context as argument.
| gc circle |gc := (ExamplesBrowser prepareScratchWindow) graphicsContext.
"Blue filled circle"circle := Circle center: 200@200 radius: 100. "Basic Step 1"circle asFiller displayOn: (gc paint: ColorValue blue). "Basic Steps 2, 3"
"Black stroked circle"gc paint: ColorValue black; lineWidth: 2.circle asStroker displayOn: gc.
Variants
V1. Displaying a Filled Dot➤ Send a displayDotOfDiameter:at: message to the graphics context
of the display surface. The first argument is the diameter ofthe circle. The second argument is the center point.
| gc |gc := (ExamplesBrowser prepareScratchWindow) graphicsContext.
gc displayDotOfDiameter: 200 at: 200@200. "V1 Step"
V2. Displaying an Ellipse1. For a stroked ellipse, send a displayArcBoundedBy:start-
Angle:sweepAngle: message to the graphics context. The firstargument is the rectangle that encloses the ellipse. Thesecond argument is 0 and the third argument is 360.
2. For a filled ellipse, send adisplayWedgeBoundedBy:startAngle::sweepAngle: message to thegraphics context, with the same arguments as above.
3. Alternatively, create an instance of EllipticalArc by sending aboundingBox:startAngle:sweepAngle: message to that class. The
Chapter 29 Geometrics
642 VisualWorks Cookbook, Rev. 2.0
arguments are the same as above. Then wrap the ellipse ina stroking or filling wrapper and display it on the graphicscontext.
| gc ellipse |gc := (ExamplesBrowser prepareScratchWindow) graphicsContext.
"Black stroked ellipse"gc displayArcBoundedBy: (150@100 extent: 100@200) "V2 Step 1"
startAngle: 0sweepAngle: 360.
"Black filled ellipse"gc displayWedgeBoundedBy: (160@110 extent: 80@180) "V2 Step 2"
startAngle: 0sweepAngle: 360.
"Red ellipse"ellipse := EllipticalArc "V2 Step 3"
boundingBox: (150@175 extent: 100@50)startAngle: 0sweepAngle: 360.
ellipse asFiller displayOn: (gc paint: ColorValue red)
V3. Displaying an Arc➤ Use the same technique as for displaying a full ellipse, but
the startAngle argument is the angle at which the arc or wedgebegins, measured in degrees clockwise from the 3 o’clockposition. The sweepAngle argument is the number of degreesspanned by the arc, measured clockwise from the startingangle.
| gc arc box |gc := (ExamplesBrowser prepareScratchWindow) graphicsContext.box := 150@100 extent: 100@200.
"Black stroked arc"gc displayArcBoundedBy: box "V3 Step"
startAngle: 0sweepAngle: 180.

Displaying an Arc, Circle, or Ellipse
VisualWorks Cookbook, Rev. 2.0 643
"Black filled arc"gc displayWedgeBoundedBy: box "V3 Step"
startAngle: 180sweepAngle: 90.
"Red arc"arc := EllipticalArc "V3 Step"
boundingBox: boxstartAngle: 270sweepAngle: 90.
arc asFiller displayOn: (gc paint: ColorValue red)
See Also■ “Changing the Line Thickness” on page 644
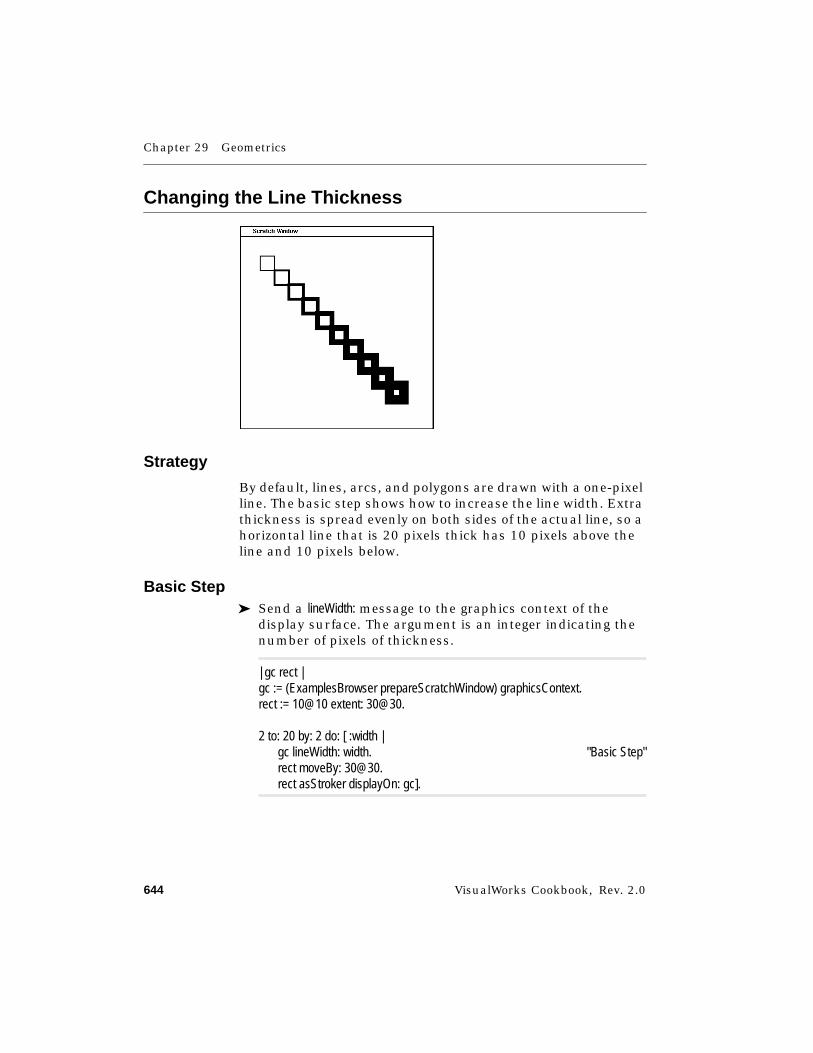
Chapter 29 Geometrics
644 VisualWorks Cookbook, Rev. 2.0
Changing the Line Thickness
Strategy
By default, lines, arcs, and polygons are drawn with a one-pixelline. The basic step shows how to increase the line width. Extrathickness is spread evenly on both sides of the actual line, so ahorizontal line that is 20 pixels thick has 10 pixels above theline and 10 pixels below.
Basic Step➤ Send a lineWidth: message to the graphics context of the
display surface. The argument is an integer indicating thenumber of pixels of thickness.
| gc rect |gc := (ExamplesBrowser prepareScratchWindow) graphicsContext.rect := 10@10 extent: 30@30.
2 to: 20 by: 2 do: [ :width |gc lineWidth: width. "Basic Step"rect moveBy: [email protected] asStroker displayOn: gc].
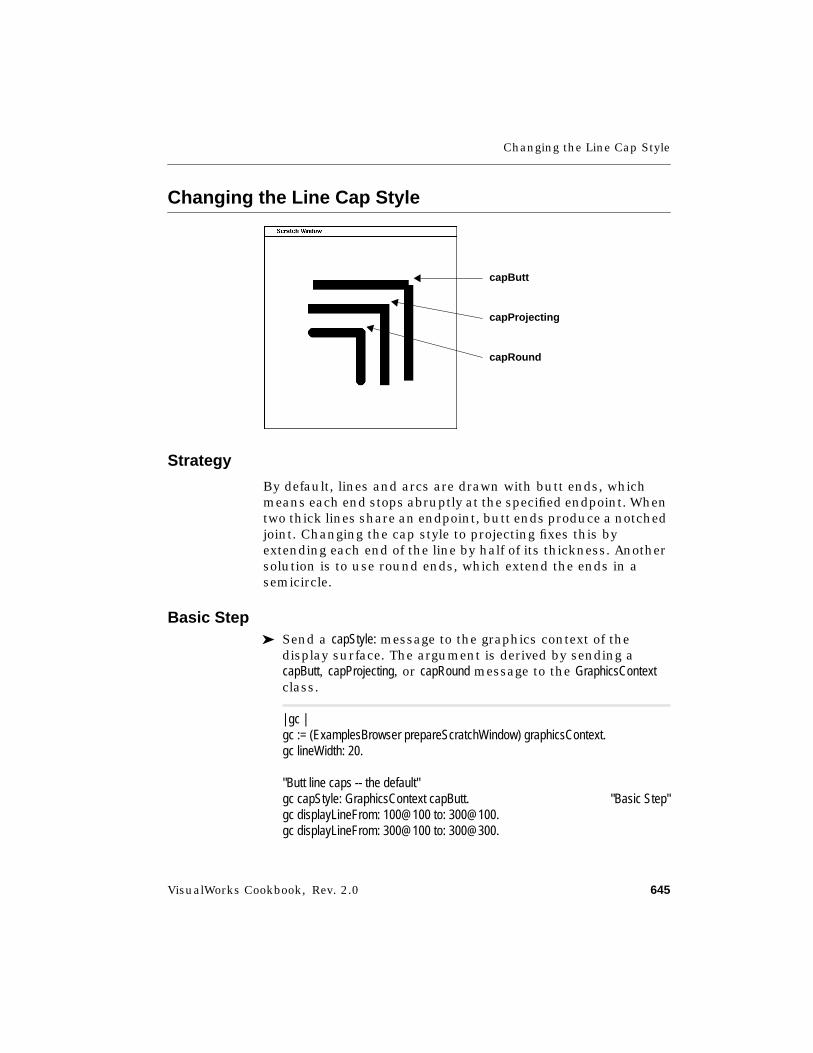
Changing the Line Cap Style
VisualWorks Cookbook, Rev. 2.0 645
Changing the Line Cap Style
Strategy
By default, lines and arcs are drawn with butt ends, whichmeans each end stops abruptly at the specified endpoint. Whentwo thick lines share an endpoint, butt ends produce a notchedjoint. Changing the cap style to projecting fixes this byextending each end of the line by half of its thickness. Anothersolution is to use round ends, which extend the ends in asemicircle.
Basic Step➤ Send a capStyle: message to the graphics context of the
display surface. The argument is derived by sending acapButt, capProjecting, or capRound message to the GraphicsContextclass.
| gc |gc := (ExamplesBrowser prepareScratchWindow) graphicsContext.gc lineWidth: 20.
"Butt line caps -- the default"gc capStyle: GraphicsContext capButt. "Basic Step"gc displayLineFrom: 100@100 to: [email protected] displayLineFrom: 300@100 to: 300@300.
capButt
capProjecting
capRound
Chapter 29 Geometrics
646 VisualWorks Cookbook, Rev. 2.0
"Projecting line caps"gc capStyle: GraphicsContext capProjecting. "Basic Step"gc displayLineFrom: 100@150 to: [email protected] displayLineFrom: 250@150 to: 250@300.
"Round line caps"gc capStyle: GraphicsContext capRound. "Basic Step"gc displayLineFrom: 100@200 to: [email protected] displayLineFrom: 200@200 to: 200@300.
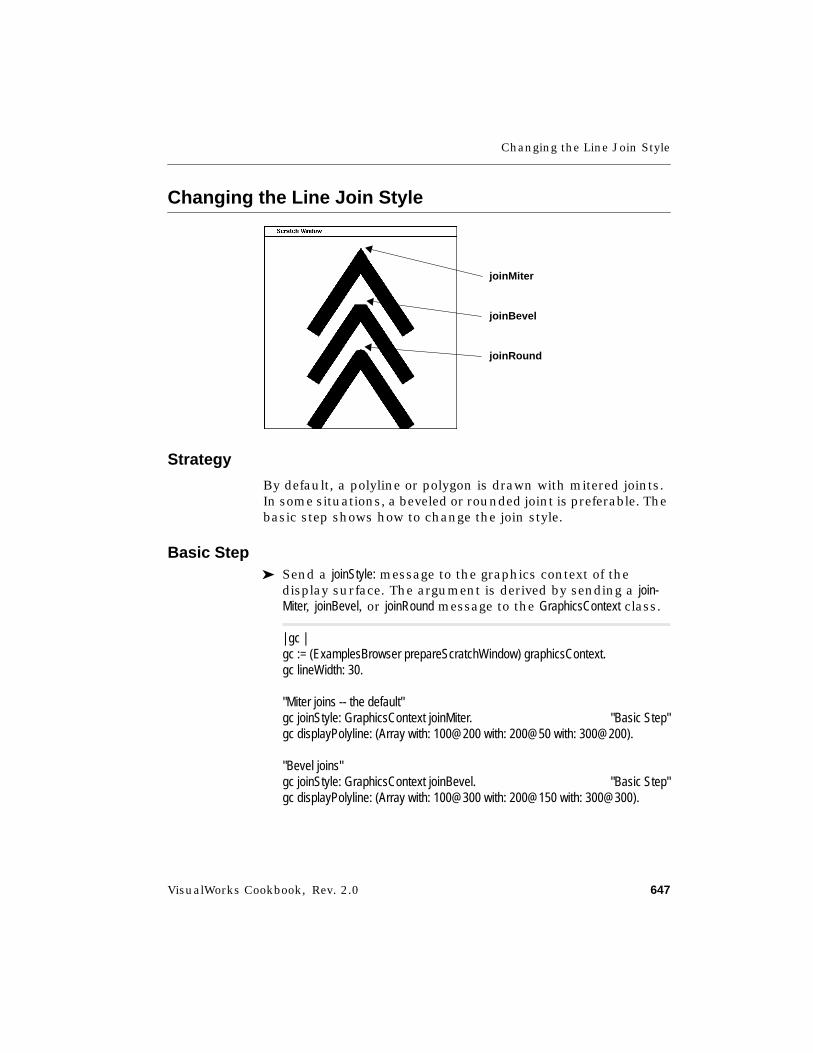
Changing the Line Join Style
VisualWorks Cookbook, Rev. 2.0 647
Changing the Line Join Style
Strategy
By default, a polyline or polygon is drawn with mitered joints.In some situations, a beveled or rounded joint is preferable. Thebasic step shows how to change the join style.
Basic Step➤ Send a joinStyle: message to the graphics context of the
display surface. The argument is derived by sending a join-Miter, joinBevel, or joinRound message to the GraphicsContext class.
| gc |gc := (ExamplesBrowser prepareScratchWindow) graphicsContext.gc lineWidth: 30.
"Miter joins -- the default"gc joinStyle: GraphicsContext joinMiter. "Basic Step"gc displayPolyline: (Array with: 100@200 with: 200@50 with: 300@200).
"Bevel joins"gc joinStyle: GraphicsContext joinBevel. "Basic Step"gc displayPolyline: (Array with: 100@300 with: 200@150 with: 300@300).
joinMiter
joinBevel
joinRound
Chapter 29 Geometrics
648 VisualWorks Cookbook, Rev. 2.0
"Round joins"gc joinStyle: GraphicsContext joinRound. "Basic Step"gc displayPolyline: (Array with: 100@400 with: 200@250 with: 300@400).
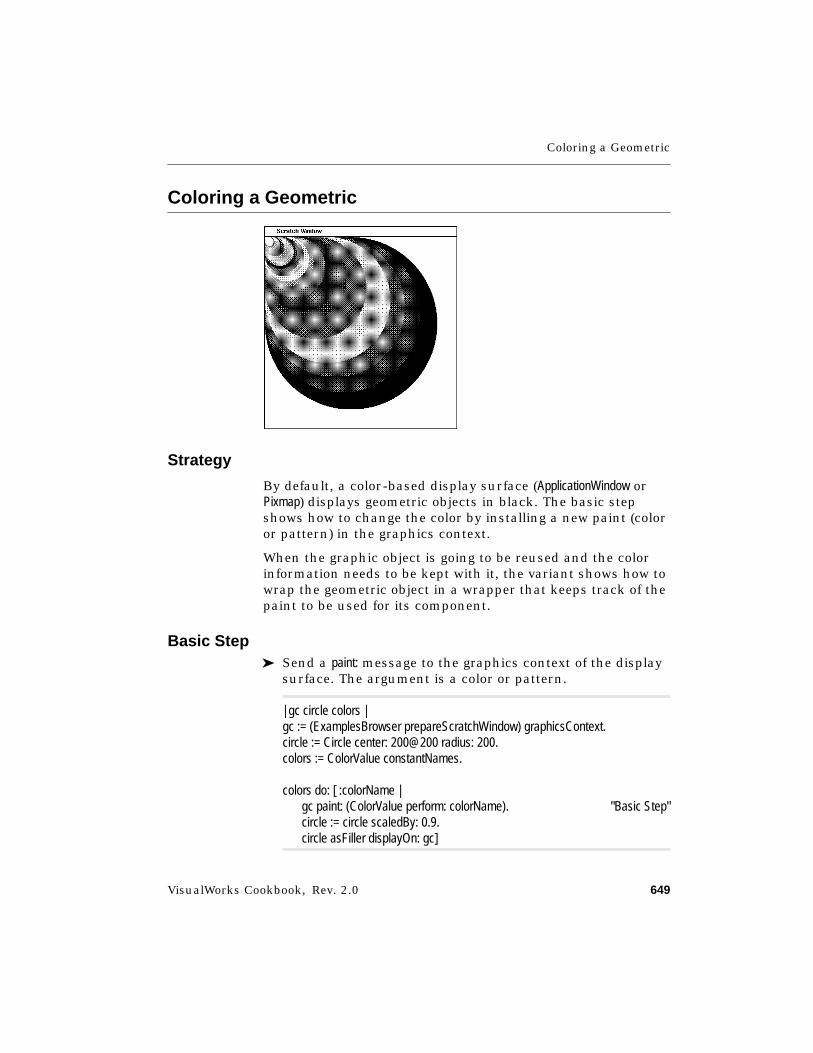
Coloring a Geometric
VisualWorks Cookbook, Rev. 2.0 649
Coloring a Geometric
Strategy
By default, a color-based display surface (ApplicationWindow orPixmap) displays geometric objects in black. The basic stepshows how to change the color by installing a new paint (coloror pattern) in the graphics context.
When the graphic object is going to be reused and the colorinformation needs to be kept with it, the variant shows how towrap the geometric object in a wrapper that keeps track of thepaint to be used for its component.
Basic Step➤ Send a paint: message to the graphics context of the display
surface. The argument is a color or pattern.
| gc circle colors |gc := (ExamplesBrowser prepareScratchWindow) graphicsContext.circle := Circle center: 200@200 radius: 200.colors := ColorValue constantNames.
colors do: [ :colorName |gc paint: (ColorValue perform: colorName). "Basic Step"circle := circle scaledBy: 0.9.circle asFiller displayOn: gc]
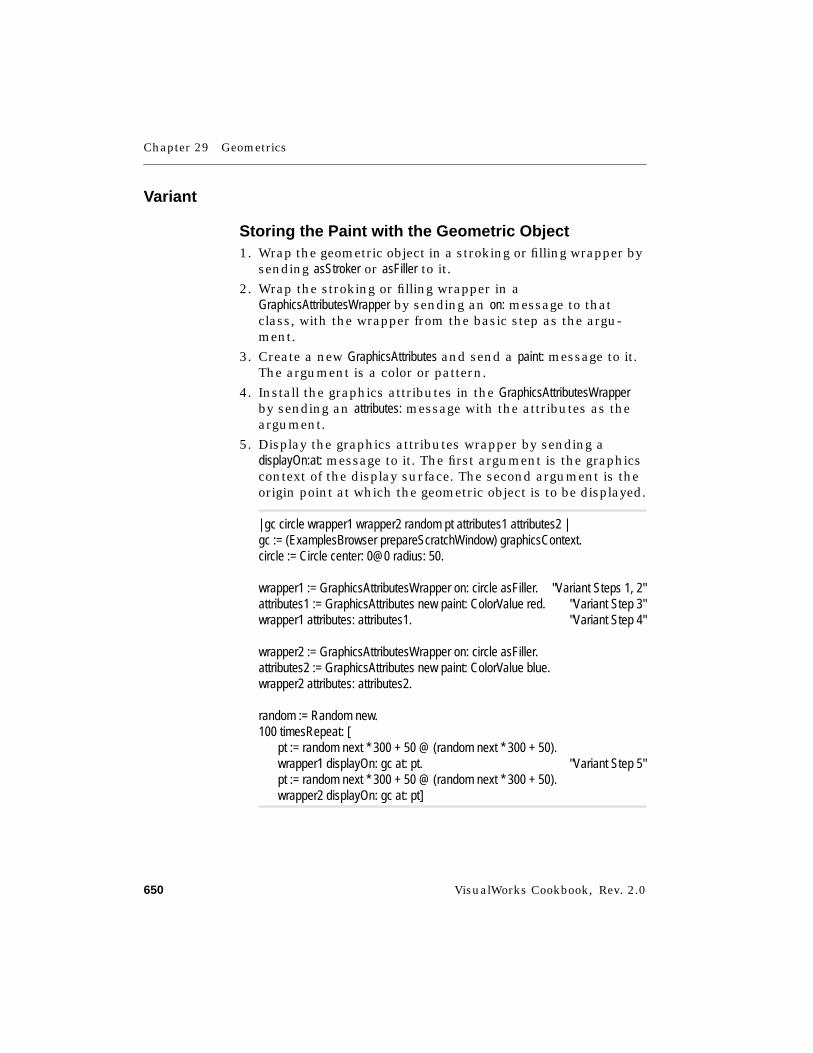
Chapter 29 Geometrics
650 VisualWorks Cookbook, Rev. 2.0
Variant
Storing the Paint with the Geometric Object1. Wrap the geometric object in a stroking or filling wrapper by
sending asStroker or asFiller to it.
2. Wrap the stroking or filling wrapper in aGraphicsAttributesWrapper by sending an on: message to thatclass, with the wrapper from the basic step as the argu-ment.
3. Create a new GraphicsAttributes and send a paint: message to it.The argument is a color or pattern.
4. Install the graphics attributes in the GraphicsAttributesWrapperby sending an attributes: message with the attributes as theargument.
5. Display the graphics attributes wrapper by sending adisplayOn:at: message to it. The first argument is the graphicscontext of the display surface. The second argument is theorigin point at which the geometric object is to be displayed.
| gc circle wrapper1 wrapper2 random pt attributes1 attributes2 |gc := (ExamplesBrowser prepareScratchWindow) graphicsContext.circle := Circle center: 0@0 radius: 50.
wrapper1 := GraphicsAttributesWrapper on: circle asFiller. "Variant Steps 1, 2"attributes1 := GraphicsAttributes new paint: ColorValue red. "Variant Step 3"wrapper1 attributes: attributes1. "Variant Step 4"
wrapper2 := GraphicsAttributesWrapper on: circle asFiller.attributes2 := GraphicsAttributes new paint: ColorValue blue.wrapper2 attributes: attributes2.
random := Random new.100 timesRepeat: [
pt := random next * 300 + 50 @ (random next * 300 + 50).wrapper1 displayOn: gc at: pt. "Variant Step 5"pt := random next * 300 + 50 @ (random next * 300 + 50).wrapper2 displayOn: gc at: pt]
Coloring a Geometric
VisualWorks Cookbook, Rev. 2.0 651
See Also■ “Creating a Color” on page 686
■ “Creating a Tiled Pattern” on page 692
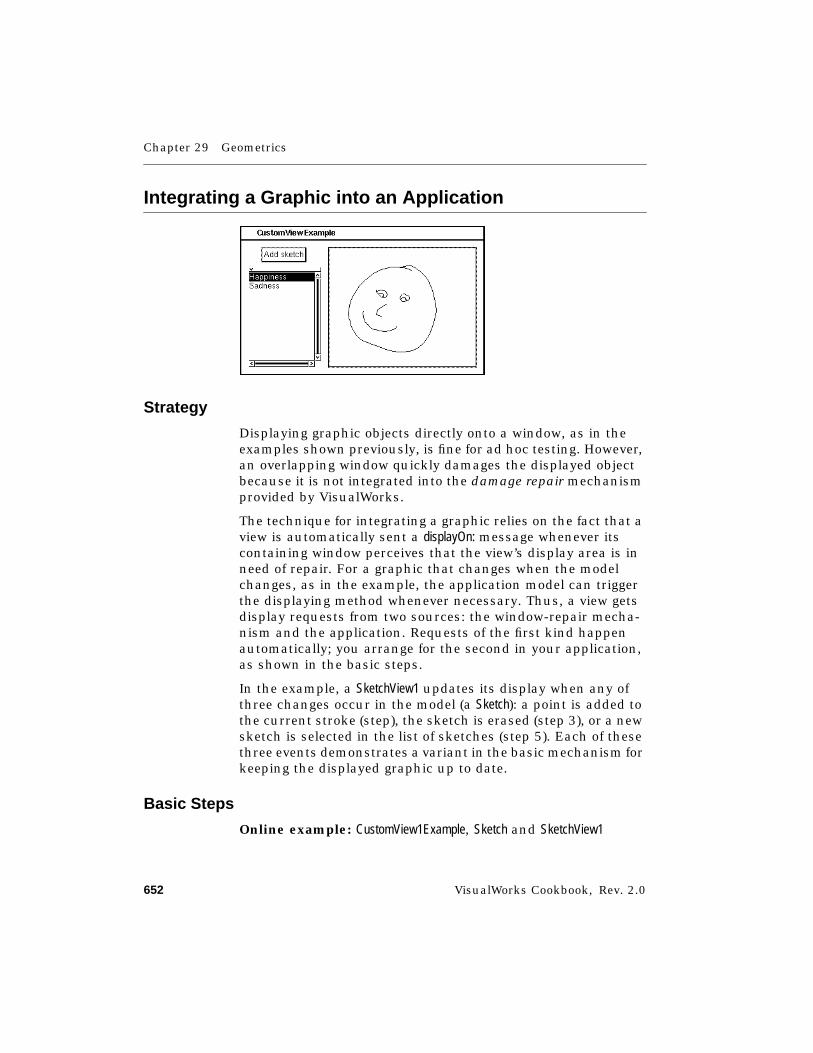
Chapter 29 Geometrics
652 VisualWorks Cookbook, Rev. 2.0
Integrating a Graphic into an Application
Strategy
Displaying graphic objects directly onto a window, as in theexamples shown previously, is fine for ad hoc testing. However,an overlapping window quickly damages the displayed objectbecause it is not integrated into the damage repair mechanismprovided by VisualWorks.
The technique for integrating a graphic relies on the fact that aview is automatically sent a displayOn: message whenever itscontaining window perceives that the view’s display area is inneed of repair. For a graphic that changes when the modelchanges, as in the example, the application model can triggerthe displaying method whenever necessary. Thus, a view getsdisplay requests from two sources: the window-repair mecha-nism and the application. Requests of the first kind happenautomatically; you arrange for the second in your application,as shown in the basic steps.
In the example, a SketchView1 updates its display when any ofthree changes occur in the model (a Sketch): a point is added tothe current stroke (step), the sketch is erased (step 3), or a newsketch is selected in the list of sketches (step 5). Each of thesethree events demonstrates a variant in the basic mechanism forkeeping the displayed graphic up to date.
Basic Steps
Online example: CustomView1Example, Sketch and SketchView1
Integrating a Graphic into an Application
VisualWorks Cookbook, Rev. 2.0 653
1. In the view that is responsible for displaying the graphic (inthe example, SketchView1), create a displayOn: method. Thismethod is responsible for creating the graphic objects basedon data from the model. The method displays the graphicobjects on the graphics context that is supplied as themethod argument. This method is triggered whenever aninvalidate message is received by the view, as when windowdamage occurs or the view is notified of a change in themodel.
displayOn: aGraphicsContext "Basic Step 1"self model isNil ifTrue: [^self].
self model strokes do: [ :stroke |aGraphicsContext displayPolyline: stroke].
2. In any method in the domain model (Sketch) that affects thegraphics being displayed, send a changed:with: message to self.The first argument is a symbol identifying the nature of thechange (#stroke, because a point has been added to thecurrent stroke in the sketch). The second argument is adata or control parameter that will be needed by the view todisplay the appropriate graphic (in the example, a linesegment is sent, which is all that the view needs to add toits display of the sketch). The changed:with: message causes anupdate:with: message with the same parameters to be sent toall dependents of the model—the view is the primary andoften the only dependent.
add: aPoint"Add aPoint to the current stroke."
self strokes last add: aPoint.self changed: #stroke with: self currentLineSegment. "Basic Step "
3. When the change in the model is such that the view needsno data or control parameter, use nil as the secondargument in the changed:with: message. In the example, whenthe Sketch model erases all or part of itself, it specifies #eraseas the first argument in the changed:with: message and nil asthe second argument, because the view has no way of
Chapter 29 Geometrics
654 VisualWorks Cookbook, Rev. 2.0
removing part of the drawing except to display the newsketch entirely.
eraseAll"Erase my contents."
self strokes removeAll: self strokes copy.self changed: #erase with: nil. "Basic Step 3"
4. In the view (SketchView1), create an update:with: method in anupdating protocol. This method is invoked by the modelwhenever it changes and is responsible for updating itsdisplay based on the aspect of the model that changed. Inthe example, it displays a new line when the #stroke aspect ischanged. When the sketch is #erased, the update:with: methodsends invalidate to the view. This inherited method causes adisplayOn: message to be sent to the view with the appropriategraphics context.
update: anAspect with: anObject "Basic Step 4""When a point is added to the model..."anAspect == #stroke
ifTrue: [anObject asStroker displayOn: self graphicsContext].
"When the model erases its contents..."anAspect == #erase
ifTrue: [self invalidate].
5. When an entirely new model is given to the view using itsmodel: method, the view sends invalidate to itself, again causinga displayOn: message to be sent to the view with the appro-priate graphics context. Because model: overrides an inher-ited method with that name, begin the method by invokingthe inherited version by sending a model: message to super.
model: aModelsuper model: aModel.self invalidate. "Basic Step 5"
"Tell the controller where to send menu messages."self controller performer: aModel.
Integrating a Graphic into an Application
VisualWorks Cookbook, Rev. 2.0 655
See Also■ “Defining What a View Displays” on page 380


VisualWorks Cookbook, Rev. 2.0 657
Chapter 30
Images, Cursors, and Icons
Creating a Graphic Image 658Displaying an Image 662Coloring Pixels in an Image 664Masking Part of an Image 666Expanding or Shrinking an Image 668Flopping an Image 669Rotating an Image 670Layering Two Images 672Caching an Image 674Animating an Image 675Creating a Cursor 678Changing the Current Cursor 681Creating an Icon 682Associating an Icon with a Window 683
See Also■ “Geometrics” on page 629
■ “Color” on page 685
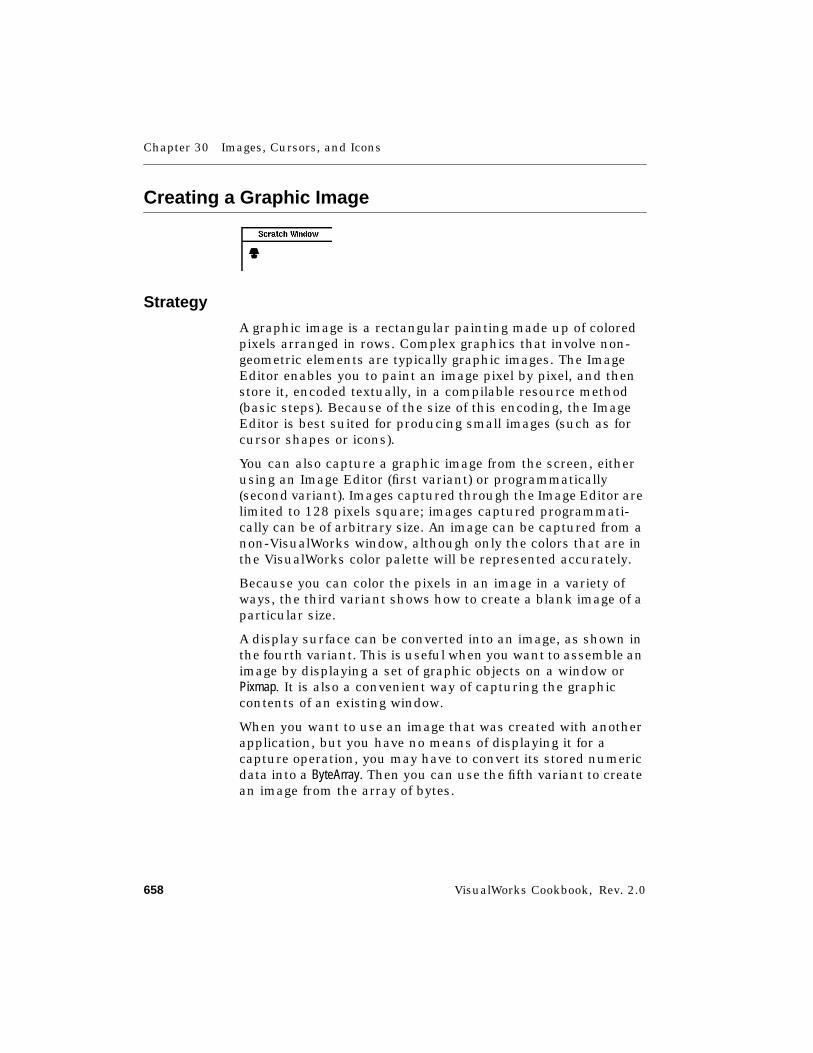
Chapter 30 Images, Cursors, and Icons
658 VisualWorks Cookbook, Rev. 2.0
Creating a Graphic Image
Strategy
A graphic image is a rectangular painting made up of coloredpixels arranged in rows. Complex graphics that involve non-geometric elements are typically graphic images. The ImageEditor enables you to paint an image pixel by pixel, and thenstore it, encoded textually, in a compilable resource method(basic steps). Because of the size of this encoding, the ImageEditor is best suited for producing small images (such as forcursor shapes or icons).
You can also capture a graphic image from the screen, eitherusing an Image Editor (first variant) or programmatically(second variant). Images captured through the Image Editor arelimited to 128 pixels square; images captured programmati-cally can be of arbitrary size. An image can be captured from anon-VisualWorks window, although only the colors that are inthe VisualWorks color palette will be represented accurately.
Because you can color the pixels in an image in a variety ofways, the third variant shows how to create a blank image of aparticular size.
A display surface can be converted into an image, as shown inthe fourth variant. This is useful when you want to assemble animage by displaying a set of graphic objects on a window orPixmap. It is also a convenient way of capturing the graphiccontents of an existing window.
When you want to use an image that was created with anotherapplication, but you have no means of displaying it for acapture operation, you may have to convert its stored numericdata into a ByteArray. Then you can use the fifth variant to createan image from the array of bytes.
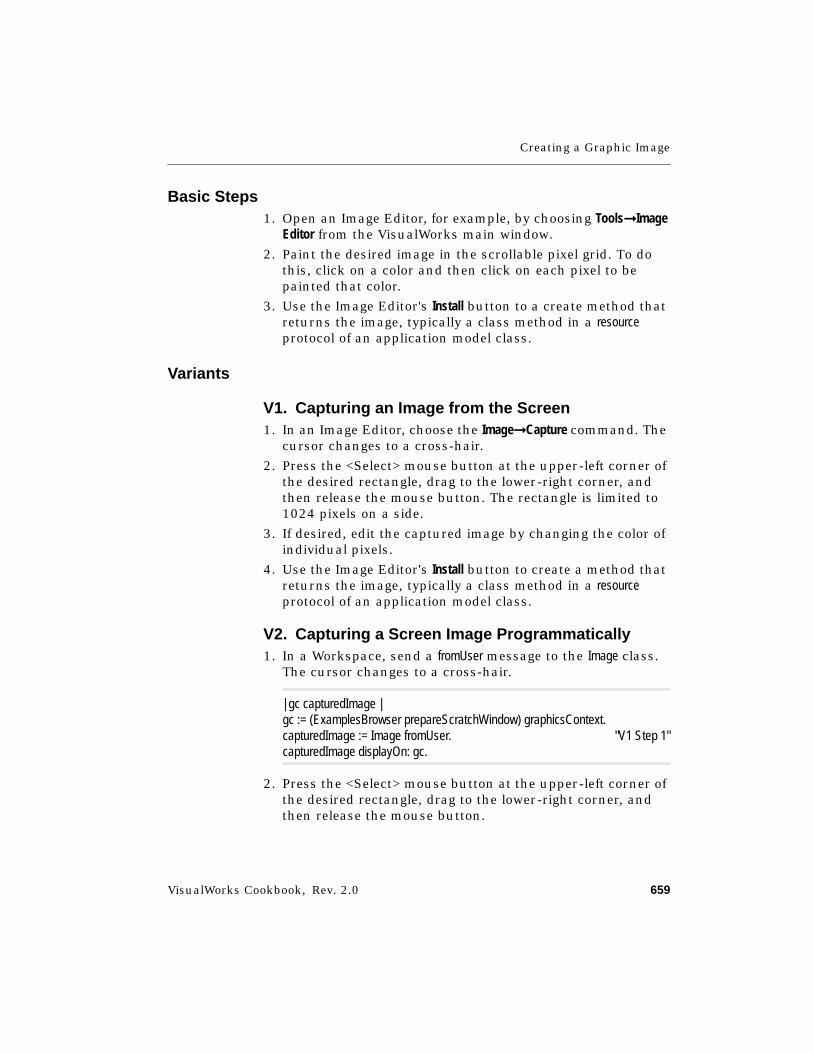
Creating a Graphic Image
VisualWorks Cookbook, Rev. 2.0 659
Basic Steps1. Open an Image Editor, for example, by choosing Tools➞Image
Editor from the VisualWorks main window.
2. Paint the desired image in the scrollable pixel grid. To dothis, click on a color and then click on each pixel to bepainted that color.
3. Use the Image Editor's Install button to a create method thatreturns the image, typically a class method in a resourceprotocol of an application model class.
Variants
V1. Capturing an Image from the Screen1. In an Image Editor, choose the Image➞Capture command. The
cursor changes to a cross-hair.
2. Press the <Select> mouse button at the upper-left corner ofthe desired rectangle, drag to the lower-right corner, andthen release the mouse button. The rectangle is limited to1024 pixels on a side.
3. If desired, edit the captured image by changing the color ofindividual pixels.
4. Use the Image Editor's Install button to create a method thatreturns the image, typically a class method in a resourceprotocol of an application model class.
V2. Capturing a Screen Image Programmatically1. In a Workspace, send a fromUser message to the Image class.
The cursor changes to a cross-hair.
| gc capturedImage |gc := (ExamplesBrowser prepareScratchWindow) graphicsContext.capturedImage := Image fromUser. "V1 Step 1"capturedImage displayOn: gc.
2. Press the <Select> mouse button at the upper-left corner ofthe desired rectangle, drag to the lower-right corner, andthen release the mouse button.
Chapter 30 Images, Cursors, and Icons
660 VisualWorks Cookbook, Rev. 2.0
V3. Creating a Blank Image➤ Send an extent:depth:palette: message to the Image class. The
extent argument is a Point whose x coordinate controls thewidth of the image (in pixels) and whose y coordinatecontrols the height. The depth argument is an integer indi-cating the color depth of the image—that is, the number ofbits required to represent a color in the palette that theimage uses. The palette argument is a color palette fromwhich the image draws its colors.
"Inspect"| blankImage palette |palette := Screen default colorPalette.
blankImage := Image "V3 Step"extent: 8@8depth: (palette depth)palette: palette.
^blankImage
V4. Creating an Image from a Display Surface➤ Send an asImage message to a display surface (window,
Pixmap, or Mask). In the case of a window, the window mustnot be overlapped by other windows.
| gc window image |gc := (ExamplesBrowser prepareScratchWindow) graphicsContext.window := Window currentWindow.
window raise.
image := window asImage. "V4 Step"image displayOn: gc.
V5. Creating an Image from a Byte Array➤ Send an extent:depth:palette:bits:pad: message to the Image class.
The first three arguments are the same as in step V3. Thebits argument is a ByteArray specifying the color for each pixel,using the color encodings from the palette with a multipleof 32 bits per row. The pad argument is 8, 16, or 32.
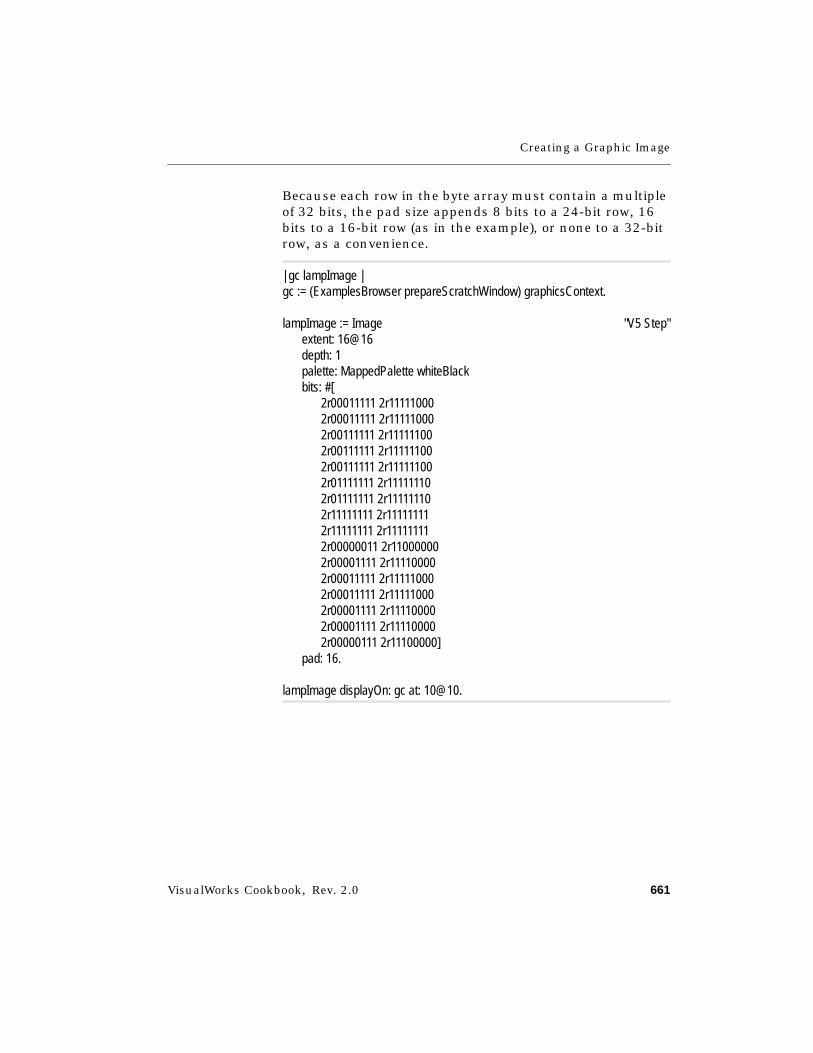
Creating a Graphic Image
VisualWorks Cookbook, Rev. 2.0 661
Because each row in the byte array must contain a multipleof 32 bits, the pad size appends 8 bits to a 24-bit row, 16bits to a 16-bit row (as in the example), or none to a 32-bitrow, as a convenience.
| gc lampImage |gc := (ExamplesBrowser prepareScratchWindow) graphicsContext.
lampImage := Image "V5 Step"extent: 16@16depth: 1palette: MappedPalette whiteBlackbits: #[
2r00011111 2r111110002r00011111 2r111110002r00111111 2r111111002r00111111 2r111111002r00111111 2r111111002r01111111 2r111111102r01111111 2r111111102r11111111 2r111111112r11111111 2r111111112r00000011 2r110000002r00001111 2r111100002r00011111 2r111110002r00011111 2r111110002r00001111 2r111100002r00001111 2r111100002r00000111 2r11100000]
pad: 16.
lampImage displayOn: gc at: 10@10.
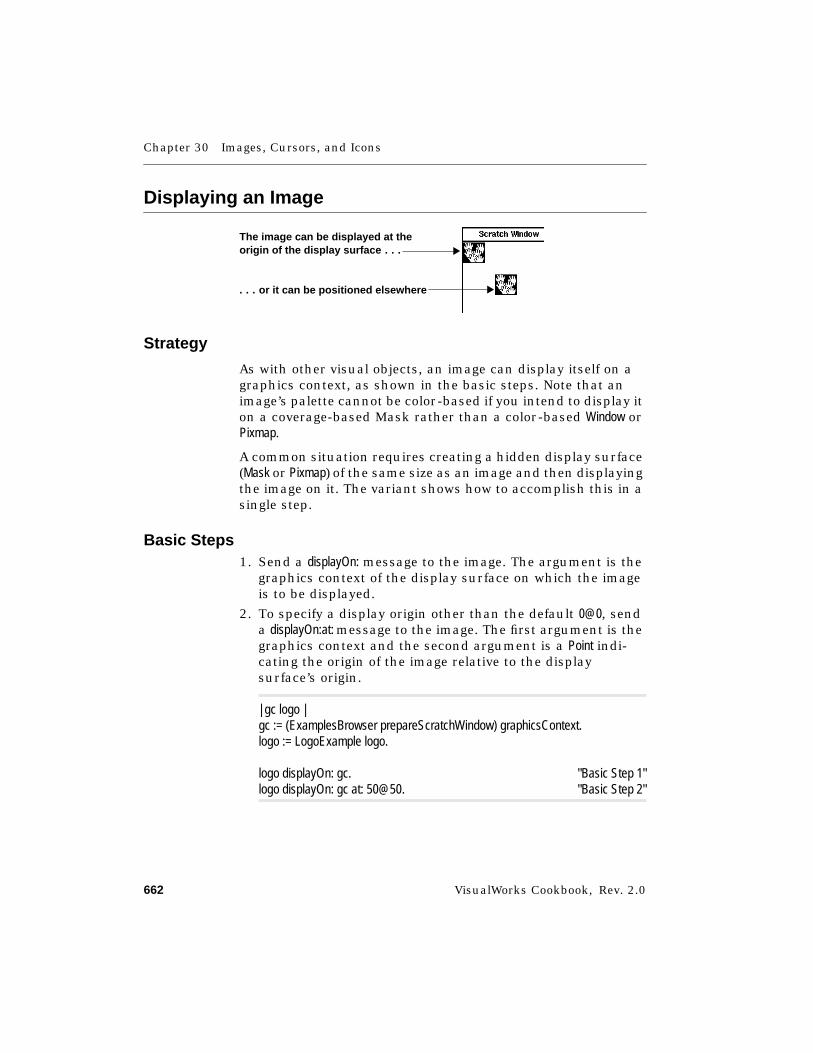
Chapter 30 Images, Cursors, and Icons
662 VisualWorks Cookbook, Rev. 2.0
Displaying an Image
Strategy
As with other visual objects, an image can display itself on agraphics context, as shown in the basic steps. Note that animage’s palette cannot be color-based if you intend to display iton a coverage-based Mask rather than a color-based Window orPixmap.
A common situation requires creating a hidden display surface(Mask or Pixmap) of the same size as an image and then displayingthe image on it. The variant shows how to accomplish this in asingle step.
Basic Steps1. Send a displayOn: message to the image. The argument is the
graphics context of the display surface on which the imageis to be displayed.
2. To specify a display origin other than the default 0@0, senda displayOn:at: message to the image. The first argument is thegraphics context and the second argument is a Point indi-cating the origin of the image relative to the displaysurface’s origin.
| gc logo |gc := (ExamplesBrowser prepareScratchWindow) graphicsContext.logo := LogoExample logo.
logo displayOn: gc. "Basic Step 1"logo displayOn: gc at: 50@50. "Basic Step 2"
The image can be displayed at theorigin of the display surfac e . . .
. . . or it can be positioned elsewhere
Displaying an Image
VisualWorks Cookbook, Rev. 2.0 663
Variant
Creating a Display Surface Bearing an Image➤ Send an asRetainedMedium message to the image. If the image
has a color-based palette, a Pixmap will be returned. If theimage has a coverage-based palette, a Mask will be returned.
"Inspect"| image pixmap |image := LogoExample logo.
pixmap := image asRetainedMedium. "Variant Step"^pixmap
See Also■ “Defining What a View Displays” on page 380
■ “Integrating a Graphic into an Application” on page 652
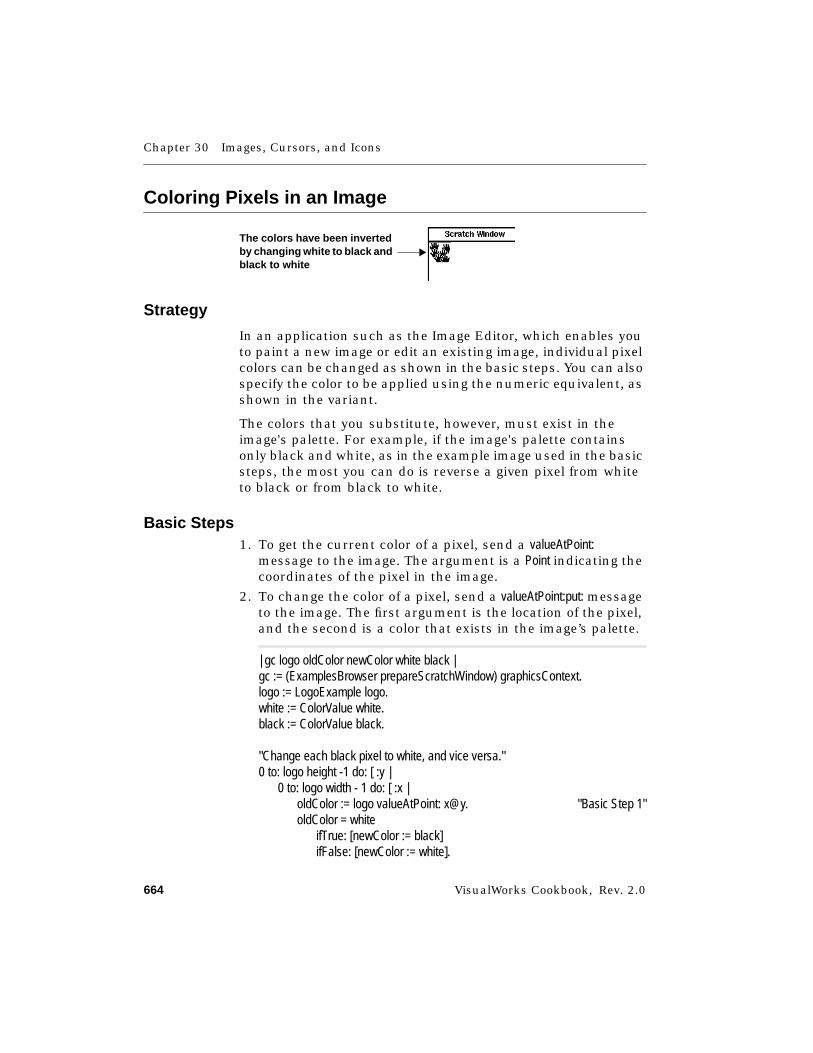
Chapter 30 Images, Cursors, and Icons
664 VisualWorks Cookbook, Rev. 2.0
Coloring Pixels in an Image
Strategy
In an application such as the Image Editor, which enables youto paint a new image or edit an existing image, individual pixelcolors can be changed as shown in the basic steps. You can alsospecify the color to be applied using the numeric equivalent, asshown in the variant.
The colors that you substitute, however, must exist in theimage's palette. For example, if the image's palette containsonly black and white, as in the example image used in the basicsteps, the most you can do is reverse a given pixel from whiteto black or from black to white.
Basic Steps1. To get the current color of a pixel, send a valueAtPoint:
message to the image. The argument is a Point indicating thecoordinates of the pixel in the image.
2. To change the color of a pixel, send a valueAtPoint:put: messageto the image. The first argument is the location of the pixel,and the second is a color that exists in the image’s palette.
| gc logo oldColor newColor white black |gc := (ExamplesBrowser prepareScratchWindow) graphicsContext.logo := LogoExample logo.white := ColorValue white.black := ColorValue black.
"Change each black pixel to white, and vice versa."0 to: logo height -1 do: [ :y |
0 to: logo width - 1 do: [ :x |oldColor := logo valueAtPoint: x@y. "Basic Step 1"oldColor = white
ifTrue: [newColor := black]ifFalse: [newColor := white].
The colors have been invertedby changing white to black andblack to white
Coloring Pixels in an Image
VisualWorks Cookbook, Rev. 2.0 665
logo valueAtPoint: x@y put: newColor]]. "Basic Step 2"
logo displayOn: gc
Variant
Specifying the New Color by Its Encoded Number1. To get the current color number of a pixel, send an atPoint:
message to the image. The argument is a Point indicating thecoordinates of the pixel in the image. The number thatidentifies the pixel color in the image’s palette is returned.
2. To change the color of a pixel, send an atPoint:put: message tothe image. The first argument is the location of the pixeland the second argument is a color number that exists inthe image’s palette.
| gc logo oldColor newColor |gc := (ExamplesBrowser prepareScratchWindow) graphicsContext.logo := LogoExample logo.
"Change each black pixel to white, and vice versa."0 to: logo height -1 do: [ :y |
0 to: logo width - 1 do: [ :x |oldColor := logo atPoint: x@y. "Variant Step 1"oldColor = 1
ifTrue: [newColor := 0]ifFalse: [newColor := 1].
logo atPoint: x@y put: newColor]]. "Variant Step 2"
logo displayOn: gc
See Also■ “Creating a Color” on page 686
■ “Changing an Image’s Color Palette” on page 696
■ “Changing the Policy for Rendering Colors” on page 698
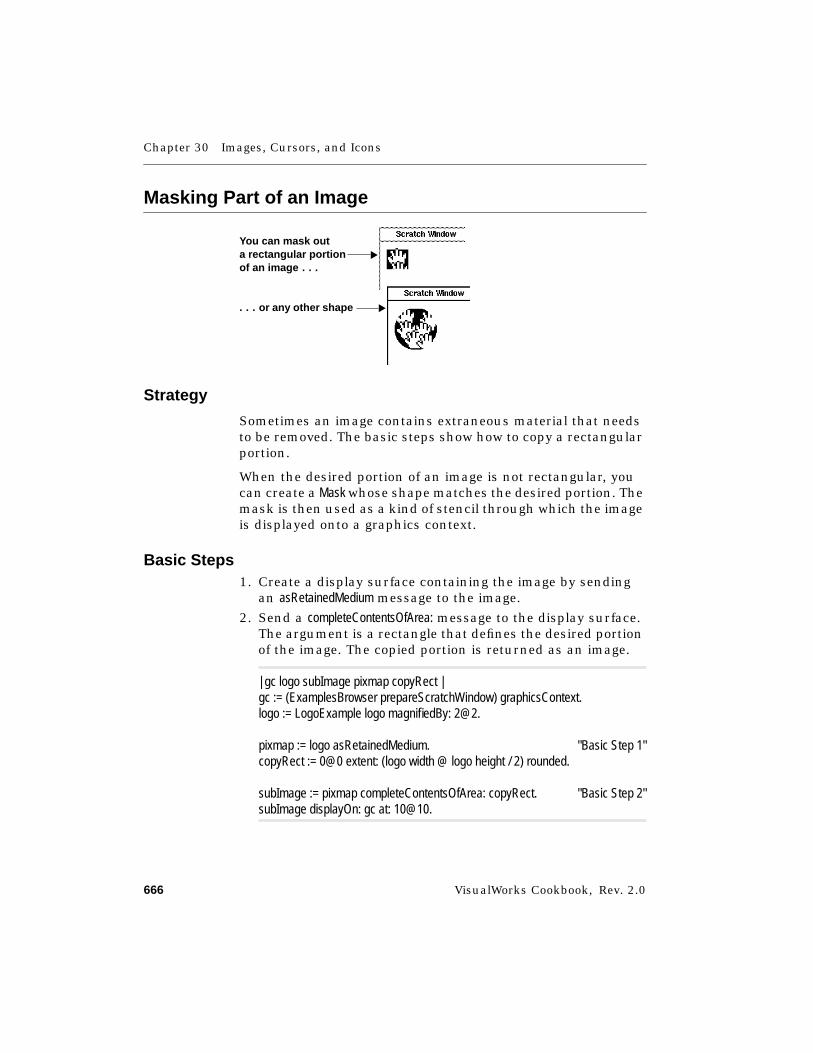
Chapter 30 Images, Cursors, and Icons
666 VisualWorks Cookbook, Rev. 2.0
Masking Part of an Image
Strategy
Sometimes an image contains extraneous material that needsto be removed. The basic steps show how to copy a rectangularportion.
When the desired portion of an image is not rectangular, youcan create a Mask whose shape matches the desired portion. Themask is then used as a kind of stencil through which the imageis displayed onto a graphics context.
Basic Steps1. Create a display surface containing the image by sending
an asRetainedMedium message to the image.
2. Send a completeContentsOfArea: message to the display surface.The argument is a rectangle that defines the desired portionof the image. The copied portion is returned as an image.
| gc logo subImage pixmap copyRect |gc := (ExamplesBrowser prepareScratchWindow) graphicsContext.logo := LogoExample logo magnifiedBy: 2@2.
pixmap := logo asRetainedMedium. "Basic Step 1"copyRect := 0@0 extent: (logo width @ logo height / 2) rounded.
subImage := pixmap completeContentsOfArea: copyRect. "Basic Step 2"subImage displayOn: gc at: 10@10.
You can mask outa rectangular portionof an imag e . . .
. . . or any other shape
Masking Part of an Image
VisualWorks Cookbook, Rev. 2.0 667
Variant
Masking a Nonrectangular Portion1. Create a display surface on which the image has been
displayed by sending asRetainedMedium to the image.
2. Create the desired mask by sending an extent: message to theMask class. The argument is a Point indicating the size of themask. You can display the desired shape or shapes on theMask as with a window or other display surface (in theexample, a solid oval is displayed). The shapes on the maskdefine the regions through which the image will be visible.
3. Send a copyArea:from:sourceOffset:destinationOffset: message to thegraphics context of the destination display surface (in theexample, the scratch window). The copyArea argument is themask. The from argument is the graphics context of thesource display surface (the pixmap containing the logo).The sourceOffset argument is a Point indicating the origin of themask when placed over the source display surface. The desti-nationOffset argument is the origin of the subimage whendisplayed on the destination display surface.
| gc logo pixmap ovalMask |gc := (ExamplesBrowser prepareScratchWindow) graphicsContext.logo := LogoExample logo magnifiedBy: [email protected] := logo asRetainedMedium. "Variant Step 1"
ovalMask := Mask extent: 66@66. "Variant Step 2"ovalMask graphicsContext
displayWedgeBoundedBy: ovalMask boundsstartAngle: 0sweepAngle: 360.
gc copyArea: ovalMask "Variant Step 3"from: pixmap graphicsContextsourceOffset: 0@0destinationOffset: 10@10.
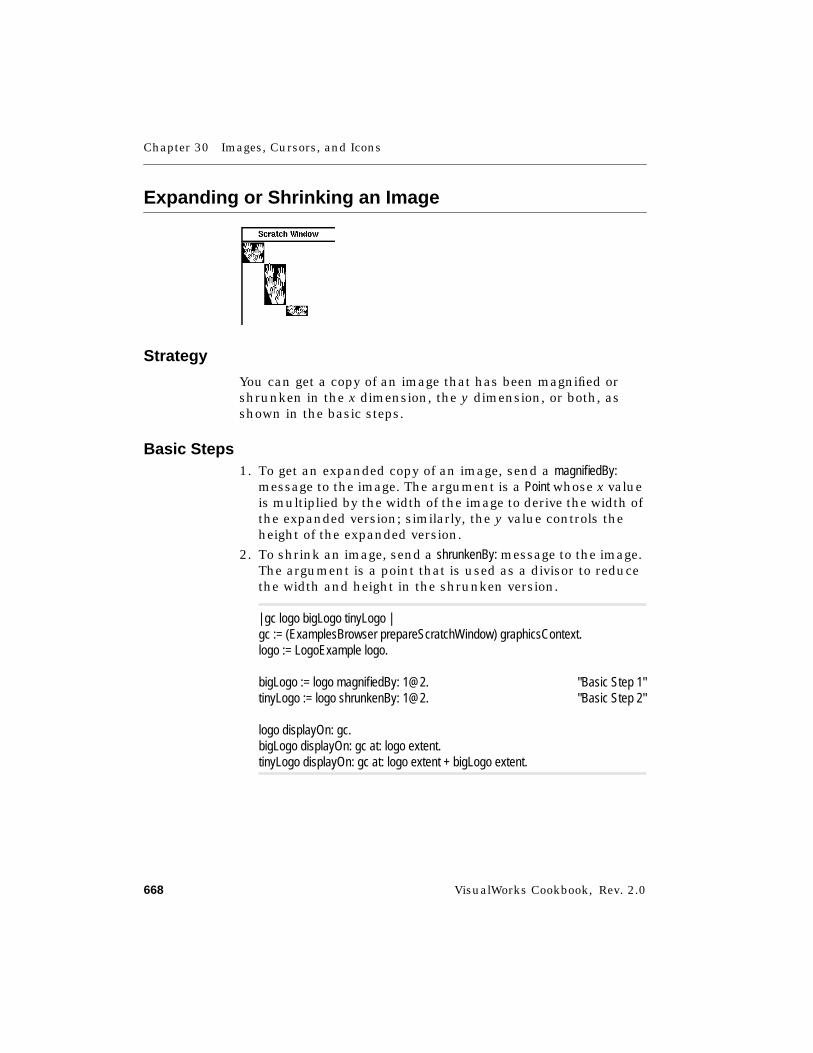
Chapter 30 Images, Cursors, and Icons
668 VisualWorks Cookbook, Rev. 2.0
Expanding or Shrinking an Image
Strategy
You can get a copy of an image that has been magnified orshrunken in the x dimension, the y dimension, or both, asshown in the basic steps.
Basic Steps1. To get an expanded copy of an image, send a magnifiedBy:
message to the image. The argument is a Point whose x valueis multiplied by the width of the image to derive the width ofthe expanded version; similarly, the y value controls theheight of the expanded version.
2. To shrink an image, send a shrunkenBy: message to the image.The argument is a point that is used as a divisor to reducethe width and height in the shrunken version.
| gc logo bigLogo tinyLogo |gc := (ExamplesBrowser prepareScratchWindow) graphicsContext.logo := LogoExample logo.
bigLogo := logo magnifiedBy: 1@2. "Basic Step 1"tinyLogo := logo shrunkenBy: 1@2. "Basic Step 2"
logo displayOn: gc.bigLogo displayOn: gc at: logo extent.tinyLogo displayOn: gc at: logo extent + bigLogo extent.
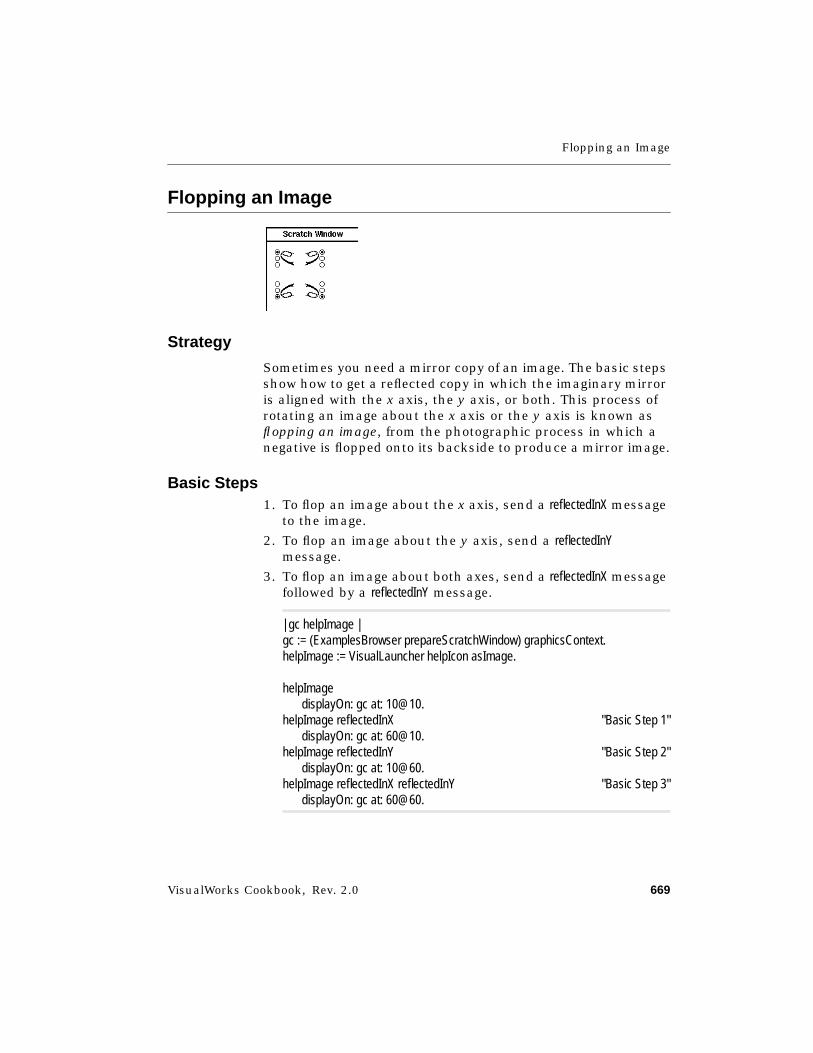
Flopping an Image
VisualWorks Cookbook, Rev. 2.0 669
Flopping an Image
Strategy
Sometimes you need a mirror copy of an image. The basic stepsshow how to get a reflected copy in which the imaginary mirroris aligned with the x axis, the y axis, or both. This process ofrotating an image about the x axis or the y axis is known asflopping an image, from the photographic process in which anegative is flopped onto its backside to produce a mirror image.
Basic Steps1. To flop an image about the x axis, send a reflectedInX message
to the image.
2. To flop an image about the y axis, send a reflectedInYmessage.
3. To flop an image about both axes, send a reflectedInX messagefollowed by a reflectedInY message.
| gc helpImage |gc := (ExamplesBrowser prepareScratchWindow) graphicsContext.helpImage := VisualLauncher helpIcon asImage.
helpImagedisplayOn: gc at: 10@10.
helpImage reflectedInX "Basic Step 1"displayOn: gc at: 60@10.
helpImage reflectedInY "Basic Step 2"displayOn: gc at: 10@60.
helpImage reflectedInX reflectedInY "Basic Step 3"displayOn: gc at: 60@60.
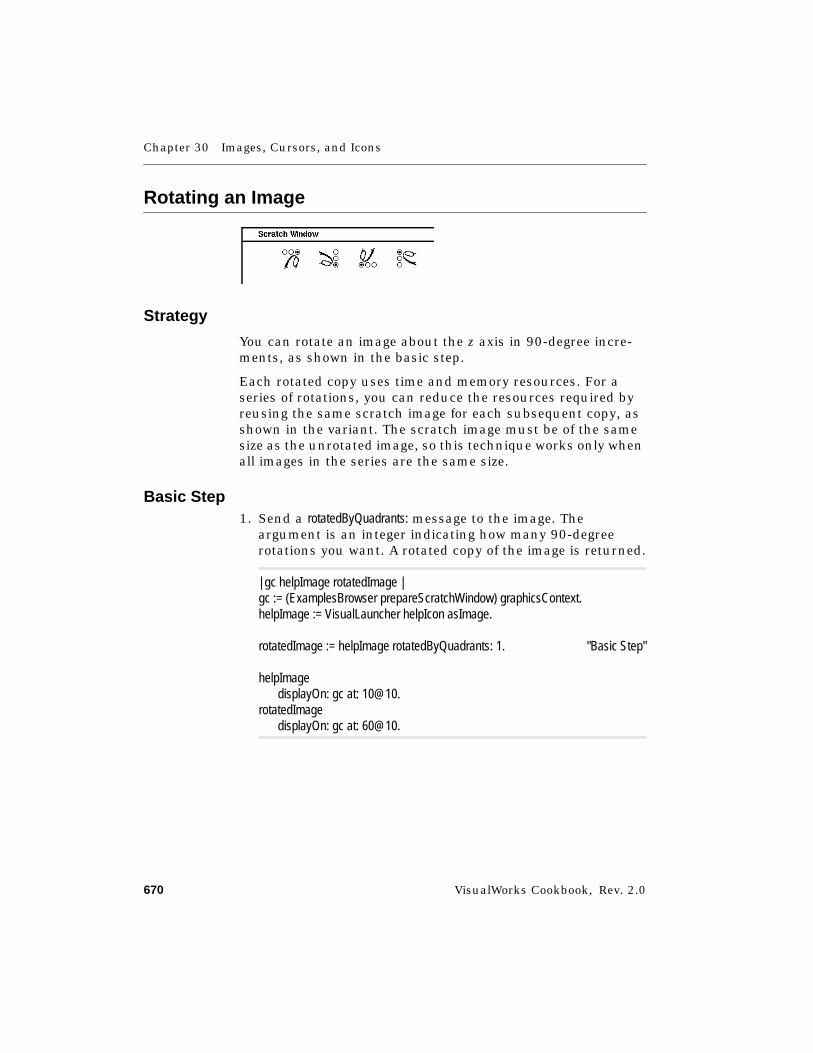
Chapter 30 Images, Cursors, and Icons
670 VisualWorks Cookbook, Rev. 2.0
Rotating an Image
Strategy
You can rotate an image about the z axis in 90-degree incre-ments, as shown in the basic step.
Each rotated copy uses time and memory resources. For aseries of rotations, you can reduce the resources required byreusing the same scratch image for each subsequent copy, asshown in the variant. The scratch image must be of the samesize as the unrotated image, so this technique works only whenall images in the series are the same size.
Basic Step1. Send a rotatedByQuadrants: message to the image. The
argument is an integer indicating how many 90-degreerotations you want. A rotated copy of the image is returned.
| gc helpImage rotatedImage |gc := (ExamplesBrowser prepareScratchWindow) graphicsContext.helpImage := VisualLauncher helpIcon asImage.
rotatedImage := helpImage rotatedByQuadrants: 1. "Basic Step"
helpImagedisplayOn: gc at: 10@10.
rotatedImagedisplayOn: gc at: 60@10.
Rotating an Image
VisualWorks Cookbook, Rev. 2.0 671
Variant
Reusing the Rotated Image1. Create a scratch image the same size as the image that is to
be rotated by sending a copyEmpty message to the originalimage.
2. Send a rotateByQuadrants:to: message to the image to be copied.The first argument is the number of quadrants to rotate theimage. The second argument is the scratch image.
| gc helpImage scratchImage |gc := (ExamplesBrowser prepareScratchWindow) graphicsContext.helpImage := VisualLauncher helpIcon asImage.
scratchImage := helpImage copyEmpty. "Variant Step 1"
1 to: 4 do: [ :quads |helpImage rotateByQuadrants: quads to: scratchImage. "Variant Step 2"scratchImage displayOn: gc at: (60 * quads) @ 10]
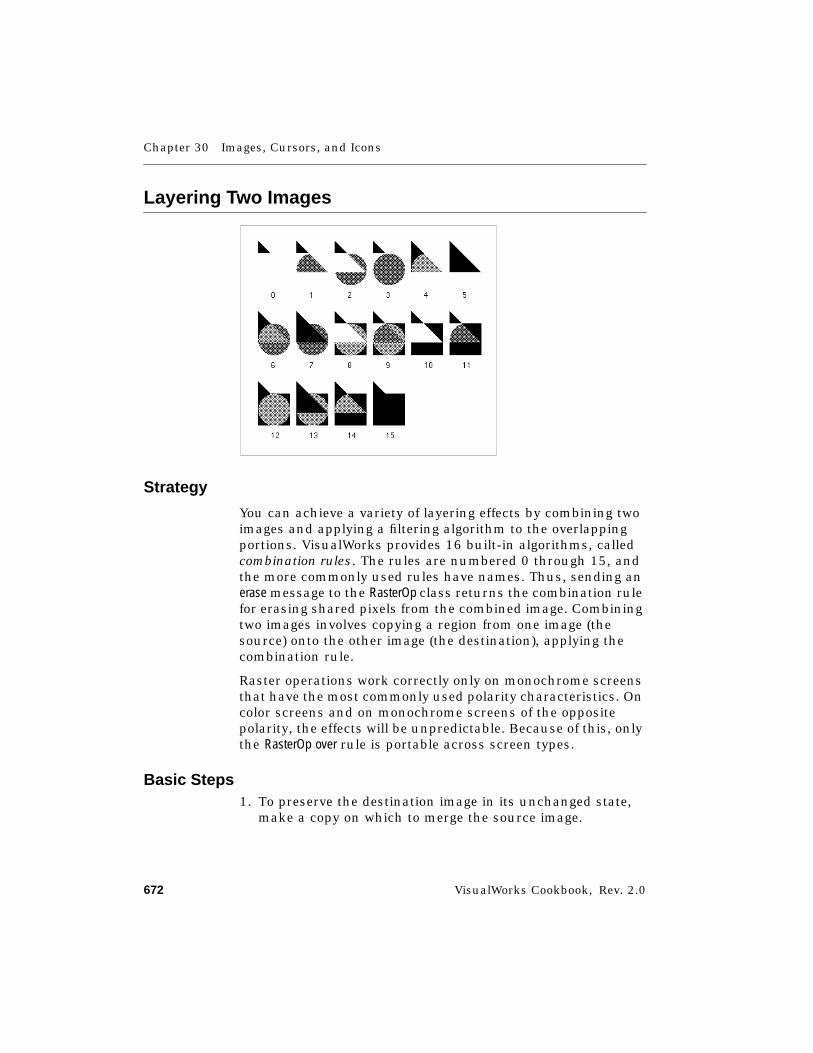
Chapter 30 Images, Cursors, and Icons
672 VisualWorks Cookbook, Rev. 2.0
Layering Two Images
Strategy
You can achieve a variety of layering effects by combining twoimages and applying a filtering algorithm to the overlappingportions. VisualWorks provides 16 built-in algorithms, calledcombination rules. The rules are numbered 0 through 15, andthe more commonly used rules have names. Thus, sending anerase message to the RasterOp class returns the combination rulefor erasing shared pixels from the combined image. Combiningtwo images involves copying a region from one image (thesource) onto the other image (the destination), applying thecombination rule.
Raster operations work correctly only on monochrome screensthat have the most commonly used polarity characteristics. Oncolor screens and on monochrome screens of the oppositepolarity, the effects will be unpredictable. Because of this, onlythe RasterOp over rule is portable across screen types.
Basic Steps1. To preserve the destination image in its unchanged state,
make a copy on which to merge the source image.
Layering Two Images
VisualWorks Cookbook, Rev. 2.0 673
2. Send a copy:from:in:rule: message to the destination image (inthe example, triangle). The copy argument is a rectangle identi-fying the region in the destination image to be merged withthe source image (the lower part of the triangle). The fromargument is the origin of the rectangle within the sourceimage (the origin of the circle, because we want to copy theentire circle). The in argument is the source image. The ruleargument is an integer identifying a combination rule(which can be derived by sending and, over, erase, reverse, under,or reverseUnder to the RasterOp class).
| gc triangle circle scratch |gc := (ExamplesBrowser prepareScratchWindow) graphicsContext.
triangle := Pixmap extent: [email protected] graphicsContext
displayPolygon: (Arraywith: 0@0with: 0@50with: 50@50).
triangle := triangle asImage.
circle := Pixmap extent: [email protected] graphicsContext
displayDotOfDiameter: 50at: 25@25.
circle := circle asImage.
0 to: 15 do: [ :rule |scratch := triangle copy. "Basic Step 1"scratch "Basic Step 2"
copy: (0@20 extent: 50@50)from: 0@0in: circlerule: rule.
scratch displayOn: gc at: (50 * rule \\ 400) @ (50 * rule // 400 * 100)]
Chapter 30 Images, Cursors, and Icons
674 VisualWorks Cookbook, Rev. 2.0
Caching an Image
Strategy
A display surface such as a Pixmap usually can be displayed onanother display surface (such as a window) more quickly thanan equivalent Image. However, an Image has greater longevitybecause it does not require a resource from the operatingsystem, and thus it survives when you quit and restart Visual-Works. A CachedImage combines the longevity of an Image with thedisplaying speed of a display surface. Whenever its displaysurface is unavailable, as when it has been destroyed by a save-and-restart operation, it is recreated from the image automati-cally. This relieves your application from having to recreatesuch display surfaces manually. The images used by Visual-Works, such as the insertion point in the text editor, use cachedimages in this way.
Note that a CachedImage must be treated like a display surface,not an image. For example, you cannot rotate a CachedImage.
Basic Step➤ Create a CachedImage by sending an on: message to that class.
The argument is the image that is to be cached.
| gc logo |gc := (ExamplesBrowser prepareScratchWindow) graphicsContext.
logo := CachedImage on: LogoExample logo. "Basic Step"logo displayOn: gc.
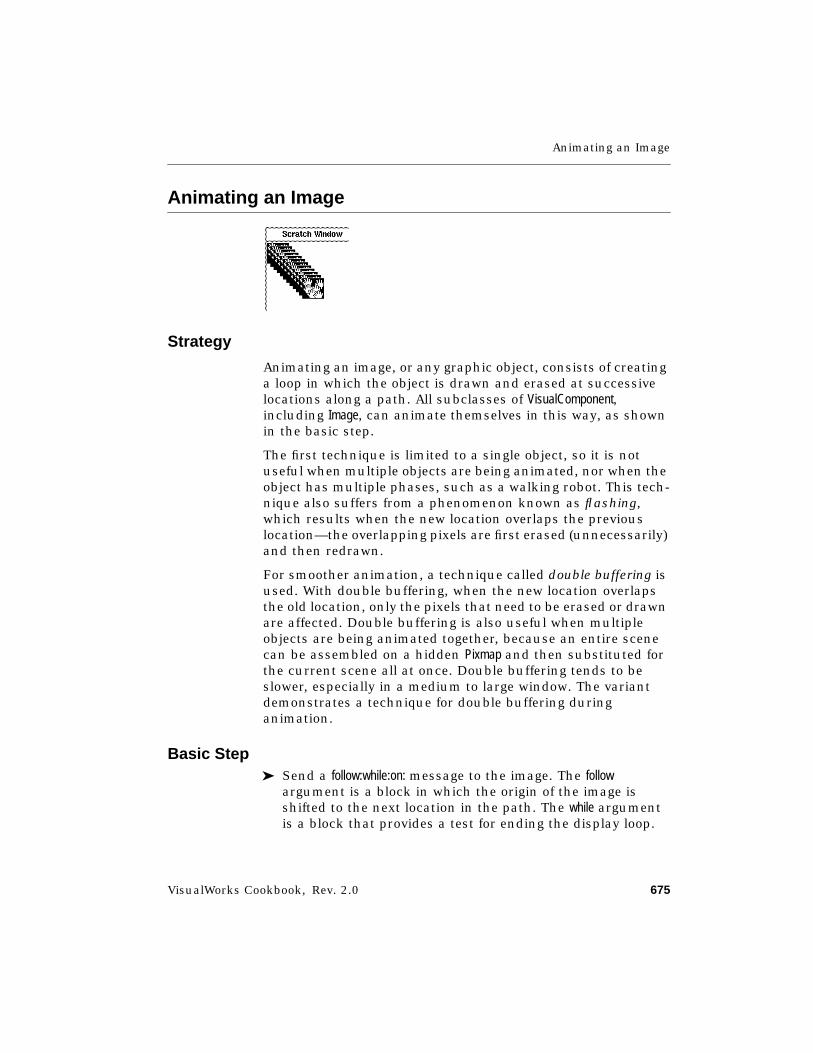
Animating an Image
VisualWorks Cookbook, Rev. 2.0 675
Animating an Image
Strategy
Animating an image, or any graphic object, consists of creatinga loop in which the object is drawn and erased at successivelocations along a path. All subclasses of VisualComponent,including Image, can animate themselves in this way, as shownin the basic step.
The first technique is limited to a single object, so it is notuseful when multiple objects are being animated, nor when theobject has multiple phases, such as a walking robot. This tech-nique also suffers from a phenomenon known as flashing,which results when the new location overlaps the previouslocation—the overlapping pixels are first erased (unnecessarily)and then redrawn.
For smoother animation, a technique called double buffering isused. With double buffering, when the new location overlapsthe old location, only the pixels that need to be erased or drawnare affected. Double buffering is also useful when multipleobjects are being animated together, because an entire scenecan be assembled on a hidden Pixmap and then substituted forthe current scene all at once. Double buffering tends to beslower, especially in a medium to large window. The variantdemonstrates a technique for double buffering duringanimation.
Basic Step➤ Send a follow:while:on: message to the image. The follow
argument is a block in which the origin of the image isshifted to the next location in the path. The while argumentis a block that provides a test for ending the display loop.
Chapter 30 Images, Cursors, and Icons
676 VisualWorks Cookbook, Rev. 2.0
The on argument is the graphics context of the displaysurface on which the animation is to take place.
| gc logo origin jump |gc := (ExamplesBrowser prepareScratchWindow) graphicsContext.logo := LogoExample logo.origin := [email protected] := 3@3.
logo "Basic Step"follow: [origin := origin + jump]while: [origin x < 400]on: gc.
Variant
Animating with Double Buffering1. Create a Pixmap of the same size as the window on which the
animation is to take place by sending an extent: message tothe Pixmap class. The argument is a rectangle with thewindow’s dimensions, which can be derived by sending aclippingBounds message to the window’s graphics context.
2. Create a loop in which the erase-and-display operationsoccur.
3. Inside the loop, begin by moving the origin of each object tobe animated.
4. Still inside the loop, erase the Pixmap by sending a clearmessage to it.
5. Still inside the loop, display each animated object in its newlocation.
6. Still inside the loop, display the Pixmap on the window.
| gc buffer logo windowSize origin1 origin2 jump bufferGC |gc := (ExamplesBrowser prepareScratchWindow) graphicsContext.windowSize := gc clippingBounds extent.logo := LogoExample logo.origin1 := [email protected] := [email protected] := 5.
Animating an Image
VisualWorks Cookbook, Rev. 2.0 677
buffer := Pixmap extent: windowSize. "Variant Step 1"bufferGC := buffer graphicsContext.
80 timesRepeat: [ "Variant Step 2"origin1 := origin1 + jump. "Variant Step 3"origin2 := (origin2 x - jump) @ (origin2 y + jump).
"Clear the buffer, then assemble the next scene."buffer clear. "Variant Step 4"logo displayOn: bufferGC at: origin1. "Variant Step 5"logo displayOn: bufferGC at: origin2.
"Display the next scene."buffer displayOn: gc] "Variant Step 6"
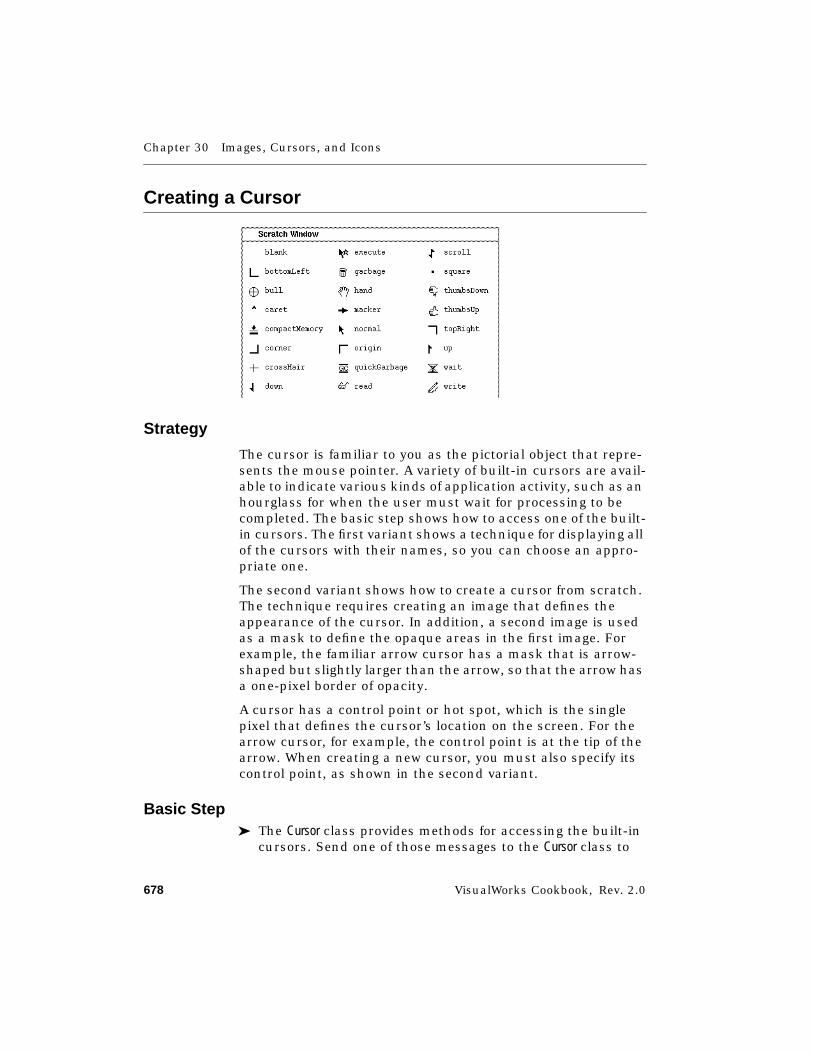
Chapter 30 Images, Cursors, and Icons
678 VisualWorks Cookbook, Rev. 2.0
Creating a Cursor
Strategy
The cursor is familiar to you as the pictorial object that repre-sents the mouse pointer. A variety of built-in cursors are avail-able to indicate various kinds of application activity, such as anhourglass for when the user must wait for processing to becompleted. The basic step shows how to access one of the built-in cursors. The first variant shows a technique for displaying allof the cursors with their names, so you can choose an appro-priate one.
The second variant shows how to create a cursor from scratch.The technique requires creating an image that defines theappearance of the cursor. In addition, a second image is usedas a mask to define the opaque areas in the first image. Forexample, the familiar arrow cursor has a mask that is arrow-shaped but slightly larger than the arrow, so that the arrow hasa one-pixel border of opacity.
A cursor has a control point or hot spot, which is the singlepixel that defines the cursor’s location on the screen. For thearrow cursor, for example, the control point is at the tip of thearrow. When creating a new cursor, you must also specify itscontrol point, as shown in the second variant.
Basic Step➤ The Cursor class provides methods for accessing the built-in
cursors. Send one of those messages to the Cursor class to
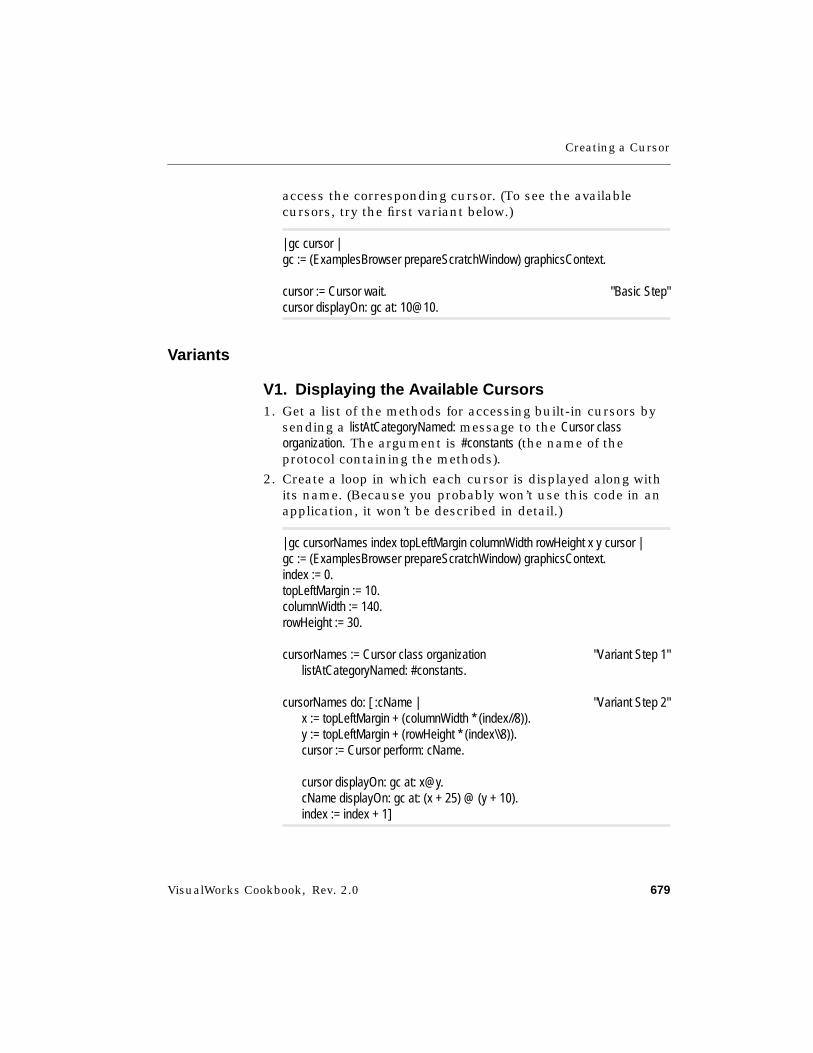
Creating a Cursor
VisualWorks Cookbook, Rev. 2.0 679
access the corresponding cursor. (To see the availablecursors, try the first variant below.)
| gc cursor |gc := (ExamplesBrowser prepareScratchWindow) graphicsContext.
cursor := Cursor wait. "Basic Step"cursor displayOn: gc at: 10@10.
Variants
V1. Displaying the Available Cursors1. Get a list of the methods for accessing built-in cursors by
sending a listAtCategoryNamed: message to the Cursor classorganization. The argument is #constants (the name of theprotocol containing the methods).
2. Create a loop in which each cursor is displayed along withits name. (Because you probably won’t use this code in anapplication, it won’t be described in detail.)
| gc cursorNames index topLeftMargin columnWidth rowHeight x y cursor |gc := (ExamplesBrowser prepareScratchWindow) graphicsContext.index := 0.topLeftMargin := 10.columnWidth := 140.rowHeight := 30.
cursorNames := Cursor class organization "Variant Step 1"listAtCategoryNamed: #constants.
cursorNames do: [ :cName | "Variant Step 2"x := topLeftMargin + (columnWidth * (index//8)).y := topLeftMargin + (rowHeight * (index\\8)).cursor := Cursor perform: cName.
cursor displayOn: gc at: [email protected] displayOn: gc at: (x + 25) @ (y + 10).index := index + 1]
Chapter 30 Images, Cursors, and Icons
680 VisualWorks Cookbook, Rev. 2.0
V2. Creating a New Cursor
Online example: CursorExample
1. Create an image that provides the pictorial element in thecursor. If you use the Image Editor to create the image, youmust convert its palette to a color-based palette rather thana coverage-based one. To do so, edit the resource methodthat defines the image, substituting MappedPalette whiteBlack (oranother two-color palette) for the default CoveragePalette mono-MaskPalette.
2. Create a coverage-based image that defines the opaqueportion of the first image. The Image Editor can be used tocreate this image. Typically, it is the same shape as theimage from step 1, but completely darkened and one pixellarger on each side.
3. Create the cursor by sending an image:mask:hotSpot:name:message to the Cursor class. The image argument is the color-based image that you created in step 1. The mask argumentis the coverage-based image from step 2. The hotSpotargument is a point indicating which pixel in the image isthe control point. The name argument is a string containinga descriptive name for the cursor. The name is of littleimportance, but it is displayed when you inspect a cursor.
| cursor colorImage maskImage |colorImage := CursorExample townCrierForCursor. "V2 Step 1"maskImage := CursorExample shadow. "V2 Step 2"
cursor := Cursor "V2 Step 3"image: colorImagemask: maskImagehotSpot: 8@8name: 'townCrier'.
cursor showWhile: [(Delay forSeconds: 3) wait].
Changing the Current Cursor
VisualWorks Cookbook, Rev. 2.0 681
Changing the Current Cursor
Strategy
By default, an arrow cursor is displayed and moves in responseto mouse movements. You can display a different cursor as away of indicating that your application is processing informa-tion (reading or writing data, for example). Changing the cursoris also a means of indicating to the user of your application thata certain kind of input is expected—for example, the crossHaircursor is typically used to indicate that a drawing operation isexpected. The basic steps show how to display a differentcursor and then revert to the normal cursor when appropriate.
In the example, the SketchController1 causes the cursor to changeto a cross-hair whenever it comes within the boundaries of theSketchView1.
Basic Step
Online example: CustomView1Example and SketchController1
➤ Send a showWhile: message to the cursor. The argument is ablock containing the actions that are to take place while thecursor is in its changed state. After the actions in the blockare finished, the cursor will return to normal automatically.(In the example, the controller changes the cursor for aslong as it holds onto control.)
controlLoop"Change the cursor to a cross-hair for drawing."
Cursor crossHair showWhile: [super controlLoop]. "Basic Step"
Chapter 30 Images, Cursors, and Icons
682 VisualWorks Cookbook, Rev. 2.0
Creating an Icon
Strategy
Most often used to represent a collapsed window, an icon typi-cally provides a pictorial clue to the nature of the window. Thebasic steps show how to create an icon.
Basic Steps1. Create an Image containing the pictorial element for the icon.
You can use the Image Editor to create the image and saveit in a method (in the example, the image is returned by thetownCrier method of the CursorExample class).
2. Create a Mask containing the image by sending anasRetainedMedium message to the image.
3. Create an icon by sending an image: message to the Iconclass. The argument is the mask from step 2.
| icon gc image mask |
image := CursorExample townCrier. "Basic Step 1"mask := image asRetainedMedium. "Basic Step 2"
gc := (ExamplesBrowser prepareScratchWindow) graphicsContext.
icon := Icon image: mask. "Basic Step 3"icon displayOn: gc at: 10@10.
Note that the Icon instance takes care of reconstructing theMask instance when you quit and restart VisualWorks.
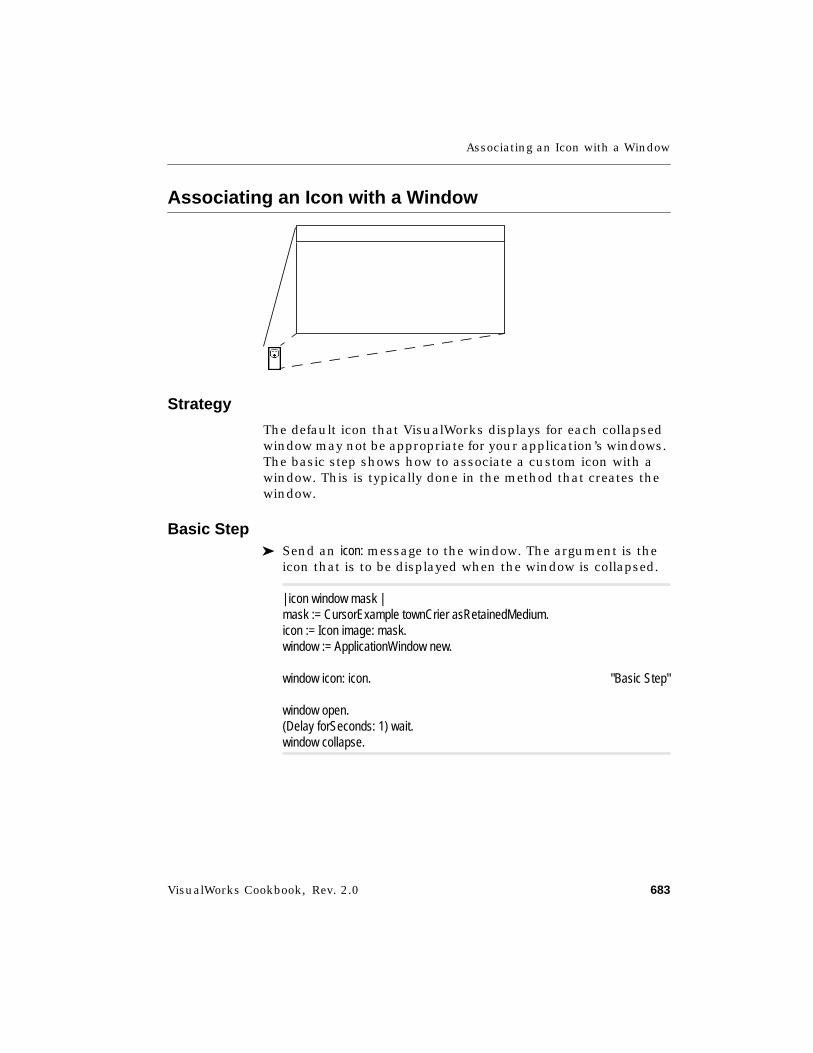
Associating an Icon with a Window
VisualWorks Cookbook, Rev. 2.0 683
Associating an Icon with a Window
Strategy
The default icon that VisualWorks displays for each collapsedwindow may not be appropriate for your application’s windows.The basic step shows how to associate a custom icon with awindow. This is typically done in the method that creates thewindow.
Basic Step➤ Send an icon: message to the window. The argument is the
icon that is to be displayed when the window is collapsed.
| icon window mask |mask := CursorExample townCrier asRetainedMedium.icon := Icon image: mask.window := ApplicationWindow new.
window icon: icon. "Basic Step"
window open.(Delay forSeconds: 1) wait.window collapse.

VisualWorks Cookbook, Rev. 2.0 685
Chapter 31
Color
Creating a Color 686Creating a Coverage 690Creating a Tiled Pattern 692Applying a Color or Pattern 694Changing an Image’s Color Palette 696Changing the Policy for Rendering Colors 698
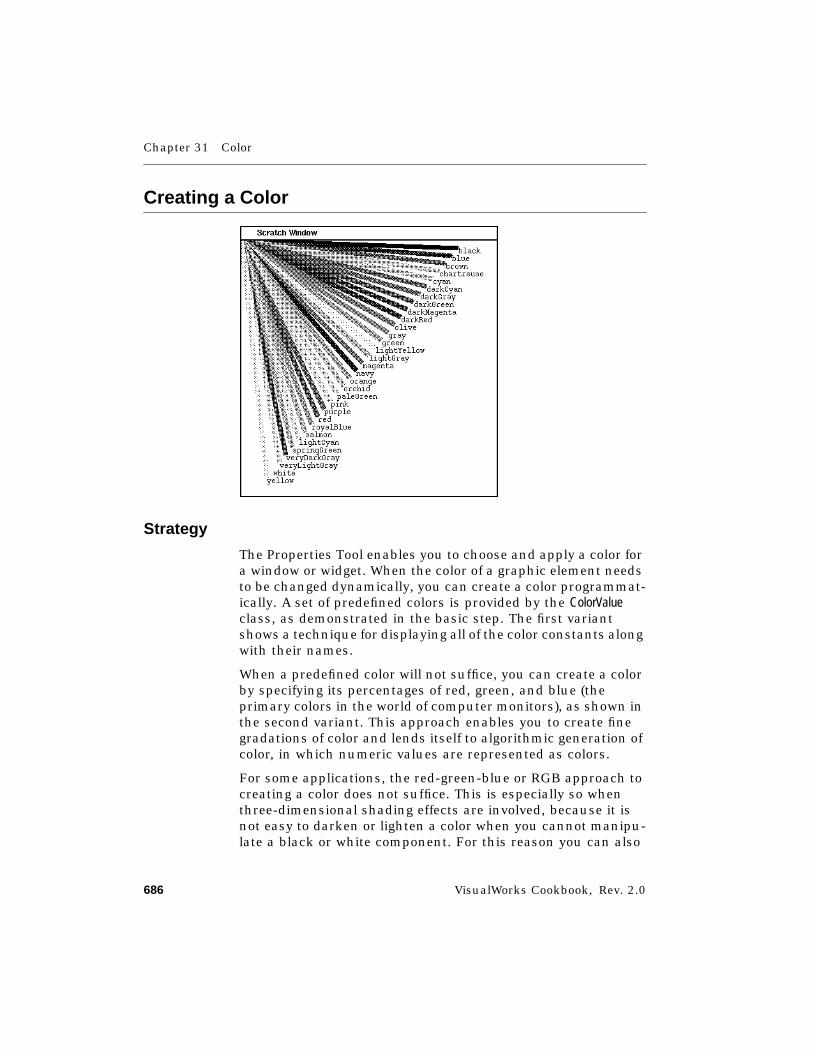
Chapter 31 Color
686 VisualWorks Cookbook, Rev. 2.0
Creating a Color
Strategy
The Properties Tool enables you to choose and apply a color fora window or widget. When the color of a graphic element needsto be changed dynamically, you can create a color programmat-ically. A set of predefined colors is provided by the ColorValueclass, as demonstrated in the basic step. The first variantshows a technique for displaying all of the color constants alongwith their names.
When a predefined color will not suffice, you can create a colorby specifying its percentages of red, green, and blue (theprimary colors in the world of computer monitors), as shown inthe second variant. This approach enables you to create finegradations of color and lends itself to algorithmic generation ofcolor, in which numeric values are represented as colors.
For some applications, the red-green-blue or RGB approach tocreating a color does not suffice. This is especially so whenthree-dimensional shading effects are involved, because it isnot easy to darken or lighten a color when you cannot manipu-late a black or white component. For this reason you can also
Creating a Color
VisualWorks Cookbook, Rev. 2.0 687
create a color using hue, saturation, and brightness (known asHSB color), as shown in the third variant.
Basic Step➤ Send a cyan message to the ColorValue class, or another
message identifying one of the predefined color constants.
| gc color |gc := (ExamplesBrowser prepareScratchWindow) graphicsContext.
color := ColorValue cyan. "Basic Step"
gc paint: color.gc displayDotOfDiameter: 400 at: 200@200.
Variants
V1. Displaying the Predefined Colors1. Get the list of color constants by sending a constantNames
message to the ColorValue class.
2. Create a loop in which a thick line is drawn in each color,with the color name displayed at the end of the line.(Because this is not likely to be a loop that you will use inan application, it will not be described in detail.)
| gc endPoint colors |gc := (ExamplesBrowser prepareScratchWindow) graphicsContext.gc lineWidth: 7.endPoint := 350@0.
colors := ColorValue constantNames. "V1 Step 1"
colors do: [ :c | "V1 Step 2"endPoint := endPoint + (-10@12).gc paint: (ColorValue perform: c).gc displayLineFrom: 0@0 to: endPoint.gc paint: ColorValue black.c asString displayOn: gc at: endPoint + (0@8)]
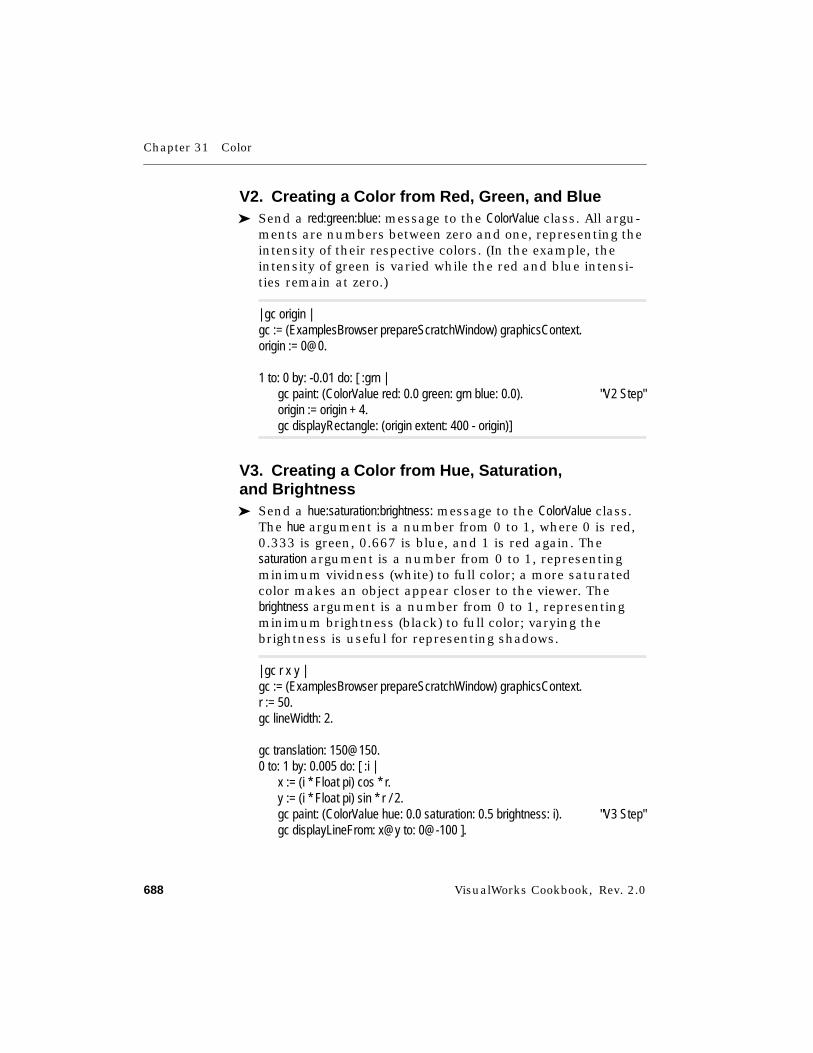
Chapter 31 Color
688 VisualWorks Cookbook, Rev. 2.0
V2. Creating a Color from Red, Green, and Blue➤ Send a red:green:blue: message to the ColorValue class. All argu-
ments are numbers between zero and one, representing theintensity of their respective colors. (In the example, theintensity of green is varied while the red and blue intensi-ties remain at zero.)
| gc origin |gc := (ExamplesBrowser prepareScratchWindow) graphicsContext.origin := 0@0.
1 to: 0 by: -0.01 do: [ :grn |gc paint: (ColorValue red: 0.0 green: grn blue: 0.0). "V2 Step"origin := origin + 4.gc displayRectangle: (origin extent: 400 - origin)]
V3. Creating a Color from Hue, Saturation,and Brightness➤ Send a hue:saturation:brightness: message to the ColorValue class.
The hue argument is a number from 0 to 1, where 0 is red,0.333 is green, 0.667 is blue, and 1 is red again. Thesaturation argument is a number from 0 to 1, representingminimum vividness (white) to full color; a more saturatedcolor makes an object appear closer to the viewer. Thebrightness argument is a number from 0 to 1, representingminimum brightness (black) to full color; varying thebrightness is useful for representing shadows.
| gc r x y |gc := (ExamplesBrowser prepareScratchWindow) graphicsContext.r := 50.gc lineWidth: 2.
gc translation: [email protected] to: 1 by: 0.005 do: [ :i |
x := (i * Float pi) cos * r.y := (i * Float pi) sin * r / 2.gc paint: (ColorValue hue: 0.0 saturation: 0.5 brightness: i). "V3 Step"gc displayLineFrom: x@y to: 0@-100 ].
Creating a Color
VisualWorks Cookbook, Rev. 2.0 689
gc translation: [email protected] to: 1 by: 0.005 do: [ :i |
x := (i * Float pi) cos * r.y := (i * Float pi) sin * r / 2.gc paint: (ColorValue hue: 0.0 saturation: 0.75 brightness: i).gc displayLineFrom: x@y to: 0@-100 ].
gc translation: [email protected] to: 1 by: 0.005 do: [ :i |
x := (i * Float pi) cos * r.y := (i * Float pi) sin * r / 2.gc paint: (ColorValue hue: 0.0 saturation: 1.0 brightness: i).gc displayLineFrom: x@y to: 0@-100 ]
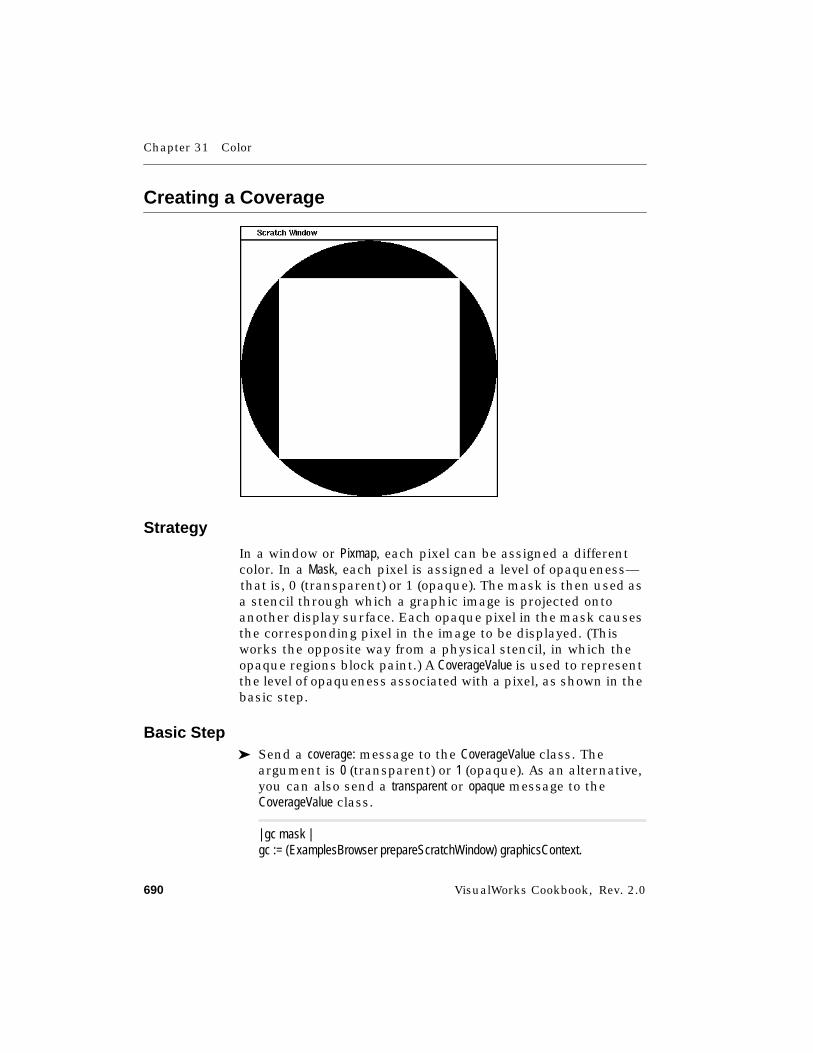
Chapter 31 Color
690 VisualWorks Cookbook, Rev. 2.0
Creating a Coverage
Strategy
In a window or Pixmap, each pixel can be assigned a differentcolor. In a Mask, each pixel is assigned a level of opaqueness—that is, 0 (transparent) or 1 (opaque). The mask is then used asa stencil through which a graphic image is projected ontoanother display surface. Each opaque pixel in the mask causesthe corresponding pixel in the image to be displayed. (Thisworks the opposite way from a physical stencil, in which theopaque regions block paint.) A CoverageValue is used to representthe level of opaqueness associated with a pixel, as shown in thebasic step.
Basic Step➤ Send a coverage: message to the CoverageValue class. The
argument is 0 (transparent) or 1 (opaque). As an alternative,you can also send a transparent or opaque message to theCoverageValue class.
| gc mask |gc := (ExamplesBrowser prepareScratchWindow) graphicsContext.
Creating a Coverage
VisualWorks Cookbook, Rev. 2.0 691
mask := Mask extent: 400@400.
mask graphicsContextdisplayDotOfDiameter: 400 at: 200@200.
mask graphicsContextpaint: (CoverageValue coverage: 0); "Basic Step"displayRectangle: (59@59 extent: 283@283).
mask displayOn: gc at: 0@0.

Chapter 31 Color
692 VisualWorks Cookbook, Rev. 2.0
Creating a Tiled Pattern
Strategy
A Pattern is created by filling a space with a single graphic imagethat is repeated over and over, like tiles covering a floor. Apattern can be used in the same situations in which you woulduse a solid color. The basic steps show how to create a tile andfrom it, a pattern.
By default, the first tile in the pattern is displayed at the originof the display surface. You can shift that first tile, and with itthe entire pattern. This shift, known as the tile phase, is some-times helpful for aligning the edges of the tiles with the edges ofthe graphic object that is being painted, as in the variant.
Basic Steps1. Create the graphic image that will serve as the repeating tile
in the pattern. You can also use a window, Pixmap, or Mask asthe tile.
2. Send an asPattern message to the tile.
Creating a Tiled Pattern
VisualWorks Cookbook, Rev. 2.0 693
| gc tile |gc := (ExamplesBrowser prepareScratchWindow) graphicsContext.
tile := Image parcPlaceDigitalkLogo shrunkenBy: 4@4. "Basic Step 1"tile := tile asPattern. "Basic Step 2"
gc paint: tile.gc displayRectangle: (50@50 extent: 300@300).
Variant
Adjusting a Pattern’s Tile Phase➤ Send a tilePhase: message to the graphics context of the
display surface on which the patterned object is to bedisplayed. The argument is a point that defines the origin ofthe first tile in the pattern. (As in the example, the tilephase is often the same as the origin of the painted object,which aligns the tiles with the top and left edges of theobject.)
| gc tile |gc := (ExamplesBrowser prepareScratchWindow) graphicsContext.tile := Image parcPlaceDigitalkLogo shrunkenBy: [email protected] := tile asPattern.gc paint: tile.
gc tilePhase: 50@50. "Variant Step"
gc displayRectangle: (50@50 extent: 300@300).
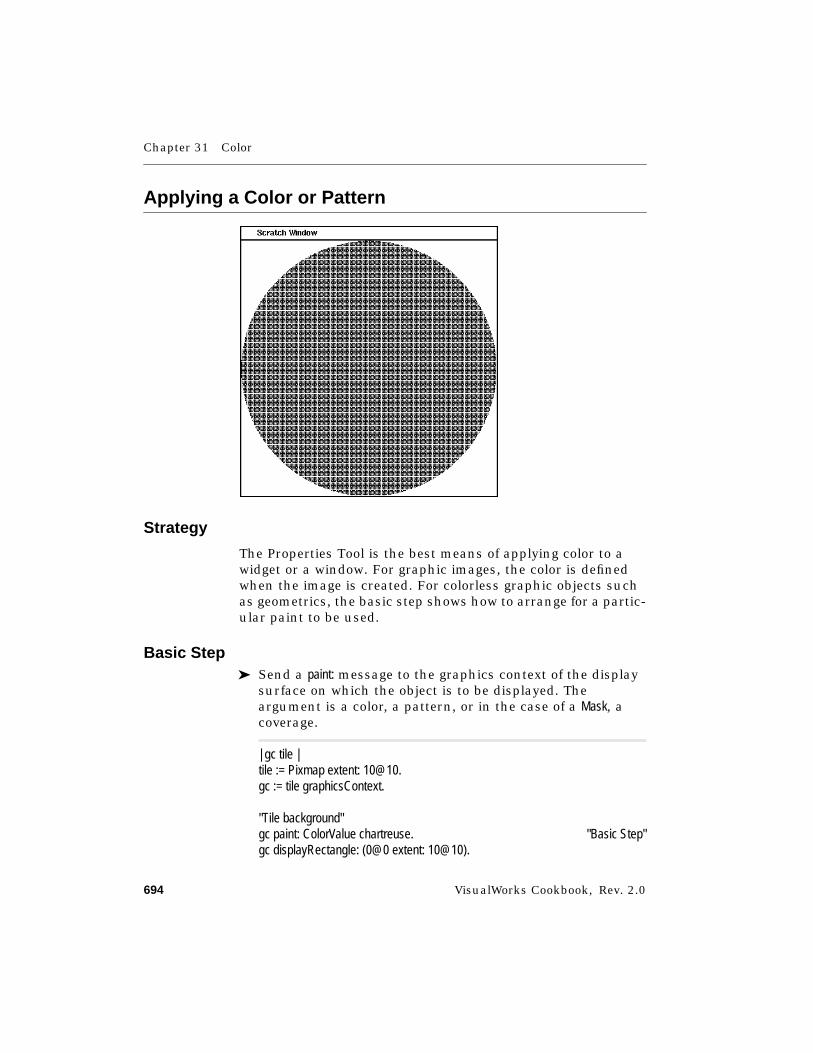
Chapter 31 Color
694 VisualWorks Cookbook, Rev. 2.0
Applying a Color or Pattern
Strategy
The Properties Tool is the best means of applying color to awidget or a window. For graphic images, the color is definedwhen the image is created. For colorless graphic objects suchas geometrics, the basic step shows how to arrange for a partic-ular paint to be used.
Basic Step➤ Send a paint: message to the graphics context of the display
surface on which the object is to be displayed. Theargument is a color, a pattern, or in the case of a Mask, acoverage.
| gc tile |tile := Pixmap extent: [email protected] := tile graphicsContext.
"Tile background"gc paint: ColorValue chartreuse. "Basic Step"gc displayRectangle: (0@0 extent: 10@10).
Applying a Color or Pattern
VisualWorks Cookbook, Rev. 2.0 695
"Tile foreground"gc paint: ColorValue red.gc displayDotOfDiameter: 10 at: 4@4.
"Patterned circle"gc := (ExamplesBrowser prepareScratchWindow) graphicsContext.gc paint: tile asPattern. "Basic Step"gc displayDotOfDiameter: 400 at: 200@200.
See Also■ “Coloring a Widget” on page 75
■ “Coloring a Window” on page 94
■ “Coloring a Geometric” on page 649
■ “Coloring Pixels in an Image” on page 664
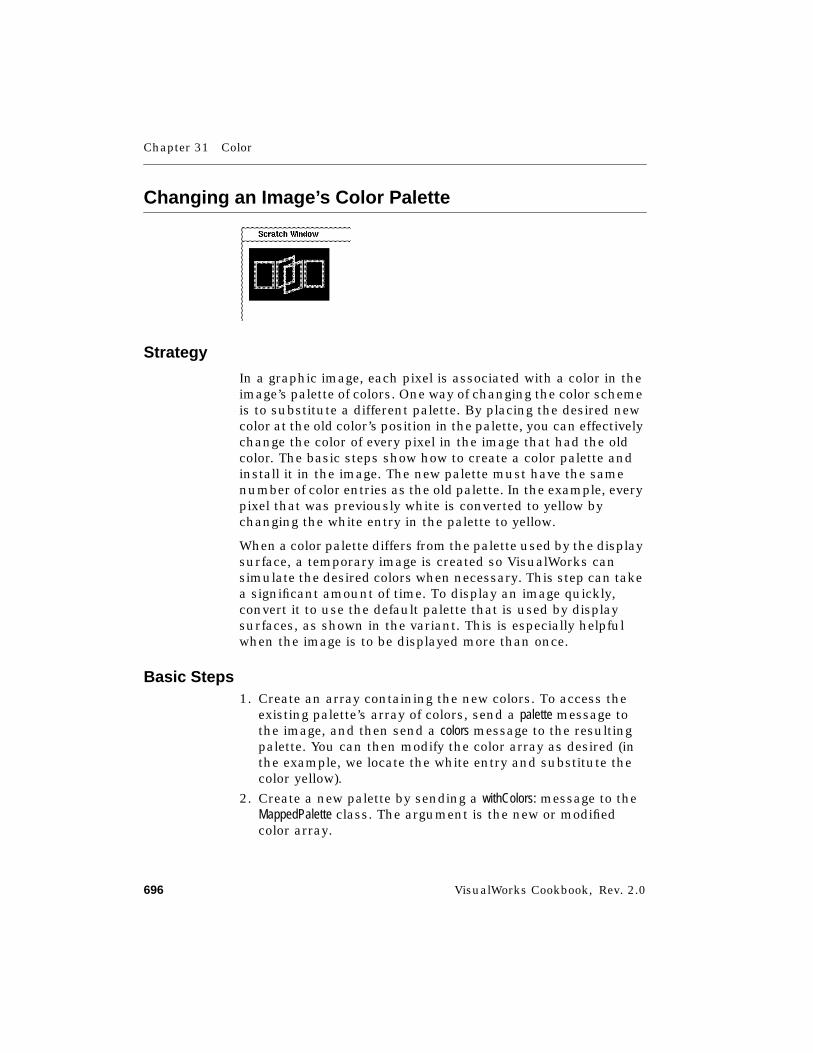
Chapter 31 Color
696 VisualWorks Cookbook, Rev. 2.0
Changing an Image’s Color Palette
Strategy
In a graphic image, each pixel is associated with a color in theimage’s palette of colors. One way of changing the color schemeis to substitute a different palette. By placing the desired newcolor at the old color’s position in the palette, you can effectivelychange the color of every pixel in the image that had the oldcolor. The basic steps show how to create a color palette andinstall it in the image. The new palette must have the samenumber of color entries as the old palette. In the example, everypixel that was previously white is converted to yellow bychanging the white entry in the palette to yellow.
When a color palette differs from the palette used by the displaysurface, a temporary image is created so VisualWorks cansimulate the desired colors when necessary. This step can takea significant amount of time. To display an image quickly,convert it to use the default palette that is used by displaysurfaces, as shown in the variant. This is especially helpfulwhen the image is to be displayed more than once.
Basic Steps1. Create an array containing the new colors. To access the
existing palette’s array of colors, send a palette message tothe image, and then send a colors message to the resultingpalette. You can then modify the color array as desired (inthe example, we locate the white entry and substitute thecolor yellow).
2. Create a new palette by sending a withColors: message to theMappedPalette class. The argument is the new or modifiedcolor array.
Changing an Image’s Color Palette
VisualWorks Cookbook, Rev. 2.0 697
3. Install the new palette by sending a palette: message to theimage. The argument is the new palette.
| gc palette image colors whiteIndex |gc := (ExamplesBrowser prepareScratchWindow) graphicsContext.image := InputFieldSpec paletteIcon asImage.
colors := image palette colors. "Basic Step 1"whiteIndex := colors indexOf: ColorValue white.colors at: whiteIndex put: ColorValue yellow.
palette := MappedPalette withColors: colors. "Basic Step 2"
image := image palette: palette. "Basic Step 3"image displayOn: gc at: 10@10.
Variant
Converting an Image to Use the Default Palette➤ Send a convertToPalette: message to the image. The argument
is the default color palette, which can be accessed bysending a default message to the Screen class and thensending a colorPalette message to the resulting screen. (For acoverage-based image, send a coveragePalette message insteadof colorPalette.)
| gc image |gc := (ExamplesBrowser prepareScratchWindow) graphicsContext.image := Image parcPlaceDigitalkLogo magnifiedBy: 2@2.
image := image convertToPalette: Screen default colorPalette. "Variant Step"image displayOn: gc at: 10@10.
Chapter 31 Color
698 VisualWorks Cookbook, Rev. 2.0
Changing the Policy for Rendering Colors
Strategy
When a graphic image contains a color that does not exist in thescreen’s palette, a neighboring color is used instead. Visual-Works provides three different renderers for deciding whichcolor to substitute for a missing color. Of the three, NearestPaintis the fastest and is the default on color screens. OrderedDither isthe default on monochrome and gray-scale screens. ErrorDiffusionuses a more sophisticated color-blending algorithm thanOrderedDither does, but it tends to be slower.
The basic step shows how to convert a graphic image of threecolored spotlights to the screen’s palette using a specifiedrenderer. Converting the image in this way makes it possible todisplay the converted image multiple times, instead of leavingit to the display surface to perform the conversion each time theoriginal image is displayed on it.
The image can be converted to a palette other than the screen’spalette. In the first variant, the color image is converted to amonochrome palette. This technique is useful when you wantto show what the image looks like on a screen that has a limitedpalette.
Graphic objects other than images do not have their own color,so the rendering is performed by the graphics context of thedisplay surface. The second variant shows how to install thedesired renderer in the graphics context. The example paints aseries of 4-pixel squares successively, each time shifting thecolor from red toward green.
Basic Step➤ Send a convertForGraphicsDevice:renderedBy: message to the image.
The first argument is typically Screen default. The secondargument is NearestPaint when you want to use the nearest

Changing the Policy for Rendering Colors
VisualWorks Cookbook, Rev. 2.0 699
available paint from the screen’s palette, OrderedDither whenyou want to synthesize the nonexistent color by blendingneighboring colors, and ErrorDiffusion when you want to use amore sophisticated (but often slower) blending algorithm.
"THIS EXAMPLE IS INTENDED TO BE USED ONA COLOR SCREEN. IT CAN TAKE SEVERAL MINUTES."| gc r g b im |gc := (ExamplesBrowser prepareScratchWindow) graphicsContext.im := Image
extent: 60@60depth: 15palette: (FixedPalette
redShift: 10 redMask: 31greenShift: 5 greenMask: 31blueShift: 0 blueMask: 31).
0 to: 59 do: [:x |0 to: 59 do: [:y |
r := 1 - ((x@y - (10@10)) r / 30) max: 0.g := 1 - ((x@y - (20@50)) r / 30) max: 0.b := 1 - ((x@y - (50@30)) r / 30) max: 0.im atPoint: x@y put: (im palette
indexOfPaintNearest: (ColorValue red: r green: g blue: b))]].
(im convertForGraphicsDevice: Screen default "Basic Step"renderedBy: NearestPaint new)
displayOn: gc at: 10@10.
(im convertForGraphicsDevice: Screen default "Basic Step"renderedBy: OrderedDither new)
displayOn: gc at: 80@10.
(im convertForGraphicsDevice: Screen default "Basic Step"renderedBy: ErrorDiffusion new)
displayOn: gc at: 150@10.
Chapter 31 Color
700 VisualWorks Cookbook, Rev. 2.0
Variants
V1. Converting an Image to a Specific Palette➤ Send a convertToPalette:renderedBy: message to the image. The
first argument is the desired palette (in the example, amonochrome palette). The second argument is the desiredrenderer (a NearestPaint, an OrderedDither, or an ErrorDiffusion).
| gc r g b im |gc := (ExamplesBrowser prepareScratchWindow) graphicsContext.im := Image
extent: 60@60depth: 15 palette: (FixedPalette
redShift: 10 redMask: 31greenShift: 5 greenMask: 31blueShift: 0 blueMask: 31).
0 to: 59 do: [:x |0 to: 59 do: [:y |
r := 1 - ((x@y - (10@10)) r / 30) max: 0.g := 1 - ((x@y - (20@50)) r / 30) max: 0.b := 1 - ((x@y - (50@30)) r / 30) max: 0.im atPoint: x@y put: (im palette
indexOfPaintNearest: (ColorValue brightness: 1-((1-r)*(1-g)*(1-b))))]].
(im convertToPalette: MappedPalette whiteBlack "V1 Step"renderedBy: NearestPaint new)
displayOn: gc at: 10@10.
(im convertToPalette: MappedPalette whiteBlack "V1 Step"renderedBy: OrderedDither new)
displayOn: gc at: 80@10.
(im convertToPalette: MappedPalette whiteBlack "V1 Step"renderedBy: ErrorDiffusion new)
displayOn: gc at: 150@10.
Changing the Policy for Rendering Colors
VisualWorks Cookbook, Rev. 2.0 701
V2. Setting the Rendering Policyfor Nonimage Graphics1. Install a paint policy in the graphics context of the display
surface by sending a paintPolicy: message to the graphicscontext. The argument is a PaintPolicy, typically a newinstance.
2. Set the rendering algorithm by sending a paintRenderer:message to the paint policy. The argument is a NearestPaint oran OrderedDither (but not an ErrorDiffusion, which is only usedwith images). By default, a new OrderedDither has an order of6, which means it synthesizes 65 (2 to the sixth, plus 1)intermediate color values between each pair of neighboringcolors in the palette. You can set the order by sending anorder: message to the OrderedDither class to create an instance;the argument is the desired order number.
| gc |gc := (ExamplesBrowser prepareScratchWindow) graphicsContext.
gc paintPolicy: (PaintPolicy new imageRenderer: OrderedDither new)."V2 Step 1"
gc paintPolicy paintRenderer: NearestPaint new. "V2 Step 2"0 to: 60 by: 4 do: [:i |
0 to: 60 by: 4 do: [:j |gc paint: (ColorValue red: i/60 green: j/60 blue: 0).gc displayRectangle: (i@j+(10@10) extent: 4@4)]].
gc paintPolicy paintRenderer: (OrderedDither order: 1). "V2 Step 2"0 to: 60 by: 4 do: [:i |
0 to: 60 by: 4 do: [:j |gc paint: (ColorValue red: i/60 green: j/60 blue: 0).gc displayRectangle: (i@j+(80@10) extent: 4@4)]].
gc paintPolicy paintRenderer: (OrderedDither order: 6). "V2 Step 2"0 to: 60 by: 4 do: [:i |
0 to: 60 by: 4 do: [:j |gc paint: (ColorValue red: i/60 green: j/60 blue: 0).gc displayRectangle: (i@j+(150@10) extent: 4@4)]].

VisualWorks Cookbook, Rev. 2.0 703
Chapter 32
Adapting Domain Models toWidgets
Setting up Simple Value Models (ValueHolder) 704Adapting Part of a Domain Model (AspectAdaptor) 706Synchronizing Updates (Buffering) 710Adapting a Collection (SelectionInList) 713Adapting a Collection Element 715Creating a Custom Adaptor (PluggableAdaptor) 717
See Also■ “Changing the Range Dynamically” on page 270
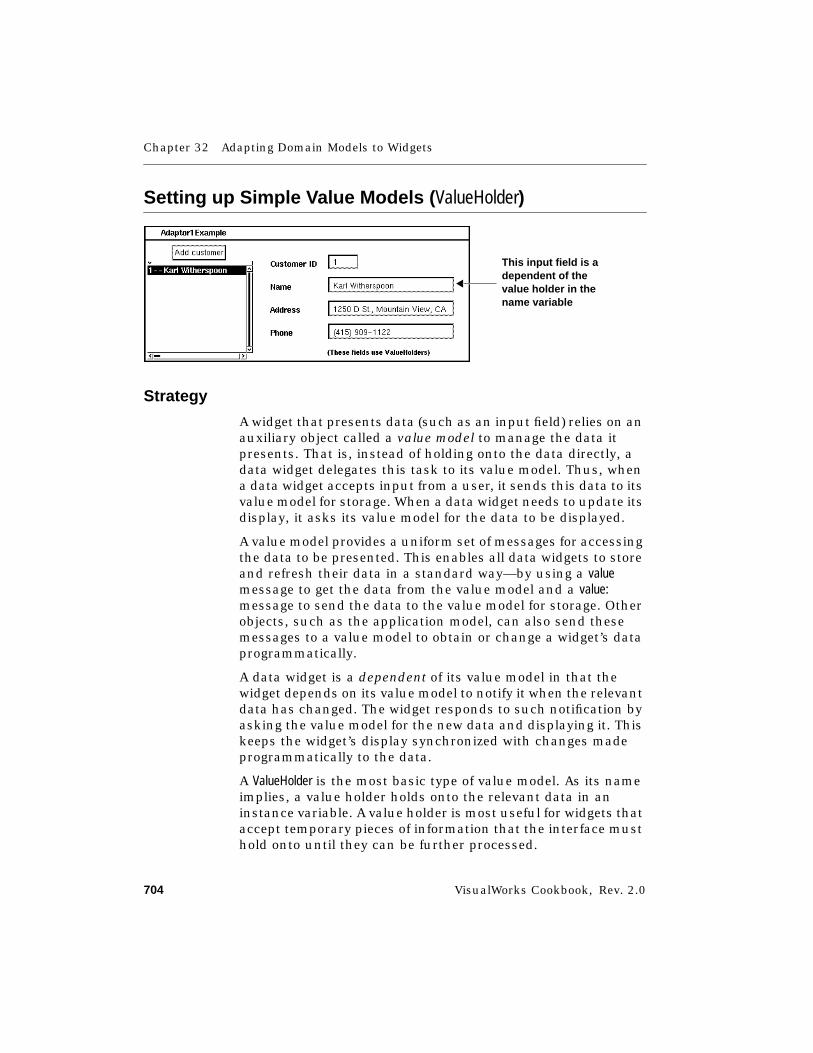
Chapter 32 Adapting Domain Models to Widgets
704 VisualWorks Cookbook, Rev. 2.0
Setting up Simple Value Models ( ValueHolder)
Strategy
A widget that presents data (such as an input field) relies on anauxiliary object called a value model to manage the data itpresents. That is, instead of holding onto the data directly, adata widget delegates this task to its value model. Thus, whena data widget accepts input from a user, it sends this data to itsvalue model for storage. When a data widget needs to update itsdisplay, it asks its value model for the data to be displayed.
A value model provides a uniform set of messages for accessingthe data to be presented. This enables all data widgets to storeand refresh their data in a standard way—by using a valuemessage to get the data from the value model and a value:message to send the data to the value model for storage. Otherobjects, such as the application model, can also send thesemessages to a value model to obtain or change a widget’s dataprogrammatically.
A data widget is a dependent of its value model in that thewidget depends on its value model to notify it when the relevantdata has changed. The widget responds to such notification byasking the value model for the new data and displaying it. Thiskeeps the widget’s display synchronized with changes madeprogrammatically to the data.
A ValueHolder is the most basic type of value model. As its nameimplies, a value holder holds onto the relevant data in aninstance variable. A value holder is most useful for widgets thataccept temporary pieces of information that the interface musthold onto until they can be further processed.
This input field is adependent of thevalue holder in thename variable
Setting up Simple Value Models (ValueHolder)
VisualWorks Cookbook, Rev. 2.0 705
The basic step shows a common way to create a value holder.The variants demonstrate special-purpose ways.
Basic Step
Online example: Adaptor1Example
➤ Send an asValue message to the data object that is to becontained (in the example, the number 0 is asked to returna value holder containing itself).
initializeIDaccountID := 0 asValue. "Basic Step"accountID onChangeSend: #changedID to: self.
Variants
V1. Creating a Value Holder on an Empty String
Online example: Adaptor1Example
➤ Send a newString message to the ValueHolder class. This isequivalent to the expression String new asValue, and the choiceof which to use is a matter of personal preference.
initializeNamename := ValueHolder newString. "V1 Step"name onChangeSend: #changedName to: self.
V2. Creating a Value Holderon a Boolean Value (False)➤ Send a newBoolean message to the ValueHolder class. This is
equivalent to the expression false asValue.
V3. Creating a Value Holderon a Decimal Number (0.0)➤ Send a newFraction message to the ValueHolder class. This is
equivalent to the expression 0.0 asValue.
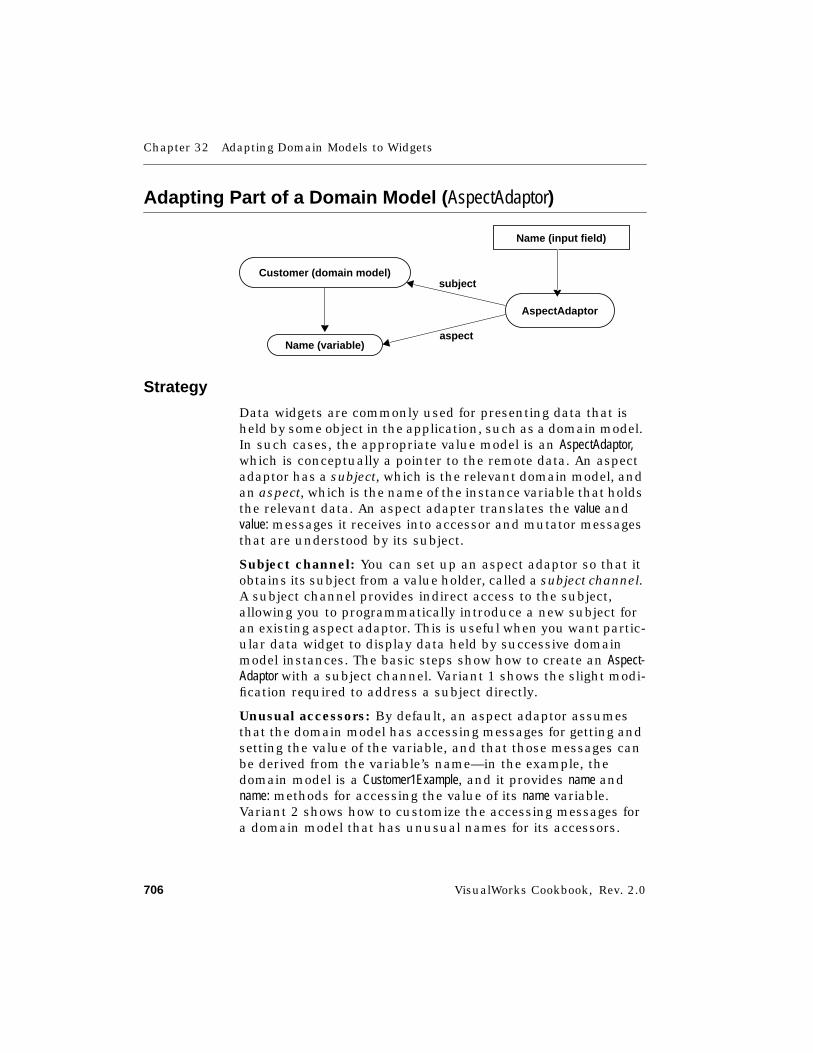
Chapter 32 Adapting Domain Models to Widgets
706 VisualWorks Cookbook, Rev. 2.0
Adapting Part of a Domain Model ( AspectAdaptor)
Strategy
Data widgets are commonly used for presenting data that isheld by some object in the application, such as a domain model.In such cases, the appropriate value model is an AspectAdaptor,which is conceptually a pointer to the remote data. An aspectadaptor has a subject, which is the relevant domain model, andan aspect, which is the name of the instance variable that holdsthe relevant data. An aspect adapter translates the value andvalue: messages it receives into accessor and mutator messagesthat are understood by its subject.
Subject channel: You can set up an aspect adaptor so that itobtains its subject from a value holder, called a subject channel.A subject channel provides indirect access to the subject,allowing you to programmatically introduce a new subject foran existing aspect adaptor. This is useful when you want partic-ular data widget to display data held by successive domainmodel instances. The basic steps show how to create an Aspect-Adaptor with a subject channel. Variant 1 shows the slight modi-fication required to address a subject directly.
Unusual accessors: By default, an aspect adaptor assumesthat the domain model has accessing messages for getting andsetting the value of the variable, and that those messages canbe derived from the variable’s name—in the example, thedomain model is a Customer1Example, and it provides name andname: methods for accessing the value of its name variable.Variant 2 shows how to customize the accessing messages fora domain model that has unusual names for its accessors.
subject
AspectAdaptor
Name (input field)
Name (variable)
Customer (domain model)
aspect
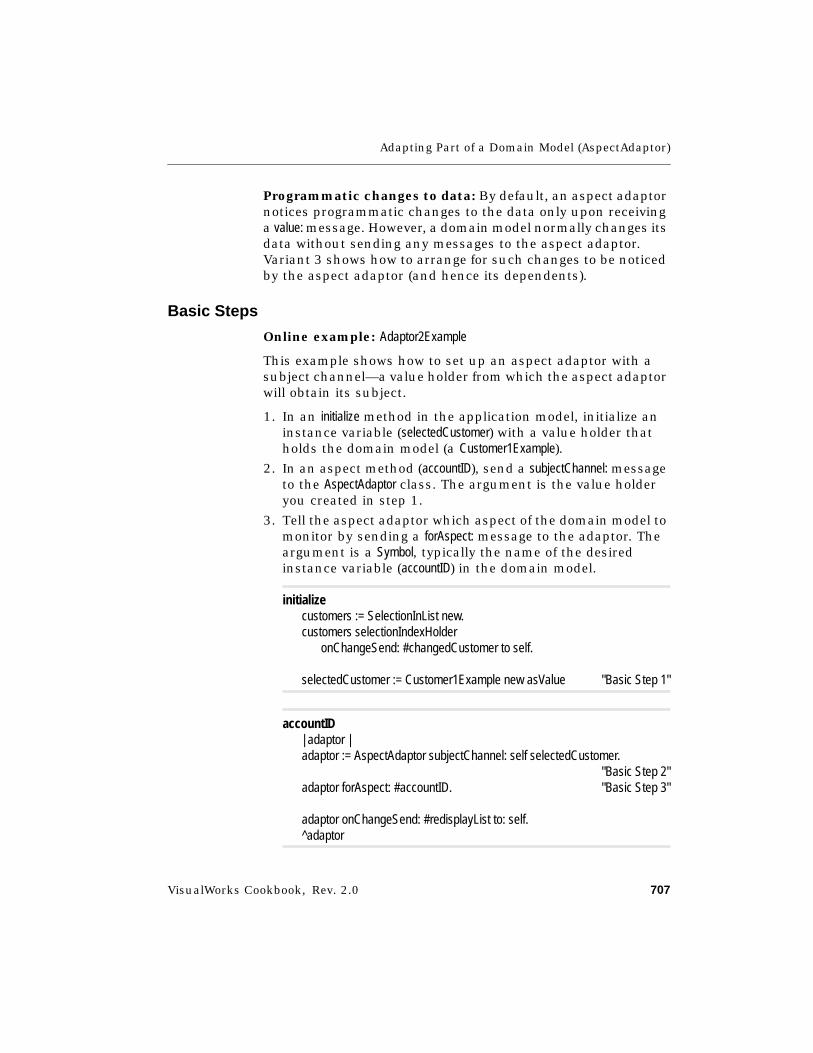
Adapting Part of a Domain Model (AspectAdaptor)
VisualWorks Cookbook, Rev. 2.0 707
Programmatic changes to data: By default, an aspect adaptornotices programmatic changes to the data only upon receivinga value: message. However, a domain model normally changes itsdata without sending any messages to the aspect adaptor.Variant 3 shows how to arrange for such changes to be noticedby the aspect adaptor (and hence its dependents).
Basic Steps
Online example: Adaptor2Example
This example shows how to set up an aspect adaptor with asubject channel—a value holder from which the aspect adaptorwill obtain its subject.
1. In an initialize method in the application model, initialize aninstance variable (selectedCustomer) with a value holder thatholds the domain model (a Customer1Example).
2. In an aspect method (accountID), send a subjectChannel: messageto the AspectAdaptor class. The argument is the value holderyou created in step 1.
3. Tell the aspect adaptor which aspect of the domain model tomonitor by sending a forAspect: message to the adaptor. Theargument is a Symbol, typically the name of the desiredinstance variable (accountID) in the domain model.
initializecustomers := SelectionInList new.customers selectionIndexHolder
onChangeSend: #changedCustomer to self.
selectedCustomer := Customer1Example new asValue "Basic Step 1"
accountID| adaptor |adaptor := AspectAdaptor subjectChannel: self selectedCustomer.
"Basic Step 2"adaptor forAspect: #accountID. "Basic Step 3"
adaptor onChangeSend: #redisplayList to: self.^adaptor
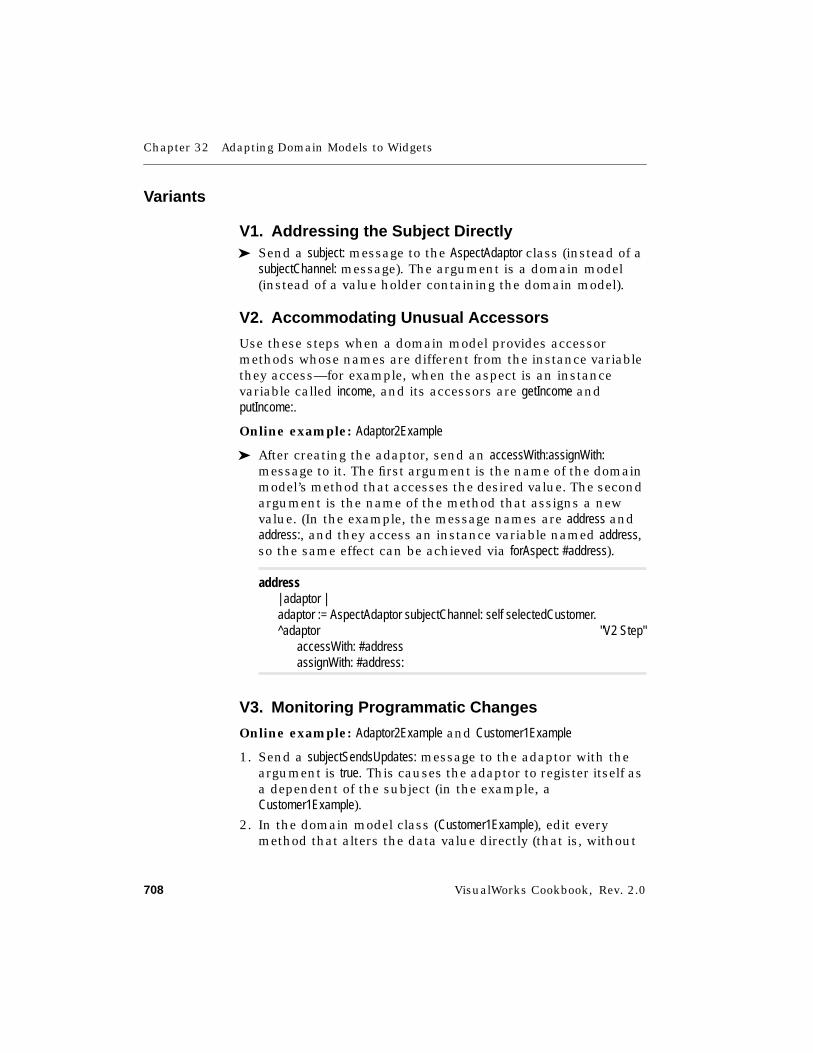
Chapter 32 Adapting Domain Models to Widgets
708 VisualWorks Cookbook, Rev. 2.0
Variants
V1. Addressing the Subject Directly➤ Send a subject: message to the AspectAdaptor class (instead of a
subjectChannel: message). The argument is a domain model(instead of a value holder containing the domain model).
V2. Accommodating Unusual Accessors
Use these steps when a domain model provides accessormethods whose names are different from the instance variablethey access—for example, when the aspect is an instancevariable called income, and its accessors are getIncome andputIncome:.
Online example: Adaptor2Example
➤ After creating the adaptor, send an accessWith:assignWith:message to it. The first argument is the name of the domainmodel’s method that accesses the desired value. The secondargument is the name of the method that assigns a newvalue. (In the example, the message names are address andaddress:, and they access an instance variable named address,so the same effect can be achieved via forAspect: #address).
address| adaptor |adaptor := AspectAdaptor subjectChannel: self selectedCustomer.^adaptor "V2 Step"
accessWith: #addressassignWith: #address:
V3. Monitoring Programmatic Changes
Online example: Adaptor2Example and Customer1Example
1. Send a subjectSendsUpdates: message to the adaptor with theargument is true. This causes the adaptor to register itself asa dependent of the subject (in the example, aCustomer1Example).
2. In the domain model class (Customer1Example), edit everymethod that alters the data value directly (that is, without
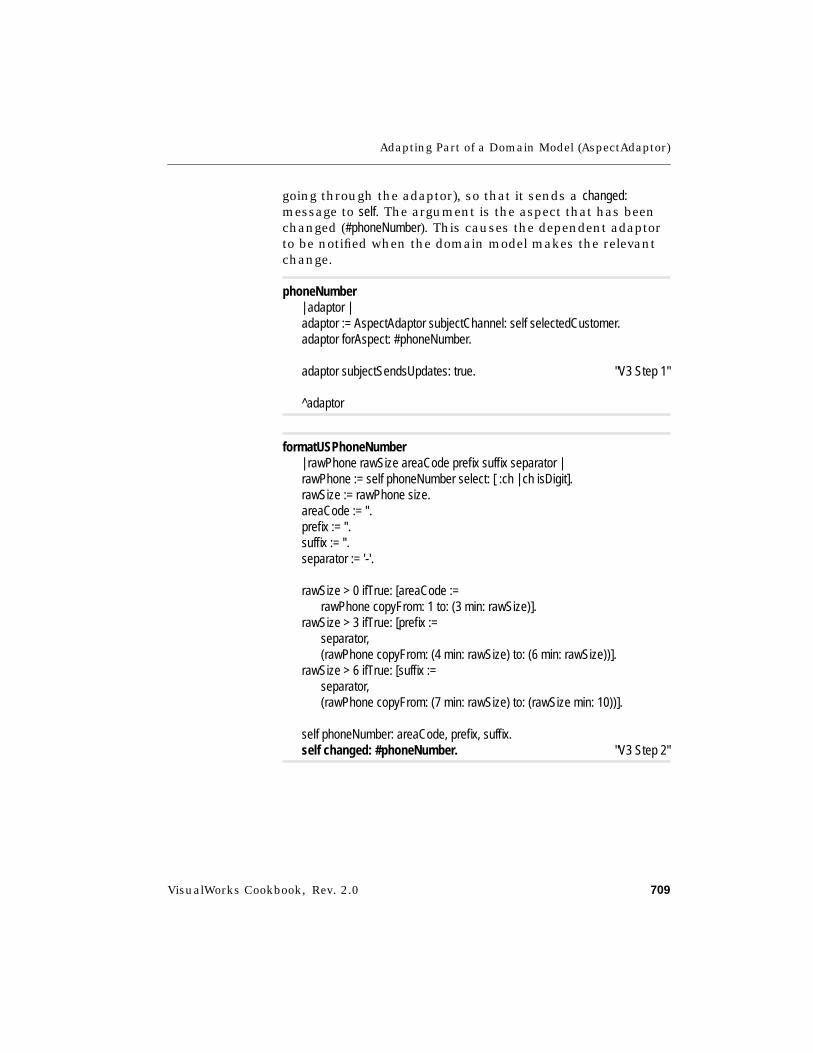
Adapting Part of a Domain Model (AspectAdaptor)
VisualWorks Cookbook, Rev. 2.0 709
going through the adaptor), so that it sends a changed:message to self. The argument is the aspect that has beenchanged (#phoneNumber). This causes the dependent adaptorto be notified when the domain model makes the relevantchange.
phoneNumber| adaptor |adaptor := AspectAdaptor subjectChannel: self selectedCustomer.adaptor forAspect: #phoneNumber.
adaptor subjectSendsUpdates: true. "V3 Step 1"
^adaptor
formatUSPhoneNumber| rawPhone rawSize areaCode prefix suffix separator |rawPhone := self phoneNumber select: [ :ch | ch isDigit].rawSize := rawPhone size.areaCode := ''.prefix := ''.suffix := ''.separator := '-'.
rawSize > 0 ifTrue: [areaCode :=rawPhone copyFrom: 1 to: (3 min: rawSize)].
rawSize > 3 ifTrue: [prefix :=separator,(rawPhone copyFrom: (4 min: rawSize) to: (6 min: rawSize))].
rawSize > 6 ifTrue: [suffix :=separator,(rawPhone copyFrom: (7 min: rawSize) to: (rawSize min: 10))].
self phoneNumber: areaCode, prefix, suffix.self changed: #phoneNumber. "V3 Step 2"
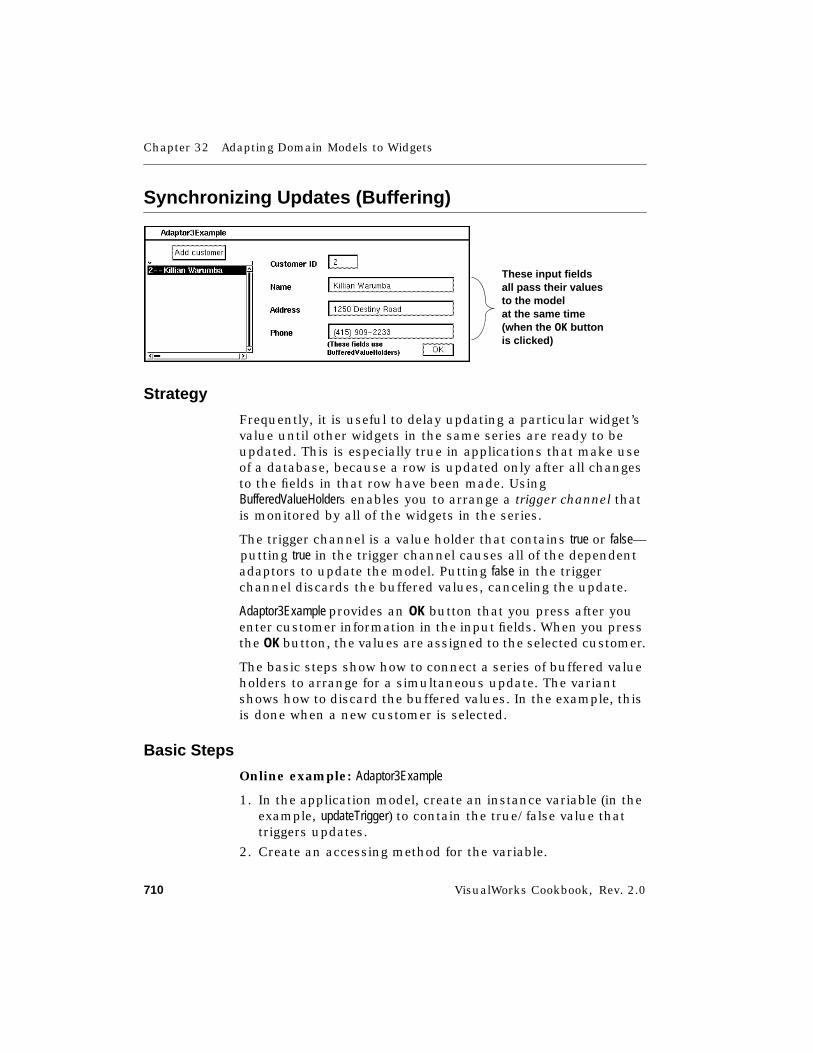
Chapter 32 Adapting Domain Models to Widgets
710 VisualWorks Cookbook, Rev. 2.0
Synchronizing Updates (Buffering)
Strategy
Frequently, it is useful to delay updating a particular widget’svalue until other widgets in the same series are ready to beupdated. This is especially true in applications that make useof a database, because a row is updated only after all changesto the fields in that row have been made. UsingBufferedValueHolders enables you to arrange a trigger channel thatis monitored by all of the widgets in the series.
The trigger channel is a value holder that contains true or false—putting true in the trigger channel causes all of the dependentadaptors to update the model. Putting false in the triggerchannel discards the buffered values, canceling the update.
Adaptor3Example provides an OK button that you press after youenter customer information in the input fields. When you pressthe OK button, the values are assigned to the selected customer.
The basic steps show how to connect a series of buffered valueholders to arrange for a simultaneous update. The variantshows how to discard the buffered values. In the example, thisis done when a new customer is selected.
Basic Steps
Online example: Adaptor3Example
1. In the application model, create an instance variable (in theexample, updateTrigger) to contain the true/false value thattriggers updates.
2. Create an accessing method for the variable.
These input fieldsall pass their valuesto the modelat the same time(when the OK buttonis clicked)
Synchronizing Updates (Buffering)
VisualWorks Cookbook, Rev. 2.0 711
updateTrigger "Basic Step 2"^updateTrigger
3. Initialize the variable to a value holder containing false.
initializecustomers := SelectionInList new.customers selectionIndexHolder onChangeSend: #changedCustomer to:
self.
selectedCustomer := Customer1Example new asValue.
updateTrigger := false asValue. "Basic Step 3"
4. For each widget in the series, place the widget’s value modelin a BufferedValueHolder by sending a subject:triggerChannel:message to the BufferedValueHolder class. The first argument isthe widget’s value model (in the example, an AspectAdaptor).The second argument is the trigger channel (updateTrigger).This is typically done when the widget’s value model isinitialized. Note that the buffered value holder does notreplace the widget’s value model—rather, it contains thatvalue model.
accountID| adaptor bufferedAdaptor |adaptor := AspectAdaptor subjectChannel: self selectedCustomer.adaptor forAspect: #accountID.
bufferedAdaptor := BufferedValueHolder "Basic Step 4"subject: adaptortriggerChannel: self updateTrigger.
^bufferedAdaptor
5. Provide a button, a menu command, or other device withwhich the user can indicate that the series of values haveall been edited as much as necessary (in the example,completion is indicated using an OK button that triggers anaccept action).
Chapter 32 Adapting Domain Models to Widgets
712 VisualWorks Cookbook, Rev. 2.0
6. In the action method (accept), send a value: message to thetrigger channel (updateTrigger). The argument is true.
acceptself updateTrigger value: true. "Basic Step 6"
self redisplayList.
Variant
Discarding the Buffered Values
Online example: Adaptor3Example
➤ Send a value: message to the trigger channel (updateChannel).The argument is false. This is typically done after confirmingthat the user wants to abandon the edited data.
changedCustomer| chosenCustomer selector |chosenCustomer := self customers selection.
chosenCustomer isNilifTrue: [
self selectedCustomer value: Customer1Example new.selector := #disable]
ifFalse: [self selectedCustomer value: chosenCustomer.selector := #enable].
"Discard changes that were not OK'd."self updateTrigger value: false. "Variant Step"
"Enable/disable selection-sensitive widgets."#( #accountID #name #address #phoneNumber #ok)
do: [ :componentName| (self builder componentAt: componentName)
perform: selector].
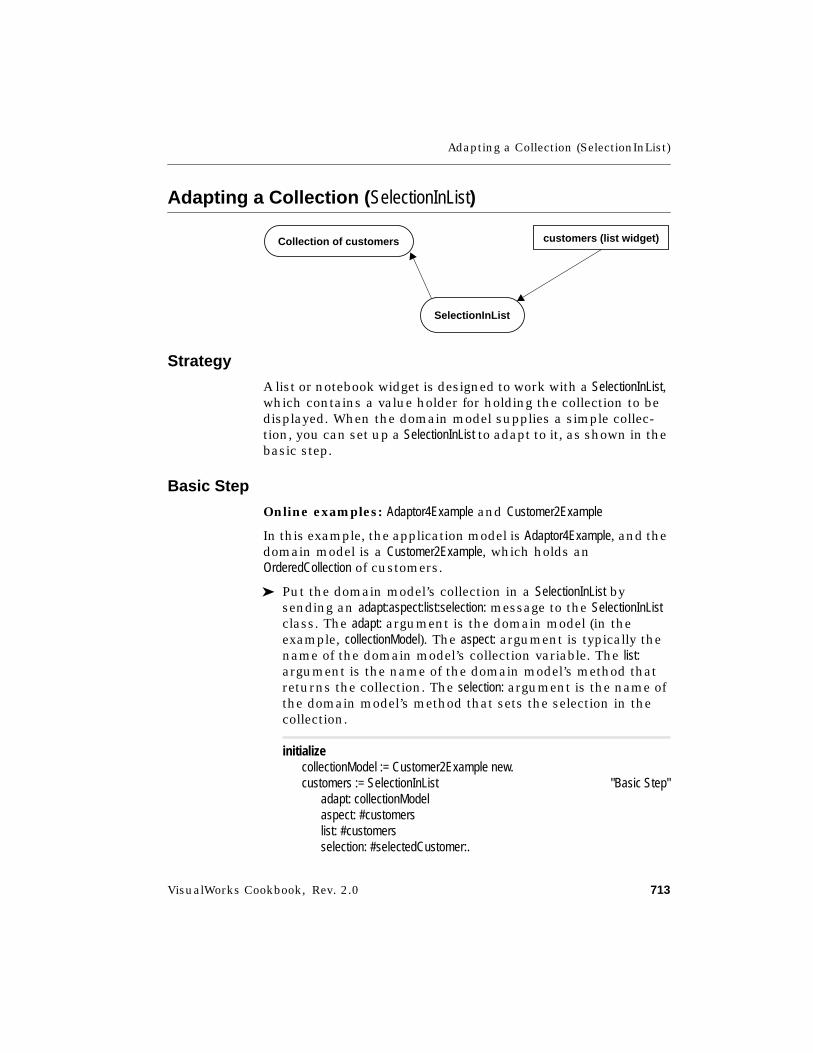
Adapting a Collection (SelectionInList)
VisualWorks Cookbook, Rev. 2.0 713
Adapting a Collection ( SelectionInList)
Strategy
A list or notebook widget is designed to work with a SelectionInList,which contains a value holder for holding the collection to bedisplayed. When the domain model supplies a simple collec-tion, you can set up a SelectionInList to adapt to it, as shown in thebasic step.
Basic Step
Online examples: Adaptor4Example and Customer2Example
In this example, the application model is Adaptor4Example, and thedomain model is a Customer2Example, which holds anOrderedCollection of customers.
➤ Put the domain model’s collection in a SelectionInList bysending an adapt:aspect:list:selection: message to the SelectionInListclass. The adapt: argument is the domain model (in theexample, collectionModel). The aspect: argument is typically thename of the domain model’s collection variable. The list:argument is the name of the domain model’s method thatreturns the collection. The selection: argument is the name ofthe domain model’s method that sets the selection in thecollection.
initializecollectionModel := Customer2Example new.customers := SelectionInList "Basic Step"
adapt: collectionModelaspect: #customerslist: #customersselection: #selectedCustomer:.
Collection of customers
SelectionInList
customers (list widget)
Chapter 32 Adapting Domain Models to Widgets
714 VisualWorks Cookbook, Rev. 2.0
customers selectionIndexHolderonChangeSend: #changedCustomer to: self.
selectedCustomer := Customer1Example new asValue.
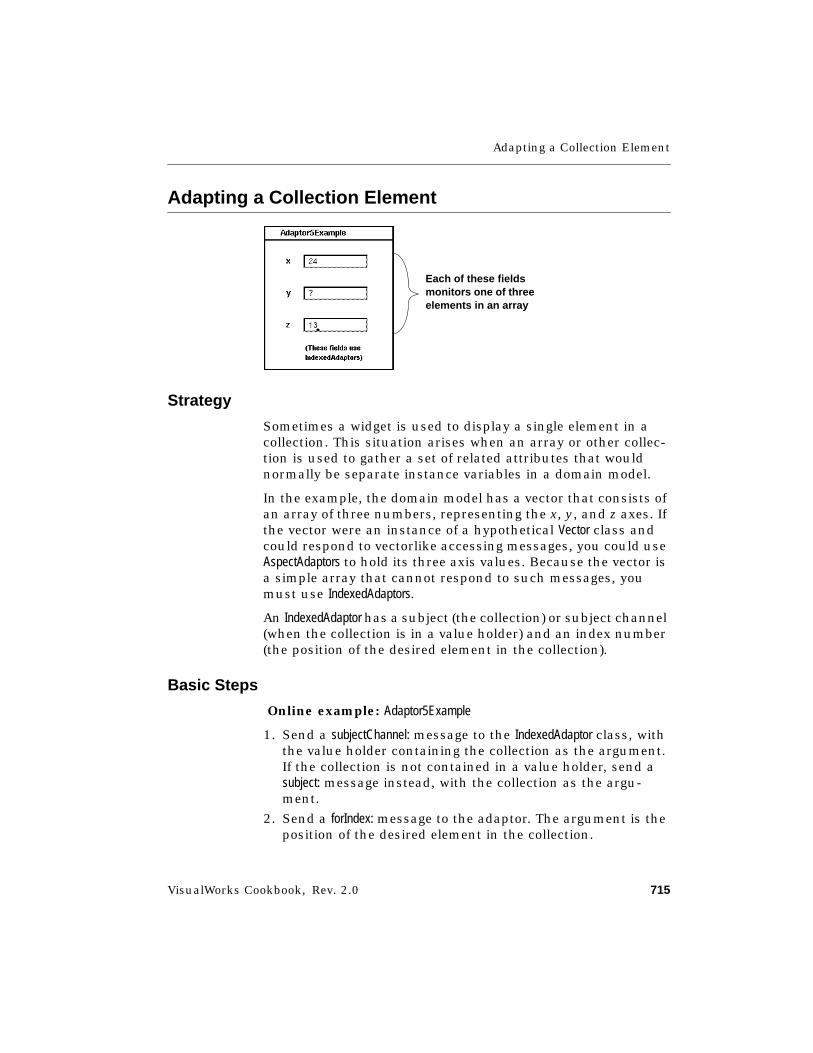
Adapting a Collection Element
VisualWorks Cookbook, Rev. 2.0 715
Adapting a Collection Element
Strategy
Sometimes a widget is used to display a single element in acollection. This situation arises when an array or other collec-tion is used to gather a set of related attributes that wouldnormally be separate instance variables in a domain model.
In the example, the domain model has a vector that consists ofan array of three numbers, representing the x, y, and z axes. Ifthe vector were an instance of a hypothetical Vector class andcould respond to vectorlike accessing messages, you could useAspectAdaptors to hold its three axis values. Because the vector isa simple array that cannot respond to such messages, youmust use IndexedAdaptors.
An IndexedAdaptor has a subject (the collection) or subject channel(when the collection is in a value holder) and an index number(the position of the desired element in the collection).
Basic Steps
Online example: Adaptor5Example
1. Send a subjectChannel: message to the IndexedAdaptor class, withthe value holder containing the collection as the argument.If the collection is not contained in a value holder, send asubject: message instead, with the collection as the argu-ment.
2. Send a forIndex: message to the adaptor. The argument is theposition of the desired element in the collection.
Each of these fieldsmonitors one of threeelements in an array
Chapter 32 Adapting Domain Models to Widgets
716 VisualWorks Cookbook, Rev. 2.0
xAxis| adaptor |adaptor := IndexedAdaptor subjectChannel: self vector. "Basic Step 1"^adaptor forIndex: 1 "Basic Step 2"
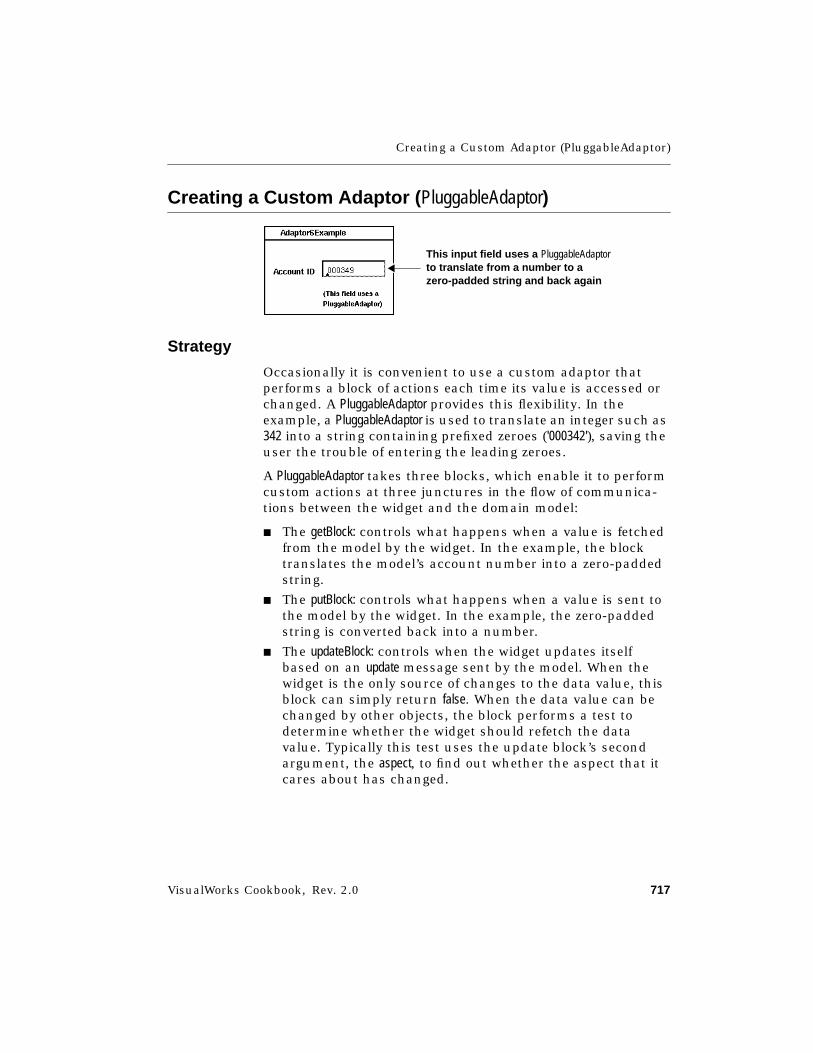
Creating a Custom Adaptor (PluggableAdaptor)
VisualWorks Cookbook, Rev. 2.0 717
Creating a Custom Adaptor ( PluggableAdaptor)
Strategy
Occasionally it is convenient to use a custom adaptor thatperforms a block of actions each time its value is accessed orchanged. A PluggableAdaptor provides this flexibility. In theexample, a PluggableAdaptor is used to translate an integer such as342 into a string containing prefixed zeroes ('000342'), saving theuser the trouble of entering the leading zeroes.
A PluggableAdaptor takes three blocks, which enable it to performcustom actions at three junctures in the flow of communica-tions between the widget and the domain model:
■ The getBlock: controls what happens when a value is fetchedfrom the model by the widget. In the example, the blocktranslates the model’s account number into a zero-paddedstring.
■ The putBlock: controls what happens when a value is sent tothe model by the widget. In the example, the zero-paddedstring is converted back into a number.
■ The updateBlock: controls when the widget updates itselfbased on an update message sent by the model. When thewidget is the only source of changes to the data value, thisblock can simply return false. When the data value can bechanged by other objects, the block performs a test todetermine whether the widget should refetch the datavalue. Typically this test uses the update block’s secondargument, the aspect, to find out whether the aspect that itcares about has changed.
This input field uses a PluggableAdaptorto translate from a number to azero-padded string and back again
Chapter 32 Adapting Domain Models to Widgets
718 VisualWorks Cookbook, Rev. 2.0
Basic Steps
Online example: Adaptor6Example
1. Create the custom adaptor by sending an on: message to thePluggableAdaptor class. The argument is the domain model.
2. Send a getBlock:putBlock:updateBlock: message to the adaptor. Thefirst block takes one argument: the domain model. Thesecond block takes two arguments: the model and the valueto be assigned. The third block takes three arguments: themodel, the aspect of the model that was changed, and aparameter that corresponds to the argument of a changed:with:message, when applicable.
initializeaccountID := 1.paddedID := PluggableAdaptor on: self. "Basic Step 1"paddedID "Basic Step 2"
getBlock: [ :model || paddedString |paddedString := model accountID printString.6 - paddedString size
timesRepeat: [paddedString := '0', paddedString].paddedString]
putBlock: [ :model :value |model accountID: value asNumber]
updateBlock: [ :model :aspect :parameter | false]
VisualWorks Cookbook, Rev. 2.0 719
Index
Symbols- 431, 518$ 530& 38* 432** 436+ 431, 510, 545/ 432// 432:= 4< 439<= 439<Control>-click xvii<Meta>-click xvii<Operate> button xvi<Select> button xvi<Shift>-click xvii<Window> button xvi= 438== 438> 440>= 440@ 451, 630\ 553\\ 432^ 20| 38~= 438~~ 439
’ 532
Aabbreviating a string 551abs message 450absolute number 450accelerator
See also shortcut keyaccess date of a file 596accessing method 10accessors
adapting 706accessWith:assignWith: message 708action
overriding an inherited 304action button
adding 164uses for 164
action method 47Action property 48active window, accessing 99adapt:aspect:list:selection: message 713adaptor
aspect of a model 706buffered 710custom 717on a collection 713on a collection element 715value holder 704
Index
720 VisualWorks Cookbook, Rev. 2.0
Adaptor1Example 705Adaptor2Example 707, 708Adaptor3Example 710, 712Adaptor4Example 713Adaptor5Example 715Adaptor6Example 718add command
in System Browser 29, 31add: message 497add:before: message 498add:beforeIndex: message 498addAll: message 498addAll:beforeIndex: message 499addAllFirst: message 499addDays: message 471addFirst: message 498adding
dates 471elements to a collection 497numbers 431times 482
addItemLabel:value: message 245addTime: message 482after: message 513Align command 65Align->Distribute command 66aligning
text 561text in a field 124widgets 65
allBold message 574and: message 38animating
a graphic image 675anyButtonPressed message 414appending
text to a file 599appendStream message 599application
closing windows 101designing 42grouping its classes 29inheriting capabilities 302integrating graphics 652nesting 305starting 82
application modeland custom controller 399combined with domain model 46connecting to interface 47description 43
ApplicationDialogController 407ApplicationModel 302
creating a subclass 27ApplicationWindow 82applyColorDrop: message 360applyColorEnter: message 352applyColorExit: message 352, 353applyColorOver: message 352applyMoreColorEnter: message 354applyMoreColorExit: message 354applyMoreColorOver: message 354arc
displaying 640arcCos message 443arcSin message 442arcTan message 443Arrange->Align command 65Arrange->Bring To Front command 74Arrange->Equalize command 56array
creating 492description 490expanding 499literal 493removing an element 504See also collection
as geometric object 637
Index
VisualWorks Cookbook, Rev. 2.0 721
asArray message 522asCharacter message 451asComposedText message 556, 569, 607asDays message 465asDouble message 449asFilename message 592, 598asFiller message 637asFixedPoint: message 428, 449asFloat message 449asImage message 660asList message 522asLowercase message 537, 571asPattern message 586, 692aspect adaptor 122, 706Aspect property 48aspectAt:put: message 299asPoint message 451asRational message 449asRetainedMedium message 663, 666asSeconds message 466, 480asSet message 523assigning to a variable 4Association 490association
removing from dictionary 503associationAt: message 17asString message 595asStroker message 632asText message 557asUppercase message 537, 571asValue message 705at: message 511at:ifAbsent: message 512at:put: message 497, 505atAllPut: message 506atEnd message 618atNameKey
message 261atPoint: message 665
atPoint:put: message 665
Bbackground: message 95backgroundColor: message 76, 257base
of a number 429baseline
in text 580baseline: message 577before: message 513beginSubMenuLabeled: message 231beInvisible message 70beMaster message 105beOff message 255beOn message 255bePartner message 106beSlave message 105between:and: message 440beTwoDimensional message 274beVisible message 70Bezier curve 634binary file
See also BOSSbinary message 6BinaryObjectStorage 614binaryReaderBlockForVersion:format:
method 624binaryRepresentationVersion
method 624binding
in a notebook 322blanking a subcanvas 312blueButton 412blueButtonPressed message 413bold emphasis 572boolean
in a field 126
Index
722 VisualWorks Cookbook, Rev. 2.0
Border property 67bordering a widget 67BOSS
appending 615converting old data 624custom representations 626omitting source code 622random access 619reading a file 617sequential access 618skipping the initial scan 617storing a class 621storing a collection 615storing objects 614
bounded widget 58boundingBox:startAngle:sweepAngle:
message 641bounds message 59box
around widgets 156branch
creating 33browseAllCallsOn: message 17BufferedValueHolder 710buffering
model updates 710builder
window 85bulletin boards xxbutton
default 165graphic label 167highlighting 168See also action buttonSee also check boxSee also menu buttonSee also radio button
ButtonExample 160, 162, 164, 167buttons, mouse, see mouse buttons
bypassing a dependency 78byte array
creating an image 660in a field 126
Ccaching
a graphic image 674Can Tab property 74canBeWritten message 599, 611canvas
opening 82polling vs. event-driven 392tab order 74
cap style of a line 645capacity message 495capturing
a graphic image 659cascading messages 9case
in a string search 544in text 571of a character 535of a string 537
categoryof classes 29of messages 31
ceiling message 434center:radius: message 640centered message 561century
seconds in 480chaining messages 7change validation callback 132Change Validation property 133changed: message 384, 709changed:with: message 382, 653, 718changeRequest message 102

Index
VisualWorks Cookbook, Rev. 2.0 723
charactercategories of 534comparing 540composed 531counting in text 564creating 451, 530line ends 553nondisplaying 530
CharacterAttributes 576, 578characterAttributes: message 577, 579,
583check box
adding 162in menu 254uses for 162
choose:fromList:values:lines:cancel:message 289
choose:labels:values:default:message 282
circle 640See also ellipse
classBOSS representation 626category 29changing BOSSed instances 624creating 26grouping 29in a BOSS file 621moving to different category 30naming conventions 26
class categoryadding 29definition 29removing 29renaming 30reordering 30
class instance variabledeclaring 14removing 17
usage 11class var refs command 16class variable
declaring 14removing 16undeclared 19usage 11
clear all command 88clearAll message 193click xvii
See also mouseclient: message 312client:spec: message 311, 335clientData message 360clippingBounds message 676clock
elapsed seconds 481close message 598closeRequest message 101closing a window 101code
timing 484collapse message 103collapsing a window 103collect: message 37, 526collection
adapting 713adapting an element 715adding elements 497capacity 495combining 510comparing 517copying elements 508counting occurrences 513creating 491finding an element 36finding elements 511in a BOSS file 615inserting an element 498

Index
724 VisualWorks Cookbook, Rev. 2.0
iterating 35looping 524removing elements 500replacing elements 505See also arraySee also dictionarySee also listSee also list widgetSee also setselecting elements 36size 495sorting 519subtracting a subset 518testing for emptiness 495transforming 37type conversion 522types 490
collection classcreating 27
colorapplying 694box widget 157creating 686dithering 698in a menu 257label widget 116of a geometric object 649palette 696predefined 686rendering policy 698
color emphasis 585color: message 257ColorDDExample 344, 351, 354, 356,
360, 367colorDrag: message 345, 360ColorExample 76coloring
a graphic image 664a widget 75
a window 94text 585
colorLayerEnter: message 356colorLayerExit: message 356colorLayerOver: message 356colorPalette message 697colors message 696ColorValue 686colorWantToDrag: message 345column selecting
dataset 209column widths
dataset 207table 219
combiningcollections 510graphic images 672strings 545
combo boxcreating 146
ComboBoxExample 146ComboConversionExample 148comma
for combining collections 510for combining strings 545
comparingcharacters 540collections 517dates 473files or directories 605numbers 438strings 540texts 568
completeContentsOfArea: message 666component
See also widgetcomponentAt: message 55composed character 531composeDiacritical: message 531
Index
VisualWorks Cookbook, Rev. 2.0 725
ComposedText 113, 607See also text
composite viewconnecting to controller 386
compositionWidth: message 559, 570compressing
a string 551concatenating
See also combiningconditional expression 33conditional looping 35conditional test 38ConfigurableDropSource 372ConfigurableDropTarget 341, 348confirm: message 280confirmer dialog 280connecting
controller to model 399controller to view 400field to field 143view to controller 385
constantNames message 687constants
numeric 458constraining window size 87construct: message 593contents
of a file or directory 597contents message 617contentsOfEntireFile message 597, 605contextApplication: message 346contextWidget: message 345contextWindow: message 345continuousAccept: message 137contractTo: message 551control loop 405controlActivity method 406, 412, 413,
416, 417controlInitialize method 407
Controller 393, 405controller
activity 405connecting to model 399connecting to view 400connecting view 385consuming events 406creating 395cursor control 408cursor location 419dual-architecture 393event methods 405handing off control 411initializing 401, 407keyboard input 416loading event-driven code 393mouse input 412polling vs. event-driven 392pop-up menu 409routing menu messages 410taking control 402terminating 408yielding control 403
controller: message 386, 401ControllerWithMenu 409controlLoop method 408ControlManager 392controlPoints: message 634controlTerminate method 408conventions
screen xvitypographic xiv–xvi
convertForGraphicsDevice:renderedBy:message 698
convertingcollection type 522number types 449old BOSS data 624
convertToPalette
Index
726 VisualWorks Cookbook, Rev. 2.0
message 697convertToPalette:renderedBy:
message 700copy:from:in:rule: message 673copyArea:from:sourceOffset:destination
Offset: message 667copyEmpty message 671copyFrom:to: message 509, 547, 569copying
a file or directory 603elements in a collection 508text 569
copyReplaceAll:with: message 550copyReplaceFrom:to:with: message 549copyTo: message 603copyUpTo: message 547copyWith: message 499copyWithout: message 504corner: message 638cos message 442coverage
as a paint 690coverage: message 690CoveragePalette 680coveragePalette message 697CoverageValue 690CR
as line end 553CUARadioButtonView 401current
time 478current window
See also active windowcursor
changing 681changing via controller 408creating 678predefined 678sensing location 419
cursorPoint message 420cursorPointFor: message 420curve
Bezier 634spline 634
customadaptor 717controller 395dialog 296font 576view 376
Customer1Example 20, 24, 26, 708Customer2Example 713CustomerExample 25CustomView1Example 376, 379, 389,
395, 652, 681CustomView2Example 396
Ddamage
rectangle 387window 93
dataas fields in a file 609formatting 129
data types 125dataset
adding a row 210connecting data 212
dataset columnslabels 213order 207scrolling 207selecting 209widths 207
dataset widgetadding 204label colors 214
Index
VisualWorks Cookbook, Rev. 2.0 727
row marker 211selecting columns 209splitting column labels 213
Dataset1Example 205Dataset2Example 210Dataset3Example 212Dataset4Example 213date
adding 471comparing 473creating 462day information 465days left in year 469days since 1901 465formatting 475in a field 125leap year 469month information 467previous day of week 472seconds since 1901 466subtracting 471year information 469
dateAndTimeNow message 483dates message 596day
hours in 481in a date 465of year 468seconds in 480
dayOfMonth message 465days
in each month 467daysInMonth message 467daysInYear message 469daysLeftInYear message 469declaring a variable 13default
button 165font 575, 588
message 23palette 697
defaultController method 401defaultControllerClass method 385, 400defaultDirectory message 594degreesToRadians message 450delete message 602deleting
a file or directory 602denominator message 428dependency
adding and removing 78bypassing 78
DependencyExample 79dependent window
See also slave windowdesiresFocus message 395detect: message 36detect:ifNone: message 515diacritical mark 531dialog
custom 296file name 286list 289multiple-choice 282textual 284warning 278yes-no 280
DialogExample 278, 283, 297dictionary
description 490removing an association 503See also collection
dimensions, accessing window 88directory
characteristics 594comparing 605contents 597copying or moving 603
Index
728 VisualWorks Cookbook, Rev. 2.0
creating 592dates 596default 594deleting 602distinguishing from file 596parent 595
directoryContents message 597, 606disable message 72, 248disabling
menu items 248widgets 72
display message 93display surface
capturing as an image 660displayArcBoundedBy:startAngle:sweep
Angle: message 641displayBox: message 88displayDotOfDiameter:at: message 641displaying
a graphic image 662a line 631a point 630a polygon 637in a view 380text 558
displayLineFrom:to: message 630, 631displayOn: message 558, 632displayOn: method 380displayOn:at: message 662displayPolygon: message 637displayPolyLine: message 632displayWedgeBoundedBy:startAngle:swe
epAngle: message 641Distribute command 66distributing widgets 66dithering color 698divider 154
in a menu 250dividing
numbers 432division 428divisor, greatest common 453do: message 35, 524documentation, see VisualWorks
documentationdoDragDrop message 346dollar sign
in creating a character 530domain model
adapting an aspect 706combined with application model 46connecting to view 378creating 45description 45updating view 382
DoubleSee also floating-point
double-click xviidouble-clicking 392drag and drop 339–373
adding 343–349defining custom pointers 371dragging multiple selections 347drag-ok method 343drag-start method 343dropping data on a list item 361effect symbol. See effect symbolexamining dragged data 365framework classes 341implementation example 341providing visual feedback 350responding to a drop 359using modifier keys 366See also drop sourceSee also drop target
Drag OK property 343Drag Start property 343DragDropContext 341, 351
Index
VisualWorks Cookbook, Rev. 2.0 729
DragDropData 341, 345DragDropManager 341, 346, 348, 359drop method 359Drop property 348, 359drop source 340, 343
adding 343–347setting up 340
drop target 340, 348adding 348–349button 354changing button label 354examining dragged data 365list item 356, 361messages 350providing visual feedback 350–358,
371responding to a drop 359setting up 340tracking a specific list item 356using modifier keys 366
dropFinalVowels message 551DropSource 341, 346dummy
See also placeholder
Eedit all command 30
in System Browser 32edit message 601editing
a list 187editor
opening on a file 601editor widget
accessing selection 174adding 172connecting to list 200connecting to notebook 336
Editor1Example 173, 174, 200Editor2Example 93, 310editors
image 659effect symbol 351, 360
adding 372creating custom symbol 373defining 371types of 351See also target emphasis
electronic bulletin boards xxelectronic mail xxelements
adapting 715adding to collection 497
ellipse 640grouping widgets 158
Ellipse property 158EllipticalArc 641embedded canvas
See also subcanvasemphasizeAllWith: message 573, 586emphasizeFrom:to:with: message 572,
578, 585enable message 72, 248endSubMenu message 231enterEvent: method 406Entry property 348, 350enumerating
See also loopingenumerating a collection 35equality
of numbers 438Equalize command 56error
compilation 19ErrorDiffusion 699even message 445event
Index
730 VisualWorks Cookbook, Rev. 2.0
consumption 406methods 405user-input 392window 106
Event Driven property 394event-driven controller
See controllerevents.st 393exists message 594Exit property 348, 350exit validation callback 132Exit Validation property 133exitEvent: method 406exp message 444expand message 103expandedMenu message 140expanding
graphic images 668windows 103
exponentialof a number 444
extent: message 638extent:depth:palette: message 660extent:depth:palette:bits:pad:
message 660
Ffactorial 453factoring
numbers 453family of a font 582family: message 582fax support xxifield
aligning 124connecting to a field 143creating 122dialog 284
filtering and validating 132formatting numbers 129highlighting 150in a text file 609insertion point 150menu 139menu of entries 146read-only 124size restriction 124type restriction 125widget, connecting to a slider 267
FieldConnectionExample 143, 144FieldMenuExample 139FieldSelectionExample 150FieldTypeExample 126, 131FieldValidation1Example 136FieldValidation2Example 137FieldValidInputExample 133, 134file
binarySee also BOSS
characteristics 594comparing 605contents 597copying or moving 603creating 592dates 596deleting 602distinguishing from directory 596fields of textual data 609opening an editor 601parts of name 595permissions 611printing 607size 594storing text 598
file namedialog 286
file out
Index
VisualWorks Cookbook, Rev. 2.0 731
vs. a BOSS file 621Filename 592fileSize message 594filling wrapper for geometrics 637fill-in-the-blank dialog 284filtering
field input 132finalization
upon window closing 102finding
elements in a collection 511See also searching
findString:ignoreCase:useWildcards:message 544
findString:startingAt:ifAbsent:message 543
findString:startingAt:ignoreCase:useWildcards: message 566
first message 514firstDayOfMonth message 468firstIndent: message 562fixed command 57fixed size command 87fixed-point number
creating 428definition 426in a field 126
fixedWidth emphasis 582floating-point number
creating 427definition 426
floor message 434flopping an image 669follow:while:on: message 675font
changing widget’s 68creating 576default 588default for platform 575
family 582in a text 572label 116menu 587name 582platform 589size 578
font mixing 116Font1Example 68Font2Example 589FontDescription 576, 583fonts xiv–xviforAspect: message 707foregroundColor: message 76forgetInterval: message 619forIndex: message 715Format property 126, 129formatting
a date 475displayed data 129numeric field 129
fractioncreating 428definition 426
from:to: message 632fromDays: message 464fromGenerator:seededWith:
message 455fromSeconds: message 479fromUser message 659
Ggcd: message 453geometric
arc 640Bezier curve 634color 649ellipse 640
Index
732 VisualWorks Cookbook, Rev. 2.0
integrating in application 652line 631point 630polygon 637rendering color 701spline 634
getBlock:putBlock:updateBlock:message 718
global variableremoving 17usage 10
globalCursorPoint message 100, 421globalPoint message 421graphic image
animating 675caching 674capturing 659coloring 664converting to display surface 663creating 658displaying 662expanding and shrinking 668flopping 669in menu 254layering 672masking 666palette 696rotating 670
graphic label 111, 118in a button 167
graphicsSee also geometric
graphics context 558GraphicsAttributes 650GraphicsAttributesWrapper 650GraphicsContext 380graphicsContext message 631graying out
See also disabling
greater than 440greatest common divisor 453grid
in lines of text 580grid: message 271gridForFont:withLead: message 580,
583grouping widgets 156
HhandlerForMouseEvent: method 403hardcopy
See also printinghardcopy message 565hasAlt message 417hasCtrl message 417hasLock message 417hasMeta message 417hasShift message 417head message 595HelpBrowser example 168HideExample 70, 72hideItem: message 247hiding
widgets 70windows 104
hierarchic menus 231highlighting
button 168in a field 150in a list 196See also selection
hiliteSelection: message 168holder
See also value holderhour
minutes in 481hours
Index
VisualWorks Cookbook, Rev. 2.0 733
in day 481hsb color 688hue:saturation:brightness: message 688
Iicon
creating 682in a menu 254linking to a window 683predefined 682window 108
icon: message 108, 683iconify
See also collapsingID property 54identity
comparing numbers 438IdentityDictionary 346ifTrue: message 33image
See also graphic image 658Image Editor 659image:mask:hotSpot:name:
message 680includes: message 513includesAssociation: message 513includesKey: message 513indenting
text 562IndexedAdaptor 715indexOf: message 512, 543indexOfSubCollection:startingAt:
message 514inequality
testing numbers 438inheriting
application capabilities 302initialize message 24, 123
initialize method 48initializeDispatchTable method 417initializeMenu method 409Initially Disabled property 72Initially Invisible property 70input architecture 392input controller
See controllerinput field
See also fieldinserting
element in a collection 498insertion point
in a field 150inst var refs command 16install command 27instance
creating 22initializing 24used in drag and drop 341
instance variabledeclaring 14removing 16undeclared 19usage 11
integercreating 426definition 426small-large boundary 459
integratinggraphics in an application 652view in interface 389
interfaceconnecting to models 47integrating a custom view 389painting 43reusing 308swapping at runtime 310
interface builder 43
Index
734 VisualWorks Cookbook, Rev. 2.0
interface componentSee also widget
interfaceSpecFor: message 311interval
iterating 34invalidate message 174, 653invalidateRectangle 388invalidateRectangle: message 388invalidateRectangle:repairNow:
message 388invalidating a view 387invisible, making a widget 70isAlphabetic message 534isAlphaNumeric message 534isComposed message 536isControlActive method 403isControlWanted method 403isDigit message 535isDirectory message 596isEmpty message 495isInteger message 445isLetter message 534isLowercase message 535isSeparator message 535isVowel message 534isZero message 446italic emphasis 572iterating
See also loopingiterating a collection 35
Jjoin style of a line 647justified message 561justify
See also aligning
Kkey: message 345keyAtValue:ifAbsent: message 512keyboard
sensing input 416keyboard activity, responding to 392keyboard shortcut 252KeyboardEvent 416keyboardEvent message 417keyboardHook: message 136keyboardPeek message 417keyboardPressed message 417KeyboardProcessor 395, 411keyboardProcessor message 411keyPressedEvent: message 416keyPressedEvent: method 418keysAndValuesDo: message 526keysDo: message 526keyValue message 417keyword message 5
Llabel
aligning table labels 223table columns 223table rows 223window 92
Label property 92label widget
changing at runtime 113color 116creating 110font 116graphic 111multi-line 110registry of labels 118
label: message 92, 114labelAt:put: message 119
Index
VisualWorks Cookbook, Rev. 2.0 735
labelImage: message 254labelString
message 69labelString: message 113, 354large emphasis 572, 578LargeNegativeInteger 426LargePositiveInteger 426last message 514lastIndexOf: message 512Launcher
creating 294layering
graphic images 672Layout->Be Bounded command 58Layout->Relative command 56, 60Layout->Unbounded command 58lcm: message 453leap message 469least common multiple 453leftFlush message 561length
of a string 539of text line 559
less than 439LF, as line end 553line
cap style 645displaying 631join style 647See also dividerthickness 644
line end characters 553line message 250line spacing in text 580LineExample 154, 156, 158lineGrid: message 577LineSegment 631lineWidth: message 644lining up
See also aligninglist
creating 492description 490See also collection
list dialog 289list widget
adding 184connecting to editor 200connecting two lists 198controlling textual representation 185editing the list 187highlighting style 196menu 194multiple selections 189selection 191
List1Example 185, 187, 190, 191, 194,196, 198
List2Example 303, 306, 308, 310listAtCategoryNamed: message 679listPlatformFonts message 589literal
array 493ln message 444Locale object 129log message 444log: message 444logarithmic functions 444LogoExample 110, 111, 113, 114, 116,
118LookPreferences 76loop
creating 34looping 34–37
through a collection 524lowercase
See also case
Index
736 VisualWorks Cookbook, Rev. 2.0
MmagnifiedBy: message 668mail
electronic xxmakeDirectory message 593makeUnwritable message 611makeWritable message 611map message 104MappedPalette 680, 696marker
in a slider 273mask
creating 666setting opaqueness 690
master window 105master windows 292max size command 87max: message 441maximum
of two numbers 441maximumSize: message 87maxVal message 459Menu 410menu
as list in dialog 289check box in 254color 257combined with field 146creating 226disabling an item 248divider 250icon 254in a field 139in a Launcher 294in list widget 194modifying at runtime 243of commands 227of fonts 587
of values 228pop-up 240routing messages 410shortcut key 252submenu 231via controller 409
menu baradding 98, 233creating 233
Menu Bar property 98, 233menu button
adding 236Menu Editor 226, 259menu item
label 254Menu property 48menuAt
message 261menuAt: message 247MenuBuilder 227MenuCommandExample 227, 231, 233,
238, 240, 248, 250, 252MenuEditorExample 260, 261menuHolder: message 410menuItemLabeled: message 246menuItems message 261MenuModifyExample 245, 246, 247,
257MenuSwapExample 243MenuValueExample 228, 229, 235, 236,
241, 254, 255merging graphic images 672Message
constructing 4message
binary 6cascading 9chaining 7definition 4
Index
VisualWorks Cookbook, Rev. 2.0 737
keyword 5message category
See also protocolmessage expression 4
complex 7MessageSend 626method
copying to other class 32creating 18grouping 31instance vs. class 18moving to different protocol 32subdividing 18
millisecondClockValue message 454,481
millisecondsToRun: message 484min size command 87min: message 441minimum
of two numbers 441minimumSize: message 87minor keys in notebook 328minutes
in hour 481minVal message 459model
See also application modelSee also domain model
model: message 399, 654model: method 379modification date of a file 596modulo division 432monoMaskPalette message 680month
days in 467in a date 467
monthIndex message 467monthName message 467mouse
sensing input 412waiting for click 421
mouse action, responding to 392mouse buttons xvi
<Operate> button xvi<Select> button xvi<Window> button xvione-button mouse xviithree-button mouse xvitwo-button mouse xvii
mouse operations xvii<Control>click xvii<Meta>-click xvii<Shift>-click xviiclick xviidouble-click xvii
MouseEvent 419MouseMovedEvent 419mouseMovedEvent: method 414move to command
in System Browser 30, 32moveBy: message 63MoveExample 63moveTo: message 64, 91, 603moving
a file or directory 603a widget 63a window 90
Multi Select property 189, 347multi-line label 110multiple, least common 453multiple-choice dialog 282multiplying
numbers 432MultiSelectionInList 190, 347, 490
Nname
Index
738 VisualWorks Cookbook, Rev. 2.0
of a font 582name key 261name: message 583nameKey message 261natural log 444NearestPaint 698negated message 448negative message 447nesting
applications 305new message 22new: message 492new:withAll: message 492newBoolean message 705newBounds: message 59newDay:monthNumber:year:
message 463newDay:year: message 463newFraction message 705newString message 705newWithDefaultAttributes
message 576, 579, 582nextIndexOf:from:to: message 512nextPut: message 614, 615nextPutAll: message 545, 598, 615nextPutClasses: message 621noButtonPressed message 415NoController 386noMenu message 142nonBlueButtonPressed message 415nontextual collection
displaying in list 185normalSelection message 197notational conventions xiv–xvinotebook widget
adding 316binding appearance 322changing the page 334connecting to editor 336
index tabs 324minor keys 328, 331secondary tabs 328starting page 326tab selection 319
Notebook1Example 316, 320, 326Notebook2Example 320, 328Notebook3Example 322, 324, 331Notebook4Example 334Notebook5Example 337now message 478number
adding 431comparing 438constants 458creating 426dividing 432exponential 444factoring 453field formatting 129in a field 125logarithmic functions 444maximum 441minimum 441multiplying 432raised to a power 436random 454range checking 440root 436rounding 434See also fixed-pointSee also floating-pointSee also fractionSee also integerSee also radix notation 429See also scientific notation 429sign conversion 447subtracting 431testing 445

Index
VisualWorks Cookbook, Rev. 2.0 739
trigonometric functions 442type conversion 449
NumberPrintPolicy 131numerator message 428
Oobject
in a field 126See also instance
object fileSee also BOSS
occurrencesOf: message 513odd message 446onChangeSend:to: message 79online documentation, see VisualWorks
documentationonNew: message 614onOld: message 615, 617onOldNoScan: message 617opaque message 690open message 83openDialogInterface: message 297openFor:interface: message 298openIn: message 90opening
canvases 83specs 83windows 82
openOnMenu: message 294openWithExtent: message 86openWithSpec: message 83or: message 38order
of tabbing 74order of execution 8OrderedCollection 490OrderedDither 698Over property 348, 350
Ppage
in a notebook 326paint
applying 694See also colorSee also coverageSee also pattern
paint: message 649, 694PaintPolicy 701paintPolicy: message 701paintRenderer: message 701palette
default 697of an image 696
palette message 696pane
See also viewParagraphEditor 403, 417parsing order of messages 8partner windows 106password
in a field 125Pattern 585pattern
applying 694creating 692tile phase 693
patterned text 585performer: message 410permissions
on a file or directory 611persistence
See also BOSSphase
of a tiled pattern 693pi message 459pixelSize: message 579
Index
740 VisualWorks Cookbook, Rev. 2.0
placeholderbutton action 165
platform fonts, listing 589PluggableAdaptor 127, 717point
creating 451, 630displaying 630
pointer shapeSee effect symbol
pointer-type classcreating 27
PointExample 614, 624policy
for rendering color 698policy colors, in Color Tool 76polling controller
See controllerpolygon
displaying 637PolyLine 631Polyline 637pool dictionary
declaring 15removing 17usage 12
pop-up menu 409creating 240
position: message 619positioning a widget 60positive message 447postBuildWith: method 136, 143, 168power
of a number 436pref size command 86PreferredCustomerExample 25previous day of week 472Print property 148printFormat: message 475printing
a text file 607text 565
printString message 451printStringRadix: message 452printTextFile message 607protocol
adding 31creating 31private vs. public 31removing 31renaming 32reordering 32
Qquotation mark
in creating a string 532
RradiansToDegrees message 450radio button
adding 160uses for 160
radix notation 429random access
in a BOSS file 619random number
generating 454range
in a slider 270of numbers 440
rangeStart: message 271rangeStop: message 271RasterOp 672rational number 449Read property 148read stream 610readAppendStream message 615

Index
VisualWorks Cookbook, Rev. 2.0 741
readFromString: message 462, 478read-only
fields 124sliders 266
readStream message 617receiver 4receiver:selector:arguments:
message 626reciprocal message 450Rectangle 637red:green:blue: message 688redButton 412redButtonPressed message 413redisplaying a view 387reducedMenu message 140references
to a variable 16reflectedInX message 669reflectedInY message 669refreshing a window 93registering an interest 78registry
labels 118reject: message 36, 515relative sizing of widget 57remainder division 432remove command
in System Browser 29, 31remove: message 500remove:ifAbsent: message 501removeAll: message 501removeAllSuchThat: message 503removeFirst message 502removeFirst: message 502removeFrom:to: message 502removeItem: message 246removeKey: message 17, 503removeKey:ifAbsent: message 503removeLast message 502
removeLast: message 502removing a variable 16rename as command
in System Browser 30, 32renameTo: message 604rendering color 698repeating a block 34replaceAll:with: message 507replaceFrom:to:with: message 567replaceFrom:to:with:startingAt:
message 507replaceSelectionWith: message 174replacing
elements in a collection 505part of a text 567
representBinaryOn: method 626request: message 284requestActivationFor: message 411requestFileName: message 286resetSelections message 174resetViews message 588respondsToArithmetic message 445restIndent: message 562retractInterestsFor: message 79return
from a method 20reuse techniques 18, 301–314reusing
interface 308reverse message 521reverseDo: message 525rgb color 688rightFlush message 561root
of a number 436rotateByQuadrants:to: message 671rotatedByQuadrants: message 670rotating
a graphic image 670
Index
742 VisualWorks Cookbook, Rev. 2.0
See also floppingrounded message 434rounding numbers 434roundTo: message 435row selector
dataset 211
SsameAs: message 541sameCharacters: message 542scale 428scanning
fields in a file 609ScheduledControllers 99scientific notation 429scope of variables 10Screen 100, 589
default palette 697screen capture
See also graphic image 659screen conventions xviscreen coordinates
of cursor 421scroll bars
adding and removing 96searching
a string 543in a text 566
secondary tabs in notebook 328seconds
creating time 478in a date 466in century 480in day 480in minute 480since clock reset 481
select: message 36, 515selectAll message 193
selectioneditor widget 174list 191
selection: message 327selectionBackgroundColor: message 76selectionForegroundColor: message 76selectionIndex: message 326selectionIndexes: message 193SelectionInList 184, 205, 317, 344, 490,
713SelectionInTable 218SelectionInTable class 216selections message 347selections: message 193sensing input
See also controllersensor
cursor location 419sensor message 417, 420separator
characters 535sequential access
in a BOSS file 618serif emphasis 572, 582set
creating 492description 490See also collection
setDefaultQuery: message 576, 579,582
setDefaultTimeZone: message 487setDefaultTo: message 588setMarkerLength: message 273setting up a dependency 78setToEnd message 615setValue: message 80shortcut key
in a menu 252shortcutKeyCharacter: message 252
Index
VisualWorks Cookbook, Rev. 2.0 743
shortening a string 551showDropFeedbackIn:allowScrolling:
message 357showWhile: message 681shrinking graphic images 668shrunkenBy: message 668sign
of a number 447sign message 447SimpleDialog 297
creating a subclass 27sin message 442size
of a file 594of a string 539of field input 124of font 578of text 564
Size as Default property 165size message 495, 539Size1Example 57, 61Size2Example 58, 62Size3Example 59sizing
widgets 56windows 86
Sketch 376, 382, 395, 652SketchController1 376, 385, 396, 400,
403, 406, 408, 409, 413, 417,420, 681
SketchController2 396, 397, 403, 405,407, 413, 418, 420
SketchView1 376, 379, 380, 382, 385,388, 389, 395, 400, 652, 681
SketchView2 396slave window 105slider widget
adding 264connecting to field 267
marker length 273modifying range 270read-only 266two-dimensional 274
Slider1Example 264, 267, 270Slider2Example 123, 268, 273, 274small emphasis 572, 578SmallInteger 426sort message 519SortedCollection 490sorting
a collection 519sortWith: message 520source code
omitting in BOSS file 622source: message 84sourceData message 360sourceMode: message 622spacing a group of widgets 66spacing widgets 66spacing, of lines in text 580spawn command 19spec
opening 83special symbols xiv–xvispellAgainst: message 542Spline 634sqrt message 436squared message 436start:end:controlPoint1:controlPoint2:
message 635stencil
See also maskstream
closing 598creating 598for reading a text file 609positioning 615
strictlyPositive message 447
Index
744 VisualWorks Cookbook, Rev. 2.0
strikeout emphasis 572string
abbreviating 551changing its case 537combining 545comparing 540converting to text 556creating 451, 532getting a substring 547in a field 125length and width 539removing a substring 549replacing a substring 549searching 543
StringPrintPolicy 131strokedSelection message 197stroking wrapper for geometrics 632style
See also text stylestyle of text
See also fontstyleNamed: message 68, 557, 575styleNamed:put: message 587subcanvas
accessing embedded widget 313in a notebook 334
subcanvas widgetadding 302blanking 312
Subcanvas1Example 303Subcanvas2Example 306, 308Subcanvas3Example 310, 312, 313subclass
creating 26subject
of an adaptor 706subject channel
of an adaptor 706subject: message 708, 715
subject:triggerChannel: message 711subjectChannel: message 707, 715subjectSendsUpdates: message 708submenu
creating 231submenu message 261substituting a menu 243substring
extracting 547subtractDate: message 471subtractDays: message 471subtracting
dates 471numbers 431time 482
subtractTime: message 482super message 25support, technical xix
electronic bulletin boards xxelectronic mail xxfax xxitelephone xxiWorld Wide Web xx
swapping interfaces 310symbol
in a field 125symbols used in documentation xiv–xvisynchronizing
updates in model 710System font 588systemDefault text style 575
Ttab stops in text 562tabbing order 74table
updating 221table widget
Index
VisualWorks Cookbook, Rev. 2.0 745
adding 216aligning labels 223connecting to input field 221labeling 223
Table1Example 218Table2Example 221Table3Example 223TableInterface class 216tail message 595takeKeyboardFocus message 150, 151tan message 442target emphasis 356, 361technical support xix
electonic mail xxelectronic bulletin boards xxfax support xxitelephone support xxiWorld Wide Web xx
telephone support xxitemplatesMenuForMenuBar
message 229temporary variable
declaring 13removing 16undeclared 19usage 10
testingequality of numbers 438
textadding emphasis 572aligning 561boldfacing 572changing case 571color 585comparing 568copying a subtext 569creating 556custom font 576default font 575
displaying 558editor
See also editor widgetfont family 582font size 578in a field 125indents and tabs 562line length 559line spacing 580patterned 585printing 565replacing a subtext 567searching 566size 564storing in file 598vs. string 556word wrapping 560
text styleadding 587creating 576default 588emphasis 572See also fonttab stops 562
text: message 571TextAttributes 68, 556, 575, 578, 583,
587, 588See also text style
textStyle message 563textStyle: message 69, 563, 575, 577,
579, 583textual dialog 284thickness
box widget 157of a line 644
tilein a pattern 692phase 693
tilePhase: message 693

Index
746 VisualWorks Cookbook, Rev. 2.0
Time 454time
adding 482creating 478current 478in a field 125seconds 480subtracting 482zones 486
time stamp 483in a field 125
timeDifference:DST:at:from:to:startDay:message 487
timesRepeat: message 34TimestampPrintPolicy 131TimeZone 486timing code 484title
See also window labelto:by:do: message 35to:do: message 34today message 462tooldd.st 341topComponent message 99, 411totalSeconds message 480transparent message 690trigonometric functions 442true-false dialog 280truncated message 434truncateTo: message 435truncating
a string 551two-dimensional slider 274type
of field input 125Type property 125, 129TypeConverter 127, 131typographic conventions xiv–xvi
UUI
See also interfaceUIBuilder 84
See also builderunbounded widget 58, 62Undeclared 13undeclared variables 13underline emphasis 572unhideItem: message 247unity message 458unmap message 104update:with: message 653update:with: method 383updating
a table 221a view 382an aspect adaptor 707buffered 710
uppercaseSee also case
useHorizontalScrollBar message 97user interface
See also interfaceuser-input event 392useTabs: message 563useVerticalScrollBar message 97
Vvalidating
field input 132Validation properties 133value holder 122, 704
dependency 78valueAtPoint: message 664valueAtPoint:put: message 664valueNowOrOnUnwindDo: message 600,
614
Index
VisualWorks Cookbook, Rev. 2.0 747
variableaccessing 10class instance 11declaring 13default value 13naming 13pool dictionary 12removing 16See also class variableSee also global variableSee also instance variableSee also temporary variabletypes 10undeclared 13
variable-byte classcreating 27
VariableSizeTextAttributes 578version
of a BOSS file 624vertices: message 637view
connecting to controller 385, 400connecting to model 378creating 376displaying 380integrating in interface 389invalidating 387redisplaying 387updating 382with no controller 386
viewHasCursor message 421viewHasCursorWithEvent: message 421visibility of a widget 70visual component
See also widgetvisualAt:put: message 118visuals message 119VisualWorks documentation
online xix
Database Cookbook xixDatabase Quick Start Guides xixInternational User’s Guide xixVisualWorks Cookbook xixVisualWorks DLL and C Connect
Reference xixprinted
Database Connect User’s Guide xviiiDatabase Tools Tutorial and
Cookbook xviiiInstallation Guide xviiiInternational User’s Guide xviiiObject Reference xviiiRelease Notes xviiiTutorial xviiiUser’s Guide xviii
WwaitButton message 100, 421waitClickButton message 421waiting
for mouse click 421waitNoButton message 421warn: message 278warn:for: message 292warning dialog 278weekday message 465weekDayToStartDST message 486whileTrue: message 35white space characters 535whiteBlack message 680widget
accessing programmatically 54aligning 65border 67bounded vs. unbounded 58color 75dependency 78
Index
748 VisualWorks Cookbook, Rev. 2.0
disable 72distribute 66drop source. See drop sourcedrop target. See drop targetembedded in subcanvas 313font 68grouping visually 156hiding 70positioning 60separating groups 154sizing 56spacing 66tab order 74unbounded 62
widget message 55WidgetWrapper 54, 411width
of a string 539of dataset columns 207of table columns 219
wildcardin a string search 544
windowaccessing dimensions 88active 99at a location 100clearing size constraints 88closing 101color 94Event Driven property 394events 106expanding and collapsing 103from a builder 85hiding 104icon 108, 682, 683label 92master 292menu bar 98, 233moving 90
opening 82refreshing 93scroll bars 96sizing 86slave 105
window message 85windowAt: message 100#windowSpec 83with:do: message 527with:with:with:with: message 492withAll: message 493withColors: message 696withCRs message 553withText:style: message 557wordWrap: message 560, 570working directory 594World Wide Web xxwrapper 54wrapping text 560write stream 609, 614WriteStream 545writeStream message 598
Yyear
counting days 469day in 468days left 469in a date 469
yellowButton 412yellowButtonPressed message 413yes-no dialog 280yielding control 403
Zzero 458zone, time 486
Related Documents