1 UNIT I UNIT I UNIT I UNIT I LESSON LESSON LESSON LESSON - 1 VISUAL BASIC GETTING STARTED VISUAL BASIC GETTING STARTED VISUAL BASIC GETTING STARTED VISUAL BASIC GETTING STARTED Contents Contents Contents Contents 1.0 Aims & Objectives 1.1 Introduction 1.2 Advantages of Visual Basic 1.3 Disadvantages of Visual basic 1.4 Let us sum up 1.5 References 1.0 1.0 1.0 1.0 AIMS & OBJECTIVES AIMS & OBJECTIVES AIMS & OBJECTIVES AIMS & OBJECTIVES In this lesson we are going to learn about the Visual Basic Development Environment with the tool bars 1.1 1.1 1.1 1.1 INTRODUCTION INTRODUCTION INTRODUCTION INTRODUCTION Visual Basic is an extremely flexible programming product designed for a variety of applications. Also it is used to build powerful commercial applications and corporate productivity tools. VISUAL BASIC VISUAL BASIC VISUAL BASIC VISUAL BASIC is a high level programming language which was evolved from the earlier DOS version called BASIC. BASIC means Beginners' All-purpose Symbolic Instruction Code. It is a very easy programming language to learn. The codes look a lot like English Language. Different software companies produced different version of BASIC, such as Microsoft QBASIC, QUICKBASIC, GWBASIC, IBM BASICA and so on. However, it seems people only use Microsoft Visual Basic today, as it is a well developed programming language and supporting resources are available everywhere. With Visual Basic, you can program practically everything depending on your objective. For example, you can program educational software to teach science, mathematics, language, history, geography and so on. You can also program financial and accounting software to make you a more efficient accountant or financial controller. For those of you who like games, you can program that as well. Indeed, there is no limit to what you can program! There are many such programs in this tutorial, so you must spend more time on the tutorial in order to benefit the most. VISUAL BASIC is a VISUAL and events driven Programming Language. These are the main divergence from the old BASIC. In BASIC, programming is done in a text-only environment and the program is executed sequentially. In VISUAL BASIC, programming is done in a graphical environment. In the old BASIC, you

Welcome message from author
This document is posted to help you gain knowledge. Please leave a comment to let me know what you think about it! Share it to your friends and learn new things together.
Transcript

1
UNIT IUNIT IUNIT IUNIT I
LESSON LESSON LESSON LESSON ---- 1111
VISUAL BASIC GETTING STARTEDVISUAL BASIC GETTING STARTEDVISUAL BASIC GETTING STARTEDVISUAL BASIC GETTING STARTED
ContentsContentsContentsContents
1.0 Aims & Objectives
1.1 Introduction
1.2 Advantages of Visual Basic
1.3 Disadvantages of Visual basic
1.4 Let us sum up
1.5 References
1.0 1.0 1.0 1.0 AIMS & OBJECTIVESAIMS & OBJECTIVESAIMS & OBJECTIVESAIMS & OBJECTIVES
In this lesson we are going to learn about the Visual Basic Development
Environment with the tool bars
1.1 1.1 1.1 1.1 INTRODUCTIONINTRODUCTIONINTRODUCTIONINTRODUCTION
Visual Basic is an extremely flexible programming product designed for a variety of applications. Also it is used to build powerful commercial applications and corporate productivity tools.
VISUAL BASICVISUAL BASICVISUAL BASICVISUAL BASIC is a high level programming language which was evolved from the earlier DOS version called BASIC. BASIC means BBBBeginners' AAAAll-purpose SSSSymbolic IIIInstruction CCCCode. It is a very easy programming language to learn. The codes look a lot like English Language. Different software companies produced different version of BASIC, such as Microsoft QBASIC, QUICKBASIC, GWBASIC, IBM BASICA and so on. However, it seems people only use Microsoft Visual Basic today, as it is a well developed programming language and supporting resources are available everywhere.
With Visual Basic, you can program practically everything depending on your objective. For example, you can program educational software to teach science, mathematics, language, history, geography and so on. You can also program financial and accounting software to make you a more efficient accountant or financial controller. For those of you who like games, you can program that as well. Indeed, there is no limit to what you can program! There are many such programs in this tutorial, so you must spend more time on the tutorial in order to benefit the most.
VISUAL BASIC is a VISUAL and events driven Programming Language. These are the main divergence from the old BASIC. In BASIC, programming is done in a text-only environment and the program is executed sequentially. In VISUAL BASIC, programming is done in a graphical environment. In the old BASIC, you
2
have to write program codes for each graphical object you wish to display it on screen, including its position and its color. However, In Visual Basic, you just need to drag and drop any graphical object anywhere on the form, and you can change its color any time using the properties windows.
On the other hand, because users may click on certain object randomly, so each object has to be programmed independently to be able to response to those actions (events). Therefore, a VISUAL BASIC Program is made up of many subprograms, each has its own program codes, and each can be executed independently and at the same time each can be linked together in one way or another.
1.2 ADVANTAGES OF VISUAL BASIC:1.2 ADVANTAGES OF VISUAL BASIC:1.2 ADVANTAGES OF VISUAL BASIC:1.2 ADVANTAGES OF VISUAL BASIC:
� It's simple language. Things that may be difficult to program with other language can be done in Visual Basic very easily.
� Because Visual Basic is so popular, there are many good resources (Books, Web sites, News groups and more) that can help you learn the language.
� You can find the answers to your programming problems much more easily than other programming languages.
� You can find many tools (Sharewares and Free wares) on the internet that will spare you some programming time.
For example, if you want to ping a user over the internet in your program, Instead of writing the ping function yourself, you can download a control that does it, and use it in your program. Compare to other languages, Visual Basic have the widest variety of tools that you can download on the internet and use in your programs.
1.3 1.3 1.3 1.3 DISADVANTAGES OF VISUAL BASIC:DISADVANTAGES OF VISUAL BASIC:DISADVANTAGES OF VISUAL BASIC:DISADVANTAGES OF VISUAL BASIC:
� Visual Basic is powerful language, but it's not suit for programming
really sophisticated games.
� It's much slower than other languages.
1.41.41.41.4 LET US SUM UPLET US SUM UPLET US SUM UPLET US SUM UP
In this lesson we have learnt about
• What is Visual Basic?
• Application areas of Visual Basic
• Advantages & Disadvantages of Visual Baisc
• Important features of Visual Basic
3
1.5 REFERENCES1.5 REFERENCES1.5 REFERENCES1.5 REFERENCES
Gary CornellGary CornellGary CornellGary Cornell, “Visual Basic 6.0 from the Ground Up”.Tata McGraw Hill
Company,1999.
Content Development GroupContent Development GroupContent Development GroupContent Development Group “ Visual Basic 6.0 Programming” Tata McGraw Hill
Company,Ninth Reprint,2007.
Noel JerkeNoel JerkeNoel JerkeNoel Jerke “The Complete Reference : Visual Basic 6.0”, Tata McGraw Hill
Company,24th reprint,2006.
4
LESSONLESSONLESSONLESSON----2222
FEATURES AND CAPABILITIES OF VISUAL BASIC FEATURES AND CAPABILITIES OF VISUAL BASIC FEATURES AND CAPABILITIES OF VISUAL BASIC FEATURES AND CAPABILITIES OF VISUAL BASIC PROGRAMPROGRAMPROGRAMPROGRAM
ContentsContentsContentsContents
2.0 Aims & Objectives
2.1 Important features of visual basic (VB 6.0)
2.2 Learn How to build your first program
2.2.1 Starting Visual Basic
2.3 Let us Sum Up
2.4 References
In this lesson we are going to learn about
• Important features of visual basic (VB 6.0)
• How to load and start Visual Basic
• How to write the first application program in Visual Basic
Visual Basic (VB)Visual Basic (VB)Visual Basic (VB)Visual Basic (VB) is an event-driven programming language. This is called because programming is done in a graphical environment unlike the previous version BASIC where programming is done in a text only environment and executed sequentially in order to control the user interface. Visual Basic enables the user to design the user interface quickly by drawing and arranging the user elements. Due to this spent time is saved for the repetitive task.
2.1 2.1 2.1 2.1 IMPORTANT FEATURES OF VISUAL BASIC (VB 6.0)IMPORTANT FEATURES OF VISUAL BASIC (VB 6.0)IMPORTANT FEATURES OF VISUAL BASIC (VB 6.0)IMPORTANT FEATURES OF VISUAL BASIC (VB 6.0)
� Full set of objects - you 'draw' the application
� Lots of icons and pictures for your use
� Response to mouse and keyboard actions
� Clipboard and printer access
� Full array of mathematical, string handling, and graphics functions
� Can handle fixed and dynamic variable and control arrays
� Sequential and random access file support
� Useful debugger and error-handling facilities
� Powerful database access tools
� ActiveX support
5
� Package & Deployment Wizard makes distributing your applications simple
� Faster compiler
� New ActiveX data control object
� Allows database integration with wide variety of applications
� New data report designer
� New Package & Deployment Wizard
� Additional internet capabilities.
The Visual Basic development environment contains all the resources you need to build powerful Windows-based programs quickly and efficiently. This chapter introduces you to the features and capabilities of the Visual Basic 6.0 program development system, helps you get started with Visual Basic, and describes the various Visual Basic tools and windows that are available to you.
2.2.2.2.2222 LEARN HOW TO:LEARN HOW TO:LEARN HOW TO:LEARN HOW TO:
� Explore and configure the Visual Basic development environment.
� Build your first program.
� Create an executable (.EXE) file.executable (.EXE) file.executable (.EXE) file.executable (.EXE) file.
2.2.2.2.2222.1.1.1.1 STARTING VISUAL BASICSTARTING VISUAL BASICSTARTING VISUAL BASICSTARTING VISUAL BASIC
1. In Windows, click StartStartStartStart, point to Programs, and point to the Microsoft Visual
Basic 6.0 folder. The icons in the folder appear in a list.
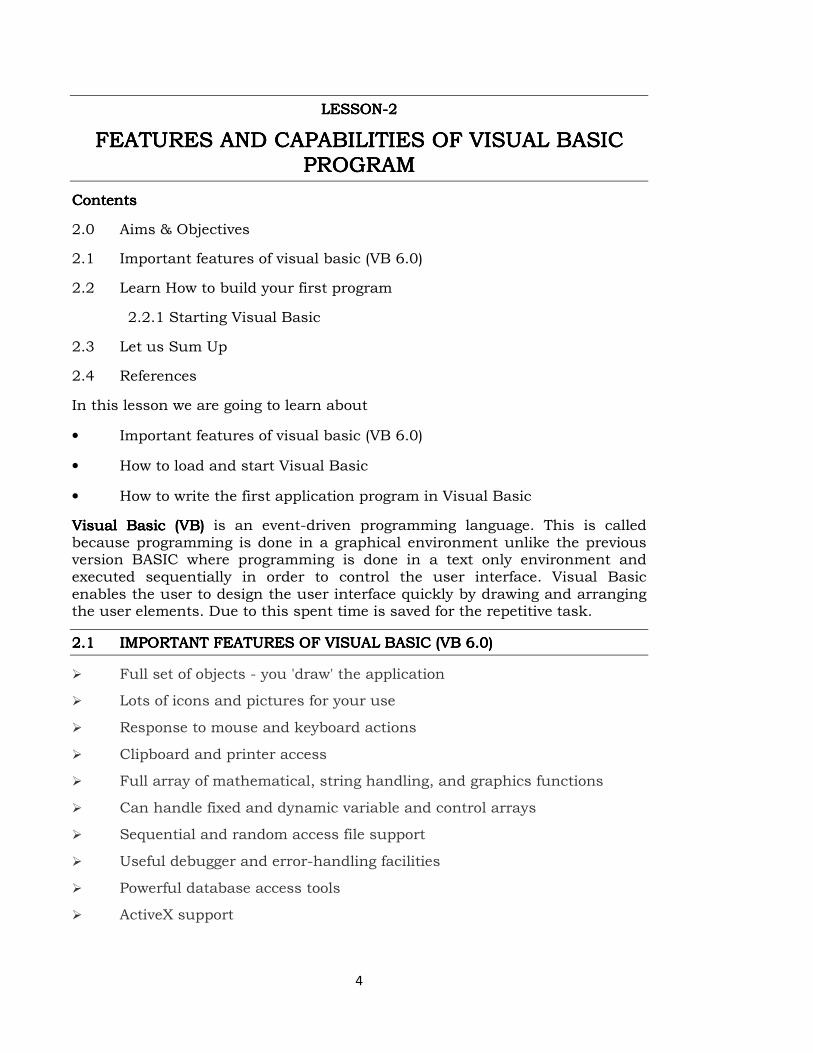
2. Click the Microsoft Visual Basic 6.0 Microsoft Visual Basic 6.0 Microsoft Visual Basic 6.0 Microsoft Visual Basic 6.0 program icon. The New Project New Project New Project New Project dialog
box appears. This dialog box prompts you for the type of programming project
you want to create. See the picture of New Project New Project New Project New Project window below
.
Figure Figure Figure Figure 2222.1.1.1.1 New Project WindowNew Project WindowNew Project WindowNew Project Window
6
3. To accept the default new project, click OKOKOKOK.
In the Visual Basic development environment, a new project (a standard, 32-bit
Visual Basic application) and the related windows and tools open. See the
picture below.
2.2.2.2.3333 LET US SUM UPLET US SUM UPLET US SUM UPLET US SUM UP
In this lesson we have learned how to start visual basic and to write your first
program.
2.2.2.2.4444 REFERENCESREFERENCESREFERENCESREFERENCES
Gary CornellGary CornellGary CornellGary Cornell, “Visual Basic 6.0 from the Ground Up”.Tata McGraw Hill
Company,1999.
Content Development GroupContent Development GroupContent Development GroupContent Development Group “Visual Basic 6.0 Programming” Tata McGraw Hill
Company,Ninth Reprint,2007.
Noel JerkeNoel JerkeNoel JerkeNoel Jerke “The Complete Reference: Visual Basic 6.0”, Tata McGraw Hill
Company, 24th reprint, 2006.
7
LESSONLESSONLESSONLESSON----3333
VISUAL BASIC DEVELOPMENT ENVIRONMENTVISUAL BASIC DEVELOPMENT ENVIRONMENTVISUAL BASIC DEVELOPMENT ENVIRONMENTVISUAL BASIC DEVELOPMENT ENVIRONMENT
ContentsContentsContentsContents
3.0 Aims & Objectives
3.1 The Visual Basic Development Environment
3.2 Let us Sum Up
3.3 References
3.0 AIMS & OBJECTIVES3.0 AIMS & OBJECTIVES3.0 AIMS & OBJECTIVES3.0 AIMS & OBJECTIVES
In this lesson the pictorial representation of Visual Basic Development
environment.
3.1 THE VISUAL BASIC DEVELOPMENT ENVIRONMENT3.1 THE VISUAL BASIC DEVELOPMENT ENVIRONMENT3.1 THE VISUAL BASIC DEVELOPMENT ENVIRONMENT3.1 THE VISUAL BASIC DEVELOPMENT ENVIRONMENT
Learning the ins and outs of the development environment before you learn VB is somewhat like learning the parts of a vehicle before you learn how to drive. If you take the time to learn some of the development environment’s fundamental principles, you will be better able to learn VB. You then will become more comfortable within VB's environment and will have a better understanding of the related words in upcoming lessons.
One of the most significant changes in Visual Basic 6.0 is the Integrated Development Environment (IDE). IDE is a term commonly used in the programming world to describe the interface and environment that we use to create our applications. It is called integrated because we can access virtually all of the development tools that we need from one screen called an interface. The IDE is also commonly referred to as the design environment, or the program.
In previous versions of Visual Basic, the IDE was designed as a Single Document Interface (SDI). In a Single Document Interface, each window is a free-floating window that is contained within a main window and can move anywhere on the screen as long as Visual Basic is the current application. But, in Visual Basic 6.0, the IDE is in a Multiple Document Interface (MDI) format. In this format, the windows associated with the project will stay within a single container known as the parent. Code and form-based windows will stay within the main container form.
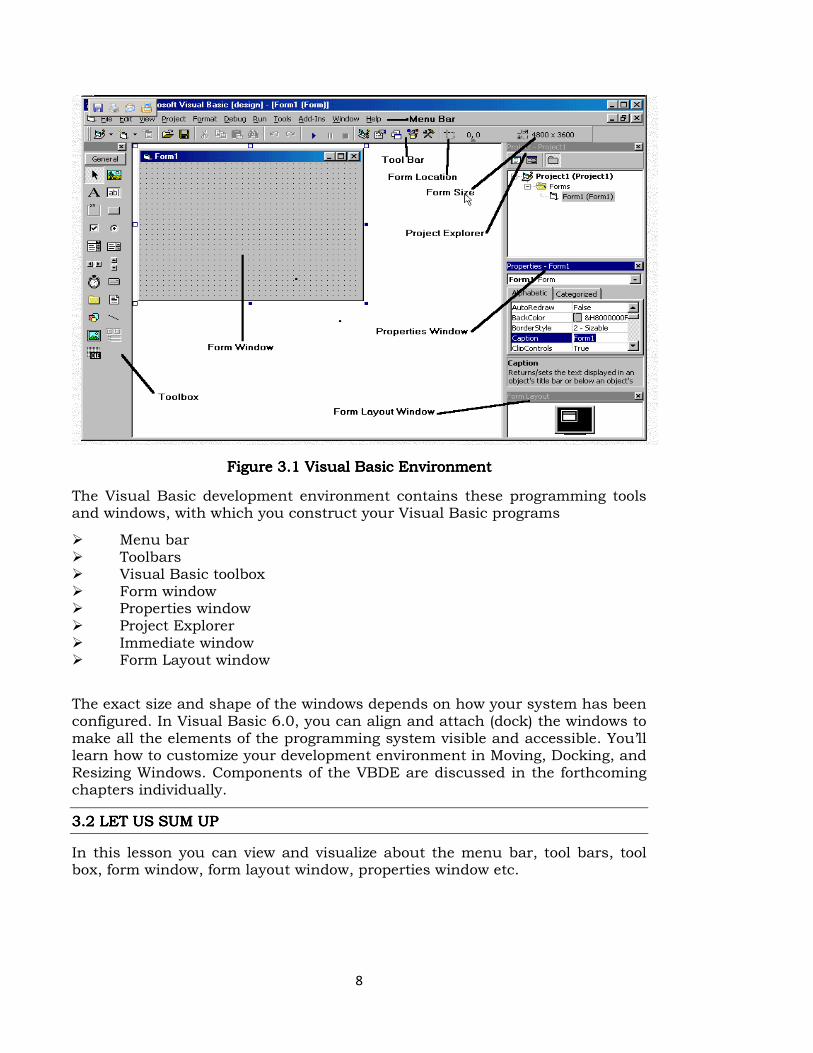
The image below shows the VB development environment with many of the important screen components labeled. As you can see from the menu and tool bar, VB looks somewhat like other Windows programs.
8
Figure 3.1 Figure 3.1 Figure 3.1 Figure 3.1 Visual Basic EnvironmentVisual Basic EnvironmentVisual Basic EnvironmentVisual Basic Environment
The Visual Basic development environment contains these programming tools and windows, with which you construct your Visual Basic programs
� Menu bar � Toolbars � Visual Basic toolbox � Form window � Properties window � Project Explorer � Immediate window � Form Layout window
The exact size and shape of the windows depends on how your system has been configured. In Visual Basic 6.0, you can align and attach (dock) the windows to make all the elements of the programming system visible and accessible. You’ll learn how to customize your development environment in Moving, Docking, and Resizing Windows. Components of the VBDE are discussed in the forthcoming chapters individually.
3.23.23.23.2 LET US SUM UPLET US SUM UPLET US SUM UPLET US SUM UP
In this lesson you can view and visualize about the menu bar, tool bars, tool box, form window, form layout window, properties window etc.

9
3.3 REFERENCES3.3 REFERENCES3.3 REFERENCES3.3 REFERENCES
Gary CornellGary CornellGary CornellGary Cornell, “Visual Basic 6.0 from the Ground Up”.Tata McGraw Hill
Company, 1999.
Content Development GroupContent Development GroupContent Development GroupContent Development Group “Visual Basic 6.0 Programming” Tata McGraw Hill
Company,Ninth Reprint,2007.
Noel JerkeNoel JerkeNoel JerkeNoel Jerke “The Complete Reference: Visual Basic 6.0”, Tata McGraw Hill
Company, 24th reprint, 2006.

10
LESSONLESSONLESSONLESSON----4444
THE TOOL BOX AND CUSTOM CONTROLS AND THE TOOL BOX AND CUSTOM CONTROLS AND THE TOOL BOX AND CUSTOM CONTROLS AND THE TOOL BOX AND CUSTOM CONTROLS AND COMPONENTSCOMPONENTSCOMPONENTSCOMPONENTS
ContentsContentsContentsContents
4.0 Aims & Objectives
4.1 Menu Bar
4.2 Loading and Running a program
4.3 Programming Tools
4.4 Let us Sum Up
4.5 References
4.04.04.04.0 AIMS AIMS AIMS AIMS &&&& OBJECTIVESOBJECTIVESOBJECTIVESOBJECTIVES
In this lesson we are going to learn about the various menus in the menu bar, and the standard tool bars. Also, to learn how to load and run a program with the help of programming tool bars.
4.1 4.1 4.1 4.1 Menu BarMenu BarMenu BarMenu Bar
Displays the commands you use to work with Visual Basic. Besides the standard File, Edit, View, Window, and Help menus, menus are provided to access functions specific to
programming such as Project, Format, or Debug. The various options available in the File Menu, Edit Menu, View Menu, Project Menu, Format Menu, Debug Menu, and Window Menu can be selected as pull-down menu in the Menu Bar.
Using the file Using the file Using the file Using the file menu:menu:menu:menu: The items in the File Menu are useful only when developing own applications by the user. The options available in File Menu are : New Project,New Project,New Project,New Project, Open Open Open Open Project,Project,Project,Project, Add/Remove Project,Add/Remove Project,Add/Remove Project,Add/Remove Project, Save Project,Save Project,Save Project,Save Project, Save Project As,Save Project As,Save Project As,Save Project As, Save Form,Save Form,Save Form,Save Form, Save Form As, Print,Save Form As, Print,Save Form As, Print,Save Form As, Print, Print Setup,Print Setup,Print Setup,Print Setup, Make .Exe, Make Project Group,Make .Exe, Make Project Group,Make .Exe, Make Project Group,Make .Exe, Make Project Group, The Most Recently Used ListThe Most Recently Used ListThe Most Recently Used ListThe Most Recently Used List, Exit, Exit, Exit, Exit....
Edit Menu: Edit Menu: Edit Menu: Edit Menu: It contains more than 20 items.The most useful ones are : Undo,Undo,Undo,Undo, Redo,Redo,Redo,Redo, Cut,Cut,Cut,Cut, Copy,Copy,Copy,Copy, Paste,Paste,Paste,Paste, PasteLink,PasteLink,PasteLink,PasteLink, Delete,Delete,Delete,Delete, SelectAll,SelectAll,SelectAll,SelectAll, Find,Find,Find,Find, Find Next,Find Next,Find Next,Find Next, Replace,Replace,Replace,Replace, Indent, Outdent, Inset File, List Properities/Methods,….,Complete Word and Indent, Outdent, Inset File, List Properities/Methods,….,Complete Word and Indent, Outdent, Inset File, List Properities/Methods,….,Complete Word and Indent, Outdent, Inset File, List Properities/Methods,….,Complete Word and Book Mark.Book Mark.Book Mark.Book Mark.
View Menu: View Menu: View Menu: View Menu: The view menu lets you display or hide features of Visual Basic environment. The items on this menu are: Code, Object, Definition, Last Code, Object, Definition, Last Code, Object, Definition, Last Code, Object, Definition, Last Position, Object Browser, Immediate Window, Local Window, Watch Window, Position, Object Browser, Immediate Window, Local Window, Watch Window, Position, Object Browser, Immediate Window, Local Window, Watch Window, Position, Object Browser, Immediate Window, Local Window, Watch Window, Call Stack, Project Explorer, Project Window, Form Layout Window, Prosperities Call Stack, Project Explorer, Project Window, Form Layout Window, Prosperities Call Stack, Project Explorer, Project Window, Form Layout Window, Prosperities Call Stack, Project Explorer, Project Window, Form Layout Window, Prosperities Pages, Toolbox, Color Palette, Pages, Toolbox, Color Palette, Pages, Toolbox, Color Palette, Pages, Toolbox, Color Palette, and Toolbarsand Toolbarsand Toolbarsand Toolbars....

11
Using the Project Menu: Using the Project Menu: Using the Project Menu: Using the Project Menu: The item in the Project Menu let you insert various procedures, windows, code, modules and so on, into your projects. The items on this menu are: Add Form, AddAdd Form, AddAdd Form, AddAdd Form, Add MDIMDIMDIMDI Form, Add Module, Add Class Module, Form, Add Module, Add Class Module, Form, Add Module, Add Class Module, Form, Add Module, Add Class Module, Add User Control, More Activex DAdd User Control, More Activex DAdd User Control, More Activex DAdd User Control, More Activex Designers,esigners,esigners,esigners, Add File, Remove Form1, Add File, Remove Form1, Add File, Remove Form1, Add File, Remove Form1, References, Components, Project Prosperities.References, Components, Project Prosperities.References, Components, Project Prosperities.References, Components, Project Prosperities.
The Format Menu: The Format Menu: The Format Menu: The Format Menu: The items in this menu are used to position controls wherever the user wants to. The items are: Align, Make Same Size, Size to Grid, Align, Make Same Size, Size to Grid, Align, Make Same Size, Size to Grid, Align, Make Same Size, Size to Grid, Horizontal Spacing, VertiHorizontal Spacing, VertiHorizontal Spacing, VertiHorizontal Spacing, Vertical Spacing Center in Form, Order, and Lock Controls.cal Spacing Center in Form, Order, and Lock Controls.cal Spacing Center in Form, Order, and Lock Controls.cal Spacing Center in Form, Order, and Lock Controls.
The Run and Debug Menus: The Run and Debug Menus: The Run and Debug Menus: The Run and Debug Menus: Most of the items on these menus are used when debugging. The items are: Start, Start with Full Compile, End.Start, Start with Full Compile, End.Start, Start with Full Compile, End.Start, Start with Full Compile, End.
Using the Tools Menu: Using the Tools Menu: Using the Tools Menu: Using the Tools Menu: This menu is used when to add procedures, add code etc. Some of the options are: Editor Tab, Editor Editor Tab, Editor Editor Tab, Editor Editor Tab, Editor FormatFormatFormatFormat Tab, and General Tab.Tab, and General Tab.Tab, and General Tab.Tab, and General Tab.
Using the AddUsing the AddUsing the AddUsing the Add----Ins Menu: Ins Menu: Ins Menu: Ins Menu: The Add-Ins menu gives you access to separate tools that can be seamlessly integrated into Visual Basic. You can add and remove add-ins from the Add-In menu.
Using the Window Menu:Using the Window Menu:Using the Window Menu:Using the Window Menu: It is common to most window applications. It lets you control how the windows in your screen appear.
4.4.4.4.2222 LOADING AND RUNNING A PROGRAMLOADING AND RUNNING A PROGRAMLOADING AND RUNNING A PROGRAMLOADING AND RUNNING A PROGRAM
Before you can work with a Visual Basic program, you need to load the program into memory, just as you would load a word processing document in a word processor for editing.
To load a Visual Basic program into memory and run it
1. On the File File File File menu, click Open ProjectOpen ProjectOpen ProjectOpen Project.
The Open Project Open Project Open Project Open Project dialog box appears. With this dialog box, you can open any existing Visual Basic program on your hard disk, attached network drive, CD-ROM, or floppy disk.
2. If necessary, use the Look In Look In Look In Look In drop-down list box and the Up One Level Up One Level Up One Level Up One Level button to locate the program you want to load. Then, double-click the program name. The project file loads the Visual Basic user interface form, properties, and program code.(Visual Basic project files are distinguished by the .VBP file name Visual Basic project files are distinguished by the .VBP file name Visual Basic project files are distinguished by the .VBP file name Visual Basic project files are distinguished by the .VBP file name extensionextensionextensionextension.)
3. If the program user interface does not appear, open the Forms folder in the Project window, select the first form, and then click View Object View Object View Object View Object in the Project window. This is an optional but useful step, especially if you want to look at the program user interface in the Form window before you run it.
4. On the Visual Basic Standard toolbar, click Start Start Start Start to run the program. The toolbox and several of the other windows disappear, and the Visual Basic program starts to run.
5. On the toolbar, click End End End End when you want to exit the program.

12
4444....3333 PROGRAMMING TPROGRAMMING TPROGRAMMING TPROGRAMMING TOOLSOOLSOOLSOOLS
The location and purpose of the Visual Basic 6.0 programming tools are
described in the following.
Menu bar: Menu bar: Menu bar: Menu bar: Located at the top of the screen, the menu bar provides access to the commands that control the Visual Basic programming environment. Menus and commands work according to standard conventions used in all Windows-based programs. You can use these menus and commands by using keyboard commands or the mouse.
Toolbars: Toolbars: Toolbars: Toolbars: Located below the menu bar, toolbars are collections of buttons that serve as shortcuts for executing commands and controlling the Visual Basic development environment. You can open special-purpose toolbars by using the View View View View menu Toolbars Toolbars Toolbars Toolbars command. The four built-in toolbars are Standard, Edit, Debug and Form Editor. For example the debug bar is shown below like all the other three toolbars can be viewed separately.
Figure Figure Figure Figure 4.14.14.14.1 Debug toolbarDebug toolbarDebug toolbarDebug toolbar
Windows taskbar: Windows taskbar: Windows taskbar: Windows taskbar: This taskbar is located along the bottom of the screen. You can use the taskbar to switch between Visual Basic forms as your program runs and to activate other Windows based programs.
4.44.44.44.4 LET US SUM UPLET US SUM UPLET US SUM UPLET US SUM UP
In this lesson the standard tool bars and its applications are explained.
4.54.54.54.5 REFERENCESREFERENCESREFERENCESREFERENCES
Gary CornellGary CornellGary CornellGary Cornell, “Visual Basic 6.0 from the Ground Up”. Tata McGraw Hill
Company,1999.
Content Development GroupContent Development GroupContent Development GroupContent Development Group “Visual Basic 6.0 Programming” Tata McGraw Hill
Company,Ninth Reprint,2007.
Noel JerkeNoel JerkeNoel JerkeNoel Jerke “The Complete Reference: Visual Basic 6.0”, Tata McGraw Hill
Company, 24th reprint, 2006.
13
LESSON LESSON LESSON LESSON –––– 5555
TOOLBOX CONTROLSTOOLBOX CONTROLSTOOLBOX CONTROLSTOOLBOX CONTROLS
ContenContenContenContentstststs
5.0 Aims & Objectives
5.1 Toolbox Controls
5.2 The Toolbox
5.3 Customizing a Form and Writing Simple Programs
5.3.1 Form Window
5.3.2 Properties Window
5.3.3 Project Window
5.3.4 Code Window
5.4 Developing Visual Basic Programs
5.4.1 Developing Your First Visual Basic Programs
5.4.1.1 Planning the Program
5.4.1.2 Planning For Window-Based Application
5.5 Testing, Compiling and Distributing The Program
5.6 Let Us Sum Up
5.7 References
5.05.05.05.0 AIMS & OBJECTIVESAIMS & OBJECTIVESAIMS & OBJECTIVESAIMS & OBJECTIVES
In this lesson we are going to learn about how the tool box controls can
be used as elements for form designing and OLE for object linking &
embedding.
5.15.15.15.1 TOOLBOX CONTROLSTOOLBOX CONTROLSTOOLBOX CONTROLSTOOLBOX CONTROLS
You use special tools, called controls, to add elements of a program user interface to a form. You can find these resources in the toolbox, which is typically located along the left side of the screen.(If the toolbox is not open, display it by using the Toolbox Toolbox Toolbox Toolbox command on the View View View View menu.) By using toolbox controls, you can add these elements to the user interface:
� Artwork
� Labels and text boxes
� Buttons
14
� List boxes
� Scroll bars
� File system controls
� Timers
� Geometric shapes
� Data and OLE OLE OLE OLE controls
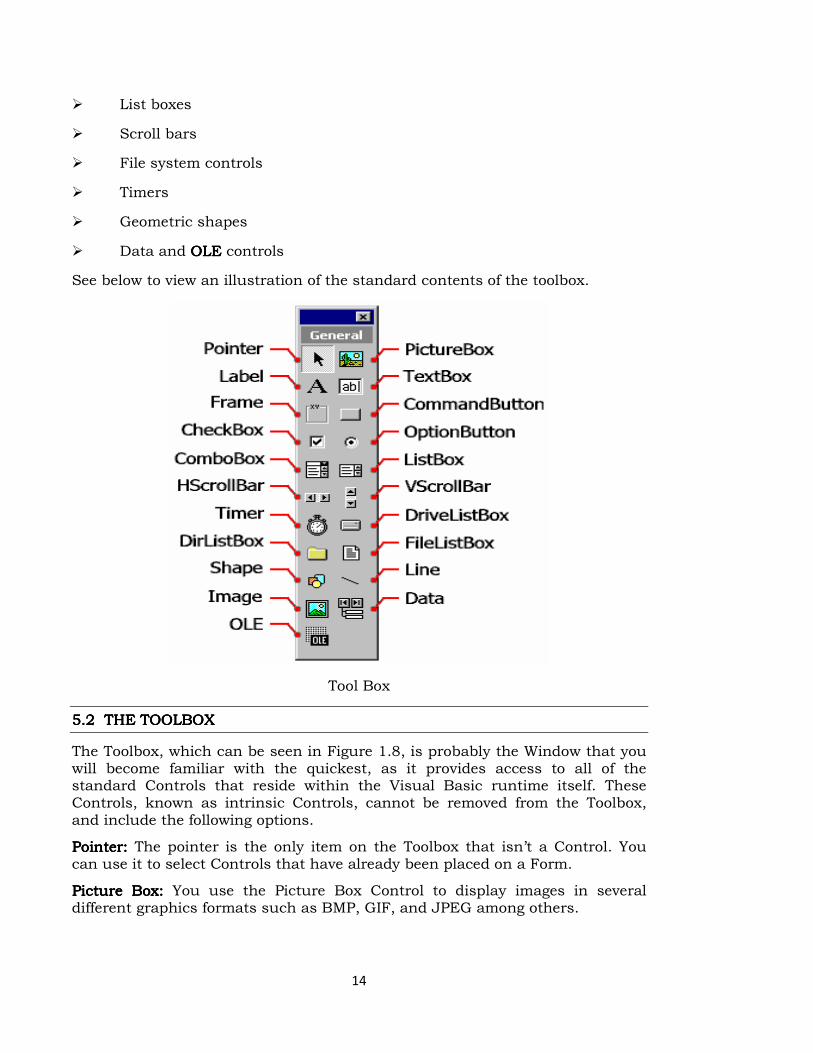
See below to view an illustration of the standard contents of the toolbox.
Tool Box
5.5.5.5.2222 THE TOOLBOXTHE TOOLBOXTHE TOOLBOXTHE TOOLBOX
The Toolbox, which can be seen in Figure 1.8, is probably the Window that you will become familiar with the quickest, as it provides access to all of the standard Controls that reside within the Visual Basic runtime itself. These Controls, known as intrinsic Controls, cannot be removed from the Toolbox, and include the following options.
Pointer:Pointer:Pointer:Pointer: The pointer is the only item on the Toolbox that isn’t a Control. You can use it to select Controls that have already been placed on a Form.
Picture BoxPicture BoxPicture BoxPicture Box:::: You use the Picture Box Control to display images in several different graphics formats such as BMP, GIF, and JPEG among others.

15
Label:Label:Label:Label: The Label Control is used to display text information that does not have a need to be edited by an end user. It’s often displayed next to additional Controls such as Text Boxes to label their use.
TextboxTextboxTextboxTextbox:::: You use Text Box Controls for user input. It may be the most widely used Control.
Frame:Frame:Frame:Frame: A Frame Control is typically used for containing other Controls and for dividing the GUI. Controls placed within a Frame cannot be displayed outside of it, and if the Frame is moved on the Form, the Controls are moved with it.
Command ButtonCommand ButtonCommand ButtonCommand Button:::: Much like the Text Box Control, Command Button Controls are used for input on almost every Form. They are used as standard buttons for input like OK or Cancel.
CheckboxCheckboxCheckboxCheckbox:::: If you need the ability to select True/False or Yes/No, the Check Box Control is the correct Control.
Option ButtonOption ButtonOption ButtonOption Button:::: The Option Button Control is similar to the Check Box Control in that it offers the ability to select an option. However, an Option Button Control is most often used when a group of options exists and only one item can be selected. All additional items are deselected when a choice is made.
List BoxList BoxList BoxList Box:::: The List Box Control contains a list of items, allowing an end user to select one or more items.
Combo BoxCombo BoxCombo BoxCombo Box:::: Combo Box Controls are similar to List Box Controls, but they only provide support for a single selection.
ScrollbarsScrollbarsScrollbarsScrollbars:::: The Scrollbar and Scrollbar Controls let you create scroll bars but are used infrequently because many Controls provide the ability to display their own Scroll Bars.
Timer:Timer:Timer:Timer: The Timer Control is an oddity when it is compared to other Controls, in that it isn’t displayed at runtime. It’s used to provide timed functions for certain events.
DriveListBox, DirListBox, FileListBox:DriveListBox, DirListBox, FileListBox:DriveListBox, DirListBox, FileListBox:DriveListBox, DirListBox, FileListBox: These Controls can be used individually, but many times are used together to provide dialog boxes (also known as windows in this book) that display the contents of Drives, Directories, and Files.
Shape, Line:Shape, Line:Shape, Line:Shape, Line: The Shape and Line Controls are simply used to display lines, rectangles, circles, and ovals on Forms.
Image:Image:Image:Image: You can think of the Image Control as a lighter version of the Picture Box Control, and although it doesn’t provide all of the functionality that the Picture Box Control does, it consumes fewer resources. As a result, you should use the Image Control whenever possible.
Data:Data:Data:Data: The Data Control is a component that allows you to connect one or more Controls on a Form to fields in a database.
OLE:OLE:OLE:OLE: The OLE (Object Linking and Embedding) Control can host Windows belonging to other executable programs. For instance, you can use it to display a spreadsheet generated by Microsoft Excel or a Word document.

16
5.5.5.5.3333 CUSTOMIZING A FORM AND WRITING SIMPLE PROGRAMSCUSTOMIZING A FORM AND WRITING SIMPLE PROGRAMSCUSTOMIZING A FORM AND WRITING SIMPLE PROGRAMSCUSTOMIZING A FORM AND WRITING SIMPLE PROGRAMS
5.5.5.5.3333.1.1.1.1 FORM WINDOWFORM WINDOWFORM WINDOWFORM WINDOW
When you start Visual Basic, a default form (Form1) with a standard grid (a window consisting of regularly spaced dots) appears in a pane called the Form window. You can use the Form window grid to create the user interface create the user interface create the user interface create the user interface and to line up interface elements
Figure Figure Figure Figure 5.15.15.15.1 Form WindowForm WindowForm WindowForm Window
Building Interface ElementsBuilding Interface ElementsBuilding Interface ElementsBuilding Interface Elements
To build the interface elements, you click an interface control in the Visual Basic toolbox, and then you draw the user interface element on your form by using the mouse. This process is usually a simple matter of clicking to position one corner of the element and then dragging to create a rectangle the size you want. After you create the element — say, a text box — you can refine it by setting properties for the element. In a text box, for example, you can set properties to make the text boldface, italic, or underlined. You can also adjust the size of the form by using the mouse — the form can take up part or the entire screen.
Controlling Form PlacementControlling Form PlacementControlling Form PlacementControlling Form Placement
To control the placement of the form when you run the program, adjust the placement of the form in the FFFForm Layout orm Layout orm Layout orm Layout window.
5.5.5.5.3333.2.2.2.2 PROPERTIES WINDOWPROPERTIES WINDOWPROPERTIES WINDOWPROPERTIES WINDOW
With the Properties window, you change the characteristics (property settings) of the user interface elements on a form. A property setting is a characteristic of a user interface object. For example, you can change the text displayed by a text box control to a different font, point size, or alignment. (With Visual Basic,

17
you can display text in any font installed on your system, just as you can in Microsoft Excel or Microsoft Word.)
Displaying the Properties Displaying the Properties Displaying the Properties Displaying the Properties WindowWindowWindowWindow
To display the Properties window, click the Properties Window Properties Window Properties Window Properties Window button on the toolbar. If the window is currently docked, you can enlarge it by double-clicking the title bar. To redock properties window, double-click its title bar again.
Figure 5.2Figure 5.2Figure 5.2Figure 5.2 Properties WindowProperties WindowProperties WindowProperties Window
Properties Window ElementsProperties Window ElementsProperties Window ElementsProperties Window Elements
� The Properties window contains the following elements:
� A drop-down list box at the top of the window, from which you select the object whose properties you want to view or set.
� Two tabs, which list the properties either alphabetically or by category.
� A description pane that shows the name of the selected property and a short description of it.
Changing Property SettingsChanging Property SettingsChanging Property SettingsChanging Property Settings
You can change property settings by using the Properties window while you design the user interface or by using program code to make changes while the program runs.

18
5.5.5.5.3333.3.3.3.3 PROJECT WINDOWPROJECT WINDOWPROJECT WINDOWPROJECT WINDOW
A Visual Basic program consists of several files that are linked together to make the program run. The Visual Basic 6.0 development environment includes a Project window to help you switch back and forth between these components as you work on a project.
Figure Figure Figure Figure 5.35.35.35.3 Project WindowProject WindowProject WindowProject Window
Project Window ComponentsProject Window ComponentsProject Window ComponentsProject Window Components
The Project window lists all the files used in the programming process and provides access to them with two special buttons: View Code View Code View Code View Code and View ObjectView ObjectView ObjectView Object.
Displaying the Project WindowDisplaying the Project WindowDisplaying the Project WindowDisplaying the Project Window
To display the Project window, click the Project Explorer Project Explorer Project Explorer Project Explorer button on the Visual Basic toolbar. If the window is currently docked, you can enlarge it by double-clicking the title bar. To re-dock the Project window, double-click its title bar again.
Adding and Removing FilesAdding and Removing FilesAdding and Removing FilesAdding and Removing Files
The project file maintains a list of all the supporting files in a Visual Basic programming project.You can recognize project files by their .vbp file name extension. You can add individual files to and remove them from a project by using commands on the Project menu. The changes that you make will be reflected in the Project window.
Note:Note:Note:Note: In Visual Basic versions 1 through 3, project files had the .mak file name extension. In Visual Basic versions 4, 5, and 6.0, project files have the .vbp file name extension.
Adding ProjectsAdding ProjectsAdding ProjectsAdding Projects
If you load additional projects into Visual Basic with the File File File File menu Add Project Add Project Add Project Add Project command, outlining symbols appear in the Project window help you to organize and switch between projects.
19
5.5.5.5.3333.4.4.4.4 CODE WINDOWCODE WINDOWCODE WINDOWCODE WINDOW
You can create much of your program by using controls and setting properties. However, most Visual Basic programs require additional program code that acts as the brains behind the user interface that you create. This computing logic is created using program statements — keywords, identifiers, and arguments — that clearly spell out what the program should do each step of the way. You enter program statements in the Code window, a special text editing window designed specifically for Visual Basic program code. You can display the Code window in either of two ways:
� By clicking View Code View Code View Code View Code in the Project window.
� By clicking the View View View View menu Code Code Code Code command.
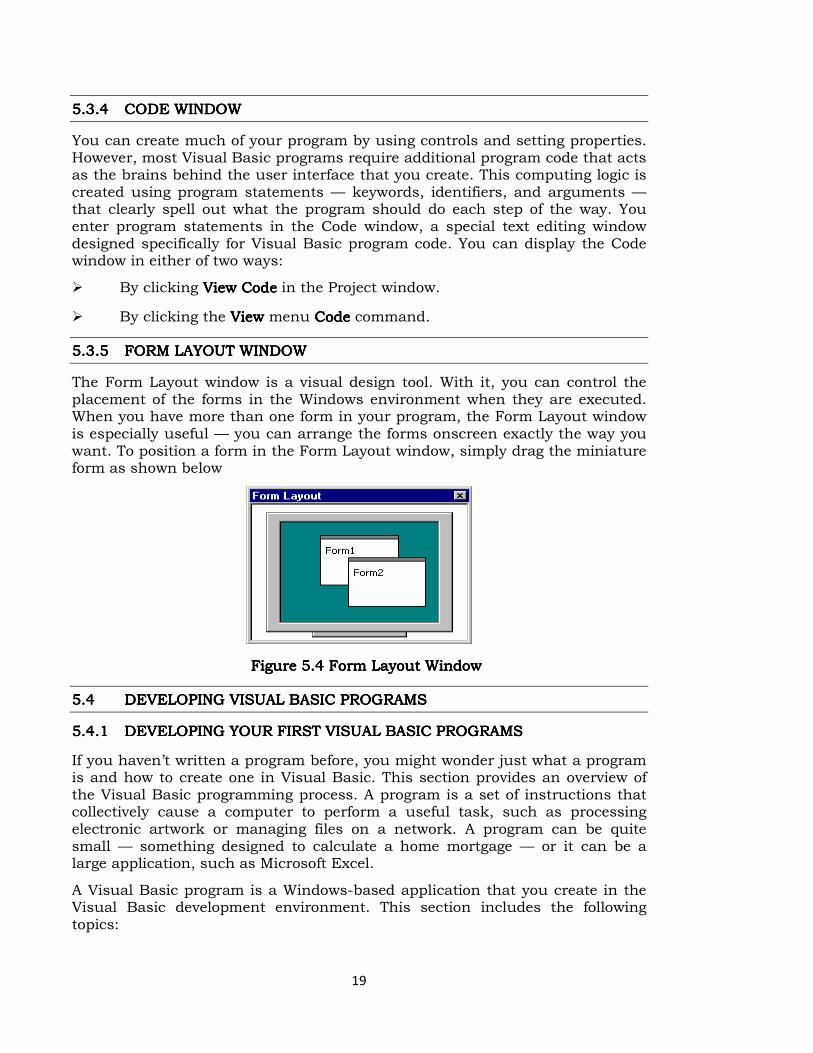
5.5.5.5.3333.5.5.5.5 FORM LAYOUT WINDOWFORM LAYOUT WINDOWFORM LAYOUT WINDOWFORM LAYOUT WINDOW
The Form Layout window is a visual design tool. With it, you can control the placement of the forms in the Windows environment when they are executed. When you have more than one form in your program, the Form Layout window is especially useful — you can arrange the forms onscreen exactly the way you want. To position a form in the Form Layout window, simply drag the miniature form as shown below
FigureFigureFigureFigure 5.45.45.45.4 Form Layout WindowForm Layout WindowForm Layout WindowForm Layout Window
5.45.45.45.4 DEVELOPING VISUAL BASIC PROGRAMSDEVELOPING VISUAL BASIC PROGRAMSDEVELOPING VISUAL BASIC PROGRAMSDEVELOPING VISUAL BASIC PROGRAMS
5.5.5.5.4444.1.1.1.1 DEVELOPING YOUR FIRST VISUAL BASIC PROGRAMSDEVELOPING YOUR FIRST VISUAL BASIC PROGRAMSDEVELOPING YOUR FIRST VISUAL BASIC PROGRAMSDEVELOPING YOUR FIRST VISUAL BASIC PROGRAMS
If you haven’t written a program before, you might wonder just what a program is and how to create one in Visual Basic. This section provides an overview of the Visual Basic programming process. A program is a set of instructions that collectively cause a computer to perform a useful task, such as processing electronic artwork or managing files on a network. A program can be quite small — something designed to calculate a home mortgage — or it can be a large application, such as Microsoft Excel.
A Visual Basic program is a Windows-based application that you create in the Visual Basic development environment. This section includes the following topics:

20
� Planning the Program
� Building the Program
� Testing, Compiling, and Distributing the Program
5.5.5.5.4444....1.11.11.11.1 PLANNING THE PROGRAMPLANNING THE PROGRAMPLANNING THE PROGRAMPLANNING THE PROGRAM
The first step in programming is determining exactly what you want your program to accomplish. This sounds simple (isn’t it obvious?), but without a mission statement, even the best programmer can have trouble building an application he or she is happy with. Planning a program is a little like planning a barbecue. For a barbecue to go off smoothly, you need to prepare for it ahead of time. You need to organize the menu, invite your friends, buy the food, and (most likely) clean your house. But a barbecue can be entertaining if friends just happen to drop by and bring stuff. Programs, though, usually don’t turn out the best if they’re built with the stone-soup approach.
Identify your ObIdentify your ObIdentify your ObIdentify your Objectivesjectivesjectivesjectives
Long before you sit down in front of your computer, you should spend some time thinking about the programming problem you are trying to solve. Up-front planning will save you development time down the road, and you’ll probably be much happier with the result. One part of the planning process might be creating an ordered list of programming steps, called an algorithm.algorithm.algorithm.algorithm.
Ask Yourself QuestionsAsk Yourself QuestionsAsk Yourself QuestionsAsk Yourself Questions
When you plan Visual Basic programming projects, you might find it useful to ask yourself the following questions about your program:
� What What What What is the goal (mission) goal (mission) goal (mission) goal (mission) of the program I am writing?
� Who Who Who Who will use the program?
� What What What What will the program look like look like look like look like when it starts?
� What information What information What information What information will the user enter in the program?
� How How How How will the program process the input?
� What What What What information (output) (output) (output) (output) will the program produce?
When you finish this preliminary work, you’ll be ready to build the program with VBVBVBVB.
5.4.1.25.4.1.25.4.1.25.4.1.2 PLANNING FOR WINDOWPLANNING FOR WINDOWPLANNING FOR WINDOWPLANNING FOR WINDOW----BASED APPLICATIONBASED APPLICATIONBASED APPLICATIONBASED APPLICATION
Building a Windows-based application with Visual Basic involves three programming steps: creating the user interface, setting the properties, and writing the code. And, of course, your project must be saved.
These steps are described in the following topics:
� Creating the User Interface
� Setting the Properties
21
� Writing Program Code
� Saving a Project
Creating the User InterfaceCreating the User InterfaceCreating the User InterfaceCreating the User Interface
After you have established a clear goal for your program, it's important to think about how it will look and how it will process information. The complete set of forms and controls used in a program is called the program user interface. The user interface includes all the menus, dialog boxes, buttons, objects, and pictures that users see when they operate the program. In the Visual Basic development environment, you can create all the components of a Windows-based application quickly and efficiently.
Setting the PropertiesSetting the PropertiesSetting the PropertiesSetting the Properties
Properties are programmable characteristics associated with forms and their controls. You can set these properties either as you design your program (at design time) or while you run it (at run time). You change properties at design time by selecting an object, clicking the Properties window, and changing one or more of the property settings. To set properties at run time, you use Visual Basic program code.
Writing the Program CodeWriting the Program CodeWriting the Program CodeWriting the Program Code
You finish building your program by typing program code for one or more user interface elements. Writing program code gives you more control over how your program works than you can get by just setting properties of user interface elements at design time. By using program code, you completely express your thoughts about how your application:
� Processes data
� Tests for conditions
� Changes the order in which Visual Basic carries out instructions.
The Visual Basic Programming LanguageThe Visual Basic Programming LanguageThe Visual Basic Programming LanguageThe Visual Basic Programming Language
The Visual Basic programming language contains several hundred statements, functions, and special characters. However, most of your programming tasks will be handled by a few dozen, easy-to-remember keywords.In this course, you’ll spend a lot of time exploring the subtleties of writing useful program codethat you can adapt to a variety of situations. For now, though, just keep these points in mind:
� Program code follows a particular form (syntax) required by the Visual Basic compiler.
� You enter and edit program code in the Code window; a special text editor designed to track and correct (debug) program statement errors.
Saving a ProjectSaving a ProjectSaving a ProjectSaving a Project
After you complete a program or find a good stopping point, you should save the project to disk with the Save Project As Save Project As Save Project As Save Project As command on the File File File File menu.
22
Saving to DiskSaving to DiskSaving to DiskSaving to Disk
Saving a Visual Basic project to disk is a little more complicated than saving a Word or Excel document. In addition to the project (.vbp) file, Visual Basic also creates a separate file for each form (.frm file) and (if necessary) for each standard code module (.bas file) in your project. You must save each of these files, one by one.When you choose the Save Project As Save Project As Save Project As Save Project As command, Visual Basic prompts you for each file name,one at a time. The process concludes when the project assembly instructions (which serve as theprogram’s packing list) are saved in a project file. The file names included in this packing list are the components listed in the Project window.
NoteNoteNoteNote: You can recognize PROJECT files by their .vbp file name extension, and
FORM files as .frm file name extension....
Reusing Component FilesReusing Component FilesReusing Component FilesReusing Component Files
You can use component files associated with a project in future programming projects by using the Project Project Project Project menu Add File Add File Add File Add File command. This command merges forms and standard
code modules into the current programming project and makes them appear in the current program Project window.
5.5.5.5.5555 TESTING, COMPILING AND DISTRIBUTING THE PROGRAMTESTING, COMPILING AND DISTRIBUTING THE PROGRAMTESTING, COMPILING AND DISTRIBUTING THE PROGRAMTESTING, COMPILING AND DISTRIBUTING THE PROGRAM
After you create a working version of your program, you need to test it carefully to verify that it works correctly. If you wish to distribute your program, you also need to compile it into an executable program (a stand-alone Windows-based program) and give it to your users. If you decide to revise the program later, you repeat the process, beginning with planning and an analysis of any new goals. These steps complete the software development life cycle.
Testing and DebuggingTesting and DebuggingTesting and DebuggingTesting and Debugging
Testing a program involves checking it against a variety of real-life operating conditions to determine whether it works correctly. A problem that stops the program from running or from producing the expected results is called a software defect (bug).If you’ve used software for any length of time, you’ve probably run into your share of computer glitches caused by faulty software. Now that you are the programmer, it’s your job to stamp out these problems before they reach the end user. Fortunately for all of us, Visual Basic provides some excellent debugging tools to catch bugs.
CompilingCompilingCompilingCompiling
When you’ve finished creating and testing your program, you can compile it into an executable (.exe) file that will run under Windows or Windows NT. Creating an executable file with Visual Basic is as simple as clicking the Make Make Make Make Project1.exe Project1.exe Project1.exe Project1.exe command on the File File File File menu. If you plan to run your new Visual Basic application only on your own system, creating the executable file will be your final step. When you want to run your new program, simply double click
23
the program’s .exe file in Windows Explorer. Or, use the file to create a shortcut icon that you can place on your Windows desktop.
DisDisDisDistributingtributingtributingtributing
You might want to share a Visual Basic executable file with friends or colleagues or sell your program. If so, you need to put the program and a few necessary support files on a disk (or the network), where your users or customers can get at them. All Visual Basic programs require one or more dynamicdynamicdynamicdynamic----link library (DLL) link library (DLL) link library (DLL) link library (DLL) files to run. To get your users up and running, you need to copy the necessary files from your hard disk to a distribution disk. The exact DLL files you need depends on these factors:
� The operating system that your users run.
� The Visual Basic features that your program uses.
5.6 5.6 5.6 5.6 LET US SUM UP LET US SUM UP LET US SUM UP LET US SUM UP
In this lesson we have learnt
• How to create control
• About the usage of form window, properties window, project window,
code window and form layout window
• How to develop a visual basic program
• How to test, compile and distribute the program
5.75.75.75.7 REFERENCESREFERENCESREFERENCESREFERENCES
Gary CornellGary CornellGary CornellGary Cornell, “Visual Basic 6.0 from the Ground Up”.Tata McGraw Hill
Company,1999.
Content Development GroupContent Development GroupContent Development GroupContent Development Group “Visual Basic 6.0 Programming” Tata McGraw Hill
Company,Ninth Reprint,2007.
Noel JerkeNoel JerkeNoel JerkeNoel Jerke “The Complete Reference: Visual Basic 6.0”, Tata McGraw Hill
Company, 24th reprint, 2006.
24
UNIT UNIT UNIT UNIT –––– IIIIIIII
LESSON LESSON LESSON LESSON 6666
BUILDING THE USER INTERFACEBUILDING THE USER INTERFACEBUILDING THE USER INTERFACEBUILDING THE USER INTERFACE
ContentsContentsContentsContents
6.0 Aims & Objectives
6.1 Creating Controls
6.2 Properties Setting
6.3 Let us Sum Up
6.4 References
6.0 AIMS & OBJECTIVES6.0 AIMS & OBJECTIVES6.0 AIMS & OBJECTIVES6.0 AIMS & OBJECTIVES
This lesson introduces the standard Visual Basic toolbox controls and teaches
you how to use them to build useful interface features. In this lesson, you will
learn how
• To Create Controls
• To set the Properties
6.16.16.16.1 CREATING CONTROLSCREATING CONTROLSCREATING CONTROLSCREATING CONTROLS
Like any specialized activity, Visual Basic programming comes with its own evolving set of technical terms. Many of these terms have their roots in object-oriented programming, a methodology closely associated with C++ programming. As you work through the chapters in this course, you’ll want to be familiar with these essential Visual Basic concepts.
ControlControlControlControl
A control is a tool you use to create objects on a Visual Basic form. You select controls from the toolbox and use the mouse to draw objects on a form. You use most controls to create user interface elements, such as command buttons, image boxes, and list boxes.
ObjectObjectObjectObject
An object is a type of user interface element you create on a Visual Basic form by using a toolbox control. (In fact, in Visual Basic, the form itself is also an object.) You can move, resize, and customize objects by setting object properties. Objects also have what is known as inherent functionality — they know how to operate and can respond to certain situations on their own. (A list box “knows” how to scroll, for example.) You can customize Visual Basic objects by using event procedures that are fine-tuned for different conditions in a program.
25
6.6.6.6.2222 PROPERTIES SETTINGPROPERTIES SETTINGPROPERTIES SETTINGPROPERTIES SETTING
A property is a value or characteristic held by a Visual Basic object, such as Caption Caption Caption Caption or ForeForeForeFore ColorColorColorColor. Properties can be set at design time by using the Properties window or at run time by using statements in the program code. In code, the format for setting a property is:
Object. Property = Value
Where
Object Object Object Object is the name of the object you’re customizing.
Property Property Property Property is the characteristic you want to change.
Value Value Value Value is the new property setting.
For example,For example,For example,For example,
Command1.Caption = "Hello"
Could be used in the program code to set the Caption Caption Caption Caption property of the
Command1 Command1 Command1 Command1 object to
“Hello”.
Event ProcedureEvent ProcedureEvent ProcedureEvent Procedure
An event procedure is a block of code that runs when a program object is manipulated. For example, clicking the first command button in a program executes the Command1_Click event procedure. Event procedures typically evaluate and set properties and use other program statements to perform the work of the program.
Program StatementProgram StatementProgram StatementProgram Statement
A program statement is a combination of keywords, identifiers, and arguments in the code that does the work of the program. Visual Basic program statements create storage space for data, open files, perform calculations, and do several other important tasks.
MethodMethodMethodMethod
A method is a special keyword that performs an action or a service for a
particular program object. In code, the format for using a method is
Object. Method Value
Where
Object Object Object Object is the name of the object you are working with.
Method Method Method Method is the action you want the object to perform.
Value Value Value Value is an optional argument to be used by the method.
26
For example,For example,For example,For example,
This statement uses the Add Item Add Item Add Item Add Item method to put the word Check in the List1 List1 List1 List1
list box:
List1.AddItem "Check"
VariableVariableVariableVariable
A variable or identifier is a special container that holds data temporarily in a program. You create variables to store calculation results, create file names, process input, and so on. Variables can store numbers, names, property values, and references to objects.
6.36.36.36.3 LET US SUM UPLET US SUM UPLET US SUM UPLET US SUM UP
In this lesson you have learnt how
• To Create Controls
• To set the Properties
6.46.46.46.4 REFERENCESREFERENCESREFERENCESREFERENCES
Gary CornellGary CornellGary CornellGary Cornell, “Visual Basic 6.0 from the Ground Up”. Tata McGraw Hill
Company,1999.
Content Development GroupContent Development GroupContent Development GroupContent Development Group “Visual Basic 6.0 Programming” Tata McGraw Hill
Company,Ninth Reprint,2007.
Noel JerkeNoel JerkeNoel JerkeNoel Jerke “The Complete Reference: Visual Basic 6.0”, Tata McGraw Hill
Company, 24th reprint, 2006.

27
LESSON LESSON LESSON LESSON ---- 7777
VISUAL BASIC OBJECTSVISUAL BASIC OBJECTSVISUAL BASIC OBJECTSVISUAL BASIC OBJECTS
Contents
7.0 Aims & Objectives
7.1 Naming Visual Basic Objects
7.2 Basic Controls
7.2.1 Label
7.2.2 Textbox
7.2.3 Command button
7.2.4 The File Controls in Visual Basic
7.2.5 Using ScrollBar Control In Visual Basic
7.3 Let us Sum up
7.4 References
7.07.07.07.0 AIMS & OBJECTIVESAIMS & OBJECTIVESAIMS & OBJECTIVESAIMS & OBJECTIVES
In this lesson we are going to learn about how
• To Name Visual Basic objects.
• To Use basic controls to display text and process input.
• To Use file system controls to browse the files and folders on your computer.
7.17.17.17.1 NAMING VISUAL BASIC OBJECTSNAMING VISUAL BASIC OBJECTSNAMING VISUAL BASIC OBJECTSNAMING VISUAL BASIC OBJECTS
You may be a Visual Basic beginner now, but that won’t be true for long. As your programs increase in size and sophistication, the number of objects you use on your forms will multiply quickly. There is an easy way to avoid mistaking one object for another in the Properties window or in your program code: assigning a unique name to each object soon after you creates it. It’s simple — when you set your other object properties, just click the (NameNameNameName) property, and then give the object a unique name.
Visual Basic Object NamesVisual Basic Object NamesVisual Basic Object NamesVisual Basic Object Names
Programmers typically create names for their objects that clearly identify the purpose of the object and the toolbox control that created it. For example, you might give the name lblInstructions lblInstructions lblInstructions lblInstructions to a label that displays user-operating instructions. (In this case, lbl stands for the Label Label Label Label control, and Instructions describes the label's purpose).
28
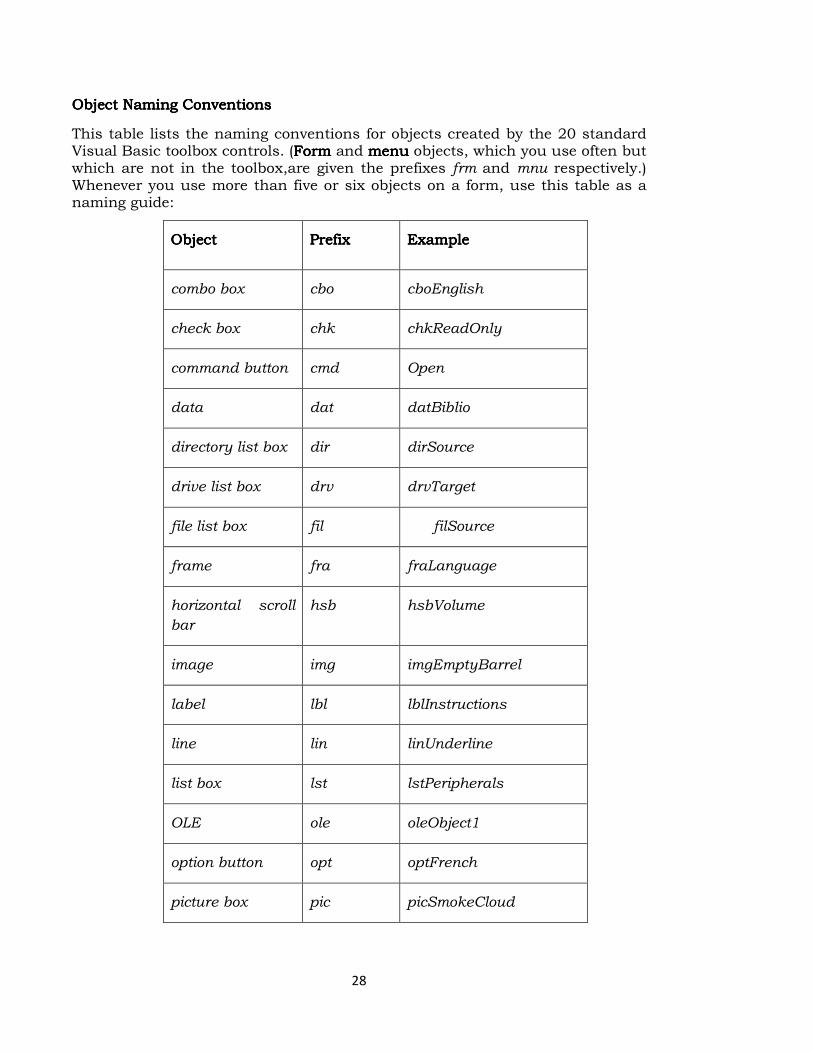
Object NaObject NaObject NaObject Naming Conventionsming Conventionsming Conventionsming Conventions
This table lists the naming conventions for objects created by the 20 standard Visual Basic toolbox controls. (Form Form Form Form and menu menu menu menu objects, which you use often but which are not in the toolbox,are given the prefixes frm and mnu respectively.) Whenever you use more than five or six objects on a form, use this table as a naming guide:
ObjectObjectObjectObject PrefixPrefixPrefixPrefix ExampleExampleExampleExample
combo box cbo cboEnglish
check box chk chkReadOnly
command button cmd Open
data dat datBiblio
directory list box dir dirSource
drive list box drv drvTarget
file list box fil filSource
frame fra fraLanguage
horizontal scroll
bar
hsb hsbVolume
image img imgEmptyBarrel
label lbl lblInstructions
line lin linUnderline
list box lst lstPeripherals
OLE ole oleObject1
option button opt optFrench
picture box pic picSmokeCloud

29
shape shp shpWireScreen
text box txt txtGetName
timer tmr tmrRunAnimation
vertical scroll bar vsb vsbTemperature
7.7.7.7.2 BASIC CONTROLS2 BASIC CONTROLS2 BASIC CONTROLS2 BASIC CONTROLS
As you learned in Toolbox Controls, controls are the design tools you use to
build the user interface of a Visual Basic program. After you place controls on a
form, they become objects that you can customize with property settings and
program code. In this section, you learn about the most basic user interface
controls in the Visual Basic toolbox.
7.2.1 7.2.1 7.2.1 7.2.1 LABELLABELLABELLABEL
LabelLabelLabelLabel, the simplest control in the Visual Basic toolbox, displays formatted text on a user interface form. Typical uses for the Label Label Label Label control include:
� Help text
� Program splash screen splash screen splash screen splash screen headings
� Formatted output, such as names, times, and dates
� Descriptive labels for other objects, including text boxes and list boxes.
A label label label label is a control you use to display text that a user can't edit directly. user can't edit directly. user can't edit directly. user can't edit directly. We've seen, though, in previous examples, that the text of a label box can be changed at run-time in response to events.
Label Properties:Label Properties:Label Properties:Label Properties:
Alignment Alignment Alignment Alignment Aligns caption within border.
Appearance Appearance Appearance Appearance Selects 3-D or flat appearance.
AutoSize AutoSize AutoSize AutoSize If True, the label is resized to fit the text specified by the caption
property. If False, the label will remain the size defined at design time and the
text may be clipped.
BorderStyle BorderStyle BorderStyle BorderStyle Determines type of border.
Caption Caption Caption Caption String to be displayed in box.
Font Font Font Font Sets font type, style, size.
30
WordWrap WordWrap WordWrap WordWrap Works in conjunction with Auto Size property. If AutoSize = True,
WordWrap = True, then the text will wrap and label will expand vertically to fit
the Caption. If AutoSize = True, WordWrap = False, then the text will not wrap
and the label expands horizontally to fit the Caption. If AutoSize = False, the
text will not wrap regardless of WordWrap value.
Label Events:Label Events:Label Events:Label Events:
Click Click Click Click Event triggered when user clicks on a label.
DblClick DblClick DblClick DblClick Event triggered when user double-clicks on a label.
Creating Labels on a FormCreating Labels on a FormCreating Labels on a FormCreating Labels on a Form
To create a label control on a form, we surely refer to the toolbox window to select the label icon,shown as capital letter “A”. When the label control is selected, the label can be placed on a form by creating a rectangle with the mouse, which is held left button clicked. Once the left button is released, the label of size as the rectangle created is placed on the form.
Creating Labels in CodeCreating Labels in CodeCreating Labels in CodeCreating Labels in Code
You can also set label properties with program code, as shown in the following.
The program codes below, when command1 button is clicked, will set the caption of label1 as
“Welcome” and label2 as “Please enter your name below:”
Private Sub Command1_Click ()Private Sub Command1_Click ()Private Sub Command1_Click ()Private Sub Command1_Click ()
Label1.Caption = "Welcome"Label1.Caption = "Welcome"Label1.Caption = "Welcome"Label1.Caption = "Welcome"
Label2.Caption = "Please enter your name below:"Label2.Caption = "Please enter your name below:"Label2.Caption = "Please enter your name below:"Label2.Caption = "Please enter your name below:"
lblDigitalClock.Caption = TimelblDigitalClock.Caption = TimelblDigitalClock.Caption = TimelblDigitalClock.Caption = Time
End SubEnd SubEnd SubEnd Sub
7.2.7.2.7.2.7.2.2222 TEXTBOXTEXTBOXTEXTBOXTEXTBOX
A Textbox Textbox Textbox Textbox is used to display information entered at design time, by a user at run-time, or assigned within code. The displayed text may be edited. The Textbox Textbox Textbox Textbox control is one of the most versatile tools in the Visual Basic toolbox. This control performs two functions:
� Displaying output Displaying output Displaying output Displaying output (such as operating instructions or the contents of a
file) on a form.
� Receiving text Receiving text Receiving text Receiving text (such as names and phone numbers) as user input.
31
How a text box works depends on how you set its properties and how you
reference the text box in your program code. The following popup illustration
shows a text box that:
� Displays data entry instructions for the user.
� Receives input when the user types in a delivery note and clicks the Print Print Print Print
Order Order Order Order button.
Text Box Text Box Text Box Text Box Properties:Properties:Properties:Properties:
Appearance Appearance Appearance Appearance Selects 3-D or flat appearance.
BorderStyle BorderStyle BorderStyle BorderStyle Determines type of border.
Font Font Font Font Sets Sets Sets Sets font type, style, size.
MaxLength MaxLength MaxLength MaxLength Limits the length of displayed text (0 value indicates unlimited
length).
MultiLine MultiLine MultiLine MultiLine Specifies whether text box displays single line or multiple lines.
PasswordChar PasswordChar PasswordChar PasswordChar Hides text with a single character.
ScrollBars ScrollBars ScrollBars ScrollBars Specifies type of displayed scroll bar(s).
SelLength SelLength SelLength SelLength Length of selected text (run-time only).
SelStart SelStart SelStart SelStart Starting position of selected text (run-time only).
SelText SelText SelText SelText Selected text (run-time only).
Tag Tag Tag Tag Stores a string expression.
Text Text Text Text Displayed text.
Text Box Events:Text Box Events:Text Box Events:Text Box Events:
Change Change Change Change Triggered every time the Text Text Text Text property changes.
LostFocus LostFocus LostFocus LostFocus Triggered when the user leaves the text box. This is a good place to
examine the contents of a text box after editing.
KeyPress KeyPress KeyPress KeyPress Triggered whenever a key is pressed. Used for key trapping, as seen in
last class.
Text Box Methods:Text Box Methods:Text Box Methods:Text Box Methods:
SetFocus SetFocus SetFocus SetFocus Places the cursor in a specified text box.
The sample code below shows how to control a text box,
Command 1 is clicked,Command 1 is clicked,Command 1 is clicked,Command 1 is clicked,
Private Sub Command1_Click()

32
'The following line places text in a text box:
Text1.Text = "Enter your delivery note here."
End Sub
Command 2 is clicked,Command 2 is clicked,Command 2 is clicked,Command 2 is clicked,
Private Sub Command2_Click()
'This line saves input from a text box in a variable:
DeliveryNote = Text1.Text
End Sub
7.2.7.2.7.2.7.2.3333 COMMANDBUTTONCOMMANDBUTTONCOMMANDBUTTONCOMMANDBUTTON
Use the CommandButton CommandButton CommandButton CommandButton control to create buttons with a variety of uses on a form. A command button is the most basic way to get user input while a program is running. By clicking a command button, the user requests that a specific action be taken in the program. Or, in Visual Basic terms, clicking a command button creates an event, which must be processed in your program.
Here are some command buttons that you’d typically find in a program:
OK OK OK OK Accepts a list of options and indicates that the user is ready to proceed.
Cancel Cancel Cancel Cancel Discards a list of options.
Quit Quit Quit Quit Exits an open dialog box or program.
In each case, you should use command buttons carefully so that they work as expected when they are clicked.
Command Button Properties:Command Button Properties:Command Button Properties:Command Button Properties:
Appearance Appearance Appearance Appearance Selects 3-D or flat appearance.
Cancel Cancel Cancel Cancel Allows selection of button with Esc Esc Esc Esc key (only one button on a form can
have this property True).
Caption Caption Caption Caption String to be displayed on button.
Default Default Default Default Allows selection of button with Enter Enter Enter Enter key (only one button on a form
can have this property True).
Font Font Font Font Sets font type, style, size.
33
Command Button Events:Command Button Events:Command Button Events:Command Button Events:
Click Click Click Click Event triggered when button is selected either by clicking on it or by
pressing the access key.
Changing Command Button PropertiesChanging Command Button PropertiesChanging Command Button PropertiesChanging Command Button Properties
You can change command button properties properties properties properties (like those of all objects) in two
ways:
� By adjusting property settings in the Properties window.
� By changing properties with program code.
7.2.4 7.2.4 7.2.4 7.2.4 THE FILE CONTROLS THE FILE CONTROLS THE FILE CONTROLS THE FILE CONTROLS IN VISUAL BASICIN VISUAL BASICIN VISUAL BASICIN VISUAL BASIC
Three of the controls on the ToolBox let you access the computer's file system. They are DriveListBox, DirListBox and FileListBox controls (see below figure) , which are the basic blocks for building dialog boxes that display the host computer's file system. Using these controls, user can traverse the host computer's file system, locate any folder or files on any hard disk, even on network drives. The files are controls are independent of one another, and each can exist on it's own, but they are rarely used separately. The files controls are described next.
Following figure shows three files controls are used in the design of Forms that let users explore the entire structure of their hard disks.
* DriveListBoxDriveListBoxDriveListBoxDriveListBox: Displays the names of the drives within and connected to the PC. The basic property of this control is the drive property, which set the drive to be initially selected in the control or returns the user's selection.
* DirListBox:DirListBox:DirListBox:DirListBox: Displays the folders of current Drive. The basic property of this control is the Path property, which is the name of the folder whose sub folders are displayed in the control.
* FileListBoxFileListBoxFileListBoxFileListBox: Displays the files of the current folder. The basic property of this control is also called Path, and it's the path name of the folder whose files are displayed.
34
The three File controls are not tied to one another. If you place all three of them on a Form, you will see the names of all the folders under the current folder, and so on. Each time you select a folder in the DirlistBox by double clicking its name, its sub folders are displayed. Similarly , the FileListBox control will display the names of all files in the current folder. Selecting a drive in the DriveListBox control, however this doesn't affect the contents of the DirListBox.
To connect to the File controls, you must assign the appropriate values to the properties. To compel the DirListBox to display the folders of the selected drive in the DriveListBox, you must make sure that each time the user selects another drive, the Path property of the DirListBox control matches the Drive property of the DriveListBox.
The following is the minimum code you must place in the DriveListBox control's change event :
Private Sub Drive1_Change( ) Dir1.Path = Drive1.Drive End Sub
Similarly, every time in the current selection in DirListBox control changes, you must set the FileListBox control's path property to point the new path of the DirListBox control :
Private Sub Dir1_Change( ) File1.Path = Dir1.Path End Sub
This is all it takes to connect the three file controls. Following example shows the use of File controls.
* Open a New project and save the Form as FileControls.frm and save the Project as FileControls.vbp.
* Design the application as shown above.
The following code is typed in the Change events of the DriveListBox and DirListBox
35
Save the project and run it by pressing F5. You can see that the folders and files are shown according to your selection.
7.2.57.2.57.2.57.2.5 USING SCROLLBAR CONTROL IN USING SCROLLBAR CONTROL IN USING SCROLLBAR CONTROL IN USING SCROLLBAR CONTROL IN VISUAL BASICVISUAL BASICVISUAL BASICVISUAL BASIC
The ScrollBar is a commonly used control, which enables the user to select a value by positioning it at the desired location. It represents a set of values. The Min and Max property represents the minimum and maximum value. The value property of the ScrollBar represents its current value that may be any integer between minimum and maximum values assigned.
Following example illustrates the ScrollBar control
* Open a new Standard EXE project and name the form as ScrollBar.frm and name the project as ScrollBar.vbp
* When the thumb's position of the ScrollBar is changed the value has to displayed in the TextBox.
* Design the application as shown below.
ObjectObjectObjectObject Property Property Property Property SettingSettingSettingSetting
FormFormFormForm Caption Name
Scroll Bar frmScrollbar
CommandButtonCommandButtonCommandButtonCommandButton Caption Name
Exit cmdExit
VScrollBarVScrollBarVScrollBarVScrollBar
Max Min Name Value
100 0 vsb1 50
TextBoxTextBoxTextBoxTextBox Name Text
txtPercentage %
36
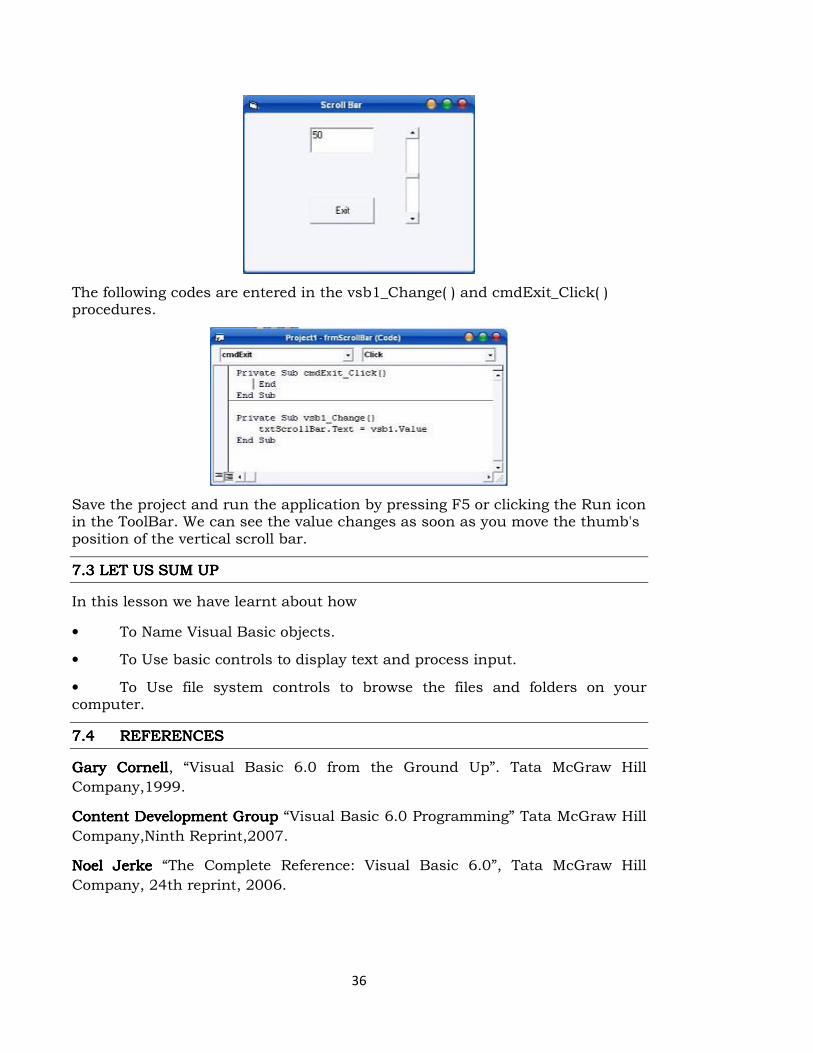
The following codes are entered in the vsb1_Change( ) and cmdExit_Click( ) procedures.
Save the project and run the application by pressing F5 or clicking the Run icon in the ToolBar. We can see the value changes as soon as you move the thumb's position of the vertical scroll bar.
7.37.37.37.3 LET US SUM UPLET US SUM UPLET US SUM UPLET US SUM UP
In this lesson we have learnt about how
• To Name Visual Basic objects.
• To Use basic controls to display text and process input.
• To Use file system controls to browse the files and folders on your computer.
7.47.47.47.4 REFERENCESREFERENCESREFERENCESREFERENCES
Gary CornellGary CornellGary CornellGary Cornell, “Visual Basic 6.0 from the Ground Up”. Tata McGraw Hill
Company,1999.
Content Development GroupContent Development GroupContent Development GroupContent Development Group “Visual Basic 6.0 Programming” Tata McGraw Hill
Company,Ninth Reprint,2007.
Noel JerkeNoel JerkeNoel JerkeNoel Jerke “The Complete Reference: Visual Basic 6.0”, Tata McGraw Hill
Company, 24th reprint, 2006.
37
LESSON LESSON LESSON LESSON –––– 8888
CONTROLS IN ACTIONCONTROLS IN ACTIONCONTROLS IN ACTIONCONTROLS IN ACTION
Example Example Example Example : : : : Basic Controls in ActionBasic Controls in ActionBasic Controls in ActionBasic Controls in Action
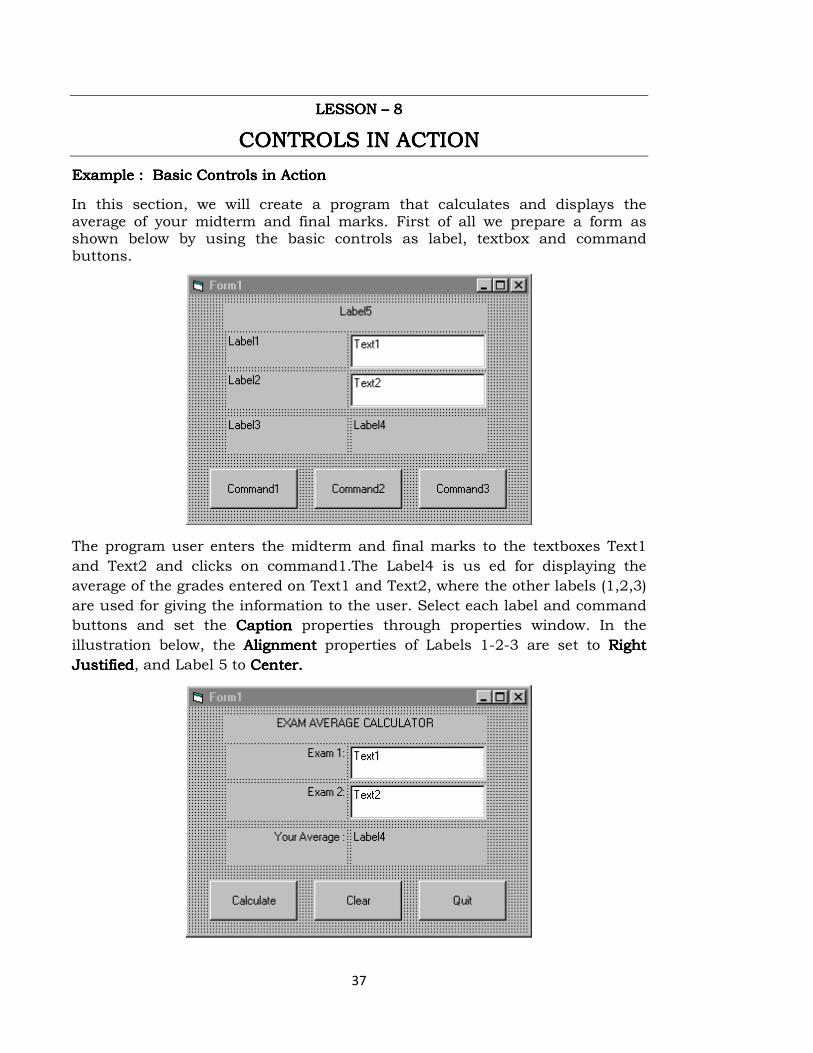
In this section, we will create a program that calculates and displays the average of your midterm and final marks. First of all we prepare a form as shown below by using the basic controls as label, textbox and command buttons.
The program user enters the midterm and final marks to the textboxes Text1
and Text2 and clicks on command1.The Label4 is us ed for displaying the
average of the grades entered on Text1 and Text2, where the other labels (1,2,3)
are used for giving the information to the user. Select each label and command
buttons and set the Caption Caption Caption Caption properties through properties window. In the
illustration below, the Alignment Alignment Alignment Alignment properties of Labels 1-2-3 are set to Right Right Right Right
JustifiedJustifiedJustifiedJustified, and Label 5 to Center.Center.Center.Center.

38
Type the following code to the click event procedures of command buttons and
form_loadform_loadform_loadform_load
Finally the output of this little program gives us a simple average calculator. See figure below.
39
LESSON LESSON LESSON LESSON –––– 9999
DATA INPUT CONTROLSDATA INPUT CONTROLSDATA INPUT CONTROLSDATA INPUT CONTROLS
ContentsContentsContentsContents
9.0 Aims & Objectives
9.1 List Box
9.2 Combo Box
9.3 Example : Input controls in action
9.4 Let us Sum up
9.5 References
9.09.09.09.0 AIMS & OBJECTIVESAIMS & OBJECTIVESAIMS & OBJECTIVESAIMS & OBJECTIVES
In this lesson, you will learn to use two versatile toolbox controls.
This section includes the following topics:
9.1 9.1 9.1 9.1 LISTBOXLISTBOXLISTBOXLISTBOX
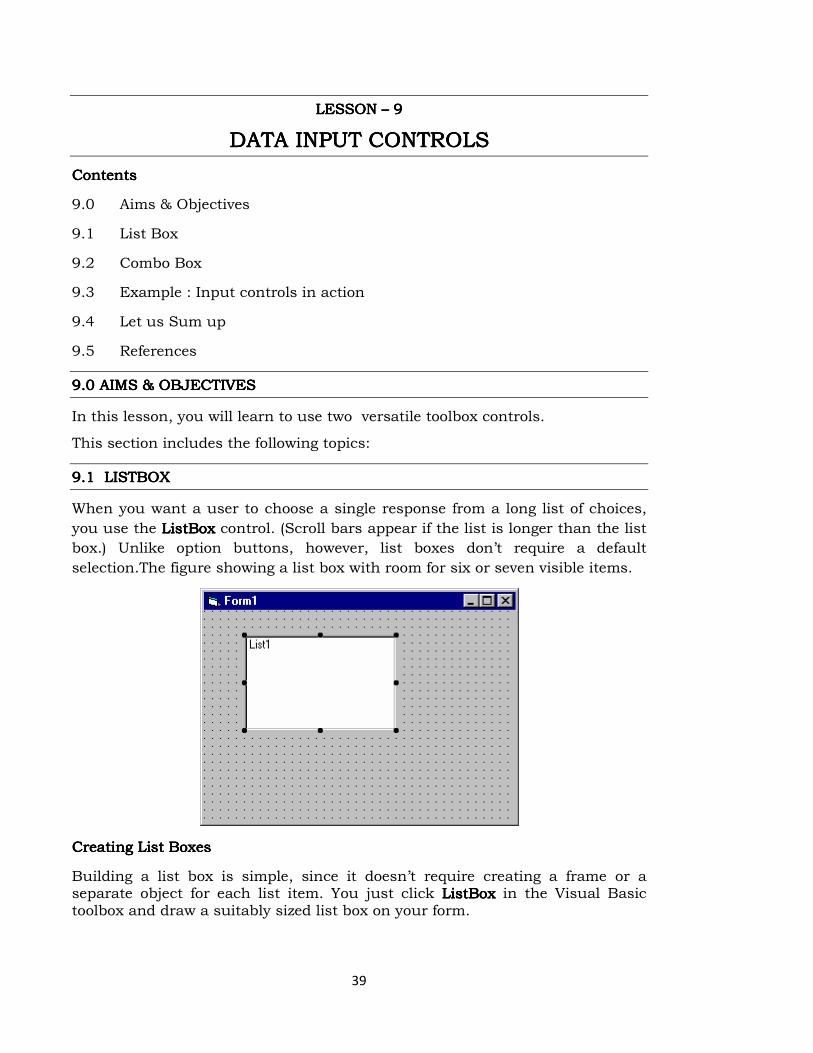
When you want a user to choose a single response from a long list of choices,
you use the ListBox ListBox ListBox ListBox control. (Scroll bars appear if the list is longer than the list
box.) Unlike option buttons, however, list boxes don’t require a default
selection.The figure showing a list box with room for six or seven visible items.
Creating List BoxesCreating List BoxesCreating List BoxesCreating List Boxes
Building a list box is simple, since it doesn’t require creating a frame or a separate object for each list item. You just click ListBox ListBox ListBox ListBox in the Visual Basic toolbox and draw a suitably sized list box on your form.
40
Setting List Box PropertiesSetting List Box PropertiesSetting List Box PropertiesSetting List Box Properties
In a Visual Basic program, you can define list box characteristics in the ProProProProperties window perties window perties window perties window or by using program code, so that users can add, remove, or sort list box items while the program runs. You add choices to a list box with the AddItem AddItem AddItem AddItem method, which is typically placed in the Form_Load Form_Load Form_Load Form_Load event procedure. (AddItem AddItem AddItem AddItem is a method normally used with list-oriented objects).
The sample code below shows an example of the AddItem AddItem AddItem AddItem method.
Private Sub Form_Load()
List1.AddItem “Extra hard disk”
List1.AddItem “Printer”
List1.AddItem “Satellite dish”
End Sub
Adding Default Program StatementsAdding Default Program StatementsAdding Default Program StatementsAdding Default Program Statements
Each time your Visual Basic program displays a form, the Form_Load event
procedure (a block of code) runs. Although Form_Load doesn’t contain default
program statements, you can add statements to it. Just double-click the form
to open the Form_Load event procedure in the code window.
9.2 9.2 9.2 9.2 COMBOBOXCOMBOBOXCOMBOBOXCOMBOBOX
Objects created with the ComboBox ComboBox ComboBox ComboBox control are similar to those created with the ListBox ListBox ListBox ListBox control.Like a list box, items can be added to, removed from, or sorted in a combo (combination) box while your program runs. However, there are differences. Combo boxes take up less space on the form, show a default setting, and in their default Style property setting are only one line high. But if the user clicks the combo box while your program runs, the combo box expands to reveal a full list of choices. (If the list is too long to be displayed in the combo box, scroll bars appear).
The illustration showing a combo box on a form.
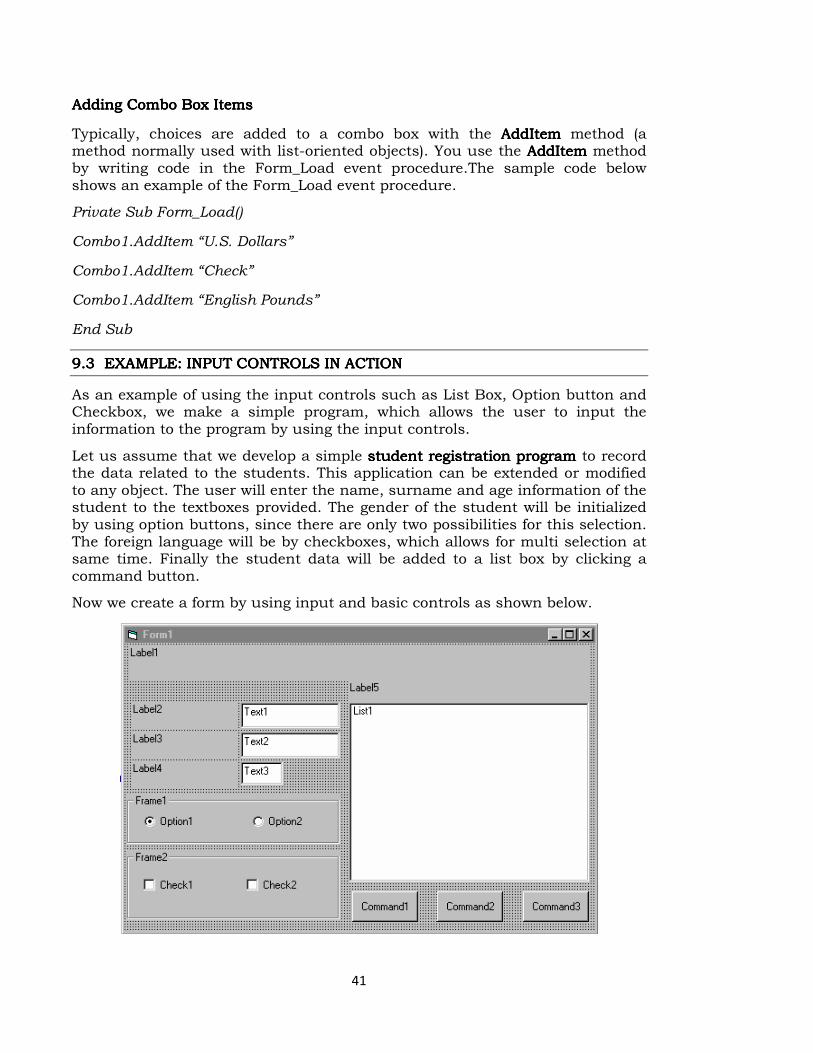
41
Adding Combo Box ItemsAdding Combo Box ItemsAdding Combo Box ItemsAdding Combo Box Items
Typically, choices are added to a combo box with the AddItem AddItem AddItem AddItem method (a method normally used with list-oriented objects). You use the AddItem AddItem AddItem AddItem method by writing code in the Form_Load event procedure.The sample code below shows an example of the Form_Load event procedure.
Private Sub Form_Load()
Combo1.AddItem “U.S. Dollars”
Combo1.AddItem “Check”
Combo1.AddItem “English Pounds”
End Sub
9.9.9.9.3333 EXAMPLE: INPUT CONTROLS IN ACTIONEXAMPLE: INPUT CONTROLS IN ACTIONEXAMPLE: INPUT CONTROLS IN ACTIONEXAMPLE: INPUT CONTROLS IN ACTION
As an example of using the input controls such as List Box, Option button and Checkbox, we make a simple program, which allows the user to input the information to the program by using the input controls.
Let us assume that we develop a simple student registration program student registration program student registration program student registration program to record the data related to the students. This application can be extended or modified to any object. The user will enter the name, surname and age information of the student to the textboxes provided. The gender of the student will be initialized by using option buttons, since there are only two possibilities for this selection. The foreign language will be by checkboxes, which allows for multi selection at same time. Finally the student data will be added to a list box by clicking a command button.
Now we create a form by using input and basic controls as shown below.
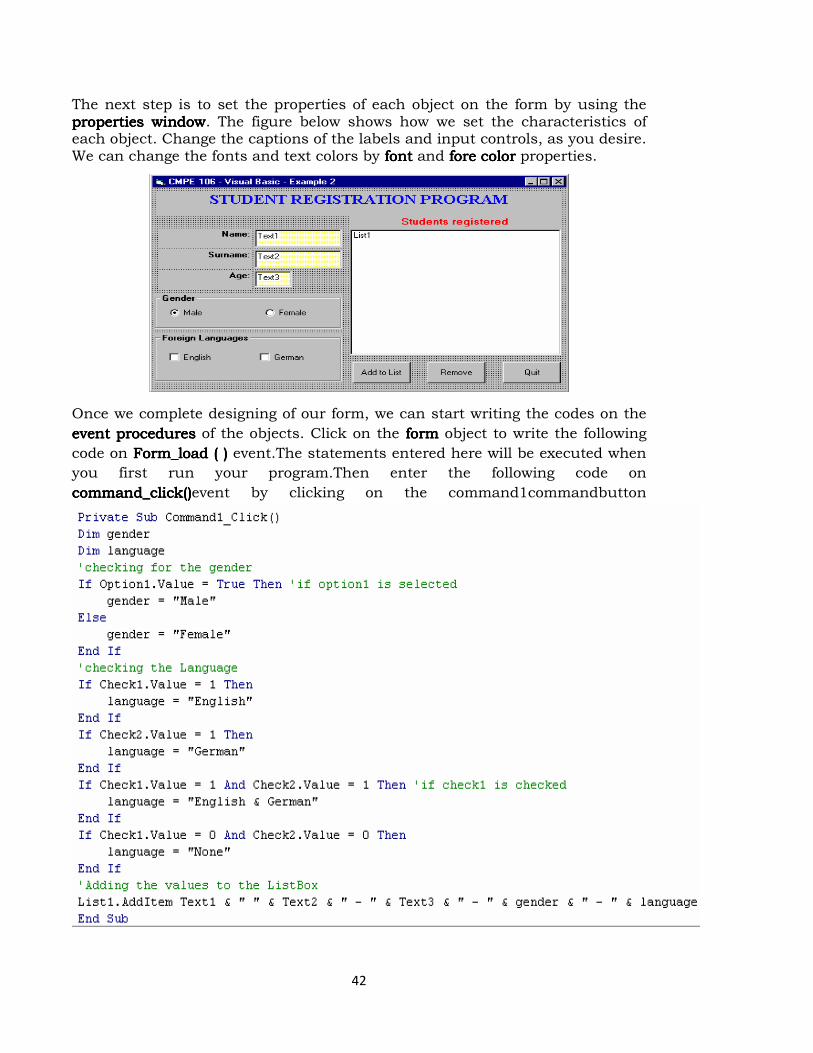
42
The next step is to set the properties of each object on the form by using the properties windowproperties windowproperties windowproperties window. The figure below shows how we set the characteristics of each object. Change the captions of the labels and input controls, as you desire. We can change the fonts and text colors by font font font font and foreforeforefore color color color color properties.
Once we complete designing of our form, we can start writing the codes on the
eventeventeventevent procedures procedures procedures procedures of the objects. Click on the form form form form object to write the following
code on Form_load ( ) Form_load ( ) Form_load ( ) Form_load ( ) event.The statements entered here will be executed when
you first run your program.Then enter the following code on
command_click()command_click()command_click()command_click()event by clicking on the command1commandbutton
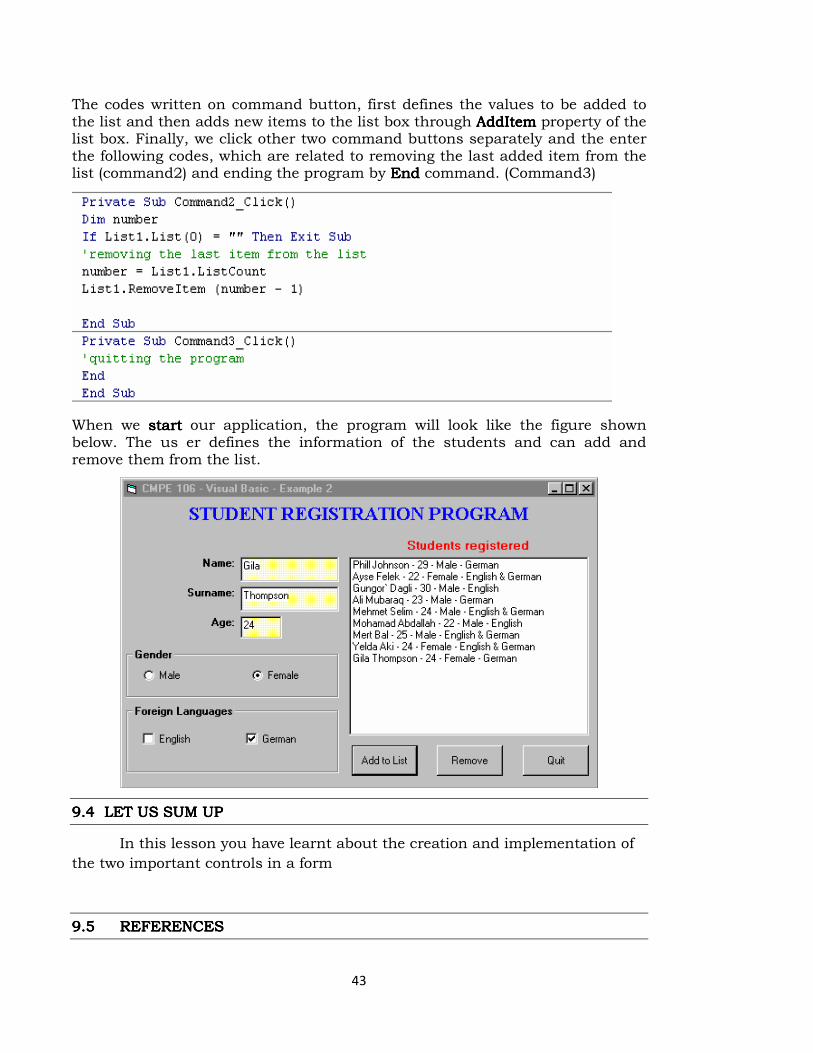
43
The codes written on command button, first defines the values to be added to the list and then adds new items to the list box through AddItem AddItem AddItem AddItem property of the list box. Finally, we click other two command buttons separately and the enter the following codes, which are related to removing the last added item from the list (command2) and ending the program by End End End End command. (Command3)
When we start start start start our application, the program will look like the figure shown below. The us er defines the information of the students and can add and remove them from the list.
9.9.9.9.4444 LET US SUM UPLET US SUM UPLET US SUM UPLET US SUM UP
In this lesson you have learnt about the creation and implementation of
the two important controls in a form
9.9.9.9.5555 REFERENCESREFERENCESREFERENCESREFERENCES
44
Gary CornellGary CornellGary CornellGary Cornell, “Visual Basic 6.0 from the Ground Up”. Tata McGraw Hill
Company,1999.
Content Development GroupContent Development GroupContent Development GroupContent Development Group “Visual Basic 6.0 Programming” Tata McGraw Hill
Company,Ninth Reprint,2007.
Noel JerkeNoel JerkeNoel JerkeNoel Jerke “The Complete Reference: Visual Basic 6.0”, Tata McGraw Hill
Company, 24th reprint, 2006.
LLLLESSON ESSON ESSON ESSON –––– 10101010
45
VARIABLES & OPERATORSVARIABLES & OPERATORSVARIABLES & OPERATORSVARIABLES & OPERATORS
ContentsContentsContentsContents
10.0 Aims & Objectives
10.1 Visual Basic variables & operators
10.1.1 Using variables to store information
10.1.2 The Anatomy of A Visual Basic Program Statement
10.1.3 Creating Variables
10.2 Using Functions
10.2.1 What is Function?
10.3 Using MsgBox
10.4 Using InputBox
10.5 Mathematical Function
10.6 Working with specified data types
10.6.1 Fine tuning variable size
10.6.2 User defined data types
10.6.3 Constants
10.7 VB operators
10.7.1 Basic arithmetic operators
10.7.2 Advanced operators
10.7.3 Operator precedence
10.8 Example
10.9 Let us Sum up
10.10 References
10.010.010.010.0 AIMS & OBJECTIVESAIMS & OBJECTIVESAIMS & OBJECTIVESAIMS & OBJECTIVES
In this lesson we are gong to learn about the visual basic variables and
operators.Also, declaration and its use in implementation.
10101010.1 .1 .1 .1 VISUAL BASIC VARIABLES AND VISUAL BASIC VARIABLES AND VISUAL BASIC VARIABLES AND VISUAL BASIC VARIABLES AND OPERATORSOPERATORSOPERATORSOPERATORS
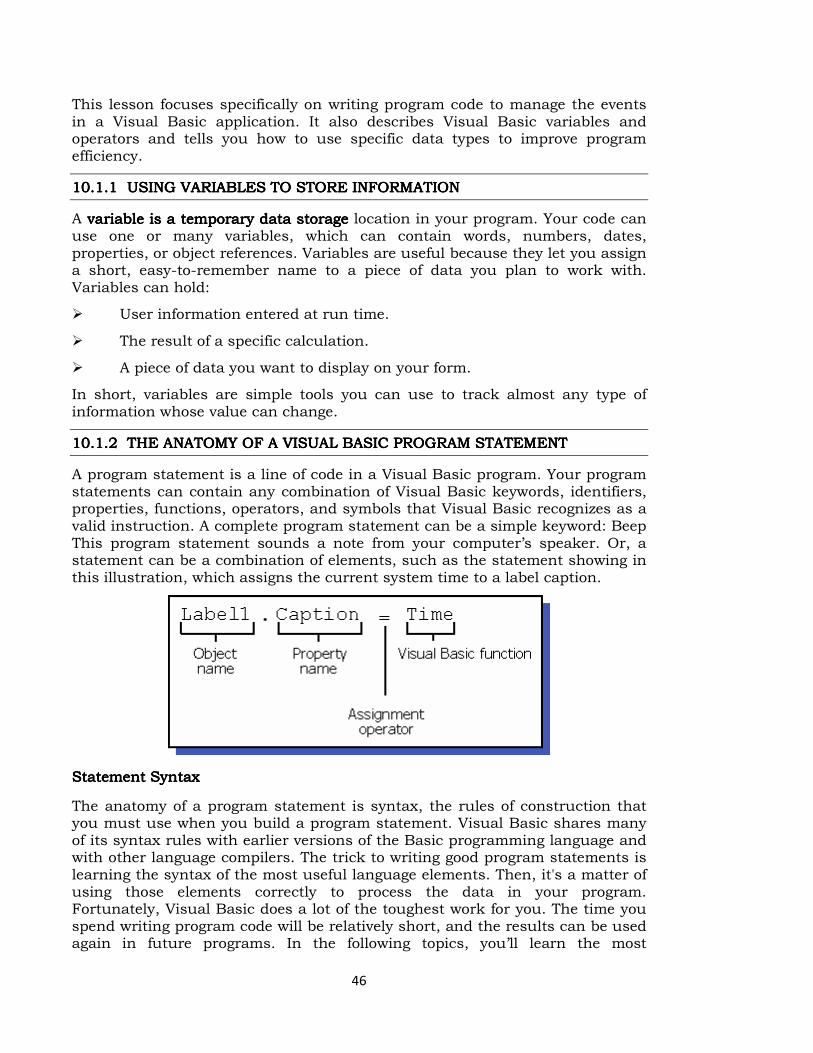
46
This lesson focuses specifically on writing program code to manage the events in a Visual Basic application. It also describes Visual Basic variables and operators and tells you how to use specific data types to improve program efficiency.
10101010.1..1..1..1.1111 USING VARIABLES TO STORE INFORMATIONUSING VARIABLES TO STORE INFORMATIONUSING VARIABLES TO STORE INFORMATIONUSING VARIABLES TO STORE INFORMATION
A variable is a temporary data storage variable is a temporary data storage variable is a temporary data storage variable is a temporary data storage location in your program. Your code can use one or many variables, which can contain words, numbers, dates, properties, or object references. Variables are useful because they let you assign a short, easy-to-remember name to a piece of data you plan to work with. Variables can hold:
� User information entered at run time.
� The result of a specific calculation.
� A piece of data you want to display on your form.
In short, variables are simple tools you can use to track almost any type of information whose value can change.
10101010.1..1..1..1.2 2 2 2 THE ANATOMY OF A VISUAL BASIC PROGRAM STATEMENTTHE ANATOMY OF A VISUAL BASIC PROGRAM STATEMENTTHE ANATOMY OF A VISUAL BASIC PROGRAM STATEMENTTHE ANATOMY OF A VISUAL BASIC PROGRAM STATEMENT
A program statement is a line of code in a Visual Basic program. Your program statements can contain any combination of Visual Basic keywords, identifiers, properties, functions, operators, and symbols that Visual Basic recognizes as a valid instruction. A complete program statement can be a simple keyword: Beep This program statement sounds a note from your computer’s speaker. Or, a statement can be a combination of elements, such as the statement showing in this illustration, which assigns the current system time to a label caption.
Statement SyntaxStatement SyntaxStatement SyntaxStatement Syntax
The anatomy of a program statement is syntax, the rules of construction that you must use when you build a program statement. Visual Basic shares many of its syntax rules with earlier versions of the Basic programming language and with other language compilers. The trick to writing good program statements is learning the syntax of the most useful language elements. Then, it's a matter of using those elements correctly to process the data in your program. Fortunately, Visual Basic does a lot of the toughest work for you. The time you spend writing program code will be relatively short, and the results can be used again in future programs. In the following topics, you’ll learn the most
47
important Visual Basic keywords and program statements. You’ll find that they complement the programming skills you’ve already learned rather nicely—and they can help you to write powerful programs in the future.
10101010.1..1..1..1.3 CREATING VARIABLES3 CREATING VARIABLES3 CREATING VARIABLES3 CREATING VARIABLES
Declaring a variable is the process of creating a variable in your Visual Basic program code. You can do this explicitly with the Dim Dim Dim Dim keyword or implicitly by typing a new variable name in a program statement.
This section includes the following topics:
� Explicit Declarations
� Implicit Declarations
Explicit DeclarationsExplicit DeclarationsExplicit DeclarationsExplicit Declarations
In Visual Basic, one of the ways to create a variable is to declare it explicitly. Typically, you declare a variable explicitly before you use the variable (usually at the beginning of an event procedure). You declare the variable by typing a Dim Dim Dim Dim (dimension) statement and the variable name. For example, the following statement creates space for a program variable named LastName: Dim LastName .Typing the statement reserves room for the variable in memory when the program runs, and lets Visual Basic know what type of data it should expect to see later.
Specifying the Variable Data Type Specifying the Variable Data Type Specifying the Variable Data Type Specifying the Variable Data Type
If you like, you can specify the variable data type after you type the variable name. (You’ll learn about several fundamental data types in Working with Specific Data Types.) With Visual Basic, you can identify the data type in advance, so you can control how much memory your program uses. For example, if the variable holds an integer (a small number without any decimal places), you can declare the variable as an integer and save some memory.
Default DatDefault DatDefault DatDefault Data Typea Typea Typea Type
By default, however, Visual Basic reserves space for a variable data type called a Variant Variant Variant Variant (a variable that can hold data of any size or format). This general-purpose data type is extremely flexible — in fact, it might be the only variable you use in your programs.
Assignment OperatorAssignment OperatorAssignment OperatorAssignment Operator
After you declare a variable, you are free to assign information to it in your code
by using the assignment operator (=). assignment operator (=). assignment operator (=). assignment operator (=). This statement assigns the name
“Jefferson” to the LastName variable:
LastName = "Jefferson"
After this assignment, you can substitute the LastName variable for the name
“Jefferson” in your code. For example, this assignment statement would display
Jefferson in the first label (Label1) on your form:
48
Label1.Caption = LastName
Implicit DeclarationsImplicit DeclarationsImplicit DeclarationsImplicit Declarations
You can also declare a variable without the Dim Dim Dim Dim statement; this process is called implicit declaration. To declare a variable implicitly, you simply use the variable on its own and skip the Dim Dim Dim Dim statement altogether. Here's an example:
LastName = "Charles V"
Advantages and DisadvantagesAdvantages and DisadvantagesAdvantages and DisadvantagesAdvantages and Disadvantages
In this course, you’ll see variables declared with both explicit and implicit techniques. Implicit declaration has the advantage of speed because you don’t spend time typing the Dim Dim Dim Dim statement. However "the management" often discourages it for several reasons. First, implicit declaration doesn’t force you to organize and list your variables in advance. Also, creating variables in this way prevents Visual Basic from displaying an error message if you mistype the variable name later.
Note:Note:Note:Note: If you decide to always declare your variables by using the Dim statement, you can ask Visual Basic to enforce your decision by setting the Require Require Require Require Variable Declaration Variable Declaration Variable Declaration Variable Declaration checkbox in the Options Options Options Options dialog box. When you set this option, Visual Basic generates an error message whenever it finds a variable that has not been explicitly declared in the code.
To require variable declarationTo require variable declarationTo require variable declarationTo require variable declaration
1. From the Tools Tools Tools Tools menu, click OptionsOptionsOptionsOptions.
2. Click the Editor Editor Editor Editor tab.
3. Select the Require Variable Declaration Require Variable Declaration Require Variable Declaration Require Variable Declaration check box.
To turn off this option, simply carry out these steps in reverse order.
Changing Variable ValuesChanging Variable ValuesChanging Variable ValuesChanging Variable Values
Variables can maintain the same value throughout a program; or, more likely, they can change values several times, depending on your needs. To view sample code that shows a variant variable named LastName can contain both text and a number, and how the variable can be assigned to object properties.
Dim LastName 'declare LastName variable
LastName = "Smart" 'store "Smart" in variable
Label1.Caption = LastName 'display "Smart" in Label1 object
LastName = 99 'now place 99 in variable
Label2.Caption = LastName 'display this value in Label2 object
10101010....2222 USING FUNCTIONSUSING FUNCTIONSUSING FUNCTIONSUSING FUNCTIONS
49
In this section, you learn how to use these three special Visual Basic keywords, called functions, in a program.
� The MsgBox MsgBox MsgBox MsgBox function, which displays output in a popup dialog box.
� The InputBox InputBox InputBox InputBox function, which prompts the user to supply input in a dialog box.
� Mathematical functions, with which Visual Basic calculates new values.
This section includes the following topics:
� What is a Function?
� Using the MsgBox Function
� Using the InputBox Function
� Demonstration: Using InputBox and MsgBox
� Mathematical Functions
10.10.10.10.2.12.12.12.1 WHAT IS A FUNCTION?WHAT IS A FUNCTION?WHAT IS A FUNCTION?WHAT IS A FUNCTION?
A Visual Basic function is a statement that performs meaningful work meaningful work meaningful work meaningful work (such as prompting the user for information) and returns a value to the program. The value that a Visual Basic function returns can be assigned to a variable, a property, another statement, or another function. A Visual Basic function is different from a Function procedure that you write yourself.
Visual Basic functions often include one or more arguments that define their activities. For example, the InputBox InputBox InputBox InputBox function uses the Prompt variable to display a dialog box with instructions for the user. When a function uses one or more arguments, they are separated by commasare separated by commasare separated by commasare separated by commas, and the whole group of arguments is enclosed in parentheses. The following statement shows a function call that has two arguments:
FullName = InputBox$(Prompt, Title)
The Prompt Prompt Prompt Prompt argument takes a string that displays a prompt for the user in the
Input Input Input Input box, and the Title Title Title Title argument takes a string that displays a title in the
input box title bar.
10.310.310.310.3 USING THE MSGBOX FUNCTIONUSING THE MSGBOX FUNCTIONUSING THE MSGBOX FUNCTIONUSING THE MSGBOX FUNCTION
MsgBox MsgBox MsgBox MsgBox is a useful dialog box function that displays output. Like InputInputInputInputBoxBoxBoxBox, MsgBox MsgBox MsgBox MsgBox takes one or more arguments as input, and you can assign the value returned (the results of the function call) to a variable. This is the syntax for MsgBoxMsgBoxMsgBoxMsgBox:
ButtonClicked = MsgBox(Message, NumberOfButtons, Title)
Where

50
� Message Message Message Message is the text to be displayed on the screen.
� NumberOfButtons NumberOfButtons NumberOfButtons NumberOfButtons is a button style number (0 through 5).
� Title Title Title Title is the text displayed in the message box title bar.
� ButtonClicked ButtonClicked ButtonClicked ButtonClicked is assigned the result returned by the function, which indicates which button in the dialog box the user clicked.
Note: Note: Note: Note: If you want to display only a message with MsgBoxMsgBoxMsgBoxMsgBox, the assignment operator (=), the
ButtonClicked variable, the NumberOfButtons argument, and the Title argument are optional items. For more information about these optional arguments (including the different buttons you can use in a message box), search for MsgBox function in the Visual Basic online Help.
MsgboxesMsgboxesMsgboxesMsgboxes
Message boxes are used when you want to ask the user a question or display an error message(s) and advise the user. There are six types of message boxes here are their functions and what they do. Here is the listing of all the possible msgbox events
The Buttons displayed in a The Buttons displayed in a The Buttons displayed in a The Buttons displayed in a
message heremessage heremessage heremessage here
Button Layout
Value Short Description
vbOKonly 0 Displays the OK button.
vbOKCancel 1 Displays the ok and cancel button.
vbAbortRetryIgnore 2 Displays the Abort , Retry , Ignore
vbYesNoCancel 3 Displays Yes , No and Cancel button
vbYesNo 4 Displays the Yes / No button
vbRetryCancel 5 Displays the retry and Cancel buttons.
The Icons displayed in the message box are here
Icon on
message Value Short Description
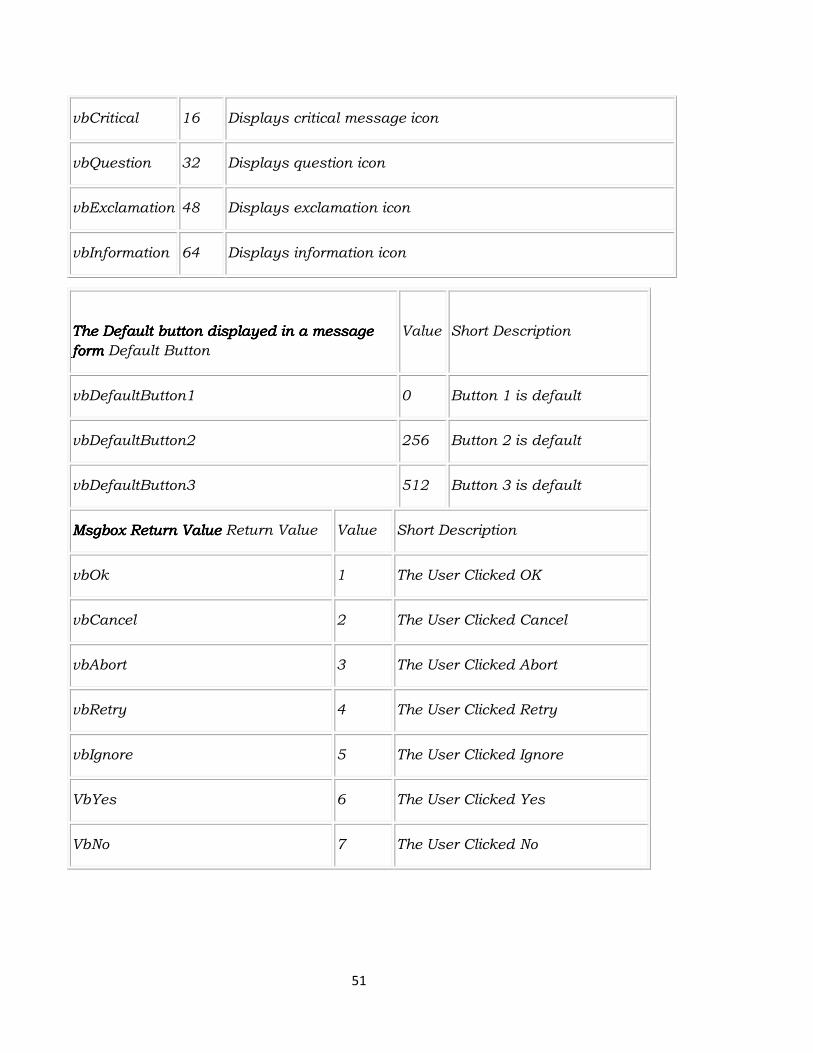
51
vbCritical 16 Displays critical message icon
vbQuestion 32 Displays question icon
vbExclamation 48 Displays exclamation icon
vbInformation 64 Displays information icon
The Default button displayed in a message The Default button displayed in a message The Default button displayed in a message The Default button displayed in a message
formformformform Default Button
Value Short Description
vbDefaultButton1 0 Button 1 is default
vbDefaultButton2 256 Button 2 is default
vbDefaultButton3 512 Button 3 is default
Msgbox Return Msgbox Return Msgbox Return Msgbox Return ValueValueValueValue Return Value Value Short Description
vbOk 1 The User Clicked OK
vbCancel 2 The User Clicked Cancel
vbAbort 3 The User Clicked Abort
vbRetry 4 The User Clicked Retry
vbIgnore 5 The User Clicked Ignore
VbYes 6 The User Clicked Yes
VbNo 7 The User Clicked No
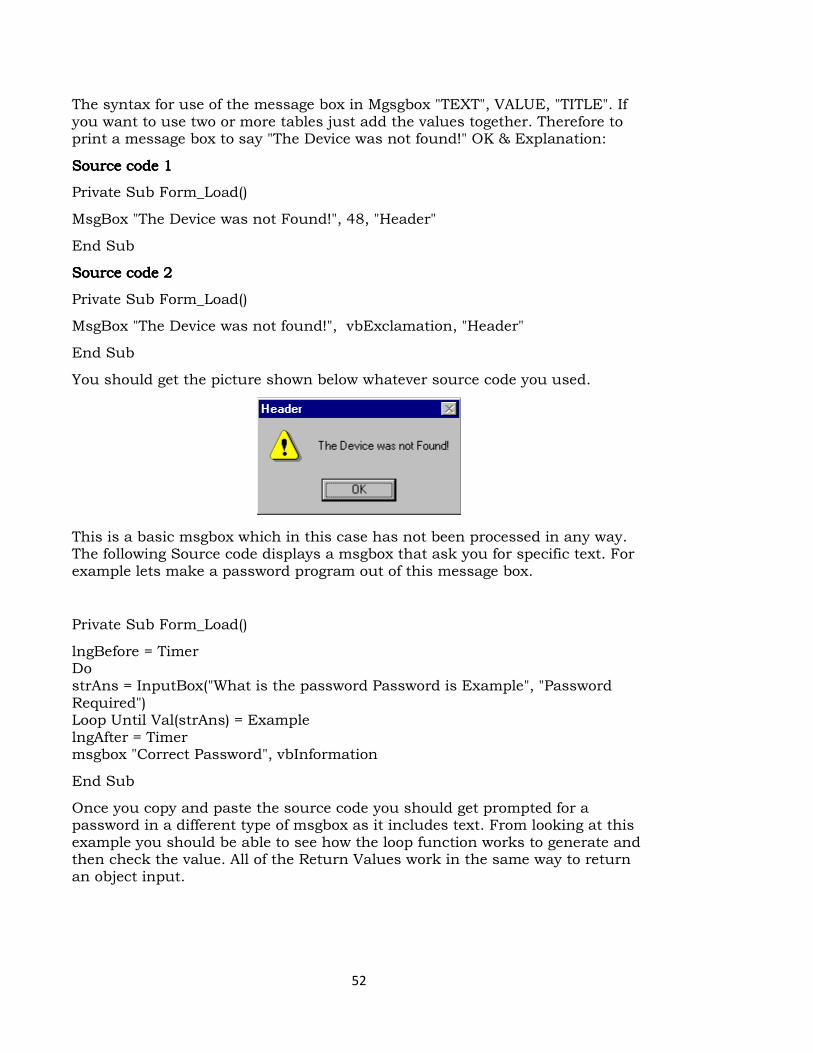
52
The syntax for use of the message box in Mgsgbox "TEXT", VALUE, "TITLE". If you want to use two or more tables just add the values together. Therefore to print a message box to say "The Device was not found!" OK & Explanation:
Source code 1 Source code 1 Source code 1 Source code 1
Private Sub Form_Load()
MsgBox "The Device was not Found!", 48, "Header"
End Sub
Source code 2 Source code 2 Source code 2 Source code 2
Private Sub Form_Load()
MsgBox "The Device was not found!", vbExclamation, "Header"
End Sub
You should get the picture shown below whatever source code you used.
This is a basic msgbox which in this case has not been processed in any way. The following Source code displays a msgbox that ask you for specific text. For example lets make a password program out of this message box.
Private Sub Form_Load()
lngBefore = Timer Do strAns = InputBox("What is the password Password is Example", "Password Required") Loop Until Val(strAns) = Example lngAfter = Timer msgbox "Correct Password", vbInformation
End Sub
Once you copy and paste the source code you should get prompted for a password in a different type of msgbox as it includes text. From looking at this example you should be able to see how the loop function works to generate and then check the value. All of the Return Values work in the same way to return an object input.
53
Opening & Opening & Opening & Opening & RetrievingRetrievingRetrievingRetrieving information from filesinformation from filesinformation from filesinformation from files
When applications are loaded they normal get some setting out of the registry or
file this section will show you how to retrieve 1 string out of a file.
Private Sub Form_Load()
Dim F As Integer, password As String F = FreeFile Open App.Path & "\password.txt" For Input As F Input #F, password Close #F End Sub
As you can see from this source code the password is previously declared as a string. After this is done be sure to close the file otherwise next time you want to store or read the file the computer will think it is being used by another application and windows will not let you do anything with it. So as you can see it is Very ImportantVery ImportantVery ImportantVery Important to close the file
Storing Information to a fileStoring Information to a fileStoring Information to a fileStoring Information to a file
FTP programs often store information to a file such as a username and
password or host information in the same way. This following example will put
some information into the file.
Private Sub Form_Load()
Dim F As Integer, pass As String F = FreeFile save = txtNew Open App.Path & "\password.txt" For Output As F Write #F, Text1.text Close #F
End Sub
Although this is a bit obvious I think I should include it just incase I think differently to other people.
Printing text to the printerPrinting text to the printerPrinting text to the printerPrinting text to the printer::::
This is rather easy to do and it gets used in notepad etc...
Private Sub Form_Load()
Printer.Print " The printer will print this text " Printer.Print "" Printer.Print " It will leave a line here" Printer.Print " It should add the contence of text1.text here : " & Text1.Text & " As you can see it works" Printer.Print "" Printer.EndDoc 'This will tell the printer it has finished.
End Sub

54
Everything that apears in position (A) will get printed by the default printer printer.print " A ". The printer enddoc is used to tell the printer the job is finished if this is not added the printer can not estimate how near it will be until it has finish and when it has finished it will think it has'nt so be sure to include this to prevent confusion.
10.10.10.10.4 4 4 4 USING THE INPUT BOX FUNCTIONUSING THE INPUT BOX FUNCTIONUSING THE INPUT BOX FUNCTIONUSING THE INPUT BOX FUNCTION
One excellent use excellent use excellent use excellent use for a variable is to hold user input user input user input user input information. Often, you can use an object such as a file list box or a text box to retrieve this information. At times, though, you’ll want to deal directly with the user and save the input in a variable rather than in a property. One way to do this is to use the Input BoxInput BoxInput BoxInput Box function to display a dialog box on the screen and then store in a variable the text that the user types.
Input BoxInput BoxInput BoxInput Box syntax looks like this:
VariableName = Input Box$(Prompt)
where
VariableName is a variable used to hold the input.
Prompt is a prompt that appears in the dialog box.
The dialog box created with an Input BoxInput BoxInput BoxInput Box function typically contains these
features:
� A prompt for directing the user.
� A text box for receiving typed input.
� Two command buttons OK OK OK OK and CancelCancelCancelCancel.
10.10.10.10.5 5 5 5 MATHEMATICAL FUNCTIONSMATHEMATICAL FUNCTIONSMATHEMATICAL FUNCTIONSMATHEMATICAL FUNCTIONS
Now and then, you might want to do a little number crunching in your programs. You may need to convert a value to a different type, calculate a complex mathematical expression, or introduce randomness to your programs. Visual Basic functions can help you work with numbers in your formulas. As with any function, mathematical functions appear in a program statement and return a value to the program. In the following table, the argument n represents the number, variable, or expression you want the function to evaluate.
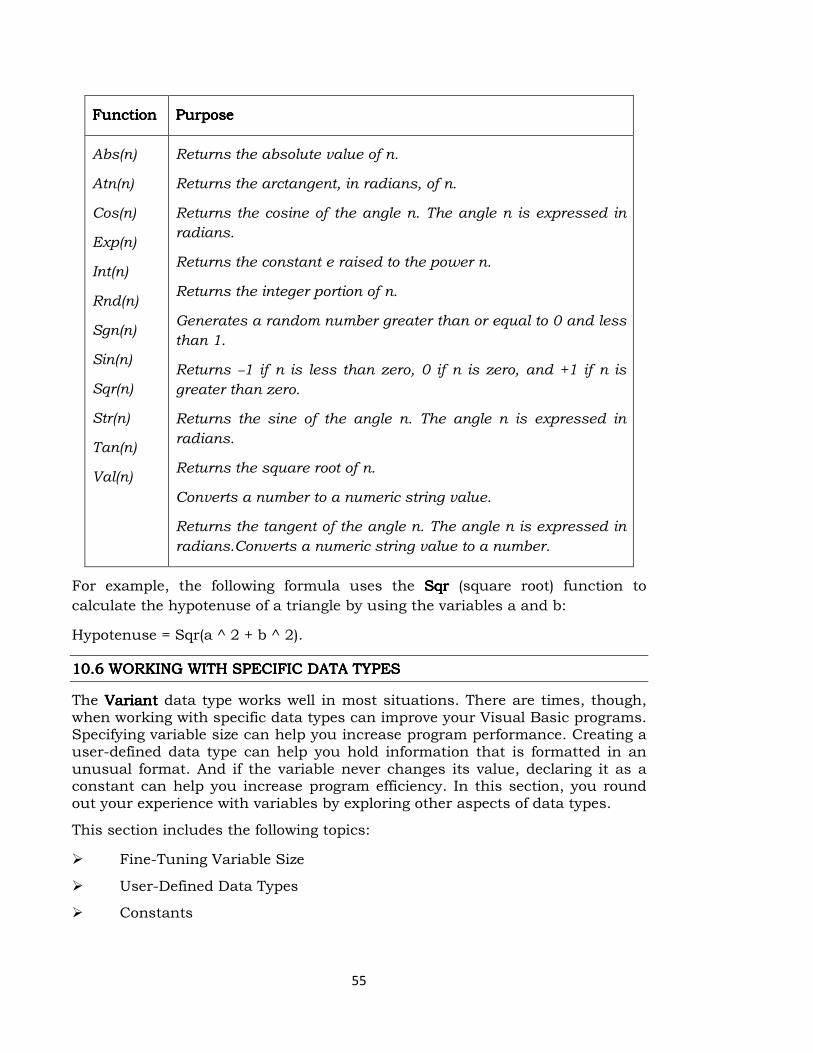
55
FunctionFunctionFunctionFunction PurposePurposePurposePurpose
Abs(n)
Atn(n)
Cos(n)
Exp(n)
Int(n)
Rnd(n)
Sgn(n)
Sin(n)
Sqr(n)
Str(n)
Tan(n)
Val(n)
Returns the absolute value of n.
Returns the arctangent, in radians, of n.
Returns the cosine of the angle n. The angle n is expressed in
radians.
Returns the constant e raised to the power n.
Returns the integer portion of n.
Generates a random number greater than or equal to 0 and less
than 1.
Returns −1 if n is less than zero, 0 if n is zero, and +1 if n is
greater than zero.
Returns the sine of the angle n. The angle n is expressed in
radians.
Returns the square root of n.
Converts a number to a numeric string value.
Returns the tangent of the angle n. The angle n is expressed in
radians.Converts a numeric string value to a number.
For example, the following formula uses the Sqr Sqr Sqr Sqr (square root) function to
calculate the hypotenuse of a triangle by using the variables a and b:
Hypotenuse = Sqr(a ^ 2 + b ^ 2).
10101010....6 6 6 6 WORKING WITH WORKING WITH WORKING WITH WORKING WITH SPECIFIC DATA TYPESSPECIFIC DATA TYPESSPECIFIC DATA TYPESSPECIFIC DATA TYPES
The Variant Variant Variant Variant data type works well in most situations. There are times, though, when working with specific data types can improve your Visual Basic programs. Specifying variable size can help you increase program performance. Creating a user-defined data type can help you hold information that is formatted in an unusual format. And if the variable never changes its value, declaring it as a constant can help you increase program efficiency. In this section, you round out your experience with variables by exploring other aspects of data types.
This section includes the following topics:
� Fine-Tuning Variable Size
� User-Defined Data Types
� Constants
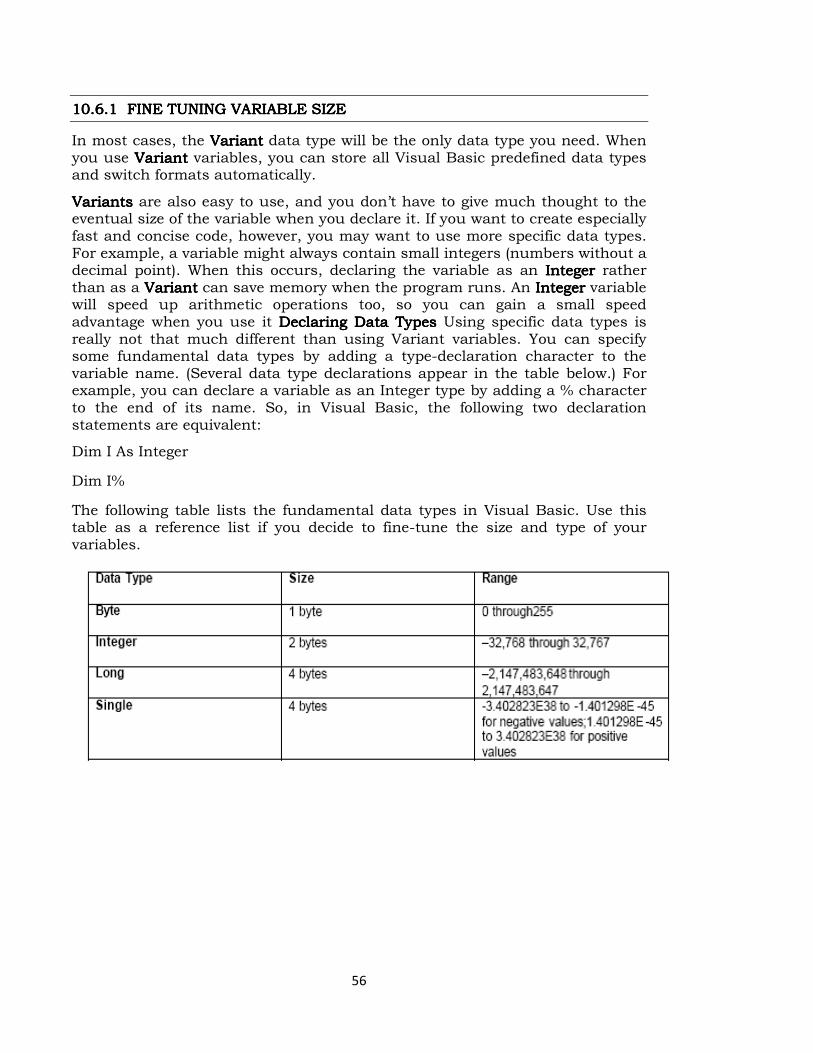
56
10101010....6666.1.1.1.1 FINE TUNING VARIABLE SIZEFINE TUNING VARIABLE SIZEFINE TUNING VARIABLE SIZEFINE TUNING VARIABLE SIZE
In most cases, the Variant Variant Variant Variant data type will be the only data type you need. When you use VariantVariantVariantVariant variables, you can store all Visual Basic predefined data types and switch formats automatically.
Variants Variants Variants Variants are also easy to use, and you don’t have to give much thought to the eventual size of the variable when you declare it. If you want to create especially fast and concise code, however, you may want to use more specific data types. For example, a variable might always contain small integers (numbers without a decimal point). When this occurs, declaring the variable as an Integer Integer Integer Integer rather than as a Variant Variant Variant Variant can save memory when the program runs. An Integer Integer Integer Integer variable will speed up arithmetic operations too, so you can gain a small speed advantage when you use it Declaring Data TypesDeclaring Data TypesDeclaring Data TypesDeclaring Data Types Using specific data types is really not that much different than using Variant variables. You can specify some fundamental data types by adding a type-declaration character to the variable name. (Several data type declarations appear in the table below.) For example, you can declare a variable as an Integer type by adding a % character to the end of its name. So, in Visual Basic, the following two declaration statements are equivalent:
Dim I As Integer
Dim I%
The following table lists the fundamental data types in Visual Basic. Use this table as a reference list if you decide to fine-tune the size and type of your variables.
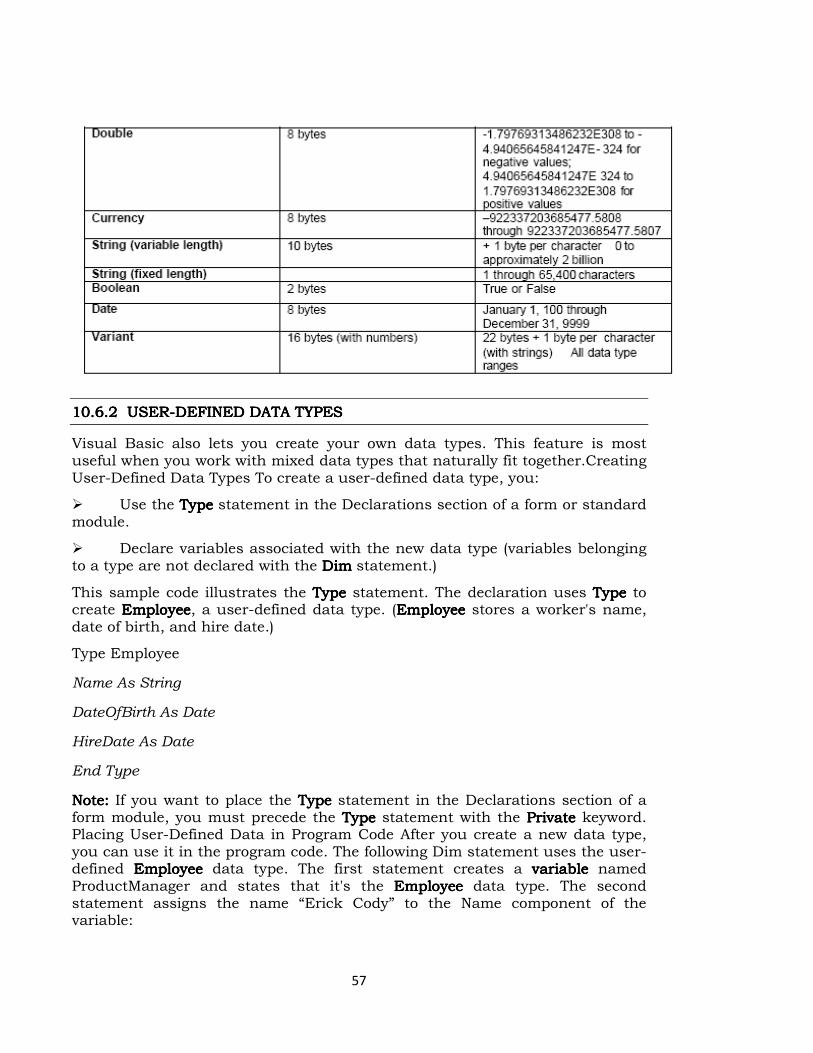
57
10101010....6666.2.2.2.2 USERUSERUSERUSER----DEFINED DATA TYPESDEFINED DATA TYPESDEFINED DATA TYPESDEFINED DATA TYPES
Visual Basic also lets you create your own data types. This feature is most useful when you work with mixed data types that naturally fit together.Creating User-Defined Data Types To create a user-defined data type, you:
� Use the Type Type Type Type statement in the Declarations section of a form or standard module.
� Declare variables associated with the new data type (variables belonging to a type are not declared with the Dim Dim Dim Dim statement.)
This sample code illustrates the Type Type Type Type statement. The declaration uses Type Type Type Type to create EmployeeEmployeeEmployeeEmployee, a user-defined data type. (Employee Employee Employee Employee stores a worker's name, date of birth, and hire date.)
Type Employee
Name As String
DateOfBirth As Date
HireDate As Date
End Type
Note:Note:Note:Note: If you want to place the Type Type Type Type statement in the Declarations section of a form module, you must precede the Type Type Type Type statement with the Private Private Private Private keyword. Placing User-Defined Data in Program Code After you create a new data type, you can use it in the program code. The following Dim statement uses the user-defined Employee Employee Employee Employee data type. The first statement creates a variable variable variable variable named ProductManager and states that it's the Employee Employee Employee Employee data type. The second statement assigns the name “Erick Cody” to the Name component of the variable:

58
Dim ProductManager As Employee
ProductManager.Name = "Erick Cody"
This looks a little like setting a property, doesn’t it? Visual Basic uses the same notation for the relationship between objects and properties as it uses for the relationship between user-defined data types and their component variables.
10101010....6666.3.3.3.3 CONSTANTSCONSTANTSCONSTANTSCONSTANTS
If a variable in your program contains a value that never changes, you should consider storing the value as a constant instead of as a variable. A constant is a meaningful name that takes the place of a number or text string that doesn’t change (such as c, a fixed mathematical quantity.)
Advantages of using constants include:
� Making program code more readable
� Saving memory
� Making program -wide changes easier to accomplish.
How Constants WorkHow Constants WorkHow Constants WorkHow Constants Work
Constants operate a lot like variables, but you can’t modify their values at run time. You declare (define) constants with the Const Const Const Const keyword, as shown in the following example:
Const Pi = 3.14159265
This statement creates a constant called Pi that you can use in place of the value of Pi cin the program code. To create a constant that's available to procedures throughout a program, use the Public Public Public Public keyword to create the constant in a standard module. For example:
Public Const Pi = 3.14159265
Displaying ConstantsDisplaying ConstantsDisplaying ConstantsDisplaying Constants
The following program statement shows how you can display the value
contained in the Pi constant with an object named Label1:
Label1.Caption = Pi
Constants are very useful in program code, especially when your program includes mathematical formulas, such as Area = πr2. The next section describes how you can use operators and variables to write mathematical formulas.
10101010....7777 USING VISUAL BASIC OPERATORSUSING VISUAL BASIC OPERATORSUSING VISUAL BASIC OPERATORSUSING VISUAL BASIC OPERATORS
Visual Basic contains several language elements designed for use in formulas (statements that use a combination of numbers, variables, operators, and keywords to create a new value). These language elements are mathematical operators, the symbols used to tie together the parts of a formula. With a few
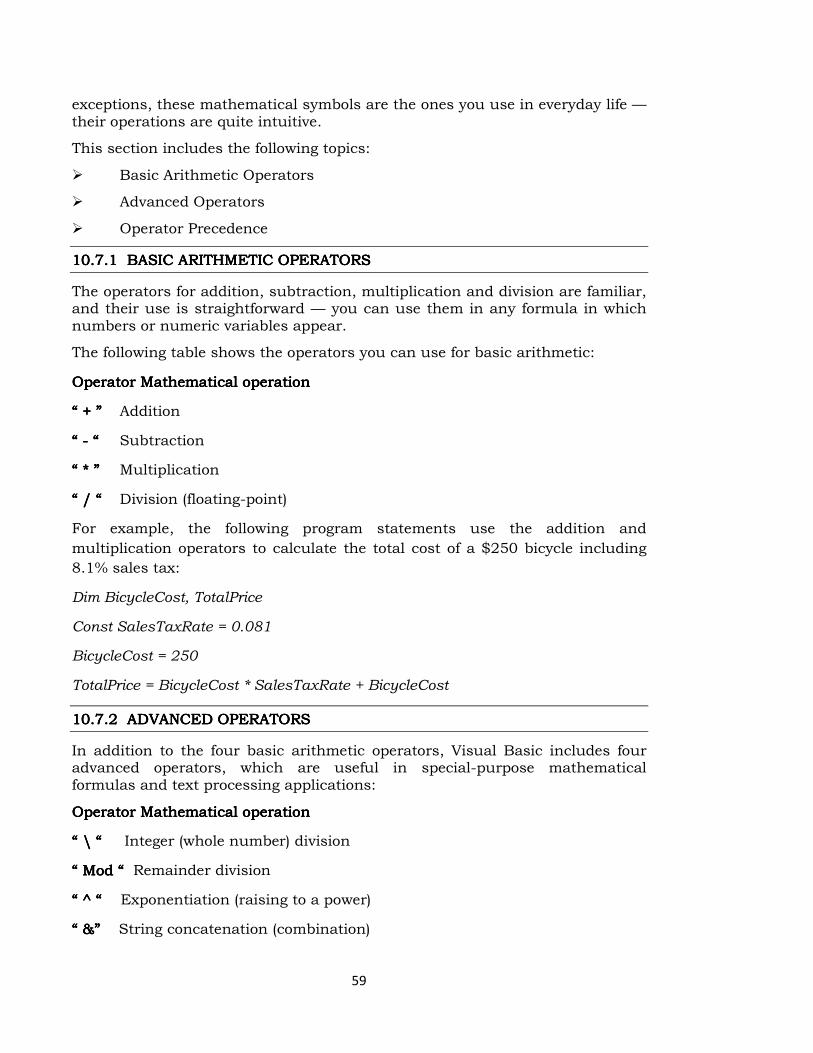
59
exceptions, these mathematical symbols are the ones you use in everyday life — their operations are quite intuitive.
This section includes the following topics:
� Basic Arithmetic Operators
� Advanced Operators
� Operator Precedence
10101010....7777.1.1.1.1 BASIC ARITHMETIC OPERATORSBASIC ARITHMETIC OPERATORSBASIC ARITHMETIC OPERATORSBASIC ARITHMETIC OPERATORS
The operators for addition, subtraction, multiplication and division are familiar, and their use is straightforward — you can use them in any formula in which numbers or numeric variables appear.
The following table shows the operators you can use for basic arithmetic:
Operator Mathematical operationOperator Mathematical operationOperator Mathematical operationOperator Mathematical operation
“ “ “ “ ++++ ”””” Addition
“ “ “ “ ---- ““““ Subtraction
“ “ “ “ **** ”””” Multiplication
“ “ “ “ //// ““““ Division (floating-point)
For example, the following program statements use the addition and
multiplication operators to calculate the total cost of a $250 bicycle including
8.1% sales tax:
Dim BicycleCost, TotalPrice
Const SalesTaxRate = 0.081
BicycleCost = 250
TotalPrice = BicycleCost * SalesTaxRate + BicycleCost
10101010....7.7.7.7.2222 ADVANCED OPERATORSADVANCED OPERATORSADVANCED OPERATORSADVANCED OPERATORS
In addition to the four basic arithmetic operators, Visual Basic includes four advanced operators, which are useful in special-purpose mathematical formulas and text processing applications:
Operator MathemaOperator MathemaOperator MathemaOperator Mathematical operationtical operationtical operationtical operation
“ “ “ “ \\\\ “ “ “ “ Integer (whole number) division
“ “ “ “ ModModModMod “ “ “ “ Remainder division
“ “ “ “ ^̂̂̂ ““““ Exponentiation (raising to a power)
“ “ “ “ &&&&” ” ” ” String concatenation (combination)
60
For example, the following program statement uses the Time Time Time Time and Date Date Date Date
functions and the string concatenation operator (&&&&) to build a sentence from
four string values:
Label1.Caption = "The current time Label1.Caption = "The current time Label1.Caption = "The current time Label1.Caption = "The current time is”is”is”is” & Time & & Time & & Time & & Time & “on“on“on“on " & Date" & Date" & Date" & Date
When you execute the program statement, the Label1 Label1 Label1 Label1 object displays output in
the following format:
The current time is 5:14:16 PM on 12/5/97
10101010....7.7.7.7.3333 OPERATOR PRECEDENCEOPERATOR PRECEDENCEOPERATOR PRECEDENCEOPERATOR PRECEDENCE
In the last few sections, you experimented with seven mathematical operators and one string operator. In Visual Basic, you can mix as many mathematical operators in a formula as you like—as long as an operator separates each numeric variable and expression. For example, this is an acceptable Visual Basic formula:
Total = 10 + 15 * 2 / 4 ^ 2
The formula processes several values and assigns the result to a variable named Total. But you're probably wondering how Visual Basic evaluates this expression. After all, there's no way to tell which mathematical operators Visual Basic uses first to solve the formula. In this example, the order of evaluation matters a great deal. Visual Basic solves this dilemma by using a specific order of precedence for mathematical operations. When Visual Basic evaluates an expression that contains more than one operator, the order of precedence supplies rules that determine which operators Visual Basic evaluates first.
The ruleThe ruleThe ruleThe rules can be summarized by these principles:s can be summarized by these principles:s can be summarized by these principles:s can be summarized by these principles:
� Use the operators in the order of precedence.
� For operators on the same precedence level, evaluate from left to right as they appear in an expression.
The following table lists mathematical operators in their order of precedence:
Order of precedence Symbols OperatorOrder of precedence Symbols OperatorOrder of precedence Symbols OperatorOrder of precedence Symbols Operator
1. ( ) The values between parentheses
2. ^ Exponentiation (raising a number to a power)
3. - Negation (creating a negative number)
4. * / Multiplication and division
5. \ Integer division
6. Mod Remainder division
7. + cc Addition and subtraction

61
8. String concatenation
Here's the formula you saw earlier:
Total = 10 + 15 * 2 / 4 ^ 2
Given the order of precedence, the expression would be evaluated by Visual Basic in the following steps. (Boldface type highlights what's happening in each step.)
Total = 10 + 15 * 2 / 4 ^ 2 4 ^ 2 4 ^ 2 4 ^ 2 Exponentiation
Total = 10 + 15 * 2 15 * 2 15 * 2 15 * 2 / 16 Multiplication
Total = 10 + 30 / 16 30 / 16 30 / 16 30 / 16 Division
Total = 10 + 1.875 10 + 1.875 10 + 1.875 10 + 1.875 Addition
Total = 11.875 11.875 11.875 11.875 Result
Using Parenthesis in a FormulaUsing Parenthesis in a FormulaUsing Parenthesis in a FormulaUsing Parenthesis in a Formula
You can use one or more pairs of parentheses in a formula to clarify the order of precedence. For example, here's how Visual Basic would calculate this simple formula:
Number = (8 - 5 * 3) ^ 2
Number = (-7) ^ 2
Number = 49
Visual Basic determines the expression between the parentheses (-7) before doing the exponentiation — even though exponentiation has a higher order of precedence than subtraction and multiplication.
You can further refine the calculation by placing nested parentheses in the formula. Here's the same formula with a new twist:
Number = ((8 - 5) * 3) ^ 2
Embedding (nesting) the second set of parentheses in the formula directs Visual
Basic to calculate the formula this way:
Number = ((8 - 5) * 3) ^ 2
Number = (3 * 3) ^ 2
Number = 9 ^ 2
Number = 81’
As you can see, the results produced by the two formulas are different: 49 in the first formula and 81 in the second. So, adding parentheses can change the result of a mathematical operation as well as make it easier to read.

62
10101010....8 8 8 8 EXAMPLE: SAVINGS ACCOUNTEXAMPLE: SAVINGS ACCOUNTEXAMPLE: SAVINGS ACCOUNTEXAMPLE: SAVINGS ACCOUNT
1. Start a new project. The idea of this project is to determine how much you save by making monthly deposits into a savings account. For those interested, the mathematical formula used is:
F = D [(1 + I) M - 1] / I
Where
F - Final amount
D - Monthly deposit amount
I - Monthly interest rate
M - Number of months
2. Place 4 label boxes, 4 text boxes, and 2 command buttons on the form. It
should look something like this:
3. Set the properties of the form and each object.
Form1:Form1:Form1:Form1:
BorderStyle 1-Fixed Single
Caption Savings Account
Name frmSavings
Label1:Label1:Label1:Label1:
Caption Monthly Deposit
Label2:Label2:Label2:Label2:

63
Caption Yearly Interest
Label3:Label3:Label3:Label3:
Caption Number of Months
Label4:Label4:Label4:Label4:
Caption Final Balance
Text1:Text1:Text1:Text1:
Text [Blank]
Name txtDeposit
Text2:Text2:Text2:Text2:
Text [Blank]
Name txtInterest
Text3:Text3:Text3:Text3:
Text [Blank]
Name txtMonths
Text4:Text4:Text4:Text4:
Text [Blank]
Name txtFinal
Command1: Command1: Command1: Command1: Caption &Calculate, Name cmdCalculate
Command2: Command2: Command2: Command2: Caption E&xit, Name cmdExit
Now, your form should look like this:
64
4. Declare four variables in the general declarations general declarations general declarations general declarations area of your form. This makes them available to all the form procedures:
Option ExplicitOption ExplicitOption ExplicitOption Explicit
Dim Dim Dim Dim Deposit As Single
Dim Dim Dim Dim Interest As Single
Dim Dim Dim Dim Months As Single
Dim Dim Dim Dim Final As Single
The Option Explicit Option Explicit Option Explicit Option Explicit statement forces us to declare all variables.
5. Attach code to the cmdCalculate cmdCalculate cmdCalculate cmdCalculate command button Click Click Click Click event.
Private Sub Private Sub Private Sub Private Sub cmdCalculate_Click ()
Dim Dim Dim Dim IntRate As Single
‘Read values from text boxes
Deposit = Val(txtDeposit.Text)
Interest = Val(txtInterest.Text)
IntRate = Interest / 1200
Months = Val(txtMonths.Text)
‘Compute final value and put in text box
Final = Deposit * ((1 + IntRate) ^ Months - 1) / IntRate
txtFinal.Text = Format(Final, "#####0.00")
End SubEnd SubEnd SubEnd Sub
This code reads the three input values (monthly deposit, interest rate, number of months) from the text boxes, computes the final balance using the provided formula, and puts that result in a text box.
6. Attach code to the cmdExit cmdExit cmdExit cmdExit command button Click Click Click Click event.
Private Sub cmdExit_Click ()Private Sub cmdExit_Click ()Private Sub cmdExit_Click ()Private Sub cmdExit_Click ()
EndEndEndEnd
End SubEnd SubEnd SubEnd Sub
7. Play with the program. Make sure it works properly. Save the project.
65
10.910.910.910.9 LET USLET USLET USLET US SUM UPSUM UPSUM UPSUM UP
In this lesson, we learnt about
• Visual Basic operators and its features.
• Creation and the use of MsgBox, InputBox
• Specialty of functions
• Use variables to store information in your program.
• Work with specific data types to streamline your calculations.
10.1010.1010.1010.10 REFERENCESREFERENCESREFERENCESREFERENCES
Gary CornellGary CornellGary CornellGary Cornell, “Visual Basic 6.0 from the Ground Up”. Tata McGraw Hill
Company, 1999.
Content Development GroupContent Development GroupContent Development GroupContent Development Group “Visual Basic 6.0 Programming” Tata McGraw Hill
Company, Ninth Reprint, 2007.Noel JerkeNoel JerkeNoel JerkeNoel Jerke “The Complete Reference: Visual
Basic 6.0”, Tata McGraw Hill Company, 24th reprint, 2006.
66
UUUUNIT NIT NIT NIT –––– IIIIIIIIIIII
LESSON LESSON LESSON LESSON –––– 11111111
CONTROLLING PROGRAM FLOWCONTROLLING PROGRAM FLOWCONTROLLING PROGRAM FLOWCONTROLLING PROGRAM FLOW
ContentsContentsContentsContents
11.0 Aims & Objectives
11.1 Event Driven Programming
11.2 Conditional Expressions
11.2.1 Comparison Operators
11.2.2: If – Then Decision Structures
11.3 Finding and Correcting the Errors
11.3.1 Three Types of Errors
11.3.2 Fixing Errors
11.4 Exercise 1: Password Validation
11.5 Exercise 2: International Welcome Program
11.6 Let us Sum up
11.7 References
11.0 11.0 11.0 11.0 AIMS & OBJECTIVESAIMS & OBJECTIVESAIMS & OBJECTIVESAIMS & OBJECTIVES
This lesson describes writing conditional expressions that control the flow of program code, and tracking down software defects with Visual Basic’s debugging tools. In this lesson, you will learn how to:
� Understand and use the principles of event-driven programming.
� Use conditional expressions, decision structures, and mathematical operators to control the order that your program executes commands.
� Find and correct errors in your programs.
11111111.1.1.1.1 EVENT DRIVEN PROGRAMMINGEVENT DRIVEN PROGRAMMINGEVENT DRIVEN PROGRAMMINGEVENT DRIVEN PROGRAMMING
So far, the programs you have written displayed menus, objects, and dialog
boxes on the screen and encouraged users to manipulate screen elements in
whatever order they saw fit. These programs put the user in charge, waited
patiently for a response, and then processed the input predictably. In
programming circles, this methodology is known as event-driven programming.
You build a program by creating a group of intelligent objects (objects that
know how to respond when the user interacts with them), and then you process
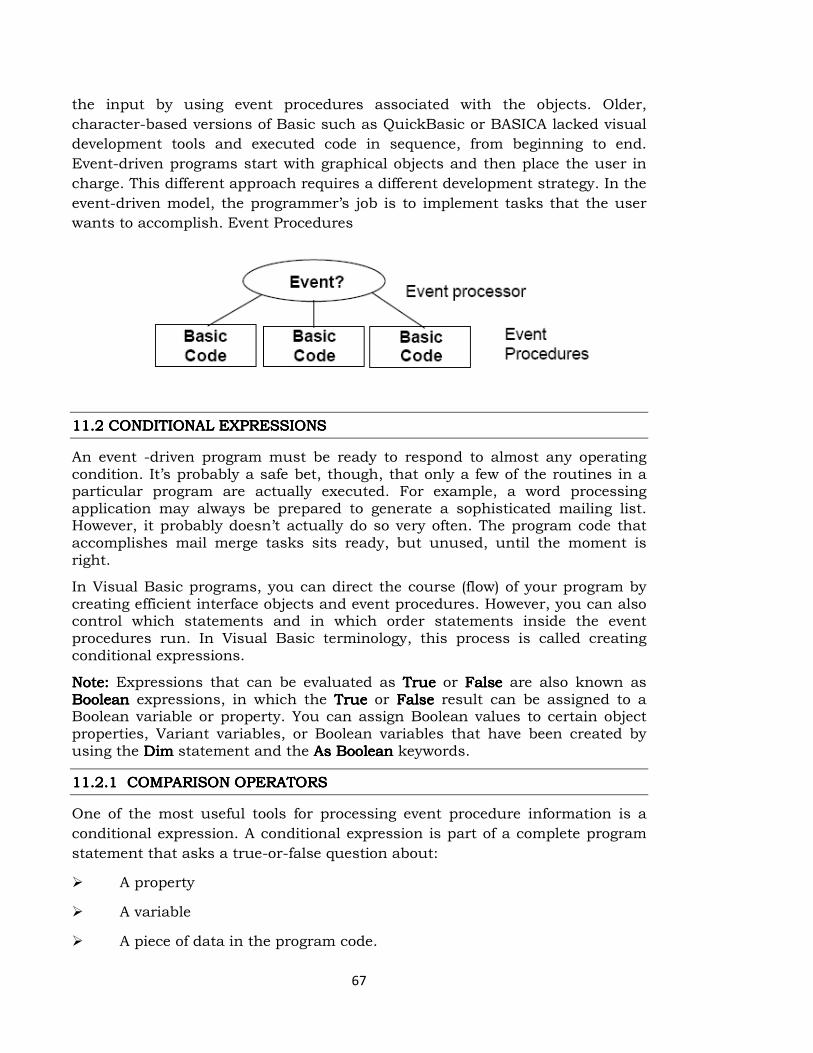
67
the input by using event procedures associated with the objects. Older,
character-based versions of Basic such as QuickBasic or BASICA lacked visual
development tools and executed code in sequence, from beginning to end.
Event-driven programs start with graphical objects and then place the user in
charge. This different approach requires a different development strategy. In the
event-driven model, the programmer’s job is to implement tasks that the user
wants to accomplish. Event Procedures
11111111.2.2.2.2 CONDITIONAL ECONDITIONAL ECONDITIONAL ECONDITIONAL EXPRESSIONSXPRESSIONSXPRESSIONSXPRESSIONS
An event -driven program must be ready to respond to almost any operating condition. It’s probably a safe bet, though, that only a few of the routines in a particular program are actually executed. For example, a word processing application may always be prepared to generate a sophisticated mailing list. However, it probably doesn’t actually do so very often. The program code that accomplishes mail merge tasks sits ready, but unused, until the moment is right.
In Visual Basic programs, you can direct the course (flow) of your program by creating efficient interface objects and event procedures. However, you can also control which statements and in which order statements inside the event procedures run. In Visual Basic terminology, this process is called creating conditional expressions.
Note:Note:Note:Note: Expressions that can be evaluated as True True True True or False False False False are also known as Boolean Boolean Boolean Boolean expressions, in which the True True True True or False False False False result can be assigned to a Boolean variable or property. You can assign Boolean values to certain object properties, Variant variables, or Boolean variables that have been created by using the Dim Dim Dim Dim statement and the As Boolean As Boolean As Boolean As Boolean keywords.
11.11.11.11.2.12.12.12.1 COMPARISON OPERATORSCOMPARISON OPERATORSCOMPARISON OPERATORSCOMPARISON OPERATORS
One of the most useful tools for processing event procedure information is a
conditional expression. A conditional expression is part of a complete program
statement that asks a true-or-false question about:
� A property
� A variable
� A piece of data in the program code.

68
At the heart of every conditional expression is a comparison operator that
creates a relationship between values. Here’s a simple conditional expression:
Price < 100. If the Price variable contains a value that is less than 100, the
expression evaluates to TrueTrueTrueTrue. If Price contains a value that is greater than or
equal to 100, it evaluates to FalseFalseFalseFalse. You can use the comparison operators in
this table to create conditional expressions:
Comparison Operator MeaningComparison Operator MeaningComparison Operator MeaningComparison Operator Meaning
“ “ “ “ = = = = “ “ “ “ Equal to
“ “ “ “ < >< >< >< > ““““ Not equal to
“ “ “ “ > > > > “ “ “ “ Greater than
“ “ “ “ < < < < ““““ Less than
“ “ “ “ > = > = > = > = ““““ Greater than or equal to
“ “ “ “ < = < = < = < = ““““ Less than or equal to
Conditional Expression ResultConditional Expression ResultConditional Expression ResultConditional Expression Result
10 < > 20 True True True True (10 is not equal to 20)
Score < 20 True True True True if Score is less than 20; otherwise, FalseFalseFalseFalse
Score = Label1.Caption True True True True if the Caption Caption Caption Caption property of the Label1 Label1 Label1 Label1 object
contains the
same value as the Score variable; otherwise, FalseFalseFalseFalse
Text1.Text = “Bill” True True True True if the word Bill is in the first text box; otherwise, FalseFalseFalseFalse
11111111.2.2.2.2.2.2.2.2 IF IF IF IF –––– THEN DECISION STRUCTURESTHEN DECISION STRUCTURESTHEN DECISION STRUCTURESTHEN DECISION STRUCTURES
When you use conditional expressions in a special block of statements known as a decision structure, you can control the order in which statements are executed. With an If...Then decision structure, your program can evaluate a condition in the program and take a course of action based on the result. In Visual Basic, your If...Then decision structures can work with single or multiple conditional statements.
SingleSingleSingleSingle----condition Structurescondition Structurescondition Structurescondition Structures
In its simplest form, an If...Then decision structure is written on a single line:
If condition Then statement
where:
condition is a conditional expression.
statement is a valid Visual Basic program statement.
69
For example, this is an If...Then decision structure that uses a simple
conditional expression:
If Score >= 20 Then Label1.Caption = "You win!"If Score >= 20 Then Label1.Caption = "You win!"If Score >= 20 Then Label1.Caption = "You win!"If Score >= 20 Then Label1.Caption = "You win!"
The decision structure uses the conditional expression, Score >= 20, to determine whether the program should set the Label1 Label1 Label1 Label1 caption to “You win!” If the Score variable contains a value greater than or equal to 20, Visual Basic sets the Caption Caption Caption Caption property. Otherwise, it skips the assignment statement and executes the next line in the event procedure. This sort of comparison always results in a result of TrueTrueTrueTrue or FalseFalseFalseFalse. A conditional expression never results in “Maybe.”
MultipleMultipleMultipleMultiple----condition Structurescondition Structurescondition Structurescondition Structures
Another Visual Basic If...Then decision structure supports several conditional
expressions. This decision structure is a block of statements that can be several
lines long — it contains these important keywords:
ElseIfElseIfElseIfElseIf, Else Else Else Else , and End IfEnd IfEnd IfEnd If.
If condition1 Then
statements executed if condition1 is True
ElseIf condition2 Then
statements executed if condition1 is False AND condition2 is True
[Additional ElseIf clauses and statements can be placed here]
Else
statements executed if none of the conditions is True
End If
In the decision structure, Visual Basic evaluates condition1 first. If this conditional expression is TrueTrueTrueTrue, the block of statements below it is executed one statement at a time. (You can include one or more program statements.) If the first condition is not TrueTrueTrueTrue, Visual Basic evaluates the second conditional expression (condition2). If the second condition is TrueTrueTrueTrue, the second block of statements is executed.
(You can add additional ElseIf ElseIf ElseIf ElseIf conditions and statements if you have more conditions to evaluate.) Finally, if none of the conditional expressions is TruTruTruTrue e e e , Visual Basic evaluates the statements below the Else Else Else Else keyword. The whole structure is closed at the bottom with the End If End If End If End If keywords. This code sample below shows how you could use a multiline If...Then structure to determine the amount of tax due on a hypothetical progressive tax return. In this decision structure, Visual Basic performs these steps:
If AdjustedIncome <= 24650 Then '15% tax bracket
TaxDue = AdjustedIncome * 0.15
70
ElseIf AdjustedIncome <= 59750 Then '28% tax bracket
TaxDue = 3697 + ((AdjustedIncome - 24650) * 0.28)
ElseIf AdjustedIncome <= 124650 Then '31% tax bracket
TaxDue = 13525 + ((AdjustedIncome - 59750) * 0.31)
ElseIf AdjustedIncome <= 271050 Then '36% tax bracket
TaxDue = 33644 + ((AdjustedIncome - 124650) * 0.36)
Else '39.6% tax bracket
TaxDue = 86348 + ((AdjustedIncome - 271050) * 0.396)
End If
� Tests the variable AdjustedIncome at the first income level.
� Continues to test subsequent income levels until one of the conditional
expressions evaluates to TrueTrueTrueTrue.
� Determines an income tax for the taxpayer.
This simple decision structure is quite useful. It could be used to compute the tax owed by any taxpayer in a progressive tax system, such as the one in the United States. (We’re assuming that the tax rates are complete and up to date and that the value in the AdjustedIncome variable is correct.) If the tax rates change, it’s a simple matter to update the conditional expressions.
Important! Important! Important! Important! The order of the conditional expressions in your If...Then and ElseIf clauses is critical. For example, reverse the order of the conditional expressions in the tax computation example. If you listed rates in the structure from highest to lowest, this is what happens:
� Taxpayers in the 15 percent, 28 percent, and 31 percent tax brackets would be placed in the 36 percent tax bracket. (That’s because they all would have an income that is less than or equal to 250,000.)
� Visual Basic would stop at the first conditional expression that is True True True True , even if the others are also True True True True . All of the conditional expressions in this example test the same variable, so they need to be listed in ascending order to get the taxpayers to fall out at the right spots. Moral: When you use more than one conditional expression, watch their order carefully.
Logical OperatorsLogical OperatorsLogical OperatorsLogical Operators
In Visual Basic, if you include more than one selection criterion in your decision structure, you can test more than one conditional expression in your If...Then and ElseIf decision structures. Visual Basic links the extra conditions by using one or more of the operators shown in this table:
Logical Operator MeaningLogical Operator MeaningLogical Operator MeaningLogical Operator Meaning
And And And And If both conditional expressions are True, then the result is True.

71
Or Or Or Or If either conditional expression is True, then the result is True.
Not Not Not Not If the conditional expression is False, then the result is True. If the conditional
expression is True, then the result is False.
Xor Xor Xor Xor If one and only one of the conditional expressions is True, then the result is True.
If both are True or both are False, then the result is False.
Note:Note:Note:Note: When expressions contain mixed operator types, your program evaluates
operators in this order:
� Mathematical operators.
� Comparison operators.
� Logical operators.
Logical Operators at WorkLogical Operators at WorkLogical Operators at WorkLogical Operators at Work
This table lists some examples of logical operators at work. In the expressions,
it is assumed that the variable Vehicle contains a value of “Bike” and that the
variable Price contains a value of 200.
Logical expression ResultLogical expression ResultLogical expression ResultLogical expression Result
Vehicle = “Bike” And Price < 300 True True True True (both expressions are TrueTrueTrueTrue)
Vehicle = “Car” Or Price < 500 True True True True (second condition is TrueTrueTrueTrue)
Not Price < 100 True True True True (condition is False False False False )
Vehicle = “Bike” Xor Price < 300 Vehicle = “Bike” Xor Price < 300 Vehicle = “Bike” Xor Price < 300 Vehicle = “Bike” Xor Price < 300 False (both conditions are (both conditions are (both conditions are (both conditions are True))))
11111111.2.3.2.3.2.3.2.3 Select Case Decision StructureSelect Case Decision StructureSelect Case Decision StructureSelect Case Decision Structure
In Visual Basic, Select Case decision structure is another way to control the
execution of statements in your programs. A Select Case structure is similar to
an If...Then structure. However, when the branching depends on one key
variable (test case), a Select Case decision structure is more efficient. This
efficiency can make your program code more readable and efficient. Creating
Select Case Structures A Select Case structure begins with the Select Case Select Case Select Case Select Case
keywords and ends with the End SelectEnd SelectEnd SelectEnd Select keywords.
This sample code below contains the syntax for a Select Case decision
structure.
Select Case variable
Case value1
statements executed if value1 matches variable
72
Case value2
statements executed if value2 matches variable
Case value3
statements executed if value3 matches variable
.
.
.
End Select
To create a Select Case decision structureTo create a Select Case decision structureTo create a Select Case decision structureTo create a Select Case decision structure
1. Replace variable with the variable, property, or other expression that is to be
the structure’s key value (test case).
2. Replace value1, value2, and value3 with numbers, strings, or other values
related to the test case.If one of the values matches the variable, the statements
below its Case clause are executed and Visual Basic continues executing
program code after the End Select End Select End Select End Select statement.
3. Include any number of Case clauses in a Select Case. If you list multiple
values after a case, separate them with commas.
This example shows how you could use a Select Case structure to print an
appropriate message about a person’s age in a program. If the Age variable
matches one of the Case values, an appropriate message is displayed by using a
label. See the code below.
Select Case Age
Case 16
Label1.Caption = "You can drive now!"
Case 18
Label1.Caption = "You can vote now!"
Case 21
Label1.Caption = "You can drink wine with your meals."
Case 65
Label1.Caption = "Time to retire and have fun!"
End Select
73
Using Using Using Using a Case Else Clausea Case Else Clausea Case Else Clausea Case Else Clause
A Select Case structure also supports a Case Else clause that displays a
message if none of the earlier cases matches. This program code, which works
with the Age example, illustrates the Case Else clause. See the example code
below.
Select Case Age
Case 16
Label1.Caption = "You can drive now!"
Case 18
Label1.Caption = "You can vote now!"
Case 21
Label1.Caption = "You can drink wine with your meals."
Case 65
Label1.Caption = "Time to retire and have fun!"
Case Else
Label1.Caption = "You're a great age! Enjoy it!"
End Select
Using the Ranges of Test Case ValuesUsing the Ranges of Test Case ValuesUsing the Ranges of Test Case ValuesUsing the Ranges of Test Case Values
Visual Basic lets you use comparison operators to include a range of test values in a Select Case structure. These are the Visual Basic comparison operators that you can use in your programs:
Comparison Operator MeaningComparison Operator MeaningComparison Operator MeaningComparison Operator Meaning
“ “ “ “ = = = = ““““ Equal to
“ “ “ “ < >< >< >< > ““““ Not equal to
“ “ “ “ > > > > ““““ Greater than
“ “ “ “ < < < < ““““ Less than
“ “ “ “ > = > = > = > = “ “ “ “ Greater than or equal to
“ “ “ “ < = < = < = < = ““““ Less than or equal to
The Is and To KeywordsThe Is and To KeywordsThe Is and To KeywordsThe Is and To Keywords
To use the comparison operators, you need to include the Is Is Is Is keyword or the To To To To keyword in the expression to identify the comparison you’re making. The Is Is Is Is

74
keyword instructs the compiler to compare the test variable to the expression listed after the Is Is Is Is keyword. The To To To To keyword identifies a range of values.
Example: Using Is and ToExample: Using Is and ToExample: Using Is and ToExample: Using Is and To
This sample code shows how the decision structure uses IsIsIsIs, ToToToTo, and several
comparison operators to test the Age variable and to display one of five
messages.
Select Case Age
Case Is < 13
Label1.Caption = "Enjoy your youth!"
Case 13 To 19
Label1.Caption = "Enjoy your teens!"
Case 21
Label1.Caption = "You can drink wine with your meals."
Case Is > 100
Label1.Caption = "Looking good!"
Case Else
Label1.Caption = "That's a nice age to be."
End Select
If the value of the Age variable is less than 13, the program displays the message, “Enjoy your youth!” For the ages 13 through 19, the program displays the message, “Enjoy your teens!” and so on.
11111111....3333 FINDING AND CORRECTING THE ERRORSFINDING AND CORRECTING THE ERRORSFINDING AND CORRECTING THE ERRORSFINDING AND CORRECTING THE ERRORS
So far, the errors you have encountered in your programs have probably been simple typing mistakes or syntax errors. But what if you discover a nastier problem in your program — one you can’t find and correct by a simple review of the objects, properties, and statements in your application? The Visual Basic development environment contains several tools you can use to track down and fix errors (bugs) in your programs. These tools won’t stop you from making mistakes, but they often can ease the pain when you encounter a mistake.
11111111.3.1.3.1.3.1.3.1 THREE TYPES OF ERRORSTHREE TYPES OF ERRORSTHREE TYPES OF ERRORSTHREE TYPES OF ERRORS
As you develop Visual Basic programs, three types of errors can produce unwanted results in your applications. These are described in the following topics:
75
� Logic errors
� Syntax errors
� Run-time errors
Logic ErrorsLogic ErrorsLogic ErrorsLogic Errors
A logic error is a human error — a programming mistake that makes the
program code produces the wrong results. Most debugging efforts focus on
tracking down programmer logic errors. Consider the following If...Then
decision structure, which evaluates two conditional expressions and then
displays one of two messages based on the result:
If Age > 13 And Age < 20 Then
Text2.Text = "You're a teenager."
Else
Text2.Text = "You're not a teenager."
End If
Can you spot the problem with this decision structure? A teenager is a person
who is between 13 and 19 years old, inclusive, yet the structure fails to identify
the person who is exactly 13. (For this age, the structure incorrectly displays
the message, “You’re not a teenager.”). This type of mistake is not a syntax error
(the statements follow the rules of Visual Basic); it is a mental mistake, or logic
error. The correct decision structure contains a greater than or equal to
operator (>=) in the first comparison after the If...Then If...Then If...Then If...Then statement:
If Age >= 13 And Age < 20 Then Believe it or not, this type of mistake is the
most common problem in Visual Basic programs. It's a matter of code that
works most of the time — but not all of the time — and it's the hardest problem
to track down and fix.
Syntax ErrorsSyntax ErrorsSyntax ErrorsSyntax Errors
A syntax error (compiler error) is a programming mistake that violates the rules
of Visual Basic, such as a misspelled property or keyword. As you type program
statements, Visual Basic points out several types of syntax errors — and you
won’t be able to run your program until you fix each one.
Runtime ErrorsRuntime ErrorsRuntime ErrorsRuntime Errors
A run-time error is any error — usually an outside event or an undiscovered
syntax error — that forces a program to stop running. Two examples of
conditions that can produce run-time errors are a misspelled file name in a
LoadPicture LoadPicture LoadPicture LoadPicture function and an open floppy drive.

76
11111111.3.2.3.2.3.2.3.2 FIXING ERRORSFIXING ERRORSFIXING ERRORSFIXING ERRORS
To fix a syntax error, edit the incorrect statement (identified by Visual Basic) in the Code window. To fix a logic or run-time error, use break mode or the Stop Stop Stop Stop statement to isolate the mistake.
� Using Break Mode
� Using the Stop Statement
Using Break ModeUsing Break ModeUsing Break ModeUsing Break Mode
One way to identify an error is to execute your program code one line at a time and examine the content of one or more variables or properties as it changes. To do this, you can enter break mode while your program runs and view your code in the Code window. Break mode gives you a close-up look at your program while the Visual Basic compiler runs it. It’s like pulling up a chair behind the pilot and copilot and watching them fly the airplane. But in this case, you can touch the controls. Visual Basic Resources for Debugging. While you debug your program, you may also want to open and use these Visual Basic resources:
Resource FunctionResource FunctionResource FunctionResource Function
Debug Debug Debug Debug toolbar Provides tools devoted entirely to tracking do when errors. Watches window Displays the contents of critical variables you’re interested in viewing. Immediate window Provides a place to enter program statements and see their effect immediately. This illustration below shows the Debug Debug Debug Debug toolbar, which you open by clicking Toolbars Toolbars Toolbars Toolbars in the ViewViewViewView menu, and then clicking DebugDebugDebugDebug.
Using the Stop StatementUsing the Stop StatementUsing the Stop StatementUsing the Stop Statement
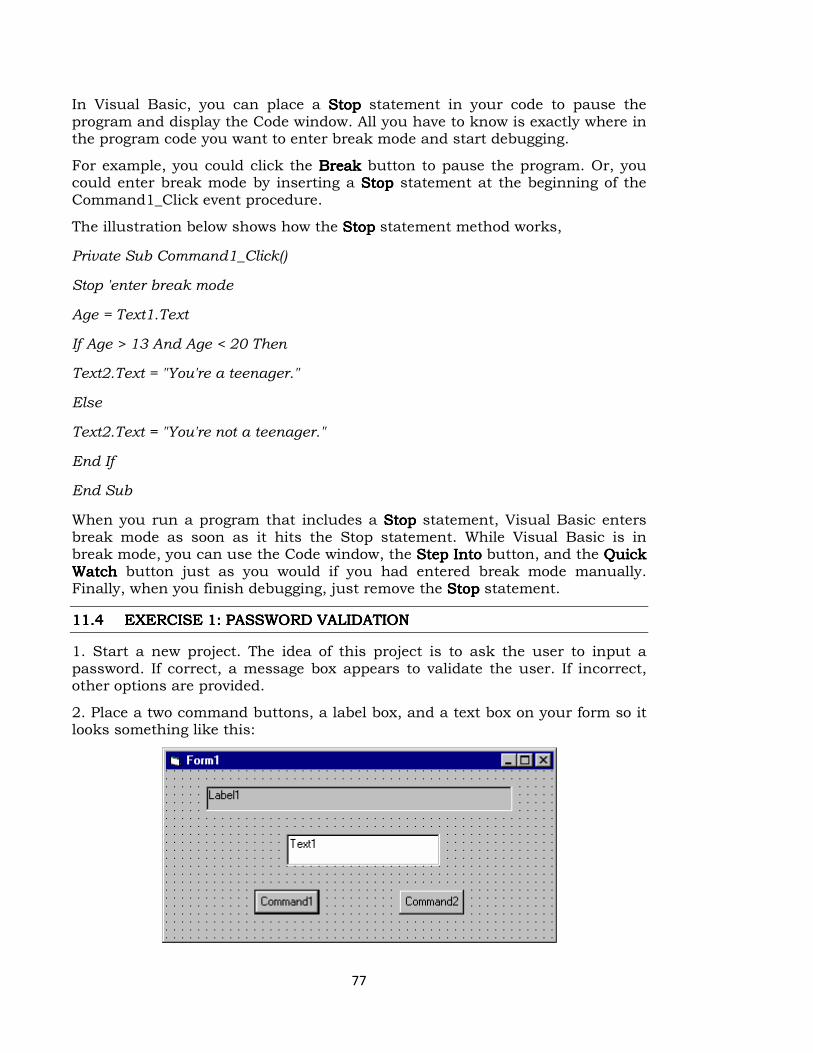
77
In Visual Basic, you can place a Stop Stop Stop Stop statement in your code to pause the program and display the Code window. All you have to know is exactly where in the program code you want to enter break mode and start debugging.
For example, you could click the Break Break Break Break button to pause the program. Or, you could enter break mode by inserting a Stop Stop Stop Stop statement at the beginning of the Command1_Click event procedure.
The illustration below shows how the Stop Stop Stop Stop statement method works,
Private Sub Command1_Click()
Stop 'enter break mode
Age = Text1.Text
If Age > 13 And Age < 20 Then
Text2.Text = "You're a teenager."
Else
Text2.Text = "You're not a teenager."
End If
End Sub
When you run a program that includes a Stop Stop Stop Stop statement, Visual Basic enters break mode as soon as it hits the Stop statement. While Visual Basic is in break mode, you can use the Code window, the StepStepStepStep Into Into Into Into button, and the Quick Quick Quick Quick Watch Watch Watch Watch button just as you would if you had entered break mode manually. Finally, when you finish debugging, just remove the Stop Stop Stop Stop statement.
11111111.4.4.4.4 EXERCISE 1: PASSWORD VALIDATIONEXERCISE 1: PASSWORD VALIDATIONEXERCISE 1: PASSWORD VALIDATIONEXERCISE 1: PASSWORD VALIDATION
1. Start a new project. The idea of this project is to ask the user to input a password. If correct, a message box appears to validate the user. If incorrect, other options are provided.
2. Place a two command buttons, a label box, and a text box on your form so it looks something like this:

78
3. Set the properties of the form and each object.
Form1:Form1:Form1:Form1:
BorderStyle 1-Fixed Single
Caption Password Validation
Name frmPassword
Label1:Label1:Label1:Label1:
Alignment 2-Center
BorderStyle 1-Fixed Single
Caption Please Enter Your Password:
FontSize 10
FontStyle Bold
Text1:Text1:Text1:Text1:
FontSize 14
FontStyle Regular
Name txtPassword
PasswordChar *
Tag [Whatever you choose as a password]
Text [Blank]
Command1:Command1:Command1:Command1:
Caption &Validate
Default True
Name cmdValid
Command2:Command2:Command2:Command2:
Cancel True
Caption E&xit
Name cmdExit
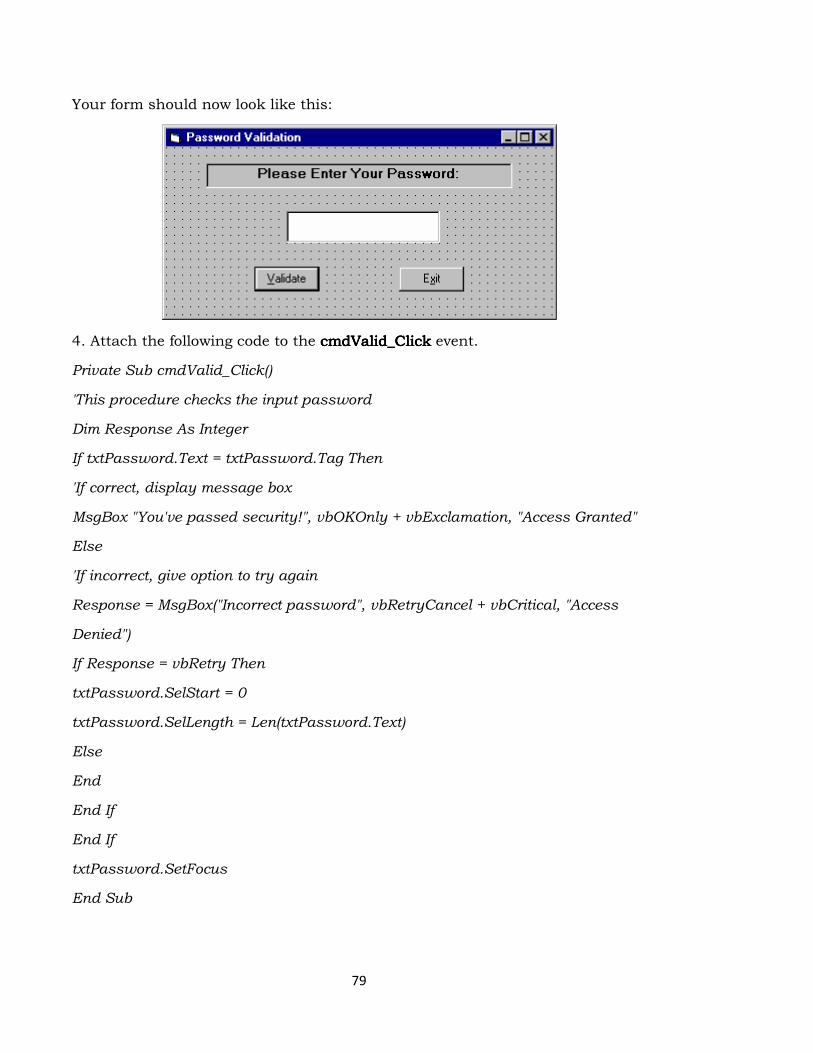
79
Your form should now look like this:
4. Attach the following code to the cmdValid_Click cmdValid_Click cmdValid_Click cmdValid_Click event.
Private Sub cmdValid_Click()
'This procedure checks the input password
Dim Response As Integer
If txtPassword.Text = txtPassword.Tag Then
'If correct, display message box
MsgBox "You've passed security!", vbOKOnly + vbExclamation, "Access Granted"
Else
'If incorrect, give option to try again
Response = MsgBox("Incorrect password", vbRetryCancel + vbCritical, "Access
Denied")
If Response = vbRetry Then
txtPassword.SelStart = 0
txtPassword.SelLength = Len(txtPassword.Text)
Else
End
End If
End If
txtPassword.SetFocus
End Sub
80
This code checks the input password to see if it matches the stored value. If so, it prints an acceptance message. If incorrect, it displays a message box to that effect and asks the user if they want to try again. If Yes (Retry), another try is granted. If No (Cancel), the program is ended. Notice the use of SelLength SelLength SelLength SelLength and SelStart SelStart SelStart SelStart to highlight an incorrect entry. This allows the user to type right over the incorrect response.
5. Attach the following code to the Form_Form_Form_Form_Activate Activate Activate Activate event.
Private Sub Form_Activate()Private Sub Form_Activate()Private Sub Form_Activate()Private Sub Form_Activate()
txtPassword.SetFocustxtPassword.SetFocustxtPassword.SetFocustxtPassword.SetFocus
End SubEnd SubEnd SubEnd Sub
6. Attach the following code to the cmdExit_ Click cmdExit_ Click cmdExit_ Click cmdExit_ Click event.
Private Sub cmdExit_Click()Private Sub cmdExit_Click()Private Sub cmdExit_Click()Private Sub cmdExit_Click()
EndEndEndEnd
End SubEnd SubEnd SubEnd Sub
7. Try running the program. Try both options: input correct password (note it is
case sensitive) and input incorrect password. Save your project. If you have
time, define a constant, TRYMAX = 3, and modify the code to allow the user to
have just TRYMAX attempts to get the correct password. After the final try,
inform the user you are logging him/her off. You’ll also need a variable that
counts the number of tries (make it a Static variable).
11.511.511.511.5 EXERCISE 2: INTERNATIONAL WELCOME PROGRAMEXERCISE 2: INTERNATIONAL WELCOME PROGRAMEXERCISE 2: INTERNATIONAL WELCOME PROGRAMEXERCISE 2: INTERNATIONAL WELCOME PROGRAM
1. Designing1. Designing1. Designing1. Designing the Formthe Formthe Formthe Form
In this exercise, you will open a new project and build a form containing four label objects, a list box object, and a command button. You’ll also set a few important properties.
To create objects on the formTo create objects on the formTo create objects on the formTo create objects on the form
1. Start Visual Basic and open a new, standard Visual Basic application.
2. In the toolbox, click LabelLabelLabelLabel, and then create a large box in the top middle of
the form to display a title for the program.
3. In the toolbox, click ListBoxListBoxListBoxListBox, and then create a list box on the left side of the
form.
4. Above the list box, create a small label. To display program output, create
two small labels on the right side of the screen.
5. In the toolbox, click CommandButtonCommandButtonCommandButtonCommandButton, and then create a small command
button in the bottom middle of the form.
81
6. Open the Properties window, and then set these object properties on the
form:
Object Property SeObject Property SeObject Property SeObject Property Settingttingttingtting
Label1 Caption Label1 Caption Label1 Caption Label1 Caption “International Welcome Program”
Font Font Font Font Times New Roman, Bold, 14-point
Label2 Caption Label2 Caption Label2 Caption Label2 Caption “Choose a country”
Label3 Caption Label3 Caption Label3 Caption Label3 Caption (Empty)
Label4 Caption Label4 Caption Label4 Caption Label4 Caption (Empty)
BorderStyle BorderStyle BorderStyle BorderStyle 1 - Fixed Single
ForeColor ForeColor ForeColor ForeColor Medium red (&H00000080&)
Command1Caption Command1Caption Command1Caption Command1Caption “Quit”
NoteNoteNoteNote:::: The word (Empty) in the table means remove all text from the indicated
property setting.
7. From the File File File File menu, click Save Project AsSave Project AsSave Project AsSave Project As, and then save your form and
project to disk under the name MyLab5. You will be prompted for two file
names — one for your form file (MyLab5.frm) and one for your project file
(MyLab5.vbp).
2. Using2. Using2. Using2. Using the Select Casethe Select Casethe Select Casethe Select Case
In this exercise, you:
� Write an event procedure that uses the Select Case decision structure to
process the items in the list box.
� Fill the list box by using the List1 object’s AddItem AddItem AddItem AddItem method in the
Form_Load event procedure.
To write the codeTo write the codeTo write the codeTo write the code
1. Double-click the form (not an object, but the form itself).
The Form_Load event procedure appears in the Code window.
2. To initialize the list box, type the following program code:
List1.AddItem "England"
List1.AddItem "Germany"
List1.AddItem "Spain"
List1.AddItem "Italy"

82
These lines of code use the AddItem AddItem AddItem AddItem method of the list box object to add entries to the list box on your form.
3. Open the Object Object Object Object drop-down list box, and then click the List1 List1 List1 List1 object in the list box. The List1_Click event procedure appears in the Code window.
4. To process the list box selection with Select Case, type these lines of program code:
Label3.Caption = List1.Text
Select Case List1.ListIndex
Case 0
Label4.Caption = "Hello, programmer"
Case 1
Label4.Caption = "Hallo, programmierer"
Case 2
Label4.Caption = "Hola, programador"
Case 3
Label4.Caption = "Ciao, programmatori"
End Select
The first statement in this block of code copies the name of the selected list box
item to the caption of the third label on the form. The most important property
used in the statement is List1.TextList1.TextList1.TextList1.Text, which contains the exact text of the item
selected in the list box. The remaining statements are part of the Select Case
decision structure. The structure uses the ListIndex ListIndex ListIndex ListIndex property of the list box
object as a test case variable and compares it to several values. The ListIndex ListIndex ListIndex ListIndex
property always contains the number of the item selected in the list box; the
item at the top is 0 (zero), the second item is 1, the third item is 2, and so on.
Using ListIndexListIndexListIndexListIndex, the Select Case structure can quickly identify the user’s choice
and display the correct greeting on the form.
5. Open the Object Object Object Object drop-down list box.
6. In the list box, click the Command1 Command1 Command1 Command1 object.
7. In the event procedure, type EndEndEndEnd, and then close the Code window.
8. To save your program to disk, click Save ProjectSave ProjectSave ProjectSave Project.
3. Testing3. Testing3. Testing3. Testing the Programthe Programthe Programthe Program
In this exercise, you run the program and verify that each message contains
accurate information. If it doesn’t, you use the debugging tools to find the
problem.

83
To test the programTo test the programTo test the programTo test the program
1. To run the program, click Start Start Start Start on the toolbar. Visual Basic loads the
program and displays your opening form.
2. Click each of the country names in the Choose Choose Choose Choose aaaa Country Country Country Country list box. The
program should display a greeting for each of the countries listed, and the
name of the country should appear above the greeting.
3. If you notice a bug in the program, or if you want to watch Visual Basic run
the program code. Click Break Break Break Break to enter break mode. Run the program one
statement at a time by displaying the Debug Debug Debug Debug toolbar and clicking StepStepStepStep Into Into Into Into
repeatedly.
4. When you’re finished testing the program, click Quit Quit Quit Quit to exit.
11.611.611.611.6 LET US SUM UPLET US SUM UPLET US SUM UPLET US SUM UP
In this lesson you learnt how to:
• Understand and use the principles of event-driven programming.
• Use conditional expressions, decision structures, and mathematical operators to control the order that your program executes commands.
• Find and correct errors in your programs.
11.711.711.711.7 REFERENCESREFERENCESREFERENCESREFERENCES
Gary CornellGary CornellGary CornellGary Cornell, “Visual Basic 6.0 from the Ground Up”. Tata McGraw Hill
Company, 1999.
Content Development GroupContent Development GroupContent Development GroupContent Development Group “Visual Basic 6.0 Programming” Tata McGraw Hill
Company, Ninth Reprint, 2007.
Noel JerkeNoel JerkeNoel JerkeNoel Jerke “The Complete Reference: Visual Basic 6.0”, Tata McGraw Hill
Company, 24th reprint, 2006.
84
LESSON LESSON LESSON LESSON -------- 12121212
USING LOOPS AND TIMERSUSING LOOPS AND TIMERSUSING LOOPS AND TIMERSUSING LOOPS AND TIMERS
12.0 Aims & Objectives
12.1 Writing For….Next Loops
12.1.1 Anatomy of A for…Next Loop
12.1.2 Using the Counter Variable in a Loop
12.1.3 Complex FOR…NEXT Loops
12.1.4 Using the EXIT FOR Statement
12.2 Writing Do Loops
12.2.1 Anatomy of a Do Loop
12.2.2 Avoiding an Endless Loop
12.2.3 Avoiding an Endless Loop
12.2.4 Using the Until Keyword
12.3 Built-in Functions
12.4 DateDiff Function
12.5 Format Function
12.6 Let us Sum up
12.7 References
12.0 12.0 12.0 12.0 AIMS & OBJECTIVESAIMS & OBJECTIVESAIMS & OBJECTIVESAIMS & OBJECTIVES
This Lesson describes how to write repeating statements (loops) in program code and how to use the Timer Timer Timer Timer control to create clocks and other time-related utilities. In this lesson, you will learn how to:
� Write the For…or…or…or…Next Loop Next Loop Next Loop Next Loop statement to run a block of code a set number of times.
� Write the Do… Loop Do… Loop Do… Loop Do… Loop statement to run a block of code until a specific condition.
� Use the Timer Timer Timer Timer control to create a digital clock and other special effects.
12121212.1.1.1.1 WRITING FOR….NEXT LOOPSWRITING FOR….NEXT LOOPSWRITING FOR….NEXT LOOPSWRITING FOR….NEXT LOOPS
With a For...Next For...Next For...Next For...Next loop, you can execute a specific group of program statements in an event procedure a specific number of times. This can be useful when you want to perform several related calculations, work with elements on the screen, or process several pieces of user input.
85
12121212.1.1.1.1.1.1.1.1 ANATOMY OF A FOR…NEXT LOOPANATOMY OF A FOR…NEXT LOOPANATOMY OF A FOR…NEXT LOOPANATOMY OF A FOR…NEXT LOOP
A For...Next For...Next For...Next For...Next loop is really just a shorthand way of writing out a long list of program statements. Since each group of statements in the list would do essentially the same thing, Visual Basic lets you define a group of statements and request that it be executed as many times as you want.
For...Next Loop Syntax
The syntax for a For...Next For...Next For...Next For...Next loop looks like this:
For variable = start To end
statements to be repeated
Next variable
In this syntax statement, ForForForFor, ToToToTo, and Next Next Next Next are required keywords, and the equal sign (====) is a required operator. First, you replace variable with the name of a numeric variable that keeps track of the current loop count. Next, you replace start and end with numeric values that represent the starting and stopping points for the loop. The line or lines between the For For For For and Next Next Next Next statements are the instructions that repeat each time the loop executes.
Making a BeeperMaking a BeeperMaking a BeeperMaking a Beeper
For example, the following For...Next For...Next For...Next For...Next loop sounds four beeps in rapid
succession from the computer’s speaker:
For i = 1 To 4
Beep
Next i
This loop is the functional equivalent of writing the Beep Beep Beep Beep statement four times
in a procedure. To the Visual Basic compiler, the loop looks like this:
Beep
Beep
Beep
Beep
The loop uses the variable i. By convention, i stands for the first integer counter in a For...Next For...Next For...Next For...Next loop.Each time Visual Basic executes the loop, the counter variable increases by one. (The first time through the loop, the variable contains a value of 1, the value of start. The last time through, the variable value is 4, the value of end.) As you’ll see in the following examples, you can use this counter variable in your loops to great advantage.

86
12121212.1.2.1.2.1.2.1.2 USING THE COUNTER VARIABLE IN A LOOPUSING THE COUNTER VARIABLE IN A LOOPUSING THE COUNTER VARIABLE IN A LOOPUSING THE COUNTER VARIABLE IN A LOOP
A counter variable is just like any other variable. You can assign counter variables to properties, use them in calculations, or display them in a program. One of the handiest techniques for displaying a counter variable is to use the Print Print Print Print method. This method displays output on a form or prints output with an attached printer. The Print Print Print Print method has the following syntax:
Print expression where expression is a variable, property, text value, or numeric
value in the procedure.
Print Method Counter Variable
For example, you could use the Print Print Print Print method in a For…Next For…Next For…Next For…Next loop to display
output on a form:
For i = 1 To 10
Print "Line"; i
Next i
The Print Print Print Print method displays the word Line, followed by the loop counter, 10 times on the form. The Print Print Print Print method uses these symbols to separate elements in an expression list:
Symbol BehaviorSymbol BehaviorSymbol BehaviorSymbol Behavior
comma (,,,,) Places the elements one tab field apart.
semicolon (;;;;) Places elements side by side. (Visual Basic displays the counter variable next to the string with no additional spaces in between.)
If you were to run this program, however, you would probably notice that there is a space between “Line” and the counter variable. That's because when the Print Print Print Print method prints numeric values, Visual Basic reserves a space for a minus sign, even if the minus sign isn’t needed.
Note: YouNote: YouNote: YouNote: You can use any combination of semicolons and commas to separate
expression list elements.
12121212.1.3.1.3.1.3.1.3 CHANGING PROPERTIES WITH A CHANGING PROPERTIES WITH A CHANGING PROPERTIES WITH A CHANGING PROPERTIES WITH A LOOPLOOPLOOPLOOP
In Visual Basic, you can use loops to change properties and update key
variables that:
� Open bitmaps with the Picture Picture Picture Picture property.
� Keep a running total with a variable.
� Change the text size on your form by updating the form's FontSize FontSize FontSize FontSize
property.
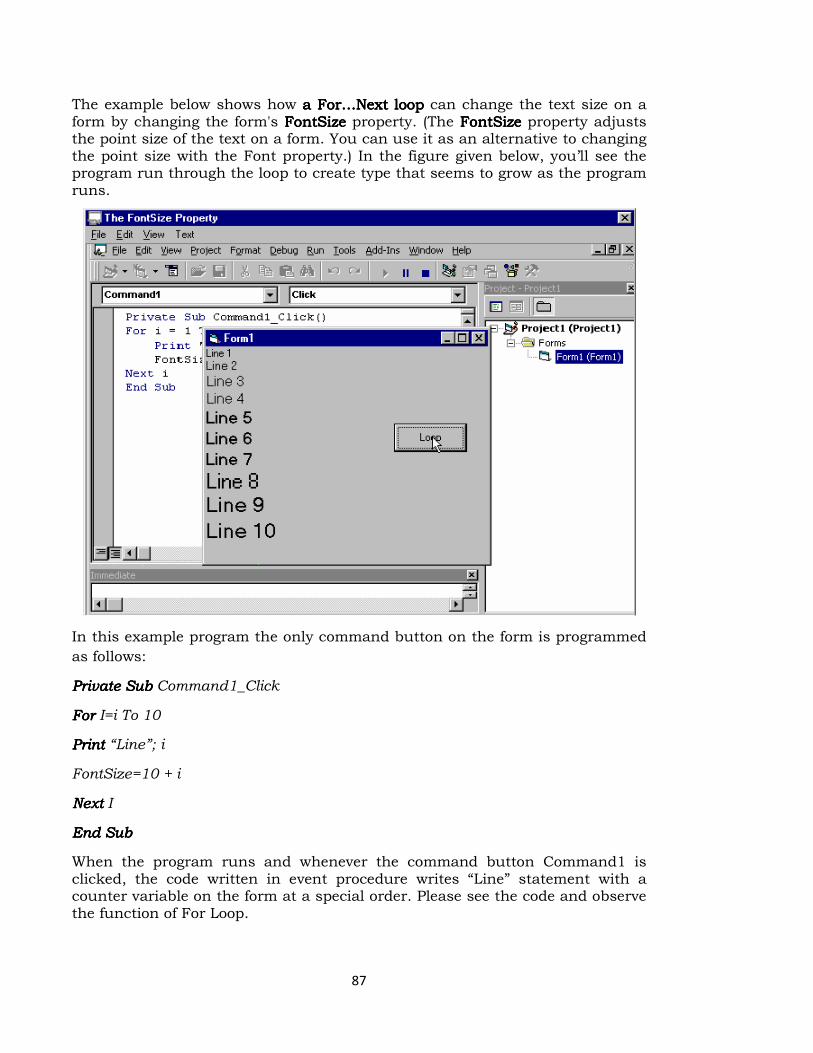
87
The example below shows how a For…Next loop a For…Next loop a For…Next loop a For…Next loop can change the text size on a form by changing the form's FontSize FontSize FontSize FontSize property. (The FontSize FontSize FontSize FontSize property adjusts the point size of the text on a form. You can use it as an alternative to changing the point size with the Font property.) In the figure given below, you’ll see the program run through the loop to create type that seems to grow as the program runs.
In this example program the only command button on the form is programmed
as follows:
Private Sub Private Sub Private Sub Private Sub Command1_Click
For For For For I=i To 10
Print Print Print Print “Line”; i
FontSize=10 + i
Next Next Next Next I
End SubEnd SubEnd SubEnd Sub
When the program runs and whenever the command button Command1 is clicked, the code written in event procedure writes “Line” statement with a counter variable on the form at a special order. Please see the code and observe the function of For Loop.
88
12121212.1.4.1.4.1.4.1.4 COMPLEX FOR…NEXT LOOPSCOMPLEX FOR…NEXT LOOPSCOMPLEX FOR…NEXT LOOPSCOMPLEX FOR…NEXT LOOPS
Using counter variables in a For...Next For...Next For...Next For...Next loop can be a powerful tool in your
programs. With a little imagination, you can use counter variables to create
several useful sequences of numbers in your loops.
Creating Loops with a Custom CounterCreating Loops with a Custom CounterCreating Loops with a Custom CounterCreating Loops with a Custom Counter
You can create a loop with a counter pattern other than 1, 2, 3, 4, and so on. First, you specify a different start value in the loop. Then, you use the Step Step Step Step keyword to increment the counter at different intervals. For example, this loop controls the print sequence of numbers on a form:
For i = 5 To 25 Step 5
Print i
Next i
The program prints this sequence of numbers:
5
10
15
20
25
Specifying Decimal ValuesSpecifying Decimal ValuesSpecifying Decimal ValuesSpecifying Decimal Values
You can also specify decimal values in a loop. For example, here's another
For...Next For...Next For...Next For...Next loop that controls the print sequence of numbers on a form:
For i = 1 To 2.5 Step 0.5
Print i
Next i
The program prints this sequence of numbers:
1
1.5
2
2.5
89
Nested For...Next LoopsNested For...Next LoopsNested For...Next LoopsNested For...Next Loops
You can also place one For…Next For…Next For…Next For…Next loop inside another to create really interesting effects. If you try this, be sure you use a different counter variable for each loop, such as i i i i for the first, and j j j j for the second.
12121212.1.5.1.5.1.5.1.5 USING THE EXIT FOR STATEMENTUSING THE EXIT FOR STATEMENTUSING THE EXIT FOR STATEMENTUSING THE EXIT FOR STATEMENT
Finally, you may wish to know how to leave a loop early if the need arises. In Visual Basic, you can use an Exit For Exit For Exit For Exit For statement to exit a For...Next For...Next For...Next For...Next loop before the loop has finished executing. With this capability, you can respond to specific events that occur before the loop runs the pres et number of times.
For example, in this For...Next For...Next For...Next For...Next loop, the loop prompts the user for 10 names
and prints them on the form, unless the user enters the word Done. (If the user
does enter Done, the program jumps to the first statement that follows the Next Next Next Next
statement):
For i = 1 To 10
InpName = InputBox("Type a name or Done to quit.")
If InpName = "Done" Then Exit For
Print InpName
Next i
As this example shows, you can use If statements with Exit For Exit For Exit For Exit For statements. You’ll find this combination useful for handling special cases that come up in a loop, and you'll probably use it often.
12121212....2222 WRITING DO LOOPSWRITING DO LOOPSWRITING DO LOOPSWRITING DO LOOPS
Do Do Do Do loops are valuable because occasionally you can’t know in advance how
many times a loop should repeat. As an alternative to a For...Next For...Next For...Next For...Next loop, you can
write a Do Do Do Do loop that executes statements until a certain condition in the loop is
true. For example, you might want to let the user enter names in a database
until the user types Done in an input box. In that case, you could use a Do Do Do Do loop
to cycle indefinitely until the user enters the text string, Done.
12121212....2222.1.1.1.1 ANATOMY OF A DO LOOPANATOMY OF A DO LOOPANATOMY OF A DO LOOPANATOMY OF A DO LOOP
A Do Do Do Do loop has several formats, which depend on where and how Visual Basic
evaluates the loop Condition .
A Standard Do LoopA Standard Do LoopA Standard Do LoopA Standard Do Loop
The most common Do Do Do Do loop syntax looks like this:
Do While condition
block of statements to be executed
90
Loop
For example, this Do Do Do Do loop consists of statements that process input until the
user enters the word Done:
Do While InpName <> "Done"
InpName = InputBox("Type a name or Done to quit.")
If InpName <> "Done" Then Print InpName
Loop
The conditional statement in this loop is InpName <> "Done". The Visual Basic compiler translates this statement to mean “loop as long as the InpName variable doesn’t contain the word "Done.”
NoteNoteNoteNote :::: This code brings up an interesting fact about Do Do Do Do loops: if the condition at the top of the loop is not True True True True when the Do Do Do Do statement is first evaluated, Visual Basic never executes the Do Do Do Do loop. Suppose that the InpName variable did contain the text string “Done” before the loop started (perhaps from an earlier assignment in the event procedure). Visual Basic would skip the loop altogether and continue with the line below the Loop Loop Loop Loop keyword. Also, note that this type of loop requires an extra If...Then If...Then If...Then If...Then structure to prevent the exit value from being displayed when the user types it. Conditional Test at the Bottom of the Loop If you want the loop to always run at least once in a program put the conditional test at the bottom of the loop. For example, this loop is essentially the same as the Do Do Do Do loop shown above, but the loop condition is tested after a name is received from the InputBox InputBox InputBox InputBox function:
Do
InpName = InputBox("Type a name or Done to quit.")
If InpName <> "Done" Then Print InpName
Loop While InpName <> "Done"
The advantage of this syntax is that you can update the InpName variable before the conditional test in the loop. This syntax prevents a preexisting “Done” value causing the loop to be skipped. Testing the loop condition at the bottom ensures that your loop will be executed at least once, but often, you’ll need to add a few extra statements to process the data.
12.12.12.12.2222.2.2.2.2 AVOIDING AN ENDLESS LOOPAVOIDING AN ENDLESS LOOPAVOIDING AN ENDLESS LOOPAVOIDING AN ENDLESS LOOP
Do Do Do Do loops are relentless, so it is very important that you design test conditions carefully. Each loop must have a True True True True exit point. If a loop test never evaluates to False False False False , the loop will execute endlessly, and your program will no longer respond to input.
91
Consider the following example:
Do
Number = InputBox("Enter number to square, or -1 to quit.")
Number = Number * Number
Print Number
Loop While Number >= 0
In this loop, the user enters number after number, and the program squares each number and prints it on the form. Unfortunately, when the user has had enough, he or she can’t quit because the advertised exit condition doesn’t work. When the user enters ----1111, the program squares it, and the Number variable is assigned the value 1. (You can fix this logic error by setting a different exit condition.) It's a good thing to watch for endless Do Do Do Do loops. Fortunately, faulty exit conditions are pretty easy to spot if you test your program thoroughly.
12.12.12.12.2222.3.3.3.3 USING THE UNTIL KEYWORDUSING THE UNTIL KEYWORDUSING THE UNTIL KEYWORDUSING THE UNTIL KEYWORD
So far, the Do Do Do Do loops you have seen use the While While While While keyword to execute statements as long as the loop condition remained TrueTrueTrueTrue. In Visual Basic, you can also use the Until Until Until Until keyword in Do Do Do Do loops to cycle until a certain condition is true.
Testing a ConditionTesting a ConditionTesting a ConditionTesting a Condition
To test a condition, you can use the Until Until Until Until keyword at the top or bottom of a Do Do Do Do loop, just as you use the While While While While keyword. For example, the following Do Do Do Do loop uses the Until Until Until Until keyword to loop repeatedly until the user enters the word Done in an input box:
Do
InpName = InputBox("Type a name or Done to quit.")
If InpName <> "Done" Then Print InpName
Loop Until InpName = "Done"
Test Condition OperatorsTest Condition OperatorsTest Condition OperatorsTest Condition Operators
As you can see, a loop that uses the Until Until Until Until keyword is very similar to a loop that uses the While keyword. In our example, the only difference is that the test condition usually contains the equal to operator (====) versus the not-equal-to operator (<>(<>(<>(<>). If using the Until Until Until Until keyword makes sense to you, feel free to use it with test conditions in your DoDoDoDo loops.
12.312.312.312.3 BuiltBuiltBuiltBuilt----in in in in FunctionsFunctionsFunctionsFunctions
Date and Time are internally stored as numbers in Visual Basic. The decimal points represents the time between 0:00:00 and 23:59:59 hours inclusive.

92
The system's current date and time can be retrieved using the Now, Date and Time functions in Visual Basic. The Now function retrieves the date and time, while Date function retrieves only date and Time function retrieves only the time.
To display both the date and time together a message box is displayed use the statement given below.
MsgBox "The current date and time of the system is" & Now
Here & is used as a concatenation operator to concentrate the string and the Now function. Selective portions of the date and time value can be extracted using the below listed functions.
FunctionFunctionFunctionFunction Extracted PortionExtracted PortionExtracted PortionExtracted Portion
Year ( ) Year (Now)
Month ( ) Month (Now)
Day ( ) Day (Now)
WeekDay ( ) WeekDay (Now)
Hour ( ) Hour (Now)
Minute ( ) Minute (Now)
Second ( ) Second (Now)
The calculation and conversion functions related to date and time functions are listed below.
FunctionFunctionFunctionFunction DescriptionDescriptionDescriptionDescription
DateAdd ( ) Returns a date to which a specific interval has been
added
DateDiff ( ) Returns a Long data type value specifying the

93
interval between the two values
DatePart ( ) Returns an Integer containing the specified part of a
given date
DateValue ( ) Converts a string to a Date
TimeValue ( ) Converts a string to a time
DateSerial ( ) Returns a date for specified year, month and day
11112.4 2.4 2.4 2.4 DateDiff FunctionDateDiff FunctionDateDiff FunctionDateDiff Function
The DateDiff function returns the intervals between two dates in terms of years, months or days. The syntax for this is given below.
DateDiff (interval, date1, date2[, firstdayofweek[, firstweekofyear]])
12.512.512.512.5 Format FunctionFormat FunctionFormat FunctionFormat Function
The format function accepts a numeric value and converts it to a string in the format specified by the format argument. The syntax for this is given below.
Format (expression[, format[, firstdayofweek[, firstweekofyear]]])
The Format function syntax has these parts:
PartPartPartPart DescriptionDescriptionDescriptionDescription
Expression Required any valid expression
format Optional. A valid named or user-defined format
expression.
firstdayofweek Optional. A contant that specifies the first day of
the week.
firstweekofyear Optional. A contant that specifies the first week of
the year
94
12.6 12.6 12.6 12.6 LET US SUM UPLET US SUM UPLET US SUM UPLET US SUM UP
In this lesson we have learnt how to
• Write the ForForForFor…Next Loop Next Loop Next Loop Next Loop statement to run a block of code a set number of times.
• Write the Do… Loop Do… Loop Do… Loop Do… Loop statement to run a block of code until a specific condition.
• Use the Timer Timer Timer Timer control to create a digital clock and other special effects.
12.7 12.7 12.7 12.7 REFERENCESREFERENCESREFERENCESREFERENCES
Gary CornellGary CornellGary CornellGary Cornell, “Visual Basic 6.0 from the Ground Up”. Tata McGraw Hill
Company,1999.
Content DevelopmentContent DevelopmentContent DevelopmentContent Development GroupGroupGroupGroup “Visual Basic 6.0 Programming” Tata McGraw Hill
Company,Ninth Reprint,2007.
Noel JerkeNoel JerkeNoel JerkeNoel Jerke “The Complete Reference: Visual Basic 6.0”, Tata McGraw Hill
Company, 24th reprint, 2006.
95
LESLESLESLESSSSSON ON ON ON –––– 13131313
CONTROL ARRAYS IN VISUAL BASICCONTROL ARRAYS IN VISUAL BASICCONTROL ARRAYS IN VISUAL BASICCONTROL ARRAYS IN VISUAL BASIC
ContentsContentsContentsContents
13.0 Aims & Objectives
13.1 Introduction to Arrays
13.1.1 Fixed-Size Arrays
13.1.2 Multidimensional Arrays
13.1.3 Dynamic Arrays
13.2 Control Array
13.2.1 Creating a Control Array at Design Time
13.3 Let us Sum up
13.4 References
13.0 AIMS & 13.0 AIMS & 13.0 AIMS & 13.0 AIMS & OBJECTIVESOBJECTIVESOBJECTIVESOBJECTIVES
This lesson teaches you about the important concept how to handle
arrays in Visual Basic.Visual Basic.Visual Basic.Visual Basic.
13.113.113.113.1 INTRODUCTION TO ARRAYSINTRODUCTION TO ARRAYSINTRODUCTION TO ARRAYSINTRODUCTION TO ARRAYS
Visual Basic uses variables for storing values. However the disadvantage with variable is that it can hold only a single value. When you assign another value the previous value is lost. Sometimes there may be a requirement to retain and store multiple values. Let us consider the case where we require to store the marks of all students in class where the class strength is 60. One alternative that we have is to think of 60 different variable names and to store values in them. However this is not an easy proposition, as it will become difficult to remember and manage 60 variables. The other solution to this problem is to have a special variable, which can hold 60 different values; This special variable is an array. The values, which are stored in an array, are called elements of the array. The array elements are identified by a common name followed by a subscript in brackets. The first element in the array the default subscript is o the second element 1 so on; hence the subscript for the last element will be size-1. You should declare an array before you use. Declaration involves specifying the data type and the size of the array i.e. the maximum number of elements that you want to store in the array.
An array is a contiguous area in the memory, referred to by a common name. It is a series of variables having the same data type. Each element of an array has a unique identifying index number by which it can be referenced. Changes made to one element of an array do not affect other elements.Arrays should be defined before being used in a program. The definition of the array specifies the array’s name and the number of elements it can hold.

96
For exampleFor exampleFor exampleFor example
Dim Icounts (14) As Integer : Defines an array Icounts that can store a maximum of 15 integers, with index numbers running from 0 t014.
The array in the above case can also be defined as: 3333
Dim Icounts (0 To 14) As Integer
These values 0 and 14 are referred to as lower bound and upper bound, respectively. The Lbound and Ubound are in-built functions which return the lower and upper bounds of an array.
For example,For example,For example,For example,
Dim Ival (20) As Integer
Dim Retval1 As, Integer
Dim Retval2 As Integer
Retval1 = Ubound (Ival)
Retval2 = Lbound (lval)
Print Retval1
Print Retval2
In this case, the variables Retval1 and Retval2 will contain 20 and 0, respectively. The behavior of array subscripting can be changed by using the Option Base statement. The statement Option Base 1 in the declarations section of a module causes all arrays in that module to begin with index number 1 instead of 0. Visual Basic allows you to change the lower and upper bounds at the time of definition.
For exampleFor exampleFor exampleFor example,
Dim Icounts (20 To 34) As Integer.The lower bound in this case is 20, while the upper bound is 34. Arrays are of three types:
� Fixed-size
� Multidimensional
� Dynamic
13.1.113.1.113.1.113.1.1 FIXEDFIXEDFIXEDFIXED----SIZE ARRAYSSIZE ARRAYSSIZE ARRAYSSIZE ARRAYS
A fixed-size array always has the same size. Declaring a fixed-size array, depends on the scope of the array.
� To create a public array, use the Public statement in the declarations section of a module.
� To create a module-level array, use the Private statement in the Declarations section of a module.
� To create a local array, use the Private statement in a procedure.
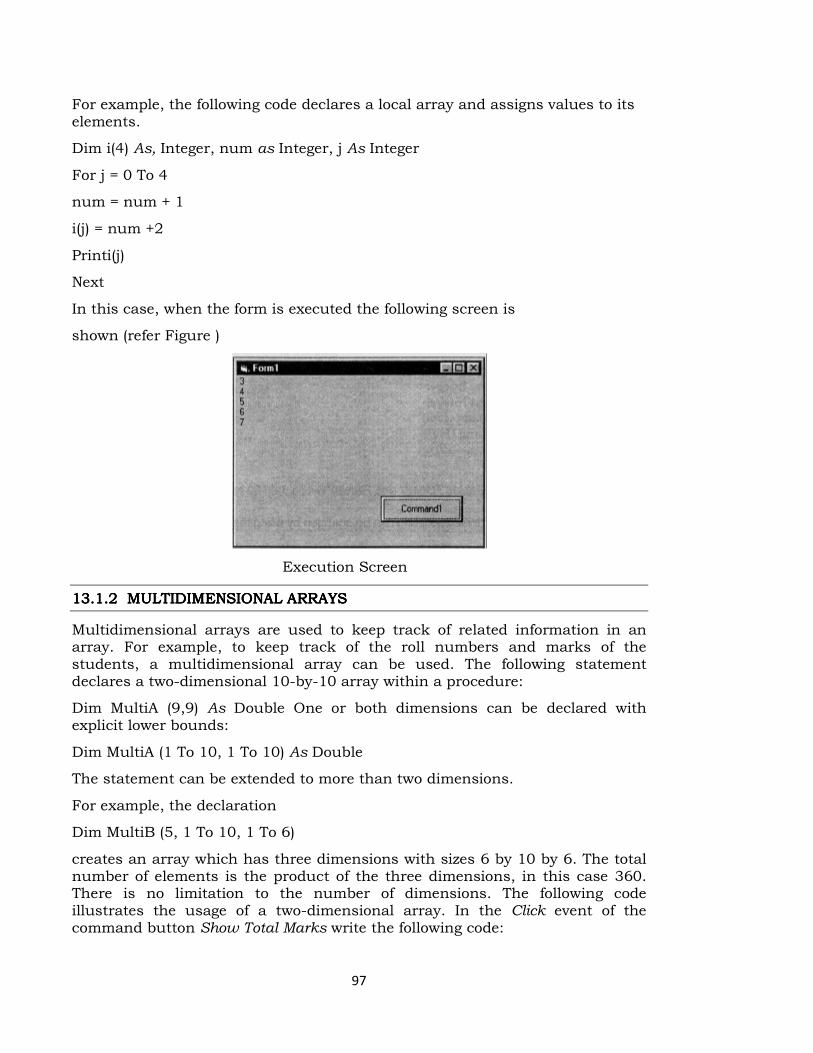
97
For example, the following code declares a local array and assigns values to its elements.
Dim i(4) As, Integer, num as Integer, j As Integer
For j = 0 To 4
num = num + 1
i(j) = num +2
Printi(j)
Next
In this case, when the form is executed the following screen is
shown (refer Figure )
Execution Screen
13.1.2 13.1.2 13.1.2 13.1.2 MULTIDIMENSIONAL ARRAYSMULTIDIMENSIONAL ARRAYSMULTIDIMENSIONAL ARRAYSMULTIDIMENSIONAL ARRAYS
Multidimensional arrays are used to keep track of related information in an array. For example, to keep track of the roll numbers and marks of the students, a multidimensional array can be used. The following statement declares a two-dimensional 10-by-10 array within a procedure:
Dim MultiA (9,9) As Double One or both dimensions can be declared with explicit lower bounds:
Dim MultiA (1 To 10, 1 To 10) As Double
The statement can be extended to more than two dimensions.
For example, the declaration
Dim MultiB (5, 1 To 10, 1 To 6)
creates an array which has three dimensions with sizes 6 by 10 by 6. The total number of elements is the product of the three dimensions, in this case 360. There is no limitation to the number of dimensions. The following code illustrates the usage of a two-dimensional array. In the Click event of the command button Show Total Marks write the following code:
98
Option ExplicitOption ExplicitOption ExplicitOption Explicit
Dim Loop_rollno As Integer
Dim Loop_marks As Integer
Private Sub Command1_ClickO
Dim i(2,1) As Integer ‘creates a two-dim array called i
Loop_rollno = 0 ‘initializes Loop_rollno to 0
Loop_marks = 0 ‘initializes Loop_marks to 0
Dim marks As Integer, roll As Integer, Sum As Integer ‘initializes
Loop_marks to 0
roll = 0 ‘initializes roll to 0
marks = 0 ‘initializes marks to 0
For Loop_rollno = 0 To 2
Sum=0
MsgBox “Enter marks for roll no:” & Loop_rollno + 1
For Loop_marks = 0 To 1
marks = InputBox(“Enter Marks”)
i(Loop_rollno, Loop_marks) = marks
Print i(Loop_rollno, Loop_marks)
Sum = Sum + i(Loop_rollno, Loop_marks)
Next
MsgBox Sum
Next
End Sub
On form execution when the user clicks on the button, the user is prompted to enter marks for rollno 1. When the user enters the marks, the sum of the two marks is displayed. The user has to enter two marks each for three roll numbers.
13.1.13.1.13.1.13.1.3333 DYNAMIC ARRAYSDYNAMIC ARRAYSDYNAMIC ARRAYSDYNAMIC ARRAYS
Sometimes you do not know exactly how large the array should be. You may need to change the size of the array at run time. In such a situation, you use dynamic arrays. A dynamic array can be resized at any time. It helps you to manage memory more efficiently. For example,you can use a large array for a short time and then free up memory to the system when you no longer need to use the array. After a dynamic array is initially declared, you can add new elements as needed, rather than establishing the size of the array at the time
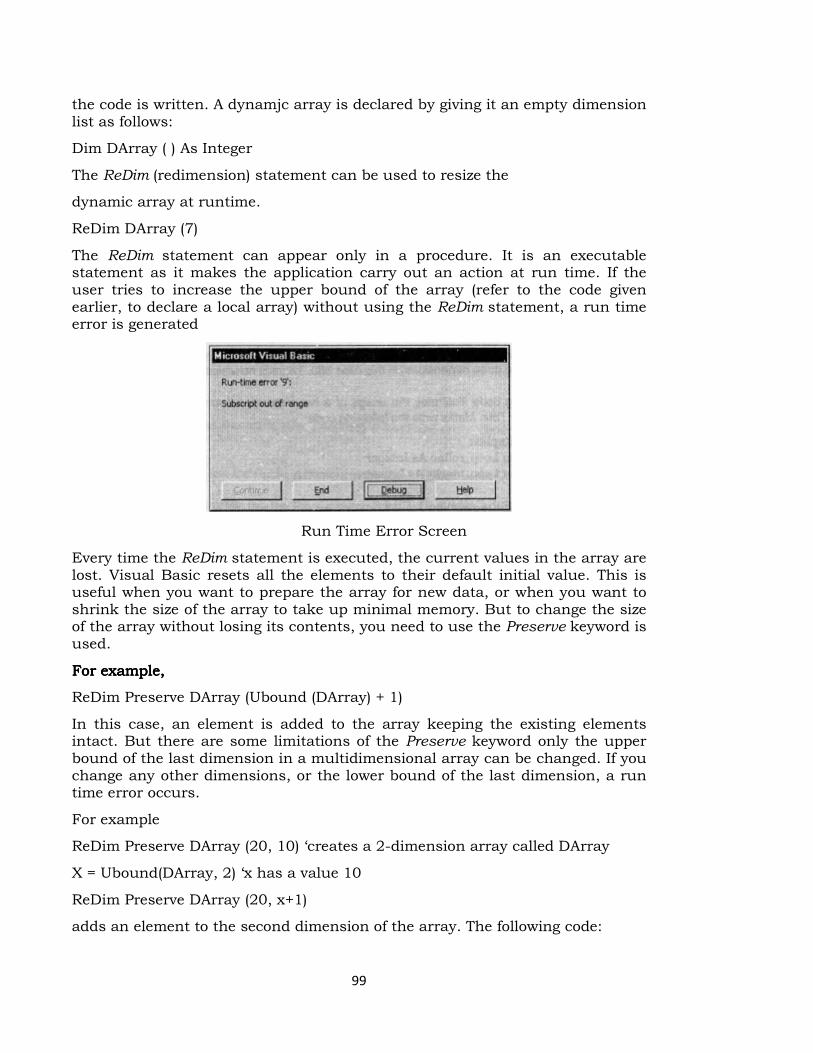
99
the code is written. A dynamjc array is declared by giving it an empty dimension list as follows:
Dim DArray ( ) As Integer
The ReDim (redimension) statement can be used to resize the
dynamic array at runtime.
ReDim DArray (7)
The ReDim statement can appear only in a procedure. It is an executable statement as it makes the application carry out an action at run time. If the user tries to increase the upper bound of the array (refer to the code given earlier, to declare a local array) without using the ReDim statement, a run time error is generated
Run Time Error Screen
Every time the ReDim statement is executed, the current values in the array are lost. Visual Basic resets all the elements to their default initial value. This is useful when you want to prepare the array for new data, or when you want to shrink the size of the array to take up minimal memory. But to change the size of the array without losing its contents, you need to use the Preserve keyword is used.
FFFFor example,or example,or example,or example,
ReDim Preserve DArray (Ubound (DArray) + 1)
In this case, an element is added to the array keeping the existing elements intact. But there are some limitations of the Preserve keyword only the upper bound of the last dimension in a multidimensional array can be changed. If you change any other dimensions, or the lower bound of the last dimension, a run time error occurs.
For example
ReDim Preserve DArray (20, 10) ‘creates a 2-dimension array called DArray
X = Ubound(DArray, 2) ‘x has a value 10
ReDim Preserve DArray (20, x+1)
adds an element to the second dimension of the array. The following code:

100
ReDim Preserve DArray (25, 11)
generates an error.
The ReDim statement cannot be used to change the data type of an array at run time unless the array is of Variant type. If you make an array smaller than its previous size, all elements will be lost. Aiso, you cannot change the number of dimensions of an array.
13.213.213.213.2 CONTROL ARRAYCONTROL ARRAYCONTROL ARRAYCONTROL ARRAY
A control array is a group of controls that share the same name and type. They also share the same event procedure. A control array has at least one element and can grow to as many elements as your system resources and memory permit. Its size depends on how much memory and Windows resources each control requires. The maximum index you can use in a control array is 32767. Elements of the same control array have their own property settings. Common uses of control arrays include menu controls and option button groupings.
13.2.113.2.113.2.113.2.1 CREATING CONTROL ARRAYS AT DESIGN TIMECREATING CONTROL ARRAYS AT DESIGN TIMECREATING CONTROL ARRAYS AT DESIGN TIMECREATING CONTROL ARRAYS AT DESIGN TIME
There are three ways to create a control array at design time.
• Assigning the same name in the Name property for more than one control.
• Copying an existing control and then pasting it to the Form.
• Setting the Index property to a value that is not null.
Adding a Control Array at Run TimeAdding a Control Array at Run TimeAdding a Control Array at Run TimeAdding a Control Array at Run Time
Control arrays can be created at run time using the statements
• Load object (Index %)
• Unload object (Index %)
Where object is the name of the control to add or delete from the control array. Index % is the value of the index in the array. The control array to be added must be an element of the existing array created at design time with an index value of 0. When a new element of a control array is loaded, most of the property settings are copied from the lowest existing element in the array.
Following example illustrates the use of the control array.
**** Open a Standard EXE project and save the Form as Calculator.frm and save the Project as Calculater.vbp.
**** Design the form as shown below.
Object Object Object Object PropertyPropertyPropertyProperty Setting Setting Setting Setting
FormFormFormForm Caption Name
Calculator frmCalculator
101
CommandButtonCommandButtonCommandButtonCommandButton Caption Name Index
1 cmd 0
CommandButtonCommandButtonCommandButtonCommandButton Caption Name Index
2 cmd 1
CommandButtonCommandButtonCommandButtonCommandButton Caption Name Index
3 cmd 2
CommandButtonCommandButtonCommandButtonCommandButton Caption Name Index
4 cmd 3
CommandButtonCommandButtonCommandButtonCommandButton Caption Name Index
5 cmd 4
CommandButtonCommandButtonCommandButtonCommandButton Caption Name Index
6 cmd 5
CommandButtonCommandButtonCommandButtonCommandButton Caption Name Index
7 cmd 6
CommandButtonCommandButtonCommandButtonCommandButton Caption Name Index
8 cmd 7
CommandButtonCommandButtonCommandButtonCommandButton Caption Name Index
9 cmd 8
CommandButtonCommandButtonCommandButtonCommandButton Caption Name Index
0 cmd 10
CommandButtonCommandButtonCommandButtonCommandButton Caption Name Index
.... cmd 11
CommandButtonCommandButtonCommandButtonCommandButton Caption Name
AC cmdAC
CommandButtonCommandButtonCommandButtonCommandButton Caption Name
+ cmdPlus
CommandButtonCommandButtonCommandButtonCommandButton Caption Name
- cmdMinus
CommandButtonCommandButtonCommandButtonCommandButton Caption Name
* cmdMultiply
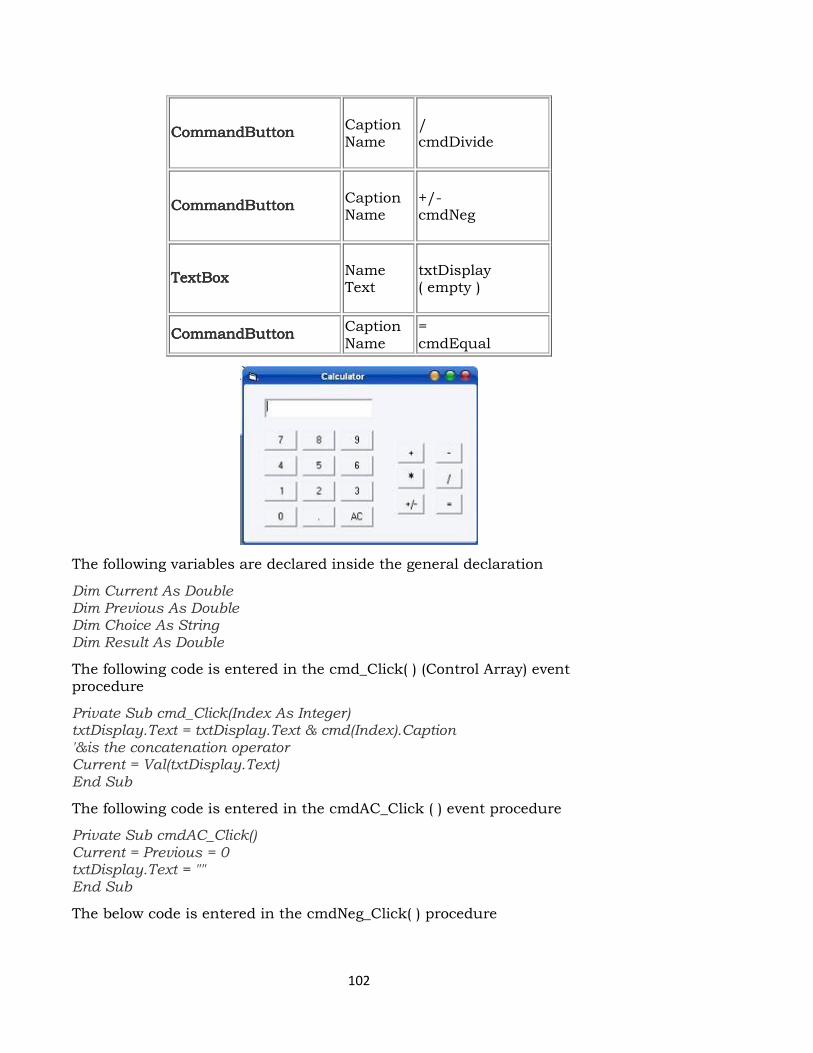
102
CommandButtonCommandButtonCommandButtonCommandButton Caption Name
/ cmdDivide
CommandButtonCommandButtonCommandButtonCommandButton Caption Name
+/- cmdNeg
TextBoxTextBoxTextBoxTextBox Name Text
txtDisplay ( empty )
CommandButtonCommandButtonCommandButtonCommandButton Caption Name
= cmdEqual
The following variables are declared inside the general declaration
Dim Current As Double Dim Previous As Double Dim Choice As String Dim Result As Double
The following code is entered in the cmd_Click( ) (Control Array) event procedure
Private Sub cmd_Click(Index As Integer) txtDisplay.Text = txtDisplay.Text & cmd(Index).Caption '&is the concatenation operator Current = Val(txtDisplay.Text) End Sub
The following code is entered in the cmdAC_Click ( ) event procedure
Private Sub cmdAC_Click() Current = Previous = 0 txtDisplay.Text = "" End Sub
The below code is entered in the cmdNeg_Click( ) procedure
103
Private Sub cmdNeg_Click() Current = -Current txtDisplay.Text = Current End Sub
The following code is entered in the click events of the cmdPlus, cmdMinus, cmdMultiply, cmdDevide controls respectively.
Private Sub cmdDevide_Click() txtDisplay.Text = "" Previous = Current Current = 0 Choice = "/" End Sub
Private Sub cmdMinus_Click() txtDisplay.Text = "" Previous = Current Current = 0 Choice = "-" End Sub
Private Sub cmdMultiply_Click() txtDisplay.Text = "" Previous = Current Current = 0 Choice = "*" End Sub
Private Sub cmdPlus_Click() txtDisplay.Text = "" Previous = Current Current = 0 Choice = "+" End Sub
To print the result on the text box, the following code is entered in the cmdEqual_Click ( ) event procedure.
Private Sub cmdEqual_Click()
Select Case Choice Case "+" Result = Previous + Current txtDisplay.Text = Result Case "-" Result = Previous - Current txtDisplay.Text = Result Case "*" Result = Previous * Current txtDisplay.Text = Result Case "/"

104
Result = Previous / Current txtDisplay.Text = Result End Select Current = Result End Sub
Save and run the project. On clicking digits of user's choice and an operator button, the output appears.
13.313.313.313.3 LET US SUM UPLET US SUM UPLET US SUM UPLET US SUM UP
In this lesson you learnt about the specialty of arrays, static and dynamic arrays, multidimensional and control arrays.
13.413.413.413.4 REFERENCESREFERENCESREFERENCESREFERENCES
Gary CornellGary CornellGary CornellGary Cornell, “Visual Basic 6.0 from the Ground Up”. Tata McGraw Hill
Company,1999.
Content Development GroupContent Development GroupContent Development GroupContent Development Group “Visual Basic 6.0 Programming” Tata McGraw Hill
Company,Ninth Reprint,2007.
Noel JerkeNoel JerkeNoel JerkeNoel Jerke “The Complete Reference: Visual Basic 6.0”, Tata McGraw Hill
Company, 24th reprint, 2006.
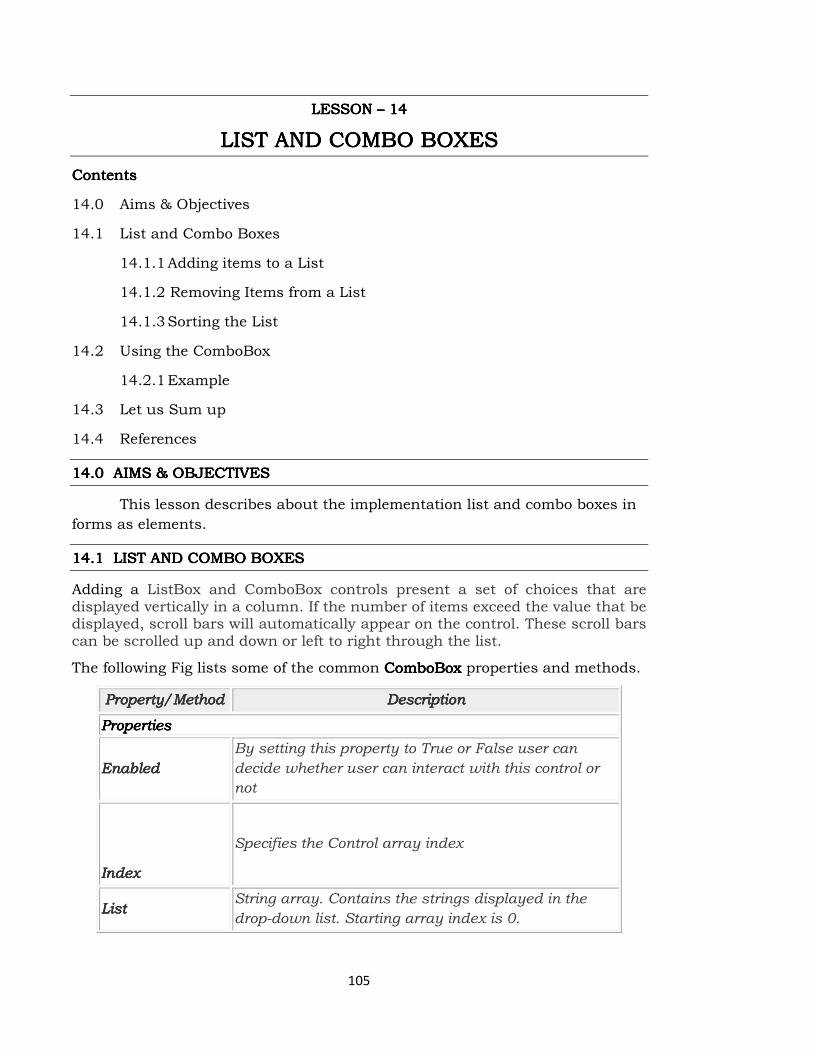
105
LLLLESSON ESSON ESSON ESSON –––– 14141414
LIST AND COMBO BOXESLIST AND COMBO BOXESLIST AND COMBO BOXESLIST AND COMBO BOXES
ContentsContentsContentsContents
14.0 Aims & Objectives
14.1 List and Combo Boxes
14.1.1 Adding items to a List
14.1.2 Removing Items from a List
14.1.3 Sorting the List
14.2 Using the ComboBox
14.2.1 Example
14.3 Let us Sum up
14.4 References
14.014.014.014.0 AIMS & OBJECTIVESAIMS & OBJECTIVESAIMS & OBJECTIVESAIMS & OBJECTIVES
This lesson describes about the implementation list and combo boxes in
forms as elements.
14.114.114.114.1 LIST AND COMBO BOXESLIST AND COMBO BOXESLIST AND COMBO BOXESLIST AND COMBO BOXES
Adding a ListBox and ComboBox controls present a set of choices that are displayed vertically in a column. If the number of items exceed the value that be displayed, scroll bars will automatically appear on the control. These scroll bars can be scrolled up and down or left to right through the list.
The following Fig lists some of the common ComboBoxComboBoxComboBoxComboBox properties and methods.
Property/MethodProperty/MethodProperty/MethodProperty/Method DescriptionDescriptionDescriptionDescription
Properties Properties Properties Properties
EnabledEnabledEnabledEnabled
By setting this property to True or False user can
decide whether user can interact with this control or
not
IndexIndexIndexIndex
Specifies the Control array index
ListListListList String array. Contains the strings displayed in the
drop-down list. Starting array index is 0.
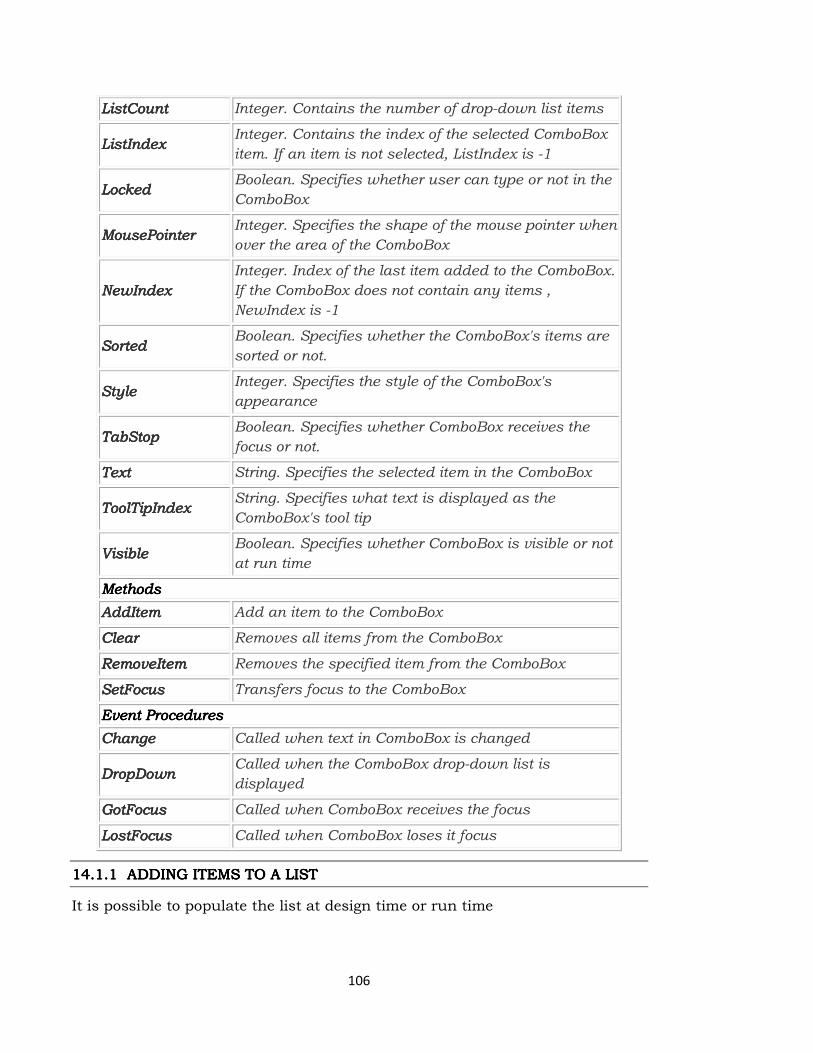
106
ListCountListCountListCountListCount Integer. Contains the number of drop-down list items
ListIndexListIndexListIndexListIndex Integer. Contains the index of the selected ComboBox
item. If an item is not selected, ListIndex is -1
LockedLockedLockedLocked Boolean. Specifies whether user can type or not in the
ComboBox
MousePointerMousePointerMousePointerMousePointer Integer. Specifies the shape of the mouse pointer when
over the area of the ComboBox
NewIndexNewIndexNewIndexNewIndex
Integer. Index of the last item added to the ComboBox.
If the ComboBox does not contain any items ,
NewIndex is -1
SortedSortedSortedSorted Boolean. Specifies whether the ComboBox's items are
sorted or not.
StyleStyleStyleStyle Integer. Specifies the style of the ComboBox's
appearance
TabStopTabStopTabStopTabStop Boolean. Specifies whether ComboBox receives the
focus or not.
TextTextTextText String. Specifies the selected item in the ComboBox
ToolTipIndexToolTipIndexToolTipIndexToolTipIndex String. Specifies what text is displayed as the
ComboBox's tool tip
VisibleVisibleVisibleVisible Boolean. Specifies whether ComboBox is visible or not
at run time
MethodsMethodsMethodsMethods
AddItemAddItemAddItemAddItem Add an item to the ComboBox
ClearClearClearClear Removes all items from the ComboBox
RemoveItemRemoveItemRemoveItemRemoveItem Removes the specified item from the ComboBox
SetFocusSetFocusSetFocusSetFocus Transfers focus to the ComboBox
Event Procedures Event Procedures Event Procedures Event Procedures
ChangeChangeChangeChange Called when text in ComboBox is changed
DropDownDropDownDropDownDropDown Called when the ComboBox drop-down list is
displayed
GotFocusGotFocusGotFocusGotFocus Called when ComboBox receives the focus
LostFocusLostFocusLostFocusLostFocus Called when ComboBox loses it focus
14.1.114.1.114.1.114.1.1 ADDING ITEMS TO A LISTADDING ITEMS TO A LISTADDING ITEMS TO A LISTADDING ITEMS TO A LIST
It is possible to populate the list at design time or run time
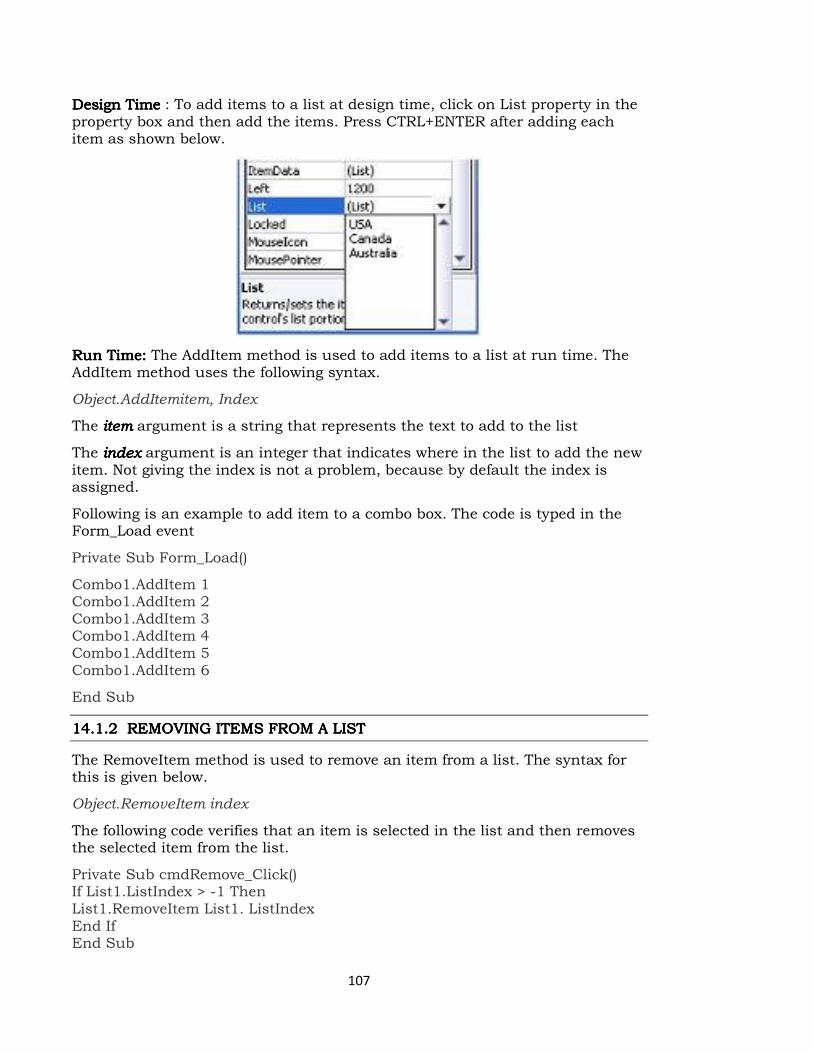
107
Design TimeDesign TimeDesign TimeDesign Time : To add items to a list at design time, click on List property in the property box and then add the items. Press CTRL+ENTER after adding each item as shown below.
Run Run Run Run Time:Time:Time:Time: The AddItem method is used to add items to a list at run time. The AddItem method uses the following syntax.
Object.AddItemitem, Index
The itemitemitemitem argument is a string that represents the text to add to the list
The indexindexindexindex argument is an integer that indicates where in the list to add the new item. Not giving the index is not a problem, because by default the index is assigned.
Following is an example to add item to a combo box. The code is typed in the Form_Load event
Private Sub Form_Load()
Combo1.AddItem 1 Combo1.AddItem 2 Combo1.AddItem 3 Combo1.AddItem 4 Combo1.AddItem 5 Combo1.AddItem 6
End Sub
14.1.214.1.214.1.214.1.2 REMOVING ITEMS FROM A LIST REMOVING ITEMS FROM A LIST REMOVING ITEMS FROM A LIST REMOVING ITEMS FROM A LIST
The RemoveItem method is used to remove an item from a list. The syntax for this is given below.
Object.RemoveItem index
The following code verifies that an item is selected in the list and then removes the selected item from the list.
Private Sub cmdRemove_Click() If List1.ListIndex > -1 Then List1.RemoveItem List1. ListIndex End If End Sub

108
14.1.3 14.1.3 14.1.3 14.1.3 SORTING THE LISTSORTING THE LISTSORTING THE LISTSORTING THE LIST
The Sorted property is set to True to enable a list to appear in alphanumeric order and False to display the list items in the order which they are added to the list.
14.2 14.2 14.2 14.2 USING THE COMBOBOXUSING THE COMBOBOXUSING THE COMBOBOXUSING THE COMBOBOX
A ComboBox combines the features of a TextBox and a ListBox. This enables the user to select either by typing text into the ComboBox or by selecting an item from the list. There are three types of ComboBox styles that are represented as shown below.
Dropdown combo
Simple combo
Dropdown list
� Dropdown Combo (style 0)
� Simple Combo (style 1)
� Dropdown List (style 2)
The Simple Combo box displays an edit area with an attached list box always visible immediately below the edit area. A simple combo box displays the contents of its list all the time. The user can select an item from the list or type an item in the edit box portion of the combo box. A scroll bar is displayed beside the list if there are too many items to be displayed in the list box area.
The Dropdown Combo box first appears as only an edit area with a down arrow button at the right. The list portion stays hidden until the user clicks the down-arrow button to drop down the list portion. The user can either select a value from the list or type a value in the edit area.
The Dropdown list combo box turns the combo box into a Dropdown list box. At run time , the control looks like the Dropdown combo box. The user could click the down arrow to view the list. The difference between Dropdown combo & Dropdown list combo is that the edit area in the Dropdown list combo is disabled. The user can only select an item and cannot type anything in the edit area. Anyway this area displays the selected item.
14.2.1 14.2.1 14.2.1 14.2.1 Example Example Example Example
This example is to Add, Remove, Clear the list of items and finally close the application.
� Open a new Standard EXE project is opened an named the Form as Listbox.frm and save the project as Listbox.vbp

109
� Design the application as shown below.
ObjectObjectObjectObject PropertyPropertyPropertyProperty SettingsSettingsSettingsSettings
FormFormFormForm Caption Name
ListBox frmListBox
TextBox TextBox TextBox TextBox Text Name
(empty) txtName
LabelLabelLabelLabel Caption Name
Enter a name lblName
ListBoxListBoxListBoxListBox Name lstName
LabelLabelLabelLabel Caption Name
Amount Entered lblAmount
LabelLabelLabelLabel Caption Name Border Style
(empty) lblDisplay 1 Fixed Single
CommandButtonCommandButtonCommandButtonCommandButton Caption Name
Add cmdAdd
CommandButtonCommandButtonCommandButtonCommandButton Caption Name
Remove cmdRemove
CommandButtonCommandButtonCommandButtonCommandButton Caption Name
Clear cmdClear
CommandButtonCommandButtonCommandButtonCommandButton Caption Name
Exit cmdExit
The following event procedures are entered for the TextBox and CommandButton controls.
Private Sub txtName_Change() If (Len(txtName.Text) > 0) Then 'Enabling the Add button 'if atleast one character 'is entered cmdAdd.Enabled = True

110
End If End Sub
Private Sub cmdAdd_Click() lstName.AddItem txtName.Text 'Add the entered the characters to the list box txtName.Text = "" 'Clearing the text box txtName.SetFocus 'Get the focus back to the 'text box lblDisplay.Caption = lstName.ListCount 'Display the number of items in the list box cmdAdd.Enabled = False ' Disabling the Add button
End Sub
The click event of the Add button adds the text to the list box that was typed in the Text box. Then the text box is cleared and the focus is got to the text box. The number of entered values will is increased according to the number of items added to the listbox.
Private Sub cmdClear_Click() lstName.Clear lblDisplay.Caption = lstName.ListCount End Sub
Private Sub cmdExit_Click() Unload Me End Sub
Private Sub cmdRemove_Click() Dim remove As Integer
remove = lstName.ListIndex 'Getting the index
If remove >= 0 Then 'make sure an item is selected 'in the list box
lstName.RemoveItem remove 'Remove item from the list box lblDisplay.Caption = lstName.ListCount 'Display the number of items 'in the listbox
End If
End Sub
Remove button removes the selected item from the list as soon as you pressed the Remove button. The number of items is decreased in the listbox and the value is displayed in the label.
The code for the clear button clears the listbox when you press it. And the number of items shown in the label becomes
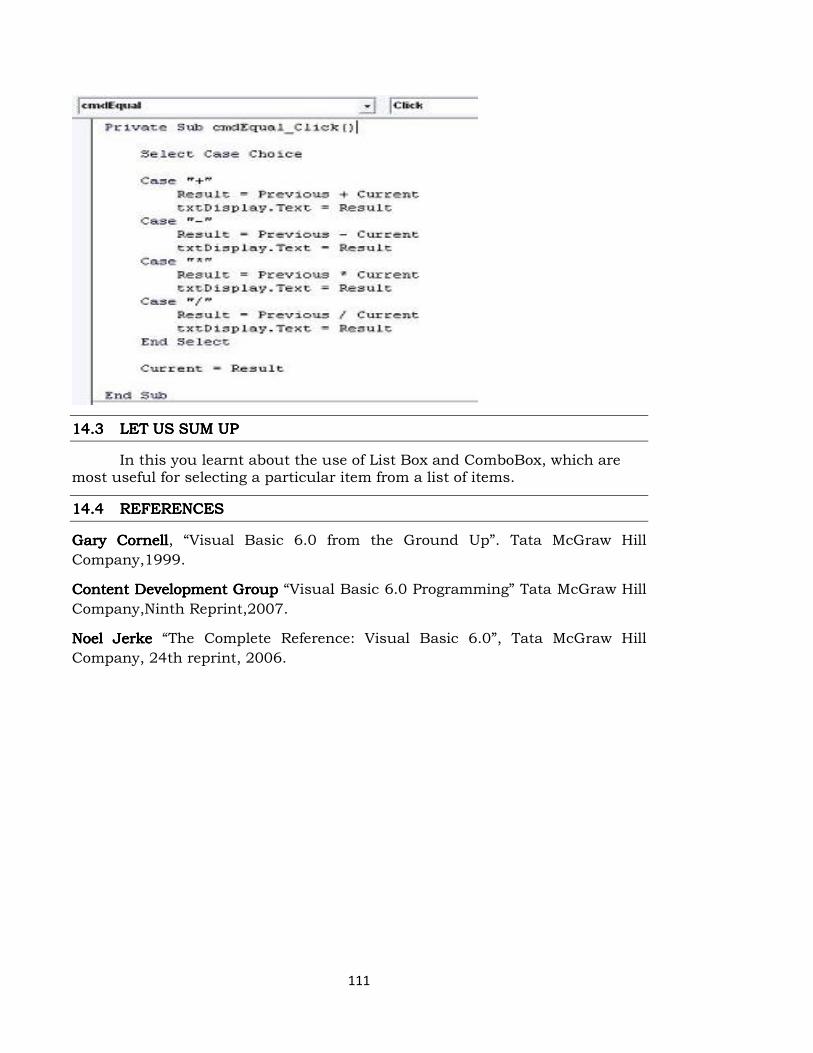
111
14.3 14.3 14.3 14.3 LET US SUM UPLET US SUM UPLET US SUM UPLET US SUM UP
In this you learnt about the use of List Box and ComboBox, which are most useful for selecting a particular item from a list of items.
14.14.14.14.4444 REFERENCESREFERENCESREFERENCESREFERENCES
Gary CornellGary CornellGary CornellGary Cornell, “Visual Basic 6.0 from the Ground Up”. Tata McGraw Hill
Company,1999.
Content Development GroupContent Development GroupContent Development GroupContent Development Group “Visual Basic 6.0 Programming” Tata McGraw Hill
Company,Ninth Reprint,2007.
Noel JerkeNoel JerkeNoel JerkeNoel Jerke “The Complete Reference: Visual Basic 6.0”, Tata McGraw Hill
Company, 24th reprint, 2006.

112
LESSON LESSON LESSON LESSON –––– 15151515
FLEXGRID CONTROLFLEXGRID CONTROLFLEXGRID CONTROLFLEXGRID CONTROL
ContentsContentsContentsContents
15.0 Aims & Objectives
15.1 Features of Flex grid Control
15.2 Using the Flex Grid
15.3 Changing Cell Background & Foreground Colours
15.4 Populating the Flex Grid
15.5 Using a Dynamic Textbox to enter Data into the Flex Grid
15.6 Using Arrays behind Flex Grids
15.6.1 Adding Totals to Flex Grids
15.6.2 Trapping Restricted Cell Rows and Columns
15.6.3 Trapping Amended Data within the Flex Grid
15.7 Adding Combo Boxes to Flex Grids
15.8 Adding Popup Menus to Flex Grids
15.9 Using Flex Grids Cell Merge to Group like Rows
15.10 Let us sum up
15.11 References
15.0 15.0 15.0 15.0 AIMS &AIMS &AIMS &AIMS & OBJECTIVESOBJECTIVESOBJECTIVESOBJECTIVES
Using Microsoft's FlexGrid control (MSFLXGRD.OCX) you can create utilities to display, filter, edit, validate and update your data. For example, such utilities could include:
� data entry & validation
� high level reports
� ported spreadsheet macro applications retaining cell layout & format
15.115.115.115.1 FEATURES OF FLEXGRID CONTROLFEATURES OF FLEXGRID CONTROLFEATURES OF FLEXGRID CONTROLFEATURES OF FLEXGRID CONTROL
Included in VB4(32-bit), VB5 and VB6, are several grid-orientated controls aimed at managing rows and columns of data, however one of the most versatile, hence its name, is the FlexGrid. Most of the other grid objects are specifically designed for data binding, whereas the FlexGrid has many collections of properties, methods and events that lend themselves to several environments in addition to just data-binding.

113
One of the most powerful applications of the FlexGrid is in managing data from database tables in an unbound state. That is, to populate & edit the FlexGrid and writes the contents back to the database in code. This may seem a pointless exercise as objects such Microsoft's Data Bound Grid Control are written specifically for this purpose, except these grids simply display the contents of a recordset, record by record, field by field. Whereas the FlexGid can populate the grid in any manner, examples of which are:
� separating grouped data with blank rows/columns,
� adding sub/grand-total rows/columns,
� changing the colour of the cell background or text in individual or multiple cells,
� reacting to the state of the data, e.g. highlighting negative values,
� validating entered data e.g., numeric values, positive values, permitted date ranges etc.
These are just a few of the possibilities available with FlexGrids, we'll take a look at more later on.
One important point is that in addition to the grid controls available as standard to Visual Basic, many third party grid controls are available that boast impressive features such as embedded combo boxes, picture boxes, custom data validation etc. Many of these are excellent controls, however they all come at a price proportional to the size of their feature list.
That said, most of the functionality found in these third party grids can be accessed with FlexGrids with a little extra code which we'll cover in this article and as well as saving money, you'll gain knowledge of creating and customising your grid controls to suit your specific application and you won't have to remember to distribute those third part runtime dll's that custom controls often require.
15.215.215.215.2 USING THE FLEXGRID USING THE FLEXGRID USING THE FLEXGRID USING THE FLEXGRID
To use the FlexGrid in your application, right click the Toolbox or select the Project menu and choose 'Components'. The Components dialog box appears as shown in Figure 1
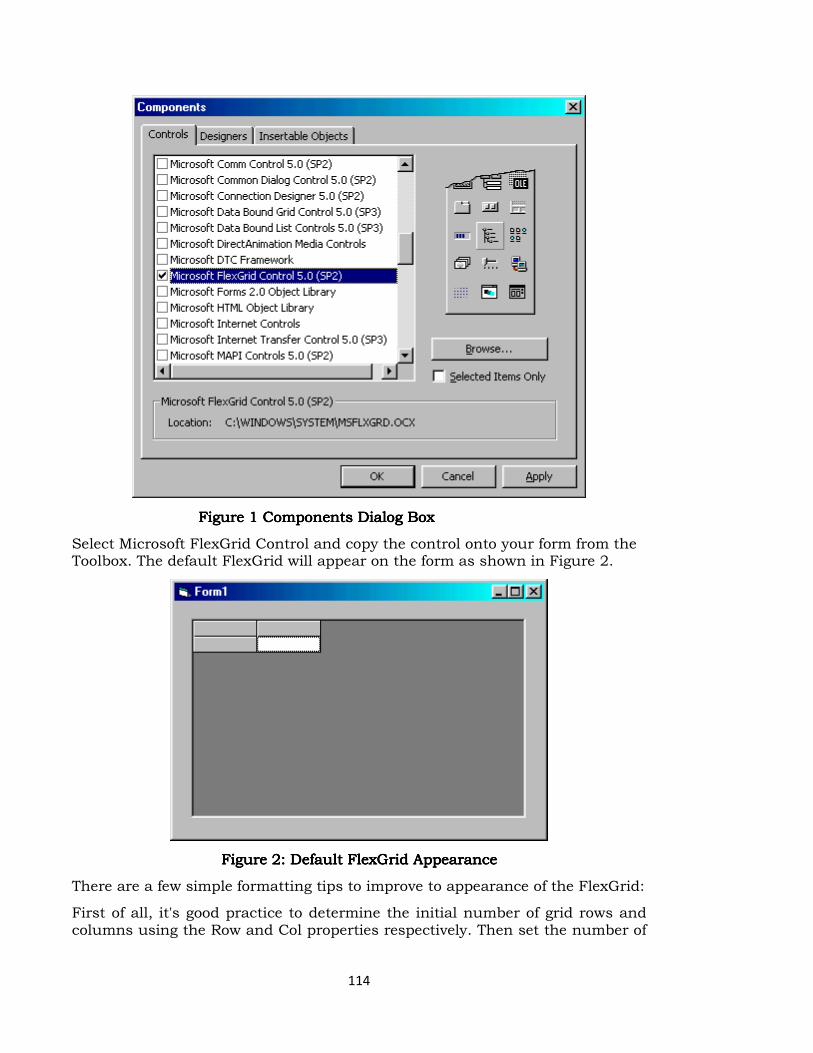
114
Figure 1 Figure 1 Figure 1 Figure 1 Components Dialog BoxComponents Dialog BoxComponents Dialog BoxComponents Dialog Box
Select Microsoft FlexGrid Control and copy the control onto your form from the Toolbox. The default FlexGrid will appear on the form as shown in Figure 2.
Figure 2: Default FlexGrid AppearanceFigure 2: Default FlexGrid AppearanceFigure 2: Default FlexGrid AppearanceFigure 2: Default FlexGrid Appearance
There are a few simple formatting tips to improve to appearance of the FlexGrid:
First of all, it's good practice to determine the initial number of grid rows and columns using the Row and Col properties respectively. Then set the number of
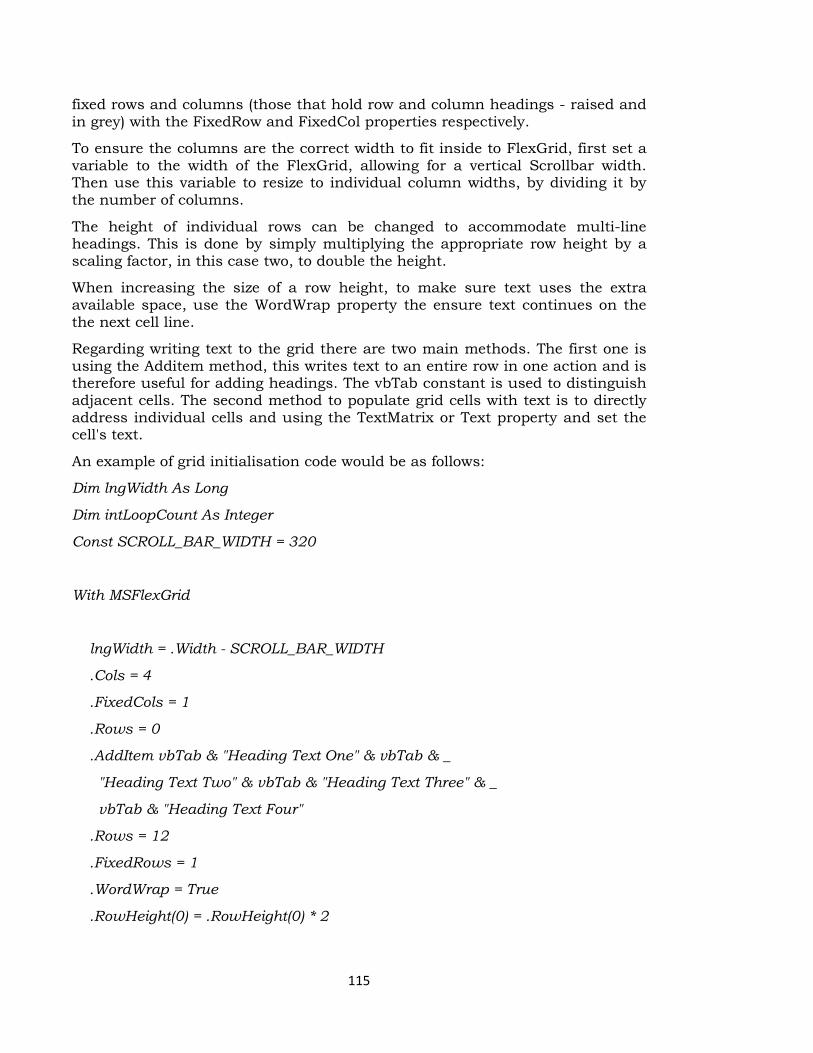
115
fixed rows and columns (those that hold row and column headings - raised and in grey) with the FixedRow and FixedCol properties respectively.
To ensure the columns are the correct width to fit inside to FlexGrid, first set a variable to the width of the FlexGrid, allowing for a vertical Scrollbar width. Then use this variable to resize to individual column widths, by dividing it by the number of columns.
The height of individual rows can be changed to accommodate multi-line headings. This is done by simply multiplying the appropriate row height by a scaling factor, in this case two, to double the height.
When increasing the size of a row height, to make sure text uses the extra available space, use the WordWrap property the ensure text continues on the the next cell line.
Regarding writing text to the grid there are two main methods. The first one is using the Additem method, this writes text to an entire row in one action and is therefore useful for adding headings. The vbTab constant is used to distinguish adjacent cells. The second method to populate grid cells with text is to directly address individual cells and using the TextMatrix or Text property and set the cell's text.
An example of grid initialisation code would be as follows:
Dim lngWidth As Long
Dim intLoopCount As Integer
Const SCROLL_BAR_WIDTH = 320
With MSFlexGrid
lngWidth = .Width - SCROLL_BAR_WIDTH
.Cols = 4
.FixedCols = 1
.Rows = 0
.AddItem vbTab & "Heading Text One" & vbTab & _
"Heading Text Two" & vbTab & "Heading Text Three" & _
vbTab & "Heading Text Four"
.Rows = 12
.FixedRows = 1
.WordWrap = True
.RowHeight(0) = .RowHeight(0) * 2

116
.ColWidth(0) = lngWidth / 4
.ColWidth(1) = lngWidth / 4
.ColWidth(2) = lngWidth / 4
.ColWidth(3) = lngWidth / 4
For intLoopCount = 1 To (.Rows - 1)
.TextMatrix(intLoopCount, 0) = "Item " & intLoopCount
Next intLoopCount
End With
The initialised FlexGrid should appear on the form as shown in Figure 3..
Figure 3: Initialised FlexGrid AppearanceFigure 3: Initialised FlexGrid AppearanceFigure 3: Initialised FlexGrid AppearanceFigure 3: Initialised FlexGrid Appearance
15.315.315.315.3 CHANGING CELL BACKGROUND & FOREGROUND COLOURSCHANGING CELL BACKGROUND & FOREGROUND COLOURSCHANGING CELL BACKGROUND & FOREGROUND COLOURSCHANGING CELL BACKGROUND & FOREGROUND COLOURS
The ability to change the individual cell background colour and cell font colour is useful for highlighting particular data states, e.g. values exceeding a specified ceiling, negative values, cells where data cannot be entered etc. To set the background colour of a cell, first reference the cell by setting the Row and Col properties to the appropriate cell, then use the CellBackColor property to set its colour. Similarly use the CellForeColor property to change the colour of the text displayed in a cell. Examples of available colours are found in the FlexGrid's Properties Window under any of the colour properties, especially the palette tab as this displays a wider range of colours. To set a range of cells to a selected colour each cell must be referenced in turn, unless all the cells in the grid are to have their colour set to the same colour in which case the BackColor and ForeColor property can be used which sets the entire grid's colour.

117
15.415.415.415.4 POPULATING THE FLEXGRIDPOPULATING THE FLEXGRIDPOPULATING THE FLEXGRIDPOPULATING THE FLEXGRID
There are two ways to populate Flexgrids: through data-binding and manually. The data-bound FlexGrid is the easiest but the least flexible approach. Add a Data Control to your form, set its DataBaseName property to an appropriate database and its RecordSource property to a table or to your required SQL query. Then set the FlexGrid's DataSource to the Data Control and when the application is run, the FlexGrid will automatically format the number of columns to the number of fields in your table or returned record set and the number of rows to the number of records.
However if you wish to display data with greater control, e.g. blank columns and rows separating grouped data, text colour and cell colour dependent upon +ve or -ve values etc., then manually, unbound populating of the FlexGrid is the best option.
Once you have a recordset, data can be directed at any cell within the FlexGrid, which gives the developer much greater control. The following code example takes a recordset which contains two fields one which hold share prices, shareprice, and one for share movements, movement, and colour codes grid cells depending on the status of the data:
With rsExample
.MoveLast
'set number of grid rows and columns
'to fit recordset
MSFlexGrid1.Rows = .RecordCount
MSFlexGrid1.Cols = 3
.MoveFirst
Do
If !movement < 0 Then
'reference cell to set cell text colour
'to Red for shareprice
MSFlexGrid1.row = .AbsolutePosition + 1
MSFlexGrid1.col = 1
MSFlexGrid1.CellForeColor = vbRed
MSFlexGrid1.TextMatrix(.AbsolutePosition + 1, 1) = _
!shareprice
MSFlexGrid1.TextMatrix(.AbsolutePosition + 1, 2) = _
!movement
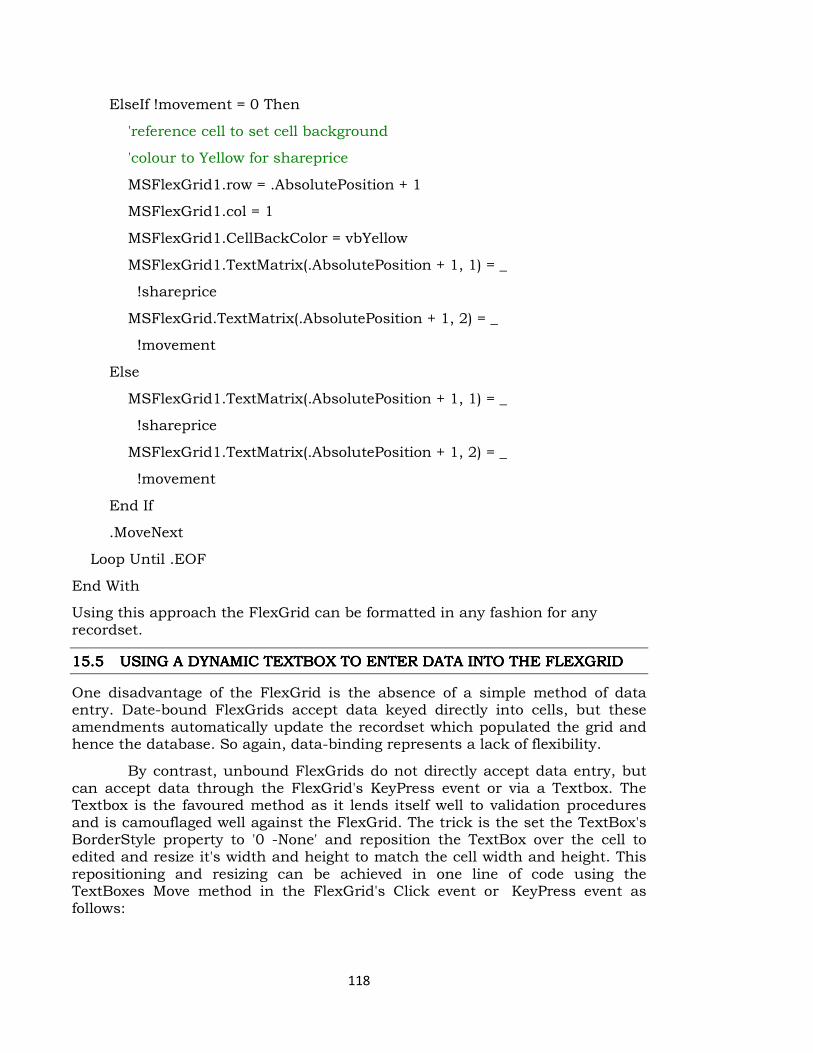
118
ElseIf !movement = 0 Then
'reference cell to set cell background
'colour to Yellow for shareprice
MSFlexGrid1.row = .AbsolutePosition + 1
MSFlexGrid1.col = 1
MSFlexGrid1.CellBackColor = vbYellow
MSFlexGrid1.TextMatrix(.AbsolutePosition + 1, 1) = _
!shareprice
MSFlexGrid.TextMatrix(.AbsolutePosition + 1, 2) = _
!movement
Else
MSFlexGrid1.TextMatrix(.AbsolutePosition + 1, 1) = _
!shareprice
MSFlexGrid1.TextMatrix(.AbsolutePosition + 1, 2) = _
!movement
End If
.MoveNext
Loop Until .EOF
End With
Using this approach the FlexGrid can be formatted in any fashion for any recordset.
15.515.515.515.5 USING A DYNAMIC TEXTBOX TO ENTER DATA INTO THE FLEXGRIDUSING A DYNAMIC TEXTBOX TO ENTER DATA INTO THE FLEXGRIDUSING A DYNAMIC TEXTBOX TO ENTER DATA INTO THE FLEXGRIDUSING A DYNAMIC TEXTBOX TO ENTER DATA INTO THE FLEXGRID
One disadvantage of the FlexGrid is the absence of a simple method of data entry. Date-bound FlexGrids accept data keyed directly into cells, but these amendments automatically update the recordset which populated the grid and hence the database. So again, data-binding represents a lack of flexibility.
By contrast, unbound FlexGrids do not directly accept data entry, but can accept data through the FlexGrid's KeyPress event or via a Textbox. The Textbox is the favoured method as it lends itself well to validation procedures and is camouflaged well against the FlexGrid. The trick is the set the TextBox's BorderStyle property to '0 -None' and reposition the TextBox over the cell to edited and resize it's width and height to match the cell width and height. This repositioning and resizing can be achieved in one line of code using the TextBoxes Move method in the FlexGrid's Click event or KeyPress event as follows:
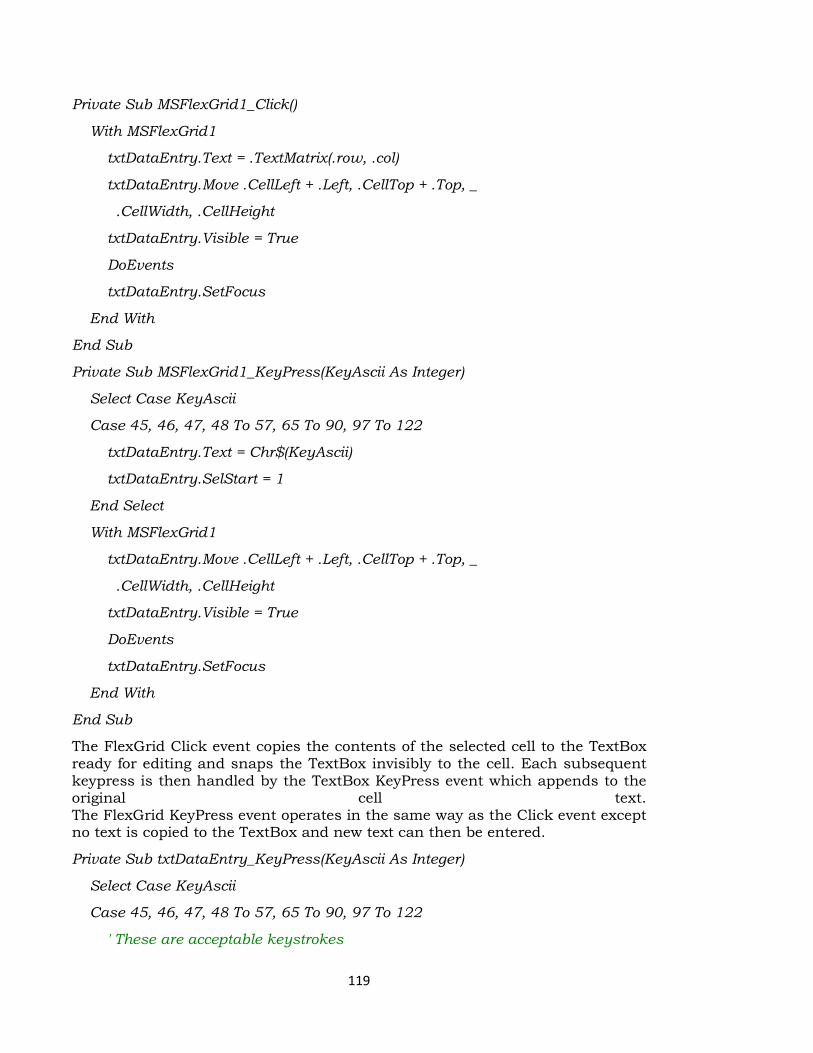
119
Private Sub MSFlexGrid1_Click()
With MSFlexGrid1
txtDataEntry.Text = .TextMatrix(.row, .col)
txtDataEntry.Move .CellLeft + .Left, .CellTop + .Top, _
.CellWidth, .CellHeight
txtDataEntry.Visible = True
DoEvents
txtDataEntry.SetFocus
End With
End Sub
Private Sub MSFlexGrid1_KeyPress(KeyAscii As Integer)
Select Case KeyAscii
Case 45, 46, 47, 48 To 57, 65 To 90, 97 To 122
txtDataEntry.Text = Chr$(KeyAscii)
txtDataEntry.SelStart = 1
End Select
With MSFlexGrid1
txtDataEntry.Move .CellLeft + .Left, .CellTop + .Top, _
.CellWidth, .CellHeight
txtDataEntry.Visible = True
DoEvents
txtDataEntry.SetFocus
End With
End Sub
The FlexGrid Click event copies the contents of the selected cell to the TextBox ready for editing and snaps the TextBox invisibly to the cell. Each subsequent keypress is then handled by the TextBox KeyPress event which appends to the original cell text. The FlexGrid KeyPress event operates in the same way as the Click event except no text is copied to the TextBox and new text can then be entered.
Private Sub txtDataEntry_KeyPress(KeyAscii As Integer)
Select Case KeyAscii
Case 45, 46, 47, 48 To 57, 65 To 90, 97 To 122
' These are acceptable keystrokes

120
Case Else
' These are unacceptable, and should be ignored
KeyAscii = 0
End Select
End Sub
The TextBox's KeyPress event can be used to validate data entry as show above.
Once the required text is entered into the TextBox and another cell is selected or return is hit, then the changes are copied back to the FlexGrid cell and a command button is enabled to alert the user the save the new data.
Private Sub MSFlexGrid1_LeaveCell()
Call SaveEdits End Sub
Private Sub MSFlexGrid1_GotFocus()
Call SaveEdits
End Sub
Private Sub SaveEdits()
If Not txtDataEntry.Visible Then Exit Sub
MSFlexGrid1.TextMatrix(MSFlexGrid1.row, MSFlexGrid1.col) = _
txtDataEntry.Text
txtDataEntry.Visible = False
'enable Save cmdButton to indicate new data to be saved
cmdSave.Enable = True
End Sub
With these six procedures above, data entry and validation will be enabled for the FlexGrid. The txtDataEntry TextBox used with the FlexGrid should appear as shown in Figure 4.
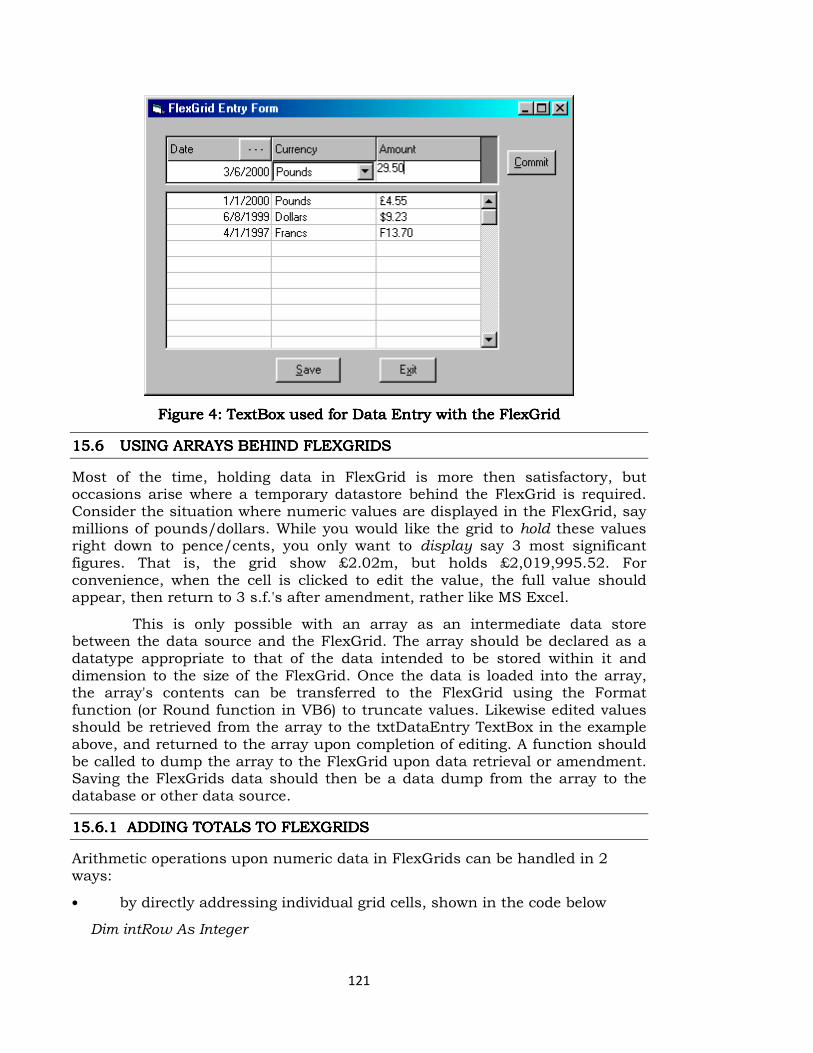
121
Figure 4: TextBox used Figure 4: TextBox used Figure 4: TextBox used Figure 4: TextBox used for Data Entry with the FlexGridfor Data Entry with the FlexGridfor Data Entry with the FlexGridfor Data Entry with the FlexGrid
15.615.615.615.6 USING ARRAYS BEHIND FLEXGRIDS USING ARRAYS BEHIND FLEXGRIDS USING ARRAYS BEHIND FLEXGRIDS USING ARRAYS BEHIND FLEXGRIDS
Most of the time, holding data in FlexGrid is more then satisfactory, but occasions arise where a temporary datastore behind the FlexGrid is required. Consider the situation where numeric values are displayed in the FlexGrid, say millions of pounds/dollars. While you would like the grid to hold these values right down to pence/cents, you only want to display say 3 most significant figures. That is, the grid show £2.02m, but holds £2,019,995.52. For convenience, when the cell is clicked to edit the value, the full value should appear, then return to 3 s.f.'s after amendment, rather like MS Excel.
This is only possible with an array as an intermediate data store between the data source and the FlexGrid. The array should be declared as a datatype appropriate to that of the data intended to be stored within it and dimension to the size of the FlexGrid. Once the data is loaded into the array, the array's contents can be transferred to the FlexGrid using the Format function (or Round function in VB6) to truncate values. Likewise edited values should be retrieved from the array to the txtDataEntry TextBox in the example above, and returned to the array upon completion of editing. A function should be called to dump the array to the FlexGrid upon data retrieval or amendment. Saving the FlexGrids data should then be a data dump from the array to the database or other data source.
15.6.115.6.115.6.115.6.1 ADDING TOTALS TO FLEXGRIDSADDING TOTALS TO FLEXGRIDSADDING TOTALS TO FLEXGRIDSADDING TOTALS TO FLEXGRIDS
Arithmetic operations upon numeric data in FlexGrids can be handled in 2 ways:
• by directly addressing individual grid cells, shown in the code below
Dim intRow As Integer

122
Dim dblTotal As Double
With MSFlexGrid1
For intRow = 1 To 5
dblTotal = dblTotal + _
Format(.TextMatrix(intRow, 1), "General Number")
Next intRow
.TextMatrix(7, 1) = Format(dblTotal, "£#,##0.00")
End With
This code sums to values in the first 5 rows of the first column in the FlexGrid and places the total in the row 7, column 1 in a monetary format.
• by addressing array elements, shown in the code below
Dim intArrayRow As Integer
Dim dblTotal As Double
Dim arrGridData() as Double
ReDim arrGridData(10, 10)
For intArrayRow = 1 To 5
dblTotal = dblTotal + arrGridData(intArrayRow , 1)
Next intArrayRow
arrGridData(7, 1) = dblTotal
Call subArray2FlxGrd
Again this example sums the first 5 rows and writes them the the seventh row in the first column of the array. The advantage of the array is the data is held as the correct datatype and arrays are faster in terms of read/write access than FlexGrids. Remember to include a call to the procedure to transfer the array data to the FlexGrid.
15.6.215.6.215.6.215.6.2 TRAPPING RESTRICTED CELL ROWS AND COLUMNSTRAPPING RESTRICTED CELL ROWS AND COLUMNSTRAPPING RESTRICTED CELL ROWS AND COLUMNSTRAPPING RESTRICTED CELL ROWS AND COLUMNS
Using the code examples above for the FlexGrid events we can use addition code to restrict data entry to specific cells or regions of the FlexGrid. Here data entry is only permitted in row 6 and between columns 4 and 8.
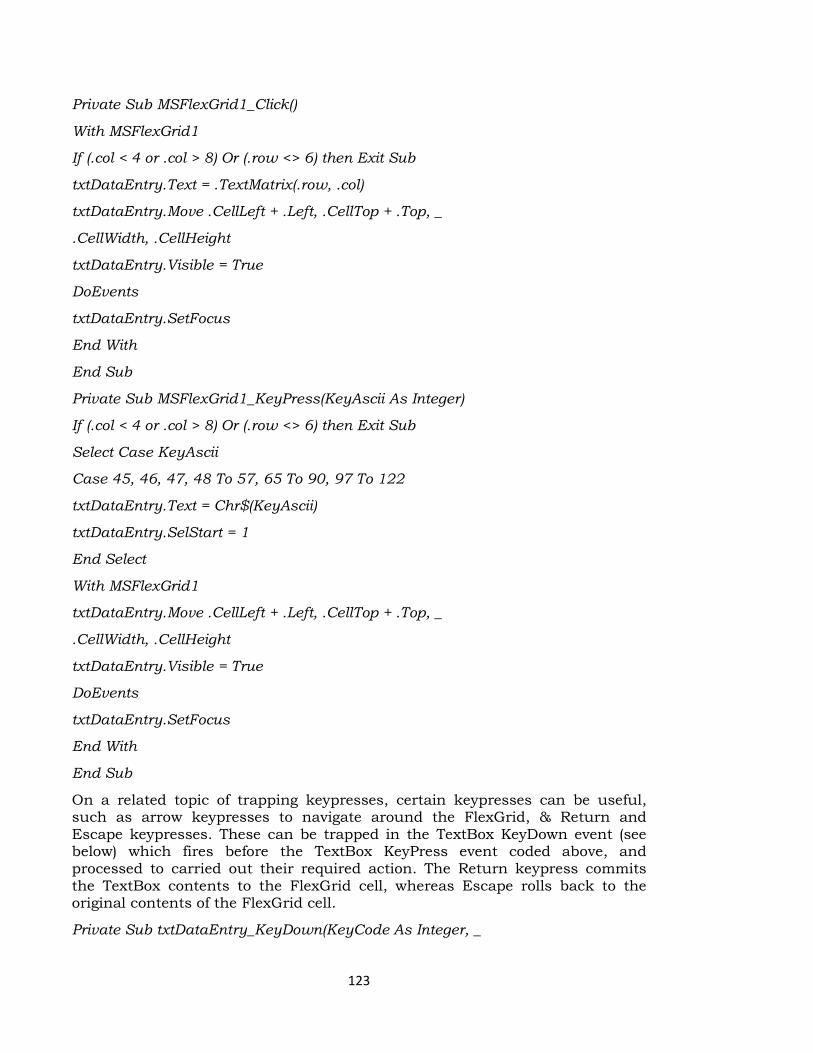
123
Private Sub MSFlexGrid1_Click()
With MSFlexGrid1
If (.col < 4 or .col > 8) Or (.row <> 6) then Exit Sub
txtDataEntry.Text = .TextMatrix(.row, .col)
txtDataEntry.Move .CellLeft + .Left, .CellTop + .Top, _
.CellWidth, .CellHeight
txtDataEntry.Visible = True
DoEvents
txtDataEntry.SetFocus
End With
End Sub
Private Sub MSFlexGrid1_KeyPress(KeyAscii As Integer)
If (.col < 4 or .col > 8) Or (.row <> 6) then Exit Sub
Select Case KeyAscii
Case 45, 46, 47, 48 To 57, 65 To 90, 97 To 122
txtDataEntry.Text = Chr$(KeyAscii)
txtDataEntry.SelStart = 1
End Select
With MSFlexGrid1
txtDataEntry.Move .CellLeft + .Left, .CellTop + .Top, _
.CellWidth, .CellHeight
txtDataEntry.Visible = True
DoEvents
txtDataEntry.SetFocus
End With
End Sub
On a related topic of trapping keypresses, certain keypresses can be useful, such as arrow keypresses to navigate around the FlexGrid, & Return and Escape keypresses. These can be trapped in the TextBox KeyDown event (see below) which fires before the TextBox KeyPress event coded above, and processed to carried out their required action. The Return keypress commits the TextBox contents to the FlexGrid cell, whereas Escape rolls back to the original contents of the FlexGrid cell.
Private Sub txtDataEntry_KeyDown(KeyCode As Integer, _
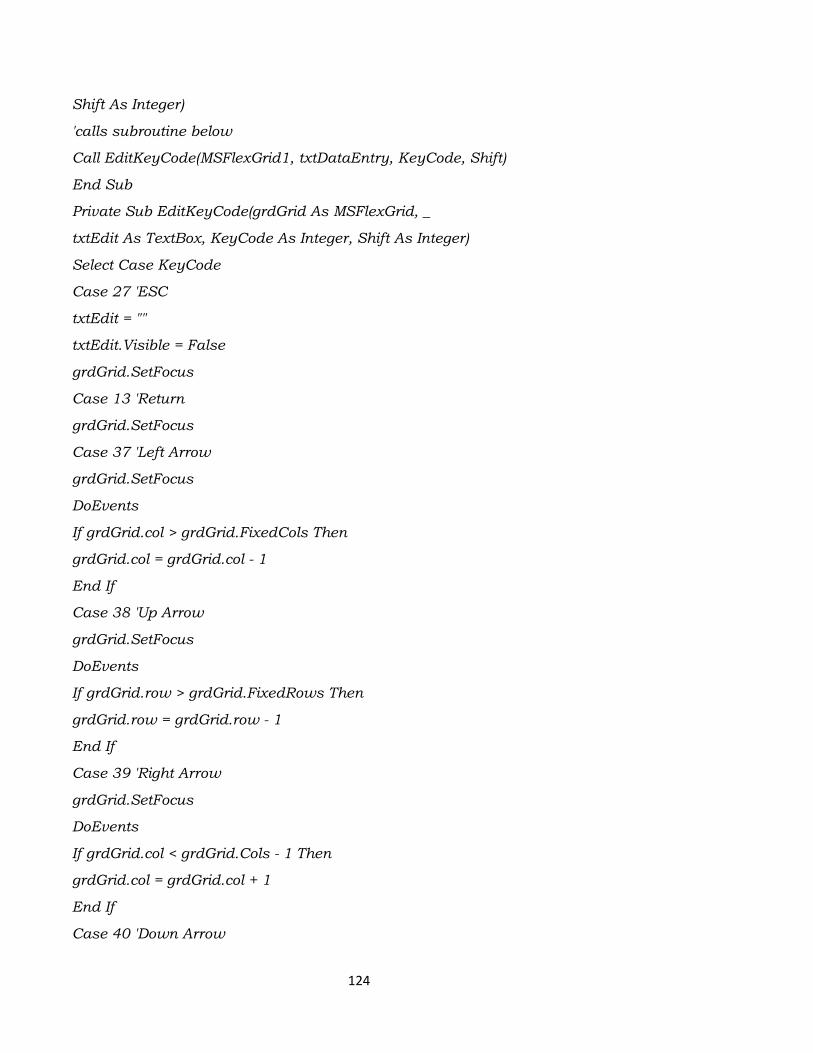
124
Shift As Integer)
'calls subroutine below
Call EditKeyCode(MSFlexGrid1, txtDataEntry, KeyCode, Shift)
End Sub
Private Sub EditKeyCode(grdGrid As MSFlexGrid, _
txtEdit As TextBox, KeyCode As Integer, Shift As Integer)
Select Case KeyCode
Case 27 'ESC
txtEdit = ""
txtEdit.Visible = False
grdGrid.SetFocus
Case 13 'Return
grdGrid.SetFocus
Case 37 'Left Arrow
grdGrid.SetFocus
DoEvents
If grdGrid.col > grdGrid.FixedCols Then
grdGrid.col = grdGrid.col - 1
End If
Case 38 'Up Arrow
grdGrid.SetFocus
DoEvents
If grdGrid.row > grdGrid.FixedRows Then
grdGrid.row = grdGrid.row - 1
End If
Case 39 'Right Arrow
grdGrid.SetFocus
DoEvents
If grdGrid.col < grdGrid.Cols - 1 Then
grdGrid.col = grdGrid.col + 1
End If
Case 40 'Down Arrow
125
grdGrid.SetFocus
DoEvents
If grdGrid.row < grdGrid.Rows - 1 Then
grdGrid.row = grdGrid.row + 1
End If
End Select
End Sub
15.6.315.6.315.6.315.6.3 TRAPPING AMENDED DATA WITHIN THE FLEXGRIDTRAPPING AMENDED DATA WITHIN THE FLEXGRIDTRAPPING AMENDED DATA WITHIN THE FLEXGRIDTRAPPING AMENDED DATA WITHIN THE FLEXGRID
In the subroutine SaveEdits was used to copy the contents of the data-entry Textbox to the FlexGrid cell. A useful technique is to use this routine to check if the Textbox contents differ from the edited cell in the Flexgrid, indicating whether or not data has been changed or newly entered. The rewritten SaveEdits subroutine below checks if the FlexGrid cell's contents have changed, and if so enables a Save CommandBox & Menu Option.
Private Sub MSFlexGrid1_LeaveCell()
Call SaveEdits
End Sub
Private Sub MSFlexGrid1_GotFocus()
Call SaveEdits
End Sub
Private Sub SaveEdits()
If Not txtDataEntry.Visible Then Exit Sub
'enable Save cmdButton if new data has been entered
If txtDataEntry.Text <> MSFlexGrid1.TextMatrix(MSFlexGrid1.row, _
MSFlexGrid1.col) Then
cmdCommit.Enabled = True
mnuCommit.Enabled = True
End If
MSFlexGrid1.TextMatrix(MSFlexGrid1.row, MSFlexGrid1.col) = _
txtDataEntry.Text
txtDataEntry.Visible = False
End Sub
Another extension of this approach is to interrogate the status of the Save Command Button when exiting the form to alert the user to unsaved data. The
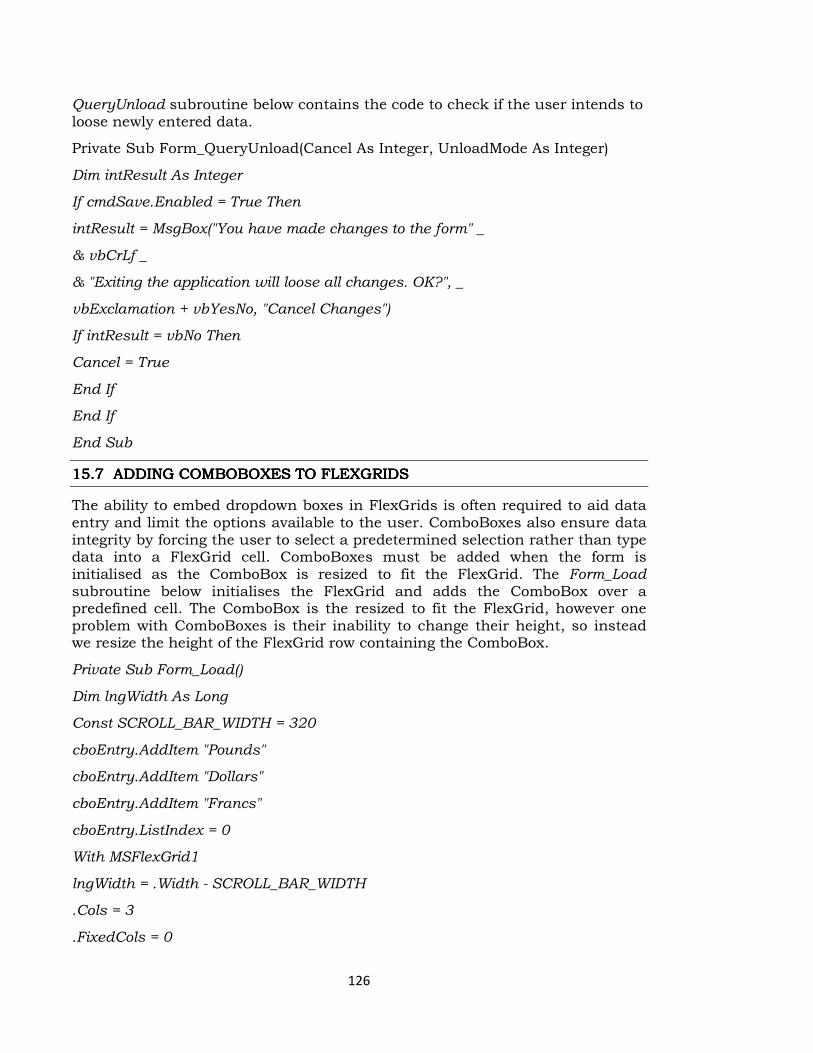
126
QueryUnload subroutine below contains the code to check if the user intends to loose newly entered data.
Private Sub Form_QueryUnload(Cancel As Integer, UnloadMode As Integer)
Dim intResult As Integer
If cmdSave.Enabled = True Then
intResult = MsgBox("You have made changes to the form" _
& vbCrLf _
& "Exiting the application will loose all changes. OK?", _
vbExclamation + vbYesNo, "Cancel Changes")
If intResult = vbNo Then
Cancel = True
End If
End If
End Sub
15.7 15.7 15.7 15.7 ADDINGADDINGADDINGADDING COMBOBOXES TO FLEXGRIDSCOMBOBOXES TO FLEXGRIDSCOMBOBOXES TO FLEXGRIDSCOMBOBOXES TO FLEXGRIDS
The ability to embed dropdown boxes in FlexGrids is often required to aid data entry and limit the options available to the user. ComboBoxes also ensure data integrity by forcing the user to select a predetermined selection rather than type data into a FlexGrid cell. ComboBoxes must be added when the form is initialised as the ComboBox is resized to fit the FlexGrid. The Form_Load subroutine below initialises the FlexGrid and adds the ComboBox over a predefined cell. The ComboBox is the resized to fit the FlexGrid, however one problem with ComboBoxes is their inability to change their height, so instead we resize the height of the FlexGrid row containing the ComboBox.
Private Sub Form_Load()
Dim lngWidth As Long
Const SCROLL_BAR_WIDTH = 320
cboEntry.AddItem "Pounds"
cboEntry.AddItem "Dollars"
cboEntry.AddItem "Francs"
cboEntry.ListIndex = 0
With MSFlexGrid1
lngWidth = .Width - SCROLL_BAR_WIDTH
.Cols = 3
.FixedCols = 0
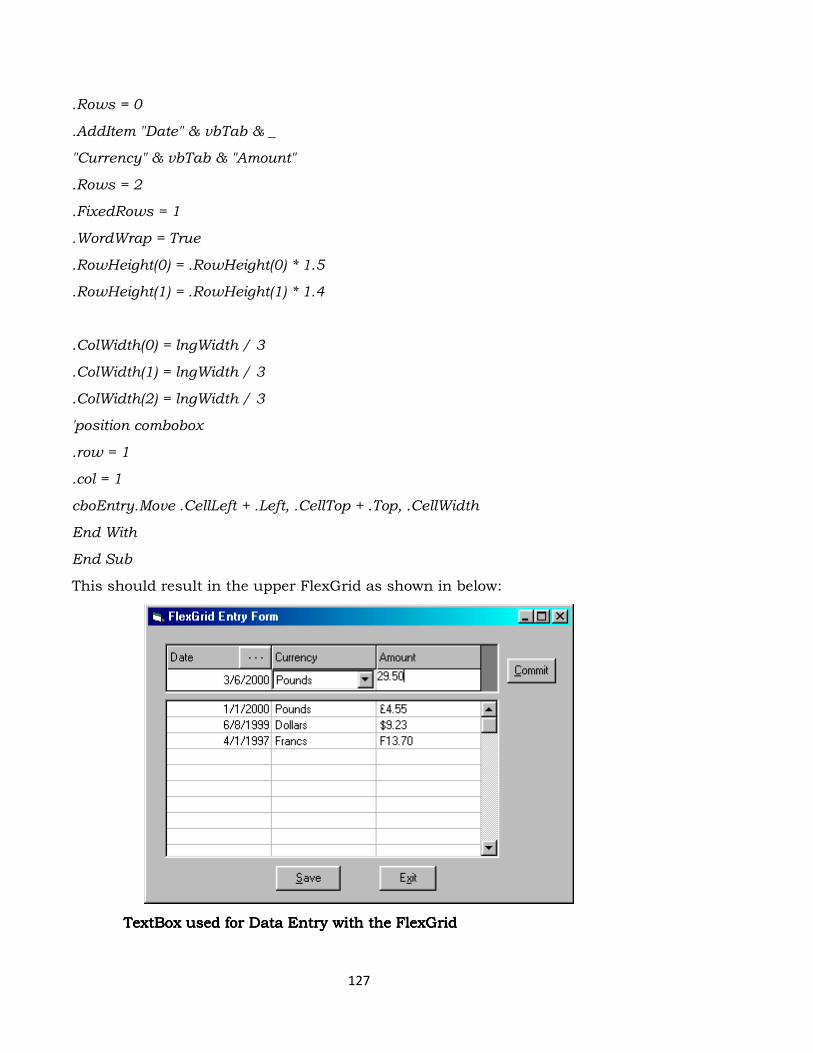
127
.Rows = 0
.AddItem "Date" & vbTab & _
"Currency" & vbTab & "Amount"
.Rows = 2
.FixedRows = 1
.WordWrap = True
.RowHeight(0) = .RowHeight(0) * 1.5
.RowHeight(1) = .RowHeight(1) * 1.4
.ColWidth(0) = lngWidth / 3
.ColWidth(1) = lngWidth / 3
.ColWidth(2) = lngWidth / 3
'position combobox
.row = 1
.col = 1
cboEntry.Move .CellLeft + .Left, .CellTop + .Top, .CellWidth
End With
End Sub
This should result in the upper FlexGrid as shown in below:
TextBox used for Data Entry TextBox used for Data Entry TextBox used for Data Entry TextBox used for Data Entry with the FlexGridwith the FlexGridwith the FlexGridwith the FlexGrid

128
15.815.815.815.8 ADDING POPUP MENUS TO FLEXGRIDSADDING POPUP MENUS TO FLEXGRIDSADDING POPUP MENUS TO FLEXGRIDSADDING POPUP MENUS TO FLEXGRIDS
Including right-button mouse-click popup menus to FlexGrids can further enhance their functionality. These can be used to invoke cell, column or row orientated functions such as edit, delete, display row/column number, save, etc.First a menu must be added to the form with its visible property set to False, then the FlexGrids MouseDown event is used to display the Menu in a popup format.
Private Sub msgReadOnly_MouseDown(Button As Integer, _
Shift As Integer, X As Single, Y As Single)
If Button = vbRightButton Then
msgReadOnly.row = msgReadOnly.MouseRow
PopupMenu mnuPopUp
End If
End Sub
Private Sub mnuPopUp_Click()
'add code here to add menu functionality
End Sub
The resultant menu should display as shown below:
Figure 5: PopUp Menus used with the FlexGridFigure 5: PopUp Menus used with the FlexGridFigure 5: PopUp Menus used with the FlexGridFigure 5: PopUp Menus used with the FlexGrid
15.915.915.915.9 USING FLEXGRIDS CELL MERGE TO GROUP LIKE ROWS USING FLEXGRIDS CELL MERGE TO GROUP LIKE ROWS USING FLEXGRIDS CELL MERGE TO GROUP LIKE ROWS USING FLEXGRIDS CELL MERGE TO GROUP LIKE ROWS
Finally, to add clarity to data within a FlexGrid, the use of the MergeCells property can group common data together. The MergeCells
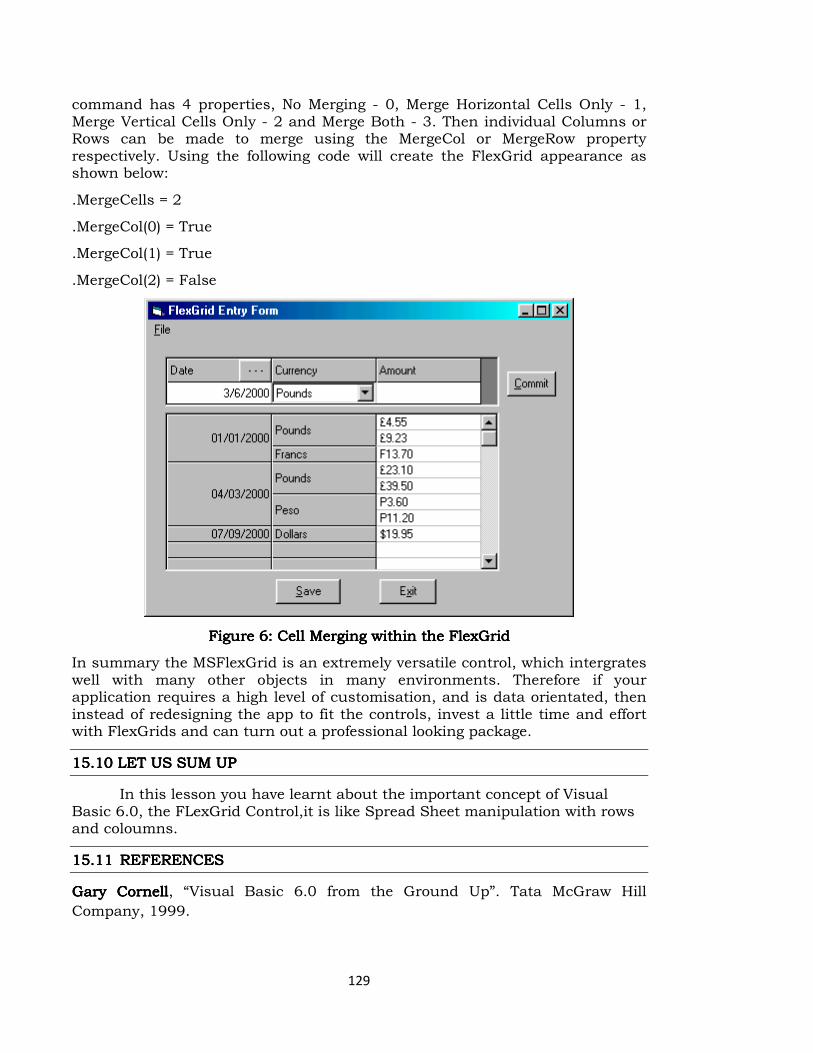
129
command has 4 properties, No Merging - 0, Merge Horizontal Cells Only - 1, Merge Vertical Cells Only - 2 and Merge Both - 3. Then individual Columns or Rows can be made to merge using the MergeCol or MergeRow property respectively. Using the following code will create the FlexGrid appearance as shown below:
.MergeCells = 2
.MergeCol(0) = True
.MergeCol(1) = True
.MergeCol(2) = False
Figure 6: Cell Merging within the FlexGridFigure 6: Cell Merging within the FlexGridFigure 6: Cell Merging within the FlexGridFigure 6: Cell Merging within the FlexGrid
In summary the MSFlexGrid is an extremely versatile control, which intergrates well with many other objects in many environments. Therefore if your application requires a high level of customisation, and is data orientated, then instead of redesigning the app to fit the controls, invest a little time and effort with FlexGrids and can turn out a professional looking package.
15.10 LET US SUM UP15.10 LET US SUM UP15.10 LET US SUM UP15.10 LET US SUM UP
In this lesson you have learnt about the important concept of Visual Basic 6.0, the FLexGrid Control,it is like Spread Sheet manipulation with rows and coloumns.
15.1115.1115.1115.11 REFERENCESREFERENCESREFERENCESREFERENCES
Gary CornellGary CornellGary CornellGary Cornell, “Visual Basic 6.0 from the Ground Up”. Tata McGraw Hill
Company, 1999.
130
Content Development GroupContent Development GroupContent Development GroupContent Development Group “Visual Basic 6.0 Programming” Tata McGraw Hill
Company,Ninth Reprint,2007.
Noel JerkeNoel JerkeNoel JerkeNoel Jerke “The Complete Reference: Visual Basic 6.0”, Tata McGraw Hill
Company, 24th reprint, 2006.
15.1015.1015.1015.10 Using to Using to Using to Using to zzzz
131
UNITUNITUNITUNIT ---- IV IV IV IV
LESSON LESSON LESSON LESSON ---- 16161616
FINISHING THE INTERFACEFINISHING THE INTERFACEFINISHING THE INTERFACEFINISHING THE INTERFACE WITH FRAMESWITH FRAMESWITH FRAMESWITH FRAMES
ContentsContentsContentsContents
16.0 Aims & Objectives
16.1 PictureBox
16.2 OptionButton
16.3 CheckBox
16.4 Let us Sum up
16.5 References
16.016.016.016.0 AIMS & OBJECTIVESAIMS & OBJECTIVESAIMS & OBJECTIVESAIMS & OBJECTIVES
In this lesson we are going to learn about the Frames and how to get the
picture box, OptionButton and CheckBox in a Frame.
16.116.116.116.1 PICTUREBOXPICTUREBOXPICTUREBOXPICTUREBOX
When you want to group several controls together - name and address, for example - you use a FrameFrameFrameFrame. The frame backcolor can be the same as the forms and only the frame borders will be obvious, or it can be a different color and stand out.
You create the frame before the controls. When you create controls in a frame, they are tied to the frame and move with it. The frame caption is the text that appears at the top of the frame - you use it to define the group.
The PictureBoxPictureBoxPictureBoxPictureBox is like a Label with a picture in it instead of text. The Picture propertyPicture propertyPicture propertyPicture property determines the name of the file, .BMP or .GIF that will be displayed. It can be used for a company logo, etc.
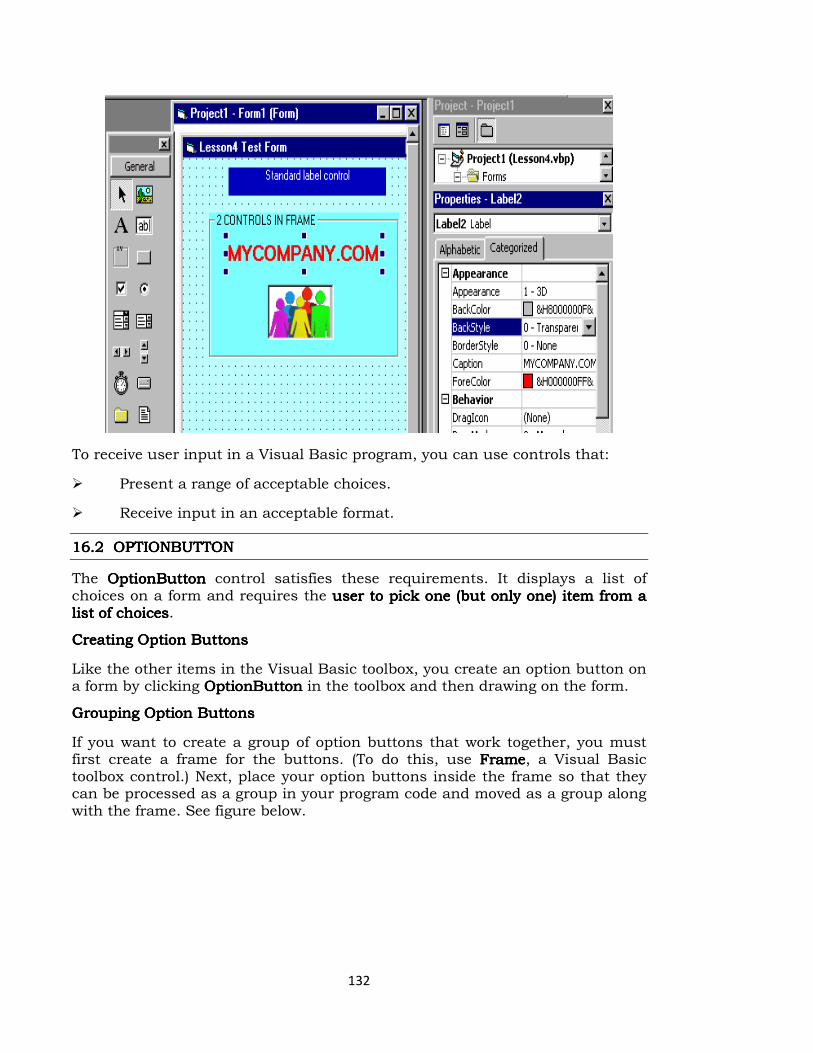
132
To receive user input in a Visual Basic program, you can use controls that:
� Present a range of acceptable choices.
� Receive input in an acceptable format.
16.216.216.216.2 OPTIONBUTTONOPTIONBUTTONOPTIONBUTTONOPTIONBUTTON
The OptionButtonOptionButtonOptionButtonOptionButton control satisfies these requirements. It displays a list of choices on a form and requires the user to pick one (but only one) item from a user to pick one (but only one) item from a user to pick one (but only one) item from a user to pick one (but only one) item from a list of choiceslist of choiceslist of choiceslist of choices.
Creating Option ButtonsCreating Option ButtonsCreating Option ButtonsCreating Option Buttons
Like the other items in the Visual Basic toolbox, you create an option button on a form by clicking OptionButton OptionButton OptionButton OptionButton in the toolbox and then drawing on the form.
Grouping Option ButtonsGrouping Option ButtonsGrouping Option ButtonsGrouping Option Buttons
If you want to create a group of option buttons that work together, you must first create a frame for the buttons. (To do this, use FrameFrameFrameFrame, a Visual Basic toolbox control.) Next, place your option buttons inside the frame so that they can be processed as a group in your program code and moved as a group along with the frame. See figure below.
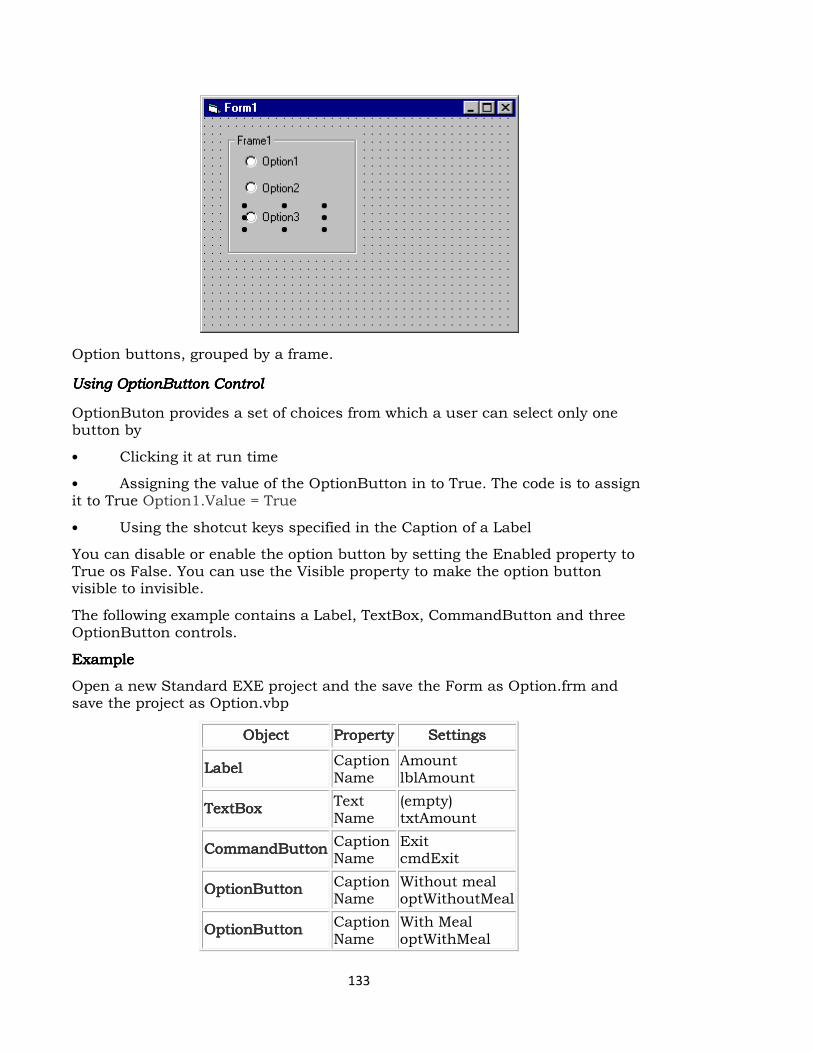
133
Option buttons, grouped by a frame.
Using OptionButton ControlUsing OptionButton ControlUsing OptionButton ControlUsing OptionButton Control
OptionButon provides a set of choices from which a user can select only one button by
• Clicking it at run time
• Assigning the value of the OptionButton in to True. The code is to assign it to True Option1.Value = True
• Using the shotcut keys specified in the Caption of a Label
You can disable or enable the option button by setting the Enabled property to True os False. You can use the Visible property to make the option button visible to invisible.
The following example contains a Label, TextBox, CommandButton and three OptionButton controls.
Example Example Example Example
Open a new Standard EXE project and the save the Form as Option.frm and save the project as Option.vbp
Object Object Object Object PropertyPropertyPropertyProperty SettingsSettingsSettingsSettings
LabelLabelLabelLabel Caption Name
Amount lblAmount
TextBoxTextBoxTextBoxTextBox Text Name
(empty) txtAmount
CommandButtonCommandButtonCommandButtonCommandButton Caption Name
Exit cmdExit
OptionButtonOptionButtonOptionButtonOptionButton Caption Name
Without meal optWithoutMeal
OptionButtonOptionButtonOptionButtonOptionButton Caption Name
With Meal optWithMeal
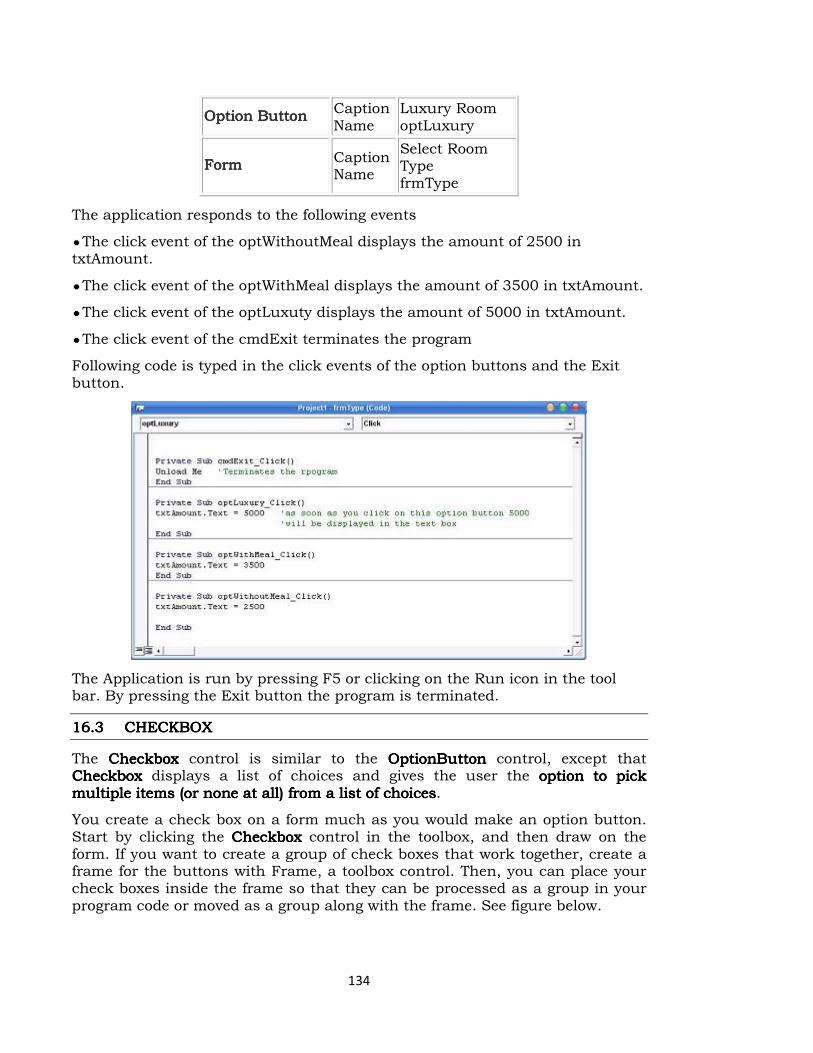
134
Option ButtonOption ButtonOption ButtonOption Button Caption Name
Luxury Room optLuxury
FormFormFormForm Caption Name
Select Room Type frmType
The application responds to the following events
The click event of the optWithoutMeal displays the amount of 2500 in txtAmount.
The click event of the optWithMeal displays the amount of 3500 in txtAmount.
The click event of the optLuxuty displays the amount of 5000 in txtAmount.
The click event of the cmdExit terminates the program
Following code is typed in the click events of the option buttons and the Exit button.
The Application is run by pressing F5 or clicking on the Run icon in the tool bar. By pressing the Exit button the program is terminated.
16.316.316.316.3 CHECKBOXCHECKBOXCHECKBOXCHECKBOX
The Checkbox Checkbox Checkbox Checkbox control is similar to the OptionButton OptionButton OptionButton OptionButton control, except that Checkbox Checkbox Checkbox Checkbox displays a list of choices and gives the user the option option option option to pick to pick to pick to pick multiple items (or none at all) from a listmultiple items (or none at all) from a listmultiple items (or none at all) from a listmultiple items (or none at all) from a list of choicesof choicesof choicesof choices.
You create a check box on a form much as you would make an option button. Start by clicking the Checkbox Checkbox Checkbox Checkbox control in the toolbox, and then draw on the form. If you want to create a group of check boxes that work together, create a frame for the buttons with Frame, a toolbox control. Then, you can place your check boxes inside the frame so that they can be processed as a group in your program code or moved as a group along with the frame. See figure below.
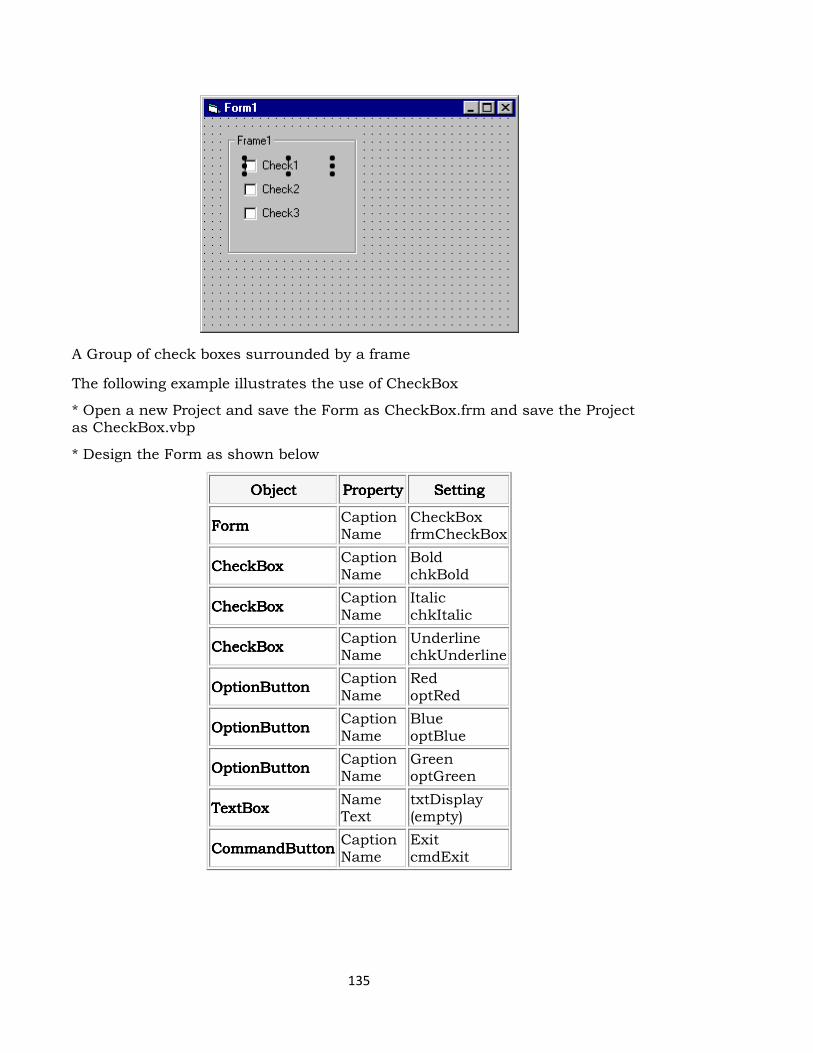
135
A Group of check boxes surrounded by a frame
The following example illustrates the use of CheckBox
* Open a new Project and save the Form as CheckBox.frm and save the Project as CheckBox.vbp
* Design the Form as shown below
ObjectObjectObjectObject Property Property Property Property SettingSettingSettingSetting
FormFormFormForm Caption Name
CheckBox frmCheckBox
CheckBoxCheckBoxCheckBoxCheckBox Caption Name
Bold chkBold
CheckBoxCheckBoxCheckBoxCheckBox Caption Name
Italic chkItalic
CheckBoxCheckBoxCheckBoxCheckBox Caption Name
Underline chkUnderline
OptionButton OptionButton OptionButton OptionButton Caption Name
Red optRed
OptionButtonOptionButtonOptionButtonOptionButton Caption Name
Blue optBlue
OptionButtonOptionButtonOptionButtonOptionButton Caption Name
Green optGreen
TextBoxTextBoxTextBoxTextBox Name Text
txtDisplay (empty)
CommandButtonCommandButtonCommandButtonCommandButton Caption Name
Exit cmdExit
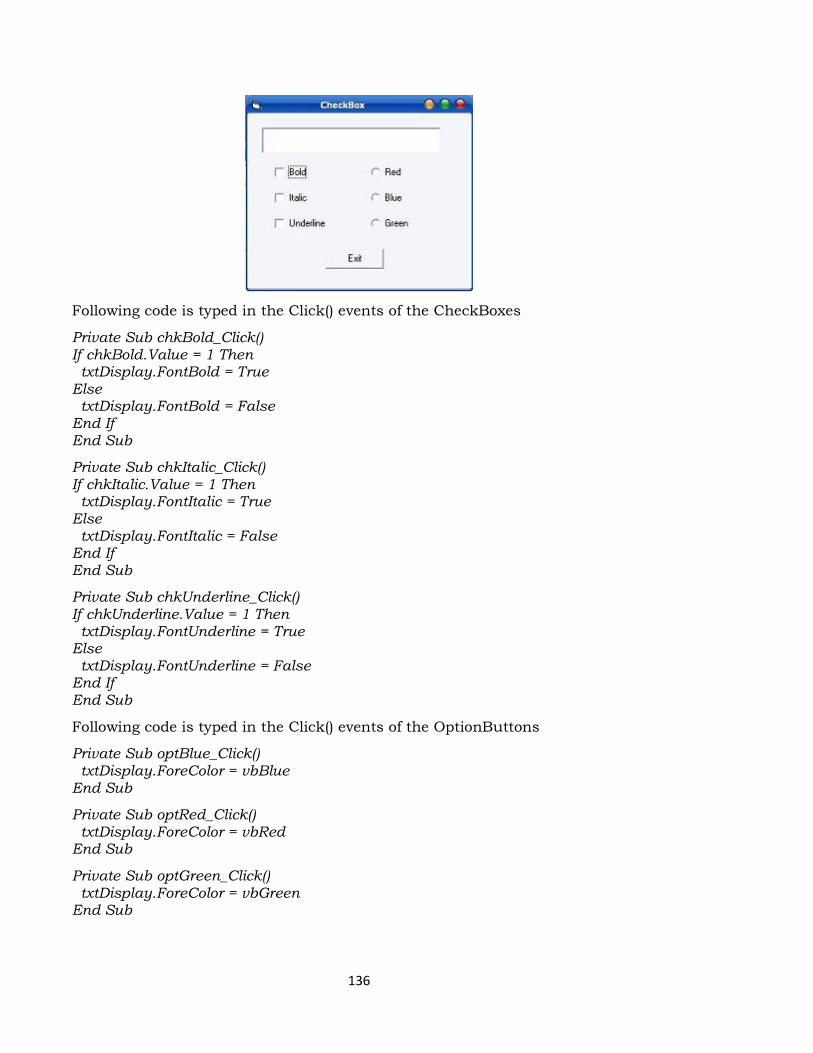
136
Following code is typed in the Click() events of the CheckBoxes
Private Sub chkBold_Click() If chkBold.Value = 1 Then txtDisplay.FontBold = True Else txtDisplay.FontBold = False End If End Sub
Private Sub chkItalic_Click() If chkItalic.Value = 1 Then txtDisplay.FontItalic = True Else txtDisplay.FontItalic = False End If End Sub
Private Sub chkUnderline_Click() If chkUnderline.Value = 1 Then txtDisplay.FontUnderline = True Else txtDisplay.FontUnderline = False End If End Sub
Following code is typed in the Click() events of the OptionButtons
Private Sub optBlue_Click() txtDisplay.ForeColor = vbBlue End Sub
Private Sub optRed_Click() txtDisplay.ForeColor = vbRed End Sub
Private Sub optGreen_Click() txtDisplay.ForeColor = vbGreen End Sub

137
To terminate the program following code is typed in the Click() event of the Exit button
Private Sub cmdExit_Click() End End Sub
16.416.416.416.4 LET US SUM UPLET US SUM UPLET US SUM UPLET US SUM UP
In ths lesson you have learnt about the importance of frames and
inclusion of OptionButton and CheckBoxes in a frame.These button will be very
useful for grouping.
16.516.516.516.5 REFERENCES REFERENCES REFERENCES REFERENCES
Gary CornellGary CornellGary CornellGary Cornell, “Visual Basic 6.0 from the Ground Up”. Tata McGraw Hill
Company, 1999.
Content Development GroupContent Development GroupContent Development GroupContent Development Group “Visual Basic 6.0 Programming” Tata McGraw Hill
Company,Ninth Reprint,2007.
Noel JerkeNoel JerkeNoel JerkeNoel Jerke “The Complete Reference: Visual Basic 6.0”, Tata McGraw Hill
Company, 24th reprint, 2006.
138
LESSON LESSON LESSON LESSON –––– 17171717
SCROLL BAR AND TIMER CONTROLSCROLL BAR AND TIMER CONTROLSCROLL BAR AND TIMER CONTROLSCROLL BAR AND TIMER CONTROL
ContentsContentsContentsContents
17.0 Aims & Objectives
17.1 ScrollBar
17.2 Using the Timer Control
17.2.1 Example: Creating a Digital Clock
17.2.2 Setting a Time Limit for Input
17.3 Let us Sum up
17.4 References
17.017.017.017.0 AIMS & OBJECTIVESAIMS & OBJECTIVESAIMS & OBJECTIVESAIMS & OBJECTIVES
In this lesson we are going to learn about the ScrollBar and Timer Control. The very important aspect of ScrollBar is selecting values between maximum and minimum. Timer Control is useful in creating digital clockis explained with an example.
17171717.1.1.1.1 SCROLLBARSCROLLBARSCROLLBARSCROLLBAR
The ScrollBar is a commonly used control, which enables the user to select a value by positioning it at the desired location. It represents a set of values. The Min and Max property represents the minimum and maximum value. The value property of the ScrollBar represents its current value that may be any integer between minimum and maximum values assigned.
Following example illustrates the ScrollBar control
� Open a new Standard EXE project and name the form as ScrollBar.frm and name the project as ScrollBar.vbp
� When the thumb's position of the ScrollBar is changed the value has to displayed in the TextBox.
� Design the application as shown below.
ObjectObjectObjectObject
PropertyPropertyPropertyProperty SettingSettingSettingSetting
FormFormFormForm Caption Name
Scroll Bar frmScrollbar
CommandButtonCommandButtonCommandButtonCommandButton Caption Name
Exit cmdExit
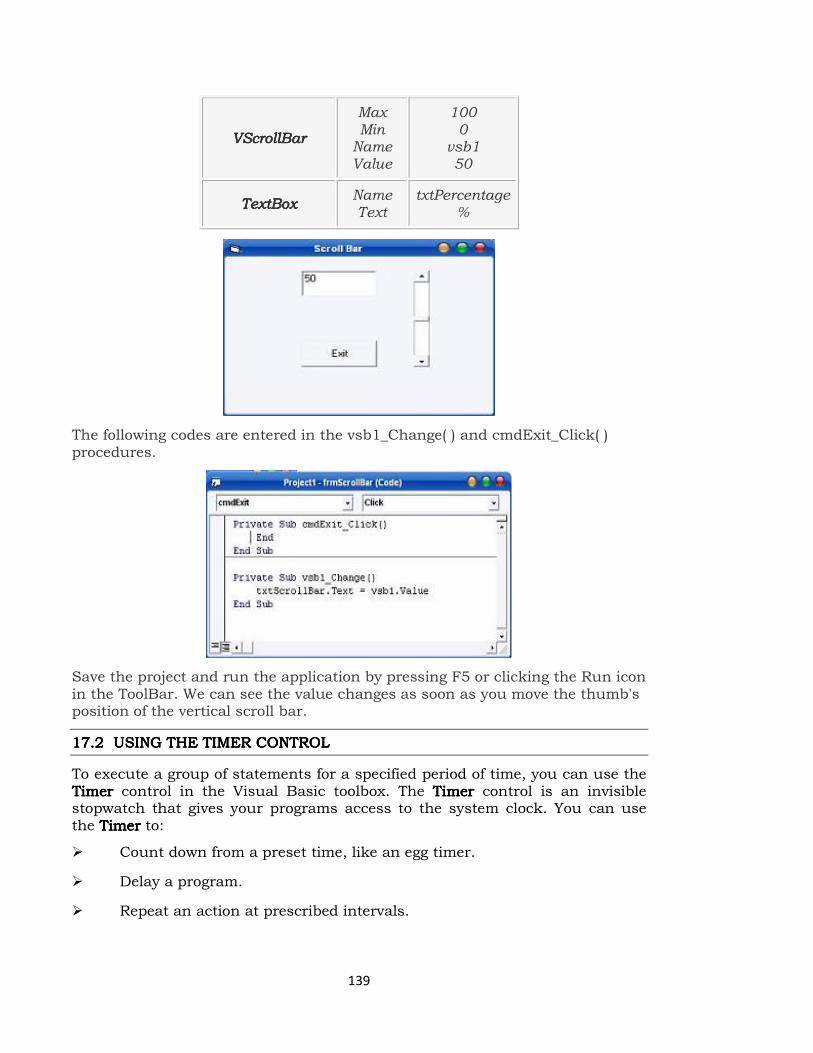
139
VScrollBarVScrollBarVScrollBarVScrollBar
Max Min Name Value
100 0
vsb1 50
TextBoxTextBoxTextBoxTextBox Name Text
txtPercentage %
The following codes are entered in the vsb1_Change( ) and cmdExit_Click( ) procedures.
Save the project and run the application by pressing F5 or clicking the Run icon in the ToolBar. We can see the value changes as soon as you move the thumb's position of the vertical scroll bar.
17.17.17.17.2222 USING THE TIMER CONTROLUSING THE TIMER CONTROLUSING THE TIMER CONTROLUSING THE TIMER CONTROL
To execute a group of statements for a specified period of time, you can use the Timer Timer Timer Timer control in the Visual Basic toolbox. The Timer Timer Timer Timer control is an invisible stopwatch that gives your programs access to the system clock. You can use the Timer Timer Timer Timer to:
� Count down from a preset time, like an egg timer.
� Delay a program.
� Repeat an action at prescribed intervals.
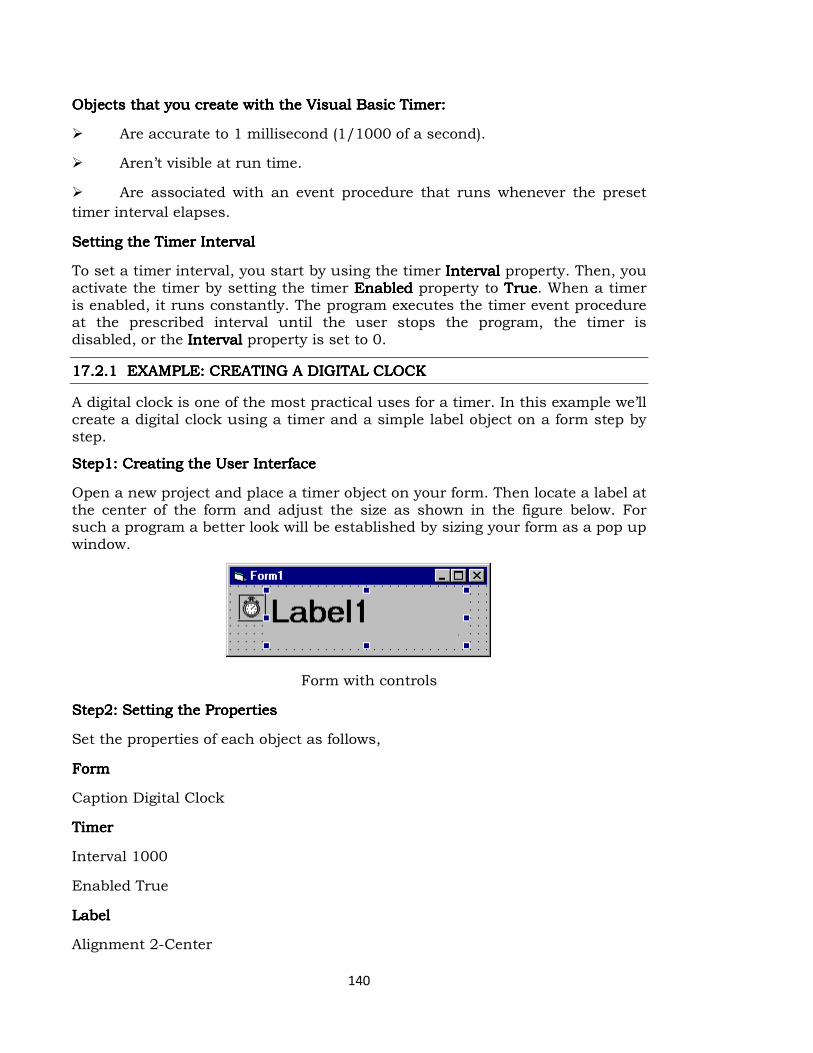
140
Objects that you create with the Objects that you create with the Objects that you create with the Objects that you create with the Visual Basic Timer:Visual Basic Timer:Visual Basic Timer:Visual Basic Timer:
� Are accurate to 1 millisecond (1/1000 of a second).
� Aren’t visible at run time.
� Are associated with an event procedure that runs whenever the preset
timer interval elapses.
Setting the Timer IntervalSetting the Timer IntervalSetting the Timer IntervalSetting the Timer Interval
To set a timer interval, you start by using the timer Interval Interval Interval Interval property. Then, you activate the timer by setting the timer Enabled Enabled Enabled Enabled property to TrueTrueTrueTrue. When a timer is enabled, it runs constantly. The program executes the timer event procedure at the prescribed interval until the user stops the program, the timer is disabled, or the Interval Interval Interval Interval property is set to 0.
17.17.17.17.2222.1.1.1.1 EXAMPLE: CREATING A DIGITAL CLOCKEXAMPLE: CREATING A DIGITAL CLOCKEXAMPLE: CREATING A DIGITAL CLOCKEXAMPLE: CREATING A DIGITAL CLOCK
A digital clock is one of the most practical uses for a timer. In this example we’ll create a digital clock using a timer and a simple label object on a form step by step.
Step1: Creating Step1: Creating Step1: Creating Step1: Creating thethethethe User InterfaceUser InterfaceUser InterfaceUser Interface
Open a new project and place a timer object on your form. Then locate a label at the center of the form and adjust the size as shown in the figure below. For such a program a better look will be established by sizing your form as a pop up window.
Form with controls
Step2: Setting the PropertiesStep2: Setting the PropertiesStep2: Setting the PropertiesStep2: Setting the Properties
Set the properties of each object as follows,
FormFormFormForm
Caption Digital Clock
TimerTimerTimerTimer
Interval 1000
Enabled True
LabelLabelLabelLabel
Alignment 2-Center
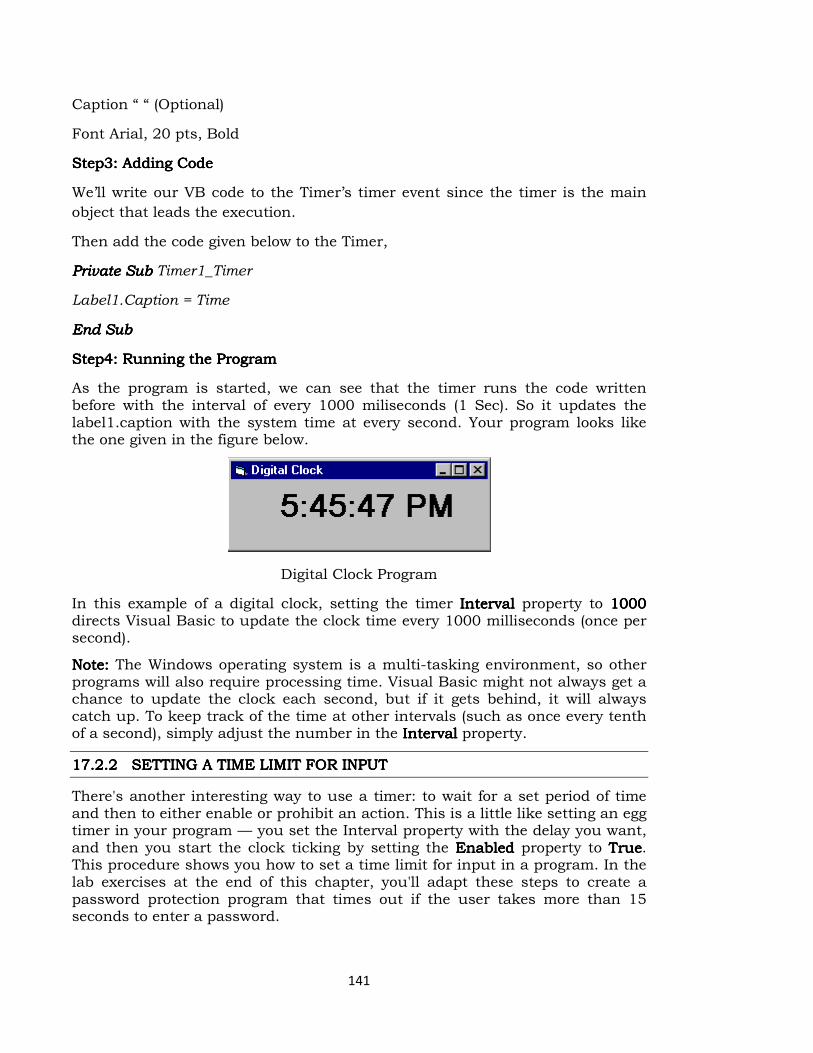
141
Caption “ “ (Optional)
Font Arial, 20 pts, Bold
Step3: Adding CodeStep3: Adding CodeStep3: Adding CodeStep3: Adding Code
We’ll write our VB code to the Timer’s timer event since the timer is the main
object that leads the execution.
Then add the code given below to the Timer,
Private Sub Private Sub Private Sub Private Sub Timer1_Timer
Label1.Caption = Time
End SubEnd SubEnd SubEnd Sub
Step4: Running Step4: Running Step4: Running Step4: Running thethethethe ProgramProgramProgramProgram
As the program is started, we can see that the timer runs the code written before with the interval of every 1000 miliseconds (1 Sec). So it updates the label1.caption with the system time at every second. Your program looks like the one given in the figure below.
Digital Clock Program
In this example of a digital clock, setting the timer Interval Interval Interval Interval property to 1000 1000 1000 1000 directs Visual Basic to update the clock time every 1000 milliseconds (once per second).
Note: Note: Note: Note: The Windows operating system is a multi-tasking environment, so other programs will also require processing time. Visual Basic might not always get a chance to update the clock each second, but if it gets behind, it will always catch up. To keep track of the time at other intervals (such as once every tenth of a second), simply adjust the number in the Interval Interval Interval Interval property.
17.17.17.17.2.22.22.22.2 SETTING A TIME LIMIT FOR INPUTSETTING A TIME LIMIT FOR INPUTSETTING A TIME LIMIT FOR INPUTSETTING A TIME LIMIT FOR INPUT
There's another interesting way to use a timer: to wait for a set period of time and then to either enable or prohibit an action. This is a little like setting an egg timer in your program — you set the Interval property with the delay you want, and then you start the clock ticking by setting the Enabled Enabled Enabled Enabled property to TrueTrueTrueTrue. This procedure shows you how to set a time limit for input in a program. In the lab exercises at the end of this chapter, you'll adapt these steps to create a password protection program that times out if the user takes more than 15 seconds to enter a password.
142
To set a user input time limitTo set a user input time limitTo set a user input time limitTo set a user input time limit
1. Create a Timer Timer Timer Timer object on your form.
2. Set the Interval Interval Interval Interval property of the Timer Timer Timer Timer object to the user input time limit.
Be sure to specify the time limit in milliseconds. For example, set the Interval Interval Interval Interval
property to 30000 for a 30-second time limit.
3. In the Timer Timer Timer Timer object’s Timer event procedure, place statements that print a
"time expired" message and that stop the program. For example:
MsgBox ("Sorry, your time is up.")
To create an event procedure to manage user inputTo create an event procedure to manage user inputTo create an event procedure to manage user inputTo create an event procedure to manage user input
1. At the place you want to begin the timed input interval, type the following
program statement to start the clock:
Timer1.Enabled = True
You can associate the event procedure with a command button, text box, or any other object that receives input. If you want the clock to start when the form first appears, place the statement in the Form_Load event procedure.
2. To turn off the clock when the user completes the input satisfactorily,
use an event procedure with the following statement:
Timer1.Enabled = False
Without this statement, the timer object event procedure automatically closes
the program when the allotted time expires.
17.317.317.317.3 LET US SUM UPLET US SUM UPLET US SUM UPLET US SUM UP
In this lesson we learnt about the importance of ScrollBar and Timer Control.
17.417.417.417.4 REFERENCESREFERENCESREFERENCESREFERENCES
Gary CornellGary CornellGary CornellGary Cornell, “Visual Basic 6.0 from the Ground Up”. Tata McGraw Hill
Company,1999.
Content Development GroupContent Development GroupContent Development GroupContent Development Group “Visual Basic 6.0 Programming” Tata McGraw Hill
Company,Ninth Reprint,2007.
Noel JerkeNoel JerkeNoel JerkeNoel Jerke “The Complete Reference: Visual Basic 6.0”, Tata McGraw Hill
Company, 24th reprint, 2006.

143
LESSON LESSON LESSON LESSON –––– 18181818
WORKING WITH MENUS AND DIALOG BOXESWORKING WITH MENUS AND DIALOG BOXESWORKING WITH MENUS AND DIALOG BOXESWORKING WITH MENUS AND DIALOG BOXES
ContentsContentsContentsContents
18.0 Aims & Objectives
18.1 Creating Menus
18.2 Using the Menu Editor
18.3 Adding Access and Shortcut Keys
18.4 Processing Menu Choices
18.018.018.018.0 AIMS & OBJECTIVESAIMS & OBJECTIVESAIMS & OBJECTIVESAIMS & OBJECTIVES
This lesson focuses on processing input from another source in the user
interface: menu commands and dialog boxes. In this lesson, you will learn how
to:
� Add menus to your programs by using the Menu Editor.
� Process menu choices by using program code.
� Use the CommonDialog CommonDialog CommonDialog CommonDialog ActiveX control to display standard dialog boxes.
18.118.118.118.1 CREATING MENUSCREATING MENUSCREATING MENUSCREATING MENUS
Menus, which are located on the menu bar menu bar menu bar menu bar of a form, contain a list of related commands. When you click a menu title in a Windows-based program, a list of menu commands should always appear in a well-organized list.
Most menu commands run immediately after they are clicked. For example, when the user clicks the Edit Edit Edit Edit menu CopyCopyCopyCopy command, Windows immediately copies information to the Clipboard. However, if ellipsis points (…) follow the menu command, Visual Basic displays a dialog box that requests more information before the command is carried out.
This section includes the following topics:
� Using the Menu Editor
� Adding Access and Shortcut Keys
� Processing Menu Choices
11118888....2222 USING THE MENU EDITORUSING THE MENU EDITORUSING THE MENU EDITORUSING THE MENU EDITOR
The Menu Editor is a Visual Basic dialog box that manages menus in your
programs. With the Menu Editor, you can:
� Add new menus
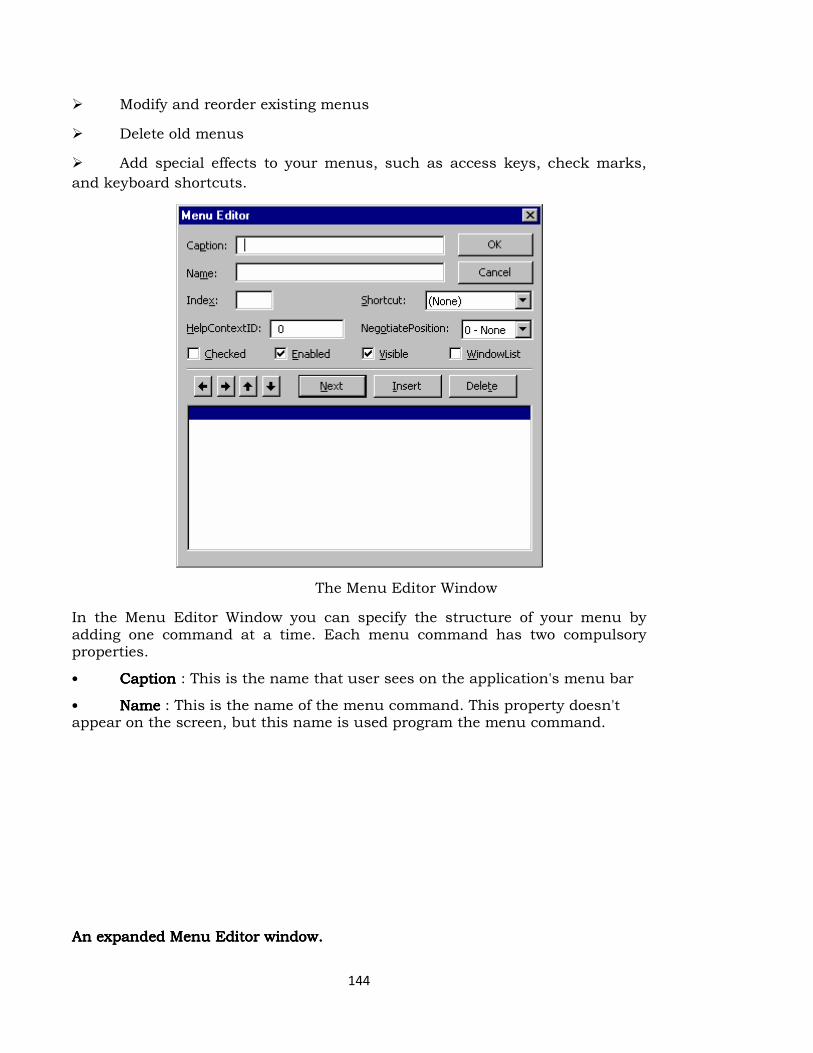
144
� Modify and reorder existing menus
� Delete old menus
� Add special effects to your menus, such as access keys, check marks,
and keyboard shortcuts.
The Menu Editor Window
In the Menu Editor Window you can specify the structure of your menu by adding one command at a time. Each menu command has two compulsory properties.
• CaptionCaptionCaptionCaption : This is the name that user sees on the application's menu bar
• NameNameNameName : This is the name of the menu command. This property doesn't appear on the screen, but this name is used program the menu command.
An expanded Menu Editor window.An expanded Menu Editor window.An expanded Menu Editor window.An expanded Menu Editor window.

145
An expanded menuAn expanded menuAn expanded menuAn expanded menu
The programmer can create menu control arrays. The Index TextBox specifies the menu's index in the control array.
The Menu Editor dialog also provides several CheckBoxes to control the appearance of the Menu.
CheckedCheckedCheckedChecked : This is unchecked by default and allows the programmer the option of creating a checked menu item( a menu item that act as a toggle and displays a check mark when selected. The following is a Check Menu items.
EnabledEnabledEnabledEnabled : specifies whether a menu is disabled or not. If you see a disabled command in a menu that means that feature is not available. The Visible checkbox specifies whether the menu is visible or not.
To add commands to the Form's menu bar, enter a caption and a name for each command. As soon as you start typing the command's caption, it also appears
146
in a new line in the list at the bottom of the Menu Editor window. To add more commands click Enter and type the Caption and the Name.
Creating Menu Command ListsCreating Menu Command ListsCreating Menu Command ListsCreating Menu Command Lists
To build lists of menu commands, you first need to create the menus and then add them to the program menu bar.
To create a listTo create a listTo create a listTo create a list of menu commands on a formof menu commands on a formof menu commands on a formof menu commands on a form
1. Click the form itself (not an object on the form).
2. On the Visual Basic toolbar, click the Menu Editor icon, or select Menu Menu Menu Menu Editor Editor Editor Editor from the Tools Tools Tools Tools menu.
3. In the Caption Caption Caption Caption text box, type the menu caption (the name that will appear on the menu bar), and then press TAB.
4. In the Name Name Name Name text box, type the menu name.
By convention, programmers use the mnu object name prefix to identify both
menus and menu commands.
5. To add the menu to your program menu bar, click NextNextNextNext. The Menu Editor
clears the dialog box for the next menu item. As you build your menus,the
structure of the menus and commands appear at the bottom of the dialog box.
6. In the Caption Caption Caption Caption text box, type the caption of your first menu command.
7. Press tab, and then type the object name of the command in the Name Name Name Name text
box.
8. With this first command highlighted in the menu list box, click the right
arrow button in the Menu Editor.
In the Menu Menu Menu Menu list box, the command moves one indent (four spaces) to the right.
Click the right arrow button in the Menu Editor Dialog box to move items to the
right, and click the left arrow button to move items to the left.
9. Click nextnextnextnext, and then continue to add commands to your menu.
The position of list box items determines what they are:
List box item List box item List box item List box item PositionPositionPositionPosition
Menu title Flush left
Menu command One indent
Submenu title Two indents
Submenu command Three indents
147
To add more menusTo add more menusTo add more menusTo add more menus
1. When you’re ready to add another menu, click the left arrow button to make the menu flush left in the Menu Menu Menu Menu list box.
2. To add another menu and menu commands, repeat Steps 3 through 9 in the preceding procedure.
3. When you’re finished entering menus and commands, click OK OK OK OK to close the Menu Editor.
(Don’t accidentally click Cancel Cancel Cancel Cancel or all your menu work will be lost.)
The Menu Editor closes, and your form appears in the programming environment with the menus you created.
Adding Event ProceduresAdding Event ProceduresAdding Event ProceduresAdding Event Procedures
After you add menus to your form, you can use event procedures to process the menu commands. Clicking a menu command on the form in the programming environment displays the event procedure that runs when the menu command is chosen. You’ll learn how to create event procedures that process menu selections in Processing Menu Choices.
11118888....3333 ADDING ACCESS AND SHORTCUT KEYSADDING ACCESS AND SHORTCUT KEYSADDING ACCESS AND SHORTCUT KEYSADDING ACCESS AND SHORTCUT KEYS
Visual Basic makes it easy to provide access key and shortcut key support for
menus and menu commands.
Access and Shortcut KeysAccess and Shortcut KeysAccess and Shortcut KeysAccess and Shortcut Keys
The access key for a command is the letter the user can press to execute the command when the menu is open. The shortcut key is the key combination the user can press to run the command without opening the menu. Here's a quick look at how to add access and shortcut keys to existing menu items. Add an access key to a menu item Start the Menu Editor. Prefix the access key letter in the menu item caption with an ampersand (&). ampersand (&). ampersand (&). ampersand (&). Add a shortcut key to a menu command Start the Menu Editor. Highlight the command in the menu list box. Pick a key combination from the Shortcut drop-down list box.
Creating Access and Shortcut KeysCreating Access and Shortcut KeysCreating Access and Shortcut KeysCreating Access and Shortcut Keys
You can create access keys and shortcut keys either when you first create your
menu commands or at a later time. The following illustration shows the menu
commands associated with two menus, File File File File and ClocClocClocClockkkk. Each menu item has an
access key ampersand character, and the Time Time Time Time and Date Date Date Date commands are
assigned shortcut keys. See figure below
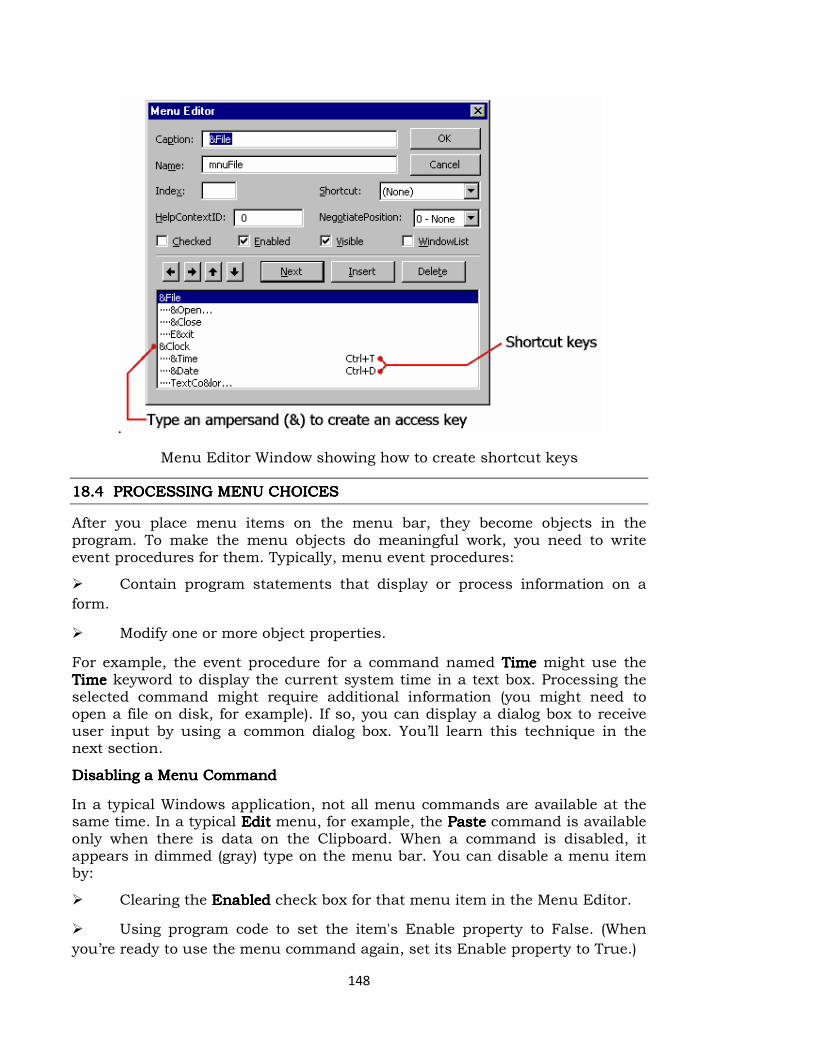
148
.
Menu Editor Window showing how to create shortcut keys
11118888....4444 PROCESSING MENU CHOICESPROCESSING MENU CHOICESPROCESSING MENU CHOICESPROCESSING MENU CHOICES
After you place menu items on the menu bar, they become objects in the program. To make the menu objects do meaningful work, you need to write event procedures for them. Typically, menu event procedures:
� Contain program statements that display or process information on a
form.
� Modify one or more object properties.
For example, the event procedure for a command named Time Time Time Time might use the Time Time Time Time keyword to display the current system time in a text box. Processing the selected command might require additional information (you might need to open a file on disk, for example). If so, you can display a dialog box to receive user input by using a common dialog box. You’ll learn this technique in the next section.
Disabling a Menu CommandDisabling a Menu CommandDisabling a Menu CommandDisabling a Menu Command
In a typical Windows application, not all menu commands are available at the same time. In a typical Edit Edit Edit Edit menu, for example, the Paste Paste Paste Paste command is available only when there is data on the Clipboard. When a command is disabled, it appears in dimmed (gray) type on the menu bar. You can disable a menu item by:
� Clearing the Enabled Enabled Enabled Enabled check box for that menu item in the Menu Editor.
� Using program code to set the item's Enable property to False. (When
you’re ready to use the menu command again, set its Enable property to True.)
149
18.518.518.518.5 LLLLET US SUM UPET US SUM UPET US SUM UPET US SUM UP
In this lesson you have learnt how to
• Add menus to your programs by using the Menu Editor.
• Process menu choices by using program code.
• Use the CommonDialog CommonDialog CommonDialog CommonDialog ActiveX control to display standard dialog boxes.
18.618.618.618.6 REFERENCESREFERENCESREFERENCESREFERENCES
Gary CornellGary CornellGary CornellGary Cornell, “Visual Basic 6.0 from the Ground Up”. Tata McGraw Hill
Company,1999.
Content Development GroupContent Development GroupContent Development GroupContent Development Group “Visual Basic 6.0 Programming” Tata McGraw Hill
Company,Ninth Reprint,2007.
Noel JerkeNoel JerkeNoel JerkeNoel Jerke “The Complete Reference: Visual Basic 6.0”, Tata McGraw Hill
Company, 24th reprint, 2006.
150
LESSON LESSON LESSON LESSON ---- 19191919
CREATING DIALOG BOXESCREATING DIALOG BOXESCREATING DIALOG BOXESCREATING DIALOG BOXES
ContentsContentsContentsContents
19.0 Aims & Objectives
19.1 Using the Common Dialog Control
19.2 Common Dialog Object event Procedures
19.2.1 Creating an Open Dialog Box
19.2.2 Creating a Color Dialog Box
19.3 Exercise: Creating a File Menu and Common Dialog Object Step by Step
19.4 Let us Sum up
19.5 References
19.0 19.0 19.0 19.0 AIMS & OBJECTIVESAIMS & OBJECTIVESAIMS & OBJECTIVESAIMS & OBJECTIVES
This lesson includes the following topics:
� Using the CommonDialog Control
� Common Dialog Object Event Procedures
A dialog box dialog box dialog box dialog box is simply a form in a program that contains input controls designed to receive information. To make your programming faster, Visual Basic includes an ActiveX control, named CommonDialogCommonDialogCommonDialogCommonDialog. With this control, you can easily display six standard dialog boxes six standard dialog boxes six standard dialog boxes six standard dialog boxes in your programs. These dialog boxes handle routine tasks such as opening files, saving files, and picking fonts. If the dialog box you want to use is not included in this ready-made collection of objects, you can create a new one by adding a second form to your program.
11119999.1.1.1.1 USING THE COMMON DIALOG CONTROLUSING THE COMMON DIALOG CONTROLUSING THE COMMON DIALOG CONTROLUSING THE COMMON DIALOG CONTROL
Before you can use the CommonDialog CommonDialog CommonDialog CommonDialog control, you need to verify that it is in your toolbox. If you don’t see the CommonDialogCommonDialogCommonDialogCommonDialog icon, follow this procedure to add it to the toolbox.
To add the CommonDialog control to the toolTo add the CommonDialog control to the toolTo add the CommonDialog control to the toolTo add the CommonDialog control to the toolboxboxboxbox
1. From the Project Project Project Project menu, click ComponentsComponentsComponentsComponents.
2. Click the Controls Controls Controls Controls tab.
3. Ensure that the Selected Items Only Selected Items Only Selected Items Only Selected Items Only box is not checked.
4. Place a check mark next to Microsoft Common Dialog ControlMicrosoft Common Dialog ControlMicrosoft Common Dialog ControlMicrosoft Common Dialog Control, and then click
OKOKOKOK.
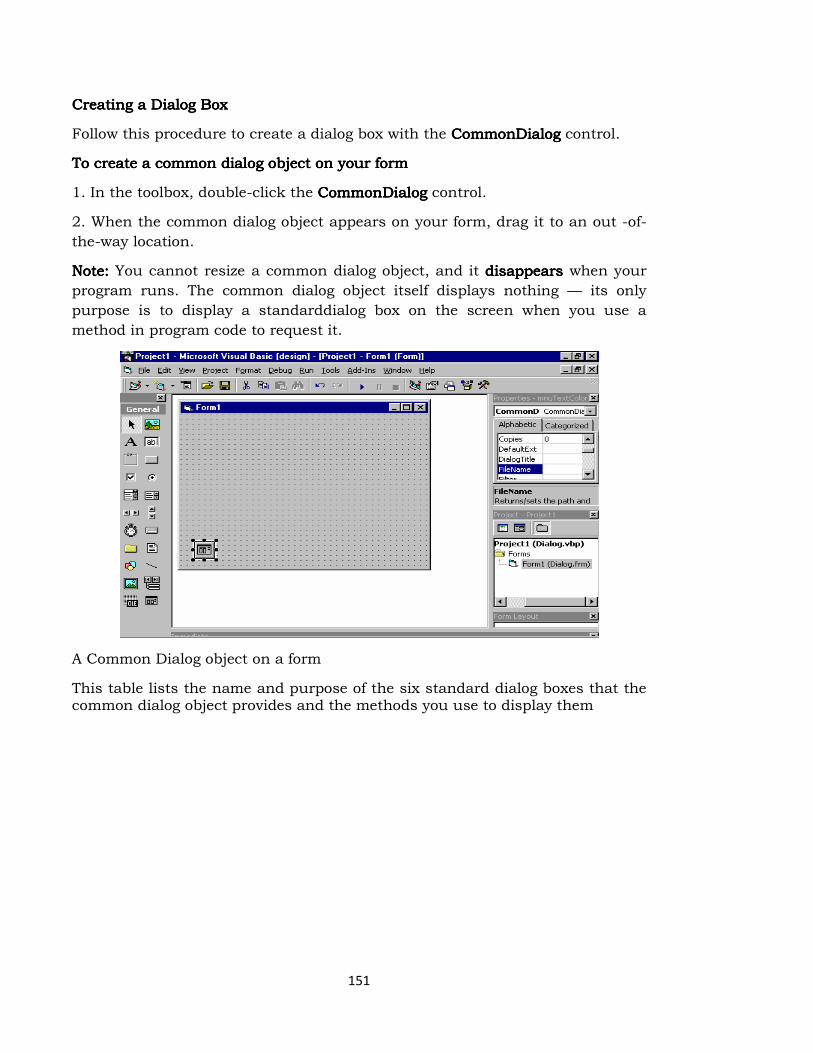
151
Creating a Dialog BoxCreating a Dialog BoxCreating a Dialog BoxCreating a Dialog Box
Follow this procedure to create a dialog box with the CommonDialog CommonDialog CommonDialog CommonDialog control.
To create a common dialog object on your formTo create a common dialog object on your formTo create a common dialog object on your formTo create a common dialog object on your form
1. In the toolbox, double-click the CommonDialog CommonDialog CommonDialog CommonDialog control.
2. When the common dialog object appears on your form, drag it to an out -of-
the-way location.
Note: Note: Note: Note: You cannot resize a common dialog object, and it disappears disappears disappears disappears when your
program runs. The common dialog object itself displays nothing — its only
purpose is to display a standarddialog box on the screen when you use a
method in program code to request it.
A Common Dialog object on a form
This table lists the name and purpose of the six standard dialog boxes that the common dialog object provides and the methods you use to display them

152
:
11119999.2.2.2.2 COMMON DIALOG OBJECT EVENT PROCEDURECOMMON DIALOG OBJECT EVENT PROCEDURECOMMON DIALOG OBJECT EVENT PROCEDURECOMMON DIALOG OBJECT EVENT PROCEDURESSSS
To display a standard dialog box in a program, you need to call the common dialog object. You do this by using the appropriate object method in an event procedure. If necessary, you also use program code to set one or more common dialog object properties before the call. (For example, if you are using the Open Open Open Open dialog box, you might want to control what type of files is displayed in the list box.) Finally, your event procedure needs to process the choices made by the user when they complete the standard dialog box.
This section presents two simple event procedures, one that manages an Open Open Open Open dialog box and one that uses information received from a Color Color Color Color dialog box.
The following topics are included in this section:
� Creating an Open Dialog Box
� Creating a Color Dialog Box
11119999....2.12.12.12.1 CREATING AN OPEN DIALOG BOXCREATING AN OPEN DIALOG BOXCREATING AN OPEN DIALOG BOXCREATING AN OPEN DIALOG BOX
The following code window shows an event procedure named
mnuOpenItem_Click. You can use this event procedure to display an Open Open Open Open
dialog box when the user clicks the Open Open Open Open command on the File File File File menu. The
event procedure assumes that you have already created a File File File File menu containing
Open Open Open Open and Close Close Close Close commands and that you want to open Windows metafiles
(.wmf). See the piece of code given below.
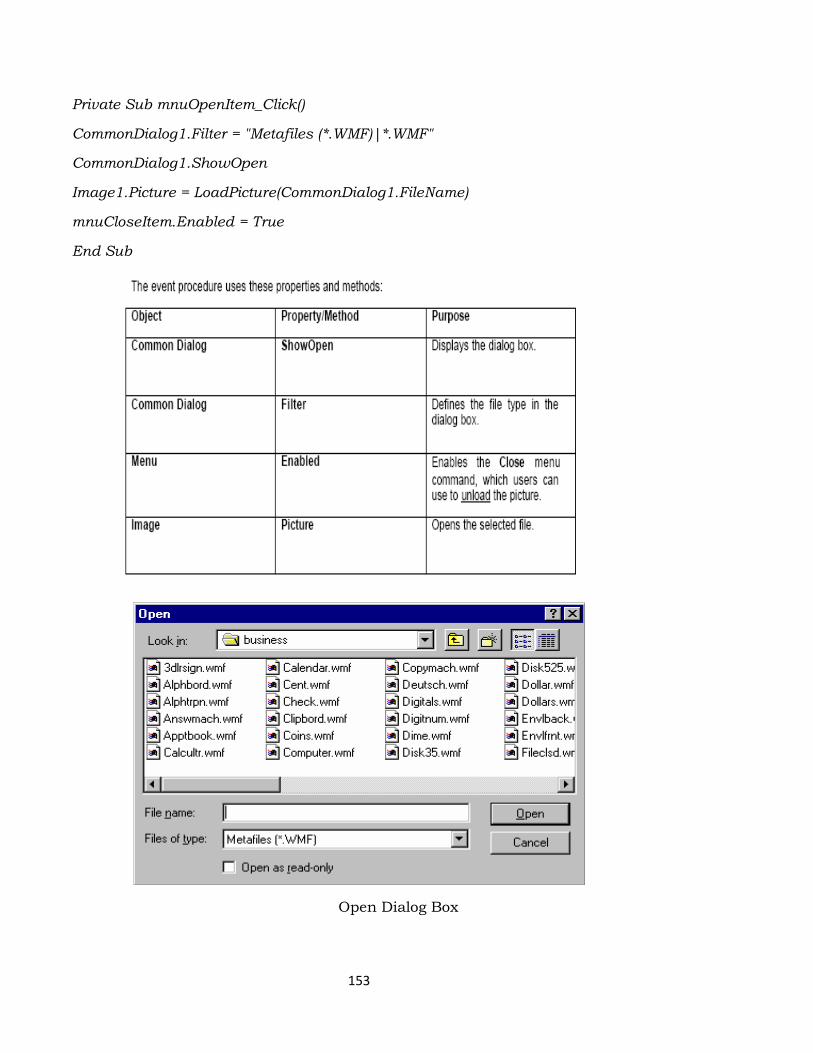
153
Private Sub mnuOpenItem_Click()
CommonDialog1.Filter = "Metafiles (*.WMF)|*.WMF"
CommonDialog1.ShowOpen
Image1.Picture = LoadPicture(CommonDialog1.FileName)
mnuCloseItem.Enabled = True
End Sub
Open Dialog Box

154
11119999.2.2.2.2.2.2.2.2 CREATING A COLOR DIALOG BOXCREATING A COLOR DIALOG BOXCREATING A COLOR DIALOG BOXCREATING A COLOR DIALOG BOX
If you need to update the color of a user interface element while your program runs, you can prompt the user to pick a new color with the Color Color Color Color dialog box displayed by using the CommonCommonCommonCommon Dialog Dialog Dialog Dialog object. The color selections provided by the Color Color Color Color dialog box are controlled by the FlagsFlagsFlagsFlags property, and the Color Color Color Color dialog box is displayed with the ShowColor ShowColor ShowColor ShowColor method. This code window shows an event procedure that you can use to change the color of a label while your program runs. The value used for the Flags Flags Flags Flags property — which in this case prompts Visual Basic to display a standard palette of color selections — is a hexadecimal (base 16) number. (To see a list of other potential values for the Flags Flags Flags Flags property, search for CommonDialog constants in the Visual Basic online Help.) The event procedure assumes that you have already created a menu command named TextColor TextColor TextColor TextColor with the Menu Editor. See the code given below
Private Sub mnuTextColorItem_Click()
CommonDialog1.Flags = &H1&
CommonDialog1.ShowColor
Label1.ForeColor = CommonDialog1.Color
End Sub
The figure below shows the color dialog box.
Color Dialog Box
19.319.319.319.3 EXERCISE : CREATINEXERCISE : CREATINEXERCISE : CREATINEXERCISE : CREATING A FILE MENU AND COMMON DIALOG G A FILE MENU AND COMMON DIALOG G A FILE MENU AND COMMON DIALOG G A FILE MENU AND COMMON DIALOG
OBJECT STEP BY STEPOBJECT STEP BY STEPOBJECT STEP BY STEPOBJECT STEP BY STEP
In this exercise, you use the Menu Editor to create a File File File File menu with OpenOpenOpenOpen, Close Close Close Close , and ExitExitExitExit commands for your program. You also assign access keys and shortcut keys to the commands, so you can run them from the keyboard.
155
To create a File menuTo create a File menuTo create a File menuTo create a File menu
1. Start Visual Basic and open a new, standard Visual Basic application.
2. On the toolbar, click Menu Editor Menu Editor Menu Editor Menu Editor to open the Menu Editor dialog box.
3. In the Caption Caption Caption Caption text box, type &File&File&File&File.
4. In the Name Name Name Name text box, type mnuFilemnuFilemnuFilemnuFile, and then click NextNextNextNext.
By placing the & character before the letter F, you specify F as the menu access
key.
To assign access and shortcut keysTo assign access and shortcut keysTo assign access and shortcut keysTo assign access and shortcut keys
1. In the Caption Caption Caption Caption text box, type &Open…&Open…&Open…&Open….
2. In the Name Name Name Name text box, type mnuOpenItemmnuOpenItemmnuOpenItemmnuOpenItem.
3. To indent the selected (highlighted) command, click the right arrow button.
4. In the Shortcut drop-down list, click CTRL+O for a shortcut key, and then click NextNextNextNext.
5. In the Caption Caption Caption Caption text box, type &Close&Close&Close&Close.
6. In the Name Name Name Name text box, type mnuCloseItemmnuCloseItemmnuCloseItemmnuCloseItem.
7. In the Shortcut drop-down list, click CTRL+C for a shortcut key and then click NextNextNextNext.
8. In the Caption Caption Caption Caption text box, type E&xE&xE&xE&xitititit.
9. In the Name Name Name Name text box, type mnuExitItemmnuExitItemmnuExitItemmnuExitItem.
10. In the Shortcut drop-down list, click CTRL+X for a shortcut key, and then click OKOKOKOK.
To save your projectTo save your projectTo save your projectTo save your project
1. From the File File File File menu, click Save Project AsSave Project AsSave Project AsSave Project As.
2. Save your form and project to disk under the name “Picture”. Visual Basic will prompt you for two file names — one for your form file (Picture.frm), and one for your project file (Picture.vbp).
To create a common dialog objectTo create a common dialog objectTo create a common dialog objectTo create a common dialog object
1. Verify that the CommonDialog CommonDialog CommonDialog CommonDialog control is in your project toolbox. If it isn't, add it now by using the Project Project Project Project menu Components Components Components Components command.
2. To add a common dialog object to your form, double-click the CommonDialog CommonDialog CommonDialog CommonDialog control in the toolbox, and then drag the object to the lower right-hand side of the form.
156
To create the image objectTo create the image objectTo create the image objectTo create the image object
1. Click the Image Image Image Image control and create a large image object in the middle of your form.When you run your program, the image object displays picture files with *.jpg extension on a form.
2. On the form, click Image1Image1Image1Image1. To restore the Properties window to full size, double-click the Properties window title bar. If you cannot see the Properties window, click Properties Properties Properties Properties on the toolbar to display it.
3. Click the Stretch Stretch Stretch Stretch property and set it to TrueTrueTrueTrue. When you run your program, Stretch Stretch Stretch Stretch makes the metafile fill the entire image object.
4. On the toolbar, click Save Project Save Project Save Project Save Project to save these changes to your program.
To write event proceduresTo write event proceduresTo write event proceduresTo write event procedures
1. In the Project window, click View Code View Code View Code View Code , click the Code window Object Object Object Object drop-down list box,and then click mnuOpenItemmnuOpenItemmnuOpenItemmnuOpenItem.
2. In the mnuOpenItem_Click event procedure, type the following code:
CommonDialog1.Filter = "JPEG FILES (*.JPG)|*.JPG"
CommonDialog1.ShowOpen
Image1.Picture = LoadPicture(CommonDialog1.Filename)
mnuCloseItem.Enabled = True
3.In the Object Object Object Object drop-down list box, click mnuClmnuClmnuClmnuCloseItemoseItemoseItemoseItem, and then type the
following code:
Image1.Picture = LoadPicture("")
mnuCloseItem.Enabled = False
4. In the Object Object Object Object drop-down list box, click mnuExitItemmnuExitItemmnuExitItemmnuExitItem, and then type End End End End in
the event procedure.
5. On the toolbar, click Save Project Save Project Save Project Save Project to save your changes.
To run the programTo run the programTo run the programTo run the program
1. On the VB toolbar, click StartStartStartStart.Visual Basic loads the program& form with its File File File File menu.
2. From the File File File File menu, click OpenOpenOpenOpen.
3. When the Open Open Open Open dialog box appears, load a picture file from your computer.
The picture selected should appear correctly sized in your image object.
4. From the File File File File menu, click CloseCloseCloseClose.
Your program should clear the picture file and turn off the Close Close Close Close command.
157
5. Try using the access keys and the shortcut keys to run the FiFiFiFile le le le menu commands. When you’re finished, click the File File File File menu Exit Exit Exit Exit command.
19.419.419.419.4 LET US SUM UPLET US SUM UPLET US SUM UPLET US SUM UP
In this lesson you have learnt about
• Using the CommonDialog Control
• Common Dialog Object Event Procedures
• Creation of color dialog box
19.519.519.519.5 REFERENCESREFERENCESREFERENCESREFERENCES
Gary CornelGary CornelGary CornelGary Cornelllll, “Visual Basic 6.0 from the Ground Up”. Tata McGraw Hill
Company,1999.
Content Development GroupContent Development GroupContent Development GroupContent Development Group “Visual Basic 6.0 Programming” Tata McGraw Hill
Company,Ninth Reprint,2007.
Noel JerkeNoel JerkeNoel JerkeNoel Jerke “The Complete Reference: Visual Basic 6.0”, Tata McGraw Hill
Company, 24th reprint, 2006.
158
LESSON LESSON LESSON LESSON –––– 20202020
MULTIPLE DOCUMENT INTERFACEMULTIPLE DOCUMENT INTERFACEMULTIPLE DOCUMENT INTERFACEMULTIPLE DOCUMENT INTERFACE
This lesson describes the important concept of Visual Basic (i.e) Multiple Document Interface (MDI) forms creation, purpose and its advantages.
MDI (MULTIPLE DOCUMENT INTERFACE)MDI (MULTIPLE DOCUMENT INTERFACE)MDI (MULTIPLE DOCUMENT INTERFACE)MDI (MULTIPLE DOCUMENT INTERFACE) FORMSFORMSFORMSFORMS
The Multiple Document Interface (MDI) was designed to simplify the exchange of information among documents, all under the same roof. With the main application, you can maintain multiple open windows, but not multiple copies of the application. Data exchange is easier when you can view and compare many documents simultaneously.
You almost certainly use Windows applications that can open multiple documents at the same time and allow the user to switch among them with a mouse-click. Multiple Word is a typical example, although most people use it in single document mode. Each document is displayed in its own window, and all document windows have the same behavior. The main Form, or MDI Form, isn't duplicated, but it acts as a container for all the windows, and it is called the parent window. The windows in which the individual documents are displayed are called Child windows.
An MDI application must have at least two Form, the parent Form and one or more child Forms. Each of these Forms has certain properties. There can be many child forms contained within the parent Form, but there can be only one parent Form.
The parent Form may not contain any controls. While the parent Form is open in design mode, the icons on the ToolBox are not displayed, but you can't place any controls on the Form. The parent Form can, and usually has its own menu.
To create an MDI application, follow these steps:
1. Start a new project and then choose Project Add MDI Form to add the parent Form.
2. Set the Form's caption to MDI Window
3. Choose Project Add Form to add a SDI Form.
4. Make this Form as child of MDI Form by setting the MDI Child property of the SDI Form to True. Set the caption property to MDI Child window.
Visual Basic automatically associates this new Form with the parent Form. This child Form can't exist outside the parent Form; in the words, it can only be opened within the parent Form.
Parent and Child MenusParent and Child MenusParent and Child MenusParent and Child Menus
MDI Form cannot contain objects other than child Forms, but MDI Forms can have their own menus. However, because most of the operations of the application have meaning only if there is at least one child Form open, there's a peculiarity about the MDI Forms. The MDI Form usually has a menu with two
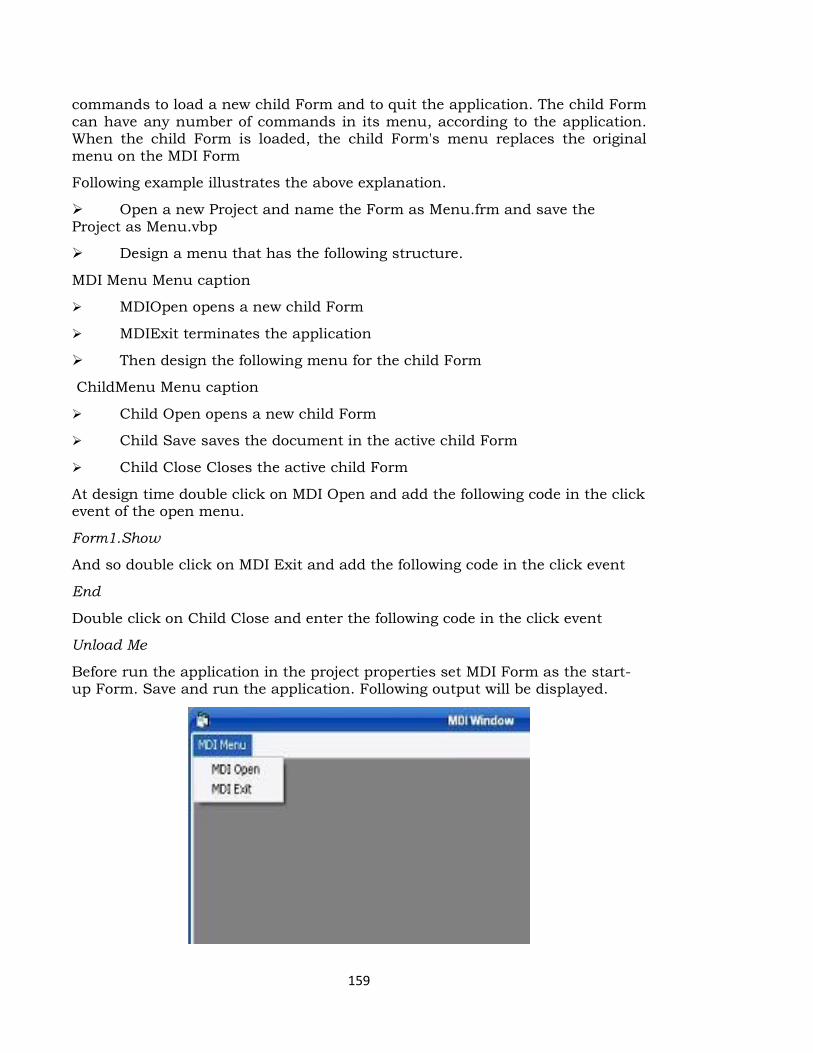
159
commands to load a new child Form and to quit the application. The child Form can have any number of commands in its menu, according to the application. When the child Form is loaded, the child Form's menu replaces the original menu on the MDI Form
Following example illustrates the above explanation.
� Open a new Project and name the Form as Menu.frm and save the Project as Menu.vbp
� Design a menu that has the following structure.
MDI Menu Menu caption
� MDIOpen opens a new child Form
� MDIExit terminates the application
� Then design the following menu for the child Form
ChildMenu Menu caption
� Child Open opens a new child Form
� Child Save saves the document in the active child Form
� Child Close Closes the active child Form
At design time double click on MDI Open and add the following code in the click event of the open menu.
Form1.Show
And so double click on MDI Exit and add the following code in the click event
End
Double click on Child Close and enter the following code in the click event
Unload Me
Before run the application in the project properties set MDI Form as the start-up Form. Save and run the application. Following output will be displayed.

160
And as soon as you click MDI Open you can notice that the main menu of the MDI Form is replaced with the Menu of the Child Form. The reason for this behavior should be obvious. The operation available through the MDI Form is quite different from the operations of the child window. Moreover, each child Form shouldn't have its own menu.
161
UNIT UNIT UNIT UNIT ––––VVVV
LESSON LESSON LESSON LESSON –––– 21212121
COMMUNICATING WITH OTHER WINDOW COMMUNICATING WITH OTHER WINDOW COMMUNICATING WITH OTHER WINDOW COMMUNICATING WITH OTHER WINDOW APPLICATIONSAPPLICATIONSAPPLICATIONSAPPLICATIONS
ContentsContentsContentsContents
21.0 Aims & Objectives
21.1 Brief introduction to the usages of Access data bases
21.2 Database Object
21.3 RecordSet Object
21.3.1 Accessing records
21.3.2 Searching the RecordSet
21.4 Updating the Database
21.5 Deleting and adding records
21.6 Let us Sum up
21.7 References
21.021.021.021.0 AIMS & OBJECTIVESAIMS & OBJECTIVESAIMS & OBJECTIVESAIMS & OBJECTIVES
This lesson is dealt for detail study about the databases and its controls.
� Brief introduction to the usages of Access data bases
� Database Object
� RecordSet Object
� Accessing records
� Searching the RecordSet
� Updating the Database
� Deleting and Adding records
21.121.121.121.1 BRIEF INTRODUCTION TOBRIEF INTRODUCTION TOBRIEF INTRODUCTION TOBRIEF INTRODUCTION TO THE USAGES OF ACCESS DATA BASESTHE USAGES OF ACCESS DATA BASESTHE USAGES OF ACCESS DATA BASESTHE USAGES OF ACCESS DATA BASES
The most compelling thing about Visual Basic is its easy way of accessing and modifying databases. This is what you should learn next; you will find many applications for this knowledge.
162
This lesson teaches you to use in this text is DAO (Data Access Objects). You will get familiar with opening a database and retrieving/adding/deleting/updating records from tables. Here, only Access Database is used (*.mdb) in examples, since this is the most used DBMS (DataBase Management System) for smaller applications made in Visual Basic. At the end of this lesson phone book application example is done for you.
21.221.221.221.2 DATABASE OBJECTDATABASE OBJECTDATABASE OBJECTDATABASE OBJECT
The first thing you must do in your application is to open a database where your tables are stored. You need to declare a variable to hold your database in order to do this. This is done with:
Dim dbMyDB As Database
This gives you a variable/object that can hold a reference to your database. To open a simple Access database named "MyDatabase.mdb", do this:
Set dbMyDB = OpenDatabase("MyDatabase.mdb")
You should really specify the complete path to the db, but if your current directory is the directory where the database is situated, this will work.
So, now you have opened a database. This won't give you any data. What you need to do is open a table in the database. You're not limited to open a single table; sometimes you have two or more tables that are related to each other and linked together w ith foreign keys, and there are ways to handle this to. But in this "Visual Basic - Database Primer" I will only show you how to open a single table.
21212121.3 .3 .3 .3 RECORDSET OBJECTRECORDSET OBJECTRECORDSET OBJECTRECORDSET OBJECT
Visual Basic uses an object called RecordSet to hold your table. To declare such an object and to open the table, do this:
Dim rsMyRS As RecordSet
Set rsMyRS = dbMyDB.OpenRecordSet("MyTable", dbOpenDynaset)
What happened there? Well, I declared a RecordSet object and used the Database object's OpenRecordSet method to open a table of type Dynaset. You can open a RecordSet in several modes. VB's online help file explains the different modes and what they ar e for. The Dynaset mode is the mode I use mostly. It gives you a RecordSet that you can add, delete and modify records in.
21.21.21.21.3333....1111 ACCESSING RECORDSACCESSING RECORDSACCESSING RECORDSACCESSING RECORDS
Now that we have opened a table (referred to as RecordSet from now on) we want to access the records in it. The RecordSet object allows us to move in it by using the methods MoveFirst, MoveNext, MovePrevious, MoveLast (among others). I will use some of these to fill up a list box with the records of our RecordSet.

163
To get this example to work, make a database (with Access) called “MyDatabase.mdb" with the table "MyTable" in it. This table should have the fields "ID" of type "Counter" that you set to be the primary key, the field "Name" of type Text and a field "P hone" of type Text. Add some records to it. Put a list box on a form and call it "lstRecords".
Dim dbMyDB As Database
Dim rsMyRS As RecordSet
Private Sub Form_Load()
Set dbMyDB = OpenDatabase("MyDatabase.mdb")
Set rsMyRS = dbMyDB.OpenRecordSet("MyTable", dbOpenDynaset)
If Not rsMyRS.EOF Then rsMyRS.MoveFirst
Do While Not rsMyRS.EOF
lstRecords.AddItem rsMyRS!Name
lstRecords.ItemData(lstRecords.NewIndex) = rsMyRS!ID
rsMyRS.MoveNext
Loop
End Sub
This will make the list box fill up with your records when the form loads. I have introduced some new concepts with this example. We have all ready covered the first part where we open the table. The line that says If Not rsMyRS.EOF Then If Not rsMyRS.EOF Then If Not rsMyRS.EOF Then If Not rsMyRS.EOF Then rsMyRS.MoveFirstrsMyRS.MoveFirstrsMyRS.MoveFirstrsMyRS.MoveFirst tells the program to move to the first record in case there are any records at all. The EOF is a Boolean property that is true if the current record is the last. It is also true if there are no records in the RecordSet.
Then we make the program add the "Name" field of all records to the list box by adding the current records field "Name" and moving to the next record. You ask for a field of a RecordSet by putting a! between the name of the RecordSet object and the name of the field. The while loop checks to see if there are more records to add.
21.21.21.21.3.23.23.23.2 SEARCHING THE RECORDSETSEARCHING THE RECORDSETSEARCHING THE RECORDSETSEARCHING THE RECORDSET
You might have wondered why I put the value of the field "ID" in the list box's ItemData property. I did this so that we would know the primary key for all the records in order to search for a record.
Put a text box somewhere on the form and call it "txtPhone". Then copy the following code to the project.
164
Private Sub lstRecords_Click()
rsMyRS.FindFirst "ID=" & Str(lstRecords.ItemData(lstRecords.ListIndex))
txtPhone.Text = rsMyRS!Phone
End Sub
This will display the phone number of the selected person when clicking in the list box. It uses the FindFirst method of the RecordSet object. This takes a string parameter that is like what is after WHERE in a SQL expression. You state the field that you want to search in (here "ID"), then the evaluation criteria (here "=") and last the value to search for (here the ItemData of the selected item in the list box).
So what we did was to search for the record with the "ID" field value that was the same as the ItemData property of the selected item in the list box. Then we show the value of the "Phone" field in the text box.
21.421.421.421.4 UPDATING THE DATABASEUPDATING THE DATABASEUPDATING THE DATABASEUPDATING THE DATABASE
You will probably want to be able to update some value of some field when doing database programming. This is done with Edit and Update. We will try to change the value of the "Phone" field by editing the text in the text box and clicking a button.
Put a command button on the form and name it "cmdUpdate". Then copy the following code to the project.
Private Sub cmdUpdate_Click()
rsMyRS.Edit
rsMyRS!Phone = txtPhone.Text
rsMyRS.Update
End Sub
Could it be that simple? Yes. This changes the phone number of our selected person. Or to put it technically: This changes the value of the "Phone" field of our current record. Imagine the current record being a set of boxes, with a field in each box. T he Edit method takes the lid off all of the boxes and Update puts them back on. When we write rsMyRS!Phone = txtPhone.Text we replace the content of the "Phone" box with the content in the text box.
21.521.521.521.5 DELETING AND ADDING RECORDSDELETING AND ADDING RECORDSDELETING AND ADDING RECORDSDELETING AND ADDING RECORDS
DeletingDeletingDeletingDeleting
Deleting records couldn't be simpler. To delete the current record you just invoke the Delete method of the RecordSet object. We will put this feature in our little project. Make one more command button named "cmdDelete" and the following code will do the work of deleting our currently selected person.

165
Private Sub cmdDelete_Click()
rsMyRS.Delete
lstRecords.RemoveItem lstRecords.ListIndex
End Sub
AddingAddingAddingAdding
Adding records is much like updateing, except you use AddNew instead of Edit. Let's add one more command button to our application. Let's call it...errh...let me see...yea! "cmdNew" =). Here is the code that adds a new record.
Private Sub cmdNew_Click()
rsMyRS.AddNew
rsMyRS!Name = "A New Person"
lstRecords.AddItem rsMyRS!Name
lstRecords.ItemData(lstRecords.NewIndex) = rsMyRS!ID
rsMyRS!Phone = "Person's Phone Number"
rsMyRS.Update
End Sub
The AddNew method takes a set of new boxes and adds them to our RecordSet. We then put some new values in them and close the lids with Update. As you can see we never stated any valu e for "ID", but as you remember, this is a field of type "Counter" wich automatically gets a unique value. The code also adds this new record to the list box so that we will be able to change the phone number of this person. I leave it up to you to add th e feature of changing the name.
21.6 21.6 21.6 21.6 LET US SUM UPLET US SUM UPLET US SUM UPLET US SUM UP
In this lesson we have done a detailed study about the handling of database in visual basic which includes the following concepts
• Brief introduction to the usages of Access data bases
• Database Object
• RecordSet Object
• Accessing records
• Searching the RecordSet
• Updating the Database
• Deleting and Adding records

166
21.721.721.721.7 REFERENCESREFERENCESREFERENCESREFERENCES
Gary CornellGary CornellGary CornellGary Cornell, “Visual Basic 6.0 from the Ground Up”. Tata McGraw Hill
Company,1999.
Content Development GroupContent Development GroupContent Development GroupContent Development Group “Visual Basic 6.0 Programming” Tata McGraw Hill
Company,Ninth Reprint,2007.
Noel JerkeNoel JerkeNoel JerkeNoel Jerke “The Complete Reference: Visual Basic 6.0”, Tata McGraw Hill
Company, 24th reprint, 2006.
167
LESSON LESSON LESSON LESSON –––– 22222222
ACTIVEACTIVEACTIVEACTIVE----X CONTROLSX CONTROLSX CONTROLSX CONTROLS
ContContContContentsentsentsents
22.0 Aims & Objectives
22.1 Active-X Data Objects
22.2 Using the ADO Data Control
22.3 ADO Data Control Events
22.4 Controls that Bind to the ADO Data Control
22.5 Using the Data Control
22.6 Creating Data Report
22.7 Let us Sum up
22.8 References
22.0 22.0 22.0 22.0 AIMS & OBJECTIVESAIMS & OBJECTIVESAIMS & OBJECTIVESAIMS & OBJECTIVES
In this lesson we are going to learn about the Active-x Data Objects.Also, how this object is used as control for accessing data from this database created
22.122.122.122.1 ACTIVEACTIVEACTIVEACTIVE----X DATA OBJECTSX DATA OBJECTSX DATA OBJECTSX DATA OBJECTS
The application that we have created so far accepts data. Let us consider the form of student registration to accept the student details and store it. To store data permanently so as to retrieve it later you need to use a data store. It is an accepted fact to store data efficiently database should be used. Thus the data accept through the form should be sent to a database. The data stored in the database can be retrieved efficiently, updated and if not required removed. There is a number of database software such as Oracle, Access etc. There must be a tool in Visual Basic, which helps to interact with the database and transfer data to and fro. In this chapter you will learn certain simple controls which help to store data and retrieve data from database with minimal coding.
22.22.22.22.2222 USIUSIUSIUSING THE ADO DATA CONTROLNG THE ADO DATA CONTROLNG THE ADO DATA CONTROLNG THE ADO DATA CONTROL
The ADO Data control uses Microsoft ActiveX Data Objects (ADO) to quickly create connections between data-bound controls and data providers. Data-bound controls are any
controls that feature a DataSource property. Data providers can be any source written to the OLE DB specification. You can also easily create your own data provider using Visual Basic’s class module. Although you can use the ActiveX Data Objects directly in your
168
applications, the ADO Data control has the advantage of being a graphic control (with Back and Forward buttons) and an easyto- use interface that allows you to create database applications with a minimum of code.
The ADO Data Control
Several of the controls found in Visual Basic’s Toolbox can be data-bound, including the CheckBox, ComboBox, Image, Label, ListBox, PictureBox, and TextBox controls. Additionally, Visual Basic includes several data-bound ActiveX controls such as the DataGrid, DataCombo, Chart, and DataList controls. You can also create your own data-bound ActiveX controls, or purchase controls from other vendors.
Previous versions of Visual Basic featured the intrinsic Data control and the Remote Data control (RDC) for data access. Both controls are still included with Visual Basic for backwardcompatibility. However, because of the flexibility of ADO, it’s recommended that new database applications be created using the ADO Data Control.
Possible UsesPossible UsesPossible UsesPossible Uses
� Connect to a local or remote database.
� Open a specified database table or define a set of records based on a Structured Query Language (SQL) query or stored procedure or view of the tables in that database.
� Pass data field values to data-bound controls, where you can display or change the values.
� Add new records or update a database based on any changes you make to data displayed in the bound controls.
To create a client, or front-end database application, add the ADO Data control to your forms just as you would any other Visual Basic control. You can have as many ADO Data controls on your form as you need. Be aware, however, that the control is a comparatively expensive” method of creating connections, using at least two connections for the first control, and one more for each subsequent control.
Creating a Front-end Database Application with Minimal Code It’s possible to create a database application using a minimum of code by setting a few properties at design time. If you are using an OLE DB data source, the Microsoft Data Link Name (.UDL) must be created on your machine. See “Creating the Northwind OLE DB Data Link” for a step-by-step example.
To create a simple frontTo create a simple frontTo create a simple frontTo create a simple front----end database applicationend database applicationend database applicationend database application
1. Draw an ADO Data Control ADO Data Control ADO Data Control ADO Data Control on a form. (The icon’s ToolTip is “ADODC.”) If the control is not available in the Toolbox, press CTRL+T to display the Components Components Components Components dialog box. In the Components Components Components Components dialog, click Microsoft ADO Data ControlMicrosoft ADO Data ControlMicrosoft ADO Data ControlMicrosoft ADO Data Control.
169
2. On the Toolbox, click the ADO Data Control ADO Data Control ADO Data Control ADO Data Control to select it. Then press F4 to display the Properties Properties Properties Properties window.
3. In the Properties Properties Properties Properties window, click ConnectionString ConnectionString ConnectionString ConnectionString to display the ConnectioConnectioConnectioConnectionString nString nString nString dialog box.
4. If you have created a Microsoft Data Link file (.UDL), select Use OLE DB File Use OLE DB File Use OLE DB File Use OLE DB File and click Browse Browse Browse Browse to find the file on the computer. If you use a DSN, click Use Use Use Use ODBC DataODBC DataODBC DataODBC Data Source Name Source Name Source Name Source Name and select a DSN from the box, or click NewNewNewNew to create one. If you wish to use create a connection string, select Use ConnectionStringUse ConnectionStringUse ConnectionStringUse ConnectionString, and then click BuildBuildBuildBuild, and use the Data Link Properties Data Link Properties Data Link Properties Data Link Properties dialog box to create a connection string. After creating the connection string, click OKOKOKOK. The ConnectionString ConnectionString ConnectionString ConnectionString property will be filled with a string
5. driver={SQL Server};server=bigsmile;uid=sa;pwd=pwd;database=pubs;
6. In the Properties Properties Properties Properties window, set the RecordSource RecordSource RecordSource RecordSource property to a SQL statement.
7. SELECT * FROM Titles WHERE AuthorID = 72 You should always include a WHERE clause when accessing a table. Failing to do so will lock the entire table, which would be a major hindrance to other users.
8. Draw a TextBox TextBox TextBox TextBox control on the form to display the database information.
9. In the Properties Properties Properties Properties window, set the DataSource DataSource DataSource DataSource property for Text1 to the name of the ADO Data control (ADODC1). This binds the text box to the ADO Data control.
10. In the Properties Properties Properties Properties window, click DataField DataField DataField DataField and a list of available fields will drop down. Click the name of the field you want to display.
11. Repeat steps 6, 7, and 8 for each additional field you want to access.
12. Press F5 to run the application. You can use the four arrow buttons on the ADO Data control to move to the beginning of the data, to the end of the data, or from record to record through the data.
Setting the ConnectionString, Source, DataSource, andSetting the ConnectionString, Source, DataSource, andSetting the ConnectionString, Source, DataSource, andSetting the ConnectionString, Source, DataSource, and DataField DataField DataField DataField ProgrammaticallyProgrammaticallyProgrammaticallyProgrammatically
The code below shows how to set these four properties programmatically. Note that setting the DataSource property requires the Set statement.
Private Sub Form_Load()
With ADODC1
.ConnectionString = “driver={SQL Server};” & _
“server=bigsmile;uid=sa;pwd=pwd;database=pubs”
.RecordSource = “Select * From Titles Where AuthorID =
7”
End With
Set Text1.DataSource = ADODC1
170
Text1.DataField = “Title”
End Sub
22.22.22.22.3333 ADO ADO ADO ADO DATA CONTROL EVENTSDATA CONTROL EVENTSDATA CONTROL EVENTSDATA CONTROL EVENTS
The ADO Data control features several events that you can program. The table below shows the events and when they occur; however the table is not meant to be a complete list all of the conditions when the events occur. For complete information, see the reference topic for the individual event.
Event OccursEvent OccursEvent OccursEvent Occurs
WillMove On Recordset.Open, Recordset.MoveNext, Recordset.Move,
Recordset.MoveLast, Recordset.MoveFirst, Recordset.MovePrevious,
Recordset.Bookmark, Recordset.AddNew, Recordset.Delete,
Recordset.Requery, Recordset.Resync
MoveComplete After WillMove
WillChangeField Before the Value property changes
FieldChangeComplete After WillChangeField
WillChangeRecord On Recordset.Update, Recordset.Delete, Recordset.CancelUpdate,
Recordset.UpdateBatch, Recordset.CancelBatch
RecordChangeComplete After WillChangeRecord
WillChangeRecordset On Recordset.Requery, Recordset.Resync, Recordset.Close,
Recordset.Open, Recordset.Filter
RecordsetChangeComplete After WillChangeRecordset
InfoMessage When the data provider returns a result
Setting DatabaseSetting DatabaseSetting DatabaseSetting Database----Related Properties ofRelated Properties ofRelated Properties ofRelated Properties of the ADO Data Controlthe ADO Data Controlthe ADO Data Controlthe ADO Data Control
When creating a connection, you can use one of three sources: a Connection String, an OLE DB file (.UDL), or an ODBC Data Source Name (DSN). When using a DSN, it’s likely you will not have to alter any of the other properties of the control. However, if you are familiar with database technology, you can alter some of the other properties exposed on the ADO Data Control. The following list describes database-related properties of the control. The list also suggests a logical order for setting the properties.
NoteNoteNoteNote:::: Database technology is complex, and the suggestions below are not meant to be taken as rules.
1. ConnectionString 1. ConnectionString 1. ConnectionString 1. ConnectionString - The ConnectionString property is a string that can contain all the settings necessary to make a connection. The parameters passed
171
in the string are driverdependent. For example, ODBC drivers allow the string to contain driver, provider, default database, server, username, and password.
2. UserN2. UserN2. UserN2. UserName ame ame ame - The name of the user, necessary if the database is password-protected. Like the Provider property, this property can be specified in the ConnectionString. If you provide both a ConnectionString and a UserName, the ConnnectionString value will override the UserName property’s value.
3. Password 3. Password 3. Password 3. Password - Also needed when accessing a protected database. Like Provider and UserName, this property’s value will be overridden if the value is specified in the ConnectionString.
4. RecordSource 4. RecordSource 4. RecordSource 4. RecordSource - This property generally contains a statement that determines what will be retrieved from the database.
5. CommandType 5. CommandType 5. CommandType 5. CommandType - The CommandType property instructs the data provider if the Source is a SQL statement, a table name, a stored procedure, or an unknown type.
6. Cursor6. Cursor6. Cursor6. CursorLocation Location Location Location - This property specifies where the cursor is located, on the client or on the server. The consequences of this decision affect the next few properties you set.
7. CursorType 7. CursorType 7. CursorType 7. CursorType - The CursorType property determines if the recordset is static, dynamic, or a keyset cursor type.
8. LockType 8. LockType 8. LockType 8. LockType - The LockType determines how the data is locked when others attempt to change data you are editing. How you set the LockType is a complex decision, dependent on many factors.
9. Mode 9. Mode 9. Mode 9. Mode -The Mode property determines what you intend to do with the recordset. For example, you can achieve some performance gains by setting it to read-only, if you are only interested in creating reports.
10. MaxRecords 10. MaxRecords 10. MaxRecords 10. MaxRecords - This property determines how large the cursor will be. How you determine this depends on the size of the records you are retrieving and the resources available on your computer (memory). A large record (one with many columns and large strings) would take more resources than a smaller record. Consequently the MaxRecords property should be no larger than necessary.
11. ConnectionTimeout 11. ConnectionTimeout 11. ConnectionTimeout 11. ConnectionTimeout - Set the ConnectionTimeout to the number of seconds to wait while establishing the connection. An error is returned if the connection times out.
12. CacheSize 12. CacheSize 12. CacheSize 12. CacheSize -The CacheSize property specifies how many records can be retrieved from the cursor. If you’ve set the CursorLocation to client side, then this property can be set to a smaller number (as small as 1) with no adverse effects. If it’s on the server side, you should optimize this figure to suit the number of rows you want to view at any one time. For example, if you use the DataGrid control to view 30 rows, set the CacheSize to 60, allowing you to scroll without retrieving more data.
172
13. BOFAction, EOFAction 13. BOFAction, EOFAction 13. BOFAction, EOFAction 13. BOFAction, EOFAction - These two properties determine what will happen when the control is at the beginning and end of the cursor. Choices include staying at the beginning or end, moving to the first or last record, or adding a new record (at the end only).
22.22.22.22.4444 CONTROLS THAT BIND TO THE ADO DATA CONTROLCONTROLS THAT BIND TO THE ADO DATA CONTROLCONTROLS THAT BIND TO THE ADO DATA CONTROLCONTROLS THAT BIND TO THE ADO DATA CONTROL
Any control that has the DataSource property can be bound to an ADO Data Control. The following intrinsic controls can be bound to the ADO Data Control:
� CheckBox
� ComboBox
� Image
� Label
� ListBox
� PictureBox
� TextBox
The following data-bound ActiveX Controls are also supplied with all versions of Visual Basic:
� DataList
� DataCombo
� DataGrid
� Microsoft Hierarchical FlexGrid
� RichTextBox
� Microsoft Chart
� DateTimePicker
� ImageCombo
� MonthView
Finally, you can create your own ActiveX controls that are databound using the BindingCollection object.
22.22.22.22.5555 USING THE DATA CONTROLUSING THE DATA CONTROLUSING THE DATA CONTROLUSING THE DATA CONTROL
The intrinsic Data control implements data access by using the Microsoft Jet Database engine –the same database engine that powers Microsoft Access. This technology gives you seamless access to many standard database formats and allows you to create data-aware applications without writing any code. The intrinsic Data control is best suited to smaller (desktop) databases, such as Access and ISAM databases. You can use the intrinsic Data control to create applications that display, edit, and update information from many types of
173
existing databases, including Microsoft Access, Btrieve, dBASE, Microsoft FoxPro, and Paradox. You can also use it to access Microsoft Excel, Lotus 1-2-3, and standard ASCII text files as if they were true databases. In addition, the data control allows you to access and manipulate remote Open Database Connectivity (ODBC) databases such as Microsoft SQL Server and Oracle.
NoteNoteNoteNote:::: Both the Data control and Remote Data control are included with Visual Basic for backward compatibility. However, because of the flexibility of ActiveX Data Objects (ADO), it’s recommended that you create new database applications using the ADO Data control. For more details, see “Using the ADO Data Control.”
The Data control, Remote Data control, and the ADO Data control are all conceptually similar: all three are “data controls” that connect a data source to a data-bound control. All three also share the same appearance - a set of four buttons that allow the user to go immediately to the beginning of the recordset, end of the recordset, and scroll backwards and forwards through the recordset.
Creating a Simple Database Application with the DataCreating a Simple Database Application with the DataCreating a Simple Database Application with the DataCreating a Simple Database Application with the Data ControlControlControlControl
To create a simple database application with the DataTo create a simple database application with the DataTo create a simple database application with the DataTo create a simple database application with the Data contrcontrcontrcontrolololol
1. Draw a Data Data Data Data control on the form. The Data control is an intrinsic control and is always available.
2. Click the Data Data Data Data control to select it, and press F4 the display the Properties Properties Properties Properties window.
3. In the Properties Properties Properties Properties window, set the Connect Connect Connect Connect property to the type of database you want to use.
4. In the Properties Properties Properties Properties window, set the DatabaseNameDatabaseNameDatabaseNameDatabaseName property to the file or directory name of the database you want to connect to.
5. On the Properties Properties Properties Properties window, set the RecordSourceRecordSourceRecordSourceRecordSource property to the name of the database table you want to access.
6. Draw a TextBox TextBox TextBox TextBox control on the form.
7. Click the TextBox TextBox TextBox TextBox control to select it, and on the Properties Properties Properties Properties window set the DataSource DataSource DataSource DataSource property to the Data control.
8. On the Properties Properties Properties Properties window, set the DataField DataField DataField DataField property to the name of the field in the database you want to view or modify.
9. Repeat steps 6, 7, and 8 for each additional field you want to access.
10. Press F5 to run the application.
Setting DataSetting DataSetting DataSetting Data----Related Properties of the Data ControlRelated Properties of the Data ControlRelated Properties of the Data ControlRelated Properties of the Data Control
The following data-related properties can be set at design time.
The list suggests a logical order for setting the properties:
Note Note Note Note Database technology is a complex science, and the suggestions below are not meant to be taken as rules.
174
1. RecordsetType1. RecordsetType1. RecordsetType1. RecordsetType---- The RecordsetType property determines if the recordset is a table, dynaset, or snapshot. The choice affects what recordset properties are available. For example, snapshot-type recordsets are more limited than dynaset recordsets.
2. DefaultType 2. DefaultType 2. DefaultType 2. DefaultType - The DefaultType property specifies whether JET or ODBCDirect workspaces are used.
3. DefaultCursorType 3. DefaultCursorType 3. DefaultCursorType 3. DefaultCursorType - The DefaultCursorType property determines the location of the cursor. You can allow the ODBC driver to determine the cursor location, or specify server or ODBC cursors. The DefaultCursorType property is valid only when using ODBCDirect workspaces.
4. Exclusive 4. Exclusive 4. Exclusive 4. Exclusive - Determines if the data is for a single- or multiuser environment.
5. Options 5. Options 5. Options 5. Options - The property determines the characteristics of the recordset. For example, in a multi-user environment, you can set the Options property to deny changes made by others.
6. BOFAction, EOFAction 6. BOFAction, EOFAction 6. BOFAction, EOFAction 6. BOFAction, EOFAction - These two properties determine what will happen when the control is at the beginning and end of the cursor. Choices include staying at the beginning or end, moving to the first or last record, or adding a new record (at the end only).
Intrinsic Data Control Is Usable withIntrinsic Data Control Is Usable withIntrinsic Data Control Is Usable withIntrinsic Data Control Is Usable with Access 2000 DatabasesAccess 2000 DatabasesAccess 2000 DatabasesAccess 2000 Databases
At design time, trying to bind the Data control to a Microsoft Access 2000 database will result in an error: “Unrecognized database format.” The Data control can still be used, however, by following the example below:
1. On the Project menu, click References. Clear the MicrosoftMicrosoftMicrosoftMicrosoft DAO 3.51 Object DAO 3.51 Object DAO 3.51 Object DAO 3.51 Object Library Library Library Library check box.
2. Set a reference to the Microsoft DAO 3.6 Object LibraryMicrosoft DAO 3.6 Object LibraryMicrosoft DAO 3.6 Object LibraryMicrosoft DAO 3.6 Object Library.
3. Draw a Data control and a TextBox control on a form.
4. On the Properties window, set the TextBox control’s DataSource property to the Data control.
5. Type the name of the field CompanyName into the DataField property box.
6. Insert code similar to the following into the code window:
7. Option Explicit
8. Private daoDB36 As Database
9. Private rs As Recordset
10. Dim sPath As String
11. Private Sub Form_Load()
12. sPath = _
13. “C:\Program Files\Microsoft Office\Office\Samples\Northwind.mdb”
14. Set daoDB36 = DBEngine.OpenDatabase(sPath)

175
15. Set rs = daoDB36.OpenRecordset (“Customers”)
16. Set Data1.Recordset = rs
17. End Sub
18. Run the project.
22.22.22.22.6666 Creating Data ReportCreating Data ReportCreating Data ReportCreating Data Report
Once you have gone to all the trouble of developing and managing a database, it is nice to have the ability to obtain printed or displayed information from your data. The process of obtaining such information is known as creating a data report.
There are two steps to creating a data report. First, we need to create a Data Environment. This is designed within Visual Basic and is used to tell the data report what is in the database. Second, we create the Data Report itself. This, too, is done within Visual Basic. The Data Environment and Data Report files then become part of the Visual Basic project developed as a database management system.
The Visual Basic 6.0 data report capabilities are vast and using them is a detailed process. The use of these capabilities is best demonstrated by example. We will look at the rudiments of report creation by building a tabular report for our phone database.
Example Example Example Example ---- Phone Directory Phone Directory Phone Directory Phone Directory ---- Building a Data ReportBuilding a Data ReportBuilding a Data ReportBuilding a Data Report
We will build a data report that lists all the names and phone numbers in our phone database. We will do this by first creating a Data Environment, then a Data Report. We will then reopen the phone database management project and add data reporting capabilities.
Creating a Data EnvironmentCreating a Data EnvironmentCreating a Data EnvironmentCreating a Data Environment
1. Start a new StandardStandardStandardStandard EXEEXEEXEEXE project.
2. On the Project menu, click AddAddAddAdd DataDataDataData EnvironmentEnvironmentEnvironmentEnvironment. If this item is not on the menu, click ComponentsComponentsComponentsComponents. Click the DesignersDesignersDesignersDesigners tab, and choose DataDataDataData EnvironmentEnvironmentEnvironmentEnvironment and click OKOKOKOK to add the designer to your menu.
3. We need to point to our database. In the DataDataDataData EnvironmentEnvironmentEnvironmentEnvironment window, right-click the Connection1Connection1Connection1Connection1 tab and select PropertiesPropertiesPropertiesProperties. In the DataDataDataData LinkLinkLinkLink PropertiesPropertiesPropertiesProperties dialog box, choose Microsoft Jet 3.51 OLE DB ProviderMicrosoft Jet 3.51 OLE DB ProviderMicrosoft Jet 3.51 OLE DB ProviderMicrosoft Jet 3.51 OLE DB Provider. Click NextNextNextNext to get to the ConnectionConnectionConnectionConnection tab. Click the ellipsisellipsisellipsisellipsis button. Find your phone database (mdb) file. Click OKOKOKOK to close the dialog box.
4. We now tell the Data EnvironmentData EnvironmentData EnvironmentData Environment what is in our database. Right-click the Connection1Connection1Connection1Connection1 tab and click RenameRenameRenameRename. Change the name of the tab to Phone. Right-click this newly named tab and click Add Command Add Command Add Command Add Command to create a Command1Command1Command1Command1 tab. Right-click this tab and choose PropertiesPropertiesPropertiesProperties. Assign the following properties:
Command Name - PhoneList Connection - Phone
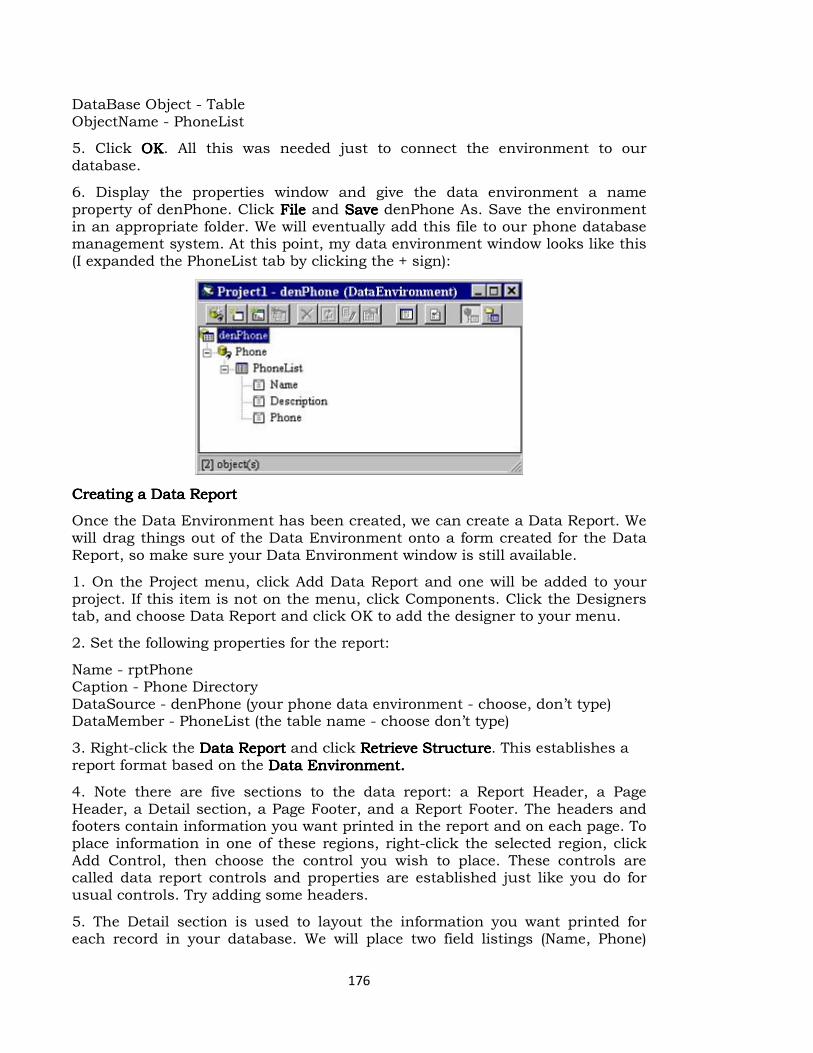
176
DataBase Object - Table ObjectName - PhoneList
5. Click OKOKOKOK. All this was needed just to connect the environment to our database.
6. Display the properties window and give the data environment a name property of denPhone. Click FileFileFileFile and SaveSaveSaveSave denPhone As. Save the environment in an appropriate folder. We will eventually add this file to our phone database management system. At this point, my data environment window looks like this (I expanded the PhoneList tab by clicking the + sign):
Creating a Data ReportCreating a Data ReportCreating a Data ReportCreating a Data Report
Once the Data Environment has been created, we can create a Data Report. We will drag things out of the Data Environment onto a form created for the Data Report, so make sure your Data Environment window is still available.
1. On the Project menu, click Add Data Report and one will be added to your project. If this item is not on the menu, click Components. Click the Designers tab, and choose Data Report and click OK to add the designer to your menu.
2. Set the following properties for the report:
Name - rptPhone Caption - Phone Directory DataSource - denPhone (your phone data environment - choose, don’t type) DataMember - PhoneList (the table name - choose don’t type)
3. Right-click the Data ReportData ReportData ReportData Report and click Retrieve StructureRetrieve StructureRetrieve StructureRetrieve Structure. This establishes a report format based on the Data EnData EnData EnData Environment.vironment.vironment.vironment.
4. Note there are five sections to the data report: a Report Header, a Page Header, a Detail section, a Page Footer, and a Report Footer. The headers and footers contain information you want printed in the report and on each page. To place information in one of these regions, right-click the selected region, click Add Control, then choose the control you wish to place. These controls are called data report controls and properties are established just like you do for usual controls. Try adding some headers.
5. The Detail section is used to layout the information you want printed for each record in your database. We will place two field listings (Name, Phone)
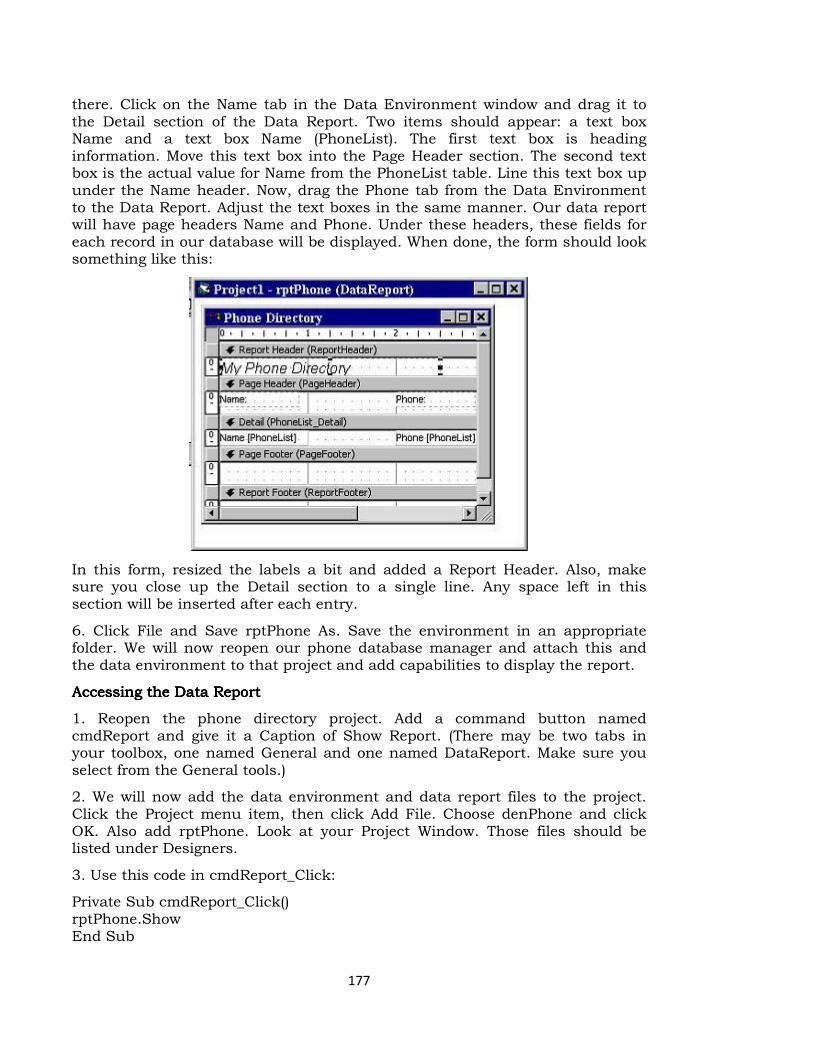
177
there. Click on the Name tab in the Data Environment window and drag it to the Detail section of the Data Report. Two items should appear: a text box Name and a text box Name (PhoneList). The first text box is heading information. Move this text box into the Page Header section. The second text box is the actual value for Name from the PhoneList table. Line this text box up under the Name header. Now, drag the Phone tab from the Data Environment to the Data Report. Adjust the text boxes in the same manner. Our data report will have page headers Name and Phone. Under these headers, these fields for each record in our database will be displayed. When done, the form should look something like this:
In this form, resized the labels a bit and added a Report Header. Also, make sure you close up the Detail section to a single line. Any space left in this section will be inserted after each entry.
6. Click File and Save rptPhone As. Save the environment in an appropriate folder. We will now reopen our phone database manager and attach this and the data environment to that project and add capabilities to display the report.
Accessing the Data ReportAccessing the Data ReportAccessing the Data ReportAccessing the Data Report
1. Reopen the phone directory project. Add a command button named cmdReport and give it a Caption of Show Report. (There may be two tabs in your toolbox, one named General and one named DataReport. Make sure you select from the General tools.)
2. We will now add the data environment and data report files to the project. Click the Project menu item, then click Add File. Choose denPhone and click OK. Also add rptPhone. Look at your Project Window. Those files should be listed under Designers.
3. Use this code in cmdReport_Click:
Private Sub cmdReport_Click() rptPhone.Show End Sub
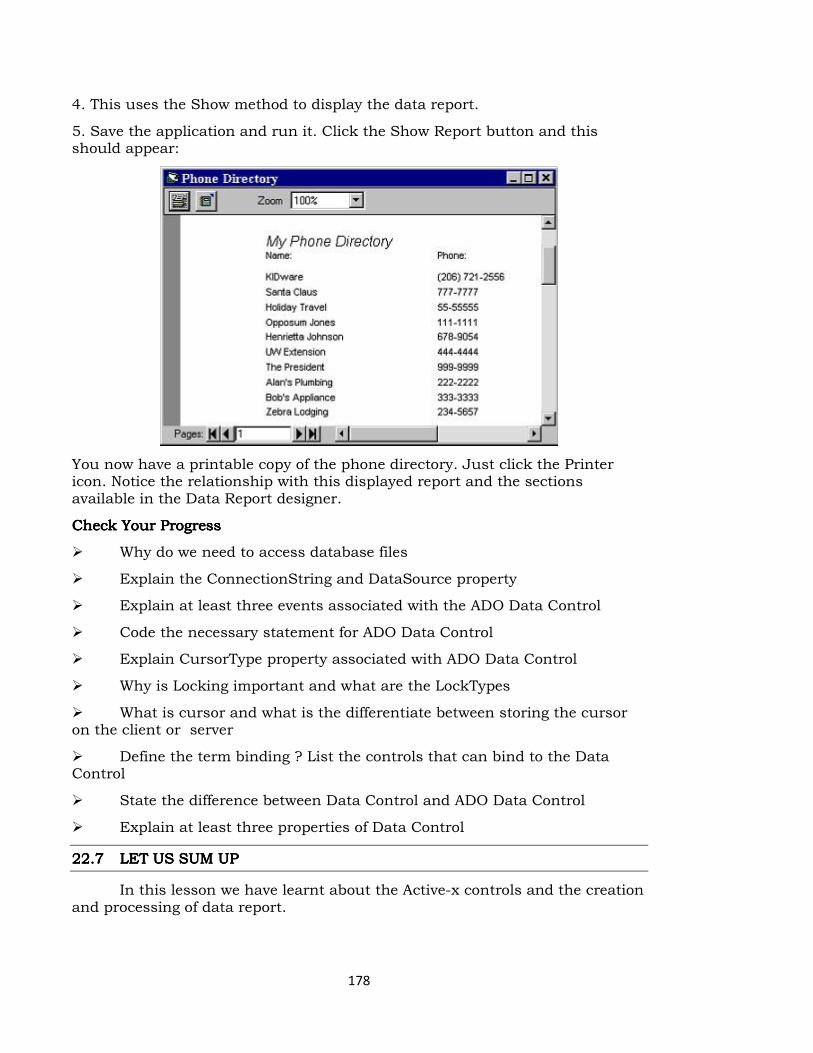
178
4. This uses the Show method to display the data report.
5. Save the application and run it. Click the Show Report button and this should appear:
You now have a printable copy of the phone directory. Just click the Printer icon. Notice the relationship with this displayed report and the sections available in the Data Report designer.
Check Your ProgressCheck Your ProgressCheck Your ProgressCheck Your Progress
� Why do we need to access database files
� Explain the ConnectionString and DataSource property
� Explain at least three events associated with the ADO Data Control
� Code the necessary statement for ADO Data Control
� Explain CursorType property associated with ADO Data Control
� Why is Locking important and what are the LockTypes
� What is cursor and what is the differentiate between storing the cursor on the client or server
� Define the term binding ? List the controls that can bind to the Data Control
� State the difference between Data Control and ADO Data Control
� Explain at least three properties of Data Control
22.22.22.22.7777 LET US SUM UPLET US SUM UPLET US SUM UPLET US SUM UP
In this lesson we have learnt about the Active-x controls and the creation and processing of data report.

179
22.22.22.22.8888 REFERENCESREFERENCESREFERENCESREFERENCES
Gary CornellGary CornellGary CornellGary Cornell, “Visual Basic 6.0 from the Ground Up”. Tata McGraw Hill
Company,1999.
Content Content Content Content Development GroupDevelopment GroupDevelopment GroupDevelopment Group “Visual Basic 6.0 Programming” Tata McGraw Hill
Company,Ninth Reprint,2007.
Noel JerkeNoel JerkeNoel JerkeNoel Jerke “The Complete Reference: Visual Basic 6.0”, Tata McGraw Hill
Company, 24th reprint, 2006.
180
LESSON 23LESSON 23LESSON 23LESSON 23
ACTIVEACTIVEACTIVEACTIVE----X X X X CONTROLSCONTROLSCONTROLSCONTROLS
ContentsContentsContentsContents
23.0 Aims & Objectives
23.1 Introduction
23.2 Implementing Custom Methods
23.3 Declaring and Raising Events
23.4 Implementing a Default User Interface Event with Procedure Attributes
Dialog Box
23.5 Events in a Control's Lifetime That Affect Properties
23.6 Managing Constituent Controls in the Resize Event
23.7 Let us Sum up
23.8 References
23.0 23.0 23.0 23.0 AIMS & OBJECTIVESAIMS & OBJECTIVESAIMS & OBJECTIVESAIMS & OBJECTIVES
This lesson will explain the detailed study about the Active-x controls in VB.
23.123.123.123.1 INTRODUCTIONINTRODUCTIONINTRODUCTIONINTRODUCTION
To implement your own ActiveX control, you must take the following basic steps:
� Put a UserControl container into your application. This object is implemented in its own separate file similar to a Form. The UserControl provides the basis for the control.
� If you decide to implement user-drawn features in your control, you must plan and implement those raphic features, putting code in the appropriate event procedures.
� Create custom methods and events in the UserControl as you would in a Class Module.
� Create custom properties in the UserControl as you would in a Class Module, remembering to make extra provision for property persistence.
� If you decide to implement constituent controls, then you must place any constituent controls that you will be using on the UserControl's surface and implement their delegated methods, delegated events, and delegated properties as well.
� Put additional code in UserControl event procedures so that you initialize your control's properties appropriately and cause them to persist.
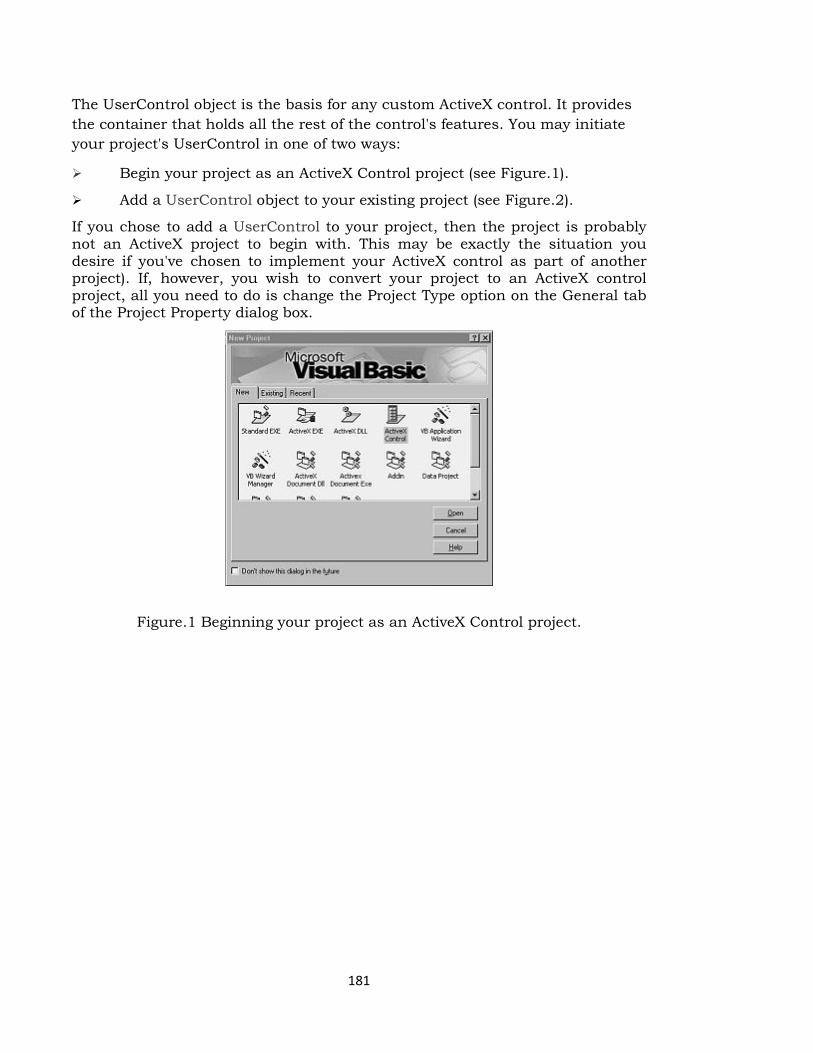
181
The UserControl object is the basis for any custom ActiveX control. It provides
the container that holds all the rest of the control's features. You may initiate
your project's UserControl in one of two ways:
� Begin your project as an ActiveX Control project (see Figure.1).
� Add a UserControl object to your existing project (see Figure.2).
If you chose to add a UserControl to your project, then the project is probably not an ActiveX project to begin with. This may be exactly the situation you desire if you've chosen to implement your ActiveX control as part of another project). If, however, you wish to convert your project to an ActiveX control project, all you need to do is change the Project Type option on the General tab of the Project Property dialog box.
Figure.1 Beginning your project as an ActiveX Control project.
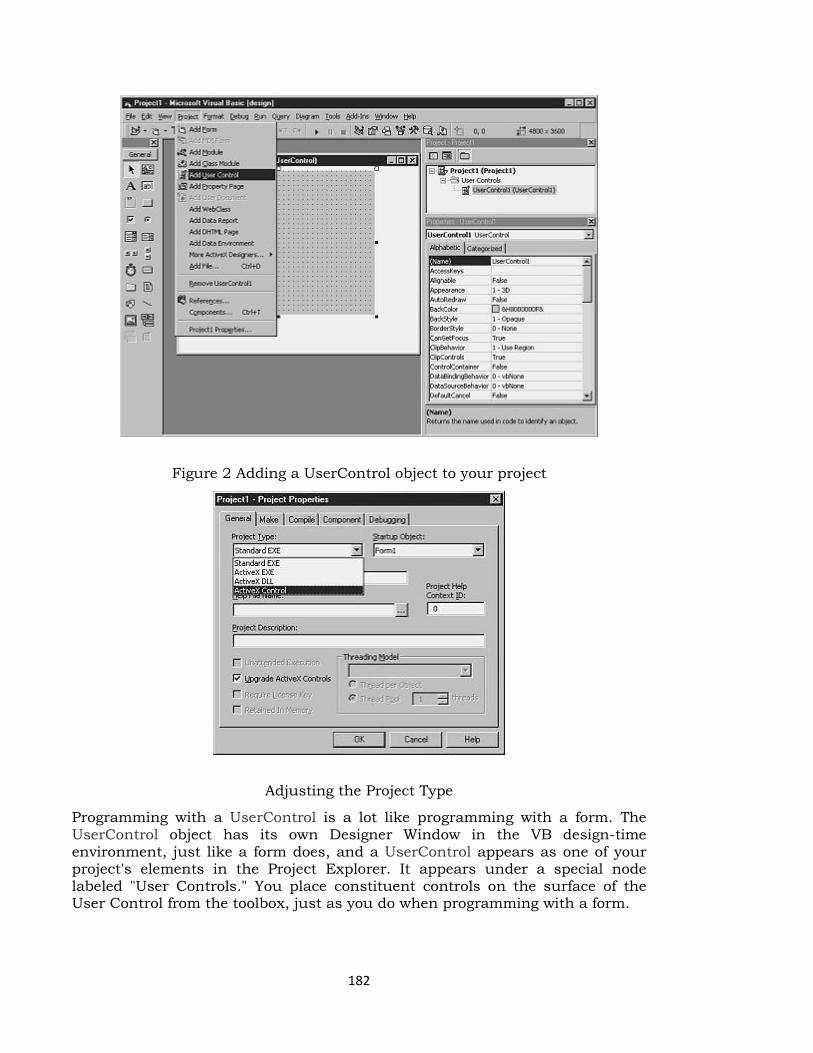
182
Figure 2 Adding a UserControl object to your project
Adjusting the Project Type
Programming with a UserControl is a lot like programming with a form. The UserControl object has its own Designer Window in the VB design-time environment, just like a form does, and a UserControl appears as one of your project's elements in the Project Explorer. It appears under a special node labeled "User Controls." You place constituent controls on the surface of the User Control from the toolbox, just as you do when programming with a form.
183
The UserControl has its own properties, which we discuss in some of the following sections. You can access these properties at design-time just like you'd access the design-time properties of a form:
Make sure that you've selected the UserControl object itself (and not one of its constituent controls), and then go to the Properties Window by pressing F4 or right-clicking the mouse.
To access a UserControl 's event procedures, make sure that you've selected the UserControl itself (and not one of its constituent controls), then double-click the mouse to view UserControl code
23.23.23.23.2 2 2 2 IMPLEMENTING CUSTOMIMPLEMENTING CUSTOMIMPLEMENTING CUSTOMIMPLEMENTING CUSTOM METHODSMETHODSMETHODSMETHODS
You implement a method for your ActiveX control in pretty much the same way that you implement methods for other ActiveX components and for classes in general. As mentioned above, custom methods for an ActiveX control are implemented as Public Procedures in the UserControl object.
If, for example, you wanted to give your developers an Alarm method for the control you are developing, you would put code similar to the code of Listing 13.4 into your UserControl's code.
Code for a Custom Control MethoCode for a Custom Control MethoCode for a Custom Control MethoCode for a Custom Control Methodddd
Public Sub Alarm (Optional Severity) 'If the alarm is more severe, 'then beep more times If IsMissing(Severity) then Severity = 1 Dim iCount As Integer For iCount = 1 To Severity Beep Next iCount End Sub
Assuming that your developer has created an instance of your control named "MyControl" in a project, then the developer could write a line of code such as
MyControl.Alarm 7
Implementing Custom Events:
The story for custom control events is much the same as for custom control
methods: You implement an event for your ActiveX control in pretty much the
same way that you implement events for other ActiveX components and for
classes in general. Besides the custom events that you create, you can also
implement delegated events or custom events that provide wrappers for the
events of an ActiveX control's constituent controls.
23.23.23.23.3333 DECLARING AND RAISING EVENTSDECLARING AND RAISING EVENTSDECLARING AND RAISING EVENTSDECLARING AND RAISING EVENTS
You declare an event for a custom control just as you would declare an event in any Class module:
184
In the UserControl object's General Declarations section you put a declaration beginning with the words "Public Event" followed by the event name you wish to use and then parentheses enclosing a list of the names and types of any parameters that the event will use. For example, let's say you declared a UserControl event called FoundOne that passes a single string parameter describing the object it has found. It would look like the following:
Public Event FoundOne(FoundName As String)
You must then put code somewhere else in the UserControl's code to actually fire the event with the RaiseEvent statement:
RaiseEvent FoundOne("Morsel")
Developers who use your control in their applications will see event procedures in their code windows for the Found event.
23.23.23.23.4444 Implementing a Default User Interface Event with the Procedure Implementing a Default User Interface Event with the Procedure Implementing a Default User Interface Event with the Procedure Implementing a Default User Interface Event with the Procedure
Attributes Dialog BoxAttributes Dialog BoxAttributes Dialog BoxAttributes Dialog Box
Imagine that you've just placed a new form in a standard VB project. Now imagine that you double-click the form before doing anything else—quick! What do you see? Of course, anyone who's programmed for more than a few days with VB will answer, "The Form/Load event procedure."
The Load event procedure is the Form event that the VB editor will show you by default, all other things being equal (that is if there's been no code placed in any other event procedures). The Load event is the default user interface event—the event whose procedure will show up by default in the Code Window if no other event procedures contain code. You can probably think of the default user interface events for many other controls: Click for a CommandButton, Change for a TextBox, and so on.
You can give your custom control its own default user interface event by following these steps:
Giving Your Custom Control Its Own Default User Interface EventGiving Your Custom Control Its Own Default User Interface EventGiving Your Custom Control Its Own Default User Interface EventGiving Your Custom Control Its Own Default User Interface Event
� Make sure you're in a Code Window for the UserControl object.
� Bring up the Tools, Procedure Attributes option on the VB menu.
� In the resulting dialog box Name field, choose the name of the custom
event to designate as the default user interface event.
� Click the Advanced button to bring up more choices.
� In the Attributes section, check the box labeled User Interface Default.
� Click OK to save your choice and exit the dialog box.
Implementing Custom Implementing Custom Implementing Custom Implementing Custom PropertiesPropertiesPropertiesProperties::::
Up to this point, we've seen that you can implement custom control methods and events in more or less the same way as you implement methods and events for other ActiveX object classes.

185
The situation for custom control properties is more complex however. This is because, as the author of a custom control, you must manage the persistence of property values as instances of a control are created and destroyed at design time.
You must do a little more work than for events and methods in order to get custom control properties to behave properly.
As we've already mentioned several times, this is because instances of your control are created and destroyed numerous times during the development life cycle. For more detail on the actual activities that cause such carnage, see the accompanying sidebar.
23.23.23.23.5555 EVENTS IN A CONTROL'S LIFETIME THAT AFFECT PROPERTIESEVENTS IN A CONTROL'S LIFETIME THAT AFFECT PROPERTIESEVENTS IN A CONTROL'S LIFETIME THAT AFFECT PROPERTIESEVENTS IN A CONTROL'S LIFETIME THAT AFFECT PROPERTIES
During the developer's design, test, compile, and redesign cycle, instances of your control will be created, then placed or sited on their container object (a Form, PictureBox, or other object capable of holding controls), and destroyed—not just once, but many times. The reason for all this activity is that an instance of your control must be destroyed and created whenever the control and its container move between the various possible degrees of being and non-being during the phases of development.
Here is a list of the occasions when instances of a control would be created and destroyed:
� CreatedCreatedCreatedCreated----. . . . The developer creates an instance of the control from the toolbox and sites it on its container.
� DestroyedDestroyedDestroyedDestroyed----.... The developer closes the Design window with the control's container.
� CreatedCreatedCreatedCreated----.... The developer reopens the Design window with the control's container.
� DestroyedDestroyedDestroyedDestroyed----.... The developer begins to run the application in the VB environment, which temporarily destroys design-time instances of objects (including your control).
� CreatedCreatedCreatedCreated----.... The control's container loads into memory and sites the control as the application runs.
� DestroyedDestroyedDestroyedDestroyed----. . . . The control's container is destroyed as the application runs.
� DestroyedDestroyedDestroyedDestroyed----.... The control's container is destroyed because the application stops running.
� CreatedCreatedCreatedCreated----.... The application has stopped running and VB returns to the design environment thus resisting your control (provided the design-time environment currently includes a sited instance of the control).
� DestroyedDestroyedDestroyedDestroyed----.... The developer closes the project or closes VB.
� Created. Created. Created. Created. The developer opens the project provided that the current view of the project includes an instance of the control's container.

186
You may wonder why it's important for you to know about the timing of the creation and destruction of ActiveX controls. After all, we can manipulate standard controls and other objects without having to know such details.
As control author, you must be able to react to control creation, destruction, and change. It's up to the control's author to determine when and how long changes to control properties will persist. As you probably know, control properties get stored with a form's other information in the form's .frm file. While a developer works on an application in the VB design environment, the copy of the form (and all its associated information) that resides in memory gets destroyed and re-created as described in the above list. It is the responsibility of each control to save and retrieve information about its own state (including any changes to property values) during these times.
You can implement this management of your custom ActiveX control's properties by programming the event procedures of various events of the UserControl object and by taking certain measures whenever a property might change, as discussed in the following subsections.
In the following sections, we discuss the bare minimum you need to do in order to get custom control properties to function adequately.
We first discuss how to create a new custom property (this is the same as for other object classes in VB) then we discuss how to initialize properties in the InitProperties event procedure. Finally, we cover the particulars of how to make properties persistent by programming the UserControl's Property Bag object in several key UserControl events.
Defining Properties Defining Properties Defining Properties Defining Properties withwithwithwith Get/Let/Set Procedures or Public Variables:Get/Let/Set Procedures or Public Variables:Get/Let/Set Procedures or Public Variables:Get/Let/Set Procedures or Public Variables:
Just as you do with other object classes in VB, you define custom properties for
ActiveX controls either with Public variables or with Property procedures
(Property Let/Set and Property Get).
Because it's very likely that a developer will use more than one instance of your control in an application, the use of Public variables is strongly discouraged. Values for the same property in different instances of the control could become confused if a Public variable were used to implement a property that the system accessed in more than one instance of a control.
Instead, you will always want to use Property procedures to implement control properties. As you'll recall from other discussions of class properties, you'll need to set up the following elements for each custom property:
� A variable that is Private to the UserControl and that will serve as a storage place for the property's actual value. Property Get and Property Let/Set will respectively retrieve and store this value.
� A Property Let or Property Set procedure that acts like a Sub procedure and accepts a parameter whose value is the new value to be assigned to the property. You will store this parameter's value in the Private storage variable just mentioned in the previous point.
187
� A Property Get procedure that acts like a Function procedure and returns the value kept in the Private storage variable.
The code in Listing illustrates how you would implement your own property for a custom control. Notice that we use Property procedures and the Private variable in almost exactly the same way as we do for custom properties in standard Class modules.
The only difference in listing from standard class modules' Property procedures is the extra line in the Property Let procedure that calls the PropertyChanged method. This call notifies VB that a property has been changed and ensures that the WriteProperties event will fire at the appropriate moment. For more detail, see the following section,
You must take into account a number of extra considerations to make your custom control properties work properly. In the following sections, we discuss what you need to know in order to create fully functioning custom properties for your controls.
Listing: Implementing Listing: Implementing Listing: Implementing Listing: Implementing aaaa Property Property Property Property forforforfor aaaa Custom ControlCustom ControlCustom ControlCustom Control
[in the general declarations section of the UserControl] Option Explicit Private mOverallColor As Long Property Get OverallColor() As Long OverallColor = mOverallColor End Property Property Let OverallColor(lColor As Long) mOverallColor = lColor 'informs the system that a 'property has changed: PropertyChanged End Property
Implementing ConstituImplementing ConstituImplementing ConstituImplementing Constituent ent ent ent Controls:Controls:Controls:Controls:
Recall that one of the ways you can implement an ActiveX control is through
constituent controls—other controls you use as building blocks for the
functionality and appearance of your custom control.
You can build your custom control from constituents by simply placing instances of controls from the toolbox on the UserControl's designer surface at design time; just as you would place controls on the surface of a Form in a standard EXE project (see Figure).
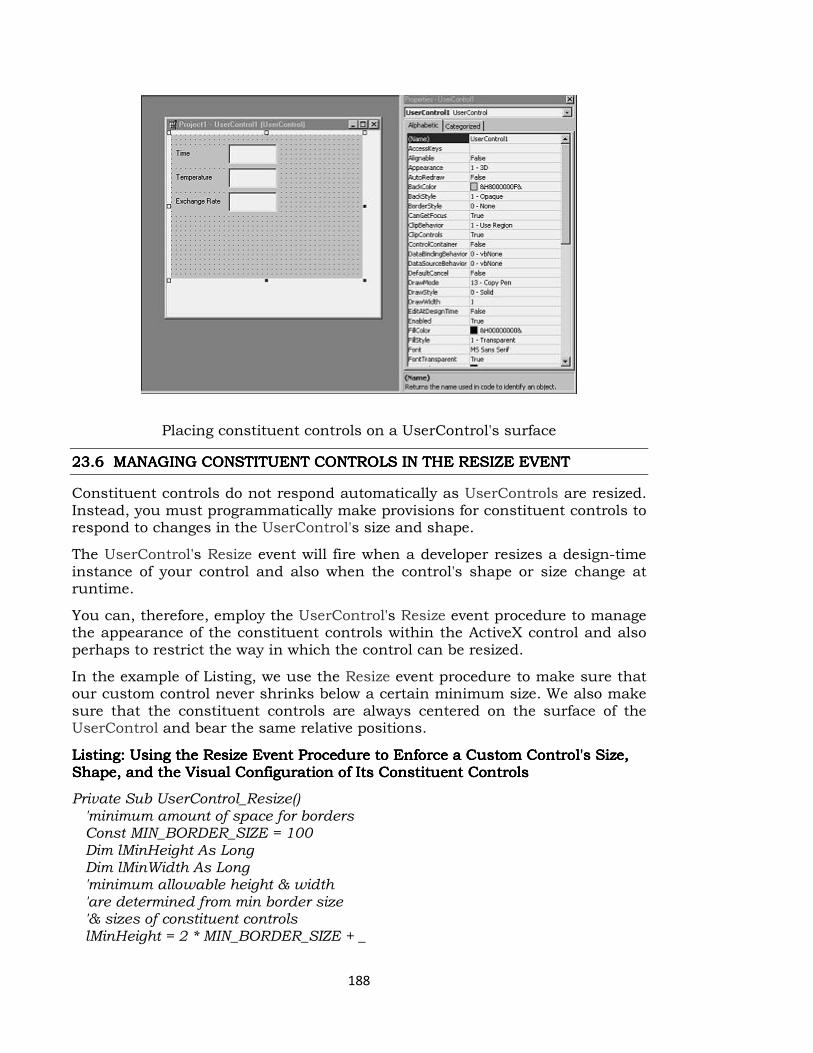
188
Placing constituent controls on a UserControl's surface
23.23.23.23.6 6 6 6 MANAGING CONSTITUENT CONTROLS IN THE RESIZE EVENTMANAGING CONSTITUENT CONTROLS IN THE RESIZE EVENTMANAGING CONSTITUENT CONTROLS IN THE RESIZE EVENTMANAGING CONSTITUENT CONTROLS IN THE RESIZE EVENT
Constituent controls do not respond automatically as UserControls are resized. Instead, you must programmatically make provisions for constituent controls to respond to changes in the UserControl's size and shape.
The UserControl's Resize event will fire when a developer resizes a design-time instance of your control and also when the control's shape or size change at runtime.
You can, therefore, employ the UserControl's Resize event procedure to manage the appearance of the constituent controls within the ActiveX control and also perhaps to restrict the way in which the control can be resized.
In the example of Listing, we use the Resize event procedure to make sure that our custom control never shrinks below a certain minimum size. We also make sure that the constituent controls are always centered on the surface of the UserControl and bear the same relative positions.
Listing: Using the Resize Event Procedure to Enforce a Custom Control's Size, Listing: Using the Resize Event Procedure to Enforce a Custom Control's Size, Listing: Using the Resize Event Procedure to Enforce a Custom Control's Size, Listing: Using the Resize Event Procedure to Enforce a Custom Control's Size, Shape, and the Visual Configuration of Its Constituent ControlsShape, and the Visual Configuration of Its Constituent ControlsShape, and the Visual Configuration of Its Constituent ControlsShape, and the Visual Configuration of Its Constituent Controls
Private Sub UserControl_Resize() 'minimum amount of space for borders Const MIN_BORDER_SIZE = 100 Dim lMinHeight As Long Dim lMinWidth As Long 'minimum allowable height & width 'are determined from min border size '& sizes of constituent controls lMinHeight = 2 * MIN_BORDER_SIZE + _
189
cmdApply.Height lMinWidth = 3 * MIN_BORDER_SIZE + _ cmdApply.Width + _ txtEnter.Width 'if this UserControl has been 're-sized to below minimum 'sizes, then re-size it to 'minimum allowable size If (ScaleHeight < lMinHeight) Then Height = lMinHeight + _ (Height - ScaleHeight) End If If (ScaleWidth < lMinWidth) Then Width = lMinWidth + _ (Width - ScaleWidth) End If 'now figure out how big the 'horizontal border can be 'given the constituent control 'sizes and the size of the UserControl Dim lhorizBorderSize As Long lhorizBorderSize = _ (ScaleWidth - _ txtEnter.Width - cmdApply.Width) / 3 'set the horizontal alignment of 'controls based on computed 'horizontal border size txtEnter.Left = lhorizBorderSize cmdApply.Left = txtEnter.Left + _ txtEnter.Width + _ lhorizBorderSize 'figure out vertical border Dim lVertBorderSize As Long lVertBorderSize = _ (ScaleHeight - cmdApply.Height) / 2 'set vertical alignment of controls cmdApply.Top = lVertBorderSize txtEnter.Top = lVertBorderSize End Sub
Testing Your ActiveTesting Your ActiveTesting Your ActiveTesting Your Active----x controls with x controls with x controls with x controls with existing existing existing existing container application:container application:container application:container application:
The most common container applications that you will want to test against your ActiveX control would be Internet browsers that support ActiveX controls such as Internet Explorer.

190
In order to test your ActiveX control with a browser, you will use the Debugging tab of VB's Project, Properties dialog box to indicate your control's behavior when you run it from the design-time
Testing Your ActiveX Control with a BrowserTesting Your ActiveX Control with a BrowserTesting Your ActiveX Control with a BrowserTesting Your ActiveX Control with a Browser
1. Make sure that your ActiveX control project is the startup project in its Project Group (only necessary if there are other projects in the Project Group).
2. Run the application. The first time you do this, the Project Properties dialog box appears with its Debugging tab selected, as in Figure. You will typically want to accept the default settings with the Start Component option button selected and the Use Existing Browser check box checked.
The Debugging tab of the Project, Properties dialog box.The Debugging tab of the Project, Properties dialog box.The Debugging tab of the Project, Properties dialog box.The Debugging tab of the Project, Properties dialog box.
3. Internet Explorer will load, and an instance of your control will appear in the Internet Explorer window frame, as in Figure 13.13.
Internet Explorer, Internet Explorer, Internet Explorer, Internet Explorer, running with the test control loaded.running with the test control loaded.running with the test control loaded.running with the test control loaded.
4. Note that you can choose IE's View Source menu option to see the sample page that was created with your project's class ID, as in Figure 13.14. If you
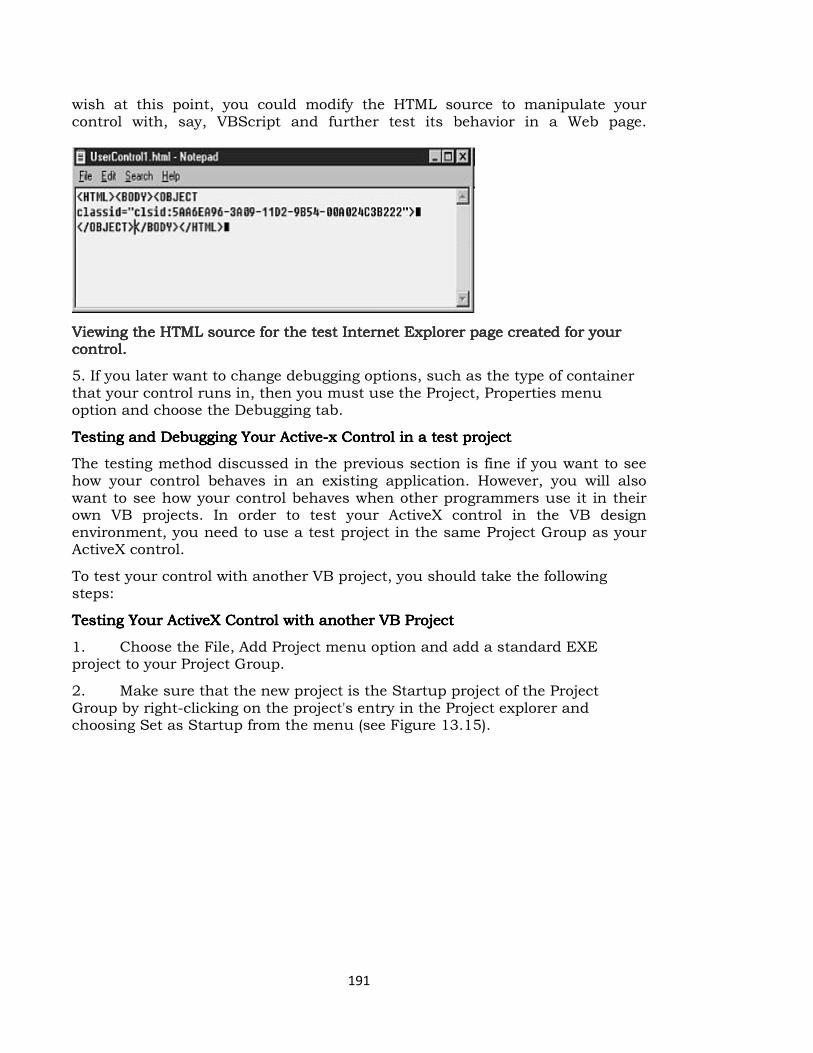
191
wish at this point, you could modify the HTML source to manipulate your control with, say, VBScript and further test its behavior in a Web page.
Viewing the HTML source for the test Internet Explorer page Viewing the HTML source for the test Internet Explorer page Viewing the HTML source for the test Internet Explorer page Viewing the HTML source for the test Internet Explorer page created for your created for your created for your created for your control.control.control.control.
5. If you later want to change debugging options, such as the type of container that your control runs in, then you must use the Project, Properties menu option and choose the Debugging tab.
Testing and Debugging Your ActiveTesting and Debugging Your ActiveTesting and Debugging Your ActiveTesting and Debugging Your Active----x Conx Conx Conx Control in a test projecttrol in a test projecttrol in a test projecttrol in a test project
The testing method discussed in the previous section is fine if you want to see how your control behaves in an existing application. However, you will also want to see how your control behaves when other programmers use it in their own VB projects. In order to test your ActiveX control in the VB design environment, you need to use a test project in the same Project Group as your ActiveX control.
To test your control with another VB project, you should take the following steps:
TestinTestinTestinTesting Your ActiveX Control with g Your ActiveX Control with g Your ActiveX Control with g Your ActiveX Control with anotheranotheranotheranother VB ProjectVB ProjectVB ProjectVB Project
1. Choose the File, Add Project menu option and add a standard EXE project to your Project Group.
2. Make sure that the new project is the Startup project of the Project Group by right-clicking on the project's entry in the Project explorer and choosing Set as Startup from the menu (see Figure 13.15).
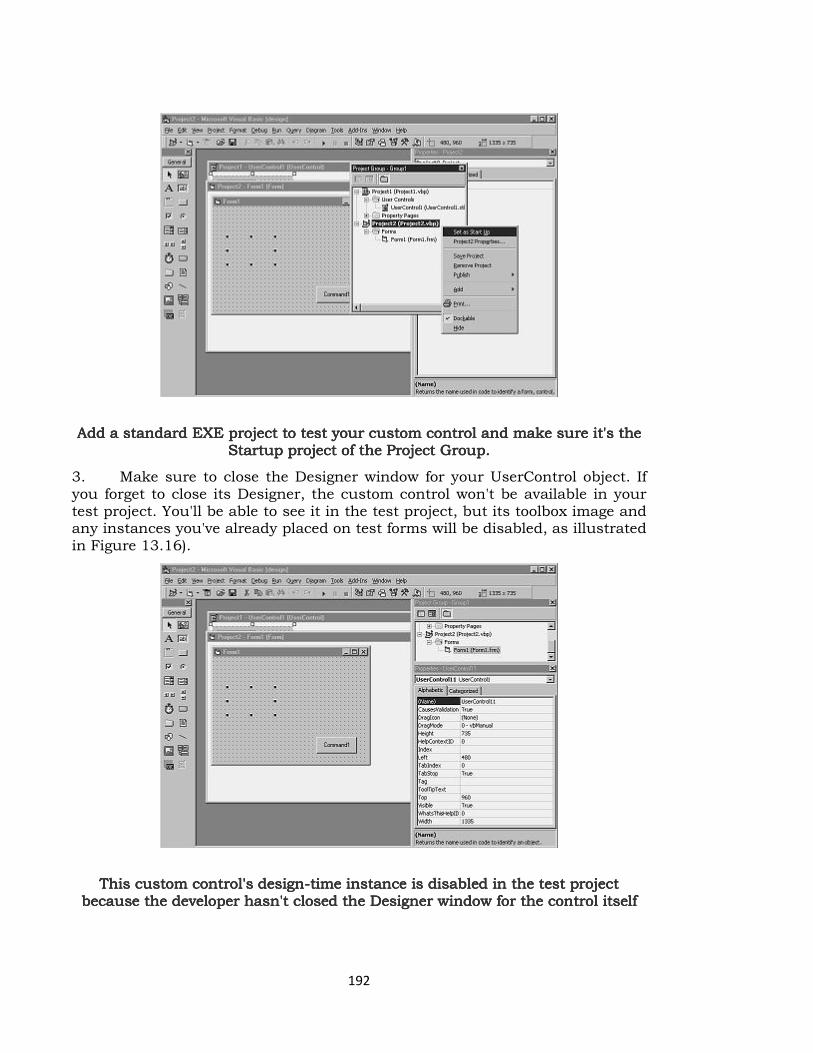
192
Add a standard EXE project to test your custom contAdd a standard EXE project to test your custom contAdd a standard EXE project to test your custom contAdd a standard EXE project to test your custom control and make sure it's the rol and make sure it's the rol and make sure it's the rol and make sure it's the
Startup project of the Project Group.Startup project of the Project Group.Startup project of the Project Group.Startup project of the Project Group.
3. Make sure to close the Designer window for your UserControl object. If you forget to close its Designer, the custom control won't be available in your test project. You'll be able to see it in the test project, but its toolbox image and any instances you've already placed on test forms will be disabled, as illustrated in Figure 13.16).
This custom control's designThis custom control's designThis custom control's designThis custom control's design----time instance is disabled in the test project time instance is disabled in the test project time instance is disabled in the test project time instance is disabled in the test project
because the developer hasn't closed the Designer window for the control itselfbecause the developer hasn't closed the Designer window for the control itselfbecause the developer hasn't closed the Designer window for the control itselfbecause the developer hasn't closed the Designer window for the control itself
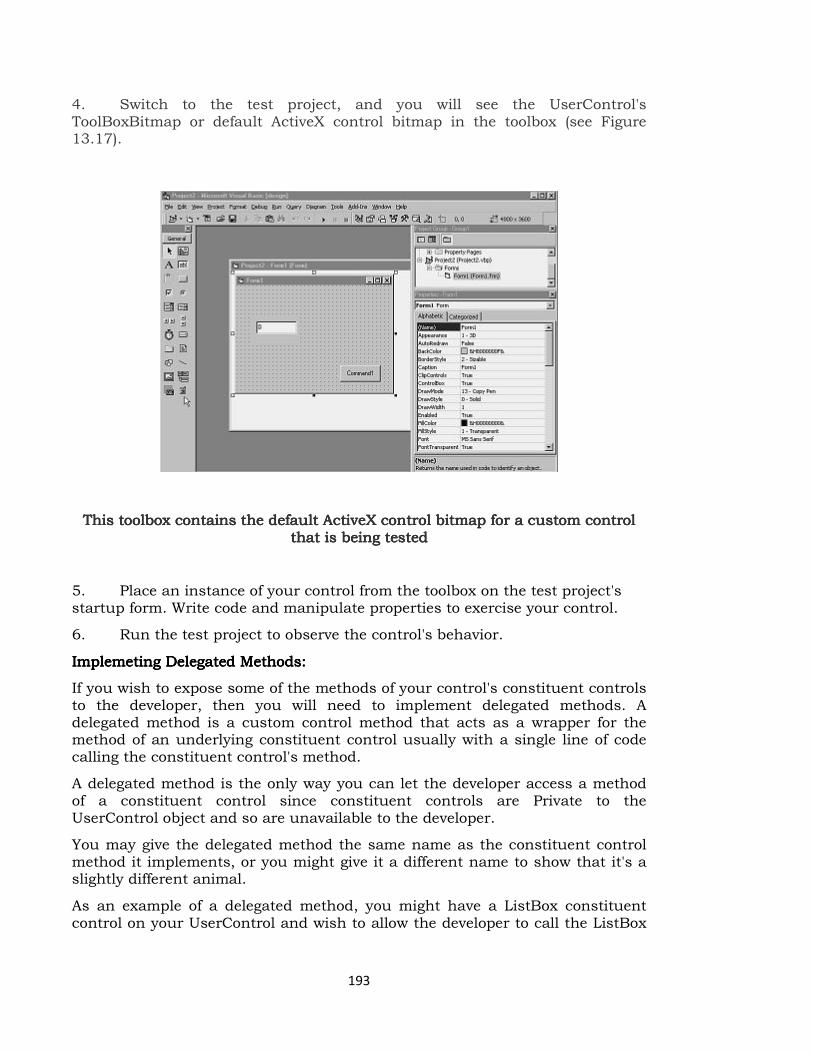
193
4. Switch to the test project, and you will see the UserControl's ToolBoxBitmap or default ActiveX control bitmap in the toolbox (see Figure 13.17).
This toolbox contains the default ActiveX control bitmap for a custom control This toolbox contains the default ActiveX control bitmap for a custom control This toolbox contains the default ActiveX control bitmap for a custom control This toolbox contains the default ActiveX control bitmap for a custom control that is beithat is beithat is beithat is being testedng testedng testedng tested
5. Place an instance of your control from the toolbox on the test project's startup form. Write code and manipulate properties to exercise your control.
6. Run the test project to observe the control's behavior.
Implemeting Delegated Methods:Implemeting Delegated Methods:Implemeting Delegated Methods:Implemeting Delegated Methods:
If you wish to expose some of the methods of your control's constituent controls to the developer, then you will need to implement delegated methods. A delegated method is a custom control method that acts as a wrapper for the method of an underlying constituent control usually with a single line of code calling the constituent control's method.
A delegated method is the only way you can let the developer access a method of a constituent control since constituent controls are Private to the UserControl object and so are unavailable to the developer.
You may give the delegated method the same name as the constituent control method it implements, or you might give it a different name to show that it's a slightly different animal.
As an example of a delegated method, you might have a ListBox constituent control on your UserControl and wish to allow the developer to call the ListBox
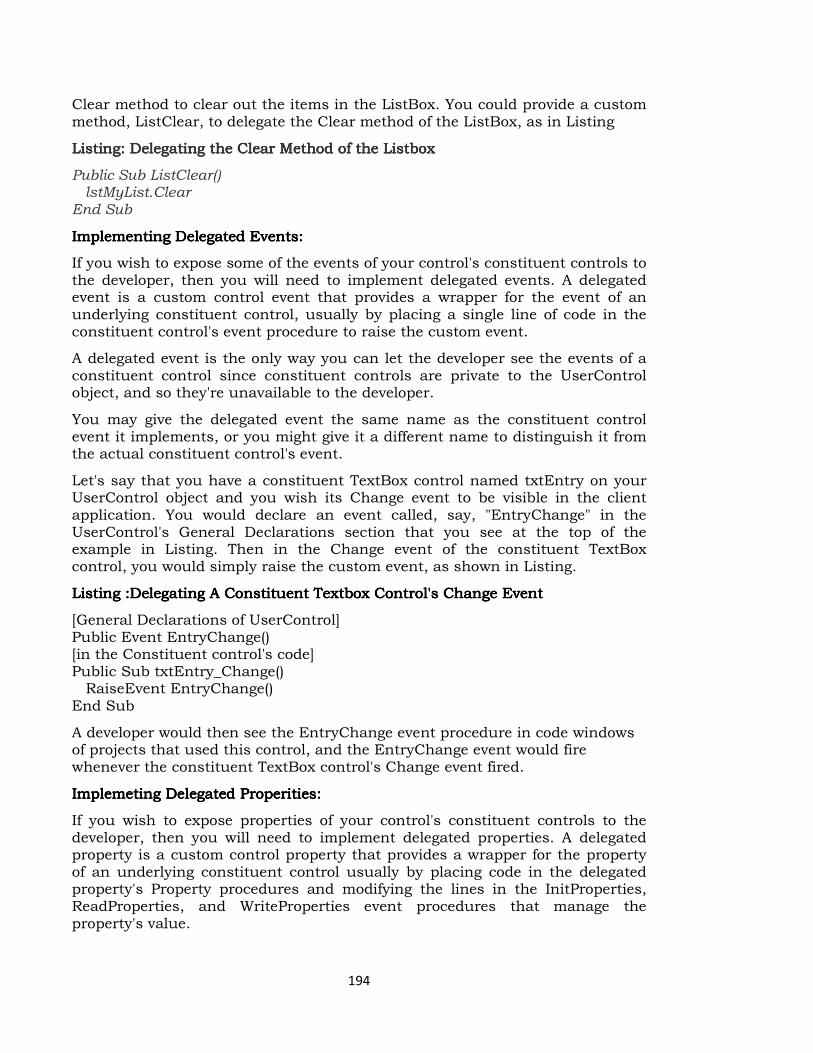
194
Clear method to clear out the items in the ListBox. You could provide a custom method, ListClear, to delegate the Clear method of the ListBox, as in Listing
Listing: Delegating the Clear Method of the ListboxListing: Delegating the Clear Method of the ListboxListing: Delegating the Clear Method of the ListboxListing: Delegating the Clear Method of the Listbox
Public Sub ListClear() lstMyList.Clear End Sub
Implementing Delegated Events:Implementing Delegated Events:Implementing Delegated Events:Implementing Delegated Events:
If you wish to expose some of the events of your control's constituent controls to the developer, then you will need to implement delegated events. A delegated event is a custom control event that provides a wrapper for the event of an underlying constituent control, usually by placing a single line of code in the constituent control's event procedure to raise the custom event.
A delegated event is the only way you can let the developer see the events of a constituent control since constituent controls are private to the UserControl object, and so they're unavailable to the developer.
You may give the delegated event the same name as the constituent control event it implements, or you might give it a different name to distinguish it from the actual constituent control's event.
Let's say that you have a constituent TextBox control named txtEntry on your UserControl object and you wish its Change event to be visible in the client application. You would declare an event called, say, "EntryChange" in the UserControl's General Declarations section that you see at the top of the example in Listing. Then in the Change event of the constituent TextBox control, you would simply raise the custom event, as shown in Listing.
Listing :Delegating A Constituent Textbox ConListing :Delegating A Constituent Textbox ConListing :Delegating A Constituent Textbox ConListing :Delegating A Constituent Textbox Control's Change Eventtrol's Change Eventtrol's Change Eventtrol's Change Event
[General Declarations of UserControl] Public Event EntryChange() [in the Constituent control's code] Public Sub txtEntry_Change() RaiseEvent EntryChange() End Sub
A developer would then see the EntryChange event procedure in code windows of projects that used this control, and the EntryChange event would fire whenever the constituent TextBox control's Change event fired.
Implemeting Delegated Properities:Implemeting Delegated Properities:Implemeting Delegated Properities:Implemeting Delegated Properities:
If you wish to expose properties of your control's constituent controls to the developer, then you will need to implement delegated properties. A delegated property is a custom control property that provides a wrapper for the property of an underlying constituent control usually by placing code in the delegated property's Property procedures and modifying the lines in the InitProperties, ReadProperties, and WriteProperties event procedures that manage the property's value.
195
A delegated property is the only way you can give the developer access to the properties of a constituent control since constituent controls are private to the UserControl object and so their very existence, let alone their individual members, are unknown to the developer.
You may give the delegated property the same name as the constituent control property it implements, or you might give it a different name to distinguish it from the actual constituent control's property.
As an example of a delegated property, let's say that you have a constituent control, txtEntry, and you wish to expose its Text property to the developer using your control. You could create a custom property EntryText to delegate the txtEntry.Text property. To accomplish the property delegation, you'd follow these steps:
Property DelegationProperty DelegationProperty DelegationProperty Delegation
1. Create Property Get and Property Let procedures for the EntryText property (see Listing 13.13). Note that we don't use a Private variable in this example to store the property's value: Rather, we use the Text property of the constituent control txtEntry.
2. Put a line of code in the InitProperties event to implement the default value for this property. Note again in Listing 13.14 the use of the Text property of the constituent control rather than a Private variable as our repository for the property's value.
3. Put the appropriate code to manage the property's value into the ReadProperties and WriteProperties event procedures. Note once again in Listing 13.15 that we use the constituent control's Text property (and not a variable) to store and retrieve the property's value.
Listing: Property Let and Property Get ProcedListing: Property Let and Property Get ProcedListing: Property Let and Property Get ProcedListing: Property Let and Property Get Procedures for a Delegated Propertyures for a Delegated Propertyures for a Delegated Propertyures for a Delegated Property
Property Let EntryText(strValue as String) txtEntry.Text = strValue PropertyChanged "EntryText" End Property Property Get EntryText() as String EntryText = txtEntry.Text End Property
Listing: Initializing A Delegated Listing: Initializing A Delegated Listing: Initializing A Delegated Listing: Initializing A Delegated Property In The Initproperties Event ProcedureProperty In The Initproperties Event ProcedureProperty In The Initproperties Event ProcedureProperty In The Initproperties Event Procedure
Private Sub InitProperties() 'Do some other initialization activies.... txtEntry.Text = "" End Sub
Listing: Managing a Persistent Delegated Property in the Readproperties and Listing: Managing a Persistent Delegated Property in the Readproperties and Listing: Managing a Persistent Delegated Property in the Readproperties and Listing: Managing a Persistent Delegated Property in the Readproperties and Writeproperties Event Writeproperties Event Writeproperties Event Writeproperties Event ProceduresProceduresProceduresProcedures
Private Sub WriteProperties(PropBag As PropertyBag) 'Write some other properties...
196
PropBag.WriteProperty _ "EntryText", txtEntry.Text End Sub Private Sub ReadProperties(PropBag As PropertyBag) 'Read some other properties... txtEntry.Text = PropBag.ReadProperty _ ("EntryText", "") End Sub
23.723.723.723.7 LET US SUM UPLET US SUM UPLET US SUM UPLET US SUM UP
In this lesson you have learnt about the detailed explanation regarding Active-x controls in VB.
23.823.823.823.8 REFERENCESREFERENCESREFERENCESREFERENCES
Gary CornellGary CornellGary CornellGary Cornell, “Visual Basic 6.0 from the Ground Up”. Tata McGraw Hill
Company,1999.
Content Development GroupContent Development GroupContent Development GroupContent Development Group “Visual Basic 6.0 Programming” Tata McGraw Hill
Company,Ninth Reprint,2007.
Noel JerkeNoel JerkeNoel JerkeNoel Jerke “The Complete Reference: Visual Basic 6.0”, Tata McGraw Hill
Company, 24th reprint, 2006.
LESSON LESSON LESSON LESSON –––– 24242424
197
FILES IN VISUAL BASICFILES IN VISUAL BASICFILES IN VISUAL BASICFILES IN VISUAL BASIC
ContentsContentsContentsContents
24.0 Aims & Objectives
24.1 Storing Data
24.2 Types of files
24.3 Opening and closing files
24.4 Access Mode
24.5 Writing and Reading a Sequential file
24.6 File design
24.7 Creating the Sequential Output form
24.024.024.024.0 AIMS & OBJECTIVESAIMS & OBJECTIVESAIMS & OBJECTIVESAIMS & OBJECTIVES
This lesson teaches you how to create and use files in visual basic.
24242424.1.1.1.1 STORING DATA STORING DATA STORING DATA STORING DATA
Data comes in many forms. It can be a list of DVDs you own and want to keep track of, the description of all the online college courses you intend to take or even the movie stars you intend to date!
In the previous lessons, you have learned how to manipulate the VB environment to produce forms, do calculations, edit text and so on. However, everything you've done so far is a one-shot deal. Even if you did create the Payroll form, you can use it to calculate the net pay for any number of employees but, you can't save any of that information.
That's where data storage comes in. There are many ways to store data for future use. The most popular and powerful method is to create a database. But that can get quite involved and it does require a certain amount of analysis knowledge and skill. The next two lessons will cover how to create and use databases in VB.
A much more accessible method and one which you have certainly used many times before, is to create a data file. A file is a collection of data on a given subject, stored on a storage medium, usually a disk or CD. There are executable files, usually with the .EXE extension, library files (.DLL), Word document files (.DOC) and a hundred other types. Many applications call for data to be stored and then read back later for further processing. Think of a simple application: an Address book to store people's names, addresses and phone numbers. You could create an Address book database and indeed, it is often the first one you learn how to do in database courses. However, the task is more suited to data file processing. You just want to create a form to input names, addresses and phone numbers and then you want to store all the information entered in a file so that you can print it or look-up numbers when
198
needed. In this lesson we will learn how to create our own files to store and retrieve data.
Defining new termsDefining new termsDefining new termsDefining new terms
� Record:Record:Record:Record: one logical section of a file that holds a related set of data. If the file contains Student information, a record would hold the information on one student: name, address, studentID, etc. If there are 5,000 students registered, the file contains 5,000 records.
� Field:Field:Field:Field: part of a record that defines a specific information. In the Student record, FirstName, LastName, StudentID, are fields. The field is the lowest element in the file. Even if the information consists of one character, Sex is M or F, it is still considered a separate field. The field is the equivalent of the variable - we call it a variable when it is used to store data in memory and call it a field when it stores in a file.
� I/O:I/O:I/O:I/O: stands for Input/Output. Whenever you work with a file you have to have ways of reading data from the file (that's InputInputInputInput) and ways of writing data to the file (that's OutputOutputOutputOutput). I/O operations consist of all those commands that let you read and write files.
24.224.224.224.2 TYPES OF FILESTYPES OF FILESTYPES OF FILESTYPES OF FILES
There are basically three types of files you can work with:
� Sequential fileSequential fileSequential fileSequential file: this is a file where all the information is written in order from the beginning to the end. To access a given record you have to read all the records stored before it. It is in fact like listening to a tape - you can go forward or back but you can't jump directly to a specific song on the tape. In fact, in the old days, magnetic tape was the most commonly used medium to store data and all files were organized this way. Now, it is still useful when there is a small amount of data to store, a file of application settings, for example. It can even be of use when there is a large amount of data to be stored, provided it all has to be processed at one time, eg: a file of invoices to produce a statement at month-end.
� Random fileRandom fileRandom fileRandom file: a file where all records are accessible individually. It is like a CD where you can jump to any track. This is useful when there is a large quantity of data to store and it has to be available quickly: you have to know if a part is in stock for a customer who is on the phone; the program doesn't have time to search through 10,000 records individually to locate the correct one. This method of storage became popular when hard-disk drives were developed.
� Binary fileBinary fileBinary fileBinary file: this is a special, compacted form of the random file. Data is stored at the byte level and you can read and write individual bytes to the file. This makes the file access very fast and efficient. We won't be covering this type of file in these exercises. If you need to find out more about it, go to the VB Reference Manual.
24.24.24.24.3333 OPENING AND CLOSING FILESOPENING AND CLOSING FILESOPENING AND CLOSING FILESOPENING AND CLOSING FILES

199
To begin our work on files we will look at some commands that are common to
both Sequential and Random files. After that we will look at the specific
processing commands for each type of file.
The first command to include in a program that needs to work with files is the
OpenOpenOpenOpen command. Open assigns the file to a numbered file handlefile handlefile handlefile handle, also called a
channelchannelchannelchannel, or sometimes a bufferbufferbufferbuffer. The format of the command is:
Open "Filename" [For Mode] [AccessRestriction] [LockType] As #FileNumberOpen "Filename" [For Mode] [AccessRestriction] [LockType] As #FileNumberOpen "Filename" [For Mode] [AccessRestriction] [LockType] As #FileNumberOpen "Filename" [For Mode] [AccessRestriction] [LockType] As #FileNumber
For example:
Open "MyFile.txt" For Random Read Lock Read As #1Open "MyFile.txt" For Random Read Lock Read As #1Open "MyFile.txt" For Random Read Lock Read As #1Open "MyFile.txt" For Random Read Lock Read As #1
� MyFile.txtMyFile.txtMyFile.txtMyFile.txt is the name of the file in the disk directory.
� For RandomFor RandomFor RandomFor Random means that access to the records can be random; if access is not specified, For random is the default value.
� ReadReadReadRead restricts access to Read-only - the user cannot write or change the records.
� Lock ReadLock ReadLock ReadLock Read means that only the person reading the record can have access to it at any given time; it is not shared among users.
� As #1As #1As #1As #1 means the file is assigned file handle #1; for all processing in the program, it will always be refered to as #1, not its Filename.
AccessRestrictionAccessRestrictionAccessRestrictionAccessRestriction and LockTypeLockTypeLockTypeLockType are parameters that are used mostly with files
in a network environment. You use them when you want the file to be shared or
not, and you want to prevent certain users from changing or deleting things
that they shouldn't. For the rest of this lesson we will not be using those
parameters.
24.24.24.24.4444 ACCESS MODEACCESS MODEACCESS MODEACCESS MODE
For ModeFor ModeFor ModeFor Mode in the Open statement indicates how the file will be used. There are
five access modes:
� Input:Input:Input:Input: open for sequential input; the file will be read sequentially starting at the beginning.
� Output:Output:Output:Output: open for sequential output; records will be written sequentially starting at the beginning; if the file does not exist, it is created; if it does exist, it is overwritten.
� Random:Random:Random:Random: open for random read and write; any specific record can be accessed.
� Append:Append:Append:Append: sequential output to the end of an existing file; if the file does not exist it is created; it does not overwrite the file.
� Binary:Binary:Binary:Binary: open for binary read and write; access is at byte level.

200
If access mode is not specified in the Open statement, For Random is used by For Random is used by For Random is used by For Random is used by
defaultdefaultdefaultdefault.
Once processing is finished, you need to CloseCloseCloseClose all the files that have been
opened. The format for the Close statementClose statementClose statementClose statement is:
Close #FileNumber1 [, #FileNumber2] ...Close #FileNumber1 [, #FileNumber2] ...Close #FileNumber1 [, #FileNumber2] ...Close #FileNumber1 [, #FileNumber2] ...
You can close any number of files with one Close statement. Eg:
Close #1, #2, #3Close #1, #2, #3Close #1, #2, #3Close #1, #2, #3
The following statement closes all open files:
CloseCloseCloseClose
24.24.24.24.5555 WRITING AND READING A SEQUENTIAL FILEWRITING AND READING A SEQUENTIAL FILEWRITING AND READING A SEQUENTIAL FILEWRITING AND READING A SEQUENTIAL FILE
There are two commands that allow you to write data to a sequential file: PrintPrintPrintPrint
and WriteWriteWriteWrite. They work in almost the same way but, the Print command does not
separate the fields in the file in quite the same way which makes the data
harder to read afterwards. There is really no valid reason to use Print when
creating a sequential file. In the rest of this lesson.
The format of the Write command is:
Write #FileNumber, OutputListWrite #FileNumber, OutputListWrite #FileNumber, OutputListWrite #FileNumber, OutputList
where FileNumber is the number the file was opened with and OutputList is
one or more variables you want to write to the file.
Address Book ExampleAddress Book ExampleAddress Book ExampleAddress Book Example
In this exercise we will create a simple address book file to keep track of
people's names, addresses and phone numbers.
To handle the various forms that we have to use, we will develop a new
technique for these lessons: the use of a MenuMenuMenuMenu of choices. Note that that is not
the same as a Menu bar used in a form. In this case we are just going to line-up
a series of buttons for the different forms that have to be called. There has also
been a small change to the display format - from now on all the forms are
maximized (they occupy the full screen) - this is often easier for the user to
work with, rather than have a number of different forms overlapping on the
screen. To get the form to run maximized, change the Form property Form property Form property Form property
WindowSWindowSWindowSWindowState tate tate tate ----> 2 > 2 > 2 > 2 ---- MaximizedMaximizedMaximizedMaximized.
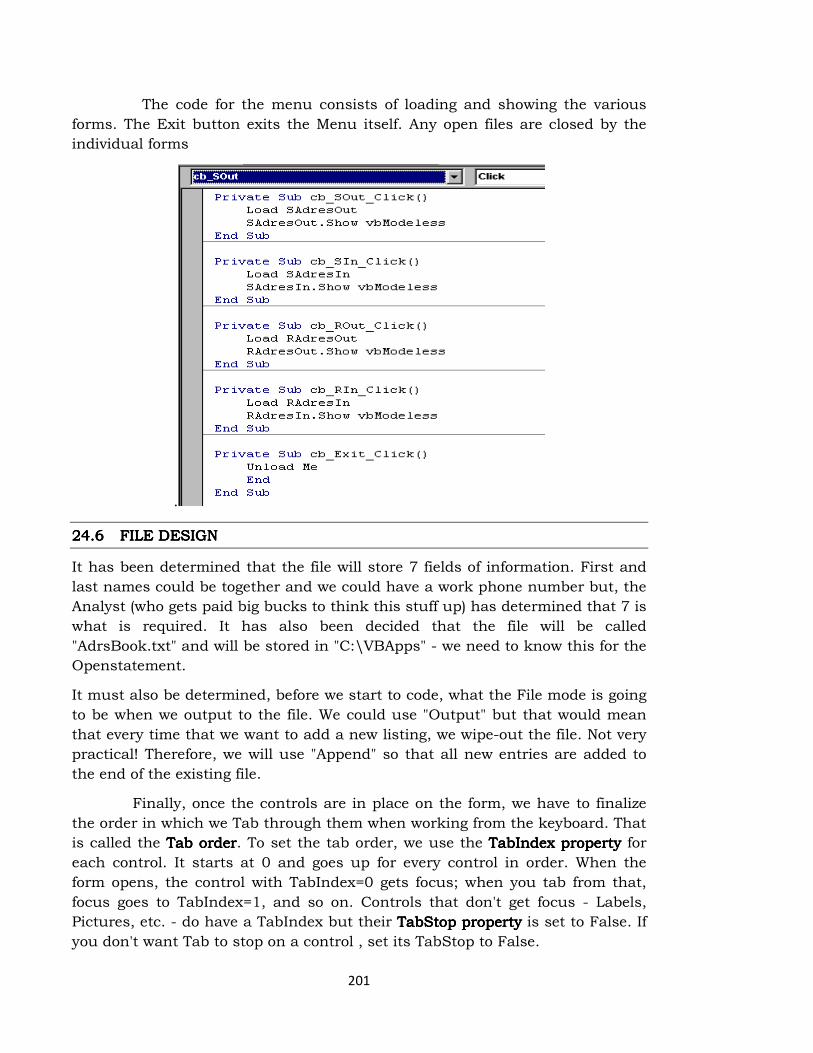
201
The code for the menu consists of loading and showing the various
forms. The Exit button exits the Menu itself. Any open files are closed by the
individual forms
.
24.24.24.24.6666 FILE DESIGNFILE DESIGNFILE DESIGNFILE DESIGN
It has been determined that the file will store 7 fields of information. First and
last names could be together and we could have a work phone number but, the
Analyst (who gets paid big bucks to think this stuff up) has determined that 7 is
what is required. It has also been decided that the file will be called
"AdrsBook.txt" and will be stored in "C:\VBApps" - we need to know this for the
Openstatement.
It must also be determined, before we start to code, what the File mode is going
to be when we output to the file. We could use "Output" but that would mean
that every time that we want to add a new listing, we wipe-out the file. Not very
practical! Therefore, we will use "Append" so that all new entries are added to
the end of the existing file.
Finally, once the controls are in place on the form, we have to finalize
the order in which we Tab through them when working from the keyboard. That
is called the Tab orderTab orderTab orderTab order. To set the tab order, we use the TabIndex propertyTabIndex propertyTabIndex propertyTabIndex property for
each control. It starts at 0 and goes up for every control in order. When the
form opens, the control with TabIndex=0 gets focus; when you tab from that,
focus goes to TabIndex=1, and so on. Controls that don't get focus - Labels,
Pictures, etc. - do have a TabIndex but their TabStop propertyTabStop propertyTabStop propertyTabStop property is set to False. If
you don't want Tab to stop on a control , set its TabStop to False.
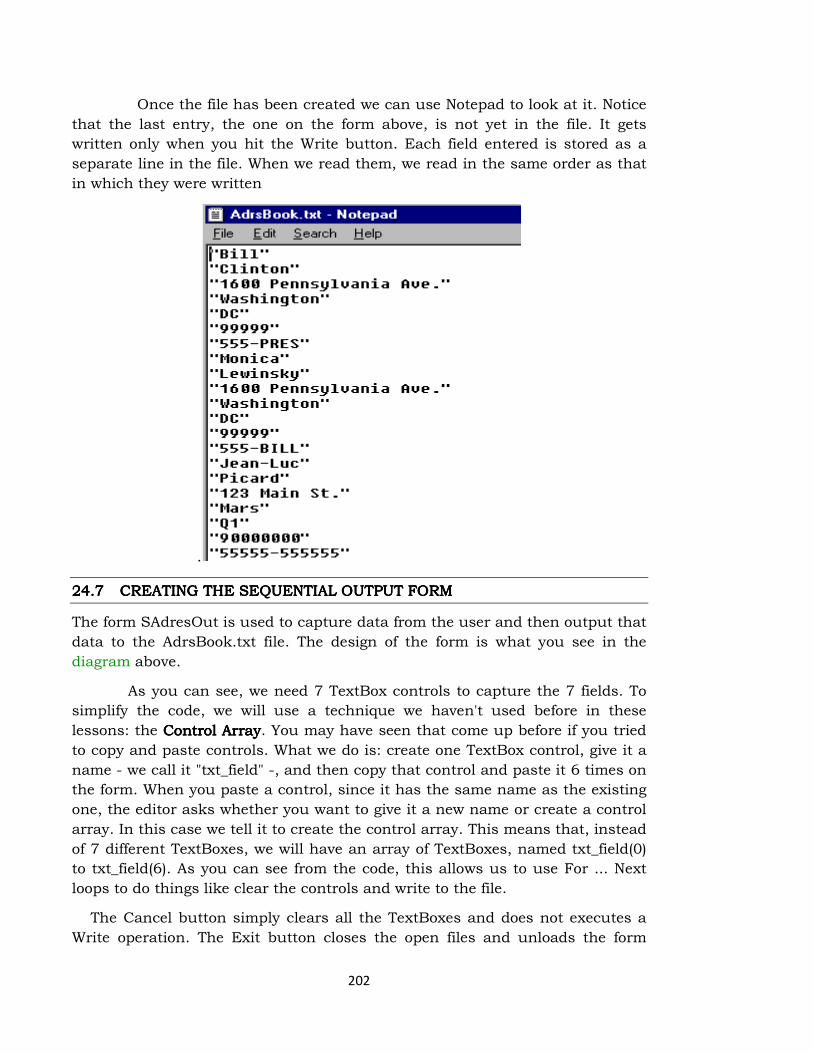
202
Once the file has been created we can use Notepad to look at it. Notice
that the last entry, the one on the form above, is not yet in the file. It gets
written only when you hit the Write button. Each field entered is stored as a
separate line in the file. When we read them, we read in the same order as that
in which they were written
.
24.24.24.24.7777 CREATING THE SEQUENTIAL OUTPUT FORMCREATING THE SEQUENTIAL OUTPUT FORMCREATING THE SEQUENTIAL OUTPUT FORMCREATING THE SEQUENTIAL OUTPUT FORM
The form SAdresOut is used to capture data from the user and then output that
data to the AdrsBook.txt file. The design of the form is what you see in the
diagram above.
As you can see, we need 7 TextBox controls to capture the 7 fields. To
simplify the code, we will use a technique we haven't used before in these
lessons: the Control ArrayControl ArrayControl ArrayControl Array. You may have seen that come up before if you tried
to copy and paste controls. What we do is: create one TextBox control, give it a
name - we call it "txt_field" -, and then copy that control and paste it 6 times on
the form. When you paste a control, since it has the same name as the existing
one, the editor asks whether you want to give it a new name or create a control
array. In this case we tell it to create the control array. This means that, instead
of 7 different TextBoxes, we will have an array of TextBoxes, named txt_field(0)
to txt_field(6). As you can see from the code, this allows us to use For ... Next
loops to do things like clear the controls and write to the file.
The Cancel button simply clears all the TextBoxes and does not executes a
Write operation. The Exit button closes the open files and unloads the form

203
which returns us automatically to the Menu form. There is no End statement,
as that would cause the program to end.
The code to write to the file is fairly straightforward. Once information has
been entered into the 7 TextBoxes, we use a FOR ... NEXT loop to execute the
Write command. The reason for this is that the Write command outputs only
one field at a time. So, we have to do 7 writes to output the whole record. After
the TextBoxes have been written-out, we clear them to create the next record.
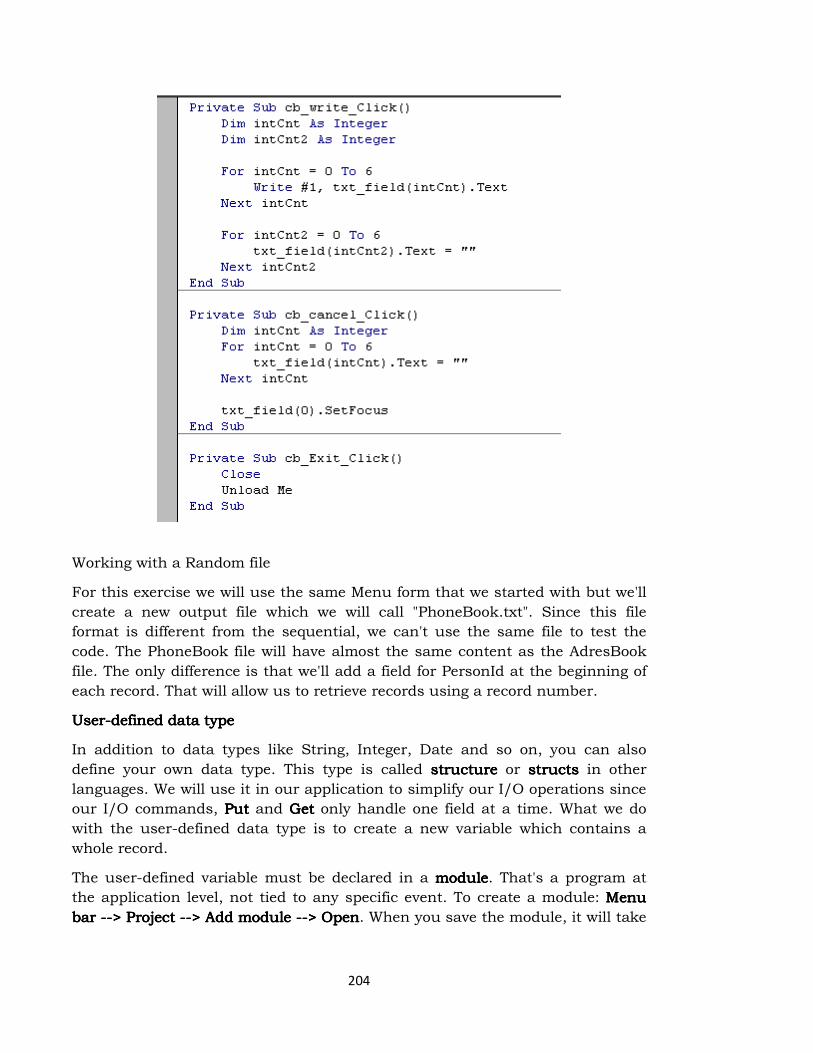
204
Working with a Random file
For this exercise we will use the same Menu form that we started with but we'll
create a new output file which we will call "PhoneBook.txt". Since this file
format is different from the sequential, we can't use the same file to test the
code. The PhoneBook file will have almost the same content as the AdresBook
file. The only difference is that we'll add a field for PersonId at the beginning of
each record. That will allow us to retrieve records using a record number.
UserUserUserUser----defined data typedefined data typedefined data typedefined data type
In addition to data types like String, Integer, Date and so on, you can also
define your own data type. This type is called structurestructurestructurestructure or structsstructsstructsstructs in other
languages. We will use it in our application to simplify our I/O operations since
our I/O commands, PutPutPutPut and GetGetGetGet only handle one field at a time. What we do
with the user-defined data type is to create a new variable which contains a
whole record.
The user-defined variable must be declared in a modulemodulemodulemodule. That's a program at
the application level, not tied to any specific event. To create a module: Menu Menu Menu Menu
bar bar bar bar --------> Project > Project > Project > Project --------> Add module > Add module > Add module > Add module --------> Open> Open> Open> Open. When you save the module, it will take
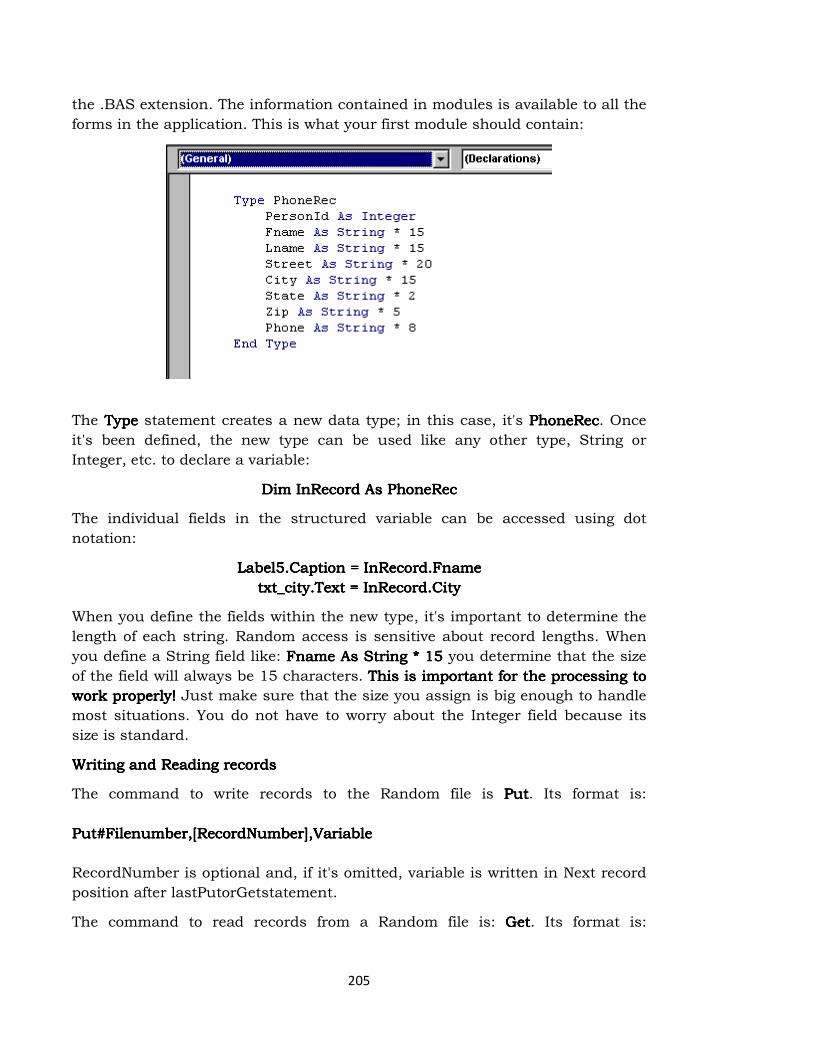
205
the .BAS extension. The information contained in modules is available to all the
forms in the application. This is what your first module should contain:
The TypeTypeTypeType statement creates a new data type; in this case, it's PhoneRecPhoneRecPhoneRecPhoneRec. Once
it's been defined, the new type can be used like any other type, String or
Integer, etc. to declare a variable:
Dim InRecord As PhoneRecDim InRecord As PhoneRecDim InRecord As PhoneRecDim InRecord As PhoneRec
The individual fields in the structured variable can be accessed using dot
notation:
Label5.Caption = InRecord.FnameLabel5.Caption = InRecord.FnameLabel5.Caption = InRecord.FnameLabel5.Caption = InRecord.Fname
txt_city.Text = InRecord.Citytxt_city.Text = InRecord.Citytxt_city.Text = InRecord.Citytxt_city.Text = InRecord.City
When you define the fields within the new type, it's important to determine the
length of each string. Random access is sensitive about record lengths. When
you define a String field like: Fname As String * 15Fname As String * 15Fname As String * 15Fname As String * 15 you determine that the size
of the field will always be 15 characters. This is important for the This is important for the This is important for the This is important for the processing to processing to processing to processing to
work properly!work properly!work properly!work properly! Just make sure that the size you assign is big enough to handle
most situations. You do not have to worry about the Integer field because its
size is standard.
Writing and Reading recordsWriting and Reading recordsWriting and Reading recordsWriting and Reading records
The command to write records to the Random file is PutPutPutPut. Its format is:
Put#Filenumber,[RecordNumber],Variable Put#Filenumber,[RecordNumber],Variable Put#Filenumber,[RecordNumber],Variable Put#Filenumber,[RecordNumber],Variable
RecordNumber is optional and, if it's omitted, variable is written in Next record
position after lastPutorGetstatement.
The command to read records from a Random file is: GetGetGetGet. Its format is:

206
Get#FileNumber,[RecordNumber],VariableGet#FileNumber,[RecordNumber],VariableGet#FileNumber,[RecordNumber],VariableGet#FileNumber,[RecordNumber],Variable
If RecordNumber is omitted, next record is read from the file.
Creating the Random fileCreating the Random fileCreating the Random fileCreating the Random file
To create the PhoneBook file, we will need a new form which is just a copy of
the SAdresOut form with the additional Person number TextBox, which is in
fact the record number. Then we'll write the code, making use of the user-
defined data type "PhoneRecPhoneRecPhoneRecPhoneRec" described earlier. This form, "RAdresOutRAdresOutRAdresOutRAdresOut", obtains
the next record number from the file, accepts input from the user and writes-
the record out to the file.

207
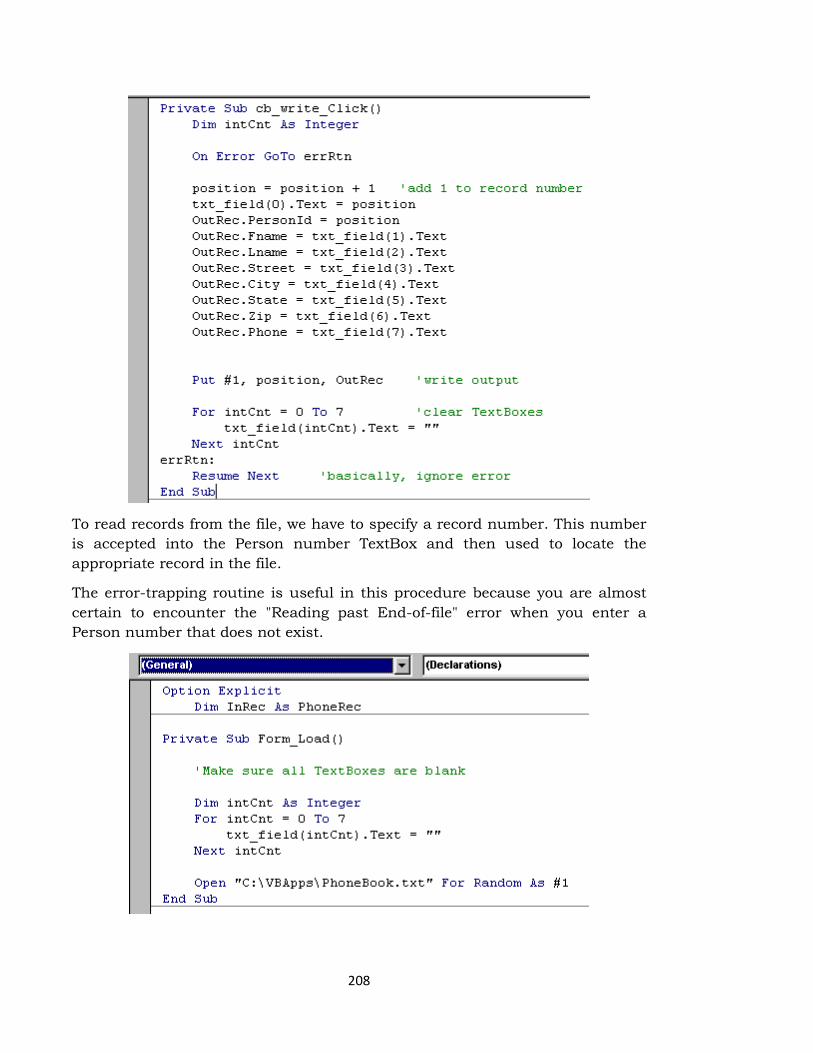
208
To read records from the file, we have to specify a record number. This number
is accepted into the Person number TextBox and then used to locate the
appropriate record in the file.
The error-trapping routine is useful in this procedure because you are almost
certain to encounter the "Reading past End-of-file" error when you enter a
Person number that does not exist.
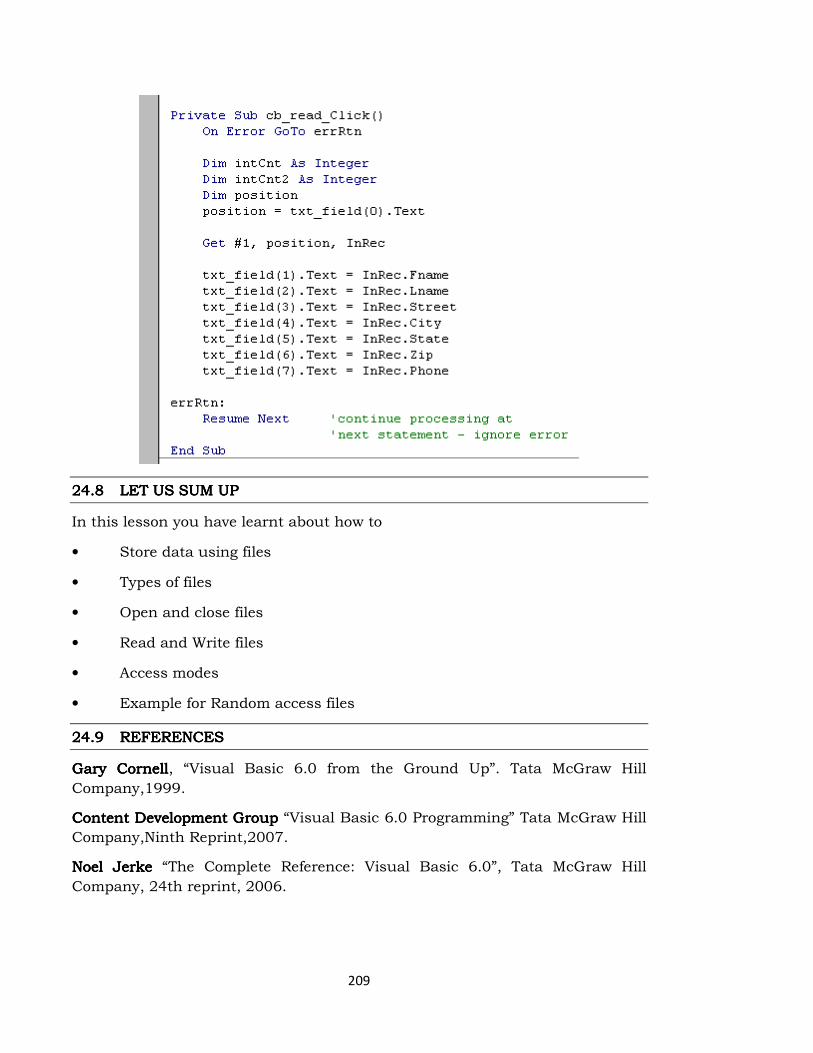
209
24.824.824.824.8 LET US SUM UPLET US SUM UPLET US SUM UPLET US SUM UP
In this lesson you have learnt about how to
• Store data using files
• Types of files
• Open and close files
• Read and Write files
• Access modes
• Example for Random access files
24.924.924.924.9 REFERENCESREFERENCESREFERENCESREFERENCES
Gary CornellGary CornellGary CornellGary Cornell, “Visual Basic 6.0 from the Ground Up”. Tata McGraw Hill
Company,1999.
Content Development GroupContent Development GroupContent Development GroupContent Development Group “Visual Basic 6.0 Programming” Tata McGraw Hill
Company,Ninth Reprint,2007.
Noel JerkeNoel JerkeNoel JerkeNoel Jerke “The Complete Reference: Visual Basic 6.0”, Tata McGraw Hill
Company, 24th reprint, 2006.

210
LESSON 25LESSON 25LESSON 25LESSON 25
MANAGING THE DATABASEMANAGING THE DATABASEMANAGING THE DATABASEMANAGING THE DATABASE
AIMSAIMSAIMSAIMS & OBJECTIVES& OBJECTIVES& OBJECTIVES& OBJECTIVES
This lesson explains about the creation,use and implementation of database.Creation of PhoneBook is considered as an example for explaining the concept.
Before starting, make a copy of your phone database file using the Windows Explorer. That way, in case we mess up, you still have a good copy. And, create a data link to the database. Here, we develop a simple DBMS for our phone number database. We will be able to display individual records and edit them. And, we will be able to add or delete records. Note this is a simple system and many of the fancy ‘bells and whistles’ (for example, asking if you really want to delete a record) that should really be here are not. Adding such amenities is left as an exercise to the student.
*frm*frm*frm*frmPhonePhonePhonePhone
Caption - Phone List Name - frmPhone
*dta*dta*dta*dtaPhonePhonePhonePhone Caption - Phone Numbers ConnectionString - [your phone database data link] (select, don’t type) RecordSource - SELECT * FROM PhoneList ORDER BY Name (the ORDER keyword sorts the database by the given field) Name - dtaPhone LockType - adLockOptimistic
*Label1:*Label1:*Label1:*Label1: Caption - Description
*Label2:*Label2:*Label2:*Label2: Caption - Phone
*Label3:*Label3:*Label3:*Label3: Caption - Name
*txtAuthor*txtAuthor*txtAuthor*txtAuthor: DataSource - dtaPhone (select, don’t type) DataField - Name (select, don’t type) Locked - False Name - txtName MaxLength - 40 TabIndex – 1 *txtISBN*txtISBN*txtISBN*txtISBN):
DataSource - dtaPhone (select, don’t type) DataField - Phone (select, don’t type) Locked - False
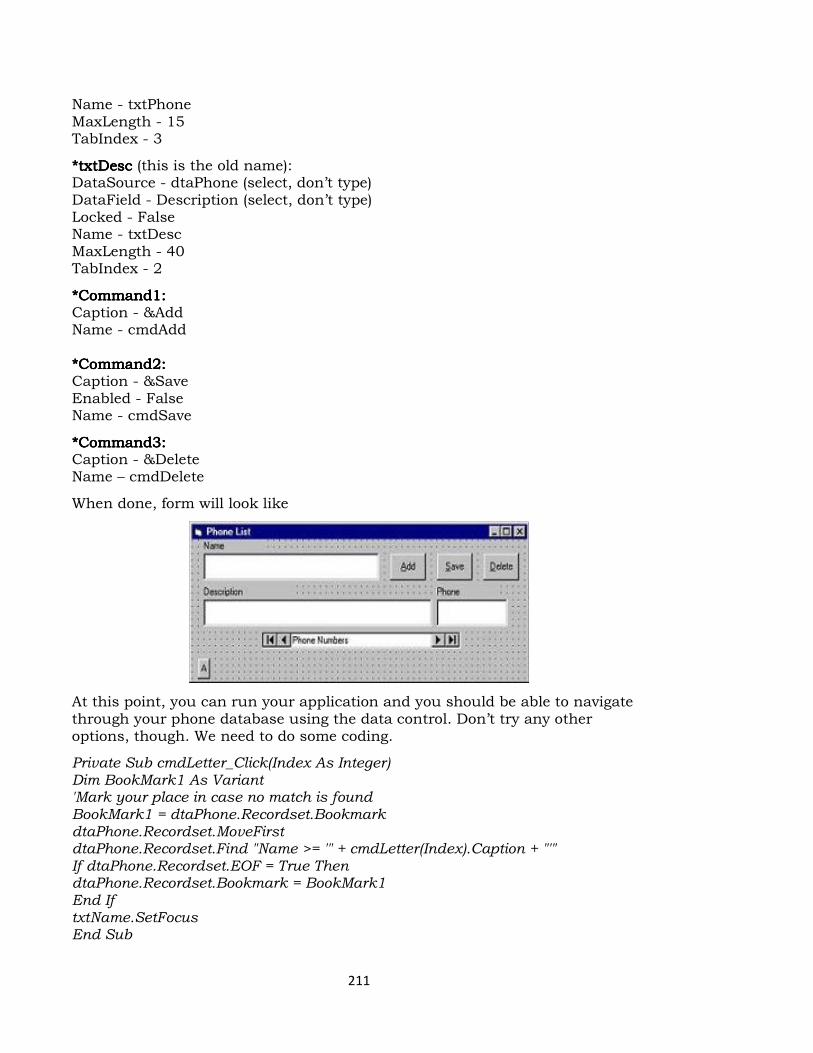
211
Name - txtPhone MaxLength - 15 TabIndex - 3
*txt*txt*txt*txtDescDescDescDesc (this is the old name): DataSource - dtaPhone (select, don’t type) DataField - Description (select, don’t type) Locked - False Name - txtDesc MaxLength - 40 TabIndex - 2
*Command1:*Command1:*Command1:*Command1: Caption - &Add Name - cmdAdd *Command2:*Command2:*Command2:*Command2: Caption - &Save Enabled - False Name - cmdSave
*Command3:*Command3:*Command3:*Command3: Caption - &Delete Name – cmdDelete
When done, form will look like
At this point, you can run your application and you should be able to navigate through your phone database using the data control. Don’t try any other options, though. We need to do some coding.
Private Sub cmdLetter_Click(Index As Integer) Dim BookMark1 As Variant 'Mark your place in case no match is found BookMark1 = dtaPhone.Recordset.Bookmark dtaPhone.Recordset.MoveFirst dtaPhone.Recordset.Find "Name >= '" + cmdLetter(Index).Caption + "'" If dtaPhone.Recordset.EOF = True Then dtaPhone.Recordset.Bookmark = BookMark1 End If txtName.SetFocus End Sub
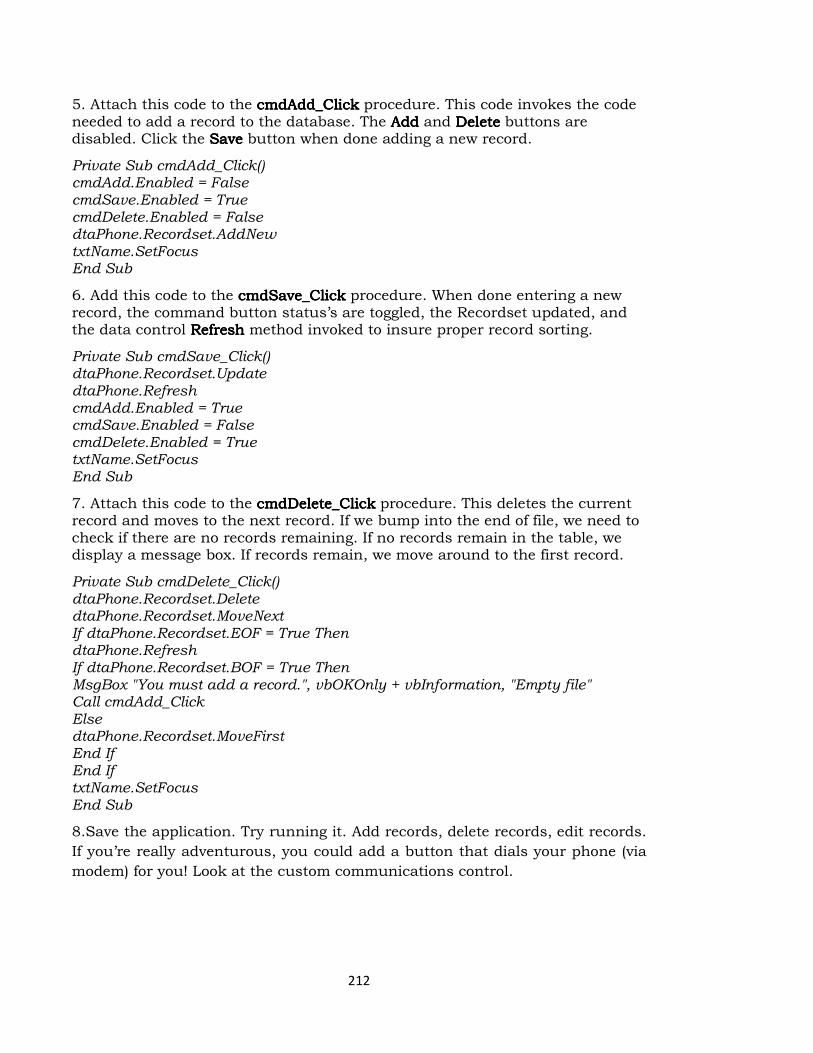
212
5. Attach this code to the cmdAdd_ClickcmdAdd_ClickcmdAdd_ClickcmdAdd_Click procedure. This code invokes the code needed to add a record to the database. The AddAddAddAdd and DeleteDeleteDeleteDelete buttons are disabled. Click the SaveSaveSaveSave button when done adding a new record.
Private Sub cmdAdd_Click() cmdAdd.Enabled = False cmdSave.Enabled = True cmdDelete.Enabled = False dtaPhone.Recordset.AddNew txtName.SetFocus End Sub
6. Add this code to the cmdSave_ClickcmdSave_ClickcmdSave_ClickcmdSave_Click procedure. When done entering a new record, the command button status’s are toggled, the Recordset updated, and the data control RefreshRefreshRefreshRefresh method invoked to insure proper record sorting.
Private Sub cmdSave_Click() dtaPhone.Recordset.Update dtaPhone.Refresh cmdAdd.Enabled = True cmdSave.Enabled = False cmdDelete.Enabled = True txtName.SetFocus End Sub
7. Attach this code to the cmdDelete_ClickcmdDelete_ClickcmdDelete_ClickcmdDelete_Click procedure. This deletes the current record and moves to the next record. If we bump into the end of file, we need to check if there are no records remaining. If no records remain in the table, we display a message box. If records remain, we move around to the first record.
Private Sub cmdDelete_Click() dtaPhone.Recordset.Delete dtaPhone.Recordset.MoveNext If dtaPhone.Recordset.EOF = True Then dtaPhone.Refresh If dtaPhone.Recordset.BOF = True Then MsgBox "You must add a record.", vbOKOnly + vbInformation, "Empty file" Call cmdAdd_Click Else dtaPhone.Recordset.MoveFirst End If End If txtName.SetFocus End Sub
8.Save the application. Try running it. Add records, delete records, edit records.
If you’re really adventurous, you could add a button that dials your phone (via
modem) for you! Look at the custom communications control.

213
CREATING THE CREATING THE CREATING THE CREATING THE DATABASEDATABASEDATABASEDATABASE
THE PROJECT MANAGEMENT EXAMPLETHE PROJECT MANAGEMENT EXAMPLETHE PROJECT MANAGEMENT EXAMPLETHE PROJECT MANAGEMENT EXAMPLE
ezConsulting Inc. is a company doing IT systems consulting work with a large
number of clients. At any given time there are dozens of projects on the go, each
employing several employees. In a given period (in this case, weekly) an
employee could work on several different projects. In order to track costs and
revenues for each project, each employee will submit a timesheet every week
showing the number of hours spent on each project. And, since all employees
are attached to only one department, costs and revenues can be calculated by
department.
It has already been determined that the ProjectMgt database will consist of the
following tables:
• EmployeesEmployeesEmployeesEmployees: details on every employee - ID, name, address, telephone, date hired, salary, chargeout rate, department
• ProjectsProjectsProjectsProjects: details of every project - project number, title, budget, start date, end date
• DepartmentsDepartmentsDepartmentsDepartments: lookup table of departments - number, name, head
• Timesheets (Master/Detail)Timesheets (Master/Detail)Timesheets (Master/Detail)Timesheets (Master/Detail): tables to store time spent on projects - date, employee, project, number of hours
The first task to be developed in the application consists of table maintenancetable maintenancetable maintenancetable maintenance.
For each of the main tables, Employees, Projects and Departments, there have
to be ways to add new records, remove records that are no longer needed and
change records when appropriate. For example, new employees are hired and
other employees leave, the name of a department is changed or a new project is
started. Each of these maintenance operations will require a separate form.
Once the maintenance functions are in place, and they have to be
memember:eferential integrityeferential integrityeferential integrityeferential integrity dictates that you can't accept a timesheet for a
non-existant employee or non-existant project), we can start working on the
operational functionsoperational functionsoperational functionsoperational functions, entering timesheets and producing reports. There will be
forms for these tasks also.
To make it easier to access the different forms, we will create an
Application MenuApplication MenuApplication MenuApplication Menu like we did in the previous lesson. The layout of the Menu
form is standard and the code consists of a series of Load and Show statements
for the various forms.
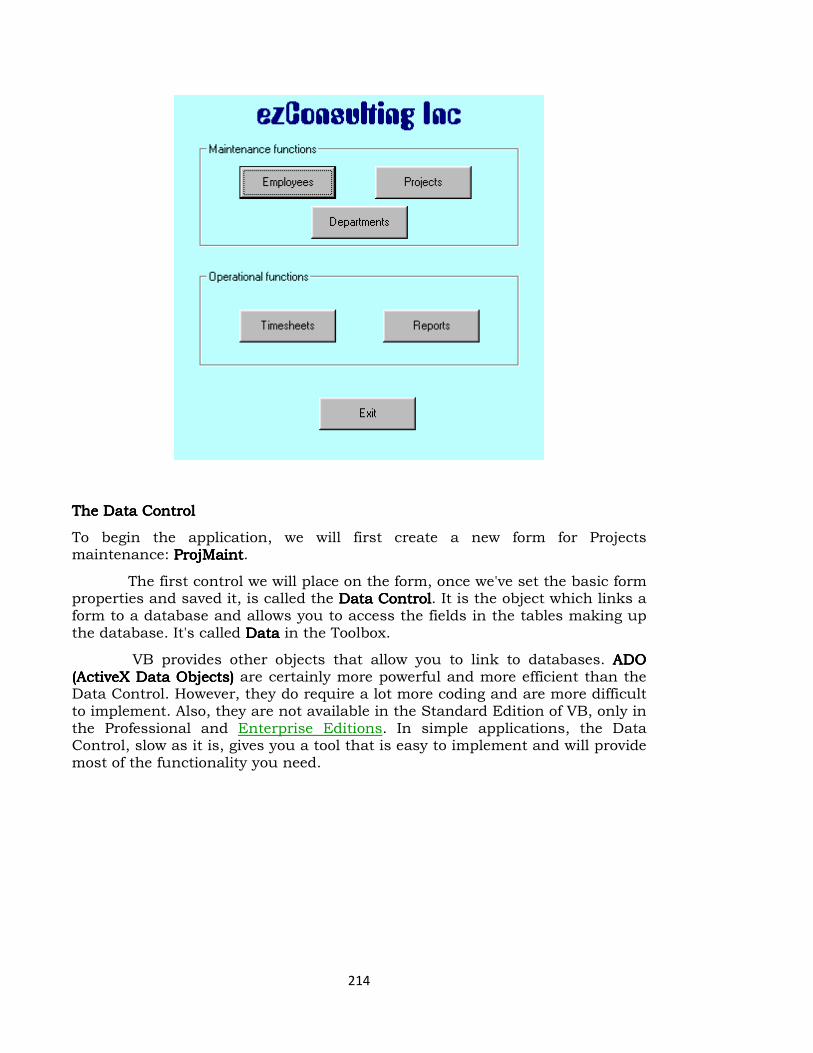
214
The Data ControlThe Data ControlThe Data ControlThe Data Control
To begin the application, we will first create a new form for Projects maintenance: ProjMaintProjMaintProjMaintProjMaint.
The first control we will place on the form, once we've set the basic form properties and saved it, is called the Data ControlData ControlData ControlData Control. It is the object which links a form to a database and allows you to access the fields in the tables making up the database. It's called DataDataDataData in the Toolbox.
VB provides other objects that allow you to link to databases. ADO ADO ADO ADO (ActiveX Data Objects)(ActiveX Data Objects)(ActiveX Data Objects)(ActiveX Data Objects) are certainly more powerful and more efficient than the Data Control. However, they do require a lot more coding and are more difficult to implement. Also, they are not available in the Standard Edition of VB, only in the Professional and Enterprise Editions. In simple applications, the Data Control, slow as it is, gives you a tool that is easy to implement and will provide most of the functionality you need.

215
The arrow buttonsarrow buttonsarrow buttonsarrow buttons on the control are used to navigate through the database records:
Firstrecord Firstrecord Firstrecord Firstrecord and Previous RecordPrevious RecordPrevious RecordPrevious Record
Next Next Next Next and Last recordLast recordLast recordLast record
The buttons correspond to 4 methodsmethodsmethodsmethods of the DC which you can use when you have to navigate using code. They are:
MoveFirstMoveFirstMoveFirstMoveFirst MovePreviousMovePreviousMovePreviousMovePrevious MoveNextMoveNextMoveNextMoveNext MoveLastMoveLastMoveLastMoveLast
Let's look at the important properties of the Data Control:
• Name:Name:Name:Name: the name to use in code - Data1 is default - eventually we'll have several data controls on the form - we'll call this one dta_proj.
• Connect:Connect:Connect:Connect: the kind of database - in this case it's Access - could be Foxpro, dBaseIV, etc.
• DatabaseName:DatabaseName:DatabaseName:DatabaseName: the name and path of the database the control is connected to.
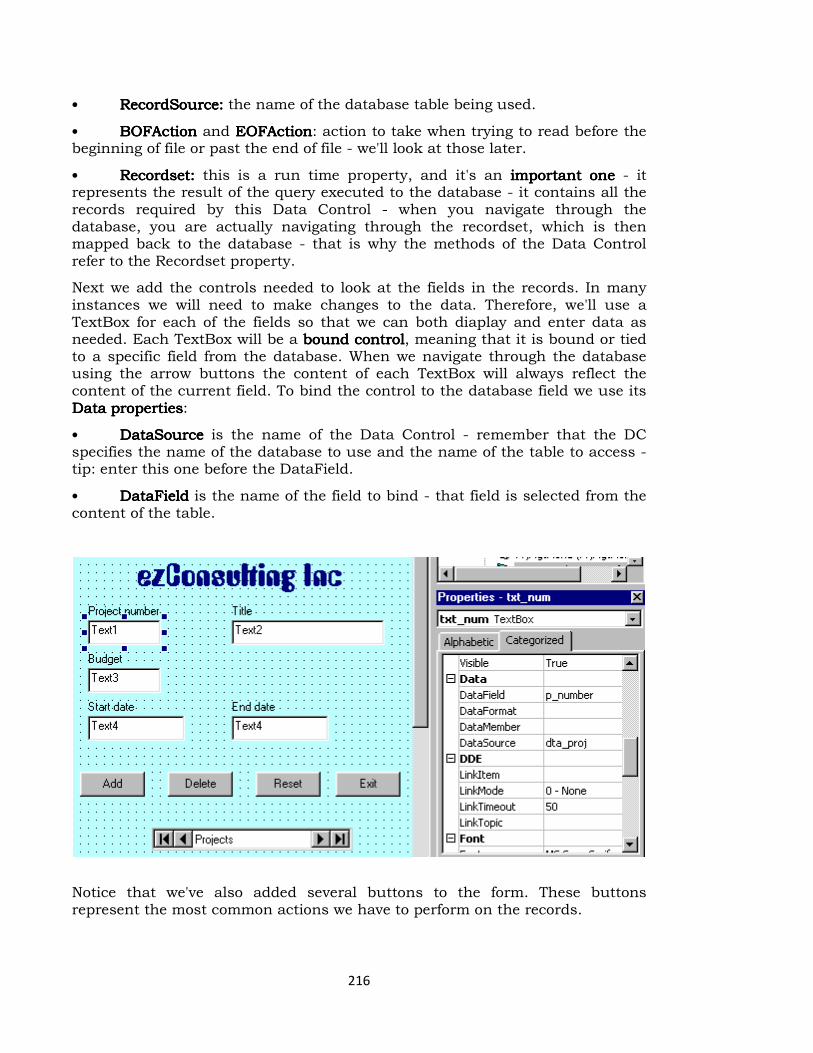
216
• RecordSource:RecordSource:RecordSource:RecordSource: the name of the database table being used.
• BOFActionBOFActionBOFActionBOFAction and EOFActionEOFActionEOFActionEOFAction: action to take when trying to read before the beginning of file or past the end of file - we'll look at those later.
• Recordset:Recordset:Recordset:Recordset: this is a run time property, and it's an important oneimportant oneimportant oneimportant one - it represents the result of the query executed to the database - it contains all the records required by this Data Control - when you navigate through the database, you are actually navigating through the recordset, which is then mapped back to the database - that is why the methods of the Data Control refer to the Recordset property.
Next we add the controls needed to look at the fields in the records. In many instances we will need to make changes to the data. Therefore, we'll use a TextBox for each of the fields so that we can both diaplay and enter data as needed. Each TextBox will be a bound controlbound controlbound controlbound control, meaning that it is bound or tied to a specific field from the database. When we navigate through the database using the arrow buttons the content of each TextBox will always reflect the content of the current field. To bind the control to the database field we use its Data propertiesData propertiesData propertiesData properties:
• DataSourceDataSourceDataSourceDataSource is the name of the Data Control - remember that the DC specifies the name of the database to use and the name of the table to access - tip: enter this one before the DataField.
• DataFieldDataFieldDataFieldDataField is the name of the field to bind - that field is selected from the content of the table.
Notice that we've also added several buttons to the form. These buttons represent the most common actions we have to perform on the records.
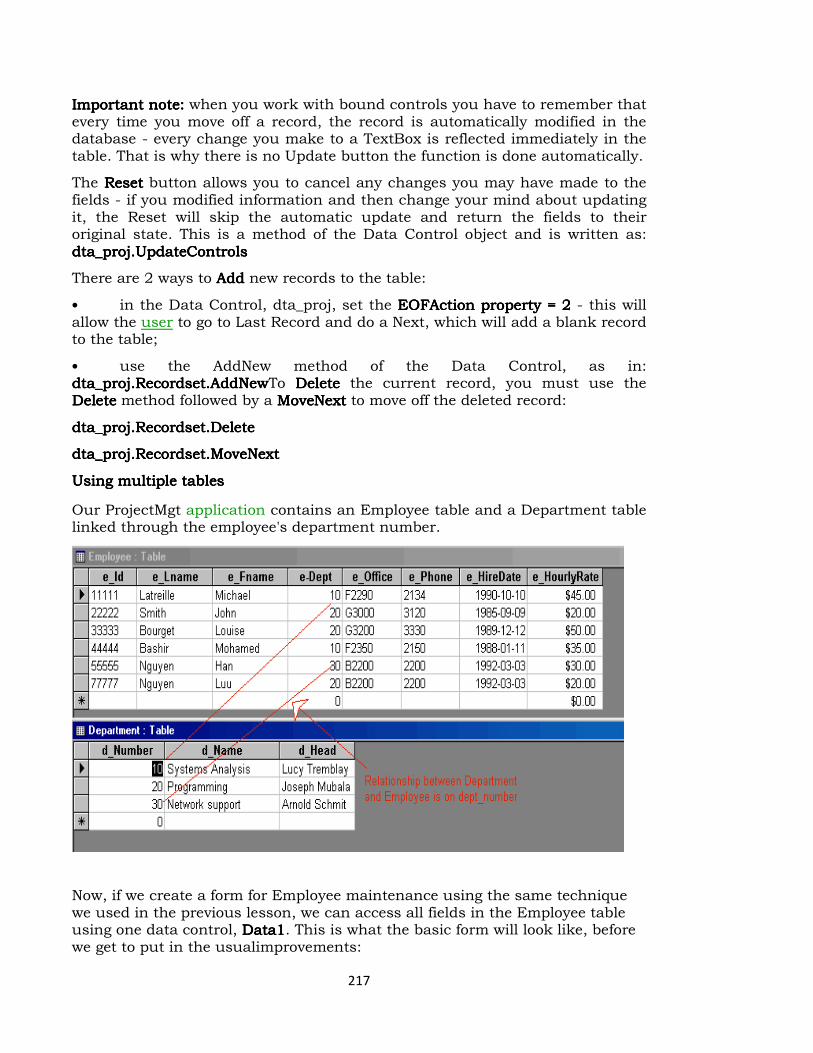
217
Important note:Important note:Important note:Important note: when you work with bound controls you have to remember that every time you move off a record, the record is automatically modified in the database - every change you make to a TextBox is reflected immediately in the table. That is why there is no Update button the function is done automatically.
The ResetResetResetReset button allows you to cancel any changes you may have made to the fields - if you modified information and then change your mind about updating it, the Reset will skip the automatic update and return the fields to their original state. This is a method of the Data Control object and is written as: dta_proj.UpdateControlsdta_proj.UpdateControlsdta_proj.UpdateControlsdta_proj.UpdateControls
There are 2 ways to AddAddAddAdd new records to the table:
• in the Data Control, dta_proj, set the EOFAction property = 2EOFAction property = 2EOFAction property = 2EOFAction property = 2 - this will allow the user to go to Last Record and do a Next, which will add a blank record to the table;
• use the AddNew method of the Data Control, as in: dta_proj.Recordset.AddNewdta_proj.Recordset.AddNewdta_proj.Recordset.AddNewdta_proj.Recordset.AddNewTo DeleteDeleteDeleteDelete the current record, you must use the DeleteDeleteDeleteDelete method followed by a MoveNextMoveNextMoveNextMoveNext to move off the deleted record:
dta_proj.Recordset.Deletedta_proj.Recordset.Deletedta_proj.Recordset.Deletedta_proj.Recordset.Delete
dta_proj.Recordset.MoveNextdta_proj.Recordset.MoveNextdta_proj.Recordset.MoveNextdta_proj.Recordset.MoveNext
Using multiple tablesUsing multiple tablesUsing multiple tablesUsing multiple tables
Our ProjectMgt application contains an Employee table and a Department table linked through the employee's department number.
Now, if we create a form for Employee maintenance using the same technique we used in the previous lesson, we can access all fields in the Employee table using one data control, Data1Data1Data1Data1. This is what the basic form will look like, before we get to put in the usualimprovements:
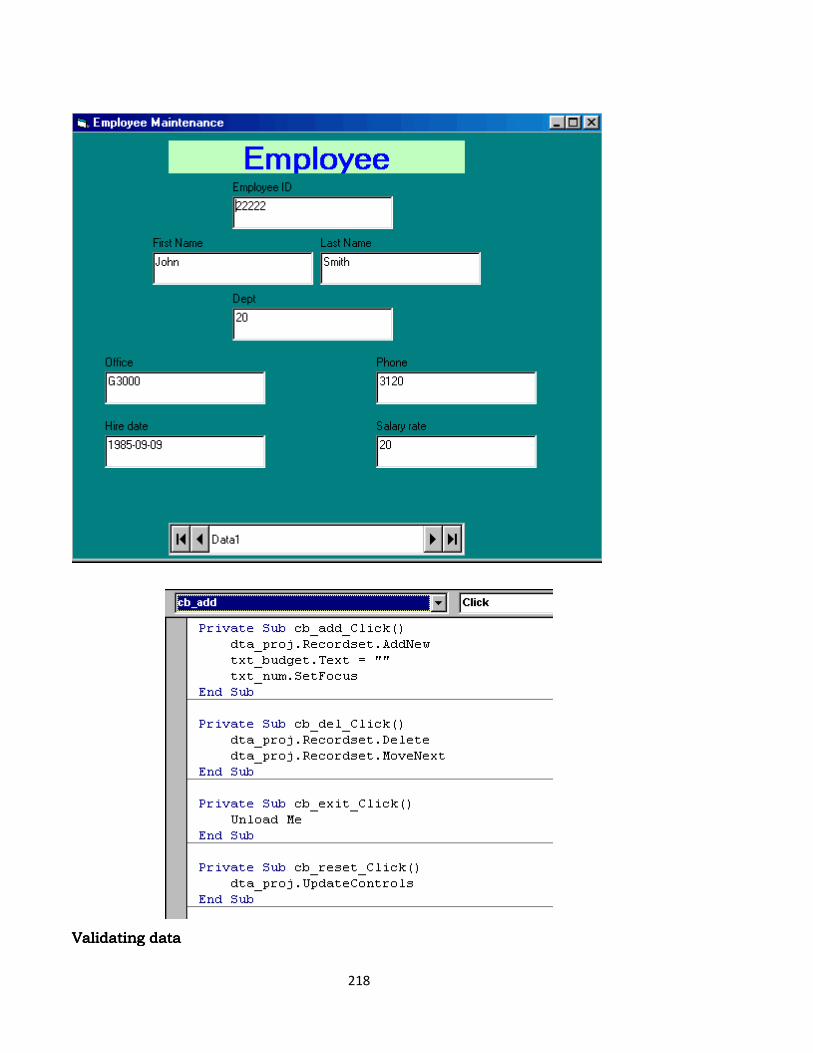
218
Validating dataValidating dataValidating dataValidating data
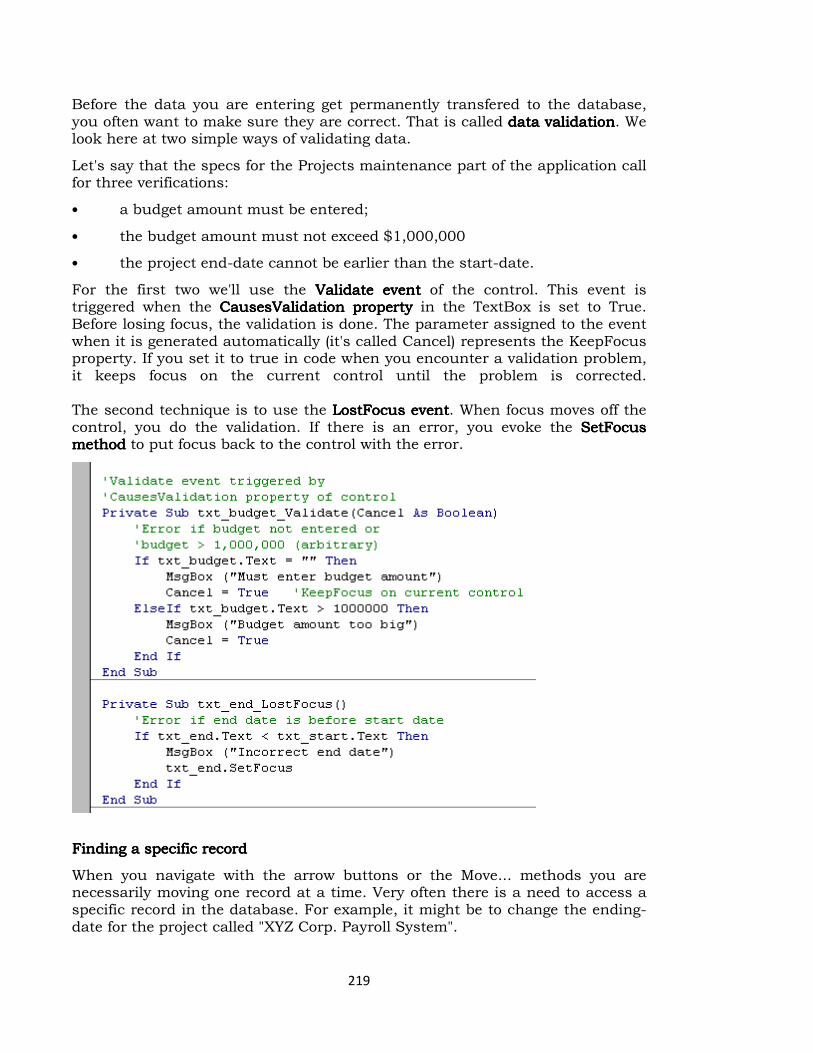
219
Before the data you are entering get permanently transfered to the database, you often want to make sure they are correct. That is called data validationdata validationdata validationdata validation. We look here at two simple ways of validating data.
Let's say that the specs for the Projects maintenance part of the application call for three verifications:
• a budget amount must be entered;
• the budget amount must not exceed $1,000,000
• the project end-date cannot be earlier than the start-date.
For the first two we'll use the Validate eventValidate eventValidate eventValidate event of the control. This event is triggered when the CausesValidation propertyCausesValidation propertyCausesValidation propertyCausesValidation property in the TextBox is set to True. Before losing focus, the validation is done. The parameter assigned to the event when it is generated automatically (it's called Cancel) represents the KeepFocus property. If you set it to true in code when you encounter a validation problem, it keeps focus on the current control until the problem is corrected. The second technique is to use the LostFocus eventLostFocus eventLostFocus eventLostFocus event. When focus moves off the control, you do the validation. If there is an error, you evoke the SetFocus SetFocus SetFocus SetFocus methodmethodmethodmethod to put focus back to the control with the error.
Finding a specific rFinding a specific rFinding a specific rFinding a specific recordecordecordecord
When you navigate with the arrow buttons or the Move... methods you are necessarily moving one record at a time. Very often there is a need to access a specific record in the database. For example, it might be to change the ending-date for the project called "XYZ Corp. Payroll System".
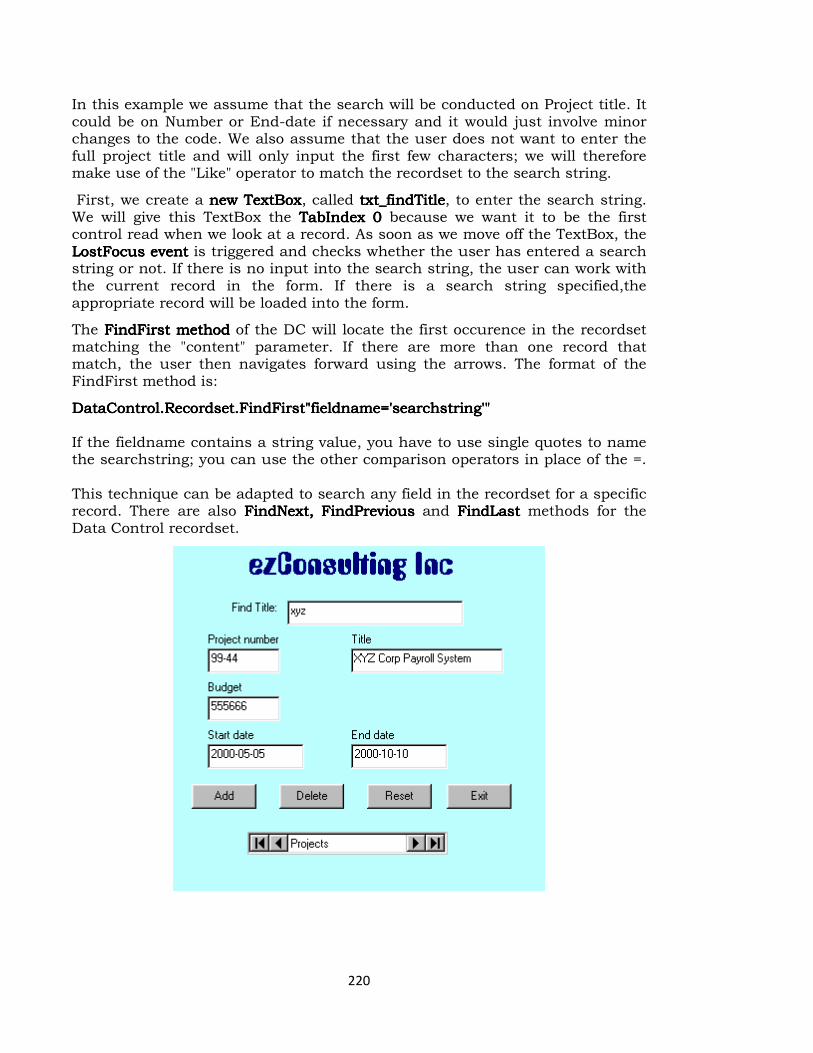
220
In this example we assume that the search will be conducted on Project title. It could be on Number or End-date if necessary and it would just involve minor changes to the code. We also assume that the user does not want to enter the full project title and will only input the first few characters; we will therefore make use of the "Like" operator to match the recordset to the search string.
First, we create a new TextBoxnew TextBoxnew TextBoxnew TextBox, called txt_findTitletxt_findTitletxt_findTitletxt_findTitle, to enter the search string. We will give this TextBox the TabIndex 0TabIndex 0TabIndex 0TabIndex 0 because we want it to be the first control read when we look at a record. As soon as we move off the TextBox, the LostFocus eventLostFocus eventLostFocus eventLostFocus event is triggered and checks whether the user has entered a search string or not. If there is no input into the search string, the user can work with the current record in the form. If there is a search string specified,the appropriate record will be loaded into the form.
The FindFirst methodFindFirst methodFindFirst methodFindFirst method of the DC will locate the first occurence in the recordset matching the "content" parameter. If there are more than one record that match, the user then navigates forward using the arrows. The format of the FindFirst method is:
DataControl.Recordset.FindFirst"fieldname='searchstring'"DataControl.Recordset.FindFirst"fieldname='searchstring'"DataControl.Recordset.FindFirst"fieldname='searchstring'"DataControl.Recordset.FindFirst"fieldname='searchstring'" If the fieldname contains a string value, you have to use single quotes to name the searchstring; you can use the other comparison operators in place of the =. This technique can be adapted to search any field in the recordset for a specific record. There are also FindNext, FindPreviousFindNext, FindPreviousFindNext, FindPreviousFindNext, FindPrevious and FindLastFindLastFindLastFindLast methods for the Data Control recordset.
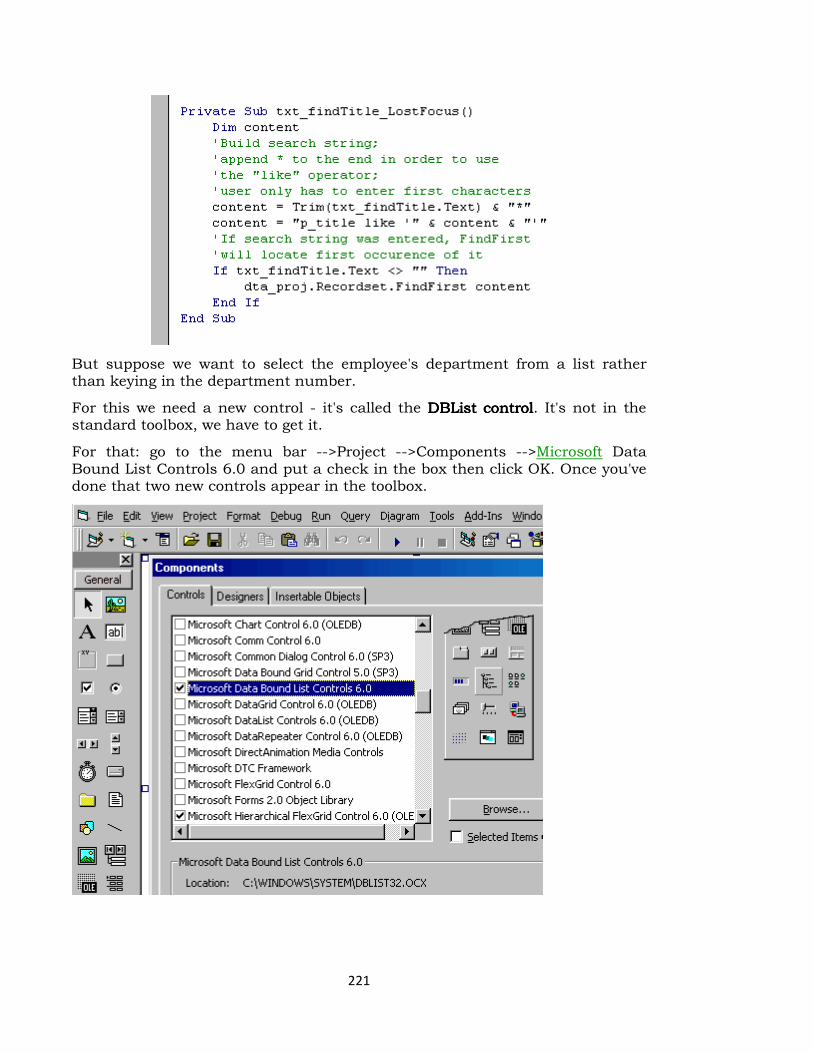
221
But suppose we want to select the employee's department from a list rather than keying in the department number.
For this we need a new control - it's called the DBList contrDBList contrDBList contrDBList controlololol. It's not in the standard toolbox, we have to get it.
For that: go to the menu bar -->Project -->Components -->Microsoft Data Bound List Controls 6.0 and put a check in the box then click OK. Once you've done that two new controls appear in the toolbox.
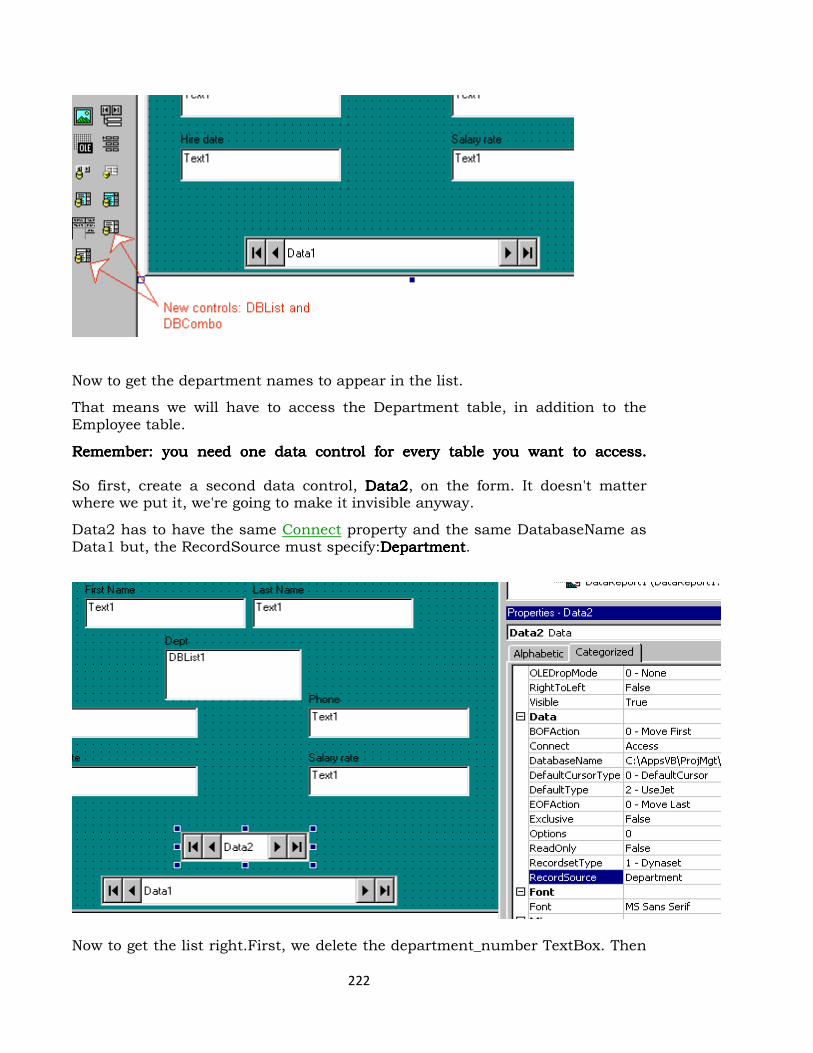
222
Now to get the department names to appear in the list.
That means we will have to access the Department table, in addition to the Employee table.
Remember: you need one data control for every table you want to access.Remember: you need one data control for every table you want to access.Remember: you need one data control for every table you want to access.Remember: you need one data control for every table you want to access. So first, create a second data control, Data2Data2Data2Data2, on the form. It doesn't matter where we put it, we're going to make it invisible anyway.
Data2 has to have the same Connect property and the same DatabaseName as Data1 but, the RecordSource must specify:DepartmentDepartmentDepartmentDepartment.
Now to get the list right.First, we delete the department_number TextBox. Then
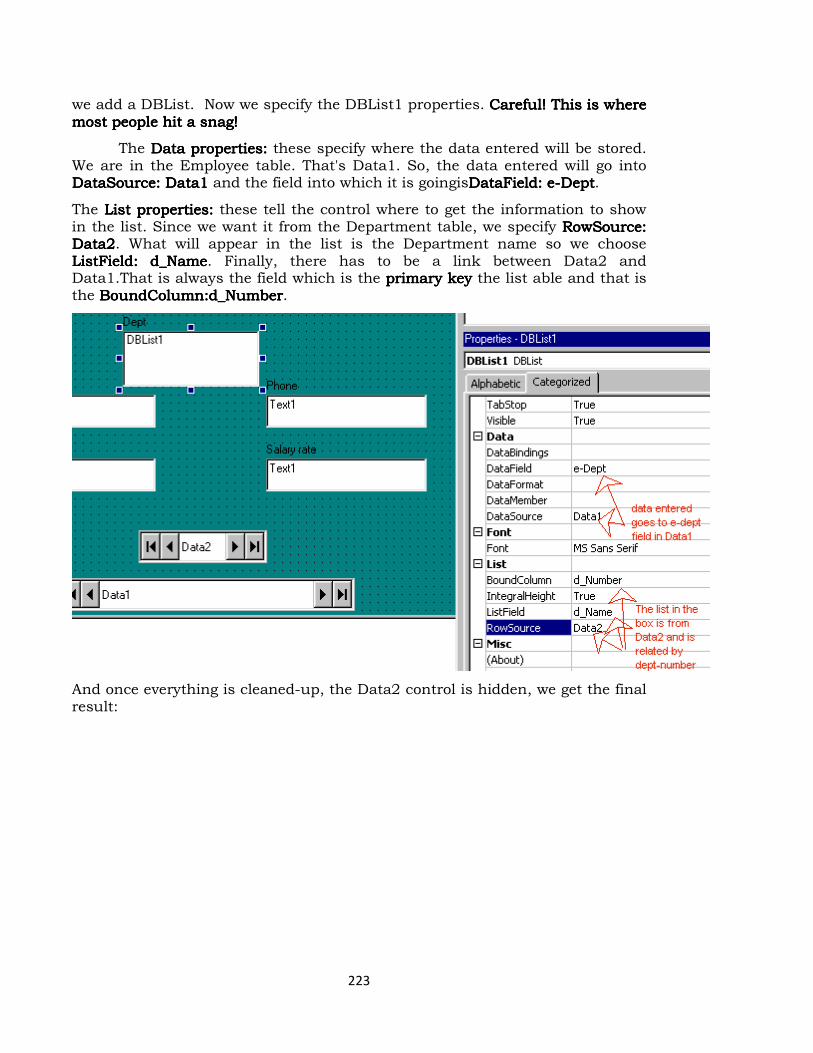
223
we add a DBList. Now we specify the DBList1 properties. Careful! This is Careful! This is Careful! This is Careful! This is where where where where most people hit a snag!most people hit a snag!most people hit a snag!most people hit a snag!
The Data properties:Data properties:Data properties:Data properties: these specify where the data entered will be stored. We are in the Employee table. That's Data1. So, the data entered will go into DataSource: Data1DataSource: Data1DataSource: Data1DataSource: Data1 and the field into which it is goingisDataFielDataFielDataFielDataFieldddd: e: e: e: e----DeptDeptDeptDept.
The List properties:List properties:List properties:List properties: these tell the control where to get the information to show in the list. Since we want it from the Department table, we specify RowSource: RowSource: RowSource: RowSource: Data2Data2Data2Data2. What will appear in the list is the Department name so we choose ListField: ListField: ListField: ListField: d_Named_Named_Named_Name. Finally, there has to be a link between Data2 and Data1.That is always the field which is the primary primary primary primary key key key key the list able and that is the BoBoBoBoundColumn:d_NumberundColumn:d_NumberundColumn:d_NumberundColumn:d_Number.
And once everything is cleaned-up, the Data2 control is hidden, we get the final result:
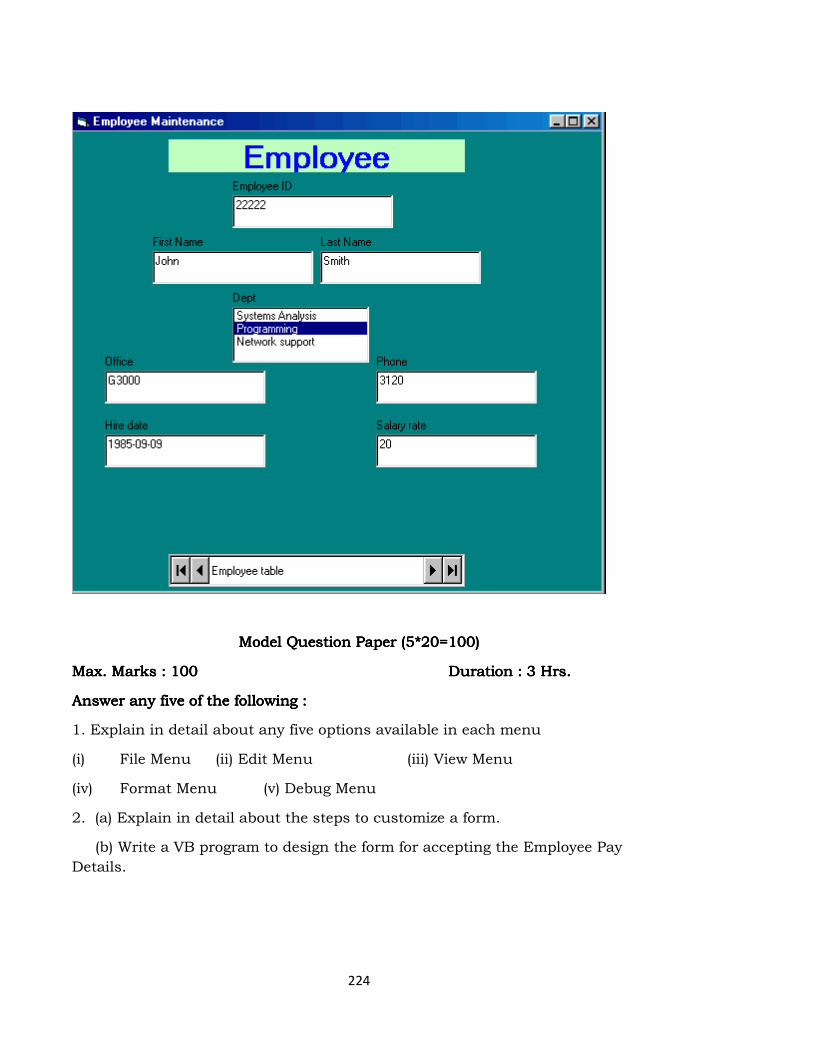
224
Model Question Paper (5*20=100)Model Question Paper (5*20=100)Model Question Paper (5*20=100)Model Question Paper (5*20=100)
Max. Marks : 100Max. Marks : 100Max. Marks : 100Max. Marks : 100 Duration : 3 Hrs.Duration : 3 Hrs.Duration : 3 Hrs.Duration : 3 Hrs.
Answer any five of the following :Answer any five of the following :Answer any five of the following :Answer any five of the following :
1. Explain in detail about any five options available in each menu
(i) File Menu (ii) Edit Menu (iii) View Menu
(iv) Format Menu (v) Debug Menu
2. (a) Explain in detail about the steps to customize a form.
(b) Write a VB program to design the form for accepting the Employee Pay
Details.
225
3. Explain in detail about
(i) Creating controls (ii) Multiple controls
(iii) Locking controls (iv) Deleting controls
4. Explain in detail about all the data types available in Visual Basic with
example.
5. Explain in detail about user defined functions and procedures with
example.
6. Explain control arrays and flexgrid control with example.
7. Explai in detail about MDI form with example
8. Explain in detail about ADO control with an example
226
Question bankQuestion bankQuestion bankQuestion bank
Visual ProgrammingVisual ProgrammingVisual ProgrammingVisual Programming
Very Short Answer Type questions:Very Short Answer Type questions:Very Short Answer Type questions:Very Short Answer Type questions:
1) Can We create CGI scripts in VB?
2) ____ property of menu cannot be set at run time.
3) ____ is the difference between Listindex and Tab index.
4) What is the need of zorder method?
5) ____ argument can be used to make a menuitem into bold.
6) ___,___ arguments will be used to run a executable program in shell
function
7) To populate a single column value which dbcontrols you to use?
8) ___ method used to move a recordset pointer in nth position in DAG.
9) ___ VB constant make the menu item in centre
10) ___ property used to add a menus at runtime.
11) ____ property is used to lock a textbox to enter a datas.
12) Timer control contains ________ no. of events
13) To set the command button for ESC ___ Property has to be changed.
14) ___,___ and __ are difference between image and picture controls.
15) ___ Property is to compress a image in image control.
16) ___,_____ and ____ container objects
17) What is the default property of datacontrol.
18) ___,__,___ are the type of combo box?
19) __ no of controls in form.
20) _____ is the property to ___,____,____ are valid for recordsource property
of dat control.
21) Which controls have refresh method.
22) ___ is a property to resize a label control according to your caption.
23) ___ Property is used to count no. of items in a combobox.
24) Clear property is available in ____,___ control.
25) ___ is the control used to call a windows application
227
26) OLE is used for _______
27) _____ collection in recordset used to assign a value from textbox to table
columns without making a binding in datacontrol.
28) Which property of menu cannot be set at run time?
29) Which Property is used to compress a image in image control?
30) How many tabs in a tabbed dialog do you consider appropriate?
31) WhatisDSN?
32) What keyword is associated with raising system level events in VB?
34) What does the Implements statement do?
35) What does Option Explicit refer to?
36) Which controls can not be placed in MDI?
39) Which controls have refresh method, clear method?
40) What is the default model of the form?
41) What is MDI form?
42) How many images can be placed in the image list?
43) What is control array?
44) Name different type of Instantiation?
45) Why we use Treeview Control?
46) What is the starting Index value? How to locate it?
47) What is Tabstrip control?
48) What is Dll?
49) What are properties available in Clip Board?
50) What is diff between the Generic Variable and Specific Variable?
51) Name Different type of Datatypes?
52) What are the type of validation available in VB?
53) What is the max size allowed for Extension in Visual Basic
54) What is the max size allowed for Max Control Names length
55) What is the max size allowed for Max Text box length.
56) What is the max size allowed for Max label caption length.
57) What is the max size allowed for Msgbox Prompt and Input Box?
228
58) What is the return type of Instr and Strcmp?
59) What is the size of the variant data type?
60) Dim x, y as integer. What is x and y data type?
61) Name some date function
62) What is the difference between Property Get, Set and Let?
63) What are types of binding?
64) What is binding?
65) What is Friend Variable?
66) Where will we give the option explicit keyword and for what?
67) What is the diff. Between function and sub procedures?
68) How many procedures are in VB?
69) What is keyword used to compare to objects?
70) How many items should you make available to users in a listbox or
combo box?
71) How many ways we can access file using VB?
72) How can you filter out specific type of file using file system controls?
73) Is it possible to call oracle database through ADO control or Object?
74) What type of recordsets are available in ADO?
75) What do you mean by provider?
76) How to get freefile location in memory?
77) Using which type we can access file line by line?
78) What are the types of Error?
79) What is the use of Scalewidth and ScaleHeight Proeperty?
80) How can you check Beginning and End of the file?
81) Which method is used to write context Into file?
82) Is there any Edit method in ADO Data Access method?
83) What do you mean by ADO?
84) What are the Internet tools available in VB6.0?
85) What do you mean by HTTP?
86) DHTML Is used for what?
229
87) Recordset object consists what?
88) What is the use of Connection object?
89) How many objects resides in ADO ?
90) What are the tools available for Debuggiu in VB?
91) How to set a shortcut key for label?
92) Name of the control used to call a windows application?
93) To set the command button for ESC, Which property needs to be
changed?
94) At runtime, which property used to count number of items in a
combobox.
95) What are the types of API .
96) How many types of API functions are availble in VB?
97) What is the use of debug Window?
98) Name controls which do not have events?
99) Can you create a tabletype of recordset in Jet - connected ODBC
database engine?
100) Can database schema be changed with DAO, RDO or ADO?
Short Answer Type Questions:Short Answer Type Questions:Short Answer Type Questions:Short Answer Type Questions:
1) What is the diff between the Create Object and Get object?
2) What are the uses of List View Control?
3) How would you attach pictures in Treeview Control?
4) What is the use of Imagelist Controls
5) What are the types of line styles available in Treeview Control? (rom
6) What is Static Variable?
7) Can you create a updatecascade, Deletecascade relation in Ms- Access?
8) What are the new events in textbox that has been included in VB6.0
9) Difference between listbox and combo box.
10) Can you create a tabletype of recordset in Jet - connected ODBC dbengine

230
11) What is the need of zorder method?
12) To populate a single column value which dbcontrols you to use?
13) What is the difference between change event in normal combobox and
dbcombobox?
14) What are 3 main differences between flexgrid control and dbgrid control?
15) To validate a range of values for a property whenever the property values
changes, which type of property procedure you use?
16) Explain the types of Views in Listview Control.
17) What will you do to find the current recordposition in data control.
18) Is it possible to set a shortcut key for label.
19) Which property of textbox cannot be changed at runtime. What is the
max size of textbox?
20) List out controls which does not have events
21)What is the default property of datacontrol.
22) Which controls can not be placed in MDI ?
23) Give Parts of ODBC?
24)Difference between ActiveX Exe and Dll.
25)What is the difference between Object and Class?
26)Difference between DDE and OLE.
27)Explain OLE Drag and Drop.
28)Difference between Linked Object and Embedded Object?
29)What is DDE?
30)What is meant by Establish Connection in RDO? .
31)Draw Sequence Modal of RDO? Explain.
32)Explain Default cursor Type and LockEdits type in RDO
33)Give brief description about class?
34)Does VB Supports OOPS Concepts? Explain.
35)Difference between Class Module and Standard Module?
36)Difference between ActiveX Control and Standard Control.
37)Types of ActiveX Components in VB?
231
38)What is ActiveX? Explain.
39)Types of Modal windows in VB.
40)What is constructors and destructors.
41)What is the use of NEW Keyword? Explain.
42) Difference Types of Procedures in VB?
43) Explain Get, Let, Set Properties.
44) Difference between Recordset and Resultsets.
45) Types of Resultsets.
46) Types of LockEdits in RDO.
47)What is the need of tabindex property is label control.
48)WhatisDAO?
49)What is the use of Tabledef?
50)Default cursor Type and LockEdit type in DAO?
Long Answer Type Questions:Long Answer Type Questions:Long Answer Type Questions:Long Answer Type Questions:
1) What is the default workspace? Explain in Detail
2) Types of cursors in RDO.
3) What is RDO?
4) What do you mean by Databound Controls? Explain.
5) Types of DBCombo boxes
6) Private Dim x as integer. Valid ?
7) What is Implicit?
8) What is the Dll required for running the VB?
9) What is Parser Bug?
10) What are the different types of Dialog Box?

232
11) What are the Style properties of List Box?
12) What are the Style Properties of Combo Box?
13) In project properties if we set Unattended what is it mean?
14) Can us able to set Instancing properties like Singleuse, GlobalSingleuse to
ActiveXDll?
15) What are the scopes of the class?
16) What is Centralization Error Handling?
17) What is Seek Method which type of record set is available this?
18) What are the different types of error?
19) Different type of Passing Value?
20) What is MAPI ?
21) Calling Stored Procedures in VB?
22) How to check the condition in Msgbox
23) What is instantiating?
24) What is ODBC?
25)Record set types and Number available in VB?
26)What are two validate with Data Control?
27)What is Dataware Control?
28)What is ADO? What are its objects ?
29)What is difference between datagrid and flexgrid?
30)How can we call Stored procedure of Back End in RDO and ADO ?
31)What is the different between Microsoft ODBC Driver and Oracle OBDC
Driver?
32)What are the Technologies for Accessing Database from Visual Basic?
33)To connect the Data Control with Back end What are all the properties to be
set?
34) Handling Error in Calling chain.
35) What is Collection Objects?
233
36) Is it possible to Manipulate data through flexgrid? Explain.
37) What is ODBC Direct and Microsoft Jet Database Engine ?
38) What third party ActiveX controls have you used?
39) If an event, such as a tool bar button or menu click, occurs on a MDI parent
how can
it invoke an action on one or more MDI child forms?
40) What are some uses and misuses of variants?Explain
41) How do you handle error conditions in your code?
42) Describe the difference between a public variable in a form and one in a
standard code module.
43) Describe the different scopes of variables in VB.
44) What do you have to do to make your class visible to programs other than
your own?
45) What are the differences between a standard module and a class module?
46)What is the difference between Msgbox Statement and MsgboxQ function?
47)What is OLE and DDE? Explain?
48) What does Option Explicit refer to?
49) Have you ever created ActiveX EXEs? If so, what were they used for?
50) Have you ever created ActiveX controls? If so, what did they do?
TRUETRUETRUETRUE----FALSEFALSEFALSEFALSE
If the statement is always true, mark true on the ScanTron sheet, otherwise mark false.
1. The properties of an object can only be set in the Properties window.
2. A MenuItem object does not have a click event procedure.
3. The only purpose of a GroupBox object is to display a title for a set of
RadioButton objects.
4. Integer division is performed with the \ operator to return only the whole
portion of the quotient.
234
5. A prompt is a label placed near a textbox describing the expected input from
the user.
6. The keystroke way to cut text is Ctrl X.
7. The keystroke way to copy text is Ctrl C.
8. The keystroke way to paste text is Ctrl P.
9. After the properties of an object are set they may not be changed.
10. Context sensitive help is available by pressing the F1 key.
11. Program execution can be started by the F6 key.
12. The text property and the name property of a textbox are the same property.
13. When naming a textbox you should use the prefix “txt”.
14. Names of labels should be prefixed with “lab”.
15. The name of a button should be prefixed with “btn”.
16. The ASCII code of “A” is 65.
17. Variables in Visual Basic can be used only for numeric values.
18. When an object is selected, it is said to “have the focus.”
19. You use an If-Then statement to choose between alternative possibilities.
20. Indenting code as you program makes your code easier to read.
21. When comments are included in code and the default colors are active,
Visual Basic turns comments to green.
22. When used in the text property of a button, the ampersand underlines the
character it precedes.
23. The triangle inequality states the sum of the lengths of any two sides of a
triangle must be equal to the third side.
24. A Dim statement reserves memory for variables.
25. A variable declared in one event procedure is available in all the event
procedures of that form.
235
26. The IsNumeric function returns True if its argument can legally be
converted to a number; otherwise, it returns False.
27. The Randomize statement uses the value returned by the system timer as
the new seed value for the Rnd function.
28. About boxes usually have a sizable border style rather than fixed.
29. In the variable assignment statement intX= 14 Mod 4, intX is assigned the
value 2.
30. An algorithm is a set of steps that tell how to solve a problem.
31. A Boolean expression is an expression that evaluates to true or false.
32. The values of static variables are always retained in memory for the
duration of a program’s execution.
33. Concatenation is the process of joining two or more strings into one string.
34. The Unicode value for an uppercase letter is the same for the corresponding
lowercase letter.
35. ChrW( ) is a built-in function that returns the character corresponding to an
integer representing a Unicode value.
36. The statement intN = intN + 1, uses intN as a counter variable.
37. intN = intN + 1 is the same as intN += 1
38. An argument is a variable or value passed to a procedure.
39. ByVal is a keyword used to declare a value parameter in a procedure.
40. ByRef is a keyword used to declare a reference parameter in a procedure.
41. A value parameter is a variable declared in a procedure to accept a copy of
an argument. Value parameters cannot alter the value of the actual argument
used in the procedure call.
42. A ByRef parameter uses the same memory location as the argument it is
passed.
43. A Call statement is used to invoke a sub procedure.
236
44. A Return statement can be used in a user-defined function to send a value
back to the expression which called the function.
45. A Sub procedure must always be declared with parameters.
46. Selecting from an AutoList reduces the chance of typing errors in code.
47. In the Code window, a blue wavy underline indicates a syntax error.
48. A static variable’s scope is local to the procedure in which it is declared, but
its lifetime is the duration of the program
49. A static variable is declared with the keyword DimDimDimDim
50. An infinite loop continues forever
PART II PART II PART II PART II ---- MULTIPLE CHOICEMULTIPLE CHOICEMULTIPLE CHOICEMULTIPLE CHOICE
Choose the best answer.
51. To count how many times a section of code has been executed, use the
statement
a) intT = intT + intX
b) intC = intC + 1
c) intT + intX = intT
d) intC + 1 = intC
52. To step through a loop from a larger limit to a lower one, make the step
a) increment positive
b) increment negative
c) lower limit negative
d) upper limit negative
53. Which property sets the maximum number of characters that can be
entered in a textbox.
a) MaxLength
b) MaxValue
237
c) MinValue
d) MultiLine
54. What of the following are the commonly used Logical Operators?
a) But, And
b) Not, And, Or
c) Yet, But
d) Neither, Nor
55. What is the Unicode value of the letter “Z”?
a) 65
b) 90
c) 91
d) 255
56. Which property controls the text appearing in the form’s title bar?
a) Caption
b) Name
c) Text
d) Title
57. Which control is best for displaying text that you don’t want the user to
change.
a) Menu Item
4b) Button
c) Label
d) TextBox
58. The largest value that can be stored by an integer type variable is
a) 255

238
b) 256
c) 32767
d) 2147483647
59. The size of a font is measured in
a) Characters
b) Inches
c) Points
d) Twips
60. Actions such as click, doubleclick, keypress, and scroll are called
a) Episodes
b) Events
c) Happenings
d) Procedures
61. Which control do you use to accept or display information you will allow the
user to change?
a) Button
b) Form
c) Label
d) Text box
62. Which of the following is a valid statement
a) txtName.Text (Jones)
b) txtName.Caption = ”Jones”
c) txtName.Text = &Jones&
d) txtName.Text = “Jones”
239
63. Which is the best data type to use for a variable that will always contain
whole numbers in the range 0 to 20,000.
a) Boolean
b) Integer
c) Long
d) Single
64. Processing the same sequence of steps repeatedly is referred to as
a) looping
b) parallel processing
c) resequencing
d) branching
65. The Rnd function
a) rounds off numbers
b) generates a random number between 0 and 1
c) generated a random number between 1 and 10
d) generates a random number between -1 and 1
66. Given this program:
intX = 1
Do While intX <> 4
lstDisplay.Items.Add (intX)
IntX = intX + 1
Loop
a) the program will display 1, 2, 3
b) the program will display 1, 2, 3, 4
c) the program will display 1, 2, 3, 4, 5
240
d) the program will display 1, 2
67. Assuming that A, B, C, D, E, and F have been properly initialized, the
following program
fragment is incorrect because
For K = A To B Step C
For L = D To E Step F
lblDisplay.Text = L + K
Next K
Next L
a) a variable name cannot be used as the initial value and the final value in a
FOR statement
b) nested FOR and NEXT statements are not allowed
c) two FOR statements cannot appear one after the other in a program
d) the inner FOR-NEXT loop must be entirely contained within the outer FOR-
NEXT loop
68. The process of eliminating errors from a computer program is called:
a) initializing
b) compiling
c) debugging
d) documenting
69). Spacing, indentation, and documentation within a program
a) are important because they make a program easier to understand
b) are needed only if anyone other than a technical person will be reviewing it
c) are required for proper execution of the program
d) are not important
241
70. To display an "About" form in Visual Basic, we can use
a) frmAbout.ShowDialogue
b) frmAbout.Display
c) frmAbout.Get
d) frmAbout.Reveal
71. To simulate rolling a die, we can use:
a) Int (6 * Rnd + 1)
b) Int (6 * Rnd)
c) Int (6 * Rnd * 1)
d) Rnd (6 * N + 1)
72. Suppose intA=5, intB=5, and intC=6 then
If Not(intA=intB And intC<5) Then
lblDisplay.text = “True”
Else
lblDisplay.text = “False”
End If
will display:
a) True
b) False
c) True False
d) nothing
73. In this If-Then statement
If condition Then
statements
242
End If
statements
If the condition tested is false, the program
a) executes the statements between Then and the End If
7b) executes the statements following the End If
c) does not execute any statements at all
d) executes both the statements between the Then and the End If and the
statements following the End If
PART III WHAT IS DISPLAYED?PART III WHAT IS DISPLAYED?PART III WHAT IS DISPLAYED?PART III WHAT IS DISPLAYED?
In the space provided on this paper, print the exact output from each of the
following lines.
1. lblDisplay.Text = 10 + 3 * 6 answer ____________________
2. lblDisplay.Text = 2 ^ 3 + 5 * 4 answer ____________________
3. lblDisplay.Text = 2 + 9 ^ (1 / 2) answer ____________________
4. lblDisplay.Text = “6+3-2” answer ____________________
5. lblDisplay.Text = 2 + 9 ^ 1 / 2 answer ____________________
REWRITE EACH LINEREWRITE EACH LINEREWRITE EACH LINEREWRITE EACH LINE
Each of the following 3 lines contains a syntax error, logical error, or run-time
error. Rewrite the
line so that it is error free.
Dim intNum =0
intNum = Value(Me.txtNum.Text)
lblDisplay = strMessage
WHAT IS DISPLAYED?WHAT IS DISPLAYED?WHAT IS DISPLAYED?WHAT IS DISPLAYED?
Neatly print in the space provided the output from each line. There are no errors.
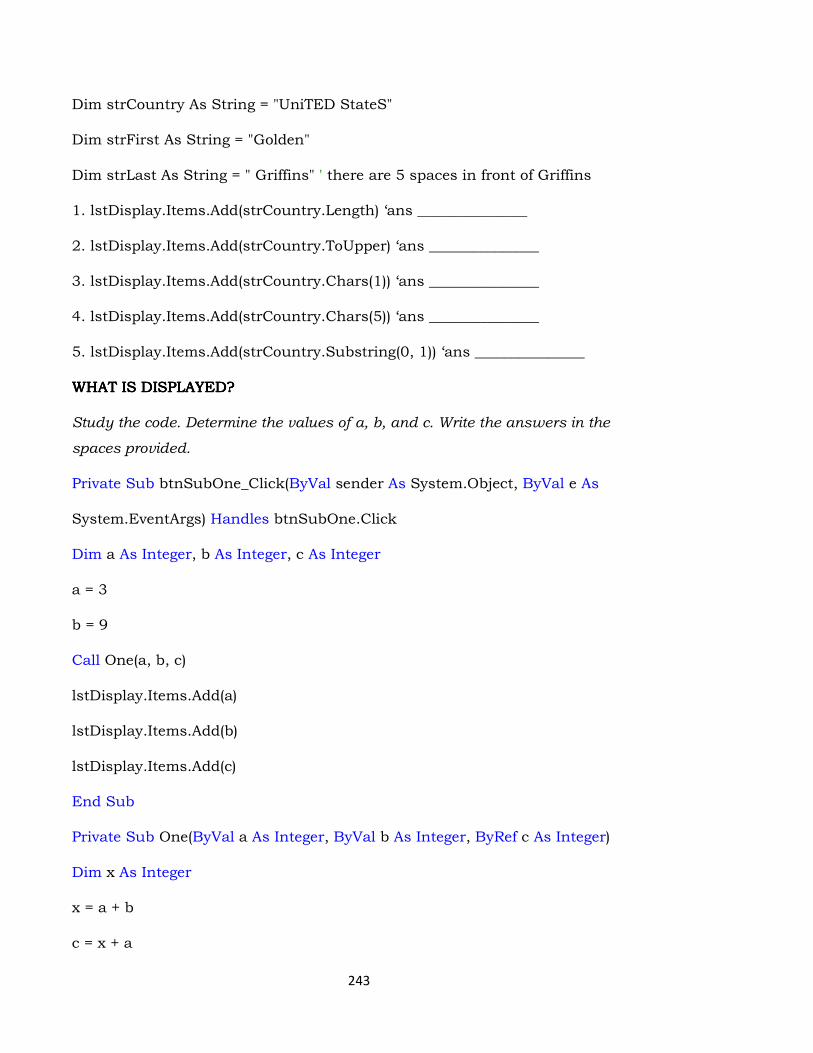
243
Dim strCountry As String = "UniTED StateS"
Dim strFirst As String = "Golden"
Dim strLast As String = " Griffins" ' there are 5 spaces in front of Griffins
1. lstDisplay.Items.Add(strCountry.Length) ‘ans _______________
2. lstDisplay.Items.Add(strCountry.ToUpper) ‘ans _______________
3. lstDisplay.Items.Add(strCountry.Chars(1)) ‘ans _______________
4. lstDisplay.Items.Add(strCountry.Chars(5)) ‘ans _______________
5. lstDisplay.Items.Add(strCountry.Substring(0, 1)) ‘ans _______________
WHAT IS DISPLAYED?WHAT IS DISPLAYED?WHAT IS DISPLAYED?WHAT IS DISPLAYED?
Study the code. Determine the values of a, b, and c. Write the answers in the
spaces provided.
Private Sub btnSubOne_Click(ByVal sender As System.Object, ByVal e As
System.EventArgs) Handles btnSubOne.Click
Dim a As Integer, b As Integer, c As Integer
a = 3
b = 9
Call One(a, b, c)
lstDisplay.Items.Add(a)
lstDisplay.Items.Add(b)
lstDisplay.Items.Add(c)
End Sub
Private Sub One(ByVal a As Integer, ByVal b As Integer, ByRef c As Integer)
Dim x As Integer
x = a + b
c = x + a
244
End Sub
End Sub
WRITE THE CODEWRITE THE CODEWRITE THE CODEWRITE THE CODE
1. Write the button click event code that will display in a list
box named lstDisplay the multiplication tables from 1 × 1
= 1 to 25 × 25 = 625. The code should put a blank line
between each table as illustrated in the diagram. This
question is asking for the nested loop code for the
assignment which we completed in class.
(a) _________
(b) _________
(c) _________
Related Documents