Writing Artix Contracts Version 4.1, September 2006

Welcome message from author
This document is posted to help you gain knowledge. Please leave a comment to let me know what you think about it! Share it to your friends and learn new things together.
Transcript

Writing Artix ContractsVersion 4.1, September 2006

IONA Technologies PLC and/or its subsidiaries may have patents, patent applications, trademarks, copyrights, or other intellectual property rights covering subject matter in this publication. Except as expressly provided in any written license agreement from IONA Technologies PLC, the furnishing of this publication does not give you any license to these patents, trademarks, copyrights, or other intellectual property. Any rights not expressly granted herein are reserved.IONA, IONA Technologies, the IONA logos, Orbix, Artix, Making Software Work Together, Adaptive Runtime Technology, Orbacus, IONA University, and IONA XMLBus are trademarks or registered trademarks of IONA Technologies PLC and/or its subsidiaries.Java and J2EE are trademarks or registered trademarks of Sun Microsystems, Inc. in the United States and other countries. CORBA is a trademark or registered trademark of the Object Management Group, Inc. in the United States and other countries. All other trademarks that appear herein are the property of their respective owners.While the information in this publication is believed to be accurate, IONA Technologies PLC makes no warranty of any kind to this material including, but not limited to, the implied warranties of merchantability and fitness for a particular purpose. IONA shall not be liable for errors contained herein, or for incidental or consequential damages in connection with the furnishing, performance or use of this material.
COPYRIGHT NOTICENo part of this publication may be reproduced, stored in a retrieval system or transmitted, in any form or by any means, photocopying, recording or otherwise, without prior written consent of IONA Technologies PLC. No third-party intellectual property right liability is assumed with respect to the use of the information contained herein. IONA Technologies PLC assumes no responsibility for errors or omissions contained in this publication. This publication and features described herein are subject to change without notice.
Copyright © 1999-2006 IONA Technologies PLC. All rights reserved.
All products or services mentioned in this publication are covered by the trademarks, service marks, or product names as designated by the companies that market those products.
Updated: March 1, 2007
PrefaceWhat is Covered in this BookThis book discusses the bindings and transports supported by Artix. It describes how the combination of WSDL elements and Artix configuration is used to set-up a binding or a transport. It also discusses the advantages of using each of the bindings and transports. In the case of transports, such as Websphere MQ, it also discusses how to access some of the transports more advanced features.
Who Should Read this BookThis book is intended for people who are developing the contracts for Artix endpoints. It assumes a working knowledge of WSDL and XML. It also assumes a working knowledge of the underlying middleware technology being discussed.
How to Use this BookThis book is broken onto three parts:
� Part I provides a basic introduction to WSDL. It also provides a discussion of the WSDL elements that make up the logical portion of an Artix contract.
� Part II discusses each of the bindings supported by Artix.
� Part III discusses each of the transports supported by Artix.
� Part IV discusses using other Artix features that are driven by contract based directives.
The Artix LibraryThe Artix documentation library is organized in the following sections:
� Getting Started
3

PREFACE
� Designing Artix Solutions
� Configuring and Managing Artix Solutions
� Using Artix Services
� Integrating Artix Solutions
� Integrating with Management Systems
� Reference
� Artix Orchestration
Getting Started
The books in this section provide you with a background for working with Artix. They describe many of the concepts and technologies used by Artix. They include:
� Release Notes contains release-specific information about Artix.
� Installation Guide describes the prerequisites for installing Artix and the procedures for installing Artix on supported systems.
� Getting Started with Artix describes basic Artix and WSDL concepts.
� Using Artix Designer describes how to use Artix Designer to build Artix solutions.
� Artix Technical Use Cases provides a number of step-by-step examples of building common Artix solutions.
Designing Artix Solutions
The books in this section go into greater depth about using Artix to solve real-world problems. They describe how to build service-oriented architectures with Artix and how Artix uses WSDL to define services:
� Building Service-Oriented Infrastructures with Artix provides an overview of service-oriented architectures and describes how they can be implemented using Artix.
� Writing Artix Contracts describes the components of an Artix contract. Special attention is paid to the WSDL extensions used to define Artix-specific payload formats and transports.
Developing Artix Solutions
The books in this section how to use the Artix APIs to build new services:
� Developing Artix Applications in C++ discusses the technical aspects of programming applications using the C++ API.
4

PREFACE
� Developing Advanced Artix Plug-ins in C++ discusses the technical aspects of implementing advanced plug-ins (for example, interceptors) using the C++ API.
� Developing Artix Applications in Java discusses the technical aspects of programming applications using the Java API.
Configuring and Managing Artix Solutions
This section includes:
� Configuring and Deploying Artix Solutions explains how to set up your Artix environment and how to configure and deploy Artix services.
� Managing Artix Solutions with JMX explains how to monitor and manage an Artix runtime using Java Management Extensions.
Using Artix Services
The books in this section describe how to use the services provided with Artix:
� Artix Router Guide explains how to integrate services using the Artix router.
� Artix Locator Guide explains how clients can find services using the Artix locator.
� Artix Session Manager Guide explains how to manage client sessions using the Artix session manager.
� Artix Transactions Guide, C++ explains how to enable Artix C++ applications to participate in transacted operations.
� Artix Transactions Guide, Java explains how to enable Artix Java applications to participate in transacted operations.
� Artix Security Guide explains how to use the security features in Artix.
Integrating Artix Solutions
The books in this section describe how to integrate Artix solutions with other middleware technologies.
� Artix for CORBA provides information on using Artix in a CORBA environment.
� Artix for J2EE provides information on using Artix to integrate with J2EE applications.
For details on integrating with Microsoft�s .NET technology, see the documentation for Artix Connect.
5
PREFACE
Integrating with Management Systems
The books in this section describe how to integrate Artix solutions with a range of enterprise and SOA management systems. They include:
� IBM Tivoli Integration Guide explains how to integrate Artix with the IBM Tivoli enterprise management system.
� BMC Patrol Integration Guide explains how to integrate Artix with the BMC Patrol enterprise management system.
� CA-WSDM Integration Guide explains how to integrate Artix with the CA-WSDM SOA management system.
� AmberPoint Integration Guide explains how to integrate Artix with the AmberPoint SOA management system.
Reference
These books provide detailed reference information about specific Artix APIs, WSDL extensions, configuration variables, command-line tools, and terms. The reference documentation includes:
� Artix Command Line Reference
� Artix Configuration Reference
� Artix WSDL Extension Reference
� Artix Java API Reference
� Artix C++ API Reference
� Artix .NET API Reference
� Artix Glossary
Artix Orchestration
These books describe the Artix support for Business Process Execution Language (BPEL), which is available as an add-on to Artix. These books include:
� Artix Orchestration Release Notes
� Artix Orchestration Installation Guide
� Artix Orchestration Administration Console Help.
Getting the Latest VersionThe latest updates to the Artix documentation can be found at http://www.iona.com/support/docs.
6

PREFACE
Compare the version dates on the web page for your product version with the date printed on the copyright page of the PDF edition of the book you are reading.
Searching the Artix LibraryYou can search the online documentation by using the Search box at the top right of the documentation home page:
http://www.iona.com/support/docs
To search a particular library version, browse to the required index page, and use the Search box at the top right, for example:
http://www.iona.com/support/docs/artix/4.0/index.xml
You can also search within a particular book. To search within a HTML version of a book, use the Search box at the top left of the page. To search within a PDF version of a book, in Adobe Acrobat, select Edit|Find, and enter your search text.
Artix Online HelpArtix Designer and Artix Orchestration Designer include comprehensive online help, providing:
� Step-by-step instructions on how to perform important tasks
� A full search feature
� Context-sensitive help for each screen
There are two ways that you can access the online help:
� Select Help|Help Contents from the menu bar. The help appears in the contents panel of the Eclipse help browser.
� Press F1 for context-sensitive help.
In addition, there are a number of cheat sheets that guide you through the most important functionality in Artix Designer and Artix Orchestration Designer. To access these, select Help|Cheat Sheets.
Artix GlossaryThe Artix Glossary is a comprehensive reference of Artix terms. It provides quick definitions of the main Artix components and concepts. All terms are defined in the context of the development and deployment of Web services using Artix.
7
PREFACE
Additional ResourcesThe IONA Knowledge Base contains helpful articles written by IONA experts about Artix and other products.
The IONA Update Center contains the latest releases and patches for IONA products.
If you need help with this or any other IONA product, go to IONA Online Support.
Comments, corrections, and suggestions on IONA documentation can be sent to .
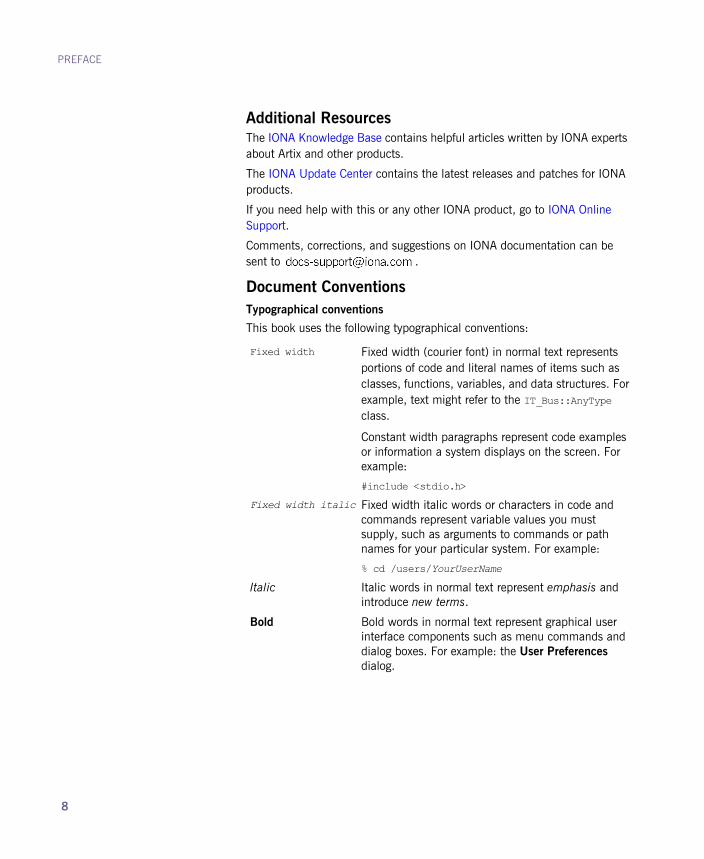
Document ConventionsTypographical conventions
This book uses the following typographical conventions:
Fixed width Fixed width (courier font) in normal text represents portions of code and literal names of items such as classes, functions, variables, and data structures. For example, text might refer to the IT_Bus::AnyType class.
Constant width paragraphs represent code examples or information a system displays on the screen. For example:
#include <stdio.h>
Fixed width italic Fixed width italic words or characters in code and commands represent variable values you must supply, such as arguments to commands or path names for your particular system. For example:
% cd /users/YourUserName
Italic Italic words in normal text represent emphasis and introduce new terms.
Bold Bold words in normal text represent graphical user interface components such as menu commands and dialog boxes. For example: the User Preferences dialog.
8

PREFACE
Keying Conventions
This book uses the following keying conventions:
No prompt When a command�s format is the same for multiple platforms, the command prompt is not shown.
% A percent sign represents the UNIX command shell prompt for a command that does not require root privileges.
# A number sign represents the UNIX command shell prompt for a command that requires root privileges.
> The notation > represents the MS-DOS or Windows command prompt.
...
.
.
.
Horizontal or vertical ellipses in format and syntax descriptions indicate that material has been eliminated to simplify a discussion.
[] Brackets enclose optional items in format and syntax descriptions.
{} Braces enclose a list from which you must choose an item in format and syntax descriptions.
| In format and syntax descriptions, a vertical bar separates items in a list of choices enclosed in {} (braces).
In graphical user interface descriptions, a vertical bar separates menu commands (for example, select File|Open).
9

PREFACE
10

Contents
Preface 3What is Covered in this Book 3Who Should Read this Book 3How to Use this Book 3The Artix Library 3Getting the Latest Version 6Searching the Artix Library 7Artix Online Help 7Artix Glossary 7Additional Resources 8Document Conventions 8
List of Figures 15
List of Tables 17
Part I Introduction
Chapter 1 Introducing Artix Contracts 21
Chapter 2 Defining Logical Data Units 25Mapping Data into Logical Data Units 27Adding Data Units to a Contract 29XMLSchema Simple Types 31Defining Complex Data Types 33
Defining Data Structures 34Defining Arrays 38Defining Types by Extension 40Defining Types by Restriction 41Defining Enumerated Types 43
Defining Elements 45
11
CONTENTS
Chapter 3 Defining Logical Messages Used by a Service 47
Chapter 4 Defining Your Logical Interfaces 53
Part II Bindings
Chapter 5 Understanding Bindings in WSDL 61
Chapter 6 Using SOAP 1.1 Messages 65Adding a SOAP 1.1 Binding 66Adding SOAP Headers to a SOAP 1.1 Binding 69Sending Data Using SOAP with Attachments 74
Chapter 7 Using SOAP 1.2 Messages 79Adding a SOAP 1.2 Binding 80Adding Headers to a SOAP 1.2 Message 83
Chapter 8 Using Tuxedo�s FML Buffers 89
Chapter 9 Using Fixed Length Records 97
Chapter 10 Using Tagged Data 115
Chapter 11 Using Tibco Rendezvous Messages 129Defining a TibrvMsg Binding 131Artix Default Mappings for TibrvMsg 138Defining Array Mapping Policies 143Defining a Custom TibrvMsg Mapping 149Adding Context Information to a TibrvMsg 167
12

CONTENTS
Chapter 12 Using XML Documents 171
Chapter 13 Using RMI 177
Chapter 14 Using G2++ Messages 183
Part III Transports
Chapter 15 Understanding How Endpoints are Defined WSDL 193
Chapter 16 Using HTTP 197Adding an HTTP Endpoint to a Contract 198Configuring an HTTP Endpoint 205
Specifying Send and Receive Timeout Limits 206Specifying a Username and a Password 208Configuring Keep-Alive Behavior 210Specifying Cache Control Directives 212
Managing Cookies in Artix Clients 216
Chapter 17 Using IIOP 219
Chapter 18 Using WebSphere MQ 225Adding a WebSphere MQ Endpoint 226Specifying the WebSphere Library to Load 232Using Queues on Remote Hosts 234Using WebSphere MQ�s Transaction Features 236Setting a Value of the Message Descriptor�s Format Field 238
Chapter 19 Using the Java Messaging System 241Defining a JMS Endpoint 242
Basic Endpoint Configuration 244Client Endpoint Configuration 248Server Endpoint Configuration 249Using the Command Line Tool 251
Migrating to the 4.x JMS WSDL Extensions 253
13

CONTENTS
Using ActiveMQ as Your JMS Provider 254
Chapter 20 Using TIBCO Rendezvous 255
Chapter 21 Using Tuxedo 261
Chapter 22 Using FTP 265Adding an FTP Endpoint 266Coordinating Requests and Responses 268
Implementing the Client�s Coordination Logic 269Implementing the Server�s Coordination Logic 273Using Properties to Control Coordination Behavior 277
Part IV Other Artix Features
Chapter 23 Working with CORBA 283Adding a CORBA Binding 284Creating a CORBA Endpoint 290
Configuring an Artix CORBA Endpoint 291Generating CORBA IDL 295
Chapter 24 Using the Artix Transformer 297Using the Artix Transformer as a Service 298Using Artix to Facilitate Interface Versioning 300WSDL Messages and the Transformer 305Writing XSLT Scripts 309
Elements of an XSLT Script 310XSLT Templates 312Common XSLT Functions 318
Chapter 25 Using Codeset Conversion 319
Index 323
14

List of Figures
Figure 1: Artix Cookie Processing 217Figure 2: MQ Remote Queues 235
15

LIST OF FIGURES
16

List of Tables
Table 1: complexType Descriptor Elements 35Table 2: Part Data Type Attributes 50
Table 3: Operation Message Elements 55
Table 4: Attributes of the Input and Output Elements 55
Table 5: wsoap12:header Attributes 83
Table 6: FML Type Support 90
Table 7: Attributes for fixed:binding 99
Table 8: Attributes for tagged:binding 117
Table 9: Attributes for tagged:operation 118
Table 10: Attributes for tagged:field 119
Table 11: Attributes for tagged:sequence 120
Table 12: Attributes for tagged:choice 122
Table 13: Attributes for tibrv:binding 132
Table 14: Attributes for tibrv:input 133
Table 15: Attributes for tibrv:output 134
Table 16: TIBCO to XSD Type Mapping 138
Table 17: Effect of tibrv:array 143
Table 18: Attributes for tibrv:array 144
Table 19: Functions Used for Specifying TibrvMsg Array Element Names 146
Table 20: Valid Casts for TibrvMsg Binding 152
Table 21: Attributes for tibrv:msg 165
Table 22: Attributes for tibrv:field 165
Table 23: Settings for CacheControl on an HTTP Server Endpoint 213
Table 24: Settings for CacheControl on HTTP Client Endpoint 214
Table 25: WebSphere MQ Server_Client Attribute Settings 232
Table 26: WebSphere MQ Transactional Attribute Settings 236
17

LIST OF TABLES
Table 27: WebSphere MQ Format Attribute Settings 238
Table 28: JMS Port Attributes 244
Table 29: Supported TIBCO Rendezvous Features 255
18
Part IIntroduction
In this part This part contains the following chapters:
Introducing Artix Contracts page 21
Defining Logical Data Units page 25
Defining Logical Messages Used by a Service page 47
Defining Your Logical Interfaces page 53
19

20

CHAPTER 1
Introducing Artix ContractsArtix contracts define endpoints using Web Service Description Language and a number of Artix extensions.
Overview When using Artix to service-enable your infrastructure, you will be working directly with the WSDL and XML Schema that makes up the Artix contract. Artix Designer provides wizards that automate most of the tasks involved in creating a well-formed and valid WSDL document. When hand-editing Artix contracts you will need to ensure that the contract is valid, as well as correct. To do that you must have some familiarity with WSDL. You can find the standard on the W3C web site, www.w3.org.
Structure of a WSDL document A WSDL document is, at its simplest, a collection of elements contained within a root definition element. These elements describe a service and how that service can is accessed.
The types, message, and portType elements describe the service�s interface and make up the logical section of a contract. Within the types element, XML Schema is used to define the structure of the data that makes up the messages. A number of message elements are used to define the structure of the messages used by the service. The portType element contains one or more operation elements that define the messages sent by the operations exposed by the service.
21

CHAPTER 1 | Introducing Artix Contracts
The binding and service elements describe how the service connects to the outside world and make up the physical section of the contract. binding elements describe how the data units defined in the message elements are mapped into a concrete, on-the-wire data format, such as SOAP. service elements contain one or more port elements which define the network interface for the service.
WSDL elements A WSDL document is made up of the following elements:
� definitions�the root element of a WSDL document. The attributes of this element specfiy the name of the WSDL document, the document�s target namespace, and the shorthand definitions for the namespaces referenced by the WSDL.
� types�the XMLSchema definitions for the data units that form the building blocks of the messages used by a service. For information about defining datatypes see �Defining Logical Data Units� on page 25.
� message�the abstract definition of the data being communicated. These elements define the arguments of the operations making up your service. For information on defining messages see �Defining Logical Messages Used by a Service� on page 47.
� portType�a collection of operation elements representing the logical interface of a service. For inforamtion about defining port types see �Defining Your Logical Interfaces� on page 53.
� operation�the logical description of an action perfromed by a service. Operations are defined by the logical messages passed between two endpoints. For information on defining operaitons see �Defining Your Logical Interfaces� on page 53.
� binding�the concrete data format specification for an endpoint. A binding element defines how the logical messages are mapped into the concrete data format used by an endpoint. This is where specifics such as parameter order and return values are specified. For information on defining bindings see �Bindings� on page 59.
� service�a collection of related port elements. These elements are respositories for organizing endpoint definitions.
22

� port�the endpoint defined by a binding and a physical address. These elements bring all of the abstract definitions together, combined with the definition of transport details, and define the physical endpoint on which a service is exposed. For information on defining endpoints see �Transports� on page 191.
Artix extensions Artix extends the original concept of WSDL by describing services that use transports and bindings beyond SOAP over HTTP. Artix also extends WSDL to allow it to describe complex systems of services and how they are integrated. To do this IONA has extended WSDL according to the procedures outlined by W3C.
The majority of the IONA WSDL extension elements are used in the physical section of the contract because they relate to how data is mapped into an on-the-wire format and how different transports are configured. In addition, Artix defines extensions for creating routes between services, CORBA data type mappings, and working with service references.
Each extension is defined in a separate namespace and IONA provides the XML Schema definitions for each extension so that any XML editor can validate an Artix contract.
Designing a contract To design an Artix contract for your services you must perform the following steps:
1. Define the data types used by your services.
2. Define the messages used in by your services.
3. Define the interfaces for your services.
4. Define the bindings between the messages used by each interface and the concrete representation of the data on the wire.
5. Define the transport details for each of the services.
6. Define any routing rules used to connect your services.
23

CHAPTER 1 | Introducing Artix Contracts
24
CHAPTER 2
Defining Logical Data UnitsIn Artix, complex data types are defined as logical units using XML Schema.
Overview When defining a service in an Artix contract, the first thing you need to consider is how the data used as parameters for the exposed operations are going to be represented. Unlike applications that are written in a programming language that uses fixed data structures, services must define their data in logical units that can be consumed by any number of applications. This involves two steps:
1. Breaking the data into logical units that can be mapped into the data types used by the physical implementations of the service.
2. Combining the logical units into messages that are passed between endpoints to carry out the operations.
This chapter discusses the first step. �Defining Logical Messages Used by a Service� on page 47 discusses the second step.
In this chapter This chapter discusses the following topics:
Mapping Data into Logical Data Units page 27
Adding Data Units to a Contract page 29
25

CHAPTER 2 | Defining Logical Data Units
XMLSchema Simple Types page 31
Defining Complex Data Types page 33
Defining Elements page 45
26
Mapping Data into Logical Data Units
Mapping Data into Logical Data Units
Overview The interfaces used to implement a service define the data representing operation parameters as XML documents. If you are defining an interface for a service that is already implemented, you need to translate the data types of the implemented operations into discreet XML elements that can be assembled into a message. If you are starting from scratch, you need to determine the building blocks from which your messages are built in such a way as they make sense from an implementation standpoint.
Available type systems for defining service data units
According to the WSDL specification, you can use any type system you like to define data types in a WSDL document. However, the W3C specification states XMLSchema is the preferred canonical type system for a WSDL document. Therefore, XMLSchema is the intrinsic type system in Artix and is the only type system supported by Artix.
XMLSchema as a type system XMLSchema is used to define how an XML document is structured. This done by defining the elements that make up the document. These elements can use native XMLSchema types, like xsd:int, or they can use types that are defined by the user. User defined types are either built up using combinations of XML elements or they are defined by restricting existing types. By combining type definitions and element definitions you can create intricate XML documents that can contain complex data.
When used in WSDL XMLSchema defines the structure of the XML document that will hold the data used to interact with a service. When defining the data units that your service uses, you can define them as types that specify the structure of the message parts. You can also define your data units as elements that will make up the message parts.
Considerations for creating your data units
You may consider simply creating logical data units that map directly to the types you envision using when implementing the service. While this approach works and closely follows the model of building RPC-style applications, it is not neccesarlily ideal for building a piece of a service-oriented architecture.
27

CHAPTER 2 | Defining Logical Data Units
The Web Services Interoperability Organization�s WS-I basic profile provides a number of guidelines for defining data units that can be seen accessed at http://www.ws-i.org/Profiles/BasicProfile-1.1-2004-08-24.html. In addition, the W3C also provides guidelines on using XML Schema to represent data types in WSDL documents:
� Use elements, not attributes.
� Do not use protocol-specific types as base types.
� Define arrays using the SOAP 1.1 array encoding format.
28

Adding Data Units to a Contract
Adding Data Units to a Contract
Overview Depending on how you choose to create your WSDL, creating new data definitions requires varying amounts of WSDL knowledge.
Artix Designer uses wizards that generate the proper XML Schema tags for you.
If you choose to use another XML editor when writing your contract, you will need to have a much more complete understanding of XML Schema. You will also be responsible for validating your schema.
Defining types in Artix Designer Artix Designer provides wizards to walk you through the creation of data definitions for your service. It automatically generates the elements needed for the type section of a contract and the wizards lead you through the steps to create different data definitions.
However, you will need to understand some XML Schema concepts when using Artix Designer. Also, Artix Designer does not allow you to take full advantage of XML Schema.
For more information on using Artix Designer, see the on-line help provided with Artix Designer.
Using an XML editor Defining the data used in an Artix contract involves seven steps:
1. Determine all the data units used in the interface described by the contract.
2. Create a types element in your contract.
3. Create a schema element, shown in Example 1, as a child of the type element.
29
CHAPTER 2 | Defining Logical Data Units
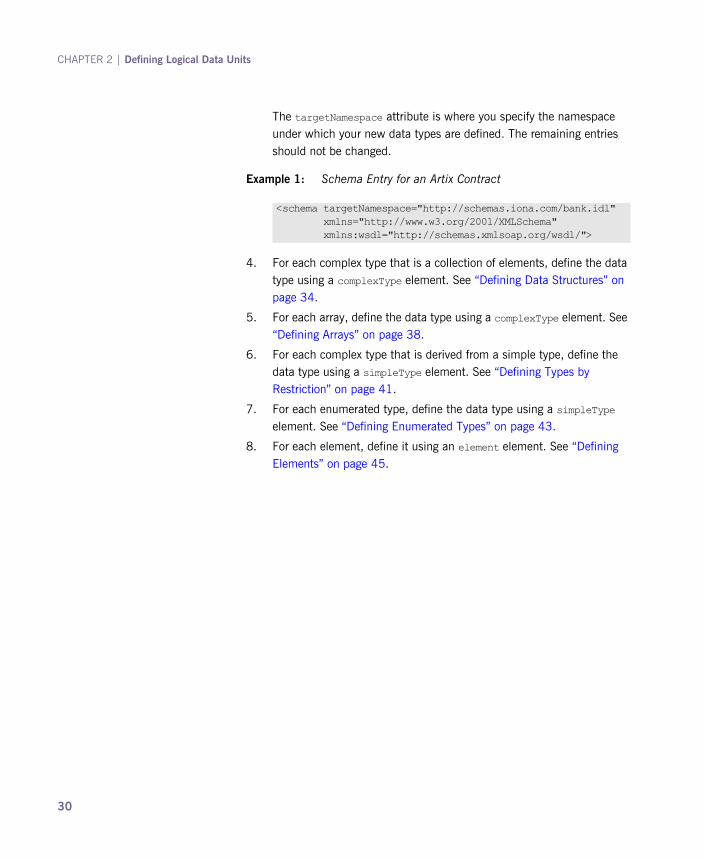
The targetNamespace attribute is where you specify the namespace under which your new data types are defined. The remaining entries should not be changed.
4. For each complex type that is a collection of elements, define the data type using a complexType element. See �Defining Data Structures� on page 34.
5. For each array, define the data type using a complexType element. See �Defining Arrays� on page 38.
6. For each complex type that is derived from a simple type, define the data type using a simpleType element. See �Defining Types by Restriction� on page 41.
7. For each enumerated type, define the data type using a simpleType element. See �Defining Enumerated Types� on page 43.
8. For each element, define it using an element element. See �Defining Elements� on page 45.
Example 1: Schema Entry for an Artix Contract
<schema targetNamespace="http://schemas.iona.com/bank.idl" xmlns="http://www.w3.org/2001/XMLSchema" xmlns:wsdl="http://schemas.xmlsoap.org/wsdl/">
30

XMLSchema Simple Types
XMLSchema Simple Types
Overview If a message part is going to be of a simple type you do not need to create a type definition for it. However, the complex types used by the interfaces defined in the contract are defined using simple types.
Entering simple types XMLSchema simple types are mainly placed in the element elements used in the types section of your contract. They are also used in the base attribute of restriction elements and extension elements.
Simple types are always entered using the xsd prefix. For example, to specify that an element is of type int, you would enter xsd:int in its type attribute as shown in Example 2.
Supported XSD simple types Artix supports the following XMLSchema simple types:
� xsd:string� xsd:normalizedString� xsd:int� xsd:unsignedInt� xsd:long� xsd:unsignedLong� xsd:short� xsd:unsignedShort� xsd:float� xsd:double� xsd:boolean� xsd:byte� xsd:unsignedByte� xsd:integer� xsd:positiveInteger� xsd:negativeInteger� xsd:nonPositiveInteger� xsd:nonNegativeInteger� xsd:decimal
Example 2: Defining an Element with a Simple Type
<element name="simpleInt" type="xsd:int" />
31

CHAPTER 2 | Defining Logical Data Units
� xsd:dateTime� xsd:time� xsd:date� xsd:QName� xsd:base64Binary� xsd:hexBinary� xsd:ID� xsd:token� xsd:language� xsd:Name� xsd:NCName� xsd:NMTOKEN� xsd:anySimpleType� xsd:anyURI� xsd:gYear� xsd:gMonth� xsd:gDay� xsd:gYearMonth� xsd:gMonthDay
32
Defining Complex Data Types
Defining Complex Data Types
Overview XMLSchema provides a flexible and powerful mechanism for building complex data structures from its simple data types. You can create data structures by creating a sequence of elements and attributes. You can also extend your defined types to create even more complex types.
In addition to allowing you to build complex data structures, you can also describe specialized types such as enumerated types, data types that have a specific range of values, or data types that need to follow certain patterns by either extending or restricting the primitive types.
In this section This section discusses the following topics:
Defining Data Structures page 34
Defining Arrays page 38
Defining Types by Extension page 40
Defining Types by Restriction page 41
Defining Enumerated Types page 43
33
CHAPTER 2 | Defining Logical Data Units
Defining Data Structures
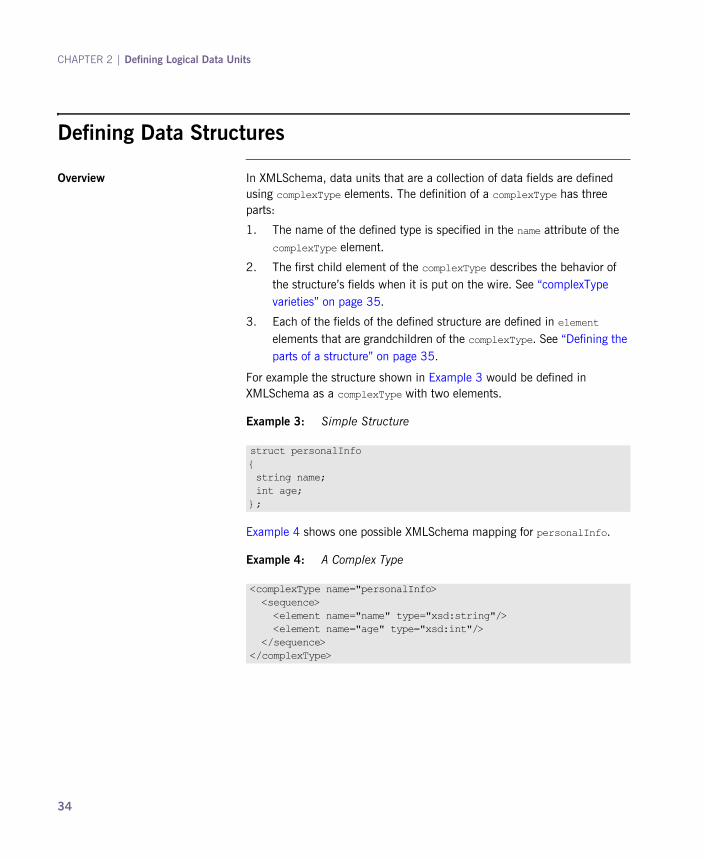
Overview In XMLSchema, data units that are a collection of data fields are defined using complexType elements. The definition of a complexType has three parts:
1. The name of the defined type is specified in the name attribute of the complexType element.
2. The first child element of the complexType describes the behavior of the structure�s fields when it is put on the wire. See �complexType varieties� on page 35.
3. Each of the fields of the defined structure are defined in element elements that are grandchildren of the complexType. See �Defining the parts of a structure� on page 35.
For example the structure shown in Example 3 would be defined in XMLSchema as a complexType with two elements.
Example 4 shows one possible XMLSchema mapping for personalInfo.
Example 3: Simple Structure
struct personalInfo{ string name; int age;};
Example 4: A Complex Type
<complexType name="personalInfo> <sequence> <element name="name" type="xsd:string"/> <element name="age" type="xsd:int"/> </sequence></complexType>
34
Defining Complex Data Types
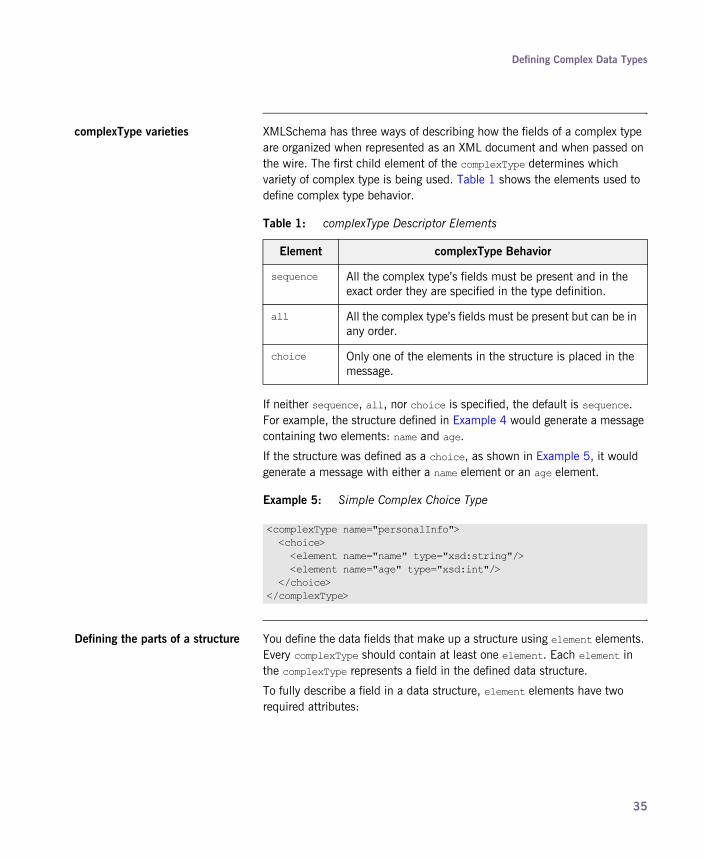
complexType varieties XMLSchema has three ways of describing how the fields of a complex type are organized when represented as an XML document and when passed on the wire. The first child element of the complexType determines which variety of complex type is being used. Table 1 shows the elements used to define complex type behavior.
If neither sequence, all, nor choice is specified, the default is sequence. For example, the structure defined in Example 4 would generate a message containing two elements: name and age.
If the structure was defined as a choice, as shown in Example 5, it would generate a message with either a name element or an age element.
Defining the parts of a structure You define the data fields that make up a structure using element elements. Every complexType should contain at least one element. Each element in the complexType represents a field in the defined data structure.
To fully describe a field in a data structure, element elements have two required attributes:
Table 1: complexType Descriptor Elements
Element complexType Behavior
sequence All the complex type�s fields must be present and in the exact order they are specified in the type definition.
all All the complex type�s fields must be present but can be in any order.
choice Only one of the elements in the structure is placed in the message.
Example 5: Simple Complex Choice Type
<complexType name="personalInfo"> <choice> <element name="name" type="xsd:string"/> <element name="age" type="xsd:int"/> </choice></complexType>
35
CHAPTER 2 | Defining Logical Data Units
� name specifies the name of the data field and must be unique within the defined complex type.
� type specifies the type of the data stored in the field. The type can be either one of the XML Schema simple types or any named complex type that is defined in the contract.
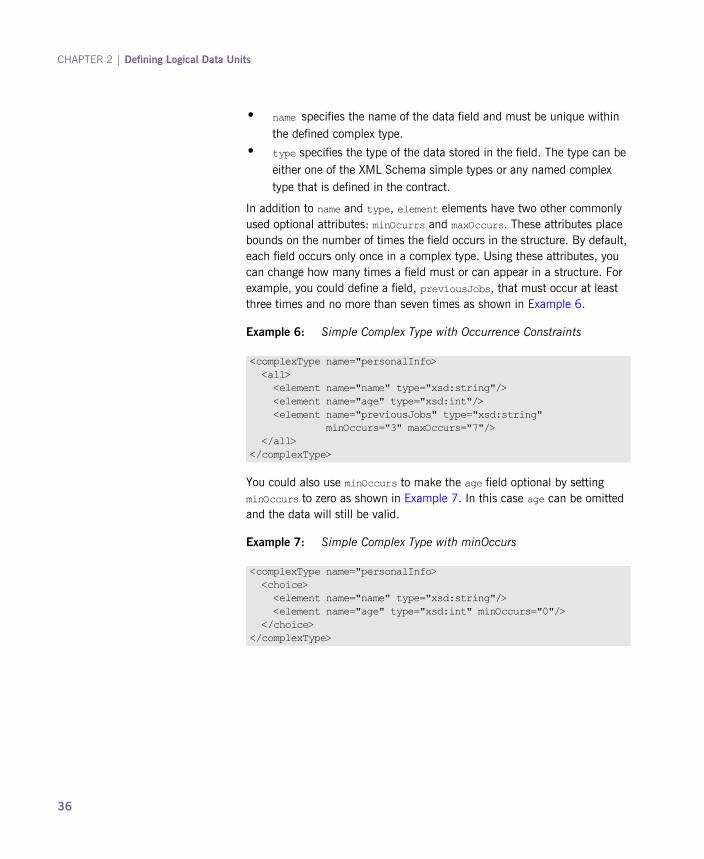
In addition to name and type, element elements have two other commonly used optional attributes: minOcurrs and maxOccurs. These attributes place bounds on the number of times the field occurs in the structure. By default, each field occurs only once in a complex type. Using these attributes, you can change how many times a field must or can appear in a structure. For example, you could define a field, previousJobs, that must occur at least three times and no more than seven times as shown in Example 6.
You could also use minOccurs to make the age field optional by setting minOccurs to zero as shown in Example 7. In this case age can be omitted and the data will still be valid.
Example 6: Simple Complex Type with Occurrence Constraints
<complexType name="personalInfo> <all> <element name="name" type="xsd:string"/> <element name="age" type="xsd:int"/> <element name="previousJobs" type="xsd:string" minOccurs="3" maxOccurs="7"/> </all></complexType>
Example 7: Simple Complex Type with minOccurs
<complexType name="personalInfo> <choice> <element name="name" type="xsd:string"/> <element name="age" type="xsd:int" minOccurs="0"/> </choice></complexType>
36

Defining Complex Data Types
Defining attributes In XML documents attributes are contained in the element�s tag. For example, in the complexType element name is an attribute. They are specified using the attribute element. It comes after the all, sequence, or choice element and are a direct child of the complexType element. Example 8 shows a complex type with an attribute.
The attribute element has three attributes:
� name is a required attribute that specifies the string identifying the attribute.
� type specifies the type of the data stored in the field. The type can be either one of the XML Schema simple types.
� use specifies if the attribute is required or optional. Valid values are required or optional.
If you specify that the attribute is optional you can add the optional attribute default. default allows you to specify a default value for the attribute.
Example 8: Complex Type with an Attribute
<complexType name="personalInfo> <all> <element name="name" type="xsd:string"/> <element name="previousJobs" type="xsd:string" minOccurs="3" maxOccurs="7"/> </all> <attribute name="age" type="xsd:int" use="optional" /></complexType>
37

CHAPTER 2 | Defining Logical Data Units
Defining Arrays
Overview Artix supports two methods for defining arrays in a contract. The first is define a complex type with a single element whose maxOccurs attribute has a value greater than one. The second is to use SOAP arrays. SOAP arrays provide added functionality such as the ability to easily define multi-dimensional arrays and transmit sparsely populated arrays.
Complex type arrays Complex type arrays are nothing more than a special case of a sequence complex type. You simply define a complex type with a single element and specify a value for the maxOccurs attribute. For example, to define an array of twenty floating point numbers you would use a complex type similar to the one shown in Example 9.
You could also specify a value for minOccurs.
SOAP arrays SOAP arrays are defined by deriving from the SOAP-ENC:Array base type using the wsdl:arrayType. The syntax for this is shown in Example 10.
Example 9: Complex Type Array
<complexType name="personalInfo> <element name="averages" type="xsd:float" maxOccurs="20"/></complexType>
Example 10: Syntax for a SOAP Array derived using wsdl:arrayType
<complexType name="TypeName"> <complexContent> <restriction base="SOAP-ENC:Array"> <attribute ref="SOAP-ENC:arrayType" wsdl:arrayType="ElementType<ArrayBounds>"/> </restriction> </complexContent> </complexType>
38

Defining Complex Data Types
Using this syntax, TypeName specifies the name of the newly-defined array type. ElementType specifies the type of the elements in the array. ArrayBounds specifies the number of dimensions in the array. To specify a single dimension array you would use []; to specify a two-dimensional array you would use either [][] or [,].
For example, the SOAP Array, SOAPStrings, shown in Example 11, defines a one-dimensional array of strings. The wsdl:arrayType attribute specifies the type of the array elements, xsd:string, and the number of dimensions, [] implying one dimension.
You can also describe a SOAP Array using a simple element as described in the SOAP 1.1 specification. The syntax for this is shown in Example 12.
When using this syntax, the element's maxOccurs attribute must always be set to unbounded.
Example 11: Definition of a SOAP Array
<complexType name="SOAPStrings"> <complexContent> <restriction base="SOAP-ENC:Array"> <attribute ref="SOAP-ENC:arrayType" wsdl:arrayType="xsd:string[]"/> </restriction> </complexContent> </complexType>
Example 12: Syntax for a SOAP Array derived using an Element
<complexType name="TypeName"> <complexContent> <restriction base="SOAP-ENC:Array"> <sequence> <element name="ElementName" type="ElementType" maxOccurs="unbounded"/> </sequence> </restriction> </complexContent> </complexType>
39

CHAPTER 2 | Defining Logical Data Units
Defining Types by Extension
Overview Like most major coding languages, XMLSchema allows you to create data types that inherit some of their elements from other data types. This is called defining a type by extension. For example, you could create a new type called alienInfo, that extends the personalInfo structure defined in Example 4 on page 34 by adding a new element called planet.
Types defined by extension have four parts:
1. The name of the type is defined by the name attribute of the complexType element.
2. The complexContent element specifies that the new type will have more than one element.
3. The type from which the new type is derived, called the base type, is specified in the base attribute of the extension element.
4. The new type�s elements and attributes are defined in the extention element as they would be for a regular complex type.
For example, alienInfo would be defined as shown in Example 13.
Note: If you are only adding new attributes to the complex type, you can use a simpleContent element.
Example 13: Type Defined by Extension
<complexType name="alienInfo"> <complexContent> <extension base="personalInfo"> <sequence> <element name="planet" type="xsd:string"/> </sequence> </extension> </complexContent></complexType>
40
Defining Complex Data Types
Defining Types by Restriction
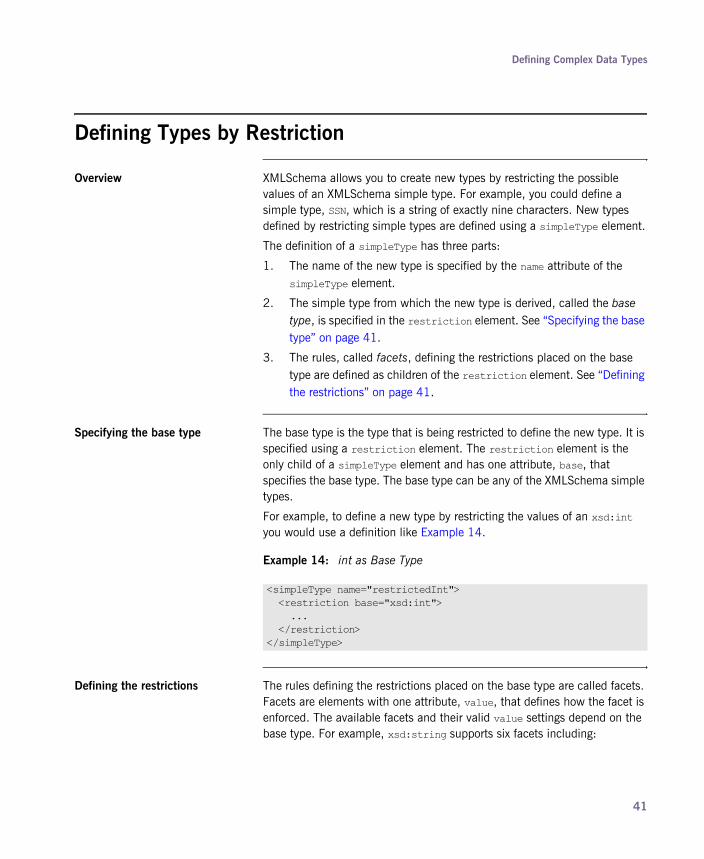
Overview XMLSchema allows you to create new types by restricting the possible values of an XMLSchema simple type. For example, you could define a simple type, SSN, which is a string of exactly nine characters. New types defined by restricting simple types are defined using a simpleType element.
The definition of a simpleType has three parts:
1. The name of the new type is specified by the name attribute of the simpleType element.
2. The simple type from which the new type is derived, called the base type, is specified in the restriction element. See �Specifying the base type� on page 41.
3. The rules, called facets, defining the restrictions placed on the base type are defined as children of the restriction element. See �Defining the restrictions� on page 41.
Specifying the base type The base type is the type that is being restricted to define the new type. It is specified using a restriction element. The restriction element is the only child of a simpleType element and has one attribute, base, that specifies the base type. The base type can be any of the XMLSchema simple types.
For example, to define a new type by restricting the values of an xsd:int you would use a definition like Example 14.
Defining the restrictions The rules defining the restrictions placed on the base type are called facets. Facets are elements with one attribute, value, that defines how the facet is enforced. The available facets and their valid value settings depend on the base type. For example, xsd:string supports six facets including:
Example 14: int as Base Type
<simpleType name="restrictedInt"> <restriction base="xsd:int"> ... </restriction> </simpleType>
41

CHAPTER 2 | Defining Logical Data Units
� length� minLength� maxLength� pattern� whitespace� enumeration
Each facet element is a child of the restriction element.
Example Example 15 shows an example of a simple type, SSN, which represents a social security number. The resulting type will be a string of the form xxx-xx-xxxx. <SSN>032-43-9876<SSN> is a valid value for an element of this type, but <SSN>032439876</SSN> is not.
Example 15: SSN Simple Type Description
<simpleType name="SSN"> <restriction base="xsd:string"> <pattern value="\d{3}-\d{2}-\d{4}"/> </restriction> </simpleType>
42
Defining Complex Data Types
Defining Enumerated Types
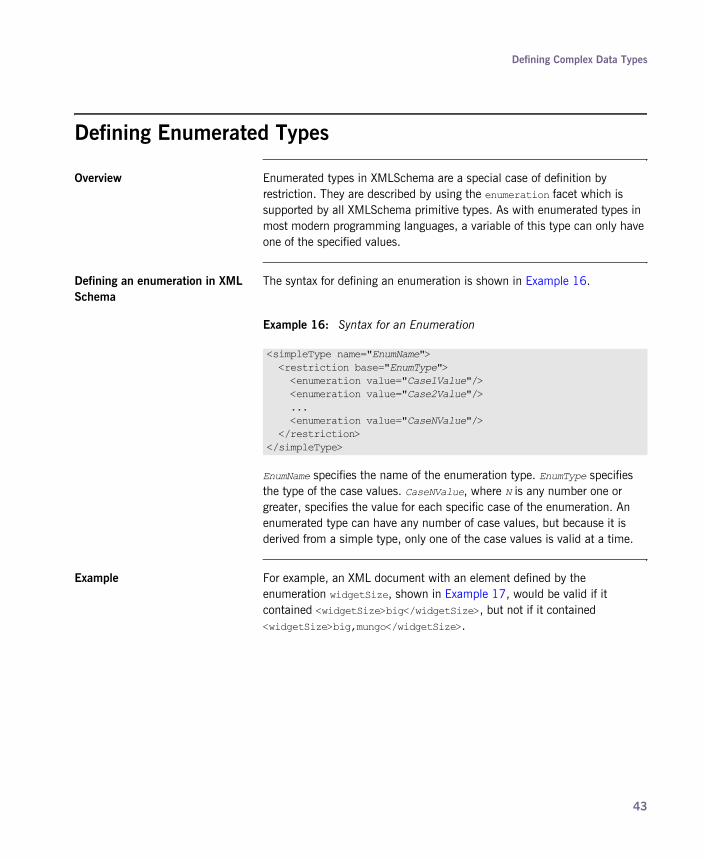
Overview Enumerated types in XMLSchema are a special case of definition by restriction. They are described by using the enumeration facet which is supported by all XMLSchema primitive types. As with enumerated types in most modern programming languages, a variable of this type can only have one of the specified values.
Defining an enumeration in XML Schema
The syntax for defining an enumeration is shown in Example 16.
EnumName specifies the name of the enumeration type. EnumType specifies the type of the case values. CaseNValue, where N is any number one or greater, specifies the value for each specific case of the enumeration. An enumerated type can have any number of case values, but because it is derived from a simple type, only one of the case values is valid at a time.
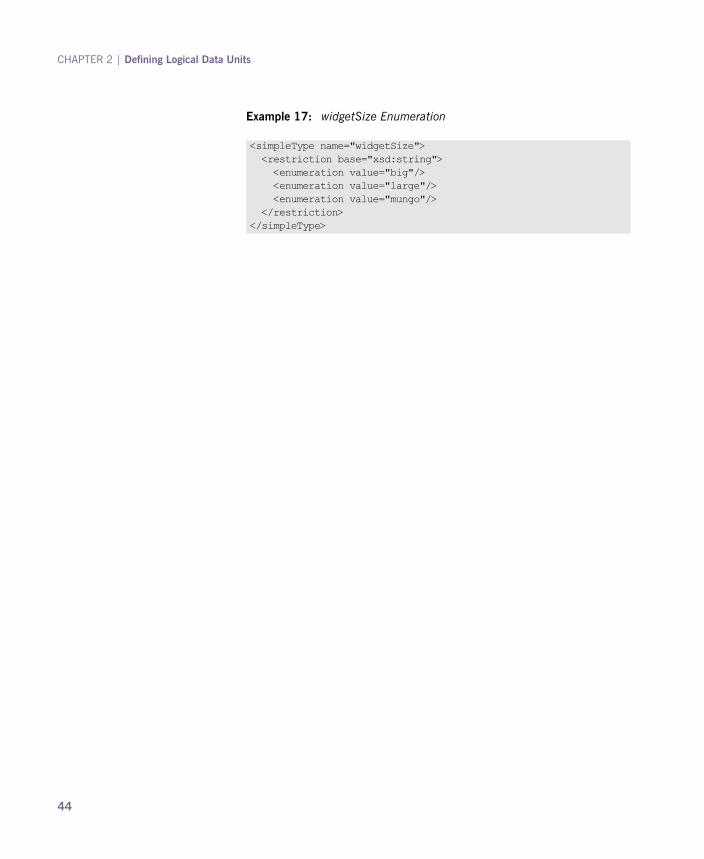
Example For example, an XML document with an element defined by the enumeration widgetSize, shown in Example 17, would be valid if it contained <widgetSize>big</widgetSize>, but not if it contained <widgetSize>big,mungo</widgetSize>.
Example 16: Syntax for an Enumeration
<simpleType name="EnumName"> <restriction base="EnumType"> <enumeration value="Case1Value"/> <enumeration value="Case2Value"/> ... <enumeration value="CaseNValue"/> </restriction> </simpleType>
43
CHAPTER 2 | Defining Logical Data Units
Example 17: widgetSize Enumeration
<simpleType name="widgetSize"> <restriction base="xsd:string"> <enumeration value="big"/> <enumeration value="large"/> <enumeration value="mungo"/> </restriction> </simpleType>
44

Defining Elements
Defining Elements
Overview Elements in XMLSchema represent an instance of an element in an XML document generated from the schema. At their most basic, an element consists of a single element element. Like the element element used to define the members of a complex type, they have three attributes:
� name is a required attribute that specifies the name of the element as it will appear in an XML document.
� type specifies the type of the element. The type can be any XML Schema primitive type or any named complex type defined in the contract. This attribute can be omitted if the type has an in-line definition.
� nillable specifies if an element can be left out of a document entirely. If nillable is set to true, the element can be omitted from any document generated using the schema.
An element can also have an in-line type definition. In-line types are specified using either a complexType element or a simpleType element. Once you specify if the type of data is complex or simple, you can define any type of data needed using the tools available for each type of data. In-line type definitions are discouraged, because they are not reusable.
45

CHAPTER 2 | Defining Logical Data Units
46

CHAPTER 3
Defining Logical Messages Used by a ServiceA service exchanges logical messages when its operations are invoked.
Overview In an Artix contract a service�s operations are defined by specifying the logical messages that are exchanged when the operation in invoked. These logical messages define the data that is passed over a network as an XML document. They contain all of the parameters that would be a part of a method invocation.
Logical messages are defined using the message element in your contracts. Each logical message consists of one or more parts, defined in part elements. While your messages can list each parameter as a seperate part, the recomended practice is to use only a single part that encapsulates the data needed for the operation.
Adding message definitions to a contract
Artix Designer provides wizards for creating and editing logical message definitions. The wizards can be access using the context menu available when you select the Messages element from a contract�s diagram view. You can also access the wizards by selcting Artix Designer | New Message. For more information see the on-line help provided with Artix Designer.
47

CHAPTER 3 | Defining Logical Messages Used by a Service
You can also add a message definition to a contract using any text or XML editor. When you use an alternate tool, you are responsible for ensuring that the message definitions are valid.
Messages and parameter lists Each operation exposed by a service can only have one input message and one output message. The input message defines all of the information the service receives when the operation is invoked. The output message defines all of the data that the service returns when the operation is completed. Fault messages define the data that the service returns when an error occurs.
In addition, each operation can have any number of fault messages. The fault messages define the data that is returned when the service encounters an error. These messages generally have only one part that provides enough information for the consumer to understand the error.
Message design for integrating with legacy systems
If you are defining an existing application as a service, you need to ensure that each parameter used by the method implementing the operation is represented in a message. You must also ensure that the return value is included in the operation�s output message.
One approach to defining your messages is RPC style. When using RPC style, you define the messages using one part for each parameter in the method�s parameter list. Each message part is based on a type defined in the types element of the contract. Your input message would contain one part for each input parameter in the method. Your output message would contain one part for each output parameter and a part to represent the return value if needed. If a parameter is both an input and an output parameter, it would be listed as a part of both the input message and the output message.
RPC style message definition is usefull when service enabling legacy systems that use transports such as Tibco or CORBA. These systems are designed around procedures and methods. As such, they are easiest to model using messages that resemble the parameter lists for the operation being invoked. RPC style also makes a cleaner mapping between Artix and the application it is exposing.
48

Message design for SOAP services While RPC style is useful for modeling existing systems, the service�s community strongly favors the wrapped document style. In wrapped document style, each message has a single part. The message�s part references a wrapper element defined in the types element of the contract. The wrapper element has the following characteristics:
� It is a complex type containing a sequence of elements. For more information see �Defining Complex Data Types� on page 33.
� If it is a wrapper for an input message:
♦ It would have one element for each of the method�s input parameters.
♦ Its name would be the same as the name of the operation with which it is associated.
� If it is a wrapper for an output message:
♦ It would have one element for each of the method�s output parameters and one for each of the method�s inout parameters.
♦ Its first element would represent the method�s return parameter.
♦ Its name would be generated by appending Response to the name of the opperation with which the wrapper is associated.
Message naming Each message in a contract must have a unique name within its namespace. It is also recommended that you use the following naming conventions:
� Messages should only be used by a single operation.
� Input message names are formed by appending Request to the name of the operation.
� Output message names are formed by appending Response to the name of the operation.
� Fault message names should represent the reason for the fault.
49
CHAPTER 3 | Defining Logical Messages Used by a Service
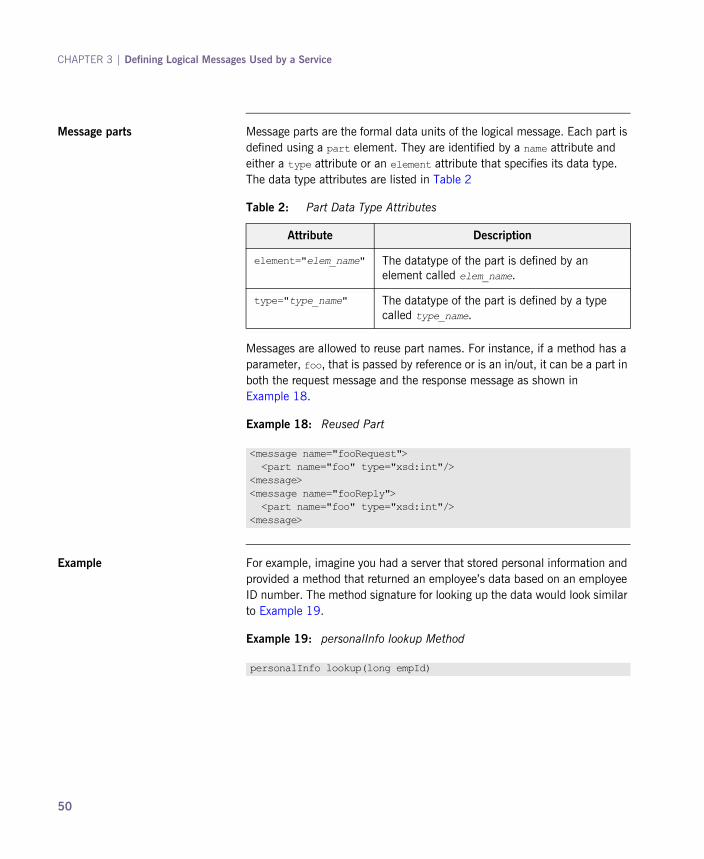
Message parts Message parts are the formal data units of the logical message. Each part is defined using a part element. They are identified by a name attribute and either a type attribute or an element attribute that specifies its data type. The data type attributes are listed in Table 2
Messages are allowed to reuse part names. For instance, if a method has a parameter, foo, that is passed by reference or is an in/out, it can be a part in both the request message and the response message as shown in Example 18.
Example For example, imagine you had a server that stored personal information and provided a method that returned an employee�s data based on an employee ID number. The method signature for looking up the data would look similar to Example 19.
Table 2: Part Data Type Attributes
Attribute Description
element="elem_name" The datatype of the part is defined by an element called elem_name.
type="type_name" The datatype of the part is defined by a type called type_name.
Example 18: Reused Part
<message name="fooRequest"> <part name="foo" type="xsd:int"/><message><message name="fooReply"> <part name="foo" type="xsd:int"/><message>
Example 19: personalInfo lookup Method
personalInfo lookup(long empId)
50
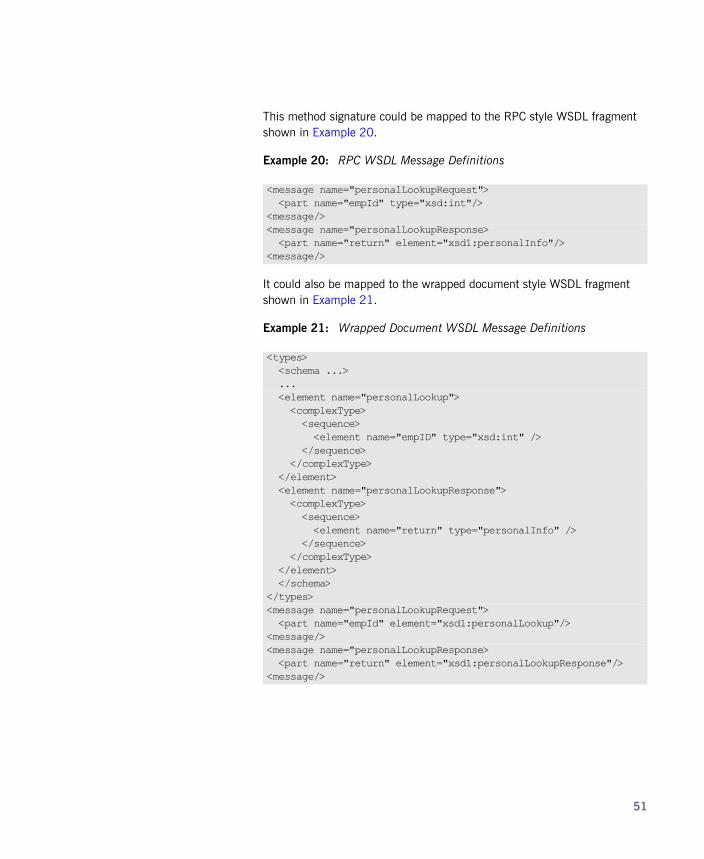
This method signature could be mapped to the RPC style WSDL fragment shown in Example 20.
It could also be mapped to the wrapped document style WSDL fragment shown in Example 21.
Example 20: RPC WSDL Message Definitions
<message name="personalLookupRequest"> <part name="empId" type="xsd:int"/><message/><message name="personalLookupResponse> <part name="return" element="xsd1:personalInfo"/><message/>
Example 21: Wrapped Document WSDL Message Definitions
<types> <schema ...> ... <element name="personalLookup"> <complexType> <sequence> <element name="empID" type="xsd:int" /> </sequence> </complexType> </element> <element name="personalLookupResponse"> <complexType> <sequence> <element name="return" type="personalInfo" /> </sequence> </complexType> </element> </schema></types><message name="personalLookupRequest"> <part name="empId" element="xsd1:personalLookup"/><message/><message name="personalLookupResponse> <part name="return" element="xsd1:personalLookupResponse"/><message/>
51

CHAPTER 3 | Defining Logical Messages Used by a Service
52
CHAPTER 4
Defining Your Logical InterfacesLogical service interfaces are defined using the portType element.
Overview Logical service interfaces are defined using the WSDL portType element. The portType is a collection of abstract operation definitions. Each operation is defined by the input, output, and fault messages used to complete the transaction the operation represents. When code is generated to implement the service interface defined by a portType element, each operation is converted into a method containing the parameters defined by the input, output, and fault messages specified in the contract.
Process Defining a logical interface in an Artix contract entails the following:
1. Creating a portType element to contain the interface definition and give it a unique name. See �Port types� on page 54.
2. Creating an operation element for each operation defined in the interface. See �Operations� on page 54.
3. For each operation, specifying the messages used to represent the operation�s parameter list, return type, and exceptions. See �Operation messages� on page 55.
53

CHAPTER 4 | Defining Your Logical Interfaces
Tools for adding logical interfaces to a contract
Artix Designer provides wizards for creating and editing logical interface definitions. The wizards can be access using the context menu available when you select the PortTypes element or one of its children from a contract�s diagram view. You can also access the wizards by selecting Artix Designer | New Port Type. For more information see the on-line help provided with Artix Designer.
You can also add a logical interface definition to a contract using any text or XML editor. When you use an alternate tool, you are responsible for ensuring that the logical interface definition is valid.
Port types A WSDL portType element is the root element in a logical interface definition. While many Web service implementations, including Artix, map portType elements directly to generated implementation objects, a logical interface definition does not specify the exact functionality provided by the the implemented service. For example, a logical interface named ticketSystem can result in an implementation that sells concert tickets or issues parking tickets.
The portType element is the unit of a WSDL document that is mapped into a binding to define the physical data used by an endpoint exposing the defined service. For more information on mapping logical interfaces into bindings see �Understanding Bindings in WSDL� on page 61.
Each portType element in a WSDL document must have a unique name, specified using the name attribute, and is made up of a collection of operations, described in operation elements. A WSDL document can describe any number of port types.
Operations Logical operations, defined using WSDL operation elements, define the interaction between two endpoints. For example, a request for a checking account balance and an order for a gross of widgets can both be defined as operations.
Each operation defined within a portType element must have a unique name, specified using the name attribute. The name attribute is required to define an operation.
54

Operation messages Logical operations are made up of a set of elements representing the logical messages communicated between the endpoints to execute the operation. The elements that can describe an operation are listed in Table 3.
An operation is required to have at least one input or one output element. An operation can have both input and output elements, but it can only have one of each. Operations are not required to have any fault messages, but can have any number of fault messages needed.
The elements have the two attributes listed in Table 4.
Table 3: Operation Message Elements
Element Description
input Specifies the message the client endpoint sends to the service provider when a request is made. The parts of this message correspond to the input parameters of the operation.
output Specifies the message that the service provider sends to the client endpoint in response to a request. The parts of this message correspond to any operation parameters that can be changed by the service provider, such as values passed by reference. This includes the return value of the operation.
fault Specifies a message used to communicate an error condition between the endpoints.
Table 4: Attributes of the Input and Output Elements
Attribute Description
name Identifies the message so it can be referenced when mapping the operation to a concrete data format. The name must be unique within the enclosing port type.
message Specifies the abstract message that describes the data being sent or received. The value of the message attribute must correspond to the name attribute of one of the abstract messages defined in the WSDL document.
55
CHAPTER 4 | Defining Your Logical Interfaces
It is not necessary to specify the name attribute for all input and output elements; WSDL provides a default naming scheme based on the enclosing operation�s name. If only one element is used in the operation, the element name defaults to the name of the operation. If both an input and an output element are used, the element name defaults to the name of the operation with Request or Response respectively appended to the name.
Return values Because the operation element is an abstract definition of the data passed during an operation, WSDL does not provide for return values to be specified for an operation. If a method returns a value it will be mapped into the output message as the last part of that message. The concrete details of how the message parts are mapped into a physical representation are described in �Bindings� on page 59.
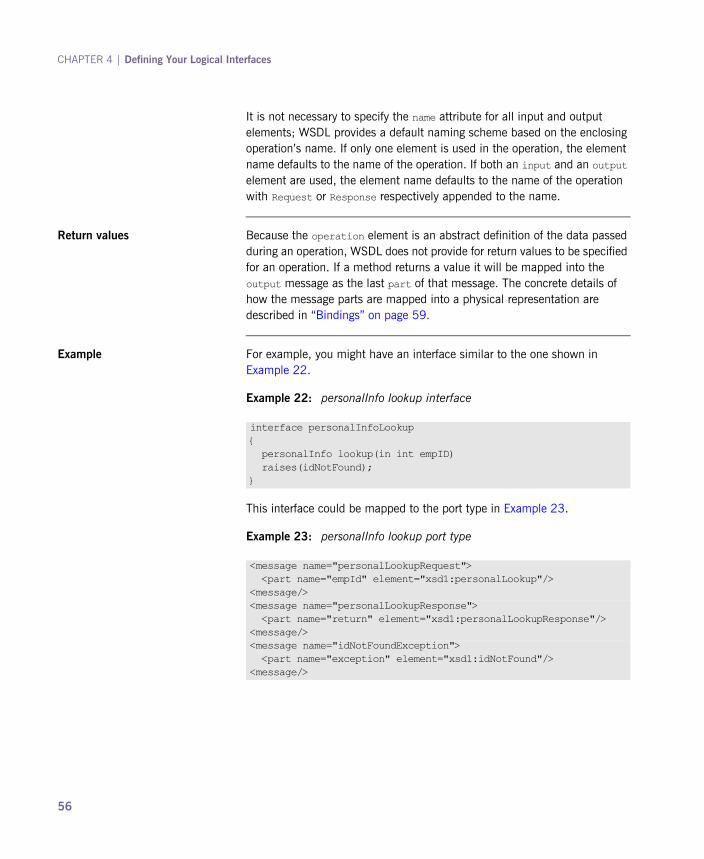
Example For example, you might have an interface similar to the one shown in Example 22.
This interface could be mapped to the port type in Example 23.
Example 22: personalInfo lookup interface
interface personalInfoLookup{ personalInfo lookup(in int empID) raises(idNotFound);}
Example 23: personalInfo lookup port type
<message name="personalLookupRequest"> <part name="empId" element="xsd1:personalLookup"/><message/><message name="personalLookupResponse"> <part name="return" element="xsd1:personalLookupResponse"/><message/><message name="idNotFoundException"> <part name="exception" element="xsd1:idNotFound"/><message/>
56

<portType name="personalInfoLookup"> <operation name="lookup"> <input name="empID" message="personalLookupRequest"/> <output name="return" message="personalLookupResponse"/> <fault name="exception" message="idNotFoundException"/> </operation></portType>
Example 23: personalInfo lookup port type
57

CHAPTER 4 | Defining Your Logical Interfaces
58

Part IIBindings
In this part This part contains the following chapters:
Understanding Bindings in WSDL page 61
Using SOAP 1.1 Messages page 65
Using SOAP 1.2 Messages page 79
Using Tuxedo�s FML Buffers page 89
Using Fixed Length Records page 97
Using Tagged Data page 115
Using Tibco Rendezvous Messages page 129
Using XML Documents page 171
Using RMI page 177
Using G2++ Messages page 183
59

60

CHAPTER 5
Understanding Bindings in WSDLBindings map the logical messages used to define a service into a concrete payload format that can be transmitted and received by an endpoint.
Overview Bindings provide a bridge between the logical messages used by a service to a concrete data format that an endpoint uses in the physical world. They describe how the logical messages are mapped into a payload format that is used on the wire by an endpoint. It is within the bindings that details such as parameter order, concrete data types, and return values are specified. For example, the parts of a message can be reordered in a binding to reflect the order required by an RPC call. Depending on the binding type, you can also identify which of the message parts, if any, represent the return type of a method.
Port types and bindings Port types and bindings are directly related. A port type is an abstract definition of a set of interactions between two logical services. A binding is a concrete definition of how the messages used to implement the logical services will be instantiated in the physical world. Each binding is then associated with a set of network details that finish the definition of one endpoint that exposes the logical service defined by the port type.
61

CHAPTER 5 | Understanding Bindings in WSDL
To ensure that an endpoint defines only a single service, WSDL requires that a binding can only represent a single port type. For example, if you had a contract with two port types, you could not write a single binding that mapped both of them into a concrete data format. You would need two bindings.
However, WSDL allows for a port type to be mapped to several bindings. For example, if your contract had a single port type, you could map it into two or more bindings. Each binding could alter how the parts of the message are mapped or they could specify entirely different payload formats for the message.
The WSDL elements Bindings are defined in a contract using the WSDL binding element. The binding element has a single attribute, name, that specifies a unique name for the binding. The value of this attribute is used to associate the binding with an endpoint as discussed in �Understanding How Endpoints are Defined WSDL� on page 193.
The actual mappings are defined in the children of the binding element. These elements vary depending on the type of payload format you decide to use. The different payload formats and the elements used to specify their mappings are discussed in the following chapters.
Adding to a contract Artix provides a number of tools for adding bindings to your contracts. These include:
� Artix Designer has wizards that lead you through the process of adding bindings to your contract.
� A number of the bindings can be generated using command line tools.
The tools will add the proper elements to your contract for you. However, it is recommended that you have some knowledge of how the different types of bindings work.
You can also add a binding to a contract using any text editor. When you hand edit a contract, you are responsible for ensuring that the contract is valid.
Supported bindings Artix supports the following bindings:
� SOAP
� CORBA
62

� Fixed record length
� Pure XML
� Tagged (variable record length)
� TibrvMsg (a TIBCO Rendezvous format)
� Tuxedo's Field Manipulation Language (FML)
� G2++
63

CHAPTER 5 | Understanding Bindings in WSDL
64
CHAPTER 6
Using SOAP 1.1 MessagesSOAP 1.1 is a common payload format used by Web services.
Overview Artix provides a tool to generate a SOAP 1.1 binding which does not use any SOAP headers. However, you can add SOAP headers to your binding using any text or XML editor. In addition, you can define a SOAP binding that uses MIME multipart attachments.
In this chapter This chapter discusses the following topics:
Adding a SOAP 1.1 Binding page 66
Adding SOAP Headers to a SOAP 1.1 Binding page 69
Sending Data Using SOAP with Attachments page 74
65
CHAPTER 6 | Using SOAP 1.1 Messages
Adding a SOAP 1.1 Binding
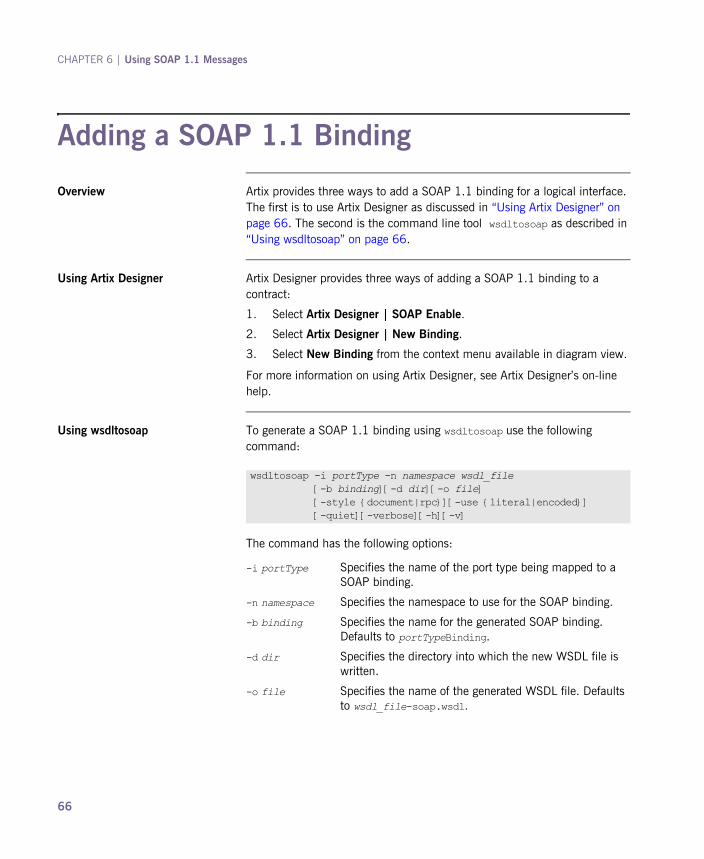
Overview Artix provides three ways to add a SOAP 1.1 binding for a logical interface. The first is to use Artix Designer as discussed in �Using Artix Designer� on page 66. The second is the command line tool wsdltosoap as described in �Using wsdltosoap� on page 66.
Using Artix Designer Artix Designer provides three ways of adding a SOAP 1.1 binding to a contract:
1. Select Artix Designer | SOAP Enable.
2. Select Artix Designer | New Binding.
3. Select New Binding from the context menu available in diagram view.
For more information on using Artix Designer, see Artix Designer�s on-line help.
Using wsdltosoap To generate a SOAP 1.1 binding using wsdltosoap use the following command:
The command has the following options:
wsdltosoap -i portType -n namespace wsdl_file [-b binding][-d dir][-o file] [-style {document|rpc}][-use {literal|encoded}] [-quiet][-verbose][-h][-v]
-i portType Specifies the name of the port type being mapped to a SOAP binding.
-n namespace Specifies the namespace to use for the SOAP binding.
-b binding Specifies the name for the generated SOAP binding. Defaults to portTypeBinding.
-d dir Specifies the directory into which the new WSDL file is written.
-o file Specifies the name of the generated WSDL file. Defaults to wsdl_file-soap.wsdl.
66
Adding a SOAP 1.1 Binding
wsdltosoap does not support the generation of document/encoded SOAP bindings.
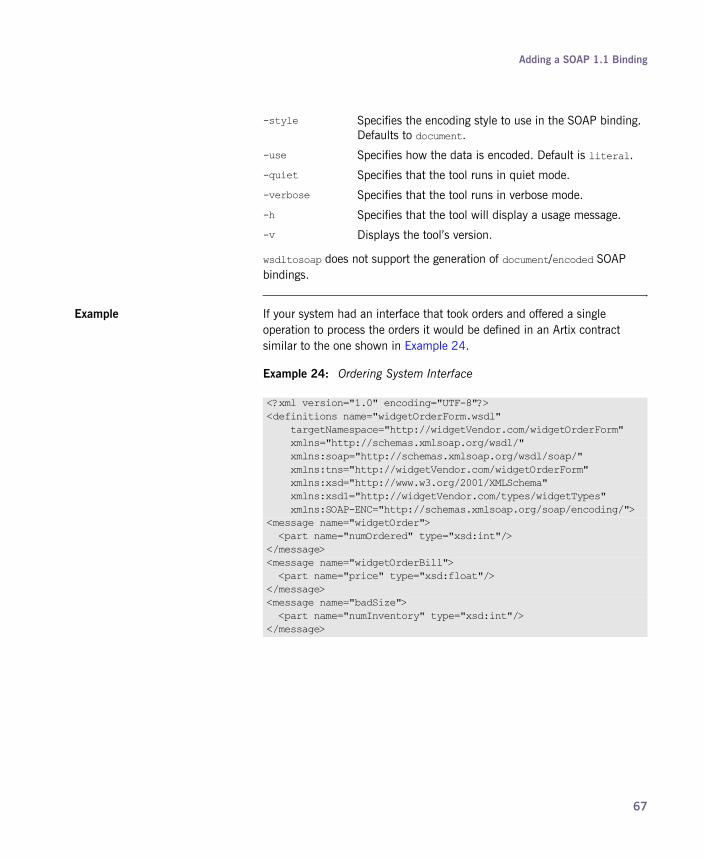
Example If your system had an interface that took orders and offered a single operation to process the orders it would be defined in an Artix contract similar to the one shown in Example 24.
-style Specifies the encoding style to use in the SOAP binding. Defaults to document.
-use Specifies how the data is encoded. Default is literal.
-quiet Specifies that the tool runs in quiet mode.
-verbose Specifies that the tool runs in verbose mode.
-h Specifies that the tool will display a usage message.
-v Displays the tool�s version.
Example 24: Ordering System Interface
<?xml version="1.0" encoding="UTF-8"?><definitions name="widgetOrderForm.wsdl" targetNamespace="http://widgetVendor.com/widgetOrderForm" xmlns="http://schemas.xmlsoap.org/wsdl/" xmlns:soap="http://schemas.xmlsoap.org/wsdl/soap/" xmlns:tns="http://widgetVendor.com/widgetOrderForm" xmlns:xsd="http://www.w3.org/2001/XMLSchema" xmlns:xsd1="http://widgetVendor.com/types/widgetTypes" xmlns:SOAP-ENC="http://schemas.xmlsoap.org/soap/encoding/"><message name="widgetOrder"> <part name="numOrdered" type="xsd:int"/></message><message name="widgetOrderBill"> <part name="price" type="xsd:float"/></message><message name="badSize"> <part name="numInventory" type="xsd:int"/></message>
67

CHAPTER 6 | Using SOAP 1.1 Messages
The SOAP binding generated for orderWidgets is shown in Example 25.
This binding specifies that messages are sent using the document/literal message style.
<portType name="orderWidgets"> <operation name="placeWidgetOrder"> <input message="tns:widgetOrder" name="order"/> <output message="tns:widgetOrderBill" name="bill"/> <fault message="tns:badSize" name="sizeFault"/> </operation></portType>...</definitions>
Example 24: Ordering System Interface
Example 25: SOAP 1.1 Binding for orderWidgets
<binding name="orderWidgetsBinding" type="tns:orderWidgets"> <soap:binding style="document" transport="http://schemas.xmlsoap.org/soap/http"/> <operation name="placeWidgetOrder"> <soap:operation soapAction="" style="document"/> <input name="order"> <soap:body use="literal"/> </input> <output name="bill"> <soap:body use="literal"/> </output> <fault name="sizeFault"> <soap:body use="literal"/> </fault> </operation></binding>
68

Adding SOAP Headers to a SOAP 1.1 Binding
Adding SOAP Headers to a SOAP 1.1 Binding
Overview SOAP headers are defined by adding soap:header elements to your default SOAP 1.1 binding. The soap:header element is an optional child of the input, output, and fault elements of the binding. The SOAP header becomes part of the parent message. A SOAP header is defined by specifying a message and a message part. Each SOAP header can only contain one message part, but you can insert as many SOAP headers as needed.
Syntax The syntax for defining a SOAP header is shown in Example 26. The message attribute of soap:header is the qualified name of the message from which the part being inserted into the header is taken. The part attribute is the name of the message part inserted into the SOAP header. Because SOAP headers are always doc style, the WSDL message part inserted into the SOAP header must be defined using an element. Together the message and the part attributes fully describe the data to insert into the SOAP header.
As well as the mandatory message and part attributes, soap:header also supports the namespace, the use, and the encodingStyle attributes. These optional attributes function the same for soap:header as they do for soap:body.
Example 26: SOAP Header Syntax
<binding name="headwig"> <soap:binding style="document"
transport="http://schemas.xmlsoap.org/soap/http"/> <operation name="weave">
<soap:operation soapAction="" style="document"/> <input name="grain"> <soap:body .../> <soap:header message="QName" part="partName"/> </input>...</binding>
69

CHAPTER 6 | Using SOAP 1.1 Messages
Development considerations When you use SOAP headers in your Artix applications, you are responsible for creating and populating the SOAP headers in your application logic. For details on Artix application development, see either Developing Artix Applications in C++ or Developing Artix Applications in Java.
Splitting messages between body and header
The message part inserted into the SOAP header can be any valid message part from the contract. It can even be a part from the parent message which is being used as the SOAP body. Because it is unlikely that you would want to send information twice in the same message, the SOAP binding provides a means for specifying the message parts that are inserted into the SOAP body.
The soap:body element has an optional attribute, parts, that takes a space delimited list of part names. When parts is defined, only the message parts listed are inserted into the SOAP body. You can then insert the remaining parts into the SOAP header.
Example Example 27 shows a modified version of the orderWidgets service shown in Example 24. This version has been modified so that each order has an xsd:base64binary value placed in the SOAP header of the request and response. The SOAP header is defined as being the keyVal part from the widgetKey message. In this case you would be responsible for adding the SOAP header in your application logic because it is not part of the input or output message.
Note: When you define a SOAP header using parts of the parent message, Artix automatically fills in the SOAP headers for you.
Example 27: SOAP 1.1 Binding with a SOAP Header
<?xml version="1.0" encoding="UTF-8"?><definitions name="widgetOrderForm.wsdl" targetNamespace="http://widgetVendor.com/widgetOrderForm" xmlns="http://schemas.xmlsoap.org/wsdl/" xmlns:soap="http://schemas.xmlsoap.org/wsdl/soap/" xmlns:tns="http://widgetVendor.com/widgetOrderForm" xmlns:xsd="http://www.w3.org/2001/XMLSchema" xmlns:xsd1="http://widgetVendor.com/types/widgetTypes" xmlns:SOAP-ENC="http://schemas.xmlsoap.org/soap/encoding/">
70

Adding SOAP Headers to a SOAP 1.1 Binding
<types> <schema targetNamespace="http://widgetVendor.com/types/widgetTypes" xmlns="http://www.w3.org/2001/XMLSchema" xmlns:wsdl="http://schemas.xmlsoap.org/wsdl/"> <element name="keyElem" type="xsd:base64Binary"/> </schema></types><message name="widgetOrder"> <part name="numOrdered" type="xsd:int"/></message><message name="widgetOrderBill"> <part name="price" type="xsd:float"/></message><message name="badSize"> <part name="numInventory" type="xsd:int"/></message><message name="widgetKey"> <part name="keyVal" element="xsd1:keyElem"/></message><portType name="orderWidgets"> <operation name="placeWidgetOrder"> <input message="tns:widgetOrder" name="order"/> <output message="tns:widgetOrderBill" name="bill"/> <fault message="tns:badSize" name="sizeFault"/> </operation></portType><binding name="orderWidgetsBinding" type="tns:orderWidgets"> <soap:binding style="document" transport="http://schemas.xmlsoap.org/soap/http"/> <operation name="placeWidgetOrder"> <soap:operation soapAction="" style="document"/> <input name="order"> <soap:body use="literal"/> <soap:header message="tns:widgetKey" part="keyVal"/> </input> <output name="bill"> <soap:body use="literal"/> <soap:header message="tns:widgetKey" part="keyVal"/> </output> <fault name="sizeFault"> <soap:body use="literal"/> </fault> </operation></binding>...</definitions>
Example 27: SOAP 1.1 Binding with a SOAP Header (Continued)
71

CHAPTER 6 | Using SOAP 1.1 Messages
You could modify Example 27 so that the header value was a part of the input and output messages as shown in Example 28. In this case keyVal is a part of the input and output messages. In the soap:body elements the parts attribute specifies that keyVal is not to be inserted into the body. However, it is inserted into the SOAP header.
Example 28: SOAP 1.1 Binding for orderWidgets with a SOAP Header
<?xml version="1.0" encoding="UTF-8"?><definitions name="widgetOrderForm.wsdl" targetNamespace="http://widgetVendor.com/widgetOrderForm" xmlns="http://schemas.xmlsoap.org/wsdl/" xmlns:soap="http://schemas.xmlsoap.org/wsdl/soap/" xmlns:tns="http://widgetVendor.com/widgetOrderForm" xmlns:xsd="http://www.w3.org/2001/XMLSchema" xmlns:xsd1="http://widgetVendor.com/types/widgetTypes" xmlns:SOAP-ENC="http://schemas.xmlsoap.org/soap/encoding/"><types> <schema targetNamespace="http://widgetVendor.com/types/widgetTypes" xmlns="http://www.w3.org/2001/XMLSchema" xmlns:wsdl="http://schemas.xmlsoap.org/wsdl/"> <element name="keyElem" type="xsd:base64Binary"/> </schema></types><message name="widgetOrder"> <part name="numOrdered" type="xsd:int"/> <part name="keyVal" element="xsd1:keyElem"/></message><message name="widgetOrderBill"> <part name="price" type="xsd:float"/> <part name="keyVal" element="xsd1:keyElem"/></message><message name="badSize"> <part name="numInventory" type="xsd:int"/></message><portType name="orderWidgets"> <operation name="placeWidgetOrder"> <input message="tns:widgetOrder" name="order"/> <output message="tns:widgetOrderBill" name="bill"/> <fault message="tns:badSize" name="sizeFault"/> </operation></portType>
72

Adding SOAP Headers to a SOAP 1.1 Binding
<binding name="orderWidgetsBinding" type="tns:orderWidgets"> <soap:binding style="document" transport="http://schemas.xmlsoap.org/soap/http"/> <operation name="placeWidgetOrder"> <soap:operation soapAction="" style="document"/> <input name="order"> <soap:body use="literal" parts="numOrdered"/> <soap:header message="tns:widgetOrder" part="keyVal"/> </input> <output name="bill"> <soap:body use="literal" parts="bill"/> <soap:header message="tns:widgetOrderBill" part="keyVal"/> </output> <fault name="sizeFault"> <soap:body use="literal"/> </fault> </operation></binding>...</definitions>
Example 28: SOAP 1.1 Binding for orderWidgets with a SOAP Header
73

CHAPTER 6 | Using SOAP 1.1 Messages
Sending Data Using SOAP with Attachments
Overview SOAP 1.1 messages generally do not carry binary data. However, the W3C SOAP 1.1 specification allows for using MIME multipart/related messages to send binary data in SOAP 1.1 messages. This technique is called using SOAP with attachments. SOAP attachments are defined in the W3C�s SOAP Messages with Attachments Note (http://www.w3.org/TR/SOAP-attachments).
Namespace The WSDL extensions used to define the MIME multipart/related messages are defined in the namespace http://schemas.xmlsoap.org/wsdl/mime/.
In the discussion that follows, it is assumed that this namespace is prefixed with mime. The entry in the WSDL definitions element to set this up is shown in Example 29.
Changing the message binding In a default SOAP binding, the first child element of the input, output, and fault elements is a soap:body element describing the body of the SOAP 1.1 message representing the data. When using SOAP with attachments, the soap:body element is replaced with a mime:multipartRelated element.
The mime:multipartRelated element tells Artix that the message body is going to be a multipart message that potentially contains binary data. The contents of the element define the parts of the message and their contents. mime:multipartRelated elements in Artix contain one or more mime:part elements that describe the individual parts of the message.
The first mime:part element must contain the soap:body element that would normally appear in a default SOAP binding. The remaining mime:part elements define the attachments that are being sent in the message.
Example 29: MIME Namespace Specification in a Contract
xmlns:mime="http://schemas.xmlsoap.org/wsdl/mime/"
Note: WSDL does not support using mime:multipartRelated for fault messages.
74

Sending Data Using SOAP with Attachments
Describing a MIME multipart message
MIME multipart messages are described using a mime:multipartRelated element that contains a number of mime:part elements. To fully describe a MIME multipart message in an Artix contract:
1. Inside the input or output message you want to send as a MIME multipart message, add a mime:mulipartRelated element as the first child element of the enclosing message.
2. Add a mime:part child element to the mime:multipartRelated element and set its name attribute to a unique string.
3. Add a soap:body element as the child of the mime:part element and set its attributes appropriately.
If the contract had a default SOAP binding, you can copy the soap:body element from the corresponding message from the default binding into the MIME multipart message.
4. Add another mime:part child element to the mime:multipartReleated element and set its name attribute to a unique string.
5. Add a mime:content child element to the mime:part element to describe the contents of this part of the message.
To fully describe the contents of a MIME message part the mime:content element has the following attributes:
♦ part�Specifies the name of the WSDL message part, from the parent message definition, that is used as the content of this part of the MIME multipart message being placed on the wire.
♦ type�The MIME type of the data in this message part. MIME types are defined as a type and a subtype using the syntax type/subtype.
There are a number of predefined MIME types such as image/jpeg and text/plain. The MIME types are maintained by the Internet Assigned Numbers Authority (IANA) and described in detail in Multipurpose Internet Mail Extensions (MIME) Part One: Format of Internet Message Bodies (ftp://ftp.isi.edu/in-notes/rfc2045.txt) and Multipurpose Internet Mail Extensions (MIME) Part Two: Media Types (ftp://ftp.isi.edu/in-notes/rfc2046.txt).
6. For each additional MIME part, repeat steps 4 and 5.
75
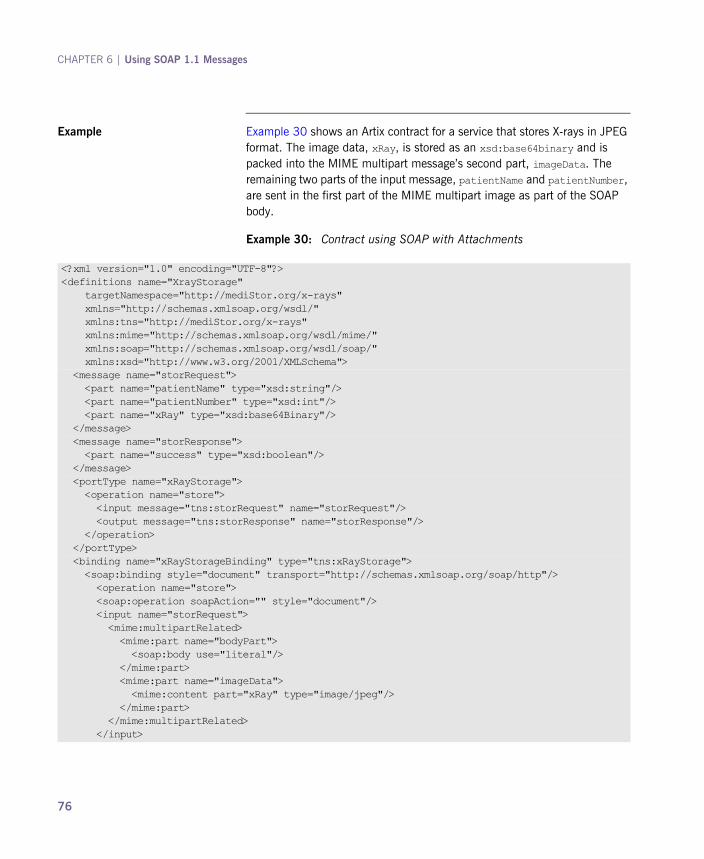
CHAPTER 6 | Using SOAP 1.1 Messages
Example Example 30 shows an Artix contract for a service that stores X-rays in JPEG format. The image data, xRay, is stored as an xsd:base64binary and is packed into the MIME multipart message�s second part, imageData. The remaining two parts of the input message, patientName and patientNumber, are sent in the first part of the MIME multipart image as part of the SOAP body.
Example 30: Contract using SOAP with Attachments
<?xml version="1.0" encoding="UTF-8"?><definitions name="XrayStorage" targetNamespace="http://mediStor.org/x-rays" xmlns="http://schemas.xmlsoap.org/wsdl/" xmlns:tns="http://mediStor.org/x-rays" xmlns:mime="http://schemas.xmlsoap.org/wsdl/mime/" xmlns:soap="http://schemas.xmlsoap.org/wsdl/soap/" xmlns:xsd="http://www.w3.org/2001/XMLSchema"> <message name="storRequest"> <part name="patientName" type="xsd:string"/> <part name="patientNumber" type="xsd:int"/> <part name="xRay" type="xsd:base64Binary"/> </message> <message name="storResponse"> <part name="success" type="xsd:boolean"/> </message> <portType name="xRayStorage"> <operation name="store"> <input message="tns:storRequest" name="storRequest"/> <output message="tns:storResponse" name="storResponse"/> </operation> </portType> <binding name="xRayStorageBinding" type="tns:xRayStorage"> <soap:binding style="document" transport="http://schemas.xmlsoap.org/soap/http"/> <operation name="store"> <soap:operation soapAction="" style="document"/> <input name="storRequest"> <mime:multipartRelated> <mime:part name="bodyPart"> <soap:body use="literal"/> </mime:part> <mime:part name="imageData"> <mime:content part="xRay" type="image/jpeg"/> </mime:part> </mime:multipartRelated> </input>
76
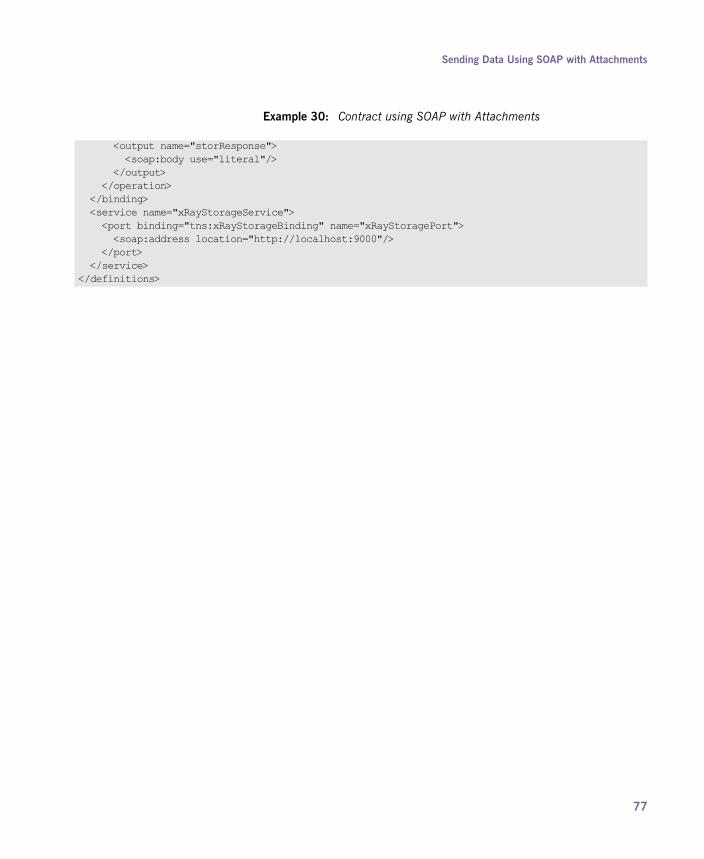
Sending Data Using SOAP with Attachments
<output name="storResponse"> <soap:body use="literal"/> </output> </operation> </binding> <service name="xRayStorageService"> <port binding="tns:xRayStorageBinding" name="xRayStoragePort"> <soap:address location="http://localhost:9000"/> </port> </service></definitions>
Example 30: Contract using SOAP with Attachments
77

CHAPTER 6 | Using SOAP 1.1 Messages
78

CHAPTER 7
Using SOAP 1.2 MessagesSOAP 1.2 is an updated specification of SOAP messages.
Overview Artix provides tools to generate a SOAP 1.2 binding which does not use any SOAP headers. However, you can add SOAP headers to your binding using any text or XML editor.
In this chapter This chapter discusses the following topics:
Adding a SOAP 1.2 Binding page 80
Adding Headers to a SOAP 1.2 Message page 83
79

CHAPTER 7 | Using SOAP 1.2 Messages
Adding a SOAP 1.2 Binding
Overview Artix provides three ways to add a SOAP 1.2 binding for a logical interface. The first is to use Artix Designer as described in �Using Artix Designer� on page 80. The second is the command line tool wsdltosoap as described in �Using wsdltosoap� on page 80.
Using Artix Designer Artix Designer provides three ways of adding a SOAP 1.2 binding to a contract:
1. Select Artix Designer | SOAP Enable.
2. Select Artix Designer | New Binding.
3. Select New Binding from the context menu available in diagram view.
For more information on using Artix Designer, see Artix Designer�s on-line help.
Using wsdltosoap To generate a SOAP 1.2 binding using wsdltosoap use the following command:
The command has the following options:
Note: Artix 4.1 only supports literal SOAP 1.2 messages.
wsdltosoap �soapversion 1.2 -i portType -n namespace wsdl_file [-b binding][-d dir][-o file] [-style {document|rpc}][-use {literal|encoded}] [-quiet][-verbose][-h][-v]
�soapversion 1.2Specifies that the generated binding should use SOAP 1.2.
-i portType Specifies the name of the port type being mapped to a SOAP binding.
-n namespace Specifies the namespace to use for the SOAP binding.
-b binding Specifies the name for the generated SOAP binding. Defaults to portTypeBinding.
80

Adding a SOAP 1.2 Binding
wsdltosoap does not support the generation of document/encoded SOAP bindings.
Example If your system had an interface that took orders and offered a single operation to process the orders it would be defined in an Artix contract similar to the one shown in Example 31.
-d dir Specifies the directory into which the new WSDL file is written.
-o file Specifies the name of the generated WSDL file. Defaults to wsdl_file-soap.wsdl.
-style Specifies the encoding style to use in the SOAP binding. Defaults to document.
-use Specifies how the data is encoded. Default is literal.
-quiet Specifies that the tool runs in quiet mode.
-verbose Specifies that the tool runs in verbose mode.
-h Specifies that the tool will display a usage message.
-v Displays the tool�s version.
Example 31: Ordering System Interface
<?xml version="1.0" encoding="UTF-8"?><definitions name="widgetOrderForm.wsdl" targetNamespace="http://widgetVendor.com/widgetOrderForm" xmlns="http://schemas.xmlsoap.org/wsdl/" xmlns:wsoap12="http://schemas.xmlsoap.org/wsdl/soap12/" xmlns:tns="http://widgetVendor.com/widgetOrderForm" xmlns:xsd="http://www.w3.org/2001/XMLSchema" xmlns:xsd1="http://widgetVendor.com/types/widgetTypes" xmlns:SOAP-ENC="http://schemas.xmlsoap.org/soap/encoding/"><message name="widgetOrder"> <part name="numOrdered" type="xsd:int"/></message><message name="widgetOrderBill"> <part name="price" type="xsd:float"/></message><message name="badSize"> <part name="numInventory" type="xsd:int"/></message>
81
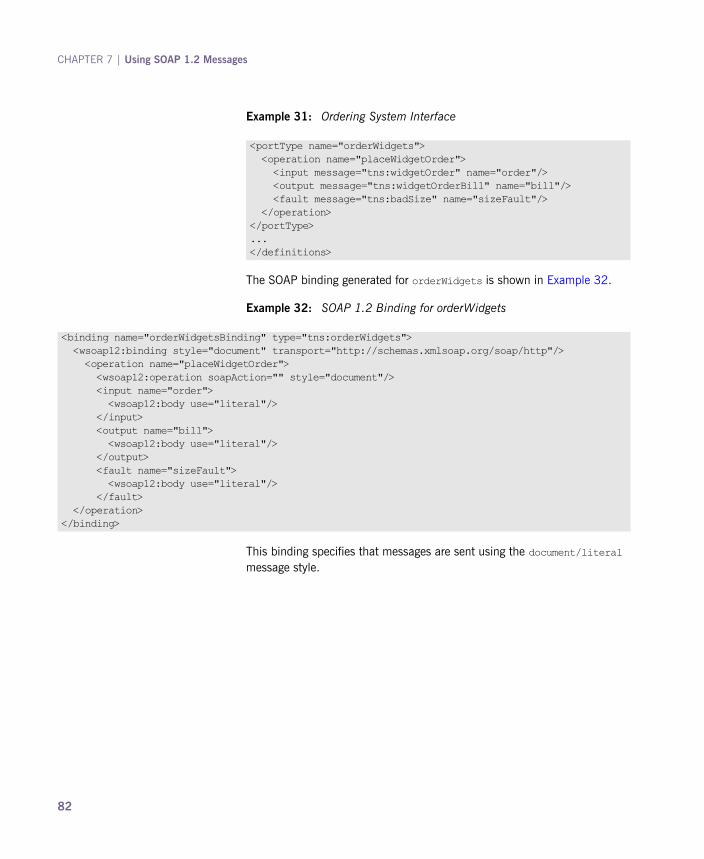
CHAPTER 7 | Using SOAP 1.2 Messages
The SOAP binding generated for orderWidgets is shown in Example 32.
This binding specifies that messages are sent using the document/literal message style.
<portType name="orderWidgets"> <operation name="placeWidgetOrder"> <input message="tns:widgetOrder" name="order"/> <output message="tns:widgetOrderBill" name="bill"/> <fault message="tns:badSize" name="sizeFault"/> </operation></portType>...</definitions>
Example 31: Ordering System Interface
Example 32: SOAP 1.2 Binding for orderWidgets
<binding name="orderWidgetsBinding" type="tns:orderWidgets"> <wsoap12:binding style="document" transport="http://schemas.xmlsoap.org/soap/http"/> <operation name="placeWidgetOrder"> <wsoap12:operation soapAction="" style="document"/> <input name="order"> <wsoap12:body use="literal"/> </input> <output name="bill"> <wsoap12:body use="literal"/> </output> <fault name="sizeFault"> <wsoap12:body use="literal"/> </fault> </operation></binding>
82

Adding Headers to a SOAP 1.2 Message
Adding Headers to a SOAP 1.2 Message
Overview SOAP message headers are defined by adding wsoap12:header elements to your SOAP 1.2 message. The wsoap12:header element is an optional child of the input, output, and fault elements of the binding. The header becomes part of the parent message. A header is defined by specifying a message and a message part. Each SOAP header can only contain one message part, but you can insert as many headers as needed.
Syntax The syntax for defining a SOAP header is shown in Example 33.
The wsoap12:header element�s attributes are described in Table 5.
Example 33: SOAP Header Syntax
<binding name="headwig"> <wsoap12:binding style="document"
transport="http://schemas.xmlsoap.org/soap/http"/> <operation name="weave">
<wsoap12:operation soapAction="" style="documment"/> <input name="grain"> <wsoap12:body .../> <wsoap12:header message="QName" part="partName" use="literal|encoded" encodingStyle="encodingURI" namespace="namespaceURI" /> </input>...</binding>
Table 5: wsoap12:header Attributes
Attribute Description
message A required attribute specifying the qualified name of the message from which the part being inserted into the header is taken.
part A required attribute specifying the name of the message part inserted into the SOAP header.
83

CHAPTER 7 | Using SOAP 1.2 Messages
Development considerations When you use SOAP headers in your Artix applications, you are responsible for creating and populating the headers in your application logic. For details on Artix application development, see either Developing Artix Applications in C++ or Developing Artix Applications in Java.
Splitting messages between body and header
The message part inserted into the SOAP header can be any valid message part from the contract. It can even be a part from the parent message which is being used as the SOAP body. Because it is unlikely that you would want to send information twice in the same message, the SOAP 1.2 binding provides a means for specifying the message parts that are inserted into the SOAP body.
The wsoap12:body element has an optional attribute, parts, that takes a space delimited list of part names. When parts is defined, only the message parts listed are inserted into the body of the SOAP 1.2 message. You can then insert the remaining parts into the message�s header.
Example Example 34 shows a modified version of the orderWidgets service shown in Example 31. This version has been modified so that each order has an xsd:base64binary value placed in the header of the request and response.
use Specifies if the message parts are to be encoded using encoding rules. If set to encoded the message parts are encoded using the encoding rules specified by the value of the encodingStyle attribute. If set to literal then the message parts are defined by the schema types referenced.
encodingStyle Specifies the encoding rules used to construct the message.
namespace Defines the namespace to be assigned to the header element serialized with use="encoded".
Table 5: wsoap12:header Attributes
Attribute Description
Note: When you define a SOAP header using parts of the parent message, Artix automatically fills in the SOAP headers for you.
84

Adding Headers to a SOAP 1.2 Message
The header is defined as being the keyVal part from the widgetKey message. In this case you would be responsible for adding the application logic to create the header because it is not part of the input or output message.
Example 34: SOAP 1.2 Binding with a SOAP Header
<?xml version="1.0" encoding="UTF-8"?><definitions name="widgetOrderForm.wsdl" targetNamespace="http://widgetVendor.com/widgetOrderForm" xmlns="http://schemas.xmlsoap.org/wsdl/" xmlns:wsoap12="http://schemas.xmlsoap.org/wsdl/soap12/" xmlns:tns="http://widgetVendor.com/widgetOrderForm" xmlns:xsd="http://www.w3.org/2001/XMLSchema" xmlns:xsd1="http://widgetVendor.com/types/widgetTypes" xmlns:SOAP-ENC="http://schemas.xmlsoap.org/soap/encoding/"><types> <schema targetNamespace="http://widgetVendor.com/types/widgetTypes" xmlns="http://www.w3.org/2001/XMLSchema" xmlns:wsdl="http://schemas.xmlsoap.org/wsdl/"> <element name="keyElem" type="xsd:base64Binary"/> </schema></types><message name="widgetOrder"> <part name="numOrdered" type="xsd:int"/></message><message name="widgetOrderBill"> <part name="price" type="xsd:float"/></message><message name="badSize"> <part name="numInventory" type="xsd:int"/></message><message name="widgetKey"> <part name="keyVal" element="xsd1:keyElem"/></message><portType name="orderWidgets"> <operation name="placeWidgetOrder"> <input message="tns:widgetOrder" name="order"/> <output message="tns:widgetOrderBill" name="bill"/> <fault message="tns:badSize" name="sizeFault"/> </operation></portType>
85

CHAPTER 7 | Using SOAP 1.2 Messages
You could modify Example 34 so that the header value was a part of the input and output messages as shown in Example 35. In this case keyVal is a part of the input and output messages. In the wsoap12:body elements the parts attribute specifies that keyVal is not to be inserted into the body. However, it is inserted into the header.
<binding name="orderWidgetsBinding" type="tns:orderWidgets"> <wsoap12:binding style="document" transport="http://schemas.xmlsoap.org/soap/http"/> <operation name="placeWidgetOrder"> <wsoap12:operation soapAction="" style="document"/> <input name="order"> <wsoap12:body use="literal"/> <wsoap12:header message="tns:widgetKey" part="keyVal"/> </input> <output name="bill"> <wsoap12:body use="literal"/> <wsoap12:header message="tns:widgetKey" part="keyVal"/> </output> <fault name="sizeFault"> <wsoap12:body use="literal"/> </fault> </operation></binding>...</definitions>
Example 34: SOAP 1.2 Binding with a SOAP Header
Example 35: SOAP 1.2 Binding for orderWidgets with a SOAP Header
<?xml version="1.0" encoding="UTF-8"?><definitions name="widgetOrderForm.wsdl" targetNamespace="http://widgetVendor.com/widgetOrderForm" xmlns="http://schemas.xmlsoap.org/wsdl/" xmlns:wsoap12="http://schemas.xmlsoap.org/wsdl/soap12/" xmlns:tns="http://widgetVendor.com/widgetOrderForm" xmlns:xsd="http://www.w3.org/2001/XMLSchema" xmlns:xsd1="http://widgetVendor.com/types/widgetTypes" xmlns:SOAP-ENC="http://schemas.xmlsoap.org/soap/encoding/"><types> <schema targetNamespace="http://widgetVendor.com/types/widgetTypes" xmlns="http://www.w3.org/2001/XMLSchema" xmlns:wsdl="http://schemas.xmlsoap.org/wsdl/"> <element name="keyElem" type="xsd:base64Binary"/> </schema></types>
86
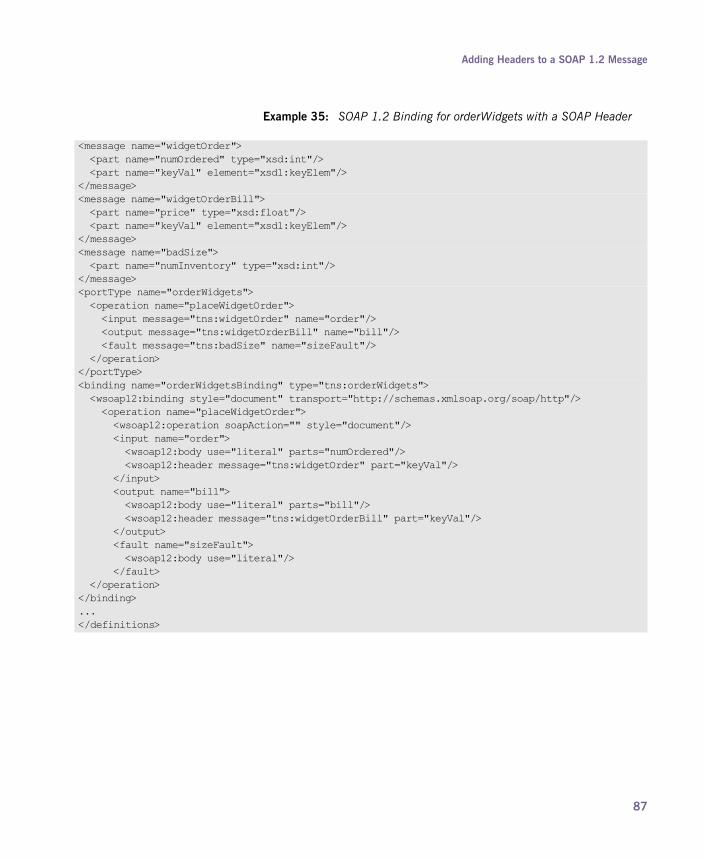
Adding Headers to a SOAP 1.2 Message
<message name="widgetOrder"> <part name="numOrdered" type="xsd:int"/> <part name="keyVal" element="xsd1:keyElem"/></message><message name="widgetOrderBill"> <part name="price" type="xsd:float"/> <part name="keyVal" element="xsd1:keyElem"/></message><message name="badSize"> <part name="numInventory" type="xsd:int"/></message><portType name="orderWidgets"> <operation name="placeWidgetOrder"> <input message="tns:widgetOrder" name="order"/> <output message="tns:widgetOrderBill" name="bill"/> <fault message="tns:badSize" name="sizeFault"/> </operation></portType><binding name="orderWidgetsBinding" type="tns:orderWidgets"> <wsoap12:binding style="document" transport="http://schemas.xmlsoap.org/soap/http"/> <operation name="placeWidgetOrder"> <wsoap12:operation soapAction="" style="document"/> <input name="order"> <wsoap12:body use="literal" parts="numOrdered"/> <wsoap12:header message="tns:widgetOrder" part="keyVal"/> </input> <output name="bill"> <wsoap12:body use="literal" parts="bill"/> <wsoap12:header message="tns:widgetOrderBill" part="keyVal"/> </output> <fault name="sizeFault"> <wsoap12:body use="literal"/> </fault> </operation></binding>...</definitions>
Example 35: SOAP 1.2 Binding for orderWidgets with a SOAP Header
87

CHAPTER 7 | Using SOAP 1.2 Messages
88
CHAPTER 8
Using Tuxedo�s FML BuffersArtix can send and receive messages packaged as FML buffers.
Overview Tuxedo�s native data format is FML. The FML buffers used by Tuxedo applications are described in one of two ways:
� A field table file that is loaded at runtime.
� A C header file that is compiled into the application.
A field table file is a detailed and user readable text file describing the contents of a buffer. It clearly describes each field�s name, ID number, data type, and a comment. Using the FML library calls, Tuxedo applications map the field table description to usable fldids at runtime.
The C header file description of an FML buffer simply maps field names to their fldid. The fldid is an integer value that represents both the type of data stored in a field and a unique identifying number for that field.
Artix works with this data by mapping the native Tuxedo data descriptions into a WSDL binding element. As part of developing an Artix solution to integrate with legacy Tuxedo applications, you must add an FML binding to the contract describing the integration.
89

CHAPTER 8 | Using Tuxedo�s FML Buffers
FML/XML Schema support An FML buffer can only contain the data types listed in Table 6.
Due to FML limitations, support for complex types is limited to xsd:sequence and xsd:all.
Mapping from a field table to an Artix contract
Creating an Artix contract to represent an FML buffer is a two-step process:
1. Create the logical data representation of the FML buffer in the Artix contract as described in �Mapping to logical type descriptions� on page 90.
2. Enter the FML binding information using Artix WSDL extensors as described in �Adding the FML binding� on page 95.
Mapping to logical type descriptions
To create a logical data type to represent data in an FML buffer:
1. If the C header file for the FML buffer does not exist, generate it from the field table using the Tuxedo mkfldhdr or mkfldhdr32 utility program.
2. For each field in the FML buffer, create an element with the following attribute settings:
♦ name is set to the name specified in the field table.
Table 6: FML Type Support
XML Schema Type FML Type
xsd:short short
xsd:unsignedShort short
xsd:int long
xsd:unsignedInt long
xsd:float float
xsd:double double
xsd:string string
xsd:base64Binary string
xsd:hexBinary string
90
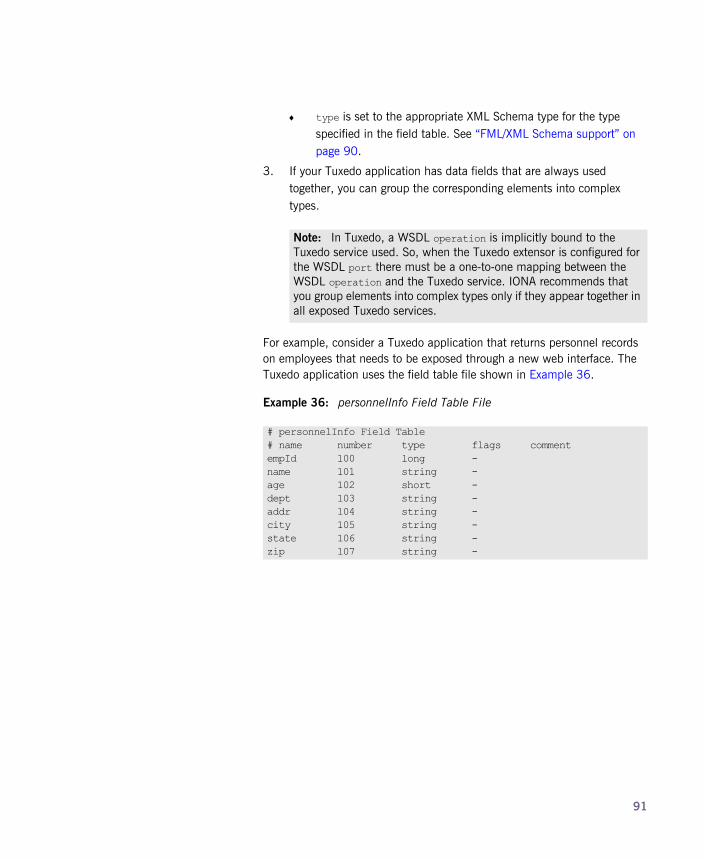
♦ type is set to the appropriate XML Schema type for the type specified in the field table. See �FML/XML Schema support� on page 90.
3. If your Tuxedo application has data fields that are always used together, you can group the corresponding elements into complex types.
For example, consider a Tuxedo application that returns personnel records on employees that needs to be exposed through a new web interface. The Tuxedo application uses the field table file shown in Example 36.
Note: In Tuxedo, a WSDL operation is implicitly bound to the Tuxedo service used. So, when the Tuxedo extensor is configured for the WSDL port there must be a one-to-one mapping between the WSDL operation and the Tuxedo service. IONA recommends that you group elements into complex types only if they appear together in all exposed Tuxedo services.
Example 36: personnelInfo Field Table File
# personnelInfo Field Table# name number type flags commentempId 100 long -name 101 string -age 102 short -dept 103 string -addr 104 string -city 105 string -state 106 string -zip 107 string -
91
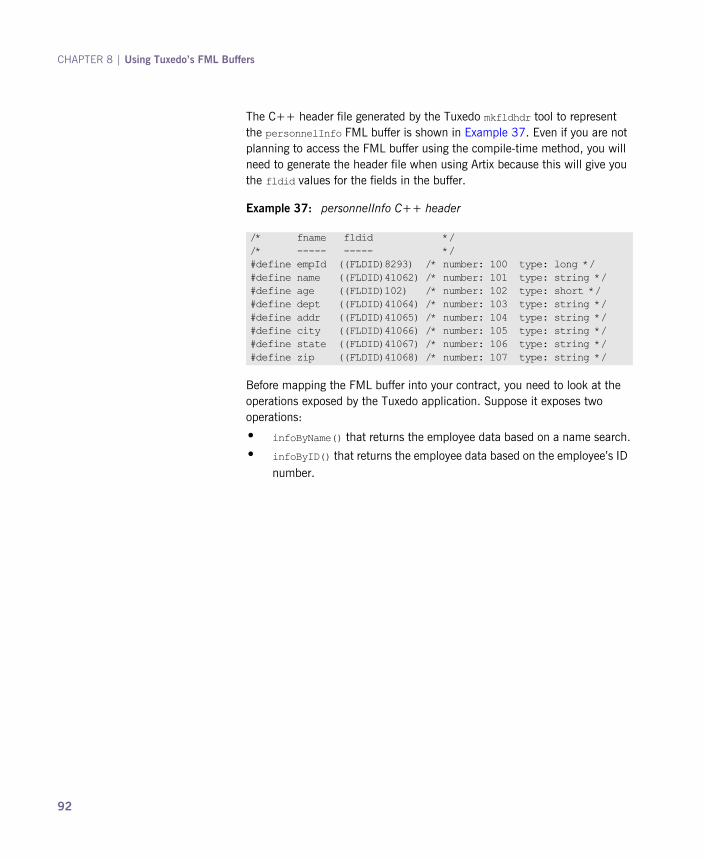
CHAPTER 8 | Using Tuxedo�s FML Buffers
The C++ header file generated by the Tuxedo mkfldhdr tool to represent the personnelInfo FML buffer is shown in Example 37. Even if you are not planning to access the FML buffer using the compile-time method, you will need to generate the header file when using Artix because this will give you the fldid values for the fields in the buffer.
Before mapping the FML buffer into your contract, you need to look at the operations exposed by the Tuxedo application. Suppose it exposes two operations:
� infoByName() that returns the employee data based on a name search.
� infoByID() that returns the employee data based on the employee�s ID number.
Example 37: personnelInfo C++ header
/* fname fldid *//* ----- ----- */#define empId ((FLDID)8293) /* number: 100 type: long */#define name ((FLDID)41062) /* number: 101 type: string */#define age ((FLDID)102) /* number: 102 type: short */#define dept ((FLDID)41064) /* number: 103 type: string */#define addr ((FLDID)41065) /* number: 104 type: string */#define city ((FLDID)41066) /* number: 105 type: string */#define state ((FLDID)41067) /* number: 106 type: string */#define zip ((FLDID)41068) /* number: 107 type: string */
92

Because the employee data is always returned as a unit you can group it into a complex type as shown in Example 38.
The interface for your Tuxedo application would be mapped to a portType similar to Example 39.
Example 38: Logical description of personneInfo FML buffer
<types> <schema targetNamespace="http://soapinterop.org/xsd" xmlns="http://www.w3.org/2001/XMLSchema" xmlns:wsdl="http://schemas.xmlsoap.org/wsdl/"> <complexType name="personnelInfo"> <sequence> <element name="empId" type="xsd:int"/> <element name="name" type="xsd:string"/> <element name="age" type="xsd:short"/> <element name="dept" type="xsd:string"/> <element name="addr" type="xsd:string"/> <element name="city" type="xsd:string"/> <element name="state" type="xsd:string"/> <element name="zip" type="xsd:string"/> </sequence> </complexType> ... </schema></types>
Example 39: personnelInfo Lookup Interface
<message name="idLookupRequest"> <part name="empId" type="xsd:int"/></message><message name="nameLookupRequest"> <part name="empId" type="xsd:string"/></message><message name="lookupResponse"> <part name="return" element="xsd1:personnelInfo"/></message>
93
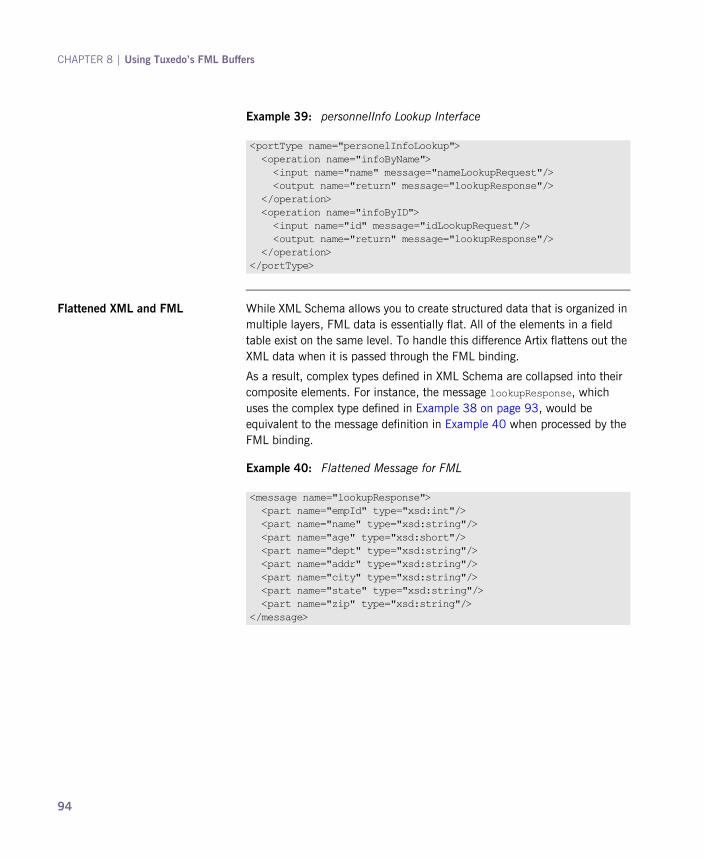
CHAPTER 8 | Using Tuxedo�s FML Buffers
Flattened XML and FML While XML Schema allows you to create structured data that is organized in multiple layers, FML data is essentially flat. All of the elements in a field table exist on the same level. To handle this difference Artix flattens out the XML data when it is passed through the FML binding.
As a result, complex types defined in XML Schema are collapsed into their composite elements. For instance, the message lookupResponse, which uses the complex type defined in Example 38 on page 93, would be equivalent to the message definition in Example 40 when processed by the FML binding.
<portType name="personelInfoLookup"> <operation name="infoByName"> <input name="name" message="nameLookupRequest"/> <output name="return" message="lookupResponse"/> </operation> <operation name="infoByID"> <input name="id" message="idLookupRequest"/> <output name="return" message="lookupResponse"/> </operation></portType>
Example 39: personnelInfo Lookup Interface
Example 40: Flattened Message for FML
<message name="lookupResponse"> <part name="empId" type="xsd:int"/> <part name="name" type="xsd:string"/> <part name="age" type="xsd:short"/> <part name="dept" type="xsd:string"/> <part name="addr" type="xsd:string"/> <part name="city" type="xsd:string"/> <part name="state" type="xsd:string"/> <part name="zip" type="xsd:string"/></message>
94

Adding the FML binding To add the binding that maps the logical description of the FML buffer to a physical FML binding:
1. Add the following line in the definition element at the beginning of the contract.
2. Create a new binding element in your contract to define the FML buffer�s binding.
3. Add a tuxedo:binding element to identify that this binding defines an FML buffer.
4. Add a tuxedo:fieldTable element to the binding to describe how the element names defined in the logical portion of the contract map to the fldid values for the corresponding fields in the FML buffer.
The tuxedo:fieldTable has a mandatory type attribute. type can be either FML for specifying that the application uses FML16 buffers or FML32 for specifying that the application uses FML32 buffers.
5. For each element in the logical data type, add a tuxedo:field element to the tuxedo:fieldTable element.
tuxedo:field defines how the logical data elements map to the physical FML buffer. It has two mandatory attributes:
♦ name specifies the name of the logical type describing the field.
♦ id specifies the fldid value for the field in the FML buffer.
6. For each operation in the interface, create a standard WSDL operation element to define the operation being bound.
7. For each operation, add a standard WSDL input and output elements to the operation element to define the messages used by the operation.
8. For each operation, add a tuxedo:operation element to the operation element.
xmlns:tuxedo="http://schemas.iona.com/transports/tuxedo"
95

CHAPTER 8 | Using Tuxedo�s FML Buffers
For example, the binding for the personalInfo FML buffer, defined in Example 36 on page 91, will be similar to the binding shown in Example 41.
Example 41: personalInfo FML binding
<?xml version="1.0" encoding="UTF-8"?><definitions name="personalInfoService" targetNamespace="http://info.org/" xmlns="http://schemas.xmlsoap.org/wsdl/" xmlns:tns="http://soapinterop.org/" xmlns:xsd="http://www.w3.org/2001/XMLSchema" xmlns:tuxedo="http://schemas.iona.com/transports/tuxedo">... <binding name="personelInfoFMLBinding" type="tns:personnelInfoLookup"> <tuxedo:binding/> <tuxedo:fieldTable type="FML"> <tuxedo:field name="empId" id="8293"/> <tuxedo:field name="name" id="41062"/> <tuxedo:field name="age" id="102"/> <tuxedo:field name="dept" id="41064"/> <tuxedo:field name="addr" id="41065"/> <tuxedo:field name="city" id="41066"/> <tuxedo:field name="state" id="41067"/> <tuxedo:field name="zip" id="41068"/> </fml:idNameMapping> <operation name="infoByName"> <tuxedo:operation/> <input name="name"/> <output name="return"/> </operation> <operation name="infoByName"> <tuxedo:operation/> <input name="name"/> <output name="return"/> </operation> </binding>...</definitions>
96

CHAPTER 9
Using Fixed Length RecordsTo make interoperating with mainframes and older systems easy, Artix can send and receive messages formatted as fixed length records.
Overview The Artix fixed binding is used to represent fixed record length data. Common uses for this type of payload format are communicating with back-end services on mainframes and applications written in COBOL. Artix provides several means for creating a contract containing a fixed binding:
� If you are integrating with an application written in COBOL and have the COBOL copybook defining the data to be used, you can import the copybook to create a contract.
� If you have a description of the fixed data in some form other than a COBOL copybook, you can create a contract by describing the data.
� If you have a logical interface you want to map to a fixed binding you can use Artix Designer to create a fixed binding.
� You can enter the binding information using any text editor or XML editor.
97

CHAPTER 9 | Using Fixed Length Records
Using Artix Designer Artix Designer provides a number of tools for creating a contract with a fixed binding:
1. You can create a new contract from a COBOL copybook by selecting New | File | WSDL from Dataset and importing it.
2. You can create a new contract from a description of the fixed data by selecting New | File | WSDL from Dataset.
3. You can add a fixed binding to a contract by selecting Artix Designer | New Binding.
4. You can add a fixed binding using the context menu available in Artix Designer�s diagram view.
For more information see the on-line help provided with Artix Designer.
Hand editing To map a logical interface to a fixed binding:
1. Add the proper namespace reference to the definition element of your contract. See �Fixed binding namespace� on page 99.
2. Add a WSDL binding element to your contract to hold the fixed binding, give the binding a unique name, and specify the port type that represents the interface being bound.
3. Add a fixed:binding element as a child of the new binding element to identify this as a fixed binding and set the element�s attributes to properly configure the binding. See �fixed:binding� on page 99.
4. For each operation defined in the bound interface, add a WSDL operation element to hold the binding information for the operation�s messages.
5. For each operation added to the binding, add a fixed:operation child element to the operation element. See �fixed:operation� on page 99.
6. For each operation added to the binding, add the input, output, and fault children elements to represent the messages used by the operation. These elements correspond to the messages defined in the port type definition of the logical operation.
98

7. For each input, output, and fault element in the binding, add a fixed:body child element to define how the message parts are mapped into the concrete fixed record length payload. See �fixed:body� on page 100.
Fixed binding namespace The IONA extensions used to describe fixed record length bindings are defined in the namespace http://schemas.iona.com/bindings/fixed. Artix tools use the prefix fixed to represent the fixed record length extensions. Add the following line to your contract:
fixed:binding fixed:binding specifies that the binding is for fixed record length data. Its attributes are described in Table 7.
The settings for the attributes on these elements become the default settings for all the messages being mapped to the current binding. All of the values can be overridden on a message-by-message basis.
fixed:operation fixed:operation is a child element of the WSDL operation element and specifies that the operation�s messages are being mapped to fixed record length data.
xmlns:fixed="http://schemas.iona.com/bindings/fixed
Table 7: Attributes for fixed:binding
Attributes Purpose
justification Specifies the default justification of the data contained in the messages. Valid values are left and right. Default is left.
encoding Specifies the codeset used to encode the text data. Valid values are any valid ISO locale or Internet Internet Assigned Numbers Authority (IANA) codeset name. Default is UTF-8.
padHexCode Specifies the hex value of the character used to pad the record.
99

CHAPTER 9 | Using Fixed Length Records
fixed:operation has one attribute, discriminator, that assigns a unique identifier to the operation. If your service only defines a single operation, you do not need to provide a discriminator. However, if your service has more than one service, you must define a unique discriminator for each operation in the service. Not doing so will result in unpredictable behavior when the service is deployed.
fixed:body fixed:body is a child element of the input, output, and fault messages being mapped to fixed record length data. It specifies that the message body is mapped to fixed record length data on the wire and describes the exact mapping for the message�s parts.
To fully describe how a message is mapped into the fixed message:
1. If the default justification, padding, or encoding settings for the attribute are not correct for this particular message, override them by setting the following optional attributes for fixed:body.
♦ justification specifies how the data in the messages are justified. Valid values are left and right.
♦ encoding specifies the codeset used to encode text data. Valid values are any valid ISO locale or IANA codeset name.
♦ padHexCode specifies the hex value of the character used to pad the record.
2. For each part in the message the fixed:body element is binding, add the appropriate child element to define the part�s concrete format on the wire.
The following child elements are used in defining how logical data is mapped to a concrete fixed format message:
♦ fixed:field maps message parts defined using a simple type. See �XMLSchema Simple Types� on page 31.
♦ fixed:sequence maps message parts defined using a sequence complex type. Complex types defined using all are not supported by the fixed format binding. See �Defining Data Structures� on page 34.
♦ fixed:choice maps message parts defined using a choice complex type. See �Defining Data Structures� on page 34.
100

3. If you need to add any fields that are specific to the binding and that will not be passed to the applications, define them using a fixed:field element with its bindingOnly attribute set to true.
When bindingOnly is set to true, the field described by the fixed:field element is not propagated beyond the binding. For input messages, this means that the field is read in and then discarded. For output messages, you must also use the fixedValue attribute.
The order in which the message parts are listed in the fixed:body element represent the order in which they are placed on the wire. It does not need to correspond to the order in which they are specified in the message element defining the logical message.
fixed:field fixed:field is used to map simple data types to a fixed length record. To define how the logical data is mapped to a fixed field:
1. Create a fixed:field child element to the fixed:body element representing the message.
2. Set the fixed:field element�s name attribute to the name of the message part defined in the logical message description that this element is mapping.
3. If the data being mapped is of type xsd:string, a simple type that has xsd:string as its base type, or an enumerated type set, the size attribute of the fixed:field element.
size specifies the length of the string record in the concrete fixed message. For example, the logical message part, raverID, described in Example 42 would be mapped to a fixed:field similar to Example 43.
Note: If the message part is going to hold a date you can opt to use the format attribute described in step 4 instead of the size attribute.
Example 42: Fixed String Message
<message name="fixedStringMessage"> <part name="raverID" type="xsd:string"/></message>
101

CHAPTER 9 | Using Fixed Length Records
In order to complete the mapping, you must know the length of the record field and supply it. In this case, the field, raverID, can contain no more than twenty characters.
4. If the data being mapped is of a numerical type, like xsd:int, or a simple type that has a numerical type as its base type, set the fixed:field element�s format attribute.
format specifies how non-string data is formatted. For example, if a field contains a 2-digit numeric value with one decimal place, it would be described in the logical part of the contract as an xsd:float, as shown in Example 44.
From the logical description of the message, Artix has no way of determining that the value of rageLevel is a 2-digit number with one decimal place because the fixed record length binding treats all data as characters. When mapping rageLevel in the fixed binding you would specify its format with ##.#, as shown in Example 45. This provides Artix with the meta-data needed to properly handle the data.
Dates are specified in a similar fashion. For example, the format of the date 12/02/72 is MM/DD/YY. When using the fixed binding it is recommended that dates are described in the logical part of the contract using xsd:string. For example, a message containing a date
Example 43: Fixed String Mapping
<fixed:field name="raverID" size="20"/>
Example 44: Fixed Record Numeric Message
<message name="fixedNumberMessage"> <part name="rageLevel" type="xsd:float"/></message>
Example 45: Mapping Numerical Data to a Fixed Binding
<fixed:field name="rageLevel" format="##.#"/>
102

would be described in the logical part of the contract as shown in Example 46.
If goDate is entered using the standard short date format for US English locales, mm/dd/yyyy, you would map it to a fixed record field as shown in Example 47.
5. If the justification setting is not correct for this particular field, overide it by setting the justification attribute. Valid values are left and right.
6. If you want the message part to have a fixed value no matter what data is set in the message part by the application, set the fixed:field element�s fixedValue attribute instead of the size or the format attribute.
fixedValue specifies a static value to be passed on the wire. When used without bindingOnly="true", the value specified by fixedValue replaces any data that is stored in the message part passed to the fixed record binding. For example, if goDate, shown in Example 46 on page 103, were mapped to the fixed field shown in Example 48, the actual message returned from the binding would always have the date 11/11/2112.
7. If the data being mapped is of an enumerated type, see �Defining Enumerated Types� on page 43, add a fixed:enumeration child element to the fixed:field element for each possible value of the enumerated type.
Example 46: Fixed Date Message
<message name="fixedDateMessage"> <part name="goDate" type="xsd:string"/></message>
Example 47: Fixed Format Date Mapping
<fixed:field name="goDate" format="mm/dd/yyyy"/>
Example 48: fixedValue Mapping
<fixed:field name="goDate" fixedValue="11/11/2112"/>
103

CHAPTER 9 | Using Fixed Length Records
fixed:enumeration takes two required attributes, value and fixedValue. value corresponds to the enumeration value as specified in the logical description of the enumerated type. fixedValue specifies the concrete value that will be used to represent the logical value on the wire.
For example, if you had an enumerated type with the values FruityTooty, Rainbow, BerryBomb, and OrangeTango the logical description of the type would be similar to Example 49.
When you map the enumerated type, you need to know the concrete representation for each of the enumerated values. The concrete representations can be identical to the logical or some other value. The enumerated type in Example 49 could be mapped to the fixed field shown in Example 50. Using this mapping Artix will write OT to the wire for this field if the enumerations value is set to OrangeTango.
Note that the parent fixed:field element uses the size attribute to specify that the concrete representation is two characters long. When mapping enumerations, the size attribute will always be used to represent the size of the concrete representation.
Example 49: Ice Cream Enumeration
<xs:simpleType name="flavorType"> <xs:restriction base="xs:string"> <xs:enumeration value="FruityTooty"/> <xs:enumeration value="Rainbow"/> <xs:enumeration value="BerryBomb"/> <xs:enumeration value="OrangeTango"/> </xs:restriction></xs:simpleType>
Example 50: Fixed Ice Cream Mapping
<fixed:field name="flavor" size="2"> <fixed:enumeration value="FruityTooty" fixedValue="FT"/> <fixed:enumeration value="Rainbow" fixedValue="RB"/> <fixed:enumeration value="BerryBomb" fixedValue="BB"/> <fixed:enumeration value="OrangeTango" fixedValue="OT"/></fixed:field>
104

fixed:choice fixed:choice is used to map choice complex types into fixed record length messages. To map a choice complex type to a fixed:choice:
1. Add a fixed:choice child element to the fixed:body element.
2. Set the fixed:choice element�s name attribute to the name of the logical message part being mapped.
3. Set the fixed:choice element�s optional discriminatorName attribute to the name of the field used as the discriminator for the union.
The value for discriminatorName corresponds to the name of a bindingOnly fixed:field element that describes the type used for the union�s discriminator as shown in Example 51. The only restriction in describing the discriminator is that it must be able to handle the values used to determine the case of the union. Therefore the values used in the union mapped in Example 51 must be two-digit integers.
4. For each element in the logical definition of the message part, add a fixed:case child element to the fixed:choice element.
fixed:case fixed:case elements describe the complete mapping of a choice complex type element to a fixed record length message. To map a choice complex type element to a fixed:case:
1. Set the fixed:case element�s name attribute to the name of the logical definition�s element.
2. Set the fixed:case element�s fixedValue attribute to the value of the discriminator that selects this element. The value of fixedValue must correspond to the format specified by the discriminatorName attribute of the parent fixed:choice element.
3. Add a child element to define how the element�s data is mapped into a fixed record.
Example 51: Using discriminatorName
<fixed:field name="disc" format="##" bindingOnly="true"/><fixed:choice name="unionStation" discriminatorName="disc">...</fixed:choice>
105

CHAPTER 9 | Using Fixed Length Records
The child elements used to map the part�s type to the fixed message are the same as the possible child elements of a fixed:body element. As with a fixed:body element, a fixed:sequence is made up of fixed:field elements to describe simple types, fixed:choice elements to describe choice complex types, and fixed:sequence elements to describe sequence complex types.
Example 52 shows an Artix contract fragment mapping a choice complex type to a fixed record length message.
Example 52: Mapping a Union to a Fixed Record Length Message
<?xml version="1.0" encoding="UTF-8"?><definitions name="fixedMappingsample"
targetNamespace="http://www.iona.com/FixedService" xmlns="http://schemas.xmlsoap.org/wsdl/" xmlns:fixed="http://schemas.iona.com/bindings/fixed" xmlns:tns="http://www.iona.com/FixedService" xmlns:xsd="http://www.w3.org/2001/XMLSchema"><types> <schema targetNamespace="http://www.iona.com/FixedService"
xmlns="http://www.w3.org/2001/XMLSchema" xmlns:wsdl="http://schemas.xmlsoap.org/wsdl/">
<xsd:complexType name="unionStationType"> <xsd:choice> <xsd:element name="train" type="xsd:string"/> <xsd:element name="bus" type="xsd:int"/> <xsd:element name="cab" type="xsd:int"/> <xsd:element name="subway" type="xsd:string"/> </xsd:choice> </xsd:complexType>...</types><message name="fixedSequence"> <part name="stationPart" type="tns:unionStationType"/></message><portType name="fixedSequencePortType">...</portType><binding name="fixedSequenceBinding" type="tns:fixedSequencePortType"> <fixed:binding/>... <fixed:field name="disc" format="##" bindingOnly="true"/>
106
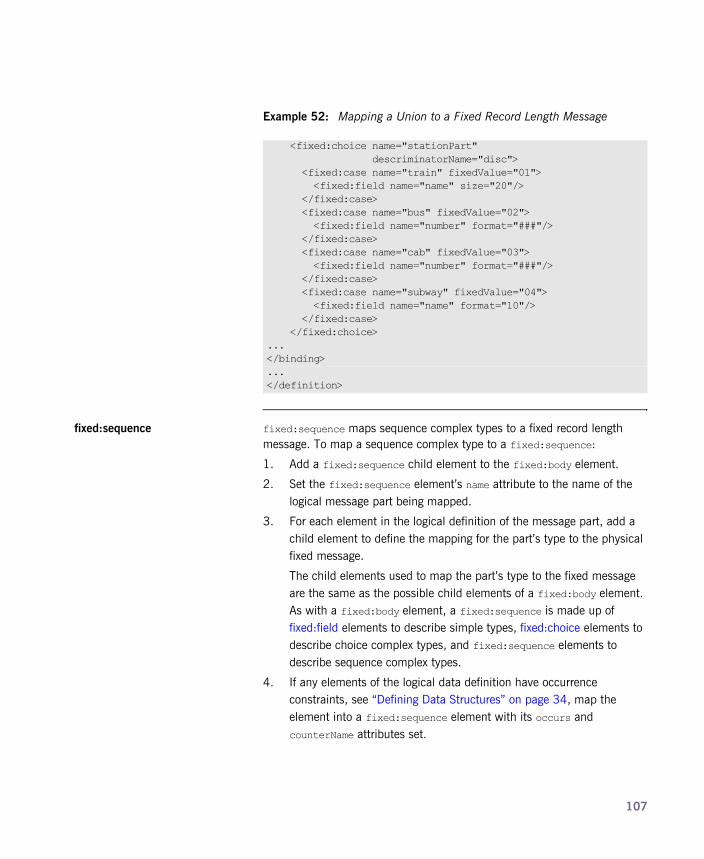
fixed:sequence fixed:sequence maps sequence complex types to a fixed record length message. To map a sequence complex type to a fixed:sequence:
1. Add a fixed:sequence child element to the fixed:body element.
2. Set the fixed:sequence element�s name attribute to the name of the logical message part being mapped.
3. For each element in the logical definition of the message part, add a child element to define the mapping for the part�s type to the physical fixed message.
The child elements used to map the part�s type to the fixed message are the same as the possible child elements of a fixed:body element. As with a fixed:body element, a fixed:sequence is made up of fixed:field elements to describe simple types, fixed:choice elements to describe choice complex types, and fixed:sequence elements to describe sequence complex types.
4. If any elements of the logical data definition have occurrence constraints, see �Defining Data Structures� on page 34, map the element into a fixed:sequence element with its occurs and counterName attributes set.
<fixed:choice name="stationPart" descriminatorName="disc"> <fixed:case name="train" fixedValue="01"> <fixed:field name="name" size="20"/> </fixed:case> <fixed:case name="bus" fixedValue="02"> <fixed:field name="number" format="###"/> </fixed:case> <fixed:case name="cab" fixedValue="03"> <fixed:field name="number" format="###"/> </fixed:case> <fixed:case name="subway" fixedValue="04"> <fixed:field name="name" format="10"/> </fixed:case> </fixed:choice>...</binding>...</definition>
Example 52: Mapping a Union to a Fixed Record Length Message
107
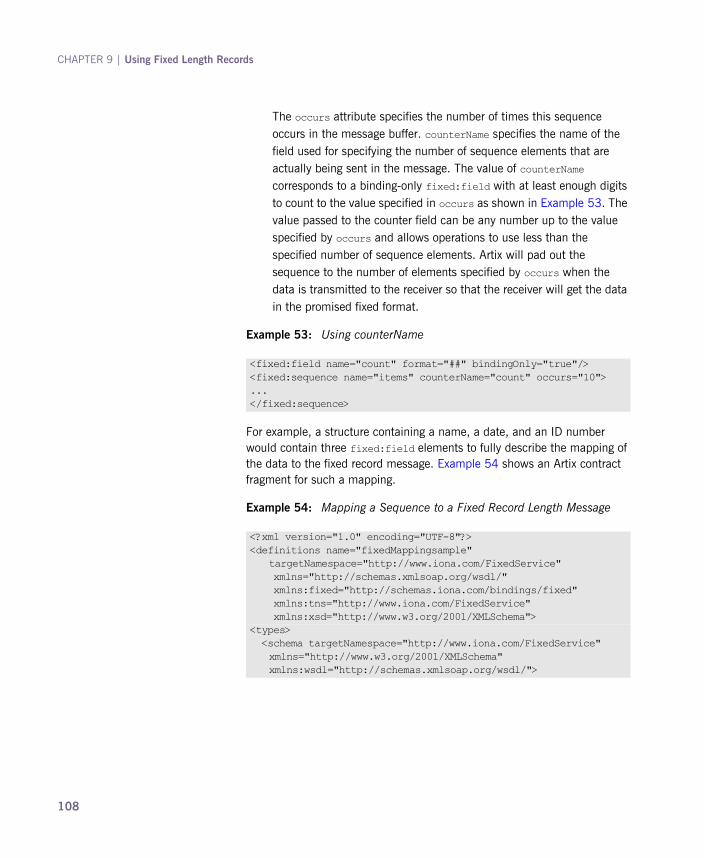
CHAPTER 9 | Using Fixed Length Records
The occurs attribute specifies the number of times this sequence occurs in the message buffer. counterName specifies the name of the field used for specifying the number of sequence elements that are actually being sent in the message. The value of counterName corresponds to a binding-only fixed:field with at least enough digits to count to the value specified in occurs as shown in Example 53. The value passed to the counter field can be any number up to the value specified by occurs and allows operations to use less than the specified number of sequence elements. Artix will pad out the sequence to the number of elements specified by occurs when the data is transmitted to the receiver so that the receiver will get the data in the promised fixed format.
For example, a structure containing a name, a date, and an ID number would contain three fixed:field elements to fully describe the mapping of the data to the fixed record message. Example 54 shows an Artix contract fragment for such a mapping.
Example 53: Using counterName
<fixed:field name="count" format="##" bindingOnly="true"/><fixed:sequence name="items" counterName="count" occurs="10">...</fixed:sequence>
Example 54: Mapping a Sequence to a Fixed Record Length Message
<?xml version="1.0" encoding="UTF-8"?><definitions name="fixedMappingsample"
targetNamespace="http://www.iona.com/FixedService" xmlns="http://schemas.xmlsoap.org/wsdl/" xmlns:fixed="http://schemas.iona.com/bindings/fixed" xmlns:tns="http://www.iona.com/FixedService" xmlns:xsd="http://www.w3.org/2001/XMLSchema"><types> <schema targetNamespace="http://www.iona.com/FixedService"
xmlns="http://www.w3.org/2001/XMLSchema" xmlns:wsdl="http://schemas.xmlsoap.org/wsdl/">
108
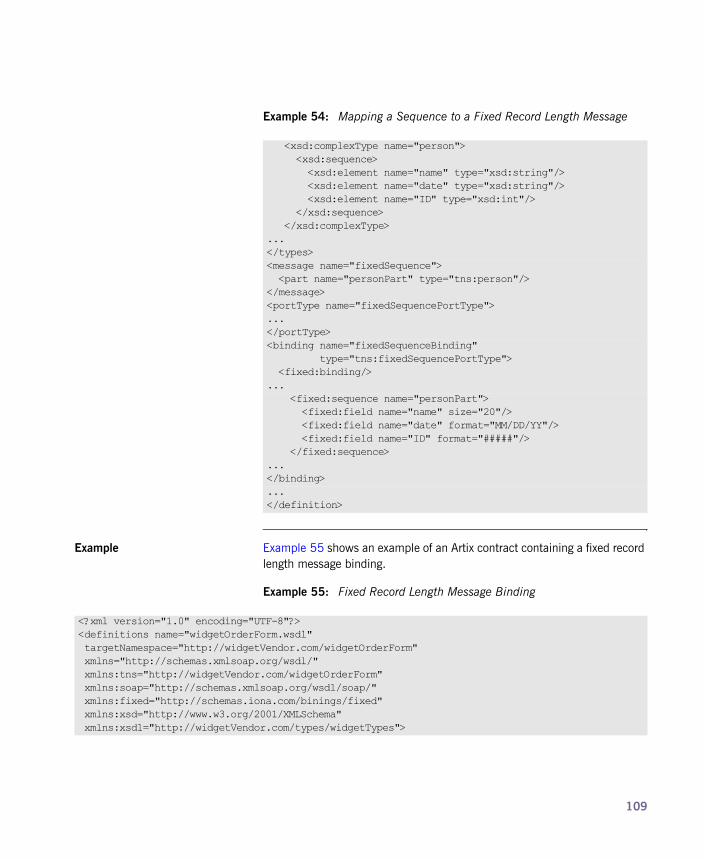
Example Example 55 shows an example of an Artix contract containing a fixed record length message binding.
<xsd:complexType name="person"> <xsd:sequence> <xsd:element name="name" type="xsd:string"/> <xsd:element name="date" type="xsd:string"/> <xsd:element name="ID" type="xsd:int"/> </xsd:sequence> </xsd:complexType>...</types><message name="fixedSequence"> <part name="personPart" type="tns:person"/></message><portType name="fixedSequencePortType">...</portType><binding name="fixedSequenceBinding" type="tns:fixedSequencePortType"> <fixed:binding/>... <fixed:sequence name="personPart"> <fixed:field name="name" size="20"/> <fixed:field name="date" format="MM/DD/YY"/> <fixed:field name="ID" format="#####"/> </fixed:sequence>...</binding>...</definition>
Example 54: Mapping a Sequence to a Fixed Record Length Message
Example 55: Fixed Record Length Message Binding
<?xml version="1.0" encoding="UTF-8"?><definitions name="widgetOrderForm.wsdl" targetNamespace="http://widgetVendor.com/widgetOrderForm" xmlns="http://schemas.xmlsoap.org/wsdl/" xmlns:tns="http://widgetVendor.com/widgetOrderForm" xmlns:soap="http://schemas.xmlsoap.org/wsdl/soap/" xmlns:fixed="http://schemas.iona.com/binings/fixed" xmlns:xsd="http://www.w3.org/2001/XMLSchema" xmlns:xsd1="http://widgetVendor.com/types/widgetTypes">
109

CHAPTER 9 | Using Fixed Length Records
<types> <schema targetNamespace="http://widgetVendor.com/types/widgetTypes" xmlns="http://www.w3.org/2001/XMLSchema" xmlns:wsdl="http://schemas.xmlsoap.org/wsdl/"> <xsd:simpleType name="widgetSize"> <xsd:restriction base="xsd:string"> <xsd:enumeration value="big"/> <xsd:enumeration value="large"/> <xsd:enumeration value="mungo"/> <xsd:enumeration value="gargantuan"/> </xsd:restriction> </xsd:simpleType>
<xsd:complexType name="Address"> <xsd:sequence> <xsd:element name="name" type="xsd:string"/> <xsd:element name="street1" type="xsd:string"/> <xsd:element name="street2" type="xsd:string"/> <xsd:element name="city" type="xsd:string"/> <xsd:element name="state" type="xsd:string"/> <xsd:element name="zipCode" type="xsd:string"/> </xsd:sequence> </xsd:complexType> <xsd:complexType name="widgetOrderInfo"> <xsd:sequence> <xsd:element name="amount" type="xsd:int"/> <xsd:element name="order_date" type="xsd:string"/> <xsd:element name="type" type="xsd1:widgetSize"/> <xsd:element name="shippingAddress" type="xsd1:Address"/> </xsd:sequence> </xsd:complexType> <xsd:complexType name="widgetOrderBillInfo"> <xsd:sequence> <xsd:element name="amount" type="xsd:int"/> <xsd:element name="order_date" type="xsd:string"/> <xsd:element name="type" type="xsd1:widgetSize"/> <xsd:element name="amtDue" type="xsd:float"/> <xsd:element name="orderNumber" type="xsd:string"/> <xsd:element name="shippingAddress" type="xsd1:Address"/> </xsd:sequence> </xsd:complexType> </schema> </types> <message name="widgetOrder"> <part name="widgetOrderForm" type="xsd1:widgetOrderInfo"/> </message>
Example 55: Fixed Record Length Message Binding
110

<xsd:complexType name="Address"> <xsd:sequence> <xsd:element name="name" type="xsd:string"/> <xsd:element name="street1" type="xsd:string"/> <xsd:element name="street2" type="xsd:string"/> <xsd:element name="city" type="xsd:string"/> <xsd:element name="state" type="xsd:string"/> <xsd:element name="zipCode" type="xsd:string"/> </xsd:sequence> </xsd:complexType> <xsd:complexType name="widgetOrderInfo"> <xsd:sequence> <xsd:element name="amount" type="xsd:int"/> <xsd:element name="order_date" type="xsd:string"/> <xsd:element name="type" type="xsd1:widgetSize"/> <xsd:element name="shippingAddress" type="xsd1:Address"/> </xsd:sequence> </xsd:complexType> <xsd:complexType name="widgetOrderBillInfo"> <xsd:sequence> <xsd:element name="amount" type="xsd:int"/> <xsd:element name="order_date" type="xsd:string"/> <xsd:element name="type" type="xsd1:widgetSize"/> <xsd:element name="amtDue" type="xsd:float"/> <xsd:element name="orderNumber" type="xsd:string"/> <xsd:element name="shippingAddress" type="xsd1:Address"/> </xsd:sequence> </xsd:complexType> </schema> </types> <message name="widgetOrder"> <part name="widgetOrderForm" type="xsd1:widgetOrderInfo"/> </message>
Example 55: Fixed Record Length Message Binding
111
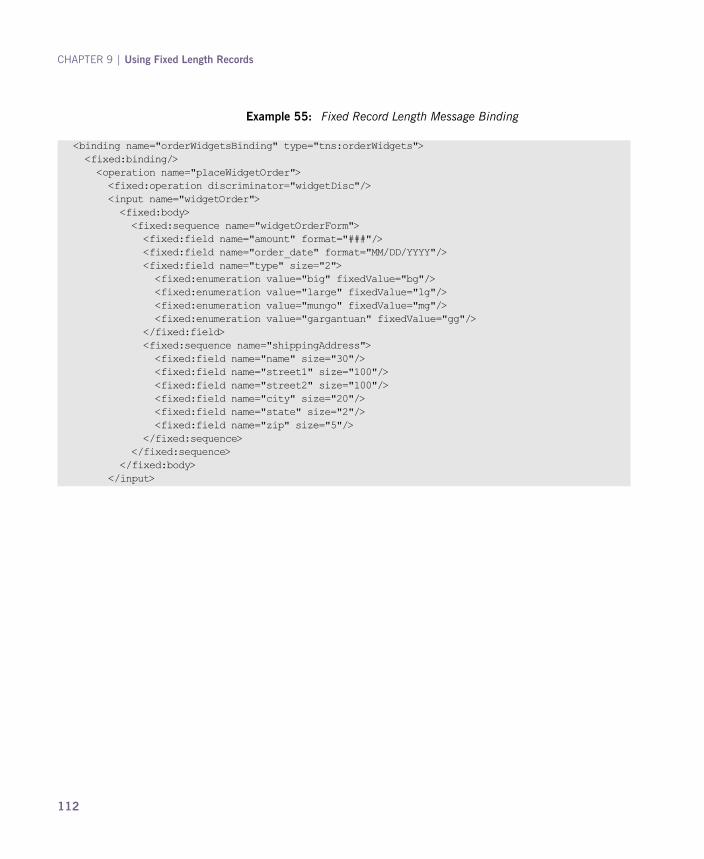
CHAPTER 9 | Using Fixed Length Records
<binding name="orderWidgetsBinding" type="tns:orderWidgets"> <fixed:binding/> <operation name="placeWidgetOrder"> <fixed:operation discriminator="widgetDisc"/> <input name="widgetOrder"> <fixed:body> <fixed:sequence name="widgetOrderForm"> <fixed:field name="amount" format="###"/> <fixed:field name="order_date" format="MM/DD/YYYY"/> <fixed:field name="type" size="2"> <fixed:enumeration value="big" fixedValue="bg"/> <fixed:enumeration value="large" fixedValue="lg"/> <fixed:enumeration value="mungo" fixedValue="mg"/> <fixed:enumeration value="gargantuan" fixedValue="gg"/> </fixed:field> <fixed:sequence name="shippingAddress"> <fixed:field name="name" size="30"/> <fixed:field name="street1" size="100"/> <fixed:field name="street2" size="100"/> <fixed:field name="city" size="20"/> <fixed:field name="state" size="2"/> <fixed:field name="zip" size="5"/> </fixed:sequence> </fixed:sequence> </fixed:body> </input>
Example 55: Fixed Record Length Message Binding
112

<output name="widgetOrderBill"> <fixed:body> <fixed:sequence name="widgetOrderConformation"> <fixed:field name="amount" format="###"/> <fixed:field name="order_date" format="MM/DD/YYYY"/> <fixed:field name="type" size="2"> <fixed:enumeration value="big" fixedValue="bg"/> <fixed:enumeration value="large" fixedValue="lg"/> <fixed:enumeration value="mungo" fixedValue="mg"/> <fixed:enumeration value="gargantuan" fixedValue="gg"/> </fixed:field> <fixed:field name="amtDue" format="####.##"/> <fixed:field name="orderNumber" size="20"/> <fixed:sequence name="shippingAddress"> <fixed:field name="name" size="30"/> <fixed:field name="street1" size="100"/> <fixed:field name="street2" size="100"/> <fixed:field name="city" size="20"/> <fixed:field name="state" size="2"/> <fixed:field name="zip" size="5"/> </fixed:sequence> </fixed:sequence> </fixed:body> </output> </operation> </binding> <service name="orderWidgetsService"> <port name="widgetOrderPort" binding="tns:orderWidgetsBinding"> <http:address location="http://localhost:8080"/> </port> </service></definitions>
Example 55: Fixed Record Length Message Binding
113

CHAPTER 9 | Using Fixed Length Records
114

CHAPTER 10
Using Tagged DataArtix has a binding that reads and writes messages where the data fields are delimited by specified characters.
Overview The tagged data format supports applications that use self-describing, or delimited, messages to communicate. Artix can read tagged data and write it out in any supported data format. Similarly, Artix is capable of converting a message from any of its supported data formats into a self-describing or tagged data message.
Artix provides several ways of creating a contract with a tagged binding:
� Artix Designer can create a contract with a tagged binding from a description of the tagged data.
� Artix Designer can create a tagged binding for an existing interface.
� You can enter the binding information using any text editor or XML editor.
Using Artix Designer Artix Designer provides a number of tools for creating a contract with a tagged binding:
1. You can create a new contract from a description of the tagged data by selecting New | File | WSDL from Dataset.
2. You can add a tagged binding to a contract by selecting Artix Designer | New Binding.
115
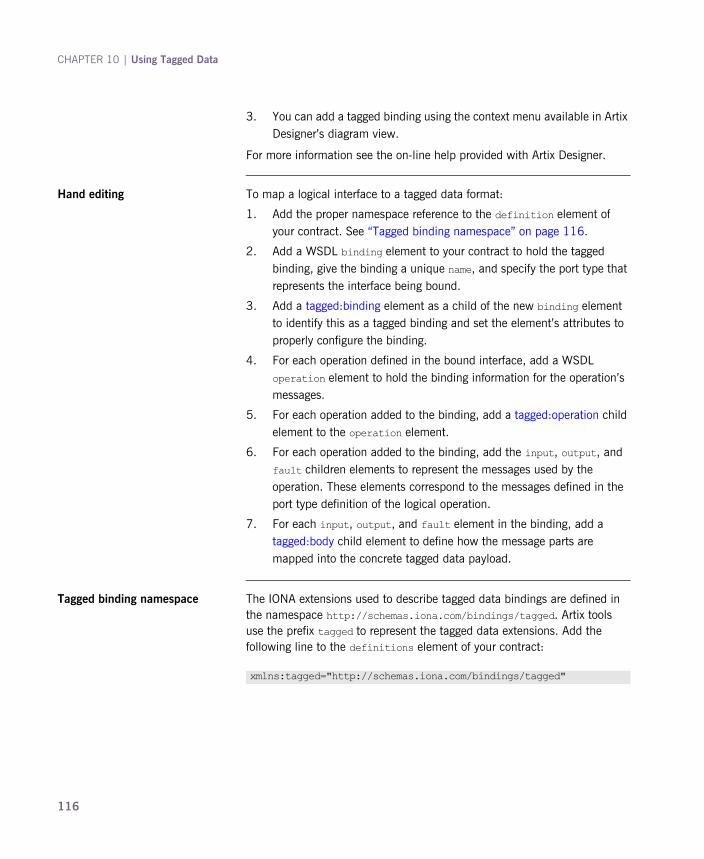
CHAPTER 10 | Using Tagged Data
3. You can add a tagged binding using the context menu available in Artix Designer�s diagram view.
For more information see the on-line help provided with Artix Designer.
Hand editing To map a logical interface to a tagged data format:
1. Add the proper namespace reference to the definition element of your contract. See �Tagged binding namespace� on page 116.
2. Add a WSDL binding element to your contract to hold the tagged binding, give the binding a unique name, and specify the port type that represents the interface being bound.
3. Add a tagged:binding element as a child of the new binding element to identify this as a tagged binding and set the element�s attributes to properly configure the binding.
4. For each operation defined in the bound interface, add a WSDL operation element to hold the binding information for the operation�s messages.
5. For each operation added to the binding, add a tagged:operation child element to the operation element.
6. For each operation added to the binding, add the input, output, and fault children elements to represent the messages used by the operation. These elements correspond to the messages defined in the port type definition of the logical operation.
7. For each input, output, and fault element in the binding, add a tagged:body child element to define how the message parts are mapped into the concrete tagged data payload.
Tagged binding namespace The IONA extensions used to describe tagged data bindings are defined in the namespace http://schemas.iona.com/bindings/tagged. Artix tools use the prefix tagged to represent the tagged data extensions. Add the following line to the definitions element of your contract:
xmlns:tagged="http://schemas.iona.com/bindings/tagged"
116

tagged:binding tagged:binding specifies that the binding is for tagged data format messages. Its ten attributes are explained in Table 8.
Table 8: Attributes for tagged:binding
Attribute Purpose
selfDescribing Required attribute specifying if the message data on the wire includes the field names. Valid values are true or false. If this attribute is set to false, the setting for fieldNameValueSeparator is ignored.
fieldSeparator Required attribute that specifies the delimiter the message uses to separate fields. Valid values include any character that is not a letter or a number.
fieldNameValueSeparator Specifies the delimiter used to separate field names from field values in self-describing messages. Valid values include any character that is not a letter or a number.
scopeType Specifies the scope identifier for complex messages. Supported values are tab(\t), curlybrace({data}), and none. The default is tab.
flattened Specifies if data structures are flattened when they are put on the wire. If selfDescribing is false, then this attribute is automatically set to true.
messageStart Specifies a special token at the start of a message. It is used when messages require a special character at the start of a the data sequence. Valid values include any character that is not a letter or a number.
messageEnd Specifies a special token at the end of a message. Valid values include any character that is not a letter or a number.
117
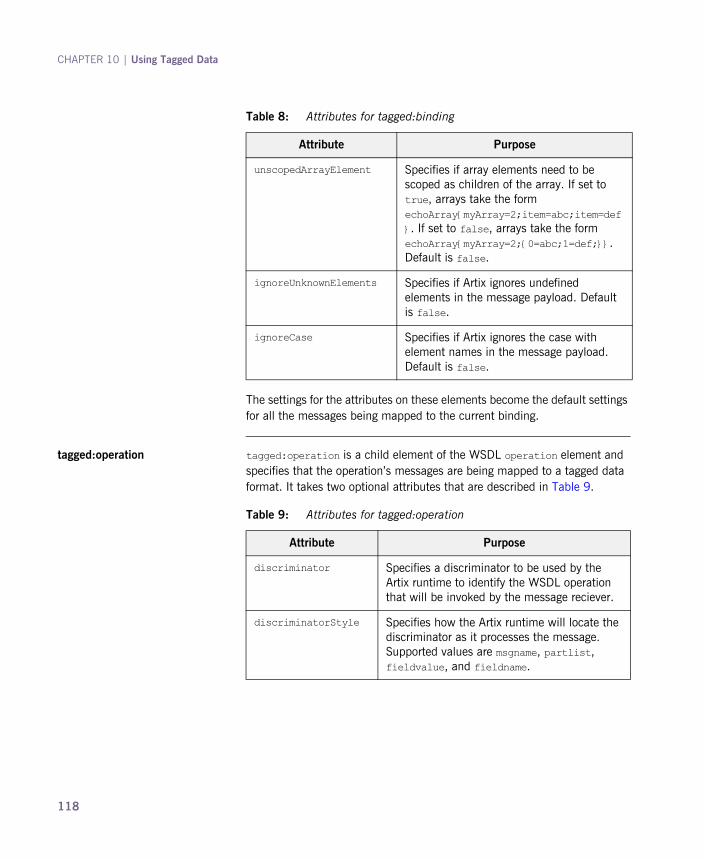
CHAPTER 10 | Using Tagged Data
The settings for the attributes on these elements become the default settings for all the messages being mapped to the current binding.
tagged:operation tagged:operation is a child element of the WSDL operation element and specifies that the operation�s messages are being mapped to a tagged data format. It takes two optional attributes that are described in Table 9.
unscopedArrayElement Specifies if array elements need to be scoped as children of the array. If set to true, arrays take the form echoArray{myArray=2;item=abc;item=def}. If set to false, arrays take the form echoArray{myArray=2;{0=abc;1=def;}}. Default is false.
ignoreUnknownElements Specifies if Artix ignores undefined elements in the message payload. Default is false.
ignoreCase Specifies if Artix ignores the case with element names in the message payload. Default is false.
Table 8: Attributes for tagged:binding
Attribute Purpose
Table 9: Attributes for tagged:operation
Attribute Purpose
discriminator Specifies a discriminator to be used by the Artix runtime to identify the WSDL operation that will be invoked by the message reciever.
discriminatorStyle Specifies how the Artix runtime will locate the discriminator as it processes the message. Supported values are msgname, partlist, fieldvalue, and fieldname.
118

tagged:body tagged:body is a child element of the input, output, and fault messages being mapped to a tagged data format. It specifies that the message body is mapped to tagged data on the wire and describes the exact mapping for the message�s parts.
tagged:body will have one or more of the following child elements:
� tagged:field
� tagged:sequence
� tagged:choice
They describe the detailed mapping of the message to the tagged data to be sent on the wire.
tagged:field tagged:field is used to map simple types and enumerations to a tagged data format. Its two attributes are described in Table 10.
When describing enumerated types tagged:field will have a number of tagged:enumeration child elements.
tagged:enumeration tagged:enumeration is a child element of tagged:field and is used to map enumerated types to a tagged data format. It takes one required attribute, value, that corresponds to the enumeration value as specified in the logical description of the enumerated type.
Table 10: Attributes for tagged:field
Attribute Purpose
name A required attribute that must correspond to the name of the logical message part that is being mapped to the tagged data field.
alias An optional attribute specifying an alias for the field that can be used to identify it on the wire.
119

CHAPTER 10 | Using Tagged Data
For example, if you had an enumerated type, flavorType, with the values FruityTooty, Rainbow, BerryBomb, and OrangeTango the logical description of the type would be similar to Example 56.
flavorType would be mapped to the tagged data format shown in Example 57.
tagged:sequence taggeded:sequence maps arrays and sequences to a tagged data format. Its three attributes are described in Table 11.
Example 56: Ice Cream Enumeration
<xs:simpleType name="flavorType"> <xs:restriction base="xs:string"> <xs:enumeration value="FruityTooty"/> <xs:enumeration value="Rainbow"/> <xs:enumeration value="BerryBomb"/> <xs:enumeration value="OrangeTango"/> </xs:restriction></xs:simpleType>
Example 57: Tagged Data Ice Cream Mapping
<tagged:field name="flavor"> <tagged:enumeration value="FruityTooty"/> <tagged:enumeration value="Rainbow"/> <tagged:enumeration value="BerryBomb"/> <tagged:enumeration value="OrangeTango"/></tagged:field>
Table 11: Attributes for tagged:sequence
Attributes Purpose
name A required attribute that must correspond to the name of the logical message part that is being mapped to the tagged data sequence.
alias An optional attribute specifying an alias for the sequence that can be used to identify it on the wire.
occurs An optional attribute specifying the number of times the sequence appears. This attribute is used to map arrays.
120

A tagged:sequence can contain any number of tagged:field, tagged:sequence, or tagged:choice child elements to describe the data contained within the sequence being mapped. For example, a structure containing a name, a date, and an ID number would contain three tagged:field elements to fully describe the mapping of the data to the fixed record message. Example 58 shows an Artix contract fragment for such a mapping.
Example 58: Mapping a Sequence to a Tagged Data Format
<?xml version="1.0" encoding="UTF-8"?><definitions name="taggedDataMappingsample"
targetNamespace="http://www.iona.com/taggedService" xmlns="http://schemas.xmlsoap.org/wsdl/" xmlns:fixed="http://schemas.iona.com/bindings/tagged" xmlns:tns="http://www.iona.com/taggedService" xmlns:xsd="http://www.w3.org/2001/XMLSchema"><types> <schema targetNamespace="http://www.iona.com/taggedService"
xmlns="http://www.w3.org/2001/XMLSchema" xmlns:wsdl="http://schemas.xmlsoap.org/wsdl/">
<xsd:complexType name="person"> <xsd:sequence> <xsd:element name="name" type="xsd:string"/> <xsd:element name="date" type="xsd:string"/> <xsd:element name="ID" type="xsd:int"/> </xsd:sequence> </xsd:complexType>...</types><message name="taggedSequence"> <part name="personPart" type="tns:person"/></message><portType name="taggedSequencePortType">...</portType><binding name="taggedSequenceBinding" type="tns:taggedSequencePortType"> <tagged:binding selfDescribing="false" fieldSeparator="pipe"/>...
121

CHAPTER 10 | Using Tagged Data
tagged:choice tagged:choice maps unions to a tagged data format. Its three attributes are described in Table 12.
A tagged:choice may contain one or more tagged:case child elements to map the cases for the union to a tagged data format.
tagged:case tagged:case is a child element of tagged:choice and describes the complete mapping of a union�s individual cases to a tagged data format. It takes one required attribute, name, that corresponds to the name of the case element in the union�s logical description.
<tagged:sequence name="personPart"> <tagged:field name="name"/> <tagged:field name="date"/> <tagged:field name="ID"/> </tagged:sequence>...</binding>...</definition>
Example 58: Mapping a Sequence to a Tagged Data Format
Table 12: Attributes for tagged:choice
Attributes Purpose
name A required attribute that must correspond to the name of the logical message part that is being mapped to the tagged data union.
discriminatorName Specifies the message part used as the discriminator for the union.
alias An optional attribute specifying an alias for the union that can be used to identify it on the wire.
122

tagged:case must contain one child element to describe the mapping of the case�s data to a tagged data format. Valid child elements are tagged:field, tagged:sequence, and tagged:choice. Example 59 shows an Artix contract fragment mapping a union to a tagged data format.
Example 59: Mapping a Union to a Tagged Data Format
<?xml version="1.0" encoding="UTF-8"?><definitions name="fixedMappingsample"
targetNamespace="http://www.iona.com/tagService" xmlns="http://schemas.xmlsoap.org/wsdl/" xmlns:fixed="http://schemas.iona.com/bindings/tagged" xmlns:tns="http://www.iona.com/tagService" xmlns:xsd="http://www.w3.org/2001/XMLSchema"><types> <schema targetNamespace="http://www.iona.com/tagService"
xmlns="http://www.w3.org/2001/XMLSchema" xmlns:wsdl="http://schemas.xmlsoap.org/wsdl/">
<xsd:complexType name="unionStationType"> <xsd:choice> <xsd:element name="train" type="xsd:string"/> <xsd:element name="bus" type="xsd:int"/> <xsd:element name="cab" type="xsd:int"/> <xsd:element name="subway" type="xsd:string"/> </xsd:choice> </xsd:complexType>...</types><message name="tagUnion"> <part name="stationPart" type="tns:unionStationType"/></message><portType name="tagUnionPortType">...</portType><binding name="tagUnionBinding" type="tns:tagUnionPortType"> <tagged:binding selfDescribing="false" fieldSeparator="comma"/>...
123
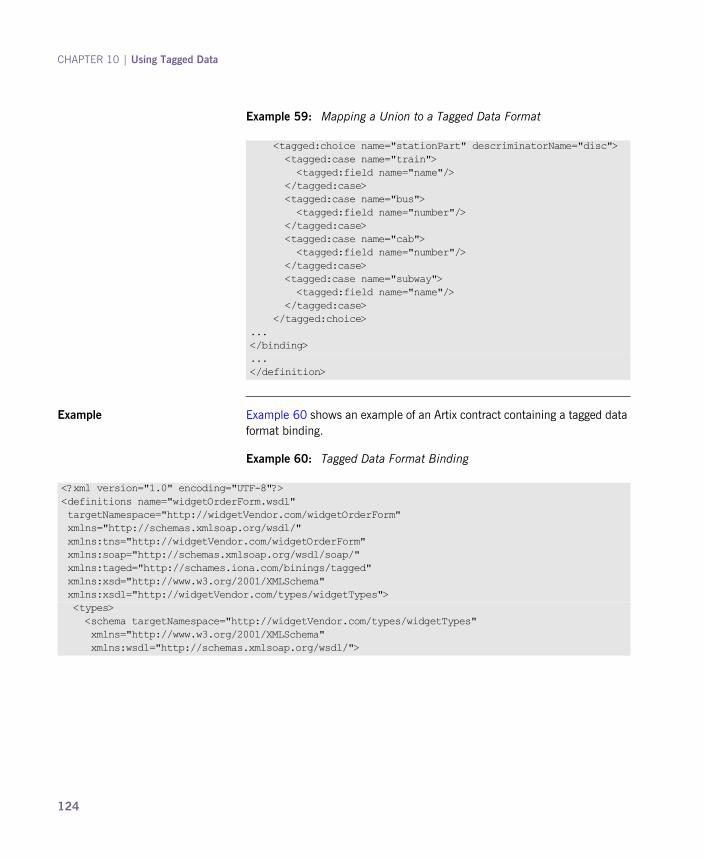
CHAPTER 10 | Using Tagged Data
Example Example 60 shows an example of an Artix contract containing a tagged data format binding.
<tagged:choice name="stationPart" descriminatorName="disc"> <tagged:case name="train"> <tagged:field name="name"/> </tagged:case> <tagged:case name="bus"> <tagged:field name="number"/> </tagged:case> <tagged:case name="cab"> <tagged:field name="number"/> </tagged:case> <tagged:case name="subway"> <tagged:field name="name"/> </tagged:case> </tagged:choice>...</binding>...</definition>
Example 59: Mapping a Union to a Tagged Data Format
Example 60: Tagged Data Format Binding
<?xml version="1.0" encoding="UTF-8"?><definitions name="widgetOrderForm.wsdl" targetNamespace="http://widgetVendor.com/widgetOrderForm" xmlns="http://schemas.xmlsoap.org/wsdl/" xmlns:tns="http://widgetVendor.com/widgetOrderForm" xmlns:soap="http://schemas.xmlsoap.org/wsdl/soap/" xmlns:taged="http://schames.iona.com/binings/tagged" xmlns:xsd="http://www.w3.org/2001/XMLSchema" xmlns:xsd1="http://widgetVendor.com/types/widgetTypes"> <types> <schema targetNamespace="http://widgetVendor.com/types/widgetTypes" xmlns="http://www.w3.org/2001/XMLSchema" xmlns:wsdl="http://schemas.xmlsoap.org/wsdl/">
124

<xsd:simpleType name="widgetSize"> <xsd:restriction base="xsd:string"> <xsd:enumeration value="big"/> <xsd:enumeration value="large"/> <xsd:enumeration value="mungo"/> <xsd:enumeration value="gargantuan"/> </xsd:restriction> </xsd:simpleType> <xsd:complexType name="Address"> <xsd:sequence> <xsd:element name="name" type="xsd:string"/> <xsd:element name="street1" type="xsd:string"/> <xsd:element name="street2" type="xsd:string"/> <xsd:element name="city" type="xsd:string"/> <xsd:element name="state" type="xsd:string"/> <xsd:element name="zipCode" type="xsd:string"/> </xsd:sequence> </xsd:complexType> <xsd:complexType name="widgetOrderInfo"> <xsd:sequence> <xsd:element name="amount" type="xsd:int"/> <xsd:element name="order_date" type="xsd:string"/> <xsd:element name="type" type="xsd1:widgetSize"/> <xsd:element name="shippingAddress" type="xsd1:Address"/> </xsd:sequence> </xsd:complexType> <xsd:complexType name="widgetOrderBillInfo"> <xsd:sequence> <xsd:element name="amount" type="xsd:int"/> <xsd:element name="order_date" type="xsd:string"/> <xsd:element name="type" type="xsd1:widgetSize"/> <xsd:element name="amtDue" type="xsd:float"/> <xsd:element name="orderNumber" type="xsd:string"/> <xsd:element name="shippingAddress" type="xsd1:Address"/> </xsd:sequence> </xsd:complexType> </schema> </types> <message name="widgetOrder"> <part name="widgetOrderForm" type="xsd1:widgetOrderInfo"/> </message> <message name="widgetOrderBill"> <part name="widgetOrderConformation" type="xsd1:widgetOrderBillInfo"/> </message>
Example 60: Tagged Data Format Binding
125

CHAPTER 10 | Using Tagged Data
<portType name="orderWidgets"> <operation name="placeWidgetOrder"> <input message="tns:widgetOrder" name="order"/> <output message="tns:widgetOrderBill" name="bill"/> </operation> </portType> <binding name="orderWidgetsBinding" type="tns:orderWidgets"> <tagged:binding selfDescribing="false" fieldSeparator="pipe"/> <operation name="placeWidgetOrder"> <tagged:operation discriminator="widgetDisc"/> <input name="widgetOrder"> <tagged:body> <tagged:sequence name="widgetOrderForm"> <tagged:field name="amount"/> <tagged:field name="order_date"/> <tagged:field name="type" > <tagged:enumeration value="big"/> <tagged:enumeration value="large"/> <tagged:enumeration value="mungo"/> <tagged:enumeration value="gargantuan"/> </tagged:field> <tagged:sequence name="shippingAddress"> <tagged:field name="name"/> <tagged:field name="street1"/> <tagged:field name="street2"/> <tagged:field name="city"/> <tagged:field name="state"/> <tagged:field name="zip"/> </tagged:sequence> </tagged:sequence> </tagged:body> </input>
Example 60: Tagged Data Format Binding
126

<output name="widgetOrderBill"> <tagged:body> <tagged:sequence name="widgetOrderConformation"> <tagged:field name="amount"/> <tagged:field name="order_date"/> <tagged:field name="type"> <tagged:enumeration value="big"/> <tagged:enumeration value="large"/> <tagged:enumeration value="mungo"/> <tagged:enumeration value="gargantuan"/> </tagged:field> <tagged:field name="amtDue"/> <tagged:field name="orderNumber"/> <tagged:sequence name="shippingAddress"> <tagged:field name="name"/> <tagged:field name="street1"/> <tagged:field name="street2"/> <tagged:field name="city"/> <tagged:field name="state"/> <tagged:field name="zip"/> </tagged:sequence> </tagged:sequence> </tagged:body> </output> </operation> </binding> <service name="orderWidgetsService"> <port name="widgetOrderPort" binding="tns:orderWidgetsBinding"> <http:address location="http://localhost:8080"/> </port> </service></definitions>
Example 60: Tagged Data Format Binding
127

CHAPTER 10 | Using Tagged Data
128

CHAPTER 11
Using Tibco Rendezvous MessagesArtix can natively use the Tibco TibrvMsg data format to send and receive messages.
Overview Tibco Rendezvous applications typically use a Tibco specific data format called a TibrvMsg. Artix provides a very flexible mechanism for mapping messages into the TibrvMsg format. This allows you to integrate with existing Tibco/RV applications by service-enabling them.
The TibrvMsg binding provides default mappings for most XML Schema constructs to simplify defining a TibrvMsg in an Artix contract. The TibrvMsg binding also supports custom mappings between the messages defined in an Artix contract and the physical representation of a TibrvMsg. Custom mappings also support the inclusion of static binding-only data.
To further extend the functionality of the TibrvMsg binding, Artix includes a mechanism for passing context data stored in an Artix application as part of a TibrvMsg. For more information about using Artix contexts see either Developing Artix Applications in C++ or Developing Artix Applications in Java.
In this chapter This chapter discusses the following topics:
129
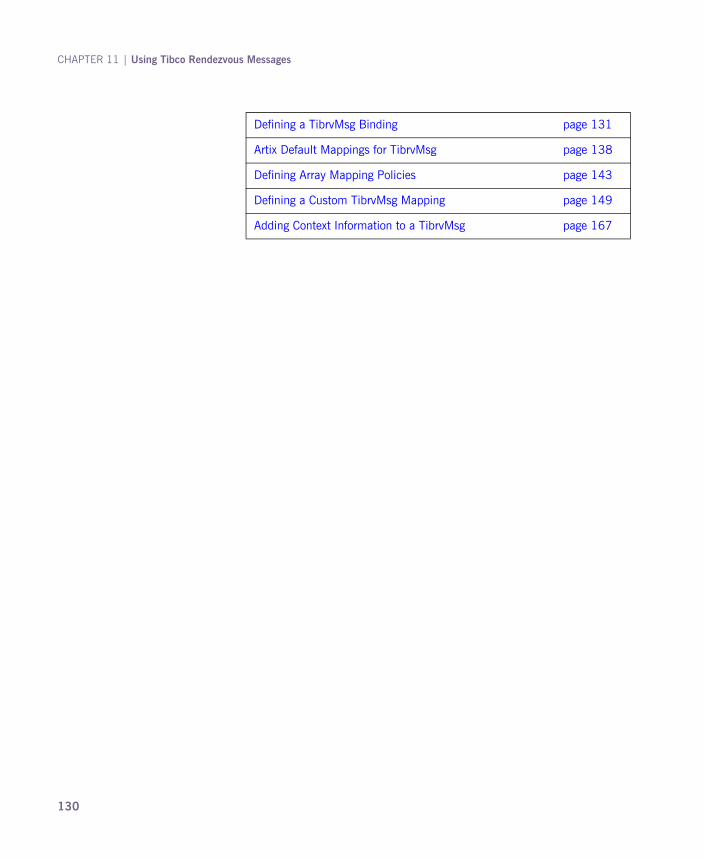
CHAPTER 11 | Using Tibco Rendezvous Messages
Defining a TibrvMsg Binding page 131
Artix Default Mappings for TibrvMsg page 138
Defining Array Mapping Policies page 143
Defining a Custom TibrvMsg Mapping page 149
Adding Context Information to a TibrvMsg page 167
130

Defining a TibrvMsg Binding
Defining a TibrvMsg Binding
Overview The Artix TibrvMsg binding provides a set of default mappings to make writing a binding simple. By default, messages are mapped into a root TibrvMsg such that parts defined using XML Schema native types become TibrvMsgFields of the root TibrvMsg and parts defined using complex types become TibrvMsgs within the root message. The elements comprising a complex type also follow the same default mapping behavior. The default mappings will work for most basic applications. For a detailed explanation of how WSDL types are mapped to TibrvMsg see �Artix Default Mappings for TibrvMsg� on page 138.
Procedure To map a logical interface to a TibrvMsg:
1. Add the proper namespace reference to the definition element of your contract. See �TibrvMsg binding namespace� on page 132.
2. Add a WSDL binding element to your contract to hold the TibrvMsg binding, give the binding a unique name, and specify the port type that represents the interface being bound.
3. Add a tibrv:binding element as a child of the new binding element to identify this as a TibrvMsg binding and specify any global parameters.
4. For each operation defined in the bound interface, add a WSDL operation element to hold the binding information for the operation�s messages.
5. For each operation in the binding, add a tibrv:operation child element and set its attributes.
6. For each operation in the binding, add the input, output, and fault children elements to represent the messages used by the operation. These elements correspond to the messages defined in the port type definition of the logical operation.
7. For each input element in the binding, add a tibrv:input child element and set its attributes.
8. For each output element in the binding, add a tibrv:output child element and set its attributes.
131

CHAPTER 11 | Using Tibco Rendezvous Messages
9. To add custom message mappings see �Defining a Custom TibrvMsg Mapping� on page 149.
TibrvMsg binding namespace The IONA extensions used to describe TibrvMsg bindings are defined in the namespace http://schemas.iona.com/transports/tibrv. Artix tools use the prefix tibrv to represent the tagged data extensions. Add the following line to the definitions element of your contract:
tibrv:binding tibrv:binding is an immediate child of the WSDL binding element and identifies that the data is to be packed into a TibrvMsg. Its attributes are described in Table 13.
In addition to the above properties, tibrv:binding can also specify a policy for how array data is handled for messages using the binding. The array policy is set using a child tibrv:array element. The array policy set at the binding level can be overridden on a per-operation basis, per-message basis, and a per-type basis. For information on defining array policies see �Defining Array Mapping Policies� on page 143.
The tibrv:binding element can also define binding-only message data using the tibrv:msg element, the tibrv:field element, or tibrv:context element. Any binding-only data defined at the binding level is attached to all messages that use the binding.
xmlns:tibrv="http://schemas.iona.com/transports/tibrv"
Table 13: Attributes for tibrv:binding
Attribute Purpose
stringEncoding An optional attribute that specifies the character set used in encoding string data included in the message. The default value is utf-8.
stringAsOpaque An optional attribute that specifies how string data is passed in messages. false, the default value, specifies that string data is passed as TIRBMSG_STRING. true specifies that string data is passed as OPAQUE.
132

Defining a TibrvMsg Binding
tibrv:operation tibrv:operation is the immediate child of a WSDL operation element. tibrv:operation has no attributes. It can, however, specify an operation-specific array policy using a a child tibrv:array element. This array policy overrides any array policy set at the binding level. For information on defining array policies see �Defining Array Mapping Policies� on page 143.
Within a tibrv:operation element you can also define binding-only message data using the tibrv:msg element, the tibrv:field element, or tibrv:context element. Any binding-only data defined at the operation level is attached to all messages that make up the operation.
tibrv:input tibrv:input is the immediate child of a WSDL input element and defines a number of properties used in mapping the input message to a TibrvMsg. Its attributes are described in Table 14.
Table 14: Attributes for tibrv:input
Attribute Purpose
messageNameFieldPath An optional attribute that specifies the field path that includes the message name. If this attribute is not specified, the first field in the top level message will be used as the message name and given the value IT_BUS_MESSAGE_NAME.
messageNameFieldValue An optional attribute that specifies the field value that corresponds to the message name. If this attribute is not specified, the WSDL message�s name will be used.
stringEncoding An optional attribute that specifies the character set used in encoding string data included in the message. This value will override the value set in tibrv:binding.
133

CHAPTER 11 | Using Tibco Rendezvous Messages
In addition to the above properties, tibrv:input can also specify a policy for how array data is handled for messages using the binding. The array policy is set using a child tibrv:array element. The array policy set at this level overrides any policies set at the binding level or the operation level. For information on defining array policies see �Defining Array Mapping Policies� on page 143.
The tibrv:input element also defines any custom mappings between the WSDL messages defined in the contract and the physical TibrvMsg on the wire. A custom mapping can also include binding-only message data and context information. For information on defining custom data mappings see �Defining a Custom TibrvMsg Mapping� on page 149.
tibrv:output tibrv:output is the immediate child of a WSDL output element and defines a number of properties used in mapping the output message to a TibrvMsg. Its attributes are described in Table 14.
stringAsOpaque An optional attribute that specifies how string data is passed in the message. false specifies that string data is passed as TIRBMSG_STRING. true specifies that string data is passed as OPAQUE. This value will override the value set in tibrv:binding.
Table 14: Attributes for tibrv:input
Attribute Purpose
Table 15: Attributes for tibrv:output
Attribute Purpose
messageNameFieldPath An optional attribute that specifies the field path that includes the message name. If this attribute is not specified, the first field in the top level message will be used as the message name and given the value IT_BUS_MESSAGE_NAME.
134
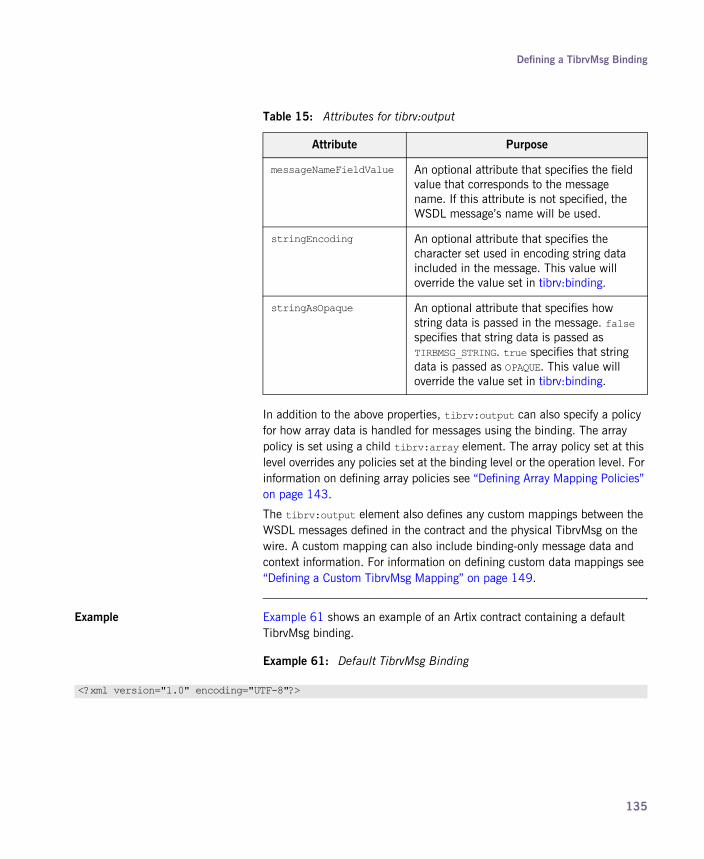
Defining a TibrvMsg Binding
In addition to the above properties, tibrv:output can also specify a policy for how array data is handled for messages using the binding. The array policy is set using a child tibrv:array element. The array policy set at this level overrides any policies set at the binding level or the operation level. For information on defining array policies see �Defining Array Mapping Policies� on page 143.
The tibrv:output element also defines any custom mappings between the WSDL messages defined in the contract and the physical TibrvMsg on the wire. A custom mapping can also include binding-only message data and context information. For information on defining custom data mappings see �Defining a Custom TibrvMsg Mapping� on page 149.
Example Example 61 shows an example of an Artix contract containing a default TibrvMsg binding.
messageNameFieldValue An optional attribute that specifies the field value that corresponds to the message name. If this attribute is not specified, the WSDL message�s name will be used.
stringEncoding An optional attribute that specifies the character set used in encoding string data included in the message. This value will override the value set in tibrv:binding.
stringAsOpaque An optional attribute that specifies how string data is passed in the message. false specifies that string data is passed as TIRBMSG_STRING. true specifies that string data is passed as OPAQUE. This value will override the value set in tibrv:binding.
Table 15: Attributes for tibrv:output
Attribute Purpose
Example 61: Default TibrvMsg Binding
<?xml version="1.0" encoding="UTF-8"?>
135

CHAPTER 11 | Using Tibco Rendezvous Messages
<definitions name="widgetOrderForm.wsdl" targetNamespace="http://widgetVendor.com/widgetOrderForm" xmlns="http://schemas.xmlsoap.org/wsdl/" xmlns:tns="http://widgetVendor.com/widgetOrderForm" xmlns:soap="http://schemas.xmlsoap.org/wsdl/soap/" xmlns:tibrv="http://schemas.iona.com/transports/tibrv" xmlns:xsd="http://www.w3.org/2001/XMLSchema" xmlns:xsd1="http://widgetVendor.com/types/widgetTypes"> <types> <schema targetNamespace="http://widgetVendor.com/types/widgetTypes" xmlns="http://www.w3.org/2001/XMLSchema" xmlns:wsdl="http://schemas.xmlsoap.org/wsdl/"> <xsd:complexType name="Address"> <xsd:sequence> <xsd:element name="name" type="xsd:string"/> <xsd:element name="street" type="xsd:string" minOccurs="1" maxOccurs="5"/> <xsd:element name="city" type="xsd:string"/> <xsd:element name="state" type="xsd:string"/> <xsd:element name="zipCode" type="xsd:string"/> </xsd:sequence> </xsd:complexType> <xsd:complexType name="widgetOrderInfo"> <xsd:sequence> <xsd:element name="amount" type="xsd:int"/> <xsd:element name="order_date" type="xsd:string"/> <xsd:element name="type" type="xsd:string"/> <xsd:element name="shippingAddress" type="xsd1:Address"/> </xsd:sequence> </xsd:complexType> <xsd:complexType name="widgetOrderBillInfo"> <xsd:sequence> <xsd:element name="amount" type="xsd:int"/> <xsd:element name="order_date" type="xsd:string"/> <xsd:element name="type" type="xsd:string"/> <xsd:element name="amtDue" type="xsd:float"/> <xsd:element name="orderNumber" type="xsd:string"/> <xsd:element name="shippingAddress" type="xsd1:Address"/> </xsd:sequence> </xsd:complexType> </schema> </types> <message name="widgetOrder"> <part name="widgetOrderForm" type="xsd1:widgetOrderInfo"/> </message>
Example 61: Default TibrvMsg Binding
136

Defining a TibrvMsg Binding
<message name="widgetOrderBill"> <part name="widgetOrderConformation" type="xsd1:widgetOrderBillInfo"/> </message> <portType name="orderWidgets"> <operation name="placeWidgetOrder"> <input message="tns:widgetOrder" name="order"/> <output message="tns:widgetOrderBill" name="bill"/> </operation> </portType> <binding name="orderWidgetsBinding" type="tns:orderWidgets"> <tibrv:binding/> <operation name="placeWidgetOrder"> <tibrv:operation/> <input name="widgetOrder"> <tibrv:input/> </input> <output name="widgetOrderBill"> <tibrv:output/> </output> </operation> </binding> <service name="orderWidgetsService"> <port name="widgetOrderPort" binding="tns:orderWidgetsBinding"> ... </port> </service></definitions>
Example 61: Default TibrvMsg Binding
137

CHAPTER 11 | Using Tibco Rendezvous Messages
Artix Default Mappings for TibrvMsg
TIBRVMSG type mapping Table 16 shows how Artix maps XSD types into TibrvMsg data types.
Table 16: TIBCO to XSD Type Mapping
TIBRVMSG XSD
TIBRVMSG_STRING xsd:string
TIBRVMSG_BOOL xsd:boolean
TIBRVMSG_I8 xsd:byte
TIBRVMSG_I16 xsd:short
TIBRVMSG_I32 xsd:int
TIBRVMSG_I64 xsd:long
TIBRVMSG_U8 xsd:unsignedByte
TIBRVMSG_U16 xsd:unsignedShort
TIBRVMSG_U32 xsd:unsignedInt
TIBRVMSG_U64 xsd:unsignedLong
TIBRVMSG_F32 xsd:float
TIBRVMSG_F64 xsd:double
TIBRVMSG_STRING xsd:decimal
TIBRVMSG_DATETIMEa xsd:dateTime
TIBRVMSG_OPAQUE xsd:base64Binary
TIBRVMSG_OPAQUE xsd:hexBinary
TIBRVMSG_STRING xsd:QName
TIBRVMSG_STRING xsd:nonPositiveInteger
TIBRVMSG_STRING xsd:negativeInteger
TIBRVMSG_STRING xsd:nonNegativeInteger
138

Artix Default Mappings for TibrvMsg
Sequence complex types Sequence complex types are mapped to a TibrvMsg message as follows:
� The elements of the complex type are enclosed in a TibrvMsg instance.
� If the complex type is specified as a message part, the value of the part element�s name attribute is used as the name of the generated TibrvMsg.
� If the complex type is specified as an element, the value of the element element�s name attribute is used as the name of the generated TibrvMsg.
� The TibrvMsg id is 0.
TIBRVMSG_STRING xsd:positiveInteger
TIBRVMSG_STRING xsd:time
TIBRVMSG_STRING xsd:date
TIBRVMSG_STRING xsd:gYearMonth
TIBRVMSG_STRING xsd:gMonthDay
TIBRVMSG_STRING xsd:gDay
TIBRVMSG_STRING xsd:gMonth
TIBRVMSG_STRING xsd:anyURI
TIBRVMSG_STRING xsd:token
TIBRVMSG_STRING xsd:language
TIBRVMSG_STRING xsd:NMTOKEN
TIBRVMSG_STRING xsd:Name
TIBRVMSG_STRING xsd:NCName
TIBRVMSG_STRING xsd:ID
a. While TIBRVMSG_DATATIME has microsecond precision, xsd:dateTimeonly supports millisecond precision. Therefore, Artix rounds all times to thenearest millisecond.
Table 16: TIBCO to XSD Type Mapping
TIBRVMSG XSD
139

CHAPTER 11 | Using Tibco Rendezvous Messages
� The elements are the mapped to child TibrvMsgField instances of the wrapping TibrvMsg.
� If an element of the sequence is of a complex type, it will be mapped into a TibrvMsg instance that conforms to the default mapping rules.
� The value of the element element�s name attribute is used as the name of the generated TibrvMsgField instance.
� The child fields� ids are 0.
� The child fields are serialized in the same order as they appear in the schema definition.
� The child fields are deserialized in the same order as they appear in schema definition.
All complex types All complex types are mapped to a TibrvMsg message as follows:
� The elements of the complex type are enclosed in a TibrvMsg instance.
� If the complex type is specified as a message part, the value of the part element�s name attribute is used as the name of the generated TibrvMsg.
� If the complex type is specified as an element, the value of the element element�s name attribute is used as the name of the generated TibrvMsg.
� The TibrvMsg id is 0.
� The elements are the mapped to child TibrvMsgField instances of the wrapping TibrvMsg.
� If an element of the all is of a complex type, it will be mapped into a TibrvMsg instance that conforms to the default mapping rules.
� The value of the element element�s name attribute is used as the name of the generated TibrvMsgField instance.
� The child field�s ids are 0.
� The child fields are serialized in the same order as they appear in the schema definition.
� The child fields can be deserialized in any order.
Choice complex types Choice complex types are mapped to a TibrvMsg message as follows:
� The elements of the complex type are enclosed in a TibrvMsg instance.
140

Artix Default Mappings for TibrvMsg
� If the complex type is specified as a message part, the value of the part element�s name attribute is used as the name of the generated TibrvMsg.
� If the complex type is specified as an element, the value of the element element�s name attribute is used as the name of the generated TibrvMsg.
� The TibrvMsg id is 0
� There must only be one and only child field in this TibrvMsg message that corresponds to the active choice element.
� The child field has the name of the corresponding choice's active element name.
� The child field id is zero.
� During deserialization the binding runtime will extract the first child field from this message using index equal to 0 as the key. If no field is found then this choice is considered an empty choice.
NMTOKEN NMTOKEN schema types are mapped as follows:
� The NMTOKEN is enclosed in a TibrvMsg instance.
� If the NMTOKEN is specified as a message part, the value of the part element�s name attribute is used as the name of the generated TibrvMsg.
� If the NMTOKEN is specified as an element, the value of the element element�s name attribute is used as the name of the generated TibrvMsg.
� The TibrvMsg id is 0
� Each NMTOKEN is mapped to a child TibrvMsgField instance of this TibrvMsg.
� The names of the children fields are an ever increasing counter values beginning with 0.
Default mapping of arrays XML Schema elements that are not mapped to native Tibrv scalar types and have minOccurs != 1 and maxOccurs != 1 are mapped as follows:
� Array elements are stored in a TibrvMsg instance at the same scope as the sibling elements of this array element.
141

CHAPTER 11 | Using Tibco Rendezvous Messages
� Array element names are a result of an expression evaluation. The expression is evaluated for every array element.
� The default array element name expression is concat(xml:attr('name'), '_', counter(1, 1).
� If an instance of an array element has 0 elements then this array instance will have nothing loaded onto the wire. Currently this is not true for scalar arrays that are loaded as a single field.
Default mapping for scalar arrays The XML Schema elements that are mapped to native Tibrv scalar types and have minOccurs != 1 and maxOccurs != 1 are mapped as follows:
� Array elements are stored in a TibrvMsg instance at the same scope as sibling elements of this array element.
� The binding utilizes the Tibrv native array mapping to store XML Schema arrays. Hence, there will be only one TibrvMsgField with the name equal to that of the XML Schema element name defining this array.
142
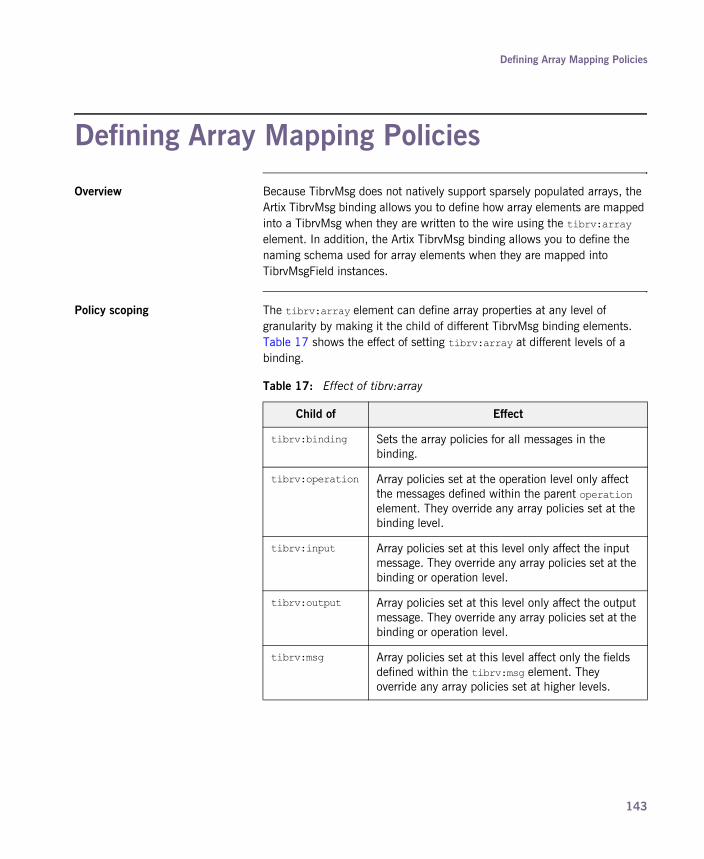
Defining Array Mapping Policies
Defining Array Mapping Policies
Overview Because TibrvMsg does not natively support sparsely populated arrays, the Artix TibrvMsg binding allows you to define how array elements are mapped into a TibrvMsg when they are written to the wire using the tibrv:array element. In addition, the Artix TibrvMsg binding allows you to define the naming schema used for array elements when they are mapped into TibrvMsgField instances.
Policy scoping The tibrv:array element can define array properties at any level of granularity by making it the child of different TibrvMsg binding elements. Table 17 shows the effect of setting tibrv:array at different levels of a binding.
Table 17: Effect of tibrv:array
Child of Effect
tibrv:binding Sets the array policies for all messages in the binding.
tibrv:operation Array policies set at the operation level only affect the messages defined within the parent operation element. They override any array policies set at the binding level.
tibrv:input Array policies set at this level only affect the input message. They override any array policies set at the binding or operation level.
tibrv:output Array policies set at this level only affect the output message. They override any array policies set at the binding or operation level.
tibrv:msg Array policies set at this level affect only the fields defined within the tibrv:msg element. They override any array policies set at higher levels.
143

CHAPTER 11 | Using Tibco Rendezvous Messages
Array policies The array policies are set using the attributes of tibrv:array. Table 18 describes the attributes used to set array policies.
tibrv:field Array policies set at this level affect only the TibrvMsg field being defined. They override any array policies set at higher levels.
Table 17: Effect of tibrv:array
Child of Effect
Table 18: Attributes for tibrv:array
Attribute Purpose
elementName Specifies an expression that when evaluated will be used as the name of the TibrvMsg field to which array elements are mapped. The default element naming scheme is to concatenate the value of WSDL element element�s name attribute with a counter. For information on specifying naming expressions see �Custom array naming expressions� on page 146.
integralAsSingleField Specifies how scalar array data is mapped into TibrvMsgField instances. true, the default, specifies that arrays are mapped into a single TibrvMsgField. false specifies that each member of an array is mapped into a separate TibrvMsgField.
loadSize Specifies if the number of elements in an array is included in the TibrvMsg. true specifies that the number of elements in the array is added as a TibrvMsgField in the same TibrvMsg as the array. false, the default, specifies that the number of elements in the array is not included in the TibrvMsg.
144
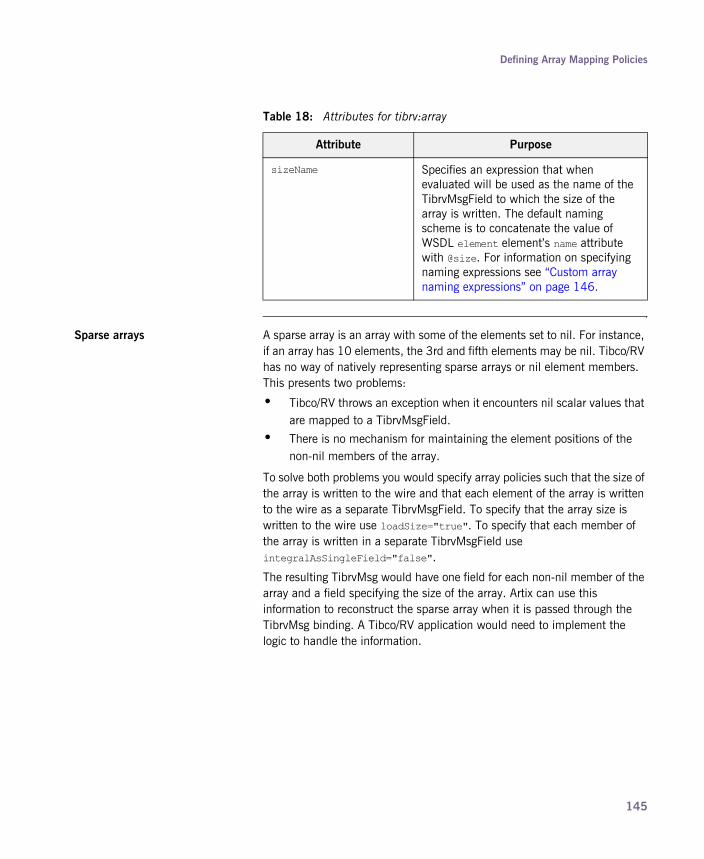
Defining Array Mapping Policies
Sparse arrays A sparse array is an array with some of the elements set to nil. For instance, if an array has 10 elements, the 3rd and fifth elements may be nil. Tibco/RV has no way of natively representing sparse arrays or nil element members. This presents two problems:
� Tibco/RV throws an exception when it encounters nil scalar values that are mapped to a TibrvMsgField.
� There is no mechanism for maintaining the element positions of the non-nil members of the array.
To solve both problems you would specify array policies such that the size of the array is written to the wire and that each element of the array is written to the wire as a separate TibrvMsgField. To specify that the array size is written to the wire use loadSize="true". To specify that each member of the array is written in a separate TibrvMsgField use integralAsSingleField="false".
The resulting TibrvMsg would have one field for each non-nil member of the array and a field specifying the size of the array. Artix can use this information to reconstruct the sparse array when it is passed through the TibrvMsg binding. A Tibco/RV application would need to implement the logic to handle the information.
sizeName Specifies an expression that when evaluated will be used as the name of the TibrvMsgField to which the size of the array is written. The default naming scheme is to concatenate the value of WSDL element element�s name attribute with @size. For information on specifying naming expressions see �Custom array naming expressions� on page 146.
Table 18: Attributes for tibrv:array
Attribute Purpose
145

CHAPTER 11 | Using Tibco Rendezvous Messages
Custom array naming expressions When specifying a naming policy for array element names you use a string expression that combines XML properties, strings, and custom naming functions. For example, you could use the expression concat(xml:attr(�name�), �_�, counter(1,1)) to specify that each element in the array street is named street_n.
Table 19 shows the available functions for use in building array element names.
Example Example 62 shows an example of an Artix contract containing a TibrvMsg binding that uses array policies. The policies are set at the binding level and:
� Force the name of the TibrvMsg containing array elements to be named street0, street1, ....
� Write out the number of elements in each street array.
� Force each element of a street array to be written out as a separate field.
Table 19: Functions Used for Specifying TibrvMsg Array Element Names
Function Purpose
xml:attr(�attribute�) Inserts the value of the named attribute.
concat(item1, item2, ...) Concatenates all of the elements into a single string.
counter(start, increment) Adds an increasing numerical value. The counter starts at start and increases by increment.
Example 62: TibrvMsg Binding with Array Policies Set
<?xml version="1.0" encoding="UTF-8"?>
146
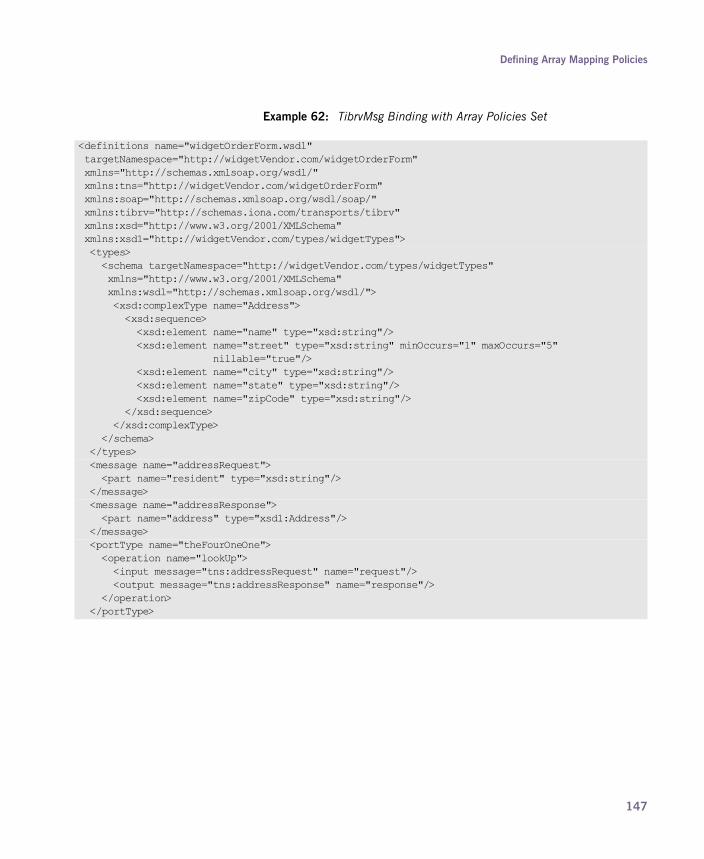
Defining Array Mapping Policies
<definitions name="widgetOrderForm.wsdl" targetNamespace="http://widgetVendor.com/widgetOrderForm" xmlns="http://schemas.xmlsoap.org/wsdl/" xmlns:tns="http://widgetVendor.com/widgetOrderForm" xmlns:soap="http://schemas.xmlsoap.org/wsdl/soap/" xmlns:tibrv="http://schemas.iona.com/transports/tibrv" xmlns:xsd="http://www.w3.org/2001/XMLSchema" xmlns:xsd1="http://widgetVendor.com/types/widgetTypes"> <types> <schema targetNamespace="http://widgetVendor.com/types/widgetTypes" xmlns="http://www.w3.org/2001/XMLSchema" xmlns:wsdl="http://schemas.xmlsoap.org/wsdl/"> <xsd:complexType name="Address"> <xsd:sequence> <xsd:element name="name" type="xsd:string"/> <xsd:element name="street" type="xsd:string" minOccurs="1" maxOccurs="5" nillable="true"/> <xsd:element name="city" type="xsd:string"/> <xsd:element name="state" type="xsd:string"/> <xsd:element name="zipCode" type="xsd:string"/> </xsd:sequence> </xsd:complexType> </schema> </types> <message name="addressRequest"> <part name="resident" type="xsd:string"/> </message> <message name="addressResponse"> <part name="address" type="xsd1:Address"/> </message> <portType name="theFourOneOne"> <operation name="lookUp"> <input message="tns:addressRequest" name="request"/> <output message="tns:addressResponse" name="response"/> </operation> </portType>
Example 62: TibrvMsg Binding with Array Policies Set
147
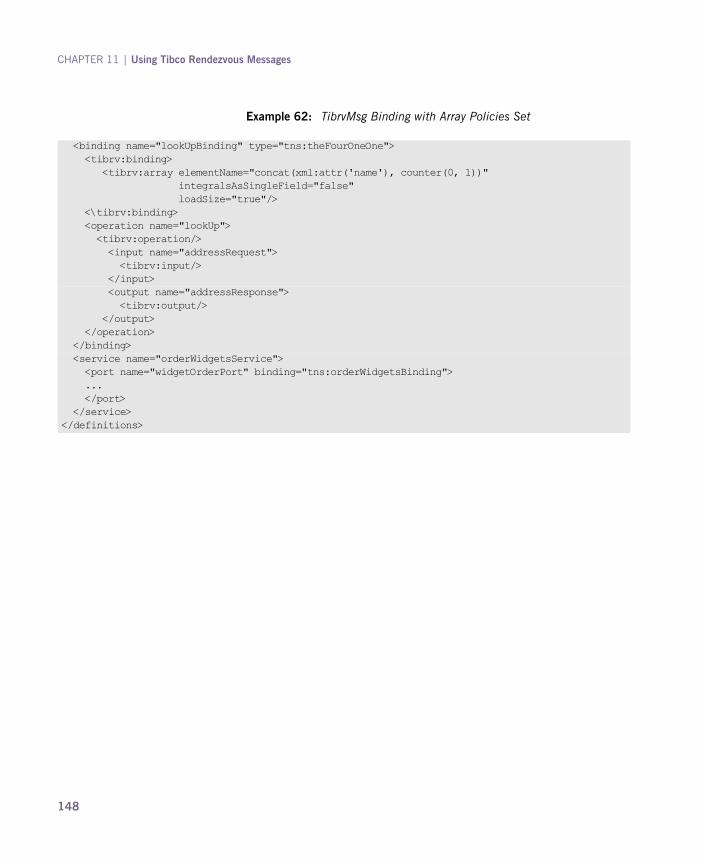
CHAPTER 11 | Using Tibco Rendezvous Messages
<binding name="lookUpBinding" type="tns:theFourOneOne"> <tibrv:binding> <tibrv:array elementName="concat(xml:attr('name'), counter(0, 1))" integralsAsSingleField="false" loadSize="true"/> <\tibrv:binding> <operation name="lookUp"> <tibrv:operation/> <input name="addressRequest"> <tibrv:input/> </input> <output name="addressResponse"> <tibrv:output/> </output> </operation> </binding> <service name="orderWidgetsService"> <port name="widgetOrderPort" binding="tns:orderWidgetsBinding"> ... </port> </service></definitions>
Example 62: TibrvMsg Binding with Array Policies Set
148

Defining a Custom TibrvMsg Mapping
Defining a Custom TibrvMsg Mapping
Overview For instances where the default mappings are insufficient to map the TibrvMsgs to corresponding WSDL messages, you can define custom mappings that allow you to specify exactly how the WSDL message parts are mapped into a TibrvMsg. Custom TibrvMsg mappings allow you to:
� override the native XML Schema type specification of contract elements.
� add binding-only elements to the TibrvMsg placed on the wire.
� place globally used contract elements in higher levels of the binding.
� change how contract elements are mapped into nested TibrvMsg structures.
Custom TibrvMsg binding elements are defined using a combination of tibrv:msg elements and tibrv:field elements.
Contract elements vs. binding-only elements
A contract element is an atomic piece of a message defined in the logical description of the interface being bound. It can be a native XML Schema type such as xsd:int, in which case it is mapped to a TibrvMsgField. Or it can be an instance of a complex type, in which case it is mapped to a TibrvMsg. For example, if a message has a part that is of type xsd:string, the part is a contract element. In contract fragment shown in Example 63,
149
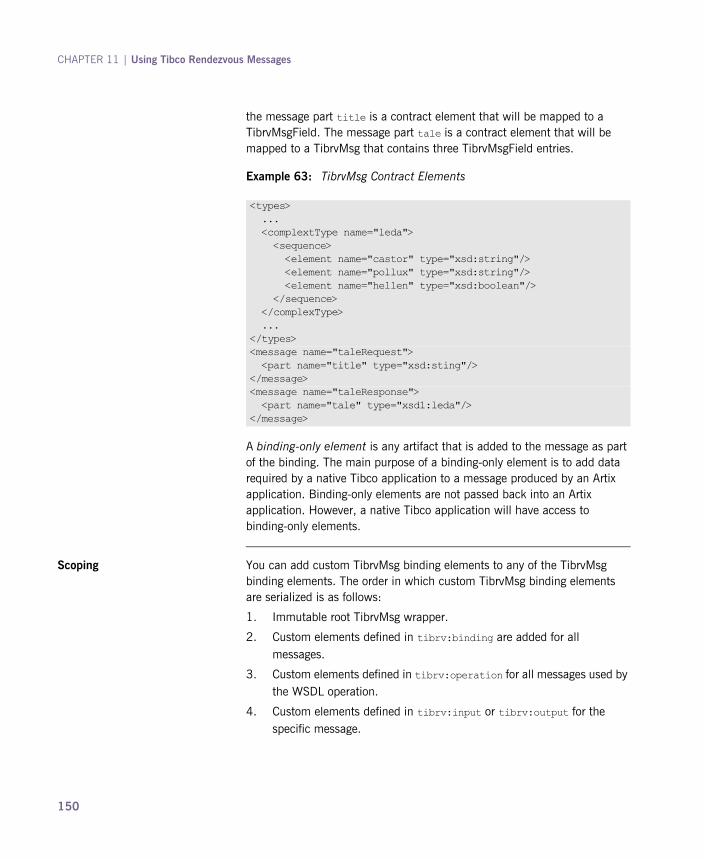
CHAPTER 11 | Using Tibco Rendezvous Messages
the message part title is a contract element that will be mapped to a TibrvMsgField. The message part tale is a contract element that will be mapped to a TibrvMsg that contains three TibrvMsgField entries.
A binding-only element is any artifact that is added to the message as part of the binding. The main purpose of a binding-only element is to add data required by a native Tibco application to a message produced by an Artix application. Binding-only elements are not passed back into an Artix application. However, a native Tibco application will have access to binding-only elements.
Scoping You can add custom TibrvMsg binding elements to any of the TibrvMsg binding elements. The order in which custom TibrvMsg binding elements are serialized is as follows:
1. Immutable root TibrvMsg wrapper.
2. Custom elements defined in tibrv:binding are added for all messages.
3. Custom elements defined in tibrv:operation for all messages used by the WSDL operation.
4. Custom elements defined in tibrv:input or tibrv:output for the specific message.
Example 63: TibrvMsg Contract Elements
<types> ... <complextType name="leda"> <sequence> <element name="castor" type="xsd:string"/> <element name="pollux" type="xsd:string"/> <element name="hellen" type="xsd:boolean"/> </sequence> </complexType> ...</types><message name="taleRequest"> <part name="title" type="xsd:sting"/></message><message name="taleResponse"> <part name="tale" type="xsd1:leda"/></message>
150

Defining a Custom TibrvMsg Mapping
If you define a binding-only element in the tibrv:binding element, it will be the first field in the TibrvMsg generated for all messages that are generated by the binding. If you also added a binding-only field in the tibrv:operation for the operation getHeader, messages used by getHeader would have both binding-only fields.
Casting XMLSchema types If the default mapping between the type of a contract element and the type of the corresponding TibrvMsgField is not appropriate, you can use the type attribute of tibrv:field to change the type of the contract element. The type attribute allows you to cast one native XML Schema type into another native XML Schema type.
When Artix finds a tibrv:field element whose name attribute corresponds to a part defined in the contract, or an element of a complex type used as a part, and whose type attribute is set, it will convert the value of the message part into the specified type. For example, given the contract fragment in Example 64, the value of casted would be converted from an int to a string. So if casted had a value of 3, the TibrvMsg binding would turn it into the string �3�.
Note: If you add a custom mapped contract element at any scope above the tibrv:input or the tibrv:output level, you must be certain that it is part of the logical messages for all elements at a lower scope. For example, if a contract element is given a custom mapping in a tibrv:operation, the corresponding WSDL message must be used by both the input and output messages. If it is not an exception will be thrown.
Example 64: Casting in a TibrvMsg Binding
<definitions ...> ... <message name="request"> <part name="input1" type="xsd:int"/> </message> <portType name="castor"> <operation name="ascend"> <input message="tns:request" name="day"/> </operation> ... </portType>
151

CHAPTER 11 | Using Tibco Rendezvous Messages
Table 20 shows the matrix of valid casts for native XML Schema types.
<binding name="castorTib" portType="castor"> <tibrv:binding/> <operation name="ascend"> <tibrv:operation/> <input message="tns:request" name="day"> <tibrv:input> <tibrv:field name="input1" type="xsd:string"/> </tibrv:input> </input> </operation> ... </binding> ...</definitions>
Example 64: Casting in a TibrvMsg Binding
Table 20: Valid Casts for TibrvMsg Binding
Type Full Support Restricted Supporta
byte short, int, long, float, double, decimal, string, boolean
unsignedByte, usignedShort, unsignedInt, unsignedLong
unsignedByte short, usignedShort, int, unsignedInt, long, unsignedLong, float, double, decimal, string, boolean
byte
short int, long, float, double, decimal, string, boolean
byte, unsignedByte, usignedShort, unsignedInt, unsignedLong
unsignedShort byte, unsignedByte, short
int, unsignedInt, long, unsignedLong, float, double, decimal, string, boolean
152

Defining a Custom TibrvMsg Mapping
int long, decimal, string, boolean
byte, unsignedByte, short, usignedShort, unsignedInt, unsignedLong, float, double
unsignedInt long, unsignedLong, decimal, string, boolean
byte, unsignedByte, short, usignedShort, int, float, double
long decimal, string, boolean
byte, unsignedByte, short, usignedShort, int, unsignedInt, unsignedLong, float, double
unsignedLong decimal, string, boolean
byte, unsignedByte, short, usignedShort, int, unsignedInt, long, float, double
float double, decimal, string, boolean
byte, unsignedByte, short, usignedShort, int, unsignedInt, long, unsignedLong
double decimal, string, boolean
byte, unsignedByte, short, usignedShort, int, unsignedInt, long, unsignedLong, float
decimal string, boolean byte, unsignedByte, short, usignedShort, int, unsignedInt, long, unsignedLong, float, double
stringb byte, unsignedByte, short, usignedShort, int, unsignedInt, long, unsignedLong, float, double, decimal, boolean, QName, DateTime
Table 20: Valid Casts for TibrvMsg Binding
Type Full Support Restricted Supporta
153
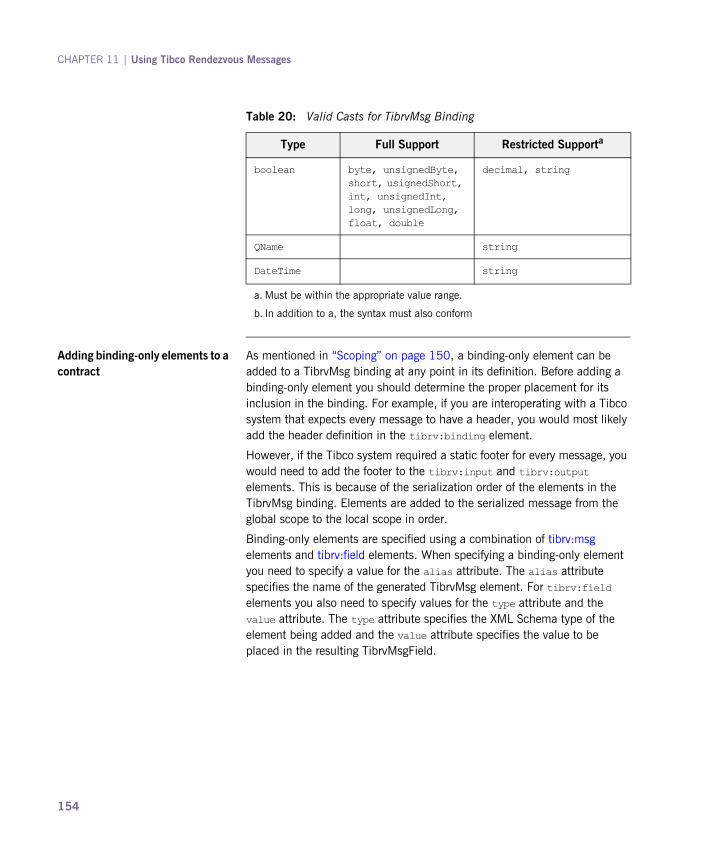
CHAPTER 11 | Using Tibco Rendezvous Messages
Adding binding-only elements to a contract
As mentioned in �Scoping� on page 150, a binding-only element can be added to a TibrvMsg binding at any point in its definition. Before adding a binding-only element you should determine the proper placement for its inclusion in the binding. For example, if you are interoperating with a Tibco system that expects every message to have a header, you would most likely add the header definition in the tibrv:binding element.
However, if the Tibco system required a static footer for every message, you would need to add the footer to the tibrv:input and tibrv:output elements. This is because of the serialization order of the elements in the TibrvMsg binding. Elements are added to the serialized message from the global scope to the local scope in order.
Binding-only elements are specified using a combination of tibrv:msg elements and tibrv:field elements. When specifying a binding-only element you need to specify a value for the alias attribute. The alias attribute specifies the name of the generated TibrvMsg element. For tibrv:field elements you also need to specify values for the type attribute and the value attribute. The type attribute specifies the XML Schema type of the element being added and the value attribute specifies the value to be placed in the resulting TibrvMsgField.
boolean byte, unsignedByte, short, usignedShort, int, unsignedInt, long, unsignedLong, float, double
decimal, string
QName string
DateTime string
a. Must be within the appropriate value range.
b. In addition to a, the syntax must also conform
Table 20: Valid Casts for TibrvMsg Binding
Type Full Support Restricted Supporta
154

Defining a Custom TibrvMsg Mapping
Example 65 shows a TibrvMsg binding that adds a static header to each message that is put on the wire.
A message generated by the binding in Example 65 would have as its first member a TibrvMsg called header as shown in Example 66.
Example 65: TibrvMsg Binding with Binding-only Elements
<binding name="headedTibcoBinding" portType="mythMaker"> <tibrv:binding> <tibrv:msg alias="header"> <tibrv:field alias="class" type="xs:string" value="greek"/> <tibrv:field alias="form" type="xs:string" value="poetry"/> </tibrv:msg> </tibrv:binding> <operation name="spinner"> ... </operation> ...</binding>
Example 66: TibrvMsg with a Header
TibrvMsg{ TibrvMsgField { name = "header"; id = 0; data.msg = { TibrvMsgField { name = "class"; id = 0; data.str = "greek"; size = sizeof(data); count = 1; type = TIBRVMSG_STRING; }
155

CHAPTER 11 | Using Tibco Rendezvous Messages
Placing binding-only elements between contract elements
In addition to adding extra-information at the beginning and end of messages, you can place binding-only elements between contract elements in a message. For example, the default mapping of the message taleResponse, defined in Example 63, would produce the TibrvMsg shown in Example 67.
TibrvMsgField { name = "form"; id = 0; data.str = "poetry"; size = sizeof(data); count = 1; type = TIBRVMSG_STRING; } } size = sizeof(data); count = 1; type = TIBRVMSG_MSG; }...}
Example 66: TibrvMsg with a Header
Example 67: Default TibrvMsg Example
TibrvMsg{ TibrvMsgField { name = "tale"; id = 0; data.msg = { TibrvMsgField { name = "castor"; id = 0; data.str = "This one is a horse trainer."; size = sizeof(data); count = 1; type = TIBRVMSG_STRING; }
156

Defining a Custom TibrvMsg Mapping
If the Tibco application you are integrating with requires an additional TibrvMsgField or an additional TibrvMsg between pollux and hellen, as shown in Example 68, you could add it to the binding by redefining the mapping of the entire contract element to include a binding-only element.
TibrvMsgField { name = "pollux"; id = 0; data.str = "This one is a boxxer."; size = sizeof(data); count = 1; type = TIBRVMSG_STRING; } TibrvMsgField { name = "hellen"; id = 0; data.str = "false"; size = sizeof(data); count = 1; type = TIBRVMSG_BOOL; } } size = sizeof(data); count = 1; type = TIBRVMSG_MSG; }...}
Example 67: Default TibrvMsg Example
Example 68: TibrvMsg with added TibrvMsg Example
TibrvMsg{ TibrvMsgField { name = "tale"; id = 0; data.msg = {
157

CHAPTER 11 | Using Tibco Rendezvous Messages
TibrvMsgField { name = "castor"; id = 0; data.str = "This one is a horse trainer."; size = sizeof(data); count = 1; type = TIBRVMSG_STRING; } TibrvMsgField { name = "pollux"; id = 0; data.str = "This one is a boxxer."; size = sizeof(data); count = 1; type = TIBRVMSG_STRING; } TibrvMsgField { name = "clytemnestra"; id = 0; data.msg = { TibrvMsgField { name = "father"; id = 0; data.str = "tyndareus"; size = sizeof(data); count = 1; type = TIBRVMSG_STRING; } TibrvMsgField { name = "husbands"; id = 0; data.i32 = 2; size = sizeof(data); count = 1; type = TIBRVMSG_I32; } }
Example 68: TibrvMsg with added TibrvMsg Example
158

Defining a Custom TibrvMsg Mapping
To add the binding-only element clytemnestra to the default binding of the message leda:
1. Because the message leda is used as an output message, add a tibrv:msg child element to the tibrv:output element.
2. Set the tibrv:msg element�s name attribute to the value of the corresponding contract message part that uses the type leda.
3. Add a tibrv:field element as a child of the tibrv:msg element.
4. Set the new tibrv:field element�s name attribute to the value of the corresponding element�s name attribute. In this instance, castor.
5. Repeat steps 3 and 4 for the second element, pollux, in leda.
6. To start the binding-only TibrvMsg element, add a tibrv:msg element after the tibrv:field element for pollux.
7. Set the new tibrv:msg element�s alias attribute to clytemnestra.
8. Add a tibrv:field element as a child of the tibrv:msg element.
9. Set the tibrv:field element�s alias attribute to father.
10. Set the tibrv:field element�s type attribute to xsd:string.
11. Set the tibrv:field element�s value attribute to tyndareus.
size = sizeof(data); count = 1; type = TIBRVMSG_MSG; } TibrvMsgField { name = "hellen"; id = 0; data.str = "false"; size = sizeof(data); count = 1; type = TIBRVMSG_BOOL; } } size = sizeof(data); count = 1; type = TIBRVMSG_MSG; }...}
Example 68: TibrvMsg with added TibrvMsg Example
159

CHAPTER 11 | Using Tibco Rendezvous Messages
12. Repeat steps 8 through 11 for the second TibrvMsgField in clytemnestra.
13. On the same level as the tibrv:field elements mapping castor and pollux, add a tibrv:field element to map helen.
Example 69 shows a binding for the message shown in Example 68.
Creating a custom mapping for a message defined in the contract
Using the tibrv:msg elements and tibrv:field elements you can change how contract elements are broken into TibrvMsgs and TibrvMsgFields. For a detailed discussion of the default TibrvMsg mapping see �Artix Default Mappings for TibrvMsg� on page 138.
Example 69: TibrvMsg Binding with an Added Binding-only Element
<binging name="tibBinding"> <tibrv:binding/> <operation ...> <tibrv:operation/> <input ...> <tibrv:input/> </input> <output name="response" message="tns:taleResponse"> <tibrv:output> <tibrv:msg name="tale"> <tibrv:field name="castor"/> <tibrv:field name="pollux"/> <tibrv:msg alias="clytemnestra"> <tibrv:field alias="father" type="xsd:string" value="tyndareus"/> <tibrv:field alias="husbands" type="xsd:int" value="2"/> <tibrv:msg/> <tibrv:field name="hellen"/> </tibrv:msg> </tibrv:output> </output> </operation></binding>
160

Defining a Custom TibrvMsg Mapping
You can alter this default mapping to add more wrapping to the TibrvMsgFields. For instance, if a message consists of a single xsd:string part, it would be mapped to a TibrvMsg similar to the one shown in Example 70.
However, you could specify that instead of being mapped straight to a TibrvMsgField, it be mapped to a TibrvMsg containing a TibrvMsgField as shown in Example 71.
Example 70: TibrvMsg for a String
TibrvMsg{ TibrvMsgField { name = "electra"; id = 0; data.str = "forelorn"; size = sizeof(data); count = 1; type = TIBRVMSG_STRING; }}
Example 71: TibrvMsg with a TibrvMsg with a String
TibrvMsg{ TibrvMsgField { name = "grandchild"; id = 0; data.msg =
161
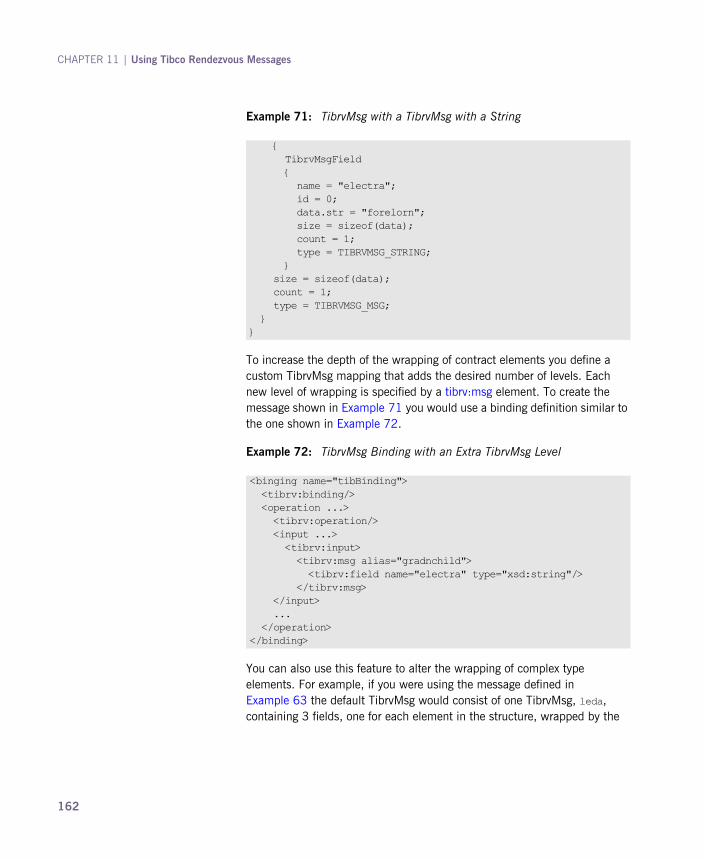
CHAPTER 11 | Using Tibco Rendezvous Messages
To increase the depth of the wrapping of contract elements you define a custom TibrvMsg mapping that adds the desired number of levels. Each new level of wrapping is specified by a tibrv:msg element. To create the message shown in Example 71 you would use a binding definition similar to the one shown in Example 72.
You can also use this feature to alter the wrapping of complex type elements. For example, if you were using the message defined in Example 63 the default TibrvMsg would consist of one TibrvMsg, leda, containing 3 fields, one for each element in the structure, wrapped by the
{ TibrvMsgField { name = "electra"; id = 0; data.str = "forelorn"; size = sizeof(data); count = 1; type = TIBRVMSG_STRING; } size = sizeof(data); count = 1; type = TIBRVMSG_MSG; }}
Example 71: TibrvMsg with a TibrvMsg with a String
Example 72: TibrvMsg Binding with an Extra TibrvMsg Level
<binging name="tibBinding"> <tibrv:binding/> <operation ...> <tibrv:operation/> <input ...> <tibrv:input> <tibrv:msg alias="gradnchild"> <tibrv:field name="electra" type="xsd:string"/> </tibrv:msg> </input> ... </operation></binding>
162

Defining a Custom TibrvMsg Mapping
root TibrvMsg. You could modify the mapping of the logical message to a TibrvMsg that resembles the one shown in Example 73. The two elements castor and pollux have been wrapped in a TibrvMsg called brothers.
Example 73: TibrvMsg with Custom TibrvMsg Wrapping
TibrvMsg{ TibrvMsgField { name = "tale"; id = 0; data.msg = { TibrvMsgField { name = "brothers" id = 0; data.msg = { TibrvMsgField { name = "castor"; id = 0; data.str = "This one is a horse trainer."; size = sizeof(data); count = 1; type = TIBRVMSG_STRING; } TibrvMsgField { name = "pollux"; id = 0; data.str = "This one is a boxxer."; size = sizeof(data); count = 1; type = TIBRVMSG_STRING; } } size = sizeof(data); count = 1; type = TIBRVMSG_MSG; }
163
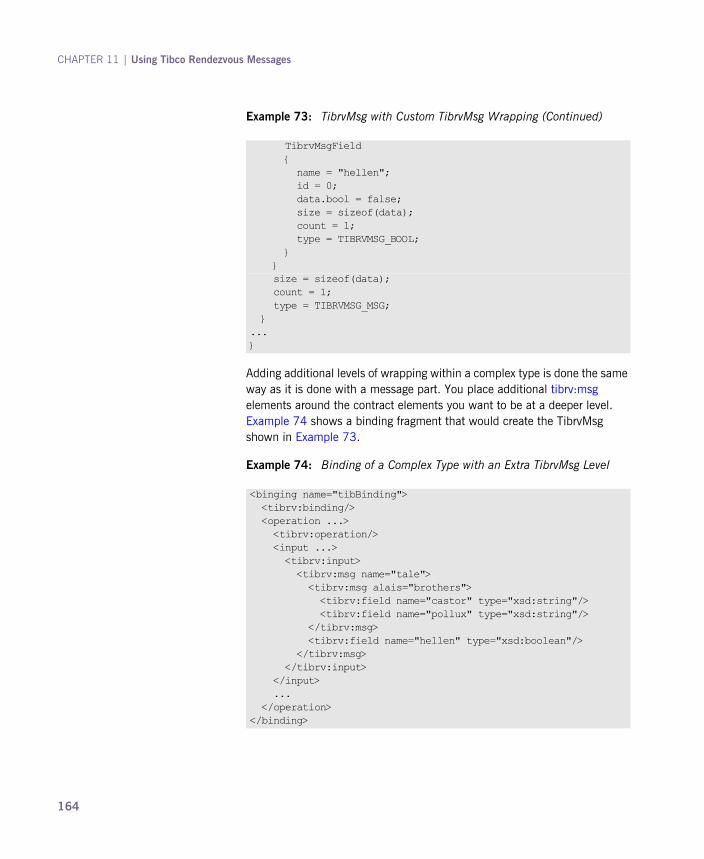
CHAPTER 11 | Using Tibco Rendezvous Messages
Adding additional levels of wrapping within a complex type is done the same way as it is done with a message part. You place additional tibrv:msg elements around the contract elements you want to be at a deeper level. Example 74 shows a binding fragment that would create the TibrvMsg shown in Example 73.
TibrvMsgField { name = "hellen"; id = 0; data.bool = false; size = sizeof(data); count = 1; type = TIBRVMSG_BOOL; } } size = sizeof(data); count = 1; type = TIBRVMSG_MSG; }...}
Example 73: TibrvMsg with Custom TibrvMsg Wrapping (Continued)
Example 74: Binding of a Complex Type with an Extra TibrvMsg Level
<binging name="tibBinding"> <tibrv:binding/> <operation ...> <tibrv:operation/> <input ...> <tibrv:input> <tibrv:msg name="tale"> <tibrv:msg alais="brothers"> <tibrv:field name="castor" type="xsd:string"/> <tibrv:field name="pollux" type="xsd:string"/> </tibrv:msg> <tibrv:field name="hellen" type="xsd:boolean"/> </tibrv:msg> </tibrv:input> </input> ... </operation></binding>
164

Defining a Custom TibrvMsg Mapping
tibrv:msg tibrv:msg instructs the binding runtime to create an instance of a TibrvMsg. Its attributes are described in Table 21.
tibrv:field tibrv:field instructs the binding to create an instance of a TibrvMsgField. Its attributes are described in Table 22.
Table 21: Attributes for tibrv:msg
Attribute Purpose
name Specifies the name of the contract element from which this TibrvMsg instance gets its value. If this attribute is not present, then the TibrvMsg is considered a binding-only element.
alias Specifies the value of the name member of the TibrvMsg instance. If this attribute is not specified, then the binding will use the value of the name attribute.
element Used only when tibrv:msg is an immediate child of tibrv:context. Specifies the QName of the element defining the context data to use when populating the TibrvMsg. See �Adding Context Information to a TibrvMsg� on page 167.
id Specifies the value of the id member of the TibrvMsg instance. The default value is 0.
minOccurs/
maxOccurs
Used only with contract elements. The values must be identical to the values specified in the schema definition.
Table 22: Attributes for tibrv:field
Attribute Purpose
name Specifies the name of the contract element from which this TibrvMsgField instance gets its value. If this attribute is not present, then the TibrvMsgField is considered a binding-only element.
165
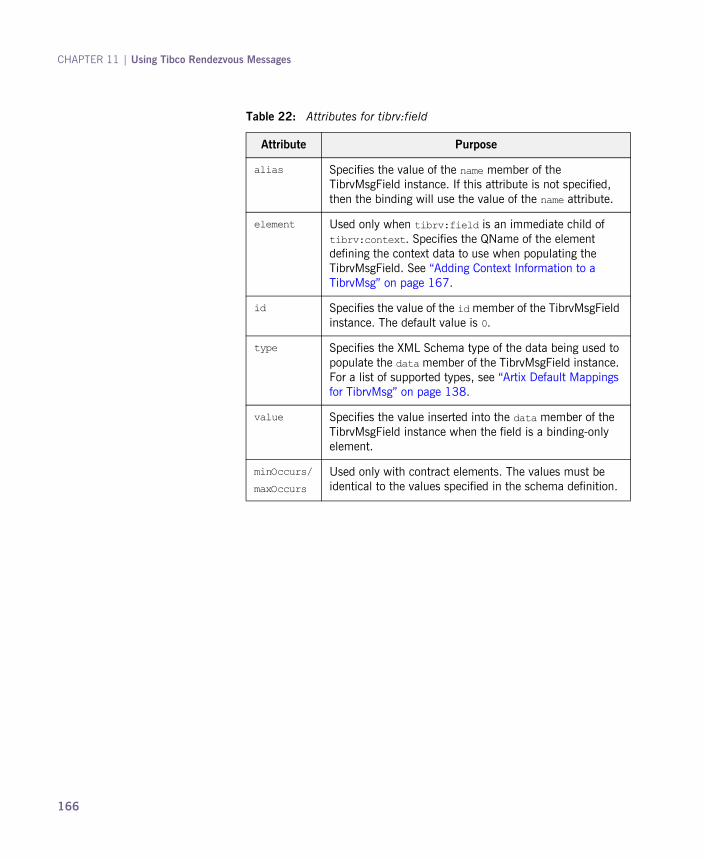
CHAPTER 11 | Using Tibco Rendezvous Messages
alias Specifies the value of the name member of the TibrvMsgField instance. If this attribute is not specified, then the binding will use the value of the name attribute.
element Used only when tibrv:field is an immediate child of tibrv:context. Specifies the QName of the element defining the context data to use when populating the TibrvMsgField. See �Adding Context Information to a TibrvMsg� on page 167.
id Specifies the value of the id member of the TibrvMsgField instance. The default value is 0.
type Specifies the XML Schema type of the data being used to populate the data member of the TibrvMsgField instance. For a list of supported types, see �Artix Default Mappings for TibrvMsg� on page 138.
value Specifies the value inserted into the data member of the TibrvMsgField instance when the field is a binding-only element.
minOccurs/
maxOccurs
Used only with contract elements. The values must be identical to the values specified in the schema definition.
Table 22: Attributes for tibrv:field
Attribute Purpose
166
Adding Context Information to a TibrvMsg
Adding Context Information to a TibrvMsg
Overview By using Artix contexts, you can define binding-only data that is dynamically generated and consumed by Artix applications. Contexts are a feature of the Artix programming model that allow application developers to pass metadata up and down the messaging chain. When using the TibrvMsg binding, you can instruct your Artix application to use context data to populate outgoing binding-only fields. On the receiving end, the TibrvMsg binding takes the information and uses it to populate a context in the application. For information on using contexts in Artix applications, see Developing Artix Applications with C++ or Developing Artix Applications with Java.
Telling the binding to get information from Artix contexts
When defining a custom TibrvMsg binding, you use the tibrv:context element to inform the binding that the immediate child element is populated from an Artix context. The immediate child of a tibrv:context element must be either a tibrv:msg element or a tibrv:field element depending on what type of information is contained in the context.
You would use tibrv:msg for context data that is an instance of a complex XML Schema type. You could also use tibrv:msg if you want an instance of a native XML Schema type wrapped in a TibrvMsg. You would use tibrv:field to insert context data that was an instance of a native XML Schema type as a TibrvMsgField.
When a tibrv:msg element or a tibrv:field element are used to insert context information into a TibrvMsg they use the element attribute in place of the name attribute. The element attribute specifies the QName used to register the context data with the Artix bus. It must correspond to a globally defined XML Schema element. Also, when inserting context information you cannot specify values for any other attributes except the alias attribute.
Application considerations When using context data in your TibrvMsg binding there is some application-specific information you need to abide by:
� At least one piece of the integrated solution must be an Artix application to process the context data.
167

CHAPTER 11 | Using Tibco Rendezvous Messages
� The Tibrv binding will automatically register, but not create an instance of, any contexts used in its binding definition with the Artix bus. Contexts are registered using the QName of the element specified in the contract.
� For any context data that will be sent in an input message, client-side Artix applications are responsible for creating an instance of the appropriate context data in the request context container before the message is handed off to the binding.
� Context data sent from a client in an input message will be available to server-side Artix applications in the request context once the message has been processed by the binding.
� For any context data that will be sent in an output message, server-side Artix applications are responsible for creating an instance of the appropriate context data in the reply context container before the message is handed off to the binding.
� Context data sent from a server in an output message will be available to client-side Artix applications in the reply context once the message has been processed by the binding.
Example If you were integrating with a Tibco server that used a header to correlate messages using an ASCII correlation ID, you could use the TibrvMsg binding�s context support to implement the correlation ID on the Artix side of the solution. The first step would be to define an XML Schema element called corrID for the context that would hold the correlation ID. Then in your TibrvMsg binding definition you would include a tibrv:context element in the tibrv:binding element to specify that all messages passing through the binding will have the header. Example 75 shows a contract fragment containing the appropriate entries for this scenario.
Example 75: Using Context Data in a TibrvMsg Binding
<definitions xmlns:xsd1="http://widgetVendor.com/types/widgetTypes" ...>
168
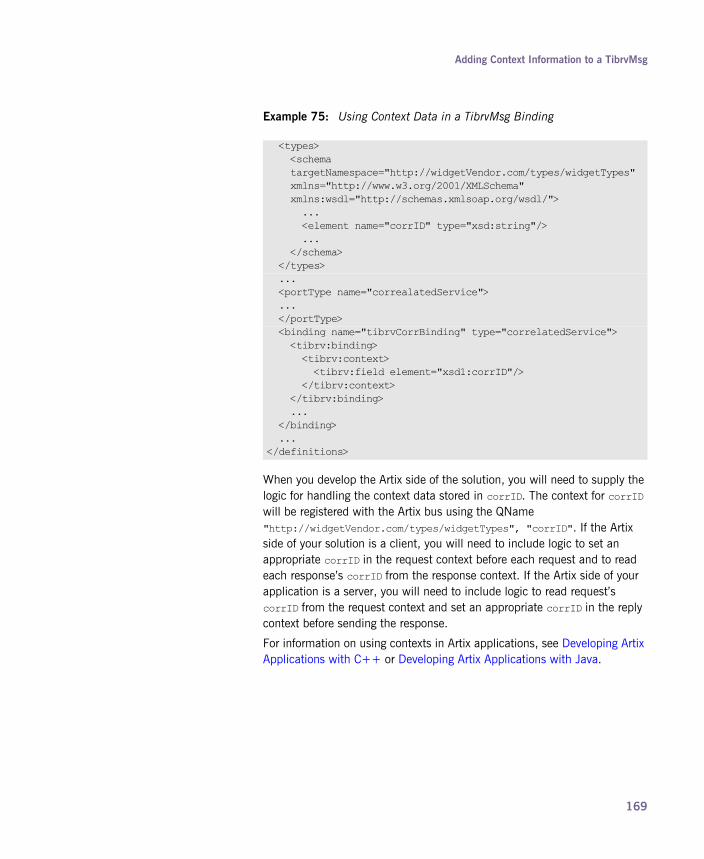
Adding Context Information to a TibrvMsg
When you develop the Artix side of the solution, you will need to supply the logic for handling the context data stored in corrID. The context for corrID will be registered with the Artix bus using the QName "http://widgetVendor.com/types/widgetTypes", "corrID". If the Artix side of your solution is a client, you will need to include logic to set an appropriate corrID in the request context before each request and to read each response�s corrID from the response context. If the Artix side of your application is a server, you will need to include logic to read request�s corrID from the request context and set an appropriate corrID in the reply context before sending the response.
For information on using contexts in Artix applications, see Developing Artix Applications with C++ or Developing Artix Applications with Java.
<types> <schema targetNamespace="http://widgetVendor.com/types/widgetTypes" xmlns="http://www.w3.org/2001/XMLSchema" xmlns:wsdl="http://schemas.xmlsoap.org/wsdl/"> ... <element name="corrID" type="xsd:string"/> ... </schema> </types> ... <portType name="correalatedService"> ... </portType> <binding name="tibrvCorrBinding" type="correlatedService"> <tibrv:binding> <tibrv:context> <tibrv:field element="xsd1:corrID"/> </tibrv:context> </tibrv:binding> ... </binding> ...</definitions>
Example 75: Using Context Data in a TibrvMsg Binding
169

CHAPTER 11 | Using Tibco Rendezvous Messages
170
CHAPTER 12
Using XML DocumentsArtix allows you to pass XML documents that are not packaged as SOAP messages.
Overview The pure XML payload format provides an alternative to the SOAP binding by allowing services to exchange data using straight XML documents without the overhead of a SOAP envelope.
Artix Designer provides a wizard for generating an XML binding from a logical interface. Alternatively, you can create an XML binding using any text or XML editor.
Using Artix Designer You can add an XML binding to a contract by either selecting Artix Designer | New Binding or selecting New Binding from the context menu available in Artix Designer�s diagram view. For more information see the on-line help provided with Artix Designer.
171

CHAPTER 12 | Using XML Documents
Hand editing To map an interface to a pure XML payload format:
1. Add the namespace declaration to include the IONA extensions defining the XML binding. See �XML binding namespace� on page 172.
2. Add a standard WSDL binding element to your contract to hold the XML binding, give the binding a unique name, and specify the name of the WSDL portType element that represents the interface being bound.
3. Add an xformat:binding child element to the binding element to identify that the messages are being handled as pure XML documents without SOAP envelopes.
4. Optionally, set the xformat:binding element�s rootNode attribute to a valid QName. For more information on the effect of the rootNode attribute see �XML messages on the wire� on page 173.
5. For each operation defined in the bound interface, add a standard WSDL operation element to hold the binding information for the operation�s messages.
6. For each operation added to the binding, add the input, output, and fault children elements to represent the messages used by the operation. These elements correspond to the messages defined in the interface definition of the logical operation.
7. Optionally add an xformat:body element with a valid rootNode attribute to the added input, output, and fault elements to override the value of rootNode set at the binding level.
XML binding namespace The IONA extensions used to describe XML format bindings are defined in the namespace http://celtix.objectweb.org/bindings/xmlformat. Artix tools use the prefix xformat to represent the XML binding extensions. Add the following line to your contracts:
Note: If any of your messages have no parts, for example the output message for an operation that returns void, you must set the rootNode attribute for the message to ensure that the message written on the wire is a valid, but empty, XML document.
xmlns:xformat="http://celtix.objectweb.org/bindings/xmlformat"
172

XML messages on the wire When you specify that an interface�s messages are to be passed as XML documents, without a SOAP envelope, you must take care to ensure that your messages form valid XML documents when they are written on the wire. You also need to ensure that non-Artix participants that receive the XML documents understand the messages generated by Artix.
A simple way to solve both problems is to use the optional rootNode attribute on either the global xformat:binding element or on the individual message�s xformat:body elements. The rootNode attribute specifies the QName for the element that serves as the root node for the XML document generated by Artix. When the rootNode attribute is not set, Artix uses the root element of the message part as the root element when using doc style messages, or an element using the message part name as the root element when using rpc style messages.
For example, if the rootNode attribute is not set the message defined in Example 76 would generate an XML document with the root element lineNumber.
For messages with one part, Artix will always generate a valid XML document even if the rootNode attribute is not set. However, the message in Example 77 would generate an invalid XML document.
Example 76: Valid XML Binding Message
<type ...> ... <element name="operatorID" type="xsd:int"/> ...</types><message name="operator"> <part name="lineNumber" element="ns1:operatorID"/></message>
Example 77: Invalid XML Binding Message
<types> ... <element name="pairName" type="xsd:string"/> <element name="entryNum" type="xsd:int"/> ...</types>
173
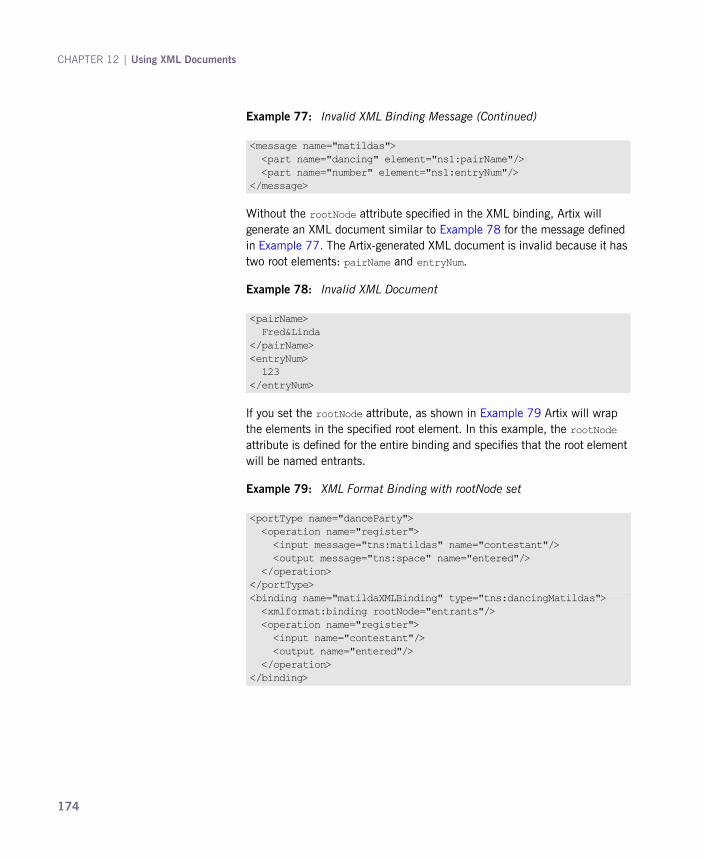
CHAPTER 12 | Using XML Documents
Without the rootNode attribute specified in the XML binding, Artix will generate an XML document similar to Example 78 for the message defined in Example 77. The Artix-generated XML document is invalid because it has two root elements: pairName and entryNum.
If you set the rootNode attribute, as shown in Example 79 Artix will wrap the elements in the specified root element. In this example, the rootNode attribute is defined for the entire binding and specifies that the root element will be named entrants.
<message name="matildas"> <part name="dancing" element="ns1:pairName"/> <part name="number" element="ns1:entryNum"/></message>
Example 77: Invalid XML Binding Message (Continued)
Example 78: Invalid XML Document
<pairName> Fred&Linda</pairName><entryNum> 123</entryNum>
Example 79: XML Format Binding with rootNode set
<portType name="danceParty"> <operation name="register"> <input message="tns:matildas" name="contestant"/> <output message="tns:space" name="entered"/> </operation></portType><binding name="matildaXMLBinding" type="tns:dancingMatildas"> <xmlformat:binding rootNode="entrants"/> <operation name="register"> <input name="contestant"/> <output name="entered"/> </operation></binding>
174

An XML document generated from the input message would be similar to Example 80. Notice that the XML document now only has one root element.
Overriding the binding�s rootNode attribute setting
You can also set the rootNode attribute for each individual message, or override the global setting for a particular message, by using the xformat:body element inside of the message binding. For example, if you wanted the output message defined in Example 79 to have a different root element from the input message, you could override the binding�s root element as shown in Example 81.
Example 80: XML Document generated using the rootNode attribute
<entrants> <pairName> Fred&Linda </pairName> <entryNum> 123 </entryNum></entrants>
Example 81: Using xformat:body
<binding name="matildaXMLBinding" type="tns:dancingMatildas"> <xmlformat:binding rootNode="entrants"/> <operation name="register"> <input name="contestant"/> <output name="entered"/> <xformat:body rootNode="entryStatus"/> </operation></binding>
175

CHAPTER 12 | Using XML Documents
176
CHAPTER 13
Using RMIArtix allows you to communicate with remote objects using RMI.
Overview Artix provides a way for Artix Java applications to connect to a remote object using RMI. The remote object does not require a Web services front end, nor does it require the ability to understand SOAP. Artix will handle the message translation.
Procedure To use RMI you need to do the following:
1. Add an RMI binding to the application�s WSDL contract.
2. Add an RMI port definition to the application�s WSDL contract.
3. Develop the application so that it uses an interface that extends java.rmi.Remote.
4. If you are developing a service, generate the RMI stubs using rmic.
5. Configure the application to load the RMI plug-in and the Java plug-in.
Note: If you want to use RMI/IIOP, you need to specify the proper flags to rmic and extend the appropriate class.
177

CHAPTER 13 | Using RMI
Namespace The IONA extensions used for RMI information to a WSDL contract are defined in the namespace http://schemas.iona.com/bindings/rmi. Artix tools use the prefix rmi to represent the RMI extensions. Add the following line to your contracts:
Adding RMI information to a contract
A contract for an Artix endpoint that uses RMI is slightly different than other contracts because the RMI connectivity feature of Artix does not use the interface generated from the logical interface definition. Instead, it uses the RMI interface of the object to which it will connect. Therefore, the portType element defining the logical interface can be left empty. If it is fully specified, it will be ignored by the runtime.
To specify that an endpoint is to use RMI you need to add an RMI binding definition and RMI endpoint definition to your contract. This is done using the rmi:class element and the rmi:address element.
The rmi:class element defines an RMI binding and is a child of the WSDL binding element. It has a single attribute, name, that specifies the fully qualified name of the Java interface of the RMI object to which your application connects. This interface must extend java.rmi.Remote.
The rmi:address element defines the connection information for an RMI endpoint. It has a single attribute, url, the specifies the JNDI URL the application will use to talk to remote objects.
Artix Designer provides a tool for adding an RMI binding to a contract. To use this tool select Artix Designer | New Binding or select New Binding from the context menu available in daigram view. For more information see the on-line help provided with Artix Designer.
xmlns:rmi="http://schemas.iona.com/bindings/rmi"
178
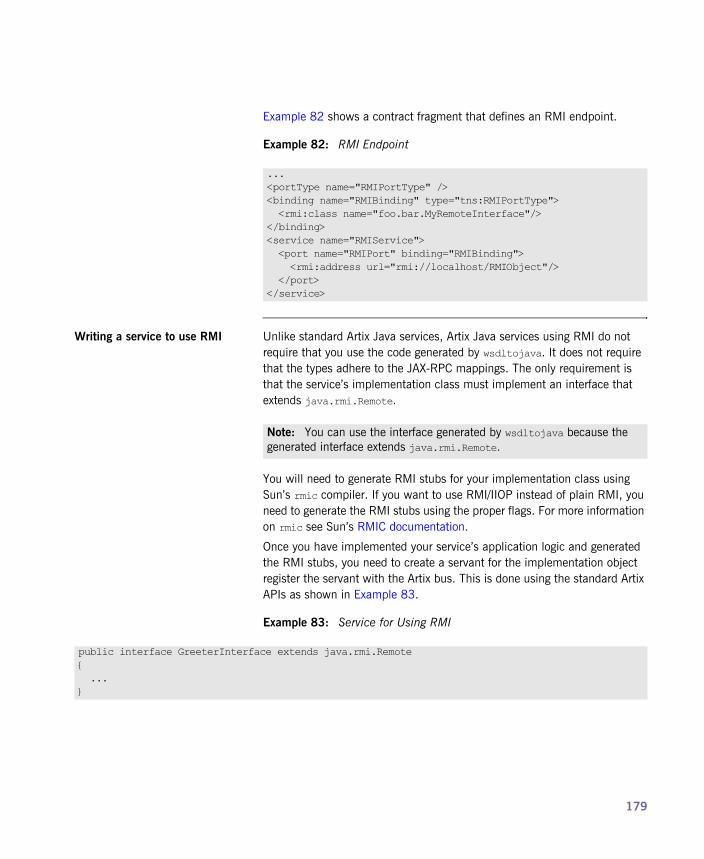
Example 82 shows a contract fragment that defines an RMI endpoint.
Writing a service to use RMI Unlike standard Artix Java services, Artix Java services using RMI do not require that you use the code generated by wsdltojava. It does not require that the types adhere to the JAX-RPC mappings. The only requirement is that the service�s implementation class must implement an interface that extends java.rmi.Remote.
You will need to generate RMI stubs for your implementation class using Sun�s rmic compiler. If you want to use RMI/IIOP instead of plain RMI, you need to generate the RMI stubs using the proper flags. For more information on rmic see Sun�s RMIC documentation.
Once you have implemented your service�s application logic and generated the RMI stubs, you need to create a servant for the implementation object register the servant with the Artix bus. This is done using the standard Artix APIs as shown in Example 83.
Example 82: RMI Endpoint
...<portType name="RMIPortType" /><binding name="RMIBinding" type="tns:RMIPortType"> <rmi:class name="foo.bar.MyRemoteInterface"/></binding><service name="RMIService"> <port name="RMIPort" binding="RMIBinding"> <rmi:address url="rmi://localhost/RMIObject"/> </port></service>
Note: You can use the interface generated by wsdltojava because the generated interface extends java.rmi.Remote.
Example 83: Service for Using RMI
public interface GreeterInterface extends java.rmi.Remote{ ...}
179

CHAPTER 13 | Using RMI
Writing a client to use RMI Implementing a client that uses the RMI binding is similar to implementing a standard Artix client in Java. You need to have access to the RMI interface implemented by the service. You use the interface to create a service proxy using the standard Artix createClient() method.
The only difference is that instead of casting the proxy returned from createClient() to the implementation class, you cast it to the RMI interface class as shown in Example 84. This gives you access to all of the
public class RMIGreeter extends UnicastRemoteObject implements GreeterInterface{ ...}
public class MyRMIService{ ... public static void main (String args[]) throws Exception { ... Servant servant = new SingleInstanceServant(new RMIGreeter(), myWsdlPath, bus); bus.registerServant(servant, new QName(tns, "MyRmiService"); ... }}
Example 83: Service for Using RMI
180
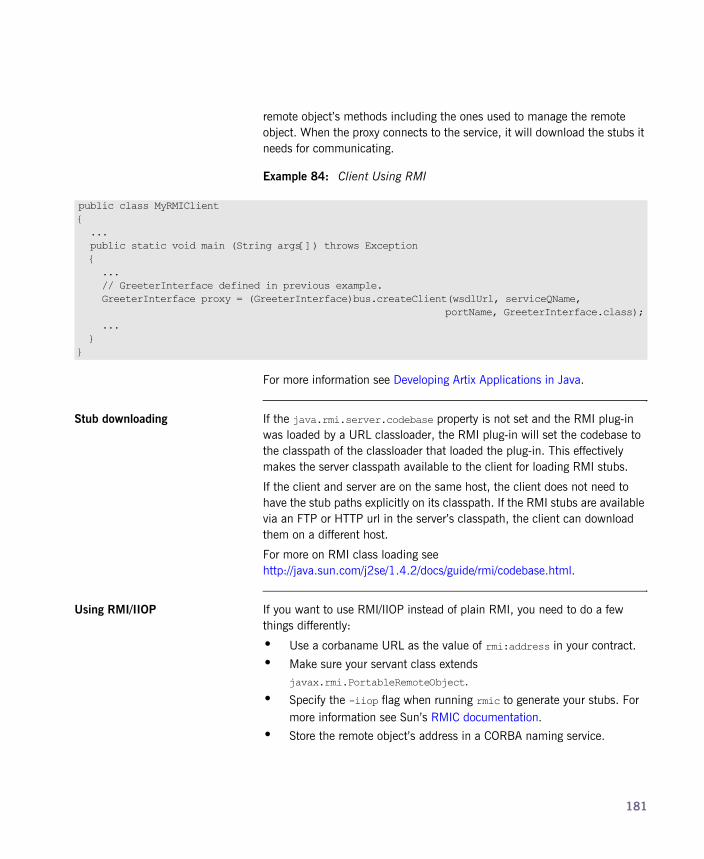
remote object�s methods including the ones used to manage the remote object. When the proxy connects to the service, it will download the stubs it needs for communicating.
For more information see Developing Artix Applications in Java.
Stub downloading If the java.rmi.server.codebase property is not set and the RMI plug-in was loaded by a URL classloader, the RMI plug-in will set the codebase to the classpath of the classloader that loaded the plug-in. This effectively makes the server classpath available to the client for loading RMI stubs.
If the client and server are on the same host, the client does not need to have the stub paths explicitly on its classpath. If the RMI stubs are available via an FTP or HTTP url in the server�s classpath, the client can download them on a different host.
For more on RMI class loading see http://java.sun.com/j2se/1.4.2/docs/guide/rmi/codebase.html.
Using RMI/IIOP If you want to use RMI/IIOP instead of plain RMI, you need to do a few things differently:
� Use a corbaname URL as the value of rmi:address in your contract.
� Make sure your servant class extends javax.rmi.PortableRemoteObject.
� Specify the -iiop flag when running rmic to generate your stubs. For more information see Sun�s RMIC documentation.
� Store the remote object�s address in a CORBA naming service.
Example 84: Client Using RMI
public class MyRMIClient{ ... public static void main (String args[]) throws Exception { ... // GreeterInterface defined in previous example. GreeterInterface proxy = (GreeterInterface)bus.createClient(wsdlUrl, serviceQName, portName, GreeterInterface.class); ... }}
181

CHAPTER 13 | Using RMI
Configuring an application to use RMI
Unlike most Artix bindings, the RMI binding does not cause your application to automatically load the plug-ins it needs. To configure your application to use RMI you must add the following to your application�s configuration:
For more information see the Artix Configuration Reference.
Limitations The RMI support in Artix has the following limitations:
� The RMI support bypasses all Artix interceptors.
� The router does not support RMI.
� Applications using RMI must be explicitly configured to load the RMI plug-in and the Java plug-in. See the Artix Configuration Reference.
� RMI is only available to Artix endpoints developed in Java.
� Artix security features are not available when using RMI.
� The APIs that resolve a service given only a QName do not work for services using RMI.
� You cannot register transient services with RMI.
Logging Errors For ports that use the RMI binding you may see errors like this in the logs:
These can be ignored.
orb_plugins=[..., "java", ...];java_plugins=["rmi"];
(IT_BUS.WSDL:0) E - WSDL for Port hello in service HelloRmiService xmlns="http://www.iona.com/com.iona.jbus.bindings.rmi.Hello" is not valid. It doesn't have any contents. ([[RmiBinding]])
182

CHAPTER 14
Using G2++ Messages
Overview G2++ is a set of mechanisms for defining and manipulating hierarchically structured messages. G2++ messages can be thought of as records, which are described in terms of their structure and the data types they contain.
G2++ is an alternative to �raw� structures (such as C or C++ structs), which rely on common data representation characteristics that might not be present in a heterogeneous distributed system.
Simple G2++ mapping example Consider the following instance of a G2++ message:
Note: Because tabs are significant in G2++ files (that is, tabs indicate scoping levels and are not simply treated as �white space�), examples in this chapter indicate tab characters as an up arrow (caret) followed by seven spaces.
183

CHAPTER 14 | Using G2++ Messages
This G2++ message can be mapped to the following logical description, expressed in WSDL:
Note that each of the message sub-structures (newPart and XYZ_Part) are initially described separately in terms of their elements, then the two sub-structures are aggregated to form the enclosing record (PRequest).
Example 85: ERecord G2++ Message
ERecord^ XYZ_Part^ ^ XYZ_Code^ someValue1^ ^ password^ someValue2^ ^ serviceFieldName^ someValue3^ newPart^ ^ newActionCode^ someValue4^ ^ newServiceClassName^ someValue5^ ^ oldServiceClassName^ someValue6
Example 86: WSDL Logical Description of ERecord Message
<types> <schema targetNamespace="http://soapinterop.org/xsd" xmlns="http://www.w3.org/2001/XMLSchema" xmlns:wsdl="http://schemas.xmlsoap.org/wsdl/"> <complexType name="XYZ_Part"> <all> <element name="XYZ_Code" type="xsd:string"/> <element name="password" type="xsd:string"/> <element name="serviceFieldName" type="xsd:string"/> </all> </complexType> <complexType name="newPart"> <all> <element name="newActionCode" type="xsd:string"/> <element name="newServiceClassName" type="xsd:string"/> <element name="oldServiceClassName" type="xsd:string"/> </all> <complexType name="PRequest"> <all> <element name="newPart" type="xsd1:newPart"/> <element name="XYZ_Part" type="xsd1:XYZ_Part"/> </all> </complexType>
184

This logical description is mapped to a physical representation of the G2++ message, also expressed in WSDL:
Note that all G2++ definitions are contained within the scope of the G2Definitions element. Each of the messages are defined within the scope of a G2MessageDescription element. The type attribute for message descriptions must be msg while the name attribute simply has to be unique.
Each record is described within the scope of a G2MessageComponent element. Within this, the name attribute must reflect the G2++ record name and the type attribute must be struct.
Nested within the records are the element definitions; however, if required, a record could be nested here by inclusion of a nested G2MessageComponent element (newPart and XYZ_Part are nested records of parent ERecord). Element name attributes must match the G2 element name. Defining a record and then referencing it as a nested struct of a parent is legal for the logical mapping but not the physical. In the physical mapping, nested structs must be defined in-place.
Example 87: WSDL Physical Representation of ERecord Message
<binding name="ERecordBinding" type="tns:ERecordRequestPortType"> <soap:binding style="rpc"transport="http://schemas.xmlsoap.org/soap/http"/> <artix:binding transport="tuxedo" format="g2++"> <G2Definitions> <G2MessageDescription name="creation" type="msg"> <G2MessageComponent name="ERecord" type="struct"> <G2MessageComponent name="XYZ_Part" type="struct"> <element name="XYZ_Code" type="element"/> <element name="password" type="element"/> <element name="serviceFieldName" type="element"/> </G2MessageComponent> <G2MessageComponent name="newPart" type="struct"> <element name="newActionCode" type="element"/> <element name="newServiceClassName" type="element"/> <element name="oldServiceClassName" type="element"/> </G2MessageComponent> </G2MessageComponent> </G2MessageDescription> </G2Definitions></artix:binding>
185

CHAPTER 14 | Using G2++ Messages
The following example illustrates the custom mapping of arrays, which differs from strictly defined G2++ array mappings. The array definition is shown below:
This represents an array with two elements. When placed in a G2++ message, the result is as follows:
In this version of the ERecord record, XYZ_Part contains an array called XYZ_MetaData, whose size is one. The single entry can be thought of as a name/value pair: pushToTalk/PT01, which allows us to ignore columnName and columnValue.
IMS_MetaData^ 2^ 0^ ^ columnName^ SERVICENAME^ ^ columnValue^ someValue1^ 1^ ^ columnName^ SERVICEACTION^ ^ columnValue^ someValue2
Example 88: Extended ERecord G2++ Message
ERecord^ XYZ_Part^ ^ XYZ_Code^ someValue1^ ^ password^ someValue2^ ^ serviceFieldName^ someValue3^ XYZ_Metadata^ 1^ ^ 0^ ^ ^ columnName^ pushToTalk^ ^ ^ columnValue^ PT01^ newPart^ ^ newActionCode^ someValue4^ ^ newServiceClassName^ someValue5^ ^ oldServiceClassName^ someValue6
186

Mapping the new ERecord record to a WSDL logical description results in the following:
Example 89: WSDL Logical Description of Extended ERecord Message
<types> <schema targetNamespace="http://soapinterop.org/xsd" xmlns="http://www.w3.org/2001/XMLSchema" xmlns:wsdl="http://schemas.xmlsoap.org/wsdl/"> <complexType name="XYZ_Part"> <all> <element name="XYZ_Code" type="xsd:string"/> <element name="password" type="xsd:string"/> <element name="serviceFieldName" type="xsd:string"/> <element name="pushToTalk" type="xsd:string"/> </all> </complexType> <complexType name="newPart"> <all> <element name="newActionCode" type="xsd:string"/> <element name="newServiceClassName" type="xsd:string"/> <element name="oldServiceClassName" type="xsd:string"/> </all> <complexType name="PRequest"> <all> <element name="newPart" type="xsd1:newPart"/> <element name="XYZ_Part" type="xsd1:XYZ_Part"/> </all> </complexType>
187

CHAPTER 14 | Using G2++ Messages
Thus the array elements columnName and columnValue are �promoted� to a name/Value pair in the logical mapping. This physical G2++ representation can now be mapped as follows:
This physical mapping of the extended ERecord message now contains an array, described with its XYZ_MetaData name (as per the G2++ record definition). Its type is "array" and its size is one. This G2MessageComponent contains a single element called "pushToTalk".
Example 90: WSDL Physical Representation of Extended ERecord Message
<binding name="ERecordBinding" type="tns:ERecordRequestPortType"> <soap:binding style="rpc"transport="http://schemas.xmlsoap.org/soap/http"/> <artix:binding transport="tuxedo" format="g2++"> <G2Definitions> <G2MessageDescription name="creating" type="msg"> <G2MessageComponent name="ERecord" type="struct"> <G2MessageComponent name="XYZ_Part" type="struct"> <element name="XYZ_Code" type="element"/> <element name="password" type="element"/> <element name="serviceFieldName" type="element"/> <G2MessageComponent name="XYZ_MetaData" type="array" size="1"> <element name="pushToTalk" type="element"/> </G2MessageComponent> </G2MessageComponent> <G2MessageComponent name="newPart" type="struct"> <element name="newActionCode" type="element"/> <element name="newServiceClassName" type="element"/> <element name="oldServiceClassName" type="element"/> </G2MessageComponent> </G2MessageComponent> </G2MessageDescription> </G2Definitions></artix:binding>
188

Ignoring unknown elements It is possible to create a G2Definitions element that begins with a G2-specific configuration scope. This configuration scope is called G2Config in the following example:
In this scope, the only variable used is IgnoreUnknownElements, which can have a value of true or false. If the value is set to true, elements or array elements that are not defined in the G2 message definitions will be ignored. For example the following record would be valid if IgnoreUnknownElements is set to true.
When parsed, the above ERecord would not include the elements "AnElement" or "AnArrayElement". If IgnoreUnknownElements is set to false, the above record would be rejected as invalid.
<G2Definitions>^ <G2Config>^ ^ <IgnoreUnknownElements value="true"/></G2Config> . . .
Example 91: Valid G2++ Record With Ignored Fields
ERecord^ XYZ_Part^ XYZ_Code^ someValue1^ AnElement^ foo^ password^ someValue2^ serviceFieldName^ someValue3^ XYZ_MetaData^ 2 ^ ^ 0^ ^ ^ columnName^ pushToTalk^ ^ ^ columnValue^ PT01^ ^ 1^ ^ ^ columnName^ AnArrayElement^ ^ ^ columnValue^ bar^ newPart^ ^ newActionCode^ someValue4^ ^ newServiceClassName^ someValue5^ ^ oldServiceClassName^ someValue6
189

CHAPTER 14 | Using G2++ Messages
190
Part IIITransports
In this part This part contains the following chapters:
Understanding How Endpoints are Defined WSDL page 193
Using HTTP page 197
Using IIOP page 219
Using WebSphere MQ page 225
Using the Java Messaging System page 241
Using TIBCO Rendezvous page 255
Using Tuxedo page 261
Using FTP page 265
191

192
CHAPTER 15
Understanding How Endpoints are Defined WSDLEndpoints represent an instantiated service. They are defined by combining a binding and the networking details used to expose the endpoint.
Overview An endpoint can be thought of as a physical manifestation of a service. It combines a binding, which specifies the physical representation of the logical data used by a service, and a set of networking details that define the physical connection details used to make the service contactable by other endpoints.
Endpoints and services In the same way a binding can only map a single interface, an endpoint can only map to a single service. However, a service can be manifested by any number of endpoints. For example, you could define a ticket selling service that was manifested by four different endpoints. However, you could not have a single endpoint that manifested both a ticket selling service and a widget selling service.
193

CHAPTER 15 | Understanding How Endpoints are Defined WSDL
The WSDL elements Endpoints are defined in a contract using a combination of the WSDL service element and the WSDL port element. The service element is a collection of related port elements. The port elements define the actual endpoints.
The WSDL service element has a single attribute, name, that specifies a unique name. The service element is used as the parent element of a collection of related port elements. WSDL makes no specification about how the port elements are related. You can associate the port elements in any manner you see fit.
The WSDL port element has a single attribute, binding, that specifies the binding used by the endpoint. The port element is the parent element of the elements that specify the actual transport details used by the endpoint. The elements used to specify the transport details are discussed in the following sections.
Adding endpoints to a contract Artix provides a number of tools for adding endpoints to your contracts. These include:
� Artix Designer has wizards that lead you through the process of adding endpoints to your contract.
� A number of the endpoint types can be generated using command line tools.
The tools will add the proper elements to your contract for you. However, it is recommended that you have some knowledge of how the different transports used in defining an endpoint work.
You can also add an endpoint to a contract using any text editor. When you hand edit a contract, you are responsible for ensuring that the contract is valid.
Supported transports Artix endpoint definitions are built using extensions defined for each of the transports Artix supports. Artix supports the following transports:
� HTTP
� BEA Tuxedo
� IBM WebSphere MQ
� TIBCO Rendezvous�
� IIOP
194

� CORBA
� Java Messaging Service
� File Transfer Protocol
195

CHAPTER 15 | Understanding How Endpoints are Defined WSDL
196

CHAPTER 16
Using HTTPHTTP is the standard transport used in Web services.
Overview HTTP is the standard TCP/IP-based protocol used for client-server communications on the World Wide Web. The main function of HTTP is to establish a connection between a web browser (client) and a web server for the purposes of exchanging files and possibly other information on the Web.
In this chapter This chapter discusses the following topics:
Adding an HTTP Endpoint to a Contract page 198
Configuring an HTTP Endpoint page 205
Managing Cookies in Artix Clients page 216
197

CHAPTER 16 | Using HTTP
Adding an HTTP Endpoint to a Contract
Overview Artix provides three ways of specifying an HTTP endpoint�s address depending on the payload format you are using. SOAP 1.1 has a standardized soap:address element. SOAP 1.2 uses the wsoap12:address element. All other payload formats use Artix�s http:address element.
As well as the standard soap:address element or http:address element, Artix provides a number of HTTP extensions. The Artix extensions allow you to specify a number of the HTTP port�s configuration values in the contract.
soap:address When you are sending SOAP 1.1 messages over HTTP you must use the soap:address element to specify the endpoint�s address. It has one attribute, location, that specifies the endpoint�s address as a URL.
Example 92 shows a port element used to send SOAP 1.1 messages over HTTP.
soap:address When you are sending SOAP 12 messages over HTTP you must use the wsoap12:address element to specify the endpoint�s address. It has one attribute, location, that specifies the endpoint�s address as a URL.
Example 92 shows a port element used to send SOAP 1.2 messages over HTTP.
Example 92: SOAP 1.1 Port Element
<service name="artieSOAP11Service"> <port binding="artieSOAPBinding" name="artieSOAPPort"> <soap:address location="http://artie.com/index.xml"> </port></service>
Example 93: SOAP 1.2 Port Element
<service name="artieSOAP12Service"> <port binding="artieSOAPBinding" name="artieSOAPPort"> <wsoap12:address location="http://artie.com/index.xml"> </port></service>
198

Adding an HTTP Endpoint to a Contract
http:address When your messages are mapped to any payload format other than SOAP, such as fixed, you must use Artix�s http:address element to specify the endpoint�s address. Like the soap:address element, it has one attribute, location, that specifies the endpoint�s address as a URL.
Using the command line tool To use wsdltoservice to add an HTTP endpoint use the following options.
wsdltoservice -transport soap/http [-e service][-t port] [-b binding][-a address][-hssdt serverSendTimeout] [-hscvt serverReceiveTimeout] [-hstrc trustedRootCertificates] [-hsuss useSecureSockets] [-hsct contentType][-hscc serverCacheControl] [-hsscse supressClientSendErrors] [-hsscre supressClientReceiveErrors] [-hshka honorKeepAlive] [-hsmps serverMultiplexPoolSize] [-hsrurl redirectURL][-hscl contentLocation] [-hsce contentEncoding][-hsst serverType] [-hssc serverCertificate] [-hsscc serverCertificateChain] [-hsspk serverPrivateKey] [-hsspkp serverPrivateKeyPassword] [-hcst clientSendTimeout] [-hccvt clientReceiveTimeout] [-hctrc trustedRootCertificates] [-hcuss useSecureSockets][-hcct contentType] [-hccc clientCacheControl][-hcar autoRedirect] [-hcun userName][-hcp password] [-hcat clientAuthorizationType] [-hca clientAuthorization][-hca accept] [-hcal acceptLanguage][-hcae acceptEncoding] [-hch host][-hccn clientConnection][-hcck cookie] [-hcbt browserType][-hcr referer] [-hcps proxyServer][-hcpun proxyUserName] [-hcpp proxyPassword] [-hcpat proxyAuthorizationType] [-hcpa proxyAuthorization] [-hccce clientCertificate] [-hcccc clientCertificateChain] [-hcpk clientPrivateKey] [-hcpkp clientPrivateKeyPassword][-o file][-d dir] [-L file][-quiet][-verbose][-h][-v]wsdlurl
199

CHAPTER 16 | Using HTTP
The -transport soap/http flag specifies that the tool is to generate an HTTP service. The other options are as follows.
-transport soap/http If the payload being sent over the wire is SOAP, use -transport soap. For all other payloads use -transport http.
-e service Specifies the name of the generated service element.
-t port Specifies the value of the name attribute of the generated port element.
-b binding Specifies the name of the binding for which the service is generated.
-a address Specifies the value used in the address element of the port.
-hssdt serverSendTimeout Specifies the number of milliseconds that the server can continue to try to send a response to the client before the connection is timed-out.
-hscvt serverReceiveTimeout
Specifies the number of milliseconds that the server can continue to try to receive a request from the client before the connection is timed-out.
-hstrc trustedRootCertificates
Specifies the full path to the X509 certificate for the certificate authority.
-hsuss useSecureSockets Specifies if the server uses secure sockets. Valid values are true or false.
-hsct contentType Specifies the media type of the information being sent in a server response.
-hscc serverCacheControl Specifies directives about the behavior that must be adhered to by caches involved in the chain comprising a request from a client to a server.
-hsscse supressClientSendErrors
Specifies whether exceptions are thrown when an error is encountered on receiving a client request. Valid values are true or false.
-hsscre supressClientReceiveErrors
Specifies whether exceptions are thrown when an error is encountered on sending a response to a client. Valid values are true or false.
200
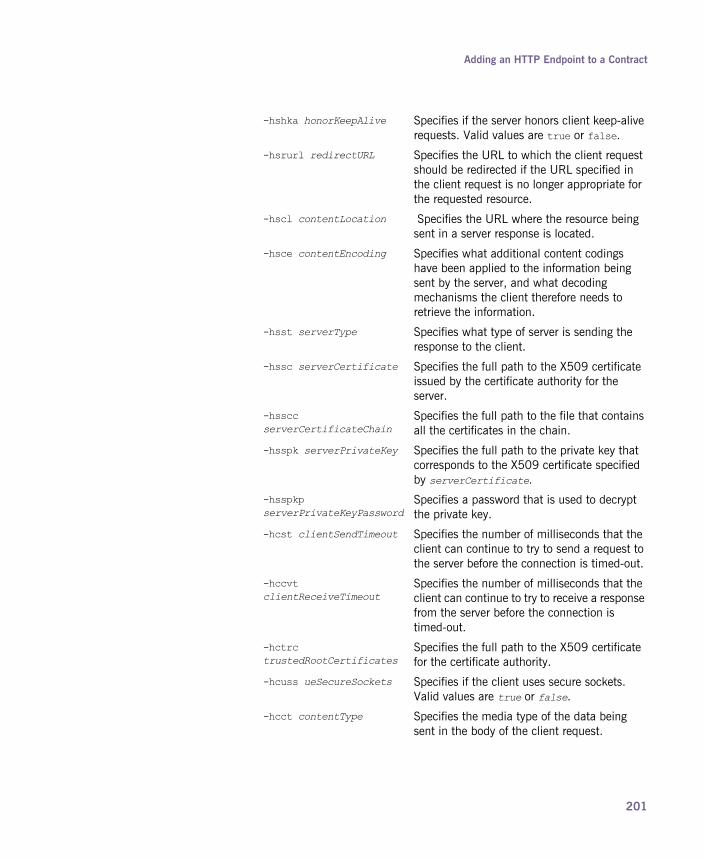
Adding an HTTP Endpoint to a Contract
-hshka honorKeepAlive Specifies if the server honors client keep-alive requests. Valid values are true or false.
-hsrurl redirectURL Specifies the URL to which the client request should be redirected if the URL specified in the client request is no longer appropriate for the requested resource.
-hscl contentLocation Specifies the URL where the resource being sent in a server response is located.
-hsce contentEncoding Specifies what additional content codings have been applied to the information being sent by the server, and what decoding mechanisms the client therefore needs to retrieve the information.
-hsst serverType Specifies what type of server is sending the response to the client.
-hssc serverCertificate Specifies the full path to the X509 certificate issued by the certificate authority for the server.
-hsscc serverCertificateChain
Specifies the full path to the file that contains all the certificates in the chain.
-hsspk serverPrivateKey Specifies the full path to the private key that corresponds to the X509 certificate specified by serverCertificate.
-hsspkp serverPrivateKeyPassword
Specifies a password that is used to decrypt the private key.
-hcst clientSendTimeout Specifies the number of milliseconds that the client can continue to try to send a request to the server before the connection is timed-out.
-hccvt clientReceiveTimeout
Specifies the number of milliseconds that the client can continue to try to receive a response from the server before the connection is timed-out.
-hctrc trustedRootCertificates
Specifies the full path to the X509 certificate for the certificate authority.
-hcuss ueSecureSockets Specifies if the client uses secure sockets. Valid values are true or false.
-hcct contentType Specifies the media type of the data being sent in the body of the client request.
201

CHAPTER 16 | Using HTTP
-hccc clientCacheControl Specifies directives about the behavior that must be adhered to by caches involved in the chain comprising a request from a client to a server.
-hcar autoRedirect Specifies if the server should automatically redirect client requests.
-hcun userName Specifies the username the client uses to register with servers.
-hcp password Specifies the password the client uses to register with servers.
-hcat clientAuthorizationType
Specifies the authorization mechanisms the client uses when contacting servers.
-hca clientAuthorization Specifies the authorization credentials used to perform the authorization.
-hca accept Specifies what media types the client is prepared to handle.
-hcal acceptLanguage Specifies what language the client prefers for the purposes of receiving a response
-hcae acceptEncoding Specifies what content codings the client is prepared to handle.
-hch host Specifies the internet host and port number of the resource on which the client request is being invoked.
-hccn clientConnection Specifies if the client will open a new connection for each request or if it will keep the original one open. Valid values are close and Keep-Alive.
-hcck cookie Specifies a static cookie to be sent to the server.
-hcbt browserType Specifies information about the browser from which the client request originates.
-hcr referer Specifies the value for the client�s referring entity.
-hcps proxyServer Specifies the URL of the proxy server, if one exists along the message path.
-hcpun proxyUserName Specifies the username that the client uses to be authorized by proxy servers.
202

Adding an HTTP Endpoint to a Contract
For more information about the specific attributes and their values see the Artix WSDL Extension Reference.
-hcpp proxyPassword Specifies the password that the client uses to be authorized by proxy servers.
-hcpat proxyAuthorizationType
Specifies the authorization mechanism the client uses with proxy servers.
-hcpa proxyAuthorization Specifies the actual data that the proxy server should use to authenticate the client.
-hccce clientCertificate Specifies the full path to the X509 certificate issued by the certificate authority for the client.
-hcccc clientCertificateChain
Specifies the full path to the file that contains all the certificates in the chain.
-hcpk clientPrivateKey Specifies the full path to the private key that corresponds to the X509 certificate specified by clientCertificate.
-hcpkp clientPrivateKeyPassword
Specifies a password that is used to decrypt the private key.
-o file Specifies the filename for the generated contract. The default is to append -service to the name of the imported contract.
-d dir Specifies the output directory for the generated contract.
-L file Specifies the location of your Artix license file. The default behavior is to check IT_PRODUCT_DIR\etc\license.txt.
-quiet Specifies that the tool runs in quiet mode.
-verbose Specifies that the tool runs in verbose mode.
-h Displays the tool�s usage statement.
-v Displays the tool�s version.
203

CHAPTER 16 | Using HTTP
Example Example 94 shows the namespace entries you need to add to the definitions element of your contract to use the HTTP extensions.
Example 95 shows a port element for an endpoint that sends fixed data over HTTP.
Example 94: Artix HTTP Extension Namespaces
<definitions ... xmlns:http="http://schemas.iona.com/transports/http" ... >
Example 95: Generic HTTP Port
<service name="artieFixedService"> <port binding="artieFixedBinding" name="artieFixedPort"> <http:address location="http://artie.com/index.xml"> </port></service>
204
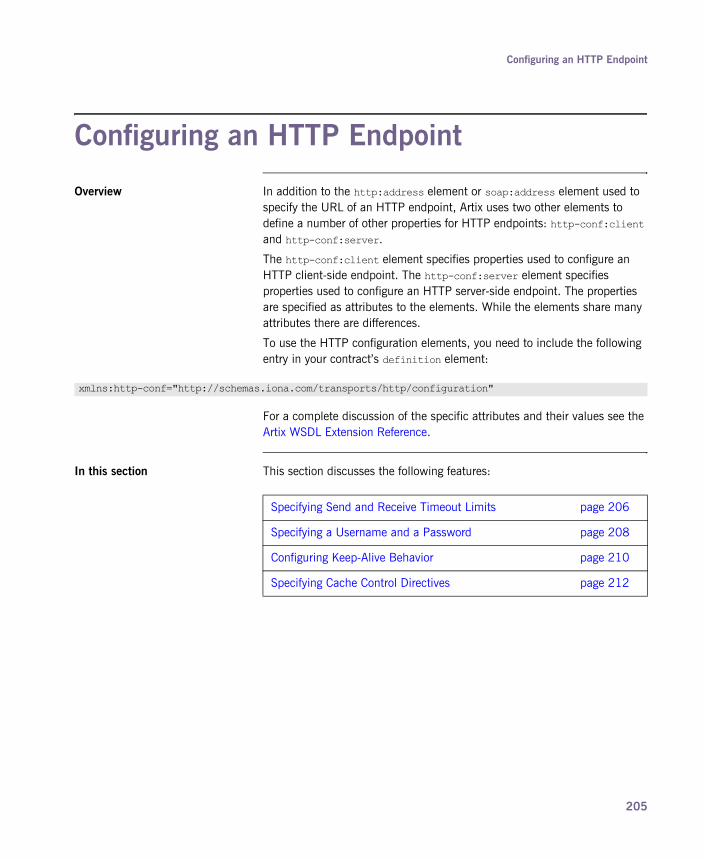
Configuring an HTTP Endpoint
Configuring an HTTP Endpoint
Overview In addition to the http:address element or soap:address element used to specify the URL of an HTTP endpoint, Artix uses two other elements to define a number of other properties for HTTP endpoints: http-conf:client and http-conf:server.
The http-conf:client element specifies properties used to configure an HTTP client-side endpoint. The http-conf:server element specifies properties used to configure an HTTP server-side endpoint. The properties are specified as attributes to the elements. While the elements share many attributes there are differences.
To use the HTTP configuration elements, you need to include the following entry in your contract�s definition element:
For a complete discussion of the specific attributes and their values see the Artix WSDL Extension Reference.
In this section This section discusses the following features:
xmlns:http-conf="http://schemas.iona.com/transports/http/configuration"
Specifying Send and Receive Timeout Limits page 206
Specifying a Username and a Password page 208
Configuring Keep-Alive Behavior page 210
Specifying Cache Control Directives page 212
205
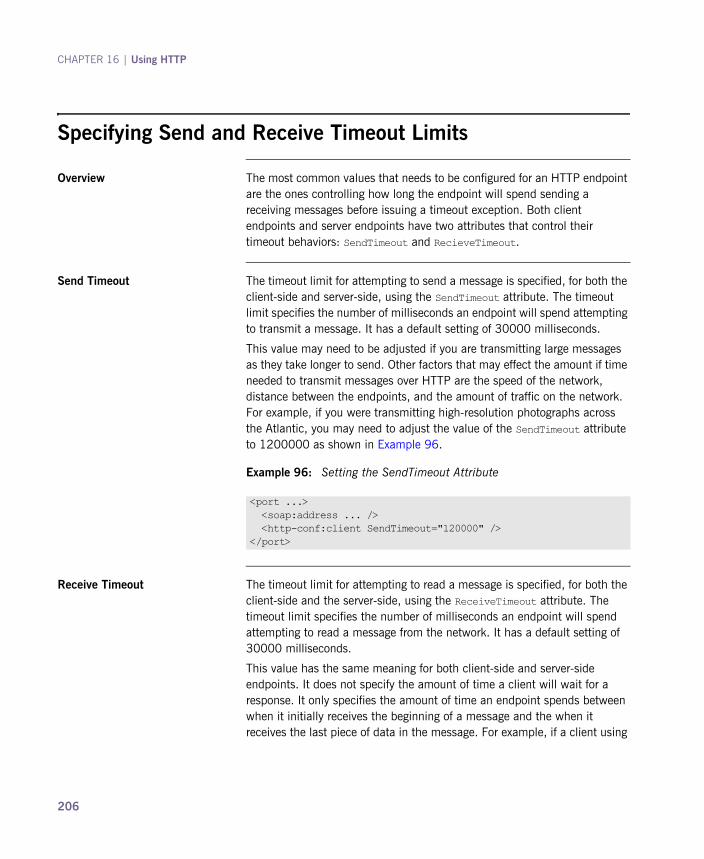
CHAPTER 16 | Using HTTP
Specifying Send and Receive Timeout Limits
Overview The most common values that needs to be configured for an HTTP endpoint are the ones controlling how long the endpoint will spend sending a receiving messages before issuing a timeout exception. Both client endpoints and server endpoints have two attributes that control their timeout behaviors: SendTimeout and RecieveTimeout.
Send Timeout The timeout limit for attempting to send a message is specified, for both the client-side and server-side, using the SendTimeout attribute. The timeout limit specifies the number of milliseconds an endpoint will spend attempting to transmit a message. It has a default setting of 30000 milliseconds.
This value may need to be adjusted if you are transmitting large messages as they take longer to send. Other factors that may effect the amount if time needed to transmit messages over HTTP are the speed of the network, distance between the endpoints, and the amount of traffic on the network. For example, if you were transmitting high-resolution photographs across the Atlantic, you may need to adjust the value of the SendTimeout attribute to 1200000 as shown in Example 96.
Receive Timeout The timeout limit for attempting to read a message is specified, for both the client-side and the server-side, using the ReceiveTimeout attribute. The timeout limit specifies the number of milliseconds an endpoint will spend attempting to read a message from the network. It has a default setting of 30000 milliseconds.
This value has the same meaning for both client-side and server-side endpoints. It does not specify the amount of time a client will wait for a response. It only specifies the amount of time an endpoint spends between when it initially receives the beginning of a message and the when it receives the last piece of data in the message. For example, if a client using
Example 96: Setting the SendTimeout Attribute
<port ...> <soap:address ... /> <http-conf:client SendTimeout="120000" /></port>
206

Configuring an HTTP Endpoint
the default settings sends a response to a service that takes 90 seconds to process the response, the client will not timeout. However, if it takes the client 45 seconds to read the response from the network, it will timeout.
The causes for long read times are similar to the reasons for long send times. Large messages, heavy network traffic, and large physical distances can all have an impact on the amount if time it takes an HTTP endpoint to receive a message. For example, if you are transmitting map data to a remote research facility, you may want to specify a value of 600000 for the ReceiveTimeout attribute of the remote endpoint as shown in Example 97.
Example 97: Setting the ReceiveTimeout Attribute
<port ...> <soap:address ... /> <http-conf:server ReceiveTimeout="600000" /></port>
207

CHAPTER 16 | Using HTTP
Specifying a Username and a Password
Overview Username/password authentication is a common way of requiring clients to identify themselves. By requiring a client to provide a username and a password, a server can keep a record of who is accessing it and determine if they are authorized to access the functionality requested. For example, many Wiki applications and blogging applications require a username and password before allowing content to be edited.
In Artix, the username and password presented by an HTTP endpoint are specified using the following attributes of the http-conf:client element:
� UserName� Password
Be aware that these values will be visible to anyone that has access to the endpoint�s contract. Using this style of authentication does not provide a high level of security. For information on using stronger security measures with Artix see the Artix Security Guide.
Setting a username You set a username using the http-conf:client element�s UserName attribute. The value you specify is used to populate the username field in the HTTP header of all messages sent from the endpoint. Setting this attribute is optional. If no value is specified, Artix does not populate the username field of the HTTP header with a default value.
Setting a password You set a password using the http-conf:client element�s Password attribute. The value you specify is used to populate the password field in the HTTP header of all messages sent from the endpoint. It is an entirely optional attribute. If no value is specified, Artix does not populate the password field of the HTTP header with a default value.
Relationship between the attributes
The UserName attribute and the Password attribute are independent of each other. Although most applications that require a username also require a password, it is not mandatory that this pattern is followed. An application may just require a username for identification, or it may just use a password to provide a level of exclusivity.
208

Configuring an HTTP Endpoint
Similarly, Artix does not require that the two attributes be used together. If an endpoint only needs to provide a password, you can provide a value for the Password attribute without providing a value for the UserName attribute. Example 98 shows an HTTP endpoint definition that specifies just a username.
The attributes and other security features
Specifying a username and password in an endpoint�s contract does not effect the use of other Artix security features. You are not forced to use HTTPS when using a username or password. Similarly, you are not stopped from implementing your endpoint using WS-Security headers. For more details on using Artix�s security features see the Artix Security Guide.
Example 98: Specifying Just a Usernamre
<port ...> <http:address ... /> <http-conf:client UserName="Joe" /></port>
209

CHAPTER 16 | Using HTTP
Configuring Keep-Alive Behavior
Overview The default behavior of Artix endpoints is to open a connection and keep it open for as long as the client requires. However, it is not always desirable to keep a connection open over multiple requests. This can present a security problem. Artix endpoints can, therefore, be configured to close connections after each request/response cycle.
Making keep-alive requests HTTP client endpoints are configured to make keep-alive requests using the http-conf:client element�s Conneciton attribute. This attribute has two values: close and Keep-Alive.
Keep-Alive is the default. It specifies that the client endpoint wishes to keep its connections open for future requests. The client will request that the server keep the connection open. If the server does honor the request, the connection remains open until one of the endpoints dies. If the server does not honor the request, the client must open a new conneciton for each request.
close specifies that the client endpoint does not wish to keep its connecitons open for future requests. The client will always open a new connection for each request.
Example 99 shows a port element that defines an HTTP client endpoint that does not want to reuse connections.
Honoring keep-alive requests HTTP server endpoints are not required to honor keep-alive requests. The default behavior of Artix HTTP server endpoints is the accept keep-alive requests. You can change this behavior using the http-conf:server element�s HonorKeepAlive attribute. It has two values: false and true.
Example 99: Specifying that the HTTP Connection is Closed
<port ...> <soap:address location="http://localhost:8080" /> <http-conf:client Conneciton="close" /></port>
210

Configuring an HTTP Endpoint
true is the default. It specifies that the server endpoint will honor all keep-alive requests. If a client connects to the server endpoint using at least HTTP 1.1 and requests that the connection is kept alive, the server endpoint is left open. The client can continue to make requests over the original connection.
false specifies that the server endpoint rejects all keep-alive requests. Once the endpoint responds to a request it closes the connection used for the request/response sequence.
Example 100 shows a port element that defines an HTTP server endpoint that rejects keep-alive requests.
Example 100: Rejecting Keep-Alive Requests
<port ...> <soap:address location="http://localhost:8080" /> <http-conf:server HonorKeepAlive="false" /></port>
211
CHAPTER 16 | Using HTTP
Specifying Cache Control Directives
Overview A common method to reduce latency and control network traffic on the Web is to use caches that sit between server endpoints and client endpoints. These caches monitor the interactions between the endpoints. They store responses to requests as they are passed from a server endpoint to a client endpoint.
When a cache sees a request that it recognizes, it will check its stored responses. If a match is found, the cache will respond to the request on behalf of the server endpoint. The server endpoint will never know the request was made and the client endpoint will never know that it is getting a cached response.
While this optimizes the transaction time, it does pose a few possible problems:
� If a server endpoint collects usage statistics, it will not have accurate data.
� If the server endpoint frequently updates its data, the client endpoint may get a response that is out of date.
HTTP provides a mechanism for specifying cache behavior using the HTTP message header. You can configure these settings for your endpoints using the CacheControl attribute of both the http-conf:server element and the http-conf:client element.
Server endpoint settings Server endpoints can tell caches how to handle the responses they issue. For example, a server endpoint can direct caches that its responses are stale after 10 seconds. These directives are only valid for the responses issued from a particular server endpoint.
212
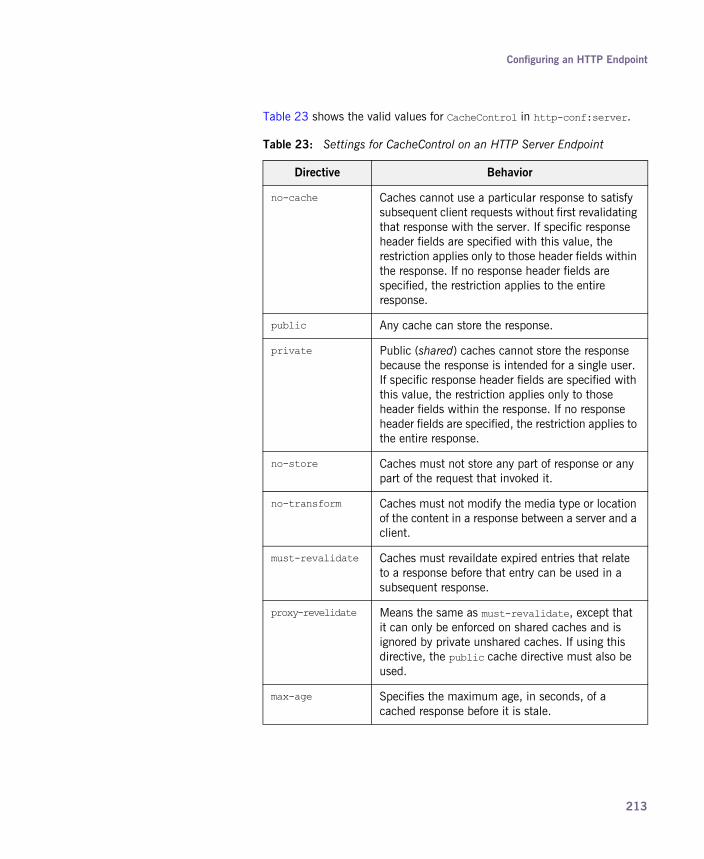
Configuring an HTTP Endpoint
Table 23 shows the valid values for CacheControl in http-conf:server.
Table 23: Settings for CacheControl on an HTTP Server Endpoint
Directive Behavior
no-cache Caches cannot use a particular response to satisfy subsequent client requests without first revalidating that response with the server. If specific response header fields are specified with this value, the restriction applies only to those header fields within the response. If no response header fields are specified, the restriction applies to the entire response.
public Any cache can store the response.
private Public (shared) caches cannot store the response because the response is intended for a single user. If specific response header fields are specified with this value, the restriction applies only to those header fields within the response. If no response header fields are specified, the restriction applies to the entire response.
no-store Caches must not store any part of response or any part of the request that invoked it.
no-transform Caches must not modify the media type or location of the content in a response between a server and a client.
must-revalidate Caches must revaildate expired entries that relate to a response before that entry can be used in a subsequent response.
proxy-revelidate Means the same as must-revalidate, except that it can only be enforced on shared caches and is ignored by private unshared caches. If using this directive, the public cache directive must also be used.
max-age Specifies the maximum age, in seconds, of a cached response before it is stale.
213
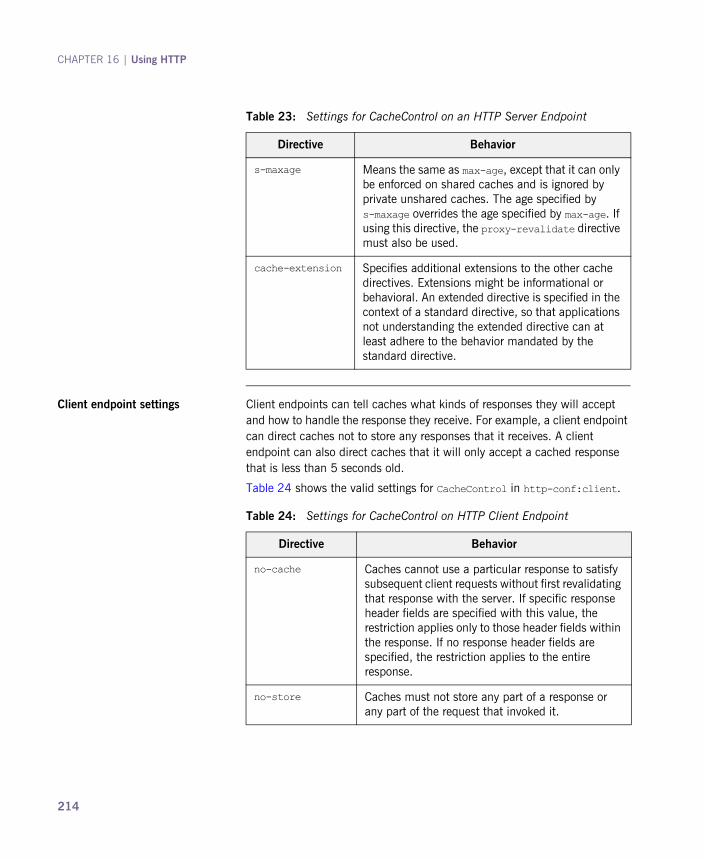
CHAPTER 16 | Using HTTP
Client endpoint settings Client endpoints can tell caches what kinds of responses they will accept and how to handle the response they receive. For example, a client endpoint can direct caches not to store any responses that it receives. A client endpoint can also direct caches that it will only accept a cached response that is less than 5 seconds old.
Table 24 shows the valid settings for CacheControl in http-conf:client.
s-maxage Means the same as max-age, except that it can only be enforced on shared caches and is ignored by private unshared caches. The age specified by s-maxage overrides the age specified by max-age. If using this directive, the proxy-revalidate directive must also be used.
cache-extension Specifies additional extensions to the other cache directives. Extensions might be informational or behavioral. An extended directive is specified in the context of a standard directive, so that applications not understanding the extended directive can at least adhere to the behavior mandated by the standard directive.
Table 23: Settings for CacheControl on an HTTP Server Endpoint
Directive Behavior
Table 24: Settings for CacheControl on HTTP Client Endpoint
Directive Behavior
no-cache Caches cannot use a particular response to satisfy subsequent client requests without first revalidating that response with the server. If specific response header fields are specified with this value, the restriction applies only to those header fields within the response. If no response header fields are specified, the restriction applies to the entire response.
no-store Caches must not store any part of a response or any part of the request that invoked it.
214

Configuring an HTTP Endpoint
max-age The client can accept a response whose age is no greater than the specified time in seconds.
max-stale The client can accept a response that has exceeded its expiration time. If a value is assigned to max-stale, it represents the number of seconds beyond the expiration time of a response up to which the client can still accept that response. If no value is assigned, it means the client can accept a stale response of any age.
min-fresh The client wants a response that will be still be fresh for at least the specified number of seconds indicated.
no-transform Caches must not modify media type or location of the content in a response between a server and a client.
only-if-cached Caches should return only responses that are currently stored in the cache, and not responses that need to be reloaded or revalidated.
cache-extension Specifies additional extensions to the other cache directives. Extensions might be informational or behavioral. An extended directive is specified in the context of a standard directive, so that applications not understanding the extended directive can at least adhere to the behavior mandated by the standard directive.
Table 24: Settings for CacheControl on HTTP Client Endpoint
Directive Behavior
215

CHAPTER 16 | Using HTTP
Managing Cookies in Artix Clients
Overview Artix can send and receive cookies. It can also be configured to pass along a static cookie with all outgoing requests. While Artix can send and receive cookies, it is up to the application to set dynamic cookies and ensure they are properly managed.
Sending static cookies If you want your client to always attach a static cookie to its requests, you can specify this in the client�s contract. The cookie is specified using the cookie attribute of the http-conf:client element.
216

Managing Cookies in Artix Clients
How Artix processes cookies Artix handles cookies using its context mechanism. For an HTTP application there are two contexts. One context is for incoming messages and the other is for outgoing messages. Figure 1 shows how an Artix client manages cookies.
When a client makes a request it can save a cookie into its outbound context and it will be sent with all future requests. If a client receives a cookie from a service, that cookie is stored in the client�s inbound context.
The received cookie does not have to be inspected. In order to inspect the contents of a received cookie, you will need to add the proper logic to your client using the Artix context APIs.
The received cookie is not automatically transferred to the out bound context. If you client needs to pass a received cookie along with future requests, you will need to add logic to your client so that it will transfer the received cookie from the client�s inbound context to the outbound context.
Figure 1: Artix Cookie Processing
Artix Client Process
Outbound Context
Inbound Context
Client Logic
Cookie
Cookie
Client canread the cookie�s
data from thecontext
Client canset data to be
sent as acookie
217
CHAPTER 16 | Using HTTP
More information For information about setting cookies and using Artix contexts see the relevant programming guide:
� Developing Artix Applications in C++
� Developing Artix Applications in Java
218

CHAPTER 17
Using IIOPUsing IIOP to send non-CORBA formats allows you to take advantages of CORBA services and QoS without using CORBA applications.
Overview Artix allows you to use IIOP as a generic transport for sending data using any of the payload formats. When using IIOP as a generic transport, you define your endpoint�s address using iiop:address. The benefit of using the generic IIOP transport is that it allows you to use CORBA services without requiring your applications to be CORBA applications. For example, you could use an IIOP tunnel to send fixed format messages to an endpoint whose address is published in a CORBA naming service.
Namespace The namespace under which the IIOP extensions are defined is "http://schemas.iona.com/bindings/iiop_tunnel". If you are going to add an IIOP port by hand you will need to add this to your contract�s definition element.
IIOP address specification The IOR, or address, of the IIOP port is specified using the iiop:address element. You have four options for specifying IORs in Artix contracts:
� Specify the object�s IOR directly in the contract, using the stringified IOR format:
IOR:22342....
219

CHAPTER 17 | Using IIOP
� Specify a file location for the IOR, using the following syntax:
� Specify that the IOR is published to a CORBA name service, by entering the object�s name using the corbaname format:
For more information on using the name service with Artix see Artix for CORBA.
� Specify the IOR using corbaloc, by specifying the port at which the service exposes itself, using the corbaloc syntax.
When using corbaloc, you must be sure to configure your service to start up on the specified host and port.
Specifying type of payload encoding
The IIOP transport can perform codeset negotiation on the encoded messages passed through it if your CORBA system supports it. By default, this feature is disabled so that the agents sending the message maintain complete control over codeset conversion. If you wish to enable automatic codeset negotiation use the following element:
Specifying POA policies Using the optional iiop:policy element, you can describe the POA polices Artix will use when creating the IIOP endpoint. These policies include:
� POA Name
� Persistence
� ID Assignment
Setting these policies lets you exploit some of the enterprise features of IONA�s Orbix 6.x, such as load balancing and fault tolerance, when deploying an Artix endpoints using the IIOP transport. For information on using these advanced CORBA features, see the Orbix documentation.
file:///file_name
Note: The file specification requires three backslashes (///).
corbaname:rir/NameService#object_name
corbaloc:iiop:host:port/service_name
<iiop:payload type="string"/>
220

POA Name
Artix POAs are created with the default name of WS_ORB. To specify a name for the POA that Artix creates for an IIOP endpoint, you use the following:
The POA name is used for setting certain policies, such as direct persistence and well-known port numbers in the CORBA configuration.
Persistence
By default Artix POAs have a persistence policy of false. To set the POA�s persistence policy to true, use the following:
ID Assignment
By default Artix POAs are created with a SYSTEM_ID policy, meaning that their ID is assigned by Artix. To specify that the IIOP endpoint�s POA should use a user-assigned ID, use the following:
This creates a POA with a USER_ID policy and an object id of POAid.
Using the command line tool To use wsdltoservice to add an IIOP endpoint use the tool with the following options.
The -transport iiop flag specifies that the tool is to generate an IIOP endpoint. The other options are as follows.
<iiop:policy poaname="poa_name"/>
<iiop:policy persistent="true"/>
<corba:policy serviceid="POAid"/>
wsdltoservice -transport iiop [-e service][-t port][-b binding] [-a address][-poa poaName][-sid serviceId] [-pst persists][-paytype payload][-o file] [-d dir][-L file][-quiet][-verbose][-h][-v] wsdlurl
-e service Specifies the name of the generated service element.
-t port Specifies the value of the name attribute of the generated port element.
-b binding Specifies the name of the binding for which the endpoint is generated.
221
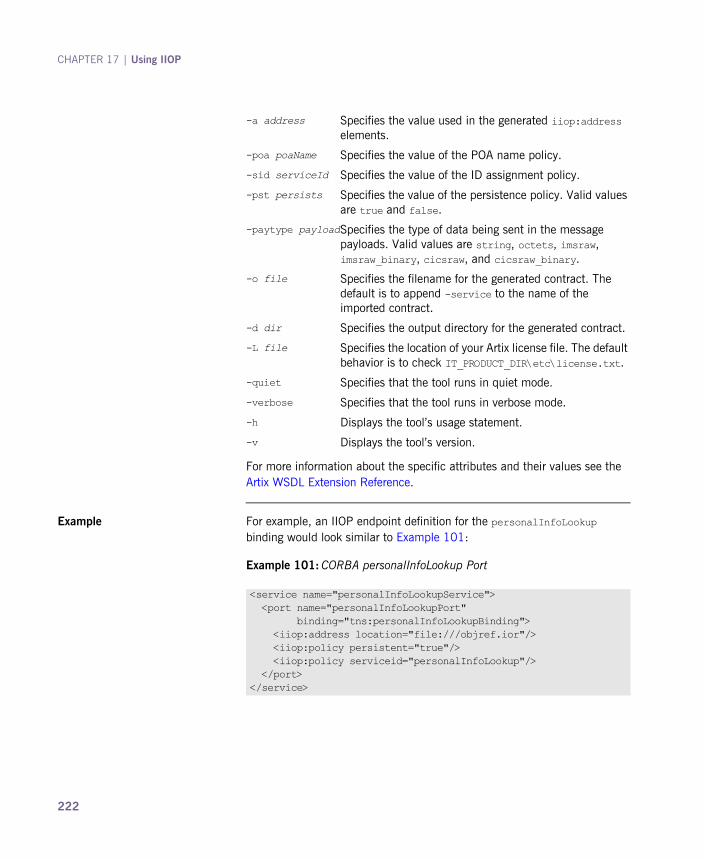
CHAPTER 17 | Using IIOP
For more information about the specific attributes and their values see the Artix WSDL Extension Reference.
Example For example, an IIOP endpoint definition for the personalInfoLookup binding would look similar to Example 101:
-a address Specifies the value used in the generated iiop:address elements.
-poa poaName Specifies the value of the POA name policy.
-sid serviceId Specifies the value of the ID assignment policy.
-pst persists Specifies the value of the persistence policy. Valid values are true and false.
-paytype payloadSpecifies the type of data being sent in the message payloads. Valid values are string, octets, imsraw, imsraw_binary, cicsraw, and cicsraw_binary.
-o file Specifies the filename for the generated contract. The default is to append -service to the name of the imported contract.
-d dir Specifies the output directory for the generated contract.
-L file Specifies the location of your Artix license file. The default behavior is to check IT_PRODUCT_DIR\etc\license.txt.
-quiet Specifies that the tool runs in quiet mode.
-verbose Specifies that the tool runs in verbose mode.
-h Displays the tool�s usage statement.
-v Displays the tool�s version.
Example 101: CORBA personalInfoLookup Port
<service name="personalInfoLookupService"> <port name="personalInfoLookupPort" binding="tns:personalInfoLookupBinding"> <iiop:address location="file:///objref.ior"/> <iiop:policy persistent="true"/> <iiop:policy serviceid="personalInfoLookup"/> </port></service>
222

Artix expects the IOR for the IIOP endpoint to be located in a file called objref.ior, and creates a persistent POA with an object id of personalInfo to configure the IIOP endpoint.
223

CHAPTER 17 | Using IIOP
224
CHAPTER 18
Using WebSphere MQArtix can use WebSphere MQ to transport messages and leverage much of WebSphere�s infrastructure to provide QoS.
In this chapter This chapter discusses the following topics:
Adding a WebSphere MQ Endpoint page 226
Specifying the WebSphere Library to Load page 232
Using Queues on Remote Hosts page 234
Using WebSphere MQ�s Transaction Features page 236
Setting a Value of the Message Descriptor�s Format Field page 238
225
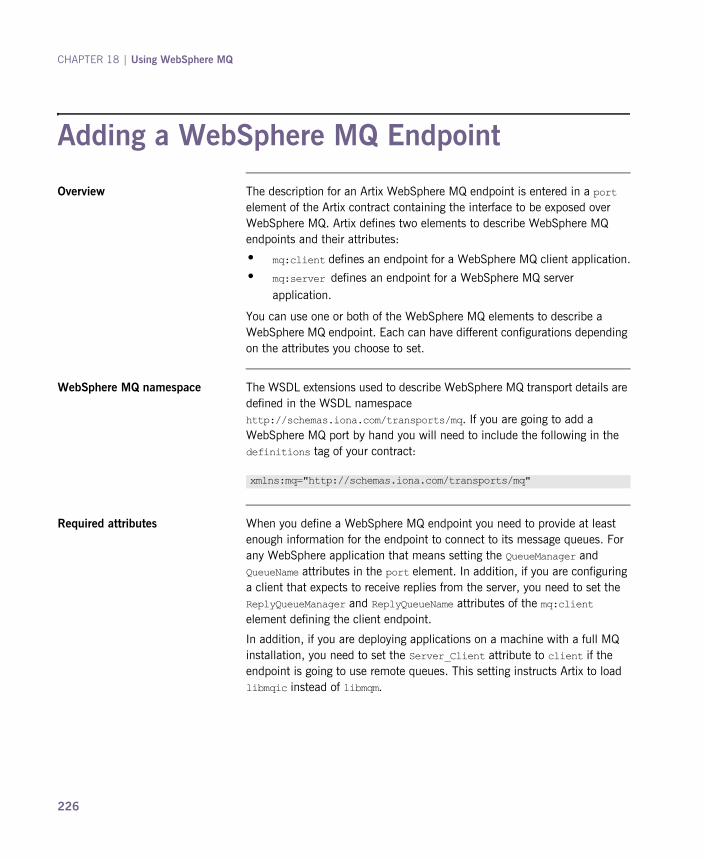
CHAPTER 18 | Using WebSphere MQ
Adding a WebSphere MQ Endpoint
Overview The description for an Artix WebSphere MQ endpoint is entered in a port element of the Artix contract containing the interface to be exposed over WebSphere MQ. Artix defines two elements to describe WebSphere MQ endpoints and their attributes:
� mq:client defines an endpoint for a WebSphere MQ client application.
� mq:server defines an endpoint for a WebSphere MQ server application.
You can use one or both of the WebSphere MQ elements to describe a WebSphere MQ endpoint. Each can have different configurations depending on the attributes you choose to set.
WebSphere MQ namespace The WSDL extensions used to describe WebSphere MQ transport details are defined in the WSDL namespace http://schemas.iona.com/transports/mq. If you are going to add a WebSphere MQ port by hand you will need to include the following in the definitions tag of your contract:
Required attributes When you define a WebSphere MQ endpoint you need to provide at least enough information for the endpoint to connect to its message queues. For any WebSphere application that means setting the QueueManager and QueueName attributes in the port element. In addition, if you are configuring a client that expects to receive replies from the server, you need to set the ReplyQueueManager and ReplyQueueName attributes of the mq:client element defining the client endpoint.
In addition, if you are deploying applications on a machine with a full MQ installation, you need to set the Server_Client attribute to client if the endpoint is going to use remote queues. This setting instructs Artix to load libmqic instead of libmqm.
xmlns:mq="http://schemas.iona.com/transports/mq"
226

Adding a WebSphere MQ Endpoint
Using the command line tool To use wsdltoservice to add a WebSphere MQ endpoint use the tool with the following options.
The -transport mq flag specifies that the tool is to generate a WebSphere MQ service. The other options are as follows.
wsdltoservice -transport mq [-e service][-t port][-b binding] [-sqm queueManager][-sqn queue][-srqm queueManager] [-srqn queue][-smqn modelQueue][-sus usageStyle] [-scs correlationStyle][-sam accessMode] [-sto timeout][-sme expiry][-smp priority] [-smi messageId][-sci correlationId][-sd delivery] [-st transactional][-sro reportOption][-sf format] [-sad applicationData][-sat accountingToken] [-scn connectionName][-sc convert][-scr reusable] [-scfp fastPath][-said idData][-saod originData] [-cqm queueManager][-cqn queue][-crqm queueManager] [-crqn queue][-cmqn modelQueue][-cus usageStyle] [-ccs correlationStyle][-cam accessMode] [-cto timeout][-cme expiry][-cmp priority] [-cmi messageId][-cci correlationId][-cd delivery] [-ct transactional][-cro reportOption][-cf format] [-cad applicationData][-cat accountingToken] [-ccn connectionName][-cc convert][-ccr reusable] [-ccfp fastPath][-caid idData][-caod originData] [-caqn queue][-cui userId][-o file][-d dir] [-L file][-quiet][-verbose][-h][-v] wsdlurl
-e service Specifies the name of the generated service element.
-t port Specifies the value of the name attribute of the generated port element.
-b binding Specifies the name of the binding for which the endpoint is generated.
-sqm queueManager Specifies the name of the server�s queue manager.
-sqn queue Specifies the name of the server�s request queue.
-srqm queueManager Specifies the name of the server�s reply queue manager.
-srqn queue Specifies the name of the server�s reply queue.
-smqn modelQueue Specifies the name of the server�s model queue.
227

CHAPTER 18 | Using WebSphere MQ
-sus usageStyle Specifies the value of the server�s UsageStyle attribute. Valid values are Peer, Requester, or Responder.
-scs correlationStyle Specifies the value of the server�s CorrelationStyle attribute. Valid values are messageId, correlationId, or messageId copy.
-sam accessMode Specifies the value of the server�s AccessMode attribute. Valid values are peek, send, receive, receive exclusive, or receive shared.
-sto timeout Specifies the value of the server�s Timeout attribute.
-sme expiry Specifies the value of the server�s MessageExpiry attribute.
-smp priority Specifies the value of the server�s MessagePriority attribute.
-smi messageId Specifies the value of the server�s MessageId attribute.
-sci correlationId Specifies the value of the server�s CorrelationID attribute.
-sd delivery Specifies the value of the server�s Delivery attribute.
-st transactional Specifies the value of the server�s Transactional attribute. Valid values are none, internal, or xa.
-sro reportOption Specifies the value of the server�s ReportOption attribute. Valid values are none, coa, cod, exception, expiration, or discard.
-sf format Specifies the value of the server�s Format attribute.
-sad applicationData Specifies the value of the server�s ApplicationData attribute.
-sat accountingToken Specifies the value of the server�s AccountingToken attribute.
-scn connectionName Specifies the name of the connection by which the adapter connects to the queue.
-sc convert Specifies if the messages in the queue need to be converted to the system�s native encoding. Valid values are true or false.
228
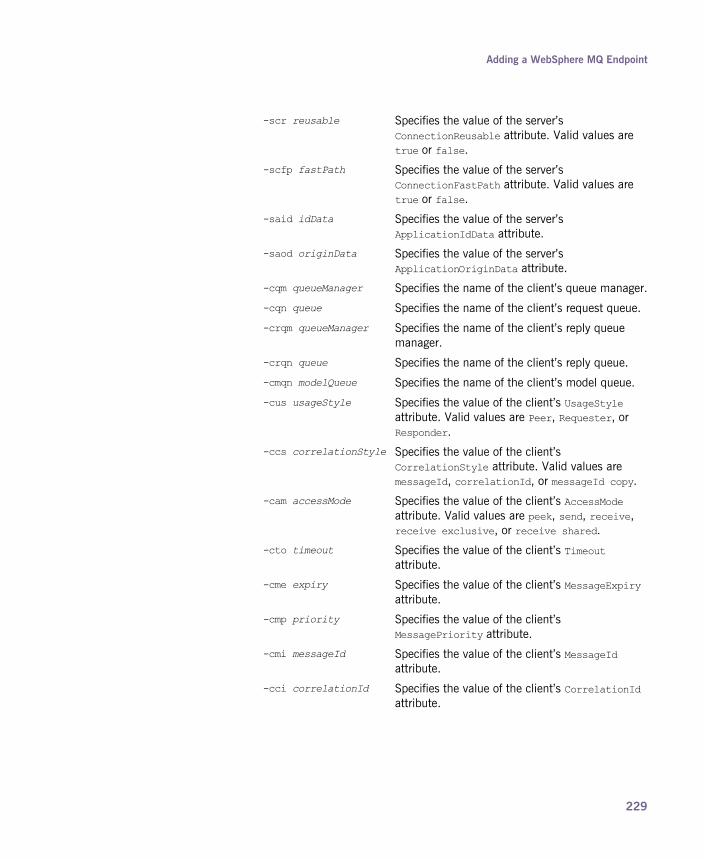
Adding a WebSphere MQ Endpoint
-scr reusable Specifies the value of the server�s ConnectionReusable attribute. Valid values are true or false.
-scfp fastPath Specifies the value of the server�s ConnectionFastPath attribute. Valid values are true or false.
-said idData Specifies the value of the server�s ApplicationIdData attribute.
-saod originData Specifies the value of the server�s ApplicationOriginData attribute.
-cqm queueManager Specifies the name of the client�s queue manager.
-cqn queue Specifies the name of the client�s request queue.
-crqm queueManager Specifies the name of the client�s reply queue manager.
-crqn queue Specifies the name of the client�s reply queue.
-cmqn modelQueue Specifies the name of the client�s model queue.
-cus usageStyle Specifies the value of the client�s UsageStyle attribute. Valid values are Peer, Requester, or Responder.
-ccs correlationStyle Specifies the value of the client�s CorrelationStyle attribute. Valid values are messageId, correlationId, or messageId copy.
-cam accessMode Specifies the value of the client�s AccessMode attribute. Valid values are peek, send, receive, receive exclusive, or receive shared.
-cto timeout Specifies the value of the client�s Timeout attribute.
-cme expiry Specifies the value of the client�s MessageExpiry attribute.
-cmp priority Specifies the value of the client�s MessagePriority attribute.
-cmi messageId Specifies the value of the client�s MessageId attribute.
-cci correlationId Specifies the value of the client�s CorrelationId attribute.
229
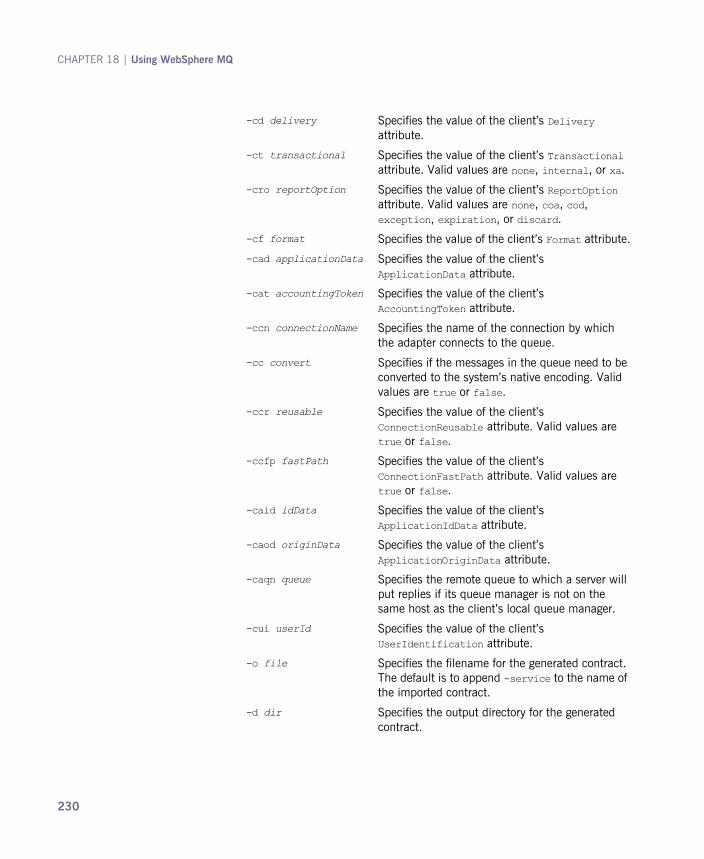
CHAPTER 18 | Using WebSphere MQ
-cd delivery Specifies the value of the client�s Delivery attribute.
-ct transactional Specifies the value of the client�s Transactional attribute. Valid values are none, internal, or xa.
-cro reportOption Specifies the value of the client�s ReportOption attribute. Valid values are none, coa, cod, exception, expiration, or discard.
-cf format Specifies the value of the client�s Format attribute.
-cad applicationData Specifies the value of the client�s ApplicationData attribute.
-cat accountingToken Specifies the value of the client�s AccountingToken attribute.
-ccn connectionName Specifies the name of the connection by which the adapter connects to the queue.
-cc convert Specifies if the messages in the queue need to be converted to the system�s native encoding. Valid values are true or false.
-ccr reusable Specifies the value of the client�s ConnectionReusable attribute. Valid values are true or false.
-ccfp fastPath Specifies the value of the client�s ConnectionFastPath attribute. Valid values are true or false.
-caid idData Specifies the value of the client�s ApplicationIdData attribute.
-caod originData Specifies the value of the client�s ApplicationOriginData attribute.
-caqn queue Specifies the remote queue to which a server will put replies if its queue manager is not on the same host as the client�s local queue manager.
-cui userId Specifies the value of the client�s UserIdentification attribute.
-o file Specifies the filename for the generated contract. The default is to append -service to the name of the imported contract.
-d dir Specifies the output directory for the generated contract.
230

Adding a WebSphere MQ Endpoint
For more information about the specific attributes and their values see the Artix WSDL Extension Reference.
Example An Artix contract exposing an interface, monsterBash, bound to a SOAP payload format, Raydon, on an WebSphere MQ queue, UltraMan would contain a service element similar to Example 102.
-L file Specifies the location of your Artix license file. The default behavior is to check IT_PRODUCT_DIR\etc\license.txt.
-quiet Specifies that the tool runs in quiet mode.
-verbose Specifies that the tool runs in verbose mode.
-h Displays the tool�s usage statement.
-v Displays the tool�s version.
Example 102: Sample WebSphere MQ Port
<service name="Mothra"> <port name="X" binding="tns:Raydon"> <mq:server QueueManager="UMA" QueueName="UltraMan" ReplyQueueManager="WINR" ReplyQueueName="Elek" AccessMode="receive" CorrelationStyle="messageId copy"/> </port></service>
231
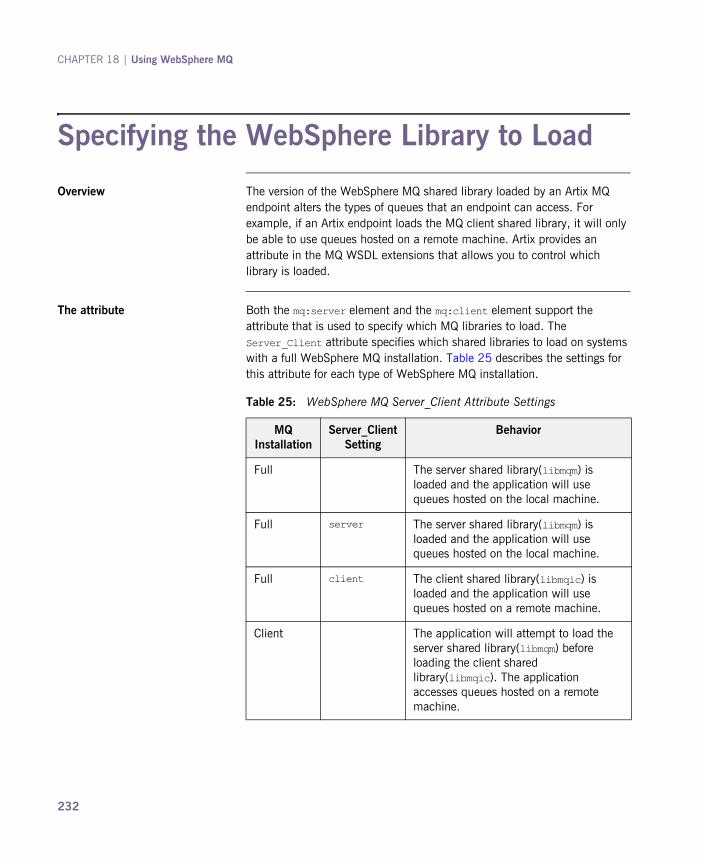
CHAPTER 18 | Using WebSphere MQ
Specifying the WebSphere Library to Load
Overview The version of the WebSphere MQ shared library loaded by an Artix MQ endpoint alters the types of queues that an endpoint can access. For example, if an Artix endpoint loads the MQ client shared library, it will only be able to use queues hosted on a remote machine. Artix provides an attribute in the MQ WSDL extensions that allows you to control which library is loaded.
The attribute Both the mq:server element and the mq:client element support the attribute that is used to specify which MQ libraries to load. The Server_Client attribute specifies which shared libraries to load on systems with a full WebSphere MQ installation. Table 25 describes the settings for this attribute for each type of WebSphere MQ installation.
Table 25: WebSphere MQ Server_Client Attribute Settings
MQ Installation
Server_Client Setting
Behavior
Full The server shared library(libmqm) is loaded and the application will use queues hosted on the local machine.
Full server The server shared library(libmqm) is loaded and the application will use queues hosted on the local machine.
Full client The client shared library(libmqic) is loaded and the application will use queues hosted on a remote machine.
Client The application will attempt to load the server shared library(libmqm) before loading the client shared library(libmqic). The application accesses queues hosted on a remote machine.
232

Specifying the WebSphere Library to Load
Example Example 103 shows an a service element for an MQ endpoint that uses the MQ client shared library.
Client server The application will fail because it cannot load the server shared libraries.
Client client The client shared library(libmqic) is loaded and the application accesses queues hosted on a remote machine.
Table 25: WebSphere MQ Server_Client Attribute Settings
MQ Installation
Server_Client Setting
Behavior
Example 103: ARTIX MQ Endpoint Using MQ Client Library
<service name="Mothra"> <port name="X" binding="tns:Raydon"> <mq:server QueueManager="UMA" QueueName="UltraMan" ReplyQueueManager="WINR" ReplyQueueName="Elek" Server_Client="client" /> </port></service>
233

CHAPTER 18 | Using WebSphere MQ
Using Queues on Remote Hosts
Overview When interoperating between WebSphere MQ endpoints whose queue managers are on different hosts, Artix requires that you specify the name of the remote queue to which the server will post reply messages. This ensures that the server will put the replies on the proper queue. Otherwise, the server will receive a request message with the ReplyToQ field set to a queue that is managed by a queue manager on a remote host and will be unable to send the reply.
You specify this server�s local reply queue name in the mq:client element�s AliasQueueName attribute when you define it in the client endpoint�s contract.
Effect of AliasQueueName When you specify a value for the AliasQueueName attribute in an mq:client element, you alter how Artix populates the request message�s ReplyToQ field and ReplyToQMgr field. Typically, Artix populates the reply queue information in the request message�s message descriptor with the values specified in the ReplyQueueManager attribute and the ReplyQueueName attribute. Setting the AliasQueueName attribute causes Artix to leave ReplytoQMgr empty, and to set ReplyToQ to the value of the AliasQueueName attribute. When the ReplyToQMgr field of the message descriptor is left empty, the sending queue manager inspects the queue named in the ReplyToQ field to determine who its queue manager is and uses that value for ReplyToQMgr. The server puts the message on the remote queue that is configured as a proxy for the client�s local reply queue.
Example If you had a system defined similar to that shown in Figure 2, you would need to use the AliasQueueName attribute setting when configuring your WebSphere MQ client. In this set up the client is running on a host with a local queue manager QMgrA. QMgrA has two queues configured. RqA is a remote queue that is a proxy for RqB and RplyA is a local queue. The server is running on a different machine whose local queue manager is QMgrB.
234

Using Queues on Remote Hosts
QMgrB also has two queues. RqB is a local queue and RplyB is a remote queue that is a proxy for RplyA. The client places its request on RqA and expects replies to arrive on RplyA.
The port elements for the client and server for this deployment are shown in Example 104. The AliasQueueName attribute is set to RplyB because that is the remote queue proxying for the reply queue in server�s local queue manager. The ReplyQueueManager attribute and the ReplyQueueName attribute are set to the client�s local queue manager so that it knows where to listen for responses. In this example, the server�s ReplyQueueManager attribute and ReplyQueueName attribute do not need to be set because you are assured that the client is populating the request�s message descriptor with the needed information for the server to determine where replies are sent.
Figure 2: MQ Remote Queues
Example 104: Setting Up WebSphere MQ Ports for Intercommunication
<mq:client QueueManager="QMgrA" QueueName="RqA" ReplyQueueManager="QMgrA" ReplyQueueName="RplyA" AliasQueueName="RplyB" Format="string" Convert="true"/><mq:server QueueManager="QMgrB" QueueName="RqB" Format="String" Convert="true"/>
235
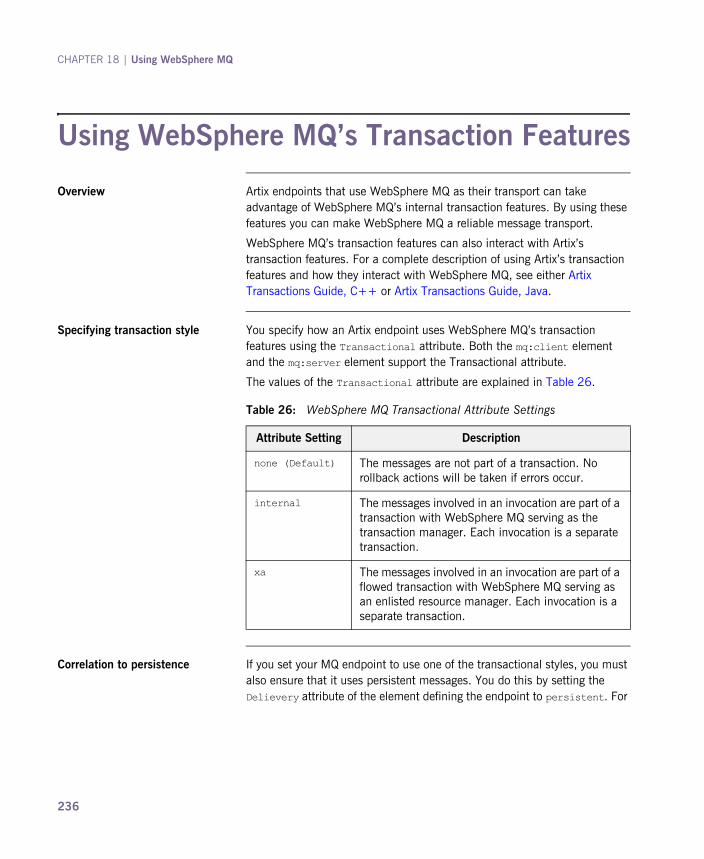
CHAPTER 18 | Using WebSphere MQ
Using WebSphere MQ�s Transaction Features
Overview Artix endpoints that use WebSphere MQ as their transport can take advantage of WebSphere MQ�s internal transaction features. By using these features you can make WebSphere MQ a reliable message transport.
WebSphere MQ�s transaction features can also interact with Artix�s transaction features. For a complete description of using Artix�s transaction features and how they interact with WebSphere MQ, see either Artix Transactions Guide, C++ or Artix Transactions Guide, Java.
Specifying transaction style You specify how an Artix endpoint uses WebSphere MQ�s transaction features using the Transactional attribute. Both the mq:client element and the mq:server element support the Transactional attribute.
The values of the Transactional attribute are explained in Table 26.
Correlation to persistence If you set your MQ endpoint to use one of the transactional styles, you must also ensure that it uses persistent messages. You do this by setting the Delievery attribute of the element defining the endpoint to persistent. For
Table 26: WebSphere MQ Transactional Attribute Settings
Attribute Setting Description
none (Default) The messages are not part of a transaction. No rollback actions will be taken if errors occur.
internal The messages involved in an invocation are part of a transaction with WebSphere MQ serving as the transaction manager. Each invocation is a separate transaction.
xa The messages involved in an invocation are part of a flowed transaction with WebSphere MQ serving as an enlisted resource manager. Each invocation is a separate transaction.
236
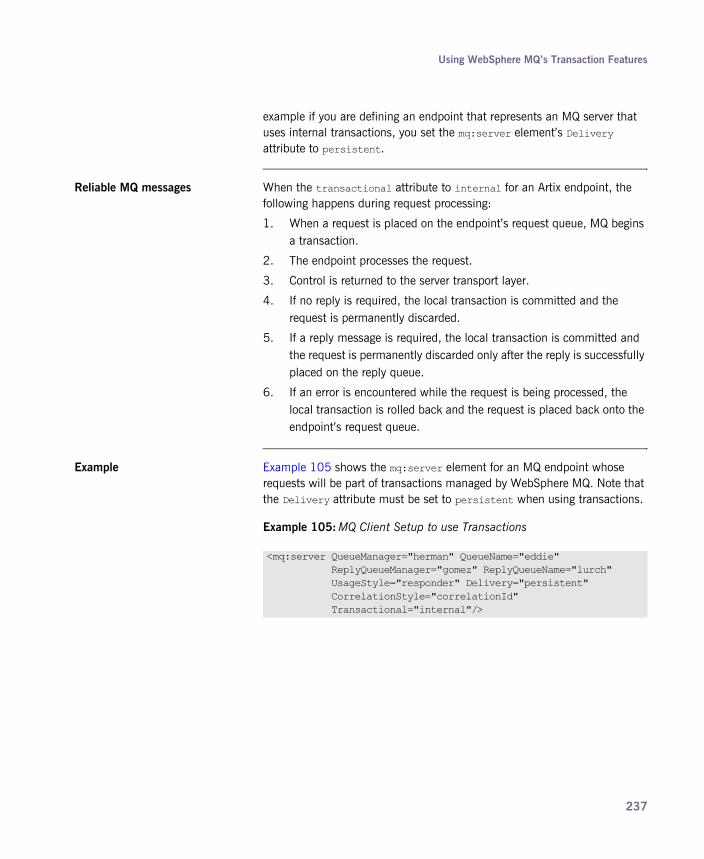
Using WebSphere MQ�s Transaction Features
example if you are defining an endpoint that represents an MQ server that uses internal transactions, you set the mq:server element�s Delivery attribute to persistent.
Reliable MQ messages When the transactional attribute to internal for an Artix endpoint, the following happens during request processing:
1. When a request is placed on the endpoint�s request queue, MQ begins a transaction.
2. The endpoint processes the request.
3. Control is returned to the server transport layer.
4. If no reply is required, the local transaction is committed and the request is permanently discarded.
5. If a reply message is required, the local transaction is committed and the request is permanently discarded only after the reply is successfully placed on the reply queue.
6. If an error is encountered while the request is being processed, the local transaction is rolled back and the request is placed back onto the endpoint�s request queue.
Example Example 105 shows the mq:server element for an MQ endpoint whose requests will be part of transactions managed by WebSphere MQ. Note that the Delivery attribute must be set to persistent when using transactions.
Example 105: MQ Client Setup to use Transactions
<mq:server QueueManager="herman" QueueName="eddie" ReplyQueueManager="gomez" ReplyQueueName="lurch" UsageStyle="responder" Delivery="persistent" CorrelationStyle="correlationId" Transactional="internal"/>
237

CHAPTER 18 | Using WebSphere MQ
Setting a Value of the Message Descriptor�s Format Field
Overview WebSphere MQ messages have a Format field in their message descriptors. Message receivers use this field to determine the nature of the data in the nature. What the message receiver does with this information is the responsibility of the application developer. Artix, however, uses the Format field to determine if the contents of a message are to undergo codeset conversion.
You can specify the value placed in the message descriptor�s Format field using the Format attribute. This attribute is supported by both the mq:client element and the mq:server element and its value is a string specifying the name of the message�s format.
Special values The Format attribute can take the special values none, string, event, programmable command, and unicode. These settings are described in Table 27.
Table 27: WebSphere MQ Format Attribute Settings
Attribute Setting Description
none (Default) Corresponds to MQFMT_NONE. No format name is specified.
string Corresponds to MQFMT_STRING. string specifies that the message consists entirely of character data. The message data may be either single-byte characters or double-byte characters.
unicode Corresponds to MQFMT_STRING. unicode specifies that the message consists entirely of Unicode characters. (Unicode is not supported in Artix at this time.)
238

Setting a Value of the Message Descriptor�s Format Field
Using Codeset Conversion Artix uses the value of the Format field in an MQ message header to determine if the message data should be converted into a host systems native codeset. If the Format field is set to MQFMT_STRING, Artix will attempt to convert the data into the host�s native codeset. If the Format field has any other value, Artix will not attempt to perform codeset conversion.
If you are interoperating with systems that use a different codeset than the system your endpoint is hosted on, you need to set the Format attribute of the Artix endpoint to string. This is particularly important when you are interoperating with WebSphere MQ applications hosted on a mainframe because the data needs to be converted into the systems native data format. Not doing so will result in the mainframe receiving corrupted data.
event Corresponds to MQFMT_EVENT. event specifies that the message reports the occurrence of an WebSphere MQ event. Event messages have the same structure as programmable commands.
programmable command Corresponds to MQFMT_PCF. programmable command specifies that the messages are user-defined messages that conform to the structure of a programmable command format (PCF) message.
For more information, consult the IBM Programmable Command Formats and Administration Interfaces documentation at http://publibfp.boulder.ibm.com/epubs/html/csqzac03/csqzac030d.htm#Header_12.
Table 27: WebSphere MQ Format Attribute Settings (Continued)
Attribute Setting Description
239

CHAPTER 18 | Using WebSphere MQ
Example Example 106 shows an mq:client element that defines an endpoint used for making requests against a server on a mainframe system.
Example 106: WebSphere MQ Client Talking to the Mainframe
<mq:client QueueManager="hunter" QueueName="bigGuy" ReplyQueueManager="slate" ReplyQueueName="rusty" Format="string" Convert="true"/>
240
CHAPTER 19
Using the Java Messaging SystemJMS is a standards based messaging system that is widely used in enterprise Java applications.
In this chapter This chapter discusses the following topics:
Defining a JMS Endpoint page 242
Migrating to the 4.x JMS WSDL Extensions page 253
Using ActiveMQ as Your JMS Provider page 254
241
CHAPTER 19 | Using the Java Messaging System
Defining a JMS Endpoint
Overview Artix provides a transport plug-in that enables endpoints to use Java Messaging System (JMS) queues and topics. One large advantage of this is that Artix allows C++ applications to interact directly with Java applications over JMS.
Artix�s JMS transport plug-in uses the Java Naming and Directory Interface (JNDI) to locate and obtain references to the JMS provider. Once Artix has established a connection to a JMS provider, Artix supports the passing of messages packaged as either a JMS ObjectMessage or a JMS TextMessage.
Message formatting The JMS transport takes messages and packages them into either a JMS ObjectMessage or a TextMessage. When a message is packaged as an ObjectMessage the message�s data, including any format-specific information, is serialized into a byte[] and placed into the JMS message body. When a message is packaged as a TextMessage, the message�s data, including any format-specific information, is converted into a string and placed into the JMS message body.
When a message sent by Artix is received by a JMS application, the JMS application is responsible for understanding how to interpret the message and the formatting information. For example, if the Artix contract specifies that the binding used for a JMS endpoint is SOAP, and the messages are packaged as a TextMessage, the JMS application will receive a string containing all of the SOAP envelope information. For a message encoded using the fixed binding, the message will contain no formatting information, simply a string of characters, numbers, and spaces.
Namespace The WSDL extensions used to define a JMS endpoint are specified in the namespace http://celtix.objectweb.org/transports/jms. To use the JMS extensions you will need to add the line shown Example 107 to the definitions element of your contract.
Example 107: JMS Extension�s Namespace
xmlns:jms="http://celtix.objectweb.org/transports/jms"
242
Defining a JMS Endpoint
In this section This section discusses the following topics:
Basic Endpoint Configuration page 244
Client Endpoint Configuration page 248
Server Endpoint Configuration page 249
Using the Command Line Tool page 251
243

CHAPTER 19 | Using the Java Messaging System
Basic Endpoint Configuration
Overview JMS endpoints need to know certain basic information about how to establish a connection to the proper destination. This information is provided using the jms.address element and its child the jms:JMSNamingProperty element. The jms:address element�s attributes specify the information needed to identify the JMS broker and the destination. The jms:JMSNamingProperty element specifies the Java properties used to connect to the JNDI service.
address element The basic configuration for a JMS endpoint is done by using a jms:address element in your service�s port element. The jms:address element uses the attributes described in Table 28 to configure the connection to the JMS broker.
Table 28: JMS Port Attributes
Attribute Description
destinationStyle Specifies if the JMS destination is a JMS queue or a JMS topic.
jndiConnectionFactoryName Specifies the JNDI name of the JMS connection factory to use when connecting to the JMS destination.
jndiDestinationName Specifies the JNDI name of the JMS destination to which requests are sent.
jndiReplyDestinationName Specifies the JNDI name of the JMS destinations where replies are sent. This attribute allows you to use a user defined destination for replies. For more details see �Using a named reply destination�.
connectionUserName Specifies the username to use when connecting to a JMS broker.
connectionPassword Specifies the password to use when connecting to a JMS broker.
244

Defining a JMS Endpoint
JMSNamingProperties element To increase interoperability with JMS and JNDI providers, the jms:address element has a child element, jms:JMSNamingProperty, that allows you to specify the values used to populate the properties used when connecting to the JNDI provider. The jms:JMSNamingProperty element has two attributes: name and value. The name attribute specifies the name of the property to set. The value attribute specifies the value for the specified property.
The following is a list of common JNDI properties that can be set:
� java.naming.factory.initial� java.naming.provider.url� java.naming.factory.object� java.naming.factory.state� java.naming.factory.url.pkgs� java.naming.dns.url� java.naming.authoritative� java.naming.batchsize� java.naming.referral� java.naming.security.protocol� java.naming.security.authentication� java.naming.security.principal� java.naming.security.credentials� java.naming.language� java.naming.applet
For more details on what information to use in these attributes, check your JNDI provider�s documentation and consult the Java API reference material.
Using a named reply destination By default Artix endpoints using JMS create a temporary queue for the response queue. You can change this behavior by setting the jndiReplyDestinationName attribute in the endpoints contract. An Artix client endpoint will listen for replies on the specified destination and it will specify the value of the attribute in the ReplyTo field of all outgoing requests. An Artix service endpoint will use the value of the jndiReplyDestinationName attribute as the location for placing replies if there is no destination specified in the request�s ReplyTo field.
245

CHAPTER 19 | Using the Java Messaging System
Examples Example 108 shows an example of an Artix JMS port specification that uses dynamic queues.
Example 108 shows an example of an Artix JMS port specification that does not use dynamic queues.
Alternate InitialContextFactory settings for using SonicMQ
If you are using Sonic MQ, you will need to use an alternative method of specifying the InitialContextFactory value. You specify a colon-separated list of package prefixes to force the JNDI service to instantiate a context
Example 108: Artix JMS Port with Dynamic Queues
<service name="JMSService"> <port binding="tns:Greeter_SOAPBinding" name="SoapPort"> <jms:address jndiConnectionFactoryName="ConnectionFactory" jndiDestinationName="dynamicQueues/test.artix.jmstransport"> <jms:JMSNamingProperty name="java.naming.factory.initial" value="org.activemq.jndi.ActiveMQInitialContextFactory" /> <jms:JMSNamingProperty name="java.naming.provider.url" value="tcp://localhost:61616" /> </jms:address> </port></service>
Example 109: Artix JMS Port with Non-dynamic Queues
<service name="JMSService"> <port binding="tns:Greeter_SOAPBinding" name="SoapPort"> <jms:address jndiConnectionFactoryName="ConnectionFactory" jndiDestinationName="MyQueue" destinationStyle="queue" > <jms:JMSNamingProperty name="java.naming.factory.initial" value="org.activemq.jndi.ActiveMQInitialContextFactory" /> <jms:JMSNamingProperty name="java.naming.provider.url" value="tcp://localhost:61616" /> <jms:JMSNamingProperty name="queue.MyQueue" value="example.MyQueue" /> </jms:address> </port></service>
246

Defining a JMS Endpoint
factory with the class name com.iona.jbus.jms.naming.sonic.sonicURLContextFactory to perform lookups. This is shown in Example 110.
Using the contract in Example 110, Artix would use the URL sonic:jms/queue/helloWorldQueue to get a reference to the desired queue. Artix would be handed a reference to a queue named helloWorldQueue if the JMS broker has such a queue.
Example 110: JMS Port with Alternate InitialContextFactory Specification
<service name="JMSService"> <port binding="tns:Greeter_SOAPBinding" name="SoapPort"> <jms:address jndiConnectionFactoryName="sonic:jms/queue/connectionFactory" jndiDestinationName="sonic:jms/queue/helloWorldQueue"> <jms:JMSNamingProperty name="java.naming.factory.initial" value="com.iona.jbus.jms.naming.sonic.sonicURLContextFactory" /> <jms:JMSNamingProperty name="java.naming.provider.url" value="tcp://localhost:61616" /> </jms:address> </port></service>
247
CHAPTER 19 | Using the Java Messaging System
Client Endpoint Configuration
Overview JMS client endpoints can be configured to use different types of messages.
client element The client endpoint�s behaviors are configured using the jms:client element. The jms:client element is a child of the WSDL port element and has one attribute:
This element is optional. The default behavior of a JMS client endpoint is to send text messages.
messageType Specifies how the message data will be packaged as a JMS message. text specifies that the data will be packaged as a TextMessage. binary specifies that the data will be packaged as an ObjectMessage.
248
Defining a JMS Endpoint
Server Endpoint Configuration
Overview JMS server endpoints have a number of behaviors that are configurable in the contract. These include if the server uses durable subscriptions, if the servER uses local JMS transactions, and the message selectors used by the endpoint.
server element Server endpoint behaviors are configured using the jms:server element. The jms:server element is a child of the WSDL port element and has the following attributes:
The jms:server element and all of its attributes are optional.
Setting up durable subscriptions If you want to configure your server to use durable subscriptions, you can set the optional durableSubscriberName attribute. The value of the attribute is the name used to register the durable subscription.
Using message selectors If you want to configure your server to use a JMS message selector, you can set the optional messageSelector attribute. The value of the attribute is the string value of the selector. For more information on the syntax used to specify message selectors, see the JMS 1.1 specification.
useMessageIDAsCorrealationID Specifies whether JMS will use the message ID to correlate messages. The default is false.
durableSubscriberName Specifies the name used to register a durable subscription. See �Setting up durable subscriptions� on page 249
messageSelector Specifies the string value of a message selector to use. See �Using message selectors� on page 249.
transactional Specifies whether the local JMS broker will create transactions around message processing. The default is false. See �Using reliable messaging� on page 250.
249

CHAPTER 19 | Using the Java Messaging System
Using reliable messaging If you want your server to use the local JMS broker�s transaction capabilities, you can set the optional transactional attribute to true.
When the transactional attribute is set, an Artix server�s JMS transport layer will begin a transaction when it pulls a request from the queue. The server will then process the request and send the response back to the JMS transport layer. Once the JMS transport layer has successfully placed the response on the response queue, the transport layer will commit the transaction. So, if the Artix server crashes while processing a request or the transport layer is unable to send the response, the JMS broker will hold the request in the queue until it is successfully processed.
In cases where Artix is acting as a router between JMS and another transport, setting the transactional attribute will ensure that the message is delivered to the second server. The JMS portion of the router will not commit the message until the message has been successfully consumed by the outbound transport layer. If an exception is thrown during the consumption of the message, the JMS transport will rollback the message, pull it from the queue again, and attempt to resend it.
250

Defining a JMS Endpoint
Using the Command Line Tool
Overview The wsdltoservice tool can add a JMS endpoint definition to your contract.
wsdltoservice To use wsdltoservice to add a JMS endpoint use the tool with the following options:
The -transport jms flag specifies that the tool is to generate a JMS endpoint. The other options are as follows:
wsdltoservice -transport jms [-e service][-t port] [-b binding][-o file][-d dir] [-jnp propName:propVal]*[-jds (queue/topic)] [-jnf connectionFactoryName] [-jdn destinationName] [-jrdn replyDesinationName] [-jcun username][-jcp password] [-jmt (text/binary)][-jms messageSelector] [-jumi (true/false)][-jtr (true/false)] [-jdsn durableSubscriber] [-L file][-quiet][-verbose][-h][-v] wsdlurl
-e service Specifies the name of the generated service element.
-t port Specifies the value of the name attribute of the generated port element.
-b binding Specifies the name of the binding for which the service is generated.
-o file Specifies the filename for the generated contract. The default is to append -service to the name of the imported contract.
-d dir Specifies the output directory for the generated contract.
-jnp propName:propVal Specifies any optional Java properties to use in connecting to the JNDI provider. This information is used to populate a JMSNamingProperty element. You can use this flag multiple times.
251

CHAPTER 19 | Using the Java Messaging System
For more information about the specific attributes and their values see the Artix WSDL Extension Reference.
-jds (queue/topic) Specifies if the JMS destination is a JMS queue or a JMS topic.
-jfn connectionFactoryName Specifies the JNDI name bound to the JMS connection factory to use when connecting to the JMS destination.
-jdn destinationName Specifies the JNDI name of the JMS destination to which Artix connects.
-jrdn replyDestinationName Specifies the JNDI name of the JMS destination used for replies.
-jcun username Specifies the username used to connect to the JMS broker.
-jcp password Specifies the password used to connect to the JMS broker.
-jmt (text/binary) Specifies how the message data will be packaged as a JMS message.
-jms messageSelector Specifies a message selector to use when pulling messages from the JMS destination.
-jumi (true/false) Specifies if the JMS message id should be used as the correlation id.
-jtr (true/false) Specifies if the services uses local JMS transactions when processing requests.
-jdsn durableSubscriber Specifies the name of the durable subscription to use.
-L file Specifies the location of your Artix license file. The default behavior is to check IT_PRODUCT_DIR\etc\license.txt.
-quiet Specifies that the tool runs in quiet mode.
-verbose Specifies that the tool runs in verbose mode.
-h Displays the tool�s usage statement.
-v Displays the tool�s version.
252

Migrating to the 4.x JMS WSDL Extensions
Migrating to the 4.x JMS WSDL Extensions
Overview The WSDL extensions used to configure a JMS endpoint were modified in the 4.0 release of Artix. This update makes Artix JMS endpoint definitions compatible with Celtix JMS endpoints. To make the transition as smooth as possible, Artix includes an XSLT script that can be used to automatically migrate an old JMS endpoint definition to a new JMS endpoint definition.
XSLT script The XSLT script used to migrate old JMS endpoint definitions to 4.x JMS endpoints is called oldjmswsdl_to_newjmswsdl.xsl and it is located in IntallDir/Artix/Version/etc/xslt/utilities/jms. It will take any Artix contract containing a pre-4.x Artix JMS endpoint definition as input and output an equivalent Artix contract containing a 4.x Artix JMS endpoint.
Using the script with Artix You can use Artix�s XSLT processor to convert your JMS endpoints. To do so you run the Artix xslttransform command line tool using the options shown in Example 111.
The XSLT processor will read the contract in oldWsdl.wsdl, transform the old JMS endpoint to a new JMS endpoint, and save the resulting contract in newWsdl.wsdl.
Example 111: Running the Transformer with the JMS Migration Script
xslttransform -XSL oldjmswsdl_to_newjmswsdl.xsl -IN oldWsdl.wsdl -OUT newWsdl.wsdl
253

CHAPTER 19 | Using the Java Messaging System
Using ActiveMQ as Your JMS Provider
Overview Artix installs ActiveMQ, an open source JMS implementation, for you to use as a possible messaging system. All of the Artix JMS demos are configured to use ActiveMQ, so to run the demos you must start the ActiveMQ broker.
Setting the CLASSPATH When you set your Artix environment using the artix_env script, the ActiveMQ jars are automatically added to your CLASSPATH.
If you don not want to set the Artix environment before starting ActiveMQ you need to add InstallDir/lib/activemq/activemq/3.2.1/activemq-rt.jar to your CLASSPATH.
Staring the broker To start the ActiveMQ JMS broker run the following command:
Stopping the broker To shutdown the ActiveMQ JMS broker run the following command:
Security By default, ActiveMQ�s security features are turned off. To turn on ActiveMQ�s security features see the ActiveMQ documentation.
More information For more information on using ActiveMQ see the project�s homepage at http://activemq.org.
InstallDir/Artix/Version/bin/start_jms_broker
InstallDir/Artix/Version/bin/jmsbrokerinteract -sd
254
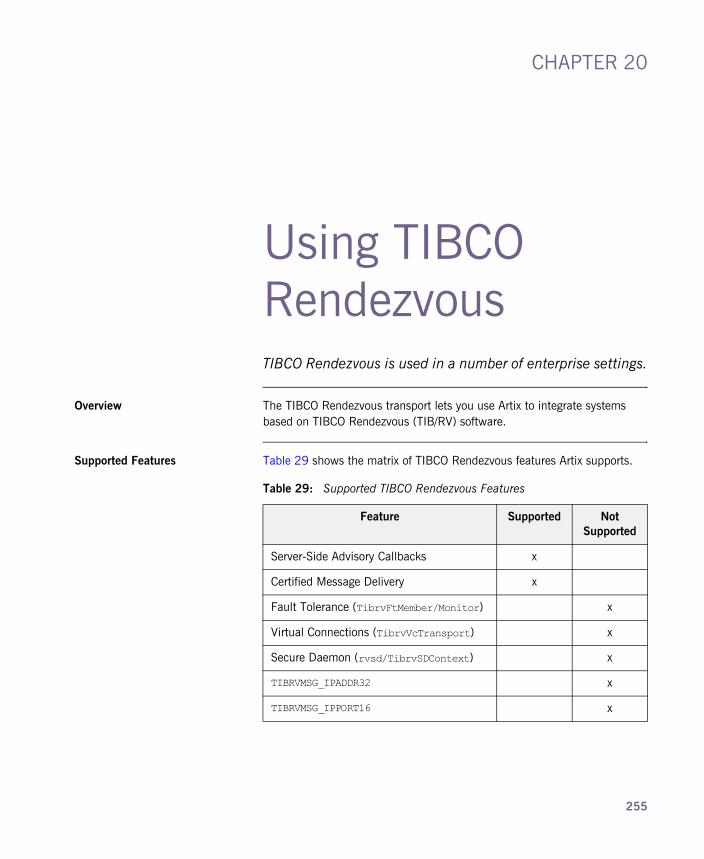
CHAPTER 20
Using TIBCO RendezvousTIBCO Rendezvous is used in a number of enterprise settings.
Overview The TIBCO Rendezvous transport lets you use Artix to integrate systems based on TIBCO Rendezvous (TIB/RV) software.
Supported Features Table 29 shows the matrix of TIBCO Rendezvous features Artix supports.
Table 29: Supported TIBCO Rendezvous Features
Feature Supported Not Supported
Server-Side Advisory Callbacks x
Certified Message Delivery x
Fault Tolerance (TibrvFtMember/Monitor) x
Virtual Connections (TibrvVcTransport) x
Secure Daemon (rvsd/TibrvSDContext) x
TIBRVMSG_IPADDR32 x
TIBRVMSG_IPPORT16 x
255

CHAPTER 20 | Using TIBCO Rendezvous
Namespace To use the TIB/RV transport, you need to define the endpoint using TIB/RV in the physical part of an Artix contract. The extensions used to describe a TIB/RV endpoint are defined in the namespace:
This namespace will need to be included in your Artix contract�s definition element.
Describing the port As with other transports, the TIB/RV transport specifications are contained within a port element. Artix uses tibrv:port to describe the attributes of a TIB/RV endpoint. The only required attribute for a tibrv:port element is serverSubject which specifies the subject to which the server listens.
Using the command line tools To use wsdltoservice to add a TIB/RV endpoint use the following options.
xmlns:tibrv="http://schemas.iona.com/transports/tibrv"
wsdltoservice -transport tibrv [-e service][-t port][-b binding] [-tss subject][-tcst subject][-tbt bindingType] [-tcl callbackLevel][-trdt timeout] [-tts transportService][-ttn transportNetwork] [-ttbm batchMode][-tqp priority] [-tqlp queueLimitPolicy][-tqme queueMaxEvents] [-tqda queueDiscardAmount][-tcs cmSupport] [-tctsn cmTransportServerName] [-tctcn cmTransportClientName] [-tctro cmTransportRequestOld] [-tctln cmTransportLedgerName] [-tctsl cmTransportSyncLedger] [-tctra cmTransportRelayAgent] [-tctdtl cmTransportDefaultTimeLimit]
256

The -transport tibrv flag specifies that the tool is to generate a TIB/RV service. The other options are as follows.
[-tclca cmListenerCancelAgreements] [-tcqtsn cmQueueTransportServerName] [-tcqtcn cmQueueTransportClientName] [-tcqtww cmQueueTransportWorkerWeight] [-tcqtws cmQueueTransportWorkerTasks] [-tcqtsw cmQueueTransportSchedulerWeight] [-tcqtsh cmQueueTransportSchedulerHeartbeat] [-tcqtsa cmQueueTransportSchedulerActivation] [-tcqtct cmQueueTransportCompleteTime] [-tmnfv messageNameFieldValue] [-tmnfp messageNameFieldPath] [-tbfi bindingFieldId][-tbfn bindingFieldName] [-o file][-d dir][-L file] [-quiet][-verbose][-h][-v] wsdlurl
-e service Specifies the name of the generated service element.
-t port Specifies the value of the name attribute of the generated port element.
-b binding Specifies the name of the binding for which the endpoint is generated.
-tss subject Specifies the subject to which the server listens.
-tcst subject Specifies the prefix to the subject on which the client listens for replies.
-tbt bindingType Specifies the message binding type. Valid values are msg, xml, opaque, or string.
-tcl callbackLevel Specifies the server-side callback level when TIB/RV system advisory messages are received. Valid values are INFO, WARN, or ERROR.
-trdt timeout Specifies the client-side response receive dispatch timeout.
-tts transportService Specifies the UDP service name or port for TibrvNetTransport.
-ttn transportNetwork Specifies the binding network addresses for TibrvNetTransport.
257
CHAPTER 20 | Using TIBCO Rendezvous
-ttbm batchMode Specifies if the TIB/RV transport uses batch mode to send messages. Valid values are DEFAULT_BATCH and TIMER_BATCH.
-tqp priority Specifies the queue priority.
-tqlp queueLimitPolicy Valid values are DISCARD_NONE, DISCARD_NEW, DISCARD_FIRST, or DISCARD_LAST.
-tqme queueMaxEvents Specifies the queue max events.
-tqda queueDiscardAmount Specifies the queue discard amount.
-tcs cmSupport Specifies if Certified Message Delivery support is enabled. Valid values are true or false.
-tctsn cmTransportServerName Specifies the server�s TibrvCmTransport correspondent name.
-tctcn cmTransportClientName Specifies the client TibrvCmTransport correspondent name.
-tctro cmTransportRequestOld Specifies if the endpoint can request old messages on start-up. Valid values are true or false.
-tctln cmTransportLedgerName Specifies the TibrvCmTransport ledger file.
-tctsl cmTransportSyncLedger Specifies if the endpoint uses a synchronous ledger. Valid values are true or false.
-tctra cmTransportRelayAgent Specifies the endpoint�s TibrvCmTransport relay agent.
-tctdtl cmTransportDefaultTimeLimit
Specifies the default time limit for a Certified Message to be delivered.
-tclca cmListenerCancelAgreements
Specifies if Certified Message agreements are canceled when the endpoint disconnects. Valid values are true or false.
-tcqtsn cmQueueTransportServerName
Specifies the server�s TibrvCmQueueTransport correspondent name.
258

-tcqtcn cmQueueTransportClientName
Specifies the client�s TibrvCmQueueTransport correspondent name.
-tcqtww cmQueueTransportWorkerWeight
Specifies the endpoint�s TibrvCmQueueTransport worker weight.
-tcqtws cmQueueTransportWorkerTasks
Specifies the endpoint�s TibrvCmQueueTransport worker tasks parameter.
-tcqtsw cmQueueTransportSchedulerWeight
Specifies the TibrvCmQueueTransport scheduler weight parameter.
-tcqtsh cmQueueTransportSchedulerHeartbeat
Specifies the endpoint�s TibrvCmQueueTransport scheduler heartbeat parameter.
-tcqtsa cmQueueTransportSchedulerActivation
Specifies the TibrvCmQueueTransport scheduler activation parameter.
-tcqtct cmQueueTransportCompleteTime
Specifies the TibrvCmQueueTransport complete time parameter.
-tmnfv messageNameFieldValue Specifies the message name field value.
-tmnfp messageNameFieldPath Specifies the message name field path.
-tbfi bindingFieldId Specifies the binding field id.
-tbfn bindingFieldName Specifies the binding field name.
-o file Specifies the filename for the generated contract. The default is to append -service to the name of the imported contract.
-d dir Specifies the output directory for the generated contract.
-L file Specifies the location of your Artix license file. The default behavior is to check IT_PRODUCT_DIR\etc\license.txt.
-quiet Specifies that the tool runs in quiet mode.
-verbose Specifies that the tool runs in verbose mode.
-h Displays the tool�s usage statement.
-v Displays the tool�s version.
259

CHAPTER 20 | Using TIBCO Rendezvous
For more information about the specific attributes and their values see the Artix WSDL Extension Reference.
Example Example 112 shows an Artix description for a TIB/RV endpoint.
Example 112: TIB/RV Port Description
<service name="BaseService"> <port binding="tns:BasePortBinding" name="BasePort"> <tibrv:port serverSubject="Artix.BaseService.BasePort"/> </port> </service>
260
CHAPTER 21
Using TuxedoOverview Artix allows services to connect using Tuxedo�s transport mechanism. This
provides them with all of the qualities of service associated with Tuxedo.
Tuxedo namespaces To use the Tuxedo transport, you need to describe the endpoint using Tuxedo in the physical part of an Artix contract. The extensions used to describe a Tuxedo endpoint are defined in the following namespace:
This namespace will need to be included in your Artix contract�s definition element.
Defining the Tuxedo services As with other transports, the Tuxedo transport description is contained within a port element. Artix uses tuxedo:server to describe the attributes of a Tuxedo endpoint. tuxedo:server has a child element, tuxedo:service, that gives the bulletin board name of a Tuxedo endpoint. The bulletin board name for the endpoint is specified in the element�s name attribute. You can define more than one Tuxedo service to act as an endpoint.
Mapping operations to a Tuxedo service
For each of the Tuxedo services that are endpoints, you must specify which of the operations bound to the endpoint being defined are handled by the Tuxedo service. This is done using one or more tuxedo:input child elements. tuxedo:input takes one required attribute, operation, that specifies the WSDL operation that is handled by this Tuxedo service endpoint.
xmlns:tuxedo="http://schemas.iona.com/transports/tuxedo"
261

CHAPTER 21 | Using Tuxedo
Using the command line tools To use wsdltoservice to add a Tuxedo endpoint use the tool with the following options.
The -transport tuxedo flag specifies that the tool is to generate a Tuxedo service. The other options are as follows.
wsdltoservice -transport tuxedo [-e service][-t port] [-b binding][-tsn tuxService] [-tfn tuxService:tuxFunction] [-ton tuxService:operation] [-o file][-d dir][-L file][-quiet][-verbose][-h][-v] wsdlurl
-e service Specifies the name of the generated service element.
-t port Specifies the value of the name attribute of the generated port element.
-b binding Specifies the name of the binding for which the endpoint is generated.
-tsn tuxService Specifies the name the service uses when registering with the Tuxedo bulletin board.
-tfn tuxService:tuxFunction Specifies the name of the function to be used on the specified Tuxedo bulletin board.
-ton tuxService:operation Specifies the WSDL operation that is handled by the specified Tuxedo endpoint.
-o file Specifies the filename for the generated contract. The default is to append -service to the name of the imported contract.
-d dir Specifies the output directory for the generated contract.
-L file Specifies the location of your Artix license file. The default behavior is to check IT_PRODUCT_DIR\etc\license.txt.
-quiet Specifies that the tool runs in quiet mode.
-verbose Specifies that the tool runs in verbose mode.
262

For more information about the specific attributes and their values see the Artix WSDL Extension Reference.
Example An Artix contract exposing the personalInfoService as a Tuxedo endpoint would contain a service element similar to Example 113 on page 263.
-h Displays the tool�s usage statement.
-v Displays the tool�s version.
Example 113: Tuxedo Port Description
<service name="personalInfoService"> <port binding="tns:personalInfoBinding" name="tuxInfoPort"> <tuxedo:server> <tuxedo:service name="personalInfoService"> <tuxedo:input operation="infoRequest"/> </tuxedo:service> </tuxedo:server> </port></service>
263

CHAPTER 21 | Using Tuxedo
264

CHAPTER 22
Using FTPOverview Artix allows endpoints to communicate using a remote FTP server as an
intermediary persistent datastore. When using the FTP transport, client endpoints will put request messages into a folder on the FTP server and then begin scanning the folder for a response. Server endpoints will scan the request folder on the FTP server for requests. When a request is found, the service endpoint will get it and process the request. When the service endpoint finishes processing the request, it will post the response back to the FTP server. When the client sees the response, it will get the response from the FTP server.
Because of the file-based nature of the FTP transport and the fact that endpoints do not have a direct connection to each other, the FTP transport places the burden of implementing a request/response coordination scheme on the developer. The FTP transport also requires that you implement the logic determining how the request and response messages are cleaned-up.
In this chapter This chapter discusses the following topics:
Adding an FTP Endpoint page 266
Coordinating Requests and Responses page 268
265
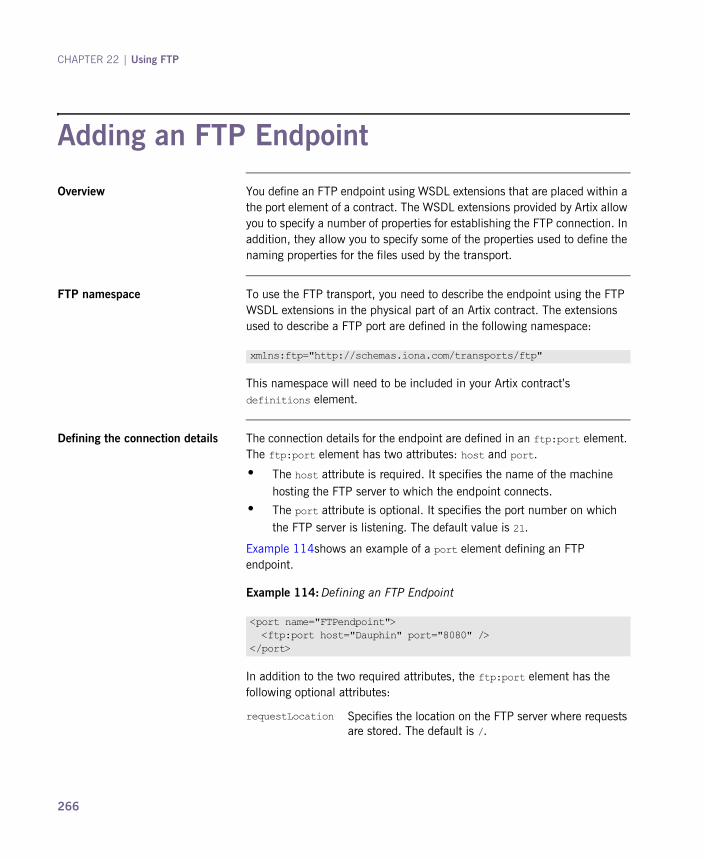
CHAPTER 22 | Using FTP
Adding an FTP Endpoint
Overview You define an FTP endpoint using WSDL extensions that are placed within a the port element of a contract. The WSDL extensions provided by Artix allow you to specify a number of properties for establishing the FTP connection. In addition, they allow you to specify some of the properties used to define the naming properties for the files used by the transport.
FTP namespace To use the FTP transport, you need to describe the endpoint using the FTP WSDL extensions in the physical part of an Artix contract. The extensions used to describe a FTP port are defined in the following namespace:
This namespace will need to be included in your Artix contract�s definitions element.
Defining the connection details The connection details for the endpoint are defined in an ftp:port element. The ftp:port element has two attributes: host and port.
� The host attribute is required. It specifies the name of the machine hosting the FTP server to which the endpoint connects.
� The port attribute is optional. It specifies the port number on which the FTP server is listening. The default value is 21.
Example 114shows an example of a port element defining an FTP endpoint.
In addition to the two required attributes, the ftp:port element has the following optional attributes:
xmlns:ftp="http://schemas.iona.com/transports/ftp"
Example 114: Defining an FTP Endpoint
<port name="FTPendpoint"> <ftp:port host="Dauphin" port="8080" /></port>
requestLocation Specifies the location on the FTP server where requests are stored. The default is /.
266

Adding an FTP Endpoint
Specifying optional naming properties
You can specify optional naming policies using an ftp:properties element. The ftp:properties element is a container for a number ftp:property elements. The ftp:property elements specify the individual naming properties. Each ftp:property element has two attributes, name and value, that make up a name-value pair that are used to provide information to the naming implementation used by the endpoint.
The default naming implementation provided with Artix has two properties:
For information on defining optional properties see �Using Properties to Control Coordination Behavior� on page 277.
replyLocation Specifies the location on the FTP server where replies are stored. The default is /.
connectMode Specifies the connection mode used to connect to the FTP daemon. Valid values are passive and active. The default is passive.
scanInsterval Specifies the interval, in seconds, at which the request and reply locations are scanned for updates. The default is 5.
staticFilemanes Determines if the endpoint uses a static, non-unique, naming scheme for its files. Valid values are true and false. The default is true.
requestFilenamePrefix Specifies the prefix to use for file names when staticFilenames is set to false.
267

CHAPTER 22 | Using FTP
Coordinating Requests and Responses
Overview FTP requires that messages are written out to a file system for retrieval. This poses a few problems. The first is determining a naming scheme that is agreed upon by all endpoints that use a common location on an FTP server. Client endpoints and the server endpoints they are making requests on need a method to coordinate requests and responses. This includes knowing which messages are intended for which endpoint.
The other problem posed by using a file system as a transport is knowing when a message can be cleaned-up. If a message is cleaned-up too soon, there is no way to re-read the message if something goes wrong while it is being processed. If a message is not cleaned-up soon enough, it is possible that the message will be processed more than once.
Artix requires that you implement the logic used to determine the file naming and clean-up logic used by your FTP endpoints. This is done by implementing four Java interfaces: two for the client-side and two for the server-side.
Default implementation Artix provides a default implementation for coordinating requests and responses. The default implementation enables clients and servers to interact as if they are using a standard RPC mechanism. Message names are generated at runtime following a pattern based on the server endpoint�s service name. Request messages are cleaned-up by the server endpoint when the corresponding response is written to the file system. Responses are cleaned-up by the client endpoint when they are read from the file system.
In this section This section discusses the following topics:
Implementing the Client�s Coordination Logic page 269
Implementing the Server�s Coordination Logic page 273
Using Properties to Control Coordination Behavior page 277
268
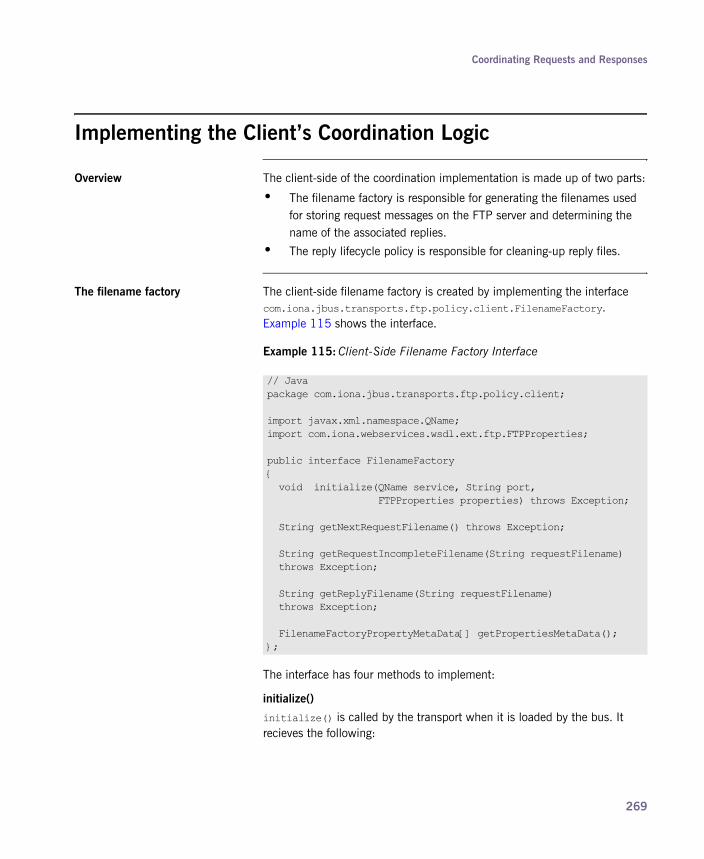
Coordinating Requests and Responses
Implementing the Client�s Coordination Logic
Overview The client-side of the coordination implementation is made up of two parts:
� The filename factory is responsible for generating the filenames used for storing request messages on the FTP server and determining the name of the associated replies.
� The reply lifecycle policy is responsible for cleaning-up reply files.
The filename factory The client-side filename factory is created by implementing the interface com.iona.jbus.transports.ftp.policy.client.FilenameFactory. Example 115 shows the interface.
The interface has four methods to implement:
initialize()
initialize() is called by the transport when it is loaded by the bus. It recieves the following:
Example 115: Client-Side Filename Factory Interface
// Javapackage com.iona.jbus.transports.ftp.policy.client;
import javax.xml.namespace.QName;import com.iona.webservices.wsdl.ext.ftp.FTPProperties;
public interface FilenameFactory{ void initialize(QName service, String port, FTPProperties properties) throws Exception;
String getNextRequestFilename() throws Exception;
String getRequestIncompleteFilename(String requestFilename) throws Exception;
String getReplyFilename(String requestFilename) throws Exception;
FilenameFactoryPropertyMetaData[] getPropertiesMetaData();};
269
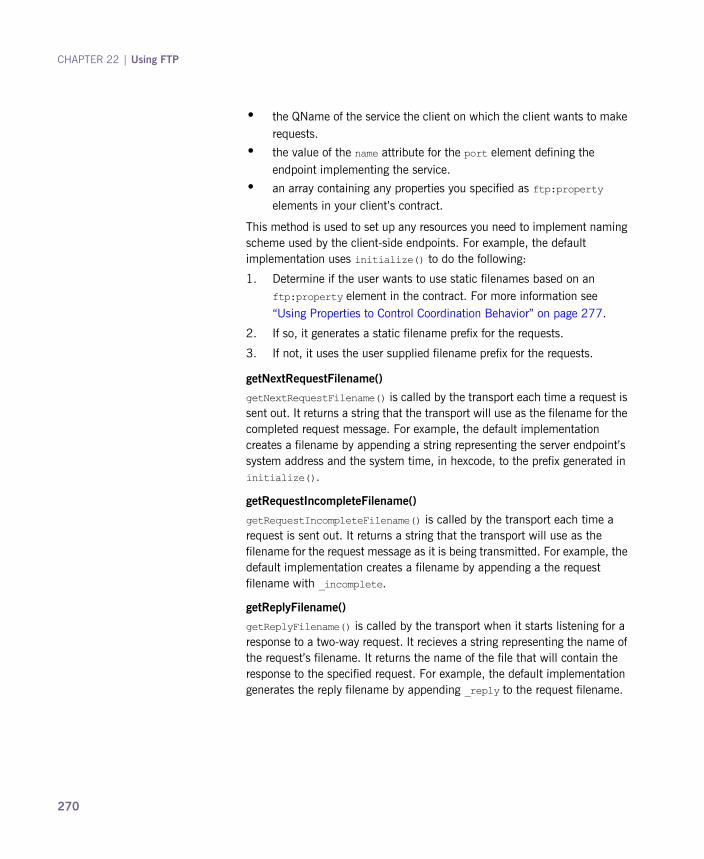
CHAPTER 22 | Using FTP
� the QName of the service the client on which the client wants to make requests.
� the value of the name attribute for the port element defining the endpoint implementing the service.
� an array containing any properties you specified as ftp:property elements in your client�s contract.
This method is used to set up any resources you need to implement naming scheme used by the client-side endpoints. For example, the default implementation uses initialize() to do the following:
1. Determine if the user wants to use static filenames based on an ftp:property element in the contract. For more information see �Using Properties to Control Coordination Behavior� on page 277.
2. If so, it generates a static filename prefix for the requests.
3. If not, it uses the user supplied filename prefix for the requests.
getNextRequestFilename()
getNextRequestFilename() is called by the transport each time a request is sent out. It returns a string that the transport will use as the filename for the completed request message. For example, the default implementation creates a filename by appending a string representing the server endpoint�s system address and the system time, in hexcode, to the prefix generated in initialize().
getRequestIncompleteFilename()
getRequestIncompleteFilename() is called by the transport each time a request is sent out. It returns a string that the transport will use as the filename for the request message as it is being transmitted. For example, the default implementation creates a filename by appending a the request filename with _incomplete.
getReplyFilename()
getReplyFilename() is called by the transport when it starts listening for a response to a two-way request. It recieves a string representing the name of the request�s filename. It returns the name of the file that will contain the response to the specified request. For example, the default implementation generates the reply filename by appending _reply to the request filename.
270

Coordinating Requests and Responses
The reply lifecycle policy The reply lifecycle policy is created by implementing the com.iona.jbus.transports.ftp.policy.client.ReplyFileLifecycle interface. Example 116 shows the interface.
The interface has two methods to implement:
shouldDeleteReplyFile()
shouldDeleteReplyFile() is called by the transport after it completes reading in a reply. It recieves the filename of the reply and returns a boolean stating if the file should be deleted. If shouldDeleteReplyFile() returns true, the transport deletes the reply file. If it returns false, the transport renames reply file based on the logic implemented in renameReplyFile().
renameReplyFile()
renameReplyFile() is called by the transport if shouldDeleteReplyFile() returns false. It receives the original name of the reply file. It returns a string the contains the filename the transport uses to rename the reply file.
Configuring the client�s coordination logic
If you choose to implement your own coordination logic for an FTP client endpoint, you need to configure the endpoint to load the your implementation classes. This is done by adding two configuration values to the endpoint�s Artix configuration scope:
� plugins:ftp:policy:client:filenameFactory specifies the name of the class implementing the client�s filename factory.
� plugins:ftp:policy:client:replyFileLifecycle specifies the name of the class implementing the client�s reply lifecycle policy.
Both classes need to be on the endpoint�s classpath.
Example 116: Reply Lifecycle Interface
package com.iona.jbus.transports.ftp.policy.client;
public interface ReplyFileLifecycle{ boolean shouldDeleteReplyFile(String fileName) throws Exception;
String renameReplyFile(String fileName) throws Exception;}
271

CHAPTER 22 | Using FTP
Example 117 shows an example of an Artix configuration scope that specifies an FTP client endpoint�s coordination policies.
For more information on configuring Artix see Configuring and Deploying Artix Solutions.
Example 117: Configuring an FTP Client Endpoint
ftp_client{ plugins:ftp:policy:client:filenameFactory="demo.ftp.policy.client.myFilenameFactory"; plugins:ftp:policy:client:replyFileLifecycle="demo.ftp.policy.client.myReplyFileLifecycle";};
272

Coordinating Requests and Responses
Implementing the Server�s Coordination Logic
Overview The server-side of the coordination implementation is made up of two parts:
� The filename factory is responsible for identifying which requests to dispatch and how to name reply messages.
� The request lifecycle policy is responsible for cleaning-up request files.
The filename factory The server-side filename factory is created by implementing the interface com.iona.jbus.transports.ftp.policy.server.FilenameFactory. Example 118 shows the interface.
The interface has six methods to implement:
Example 118: Server-Side Filename Factory Interface
package com.iona.jbus.transports.ftp.policy.server;
import javax.xml.namespace.QName;
import com.iona.jbus.Bus;import com.iona.transports.ftp.Element;import com.iona.webservices.wsdl.ext.ftp.FTPProperties;
public interface FilenameFactory{ void initialize(Bus bus, QName service, String port, FTPProperties properties) throws Exception;
String getRequestFilenamesRegEx() throws Exception;
Element[] updateRequestFiles(Element[] inElements) throws Exception;
String getReplyIncompleteFilename(String requestFilename) throws Exception;
String getReplyFilename(String requestFilename) throws Exception;
FilenameFactoryPropertyMetaData[] getPropertiesMetaData();}
273

CHAPTER 22 | Using FTP
initialize()
initialize() is called by the transport when it is activiated by the bus. It recieves the following:
� the bus that has activated the transport.
� the QName of the service to which the endpoint is implementing.
� the value of the name attribute for the port element defining the endpoint�s connection details.
� an array containing any properties you specified as ftp:property elements in your server endpoint�s contract.
This method is used to set up any resources you need to implement naming scheme used by the server-side endpoints. For example, the default implementation uses initialize() to do the following:
1. Determine if the user wants to use static filenames based on an ftp:property element in the contract. For more information see �Using Properties to Control Coordination Behavior� on page 277.
2. If so, it generates a static filename prefix for the requests.
3. If not, it uses the user supplied filename prefix for the requests.
getRequestFileRegEx()
getRequestFileRegEx() is called by the transport when it initializes the server-side FTP listener. It returns a regular expression that is used to match request filenames intended for a specific server instance. For example, the default implementation returns a regular expression of the form {wsdl:tns}_{wsdl:service(@name)}_{wsdl:port(@name)}_{reqUuid}.
updateRequestFiles()
updateRequestFiles() is called by the transport after it determines thelist of possbile requests and before it dispatches the requests to the service implementation for processing. It recieves an array of com.iona.transports.ftp.Element objects. This array is a list of all the request messages selected by the request filename regular expression. updateRequestFiles() returns an array of Element objects containing only the messages that are to be dispatched to the service implementation.
274

Coordinating Requests and Responses
getReplyIncompleteFilename()
getReplyInclompleteFilename() is called by the transport when it is ready to post a response. It recieves the filename of the request that generated the response. It returns a string that is used as the filename for the response as it is being written to the FTP server. For example, the default implementation returns _incomplete appended to request filename.
getReplyFilename()
getReplyFilename() is called by the transport after it finishes writting a response to the FTP server. It recieves the filename of the request that generated the response. It returns a string that is used as the filename for the completed response. For example, the default implementation returns _reply appended to request filename.
getPropertiesMetaData()
getPropertiesMetaData() is a convience function that returns an array of all the possbile properties you can use to effect the behavior of the FTP naming scheme. The properties returned correspond to the values defined in the ftp:properties element. For more information see �Using Properties to Control Coordination Behavior� on page 277.
The request lifecycle policy The request lifecycle policy is created by implementing the com.iona.jbus.transports.ftp.policy.server.RequestFileLifecycle interface. Example 119 shows the interface.
The interface has two methods to implement:
Example 119: Request Lifecycle Interface
package com.iona.jbus.transports.ftp.policy.server;
public interface RequestFileLifecycle{ boolean shouldDeleteRequestFile(String fileName) throws Exception;
String renameRequestFile(String fileName) throws Exception;}
275

CHAPTER 22 | Using FTP
shouldDeleteRequestFile()
shouldDeleteRequestFile() is called by the transport after it completes writing in a response. It recieves the filename of the request that generated the response and returns a boolean stating if the file should be deleted. If shouldDeleteReplyFile() returns true, the transport deletes the request file. If it returns false, the transport renames reply file based on the logic implemented in renameRequestFile().
renameRequestFile()
renameRequestFile() is called by the transport if shouldDeleteRequestFile() returns false. It receives the original name of the request file. It returns a string the contains the filename the transport uses to rename the request file.
Configuring the server�s coordination logic
If you choose to use your own coordination logic for an FTP server endpoint, you need to configure the endpoint to load the proper implementation classes. This is done by adding two configuration values to the endpoint�s Artix configuration scope:
� plugins:ftp:policy:server:filenameFactory specifies the name of the class implementing the server�s filename factory.
� plugins:ftp:policy:server:requestFileLifecycle specifies the name of the class implementing the server�s request lifecycle policy.
Both classes need to be on the endpoint�s classpath.
Example 120 shows an example of an Artix configuration scope that specifies an FTP server endpoint�s coordination policies.
For more information on configuring Artix see Configuring and Deploying Artix Solutions.
Example 120: Configuring an FTP Server Endpoint
ftp_client{ plugins:ftp:policy:server:filenameFactory="demo.ftp.policy.server.myFilenameFactory"; plugins:ftp:policy:server:requestFileLifecycle="demo.ftp.policy.client.myReqFileLifecycle";};
276
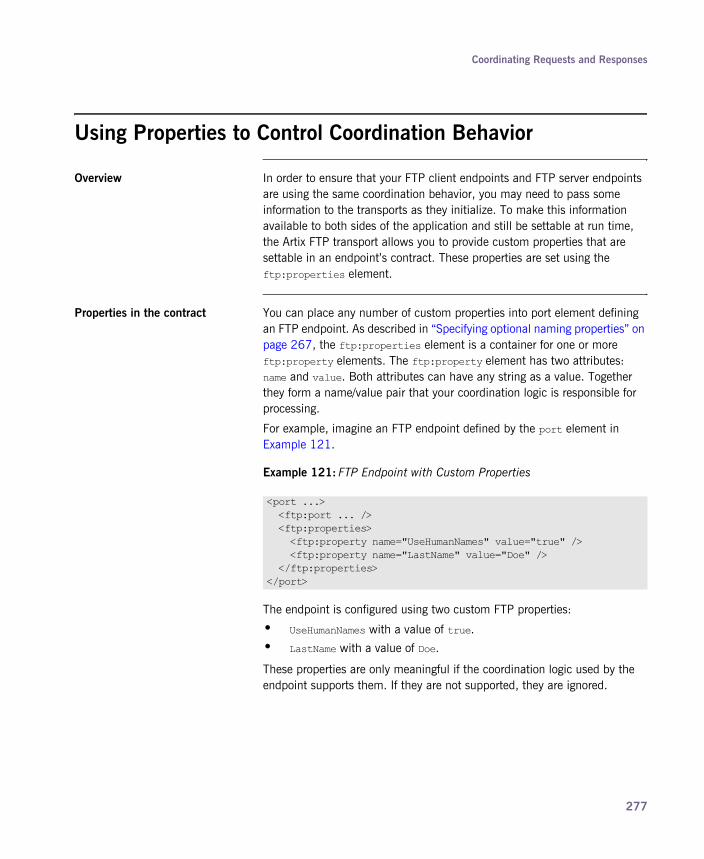
Coordinating Requests and Responses
Using Properties to Control Coordination Behavior
Overview In order to ensure that your FTP client endpoints and FTP server endpoints are using the same coordination behavior, you may need to pass some information to the transports as they initialize. To make this information available to both sides of the application and still be settable at run time, the Artix FTP transport allows you to provide custom properties that are settable in an endpoint�s contract. These properties are set using the ftp:properties element.
Properties in the contract You can place any number of custom properties into port element defining an FTP endpoint. As described in �Specifying optional naming properties� on page 267, the ftp:properties element is a container for one or more ftp:property elements. The ftp:property element has two attributes: name and value. Both attributes can have any string as a value. Together they form a name/value pair that your coordination logic is responsible for processing.
For example, imagine an FTP endpoint defined by the port element in Example 121.
The endpoint is configured using two custom FTP properties:
� UseHumanNames with a value of true.
� LastName with a value of Doe.
These properties are only meaningful if the coordination logic used by the endpoint supports them. If they are not supported, they are ignored.
Example 121: FTP Endpoint with Custom Properties
<port ...> <ftp:port ... /> <ftp:properties> <ftp:property name="UseHumanNames" value="true" /> <ftp:property name="LastName" value="Doe" /> </ftp:properties></port>
277
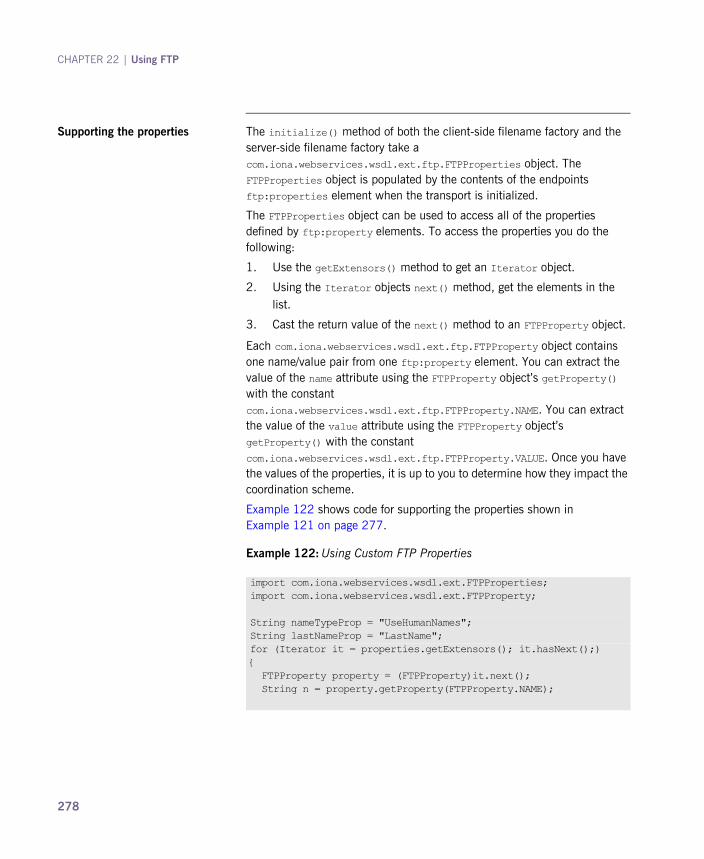
CHAPTER 22 | Using FTP
Supporting the properties The initialize() method of both the client-side filename factory and the server-side filename factory take a com.iona.webservices.wsdl.ext.ftp.FTPProperties object. The FTPProperties object is populated by the contents of the endpoints ftp:properties element when the transport is initialized.
The FTPProperties object can be used to access all of the properties defined by ftp:property elements. To access the properties you do the following:
1. Use the getExtensors() method to get an Iterator object.
2. Using the Iterator objects next() method, get the elements in the list.
3. Cast the return value of the next() method to an FTPProperty object.
Each com.iona.webservices.wsdl.ext.ftp.FTPProperty object contains one name/value pair from one ftp:property element. You can extract the value of the name attribute using the FTPProperty object�s getProperty() with the constant com.iona.webservices.wsdl.ext.ftp.FTPProperty.NAME. You can extract the value of the value attribute using the FTPProperty object�s getProperty() with the constant com.iona.webservices.wsdl.ext.ftp.FTPProperty.VALUE. Once you have the values of the properties, it is up to you to determine how they impact the coordination scheme.
Example 122 shows code for supporting the properties shown in Example 121 on page 277.
Example 122: Using Custom FTP Properties
import com.iona.webservices.wsdl.ext.FTPProperties;import com.iona.webservices.wsdl.ext.FTPProperty;
String nameTypeProp = "UseHumanNames";String lastNameProp = "LastName";for (Iterator it = properties.getExtensors(); it.hasNext();){ FTPProperty property = (FTPProperty)it.next(); String n = property.getProperty(FTPProperty.NAME);
278

Coordinating Requests and Responses
Filling in the Filename Factory Property Metadata
The server-side filename factory�s getPropertiesMetaData() method is a convenience function that can be used to publish the supported custom properties. It returns the details of the supported properties in an array of com.iona.jbus.transports.ftp.policy.server.FilenameFactoryPropert
yMetaData objects.
FilenameFactoryPropertyMetaData objects have three fields:
� name is a string that specifies the value of the ftp:property element�s name attribute.
� readOnly is a boolean that specifies if you can set this property in a contract.
� valueSet is an array of strings that specify the possible values for the property.
FilenameFactoryPropertyMetaData objects do not have any methods for populating its fields once the object is instantiated. You must set all of the values using the constructor that is shown in Example 123.
if (nameTypeProp.equals(n)) { Boolean useHuman = new
Boolean(property.getProperty(FTPProperty.VALUE)); }
if (lastNameProp.equals(n)) { String lastName = property.getProperty(FTPProperty.VALUE); } }
Example 122: Using Custom FTP Properties
Example 123: Constructor for FilenameFactoryPropertyMetaData
public FilenameFactoryPropertyMetaData(String n, boolean ro, String[] vs){ name = n; readOnly = ro; valueSet = vs;}
279

CHAPTER 22 | Using FTP
Example 124 shows code for creating an array to be returned from getPropertiesMetaData().
The list of possible values specified for the property LastName is set to null because the property can have any string value.
Example 124: Populating the Filename Properties Metadata
FilenameFactoryPropertyMetaData[] propMetas = new FilenameFactoryPropertyMetaData[]{ new FilenameFactoryPropertyMetaData("UseHumanNames", false, new String[] {Boolean.TRUE.toString(), Boolean.FALSE.toString()}), new FilenameFactoryPropertyMetaData("LastName", false, null)};
280

Part IVOther Artix Features
In this part This part contains the following chapters:
Working with CORBA page 283
Using the Artix Transformer page 297
Using Codeset Conversion page 319
281

282
CHAPTER 23
Working with CORBAArtix provides extensions for describing CORBA applications as services
Overview CORBA, unlike the other platforms supported by Artix, specifies both a mapping between the logical messages and a network protocol. Because these two cannot be decoupled, Artix provides extensions for both and requires that they be used together. To further enforce the coupling of the CORBA payload format and the CORBA network protocol all Artix tools that generate CORBA extensions generate them in sets.
In the chapter This chapter discusses the following topics:
Adding a CORBA Binding page 284
Creating a CORBA Endpoint page 290
283
CHAPTER 23 | Working with CORBA
Adding a CORBA Binding
Overview CORBA applications use a specific payload format when making and responding to requests. The CORBA binding, described using an IONA extension to WSDL, specifies the repository ID of the IDL interface represented by the port type, resolves parameter order and mode ambiguity in the operations� messages, and maps the XML Schema data types to CORBA data types.
In addition to the binding information, Artix also uses a corba:typemap element to unambiguously describe how data is mapped to CORBA data types. For primitive types, the mapping is straightforward. However, complex types such as structures, arrays, and exceptions require more detailed descriptions. For a detailed description of the CORBA type mappings see Artix for CORBA.
Options To add a CORBA binding to an Artix contract you can choose one of four methods. The first option is to use Artix Designer. Artix Designer provides a wizard that automatically generates the binding and type map information for a specified port type.
The second option is to use the wsdltocorba command line tool. The command line tool automatically generates the binding and type map information for a specified port type. See �Using wsdltocorba� on page 285.
The third option is to enter the binding and typemap information by hand using a text editor or XML editor. This option provides you the flexibility to customize the binding. However, hand editing Artix contracts can be a time consuming process and provides no error checking mechanisms. For information on the WSDL extensions used to specify a CORBA binding see �Mapping to the binding� on page 286.
284

Adding a CORBA Binding
Using wsdltocorba The wsdltocorba tool adds CORBA binding information to an existing Artix contract. To generate a CORBA binding using wsdltocorba use the following command:
The command has the following options:
The generated WSDL file will also contain a CORBA port with no address specified. To complete the port specification you can do so manually or use Artix Designer.
wsdltocorba -corba -i portType [-d dir][-b binding][-o file] [-props namespace][-wrapped] [-L file][-quiet][-verbose][-h][-v] wsdl_file
-corba Instructs the tool to generate a CORBA binding for the specified port type.
-i portType Specifies the name of the port type being mapped to a CORBA binding.
-d dir Specifies the directory into which the new WSDL file is written.
-b binding Specifies the name for the generated CORBA binding. Defaults to portTypeBinding.
-o file Specifies the name of the generated WSDL file. Defaults to wsdl_file-corba.wsdl.
-props namespace Specifies the namespace to use for the generated CORBA typemap
-wrapped Specifies that the generated CORBA binding uses wrapper types.
-L file Specifies the location of your Artix license file. The default behavior is to check IT_PRODUCT_DIR\etc\license.txt.
-quiet Specifies that the tool runs in quiet mode. No output will be shown on the console. This includes error messages.
-verbose Specifies that the tool runs in verbose mode.
-h Specifies that the tool will display a usage message.
-v Displays the tool�s version.
285

CHAPTER 23 | Working with CORBA
WSDL Namespace The WSDL extensions used to describe CORBA data mappings and CORBA transport details are defined in the WSDL namespace http://schemas.iona.com/bindings/corba. To use the CORBA extensions you will need to include the following in the definitions tag of your contract:
Mapping to the binding The extensions used to map a logical operation to a CORBA binding are described in detail below:
corba:binding indicates that the binding is a CORBA binding. This element has one required attribute: repositoryID. The repositoryID attribute specifies the full type ID of the interface. The type ID is embedded in the object�s IOR and therefore must conform to the IDs that are generated from an IDL compiler. These are of the form:
The corba:binding element also has an optional attribute, bases, that specifies that the interface being bound inherits from another interface. The value for bases is the type ID of the interface from which the bound interface inherits. For example, the following IDL:
would produce the following corba:binding:
corba:operation is an IONA-specific element of the operation element and describes the parts of the operation�s messages. corba:operation takes a single attribute, name, which duplicates the name given in operation.
corba:param is a child of corba:operation. Each part element of the input and output messages specified in the logical operation, except for the part representing the return value of the operation, must have a corresponding
xmlns:corba="http://schemas.iona.com/bindings/corba"
IDL:module/interface:1.0
//IDLinterface clash{};interface bad : clash{};
<corba:binding repositoryID="IDL:bad:1.0" bases="IDL:clash:1.0"/>
286

Adding a CORBA Binding
corba:param element. The parameter order defined in the binding must match the order specified in the IDL definition of the operation. The corba:param element has the following required attributes:
corba:return is a child of corba:operation and specifies the return type, if any, of the operation. It has two attributes:
corba:raises is a child of corba:operation and describes any exceptions the operation can raise. The exceptions are defined as fault messages in the logical definition of the operation. Each fault message must have a corresponding corba:raises element. corba:raises has one required attribute, exception, which specifies the type of data returned in the exception.
In addition to operations specified in corba:operation tags, within the operation block, each operation in the binding must also specify empty input and output elements as required by the WSDL specification. The CORBA binding specification, however, does not use them.
mode Specifies the direction of the parameter. The values directly correspond to the IDL directions: in, inout, out. Parameters set to in must be included in the input message of the logical operation. Parameters set to out must be included in the output message of the logical operation. Parameters set to inout must appear in both the input and output messages of the logical operation.
idltype Specifies the IDL type of the parameter. The type names are prefaced with corba: for primitive IDL types, and corbatm: for complex data types, which are mapped out in the corba:typeMapping portion of the contract.
name Specifies the name of the parameter as given in the logical portion of the contract.
name Specifies the name of the parameter as given in the logical portion of the contract.
idltype Specifies the IDL type of the parameter. The type names are prefaced with corba: for primitive IDL types and corbatm: for complex data types which are mapped out in the corba:typeMapping portion of the contract.
287

CHAPTER 23 | Working with CORBA
For each fault message defined in the logical description of the operation, a corresponding fault element must be provided in the operation, as required by the WSDL specification. The name attribute of the fault element specifies the name of the schema type representing the data passed in the fault message.
Example For example, a logical interface for a system to retrieve employee information might look similar to personalInfoLookup, shown in Example 125.
The CORBA binding for personalInfoLookup is shown in Example 126.
Example 125: personalInfo lookup port type
<message name="personalLookupRequest"> <part name="empId" type="xsd:int"/></message><message name="personalLookupResponse"> <part name="return" element="xsd1:personalInfo"/></message><message name="idNotFoundException"> <part name="exception" element="xsd1:idNotFound"/></message><portType name="personalInfoLookup"> <operation name="lookup"> <input name="empID" message="personalLookupRequest"/> <output name="return" message="personalLookupResponse"/> <fault name="exception" message="idNotFoundException"/> </operation></portType>
288
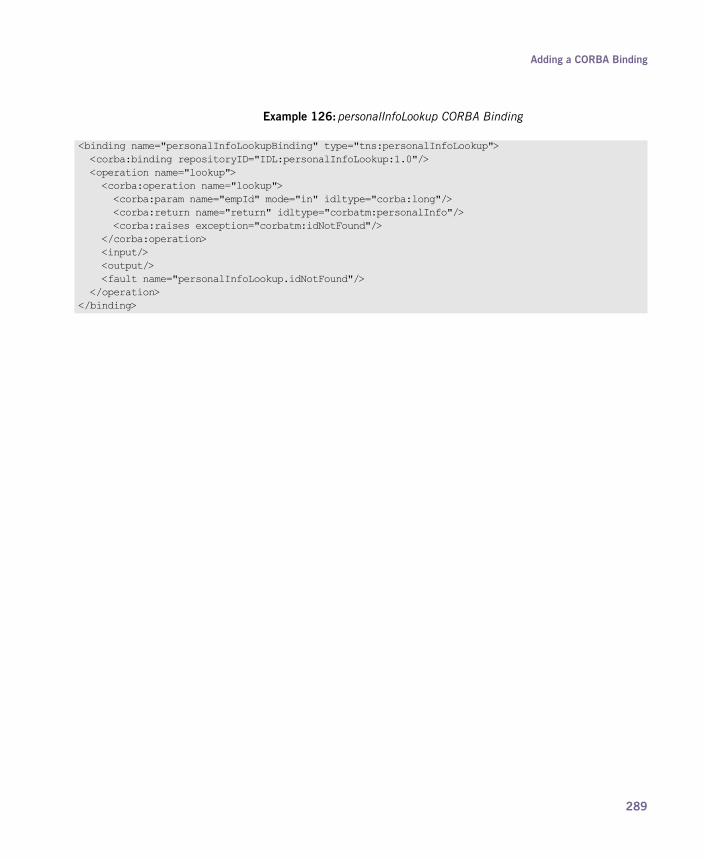
Adding a CORBA Binding
Example 126: personalInfoLookup CORBA Binding
<binding name="personalInfoLookupBinding" type="tns:personalInfoLookup"> <corba:binding repositoryID="IDL:personalInfoLookup:1.0"/> <operation name="lookup"> <corba:operation name="lookup"> <corba:param name="empId" mode="in" idltype="corba:long"/> <corba:return name="return" idltype="corbatm:personalInfo"/> <corba:raises exception="corbatm:idNotFound"/> </corba:operation> <input/> <output/> <fault name="personalInfoLookup.idNotFound"/> </operation></binding>
289
CHAPTER 23 | Working with CORBA
Creating a CORBA Endpoint
Overview Generally, when you are creating a CORBA endpoint with Artix, you need to do two things. First, you must specify the port information in the Artix contract so that Artix can instantiate the appropriate port. Second, you must generate the IDL describing your service so that a native CORBA application can understand the interfaces of the new service.
In this section This section discusses the following topics:
Configuring an Artix CORBA Endpoint page 291
Generating CORBA IDL page 295
290

Creating a CORBA Endpoint
Configuring an Artix CORBA Endpoint
Overview CORBA endpoints are described using the IONA-specific WSDL elements corba:address and corba:policy within the WSDL port element, to specify how a CORBA object is exposed.
Namespace The namespace under which the CORBA extensions are defined is "http://schemas.iona.com/bindings/corba". If you are going to add a CORBA endpoint by hand you will need to add this to your contract�s definition element.
CORBA address specification The IOR of the CORBA object is specified using the corba:address element. You have four options for specifying IORs in Artix contracts:
� Specify the object�s IOR directly in the contract, using the stringified IOR format:
� Specify a file location for the IOR, using the following syntax:
� Specify that the IOR is published to a CORBA name service, by entering the object�s name using the corbaname format:
For more information on using the name service with Artix see Artix for CORBA.
� Specify the IOR using corbaloc, by specifying the port at which the endpoint exposes itself, using the corbaloc syntax.
IOR:22342...
file:///file_name
Note: The file specification requires three backslashes (///).
corbaname:rir/NameService#object_name
corbaloc:iiop:host:port/service_name
291

CHAPTER 23 | Working with CORBA
When using corbaloc, you must be sure to configure your endpoint to start up on the specified host and port.
Specifying POA policies Using the optional corba:policy element, you can describe a number of POA polices the endpoint will use when creating the POA for connecting to a CORBA application. These policies include:
� POA Name
� Persistence
� ID Assignment
Setting these policies lets you exploit some of the enterprise features of IONA�s Orbix 6.x, such as load balancing and fault tolerance, when deploying an Artix integration project. For information on using these advanced CORBA features, see the Orbix documentation.
POA Name
Artix POAs are created with the default name of WS_ORB. To specify the name of the POA Artix creates to connect with a CORBA object, you use the following:
Persistence
By default Artix POAs have a persistence policy of false. To set the POA�s persistence policy to true, use the following:
ID Assignment
By default Artix POAs are created with a SYSTEM_ID policy, meaning that their ID is assigned by the ORB. To specify that the POA connecting a specific object should use a user-assigned ID, use the following:
This creates a POA with a USER_ID policy and an object id of POAid.
<corba:policy poaname="poa_name"/>
<corba:policy persistent="true"/>
<corba:policy serviceid="POAid"/>
292

Creating a CORBA Endpoint
Using the command line tool You can use the wsdltoservice command line tool to add a CORBA endpoint definition to an Artix contract. To use wsdltoservice to add a CORBA endpoint use the tool with the following options.
The -transport corba flag specifies that the tool is to generate a CORBA endpoint. The other options are as follows.
wsdltoservice -transport corba [-e service][-t port][-b binding] [-a address][-poa poaName][-sid serviceId] [-pst persists][-o file][-d dir][-L file] [-q][-h][-V] wsdlurl
-e service Specifies the name of the generated service element.
-t port Specifies the value of the name attribute of the generated port element.
-b binding Specifies the name of the binding for which the service is generated.
-a address Specifies the value used in the corba:address element of the port.
-poa poaName Specifies the value of the POA name policy.
-sid serviceId Specifies the value of the ID assignment policy.
-pst persists Specifies the value of the persistence policy. Valid values are true and false.
-o file Specifies the filename for the generated contract. The default is to append -service to the name of the imported contract.
-d dir Specifies the output directory for the generated contract.
-L file Specifies the location of your Artix license file. The default behavior is to check IT_PRODUCT_DIR\etc\license.txt.
-q Specifies that the tool runs in quiet mode. No output will be shown on the console. This includes error messages.
-h Specifies that the tool will display a usage message.
-V Specifies that the tool runs in verbose mode.
293

CHAPTER 23 | Working with CORBA
Example For example, a CORBA port for the personalInfoLookup binding would look similar to Example 127:
Artix expects the IOR for the CORBA object to be located in a file called objref.ior, and creates a persistent POA with an object id of personalInfo to connect the CORBA application.
Example 127: CORBA personalInfoLookup Port
<service name="personalInfoLookupService"> <port name="personalInfoLookupPort" binding="tns:personalInfoLookupBinding"> <corba:address location="file:///objref.ior"/> <corba:policy persistent="true"/> <corba:policy serviceid="personalInfoLookup"/> </port></service>
294
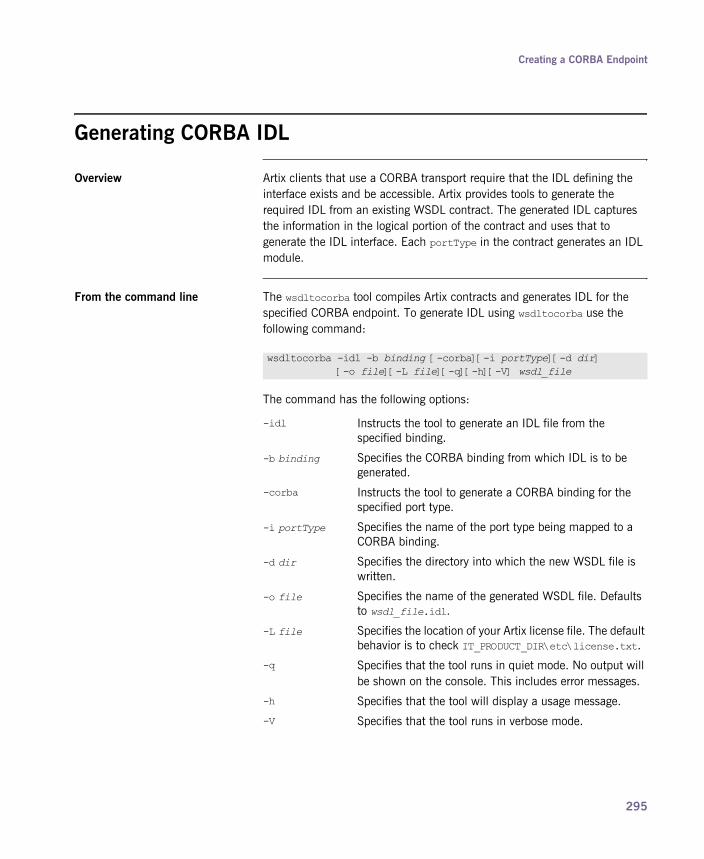
Creating a CORBA Endpoint
Generating CORBA IDL
Overview Artix clients that use a CORBA transport require that the IDL defining the interface exists and be accessible. Artix provides tools to generate the required IDL from an existing WSDL contract. The generated IDL captures the information in the logical portion of the contract and uses that to generate the IDL interface. Each portType in the contract generates an IDL module.
From the command line The wsdltocorba tool compiles Artix contracts and generates IDL for the specified CORBA endpoint. To generate IDL using wsdltocorba use the following command:
The command has the following options:
wsdltocorba -idl -b binding [-corba][-i portType][-d dir] [-o file][-L file][-q][-h][-V] wsdl_file
-idl Instructs the tool to generate an IDL file from the specified binding.
-b binding Specifies the CORBA binding from which IDL is to be generated.
-corba Instructs the tool to generate a CORBA binding for the specified port type.
-i portType Specifies the name of the port type being mapped to a CORBA binding.
-d dir Specifies the directory into which the new WSDL file is written.
-o file Specifies the name of the generated WSDL file. Defaults to wsdl_file.idl.
-L file Specifies the location of your Artix license file. The default behavior is to check IT_PRODUCT_DIR\etc\license.txt.
-q Specifies that the tool runs in quiet mode. No output will be shown on the console. This includes error messages.
-h Specifies that the tool will display a usage message.
-V Specifies that the tool runs in verbose mode.
295

CHAPTER 23 | Working with CORBA
By combining the -idl and -corba flags with wsdltocorba, you can generate a CORBA binding for a logical operation and then generate the IDL for the generated CORBA binding. When doing so, you must also use the -i portType flag to specify the port type from which to generate the binding and the -b binding flag to specify the name of the binding from which to generate the IDL.
296

CHAPTER 24
Using the Artix TransformerThe Artix transformer allows you to perform message transformations, data validation, and interface versioning without having to write additional code.
In this chapter This chapter discusses the following topics:
Using the Artix Transformer as a Service page 298
Using Artix to Facilitate Interface Versioning page 300
WSDL Messages and the Transformer page 305
Writing XSLT Scripts page 309
297

CHAPTER 24 | Using the Artix Transformer
Using the Artix Transformer as a Service
Overview Using the Artix transformer, you can create a Web service that does simple tasks such as converting dates into the proper format or generating HTML output without writing any code. You can also develop services to validate the format of requests before they are sent to a busy server for processing.
The data processing is performed by the Artix transformer which uses an XSLT script to determine how to process the data.
Procedure To use the Artix transformer as a service you:
1. Define the data, interface, binding, and transport details for the server in an Artix contract.
2. Write the XSLT script that defines the data processing you want the transformer to perform.
3. Configure the service with the transformer�s configuration details.
Defining the server The contract for a service that is implemented by the Artix transformer is the same as the Artix contract for any other service in Artix. You need to define the complex types, if any, that the service uses. Then you need to define the messages used by the service to receive and respond to requests.
Once the data types and messages are defined, you then define the service�s interface. The only limitation for a service that is implemented by the Artix Transformer is that it cannot have any fault messages. The interface can define multiple operations. Each operation will be processed using different XSLT scripts.
After defining the logical details of the service, you need to define the binding and network details for the service. The transformer can use any of the bindings and transports supported by Artix. For information on adding a binding for the transformer read �Understanding Bindings in WSDL� on page 61. For information on adding network details for the transformer read �Understanding How Endpoints are Defined WSDL� on page 193.
298

Using the Artix Transformer as a Service
Writing the scripts The XSLT scripts tell the transformer what it needs to do to process the data it receives. The scripts can be as simple or complex as they need to be to perform the task. The only requirement is that they are valid XSLT documents. For more information about writing XSLT scripts read �Writing XSLT Scripts� on page 309.
Configure the transformer The Artix transformer is an Artix plug-in and can be loaded by an Artix process. This provides a great deal of flexibility in how you configure and deploy the process. There are two common deployment patterns for deploying the Artix transformer as a service. The first is to configure the transformer to load into the Artix container. The second is to configure the transformer to load directly into the client process which is making requests against it.
For a detailed discussion of how to configure and deploy the Artix Transformer see Configuring and Deploying Artix Solutions.
299

CHAPTER 24 | Using the Artix Transformer
Using Artix to Facilitate Interface Versioning
Overview One of the most common and difficult problems faced in large scale client server deployments is upgrading systems. For example, if you change the interface for your server to add new functionality or streamline communications, you then need to change all of the clients that access the server. This can mean upgrading thousands of clients that may be scattered across the globe.
The Artix transformer provides a solution to this problem that allows you to slowly upgrade the clients without disrupting their ability to function. Using the transformer you can develop an XSLT script that converts messages between the different interfaces. Then you can place the transformer between the old clients and the new server. This solution eliminates the need for operating two versions of the same server, or trying to do a massive client and server upgrade. It also does this without requiring you to do any custom programing.
Procedure To use the Artix transformer for interface versioning:
1. Create a composite Artix contract defining both versions of the interfaces that need to be supported.
2. Define an interface for the transformer that defines operations for mapping the interfaces.
3. Add a SOAP binding to the contract for the transformer�s interface.
4. Add an HTTP port to the contract to define how the transformer can be contacted.
5. Write the XSLT scripts that define the message transformations.
6. Configure the transformer.
7. Configure the Artix chain builder to create a chain containing the transformer and the server on which clients will make requests.
300

Using Artix to Facilitate Interface Versioning
Creating a composite contract While the server and the client applications can be run without knowledge of the other�s interface, the transformer responsible for translating the messages between to the two interface versions must know about all of the interface versions used. This includes all data type definitions and message definitions used by both versions of the interface.
You can create this composite contract in several ways. The most straightforward way is to create a new contract which imports both the new interface�s contract and the old interface�s contract. To import the contracts you place an import element for each contract just after the definitions element in the new contract and before any other elements in the new contract. The import element has two attributes. location specifies the pathname of the file containing the contract that is being imported. namespace defines the XML namespace under which the imported contract can be referenced.
For example, if you were creating a composite contract for interface versioning you would have two contracts; one for the server with the updated interface and one for the client using the legacy interface. The file name for the server�s contract is r2e2.wsdl and the contract for the client is r2e1.wsdl. For simplicity, they are located in the same directory as the composite contract. The composite contract importing both versions of the interface is shown in Example 128.
Example 128: Composite WSDL
<?xml version="1.0" encoding="UTF-8"?><definitions name="transformer" targetNamespace="http://www.widgets.com/transformer" xmlns="http://schemas.xmlsoap.org/wsdl/" xmlns:r1="http://www.widgets.com/r2e2Server" xmlns:r2="http://www.widgets.com/r2e1Client" xmlns:soap="http://schemas.xmlsoap.org/wsdl/soap/" xmlns:tns="http://www.widgets.com/transformer" xmlns:wsdl="http://schemas.xmlsoap.org/wsdl/" xmlns:xsd="http://www.w3.org/2001/XMLSchema"> <import location="r2e2.wsdl" namespace="http://www.widgets.com/r2e2Server/> <import location="r2e1.wsdl" namespace="http://www.widgets.com/r2e1Client"/></definitions>
301
CHAPTER 24 | Using the Artix Transformer
Note that in the definitions element of the contract, XML namespace shortcuts are defined for the imported contracts namespace. This makes using items defined in the imported contracts much easier.
Define the transformer�s interface Once you have imported all versions of the interface that you need to support into the transformer�s composite contract, you need to define the transformer�s interface. The transformer must have one operation defined for each transformation that is required to support all of the interface versions. For example, if you only changed the structure of the request message in when upgrading the server�s interface, the transformer only needs one operation because the transformation is only one way. If you changed both the request and response messages, the transformer�s interface will need two operations; one for the request message and one for the response.
The operation to transform a request from the client to the proper format for the server takes the client�s message as its input element and the server�s message as its output message. The operation to transform a response from the server to the proper format for a client takes the server�s outgoing message as its input element and the client�s incoming message as its output element.
When adding the operations, be sure to use the proper namespaces when referencing the messages for the different versions of the interface. Using the wrong namespaces could result in an invalid contract at the very least. If the contract is valid, and the namespaces are incorrect, your system will behave erratically.
For example, if the interface in Example 128 on page 301 was updated so that both the client�s request and the server�s response need to be transformed the transformer�s interface would need two operations. In this
Note: Fault messages are not supported.
302

Using Artix to Facilitate Interface Versioning
example the name of the request message is widgetRequest and the name of the response message is widgetResponse. The interface for the transformer, versionTransform, is shown in Example 129.
In the operation transforming the request, requestTransform, the input message is taken from the namespace r1 which is the namespace under which the client�s contract is imported. The output message is taken from r2 which is the namespace under which the server�s contract is imported. For the response message transformation, responseTransform, the order is reversed. The input message is from r2 and the output message is from r1.
Defining the physical details for the transformer
After defining the operations used in transforming between the different version of the interface, you need to define the binding and network details for the transformer. The transformer can use any of the bindings and transports supported by Artix. For information on adding a binding for the transformer read �Understanding Bindings in WSDL� on page 61. For information on adding network details for the transformer read �Understanding How Endpoints are Defined WSDL� on page 193.
Writing the XSLT scripts The XSLT scripts tell the transformer what it needs to do to process the data it receives. The scripts can be as simple or complex as they need to be to perform the task. The only requirement is that they are valid XSLT documents. For more information about writing XSLT scripts read �Writing XSLT Scripts� on page 309.
Example 129: Versioning Interface
<portType name="versionTransform"> <operation name="requestTransform"> <input name="oldRequest" message="r1:widgetRequest"/> <output name="newRequest" message="r2:widgetRequest"/> </operation> <operation name="responseTransform"> <input name="newResponse" message="r2:widgetResponse"/> <output name="oldReponse" message="r1:widgetResponse"/> </operation></portType>
303

CHAPTER 24 | Using the Artix Transformer
Configuring the transformer The Artix transformer is an Artix plug-in and can be loaded by an Artix process. This provides a great deal of flexibility in how you configure and deploy the process. For a detailed discussion of how to configure and deploy the Artix transformer see Configuring and Deploying Artix Solutions.
Configuring a chain When using the transformer to do interface versioning, you need to deploy it as part of a service chain. To build a service chain in Artix you deploy the Artix chain builder. Like the transformer, the chain builder is an Artix plug-in and provides a number of deployment options. One way of deploying the chain builder along with the transformer is to deploy it alongside the transformer in an Artix container.
For a detailed discussion of how to configure and deploy the Artix chain builder see Configuring and Deploying Artix Solutions.
304

WSDL Messages and the Transformer
WSDL Messages and the Transformer
Overview Conceptually, the Artix transformer works on XML representations of the data passed along the wire. Your XSLT scripts are written based on the WSDL descriptions of the message�s being processed. This relieves you of the burden of understanding how the data on the wire is represented.
The incoming message The virtual XML document the transformer uses as input is created by using the Artix contract to map the raw data from the input port into a DOM facade. The mapping is done as follows:
� If the message is defined using the doc-literal styles, the transformer uses the message part�s schema definition to create a representation of the message.
� If the message is not defined using the doc-literal style, the transformer does the following to build an XML representation of the message:
i. the name of the message�s root element is the QName of the message element referred to by the operation�s input element.
ii. Each part element in the input message is placed in an element derived from the name attribute of the part element.
iii. If the part is of a complex type, or an element of a complex type, the type�s elements appear inside of the element containing the part.
For example, if you had a service defined by the WSDL fragment in Example 130 and the transformer implemented the operation configure the XML document would be constructed using the message oldClientInput, which is the input message.
Example 130: WSDL Fragment for Transformer
<definitions targetNamespace="vehicle.demo.example" xmlns:tns="vehicle.demo.example" ...>
305
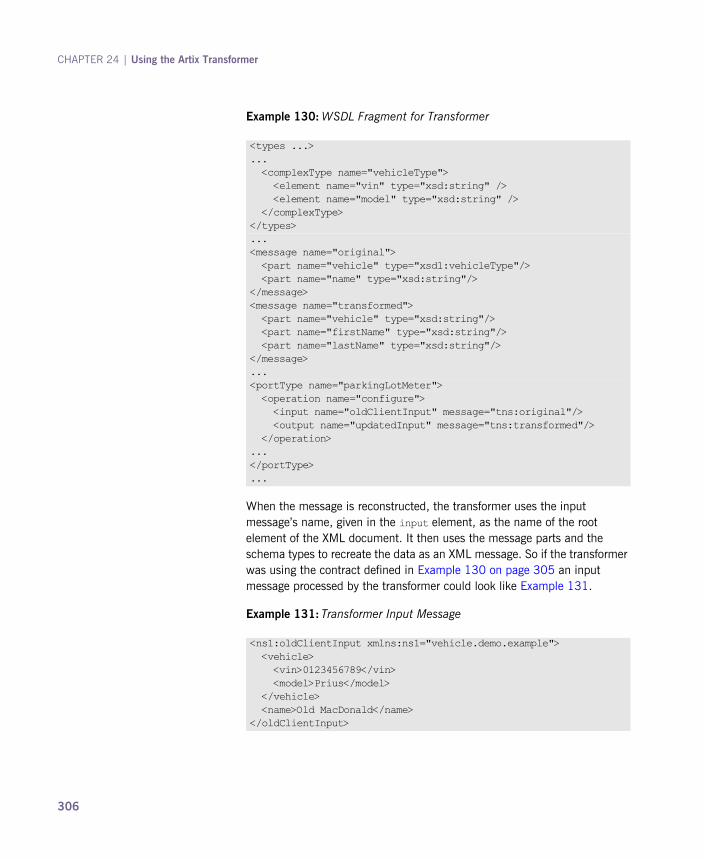
CHAPTER 24 | Using the Artix Transformer
When the message is reconstructed, the transformer uses the input message�s name, given in the input element, as the name of the root element of the XML document. It then uses the message parts and the schema types to recreate the data as an XML message. So if the transformer was using the contract defined in Example 130 on page 305 an input message processed by the transformer could look like Example 131.
<types ...>... <complexType name="vehicleType"> <element name="vin" type="xsd:string" /> <element name="model" type="xsd:string" /> </complexType></types>...<message name="original"> <part name="vehicle" type="xsd1:vehicleType"/> <part name="name" type="xsd:string"/></message><message name="transformed"> <part name="vehicle" type="xsd:string"/> <part name="firstName" type="xsd:string"/> <part name="lastName" type="xsd:string"/></message>...<portType name="parkingLotMeter"> <operation name="configure"> <input name="oldClientInput" message="tns:original"/> <output name="updatedInput" message="tns:transformed"/> </operation>...</portType>...
Example 130: WSDL Fragment for Transformer
Example 131: Transformer Input Message
<ns1:oldClientInput xmlns:ns1="vehicle.demo.example"> <vehicle> <vin>0123456789</vin> <model>Prius</model> </vehicle> <name>Old MacDonald</name></oldClientInput>
306

WSDL Messages and the Transformer
Output message The results from the transformer goes through the reverse of the process that turns the input message into a virtual XML document. The transformer uses the output message definition from the Artix contract to place the result message back onto the wire in the proper payload format. If the result message is not properly formed this attempt will fail, so you must be careful when writing your XSLT script to ensure that the results match the expected format.
When the result message is deconstructed, the transformer expects the following:
� If the output message is defined using the doc-literal style, the message must match the schema defining the message�s part.
� If the output message is not defined using the doc-literal style, then the following must be true:
♦ The name of the message�s root element is the QName of the message element referred to by the output element in the Artix contract.
♦ There are the same number of elements in the result as there are part elements in the output message definition.
♦ The elements in the result are based on the name attributes of the part elements in the output message definition.
♦ The data contained in the element representing the output message�s part elements matched the XMLSchema definitions in the contract.
For example, a result message for the configure operation defined in Example 130 on page 305 would look like Example 132.
Example 132: Transformer Output Message
<ns1:updatedInput xmlns:ns1="vehicle.demo.example">> <vehicle>Prius</vehicle> <firstName>Old</firstName> <lastName>MacDonald</lastName></updatedInput>
307

CHAPTER 24 | Using the Artix Transformer
Using element names You can configure the transformer to use the element name of the message parts instead of the value of the part element�s name attribute. For more information see Configuring and Deploying Artix Solutions.
308
Writing XSLT Scripts
Writing XSLT Scripts
Overview XML Stylesheet Language Transformations(XSLT) is a language used to describe the transformation of XML documents. The current W3C standard for XSLT is 1.0 and can be read at the W3C web site (http://www.w3.org/TR/xslt). XSLT documents, called scripts, are well-formed XML documents that describe how a source XML document is transformed into a resulting XML document. It can be used to perform tasks as simple as splitting a name entry into first and last name entries and as complex as validating that a complex XML document matches the expectations of an interface described in a WSDL document.
Procedure Writing an XSLT script can be done in a number of ways and using a number of tools. The steps given here assume that you are writing fairly simple scripts using a text editor.
To write a XSLT script you:
1. Create an XML stylesheet with the required <xsl:transform> element.
2. Determine which elements in your source message need to be processed and create <xsd:template> elements for each of them.
3. For each element that has a matching template element, define how you want the element processed to produce a new output document.
4. If child elements need to be processed as part of processing a parent element, define a template for the child element and apply it as part of the parent element�s template using <xsd:apply-templates>.
In this section This section discusses the following topics:
Elements of an XSLT Script page 310
XSLT Templates page 312
Common XSLT Functions page 318
309

CHAPTER 24 | Using the Artix Transformer
Elements of an XSLT Script
Overview An XSLT script is essentially an XML stylesheet containing a special set of elements that instruct an XSLT engine in the processing of other XML documents. An XSLT script must be defined in an <xsl:transform> element or an <xsl:stylesheet> element. In addition, it needs at least one valid top-level element to define the transformation.
The transform element The <xsl:transform> element denotes that the document is an XML stylesheet. The <xsl:stylesheet> element can be used in place of the <xsl:transform> element. They are equivalent.
When creating an XSLT script you must set the version attribute to 1.0 to inform the transformer what version of XSLT you are using. In addition, you must provide an XML namespace shortcut for the XSLT namespace in the <xsl:transform> element. Example 133 shows a valid <xsl:transform> element for an XSLT script.
Top level elements While all that is needed to make an XML document a valid XSLT script is the <xsl:transform> element, the <xsl:transform> element does not provide any instructions for processing data. The data processing instructions in an XSLT script are provided by a number of top-level XSLT elements. These element�s include:
� xsl:import� xsl:include� xsl:strip-space� xsl:preserve-space� xsl:output� xsl:key� xsl:decimal-format� xsl:namespace-alias� xsl:attribute-set
Example 133: XSLT Script Stylesheet Element
<xsl:transform version="1.0" xmlns:xsl="http://www.w3.org/1999/XSL/Transform">...</stylesheet>
310

Writing XSLT Scripts
� xsl:variable� xsl:param� xsl:template
An XSLT script can have any number and combination of top-level elements. Other than xsl:import, which must occur before any other elements, the top-level elements can be used in any order. However, be aware that the order determines the order in which processing steps happen.
Example Example 134 shows a simple XSLT script that transforms SSN elements into acctNum elements.
Using this XSLT script the transformer would change a message that contained <SSN>012457890</SSN> into a message that contained <acctNum>012457890</acctNum>.
Example 134: Simple XSLT Script
<xsl:transform version = '1.0' xmlns:xsl='http://www.w3.org/1999/XSL/Transform'> <xsl:template match="SSN"> <acctNum> <xsl:value-of select="."/> </acctNum> </xsl:template></xsl:stylesheet>
311

CHAPTER 24 | Using the Artix Transformer
XSLT Templates
Overview XSLT processors use templates to determine the elements on which to apply a set of transformations. Documents are processed from the top element through their structure to determine if elements match a defined template. If a match is found, the rules specified by the template are applied.
To write a template in XSLT:
1. Create an <xsl:template> element.
2. Provide the path to the source element it processes.
3. Write the processing rules.
xsl:template elements Templates are defined using <xsl:template> elements. These elements take one required attribute, match, which specifies the source element that triggers the rules. In addition, you can use the name attribute to give the template a unique identifier for referencing it elsewhere in the contract.
Specifying source elements You specify the elements of the source document to which template rules are matched using the match attribute of the xsl:template element. The source elements are specified using the syntax specified by the XPath specification (http://www.w3.org/TR/xpath). The source element address looks very similar to a file path where slash(/) specifies the root element and child elements are listed in top down order separated by a slash(/). For example to specify the surname element of the XML document shown in Example 135, you would specify it as /name/surname.
Example 135: Sample XML Document
<name> <firstname> Joe </firstname> <surname> Friday </surname><name>
312

Writing XSLT Scripts
Template matching order XSLT processors start processing with the <xsl:template match="/"> element if it is present. All of the processing directives for this template act on the top-level elements of the source document. For example, given the XML document shown in Example 135 on page 312 any processing rules specified in <xsl:template match="/"> would apply to the name element. In addition, specifying a template for the root element(/) forces you to make all your source element paths explicit from the root element. The XSLT script shown in Example 136 generates the string Friday when run on Example 135 on page 312.
You do not need to specify a template for the root element of the source document in an XSLT script. When you omit the root element�s template the processor treats all template paths as though they originated from the source documents top level element. The XSLT script in Example 137 generates the same output as the script in Example 136.
Template rules The contents of an <xsl:template> element define how the source document is processed to produce an output document. You can use a combination of XSLT elements, HTML, and text to define the processing rules. Any plain text and HTML that are used in the processing rules are placed directly into the output document. For example, if you wanted to generate an HTML document from an XML document you would use an XSLT script that included HTML tags as part of its processing rules. The
Example 136: XSLT Script with Root Element Template
<xsl:transform version = '1.0' xmlns:xsl='http://www.w3.org/1999/XSL/Transform'> <xsl:template match="/"> <xsl:value-of select="/name/surname"/> </xsl:template></xsl:transform>
Example 137: XSLT Script without Root Element Template
<xsl:transform version = '1.0' xmlns:xsl='http://www.w3.org/1999/XSL/Transform'> <xsl:template match="surname"> <xsl:value-of select="."/> </xsl:template></xsl:transform>
313

CHAPTER 24 | Using the Artix Transformer
script in Example 138 takes an XML document with a title element and a subTitle element and produces an HTML document where the contents of title are displayed using the <h1> style and the contents of subTitle are displayed using the <h2> style.
Applying templates to child elements
You can instruct the XSLT processor to apply any templates defined in the script to the children of the element being processed using an xsl:apply-templates element as one of the rules in a template. xsl:apply-templates instructs the XSLT processor to treat the current element as a root element and run the templates in the script against it.
For example you could rewrite Example 138 as shown in Example 139 using xsl:apply-templates and defining a template for the title and subTitle elements.
Example 138: XSLT Template with HTML
<xsl:transform version = '1.0' xmlns:xsl='http://www.w3.org/1999/XSL/Transform'> <xsl:template match="/"> <h1> <xsl:value-of select="//title"/> </h1> <h2> <xsl:value-of select="//subTitle"/> </h2> </xsl:template></xsl:transform>
Example 139: XSLT Template Using apply-templates
<xsl:transform version = '1.0' xmlns:xsl='http://www.w3.org/1999/XSL/Transform'> <xsl:template match="/"> <xsl:apply-templates/> </xsl:template> <xsl"template match="title"> <h1> <xsl:value-of select="."/> </h1> </xsl:template>
314

Writing XSLT Scripts
You can use the optional select attribute to limit the child elements to which the templates are applied. select takes an XPath value and operates in the same manner as the match attribute of xsl:template.
Example For example, if your ordering system produced bills that looked similar to the XML document in Example 140, you could use an XSLT script to reformat the bill for a system that required the customer�s name in a single element, name, and the city and state to be in a comma-separated field, city.
<xsl"template match="subTitle"> <h2> <xsl:value-of select="."/> </h2> </xsl:template></xsl:transform>
Example 139: XSLT Template Using apply-templates
Example 140: Bill XML Document
<widgetBill> <customer> <firstName> Joe </firstName> <lastName> Cool </lastName> </customer> <address> <street> 123 Main Street </street> <city> Hot Coffee </city> <state> MS </state> <zipCode> 3942 </zipCode> </address>
315
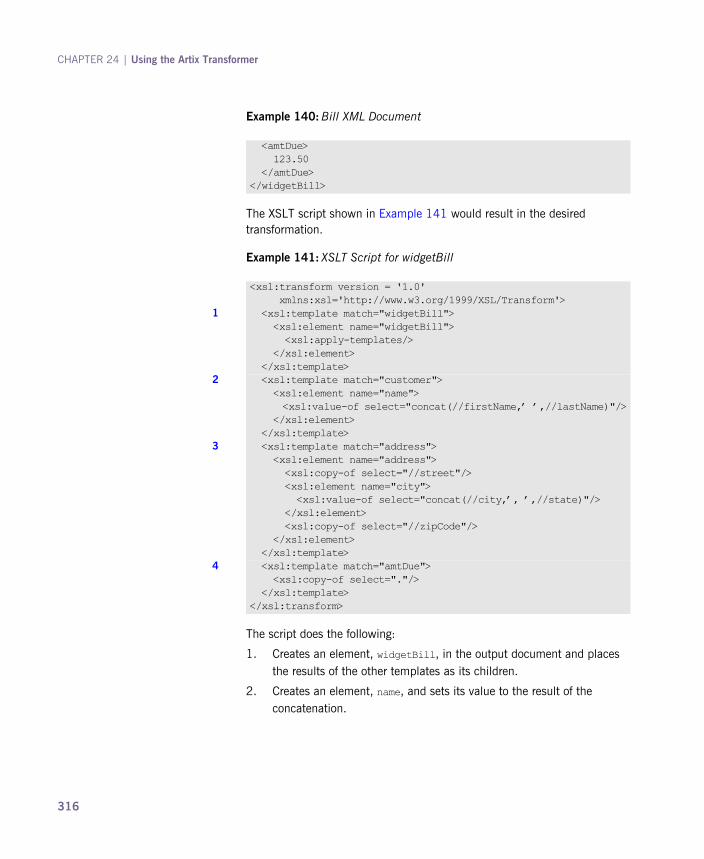
CHAPTER 24 | Using the Artix Transformer
The XSLT script shown in Example 141 would result in the desired transformation.
The script does the following:
1. Creates an element, widgetBill, in the output document and places the results of the other templates as its children.
2. Creates an element, name, and sets its value to the result of the concatenation.
<amtDue> 123.50 </amtDue></widgetBill>
Example 140: Bill XML Document
Example 141: XSLT Script for widgetBill
<xsl:transform version = '1.0' xmlns:xsl='http://www.w3.org/1999/XSL/Transform'>
1 <xsl:template match="widgetBill"> <xsl:element name="widgetBill"> <xsl:apply-templates/> </xsl:element> </xsl:template>
2 <xsl:template match="customer"> <xsl:element name="name"> <xsl:value-of select="concat(//firstName,� �,//lastName)"/> </xsl:element> </xsl:template>
3 <xsl:template match="address"> <xsl:element name="address"> <xsl:copy-of select="//street"/> <xsl:element name="city"> <xsl:value-of select="concat(//city,�, �,//state)"/> </xsl:element> <xsl:copy-of select="//zipCode"/> </xsl:element> </xsl:template>
4 <xsl:template match="amtDue"> <xsl:copy-of select="."/> </xsl:template></xsl:transform>
316

Writing XSLT Scripts
3. Creates an element, address, and sets its value to the results of the rules. address will contain a copy of the street element from the source document, a new element, city, that is a concatenation, and a copy of the zipCode element from the source document.
4. Copy the amtDue element from the source document into the output document.
Processing the document in Example 140 on page 315 with this XSLT script would result in the XML document shown in Example 142.
Example 142: Processed Bill XML Document
<widgetBill> <customer> Joe Cool </customer> <address> <street> 123 Main Street </street> <city> Hot Coffee, MS </city> <zipCode> 3942 </zipCode> </address> <amtDue> 123.50 </amtDue></widgetBill>
317
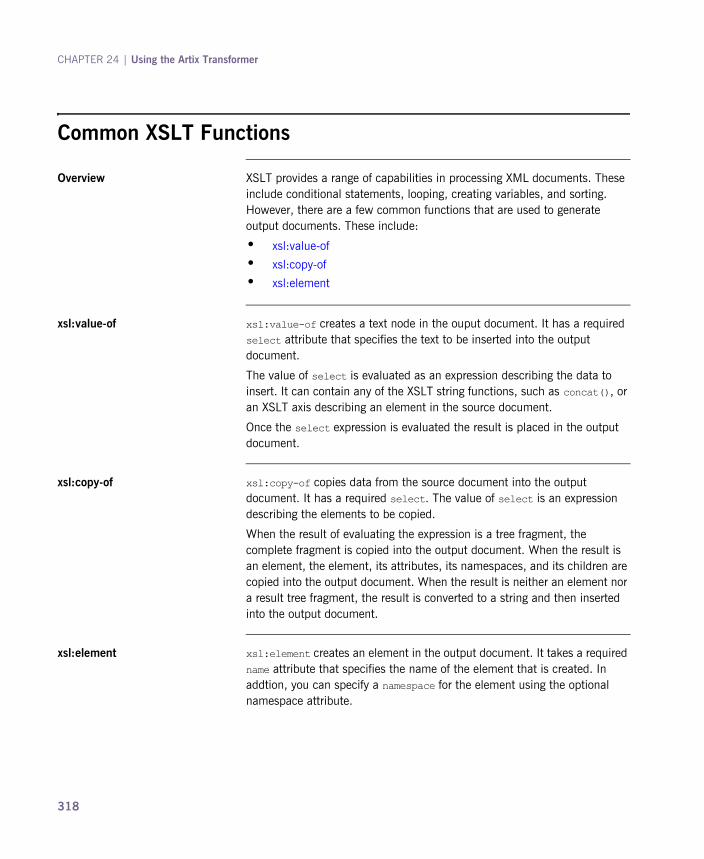
CHAPTER 24 | Using the Artix Transformer
Common XSLT Functions
Overview XSLT provides a range of capabilities in processing XML documents. These include conditional statements, looping, creating variables, and sorting. However, there are a few common functions that are used to generate output documents. These include:
� xsl:value-of
� xsl:copy-of
� xsl:element
xsl:value-of xsl:value-of creates a text node in the ouput document. It has a required select attribute that specifies the text to be inserted into the output document.
The value of select is evaluated as an expression describing the data to insert. It can contain any of the XSLT string functions, such as concat(), or an XSLT axis describing an element in the source document.
Once the select expression is evaluated the result is placed in the output document.
xsl:copy-of xsl:copy-of copies data from the source document into the output document. It has a required select. The value of select is an expression describing the elements to be copied.
When the result of evaluating the expression is a tree fragment, the complete fragment is copied into the output document. When the result is an element, the element, its attributes, its namespaces, and its children are copied into the output document. When the result is neither an element nor a result tree fragment, the result is converted to a string and then inserted into the output document.
xsl:element xsl:element creates an element in the output document. It takes a required name attribute that specifies the name of the element that is created. In addtion, you can specify a namespace for the element using the optional namespace attribute.
318

CHAPTER 25
Using Codeset ConversionSome bindings do not natively support codeset conversion. Artix provides WSDL extensions and a plug-in that add codeset conversion to these bindings.
Overview While many of the bindings supported by Artix provide a means for handling codeset conversion, some do not. It is also possible that any custom bindings you developed do not support codeset conversion. To allow bindings that do not natively support codeset conversion to participate in environments where more than one codeset is used, Artix provides an i18n message-level interceptor that will perform codeset conversion on the message buffer before it is placed on the wire.
The i18n interceptor can be configured by defining the codeset conversion in your endpoint�s Artix contract using an Artix port extensor. You can also configure the i18n interceptor programmatically using the context mechanism. The programmatic settings will override any settings described in the contract. For more information on using the context mechanism see the appropriate development guide for your development environment.
319

CHAPTER 25 | Using Codeset Conversion
Configuring Artix to use the i18n interceptor
Before your application can use the generic i18n interceptor for code conversion you must configure the Artix bus to load the required plug-ins and add the interceptor to the appropriate message interceptor lists. To configure your application to use the i18n interceptor:
1. If your application includes a client that needs to use codeset conversion, add "i18n-context:I18nInterceptorFactory" to the binding:artix:client_message_interceptor_list variable for your application.
2. If your application includes a service that needs to use codeset conversion, add "i18n-context:I18nInterceptorFactory" to the binding:artix:server_message_interceptor_list variable for your application.
For more information on configuring Artix see Configuring and Deploying Artix Solutions.
Describing the codeset conversions in the contract
You define the codeset conversions performed by the i18n interceptor in the port element defining an endpoint. There are two extensors used to define the codeset conversions. One, i18n-context:server, is for service providers and the other, i18n-context:client, is for clients. They both provide settings for how both incoming messages and outgoing messages are to be encoded. These extensions are defined in the namespace "http://schemas.iona.com/bus/i18n/context".
To define the codeset conversions performed by the i18n interceptor:
1. Add the following line to the definitions element of your contract.
2. If your application provides a service that requires codeset conversion add a i18n-context:server element to the port definition of the service endpoint.
i18n-context:server has the following attributes for defining how message codesets are converted:
♦ LocalCodeSet specifies the server�s native codeset. Default is the codeset specified by the local system�s locale setting.
xmlns:i18n-context="http://schemas.iona.com/bus/i18n/context"
320

♦ OutboundCodeSet specifies the codeset into which replies are converted. Default is the codeset specified in InboundCodeSet.
♦ InboundCodeSet specifies the codeset into which requests are converted. Default is the codeset specified in LocalCodeSet.
3. If your application includes a client that requires codeset conversion add an i18n-context:client element to the port definition of the service endpoint.
i18n-context:client has the following attributes for defining how message codesets are converted:
♦ LocalCodeSet specifies the server�s native codeset. Default is the codeset specified by the local system�s locale setting.
♦ OutboundCodeSet specifies the codeset into which requests are converted. Default is the codeset specified in LocalCodeSet.
♦ InboundCodeSet specifies the codeset into which replies are converted. Default is the codeset specified in OutboundCodeSet.
Example The contract fragment in Example 143 shows a port definition for an endpoint that defines a server/client pair. The server uses UTF-8 as its local codeset and the client uses ISO-8859-1 as its local codeset.
Using the endpoint definition above, the client will convert its requests into UTF-8 before sending them to the server. The server will convert its replies into ISO-8859-1 before sending them to the client. The client�s
Example 143: Specifying Codeset Conversion
...<service name="covertedService"> <port binding="tns:convertedFixedBinding" name="convertedPort"> <http:address location="localhost:0"/> <i18n:client LocalCodeSet="ISO-8859-1" OutboundCodeSet="UTF-8" InboundCodeSet="ISO-8859-1"/> <i18n:server LocalCodeSet="UTF-8" OutboundCodeSet="ISO-8859-1"/> </port></service>...
321

CHAPTER 25 | Using Codeset Conversion
InboundCodeSet is set to ISO-8859-1 because if left unset the value would have defaulted to UTF-8. The client would then perform an extra conversion.
322

Index
AActiveMQ 254Address specificationCORBA 291HTTP 199IIOP 219SOAP 1.1 198SOAP 1.2 198
Bbindings
CORBA 286fixed record length 98FML field tables 90G2++ 183SOAP with Attachments 75tagged 116TibrvMsg 131XML 172
Ccomplex types
all type 35TibrvMsg mapping 140
choice type 35TibrvMsg mapping 140
elements 35occurence contstraints 36sequence type 35
TibrvMsg mapping 139configuring IIOP 220corba:address 291corba:binding 286
bases 286repositoryID 286
corba:operation 286name 286
corba:param 286idltype 287mode 287name 287
corba:policy 292
persistent 292poaname 292serviceid 292
corba:raises 287exception 287
corba:return 287idltype 287name 287
corba:typemap 284
Ddurable subscriptions 249
FFilenameFactoryPropertyMetaData 279
name 279readOnly 279valueSet 279
fixed:binding 99encoding 99justification 99padHexCode 99
fixed:body 100encoding 100justification 100padHexCode 100
fixed:enumeration 104fixedValue 104value 104
fixed:field 101bindingOnly 101fixedValue 103format 102justification 103size 101
fixed:operation 99discriminator 100
fixed:sequence 107counterName 108occurs 108
ftp:port 266connectMode 267
323

INDEX
host 266port 266replyLocation 267requestLocation 266scanInsterval 267
ftp:properties 267, 275, 277ftp:property 267, 270, 274, 277
name 267, 277value 267, 277
FTPProperties 278getExtensors() 278
FTPProperty 278FTP Transport
client filename factory 269reply lifecycle policy 271request lifecycle policy 275server filename factory 273
Hhttp:address 199
location 199http-conf:client 205, 208
CacheControl 214Conneciton 210ReceiveTimeout 206SendTimeout 206UserName 208
http-conf:server 205CacheControl 213HonorKeepAlive 210ReceiveTimeout 206SendTimeout 206
Ii18n-context:client 320
InboundCodeSet 321LocalCodeSet 321OutboundCodeSet 321
i18n-context:server 320InboundCodeSet 321LocalCodeSet 320OutboundCodeSet 321
iiop:address 219iiop:payload 220iiop:policy 220
persistent 221poaname 221serviceid 221
IOR specification 219, 291
JJava Messaging System 242Java Naming and Directory Interface 242JMS 242jms:address 244
connectionPassword attribute 244connectionUserName attribute 244destinationStyle attribute 244durableSubscriberName 249jndiConnectionFactoryName attribute 244jndiDestinationName attribute 244jndiReplyDestinationName attribute 244messageSelector 249transactional 250
jms:client 248messageType attribute 248
jms:JMSNamingPropertiesname attribute 245value attribute 245
jms:JMSNamingProperty 245jms:server 249
durableSubscriberName attribute 249messageSelector attribute 249transactional attribute 249useMessageIDAsCorrealationID attribute 249
JNDI 242
Mmime:content 75
part 75type 75
mime:multipartRelated 74mime:part 74, 75
name 75mq:client 226
AliasQueueName 234Delievery 236Format 238Server_Client 232Transactional 236
mq:server 226Delivery 236Format 238Server_Client 232Transactional 236
324

INDEX
NNMTOKEN
TibrvMsg mapping 141
Pplugins:ftp:policy:client:filenameFactory 271plugins:ftp:policy:client:replyFileLifecycle 271plugins:ftp:policy:server:filenameFactory 276plugins:ftp:policy:server:requestFileLifecycle 276
Rrmi:address 178rmi:class 178
name 178RPC style design 48
Ssoap:address 198
location 198soap:body
parts 70soap:header 69
encodingStyle 69message 69namespace 69part 69use 69
Specifying POA policies 220, 292
Ttagged:binding 117tagged:body 119tagged:case 122tagged:choice 122tagged:enumeration 119tagged:field 119tagged:operation 118tagged:sequence 120tibrv:array 143tibrv:binding 132
stringAsOpaque 132stringEncoding 132
tibrv:context 167tibrv:field 165tibrv:input 133tibrv:msg 165tibrv:operation 133
tibrv:output 134messageNameFieldPath 134messageNameFieldValue 135stringAsOpaque 135stringEncoding 135
tibrv:port 256serverSubject 256
tuxedo:binding 95tuxedo:field 95
id 95name 95
tuxedo:fieldTable 95tuxedo:input 261
operation 261tuxedo:operation 95tuxedo:server 261tuxedo:service 261
name 261
WWebSphere MQ
Formatworking with mainframes 239
wrapped document style 49WSDL 21
binding element 22, 62name attribute 62
definitions element 22, 74message element 22, 47operation element 22part element 50
element attribute 50name attribute 50type attribute 50
port element 23, 194binding attribute 194
portType element 22, 54schema element 29
targetNamespace attribute 30service element 22, 194
name attribute 194types element 22, 29
WSDL designRPC style 48wrapped document style 49
wsdltocorba 285, 295wsdltoservice
adding a CORBA service 293adding a JMS service 251
325
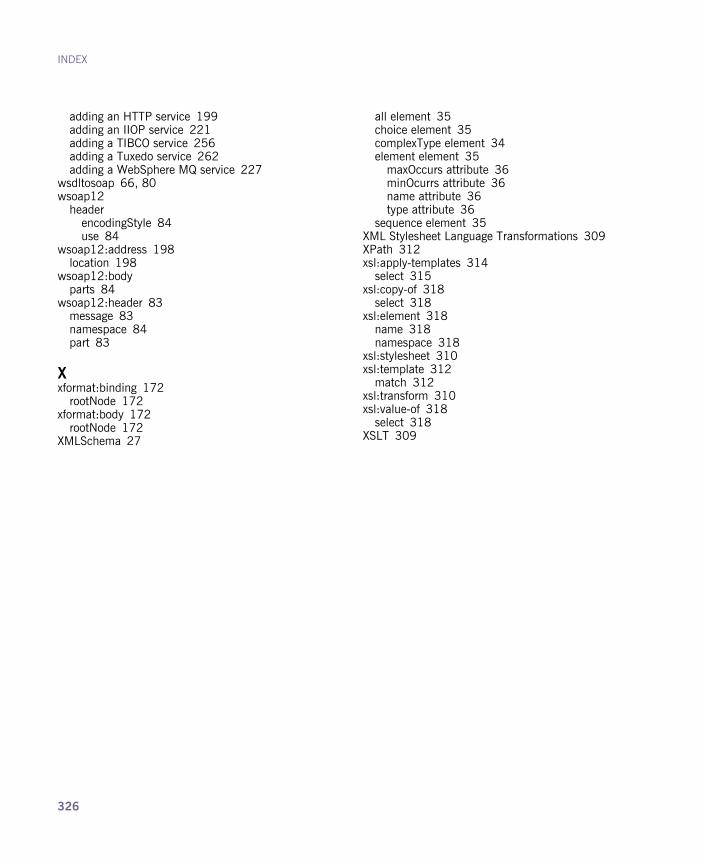
INDEX
adding an HTTP service 199adding an IIOP service 221adding a TIBCO service 256adding a Tuxedo service 262adding a WebSphere MQ service 227
wsdltosoap 66, 80wsoap12
headerencodingStyle 84use 84
wsoap12:address 198location 198
wsoap12:bodyparts 84
wsoap12:header 83message 83namespace 84part 83
Xxformat:binding 172
rootNode 172xformat:body 172
rootNode 172XMLSchema 27
all element 35choice element 35complexType element 34element element 35
maxOccurs attribute 36minOcurrs attribute 36name attribute 36type attribute 36
sequence element 35XML Stylesheet Language Transformations 309XPath 312xsl:apply-templates 314
select 315xsl:copy-of 318
select 318xsl:element 318
name 318namespace 318
xsl:stylesheet 310xsl:template 312
match 312xsl:transform 310xsl:value-of 318
select 318XSLT 309
326
Related Documents