Macintosh client Setup Guide This document describes that how to set up a Macintosh client to print using VersaWorks. For information about VersaWorks, please refer to the VersaWorks online help (Windows version) or the Quick Start Guide.

Versaworks Mac Setup en r3
Oct 24, 2014
Welcome message from author
This document is posted to help you gain knowledge. Please leave a comment to let me know what you think about it! Share it to your friends and learn new things together.
Transcript

Macintosh client Setup Guide
This document describes that how to set up a Macintosh client to print using VersaWorks. For information about VersaWorks, please refer to the VersaWorks online help (Windows version) or the Quick Start Guide.
2
Setting up the Client Computer
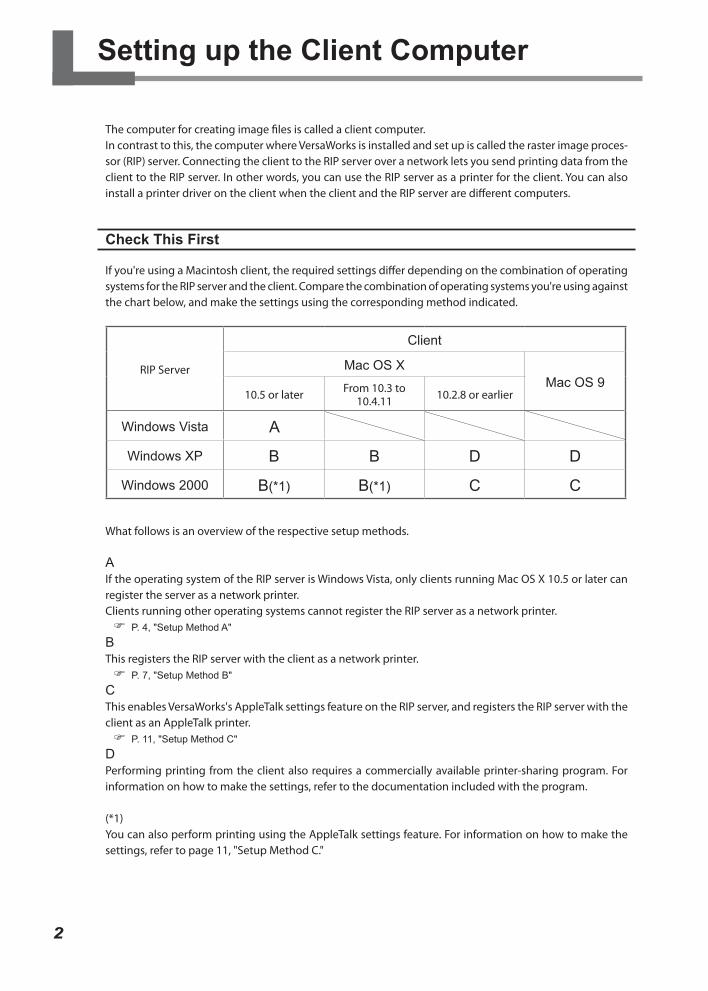
The computer for creating image files is called a client computer.In contrast to this, the computer where VersaWorks is installed and set up is called the raster image proces-sor (RIP) server. Connecting the client to the RIP server over a network lets you send printing data from the client to the RIP server. In other words, you can use the RIP server as a printer for the client. You can also install a printer driver on the client when the client and the RIP server are different computers.
Check This First
If you're using a Macintosh client, the required settings differ depending on the combination of operating systems for the RIP server and the client. Compare the combination of operating systems you're using against the chart below, and make the settings using the corresponding method indicated.
RIP Server
Client
Mac OS XMac OS 9
10.5 or later From 10.3 to 10.4.11 10.2.8 or earlier
Windows Vista A
Windows XP B B D D
Windows 2000 B(*1) B(*1) C C
What follows is an overview of the respective setup methods.
AIf the operating system of the RIP server is Windows Vista, only clients running Mac OS X 10.5 or later can register the server as a network printer.Clients running other operating systems cannot register the RIP server as a network printer. P. 4, "Setup Method A"
BThis registers the RIP server with the client as a network printer. P. 7, "Setup Method B"
CThis enables VersaWorks's AppleTalk settings feature on the RIP server, and registers the RIP server with the client as an AppleTalk printer. P. 11, "Setup Method C"
DPerforming printing from the client also requires a commercially available printer-sharing program. For information on how to make the settings, refer to the documentation included with the program.
(*1)You can also perform printing using the AppleTalk settings feature. For information on how to make the settings, refer to page 11, "Setup Method C."

Before making the settings, check the following. The printer and the computers (RIP server and client) are connected correctly and are all switched on. The printer settings have been made in the RIP server. The printer is in a state in which printing is possible.
Also, when the client is a Mac OS X machine, use the RIP server after logging on to an account that has administrator rights.
3
Setting up the Client Computer

Macintosh Cliant
Setup Method A
If you register the RIP server as a network printer on the client, you can send data to the RIP server for it to print. If the RIP server uses Windows Vista, only clients running Mac OS X 10.5 or later can register it as a network printer.
Below are the combinations of RIP server and client for which you can use this method. The RIP server is Windows Vista and the client is Mac OS X (10.5 or later).
Setting up the client
Insert the Roland VersaWorks DVD-ROM in the computer's DVD-ROM drive.
Copy the PPD file to the computer.
Double-click [For Macintosh]-[PPD File]-[English].
Double-click the [VersaWorks] icon on the desktop.
Copy the "Roland VersaWorks.PPD" file to the desired location.
4
Setting up the Client Computer
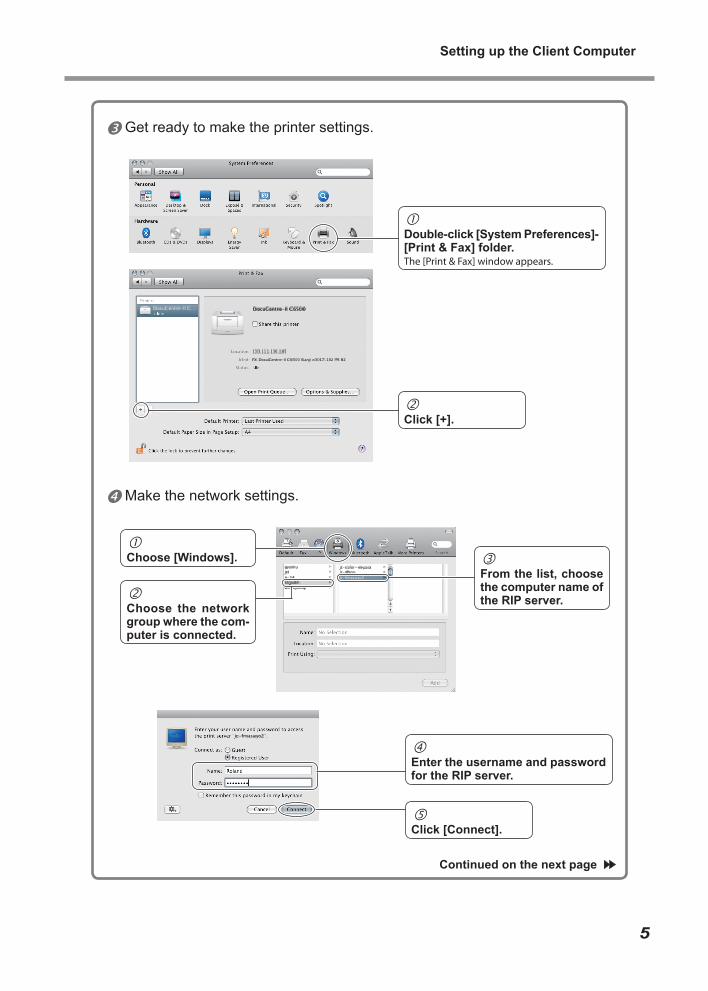
Get ready to make the printer settings.
Make the network settings.
Click [+].
Double-click [System Preferences]-[Print & Fax] folder.The [Print & Fax] window appears.
Enter the username and password for the RIP server.
Click [Connect].
Choose the network group where the com-puter is connected.
Choose [Windows].
From the list, choose the computer name of the RIP server.
Continued on the next page
5
Setting up the Client Computer

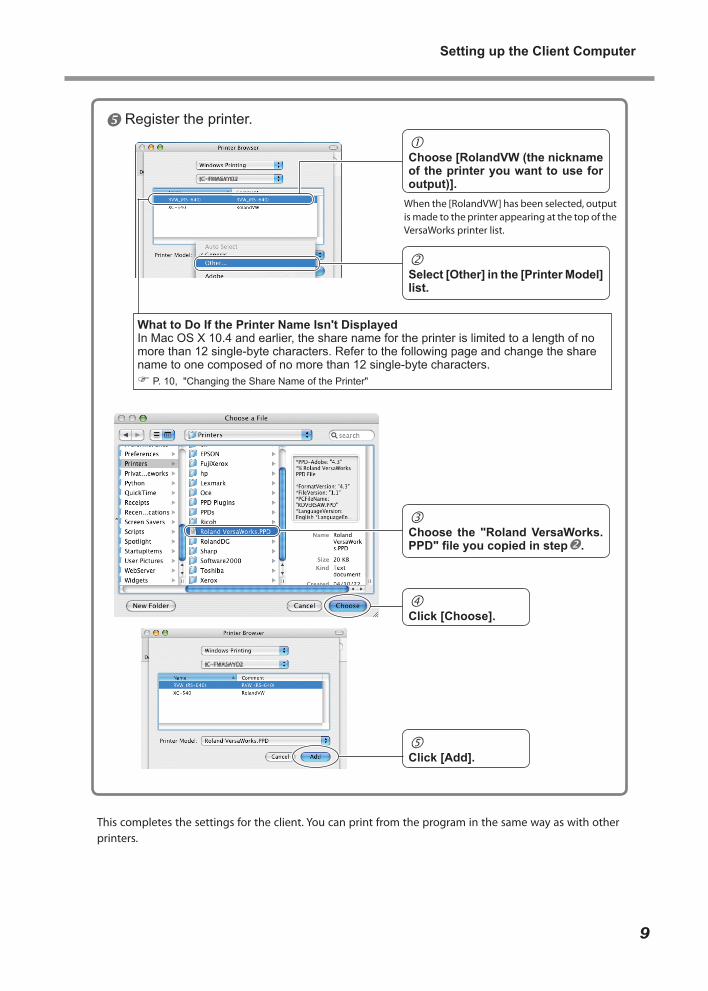
Register the printer.
This completes the settings for the client. You can print from the program in the same way as with other printers.
Select [Other] in the [Driver] list.
Choose [RolandVW (the nickname of the printer you want to use for output)].
Choose the "Roland VersaWorks.PPD" file you copied in step.
Click [Open].
Click [Add].
When the [RolandVW] has been selected, out-put is made to the printer appearing at the top of the VersaWorks printer list.
6
Setting up the Client Computer

Setup Method B
Registering the RIP server with the client as a network printer makes it possible to send printing data to the RIP server.
Below are the combinations of RIP server and client for which you can use this method. The RIP server is Windows XP and the client is Mac OS X (10.3 or later). The RIP server is Windows 2000 and the client is Mac OS X (10.3 or later).
Setting up the client
Insert the Roland VersaWorks DVD-ROM in the computer's DVD-ROM drive.
Copy the PPD file to the computer.
Double-click the [VersaWorks] icon on the desktop.
Copy the "Roland VersaWorks.PPD" file to the desired location.
Continued on the next page
Double-click [For Macintosh] - [PPD File] - [English].
7
Setting up the Client Computer

Get ready to make the printer settings.
Make the network settings.
Enter the username and password for the RIP server.
Click [OK].
Choose the workgroup where the RIP server is connected.
Choose [Windows Printing].
From the list, choose the computer name of the RIP server.
Click [Choose].
Click [Add].
(Mac OS X 10.4 only)Click [More Printers...].
Double-click [Applications] - [Utili-ties] folder, then double-click [Printer Setup Utility].The [Printer List] window appears.
Double-click the icon for the hard disk used as the startup disk.
8
Setting up the Client Computer
Register the printer.
This completes the settings for the client. You can print from the program in the same way as with other printers.
Select [Other] in the [Printer Model] list.
Choose [RolandVW (the nickname of the printer you want to use for output)].
Choose the "Roland VersaWorks.PPD" file you copied in step.
Click [Choose].
Click [Add].
When the [RolandVW] has been selected, output is made to the printer appearing at the top of the VersaWorks printer list.
What to Do If the Printer Name Isn't Displayed In Mac OS X 10.4 and earlier, the share name for the printer is limited to a length of no more than 12 single-byte characters. Refer to the following page and change the share name to one composed of no more than 12 single-byte characters. P. 10, "Changing the Share Name of the Printer"
9
Setting up the Client Computer

Changing the Share Name for the Printer
You can change the share name of the printer on the RIP server. If the client is running under Mac OS X 10.4 or earlier, use a share name composed of no more than 12 single-byte characters.
From the [Start] menu, click [Control Panel], then click [Print and Fax].
This completes the share name for the printer.
Select the printer to change, then right-click it.
Click [Sharing].The properties window for the printer to change appears.
Click the [Sharing] tab.
Change the [Share name] setting.Specify a share name of 12 characters or fewer.
Click [OK].
10
Setting up the Client Computer

Setup Method C
Registering the RIP server with the client as an AppleTalk printer makes it possible to send printing data to the RIP server. Note, however, that before you make the settings on the client, you must enable VersaWorks's AppleTalk settings feature on the RIP server.
Below are the combinations of RIP server and client for which you can use this method. The RIP server is Windows 2000 and the client is Mac OS X (any version). The RIP server is Windows 2000 and the client is Mac OS 9.
This section describes how to make the settings when the client is Mac OS X. For information on how to make the settings for Mac OS 9, refer to the help.
Setting up the RIP Server
Before you make the settings, check to make sure that the AppleTalk protocol is installed.
Start VersaWorks.
Choose [Edit], then click [AppleTalk Settings].
Make the settings for the spooler name and the input folder.The spooler name becomes the name of the printer specified for the connection destination when you make the settings for the client.
When you have finished making the AppleTalk settings, the folder you selected in changes color.
This completes the settings for the RIP server. Next, you make the settings for the client.
S e l e c t t h i s check box.
Enter the spooler name.
The color changes.
Click [OK].
Choose [Queue A] or [Queue B].
Choose a nickname for the printer.
11
Setting up the Client Computer
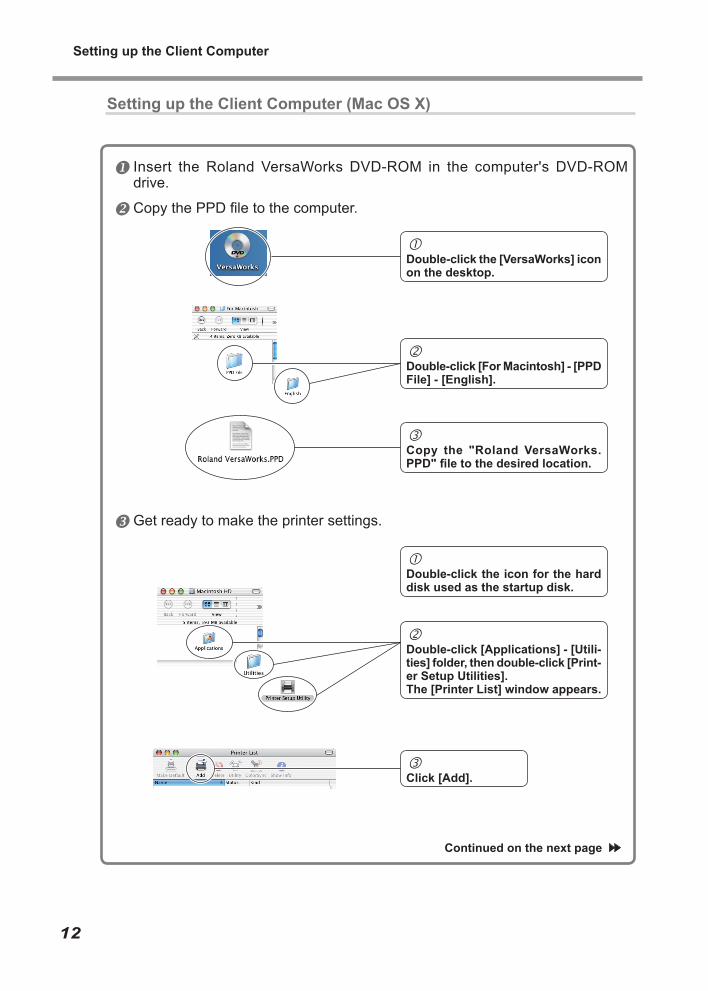
Setting up the Client Computer (Mac OS X)
Insert the Roland VersaWorks DVD-ROM in the computer's DVD-ROM drive.
Copy the PPD file to the computer.
Get ready to make the printer settings.
Copy the "Roland VersaWorks.PPD" file to the desired location.
Double-click the [VersaWorks] icon on the desktop.
Double-click [Applications] - [Utili-ties] folder, then double-click [Print-er Setup Utilities].The [Printer List] window appears.
Double-click the icon for the hard disk used as the startup disk.
Click [Add].
Continued on the next page
Double-click [For Macintosh] - [PPD File] - [English].
12
Setting up the Client Computer

Register the printer.
This completes the settings for the client. You can print from the program in the same way as with other printers.
Choose the "Roland VersaWorks.PPD" file you copied in step.
Choose the printer for the spooler name you entered in "Setting up the RIP Server."
Select [Other] in the [Printer Model] list.
Click [Choose].
Click [Add].
Choose [AppleTalk].
13
Setting up the Client Computer

Mac OS 9
Make sure the RIP server is running, then insert the Roland VersaWorks DVD-ROM into the computer's DVD-ROM drive.
Copy the PPD file to the computer.
Double-click the icon for the hard disk used as the startup disk.
Double-click the VersaWorks icon on the desktop.
Double-click [System Folder] - [Exten-sions].
Double-click the [Printer Descriptions] folder.
From the [English] folder, drag the [Ro-land VersaWorks.PPD] file to the[Printer Descriptions] folder.
Continued on the next page
Double-click [For Macintosh] - [PPD File] - [English].
14
Setting up the Client Computer

Register the printer for the spooler name you entered in "Setting up the RIP Server." P. 11, "Setting up the RIP Server"
If the window shown in the figure appears, select [Roland VersaWorks.PPD], then click [Select].
This completes the settings for the client. You can print from the program in the same way as with other printers.
From the Apple menu, choose [Chooser].
Click [LaserWriter 8].
Click [Create].The printer is registered automati-cally.
Choose the printer for the spooler name you entered in "Setting up the RIP Server."
15
Setting up the Client Computer

R3-081212
Related Documents


![COMPUTER ORGANIZATION & ARCHITECTURE · mov r3, h r3 m [h] add r3, g r3 r3+m [g] div r1, r3 r1 r1/r3 mov x, r1 m[x] r1 page 4 of 16 knreddy computer organization and architecture.](https://static.cupdf.com/doc/110x72/6144b5c334130627ed50859a/computer-organization-architecture-mov-r3-h-r3-m-h-add-r3-g-r3-r3m-g.jpg)