Veritas TM Desktop and Laptop Option 9.4 Administrator’s Guide

Welcome message from author
This document is posted to help you gain knowledge. Please leave a comment to let me know what you think about it! Share it to your friends and learn new things together.
Transcript

VeritasTM Desktop and Laptop Option 9.4
Administrator’s Guide

Documentation Version: 2020
Legal NoticeCopyright © 2020 Veritas Technologies LLC. All rights reserved.
Veritas and the Veritas Logo are trademarks or registered trademarks of Veritas Technologies LLC or its affiliates in the U.S. and other countries. Other names may be trademarks of their respective owners.
This Veritas product may contain third party software for which Veritas is required to provide attribution to the third party (“Third Party Programs”). Some of the Third Party Programs are available under open source or free software licenses. The License Agreement accompanying the Licensed Software does not alter any rights or obligations you may have under those open source or free software licenses. For more information on the Third Party Programs, please see the Third Party Notice document for this Veritas product that is available at https://www.veritas.com/about/legal/license-agreements
The information contained in this publication is subject to change without notice. Veritas Technologies LLC makes no warranty of any kind with regard to this manual, including, but not limited to, the implied warranties of merchantability and fitness for a particular purpose. Veritas Technologies LLC shall not be liable for errors contained herein or for incidental or consequential damages in connection with the furnishing, performance, or use of this manual.The software described in this book is furnished under a license agreement and may be used only in accordance with the terms of the agreement.
The product described in this document is distributed under licenses restricting its use, copying, distribution, and decompilation/reverse engineering. No part of this document may be reproduced in any form by any means without prior written authorization of Veritas Technologies LLC and its licensors, if any.
THE DOCUMENTATION IS PROVIDED "AS IS" AND ALL EXPRESS OR IMPLIED CONDITIONS, REPRESENTATIONS AND WARRANTIES, INCLUDING ANY IMPLIED WARRANTY OF MERCHANTABILITY, FITNESS FOR A PARTICULAR PURPOSE OR NON-INFRINGEMENT, ARE DISCLAIMED, EXCEPT TO THE EXTENT THAT SUCH DISCLAIMERS ARE HELD TO BE LEGALLY INVALID. VERITAS TECHNOLOGIES LLC SHALL NOT BE LIABLE FOR INCIDENTAL OR CONSEQUENTIAL DAMAGES IN CONNECTION WITH THE FURNISHING, PERFORMANCE, OR USE OF THIS DOCUMENTATION. THE INFORMATION CONTAINED IN THIS DOCUMENTATION IS SUBJECT TO CHANGE WITHOUT NOTICE.
The Licensed Software and Documentation are deemed to be commercial computer software as defined in FAR 12.212 and subject to restricted rights as defined in FAR Section 52.227-19 “Commercial Computer Software - Restricted Rights” and DFARS 227.7202, et seq. “Commercial Computer Software and Commercial Computer Software Documentation,” as applicable, and any successor regulations, whether delivered by Veritas as on premises or hosted services. Any use, modification, reproduction release, performance, display or disclosure of the Licensed Software and Documentation by the U.S. Government shall be solely in accordance with the terms of this Agreement.
Veritas Technologies LLC2625 Augustine DriveSanta Clara, California 95054, U.S.Ahttp://www.Veritas.com

Third-Party CopyrightsDouglas C. Schmidt and his research group at Washington University and University of California, IrvineCopyright citation.ACE (TM) is copyrighted by Douglas C. Schmidt and his research group at Washington University and University of California, Irvine,Copyright (c) 1993-2002, all rights reserved.
Maarten HoebenReportCtrl.h 2.0.1
Ronald L. RivestCopyright (C) 1991-2, RSA Data Security, Inc. Created 1991. All rights reserved.License to copy and use this software is granted provided that it is identified as the “RSA Data Security, Inc. MD5 Message-Digest Algorithm” in all material mentioning or referencing this software or this function.License is also granted to make and use derivative works provided that such works are identified as “derived from the RSA Data Security, Inc.MD5 Message-Digest Algorithm” in all material mentioning or referencing the derived work.RSA Data Security, Inc. makes no representations concerning either the merchantability of this software or the suitability of this software for any particular purpose. It is provided “as is” without express or implied warranty of any kind.These notices must be retained in any copies of any part of this documentation and/or software.
Wei DaiCompilation Copyright (c) 1995-2003 by Wei Dai. All rights reserved.This copyright applies only to this software distribution package as a compilation, and does not imply a copyright on any particular file in the package.The following files are copyrighted by their respective original authors, and their use is subject to additional licenses included in these files.mars.cpp - Copyright 1998 Brian Gladman.All other files in this compilation are placed in the public domain by Wei Dai and other contributors.I would like to thank the following authors for placing their works into the public domain:Joan Daemen - 3way.cppLeonard Janke - cast.cpp, seal.cppSteve Reid - cast.cppPhil Karn - des.cppMichael Paul Johnson - diamond.cppAndrew M. Kuchling - md2.cpp, md4.cppColin Plumb - md5.cpp, md5mac.cppSeal Woods - rc6.cppChris Morgan - rijndael.cppPaulo Baretto - rijndael.cpp, skipjack.cpp,square.cppRichard De Moliner - safer.cppMatthew Skala - twofish.cppPermission to use, copy, modify, and distribute this compilation for any purpose, including commercial applications, is hereby granted without fee, subject to the following restrictions:1. Any copy or modification of this compilation in any form, except in object code form as part of an application software,must include the above copyright notice and this license.2. Users of this software agree that any modification or extension they provide to Wei Dai will be considered public domainand not copyrighted unless it includes an explicit copyright notice.3. Wei Dai makes no warranty or representation that the operation of the software in this compilation will be error-free, andWei Dai is under no obligation to provide any services, by way of maintenance, update, or otherwise. THE SOFTWAREAND ANY DOCUMENTATION ARE PROVIDED “AS IS” WITHOUT EXPRESS OR IMPLIED WARRANTY INCLUDING,BUT NOT LIMITED TO, THE IMPLIED WARRANTIES OFMERCHANTABILITY AND FITNESS FOR A PARTICULAR PURPOSE. IN NO EVENT WILL WEI DAI OR ANY OTHERCONTRIBUTOR BE LIABLE FOR DIRECT, INCIDENTAL OR CONSEQUENTIAL DAMAGES, EVEN IF ADVISED OFTHE POSSIBILITY OF SUCH DAMAGES.4. Users will not use Wei Dai or any other contributor's name in any publicity or advertising, without prior written consent ineach case.5. Export of this software from the United States may require a specific license from the United States Government. It is theresponsibility of any person or organization contemplating export to obtain such a license before exporting.

6. Certain parts of this software may be protected by patents. It is the users' responsibility to obtain the appropriate licenses before using those parts.If this compilation is used in object code form in an application software, acknowledgement of the author is not required but would be appreciated. The contribution of any useful modifications or extensions to Wei Dai is not required but would also be appreciated.
Stac ElectronicsCopyright (C) Stac Electronics 1993, including one or more U.S. patents No. 4701745, 5016009, 5126739 and 5146221 and other pending patents.
Birdstep Technology, Inc.Copyright (c) 2001 Birdstep Technology Inc. All rights reserved.

Contents
Chapter 1 Veritas Desktop and Laptop OptionAbout Veritas Desktop and Laptop Option .................................................................................................... 13
DLO Components .................................................................................................................................. 14What’s New in DLO 9.4 ................................................................................................................................. 18DLO Server Installation ................................................................................................................................. 19
Before You Install ................................................................................................................................... 19System Requirements for DLO Server Components ............................................................................. 22Installing the Veritas Desktop and Laptop Option .................................................................................. 23Installing Multiple Dedupe Servers ......................................................................................................... 26Installing Multiple Edge Servers or IO Servers ...................................................................................... 27Installing DLO on VMware ESXi, Hyper-V ............................................................................................. 27
Post Installation Tasks .................................................................................................................................. 28Setting Recovery Password ................................................................................................................... 28Deploying the Desktop Agent ................................................................................................................. 29Desktop Agent Installation Options ........................................................................................................ 31Preparing for a Manual Push Deployment of the Desktop Agent ........................................................... 32Push Install Desktop Agent and Push Install DLO Maintenance Server ................................................ 33Managing Administrator Accounts ......................................................................................................... 36DLO Default Settings ............................................................................................................................. 38Configuring DLO to Use a Specific Port for Database Access ............................................................... 49Configuring Dedupe to Use a Specific Port for Database Access ......................................................... 50
Upgrading to Veritas DLO 9.4 ....................................................................................................................... 51Updating the Desktop Agent .................................................................................................................. 52Automatic Agent Upgrade ...................................................................................................................... 54Changing the License File ...................................................................................................................... 55
Chapter 2 Configuring the Desktop and Laptop OptionUsing the DLO Administration Console ......................................................................................................... 58
Showing the Task Pane ......................................................................................................................... 59Using the DLO Overview View ............................................................................................................... 59
Configuring DLO ............................................................................................................................................ 65Configuring DLO Using the Configuration Wizard .................................................................................. 65
Configuring Dedupe Server ........................................................................................................................... 66Adding Dedupe Server ........................................................................................................................... 66Adding Dedupe Storage Pool ................................................................................................................. 68

6
Adding a Dedupe Storage Location ....................................................................................................... 69Modifying Dedupe Server ....................................................................................................................... 70Modifying Dedupe Storage Pool ............................................................................................................ 71Viewing Dedupe Storage Pool Statistics ................................................................................................ 71Modifying a Dedupe Storage Location ................................................................................................... 72Changing Credentials ............................................................................................................................. 72Deleting a Dedupe Storage Location ..................................................................................................... 73Deleting Dedupe Server ......................................................................................................................... 74Dedupe Server Maintenance ................................................................................................................. 74
About DLO Profiles ........................................................................................................................................ 77Creating a New Profile ........................................................................................................................... 77Copying a Profile .................................................................................................................................... 93Modifying a Profile .................................................................................................................................. 93
About Dedupe Storage Locations ................................................................................................................. 95About DLO Storage Locations ....................................................................................................................... 97
Supported Storage Location Configurations .......................................................................................... 97Using Hidden Shares as Storage Locations .......................................................................................... 98Creating DLO Storage Locations ........................................................................................................... 99Configuring Remote Windows Share or NAS Device for DLO Storage Locations ............................... 102Deleting DLO Storage Locations .......................................................................................................... 102
About Backup Selections ............................................................................................................................ 104Default Backup Selections ................................................................................................................... 104Adding a Backup Selection .................................................................................................................. 106Defining General Backup Selection Properties .................................................................................... 107Including and Excluding Files or Folders from a Backup Selection ..................................................... 108Revision Control ................................................................................................................................... 109Setting Options for a Backup Selection ................................................................................................ 112Using DLO Macros in Backup Selections ............................................................................................ 113Modifying a Backup Selection .............................................................................................................. 115About Delta File Transfer ..................................................................................................................... 116Enabling Delta File Transfer for a Backup Selection ............................................................................ 117Deleting Backup Selections ................................................................................................................. 118
About Maintenance Servers ........................................................................................................................ 119Adding a New Maintenance Server ...................................................................................................... 119Configuring a Maintenance Server for Delegation ............................................................................... 119Changing the Default Maintenance Server .......................................................................................... 121Deleting the Maintenance Server ......................................................................................................... 121Reassigning a File Server .................................................................................................................... 122
About Automated User Assignments .......................................................................................................... 123Creating Automated User Assignments ............................................................................................... 124Modifying Automated User Assignments ............................................................................................. 126Changing the Priority of Automated User Assignments ....................................................................... 127Viewing Automated User Assignment Properties ................................................................................ 127
7
Deleting Automated User Assignments ............................................................................................... 127Mapping User Machine ............................................................................................................................... 128
Tagging User to Specific Machine ....................................................................................................... 128Configuring Global Exclude Filters .............................................................................................................. 129
Specifying Files and Folders to Exclude from all Backups ................................................................... 129Specifying E-mail to Exclude from all Backups .................................................................................... 130Specifying Files and Folders to Exclude from Compression ................................................................ 131Specifying Files and Folders to Exclude from Encryption .................................................................... 133Specifying Files and Folders to Exclude from Delta File Transfer ....................................................... 134Excluding Files that are Always Open .................................................................................................. 135Using DLO Macros to Define Global Excludes .................................................................................... 136
Connecting to DLO on a Different DLO Administration Server ................................................................... 137Veritas DLO Firewall Ports .......................................................................................................................... 138Special Considerations for Installing Veritas DLO on Remote Computers ................................................. 139Deploying Dedupe Server on IPv6 Network ................................................................................................ 140Configuring DLO to Backup Files Over Internet .......................................................................................... 141
How BOI works? .................................................................................................................................. 141Configuring Edge Server ...................................................................................................................... 141Adding Edge Server ............................................................................................................................. 142Modifying Edge Server ......................................................................................................................... 144Deleting Edge Server ........................................................................................................................... 145Configuring IO Server .......................................................................................................................... 145Adding IO Server .................................................................................................................................. 145Modifying IO Server ............................................................................................................................. 147Deleting IO Server ................................................................................................................................ 147Assigning IO Server to Storage Location ............................................................................................. 147
About the DLO Mobile Application .............................................................................................................. 149Support matrix ...................................................................................................................................... 149Advantages of DLO Mobile App ........................................................................................................... 149
Chapter 3 Managing and Monitoring DLOManaging Desktop Agent Users .................................................................................................................. 151
Manually Creating New Network User Data Folders and Setting Security Attributes .......................... 152Changing DLO Service Credentials ..................................................................................................... 153Changing DLO Administration Console UI Language .......................................................................... 153Checking Data Integrity ........................................................................................................................ 153Automatic Integrity Checker ................................................................................................................. 154Adding a Single Desktop User to DLO ................................................................................................. 155Importing Multiple Users ...................................................................................................................... 155Modifying Desktop Agent User Properties ........................................................................................... 156Enabling or Disabling DLO Access for a Desktop User ....................................................................... 156Archiving User ...................................................................................................................................... 157Deleting a User from DLO .................................................................................................................... 157

8
Searching Users and Computers in DLO Administration Console ....................................................... 158Searching Users and Computers in Restore Tab ................................................................................ 159Moving Desktop Agent Users to a New Network User Data Folder ..................................................... 159 Migrating Desktop Users to New Computers ...................................................................................... 161Viewing a List of Desktop Agent Users ................................................................................................ 162
Managing Desktop Computers .................................................................................................................... 162Modifying Computer Properties ............................................................................................................ 162Enabling or Disabling a Desktop Computer ......................................................................................... 166Deleting a Desktop Computer from DLO ............................................................................................. 166
Backing up a Desktop from the Administration Console ............................................................................. 167Setting Blackout Windows .................................................................................................................... 167Accelerating Backup Operation ............................................................................................................ 168Enabling or Disabling Backup Acceleration ......................................................................................... 169
Restoring Files and Folders from the DLO Administration Console ............................................................ 169Restoring Multiple Users or Computers in DLO Administration Console ............................................. 176Searching for Files and Folders to Restore .......................................................................................... 177
Rollback Capabilities ................................................................................................................................... 178Configuring Rollback Window .............................................................................................................. 179Steps to perform Rollback Restore ...................................................................................................... 179
Backup and Recovery of DLO Servers and User Data ............................................................................... 181Recovering Data for a Single User Emergency Restore ...................................................................... 183Recovering Data for a Single User Without DLO Emergency Restore ................................................ 183Recovering a Damaged or Corrupted DLO Administration Server ...................................................... 184Recovering a Damaged or Corrupt File Server .................................................................................... 184Backing up and Restoring the DLO File Server and Database ............................................................ 185Backing up and Recovering Data in a DLO-Dedupe Setup ................................................................. 185Disaster Recovery Scenarios ............................................................................................................... 186
Monitoring DLO Job Histories ..................................................................................................................... 189Viewing the DLO Job History ............................................................................................................... 189Setting Job History View Filters ........................................................................................................... 191Viewing History Logs ............................................................................................................................ 192Searching History Logs ........................................................................................................................ 194Searching Users and Computers in History Tab .................................................................................. 195
Monitoring Alerts on the DLO Administration Console ................................................................................ 195Configuring Alerts ................................................................................................................................. 199Managing DLO Alerts ........................................................................................................................... 200
Configuring Alerts for Notifications .............................................................................................................. 201Configuring SMTP Email for Notification .............................................................................................. 201Configuring Email Notifications for selected alert ................................................................................. 202
Managing Audit Trail ................................................................................................................................... 203Archiving Audit Data ............................................................................................................................. 203
DLO Reports ............................................................................................................................................... 204Running a Report ................................................................................................................................. 206

9
Configuring Auto Generation of DLO Reports ...................................................................................... 208Creating Custom Reports ..................................................................................................................... 209Viewing Report Properties ................................................................................................................... 211
About DLO and Clusters ............................................................................................................................. 212Requirements for Installing DLO on a Microsoft Cluster Server .......................................................... 212Configuring DLO on a Microsoft Cluster Server ................................................................................... 213Unclustering DLO ................................................................................................................................. 214Upgrading DLO on a Microsoft Cluster Server ..................................................................................... 216
Server Consolidation Utility ......................................................................................................................... 217Consolidating DLO Servers .................................................................................................................. 218Behavior of Server Consolidation ......................................................................................................... 219
Chapter 4 Administering the Desktop AgentAbout the Desktop Agent ............................................................................................................................ 221
Features and Benefits of the Desktop Agent ....................................................................................... 222Installing the Desktop Agent ........................................................................................................................ 222
System Requirements for the Desktop Agent ...................................................................................... 222Configuring the Desktop Agent ................................................................................................................... 224
Connecting to the DLO Administration Server ..................................................................................... 224Using Local Accounts on Desktop Computers (Workgroup) ................................................................ 224Using Alternate Credentials for the Desktop Agent .............................................................................. 225Resetting Dialog Boxes and Account Information ................................................................................ 226Changing your Connection Status ....................................................................................................... 227Disabling the Desktop Agent ................................................................................................................ 227Enabling the Desktop Agent ................................................................................................................. 227
Managing the Desktop Agent ...................................................................................................................... 228About the Desktop Agent Console ....................................................................................................... 228Managing Revisions ............................................................................................................................. 231File Grooming ....................................................................................................................................... 231Modifying Backup Selections in the Standard View ............................................................................. 231Adding Backup Selections in the Advanced View ................................................................................ 233Modifying Backup Selections in the Advanced View ............................................................................ 238Deleting Backup Selections in the Advanced View .............................................................................. 239Backing up Outlook PST Files Incrementally ....................................................................................... 239Checkpoint Restart ............................................................................................................................... 241Backing up Lotus Notes NSF Files Incrementally ................................................................................ 241Using the Desktop Agent when Lotus Notes is not Configured ........................................................... 242Deleting Lotus Notes Email Files ......................................................................................................... 243Backup Resumptions after Hibernate and Sleep ................................................................................. 243Viewing the Desktop Agent Status ....................................................................................................... 243Starting a Pending Job in the Status View ........................................................................................... 244Suspending or Cancelling a Job .......................................................................................................... 244Viewing Usage Details ......................................................................................................................... 244

10
Modifying Desktop Agent Settings .............................................................................................................. 246Changing Backup Job Schedule Options ............................................................................................. 247Setting Customized Options ................................................................................................................. 249Moving the Desktop User Data Folder ................................................................................................. 251Customizing Connection Policies ......................................................................................................... 252
Restoring Files Using the Desktop Agent .................................................................................................... 255Searching for Desktop Files to Restore ............................................................................................... 257Restoring Microsoft Outlook Personal Folder Files .............................................................................. 258Restoring Deleted E-mail Messages .................................................................................................... 259Restoring Files with Alternate Stream Data ......................................................................................... 259
Restoring Files Using Web Browser ............................................................................................................ 259Synchronizing Desktop User Data .............................................................................................................. 261
How Synchronization Works ................................................................................................................ 263Resolving Conflicts with Synchronized Files ........................................................................................ 266
Monitoring Job History in the Desktop Agent .............................................................................................. 266Viewing Log Files ................................................................................................................................. 268Searching for Log Files ........................................................................................................................ 269Log File Grooming ................................................................................................................................ 270
Agent Repair Installation Scenarios ............................................................................................................ 270DLO Endpoint Migration Utility .................................................................................................................... 272
Enabling or Disabling DLO Endpoint Migration .................................................................................... 273Initiating Endpoint Migration from DLO Desktop Agent ........................................................................ 273
About the Desktop Agent for Mac ............................................................................................................... 274System Requirements for Agent on Mac ............................................................................................. 275Installing the Desktop Agent on Mac .................................................................................................... 275Launching the Desktop Agent on Mac ................................................................................................. 277Configuring the Desktop Agent on Mac ............................................................................................... 278Upgrading the Desktop Agent on Mac ................................................................................................. 278Uninstalling the Desktop Agent on Mac ............................................................................................... 278Using Default Backup Selections on Mac ............................................................................................ 278About the Desktop Agent Console on Mac .......................................................................................... 279Using the Desktop Agent on Mac ......................................................................................................... 279Adding Backup Selections on Mac ....................................................................................................... 279Modifying Backup Selections on Mac .................................................................................................. 280Deleting Backup Selections on Mac ..................................................................................................... 280Modifying Desktop Agent Settings on Mac .......................................................................................... 280Restoring Files on Mac ........................................................................................................................ 281File Grooming on Mac .......................................................................................................................... 281Modifying Desktop Agent Settings on Mac .......................................................................................... 281Keyboard Shortcuts for Desktop Agent on Mac ................................................................................... 281Searching for Desktop Files to Restore ............................................................................................... 281Searching for Log Files ........................................................................................................................ 282

11
Chapter 5 DLO Command Line Interface Management ToolsDLO Command Syntax ............................................................................................................................... 285Commands in Detail .................................................................................................................................... 286DLO Command Line Interface Database and License Tools ...................................................................... 320
Command Line Options ....................................................................................................................... 321DLO Database Maintenance ................................................................................................................ 321Routine Maintenance ........................................................................................................................... 322Database Management ........................................................................................................................ 323License Management ........................................................................................................................... 323
DLO Logging Command Line Interface Tool ............................................................................................... 324Veritas DLO Log Gather Tool ...................................................................................................................... 326Veritas DLO Diagnostic Tool ....................................................................................................................... 327Garbage Collection Utility ............................................................................................................................ 327
Scheduling Garbage Collection in DLO Administration Console ......................................................... 328
Chapter 6 TroubleshootingUsing DLO with WinCVS ............................................................................................................................. 331Troubleshooting the DLO Administration Console ...................................................................................... 331Troubleshooting the Desktop Agent ............................................................................................................ 336
Troubleshooting the Desktop Agent on Mac ........................................................................................ 340Remote Installation of DLO Desktop Agent or Maintenance Server .................................................... 340
Troubleshooting the Dedupe Server ........................................................................................................... 341Troubleshooting the DLO Edge Server and IO Server ................................................................................ 343Troubleshooting Issues Related to Web Restore ........................................................................................ 344Troubleshooting Issues Related to Server Consolidation ........................................................................... 344Troubleshooting Licensing Issues ............................................................................................................... 345Troubleshooting Configuring Reports .......................................................................................................... 345Troubleshooting Database Backup during DLO Upgrade ........................................................................... 346Troubleshooting Endpoint Migration ............................................................................................................ 346
Chapter 7 AccessibilityKeyboard Navigation and Shortcuts in DLO ................................................................................................ 347General Keyboard Navigation within the GUI .............................................................................................. 348
Keyboard Navigation within Dialog Boxes ........................................................................................... 348Tabbed Dialog Boxes ........................................................................................................................... 349List Boxes ............................................................................................................................................. 349Keyboard Shortcuts .............................................................................................................................. 350Support for Accessibility Settings ......................................................................................................... 351
Glossary................................................................................................................................................................ 353

12
Index ........................................................................................................................................................................ 357

1
Veritas Desktop and Laptop OptionAbout Veritas Desktop and Laptop OptionVeritas™ Desktop and Laptop Option is a user centric backup solution that provides flexible implementation and centralized administration for backup and recovery of Windows and Mac desktops and laptops in the organization. This highly scalable solution with distributable components is suitable for environments of any scale, be it single-site, multi-site, or having remote offices, allowing you to protect even the most recent files with your users. Built-in features include source side deduplication with content aware deduplication of Outlook PST and NSF files, automatic network selection for non-intrusive backup experience which enables switching between the offline, online and backup over internet modes, self-restore capabilities offered through agent, web browser and a mobile application, rollback capabilities for ransomware protection and also detailed auto reporting.
Note: Veritas DLO is intended to provide file-level protection for desktop user data and is not intended to provide a full system backup.

14 Veritas Desktop and Laptop OptionAbout Veritas Desktop and Laptop Option
Veritas DLO, DLO Mobile Application and Web Restore are supported in the following eleven languages:
■ English
■ German
■ Spanish
■ French
■ Italian
■ Japanese
■ Korean
■ Simplified Chinese
■ Traditional Chinese
■ Brazilian Portuguese
■ Russian
DLO Components DLO contains the following components:
■ DLO Administration Server
■ DLO Administration Console
■ DLO Maintenance Server
■ DLO Dedupe Server
■ DLO Database
■ DLO Edge Server
■ DLO IO Server
■ DLO Agent (Desktop Agent)
DLO Administration ServerThe DLO Administration Server is a service running in the background. The DLO Maintenance Server, Storage Locations (File Server) and DLO Administration Console can reside on the computer where the Administration Server is installed.DLO Administration ConsoleDLO Administration Console is the graphical user interface. From the DLO Administration Console, the Administrator can perform the following tasks:
15Veritas Desktop and Laptop OptionAbout Veritas Desktop and Laptop Option
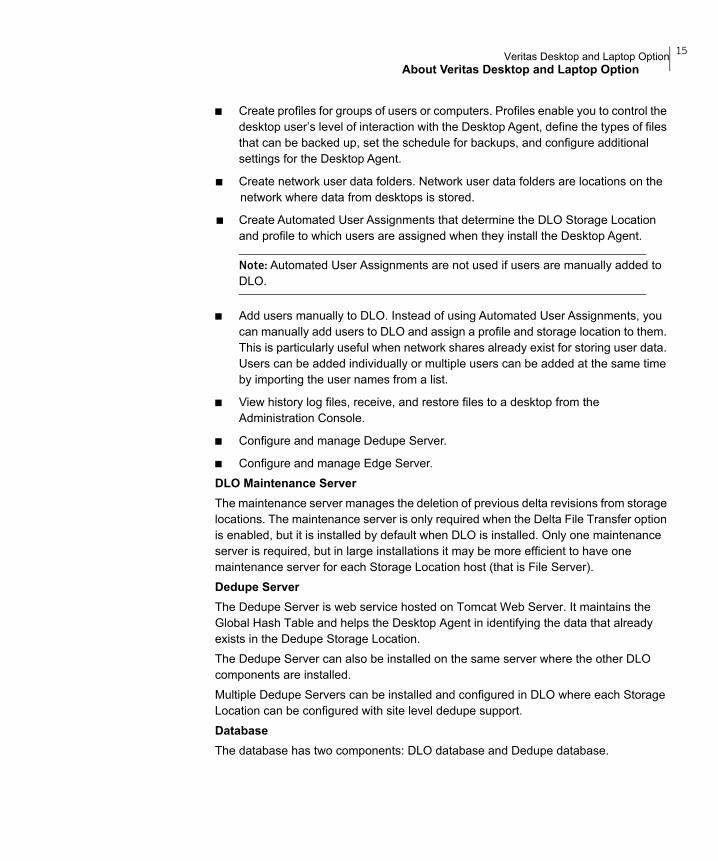
■ Create profiles for groups of users or computers. Profiles enable you to control the desktop user’s level of interaction with the Desktop Agent, define the types of files that can be backed up, set the schedule for backups, and configure additional settings for the Desktop Agent.
■ Create network user data folders. Network user data folders are locations on the network where data from desktops is stored.
■ Create Automated User Assignments that determine the DLO Storage Location and profile to which users are assigned when they install the Desktop Agent.
Note: Automated User Assignments are not used if users are manually added to DLO.
■ Add users manually to DLO. Instead of using Automated User Assignments, you can manually add users to DLO and assign a profile and storage location to them. This is particularly useful when network shares already exist for storing user data. Users can be added individually or multiple users can be added at the same time by importing the user names from a list.
■ View history log files, receive, and restore files to a desktop from the Administration Console.
■ Configure and manage Dedupe Server.
■ Configure and manage Edge Server.DLO Maintenance ServerThe maintenance server manages the deletion of previous delta revisions from storage locations. The maintenance server is only required when the Delta File Transfer option is enabled, but it is installed by default when DLO is installed. Only one maintenance server is required, but in large installations it may be more efficient to have one maintenance server for each Storage Location host (that is File Server). Dedupe ServerThe Dedupe Server is web service hosted on Tomcat Web Server. It maintains the Global Hash Table and helps the Desktop Agent in identifying the data that already exists in the Dedupe Storage Location. The Dedupe Server can also be installed on the same server where the other DLO components are installed.Multiple Dedupe Servers can be installed and configured in DLO where each Storage Location can be configured with site level dedupe support.DatabaseThe database has two components: DLO database and Dedupe database.
16 Veritas Desktop and Laptop OptionAbout Veritas Desktop and Laptop Option
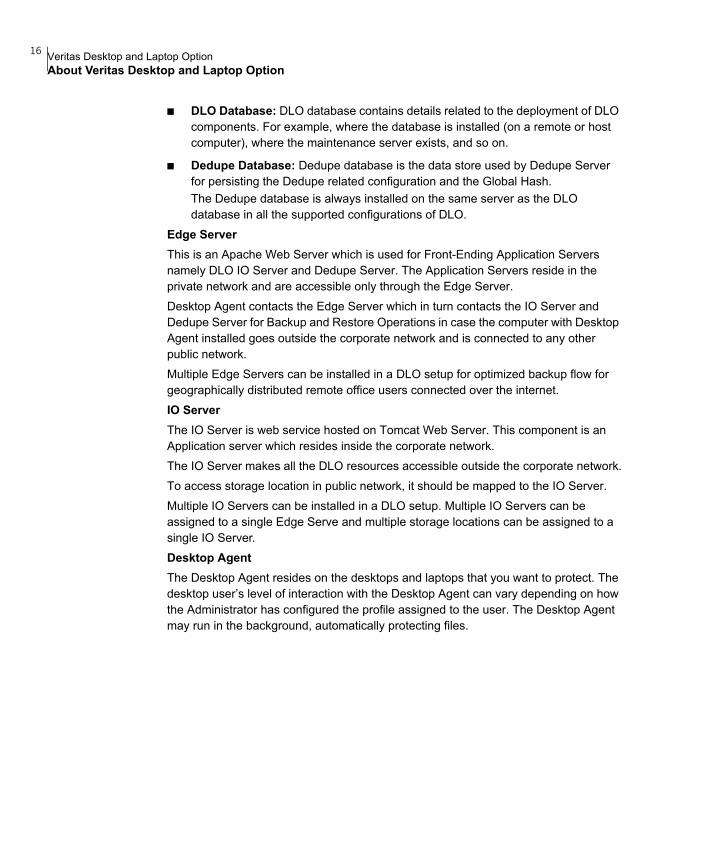
■ DLO Database: DLO database contains details related to the deployment of DLOcomponents. For example, where the database is installed (on a remote or hostcomputer), where the maintenance server exists, and so on.
■ Dedupe Database: Dedupe database is the data store used by Dedupe Serverfor persisting the Dedupe related configuration and the Global Hash.The Dedupe database is always installed on the same server as the DLOdatabase in all the supported configurations of DLO.
Edge ServerThis is an Apache Web Server which is used for Front-Ending Application Servers namely DLO IO Server and Dedupe Server. The Application Servers reside in the private network and are accessible only through the Edge Server. Desktop Agent contacts the Edge Server which in turn contacts the IO Server and Dedupe Server for Backup and Restore Operations in case the computer with Desktop Agent installed goes outside the corporate network and is connected to any other public network.Multiple Edge Servers can be installed in a DLO setup for optimized backup flow for geographically distributed remote office users connected over the internet.IO ServerThe IO Server is web service hosted on Tomcat Web Server. This component is an Application server which resides inside the corporate network. The IO Server makes all the DLO resources accessible outside the corporate network.To access storage location in public network, it should be mapped to the IO Server.Multiple IO Servers can be installed in a DLO setup. Multiple IO Servers can be assigned to a single Edge Serve and multiple storage locations can be assigned to a single IO Server.Desktop AgentThe Desktop Agent resides on the desktops and laptops that you want to protect. The desktop user’s level of interaction with the Desktop Agent can vary depending on how the Administrator has configured the profile assigned to the user. The Desktop Agent may run in the background, automatically protecting files.

17Veritas Desktop and Laptop OptionAbout Veritas Desktop and Laptop Option
Figure 1-1 Veritas Desktop and Laptop Option Components
18 Veritas Desktop and Laptop OptionWhat’s New in DLO 9.4
What’s New in DLO 9.4This section provides a brief introduction about the new features included in this release.
Simplified data restore of users who have left the organizationDLO now enhances the administrator experience with the ability to perform seamless data restore from the console, of users who have left the organization and have been deleted from the Active Directory. For more information, see “Restoring VIP user data”.
Usability EnhancementsDLO now provides key usability enhancements, in terms of Improved User machine mapping and enhanced Audit Trail reports.
Mac Encryption SupportDLO now supports the FileVault2 encryption for Mac endpoints.
19Veritas Desktop and Laptop OptionDLO Server Installation
DLO Server Installation
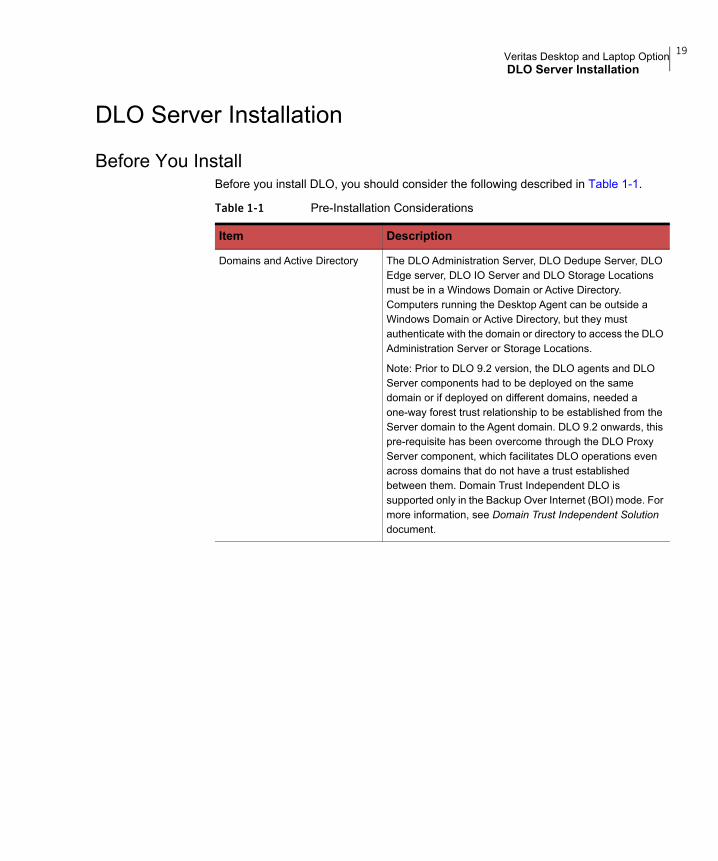
Before You InstallBefore you install DLO, you should consider the following described in Table 1-1.
Table 1-1 Pre-Installation Considerations
Item Description
Domains and Active Directory The DLO Administration Server, DLO Dedupe Server, DLO Edge server, DLO IO Server and DLO Storage Locations must be in a Windows Domain or Active Directory. Computers running the Desktop Agent can be outside a Windows Domain or Active Directory, but they must authenticate with the domain or directory to access the DLO Administration Server or Storage Locations.
Note: Prior to DLO 9.2 version, the DLO agents and DLO Server components had to be deployed on the same domain or if deployed on different domains, needed a one-way forest trust relationship to be established from the Server domain to the Agent domain. DLO 9.2 onwards, this pre-requisite has been overcome through the DLO Proxy Server component, which facilitates DLO operations even across domains that do not have a trust established between them. Domain Trust Independent DLO is supported only in the Backup Over Internet (BOI) mode. For more information, see Domain Trust Independent Solution document.

20 Veritas Desktop and Laptop OptionDLO Server Installation
User privileges for installing and managing DLO
Following are the accounts required for installing and managing DLO Components:
Domain User or Domain Administrator account for:■ Veritas DLO Administration Server: This user should
have local administrator privilege on DLOAdministration Server machine, Storage Server andSQL Server. This user should have read and writeaccess to the registry on the DLO AdministrationServer machine.
■ Mindtree Storesmart Dedupe Server service: This usershould have local administrator privilege on the DLOAdministration Server machine. This account shouldbe the same as DLO Administration Server serviceaccount.
■ SQL Server(instance): This user should have localadministrator privilege on DLO Administration Server,SQL Server machine and Storage Server.
■ SQL Server Browser: This user should have localadministrator privilege on the SQL Server machine.
■ Veritas DLO Web Server Service: This user shouldhave local administrator privilege on DLOAdministration Server machine. This account shouldbe the same as DLO Administration Server serviceaccount.
Local System Account for:■ Veritas DLO Edge Server Service■ Veritas DLO Maintenance Server
Domain User account for:■ Accessing Dedupe Storage Location. This low
privilege domain user account is also known as“Dedupe Storage Location Access Credential” and willbe used by the Desktop Agent to access the DedupeStorage Location. A user account with administratorrights is not permitted to be configured as DedupeStorage Location Access Credential account. Theadministrator needs to ensure that the password forthis user account does not expire frequently. If thepassword expires, then reset the password for thedomain user. This user should have the ‘Allow log onlocally’ policy set in the domain controller group policyobject. For more information, see “About DedupeStorage Locations” on page 95.
Table 1-1 Pre-Installation Considerations (continued)
Item Description
21Veritas Desktop and Laptop OptionDLO Server Installation
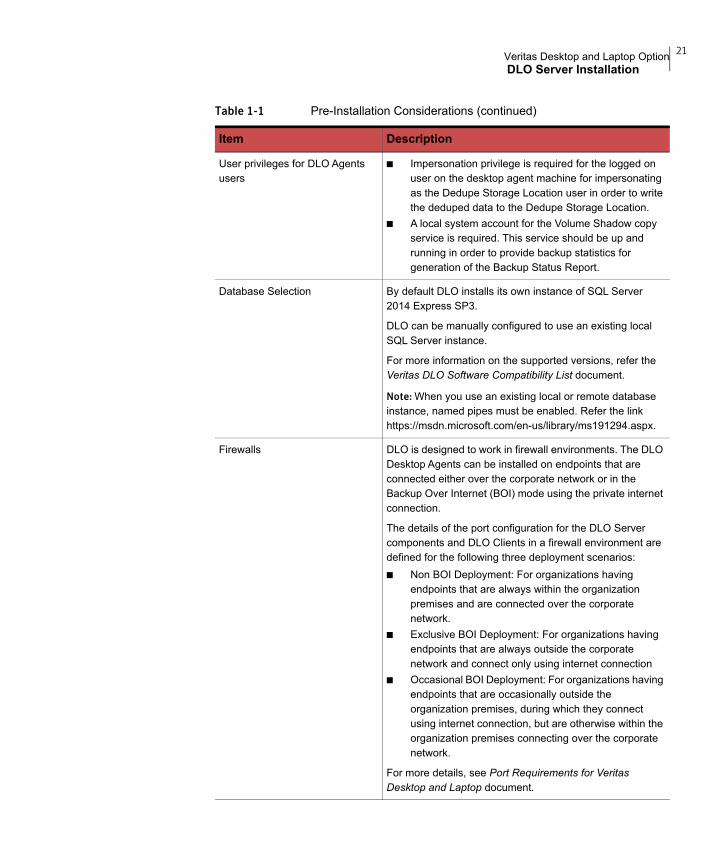
User privileges for DLO Agents users
■ Impersonation privilege is required for the logged on user on the desktop agent machine for impersonating as the Dedupe Storage Location user in order to write the deduped data to the Dedupe Storage Location.
■ A local system account for the Volume Shadow copy service is required. This service should be up and running in order to provide backup statistics for generation of the Backup Status Report.
Database Selection By default DLO installs its own instance of SQL Server 2014 Express SP3.
DLO can be manually configured to use an existing local SQL Server instance.
For more information on the supported versions, refer the Veritas DLO Software Compatibility List document.
Note: When you use an existing local or remote database instance, named pipes must be enabled. Refer the link https://msdn.microsoft.com/en-us/library/ms191294.aspx.
Firewalls DLO is designed to work in firewall environments. The DLO Desktop Agents can be installed on endpoints that are connected either over the corporate network or in the Backup Over Internet (BOI) mode using the private internet connection.
The details of the port configuration for the DLO Server components and DLO Clients in a firewall environment are defined for the following three deployment scenarios:■ Non BOI Deployment: For organizations having
endpoints that are always within the organization premises and are connected over the corporate network.
■ Exclusive BOI Deployment: For organizations having endpoints that are always outside the corporate network and connect only using internet connection
■ Occasional BOI Deployment: For organizations having endpoints that are occasionally outside the organization premises, during which they connect using internet connection, but are otherwise within the organization premises connecting over the corporate network.
For more details, see Port Requirements for Veritas Desktop and Laptop document.
Table 1-1 Pre-Installation Considerations (continued)
Item Description

22 Veritas Desktop and Laptop OptionDLO Server Installation
System Requirements for DLO Server ComponentsDLO Server components can be installed as a Standalone setup in the same machine or can be installed as a Distributed setup, across different server machines as well. Please note that the IO Server and Edge Server components are optional components that need to be configured only when opting for the Backup over Internet (BOI) capability that allows VPN-less backups.
The recommended hardware configuration for a Standalone setup with 1000 users in both non-BOI and BOI modes are as follows:
Certificates This is required for the Backup Over Internet (BOI) capability. In order to configure the BOI capability, an SSL certificate procured from a Trusted CA is a pre-requisite. This certificate is required for the Desktop Agents to communicate with the DLO Edge Server over a public URL. However, for product evaluation scenarios, an inbuilt self-signed certificate is provided in the DLO Installer package for validating the BOI capability.
Note: It is recommended to use a SSL certificate procured from a Trusted CA when deploying in production.
Table 1-1 Pre-Installation Considerations (continued)
Item Description
Table 1-2 Standalone Non-BOI Setup
Item Description
DLO Server components ■ DLO Administration Server■ DLO Administration Console■ DLO Maintenance Server■ Dedupe Server■ DLO & Dedupe Database
CPU 64 bit Quad Core Xeon, or compatible
Memory 8 GB RAM
Disk Space 10 GB
23Veritas Desktop and Laptop OptionDLO Server Installation
The latest software configuration for the DLO Server setup is as follows:
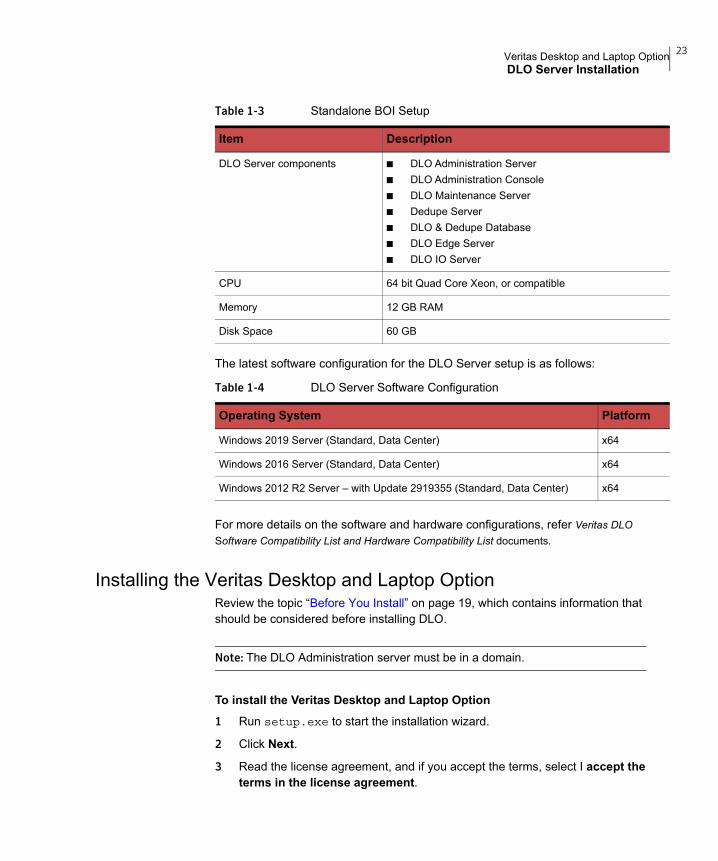
For more details on the software and hardware configurations, refer Veritas DLO Software Compatibility List and Hardware Compatibility List documents.
Installing the Veritas Desktop and Laptop OptionReview the topic “Before You Install” on page 19, which contains information that should be considered before installing DLO.
Note: The DLO Administration server must be in a domain.
To install the Veritas Desktop and Laptop Option 1 Run setup.exe to start the installation wizard.
2 Click Next.
3 Read the license agreement, and if you accept the terms, select I accept the terms in the license agreement.
Table 1-3 Standalone BOI Setup
Item Description
DLO Server components ■ DLO Administration Server■ DLO Administration Console■ DLO Maintenance Server■ Dedupe Server■ DLO & Dedupe Database ■ DLO Edge Server■ DLO IO Server
CPU 64 bit Quad Core Xeon, or compatible
Memory 12 GB RAM
Disk Space 60 GB
Table 1-4 DLO Server Software Configuration
Operating System Platform
Windows 2019 Server (Standard, Data Center) x64
Windows 2016 Server (Standard, Data Center) x64
Windows 2012 R2 Server – with Update 2919355 (Standard, Data Center) x64
24 Veritas Desktop and Laptop OptionDLO Server Installation
4 Click Next.
5 Select the components that you want to install on the computer.■ DLO Administration Console: Installs the DLO Administration Console. ■ DLO Administration Server: Installs the DLO Administration Server.■ DLO Maintenance Server: Installs the DLO Maintenance Server. ■ DLO Database Service: Installs the DLO database and Dedupe database.■ Dedupe Server: Installs the Dedupe Server.■ Edge Server: Installs the Edge Server.■ IO Server: Installs the IO Server.
Note: You can select and install each component on a separate computer, except the DLO Database Service.
6 To install DLO in a different directory, click Change.
7 Select the new directory and click OK.
8 Click Next.
9 Click Browse and select the DLO License file.
Note: DLO provides an inbuilt 60-day trialware license for product evaluation.
10 Click Next.
11 Select one of the following options for the DLO database.
Local SQL Express
2014 SP3 Instance
On a 32-bit machine, the DLO and Dedupe databases will be stored on a new local SQL Express 2014 SP3 instance located on C:\Program Files\Microsoft SQL Server\MSSQL10_50.DLO. On a 64-bit machine, the DLO and Dedupe databases will be stored on a new local SQL Express 2014 SP3 instance located on C:\Program Files (x86)\Microsoft SQL Server\MSSQL10_50.DLO.
Note: Each SQL instance requires minimum 2 GB hard disk space.

25Veritas Desktop and Laptop OptionDLO Server Installation
12 Click Next.
13 Enter the account credentials, which will be used to create DLO Storage Locations. For more information about user accounts and privileges, see “User privileges for installing and managing DLO” on page 20.
14 Click Next.
15 Click Install to begin the installation.
16 click Finish once installation is completed.
Existing Local SQL Server Instance
The DLO and Dedupe databases will be stored on a local existing SQL Server instance on this computer. Select an instance from the list provided.
Note: Named pipes must be enabled on the computer where the SQL server is installed. After enabling the named pipes, restart the SQL server and SQL server browser services. Also, make sure that the computer browser services are running.
If you select this option, make sure that the SQL service is running under domain admin credentials, and provide the same user account credential that was used to install the SQL server, else the database connection fails.
Remote SQL Server Instance
The DLO and Dedupe databases will be stored on a remote SQL server instance. Provide the IP address or host name of the computer where SQL is installed.
Note: Named pipes must be enabled on the computer where the SQL server is installed.
After enabling the named pipes, restart the SQL server and SQL server browser services. Also, the computer browser services must be running. Make sure that you provide the same user account credential that was used to install the SQL server, else the DLO Administration Console fails to launch.
Note: When a 64-bit SQL server is installed on any 64-bit server machine, the user who installs DLO on this machine must have the permission to run the SQL “SELECT” query. For more information about SQL queries, refer to the Microsoft website: http://technet.microsoft.com/en-us/library/ms191291.aspx

26 Veritas Desktop and Laptop OptionDLO Server Installation
Note: After installing the DLO components, enter the following URLs in the browser to verify the status of the Dedupe Server:http://<dedupeserver_ip_or_hostname>:8080 https://<dedupeserver_ip_or_hostname>:8443If the Dedupe Server is active, then the following message is displayed: Dedupe Server Status: (20159) Active. If there is no response from Dedupe Server, then it indicates that the Dedupe Server is not initialized, and one of the reasons could be that the database connection is inactive.
Installing Multiple Dedupe ServersTo install multiple dedupe servers1 Follow step 1 to step 4 of “Installing the Veritas Desktop and Laptop Option”.
2 Select the following two components to install on the computer. ■ DLO Database Service: Installs the DLO database and Dedupe database.■ Dedupe Server: Installs the Dedupe Server.
3 Continue from step 6 to step 16 of “Installing the Veritas Desktop and Laptop Option”.
Note: When installing Dedupe Server, if existing SQL instance is used, ensure that it does not contain a Dedupe Database since this might be in use by another Dedupe Server.
Adding DLO Admin User to Dedupe Admin Users ListIf DLO Server and multi-site Dedupe Server are installed with different user credentials, the DLO Admin user must be manually added to the list of Dedupe Admin Users.To manually add DLO admin user:
1 Navigate to the installed path of multi-site dedupe server:"C:\Program Files\Veritas\Veritas DLO"
2 Double-click DDAdmincu.exe. The Dedupe Server Log On window appears.
3 In the Dedupe Server Log On window, complete the following:
■ Server Name: Enter the server name or IP address of the local dedupe server.
■ Port Number: Enter the dedupe port number. The default port is 8443.

27Veritas Desktop and Laptop OptionDLO Server Installation
4 Click Log On. The Manage Dedupe Server window appears.
5 In the Admin Users section of the System tab, click Add. The Select Users window appears.
6 Enter the required details to add the admin user to the existing list of dedupe admin users.
7 Click OK.
8 Click Close to exit the Manage Dedupe Server window.
9 In the DLO Administration Console, click Setup.
10 In the Settings pane, right-click Dedupe Server and select New Dedupe Server to add a new Dedupe Server.
For more information to add new dedupe server, refer “Adding Dedupe Server” on page 66.
Note: The DLO Admin User should also be local Admin in the machine where Dedupe Server is installed.
Installing Multiple Edge Servers or IO ServersTo install multiple Edge servers or IO servers1 Follow step 1 to step 4 of “Installing the Veritas Desktop and Laptop Option”.
2 Select the appropriate component to be installed on the computer. ■ DLO Edge Server: Installs the DLO Edge Server.■ DLO IO Server: Installs the DLO IO Server.
3 Provide the DLO Administration Service and SQL instance to which the Edge Server or IO Server component will connect.
4 Continue with the installation.
Note: Support for configuring multiple Edge Servers is available from DLO 9.3 onwards.
Installing DLO on VMware ESXi, Hyper-VYou can install all the DLO components on a VMware ESXi, Hyper-V Server.

28 Veritas Desktop and Laptop OptionPost Installation Tasks
Ensure that your virtual environment meets all the hardware requirements and the recommendations that VMware specifies. Hardware that VMware, Hyper-V does not support may cause unknown issues. For example, DLO may not work properly if your virtual machine hardware does not support VMware. Refer to the VMware documentation for information on supported configuration.
Post Installation TasksThis section describes tasks that you should complete immediately after installation.
Setting Recovery PasswordWhen you launch the DLO Administration console for the first time, the Recovery Password wizard appears. You must set a recovery password, else DLO will not run. The recovery password enables you to retrieve encrypted data that would otherwise be lost if the DLO database is damaged or corrupted. Once set, this recovery password can only be changed using the DLO command-line interface tools.With the DLO 9.4 release, during the Upgrade process the Recovery Password Wizard appears, in order to update the existing recovery password for security reasons.During the upgrade process the following Information message is observed:The Upgrade process mandates that the existing recovery password be updated for security reasons. A command line process will be initiated through the Recovery Password Wizard to update the existing recovery password.
Note: Please ensure that the command line process is not interrupted as this may impact Emergency Restore operations.
On completion of the Recovery Password Wizard flow, the command line process DLOCommandu - SetRecoveryPwd <password> is initiated in the background, to update the existing recovery password for all users.In case any errors are observed in the command line process during the recovery password update, the number of users for whom the Recovery Password update was successful will be logged into the RecPwdUpdate.log file present in the <DLO Install Path>\Logs folder.E.g: C:\Program Files\Veritas\Veritas DLO\Logs\RecPwdUpdate.log.In case the command line process terminates because of errors or is abruptly closed, on the subsequent DLO Console launch, the below Warning message is prompted to the administrator.

29Veritas Desktop and Laptop OptionPost Installation Tasks
The product detects the recovery password is not up to date. Please update the recovery password manually using the command line DLOCommandu –SetRecoveryPwd <password> option, for security reasons.
Note: Please ensure that the command line process is not interrupted as this may impact Emergency Restore operations.
The administrator needs to manually run the DLOCommandu - SetRecoveryPwd <password> option to update the existing recovery password.The above Warning message continues to prompt on every DLO Console launch, until the recovery password has been updated as per the defined password complexity rules for security reasons.
“-SetRecoveryPwd Command” on page 299
“-EmergencyRestore Command” on page 298
Deploying the Desktop AgentWhen you install DLO, the Desktop Agent install set is placed in a share in the installation directory and is available using a Uniform Naming Convention (UNC) path.

30 Veritas Desktop and Laptop OptionPost Installation Tasks
You can choose one of the following methods to deploy the Desktop Agent from the Desktop Agent install share to the desktop computer.
Table 1-5 Desktop Agent Deployment Methods
Deployment Method Description
E-mail Send a hypertext link to the install files or include the install files as an attachment.
Web page Place the install files on your company’s intranet.
Logon scripts Create a file that includes commands for installing the Desktop Agent. Then assign the script to the User Properties for the employees who need to use DLO. The commands are executed automatically when the user logs on to the network. For more information about logon scripts, refer to your Microsoft Windows documentation.
System Center Configuration Manager (SCCM)
Use this automated system to distribute the Desktop Agent install set to the desktop computers, which then initiate the installation. For more information about SCCM, refer to your Microsoft documentation.
CD/DVD To distribute the Desktop Agent installation files on a CD/DVD, place the contents of the \\DLO Administration Server\DLO Agent share on the CD/DVD. Users can then run setup.exe from the CD/DVD. The installed Desktop Agent will be correctly associated with the DLO Administration Server.
See “Push Install Desktop Agent and Push Install DLO Maintenance Server” on page 33 for more information.
31Veritas Desktop and Laptop OptionPost Installation Tasks
Desktop Agent Installation OptionsThe Desktop Agent installation can be customized to meet specific needs. For example, it can run silently with no user interface displayed, or it can display either a basic or complete user interface. This and other customizations are accomplished by modifying the SETUP.INI file in the DLO Agent setup directory.
To customize the Desktop Agent installation 1 In the Desktop Agent setup directory, open the SETUP.INI file for editing.
2 Modify the value that begins CmdLine= /qf. The following options are available.
Desktop Agent
installation interface
Modify the /qf term to change the interface that the Desktop Agent user sees during installation of the Desktop Agent./qf
The full user interface is displayed, and a cancel button is provided.
/qbA basic progress dialog is displayed and the cancel button is enabled.
/qb!A basic user interface displayed. There is no cancel button.
/qnThe installation will be silent installation.
Note: For a completely silent install, you must run the “setup.exe /s” after modifying the SETUP.INI file.
Set the Default Media
Server
DEFAULTMEDIASERVER specifies the media server to which the Desktop Agent will attach after installation.
Launch the Desktop
Agent
The LAUNCHCLIENT option specifies whether or not the Desktop Agent should be launched immediately following installation.
To launch immediately, set LAUNCHCLIENT=”1”
To prevent immediate launch, set LAUNCHCLIENT=”0”
Suppress Reboot To suppress a reboot, even if one is required, add the following:REBOOT=ReallySuppress
32 Veritas Desktop and Laptop OptionPost Installation Tasks
3 Save and close the SETUP.INI file.Examples:For a silent installation, edit CmdLine in the SETUP.INI file as follows:
Original: CmdLine=/qf DEFAULTMEDIASERVER=”Desktop3” LAUNCHCLIENT=”1” /l*v “%TEMP%\DLOAgentInstall.log”
Modified: CmdLine=/qn DEFAULTMEDIASERVER=”Desktop3” LAUNCHCLIENT=”1” /l*v “%TEMP%\DLOAgentInstall.log”
For an installation with a basic interface but no option to cancel the installation, edit CmdLine in the SETUP.INI file as follows:
Original: CmdLine=/qf DEFAULTMEDIASERVER=”Desktop3” LAUNCHCLIENT=”1” /l*v “%TEMP%\DLOAgentInstall.log”
Modified: CmdLine=/qb! DEFAULTMEDIASERVER=”Desktop3” LAUNCHCLIENT=”1” /l*v “%TEMP%\DLOAgentInstall.log”
Preparing for a Manual Push Deployment of the Desktop AgentComplete the following steps before attempting a manual push deployment of the Desktop Agent.
1 From the \\<servername>\DLOAgent directory the following files are required:■ *.mst
■ *.cab
■ DLOBuildInfo.ini
■ *.msi
2 For a silent installation, replace /qf with /qn. To install without user interaction, but with a display of the installation progress, replace /qf with /qb.
Logging Options Logging options can be modified by changing the l*v variable.
l*v “%TEMP%\DLOAgentInstall.log”
Turns on verbose logging and create a log file at the specified location.
Note: For additional Windows Installer logging options, see http://support.microsoft.com/kb/314852/EN-US/.

33Veritas Desktop and Laptop OptionPost Installation Tasks
3 TRANSFORMS should be set to one of the mst files, according to the language used by the desktop user:1031.mst = German1033.mst = English1034.mst = Spanish1036.mst = French1040.mst = Italian1041.mst = Japanese1042.mst = Korean2052.mst = Chinese (PRC) (Simplified)1028.mst = Chinese (Traditional)1046.mst = Portuguese Brazilian1049.mst = Russian (Russia)
4 The specification of the TRANSFORMS property is required, and will affect the installer user interface and the start menu shortcuts. The DLO Agent is installed with support for all eleven languages, regardless of the transform chosen.MSI 4.5 is required on the target systems. The MSI 4.5 (KB942288-v4) installer is included in the following file:\\<servername>\DLOAgent\WindowsInstaller.exe
Push Install Desktop Agent and Push Install DLO Maintenance ServerYou can install either the Desktop Agent or the Maintenance Server on a remote computer using the push install feature.
Note: Remote installation of Desktop Agent is not supported on Mac and using Windows Group Policy Option (GPO).
PrerequisitesTo push-install DLO Desktop Agent to a computer that runs Symantec Endpoint Protection (SEP) version 11.0 or later, you must configure SEP to share files and printers. The file and printer sharing feature is turned off by default.From the DLO Administration Console, you can install the following on remote computers:
■ DLO Desktop Agent
■ DLO Maintenance ServerYou can either push-install multiple Desktop Agents or Maintenance Servers at a time, but you cannot combine both the options.

34 Veritas Desktop and Laptop OptionPost Installation Tasks
Note: The user who launches the DLO Administration Console and performs push installation of Desktop Agents should either be a part of Domain Administrator Group or should have local administrator privilege on all the Desktop Agent computers.
Procedure to Push Install Desktop Agent and DLO Maintenance Server
Note: To push install Desktop Agent on a computer that has Windows 8 or later version, the remote registry services should be enabled and started on that computer.
To push install Desktop Agent and push install DLO Maintenance Server on remote computers1 Launch the DLO Administration Console.
2 On Tools, select Install Agents and maintenance services on remote computers and click Next.
3 On Install Agent/Maintenance Server to Remote Computers > Select Component to select any of the following components:■ Agent - To push-install the Desktop Agent from the administration server to
remote computers.■ Maintenance - To push-install the DLO Maintenance Server from the
administration server to remote computers.
4 Click Add.
5 In Manual Entry of Remote Computer Name, type the following:■ Name/IP Address: Enter the computer name or IP address of the remote
computer.■ Domain Name: Enter the domain name of the remote computer.■ Browse: Click Browse. In Select Computer, choose the required remote
computer and click OK. The Name/IP Address and Domain Name is updated. Also, Remote Computer Logon Credentials is displayed with the selected computer name and domain name.
6 Click OK.
7 In Remote Computer Logon Credentials, enter the following details:■ User Name: Enter the user name for an account that has administrator rights
on the remote computer.
35Veritas Desktop and Laptop OptionPost Installation Tasks
■ Password: Enter the password for an account that has administrator rights on the remote computer.
■ Domain Name: The domain name is displayed based on the domain name you have entered in Manual Entry of Remote Computer Name.
■ Use this user name and password when attempting to connect to additional computers during the installation: Select this option if you want to use the same user name and password during the next installation. By default, this option is not selected.
8 Repeat steps 4 to 6 if you want to install the components on some more remote computers.
9 You can also import the list of IP addresses of remote computers. To import the list, do the following:■ On Install Agent/Maintenance Server to Remote Computers > Remote
Computer Selection window, click Import Computers.■ In the Import Remote Computers window, click Import List.■ Select the specific .txt file that contains all the IP addresses of remote
computers.
Note: To generate a .txt file that contains the list of Desktop Agent machines, run the DLOCommandu.exe -ListMachines command. For more information, see “-ListMachines Command” on page 313.
■ To select a remote computer, click Browse.■ Click Add List. The IP address or the computer name is displayed in the
Computer panel.■ Click the computer name or IP address and enter the details in these fields:
■ User Name: Enter the user name for an account that has the administrator rights on the remote computer.
■ Password: Enter the password for an account that has the administrator rights on the remote computer.
■ Domain Name: Enter the same domain name that you had entered in Manual Entry of Remote Computer Name.
■ Click OK.
10 Click Install.Based on the component (Desktop Agent or Maintenance Server) you have selected, the remote Desktop Agent or Maintenance Server is added.
11 To exit the wizard, click Finish.
36 Veritas Desktop and Laptop OptionPost Installation Tasks
To remove the remote Desktop Agent or Maintenance Server from the list1 Select the remote Desktop Agent or the Maintenance Server.
2 Click Remove.A Confirmation Window is displayed with the message: ‘Do you want to Delete: <Component>’.
Note: <Component> refers to either Remote Desktop Agent or Maintenance Server, depending on the component you want to delete.
3 Click Yes.The component is deleted from the list.
Managing Administrator AccountsThe DLO Administration Console can be managed by any user who has full administrative rights on the DLO Administration Server. The user’s account must be a domain or local administrator account and must have rights to create network shares and manage permissions of network shares and directories on any remote server used for DLO Storage Locations and Dedupe Storage Locations. The administrator can grant permissions to user accounts by:
■ “Creating and Configuring Users or Groups to Manage DLO Permissions”.
Creating and Configuring Users or Groups to Manage DLO PermissionsThe administrator can create and configure DLO administrator accounts for individual users or groups. Accounts can be individually configured to specify full or limited restore rights.
To grant rights to a list of individual accounts to manage DLO 1 On the DLO navigation bar, select the Network menu, and select Administrator
Accounts.
2 Do one of the following:■ To add a new DLO administrator account, click Add User or Add Group.
Continue with step 3.■ To delete an existing DLO administrator account, select the account and click
Remove. Click OK.■ To modify an existing DLO administrator account, click Edit. Make the
required changes and click OK.

37Veritas Desktop and Laptop OptionPost Installation Tasks
Note: The main administrator account cannot be edited or removed. The Remove and Edit options are disabled for this account.
3 Enter the following details:
4 Click OK.
User/Group Level ConflictsIn case of conflicts between user level sub administrators and group level sub administrators, user level sub administrators takes priority over group level sub administrators.Example: If BackupAdmin1 is added as a sub administrator in DLO and also is a part of group which is added under DLO administrators with different privileges, then BackupAdmin1 privileges will take priority.
Account name Enter the name of the user that must be assigned with administrative rights. Use the format: DomainName\AccountName
Description Enter a description for this administrator account.
Notes Enter any relevant notes about the administrator account.
Edit Permission Click Edit Permission option to select the required options:■ Add/Modify Profile■ Add/Modify Automated User Assignments■ Add/Modify Users■ Modify Computer Settings■ Add/Modify Storage Location■ Manage Dedupe Server■ Full Restore Privileges■ To set Global options■ NUDF Permissions■ IO Server Privileges■ Edge Server Privileges■ View Permission only
Note: Permissions will be granted on the user specific NUDF folders only when Restore process is initiated
Allowing someone other than the desktop user who owns the data to restore files to an alternate location can compromise data security.

38 Veritas Desktop and Laptop OptionPost Installation Tasks
In case of conflicts between group level sub administrators, the group that is added first will take priority.Example: User BackupAdmin1 belongs to a group named GroupAdmin1 and the same user is also a part of a group named GroupAdmin2 and both these groups are added under DLO administrators, then the privileges for BackupAdmin1 will be those of the group which was added first.
DLO Default SettingsWhen you start DLO for the first time, default settings are already configured during installation. You can adjust the default settings as required. Default settings are available for profiles, backup selections and Global Settings. That is, you can run DLO to back up and restore files on desktop and laptop computers safely by using only the default settings.You can change default settings for profiles, backup selections, and Global Settings.
Note: Changes to Global Settings take place immediately and apply globally to all Desktop Agents. Changes to the default profile and backup selection settings apply only to new profiles and backup selections and do not affect those that already exist.
Changing Default Profile SettingsThe default DLO profile settings can be modified as follows:
To change default profile settings1 On the DLO navigation bar, click Setup.
2 On the Task pane, under Tool Tasks, click Options.
3 In the Properties pane, under New Profile Defaults, click General.
4 Set the options as explained in “General Profile Properties” on page 78.
5 In the Properties pane, under New Profile Defaults, click User Settings.
6 Set the profile user settings options as explained in “Profile User Settings Options” on page 85.
7 In the Properties pane, under New Profile Defaults, click Schedule.
8 Set the profile schedule options as explained in “Profile User Settings Options” on page 85.
9 In the Properties pane, under New Profile Defaults, click Options.
10 Set the profile options as explained in “Additional Profile tab options” on page 90.

39Veritas Desktop and Laptop OptionPost Installation Tasks
Changing Default Backup Selection SettingsThe default DLO backup selection settings can be modified as follows.
To change default backup selection settings1 On the DLO navigation bar, click Setup.
2 On the Task pane, under Tool Tasks, select Options.
3 Under New Backup Selection Defaults in the Properties pane, click Revisions and set backup selection revision options as described in “Backup Selection Revision Control Tab Options” on page 111.
4 In the Properties pane under New Backup Selection Defaults, click Options.
5 Set the options as explained in “Backup Selection Options” on page 112.
Changing Default Global SettingsThe default DLO global settings can be modified as follows:
Note: These settings apply immediately to all Desktop Agents.
To change default global settings1 On the DLO navigation bar, click Setup.
2 On the Task pane under Tool Tasks, select Options.
3 In the Properties pane under Global Settings, click Options.
4 Set global options. Table 1-6 describes the options.
Table 1-6 Global Settings Options
Item Description
Disable
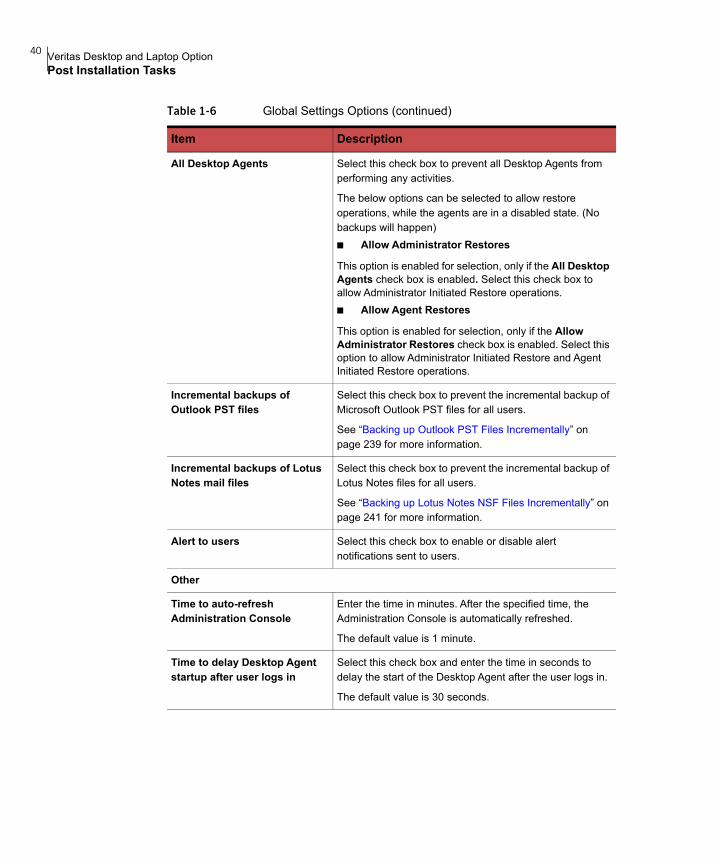
40 Veritas Desktop and Laptop OptionPost Installation Tasks
All Desktop Agents Select this check box to prevent all Desktop Agents from performing any activities.
The below options can be selected to allow restore operations, while the agents are in a disabled state. (No backups will happen)■ Allow Administrator Restores
This option is enabled for selection, only if the All Desktop Agents check box is enabled. Select this check box to allow Administrator Initiated Restore operations.■ Allow Agent Restores
This option is enabled for selection, only if the Allow Administrator Restores check box is enabled. Select this option to allow Administrator Initiated Restore and Agent Initiated Restore operations.
Incremental backups of Outlook PST files
Select this check box to prevent the incremental backup of Microsoft Outlook PST files for all users.
See “Backing up Outlook PST Files Incrementally” on page 239 for more information.
Incremental backups of Lotus Notes mail files
Select this check box to prevent the incremental backup of Lotus Notes files for all users.
See “Backing up Lotus Notes NSF Files Incrementally” on page 241 for more information.
Alert to users Select this check box to enable or disable alert notifications sent to users.
Other
Time to auto-refresh Administration Console
Enter the time in minutes. After the specified time, the Administration Console is automatically refreshed.
The default value is 1 minute.
Time to delay Desktop Agent startup after user logs in
Select this check box and enter the time in seconds to delay the start of the Desktop Agent after the user logs in.
The default value is 30 seconds.
Table 1-6 Global Settings Options (continued)
Item Description

41Veritas Desktop and Laptop OptionPost Installation Tasks
Maximum time for Desktop Agent to wait during backup interruption
Select the check box and enter the time in minutes. If the Desktop Agent loses the network connection when data is being transferred from LUDF to NUDF, the Desktop Agent waits for the specified time. If the network connection is restored within the specified time, then the backup job resumes from where it had stopped.
If the network is restored after the set time, then the backup job starts again.
The default time is 5 minutes, and the maximum time is 32767 minutes.
Dedupe verifies the data integrity of the backup file in progress after the network is restored. If the data written before network failure is lost due to any network errors, then the following error message is displayed: “Data written before network failure not found.”
Note: This option is also applicable for dedupe enabled backups.
Disable Auto Upgrade Select the check box to disable Automatic Upgrade of Desktop Agent.
Enable Audit Trail for Configuration Changes
Select the check box to enable auditing the Static Data such as profile changes, global setting changes, and edge server changes.
By default, this option is disabled.
Enable Audit Trail for Restore and Migration
Select the check box to enable auditing the Dynamic Data such as restoration made by administrators, web restores, mobile restores, user migration, and storage location migration.
By default, this option is disabled.
Table 1-6 Global Settings Options (continued)
Item Description
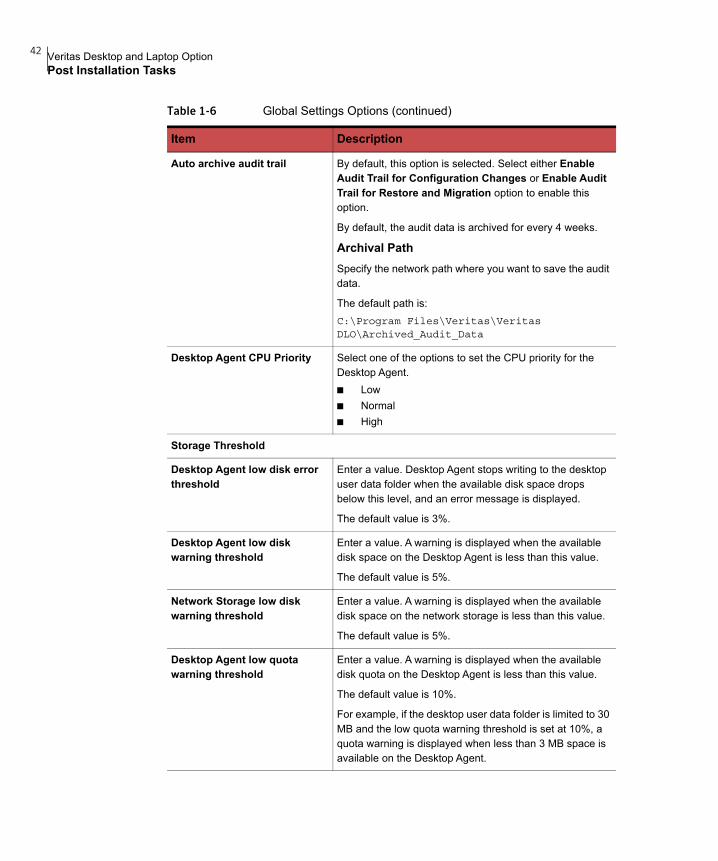
42 Veritas Desktop and Laptop OptionPost Installation Tasks
Auto archive audit trail By default, this option is selected. Select either Enable Audit Trail for Configuration Changes or Enable Audit Trail for Restore and Migration option to enable this option.
By default, the audit data is archived for every 4 weeks.
Archival Path Specify the network path where you want to save the audit data.
The default path is: C:\Program Files\Veritas\Veritas DLO\Archived_Audit_Data
Desktop Agent CPU Priority Select one of the options to set the CPU priority for the Desktop Agent.■ Low■ Normal ■ High
Storage Threshold
Desktop Agent low disk error threshold
Enter a value. Desktop Agent stops writing to the desktop user data folder when the available disk space drops below this level, and an error message is displayed.
The default value is 3%.
Desktop Agent low disk warning threshold
Enter a value. A warning is displayed when the available disk space on the Desktop Agent is less than this value.
The default value is 5%.
Network Storage low disk warning threshold
Enter a value. A warning is displayed when the available disk space on the network storage is less than this value.
The default value is 5%.
Desktop Agent low quota warning threshold
Enter a value. A warning is displayed when the available disk quota on the Desktop Agent is less than this value.
The default value is 10%.
For example, if the desktop user data folder is limited to 30 MB and the low quota warning threshold is set at 10%, a quota warning is displayed when less than 3 MB space is available on the Desktop Agent.
Table 1-6 Global Settings Options (continued)
Item Description
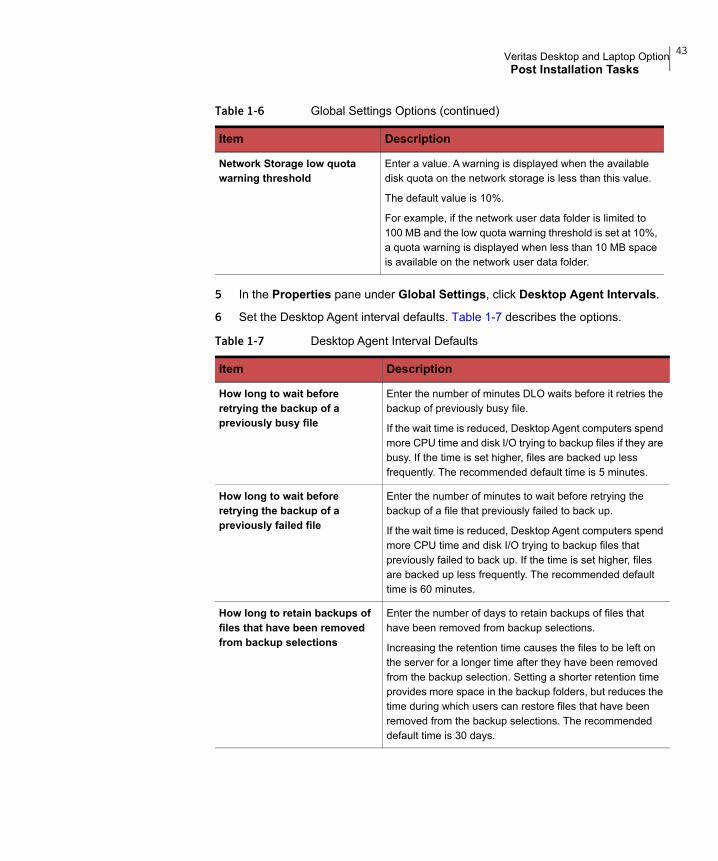
43Veritas Desktop and Laptop OptionPost Installation Tasks
5 In the Properties pane under Global Settings, click Desktop Agent Intervals.
6 Set the Desktop Agent interval defaults. Table 1-7 describes the options.
Network Storage low quota warning threshold
Enter a value. A warning is displayed when the available disk quota on the network storage is less than this value.
The default value is 10%.
For example, if the network user data folder is limited to 100 MB and the low quota warning threshold is set at 10%, a quota warning is displayed when less than 10 MB space is available on the network user data folder.
Table 1-7 Desktop Agent Interval Defaults
Item Description
How long to wait before retrying the backup of a previously busy file
Enter the number of minutes DLO waits before it retries the backup of previously busy file.
If the wait time is reduced, Desktop Agent computers spend more CPU time and disk I/O trying to backup files if they are busy. If the time is set higher, files are backed up less frequently. The recommended default time is 5 minutes.
How long to wait before retrying the backup of a previously failed file
Enter the number of minutes to wait before retrying the backup of a file that previously failed to back up.
If the wait time is reduced, Desktop Agent computers spend more CPU time and disk I/O trying to backup files that previously failed to back up. If the time is set higher, files are backed up less frequently. The recommended default time is 60 minutes.
How long to retain backups of files that have been removed from backup selections
Enter the number of days to retain backups of files that have been removed from backup selections.
Increasing the retention time causes the files to be left on the server for a longer time after they have been removed from the backup selection. Setting a shorter retention time provides more space in the backup folders, but reduces the time during which users can restore files that have been removed from the backup selections. The recommended default time is 30 days.
Table 1-6 Global Settings Options (continued)
Item Description

44 Veritas Desktop and Laptop OptionPost Installation Tasks
Minimum time between history updates
Enter the number of minutes to wait between history updates.
If there is a lot of activity, a reduced time between updates causes the computers to spend more CPU time and disk I/O to update history. A higher wait time reduces the frequency of history updates. The recommended default time is 15 minutes.
Minimum time between postings of the same alert
Enter the number of hours to wait between postings of the same alert.
When there is a recurring alert, it is displayed only once during the specified time interval. If the time is set too low, the alert log can fill up with multiple postings of the same alert. The recommended default time is 24 hours.
Minimum time between closing a job log and starting a new one
Enter the number of minutes to wait between closing a job log and starting a new one.
When the time between job logs is reduced, more job logs appear. The recommended default time is 30 minutes.
Minimum time between maintenance cycles
Enter the number of minutes to wait between maintenance cycles.
A lower time between maintenance cycles means more CPU time and disk I/O is spent conducting maintenance. Maintenance cycles remove obsolete files and folders. The recommended default time is 1440 minutes, which is 24 hours.
Minimum time between checking for changes to Lotus Notes e-mail files
Enter the number of minutes between checks for changes to Lotus Notes files.
A lower time results in more CPU time and disk I/O is used to determine if Lotus Notes files have changed. The recommended default is 30 seconds.
Time during which Desktop Agents randomly respond to restart requests
Enter the number of minutes during which the Desktop Agents will randomly respond to restart requests.
When a large number of Desktop Agents are restarted, for example when network user data folders are moved, the Desktop Agents are restarted randomly over a specified period of time. This prevents the potential for overloading DLO by starting a large number of Desktop Agents at the same time.
The recommended default time is 30 minutes.
Table 1-7 Desktop Agent Interval Defaults (continued)
Item Description

45Veritas Desktop and Laptop OptionPost Installation Tasks
7 In the Properties pane under Global Settings, click User Activity Settings.
8 Set the User Activity Settings defaults. Table 1-8 describes the options.
Changing Default Maintenance ScheduleThe maintenance schedule includes scheduling for
■ Garbage Collection ■ Database Backup■ Active Directory Scan
Garbage Collection Schedule For more information on Garbage Collection utility, see “Garbage Collection Utility” on page 327.
To change default garbage collection schedule:1 From the Tools menu in the DLO Administration Console, select Options. The
Options dialog box appears.
2 In the Properties pane, under Maintenance Schedule, select Garbage Collection.
Table 1-8 User Activity Settings
Item Description
Enable user activity restrictions
Check Enable user activity restrictions to determine how DLO will perform tasks when users are interacting with their desktop computers. User activity is based on typing and mouse movement.
Limit network bandwidth
usage to
Enter the maximum network bandwidth that DLO will use when the user is interacting with the desktop computer.
Restrictions will be removed when there has been no user activity for x seconds
Enter the number of seconds of user inactivity after which DLO will no longer restrict jobs.
Maximum scanner items per second
Scanner items per second limits the number of items processed per second during a file system scan. File system scans occur during the first backup of a desktop computer, after an abnormal system shutdown, or if the change journal is truncated. This setting reduces the impact of the scan on the desktop computer while the user is active.

46 Veritas Desktop and Laptop OptionPost Installation Tasks
3 Select the appropriate options as described in Table 1-9.
Note: Before initiating garbage collection and after successful GC, Dedupe server checks and runs DB indexing automatically.
Database Backup Schedule The DLO and Dedupe database files can be scheduled for regular backups using the Database Backup option.
To enable Database Backup Schedule:1 From the Tools menu in the DLO Administration Console, select Options. The
Options dialog box appears.
2 In the Properties pane, under Maintenance Schedule, select Database Backup.
3 Select the appropriate options as described in Table 1-10.
Table 1-9 GC Schedule Options
Item Description
Enable Garbage Collection Select this option to run the GC according to the schedule.
Run on these days Run the GC on the days that you select.
By default, Saturday is selected for a duration of 3 hours.
From Specify the time when GC must start.
Until Specify the time when GC operation must stop.
Table 1-10 Database Backup Schedule Options
Item Description
Schedule Database Backup Enable this check box, to run the database backups as per the specified schedule.
Backup Frequency Select one of the below options to define the backup frequency for the database files.■ Daily■ Weekly ■ Monthly

47Veritas Desktop and Laptop OptionPost Installation Tasks
4 The dialog Add Multi-site Dedupe Server Details appears. See Table 1-11 for options.
5 Click OK.
Active Directory Scan The Active Directory Scan option provides the administrator with the ability to configure automated and manual scans of the Active Directory to identify and auto delete users who have quit the organization.
Day/Date If backup frequency is Weekly, select a Day of the week on which the database backup should start.
If backup frequency is Monthly, select a Date on which the database backup should start.
Time Specify the time when database backup should start.
Backup Path Enter the network share path to backup the database files. The shared path should exist and the administrator should have permissions to write to the share.
Retention Period Enter the number of days to retain backups of the database files in the Backup Path.
The default retention period is 8 days. The minimum is 2 days and maximum retention period is 99 days.
Multi-site Dedupe Servers Details For multi-site dedupe server scenarios, this option allows the administrator to add/delete the database files to be backed up across multi-site dedupe servers. Click Add.
Table 1-11 Add Multi-site Dedupe Server Details
Item Description
SQL Server Host (Name/IP) Specify the SQL Server Host (Name/IP) where the associated dedupe database file to be backed up is present.
SQL Server Instance Name Specify the SQL Server Instance Name for the dedupe database that will be backed up. Click OK.
Table 1-10 Database Backup Schedule Options
Item Description

48 Veritas Desktop and Laptop OptionPost Installation Tasks
To configure automated scan of the Active Directory:1 From the Tools menu in the DLO Administration Console, select Options. The
Options dialog box appears.
2 In the Properties pane, under Maintenance Schedule, select Active Directory Scan > Auto Scan option.
3 Select the appropriate options as described in Table 1-12.
4 Click OK.
Note: Users in the Archived state will not be considered for automated scan of Active Directory.
The administrator can also choose to manually scan the Active Directory to find the list of users who have quit the organization.
To run manual scan of the Active Directory:1 From the Tools menu in the DLO Administration Console, select Options. The
Options dialog box appears.
Table 1-12 Auto Scan Options
Item Description
Configure automatic scans to identify users removed from the Active Directory
Enable this check box, to configure daily automated scans for identifying users who have quit the organization. The identified users will be moved to Removed from AD state.
Only users who have been inactive for past 24 hours or more will be selected for the scan. By default the automated scan is scheduled to run daily at 3:00 AM.
Note: To schedule automated scans of the Active Directory to a different time, edit the below registry setting in a 12 hour format (hh:mm). HKEY_LOCAL_MACHINE\SOFTWARE\Veritas\
VeritasDLO\AdminService\ ADAutoScanTime
Auto delete the identified users after _ days
Enable this check box and enter the number of days after which the users in Removed from AD state and their data will be permanently deleted from the DLO storage.
The default value for auto deletion is 45 days. The minimum value is 15 days and maximum value is 9999 days.

49Veritas Desktop and Laptop OptionPost Installation Tasks
2 In the Properties pane, under Maintenance Schedule, select Scan Active Directory > Manual Scan.
3 Click Scan Now.
Note: As the scan selects users who have been inactive for 24 hours or more, it is recommended not to run the manual scan post-holiday to avoid the possibility of large number of inactive users being picked for the Active Directory scan.
4 The Active Directory Scan Results dialog box appears that provides the list of users who are not found in the Active Directory.
5 Right-click on the users to select from Select for Disable, Select for Archive and Select for Delete actions.
6 Click on Apply to update the selected action.
Note: Delete actions once applied, will immediately delete the respective users and their data permanently from the storage location. The Export option allows the administrator to export the results in .csv format.
The Active Directory Auto Scan setting changes and Auto Deletion operations are captured in the “Audit Trail - Configuration Changes” report, if the Audit Trail for Configuration Changes option is enabled. This option can be enabled from the DLO Administration Console> Tools > Options > Global Settings > Options > Audit Trail.
The users in the Removed from AD state will not be featured in any of the reports other than the “User Status By Profile" and the "Audit Trail - Configuration Changes" reports.
Configuring DLO to Use a Specific Port for Database AccessYou may want to configure DLO to use a specific port for database access. This may be necessary, for example, if a fixed port is already being used for the SQL Server, you may need to configure DLO to use the same port to access the DLO database.
To configure DLO for alternate database access through a specific port 1 Select a unique port number for the DLO database and then refer to the
instructions at http://msdn.microsoft.com/en-us/library/ms177440(v=sql.105).aspx to set the new port number.
2 On computers that run the DLO Administration Console from outside the firewall, create the following registry key as a DWORD value if it does not exist and set the DBUseTCP flag to 1:
50 Veritas Desktop and Laptop OptionPost Installation Tasks
HKLM\Software\Veritas\Veritas DLO\AdminConsole\DBUseTCP
3 On computers that run the Desktop Agent from outside the firewall, create the following registry key as a DWORD value if it does not exist and set the DBUseTCP flag to 1:HKCU\Software\Veritas\Veritas DLO\Client\DBUseTCP orHKLM\Software\Veritas\Veritas DLO\Client\DBUseTCP
4 Set the DBTcpPort on the computers modified in steps 2 and 3 to the port number you set in step 1.
5 Restart the modified computers.
Configuring Dedupe to Use a Specific Port for Database AccessYou may want to configure the Dedupe Server to use a specific port to access the database. This may be necessary in scenarios where a fixed port is being used for the SQL Server, and SQL Server Browser service is disabled.
To configure Dedupe Server for database access through a specific port Add the specific port number in the context.xml file located at this path: C:\Program Files\Veritas\Veritas DLO\Dedupe
Server\Tomcat\webapps\DedupeServer\META-INF\context.xml
Sample context.xml where the port number is specified:<?xml version="1.0" encoding="UTF-8"?>
<Context path="/DedupeServer" docBase="DedupeServer" debug="5"
reloadable="true" crossContext="true">
<Resource name="jdbc/dedupedb" auth="Container"
type="javax.sql.DataSource"
maxActive="100" maxIdle="30" maxWait="10000"
factory="com.middleware.db.DBConnectionPoolFactory"
driverClassName="com.microsoft.sqlserver.jdbc.SQLServerDrive
r" removeAbandoned="true"
removeAbandonedTimeout="300" logAbandoned="true"
validationQuery="select 1"
autoReconnect="true"
url="jdbc:sqlserver://;serverName=172.22.68.180;instanceName
=DLO;portNumber=1445;DatabaseName=dedupedb;integratedSecurit
y=true" />
</Context>

51Veritas Desktop and Laptop OptionUpgrading to Veritas DLO 9.4
Note: After changing the values in the context.xml file, you must restart the Dedupe Server.
If you are running SQL Server as a named instance and you are not using a specific TCP/IP port number in your connection string, then you must enable the SQL Server Browser service to allow for remote connections.
To configure a SQL server to listen on a specific TCP port, refer to the instructions at http://msdn.microsoft.com/en-us/library/ms177440(v=sql.105).aspx
Upgrading to Veritas DLO 9.4DLO supports upgrades from the following previous versions:
■ Veritas DLO 9.3.3
■ Veritas DLO 9.3.2
■ Veritas DLO 9.3.1
■ Veritas DLO 9.3
■ Veritas DLO 9.2
■ Veritas DLO 9.1
■ Veritas DLO 9.0 SP1For any existing customers with previous version of DLO (DLO Backup Exec 2010 R3, DLO 7.0, DLO 7.5, DLO 7.5 SP1, DLO 8.0, DLO 8.0 SP1, DLO 8.0 SP2, DLO 8.0 SP3, and DLO 8.0 SP4), it will be a stepped upgrade support. That is, customers should first upgrade from the existing version to DLO 9.3.2, and then upgrade to this latest version.
To upgrade from a supported version of DLO to Veritas DLO 9.41 Run setup.exe to start the installation wizard.
2 Click Next.
3 Read the license agreement, and if you accept the terms, select I accept the terms in the license agreement.
4 Click Next.
5 Proceed with the installation.
Note: During the installation process, a dialog may appear indicating that the SQL services failed to start. Click Ignore to continue.
52 Veritas Desktop and Laptop OptionUpgrading to Veritas DLO 9.4
6 When the installation is completed, click Finish.
Backing up of Database during DLO UpgradeWhile upgrading to DLO 9.4, an option is provided to take backup of the existing database. To backup existing database during DLO upgrade:
1 In the Installer wizard of Veritas DLO 9.4, Backup Database option is displayed. A warning message recommending to take database backup is displayed.
2 Enter the path or click Browse to navigate to the desired network or local path to which you want to backup the database.
3 Click Next to continue with the installation.
The backed up database will be available in the network or the local path in .bak format.
Updating the Desktop AgentAs soon as the DLO Administration Server is updated, either through a full install or Maintenance Pack release, the Desktop Agents should be updated in one of the following ways:
1 Update the Desktop Agent from the Desktop Agent Computer.
2 Update the Desktop Agent using the Install Agents and Maintenance Services on Remote Computers option in the DLO Administration Console. See “Procedure to Push Install Desktop Agent and DLO Maintenance Server” on page 34 for more information.
3 Update the Desktop Agent from the Command-Line Interface.
4 Right-click on the particular user and click on Upgrade User.
Updating the Desktop Agent from the Desktop Agent ComputerTo manually update the Desktop Agents, from the Desktop Agent computer, run the following: \\<DLO Administration Server>\DLOAgent\setup.exe
Updating the Desktop Agent from the Command-Line InterfaceThe DLO Command-Line Interface tool can automatically offer updates to the Desktop Agents using the publish command.
53Veritas Desktop and Laptop OptionUpgrading to Veritas DLO 9.4
To upgrade Desktop Agents from the DLO Administration Console using the command-line interface 1 Update the DLO Administration Server as explained in the update documentation.
2 From the command line on the DLO Administration Server, change to the DLO installation directory.Default installation directory:
Example C:\Program Files\Veritas\Veritas DLO
3 Run DLOCommandu.exe with the update option to add the configuration file and make note of the ID number returned when this command is run:DLOCommandu -update -add -f “C:\Program Files\Veritas\Veritas DLO\DLOAgent\update_9.3\DLOAgentUpdate_NBU.ini”
Note: If the configuration file has been moved or renamed, you will need to specify the full path and file name in the command above.
Sample output:ID=3Name=9.4 UpdateDescription=Updates Veritas DLO Desktop Agent to 9.4MajorVersion=9MinorVersion=4PromptUser=1ExitAfterLaunch=0Build=9.4.srcPath=\\%DLOADMINSERVER%\DLOAgent\update_9.4cmdName=AutomatedAgentUpgrade.execmdArgs=cmdPath=%DOWNLOADDIR%
4 Run DLOCommandu.exe with the publish command to make the update available to Desktop Agent users.
DLOCommandu -update -publish -UI y -U UserNameDLOCommandu -update -publish -UI y -P ProfileNameThe y indicates the ID number returned when the add command was run in step 3. Using an asterisk in place of UserName or ProfileName will publish the update to all users.When this command is executed, it will return a list of all users targeted for update. Users will be updated the next time the Desktop Agent application is started.
Note: For more information on the -update command and additional command options, see “-Update Command” on page 296.

54 Veritas Desktop and Laptop OptionUpgrading to Veritas DLO 9.4
Related Topics“DLO Command Line Interface Management Tools” on page 285
Running the Desktop Agent Upgrade SilentlyDesktop Agents can be upgraded silently. During a silent upgrade, users will not be prompted to download and start the upgrade, but they will still be prompted to confirm that they want to actually perform the upgrade.
To run the Desktop Agent upgrade silently 1 From the Desktop Agent upgrade folder, open the DLOAgnetUpdate_NBU.ini
file for editing.
2 Set PromptUser=0.
3 Save and close the file.
4 Run the upgrade using one of the methods described in “Updating the Desktop Agent” on page 52.
Updating the Desktop Agents from the DLO Administration Console using Upgrade User OptionDesktop Agents can be upgraded by selecting Upgrade User option from the DLO Administration Console.
1 On the DLO navigation bar, click Setup.
2 In the Settings pane, click Users.
3 Users are listed in the Results pane.
4 Right-click the user name or select all users to see the menu options.
5 Select Upgrade User.Desktop Agent users will be prompted to download and start the upgrade.
Automatic Agent UpgradeAutomatic Desktop Agent Upgrade is supported for Agents belonging to a lower version than that of the Server. When the Desktop Agent is in network and idle, the Server sends Update notification to each DLO Agent. DLO Administrator can also disable this option from Global Settings by selecting Tools > Options > Global Settings Options > Disable Auto Upgrade.

55Veritas Desktop and Laptop OptionUpgrading to Veritas DLO 9.4
Note: This is applicable for Desktop Agents and Servers belonging to DLO 8.0 SP3 version and above.
Changing the License FileThis section explains how to change the DLO license file.
To change the license file
Option 1:
1 On the main menu, click Help > About Desktop and Laptop Option. A dialog box appears.
2 Click Change the License Key. The Change License Key dialog appears.
3 Click Browse and select DLO license file.
4 Click Change.
Option 2:
1 On the main menu, click Help > Change License Key. The Change License Key dialog appears.
2 Click Browse and select DLO license file.
3 Click Change.
Option 3:Use the command-line utility to add or change the license file.
1 Open the command prompt.
2 From the command line on the DLO Administration Server, change to the DLO installation directory. Default installation directory:
Example C:\Program Files\Veritas\Veritas DLO
3 Run the following command:

56 Veritas Desktop and Laptop OptionUpgrading to Veritas DLO 9.4
DLOCommandu.exe -ChangeLicense <license file path>
Option Description
-LIST Lists the installed license file
-ADD Adds new license file

Chapter
2 Configuring the Desktop and Laptop OptionThis section contains the following topics:
■ “Using the DLO Administration Console” on page 58
■ “Configuring DLO” on page 65
■ “About DLO Profiles” on page 77
■ “About Backup Selections” on page 104
■ “About Delta File Transfer” on page 116
■ “About Automated User Assignments” on page 123
■ “About Dedupe Storage Locations” on page 95
■ “About Automated User Assignments” on page 123
■ “Configuring Global Exclude Filters” on page 129
■ “Configuring Dedupe Server” on page 66
■ “Configuring DLO to Backup Files Over Internet” on page 141
■ “About the DLO Mobile Application” on page 149

58 Configuring the Desktop and Laptop OptionUsing the DLO Administration Console
Using the DLO Administration ConsoleWhen you launch DLO, the DLO Administration Console appears. From the console, you can configure DLO and manage backup and restore operations.
Figure 2-1 Veritas DLO Administration Console

59Configuring the Desktop and Laptop OptionUsing the DLO Administration Console
Showing the Task Pane
The User Tasks pane (hereafter referred to as Task pane) appears on the left side of the DLO Administration Console. Actions can be initiated from the Task pane, and these actions vary with the selected view.
To show the Task pane ■ From the View menu, verify that Task pane is selected, or select it.
Using the DLO Overview ViewThe DLO Overview view provides two options: Getting Started view and Dashboard.
Getting Started ViewThe Getting Started view provides links to help you set up and manage DLO. From this page, you can easily perform the following tasks or access the help associated with these tasks.
To access the getting started view 1 On the DLO navigation bar, click Overview.
2 Click the Getting Started tab.
■ Add Dedupe Server
■ Add an Edge Server
■ Add IO Server
■ Create a Profile
■ Create a Storage Location
■ Create an Automated User Assignment
■ Add Users
■ Deploy the Desktop Agent
■ Set Preferences and Default Settings
■ Manage Alerts and Notifications
■ Run Reports

60 Configuring the Desktop and Laptop OptionUsing the DLO Administration Console
Figure 2-2 Veritas Getting Started View
DashboardThe Dashboard is an easy to interpret, real time user interface that provides a graphical visualization of the DLO environment from Operational, Deployment and Capacity Planning perspectives.
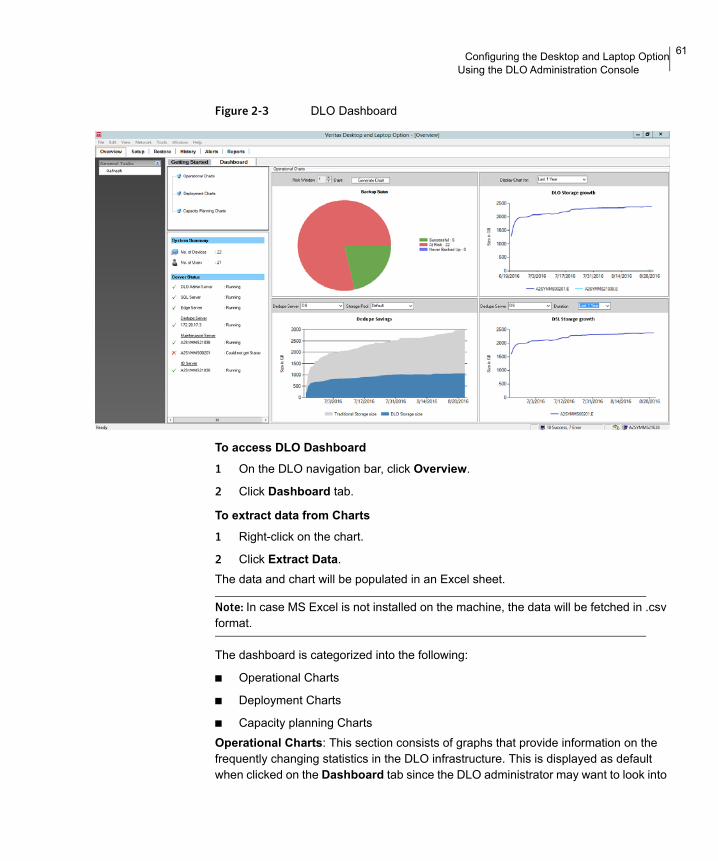
61Configuring the Desktop and Laptop OptionUsing the DLO Administration Console
Figure 2-3 DLO Dashboard
To access DLO Dashboard1 On the DLO navigation bar, click Overview.
2 Click Dashboard tab.
To extract data from Charts1 Right-click on the chart.
2 Click Extract Data. The data and chart will be populated in an Excel sheet.
Note: In case MS Excel is not installed on the machine, the data will be fetched in .csv format.
The dashboard is categorized into the following:
■ Operational Charts
■ Deployment Charts
■ Capacity planning ChartsOperational Charts: This section consists of graphs that provide information on the frequently changing statistics in the DLO infrastructure. This is displayed as default when clicked on the Dashboard tab since the DLO administrator may want to look into
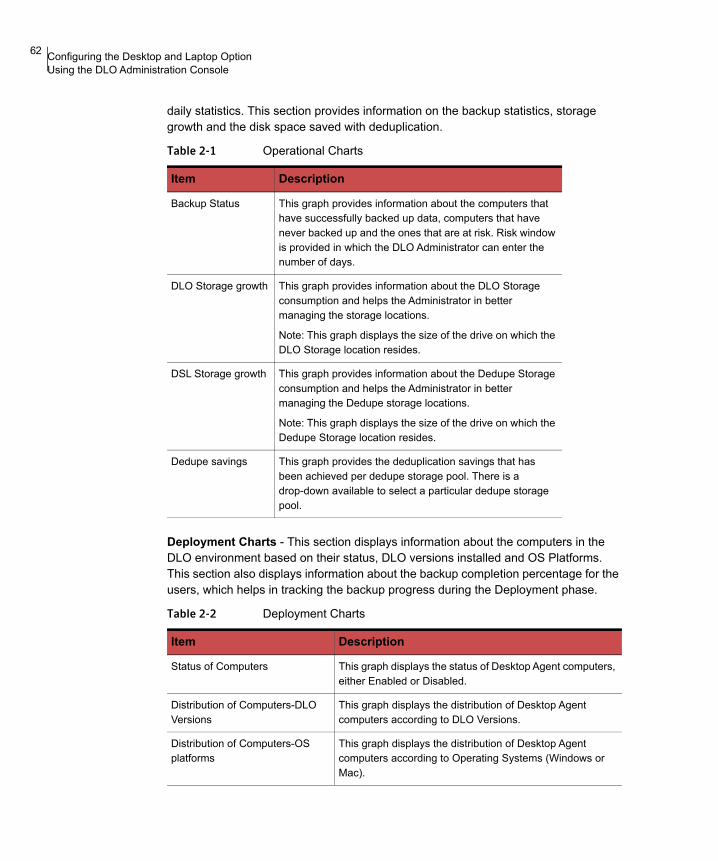
62 Configuring the Desktop and Laptop OptionUsing the DLO Administration Console
daily statistics. This section provides information on the backup statistics, storage growth and the disk space saved with deduplication.
Deployment Charts - This section displays information about the computers in the DLO environment based on their status, DLO versions installed and OS Platforms. This section also displays information about the backup completion percentage for the users, which helps in tracking the backup progress during the Deployment phase.
Table 2-1 Operational Charts
Item Description
Backup Status This graph provides information about the computers that have successfully backed up data, computers that have never backed up and the ones that are at risk. Risk window is provided in which the DLO Administrator can enter the number of days.
DLO Storage growth This graph provides information about the DLO Storage consumption and helps the Administrator in better managing the storage locations.
Note: This graph displays the size of the drive on which the DLO Storage location resides.
DSL Storage growth This graph provides information about the Dedupe Storage consumption and helps the Administrator in better managing the Dedupe storage locations.
Note: This graph displays the size of the drive on which the Dedupe Storage location resides.
Dedupe savings This graph provides the deduplication savings that has been achieved per dedupe storage pool. There is a drop-down available to select a particular dedupe storage pool.
Table 2-2 Deployment Charts
Item Description
Status of Computers This graph displays the status of Desktop Agent computers, either Enabled or Disabled.
Distribution of Computers-DLO Versions
This graph displays the distribution of Desktop Agent computers according to DLO Versions.
Distribution of Computers-OS platforms
This graph displays the distribution of Desktop Agent computers according to Operating Systems (Windows or Mac).

63Configuring the Desktop and Laptop OptionUsing the DLO Administration Console
Capacity Planning Charts - This section consists of graphs that provide information on the users and can be used by the Administrator for capacity planning and user management related activities. The section has graphs related to the Status of Users, OS Platforms used by the users and Profile wise distribution of the users.
The table below shows the information available in the System Summary view.
Backup Completion Status-Users This graph displays the percentage of backup completed, for the users according to the selected profile.
By default, this graph displays the Backup Completion percentage for all users.
Table 2-3 Capacity Planning Charts
Item Description
Status of Users This graph displays the status and count of users.
Distribution of Users-OS platforms
This graph displays the distribution of users according to their OS platforms. This helps the Administrator in determining the platform specific issues, count of users backing up their data from Mac, Windows, on both OS and not configured users.
Distribution of Users-Profiles This graph displays the distribution of users based on the assigned profiles.
Table 2-4 DLO System Summary Options
Item Description
System Summary
No. of Devices Displays the number of computers configured.
No. of Users Displays the number of users configured.
Server Status Lists the status of each DLO Server components.
Status can be Running, Stopped, or Could not get status.
DLO Administration Server
Displays the status of the DLO Administration Server.
Table 2-2 Deployment Charts
Item Description

64 Configuring the Desktop and Laptop OptionUsing the DLO Administration Console
Dedupe Server Displays the status of the Dedupe Server.
SQL Server Displays the status of the SQL Server.
Maintenance Server Displays the status of the Maintenance Server.
Edge Server Displays the status of the Edge Server.
IO Server Displays the status of the IO Server.
Table 2-4 DLO System Summary Options
Item Description
65Configuring the Desktop and Laptop OptionConfiguring DLO
Configuring DLOFor DLO to back up user data, you must set up these options in the following order:
1 Add Dedupe Server, configure the Dedupe Storage Pools and Dedupe Storage Locations. For more information, see “Adding Dedupe Server” on page 66.
2 Create a profile, which determines what files are backed up, when the files are backed up, and the level of interaction the desktop user has with the Desktop Agent. For more information, see “About DLO Profiles” on page 77.
3 Create DLO Storage Locations where user data will be stored on the network. An individual user data folder on the network is required for each desktop user. For more information, see “About Automated User Assignments” on page 123 and “Managing Desktop Agent Users” on page 151.
4 Create an Automated User Assignment to automatically assign a DLO Storage Location and profile to new users, or configure new users manually. For more information, see “About Automated User Assignments” on page 123.
Configuring DLO Using the Configuration WizardYou can set up DLO by using the configuration wizard or by setting options manually. The DLO configuration wizard provides a series of wizards that help you set up DLO in the correct order.
To access the configuration wizard1 On the DLO navigation bar, click Setup.
2 On the Task pane under Getting Started, select DLO Configuration using wizard.
3 If you want the Configuration Wizard to display each time the DLO Administration Console is started, select Always show this wizard at startup check box.
66 Configuring the Desktop and Laptop OptionConfiguring Dedupe Server
Configuring Dedupe Server Configure the Dedupe Server in the following order: 1 Add the Dedupe Server to the DLO Administration Server using the DLO Admin
Console. For more information, see “Adding Dedupe Server” on page 66.
2 Create Dedupe Storage Pools. For more information, see “Adding Dedupe Storage Pool” on page 68.
3 Create Dedupe Storage Locations. For more information, see “Adding a Dedupe Storage Location” on page 69.
4 Assign the Dedupe Storage Locations to an existing or a newly created DLO Storage Location. For more information, see “Creating DLO Storage Locations” on page 99.
5 Create a Dedupe Enabled Profile. For more information, see “Creating a New Profile” on page 77.
6 Assign the Dedupe Enabled Profile and DLO Storage Location to the user.
Adding Dedupe ServerTo add a Dedupe Server1 Launch the Veritas DLO Administration Console.
2 On the DLO navigation bar, click Setup.
3 In the Settings pane, right-click Dedupe Server, and select New Dedupe Server or New Dedupe Server using Wizard.-or-In the Task pane, under Setting Tasks, click New Dedupe Server or New Dedupe Server using Wizard.

67Configuring the Desktop and Laptop OptionConfiguring Dedupe Server
The Add Dedupe Server window appears.
4 Enter the following details:
5 Click OK.
Field Description
Name Enter a name for the Dedupe Server. This is just for identification purpose.
Description Enter a description to identify the Dedupe Server.
Server Host Name/IP Enter the host name or IP address where the Dedupe Server is installed.
HTTP Port Enter the HTTP port number of the Dedupe Server host. This port will be used by the DLO components to connect to the Dedupe Server. Default value is 8080.
HTTPS Port Enter the HTTPS port number of the Dedupe Server host. This port will be used by the DLO components to connect to the Dedupe Server. Default value is 8443.

68 Configuring the Desktop and Laptop OptionConfiguring Dedupe Server
Note: After adding Dedupe Server, you can verify the status of the Dedupe Server. Type the following URLs in your browser.http://<dedupeserver_ip_or_hostname>:8080 https://<dedupeserver_ip_or_hostname>:8443If the Dedupe Server is active, then the following message is displayed: Dedupe Server Status: (20159) Active. If there is no response from Dedupe Server, then it indicates that the Dedupe Server is not initialized, and one of the reasons could be that the database connection is down.
Adding Dedupe Storage PoolDedupe Storage Pool is a group of Dedupe Storage Locations across which deduplication is performed.
To add a new Dedupe Storage Pool1 On the DLO navigation bar, click Setup.
2 In the Settings pane, double-click the Dedupe Server. The name of the Dedupe Server is displayed.
3 Right-click the Dedupe Server name and select Manage.
4 On the Dedupe Storage Pool tab, click Add.
5 In the Add Dedupe Storage Pool window, enter the Name and Description for the Dedupe Storage Pool.
Note: The name of the Dedupe Storage Pool is just a logical name used to identify the group of Dedupe Storage Locations.
6 Click Add.The Dedupe Storage Pool is created and a confirmation message appears.

69Configuring the Desktop and Laptop OptionConfiguring Dedupe Server
Adding a Dedupe Storage LocationThe administrator defines an ID to identify the Dedupe Storage Locations. Multiple Dedupe Storage Locations cannot refer to the same DLO Storage Location. Multiple user groups can use the same Dedupe Storage Locations. For more information, see “About Dedupe Storage Locations” on page 95.
To add a Dedupe Storage Location1 On the DLO navigation bar, click Setup.
2 In the Settings pane, double-click the Dedupe Server. The name of the Dedupe Server is displayed.
3 Right-click the Dedupe Server name and select Manage.
4 By default, the Dedupe Storage Pool tab is selected.
5 Click the Dedupe Storage Location tab.
6 Click Add.
7 In the Add Dedupe Storage Location dialog, enter the following details:
Field Description
Name Enter a name for the Dedupe Storage Location. Ensure that the name does not contain any special characters, including blank space.
Description Enter the description to identify this Dedupe Storage Location.
Encryption Type Select the encryption type from the drop-down list. AES_256 is recommended. This encryption algorithm is to used to encrypt the data in the Dedupe Storage Locations.
Enable Compression This option is selected by default. Clear the check box to disable compression. If enabled, data in the Dedupe Storage Locations will be stored in compressed format.
70 Configuring the Desktop and Laptop OptionConfiguring Dedupe Server
8 Click Add.A confirmation message appears, indicating that the Dedupe Storage Location is created successfully.
Note: After configuring the Dedupe Server, creating Dedupe Storage Pools and Dedupe Storage Locations, you can create new DLO Storage Locations and assign these Dedupe Storage Locations. For existing DLO Storage Locations, you should first assign the specific Dedupe Storage Locations and then enable Dedupe for that profile. For more information, see “Creating DLO Storage Locations” on page 99.
Modifying Dedupe ServerYou may want to change the port numbers of the Dedupe Server, or when the Dedupe Server is not working, you need to set up another Dedupe Server. In such cases, modify the configuration details of the Dedupe Server.
To modify the Dedupe Server1 On the DLO navigation bar, click Setup.
Path Enter the path of the existing shared folder or click Browse and locate the required folder. Make sure that the user creating the Dedupe Storage Location has full control to the folder and subfolders of this shared folder.
To set the permissions:
1 Right-click the shared folder and select Properties.
2 Click the Sharing and Security tabs, and provide the permissions.
You can also create a shared folder as follows:■ Click the ‘+’ icon.■ Enter the computer name and folder path or click Browse to
locate the computer and folder.■ Click Create.
Note: This path should not be the same as the NUDF folder path of the DLO Storage Location. For more information, see “About Dedupe Storage Locations” on page 95.
User Name Enter the name of the domain user who has read-write (RW) access to the shared folder. This user name has to be a non- administrator account. Type the name in this format: DomainName\UserName
Password Enter the password.
Field Description

71Configuring the Desktop and Laptop OptionConfiguring Dedupe Server
2 In the Settings pane, double-click the Dedupe Server. The name of the Dedupe Server is displayed.
3 Right-click the Dedupe Server name and select Edit.
4 Change the details as required.
5 Click OK.
Modifying Dedupe Storage PoolYou can modify the properties of a Dedupe Storage Pool only when the Dedupe Server is in maintenance mode. Backup and restore jobs will stop during the maintenance period.
To modify a Dedupe Storage Pool1 On the DLO navigation bar, click Setup.
2 In the Settings pane, double-click the Dedupe Server. The name of the Dedupe Server is displayed.
3 Right-click the Dedupe Server name and select Manage.
4 Click the System tab.
5 To set the maintenance schedule, enter the time in the Timeout field.
6 Click Start.
7 On the Dedupe Storage Pool tab, select the specific row from the list and click Modify.
8 Change the properties as required.
9 Click Modify.The properties of the Dedupe Storage Pool are updated.
Viewing Dedupe Storage Pool StatisticsDedupe Storage Pool statistics is updated only when the Agent is online. When the Agent is launched, the statistics computation will start after one minute. From then onwards, the statistics is calculated every hour but updated only when the Agent is idle.
To view the Dedupe Storage Pool statistics1 Follow steps 1 to 3 as explained in the section “Modifying Dedupe Storage Pool”
on page 71.
2 On the Dedupe Storage Pool tab, select the specific row.

72 Configuring the Desktop and Laptop OptionConfiguring Dedupe Server
3 Click Statistics to view the details such as total data size, storage space used on the disk, and the deduplication savings.
Modifying a Dedupe Storage LocationYou can modify the properties of a Dedupe Storage Location only when the Dedupe Server is in maintenance mode. Backup and restore jobs will stop during the maintenance period.
Note: You can change the storage path for a Dedupe Storage Location. After changing the path, you should move all the data in the previous path to the new storage path.
To modify a Dedupe Storage Location1 On the DLO navigation bar, click Setup.
2 In the Settings pane, double-click the Dedupe Server.The name of the Dedupe Server is displayed.
3 Right-click the Dedupe Server name and select Manage.
4 Click the System tab.
5 To set the maintenance schedule, enter the time in the Timeout field.
6 Click Start.
7 On the Dedupe Storage Location tab, select the specific row from the list.
8 Click Modify.
9 In the Modify Dedupe Storage Location dialog, change the required values.
10 Click Modify.The properties of the Dedupe Storage Location are updated.
Changing CredentialsYou should change the credentials when the password used to create the Dedupe Storage Location has been changed, or when the user account has expired.
To change the credentials of users1 On the DLO navigation bar, click Setup.
2 In the Settings pane, double-click the Dedupe Server.The name of the Dedupe Server is displayed.
3 Right-click the Dedupe Server name and select Manage.
4 Click the System tab.
5 To set the maintenance schedule, enter the time in the Timeout field.

73Configuring the Desktop and Laptop OptionConfiguring Dedupe Server
6 Click Start.
7 On the Dedupe Storage Location tab, click Change Credentials.
8 Change the user name and password.Click OK.
Deleting a Dedupe Storage LocationYou can delete the Dedupe Storage Location only when the Dedupe Server is in maintenance mode. Backup and restore jobs will stop during the maintenance period. Before deleting the Dedupe Storage Location, make sure to run the Garbage Collection tool to clean and reclaim the storage space used by unwanted data. For more information, see “Garbage Collection Utility” on page 327.
Note: As long as the Dedupe Storage Location is active (listed in the DLO Administration Console), the administrator should not delete any data in the Dedupe Storage Location. Deleting this data will lead to corrupted backups for the users of the Dedupe Storage Pool to which this Dedupe Storage Location belongs. One of the scenarios where the administrator would delete the data in the Dedupe Storage Location is when a specific user is deleted or migrated to some other Dedupe Storage Pool. Even in this scenario, the administrator should not delete the data within the Dedupe Storage Location.
Note: A Dedupe Storage Location cannot be deleted if it is being used by any of the DLO Storage Locations.
To delete a Dedupe Storage Location1 On the DLO navigation bar, click Setup.
2 In the Settings pane, double-click the Dedupe Server. The name of the Dedupe Server is displayed.
3 Right-click the Dedupe Server name and select Manage.
4 Click the System tab.
5 To set the maintenance schedule, enter the time in the Timeout field.
6 Click Start.
7 On the Dedupe Storage Location tab, select the specific row from the list.
8 Click Delete.
9 In the confirmation dialog, click Yes.The Dedupe Storage Location is deleted.

74 Configuring the Desktop and Laptop OptionConfiguring Dedupe Server
Deleting Dedupe ServerWhile deleting the Dedupe Server, ensure that the Dedupe Storage Location is not associated with any DLO Storage Location.
1 On the DLO navigation bar, click Setup.
2 In the Settings pane, double-click the Dedupe Server. The name of the Dedupe Server is displayed.
3 Right-click the Dedupe Server name and select Delete.
4 A confirmation prompt appears, asking you to confirm the delete operation.
5 Click Yes.The Dedupe Server is deleted from the DLO configuration.
Dedupe Server MaintenanceThe administrator can modify the properties of the Dedupe components only when the Dedupe Server is in the maintenance mode. The administrator can perform configuration changes, maintenance operations, and add new administration users.
Note: Backup or restore operations cannot be performed during the maintenance mode.
To set the maintenance schedule1 On the DLO navigation bar, click Setup.
2 In the Settings pane, double-click the Dedupe Server.The name of the Dedupe Server is displayed.
3 Right-click the Dedupe Server name and select Manage.

75Configuring the Desktop and Laptop OptionConfiguring Dedupe Server
4 Click the System tab.
5 To set the maintenance schedule, enter the time in the Timeout field.
6 Click Start.
7 Enable HTTP communication with server for faster backup: Select this check box if required, and click Save.
8 To add admin users, click Add.
9 In the Add Admin Users window, enter the user name in this format: domain name\user name.
10 Click Add.A confirmation message appears, indicating that the operation is successful.In some cases, the following message appears: “Dedupe Server is busy with other maintenance task. Do you want to force start the maintenance window?”Click Yes to force start the maintenance window.
Command Line Option to Schedule Maintenance WindowYou can use the DdAdminCU.exe command to schedule, stop, or check the status of a Maintenance window.

76 Configuring the Desktop and Laptop OptionConfiguring Dedupe Server
SyntaxSchedule the Maintenance WindowDdAdminCU.exe -ScheduleMaintenance |-SCM <Server Name> <HTTPS PortNumber> <Maintenance Timeout Value> [-i]Stop Maintenance WindowDdAdminCU.exe -StopMaintenance |-STM <Server Name> <HTTPS PortNumber> [-i]Check the status of Maintenance WindowDdAdminCU.exe -IsMaintenanceActive |-IMA <Server Name> |<HTTPS PortNumber> [-i]Add Admin UsersDdAdminCU.exe -AddUser |-AU <Server Name> |<HTTPS PortNumber> <DomainName\UserName>[-i]
Command Options
Table 2-5 Command Options
Option Description
-ScheduleMaintenance |-SCM Schedules the Maintenance Window.
<Server Name> IP address or name of the machine where Dedupe Server is installed.
<HTTPS Port Number> Port Number of the Dedupe Server. Default: 8443
<Maintenance Timeout Value> Duration of the schedule. Default: 9999 minutes
-StopMaintenance|-STM Stops the Maintenance Window.
-IsMaintenanceActive|-IMA Checks the status of the Maintenance Window.
-AddUser Adds an admin user.
-i The command is run in interactive mode.
Default: silent mode
77Configuring the Desktop and Laptop OptionAbout DLO Profiles
About DLO ProfilesProfiles are used to customize settings for specific groups of similar users. For example, a group of highly technical users may require the option to modify the backup selections and schedules while less experienced users may require a fully automated backup service. In a profile, you can set the following:
■ Backup file and folder selections
■ Desktop and network user data folder storage limits
■ Backup schedules
■ The desktop user’s level of interaction with the Desktop Agent
■ Logging options
■ Network bandwidth usage options for backup and restore operations
■ Dedupe backup
■ Rollback window configurationThe following profile settings are not supported for Mac computers:
■ Dedupe backup
■ Backup of Outlook and Lotus Notes files, including incremental and VSS backup of such files, MAPI and non-MAPI files
■ Throttling feature
■ Connection policies
■ Rollback window configurationThe administrator cannot modify settings for individual Desktop Agent users from the DLO Administration Console unless an individual user is the only user assigned to a profile. However, the administrator can grant permission to Desktop Agent users to modify their own settings.
Creating a New ProfileNew profiles can be created to meet the specific needs of desktop users, and to support the existing IT environment.
To create a new profile1 On the DLO navigation bar, click Setup.
2 Select one of the following options to create a new profile:
a In the Tasks pane, under Settings Tasks, click New profile, or New profile using wizard.

78 Configuring the Desktop and Laptop OptionAbout DLO Profiles
b In the Settings pane, right-click Profile and select New Profile or New profile using wizard.
3 On the General tab in the New Profile dialog box, select the appropriate options. Table 2-6 describes the fields.
Table 2-6 General Profile Properties
Item Description
Profile Name Type the name of the new profile that you want to create. The profile name cannot contain any of the following characters: \”@#$%^&*()=+|/{}[]’
Description Type a description for the profile.
Enable Profile Profiles are enabled by default. To disable the profile, clear this check box.
Enable Dedupe This option is selected by default.
Note: When Dedupe is enabled, all deduped backups are handled by the Dedupe engine, and data is stored in the Dedupe Storage Locations. In case you have already created a profile, you can enable Dedupe when you choose to modify the profile.
Note: When Dedupe is enabled, DLO-based Encryption or Compression option cannot be configured for this profile. However, Dedupe-based encryption and compression will be applicable to the data.
Note: To enable Dedupe backup for a profile, the Dedupe Server must be installed and added to the DLO configuration. Otherwise, the Enable Dedupe option is disabled in the Profile Properties window. For more information, see “Configuring Dedupe Server” on page 66.
Enable BOI This option is not selected by default.
Note: When this option is enabled, backups continue using the available internet connection in case Desktop Agent goes outside the corporate network. For more information, see “Configuring DLO to Backup Files Over Internet” on page 141.

79Configuring the Desktop and Laptop OptionAbout DLO Profiles
VIP Profile Select this check box to create a VIP profile. This feature restricts the administrator from viewing and restoring data backed up by users (such as CEO, executives, directors, officers) belonging to the VIP profile.
Note: The administrator should create a new profile and enable this option. Enabling this option will ignore Global Excludes for compressed files, encrypted files, and delta file transfers.
Restoring VIP user data■ The administrator can restore the data to an alternate computer
through the DLO Administration console by using the VIP user credentials.
Note: VIP user credentials are not required if the data is being restored to the original computer.
■ In case the VIP user leaves the organization and the user account has been deleted from the Active Directory, the administrator can restore the VIP user’s data by adding the user back to the Active Directory and restoring the data from the DLO Console.
■ For Non VIP users, who have left the organization and the user account is deleted from the Active Directory, the administrator can directly restore the data from the DLO Console and need not add the user back to the Active Directory.
Storage Limits
Limit network user data folder to (MB)
Limits the disk space available on the network to store DLO backup files and type the amount of space you want to use for storage.
There are two options available:
Machine level: Select this option to enable machine level storage limit.
The storage limit set in the profile is available to a user for backing up data from multiple computers.
User level: Select this option to enable user level storage limit.
The storage limit set in the profile is available as a whole for a particular user even when data is backed up from multiple computers.
Table 2-6 General Profile Properties (continued)
Item Description
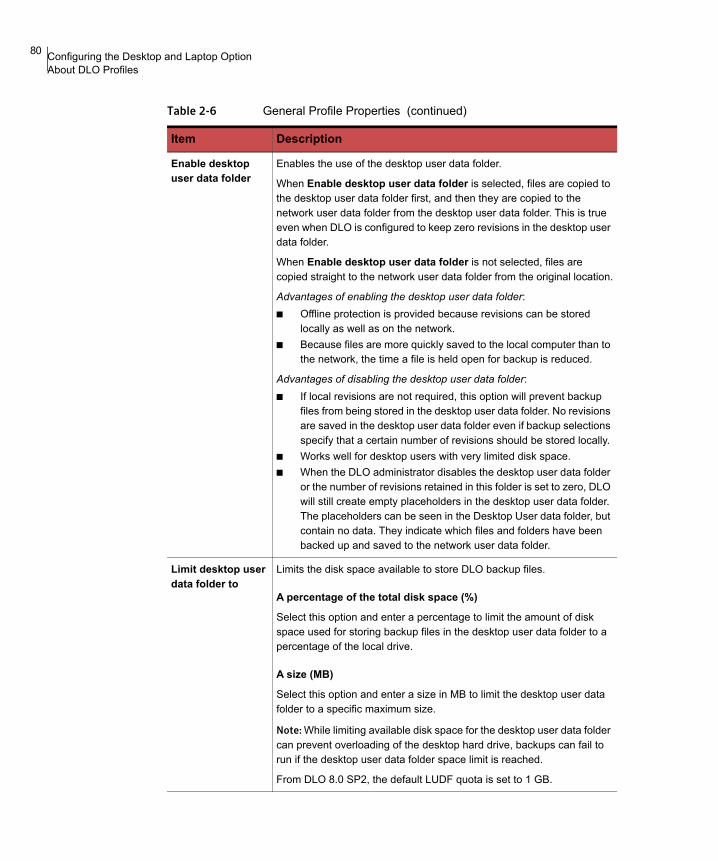
80 Configuring the Desktop and Laptop OptionAbout DLO Profiles
Enable desktop user data folder
Enables the use of the desktop user data folder.
When Enable desktop user data folder is selected, files are copied to the desktop user data folder first, and then they are copied to the network user data folder from the desktop user data folder. This is true even when DLO is configured to keep zero revisions in the desktop user data folder.
When Enable desktop user data folder is not selected, files are copied straight to the network user data folder from the original location.
Advantages of enabling the desktop user data folder:■ Offline protection is provided because revisions can be stored
locally as well as on the network.■ Because files are more quickly saved to the local computer than to
the network, the time a file is held open for backup is reduced.
Advantages of disabling the desktop user data folder:■ If local revisions are not required, this option will prevent backup
files from being stored in the desktop user data folder. No revisions are saved in the desktop user data folder even if backup selections specify that a certain number of revisions should be stored locally.
■ Works well for desktop users with very limited disk space.■ When the DLO administrator disables the desktop user data folder
or the number of revisions retained in this folder is set to zero, DLO will still create empty placeholders in the desktop user data folder. The placeholders can be seen in the Desktop User data folder, but contain no data. They indicate which files and folders have been backed up and saved to the network user data folder.
Limit desktop user data folder to
Limits the disk space available to store DLO backup files.
A percentage of the total disk space (%)
Select this option and enter a percentage to limit the amount of disk space used for storing backup files in the desktop user data folder to a percentage of the local drive.
A size (MB)
Select this option and enter a size in MB to limit the desktop user data folder to a specific maximum size.
Note: While limiting available disk space for the desktop user data folder can prevent overloading of the desktop hard drive, backups can fail to run if the desktop user data folder space limit is reached.
From DLO 8.0 SP2, the default LUDF quota is set to 1 GB.
Table 2-6 General Profile Properties (continued)
Item Description

81Configuring the Desktop and Laptop OptionAbout DLO Profiles
Note: These options are disabled if no Agents with DLO versions prior to 6.1 MP3 are registered.
4 On the Backup Throttling tab, click the Basic Throttling tab. Select the appropriate options as described in Table 2-7.
My Default Desktop User Data Folder Path
The default desktop user data folder path is the user’s local application data path. To override this location for Agents, select the Override default desktop user data folder path check box, and type the new path.
Rollback Restore
Configure Rollback Window
Select this check box and enter a certain number of days in the Keep revision files for past _ days, to maintain the latest revision of the respective days in the network user data folder.
The default retention period is 10 days. The minimum is 2 days and maximum retention period is 99 days.
Table 2-7 Basic Throttling Profile Properties
Item Description
Limit network bandwidth usage to (KB/sec)
Limiting the bandwidth for DLO data transfer is a means to manage the trade-off between backup speed vs. the impact of backups on the local computer, network, and server. The default limit is meant to be a conservative setting to minimize the impact of backups, but many factors are considered such as network speed, connection type, the amount of data backed up and the total number of computers backing up to DLO.
If computer performance is not impacted, but DLO data transfer is slow, a higher bandwidth setting may be more suitable. If computer performance is noticeably impacted during backups, a lower value will reduce the impact of backups on computer performance, but backups will take more time to complete.
Select the Limit network bandwidth usage to (KB/sec) check box, and enter a specific maximum bandwidth setting to control the rate at which data is sent to the network user data folder.
Data transfer is only limited when data is written to the network user data folder, not when it is written to the desktop user data folder. Data transfer is not limited during the incremental backup of Outlook PST files or Lotus Notes NSF files.
Table 2-6 General Profile Properties (continued)
Item Description

82 Configuring the Desktop and Laptop OptionAbout DLO Profiles
5 On the Backup Throttling tab, click the Enhanced Throttling tab.
6 Select the appropriate options for each of the three network bandwidth categories: Low bandwidth setting, Medium bandwidth setting, and High bandwidth setting.
Yield bandwidth to other programs
Enables DLO to reduce data transfer over the network when other applications on the desktop computer are transferring data. DLO automatically resumes normal data transfer rates when other applications are not using this resource.
The yield bandwidth option monitors network traffic on the desktop computer. If DLO is using more than 90% of the total current traffic, DLO is not throttled. When DLO traffic drops below 90% of the total network traffic on the desktop, and total traffic is over 60% of the maximum traffic seen on the connection, then DLO throttles itself to use only the otherwise unused portion of the connection. For example, if there was 70% total usage, DLO will throttle itself to 30% of maximum.
Note: Selecting this option can improve system performance when other network-intensive applications are running at the same time. Data transfer is only limited when data is written to the network user data folder, not when it is written to the desktop user data folder.
Table 2-8 Enhanced Throttling Properties for Bandwidth on Backups
Item Description
Bandwidth range Enter a bandwidth range for this category in KB/sec.
No network throttling Select this option to disable all network throttling for this category.
Limit network bandwidth usage to
Select this option and then select a specific percent of available network bandwidth to control the rate at which data is sent to the network user data folder.
This is applicable even in the WAN environment where DLO Desktop Agents are distributed.
Limit network bandwidth statically
Table 2-7 Basic Throttling Profile Properties (continued)
Item Description

83Configuring the Desktop and Laptop OptionAbout DLO Profiles
7 On the Restore Throttling tab, select the appropriate options for each of the three network bandwidth categories: Low bandwidth setting, Medium bandwidth setting, and High bandwidth setting.
Limit usage to Select this option and enter a specific maximum bandwidth setting (in KB/sec) to control the rate at which data is sent to the network user data folder.
Data transfer is only limited when data is written to the network user data folder, not when it is written to the desktop user data folder. Data transfer is not limited during the incremental backup of Outlook PST files or Lotus Notes NSF files.
Yield bandwidth to other programs
This option enables DLO to reduce data transfer over the network when other applications on the desktop computer are transferring data. DLO resumes normal data transfer rates when other applications are not using this resource.
Disable network backup
Select this option to not use the network for backups.
This option is generally used for the low bandwidth network category. When network backups are disabled, files do not get backed up to the network user data folder. However, backups to the local user data folder still occur.
Alert administrator if available bandwidth falls below specified value
This check box is enabled when you select the Limit network bandwidth usage to option. Enter a value (in KB/sec) so that when the bandwidth falls below this value, an alert is sent to the administrator.
Suspend backup and alert administrator on throttling failure
This check box is enabled when you select the Limit network bandwidth usage to option or the Limit network bandwidth statically option.
Select this check box to suspend the backup and alert the administrator on throttling failure.
Table 2-9 Restore Throttling Properties
Item Description
Bandwidth range Enter a bandwidth range for this category in KB/sec.
No network throttling
Select this option to disable all network throttling for this category.
Table 2-8 Enhanced Throttling Properties for Bandwidth on Backups
Item Description
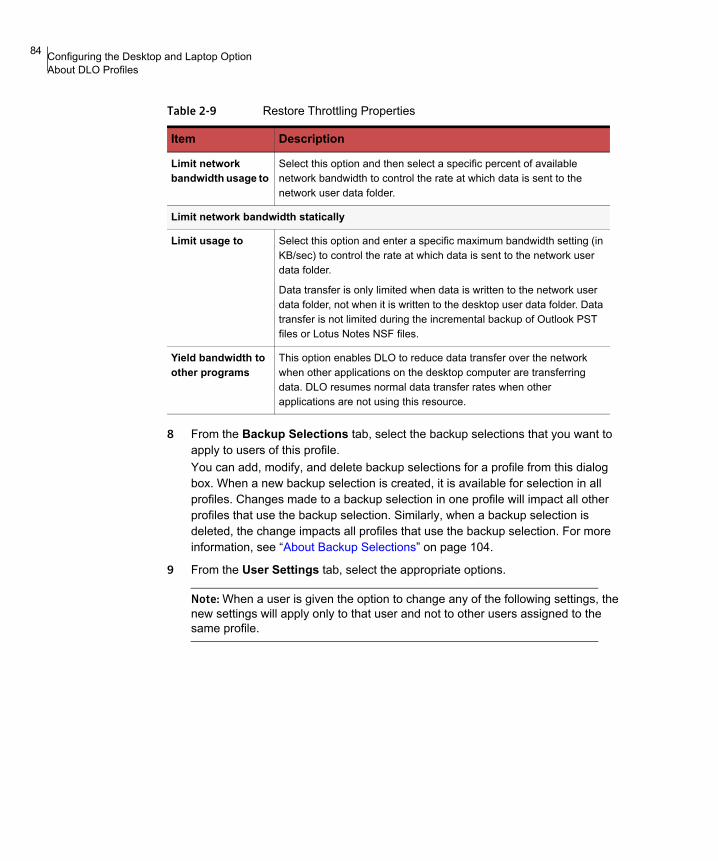
84 Configuring the Desktop and Laptop OptionAbout DLO Profiles
8 From the Backup Selections tab, select the backup selections that you want to apply to users of this profile.You can add, modify, and delete backup selections for a profile from this dialog box. When a new backup selection is created, it is available for selection in all profiles. Changes made to a backup selection in one profile will impact all other profiles that use the backup selection. Similarly, when a backup selection is deleted, the change impacts all profiles that use the backup selection. For more information, see “About Backup Selections” on page 104.
9 From the User Settings tab, select the appropriate options.
Note: When a user is given the option to change any of the following settings, the new settings will apply only to that user and not to other users assigned to the same profile.
Limit network bandwidth usage to
Select this option and then select a specific percent of available network bandwidth to control the rate at which data is sent to the network user data folder.
Limit network bandwidth statically
Limit usage to Select this option and enter a specific maximum bandwidth setting (in KB/sec) to control the rate at which data is sent to the network user data folder.
Data transfer is only limited when data is written to the network user data folder, not when it is written to the desktop user data folder. Data transfer is not limited during the incremental backup of Outlook PST files or Lotus Notes NSF files.
Yield bandwidth to other programs
This option enables DLO to reduce data transfer over the network when other applications on the desktop computer are transferring data. DLO resumes normal data transfer rates when other applications are not using this resource.
Table 2-9 Restore Throttling Properties
Item Description

85Configuring the Desktop and Laptop OptionAbout DLO Profiles
Table 2-10 describes the options.
Table 2-10 Profile User Settings Options
Item Description
Desktop Agent display settings
Select one of the following options to determine the desktop user’s level of interaction with the Desktop Agent:■ Display the complete interface: Select this option to enable
desktop users to access all Desktop Agent options.■ Display only the status: Select this option to enable desktop
users to view the status of backup jobs. With this option, desktop users cannot change settings for the Desktop Agent or access any options other than the status. Desktop users can right-click the system tray icon to open the status view or exit the program.
■ Display only the system tray icon: Select this option to display the Desktop Agent icon in the system tray in the lower right corner of the screen. Desktop users can right-click the system tray icon to exit the program.
■ Do not display anything: Select this option to run the Desktop Agent in the background. The desktop user cannot view the Desktop Agent.
Allow Users to Select the options below to enable desktop users to configure the following features of the Desktop Agent. These options are only available if Display the complete interface was selected above.
Restore Data When selected, users in this profile can restore their backed up files.
For more information, see “Restoring Files Using the Desktop Agent” on page 255.
Add user-defined backup selections
Enables users in this profile to create and modify backup selections. This option does not allow users to modify backup selections made by the DLO administrator in the profile.
Note: With this option selected, users can add a backup selection that will back up a folder, which is excluded from the profile backup selections. The only way to prevent users in a profile from backing up a specific folder is to not select this option.
For more information, “Modifying Backup Selections in the Standard View” on page 231 or “Modifying Backup Selections in the Advanced View” on page 238.
Modify profile backup selections
Enables users in this profile to modify backup selections created by the DLO administrator for the profile.

86 Configuring the Desktop and Laptop OptionAbout DLO Profiles
Customize backup selection revision policy settings
Enables users in this profile to modify the revision policy settings. Users cannot change these settings if this option is not selected. For more information, see “Backup Selection - Revision Control Tab” on page 235.
Change backup selection encryption settings
Enables users in this profile to choose encryption of backup files. For more information, see “Backup Selection Options” on page 112.
Change backup selection compression settings
Enables users in this profile to choose compression of backup files. For more information, see “Backup Selection Options” on page 112.
Change backup selection delta settings
Enables users in this profile to choose delta file transfer of backup files. For more information, see “Backup Selection Options” on page 112.
View network user data folder path
Enables users to view the network user data folder path.
Remove deleted files Enables users to remove deleted files from the Agent computer.
Customize profile logging settings
Enables users in this profile to customize profile logging settings.
For more information, see “Setting Customized Options” on page 249.
Customize profile e-mail settings
Enables users in this profile to customize mail settings in the profile. For more information, see “Setting Customized Options” on page 249.
Move local user data folder
Enables users in this profile to move the local user data folder to a new location. For more information, see “Moving the Desktop User Data Folder” on page 251.
Change groom policy settings
Enables users in this profile to customize grooming settings.
For more information, see “Setting Customized Options” on page 249.
Synchronize files Enables users in this profile to synchronize data across all their computers that run the Desktop Agent.
For more information, see “Synchronizing Desktop User Data” on page 261.
Mobile/Web Restore When selected, users in this profile can restore their backed up files from DLO Mobile Application and from the Web browser.
Table 2-10 Profile User Settings Options (continued)
Item Description

87Configuring the Desktop and Laptop OptionAbout DLO Profiles
Customize local disk quota
Enables users in this profile to limit the amount of disk space that can be used to store backup files in the desktop user data folder.
For more information, see “Setting Customized Options” on page 249.
Modify backup schedule
Enables users in this profile to modify the schedule on which their files are backed up.
For more information, see “Changing Backup Job Schedule Options” on page 247.
Customize connection policies
Enables users in this profile to customize connected based policies.
For more information, see“Customizing Connection Policies” on page 252.
Cancel scheduled or manual jobs
Enables users in this profile to cancel both scheduled and manually initiated jobs. Scheduled jobs will run again at the next scheduled time. Manual jobs must be restarted manually.
For more information, see “Suspending or Cancelling a Job” on page 244.
Suspend jobs Enables users in this profile to suspend jobs for a specified amount of time. For more information, see “Suspending or Cancelling a Job” on page 244.
Disable Desktop Agent Enables users in this profile to disable the Desktop Agent from the tray icon. They will also have the ability to re-enable the Desktop Agent once it has been disabled.
Work Offline Enables users in this profile to set the Desktop Agent to work offline. For more information, see “Changing your Connection Status” on page 227.
Save encrypted passwords used by DLO
Allows users to automatically authenticate to the media server or storage location in the event of an authentication failure. This could happen, for example, when the desktop user logs in using a local or cross-domain account.
Not selecting this option will cause DLO to prompt the user to enter a password each time DLO authenticates to a DLO resource.
Endpoint Migration Enables you to migrate user data to the new computer when a desktop or laptop user receives a new computer.
Suppress errors and warnings
Prevents error and warning messages from being displayed when a user is not interacting with the Desktop Agent.
Table 2-10 Profile User Settings Options (continued)
Item Description
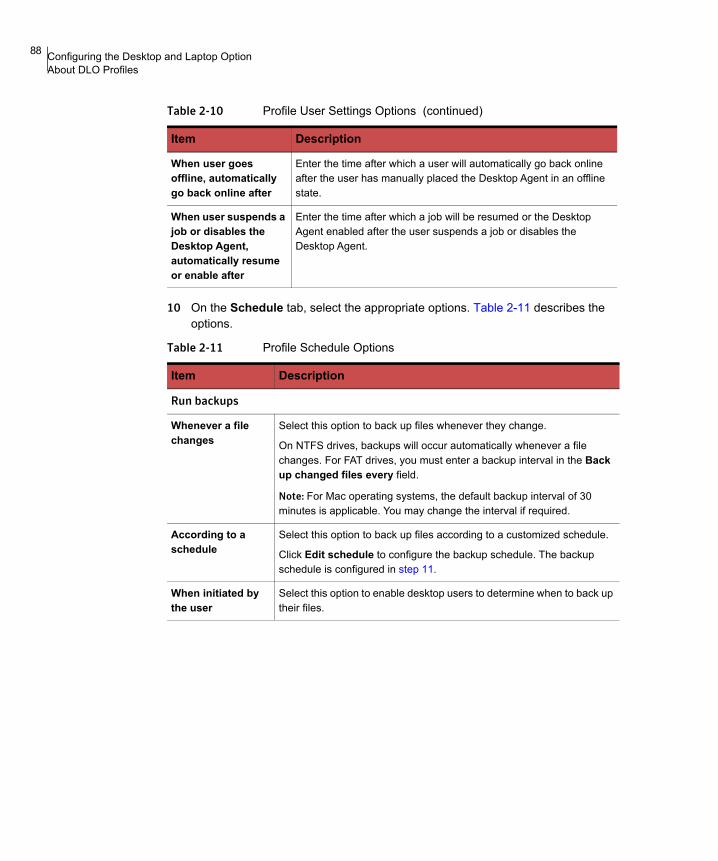
88 Configuring the Desktop and Laptop OptionAbout DLO Profiles
10 On the Schedule tab, select the appropriate options. Table 2-11 describes the options.
When user goes offline, automatically go back online after
Enter the time after which a user will automatically go back online after the user has manually placed the Desktop Agent in an offline state.
When user suspends a job or disables the Desktop Agent, automatically resume or enable after
Enter the time after which a job will be resumed or the Desktop Agent enabled after the user suspends a job or disables the Desktop Agent.
Table 2-11 Profile Schedule Options
Item Description
Run backups
Whenever a file changes
Select this option to back up files whenever they change.
On NTFS drives, backups will occur automatically whenever a file changes. For FAT drives, you must enter a backup interval in the Back up changed files every field.
Note: For Mac operating systems, the default backup interval of 30 minutes is applicable. You may change the interval if required.
According to a schedule
Select this option to back up files according to a customized schedule.
Click Edit schedule to configure the backup schedule. The backup schedule is configured in step 11.
When initiated by the user
Select this option to enable desktop users to determine when to back up their files.
Table 2-10 Profile User Settings Options (continued)
Item Description
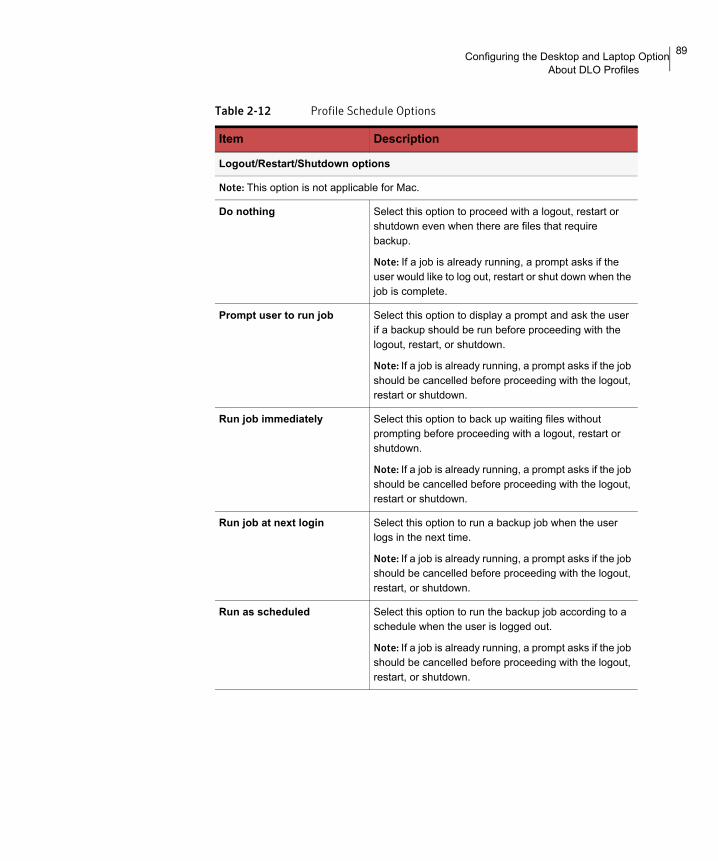
89Configuring the Desktop and Laptop OptionAbout DLO Profiles
Table 2-12 Profile Schedule Options
Item Description
Logout/Restart/Shutdown options
Note: This option is not applicable for Mac.
Do nothing Select this option to proceed with a logout, restart or shutdown even when there are files that require backup.
Note: If a job is already running, a prompt asks if the user would like to log out, restart or shut down when the job is complete.
Prompt user to run job Select this option to display a prompt and ask the user if a backup should be run before proceeding with the logout, restart, or shutdown.
Note: If a job is already running, a prompt asks if the job should be cancelled before proceeding with the logout, restart or shutdown.
Run job immediately Select this option to back up waiting files without prompting before proceeding with a logout, restart or shutdown.
Note: If a job is already running, a prompt asks if the job should be cancelled before proceeding with the logout, restart or shutdown.
Run job at next login Select this option to run a backup job when the user logs in the next time.
Note: If a job is already running, a prompt asks if the job should be cancelled before proceeding with the logout, restart, or shutdown.
Run as scheduled Select this option to run the backup job according to a schedule when the user is logged out.
Note: If a job is already running, a prompt asks if the job should be cancelled before proceeding with the logout, restart, or shutdown.

90 Configuring the Desktop and Laptop OptionAbout DLO Profiles
11 If you selected Edit schedule in the previous step, select the appropriate options, and click OK. Table 2-13 describes the options.
12 Click the Options tab and select the appropriate options.
Note: Events such as file copies, file grooms, errors and warnings are logged by DLO and can be viewed as explained in “Monitoring Alerts on the DLO Administration Console” on page 195.
Table 2-13 Backup Schedule tab options
Item Description
Run on these days Select the days on which you want to back up files.
Run once at Select this option to run a single backup on the days you selected at the time specified.
Run every Select this option to run backups at the specified time interval on the days you selected.
From If you selected Run every, select the beginning of the time interval over which you want backups to begin.
Until If you selected Run every, select the end of the time interval over which you want backups to begin.
Note: This field specifies the end of the time period within which backups will begin. If a backup is in progress at this time, it will continue to run to completion.
Start backup jobs over a period of
Select this option to stagger start times for backup jobs. Rather than starting all backup jobs at exactly the time indicated, DLO will distribute the start times over the specified interval to better distribute the demands on the server and network.
Table 2-14 Additional Profile tab options
Item Description
Log file maintenance
Keep log files for a minimum of (days)
Specify the minimum number of days to keep log files. Log files will not be deleted until they are at least as old as specified.
Note: Log files will not be deleted until their combined size exceeds the setting for the combined size of all log files, which is discussed below.

91Configuring the Desktop and Laptop OptionAbout DLO Profiles
After minimum number of days, delete oldest log files when combined size exceeds (MB)
Enter the maximum combined size of all log files to be retained before the oldest log files are deleted.
Note: You may have more than the specified number of MB of log files stored if none of the log files is as old as specified in the Keep log files for a minimum of (days) setting.
Logging options
Log groom messages Select this check box to create logs for grooming operations.
Log information messages for backup
Select this check box to create logs for all backup operations.
Log warning messages Select this check box to create logs for all operations that generate warnings.
Mail options
Enable message level incremental backups of Outlook PST files
Select this option to enable incremental backups of Microsoft Outlook Personal Folder (PST) files. Incremental backups must be enabled to allow PST files to be backed up while they are open.
If this option is not selected, PST files that are configured in Outlook will be fully backed up each time the PST file is saved, which generally occurs when Outlook is closed.
When Outlook PST files are backed up incrementally, only one revision is maintained despite the number of revisions set in the backup selection.
Note: Microsoft Outlook must be your default mail application for DLO to perform incremental backups of PST files.
Note: Synchronized files cannot be backed up incrementally.
For more information, see “Backing up Outlook PST Files Incrementally” on page 239.
Enable VSS Backups of Outlook PST Files after every 30 minutes
Select this option to enable VSS backups of Microsoft Outlook Personal Folder (PST) files.
Note: This feature is applicable for 6.1 MP5 or later versions of DLO Desktop Agent.
Table 2-14 Additional Profile tab options (continued)
Item Description

92 Configuring the Desktop and Laptop OptionAbout DLO Profiles
13 Click the Connection Policies tab to disable or limit backups for specific connection types. Click Add to create a new connection policy. Table 2-15 describes the options available to configure the policy.
Enable incremental backups of Lotus Notes e-mail files
Select this check box to enable incremental backups of Lotus Notes e-mail files. Additional configuration may be necessary. For more information, see “Backing up Lotus Notes NSF Files Incrementally” on page 241.
When Lotus Notes NSF files are backed up incrementally, only one revision is maintained regardless of the number of revisions set in the backup selection.
Table 2-15 Connection Policies Tab
Item Description
Connection Type
Dialup Select this option to limit or disable backups when using a dialup connection.
IP address range Select this option to limit or disable backups for a specific IP address range.
Specify whether you want the connection policy to apply to computers that are or are not in the IP address range you specify.
Select IPv6 or IPv4 and enter the IP address range for the connection policy.
Active Directory Select this option to limit or disable backups using Active Directory. Select Configure to configure the Active Directory settings. See “Customizing Connection Policies” on page 252 for details on configuring connection policy settings for Active Directory.
Desktop Agent Behavior
Disable network backup Select this option to prevent users from backing up to the network user data folder. Backups will continue to the desktop user data folder.
Disable network backup for files greater than
Select this option to prevent users from backing up files larger than a specified size based on the connection type. Enter a files size in KB.
Table 2-14 Additional Profile tab options (continued)
Item Description
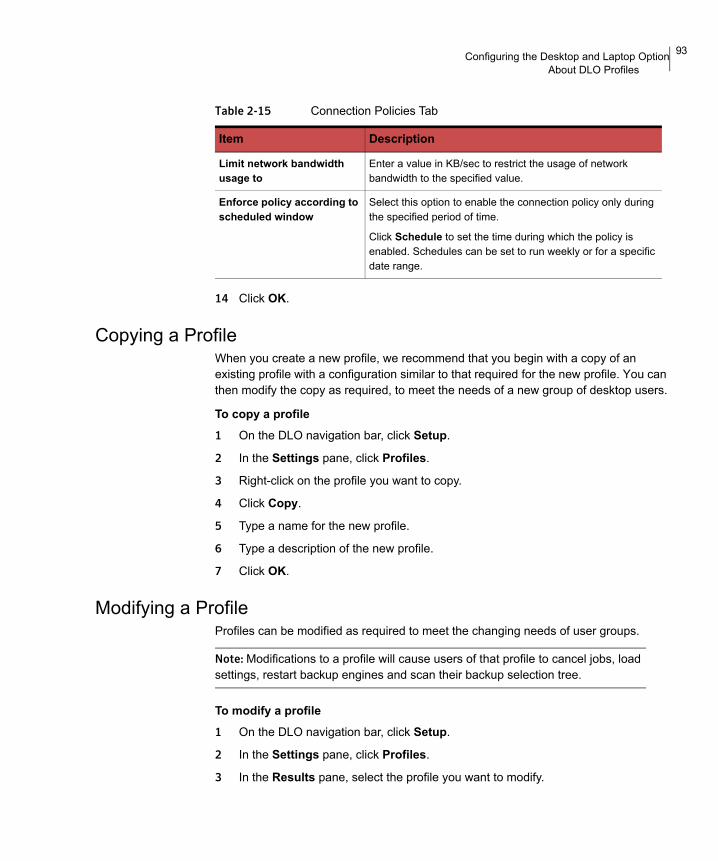
93Configuring the Desktop and Laptop OptionAbout DLO Profiles
14 Click OK.
Copying a ProfileWhen you create a new profile, we recommend that you begin with a copy of an existing profile with a configuration similar to that required for the new profile. You can then modify the copy as required, to meet the needs of a new group of desktop users.
To copy a profile1 On the DLO navigation bar, click Setup.
2 In the Settings pane, click Profiles.
3 Right-click on the profile you want to copy.
4 Click Copy.
5 Type a name for the new profile.
6 Type a description of the new profile.
7 Click OK.
Modifying a ProfileProfiles can be modified as required to meet the changing needs of user groups.
Note: Modifications to a profile will cause users of that profile to cancel jobs, load settings, restart backup engines and scan their backup selection tree.
To modify a profile 1 On the DLO navigation bar, click Setup.
2 In the Settings pane, click Profiles.
3 In the Results pane, select the profile you want to modify.
Limit network bandwidth usage to
Enter a value in KB/sec to restrict the usage of network bandwidth to the specified value.
Enforce policy according to scheduled window
Select this option to enable the connection policy only during the specified period of time.
Click Schedule to set the time during which the policy is enabled. Schedules can be set to run weekly or for a specific date range.
Table 2-15 Connection Policies Tab
Item Description

94 Configuring the Desktop and Laptop OptionAbout DLO Profiles
4 In the Task pane, under General Tasks, click Properties.
5 To enable Dedupe, on the General tab, select the Enable Dedupe check box.
Note: If any of the users associated with this profile uses a DLO Storage Location without Dedupe Storage Location, then the Dedupe option cannot be enabled for those users.
6 Modify the profile properties as needed.
7 Click OK.
Disabling Dedupe for a ProfileIf you disable the Dedupe option for a profile, then DLO manages the backup andrestore operations normally, using the Encryption, Compression, and Delta File Transfer options. Deduped data that was previously backed up can be restored.
In case you want to enable Dedupe again after some days, then the list ofusers associated with this updated profile is checked. If any user has a StorageLocation without a Dedupe Storage Location defined, then a message prompts you to define a Dedupe Storage Location for that specific user.

95Configuring the Desktop and Laptop OptionAbout Dedupe Storage Locations
About Dedupe Storage LocationsThe Dedupe Storage Location is a Common Internet File System (CIFS) network share location where data is stored as part of deduplication process. A logical group of Dedupe Storage Locations across which deduplication is performed is called a Dedupe Storage Pool. Dedupe Storage Locations hold shared data that is common across and is shared by all or a subset of users in the system. So the users pointing to Dedupe Storage Locations (through Storage Location Mapping) in the same Dedupe Storage Pool need to have read/write access to all the Dedupe Storage Locations in the Storage Pool. For security reasons, read/write access to the Dedupe Storage Locations is not granted to all the users even though they need to read and write data from the Dedupe Storage Locations. Instead, while creating the Dedupe Storage Location, the administrator configures a new user account called “Dedupe Storage Location Access Credential”, which will be used by the Desktop Agent to access the Dedupe Storage Location. Hence it is recommended that the administrator specifically creates a low privilege domain user account as “Dedupe Storage Location Access Credential” for accessing the Dedupe Storage Location, and for security reasons. In addition, the administrator should ensure that the password for this user account does not expire frequently. If the password expires, then the administrator should reset the password for the domain user.All types of CIFS network shares supported by DLO Storage Location are supported by Dedupe Storage Locations also.The following are some important facts about Dedupe Storage Locations:
■ The Dedupe Storage Location name has to be unique across groups.
■ The same network share should not be assigned to more than one Dedupe Storage Location.
■ All network shares assigned to Dedupe Storage Locations in a Dedupe Storage Pool should have the same “Dedupe Storage Location Access Credential”.
■ Only the administrator and users with “Dedupe Storage Location Access Credential” account should have access to the network share location used as a Dedupe Storage Location.
■ The “Dedupe Storage Location Access Credential” account should not have administrator rights.
■ The Dedupe Storage Location path should not be the same as the NUDF folder path.

96 Configuring the Desktop and Laptop OptionAbout Dedupe Storage Locations
■ After the Dedupe Storage Location is associated with a DLO Storage Location, and a deduped backup is performed, in case the Dedupe Storage Location should be moved, then make sure to use the -MigrateUserSL command.
■ The Dedupe Storage Location user should have the “Allow log on locally” policy set in the domain controller group policy object. To set this policy, do the following:■ After logging on locally with domain Administrator account, run gpmc.msc
(Group Policy Management).■ Double-click the Domain name.■ Expand <Group Policy Objects> and right-click <Default domain
controllers policy>. ■ Click Edit.■ Expand <Computer Configurations> <Policies> <Windows Settings>
<Security Settings> <Local Policies> <User Rights Assignment>.■ Right-click <Allow log on locally> and click Properties. Change as
required.Run gpupdate and wait for the confirmation: “user policy update has completed successfully” (default gpupdate without switches should only apply the changes).
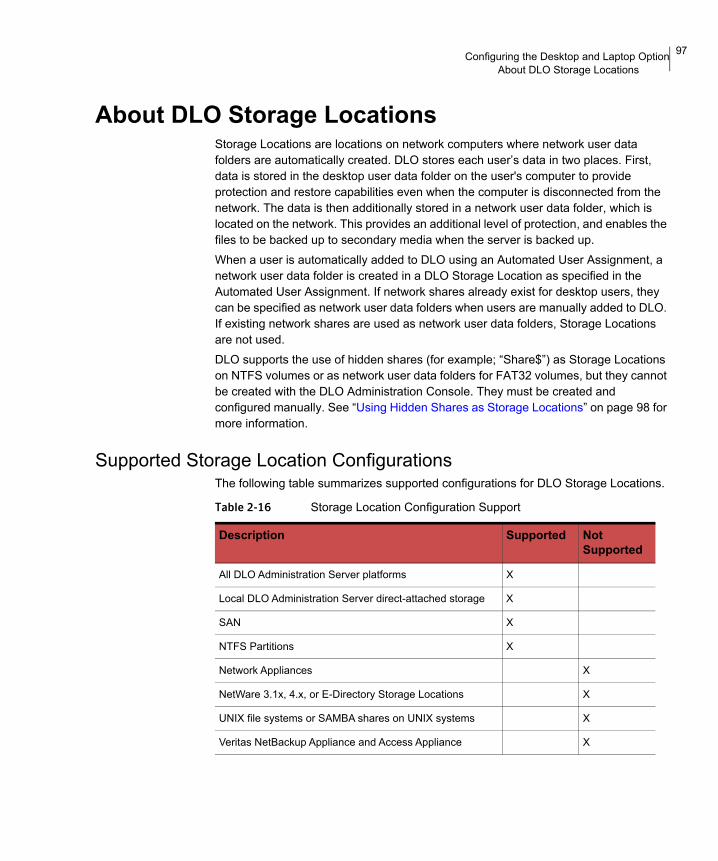
97Configuring the Desktop and Laptop OptionAbout DLO Storage Locations
About DLO Storage LocationsStorage Locations are locations on network computers where network user data folders are automatically created. DLO stores each user’s data in two places. First, data is stored in the desktop user data folder on the user's computer to provide protection and restore capabilities even when the computer is disconnected from the network. The data is then additionally stored in a network user data folder, which is located on the network. This provides an additional level of protection, and enables the files to be backed up to secondary media when the server is backed up. When a user is automatically added to DLO using an Automated User Assignment, a network user data folder is created in a DLO Storage Location as specified in the Automated User Assignment. If network shares already exist for desktop users, they can be specified as network user data folders when users are manually added to DLO. If existing network shares are used as network user data folders, Storage Locations are not used.DLO supports the use of hidden shares (for example; “Share$”) as Storage Locations on NTFS volumes or as network user data folders for FAT32 volumes, but they cannot be created with the DLO Administration Console. They must be created and configured manually. See “Using Hidden Shares as Storage Locations” on page 98 for more information.
Supported Storage Location ConfigurationsThe following table summarizes supported configurations for DLO Storage Locations.
Table 2-16 Storage Location Configuration Support
Description Supported Not Supported
All DLO Administration Server platforms X
Local DLO Administration Server direct-attached storage X
SAN X
NTFS Partitions X
Network Appliances X
NetWare 3.1x, 4.x, or E-Directory Storage Locations X
UNIX file systems or SAMBA shares on UNIX systems X
Veritas NetBackup Appliance and Access Appliance X

98 Configuring the Desktop and Laptop OptionAbout DLO Storage Locations
Using Hidden Shares as Storage LocationsDLO supports the use of hidden shares (for example; “Share$”) as Storage Locations on NTFS volumes or as network user data folders for FAT32 volumes, but these shares must be manually created and configured. They cannot be created with the DLO Administration Console. Hidden shares cannot be used for FAT based Storage Locations.The following table provides information about the permission settings for hidden shares.
Table 2-17 Permission Settings for Hidden Shares
Drive Type User or Group Permissions
Share Permissions on NTFS Volumes
Administrator Allow Full Control, Change, Read
Everyone Allow Full Control, Change, Read
Security Permissions on NTFS Volumes
Administrator Full control
Everyone Allow Read & Execute
Allow List Folder Contents
Allow Read
Special security permissions or advanced settings
Allow Traverse Folder/Execute File
Allow List Folder/Read Data
Allow Read Attributes
Allow Read Extended Attributes
Allow Read Permissions
Advanced Security Permissions on NTFS Volumes
Administrator Allow Full Control
Everyone Allow Traverse Folder / Execute File
Allow List Folder / Read Data
Allow Read Attributes
Allow Read Extended Attributes
Allow Read Permissions
Share Permissions on FAT Volumes
Administrator Allow Full Control, Change, Read
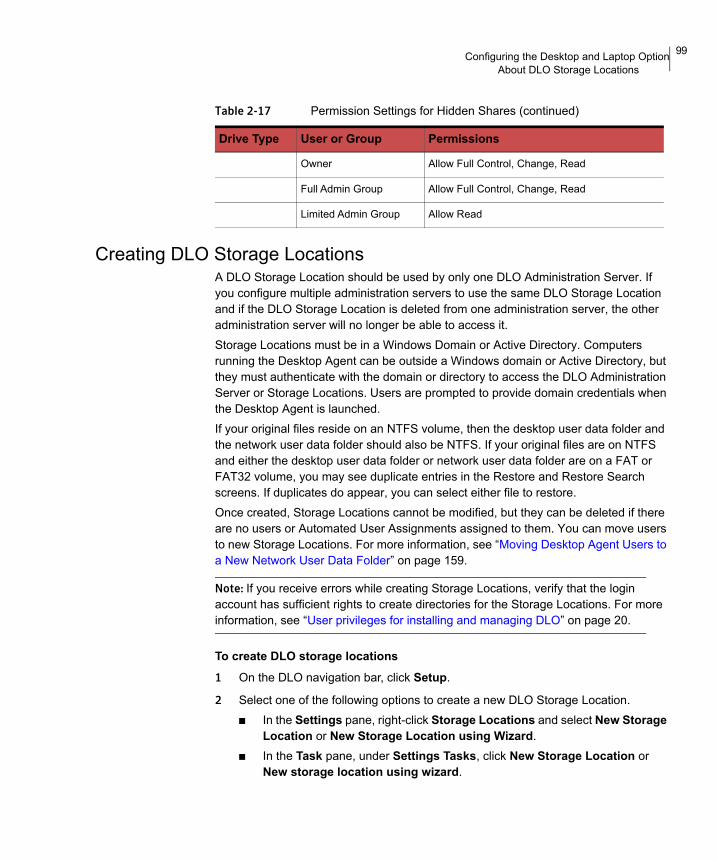
99Configuring the Desktop and Laptop OptionAbout DLO Storage Locations
Creating DLO Storage LocationsA DLO Storage Location should be used by only one DLO Administration Server. If you configure multiple administration servers to use the same DLO Storage Location and if the DLO Storage Location is deleted from one administration server, the other administration server will no longer be able to access it. Storage Locations must be in a Windows Domain or Active Directory. Computers running the Desktop Agent can be outside a Windows domain or Active Directory, but they must authenticate with the domain or directory to access the DLO Administration Server or Storage Locations. Users are prompted to provide domain credentials when the Desktop Agent is launched. If your original files reside on an NTFS volume, then the desktop user data folder and the network user data folder should also be NTFS. If your original files are on NTFS and either the desktop user data folder or network user data folder are on a FAT or FAT32 volume, you may see duplicate entries in the Restore and Restore Search screens. If duplicates do appear, you can select either file to restore.Once created, Storage Locations cannot be modified, but they can be deleted if there are no users or Automated User Assignments assigned to them. You can move users to new Storage Locations. For more information, see “Moving Desktop Agent Users to a New Network User Data Folder” on page 159.
Note: If you receive errors while creating Storage Locations, verify that the login account has sufficient rights to create directories for the Storage Locations. For more information, see “User privileges for installing and managing DLO” on page 20.
To create DLO storage locations1 On the DLO navigation bar, click Setup.
2 Select one of the following options to create a new DLO Storage Location.■ In the Settings pane, right-click Storage Locations and select New Storage
Location or New Storage Location using Wizard.■ In the Task pane, under Settings Tasks, click New Storage Location or
New storage location using wizard.
Owner Allow Full Control, Change, Read
Full Admin Group Allow Full Control, Change, Read
Limited Admin Group Allow Read
Table 2-17 Permission Settings for Hidden Shares (continued)
Drive Type User or Group Permissions

100 Configuring the Desktop and Laptop OptionAbout DLO Storage Locations
3 Select the appropriate options as described in the following table.
Table 2-18 New Storage Location Dialog Box
Item Description
Computer name Type a computer name or browse to a computer where you want to create the Storage Location.
Path Type or browse to a location on the computer where the Storage Location will be created.
Note: Storage Locations should be in the same domain as the DLO Administration Server or in a domain that trusts the administration server’s domain.
Storage Location name Type a name for the new DLO Storage Location. The name cannot contain any of the following characters: \”@#$%^&*()=+|/{}[]’
Assign Dedupe Properties ■ Select the Dedupe Server from the drop down list.■ Assign the Dedupe Storage Location by selecting
the Automatic mode or the Manual mode.
Note: Once you choose Dedupe Server and Dedupe Storage Location for a DLO Storage Location, you cannot change the Dedupe Server and Dedupe Storage Location later.
If a dedupe storage location is not configured, you can create a dedupe storage location. For more information, see “Adding a Dedupe Storage Location” on page 69.
Automatic In the Automatic mode, both the DLO Storage Location and Dedupe Storage Location will be created in the same storage location path that was specified earlier, and the Dedupe Storage Location will be assigned to the default Dedupe Storage Pool.
Note: In case you have installed or upgraded Veritas DLO, and you are selecting the Automatic mode for the first time, then you need to provide the user credentials for the Dedupe Storage Location.
During migration of storage locations, if the existing Dedupe Storage Location is part of the default Dedupe Storage Pool, then choose the manual mode and create both the Dedupe Storage Pool and Storage Location because data cannot be migrated within Dedupe Storage Pools.

101Configuring the Desktop and Laptop OptionAbout DLO Storage Locations
4 Click OK.
Importing Storage LocationsTo create multiple storage locations, you can import a text or CSV file that contains the computer name, storage location path, reference to the Dedupe Storage Location (0 or 1) and the Dedupe Server name in the following format: <computer name>,<storage location path>,0 or 1,<Dedupe Server Name>
Example WIN-7M4BNAMEMDL,C:\sl1,0,Dedupe
■ 0: If Dedupe Storage Location is not assigned
■ 1: If Dedupe Storage Location is assigned
Note: The storage location path should include a local drive letter and a UNC path cannot be provided.
Manual In the Manual mode, select an existing Dedupe Storage Location from the drop-down list, or click the Create button to create the Dedupe Storage Pool and the Dedupe Storage Location. See “Adding a Dedupe Storage Location” on page 69.
Assign IO Server You can assign an IO Server by selecting from the drop-down list.
Summary This field automatically displays the location and format of network user data folders that will be created for new users assigned to this Storage Location. Network user data folders are automatically created in the Storage Location.
DLO uses the %USERDOMAIN% and %USERNAME% variables to determine the actual folder path for each user who is assigned to a DLO Storage Location. DLO uses the user’s domain and user name to create a unique network user data folder name for that user. If the user is logged on with credentials that do not allow access to the DLO Storage Location, the user will be prompted to enter alternate domain credentials.
The network administrator can access this folder, but cannot configure the variables.
Table 2-18 New Storage Location Dialog Box (continued)
Item Description

102 Configuring the Desktop and Laptop OptionAbout DLO Storage Locations
To import multiple storage locations1 In the Settings pane, right-click Storage Locations and select Import Storage
Locations.
2 Click Browse and select the text or CSV file that contains the storage location details.
3 Click OK.The storage locations are imported and a confirmation message is displayed.
Configuring Remote Windows Share or NAS Device for DLO Storage Locations
You can create DLO Storage Locations on remote Windows shares or network attached storage devices.
To create storage locations when the DLO administration service is a full administrator on the remote system1 Ensure that the account credentials used for DLO services have full administrator
rights to the remote storage location or NAS device.
2 Ensure the shared folder on the NAS device or remote storage location is accessible as a UNC path.
Note: If the windows share on the remote storage location has been assigned a drive letter, we could use the Browse option to specify the storage location path.
Note: See hardware vendor documentation on share creation and naming.
3 Create a new DLO Storage Location as explained in the section “Creating DLO Storage Locations” on page 99.
Deleting DLO Storage LocationsBefore you can delete DLO Storage Locations, you must delete or reassign users and Automated User Assignments that use the DLO Storage Location. The DLO Storage Location associated with a user or Automated User Assignment is listed when you select Users or Automated User Assignments from the Setup view.
Note: When a DLO Storage Location is created using an existing share on a remote computer and DLO does not have full computer rights, the DLO Storage Location cannot be deleted from the DLO Administration Console. To remove the DLO Storage Location, first delete the DLO Storage Location share and then delete the DLO Storage Location from the DLO Administration Console.

103Configuring the Desktop and Laptop OptionAbout DLO Storage Locations
To delete DLO storage locations 1 On the DLO navigation bar, click Setup.
2 In the Selection pane, to expand the file servers list, click the ‘+’ icon next to File Servers.
3 In the Selection pane, click the File Server on which the DLO Storage Location resides.
4 In the Results pane, right-click the DLO Storage Location name and click Delete-OR-In the Task pane, under General Tasks, click Delete.
5 Click Yes.

104 Configuring the Desktop and Laptop OptionAbout Backup Selections
About Backup SelectionsBackup selections specify which files and folders you want to back up on desktops. Backup selections created by DLO administrators within profiles are called profile backup selections. Desktop users can also create backup selections or modify profile backup selections if the DLO administrator has provided them with sufficient rights.Backup selections are easily customized to meet a wide variety of needs. With in each backup selection you can do the following:
■ Specify the path to be backed up
■ Choose to include or exclude subfolders, file types, or specific folders
■ Set the number of revisions retained for each file in the backup selection, the frequency with which they are saved, and instructions on how long to retain backup files
■ Configure the backup selection to transfer only the changed portions of files
■ Compress or encrypt the files for transmission and storage
■ Specify how long to retain backup files after the source files are deleted
Caution: Veritas strongly recommends that you consider disk space when choosing backup selections for desktops and laptops. A large number of local copies may cause the Desktop Agent user's computer to run out of disk space. For example, you may want to avoid selecting entire drives for backup or synchronization.
Default Backup SelectionsDLO is configured to back up commonly used files and folders by default. You can add additional backup selections or cancel the use of default backup selections. The following are backed up by default.
Note: Lotus Notes files are not supported on Mac.
Table 2-19 describes the default selections for backups.
Table 2-19 Default Backup Selections
Item Description
Documents All files in Documents
Favorites All files in Favorites
Outlook PST Files PST files in the default location

105Configuring the Desktop and Laptop OptionAbout Backup Selections
Desktop All files on Desktop
Notes Files (Multi-user) Lotus Notes data for multiple user install
Notes Archive (Multi-user) Lotus Notes archive for multiple user install
Notes Files (Single-user) Lotus Notes data for single user install
Notes Archive (Single-user) Lotus Notes archive for single user install
Music All files in Music
Pictures All files in Pictures
Videos All files in Videos
Note: On Macintosh machines, this folder is named as My Movies.
OneDrive All files in OneDrive for Business
Downloads All files in Downloads
3D Objects All files in 3D objects
Outlook 2010 or 2013 PST Files Outlook 2010 or 2013 PST files in default location
Notes (ver. 8 and above) Files (Single-user)
Notes (ver. 8 and above) data for single user install
Notes (ver. 8 and above) Archives (Single-user)
Notes (ver. 8 and above) archive for single user install
Notes (ver. 9 and above) Files (Single-user)
Notes (ver. 9 and above) data for single user install
Notes (ver. 9 and above) Archives (Single-user)
Notes (ver. 9 and above) archive for single user install
Notes (ver. 9 and above) Files (Multi-user)
Notes (ver. 9 and above) data for multiple user install
Notes (ver. 9 and above) Archives (Multi-user)
Notes (ver. 9 and above) archive for multiple user install
Table 2-19 Default Backup Selections
Item Description
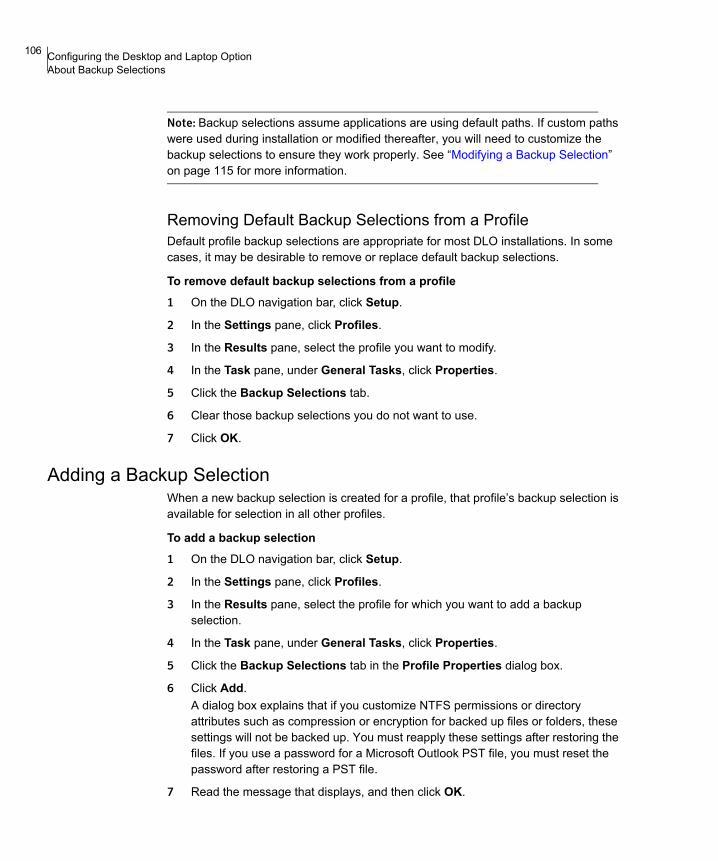
106 Configuring the Desktop and Laptop OptionAbout Backup Selections
Note: Backup selections assume applications are using default paths. If custom paths were used during installation or modified thereafter, you will need to customize the backup selections to ensure they work properly. See “Modifying a Backup Selection” on page 115 for more information.
Removing Default Backup Selections from a ProfileDefault profile backup selections are appropriate for most DLO installations. In some cases, it may be desirable to remove or replace default backup selections.
To remove default backup selections from a profile 1 On the DLO navigation bar, click Setup.
2 In the Settings pane, click Profiles.
3 In the Results pane, select the profile you want to modify.
4 In the Task pane, under General Tasks, click Properties.
5 Click the Backup Selections tab.
6 Clear those backup selections you do not want to use.
7 Click OK.
Adding a Backup SelectionWhen a new backup selection is created for a profile, that profile’s backup selection is available for selection in all other profiles.
To add a backup selection 1 On the DLO navigation bar, click Setup.
2 In the Settings pane, click Profiles.
3 In the Results pane, select the profile for which you want to add a backup selection.
4 In the Task pane, under General Tasks, click Properties.
5 Click the Backup Selections tab in the Profile Properties dialog box.
6 Click Add.A dialog box explains that if you customize NTFS permissions or directory attributes such as compression or encryption for backed up files or folders, these settings will not be backed up. You must reapply these settings after restoring the files. If you use a password for a Microsoft Outlook PST file, you must reset the password after restoring a PST file.
7 Read the message that displays, and then click OK.

107Configuring the Desktop and Laptop OptionAbout Backup Selections
8 Do any of the following to customize the backup selection properties:■ To set general backup selection properties including the name, description
and folder to be backed up, see “Defining General Backup Selection Properties” on page 107.
■ To include or exclude specific files from this backup selection, see “Including and Excluding Files or Folders from a Backup Selection” on page 108.
■ To set revision control for this backup selection, see “Setting Revision Control for a Backup Selection” on page 110.
■ To set Delta File Transfer, encryption and compression options for this backup selection, see “Setting Options for a Backup Selection” on page 112.
9 Click OK twice.
Defining General Backup Selection PropertiesWhen a backup selection is created, the name, description and path to be backed up are specified in the backup selection general dialog box. Once the backup selection is created, the name, description and backup path can be modified as needed.
1 Open the Backup Selection dialog box as described in one of the following procedures:■ “Adding a Backup Selection” on page 106■ “Modifying a Backup Selection” on page 115
2 From the General tab in the Backup Selection dialog box, select the appropriate options. Table 2-20 describes the options.
Table 2-20 Backup Selection General Tab
Item Description
Name Type a descriptive name for the backup selection.
Description Type a clear description of the backup selection. This description may include, for example, the folder selected, the group of users it was created for, or the purpose for creating the backup selection.

108 Configuring the Desktop and Laptop OptionAbout Backup Selections
3 Click OK.
Including and Excluding Files or Folders from a Backup SelectionEach backup selection can be configured to either include all files and folders, or to include or exclude specific files and folders. In addition, specific file types or folders can be specified for inclusion or exclusion using wildcards.Files and folders can also be excluded from all backups for all users using global exclude filters. Several file types are excluded by default. These global excludes can be viewed or modified in the Global Excludes dialog box.
To include or exclude files or folders from a backup selection 1 Open the Backup Selection dialog box as described in one of the following
procedures:■ “Adding a Backup Selection” on page 106■ “Modifying a Backup Selection” on page 115
2 From the Include/Exclude tab in the Backup Selection dialog box, select the appropriate options.■ Include all file types: Select this option to include all the file types in this
backup selection.
Folder to back up
Type a folder name Select this option to add a specific folder to the backup selection. Type the path to the folder, including the folder name. For example, to add a folder named MyData on drive C, type C:\MyData. For Mac machine, type /MyData.
Note: See “Using DLO Macros in Backup Selections” on page 113 for information on using macros to define the folders backed up by a backup selection.
Select a pre-defined folder Select this option to choose a pre-defined folder from the list provided.
Note: See “Using DLO Macros in Backup Selections” on page 113 for information on the macros used to define the pre-defined folders.
Include subfolders Select this option to also back up all subfolders in the specified directory. This option is selected by default.
Table 2-20 Backup Selection General Tab (continued)
Item Description

109Configuring the Desktop and Laptop OptionAbout Backup Selections
■ Include and exclude only the items listed below: Select this option to include or exclude only specific files or file types. When this option is selected, a wildcard include is added to back up all files not specifically excluded.
3 To add a filter to the Include/Exclude list, verify that you selected Include and exclude only the items listed below in step 2, and click Add Include or Add Exclude.
4 If you selected Add Exclude, you will be notified that all previously backed up files matching this exclude will be deleted from this backup selection. Click Yes to continue or No to cancel.
5 Select the appropriate options. Table 2-21 describes the options.
6 Click OK.
Revision ControlRevisions are versions of a file at a specific point in time. You configure revision settings when you create a backup selection. When a file is changed and backed up, DLO stores a new revision. DLO will store and maintain a specific number of revisions for all files in a backup selection. Because backup selections are configured separately, the number of revisions retained in each backup selection can vary.
Table 2-21 Add Include Filter or Add Exclude Filter Options
Item Description
Filter Type the name of the file or the folder that you want to include or exclude. You can use wildcards.
For example, type *.mp3 to either include or exclude all files with the file extension.mp3, or type unimportant.txt to include or exclude all files in the backup selection with this specific file name.
Click Extensions to select a predefined filter to either include or exclude all files with a given file extension.
Description Type a description of this include or exclude filter.
Apply to Select one of the following:■ Files to apply this filter to files■ Folders to apply this filter to folders■ Files and Folders to apply this filter to both files
and folders

110 Configuring the Desktop and Laptop OptionAbout Backup Selections
When the number of revisions is exceeded, DLO removes the oldest revision, maintaining only the specified number of revisions in the Desktop and network user data folders. You can limit the number of revisions retained in a given period of time. If you are working on a document and backing it up frequently, all of your revisions could potentially be just a few minutes apart. By specifying that you want to retain only two revisions every 24 hours, at least 120 minutes apart, you can retain older revisions for a longer period of time. While some intermediate versions will not be retained, it does support situations in which returning to an older revision is needed. Another consideration in determining the number of revisions to retain is the amount of storage space required to store the data. The amount of space required for backups can be estimated by multiplying the number of revisions retained by the amount of data protected.
Example If you are retaining three revisions of each file and have 10 MB of data to back up, approximately 30 MB of disk space are required if file sizes remain consistent between revisions.
Although compression can improve the space utilization, it varies significantly with file type and other factors. Typical compression ratios are approximately 2:1, so in the previous example, the maximum disk space usage might be reduced to approximately 15 MB.
File GroomingThe Desktop Agent grooms revisions based on backup selection settings and does this as new revisions are created. The oldest revision is deleted when a new revision is created that exceeds the limit. See step 2 on page 110 for revision control settings.Maintenance grooming is the process of removing backups of deleted files. It occurs at most once every 24 hours. Maintenance grooming occurs during the first backup that runs after 24 hours have passed since the last maintenance grooming.
Setting Revision Control for a Backup SelectionThe number of revisions retained in the desktop user data folder and network user data folder are specified for each backup selection and can be customized to meet specific user requirements. In addition, the time between revisions can be specified.
To set revision control for a backup selection 1 Open the Backup Selection dialog box as described in one of the following
procedures:■ “Adding a Backup Selection” on page 106■ “Modifying a Backup Selection” on page 115
2 From the Revision Control tab in the Backup Selection dialog box, select the appropriate options for both the Desktop and network user data folders.
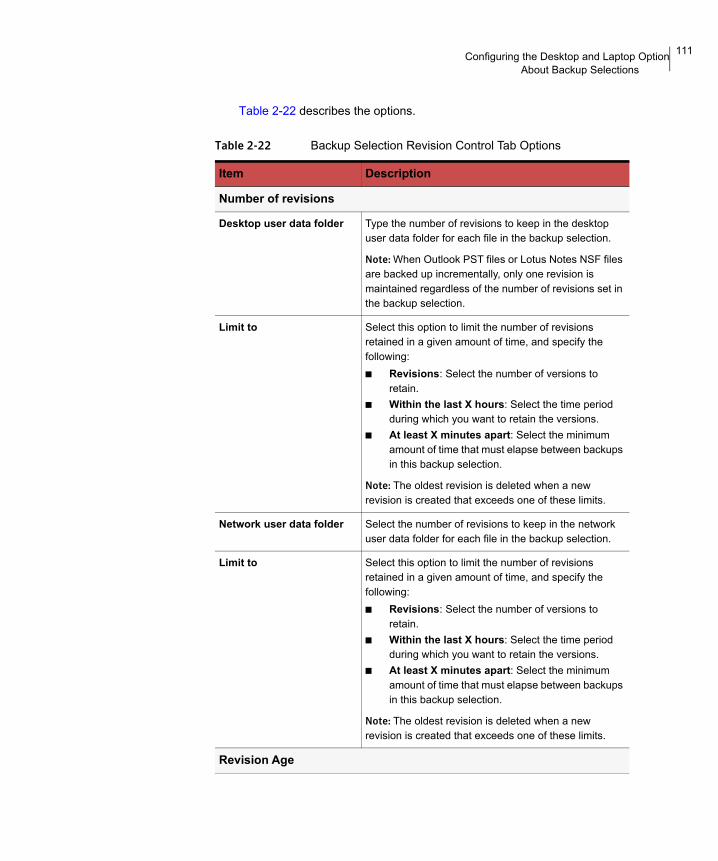
111Configuring the Desktop and Laptop OptionAbout Backup Selections
Table 2-22 describes the options.
Table 2-22 Backup Selection Revision Control Tab Options
Item Description
Number of revisions
Desktop user data folder Type the number of revisions to keep in the desktop user data folder for each file in the backup selection.
Note: When Outlook PST files or Lotus Notes NSF files are backed up incrementally, only one revision is maintained regardless of the number of revisions set in the backup selection.
Limit to Select this option to limit the number of revisions retained in a given amount of time, and specify the following:■ Revisions: Select the number of versions to
retain.■ Within the last X hours: Select the time period
during which you want to retain the versions.■ At least X minutes apart: Select the minimum
amount of time that must elapse between backups in this backup selection.
Note: The oldest revision is deleted when a new revision is created that exceeds one of these limits.
Network user data folder Select the number of revisions to keep in the network user data folder for each file in the backup selection.
Limit to Select this option to limit the number of revisions retained in a given amount of time, and specify the following:■ Revisions: Select the number of versions to
retain.■ Within the last X hours: Select the time period
during which you want to retain the versions.■ At least X minutes apart: Select the minimum
amount of time that must elapse between backups in this backup selection.
Note: The oldest revision is deleted when a new revision is created that exceeds one of these limits.
Revision Age

112 Configuring the Desktop and Laptop OptionAbout Backup Selections
Setting Options for a Backup SelectionDLO backup selections can be further customized by settings options for Delta File Transfer, Compression, and Encryption. In addition, you can specify how long to keep backup files after the original source files are deleted.
1 Open the Backup Selection dialog box as described in one of the following procedures:■ “Adding a Backup Selection” on page 106■ “Modifying a Backup Selection” on page 115
2 From the Options tab in the Backup Selection dialog box, select the appropriate options. Table 2-23 describes the options.
Note: For Dedupe enabled profile, Delta File Transfer option is selected by default, and is applicable only for non-PST files. For PST files, Delta File Transfer parameters are forcibly applied whether the option is selected or not selected.Dedupe + delta enabled (default settings): First revision undergoes deduplication. Delta transfer is applied from second revision onwards. Dedupe + delta disabled: Every revision undergoes deduplication and hence one copy is retained in the Dedupe Storage Location for each revision.
Discard all revisions in the desktop user data folder older than
Enter the number of days after which all revisions in the desktop user data folder will be deleted.
Note: The most recent revision will not be discarded.
Discard all revisions in the network user data folder older than
Enter the number of days after which all revisions in the network user data folder will be deleted.
Note: The most recent revision will not be discarded.
Table 2-22 Backup Selection Revision Control Tab Options (continued)
Item Description
Table 2-23 Backup Selection Options
Item Description
Delta File Transfer Each time a file is backed up, only the part of the file that has changed is transferred and stored in the network user data folder. In addition, delta file transfer uses compression. Enabling this option requires that you have installed and configured a maintenance server. See“Adding a New Maintenance Server” on page 119 for more information.

113Configuring the Desktop and Laptop OptionAbout Backup Selections
3 Click OK to save the backup selection.
Using DLO Macros in Backup SelectionsYou can type macros into the Type a folder name field of the backup selection dialog box to automatically back up specific folders. For more information on configuring the Type a folder name field, see “Backup Selection General Tab” on page 107.
Compression Each time a file is backed up, files in this backup selection will be compressed for data transfer over the network and for storage in the Desktop and network user data folders.
This affects files created after this feature is activated. Previously stored files will not be compressed.
Delta File Transfer also uses compression.
Encryption Select this option to encrypt files for transfer and to store files from this backup selection in an encrypted format in the network user data folder.
This affects files transmitted and stored after this feature is activated. Previously stored files will not be encrypted.
The Advanced Encryption Standard (AES) and a 256- bit key length are used. If enabled, versions are stored unencrypted in the desktop user data folder, and encrypted in the network user data folder. Transfer over the network is encrypted.
When source files are deleted, delete the backed up files from the:
Desktop user data folder after Indicate the number of days after which DLO will delete all file versions from the desktop user data folder after the source file has been deleted from the desktop.
Network user data folder after Indicate the number of days after which DLO will delete all file versions from the network user data folder after the source file has been deleted from the desktop.
Table 2-23 Backup Selection Options (continued)
Item Description

114 Configuring the Desktop and Laptop OptionAbout Backup Selections
The following table describes the macros that are supported.
Table 2-24 Folder Macros for Use with Backup Selections
Backup Selection Macro Folders Backed up
%LOCALFIXEDDATADRIVES% All local fixed data drives.
Note: DLO is not designed to back up removable media. Attempting to back up removable media may result in errors.
%MACHINENAME% Represents the desktop user's computer name.
Example: C:\documents\%machinename% represents C:\documents\UsersMachineName.
%CURRENTUSERNAME% Represents the username of the currently logged-on user.
Example: If the local administrator is logged on to the computer, C:\documents\%currentusername% represents 'C:\documents\Administrator'
%CURRENTUSERPROFILE% All files and folders in the C:\Documents and Settings\current user profile directory.
%CURRENTUSERMYDOCS% The My Documents directory for the user who is logged on.
%CURRENTUSERFAVORITES% The Favorites directory for the user who is logged on.
%CURRENTUSERPRINTHOOD% The Printers directory for the user who is logged on.
%CURRENTUSERNETHOOD% The Network Locations directory for the user who is logged on.
%CURRENTUSERDESKTOP% The Desktop directory for the user who is logged on.
%CURRENTUSERRECENT% The Recent Files directory for the user who is logged on.
%PROGRAMFILES% The Windows Program Files directory. Example: %PROGRAMFILES%\lotus\notes\data\archive
s
%LOCALAPPDATA% The Windows local application data directory:
Documents and
Settings\<user_name>\Local
Settings\Application Data”

115Configuring the Desktop and Laptop OptionAbout Backup Selections
The following additional pre-defined folder macros are available for selection in the backup selection dialog box.
Note: When you enter a path that uses a macro, a backslash is automatically added immediately following the macro. For example, if you type %LOCALFIXEDDATADRIVES%\Documents, an extra backslash is added and it appears as “x:\\Documents” in the Desktop Agent backup selection advanced view. It does not show at all in the Desktop Agent backup selection Standard view. The correct way to type this macro is %LOCALFIXEDDATADRIVES%Documents. This properly resolves to x:\Documents.
Modifying a Backup SelectionProfile backup selections can be modified from the DLO Administration Console.
To modify a backup selection 1 On the DLO navigation bar, click Setup.
2 In the Settings pane, click Profiles.
3 In the Results pane, click the profile you want to modify.
4 In the Task pane, under General Tasks, click Properties.
5 Click the Backup Selections tab.
Table 2-25 Macros for pre-defined folders in the Backup Selection dialog
Folder Name Pre-Defined Folder Macro Folders Backed Up
My Documents %CURRENTUSERMYDOCS% The My Documents directory for the user who is logged on.
Desktop %CURRENTUSERDESKTOP% The Desktop directory for the user who is logged on.
Favorites %CURRENTUSERFAVORITES% The Favorites directory for the user who is logged on.
PrintHood %CURRENTUSERPRINTHOOD% The Printers directory for the user who is logged on.
NetHood %CURRENTUSERNETHOOD% The Network Locations directory for the user who is logged on.
Recent %CURRENTUSERRECENT% The Recent Files directory for the user who is logged on.
All local fixed data drives %LOCALFIXEDDATADRIVES% All local fixed data drives.

116 Configuring the Desktop and Laptop OptionAbout Backup Selections
6 Select the backup selection you want to modify, and click Modify.
Note: The Type a folder name field in the General tab is grayed out in this view. If the path in this field is longer than the display, hold the curser over the path for a moment to display the entire path.
7 Click OK to indicate that you read the message stating that modifying this backup selection will change all profiles that are using this selection.
8 Change the backup selection as described in the following topics:“Defining General Backup Selection Properties” on page 107“Including and Excluding Files or Folders from a Backup Selection” on page 108“Setting Revision Control for a Backup Selection” on page 110“Setting Options for a Backup Selection” on page 112
9 Click OK twice.
About Delta File TransferThe Delta File Transfer feature enables incremental transfer and storage of backup data. When this option is enabled, the initial backup requires transfer of the entire file. Subsequent backups require only the transfer of the parts of the file that have changed, reducing the bandwidth required and improving backup speed.
Note: For Dedupe enabled profiles, Delta File Transfer option is applicable only for non-PST files. For PST files, Delta File Transfer parameters are forcibly applied whether the option is selected or not selected.
Excluding files from delta file transferDelta File Transfer is not limited to certain programs or file types, but does offer the ability to exclude certain file types. Default excludes are configured for Delta File Transfer because these file types do not benefit from this technology. This is usually because the file types are already highly compressed. See “Configuring Global Exclude Filters” on page 129 for more information.
Working OfflineDelta File Transfer is only used to transfer and store backup files on in the network user data folder. Backup files stored in the Desktop User Data Folder are not stored using deltas. If a Desktop Agent user is working offline, the local revisions are stored in their entirety in the desktop user data folder. When the user is once again working online, Delta File Transfer is used to transfer data to the network user data folder.

117Configuring the Desktop and Laptop OptionAbout Backup Selections
Requirements for Delta File TransferDelta File Transfer requires the use of the DLO maintenance server. The maintenance server manages the deletion of previous delta revisions from storage locations. The maintenance server is only required when the Delta File Transfer option is enabled, but it is installed by default when DLO is installed. Only one maintenance server is required, but in large installations it may be more efficient to have one maintenance server for each Storage Location host (that is File Server).The maintenance server is installed on the DLO Administration Server by default when DLO is installed. If the administration server is also the Storage Location host, then no additional steps are required to configure the maintenance server.
Maintenance Server Technical Information and TipsThe Windows Desktop Agent uses Windows RPC over named pipes to communicate with the maintenance server. For the maintenance server to function, named pipe traffic must not be blocked at any point between the DLO Client and the maintenance server.The rolloff operation for delta revisions can require significant bandwidth. For this reason, the maintenance server should be installed on the computer that is hosting the Storage Location.However, there are situations where the maintenance server cannot be installed on the same computer as the Storage Location server. For example, the maintenance server cannot be installed on a NAS device. In this case, the maintenance server should be installed on a computer with a high bandwidth connection to the Storage Location.A maintenance server can manage one or more Storage Locations. A maintenance server will always manage the Storage Locations located on same computer as the maintenance server. The maintenance server can be configured to manage additional Storage Locations hosts, that is, File Servers, from the DLO Admin console. The maintenance server uses delegation to access remote Storage Locations. See “Configuring a Maintenance Server for Delegation” on page 119 for more information.
Enabling Delta File Transfer for a Backup SelectionDelta File Transfer is off by default. It can be enabled for a given backup selection by selecting Delta in the Backup Selection Options tab as explained in “About Delta File Transfer” on page 116.In addition, if a maintenance server manages file servers that are on a target other than itself, the maintenance server must be configured for delegation as explained in “Configuring a Maintenance Server for Delegation” on page 119.Delta File Transfer can also be selected as the default compression type by changing the application default settings for compression. If the default compression setting is
118 Configuring the Desktop and Laptop OptionAbout Backup Selections
changed to Delta, all new backup selections will use Delta compression by default. See “DLO Default Settings” on page 38 for more information.
Deleting Backup SelectionsBefore you can delete a backup selection, you must be sure that it is not in use by any profiles. When you delete a backup selection from one profile, DLO deletes it from every profile.When you delete a backup selection, the backup versions are deleted in the same manner as when source files are deleted. They will be groomed after the number of days specified in the backup selection.
To delete a backup selection 1 On the DLO navigation bar, click Setup.
2 In the Settings pane, Click Profiles.
3 In the Results pane, click the profile that contains the backup selection you want to delete.
4 In the Task pane, under General Tasks, click Properties.
5 From the Backup Selections tab, select the backup selection you want to delete.
6 Click Delete.
7 Click Yes.
Related Topics“Backup Selection Options” on page 112.

119Configuring the Desktop and Laptop OptionAbout Maintenance Servers
About Maintenance ServersAdding a New Maintenance Server
After you install a new maintenance server, you must add the maintenance server to DLO. After adding the maintenance server to DLO, you can then specify which file servers it is to manage as explained in “Reassigning a File Server” on page 122.
To add a new maintenance server 1 Verify that the new maintenance server has been installed.
Note: A default maintenance server is installed with DLO. A stand-alone maintenance server can also be installed by selecting Maintenance Server as the installation type as described in “Installing the Veritas Desktop and Laptop Option” on page 23.
2 From the DLO Console, on the DLO navigation bar, click Setup.
3 In the Task pane, under Manage Tasks, click Maintenance servers.
4 Click Add.
5 Navigate to the computer where the maintenance server is installed.
6 Select this computer.
7 Click OK.
Configuring a Maintenance Server for DelegationWhen a maintenance server is configured to manage Storage Locations hosted by a different computer, they must be configured to access these locations on behalf of desktop users running the Desktop Agent. This configuration is managed using the Active Directory.
Note: For detailed information on delegating Active Directory administration, see the Microsoft website: http://technet.microsoft.com/en-us/library/cc773318(v=ws.10).aspx
To configure a maintenance server for delegation 1 Verify that the following conditions are met:
■ Both the Desktop Agent user’s account and the maintenance service's account must be in the same domain.
■ Desktop Agent user and computer accounts must be in mutually trusted domains.

120 Configuring the Desktop and Laptop OptionAbout Maintenance Servers
■ Desktop and server operating systems must be the Windows OS versions, as specified in the Veritas Desktop and Laptop Option Software Compatibility List document.
2 Confirm that the desktop user account is configured for delegation. See “Confirming the Desktop User’s Account is Configured for Delegation” on page 120.
3 Confirm that the server process account is trusted for delegation.“Confirming the Server Process Account is Trusted for Delegation” on page 120.
Confirming the Desktop User’s Account is Configured for DelegationThis process verifies that the Desktop Agent user’s account can be delegated.
To confirm that the desktop user’s account is configured for delegation1 Log on to the domain controller using a domain administrator account.
2 On the Task bar, click Start > Programs > Administrative Tools > Active Directory Users and Computers.
3 Under the domain, click the Users folder.
4 Right-click the user account to be delegated and click Properties.
5 Click the Account tab.
6 In the Account options list, verify that the Account is sensitive and cannot be delegated is not selected.
7 Click OK.
Confirming the Server Process Account is Trusted for DelegationThis process verifies that the account used to run the maintenance server process is allowed to delegate client accounts.
To confirm that the server process account is trusted for delegationExample: On a Windows Server OS machine
1 Log on to the domain controller using a domain administrator account.
2 On the Task bar, click Start > Programs > Administrative Tools > Active Directory Users and Computers.
3 Right-click the Computers folder and click Properties.
4 Right-click the computer on which the maintenance server runs and then click Properties.
5 Select the Delegation tab.
121Configuring the Desktop and Laptop OptionAbout Maintenance Servers
6 Select Trust this computer for delegation to specified services only and Use Kerberos only.
7 Click Add.
8 Click Users and Computers.
9 Type the name of the computer housing the NUDF and click Check Names > click OK.
10 In the Available Services window, select cifs > click OK.
11 Click Apply and OK.
12 Restart the DLO Maintenance Service.
Changing the Default Maintenance ServerWhen DLO is installed, a maintenance server is installed and set as the default maintenance server. New storage locations are automatically assigned to the default maintenance server when they are created. If you want new storage locations to be assigned to a different maintenance server by default, you must change this setting.
To change the default maintenance server1 From the DLO Administration Console, on the DLO navigation bar, click Setup.
2 In the Task pane, under Manage Tasks, click Maintenance servers.
3 In the Maintenance Servers list, select the check box for the maintenance server you want to set as the default.
4 Click OK.
Deleting the Maintenance ServerWhen you uninstall a maintenance server, the entry for the maintenance server still remains on the DLO Administration Console. The entry for the maintenance server must be manually deleted from the DLO Administration Console.
To delete the entry for a maintenance server1 Select Tools > Manage Maintenance Servers.
2 Select the check box for the maintenance server you want to delete.
3 Click Delete.
Note: The entry for the default maintenance server cannot be deleted from the Administration Console.

122 Configuring the Desktop and Laptop OptionAbout Maintenance Servers
Similarly, once you add a maintenance server from the DLO Administration Console, you must install the maintenance server software on the computer to begin maintenance processes.
Reassigning a File ServerYou can reassign a file server to another maintenance server that is recognized by DLO. For example, when you create a new Storage Location, it is automatically assigned to the default maintenance server. You may want to reassign it to a different maintenance server.
To reassign a file server1 Verify that the new maintenance server has been installed and configured.
2 On the DLO navigation bar, click Setup.
3 In the Task pane under Manage Tasks, click Maintenance Servers.
4 Select the maintenance server that is currently managing the file server.
5 Click Edit.
6 Select the file server you want to reassign.
7 Click Reassign.
8 Select the new maintenance server from the drop-down list.
9 Click OK three times.
123Configuring the Desktop and Laptop OptionAbout Automated User Assignments
About Automated User AssignmentsAutomated User Assignments are instructions that are applied when the Desktop Agent is first run on a desktop. The Automated User Assignment assigns a profile and network user data folder to each user who is automatically configured by DLO. These settings can be changed from the DLO Administration Console at a later time if necessary.
Note: If a user is added manually to DLO, a Storage Location and profile are selected by the DLO administrator. In this case, the Automated User Assignment will not be used. For more information, see “Managing Desktop Agent Users” on page 151.
Automated User Assignments are assigned to desktop users based either on their domain and group, or using Active Directory settings. Because users may match the criteria for more than one Automated User Assignment, the Automated User Assignments are prioritized. When the Desktop Agent is run for the first time, the Desktop Agent user’s domain and group credentials are checked against those of the Automated User Assignment starting with the highest priority assignment. When a match is made, the share and profile specified in that Automated User Assignment are assigned to the new user. Modifying Automated User Assignments does not affect users who have already been configured. Only new users configured with the Automated User Assignment will use the new settings.

124 Configuring the Desktop and Laptop OptionAbout Automated User Assignments
Figure 2-4 Viewing Automated User Assignments
For information on modifying Automated User Assignment priorities, see “Changing the Priority of Automated User Assignments” on page 127.
Creating Automated User AssignmentsAutomated User Assignments are assigned to Desktop Agent users based either on domain and group settings or Active Directory settings. The Automated User Assignment determines which Storage Location and profile are assigned to the user.
To create a new automated user assignment 1 On the DLO navigation bar, click Setup.
2 Select one of the following options to create a new automated user assignment:
a In the Tasks pane, under Settings Tasks, click New user assignment, or New user assignment using wizard.

125Configuring the Desktop and Laptop OptionAbout Automated User Assignments
b In the Settings pane, right-click Automated User Assignment and select New User Assignment or New User Assignment using wizard.
3 The New User Assignment window appears.
4 Or in the Settings pane, right-click Automated User Assignment and select New User Assignment.The New Automated User Assignment window appears.
5 Select the appropriate options as described in the following table.
Table 2-26 New Automated User Assignment Dialog Box Options
Item Description
User Assignment
User assignment name
Type a name for the Automated User Assignment. The Automated User Assignment name cannot contain the following characters: \”@#$%^&*()=+|/{}[]’
Assign using Domain and Group
Select this option to match Desktop Agent users to Automated User Assignments based on their domain and group.
Domain Select the domain to which this Automated User Assignment will apply.
Group Select the group to which this Automated User Assignment will apply.
Assign Using Active Directory
Select this option to match Desktop Agent users to Automated User Assignments based on Active Directory settings.
Configure Click the Configure button to configure the User Assignment using Active Directory. See step 6 below for information on configuring the Active Directory settings.
Storage Location/Profile
Storage Location Select a Storage Location to be assigned to the users in the selected domain and group.
Profile Select a profile to be assigned to the users in the selected domain and group.
Note: When you select a profile that has Dedupe enabled, make sure that the Storage Location associated to this profile has a Dedupe Storage Location defined. If it is not defined, then you will not be able to create an automated user assignment.

126 Configuring the Desktop and Laptop OptionAbout Automated User Assignments
6 If you chose to use Active Directory to configure the User Assignment in step 5, configure the Active Directory settings as follows:
7 Click OK.
Modifying Automated User AssignmentsModifying an Automated User Assignment affects only users added to the assignment after it has been modified. Existing Desktop Agent users are unaffected.Settings for existing Desktop Agent users can be modified from the Setup view of the DLO Administration Console. For more information, see “Modifying Desktop Agent User Properties” on page 156.
To modify an automated user assignment 1 On the DLO navigation bar, click Setup.
2 In the Selection pane, click Automated User Assignments.
Table 2-27 Active Directory Object Dialog
Item Description
Object For Automated User Assignments, the only option is User.
In LDAP Directory Type or browse to the LDAP directory.
Note: When selecting Active Directory user accounts, you must select the specific directory that holds the user accounts. Be sure not to select the user groups directory. Browse to or type the exact path of the specific user accounts directory for which you are creating this rule.
All objects in this directory Select this option to apply the connection policy to all objects in the specified directory.
Only the objects in this directory that match the criteria below
Select this option to apply the connection policy only to those objects in the specified directory that match the criteria entered.
Attributes Select an attribute from the drop-down list or type a custom attribute.
Condition Select the appropriate condition. Available options include =, <, <>, and >.
Value Type a value to complete the criteria that will be used to determine matches. Wildcards can be used to specify the value.
127Configuring the Desktop and Laptop OptionAbout Automated User Assignments
3 In the Results pane, select the Automated User Assignment you want to modify.
4 In the Task pane, under General Tasks, select Properties.
5 Modify the Automated User Assignment properties.
Changing the Priority of Automated User AssignmentsWhen you create an Automated User Assignment, DLO assigns a priority to it so that when a user is a member of more than one domain and group, it is clear which Automated User Assignment will be used. The most recently created Automated User Assignments have the lowest priority. You can change the priority of Automated User Assignments.
To change the priority of automated user assignments 1 On the DLO navigation bar, click Setup.
2 In the Selection pane, click Automated User Assignments.
3 In the Results pane, select the Automated User Assignment for which you want to change the priority.
4 In the Task pane, under Settings Tasks, select Move priority up or Move priority down.
Viewing Automated User Assignment PropertiesTo view automated user assignments 1 On the DLO navigation bar, click Setup.
2 In the Selection pane, click Automated User Assignments.
3 In the Results pane, select an Automated User Assignment.
4 In the Task pane, under General Tasks, select Properties.
Deleting Automated User AssignmentsYou can delete Automated User Assignments when you no longer need them.
To delete an automated user assignment 1 On the DLO navigation bar, click Setup.
2 In the Selection pane, click Automated User Assignments.
3 Click the Automated User Assignment to be deleted.
4 In the Task pane, under General Tasks, click Delete.
5 Click Yes.

128 Configuring the Desktop and Laptop OptionMapping User Machine
Mapping User MachineIn User Machine Mapping, the user's data is backed up only from the specified machines. If the user is logged on to different machine other than specified ones, the DLO agent does not launch and the following message is displayed:Logged on user is not mapped to this machine for backup operations. Please contact administrator.
This ensures a seamless logon to system administrators and IT teams who log into user machines for troubleshooting.
Tagging User to Specific MachineUser Machine Mapping option enables you to tag a user to specified machines. To tag a user to a specified machine:
1 From the Tools menu in the DLO Administration Console, select User Machine Mapping. The User Machine Mapping dialog box appears.
2 In the User Machine Mapping dialog, click Add. The Add User and Machine dialog appears.
3 In the Add User and Machine dialog, enter the following:
■ User Name: Enter the name of the user.
■ Machine Name: Enter the host name of the machine.
4 Click OK.
5 If you chose to import users and desktop agent machines, in the User Machine Mapping dialog, click Import.
6 Browse the required CSV file. The CSV file contains the user and machine host name.
Example: user, machinehostnameThe imported file will be displayed in the User Machine Mapping dialog box.
7 Click OK.

129Configuring the Desktop and Laptop OptionConfiguring Global Exclude Filters
Configuring Global Exclude FiltersDLO global exclude options enable you to specify the attributes of files that you want to exclude from all backups or that you do not want to compress, encrypt, or back up with Delta File Transfer. You can also exclude attachments to e-mails or specific e-mail folders from backup. Global excludes apply to both profile backup selections and user created backup selections for all Desktop Agent users who back up to the DLO Administration Server on which the excludes are configured.The files you exclude are listed on the Include/Exclude tab in the advanced view on the Desktop Agent and on the Include/Exclude tab for a profile's backup selection on the DLO Administration Console. Items configured for the global exclude list are not available for selection on the selection list.To configure global excludes, see the following procedures:“Specifying Files and Folders to Exclude from all Backups” on page 129“Specifying E-mail to Exclude from all Backups” on page 130“Specifying Files and Folders to Exclude from Compression” on page 131“Specifying Files and Folders to Exclude from Encryption” on page 133“Specifying Files and Folders to Exclude from Delta File Transfer” on page 134“Using DLO Macros to Define Global Excludes” on page 136
Specifying Files and Folders to Exclude from all BackupsFile and Folder global excludes are used to specify which files and folders, or file and folder types, are to be excluded from all backups for all users.
To specify files and folders to exclude from all backups 1 From the Tools menu in the DLO Administration Console, select Global
Excludes.
2 Select the Files/Folders tab. Default Files/Folders global excludes are listed.
3 To exclude all files greater than a specific size, select the Exclude all files greater than check box and enter a size in KB.
4 To exclude all files modified before a specified date, select the Exclude all files modified before check box and enter a date.

130 Configuring the Desktop and Laptop OptionConfiguring Global Exclude Filters
5 To add a new Files/Folders global exclude, click Add and configure as described in the following table.
6 Click OK.
7 To edit a global exclude filter, click Edit and configure as described in the step 5.
8 To delete a global exclude filter, click the filter to be deleted and click Delete. Click Yes to delete the filter or No to cancel.
9 Click OK.
Specifying E-mail to Exclude from all BackupsE-mail global excludes are used to specify the type of e-mails to be excluded from all backups for all users.
Note: Lotus Notes e-mails cannot be filtered by attachment size or type.
Note: E-mail global excludes does not apply for VSS based PST backups.
To specify e-mail attachments to exclude from all backups 1 From the Tools menu in the DLO Administration Console, select Global
Excludes.
Table 2-28 Add Global Exclude Filter Dialog
Item Description
Filter The filter determines which files or folders will be excluded from backup by the global exclude. Type a file name, wildcard, or macro for the files you want to exclude.
Examples:Wildcard: *.tmp File name: pagefile.sysMacro: %WINDIR%
Note: When using wildcards, you must use the asterisk (*) wildcard. For example, *.tmp will return all results with the .tmp extension while .tmp will return only files explicitly named .tmp.
Description Type a description of the global exclude.
Apply to Indicate whether this global exclude should apply to files, folders, or both files and folders.

131Configuring the Desktop and Laptop OptionConfiguring Global Exclude Filters
2 Select the E-mail tab.
3 To exclude from all backup attachments greater than a specific size, select the Exclude all attachments greater than check box and enter a size in KB. This feature does not apply to Lotus Notes e-mails.
4 To exclude from all backup messages received before a specified date, select the Exclude all messages received before check box and enter a date.
5 To add a new e-mail global exclude, click Add and configure as follows.
6 Click OK.
7 To edit a global e-mail filter, click the filter you want to change. Click Edit and configure as described in table 2-24, “Add Global E-mail Exclude Filter Dialog”.
8 To delete a global e-mail filter, click the filter to be deleted and click Delete. Click Yes to delete the filter or No to cancel.
9 Click OK.
Specifying Files and Folders to Exclude from CompressionCompressed file global excludes are used to specify the type of files or folders to be excluded from compression for all users.
Table 2-29 Add Global E-mail Exclude Filter Dialog
Item Description
Attachment file type The filter determines which attachment file types will be excluded from backup by the global exclude.
Note: Lotus Notes e-mails cannot be filtered by attachment type.
Filters can be file names or wildcards.
Examples:Wildcard: *.tmp File name: pagefile.sys
Note: When using wildcards, you must use the asterisk (*) wildcard. For example, *.tmp will return all results with the .tmp extension while .tmp will return only files explicitly named .tmp.
Mail folder name Type the name of the mail folder you would like to exclude from backup.
Description Type a description of the global exclude.

132 Configuring the Desktop and Laptop OptionConfiguring Global Exclude Filters
Note: Compression global excludes is not applicable for Dedupe enabled backups.
To specify files and folders to exclude from compression 1 From the Tools menu in the DLO Administration Console, select Global
Excludes.
2 To exclude files or folders from compression, select the Compressed Files tab. Default compressed files global excludes are listed.
3 To exclude all files greater than a specific size from compression, select the Exclude all files greater than check box and enter a size in KB.
4 To add a new compressed file global exclude, click Add and configure as follows.
5 Click OK.
6 To edit a global exclude filter, click the filter you want to change. Click Edit and configure as described in the “Add Global Compression Exclude Filter Dialog” table above.
7 To delete a global exclude filter, click the filter to be deleted and click Delete. Click Yes to delete the filter or No to cancel.
8 Click OK.
Table 2-30 Add Global Compression Exclude Filter Dialog
Item Description
Filter The filter determines which files or folders will be excluded from compression by the global exclude. Filters can be file names, wildcards or macros.
Examples:Wildcard: *.tmp File name: pagefile.sysMacro: %WINDIR%
Note: When using wildcards, you must use the asterisk (*) wildcard. For example, *.tmp will return all results with the .tmp extension while .tmp will return only files explicitly named .tmp.
Description Type a description of the global exclude.
Apply to Indicate whether this global exclude should apply to files, folders, or both files and folders.

133Configuring the Desktop and Laptop OptionConfiguring Global Exclude Filters
Specifying Files and Folders to Exclude from Encryption Encrypted file global excludes are used to specify which files or folders, or file and folder types, are to be excluded from encryption for all users.
Note: Encryption global excludes is not applicable for Dedupe enabled backups.
To configure encrypted file global excludes1 From the Tools menu in the DLO Administration Console, select Global
Excludes.
2 To exclude files or folders from encryption, select the Encrypted Files tab. Default encrypted files global excludes are listed.
3 To exclude files greater than a specific size from encryption, check the Exclude all files greater than check box and enter a size in KB.
4 To add a new encrypted file global exclude, click Add and configure as follows.
5 Click OK.
6 To edit a global encryption exclude filter, click the filter you want to change. Click Edit and configure as described in table 2-26, “Add Global Encryption Exclude Filter Dialog”.
Table 2-31 Add Global Encryption Exclude Filter Dialog
Item Description
Filter The filter determines which files or folders will be excluded from encryption by the global exclude. Filters can be file names, wildcards or macros.
Examples:Wildcard: *.tmp File name: pagefile.sysMacro: %WINDIR%
Note: When using wildcards, you must use the asterisk (*) wildcard. For example, *.tmp will return all results with the .tmp extension while .tmp will return only files explicitly named .tmp.
Description Type a description of the global exclude.
Apply to Indicate whether this global exclude should apply to files, folders, or both files and folders.
134 Configuring the Desktop and Laptop OptionConfiguring Global Exclude Filters
7 To delete a global encryption exclude filter, click the filter to be deleted and click Delete. Click Yes to delete the filter or No to cancel.
8 Click OK.
Specifying Files and Folders to Exclude from Delta File TransferDelta File Transfer global excludes are used to specify which files or folders, or file and folder types, are to be excluded from Delta File Transfer for all users.
Note: Delta File Transfer global excludes is not applicable for Dedupe enabled backups.
To specify files and folders to exclude from delta file transfer 1 From the Tools menu in the DLO Administration Console, select Global
Excludes.
2 To exclude files or folders from Delta File Transfer, select the Delta File Transfer tab. Default Delta File Transfer global excludes are listed. File types excluded by default from Delta File Transfer are generally file types that do not benefit from this technology.
Note: Files and Folders backed up using Delta File Transfer are also compressed with standard compression. If a file is in a backup selection that uses Delta File Transfer, but is excluded from Delta File Transfer using a global excludes filter, it is still compressed with standard compression unless it is also excluded from standard compression using another global excludes filter.
3 To exclude files greater than a specific size from Delta File Transfer, select the Exclude all files greater than check box and enter a size in KB.
4 To exclude files smaller than a specific size from Delta File Transfer, select the Exclude all files less than check box and enter a size in KB.

135Configuring the Desktop and Laptop OptionConfiguring Global Exclude Filters
5 To add a new Delta File Transfer global exclude, click Add and configure as follows.
6 Click OK.
7 To edit a global Delta File Transfer exclude filter, click the filter you want to change. Click Edit and configure as described in table 2-27, “Add Global Delta File Transfer Exclude Filter Dialog”.
8 To delete a global Delta File Transfer exclude filter, click the filter to be deleted and click Delete. To delete the filter, click Yes, and to cancel, click No.
9 Click OK.
Excluding Files that are Always OpenOn desktop computers running Windows versions, some folders and file types are generally always open and DLO is unable to back up these files. Adding these files to the Global Excludes list, or backup selection exclude list will prevent them from always being listed in the pending files list on the Desktop Agent.
■ C:\Windows\System32\Config
■ registry hives and logs, including *.DAT.LOG, *.LOG and the files system, SECURITY, default, SAM, and software
■ C:\Windows\System32\wbem
Table 2-32 Add Global Delta File Transfer Exclude Filter Dialog
Item Description
Filter The filter determines which files or folders will be excluded from Delta File Transfer by the global exclude. Filters can be file names, wildcards or macros.
Examples:Wildcard: *.tmp File name: pagefile.sysMacro: %WINDIR%
Note: When using wildcards, you must use the asterisk (*) wildcard. For example, *.tmp will return all results with the .tmp extension while .tmp will return only files explicitly named .tmp.
Description Type a description of the global exclude.
Apply to Indicate whether this global exclude should apply to files, folders, or both files and folders.

136 Configuring the Desktop and Laptop OptionConfiguring Global Exclude Filters
■ *.EVT
■ *.LOG (in particular, STI_Trace.log, WIADEBUG.LOG, WIASERVC.LOG)
■ *.DAT (in particular, NTUSER.DAT, USRCLASS.DAT)
■ *.NCB
■ *.ACCDB
■ *.LDF and *.MDF
■ *.DATA
■ *.DB
Note: Open file backup feature does not support synchronized backup selections.
Using DLO Macros to Define Global ExcludesThe following macros are typically used for excluding files using the global exclude option, but can also be used in backup selections.
Table 2-33 Global Exclude Macros
Macro Folder
%TEMP% The temp directory for the user who is logged on.
%WINDIR% The Windows directory.
Example: C:\Windows or C:\Winnt
%WEBTEMP% The web cache for the user who is logged on.
%RECYCLED% Recycle bins
%SYSTEM% The Windows system directory.
Example: C:\Windows\system or C:\Winnt\system
137Configuring the Desktop and Laptop OptionConnecting to DLO on a Different DLO Administration Server
Connecting to DLO on a Different DLO Administration Server
To connect to DLO on a different administration server, the user account must be a domain account and must have full administrator rights to the server.
To connect to DLO on a different DLO administration server1 On the DLO Administration Console main menu, click Network, and select
Connect to DLO Administration Server.
2 Select the appropriate options.
3 Click OK.
Server Enter the name of the DLO Administration Server you want to connect to, or select a server from the drop-down list.
User name Type the user name for an account with administrator access to the DLO Administration Server.
Password Type the password for this account.
Domain Enter the domain for this account.

138 Configuring the Desktop and Laptop OptionVeritas DLO Firewall Ports
Veritas DLO Firewall PortsYou may have special port requirements for Veritas DLO if you use a firewall. Firewalls sometimes affect system communications between administration servers and remote systems that reside outside the firewall environment. For more information on the port requirements, see Port Requirements for Veritas Desktop and Laptop document.
Note: In a remote DB setup, if the database is installed on a Windows Server 2012 machine, while adding the ports 1434 UDP and 1433 TCP, select the Domain check box for the Profile.
Add firewall exceptions for the following:
■ File and printer sharing
■ Remote service management
■ Windows management instrumentationThe default instance of the SQL Server Database Engine listens on TCP port 1433.Named instances of the Database Engine are configured for dynamic ports. That is, anavailable port is selected when the SQL Server service is started. While connecting toa named instance through a firewall, configure the Database Engine to listen on aspecific port, so that the appropriate port can be opened in the firewall.How to configure the SQL Server to listen on a specific TCP portTo configure the SQL Server, refer to the instructions provided athttp://msdn.microsoft.com/en-us/library/ms177440(v=sql.105).aspxHow to find the port number for a particular named instance of SQL Server
1 Click Start > Programs > Microsoft SQL Server > Configuration Tools > SQL Server Configuration Manager.
2 Expand SQL Server Network Configuration and select Protocols for <instance name>.
3 Right-click TCP/IP and select Properties.
4 In the TCP/IP Properties window, select the IP Addresses tab. The port used by the SQL Server instance can be found either in the TCP Dynamic Ports for a dynamic port, or in the TCP Port for a static port.
5 You can also find the port number using the registry entry:HKLM\Software\Microsoft\Microsoft SQL Server\<name of theinstance>\MSSQLServer\SuperSocketNetLib\TCP

139Configuring the Desktop and Laptop OptionSpecial Considerations for Installing Veritas DLO on Remote Computers
Special Considerations for Installing Veritas DLO on Remote Computers
Before you install Veritas DLO to remote computers, the following must be considered:
Table 2-34 Special Considerations
Item Description
Windows 7 and above/
Windows Server 2012, Windows Server 2016
To push-install to a computer, you must enable certain items on the destination computer’s Windows Firewall Exceptions list. You must enable the following items:■ File and Printer Sharing■ Windows Management Instrumentation (WMI)■ Remote Service ManagementFor more information, refer to the Microsoft Windows documentation.
Symantec Endpoint Protection (SEP)11.0 or later
To push-install to a computer that runs Symantec Endpoint Protection (SEP) version 11.0 or later, you must configure SEP to share files and printers. The file and printer sharing feature is turned off by default.

140 Configuring the Desktop and Laptop OptionDeploying Dedupe Server on IPv6 Network
Deploying Dedupe Server on IPv6 NetworkThis change is applicable only for versions prior to DLO 7.6 SP1.To deploy the Dedupe Server on IPv6 network, the attribute value of the protocol for different connector elements must be modified in the server.xml file.The server.xml file is located at this path:C:\Program Files\Veritas\Veritas DLO\Dedupe \Tomcat\conf\server.xmlIn the server.xml file, replace all occurrences of "org.apache.coyote.http11.Http11NioProtocol" with "org.apache.coyote.http11.Http11Protocol"After you modify the values, restart the Dedupe Server.

141Configuring the Desktop and Laptop OptionConfiguring DLO to Backup Files Over Internet
Configuring DLO to Backup Files Over InternetFor DLO to back up user data over Internet, you must set up these options in the following order:
1 Add the Edge Server using DLO Administration Console. For more information, see “Adding Edge Server” on page 142
2 Add the IO Server using DLO Administration Console. For more information, see “Adding IO Server” on page 145
3 Map an IO Server to DLO Storage Location.
4 Create a profile with Enable BOI option selected or select the option in an existing profile.
5 Assign the profile to users for continuous, non-intrusive backup of files over the internet.
For port requirements for Veritas DLO to back up over Internet, refer the Port Requirements for Veritas Desktop and Laptop Option document.
How BOI works?■ When the Desktop Agent goes outside of corporate network and has access to
the internet, the Desktop Agent works in BOI mode. It internally communicates with the Edge Server through HTTPS port 443. Hence, this port should be opened on the Desktop machine and Edge Server machine.
■ The Edge Server in turn contacts the IO Server. The IO Server will then contact the DLO resources.
■ When the Desktop Agent is launched for the first time in BOI mode, the user is prompted to enter the user name, password, and domain. Provide the required details. This is to authenticate the user in BOI mode and any subsequent launch of Desktop Agent on the same machine will not prompt the user to enter credentials again.
Configuring Edge ServerTo configure an Edge Server■ In a standalone setup, a default Edge Server namely “EdgeServer” would be
added in the DLO Administration Console.
■ Multiple Edge Servers can be added in a DLO setup.
■ In a distributed set up or in set ups where multiple Edge Servers are configured, add the Edge Server manually to the DLO Administration Server using the DLO Administration Console.
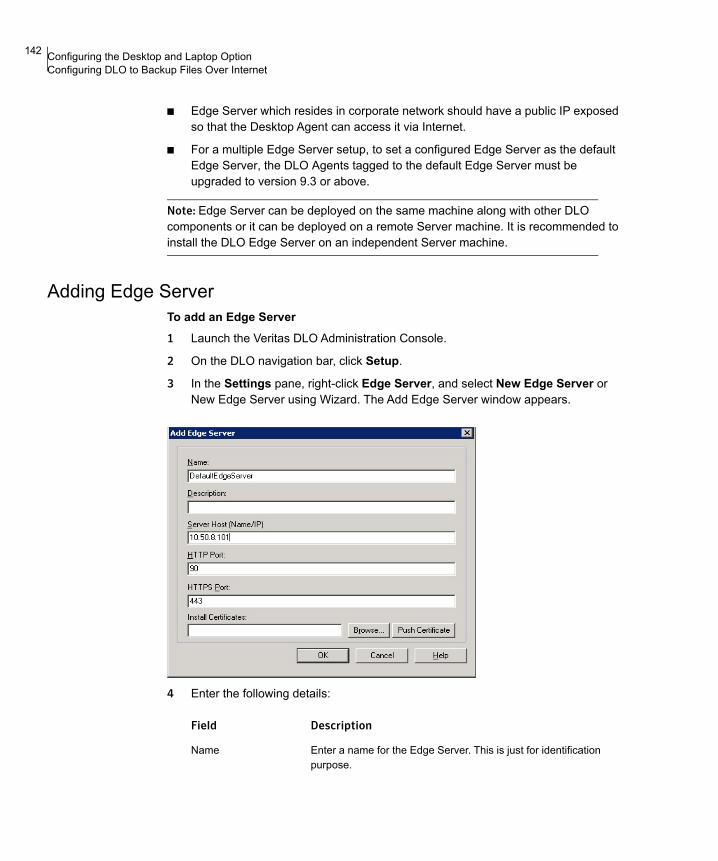
142 Configuring the Desktop and Laptop OptionConfiguring DLO to Backup Files Over Internet
■ Edge Server which resides in corporate network should have a public IP exposed so that the Desktop Agent can access it via Internet.
■ For a multiple Edge Server setup, to set a configured Edge Server as the default Edge Server, the DLO Agents tagged to the default Edge Server must be upgraded to version 9.3 or above.
Note: Edge Server can be deployed on the same machine along with other DLO components or it can be deployed on a remote Server machine. It is recommended to install the DLO Edge Server on an independent Server machine.
Adding Edge ServerTo add an Edge Server1 Launch the Veritas DLO Administration Console.
2 On the DLO navigation bar, click Setup.
3 In the Settings pane, right-click Edge Server, and select New Edge Server or New Edge Server using Wizard. The Add Edge Server window appears.
4 Enter the following details:
Field Description
Name Enter a name for the Edge Server. This is just for identification purpose.

143Configuring the Desktop and Laptop OptionConfiguring DLO to Backup Files Over Internet
About Server Certificates■ The default installation of Edge Server comes with self-signed SSL certificate.
■ It is recommended to use SSL certificate issued by a trusted Certificate Authority.
■ The files mentioned below will be needed while changing to a different certificate:PEM-encoded private key file for the Server (with .key extension)PEM-encoded X.509 certificate data file (with .crt extension)
To change the Server certificate in Edge servera Create a .crt file and place all the certificates (Server certificate, chain
certificates and root certificate) in this file.
b The order is Server certificate followed by the intermediate and then the root certificate.Example There is a Server certificate dlocert.crt which is issued by
dloserverCA.crt and their certificates have below content respectively.
Content in dloserver.crt-----BEGIN CERTIFICATE-----XXXXXXXXXXXXXXXXXXXXXXXXXXX-----END CERTIFICATE-----
Content in dloserverCA.crt-----BEGIN CERTIFICATE-----
Description Enter a description to identify the Edge Server.
Server Host Name/IP Enter the host name or IP address where the Edge Server is installed.
HTTP Port Enter the HTTP port number of the Edge Server host. This port will be used by the DLO components to connect to the Edge Server. Default value is 90.
HTTPS Port Enter the HTTPS port number of the Edge Server host. This port will be used by the DLO components to connect to the Edge Server. Default value is 443.
Install Certificates Enter the Server certificate details.
Note:While adding multiple Edge Servers, it is recommended to avoid using the same Server certificate across multiple Edge Servers.
Field Description

144 Configuring the Desktop and Laptop OptionConfiguring DLO to Backup Files Over Internet
YYYYYYYYYYYYYYYYYYYYYYYYYYYY-----END CERTIFICATE-----
Then the new .crt file should have below content-----BEGIN CERTIFICATE-----XXXXXXXXXXXXXXXXXXXXXXXXXXX-----END CERTIFICATE----------BEGIN CERTIFICATE-----YYYYYYYYYYYYYYYYYYYYYYYYYYYY-----END CERTIFICATE-----
5 Click Browse and select the .crt file created.
6 Click Push Certificate.
7 Click OK.
Note: Pushing the certificate from DLO Administration Console will bind the certificate to the Edge Server URL. Make sure to add a DNS entry mapping the Certificate name with its IP Address and publish this URL over internet.
More details on type of Server certificate supportedHow to convert DER format certificate into PEM format?In case the server certificate is in DER format, it should be converted into PEM format. OpenSSL can be used for same using below command. OpenSSL can be found in default Edge server install path: C:\Program Files\Apache Software Foundation\Apache24\bin
Command:openssl x509 -in input.crt -inform DER -out output.crt -outform PEM
Modifying Edge ServerYou may want to change the port numbers of the Edge Server, or when the Edge Server is not working, you need to set up another Edge Server. In such cases, modify the configuration details of the Edge Server.
To modify the Edge Server1 On the DLO navigation bar, click Setup.
2 In the Settings pane, double-click the Edge Server. The name of the Edge Server is displayed.
3 Right-click the Edge Server name and select Edit Edge Server.
145Configuring the Desktop and Laptop OptionConfiguring DLO to Backup Files Over Internet
4 Change the details as required.
5 Click OK.
Deleting Edge ServerWhile deleting the Edge Server, ensure that IO Servers are not added and configured in DLO.
1 On the DLO navigation bar, click Setup.
2 In the Settings pane, double-click the Edge Server. The name of the Edge Server is displayed.
3 Right-click the Edge Server name and select Delete Edge Server.
4 A confirmation prompt appears, asking you to confirm the delete operation.
5 Click Yes.The Edge Server is deleted from the DLO configuration.
Configuring IO ServerTo configure an IO Server
■ Add an IO Server to the DLO Administration Server using the DLO Administration Console.
■ Multiple IO Servers can be added in a DLO setup.
■ In a standalone or distributed setup, a default IO Server namely “DefaultIOServer” would be added in the DLO Administration Console.
■ In case more than one IO Server is deployed, it should be added manually in the DLO Administration Console.
■ An IO Server can be added only once an Edge server is added and configured in the DLO Administration Console.
Note: IO Server can be deployed on the same machine along with other DLO components or it can be deployed on a remote Server machine. It is recommended to install the DLO IO Server on an independent Server machine.
Adding IO ServerTo add an IO Server1 Launch the Veritas DLO Administration Console.
2 On the DLO navigation bar, click Setup.
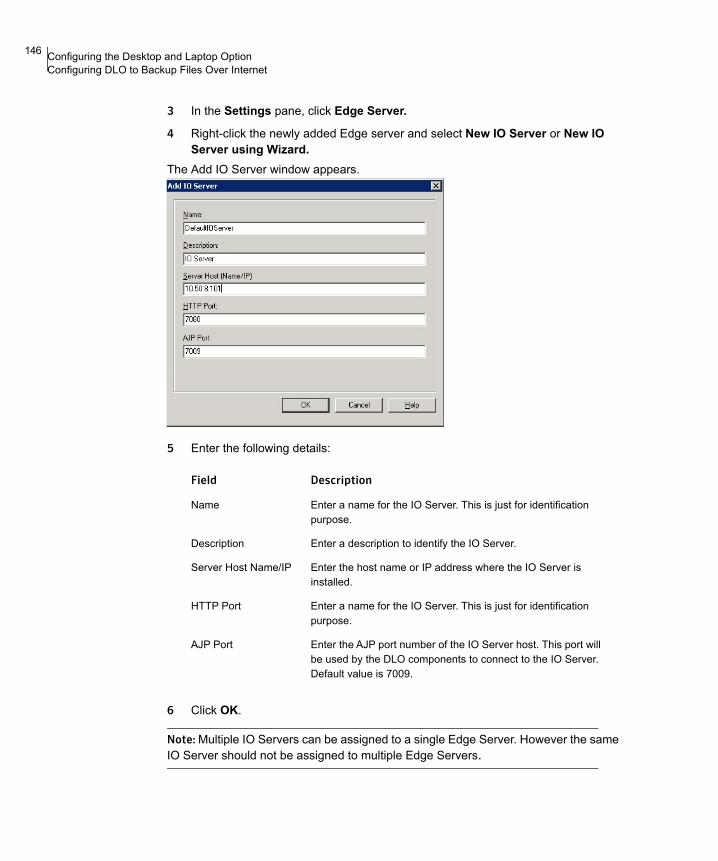
146 Configuring the Desktop and Laptop OptionConfiguring DLO to Backup Files Over Internet
3 In the Settings pane, click Edge Server.
4 Right-click the newly added Edge server and select New IO Server or New IO Server using Wizard.
The Add IO Server window appears.
5 Enter the following details:
6 Click OK.
Note: Multiple IO Servers can be assigned to a single Edge Server. However the same IO Server should not be assigned to multiple Edge Servers.
Field Description
Name Enter a name for the IO Server. This is just for identification purpose.
Description Enter a description to identify the IO Server.
Server Host Name/IP Enter the host name or IP address where the IO Server is installed.
HTTP Port Enter a name for the IO Server. This is just for identification purpose.
AJP Port Enter the AJP port number of the IO Server host. This port will be used by the DLO components to connect to the IO Server. Default value is 7009.
147Configuring the Desktop and Laptop OptionConfiguring DLO to Backup Files Over Internet
Modifying IO ServerYou may want to change the port numbers of the IO Server, or when the IO Server is not working, you need to set up another IO Server. In such cases, modify the configuration details of the IO Server.
To modify the IO Server1 On the DLO navigation bar, click Setup.
2 In the Settings pane, double-click the Edge Server. The name of the Edge Server is displayed.
3 Select IO Server from the Results pane.
4 Right-click the IO Server name and select Edit IO Server.
5 Change the details as required.
6 Click OK.
Deleting IO ServerWhile deleting the IO Server, ensure that the DLO Storage Location is not associated with any IO Server.
1 On the DLO navigation bar, click Setup.
2 In the Settings pane, double-click the Edge Server. The name of the Edge Server is displayed.
3 Right-click the IO Server name and select Delete IO Server from Results pane.
4 A confirmation prompt appears, asking you to confirm the delete operation.
5 Click Yes.The IO Server is deleted from the DLO configuration.
Assigning IO Server to Storage LocationOnce the Edge Server and IO Server are configured in DLO Administration Console, the DLO storage location should be mapped to an IO server.
Note: Same IO server can be assigned to multiple storage locations.
To assign an IO server to DLO storage location1 Double click the configured DLO storage location and assign an IO server.
2 Select an IO Server from the drop-down list.
3 Click OK.

148 Configuring the Desktop and Laptop OptionConfiguring DLO to Backup Files Over Internet
Note: An IO server can be mapped to existing storage locations or it can be even be mapped while creating new storage locations. For a DLO setup where multiple Edge Servers are configured, to map a storage location with a new IO Server that is tagged to a configured Edge Server, all Desktop Agents backing up to this Storage Location must be upgraded to version 9.3 or above.

149Configuring the Desktop and Laptop OptionAbout the DLO Mobile Application
About the DLO Mobile ApplicationDLO users can now access their backed up files even if they are not in front of their desktops or laptops. With the new DLO mobile app, you will get instant access to your backed up files on your Android/iOS smart phones. DLO ensures that corporate data that users have backed up is downloaded securely.
Note: The maximum file size that can be downloaded on Android devices and on iOS is 50 MB.
Support matrixBelow are the supported OS versions for Android and iOS devices:
Supported DevicesThe following device types are supported:
■ Android phones
■ Android tablets
■ iPads
■ iPhones
■ iPod touch
Advantages of DLO Mobile AppAnytime, anywhere access
■ Access files and folders backed up from your desktops or laptops.
Table 2-35 Supported Platforms
Mobile OS Platform OS Version
Android Lollipop
Marshmallow
Nougat (7.0)
iOS iOS 7
iOS 8.x
iOS 9
iOS 10
150 Configuring the Desktop and Laptop OptionAbout the DLO Mobile Application
Easy Restore of files■ Once the user selects Keep me logged in option, the user remains logged
into the app.■ This prevents the hassles of re-logging multiple times.
Secured File Restores■ The DLO mobile app gives you complete security, control and visibility of your
data.For more information about DLO Mobile Application, see Veritas DLO Mobile App Getting Started Guide document.
Chapter
3 Managing and Monitoring DLOThis section contains the following topics:
■ “Managing Desktop Agent Users” on page 151
■ “Managing Desktop Computers” on page 162
■ “Restoring Files and Folders from the DLO Administration Console” on page 169
■ “Rollback Capabilities” on page 178
■ “Monitoring DLO Job Histories” on page 189
■ “Monitoring Alerts on the DLO Administration Console” on page 195
■ “Configuring Alerts for Notifications” on page 201
■ “Configuring Email Notifications for selected alert” on page 202
■ “Managing Audit Trail” on page 203
■ “DLO Reports” on page 204
■ “About DLO and Clusters” on page 212
Managing Desktop Agent UsersThe DLO administrator manages Desktop Agent users from the DLO Administration Console. From this interface, the administrator can manually add users or groups of users to DLO, enable or disable users, move users to a new network share, assign a different profile, enable or disable notifications.Desktop Agent users are added to DLO either automatically using Automated User Assignments, or manually from the DLO Administration Console.

152 Managing and Monitoring DLOManaging Desktop Agent Users
Manually Creating New Network User Data Folders and Setting Security Attributes
If network shares already exist for desktop user backups, they can be added to DLO as network user data folders, or new shares can be created and added to DLO for this purpose. To create or use an existing network share as a network user data folder, the folder must have the appropriate security attributes.
To manually create network user data folders and set security attributes 1 Create or locate a network share on the computer where backup files will be
stored.
2 Right-click the share you created in step 1, and then select Properties.
3 Click the Sharing tab.
4 Verify that Share this folder is selected.
5 Click Permissions.
6 Select the following permissions for user ‘Everyone’: Full Control, Change, Read.
7 Click OK.
8 Click the Security tab.
9 Click Advanced.
10 Verify that the Inherit from parent the permission entries that apply to child objects check box is not selected.
11 Add Administrator and Everyone and give them full control permissions.
12 In this share, create a data folder for each user who will use this DLO Storage Location, or verify that a data folder already exists.
13 Right-click the data folder for a user.
14 Select Properties.
15 Select Security.
16 Verify that the Inherit from parent the permission entries that apply to child objects check box is not selected.
17 Add Administrator and the user who will be assigned to the user data folder to the share permission list.
18 Set full permission for Administrator and the user.
153Managing and Monitoring DLOManaging Desktop Agent Users
Changing DLO Service CredentialsWhen DLO is installed, you must specify the account credentials that can be used to run the DLO Administration Service. This account is used to create Storage Locations, and must have rights to create shares on any computers where backup data needs to be stored. To create Storage Locations in another domain, there must be appropriate trust relationships in effect. The domain administrator or any user with local administrative rights can change the DLO service credentials.
To change DLO service credentials1 On the Tools menu, select Manage Service Credentials.
2 Select Change DLO Service Account Information.
3 Enter the following account credentials.
Changing DLO Administration Console UI LanguageDLO now provides an option to change the language of the User Interface of DLO Administration Console.
To change language1 From the Tools menu in the DLO Administration Console, select Change
Language. The Change Language dialog box appears.
2 Select the required language from the drop down list.
3 Click OK.The DLO Administration Console will exit and relaunch for the language change to take effect.
Checking Data IntegrityThe Data Integrity Scanner simplifies the process of scanning network user data from previous DLO backups to detect unrestorable data due to problems with the encryption keys. It verifies that all data is encrypted using the most recent user key, and ensures
Change DLO service account information
Select to change the DLO service account information.
User name Type the user name for the account to be used.
Domain name Enter the domain for this account.
Password Type the password for this account.
Confirm password Type the password again.

154 Managing and Monitoring DLOManaging Desktop Agent Users
that all data has the correct recovery key for emergency restoration. This verification is applicable only to the user specific data in DLO Storage Locations, and not for the shared data in Dedupe Storage Locations.When Desktop Agents are upgraded, the Data Integrity Scanner runs automatically. When the DLO Administration console is launched, it identifies Desktop Agents that have not been checked for integrity. If any are found, a dialog appears, stating that one or more computers have not yet been validated by the Data Integrity Scanner and prompts if such Desktop Agents should be scanned.
To check data integrity 1 From the Tools menu, select Wizards and then Data Integrity Scanner.
2 Click Next.
3 If you want to set advanced options, click Advanced Options. Select the appropriate options and click OK.
4 Click Start.
5 Review the scan results. If the scan identified data encrypted with outdated keys but you did not choose to quarantine the data, you can run the scan again after setting advanced options to quarantine this data.
6 Click Next.
7 Click Finish.
Automatic Integrity CheckerThe Automatic Integrity Checker (AIC) validates the integrity of deduped data by verifying the hash values and CRI information in the Global Hash. If there is any
Permanently remove previously quarantined data
Select this check box to cause all previously quarantined data to be deleted.
Quarantine data encrypted with outdated keys
Select this check box to quarantine all files with outdated keys. If this option is not selected, data is scanned without being quarantined. After data is quarantined, the Desktop Agent backs up a new version of the file with the correct encryption-key.
Include computers that have already been validated
Select this check box to force all data to be rescanned, even if it has previously been validated.
Verbose output Select this check box to receive detailed information from the scan.
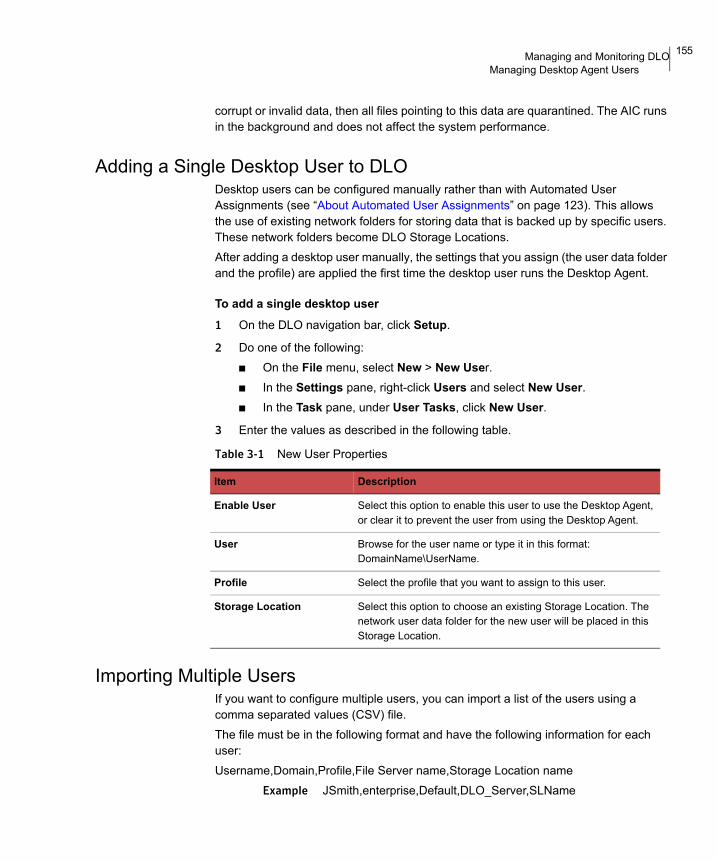
155Managing and Monitoring DLOManaging Desktop Agent Users
corrupt or invalid data, then all files pointing to this data are quarantined. The AIC runs in the background and does not affect the system performance.
Adding a Single Desktop User to DLODesktop users can be configured manually rather than with Automated User Assignments (see “About Automated User Assignments” on page 123). This allows the use of existing network folders for storing data that is backed up by specific users. These network folders become DLO Storage Locations. After adding a desktop user manually, the settings that you assign (the user data folder and the profile) are applied the first time the desktop user runs the Desktop Agent.
To add a single desktop user 1 On the DLO navigation bar, click Setup.
2 Do one of the following:■ On the File menu, select New > New User.■ In the Settings pane, right-click Users and select New User. ■ In the Task pane, under User Tasks, click New User.
3 Enter the values as described in the following table.
Importing Multiple UsersIf you want to configure multiple users, you can import a list of the users using a comma separated values (CSV) file. The file must be in the following format and have the following information for each user:Username,Domain,Profile,File Server name,Storage Location name
Example JSmith,enterprise,Default,DLO_Server,SLName
Table 3-1 New User Properties
Item Description
Enable User Select this option to enable this user to use the Desktop Agent, or clear it to prevent the user from using the Desktop Agent.
User Browse for the user name or type it in this format: DomainName\UserName.
Profile Select the profile that you want to assign to this user.
Storage Location Select this option to choose an existing Storage Location. The network user data folder for the new user will be placed in this Storage Location.

156 Managing and Monitoring DLOManaging Desktop Agent Users
To import multiple desktop users 1 On the DLO navigation bar, click Setup.
2 In the Selection pane, click Users.
3 In the Task pane, under User Tasks, click Import users using wizard.
4 Follow the instructions in the wizard.
Modifying Desktop Agent User PropertiesTo modify desktop agent user properties1 On the DLO navigation bar, click Setup.
2 In the Selection pane, click Users. Users are listed in the Results pane.
3 Select the user you want to modify.
4 In the Task pane, under General Tasks, select Properties.
5 Select the appropriate options as described in the following table.
Enabling or Disabling DLO Access for a Desktop UserThis option allows to you either allow or prevent a user from using the Desktop Agent.
To enable or disable DLO access for a desktop user 1 On the DLO navigation bar, click Setup.
2 In the Selection pane, click Users. Users are listed in the results pane.
3 Select the user you want to modify.
Table 3-2 User Properties
Item Description
Enable User Select this option to enable this user to use the Desktop Agent, or clear it to prevent the user from using the Desktop Agent.
User The name of the user. This field cannot be edited.
Profile Select a profile to apply to this user.
Network user data folder This is the location where the user’s backup files are to be stored. It cannot be modified. To move a user to a new location, see “Moving Desktop Agent Users to a New Network User Data Folder” on page 159.
157Managing and Monitoring DLOManaging Desktop Agent Users
4 In the Task pane, under General Tasks, select Properties.
5 Do one of the following:■ Clear the Enable user check box to prevent the desktop user from backing
up data with the Desktop Agent.■ Select the Enable user check box to allow the desktop user to back up data
with the Desktop Agent.
Archiving UserThe Mark as Archive option allows the administrator to archive the users who have left the organization. The status of the user changes to Archived.
■ The Desktop Agent of the archived users will be in disabled state.
■ All the reports other than “Users status by profile” does not contain archived users data.
■ All users data other than VIP user’s data can be restored from DLO Administration Console.
To archive users1 On the DLO Administration Console, click Setup.
2 In the Selection pane, click Users. Users are listed in the results pane.
3 Select one or more users to mark as archive.
4 Right-click and select Mark as Archive. The status of the user changes to Archived.
Deleting a User from DLOIf you want to permanently remove a user from the DLO database, you can delete the user’s entry from DLO Administration Console. Before deleting the user from the DLO database, you should uninstall the Desktop Agent from the user’s desktop. Otherwise, the user will automatically be re-added if the Desktop Agent is run by the user and a matching user assignment exists in DLO. If you cannot uninstall the Desktop Agent from the user’s computer, disable the user. For more information, see “Enabling or Disabling DLO Access for a Desktop User” on page 156.
To delete a user from the DLO database1 Uninstall the Desktop Agent from the user’s computer.
2 On the DLO Administration Console, click Setup.
3 In the Selection pane, click Users.
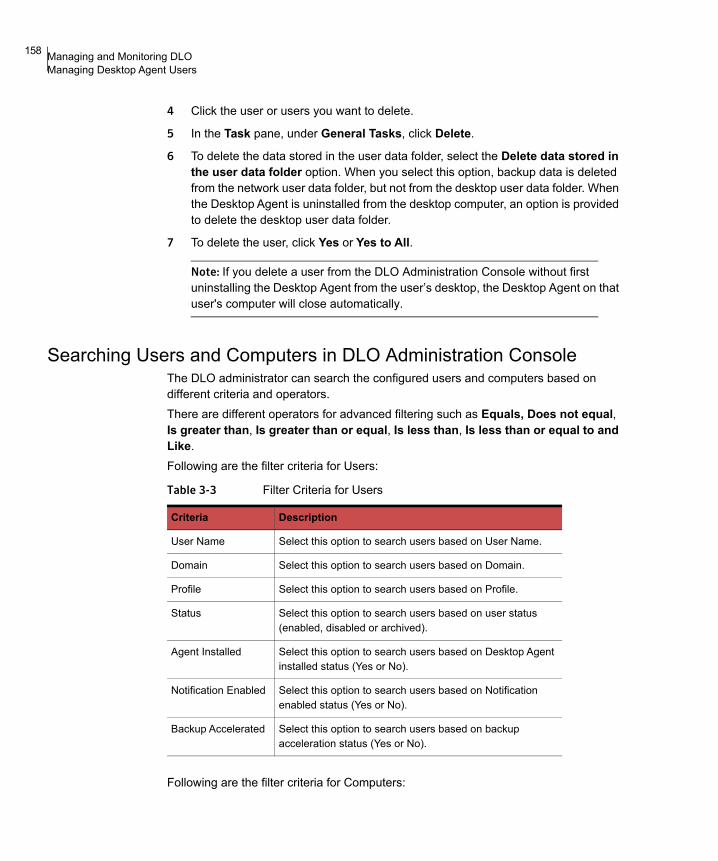
158 Managing and Monitoring DLOManaging Desktop Agent Users
4 Click the user or users you want to delete.
5 In the Task pane, under General Tasks, click Delete.
6 To delete the data stored in the user data folder, select the Delete data stored in the user data folder option. When you select this option, backup data is deleted from the network user data folder, but not from the desktop user data folder. When the Desktop Agent is uninstalled from the desktop computer, an option is provided to delete the desktop user data folder.
7 To delete the user, click Yes or Yes to All.
Note: If you delete a user from the DLO Administration Console without first uninstalling the Desktop Agent from the user’s desktop, the Desktop Agent on that user's computer will close automatically.
Searching Users and Computers in DLO Administration ConsoleThe DLO administrator can search the configured users and computers based on different criteria and operators. There are different operators for advanced filtering such as Equals, Does not equal, Is greater than, Is greater than or equal, Is less than, Is less than or equal to and Like.Following are the filter criteria for Users:
Following are the filter criteria for Computers:
Table 3-3 Filter Criteria for Users
Criteria Description
User Name Select this option to search users based on User Name.
Domain Select this option to search users based on Domain.
Profile Select this option to search users based on Profile.
Status Select this option to search users based on user status (enabled, disabled or archived).
Agent Installed Select this option to search users based on Desktop Agent installed status (Yes or No).
Notification Enabled Select this option to search users based on Notification enabled status (Yes or No).
Backup Accelerated Select this option to search users based on backup acceleration status (Yes or No).

159Managing and Monitoring DLOManaging Desktop Agent Users
Table 3-4 Filter Criteria for Computers
Searching Users and Computers in Restore TabThe Restore tab in the DLO Administration Console provides an option to search for all the users and computers.
■ On the DLO navigation bar, navigate to Task > Restore > General Tasks > Find.The search is based on different criteria and operators. 'Equals' and 'Like' are the operators used for filtering.For more information on filter criteria, see Table 3-25.
Moving Desktop Agent Users to a New Network User Data FolderWhen Desktop Agent users are moved to new network user data folders, the contents of each network user data folder is moved to a new directory. The new directories can be existing DLO Storage Locations or other directories on the network.For more information on using existing directories on the network as network user data folders, see “Manually Creating New Network User Data Folders and Setting Security Attributes” on page 152.When the network user data folder is moved to a UNC location (for example, \\myserver\userdata\username) rather than an existing DLO Storage Location, permissions on the new location need to be modified. The local administrator group and the owner of the files must have read and change permissions for the network user data folder, and the Everyone group should be removed.After the data is successfully moved, manually delete the residual data in the oldDLO Storage Location, but do not delete the data in the Dedupe Storage Location because some users may be referring to the old deduped data.
Criteria Description
Computer Select this option to search for computers based on Computer name.
User Name Select this option to search for computers based on User name.
Status Select this option to search for computers based on Computer status (enabled or disabled).
Agent Version Select this option to search for computers based on Desktop Agent version.
Build Number Select this option to search for computers based on Desktop Agent build number.

160 Managing and Monitoring DLOManaging Desktop Agent Users
Subsequent backups will be stored in the new location for each user.In a DLO set up where multiple Edge Servers are configured, in order to move one or more Desktop Agent users data to a new storage location which is tagged to a configured Edge Server, the Desktop Agents for these users must be upgraded to DLO 9.3 or above versions.
Note: For migrating NSF files, make sure that Lotus Notes client is installed on the computer where DLO Administration Console exists.
To move one or more Desktop Agent users to a new network user data folder1 On the DLO navigation bar, click Setup.
2 In the Selection pane, click Users.
3 Select one or more user to be moved.
4 In the Task pane, under User Tasks, click Move network user data folder.
Note: If the target Storage Location is tagged to a Dedupe Storage Location belonging to the same Dedupe Storage Pool, the deduped data will not be moved, and thus no space will be reclaimed.
5 Select the appropriate options as described in the following table.
6 Click Start to begin the data transfer.
Table 3-5 Move User
Item Description
User Lists the domain and user name of the selected user or users.
From Lists the current network user data folder location.
Destination
Move the user data folder to an existing Storage Location
Select this option to choose an existing Storage Location from the drop-down list. A new network user data folder will be created in the new Storage Location for each user who is moved.
Delete the user data from previous network user data folder
Select this option to delete the user data from previous NUDF location.
Note: If there is a failure in deleting the previous user data, a warning message is displayed.

161Managing and Monitoring DLOManaging Desktop Agent Users
Note: When the transfer is complete, each affected Desktop Agent will shut down and then automatically restart within a 30 minute window.
Migrating Desktop Users to New ComputersWhen a desktop user receives a new computer, DLO can be used to migrate user data to the new computer. DLO accomplishes this task by staging a user’s backed up data on the new computer using a restore process. When the user logs in, the data is restored to the same location it occupied on the original computer. The final restoration of data occurs automatically when the user logs in and does not require a connection to the DLO Administration Server.
To migrate desktop users to new computers1 Follow the steps described in “Restoring Files and Folders from the DLO
Administration Console” on page 169.
2 In step 8, select Stage to alternate computer.
3 To migrate a single user or multiple users, choose the options as specified in Table 3-12 on page 173.
4 To stage multiple users data, select Stage multiple users and click Import.
5 The Import Users to Stage Data dialog appears.
6 Select the file to import by clicking the Browse button.
Note: Comma separated values file in the .CSV and .TXT formats are supported. Information for each user should be in the following format: Username, Domain, Source Computer, Destination Computer.
7 Click Next.
8 The validation status for the users to be imported appears in the next screen.
9 Users with an enabled check box can be imported. Refer the Status column for detailed information per user.
10 Users with Valid status can proceed to Stage the data.
11 The administrator can choose the Back option, to modify the .CSV or .TXT file contents for the problematic users.
12 Click Finish.
13 Click OK.The data is staged on the new computer.

162 Managing and Monitoring DLOManaging Desktop Computers
When the owner of the staged data logs in to the new computer, DLO moves the staged data to the same location it occupied on the original computer, completing the data migration process.
Note: Mac user data can be staged only on another Mac computer. Similarly, Windows user data can be staged on to a Windows computer only.
Viewing a List of Desktop Agent UsersTo view the list of desktop agent users1 On the DLO navigation bar, click Setup.
2 In the Selection pane, click Users to list users in the Results pane.
Managing Desktop ComputersDesktop computers can be easily managed from the DLO Administration Console. You can view and modify computer properties as well as enable, disable or delete computers from the console. In addition, an immediate backup can be run on one or more selected computers.
Modifying Computer PropertiesComputer properties can be viewed and modified from the DLO Administration Console. Computer properties are based on the profile to which the desktop computer owner is assigned. Computer properties can also be changed by the desktop user if that user has sufficient rights assigned in the profile.
To view and modify computer properties 1 On the DLO navigation bar, click Setup.
2 In the Selection pane, click Computers.
3 Right-click the computer for which you want to modify properties, and click Properties.
4 To modify the backup schedule for the computer, click the Schedule tab.
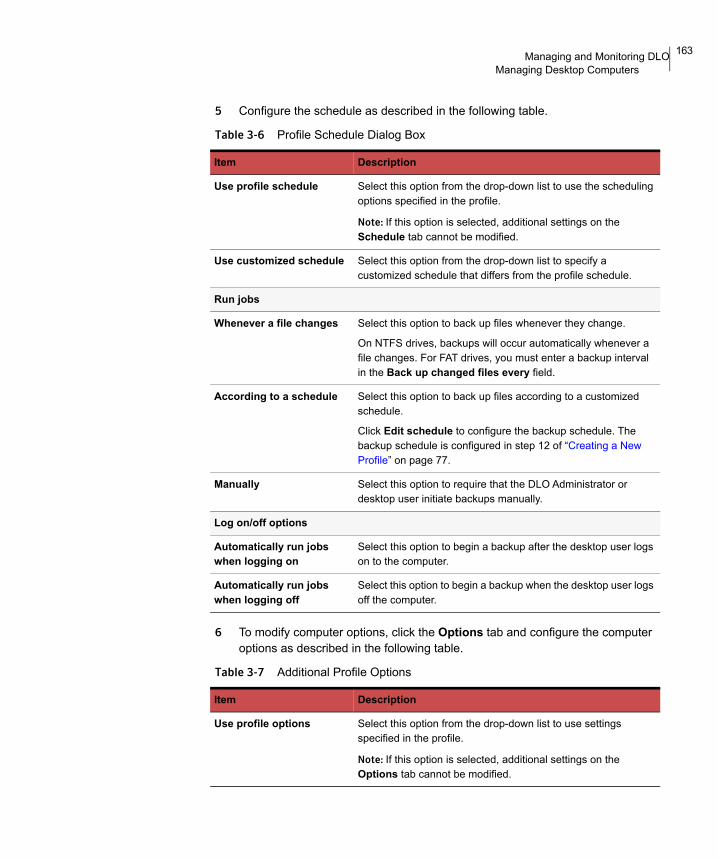
163Managing and Monitoring DLOManaging Desktop Computers
5 Configure the schedule as described in the following table.
6 To modify computer options, click the Options tab and configure the computer options as described in the following table.
Table 3-6 Profile Schedule Dialog Box
Item Description
Use profile schedule Select this option from the drop-down list to use the scheduling options specified in the profile.
Note: If this option is selected, additional settings on the Schedule tab cannot be modified.
Use customized schedule Select this option from the drop-down list to specify a customized schedule that differs from the profile schedule.
Run jobs
Whenever a file changes Select this option to back up files whenever they change.
On NTFS drives, backups will occur automatically whenever a file changes. For FAT drives, you must enter a backup interval in the Back up changed files every field.
According to a schedule Select this option to back up files according to a customized schedule.
Click Edit schedule to configure the backup schedule. The backup schedule is configured in step 12 of “Creating a New Profile” on page 77.
Manually Select this option to require that the DLO Administrator or desktop user initiate backups manually.
Log on/off options
Automatically run jobs when logging on
Select this option to begin a backup after the desktop user logs on to the computer.
Automatically run jobs when logging off
Select this option to begin a backup when the desktop user logs off the computer.
Table 3-7 Additional Profile Options
Item Description
Use profile options Select this option from the drop-down list to use settings specified in the profile.
Note: If this option is selected, additional settings on the Options tab cannot be modified.

164 Managing and Monitoring DLOManaging Desktop Computers
Use customized options Select this option from the drop-down list to specify settings that differ from the profile options.
Note: This option must be selected to enable access to additional settings on the Options tab.
Limit disk space usage on my computer to
Select this check box to limit disk space usage on the desktop computer.
To limit the usage to a percent of drive space, select % and type the maximum percentage of drive space to use.
To limit the usage to a specific size, select MB and type the maximum number of MB to use on the local drive.
Log file maintenance
Keep log files for a minimum of (days)
Type the minimum number of days to keep log files. Log files will not be deleted until they are at least as old as specified.
Note: Log files will not be deleted until their combined size exceeds the setting for the combined size of all log files, which is discussed below.
After minimum number of days, delete oldest log files when combined size exceeds (MB)
Type the maximum combined size of all log files to be retained before the oldest log files are deleted.
Note: You may have more than the specified number of MB of log files stored if none of the log files are as old as specified in the keep log files for a minimum of (days) setting.
Logging options
Log groom messages Select this check box to create logs for grooming operations.
Log information messages for backup
Select this check box to create logs for all backup operations.
Log warning messages Select this check box to create logs for all operations that generate warnings.
Mail options
Table 3-7 Additional Profile Options (Continued)
Item Description
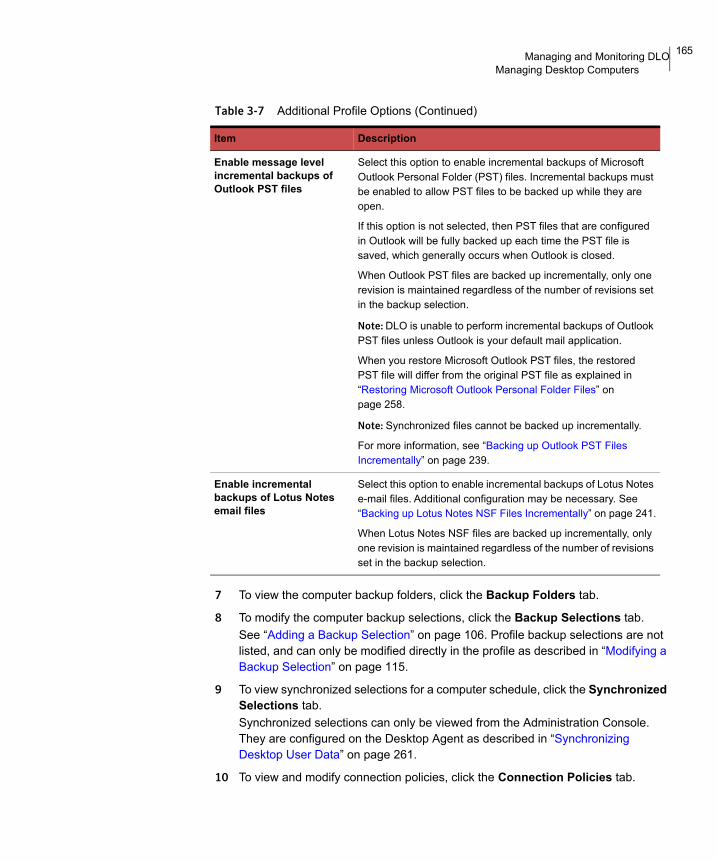
165Managing and Monitoring DLOManaging Desktop Computers
7 To view the computer backup folders, click the Backup Folders tab.
8 To modify the computer backup selections, click the Backup Selections tab. See “Adding a Backup Selection” on page 106. Profile backup selections are not listed, and can only be modified directly in the profile as described in “Modifying a Backup Selection” on page 115.
9 To view synchronized selections for a computer schedule, click the Synchronized Selections tab. Synchronized selections can only be viewed from the Administration Console. They are configured on the Desktop Agent as described in “Synchronizing Desktop User Data” on page 261.
10 To view and modify connection policies, click the Connection Policies tab.
Enable message level incremental backups of Outlook PST files
Select this option to enable incremental backups of Microsoft Outlook Personal Folder (PST) files. Incremental backups must be enabled to allow PST files to be backed up while they are open.
If this option is not selected, then PST files that are configured in Outlook will be fully backed up each time the PST file is saved, which generally occurs when Outlook is closed.
When Outlook PST files are backed up incrementally, only one revision is maintained regardless of the number of revisions set in the backup selection.
Note: DLO is unable to perform incremental backups of Outlook PST files unless Outlook is your default mail application.
When you restore Microsoft Outlook PST files, the restored PST file will differ from the original PST file as explained in “Restoring Microsoft Outlook Personal Folder Files” on page 258.
Note: Synchronized files cannot be backed up incrementally.
For more information, see “Backing up Outlook PST Files Incrementally” on page 239.
Enable incremental backups of Lotus Notes email files
Select this option to enable incremental backups of Lotus Notes e-mail files. Additional configuration may be necessary. See “Backing up Lotus Notes NSF Files Incrementally” on page 241.
When Lotus Notes NSF files are backed up incrementally, only one revision is maintained regardless of the number of revisions set in the backup selection.
Table 3-7 Additional Profile Options (Continued)
Item Description

166 Managing and Monitoring DLOManaging Desktop Computers
Profile defined connection policies can only be modified in the profile. See “Customizing Connection Policies” on page 252.
Enabling or Disabling a Desktop ComputerWhen a computer is disabled, the Desktop Agent remains on the desktop computer. The Desktop Agent can be used to restore files and view history, but backups are disabled and the user cannot modify Desktop Agent settings.
To enable or disable a desktop computer 1 On the DLO navigation bar, click Setup.
2 In the Selection pane, click Computers.
3 In the Results pane, select one or more computers to be enabled or disabled.
4 Right-click the selected computers and click Enable to enable the Desktop Agent to run on the selected computers, or click Disable to prevent the Desktop Agent from running on the selected computers.
Deleting a Desktop Computer from DLODeleting a desktop computer from DLO removes the computer from the DLO database and deletes the backed up files. This feature is most commonly used for a desktop computer that is no longer in use. Deleting a computer does not disable the Desktop Agent software. If subsequent backups are performed by the Desktop Agent, the computer entry will be added back to DLO. To prevent further backups from the computer, disable the computer rather than deleting it.
To delete a desktop computer from DLO 1 On the DLO navigation bar, click Setup.
2 In the Selection pane, click Computers.
3 In the Results pane, select one or more computers to be deleted.
4 In the Task pane, under General Tasks, click Delete.
5 When asked if you want to delete each selected computer and all backup files, click Yes.

167Managing and Monitoring DLOBacking up a Desktop from the Administration Console
Backing up a Desktop from the Administration Console
The DLO Administration Console can be used to run an immediate backup on one or more desktop computers. This allows the administrator to force a backup of a computer running in manual or scheduled mode.
To run an immediate backup on a desktop computer1 On the DLO navigation bar, click Setup.
2 In the Selection pane, click Computers.
3 In the Results pane, select one or more computers on which to run an immediate backup.
4 In the Task pane, under Computer Tasks, click Run backup now.
Setting Blackout WindowsDLO can be configured to stop backups at specific times to selected file servers, or to file servers managed by a specific maintenance server. This is done by configuring blackout windows. When a blackout window is configured for a selected resource, backups to network user data folders are suspended during the specified period.Blackout windows are specific to the resource for which they are created. To use the same schedule for two different resources, you must configure them separately.
To configure a blackout window for a network resource1 On the DLO navigation bar, click Setup.
2 In the Task pane, under Tool Tasks, click Blackout windows.
3 From the File Server list, select a network resource for which you want to configure a blackout window.
4 Do one of the following:■ To edit an existing schedule, select it from the drop-down list.■ To create a new schedule click New.
5 Configure the schedule as described in the following table.
Table 3-8 Blackout Window Schedule
Item Description
Enable Schedule Select this check box to activate this schedule.
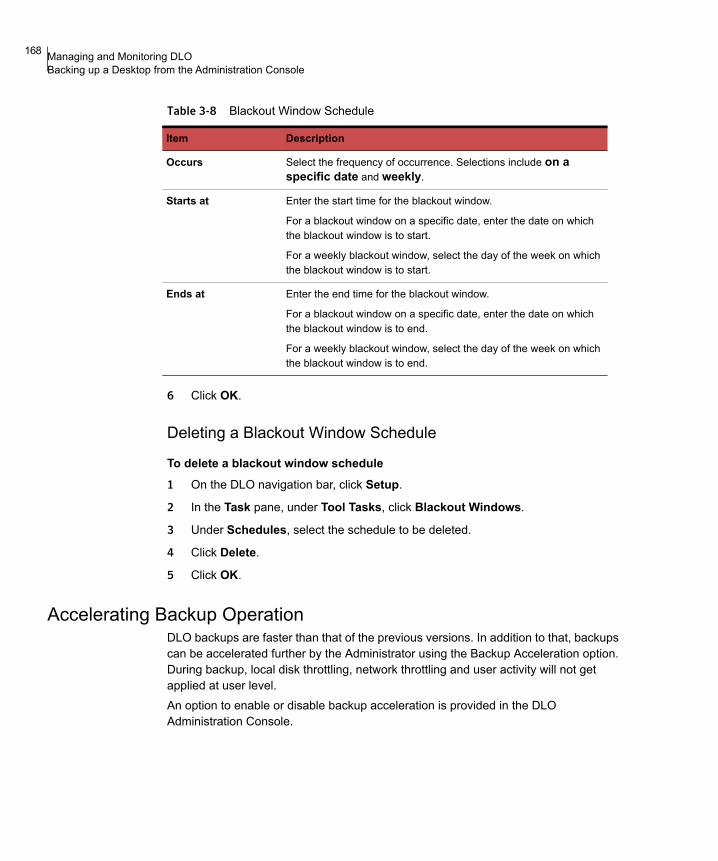
168 Managing and Monitoring DLOBacking up a Desktop from the Administration Console
6 Click OK.
Deleting a Blackout Window Schedule
To delete a blackout window schedule 1 On the DLO navigation bar, click Setup.
2 In the Task pane, under Tool Tasks, click Blackout Windows.
3 Under Schedules, select the schedule to be deleted.
4 Click Delete.
5 Click OK.
Accelerating Backup OperationDLO backups are faster than that of the previous versions. In addition to that, backups can be accelerated further by the Administrator using the Backup Acceleration option. During backup, local disk throttling, network throttling and user activity will not get applied at user level. An option to enable or disable backup acceleration is provided in the DLO Administration Console.
Occurs Select the frequency of occurrence. Selections include on a specific date and weekly.
Starts at Enter the start time for the blackout window.
For a blackout window on a specific date, enter the date on which the blackout window is to start.
For a weekly blackout window, select the day of the week on which the blackout window is to start.
Ends at Enter the end time for the blackout window.
For a blackout window on a specific date, enter the date on which the blackout window is to end.
For a weekly blackout window, select the day of the week on which the blackout window is to end.
Table 3-8 Blackout Window Schedule
Item Description

169Managing and Monitoring DLORestoring Files and Folders from the DLO Administration Console
Enabling or Disabling Backup Acceleration To enable or disable backup acceleration in the Users pane1 On the DLO navigation bar, click Setup.
2 In the Settings pane, click Users. Users are listed in the Results pane.
3 Select one or more users and right-click to view the menu options.
4 Select Enable Backup Acceleration to accelerate backup operation of users' data.
Select Disable Backup Acceleration option to disable faster backups.
Restoring Files and Folders from the DLO Administration Console
The administrator can restore files and folders to a desktop computer from the DLO Administration Console.
Note: DLO can overwrite a file which is in use by staging the file to be restored when the desktop computer restarts. Using this feature requires that the currently logged on user of the desktop computer has administrative rights on the desktop computer. Alternatively, the file can be restored by first closing the application that is using the file, or by restoring the file to an alternate location.
To restore files and folders from the DLO administration console
Note: Outlook (if MAPI PST files are restored) or Lotus Notes client should be installed on the machine where DLO Administration Console exists, and on the machine from where the emergency restore is performed.
1 On the DLO navigation bar, click Restore.
2 In the Computer pane, click the desktop from which the data to be restored originated.
3 In the Backup Folder pane tree view, select the folder containing the files you want to restore.

170 Managing and Monitoring DLORestoring Files and Folders from the DLO Administration Console
Note: DLO Administration Console provides an option to restore multiple users’ data at the same time. For more information, see “Restoring Multiple Users or Computers in DLO Administration Console” on page 176.
4 To restore the entire folder, check the folder in the Backup Folder pane.
5 To restore specific files, check the files in the File Version pane.
6 If multiple versions exist for a file, select the radio button for the file version you want to restore.
Note: When a desktop user deletes an original file, the backup files are retained until they are deleted by the file grooming process. If an original file has been deleted, but backup files are still available, the icon for the file in the restore view will have a small red ‘x’ to indicate the deletion of the original file. See “File Grooming” on page 231 for more information.
7 In the Task pane, under Restore Tasks, click the options as mentioned below to initiate the Restore operations.
8 Select the appropriate options from the following table.
Table 3-9 Restore Tasks Options
Item Description
Restore tasks
Restore to original computer Select this option to restore the selected files or folders to the computer from which they were originally backed up.
Note: When files or folders are restored to the original desktop computer, the job is submitted to the Desktop Agent and is run when the Desktop Agent connects to the DLO Administration Server. The job may run immediately if the desktop computer is currently on the network, or the job may be pending for some time if the desktop computer is not connected to the network.
Restore to alternate computer Select this option to restore the selected items to a network or local drive on a computer other than the one from which they were originally backed up.
Note: When files or folders are restored to a folder on an alternate computer, the restore job is processed immediately from the network user data folder by DLO. The job is not queued to the Desktop Agent.
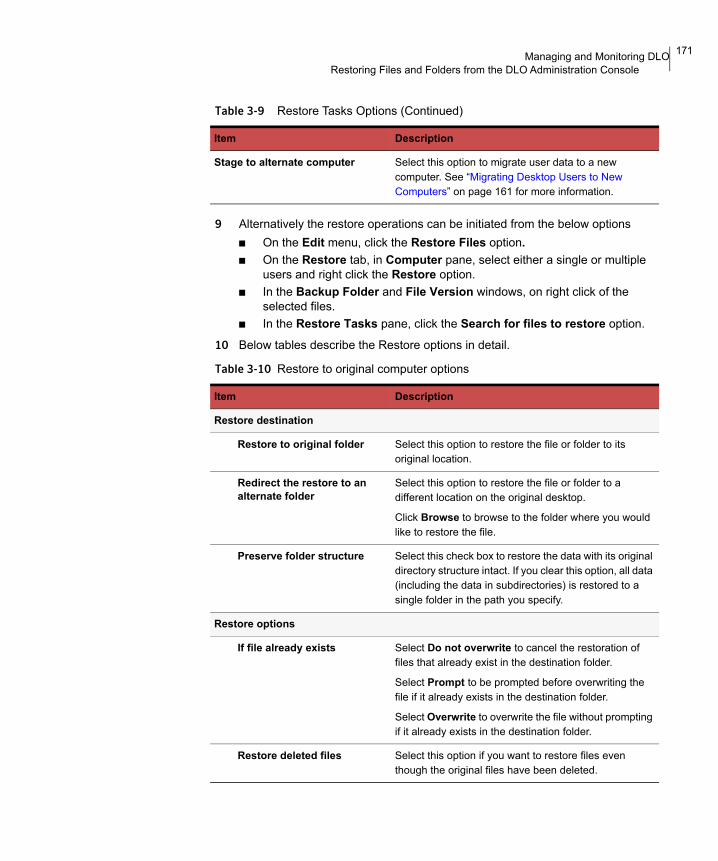
171Managing and Monitoring DLORestoring Files and Folders from the DLO Administration Console
9 Alternatively the restore operations can be initiated from the below options■ On the Edit menu, click the Restore Files option.■ On the Restore tab, in Computer pane, select either a single or multiple
users and right click the Restore option.■ In the Backup Folder and File Version windows, on right click of the
selected files. ■ In the Restore Tasks pane, click the Search for files to restore option.
10 Below tables describe the Restore options in detail.
Stage to alternate computer Select this option to migrate user data to a new computer. See “Migrating Desktop Users to New Computers” on page 161 for more information.
Table 3-9 Restore Tasks Options (Continued)
Item Description
Table 3-10 Restore to original computer options
Item Description
Restore destination
Restore to original folder Select this option to restore the file or folder to its original location.
Redirect the restore to an alternate folder
Select this option to restore the file or folder to a different location on the original desktop.
Click Browse to browse to the folder where you would like to restore the file.
Preserve folder structure Select this check box to restore the data with its original directory structure intact. If you clear this option, all data (including the data in subdirectories) is restored to a single folder in the path you specify.
Restore options
If file already exists Select Do not overwrite to cancel the restoration of files that already exist in the destination folder.
Select Prompt to be prompted before overwriting the file if it already exists in the destination folder.
Select Overwrite to overwrite the file without prompting if it already exists in the destination folder.
Restore deleted files Select this option if you want to restore files even though the original files have been deleted.
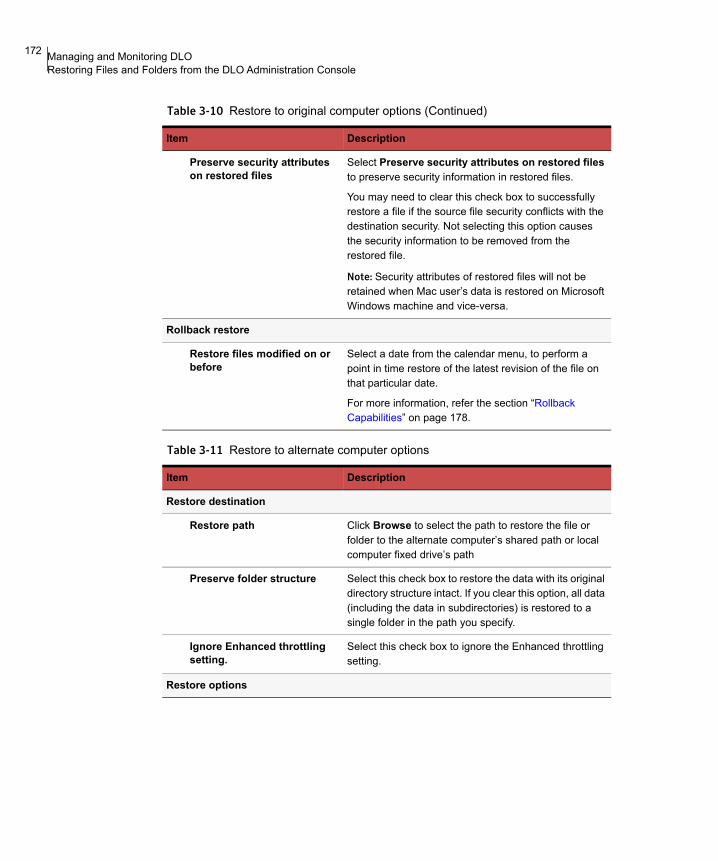
172 Managing and Monitoring DLORestoring Files and Folders from the DLO Administration Console
Preserve security attributes on restored files
Select Preserve security attributes on restored files to preserve security information in restored files.
You may need to clear this check box to successfully restore a file if the source file security conflicts with the destination security. Not selecting this option causes the security information to be removed from the restored file.
Note: Security attributes of restored files will not be retained when Mac user’s data is restored on Microsoft Windows machine and vice-versa.
Rollback restore
Restore files modified on or before
Select a date from the calendar menu, to perform a point in time restore of the latest revision of the file on that particular date.
For more information, refer the section “Rollback Capabilities” on page 178.
Table 3-11 Restore to alternate computer options
Item Description
Restore destination
Restore path Click Browse to select the path to restore the file or folder to the alternate computer’s shared path or local computer fixed drive’s path
Preserve folder structure Select this check box to restore the data with its original directory structure intact. If you clear this option, all data (including the data in subdirectories) is restored to a single folder in the path you specify.
Ignore Enhanced throttling setting.
Select this check box to ignore the Enhanced throttling setting.
Restore options
Table 3-10 Restore to original computer options (Continued)
Item Description

173Managing and Monitoring DLORestoring Files and Folders from the DLO Administration Console
If file already exists Select Do not overwrite to cancel the restoration of files that already exist in the destination folder.
Select Prompt to be prompted before overwriting the file if it already exists in the destination folder.
Select Overwrite to overwrite the file without prompting if it already exists in the destination folder.
Restore deleted files Select this option if you want to restore files even though the original files have been deleted.
Preserve security attributes on restored files
Select Preserve security attributes on restored files to preserve security information in restored files.
You may need to clear this check box to successfully restore a file if the source file security conflicts with the destination security. Not selecting this option causes the security information to be removed from the restored file.
Note: Security attributes of restored files will not be retained when Mac user’s data is restored on Microsoft Windows machine and vice-versa.
Rollback restore
Restore files modified on or before
Select a date from the calendar menu, to perform a point in time restore of the latest revision of the file on that particular date.
For more information, refer the section “Rollback Capabilities” on page 178.
Table 3-12 Stage to alternate computer
Item Description
Restore destination
Stage single user Select this option to restore the user’s data to an alternate computer by clicking the Browse button, and enter the machine name.
Table 3-11 Restore to alternate computer options (Continued)
Item Description
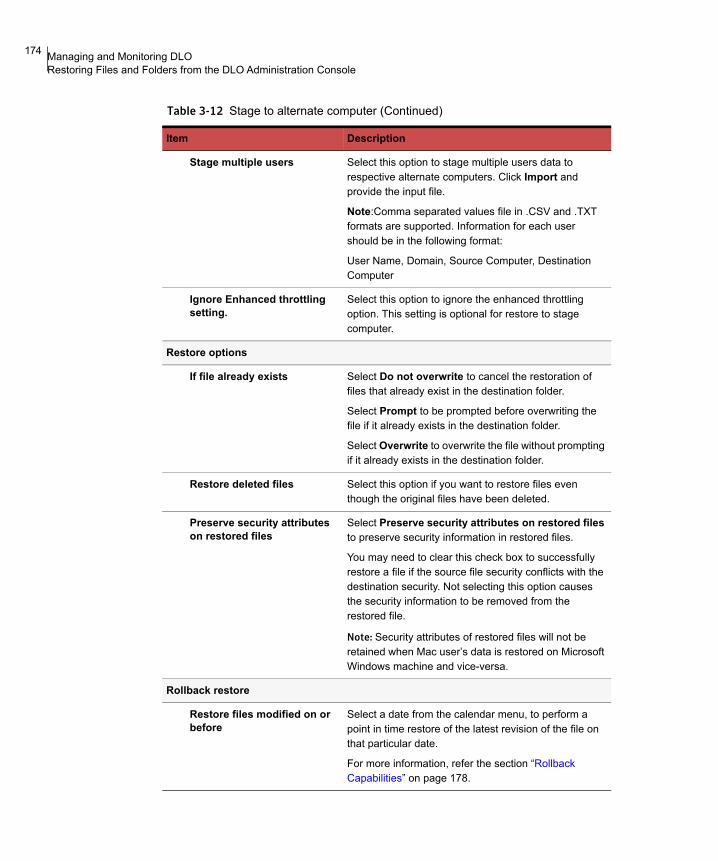
174 Managing and Monitoring DLORestoring Files and Folders from the DLO Administration Console
Stage multiple users Select this option to stage multiple users data to respective alternate computers. Click Import and provide the input file.
Note:Comma separated values file in .CSV and .TXT formats are supported. Information for each user should be in the following format:
User Name, Domain, Source Computer, Destination Computer
Ignore Enhanced throttling setting.
Select this option to ignore the enhanced throttling option. This setting is optional for restore to stage computer.
Restore options
If file already exists Select Do not overwrite to cancel the restoration of files that already exist in the destination folder.
Select Prompt to be prompted before overwriting the file if it already exists in the destination folder.
Select Overwrite to overwrite the file without prompting if it already exists in the destination folder.
Restore deleted files Select this option if you want to restore files even though the original files have been deleted.
Preserve security attributes on restored files
Select Preserve security attributes on restored files to preserve security information in restored files.
You may need to clear this check box to successfully restore a file if the source file security conflicts with the destination security. Not selecting this option causes the security information to be removed from the restored file.
Note: Security attributes of restored files will not be retained when Mac user’s data is restored on Microsoft Windows machine and vice-versa.
Rollback restore
Restore files modified on or before
Select a date from the calendar menu, to perform a point in time restore of the latest revision of the file on that particular date.
For more information, refer the section “Rollback Capabilities” on page 178.
Table 3-12 Stage to alternate computer (Continued)
Item Description

175Managing and Monitoring DLORestoring Files and Folders from the DLO Administration Console
11 Click OK.
12 Once the restore job is completed, on the Restore Status dialog, click View Summary to view the Restore Summary details.
13 On the Restore Summary dialog, select the appropriate filters for the data to be displayed from the following available filters.
14 Click View Details.
15 On the Restore Log File Viewer dialog, select the appropriate filters for the data to be displayed from the following available filters.
Table 3-14 Restore Log File Viewer Filters
Table 3-13 Restore Summary Filters
Item Description
User Select this check box to view the details for a specific desktop user, and then enter the username.
Computer Select this check box to view the details for a specific computer, and then enter a desktop computer name.
Limit search to failed restores
Select this check box to limit the display for users with failed restores.
Item Description
User Select this check box to view the details for a specific desktop user, and then enter the username.
Computer Select this check box to view the details for a specific computer, and then enter a desktop computer name.
With Filenames containing
Select this check box and enter a filename, or file type. Wildcard entries are supported.
Example: *gold.doc
Note: When using wild cards, you must use the ‘*’ wildcard. For example, *.tmp will return all results with the .tmp extension while .tmp will return only files explicitly named .tmp.

176 Managing and Monitoring DLORestoring Files and Folders from the DLO Administration Console
16 Click Search to view the filtered details.
Note: The Export option enables the administrator to save the Restore Summary and Restore Log File Viewer report in the .CSV format alone.
Restoring Multiple Users or Computers in DLO Administration Console
DLO provides an option to restore multiple users’ or computers’ data at the same time. The restore operation is at user level.The number of restores depends on the core of the machine. If the CPU is an eight core processor, then four users or computers are restored at the same time.
To restore multiple users’ or computers’ data1 On the DLO navigation bar, click Restore.
2 In the Computer pane, select one or more users to restore at the same time.For more information on combination of users, see “User Combination Criteria for Multiple Restore” on page 177.An option is provided to group the users based on Profile and Operating System.
Note: Individual drive or folder selection in the Backup Folder pane is not allowed in case of multiple user selection.
3 In the Tasks pane, under Restore Tasks, choose the appropriate restore options.For more information on the Restore options, see Table 3-9.
When the restore job is running, Administrator can view the restore status in the Active Restores pane. The Summary pane displays the following information:
■ Total number of restore jobs that are initiated
■ Total number of restore jobs that are completed
Limit search to Select this check box to limit the log files displayed to one of the following types of log entries:■ Informational entries only■ Error and warning entries only■ Error entries only■ Warning entries only
Item Description
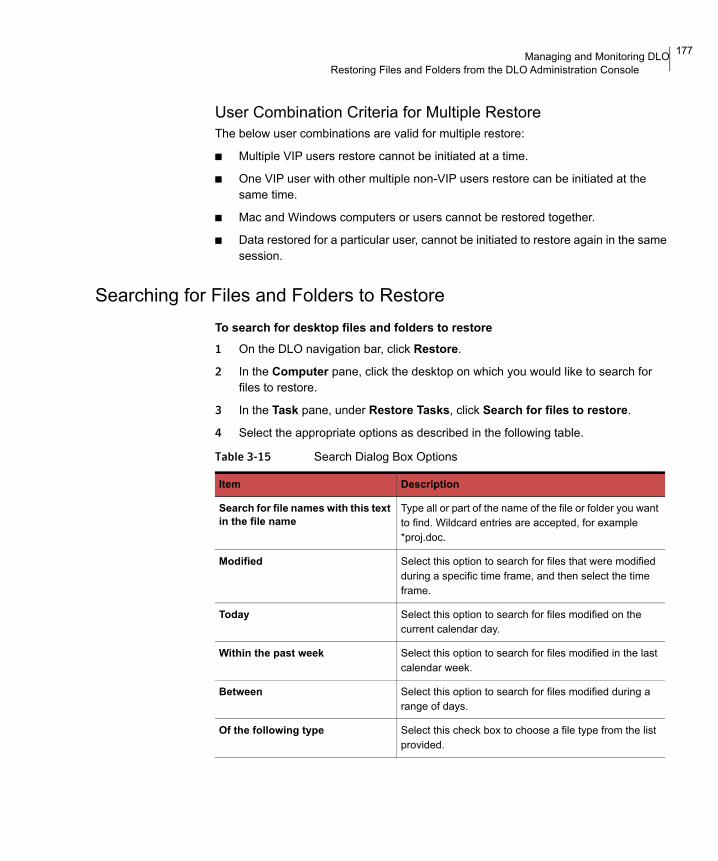
177Managing and Monitoring DLORestoring Files and Folders from the DLO Administration Console
User Combination Criteria for Multiple RestoreThe below user combinations are valid for multiple restore:
■ Multiple VIP users restore cannot be initiated at a time.
■ One VIP user with other multiple non-VIP users restore can be initiated at the same time.
■ Mac and Windows computers or users cannot be restored together.
■ Data restored for a particular user, cannot be initiated to restore again in the same session.
Searching for Files and Folders to RestoreTo search for desktop files and folders to restore1 On the DLO navigation bar, click Restore.
2 In the Computer pane, click the desktop on which you would like to search for files to restore.
3 In the Task pane, under Restore Tasks, click Search for files to restore.
4 Select the appropriate options as described in the following table.
Table 3-15 Search Dialog Box Options
Item Description
Search for file names with this text in the file name
Type all or part of the name of the file or folder you want to find. Wildcard entries are accepted, for example *proj.doc.
Modified Select this option to search for files that were modified during a specific time frame, and then select the time frame.
Today Select this option to search for files modified on the current calendar day.
Within the past week Select this option to search for files modified in the last calendar week.
Between Select this option to search for files modified during a range of days.
Of the following type Select this check box to choose a file type from the list provided.
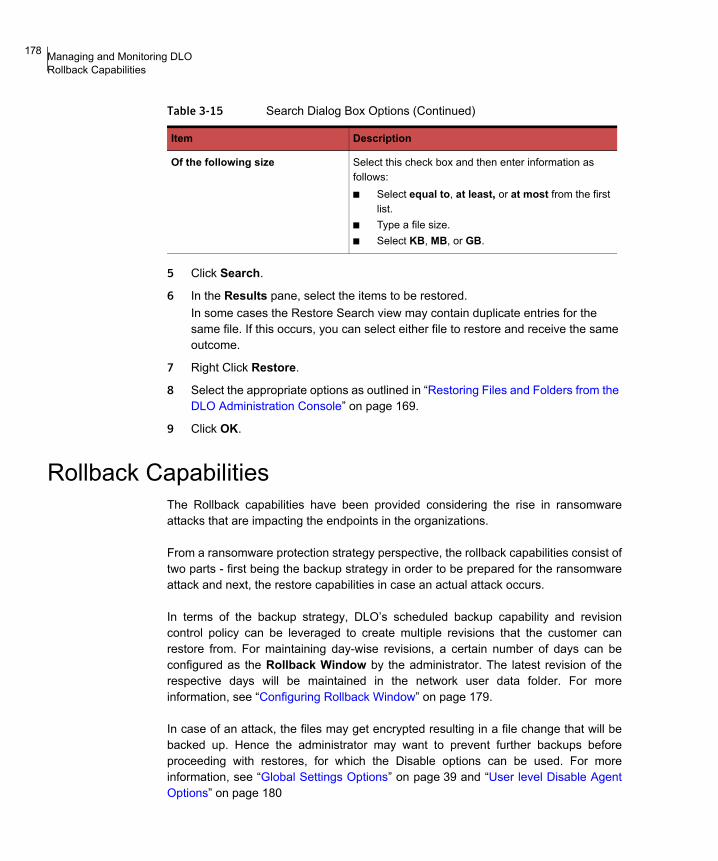
178 Managing and Monitoring DLORollback Capabilities
5 Click Search.
6 In the Results pane, select the items to be restored.In some cases the Restore Search view may contain duplicate entries for the same file. If this occurs, you can select either file to restore and receive the same outcome.
7 Right Click Restore.
8 Select the appropriate options as outlined in “Restoring Files and Folders from the DLO Administration Console” on page 169.
9 Click OK.
Rollback CapabilitiesThe Rollback capabilities have been provided considering the rise in ransomwareattacks that are impacting the endpoints in the organizations.
From a ransomware protection strategy perspective, the rollback capabilities consist oftwo parts - first being the backup strategy in order to be prepared for the ransomwareattack and next, the restore capabilities in case an actual attack occurs.
In terms of the backup strategy, DLO’s scheduled backup capability and revisioncontrol policy can be leveraged to create multiple revisions that the customer canrestore from. For maintaining day-wise revisions, a certain number of days can beconfigured as the Rollback Window by the administrator. The latest revision of therespective days will be maintained in the network user data folder. For moreinformation, see “Configuring Rollback Window” on page 179.
In case of an attack, the files may get encrypted resulting in a file change that will bebacked up. Hence the administrator may want to prevent further backups beforeproceeding with restores, for which the Disable options can be used. For moreinformation, see “Global Settings Options” on page 39 and “User level Disable AgentOptions” on page 180
Of the following size Select this check box and then enter information as follows: ■ Select equal to, at least, or at most from the first
list.■ Type a file size.■ Select KB, MB, or GB.
Table 3-15 Search Dialog Box Options (Continued)
Item Description

179Managing and Monitoring DLORollback Capabilities
For restore capabilities, in addition to a simplified restore UI, a point in time restore ofthe backed up data can be initiated by selecting a date from the restore dialog, torestore the latest revision of the file on that particular date. Once the restore activitiesare completed, the detailed summary can be viewed. For more information, see“Restoring Files and Folders from the DLO Administration Console” on page 169.
Note: Rollback capabilities are not supported for Windows and Mac endpoints with DLO versions prior to 9.1. Configuring Rollback Window is not supported on Mac endpoints.
Configuring Rollback WindowThe administrator can configure Rollback Window at a Profile level as below:
1 On the DLO navigation bar, click Setup.
2 On the Settings pane, select Profile, choose the required profile and double click.
3 On the Profile properties dialog, select the General tab.
4 In Rollback Restore, enable the check box Configure Rollback Window.
5 Enter the number of days in Keep revision files for past days. Please refer Table 2-6 for more details
6 Click OK.
Note: Configuring Rollback Window will override the network revision settings of all the backup selections associated with the profile.
Steps to perform Rollback Restore To revive from a ransomware attack, the administrator can initiate Rollback Restore operations from the DLO Administration console as below:
1 Disable the users, either using the global Disable options or selectively at a user level.
2 To disable the users selectively, on the DLO navigation bar, click Setup.
3 On the Settings pane, select Users.
4 Choose the impacted users, right click and select Disable.

180 Managing and Monitoring DLORollback Capabilities
5 Choose the appropriate options as described in the following table.
6 Alternatively, all users can be disabled at once by selecting the check box All Desktop Agents option as mentioned in Table 1-6.
7 Once the users are disabled, proceed to restore the files by selecting the appropriate options as outlined in “Restoring Files and Folders from the DLO Administration Console” on page 169.
8 Once the data is restored, it is recommended to delete the compromised data that has been backed up to the network storage location. This is in case of failures to detect the attacks on time.
9 The administrator can delete the compromised data from the network storage location using the command line option -DeleteNUDFData command. For more information, see “-DeleteNUDFData Command” on page 318.
10 Once -DeleteNUDFData command has completed, enable the agent machines selectively at the user level or using the Global options.
11 To enable the users selectively, on the DLO navigation bar, click Setup.
12 On the Settings pane, select Users.
13 Select the disabled users right click and select Enable, then Enable Agent option.
14 Alternatively, all users can be enabled at once by unchecking the All Desktop Agents option as mentioned in Table 1-6.
Once the agents are enabled, the endpoints can continue to backup the data as before.
Table 3-16 User level Disable Agent Options
Item Description
Disable Agent Select this option to disable all activities on the agent machines.
Disable except Administrator Restores
Select this option to disable all activities on the agent machine except the Administrator Initiated Restores. No backups will happen.
Disable except Agent Restores
Select this option to disable all activities on the agent machine except Administrator Initiated Restores and Agent Initiated Restores. No backups will happen.

181Managing and Monitoring DLOBackup and Recovery of DLO Servers and User Data
Backup and Recovery of DLO Servers and User DataDLO stores information in two major locations: the DLO Administration Server and the File Server. The DLO Administration Server stores the configuration database and the File Server stores the user data. The following recovery scenarios are discussed:
■ “Recovering Data for a Single User Emergency Restore” on page 183
■ “Recovering Data for a Single User Without DLO Emergency Restore” on page 183
■ “Recovering a Damaged or Corrupted DLO Administration Server” on page 184
■ “Recovering a Damaged or Corrupt File Server” on page 184This topic assumes that both the DLO Administration Server and File Server are periodically backed up to another disk, tape, or other media. Also note that for many DLO installations the Administration Server and File Server are on the same computer.
About Encrypted User DataDLO encrypts user data using a user-specific, randomly generated encryption-key. The encryption-keys are stored in DLO's configuration database on the DLO Administration Server. The encryption-keys are also stored in encrypted form on the File Server as explained in the next section.
About DLO Emergency Restore and Recovery PasswordsDLO's Emergency Restore feature is used to recover Desktop Agent user data from the File Server in the event that the configuration database is lost. Emergency Restore can also simplify the task of restoring user data for users that have been deleted using the DLO Administration Console. To use the Emergency Restore feature, a recovery password must have been created before the database was lost or the user was deleted. If user data is restored from another media, then the recovery password that was in effect when the user data was backed up must be used to recover the data. A recovery password is created when the DLO Console is first launched. For older versions of DLO, a recovery password had to be manually set using the DLO command-line interface. The recovery password is used to encrypt each user's encryption-key so the key can safely be stored on the File Server. The Emergency Restore feature prompts the administrator for the recovery password, which is used to decrypt the user's encryption-key. The encryption-key is then used to decrypt the user's data. If a recovery password has not been set, then the Emergency Restore feature cannot be used to restore encrypted user data.
182 Managing and Monitoring DLOBackup and Recovery of DLO Servers and User Data
Note: To restore the dedupe data, both DLO and dedupe database files are required. For more information on critical components of DLO, see the “Disaster Recovery Scenarios”.
Changing Recovery PasswordsIf the recovery password must be changed, the administrator must be aware that the previous recovery password will still be in effect for former backups of the File Server. The recovery password should only be changed if mandated for security reasons, such as a compromised password. If possible the recovery password should never be changed because changing or creating a recovery password will never aid in restoring existing user data. In fact, it can make it more difficult. Also, changing the recovery password can result in multiple recovery passwords being in use at the same time. For example, consider the case where a recovery password “pwd1” is established when DLO is installed. Each user's encryption-key is encrypted with the recovery password stored on the File Server. When the File Server is backed up, all the backup copies will use the recovery password “pwd1”. If the recovery password is subsequently changed to “pwd2”, then the user encryption-keys on the File Server is changed to be encrypted with the new recovery password. Subsequent backups of the File Server will use the recovery password “pwd2”. Now there are backups of the File Server using both “pwd1” and “pwd2” as the recovery password. When the Emergency Restore feature is used, the administrator will have to use the recovery password that was in effect when the File Server was backed up.
Note: The DLO 9.4 release mandates that the recovery password be updated for security reasons and thus the Recovery Password Wizard is prompted during the upgrade process.
Deleting a User using the DLO ConsoleWhen a user is deleted using the DLO Console, all data associated with the user is deleted. This includes the configuration data stored on the DLO Administration Server, and the user data stored on the File Server. The method for restoring data for a deleted user depends on whether a recovery password has been created or not.

183Managing and Monitoring DLOBackup and Recovery of DLO Servers and User Data
Recovering Data for a Single User Emergency RestoreThe Emergency Restore feature can be used to restore data for a deleted user if the user data can be restored from a backup of the File Server and a recovery password was established before taking a backup. See the section “About DLO Emergency Restore and Recovery Passwords” on page 181 for more information on Recovery Passwords.
To recover data for a single user emergency restore 1 Restore the user data to its original location on the File Server or to any other
temporary location.
2 Run the -emergencyrestore command to restore the data to DLO. dlocommandu -emergencyrestore <usersharepath> -w
<RecoveryPassword> -ap <destination-path>.
Note: If a user account that does not have administrator privileges is used to restore data, then open the command prompt by selecting the Run as Administrator option, and then run the command. Else, the files will not be restored.
Recovering Data for a Single User Without DLO Emergency RestoreIf the Recovery Password was not established or has been lost, restoring data for a deleted user requires that both the DLO Administration Server and File Server be restored to a single point in time before the user was deleted.
1 Take both the File Server and DLO Administration Server offline.
2 Back up both servers. Ensure that the backup includes the DLO configuration database and the all user data. This backup will be used to restore DLO back to its current state once the data is recovered. If any DLO data is not backed up it may be impossible to return to the current state.
3 Restore the user data to the File Server. If possible, restore just the data for the user being restored. If unsure, the entire volume on the File Server can be restored, only if sufficient precaution was taken in step 2 to ensure the entire volume was backed up.
4 Restore the configuration database to the DLO Administration Server. The default database path is C:\Program Files\Veritas\Veritas DLO\Data.
5 Restart the DLO Administration Server.
6 Use the DLO Console to restore the user's data. Select “Restore to an alternate computer” and restore the data to a temporary location.

184 Managing and Monitoring DLOBackup and Recovery of DLO Servers and User Data
Restore both the File Server and DLO Administration Server back to the most recent state.
Recovering a Damaged or Corrupted DLO Administration ServerThe following are the two cases for recovering a damaged or corrupted DLO Administration Server.
Case 1A non-system disk on the administration server fails or is otherwise corrupted.
Recovery procedure for Case 1 1 Fix or replace the failed disk.
2 Restore the entire disk from the backup copy.
3 Restart the computer.
Case 2The administration server's system hard drive fails, or the server’s computer needs to be replaced with a new computer.
Recovery procedure for Case 21 Set up the computer with the operating system software. Be sure to use the same
computer name as the failed DLO Administration Server.
2 Install DLO on the new administration server. Be sure to use the same version of DLO as was installed on the failed server.
3 Restore the DLO database files, overwriting the database files created when DLO was installed. The default database path is C:\Program Files\Veritas\Veritas DLO\Data.
4 Restart the computer.
Recovering a Damaged or Corrupt File ServerIf a non-system disk on the File Server fails or is otherwise corrupted the recovery procedure is as follows:
1 Fix or replace the failed disk.
2 Restore the entire disk from the backup copy.
3 Restart the computer.If the File Server's system hard drive fails, or the file server computer needs to be replaced with a new computer then the recovery procedure is as follows:

185Managing and Monitoring DLOBackup and Recovery of DLO Servers and User Data
1 Set up the computer with the operating system software. Be sure to use the same computer name as the failed File Server.
2 If the File Server had the DLO Maintenance Server installed, then install the DLO Maintenance Server on the computer. Be sure to use the same version of DLO as was installed on the failed File Server.
3 Restore the DLO file data.
Backing up and Restoring the DLO File Server and Database
Note: This process is applicable to the setup where only DLO components are installed and configured.
You can use Veritas DLO to back up the DLO Storage Locations, network user data folders, and the DLO database. To back up Desktop Agent user data, create a backup job and include the DLO Storage Location or network user data folder in the backup selection. To restore Desktop Agent user data from DLO, restore the data from DLO to a DLO Storage Location or network user data folder, and then use the DLO Administration Console to restore data to the desktop user data folder.To back up the DLO database, use the -backup command as described in “DLO Database Maintenance” on page 321 to create a copy of the database, and then create a backup job in DLO to back up this copy of the database. Use the -restore command to restore the database from a specific backup file.
Backing up and Recovering Data in a DLO-Dedupe Setup
Note: This recovery process is applicable to the setup where the DLO and Dedupe components are installed and configured together.
When a DLO Admin server is configured with a Dedupe Server, the following components form a single logical entity in time.
■ DLO configuration database
■ Dedupe Server database files
■ DLO file data in file server
■ Dedupe Storage Location dataHence, the backup and restore of these components should be performed together at a single logical point in time (PIT).
186 Managing and Monitoring DLOBackup and Recovery of DLO Servers and User Data
PIT across all the components requires the data writes to be stopped on all the components. The data writes can be stopped by disconnecting the individual components from the network or the Dedupe Server can be switched to maintenance mode by scheduling a Maintenance Window from the DLO Administration Console.
Backup■ Schedule a Maintenance Window with sufficient time out for backing up all
components. If backup time cannot be estimated in advance, then a time out of ‘9999’ minutes can be specified.
■ Back up all the components and tag them together for easy identification of the same Point in Time for all the components.
■ Stop the Maintenance Window from the DLO Administration Console. For more information on scheduling or stopping a Maintenance Window, see “Dedupe Server Maintenance” on page 74.You can also use the command-line option to schedule a Maintenance Window. For more information, see “Command Line Option to Schedule Maintenance Window” on page 75.
RestoreIn case of a disaster, data of all the components should be restored to a suitable logical PIT backup. To restore the data, follow these steps:
1 Shut down the Dedupe Server if it is running.
2 Restore all components data to the same logical Point in Time.
3 Run the following command:DDAdminCU.exe -ConfirmDR
4 Start the Dedupe Server.We recommend that you follow this procedure for backup and restore operations, and thus prevent data loss or any issue related to data integrity.
Disaster Recovery ScenariosThe disaster recovery scenarios have been tested and qualified in the following distributed setups:
■ Server 1: DLO Administration Server, DLO Admin Console and DLO Maintenance Server
■ Server 2: Mindtree Storesmart Dedupe Server
■ Server 3: Database Service (DB Service)

187Managing and Monitoring DLOBackup and Recovery of DLO Servers and User Data
■ Server 4: DLO Storage Location (NUDF)
■ Server 5: Dedupe Storage Location (DSL)
■ All DLO components residing on a single computerThe following table contains various disaster recovery scenarios where data can be restored successfully.
Table 3-17 Disaster Recovery Scenarios
Scenario Result Remarks
Dedupe Disabled Profile
All critical components and server states are backed up
All the components are restored to the point in time when it was backed up.
To restore data using the Emergency Restore feature, use the recovery password that was provided while configuring DLO for the first time.
Restore and backups are successful.
Only the DLO Database and NUDF are backed up
1 After the DLO installation is completed, stop the SQL service on the DB server.
2 Replace the DLO DB files and start the SQL service.
3 Now, launch the DLO Admin console.
4 Restore the data.
The DLO Agents that were configured earlier can continue to back up and restore data.
Only NUDF is backed up Once the server components are installed similar to the setup that was available earlier, data that was already backed up can be restored using the Emergency Restore feature.
Use the recovery password that was provided while configuring DLO for the first time.
Data can be restored using Emergency Restore feature.
Dedupe Enabled Profile
All critical components and server states are backed up
All the components are restored to the point in time (PIT) when it was backed up.
Restore and backups are successful

188 Managing and Monitoring DLOBackup and Recovery of DLO Servers and User Data
To restore data using the Emergency Restore feature, use the recovery password that was provided while configuring DLO for the first time.
Dedupe DB,DLO DB,DSL and DLO Storage backed up
1 After the DLO installation is completed, stop the SQL service on the DB server.
2 Replace the existing DLO DB files with the files that were backed up at an earlier PIT.
3 Start the SQL service.
4 Stop the Mindtree Storesmart Dedupe Server service.
5 Open the command prompt on the Dedupe server machine and run this command from the installation path: DDAdminCU.exe -ConfirmDR
6 Click OK and complete the DR process.
7 Start the Mindtree Storesmart Dedupe Server service.
8 Now, launch the DLO Admin console.
9 To verify that the data restored from the PIT backup is intact, click the Restore tab on the DLO Admin console and restore data.
Data can be restored from the DLO Admin console or by using the Emergency Restore feature.
The DLO Agents that were configured earlier can continue to back up and restore data.
Combination of Dedupe and Non-Dedupe Data
All critical components and server states are backed up
All the components are restored to the point in time when it was backed up.
To restore data using the Emergency Restore feature, use the recovery password that was provided while configuring DLO for the first time.
Table 3-17 Disaster Recovery Scenarios
Scenario Result Remarks

189Managing and Monitoring DLOMonitoring DLO Job Histories
Monitoring DLO Job HistoriesUse the History view on the DLO Administration Console to view information about the status of Desktop Agent jobs. These jobs include backup, restore, synchronization, and move user jobs. History logs are generated on each desktop running the Desktop Agent and are viewed either on the DLO Administration Console or on the Desktop Agent Console. You can filter history logs so that old or less important logs are not displayed, or only backup or restore job logs are displayed.
Viewing the DLO Job HistoryBy default, the history logs are updated when a job runs and an hour has passed since the last update. However, if the job's status changes, the history log is updated immediately to reflect the new status.
To display the history view in the DLO administration console ◆ On the DLO navigation bar, click History.
The History view includes a computer history and a job history for each desktop that is displayed. The History pane displays all desktops that are backed up with the Desktop Agent and provides the summary of information as described in the following table.
Only the DLO Database and NUDF are backed up
1 After the DLO installation is completed, stop the SQL service on the DB server.
2 Replace the existing DLO DB files with the files that were backed up at an earlier PIT.
3 Start the SQL service.
4 Now, launch the DLO Admin console.
5 Restore the non-dedupe data.
Non-Dedupe data can be restored.
Table 3-17 Disaster Recovery Scenarios
Scenario Result Remarks
Table 3-18 Computer History Pane
Item Description
User Name The name of the user who is logged on to the desktop that generated the message.

190 Managing and Monitoring DLOMonitoring DLO Job Histories
Note: In the computer history pane, the column Backup Completion (%) will not be updated for Windows desktop agents prior to DLO 8.0 SP3 and Mac agents prior to DLO 9.1. In the DLO Administration console, the Successfully Protected status will include only endpoints with 100% Backup Completion (%).
The Job History pane displays information as described in the following table.
Computer The name of the desktop that generated this message.
Profile The name of the profile that is assigned to the user who is logged on to the desktop.
For more information on profiles, see “About DLO Profiles” on page 77
Time when Agent was Last Active
The time when the desktop agent was last active and communicated to the DLO Server.
Note:This value is updated every 15 minutes in case there are no network connectivity issues.
Time of Last Successful Backup
The time when the desktop agent backed up the users data completely. (achieved 100% backup completion)
Note: An empty value indicates that the computer has not achieved 100% backup completion even once.
Backup Completion(%) The percentage of backups completed based on the size of files in the backup selection.
Backup Mode The backup mode specified in the profile. Backup modes include:■ Continuous: The backup occurs whenever a file changes■ Scheduled: The backup occurs according to a schedule■ Manual: The backup occurs when initiated by the user
Operating System The operating system of the Desktop agent machine.
Table 3-19 Job History Pane
Item Description
Start Time The time the job was started.
End Time The time the job ended.
Operation The operation performed in this job, such as backup or restore.
Table 3-18 Computer History Pane (Continued)
Item Description

191Managing and Monitoring DLOMonitoring DLO Job Histories
Setting Job History View FiltersThe job history view can be filtered to show only the type of jobs you wish to view. You can filter jobs by type, alerts received during the job, or by the time period in which the job was run.
To set job history view filters 1 On the DLO navigation bar, click History.
2 Click the desktop for which you want to view the history.
3 On the Task pane, under Job History View Filters, select one of the following options.
Status The current status of the job, such as active, completed, completed with errors, completed with warnings, cancelled, or failed.
Files Protected (Desktop) The number of files copied to the desktop user data folder during the job.
Size Protected (Desktop) The total bytes of data copied to the desktop user data folder during the job.
Files Protected (Network) The number of files copied to the network user data folder during the job.
Size Protected (Network) The total bytes of data copied to the network user data folder during the job.
Errors The number of errors, if any, that were generated during the job.
Table 3-19 Job History Pane (Continued)
Item Description
Table 3-20 Type of Jobs Viewed in the History View
Item Description
List all jobs Lists history logs for all jobs that have run on the selected desktop. These may include backup, synchronization, restore, or move user jobs.
List backup jobs only Lists history logs only for backup jobs that have run on the selected desktop.
List restore jobs only Lists history logs only for restore jobs that have run on the selected desktop.

192 Managing and Monitoring DLOMonitoring DLO Job Histories
4 To filter job history logs based on alerts received, select one or more of the following options.
5 To set a time frame for filters to be displayed, select one of the following options.
Viewing History LogsHistory logs are listed for each job on a desktop computer. They are viewed in the DLO Administration Console History view.
To view a history log in the DLO administration console 1 On the DLO navigation bar, click History.
List Web restore jobs only Lists history logs only for Web restore jobs that have run on the selected desktop. It also displays the IP Address of the device from where the Web restore was initiated for the particular file.
Table 3-21 Selections to Filter Job Histories Based on Alerts Received
Item Description
Show successful jobs Lists history logs for all successful jobs on the selected desktop.
Show jobs with warnings Lists history logs for all jobs that generated warnings on the selected desktop.
Show jobs with errors Lists history logs for all jobs that generated errors on the selected desktop.
Show cancelled jobs Lists history logs for all jobs that were cancelled on the selected desktop.
Table 3-22 Time Frame for Job Histories viewed
Item Description
Show last 24 hours Lists history logs that have been generated in the last 24 hours, and that meet all other filtering criteria.
Show last 7 days Lists history logs that have been generated in the last 7 days, and that meet all other filtering criteria.
Show all Lists all history logs that also meet all other filtering criteria.
Table 3-20 Type of Jobs Viewed in the History View (Continued)
Item Description

193Managing and Monitoring DLOMonitoring DLO Job Histories
2 In the History pane, select the computer for which you want to view a history log.
3 In the Job History pane, click the log you want to view.
4 In the Task pane, under General Tasks, click View history log file to display the log file viewer with all log messages for this job.
Table 3-23 Log File Viewer
5 To filter the results, select the appropriate options as described in the following table.
Table 3-24 Log File Viewer Filtering Options
Item Description
Search for log entries in
All log files Select this option to show all log entries in the log file viewer.
Current log file Select this option to search only those log entries in the current log file.
With timestamp Select this check box to search only those log entries within a specified time period. The options include:■ Today: Show only log files that were created today■ Within the last week: Show all log files created in the last week■ Between dates: Show all log files created between the dates
entered

194 Managing and Monitoring DLOMonitoring DLO Job Histories
6 Click Search.
7 Double-click a log entry to view additional details.
8 Click Close.
Searching History LogsHistory log files are easily searched using the Log File Viewer. This enables you to refine the list of jobs as required.
To search for log files using the DLO administration console 1 On the DLO navigation bar, click History.
Of the following type Select this check box to show only logs of the indicated type. The available selections will vary depending on the log file, but may include the following:■ Backup■ Restore■ Move User■ Maintenance■ Dedupe■ Web Restore
With File names containing
Select this check box to enter a file name, or file type. Wildcard entries are supported.
Example: *gold.doc
Note: When using wildcards you must use the ‘*’ wildcard. For example, *.tmp will return all results with the .tmp extension while .tmp will return only files explicitly named .tmp.
Limit search to Select this check box to limit the log files displayed to one of the following types of log entries:■ Informational entries only■ Error and warning entries only■ Error entries only■ Warning entries only■ Local data folder entries only■ Local data folder error entries only■ Network data folder entries only■ Network data folder error entries only
Table 3-24 Log File Viewer Filtering Options (Continued)
Item Description

195Managing and Monitoring DLOMonitoring Alerts on the DLO Administration Console
2 In the Task pane, under General Tasks, click Search log files to display the log file viewer.
3 Set filtering options as discussed in step 5 on page 193.
4 Click Search.
5 Double-click a log entry to view additional details.
6 Click Close.
Searching Users and Computers in History TabThe History tab in the DLO Administration Console provides an option to search for all the users and computers. This search is based on different criteria and operators. 'Equals' and 'Like' are the operators used for filtering.
Table 3-25 Filter Criteria
To search for users or computers1 On the DLO navigation bar, click History.
2 In the Task pane, under General Tasks, click Find to display the search filter.
3 Select the required search criteria using the desired operator. For more information, see Table 3-25.
4 Click Find All. The required users and computes are displayed in the History pane.
Monitoring Alerts on the DLO Administration ConsoleAlerts appear in DLO when the system needs administrator attention. Alerts help the DLO administrator understand the current condition of DLO jobs by displaying information on jobs.Alerts can be generated to provide general information, or they can be in response to a problem. When an alert is generated due to a problem, the alert contains information about the problem, and in some cases, recommendations on how to fix it.
Criteria Description
User Name Select this option to search for users based on the name of the user.
Computer Select this option to search for computers based on the name of the computer.

196 Managing and Monitoring DLOMonitoring Alerts on the DLO Administration Console
The DLO administrator can choose to display all alerts, or limit the type of alerts that appear.
■ Active alerts display the alerts that are active in the system and need a response from the operator.
■ Alert history displays alerts that have been responded to or alerts that have been automatically cleared from the system.
In addition, the status bar at the bottom of the screen displays an alert icon for the most severe type of alert in the Active alerts list. Therefore, if the current or most recent alert is not the most severe, the icon in the status bar will not match the icon for the most recent alert in the alert list.The Desktop Agent filters the alerts to minimize the load on DLO. By default, alerts are limited to one of each type in 24 hours. For example, you will see only one “Local Out of Disk Condition” alert in a 24-hour period from a desktop running the Desktop Agent.
Note: “Backup/Restore complete” alerts cannot be filtered. If you enable these alerts, they are generated each time a backup or restore job completes.
Active alerts that are older than a specified number of days are cleared and moved into the alert history. The alerts in the history will be deleted if they have been cleared for more than a specified number of days.If an alert is manually cleared, it is moved into the alert history. Deleting an alert manually removes it permanently.You can set up DLO to notify the administrator and respective users when the selected alert occurs. See “Configuring Alerts for Notifications” on page 201 for more information.The following table describes the alert types.
Table 3-26 Alert Categories
Alert Type Description
Informational Notifies you that an expected action has occurred, such as the successful completion of a backup or restore job.
Warning Notifies you of a potential issue. For example, an alert is generated when a backup has not been completed on a desktop within a given time frame, or if the disk quota limitations are being approached.
Error Notifies you of an active or pending danger to the application or its data. An error would be generated, for example, if a backup failed to complete, or if a desktop has exceeded its disk quota limitations.

197Managing and Monitoring DLOMonitoring Alerts on the DLO Administration Console
The following table describes the possible alerts.
Table 3-27 DLO Alerts
Type Name Description
Errors
A backup job has completed with errors
A backup job has completed, but errors were generated.
A restore job has completed with errors
A restore job has completed, but errors were generated.
A restore job submitted to client has completed with errors.
An error has occurred on the file server
Errors were generated on the file server.
Desktop user data folder disk space full
The volume containing the desktop user data folder is full. There is insufficient free disk space to back up the current file. The file will be copied directly to the network user data folder.
Desktop user data folder storage limit has been reached
The specified disk storage limit was reached when attempting to add a new revision to the desktop user data folder.
File name, directory name, or volume label syntax is incorrect.
Indicates either a storage system problem that requires attention, or a file name denied by SRM software. If the latter, these files should be added to DLO’s global exclude list. See “Configuring Global Exclude Filters” on page 129 for more information.
Network user data folder disk space full
The volume containing the network user data folder is full. There is insufficient free disk space to back up the current file.
Network user data folder storage limit has been reached
The specified disk storage limit was reached when attempting to add a new revision to the network user data folder.
Unable to configure the Desktop Agent
A new user has connected, but for an unknown reason, cannot be configured properly.
Suspend backup and alert administrator on throttling failure
The backup job has been suspended because of a throttling failure.
Throttling failed during backup
A throttling job has failed during backup.

198 Managing and Monitoring DLOMonitoring Alerts on the DLO Administration Console
Database backup has failed DLO database backup has failed.
Dedupe database backup has failed.
Warning
A backup job has completed with warnings
A backup job has completed, but warnings weregenerated.
A restore job has completed with warnings
A restore job has completed, but warnings were generated.
A restore job submitted to client has completed with warnings.
A restore job has not completed in 1 hour
A restore job was submitted, but an hour has passed and the restore job is not complete.
A restore job has not completed in 12 hours
A restore job was submitted, but 12 hours have passed and the restore job is not complete.
A restore job has not completed in 24 hours
A restore job was submitted, but 24 hours have passed and the restore job is not complete.
Approaching SQL Database Storage Limit
The SQL database is approaching its storage limit. This is mainly for SQL Express Edition where the database size is limited to 10GB.
Approaching SQL Disk Storage Limit
The volume containing Dedupe database is approaching the storage limit. This is mainly for SQL Enterprise and Standard Editions.
Desktop user data folder approaching storage limit
The amount of stored backup data in a user’s desktop user data folder is approaching the specified size limit.
Desktop user data folder disk space low
The volume containing the desktop user data folder is running low.
Evaluation period daily reminder
This reminder specifies the number of days remaining in the evaluation period for DLO.
Evaluation period has expired
The DLO evaluation period has expired. A license is required to continue to use DLO.
Network user data folder approaching storage limit
The amount of stored backup data in a user’s network user data folder is approaching the specified size limit.
Network user data folder disk space low
The volume containing the network user data folder is running low.
Table 3-27 DLO Alerts (Continued)
Type Name Description

199Managing and Monitoring DLOMonitoring Alerts on the DLO Administration Console
Configuring AlertsTo configure alerts 1 On the DLO navigation bar, click Alerts.
No backups in 14 days A desktop computer has not performed a backup for 14 days.
No backups in 28 days A desktop computer has not performed a backup for 28 days.
No backups in 7 days A desktop computer has not performed a backup for 7 days.
No matching automated user assignment
A new user connected, but no matching Automated User Assignment was found.
Informational
100% Backup successfully completed
100% Backup successfully completed with the time of completion.
A backup job has completed
A backup job has completed successfully.
A restore job has been queued
A restore job was initiated from the DLO Administration Server.
A restore job has completed
A restore job has completed successfully.
A restore job submitted to client has completed.
PST file was skipped because it is not configured in Outlook
A PST file on the desktop computer was not backed up because it was not configured in Microsoft Outlook.
User was configured A new user connected and was successfully configured.
Dedupe synchronization has started
Dedupe synchronization task has been initiated.
Dedupe synchronization has stopped
Dedupe synchronization task has completed.
Database backup has completed
DLO database backup has completed.
Dedupe database backup has completed.
Table 3-27 DLO Alerts (Continued)
Type Name Description
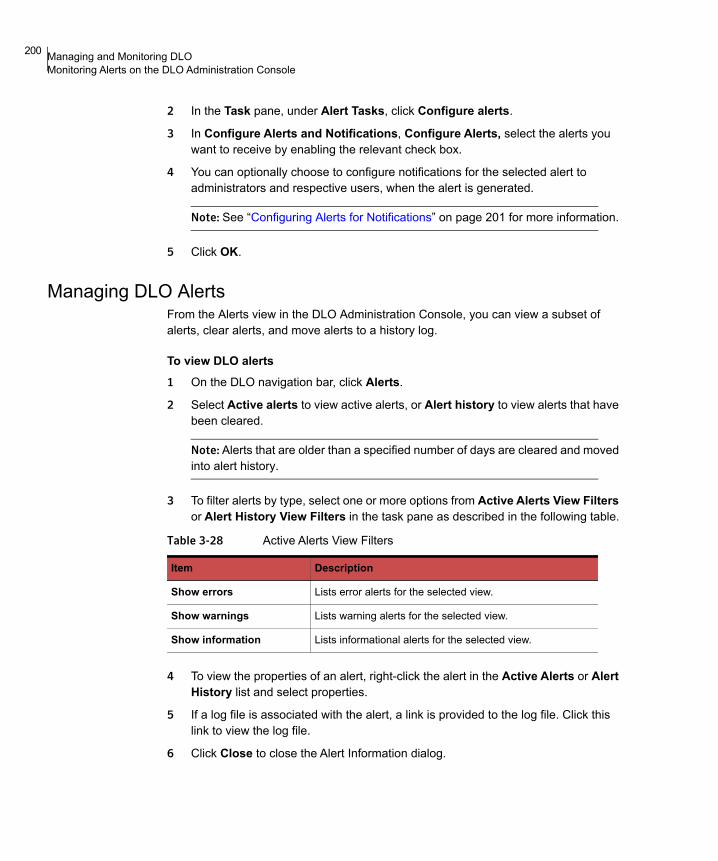
200 Managing and Monitoring DLOMonitoring Alerts on the DLO Administration Console
2 In the Task pane, under Alert Tasks, click Configure alerts.
3 In Configure Alerts and Notifications, Configure Alerts, select the alerts you want to receive by enabling the relevant check box.
4 You can optionally choose to configure notifications for the selected alert to administrators and respective users, when the alert is generated.
Note: See “Configuring Alerts for Notifications” on page 201 for more information.
5 Click OK.
Managing DLO AlertsFrom the Alerts view in the DLO Administration Console, you can view a subset of alerts, clear alerts, and move alerts to a history log.
To view DLO alerts1 On the DLO navigation bar, click Alerts.
2 Select Active alerts to view active alerts, or Alert history to view alerts that have been cleared.
Note: Alerts that are older than a specified number of days are cleared and moved into alert history.
3 To filter alerts by type, select one or more options from Active Alerts View Filters or Alert History View Filters in the task pane as described in the following table.
4 To view the properties of an alert, right-click the alert in the Active Alerts or Alert History list and select properties.
5 If a log file is associated with the alert, a link is provided to the log file. Click this link to view the log file.
6 Click Close to close the Alert Information dialog.
Table 3-28 Active Alerts View Filters
Item Description
Show errors Lists error alerts for the selected view.
Show warnings Lists warning alerts for the selected view.
Show information Lists informational alerts for the selected view.

201Managing and Monitoring DLOConfiguring Alerts for Notifications
Clearing DLO AlertsAlerts are set by default to move to the alert history after a specified time; however, some alerts may appear frequently and fill the Active alerts pane. You may want to clear these alerts to the Alert history pane before they are automatically moved by the system.
To clear DLO alerts 1 On the DLO navigation bar, click Alerts.
2 If needed, filter the Alerts view as described in “To view DLO alerts” on page 200.
3 From the alert list, select one or more alerts that you want to clear.
4 In the Task pane, under Alert Tasks, do one of the following:■ Select Respond to clear only the selected alerts■ Select Respond OK to all to change the status of all alerts to cleared
Configuring Alerts for NotificationsDLO can be configured to send notifications for the selected alert to administrators and end users using the SMTP mail server. The administrator can configure custom messages for notifications that will be sent to the end users when the alert is generated.
Note: Support for Configuring Recipients and Configuring emails through VIM, MAPI and Pagers has been deprecated and removed.
To use email notifications you must perform the following:
■ Configure SMTP mail server to notify the administrators and respective users.
■ Configure Email Notifications for the selected alert.
Configuring SMTP Email for NotificationYou must have an SMTP-compliant email system, such as a POP3 mail server to receive notification messages using the SMTP notification method.
To configure the SMTP email notification method 1 From the Tools menu, click Configure SMTP for emails.

202 Managing and Monitoring DLOConfiguring Alerts for Notifications
2 Select the appropriate options as described in the following table.
3 Click OK.
Configuring Email Notifications for selected alertTo configure email notifications for the selected alert, do the following
1 On the DLO navigation bar, click Alerts.
2 In the Task pane, under Notification Tasks, click Configure Notifications.
3 In Configure Alerts and Notifications > Configure Alerts, select the alert you would like to receive by enabling the relevant check box.
4 Click on the alert description to select the alert for configuring the notification.
Note: Configuring Notifications is not allowed for multiple alert selections.
5 In Configure Notifications > User Notification, you can enable the Notify relevant end users check box, to send email notifications to the respective users when the alert is generated.
Table 3-29 SMTP Configuration Dialog Box
Item Description
Enable Select this check box to activate the notification method.
SMTP mail server Type the name of an SMTP mail server on which you have a valid user account. DLO will not check the server name or the email address for validity.
SMTP port Defaults to a standard SMTP port. In most cases, the default should not have to be changed.
Sender Name Type the name of the user from whom the notification message will be sent.
Sender email address Type the email address of the user from whom the notification message will be sent.
Enable SMTP Authentication
Select this check box to enable SMTP authentication.
SMTP server login Type the SMTP server login credentials.
Sender password Type the password for this login.
Confirm password Type the password again to confirm.

203Managing and Monitoring DLOManaging Audit Trail
6 In Include Custom Message, you can choose to append the custom message to the notification to be sent to end users.
Note: The Enable Notifications option that allows the end users to receive email notifications, is enabled by default. You can restrict all users or individual users from receiving email notifications from the DLO Administration Console > Setup > Settings >Users, by right-clicking the user name and selecting Disable Notifications. To allow email notifications select Enable Notifications.
7 In Administrator Notification, enter the email address of the recipients who should receive the notifications.
8 Click OK.
Note: To verify if the SMTP Server is configured correctly, use the Test SMTP Configuration option.
Managing Audit TrailThe Audit trail feature allows you to track the changes made by the DLO Administrators on the DLO Administration Console and also changes made by the Desktop Agent.Administrator can view the audit information by running the following reports:
■ Audit Trail - Restore and Migration
■ Audit Trail - Configuration ChangesFor more information on these reports, see “DLO Reports” on page 204.DLO Administrator can enable the auditing feature from Global Settings by selecting the required options:
■ Tools > Options > Global Settings Options > Enable Audit Trail for Configuration Changes.
■ Tools > Options > Global Settings Options > Enable Audit Trail for Restore and Migration.
For more information on these options, see Table 1-6 on page 39.
Archiving Audit DataThere is a command line utility which allows you to archive the audit data to the CSV file and also allows you to clean up the audit records in the database. For more information, see “-ArchiveAuditData Command” on page 315.
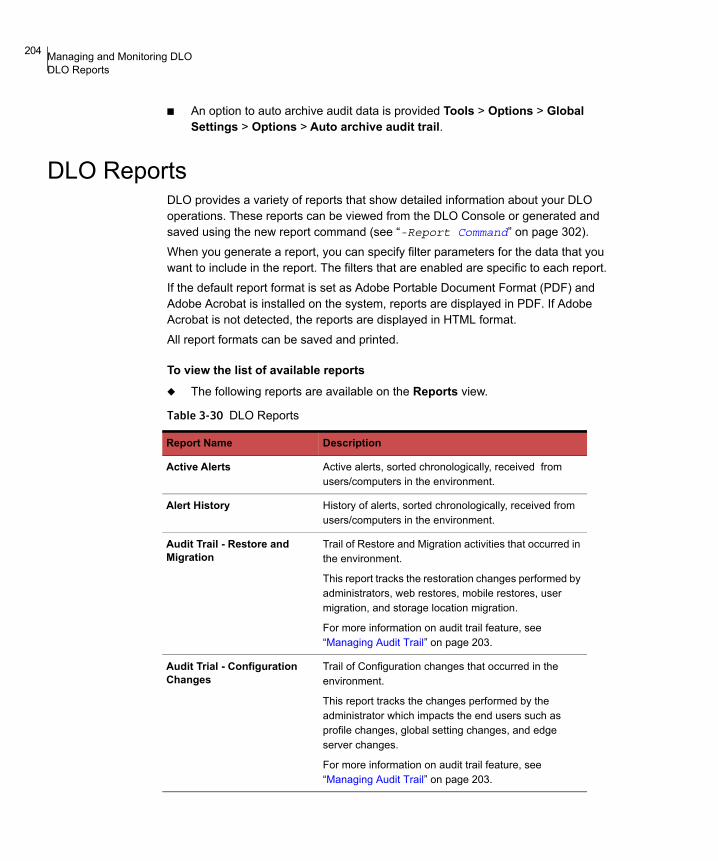
204 Managing and Monitoring DLODLO Reports
■ An option to auto archive audit data is provided Tools > Options > Global Settings > Options > Auto archive audit trail.
DLO ReportsDLO provides a variety of reports that show detailed information about your DLO operations. These reports can be viewed from the DLO Console or generated and saved using the new report command (see “-Report Command” on page 302). When you generate a report, you can specify filter parameters for the data that you want to include in the report. The filters that are enabled are specific to each report.If the default report format is set as Adobe Portable Document Format (PDF) and Adobe Acrobat is installed on the system, reports are displayed in PDF. If Adobe Acrobat is not detected, the reports are displayed in HTML format. All report formats can be saved and printed.
To view the list of available reports◆ The following reports are available on the Reports view.
Table 3-30 DLO Reports
Report Name Description
Active Alerts Active alerts, sorted chronologically, received from users/computers in the environment.
Alert History History of alerts, sorted chronologically, received from users/computers in the environment.
Audit Trail - Restore and Migration
Trail of Restore and Migration activities that occurred in the environment.
This report tracks the restoration changes performed by administrators, web restores, mobile restores, user migration, and storage location migration.
For more information on audit trail feature, see “Managing Audit Trail” on page 203.
Audit Trial - Configuration Changes
Trail of Configuration changes that occurred in the environment.
This report tracks the changes performed by the administrator which impacts the end users such as profile changes, global setting changes, and edge server changes.
For more information on audit trail feature, see “Managing Audit Trail” on page 203.
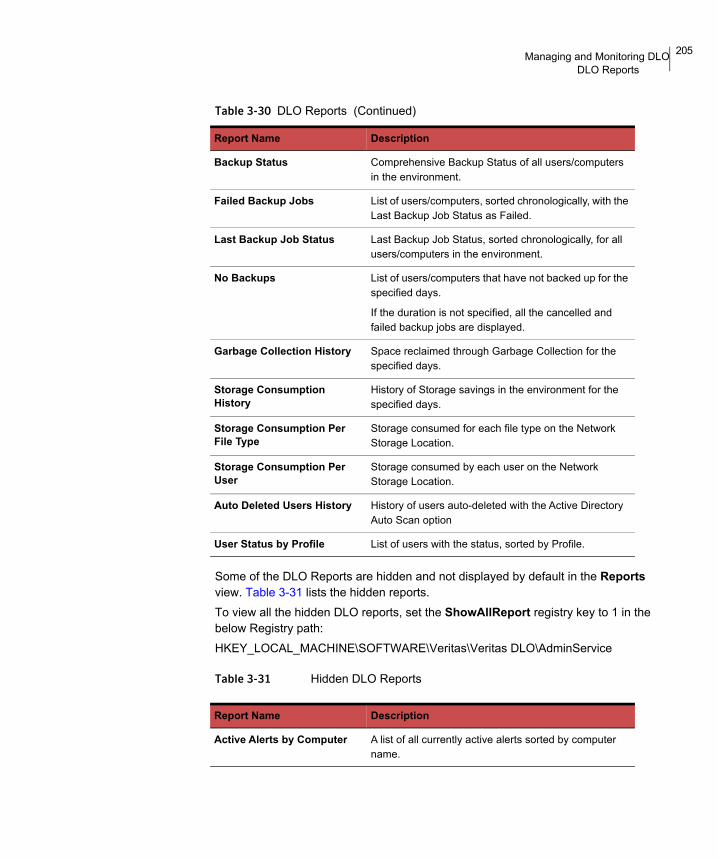
205Managing and Monitoring DLODLO Reports
Some of the DLO Reports are hidden and not displayed by default in the Reports view. Table 3-31 lists the hidden reports. To view all the hidden DLO reports, set the ShowAllReport registry key to 1 in the below Registry path: HKEY_LOCAL_MACHINE\SOFTWARE\Veritas\Veritas DLO\AdminService
Table 3-31 Hidden DLO Reports
Backup Status Comprehensive Backup Status of all users/computers in the environment.
Failed Backup Jobs List of users/computers, sorted chronologically, with the Last Backup Job Status as Failed.
Last Backup Job Status Last Backup Job Status, sorted chronologically, for all users/computers in the environment.
No Backups List of users/computers that have not backed up for the specified days.
If the duration is not specified, all the cancelled and failed backup jobs are displayed.
Garbage Collection History Space reclaimed through Garbage Collection for the specified days.
Storage Consumption History
History of Storage savings in the environment for the specified days.
Storage Consumption Per File Type
Storage consumed for each file type on the Network Storage Location.
Storage Consumption Per User
Storage consumed by each user on the Network Storage Location.
Auto Deleted Users History History of users auto-deleted with the Active Directory Auto Scan option
User Status by Profile List of users with the status, sorted by Profile.
Table 3-30 DLO Reports (Continued)
Report Name Description
Report Name Description
Active Alerts by Computer A list of all currently active alerts sorted by computer name.

206 Managing and Monitoring DLODLO Reports
Running a ReportWhen you run a report, you can specify filtering criteria to determine which items will be included in the report. After the report is generated, only the items that match the entered criteria appear in the report. If no criteria are entered, all available entries are included in the report.
Active Alerts by User A list of all currently active alerts from all computers sorted alphabetically by Desktop Agent user name.
Alert History by Computer A list of alerts that have been sent by all computers in the past, sorted by computer name.
Alert History by User A list of alerts that have been sent by all computers in the past, sorted by Desktop Agent user name.
Backup Status Dashboard This report shows the status of file backups for all clients associated with a storage location.
Backup Job History This report shows the status of backup jobs for a user in a specified duration.
Failed Backup by Computer A list of computers that have a failed status for the last backup, sorted by computer name.
Note: Only the last backup result is stored in the DLO database, so it is only possible to report the last backup result for each desktop computer and not a complete history of failed jobs.
Failed Backup by User A list of computers that have a failed status for the last backup, sorted by Desktop Agent user name.
Note: Only the last backup result is stored in the DLO database, so it is only possible to report the last backup result for each desktop computer and not a complete history of failed jobs.
Last Backup Status by Computer
A list of the last backup status for all Desktop Agent computers, sorted by computer name.
Last Backup Status by Profile This report displays backup failures, successes, and warnings for machines and is grouped by profile name.
Last Backup Status by User A list of the last backup status for all Desktop Agent computers, sorted by Desktop Agent user name.
Percentage Backup This report shows the percentage of backups completed.
Report Name Description

207Managing and Monitoring DLODLO Reports
To run a report1 On the navigation bar, click Reports.
2 On the Reports pane, select the report you want to run.
3 In the Task pane, under Reports Tasks, click Run report now.
4 Select the appropriate filters for the data you want to include in the report from the following available filters. Some of these filters are disabled depending on the report selected.
Note: By default reports will open in report viewer. Enabling this option will allow you to generate in one of the below formats.
5 Enable the check box and select the appropriate report type to generate the reports.
Table 3-32 Report Filters
Item Description
Computer Select this check box to create a report for a specific computer, and then enter a desktop computer name.
User Select this check box to create a report for a specific desktop user, and then enter the user’s name.
Profile Select this check box to create a report for a specific profile, and then enter a profile name.
Days Select this check box to create a report for a specific number of days, and then enter the number of days.
Table 3-33 Report Types
Item Description
CSV Select this radio button to generate a report in CSV format.
XML Select this radio button to generate a report in XML format.
PDF Select this radio button to generate a report in PDF format.
XLS Select this radio button to generate a report in XLS format.

208 Managing and Monitoring DLODLO Reports
6 Click OK to run the report.
Configuring Auto Generation of DLO ReportsThe DLO Administration Console provides an option to configure auto generation of selected DLO report. You can also send the auto generated reports to the Administrators through email.
To configure auto report generation
Note: Before configuring auto report generation, SMTP must be enabled. For more information on how to enable SMTP, see “Configuring SMTP Email for Notification” on page 201.
1 On the navigation bar, click Reports.
2 In the Reports pane, select the report to configure auto reporting.
Note: Configuring Auto reporting is limited to certain reports. For more information on report list, see “List of Reports Supporting Auto Report Generation” on page 209.
3 In the Task pane, under Reports Tasks, click Configure Auto Reporting.
4 Enter the following details.
DOC Select this radio button to generate a report in DOC format.
Table 3-33 Report Types
Item Description
Enable Auto Reporting
Select this option to configure auto report generation.
Run Report on Generate report on the days that you select.
Select at least one day of the week.
At Specify the time at which the report has to be generated.

209Managing and Monitoring DLODLO Reports
5 Click OK.
Note: The Email comprise of attachment of the auto generated report as per the selected Report Type option. If the size of the selected report is greater than 10 MB, the attachment is sent as a .CAB file. The report size can be configured by setting the value specified by the registry key ‘ReportSize’ in the path HKEY_LOCAL_MACHINE\SOFTWARE\Veritas\Veritas DLO\AdminService.
List of Reports Supporting Auto Report GenerationYou can configure auto generation of only the following DLO reports:
■ Active Alerts
■ Alert History
■ Backup Status
■ Backup Status Dashboard
■ Failed Backup Jobs
■ Last Backup Job Status
■ No Backups
■ Percentage Backup
■ Storage Consumption Per User
■ User Status By Profile
Creating Custom ReportsThe DLO Administration Console provides an option to create custom reports, where the administrator can select the columns to be added to the custom report from the available list of columns.
Email Enter the email address of the recipient. Select at least one Email address.
Note: Multiple email addresses can be provided in the below format:
[email protected];[email protected];[email protected]
Report Type Select one of the report types.
The report can be generated in one of the following formats CSV, XML, PDF, XLS or DOC.

210 Managing and Monitoring DLODLO Reports
Note: Configure Auto Reporting option is not available for custom reports. A maximum of five custom reports can be configured per DLO Administration Console.
To add a Custom Report1 On the navigation bar, click Reports.
2 In the Task pane, under Reports Tasks, click Add Custom Report, the Add Custom Report dialog appears.
3 Click OK.This creates a custom report with the selected fields.
Note: This report is generated only in XLS format.
Table 3-34 Add Custom Report Properties
Item Description
Report Name The name of the custom report.
Report Description The description for the custom report.
Select the columns to be added to the custom report
The Username and the Computer columns are selected by default. Following is a list of the columns that can be added to the custom report■ Profile■ Time when Agent was Last Active■ Time of Last Successful Backup■ Count of Files in Backup Selection■ Size of Files in Backup Selection■ Backup Completion Percentage■ Count of Files Pending for Backup■ Estimated Time for Backup Completion■ Average Time available for Backup■ Last Backup Job Time■ Last Backup Job Status■ User Share Path■ Agent Version■ Build Number■ Computer Status
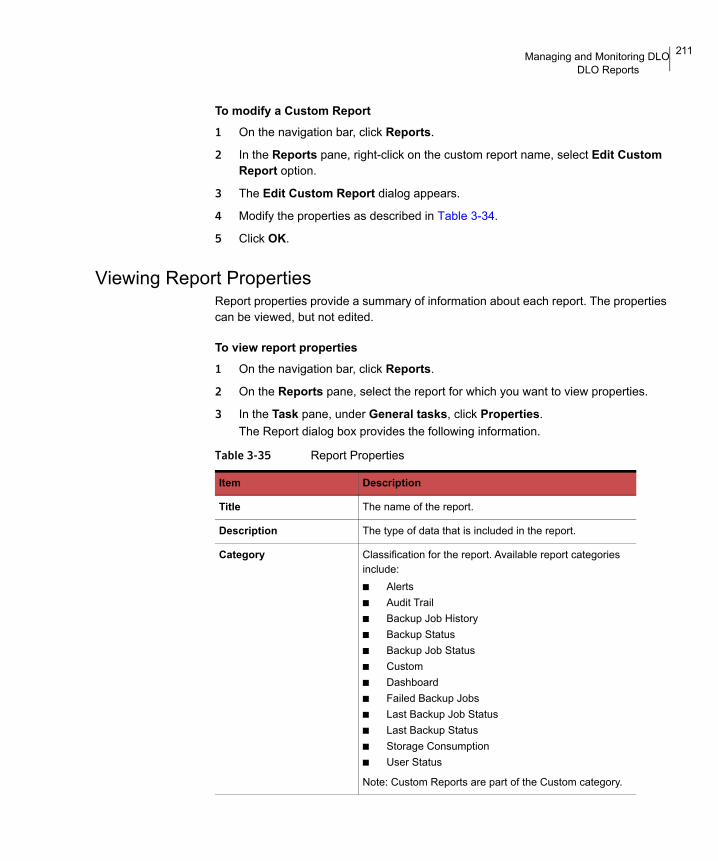
211Managing and Monitoring DLODLO Reports
To modify a Custom Report1 On the navigation bar, click Reports.
2 In the Reports pane, right-click on the custom report name, select Edit Custom Report option.
3 The Edit Custom Report dialog appears.
4 Modify the properties as described in Table 3-34.
5 Click OK.
Viewing Report PropertiesReport properties provide a summary of information about each report. The properties can be viewed, but not edited.
To view report properties1 On the navigation bar, click Reports.
2 On the Reports pane, select the report for which you want to view properties.
3 In the Task pane, under General tasks, click Properties.The Report dialog box provides the following information.
Table 3-35 Report Properties
Item Description
Title The name of the report.
Description The type of data that is included in the report.
Category Classification for the report. Available report categories include:■ Alerts■ Audit Trail■ Backup Job History■ Backup Status■ Backup Job Status■ Custom■ Dashboard■ Failed Backup Jobs■ Last Backup Job Status■ Last Backup Status■ Storage Consumption■ User Status
Note: Custom Reports are part of the Custom category.

212 Managing and Monitoring DLOAbout DLO and Clusters
4 Click OK.
About DLO and ClustersIn a server cluster, Veritas DLO can protect data on local disks and shared disks. Clustered servers provide high availability of applications and data to users. In a clustered server, several servers (nodes) are linked in a network. The Microsoft Cluster Service (MSCS) allows every node to access the shared disks only when it becomes active. If a node is unavailable, cluster resources migrate to an available node (failover). The shared disks and the virtual server are kept available. During failover, you experience only a short interruption in service.DLO Administration service, DLO Database service, Dedupe Server service, and Dedupe Database service configured in a standalone setup are supported in a clustered environment.
Requirements for Installing DLO on a Microsoft Cluster ServerThe following are the pre-requisites to install DLO Administration Server on a Microsoft cluster:
■ Two-node clusters are supported with DLO on Microsoft Windows Server OS versions. For details on the supported platforms, refer to the Veritas Desktop and Laptop Option Software Compatibility List document.
Author The creator of the report.
Subject The version of the product for which the report was created.
Keywords The primary information used to categorize the report.
File Name The file name of the report template. Report templates are specified in Report Definition Language (RDL) and are structured XML schemas that specify the report definition.
File Size The size of the report template.
Creation Date The date the report was installed on the system.
Table 3-35 Report Properties (Continued)
Item Description

213Managing and Monitoring DLOAbout DLO and Clusters
■ DLO clusters can be configured on Microsoft Windows Server OS majority node configurations. However, there must be a shared disk in the configuration for DLO to share the database files between the nodes.
■ DLO Storage Server will be configured on the shared disk.
■ The controlling node and designated failover nodes must be online when installing DLO Administration Server component into the cluster.
■ A unique IP address and a unique network name are required for configuring DLO services on a MSCS cluster.
■ While configuring the DLO services on a MSCS cluster, it is mandatory that the user executing the DLO Cluster configuration utility from the active node must be the owner of the shared disk and the active node.
■ Use the domain admin account for DLO services on all nodes in the cluster. If nodes in a cluster use DLO and have different accounts, change the services to use the domain admin account.
■ While clustering the machine using domain user account, which is part of domain admin group, provide additional rights/privileges to this user account on the “Computer” container in Domain Controller for performing cluster operations. The user account should have the following privileges: ■ Create Computer Object■ Read All PropertiesIf the user is added to a different group other than the domain admin group, then provide the above two privileges to this specific user or group. Also, this user should be a local administrator on the computers that will be part of cluster.
Configuring DLO on a Microsoft Cluster ServerTo configure DLO Server components in a standalone setup on a Microsoft Cluster Server:1 Install DLO Server components on all the nodes.
2 Go to Start > Programs > Veritas > Veritas DLO > DLOCluster Configuration Utility.
3 In the Veritas Cluster Configuration Wizard, click Next.
4 In Cluster Group Information, type the following:
a In Type a unique name for the Veritas DLO cluster group, or use default - enter the required name or use Veritas DLO (default name).
b In Select a network adaptor card for this node, or use the default - select the public option.
214 Managing and Monitoring DLOAbout DLO and Clusters
Note: The private option is selected for using clusters internally.
c To select the drive, click Change.
Note: The MSCS Quorum drive <disk> is not supported.
d In Change Location of Application Data, select a new location for Veritas DLO's application data and click Next.
Note: Ensure that you select the shared disk drive only.
The changed location is displayed in the Cluster Group Information window.
5 Click Next.
6 In Virtual Server Information, type the following:
a In Enter a name for the Veritas DLO virtual server or use the default - enter the required server name or use DLOVRS (default name).
b In Type the IP Address of the Veritas DLO virtual server - enter the virtual IP address of the virtual server.
c In Type the subnet mask of the Veritas DLO virtual server - enter the subnet mask of the virtual server.
d Click Next.
7 In Add or Remove Nodes, click Add to add the nodes to the Veritas DLO cluster group.
8 Click Next.
9 In Ready to Configure the Cluster, click Configure.The cluster is configured successfully.
10 In Summary, the summary of changes that are made to the cluster configuration are displayed.
11 To exit the wizard, click Finish.
Unclustering DLOPre-requisites for Unclustering DLOBefore unclustering DLO, ensure that you complete the following tasks:Please note Steps 1, 2 and 3 can be skipped for DLO upgrade related unclustering operations.
215Managing and Monitoring DLOAbout DLO and Clusters
1 Create a new Dedupe Storage Location on the local disk.
2 Create a new DLO Storage Location on the local disk and assign the Dedupe Storage Location that was created on the local disk to this DLO Storage Location.
3 Move the network user data folder from the virtual server to the newly created DLO Storage Location on the local disk.
4 Run the -ChangeDB command to change the existing database on the shared disk to a database on the local disk.DLOCommandu.exe –ChangeDB –DBServer <DB Server Name>
-DBInstance <DB Instance Name> -DBName <DLO Database Name>
-DBDataFile <DLO data file name> -DBLogFile <DLO log file>
For more information about the command, see “-ChangeDB Command” on page 290.
5 Run the -ChangeServer command to change the existing media server on the shared disk to a media server on the local disk.DLOCommandu.exe -ChangeServer -M <Media server name> –A
For more information about the command, see “-ChangeServer Command” on page 291.
To uncluster Veritas DLO:1 Go to Start > Programs > Veritas > Veritas DLO > DLOCluster Configuration
Utility.
2 In Veritas Cluster Configuration Wizard, click Next.
3 In Add or Remove Nodes, select the nodes that must be removed from the cluster and click Remove. The selected nodes are moved to Nodes not in the Veritas DLO cluster group.
4 Click Next. A warning message stating ‘You have chosen to remove all nodes. Do you wish to remove the data off the shared drive?’ is displayed.
5 Click Yes. A warning message is displayed: ‘Do you wish to make the data from the shared drive available for use by this local node after removal of the cluster group?’
6 Click Yes.
7 In Ready to Configure the Cluster, click Configure to apply the settings to the cluster configuration.After the cluster is removed successfully, the Summary screen displays the summary of changes that are made to the cluster configuration.
8 To exit the wizard, click Finish.

216 Managing and Monitoring DLOAbout DLO and Clusters
Upgrading DLO on a Microsoft Cluster ServerThis section explains the procedure to upgrade from existing DLO cluster environment to the latest version. For details on the upgrade support, refer to the Veritas Desktop and Laptop Option Software Compatibility List document.To upgrade DLO on a Microsoft cluster server, the administrator will need to uncluster the existing DLO on the server, followed by an upgrade to the latest DLO version and re-configure DLO on the Microsoft cluster server.
Note: For unclustering DLO, the prerequisite steps have to be executed on the Active node, where DLO Cluster Configuration utility will be run. The DLO Cluster Configuration utility run during the unclustering and reclustering operations, should be done on the same node, else the database used will be different and empty.
To upgrade DLO on a Microsoft cluster server1 Uncluster the existing DLO on the server, follow the procedure explained in the
section, “Unclustering DLO” on page 214.
Note: Upgrade process will fail if DLO is not unclustered.
2 Launch the DLO console on both the server nodes to verify DLO is working fine.
3 In case of any issues:
■ Verify if the DLO Database and Dedupe database is attached from the default path using management studio or OSQL command: OSQL –E –S .\<DLO instance name> -d Master –q “select * from sysdatabases”
■ Check the DLO Admin service is running
Note: Post DLO Un-clustering, one of the DLO server (active node) will have database which has all the configurations done earlier. Other DLO server (passive node) will have no data.
4 Upgrade the DLO Server on both the server machines to the latest version separately.
5 In the Microsoft failover cluster manager, under Services and applications, delete the existing service (by default Veritas DLO)
6 Note down the service name, Virtual Server name and Virtual IP to be used later for DLO cluster reconfiguration
7 Delete the database files in the shared disk, if they are available.

217Managing and Monitoring DLOServer Consolidation Utility
8 Launch the DLO Console from both the nodes separately, to ensure DLO is upgraded properly.
9 In case of any issues, check if the databases are attached properly.
10 Exit both the DLO Servers from both the nodes.
11 To re-configure DLO on the Microsoft cluster server, follow the procedure explained in the section “Configuring DLO on a Microsoft Cluster Server” on page 213.
Server Consolidation UtilityFor existing DLO customers to easily adopt the Higher Server Scalability, DLO provides a utility to consolidate existing DLO Servers. The DLO Administrators can consolidate two different existing DLO Servers to a single server provided the Destination Server must have sufficient resources.PrerequisitesThe following tasks must be performed before consolidating the DLO Servers:
■ The Source and the Destination Administration Servers and the SQL Servers must be on the same domain.
■ The Source and the Destination DLO Administration Servers must be in DLO 9.0 or above version.
■ In case Dedupe Server is configured on the Source Server, then it must also be configured on the Destination Server before proceeding with Server Consolidation.
■ If Edge Server is configured on the Source Server, then it must also be configured on the Destination Server.
■ The Destination Database backup is mandatory.
■ In case the user credentials of Destination and Source SQL Servers are different, the Destination SQL user should be added in the sysadmin group in the Source Database manually.
■ The logged in user credentials with which you run the utility must also be added in the sysadmin group in the Destination Database.
■ Run the DLOServerConsolidationU.exe utility on the Destination Server only. In case of Remote Database Setups, run the utility on the Database machine.
Note: Server consolidation is not supported when multiple Dedupe Servers are configured either in the Source or Destination Server.
218 Managing and Monitoring DLOServer Consolidation Utility
Consolidating DLO Servers To consolidate DLO server1 In the Destination Database machine, open Command Prompt and navigate to the
DLO install path.
2 Run DLOServerConsolidationU.exe. The DLO Server Consolidation Utility dialog box appears.
3 Enter the following details in the Server Details pane:
■ Source DB Server\SQL Instance: Enter the hostname and the instance name of the source server database.
■ Destination DB Server\SQL Instance: Enter hostname and the instance name of the destination server database.
Example: <hostname\instancename>If the SQL instance is the default instance, then enter only the hostname.
Note: Same users with same or different machine will not be consolidated to Destination Server. Blackout window will be set in both Source and Destination DLO Servers.
4 Click Connect. A recommended message to take Database backup appears. Confirm the data backup and continue with consolidation.
5 In the Dedupe Storage Pool Mapping pane, map the Source Dedupe Storage Pool with the Destination Dedupe Storage Pool by selecting the required one from the drop down list in the Destination Dedupe Pool(s).
Multiple-to-one and one-to-one mapping options are available.
Note: It is mandatory to map all the Source Storage Pools to Destination Storage Pool.
6 Click Consolidate. If the server consolidation has failed, the process is continued from the point of failure in the next run of the utility.
7 The Progress bar displays the progress of the consolidation process.After consolidation, Administrator can check the Destination Server for the Source Server details. The migrated users will refer to the Source Server's Maintenance Server and IO Server.Manually the permission should be provided on the Source SL for restoring the migrated users data from the Destination Server only when the source and destination server logged in users are different.
219Managing and Monitoring DLOServer Consolidation Utility
Server Consolidation on Remote DatabaseIn case if the Destination server has remote database, then run the DLOServerConsolidationU.exe from the Database machine.
1 Navigate to the DBConsolidation folder available within the DLO install package.
2 Copy the Consolidation_Scripts folder, DLOServerConsolidationU.exe and all the .dll files present in the x86 or x64 folder based on the bitness of the Destination Database machine to DLO install path of Destination Database machine.
3 Run the DLOServerConsolidationU.exe.
Behavior of Server ConsolidationThe following are the behavior of DLO Database Consolidation:
■ After consolidation, all the merged users will be:■ Connected to Dedupe Server and Edge Server of the Destination Server.■ Referring to Global Settings of Destination Server.
■ After server migration, the migrated users will still refer to the Source Server's Maintenance Server and IO Server
■ The Source Edge Server and Dedupe Server will not be migrated. Migrated users will refer to the Edge Server and Dedupe server of the destination DLO Server.
■ Maintenance Server, File Server and Backup Server of Source Server will be pointing to same server as that defined in Source Server.
■ Repeated merging of the DLO Servers is not allowed.

220 Managing and Monitoring DLOServer Consolidation Utility

Chapter
4 Administering the Desktop AgentThis section contains the following topics:
■ “About the Desktop Agent” on page 221
■ “Features and Benefits of the Desktop Agent” on page 222
■ “System Requirements for the Desktop Agent” on page 222
■ “Installing the Desktop Agent” on page 222
■ “Configuring the Desktop Agent” on page 224
■ “Managing the Desktop Agent” on page 228
■ “Managing the Desktop Agent” on page 228
■ “Modifying Desktop Agent Settings” on page 246
■ “Restoring Files Using Web Browser” on page 259
■ “Synchronizing Desktop User Data” on page 261
■ “Restoring Files Using the Desktop Agent” on page 255
■ “Monitoring Job History in the Desktop Agent” on page 266
■ “About the Desktop Agent for Mac” on page 274
About the Desktop AgentThe Desktop Agent is a Veritas DLO component that protects files on desktop and laptop (collectively referred to as desktops) by backing up data to the desktop’s local drive and to a Storage Location on the network. The DLO administrator initially configures the Desktop Agent.
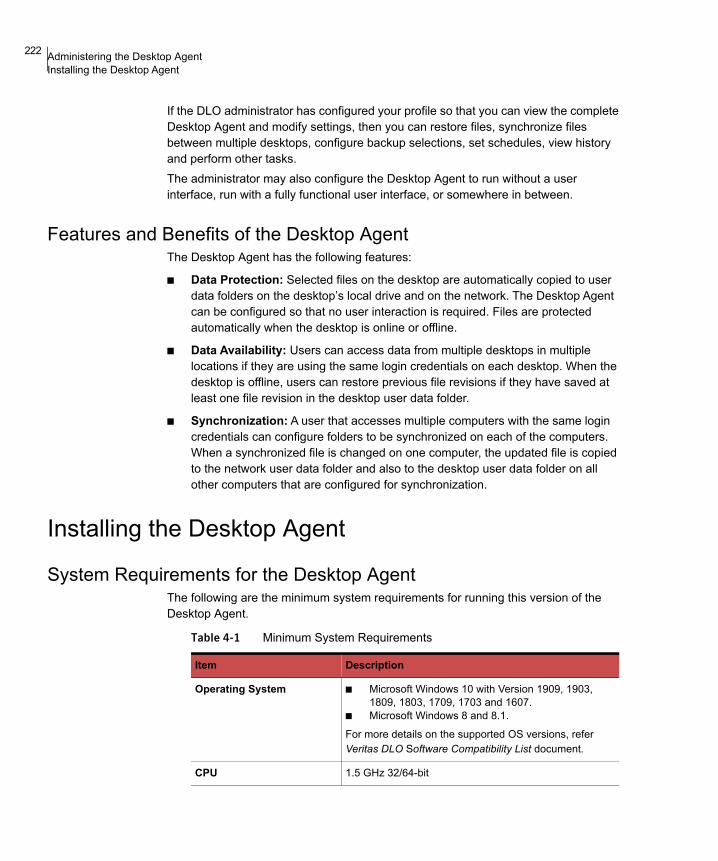
222 Administering the Desktop AgentInstalling the Desktop Agent
If the DLO administrator has configured your profile so that you can view the complete Desktop Agent and modify settings, then you can restore files, synchronize files between multiple desktops, configure backup selections, set schedules, view history and perform other tasks.The administrator may also configure the Desktop Agent to run without a user interface, run with a fully functional user interface, or somewhere in between.
Features and Benefits of the Desktop AgentThe Desktop Agent has the following features:
■ Data Protection: Selected files on the desktop are automatically copied to user data folders on the desktop’s local drive and on the network. The Desktop Agent can be configured so that no user interaction is required. Files are protected automatically when the desktop is online or offline.
■ Data Availability: Users can access data from multiple desktops in multiple locations if they are using the same login credentials on each desktop. When the desktop is offline, users can restore previous file revisions if they have saved at least one file revision in the desktop user data folder.
■ Synchronization: A user that accesses multiple computers with the same login credentials can configure folders to be synchronized on each of the computers. When a synchronized file is changed on one computer, the updated file is copied to the network user data folder and also to the desktop user data folder on all other computers that are configured for synchronization.
Installing the Desktop Agent
System Requirements for the Desktop AgentThe following are the minimum system requirements for running this version of the Desktop Agent.
Table 4-1 Minimum System Requirements
Item Description
Operating System ■ Microsoft Windows 10 with Version 1909, 1903, 1809, 1803, 1709, 1703 and 1607.
■ Microsoft Windows 8 and 8.1.
For more details on the supported OS versions, refer Veritas DLO Software Compatibility List document.
CPU 1.5 GHz 32/64-bit

223Administering the Desktop AgentInstalling the Desktop Agent
The DLO administrator or the desktop user can install the Desktop Agent. For more information about user rights and privileges, see “User privileges for installing and managing DLO” on page 20. The logged on user will only have access to DLO backup files associated with the logged on account.
Note: You must have administrator rights to the desktop where the Desktop Agent needs to be installed. If you need to restart the desktop during installation, you must use the same administrator login credentials so that the installation completes successfully.
To install the Desktop Agent 1 From the desktop on which you want to install the Desktop Agent, browse to the
network server where the installation files for the Desktop Agent are stored. The default location is \\<DLO Administration Server name>\DLOAgent. If you are not sure of the location, contact the administrator.
2 Double-click the file setup.exe.
3 On the Welcome screen, click Next.
4 Read the license agreement, and then click I accept the terms in the license agreement.
5 Click Next.
6 Do one of the following:
a To change the location on the desktop’s local drive where the Desktop Agent will be installed, click Change and enter the alternate location, then click OK.
b To install the Desktop Agent in the default location, continue with step 7.The default installation location is C:\Program Files\Veritas\Veritas DLO\DLO.
7 Click Next.
8 Click Install.
Processor Pentium, Xeon, AMD, or compatible
Memory Minimum required : 1 GB
Recommended: 2 GB(or more for better performance).
Disk Space 100 MB free space
Table 4-1 Minimum System Requirements (continued)
Item Description

224 Administering the Desktop AgentConfiguring the Desktop Agent
9 Once the installation is completed, click Finish.
Configuring the Desktop AgentYou can configure the Desktop Agent to connect to the DLO Administration Server, manage local accounts, change the connection status, enable or disable the Desktop Agent, and manage other tasks as explained in the following sections.
Connecting to the DLO Administration ServerThe Desktop Agent communicates with the DLO Administration service and the DLO database.
Note: If you connect to the DLO Administration Server for the first time with one set of credentials, and then later connect to the Administration Server with a different set of credentials, authentication may fail. Restart the computer to reconnect.
The Desktop Agent receives a notification when any new information is available and retrieves it. This will happen, for example, when settings or synchronized files change or if a software update is available. The Desktop Agent and the DLO Administration Server do not contact each other directly.
Caution: If you attempt to connect to a server using characters in the share name that do not exist on the code page for the local system, the connection will fail. Code pages map character codes to individual characters, and are typically specific to a language or group of languages.
Using Local Accounts on Desktop Computers (Workgroup)The following should be considered when using local accounts on desktops that run the Desktop Agent:
■ You can use only one set of domain credentials with one local account. If you use more than one local account on a desktop computer or laptop, you should either disable DLO for other accounts or have unique domain credentials for each account. For more information, see “To log on with alternate credentials or to disable accounts” on page 225.
Example If you usually log on to the desktop computer as ‘myusername’, you should have a domain account to use DLO. If you also occasionally log on as ‘administrator’, you can disable the other

225Administering the Desktop AgentConfiguring the Desktop Agent
account. Alternately, you can provide a unique set of domain credentials that can be used for DLO when you are logged on as ‘administrator’.
■ Multiple users of the same desktop computer can all use DLO, but must provide unique credentials for the desktop computer and unique domain credentials for the Desktop Agent.
■ When the Desktop Agent is installed on a computer that is not in a domain, and when you launch the Desktop Agent for the first time, you are prompted to enter the user name, password, and domain. Provide the domain user credentials with which you would want to launch the Desktop Agent.
Using Alternate Credentials for the Desktop AgentBy default, the Desktop Agent uses the logon account, but could be an alternate account if one has been specified; for example, to connect across domains.If you are logged on with credentials that are not recognized by the Desktop Agent, you can specify alternate credentials for Desktop Agent operation and save the account information for future sessions. If you prefer, you can disable an account for Desktop Agent operations so that the Desktop Agent will not run when you are logged on with another account currently being used. A dialog is displayed, which allows you to save this account information for future connections.
Note: If you have a previously established network connection to the DLO Administration Server and it does not match the account the Desktop Agent is using, the Desktop Agent will attempt to reconnect as the Desktop Agent user. If this fails, the following error message is displayed: “Multiple connections to a server or shared resource by the same user, using more than one user name, are not allowed. Disconnect all previous connections to the server or shared resource and try again.”
In a cross-domain configuration where there is no trust relationship, if multiple users are running the same Desktop Agent, then each user must provide a unique user name and password in the DLO Administration Server domain. If different users use the same credentials, DLO displays an error message stating that the user is already connected to the administration server.
Note: For information on resetting accounts that have been disabled for Desktop Agent operation, see “To reset dialogs and account information” on page 226.
To log on with alternate credentials or to disable accounts 1 When you are logged on to the desktop computer with an account that is not
recognized by the Desktop Agent, the Alternate Credential dialog box appears.

226 Administering the Desktop AgentConfiguring the Desktop Agent
2 Specify the logon options for the Desktop Agent as follows:
3 Click OK.
Resetting Dialog Boxes and Account InformationWhile you can suppress dialogs by selecting the Don’t show me this message again check box, these dialogs can be reset so they will once again be displayed. If passwords and account information are cleared, the Desktop Agent will prompt for this information if it is required to access a resource.
To reset dialogs and account information 1 From the Tools menu, click Options.
2 If you want to reset any information dialogs suppressed by the Don’t show me this message again check box, click Reset dialogs.
3 Click Yes when prompted to reset the dialogs.
Table 4-2 Alternate Credentials
Item Description
Use this account Select this option to enable the Desktop Agent to run with the account you are currently logged on.
User name Enter the user name for the account that will be used for Desktop Agent operation.
Password Enter the password for the account that will be used for Desktop Agent operation.
Domain Type the domain for the account that will be used for Desktop Agent operation.
Save my password Select this option to have DLO save and use this password in the future to automatically authenticate to the media server or storage location in the event of an authentication failure.
Note: This option will appear only if the DLO administrator has enabled this option. On newly-deployed Desktop Agents, this option will not be displayed until the second time when the Desktop Agent connects to the media server.
Disable this account Select this option to prevent the Desktop Agent from operating with the account you are currently logged on.

227Administering the Desktop AgentConfiguring the Desktop Agent
4 If you want to clear any passwords and account information that the Desktop Agent has stored, click Reset accounts.
5 Click Yes when prompted to clear the accounts.
6 Click OK.
Changing your Connection StatusWhen you are using the Desktop Agent, your connection status is displayed in the lower right corner of the Desktop Agent Console. When the Desktop Agent is in offline mode, the following are true until you choose to work online again:
■ Files are not transferred to the network user data folder. Pending files remain in the pending files list with a status as “Pending network.”
■ Job logs are not copied to the network user data folder.
■ are not posted to the DLO Administration Server.
To change your connection status 1 Click the connection status on the lower right corner of the Desktop Agent.
2 Do one of the following:■ Click Work Offline to place the Desktop Agent in offline mode.■ Click Work Online to place the Desktop Agent in online mode.
Note: The DLO Administrator sets a maximum time after which the Desktop Agent automatically returns to the online mode, assuming a network connection is available.
Disabling the Desktop AgentYou can disable the Desktop Agent if this option is enabled in your profile.
To disable the Desktop Agent 1 From the Windows system tray, right-click the Desktop Agent icon.
2 Click Disable. This option will be grayed out if you do not have permission to take this action.
Enabling the Desktop AgentIf the Desktop Agent has been disabled, you can re-enable the Desktop Agent if this option is enabled in your profile.

228 Administering the Desktop AgentManaging the Desktop Agent
To enable the Desktop Agent1 From the Windows system tray, right-click the Desktop Agent icon.
2 Click Enable. This option will be grayed out if you do not have permission to take this action.
Managing the Desktop AgentWhen data is backed up by the Desktop Agent, it is transferred to the user data folder on the desktop’s local drive. Then, the data is transferred to a network user data folder, which is assigned by the DLO Administrator. Network user data folders are typically also backed up by Veritas DLO, which provides an additional level of protection.From the Backup Selections view, select files that you want to protect. Backup selections are initially assigned by the administrator, but if the DLO administrator has set your profile so that you can view the complete Desktop Agent and modify settings, then you can choose your backup selections. You can change Desktop Agent settings and backup selections when you are working offline. The settings will be stored, and once you are working online, the settings are automatically transferred. If the administrator has also made changes that conflict with the changes made on the Desktop Agent, the changes made by the administrator will be used.You can view and modify backup selections using two views: standard and advanced. The standard view lists the contents of your local drives, allowing you to select files and folders to be backed up. It also uses default backup selection settings to add new selections. The advanced view provides more configuration options for selections.A backup selection consists of the following:
■ A folder or list of folders
■ Criteria for the files to be included or excluded from the backup
■ Limits on the number of file revisions to retain
■ Settings for compression, backup file deletion, and encryption
About the Desktop Agent ConsoleThe Desktop Agent Console is the user interface. Access to the Desktop Agent Console is controlled by the DLO administrator. The DLO administrator may choose from the following:
■ Display the complete interface: Enables desktop users to access all Desktop Agent options.

229Administering the Desktop AgentManaging the Desktop Agent
■ Display only the status: Enables desktop users to view the status of backup jobs, but they cannot change Desktop Agent settings or access options other than status. Desktop users can right-click the system tray icon to open the status view or exit the program.
■ Display only the system tray icon: The desktop user sees only the Desktop Agent icon in the system tray in the lower right corner of the screen. Desktop users can right-click the system tray icon to exit the program.
■ Do not display anything: The Desktop Agent runs in the background. The desktop user cannot view the Desktop Agent.
Figure 4-1 Veritas DLO Desktop Agent Console

230 Administering the Desktop AgentManaging the Desktop Agent
The Desktop Agent Console has the following menu options.
Note: To ensure that you have the latest status and settings at any time while using the Desktop Agent, click Tasks > Refresh.
Table 4-3 Desktop Agent Console Features
Item Description
Menu bar The menu bar appears across the top of the screen. To display a menu, click the menu name. Some menu items are not available until an item is selected from the console screen.
Tasks bar The Tasks bar appears on the left side of the Desktop Agent Console. To hide the Tasks bar, from the View menu, select Tasks bar. Actions are initiated from the Tasks bar, and these actions vary with the selected view.
Views menu The Views menu appears in the Tasks bar and enables you to navigate to different views.
Status Provides job status, lists pending jobs, and summarizes recent backup activity. See “Restoring Files Using the Desktop Agent” on page 255 for more information.
Backup Selections
Enables you to define what data is protected by the Desktop Agent. See “Managing the Desktop Agent” on page 228 for more information.
Synchronized Selections
Enables you to configure the Desktop Agent to maintain a user’s selected files and folders on multiple computers so that the most recent backed up version is always available to the user. See “Synchronizing Desktop User Data” on page 261 for more information.
Restore Enables the user to restore backed up data and search for backed up files. See “Restoring Files Using the Desktop Agent” on page 255 for more information.
History Displays error, warning, and informational messages.
Tasks menu Actions are initiated from the tasks menu. These actions vary with the selected view.
Tools menu > Options
Enables you to do the following:■ Reset dialogs that have been suppressed by the Don’t show me
this message again check box.■ Clear passwords and account information that the Desktop Agent
has stored. See “Resetting Dialog Boxes and Account Information” on page 226 for more information.
231Administering the Desktop AgentManaging the Desktop Agent
Managing RevisionsRevisions are versions of a file at a specific point in time. When a file is changed and backed up, DLO stores a new revision. DLO stores and maintains a specific number of revisions for all files in a backup selection. Because each backup selection is configured separately, the number of revisions retained can vary for different backup selections.When the number of revisions exceed the limit, DLO removes the oldest revision, maintaining only the specified number of revisions in the desktop and network user data folders. You can limit the number of revisions DLO retains in a given period of time. If you are working on a document and backing it up frequently, all your revisions could potentially be just a few minutes apart. By specifying that you want to retain only 2 revisions every 24 hours, at least 120 minutes apart, you can retain older revisions for a longer period of time. While some intermediate versions will not be retained, it does support situations when you want to access the older revision. The amount of space required for backups can be estimated by multiplying the number of revisions retained by the amount of data protected.
Example If you are retaining three revisions of each file and have 10 MB to back up, approximately 30 MB of disk space will be required.
Although compression can improve the space utilization, it varies significantly with file type and other factors.
Alternate stream backupDLO protects all of the alternate streams for a file, including security streams. If a new version of a file contains only alternate stream data modifications, the new version replaces the old version without impacting the revision count.
File GroomingThe Desktop Agent grooms revisions based on backup selection settings and performs this task as new revisions are created. The oldest revision is deleted when a new revision is created that exceeds the limit. Maintenance grooming is the process for grooming deleted files. It occurs at most once every 24 hours. Maintenance grooming occurs during the first backup that runs after 24 hours have passed since the last maintenance grooming.
Modifying Backup Selections in the Standard ViewBackup selections in the Standard view provides a list of drives, folders, and files that you can select for backup.

232 Administering the Desktop AgentManaging the Desktop Agent
Note: Profile backup selections are the settings configured for your profile by the DLO administrator. Profile backup selections are displayed in the Standard view with gray check boxes.You cannot modify profile backup selections in the Standard view. You can only modify the backup selections that you create on the Desktop Agent. They can be modified in the Advanced view if the administrator has granted you sufficient rights. See “Modifying Backup Selections in the Advanced View” on page 238 for more information.
When you create new backup selections in the Standard view, the default backup selection settings are used. When you add new sub folders and files to the backup selection using the Standard view, these new backup selections will have the same settings as the main folders.
Figure 4-2 Standard View
In the Standard view, files and folders are represented in a tree view where users can select files and folders for backup. When the check box next to a file or folder is grayed out, it indicates that the selection was defined by the administrator and can only be changed if the administrator has granted this right in the profile definition. When a red 'X' appears in the check box next to a file or folder, this item has been globally excluded from all backups by the administrator and cannot be selected.

233Administering the Desktop AgentManaging the Desktop Agent
To modify backup selections in the backup selections standard view 1 Under Views in the Tasks bar, click Backup Selections.
2 Click Standard view.
3 Select the folders and files you want to back up.Expand selections by clicking the plus sign (+) and collapse selections by clicking the minus sign (-).
Note: To return to the last saved settings at any time, click Undo changes.
4 Click Save changes to save the new settings or Undo changes to return to the last saved settings.After clicking Save, previously backed-up selections that were not selected are considered as deleted backup selections and will no longer be backed up. The backup files for this selection will be deleted after the number of days specified in the backup selection settings. The source files for the deleted backup selection will not be deleted by the Desktop Agent.Selected folders that were not previously selected are added to the backup selections for this desktop.
Adding Backup Selections in the Advanced ViewTo add a backup selection in the backup selections advanced view 1 Under Views in the Tasks bar, click Backup Selections.
2 Click Advanced view.
3 Click Add.
4 From the General tab in the Backup Selection dialog box, select the appropriate options.
Table 4-4 Backup Selection Options
Item Description
Name Type a descriptive name for the backup selection.
Description Type a clear description of the backup selection. This description may include, for example, the folder selected, the group of users it was created for, or the purpose for creating the backup selection.
Folder to back up
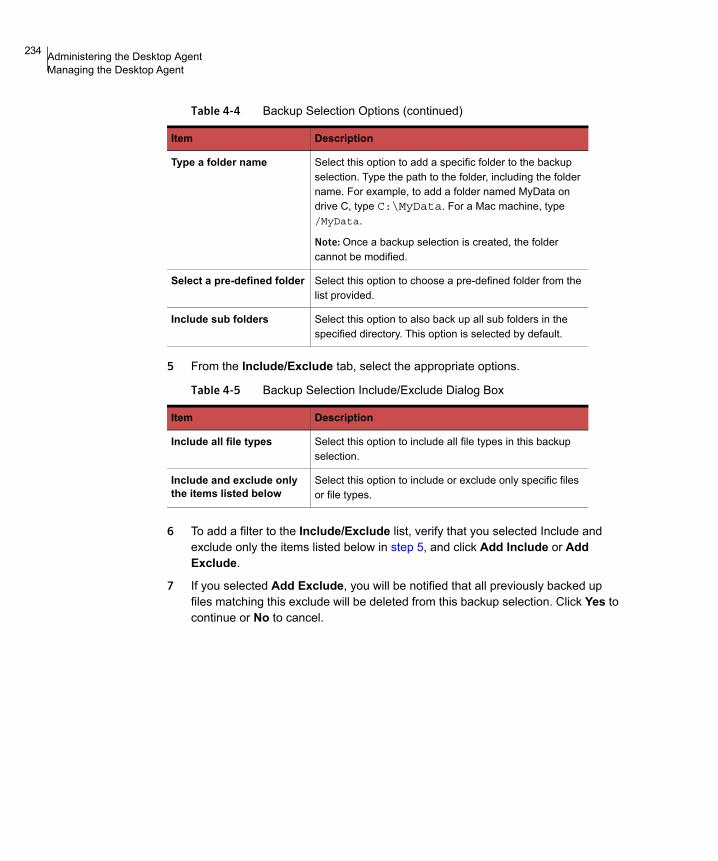
234 Administering the Desktop AgentManaging the Desktop Agent
5 From the Include/Exclude tab, select the appropriate options.
6 To add a filter to the Include/Exclude list, verify that you selected Include and exclude only the items listed below in step 5, and click Add Include or Add Exclude.
7 If you selected Add Exclude, you will be notified that all previously backed up files matching this exclude will be deleted from this backup selection. Click Yes to continue or No to cancel.
Type a folder name Select this option to add a specific folder to the backup selection. Type the path to the folder, including the folder name. For example, to add a folder named MyData on drive C, type C:\MyData. For a Mac machine, type /MyData.
Note: Once a backup selection is created, the folder cannot be modified.
Select a pre-defined folder Select this option to choose a pre-defined folder from the list provided.
Include sub folders Select this option to also back up all sub folders in the specified directory. This option is selected by default.
Table 4-5 Backup Selection Include/Exclude Dialog Box
Item Description
Include all file types Select this option to include all file types in this backup selection.
Include and exclude only the items listed below
Select this option to include or exclude only specific files or file types.
Table 4-4 Backup Selection Options (continued)
Item Description

235Administering the Desktop AgentManaging the Desktop Agent
8 Select the appropriate options.
9 Click OK.
10 From the Revision Control tab, select the appropriate options for both the desktop and network user data folders.
Table 4-6 Add Include Filter or Add Exclude Filter Dialog Box Options
Item Description
Filter Type the name of the file or folder, or a wildcard description of the file or folder that you want to include or exclude from backup selections.
For example, type *.mp3 to either include or exclude all files with this file extension in the backup selection, or type unimportant.txt to include or exclude all files in the backup selection with this specific file name.
Click Extensions to select a predefined filter to either include or exclude all files with a given file extension.
Description Type a description for this include or exclude filter.
Apply to Select one of the following:■ Files to apply this filter to file ■ Folders to apply this filter to folders ■ Files and Folders to apply this filter to both files and
folders
Table 4-7 Backup Selection - Revision Control Tab
Item Description
Number of Revisions
Desktop user data folder Type the number of revisions to be retained in the desktop user data folder for each file in the backup selection.
Note: When Outlook PST files are backed up incrementally, only one revision is maintained irrespective of the number of revisions set in the backup selection.
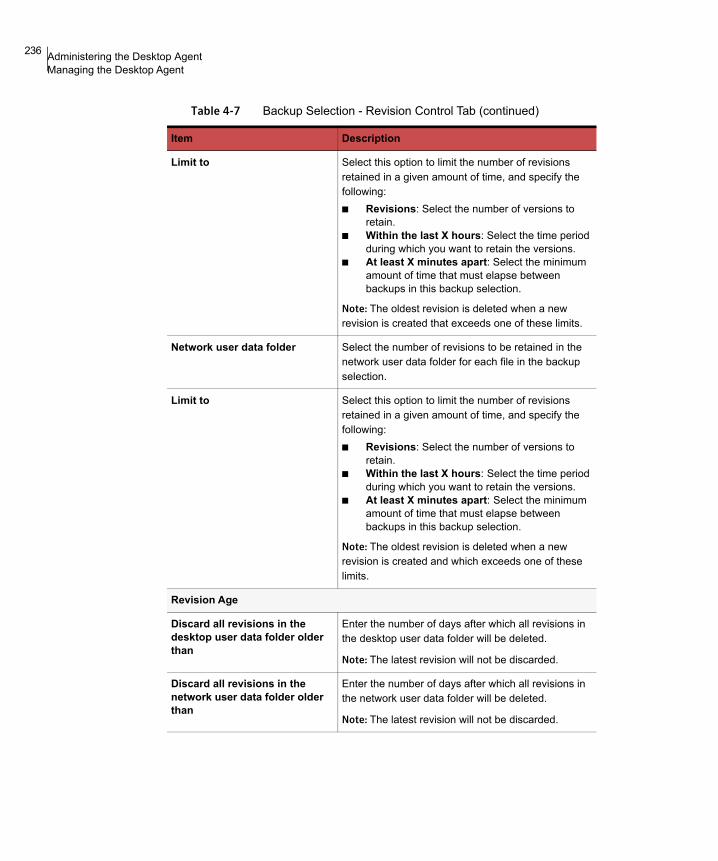
236 Administering the Desktop AgentManaging the Desktop Agent
Limit to Select this option to limit the number of revisions retained in a given amount of time, and specify the following:■ Revisions: Select the number of versions to
retain.■ Within the last X hours: Select the time period
during which you want to retain the versions.■ At least X minutes apart: Select the minimum
amount of time that must elapse between backups in this backup selection.
Note: The oldest revision is deleted when a new revision is created that exceeds one of these limits.
Network user data folder Select the number of revisions to be retained in the network user data folder for each file in the backup selection.
Limit to Select this option to limit the number of revisions retained in a given amount of time, and specify the following:■ Revisions: Select the number of versions to
retain.■ Within the last X hours: Select the time period
during which you want to retain the versions.■ At least X minutes apart: Select the minimum
amount of time that must elapse between backups in this backup selection.
Note: The oldest revision is deleted when a new revision is created and which exceeds one of these limits.
Revision Age
Discard all revisions in the desktop user data folder older than
Enter the number of days after which all revisions in the desktop user data folder will be deleted.
Note: The latest revision will not be discarded.
Discard all revisions in the network user data folder older than
Enter the number of days after which all revisions in the network user data folder will be deleted.
Note: The latest revision will not be discarded.
Table 4-7 Backup Selection - Revision Control Tab (continued)
Item Description

237Administering the Desktop AgentManaging the Desktop Agent
11 From the Options tab, select the appropriate options.
12 Click OK to save your changes.
Table 4-8 Backup Selection - Options Tab
Item Description
Delta File Transfer If you choose Delta File Transfer, each time a file is backed up, only the part of the file that has changed is transferred and stored in the network user data folder. In addition, Delta file transfer uses compression. Enabling this option requires that the DLO administrator has installed and configured a maintenance server.
Compression When you select compression, each time a file is backed up, it is compressed for data transfer over the network and for storage in the desktop and network user data folders.
Compression is applicable to only those files that are created after this option is activated. Previously stored files will not be compressed.
Delta File Transfer also uses compression.
Encryption Select this option to encrypt files for transfer and for storage in an encrypted format in the network user data folder.
Encryption is applicable to only those files that are created after this option is activated. Previously stored files will not be encrypted.
The Advanced Encryption Standard (AES) and a 256-bit key length are used. If enabled, versions are stored without encryption in the desktop user data folder, and encrypted in the network user data folder. Transfer over the network is encrypted.
When source files are deleted, delete the backed up files from the:
Desktop user data folder after
Indicate the number of days after which DLO will delete all file versions from the desktop user data folder after the source file has been deleted from the desktop. The default setting is 60 days.
Network user data folder after
Indicate the number of days after which DLO will delete all file versions from the network user data folder after the source file has been deleted from the desktop. The default setting is 60 days.

238 Administering the Desktop AgentManaging the Desktop Agent
Modifying Backup Selections in the Advanced ViewYou can modify backup selections created on the Desktop Agent and those created by the DLO administrator only if the administrator has granted sufficient rights in the profile.
1 Under Views in the Tasks bar, click Backup Selections.
2 Click Advanced view.
3 Select the backup selection you want to change, and then click Modify.
4 Profile backup selections are those set by the DLO administrator. If the backup selection is a profile backup selection, and if the user has been granted sufficient rights, it can be modified by selecting Use custom selection from the drop-down list. Once this option is selected, your backup selection will no longer be updated when the administrator updates the profile backup selection.You can return to the profile backup selection settings at any time by selecting Use Profile selection from the drop-down list. Once you select this option, your profile will be updated if the DLO administrator modifies the profile backup selection.
5 Modify the backup selection properties as required. For more information on backup selection settings, review the instructions beginning with step 4 on page 233.
6 Click OK.

239Administering the Desktop AgentManaging the Desktop Agent
Deleting Backup Selections in the Advanced ViewWhen you delete a backup selection, the backup files are deleted after the number of days specified in the backup selection. See “Backup Selection - Options Tab” on page 237 for more information.
Note: Although Agent users are granted full permission, they cannot delete profile backup selections created by the administrator through the DLO Administration Console.
To delete a backup selection 1 Under Views in the Tasks bar, click Backup Selections.
2 Click Advanced view.
3 Select the backup selection you want to delete.
4 Click Remove.
5 Click Yes to verify that you want to delete this backup selection, or click No to cancel.
Backing up Outlook PST Files IncrementallyDLO is configured to back up PST files incrementally by default. The administrator can control the incremental backup of PST files through the profile or you can change the settings in the Options tab on the Desktop Agent if the administrator has granted sufficient rights.
Note: Outlook must be the default mail application to perform incremental backups of Outlook PST files.
The following limitations should be considered when backing up Outlook PST files incrementally:
■ Some of the DLO options are not used even if they are enabled. These options include Delta File Transfer, Compression, and Encryption.DLO relies on Microsoft's Messaging Application Programming Interface (MAPI) code to perform the actual backup of PST files. Using MAPI prevents the use of these DLO options during an incremental backup.This is a limitation of the way incremental backups are performed and is a normal behavior for backups of Outlook *.pst files. This limitation applies only to incremental backups.

240 Administering the Desktop AgentManaging the Desktop Agent
■ When Outlook PST files are backed up incrementally, only one revision is maintained irrespective of the number of revisions set in the backup selection.
■ The restored Outlook PST file will differ from the original PST file as explained in Restoring Microsoft Outlook Personal Folder Files on page 258.
■ Synchronized files cannot be backed up incrementally.
■ Even though a DLO profile is configured to limit the bandwidth usage during data transfer to the network user data folder, this setting is not applicable for incremental transfer of PST files.
Setting Outlook as the default email applicationDLO is unable to perform incremental backups of Outlook PST files unless Outlook is your default mail application.
To specify Outlook as your default mail application in your internet options 1 Open Internet Explorer.
2 On the Tools menu, click Internet Options.
3 Select the Programs tab.
4 Select Microsoft Office Outlook in the email list.
Note: If you do not intend to use Outlook as your default mail application, you can disable the warning message about incremental backups in the Desktop Agent.On the Views menu, select Settings.Click the Options tab and clear the Enable incremental backups of Outlook PST files check box.
Pending PST filesWhen an Outlook PST file is included in a DLO backup selection, it will appear in the Desktop Agent pending queue whenever the PST file is closed. Because PST files are a shared resource, opening and closing of PST files is controlled by a process called MAPI. Both DLO and Outlook access PST files using the MAPI process. MAPI opens a PST upon request from the application. MAPI may or may not, depending on the version in use, close a PST in response to the following:
■ An application such as DLO or Microsoft Outlook detaches from the PST (when Outlook is closed)
■ DLO startup
■ After 30 minutes of inactivity in the PSTWhen the PST is closed, DLO does one of the following.

241Administering the Desktop AgentManaging the Desktop Agent
■ If the PST is being handled incrementally by MAPI (see section on incremental PST), then DLO determines if the PST has been backed up in its entirety.
■ If the PST has already been backed up, then the entry is removed from the Desktop Agent pending queue because DLO knows the PST is in sync. If the PST is not being handled incrementally, the PST will be backed up in its entirety at this time.
Checkpoint RestartDuring huge file backups to network, in case of any interruptions, the backups would get triggered from start. With checkpoint restart, backups will now resume from the state it had stopped.The following are the situations in which network backups could get interrupted:
■ Desktop Agent pauses and resumes
■ Desktop Agent restarts
■ Desktop Agent machine restarts, shuts down, and logs off
■ Desktop Agent is refreshed
■ Network failure beyond BIT interval
Backing up Lotus Notes NSF Files IncrementallyThe following types of Lotus Notes NSF Files can be backed up incrementally.
When a file is backed up incrementally, there is no progress indicator in the Desktop Agent Status view, and only one revision is retained.
Table 4-9 NSF Files That Can Be Backed Up Incrementally
File Name Location Description
BOOKMARK.NSF Notes\Data directory Contains saved bookmarks and Welcome Page information.
NAMES.NSF Notes\Data directory This file contains contacts, connections, locations, and Personal Address Book information.
A_<name>.NSF This is an e-mail archive file. E-mail must be archived to be incrementally backed up by DLO. Refer to the Lotus Notes documentation for more information on archiving e-mail.

242 Administering the Desktop AgentManaging the Desktop Agent
Note: Even though a DLO profile is configured to limit the bandwidth usage during data transfer to the network user data folder, this setting is not applicable for incremental transfer of Lotus Notes NSF files.
Lotus Notes must already be installed before the Desktop Agent is installed. If Lotus Notes is installed after the Desktop Agent, you must run the Desktop Agent installer again to repair the installation. Additionally, if Lotus Notes is open during the Desktop Agent installation, Lotus Notes must be restarted. Lotus Notes email files can only be backed up incrementally with DLO if the e-mails have been archived. Once emails are archived, the resulting archive file can be backed up incrementally. Refer to the Lotus Notes documentation for information on archiving e-mails.
To configure the Desktop Agent for incremental backup of Lotus Notes files 1 Verify that Lotus Notes was installed before the Desktop Agent was installed, or
that the Desktop Agent installer was run again after Lotus Notes was installed to repair the installation.
2 Verify that emails to be backed up have been archived in Lotus Notes.
3 Verify that the Lotus Notes NSF files to be backed up have been selected in the appropriate backup selection. See “Managing the Desktop Agent” on page 228 for more information on backup selections.
4 Under Tools in the Desktop Agent Tasks bar, click Options.
5 Click the Options tab.
6 Check Enable message level incremental backups of Lotus Notes email files.
7 Click OK.
Using the Desktop Agent when Lotus Notes is not ConfiguredWhen a user logs in to a computer that has both DLO and Lotus Notes installed, but that user is not yet configured in Lotus Notes, a debugging DOS-window may appear, which contains the following errors:<time_date_stamp> Created new log files as C:\Documents and Settings\<user_name>\Local Settings\Application Data\Lotus\Notes\Data\log.nsf.<time_date_stamp> A previous process with the process ID <####> failed to terminate properly.
The DOS-window cannot be closed without manually exiting the DLO process. If you configure the current user for Lotus Notes, the errors are no longer generated at login for that user.

243Administering the Desktop AgentManaging the Desktop Agent
Deleting Lotus Notes Email FilesIf a Lotus Notes Email message is deleted before it is backed up by DLO, it will not be backed up.
Backup Resumptions after Hibernate and SleepDLO halts the backup job in case the computer is put to Hibernate or Sleep and resumes the job when the computer is back from that state. Make sure that “Maximum time for Desktop Agent to wait during backup interruption” is selected under Tools > Options > Global Settings option.If the Desktop Agent computer is put to Hibernate or Sleep when data is being transferred from LUDF to NUDF, the Desktop Agent waits until the user logs in and resumes the network backups from where it had stopped.Desktop Agent refreshes once network backups are completed after the computer is back from Hibernate and Sleep.
Viewing the Desktop Agent StatusThe Desktop Agent Status view provides a summary of the following Desktop Agent operations.
Table 4-10 Desktop Agent Status
Type of Job Running Options
Status Displays the current state of Desktop Agent jobs, displays when backups will run, and summarizes the results of the last backup.
Details This link is located just below the status summary if a backup selection has been made for a FAT drive. It provides scheduling details based on current Desktop Agent settings.
Show/Hide Pending Files
Hides or displays pending files. This selection toggles between Hide pending files and Show pending files when you click the link.
Backup Summary
Backup Completion Displays the percentage of backups completed based on the size of files in the backup selection.
Backup Selection Displays the total number and size of the files in the Backup Selection for this computer.

244 Administering the Desktop AgentManaging the Desktop Agent
Starting a Pending Job in the Status ViewTo run a pending job from the status view1 Under Views in the Desktop Agent Tasks bar, click Status.
2 Under Tasks in the Desktop Agent Tasks bar, click Run job.All pending jobs will be run, such as backup, synchronization or restore jobs.
Suspending or Cancelling a JobIf the DLO administrator has set your profile so that you can suspend and cancel jobs, then you can click the Suspend button to suspend a job. The available options depend on the type of job being suspended. When you click Suspend, a dialog opens specifying the options available.
Note: The DLO administrator sets the maximum time after which a suspended job will resume.
Table 4-11 Options for Suspending Jobs
Viewing Usage DetailsThe Desktop Agent Status view provides a summary of information on both local and network disk space used to store your data. Additional usage details and a grooming function are available in the Usage Details dialog:
■ Total disk space currently used on the network and desktop computer to store your backup data
■ Quotas, or maximum allowed storage space which can be used to store your data on the network and desktop computers
Type of Job Running Options
Continuous ■ Suspend the job and resume after a specified number of minutes
Manual ■ Suspend the job and resume after a specified number of minutes
■ Cancel the job until it is started again manually
Scheduled ■ Suspend the job and resume after a specified number of minutes
■ Cancel the job until it is scheduled to run again

245Administering the Desktop AgentManaging the Desktop Agent
■ The disk space available on the network and desktop computer for storing your data
■ An option to immediately delete old revisions and deleted files
■ Links to additional information and help
Note: The link to usage details is only available when the Desktop Agent is idle. It will not be shown when a job is running.
To view usage details and groom files1 On the Desktop Agent UI, Tools menu, click Usage Summary to open the Usage
Details dialog.
2 Review the usage information and take the appropriate actions as described in the following table.
Table 4-12 Usage Details
Item Description
Usage
Local Summarizes disk space usage on the desktop computer for storing your data. The following information is provided:
Using: The total disk space on the desktop computer currently being utilized to store your backup data.
Quota: The maximum amount of disk space you can use to store your backup data on the desktop computer. The administrator sets this quota limit in the profile, but if you have been given the rights, then you can modify the settings from the Desktop Agent Settings view. For more information, see “Modifying Desktop Agent Settings” on page 246.
Available: The amount of free disk space available on the desktop computer for storing your data without exceeding a quota. If there is no quota, the Desktop Agent will reserve a small amount of disk space so the drive will not fill completely with backup data.

246 Administering the Desktop AgentModifying Desktop Agent Settings
Modifying Desktop Agent SettingsIf the DLO administrator has set your profile so that you can view the complete Desktop Agent and modify settings, you can use the Settings view to modify the following:
■ Backup job schedule options
Network Summarizes disk space usage on the network for storing your data. The following information is provided:
Using: The total disk space on the network currently being utilized to store your backup data.
Quota: The maximum amount of disk space you can use to store your backup data on the network.
Available: The amount of free disk space available on the network for storing backup data for the current user without exceeding a quota.
Synchronized Files Summarizes disk space usage for storing synchronized data. The following information is provided:
Using: The total disk space on the network currently being utilized to store your synchronized data.
Remove deleted files Select this option to immediately and permanently delete all files that are marked as deleted in your Network and desktop user data folders. The periodic maintenance cycle will otherwise delete these files after the amount of time specified in your assigned profile.
Click this button to open the Remove Deleted Files dialog. Choose from the following options:■ Remove only the deleted files that currently meet
the backup selection deleted files criteria■ Remove all deleted files
Select the Remove files from the network user data folder check box to additionally groom deleted files from the network user data folder.
Additional information
View last job log Click the button to open the Log File Viewer. For more information on the log file viewer, see “Monitoring Job History in the Desktop Agent” on page 266.
Table 4-12 Usage Details (continued)
Item Description
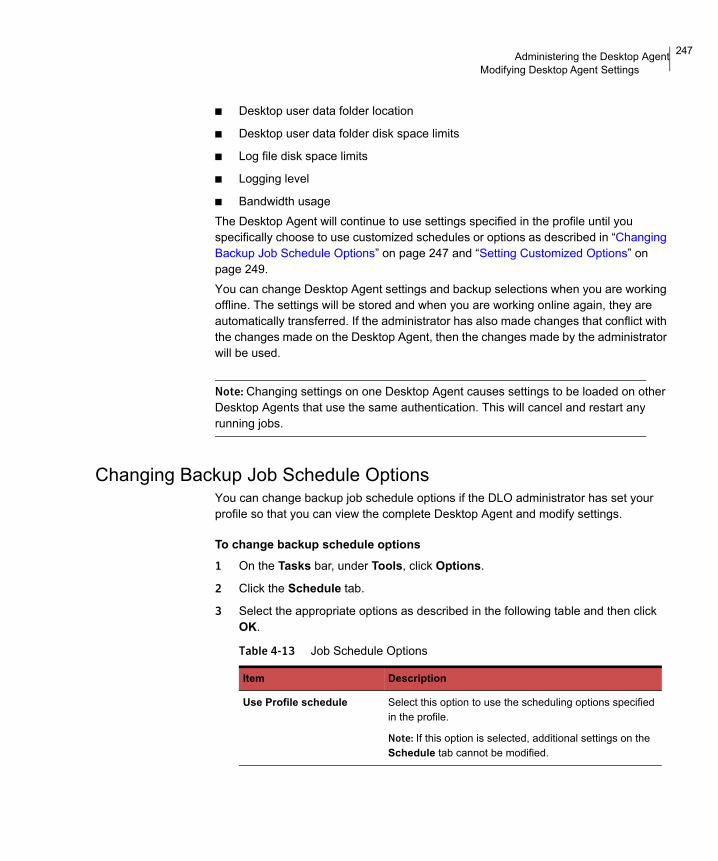
247Administering the Desktop AgentModifying Desktop Agent Settings
■ Desktop user data folder location
■ Desktop user data folder disk space limits
■ Log file disk space limits
■ Logging level
■ Bandwidth usageThe Desktop Agent will continue to use settings specified in the profile until you specifically choose to use customized schedules or options as described in “Changing Backup Job Schedule Options” on page 247 and “Setting Customized Options” on page 249.You can change Desktop Agent settings and backup selections when you are working offline. The settings will be stored and when you are working online again, they are automatically transferred. If the administrator has also made changes that conflict with the changes made on the Desktop Agent, then the changes made by the administrator will be used.
Note: Changing settings on one Desktop Agent causes settings to be loaded on other Desktop Agents that use the same authentication. This will cancel and restart any running jobs.
Changing Backup Job Schedule OptionsYou can change backup job schedule options if the DLO administrator has set your profile so that you can view the complete Desktop Agent and modify settings.
To change backup schedule options 1 On the Tasks bar, under Tools, click Options.
2 Click the Schedule tab.
3 Select the appropriate options as described in the following table and then click OK.
Table 4-13 Job Schedule Options
Item Description
Use Profile schedule Select this option to use the scheduling options specified in the profile.
Note: If this option is selected, additional settings on the Schedule tab cannot be modified.
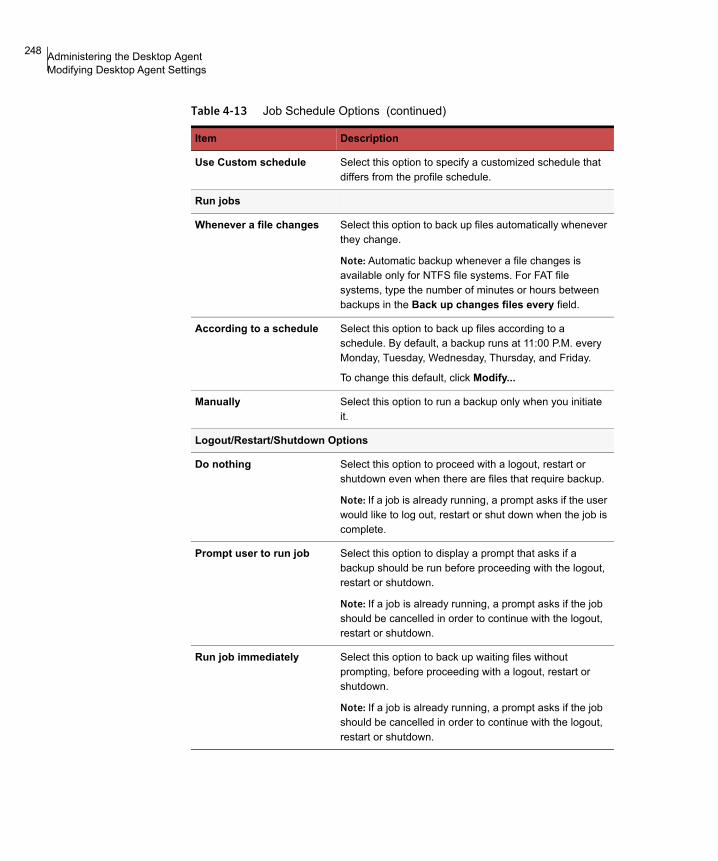
248 Administering the Desktop AgentModifying Desktop Agent Settings
Use Custom schedule Select this option to specify a customized schedule that differs from the profile schedule.
Run jobs
Whenever a file changes Select this option to back up files automatically whenever they change.
Note: Automatic backup whenever a file changes is available only for NTFS file systems. For FAT file systems, type the number of minutes or hours between backups in the Back up changes files every field.
According to a schedule Select this option to back up files according to a schedule. By default, a backup runs at 11:00 P.M. every Monday, Tuesday, Wednesday, Thursday, and Friday.
To change this default, click Modify...
Manually Select this option to run a backup only when you initiate it.
Logout/Restart/Shutdown Options
Do nothing Select this option to proceed with a logout, restart or shutdown even when there are files that require backup.
Note: If a job is already running, a prompt asks if the user would like to log out, restart or shut down when the job is complete.
Prompt user to run job Select this option to display a prompt that asks if a backup should be run before proceeding with the logout, restart or shutdown.
Note: If a job is already running, a prompt asks if the job should be cancelled in order to continue with the logout, restart or shutdown.
Run job immediately Select this option to back up waiting files without prompting, before proceeding with a logout, restart or shutdown.
Note: If a job is already running, a prompt asks if the job should be cancelled in order to continue with the logout, restart or shutdown.
Table 4-13 Job Schedule Options (continued)
Item Description

249Administering the Desktop AgentModifying Desktop Agent Settings
Setting Customized OptionsYou can change additional Desktop Agent settings, such as disk space used by the desktop user data folder, if the DLO administrator has configured your profile so that you are able to view the complete Desktop Agent and modify settings.
To set customized options1 On the Tasks bar, under Tools, click Options.
2 Click the Options tab.
3 Select Use custom options from the drop-down list.
4 Select the appropriate options as described in the following table and then click OK.
Run job as scheduled Select this option to proceed with a logout, restart or shutdown and back up files according to the schedule.
Note: If a job is already running, a prompt asks if the job should be cancelled in order to continue with the logout, restart or shutdown.
Run job at next login Select this option to proceed with a logout, restart or shutdown without prompting, and run a job the at the next login.
Note: If a job is already running, a prompt asks if the job should be cancelled in order to continue with the logout, restart or shutdown.
Table 4-13 Job Schedule Options (continued)
Item Description
Table 4-14 Options Dialog Box
Item Description
Use Profile options Select this option to use the scheduling options specified in the profile.
Note: If this option is selected, additional settings on the Schedule tab cannot be modified.
Use custom options Select this option to specify a customized schedule that differs from the profile schedule.
Note: This option must be selected to enable access to additional settings on the Options tab.

250 Administering the Desktop AgentModifying Desktop Agent Settings
Limit disk space usage on my computer to:
Select this option to limit the amount of space used on the computer to store backup files.
%Select % to enter a percentage of the hard disk space that can be used to store backup files.
MB
Select MB to enter the maximum number of megabytes of disk space that can be used to store backup files.
Log file maintenance
Keep log files for a minimum of (days)
Specify the minimum number of days to keep log files. Log files will not be deleted until they are at least as old as specified.
Note: Log grooming occurs each time a log is created. Log files will not be deleted until the minimum duration has been reached and, when the combined size of all log files is also reached.
After minimum number of days, delete oldest log files when combined size exceeds
Enter the maximum combined size of all log files to be retained before the oldest log files are deleted.
Note: You may have more than the specified number of MB of log files stored if none of the log files are as old as specified in the Keep log files for a minimum of (days) setting.
Logging options
Log groom messages Select this option to create logs for grooming operations.
Log information messages for backup
Select this option to create logs for all backup operations.
Log warning messages Select this option to create logs for all operations that generate warnings.
Table 4-14 Options Dialog Box (continued)
Item Description

251Administering the Desktop AgentModifying Desktop Agent Settings
Moving the Desktop User Data FolderYou can change the location of the desktop user data folder if the DLO administrator has configured your profile so that you are able to view and modify the complete Desktop Agent and modify settings.
To move the desktop user data folder 1 In the Tasks bar, under Tools, click Settings.
2 Click the Backup Folders tab.
3 Click Move.
Enable message level incremental backups of Outlook PST files
Select this option to enable incremental backups of Microsoft Outlook Personal Folder (PST) files. Incremental backups must be enabled to allow PST files to be backed up while they are open.
If this option is not selected, then PST files that are configured in Outlook will be fully backed up each time the PST file is saved, which generally occurs when Outlook is closed.
For more information, see “Backing up Outlook PST Files Incrementally” on page 239.
Enable message level incremental backups of Lotus Notes email files
Select this option to enable the configuration of DLO for incremental backup of certain Lotus Notes NSF files. Additional steps may be necessary to ensure backup of these files. See “Backing up Lotus Notes NSF Files Incrementally” on page 241 for more information.
To prevent the incremental backup of Lotus Notes files, clear this check box.
Table 4-14 Options Dialog Box (continued)
Item Description
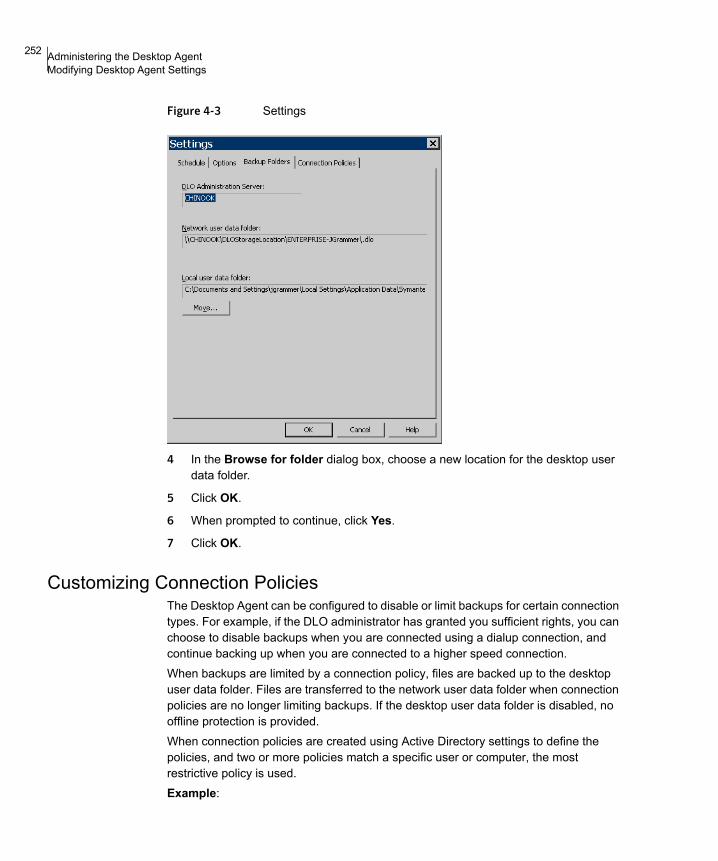
252 Administering the Desktop AgentModifying Desktop Agent Settings
Figure 4-3 Settings
4 In the Browse for folder dialog box, choose a new location for the desktop user data folder.
5 Click OK.
6 When prompted to continue, click Yes.
7 Click OK.
Customizing Connection PoliciesThe Desktop Agent can be configured to disable or limit backups for certain connection types. For example, if the DLO administrator has granted you sufficient rights, you can choose to disable backups when you are connected using a dialup connection, and continue backing up when you are connected to a higher speed connection.When backups are limited by a connection policy, files are backed up to the desktop user data folder. Files are transferred to the network user data folder when connection policies are no longer limiting backups. If the desktop user data folder is disabled, no offline protection is provided.When connection policies are created using Active Directory settings to define the policies, and two or more policies match a specific user or computer, the most restrictive policy is used. Example:
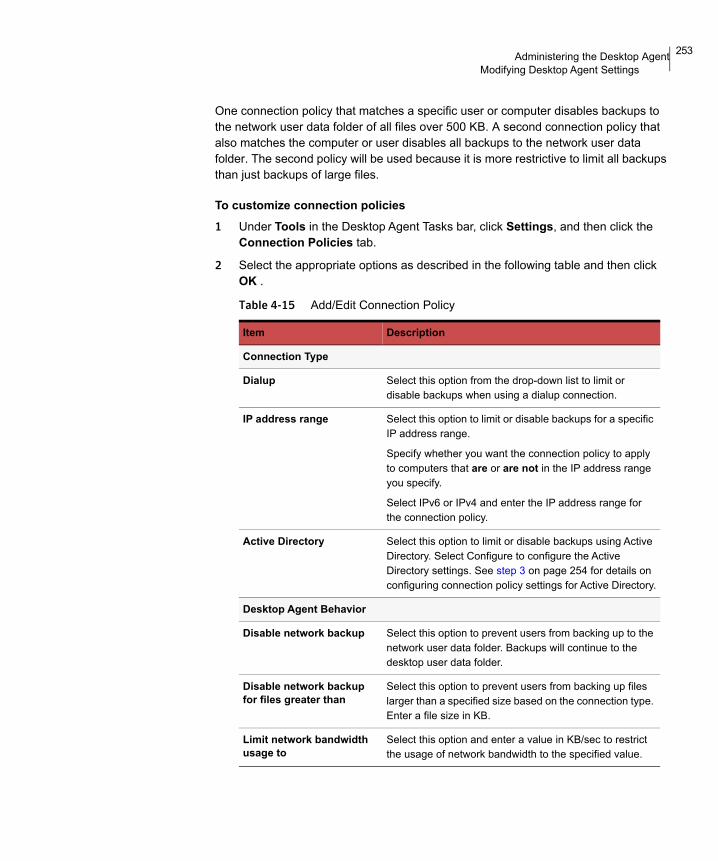
253Administering the Desktop AgentModifying Desktop Agent Settings
One connection policy that matches a specific user or computer disables backups to the network user data folder of all files over 500 KB. A second connection policy that also matches the computer or user disables all backups to the network user data folder. The second policy will be used because it is more restrictive to limit all backups than just backups of large files.
To customize connection policies 1 Under Tools in the Desktop Agent Tasks bar, click Settings, and then click the
Connection Policies tab.
2 Select the appropriate options as described in the following table and then click OK .
Table 4-15 Add/Edit Connection Policy
Item Description
Connection Type
Dialup Select this option from the drop-down list to limit or disable backups when using a dialup connection.
IP address range Select this option to limit or disable backups for a specific IP address range.
Specify whether you want the connection policy to apply to computers that are or are not in the IP address range you specify.
Select IPv6 or IPv4 and enter the IP address range for the connection policy.
Active Directory Select this option to limit or disable backups using Active Directory. Select Configure to configure the Active Directory settings. See step 3 on page 254 for details on configuring connection policy settings for Active Directory.
Desktop Agent Behavior
Disable network backup Select this option to prevent users from backing up to the network user data folder. Backups will continue to the desktop user data folder.
Disable network backup for files greater than
Select this option to prevent users from backing up files larger than a specified size based on the connection type. Enter a file size in KB.
Limit network bandwidth usage to
Select this option and enter a value in KB/sec to restrict the usage of network bandwidth to the specified value.

254 Administering the Desktop AgentModifying Desktop Agent Settings
3 If you selected Active Directory in step 2 above, configure the Active Directory settings as described in the following table and click OK.
4 Click OK to close the Add/Edit Connection Policy dialog.
5 Click OK to close the Settings dialog.
Enforce policy according to scheduled window
Select this check box to enable the connection policy to apply only during the specified period of time.
Click Schedule to set the time during which the policy will be in affect. Schedules can be set to run weekly or for a specific date range.
Table 4-16 Active Directory Object Dialog
Item Description
Object Select the Active Directory Object you want to use to configure the connection policy. You can select either Computer or User.
In LDAP Directory Type or browse to the LDAP directory.
All objects in this directory Select this option to apply the connection policy to all objects in this directory.
Only the objects in this directory that match the criteria below
Select this option to apply the connection policy only to those objects in the directory that match the specified criteria.
Attributes Select an attribute from the drop-down list or type in a custom attribute.
Condition Select the appropriate condition. Available options include =, <, <>, and >.
Value Type a value to complete the criteria that will be used to determine matches. Wildcards can be used to specify the value.
Table 4-15 Add/Edit Connection Policy
Item Description

255Administering the Desktop AgentRestoring Files Using the Desktop Agent
Restoring Files Using the Desktop AgentIf the DLO administrator has set your profile to include restoring files, then you can use the Desktop Agent to restore files to the original or an alternate directory. If a Desktop Agent user has more than one desktop computer running DLO, files can be selected from all available backups on each of the user’s desktops, but can only be restored to the current desktop computer.For information on backing up and restoring Microsoft Outlook PST files, see “Backing up Outlook PST Files Incrementally” on page 239 and “Restoring Microsoft Outlook Personal Folder Files” on page 258.
Figure 4-4 Restore View
If you customize NTFS permissions or directory attributes, such as compression or encryption for files or folders, you must reapply these settings after restoration. If you disconnect from the network while the Desktop Agent is running, you may encounter a slow response when browsing the Restore view. From the Tasks menu, select Refresh to fix this problem.
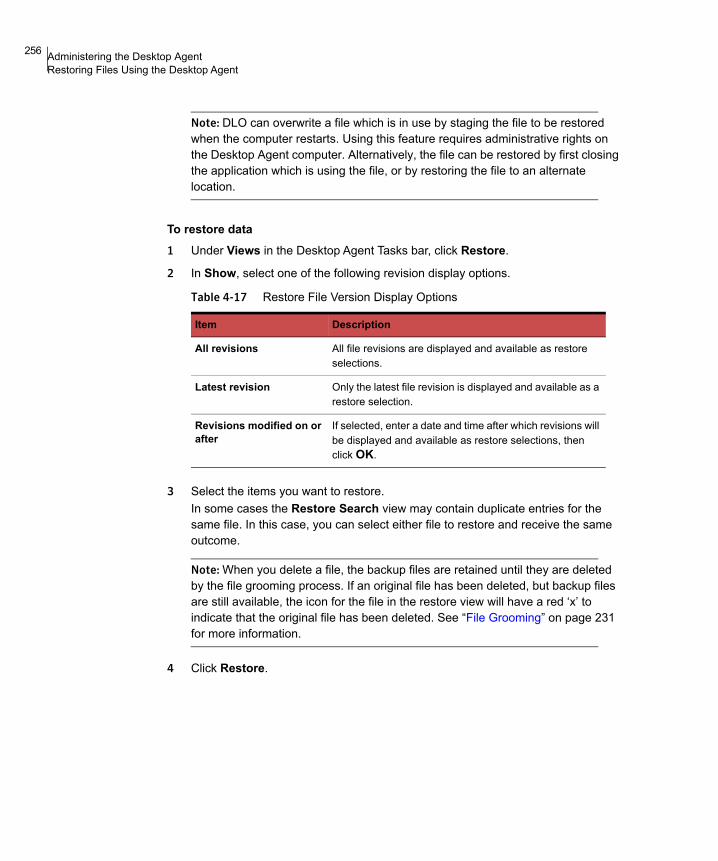
256 Administering the Desktop AgentRestoring Files Using the Desktop Agent
Note: DLO can overwrite a file which is in use by staging the file to be restored when the computer restarts. Using this feature requires administrative rights on the Desktop Agent computer. Alternatively, the file can be restored by first closing the application which is using the file, or by restoring the file to an alternate location.
To restore data1 Under Views in the Desktop Agent Tasks bar, click Restore.
2 In Show, select one of the following revision display options.
3 Select the items you want to restore.In some cases the Restore Search view may contain duplicate entries for the same file. In this case, you can select either file to restore and receive the same outcome.
Note: When you delete a file, the backup files are retained until they are deleted by the file grooming process. If an original file has been deleted, but backup files are still available, the icon for the file in the restore view will have a red ‘x’ to indicate that the original file has been deleted. See “File Grooming” on page 231 for more information.
4 Click Restore.
Table 4-17 Restore File Version Display Options
Item Description
All revisions All file revisions are displayed and available as restore selections.
Latest revision Only the latest file revision is displayed and available as a restore selection.
Revisions modified on or after
If selected, enter a date and time after which revisions will be displayed and available as restore selections, then click OK.

257Administering the Desktop AgentRestoring Files Using the Desktop Agent
5 Select the appropriate options as described in the following table and then click OK.
Searching for Desktop Files to RestoreTo search for desktop files and folders to restore1 Under Views in the Desktop Agent Tasks bar, click Restore.
2 Under Tasks in the Desktop Agent Tasks bar, click Search for files to restore to open the Search dialog.
Table 4-18 Restore Dialog Box Options
Item Description
Restore to the original folders on this computer
Select this option to restore files and folders to their original location.
Redirect the restore to an alternate folder on this computer
Select this option to restore files and folders to an alternate folder on the same computer.
Preserve folder structure Select this option to restore the data with its original directory structure. If you clear this option, all data (including the data in subdirectories) is restored to the path you specify.
Options
If file already exists Select one of the following:■ Do not overwrite■ Prompt■ Overwrite
Restore deleted files Select this option if you want to restore files even though the source file has been deleted.
Preserve security attributes on restored files
Select Preserve security attributes on restored files to preserve security information in restored files.
You may need to clear this check box to successfully restore a file if the source file security conflicts with the destination security. If you do not select this check box, then the security information is removed from the restored file.

258 Administering the Desktop AgentRestoring Files Using the Desktop Agent
3 Select the appropriate options as described in the following table and then click OK.
Restoring Microsoft Outlook Personal Folder FilesWhen you restore Microsoft Outlook Personal Folder (PST) files, the following differences exist between the restored PST and the original PST:
■ The file size will be different.
■ Any rule that points to a folder inside a PST file will no longer work. You must edit the rule to point to the correct folder.
■ Restored PST files will have Inbox, Outbox, and Sent Items folders, even if the original files did not have them.
■ If you use a password for your PST file, you must reset the password after restoring your PST file.
Table 4-19 Search Dialog Box Options
Item Description
Search for file names with this text in the file name
Type all or part of the file name or folder you want to find.
Modified Select this option to search for files that were modified during a specific time frame. Then specify the time frame.
Today Select this option to search for files modified on the current calendar day.
Within the past week Select this option to search for files modified in the last calendar week.
Between Select this option to search between calendar dates.
Of the following type Select this option to choose a file type from the list provided.
Of the following size Select this option and then enter information as follows: ■ Select equal to, at least, or at most from the
first list■ Type a file size■ Select KB, MB, or GB

259Administering the Desktop AgentRestoring Files Using Web Browser
Note: Make sure that the appropriate 32-bit or 64-bit Outlook or Lotus Notes client is installed on the computer where you want to restore the PST or NSF files.
Restoring Deleted E-mail MessagesThe default behavior when deleting a message from a mail archive may differ depending on the mail application. With Lotus Notes, there is a “soft delete” feature that allows a message to be maintained in a special folder, the “Trash,” for a measured interval (default is 48-hours). After that, the message is permanently deleted. Outlook behaves in much the same manner. Deleted messages are moved to the “Deleted Items” folder but there is no time limit associated with this action. Outlook will permanently delete a message when the user empties the Deleted Items folder.In either case, the Desktop Agent will replicate the delete during the next backup operation. If users accidentally deletes a message from a mail archive, they will need to recover that file from the appropriate folder assuming the file has not been permanently deleted by the mail application. Because there are no versions maintained for e-mail archives, permanently deleted messages will be unavailable after the time limit has expired or when the user has manually emptied the folder.
Restoring Files with Alternate Stream DataDLO protects all of the alternate streams for a file, including security streams. If a new version of a file contains only changes to alternate stream data, the file replaces the previous version and does not impact the revision count. Only revisions with actual data changes are treated as new revisions.FAT partitions do not use alternate data streams. If a file is restored from an NTFS partition to a FAT partition, the alternate steam data will not be included in the restored file.When a file is restored, one of the options is to preserve the security attributes on restored files. If this option is not selected, the security attributes are removed from the restored file. This option is set in the restore dialog box. See “Restore Dialog Box Options” on page 257 for more information.
Restoring Files Using Web BrowserThis feature enables DLO users to access their backed up files using a web browser. Once the user is authenticated, the backed up data can be downloaded to desktops and laptops.

260 Administering the Desktop AgentRestoring Files Using Web Browser
Note: The maximum file size that can be restored using web browser is 50 MB.
Pre-requisites for Web restore1 Configure Edge Server and IO Server.
2 Map the IO Server to the DLO Storage location.
3 Mobile/Web Restore and Restore data option should be selected under User Settings in the profile. This option is selected by default. DLO Administrator can allow or deny Web Restore access to user by this option.
To restore dataAccess Web restore URL https://<EdgeServer_ip_or_hostname_or_CertificateName> from the Web browser.
Note: To use CertificateName in the URL, you will have to procure an SSL Certificate and bind it to the Edge Server.
1 Enter username and password.
2 Click Login.
3 Select the particular device.
4 Navigate and select the files to be restored.
5 Click download icon.To check the download status, click Progress.
Note: Multiple devices will be listed under Your devices in case the user has backed up data from more than one device. Select the required device from which the data has to be restored.
Following are the supported Browsers:
■ Internet Explorer
■ Mozilla Firefox
■ Google Chrome
■ Safari 5.1
■ Microsoft Edge
There are additional options provided on the Web Restore UI.
261Administering the Desktop AgentSynchronizing Desktop User Data
DLO Agent: This option can be used to download the Desktop Agent installer package on the Desktop machine for install or upgrade.DLO Mac Agent: This option can be used to download the Mac Desktop Agent installer package on the Desktop machine for install or upgrade.Server Certificate: This option can be used to download the Server Certificates.In case there are changes in the Edge Server Certificates and the Desktop Agent is out of the corporate network, the user needs to download the new Server Certificates for backups over Internet.On download, if the Certificates.zip contains both the Default Edge Server and the Configured Edge Server folders, replace the certificates on the Desktop Agent machine as follows:
■ The certificates in the Default Edge Server folder needs to be placed in the Desktop Agent install path. For e.g C:\Program Files\Veritas\Veritas DLO\DLO\
■ The certificates in the Configured Edge Server folder needs to be placed in the <Agent Install Path>\Certificates\domain-username folder. In case the Certificates/domain-username folder is not present, create the same and copy the files. For e.g: C:\Program Files\Veritas\Veritas DLO\DLO\Certificates\domain1-user1\
On download, if the Certificates.zip contains only the Default Edge Server folder, replace the certificates on the Desktop Agent machine as follows:
■ The certificates in the Default Edge Server folder needs to be placed in both the Desktop Agent install path and in the <Agent Install Path>\Certificates\domain-username folder.
Note: Make sure that the appropriate 32-bit or 64-bit Outlook or Lotus Notes client is installed on the IO Server computer for Web restore of PST or NSF files.
Synchronizing Desktop User DataSynchronizing backed-up data allows you to work on a file on any of your desktops with the assurance that you are working on the most recent version. With the DLO 9.3 version, synchronization of files and folders across multiple endpoints belonging to the same user is extended for endpoints connected over the internet.
Your backed up data is stored in the desktop user data folder on the local drive of each desktop running the Desktop Agent, and in the network user data folder. If you have multiple desktops, your network user data folder contains copies of backed up files from each desktop. When a folder is synchronized using the Desktop Agent, only one copy of the folder and its contents are included in the network user data folder. When

262 Administering the Desktop AgentSynchronizing Desktop User Data
the file is changed on one desktop and the next time a DLO job is run, it is stored in the desktop user data folder on that computer, and then uploaded to the network user data folder. It is then available for download to another synchronized desktop computer the next time that computer runs a job.After a folder is synchronized, the Desktop Agent checks the network user data folder each time the desktop is connected to the network and a job is run. If new file versions are available in any of the synchronized folders, the Desktop Agent downloads the new version to the source folder on the desktop. In case of scheduled backups or when the same file is updated on both computers in the offline state and the agents come online at the same time, conflicts will occur during synchronization and the user will be prompted to select a particular file revision to use.The Synchronized Selections view displays folders backed up on your other desktops that are available for synchronization. Select any of these folders that you want to synchronize with the current desktop computer.

263Administering the Desktop AgentSynchronizing Desktop User Data
Figure 4-5 Synchronized Selections View
Note: If you customize NTFS permissions or folder attributes for compression or encryption, you must reapply these settings after synchronization.
How Synchronization WorksWhen a DLO job runs, DLO does the following to back up and synchronize files:
■ Backs up files that changed on the desktop.
■ Makes synchronized files available to other computers with which the desktop is synchronized.

264 Administering the Desktop AgentSynchronizing Desktop User Data
■ Downloads synchronized files that were changed on another computer and uploaded since the last DLO job.
■ Retains all conflicting versions of files. You can then choose which version to use.
Following are few important facts of Synchronization:
■ Synchronization works only across the desktop agents of the same version.
■ For synchronized folders, files with same name on both computers are synchronized based on the last modified time.
■ For desktop agents connected in the BOI mode, there will be a maximum delay of ten minutes to reflect the synchronized files and folders of the other endpoint.
■ Backup selection settings modified post synchronization, will be applicable to the synchronized backup selections after unsynchronization.
■ If only the sub folders in a backup selection are synchronized, after unsynchronization, these subfolders are added as customized backup selections.This is to avoid conflicts arising for settings of synched folder and the root folder which is not synchronized.
■ If the administrator deletes or unchecks a backup selection after synchronization, once these files or folders are unsynchronized, they are added as part of the customized backup selection.
■ Synchronization is not supported for configured Lotus Notes and configured PST files.
■ Synchronization is not supported across Mac endpoints.
■ Machine level quota for the network user data folder will not be applicable for synchronized files or folders.
■ It is recommended to synchronize files and folders of backup selections with a continuous mode of backup, to avoid conflicts that may arise for scheduled backups.By default, the continuous mode of backup is enabled for a profile.
Global Excludes defined for a backup selection are also applicable to the synchronized selections. See “Configuring Global Exclude Filters” on page 129 for more information.You can manage synchronization using the following options:
■ Standard view: Enables you to create new synchronization sets.
■ Advanced view: Enables you to modify settings for each synchronization set.
Note: The clocks on all the user’s computers must also be synchronized.
265Administering the Desktop AgentSynchronizing Desktop User Data
To synchronize a folder across multiple desktops1 Under Views in the Desktop Agent Tasks bar, click Synchronized Selections.
2 Click Standard view. Desktops available for synchronization appear in the Remote Computers pane.
Note: A desktop must have the same owner and must be backed up with the Desktop Agent to appear in the Synchronized Selections view. Only backed up folders are available for synchronization.
3 Select the folders that you want to synchronize.
4 When the Choose Local Folder dialog box appears, type or browse to the location where the synchronized files must be stored.
5 Click OK.
6 Click Save changes to save the selections or Undo changes to return to the last saved settings.
To view or change a synchronized folder 1 Under Views in the Desktop Agent Tasks bar, click Synchronized Selections.
2 Select the Advanced view option.
3 Click the folder to be viewed or modified.
4 Click Modify.The General tab in the Synchronized Folder dialog box identifies the location where synchronized files from this selection will be stored, and also lists other computers synchronizing with the selected folder.
5 Configure the synchronization folder settings as described for backup selection configuration, beginning with step 5 on page 234.
6 Click OK.
To remove a synchronized folder
Note: When a synchronized selection is deleted, the backup files are deleted in the same manner as when source files are deleted. They will be groomed after the number of days specified in the backup selection.
1 Under Views in the Desktop Agent Tasks bar, click Synchronized Selections.
2 Click the Advanced View option.
3 Click the synchronization selection to be deleted.
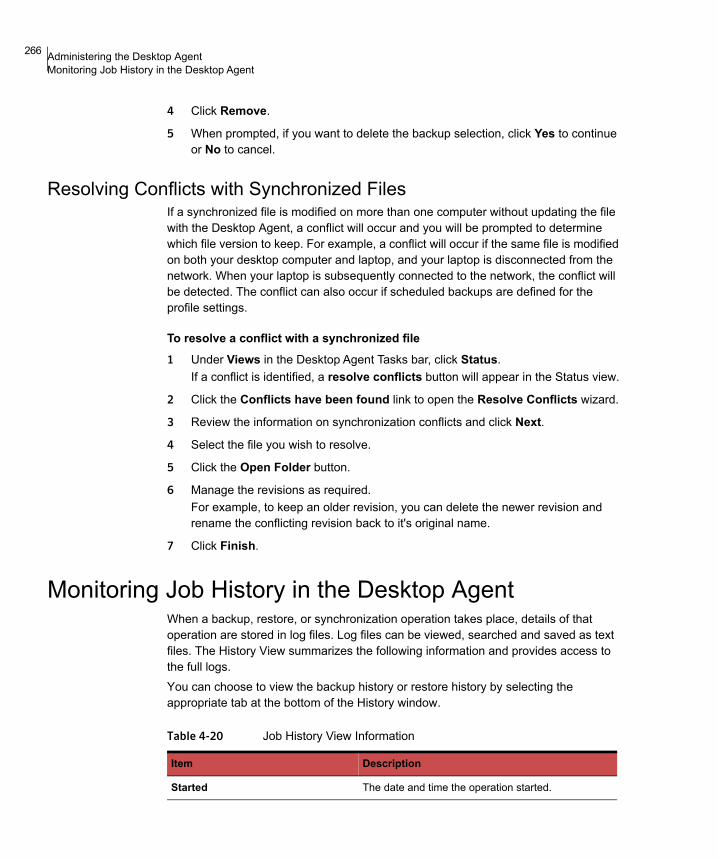
266 Administering the Desktop AgentMonitoring Job History in the Desktop Agent
4 Click Remove.
5 When prompted, if you want to delete the backup selection, click Yes to continue or No to cancel.
Resolving Conflicts with Synchronized FilesIf a synchronized file is modified on more than one computer without updating the file with the Desktop Agent, a conflict will occur and you will be prompted to determine which file version to keep. For example, a conflict will occur if the same file is modified on both your desktop computer and laptop, and your laptop is disconnected from the network. When your laptop is subsequently connected to the network, the conflict will be detected. The conflict can also occur if scheduled backups are defined for the profile settings.
To resolve a conflict with a synchronized file 1 Under Views in the Desktop Agent Tasks bar, click Status.
If a conflict is identified, a resolve conflicts button will appear in the Status view.
2 Click the Conflicts have been found link to open the Resolve Conflicts wizard.
3 Review the information on synchronization conflicts and click Next.
4 Select the file you wish to resolve.
5 Click the Open Folder button.
6 Manage the revisions as required. For example, to keep an older revision, you can delete the newer revision and rename the conflicting revision back to it's original name.
7 Click Finish.
Monitoring Job History in the Desktop AgentWhen a backup, restore, or synchronization operation takes place, details of that operation are stored in log files. Log files can be viewed, searched and saved as text files. The History View summarizes the following information and provides access to the full logs. You can choose to view the backup history or restore history by selecting the appropriate tab at the bottom of the History window.
Table 4-20 Job History View Information
Item Description
Started The date and time the operation started.

267Administering the Desktop AgentMonitoring Job History in the Desktop Agent
Ended The date and time the operation ended.
Status The status of the job, such as Active, Completed, Cancelled, or Failed.
Files Transferred (Local) The total number of files transferred to the desktop user data folder during the listed job.
Size Transferred (Local) The total number of bytes of data transferred to the desktop user data folder during the listed job.
Files Transferred (Network) The total number of files transferred to the network user data folder during the listed job.
This information is only available for the backup history, not the restore history.
Size Transferred (Network) The total number of bytes of data transferred to the network user data folder during the listed job.
This information is only available for the backup history, not the restore history.
Errors The number of files that failed to copy and produced errors.
Table 4-20 Job History View Information (continued)
Item Description

268 Administering the Desktop AgentMonitoring Job History in the Desktop Agent
Figure 4-6 History View
Viewing Log FilesTo view history logs 1 Under Views in the Desktop Agent Tasks bar, click History.
2 To view backup logs, select the Backup tab, or to view restore logs, select the Restore tab.
3 Select the appropriate History view filter option from the Show drop-down list:■ All logs: All history logs are displayed.■ All logs with errors: History logs for all jobs that generated errors are
displayed.■ Logs filtered by date: All logs generated after a specified date and time are
displayed. Enter the date and time after which logs are to be displayed in the Filter by date dialog box and click OK.
4 Click the job history entry for which you want to view the history log.
5 To open the log file viewer, click View Log.

269Administering the Desktop AgentMonitoring Job History in the Desktop Agent
6 If required, click Save As to save the log file as a text file.
7 To exit the log file viewer, click Close.
Searching for Log FilesThe Log File Viewer has a powerful search mechanism to help you locate the log files you want to view.
To search for log files 1 Under Views in the Desktop Agent Tasks bar, click History.
2 In the History pane, click the Search link to open the Log File Viewer.
3 Enter filtering parameters as described in the following table.
Table 4-21 Log File Viewer Filtering Options
Item Description
Search for log entries in
All log files Select this option to show all log entries in the log file viewer.
Current log file Select this option to search only those log entries in the current log file.
With timestamp of Select this check box to search only those log entries within a specified time period. The options include:
Today: Show only log files that were created today.
Within the last week: Show all log files created in the last week.
Between dates: Show all log files created between the dates entered.
Of the following type Select this check box to show only logs of the indicated type. You may select one of the following types:■ Backup■ Restore■ Move User■ Maintenance■ Error■ Warning
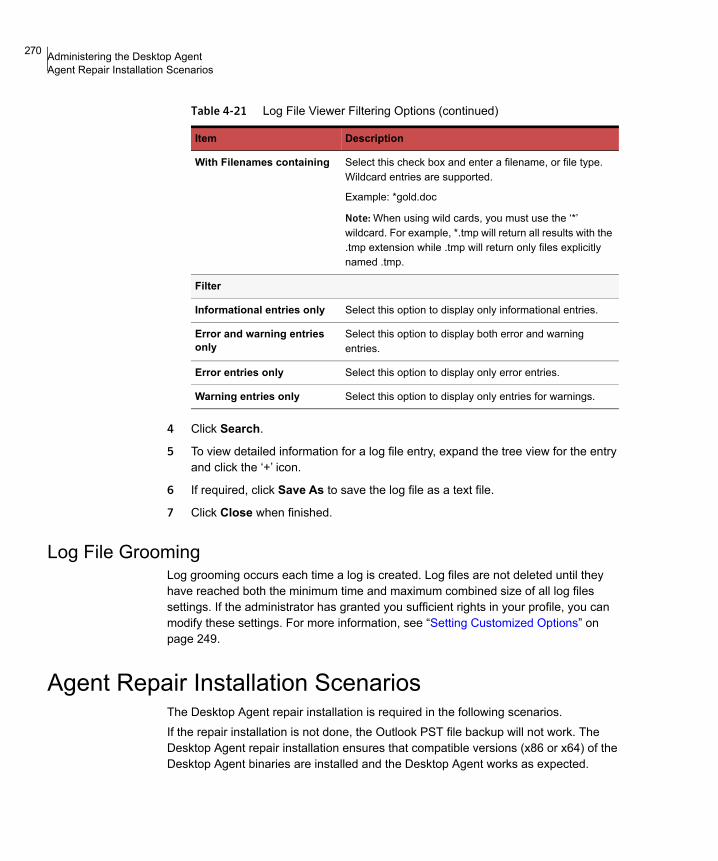
270 Administering the Desktop AgentAgent Repair Installation Scenarios
4 Click Search.
5 To view detailed information for a log file entry, expand the tree view for the entry and click the ‘+’ icon.
6 If required, click Save As to save the log file as a text file.
7 Click Close when finished.
Log File GroomingLog grooming occurs each time a log is created. Log files are not deleted until they have reached both the minimum time and maximum combined size of all log files settings. If the administrator has granted you sufficient rights in your profile, you can modify these settings. For more information, see “Setting Customized Options” on page 249.
Agent Repair Installation ScenariosThe Desktop Agent repair installation is required in the following scenarios. If the repair installation is not done, the Outlook PST file backup will not work. The Desktop Agent repair installation ensures that compatible versions (x86 or x64) of the Desktop Agent binaries are installed and the Desktop Agent works as expected.
With Filenames containing Select this check box and enter a filename, or file type. Wildcard entries are supported.
Example: *gold.doc
Note: When using wild cards, you must use the ‘*’ wildcard. For example, *.tmp will return all results with the .tmp extension while .tmp will return only files explicitly named .tmp.
Filter
Informational entries only Select this option to display only informational entries.
Error and warning entries only
Select this option to display both error and warning entries.
Error entries only Select this option to display only error entries.
Warning entries only Select this option to display only entries for warnings.
Table 4-21 Log File Viewer Filtering Options (continued)
Item Description
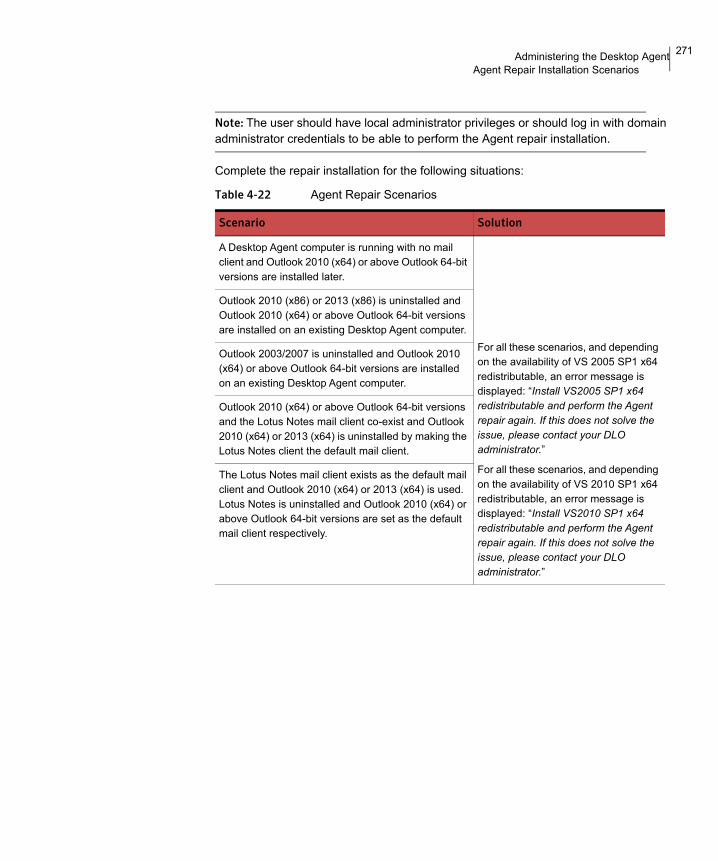
271Administering the Desktop AgentAgent Repair Installation Scenarios
Note: The user should have local administrator privileges or should log in with domain administrator credentials to be able to perform the Agent repair installation.
Complete the repair installation for the following situations:
Table 4-22 Agent Repair Scenarios
Scenario Solution
A Desktop Agent computer is running with no mail client and Outlook 2010 (x64) or above Outlook 64-bit versions are installed later.
For all these scenarios, and depending on the availability of VS 2005 SP1 x64 redistributable, an error message is displayed: “Install VS2005 SP1 x64 redistributable and perform the Agent repair again. If this does not solve the issue, please contact your DLO administrator.”
For all these scenarios, and depending on the availability of VS 2010 SP1 x64 redistributable, an error message is displayed: “Install VS2010 SP1 x64 redistributable and perform the Agent repair again. If this does not solve the issue, please contact your DLO administrator.”
Outlook 2010 (x86) or 2013 (x86) is uninstalled and Outlook 2010 (x64) or above Outlook 64-bit versions are installed on an existing Desktop Agent computer.
Outlook 2003/2007 is uninstalled and Outlook 2010 (x64) or above Outlook 64-bit versions are installed on an existing Desktop Agent computer.
Outlook 2010 (x64) or above Outlook 64-bit versions and the Lotus Notes mail client co-exist and Outlook 2010 (x64) or 2013 (x64) is uninstalled by making the Lotus Notes client the default mail client.
The Lotus Notes mail client exists as the default mail client and Outlook 2010 (x64) or 2013 (x64) is used. Lotus Notes is uninstalled and Outlook 2010 (x64) or above Outlook 64-bit versions are set as the default mail client respectively.

272 Administering the Desktop AgentDLO Endpoint Migration Utility
DLO Endpoint Migration UtilityWhen a desktop or laptop user receives a new computer, DLO can be used to migrate user data to the new computer. This is accomplished by DLO Endpoint Migration utility. Endpoint Migration allows the user to migrate the data from source machine to destination machine, provided same user must be logged in to the destination machine.
Note: Endpoint Migration Utility is limited to the following:1. Endpoint Migration Utility is supported only for Windows operating system.2. Desktop Agent machine which has DLO version prior to DLO 9.0. If a user with Agent machine lower than DLO 9.0 version, launches the utility, a message is displayed prompting the user to upgrade Agent machine to Veritas DLO 9.0.3. Desktop Agent machine which is in BOI mode.
Outlook 2010 (x64) or above Outlook 64-bit versions are uninstalled and Outlook 2010 (x86) or above Outlook 32-bit versions are installed on an existing Desktop Agent computer.
For all these scenarios, and depending on the availability of VS2005 SP1 x86 redistributable, an error message is displayed: “Install VS2005 SP1 x86 redistributable and perform the Agent repair again. If this does not resolve the issue, please contact your DLO administrator.”
For all these scenarios, and depending on the availability of VS2010 SP1 x86 redistributable, an error message is displayed: “Install VS2010 SP1 x86 redistributable and perform the Agent repair again. If this does not resolve the issue, please contact your DLO administrator.”
Outlook 2010 (x64) or above Outlook 64-bit versions are uninstalled on an existing Desktop Agent computer.
On an existing Desktop Agent computer, Outlook 2010 (x64) or above Outlook 64-bit versions and the Lotus Notes mail client co-exist and the default mail client is toggled between Outlook 2010 (x64) or above Outlook 64-bit versions and Lotus Notes.
Table 4-22 Agent Repair Scenarios
Scenario Solution

273Administering the Desktop AgentDLO Endpoint Migration Utility
Enabling or Disabling DLO Endpoint MigrationThe DLO Administrators can either permit or restrict user to select Endpoint migration from DLO Desktop Agent. There is an option for the Administrator to enable or disable Endpoint Migration option in the DLO Administration Console.
■ Navigate to Profiles > Profile Properties > User Settings. Select Endpoint Migration option to enable or disable Endpoint Migration.
Initiating Endpoint Migration from DLO Desktop AgentWhen a user, who is already backed up by DLO, is logged in to a new machine for the first time and on which DLO is installed, a message is prompted to confirm initiation of endpoint migration. On confirming, endpoint migration is initiated in the destination machine to migrate user data from source machine. The data can also be migrated later, by selecting endpoint Migration option from DLO Desktop Agent. Once endpoint migration is initiated, the DLO Desktop Agent exits automatically. To migrate user data to destination machine:
1 On the Tools menu, select Endpoint Migration. The DLO Endpoint Migration dialog box appears.
2 In the Source pane, complete the following details:
■ Machine Name: Select the source machine from where the data must be migrated from the drop down list. On selecting the source machine, the backup selection and source machine drives are listed.
By default, all the backup selections configured in the source machine are selected. The selected drives and folders are displayed in the Selected Folders pane.
Note: If the any of the drives in the source machine are full, that particular drive will not be listed for selection as it requires some free space to create snapshot for the drive.
If the source machine is not available, a message is prompted to restore the source machine NUDF data to the destination machine. On confirming, the DLO backed up NUDF data will be restored to the destination machine. The NUDF data is also migrated from source NUDF location to destination NUDF location.
3 In the Destination pane, complete the following fields:
■ Machine Name: The destination machine name appears. This field is not-editable.
■ Preserve Drive and folder Structure: Select this option to copy the data to the same drive or folder as that of the source machine.

274 Administering the Desktop AgentAbout the Desktop Agent for Mac
■ Migrate to alternate location: Select this option to enter an alternate location to migrate user data. Click Browse to choose a different path to move the data.
■ If the file already exists: Select one of the following options from the dropdown list:■ Do not overwrite: If selected, the files that are already present in the
destination machine, fails to migrate. The Endpoint Migration report displays the details of failed files.
■ Overwrite: If selected, overwrites the existing file in the destination machine.
■ Migrate NUDF data from source machine to destination machine: Select this option to move NUDF and LUDF data from source machine to destination machine.
This option is available when endpoint migration is initiated for the first time in the destination machine. Once the backed up data is moved, this option is unavailable.
4 Click Start to begin the endpoint migration. The endpoint migration progress status appears.■ To pause the endpoint migration, click Pause. ■ Click Cancel to stop the endpoint migration.
5. Once endpoint migration is completed, a report is generated. Click Report to display the following details:
■ Number of files migrated
■ Size of migrated data
■ Number of failed files, if any
■ Error message for failed files
■ Size of NUDF migrated data
■ Number of NUDF migrated files
■ Size of restored data
■ Number of files restoredAlternately, the report is available in the below path of destination machine:C:\Users\<UserName>\AppData\Local\Veritas\DLO\.settings
About the Desktop Agent for MacThe Desktop Agent can be installed on Mac computers. Users can perform backup and restore operations using the DLO Agent console that is customized for Mac operating system. For more information, see “Features and Benefits of the Desktop Agent” on page 222.

275Administering the Desktop AgentAbout the Desktop Agent for Mac
Note: The features Desktop Agent CPU Priority, Backup Interruption Tolerance and Endpoint Migration Utility are not supported for Mac.
System Requirements for Agent on MacThe following are the minimum system requirements for this version of Desktop Agent that needs to be installed on a Mac computer.
Installing the Desktop Agent on MacUsers with administrator rights can install the Desktop Agent. After the Desktop Agent is installed, any user who logs on to that desktop can use the Desktop Agent. The logged on user will only have access to DLO backup files associated with the logged on account.
When the Mac Desktop Agent is installed on a computer that is not in a domain, and when you launch the Desktop Agent for the first time, you are prompted to enterthe user name, password, and domain. Provide the domain user credentials.
PrerequisitesComplete the following tasks before installing the Desktop Agent on a Mac machine.
1 Install and configure DLO Administration Server on a Windows server machine.
2 The DLO administrator must ensure that the TCP/IP protocol is enabled for the DB instance, and the port number is set.
Item Description
Operating system ■ Mac OS 10.15 (64-bit)■ Mac OS 10.14 (64-bit)■ Mac OS 10.13 (64-bit)■ Mac OS 10.12 (64-bit)■ Mac OS 10.11 (64-bit)■ Mac OS 10.10 (64-bit)■ Mac OS 10.9 (64-bit)
Processor Intel
Memory 2 GB RAM or more
Disk space 300 MB hard disk space

276 Administering the Desktop AgentAbout the Desktop Agent for Mac
3 Irrespective of the firewall state in the DB server (ON or OFF), the administrator must enter the DB port in SQL Server Configuration Manager > SQL Server Network Configuration > “Protocols for <Instance name>” > TCP/IP Protocol Settings > TCP Port.
4 If the firewall is ON in the DB server, then this port should also be included in the firewall exception list.
5 Also, restart the DLO DB service after providing the TCP port number.
6 If there is a customized TCP Port, then do the following on DLO Mac Agent once it is installed:
a Open the Agentconfiguration.plist file located in /users/<username>/.Applications/Veritas/DLO/.settings folder.
b Change the String value of the key DBPort from 1433 to the new value.
c Launch the DLO Mac Agent.
Note: The default port to communicate with DB Server is 1433.
7 To verify the communication to DB server, use Telnet. (Example, telnet <IP> <port>.)
To install the Desktop Agent on Mac 1 From the desktop on which you want to install the Desktop Agent, go to the
desktop menu options, select Finder.
2 Select Go > Connect to Server.
3 In the Server Address field, type the network address of DLO Server using one of the following formats.■ smb://IPaddress/■ smb://DNSname/
4 Click Connect.
Note: You can also type the server address along with the share name. smb://IPaddress/DLOMacAgent.
5 From the list of shared folders, open DLOMacAgent folder, copy the setup.ini and the installer package for Mac to your local machine.
6 Copy the installer package for Mac to the same location where you copied the setup.ini file.

277Administering the Desktop AgentAbout the Desktop Agent for Mac
7 Double-click the file Veritas_DLO_Agent.pkg
8 On the Welcome screen, click Continue.
9 Read the license agreement, and click Continue.
10 Click Agree.
11 The default installation path for Mac is: /Applications. To install the Desktop Agent in an alternate location, click the Change Install Location button, and do one of the following:
a Select Install for all users to install Desktop Agent in the default location, OR
b Select Install on a specific disk to install in any other disk other than the default startup disk. This option is useful when you want to install the Desktop Agent on any additional hard disks or hard drive partitions that exist on the local Mac machine.
12 Click Continue.
13 Click Install.
14 Once the installation is completed, click Close.
Launching the Desktop Agent on MacTo launch the Desktop Agent1 Navigate to the location where you installed the Desktop Agent and double-click
the application VeritasDLO.
2 When you launch the Desktop Agent for the first time, a dialog is displayed.
3 Type the password. The User Name field displays the name of the user who has logged in.
4 To save the user credentials to the login keychain, select the check box Save encrypted passwords used by DLO and click OK. In case you clear this check box, then you need to enter the user credentials every time you launch the Desktop Agent.
5 Click Log in.
6 Once the authentication is successful, an initializing screen is displayed and you can see a DLO tray app icon to the right of the Desktop menu.
7 Click the Desktop Agent tray app icon and from the tray app menu, click Open Desktop Agent.The Desktop Agent is launched and relevant status of the Agent is displayed in the Status menu.

278 Administering the Desktop AgentAbout the Desktop Agent for Mac
Configuring the Desktop Agent on MacThe Desktop Agent communicates with the DLO database and services on the DLO Administration Server.You can also configure the connection status, enable or disable the Desktop Agent.For more information, refer to the following topics:“Connecting to the DLO Administration Server” on page 224“Changing your Connection Status” on page 227“Enabling the Desktop Agent” on page 227“Disabling the Desktop Agent” on page 227
Upgrading the Desktop Agent on MacTo upgrade the Desktop Agent
1 Copy setup.ini and the installer package for Mac from DLOMacAgent shared folder present in DLO Server to your local machine.
2 Proceed with DLO Mac Agent installation.For more information on installing the Desktop Agent, refer “To install the Desktop Agent on Mac” on page 276
Uninstalling the Desktop Agent on MacTo uninstall the Desktop Agent, delete the folder where the application is located. That is, navigate to the path where the Desktop Agent is installed, (example: /Applications) right-click the application Veritas DLO and click Move to Trash.
Using Default Backup Selections on MacDLO is configured to back up commonly used files and folders by default. You can add additional backup selections or cancel the use of default backup selections. The following are backed up by default.
Table 4-23 Default Backup Selections for Agents on Mac
Item Description
Documents All files in Documents
Desktop All files in Desktop
Music All files in Music
Movies All files in Movies
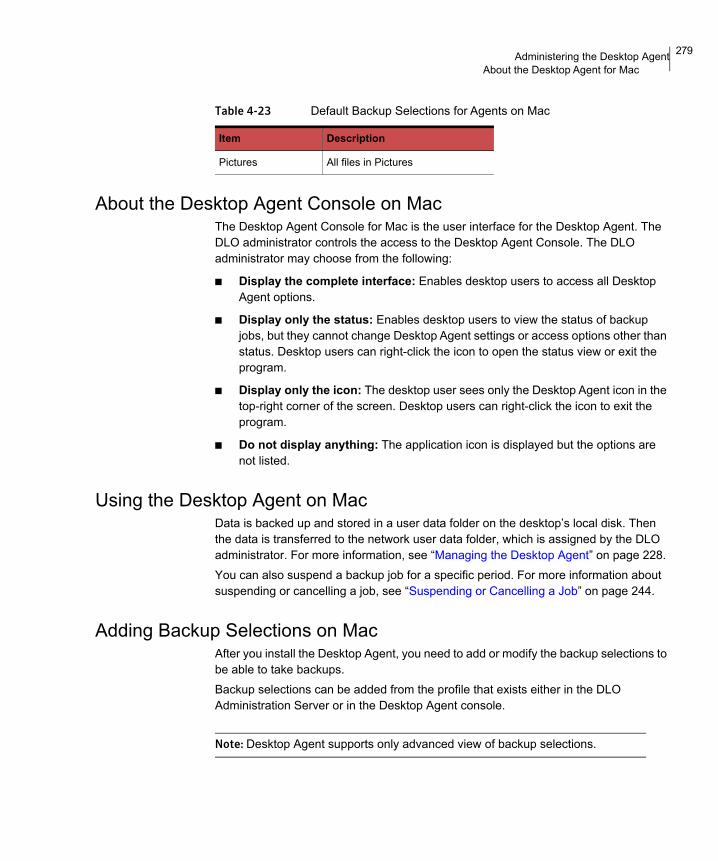
279Administering the Desktop AgentAbout the Desktop Agent for Mac
About the Desktop Agent Console on MacThe Desktop Agent Console for Mac is the user interface for the Desktop Agent. The DLO administrator controls the access to the Desktop Agent Console. The DLO administrator may choose from the following:
■ Display the complete interface: Enables desktop users to access all Desktop Agent options.
■ Display only the status: Enables desktop users to view the status of backup jobs, but they cannot change Desktop Agent settings or access options other than status. Desktop users can right-click the icon to open the status view or exit the program.
■ Display only the icon: The desktop user sees only the Desktop Agent icon in the top-right corner of the screen. Desktop users can right-click the icon to exit the program.
■ Do not display anything: The application icon is displayed but the options are not listed.
Using the Desktop Agent on MacData is backed up and stored in a user data folder on the desktop’s local disk. Then the data is transferred to the network user data folder, which is assigned by the DLO administrator. For more information, see “Managing the Desktop Agent” on page 228.You can also suspend a backup job for a specific period. For more information about suspending or cancelling a job, see “Suspending or Cancelling a Job” on page 244.
Adding Backup Selections on MacAfter you install the Desktop Agent, you need to add or modify the backup selections to be able to take backups.Backup selections can be added from the profile that exists either in the DLO Administration Server or in the Desktop Agent console.
Note: Desktop Agent supports only advanced view of backup selections.
Pictures All files in Pictures
Table 4-23 Default Backup Selections for Agents on Mac
Item Description
280 Administering the Desktop AgentAbout the Desktop Agent for Mac
To add a backup selection 1 Under Views in the Tasks bar, click Backup Selections.
2 Click Add to add a backup selection folder-OR-Drag the required backup selection folder to the right pane.
Note: You can drag only folders into the backup selection list and the current version supports the drag-and-drop of only one folder at a time.
3 Follow the procedure from step 4 on page 233 until step 12.
Modifying Backup Selections on MacTo make sure that you have the privileges to modify a profile backup selection, check the privileges in User Settings for the profile.
1 To modify a backup selection
1 Under Views in the Tasks bar, click Backup Selections.
2 Select the folder that you want to modify and click Modify or double-click the folder.
3 Follow the procedure from step 4 on page 238 until step 6.
Deleting Backup Selections on MacWhen you delete a backup selection, the backup files are deleted after the number of days specified in the backup selection. See “Backup Selection - Options Tab” on page 237 for more information.
To delete a backup selection 1 Under Views in the Tasks Bar, click Backup Selections.
2 Select the backup selection you want to delete.
3 Click Remove.
4 Click Yes to verify that you want to delete this backup selection, or click No to cancel.
Modifying Desktop Agent Settings on MacTo modify the settings of the Desktop Agent on Mac, see “Modifying Desktop Agent Settings” on page 246.

281Administering the Desktop AgentAbout the Desktop Agent for Mac
Restoring Files on MacIf the DLO administrator has set your profile to include restoring files, then you can use the Desktop Agent to restore files to the original or an alternate directory. If a Desktop Agent user has more than one desktop computer running DLO, files can be selected from all available backups on each of the user’s desktops, but can only be restored to the current desktop computer.
File Grooming on MacThe Desktop Agent grooms revisions based on the backup selection settings and this job is performed as new revisions are created. The oldest revision is deleted when a new revision is created that exceeds the limit.
Modifying Desktop Agent Settings on MacThe Desktop Agent will continue to use settings specified in the profile until youuse customized schedules or options as described in “Changing Backup Job Schedule Options” on page 247 and “Setting Customized Options” on page 249.
Keyboard Shortcuts for Desktop Agent on MacThe following are the keyboard shortcuts.
■ Quit Agent: Command + Q
■ Close Agent window: Command + W
Searching for Desktop Files to RestoreTo search for desktop files to restore1 Under Views in the Desktop Agent Tasks bar, click Restore.
2 Click Search for files to restore to open the Search dialog.
3 Select the appropriate options as described in the following table and then click OK.
Table 4-24 Search Dialog Box Options
Item Description
Search for file names with this text in the file name
Type all or part of the file name or folder you want to find.

282 Administering the Desktop AgentAbout the Desktop Agent for Mac
Searching for Log FilesThe Log File Viewer has a powerful search mechanism to help you locate the log files you want to view.
To search for log files 1 Under Views in the Desktop Agent Tasks bar, click History.
2 In the History Pane, click Search to open the Log File Viewer.
3 Enter filtering parameters as described in the following table.
Modified Select this option to search for files that were modified during a specific time frame. Then specify the time frame.
Today Select this option to search for files modified on the current calendar day.
Within the past week Select this option to search for files modified in the last calendar week.
Between Select this option to search between calendar dates.
Table 4-24 Search Dialog Box Options (continued)
Item Description
Table 4-25 Log File Viewer Filtering Options
Item Description
Search for log entries in
All log files Select this option to show all log entries in the log file viewer.
Current log file Select this option to search only those log entries in the current log file.
With timestamp of Select this check box to search only those log entries within a specified time period. The options include:
Today: Show only log files that were created today.
Within the last week: Show all log files created in the last week.
Between dates: Show all log files created between the dates entered.

283Administering the Desktop AgentAbout the Desktop Agent for Mac
4 Click Search.
5 To view detailed information for a log file entry, hover over the log entry.
6 If required, click Save As to save the log file as a text file.
7 Click Close when finished.

284 Administering the Desktop AgentAbout the Desktop Agent for Mac

Chapter
5 DLO Command Line Interface Management ToolsDLO provides a number of powerful command-line system tools to manage DLO server operations as explained in the following sections:
■ “DLO Command Syntax” on page 285
■ “Commands in Detail” on page 286
DLO Command SyntaxDLO Command Line Interface commands are run from the installation directory and are executed with the DLOCommandu command.DLOCommandu is executed as follows:DLOCommandu [remote-server-options] command
[command-options-and-arguments] [log-file-option]
Remote server options allow you to specify the name of the remote server on which you want to run a command. You can also enter your username and password if required.Remote server options are described in the following table.
Table 5-1 Remote Server Options
Option Description
–C <computer> Remote computer name, default to local computer
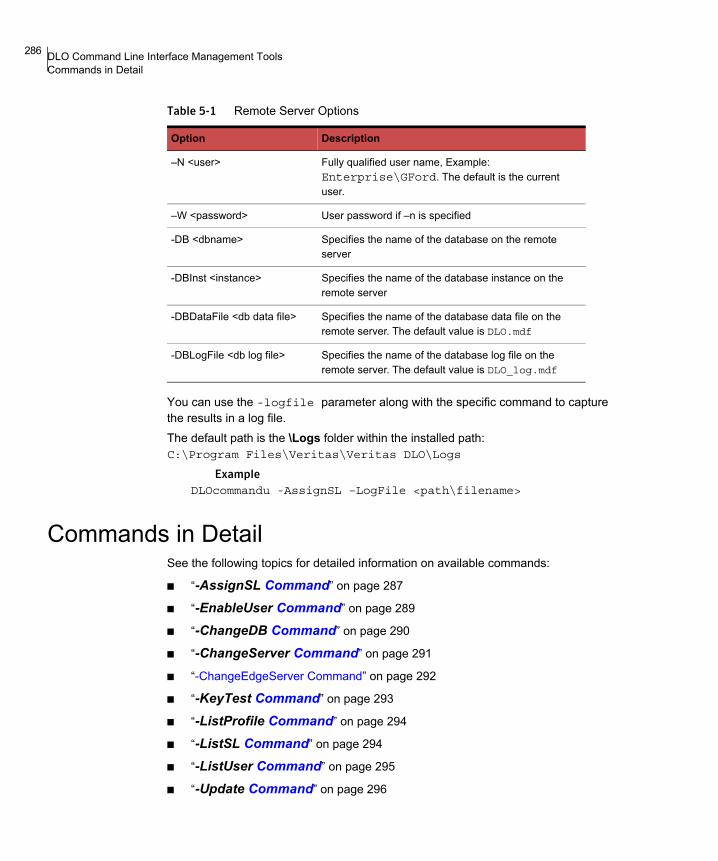
286 DLO Command Line Interface Management ToolsCommands in Detail
You can use the -logfile parameter along with the specific command to capture the results in a log file.The default path is the \Logs folder within the installed path: C:\Program Files\Veritas\Veritas DLO\Logs
ExampleDLOcommandu -AssignSL –LogFile <path\filename>
Commands in DetailSee the following topics for detailed information on available commands:
■ “-AssignSL Command” on page 287
■ “-EnableUser Command” on page 289
■ “-ChangeDB Command” on page 290
■ “-ChangeServer Command” on page 291
■ “-ChangeEdgeServer Command” on page 292
■ “-KeyTest Command” on page 293
■ “-ListProfile Command” on page 294
■ “-ListSL Command” on page 294
■ “-ListUser Command” on page 295
■ “-Update Command” on page 296
–N <user> Fully qualified user name, Example: Enterprise\GFord. The default is the current user.
–W <password> User password if –n is specified
-DB <dbname> Specifies the name of the database on the remote server
-DBInst <instance> Specifies the name of the database instance on the remote server
-DBDataFile <db data file> Specifies the name of the database data file on the remote server. The default value is DLO.mdf
-DBLogFile <db log file> Specifies the name of the database log file on the remote server. The default value is DLO_log.mdf
Table 5-1 Remote Server Options
Option Description

287DLO Command Line Interface Management ToolsCommands in Detail
■ “-EmergencyRestore Command” on page 298
■ “-SetRecoveryPwd Command” on page 299
■ “-NotifyClients Command” on page 299
■ “-InactiveAccounts Command” on page 299
■ “-RenameDomain Command” on page 300
■ “-RenameMS Command” on page 300
■ “-LimitAdminTo Command” on page 301
■ “-IOProfile command” on page 301
■ “-Report Command” on page 302
■ “-ListReport Command” on page 303
■ “-MigrateDomain Command” on page 304
■ “-ChangeProfile Command” on page 304
■ “-ReportInfoGen Command” on page 304
■ “-MigrateUserSL Command” on page 305
■ “-MigrateUser Command” on page 308
■ “-ListMachines Command” on page 313
■ “-DeletePendingUser Command” on page 313
■ “-RemoteExecute Command” on page 314
■ “-ArchiveAuditData Command” on page 315
■ “-Diagnose Command” on page 316
■ “-ArchiveUser Command” on page 317
■ “-ChangeLicense Command” on page 317
■ “-RenameUser Command” on page 317
■ “-DeleteNUDFData Command” on page 318
■ “-DeletePendingRestore Command” on page 320
-AssignSL CommandThe –AssignSL command is used to assign a new DLO Storage Location to existing users when the existing DLO Storage Location is no longer available. The new DLO Storage Location must be managed by the same DLO Administration Server.

288 DLO Command Line Interface Management ToolsCommands in Detail
Caution: If the existing DLO Storage Location is accessible, use the -MoveUser command to move users to a new DLO Storage Location. See “Moving Desktop Agent Users to a New Network User Data Folder” on page 159 for more information.
Desktop Agent users can be assigned to new DLO Storage Locations based on the user account name, profile name, profile ID, DLO Storage Location, DLO Storage Location ID, and file server. The Desktop Agent that is being moved will be disabled until the Administration Server is notified that the move is complete.
Note: This command does not move the user’s data. To assign a new DLO Storage Location to existing users and move the associated data, use the “-MigrateUserSL Command” on page 305.
SyntaxDLOCommandu –AssignSL –NI [–A | –F | –P | –PI | –S | –SI | –
U]
Note: Wildcard matches (*) are permitted in profile, Storage Location and user names.Quotation marks are required around names if the name contains a space or colon.

289DLO Command Line Interface Management ToolsCommands in Detail
Command Options
ExamplesDLOCommandu –AssignSL –NI DLO_SL02 –A
DLOCommandu –AssignSL –NI DLO_SL03 –U mmouse
-EnableUser CommandThe -EnableUser command is used to enable or disable a user. Use this command if you want to force the desktop computer to refresh from the DLO Administration Server.
SyntaxDLOCommandu -EnableUser [–E | –D] [–A | –F | –P | –PI | –S |
–SI | –U]
Note: Wildcard matches (*) are permitted in profile, Storage Location and user names.Quotation marks are required around names if the name contains a space or colon.
Table 5-2 –AssignSL Options
Option Description
–NI <new SLID> The -NI option is used to specify the name of the new Storage Location.
–A Assigns a new Storage Location to all users.
–F <file server> Assigns a new Storage Location to users with Storage Locations on the named file server.
–P <profile name> Assigns a new Storage Location to users with named profile.
–PI <profile ID> Assigns a new Storage Location to users with given profile ID.
–S <SL name> Assigns a new Storage Location to users with named Storage Location.
–SI <SL ID> Assigns a new Storage Location to users with the given Storage Location ID.
–U <user> Assigns a new Storage Location to named user account only.

290 DLO Command Line Interface Management ToolsCommands in Detail
Command Options
ExamplesDLOCommandu –EnableUser –E –ADLOCommandu –EnableUser –D –U mmouse
-ChangeDB CommandThe -ChangeDB command is used to change the existing database to another DLO or Dedupe database.
SyntaxDLOCommandu –ChangeDB –DBServer <DB server name> -RemoteDB -DBInstance <DB instance name> -DBName <DLO database name> -DBDataFile <DLO data file name> -DBLogFile <DLO log file>
Table 5-3 –EnableUser Command Options
Option Description
–E Enables a user account. The default value is to enable a user.
–D Disables a user account.
–A Enables or disables all users on the DLO Administration Server.
–F <file server> Enables or disables users with storage locations on the named file server.
–P <profile name> Enables or disables users with the specified profile name.
–PI <profile ID> Enables or disables users that are assigned to the specified profile.
–S <SL name> Enables or disables users assigned to the specified Storage Location.
–SI <SL ID> Enables or disables users in the specified Storage Location.
–U <user> Enables or disables only the user with the specified user name.

291DLO Command Line Interface Management ToolsCommands in Detail
Command Options
-ChangeServer CommandThe -ChangeServer command is used to reassign users to another DLO Administration Server. Each desktop user must back up data to a network user data folder that is managed by the same Administration Server to which the user is assigned. If a matching automated user assignment is available on the new DLO Administration Server, the user is automatically assigned a profile and Storage Location. If a matching automated user assignment is not available, the user can be manually configured.When a Desktop Agent user is reassigned from one Administration Server to another, the user’s current profile settings and existing backup files are not moved. They remain on the original file server.
SyntaxDLOCommandu –ChangeServer –M <DLO Administration Server> [ –A | –F <file server> | –P <profile name> | –PI <profile id> | –S <SL name> | –SI <SL id> | –SP <SL path> | –U <user> ]
Note: Wildcard matches (*) are permitted in profile, Storage Location, and user names.Quotation marks are required around names if the name contains a space or colon.
Table 5-4 -ChangeDB Command Options
Option Description
–DBServer The name of the new database server
-RemoteDB The name of the remote database server. Use this option when the DLO Administration Server and the DLO database server are installed on different machines.
–DBInstance The name of the database instance.
Note: Specify "" in case of a blank database instance.
–DBName The name of the database. Default value is DLO
–DBDataFile The name of the database file. Default value is DLO.mdf
–DBLogFile The name of the log file. Default value is DLO_log.ldf
-G Sends global notification
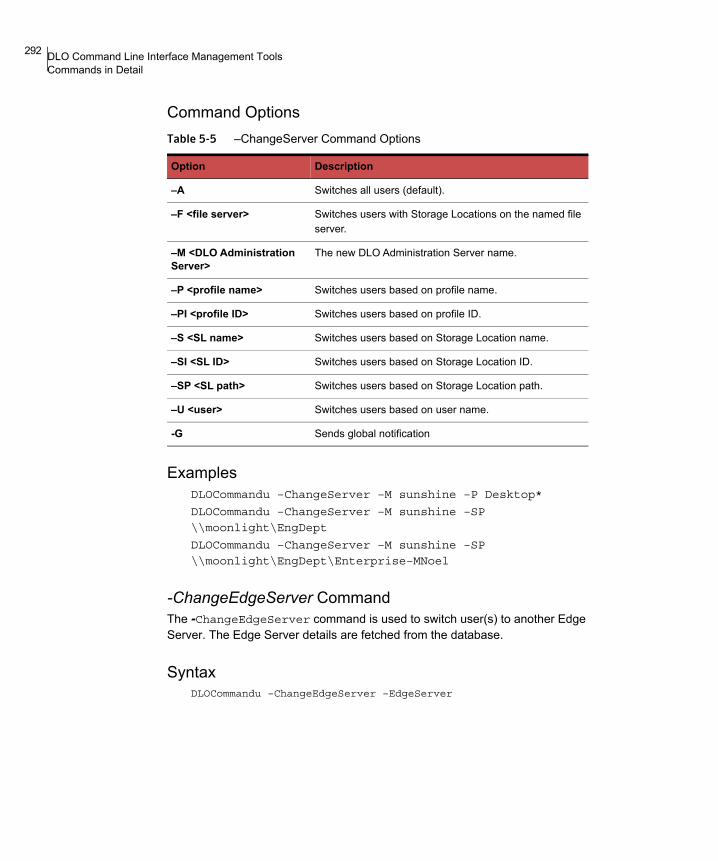
292 DLO Command Line Interface Management ToolsCommands in Detail
Command Options
ExamplesDLOCommandu –ChangeServer –M sunshine –P Desktop*
DLOCommandu –ChangeServer –M sunshine –SP
\\moonlight\EngDept
DLOCommandu –ChangeServer –M sunshine –SP
\\moonlight\EngDept\Enterprise–MNoel
-ChangeEdgeServer CommandThe -ChangeEdgeServer command is used to switch user(s) to another Edge Server. The Edge Server details are fetched from the database.
SyntaxDLOCommandu –ChangeEdgeServer –EdgeServer
Table 5-5 –ChangeServer Command Options
Option Description
–A Switches all users (default).
–F <file server> Switches users with Storage Locations on the named file server.
–M <DLO Administration Server>
The new DLO Administration Server name.
–P <profile name> Switches users based on profile name.
–PI <profile ID> Switches users based on profile ID.
–S <SL name> Switches users based on Storage Location name.
–SI <SL ID> Switches users based on Storage Location ID.
–SP <SL path> Switches users based on Storage Location path.
–U <user> Switches users based on user name.
-G Sends global notification
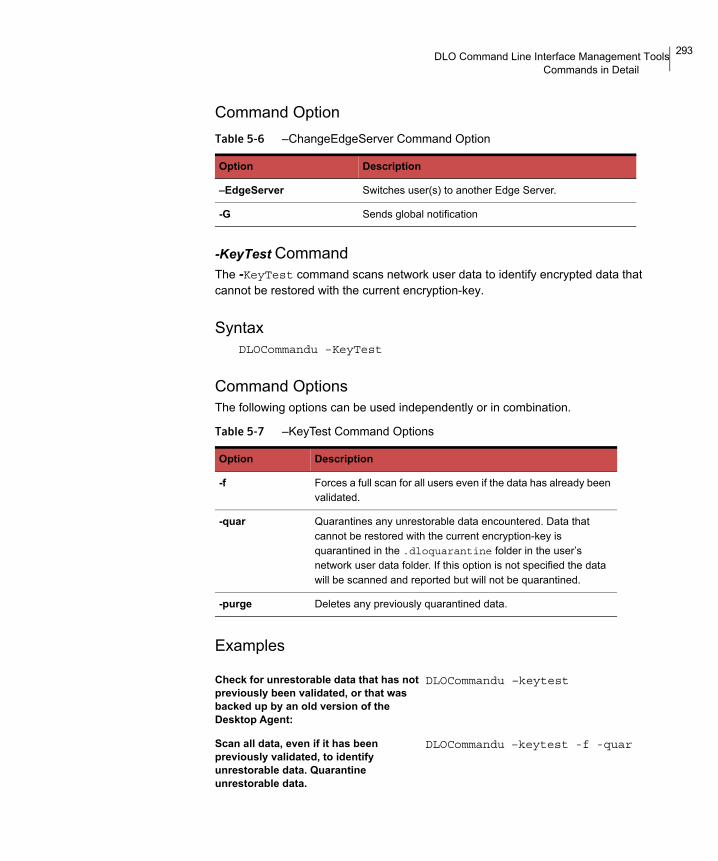
293DLO Command Line Interface Management ToolsCommands in Detail
Command Option
-KeyTest CommandThe -KeyTest command scans network user data to identify encrypted data that cannot be restored with the current encryption-key.
SyntaxDLOCommandu –KeyTest
Command OptionsThe following options can be used independently or in combination.
Examples
Table 5-6 –ChangeEdgeServer Command Option
Option Description
–EdgeServer Switches user(s) to another Edge Server.
-G Sends global notification
Table 5-7 –KeyTest Command Options
Option Description
-f Forces a full scan for all users even if the data has already been validated.
-quar Quarantines any unrestorable data encountered. Data that cannot be restored with the current encryption-key is quarantined in the .dloquarantine folder in the user’s network user data folder. If this option is not specified the data will be scanned and reported but will not be quarantined.
-purge Deletes any previously quarantined data.
Check for unrestorable data that has not previously been validated, or that was backed up by an old version of the Desktop Agent:
DLOCommandu –keytest
Scan all data, even if it has been previously validated, to identify unrestorable data. Quarantine unrestorable data.
DLOCommandu –keytest -f -quar

294 DLO Command Line Interface Management ToolsCommands in Detail
-ListProfile CommandThe -ListProfile command is used to list profiles of Desktop Agent users.
SyntaxDLOCommandu –ListProfile [–A | –P ]
Note: Wildcard matches (*) are permitted in profile, Storage Location and user names.Quotation marks are required around names if the name contains a space or colon.
Command Options
ExamplesDLOCommandu –ListProfile –A
DLOCommandu –ListProfile –P <yourprofile>
-ListSL CommandThe -ListSL command is used to list the DLO storage locations.
SyntaxDLOCommandu –listsl [–A | –F | –S ]
Note: Wildcard matches (*) are permitted in profile, Storage Location, and user names.Quotation marks are required around names if the name contains a space or colon.
Table 5-8 –ListProfile Command Options
Option Description
–A Lists settings for all profiles (default).
–P <profile name> Lists settings for only the specified profile.

295DLO Command Line Interface Management ToolsCommands in Detail
Command Options
ExamplesDLOCommandu –listsl –A
DLOCommandu –listsl –F yourserver
DLOCommandu –listsl –S yourSL
-ListUser CommandThe -ListUser command is used to list by All, file server, profile name, profile ID, DLO Storage Location name, DLO Storage Location ID, or user name.
SyntaxDLOCommandu –listuser [–A | –F | –P | –PI | –S | –SI | –U]
Note: Wildcard matches (*) are permitted in profile, Storage Location, and user names.Quotation marks are required around names if the name contains a space or colon.
Table 5-9 –ListSL Command Options
Option Description
–A Lists all storage locations (default)
–F <file server> Lists storage locations for the named server
–S <SL name> Lists only the named storage location.

296 DLO Command Line Interface Management ToolsCommands in Detail
Command Options
ExamplesDLOCommandu –listuser –A
DLOCommandu –listuser –P yourprofile
DLOCommandu –listuser –U mmouse
DLOCommandu –listuser –U m*
-Update CommandThe -Update command is used to list, add, remove, and publish Desktop Agent updates.
SyntaxDLOCommandu –update [–list | –add | –remove | –publish]
SubcommandsThe following subcommands allow you to list, add, remove, or publish updates. See “Command Options” on page 297 for a description of the available options for each command.
Table 5-10 –ListUser Command Options
Option Description
–A Lists settings for all users (default)
–F <file server> Lists settings for users with storage locations on the named file server
–P <profile name> Lists settings for users by profile name
–PI <profile ID> Lists settings for users by profile ID
–S <SL name> Lists settings for users by Storage Location name
–SI <SL ID> Lists settings for users by Storage Location ID
–U <user> Lists settings for users by user name
Table 5-11 –Update Sub commands
Sub Command Description
–List [-A|–UI <update ID>] Lists settings for previously used updates.

297DLO Command Line Interface Management ToolsCommands in Detail
Command Options
Note: Wildcard matches (*) are permitted in profile, DLO Storage Location and user names.Quotation marks are required around names if the name contains a space or colon.
–Add –F <file name> Adds an “update definition file” to the updates list and assigns it a unique update ID number. The update ID number is used when the update is published with the -publish command.
–Remove [-UI <update ID>|–A] Removes a file or files from the update list.
–Publish [-R] –UI <update ID> [–P <profile name>|–PI <profile ID>|–U <user>]
Makes the specified updates available to users. Users can be identified by using the following options:
-P Profile name
–PI Profile RecordID. To obtain the profile RecordID, run the -listprofile command.
–U User name
Table 5-12 –Update Command and Sub-Command Options
Option Description
–A Updates all
–F <file name> Specifies a text file that contains update records
–U <user name> Specifies a fully qualified user name, such as Enterprise\JFord
–P <profile name> Specifies a profile name
–PI <profile ID> Specifies a profile record ID
–R Designates to un-publish
–UI <update ID> Specifies an update record ID
Table 5-11 –Update Sub commands
Sub Command Description

298 DLO Command Line Interface Management ToolsCommands in Detail
Examples◆ To list published updates:
Lists settings for all published updates.DLOCommandu -update -list -A
To list details of a specific update:DLOCommandu -update -list -UI <updateID>
◆ To add a file to the update list and assign it an ID number.Prepares an update file to be published and assigns it a unique Record ID number. The Record ID number is returned when the following command is executed:
DLOCommandu -update -add -f cntlfile.txt
◆ To publish an update for Desktop Agent users.You can specify whether this update should be available to all users, specific users, or users in a profile. You can also use wildcards to specify profile and user names.To publish an update for a profile:
DLOCommandu -update -publish -UI <updateID> -P <profile
name>
DLOCommandu -update -publish -UI 63 -P yourprofile
To publish an update for a specific user:DLOCommandu -update -list -UI <updateID> -U <username>
To publish an update for all users:DLOCommandu -update -list -UI <updateID> -U *
◆ To remove a file from the update listIf the file was previously published, it must be unpublished before removing it.
To unpublish:DLOCommandu -update -publish -R -UI 33
To remove:DLOCommandu -update -remove -UI 3
-EmergencyRestore CommandThe -Emergency Restore command uses the DLO administrator’s recovery password to restore user data that would otherwise be unavailable if the DLO database is damaged or corrupted. You must know the recovery password to execute this command. The data will be restored to the specified location in the original data structure, but it will no longer be encrypted. See “Setting Recovery Password” on page 28 for more information.In case of VIP users, type the VIP password to restore the data.

299DLO Command Line Interface Management ToolsCommands in Detail
SyntaxDLOCommandu –EmergencyRestore <usersharepath> -W <recovery
password> -AP <destination path>
Command Options
-SetRecoveryPwd CommandThe -SetRecoveryPwd command is used to change the recovery password, which enables you to retrieve encrypted data that would otherwise be lost if the DLO database is damaged or corrupted. The -SetRecoveryPwd command now updates the password for existing users as well as new users.Once set, this recovery password can only be changed using the DLO command line interface tools.See “Setting Recovery Password” on page 28 for more information.
SyntaxDLOCommandu –SetRecoveryPwd <password>
-NotifyClients CommandThe -NotifyClients command forces the Desktop Agents to refresh the profile settings immediately, or the next time the Desktop Agent connects if it is offline.
SyntaxDLOCommandu –notifyclients
-InactiveAccounts CommandThe -InactiveAccounts command is used to list and delete accounts based on the Time when the Agent was Last Active.
To list inactive accountsdlocommandu -inactiveaccounts -list -days <#days>
Table 5-13 –EmergencyRestore Command Options
Option Description
<usersharepath> Specifies the full path to the user share directory
-W <recovery password> Specifies the recovery password
-AP <destination path> Specifies the path to which data will be restored

300 DLO Command Line Interface Management ToolsCommands in Detail
This command returns a list of inactive accounts. The list includes the following information, which is used to delete specific accounts:
■ computer name ■ computer ID ■ domain\user name ■ user ID
To delete specific inactive accountsdlocommandu –inactiveaccounts -delete –U <domain\user name> -M
<computer name> -days <#days>
dlocommandu –inactiveaccounts -delete –UI <userID> -MI <computer
ID> -days <#days>
Where –U and -M are used to delete the user and computer by name and –UI and -MI are used to delete the user and computer by ID.
To delete ALL accounts inactive for a specified number of daysdlocommandu -inactiveaccounts -delete -a <#days>
-RenameDomain CommandThe -RenameDomain command is used after a Windows NT domain has been renamed. Running the -RenameDomain command changes each Desktop Agent user’s record to reflect the new domain name and changes the path for the network user data folder. It also notifies each Desktop Agent of the change.
SyntaxDLOCommandu –RenameDomain -OD <Old Domain Name> -ND <New
Domain Name>
-RenameMS CommandThe -RenameMS command is used when an Administration Server has been renamed. Running the -RenameMS command updates the installation share, DLO Storage Location paths and network user data folder paths. It also notifies each Desktop Agent of the change.
SyntaxDLOCommandu –RenameMS -OM <Old Media Server Name> -NM <New
Media Server Name>

301DLO Command Line Interface Management ToolsCommands in Detail
-LimitAdminTo CommandThe -LimitAdminTo command limits administration of DLO to the specified group or user.
Syntax:DLOCommandu –LimitAdminTo -NAU <domain\NewAdminName>
DLOCommandu –LimitAdminTo -NAU <domain\NewAdminGroup>
Command options
-IOProfile commandThe -IOProfile command enables a profile to be exported from one Administration Server, and then imported to another Administration Server. An option is also provided to import global settings.
Note: When a profile is imported, it does not initially have any users assigned to it, so there is no immediate impact. When global settings are imported, they immediately apply to all Desktop Agent users assigned to the server.
◆ To export a profile:DLOCommandu –C <master server name> -IOProfile -DBF <export
file name> -E <profile name>
This exports the requested named profile (-E) from the specified server (-C) into the named file (-DBF). It is not necessary to specify the master server name with the -C option if the profile is on the same server where the command is run.
◆ To import a profile:DLOCommandu –C < server name> -IOProfile -DBF <export file
name>
This imports the profile in the given file (-DBF) into the named server (-C.)
Table 5-14 -LimitAdminTo Command Option
Option Description
-NAU The -NAU option is used to add a new DLO administrator or to add a group that can be used of DLO administrators.
-DAU The -DAU option is used to delete a DLO administrator or a DLO administration group.
-L The -L option lists all of the current DLO administrators and groups.

302 DLO Command Line Interface Management ToolsCommands in Detail
◆ To import the console settings for DLO administrator account management in addition to the profile, use the ‘import profile to replace console settings’ (IPRCS) option as follows:DLOCommandu –C < server name> -IOProfile -DBF <export file
name> -IPRCS
◆ To import the global settings in addition to the profile, use the ‘import profile to replace global settings’ (IPRGS) option as follows:DLOCommandu –C < server name> -IOProfile -DBF <export file
name> -IPRGS
-Report CommandThe -Report command generates and saves one of the predefined DLO reports. To generate a report you must specify the name of the .rdl file associated with the report. For a list of all available reports and their corresponding .rdl file names, use the “-ListReport Command” on page 303 or use the file name available when selecting Reports < report_name > Properties from the DLO Administration Console.Any filter criteria and the output path where the report is stored are optional. The report format is also optional. By default the report is generated and saved in HTML format. The default report format in the DLO global settings is not used by this command.
SyntaxDLOCommandu -Report -RDL <RDL File Name> [-O <Output Path>]
[-FC <Computer Name>] [-FU <User Name>] [-T <PDF | HTML | XML
| XLS>]

303DLO Command Line Interface Management ToolsCommands in Detail
Command Options
ExamplesDLOCommandU -Report -RDL DLOactiveevents_en.rdl -FC MyDesktop -O C:\DLOReports -T PDF
This sample command generates a report of the Active Alerts in the past 3 days, for the machine named MyDesktop and stores the report in C:\DLOReports folder.For unique report identification, generated reports have a name which is the .rdl file name appended by a time stamp. The time stamp includes year, day, month, hours and minutes.In this example, if the command is executed at 10.28 AM on 25 March 2013, it generates the report file in the folder C:\DLOReports, with the name as DLOactiveevents_en_201325031028.pdf.
-ListReport CommandThis command lists all of the reports available in DLO and the names of the corresponding RDL files. The command does not accept any options. Use this command to determine the name of the RDL file used as input to the “-Report Command” on page 302.
SyntaxDLOCommandu -ListReport
Table 5-15 -Report Command Option
Option Description
-RDL <RDL File Name> The name of the .rdl file associated with the required report. Report templates are specified in Report Definition Language (RDL).
An RDL file name is required.
-O <Output Path> Path for storing the generated report.
If a path is not specified, the report is stored in the current directory.
-FC <Computer name> Filter specifying the name of a computer.
-FU <User name> Filter specifying the name of a user.
-T <PDF or HTML or XML or XLS>
The format of the report.
If a report format is not specified, PDF is used.

304 DLO Command Line Interface Management ToolsCommands in Detail
-ReportInfoGen CommandThis command collects the most recent information for the following reports:
■ File Type Usage
■ Backup Job History
Note: When you want view the most recent information, then run this command before generating the specific report.
SyntaxDLOCommandU.exe -ReportInfoGen –DBServer <DB Server Name> -DBInstance < DB Instance Name>
-MigrateDomain CommandThis command is used to migrate a user from an old domain to a new domain in trust.
SyntaxDLOCommandu -MigrateDomain -OD <OldDomainName> -ND <NewDomainName> -U <UserName> *
Command Options
-ChangeProfile CommandThis command is used to change the profile assigned to the user(s). Multiple users can be assigned with the same profile.
SyntaxDLOCommandu -ChangeProfile -NP|-NPI [-A|-F|-P|-PI|-S |-SI|-U]|-UF
Table 5-16 -MigrateDomain Command Option
Option Description
-OD The name of the old domain.
-ND The name of the new domain.
-U The name of the user, with or without wildcard.
To migrate all users, type the wildcard as the parameter.

305DLO Command Line Interface Management ToolsCommands in Detail
Note: Wildcard '*' match is permitted in profile, Storage Location, and user names. Quotations around name are required if name contains a space or colon.
Command Options
ExamplesDLOCommandu -ChangeProfile -NP newprof -A
-MigrateUserSL CommandThis command migrates an existing DLO user's network user data folder (NUDF) from one storage location to another location. Users are moved to the new storage location along with their data. A storage location should be a CIFS-based network user data folder that can exist on a Windows server and on certified NAS devices that support CIFS.Users are disabled during a migration until the client computer is notified that the migration is complete. On successful migration, the DLO Agent automatically restarts, the user is enabled and the user profile is updated to point to the new storage location.
Table 5-17 Change Profile Command Options
Options Descriptions
-NI <new SL ID> New Storage Location ID
-NPI <new SL path> Fully qualified UNC path to new network user data folder
-A Migrate all users
-F <file server> Migrate users with storage locations on the named file server
-P <profile name> Migrate users with named profile
-PI <profile ID> Migrate users with given profile ID
-S <SL name> Migrate users with named storage location
-SI <SL ID> Migrate users with given storage location ID
-U <user> Migrate named user
-UF <text file name> Migrate user listed in the given text file.
Note: While running the above command, the text file should be placed in the path C:\Program Files\Veritas\Veritas DLO.
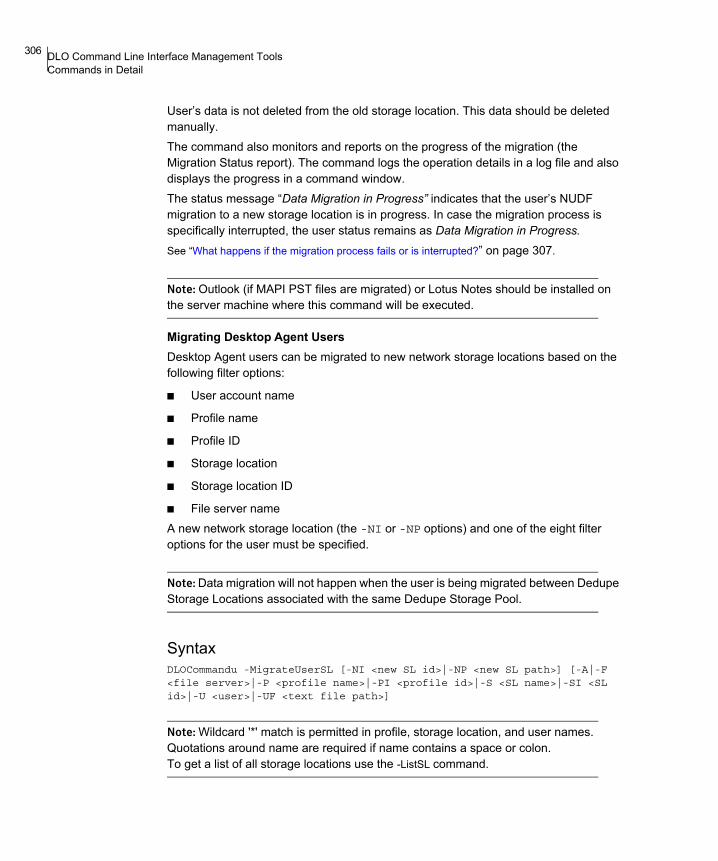
306 DLO Command Line Interface Management ToolsCommands in Detail
User’s data is not deleted from the old storage location. This data should be deleted manually. The command also monitors and reports on the progress of the migration (the Migration Status report). The command logs the operation details in a log file and also displays the progress in a command window.The status message “Data Migration in Progress” indicates that the user’s NUDF migration to a new storage location is in progress. In case the migration process is specifically interrupted, the user status remains as Data Migration in Progress.
See “What happens if the migration process fails or is interrupted?” on page 307.
Note: Outlook (if MAPI PST files are migrated) or Lotus Notes should be installed on the server machine where this command will be executed.
Migrating Desktop Agent UsersDesktop Agent users can be migrated to new network storage locations based on the following filter options:
■ User account name
■ Profile name
■ Profile ID
■ Storage location
■ Storage location ID
■ File server nameA new network storage location (the -NI or -NP options) and one of the eight filter options for the user must be specified.
Note: Data migration will not happen when the user is being migrated between Dedupe Storage Locations associated with the same Dedupe Storage Pool.
SyntaxDLOCommandu -MigrateUserSL [-NI <new SL id>|-NP <new SL path>] [-A|-F <file server>|-P <profile name>|-PI <profile id>|-S <SL name>|-SI <SL id>|-U <user>|-UF <text file path>]
Note: Wildcard '*' match is permitted in profile, storage location, and user names. Quotations around name are required if name contains a space or colon.To get a list of all storage locations use the -ListSL command.
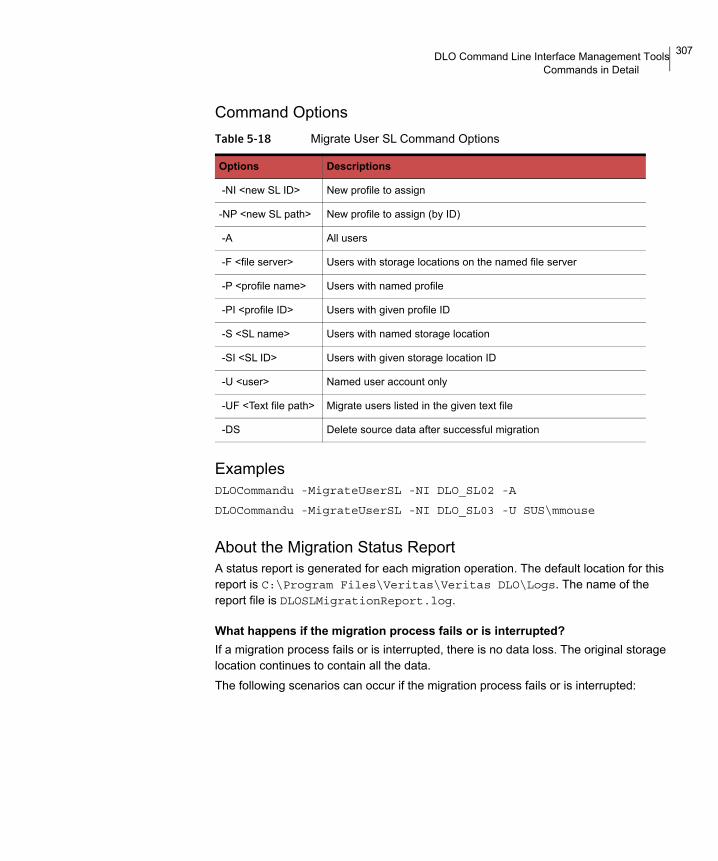
307DLO Command Line Interface Management ToolsCommands in Detail
Command Options
ExamplesDLOCommandu -MigrateUserSL -NI DLO_SL02 -A
DLOCommandu -MigrateUserSL -NI DLO_SL03 -U SUS\mmouse
About the Migration Status ReportA status report is generated for each migration operation. The default location for this report is C:\Program Files\Veritas\Veritas DLO\Logs. The name of the report file is DLOSLMigrationReport.log.
What happens if the migration process fails or is interrupted?If a migration process fails or is interrupted, there is no data loss. The original storage location continues to contain all the data.The following scenarios can occur if the migration process fails or is interrupted:
Table 5-18 Migrate User SL Command Options
Options Descriptions
-NI <new SL ID> New profile to assign
-NP <new SL path> New profile to assign (by ID)
-A All users
-F <file server> Users with storage locations on the named file server
-P <profile name> Users with named profile
-PI <profile ID> Users with given profile ID
-S <SL name> Users with named storage location
-SI <SL ID> Users with given storage location ID
-U <user> Named user account only
-UF <Text file path> Migrate users listed in the given text file
-DS Delete source data after successful migration
308 DLO Command Line Interface Management ToolsCommands in Detail
Case 1
Migration process fails due to issues such as data size mismatch on the source and destination administration servers.If the migration process fails due to issues such as network outage, the partially migrated files are deleted from the new storage location. Any new backups are stored in the original storage location. All the data needs to be copied again.The migration procedure must be followed again to migrate the NUDF to another storage location.
Case 2
Migration process is specifically interrupted.If you interrupt the migration process with a kill command or a system shutdown, the user status appears as Data Migration in Progress. The status of the computer user is also disabled. The partially migrated files remain on the new storage location.In this case, this user and the respective computers must be enabled through the DLO Administration Console. The partially migrated files should also be removed from the new storage location.The migration process must be started again to migrate the NUDF to another storage location.
-MigrateUser CommandThis command migrates the configuration details for single or multiple users from one Administration Server to another Administration Server. All user-specific settings such as customized backup selection and policies are migrated along with the user.The command also monitors and reports on the progress of the migration (the User Migration Status Report). The command logs the operation updates and progress in a log file.The user that is migrated is disabled until the client computer is notified that the migration is complete. Upon successful migration, the DLO Agent automatically restarts and connects to the new Administration Server.The following are the status messages for user migration:
User Migrated Indicates the status of the user on the source administration server after the user is successfully migrated.
User Migration in Progress
Indicates the status of the user on the source administration server while the user is migrated.
If the migration process is specifically interrupted, the user status appears as User Migration in Progress.
309DLO Command Line Interface Management ToolsCommands in Detail
Prerequisites for Migrating Users across Administration ServersThe following prerequisites must be met before you can migrate users across Administration Servers:
Note: As a precaution, before migrating the users to the destination Administration Server, it is recommended to restore the data for these users.
Domain The source and the destination administration servers must be on the same domain or on trusted domains.
Administrative Rights The Administrator of the source Administration server must have administrative rights on the destination Administration server.
DLO Versions The source and the destination administration servers must have the same DLO versions and same patch levels.
Shared Clients The user that is migrated must not share the client computer with any other user.
Storage Locations On the destination administration server, create a temporary Storage Location (shared folder). The name of this Storage Location should be the same as the storage location on the source server.
Profile On the destination Administration server, create the same profile that is present on the source Administration server. This profile is used by the user that is to be migrated. The profiles can be migrated to the destination Administration server by using the
-IOProfile command. For more information, see “-IOProfile command” on page 301.
Dedupe Server The source and destination Dedupe Servers must be on the same domain or on a trusted domain.
Dedupe Storage Pools
On the destination administration server, configure the same Dedupe Storage Pool that is present on the source administration server. The name of the Dedupe Storage Pool on the destination administration server must be the same as the Dedupe Storage Pool on the source administration server.
Dedupe Storage Locations
On the destination administration server, create a temporary Dedupe Storage Location (shared folder). The name of this Dedupe Storage Location should be the same as the dedupe storage location on the source server.

310 DLO Command Line Interface Management ToolsCommands in Detail
Migrating Users across Administration ServersBefore you start the migration process, review the section “Prerequisites for Migrating Users across Administration Servers” on page 309.
To migrate users across Administration Servers1 On the destination administration server, configure the same storage location that
is present on the source administration server. The name of this storage location must be the same as the storage location name on the source administration servers. For example, if the name of the storage location is storage1 on the source administration server, then the destination server must also contain a storage location named as storage1.
2 On the destination administration server, create the same profile for the user. The profile can be migrated to the destination server with the -IOProfile command. The profile name must be the same on both the source and destination servers. For more information, see “-IOProfile command” on page 301.
3 On the source administration server, enter this command:DLOCommandu -MigrateUser -M <media server>[-A|-F <file
server>|-P <profile name>|-PI <profile id>|-S <SL name>|-SI
<SL id>|-U <user>|-UF <text file path>]
Note: Wildcard '*' match is permitted in profile, Storage Location, and user names. Quotations around name are required if name contains a space or colon.To get a list of all storage locations, use the -ListSL command.
Command OptionsTable 5-19 Migrate User Command Options
Option Description
-M <media server> New media server name
-A Migrate all users
-F <file server> Migrate users with storage locations on the named file server
-P <profile name> Migrate users with named profile
-PI <profile ID> Migrate users with given profile ID
-S <SL name> Migrate users with given storage location
-SI <SL ID> Migrate users with given storage location ID
-U <user> Migrate named user only

311DLO Command Line Interface Management ToolsCommands in Detail
Optional parameters for destination DB
Table 5-20 Destination DB
Note: For the -DBInstance option, specify “” in case of a blank instance.
The following are examples of using this command:DLOCommandu -MigrateUser -M MARY.CAF.dlo.com -P Profile1DLOCommandu -MigrateUser -M MARY.CAF.dlo.com -U CAF\ummouse
On the source administration server, the user’s status changes to User Migrated once the migration is successful. Delete this user from the Administration Console.
User Migration Status ReportA status report is generated for each migration operation. The default location for this report is C:\Program Files\Veritas\Veritas DLO\Logs. The name of the report file is DLOUserMigrationReport.log.
Troubleshooting during migration process
What happens when the migration process is interrupted?The migration process may fail due to many reasons.
-UF <text file path> Migrate users listed in the given text file.
Option Description
Option Description
-DB server <DB server> Default: same as media server
-DBInstance <DB instance>
Default: DLO
-DBName <DB name> Default: DLO
-DBDataFile <DB data file>
Default: DLO.mdf
-DBLogFile <Db log file>
Default: DLO_log.mdf
312 DLO Command Line Interface Management ToolsCommands in Detail
Case 1
Migration process fails due to issues such as network outage.In a multiple-user migration process, only one user is migrated at a time.A rollback operation occurs if the migration process fails due to the following issues:
■ Network outage
■ Sharing of the client computer by multiple users during the migrationIn these cases, the following takes place:
■ Migrated users are not affected. These users are successfully migrated to the destination administration server. The status for these users appears on the source administration server as User Migrated.
■ Users that are not migrated still exist on the source administration server. See the migration procedure in the preceding sections to migrate these users to the new administration server.
■ Users that were in the process of migration are affected. A rollback operation follows and the particular user on the source administration server rolls back to its previous status (Enabled/Disabled). Also, the user profile points only to the source administration server.
The migration process must be started again to migrate this user to the new administration server.
Case 2
Migration process is specifically interrupted:In a multiple-user migration process, only one user is migrated at a time.If the migration process is specifically interrupted by issuing a kill command or system shutdown, then:
■ Migrated users are not affected. These users are successfully migrated to the destination administration server.
■ Users that were not migrated still exist on the source administration server. See “Migrating Users across Administration Servers” on page 310 to migrate these users to the new administration server.
Users in the process of migration are affected. The status for this particular user appears on the source administration server as User Migration in Progress. The computers and users of these computers are also disabled. The user and the respective computers for that user must be enabled on the source administration server through the DLO Administration Console. Then, migrate the user.
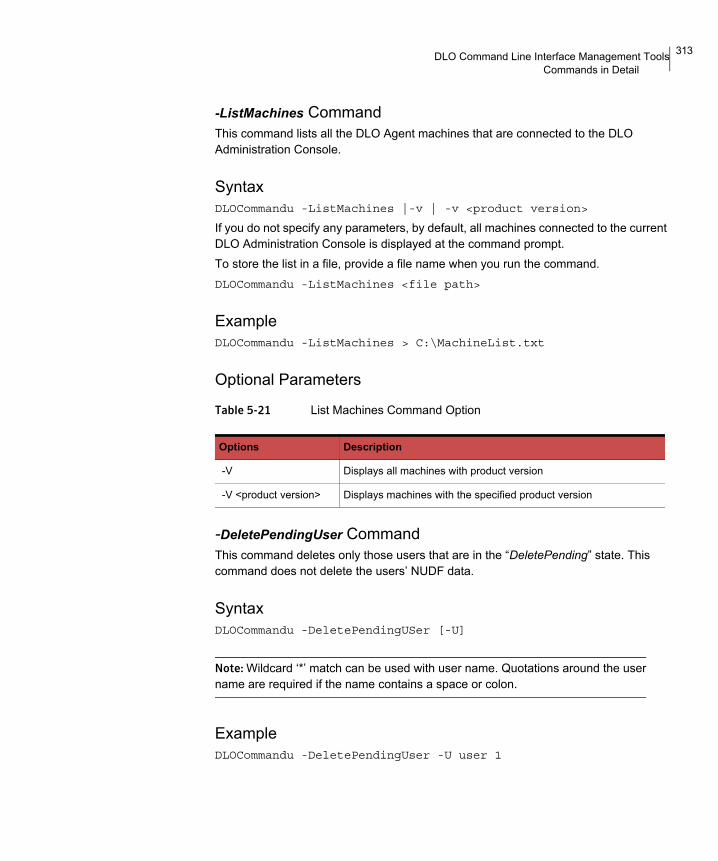
313DLO Command Line Interface Management ToolsCommands in Detail
-ListMachines CommandThis command lists all the DLO Agent machines that are connected to the DLO Administration Console.
SyntaxDLOCommandu -ListMachines |-v | -v <product version>
If you do not specify any parameters, by default, all machines connected to the current DLO Administration Console is displayed at the command prompt. To store the list in a file, provide a file name when you run the command. DLOCommandu -ListMachines <file path>
ExampleDLOCommandu -ListMachines > C:\MachineList.txt
Optional Parameters
Table 5-21 List Machines Command Option
-DeletePendingUser CommandThis command deletes only those users that are in the “DeletePending” state. This command does not delete the users’ NUDF data.
SyntaxDLOCommandu -DeletePendingUSer [-U]
Note: Wildcard ‘*’ match can be used with user name. Quotations around the user name are required if the name contains a space or colon.
ExampleDLOCommandu -DeletePendingUser -U user 1
Options Description
-V Displays all machines with product version
-V <product version> Displays machines with the specified product version

314 DLO Command Line Interface Management ToolsCommands in Detail
Optional Parameters
Table 5-22 Delete Pending User Command Option
-RemoteExecute CommandThis command enables the administrator to collect logs from the Desktop Agent machine remotely. The logs will be available in the user’ network share path under <user’s network share path>/.dlo/.remoteexecute directory.
Syntax:DLOCommandU.exe -RemoteExecute -LGT [-IL |-AL |-DEDL |-OSL | -WT | -A | -F | -P | -PI | -S | -SI | -U]DLOCommandU.exe -RemoteExecute -LGT [-EV |-DV |-A | -F | -P | -PI | -S | -SI | -U]
ExampleDLOCommandU.exe -RemoteExecute -LGT -EV -U user1
Enables Verbose logs for user1DLOCommandU.exe -RemoteExecute -LGT -DV -A
Disables Verbose logs for all usersDLOCommandU.exe -RemoteExecute -LGT -U user1
Collects all types of logs for user1DLOCommandU.exe -RemoteExecute -LGT -AL -WT 30 -U user1
Enables Verbose for a duration of 30 minutes for user1
Note: Wildcard ‘*’ match can be used with user name. Quotations around the user name are required if the name contains a space or colon.
Optional Parameters
Table 5-23 Remote Execute Command Option
Options Description
-U Deletes users in pending state
Options Description
-LGT Specific Parameters

315DLO Command Line Interface Management ToolsCommands in Detail
-ArchiveAuditData CommandThis command enables the administrator to archive the audit data to the CSV file and also to clean up audit records in the database.Syntax:DLOCommandU.exe -ArchiveAuditData -<Type of Data> -<Path\filename>
ExampleDLOCommandu.exe -ArchiveAuditData -SD -Path C:\Audit_ReportDLOCommandu.exe -ArchiveAuditData -DD -Path C:\Audit_Report
Optional Parameters
Table 5-24 Archive Audit Data Command Option
-IL Installer Logs
-AL Application Logs
-OSL Operating System Logs
-DEDL Dedupe Logs
-EV Enable Verbose mode
-DV Disable Verbose mode
-WT Duration for which verbose should be enabled (in minutes)
-A Collects logs for all users
-F Collects logs with storage location on the named file server
-P Collects logs based on Profile name
-PI Collects logs based on Profile ID
-S Collects logs based on Storage Location name
-SI Collects logs based on Storage Location ID
-U Collects logs based on user name
Options Description
Options Description
-SD Archive audit trail data for configuration changes
-DD Archive audit trail data for restore and migration
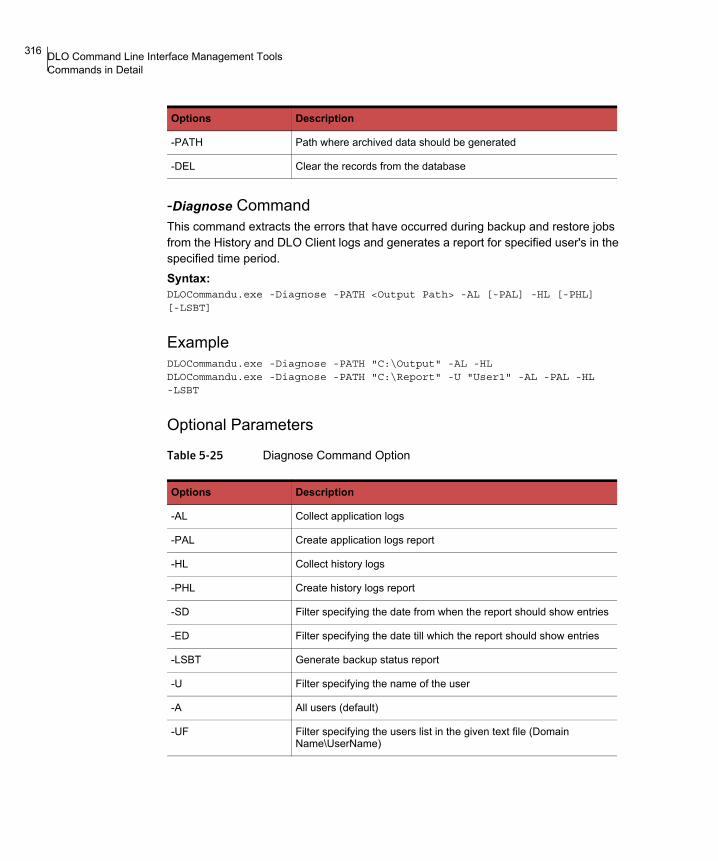
316 DLO Command Line Interface Management ToolsCommands in Detail
-Diagnose CommandThis command extracts the errors that have occurred during backup and restore jobs from the History and DLO Client logs and generates a report for specified user's in the specified time period.Syntax:DLOCommandu.exe -Diagnose -PATH <Output Path> -AL [-PAL] -HL [-PHL] [-LSBT]
ExampleDLOCommandu.exe -Diagnose -PATH "C:\Output" -AL -HL DLOCommandu.exe -Diagnose -PATH "C:\Report" -U "User1" -AL -PAL -HL -LSBT
Optional Parameters
Table 5-25 Diagnose Command Option
-PATH Path where archived data should be generated
-DEL Clear the records from the database
Options Description
Options Description
-AL Collect application logs
-PAL Create application logs report
-HL Collect history logs
-PHL Create history logs report
-SD Filter specifying the date from when the report should show entries
-ED Filter specifying the date till which the report should show entries
-LSBT Generate backup status report
-U Filter specifying the name of the user
-A All users (default)
-UF Filter specifying the users list in the given text file (Domain Name\UserName)

317DLO Command Line Interface Management ToolsCommands in Detail
-ArchiveUser CommandThis command allows the administrator to archive the users who have left the organization.
SyntaxDLOCommandu.exe -ArchiveUser -F | -U
ExampleDLOCommandu.exe -ArchiveUser -U user 1
Optional Parameters
Table 5-26 Archive User Command Option
-ChangeLicense CommandThis command allows the administrator to add new license file.
SyntaxDLOCommandu.exe -ChangeLicense -<license file path>
Optional Parameters
Table 5-27 Change License Command Option
-RenameUser CommandThis command is used after ADS domain user is renamed. Run this command to modify each renamed user's record to reflect the new user name, new paths for the network user data folder and data Storage Location.Before initiating this command, exit or log off the DLO Desktop Agent. To run the command:
Options Description
-F Archives users provided in the CSV file
-U Archives specific user
Options Description
-LIST Lists the installed license file
-ADD Adds new license file

318 DLO Command Line Interface Management ToolsCommands in Detail
1 Create a text file on the server machine in the following format: OldUsername NewUsername OldUsername NewuserName
Note: Only Tab is allowed in between OldUsername and NewUsername.
2 Browse to the installation path of the server and run the following command:
DLOCommandu.exe -RenameUser -UF <text file path>\<filename>
Example:
DLOCommandu.exe -RenameUser -UF <Path>\Users.txt
3 Restart the DLO server and SQL server machine before launching the DLO Desktop Agent in the renamed user context.
Optional Parameters
Table 5-28 RenameUser Command Option
-DeleteNUDFData CommandThis command is used to delete the compromised data from the network user data folder.To run the command:Browse to the installation path of the server and run the following command:DLOCommandu.exe -DeleteNUDFData -U <User Name> -M <Machine Name> -ST <Start Date> | -ET <End Date> -SU <Success Status> -ReportPath <Report Path> -S <SL Name> -ST <Start Date> | -ET <End Date> -SI <SL ID> -ST <Start Date> | -ET <End Date> -UF <Text File Path>\<filename> -ST <Start Date> | -ET <End Date> -A -ST <Start Date> | -ET <End Date>
Example:DLOCommandU.exe -DeleteNUDFData -U “user1” -ST “06/10/2017 10:30”DLOCommandU.exe -DeleteNUDFData -UF “D:\DeleteNUDFDATA_file.txt” -SU -ST “06/10/2017 10:30”
To specify the -UF option, create a text file on the server machine in the following format: Username,Machinename
Option Description
-UF Migrate users listed in the given text file.

319DLO Command Line Interface Management ToolsCommands in Detail
Eg:user1,DT1234
Note: In case the machine name is not provided , the command will delete the compromised data for all the associated user machines.
DLOCommandU.exe -DeleteNUDFData -S NUDF_Path -ST “06/10/2017 10:30”DLOCommandU.exe -DeleteNUDFData -SI 100 -ST “06/10/2017 10:30” -ET “06/15/2017 10:30”
Note: Wildcard matches(*) is allowed only with usernames. Quotations are mandatory around Start Time and End Time. Quotations are required around the names if they contain a space or colon. To get a list of all storage locations, use the -ListSL command.
Optional Parameters
Table 5-29 DeleteNUDFData Command Option
Note: By default the -DeleteNUDFData command results will be saved in .CSV file format in the NUDF Deletion Summary folder in the DLO install path.
Option Description
-U User Name.
-M Machine Name.
-S Storage Location Name.
-SI Storage Location ID.
-ST Start Time in (MM/DD/YYYY HH:MM) from when the data needs to be deleted.
-ET End Time in (MM/DD/YYYY HH:MM) till when the data needs to be deleted.
-A Deletes the NUDF data of all the users and machines.
-UF Deletes the NUDF data of selected users and machines specified in the given text file.
-SU Lists the success and failure status for the files to be deleted. By default only the failure status will be reported.
-ReportPath Custom path to generate the report.
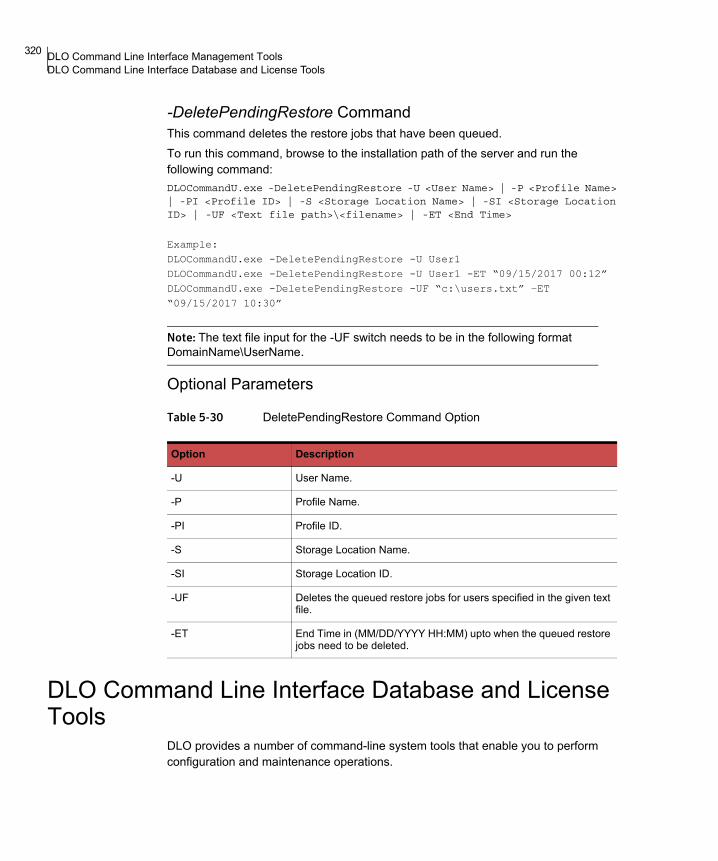
320 DLO Command Line Interface Management ToolsDLO Command Line Interface Database and License Tools
-DeletePendingRestore CommandThis command deletes the restore jobs that have been queued.To run this command, browse to the installation path of the server and run the following command:DLOCommandU.exe -DeletePendingRestore -U <User Name> | -P <Profile Name> | -PI <Profile ID> | -S <Storage Location Name> | -SI <Storage Location ID> | -UF <Text file path>\<filename> | -ET <End Time>
Example:DLOCommandU.exe -DeletePendingRestore -U User1DLOCommandU.exe -DeletePendingRestore -U User1 -ET “09/15/2017 00:12”DLOCommandU.exe -DeletePendingRestore -UF “c:\users.txt” –ET “09/15/2017 10:30”
Note: The text file input for the -UF switch needs to be in the following format DomainName\UserName.
Optional Parameters
Table 5-30 DeletePendingRestore Command Option
DLO Command Line Interface Database and License Tools
DLO provides a number of command-line system tools that enable you to perform configuration and maintenance operations.
Option Description
-U User Name.
-P Profile Name.
-PI Profile ID.
-S Storage Location Name.
-SI Storage Location ID.
-UF Deletes the queued restore jobs for users specified in the given text file.
-ET End Time in (MM/DD/YYYY HH:MM) upto when the queued restore jobs need to be deleted.
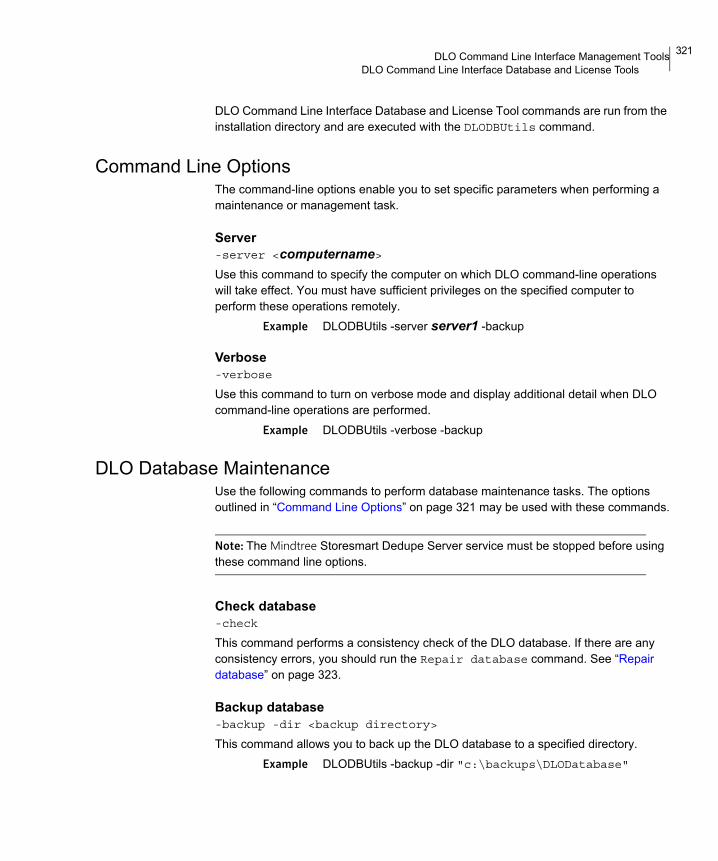
321DLO Command Line Interface Management ToolsDLO Command Line Interface Database and License Tools
DLO Command Line Interface Database and License Tool commands are run from the installation directory and are executed with the DLODBUtils command.
Command Line OptionsThe command-line options enable you to set specific parameters when performing a maintenance or management task.
Server-server <computername>Use this command to specify the computer on which DLO command-line operations will take effect. You must have sufficient privileges on the specified computer to perform these operations remotely.
Example DLODBUtils -server server1 -backup
Verbose-verbose
Use this command to turn on verbose mode and display additional detail when DLO command-line operations are performed.
Example DLODBUtils -verbose -backup
DLO Database MaintenanceUse the following commands to perform database maintenance tasks. The options outlined in “Command Line Options” on page 321 may be used with these commands.
Note: The Mindtree Storesmart Dedupe Server service must be stopped before using these command line options.
Check database-check
This command performs a consistency check of the DLO database. If there are any consistency errors, you should run the Repair database command. See “Repair database” on page 323.
Backup database-backup -dir <backup directory>
This command allows you to back up the DLO database to a specified directory.Example DLODBUtils -backup -dir "c:\backups\DLODatabase"

322 DLO Command Line Interface Management ToolsDLO Command Line Interface Database and License Tools
IDRThis command copies and recovers DLO Intelligent (IDR) MSDE database files.-setupidr
Makes a copy of the MSDE database files.Example DLODBUtils -setupidr
-idr
Restores the MSDE database files saved with the -setupidr command. The computer must be restarted after executing this command so that the changes take effect.
Example DLODBUtils -idr
Restore databaseThe restore command allows you to restore the DLO or Dedupe database from the specified backup file.-restore -databasefile <restore from> -databasename <DLO or
dedupedb>
Example
DLODBUtils -restore -databasefile "c:\backup\DLO.bak" -databasename DLODLODBUtils -restore -databasefile "c:\backup\DedupeDB.bak" -databasename dedupedb
Note: Exclusive database access is required to run the -restore command.
Routine MaintenanceUse the following commands to perform routine maintenance. The options outlined in “Command Line Options” on page 321 may be used with these commands.
Compact database-compact
Compresses the DLO database by removing the unused space in the databases.Example DLODBUtils -compact
Rebuild index-rebuildindex
Rebuilds the index for the DLO database.Example DLODBUtils -rebuildindex

323DLO Command Line Interface Management ToolsDLO Command Line Interface Database and License Tools
Repair database-repair
Repairs the DLO database.Example DLODBUtils -repair
Note: This includes quick repairs such as repairing missing rows in non-clustered indexes and more time-consuming repairs such as rebuilding an index.
Groom -groomalerts daysRemoves alerts older than a specified number of days.
Example DLODBUtils -groomalerts 5
Database Management
Note: Exclusive database access is required to run the -attach or -detach command. Stop the DLO Administration Service and Mindtree Storesmart Dedupe Server services before running these commands and then restart the services after running the commands.
Attach databaseThis command makes the DLO database available to the database engine.-attach -datafile <database file name> -logfile <database log
file name>
Example DLODBUtils -attach -datafile "c:\backup\DLO.mdf" -logfile "c:\backup\DLO.ldf"
Detach databaseUse this command to detach the DLO database.
Example DLODBUtils -detach
License ManagementThese command-line tools enable license management from the command line.
List license-LIST
Lists current DLO licenses.

324 DLO Command Line Interface Management ToolsDLO Logging Command Line Interface Tool
Example DLOCommandu.exe -ChangeLicense -LIST <license file>
Add license-ADD <license file>
Adds the specified license file.Example DLOCommandu.exe -ChangeLicense -ADD <license file>
DLO Logging Command Line Interface ToolDLO provides a command-line tool that enables logging with different logging levels for all the DLO binaries. These DLOLoggingu command is run from the installation directory.C:\Program Files\Veritas\Veritas DLO\DLOLoggingu.exe
SyntaxDLOLoggingu -E <DLO component Executable name> [Options [-L |
-LS]]
Note: In a distributed DLO environment, the DLO Logging command-line tool will be deployed in each machine where individual DLO component is installed.
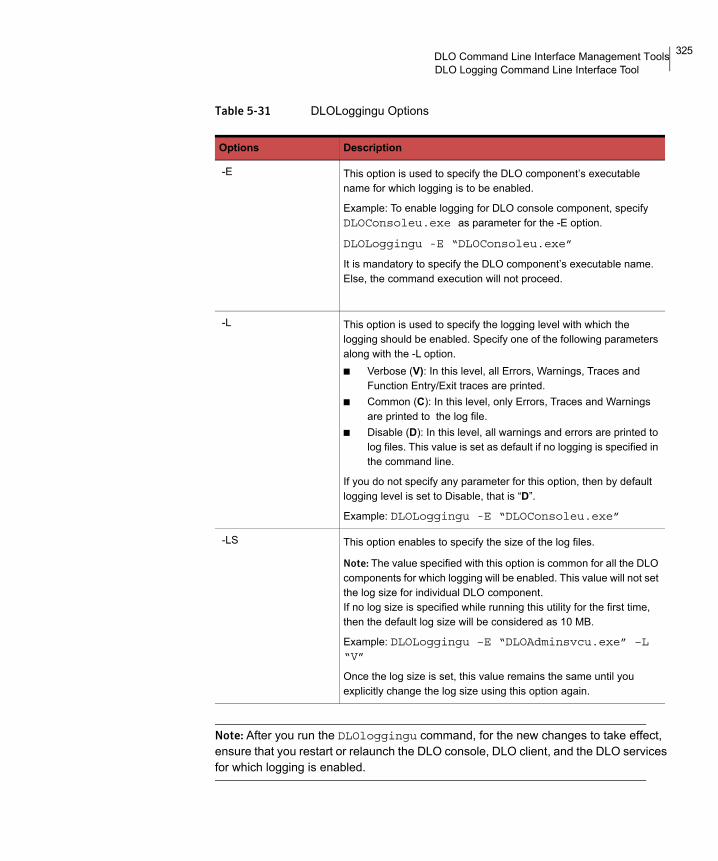
325DLO Command Line Interface Management ToolsDLO Logging Command Line Interface Tool
Table 5-31 DLOLoggingu Options
Note: After you run the DLOloggingu command, for the new changes to take effect, ensure that you restart or relaunch the DLO console, DLO client, and the DLO services for which logging is enabled.
Options Description
-E This option is used to specify the DLO component’s executable name for which logging is to be enabled.
Example: To enable logging for DLO console component, specify DLOConsoleu.exe as parameter for the -E option.
DLOLoggingu -E “DLOConsoleu.exe”
It is mandatory to specify the DLO component’s executable name. Else, the command execution will not proceed.
-L This option is used to specify the logging level with which the logging should be enabled. Specify one of the following parameters along with the -L option. ■ Verbose (V): In this level, all Errors, Warnings, Traces and
Function Entry/Exit traces are printed.■ Common (C): In this level, only Errors, Traces and Warnings
are printed to the log file. ■ Disable (D): In this level, all warnings and errors are printed to
log files. This value is set as default if no logging is specified in the command line.
If you do not specify any parameter for this option, then by default logging level is set to Disable, that is “D”.
Example: DLOLoggingu -E “DLOConsoleu.exe”
-LS This option enables to specify the size of the log files.
Note: The value specified with this option is common for all the DLO components for which logging will be enabled. This value will not set the log size for individual DLO component.If no log size is specified while running this utility for the first time, then the default log size will be considered as 10 MB.
Example: DLOLoggingu –E “DLOAdminsvcu.exe” –L “V”
Once the log size is set, this value remains the same until you explicitly change the log size using this option again.

326 DLO Command Line Interface Management ToolsVeritas DLO Log Gather Tool
ExampleTo enable verbose logging for DLO Administration service, run the following command:DLOLoggingu –E “DLOAdminsvcu.exe” –L “V” –LS “20”
After executing this command, restart the DLO administration service for the new changes to take effect.
Veritas DLO Log Gather ToolThe Veritas DLO Log Gather tool enables you to collect logs from various product install paths, log path, registry export, operating system, and from the installed applications.
Note: The tool also depends on DLODBUtils.exe to collect the DB backup, and DLOCommandu.exe to collect information about users, profiles, and computers. Therefore, check whether the machine on which DLO is installed is 32-bit or 64-bit, and then run the appropriate version of the tool on that machine.
To gather the logs1 Navigate to the following path:
C:\Program Files\Veritas\Veritas DLO
2 Double-click the DLOGatherU.exe tool.
3 Select the appropriate check boxes to gather the required logs.■ DLO Installation Logs■ DLO Application Logs■ Operating System Logs■ DLO Database■ Dedupe Logs
4 Enter the path of the directory or click Browse to select the output directory where the gathered logs should be saved.
5 In the Additional files to gather field, enter the file names or click Browse to select the additional files to be gathered.
6 Click Add Files.
7 Click Gather to start collecting the selected logs.Once the process is completed, a file is created in the selected output directory in the following format: IncidentNumber_MachineName_CurrentTime.cab

327DLO Command Line Interface Management ToolsVeritas DLO Diagnostic Tool
Veritas DLO Diagnostic ToolThis utility is used to scan and diagnose the status of DLO Services and accessibility of various components in DLO.It can be run to narrow down issues in case of failures in terms of backups, restores and other connectivity failures.
To run the tool1 Navigate to the following path:
C:\Program Files\Veritas\Veritas DLO
In case DLO has been installed on a custom path, navigate to the custom install path to locate this tool.
2 Double-click the DLODiagnosticUtility.exe tool.
3 Click Scan.
4 Click Export to generate a report.The report by default will be generated in the path: C:\Users\<UserName>\AppData\Local\Veritas\DLO\.settings
5 Click Quick Diagnose to extract the errors that have occurred during backup and restore jobs from the History logs and generates history data analysis and Backup Status report for all the users. For more information, see “-Diagnose Command” on page 316.
6 Click Rescan to re-run the tool.
Garbage Collection UtilityGarbage Collection (GC) is an administrative job that needs to be scheduled in the Dedupe Server machine. GC tool reclaims the Dedupe Storage Location storage space used by unreferenced data.This job is a time-bound process that runs as per the maximum duration specified in the command. The time taken to complete the process for 50 GB data is approximately 4 hours.Backup and restore jobs are supported during garbage collection. However, intermittent failures may occur during restore job if the same file is being garbage collected. In such case, perform the restore job again.The Garbage Collection tool tries to accomplish as much as possible in the specified duration, and exits once the time limit is reached. If the job is not completed in the specified duration, then the tool continues the job from where it was stopped in the previous run.
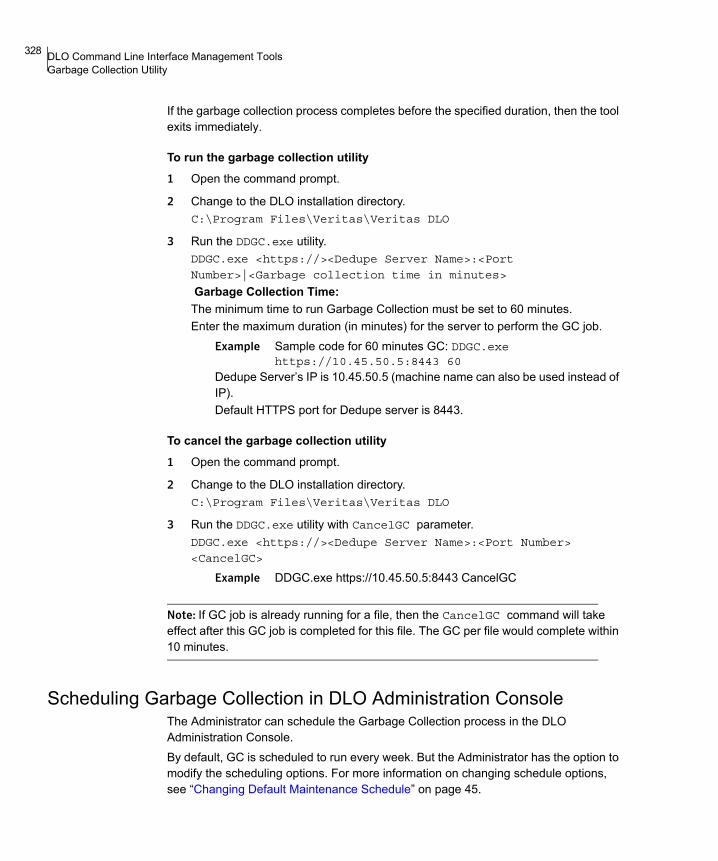
328 DLO Command Line Interface Management ToolsGarbage Collection Utility
If the garbage collection process completes before the specified duration, then the tool exits immediately.
To run the garbage collection utility1 Open the command prompt.
2 Change to the DLO installation directory. C:\Program Files\Veritas\Veritas DLO
3 Run the DDGC.exe utility.DDGC.exe <https://><Dedupe Server Name>:<Port
Number>|<Garbage collection time in minutes>
Garbage Collection Time: The minimum time to run Garbage Collection must be set to 60 minutes.Enter the maximum duration (in minutes) for the server to perform the GC job.
Example Sample code for 60 minutes GC: DDGC.exe https://10.45.50.5:8443 60
Dedupe Server’s IP is 10.45.50.5 (machine name can also be used instead of IP). Default HTTPS port for Dedupe server is 8443.
To cancel the garbage collection utility1 Open the command prompt.
2 Change to the DLO installation directory. C:\Program Files\Veritas\Veritas DLO
3 Run the DDGC.exe utility with CancelGC parameter.DDGC.exe <https://><Dedupe Server Name>:<Port Number>
<CancelGC>
Example DDGC.exe https://10.45.50.5:8443 CancelGC
Note: If GC job is already running for a file, then the CancelGC command will take effect after this GC job is completed for this file. The GC per file would complete within 10 minutes.
Scheduling Garbage Collection in DLO Administration ConsoleThe Administrator can schedule the Garbage Collection process in the DLO Administration Console.By default, GC is scheduled to run every week. But the Administrator has the option to modify the scheduling options. For more information on changing schedule options, see “Changing Default Maintenance Schedule” on page 45.

329DLO Command Line Interface Management ToolsGarbage Collection Utility
The DLO Administration Service triggers garbage collection depending on the schedule. The next schedule details are updated in the DLO database once the garbage collection is completed.The garbage collection details are tracked in the Garbage Collection History report under DLO Reports.
Note: Before initiating garbage collection and after successful GC run, Dedupe server checks and runs DB indexing automatically.

330 DLO Command Line Interface Management ToolsGarbage Collection Utility

Chapter
6 TroubleshootingThis section contains the following topics:■ “Using DLO with WinCVS”■ “Troubleshooting the DLO Administration Console” ■ “Troubleshooting the Desktop Agent”■ “Troubleshooting the Desktop Agent on Mac”■ “Troubleshooting the Dedupe Server”■ “Troubleshooting the DLO Edge Server and IO Server”■ “Troubleshooting Issues Related to Web Restore”■ “Troubleshooting Issues Related to Server Consolidation”■ “Troubleshooting Licensing Issues”■ “Troubleshooting Configuring Reports”■ “Troubleshooting Database Backup during DLO Upgrade”■ “Troubleshooting Endpoint Migration”
Using DLO with WinCVSWhen DLO runs concurrently with WinCVS, permission denied errors are sometimes generated when checking out source. This error can be avoided by excluding any directories named cvs using global excludes or backup selection excludes.
Troubleshooting the DLO Administration ConsoleThis topic contains frequently asked questions that you may encounter while running the DLO Administration Console, and provides answers for these questions.
Troubleshooting Post Installation IssuesOnce the installation is complete, the DLO Summary is displayed. In case any of the services fail to start, check for the following:

332 TroubleshootingTroubleshooting the DLO Administration Console
Mindtree StoreSmart Dedupe Server fails to start.Check if:
■ SQL Server and SQL Server Browser Services are running with Domain user/Administrator account.
■ TCP/IP is enabled.■ Run the following osql commands to check if the DLO and Dedupe Databases are upgraded
and attached. The version should be 4.x.1 osql –E –S .\Instance_Name –d Master –Q “select name from
sysdatabases where name in ('DLO','Dedupedb')”
2 osql –E –S .\Instance_Name –d DedupeDB –Q “select config_value from system_config where config_name='dedupedb_version'”
■ Port 8443 and 8080 are not used by any other application or service.■ Firewall is off and the ports 8080, 8443 are added to the exception list.■ Context.xml has the appropriate values for DB server, server name and instance name. For
more information, see “Configuring Dedupe to Use a Specific Port for Database Access” on page 50.
Veritas DLO Administration Service or DLO Console fails to start.Check if:
■ DLOAgent folder is shared on Admin Service Machine.■ SQL Server and SQL Server Browser Services are running with Domain user/Administrator
account.■ DLO database is attached.■ Run the osql command to check if the DLO and Dedupe Databases are attached:osql –E –S .\Instance_Name –d Master –Q “select name from sysdatabasesNamed pipe is enabled. where name in ('DLO','Dedupedb')”■ Named pipe is enabled.
I modified an Automated User Assignment, but the change isn’t reflected for existing Desktop Agent users.Automated User Assignments are only used once to assign a profile and Storage Location to a new Desktop Agent user. An Automated User Assignment can be modified to change the profile and Storage Location settings, but these changes will only apply to new users. Users that have already been configured will not be affected by subsequent changes in the Automated User Assignment.This also applies to existing users who install the Desktop Agent on another desktop. The new installation will use the existing user settings and will store data in the user’s existing user data folder. Automated User Assignment changes will not affect an existing user, even if the Desktop Agent installation is on a new computer.Settings for an existing desktop user can be changed by modifying the profile to which the user is assigned, or by reassigning that user to a new profile or Storage Location.
A desktop user ran the Desktop Agent and received an error indicating “Unable to configure the Desktop Agent. No settings found for the current user and no automatic user assignments match.” What does this indicate?

333TroubleshootingTroubleshooting the DLO Administration Console
This message means that DLO could not find the user or an Automated User Assignment that matched the user's domain and group.Users are added to DLO either by an Automated User Assignment or by manually adding them.In the first case, you use an Automated User Assignment that matches the user’s domain and group. The Automated User Assignment assigns a profile and Storage Location to the Desktop Agent and adds the user to DLO. Check that you have created Automated User Assignments that match the domain and group to which the user belongs who is running the Desktop Agent. You can also create an Automated User Assignment that covers all domains and all groups. This method identifies any users who might not match a more specific Automated User Assignment. Such an “identifying” Automated User Assignment would typically be set to the lowest priority.The other option is to manually add users to DLO. This process requires that you assign a profile and assign either a Storage Location or a user data folder to the new user.Before running the Desktop Agent, make sure that the user has a matching Automated User Assignment, or is added manually.Related topics “About Automated User Assignments” on page 123
When do I need a network user data folder, and when do I need a Storage Location?Every Desktop Agent user must have a network user data folder, which is used to store backup data on the network. Storage Locations are locations on the network where network user data folders are automatically created and maintained. They are not required if existing network shares are used to store user data.If you want DLO to automatically create network user data folders, use a Storage Location. When new users are added to a Storage Location, network user data folders are automatically created for them within the Storage Location.Alternatively, if you would like to use existing network shares as network user data folders, or if you want to create network user data folders manually, then do not use Storage Locations. Related topics “Configuring DLO” on page 65
I'm trying to create a Storage Location on a remote file server, and I am receiving an error indicating the MSDE Database Instance for the Desktop and Laptop Option needs to have access to the remote file server. What do I need to do?To create Storage Locations on a remote file server, you must use an account that has administrative rights on the remote file server. For details about creating the Storage Location, see “Managing Administrator Accounts” on page 36.
I manually added a new user and assigned the user to an existing Storage Location. I don't see a new user data folder for the new user in this Storage Location. Isn't it supposed to create one?User data folders are created only after the Desktop Agent is both installed on the desktop and run by the new user.
How do I prevent a user from backing up data?1 On the Navigation bar, click Setup. In the Settings pane, click Users.
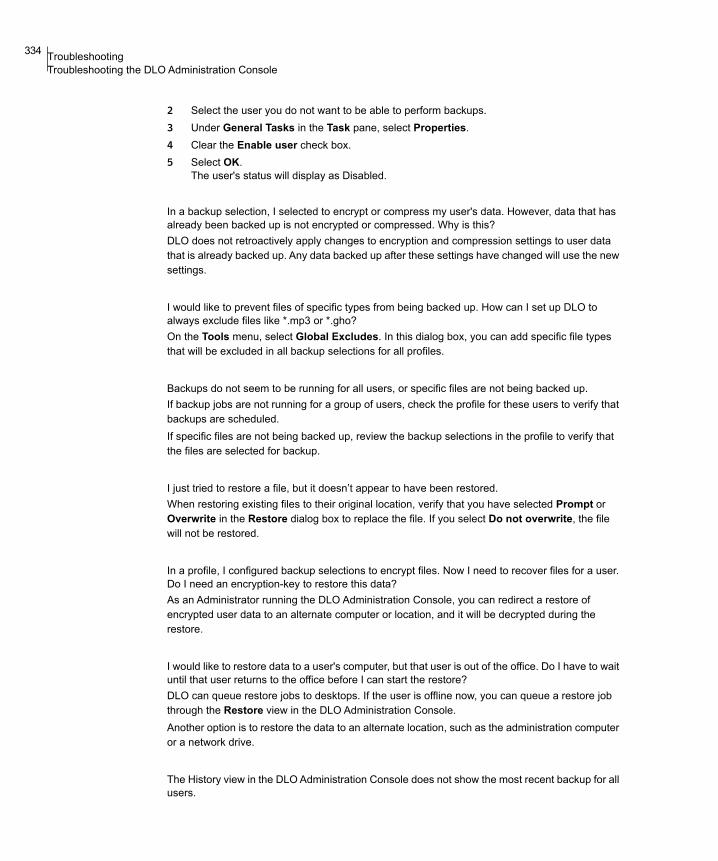
334 TroubleshootingTroubleshooting the DLO Administration Console
2 Select the user you do not want to be able to perform backups.3 Under General Tasks in the Task pane, select Properties. 4 Clear the Enable user check box.5 Select OK.
The user's status will display as Disabled.
In a backup selection, I selected to encrypt or compress my user's data. However, data that has already been backed up is not encrypted or compressed. Why is this?DLO does not retroactively apply changes to encryption and compression settings to user data that is already backed up. Any data backed up after these settings have changed will use the new settings.
I would like to prevent files of specific types from being backed up. How can I set up DLO to always exclude files like *.mp3 or *.gho?On the Tools menu, select Global Excludes. In this dialog box, you can add specific file types that will be excluded in all backup selections for all profiles.
Backups do not seem to be running for all users, or specific files are not being backed up.If backup jobs are not running for a group of users, check the profile for these users to verify that backups are scheduled.If specific files are not being backed up, review the backup selections in the profile to verify that the files are selected for backup.
I just tried to restore a file, but it doesn’t appear to have been restored.When restoring existing files to their original location, verify that you have selected Prompt or Overwrite in the Restore dialog box to replace the file. If you select Do not overwrite, the file will not be restored.
In a profile, I configured backup selections to encrypt files. Now I need to recover files for a user. Do I need an encryption-key to restore this data?As an Administrator running the DLO Administration Console, you can redirect a restore of encrypted user data to an alternate computer or location, and it will be decrypted during the restore.
I would like to restore data to a user's computer, but that user is out of the office. Do I have to wait until that user returns to the office before I can start the restore?DLO can queue restore jobs to desktops. If the user is offline now, you can queue a restore job through the Restore view in the DLO Administration Console.Another option is to restore the data to an alternate location, such as the administration computer or a network drive.
The History view in the DLO Administration Console does not show the most recent backup for all users.

335TroubleshootingTroubleshooting the DLO Administration Console
The DLO Administration Console is automatically updated when a job runs, but not more than once per hour.
I am not able to run either the -emergencyrestore, -migrateuser, or the -migrateuserSL command.The error occurs because these commands should be run with a user account that has administrator privileges.If the user account does not have administrator privileges, then open the command prompt by selecting the “Run as Administrator” option, and then run the specific command.
When I am clustering DLO Admin Service using domain user account, which is part of “Domain Admin” group, the following error message is displayed: “This software will not run on a machine that is not part of cluster.”To resolve this issue, make sure that all the required rights/privileges are provided to this user account or group. Also this user account should be local administrator on all computers that are part of MSCS cluster or failover clustering.For more information on configuring a user account for failover cluster, refer to the link: http://technet.microsoft.com/en-us/library/cc731002%28WS.10%29.aspx
Emergency Restore, restore from Admin Console, or restore from Agent fails and the following error message is displayed: “Invalid codec specified.”This error occurs if NSF files are being restored and Lotus Notes client is not installed on the server or Agent machine where the files are restored.To resolve this issue, install Lotus Notes client on the server or Agent machine and continue with restore.
Migration of deduped data fails.This error occurs if NSF files are being migrated and Lotus Notes client is not installed on the server machine where the files are migrated.To resolve this issue, install Lotus Notes client on the server machine and continue with data migration.
Although as a sub administrator I have the permission to add/modify Dedupe Server, I am not able to create a Dedupe Storage Location because the Create (+) button is greyed out.The sub administrator should have local administrative rights on the server machine. Also, use the “Run as administrator” option while launching the DLO administration console.
While I am migrating users between VIP and non VIP profiles, I get the following error message: “Profile migration failed.”One of the reasons may be because some user is accessing the network share folder that contains the user data. Before migrating the users, ensure that this folder is not accessed by anyone.

336 TroubleshootingTroubleshooting the Desktop Agent
Negative values are displayed in the Storage Statistics Report.The report displays negative values in the following scenarios:
■ When the cumulative size of the source files is less than the cumulative size of the deduped data.
■ Synchronization/garbage collection is performed periodically to synchronize the data in the storage locations. The negative values can occur when there is significant change in the storage location data and the synchronization/grooming is yet to run.
This negative value is corrected once the garbage collection process is run.
Troubleshooting the Desktop AgentThis topic contains frequently asked questions that you may encounter while running the Desktop Agent, and provides answers for these questions.
I installed the Desktop Laptop Option, but I do not know how to install the Desktop Agent on users’ computers.The Desktop Agent can be installed by running the installation program from the share where DLO is installed as described below. The Desktop Agent installation program is located in a share where you installed DLO. This share will have a name in the following format: \\<Server>\DLOAgent. Using Windows Explorer, browse to this share from the desktop that you want to protect with the Desktop Agent. Run Setup.exe from this share. You must be an administrator on the desktop to install the Desktop Agent software.Veritas recommends that DLO administrators run the Configuration Wizard to familiarize themselves with the application. You can also install the Desktop Agent by using the “Push Install Desktop Agent” option. See “Procedure to Push Install Desktop Agent and DLO Maintenance Server” on page 34 for more information.
Can I install the Desktop Agent on Windows Servers or DLO Administration Servers?Because the Desktop Agent is designed to protect user data rather than critical server data, it cannot be installed on Windows Servers or DLO Administration Servers.
I am receiving the following error while authenticating through the Desktop Agent to the DLO Administration Server: “Failed to Initialize database. 0x800A0E7D”You attempted to connect to the DLO Administration Server with an account that is not in the same domain, or a trusted domain, as the administration server. For DLO to function properly, the DLO Administration Server must be in a Windows Domain.
I have a desktop and a laptop computer protected by the Desktop Agent. Why can't I move my laptop to a new Storage Location?When a user has multiple computers running the Desktop Agent, all backup data is stored in the same network user data folder. If you want to move your data to a new Storage Location, you must move the entire network user data folder for all of your computers to that new location.
I am trying to synchronize files between my desktop and laptop computers, but I cannot see my other computer in the Synchronization View in the Desktop Agent.

337TroubleshootingTroubleshooting the Desktop Agent
To synchronize data between two computers, the same user account must be used when running the Desktop Agent on each computer. For example, the user Domain\MyUser must have backed up data on Computer A and Computer B in order for synchronization to take place between these two computers.If you are sure you have backed up data while running the Desktop Agent under the same user account on both of your computers, select Refresh in the Desktop Agent's Synchronization View to make the synchronization selections available. If this is not successful, Exit from the File menu and restart the Desktop Agent application.
What files or folders can I synchronize between my computers?Any data backed up by a backup selection are eligible for synchronization. These backup selections may be defined by the DLO Administrator in the profile or in a backup selection created with the Desktop Agent.
I would like to share my synchronized data with my co-workers. How can I do this?DLO does not provide functionality for sharing files between users. Synchronization is designed to share files between a single user's computers.
DLO backup of Outlook PST files is slow during “Copying local” phase of the backup job.When DLO performs a backup of an Outlook PST file, DLO copies the snapshot of the PST to the Local User Data Folder (LUDF), and then it copies the file to the Network User Data Folder (NUDF). During the first stage, the “Status” column in the Desktop Agent window displays the status as “Copying local (x%)”. Sometimes, this “Copying local” phase can be very slow.To find out if DLO is introducing a sleep mechanism, enable DLO Agent logging and capture the slow backup job in the log.
Cause:The “Copying local” phase can be slow due to one of the following reasons:
■ The PST file is very large. The snapshot still occurs on the entire PST file, even if it is only doing a “Message level incremental”.
■ The local AntiVirus application may be slowing down the process. Try disabling AntiVirus and observe the performance of the next backup job.
■ DLO may be doing disk throttling. DLO monitors the LogicalDisk Performance Counter called “Current Disk Queue Length”. If the queue length exceeds 2 (default value of 2), DLO introduces a sleep mechanism during the “Copying local” phase of the backup jobs. This is to prevent DLO from consuming disk cycles that other applications might need.
To enable Desktop Agent Logging:1 Launch the Desktop Agent GUI.2 Select Tools > Support > Enable Verbose Logging.3 Restart the Desktop Agent.Once a slow backup has been captured, locate the newly created DLOClient.log file:The DLOClient.log will be located here:On Windows 7: C:\Users\<UserName>\AppData\Local\Veritas\DLO\.settingsOn XP: C: \Documents and Settings \<UserName> \Local Settings \Application Data\Veritas\DLO\.settings

338 TroubleshootingTroubleshooting the Desktop Agent
Example:In the log file, look for lines such as: diskthrottle.cpp(228) Read queue: 8.73956, sleeping for 2000msdiskthrottle.cpp(228) Read queue: 4.50836, sleeping for 1254msdiskthrottle.cpp(228) Read queue: 11.5639, sleeping for 2000msdiskthrottle.cpp(228) Read queue: 3.54665, sleeping for 773msdiskthrottle.cpp(228) Read queue: 2.85208, sleeping for 426msIn the above example, it can be observed that DLO is introducing a sleep mechanism to prevent over-throttling of the physical disk.The average of the sum of the queue length above is 6.625. Rounding up = 7.If logs suggest the performance delays are associated with disk throttling (as seen above) and you have determined that it is alright for DLO to consume additional disk resources, these registry adjustments will increase the threshold at which DLO engages disk throttling:
Note: DLO will divide the specified registry value by 10, so take the observed average queue length and multiply by 10 to determine the value that you must implement in the registry.
1 Open regedit2 Navigate to HKLM\Software\Veritas\DLO\3.0\Client.3 Create a new DWORD value named DiskQueueLimit.4 Type the value as 70 decimal.5 Navigate to HKCU\Software\Veritas\DLO\3.0\Client.6 Create a new DWORD value named DiskQueueLimit.7 Type the value as 70 decimal.8 Restart the Desktop Agent (do not just minimize and maximize it).
Note: The value of 70 was obtained by calculating the average read queue length during a slow backup event and multiplying by 10. The value of 70 may not necessarily apply to all desktop environments. Follow the logging example as explained above, to determine the average queue length experienced on the problematic host, and apply the observed adjusted average to the DiskQueueLimit registry key.
When I upgrade the Desktop Agent by using a different user account (instead of the administrator account that was used to log on to the machine and install Desktop Agent), and when I try to access the existing desktop user data folder, the Desktop Agent goes to disabled state with the following error: “Access denied. Failed to create recovery key.”The error occurs because the user account may not have the privileges to access the existing desktop user data folder. To resolve this issue, follow these steps:
1 Right-click the desktop user data folder, and select Properties.2 Select the Security tab and add the user account. 3 Click Apply.
The recovery key is created.
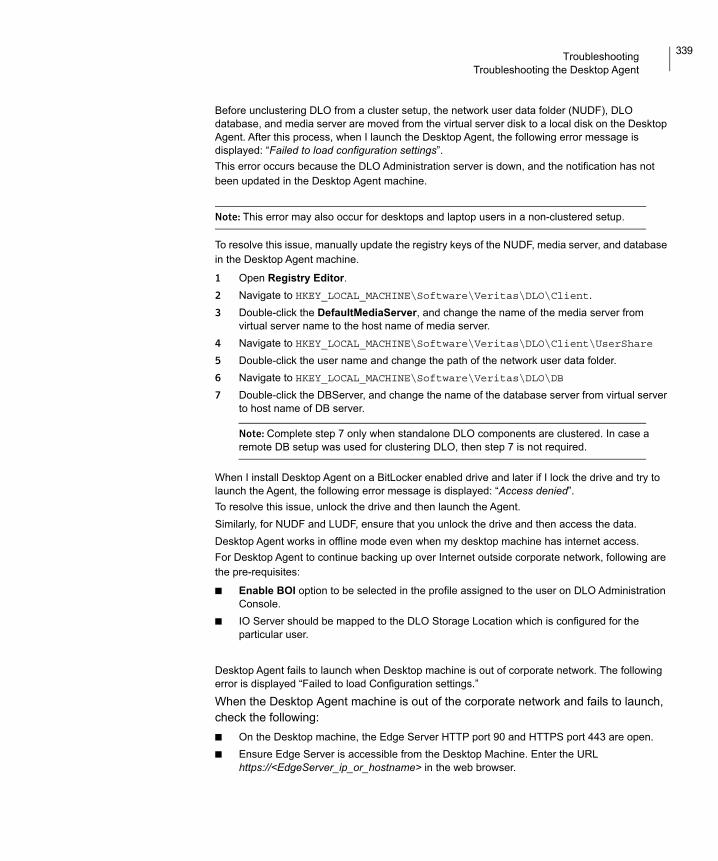
339TroubleshootingTroubleshooting the Desktop Agent
Before unclustering DLO from a cluster setup, the network user data folder (NUDF), DLO database, and media server are moved from the virtual server disk to a local disk on the Desktop Agent. After this process, when I launch the Desktop Agent, the following error message is displayed: “Failed to load configuration settings”.This error occurs because the DLO Administration server is down, and the notification has not been updated in the Desktop Agent machine.
Note: This error may also occur for desktops and laptop users in a non-clustered setup.
To resolve this issue, manually update the registry keys of the NUDF, media server, and database in the Desktop Agent machine.
1 Open Registry Editor.2 Navigate to HKEY_LOCAL_MACHINE\Software\Veritas\DLO\Client.3 Double-click the DefaultMediaServer, and change the name of the media server from
virtual server name to the host name of media server. 4 Navigate to HKEY_LOCAL_MACHINE\Software\Veritas\DLO\Client\UserShare5 Double-click the user name and change the path of the network user data folder. 6 Navigate to HKEY_LOCAL_MACHINE\Software\Veritas\DLO\DB7 Double-click the DBServer, and change the name of the database server from virtual server
to host name of DB server.
Note: Complete step 7 only when standalone DLO components are clustered. In case a remote DB setup was used for clustering DLO, then step 7 is not required.
When I install Desktop Agent on a BitLocker enabled drive and later if I lock the drive and try to launch the Agent, the following error message is displayed: “Access denied”.To resolve this issue, unlock the drive and then launch the Agent.Similarly, for NUDF and LUDF, ensure that you unlock the drive and then access the data.Desktop Agent works in offline mode even when my desktop machine has internet access.For Desktop Agent to continue backing up over Internet outside corporate network, following are the pre-requisites:
■ Enable BOI option to be selected in the profile assigned to the user on DLO Administration Console.
■ IO Server should be mapped to the DLO Storage Location which is configured for the particular user.
Desktop Agent fails to launch when Desktop machine is out of corporate network. The following error is displayed “Failed to load Configuration settings.”
When the Desktop Agent machine is out of the corporate network and fails to launch, check the following:■ On the Desktop machine, the Edge Server HTTP port 90 and HTTPS port 443 are open.■ Ensure Edge Server is accessible from the Desktop Machine. Enter the URL
https://<EdgeServer_ip_or_hostname> in the web browser.

340 TroubleshootingTroubleshooting the Desktop Agent
■ In the Desktop Agent install path, edge_server.ini file should be present.Verify the Edge Server and port details in the file.
Troubleshooting the Desktop Agent on MacI am unable to launch the Desktop Agent, as the following message is displayed: “The Desktop Agent cannot launch until it can contact the server database.” This problem occurs if the Desktop Agent is unable to communicate with the DB server, and due to one of these reasons:
■ DB server is shut down■ Unable to telnet to DB server through the specified port
I am unable to launch the Desktop Agent, as the following message is displayed: “Unable to configure a Desktop Agent. No settings found for the current user and no automatic user assignments match.”This error occurs because the AUA settings are not configured in the DLO Administration server, or the user is not part of the configured AUA settings. To resolve this issue, configure the AUA settings or manually add this user account in the server, and launch the Desktop Agent again.
The following error message is displayed: “Authentication Failed. Do you want to try again?” This error message is displayed when you enter an invalid password in the credential prompt. Click OK to enter the password again, or click Cancel to launch the Desktop Agent again.
How do I view the files that are backed up locally (or) where is DUDF located?
DUDF path is actually hidden. ■ The DUDF path is /Users/<username>/.Applications/Veritas/DLO/.■ Files that are backed up locally are located in
/Users/<username>/.Applications/Veritas/DLO/.dlo/_lm.■ Application logs are located in
/Users/<username>/.Applications/Veritas/DLO/.settings
■ History logs are located in /Users/<username>/.Applications/Veritas/DLO/.dlo/.logs.
Does DLO MAC Agent trigger backups for Apple Mail and Microsoft Outlook versions for Mac?Yes, Desktop Agent triggers backups for Apple Mail and Microsoft Outlook versions for Mac, only if you have added the path of the Mail directory as part of the profile (or) custom backup selection.
DLO Mac Agent crashes. How do I resolve this issue?1 Navigate to the path /Library/Logs/Diagnostic reports, locate the crash log:
VeritasDLO_YYYY-MM-DD-HHMMSS_<Machine name>.crash
2 Send the crash log along with the scenario that caused the DLO Mac Agent crash.
Remote Installation of DLO Desktop Agent or Maintenance ServerI am receiving the following error: “Remote Install Error: Credentials not found for machine.”

341TroubleshootingTroubleshooting the Dedupe Server
You must ensure that the “Windows Management Instrumentation” and “Remote Registry” services are running on the remote machine and has execute permission for “Windows Management Instrumentation” service.
Remote installation of DLO Agent or Maintenance Server is failing.On the ‘Installation Status’ screen, right-click the remote computer for which installation is failing, select the ‘View Push log’ or ‘View Install Log’ option and look for the error.
The “Administration services are down” error is displayed after launching the console with Remote DB.You must ensure that ‘Veritas DLO SQL services’ and ‘SQL browser services’ on remote database are started. If the error still persists, then start the ‘Veritas DLO administration services’.
Troubleshooting the Dedupe ServerDedupe Server is installed but the following error message is displayed: “The server host or port details you have entered is invalid or there is no Dedupe Server running at the specified location.”This error could occur if some other application and Dedupe Server are using the same default HTTPS port number 8443 or HTTP port number 8080.After installing the Dedupe Server, change the default HTTP and HTTPS port numbers in the server.xml file located at this path:C:\Program Files\Veritas\Veritas DLO\Dedupe
\Tomcat\conf\server.xml.
For example, if you want to configure the HTTP port number to 8181 and HTTPS port number to 8445, then do the following:
■ Replace all occurrences of the value 8080 with 8181.■ Replace all occurrences of the value 8443 with 8445.After changing the values, restart the Dedupe Server.

342 TroubleshootingTroubleshooting the Dedupe Server
Scenario 1: “The network path was not found” appears on selecting “Manage” option of Dedupe server on DLO Console while editing server.xml to change HTTP/HTTPS port number.To resolve this issue, follow the below steps:Open the command prompt and run the commands below.
SQLCMD -E -S localhost\<DLO Instance name>
Update dedupeserver set ddhttpport=8181 where ddname=”<Dedupe Server
name>”
Update dedupeserver set ddhttpsport=8445 where ddname=”<Dedupe Server
name>”
Scenario 1:
While installing only the Dedupe Server on a machine, if I provide a different user account (instead of the administrator account that was used to log on to the machine) for the SQL service, I am not able to add the Dedupe Server and the following error message is displayed: “The Dedupe details you have entered is invalid or there is no Dedupe Server running at the specified location.”
After installing the DLO components, how do I verify the status of the Dedupe Server?Type one of the following URLs in your browser.http://<dedupeserver_ip_or_hostname>:8080 or https://<dedupeserver_ip_or_hostname>:8443
If there is no response from the Dedupe Server, then it indicates that the Dedupe Server is not initialized, and one of the reasons could be that the database connection is down. This issue will be logged in the dedupeserver.log file located at this path: C:\Program Files\Veritas\Veritas DLO\DedupeServer\Tomcat\logs.
I want to modify a Dedupe Storage Location but it is disabled in the DLO Administration Console.You can modify the Dedupe Storage Location only when the Maintenance Window is scheduled.
Response Remark
StoreSmart Dedupe Server Status: (20159) Active
Dedupe Server is up and running after installation.
StoreSmart Dedupe Server Status: (20157) Garbage Collection In Progress
Dedupe Server is up and running and Garbage Collection is in progress.
StoreSmart Dedupe Server Status: (20158) Under Maintenance
Dedupe Server is up and running and MaintenanceWindow is active.
No response Dedupe Server is not initialized.
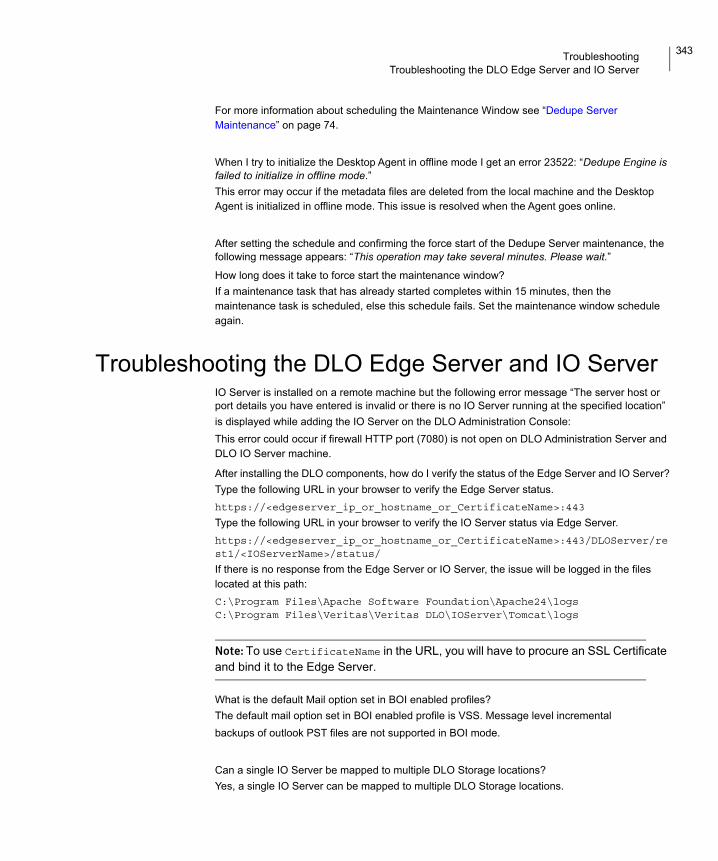
343TroubleshootingTroubleshooting the DLO Edge Server and IO Server
For more information about scheduling the Maintenance Window see “Dedupe Server Maintenance” on page 74.
When I try to initialize the Desktop Agent in offline mode I get an error 23522: “Dedupe Engine is failed to initialize in offline mode.”This error may occur if the metadata files are deleted from the local machine and the Desktop Agent is initialized in offline mode. This issue is resolved when the Agent goes online.
After setting the schedule and confirming the force start of the Dedupe Server maintenance, the following message appears: “This operation may take several minutes. Please wait.”
How long does it take to force start the maintenance window?If a maintenance task that has already started completes within 15 minutes, then the maintenance task is scheduled, else this schedule fails. Set the maintenance window schedule again.
Troubleshooting the DLO Edge Server and IO ServerIO Server is installed on a remote machine but the following error message “The server host or port details you have entered is invalid or there is no IO Server running at the specified location”is displayed while adding the IO Server on the DLO Administration Console:This error could occur if firewall HTTP port (7080) is not open on DLO Administration Server and DLO IO Server machine.
After installing the DLO components, how do I verify the status of the Edge Server and IO Server?Type the following URL in your browser to verify the Edge Server status.https://<edgeserver_ip_or_hostname_or_CertificateName>:443
Type the following URL in your browser to verify the IO Server status via Edge Server.https://<edgeserver_ip_or_hostname_or_CertificateName>:443/DLOServer/rest1/<IOServerName>/status/
If there is no response from the Edge Server or IO Server, the issue will be logged in the files located at this path: C:\Program Files\Apache Software Foundation\Apache24\logsC:\Program Files\Veritas\Veritas DLO\IOServer\Tomcat\logs
Note: To use CertificateName in the URL, you will have to procure an SSL Certificate and bind it to the Edge Server.
What is the default Mail option set in BOI enabled profiles?The default mail option set in BOI enabled profile is VSS. Message level incrementalbackups of outlook PST files are not supported in BOI mode.
Can a single IO Server be mapped to multiple DLO Storage locations?Yes, a single IO Server can be mapped to multiple DLO Storage locations.

344 TroubleshootingTroubleshooting Issues Related to Web Restore
When the Desktop Agent is upgraded to Veritas DLO 9.4 version, can BOI be enabled in the
existing profile?Yes, Enable BOI option can be selected in the existing profile.
Troubleshooting Issues Related to Web RestoreThis topic contains frequently asked questions that you may encounter while accessing the backed up files using a web browser.
Troubleshooting Web Restore IssuesIn case you are unable to access the files using the web browser or facing issues while downloading the files, check for the following:■ The DLO Storage location is mapped to an IO Server.■ The options Restore data and Mobile/Web Restore should be selected under Profile >
User Settings.■ The Edge Server URL is added under Trusted sites in browser settings.
Troubleshooting Issues Related to Server Consolidation
This topic contains frequently asked questions that you may encounter while performing server consolidation.I am receiving the following error: “Failed to connect to Source Database Server”.You must ensure the following:
■ SQL Server is reachable.■ SQL Services are running.■ SQL instance is allowed to access remote connections.■ In case firewall is on, check if SQL ports are blocked on the remote machine and on the
Server machines.■ The Source SQL server user is a sysadmin on the Destination SQL Server.
I am receiving the following error: “Failed to connect to Destination Database Server”.You must ensure the following:
■ SQL Server is reachable.■ SQL Services are running.■ SQL instance is allowed to access remote connections.■ In case firewall is on, check if SQL ports are blocked on the remote machine and on the
Server machines.■ The logged in user credentials with which the utility is launched should be sysadmin on the
Destination SQL Server.

345TroubleshootingTroubleshooting Licensing Issues
I am receiving the following error: “The program can’t start because MSVCR100.dll is missing from your computer. Try reinstalling the program to fix this problem.” when DLO Log Gather Utility/DLO Server Consolidation Utility is run on remote database machine.You must ensure the following:
■ Microsoft VC 2010 Redistributables is installed based on database machine bitness.
Logging - The below logs should be looked into in case of any failure during consolidation.■ All logs under “Veritas DLO install path\Logs\Server_Consolidation”.■ Any failures specific to the consolidation utility will logged into dloserverconsolidationu.log.■ Any failures specific to the DLO db script will be logged in DLODbMergeOutputFile.txt.■ Any failures specific to the dedupe db script will be logged in DedupeDbMergePreHash.txt
and DedupeDbMergeHash.txt
If clients are not going to BOI mode after consolidation, run the command line utility to push the cert and ini file.
Troubleshooting Licensing Issues1 Logging
The logs for licensing can be found under “Veritas DLO install path\Logs\DLOVeritasSLIC.log”2 If invalid license or license expired message is seen in console UI even if license is installed,
check the following:■ Make sure license file is present under C:\ProgramData\Veritas Shared\Licenses.
■ Restart DLO admin service.■ Check GSLicenseStatus in globalsettings table.■ Run List command from command utility to check installed license files.■ Check expiry date and end date from the data listed by List command.
Troubleshooting Configuring Reports1 In case configuration of auto reporting fails, make sure below services are running ■ Admin Service■ SQL service2 In case issues is observed for receiving e-mail, the reason could be following■ SMTP is not configured or problems related to exchange server.3 Logging for Reports ■ Logs related to configuration are part of dloadminsvcu.log which is under the logs folder of
DLO installed path. ■ Logs related to generating report are part of dlocommandu.log and DLOReport.log■ Sample error trace - Snippet of an error From dloadminsvcu.log
09/30/16,12:06:52:406,dloadminsvcu.exe,11544:,E>,reportconfig.cpp(391),ReportConfig::GetDetailsFromDB Caught exception

346 TroubleshootingTroubleshooting Database Backup during DLO Upgrade
09/26/16, 00:01:20:810, dloadminsvcu.exe, 23888:, T>, reportconfig.cpp( 214 ), ReportConfig::ReportToRun Next Report will run in :1 minutes
Troubleshooting Database Backup during DLO Upgrade
Logging
■ Installer generates log files that traces the progress of backup, as well as it helps troubleshooting in case of any errors.
■ The logs will get collected in the “Veritas DLO install path\Logs\DLODBBackup.log” and “Veritas DLO install path\Logs\DedupeDBBackup.log”
Troubleshooting Endpoint Migration1 In case when selected machine is not reachable.■ Go to Services.msc and check “Veritas DLO Desktop Agent Change Journal Reader”
service is running in source machine.■ In case of “Access denied for user” prompt message, admin should provide a rights to use
the Endpoint Migration utility. (In Veritas DLO Console “Setup > Profile > Profile Name > Profile Properties > User Settings tab ”)
2 Logging ■ EndpointMigration utility logs will be created under
-%localappdata%/Veritas/DLO/.Settings/DLOEndpointMigration.log■ Sample error trace - Snippet of an error From DLOEndpointMigration.log
Unhandled exception
10/1/16, 12:13:38:10, dloendpointmigration.exe, 2164:, E>, dlopcmigrationdlg.cpp( 1692 ),
Failed GetPCMigrationRights
User is not configured
10/8/16, 10:13:38:728, dloendpointmigration.exe, 2164:, E>, dlopcmigrationdlg.cpp( 1471 )DLOPCMigration::ConnectDB()
RPC call failed to get Drives name
10/15/16, 10:13:38:728, dloendpointmigration.exe, 2164:, E>, dlopcmigrationdlg.cpp( 885 ), DLOPCMigration::OnCbnSelChangeMachineName() ■ EndpointMigration utility generates report after data migration under
-%localappdata%/Veritas/DLO/.Settings/
Ex: DLO Endpoint Migration Utility Report 10192016111230.csv

Chapter
7 AccessibilityVeritas products meet federal accessibility requirements for software as defined in Section 508 of the Rehabilitation Act: http://www.access-board.gov/508.htmKeyboard shortcuts are available for all graphical user interface (GUI) operations and menu items. Veritas products are compatible with operating system accessibility settings as well as a variety of assisting technologies. All manuals are provided as accessible PDF files, and the online help is provided as HTML displayed in a compliant viewer.The following topics explain the accessibility features and compliance in DLO:
■ “Keyboard Navigation and Shortcuts in DLO” on page 347
■ “General Keyboard Navigation within the GUI” on page 348
■ “Keyboard Navigation within Dialog Boxes” on page 348
■ “Keyboard Shortcuts” on page 350
■ “Support for Accessibility Settings” on page 351
Keyboard Navigation and Shortcuts in DLOAll program functions and menu items are accessible using the keyboard exclusively. DLO uses standard operating system navigation keys and keyboard shortcuts. For its unique functions, DLO uses its own keyboard shortcuts, which are documented in “Keyboard Shortcuts” on page 350.Items in the task pane that do not have keyboard shortcuts can be accessed by using the operating system’s “mouse keys”, which allow you to control the mouse through the numerical keyboard.To see a table of the standard Microsoft navigation keys and keyboard shortcuts, select your version of Microsoft Windows from the table at:
http://www.microsoft.com/enable/products/keyboard.aspx
348 AccessibilityGeneral Keyboard Navigation within the GUI
General Keyboard Navigation within the GUIYou can navigate and use DLO with only the keyboard. In the GUI, the current active tree or table has a dark blue highlight, and the current active tab, radio button, or check box is enclosed within a rectangle formed by dotted lines. These areas are said to have focus and will respond to commands.All Veritas GUIs use the following keyboard navigation standards:
■ The TAB key moves the focus to the next active area, field, or control, following a preset sequence. SHIFT+TAB moves the focus in the reverse direction through the sequence
■ CTRL+TAB exits any Console area that you internally navigate with the TAB key
■ UP and DOWN ARROW keys move focus up and down the items of a list
■ The ALT key in combination with the underlined mnemonic letter for a field or command button shifts the focus to that field or button
■ Either ENTER or the SPACEBAR activates your selection. For example, after pressing the TAB key to select Next in a wizard panel, press the SPACEBAR to display the next screen
■ SHIFT+F10 provides access to context menus
Keyboard Navigation within Dialog BoxesDialog boxes contain groups of controls necessary to set options or settings for programs. Here are some general rules about dialog box navigation:
■ The TAB key moves focus between controls within the dialog box along a preset sequence.
■ Controls displaying a mnemonic (an underlined letter) can be selected regardless of focus by typing ALT and the underlined letter.
■ A dark border indicates the default command button. Press ENTER at any time to choose the button with a dark border.
■ ESC chooses the Cancel button if one exists.
■ SPACEBAR chooses a control you select with the TAB key.
■ SPACEBAR changes the state of a check box that has focus. Typing a mnemonic (if one is available) will move the focus to the check box and change its state.
■ Arrow keys move focus within radio buttons, list boxes, sliders, groups of option controls, or groups of page tabs.
■ Items that cannot be changed are not visited by the TAB key sequence. Options that are unavailable are grayed-out and can neither be selected nor given focus.

349AccessibilityGeneral Keyboard Navigation within the GUI
While the controls described here are typically found in dialog boxes, they can also occur in other contexts. The same navigation standards will apply.
Tabbed Dialog BoxesSome dialog boxes use tabbed pages to subcategorize groups of many options. Each tabbed page contains different groups of controls. Use TAB to move the focus between tabbed pages within a dialog box. Typing the mnemonic for a tab also moves the focus to the tabbed page and displays its page of controls.The following table lists keyboard navigation rules within tabbed dialog boxes.
List BoxesList boxes display a column of available choices. Different types of list boxes are available with additional navigation conventions:
■ Drop-down list boxes by default show only the selected item. A small button to the right of the control shows a downward-pointing arrow. Select the arrow to display more items from the list box. If there are more choices than can fit in the preset list box area, a slider appears along the side of the list box. Show or hide the list using ALT+DOWN ARROW, ALT+UP ARROW, or F4. The TAB key selects an item.
■ Extended selection list boxes support selecting single items, blocks of items, or combinations of the two. After selecting an item, hold down CTRL+navigation keys to select or clear additional items or blocks of items.
Table 7-1 Keyboard Navigation within Tabbed Dialog Boxes
Keyboard input Result
CTRL+PAGE DOWN or CTRL+TAB
Switches to the next tab and displays the page.
CTRL+ PAGE UP Switches to the previous tab and displays the page.
RIGHT ARROR or LEFT ARROW
When the focus is on a tab selector, chooses the next or previous tab in the current row and displays the page.

350 AccessibilityGeneral Keyboard Navigation within the GUI
Keyboard ShortcutsAll menu items can be selected by using accelerator or mnemonic keyboard shortcuts. An accelerator is a key combination that provides shortcut access to a GUI function. A mnemonic (sometimes referred to as a “hot key”) is a single-key equivalent (used in combination with the ALT key) for selecting GUI components such as menu items. The mnemonic “hot key” letter is underlined in the GUI.Routine functions such as opening, saving, and printing files can be performed using the standard Microsoft keyboard shortcuts. Other menu items are unique to DLO. The following table lists the shortcut keys in the Desktop Laptop Option Administration Console.
The following table lists the shortcut keys in the Desktop Agent:
Table 7-2 Keyboard Shortcuts Unique to DLO Administration Console
Accelerator Mnemonic Result
ALT F The File menu expands. From the File menu, you can create new profiles, Storage Locations, and add users.
ALT E The Edit menu expands. From the Edit menu, you can restore files, search for files to restore, manage, and delete items.
ALT V The View menu expands. From the View menu, you can change the information that displays on the screen.
ALT N The Network menu expands. Use the Network menu to work with administrator accounts, connect to the DLO Administration Servers on the network, or to reconnect to a local DLO Administration Server.
ALT T The Tools menu expands. Use the Tools menu to set global excludes, access all DLO wizards, and manage service credentials.
ALT W The Window menu expands. Use the Window menu to move to a new window or view.
ALT H The Help menu expands.Use the Help menu to access documentation and various Veritas web sites.
Table 7-3 Keyboard Shortcuts Unique to Desktop Agent
Accelerator Mnemonic Result
ALT F The File menu expands. From the File menu, you can minimize or exit the Desktop Agent.

351AccessibilityGeneral Keyboard Navigation within the GUI
Select secondary menu items by opening the main menu and using the UP or DOWN ARROW key until the required item is highlighted. Press the RIGHT ARROW key to open a submenu, and ENTER to select your choice.Keyboard shortcuts are not case-sensitive. Mnemonic keystrokes may be pressed either sequentially or simultaneously. All menu items have mnemonics, but not all menu items have accelerators.
Support for Accessibility SettingsVeritas software responds to operating system accessibility settings.Veritas products are compatible with Microsoft's accessibility utilities. In Windows 2000, accessibility options involving keyboard responsiveness, display contrast, alert sounds, and mouse operation can be set through the Control Panel.
To set accessibility options1 On the Start menu, select Settings, and then select Control Panel.
2 Select Accessibility Options.
Note: You can also set accessibility options through the Accessibility Wizard. On the Start menu, select Programs, and then select Accessories. Select Accessibility, and then select Accessibility Wizard.
Though all graphics in Veritas documentation can be read by screen readers, setting your screen reader to ignore graphics may improve performance.
ALT V The View menu expands. From the View menu, you can change the information that displays on the screen.
ALT K The Tasks menu expands. Use the Tasks menu to run a job or refresh the view.
ALT T The Tools menu expands. Use the Tools menu to reset dialog boxes and accounts.
ALT H The Help menu expands. Use the Help menu to access the online help for the Desktop Agent.
Table 7-3 Keyboard Shortcuts Unique to Desktop Agent
Accelerator Mnemonic Result

352 AccessibilityGeneral Keyboard Navigation within the GUI

Glossary
AdministratorThe user that configures DLO using the Veritas DLO Administration Console. This user must have administrative rights to operate the console.
AuthenticationThe process of validating a user’s credentials.
Automated User AssignmentsRules that assign profiles and Storage Locations to a specified group of desktop users. Settings are applied the first time a user runs the Desktop Agent.
CompressionA method of reducing data to expedite transmission time or storage volume.
ChunkUniquely identified data block.
Chunk Retrieval Information (CRI)Location of data in the Dedupe Storage Location where it was written during backup. CRI is used to read back the data during restore.
Chunk SignatureHash value of the data block.
Dedupe Storage LocationA shared storage location on the network where data is stored.
Dedupe Storage PoolGroups of Dedupe Storage Locations across which deduplication is performed.
DLO Administration ConsoleThe administrator’s interface with the Desktop and Laptop Option.
DLO Backup SelectionThe files and folders on a desktop or laptop that are selected for backup by the DLO Administrator or desktop user.
DLO DatabaseThe location where policy settings and status information are stored.
DLO File ServerThe computer that hosts DLO Storage Locations.
Dedupe DatabaseData store used by Dedupe Server for storing the configuration and Global Hash Table.
Delta File Transfer

354 Glossary
Delta File Transfer is a compression process that allows only the changed portion of a file to be transferred once the complete original file is backed up. Delta File Transfer reduces bandwidth use and disk storage requirements.
Desktop Agent Install ShareThe network share where the Desktop Agent install files are located. This folder is set up on the DLO Administration Server when DLO is installed, and facilitates the installation of the Desktop Agent on desktops.
Desktop AgentThe DLO software that runs on desktop and laptop computers.
Desktop Agent ConsoleThe user interface for the Desktop Agent software.
EncryptionA process used to ensure data security of files and folders on disk and during data transfer.
Global Hash TableTable that maps data signature to CRI for the data that is stored in the Dedupe Storage Locations.
Open File HandlingThe process by which files currently in use can be backed up.
OptimizationThe process of reducing network traffic and file storage through technologies such as compression.
ProfileDLO settings configured by the administrator and that apply to users or groups of users.
RevisionA version of a file at a specific point in time.
Storage LocationA shared location on the network in which network user data folders and backup files are stored.
SynchronizationThe process that maintains the most recent version of selected files and folders belonging to the same user on multiple desktops. Synchronization is available for files and folders that are backed up by DLO.
TaskAn accessible program function that varies with the view selected in the DLO Administration Console or Desktop Agent console.

355Glossary
UserThe person who operates the desktop or laptop computer on which the Desktop Agent is run.
User Data FolderThe folder in which user backup data is stored. There is a user data folder on each desktop that is protected by the Desktop Agent, and one user data folder on the network for each Desktop Agent user.User NameThe user name used for Windows authentication.
ViewThe main navigational interface in the DLO Administration Console.

356 Glossary

Index
AAccelerating Backup Operation 168accessibility
dialog boxes 348keyboard navigation 348keyboard shortcuts 350settings 351
Active Directoryfor Automated User Assignments 126for connection policies 254
Active Directory Scan 47add a dedupe storage location 69Adding Dedupe Server 66alert history, defined 199alerts
defined for DLO 196displaying in DLO 199managing in DLO 200
Archive audit data 42-ArchiveUser Command 317Auto archive audit trail 42Auto Reporting 208, 212Automated User Assignment 123
deleting 127modifying 126priority, changing 127properties, viewing 127using Active Directory 126
Automated User Assignments 123
Bbacking up
Outlook PST files 240backup selections
adding 106macros in 113
blackout window, setting 167
C-ChangeDB 290ChangeEdgeServer 292ChangeLicense 317, 318, 320
Changing Credentials 72command line interface
-emergencyrestore 298-keytest 293-listprofile 294-listsl 294-listuser 295remote server options 285-setrecoverypwd 299-update 296
Command Line Options 321command line tools
database commands 321license management 323maintenance commands 322
compressiondelta file transfer 112, 116DLO backup selections, setting 112
configuration wizard 65Configure Alerts dialog box 199Configure DLO Using the Configuration Wizard 65Configuring Dedupe Server 66connection based policies
configuring 92, 252using Active Directory 254
create a new profile 77Creating Automated User Assignments 124customize NTFS permissions 263
DDatabase Backup Schedule 46Database Management 323Dedupe Storage Pool 68Dedupe Storage Pool statistics 71deleting
Automated User Assignment 127revisions in DLO 113Storage Location in DLO 102
deleting DLO alerts 201Deleting the Maintenance Server 121delta file transfer 112, 116Desktop 156
358 Index
Desktop Agentsee also Desktop and Laptop Option (DLO)advanced view option 233backup selections
modifying 231overview 228
Desktop User Data Folder, moving 251glossary 353History view 266include/exclude 234log files, overview 266menu bar, described 230overview 221Restore dialog box 256restoring files 255revision control tab 235schedule, customized 247scheduling backup jobs 247standard view option 231Status view 243storage limits for user data 249synchronization
create new sets 263delete synchronized folder 265
tasks bar, described 230views menu, described 230
Desktop Agent Console 228Desktop Agent for Mac 274Desktop Agent Users, managing 151Desktop and Laptop Option (DLO)
see also Desktop Agentaccess, disabling/enabling 156adding user 155alerts
categories, defined 196Configure Alerts dialog box 199displaying 199managing 200
Automated User Assignmentdeleting 127modifying 126priority, changing 127properties, viewing 127
backup selectionadding 104deleting 118modifying 115
Computer History pane 189encryption, setting for backup selection 112
filter options, History view 191History view 189include/exclude 108, 234Job History pane 190Move priority down option 127Move priority up option 127Profile
edit schedule 90properties, changing user 156removing user 157revisions
defined 109deleting automatically 113setting number to keep in DLO 110, 235
Search history log file option 194Storage Location
deleting 102View history log file option 192viewing users 162
DLO Administration Server, connecting to 137DLO Endpoint Migration 272DLO Log Gather Tool 326, 327DLO Storage Locations 97
Ee-mail
configuring SMTP notification 201Enable Dedupe 78Enable Dedupe check box 94-EnableUser command 289encryption 334Encryption Type 69encryption, backup selections, in DLO 112
FFile Grooming on Mac 281file restore 169filters
History view filters, setting in DLO 191
GGarbage Collection Utility 327global excludes
adding 129, 130, 131, 133deleting 129, 130, 131, 133macros 136
glossary of terms 353grooming
files 110
359Index
Iinclude/exclude
Desktop Agent backup selections 234DLO backup selections 108
installationsilent 31
Jjob history
History view filters, setting in DLO 191viewing in Desktop Agent 266
job monitor, DLO jobs, viewing 189
LLicense Management 323Logging Command Line Interface Tool 324Logging options 91Lotus Notes
back up nsf files 241
Mmacros, global excludes 136maintenance mode 74-MigrateUser 308-MigrateUserSL 305Migrating a Standalone BE-DLO 56Migrating Users across Administration Servers 310Migration Status Report 307modify a dedupe storage location 72Modifying a Dedupe Storage Pool 71monitoring alerts 195Move priority options in DLO 127mport multiple users in CSV file 155
Nnetwork user data folder, creating 152nsf files
backing up 241
OOutlook PST files, backing up 240
PParallel Restore 176priority options in DLO, Move 127priority, Automated User Assignment, changing 127Profile
edit schedule 90profile
copy 93profile options 163profile schedule 163
Profiles 77PST files, backing up 240Push 33
Rrecovery password, setting 28reports 204
running 206Resetting Dialog Boxes and Account Information 226Restore dialog box
Desktop Agent 256restoring
files, using Desktop Agent 255revisions
defined 109deleting automatically in DLO 113number to keep, setting in Desktop Agent 235number to keep, setting in DLO 110, 235Revision Control tab, Desktop Agent 235Revision Control tab, DLO 110
Rollback Capabilities 178Routine Maintenance 322
SSchedule Maintenance Window 75scheduling
backup jobs in Desktop Agent 247search
log file history 194selections
Desktop Agent, backup 228DLO, backup 104
Server Consolidation 217, 219service credentials, managing 153set the maintenance schedule 74silent install 31storage limits for user data
Desktop Agent 249Storage Location
deleting 102synchronization
create new sets 263delete synchronized folder 265
Synchronizing data 261
TTroubleshooting the Dedupe Server 341
UUnclustering DLO 214Upgrading DLO on a Microsoft Cluster Server 216Users
360 Index
removing from DLO 157viewing in DLO 162
usersaccess, disabling/enabling in DLO 156adding in DLO 155Desktop Agent access via Profile 221managing 151
Vview history logs 268viewing
Automated User Assignment properties 127users in DLO 162
Related Documents