Veritas Storage Foundation™ 6.0.1 Installation Guide - Solaris April 2013

Welcome message from author
This document is posted to help you gain knowledge. Please leave a comment to let me know what you think about it! Share it to your friends and learn new things together.
Transcript
Veritas Storage Foundation™6.0.1 Installation Guide -Solaris
April 2013
Veritas Storage Foundation™ Installation GuideThe software described in this book is furnished under a license agreement and may be usedonly in accordance with the terms of the agreement.
Product version: 6.0.1
Document version: 6.0.1 Rev 4
Legal NoticeCopyright © 2013 Symantec Corporation. All rights reserved.
Symantec, the Symantec Logo, the Checkmark Logo, Veritas, Veritas Storage Foundation,CommandCentral, NetBackup, Enterprise Vault, and LiveUpdate are trademarks or registeredtrademarks of Symantec Corporation or its affiliates in the U.S. and other countries. Othernames may be trademarks of their respective owners.
The product described in this document is distributed under licenses restricting its use,copying, distribution, and decompilation/reverse engineering. No part of this documentmay be reproduced in any form by any means without prior written authorization ofSymantec Corporation and its licensors, if any.
THE DOCUMENTATION IS PROVIDED "AS IS" AND ALL EXPRESS OR IMPLIED CONDITIONS,REPRESENTATIONS AND WARRANTIES, INCLUDING ANY IMPLIED WARRANTY OFMERCHANTABILITY, FITNESS FOR A PARTICULAR PURPOSE OR NON-INFRINGEMENT,ARE DISCLAIMED, EXCEPT TO THE EXTENT THAT SUCH DISCLAIMERS ARE HELD TOBE LEGALLY INVALID. SYMANTEC CORPORATION SHALL NOT BE LIABLE FOR INCIDENTALOR CONSEQUENTIAL DAMAGES IN CONNECTION WITH THE FURNISHING,PERFORMANCE, OR USE OF THIS DOCUMENTATION. THE INFORMATION CONTAINEDIN THIS DOCUMENTATION IS SUBJECT TO CHANGE WITHOUT NOTICE.
The Licensed Software and Documentation are deemed to be commercial computer softwareas defined in FAR 12.212 and subject to restricted rights as defined in FAR Section 52.227-19"Commercial Computer Software - Restricted Rights" and DFARS 227.7202, "Rights inCommercial Computer Software or Commercial Computer Software Documentation", asapplicable, and any successor regulations. Any use, modification, reproduction release,performance, display or disclosure of the Licensed Software and Documentation by the U.S.Government shall be solely in accordance with the terms of this Agreement.

Symantec Corporation350 Ellis StreetMountain View, CA 94043
http://www.symantec.com
Technical SupportSymantec Technical Support maintains support centers globally. TechnicalSupport’s primary role is to respond to specific queries about product featuresand functionality. The Technical Support group also creates content for our onlineKnowledge Base. The Technical Support group works collaboratively with theother functional areas within Symantec to answer your questions in a timelyfashion. For example, the Technical Support group works with Product Engineeringand Symantec Security Response to provide alerting services and virus definitionupdates.
Symantec’s support offerings include the following:
■ A range of support options that give you the flexibility to select the rightamount of service for any size organization
■ Telephone and/or Web-based support that provides rapid response andup-to-the-minute information
■ Upgrade assurance that delivers software upgrades
■ Global support purchased on a regional business hours or 24 hours a day, 7days a week basis
■ Premium service offerings that include Account Management Services
For information about Symantec’s support offerings, you can visit our website atthe following URL:
www.symantec.com/business/support/index.jsp
All support services will be delivered in accordance with your support agreementand the then-current enterprise technical support policy.
Contacting Technical SupportCustomers with a current support agreement may access Technical Supportinformation at the following URL:
www.symantec.com/business/support/contact_techsupp_static.jsp
Before contacting Technical Support, make sure you have satisfied the systemrequirements that are listed in your product documentation. Also, you should beat the computer on which the problem occurred, in case it is necessary to replicatethe problem.
When you contact Technical Support, please have the following informationavailable:
■ Product release level
■ Hardware information
■ Available memory, disk space, and NIC information
■ Operating system
■ Version and patch level
■ Network topology
■ Router, gateway, and IP address information
■ Problem description:
■ Error messages and log files
■ Troubleshooting that was performed before contacting Symantec
■ Recent software configuration changes and network changes
Licensing and registrationIf your Symantec product requires registration or a license key, access our technicalsupport Web page at the following URL:
www.symantec.com/business/support/
Customer serviceCustomer service information is available at the following URL:
www.symantec.com/business/support/
Customer Service is available to assist with non-technical questions, such as thefollowing types of issues:
■ Questions regarding product licensing or serialization
■ Product registration updates, such as address or name changes
■ General product information (features, language availability, local dealers)
■ Latest information about product updates and upgrades
■ Information about upgrade assurance and support contracts
■ Information about the Symantec Buying Programs
■ Advice about Symantec's technical support options
■ Nontechnical presales questions
■ Issues that are related to CD-ROMs or manuals
Support agreement resourcesIf you want to contact Symantec regarding an existing support agreement, pleasecontact the support agreement administration team for your region as follows:
[email protected] and Japan
[email protected], Middle-East, and Africa
[email protected] America and Latin America
DocumentationProduct guides are available on the media in PDF format. Make sure that you areusing the current version of the documentation. The document version appearson page 2 of each guide. The latest product documentation is available on theSymantec website.
https://sort.symantec.com/documents
Your feedback on product documentation is important to us. Send suggestionsfor improvements and reports on errors or omissions. Include the title anddocument version (located on the second page), and chapter and section titles ofthe text on which you are reporting. Send feedback to:
For information regarding the latest HOWTO articles, documentation updates,or to ask a question regarding product documentation, visit the Storage andClustering Documentation forum on Symantec Connect.
https://www-secure.symantec.com/connect/storage-management/forums/storage-and-clustering-documentation
About Symantec ConnectSymantec Connect is the peer-to-peer technical community site for Symantec’senterprise customers. Participants can connect and share information with otherproduct users, including creating forum posts, articles, videos, downloads, blogsand suggesting ideas, as well as interact with Symantec product teams andTechnical Support. Content is rated by the community, and members receivereward points for their contributions.
http://www.symantec.com/connect/storage-management

Technical Support . . . . . . . . . . . . . . . . . . . . . . . . . . . . . . . . . . . . . . . . . . . . . . . . . . . . . . . . . . . . . . . . . . . . . . . . . . . . . . . . . . . . . . . . . . . . . . . 4
Section 1 Installation overview and planning . . . . . . . . . . . . . . . . . . 15
Chapter 1 Introducing Storage Foundation . . . . . . . . . . . . . . . . . . . . . . . . . . . . . . . . . . . . . . 17
About Veritas products ... . . . . . . . . . . . . . . . . . . . . . . . . . . . . . . . . . . . . . . . . . . . . . . . . . . . . . . . . . . . . . . 17About Storage Foundation .... . . . . . . . . . . . . . . . . . . . . . . . . . . . . . . . . . . . . . . . . . . . . . . . . . . . 17About Veritas Replicator Option .... . . . . . . . . . . . . . . . . . . . . . . . . . . . . . . . . . . . . . . . . . . . 18
About Veritas graphical user interfaces ... . . . . . . . . . . . . . . . . . . . . . . . . . . . . . . . . . . . . . . . . . 18About Veritas Operations Manager ... . . . . . . . . . . . . . . . . . . . . . . . . . . . . . . . . . . . . . . . . . 18
Chapter 2 System requirements . . . . . . . . . . . . . . . . . . . . . . . . . . . . . . . . . . . . . . . . . . . . . . . . . . . . . . . . . 19
Release notes ... . . . . . . . . . . . . . . . . . . . . . . . . . . . . . . . . . . . . . . . . . . . . . . . . . . . . . . . . . . . . . . . . . . . . . . . . . . . 19Hardware compatibility list (HCL) ... . . . . . . . . . . . . . . . . . . . . . . . . . . . . . . . . . . . . . . . . . . . . . . . . 19Supported operating systems .... . . . . . . . . . . . . . . . . . . . . . . . . . . . . . . . . . . . . . . . . . . . . . . . . . . . . . 20Veritas File System requirements ... . . . . . . . . . . . . . . . . . . . . . . . . . . . . . . . . . . . . . . . . . . . . . . . . . 20Disk space requirements ... . . . . . . . . . . . . . . . . . . . . . . . . . . . . . . . . . . . . . . . . . . . . . . . . . . . . . . . . . . . . 21Discovering product versions and various requirement
information .... . . . . . . . . . . . . . . . . . . . . . . . . . . . . . . . . . . . . . . . . . . . . . . . . . . . . . . . . . . . . . . . . . . . . . . 21Database requirements ... . . . . . . . . . . . . . . . . . . . . . . . . . . . . . . . . . . . . . . . . . . . . . . . . . . . . . . . . . . . . . . 22
Chapter 3 Planning to install SF . . . . . . . . . . . . . . . . . . . . . . . . . . . . . . . . . . . . . . . . . . . . . . . . . . . . . . . . . 23
About planning for SF installation .... . . . . . . . . . . . . . . . . . . . . . . . . . . . . . . . . . . . . . . . . . . . . . . . 23About installation and configuration methods for SF .... . . . . . . . . . . . . . . . . . . . . . . 24
About response files ... . . . . . . . . . . . . . . . . . . . . . . . . . . . . . . . . . . . . . . . . . . . . . . . . . . . . . . . . . . . . 24About the Veritas installer ... . . . . . . . . . . . . . . . . . . . . . . . . . . . . . . . . . . . . . . . . . . . . . . . . . . . . . . . . . . 25Downloading the Storage Foundation software .... . . . . . . . . . . . . . . . . . . . . . . . . . . . . . . 27
Chapter 4 Licensing SF . . . . . . . . . . . . . . . . . . . . . . . . . . . . . . . . . . . . . . . . . . . . . . . . . . . . . . . . . . . . . . . . . . . . . . . . . 29
About Veritas product licensing .... . . . . . . . . . . . . . . . . . . . . . . . . . . . . . . . . . . . . . . . . . . . . . . . . . . 29Setting or changing the product level for keyless licensing .... . . . . . . . . . . . . . . 30Installing Veritas product license keys ... . . . . . . . . . . . . . . . . . . . . . . . . . . . . . . . . . . . . . . . . . . 32
Contents
Section 2 Installation of Storage Foundation . . . . . . . . . . . . . . . . . . . 33
Chapter 5 Preparing to install Storage Foundation . . . . . . . . . . . . . . . . . . . . . . . . 35
Installation preparation overview .... . . . . . . . . . . . . . . . . . . . . . . . . . . . . . . . . . . . . . . . . . . . . . . . 35About using ssh or rsh with the Veritas installer ... . . . . . . . . . . . . . . . . . . . . . . . . . . . . . 36Creating root user ... . . . . . . . . . . . . . . . . . . . . . . . . . . . . . . . . . . . . . . . . . . . . . . . . . . . . . . . . . . . . . . . . . . . . . 37Creating the /opt directory .... . . . . . . . . . . . . . . . . . . . . . . . . . . . . . . . . . . . . . . . . . . . . . . . . . . . . . . . . 38Setting environment variables ... . . . . . . . . . . . . . . . . . . . . . . . . . . . . . . . . . . . . . . . . . . . . . . . . . . . . . 38Mounting the product disc ... . . . . . . . . . . . . . . . . . . . . . . . . . . . . . . . . . . . . . . . . . . . . . . . . . . . . . . . . . . 38Assessing the system for installation readiness ... . . . . . . . . . . . . . . . . . . . . . . . . . . . . . . 39
About Symantec Operations Readiness Tools ... . . . . . . . . . . . . . . . . . . . . . . . . . . . 39Prechecking your systems using the Veritas installer ... . . . . . . . . . . . . . . . . . 40
Making the IPS publisher accessible ... . . . . . . . . . . . . . . . . . . . . . . . . . . . . . . . . . . . . . . . . . . . . . 40
Chapter 6 Installing Storage Foundation using thescript-based installer . . . . . . . . . . . . . . . . . . . . . . . . . . . . . . . . . . . . . . . . . . . . . . . . . . . 43
Installing Storage Foundation using the installer ... . . . . . . . . . . . . . . . . . . . . . . . . . . . . 43Installing language packages ... . . . . . . . . . . . . . . . . . . . . . . . . . . . . . . . . . . . . . . . . . . . . . . . . . . . . . . . 45
Chapter 7 Installing Storage Foundation using the web-basedinstaller . . . . . . . . . . . . . . . . . . . . . . . . . . . . . . . . . . . . . . . . . . . . . . . . . . . . . . . . . . . . . . . . . . . . . . . . . . . 47
About the Web-based installer ... . . . . . . . . . . . . . . . . . . . . . . . . . . . . . . . . . . . . . . . . . . . . . . . . . . . . . 47Before using the Veritas Web-based installer ... . . . . . . . . . . . . . . . . . . . . . . . . . . . . . . . . . . 48Starting the Veritas Web-based installer ... . . . . . . . . . . . . . . . . . . . . . . . . . . . . . . . . . . . . . . . 48Obtaining a security exception on Mozilla Firefox .... . . . . . . . . . . . . . . . . . . . . . . . . . . 49Performing a pre-installation check with the Veritas Web-based
installer ... . . . . . . . . . . . . . . . . . . . . . . . . . . . . . . . . . . . . . . . . . . . . . . . . . . . . . . . . . . . . . . . . . . . . . . . . . . . . 50Installing SF with the Web-based installer ... . . . . . . . . . . . . . . . . . . . . . . . . . . . . . . . . . . . . . 50
Chapter 8 Performing an automated installation usingresponse files . . . . . . . . . . . . . . . . . . . . . . . . . . . . . . . . . . . . . . . . . . . . . . . . . . . . . . . . . . . . . . . . . 53
Installing SF using response files ... . . . . . . . . . . . . . . . . . . . . . . . . . . . . . . . . . . . . . . . . . . . . . . . . . 53Response file variables to install Storage Foundation .... . . . . . . . . . . . . . . . . . . . . . . 54Sample response file for SF installation .... . . . . . . . . . . . . . . . . . . . . . . . . . . . . . . . . . . . . . . . . 56Configuring SF using response files ... . . . . . . . . . . . . . . . . . . . . . . . . . . . . . . . . . . . . . . . . . . . . . . 57Response file variables to configure Storage Foundation .... . . . . . . . . . . . . . . . . . 57
Contents8
Chapter 9 Installing Storage Foundation using operatingsystem-specific methods . . . . . . . . . . . . . . . . . . . . . . . . . . . . . . . . . . . . . . . . . . . . . 61
Installing SF on Solaris 11 using Automated Installer ... . . . . . . . . . . . . . . . . . . . . . . 61About Automated Installation .... . . . . . . . . . . . . . . . . . . . . . . . . . . . . . . . . . . . . . . . . . . . . . . 61Using Automated Installer ... . . . . . . . . . . . . . . . . . . . . . . . . . . . . . . . . . . . . . . . . . . . . . . . . . . . . 62Using AI to install the Solaris 11 operating system and SFHA
products ... . . . . . . . . . . . . . . . . . . . . . . . . . . . . . . . . . . . . . . . . . . . . . . . . . . . . . . . . . . . . . . . . . . . . . . 63Installing SF on Solaris 10 using JumpStart ... . . . . . . . . . . . . . . . . . . . . . . . . . . . . . . . . . . . 68
Overview of JumpStart installation tasks ... . . . . . . . . . . . . . . . . . . . . . . . . . . . . . . . . . 69Generating the finish scripts ... . . . . . . . . . . . . . . . . . . . . . . . . . . . . . . . . . . . . . . . . . . . . . . . . . 69Preparing installation resources ... . . . . . . . . . . . . . . . . . . . . . . . . . . . . . . . . . . . . . . . . . . . . 71Adding language pack information to the finish file ... . . . . . . . . . . . . . . . . . . 72Using a Flash archive to install SF and the operating
system .... . . . . . . . . . . . . . . . . . . . . . . . . . . . . . . . . . . . . . . . . . . . . . . . . . . . . . . . . . . . . . . . . . . . . . . . 73Creating the Veritas post-deployment scripts ... . . . . . . . . . . . . . . . . . . . . . . . . . . . 74
Installing SF using the system command .... . . . . . . . . . . . . . . . . . . . . . . . . . . . . . . . . . . . . . . 75Manually installing packages on Solaris brand non-global zones ... . . . . . . . . 77
Chapter 10 Configuring Storage Foundation . . . . . . . . . . . . . . . . . . . . . . . . . . . . . . . . . . . . . . 79
Configuring Storage Foundation using the installer ... . . . . . . . . . . . . . . . . . . . . . . . . . 79Configuring Storage Foundation manually ... . . . . . . . . . . . . . . . . . . . . . . . . . . . . . . . . . . . . . 79
Configuring Veritas Volume Manager ... . . . . . . . . . . . . . . . . . . . . . . . . . . . . . . . . . . . . . 80Configuring Veritas File System .... . . . . . . . . . . . . . . . . . . . . . . . . . . . . . . . . . . . . . . . . . . . . 83
Configuring the Storage Foundation for Databases repository databaseafter installation .... . . . . . . . . . . . . . . . . . . . . . . . . . . . . . . . . . . . . . . . . . . . . . . . . . . . . . . . . . . . . . . . . 84
Section 3 Upgrade of SF . . . . . . . . . . . . . . . . . . . . . . . . . . . . . . . . . . . . . . . . . . . . . . . . . . . . . . . . . . . . . . . . 85
Chapter 11 Planning to upgrade SF . . . . . . . . . . . . . . . . . . . . . . . . . . . . . . . . . . . . . . . . . . . . . . . . . . . . . . 87
Upgrade methods for SF .... . . . . . . . . . . . . . . . . . . . . . . . . . . . . . . . . . . . . . . . . . . . . . . . . . . . . . . . . . . . . 87Supported upgrade paths for SF 6.0.1 ... . . . . . . . . . . . . . . . . . . . . . . . . . . . . . . . . . . . . . . . . . . . 88About using the installer to upgrade when the root disk is
encapsulated .... . . . . . . . . . . . . . . . . . . . . . . . . . . . . . . . . . . . . . . . . . . . . . . . . . . . . . . . . . . . . . . . . . . . . . 90Preparing to upgrade SF .... . . . . . . . . . . . . . . . . . . . . . . . . . . . . . . . . . . . . . . . . . . . . . . . . . . . . . . . . . . . . 91
Getting ready for the upgrade .... . . . . . . . . . . . . . . . . . . . . . . . . . . . . . . . . . . . . . . . . . . . . . . . 91Creating backups .... . . . . . . . . . . . . . . . . . . . . . . . . . . . . . . . . . . . . . . . . . . . . . . . . . . . . . . . . . . . . . . . 93Tasks for upgrading the Storage Foundation for Databases
(SFDB) ... . . . . . . . . . . . . . . . . . . . . . . . . . . . . . . . . . . . . . . . . . . . . . . . . . . . . . . . . . . . . . . . . . . . . . . . . . 94Determining if the root disk is encapsulated .... . . . . . . . . . . . . . . . . . . . . . . . . . . . 94Pre-upgrade tasks for migrating the SFDB repository
database ... . . . . . . . . . . . . . . . . . . . . . . . . . . . . . . . . . . . . . . . . . . . . . . . . . . . . . . . . . . . . . . . . . . . . . . 94
9Contents
Pre-upgrade planning for Veritas Volume Replicator ... . . . . . . . . . . . . . . . . . 95Verifying that the file systems are clean .... . . . . . . . . . . . . . . . . . . . . . . . . . . . . . . . . . 98Upgrading the array support ... . . . . . . . . . . . . . . . . . . . . . . . . . . . . . . . . . . . . . . . . . . . . . . . . . 99
Chapter 12 Upgrading Storage Foundation . . . . . . . . . . . . . . . . . . . . . . . . . . . . . . . . . . . . . . 101
Upgrading Storage Foundation with the product installer when OSupgrade is not required .... . . . . . . . . . . . . . . . . . . . . . . . . . . . . . . . . . . . . . . . . . . . . . . . . . . . . . 101
Upgrading Storage Foundation to 6.0.1 using the product installeror manual steps ... . . . . . . . . . . . . . . . . . . . . . . . . . . . . . . . . . . . . . . . . . . . . . . . . . . . . . . . . . . . . . . . . . 104Upgrading Storage Foundation with the product installer ... . . . . . . . . . 105Upgrading Storage Foundation using manual steps ... . . . . . . . . . . . . . . . . . 107Upgrading Veritas Storage Foundation to 6.0.1 using upgrade
scripts (OS upgrade) ... . . . . . . . . . . . . . . . . . . . . . . . . . . . . . . . . . . . . . . . . . . . . . . . . . . . . . 110Upgrading Storage Foundation using the Veritas Web-based
installer ... . . . . . . . . . . . . . . . . . . . . . . . . . . . . . . . . . . . . . . . . . . . . . . . . . . . . . . . . . . . . . . . . . . . . . . . . . . . 113Upgrading the Solaris operating system .... . . . . . . . . . . . . . . . . . . . . . . . . . . . . . . . . . . . . . 114Upgrading Veritas Volume Replicator ... . . . . . . . . . . . . . . . . . . . . . . . . . . . . . . . . . . . . . . . . . 117
Upgrading VVR without disrupting replication .... . . . . . . . . . . . . . . . . . . . . . . 117Upgrading language packages ... . . . . . . . . . . . . . . . . . . . . . . . . . . . . . . . . . . . . . . . . . . . . . . . . . . . . 119
Chapter 13 Performing an automated SF upgrade usingresponse files . . . . . . . . . . . . . . . . . . . . . . . . . . . . . . . . . . . . . . . . . . . . . . . . . . . . . . . . . . . . . . . 121
Upgrading SF using response files ... . . . . . . . . . . . . . . . . . . . . . . . . . . . . . . . . . . . . . . . . . . . . . . 121Response file variables to upgrade Storage Foundation .... . . . . . . . . . . . . . . . . . 122Sample response file for SF upgrade .... . . . . . . . . . . . . . . . . . . . . . . . . . . . . . . . . . . . . . . . . . . 123
Chapter 14 Upgrading SF using Live Upgrade . . . . . . . . . . . . . . . . . . . . . . . . . . . . . . . . . . 125
About Live Upgrade .... . . . . . . . . . . . . . . . . . . . . . . . . . . . . . . . . . . . . . . . . . . . . . . . . . . . . . . . . . . . . . . . . 125About Live Upgrade in a Veritas Volume Replicator (VVR)
environment .... . . . . . . . . . . . . . . . . . . . . . . . . . . . . . . . . . . . . . . . . . . . . . . . . . . . . . . . . . . . . . 126Supported upgrade paths for Live Upgrade .... . . . . . . . . . . . . . . . . . . . . . . . . . . . . . . . . . 127Performing Live Upgrade in a Solaris zone environment .... . . . . . . . . . . . . . . . . 128Before you upgrade SF using Solaris Live Upgrade .... . . . . . . . . . . . . . . . . . . . . . . . . 130Upgrading SF and Solaris using Live Upgrade .... . . . . . . . . . . . . . . . . . . . . . . . . . . . . . . 133
Creating a new boot environment on the alternate bootdisk ... . . . . . . . . . . . . . . . . . . . . . . . . . . . . . . . . . . . . . . . . . . . . . . . . . . . . . . . . . . . . . . . . . . . . . . . . . . . 134
Upgrading SF using the installer for a Live Upgrade .... . . . . . . . . . . . . . . . 135Upgrading SF manually ... . . . . . . . . . . . . . . . . . . . . . . . . . . . . . . . . . . . . . . . . . . . . . . . . . . . . . . 136Completing the Live Upgrade .... . . . . . . . . . . . . . . . . . . . . . . . . . . . . . . . . . . . . . . . . . . . . . 138Verifying Live Upgrade of SF .... . . . . . . . . . . . . . . . . . . . . . . . . . . . . . . . . . . . . . . . . . . . . . . 140
Upgrading Solaris using Live Upgrade .... . . . . . . . . . . . . . . . . . . . . . . . . . . . . . . . . . . . . . . . . 140
Contents10
Removing and reinstalling SF using the installer ... . . . . . . . . . . . . . . . . . . . . . 141Upgrading SF using Live Upgrade .... . . . . . . . . . . . . . . . . . . . . . . . . . . . . . . . . . . . . . . . . . . . . . . 142Administering boot environments ... . . . . . . . . . . . . . . . . . . . . . . . . . . . . . . . . . . . . . . . . . . . . . . 142
Reverting to the primary boot environment .... . . . . . . . . . . . . . . . . . . . . . . . . . . 142Switching the boot environment for Solaris SPARC .... . . . . . . . . . . . . . . . . 143Switching the boot environment for Solaris x86-64 .... . . . . . . . . . . . . . . . . . 145
Chapter 15 Migrating from Storage Foundation Basic to StorageFoundation Standard . . . . . . . . . . . . . . . . . . . . . . . . . . . . . . . . . . . . . . . . . . . . . . . . . . 149
Migrating from Storage Foundation Basic to Storage FoundationStandard .... . . . . . . . . . . . . . . . . . . . . . . . . . . . . . . . . . . . . . . . . . . . . . . . . . . . . . . . . . . . . . . . . . . . . . . . . . 149
Chapter 16 Performing post-upgrade tasks . . . . . . . . . . . . . . . . . . . . . . . . . . . . . . . . . . . . . . 153
Optional configuration steps ... . . . . . . . . . . . . . . . . . . . . . . . . . . . . . . . . . . . . . . . . . . . . . . . . . . . . . 153Re-joining the backup boot disk group into the current disk
group .... . . . . . . . . . . . . . . . . . . . . . . . . . . . . . . . . . . . . . . . . . . . . . . . . . . . . . . . . . . . . . . . . . . . . . . . . . . . . . 154Reverting to the backup boot disk group after an unsuccessful
upgrade .... . . . . . . . . . . . . . . . . . . . . . . . . . . . . . . . . . . . . . . . . . . . . . . . . . . . . . . . . . . . . . . . . . . . . . . . . . . 154Post upgrade tasks for migrating the SFDB repository database ... . . . . . . . 155
Migrating from a 5.0 repository database to 6.0.1 ... . . . . . . . . . . . . . . . . . . . . 156Migrating from a 5.1 or higher repository database to 6.0.1 ... . . . . . . . 158After upgrading from 5.0.x and before migrating SFDB .... . . . . . . . . . . . 160
Recovering VVR if automatic upgrade fails ... . . . . . . . . . . . . . . . . . . . . . . . . . . . . . . . . . . . 160Upgrading disk layout versions .... . . . . . . . . . . . . . . . . . . . . . . . . . . . . . . . . . . . . . . . . . . . . . . . . . 161Upgrading VxVM disk group versions .... . . . . . . . . . . . . . . . . . . . . . . . . . . . . . . . . . . . . . . . . 161Updating variables ... . . . . . . . . . . . . . . . . . . . . . . . . . . . . . . . . . . . . . . . . . . . . . . . . . . . . . . . . . . . . . . . . . . 162Setting the default disk group .... . . . . . . . . . . . . . . . . . . . . . . . . . . . . . . . . . . . . . . . . . . . . . . . . . . . 162Upgrading the Array Support Library .... . . . . . . . . . . . . . . . . . . . . . . . . . . . . . . . . . . . . . . . . . 162
Adding JBOD support for storage arrays for which there is notan ASL available ... . . . . . . . . . . . . . . . . . . . . . . . . . . . . . . . . . . . . . . . . . . . . . . . . . . . . . . . . . . 162
Unsuppressing DMP for EMC PowerPath disks ... . . . . . . . . . . . . . . . . . . . . . . . . 163Converting from QuickLog to Multi-Volume support ... . . . . . . . . . . . . . . . . . . . . . . 172Verifying the Storage Foundation upgrade .... . . . . . . . . . . . . . . . . . . . . . . . . . . . . . . . . . . 174
Section 4 Post-installation tasks . . . . . . . . . . . . . . . . . . . . . . . . . . . . . . . . . . . . . . . . . . . . 175
Chapter 17 Performing post-installation tasks . . . . . . . . . . . . . . . . . . . . . . . . . . . . . . . . 177
Changing root user into root role ... . . . . . . . . . . . . . . . . . . . . . . . . . . . . . . . . . . . . . . . . . . . . . . . . 177
11Contents
Chapter 18 Verifying the SF installation . . . . . . . . . . . . . . . . . . . . . . . . . . . . . . . . . . . . . . . . . . . . 179
Verifying that the products were installed .... . . . . . . . . . . . . . . . . . . . . . . . . . . . . . . . . . . 179Installation log files ... . . . . . . . . . . . . . . . . . . . . . . . . . . . . . . . . . . . . . . . . . . . . . . . . . . . . . . . . . . . . . . . . . 180
Using the installation log file ... . . . . . . . . . . . . . . . . . . . . . . . . . . . . . . . . . . . . . . . . . . . . . . . 180Using the summary file ... . . . . . . . . . . . . . . . . . . . . . . . . . . . . . . . . . . . . . . . . . . . . . . . . . . . . . . 180
Starting and stopping processes for the Veritas products ... . . . . . . . . . . . . . . . 180Checking Veritas Volume Manager processes ... . . . . . . . . . . . . . . . . . . . . . . . . . . . . . . . 181Checking Veritas File System installation .... . . . . . . . . . . . . . . . . . . . . . . . . . . . . . . . . . . . 182
Verifying Veritas File System kernel installation .... . . . . . . . . . . . . . . . . . . . . 182Verifying command installation .... . . . . . . . . . . . . . . . . . . . . . . . . . . . . . . . . . . . . . . . . . . 182
Section 5 Uninstallation of SF . . . . . . . . . . . . . . . . . . . . . . . . . . . . . . . . . . . . . . . . . . . . . . . . . . 183
Chapter 19 Uninstalling Storage Foundation . . . . . . . . . . . . . . . . . . . . . . . . . . . . . . . . . . . 185
About removing Storage Foundation .... . . . . . . . . . . . . . . . . . . . . . . . . . . . . . . . . . . . . . . . . . 185Preparing to uninstall .. . . . . . . . . . . . . . . . . . . . . . . . . . . . . . . . . . . . . . . . . . . . . . . . . . . . . . . . . . . . . . . . 186
Preparing to remove Veritas Volume Manager ... . . . . . . . . . . . . . . . . . . . . . . . . 186Preparing to remove Veritas File System .... . . . . . . . . . . . . . . . . . . . . . . . . . . . . . . 193
Removing the Replicated Data Set ... . . . . . . . . . . . . . . . . . . . . . . . . . . . . . . . . . . . . . . . . . . . . . . 194Uninstalling SF packages using the script-based installer ... . . . . . . . . . . . . . . . 196Uninstalling SF with the Veritas Web-based installer ... . . . . . . . . . . . . . . . . . . . . . 197Uninstalling Storage Foundation using the pkgrm or pkg uninstall
command .... . . . . . . . . . . . . . . . . . . . . . . . . . . . . . . . . . . . . . . . . . . . . . . . . . . . . . . . . . . . . . . . . . . . . . . . . 198Uninstalling the language packages using the pkgrm
command .... . . . . . . . . . . . . . . . . . . . . . . . . . . . . . . . . . . . . . . . . . . . . . . . . . . . . . . . . . . . . . . . . . . 199Removing the Storage Foundation for Databases (SFDB) repository
after removing the product ... . . . . . . . . . . . . . . . . . . . . . . . . . . . . . . . . . . . . . . . . . . . . . . . . . 199
Chapter 20 Uninstalling SF using response files . . . . . . . . . . . . . . . . . . . . . . . . . . . . . 201
Uninstalling SF using response files ... . . . . . . . . . . . . . . . . . . . . . . . . . . . . . . . . . . . . . . . . . . . . 201Response file variables to uninstall Storage Foundation .... . . . . . . . . . . . . . . . . 202Sample response file for SF uninstallation .... . . . . . . . . . . . . . . . . . . . . . . . . . . . . . . . . . . 203
Section 6 Installation reference . . . . . . . . . . . . . . . . . . . . . . . . . . . . . . . . . . . . . . . . . . . . . . 205
Appendix A Installation scripts . . . . . . . . . . . . . . . . . . . . . . . . . . . . . . . . . . . . . . . . . . . . . . . . . . . . . . . . . . . . 207
Installation script options .... . . . . . . . . . . . . . . . . . . . . . . . . . . . . . . . . . . . . . . . . . . . . . . . . . . . . . . . . 207
Contents12
Appendix B Tunable files for installation . . . . . . . . . . . . . . . . . . . . . . . . . . . . . . . . . . . . . . . . . . . 213
About setting tunable parameters using the installer or a responsefile ... . . . . . . . . . . . . . . . . . . . . . . . . . . . . . . . . . . . . . . . . . . . . . . . . . . . . . . . . . . . . . . . . . . . . . . . . . . . . . . . . . . 213
Setting tunables for an installation, configuration, or upgrade .... . . . . . . . . 214Setting tunables with no other installer-related operations .... . . . . . . . . . . . . 215Setting tunables with an un-integrated response file ... . . . . . . . . . . . . . . . . . . . . . . 216Preparing the tunables file ... . . . . . . . . . . . . . . . . . . . . . . . . . . . . . . . . . . . . . . . . . . . . . . . . . . . . . . . . 217Setting parameters for the tunables file ... . . . . . . . . . . . . . . . . . . . . . . . . . . . . . . . . . . . . . . . 217Tunables value parameter definitions ... . . . . . . . . . . . . . . . . . . . . . . . . . . . . . . . . . . . . . . . . . 218
Appendix C Configuring the secure shell or the remote shell forcommunications . . . . . . . . . . . . . . . . . . . . . . . . . . . . . . . . . . . . . . . . . . . . . . . . . . . . . . . . . . 227
About configuring secure shell or remote shell communication modesbefore installing products ... . . . . . . . . . . . . . . . . . . . . . . . . . . . . . . . . . . . . . . . . . . . . . . . . . . . 227
Manually configuring and passwordless ssh .... . . . . . . . . . . . . . . . . . . . . . . . . . . . . . . . . 228Restarting the ssh session .... . . . . . . . . . . . . . . . . . . . . . . . . . . . . . . . . . . . . . . . . . . . . . . . . . . . . . . . . 233Enabling and disabling rsh for Solaris ... . . . . . . . . . . . . . . . . . . . . . . . . . . . . . . . . . . . . . . . . . 233
Appendix D Storage Foundation components . . . . . . . . . . . . . . . . . . . . . . . . . . . . . . . . . . . 235
Storage Foundation installation packages ... . . . . . . . . . . . . . . . . . . . . . . . . . . . . . . . . . . . . 235Chinese language packages ... . . . . . . . . . . . . . . . . . . . . . . . . . . . . . . . . . . . . . . . . . . . . . . . . . . . . . . . 238Japanese language packages ... . . . . . . . . . . . . . . . . . . . . . . . . . . . . . . . . . . . . . . . . . . . . . . . . . . . . . . 238Veritas Storage Foundation obsolete and reorganized installation
packages ... . . . . . . . . . . . . . . . . . . . . . . . . . . . . . . . . . . . . . . . . . . . . . . . . . . . . . . . . . . . . . . . . . . . . . . . . . . 239
Appendix E Troubleshooting installation issues . . . . . . . . . . . . . . . . . . . . . . . . . . . . . . 243
Restarting the installer after a failed connection .... . . . . . . . . . . . . . . . . . . . . . . . . . 243What to do if you see a licensing reminder ... . . . . . . . . . . . . . . . . . . . . . . . . . . . . . . . . . . . 243About the VRTSspt package troubleshooting tools ... . . . . . . . . . . . . . . . . . . . . . . . . . 244Incorrect permissions for root on remote system .... . . . . . . . . . . . . . . . . . . . . . . . . . . 245Inaccessible system .... . . . . . . . . . . . . . . . . . . . . . . . . . . . . . . . . . . . . . . . . . . . . . . . . . . . . . . . . . . . . . . . . 246Troubleshooting the webinstaller ... . . . . . . . . . . . . . . . . . . . . . . . . . . . . . . . . . . . . . . . . . . . . . . . 246
Appendix F Compatability issues when installing StorageFoundation with other products . . . . . . . . . . . . . . . . . . . . . . . . . . . . . . . 247
Installing, uninstalling, or upgrading Storage Foundation productswhen other Veritas products are present ... . . . . . . . . . . . . . . . . . . . . . . . . . . . . . . . 247
Installing, uninstalling, or upgrading Storage Foundation productswhen VOM is already present ... . . . . . . . . . . . . . . . . . . . . . . . . . . . . . . . . . . . . . . . . . . . . . . 248
13Contents

Installing, uninstalling, or upgrading Storage Foundation productswhen NetBackup is already present ... . . . . . . . . . . . . . . . . . . . . . . . . . . . . . . . . . . . . . . . 248
Index . . . . . . . . . . . . . . . . . . . . . . . . . . . . . . . . . . . . . . . . . . . . . . . . . . . . . . . . . . . . . . . . . . . . . . . . . . . . . . . . . . . . . . . . . . . . . . . . . . . . . . . . . . . . . . . . . . . 249
Contents14
Installation overview andplanning
■ Chapter 1. Introducing Storage Foundation
■ Chapter 2. System requirements
■ Chapter 3. Planning to install SF
■ Chapter 4. Licensing SF
1Section

16
Introducing StorageFoundation
This chapter includes the following topics:
■ About Veritas products
■ About Veritas graphical user interfaces
About Veritas productsThe following products are available for this release.
About Storage FoundationVeritas Storage Foundation by Symantec includes Veritas File System by Symantec(VxFS) and Veritas Volume Manager by Symantec (VxVM) with various featurelevels.
Veritas File System is a high-performance journaling file system that provideseasy management and quick-recovery for applications. Veritas File System deliversscalable performance, continuous availability, increased I/O throughput, andstructural integrity.
Veritas Volume Manager removes the physical limitations of disk storage. Youcan configure, share, manage, and optimize storage I/O performance onlinewithout interrupting data availability. Veritas Volume Manager also provideseasy-to-use, online storage management tools to reduce downtime.
You add high availability functionality to Storage Foundation HA by installingVeritas Cluster Server software.
VxFS and VxVM are a part of all Veritas Storage Foundation products. Do notinstall or update VxFS or VxVM as individual components.
1Chapter
About Veritas Storage Foundation BasicStorage Foundation Basic supports all Storage Foundation Standard features,however, there are deployment and technical support limitations.
About Veritas Replicator OptionVeritas Replicator Option is an optional, separately-licensable feature.
Veritas Volume Replicator replicates data to remote locations over any standardIP network to provide continuous data availability.
This option is available with Storage Foundation for Oracle RAC, StorageFoundation Cluster File System, and Storage Foundation Standard and Enterpriseproducts.
Before installing this option, read the Release Notes for the product.
To install the option, follow the instructions in the Installation Guide for theproduct.
About Veritas graphical user interfacesThe following are descriptions of Veritas GUIs.
About Veritas Operations ManagerVeritas Operations Manager provides a centralized management console forVeritas Storage Foundation and High Availability products. You can use VeritasOperations Manager to monitor, visualize, and manage storage resources andgenerate reports.
Symantec recommends using Veritas Operations Manager (VOM) to manageStorage Foundation and Cluster Server environments.
You can download Veritas Operations Manager at no charge athttp://go.symantec.com/vom.
Refer to the Veritas Operations Manager documentation for installation, upgrade,and configuration instructions.
The Veritas Enterprise Administrator (VEA) console is no longer packaged withStorage Foundation products. If you want to continue using VEA, a softwareversion is available for download from http://go.symantec.com/vcsm_download.Veritas Storage Foundation Management Server is deprecated.
Introducing Storage FoundationAbout Veritas graphical user interfaces
18
System requirements
This chapter includes the following topics:
■ Release notes
■ Hardware compatibility list (HCL)
■ Supported operating systems
■ Veritas File System requirements
■ Disk space requirements
■ Discovering product versions and various requirement information
■ Database requirements
Release notesThe Release Notes for each Veritas product contains last minute news andimportant details for each product, including updates to system requirementsand supported software. Review the Release Notes for the latest informationbefore you start installing the product.
The product documentation is available on the Web at the following location:
https://sort.symantec.com/documents
Hardware compatibility list (HCL)The hardware compatibility list contains information about supported hardwareand is updated regularly. Before installing or upgrading Storage Foundation andHigh Availability Solutions products, review the current compatibility list toconfirm the compatibility of your hardware and software.
2Chapter
For the latest information on supported hardware, visit the following URL:
http://www.symantec.com/docs/TECH170013
For information on specific High Availability setup requirements, see theVeritasCluster Server Installation Guide.
Supported operating systemsFor information on supported operating systems, see the Storage FoundationRelease Notes.
Veritas File System requirementsVeritas File System requires that the values of the Solaris variableslwp_default_stksize and svc_default_stksize are at least 0x6000 (for Solaris10) and 0x8000 (for Solaris 11). When you install the Veritas File System package,VRTSvxfs, the VRTSvxfs packaging scripts check the values of these variables inthe kernel. If the values are less than the required values, VRTSvxfs increases thevalues and modifies the /etc/system file with the required values. If the VRTSvxfsscripts increase the values, the installation proceeds as usual except that youmust reboot and restart the installation program. A message displays if a rebootis required.
To avoid an unexpected need for a reboot, verify the values of the variables beforeinstalling Veritas File System. Use the following commands to check the valuesof the variables:
# echo "lwp_default_stksize/X" | mdb -klwp_default_stksize:lwp_default_stksize: 6000
# echo "svc_default_stksize/X" | mdb -ksvc_default_stksize:svc_default_stksize: 6000
For Solaris 10:
# echo "lwp_default_stksize/X" | mdb -klwp_default_stksize:lwp_default_stksize: 8000
# echo "svc_default_stksize/X" | mdb -ksvc_default_stksize:svc_default_stksize: 8000
For Solaris 11:
System requirementsSupported operating systems
20
If the values shown are less than 6000 (for Solaris 10) and less than 8000 (forSolaris 11), you can expect a reboot after installation.
Note: The default value of the svc_default_stksize variable is 0 (zero), whichindicates that the value is set to the value of the lwp_default_stksize variable.In this case, no reboot is required, unless the value of the lwp_default_stksize
variable is too small.
To avoid a reboot after installation, you can modify the /etc/system file with theappropriate values. Reboot the system prior to installing the packages. Add thefollowing lines to the /etc/system file:
set lwp_default_stksize=0x6000set rpcmod:svc_default_stksize=0x6000
For Solaris 10:
set lwp_default_stksize=0x8000set rpcmod:svc_default_stksize=0x8000
For Solaris 11:
Disk space requirementsBefore installing your products, confirm that your system has enough free diskspace.
Use the Perform a Pre-installation Check (P) menu for the Web-based installerto determine whether there is sufficient space.
Or, go to the installation directory and run the installer with the -precheck option.
# ./installer -precheck
See “About the Veritas installer” on page 25.
Discoveringproduct versionsandvarious requirementinformation
Symantec provides several methods to check the Veritas product you haveinstalled, plus various requirement information.
You can check the existing product versions using the installer command withthe -versionoption before or after you install. After you have installed the current
21System requirementsDisk space requirements
version of the product, you can use theshowversion script in the /opt/VRTS/installdirectory to find version information.
The information that the version option or the showversion script discovers onsystems includes the following:
■ The installed version of all released Storage Foundation and High AvailabilitySuite of products
■ The required packages or patches (if applicable) that are missing
■ The available updates (including patches or hotfixes) from Symantec OperationsReadiness Tools (SORT) for the installed products
To run the version checker
1 Mount the media.
2 Start the installer with the -version option.
# ./installer -version system1 system2
Database requirementsThe following TechNote identifies the most current information on supporteddatabase and operating system combinations:
http://www.symantec.com/docs/DOC4039
Note: SF supports running Oracle, DB2, and Sybase on VxFS and VxVM.
SF does not support running SFDB tools with DB2 and Oracle.
System requirementsDatabase requirements
22
Planning to install SF
This chapter includes the following topics:
■ About planning for SF installation
■ About installation and configuration methods for SF
■ About the Veritas installer
■ Downloading the Storage Foundation software
About planning for SF installationBefore you continue, make sure that you are using the current version of thisguide. The latest documentation is available on the Symantec Symantec OperationsReadiness Tools (SORT) website.
https://sort.symantec.com/documents
Document version: 6.0.1 Rev 4.
This installation guide is designed for system administrators who already have aknowledge of basic UNIX system and network administration. Basic knowledgeincludes commands such as tar, mkdir, and simple shell scripting. Also requiredis basic familiarity with the specific platform and operating system where SF willbe installed.
Follow the preinstallation instructions if you are installing Storage Foundation.
The following Veritas Storage Foundation products by Symantec are installedwith these instructions:
■ Veritas Storage Foundation Basic
■ Veritas Storage Foundation (Standard and Enterprise Editions)
Several component products are bundled with each of these SF products.
3Chapter
About installation and configuration methods for SFYou can install and configure SF using Veritas installation programs or usingnative operating system methods.
Use one of the following methods to install and configure SF:
■ The Veritas product installerThe installer displays a menu that simplifies the selection of installationoptions.
■ The product-specific installation scriptsThe installation scripts provide a command-line interface to install a specificproduct. The product-specific scripts enable you to specify some additionalcommand-line options. Installing with the installation script is also the sameas specifying SF from the installer menu.
■ The Web-based Veritas installerThe installer provides an interface to manage the installation from a remotesite using a standard Web browser.See “About the Web-based installer” on page 47.
■ Silent installation with response filesYou can use any of the above options to generate a response file. You can thencustomize the response file for another system. Run the product installationscript with the response file to install silently on one or more systems.See “About response files” on page 24.
■ JumpStartYou can use the Veritas product installer or the product-specific installationscript to generate a Jumpstart script file. Use the generated script to installVeritas packages from your JumpStart server.
About response filesThe installer or product installation script generates a response file during anyinstallation, configuration, upgrade (except rolling upgrade), or uninstallprocedure. The response file contains the configuration information that youentered during the procedure. When the procedure completes, the installationscript displays the location of the response files.
You can use the response file for future installation procedures by invoking aninstallation script with the -responsefile option. The response file passesarguments to the script to automate the installation of that product. You can editthe file to automate installation and configuration of additional systems.
You can generate a response file using the -makeresponsefile option.
Planning to install SFAbout installation and configuration methods for SF
24
See “Installation script options” on page 207.
Syntax in the response fileThe syntax of the Perl statements that are included in the response file variablesvaries. It can depend on whether the variables require scalar or list values.
For example, in the case of a string value:
$CFG{Scalar_variable}="value";
or, in the case of an integer value:
$CFG{Scalar_variable}=123;
or, in the case of a list:
$CFG{List_variable}=["value", "value", "value"];
About the Veritas installerTo install your Veritas product, use one of the following methods:
■ The general product installer. The general product installer enables you toinstall and configure the product, verify preinstallation requirements, andview the product’s description. You perform the installation from a disc, andyou are prompted to choose a product to install.See “Installing Storage Foundation using the installer” on page 43.
■ Product-specific installation scripts. If you obtained a standalone Veritasproduct from an electronic download site, the single product download filesdo not contain the general product installer. Use the product installation scriptto install the individual products. You can find these scripts at the root of theproduct media in the scripts directory. These scripts are also installed withthe product.
Table 3-1 lists all the SFHA Solutions product installation scripts. The list ofproduct installation scripts that you find on your system depends on the productthat you install on your system.
Note:The name of the script is different depending on whether you run the scriptfrom the install media or from a system on which the product software is installed.
25Planning to install SFAbout the Veritas installer
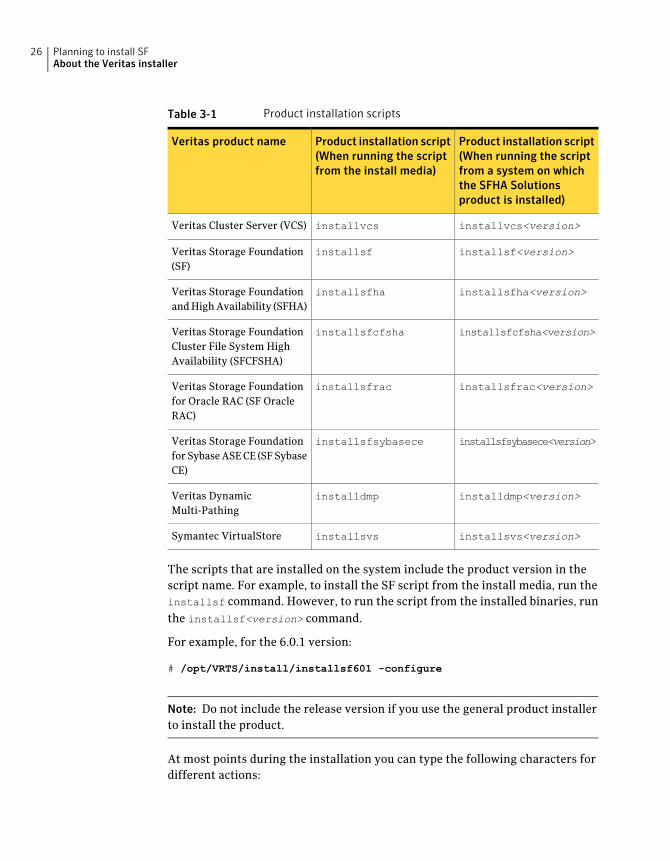
Table 3-1 Product installation scripts
Product installation script(When running the scriptfrom a system on whichthe SFHA Solutionsproduct is installed)
Product installation script(When running the scriptfrom the install media)
Veritas product name
installvcs<version>installvcsVeritas Cluster Server (VCS)
installsf<version>installsfVeritas Storage Foundation(SF)
installsfha<version>installsfhaVeritas Storage Foundationand High Availability (SFHA)
installsfcfsha<version>installsfcfshaVeritas Storage FoundationCluster File System HighAvailability (SFCFSHA)
installsfrac<version>installsfracVeritas Storage Foundationfor Oracle RAC (SF OracleRAC)
installsfsybasece<version>installsfsybaseceVeritas Storage Foundationfor Sybase ASE CE (SF SybaseCE)
installdmp<version>installdmpVeritas DynamicMulti-Pathing
installsvs<version>installsvsSymantec VirtualStore
The scripts that are installed on the system include the product version in thescript name. For example, to install the SF script from the install media, run theinstallsf command. However, to run the script from the installed binaries, runthe installsf<version> command.
For example, for the 6.0.1 version:
# /opt/VRTS/install/installsf601 -configure
Note: Do not include the release version if you use the general product installerto install the product.
At most points during the installation you can type the following characters fordifferent actions:
Planning to install SFAbout the Veritas installer
26
■ Use b (back) to return to a previous section of the installation procedure. Theback feature of the installation scripts is context-sensitive, so it returns to thebeginning of a grouped section of questions.
■ Use Control+c to stop and exit the program if an installation procedure hangs.After a short delay, the script exits.
■ Use q to quit the installer.
■ Use ? to display help information.
■ Use the Enter button to accept a default response.
See “Installation script options” on page 207.
Downloading the Storage Foundation softwareOne method of obtaining the Storage Foundation software is to download it toyour local system from the Symantec Web site.
For a Trialware download, perform the following. Contact your Veritasrepresentative for more information.
To download the trialware version of the software
1 Open the following link in your browser:
http://www.symantec.com/index.jsp
2 In Products and Solutions section, click the Trialware & Downloads link.
3 On the next page near the bottom of the page, click Business Continuity.
4 Under Cluster Server, click Download Now.
5 In the new window, click Download Now.
6 Review the terms and conditions, and click I agree.
7 You can use existing credentials to log in or create new credentials.
8 Find the product that you want to download and select it. Continue with theinstallation.
If you download a standalone Veritas product, the single product download filesdo not contain the product installer. Use the installation script for the specificproduct to install the product.
Note:Trialware is the full product version. The enabled licensing places the productin a demo or a trial state.
27Planning to install SFDownloading the Storage Foundation software
See “About the Veritas installer” on page 25.
To download the software
1 Verify that you have enough space on your filesystem to store the downloadedsoftware.
The estimated space for download, gunzip, and tar extract is 2 GB for SPARCand 1.5 GB for Opteron.
If you plan to install the software on the same system, make sure that youalso have enough space for the installed software.
See “Disk space requirements” on page 21.
2 To see the space available, you can use the df command with the name of thelocal file system where you intend to download the software.
# /usr/bin/df -l filesystem
Caution:When you select a location to download files, do not select a directorythat contains Veritas products from a previous release or maintenance pack.Make sure that different versions exist in different directories.
3 Download the software, specifying the file system with sufficient space forthe file.
Planning to install SFDownloading the Storage Foundation software
28
Licensing SF
This chapter includes the following topics:
■ About Veritas product licensing
■ Setting or changing the product level for keyless licensing
■ Installing Veritas product license keys
About Veritas product licensingYou have the option to install Veritas products without a license key. Installationwithout a license does not eliminate the need to obtain a license. A software licenseis a legal instrument governing the usage or redistribution of copyright protectedsoftware. The administrator and company representatives must ensure that aserver or cluster is entitled to the license level for the products installed. Symantecreserves the right to ensure entitlement and compliance through auditing.
If you encounter problems while licensing this product, visit the Symanteclicensing support website.
www.symantec.com/techsupp/
The Veritas product installer prompts you to select one of the following licensingmethods:
■ Install a license key for the product and features that you want to install.When you purchase a Symantec product, you receive a License Key certificate.The certificate specifies the product keys and the number of product licensespurchased.
■ Continue to install without a license key.The installer prompts for the product modes and options that you want toinstall, and then sets the required product level.
4Chapter
Within 60 days of choosing this option, you must install a valid license keycorresponding to the license level entitled. If you do not comply with the aboveterms, continuing to use the Symantec product is a violation of your end userlicense agreement, and results in warning messages.For more information about keyless licensing, see the following URL:http://go.symantec.com/sfhakeyless
If you upgrade to this release from a prior release of the Veritas software, theinstaller asks whether you want to upgrade the key to the new version. The existinglicense keys may not activate new features in this release.
If you upgrade with the product installer, or if you install or upgrade with a methodother than the product installer, you must do one of the following to license theproducts:
■ Run the vxkeyless command to set the product level for the products youhave purchased. This option also requires that you manage the server or clusterwith a management server.See “Setting or changing the product level for keyless licensing” on page 30.See the vxkeyless(1m) manual page.
■ Use the vxlicinst command to install a valid product license key for theproducts you have purchased.See “Installing Veritas product license keys” on page 32.See the vxlicinst(1m) manual page.
You can also use the above options to change the product levels to another levelthat you are authorized to use. For example, you can add the replication optionto the installed product. You must ensure that you have the appropriate licensefor the product level and options in use.
Note: In order to change from one product group to another, you may need toperform additional steps.
Setting or changing the product level for keylesslicensing
The keyless licensing method uses product levels to determine the Veritas productsand functionality that are licensed.
For more information to use keyless licensing and to download the managementserver, see the following URL:
http://go.symantec.com/vom
Licensing SFSetting or changing the product level for keyless licensing
30
When you set the product license level for the first time, you enable keylesslicensing for that system. If you install with the product installer and select thekeyless option, you are prompted to select the product and feature level that youwant to license.
After you install, you can change product license levels at any time to reflect theproducts and functionality that you want to license. When you set a product level,you agree that you have the license for that functionality.
To set or change the product level
1 Change your current working directory:
# cd /opt/VRTSvlic/bin
2 View the current setting for the product level.
# ./vxkeyless -v display
3 View the possible settings for the product level.
# ./vxkeyless displayall
4 Set the desired product level.
# ./vxkeyless set prod_levels
where prod_levels is a comma-separated list of keywords. The keywords arethe product levels as shown by the output of step 3.
If you want to remove keyless licensing and enter a key, you must clear the keylesslicenses. Use the NONE keyword to clear all keys from the system.
Warning: Clearing the keys disables the Veritas products until you install a newkey or set a new product level.
To clear the product license level
1 View the current setting for the product license level.
# ./vxkeyless [-v] display
2 If there are keyless licenses installed, remove all keyless licenses:
# ./vxkeyless [-q] set NONE
31Licensing SFSetting or changing the product level for keyless licensing
For more details on using the vxkeyless utility, see the vxkeyless(1m) manualpage.
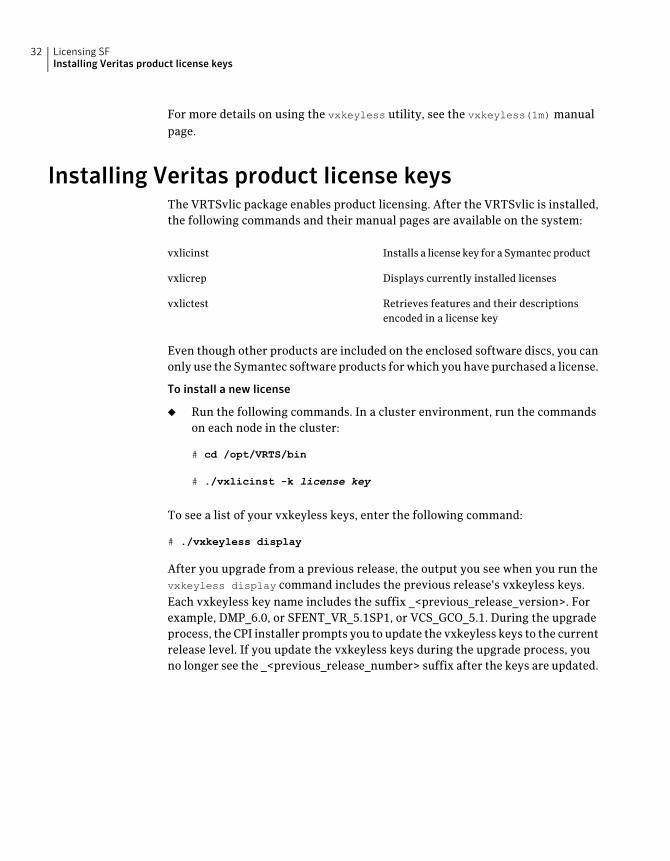
Installing Veritas product license keysThe VRTSvlic package enables product licensing. After the VRTSvlic is installed,the following commands and their manual pages are available on the system:
Installs a license key for a Symantec productvxlicinst
Displays currently installed licensesvxlicrep
Retrieves features and their descriptionsencoded in a license key
vxlictest
Even though other products are included on the enclosed software discs, you canonly use the Symantec software products for which you have purchased a license.
To install a new license
◆ Run the following commands. In a cluster environment, run the commandson each node in the cluster:
# cd /opt/VRTS/bin
# ./vxlicinst -k license key
To see a list of your vxkeyless keys, enter the following command:
# ./vxkeyless display
After you upgrade from a previous release, the output you see when you run thevxkeyless display command includes the previous release's vxkeyless keys.Each vxkeyless key name includes the suffix _<previous_release_version>. Forexample, DMP_6.0, or SFENT_VR_5.1SP1, or VCS_GCO_5.1. During the upgradeprocess, the CPI installer prompts you to update the vxkeyless keys to the currentrelease level. If you update the vxkeyless keys during the upgrade process, youno longer see the _<previous_release_number> suffix after the keys are updated.
Licensing SFInstalling Veritas product license keys
32
Installation of StorageFoundation
■ Chapter 5. Preparing to install Storage Foundation
■ Chapter 6. Installing Storage Foundation using the script-based installer
■ Chapter 7. Installing Storage Foundation using the web-based installer
■ Chapter 8. Performing an automated installation using response files
■ Chapter 9. Installing Storage Foundation using operating system-specificmethods
■ Chapter 10. Configuring Storage Foundation
2Section

34
Preparing to install StorageFoundation
This chapter includes the following topics:
■ Installation preparation overview
■ About using ssh or rsh with the Veritas installer
■ Creating root user
■ Creating the /opt directory
■ Setting environment variables
■ Mounting the product disc
■ Assessing the system for installation readiness
■ Making the IPS publisher accessible
Installation preparation overviewTable 5-1 provides an overview of an installation using the product installer.
Table 5-1 Installation overview
SectionInstallation task
See “About Veritas product licensing”on page 29.
Obtain product licenses.
5Chapter
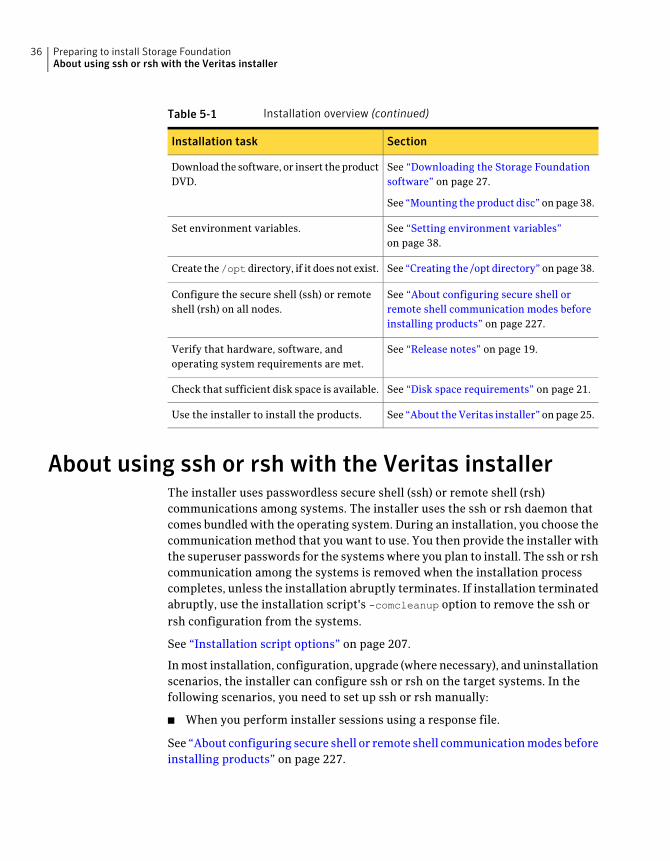
Table 5-1 Installation overview (continued)
SectionInstallation task
See “Downloading the Storage Foundationsoftware” on page 27.
See “Mounting the product disc” on page 38.
Download the software, or insert the productDVD.
See “Setting environment variables”on page 38.
Set environment variables.
See “Creating the /opt directory” on page 38.Create the/optdirectory, if it does not exist.
See “About configuring secure shell orremote shell communication modes beforeinstalling products” on page 227.
Configure the secure shell (ssh) or remoteshell (rsh) on all nodes.
See “Release notes” on page 19.Verify that hardware, software, andoperating system requirements are met.
See “Disk space requirements” on page 21.Check that sufficient disk space is available.
See “About the Veritas installer” on page 25.Use the installer to install the products.
About using ssh or rsh with the Veritas installerThe installer uses passwordless secure shell (ssh) or remote shell (rsh)communications among systems. The installer uses the ssh or rsh daemon thatcomes bundled with the operating system. During an installation, you choose thecommunication method that you want to use. You then provide the installer withthe superuser passwords for the systems where you plan to install. The ssh or rshcommunication among the systems is removed when the installation processcompletes, unless the installation abruptly terminates. If installation terminatedabruptly, use the installation script's -comcleanup option to remove the ssh orrsh configuration from the systems.
See “Installation script options” on page 207.
In most installation, configuration, upgrade (where necessary), and uninstallationscenarios, the installer can configure ssh or rsh on the target systems. In thefollowing scenarios, you need to set up ssh or rsh manually:
■ When you perform installer sessions using a response file.
See “About configuring secure shell or remote shell communication modes beforeinstalling products” on page 227.
Preparing to install Storage FoundationAbout using ssh or rsh with the Veritas installer
36
Creating root userOn Oracle Solaris 11, you need to change the root role into a user as you cannotdirectly log in as root user.
To change root role into a user
1 Log in as local user and assume the root role.
% su - root
2 Remove the root role from local users who have been assigned the role.
# roles admin
root
# usermod -R " " admin
3 Change the root role into a user.
# rolemod -K type=normal root
4 Verify the change.
■ # getent user_attr root
root::::auths=solaris.*;profiles=All;audit_flags=lo\
:no;lock_after_retries=no;min_label=admin_low;clearance=admin_high
If the type keyword is missing in the output or is equal to normal, theaccount is not a role.
■ # userattr type root
If the output is empty or lists normal, the account is not a role.
Note: For more information, see the Oracle documentation on Oracle Solaris11 operating system.
Note: After installation, you may want to change root user into root role to allowlocal users to assume the root role.
See “Changing root user into root role” on page 177.
37Preparing to install Storage FoundationCreating root user
Creating the /opt directoryThe directory /opt must exist, be writable and must not be a symbolic link.
If you are upgrading, you cannot have a symbolic link from /opt to an unconvertedvolume. If you do have a symbolic link to an unconverted volume, the symboliclink will not function during the upgrade and items in /opt will not be installed.
Setting environment variablesMost of the commands used in the installation are in the /sbin or /usr/sbindirectory. Add these directories to your PATH environment variable as necessary.
After installation, SF commands are in/opt/VRTS/bin. SF manual pages are storedin /opt/VRTS/man.
Some VCS custom scripts reside in /opt/VRTSvcs/bin. If you are installing a highavailability product, add /opt/VRTSvcs/bin to the PATH also.
Add the following directories to your PATH and MANPATH environment variable:
■ If you are using Bourne or Korn shell (sh or ksh), enter the following:
$ PATH=$PATH:/usr/sbin:/opt/VRTS/bin
$ MANPATH=/usr/share/man:/opt/VRTS/man:$MANPATH
$ export PATH MANPATH
■ If you are using a C shell (csh or tcsh), enter the following:
% set path = ( $path /usr/sbin /opt/VRTS/bin )
% setenv MANPATH /usr/share/man:/opt/VRTS/man:$MANPATH
Mounting the product discYou must have superuser (root) privileges to load the SF software.
To mount the product disc
1 Log in as superuser on a system where you want to install SF.
The systems must be in the same subnet.
2 Insert the product disc into a DVD drive that is connected to your system.
Preparing to install Storage FoundationCreating the /opt directory
38
3 If Solaris volume management software is running on your system, thesoftware disc automatically mounts as /cdrom/cdrom0.
4 If Solaris volume management software is not available to mount the DVD,you must mount it manually. After you insert the software disc, enter:
# mount -F hsfs -o ro /dev/dsk/c0t6d0s2 /cdrom
Where c0t6d0s2 is the default address for the disc drive.
Assessing the system for installation readinessSymantec provides the following tools for assessing your system, to ensure thatthe system meets the requirements for installing Storage Foundation 6.0.1.
Symantec Operations Readiness Tools(SORT) is a Web-based application that isdesigned to support Symantec enterpriseproducts.
See “About Symantec Operations ReadinessTools” on page 39.
Symantec Operations Readiness Tools
Performs a pre-installation check on thespecified systems. The Veritas productinstaller reports whether the specifiedsystems meet the minimum requirementsfor installing Storage Foundation 6.0.1.
See “Prechecking your systems using theVeritas installer” on page 40.
Prechecking your systems using the installer
About Symantec Operations Readiness ToolsSymantec Operations Readiness Tools (SORT) is a Web site that automates andsimplifies some of the most time-consuming administrative tasks. SORT helpsyou manage your datacenter more efficiently and get the most out of yourSymantec products.
Among its broad set of features, SORT lets you do the following:
■ Generate server-specific reports that describe how to prepare your servers forinstallation or upgrade of Symantec enterprise products.
■ Access a single site with the latest production information, including patches,agents, and documentation.
39Preparing to install Storage FoundationAssessing the system for installation readiness
■ Create automatic email notifications for changes in patches, documentation,and array-specific modules.
To access SORT, go to:
https://sort.symantec.com
Prechecking your systems using the Veritas installerThe script-based and Web-based installer's precheck option checks for thefollowing:
■ Recommended swap space for installation
■ Recommended memory sizes on target systems for Veritas programs for bestperformance
■ Required operating system versions
To use the precheck option
1 Start the script-based or Web-based installer.
See “Installing Storage Foundation using the installer” on page 43.
See “Installing SF with the Web-based installer” on page 50.
2 Select the precheck option:
■ From the Web-based installer, select the PerformaPre-InstallationCheckfrom the Task pull-down menu.
■ In the script-based installer, from root on the system where you want toperform the check, start the installer.
# ./installer
In the Task Menu, press the p key to start the precheck.
3 Review the output and make the changes that the installer recommends.
Making the IPS publisher accessibleThe installation of SF 6.0.1 fails on Solaris 11 if the Image Packaging System (IPS)publisher is inaccessible. The following error message is displayed:
CPIERRORV-9-20-1273Unable to contact configuredpublishers on<node_name>.
Solaris 11 introduces the new Image Packaging System (IPS) and sets a defaultpublisher (solaris) during Solaris installation. When additional packages are beinginstalled, the set publisher must be accessible for the installation to succeed. Ifthe publisher is inaccessible, as in the case of a private network, then package
Preparing to install Storage FoundationMaking the IPS publisher accessible
40
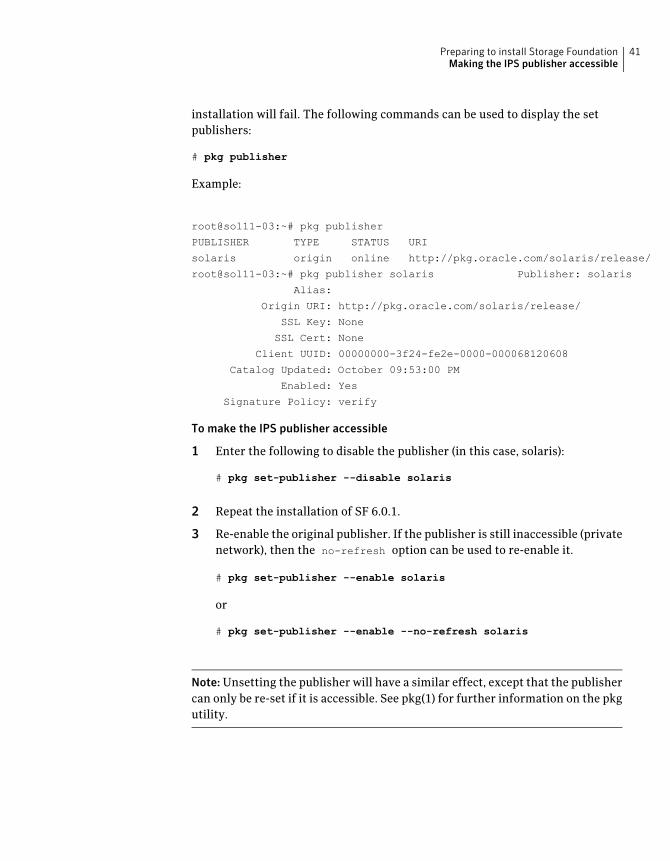
installation will fail. The following commands can be used to display the setpublishers:
# pkg publisher
Example:
root@sol11-03:~# pkg publisher
PUBLISHER TYPE STATUS URI
solaris origin online http://pkg.oracle.com/solaris/release/
root@sol11-03:~# pkg publisher solaris Publisher: solaris
Alias:
Origin URI: http://pkg.oracle.com/solaris/release/
SSL Key: None
SSL Cert: None
Client UUID: 00000000-3f24-fe2e-0000-000068120608
Catalog Updated: October 09:53:00 PM
Enabled: Yes
Signature Policy: verify
To make the IPS publisher accessible
1 Enter the following to disable the publisher (in this case, solaris):
# pkg set-publisher --disable solaris
2 Repeat the installation of SF 6.0.1.
3 Re-enable the original publisher. If the publisher is still inaccessible (privatenetwork), then the no-refresh option can be used to re-enable it.
# pkg set-publisher --enable solaris
or
# pkg set-publisher --enable --no-refresh solaris
Note:Unsetting the publisher will have a similar effect, except that the publishercan only be re-set if it is accessible. See pkg(1) for further information on the pkgutility.
41Preparing to install Storage FoundationMaking the IPS publisher accessible

Preparing to install Storage FoundationMaking the IPS publisher accessible
42
Installing StorageFoundation using thescript-based installer
This chapter includes the following topics:
■ Installing Storage Foundation using the installer
■ Installing language packages
Installing Storage Foundation using the installerThe Veritas product installer is the recommended method to license and installStorage Foundation.
The following sample procedure is based on the installation of Storage Foundationon a single system.
To install Storage Foundation
1 Set up the systems so that the commands execute on remote machines withoutprompting for passwords or confirmations with remote shell or secure shellcommunication utilities.
See “About configuring secure shell or remote shell communication modesbefore installing products” on page 227.
2 Load and mount the software disc. If you downloaded the software, navigateto the top level of the download directory and skip the next step.
See “Mounting the product disc” on page 38.
6Chapter
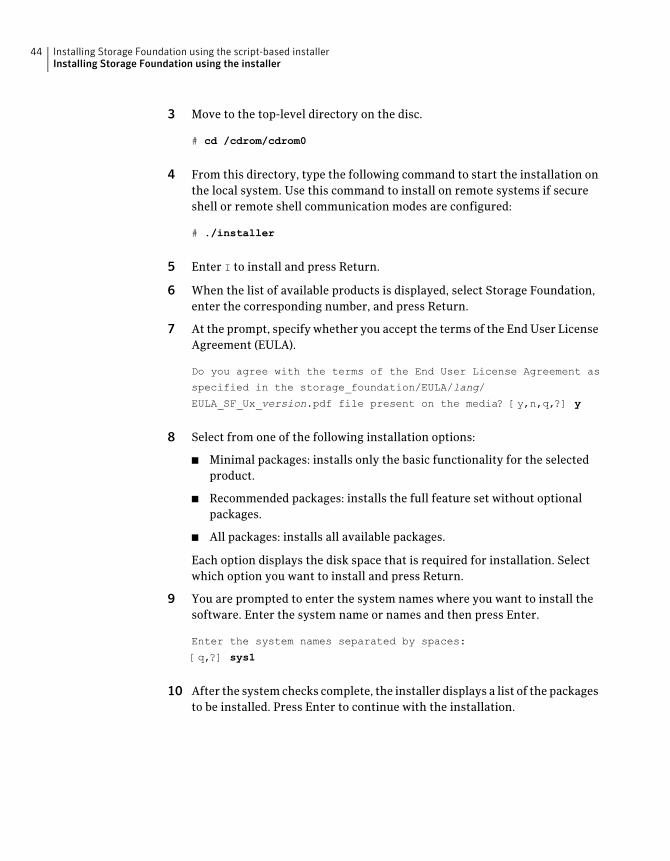
3 Move to the top-level directory on the disc.
# cd /cdrom/cdrom0
4 From this directory, type the following command to start the installation onthe local system. Use this command to install on remote systems if secureshell or remote shell communication modes are configured:
# ./installer
5 Enter I to install and press Return.
6 When the list of available products is displayed, select Storage Foundation,enter the corresponding number, and press Return.
7 At the prompt, specify whether you accept the terms of the End User LicenseAgreement (EULA).
Do you agree with the terms of the End User License Agreement as
specified in the storage_foundation/EULA/lang/
EULA_SF_Ux_version.pdf file present on the media? [y,n,q,?] y
8 Select from one of the following installation options:
■ Minimal packages: installs only the basic functionality for the selectedproduct.
■ Recommended packages: installs the full feature set without optionalpackages.
■ All packages: installs all available packages.
Each option displays the disk space that is required for installation. Selectwhich option you want to install and press Return.
9 You are prompted to enter the system names where you want to install thesoftware. Enter the system name or names and then press Enter.
Enter the system names separated by spaces:
[q,?] sys1
10 After the system checks complete, the installer displays a list of the packagesto be installed. Press Enter to continue with the installation.
Installing Storage Foundation using the script-based installerInstalling Storage Foundation using the installer
44
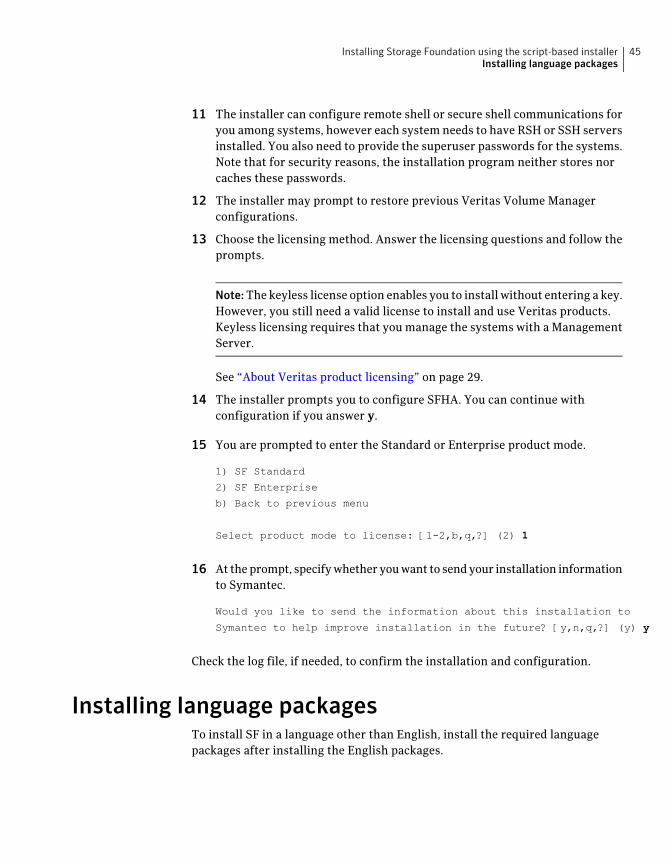
11 The installer can configure remote shell or secure shell communications foryou among systems, however each system needs to have RSH or SSH serversinstalled. You also need to provide the superuser passwords for the systems.Note that for security reasons, the installation program neither stores norcaches these passwords.
12 The installer may prompt to restore previous Veritas Volume Managerconfigurations.
13 Choose the licensing method. Answer the licensing questions and follow theprompts.
Note:The keyless license option enables you to install without entering a key.However, you still need a valid license to install and use Veritas products.Keyless licensing requires that you manage the systems with a ManagementServer.
See “About Veritas product licensing” on page 29.
14 The installer prompts you to configure SFHA. You can continue withconfiguration if you answer y.
15 You are prompted to enter the Standard or Enterprise product mode.
1) SF Standard
2) SF Enterprise
b) Back to previous menu
Select product mode to license: [1-2,b,q,?] (2) 1
16 At the prompt, specify whether you want to send your installation informationto Symantec.
Would you like to send the information about this installation to
Symantec to help improve installation in the future? [y,n,q,?] (y) y
Check the log file, if needed, to confirm the installation and configuration.
Installing language packagesTo install SF in a language other than English, install the required languagepackages after installing the English packages.
45Installing Storage Foundation using the script-based installerInstalling language packages
To install the language packages on the server
1 Insert the "Language" disc into the DVD-ROM or CD-ROM drive. With Solarisvolume management software, the disc is automatically mounted as/cdrom/cdrom0.
2 Install the language packages using the install_lp command.
# cd /cdrom/cdrom0
# ./install_lp
Installing Storage Foundation using the script-based installerInstalling language packages
46
Installing StorageFoundation using theweb-based installer
This chapter includes the following topics:
■ About the Web-based installer
■ Before using the Veritas Web-based installer
■ Starting the Veritas Web-based installer
■ Obtaining a security exception on Mozilla Firefox
■ Performing a pre-installation check with the Veritas Web-based installer
■ Installing SF with the Web-based installer
About the Web-based installerUse the Web-based installer interface to install Veritas products. The Web-basedinstaller can perform most of the tasks that the script-based installer performs.
You use the webinstaller script to start and stop the Veritas XPortal Serverxprtlwid process. The webinstaller script can also be used to check the statusof the XPortal Server.
When the webinstaller script starts the xprtlwid process, the script displays aURL. Use this URL to access the Web-based installer from a Web browser such asInternet Explorer or FireFox.
7Chapter
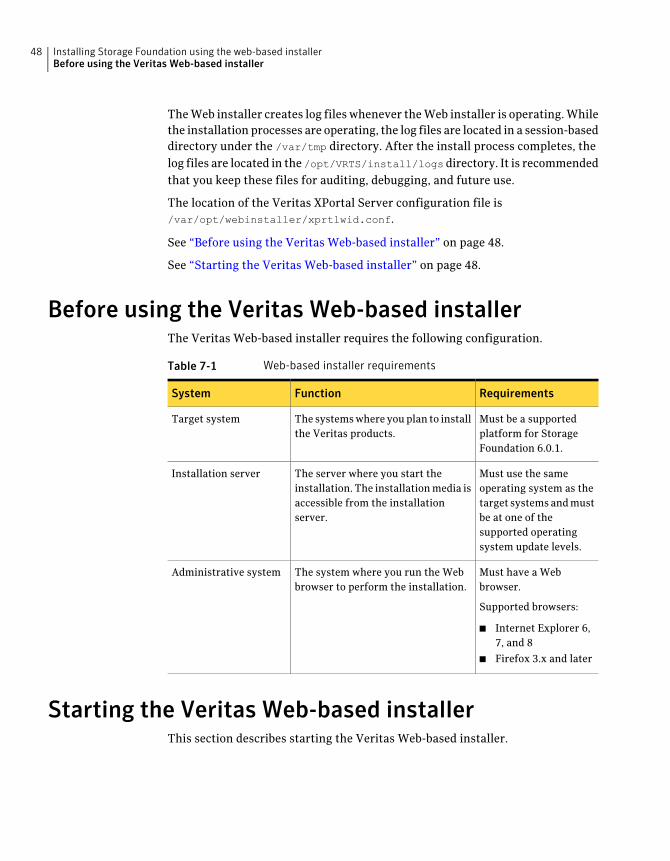
The Web installer creates log files whenever the Web installer is operating. Whilethe installation processes are operating, the log files are located in a session-baseddirectory under the /var/tmp directory. After the install process completes, thelog files are located in the /opt/VRTS/install/logs directory. It is recommendedthat you keep these files for auditing, debugging, and future use.
The location of the Veritas XPortal Server configuration file is/var/opt/webinstaller/xprtlwid.conf.
See “Before using the Veritas Web-based installer” on page 48.
See “Starting the Veritas Web-based installer” on page 48.
Before using the Veritas Web-based installerThe Veritas Web-based installer requires the following configuration.
Table 7-1 Web-based installer requirements
RequirementsFunctionSystem
Must be a supportedplatform for StorageFoundation 6.0.1.
The systems where you plan to installthe Veritas products.
Target system
Must use the sameoperating system as thetarget systems and mustbe at one of thesupported operatingsystem update levels.
The server where you start theinstallation. The installation media isaccessible from the installationserver.
Installation server
Must have a Webbrowser.
Supported browsers:
■ Internet Explorer 6,7, and 8
■ Firefox 3.x and later
The system where you run the Webbrowser to perform the installation.
Administrative system
Starting the Veritas Web-based installerThis section describes starting the Veritas Web-based installer.
Installing Storage Foundation using the web-based installerBefore using the Veritas Web-based installer
48
To start the Web-based installer
1 Start the Veritas XPortal Server process xprtlwid, on the installation server:
# ./webinstaller start
The webinstaller script displays a URL. Note this URL.
Note: If you do not see the URL, run the command again.
The default listening port is 14172. If you have a firewall that blocks port14172, use the -port option to use a free port instead.
2 On the administrative server, start the Web browser.
3 Navigate to the URL that the script displayed.
4 Certain browsers may display the following message:
Secure Connection Failed
Obtain a security exception for your browser.
When prompted, enter root and root's password of the installation server.
5 Log in as superuser.
Obtaining a security exception on Mozilla FirefoxYou may need to get a security exception on Mozilla Firefox.
The following instructions are general. They may change because of the rapidrelease cycle of Mozilla browsers.
To obtain a security exception
1 Click Or you can add an exception link.
2 Click I Understand the Risks, or You can add an exception.
3 Click Get Certificate button.
4 Uncheck Permanently Store this exception checkbox (recommended).
5 Click Confirm Security Exception button.
6 Enter root in User Name field and root password of the web server in thePassword field.
49Installing Storage Foundation using the web-based installerObtaining a security exception on Mozilla Firefox
Performing a pre-installation check with the VeritasWeb-based installer
This section describes performing a pre-installation check with the VeritasWeb-based installer.
To perform a pre-installation check
1 Start the Web-based installer.
See “Starting the Veritas Web-based installer” on page 48.
2 On the Select a task and a product page, select Perform a Pre-installationCheck from the Task drop-down list. Select VeritasStorageFoundationandHigh Availability from the Product drop-down list and click Next.
3 Select the Storage Foundation from the Product drop-down list, and clickNext.
4 Indicate the systems on which to perform the precheck. Enter one or moresystem names, separated by spaces. Click Next.
5 The installer performs the precheck and displays the results.
6 If the validation completes successfully, click Next. The installer promptsyou to begin the installation. Click Yes to install on the selected system. ClickNo to install later.
7 Click Finish. The installer prompts you for another task.
Installing SF with the Web-based installerThis section describes installing SF with the Veritas Web-based installer.
To install SF using the Web-based installer
1 Perform preliminary steps.
See “Performing a pre-installation check with the Veritas Web-based installer”on page 50.
2 Start the Web-based installer.
See “Starting the Veritas Web-based installer” on page 48.
3 Select Install a Product from the Task drop-down list.
4 Select Storage Foundation from the Product drop-down list, and click Next.
5 On the License agreement page, read the End User License Agreement (EULA).To continue, select Yes, I agree and click Next.
Installing Storage Foundation using the web-based installerPerforming a pre-installation check with the Veritas Web-based installer
50
6 Choose minimal, recommended, or all packages. Click Next.
7 Indicate the systems where you want to install. Separate multiple systemnames with spaces. Click Next.
8 If you have not yet configured a communication mode among systems, youhave the option to let the installer configure ssh or rsh. If you choose to allowthis configuration, select the communication mode and provide the superuserpasswords for the systems.
9 After the validation completes successfully, click Next to install SF on theselected system.
10 After the installation completes, you must choose your licensing method.
On the license page, select one of the following tabs:
■ Keyless licensing
Note: The keyless license option enables you to install without enteringa key. However, in order to ensure compliance you must manage thesystems with a management server.
For more information, go to the following website:
http://go.symantec.com/sfhakeyless
Complete the following information:
■ Choose whether you want to install Standard or Enterprise mode.
■ Choose whether you want to enable Veritas Replicator.
Click Register.
■ Enter license keyIf you have a valid license key, select this tab. Enter the license key foreach system. Click Register.
11 For Storage Foundation, click Next to complete the configuration and startthe product processes.
Note that you are prompted to configure only if the product is not yetconfigured.
If you select n, you can exit the installer. You must configure the productbefore you can use SF.
After the installation completes, the installer displays the location of the logand summary files. If required, view the files to confirm the installation status.
51Installing Storage Foundation using the web-based installerInstalling SF with the Web-based installer
12 To configure Veritas Storage Foundation, start the Web-based installer andselect Configure a product. Click the OK button. The installers checks forupdates. Click the Next button.
The the installer displays the save location for the task log files, summaryfile, and response file.
Click Finish button. If a message displays requesting a reboot, execute thecommand to reboot the system.
/usr/sbin/shutdown -r now
13 If prompted, select the checkbox to specify whether you want to send yourinstallation information to Symantec.
Would you like to send the information about this installation
to Symantec to help improve installation in the future?
Click Finish. The installer asks if you would like to read the summary file.Select Yes to read the summary file. If you select No, the installer promptsyou for another task.
Installing Storage Foundation using the web-based installerInstalling SF with the Web-based installer
52
Performing an automatedinstallation using responsefiles
This chapter includes the following topics:
■ Installing SF using response files
■ Response file variables to install Storage Foundation
■ Sample response file for SF installation
■ Configuring SF using response files
■ Response file variables to configure Storage Foundation
Installing SF using response filesTypically, you can use the response file that the installer generates after youperform SF installation on a system to install SF on other systems. You can alsocreate a response file using the -makeresponsefile option of the installer.
To install SF using response files
1 Make sure the systems where you want to install SF meet the installationrequirements.
2 Make sure the preinstallation tasks are completed.
3 Copy the response file to the system where you want to install SF.
4 Edit the values of the response file variables as necessary.
8Chapter
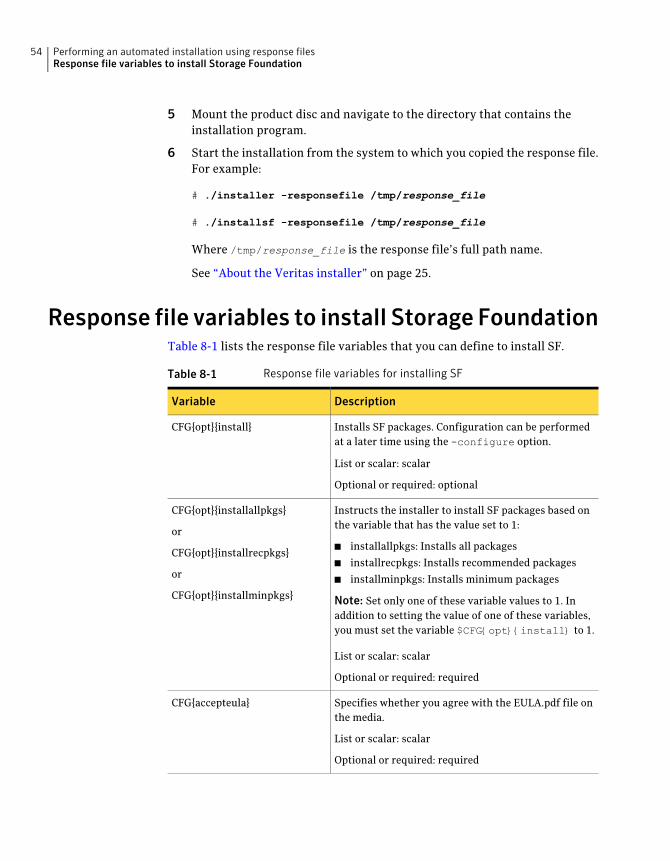
5 Mount the product disc and navigate to the directory that contains theinstallation program.
6 Start the installation from the system to which you copied the response file.For example:
# ./installer -responsefile /tmp/response_file
# ./installsf -responsefile /tmp/response_file
Where /tmp/response_file is the response file’s full path name.
See “About the Veritas installer” on page 25.
Response file variables to install Storage FoundationTable 8-1 lists the response file variables that you can define to install SF.
Table 8-1 Response file variables for installing SF
DescriptionVariable
Installs SF packages. Configuration can be performedat a later time using the -configure option.
List or scalar: scalar
Optional or required: optional
CFG{opt}{install}
Instructs the installer to install SF packages based onthe variable that has the value set to 1:
■ installallpkgs: Installs all packages
■ installrecpkgs: Installs recommended packages
■ installminpkgs: Installs minimum packages
Note: Set only one of these variable values to 1. Inaddition to setting the value of one of these variables,you must set the variable $CFG{opt}{install} to 1.
List or scalar: scalar
Optional or required: required
CFG{opt}{installallpkgs}
or
CFG{opt}{installrecpkgs}
or
CFG{opt}{installminpkgs}
Specifies whether you agree with the EULA.pdf file onthe media.
List or scalar: scalar
Optional or required: required
CFG{accepteula}
Performing an automated installation using response filesResponse file variables to install Storage Foundation
54
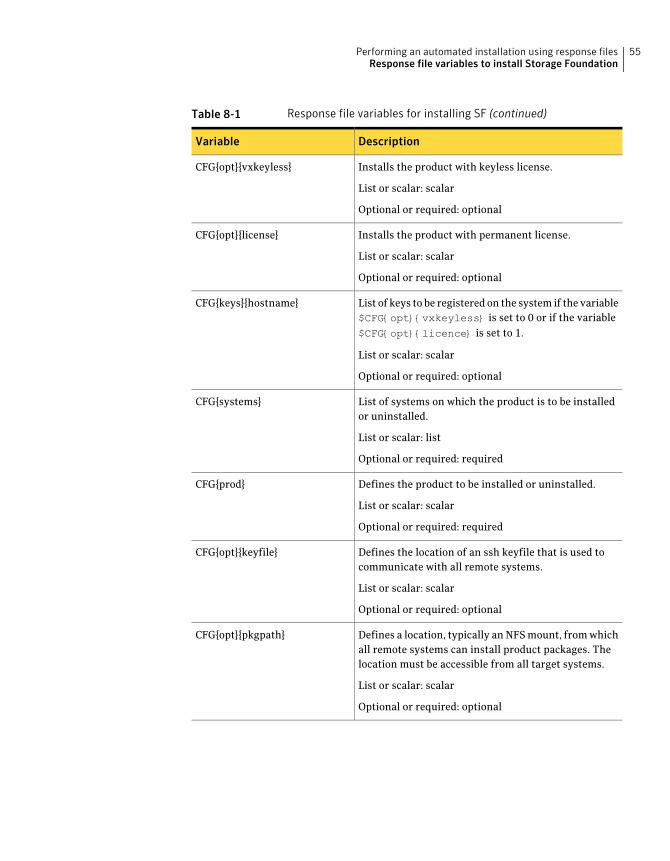
Table 8-1 Response file variables for installing SF (continued)
DescriptionVariable
Installs the product with keyless license.
List or scalar: scalar
Optional or required: optional
CFG{opt}{vxkeyless}
Installs the product with permanent license.
List or scalar: scalar
Optional or required: optional
CFG{opt}{license}
List of keys to be registered on the system if the variable$CFG{opt}{vxkeyless} is set to 0 or if the variable$CFG{opt}{licence} is set to 1.
List or scalar: scalar
Optional or required: optional
CFG{keys}{hostname}
List of systems on which the product is to be installedor uninstalled.
List or scalar: list
Optional or required: required
CFG{systems}
Defines the product to be installed or uninstalled.
List or scalar: scalar
Optional or required: required
CFG{prod}
Defines the location of an ssh keyfile that is used tocommunicate with all remote systems.
List or scalar: scalar
Optional or required: optional
CFG{opt}{keyfile}
Defines a location, typically an NFS mount, from whichall remote systems can install product packages. Thelocation must be accessible from all target systems.
List or scalar: scalar
Optional or required: optional
CFG{opt}{pkgpath}
55Performing an automated installation using response filesResponse file variables to install Storage Foundation
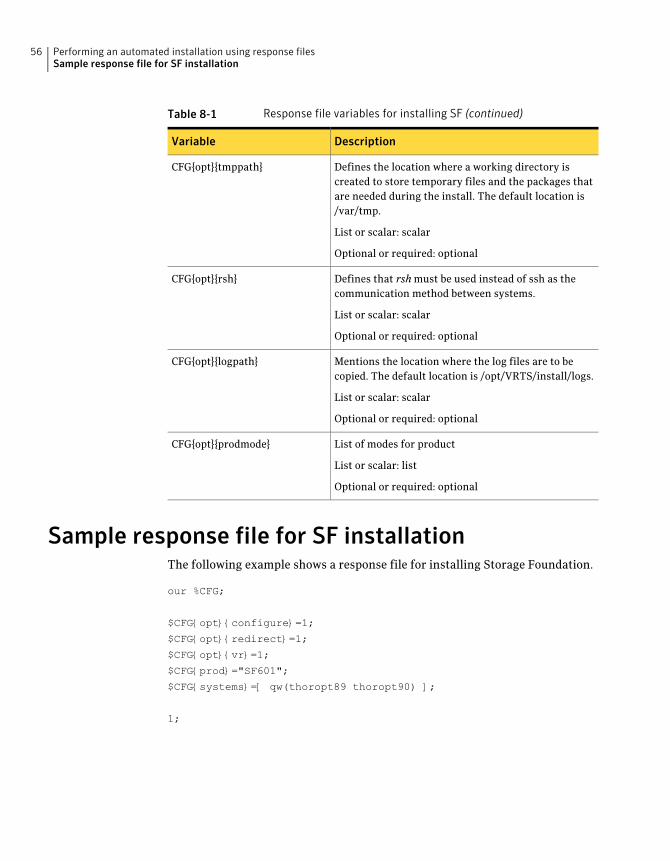
Table 8-1 Response file variables for installing SF (continued)
DescriptionVariable
Defines the location where a working directory iscreated to store temporary files and the packages thatare needed during the install. The default location is/var/tmp.
List or scalar: scalar
Optional or required: optional
CFG{opt}{tmppath}
Defines that rsh must be used instead of ssh as thecommunication method between systems.
List or scalar: scalar
Optional or required: optional
CFG{opt}{rsh}
Mentions the location where the log files are to becopied. The default location is /opt/VRTS/install/logs.
List or scalar: scalar
Optional or required: optional
CFG{opt}{logpath}
List of modes for product
List or scalar: list
Optional or required: optional
CFG{opt}{prodmode}
Sample response file for SF installationThe following example shows a response file for installing Storage Foundation.
our %CFG;
$CFG{opt}{configure}=1;
$CFG{opt}{redirect}=1;
$CFG{opt}{vr}=1;
$CFG{prod}="SF601";
$CFG{systems}=[ qw(thoropt89 thoropt90) ];
1;
Performing an automated installation using response filesSample response file for SF installation
56
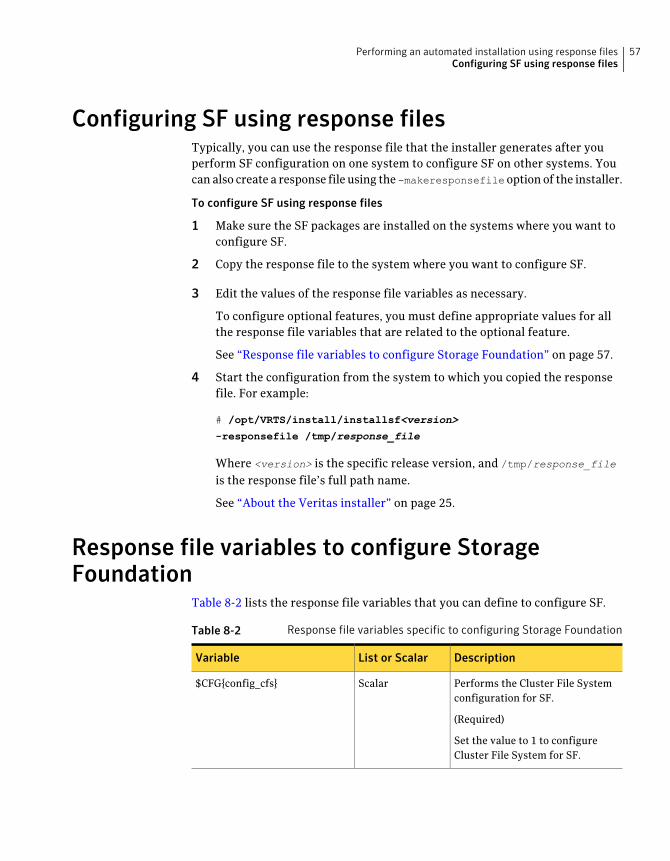
Configuring SF using response filesTypically, you can use the response file that the installer generates after youperform SF configuration on one system to configure SF on other systems. Youcan also create a response file using the -makeresponsefileoption of the installer.
To configure SF using response files
1 Make sure the SF packages are installed on the systems where you want toconfigure SF.
2 Copy the response file to the system where you want to configure SF.
3 Edit the values of the response file variables as necessary.
To configure optional features, you must define appropriate values for allthe response file variables that are related to the optional feature.
See “Response file variables to configure Storage Foundation” on page 57.
4 Start the configuration from the system to which you copied the responsefile. For example:
# /opt/VRTS/install/installsf<version>
-responsefile /tmp/response_file
Where <version> is the specific release version, and /tmp/response_file
is the response file’s full path name.
See “About the Veritas installer” on page 25.
Response file variables to configure StorageFoundation
Table 8-2 lists the response file variables that you can define to configure SF.
Table 8-2 Response file variables specific to configuring Storage Foundation
DescriptionList or ScalarVariable
Performs the Cluster File Systemconfiguration for SF.
(Required)
Set the value to 1 to configureCluster File System for SF.
Scalar$CFG{config_cfs}
57Performing an automated installation using response filesConfiguring SF using response files
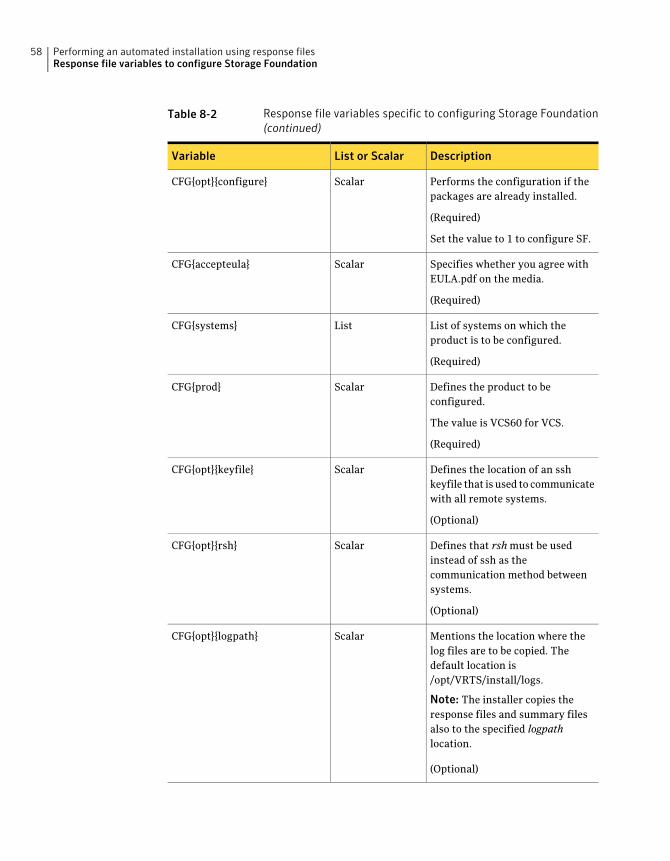
Table 8-2 Response file variables specific to configuring Storage Foundation(continued)
DescriptionList or ScalarVariable
Performs the configuration if thepackages are already installed.
(Required)
Set the value to 1 to configure SF.
ScalarCFG{opt}{configure}
Specifies whether you agree withEULA.pdf on the media.
(Required)
ScalarCFG{accepteula}
List of systems on which theproduct is to be configured.
(Required)
ListCFG{systems}
Defines the product to beconfigured.
The value is VCS60 for VCS.
(Required)
ScalarCFG{prod}
Defines the location of an sshkeyfile that is used to communicatewith all remote systems.
(Optional)
ScalarCFG{opt}{keyfile}
Defines that rsh must be usedinstead of ssh as thecommunication method betweensystems.
(Optional)
ScalarCFG{opt}{rsh}
Mentions the location where thelog files are to be copied. Thedefault location is/opt/VRTS/install/logs.
Note: The installer copies theresponse files and summary filesalso to the specified logpathlocation.
(Optional)
ScalarCFG{opt}{logpath}
Performing an automated installation using response filesResponse file variables to configure Storage Foundation
58

Table 8-2 Response file variables specific to configuring Storage Foundation(continued)
DescriptionList or ScalarVariable
Defines a Boolean value 0 or 1.
The value 1 indicates that theinstallation logs are uploaded to theSymantec Web site.
The value 0 indicates that theinstallation logs are not uploadedto the Symantec Web site.
(Optional)
ScalarCFG{uploadlogs}
Note that some optional variables make it necessary to define other optionalvariables. For example, all the variables that are related to the cluster servicegroup (csgnic, csgvip, and csgnetmask) must be defined if any are defined. Thesame is true for the SMTP notification (smtpserver, smtprecp, and smtprsev), theSNMP trap notification (snmpport, snmpcons, and snmpcsev), and the GlobalCluster Option (gconic, gcovip, and gconetmask).
59Performing an automated installation using response filesResponse file variables to configure Storage Foundation

Performing an automated installation using response filesResponse file variables to configure Storage Foundation
60
Installing StorageFoundation using operatingsystem-specific methods
This chapter includes the following topics:
■ Installing SF on Solaris 11 using Automated Installer
■ Installing SF on Solaris 10 using JumpStart
■ Installing SF using the system command
■ Manually installing packages on Solaris brand non-global zones
Installing SF on Solaris 11 using Automated InstallerYou can use the Oracle Solaris Automated Installer (AI) to install the Solaris 11operating system on multiple client systems in a network. AI performs a hands-freeinstallation (automated installation without manual interactions) of both x86 andSPARC systems. You can also use AI media (AI bootable image, provided by Oracle,which can be downloaded from the Oracle Web site) to install the Oracle SolarisOS on a single SPARC or x86 platform. All cases require access to a packagerepository on the network to complete the installation.
About Automated InstallationAI automates the installation of the Oracle Solaris 11 OS on one or more SPARCor x86 clients in a network. Automated Installation applies to Solaris 11 only. Youcan install the Oracle Solaris OS on many different types of clients.The clientscan differ in:
9Chapter
■ architecture
■ memory charecteristics
■ MAC address
■ IP address
■ CPU
The installations can differ depending on specifications including networkconfiguration and packages installed.
An automated installation of a client in a local network consists of the followinghigh-level steps:
1 A client system boots and gets IP information from the DHCP server
2 Characteristics of the client determine which AI service and which installationinstructions are used to install the client.
3 The installer uses the AI service instructions to pull the correct packagesfrom the package repositories and install the Oracle Solaris OS on the client.
Using Automated InstallerTo use Automated Installer to install systems over the network, set up DHCP andset up an AI service on an AI server. The DHCP server and AI server can be thesame system or two different systems.
Make sure that the systems can access an Oracle Solaris Image Packaging System(IPS) package repository. The IPS package repository can reside on the AI server,on another server on the local network, or on the Internet.
An AI service is associated with a SPARC or x86 AI install image and one or moresets of installation instructions. The installation instructions specify one or moreIPS package repositories from where the system retrieves the packages neededto complete the installation. The installation instructions also include the namesof additional packages to install and information such as target device and partitioninformation. You can also specify instructions for post-installation configurationof the system.
Consider the operating systems and packages you are installing on the systems.Depending on your configuration and needs, you may want do one of the following:
■ If two systems have different architectures or need to be installed with differentversions of the Oracle Solaris OS, create two AI services, and associate eachAI service with a different AI image.
■ If two systems need to be installed with the same version of the Oracle SolarisOS but need to be installed differently in other ways, create two sets of
Installing Storage Foundation using operating system-specific methodsInstalling SF on Solaris 11 using Automated Installer
62
installation instructions for the AI service. The different installationinstructions can specify different packages to install or a different slice as theinstall target.
The installation begins when you boot the system. DHCP directs the system tothe AI install server, and the system accesses the install service and the installationinstructions within that service.
For more information, see the Oracle® Solaris 11 Express Automated InstallerGuide.
Using AI to install the Solaris 11 operating system and SFHA productsUse the following procedure to install the Solaris 11 operating system and SFHAproducts using AI.
To use AI to install the Solaris 11 operating system and SFHA products
1 Follow the Oracle documentation to setup a Solaris AI server and DHCP server.
You can find the documentation at http://docs.oracle.com.
2 Set up the Symantec package repository.
Run the following commands to start up necessary SMF services and createdirectories:
# svcadm enable svc:/network/dns/multicast:default
# mkdir /ai
# zfs create -o compression=on -o mountpoint=/ai rpool/ai
63Installing Storage Foundation using operating system-specific methodsInstalling SF on Solaris 11 using Automated Installer
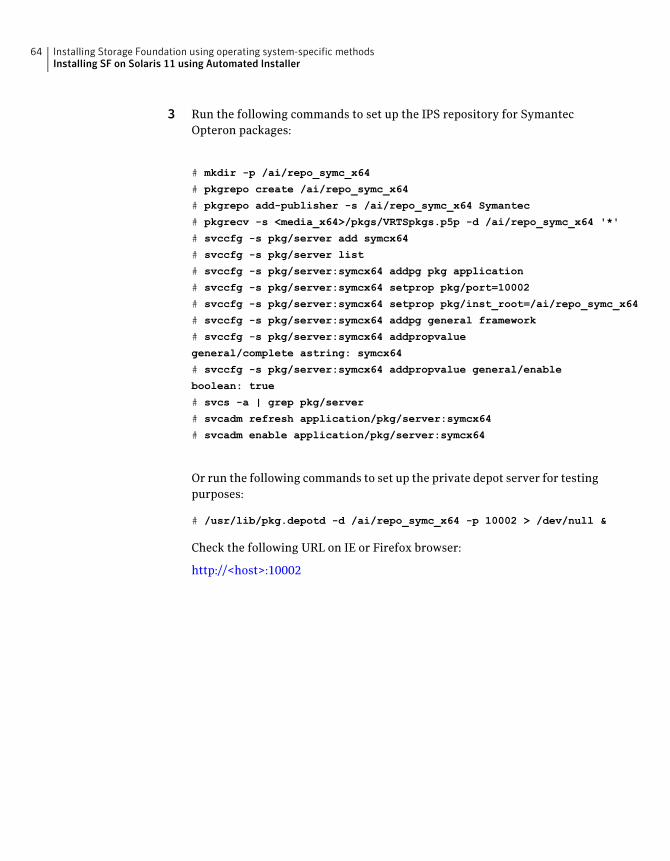
3 Run the following commands to set up the IPS repository for SymantecOpteron packages:
# mkdir -p /ai/repo_symc_x64
# pkgrepo create /ai/repo_symc_x64
# pkgrepo add-publisher -s /ai/repo_symc_x64 Symantec
# pkgrecv -s <media_x64>/pkgs/VRTSpkgs.p5p -d /ai/repo_symc_x64 '*'
# svccfg -s pkg/server add symcx64
# svccfg -s pkg/server list
# svccfg -s pkg/server:symcx64 addpg pkg application
# svccfg -s pkg/server:symcx64 setprop pkg/port=10002
# svccfg -s pkg/server:symcx64 setprop pkg/inst_root=/ai/repo_symc_x64
# svccfg -s pkg/server:symcx64 addpg general framework
# svccfg -s pkg/server:symcx64 addpropvalue
general/complete astring: symcx64
# svccfg -s pkg/server:symcx64 addpropvalue general/enable
boolean: true
# svcs -a | grep pkg/server
# svcadm refresh application/pkg/server:symcx64
# svcadm enable application/pkg/server:symcx64
Or run the following commands to set up the private depot server for testingpurposes:
# /usr/lib/pkg.depotd -d /ai/repo_symc_x64 -p 10002 > /dev/null &
Check the following URL on IE or Firefox browser:
http://<host>:10002
Installing Storage Foundation using operating system-specific methodsInstalling SF on Solaris 11 using Automated Installer
64
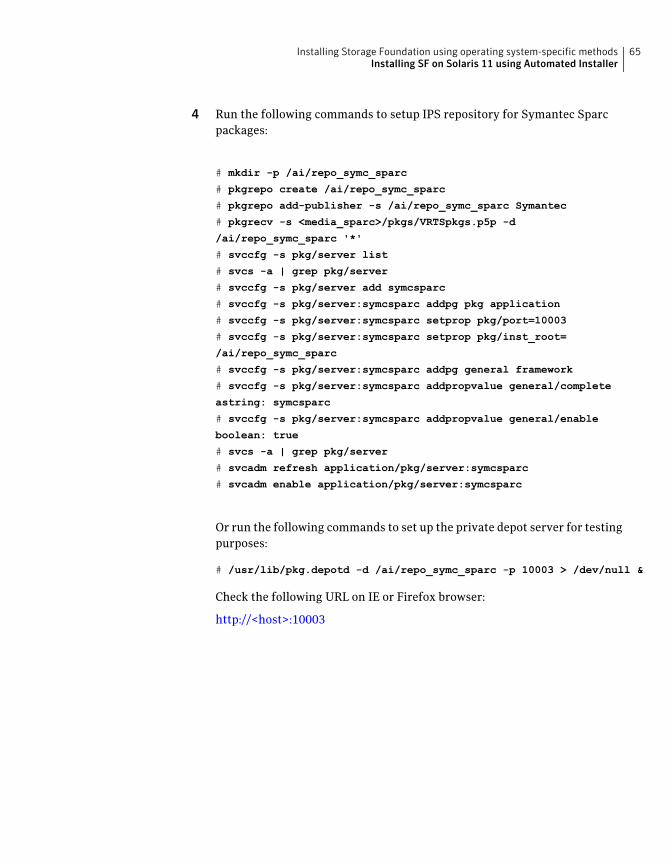
4 Run the following commands to setup IPS repository for Symantec Sparcpackages:
# mkdir -p /ai/repo_symc_sparc
# pkgrepo create /ai/repo_symc_sparc
# pkgrepo add-publisher -s /ai/repo_symc_sparc Symantec
# pkgrecv -s <media_sparc>/pkgs/VRTSpkgs.p5p -d
/ai/repo_symc_sparc '*'
# svccfg -s pkg/server list
# svcs -a | grep pkg/server
# svccfg -s pkg/server add symcsparc
# svccfg -s pkg/server:symcsparc addpg pkg application
# svccfg -s pkg/server:symcsparc setprop pkg/port=10003
# svccfg -s pkg/server:symcsparc setprop pkg/inst_root=
/ai/repo_symc_sparc
# svccfg -s pkg/server:symcsparc addpg general framework
# svccfg -s pkg/server:symcsparc addpropvalue general/complete
astring: symcsparc
# svccfg -s pkg/server:symcsparc addpropvalue general/enable
boolean: true
# svcs -a | grep pkg/server
# svcadm refresh application/pkg/server:symcsparc
# svcadm enable application/pkg/server:symcsparc
Or run the following commands to set up the private depot server for testingpurposes:
# /usr/lib/pkg.depotd -d /ai/repo_symc_sparc -p 10003 > /dev/null &
Check the following URL on IE or Firefox browser:
http://<host>:10003
65Installing Storage Foundation using operating system-specific methodsInstalling SF on Solaris 11 using Automated Installer
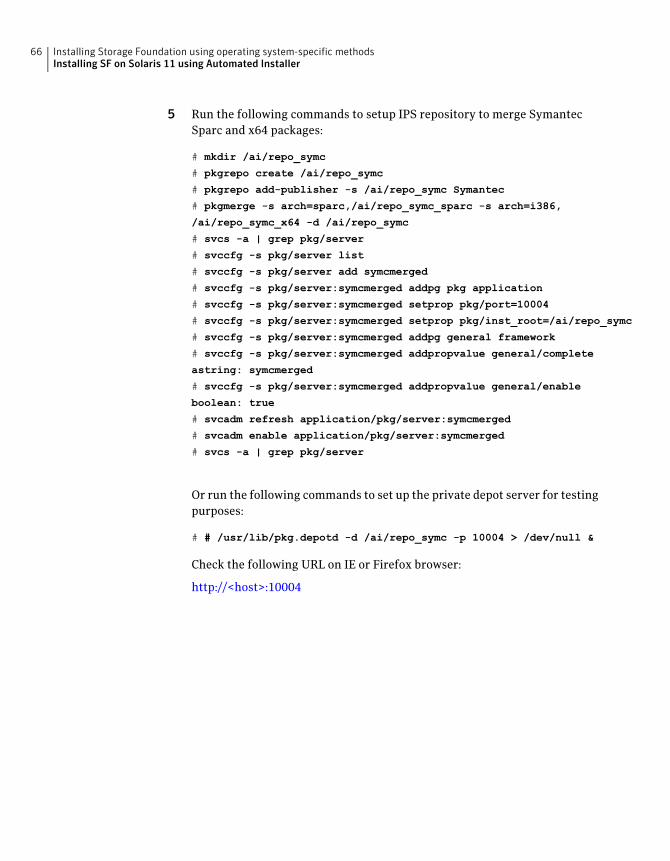
5 Run the following commands to setup IPS repository to merge SymantecSparc and x64 packages:
# mkdir /ai/repo_symc
# pkgrepo create /ai/repo_symc
# pkgrepo add-publisher -s /ai/repo_symc Symantec
# pkgmerge -s arch=sparc,/ai/repo_symc_sparc -s arch=i386,
/ai/repo_symc_x64 -d /ai/repo_symc
# svcs -a | grep pkg/server
# svccfg -s pkg/server list
# svccfg -s pkg/server add symcmerged
# svccfg -s pkg/server:symcmerged addpg pkg application
# svccfg -s pkg/server:symcmerged setprop pkg/port=10004
# svccfg -s pkg/server:symcmerged setprop pkg/inst_root=/ai/repo_symc
# svccfg -s pkg/server:symcmerged addpg general framework
# svccfg -s pkg/server:symcmerged addpropvalue general/complete
astring: symcmerged
# svccfg -s pkg/server:symcmerged addpropvalue general/enable
boolean: true
# svcadm refresh application/pkg/server:symcmerged
# svcadm enable application/pkg/server:symcmerged
# svcs -a | grep pkg/server
Or run the following commands to set up the private depot server for testingpurposes:
# # /usr/lib/pkg.depotd -d /ai/repo_symc -p 10004 > /dev/null &
Check the following URL on IE or Firefox browser:
http://<host>:10004
Installing Storage Foundation using operating system-specific methodsInstalling SF on Solaris 11 using Automated Installer
66
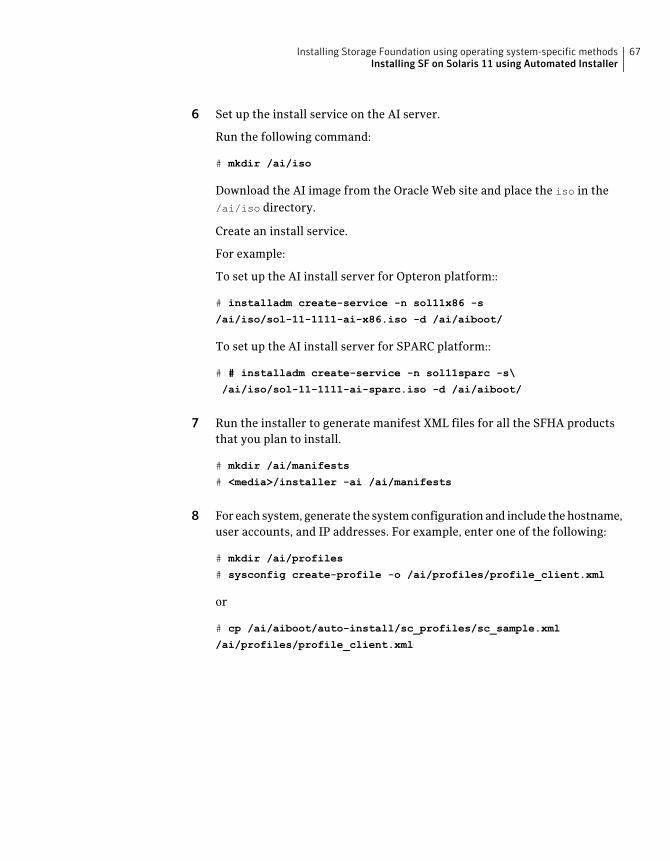
6 Set up the install service on the AI server.
Run the following command:
# mkdir /ai/iso
Download the AI image from the Oracle Web site and place the iso in the/ai/iso directory.
Create an install service.
For example:
To set up the AI install server for Opteron platform::
# installadm create-service -n sol11x86 -s
/ai/iso/sol-11-1111-ai-x86.iso -d /ai/aiboot/
To set up the AI install server for SPARC platform::
# # installadm create-service -n sol11sparc -s\
/ai/iso/sol-11-1111-ai-sparc.iso -d /ai/aiboot/
7 Run the installer to generate manifest XML files for all the SFHA productsthat you plan to install.
# mkdir /ai/manifests
# <media>/installer -ai /ai/manifests
8 For each system, generate the system configuration and include the hostname,user accounts, and IP addresses. For example, enter one of the following:
# mkdir /ai/profiles
# sysconfig create-profile -o /ai/profiles/profile_client.xml
or
# cp /ai/aiboot/auto-install/sc_profiles/sc_sample.xml
/ai/profiles/profile_client.xml
67Installing Storage Foundation using operating system-specific methodsInstalling SF on Solaris 11 using Automated Installer

9 Add a system and match it to the specified product manifest and systemconfiguration.
Run the following command to add an Opteron system, for example:
# installadm create-client -e "<client_MAC>" -n sol11x86
# installadm add-manifest -n sol11x86 -f
/ai/manifests/vrts_manifest_sfha.xml
# installadm create-profile -n sol11x86 -f
/ai/profiles/profile_client.xml -p profile_sc
# installadm set-criteria -n sol11x86 -m vrts_sfha
-p profile_sc -c mac="<client_MAC>"
# installadm list -m -c -p -n sol11x86
Run the following command to add a SPARC system, for example:
# installadm create-client -e "<client_MAC>" -n sol11sparc
# installadm add-manifest -n sol11sparc -f \
/ai/manifests/vrts_manifest_sfha.xml
# installadm create-profile -n sol11sparc -f \
/ai/profiles/profile_client.xml -p profile_sc
# installadm set-criteria -n sol11sparc -m \
vrts_sfha -p profile_sc -c mac="<client_MAC>"
# installadm list -m -c -p -n sol11sparc
10 For Opteron system, use Preboot Execution Environment(PXE) to reboot thesystem and install the operating system and Storage Foundation products.
For Sparc system, run the following command to reboot the system and installthe operating system and Storage Foundation products:
# boot net:dhcp - install
Installing SF on Solaris 10 using JumpStartThis installation method applies only to Solaris 10. These JumpStart instructionsassume a working knowledge of JumpStart. See the JumpStart documentationthat came with your operating system for details on using JumpStart.
Upgrading is not supported. The following procedure assumes a stand-aloneconfiguration.
For the language pack, you can use JumpStart to install packages. You add thelanguage packages in the script, and put those files in the JumpStart serverdirectory.
Installing Storage Foundation using operating system-specific methodsInstalling SF on Solaris 10 using JumpStart
68
You can use a Flash archive to install SF and the operating system in conjunctionwith JumpStart.
See “Using a Flash archive to install SF and the operating system” on page 73.
Overview of JumpStart installation tasksReview the summary of tasks before you perform the JumpStart installation.
Summary of tasks
1 Add a client (register to the JumpStart server). See the JumpStartdocumentation that came with your operating system for details.
2 Read the JumpStart installation instructions.
3 Generate the finish scripts.
See “Generating the finish scripts” on page 69.
4 Prepare shared storage installation resources.
See “Preparing installation resources” on page 71.
5 Modify the rules file for JumpStart.
See the JumpStart documentation that came with your operating system fordetails.
6 Install the operating system using the JumpStart server.
7 When the system is up and running, run the installer command from theinstallation media to configure the Veritas software.
# /opt/VRTS/install/installer -configure
See “About the Veritas installer” on page 25.
Generating the finish scriptsPerform these steps to generate the finish scripts to install SF.
69Installing Storage Foundation using operating system-specific methodsInstalling SF on Solaris 10 using JumpStart
To generate the script
1 Run the product installer program to generate the scripts for all products.
./installer -jumpstart directory_to_generate_scripts
Or
./install<productname> -jumpstart directory_to_generate_script
where <productname> is the product's installation command, anddirectory_to_generate_scripts is where you want to put the product's script.
For example:
# ./installsf -jumpstart /js_scripts
2 When you are prompted to encapsulate the root disk automatically, chooseyes to do so. If you do not want to encapsulate it automatically, choose noand go to step 6.
3 Specify a disk group name for the root disk.
Specify the disk group name of the root disk to be encapsulated:
rootdg
4 Specify private region length.
Specify the private region length of the root disk to be
encapsulated: (65536)
Installing Storage Foundation using operating system-specific methodsInstalling SF on Solaris 10 using JumpStart
70
5 Specify the disk's media name of the root disk to encapsulate.
Specify the disk media name of the root disk to be encapsulated:
(rootdg_01)
6 JumpStart finish scripts and encapsulation scripts are generated in thedirectory you specified in step 1.
Output resembles:
The finish scripts for SF is generated at /js_scripts/
jumpstart_sf.fin
The encapsulation boot disk script for VM is generated at
/js_scripts/encap_bootdisk_vm.fin
List the js_scripts directory.
# ls /js_scripts
Output resembles:
encap_bootdisk_vm.fin jumpstart_sf.fin
Preparing installation resourcesPrepare resources for the JumpStart installation.
To prepare the resources
1 Copy the pkgs directory of the installation media to the shared storage.
# cd /path_to_installation_media
# cp -r pkgs BUILDSRC
2 Generate the response file with the list of packages.
# cd BUILDSRC/pkgs/
# pkgask -r package_name.response -d /
BUILDSRC/pkgs/packages_name.pkg
71Installing Storage Foundation using operating system-specific methodsInstalling SF on Solaris 10 using JumpStart
3 Create the adminfile file under BUILDSRC/pkgs/ directory.
mail=
instance=overwrite
partial=nocheck
runlevel=quit
idepend=quit
rdepend=nocheck
space=quit
setuid=nocheck
conflict=nocheck
action=nocheck
basedir=default
4 If you want to encapsulate the root disk automatically when you perform theJumpStart installation, copy the scripts encap_bootdisk_vm.fin generatedpreviously to ENCAPSRC.
See “Generating the finish scripts” on page 69.
Adding language pack information to the finish fileTo add the language pack information to the finish file, perform the followingprocedure.
Installing Storage Foundation using operating system-specific methodsInstalling SF on Solaris 10 using JumpStart
72
To add the language pack information to the finish file
1 For the language pack, copy the language packages from the language packinstallation disc to the shared storage.
# cd /cdrom/cdrom0/pkgs
# cp -r * BUILDSRC/pkgs
If you downloaded the language pack:
# cd /path_to_language_pack_installation_media/pkgs
# cp -r * BUILDSRC/pkgs
2 In the finish script, copy the product package information and replace theproduct packages with language packages.
3 The finish script resembles:
. . .
for PKG in product_packages
do
...
done. . .
for PKG in language_packages
do
...
done. . .
Using a Flash archive to install SF and the operating systemYou can only use Flash archive on the Solaris 10 operating system. In the followingoutline, refer to Solaris documentation for Solaris-specific tasks.
Note: Symantec does not support Flash Archive installation if the root disk of themaster system is encapsulated.
The following is an overview of the creation and installation of a Flash archivewith Veritas software.
■ If you plan to start flar (flash archive) creation from bare metal, perform step1 through step 10.
■ If you plan to start flar creation from a system where you have installed, butnot configured the product, perform step 1 through step 4. Skip step 5 andfinish step 6 through step 10.
73Installing Storage Foundation using operating system-specific methodsInstalling SF on Solaris 10 using JumpStart
■ If you plan to start flar creation from a system where you have installed andconfigured the product, perform step 5 through step 10.
Flash archive creation overview
1 Ensure that you have installed Solaris 10 on the master system.
2 Use JumpStart to create a clone of a system.
3 Reboot the cloned system.
4 Install the Veritas products on the master system.
Perform one of the installation procedures from this guide.
5 If you have configured the product on the master system, create thevrts_deployment.sh file and the vrts_deployment.cf file and copy themto the master system.
See “Creating the Veritas post-deployment scripts” on page 74.
6 Use the flarcreate command to create the Flash archive on the mastersystem.
7 Copy the archive back to the JumpStart server.
8 Use JumpStart to install the Flash archive to the selected systems.
9 Configure the Veritas product on all nodes in the cluster. Start configurationwith the following command:
# /opt/VRTS/install/installsf -configure
See “About the Veritas installer” on page 25.
10 Perform post-installation and configuration tasks.
See the product installation guide for the post-installation and configurationtasks.
Creating the Veritas post-deployment scriptsThe generated files vrts_deployment.sh and vrts_post-deployment.cf arecustomized Flash archive post-deployment scripts. These files clean up Veritasproduct settings on a cloned system before you reboot it for the first time. Includethese files in your Flash archives.
Installing Storage Foundation using operating system-specific methodsInstalling SF on Solaris 10 using JumpStart
74
To create the post-deployment scripts
1 Mount the product disc.
2 From the prompt, run the -flash_archive option for the installer. Specifya directory where you want to create the files.
# ./installer -flash_archive /tmp
3 Copy the vrts_postedeployment.sh file and the vrts_postedeployment.cf fileto the golden system.
4 On the golden system perform the following:
■ Put the vrts_postdeployment.sh file in the /etc/flash/postdeploymentdirectory.
■ Put the vrts_postdeployment.cf file in the /etc/vx directory.
5 Make sure that the two files have the following ownership and permissions:
# chown root:root /etc/flash/postdeployment/vrts_postdeployment.sh
# chmod 755 /etc/flash/postdeployment/vrts_postdeployment.sh
# chown root:root /etc/vx/vrts_postdeployment.cf
# chmod 644 /etc/vx/vrts_postdeployment.cf
Note that you only need these files in a Flash archive where you have installedVeritas products.
Installing SF using the system commandInstalling SF on Solaris 10 using the pkgadd command
On Solaris 10, the packages must be installed while in the global zone.
To install SF on Solaris 10 using the pkgadd command
1 Mount the software disc.
See “Mounting the product disc” on page 38.
2 Copy the supplied VRTS* files from the installation media to a temporarylocation. Modify them if needed.
# cp /cdrom/cdrom0/pkgs/VRTS* \
/tmp/pkgs
75Installing Storage Foundation using operating system-specific methodsInstalling SF using the system command
3 Create the admin file in the current directory. Specify the -a adminfile
option when you use the pkgadd command:
mail=
instance=overwrite
partial=nocheck
runlevel=quit
idepend=quit
rdepend=nocheck
space=quit
setuid=nocheck
conflict=nocheck
action=nocheck
basedir=default
4 Use the product-specific install command with one of the following optionsto get a list of packages in the order to be installed:
■ minpkgs
■ recpkgs
■ allpkgs
See “About the Veritas installer” on page 25.
See “Installation script options” on page 207.
5 Install the packages listed in step 4.
# pkgadd -a adminfile -d /tmp/pkgs pkgname.pkg
On Solaris 10, these packages must be installed while in the global zone. If apackage's pkginfo file contains the variable SUNW_PKG_ALLZONES set notequal to true, the -G option should additionally be specified to the pkgadd
command.
6 Verify that the packages are installed:
# pkginfo -l
packagename
7 Start the processes.
See “Starting and stopping processes for the Veritas products ” on page 180.
Installing SF on Solaris 11 using the pkg install command
Installing Storage Foundation using operating system-specific methodsInstalling SF using the system command
76
To install SF on Solaris 11 using the pkg install command
1 Mount the software disc.
See “Mounting the product disc” on page 38.
2 Copy the supplied VRTS* files from the installation media to a temporarylocation. Modify them if needed.
# cp /cdrom/cdrom0/pkgs/VRTS* \
/tmp/pkgs
3 Use the product-specific install command with one of the following optionsto get a list of packages in the order to be installed:
■ minpkgs
■ recpkgs
■ allpkgs
See “About the Veritas installer” on page 25.
See “Installation script options” on page 207.
4 Install the packages listed in step 3.
# /usr/bin/pkg set-publisher -p /tmp/pkgs/VRTSpkgs.p5p Symantec
# /usr/bin/pkg install -accept pkgname
# /usr/bin/pkg unset-publisher Symantec
5 Verify that the packages are installed:
# pkg info packagename
6 Start the processes.
See “Starting and stopping processes for the Veritas products ” on page 180.
Manually installing packages on Solaris brandnon-global zones
With Oracle Solaris 11, you must manually install SF packages inside non-globalzones. The native non-global zones are called Solaris brand zones.
77Installing Storage Foundation using operating system-specific methodsManually installing packages on Solaris brand non-global zones
To install packages manually on Solaris brand non-global zones:
1 Ensure that the SMF service svc:/application/pkg/system-repository:defaultis online on the global zone.
# svcs svc:/application/pkg/system-repository
2 Log on to the non-global zone as a superuser.
3 Copy the VRTSpkgs.p5p package from the pkgs directory from the installationmedia to the non-global zone (for example at /tmp/install directory).
4 Disable the publishers that are not reachable, as package install may fail ifany of the already added repositories are unreachable.
#pkg set-publisher --disable <publisher name>
5 Add a file-based repository in the non-global zone.
# pkg set-publisher -p/tmp/install/VRTSpkgs.p5p Symantec
6 Install the required packages.
7 Remove the publisher on the non-global zone.
#pkg unset-publisher Symantec
8 Clear the state of the SMF service, as setting the file-based repository causesSMF service svc:/application/pkg/system-repository:default to go intomaintenance state.
# svcadm clear svc:/application/pkg/system-repository:default
9 Enable the publishers that were disabled earlier.
# pkg set-publisher --enable <publisher>
Note: Perform steps 2 through 9 on each non-global zone.
Installing Storage Foundation using operating system-specific methodsManually installing packages on Solaris brand non-global zones
78
Configuring StorageFoundation
This chapter includes the following topics:
■ Configuring Storage Foundation using the installer
■ Configuring Storage Foundation manually
■ Configuring the Storage Foundation for Databases repository database afterinstallation
Configuring Storage Foundation using the installerYou can use the installer to configure Storage Foundation, although it requiresminimal configuration. You do need to start it.
To start Storage Foundation
1 Go to the installation directory.
2 Run the installer command with the configure option.
# ./installer -configure
Configuring Storage Foundation manuallyYou can manually configure different products within Storage Foundation.
10Chapter
Configuring Veritas Volume ManagerUse the following procedures to configure Veritas Volume Manager. If you haveinstalled and configured VxVM using the product installer, you do not need tocomplete the procedures in this section.
For information on setting up VxVM disk groups and volumes after installation,see "Configuring Veritas Volume Manager" in the Veritas Storage FoundationAdministrator’s Guide.
In releases of VxVM (Volume Manager) before 4.0, a system that was installedwith VxVM was configured with a default disk group, rootdg. The rootdg diskgroup had to contain at least one disk. By default, operations were directed to therootdg disk group. From release 4.0 onward, VxVM can function without any diskgroup having been configured.
Starting and enabling the configuration daemonThe VxVM configuration daemon (vxconfigd) maintains VxVM disk and diskgroup configurations. The vxconfigd communicates configuration changes tothe kernel and modifies configuration information stored on disk.
Startup scripts usually invoke vxconfigd at system boot time. The vxconfigd
daemon must be running for VxVM to operate properly.
The following procedures describe how to check thatvxconfigd is started, whetherit is enabled or disabled, how to start it manually, or how to enable it as required.
To determine whether vxconfigd is enabled, use the following command:
# vxdctl mode
The following message indicates that the vxconfigd daemon is running andenabled:
mode: enabled
This message indicates that vxconfigd is not running:
mode: not-running
This message indicates that vxconfigd is running, but not enabled:
mode: disabled
To start the vxconfigd daemon, enter the following command:
# vxconfigd
Configuring Storage FoundationConfiguring Storage Foundation manually
80
To enable the volume daemon, enter the following command:
# vxdctl enable
Once started, vxconfigd automatically becomes a background process.
By default, vxconfigd writes error messages to the console. However, you canconfigure it to write errors to a log file. For more information, see thevxconfigd(1M) and vxdctl(1M) manual pages.
Starting the volume I/O daemonThe volume I/O daemon (vxiod) provides extended I/O operations without blockingcalling processes. Several vxiod daemons are usually started at system boot timeafter initial installation, and they should be running at all times. The procedurebelow describes how to verify that the vxiod daemons are running, and how tostart them if necessary.
To verify that vxiod daemons are running, enter the following command:
# vxiod
The vxiod daemon is a kernel thread and is not visible using the ps command.
If, for example, 16 vxiod daemons are running, the following message displays:
16 volume I/O daemons running
where 16 is the number of vxioddaemons currently running. If no vxioddaemonsare currently running, start some by entering this command:
# vxiod set no_of_daemons
where the number of daemons ranges from 1 to16. Symantec recommends thatat least one vxiod daemon should be run for each CPU in the system.
For more information, see the vxiod(1M) manual page.
Using vxinstall to configure Veritas Volume ManagerIf you used the Veritas Installation Menu or the installvm script, you do not needto carry out the instructions in this section. Licensing, configuration of enclosurebased naming and creation of a default disk group are managed by the menuinstaller and the installvm script.
Because you are no longer required to configure VxVM disks immediately, thevxinstall command no longer invokes the vxdiskadm program, making it muchsimpler than in previous releases.
81Configuring Storage FoundationConfiguring Storage Foundation manually
The utility provides the following functions:
■ Licensing VxVM.
■ Setting up a system-wide default disk group.
■ Starting VxVM daemons in case installation of SF has been done manually.
To run the command, enter
# vxinstall
which will prompt you to enter a license key:
Are you prepared to enter a license key [y,n,q,?] (default: y) y
The vxinstall program then asks if you want to set up a system-wide defaultdisk group, which is optional:
Do you want to setup a system wide default disk group ?
[y,n,q,?] (default: y)
VxVM will continue with the question:
Which disk group [<group>,list,q,?] ?
If you know the name of the disk group that you want to use as the default diskgroup, enter it at the prompt, or use the list option and make a selection.
In releases prior to VxVM 4.0, the default disk group was rootdg (the root diskgroup). For VxVM to function, the rootdg disk group had to exist and it had tocontain at least one disk. This requirement no longer exists, however you mayfind it convenient to create a system-wide default disk group. For operations thatrequire a disk group, the system-wide default disk group will be used if the VxVMcommand is not specified with the -g option. The main benefit of creating a defaultdisk group is that VxVM commands default to the default disk group and you willnot need to use the -g option. To verify the default disk group after it has beencreated, enter the command:
# vxdg defaultdg
VxVM does not allow you to use the following names for the default disk groupbecause they are reserved words: bootdg, defaultdg and nodg.
At this stage, the installation of VxVM is complete. To carry out further taskssuch as disk encapsulation or initialization, see the Veritas Storage FoundationAdministrator’s Guide.
Configuring Storage FoundationConfiguring Storage Foundation manually
82
Configuring Veritas File SystemAfter installing Veritas File System, you can create a file system on a disk slice orVeritas Volume Manager volume with the mkfs command. Before you can use thisfile system, you must mount it with the mount command. You can unmount thefile system later with the umount command. A file system can be automaticallymounted at system boot time if you add an entry for it in the following file:
/etc/vfstab
The Veritas-specific commands are described in the Veritas File System guidesand online manual pages.
See the Veritas File System Administrator’s Guide.
Loading and unloading the file system moduleThe vxfs file system module automatically loads on the first reference to a VxFSfile system. This occurs when a user tries to mount a VxFS disk layout. In someinstances, you may want to load the file system module manually. To do this, firstload vxfs, then vxportal. vxportal is a pseudo device driver that enables VxFScommands to issue ioctls to the VxFS modules even when there are no file systemsmounted on the system.
# modload /kernel/fs/vxfs
# modload /kernel/drv/vxportal
If you have a license for the Veritas Quick I/O feature, you can load its kernelmodules:
# modload /usr/kernel/drv/sparcv9/fdd
To determine if the modules successfully loaded, enter:
# modinfo | grep vxportal
# modinfo | grep vxfs
The above commands provide information about the modules. The first field inthe output is the module ID.
You can unload the module by entering:
# modunload -i portal_module_id
# modunload -i vxfs_module_id
The modunload command fails if any mounted VxFS file systems exist. Todetermine if any VxFS file systems are mounted, enter:
83Configuring Storage FoundationConfiguring Storage Foundation manually
# df -F vxfs
vxtunefs command permissions and Cached Quick I/OBy default, you must have superuser (root) privileges to use the/opt/VRTS/bin/vxtunefs command. The vxtunefs command is a tool that letsyou change caching policies to enable Cached Quick I/O and change other filesystem options. Database administrators can be granted permission to changedefault file system behavior in order to enable and disable Cached Quick I/O. Thesystem administrator must change thevxtunefs executable permissions as follows:
# chown root /opt/VRTS/bin/vxtunefs
# chgrp dba /opt/VRTS/bin/vxtunefs
# chmod 4550 /opt/VRTS/bin/vxtunefs
Setting the permissions for /opt/VRTS/bin/vxtunefs to 4550 allows all users inthe dba group to use the vxtunefs command to modify caching behavior for QuickI/O files.
For more information, see the Veritas File System Administrator’s Guide.
Configuring the Storage Foundation for Databasesrepository database after installation
If you want to use Storage Foundation for Databases (SFDB), you must set up theSFDB repository after installing and configuring SF and . For SFDB repository setup procedures:
SeeVeritasStorageFoundation:StorageandAvailabilityManagement forDatabases
Configuring Storage FoundationConfiguring the Storage Foundation for Databases repository database after installation
84
Upgrade of SF
■ Chapter 11. Planning to upgrade SF
■ Chapter 12. Upgrading Storage Foundation
■ Chapter 13. Performing an automated SF upgrade using response files
■ Chapter 14. Upgrading SF using Live Upgrade
■ Chapter 15. Migrating from Storage Foundation Basic to Storage FoundationStandard
■ Chapter 16. Performing post-upgrade tasks
3Section

86
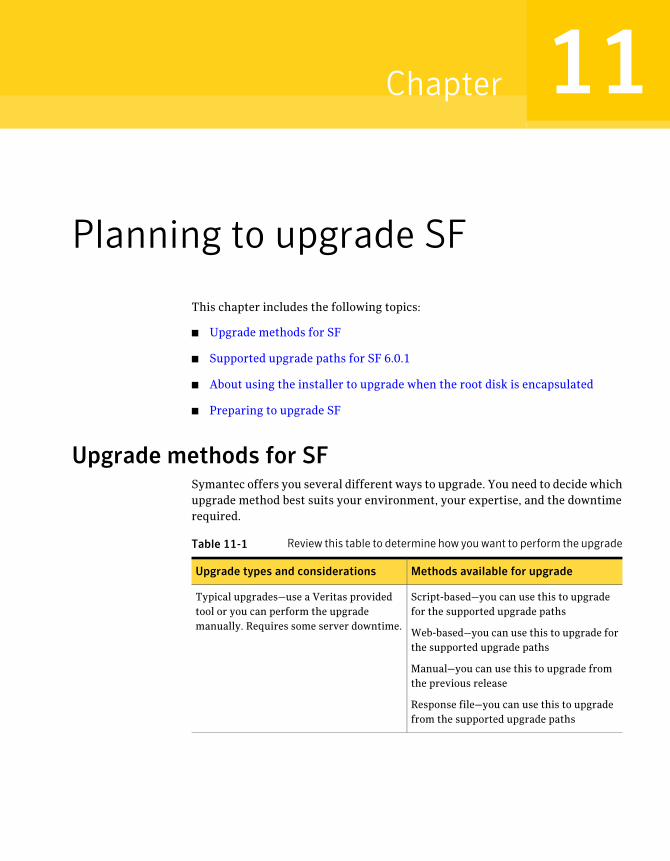
Planning to upgrade SF
This chapter includes the following topics:
■ Upgrade methods for SF
■ Supported upgrade paths for SF 6.0.1
■ About using the installer to upgrade when the root disk is encapsulated
■ Preparing to upgrade SF
Upgrade methods for SFSymantec offers you several different ways to upgrade. You need to decide whichupgrade method best suits your environment, your expertise, and the downtimerequired.
Table 11-1 Review this table to determine how you want to perform the upgrade
Methods available for upgradeUpgrade types and considerations
Script-based—you can use this to upgradefor the supported upgrade paths
Web-based—you can use this to upgrade forthe supported upgrade paths
Manual—you can use this to upgrade fromthe previous release
Response file—you can use this to upgradefrom the supported upgrade paths
Typical upgrades—use a Veritas providedtool or you can perform the upgrademanually. Requires some server downtime.
11Chapter
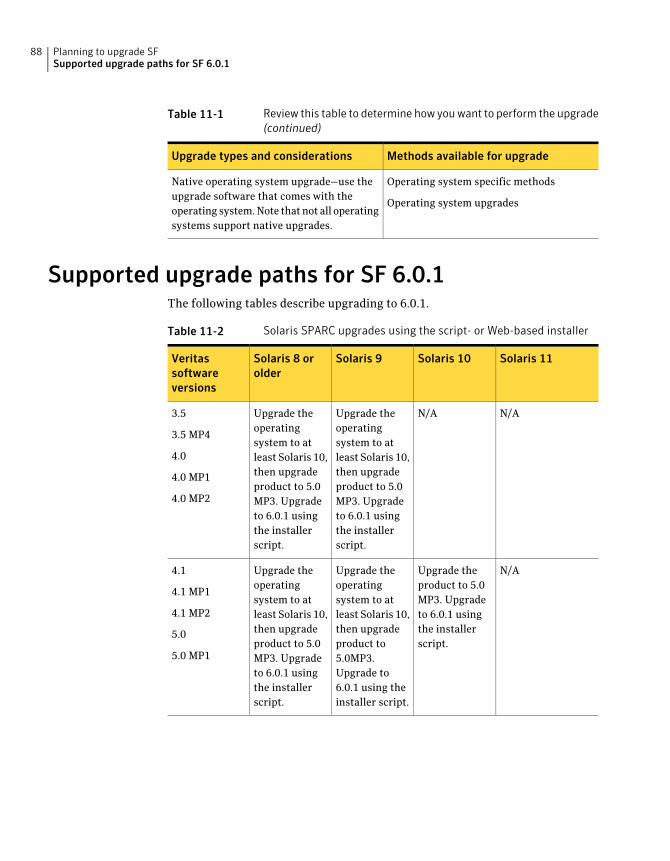
Table 11-1 Review this table to determine how you want to perform the upgrade(continued)
Methods available for upgradeUpgrade types and considerations
Operating system specific methods
Operating system upgrades
Native operating system upgrade—use theupgrade software that comes with theoperating system. Note that not all operatingsystems support native upgrades.
Supported upgrade paths for SF 6.0.1The following tables describe upgrading to 6.0.1.
Table 11-2 Solaris SPARC upgrades using the script- or Web-based installer
Solaris 11Solaris 10Solaris 9Solaris 8 orolder
Veritassoftwareversions
N/AN/AUpgrade theoperatingsystem to atleast Solaris 10,then upgradeproduct to 5.0MP3. Upgradeto 6.0.1 usingthe installerscript.
Upgrade theoperatingsystem to atleast Solaris 10,then upgradeproduct to 5.0MP3. Upgradeto 6.0.1 usingthe installerscript.
3.5
3.5 MP4
4.0
4.0 MP1
4.0 MP2
N/AUpgrade theproduct to 5.0MP3. Upgradeto 6.0.1 usingthe installerscript.
Upgrade theoperatingsystem to atleast Solaris 10,then upgradeproduct to5.0MP3.Upgrade to6.0.1 using theinstaller script.
Upgrade theoperatingsystem to atleast Solaris 10,then upgradeproduct to 5.0MP3. Upgradeto 6.0.1 usingthe installerscript.
4.1
4.1 MP1
4.1 MP2
5.0
5.0 MP1
Planning to upgrade SFSupported upgrade paths for SF 6.0.1
88
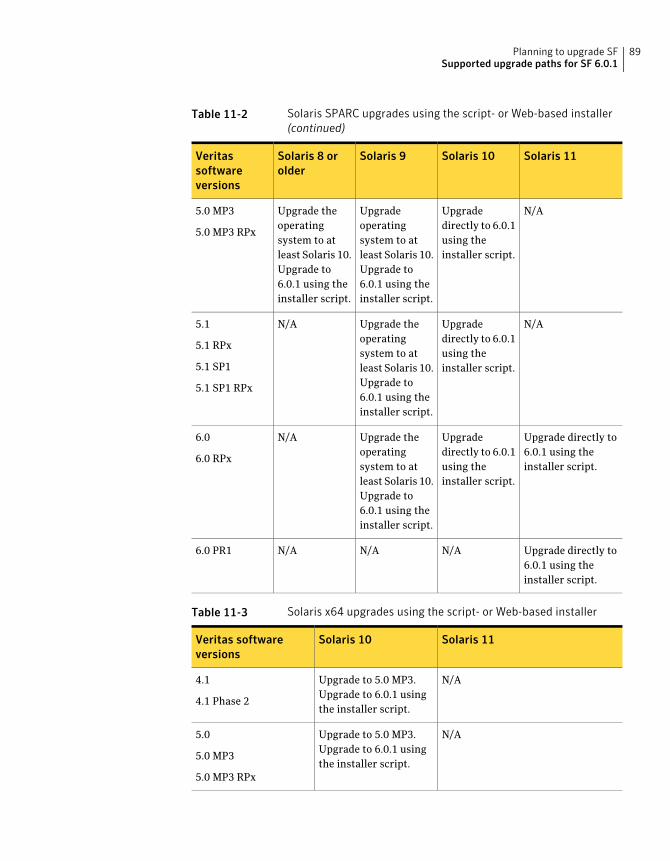
Table 11-2 Solaris SPARC upgrades using the script- or Web-based installer(continued)
Solaris 11Solaris 10Solaris 9Solaris 8 orolder
Veritassoftwareversions
N/AUpgradedirectly to 6.0.1using theinstaller script.
Upgradeoperatingsystem to atleast Solaris 10.Upgrade to6.0.1 using theinstaller script.
Upgrade theoperatingsystem to atleast Solaris 10.Upgrade to6.0.1 using theinstaller script.
5.0 MP3
5.0 MP3 RPx
N/AUpgradedirectly to 6.0.1using theinstaller script.
Upgrade theoperatingsystem to atleast Solaris 10.Upgrade to6.0.1 using theinstaller script.
N/A5.1
5.1 RPx
5.1 SP1
5.1 SP1 RPx
Upgrade directly to6.0.1 using theinstaller script.
Upgradedirectly to 6.0.1using theinstaller script.
Upgrade theoperatingsystem to atleast Solaris 10.Upgrade to6.0.1 using theinstaller script.
N/A6.0
6.0 RPx
Upgrade directly to6.0.1 using theinstaller script.
N/AN/AN/A6.0 PR1
Table 11-3 Solaris x64 upgrades using the script- or Web-based installer
Solaris 11Solaris 10Veritas softwareversions
N/AUpgrade to 5.0 MP3.Upgrade to 6.0.1 usingthe installer script.
4.1
4.1 Phase 2
N/AUpgrade to 5.0 MP3.Upgrade to 6.0.1 usingthe installer script.
5.0
5.0 MP3
5.0 MP3 RPx
89Planning to upgrade SFSupported upgrade paths for SF 6.0.1
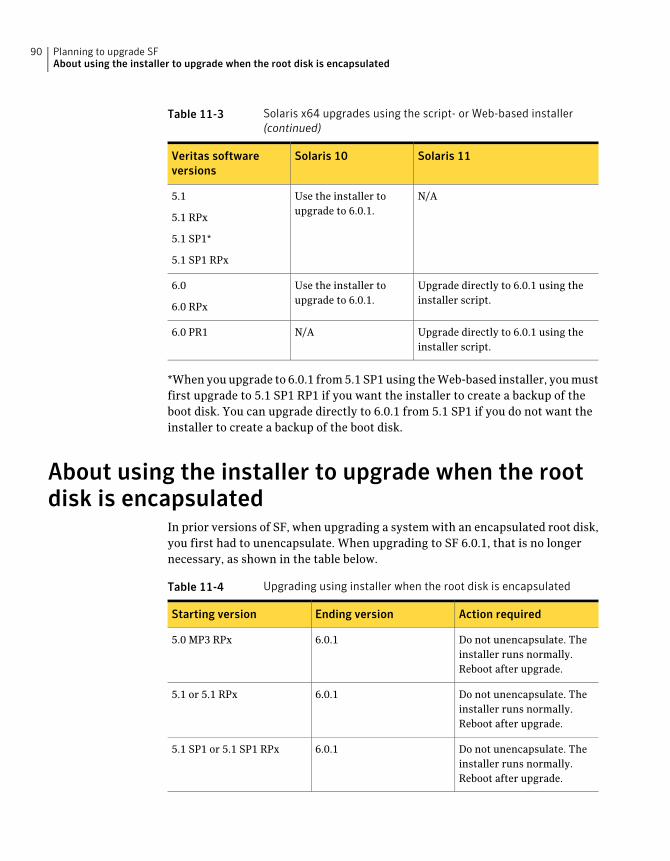
Table 11-3 Solaris x64 upgrades using the script- or Web-based installer(continued)
Solaris 11Solaris 10Veritas softwareversions
N/AUse the installer toupgrade to 6.0.1.
5.1
5.1 RPx
5.1 SP1*
5.1 SP1 RPx
Upgrade directly to 6.0.1 using theinstaller script.
Use the installer toupgrade to 6.0.1.
6.0
6.0 RPx
Upgrade directly to 6.0.1 using theinstaller script.
N/A6.0 PR1
*When you upgrade to 6.0.1 from 5.1 SP1 using the Web-based installer, you mustfirst upgrade to 5.1 SP1 RP1 if you want the installer to create a backup of theboot disk. You can upgrade directly to 6.0.1 from 5.1 SP1 if you do not want theinstaller to create a backup of the boot disk.
About using the installer to upgrade when the rootdisk is encapsulated
In prior versions of SF, when upgrading a system with an encapsulated root disk,you first had to unencapsulate. When upgrading to SF 6.0.1, that is no longernecessary, as shown in the table below.
Table 11-4 Upgrading using installer when the root disk is encapsulated
Action requiredEnding versionStarting version
Do not unencapsulate. Theinstaller runs normally.Reboot after upgrade.
6.0.15.0 MP3 RPx
Do not unencapsulate. Theinstaller runs normally.Reboot after upgrade.
6.0.15.1 or 5.1 RPx
Do not unencapsulate. Theinstaller runs normally.Reboot after upgrade.
6.0.15.1 SP1 or 5.1 SP1 RPx
Planning to upgrade SFAbout using the installer to upgrade when the root disk is encapsulated
90
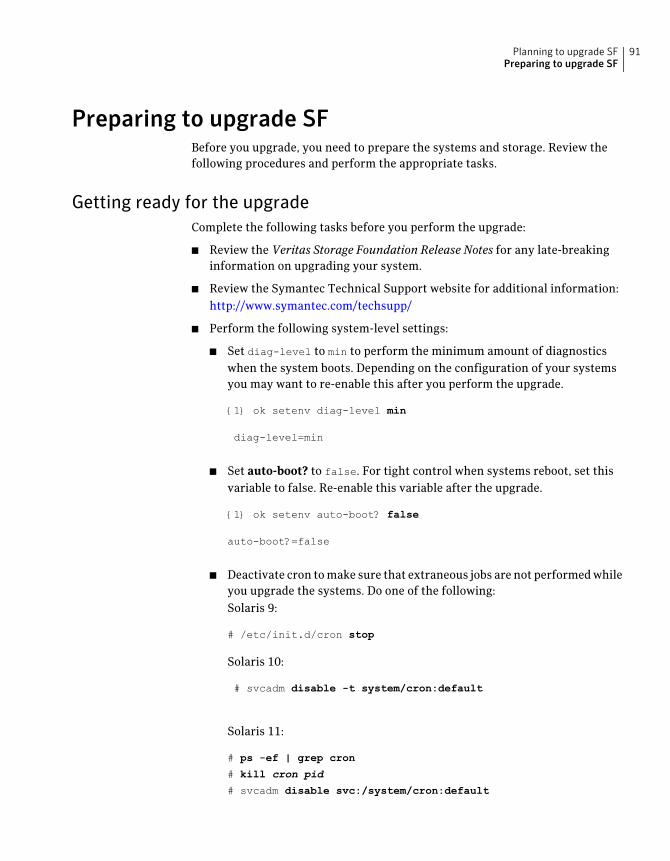
Preparing to upgrade SFBefore you upgrade, you need to prepare the systems and storage. Review thefollowing procedures and perform the appropriate tasks.
Getting ready for the upgradeComplete the following tasks before you perform the upgrade:
■ Review the Veritas Storage Foundation Release Notes for any late-breakinginformation on upgrading your system.
■ Review the Symantec Technical Support website for additional information:http://www.symantec.com/techsupp/
■ Perform the following system-level settings:
■ Set diag-level to min to perform the minimum amount of diagnosticswhen the system boots. Depending on the configuration of your systemsyou may want to re-enable this after you perform the upgrade.
{1} ok setenv diag-level min
diag-level=min
■ Set auto-boot? to false. For tight control when systems reboot, set thisvariable to false. Re-enable this variable after the upgrade.
{1} ok setenv auto-boot? false
auto-boot?=false
■ Deactivate cron to make sure that extraneous jobs are not performed whileyou upgrade the systems. Do one of the following:Solaris 9:
# /etc/init.d/cron stop
Solaris 10:
# svcadm disable -t system/cron:default
Solaris 11:
# ps -ef | grep cron
# kill cron pid
# svcadm disable svc:/system/cron:default
91Planning to upgrade SFPreparing to upgrade SF
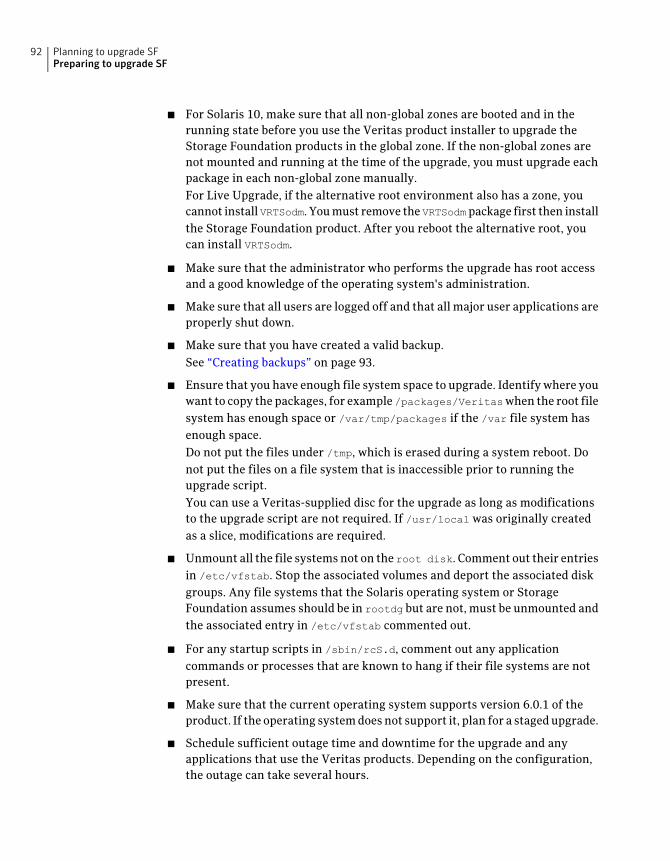
■ For Solaris 10, make sure that all non-global zones are booted and in therunning state before you use the Veritas product installer to upgrade theStorage Foundation products in the global zone. If the non-global zones arenot mounted and running at the time of the upgrade, you must upgrade eachpackage in each non-global zone manually.For Live Upgrade, if the alternative root environment also has a zone, youcannot install VRTSodm. You must remove the VRTSodmpackage first then installthe Storage Foundation product. After you reboot the alternative root, youcan install VRTSodm.
■ Make sure that the administrator who performs the upgrade has root accessand a good knowledge of the operating system's administration.
■ Make sure that all users are logged off and that all major user applications areproperly shut down.
■ Make sure that you have created a valid backup.See “Creating backups” on page 93.
■ Ensure that you have enough file system space to upgrade. Identify where youwant to copy the packages, for example /packages/Veritaswhen the root filesystem has enough space or /var/tmp/packages if the /var file system hasenough space.Do not put the files under /tmp, which is erased during a system reboot. Donot put the files on a file system that is inaccessible prior to running theupgrade script.You can use a Veritas-supplied disc for the upgrade as long as modificationsto the upgrade script are not required. If /usr/local was originally createdas a slice, modifications are required.
■ Unmount all the file systems not on the root disk. Comment out their entriesin /etc/vfstab. Stop the associated volumes and deport the associated diskgroups. Any file systems that the Solaris operating system or StorageFoundation assumes should be in rootdg but are not, must be unmounted andthe associated entry in /etc/vfstab commented out.
■ For any startup scripts in /sbin/rcS.d, comment out any applicationcommands or processes that are known to hang if their file systems are notpresent.
■ Make sure that the current operating system supports version 6.0.1 of theproduct. If the operating system does not support it, plan for a staged upgrade.
■ Schedule sufficient outage time and downtime for the upgrade and anyapplications that use the Veritas products. Depending on the configuration,the outage can take several hours.
Planning to upgrade SFPreparing to upgrade SF
92
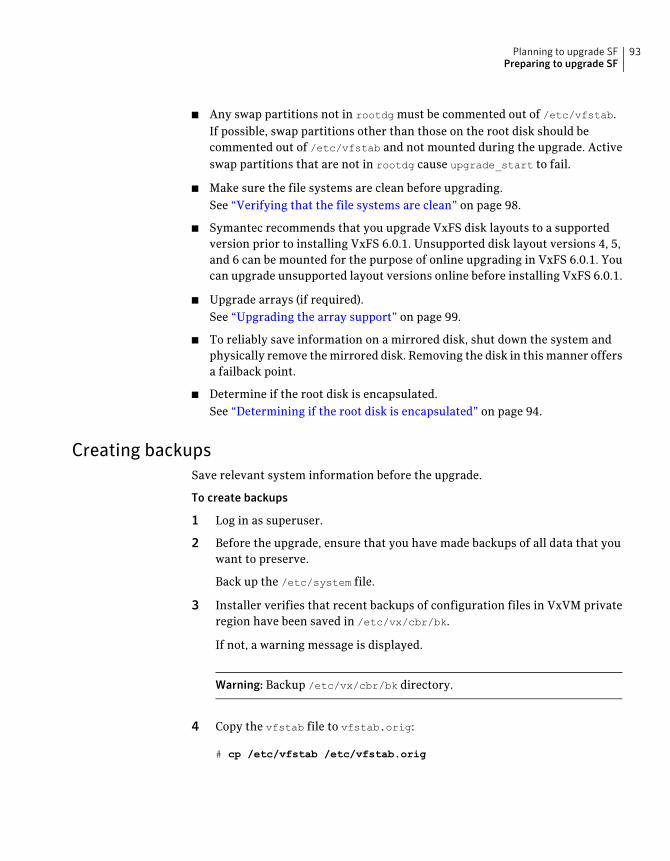
■ Any swap partitions not in rootdg must be commented out of /etc/vfstab.If possible, swap partitions other than those on the root disk should becommented out of /etc/vfstab and not mounted during the upgrade. Activeswap partitions that are not in rootdg cause upgrade_start to fail.
■ Make sure the file systems are clean before upgrading.See “Verifying that the file systems are clean” on page 98.
■ Symantec recommends that you upgrade VxFS disk layouts to a supportedversion prior to installing VxFS 6.0.1. Unsupported disk layout versions 4, 5,and 6 can be mounted for the purpose of online upgrading in VxFS 6.0.1. Youcan upgrade unsupported layout versions online before installing VxFS 6.0.1.
■ Upgrade arrays (if required).See “Upgrading the array support” on page 99.
■ To reliably save information on a mirrored disk, shut down the system andphysically remove the mirrored disk. Removing the disk in this manner offersa failback point.
■ Determine if the root disk is encapsulated.See “Determining if the root disk is encapsulated” on page 94.
Creating backupsSave relevant system information before the upgrade.
To create backups
1 Log in as superuser.
2 Before the upgrade, ensure that you have made backups of all data that youwant to preserve.
Back up the /etc/system file.
3 Installer verifies that recent backups of configuration files in VxVM privateregion have been saved in /etc/vx/cbr/bk.
If not, a warning message is displayed.
Warning: Backup /etc/vx/cbr/bk directory.
4 Copy the vfstab file to vfstab.orig:
# cp /etc/vfstab /etc/vfstab.orig
93Planning to upgrade SFPreparing to upgrade SF
5 Run the vxlicrep, vxdisk list, and vxprint -ht commands and record theoutput. Use this information to reconfigure your system after the upgrade.
6 If you are installing the high availability version of the Veritas StorageFoundation 6.0.1 software, follow the guidelines given in the Veritas ClusterServer Installation Guide and Veritas Cluster Server Release Notes forinformation on preserving your VCS configuration across the installationprocedure.
Tasks for upgrading the Storage Foundation for Databases (SFDB)Tasks for upgrading SFDB tools to version 6.0.1:
■ Preparing to migrate the repository database before upgrading from 5.0x orearlier to 6.0.1See “Pre-upgrade tasks for migrating the SFDB repository database” on page 94.
■ Migrating the repository database after upgrading from 5.0.x or earlier to 6.0.1See “Post upgrade tasks for migrating the SFDB repository database”on page 155.
Determining if the root disk is encapsulatedBefore you upgrade, you need to determine if the root disk is encapsulated byrunning the following command:
# mount | grep "/ on"
If the output from this command includes a path name that contains vx androotvol as in /dev/vx/dsk/bootdg/rootvol, then the root disk is encapsulated.
If the root disk is encapsulated, follow the appropriate upgrade procedures.
See “About using the installer to upgrade when the root disk is encapsulated”on page 90.
Pre-upgrade tasks for migrating the SFDB repository databaseIf you plan to continue using Database Storage Checkpoints or SmartTier forOracle policies you created with a 5.0x or earlier version of Storage Foundationfor Oracle, you must prepare to migrate the SFDB repository database to 6.0.1before upgrading to Storage Foundation or Storage Foundation for Oracle RAC6.0.1.
Planning to upgrade SFPreparing to upgrade SF
94
Note: The Sfua_Base repository resource group will be removed from the main.cffile. It is not required as a separate service group for SF 6.0.1.
Perform the following before upgrading SF.
To prepare to migrate the repository database
◆ Resynchronize all existing snapshots before upgrading. As Oracle user, enter:
$ /opt/VRTS/bin/dbed_vmsnap -S $ORACLE_SID \
-f SNAPPLAN -o resync
Warning: The Database Flashsnap clone database will not be able to be carriedover after upgrading. You must create a new Database Flashsnap clonedatabase after upgrading to 6.0.1.
Pre-upgrade planning for Veritas Volume ReplicatorBefore installing or upgrading Veritas Volume Replicator (VVR):
■ Confirm that your system has enough free disk space to install VVR.
■ Make sure you have root permissions. You must have root permissions toperform the install and upgrade procedures.
■ If replication using VVR is configured, Symantec recommends that the diskgroup version is at least 110 prior to upgrading.You can check the Disk Group version using the following command:
# vxdg list diskgroup
■ If replication using VVR is configured, make sure the size of the SRL volumeis greater than 110 MB.Refer to the Veritas Storage Foundation and High Availability SolutionsReplication Administrator’s Guide.
■ If replication using VVR is configured, verify that all the Primary RLINKs areup-to-date on all the hosts.
# /usr/sbin/vxrlink -g diskgroup status rlink_name
Note: Do not continue until the primary RLINKs are up-to-date.
95Planning to upgrade SFPreparing to upgrade SF
■ If VCS is used to manage VVR replication, follow the preparation steps toupgrade VVR and VCS agents.
■ Make sure that you have worked out all terminal emulation issues. Make surethat the terminal you use is fully functional for OpenBoot prompts andsingle-user and multi-user run levels.
See the Veritas Storage Foundation and High Availability Solutions ReplicationAdministrator's Guide for more information.
See the Getting Started Guide for more information on the documentation.
Planning an upgrade from the previous VVR versionIf you plan to upgrade VVR from the previous VVR version, you can upgrade VVRwith reduced application downtime by upgrading the hosts at separate times.While the Primary is being upgraded, the application can be migrated to theSecondary, thus reducing downtime. The replication between the (upgraded)Primary and the Secondary, which have different versions of VVR, will stillcontinue. This feature facilitates high availability even when the VVR upgrade isnot complete on both the sites. Symantec recommends that the Secondary hostsbe upgraded before the Primary host in the Replicated Data Set (RDS).
See the Storage FoundationReleaseNotes for information regarding VVR supportfor replicating across Storage Foundation versions
Replicating between versions is intended to remove the restriction of upgradingthe Primary and Secondary at the same time. VVR can continue to replicate anexisting RDS with Replicated Volume Groups (RVGs) on the systems that youwant to upgrade. When the Primary and Secondary are at different versions, VVRdoes not support changing the configuration with the vradmin command orcreating a new RDS.
Also, if you specify TCP as the network protocol, the VVR versions on the Primaryand Secondary determine whether the checksum is calculated. As shown inTable 11-5, if either the Primary or Secondary are running a version of VVR priorto 6.0.1, and you use the TCP protocol, VVR calculates the checksum for everydata packet it replicates. If the Primary and Secondary are at VVR 6.0.1, VVR doesnot calculate the checksum. Instead, it relies on the TCP checksum mechanism.
Table 11-5 VVR versions and checksum calculations
VVR calculates checksumTCP connections?
VVR 6.0.1
(DG version >= 150)
VVR prior to 6.0.1
(DG version <= 140)
YesSecondaryPrimary
Planning to upgrade SFPreparing to upgrade SF
96
Table 11-5 VVR versions and checksum calculations (continued)
VVR calculates checksumTCP connections?
VVR 6.0.1
(DG version >= 150)
VVR prior to 6.0.1
(DG version <= 140)
YesPrimarySecondary
YesPrimary and Secondary
NoPrimary and Secondary
Note:When replicating between versions of VVR, avoid using commands associatedwith new features. The earlier version may not support new features and problemscould occur.
If you do not need to upgrade all the hosts in the RDS simultaneously, you canuse replication between versions after you upgrade one host. You can then upgradethe other hosts in the RDS later at your convenience.
Note: If you have a cluster setup, you must upgrade all the nodes in the cluster atthe same time.
Planning and upgrading VVR to use IPv6 as connection protocol
Storage Foundation supports using IPv6 as the connection protocol.
This release supports the following configurations for VVR:
■ VVR continues to support replication between IPv4-only nodes with IPv4 asthe internet protocol
■ VVR supports replication between IPv4-only nodes and IPv4/IPv6 dual-stacknodes with IPv4 as the internet protocol
■ VVR supports replication between IPv6-only nodes and IPv4/IPv6 dual-stacknodes with IPv6 as the internet protocol
■ VVR supports replication between IPv6 only nodes
■ VVR supports replication to one or more IPv6 only nodes and one or more IPv4only nodes from a IPv4/IPv6 dual-stack node
■ VVR supports replication of a shared disk group only when all the nodes inthe cluster that share the disk group are at IPv4 or IPv6
97Planning to upgrade SFPreparing to upgrade SF
Additional settings for using VVR in a localized environmentIf the language packages for VVR are installed, VVR displays localized messages,if the client locale is a supported non-English locale. The client locale is the localefrom which you are accessing the VVR command line or GUI. For example, if theJapanese version of VVR is installed, then the messages are displayed in theJapanese locale, if the client locale is Japanese.
Make sure that the appropriate locale has been installed on all the hosts that areintended to be a part of the VVR RDS setup. Otherwise, some VVR error messageswill be displayed in English, because it is the default locale. Make sure the followingsettings are done on all hosts that are intended to be part of the RDS:
■ Install the required client locale from the Operating System disc.
■ Install the required Volume Manager and VVR localized packages.
■ Set the client locale, before using any of the VVR interfaces:
■ For the VVR command line, set the locale using the appropriate methodfor your operating system.
■ For VRW, select the locale from the VRW login page.
Verifying that the file systems are cleanVerify that all file systems have been cleanly unmounted.
Planning to upgrade SFPreparing to upgrade SF
98
To make sure the file systems are clean
1 Verify that all file systems have been cleanly unmounted:
# echo "8192B.p S" | /opt/VRTSvxfs/sbin/fsdb filesystem | \
grep clean
flags 0 mod 0 clean clean_value
A clean_value value of 0x5a indicates the file system is clean. A value of 0x3cindicates the file system is dirty. A value of 0x69 indicates the file system isdusty. A dusty file system has pending extended operations.
2 If a file system is not clean, enter the following commands for that file system:
# opt/VRTS/bin/fsck -F vxfs filesystem
# opt/VRTS/bin/mount -F vxfs Block_Device
mountpoint
# opt/VRTS/bin/umount mountpoint
These commands should complete any extended operations on the file systemand unmount the file system cleanly.
A pending large package clone removal extended operation might be inprogress if the umount command fails with the following error:
file system device busy
An extended operation is in progress if the following message is generatedon the console:
Storage Checkpoint asynchronous operation on file_system
file system still in progress.
3 If an extended operation is in progress, you must leave the file systemmounted for a longer time to allow the operation to complete. Removing avery large package clone can take several hours.
4 Repeat step 1 to verify that the unclean file system is now clean.
Upgrading the array supportThe Storage Foundation 6.0.1 release includes all array support in a single package,VRTSaslapm. The array support package includes the array support previouslyincluded in the VRTSvxvm package. The array support package also includessupport previously packaged as external array support libraries (ASLs) and arraypolicy modules (APMs).
See the 6.0.1 Hardware Compatibility List for information about supported arrays.
99Planning to upgrade SFPreparing to upgrade SF
See “Hardware compatibility list (HCL)” on page 19.
When you upgrade Storage Foundation products with the product installer, theinstaller automatically upgrades the array support. If you upgrade StorageFoundation products with manual steps, you should remove any external ASLsor APMs that were installed previously on your system. Installing the VRTSvxvmpackage exits with an error if external ASLs or APMs are detected.
After you have installed Storage Foundation 6.0.1, Symantec provides supportfor new disk arrays through updates to the VRTSaslapm package.
For more information about array support, see the Veritas Storage FoundationAdministrator's Guide.
Planning to upgrade SFPreparing to upgrade SF
100
Upgrading StorageFoundation
This chapter includes the following topics:
■ Upgrading Storage Foundation with the product installer when OS upgrade isnot required
■ Upgrading Storage Foundation to 6.0.1 using the product installer or manualsteps
■ Upgrading Storage Foundation using the Veritas Web-based installer
■ Upgrading the Solaris operating system
■ Upgrading Veritas Volume Replicator
■ Upgrading language packages
Upgrading Storage Foundation with the productinstaller when OS upgrade is not required
This section describes upgrading to the current Storage Foundation if the rootdisk is unencapsulated, and you do not intend to upgrade your Solaris version.Only use this procedure if you are already running a version of Solaris that issupported with 6.0.1.
To upgrade Storage Foundation
1 Log in as superuser.
2 If the root disk is encapsulated under VxVM, unmirror and unencapsulatethe root disk as described in the following steps, to be performed in the orderlisted:
12Chapter

■ Use the vxplex command to remove all the plexes of the volumes rootvol,swapvol, usr, var, opt and home that are on disks other than the root disk.
For example, the following command removes the plexes mirrootvol-01,and mirswapvol-01 that are configured on a disk other than the root disk:
# vxplex -o rm dis mirrootvol-01 mirswapvol-01
Warning: Do not remove the plexes on the root disk that correspond tothe original disk partitions.
■ Enter the following command to convert all the encapsulated volumes inthe root disk back to being accessible directly through disk partitionsinstead of through volume devices.
# /etc/vx/bin/vxunroot
Following the removal of encapsulation, the system is rebooted from theunencapsulated root disk.
If your system is running VxVM 4.1 MP2, the following remnants ofencapsulation will still be present:
■ Partition table entries for the private and public regions
■ GRUB or LILO configuration entries for VxVM
3 Unmount any mounted VxFS file systems.
The installer supports the upgrade of multiple hosts, if each host is runningthe same version of VxVM and VxFS. Hosts must be upgraded separately ifthey are running different versions.
If any VxFS file systems are mounted with the QuickLog feature, QuickLogmust be disabled before upgrading. See the "Veritas QuickLog" chapter of theStorage Foundation Administrator’s Guide for more information.
4 If your system has separate /opt and /var file systems, make sure they aremounted before proceeding with installation.
5 If replication using VVR is configured, verify that all the Primary RLINKs areup-to-date:
# /usr/sbin/vxrlink -g diskgroup status rlink_name
Note: Do not continue until the Primary RLINKs are up-to-date.
Upgrading Storage FoundationUpgrading Storage Foundation with the product installer when OS upgrade is not required
102
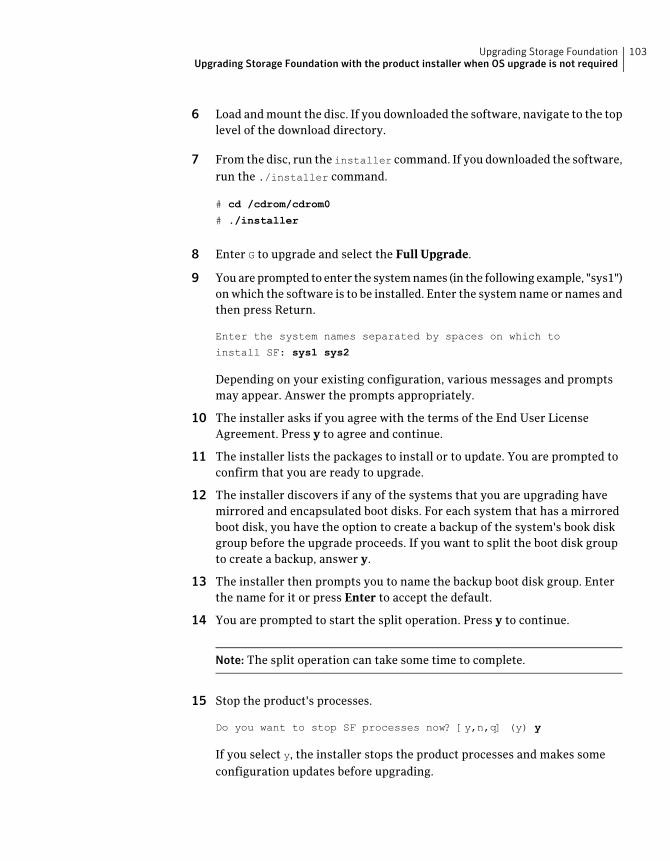
6 Load and mount the disc. If you downloaded the software, navigate to the toplevel of the download directory.
7 From the disc, run the installer command. If you downloaded the software,run the ./installer command.
# cd /cdrom/cdrom0
# ./installer
8 Enter G to upgrade and select the Full Upgrade.
9 You are prompted to enter the system names (in the following example, "sys1")on which the software is to be installed. Enter the system name or names andthen press Return.
Enter the system names separated by spaces on which to
install SF: sys1 sys2
Depending on your existing configuration, various messages and promptsmay appear. Answer the prompts appropriately.
10 The installer asks if you agree with the terms of the End User LicenseAgreement. Press y to agree and continue.
11 The installer lists the packages to install or to update. You are prompted toconfirm that you are ready to upgrade.
12 The installer discovers if any of the systems that you are upgrading havemirrored and encapsulated boot disks. For each system that has a mirroredboot disk, you have the option to create a backup of the system's book diskgroup before the upgrade proceeds. If you want to split the boot disk groupto create a backup, answer y.
13 The installer then prompts you to name the backup boot disk group. Enterthe name for it or press Enter to accept the default.
14 You are prompted to start the split operation. Press y to continue.
Note: The split operation can take some time to complete.
15 Stop the product's processes.
Do you want to stop SF processes now? [y,n,q] (y) y
If you select y, the installer stops the product processes and makes someconfiguration updates before upgrading.
103Upgrading Storage FoundationUpgrading Storage Foundation with the product installer when OS upgrade is not required
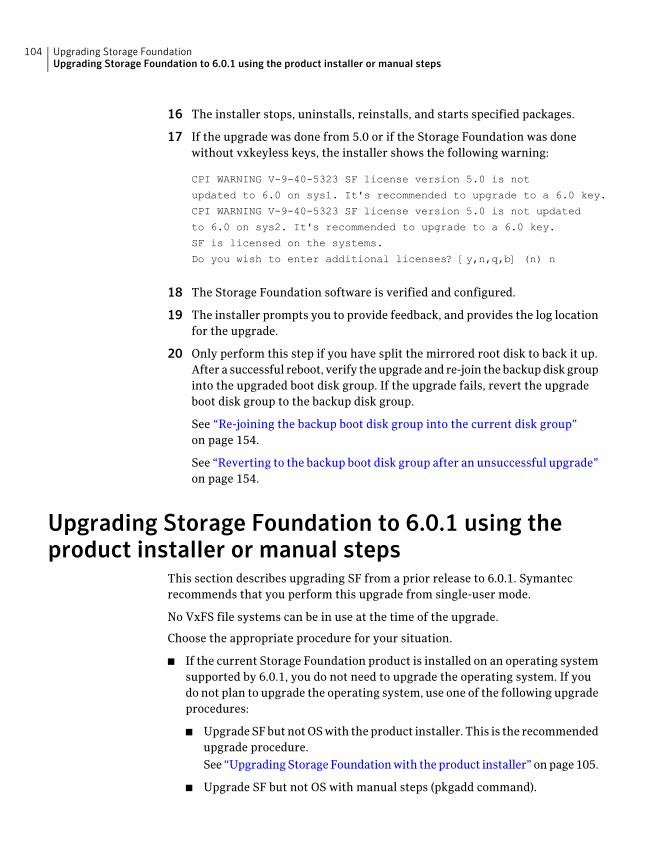
16 The installer stops, uninstalls, reinstalls, and starts specified packages.
17 If the upgrade was done from 5.0 or if the Storage Foundation was donewithout vxkeyless keys, the installer shows the following warning:
CPI WARNING V-9-40-5323 SF license version 5.0 is not
updated to 6.0 on sys1. It's recommended to upgrade to a 6.0 key.
CPI WARNING V-9-40-5323 SF license version 5.0 is not updated
to 6.0 on sys2. It's recommended to upgrade to a 6.0 key.
SF is licensed on the systems.
Do you wish to enter additional licenses? [y,n,q,b] (n) n
18 The Storage Foundation software is verified and configured.
19 The installer prompts you to provide feedback, and provides the log locationfor the upgrade.
20 Only perform this step if you have split the mirrored root disk to back it up.After a successful reboot, verify the upgrade and re-join the backup disk groupinto the upgraded boot disk group. If the upgrade fails, revert the upgradeboot disk group to the backup disk group.
See “Re-joining the backup boot disk group into the current disk group”on page 154.
See “Reverting to the backup boot disk group after an unsuccessful upgrade”on page 154.
Upgrading Storage Foundation to 6.0.1 using theproduct installer or manual steps
This section describes upgrading SF from a prior release to 6.0.1. Symantecrecommends that you perform this upgrade from single-user mode.
No VxFS file systems can be in use at the time of the upgrade.
Choose the appropriate procedure for your situation.
■ If the current Storage Foundation product is installed on an operating systemsupported by 6.0.1, you do not need to upgrade the operating system. If youdo not plan to upgrade the operating system, use one of the following upgradeprocedures:
■ Upgrade SF but not OS with the product installer. This is the recommendedupgrade procedure.See “Upgrading Storage Foundation with the product installer” on page 105.
■ Upgrade SF but not OS with manual steps (pkgadd command).
Upgrading Storage FoundationUpgrading Storage Foundation to 6.0.1 using the product installer or manual steps
104
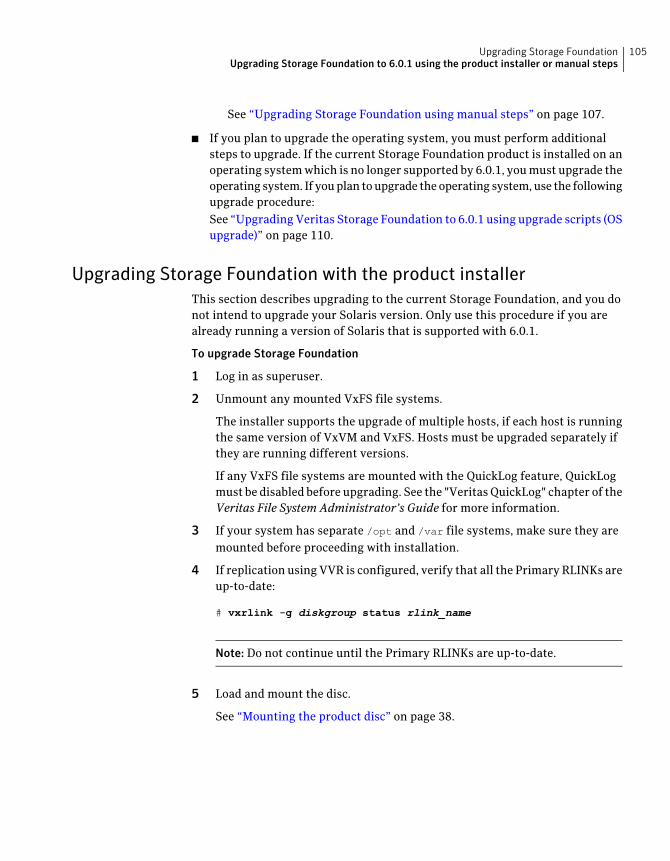
See “Upgrading Storage Foundation using manual steps” on page 107.
■ If you plan to upgrade the operating system, you must perform additionalsteps to upgrade. If the current Storage Foundation product is installed on anoperating system which is no longer supported by 6.0.1, you must upgrade theoperating system. If you plan to upgrade the operating system, use the followingupgrade procedure:See “Upgrading Veritas Storage Foundation to 6.0.1 using upgrade scripts (OSupgrade)” on page 110.
Upgrading Storage Foundation with the product installerThis section describes upgrading to the current Storage Foundation, and you donot intend to upgrade your Solaris version. Only use this procedure if you arealready running a version of Solaris that is supported with 6.0.1.
To upgrade Storage Foundation
1 Log in as superuser.
2 Unmount any mounted VxFS file systems.
The installer supports the upgrade of multiple hosts, if each host is runningthe same version of VxVM and VxFS. Hosts must be upgraded separately ifthey are running different versions.
If any VxFS file systems are mounted with the QuickLog feature, QuickLogmust be disabled before upgrading. See the "Veritas QuickLog" chapter of theVeritas File System Administrator’s Guide for more information.
3 If your system has separate /opt and /var file systems, make sure they aremounted before proceeding with installation.
4 If replication using VVR is configured, verify that all the Primary RLINKs areup-to-date:
# vxrlink -g diskgroup status rlink_name
Note: Do not continue until the Primary RLINKs are up-to-date.
5 Load and mount the disc.
See “Mounting the product disc” on page 38.
105Upgrading Storage FoundationUpgrading Storage Foundation to 6.0.1 using the product installer or manual steps
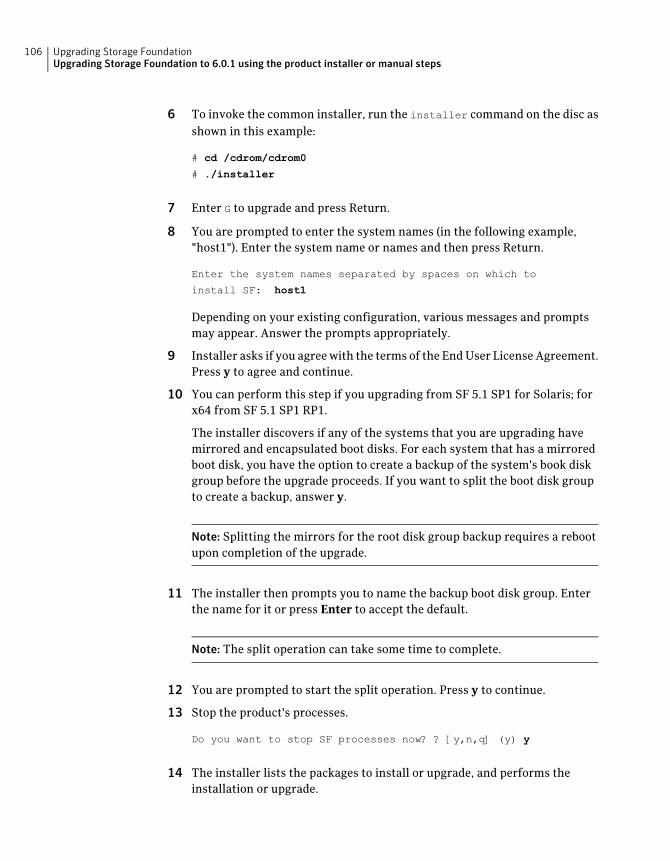
6 To invoke the common installer, run the installer command on the disc asshown in this example:
# cd /cdrom/cdrom0
# ./installer
7 Enter G to upgrade and press Return.
8 You are prompted to enter the system names (in the following example,"host1"). Enter the system name or names and then press Return.
Enter the system names separated by spaces on which to
install SF: host1
Depending on your existing configuration, various messages and promptsmay appear. Answer the prompts appropriately.
9 Installer asks if you agree with the terms of the End User License Agreement.Press y to agree and continue.
10 You can perform this step if you upgrading from SF 5.1 SP1 for Solaris; forx64 from SF 5.1 SP1 RP1.
The installer discovers if any of the systems that you are upgrading havemirrored and encapsulated boot disks. For each system that has a mirroredboot disk, you have the option to create a backup of the system's book diskgroup before the upgrade proceeds. If you want to split the boot disk groupto create a backup, answer y.
Note: Splitting the mirrors for the root disk group backup requires a rebootupon completion of the upgrade.
11 The installer then prompts you to name the backup boot disk group. Enterthe name for it or press Enter to accept the default.
Note: The split operation can take some time to complete.
12 You are prompted to start the split operation. Press y to continue.
13 Stop the product's processes.
Do you want to stop SF processes now? ? [y,n,q] (y) y
14 The installer lists the packages to install or upgrade, and performs theinstallation or upgrade.
Upgrading Storage FoundationUpgrading Storage Foundation to 6.0.1 using the product installer or manual steps
106
15 If the upgrade was done from 5.0 or if the Storage Foundation was donewithout vxkeyless keys, the installer shows the following warning:
CPI WARNING V-9-40-5323 SF license version 5.0 is not
updated to 6.0 on sys1. It's recommended to upgrade to a 6.0 key.
CPI WARNING V-9-40-5323 SF license version 5.0 is not updated
to 6.0 on sys2. It's recommended to upgrade to a 6.0 key.
SF is licensed on the systems
Do you wish to enter additional licenses? [y,n,q,b] (n) n
16 The installer verifies, configures, and starts the Veritas Storage Foundationsoftware.
17 Only perform this step if you have split the boot disk group into a backupdisk group. After a successful reboot, verify the upgrade and re-join the backupdisk group. If the upgrade fails, revert to the backup disk group.
See “Re-joining the backup boot disk group into the current disk group”on page 154.
See “Reverting to the backup boot disk group after an unsuccessful upgrade”on page 154.
Upgrading Storage Foundation using manual stepsThis section describes upgrading from a previous version of Storage Foundationto the current Storage Foundation (6.0.1) when you do not intend to upgrade yourSolaris version. Only use this procedure if you are already running a version ofSolaris that is supported with 6.0.1.
107Upgrading Storage FoundationUpgrading Storage Foundation to 6.0.1 using the product installer or manual steps

To upgrade Storage Foundation
1 Unmount any mounted VxFS file systems.
The installer supports the upgrade of multiple hosts, if each host is runningthe same version of VxVM and VxFS. Hosts must be upgraded separately ifthey are running different versions.
If any VxFS file systems are mounted with the QuickLog feature, QuickLogmust be disabled before upgrading. See the "Veritas QuickLog" chapter of theVeritas File System Administrator’s Guide for more information.
2 If the VxFS NetBackup libraries package (VRTSfsnbl) is installed, remove itbefore you install the new packages.
To remove the package, use the pkgrm (Solaris 10) or pkg uninstall (Solaris11) command as follows:
# pkgrm VRTSfsnbl
or
# pkg uninstall VRTSfsnbl
Respond to any system messages as needed.
The libraries contained in this package are included in the VRTSvxfs packagein 6.0.1.
3 Verify that all the Primary RLINKs are up-to-date on all the hosts.
# vxrlink -g diskgroup status rlink_name
Caution: Do not continue until the Primary RLINKs are up-to-date.
4 If your system has separate /opt and /var file systems, make sure they aremounted before proceeding with installation.
5 Load and mount the software disc.
See “Mounting the product disc” on page 38.
6 Change to the directory containing the SF packages.
# cd /dvd_mount
7 If VVR is configured, run the vvr_upgrade_start script on all hosts to savethe original VVR configuration:
# ./scripts/vvr_upgrade_start
Upgrading Storage FoundationUpgrading Storage Foundation to 6.0.1 using the product installer or manual steps
108
8 Remove the Veritas packages from your existing installation.
Refer to the Storage Foundation Installation Guide for the previous releaseto obtain the list of packages to remove.
9 Run the following command to obtain a list of recommended packages toinstall:
# ./installsf -recpkgs
10 Use the pkgadd (Solaris 10) or pkg install (Solaris 11) command to installthe packages from the previous steps.
On Solaris 10:
# pkgadd -d ./package_name.pkg
On Solaris 11:
# pkg set-publisher -p /dvd_mount/VRTSpkgs.p5p Symantec
# pkg install --accept pkg_name
# pkg unset-publisher Symantec
If replication using VVR is configured, ignore the following error messagesthat appear on the Primary console during the installation process:
VxVM VVR vxrlink ERROR V-5-1-3371 Can not recover rlink_name.
rvg_name is in PASSTHRU mode
VxVM VVR vxrlink ERROR V-5-1-3473 Log header I/O error
Also ignore the following error message that appears on the Secondaryconsole:
WARNING: VxVM VVR vxio V-5-0-278 Rlink rlink_name is stale and
not replicating
11 Configure the SF installation using the installsf -configure command.
12 If VVR is configured, issue the following command on all the hosts to completethe upgrade. If a host contains only Secondary RVGs, we recommend thatyou first run the following command on that host:
# /dvd_mount/scripts/vvr_upgrade_finish
The vvr_upgrade_finish script upgrades only the SRL, after which, the RVGcannot work with the earlier versions of VxVM or VVR.
109Upgrading Storage FoundationUpgrading Storage Foundation to 6.0.1 using the product installer or manual steps

Upgrading Veritas Storage Foundation to 6.0.1 using upgrade scripts(OS upgrade)
This section describes upgrading to the current Veritas Storage Foundation andneed to upgrade the Solaris version. If the operating system is not at a supportedSolaris version, you must follow this procedure.
This upgrade procedure allows you to retain existing VxVM and VxFSconfigurations. After upgrading, you can resume using your file systems andvolumes as before (without having to run vxinstall again).
It is important that you follow these steps in the specified order.
To begin the upgrade
1 If VCS agents for VVR are configured, you must perform the pre-upgradesteps before proceeding.
2 Load and mount the disc.
See “Mounting the product disc” on page 38.
3 Verify that an upgrade is possible on the system. Enter the followingcommand:
# /dvd_mount/scripts/upgrade_start -check
4 Run the upgrade_start script to preserve the previous configuration ofVolume Manager.
# /dvd_mount/scripts/upgrade_start
5 If the upgrade_start script fails for any reason, run the upgrade_finish
script to undo any changes already made. Verify that the system is restoredby comparing /etc/system, /etc/vfstab, and the output of the format
command. Then determine and correct the cause of theupgrade_start failure.If you cannot correct the problem in a timely manner, restore the vfstab fileto the version saved, restore any other applications, and perform an init 6
to completely restore the system.
6 Verify that all the Primary RLINKs are up-to-date on all the hosts.
# vxrlink -g diskgroup status rlink_name
Caution: Do not continue until the Primary RLINKs are up-to-date.
Upgrading Storage FoundationUpgrading Storage Foundation to 6.0.1 using the product installer or manual steps
110
7 If VVR is configured, run the vvr_upgrade_start script on all hosts to savethe original VVR configuration:
# /dvd_mount/scripts/vvr_upgrade_start
8 If you have VxFS file systems specified in the /etc/vfstab file, commentthem out.
9 Remove the existing Storage Foundation packages in one of the followingways:
■ using the uninstallsf script
■ using pkgrm
For details, refer to the StorageFoundation InstallationGuide for the existingStorage Foundation version.
After you run the uninstallsf script, verify that all VRTS* packages areremoved; otherwise, remove them manually using pkgrm.
10 If you are upgrading the operating system, do so now.
Refer to the Solaris installation documentation.
11 Install the Storage Foundation packages in one of the following ways:
■ using the common installerSee “To upgrade the Veritas Storage Foundation packages with the productinstaller” on page 111.
■ using manual stepsSee “To upgrade the Veritas Storage Foundation packages with manualsteps” on page 112.
To upgrade the Veritas Storage Foundation packages with the product installer
1 Load and mount the disc.
See “Mounting the product disc” on page 38.
2 To invoke the common installer, run the installer command on the disc asshown in this example:
# cd /dvd_mount
# ./installer
3 Select I to upgrade the product. The installer will ask you if you want to usethe previous configuration.
4 Depending on your existing configuration, various messages and promptsmay appear. Answer the prompts appropriately.
111Upgrading Storage FoundationUpgrading Storage Foundation to 6.0.1 using the product installer or manual steps
5 If you commented out VxFS File System entries in the /etc/vfstab file,uncomment them.
6 Complete the upgrade by restoring the configuration.
To upgrade the Veritas Storage Foundation packages with manual steps
1 If you are upgrading from Veritas Storage Foundation for DB2 or VeritasStorage Foundation for Oracle, resynchronize all existing snapshots beforeupgrading.
For Veritas Storage Foundation for DB2:
# /opt/VRTS/bin/db2ed_vmsnap -D DB2DATABASE -f SNAPPLAN \
-o resync
For Veritas Storage Foundation for Oracle:
# /opt/VRTS/bin/dbed_vmsnap -S $ORACLE_SID -f SNAPPLAN \
-o resync
2 Load and mount the software disc.
3 Change to the directory containing the packages.
# cd /dvd_mount
4 Run the following command to obtain a list of recommended packages toinstall:
./installsf -recpkgs
Run the following command to obtain a list of all packages to install:
./installsf -allpkgs
5 Add packages with the pkgadd command.
6 If you commented out VxFS File System entries in the /etc/vfstab file,uncomment them.
7 Complete the upgrade by restoring the configuration.
Upgrading Storage FoundationUpgrading Storage Foundation to 6.0.1 using the product installer or manual steps
112
Restoring the configuration and completing the upgrade
1 Complete the upgrade using the upgrade_finish script.
# devlinks
# /dvd_mount/scripts/upgrade_finish
2 Configure the product using the following command:
# /dvd_mount/installer -configure
If some Veritas modules fail to unload, perform the following steps:
■ Reboot the systems.
3 Importing a pre-6.0.1 Veritas Volume Manager disk group does notautomatically upgrade the disk group version to the VxVM 6.0.1 level. Youmay need to manually upgrade each of your disk groups following a VxVMupgrade.
See “Upgrading VxVM disk group versions” on page 161.
Upgrading Storage Foundation using the VeritasWeb-based installer
This section describes upgrading SF with the Veritas Web-based installer. Theinstaller detects and upgrades the product that is currently installed on thespecified system or systems.
To upgrade SF
1 Perform the required steps to save any data that you wish to preserve. Forexample, make configuration file backups.
2 Start the Web-based installer.
See “Starting the Veritas Web-based installer” on page 48.
3 On the Select a task and a product page, select Upgrade a Product from theTask drop-down menu.
The installer detects the product that is installed on the specified system.Click Next.
4 Indicate the systems on which to upgrade. Enter one or more system names,separated by spaces. Click Next.
113Upgrading Storage FoundationUpgrading Storage Foundation using the Veritas Web-based installer
5 On the License agreement page, select whether you accept the terms of theEnd User License Agreement (EULA). To continue, select YesIagree and clickNext.
6 The installer discovers if any of the systems that you are upgrading havemirrored and encapsulated boot disks. For each system that has a mirroredboot disk, you have the option to create a backup of the book disk group. Tocreate the backup, check the Splitmirrors onall the systems box. Check theappropriate box to use the same name for the backup disk group on allsystems--you can use the default name or choose a new one. Check the systemswhere you want to create the backup. When you are ready, click the Nextbutton.
7 Click Next to complete the upgrade.
After the upgrade completes, the installer displays the location of the log andsummary files. If required, view the files to confirm the installation status.
8 If you are prompted to reboot the systems, enter the following rebootcommand:
# /usr/sbin/shutdown -r now
9 After the upgrade, if the product is not configured, the Web-based installerasks: "Do you want to configure this product?" If the product is alreadyconfigured, it will not ask any questions.
10 Click Finish. The installer prompts you for another task.
11 Only perform this step if you have split the mirrored root disk to back it up.After a successful reboot, verify the upgrade and re-join the backup disk groupinto the upgraded boot disk group. If the upgrade fails, revert the upgradeboot disk group to the backup disk group.
See “Re-joining the backup boot disk group into the current disk group”on page 154.
See “Reverting to the backup boot disk group after an unsuccessful upgrade”on page 154.
Upgrading the Solaris operating systemIf you are running Storage Foundation 6.0.1 with an earlier release of the Solarisoperating system, you can upgrade the Solaris operating system using the followingprocedure.
Upgrading Storage FoundationUpgrading the Solaris operating system
114
Warning: You should only use this procedure to upgrade the Solaris operatingsystem if you are running Storage Foundation 6.0.1.
The directory /opt must exist, be writable, and must not be a symbolic link. Thisis because the volumes not temporarily converted by the upgrade_start areunavailable during the upgrade process. If you have a symbolic link from /opt toone of the unconverted volumes, the symbolic link will not function during theupgrade and items in /opt will not be installed.
To upgrade the Solaris operating system only
1 Bring the system down to single-user mode using the following command:
# init S
You must mount /opt manually if /opt is on its own partition.
2 Load and mount the software disc from the currently installed version ofStorage Foundation.
See “Mounting the product disc” on page 38.
3 Change directory:
# cd /mount_point/scripts
4 Run the upgrade_start with the -check argument to detect any problemsthat exist which could prevent a successful upgrade. Use the upgrade_startscript that was supplied with the currently installed SF release. If thiscommand reports success, you can proceed with running the upgrade_startscript, but if it reports errors, correct the problem(s) and rerun upgrade_start
-check.
# ./upgrade_start -check
5 Run the upgrade_start script so that the system can come up with partitions.The upgrade_start script searches for volumes containing file systems, andif any are found, converts them to partitions:
# ./upgrade_start
6 Bring the system down to run level 0.
# init 0
115Upgrading Storage FoundationUpgrading the Solaris operating system
7 Upgrade the operating system to a supported version of Solaris.
You should boot up the system from run level 0 depending on the Solarisupgrade procedure that you want to follow. Refer to the Solaris installationdocumentation for instructions on how to upgrade the Solaris operatingsystem.
8 After installing the Solaris operating system, install any Solaris patchesrequired by Storage Foundation 6.0.1.
See the Storage Foundation Release Notes.
9 After the system is up with the upgraded Solaris operating system, bring thesystem down to single-user mode by entering:
# init S
10 Ensure that /opt is mounted.
11 Load and mount the software disc from the currently installed version ofStorage Foundation.
12 If you upgraded to Solaris 10, you must reinstall certain Storage Foundationpackages in order to support Solaris 10 functionality.
To reinstall the required packages, follow the steps below:
■ Remove the existing packages in the reverse order of their installation.For example, if you chose the installation of all packages then uninstallthose in the following order.For Storage Foundation:
# pkgrm VRTSat VRTSodm VRTSdbed
VRTSfssdk VRTSvxfs VRTSsfmh VRTSob VRTSaslapm
VRTSvxvm VRTSspt VRTSperl VRTSvlic
■ Run the following commands.To obtain a list of recommended packages to install:
# ./installsf -recpkgs
OrTo obtain a list of all packages to install:
# ./installsf -allpkgs
■ Change to the directory containing the appropriate packages.
# cd /mount_point/pkgs
Upgrading Storage FoundationUpgrading the Solaris operating system
116
■ Use the pkgadd command to install the packages from the list yougenerated.
■ Reboot the system.
13 Complete the upgrade from the software disc from the currently installedversion of Storage Foundation by entering:
# devlinks
# ./upgrade_finish
Upgrading Veritas Volume ReplicatorIf a previous version of Veritas Volume Replicator (VVR) is configured, the productinstaller upgrades VVR automatically when you upgrade the Storage Foundationproducts.
When upgrading from 4.1 MP1 or later, you have the option to upgrade withoutdisrupting replication.
See “Upgrading VVR without disrupting replication” on page 117.
Upgrading VVR without disrupting replicationThis section describes the upgrade procedure from an earlier version of VVR tothe current version of VVR when replication is in progress, assuming that you donot need to upgrade all the hosts in the RDS simultaneously.
You may also need to set up replication between versions.
See “Planning an upgrade from the previous VVR version” on page 96.
When both the Primary and the Secondary have the previous version of VVRinstalled, the upgrade can be performed either on the Primary or on the Secondary.We recommend that the Secondary hosts be upgraded before the Primary host inthe RDS. This section includes separate sets of steps, for the Primary upgrade andfor the Secondary upgrade.
Note: If you have a cluster setup, you must upgrade all the nodes in the cluster atthe same time.
Upgrading VVR on the SecondaryFollow these instructions to upgrade the Secondary hosts.
117Upgrading Storage FoundationUpgrading Veritas Volume Replicator
To upgrade the Secondary
1 Stop replication to the Secondary host by initiating a Primary pause usingthe following command:
# vradmin -g diskgroup pauserep local_rvgname
2 Upgrade from VVR 5.1 or later to VVR 6.0.1 on the Secondary.
3 Do one of the following:
■ Upgrade the disk group now. Enter the following:
# vxdg upgrade dgname
■ Upgrade the disk group later.If you upgrade the disk group later, be sure to pause replication beforeyou upgrade the disk group.
4 Resume the replication from the Primary using the following command:
# vradmin -g diskgroup resumerep local_rvgname sec_hostname
Upgrading VVR on the PrimaryAfter you upgrade the Secondary, use the Veritas product installer to upgrade thePrimary.
To upgrade the Primary
1 Stop replication to the Primary host by initiating a Primary pause using thefollowing command:
# vradmin -g diskgroup pauserep local_rvgname
2 Upgrade from VVR 5.1 or later to VVR 6.0.1 on the Secondary.
3 Do one of the following:
■ Upgrade the disk group now. Enter the following:
# vxdg upgrade dgname
■ Upgrade the disk group later.
Upgrading Storage FoundationUpgrading Veritas Volume Replicator
118

If you upgrade the disk group later, be sure to pause replication beforeyou upgrade the disk group.
4 Resume the replication from the Primary using the following command:
# vradmin -g diskgroup resumerep local_rvgname
sec_hostname
See “Planning an upgrade from the previous VVR version” on page 96.
Upgrading language packagesIf you are upgrading Veritas products in a language other than English, you mustinstall the required language packages after installing the English packages.Verifythat the English installation is correct before proceeding.
Install the language packages as for an initial installation.
See “Installing language packages” on page 45.
119Upgrading Storage FoundationUpgrading language packages

Upgrading Storage FoundationUpgrading language packages
120
Performing an automatedSF upgrade using responsefiles
This chapter includes the following topics:
■ Upgrading SF using response files
■ Response file variables to upgrade Storage Foundation
■ Sample response file for SF upgrade
Upgrading SF using response filesTypically, you can use the response file that the installer generates after youperform SF upgrade on one system to upgrade SF on other systems. You can alsocreate a response file using the makeresponsefile option of the installer.
To perform automated SF upgrade
1 Make sure the systems where you want to upgrade SF meet the upgraderequirements.
2 Make sure the pre-upgrade tasks are completed.
3 Copy the response file to one of the systems where you want to upgrade SF.
4 Edit the values of the response file variables as necessary.
13Chapter
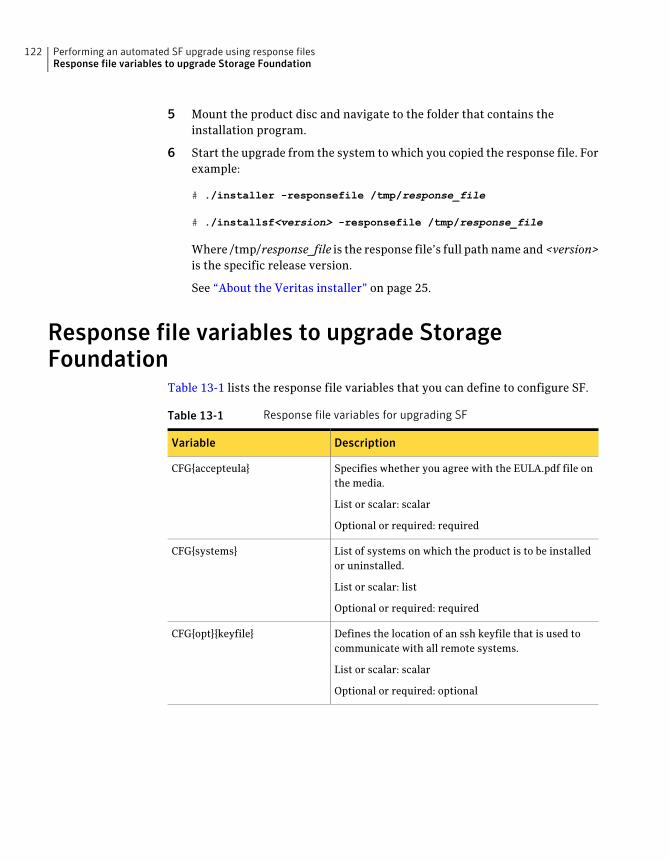
5 Mount the product disc and navigate to the folder that contains theinstallation program.
6 Start the upgrade from the system to which you copied the response file. Forexample:
# ./installer -responsefile /tmp/response_file
# ./installsf<version> -responsefile /tmp/response_file
Where /tmp/response_file is the response file’s full path name and <version>is the specific release version.
See “About the Veritas installer” on page 25.
Response file variables to upgrade StorageFoundation
Table 13-1 lists the response file variables that you can define to configure SF.
Table 13-1 Response file variables for upgrading SF
DescriptionVariable
Specifies whether you agree with the EULA.pdf file onthe media.
List or scalar: scalar
Optional or required: required
CFG{accepteula}
List of systems on which the product is to be installedor uninstalled.
List or scalar: list
Optional or required: required
CFG{systems}
Defines the location of an ssh keyfile that is used tocommunicate with all remote systems.
List or scalar: scalar
Optional or required: optional
CFG{opt}{keyfile}
Performing an automated SF upgrade using response filesResponse file variables to upgrade Storage Foundation
122
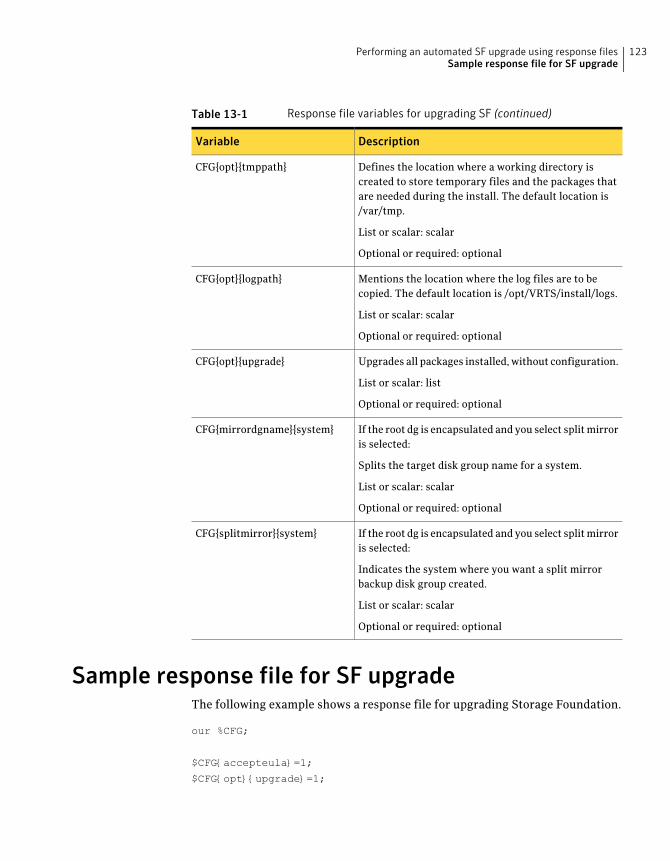
Table 13-1 Response file variables for upgrading SF (continued)
DescriptionVariable
Defines the location where a working directory iscreated to store temporary files and the packages thatare needed during the install. The default location is/var/tmp.
List or scalar: scalar
Optional or required: optional
CFG{opt}{tmppath}
Mentions the location where the log files are to becopied. The default location is /opt/VRTS/install/logs.
List or scalar: scalar
Optional or required: optional
CFG{opt}{logpath}
Upgrades all packages installed, without configuration.
List or scalar: list
Optional or required: optional
CFG{opt}{upgrade}
If the root dg is encapsulated and you select split mirroris selected:
Splits the target disk group name for a system.
List or scalar: scalar
Optional or required: optional
CFG{mirrordgname}{system}
If the root dg is encapsulated and you select split mirroris selected:
Indicates the system where you want a split mirrorbackup disk group created.
List or scalar: scalar
Optional or required: optional
CFG{splitmirror}{system}
Sample response file for SF upgradeThe following example shows a response file for upgrading Storage Foundation.
our %CFG;
$CFG{accepteula}=1;
$CFG{opt}{upgrade}=1;
123Performing an automated SF upgrade using response filesSample response file for SF upgrade

$CFG{systems}=[ qw(system01) ];
1;
Performing an automated SF upgrade using response filesSample response file for SF upgrade
124
Upgrading SF using LiveUpgrade
This chapter includes the following topics:
■ About Live Upgrade
■ Supported upgrade paths for Live Upgrade
■ Performing Live Upgrade in a Solaris zone environment
■ Before you upgrade SF using Solaris Live Upgrade
■ Upgrading SF and Solaris using Live Upgrade
■ Upgrading Solaris using Live Upgrade
■ Upgrading SF using Live Upgrade
■ Administering boot environments
About Live UpgradeYou can use Live Upgrade on Solaris 10 systems to perform the following typesof upgrade:
■ Upgrade the operating system and SF.See “Upgrading SF and Solaris using Live Upgrade” on page 133.
■ Upgrade the operating system.See “Upgrading Solaris using Live Upgrade” on page 140.
■ Upgrade SF.See “Upgrading SF using Live Upgrade” on page 142.
14Chapter
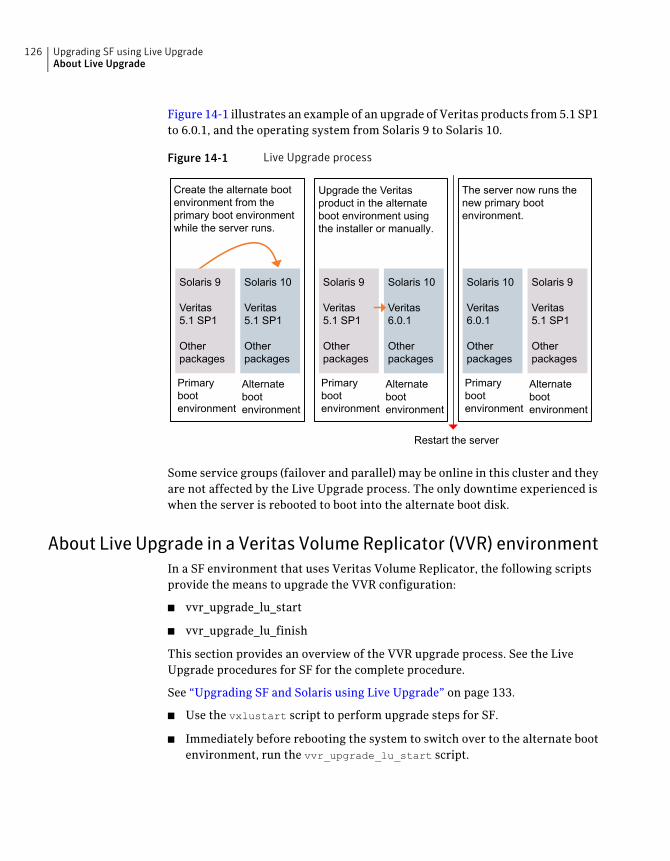
Figure 14-1 illustrates an example of an upgrade of Veritas products from 5.1 SP1to 6.0.1, and the operating system from Solaris 9 to Solaris 10.
Figure 14-1 Live Upgrade process
Create the alternate bootenvironment from theprimary boot environmentwhile the server runs.
Solaris 9
Veritas5.1 SP1
Otherpackages
Solaris 10
Veritas5.1 SP1
Otherpackages
Primarybootenvironment
Alternatebootenvironment
The server now runs thenew primary bootenvironment.
Solaris 10
Veritas6.0.1
Otherpackages
Solaris 9
Veritas5.1 SP1
Otherpackages
Primarybootenvironment
Alternatebootenvironment
Upgrade the Veritasproduct in the alternateboot environment usingthe installer or manually.
Solaris 9
Veritas5.1 SP1
Otherpackages
Solaris 10
Veritas6.0.1
Otherpackages
Primarybootenvironment
Alternatebootenvironment
Restart the server
Upgrade the Veritasproduct in the alternateboot environment usingthe installer or manually.
Some service groups (failover and parallel) may be online in this cluster and theyare not affected by the Live Upgrade process. The only downtime experienced iswhen the server is rebooted to boot into the alternate boot disk.
About Live Upgrade in a Veritas Volume Replicator (VVR) environmentIn a SF environment that uses Veritas Volume Replicator, the following scriptsprovide the means to upgrade the VVR configuration:
■ vvr_upgrade_lu_start
■ vvr_upgrade_lu_finish
This section provides an overview of the VVR upgrade process. See the LiveUpgrade procedures for SF for the complete procedure.
See “Upgrading SF and Solaris using Live Upgrade” on page 133.
■ Use the vxlustart script to perform upgrade steps for SF.
■ Immediately before rebooting the system to switch over to the alternate bootenvironment, run the vvr_upgrade_lu_start script.
Upgrading SF using Live UpgradeAbout Live Upgrade
126
Note: Use the vvr_upgrade_lu_start script only when the applications arestopped and the next step is to switch over to the alternate boot environment.
■ After the vvr_upgrade_lu_start script completes successfully, reboot thesystem. This reboot results in the system booting from the alternate bootenvironment.
■ After the objects are recovered, and the disk group version is upgraded (ifdesired), run the vvr_upgrade_lu_finish script.
Supported upgrade paths for Live UpgradeThe systems where you plan to use Live Upgrade must run Solaris 9 or Solaris 10.You can upgrade from systems that run Solaris 9, but SF 6.0.1 is not supportedon Solaris 9. Live Upgrade is not supported on Solaris 11.
For Solaris 10, make sure that all non-global zones are booted and in the installedstate before you use the Symantec product installer to upgrade the StorageFoundation products in the global zone. If the non-global zones are not mountedand running at the time of the upgrade, you must upgrade each package in eachnon-global zone manually.
For Live Upgrade, if the alternative root environment also has a zone, you cannotinstall VRTSodm. You must remove the VRTSodm package first then install theStorage Foundation product. After you reboot the alternative root, you can installVRTSodm.
SF version must be at least 5.0 MP3.
Symantec requires that both global and non-global zones run the same versionof Veritas products.
Note: If you use Live Upgrade on a system where non-global zones are configured,make sure that all the zones are in the installed state before you start LiveUpgrade.
You can use Live Upgrade in the following virtualized environments:
127Upgrading SF using Live UpgradeSupported upgrade paths for Live Upgrade
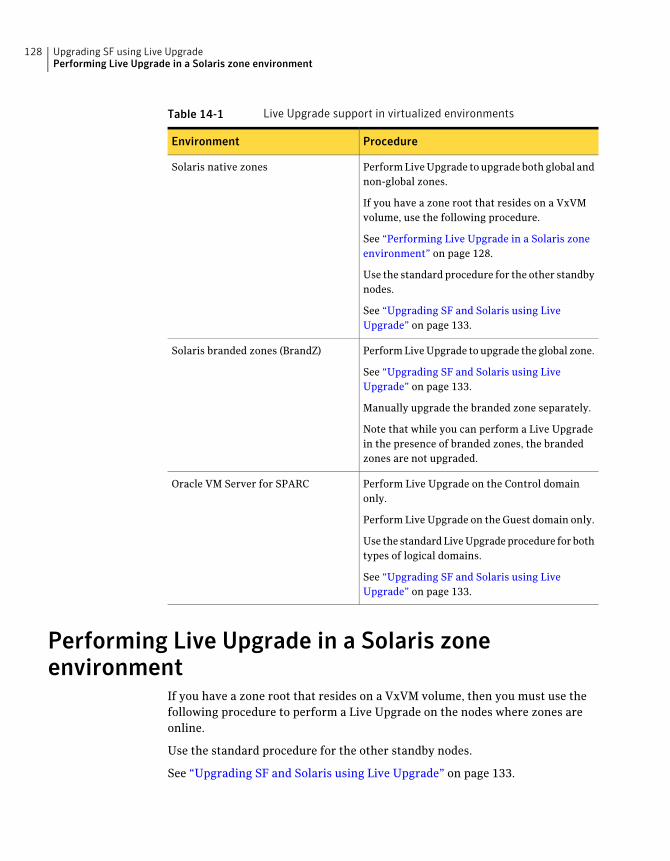
Table 14-1 Live Upgrade support in virtualized environments
ProcedureEnvironment
Perform Live Upgrade to upgrade both global andnon-global zones.
If you have a zone root that resides on a VxVMvolume, use the following procedure.
See “Performing Live Upgrade in a Solaris zoneenvironment” on page 128.
Use the standard procedure for the other standbynodes.
See “Upgrading SF and Solaris using LiveUpgrade” on page 133.
Solaris native zones
Perform Live Upgrade to upgrade the global zone.
See “Upgrading SF and Solaris using LiveUpgrade” on page 133.
Manually upgrade the branded zone separately.
Note that while you can perform a Live Upgradein the presence of branded zones, the brandedzones are not upgraded.
Solaris branded zones (BrandZ)
Perform Live Upgrade on the Control domainonly.
Perform Live Upgrade on the Guest domain only.
Use the standard Live Upgrade procedure for bothtypes of logical domains.
See “Upgrading SF and Solaris using LiveUpgrade” on page 133.
Oracle VM Server for SPARC
Performing Live Upgrade in a Solaris zoneenvironment
If you have a zone root that resides on a VxVM volume, then you must use thefollowing procedure to perform a Live Upgrade on the nodes where zones areonline.
Use the standard procedure for the other standby nodes.
See “Upgrading SF and Solaris using Live Upgrade” on page 133.
Upgrading SF using Live UpgradePerforming Live Upgrade in a Solaris zone environment
128

To perform a Live Upgrade on a node that has a zone root on a VxVM volume
1 Unmount all file systems that do not contain local zone root.
2 By default, Zone agent BootState is set to "multi-user."
Shut down any application that runs on local zone. Leave the zone running.
Note: Symantec recommends that you set BootState to "multi-user-server"to run applications inside non-global zones.
3 Make sure that the boot environment disk has enough space for local zoneroot being copied over during the Live Upgrade.
4 Follow the instruction to upgrade using Live Upgrade (which includesvxlustart, the product upgrade, and vxlufinish).
Before rebooting the systems to complete the Live Upgrade, perform thefollowing steps.
5 On the system that houses the local zone, copy all files and directories beforethe upgrade on the local zone root to another location.
# zoneadm list -cv
ID NAME STATUS PATH BRAND IP
0 global running / native shared
6 ora-lzone running /oralzones native shared
# zoneadm -z ora-lzone halt
# cd /oralzones
# ls
dev lost+found root SUNWattached.xml
# mv dev dev.41
# mv root root.41
# mv SUNWattached.xml SUNWattached.xml.41
129Upgrading SF using Live UpgradePerforming Live Upgrade in a Solaris zone environment
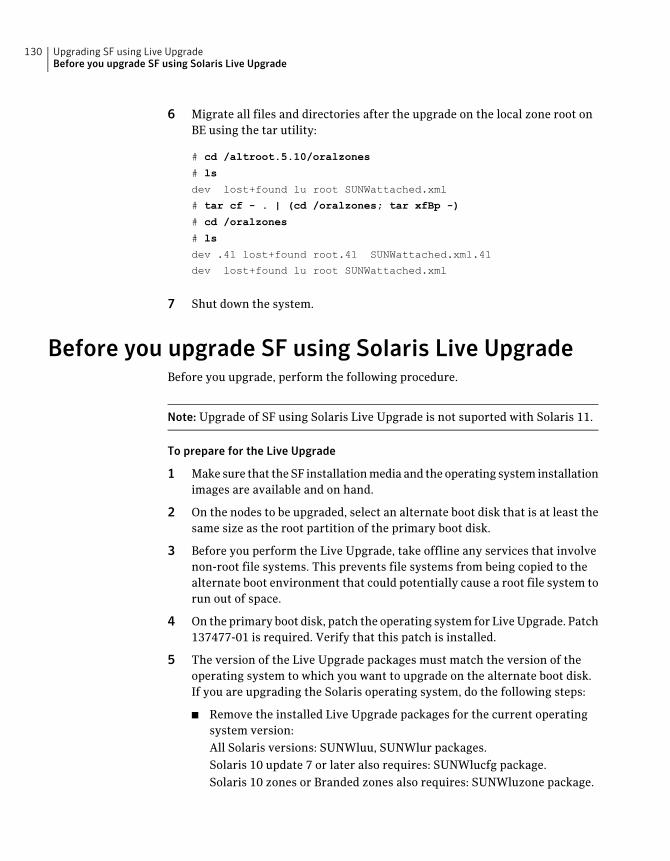
6 Migrate all files and directories after the upgrade on the local zone root onBE using the tar utility:
# cd /altroot.5.10/oralzones
# ls
dev lost+found lu root SUNWattached.xml
# tar cf - . | (cd /oralzones; tar xfBp -)
# cd /oralzones
# ls
dev .41 lost+found root.41 SUNWattached.xml.41
dev lost+found lu root SUNWattached.xml
7 Shut down the system.
Before you upgrade SF using Solaris Live UpgradeBefore you upgrade, perform the following procedure.
Note: Upgrade of SF using Solaris Live Upgrade is not suported with Solaris 11.
To prepare for the Live Upgrade
1 Make sure that the SF installation media and the operating system installationimages are available and on hand.
2 On the nodes to be upgraded, select an alternate boot disk that is at least thesame size as the root partition of the primary boot disk.
3 Before you perform the Live Upgrade, take offline any services that involvenon-root file systems. This prevents file systems from being copied to thealternate boot environment that could potentially cause a root file system torun out of space.
4 On the primary boot disk, patch the operating system for Live Upgrade. Patch137477-01 is required. Verify that this patch is installed.
5 The version of the Live Upgrade packages must match the version of theoperating system to which you want to upgrade on the alternate boot disk.If you are upgrading the Solaris operating system, do the following steps:
■ Remove the installed Live Upgrade packages for the current operatingsystem version:All Solaris versions: SUNWluu, SUNWlur packages.Solaris 10 update 7 or later also requires: SUNWlucfg package.Solaris 10 zones or Branded zones also requires: SUNWluzone package.
Upgrading SF using Live UpgradeBefore you upgrade SF using Solaris Live Upgrade
130
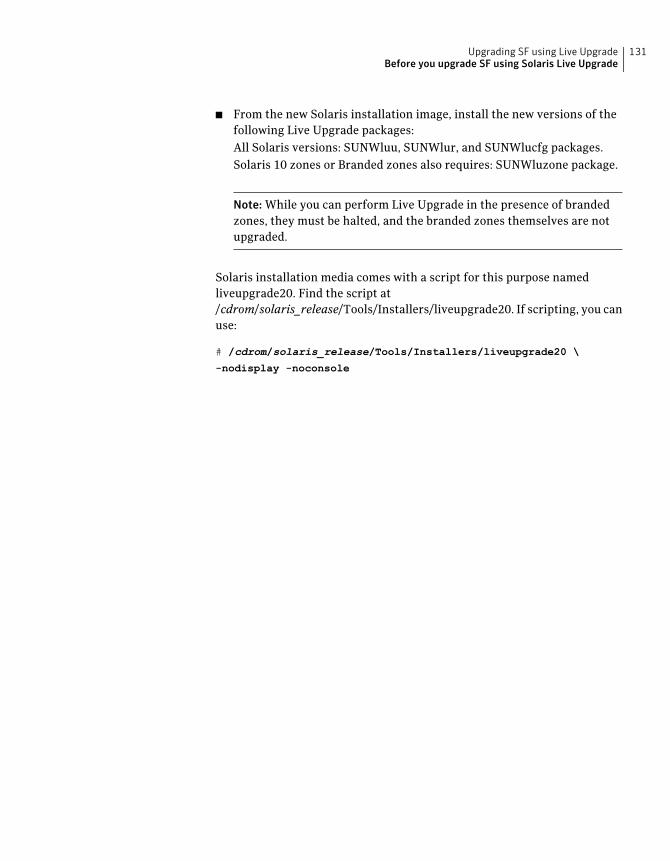
■ From the new Solaris installation image, install the new versions of thefollowing Live Upgrade packages:All Solaris versions: SUNWluu, SUNWlur, and SUNWlucfg packages.Solaris 10 zones or Branded zones also requires: SUNWluzone package.
Note: While you can perform Live Upgrade in the presence of brandedzones, they must be halted, and the branded zones themselves are notupgraded.
Solaris installation media comes with a script for this purpose namedliveupgrade20. Find the script at/cdrom/solaris_release/Tools/Installers/liveupgrade20. If scripting, you canuse:
# /cdrom/solaris_release/Tools/Installers/liveupgrade20 \
-nodisplay -noconsole
131Upgrading SF using Live UpgradeBefore you upgrade SF using Solaris Live Upgrade
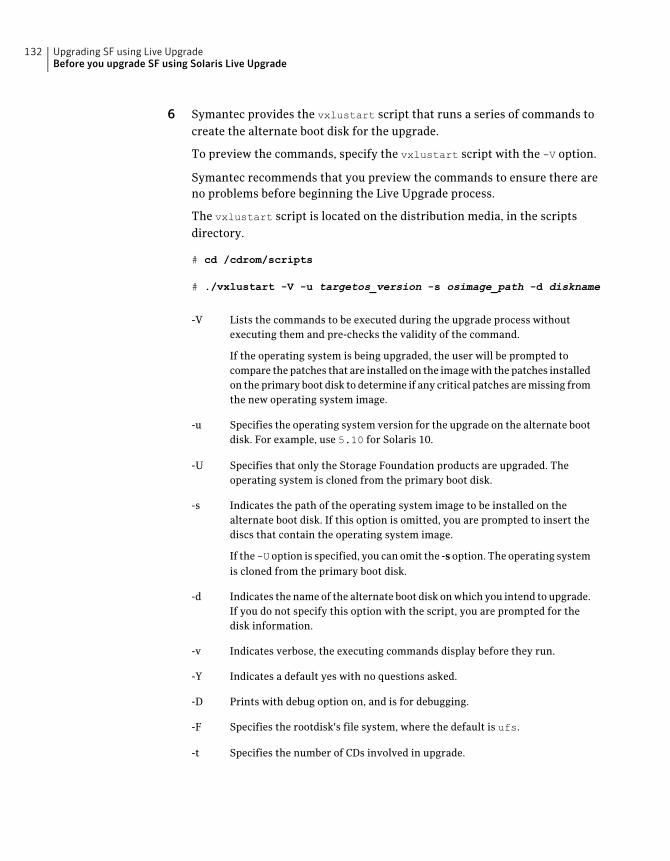
6 Symantec provides the vxlustart script that runs a series of commands tocreate the alternate boot disk for the upgrade.
To preview the commands, specify the vxlustart script with the -V option.
Symantec recommends that you preview the commands to ensure there areno problems before beginning the Live Upgrade process.
The vxlustart script is located on the distribution media, in the scriptsdirectory.
# cd /cdrom/scripts
# ./vxlustart -V -u targetos_version -s osimage_path -d diskname
Lists the commands to be executed during the upgrade process withoutexecuting them and pre-checks the validity of the command.
-V
If the operating system is being upgraded, the user will be prompted tocompare the patches that are installed on the image with the patches installedon the primary boot disk to determine if any critical patches are missing fromthe new operating system image.
Specifies the operating system version for the upgrade on the alternate bootdisk. For example, use 5.10 for Solaris 10.
-u
Specifies that only the Storage Foundation products are upgraded. Theoperating system is cloned from the primary boot disk.
-U
Indicates the path of the operating system image to be installed on thealternate boot disk. If this option is omitted, you are prompted to insert thediscs that contain the operating system image.
-s
If the-U option is specified, you can omit the -s option. The operating systemis cloned from the primary boot disk.
Indicates the name of the alternate boot disk on which you intend to upgrade.If you do not specify this option with the script, you are prompted for thedisk information.
-d
Indicates verbose, the executing commands display before they run.-v
Indicates a default yes with no questions asked.-Y
Prints with debug option on, and is for debugging.-D
Specifies the rootdisk's file system, where the default is ufs.-F
Specifies the number of CDs involved in upgrade.-t
Upgrading SF using Live UpgradeBefore you upgrade SF using Solaris Live Upgrade
132
Specifies that if the machine crashes or reboots before the vxlufinishcommand is run, the alternate disk is remounted using this option.
-r
For example, to preview the commands to upgrade only the Veritas product:
# ./vxlustart -V -u 5.10 -U -d disk_name
For example, to preview the commands for an upgrade to Solaris 10 update6:
# ./vxlustart -V -u 5.10 -s /mnt/Solaris_10u6 -d c0t1d0s0
Note: This command prompts you to compare the patches that are installedon the image with the patches installed on the primary boot disk. If anypatches are missing from the new operating system's image, note the patchnumbers. To ensure the alternate boot disk is the same as the primary bootdisk, you will need to install these patches on the alternate boot disk.
7 If the specified image is missing patches that are installed on the primaryboot disk, note the patch numbers. To ensure that the alternate boot disk isthe same as the primary boot disk, you need to install any missing patcheson the alternate boot disk.
In the procedure examples, the primary or current boot environment resides onDisk0 (c0t0d0s0) and the alternate or inactive boot environment resides on Disk1(c0t1d0s0).
Upgrading SF and Solaris using Live UpgradePerform the Live Upgrade manually or use the installer.
Upgrading SF using Live Upgrade involves the following steps:
■ Prepare to upgrade using Solaris Live Upgrade.See “Before you upgrade SF using Solaris Live Upgrade” on page 130.
■ Create a new boot environment on the alternate boot disk.See “Creating a new boot environment on the alternate boot disk” on page 134.
■ Upgrade to Storage Foundation 6.0.1 on the alternate boot environmentmanually or using the installer.
To upgrade SF manually, refer to the following procedure:
■ See “Upgrading SF manually” on page 136.
To upgrade SF using the installer, refer to the following procedure:
133Upgrading SF using Live UpgradeUpgrading SF and Solaris using Live Upgrade
■ See “Upgrading SF using the installer for a Live Upgrade” on page 135.
■ Switch the alternate boot environment to be the new primary.See “Completing the Live Upgrade ” on page 138.
■ Verify Live Upgrade of SF.See “Verifying Live Upgrade of SF” on page 140.
Creating a new boot environment on the alternate boot diskRun the vxlustart command to create a new boot environment on the alternateboot disk.
Note: This step can take several hours to complete. Do not interrupt the sessionas it may leave the boot environment unstable.
At the end of the process:
■ The Solaris operating system on the alternate boot disk is upgraded, if youhave chosen to upgrade the operating system.
■ A new boot environment is created on the alternate boot disk by cloning theprimary boot environment.
To create a new boot environment on the alternate boot disk
1 Navigate to the install media for the Symantec products:
# cd /cdrom/scripts
2 View the list of VxVM disks on which you want to create the new bootenvironment.
# vxdisk list
Upgrading SF using Live UpgradeUpgrading SF and Solaris using Live Upgrade
134
3 Run one of the following commands to perform the upgrade:
To upgrade the operating system, by itself or together with upgrading theVeritas products:
# ./vxlustart -v -u targetos_version \
-s osimage_path -d disk_name
Where targetos_version is the version of the operating system
osimage_path is the full path to the operating system image
disk_name is the name of the disk as displayed in the output of step 2.
To upgrade the Veritas product only:
# ./vxlustart -v -u 5.10 -U -d disk_name
The options to the vxlustart command are listed in the preupgrade section.
See “Before you upgrade SF using Solaris Live Upgrade” on page 130.
For example, to upgrade to Solaris 10 update 6:
# ./vxlustart -v -u 5.10 -s /mnt/Solaris_10u6
4 Review the output and note the new mount points. If the system is rebootedbefore completion of the upgrade or if the mounts become unmounted, youmay need to remount the disks.
If you need to remount, run the command:
# vxlustart -r -u targetos_version -d disk_name
5 After the alternate boot disk is created and mounted on /altroot.5.10, installany operating system patches or packages on the alternate boot disk that arerequired for the Veritas product installation:
# pkgadd -R /altroot.5.10 -d pkg_dir
Upgrading SF using the installer for a Live UpgradeYou can use the Veritas product installer to upgrade SF as part of the Live Upgrade.
At the end of the process the following occurs:
■ Storage Foundation 6.0.1 is installed on the alternate boot disk.
135Upgrading SF using Live UpgradeUpgrading SF and Solaris using Live Upgrade

To perform Live Upgrade of SF using the installer
1 Insert the product disc with Storage Foundation 6.0.1 or access your copy ofthe software on the network.
2 Run the installer script specifying the root path as the alternate boot disk:
# ./installsf -upgrade -rootpath /altroot.5.10
See “Removing and reinstalling SF using the installer” on page 141.
3 Enter the names of the nodes that you want to upgrade to Storage Foundation6.0.1.
Note:Make sure that the installed version of VxFS uses the disk layout version6 or later. If you are on a previous disk layout version, upgrade the versionbefore you proceed with the SF installation.
The installer displays the list of packages to be installed or upgraded on thenodes.
4 Press Return to continue with the installation.
5 Verify that the version of the Veritas packages on the alternate boot disk is6.0.1.
# pkginfo -R /altroot.5.10 -l VRTSpkgname
For example:
# pkginfo -R /altroot.5.10 -l VRTSvxvm
Review the installation logs at /altroot.5.10/opt/VRTS/install/logs.
Upgrading SF manuallyYou can perform a manual upgrade of SF using Live Upgrade.
At the end of the process the following occurs:
■ Storage Foundation 6.0.1 is installed on the alternate boot disk.
To perform Live Upgrade of SF manually
1 Remove the SF packages on the alternate boot disk in the reverse order inwhich they were installed:
■ # pkgrm -R /altroot.5.10 \
VRTSmapro VRTSgapms VRTSvxmsa VRTSfasag VRTSfas VRTSvail \
VRTSfsmnd VRTSfssdk VRTSfsman VRTSvrw VRTSweb VRTSjre15 \
Upgrading SF using Live UpgradeUpgrading SF and Solaris using Live Upgrade
136
VRTSvcsvr VRTSvrpro VRTSddlpr VRTSvdid VRTSalloc VRTSdcli \
VRTSvmpro VRTSvmman VRTSfspro VRTSdsa VRTSvxvm VRTSvxfs \
VRTSspt VRTSaa VRTSmh VRTSccg VRTSobgui VRTSob VRTSobc33 \
VRTSat VRTSpbx VRTSicsco VRTSvlic VRTSperl
Note that this package list is an example. Full package lists vary fromrelease to release and by product option.
■ For Storage Foundation:
# pkgrm -R /altroot.5.10 \
VRTSmapro VRTSgapms VRTSvxmsa VRTSfasag VRTSfas VRTSvail \
VRTScmccc VRTScmcs VRTSacclib VRTScssim VRTScscm VRTScscw \
VRTSvcsmn VRTSvcsag VRTSvcsmg VRTSvcs VRTSvxfen VRTSgab \
VRTSllt VRTSfsmnd VRTSfssdk VRTSfsman VRTSvrw VRTSjre15 \
VRTSvcsvr VRTSvrpro VRTSddlpr VRTSvdid VRTSalloc VRTSdcli \
VRTSvmpro VRTSvmman VRTSfspro VRTSdsa VRTSvxvm VRTSvxfs \
VRTSspt VRTSaa VRTSmh VRTSccg VRTSobgui VRTSob VRTSobc33 \
VRTSat VRTSpbx VRTSicsco VRTSvlic VRTSperl
Note that this package list is an example. Full package lists vary fromrelease to release and by product option.
The -R option removes the packages from the root path /altroot.5.10 onthe alternate boot disk.
2 Install the SF packages from the pkgs directory. You must install the packagesin the following order one at a time to the alternate boot disk using the pkgaddcommand:
■ For Storage Foundation:
VRTSvlic.pkg VRTSperl.pkg VRTSspt.pkg VRTSvxvm.pkg VRTSaslapm.pkg
VRTSob.pkg VRTSsfmh.pkg VRTSvxfs.pkg VRTSfssdk.pkg VRTSdbed.pkg
VRTSodm.pkg VRTSsfcpi601.pkg
For example:
# pkgadd -R /altroot.5.10 -d package_name.pkg
Where you replace package_name.pkg with a package's name, for exampleVRTSperl.pkg.
# pkgadd -R /altroot.5.10 -d VRTSperl.pkg
3 Verify that the version of the Veritas packages on the alternate boot disk is6.0.1.
137Upgrading SF using Live UpgradeUpgrading SF and Solaris using Live Upgrade
# pkginfo -R /altrootpath -l VRTSpkgname
For example:
# pkginfo -R /altroot.5.10 -l VRTSvxvm
Completing the Live UpgradeAt the end of the process:
■ If the original primary boot disk was encapsulated, the alternate boot disk isencapsulated.
■ The alternate boot environment is activated.
■ The system is booted from the alternate boot disk.
To complete the Live Upgrade
1 Complete the Live upgrade process using one of the following commands.
If the primary root disk is not encapsulated, run the following command:
# ./vxlufinish -u target_os_version
Live Upgrade finish on the Solaris release <5.10>
If the primary root disk is encapsulated by VxVM, run the following command:
# ./vxlufinish -u target_os_version -g diskgroup
Live Upgrade finish on the Solaris release <5.10>
The Live Upgrade process encapsulates the alternate root disk if the primaryroot disk was encapsulated.
2 Complete the Live upgrade process using one of the following commands.You must enter the command on all nodes in the cluster.
If the primary root disk is not encapsulated, run the following command:
# ./vxlufinish -u target_os_version
Live Upgrade finish on the Solaris release <5.10>
If the primary root disk is encapsulated by VxVM, run the following command:
# ./vxlufinish -u target_os_version -g diskgroup
Live Upgrade finish on the Solaris release <5.10>
The Live Upgrade process encapsulates the alternate root disk if the primaryroot disk was encapsulated.
Upgrading SF using Live UpgradeUpgrading SF and Solaris using Live Upgrade
138
3 If the system crashes or reboots before Live Upgrade completes successfully,you can remount the alternate disk using the following command:
# ./vxlustart -r -u target_os_version
Then, rerun the vxlufinish command from step 2
# ./vxlufinish -u target_os_version
4 If you are upgrading VVR, run the vvr_upgrade_lu_start command.
Note: Only run the vvr_upgrade_lu_start command when you are ready toreboot the nodes and switch over to the alternate boot environment.
5 Reboot the system. The boot environment on the alternate disk is activatedwhen you restart the it.
Reboot all the nodes in the cluster. The boot environment on the alternatedisk is activated when you restart the nodes.
Note:Do not use the reboot, halt, or uadmin commands to reboot the system.Use either the init or the shutdown commands to enable the system to bootusing the alternate boot environment.
You can ignore the following error if it appears: ERROR: boot environment<dest.13445> already mounted on </altroot.5.10>.
# shutdown -g0 -y -i6
6 After the alternate boot environment is activated, you can switch bootenvironments. If the root disk is encapsulated, refer to the procedure to switchthe boot environments manually.
See “Administering boot environments” on page 142.
7 After the upgrade, perform any required post-upgrade tasks such as upgradingthe disk group.
8 After the objects are recovered, and the disk group version is upgraded (ifdesired), run the vvr_upgrade_lu_finish script.
139Upgrading SF using Live UpgradeUpgrading SF and Solaris using Live Upgrade
Verifying Live Upgrade of SFTo ensure that Live Upgrade has completed successfully, vverify that the systemhave booted from the alternate boot environment.
To verify that Live Upgrade completed successfully
1 Verify that the alternate boot environment is active.
# lustatus
If the alternate boot environment is not active, you can revert to the primaryboot environment.
See “Reverting to the primary boot environment” on page 142.
2 Perform other verification as required to ensure that the new bootenvironment is configured correctly.
3 In a zone environment, verify the zone configuration.
Upgrading Solaris using Live UpgradeIf you are upgrading Solaris only, you must remove and reinstall SF from thealternate boot environment prior to completing the Live Upgrade. You mustremove and reinstall because SF has kernel components that are specific to Solarisoperating system versions. The correct version of the SF packages must beinstalled.
Upgrading Solaris using Live Upgrade involves the following steps:
■ Preparing to upgrade using Solaris Live Upgrade.See “Before you upgrade SF using Solaris Live Upgrade” on page 130.
■ Creating a new boot environment on the alternate boot diskSee “Creating a new boot environment on the alternate boot disk” on page 134.
■ Removing and reinstalling Storage Foundation 6.0.1 on the alternate bootenvironment:Using manual steps:See “Upgrading SF manually” on page 136.Using the installer:See “Removing and reinstalling SF using the installer” on page 141.
Note: Do NOT configure the Storage Foundation 6.0.1
■ Switching the alternate boot environment to be the new primary
Upgrading SF using Live UpgradeUpgrading Solaris using Live Upgrade
140
See “Completing the Live Upgrade ” on page 138.
■ Verifying Live Upgrade of SF.See “Verifying Live Upgrade of SF” on page 140.
Removing and reinstalling SF using the installerSF has kernel components that are specific for Solaris operating system versions.When you use Solaris Live Upgrade to upgrade the Solaris operating system, youmust complete these steps to ensure the correct version of SF components areinstalled.
Run the installer on the alternate boot disk to remove and reinstall StorageFoundation 6.0.1.
At the end of the process the following occurs:
■ Storage Foundation 6.0.1 is installed on the alternate boot disk, with the correctbinaries for the new operating system version
To remove and reinstall SF using the installer
1 Uninstall using the installer script, specifying the alternate boot disk as theroot path:
# /opt/VRTS/install/uninstallsf<version>
-rootpath altrootpath
Where <version> is the specific release version.
See “About the Veritas installer” on page 25.
2 Enter the names of the nodes that you want to uninstall.
The installer displays the list of packages that will be uninstalled.
3 Press Return to continue.
4 Install using the installer script, specifying the root path as the alternate bootdisk as follows:
# /cdrom/storage_foundation/installsf -install \
-rootpath /altrootpath
5 Press Return to continue.
6 Verify that the version of the Veritas packages on the alternate boot disk is6.0.1.
# pkginfo -R /altroot.5.10 -l VRTSpkgname
141Upgrading SF using Live UpgradeUpgrading Solaris using Live Upgrade
For example:
# pkginfo -R /altroot.5.10 -l VRTSvxvm
Review the installation logs at /altroot.5.10/opt/VRTS/install/log.
Upgrading SF using Live UpgradePerform the Live Upgrade manually or use the installer. The nodes will not forma cluster until all of the nodes are upgraded to Storage Foundation 6.0.1. At theend of the Live Upgrade of the last node, all the nodes must boot from the alternateboot environment and join the cluster.
Upgrading SF using Live Upgrade involves the following steps:
■ Prepare to upgrade using Solaris Live Upgrade.See “Before you upgrade SF using Solaris Live Upgrade” on page 130.
■ Create a new boot environment on the alternate boot disk.See “Creating a new boot environment on the alternate boot disk” on page 134.
■ Upgrade to Storage Foundation 6.0.1 on the alternate boot environmentmanually or using the installer. Refer to one of the following:
To upgrade SF manually:
■ See “Upgrading SF manually” on page 136.
To upgrade SF using the installer:
■ See “Upgrading SF using the installer for a Live Upgrade” on page 135.
■ Switch the alternate boot environment to be the new primary.See “Completing the Live Upgrade ” on page 138.
■ Verify Live Upgrade of SF.See “Verifying Live Upgrade of SF” on page 140.
Administering boot environmentsUse the following procedures to perform relevant administrative tasks for bootenvironments.
Reverting to the primary boot environmentIf the alternate boot environment fails to start, you can revert to the primary bootenvironment.
Start the system from the primary boot environment in the PROM monitor mode.
Upgrading SF using Live UpgradeUpgrading SF using Live Upgrade
142
ok> boot disk0
where disk0 is the primary boot disk.
Switching the boot environment for Solaris SPARCYou do not have to perform the following procedures to switch the bootenvironment when you use the vxlufinish scripts to process Live Upgrade. Youmust perform the following procedures when you perform a manual Live Upgrade.
Two different procedures exist to switch the boot environment, choose one of thefollowing procedures based on the encapsulation of the root disk:
■ See “To switch the boot environment if the root disk is not encapsulated”on page 144.
■ See “To switch the boot environment if the root disk is encapsulated”on page 145.
The switching procedures for Solaris SPARC vary, depending on whether VxVMencapsulates the root disk.
143Upgrading SF using Live UpgradeAdministering boot environments
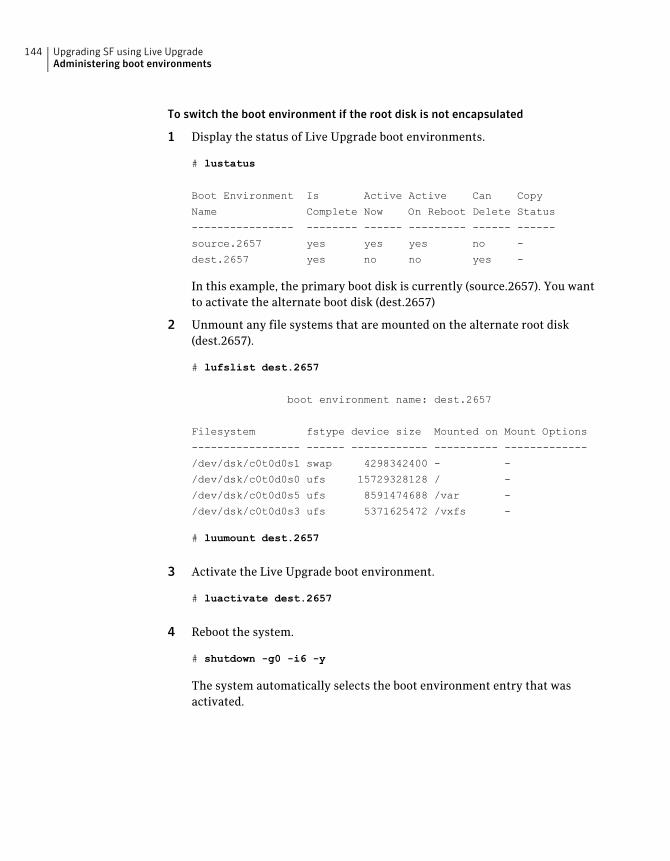
To switch the boot environment if the root disk is not encapsulated
1 Display the status of Live Upgrade boot environments.
# lustatus
Boot Environment Is Active Active Can Copy
Name Complete Now On Reboot Delete Status
---------------- -------- ------ --------- ------ ------
source.2657 yes yes yes no -
dest.2657 yes no no yes -
In this example, the primary boot disk is currently (source.2657). You wantto activate the alternate boot disk (dest.2657)
2 Unmount any file systems that are mounted on the alternate root disk(dest.2657).
# lufslist dest.2657
boot environment name: dest.2657
Filesystem fstype device size Mounted on Mount Options
----------------- ------ ------------ ---------- -------------
/dev/dsk/c0t0d0s1 swap 4298342400 - -
/dev/dsk/c0t0d0s0 ufs 15729328128 / -
/dev/dsk/c0t0d0s5 ufs 8591474688 /var -
/dev/dsk/c0t0d0s3 ufs 5371625472 /vxfs -
# luumount dest.2657
3 Activate the Live Upgrade boot environment.
# luactivate dest.2657
4 Reboot the system.
# shutdown -g0 -i6 -y
The system automatically selects the boot environment entry that wasactivated.
Upgrading SF using Live UpgradeAdministering boot environments
144
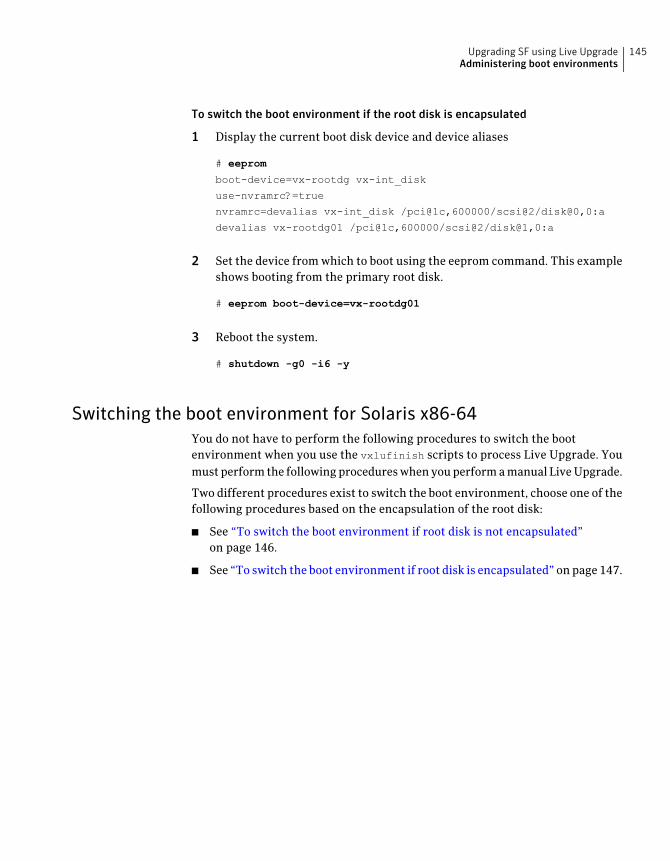
To switch the boot environment if the root disk is encapsulated
1 Display the current boot disk device and device aliases
# eeprom
boot-device=vx-rootdg vx-int_disk
use-nvramrc?=true
nvramrc=devalias vx-int_disk /pci@1c,600000/scsi@2/disk@0,0:a
devalias vx-rootdg01 /pci@1c,600000/scsi@2/disk@1,0:a
2 Set the device from which to boot using the eeprom command. This exampleshows booting from the primary root disk.
# eeprom boot-device=vx-rootdg01
3 Reboot the system.
# shutdown -g0 -i6 -y
Switching the boot environment for Solaris x86-64You do not have to perform the following procedures to switch the bootenvironment when you use the vxlufinish scripts to process Live Upgrade. Youmust perform the following procedures when you perform a manual Live Upgrade.
Two different procedures exist to switch the boot environment, choose one of thefollowing procedures based on the encapsulation of the root disk:
■ See “To switch the boot environment if root disk is not encapsulated”on page 146.
■ See “To switch the boot environment if root disk is encapsulated” on page 147.
145Upgrading SF using Live UpgradeAdministering boot environments
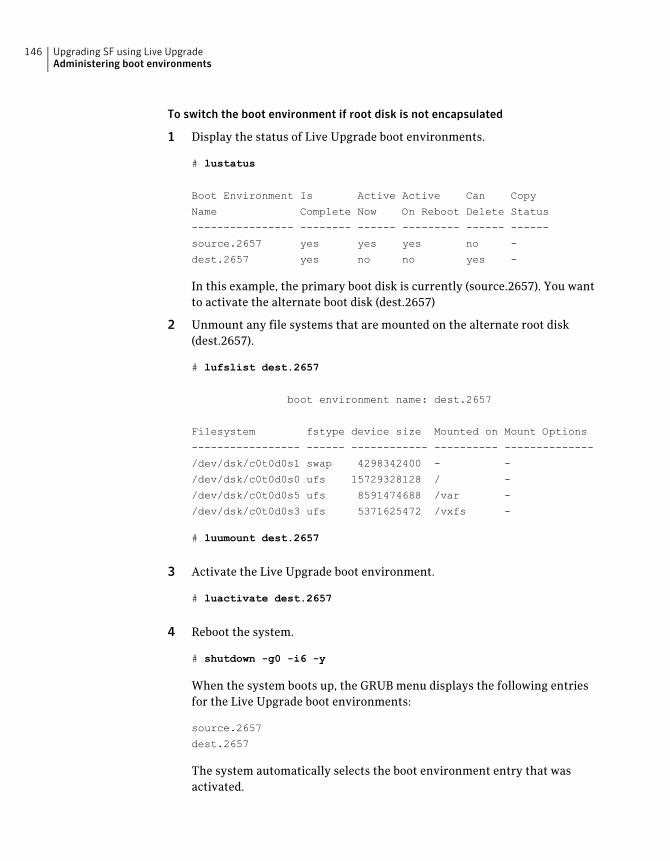
To switch the boot environment if root disk is not encapsulated
1 Display the status of Live Upgrade boot environments.
# lustatus
Boot Environment Is Active Active Can Copy
Name Complete Now On Reboot Delete Status
---------------- -------- ------ --------- ------ ------
source.2657 yes yes yes no -
dest.2657 yes no no yes -
In this example, the primary boot disk is currently (source.2657). You wantto activate the alternate boot disk (dest.2657)
2 Unmount any file systems that are mounted on the alternate root disk(dest.2657).
# lufslist dest.2657
boot environment name: dest.2657
Filesystem fstype device size Mounted on Mount Options
----------------- ------ ------------ ---------- --------------
/dev/dsk/c0t0d0s1 swap 4298342400 - -
/dev/dsk/c0t0d0s0 ufs 15729328128 / -
/dev/dsk/c0t0d0s5 ufs 8591474688 /var -
/dev/dsk/c0t0d0s3 ufs 5371625472 /vxfs -
# luumount dest.2657
3 Activate the Live Upgrade boot environment.
# luactivate dest.2657
4 Reboot the system.
# shutdown -g0 -i6 -y
When the system boots up, the GRUB menu displays the following entriesfor the Live Upgrade boot environments:
source.2657
dest.2657
The system automatically selects the boot environment entry that wasactivated.
Upgrading SF using Live UpgradeAdministering boot environments
146
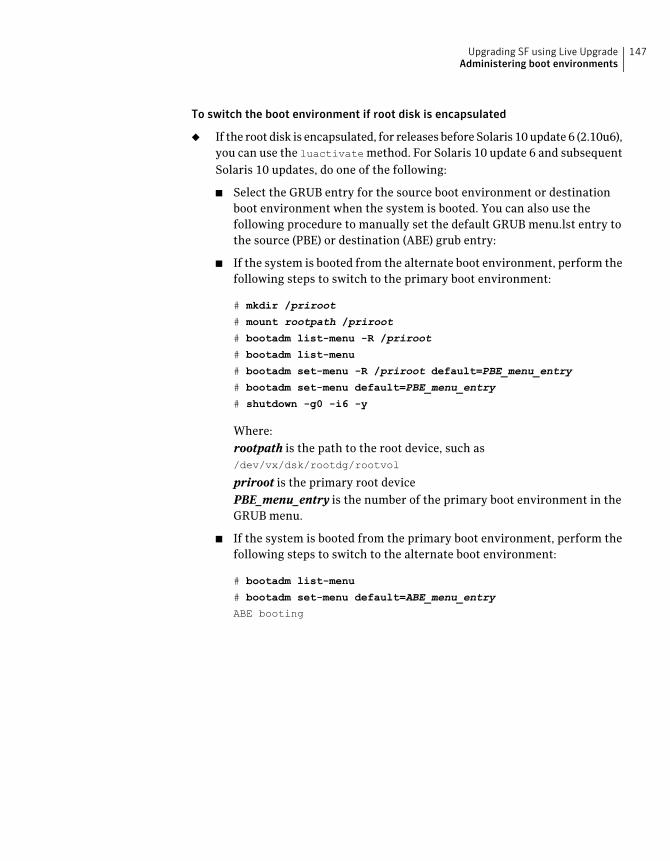
To switch the boot environment if root disk is encapsulated
◆ If the root disk is encapsulated, for releases before Solaris 10 update 6 (2.10u6),you can use the luactivate method. For Solaris 10 update 6 and subsequentSolaris 10 updates, do one of the following:
■ Select the GRUB entry for the source boot environment or destinationboot environment when the system is booted. You can also use thefollowing procedure to manually set the default GRUB menu.lst entry tothe source (PBE) or destination (ABE) grub entry:
■ If the system is booted from the alternate boot environment, perform thefollowing steps to switch to the primary boot environment:
# mkdir /priroot
# mount rootpath /priroot
# bootadm list-menu -R /priroot
# bootadm list-menu
# bootadm set-menu -R /priroot default=PBE_menu_entry
# bootadm set-menu default=PBE_menu_entry
# shutdown -g0 -i6 -y
Where:rootpath is the path to the root device, such as/dev/vx/dsk/rootdg/rootvol
priroot is the primary root devicePBE_menu_entry is the number of the primary boot environment in theGRUB menu.
■ If the system is booted from the primary boot environment, perform thefollowing steps to switch to the alternate boot environment:
# bootadm list-menu
# bootadm set-menu default=ABE_menu_entry
ABE booting
147Upgrading SF using Live UpgradeAdministering boot environments

Upgrading SF using Live UpgradeAdministering boot environments
148
Migrating from StorageFoundation Basic to StorageFoundation Standard
This chapter includes the following topics:
■ Migrating from Storage Foundation Basic to Storage Foundation Standard
Migrating from Storage Foundation Basic to StorageFoundation Standard
Use this procedure to migrate from Storage Foundation (SF) Basic to StorageFoundation Standard.
To migrate from Storage Foundation Basic to Storage Foundation Standard
1 Log in as superuser on a system where you want to install Storage FoundationStandard.
2 Use the following command to confirm that you are currently running StorageFoundation Basic.
# /opt/VRTSvlic/bin/vxlicrep | grep Basic
You should see the following output:
Product Name = VERITAS Storage Foundation Basic
3 Mount the installation media for Storage Foundation.
15Chapter
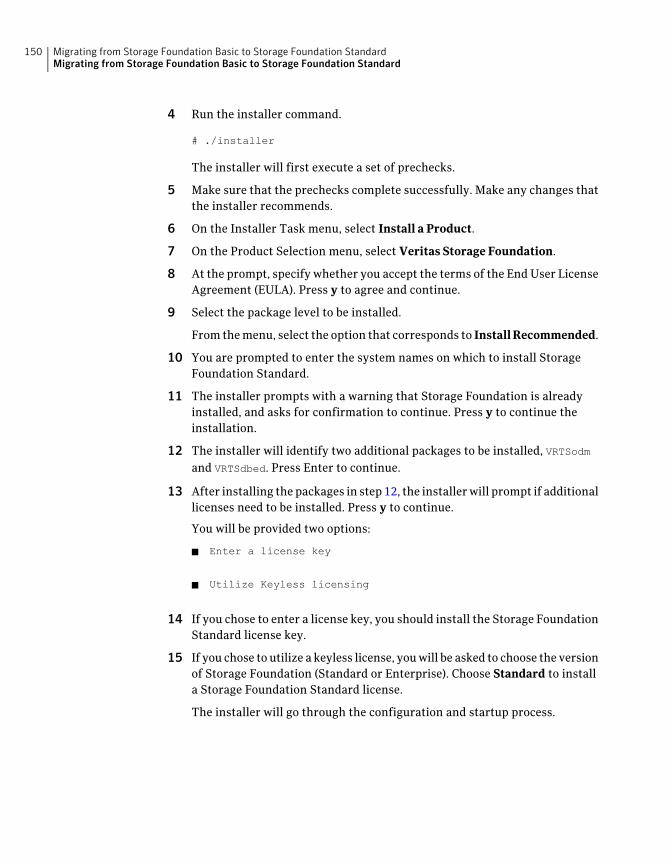
4 Run the installer command.
# ./installer
The installer will first execute a set of prechecks.
5 Make sure that the prechecks complete successfully. Make any changes thatthe installer recommends.
6 On the Installer Task menu, select Install a Product.
7 On the Product Selection menu, select Veritas Storage Foundation.
8 At the prompt, specify whether you accept the terms of the End User LicenseAgreement (EULA). Press y to agree and continue.
9 Select the package level to be installed.
From the menu, select the option that corresponds to InstallRecommended.
10 You are prompted to enter the system names on which to install StorageFoundation Standard.
11 The installer prompts with a warning that Storage Foundation is alreadyinstalled, and asks for confirmation to continue. Press y to continue theinstallation.
12 The installer will identify two additional packages to be installed, VRTSodmand VRTSdbed. Press Enter to continue.
13 After installing the packages in step 12, the installer will prompt if additionallicenses need to be installed. Press y to continue.
You will be provided two options:
■ Enter a license key
■ Utilize Keyless licensing
14 If you chose to enter a license key, you should install the Storage FoundationStandard license key.
15 If you chose to utilize a keyless license, you will be asked to choose the versionof Storage Foundation (Standard or Enterprise). Choose Standard to installa Storage Foundation Standard license.
The installer will go through the configuration and startup process.
Migrating from Storage Foundation Basic to Storage Foundation StandardMigrating from Storage Foundation Basic to Storage Foundation Standard
150
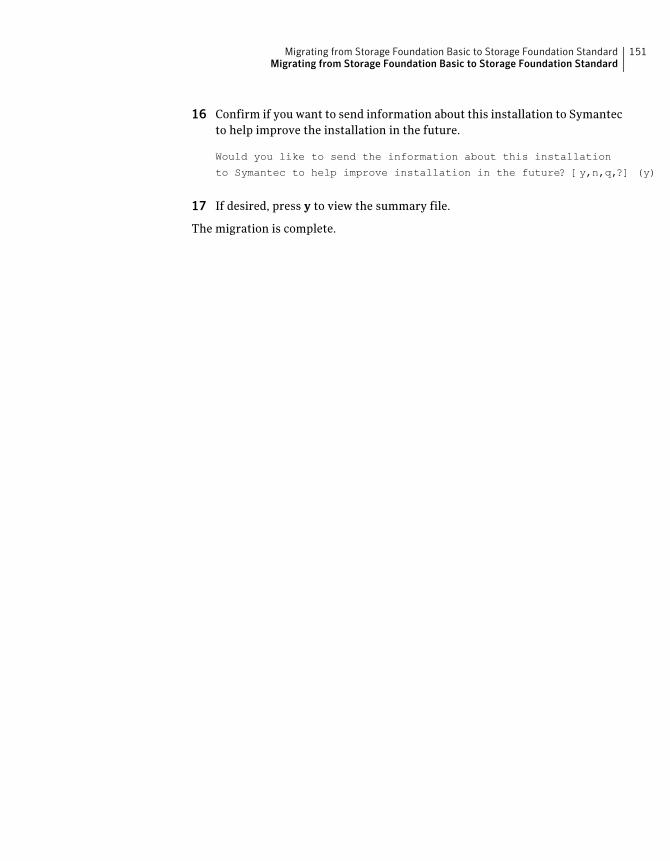
16 Confirm if you want to send information about this installation to Symantecto help improve the installation in the future.
Would you like to send the information about this installation
to Symantec to help improve installation in the future? [y,n,q,?] (y)
17 If desired, press y to view the summary file.
The migration is complete.
151Migrating from Storage Foundation Basic to Storage Foundation StandardMigrating from Storage Foundation Basic to Storage Foundation Standard

Migrating from Storage Foundation Basic to Storage Foundation StandardMigrating from Storage Foundation Basic to Storage Foundation Standard
152
Performing post-upgradetasks
This chapter includes the following topics:
■ Optional configuration steps
■ Re-joining the backup boot disk group into the current disk group
■ Reverting to the backup boot disk group after an unsuccessful upgrade
■ Post upgrade tasks for migrating the SFDB repository database
■ Recovering VVR if automatic upgrade fails
■ Upgrading disk layout versions
■ Upgrading VxVM disk group versions
■ Updating variables
■ Setting the default disk group
■ Upgrading the Array Support Library
■ Converting from QuickLog to Multi-Volume support
■ Verifying the Storage Foundation upgrade
Optional configuration stepsAfter the upgrade is complete, additional tasks may need to be performed.
You can perform the following optional configuration steps:
16Chapter
■ If Veritas Volume Replicator (VVR) is configured, do the following steps in theorder shown:
■ Reattach the RLINKs.
■ Associate the SRL.
■ To encapsulate and mirror the boot disk, follow the procedures in the"Administering Disks" chapter of the Veritas Storage FoundationAdministrator’s Guide.
■ To upgrade VxFS Disk Layout versions and VxVM Disk Group versions, followthe upgrade instructions.See “Upgrading VxVM disk group versions” on page 161.
Re-joining thebackupboot disk group into the currentdisk group
Perform this procedure to rejoin the backup boot disk if you split the mirroredboot disk during upgrade. After a successful upgrade and reboot, you no longerneed to keep the boot disk group backup.
To re-join the backup boot disk group
◆ Re-join the backup_bootdg disk group to the boot disk group.
# /etc/vx/bin/vxrootadm -Y join backup_bootdg
where the -Y option indicates a silent operation, and backup_bootdg is thename of the backup boot disk group that you created during the upgrade.
Reverting to the backup boot disk group after anunsuccessful upgrade
Perform this procedure if your upgrade was unsuccessful and you split themirrored boot disk to back it up during upgrade. You can revert to the backup thatyou created when you upgraded.
Performing post-upgrade tasksRe-joining the backup boot disk group into the current disk group
154
To revert the backup boot disk group after an unsuccessful upgrade
1 To determine the boot disk groups, look for the rootvol volume in the outputof the vxprint command.
# vxprint
2 Use the vxdg command to find the boot disk group where you are currentlybooted.
# vxdg bootdg
3 Boot the operating system from the backup boot disk group.
4 Join the original boot disk group to the backup disk group.
# /etc/vx/bin/vxrootadm -Y join original_bootdg
where the -Y option indicates a silent operation, and original_bootdg is theboot disk group that you no longer need.
Post upgrade tasks formigrating the SFDB repositorydatabase
Database Storage Checkpoints that have been created by using the SFDB toolsbefore upgrade are visible using the vxsfadm CLI, and you can mount theseDatabase Storage Checkpoints and roll back to them, if required. However, creatingclones by using migrated Database Storage Checkpoints is not supported.
If you want to continue using previously created FlashSnap snapplans to takesnapshots, you must validate them by using the-o validateoption of thevxsfadmcommand.
To continue using the Database Storage Checkpoints or SmartTier for Oraclepolicies you created with a 5.0x or earlier version of Storage Foundation for Oracle,you must perform one of the following procedures after upgrading SF to 6.0.1:
■ Rename startup script after upgrading from 5.0x and before migrating theSFDB repositorySee “After upgrading from 5.0.x and before migrating SFDB” on page 160.
■ Migrate from a 5.0x SFDB repository database to 6.0.1See “Migrating from a 5.0 repository database to 6.0.1” on page 156.
■ Migrate from a 5.1 or 5.1SP1 repository database to 6.0.1See “Migrating from a 5.1 or higher repository database to 6.0.1” on page 158.
155Performing post-upgrade tasksPost upgrade tasks for migrating the SFDB repository database
Migrating from a 5.0 repository database to 6.0.1To migrate from a 5.0 repository database to 6.0.1
1 Rename the startup script NO_S*vxdbms3 to S*vxdbms3.
See “After upgrading from 5.0.x and before migrating SFDB” on page 160.
2 As root, dump out the old Sybase ASA repository. If you are using SFHA orSF Oracle RAC, you only need to do this on one node.
# /opt/VRTSdbed/migrate/sfua_rept_migrate
3 On the same node that you ran sfua_rept_migrate run the followingcommand as Oracle user. For each Oracle instance, migrate the old repositorydata to the SQLite repository.
$ /opt/VRTS/bin/dbed_update -S $ORACLE_SID -H $ORACLE_HOME
4 By default, the repository is created on the file system which contains theOracle SYSTEM tablespace. If you need an alternative repository path, firstverify the following requirements:
■ Repository path has to be a directory writable by Oracle user.
■ The update commands will not be able to verify accessibility of therepository path and will fail if you have not set up the path correctly.
Create an alternate repository path.
$ /opt/VRTS/bin/dbed_update -S $ORACLE_SID -H $ORACLE_HOME -R \
Alternate_path
5 If you are using Database Flashsnap for off-host processing, and if you havea repository on the secondary host that you need to migrate: perform theprevious steps on the secondary host.
Performing post-upgrade tasksPost upgrade tasks for migrating the SFDB repository database
156

6 On the primary host, edit your snapplans to remove the"SNAPSHOT_DG=SNAP_*" parameter and add“SNAPSHOT_DG_PREFIX=SNAP_*". The parameter can be any PREFIX valueand not necessarily "SNAP_*".
For example:
$ /usr/oracle> more SNAPPLAN1
SNAPSHOT_VERSION=5.0
PRIMARY_HOST=system1
SECONDARY_HOST=system1.example.com
PRIMARY_DG=system1_data
SNAPSHOT_DG=SNAP_system1_data
ORACLE_SID=HN1
ARCHIVELOG_DEST=/oracle/orahome/dbs/arch
SNAPSHOT_ARCHIVE_LOG=yes
SNAPSHOT_MODE=online
SNAPSHOT_PLAN_FOR=database
SNAPSHOT_PLEX_TAG=dbed_flashsnap
SNAPSHOT_VOL_PREFIX=SNAP_
ALLOW_REVERSE_RESYNC=no
SNAPSHOT_MIRROR=1
$ /usr/oracle> more SNAPPLAN1
SNAPSHOT_VERSION=5.0
PRIMARY_HOST=system1
SECONDARY_HOST=system1.example.com
PRIMARY_DG=judge_data
SNAPSHOT_DG_PREFIX=SNAP_system1_data
ORACLE_SID=HN1
ARCHIVELOG_DEST=/oracle/orahome/dbs/arch
SNAPSHOT_ARCHIVE_LOG=yes
SNAPSHOT_MODE=online
SNAPSHOT_PLAN_FOR=database
SNAPSHOT_PLEX_TAG=dbed_flashsnap
SNAPSHOT_VOL_PREFIX=SNAP_
ALLOW_REVERSE_RESYNC=no
SNAPSHOT_MIRROR=1
157Performing post-upgrade tasksPost upgrade tasks for migrating the SFDB repository database
7 On the primary host, revalidate your snapshots using the following command:
$ /opt/VRTS/bin/vxsfadm -s flashsnap \
-a oracle -c SNAPPLAN -o validate
This completes the migration of the repository for Database StorageCheckpoints and Database Tiered Storage parameters.
To begin using the Storage Foundation for Databases (SFDB) tools:
SeeStorageFoundation: StorageandAvailabilityManagement forOracleDatabases
Migrating from a 5.1 or higher repository database to 6.0.1To migrate from a 5.0 repository database to 6.0.1
1 Run the following command as Oracle user. For each Oracle instance, migratethe old repository data to the SQLite repository.
$ /opt/VRTS/bin/dbed_update -S $ORACLE_SID -H $ORACLE_HOME
2 By default, the repository is created on the file system which contains theOracle SYSTEM tablespace. If you need an alternative repository path, firstverify the following requirements:
■ Repository path has to be a directory writable by Oracle user.
■ The update commands will not be able to verify accessibility of therepository path and will fail if you have not set up the path correctly.
Create an alternate repository path.
$ /opt/VRTS/bin/dbed_update -S $ORACLE_SID -H $ORACLE_HOME -R \
Alternate_path
3 If you are using Database Flashsnap for off-host processing, and if you havea repository on the secondary host that you need to migrate: perform theprevious steps on the secondary host.
Performing post-upgrade tasksPost upgrade tasks for migrating the SFDB repository database
158
4 On the primary host, edit your snapplans to remove the"SNAPSHOT_DG=SNAP_*" parameter and add“SNAPSHOT_DG_PREFIX=SNAP_*". The parameter can be any PREFIX valueand not necessarily "SNAP_*".
For example:
$ /usr/oracle> more SNAPPLAN1
SNAPSHOT_VERSION=5.0
PRIMARY_HOST=system1
SECONDARY_HOST=system1.example.com
PRIMARY_DG=system1_data
SNAPSHOT_DG=SNAP_system1_data
ORACLE_SID=HN1
ARCHIVELOG_DEST=/oracle/orahome/dbs/arch
SNAPSHOT_ARCHIVE_LOG=yes
SNAPSHOT_MODE=online
SNAPSHOT_PLAN_FOR=database
SNAPSHOT_PLEX_TAG=dbed_flashsnap
SNAPSHOT_VOL_PREFIX=SNAP_
ALLOW_REVERSE_RESYNC=no
SNAPSHOT_MIRROR=1
$ /usr/oracle> more SNAPPLAN1
SNAPSHOT_VERSION=5.0
PRIMARY_HOST=system1
SECONDARY_HOST=system1.example.com
PRIMARY_DG=judge_data
SNAPSHOT_DG_PREFIX=SNAP_system1_data
ORACLE_SID=HN1
ARCHIVELOG_DEST=/oracle/orahome/dbs/arch
SNAPSHOT_ARCHIVE_LOG=yes
SNAPSHOT_MODE=online
SNAPSHOT_PLAN_FOR=database
SNAPSHOT_PLEX_TAG=dbed_flashsnap
SNAPSHOT_VOL_PREFIX=SNAP_
ALLOW_REVERSE_RESYNC=no
SNAPSHOT_MIRROR=1
159Performing post-upgrade tasksPost upgrade tasks for migrating the SFDB repository database
5 On the primary host, revalidate your snapshots using the following command:
$ /opt/VRTS/bin/vxsfadm -s flashsnap \
-a oracle -c SNAPPLAN -o validate
This completes the migration of the repository for Database StorageCheckpoints and Database Tiered Storage parameters.
To begin using the Storage Foundation for Databases (SFDB) tools:
SeeStorageFoundation: StorageandAvailabilityManagement forOracleDatabases
After upgrading from 5.0.x and before migrating SFDBWhen upgrading from SF version 5.0 to SF 6.0.1 the S*vxdbms3 startup script isrenamed to NO_S*vxdbms3. The S*vxdbms3 startup script is required bysfua_rept_migrate. Thus when sfua_rept_migrate is run, it is unable to findthe S*vxdbms3 startup script and gives the error message:
/sbin/rc3.d/S*vxdbms3 not found
SFORA sfua_rept_migrate ERROR V-81-3558 File: is missing.
SFORA sfua_rept_migrate ERROR V-81-9160 Failed to mount repository.
To prevent S*vxdbms3 startup script error
◆ Rename the startup script NO_S*vxdbms3 to S*vxdbms3.
Recovering VVR if automatic upgrade failsIf the upgrade fails during the configuration phase, after displaying the VVRupgrade directory, the configuration needs to be restored before the next attempt.Run the scripts in the upgrade directory in the following order to restore theconfiguration:
# restoresrl
# adddcm
# srlprot
# attrlink
# start.rvg
After the configuration is restored, the current step can be retried.
Performing post-upgrade tasksRecovering VVR if automatic upgrade fails
160
Upgrading disk layout versionsIn this release, you can create and mount only file systems with disk layout Version7, 8, and 9. You can only local mount disk layout Version 6 only to upgrade to alater disk layout version.
Disk layout Version 6 has been deprecated and you cannot cluster mount anexisting file system that has disk layout Version 6. To upgrade a cluster file systemwith disk layout Version 6, you must local mount the file system and then upgradethe file system using the vxupgrade utility to a later version.
See the vxupgrade(1M) manual page.
Support for disk layout Version 4 and 5 has been removed. You must upgrade anyexisting file systems with disk layout Version 4 or 5 to disk layout Version 7 orlater using the vxfsconvert command.
See the vxfsconvert(1M) manual page.
Note:Symantec recommends that you upgrade existing file systems to the highestsupported disk layout version prior to upgrading to this release.
You can check which disk layout version your file system has by using the followingcommand:
# fstyp -v /dev/vx/dsk/dg1/vol1 | grep -i version
For more information about disk layout versions, see the Veritas StorageFoundation Administrator's Guide.
Upgrading VxVM disk group versionsAll Veritas Volume Manager disk groups have an associated version number. EachVxVM release supports a specific set of disk group versions. VxVM can importand perform tasks on disk groups with those versions. Some new features andtasks work only on disk groups with the current disk group version. Before youcan perform the tasks or use the features, upgrade the existing disk groups.
For 6.0.1, the Veritas Volume Manager disk group version is different than inprevious VxVM releases. Symantec recommends that you upgrade the disk groupversion if you upgraded from a previous VxVM release.
After upgrading to SF 6.0.1, you must upgrade any existing disk groups that areorganized by ISP. Without the version upgrade, configuration query operationscontinue to work fine. However, configuration change operations will not functioncorrectly.
161Performing post-upgrade tasksUpgrading disk layout versions
For more information about ISP disk groups, refer to the Veritas StorageFoundation Administrator's Guide.
Use the following command to find the version of a disk group:
# vxdg list diskgroup
To upgrade a disk group to the current disk group version, use the followingcommand:
# vxdg upgrade diskgroup
For more information about disk group versions, see theVeritasStorageFoundationAdministrator's Guide.
Updating variablesIn /etc/profile, update the PATH and MANPATH variables as needed.
MANPATH could include /opt/VRTS/man and PATH /opt/VRTS/bin.
Setting the default disk groupYou may find it convenient to create a system-wide default disk group. The mainbenefit of creating a default disk group is that VxVM commands default to thedefault disk group. You do not need to use the -g option.
You can set the name of the default disk group after installation by running thefollowing command on a system:
# vxdctl defaultdg diskgroup
See the Veritas Storage Foundation Administrator’s Guide.
Upgrading the Array Support LibraryVxVM provides support for new disk arrays in the form of Array Support Library(ASL) software package.
Adding JBOD support for storage arrays for which there is not an ASLavailable
If an array is of type A/A-A, A/P or ALUA and a suitable ASL is not available, thearray must be claimed as an JBOD of type A/P. This is to prevent path delays and
Performing post-upgrade tasksUpdating variables
162
I/O failures arising. As JBODs are assumed to be type A/A by default, you mustcreate appropriate JBOD entries for such arrays.
To configure an A/A-A, A/P or ALUA array as a JBOD
1 Stop all applications, such as databases, from accessing VxVM volumes thatare configured on the array, and unmount all VxFS file systems and StorageCheckpoints that are configured on the array.
2 Add the array as a JBOD of type A/P:
# vxddladm addjbod vid=SUN pid=T300 policy=ap
3 If you have not already done so, upgrade the Storage Foundation or VxVMsoftware to 6.0.1. Device discovery will be performed during the upgrade, andthe array will be claimed as a JBOD of appropriate type.
If you have already upgraded your system to 6.0.1, run the following commandto perform device discovery:
# vxdctl enable
4 Verify that the array has been added with the policy set to APdisk:
# vxddladm listjbod
VID PID Opcode Page Code Page Offset SNO length Policy
============================================================
SUN T300 18 -1 36 12 APdisk
5 Check that the correct devices are listed for the array:
# vxdisk list
DEVICE TYPE DISK GROUP STATUS
APdisk_0 auto:cdsdisk - - online invalid
APdisk_1 auto:cdsdisk - - online invalid
APdisk_2 auto:cdsdisk - - online invalid
...
Unsuppressing DMP for EMC PowerPath disksThis section is only applicable if you are upgrading a system that includes EMCPowerPath disks.
In releases of VxVM before 4.1, a combination of DMP subpaths and the controllersof DMP subpaths were usually suppressed to prevent interference between DMPand the EMC PowerPath multi-pathing driver. Suppression has the effect of hiding
163Performing post-upgrade tasksUpgrading the Array Support Library
these subpaths and their controllers from DMP, and as a result the disks on thesesubpaths and controllers cannot be seen by VxVM.
VxVM 4.1 and later releases have the ability to discover EMCpower disks, andconfigure them as autodiscovered disks that DMP recognizes are under the controlof a separate multi-pathing driver. This has the benefit of allowing such disks toreconfigured in cluster-shareable disk groups. Before upgrading to VxVM 6.0.1,you must remove the suppression of the subpaths and controllers so that DMPcan determine the association between EMCpower metadevices and c#t#d# diskdevices.
In the following scenarios, you may need to unsuppress DMP subpaths andcontrollers:
■ Converting a foreign diskSee “Converting a foreign disk to auto:simple” on page 164.
■ Converting a defined diskSee “Converting a defined disk to auto:simple” on page 167.
■ Converting a powervxvm diskSee “Converting a powervxvm disk to auto:simple” on page 170.
Because emcpower disks are auto-discovered, the powervxvm script should bedisabled and removed from the startup script. To remove the powervxvm script,use the command:
# powervxvm remove
Converting a foreign disk to auto:simpleRelease 4.0 of VxVM provided the vxddladm addforeign command to configureforeign disks with default disk offsets for the private and public regions, and todefine them as simple disks. A foreign disk must be manually converted toauto:simple format before upgrading to VxVM 6.0.1.
If the foreign disk is defined on a slice other than s2, you must copy the partitionentry for that slice to that for s0 and change the tag. If the tag of the original sliceis changed, the status of the disk is seen as online:aliased after the upgrade.
The following example is used to illustrate the procedure. The vxdisk list
command can be used to display the EMCpower disks that are known to VxVM:
# vxdisk list
DEVICE TYPE DISK GROUP STATUS
c6t0d12s2 auto:sliced - - online
emcpower10c simple fdisk fdg online
...
Performing post-upgrade tasksUpgrading the Array Support Library
164
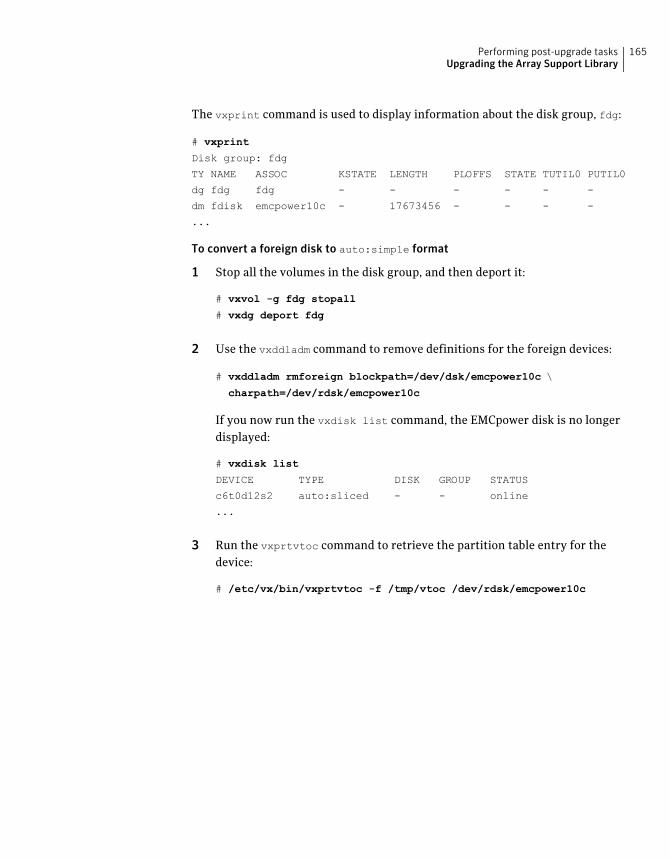
The vxprint command is used to display information about the disk group, fdg:
# vxprint
Disk group: fdg
TY NAME ASSOC KSTATE LENGTH PLOFFS STATE TUTIL0 PUTIL0
dg fdg fdg - - - - - -
dm fdisk emcpower10c - 17673456 - - - -
...
To convert a foreign disk to auto:simple format
1 Stop all the volumes in the disk group, and then deport it:
# vxvol -g fdg stopall
# vxdg deport fdg
2 Use the vxddladm command to remove definitions for the foreign devices:
# vxddladm rmforeign blockpath=/dev/dsk/emcpower10c \
charpath=/dev/rdsk/emcpower10c
If you now run the vxdisk list command, the EMCpower disk is no longerdisplayed:
# vxdisk list
DEVICE TYPE DISK GROUP STATUS
c6t0d12s2 auto:sliced - - online
...
3 Run the vxprtvtoc command to retrieve the partition table entry for thedevice:
# /etc/vx/bin/vxprtvtoc -f /tmp/vtoc /dev/rdsk/emcpower10c
165Performing post-upgrade tasksUpgrading the Array Support Library
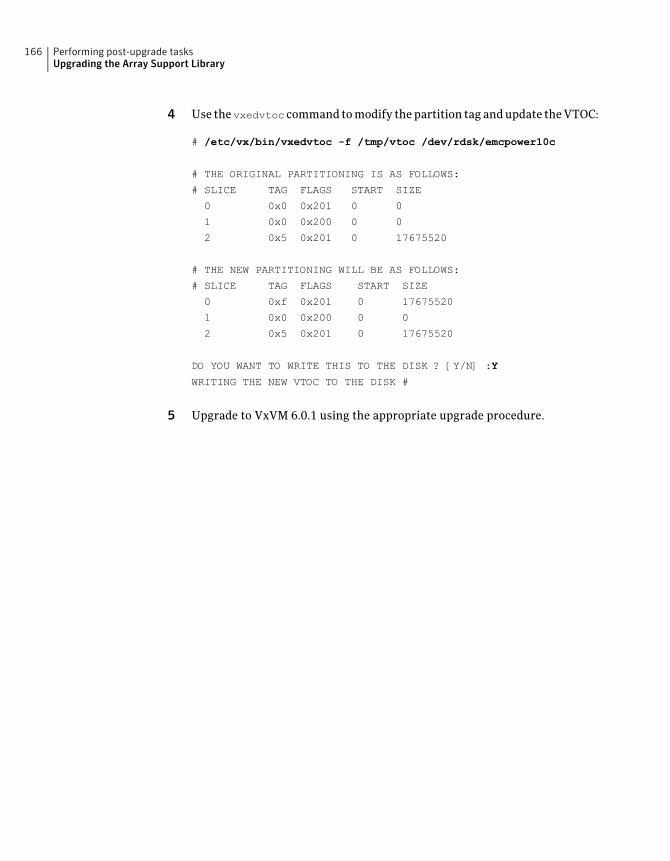
4 Use thevxedvtoc command to modify the partition tag and update the VTOC:
# /etc/vx/bin/vxedvtoc -f /tmp/vtoc /dev/rdsk/emcpower10c
# THE ORIGINAL PARTITIONING IS AS FOLLOWS:
# SLICE TAG FLAGS START SIZE
0 0x0 0x201 0 0
1 0x0 0x200 0 0
2 0x5 0x201 0 17675520
# THE NEW PARTITIONING WILL BE AS FOLLOWS:
# SLICE TAG FLAGS START SIZE
0 0xf 0x201 0 17675520
1 0x0 0x200 0 0
2 0x5 0x201 0 17675520
DO YOU WANT TO WRITE THIS TO THE DISK ? [Y/N] :Y
WRITING THE NEW VTOC TO THE DISK #
5 Upgrade to VxVM 6.0.1 using the appropriate upgrade procedure.
Performing post-upgrade tasksUpgrading the Array Support Library
166
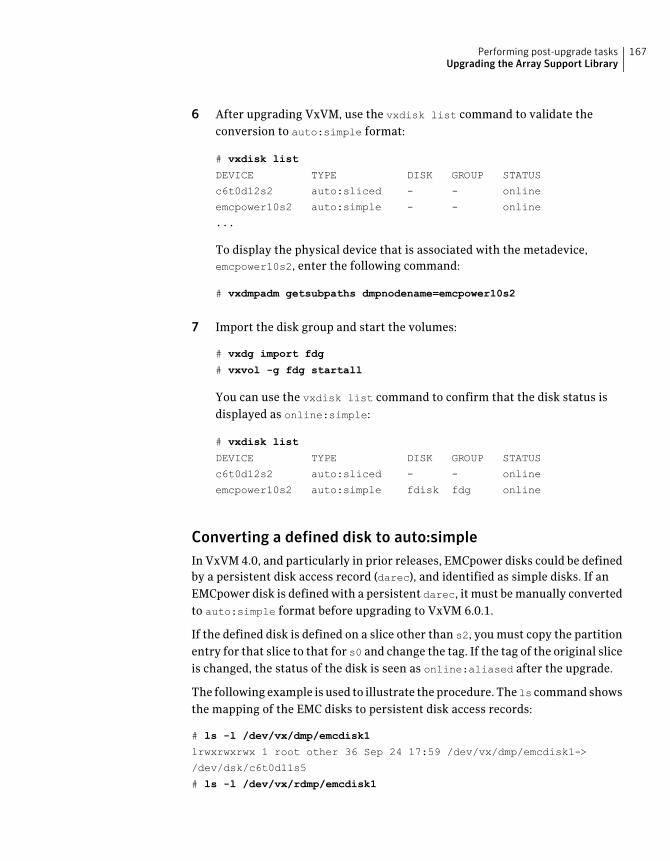
6 After upgrading VxVM, use the vxdisk list command to validate theconversion to auto:simple format:
# vxdisk list
DEVICE TYPE DISK GROUP STATUS
c6t0d12s2 auto:sliced - - online
emcpower10s2 auto:simple - - online
...
To display the physical device that is associated with the metadevice,emcpower10s2, enter the following command:
# vxdmpadm getsubpaths dmpnodename=emcpower10s2
7 Import the disk group and start the volumes:
# vxdg import fdg
# vxvol -g fdg startall
You can use the vxdisk list command to confirm that the disk status isdisplayed as online:simple:
# vxdisk list
DEVICE TYPE DISK GROUP STATUS
c6t0d12s2 auto:sliced - - online
emcpower10s2 auto:simple fdisk fdg online
Converting a defined disk to auto:simpleIn VxVM 4.0, and particularly in prior releases, EMCpower disks could be definedby a persistent disk access record (darec), and identified as simple disks. If anEMCpower disk is defined with a persistent darec, it must be manually convertedto auto:simple format before upgrading to VxVM 6.0.1.
If the defined disk is defined on a slice other than s2, you must copy the partitionentry for that slice to that for s0 and change the tag. If the tag of the original sliceis changed, the status of the disk is seen as online:aliased after the upgrade.
The following example is used to illustrate the procedure. Thels command showsthe mapping of the EMC disks to persistent disk access records:
# ls -l /dev/vx/dmp/emcdisk1
lrwxrwxrwx 1 root other 36 Sep 24 17:59 /dev/vx/dmp/emcdisk1->
/dev/dsk/c6t0d11s5
# ls -l /dev/vx/rdmp/emcdisk1
167Performing post-upgrade tasksUpgrading the Array Support Library
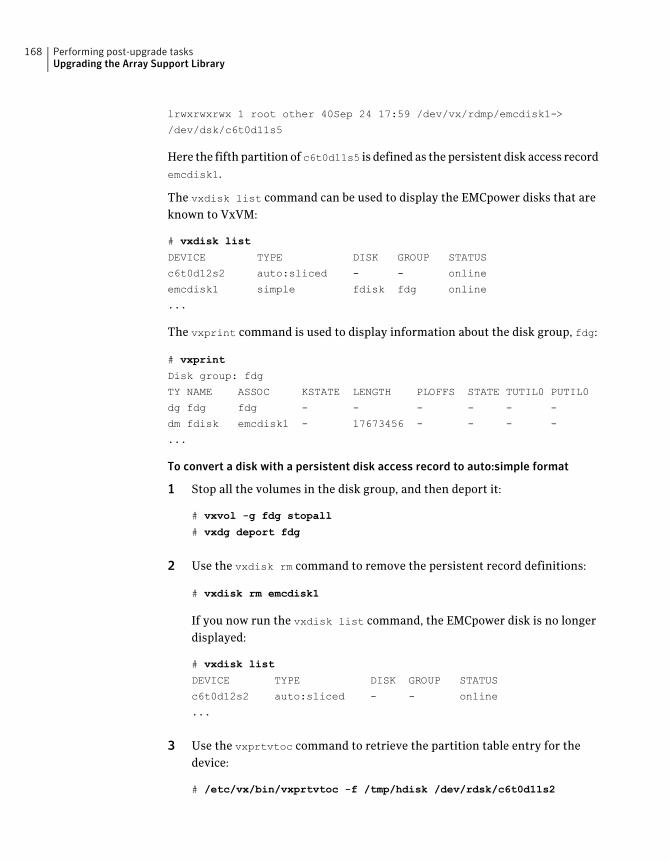
lrwxrwxrwx 1 root other 40Sep 24 17:59 /dev/vx/rdmp/emcdisk1->
/dev/dsk/c6t0d11s5
Here the fifth partition of c6t0d11s5 is defined as the persistent disk access recordemcdisk1.
The vxdisk list command can be used to display the EMCpower disks that areknown to VxVM:
# vxdisk list
DEVICE TYPE DISK GROUP STATUS
c6t0d12s2 auto:sliced - - online
emcdisk1 simple fdisk fdg online
...
The vxprint command is used to display information about the disk group, fdg:
# vxprint
Disk group: fdg
TY NAME ASSOC KSTATE LENGTH PLOFFS STATE TUTIL0 PUTIL0
dg fdg fdg - - - - - -
dm fdisk emcdisk1 - 17673456 - - - -
...
To convert a disk with a persistent disk access record to auto:simple format
1 Stop all the volumes in the disk group, and then deport it:
# vxvol -g fdg stopall
# vxdg deport fdg
2 Use the vxdisk rm command to remove the persistent record definitions:
# vxdisk rm emcdisk1
If you now run the vxdisk list command, the EMCpower disk is no longerdisplayed:
# vxdisk list
DEVICE TYPE DISK GROUP STATUS
c6t0d12s2 auto:sliced - - online
...
3 Use the vxprtvtoc command to retrieve the partition table entry for thedevice:
# /etc/vx/bin/vxprtvtoc -f /tmp/hdisk /dev/rdsk/c6t0d11s2
Performing post-upgrade tasksUpgrading the Array Support Library
168
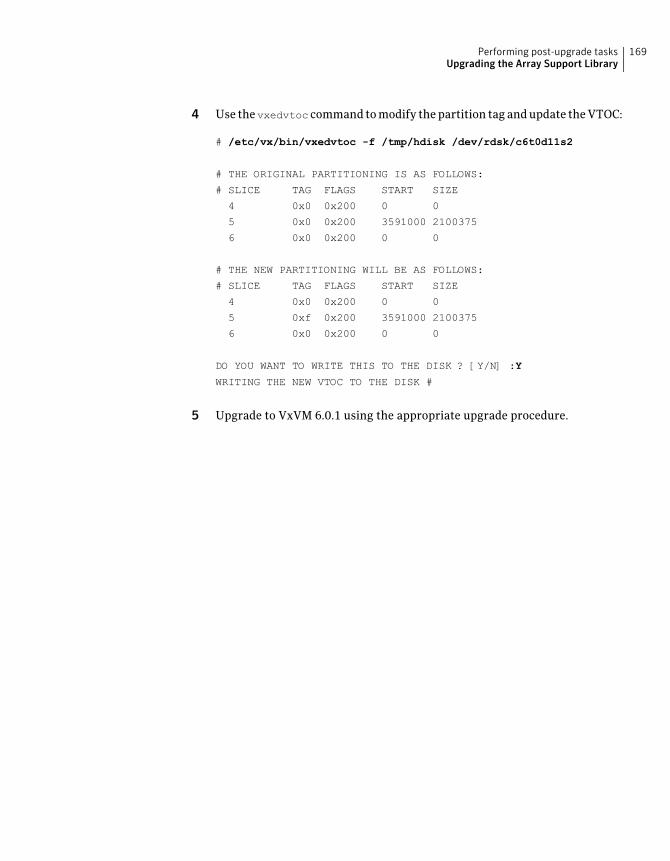
4 Use thevxedvtoc command to modify the partition tag and update the VTOC:
# /etc/vx/bin/vxedvtoc -f /tmp/hdisk /dev/rdsk/c6t0d11s2
# THE ORIGINAL PARTITIONING IS AS FOLLOWS:
# SLICE TAG FLAGS START SIZE
4 0x0 0x200 0 0
5 0x0 0x200 3591000 2100375
6 0x0 0x200 0 0
# THE NEW PARTITIONING WILL BE AS FOLLOWS:
# SLICE TAG FLAGS START SIZE
4 0x0 0x200 0 0
5 0xf 0x200 3591000 2100375
6 0x0 0x200 0 0
DO YOU WANT TO WRITE THIS TO THE DISK ? [Y/N] :Y
WRITING THE NEW VTOC TO THE DISK #
5 Upgrade to VxVM 6.0.1 using the appropriate upgrade procedure.
169Performing post-upgrade tasksUpgrading the Array Support Library
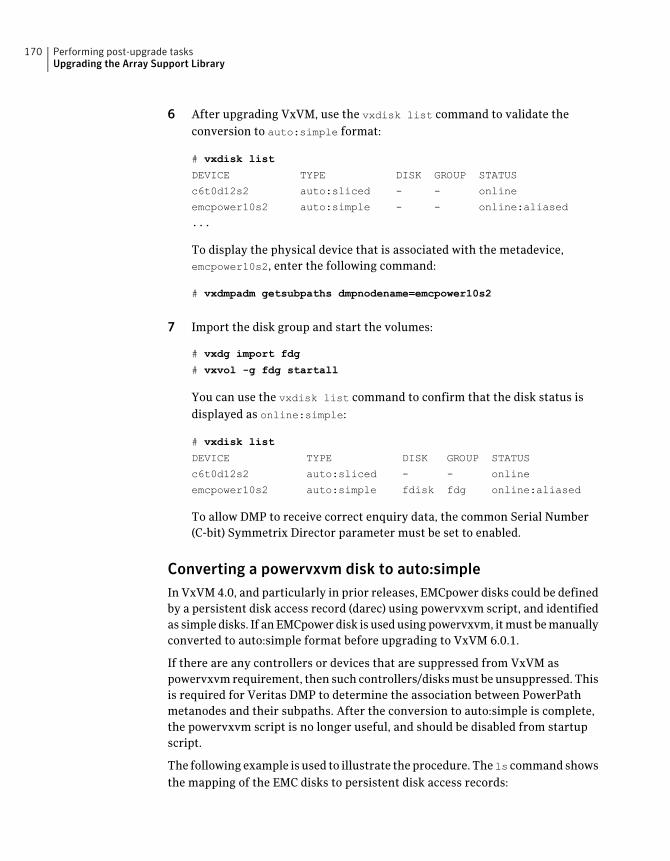
6 After upgrading VxVM, use the vxdisk list command to validate theconversion to auto:simple format:
# vxdisk list
DEVICE TYPE DISK GROUP STATUS
c6t0d12s2 auto:sliced - - online
emcpower10s2 auto:simple - - online:aliased
...
To display the physical device that is associated with the metadevice,emcpower10s2, enter the following command:
# vxdmpadm getsubpaths dmpnodename=emcpower10s2
7 Import the disk group and start the volumes:
# vxdg import fdg
# vxvol -g fdg startall
You can use the vxdisk list command to confirm that the disk status isdisplayed as online:simple:
# vxdisk list
DEVICE TYPE DISK GROUP STATUS
c6t0d12s2 auto:sliced - - online
emcpower10s2 auto:simple fdisk fdg online:aliased
To allow DMP to receive correct enquiry data, the common Serial Number(C-bit) Symmetrix Director parameter must be set to enabled.
Converting a powervxvm disk to auto:simpleIn VxVM 4.0, and particularly in prior releases, EMCpower disks could be definedby a persistent disk access record (darec) using powervxvm script, and identifiedas simple disks. If an EMCpower disk is used using powervxvm, it must be manuallyconverted to auto:simple format before upgrading to VxVM 6.0.1.
If there are any controllers or devices that are suppressed from VxVM aspowervxvm requirement, then such controllers/disks must be unsuppressed. Thisis required for Veritas DMP to determine the association between PowerPathmetanodes and their subpaths. After the conversion to auto:simple is complete,the powervxvm script is no longer useful, and should be disabled from startupscript.
The following example is used to illustrate the procedure. Thels command showsthe mapping of the EMC disks to persistent disk access records:
Performing post-upgrade tasksUpgrading the Array Support Library
170
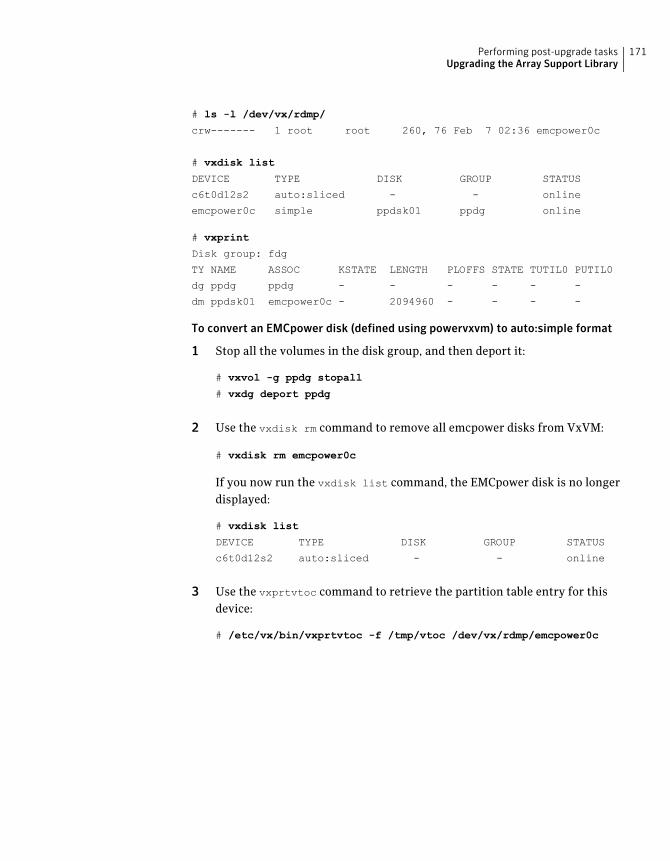
# ls -l /dev/vx/rdmp/
crw------- 1 root root 260, 76 Feb 7 02:36 emcpower0c
# vxdisk list
DEVICE TYPE DISK GROUP STATUS
c6t0d12s2 auto:sliced - - online
emcpower0c simple ppdsk01 ppdg online
# vxprint
Disk group: fdg
TY NAME ASSOC KSTATE LENGTH PLOFFS STATE TUTIL0 PUTIL0
dg ppdg ppdg - - - - - -
dm ppdsk01 emcpower0c - 2094960 - - - -
To convert an EMCpower disk (defined using powervxvm) to auto:simple format
1 Stop all the volumes in the disk group, and then deport it:
# vxvol -g ppdg stopall
# vxdg deport ppdg
2 Use the vxdisk rm command to remove all emcpower disks from VxVM:
# vxdisk rm emcpower0c
If you now run the vxdisk list command, the EMCpower disk is no longerdisplayed:
# vxdisk list
DEVICE TYPE DISK GROUP STATUS
c6t0d12s2 auto:sliced - - online
3 Use the vxprtvtoc command to retrieve the partition table entry for thisdevice:
# /etc/vx/bin/vxprtvtoc -f /tmp/vtoc /dev/vx/rdmp/emcpower0c
171Performing post-upgrade tasksUpgrading the Array Support Library

4 Use thevxedvtoc command to modify the partition tag and update the VTOC:
# /etc/vx/bin/vxedvtoc -f /tmp/vtoc /dev/vx/rdmp/emcpower0c
# THE ORIGINAL PARTITIONING IS AS FOLLOWS:
# SLICE TAG FLAGS START SIZE
0 0x0 0x201 0 0
1 0x0 0x200 0 0
2 0x5 0x201 0 17675520
# THE NEW PARTITIONING WILL BE AS FOLLOWS:
# SLICE TAG FLAGS START SIZE
0 0xf 0x201 0 17675520
1 0x0 0x200 0 0
2 0x5 0x201 0 17675520
DO YOU WANT TO WRITE THIS TO THE DISK ? [Y/N] :Y
WRITING THE NEW VTOC TO THE DISK #
5 Upgrade to VxVM 6.0.1 using the appropriate upgrade procedure.
6 After upgrading VxVM, use the vxdisk list command to validate theconversion to auto:simple format:
# vxdisk list
DEVICE TYPE DISK GROUP STATUS
c6t0d12s2 auto:sliced - - online
emcpower0s2 auto:simple - - online
7 Import the disk group and start the volumes.
# vxdg import ppdg
# vxvol -g ppdg startall
# vxdisk list
DEVICE TYPE DISK GROUP STATUS
c6t0d12s2 auto:sliced - - online
emcpower0s2 auto:simple ppdsk01 ppdg online
Converting from QuickLog to Multi-Volume supportThe 4.1 release of the Veritas File System is the last major release to supportQuickLog. The Version 6 and later disk layouts do not support QuickLog. The
Performing post-upgrade tasksConverting from QuickLog to Multi-Volume support
172
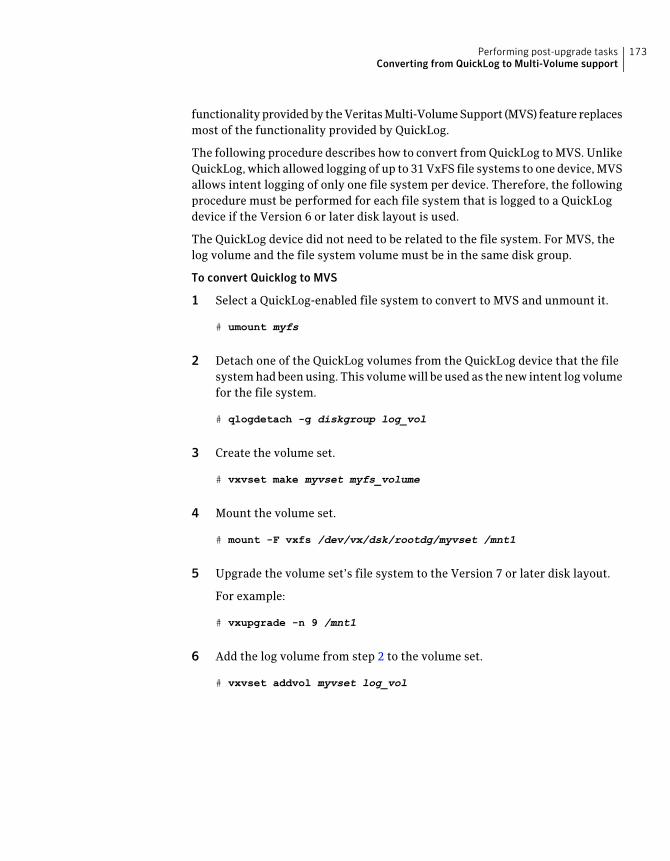
functionality provided by the Veritas Multi-Volume Support (MVS) feature replacesmost of the functionality provided by QuickLog.
The following procedure describes how to convert from QuickLog to MVS. UnlikeQuickLog, which allowed logging of up to 31 VxFS file systems to one device, MVSallows intent logging of only one file system per device. Therefore, the followingprocedure must be performed for each file system that is logged to a QuickLogdevice if the Version 6 or later disk layout is used.
The QuickLog device did not need to be related to the file system. For MVS, thelog volume and the file system volume must be in the same disk group.
To convert Quicklog to MVS
1 Select a QuickLog-enabled file system to convert to MVS and unmount it.
# umount myfs
2 Detach one of the QuickLog volumes from the QuickLog device that the filesystem had been using. This volume will be used as the new intent log volumefor the file system.
# qlogdetach -g diskgroup log_vol
3 Create the volume set.
# vxvset make myvset myfs_volume
4 Mount the volume set.
# mount -F vxfs /dev/vx/dsk/rootdg/myvset /mnt1
5 Upgrade the volume set’s file system to the Version 7 or later disk layout.
For example:
# vxupgrade -n 9 /mnt1
6 Add the log volume from step 2 to the volume set.
# vxvset addvol myvset log_vol
173Performing post-upgrade tasksConverting from QuickLog to Multi-Volume support
7 Add the log volume to the file system. The size of the volume must be specified.
# fsvoladm add /mnt1 log_vol 50m
8 Move the log to the new volume.
# fsadm -o logdev=log_vol,logsize=16m /mnt1
Verifying the Storage Foundation upgradeRefer to the section about verifying the installation to verify the upgrade.
See “Verifying that the products were installed” on page 179.
Performing post-upgrade tasksVerifying the Storage Foundation upgrade
174
Post-installation tasks
■ Chapter 17. Performing post-installation tasks
■ Chapter 18. Verifying the SF installation
4Section

176
Performingpost-installation tasks
This chapter includes the following topics:
■ Changing root user into root role
Changing root user into root roleOn Oracle Solaris 11, to perform installation, you need to create root user. Thismeans that a local user cannot assume the root role. After installation, you maywant to turn root user into root role for a local user, who can log in as root.
1. Log in as root user.
2. Change the root account into role:
# rolemod -K type=role root
# getent user_attr root
root::::type=role;auths=solaris.*;profiles=All;audit_flags=lo\
:no;lock_after_retries=no;min_label=admin_low;clearance=admin_high
3. Assign the root role to a local user who was unassigned the role:
# usermod -R root admin
For more information, see the Oracle documentation on Oracle Solaris 11 operatingsystem.
17Chapter

Performing post-installation tasksChanging root user into root role
178
Verifying the SF installation
This chapter includes the following topics:
■ Verifying that the products were installed
■ Installation log files
■ Starting and stopping processes for the Veritas products
■ Checking Veritas Volume Manager processes
■ Checking Veritas File System installation
Verifying that the products were installedVerify that the SF products are installed.
Use the pkginfo (Solaris 10) or pkg info (Solaris 11) command to check whichpackages have been installed.
Solaris 10:
# pkginfo -l VRTSvlic package_name package_name ...
Solaris 11:
# pkg info -| VRTSvlic package_name package_name
You can verify the version of the installed product. Use the following command:
# /opt/VRTS/install/installsf<version>
Where <version> is the specific release version.
See “About the Veritas installer” on page 25.
Use the following sections to further verify the product installation.
18Chapter
Installation log filesAfter every product installation, the installer creates three text files:
■ Installation log file
■ Response file
■ Summary file
The name and location of each file is displayed at the end of a product installation,and are always located in the /opt/VRTS/install/logs directory. It isrecommended that you keep the files for auditing, debugging, and future use.
Using the installation log fileThe installation log file contains all commands executed during the procedure,their output, and errors generated by the commands. This file is for debugginginstallation problems and can be used for analysis by Veritas Support.
Using the summary fileThe summary file contains the results of the installation by the installer or productinstallation scripts. The summary includes the list of the packages, and the status(success or failure) of each package. The summary also indicates which processeswere stopped or restarted during the installation. After installation, refer to thesummary file to determine whether any processes need to be started.
Starting and stopping processes for the Veritasproducts
After the installation and configuration is complete, the Veritas product installerstarts the processes that are used by the installed products. You can use theproduct installer to stop or start the processes, if required.
Verifying the SF installationInstallation log files
180
To stop the processes
◆ Use the -stop option to stop the product installation script.
For example, to stop the product's processes, enter the following command:
# ./installer -stop
or
# /opt/VRTS/install/installsf<version> -stop
Where <version> is the specific release version.
See “About the Veritas installer” on page 25.
To start the processes
◆ Use the -start option to start the product installation script.
For example, to start the product's processes, enter the following command:
# ./installer -start
or
# /opt/VRTS/install/installsf<version> -start
Where <version> is the specific release version.
See “About the Veritas installer” on page 25.
Checking Veritas Volume Manager processesUse the following procedure to verify that Volume Manager processes are running.
To confirm that key Volume Manager processes are running
◆ Type the following command:
# ps -ef | grep vx
Entries for the vxconfigd, vxnotify, vxesd, vxrelocd, vxcached, andvxconfigbackupdprocesses should appear in the output from this command.If you disable hot-relocation, the vxrelocd and vxnotify processes are notdisplayed.
For more details on hot relocation, see Veritas Storage FoundationAdministrator's Guide.
181Verifying the SF installationChecking Veritas Volume Manager processes
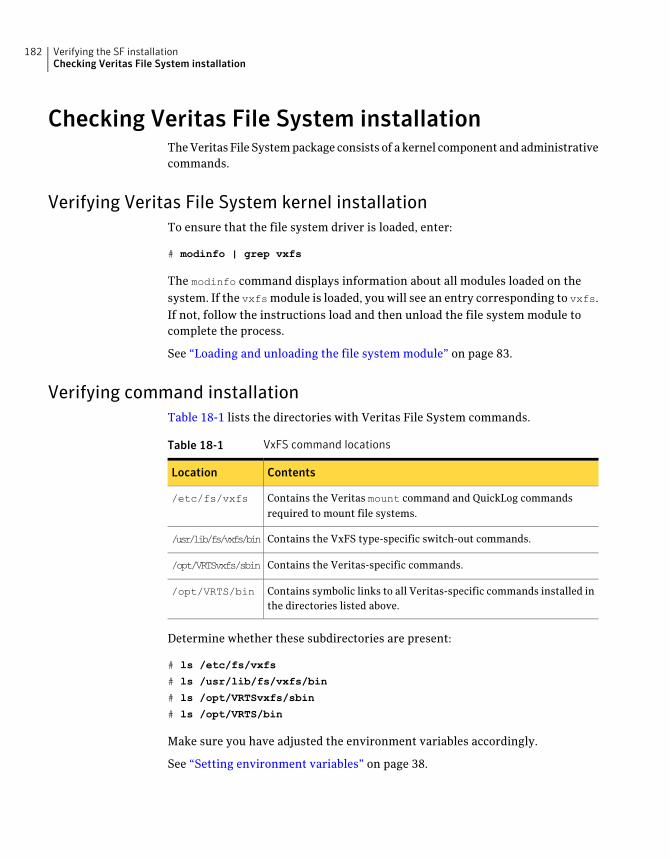
Checking Veritas File System installationThe Veritas File System package consists of a kernel component and administrativecommands.
Verifying Veritas File System kernel installationTo ensure that the file system driver is loaded, enter:
# modinfo | grep vxfs
The modinfo command displays information about all modules loaded on thesystem. If the vxfsmodule is loaded, you will see an entry corresponding to vxfs.If not, follow the instructions load and then unload the file system module tocomplete the process.
See “Loading and unloading the file system module” on page 83.
Verifying command installationTable 18-1 lists the directories with Veritas File System commands.
Table 18-1 VxFS command locations
ContentsLocation
Contains the Veritas mount command and QuickLog commandsrequired to mount file systems.
/etc/fs/vxfs
Contains the VxFS type-specific switch-out commands./usr/lib/fs/vxfs/bin
Contains the Veritas-specific commands./opt/VRTSvxfs/sbin
Contains symbolic links to all Veritas-specific commands installed inthe directories listed above.
/opt/VRTS/bin
Determine whether these subdirectories are present:
# ls /etc/fs/vxfs
# ls /usr/lib/fs/vxfs/bin
# ls /opt/VRTSvxfs/sbin
# ls /opt/VRTS/bin
Make sure you have adjusted the environment variables accordingly.
See “Setting environment variables” on page 38.
Verifying the SF installationChecking Veritas File System installation
182
Uninstallation of SF
■ Chapter 19. Uninstalling Storage Foundation
■ Chapter 20. Uninstalling SF using response files
5Section

184
Uninstalling StorageFoundation
This chapter includes the following topics:
■ About removing Storage Foundation
■ Preparing to uninstall
■ Removing the Replicated Data Set
■ Uninstalling SF packages using the script-based installer
■ Uninstalling SF with the Veritas Web-based installer
■ Uninstalling Storage Foundation using the pkgrm or pkg uninstall command
■ Removing the Storage Foundation for Databases (SFDB) repository afterremoving the product
About removing Storage FoundationThis section covers uninstallation requirements and steps to uninstall the Veritassoftware.
Only users with superuser privileges can uninstall Storage Foundation.
Warning: Failure to follow the instructions in the following sections may resultin unexpected behavior.
19Chapter
Preparing to uninstallReview the following removing the Veritas software.
Preparing to remove Veritas Volume ManagerThis section describes the steps you need to take before removing Veritas VolumeManager (VxVM) to preserve the contents of the volumes.
Warning: Failure to follow the preparations in this section might result inunexpected behavior.
Moving volumes from an encapsulated root diskUse the following procedure to move volumes from an encapsulated root disk.
To uninstall VxVM if root, swap, usr, or var is a volume under Volume Managercontrol
1 Ensure that the rootvol, swapvol, usr, and var volumes have only oneassociated plex each.
The plex must be contiguous, non-striped, non-spanned, and non-sparse. Toobtain this information, enter the following:
# vxprint -ht rootvol swapvol usr var
If any of these volumes have more than one associated plex, remove theunnecessary plexes using the following command:
# vxplex -o rm dis plex_name
2 Run the vxunroot command:
# /etc/vx/bin/vxunroot
The vxunroot command changes the volume entries in /etc/vfstab to theunderlying disk partitions for rootvol, swapvol, usr, and var. It also modifies/etc/system and prompts for a reboot so that disk partitions are mountedinstead of volumes for root, swap, usr, and var.
3 Once you have changed the root, swap, usr, and var volumes, move allremaining volumes to disk partitions.
You can do this using one of the following procedures:
■ Back up the entire system to tape and then recover from tape.
Uninstalling Storage FoundationPreparing to uninstall
186
■ Back up each file system individually and then recover them all aftercreating new file systems on disk partitions.
■ Move volumes incrementally to disk partitions.See “Moving volumes to disk partitions” on page 187.Otherwise, shut down VxVM.
Moving volumes to disk partitionsUse the following procedure to move volumes incrementally to disk partitions.
To move volumes incrementally to disk partitions
1 Evacuate disks using vxdiskadm, the VOM GUI, or the vxevac utility.
Evacuation moves subdisks from the specified disks to target disks. Theevacuated disks provide the initial free disk space for volumes to be movedto disk partitions.
2 Remove the evacuated disks from VxVM control by entering:
# vxdg rmdisk diskname
# vxdisk rm devname
3 Decide which volume to move first, and if the volume is mounted, unmountit.
4 If the volume is being used as a raw partition for database applications, makesure that the application is not updating the volume and that you have appliedthe sync command to the data on the volume.
5 Create a partition on free disk space of the same size as the volume using theformat command.
If there is not enough free space for the partition, add a new disk to the systemfor the first volume removed. Subsequent volumes can use the free spacegenerated by the removal of this first volume.
6 Copy the data on the volume onto the newly created disk partition using acommand such as dd.
# dd if=/dev/vx/dsk/diskgroup/lhome of=/dev/dsk/c2t2d2s7
where c2t2d2 is the disk outside of Volume Manager and s7 is the newlycreated partition.
7 Replace the entry for that volume (if present) in /etc/vfstab with an entryfor the newly created partition.
8 Mount the disk partition if the corresponding volume was previously mounted.
187Uninstalling Storage FoundationPreparing to uninstall
9 Stop and remove the volume from VxVM using the commands.
# vxvol -g diskgroup stop volume_name
# vxedit -rf rm volume_name
10 Remove any free disks (those having no subdisks defined on them) byremoving the volumes from VxVM control.
To check if there are still some subdisks remaining on a particular disk, usethe vxprint command.
# vxprint -g diskgroup -F '%sdnum' diskname
If the output is not 0, there are still some subdisks on this disk that you needto remove. If the output is 0, remove the disk from VxVM control.
# vxdg rmdisk diskname
# vxdisk rm devname
Use the free space created for adding the data from the next volume you wantto remove.
11 After you successfully convert all volumes into disk partitions, reboot thesystem.
12 After the reboot, make sure none of the volumes are open by using thevxprintcommand.
# vxprint -Aht -e v_open
13 If any volumes remain open, repeat the steps listed above.
Example of moving volumes to disk partitions on SolarisThis example shows how to move the data on a volume to a disk partition. In theexample, there are three disks: disk1 and disk2 are subdisks on volume vol01
and disk3 is a free disk. The data on vol01 is copied to disk3 using vxevac.
These are the contents of the disk group voldg before the data on vol01 is copiedto disk3.
# vxprint -g voldg -ht
DG NAME NCONFIG NLOG MINORS GROUP-ID
DM NAME DEVICE TYPE PRIVLEN PUBLEN STATE
RV NAME RLINK_CNT KSTATE STATE PRIMARY DATAVOLS SRL
RL NAME RVG KSTATE STATE REM_HOST REM_DG REM_RLNK
V NAME RVG KSTATE STATE LENGTH READPOL PREFPLEX UTYPE
Uninstalling Storage FoundationPreparing to uninstall
188
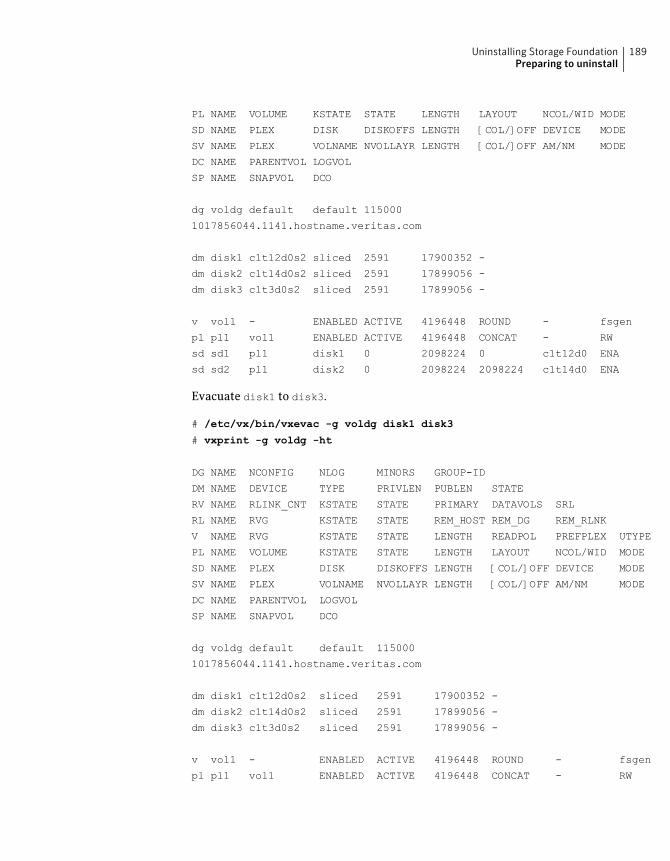
PL NAME VOLUME KSTATE STATE LENGTH LAYOUT NCOL/WID MODE
SD NAME PLEX DISK DISKOFFS LENGTH [COL/]OFF DEVICE MODE
SV NAME PLEX VOLNAME NVOLLAYR LENGTH [COL/]OFF AM/NM MODE
DC NAME PARENTVOL LOGVOL
SP NAME SNAPVOL DCO
dg voldg default default 115000
1017856044.1141.hostname.veritas.com
dm disk1 c1t12d0s2 sliced 2591 17900352 -
dm disk2 c1t14d0s2 sliced 2591 17899056 -
dm disk3 c1t3d0s2 sliced 2591 17899056 -
v vol1 - ENABLED ACTIVE 4196448 ROUND - fsgen
pl pl1 vol1 ENABLED ACTIVE 4196448 CONCAT - RW
sd sd1 pl1 disk1 0 2098224 0 c1t12d0 ENA
sd sd2 pl1 disk2 0 2098224 2098224 c1t14d0 ENA
Evacuate disk1 to disk3.
# /etc/vx/bin/vxevac -g voldg disk1 disk3
# vxprint -g voldg -ht
DG NAME NCONFIG NLOG MINORS GROUP-ID
DM NAME DEVICE TYPE PRIVLEN PUBLEN STATE
RV NAME RLINK_CNT KSTATE STATE PRIMARY DATAVOLS SRL
RL NAME RVG KSTATE STATE REM_HOST REM_DG REM_RLNK
V NAME RVG KSTATE STATE LENGTH READPOL PREFPLEX UTYPE
PL NAME VOLUME KSTATE STATE LENGTH LAYOUT NCOL/WID MODE
SD NAME PLEX DISK DISKOFFS LENGTH [COL/]OFF DEVICE MODE
SV NAME PLEX VOLNAME NVOLLAYR LENGTH [COL/]OFF AM/NM MODE
DC NAME PARENTVOL LOGVOL
SP NAME SNAPVOL DCO
dg voldg default default 115000
1017856044.1141.hostname.veritas.com
dm disk1 c1t12d0s2 sliced 2591 17900352 -
dm disk2 c1t14d0s2 sliced 2591 17899056 -
dm disk3 c1t3d0s2 sliced 2591 17899056 -
v vol1 - ENABLED ACTIVE 4196448 ROUND - fsgen
pl pl1 vol1 ENABLED ACTIVE 4196448 CONCAT - RW
189Uninstalling Storage FoundationPreparing to uninstall
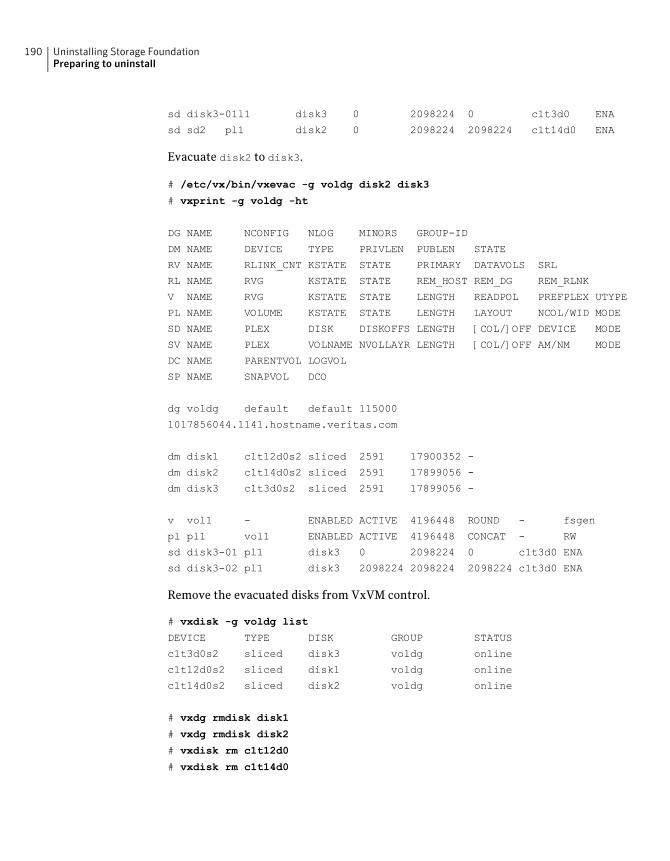
sd disk3-01l1 disk3 0 2098224 0 c1t3d0 ENA
sd sd2 pl1 disk2 0 2098224 2098224 c1t14d0 ENA
Evacuate disk2 to disk3.
# /etc/vx/bin/vxevac -g voldg disk2 disk3
# vxprint -g voldg -ht
DG NAME NCONFIG NLOG MINORS GROUP-ID
DM NAME DEVICE TYPE PRIVLEN PUBLEN STATE
RV NAME RLINK_CNT KSTATE STATE PRIMARY DATAVOLS SRL
RL NAME RVG KSTATE STATE REM_HOST REM_DG REM_RLNK
V NAME RVG KSTATE STATE LENGTH READPOL PREFPLEX UTYPE
PL NAME VOLUME KSTATE STATE LENGTH LAYOUT NCOL/WID MODE
SD NAME PLEX DISK DISKOFFS LENGTH [COL/]OFF DEVICE MODE
SV NAME PLEX VOLNAME NVOLLAYR LENGTH [COL/]OFF AM/NM MODE
DC NAME PARENTVOL LOGVOL
SP NAME SNAPVOL DCO
dg voldg default default 115000
1017856044.1141.hostname.veritas.com
dm disk1 c1t12d0s2 sliced 2591 17900352 -
dm disk2 c1t14d0s2 sliced 2591 17899056 -
dm disk3 c1t3d0s2 sliced 2591 17899056 -
v vol1 - ENABLED ACTIVE 4196448 ROUND - fsgen
pl pl1 vol1 ENABLED ACTIVE 4196448 CONCAT - RW
sd disk3-01 pl1 disk3 0 2098224 0 c1t3d0 ENA
sd disk3-02 pl1 disk3 2098224 2098224 2098224 c1t3d0 ENA
Remove the evacuated disks from VxVM control.
# vxdisk -g voldg list
DEVICE TYPE DISK GROUP STATUS
c1t3d0s2 sliced disk3 voldg online
c1t12d0s2 sliced disk1 voldg online
c1t14d0s2 sliced disk2 voldg online
# vxdg rmdisk disk1
# vxdg rmdisk disk2
# vxdisk rm c1t12d0
# vxdisk rm c1t14d0
Uninstalling Storage FoundationPreparing to uninstall
190
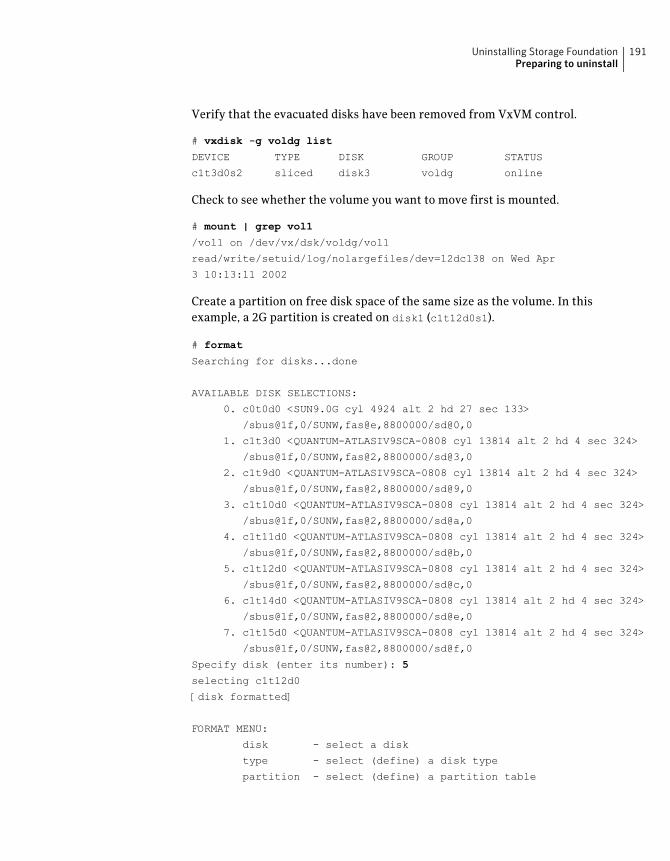
Verify that the evacuated disks have been removed from VxVM control.
# vxdisk -g voldg list
DEVICE TYPE DISK GROUP STATUS
c1t3d0s2 sliced disk3 voldg online
Check to see whether the volume you want to move first is mounted.
# mount | grep vol1
/vol1 on /dev/vx/dsk/voldg/vol1
read/write/setuid/log/nolargefiles/dev=12dc138 on Wed Apr
3 10:13:11 2002
Create a partition on free disk space of the same size as the volume. In thisexample, a 2G partition is created on disk1 (c1t12d0s1).
# format
Searching for disks...done
AVAILABLE DISK SELECTIONS:
0. c0t0d0 <SUN9.0G cyl 4924 alt 2 hd 27 sec 133>
/sbus@1f,0/SUNW,fas@e,8800000/sd@0,0
1. c1t3d0 <QUANTUM-ATLASIV9SCA-0808 cyl 13814 alt 2 hd 4 sec 324>
/sbus@1f,0/SUNW,fas@2,8800000/sd@3,0
2. c1t9d0 <QUANTUM-ATLASIV9SCA-0808 cyl 13814 alt 2 hd 4 sec 324>
/sbus@1f,0/SUNW,fas@2,8800000/sd@9,0
3. c1t10d0 <QUANTUM-ATLASIV9SCA-0808 cyl 13814 alt 2 hd 4 sec 324>
/sbus@1f,0/SUNW,fas@2,8800000/sd@a,0
4. c1t11d0 <QUANTUM-ATLASIV9SCA-0808 cyl 13814 alt 2 hd 4 sec 324>
/sbus@1f,0/SUNW,fas@2,8800000/sd@b,0
5. c1t12d0 <QUANTUM-ATLASIV9SCA-0808 cyl 13814 alt 2 hd 4 sec 324>
/sbus@1f,0/SUNW,fas@2,8800000/sd@c,0
6. c1t14d0 <QUANTUM-ATLASIV9SCA-0808 cyl 13814 alt 2 hd 4 sec 324>
/sbus@1f,0/SUNW,fas@2,8800000/sd@e,0
7. c1t15d0 <QUANTUM-ATLASIV9SCA-0808 cyl 13814 alt 2 hd 4 sec 324>
/sbus@1f,0/SUNW,fas@2,8800000/sd@f,0
Specify disk (enter its number): 5
selecting c1t12d0
[disk formatted]
FORMAT MENU:
disk - select a disk
type - select (define) a disk type
partition - select (define) a partition table
191Uninstalling Storage FoundationPreparing to uninstall
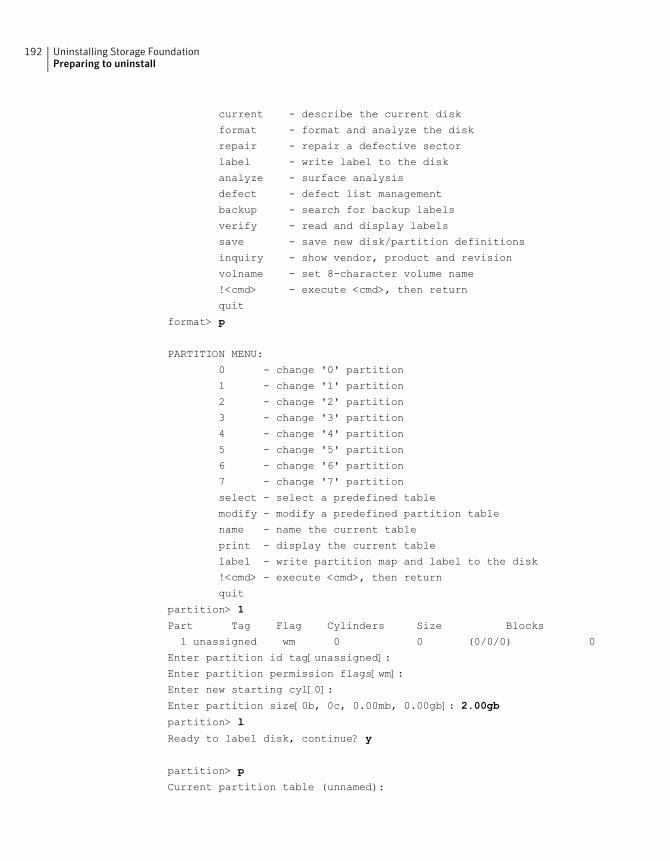
current - describe the current disk
format - format and analyze the disk
repair - repair a defective sector
label - write label to the disk
analyze - surface analysis
defect - defect list management
backup - search for backup labels
verify - read and display labels
save - save new disk/partition definitions
inquiry - show vendor, product and revision
volname - set 8-character volume name
!<cmd> - execute <cmd>, then return
quit
format> p
PARTITION MENU:
0 - change '0' partition
1 - change '1' partition
2 - change '2' partition
3 - change '3' partition
4 - change '4' partition
5 - change '5' partition
6 - change '6' partition
7 - change '7' partition
select - select a predefined table
modify - modify a predefined partition table
name - name the current table
print - display the current table
label - write partition map and label to the disk
!<cmd> - execute <cmd>, then return
quit
partition> 1
Part Tag Flag Cylinders Size Blocks
1 unassigned wm 0 0 (0/0/0) 0
Enter partition id tag[unassigned]:
Enter partition permission flags[wm]:
Enter new starting cyl[0]:
Enter partition size[0b, 0c, 0.00mb, 0.00gb]: 2.00gb
partition> l
Ready to label disk, continue? y
partition> p
Current partition table (unnamed):
Uninstalling Storage FoundationPreparing to uninstall
192
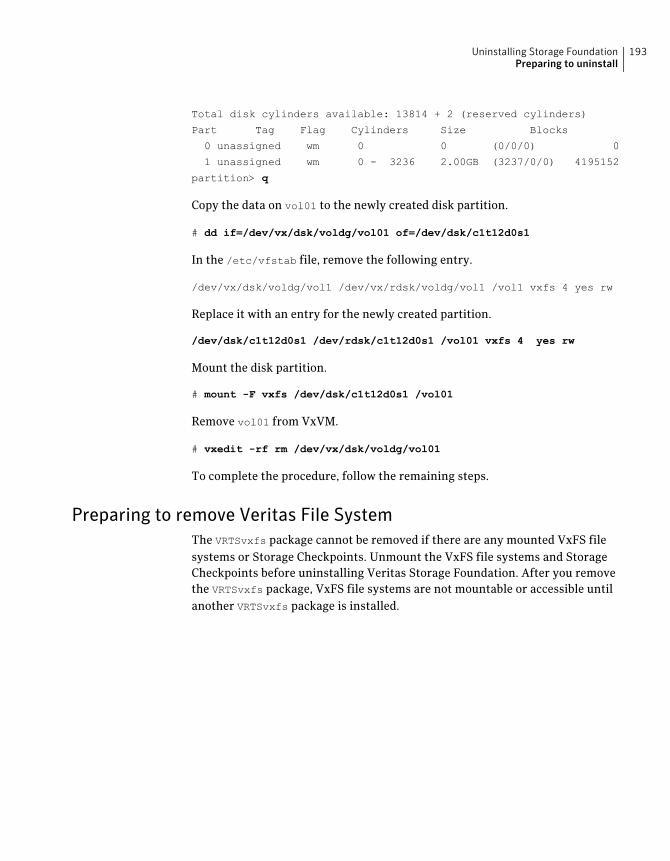
Total disk cylinders available: 13814 + 2 (reserved cylinders)
Part Tag Flag Cylinders Size Blocks
0 unassigned wm 0 0 (0/0/0) 0
1 unassigned wm 0 - 3236 2.00GB (3237/0/0) 4195152
partition> q
Copy the data on vol01 to the newly created disk partition.
# dd if=/dev/vx/dsk/voldg/vol01 of=/dev/dsk/c1t12d0s1
In the /etc/vfstab file, remove the following entry.
/dev/vx/dsk/voldg/vol1 /dev/vx/rdsk/voldg/vol1 /vol1 vxfs 4 yes rw
Replace it with an entry for the newly created partition.
/dev/dsk/c1t12d0s1 /dev/rdsk/c1t12d0s1 /vol01 vxfs 4 yes rw
Mount the disk partition.
# mount -F vxfs /dev/dsk/c1t12d0s1 /vol01
Remove vol01 from VxVM.
# vxedit -rf rm /dev/vx/dsk/voldg/vol01
To complete the procedure, follow the remaining steps.
Preparing to remove Veritas File SystemThe VRTSvxfs package cannot be removed if there are any mounted VxFS filesystems or Storage Checkpoints. Unmount the VxFS file systems and StorageCheckpoints before uninstalling Veritas Storage Foundation. After you removethe VRTSvxfs package, VxFS file systems are not mountable or accessible untilanother VRTSvxfs package is installed.
193Uninstalling Storage FoundationPreparing to uninstall
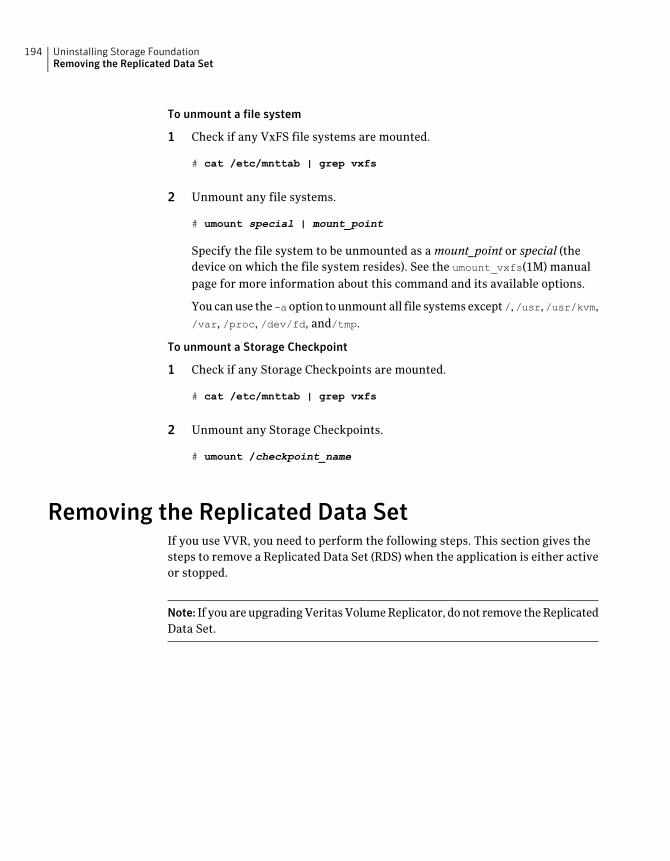
To unmount a file system
1 Check if any VxFS file systems are mounted.
# cat /etc/mnttab | grep vxfs
2 Unmount any file systems.
# umount special | mount_point
Specify the file system to be unmounted as a mount_point or special (thedevice on which the file system resides). See the umount_vxfs(1M) manualpage for more information about this command and its available options.
You can use the-aoption to unmount all file systems except/,/usr,/usr/kvm,/var, /proc, /dev/fd, and/tmp.
To unmount a Storage Checkpoint
1 Check if any Storage Checkpoints are mounted.
# cat /etc/mnttab | grep vxfs
2 Unmount any Storage Checkpoints.
# umount /checkpoint_name
Removing the Replicated Data SetIf you use VVR, you need to perform the following steps. This section gives thesteps to remove a Replicated Data Set (RDS) when the application is either activeor stopped.
Note: If you are upgrading Veritas Volume Replicator, do not remove the ReplicatedData Set.
Uninstalling Storage FoundationRemoving the Replicated Data Set
194

To remove the Replicated Data Set
1 Verify that all RLINKs are up-to-date:
# vxrlink -g diskgroup status rlink_name
If the Secondary is not required to be up-to-date, proceed to 2 and stopreplication using the -f option with the vradmin stoprep command.
2 Stop replication to the Secondary by issuing the following command on anyhost in the RDS:
The vradmin stoprep command fails if the Primary and Secondary RLINKsare not up-to-date. Use the -f option to stop replication to a Secondary evenwhen the RLINKs are not up-to-date.
# vradmin -g diskgroup stoprep local_rvgname sec_hostname
The argument local_rvgname is the name of the RVG on the local host andrepresents its RDS.
The argument sec_hostname is the name of the Secondary host as displayedin the output of the vradmin printrvg command.
3 Remove the Secondary from the RDS by issuing the following command onany host in the RDS:
# vradmin -g diskgroup delsec local_rvgname sec_hostname
The argument local_rvgname is the name of the RVG on the local host andrepresents its RDS.
The argument sec_hostname is the name of the Secondary host as displayedin the output of the vradmin printrvg command.
4 Remove the Primary from the RDS by issuing the following command on thePrimary:
# vradmin -g diskgroup delpri local_rvgname
When used with the -f option, the vradmin delpri command removes thePrimary even when the application is running on the Primary.
The RDS is removed.
5 If you want to delete the SRLs from the Primary and Secondary hosts in theRDS, issue the following command on the Primary and all Secondaries:
# vxedit -r -g diskgroup rm srl_name
195Uninstalling Storage FoundationRemoving the Replicated Data Set
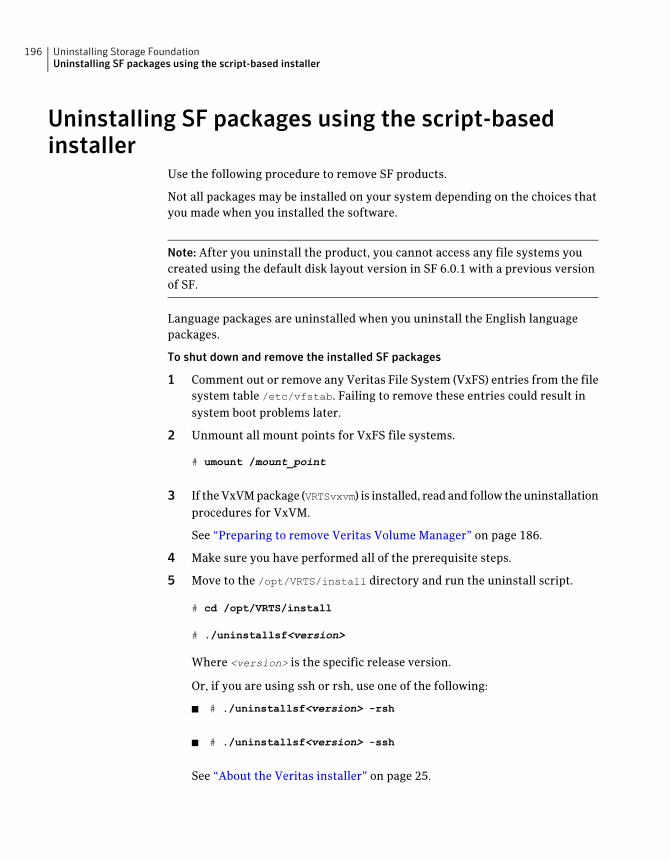
Uninstalling SF packages using the script-basedinstaller
Use the following procedure to remove SF products.
Not all packages may be installed on your system depending on the choices thatyou made when you installed the software.
Note: After you uninstall the product, you cannot access any file systems youcreated using the default disk layout version in SF 6.0.1 with a previous versionof SF.
Language packages are uninstalled when you uninstall the English languagepackages.
To shut down and remove the installed SF packages
1 Comment out or remove any Veritas File System (VxFS) entries from the filesystem table /etc/vfstab. Failing to remove these entries could result insystem boot problems later.
2 Unmount all mount points for VxFS file systems.
# umount /mount_point
3 If the VxVM package (VRTSvxvm) is installed, read and follow the uninstallationprocedures for VxVM.
See “Preparing to remove Veritas Volume Manager” on page 186.
4 Make sure you have performed all of the prerequisite steps.
5 Move to the /opt/VRTS/install directory and run the uninstall script.
# cd /opt/VRTS/install
# ./uninstallsf<version>
Where <version> is the specific release version.
Or, if you are using ssh or rsh, use one of the following:
■ # ./uninstallsf<version> -rsh
■ # ./uninstallsf<version> -ssh
See “About the Veritas installer” on page 25.
Uninstalling Storage FoundationUninstalling SF packages using the script-based installer
196
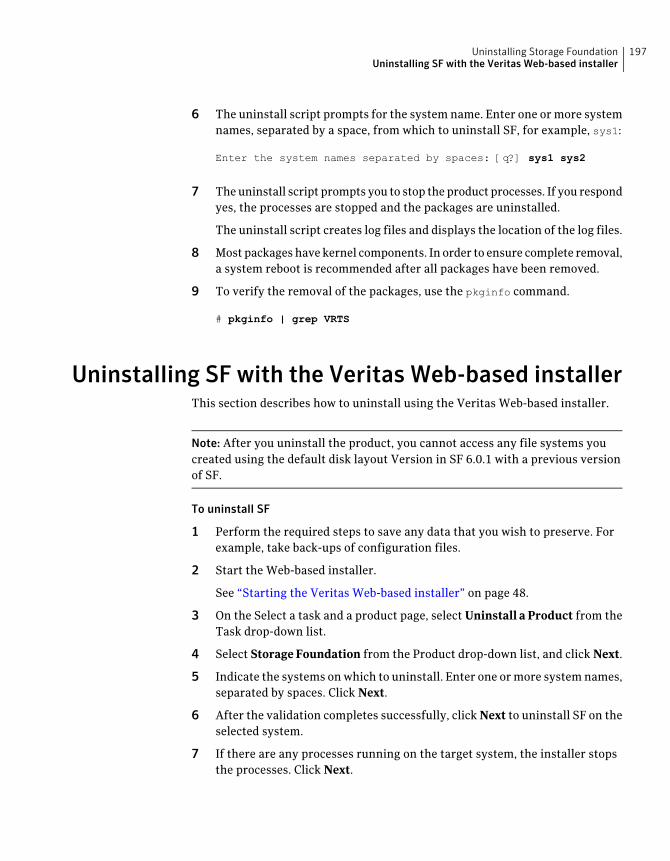
6 The uninstall script prompts for the system name. Enter one or more systemnames, separated by a space, from which to uninstall SF, for example, sys1:
Enter the system names separated by spaces: [q?] sys1 sys2
7 The uninstall script prompts you to stop the product processes. If you respondyes, the processes are stopped and the packages are uninstalled.
The uninstall script creates log files and displays the location of the log files.
8 Most packages have kernel components. In order to ensure complete removal,a system reboot is recommended after all packages have been removed.
9 To verify the removal of the packages, use the pkginfo command.
# pkginfo | grep VRTS
Uninstalling SF with the Veritas Web-based installerThis section describes how to uninstall using the Veritas Web-based installer.
Note: After you uninstall the product, you cannot access any file systems youcreated using the default disk layout Version in SF 6.0.1 with a previous versionof SF.
To uninstall SF
1 Perform the required steps to save any data that you wish to preserve. Forexample, take back-ups of configuration files.
2 Start the Web-based installer.
See “Starting the Veritas Web-based installer” on page 48.
3 On the Select a task and a product page, select Uninstall a Product from theTask drop-down list.
4 Select Storage Foundation from the Product drop-down list, and click Next.
5 Indicate the systems on which to uninstall. Enter one or more system names,separated by spaces. Click Next.
6 After the validation completes successfully, click Next to uninstall SF on theselected system.
7 If there are any processes running on the target system, the installer stopsthe processes. Click Next.
197Uninstalling Storage FoundationUninstalling SF with the Veritas Web-based installer
8 After the installer stops the processes, the installer removes the productsfrom the specified system.
Click Next.
9 After the uninstall completes, the installer displays the location of thesummary, response, and log files. If required, view the files to confirm thestatus of the removal.
10 Click Finish.
Most packages have kernel components. In order to ensure their completeremoval, a system reboot is recommended after all the packages have beenremoved.
Uninstalling Storage Foundation using the pkgrm orpkg uninstall command
Use the following procedure to uninstall Storage Foundation using the pkgrmcommand.
If you are uninstalling Storage Foundation using the pkgrm command, thepackages must be removed in a specific order, or else the uninstallation will fail.Removing the packages out of order will result in some errors, including possiblecore dumps, although the packages will still be removed.
To uninstall Storage Foundation
1 Unmount all VxFS file systems and Storage Checkpoints, and close all VxVMvolumes.
Comment out or remove any Veritas File System (VxFS) entries from the filesystem table /etc/vfstab. Failing to remove these entries could result insystem boot problems later.
2 Unmount all mount points for VxFS file systems and Storage Checkpoints.
# umount /mount_point
3 Stop all applications from accessing VxVM volumes, and close all VxVMvolumes.
4 Stop various daemons, if applicable.
# /opt/VRTS/bin/vxsvcctrl stop
5 Remove the packages in the following order:
■ For Storage Foundation (Solaris 10):
Uninstalling Storage FoundationUninstalling Storage Foundation using the pkgrm or pkg uninstall command
198
# pkgrm VRTSodm VRTSdbed VRTSfssdk \
VRTSvxfs VRTSsfmh VRTSob VRTSaslapm VRTSvxvm \
VRTSspt VRTSperl VRTSvlic
■ For Storage Foundation (Solaris 11):
# pkg uninstall VRTSodm VRTSdbed VRTSfssdk \
VRTSvxfs VRTSsfmh VRTSob VRTSaslapm VRTSvxvm \
VRTSspt VRTSperl VRTSvlic
Uninstalling the language packages using the pkgrm commandIf you would like to remove only the language packages, you can do so with thepkgrm command.
If you use the product installer menu or the uninstallation script, you can removethe language packages along with the English packages.
To remove the language packages
◆ Use the pkgrm command to remove the appropriate packages.
See “Chinese language packages” on page 238.
See “Japanese language packages” on page 238.
# pkgrm package_name package_name ...
Because the packages do not contain any dependencies, you can remove themin any order.
Removing the Storage Foundation for Databases(SFDB) repository after removing the product
After removing the product, you can remove the SFDB repository file and anybackups.
Removing the SFDB repository file disables the SFDB tools.
199Uninstalling Storage FoundationRemoving the Storage Foundation for Databases (SFDB) repository after removing the product
To remove the SFDB repository
1 Identify the SFDB repositories created on the host.
# cat /var/vx/vxdba/rep_loc
2 Remove the directory identified by the location key.
3 Remove the repository location file.
# rm -rf /var/vx/vxdba/rep_loc
This completes the removal of the SFDB repository.
Uninstalling Storage FoundationRemoving the Storage Foundation for Databases (SFDB) repository after removing the product
200

Uninstalling SF usingresponse files
This chapter includes the following topics:
■ Uninstalling SF using response files
■ Response file variables to uninstall Storage Foundation
■ Sample response file for SF uninstallation
Uninstalling SF using response filesTypically, you can use the response file that the installer generates after youperform SF uninstallation on one system to uninstall SF on other systems.
To perform an automated uninstallation
1 Make sure that you meet the prerequisites to uninstall SF.
2 Copy the response file to one of the cluster systems where you want touninstall SF.
3 Edit the values of the response file variables as necessary.
4 Start the uninstallation from the system to which you copied the responsefile. For example:
# /opt/VRTS/install/uninstallsf<version>
-responsefile /tmp/response_file
Where <version> is the specific release version, and /tmp/response_file isthe response file’s full path name.
See “About the Veritas installer” on page 25.
20Chapter
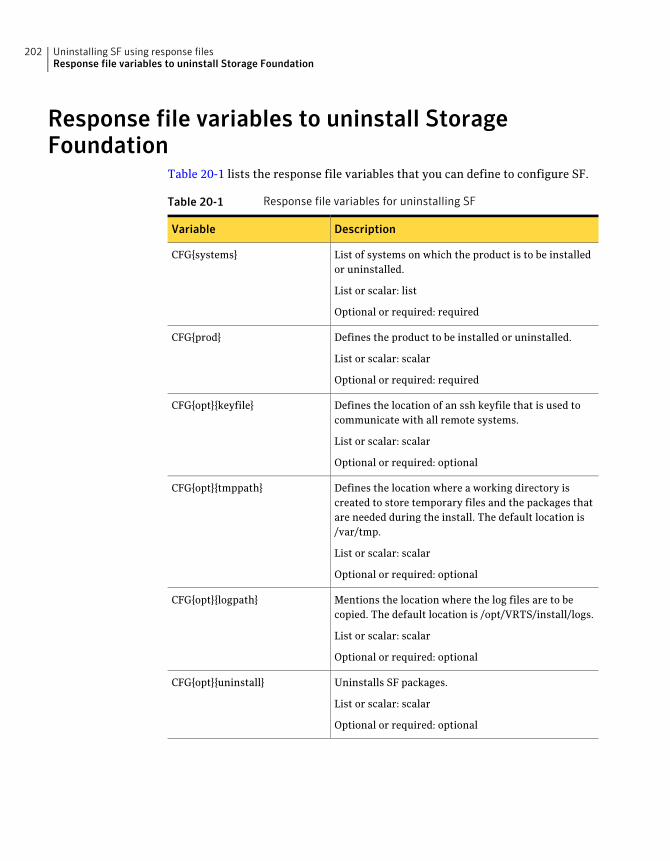
Response file variables to uninstall StorageFoundation
Table 20-1 lists the response file variables that you can define to configure SF.
Table 20-1 Response file variables for uninstalling SF
DescriptionVariable
List of systems on which the product is to be installedor uninstalled.
List or scalar: list
Optional or required: required
CFG{systems}
Defines the product to be installed or uninstalled.
List or scalar: scalar
Optional or required: required
CFG{prod}
Defines the location of an ssh keyfile that is used tocommunicate with all remote systems.
List or scalar: scalar
Optional or required: optional
CFG{opt}{keyfile}
Defines the location where a working directory iscreated to store temporary files and the packages thatare needed during the install. The default location is/var/tmp.
List or scalar: scalar
Optional or required: optional
CFG{opt}{tmppath}
Mentions the location where the log files are to becopied. The default location is /opt/VRTS/install/logs.
List or scalar: scalar
Optional or required: optional
CFG{opt}{logpath}
Uninstalls SF packages.
List or scalar: scalar
Optional or required: optional
CFG{opt}{uninstall}
Uninstalling SF using response filesResponse file variables to uninstall Storage Foundation
202
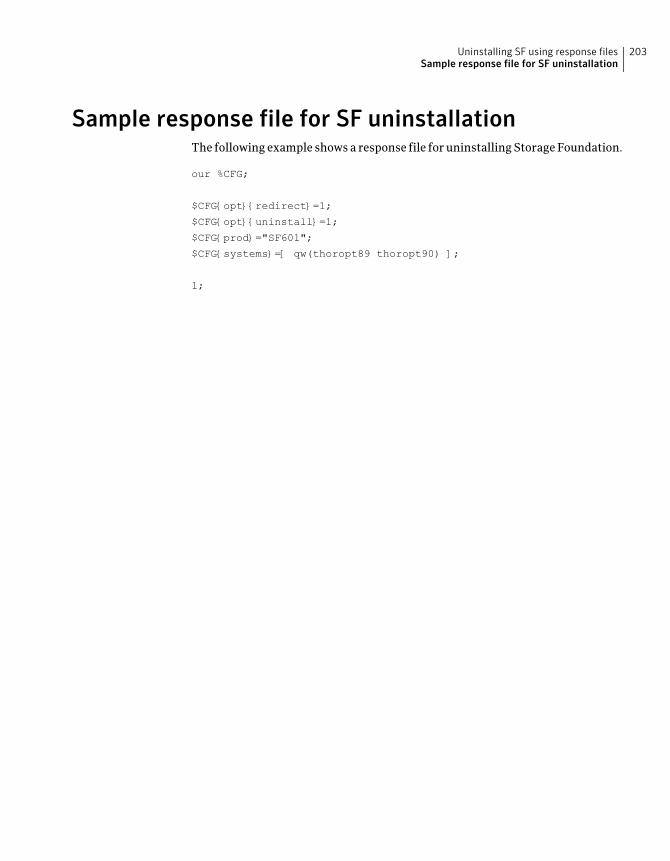
Sample response file for SF uninstallationThe following example shows a response file for uninstalling Storage Foundation.
our %CFG;
$CFG{opt}{redirect}=1;
$CFG{opt}{uninstall}=1;
$CFG{prod}="SF601";
$CFG{systems}=[ qw(thoropt89 thoropt90) ];
1;
203Uninstalling SF using response filesSample response file for SF uninstallation

Uninstalling SF using response filesSample response file for SF uninstallation
204
Installation reference
■ Appendix A. Installation scripts
■ Appendix B. Tunable files for installation
■ Appendix C. Configuring the secure shell or the remote shell forcommunications
■ Appendix D. Storage Foundation components
■ Appendix E. Troubleshooting installation issues
■ Appendix F. Compatability issues when installing Storage Foundation withother products
6Section

206
Installation scripts
This appendix includes the following topics:
■ Installation script options
Installation script optionsTable A-1 shows command line options for the installation script. For an initialinstall or upgrade, options are not usually required. The installation script optionsapply to all Veritas Storage Foundation product scripts, except where otherwisenoted.
See “About the Veritas installer” on page 25.
Table A-1 Available command line options
FunctionCommandline Option
Displays all packages required for the specifiedproduct. The packages are listed in correctinstallation order. The output can be used tocreate scripts for command line installs, or forinstallations over a network.
-allpkgs
The -comcleanup option removes the secureshell or remote shell configuration added byinstaller on the systems. The option is onlyrequired when installation routines thatperformed auto-configuration of the shell areabruptly terminated.
-comcleanup
Configures the product after installation.-configure
Specifies the location of a file that contains a listof hostnames on which to install.
–hostfile full_path_to_file
AAppendix

Table A-1 Available command line options (continued)
FunctionCommandline Option
The -installallpkgs option is used to selectall packages.
-installallpkgs
The -installrecpkgsoption is used to selectthe recommended packages set.
-installrecpkgs
The -installminpkgsoption is used to selectthe minimum packages set.
–installminpkgs
The -ignorepatchreqs option is used to allowinstallation or upgrading even if the prerequisitepackages or patches are missed on the system.
-ignorepatchreqs
Produces a sample finish file for Solaris JumpStartinstallation. The dir_path indicates the path tothe directory in which to create the finish file.
–jumpstart dir_path
Specifies a key file for secure shell (SSH) installs.This option passes -i ssh_key_file to everySSH invocation.
–keyfile ssh_key_file
Registers or updates product licenses on thespecified systems.
-license
Specifies a directory other than/opt/VRTS/install/logs as the locationwhere installer log files, summary files, andresponse files are saved.
–logpath log_path
Use the -makeresponsefile option only togenerate response files. No actual softwareinstallation occurs when you use this option.
-makeresponsefile
Displays the minimal packages required for thespecified product. The packages are listed incorrect installation order. Optional packages arenot listed. The output can be used to create scriptsfor command line installs, or for installations overa network. See allpkgs option.
-minpkgs
Allows installation of product packages withoutentering a license key. Licensed features cannotbe configured, started, or used when this optionis specified.
-nolic
Installation scriptsInstallation script options
208
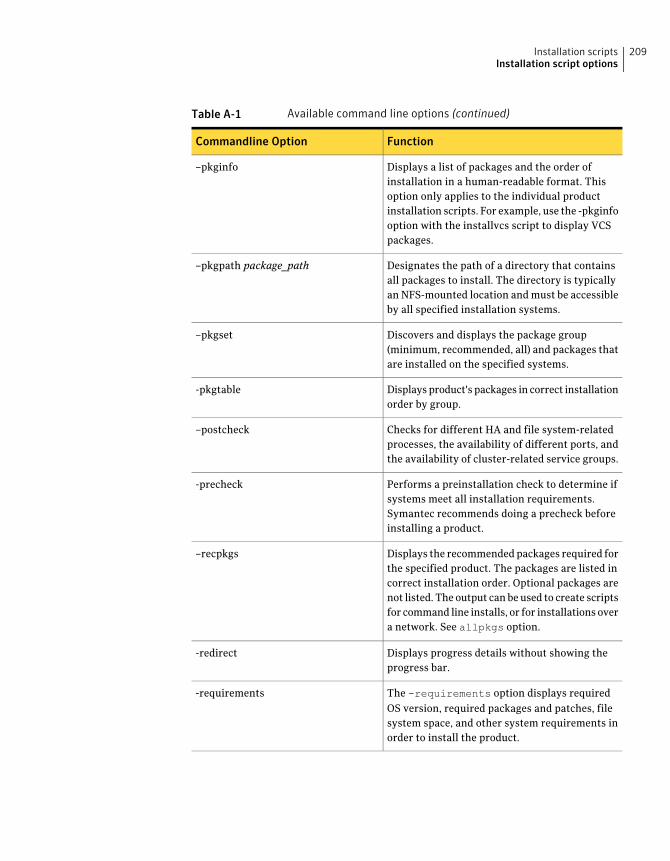
Table A-1 Available command line options (continued)
FunctionCommandline Option
Displays a list of packages and the order ofinstallation in a human-readable format. Thisoption only applies to the individual productinstallation scripts. For example, use the -pkginfooption with the installvcs script to display VCSpackages.
–pkginfo
Designates the path of a directory that containsall packages to install. The directory is typicallyan NFS-mounted location and must be accessibleby all specified installation systems.
–pkgpath package_path
Discovers and displays the package group(minimum, recommended, all) and packages thatare installed on the specified systems.
–pkgset
Displays product's packages in correct installationorder by group.
-pkgtable
Checks for different HA and file system-relatedprocesses, the availability of different ports, andthe availability of cluster-related service groups.
–postcheck
Performs a preinstallation check to determine ifsystems meet all installation requirements.Symantec recommends doing a precheck beforeinstalling a product.
-precheck
Displays the recommended packages required forthe specified product. The packages are listed incorrect installation order. Optional packages arenot listed. The output can be used to create scriptsfor command line installs, or for installations overa network. See allpkgs option.
–recpkgs
Displays progress details without showing theprogress bar.
-redirect
The -requirements option displays requiredOS version, required packages and patches, filesystem space, and other system requirements inorder to install the product.
-requirements
209Installation scriptsInstallation script options
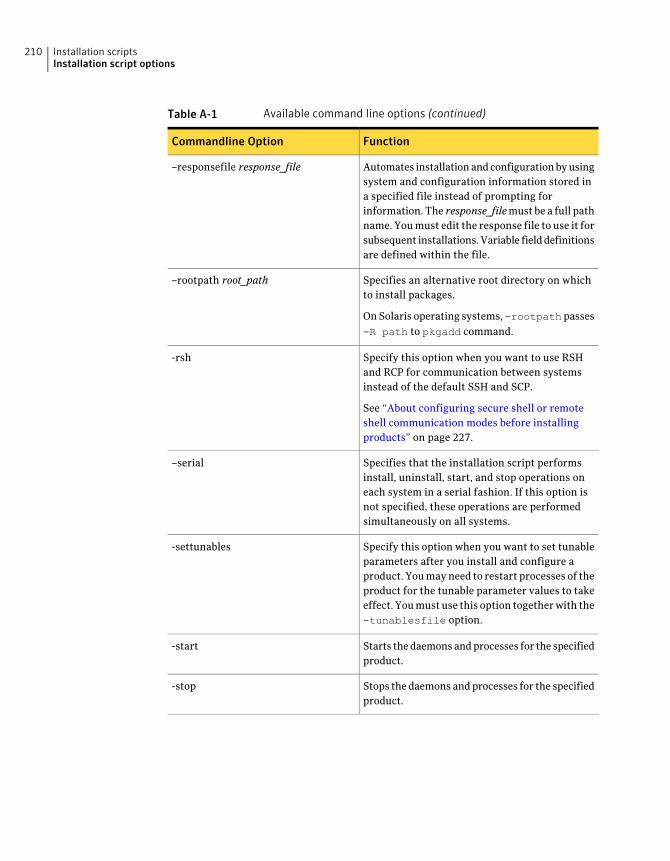
Table A-1 Available command line options (continued)
FunctionCommandline Option
Automates installation and configuration by usingsystem and configuration information stored ina specified file instead of prompting forinformation. The response_filemust be a full pathname. You must edit the response file to use it forsubsequent installations. Variable field definitionsare defined within the file.
–responsefile response_file
Specifies an alternative root directory on whichto install packages.
On Solaris operating systems,-rootpathpasses-R path to pkgadd command.
–rootpath root_path
Specify this option when you want to use RSHand RCP for communication between systemsinstead of the default SSH and SCP.
See “About configuring secure shell or remoteshell communication modes before installingproducts” on page 227.
-rsh
Specifies that the installation script performsinstall, uninstall, start, and stop operations oneach system in a serial fashion. If this option isnot specified, these operations are performedsimultaneously on all systems.
–serial
Specify this option when you want to set tunableparameters after you install and configure aproduct. You may need to restart processes of theproduct for the tunable parameter values to takeeffect. You must use this option together with the-tunablesfile option.
-settunables
Starts the daemons and processes for the specifiedproduct.
-start
Stops the daemons and processes for the specifiedproduct.
-stop
Installation scriptsInstallation script options
210
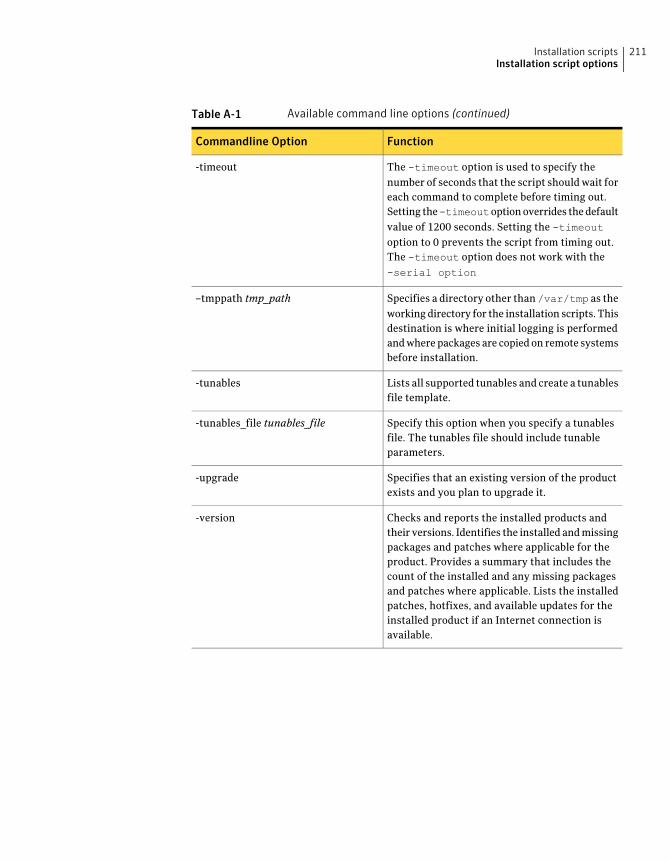
Table A-1 Available command line options (continued)
FunctionCommandline Option
The -timeout option is used to specify thenumber of seconds that the script should wait foreach command to complete before timing out.Setting the-timeoutoption overrides the defaultvalue of 1200 seconds. Setting the -timeoutoption to 0 prevents the script from timing out.The -timeout option does not work with the-serial option
-timeout
Specifies a directory other than/var/tmp as theworking directory for the installation scripts. Thisdestination is where initial logging is performedand where packages are copied on remote systemsbefore installation.
–tmppath tmp_path
Lists all supported tunables and create a tunablesfile template.
-tunables
Specify this option when you specify a tunablesfile. The tunables file should include tunableparameters.
-tunables_file tunables_file
Specifies that an existing version of the productexists and you plan to upgrade it.
-upgrade
Checks and reports the installed products andtheir versions. Identifies the installed and missingpackages and patches where applicable for theproduct. Provides a summary that includes thecount of the installed and any missing packagesand patches where applicable. Lists the installedpatches, hotfixes, and available updates for theinstalled product if an Internet connection isavailable.
-version
211Installation scriptsInstallation script options

Installation scriptsInstallation script options
212
Tunable files for installation
This appendix includes the following topics:
■ About setting tunable parameters using the installer or a response file
■ Setting tunables for an installation, configuration, or upgrade
■ Setting tunables with no other installer-related operations
■ Setting tunables with an un-integrated response file
■ Preparing the tunables file
■ Setting parameters for the tunables file
■ Tunables value parameter definitions
About setting tunable parameters using the installeror a response file
You can set non-default product and system tunable parameters using a tunablesfile. With the file, you can set tunables such as the I/O policy or toggle nativemulti-pathing. The tunables file passes arguments to the installer script to settunables. With the file, you can set the tunables for the following operations:
■ When you install, configure, or upgrade systems.
# ./installer -tunablesfile tunables_file_name
See “Setting tunables for an installation, configuration, or upgrade” on page 214.
■ When you apply the tunables file with no other installer-related operations.
# ./installer -tunablesfile tunables_file_name -settunables [
system1 system2 ...]
BAppendix
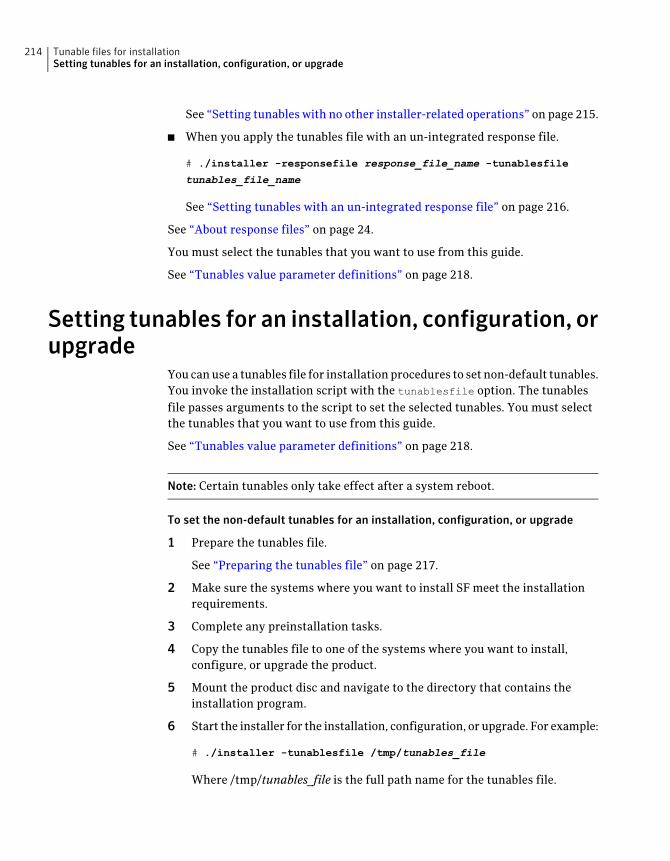
See “Setting tunables with no other installer-related operations” on page 215.
■ When you apply the tunables file with an un-integrated response file.
# ./installer -responsefile response_file_name -tunablesfile
tunables_file_name
See “Setting tunables with an un-integrated response file” on page 216.
See “About response files” on page 24.
You must select the tunables that you want to use from this guide.
See “Tunables value parameter definitions” on page 218.
Setting tunables for an installation, configuration, orupgrade
You can use a tunables file for installation procedures to set non-default tunables.You invoke the installation script with the tunablesfile option. The tunablesfile passes arguments to the script to set the selected tunables. You must selectthe tunables that you want to use from this guide.
See “Tunables value parameter definitions” on page 218.
Note: Certain tunables only take effect after a system reboot.
To set the non-default tunables for an installation, configuration, or upgrade
1 Prepare the tunables file.
See “Preparing the tunables file” on page 217.
2 Make sure the systems where you want to install SF meet the installationrequirements.
3 Complete any preinstallation tasks.
4 Copy the tunables file to one of the systems where you want to install,configure, or upgrade the product.
5 Mount the product disc and navigate to the directory that contains theinstallation program.
6 Start the installer for the installation, configuration, or upgrade. For example:
# ./installer -tunablesfile /tmp/tunables_file
Where /tmp/tunables_file is the full path name for the tunables file.
Tunable files for installationSetting tunables for an installation, configuration, or upgrade
214
7 Proceed with the operation. When prompted, accept the tunable parameters.
Certain tunables are only activated after a reboot. Review the output carefullyto determine if the system requires a reboot to set the tunable value.
8 The installer validates the tunables. If an error occurs, exit the installer andcheck the tunables file.
Setting tunables with no other installer-relatedoperations
You can use the installer to set tunable parameters without any otherinstaller-related operations. You must use the parameters described in this guide.Note that many of the parameters are product-specific. You must select thetunables that you want to use from this guide.
See “Tunables value parameter definitions” on page 218.
Note: Certain tunables only take effect after a system reboot.
To set tunables with no other installer-related operations
1 Prepare the tunables file.
See “Preparing the tunables file” on page 217.
2 Make sure the systems where you want to install SF meet the installationrequirements.
3 Complete any preinstallation tasks.
4 Copy the tunables file to one of the systems that you want to tune.
5 Mount the product disc and navigate to the directory that contains theinstallation program.
6 Start the installer with the -settunables option.
# ./installer -tunablesfile tunables_file_name -settunables [
sys123 sys234 ...]
Where /tmp/tunables_file is the full path name for the tunables file.
215Tunable files for installationSetting tunables with no other installer-related operations
7 Proceed with the operation. When prompted, accept the tunable parameters.
Certain tunables are only activated after a reboot. Review the output carefullyto determine if the system requires a reboot to set the tunable value.
8 The installer validates the tunables. If an error occurs, exit the installer andcheck the tunables file.
Setting tunables with an un-integrated response fileYou can use the installer to set tunable parameters with an un-integrated responsefile. You must use the parameters described in this guide. Note that many of theparameters are product-specific. You must select the tunables that you want touse from this guide.
See “Tunables value parameter definitions” on page 218.
Note: Certain tunables only take effect after a system reboot.
To set tunables with an un-integrated response file
1 Make sure the systems where you want to install SF meet the installationrequirements.
2 Complete any preinstallation tasks.
3 Prepare the tunables file.
See “Preparing the tunables file” on page 217.
4 Copy the tunables file to one of the systems that you want to tune.
5 Mount the product disc and navigate to the directory that contains theinstallation program.
6 Start the installer with the -responsefile and -tunablesfile options.
# ./installer -responsefile response_file_name -tunablesfile
tunables_file_name
Where response_file_name is the full path name for the response file andtunables_file_name is the full path name for the tunables file.
7 Certain tunables are only activated after a reboot. Review the output carefullyto determine if the system requires a reboot to set the tunable value.
8 The installer validates the tunables. If an error occurs, exit the installer andcheck the tunables file.
Tunable files for installationSetting tunables with an un-integrated response file
216
Preparing the tunables fileA tunables file is a Perl module and consists of an opening and closing statement,with the tunables defined between. Use the hash symbol at the beginning of theline to comment out the line. The tunables file opens with the line "our %TUN;"and ends with the return true "1;" line. The final return true line only needs toappear once at the end of the file. Define each tunable parameter on its own line.
You can use the installer to create a tunables file template, or manually formattunables files you create.
To create a tunables file template
◆ Start the installer with the -tunables option. Enter the following:
# ./installer -tunables
You see a list of all supported tunables, and the location of the tunables filetemplate.
To manually format tunables files
◆ Format the tunable parameter as follows:
$TUN{"tunable_name"}{"system_name"|"*"}=value_of_tunable;
For the system_name, use the name of the system, its IP address, or a wildcardsymbol. The value_of_tunable depends on the type of tunable you are setting. Endthe line with a semicolon.
The following is an example of a tunables file.
#
# Tunable Parameter Values:
#
our %TUN;
$TUN{"tunable1"}{"*"}=1024;
$TUN{"tunable3"}{"sys123"}="SHA256";
1;
Setting parameters for the tunables fileEach tunables file defines different tunable parameters. The values that you canuse are listed in the description of each parameter. Select the tunables that youwant to add to the tunables file and then configure each parameter.
217Tunable files for installationPreparing the tunables file
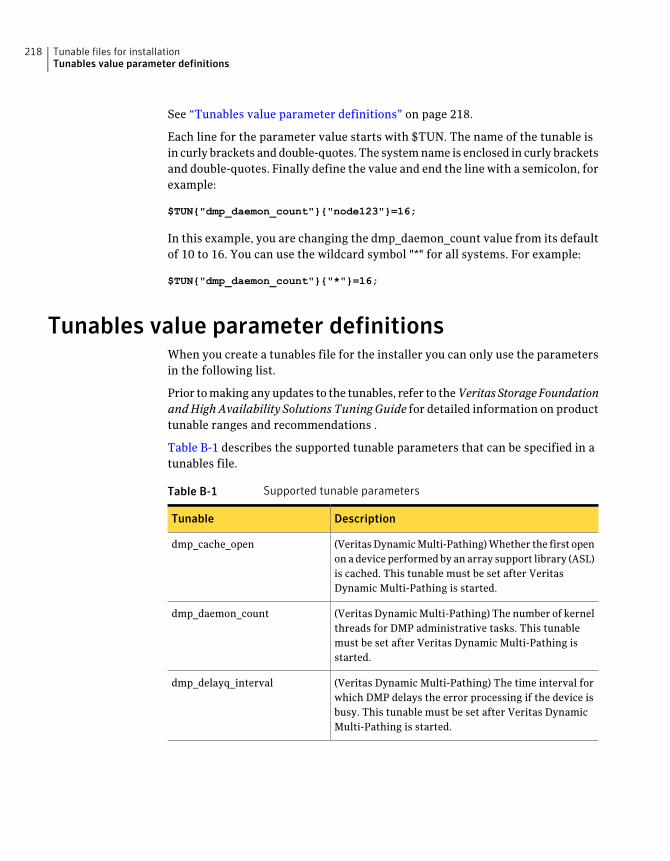
See “Tunables value parameter definitions” on page 218.
Each line for the parameter value starts with $TUN. The name of the tunable isin curly brackets and double-quotes. The system name is enclosed in curly bracketsand double-quotes. Finally define the value and end the line with a semicolon, forexample:
$TUN{"dmp_daemon_count"}{"node123"}=16;
In this example, you are changing the dmp_daemon_count value from its defaultof 10 to 16. You can use the wildcard symbol "*" for all systems. For example:
$TUN{"dmp_daemon_count"}{"*"}=16;
Tunables value parameter definitionsWhen you create a tunables file for the installer you can only use the parametersin the following list.
Prior to making any updates to the tunables, refer to theVeritasStorageFoundationandHighAvailability SolutionsTuningGuide for detailed information on producttunable ranges and recommendations .
Table B-1 describes the supported tunable parameters that can be specified in atunables file.
Table B-1 Supported tunable parameters
DescriptionTunable
(Veritas Dynamic Multi-Pathing) Whether the first openon a device performed by an array support library (ASL)is cached. This tunable must be set after VeritasDynamic Multi-Pathing is started.
dmp_cache_open
(Veritas Dynamic Multi-Pathing) The number of kernelthreads for DMP administrative tasks. This tunablemust be set after Veritas Dynamic Multi-Pathing isstarted.
dmp_daemon_count
(Veritas Dynamic Multi-Pathing) The time interval forwhich DMP delays the error processing if the device isbusy. This tunable must be set after Veritas DynamicMulti-Pathing is started.
dmp_delayq_interval
Tunable files for installationTunables value parameter definitions
218
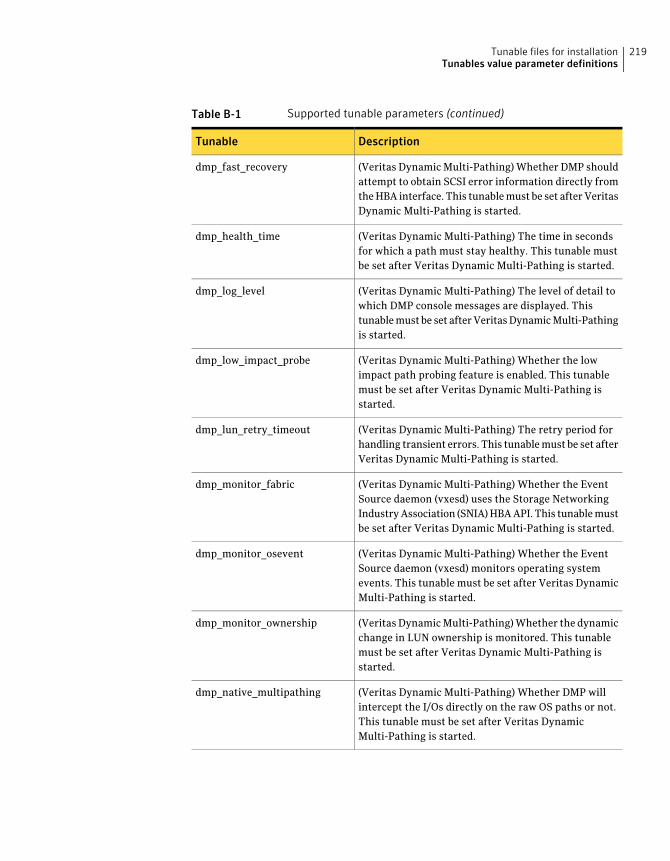
Table B-1 Supported tunable parameters (continued)
DescriptionTunable
(Veritas Dynamic Multi-Pathing) Whether DMP shouldattempt to obtain SCSI error information directly fromthe HBA interface. This tunable must be set after VeritasDynamic Multi-Pathing is started.
dmp_fast_recovery
(Veritas Dynamic Multi-Pathing) The time in secondsfor which a path must stay healthy. This tunable mustbe set after Veritas Dynamic Multi-Pathing is started.
dmp_health_time
(Veritas Dynamic Multi-Pathing) The level of detail towhich DMP console messages are displayed. Thistunable must be set after Veritas Dynamic Multi-Pathingis started.
dmp_log_level
(Veritas Dynamic Multi-Pathing) Whether the lowimpact path probing feature is enabled. This tunablemust be set after Veritas Dynamic Multi-Pathing isstarted.
dmp_low_impact_probe
(Veritas Dynamic Multi-Pathing) The retry period forhandling transient errors. This tunable must be set afterVeritas Dynamic Multi-Pathing is started.
dmp_lun_retry_timeout
(Veritas Dynamic Multi-Pathing) Whether the EventSource daemon (vxesd) uses the Storage NetworkingIndustry Association (SNIA) HBA API. This tunable mustbe set after Veritas Dynamic Multi-Pathing is started.
dmp_monitor_fabric
(Veritas Dynamic Multi-Pathing) Whether the EventSource daemon (vxesd) monitors operating systemevents. This tunable must be set after Veritas DynamicMulti-Pathing is started.
dmp_monitor_osevent
(Veritas Dynamic Multi-Pathing) Whether the dynamicchange in LUN ownership is monitored. This tunablemust be set after Veritas Dynamic Multi-Pathing isstarted.
dmp_monitor_ownership
(Veritas Dynamic Multi-Pathing) Whether DMP willintercept the I/Os directly on the raw OS paths or not.This tunable must be set after Veritas DynamicMulti-Pathing is started.
dmp_native_multipathing
219Tunable files for installationTunables value parameter definitions
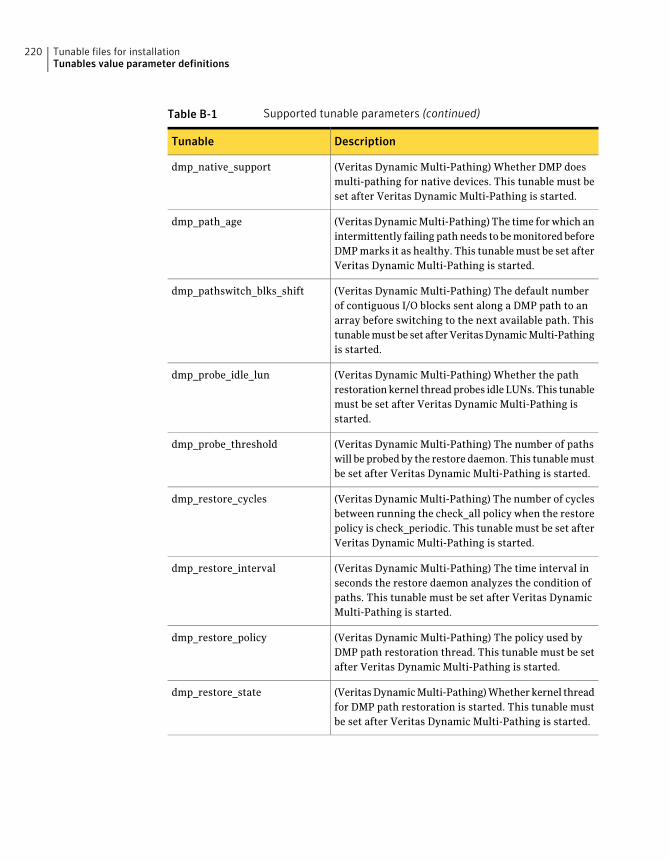
Table B-1 Supported tunable parameters (continued)
DescriptionTunable
(Veritas Dynamic Multi-Pathing) Whether DMP doesmulti-pathing for native devices. This tunable must beset after Veritas Dynamic Multi-Pathing is started.
dmp_native_support
(Veritas Dynamic Multi-Pathing) The time for which anintermittently failing path needs to be monitored beforeDMP marks it as healthy. This tunable must be set afterVeritas Dynamic Multi-Pathing is started.
dmp_path_age
(Veritas Dynamic Multi-Pathing) The default numberof contiguous I/O blocks sent along a DMP path to anarray before switching to the next available path. Thistunable must be set after Veritas Dynamic Multi-Pathingis started.
dmp_pathswitch_blks_shift
(Veritas Dynamic Multi-Pathing) Whether the pathrestoration kernel thread probes idle LUNs. This tunablemust be set after Veritas Dynamic Multi-Pathing isstarted.
dmp_probe_idle_lun
(Veritas Dynamic Multi-Pathing) The number of pathswill be probed by the restore daemon. This tunable mustbe set after Veritas Dynamic Multi-Pathing is started.
dmp_probe_threshold
(Veritas Dynamic Multi-Pathing) The number of cyclesbetween running the check_all policy when the restorepolicy is check_periodic. This tunable must be set afterVeritas Dynamic Multi-Pathing is started.
dmp_restore_cycles
(Veritas Dynamic Multi-Pathing) The time interval inseconds the restore daemon analyzes the condition ofpaths. This tunable must be set after Veritas DynamicMulti-Pathing is started.
dmp_restore_interval
(Veritas Dynamic Multi-Pathing) The policy used byDMP path restoration thread. This tunable must be setafter Veritas Dynamic Multi-Pathing is started.
dmp_restore_policy
(Veritas Dynamic Multi-Pathing) Whether kernel threadfor DMP path restoration is started. This tunable mustbe set after Veritas Dynamic Multi-Pathing is started.
dmp_restore_state
Tunable files for installationTunables value parameter definitions
220
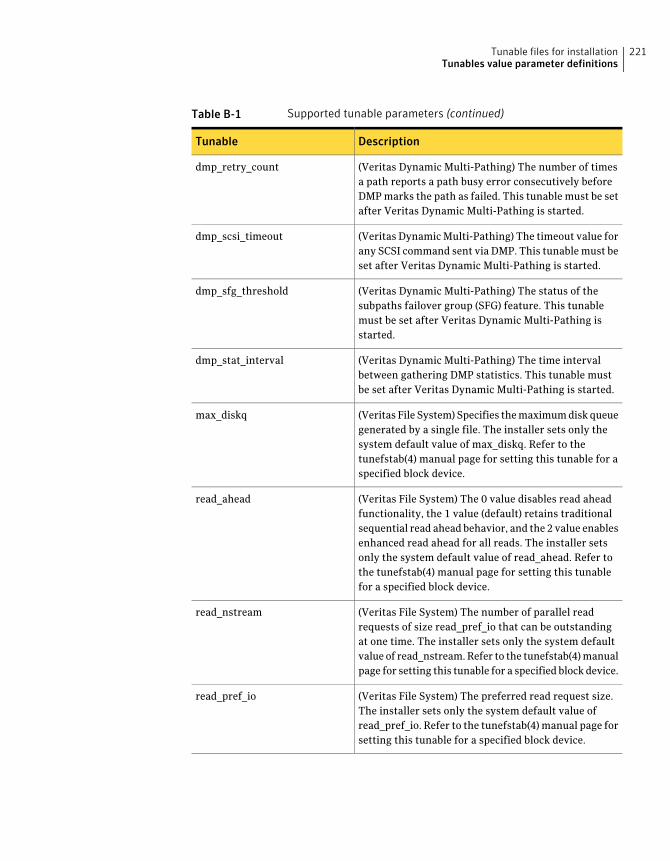
Table B-1 Supported tunable parameters (continued)
DescriptionTunable
(Veritas Dynamic Multi-Pathing) The number of timesa path reports a path busy error consecutively beforeDMP marks the path as failed. This tunable must be setafter Veritas Dynamic Multi-Pathing is started.
dmp_retry_count
(Veritas Dynamic Multi-Pathing) The timeout value forany SCSI command sent via DMP. This tunable must beset after Veritas Dynamic Multi-Pathing is started.
dmp_scsi_timeout
(Veritas Dynamic Multi-Pathing) The status of thesubpaths failover group (SFG) feature. This tunablemust be set after Veritas Dynamic Multi-Pathing isstarted.
dmp_sfg_threshold
(Veritas Dynamic Multi-Pathing) The time intervalbetween gathering DMP statistics. This tunable mustbe set after Veritas Dynamic Multi-Pathing is started.
dmp_stat_interval
(Veritas File System) Specifies the maximum disk queuegenerated by a single file. The installer sets only thesystem default value of max_diskq. Refer to thetunefstab(4) manual page for setting this tunable for aspecified block device.
max_diskq
(Veritas File System) The 0 value disables read aheadfunctionality, the 1 value (default) retains traditionalsequential read ahead behavior, and the 2 value enablesenhanced read ahead for all reads. The installer setsonly the system default value of read_ahead. Refer tothe tunefstab(4) manual page for setting this tunablefor a specified block device.
read_ahead
(Veritas File System) The number of parallel readrequests of size read_pref_io that can be outstandingat one time. The installer sets only the system defaultvalue of read_nstream. Refer to the tunefstab(4) manualpage for setting this tunable for a specified block device.
read_nstream
(Veritas File System) The preferred read request size.The installer sets only the system default value ofread_pref_io. Refer to the tunefstab(4) manual page forsetting this tunable for a specified block device.
read_pref_io
221Tunable files for installationTunables value parameter definitions
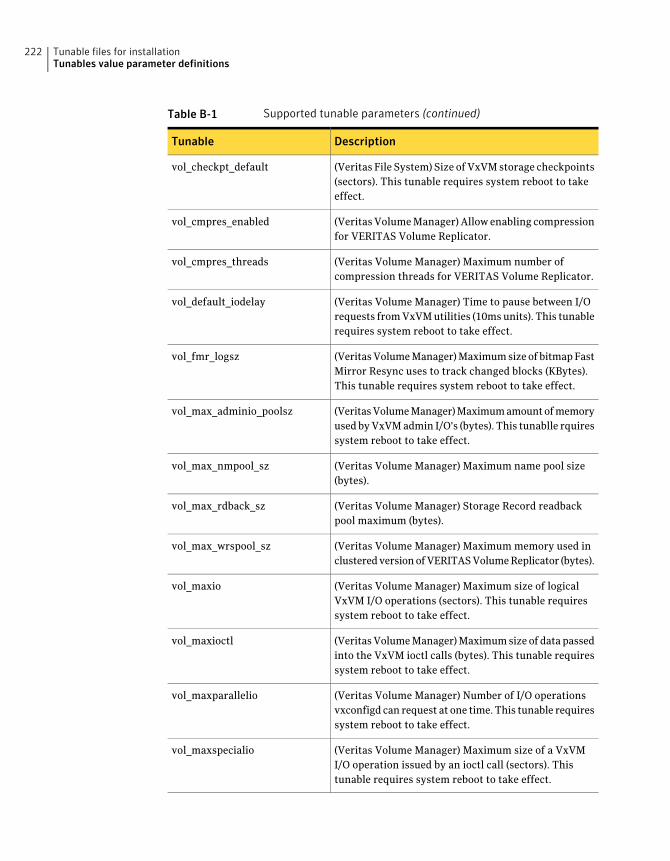
Table B-1 Supported tunable parameters (continued)
DescriptionTunable
(Veritas File System) Size of VxVM storage checkpoints(sectors). This tunable requires system reboot to takeeffect.
vol_checkpt_default
(Veritas Volume Manager) Allow enabling compressionfor VERITAS Volume Replicator.
vol_cmpres_enabled
(Veritas Volume Manager) Maximum number ofcompression threads for VERITAS Volume Replicator.
vol_cmpres_threads
(Veritas Volume Manager) Time to pause between I/Orequests from VxVM utilities (10ms units). This tunablerequires system reboot to take effect.
vol_default_iodelay
(Veritas Volume Manager) Maximum size of bitmap FastMirror Resync uses to track changed blocks (KBytes).This tunable requires system reboot to take effect.
vol_fmr_logsz
(Veritas Volume Manager) Maximum amount of memoryused by VxVM admin I/O's (bytes). This tunablle rquiressystem reboot to take effect.
vol_max_adminio_poolsz
(Veritas Volume Manager) Maximum name pool size(bytes).
vol_max_nmpool_sz
(Veritas Volume Manager) Storage Record readbackpool maximum (bytes).
vol_max_rdback_sz
(Veritas Volume Manager) Maximum memory used inclustered version of VERITAS Volume Replicator (bytes).
vol_max_wrspool_sz
(Veritas Volume Manager) Maximum size of logicalVxVM I/O operations (sectors). This tunable requiressystem reboot to take effect.
vol_maxio
(Veritas Volume Manager) Maximum size of data passedinto the VxVM ioctl calls (bytes). This tunable requiressystem reboot to take effect.
vol_maxioctl
(Veritas Volume Manager) Number of I/O operationsvxconfigd can request at one time. This tunable requiressystem reboot to take effect.
vol_maxparallelio
(Veritas Volume Manager) Maximum size of a VxVMI/O operation issued by an ioctl call (sectors). Thistunable requires system reboot to take effect.
vol_maxspecialio
Tunable files for installationTunables value parameter definitions
222
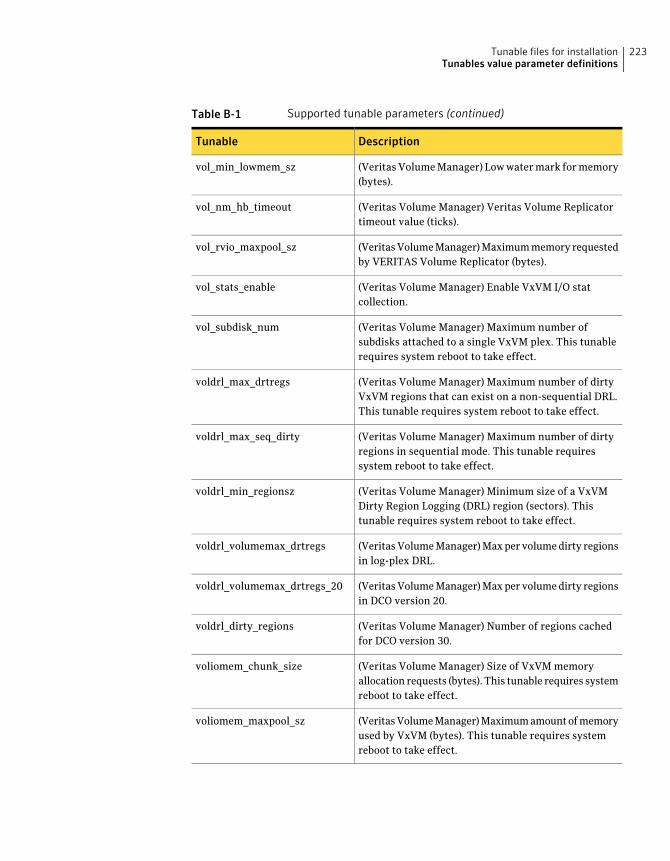
Table B-1 Supported tunable parameters (continued)
DescriptionTunable
(Veritas Volume Manager) Low water mark for memory(bytes).
vol_min_lowmem_sz
(Veritas Volume Manager) Veritas Volume Replicatortimeout value (ticks).
vol_nm_hb_timeout
(Veritas Volume Manager) Maximum memory requestedby VERITAS Volume Replicator (bytes).
vol_rvio_maxpool_sz
(Veritas Volume Manager) Enable VxVM I/O statcollection.
vol_stats_enable
(Veritas Volume Manager) Maximum number ofsubdisks attached to a single VxVM plex. This tunablerequires system reboot to take effect.
vol_subdisk_num
(Veritas Volume Manager) Maximum number of dirtyVxVM regions that can exist on a non-sequential DRL.This tunable requires system reboot to take effect.
voldrl_max_drtregs
(Veritas Volume Manager) Maximum number of dirtyregions in sequential mode. This tunable requiressystem reboot to take effect.
voldrl_max_seq_dirty
(Veritas Volume Manager) Minimum size of a VxVMDirty Region Logging (DRL) region (sectors). Thistunable requires system reboot to take effect.
voldrl_min_regionsz
(Veritas Volume Manager) Max per volume dirty regionsin log-plex DRL.
voldrl_volumemax_drtregs
(Veritas Volume Manager) Max per volume dirty regionsin DCO version 20.
voldrl_volumemax_drtregs_20
(Veritas Volume Manager) Number of regions cachedfor DCO version 30.
voldrl_dirty_regions
(Veritas Volume Manager) Size of VxVM memoryallocation requests (bytes). This tunable requires systemreboot to take effect.
voliomem_chunk_size
(Veritas Volume Manager) Maximum amount of memoryused by VxVM (bytes). This tunable requires systemreboot to take effect.
voliomem_maxpool_sz
223Tunable files for installationTunables value parameter definitions

Table B-1 Supported tunable parameters (continued)
DescriptionTunable
(Veritas Volume Manager) Size of a VxVM error tracebuffer (bytes). This tunable requires system reboot totake effect.
voliot_errbuf_dflt
(Veritas Volume Manager) Default size of a VxVM I/Otrace buffer (bytes). This tunable requires system rebootto take effect.
voliot_iobuf_default
(Veritas Volume Manager) Maximum total size of allVxVM I/O trace buffers (bytes). This tunable requiressystem reboot to take effect.
voliot_iobuf_limit
(Veritas Volume Manager) Maximum size of a VxVMI/O trace buffer (bytes). This tunable requires systemreboot to take effect.
voliot_iobuf_max
(Veritas Volume Manager) Maximum number of VxVMtrace channels available for vxtrace commands. Thistunable requires system reboot to take effect.
voliot_max_open
(Veritas Volume Manager) Maximum paging modulememory used by Instant Snapshots (Kbytes).
volpagemod_max_memsz
(Veritas Volume Manager) Maximum number of VxVMRAID-5 transient reconstruct operations in parallel.This tunable requires system reboot to take effect.
volraid_rsrtransmax
(Veritas File System) Maximum number of threads VxFSwill detect read_ahead patterns on. This tunablerequires system reboot to take effect.
vx_era_nthreads
(Veritas File System) VxFS metadata buffer cache highwater mark. This tunable requires system reboot to takeeffect.
vx_bc_bufhwm
(Veritas File System) Number of entries in the VxFSinode table. This tunable requires system reboot to takeeffect.
vxfs_ninode
(Veritas File System) The number of parallel writerequests of size write_pref_io that can be outstandingat one time. The installer sets only the system defaultvalue of write_nstream. Refer to the tunefstab(4) manualpage for setting this tunable for a specified block device.
write_nstream
Tunable files for installationTunables value parameter definitions
224
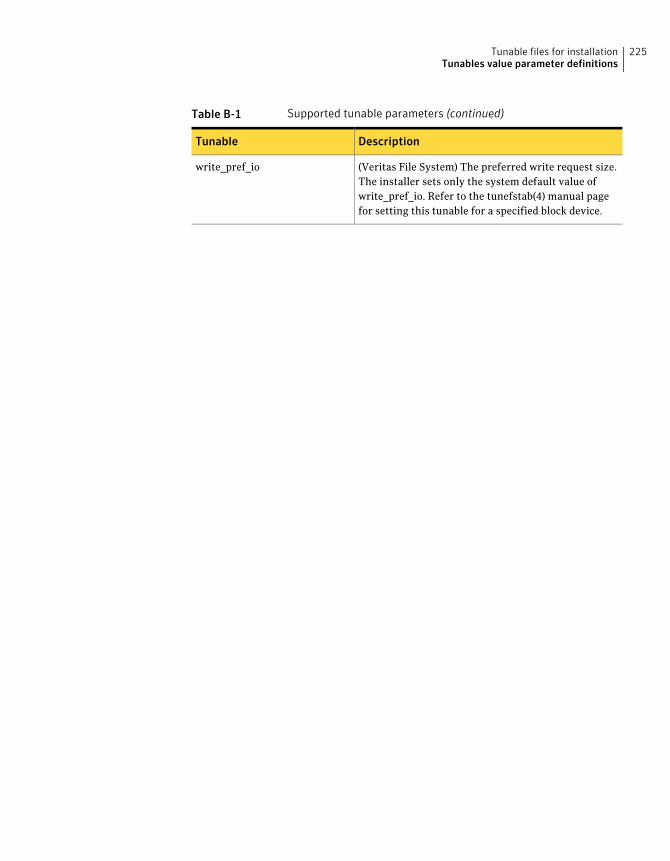
Table B-1 Supported tunable parameters (continued)
DescriptionTunable
(Veritas File System) The preferred write request size.The installer sets only the system default value ofwrite_pref_io. Refer to the tunefstab(4) manual pagefor setting this tunable for a specified block device.
write_pref_io
225Tunable files for installationTunables value parameter definitions

Tunable files for installationTunables value parameter definitions
226
Configuring the secure shellor the remote shell forcommunications
This appendix includes the following topics:
■ About configuring secure shell or remote shell communication modes beforeinstalling products
■ Manually configuring and passwordless ssh
■ Restarting the ssh session
■ Enabling and disabling rsh for Solaris
About configuring secure shell or remote shellcommunication modes before installing products
Establishing communication between nodes is required to install Veritas softwarefrom a remote system, or to install and configure a system. The system from whichthe installer is run must have permissions to run rsh (remote shell) or ssh (secureshell) utilities. You need to run the installer with superuser privileges on thesystems where you plan to install Veritas software.
You can install products to remote systems using either secure shell (ssh) orremote shell (rsh). Symantec recommends that you use ssh as it is more securethan rsh.
This section contains an example of how to set up ssh password freecommunication. The example sets up ssh between a source system (system1) that
CAppendix

contains the installation directories, and a target system (system2). This procedurealso applies to multiple target systems.
Note: The script- and Web-based installers support establishing passwordlesscommunication for you.
Manually configuring and passwordless sshThe ssh program enables you to log into and execute commands on a remotesystem. ssh enables encrypted communications and an authentication processbetween two untrusted hosts over an insecure network.
In this procedure, you first create a DSA key pair. From the key pair, you appendthe public key from the source system to the authorized_keys file on the targetsystems.
Figure C-1 illustrates this procedure.
Figure C-1 Creating the DSA key pair and appending it to target systems
Source System: system1 Target System: system2
PrivateKey
PublicKey
authorized_keysfile
Read the ssh documentation and online manual pages before enabling ssh. Contactyour operating system support provider for issues regarding ssh configuration.
Visit the OpenSSH website that is located at: http://openssh.org to access onlinemanuals and other resources.
Configuring the secure shell or the remote shell for communicationsManually configuring and passwordless ssh
228
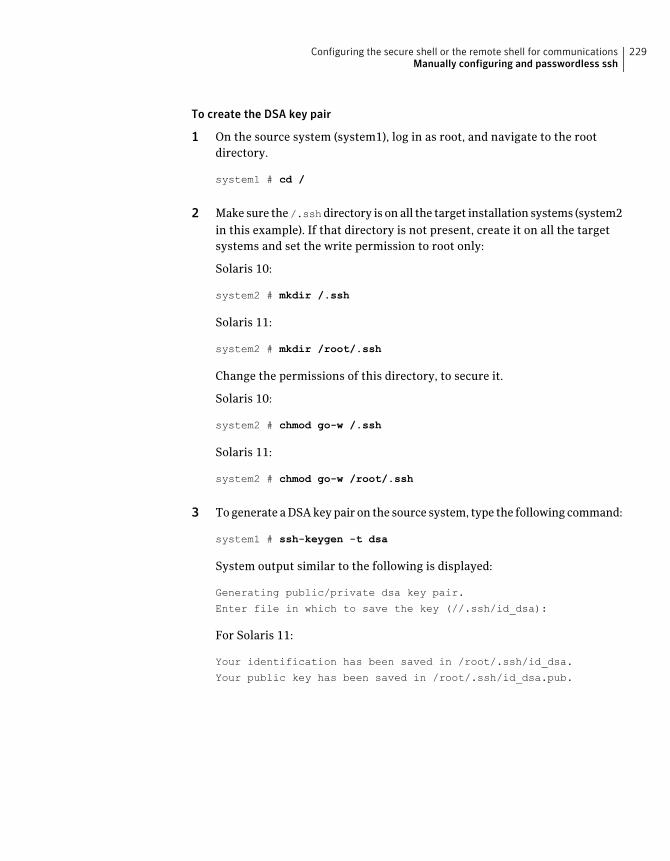
To create the DSA key pair
1 On the source system (system1), log in as root, and navigate to the rootdirectory.
system1 # cd /
2 Make sure the/.sshdirectory is on all the target installation systems (system2in this example). If that directory is not present, create it on all the targetsystems and set the write permission to root only:
Solaris 10:
system2 # mkdir /.ssh
Solaris 11:
system2 # mkdir /root/.ssh
Change the permissions of this directory, to secure it.
Solaris 10:
system2 # chmod go-w /.ssh
Solaris 11:
system2 # chmod go-w /root/.ssh
3 To generate a DSA key pair on the source system, type the following command:
system1 # ssh-keygen -t dsa
System output similar to the following is displayed:
Generating public/private dsa key pair.
Enter file in which to save the key (//.ssh/id_dsa):
For Solaris 11:
Your identification has been saved in /root/.ssh/id_dsa.
Your public key has been saved in /root/.ssh/id_dsa.pub.
229Configuring the secure shell or the remote shell for communicationsManually configuring and passwordless ssh
4 Press Enter to accept the default location of /.ssh/id_dsa.
5 When the program asks you to enter the passphrase, press the Enter keytwice.
Enter passphrase (empty for no passphrase):
Do not enter a passphrase. Press Enter.
Enter same passphrase again:
Press Enter again.
To append the public key from the source system to the authorized_keys file onthe target system, using secure file transfer
1 Make sure the secure file transfer program (SFTP) is enabled on all the targetinstallation systems (system2 in this example).
To enable SFTP, the /etc/ssh/sshd_config file must contain the followingtwo lines:
PermitRootLogin yes
Subsystem sftp /usr/lib/ssh/sftp-server
2 If the lines are not there, add them and restart ssh.
To restart ssh on Solaris 10 and Solaris 11, type the following command:
system1 # svcadm restart ssh
Configuring the secure shell or the remote shell for communicationsManually configuring and passwordless ssh
230
3 From the source system (system1), move the public key to a temporary fileon the target system (system2).
Use the secure file transfer program.
In this example, the file name id_dsa.pub in the root directory is the namefor the temporary file for the public key.
Use the following command for secure file transfer:
system1 # sftp system2
If the secure file transfer is set up for the first time on this system, outputsimilar to the following lines is displayed:
Connecting to system2 ...
The authenticity of host 'system2 (10.182.00.00)'
can't be established. DSA key fingerprint is
fb:6f:9f:61:91:9d:44:6b:87:86:ef:68:a6:fd:88:7d.
Are you sure you want to continue connecting (yes/no)?
4 Enter yes.
Output similar to the following is displayed:
Warning: Permanently added 'system2,10.182.00.00'
(DSA) to the list of known hosts.
root@system2 password:
5 Enter the root password of system2.
6 At the sftp prompt, type the following command:
sftp> put /.ssh/id_dsa.pub
The following output is displayed:
Uploading /.ssh/id_dsa.pub to /id_dsa.pub
7 To quit the SFTP session, type the following command:
sftp> quit
231Configuring the secure shell or the remote shell for communicationsManually configuring and passwordless ssh
8 To begin the ssh session on the target system (system2 in this example), typethe following command on system1:
system1 # ssh system2
Enter the root password of system2 at the prompt:
password:
9 After you log in to system2, enter the following command to append theid_dsa.pub file to the authorized_keys file:
system2 # cat /id_dsa.pub >> /.ssh/authorized_keys
10 After the id_dsa.pub public key file is copied to the target system (system2),and added to the authorized keys file, delete it. To delete the id_dsa.pub
public key file, enter the following command on system2:
system2 # rm /id_dsa.pub
11 To log out of the ssh session, enter the following command:
system2 # exit
12 When you install from a source system that is also an installation target, alsoadd the local system id_dsa.pub key to the local authorized_keys file. Theinstallation can fail if the installation source system is not authenticated.
To add the local system id_dsa.pub key to the local authorized_keys file,enter the following command:
system1 # cat /.ssh/id_dsa.pub >> /.ssh/authorized_keys
13 Run the following commands on the source installation system. If your sshsession has expired or terminated, you can also run these commands to renewthe session. These commands bring the private key into the shell environmentand make the key globally available to the user root:
system1 # exec /usr/bin/ssh-agent $SHELL
system1 # ssh-add
Identity added: //.ssh/id_dsa
This shell-specific step is valid only while the shell is active. You must executethe procedure again if you close the shell during the session.
Configuring the secure shell or the remote shell for communicationsManually configuring and passwordless ssh
232
To verify that you can connect to a target system
1 On the source system (system1), enter the following command:
system1 # ssh -l root system2 uname -a
where system2 is the name of the target system.
2 The command should execute from the source system (system1) to the targetsystem (system2) without the system requesting a passphrase or password.
3 Repeat this procedure for each target system.
Restarting the ssh sessionAfter you complete this procedure, ssh can be restarted in any of the followingscenarios:
■ After a terminal session is closed
■ After a new terminal session is opened
■ After a system is restarted
■ After too much time has elapsed, to refresh ssh
To restart ssh
1 On the source installation system (system1), bring the private key into theshell environment.
system1 # exec /usr/bin/ssh-agent $SHELL
2 Make the key globally available for the user root
system1 # ssh-add
Enabling and disabling rsh for SolarisThe following section describes how to enable remote shell on Solaris system.
Veritas recommends configuring a secure shell environment for Veritas productinstallations.
See “Manually configuring and passwordless ssh” on page 228.
See the operating system documentation for more information on configuringremote shell.
233Configuring the secure shell or the remote shell for communicationsRestarting the ssh session
To enable rsh
1 To determine the current status of rsh and rlogin, type the followingcommand:
# inetadm | grep -i login
If the service is enabled, the following line is displayed:
enabled online svc:/network/login:rlogin
If the service is not enabled, the following line is displayed:
disabled disabled svc:/network/login:rlogin
2 To enable a disabled rsh/rlogin service, type the following command:
# inetadm -e rlogin
3 To disable an enabled rsh/rlogin service, type the following command:
# inetadm -d rlogin
4 Modify the .rhosts file. A separate .rhosts file is in the $HOME directory ofeach user. This file must be modified for each user who remotely accessesthe system using rsh. Each line of the .rhosts file contains a fully qualifieddomain name or IP address for each remote system having access to the localsystem. For example, if the root user must remotely access system1 fromsystem2, you must add an entry forsystem2.companyname.com in the.rhostsfile on system1.
# echo "system2.companyname.com" >> $HOME/.rhosts
5 After you complete an installation procedure, delete the .rhosts file fromeach user’s $HOME directory to ensure security:
# rm -f $HOME/.rhosts
Configuring the secure shell or the remote shell for communicationsEnabling and disabling rsh for Solaris
234
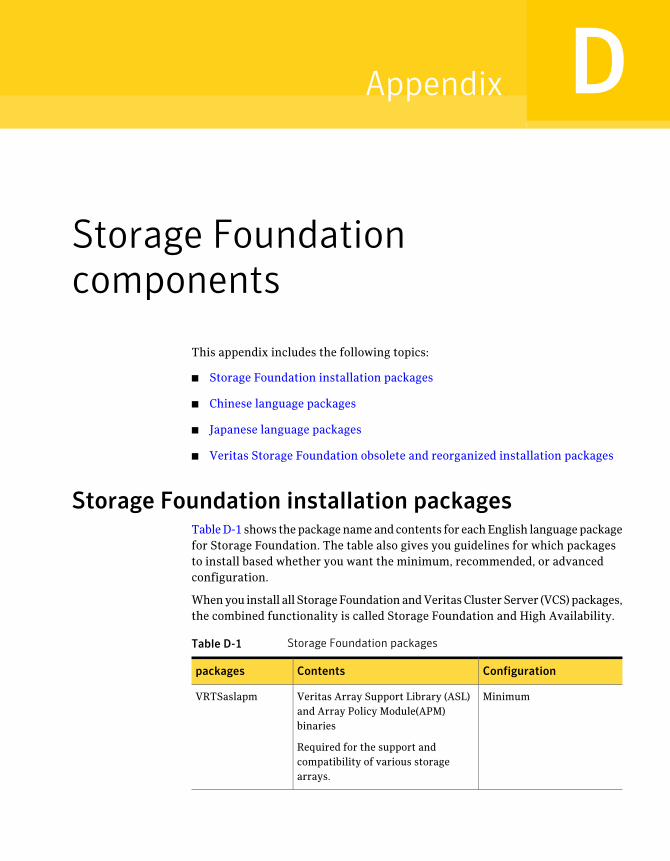
Storage Foundationcomponents
This appendix includes the following topics:
■ Storage Foundation installation packages
■ Chinese language packages
■ Japanese language packages
■ Veritas Storage Foundation obsolete and reorganized installation packages
Storage Foundation installation packagesTable D-1 shows the package name and contents for each English language packagefor Storage Foundation. The table also gives you guidelines for which packagesto install based whether you want the minimum, recommended, or advancedconfiguration.
When you install all Storage Foundation and Veritas Cluster Server (VCS) packages,the combined functionality is called Storage Foundation and High Availability.
Table D-1 Storage Foundation packages
ConfigurationContentspackages
MinimumVeritas Array Support Library (ASL)and Array Policy Module(APM)binaries
Required for the support andcompatibility of various storagearrays.
VRTSaslapm
DAppendix
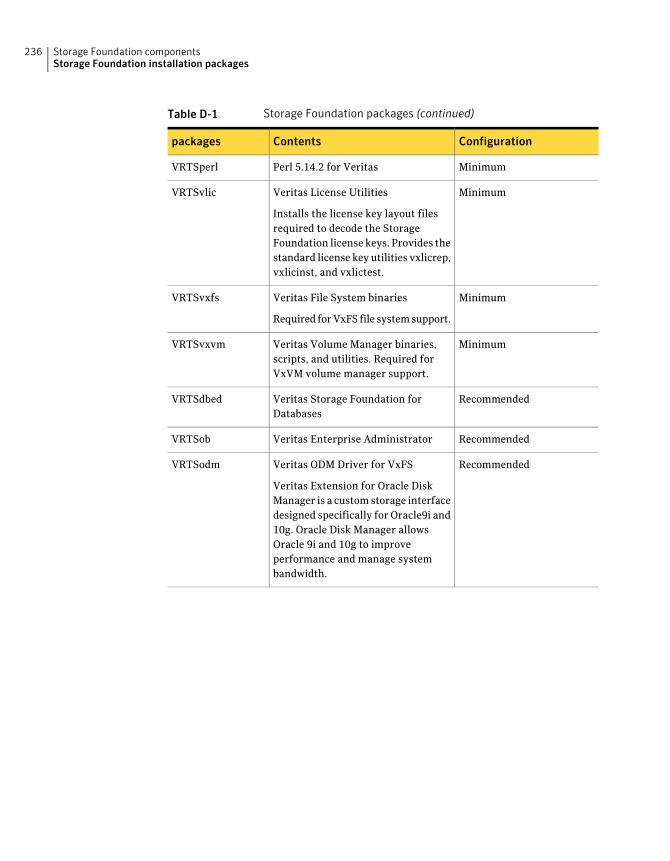
Table D-1 Storage Foundation packages (continued)
ConfigurationContentspackages
MinimumPerl 5.14.2 for VeritasVRTSperl
MinimumVeritas License Utilities
Installs the license key layout filesrequired to decode the StorageFoundation license keys. Provides thestandard license key utilities vxlicrep,vxlicinst, and vxlictest.
VRTSvlic
MinimumVeritas File System binaries
Required for VxFS file system support.
VRTSvxfs
MinimumVeritas Volume Manager binaries,scripts, and utilities. Required forVxVM volume manager support.
VRTSvxvm
RecommendedVeritas Storage Foundation forDatabases
VRTSdbed
RecommendedVeritas Enterprise AdministratorVRTSob
RecommendedVeritas ODM Driver for VxFS
Veritas Extension for Oracle DiskManager is a custom storage interfacedesigned specifically for Oracle9i and10g. Oracle Disk Manager allowsOracle 9i and 10g to improveperformance and manage systembandwidth.
VRTSodm
Storage Foundation componentsStorage Foundation installation packages
236
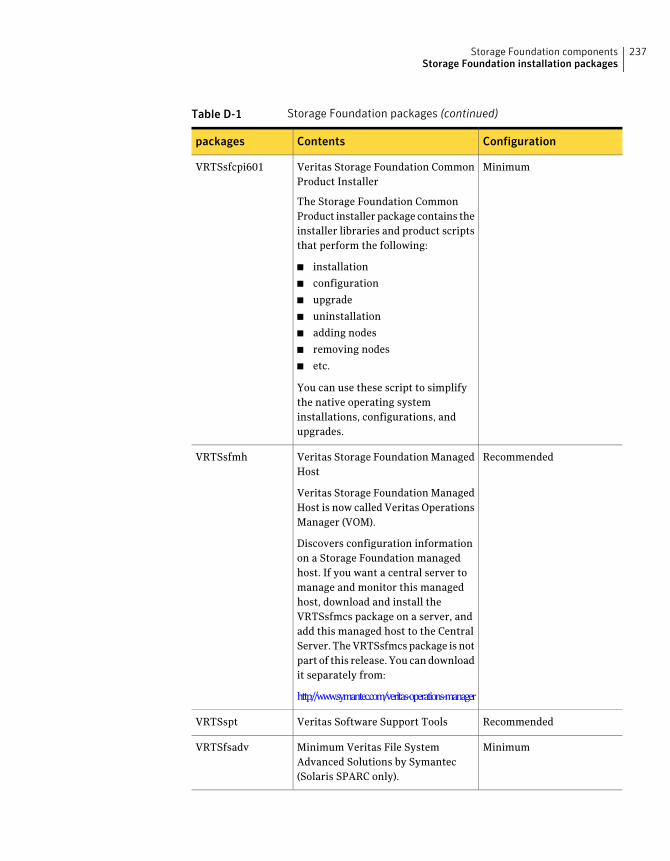
Table D-1 Storage Foundation packages (continued)
ConfigurationContentspackages
MinimumVeritas Storage Foundation CommonProduct Installer
The Storage Foundation CommonProduct installer package contains theinstaller libraries and product scriptsthat perform the following:
■ installation
■ configuration
■ upgrade
■ uninstallation
■ adding nodes
■ removing nodes
■ etc.
You can use these script to simplifythe native operating systeminstallations, configurations, andupgrades.
VRTSsfcpi601
RecommendedVeritas Storage Foundation ManagedHost
Veritas Storage Foundation ManagedHost is now called Veritas OperationsManager (VOM).
Discovers configuration informationon a Storage Foundation managedhost. If you want a central server tomanage and monitor this managedhost, download and install theVRTSsfmcs package on a server, andadd this managed host to the CentralServer. The VRTSsfmcs package is notpart of this release. You can downloadit separately from:
http://www.symantec.com/veritas-operations-manager
VRTSsfmh
RecommendedVeritas Software Support ToolsVRTSspt
MinimumMinimum Veritas File SystemAdvanced Solutions by Symantec(Solaris SPARC only).
VRTSfsadv
237Storage Foundation componentsStorage Foundation installation packages
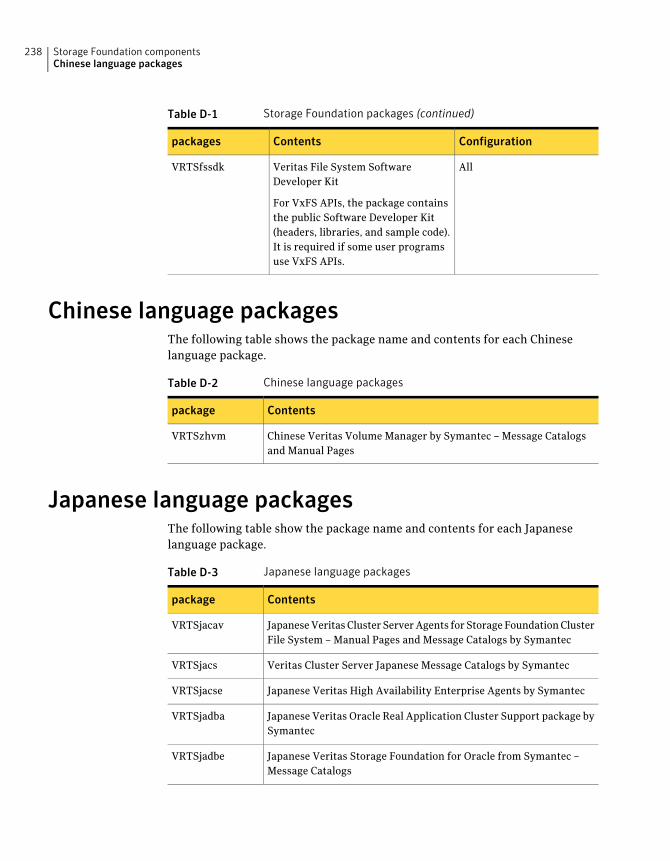
Table D-1 Storage Foundation packages (continued)
ConfigurationContentspackages
AllVeritas File System SoftwareDeveloper Kit
For VxFS APIs, the package containsthe public Software Developer Kit(headers, libraries, and sample code).It is required if some user programsuse VxFS APIs.
VRTSfssdk
Chinese language packagesThe following table shows the package name and contents for each Chineselanguage package.
Table D-2 Chinese language packages
Contentspackage
Chinese Veritas Volume Manager by Symantec – Message Catalogsand Manual Pages
VRTSzhvm
Japanese language packagesThe following table show the package name and contents for each Japaneselanguage package.
Table D-3 Japanese language packages
Contentspackage
Japanese Veritas Cluster Server Agents for Storage Foundation ClusterFile System – Manual Pages and Message Catalogs by Symantec
VRTSjacav
Veritas Cluster Server Japanese Message Catalogs by SymantecVRTSjacs
Japanese Veritas High Availability Enterprise Agents by SymantecVRTSjacse
Japanese Veritas Oracle Real Application Cluster Support package bySymantec
VRTSjadba
Japanese Veritas Storage Foundation for Oracle from Symantec –Message Catalogs
VRTSjadbe
Storage Foundation componentsChinese language packages
238
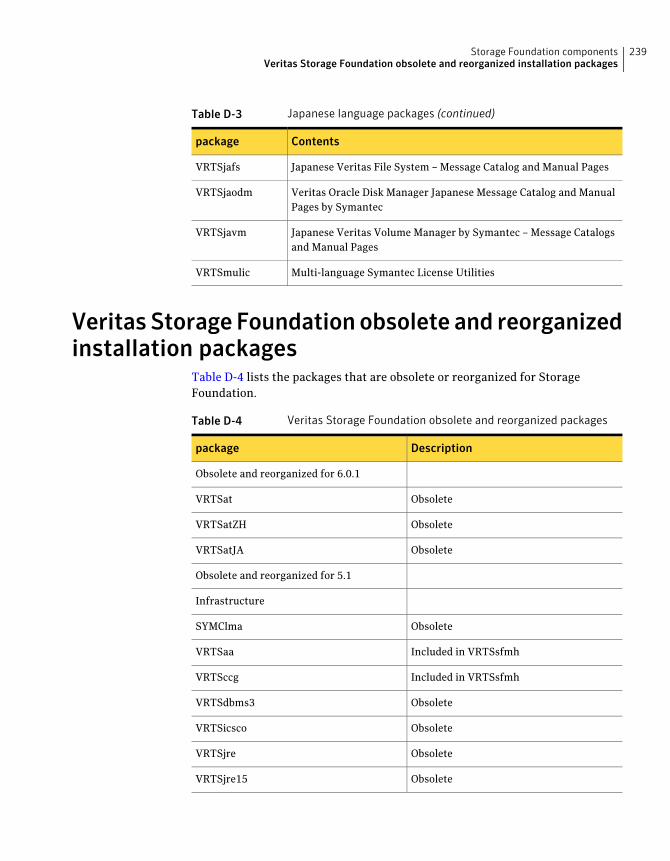
Table D-3 Japanese language packages (continued)
Contentspackage
Japanese Veritas File System – Message Catalog and Manual PagesVRTSjafs
Veritas Oracle Disk Manager Japanese Message Catalog and ManualPages by Symantec
VRTSjaodm
Japanese Veritas Volume Manager by Symantec – Message Catalogsand Manual Pages
VRTSjavm
Multi-language Symantec License UtilitiesVRTSmulic
Veritas Storage Foundation obsolete and reorganizedinstallation packages
Table D-4 lists the packages that are obsolete or reorganized for StorageFoundation.
Table D-4 Veritas Storage Foundation obsolete and reorganized packages
Descriptionpackage
Obsolete and reorganized for 6.0.1
ObsoleteVRTSat
ObsoleteVRTSatZH
ObsoleteVRTSatJA
Obsolete and reorganized for 5.1
Infrastructure
ObsoleteSYMClma
Included in VRTSsfmhVRTSaa
Included in VRTSsfmhVRTSccg
ObsoleteVRTSdbms3
ObsoleteVRTSicsco
ObsoleteVRTSjre
ObsoleteVRTSjre15
239Storage Foundation componentsVeritas Storage Foundation obsolete and reorganized installation packages
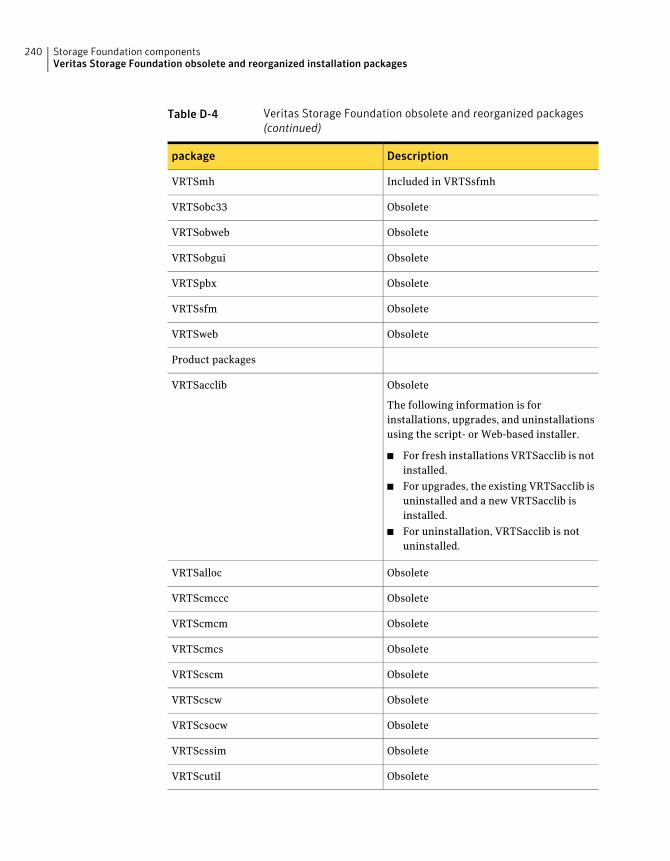
Table D-4 Veritas Storage Foundation obsolete and reorganized packages(continued)
Descriptionpackage
Included in VRTSsfmhVRTSmh
ObsoleteVRTSobc33
ObsoleteVRTSobweb
ObsoleteVRTSobgui
ObsoleteVRTSpbx
ObsoleteVRTSsfm
ObsoleteVRTSweb
Product packages
Obsolete
The following information is forinstallations, upgrades, and uninstallationsusing the script- or Web-based installer.
■ For fresh installations VRTSacclib is notinstalled.
■ For upgrades, the existing VRTSacclib isuninstalled and a new VRTSacclib isinstalled.
■ For uninstallation, VRTSacclib is notuninstalled.
VRTSacclib
ObsoleteVRTSalloc
ObsoleteVRTScmccc
ObsoleteVRTScmcm
ObsoleteVRTScmcs
ObsoleteVRTScscm
ObsoleteVRTScscw
ObsoleteVRTScsocw
ObsoleteVRTScssim
ObsoleteVRTScutil
Storage Foundation componentsVeritas Storage Foundation obsolete and reorganized installation packages
240
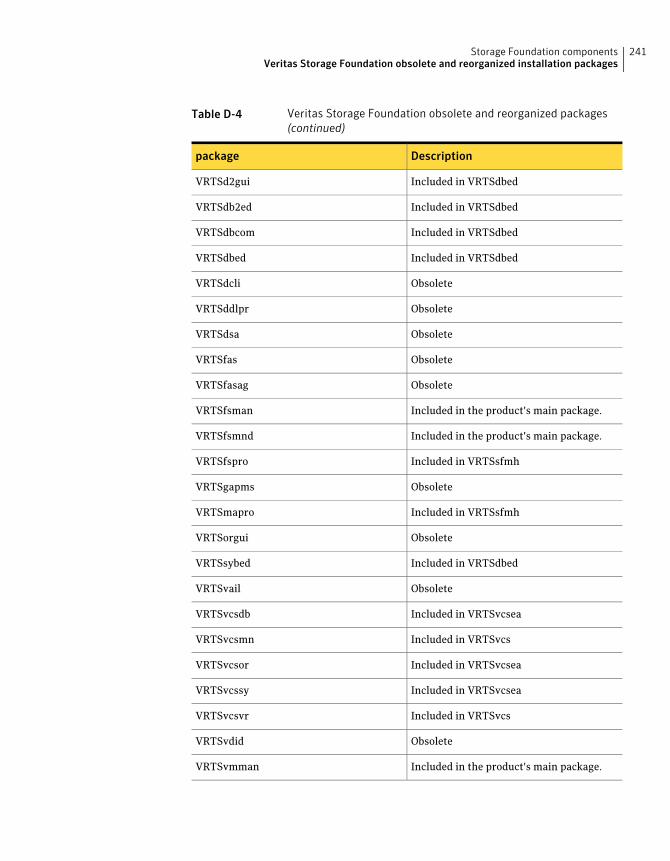
Table D-4 Veritas Storage Foundation obsolete and reorganized packages(continued)
Descriptionpackage
Included in VRTSdbedVRTSd2gui
Included in VRTSdbedVRTSdb2ed
Included in VRTSdbedVRTSdbcom
Included in VRTSdbedVRTSdbed
ObsoleteVRTSdcli
ObsoleteVRTSddlpr
ObsoleteVRTSdsa
ObsoleteVRTSfas
ObsoleteVRTSfasag
Included in the product's main package.VRTSfsman
Included in the product's main package.VRTSfsmnd
Included in VRTSsfmhVRTSfspro
ObsoleteVRTSgapms
Included in VRTSsfmhVRTSmapro
ObsoleteVRTSorgui
Included in VRTSdbedVRTSsybed
ObsoleteVRTSvail
Included in VRTSvcseaVRTSvcsdb
Included in VRTSvcsVRTSvcsmn
Included in VRTSvcseaVRTSvcsor
Included in VRTSvcseaVRTSvcssy
Included in VRTSvcsVRTSvcsvr
ObsoleteVRTSvdid
Included in the product's main package.VRTSvmman
241Storage Foundation componentsVeritas Storage Foundation obsolete and reorganized installation packages
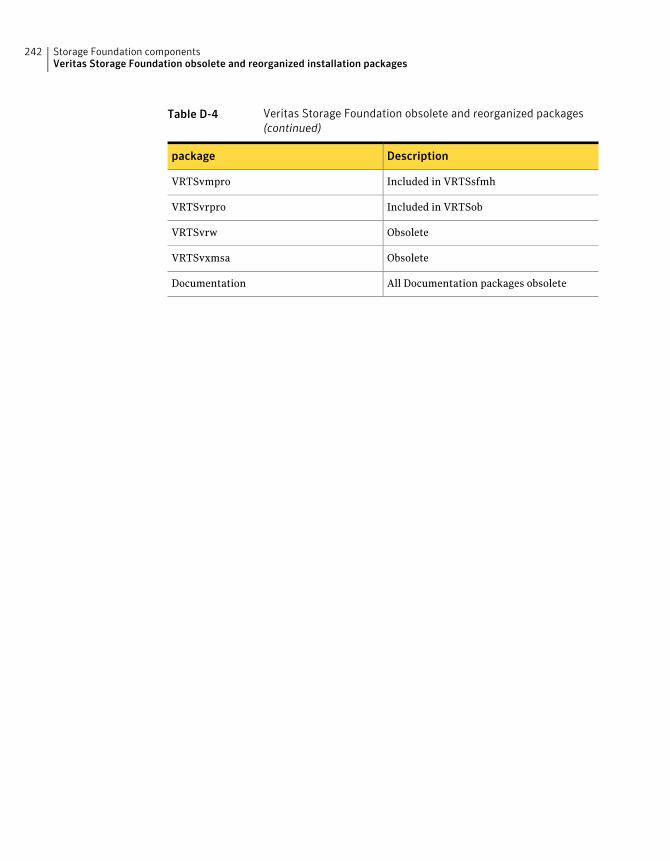
Table D-4 Veritas Storage Foundation obsolete and reorganized packages(continued)
Descriptionpackage
Included in VRTSsfmhVRTSvmpro
Included in VRTSobVRTSvrpro
ObsoleteVRTSvrw
ObsoleteVRTSvxmsa
All Documentation packages obsoleteDocumentation
Storage Foundation componentsVeritas Storage Foundation obsolete and reorganized installation packages
242

Troubleshootinginstallation issues
This appendix includes the following topics:
■ Restarting the installer after a failed connection
■ What to do if you see a licensing reminder
■ About the VRTSspt package troubleshooting tools
■ Incorrect permissions for root on remote system
■ Inaccessible system
■ Troubleshooting the webinstaller
Restarting the installer after a failed connectionIf an installation is killed because of a failed connection, you can restart theinstaller to resume the installation. The installer detects the existing installation.The installer prompts you whether you want to resume the installation. If youresume the installation, the installation proceeds from the point where theinstallation failed.
What to do if you see a licensing reminderIn this release, you can install without a license key. In order to comply with theEnd User License Agreement, you must either install a license key or make thehost managed by a Management Server. If you do not comply with these termswithin 60 days, the following warning messages result:
EAppendix
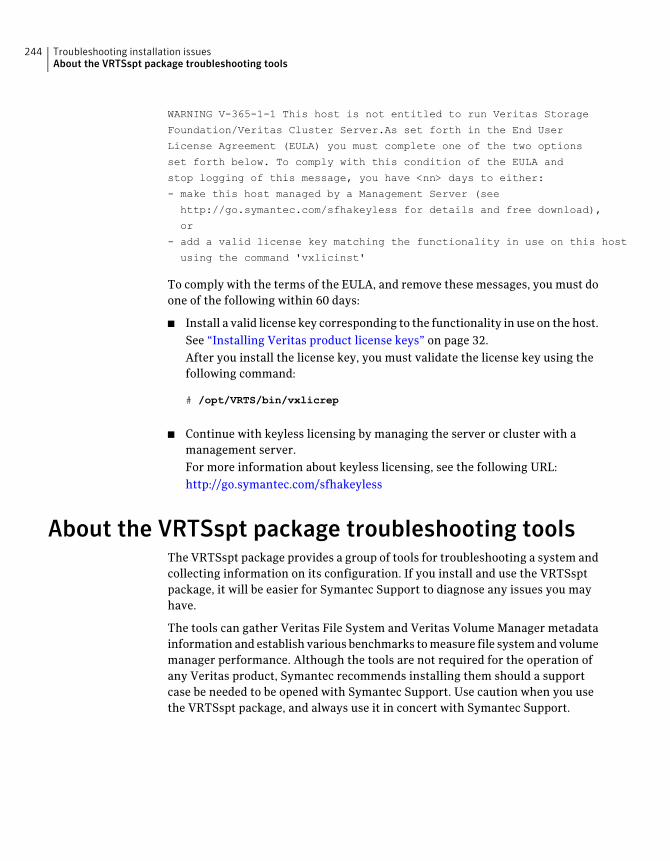
WARNING V-365-1-1 This host is not entitled to run Veritas Storage
Foundation/Veritas Cluster Server.As set forth in the End User
License Agreement (EULA) you must complete one of the two options
set forth below. To comply with this condition of the EULA and
stop logging of this message, you have <nn> days to either:
- make this host managed by a Management Server (see
http://go.symantec.com/sfhakeyless for details and free download),
or
- add a valid license key matching the functionality in use on this host
using the command 'vxlicinst'
To comply with the terms of the EULA, and remove these messages, you must doone of the following within 60 days:
■ Install a valid license key corresponding to the functionality in use on the host.See “Installing Veritas product license keys” on page 32.After you install the license key, you must validate the license key using thefollowing command:
# /opt/VRTS/bin/vxlicrep
■ Continue with keyless licensing by managing the server or cluster with amanagement server.For more information about keyless licensing, see the following URL:http://go.symantec.com/sfhakeyless
About the VRTSspt package troubleshooting toolsThe VRTSspt package provides a group of tools for troubleshooting a system andcollecting information on its configuration. If you install and use the VRTSsptpackage, it will be easier for Symantec Support to diagnose any issues you mayhave.
The tools can gather Veritas File System and Veritas Volume Manager metadatainformation and establish various benchmarks to measure file system and volumemanager performance. Although the tools are not required for the operation ofany Veritas product, Symantec recommends installing them should a supportcase be needed to be opened with Symantec Support. Use caution when you usethe VRTSspt package, and always use it in concert with Symantec Support.
Troubleshooting installation issuesAbout the VRTSspt package troubleshooting tools
244
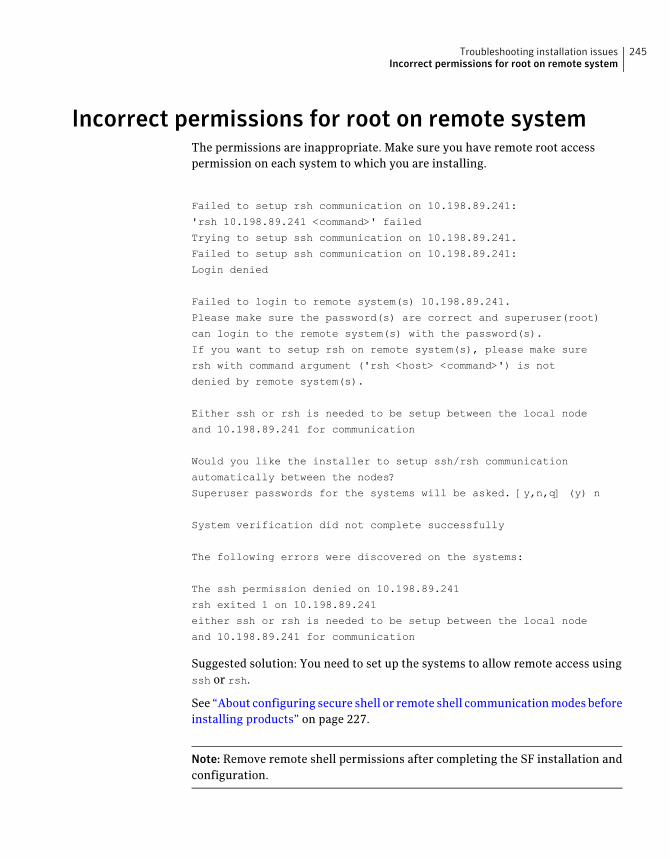
Incorrect permissions for root on remote systemThe permissions are inappropriate. Make sure you have remote root accesspermission on each system to which you are installing.
Failed to setup rsh communication on 10.198.89.241:
'rsh 10.198.89.241 <command>' failed
Trying to setup ssh communication on 10.198.89.241.
Failed to setup ssh communication on 10.198.89.241:
Login denied
Failed to login to remote system(s) 10.198.89.241.
Please make sure the password(s) are correct and superuser(root)
can login to the remote system(s) with the password(s).
If you want to setup rsh on remote system(s), please make sure
rsh with command argument ('rsh <host> <command>') is not
denied by remote system(s).
Either ssh or rsh is needed to be setup between the local node
and 10.198.89.241 for communication
Would you like the installer to setup ssh/rsh communication
automatically between the nodes?
Superuser passwords for the systems will be asked. [y,n,q] (y) n
System verification did not complete successfully
The following errors were discovered on the systems:
The ssh permission denied on 10.198.89.241
rsh exited 1 on 10.198.89.241
either ssh or rsh is needed to be setup between the local node
and 10.198.89.241 for communication
Suggested solution: You need to set up the systems to allow remote access usingssh or rsh.
See “About configuring secure shell or remote shell communication modes beforeinstalling products” on page 227.
Note: Remove remote shell permissions after completing the SF installation andconfiguration.
245Troubleshooting installation issuesIncorrect permissions for root on remote system
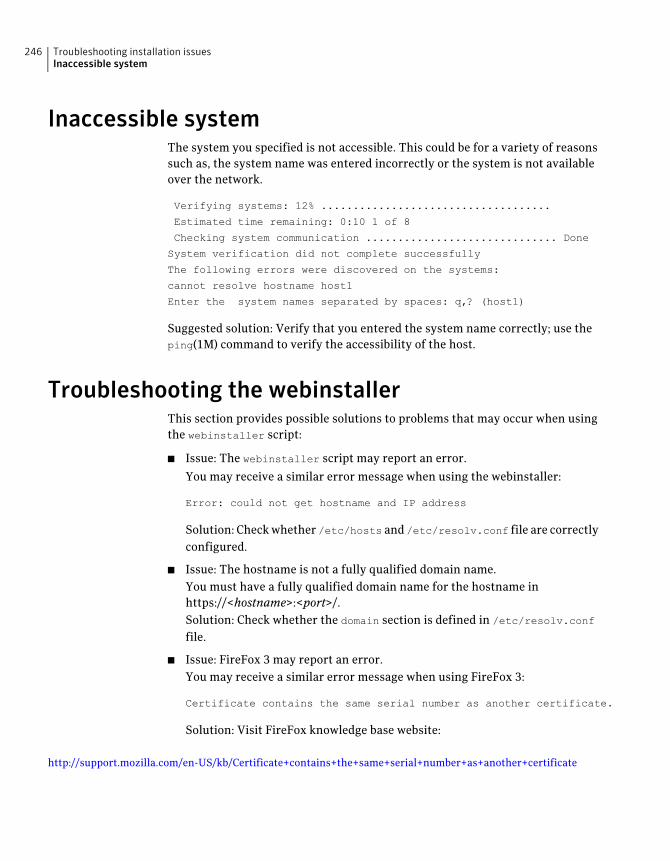
Inaccessible systemThe system you specified is not accessible. This could be for a variety of reasonssuch as, the system name was entered incorrectly or the system is not availableover the network.
Verifying systems: 12% ....................................
Estimated time remaining: 0:10 1 of 8
Checking system communication .............................. Done
System verification did not complete successfully
The following errors were discovered on the systems:
cannot resolve hostname host1
Enter the system names separated by spaces: q,? (host1)
Suggested solution: Verify that you entered the system name correctly; use theping(1M) command to verify the accessibility of the host.
Troubleshooting the webinstallerThis section provides possible solutions to problems that may occur when usingthe webinstaller script:
■ Issue: The webinstaller script may report an error.
You may receive a similar error message when using the webinstaller:
Error: could not get hostname and IP address
Solution: Check whether /etc/hosts and /etc/resolv.conf file are correctlyconfigured.
■ Issue: The hostname is not a fully qualified domain name.You must have a fully qualified domain name for the hostname inhttps://<hostname>:<port>/.Solution: Check whether the domain section is defined in /etc/resolv.conf
file.
■ Issue: FireFox 3 may report an error.You may receive a similar error message when using FireFox 3:
Certificate contains the same serial number as another certificate.
Solution: Visit FireFox knowledge base website:
http://support.mozilla.com/en-US/kb/Certificate+contains+the+same+serial+number+as+another+certificate
Troubleshooting installation issuesInaccessible system
246
Compatability issues wheninstalling StorageFoundation with otherproducts
This appendix includes the following topics:
■ Installing, uninstalling, or upgrading Storage Foundation products when otherVeritas products are present
■ Installing, uninstalling, or upgrading Storage Foundation products when VOMis already present
■ Installing, uninstalling, or upgrading Storage Foundation products whenNetBackup is already present
Installing, uninstalling, or upgrading StorageFoundation products when other Veritas productsare present
Installing Storage Foundation when other Veritas products are installed can createcompatibility issues. For example, installing Storage Foundation products whenVOM, ApplicationHA, and NetBackup are present on the systems.
FAppendix
Installing, uninstalling, or upgrading StorageFoundation products when VOM is already present
If you plan to install or upgrade Storage Foundation products on systems whereVOM has already been installed, be aware of the following compatibility issues:
■ When you install or upgrade Storage Foundation products where SFM or VOMCentral Server is present, the installer skips the VRTSsfmh upgrade and leavesthe SFM Central Server and Managed Host packages as is.
■ When uninstalling Storage Foundation products where SFM or VOM CentralServer is present, the installer does not uninstall VRTSsfmh.
■ When you install or upgrade Storage Foundation products where SFM or VOMManaged Host is present, the installer gives warning messages that it willupgrade VRTSsfmh.
Installing, uninstalling, or upgrading StorageFoundation products when NetBackup is alreadypresent
If you plan to install or upgrade Storage Foundation on systems where NetBackuphas already been installed, be aware of the following compatibility issues:
■ When you install or upgrade Storage Foundation products where NetBackupis present, the installer does not uninstall VRTSpbx and VRTSicsco. It doesnot upgrade VRTSat.
■ When you uninstall Storage Foundation products where NetBackup is present,the installer does not uninstall VRTSpbx, VRTSicsco, and VRTSat.
Compatability issues when installing Storage Foundation with other productsInstalling, uninstalling, or upgrading Storage Foundation products when VOM is already present
248
Bbackup boot disk group 154
rejoining 154bootdg 82
Cconfiguration daemon (vxconfigd)
starting 80configuring
rsh 36ssh 36
creatingFlash archive 73post-deployment scripts 74
Ddefault disk group 82defaultdg 82disk groups
bootdg 82default 82nodg 82root 82rootdg 80, 82
Fflarcreate 73Flash archive 73
post-deployment scripts 74
II/O daemon (vxiod)
starting 81Installing
SF with the Web-based installer 50installing
JumpStart 68
JJumpStart
installing 68
Llanguage packages
removal 199Live Upgrade
preparing 130upgrade paths 125upgrading Solaris on alternate boot disk 134
localized environment settings for using VVRsettings for uisng VVR in a localized
environment 98
Mmigrating
from Storage Foundation Basic to StorageFoundation Standard 149
mountingsoftware disc 38
Nnodg 82
Pplanning to upgrade VVR 95post-deployment scripts 74preinstallation 95preparing
Live Upgrade 130
Rrejoining
backup boot disk group 154removing
the Replicated Data Set 194Replicated Data Set
removing the 194
Index
root disk group 80, 82rootdg 82rsh
configuration 36
Ssettings for uisng VVR in a localized environment
localized environment settings for using VVR 98ssh
configuration 36starting vxconfigd configuration daemon 80starting vxiod daemon 81Storage Foundation Basic to Storage Foundation
Standardmigrating 149
Ttunables file
about setting parameters 213parameter definitions 218preparing 217setting for configuration 214setting for installation 214setting for upgrade 214setting parameters 217setting with no other operations 215setting with un-integrated response file 216
Uunsuccessful upgrade 154upgrade paths
Live Upgrade 125upgrading VVR
from 4.1 96planning 95
using Live Upgrade 125
Vverifying installation
kernel component 182Veritas Operations Manager 18vradmin
delpri 195stoprep 195
VVR 4.1planning an upgrade from 96
vxconfigd configuration daemonstarting 80
vxdctl mode command 80vxinstall program 81–82vxinstall program, running 81vxiod I/O daemon
starting 81vxplex
used to remove mirrors of root diskvolumes 102, 105
WWeb-based installer 50
Index250
Related Documents