Valve Adjustment For 16 Valve Suzuki GS Motors By Mr. Basic (Aaron), member of The GS Resources Forum Hello fellow GS riders. Today we are going to adjust our valve clearances on our Suzuki 16v TSCC engine. Sounds like fun, right? It’s not nearly as bad as it sounds, and we are lucky since we have no shims, shim tools, or zip ties to deal with. Ease of adjustment is the price we pay for having to do it more often I guess. Anyway, Lets get started. PLEASE NOTE - The writer and the host of this guide cannot be held responsible if you break something or hurt yourself. The following procedure is simply what worked for me. If you don't know what you are doing and/or aren't comfortable with the insides of an engine, please don't do this yourself, take it to a mechanic and have them do it for you. It shouldn't take them very long (a couple hours maybe) and you have the peace of mind that it is done correctly. Incorrect valve clearances can cause MAJOR issues in your engine, including (but not limited to) broken valves, rapidly wearing valves, burnt valves, broken pistons and all sorts of other not fun stuff. (BassCliff <editor> note: This guide is to familiarize the new motorcycle mechanic with these procedures. This guide does not replace procedures and part numbers found in the Suzuki Shop manual, Clymer or Haynes publications. Pleaser refer to your factory documentation for details specific to your motorcycle.) NOTES: The engine needs to be cold for adjustment, so if you have ridden the bike, wait several hours for the engine to COMPLETELY cool before adjustment. Also note that if your bike is not really clean (mine isn't, as I just purchased it and the PO did not take the greatest care of it) it helps to clean the head and valve cover as well as the tachometer gear before starting this. This can help keep dirt and grime out of the engine. I cleaned after and it took much longer because I had to clean out all the little parts that fell into the head when I removed the valve cover. To help with adjustments, make yourself a couple of tools with a couple of square head screws and a couple 6-8" pieces of 3/8" wooden dowel. These are square head screws that are a common wood screw - I found a #8 x 3/4" screw works pretty well. Go to the local hardware store and buy a couple in a few different sizes and use the ones that fit best. Install the screw into the end of the wooden dowel so that in the end you have a screw head on the end of a stick. You need 2 of these. Step 1 - Remove the Seat. On my GS750 it’s not too hard, unlock the back, lift up and pull back. That's all there is to it. Step 2 - Remove the Gas tank. To do this: Remove the bolt(s) on the rear of the tank. Disconnect both the vacuum line and fuel line from the petcock. Disconnect the fuel level sending unit, there are 2 bullet connectors to accomplish this. You can leave the hose that is connected to the fuel level sending unit cover on, as it is just a drain hose. Note: Make sure the petcock is NOT set to the Prime position when you disconnect the fuel line.

Welcome message from author
This document is posted to help you gain knowledge. Please leave a comment to let me know what you think about it! Share it to your friends and learn new things together.
Transcript
Valve Adjustment For 16 Valve Suzuki GS MotorsBy Mr. Basic (Aaron), member of The GS Resources Forum
Hello fellow GS riders. Today we are going to adjust our valve clearances on our Suzuki 16v TSCC engine. Sounds like fun, right? It’s not nearly as bad as it sounds, and we are lucky since we have no shims, shim tools, or zip ties to deal with. Ease of adjustment is the price we pay for having to do it more often I guess. Anyway, Lets get started.
PLEASE NOTE - The writer and the host of this guide cannot be held responsible if you break something or hurt yourself. The following procedure is simply what worked for me. If you don't know what you are doing and/or aren't comfortable with the insides of an engine, please don't do this yourself, take it to a mechanic and have them do it for you. It shouldn't take them very long (a couple hours maybe) and you have the peace of mind that it is done correctly. Incorrect valve clearances can cause MAJOR issues in your engine, including (but not limited to) broken valves, rapidly wearing valves, burnt valves, broken pistons and all sorts of other not fun stuff.
(BassCliff <editor> note: This guide is to familiarize the new motorcycle mechanic with these procedures. This guide does not replace procedures and part numbers found in the Suzuki Shop manual, Clymer or Haynes publications. Pleaser refer to your factory documentation for details specific to your motorcycle.)
NOTES: The engine needs to be cold for adjustment, so if you have ridden the bike, wait several hours for the engine to COMPLETELY cool before adjustment.
Also note that if your bike is not really clean (mine isn't, as I just purchased it and the PO did not take the greatest care of it) it helps to clean the head and valve cover as well as the tachometer gear before starting this. This can help keep dirt and grime out of the engine. I cleaned after and it took much longer because I had to clean out all the little parts that fell into the head when I removed the valve cover.
To help with adjustments, make yourself a couple of tools with a couple of square head screws and a couple 6-8" pieces of 3/8" wooden dowel. These are square head screws that are a common wood screw - I found a #8 x 3/4" screw works pretty well. Go to the local hardware store and buy a couple in a few different sizes and use the ones that fit best. Install the screw into the end of the wooden dowel so that in the end you have a screw head on the end of a stick. You need 2 of these.
Step 1 - Remove the Seat. On my GS750 it’s not too hard, unlock the back, lift up and pull back. That's all there is to it.
Step 2 - Remove the Gas tank. To do this: Remove the bolt(s) on the rear of the tank. Disconnect both the vacuum line and fuel line from the petcock. Disconnect the fuel level sending unit, there are 2 bullet connectors to accomplish this. You can leave the hose that is connected to the fuel level sending unit cover on, as it is just a drain hose. Note: Make sure the petcock is NOT set to the Prime position when you disconnect the fuel line.
After these steps are complete you get something that looks like this only with the carburetors and their respective hoses (fuel, vacuum, and vent) as well as the breather hose still attached.
I apologize for not having a picture with the carburetors on, but they were off the bike for cleaning when this was written.
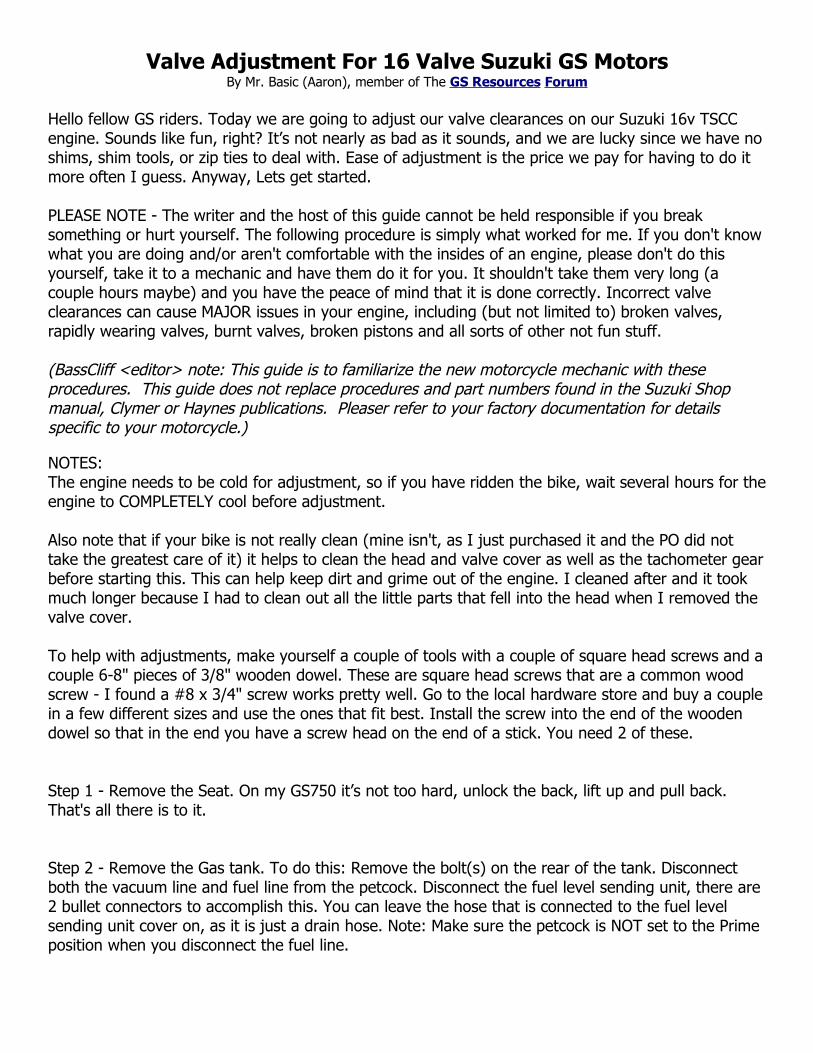
Step 3 - Remove the breather hose and Tachometer drive gear. To remove the tachometer gear take out the small bolt next to it, remove the lock plate, and then remove the gear itself.
Removal of the tachometer gear and cable can be difficult. I ended up using a large flat screwdriver to pry it out part way and was able to pull it out the rest of the way. Please be careful not to damage the O-ring that is on the end.
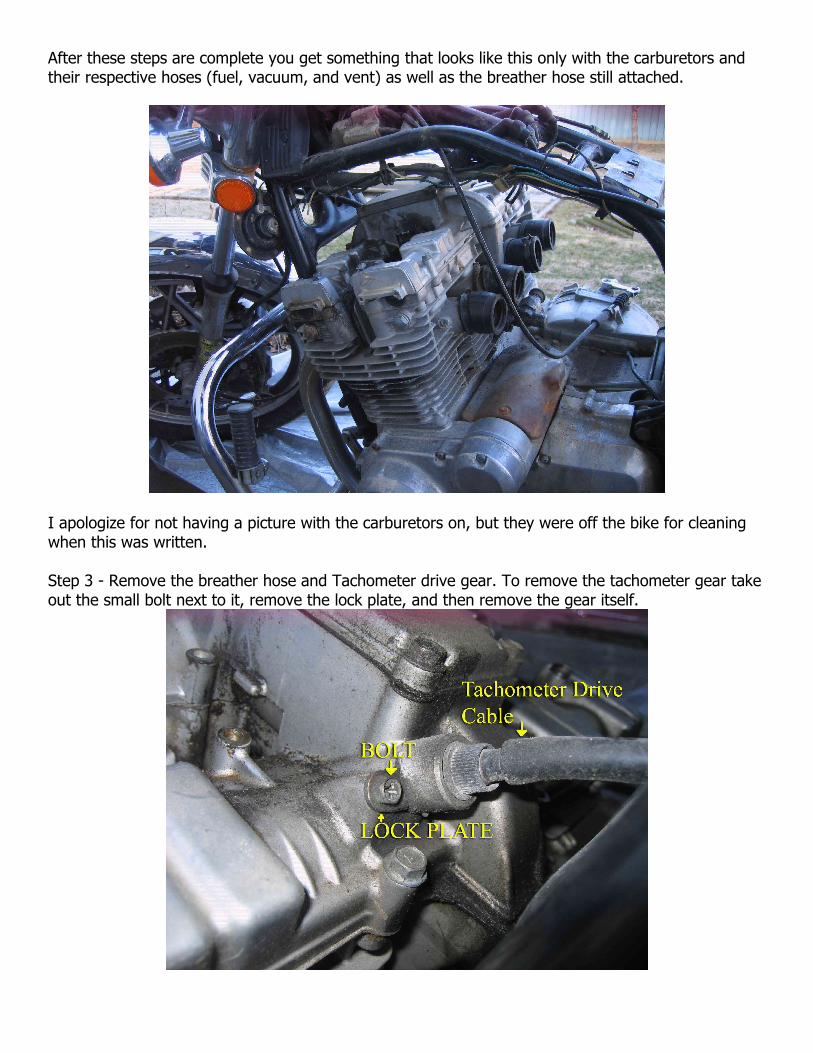
Step 4 - After the tachometer gear/cable, breather hose, and plug wires are removed and/or tucked out of the way, you can remove the Valve cover itself. The bolts that hold the valve cover on are 10mm. There are also 4 phillips screws that must be removed prior to valve cover removal. After all bolts are out, remove the valve cover. If stuck, hit the cover gently with a rubber mallet to break loose the gasket. After the gasket is loose - remove the cover by first lifting up and then wiggling your way out. I found that the cover came out the right side of the bike easiest. Note that on my 1980 GS750L I did not have to remove the breather assembly. However, on other models the breather may have to be removed in order to get the cover out of the frame.
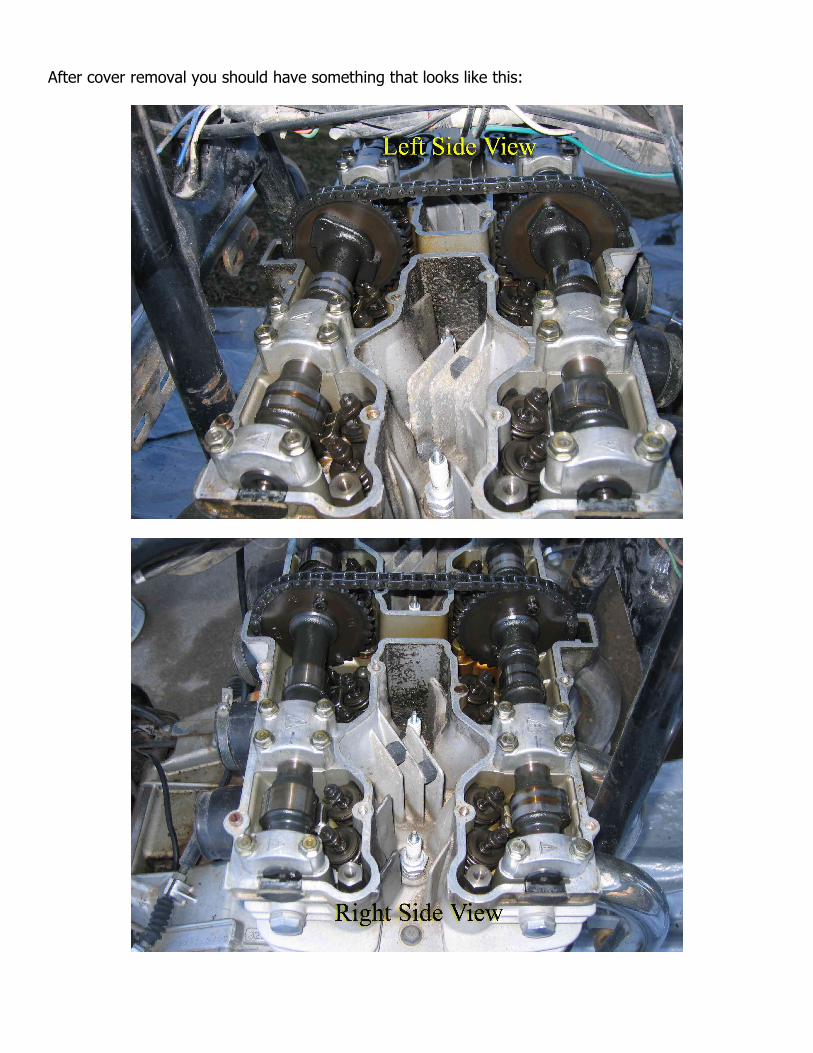
After cover removal you should have something that looks like this:
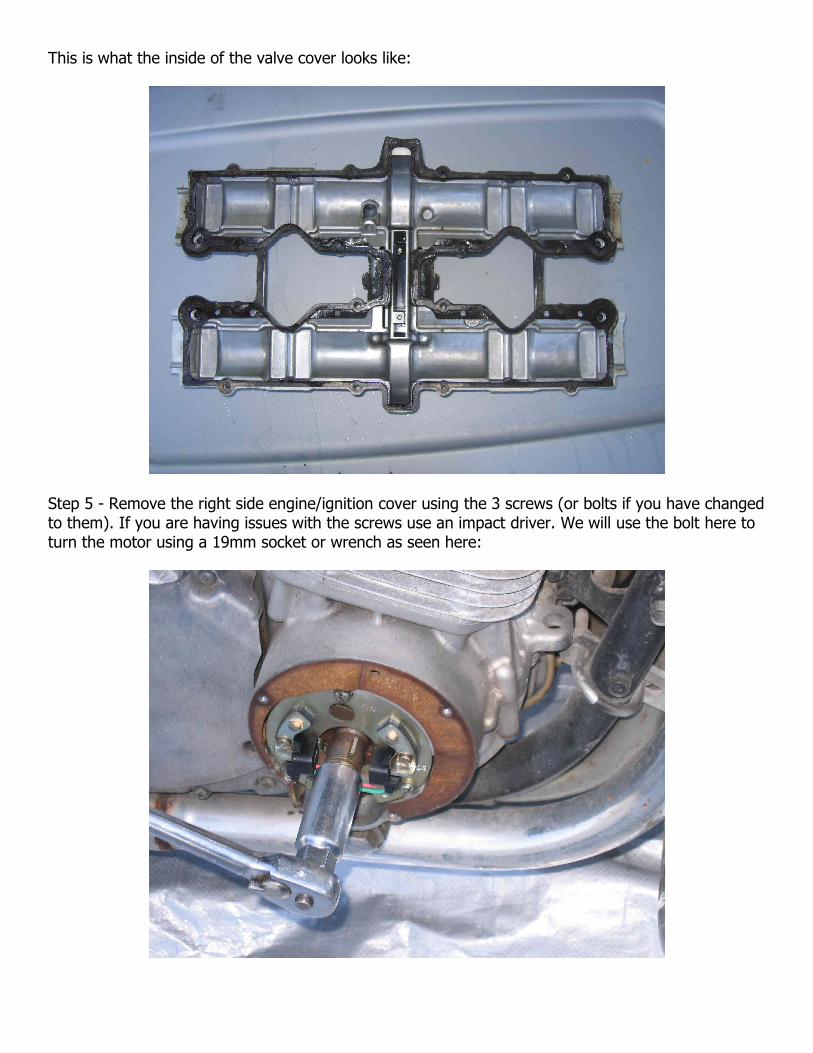
This is what the inside of the valve cover looks like:
Step 5 - Remove the right side engine/ignition cover using the 3 screws (or bolts if you have changed to them). If you are having issues with the screws use an impact driver. We will use the bolt here to turn the motor using a 19mm socket or wrench as seen here:
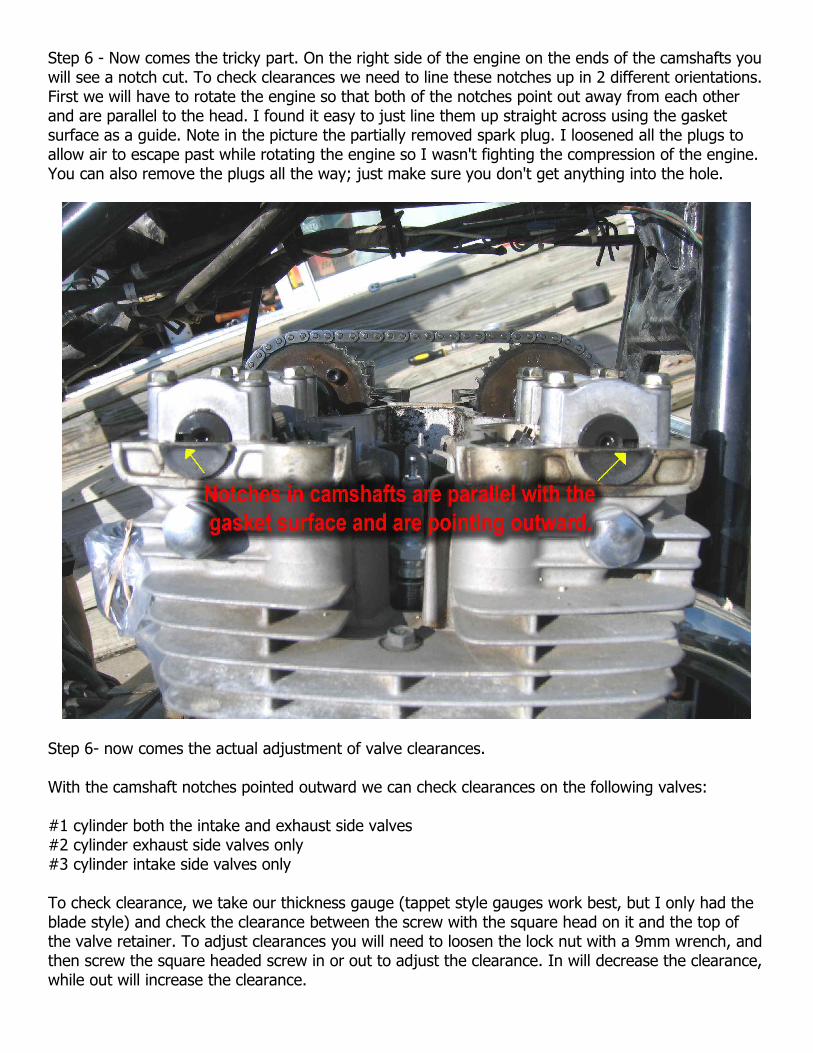
Step 6 - Now comes the tricky part. On the right side of the engine on the ends of the camshafts you will see a notch cut. To check clearances we need to line these notches up in 2 different orientations. First we will have to rotate the engine so that both of the notches point out away from each other and are parallel to the head. I found it easy to just line them up straight across using the gasket surface as a guide. Note in the picture the partially removed spark plug. I loosened all the plugs to allow air to escape past while rotating the engine so I wasn't fighting the compression of the engine. You can also remove the plugs all the way; just make sure you don't get anything into the hole.
Step 6- now comes the actual adjustment of valve clearances.
With the camshaft notches pointed outward we can check clearances on the following valves:
#1 cylinder both the intake and exhaust side valves#2 cylinder exhaust side valves only#3 cylinder intake side valves only
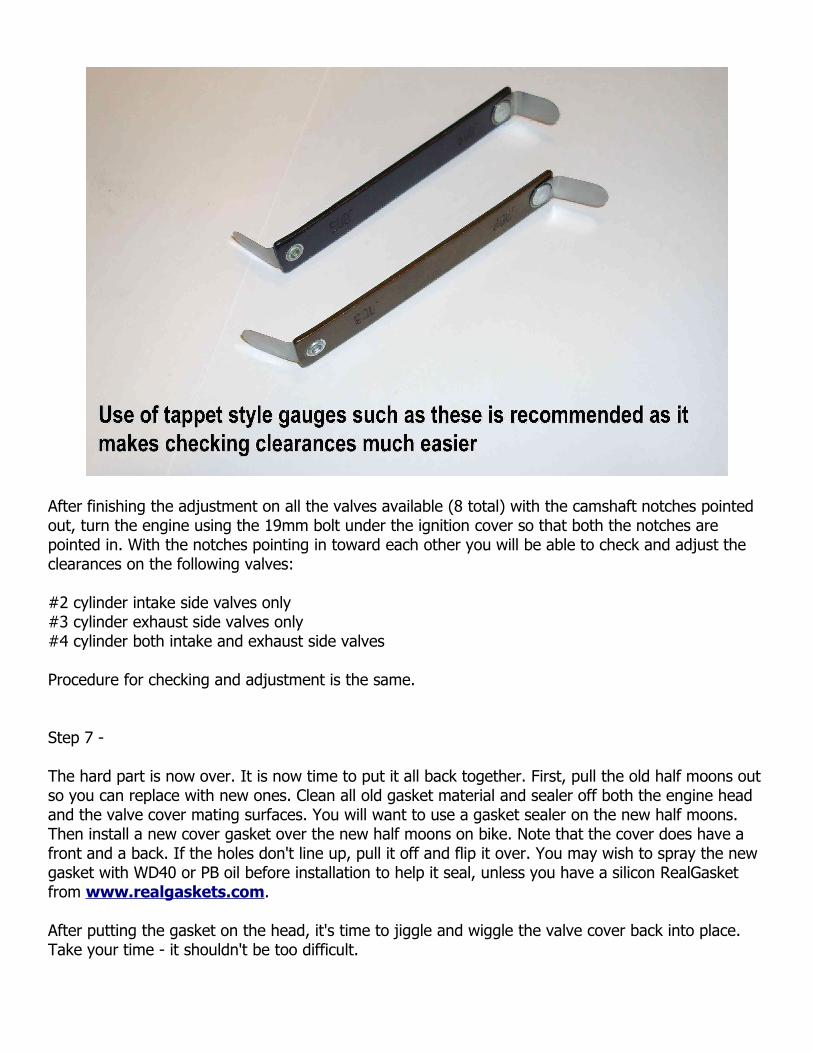
To check clearance, we take our thickness gauge (tappet style gauges work best, but I only had the blade style) and check the clearance between the screw with the square head on it and the top of the valve retainer. To adjust clearances you will need to loosen the lock nut with a 9mm wrench, and then screw the square headed screw in or out to adjust the clearance. In will decrease the clearance, while out will increase the clearance.
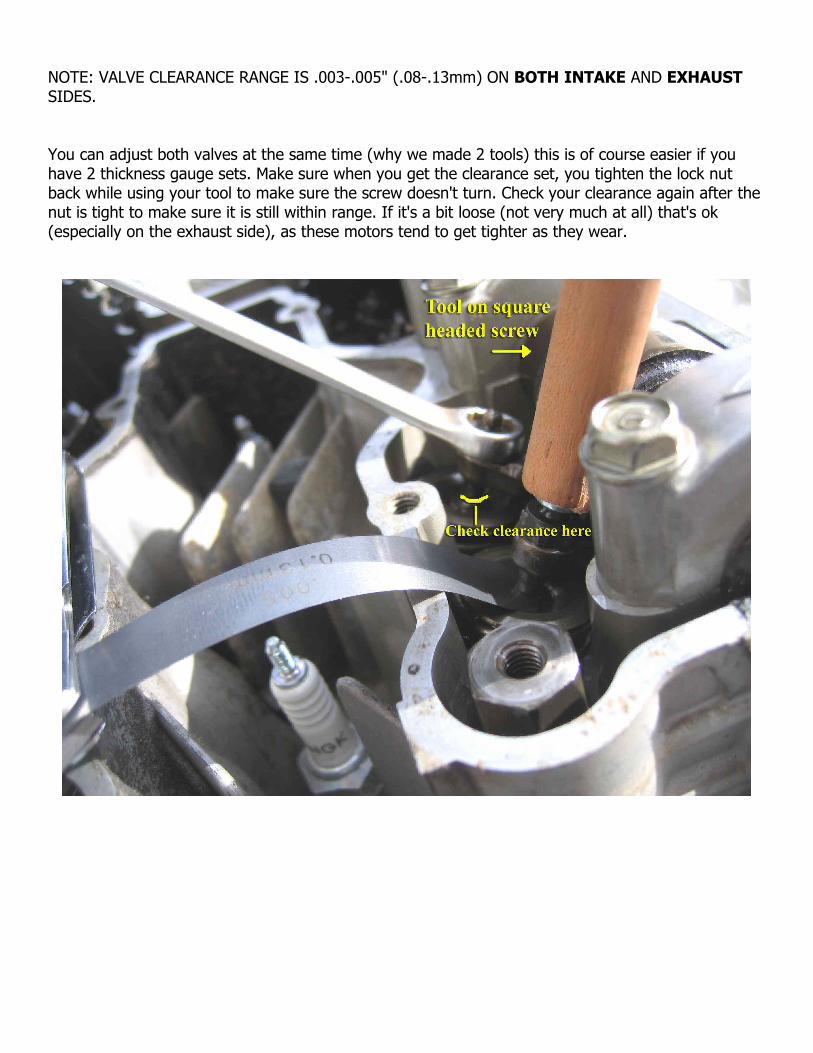
NOTE: VALVE CLEARANCE RANGE IS .003-.005" (.08-.13mm) ON BOTH INTAKE AND EXHAUST SIDES.
You can adjust both valves at the same time (why we made 2 tools) this is of course easier if you have 2 thickness gauge sets. Make sure when you get the clearance set, you tighten the lock nut back while using your tool to make sure the screw doesn't turn. Check your clearance again after the nut is tight to make sure it is still within range. If it's a bit loose (not very much at all) that's ok (especially on the exhaust side), as these motors tend to get tighter as they wear.
After finishing the adjustment on all the valves available (8 total) with the camshaft notches pointed out, turn the engine using the 19mm bolt under the ignition cover so that both the notches are pointed in. With the notches pointing in toward each other you will be able to check and adjust the clearances on the following valves:
#2 cylinder intake side valves only#3 cylinder exhaust side valves only#4 cylinder both intake and exhaust side valves
Procedure for checking and adjustment is the same.
Step 7 -
The hard part is now over. It is now time to put it all back together. First, pull the old half moons out so you can replace with new ones. Clean all old gasket material and sealer off both the engine head and the valve cover mating surfaces. You will want to use a gasket sealer on the new half moons. Then install a new cover gasket over the new half moons on bike. Note that the cover does have a front and a back. If the holes don't line up, pull it off and flip it over. You may wish to spray the new gasket with WD40 or PB oil before installation to help it seal, unless you have a silicon RealGasket from www.realgaskets.com.
After putting the gasket on the head, it's time to jiggle and wiggle the valve cover back into place. Take your time - it shouldn't be too difficult.
After the cover is back into place, replace the bolts and get them finger tight before you torque them down. The bolts get tightened working inside to outside, alternating sides. I don't have an exact order, just try to work from the inside to the outside and don't do more than one bolt on a side in a row (i.e. - left front side, right rear side, left rear side, right front side etc) and don't torque them down too much, 6-7 ft/lbs or so is plenty.
(BassCliff <editor> note: If you use a RealGasket, torque is ONLY 15 inch pounds, that's about 1.25 ft/lbs.)
After this is done, reinstall the breather hose and put the ignition cover back on. Also reinstall the tachometer drive gear and cable. If needed, replace the O-ring. If not, just slide it back in. I put a little bit of PB oil on it to help it slide back in. It may take a bit of twisting of the housing to get everything lined up properly and the housing to slide all the way in. Reinstall the locking plate and bolt and tighten.
Reinstall gas tank making sure you hook up the vacuum and fuel lines correctly. Route the hose off the fuel level sending unit out the back someplace open to ground but out of the way of any moving parts. Reconnect the wires for the fuel gauge send unit.
Put the seat back on. That's pretty much it.
Congratulations! Take her for a test ride and see how it runs. If too many of the clearances were off before, you should now notice decreased vibrations, especially at higher RPM. It should be a little quieter as well with less noticeable upper engine noises (if you have an ear for that sort of thing.)
For those out there with these 16v engines that have never done it before, I hope this has helped illustrate how to adjust the valves. For those familiar with the procedure, please let me know if anything needs editing.
Thanks go out to the entire www.thegsresources.com forum community for help with all the questions I asked. Special thanks to Bikecliff (a.k.a. BassCliff) for hosting this guide, tkent02 for the advice on the DIY adjustment tools, and my wife for dealing with me while working on my GS.
− Basic
Addendum
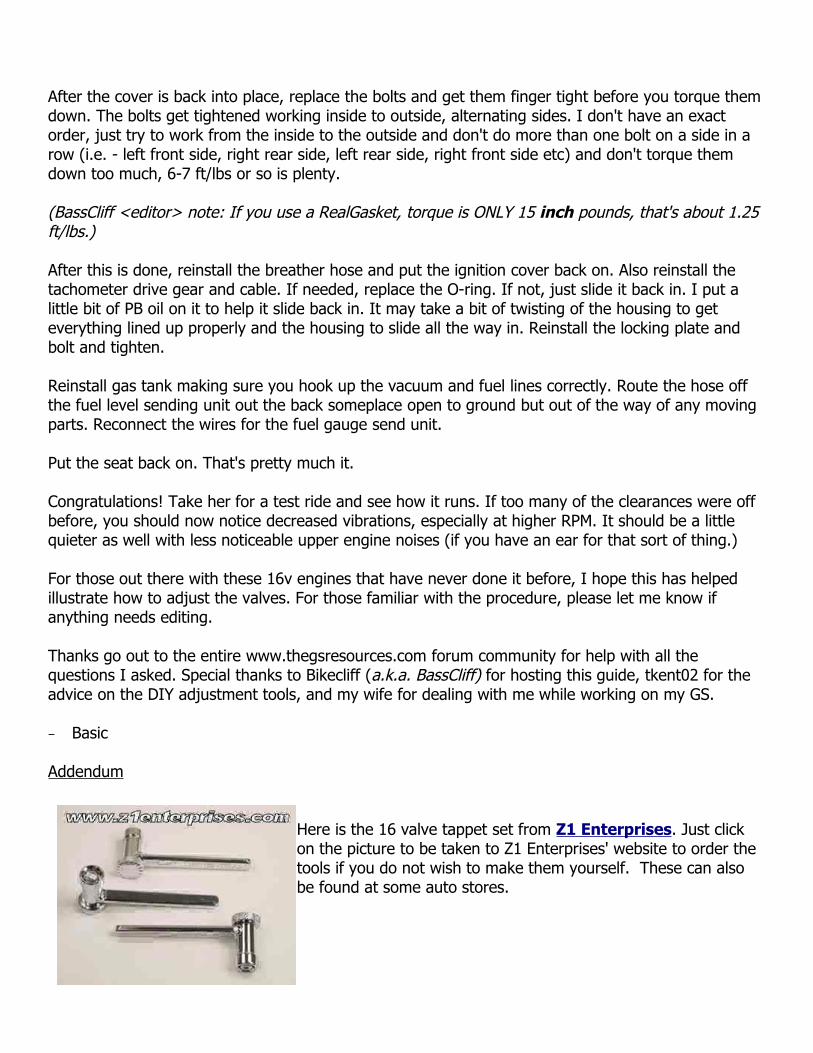
Here is the 16 valve tappet set from Z1 Enterprises. Just click on the picture to be taken to Z1 Enterprises' website to order the tools if you do not wish to make them yourself. These can also be found at some auto stores.
Related Documents