GestióIP IPAM v3.2 IP address management software Network Configuration Backup and Management Module User Guide v0.7 www.gestioip.net GestióIP Copyright © Marc Uebel 2017

Welcome message from author
This document is posted to help you gain knowledge. Please leave a comment to let me know what you think about it! Share it to your friends and learn new things together.
Transcript
GestióIP IPAMv3.2
IP address management software
Network Configuration Backup and ManagementModule User Guide
v0.7
www.gestioip.net
GestióIP Copyright © Marc Uebel 2017

GestióIP 3.2 – Network Configuration Backup and Management Module
Table of Contents1 Introduction.......................................................................................................................................4
1.1 Features......................................................................................................................................42 Configuration.....................................................................................................................................4
2.1 Enable Device Configuration Management...............................................................................42.1.1 License key........................................................................................................................4
2.1.1.1 Introduce the license key............................................................................................52.2 Configure GestióIP Configuration Management.......................................................................6
2.2.1 Device User Groups...........................................................................................................72.2.1.1 Create, edit, delete Device User Groups....................................................................7
2.2.2 Configuration Backup Server.............................................................................................82.2.2.1 Create, edit, delete Configuration Backup Server......................................................8
2.2.2.1.1Backup Server behind NAT.................................................................................92.2.3 Job Groups.......................................................................................................................10
2.2.3.1 Create, edit, delete Job Groups.................................................................................102.2.4 Show Job details...............................................................................................................112.2.5 Search through configurations.........................................................................................112.2.6 Diff configuration/command outputs (of the same or different devices).........................122.2.7 Show the Job execution logfiles.......................................................................................13
2.3 CM Dashboard.........................................................................................................................142.4 Configuration Management for devices..................................................................................15
2.4.1 Configure Configuration Management for devices..........................................................152.4.1.1 Enable Configuration Management for a device......................................................152.4.1.2 Assign Jobs to devices..............................................................................................162.4.1.3 Delete Jobs from devices..........................................................................................172.4.1.4 Disable Configuration Management for a device.....................................................172.4.1.5 Delete Configuration Management for a device......................................................17
2.4.2 Mass update......................................................................................................................172.4.2.1 Enable CM................................................................................................................182.4.2.2 Disable CM...............................................................................................................19
3 Working with Jobs...........................................................................................................................203.1 Assigned Jobs..........................................................................................................................21
3.1.1 Show last Job execution log.............................................................................................213.1.2 Show/download stored configurations/Job outputs.........................................................213.1.3 Diff stored configurations/Job outputs.............................................................................213.1.4 Search through stored device configurations/Job outputs................................................223.1.5 Execute an assigned Job...................................................................................................22
3.2 Restore configurations or upload files to devices....................................................................223.3 Execute unassigned device Jobs..............................................................................................23
3.3.1 List the content of the backup directory...........................................................................233.4 Run Jobs automatically/schedule Jobs.....................................................................................24
3.4.1 fetch_config.pl arguments................................................................................................243.4.2 logfiles fetch_config.pl....................................................................................................263.4.3 Configure cron jobs..........................................................................................................26
3.5 Bulk changes............................................................................................................................274 XML files/Device Type Groups......................................................................................................28
2
GestióIP 3.2 – Network Configuration Backup and Management Module
4.1 XML files parameters..............................................................................................................284.1.1 Using wildcards/special characters..................................................................................33
4.2 Create new Jobs for an existing Device Type Group..............................................................344.3 Create XML files/Create Device Type Groups.......................................................................374.4 Check XML files syntax..........................................................................................................37
4.4.1 Support.............................................................................................................................384.4.2 Share your XML file........................................................................................................38
5 Troubleshooting...............................................................................................................................395.1 Server timeout..........................................................................................................................395.2 Jobs do not appear....................................................................................................................395.3 Running Jobs............................................................................................................................39
5.3.1 Background......................................................................................................................396 Configuration Backup Server..........................................................................................................41
6.1 Installation of the FTP, TFTP and SSH (SCP) server software...............................................416.1.1 Debian/Ubuntu.................................................................................................................41
6.1.1.1 FTP server................................................................................................................416.1.1.2 TFPT server..............................................................................................................426.1.1.3 SSH (SCP) server.....................................................................................................43
6.1.2 OpenSuse.........................................................................................................................446.1.2.1 FTP server................................................................................................................446.1.2.2 TFTP server..............................................................................................................456.1.2.3 SSH (SCP) server.....................................................................................................46
6.1.3 Fedora/Redhat/CentOS....................................................................................................466.1.3.1 FTP server................................................................................................................466.1.3.2 TFPT server..............................................................................................................476.1.3.3 SSH (SCP) server.....................................................................................................48
6.2 Firewall....................................................................................................................................49
3
GestióIP 3.2 – Network Configuration Backup and Management Module
1 IntroductionGestióIP's Device Configuration Management Module allows to automatically backup and manage configurations of network devices like switches, router, load balancer or firewalls. It furthermore permits to execute commands on the devices and to optionally store the command's output. This offers many possibilities. You can, for example, create a Job which executes every day a command like “show arp” to create a MACaddress/porthistory for your switches or you can make bulk changes like changing the password of multiple devices.
1.1 FeaturesThe Device Configuration Management Module offers the following main features:
• Automatic configuration backups for multiple devices.
• Automatic execution of commands for multiple devices.
• Configuration down and upload.
• Diff between stored configurations or stored Job outputs.
• Search through stored configurations or stored Job outputs.
• Configuration history.
• XML files to easily create custom Jobs.
2 Configuration
2.1 Enable Device Configuration Management
2.1.1 License keyThe Configuration Management Module (CMM) is a “nonfree” component of GestióIP. To enable the CMM you need to purchase a license key.
Go to http://www.gestioip.net/configuration_backup_and_management.html to apply for a license key o to request a free trial key.
The license key is associated with the hostname of the GestióIP server.
To show the hostname of the GestióIP server execute the command “hostname” from a terminal or go to “Manage” “GestióIP”. The hostname appears in front of the textbox “Licence Key”. The →
4
GestióIP 3.2 – Network Configuration Backup and Management Module
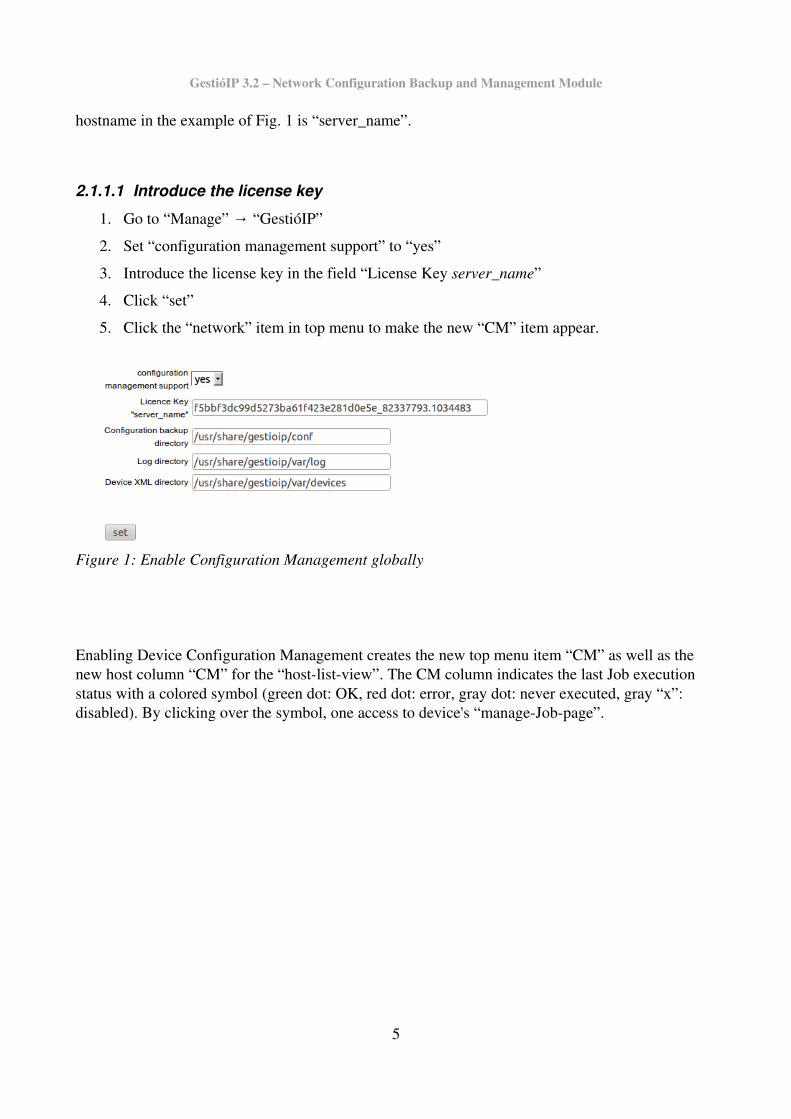
hostname in the example of Fig. 1 is “server_name”.
2.1.1.1 Introduce the license key
1. Go to “Manage” “GestióIP”→
2. Set “configuration management support” to “yes”
3. Introduce the license key in the field “License Key server_name”
4. Click “set”
5. Click the “network” item in top menu to make the new “CM” item appear.
Enabling Device Configuration Management creates the new top menu item “CM” as well as the new host column “CM” for the “hostlistview”. The CM column indicates the last Job execution status with a colored symbol (green dot: OK, red dot: error, gray dot: never executed, gray “x”: disabled). By clicking over the symbol, one access to device's “manageJobpage”.
5
Figure 1: Enable Configuration Management globally

GestióIP 3.2 – Network Configuration Backup and Management Module
2.2 Configure GestióIP Configuration ManagementThe “CM” item appears in the top menu after enabling the Configuration Management Module.
The CM menu offers the following options:
• Access the Dashboard
• Show CM hosts list/manage devices with configured Configuration Management.
• Manage Device User Groups.
• Manage Configuration Backup Server.
• Mange Job Groups.
• Show Job details.
• Search through stored configurations or command outputs.
• Diff configurations/command outputs (of the same or different devices).
• Show the Job execution logfiles.
Before you can assign backup or other Jobs to devices, you need to create at lease one Device User Group, one Configuration Backup Server and one Job Group. Furthermore there must exist an adequate Device Type Group with Jobs for the specific device model (see 4).
6
Figure 2: CM Menu
GestióIP 3.2 – Network Configuration Backup and Management Module
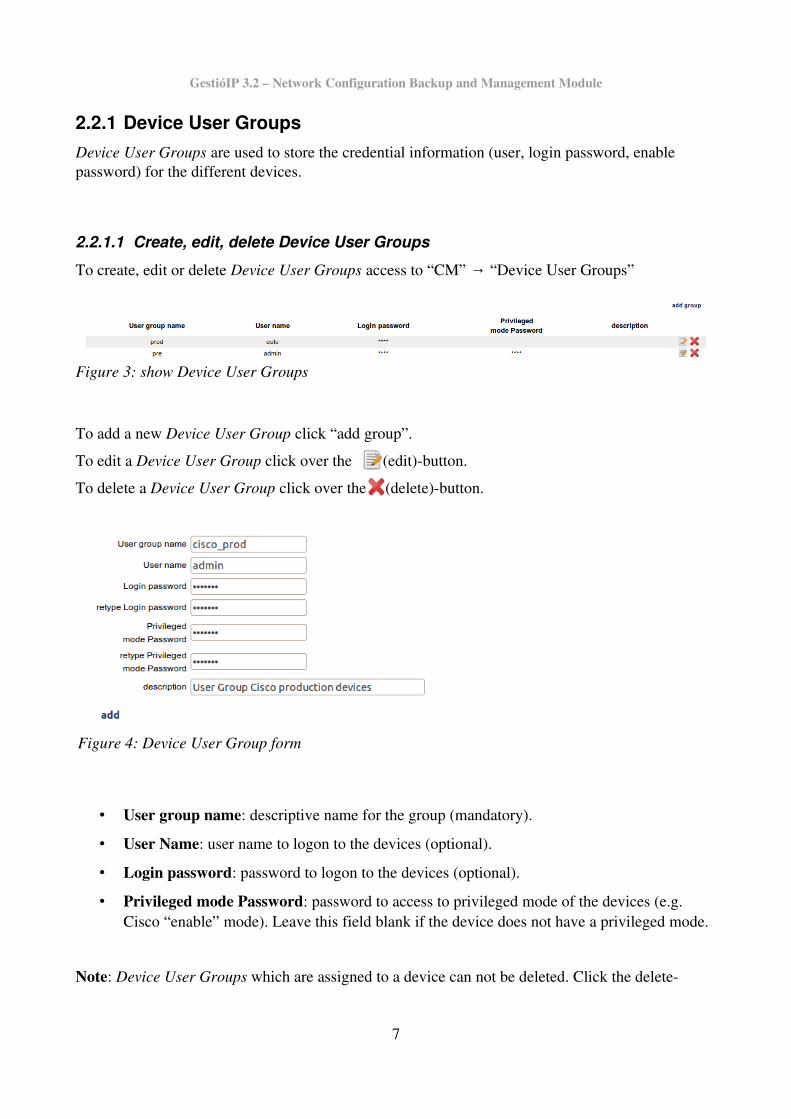
2.2.1 Device User GroupsDevice User Groups are used to store the credential information (user, login password, enable password) for the different devices.
2.2.1.1 Create, edit, delete Device User Groups
To create, edit or delete Device User Groups access to “CM” “Device User Groups”→
To add a new Device User Group click “add group”.
To edit a Device User Group click over the (edit)button.
To delete a Device User Group click over the (delete)button.
• User group name: descriptive name for the group (mandatory).
• User Name: user name to logon to the devices (optional).
• Login password: password to logon to the devices (optional).
• Privileged mode Password: password to access to privileged mode of the devices (e.g. Cisco “enable” mode). Leave this field blank if the device does not have a privileged mode.
Note: Device User Groups which are assigned to a device can not be deleted. Click the delete
7
Figure 3: show Device User Groups
Figure 4: Device User Group form
GestióIP 3.2 – Network Configuration Backup and Management Module
button to list the devices which are using that group.
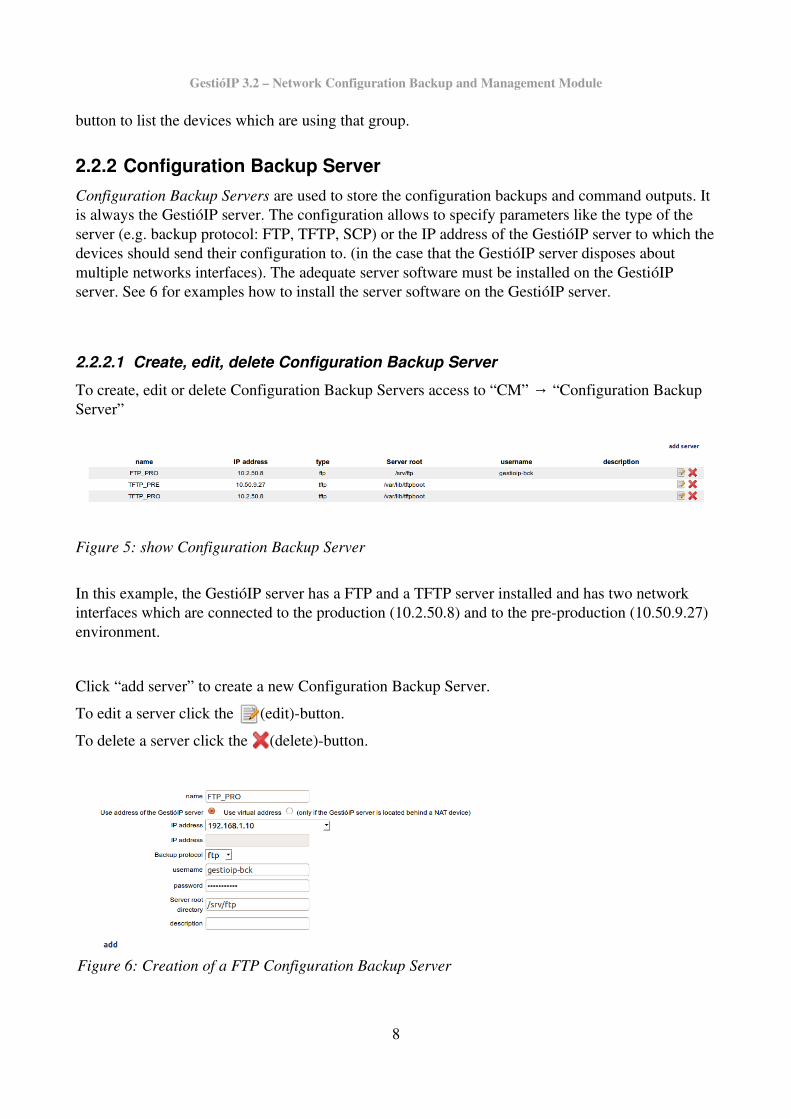
2.2.2 Configuration Backup ServerConfiguration Backup Servers are used to store the configuration backups and command outputs. It is always the GestióIP server. The configuration allows to specify parameters like the type of the server (e.g. backup protocol: FTP, TFTP, SCP) or the IP address of the GestióIP server to which thedevices should send their configuration to. (in the case that the GestióIP server disposes about multiple networks interfaces). The adequate server software must be installed on the GestióIP server. See 6 for examples how to install the server software on the GestióIP server.
2.2.2.1 Create, edit, delete Configuration Backup Server
To create, edit or delete Configuration Backup Servers access to “CM” “Configuration Backup →Server”
In this example, the GestióIP server has a FTP and a TFTP server installed and has two network interfaces which are connected to the production (10.2.50.8) and to the preproduction (10.50.9.27) environment.
Click “add server” to create a new Configuration Backup Server.
To edit a server click the (edit)button.
To delete a server click the (delete)button.
8
Figure 6: Creation of a FTP Configuration Backup Server
Figure 5: show Configuration Backup Server
GestióIP 3.2 – Network Configuration Backup and Management Module
• name: descriptive name for the server (mandatory).
• IP address: IP address of the server to which the devices should connect to (see 2.2.2.1.1) (mandatory).
• backup protocol: Server type (FTP, TFTP or SCP (SSH)) (mandatory).
• username: username to authenticate with the server (only FTP and SCP) (optional).
• password: username's password to authenticate with the server (only FTP and SCP) (optional).
• Server Root directory: root directory of the server. The directory to which the configuration backups/commandoutputs will be uploaded. (mandatory).
• description: an optional description.
See 6 for the values “username” and “Server Root directory”.
Note: Configuration Backup Server which are assigned to devices can not be deleted. Click the deletebutton to list the devices which are using that server.
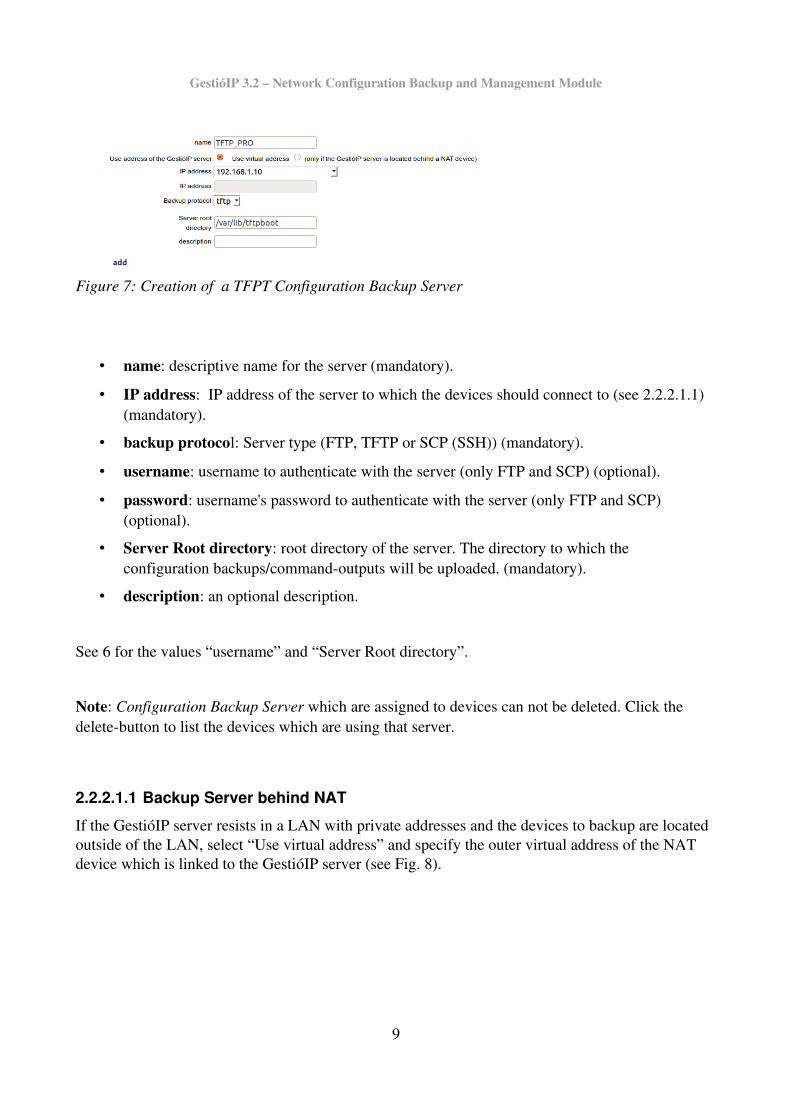
2.2.2.1.1 Backup Server behind NAT
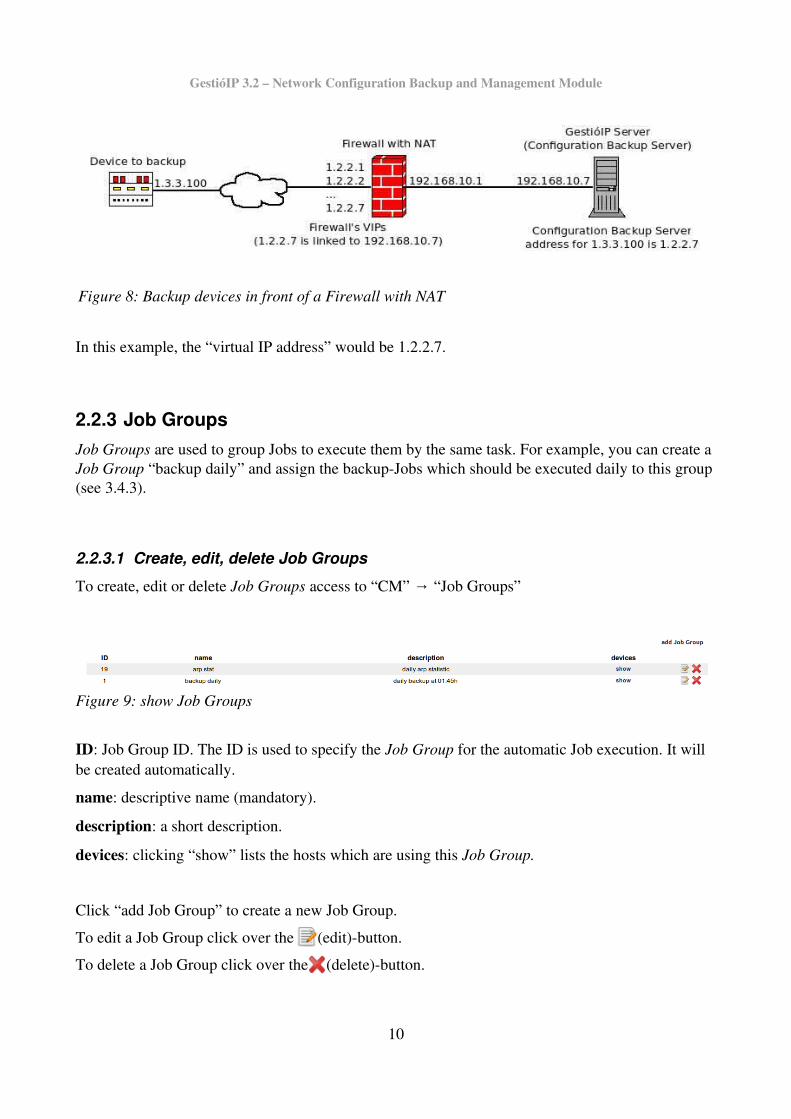
If the GestióIP server resists in a LAN with private addresses and the devices to backup are located outside of the LAN, select “Use virtual address” and specify the outer virtual address of the NAT device which is linked to the GestióIP server (see Fig. 8).
9
Figure 7: Creation of a TFPT Configuration Backup Server
GestióIP 3.2 – Network Configuration Backup and Management Module
In this example, the “virtual IP address” would be 1.2.2.7.
2.2.3 Job GroupsJob Groups are used to group Jobs to execute them by the same task. For example, you can create a Job Group “backup daily” and assign the backupJobs which should be executed daily to this group (see 3.4.3).
2.2.3.1 Create, edit, delete Job Groups
To create, edit or delete Job Groups access to “CM” “Job Groups”→
ID: Job Group ID. The ID is used to specify the Job Group for the automatic Job execution. It will be created automatically.
name: descriptive name (mandatory).
description: a short description.
devices: clicking “show” lists the hosts which are using this Job Group.
Click “add Job Group” to create a new Job Group.
To edit a Job Group click over the (edit)button.
To delete a Job Group click over the (delete)button.
10
Figure 9: show Job Groups
Figure 8: Backup devices in front of a Firewall with NAT
GestióIP 3.2 – Network Configuration Backup and Management Module
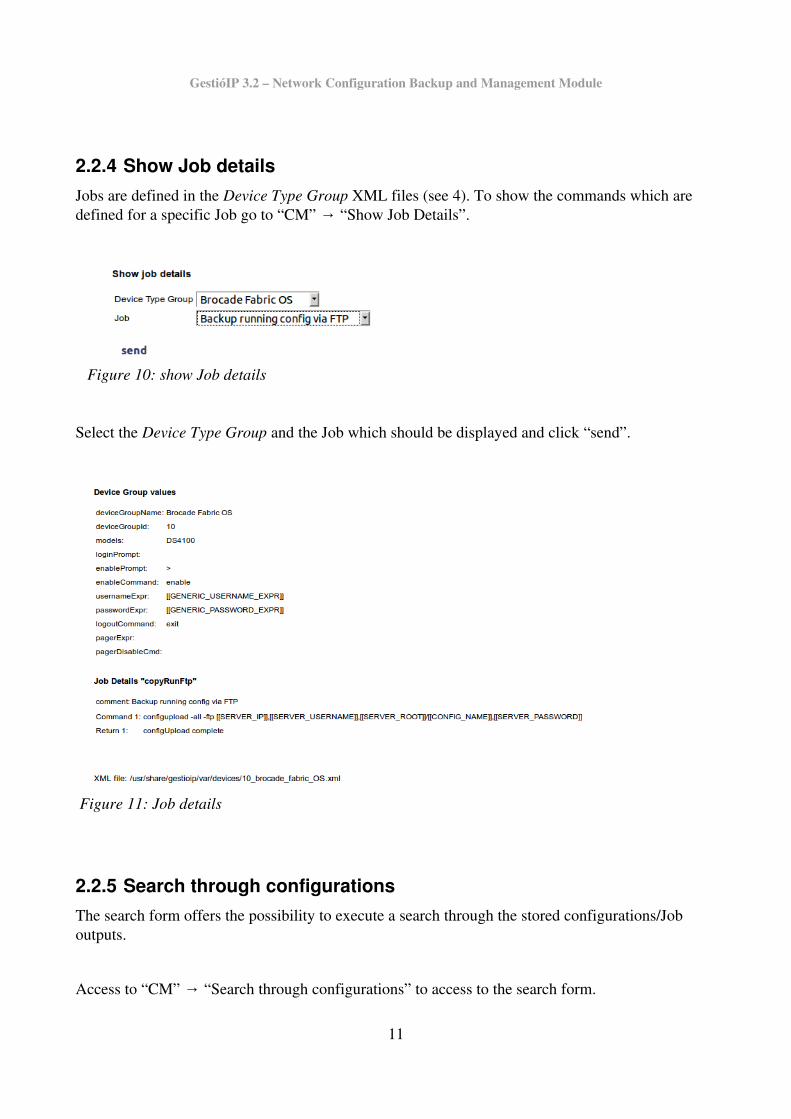
2.2.4 Show Job detailsJobs are defined in the Device Type Group XML files (see 4). To show the commands which are defined for a specific Job go to “CM” “Show Job Details”.→
Select the Device Type Group and the Job which should be displayed and click “send”.
2.2.5 Search through configurationsThe search form offers the possibility to execute a search through the stored configurations/Job outputs.
Access to “CM” “Search through configurations” to access to the search form.→
11
Figure 10: show Job details
Figure 11: Job details

GestióIP 3.2 – Network Configuration Backup and Management Module
The form permits to search through the configurations/Job outputs of
• all Jobs of a Device Type Group
• a specific Job
• a Job Group
• a combination of the fields
The checkbox “search only through last logfiles” offers the possibility to search either through all stored configurations or through only the last ones.
Note: To search through the configurations/Job outputs for a specific device go to the “manageJobspage” (“CM” “Show CM hosts” click over the colored CMsymbol).→ →
2.2.6 Diff configuration/command outputs (of the same or different devices)
To diff configurations/command outputs click over “CM” “Diff configurations”.→
Step I: Select the devices/Jobs to diff configurations from.
To find a specific Job more easily you can order the Jobs by the IP addresses or by the hostnames.
12
Figure 12: search through configuration/command outputs

GestióIP 3.2 – Network Configuration Backup and Management Module
Step II: Select the configurations which should be diffed and click “diff”.
Note: You also can diff the configurations/Job outputs for a specific device from the “manageJobspage” (“CM” “Show CM hosts” click over the colored CMsymbol).→ →
2.2.7 Show the Job execution logfiles.To show the Job execution log files click over “CM” “Show Job execution log files”.→
Select the log file which should be shown and click “show”.
Note: You can also access to the last execution log for a specific Job from the “manageJobspage”.
13
Figure 13: Diff configurations step I
Figure 14: Diff configurations step II
Figure 15: Show Job execution log
GestióIP 3.2 – Network Configuration Backup and Management Module
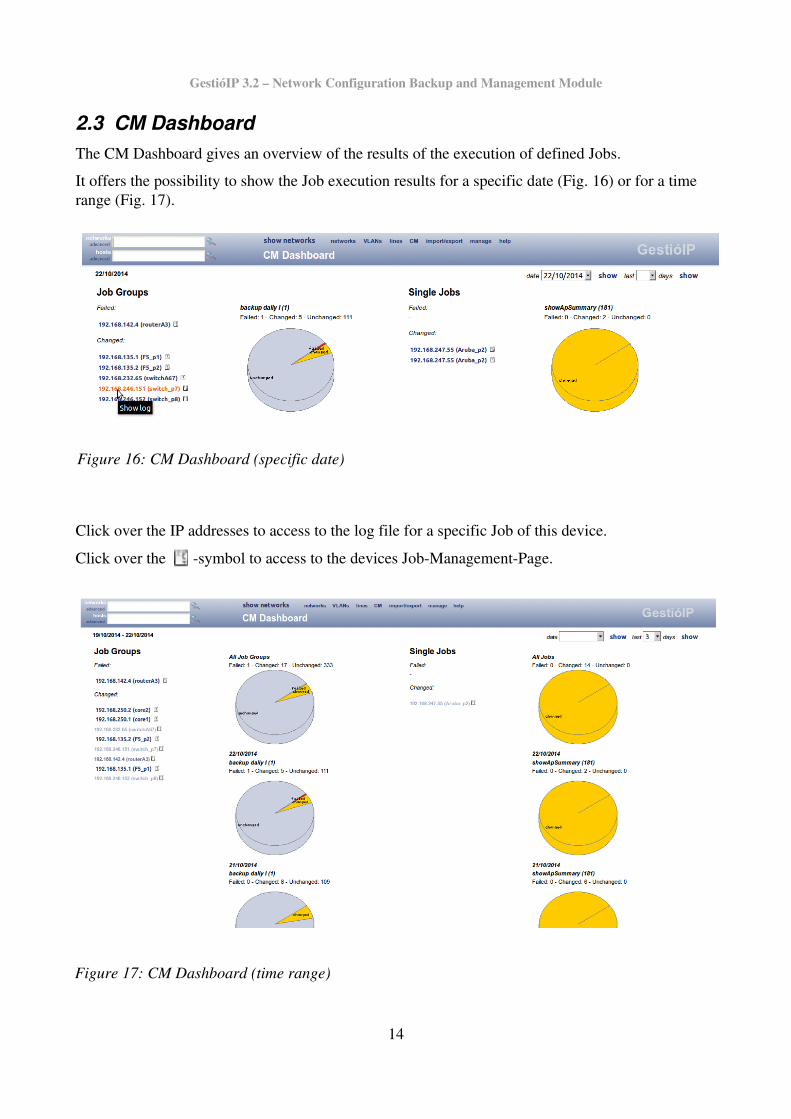
2.3 CM DashboardThe CM Dashboard gives an overview of the results of the execution of defined Jobs.
It offers the possibility to show the Job execution results for a specific date (Fig. 16) or for a time range (Fig. 17).
Click over the IP addresses to access to the log file for a specific Job of this device.
Click over the symbol to access to the devices JobManagementPage.
14
Figure 16: CM Dashboard (specific date)
Figure 17: CM Dashboard (time range)
GestióIP 3.2 – Network Configuration Backup and Management Module
The “time range view” gives an overview of the Jobs which were executed within a specific time range.
The IP addresses appear in three different shades of colors.
Failed:
red – no successful execution within the time range
orange – more then one failed Job execution within the time range
dark blue – one failed Job execution within the time range
Changed:
light blue – configuration changes during all Job executions
darker blue – configuration changes during some Job executions
dark blue – configuration changes during one Job execution
Only the IP addresses which appear in dark blue offer links to the log files. To access to the log filesfor IPs with multiple fails/changes, click over the graph for a specific date.
2.4 Configuration Management for devicesAll device specific CM configuration (Device Type Group, Configuration Backup Server, ...) as well as the association of Jobs to devices is made from the “edithostform”.
2.4.1 Configure Configuration Management for devicesGo to hostlistview (“networks” click over the adequate network) or execute a search for the →device which should be configured. Access to the “edithostform” by clicking on the "edit" icon
behind the device's IP address.
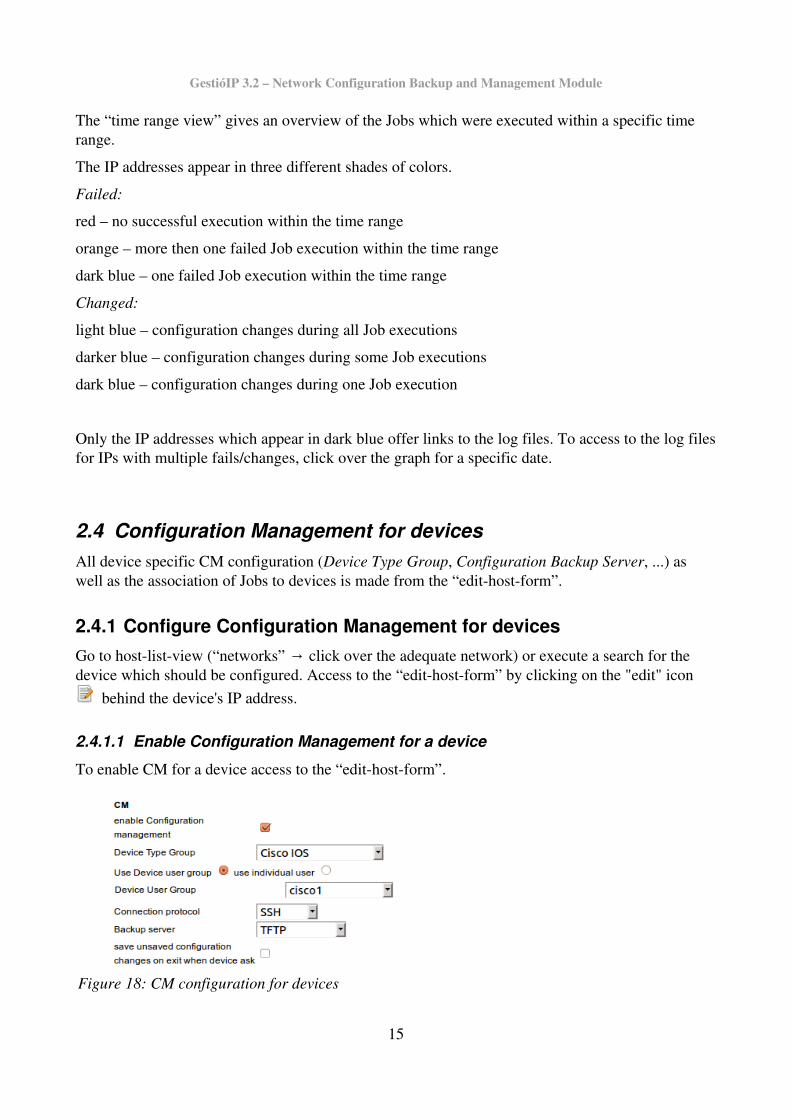
2.4.1.1 Enable Configuration Management for a device
To enable CM for a device access to the “edithostform”.
15
Figure 18: CM configuration for devices
GestióIP 3.2 – Network Configuration Backup and Management Module
1. Check the “enable Configuration Management” checkbox to enable the Configuration Management for this device.
2. Select the adequate Device Type Group for the device. The Device Type Group determine which Jobs are available for the device. Device Type Groups are defined in form of XML files. If there is no predefined XML file for your device model available, you can create a new XML file for your device model (see 4.3).
3. Select the Device User Group which holds the correct user information to access to the device or configure the user information for this device individually.
4. Select the connection protocol which should be used by the Configuration Backup Server to connect to the device.
5. Select the Configuration Backup Server where the device configurations and the Job outputsshould be stored.
6. Before a Job logsout from the device, the device might ask if unsaved configuration changes should be stored. Check the checkbox “save unsaved configuration changes on exit when device ask” to force the Job to save unsaved configuration changes before loggingout.
Hint: You can use host mass update feature to configure CM for multiple devices simultaneously.
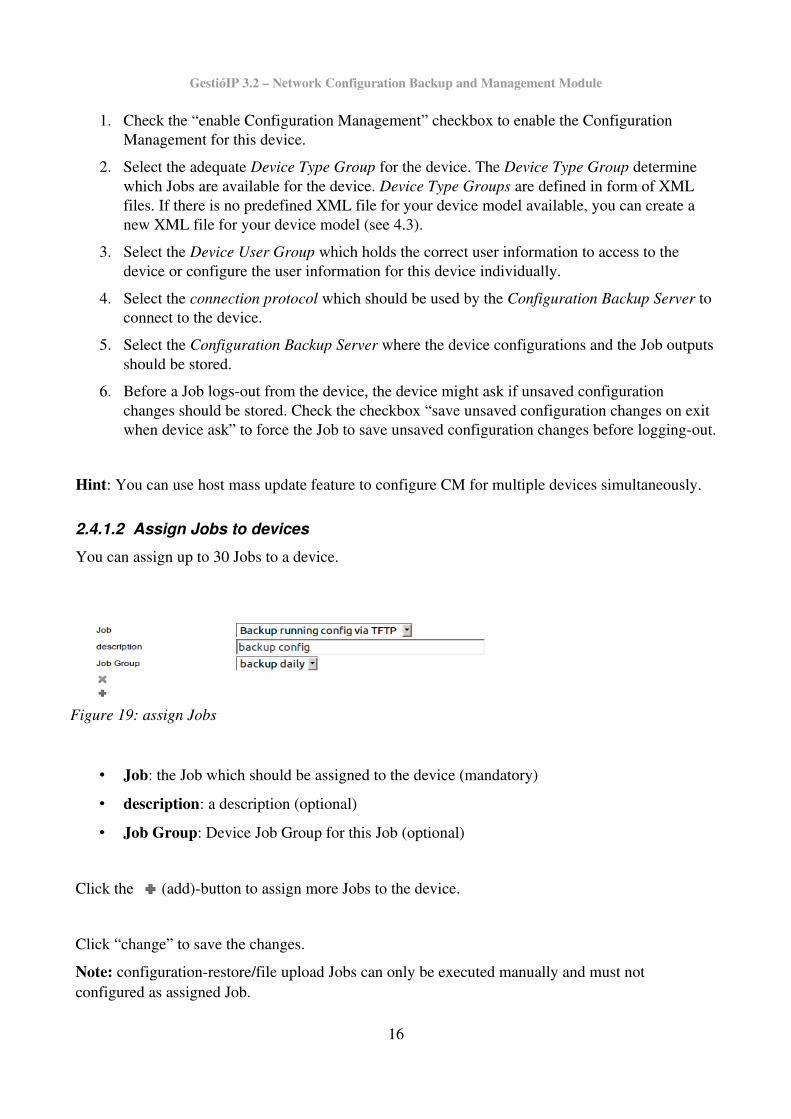
2.4.1.2 Assign Jobs to devices
You can assign up to 30 Jobs to a device.
• Job: the Job which should be assigned to the device (mandatory)
• description: a description (optional)
• Job Group: Device Job Group for this Job (optional)
Click the (add)button to assign more Jobs to the device.
Click “change” to save the changes.
Note: configurationrestore/file upload Jobs can only be executed manually and must not configured as assigned Job.
16
Figure 19: assign Jobs

GestióIP 3.2 – Network Configuration Backup and Management Module
2.4.1.3 Delete Jobs from devices
To delete Jobs from devices click the (delete)button.
This will clean the specific Job form.
Click “change” to save the changes
2.4.1.4 Disable Configuration Management for a device
Disabling CM for a device causes that the Jobs will not longer be processed by the automatic Job execution.
To disable CM for a device uncheck the “enable Configuration Management” checkbox and click “save”. The CM configuration and the Jobs will be deactivated but not deleted.
2.4.1.5 Delete Configuration Management for a device
To delete the CM configuration for a device uncheck the “enable Configuration Management” checkbox and check the checkbox “Delete complete Configuration Management configuration” (seeFig. 20). Click “save” to save the changes. This will delete the CM configuration as well as all Jobs which are assigned to this device.
2.4.2 Mass updateTo configure CM for multiple devices you can use the massupdate feature.
17
Figure 20: Disable CM for a device
GestióIP 3.2 – Network Configuration Backup and Management Module
2.4.2.1 Enable CM
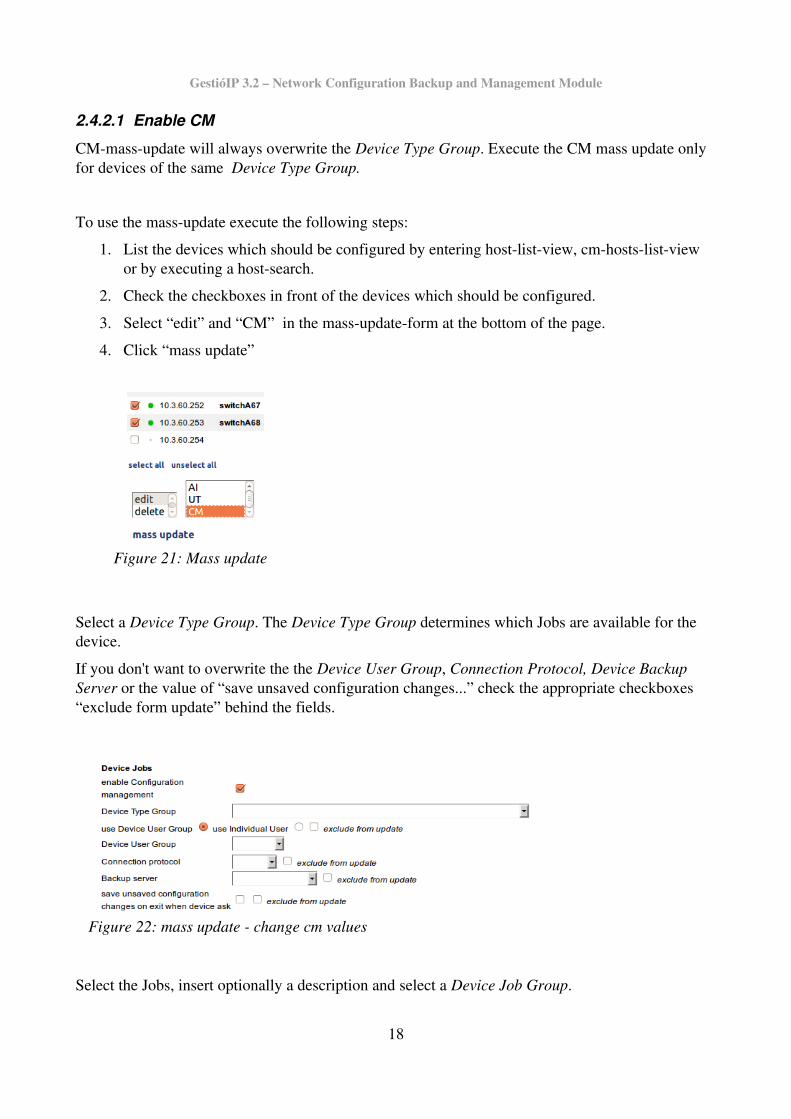
CMmassupdate will always overwrite the Device Type Group. Execute the CM mass update only for devices of the same Device Type Group.
To use the massupdate execute the following steps:
1. List the devices which should be configured by entering hostlistview, cmhostslistview or by executing a hostsearch.
2. Check the checkboxes in front of the devices which should be configured.
3. Select “edit” and “CM” in the massupdateform at the bottom of the page.
4. Click “mass update”
Select a Device Type Group. The Device Type Group determines which Jobs are available for the device.
If you don't want to overwrite the the Device User Group, Connection Protocol, Device Backup Server or the value of “save unsaved configuration changes...” check the appropriate checkboxes “exclude form update” behind the fields.
Select the Jobs, insert optionally a description and select a Device Job Group.
18
Figure 21: Mass update
Figure 22: mass update change cm values

GestióIP 3.2 – Network Configuration Backup and Management Module
Click “change” to save the changes.
2.4.2.2 Disable CM
To disable CM for multiple devices go to CM mass update form for the devices you want to edit (see 2.4.2.1)
Uncheck the checkbox “enable Configuration Management”.
If you want that the complete CM configuration as well as the Jobs which are associated with the devices are deleted, check the checkbox “Delete complete Configuration”.
Click “change” to save the changes.
If you only want to delete the associated Jobs from the devices check the checkbox “Delete old Jobsfrom devices” (you must always select a Device Type Group) and click “change”.
19
Figure 23: mass update disable CM
Figure 24: Mass Update Jobs
GestióIP 3.2 – Network Configuration Backup and Management Module
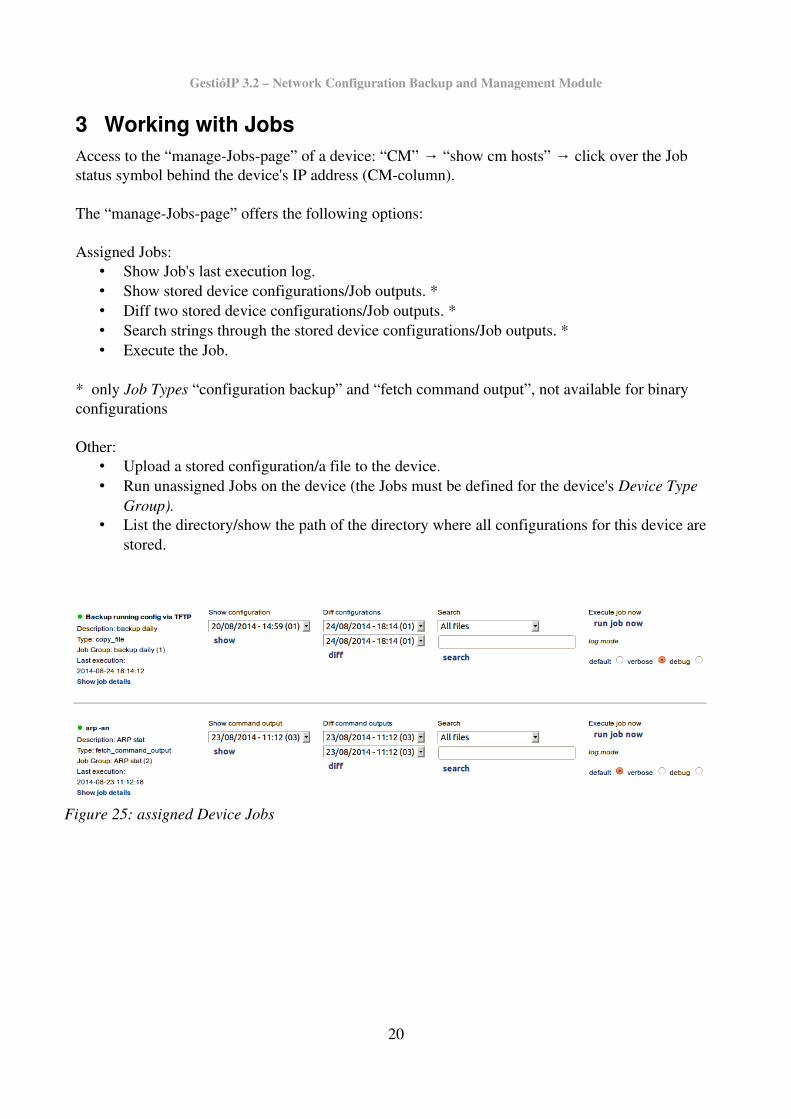
3 Working with JobsAccess to the “manageJobspage” of a device: “CM” “show cm hosts” click over the Job → →status symbol behind the device's IP address (CMcolumn).
The “manageJobspage” offers the following options:
Assigned Jobs:• Show Job's last execution log.• Show stored device configurations/Job outputs. *• Diff two stored device configurations/Job outputs. *• Search strings through the stored device configurations/Job outputs. *• Execute the Job.
* only Job Types “configuration backup” and “fetch command output”, not available for binary configurations
Other:• Upload a stored configuration/a file to the device.• Run unassigned Jobs on the device (the Jobs must be defined for the device's Device Type
Group).• List the directory/show the path of the directory where all configurations for this device are
stored.
20
Figure 25: assigned Device Jobs
GestióIP 3.2 – Network Configuration Backup and Management Module
3.1 Assigned Jobs
3.1.1 Show last Job execution logClick over the colored symbol if front of the Job to show the last execution log for this Job. The color indicates, if the Job was executed successfully (green), with errors (red) or if the Job was never executed (gray). To access to older logfile go to “CM” “Show job execution logfiles”.→
3.1.2 Show/download stored configurations/Job outputsSelect the configuration/Job output from the “Show configuration/Show command output” selectbox and click “show”. This will show the configuration on a webpage as well as a link to downloadthe configuration/Job output.
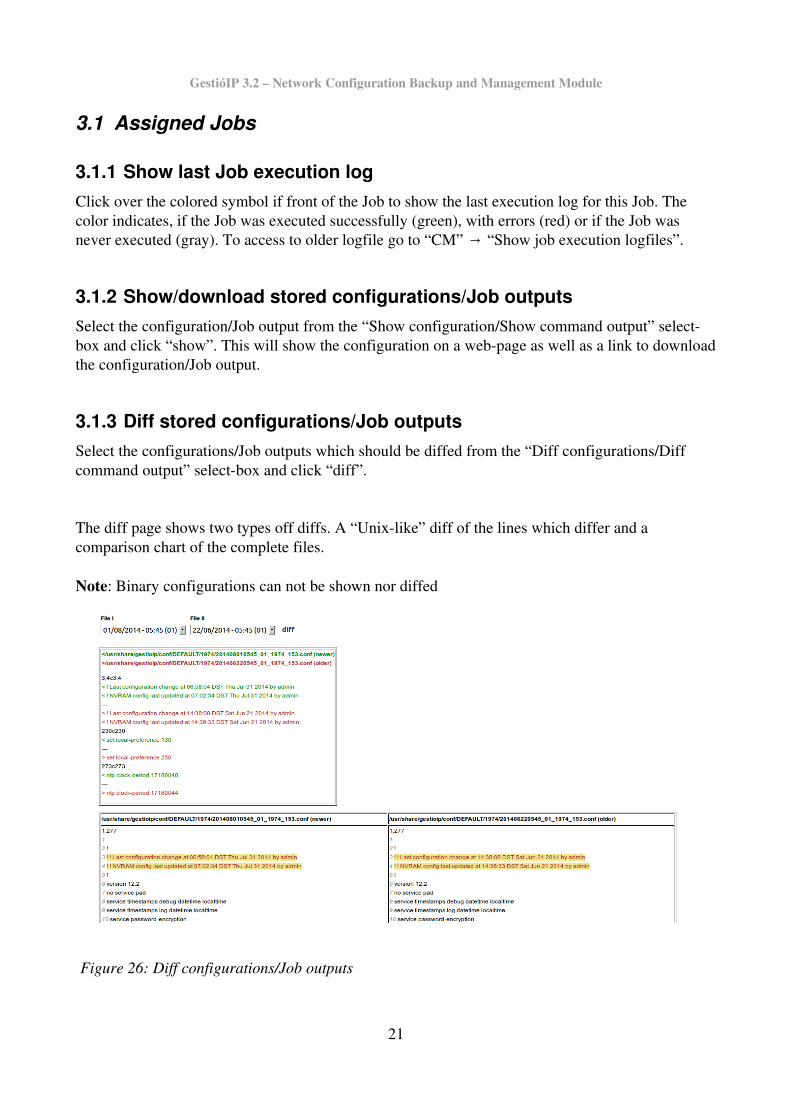
3.1.3 Diff stored configurations/Job outputsSelect the configurations/Job outputs which should be diffed from the “Diff configurations/Diff command output” selectbox and click “diff”.
The diff page shows two types off diffs. A “Unixlike” diff of the lines which differ and a comparison chart of the complete files.
Note: Binary configurations can not be shown nor diffed
21
Figure 26: Diff configurations/Job outputs
GestióIP 3.2 – Network Configuration Backup and Management Module
3.1.4 Search through stored device configurations/Job outputsSelect either “all files” to execute a search through all stored backups or select a specific configuration/Joboutput (see Fig. 25), introduce a search string and click “search”.
Click “show” to show the complete file.
3.1.5 Execute an assigned JobTo execute a assigned Job manually select the loglevel and click “run job now”.
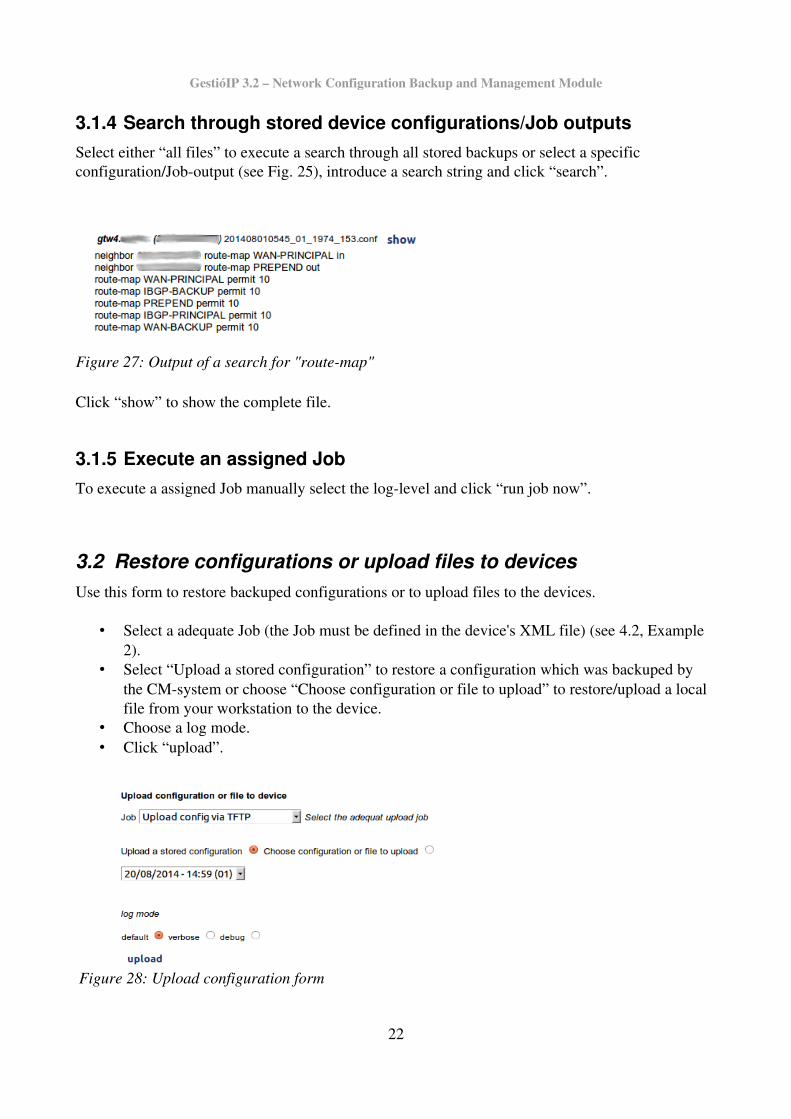
3.2 Restore configurations or upload files to devicesUse this form to restore backuped configurations or to upload files to the devices.
• Select a adequate Job (the Job must be defined in the device's XML file) (see 4.2, Example 2).
• Select “Upload a stored configuration” to restore a configuration which was backuped by the CMsystem or choose “Choose configuration or file to upload” to restore/upload a local file from your workstation to the device.
• Choose a log mode.• Click “upload”.
22
Figure 27: Output of a search for "routemap"
Figure 28: Upload configuration form
GestióIP 3.2 – Network Configuration Backup and Management Module
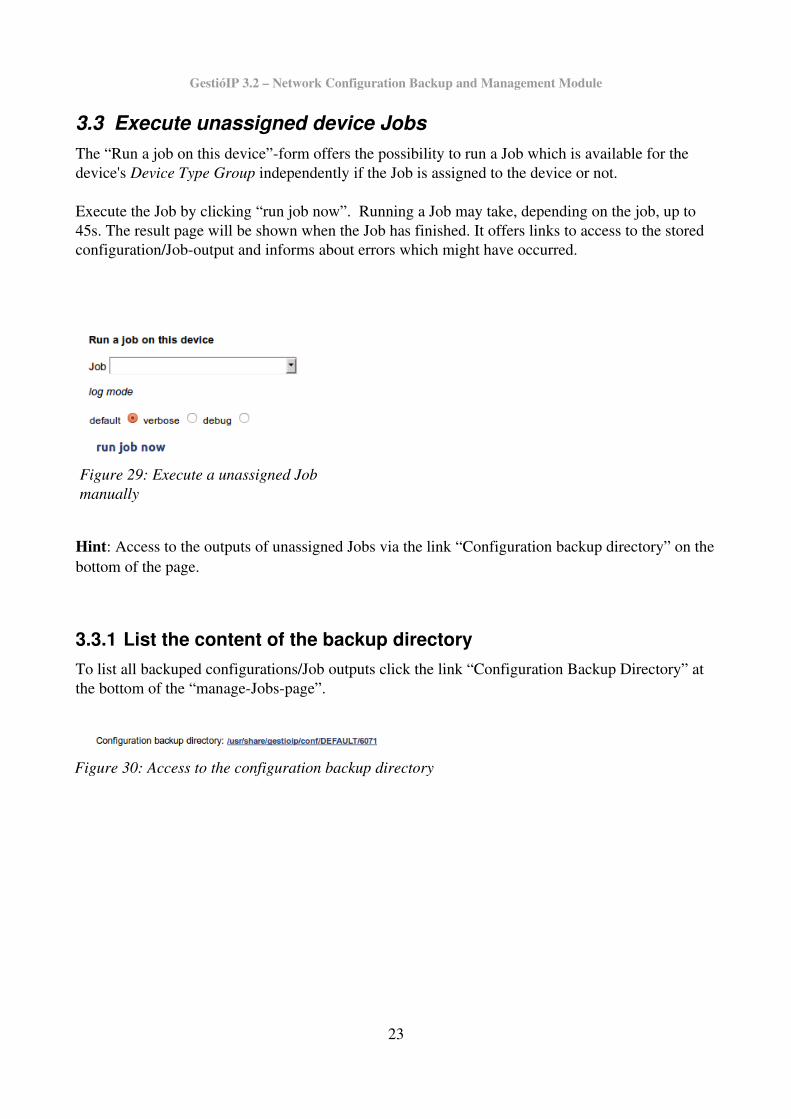
3.3 Execute unassigned device JobsThe “Run a job on this device”form offers the possibility to run a Job which is available for the device's Device Type Group independently if the Job is assigned to the device or not.
Execute the Job by clicking “run job now”. Running a Job may take, depending on the job, up to 45s. The result page will be shown when the Job has finished. It offers links to access to the stored configuration/Joboutput and informs about errors which might have occurred.
Hint: Access to the outputs of unassigned Jobs via the link “Configuration backup directory” on thebottom of the page.
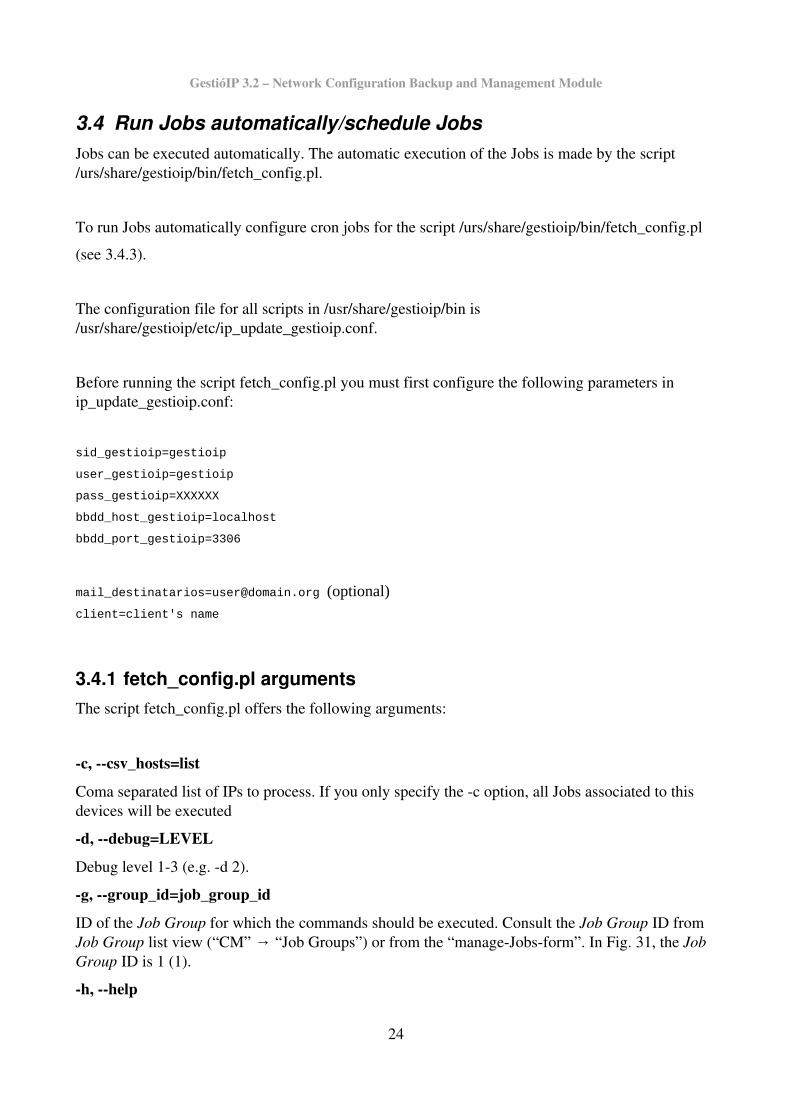
3.3.1 List the content of the backup directoryTo list all backuped configurations/Job outputs click the link “Configuration Backup Directory” at the bottom of the “manageJobspage”.
23
Figure 29: Execute a unassigned Job manually
Figure 30: Access to the configuration backup directory
GestióIP 3.2 – Network Configuration Backup and Management Module
3.4 Run Jobs automatically/schedule JobsJobs can be executed automatically. The automatic execution of the Jobs is made by the script /urs/share/gestioip/bin/fetch_config.pl.
To run Jobs automatically configure cron jobs for the script /urs/share/gestioip/bin/fetch_config.pl
(see 3.4.3).
The configuration file for all scripts in /usr/share/gestioip/bin is /usr/share/gestioip/etc/ip_update_gestioip.conf.
Before running the script fetch_config.pl you must first configure the following parameters in ip_update_gestioip.conf:
sid_gestioip=gestioip
user_gestioip=gestioip
pass_gestioip=XXXXXX
bbdd_host_gestioip=localhost
bbdd_port_gestioip=3306
[email protected] (optional)client=client's name
3.4.1 fetch_config.pl argumentsThe script fetch_config.pl offers the following arguments:
c, csv_hosts=list
Coma separated list of IPs to process. If you only specify the c option, all Jobs associated to this devices will be executed
d, debug=LEVEL
Debug level 13 (e.g. d 2).
g, group_id=job_group_id
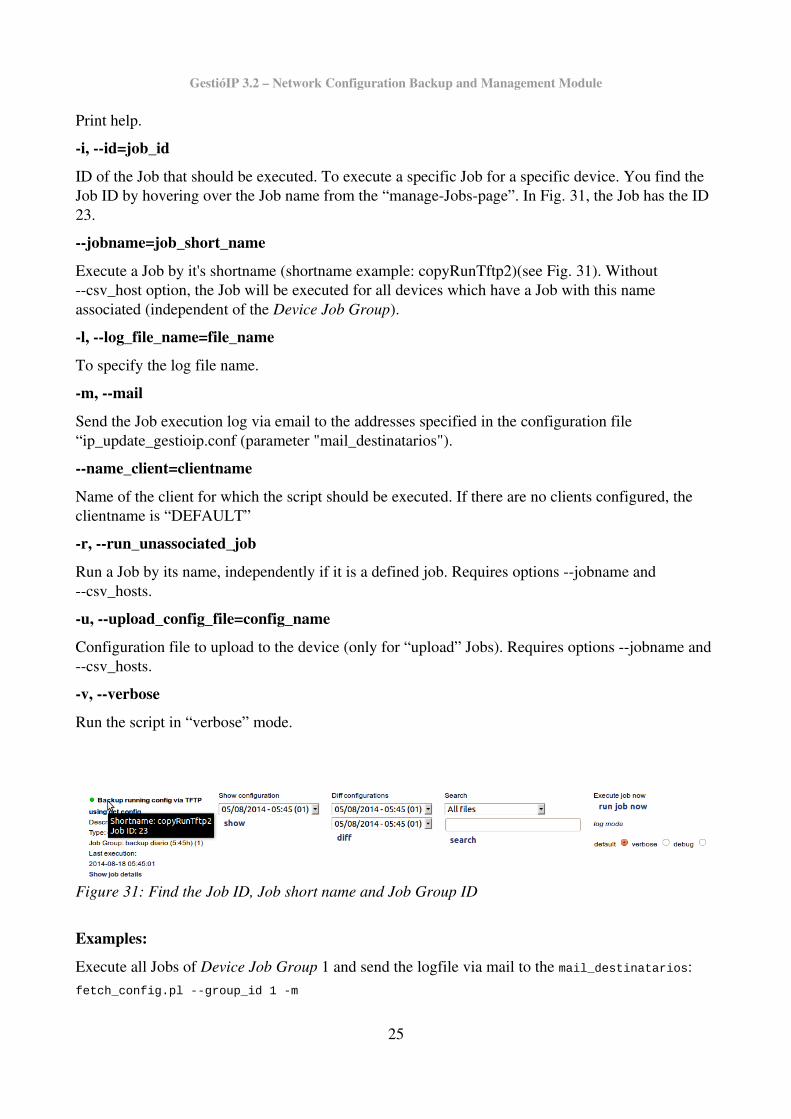
ID of the Job Group for which the commands should be executed. Consult the Job Group ID from Job Group list view (“CM” “Job Groups”) or from the “manageJobsform”. In Fig. → 31, the Job Group ID is 1 (1).
h, help
24
GestióIP 3.2 – Network Configuration Backup and Management Module
Print help.
i, id=job_id
ID of the Job that should be executed. To execute a specific Job for a specific device. You find the Job ID by hovering over the Job name from the “manageJobspage”. In Fig. 31, the Job has the ID 23.
jobname=job_short_name
Execute a Job by it's shortname (shortname example: copyRunTftp2)(see Fig. 31). Without csv_host option, the Job will be executed for all devices which have a Job with this name associated (independent of the Device Job Group).
l, log_file_name=file_name
To specify the log file name.
m, mail
Send the Job execution log via email to the addresses specified in the configuration file “ip_update_gestioip.conf (parameter "mail_destinatarios").
name_client=clientname
Name of the client for which the script should be executed. If there are no clients configured, the clientname is “DEFAULT”
r, run_unassociated_job
Run a Job by its name, independently if it is a defined job. Requires options jobname and csv_hosts.
u, upload_config_file=config_name
Configuration file to upload to the device (only for “upload” Jobs). Requires options jobname and csv_hosts.
v, verbose
Run the script in “verbose” mode.
Examples:
Execute all Jobs of Device Job Group 1 and send the logfile via mail to the mail_destinatarios:fetch_config.pl --group_id 1 -m
25
Figure 31: Find the Job ID, Job short name and Job Group ID

GestióIP 3.2 – Network Configuration Backup and Management Module
Execute a specific Job for a specific device by the Job ID in “verbose” mode:fetch_config.pl --id 33 -v
Run all associated Jobs with the name “copyRunTftp” (on all devices which have this Job associated):fetch_config.pl --name copyRunTftp
Run a Job on a device which is not associated with the device (but defined for device's Device TypeGroup):fetch_config.pl --csv_hosts 192.168.32.8 --jobname copyRunTftp --run_unassociated_job
Run all Jobs which are associated with the specified devices:fetch_config.pl --csv_hosts 192.168.32.8,192.168.55.4,10.3.20.9
3.4.2 logfiles fetch_config.plEvery run of fetch_config.pl creates a logfile. The logfiles are stored in /usr/share/gestioip/var/log.
Example:
20140821101642_1_fetch_config.log – logfile from 21/08/2014 10:16:42
Running the script with the v (verbose) option creates an additional logfile which holds the output of the device. This may be useful for troubleshooting purposes. This additional log files terminatingin “_stdout” (20140821101629_1_fetch_config.log_stdout).
Hint: Create a cronjob to delete old logfiles:35 3 * * * find /usr/share/gestioip/var/log -type f -mtime +30 -delete > /dev/null 2>&1
This cronjob will delete every day at 3:35h all files from the log directory which are older than 30 days.
3.4.3 Configure cron jobsTo execute the Jobs automatically you need to configure conjobs.
Example:
Configuration of a cron job which runs all Jobs of the Device Job Group with ID “1” and sends the Job execution report via mail every day at 05:45h am.
45 5 * * * /usr/share/gestioip/bin/fetch_config.pl -g 1 -m >/dev/null 2>&1
Note: the execution of fetch_config.pl for one Job takes normally about 1015s per Job. Count with
26
GestióIP 3.2 – Network Configuration Backup and Management Module
around 20 minutes for 100 Jobs or around 3,5 hours for 1000 Jobs. To speed up the execution you can define multiple Job Groups and run an instances of fetch_config for each Job Group in parallel.
Example:
If you want to run backup Jobs for 3000 devices create three different Job Groups (e.g. backup1 (ID: 6), backup2 (ID: 7) and backup3 (ID: 8)), assign 1000 Jobs to each Job Group and create a cron job for each Job Group.
15 3 * * * /usr/share/gestioip/bin/fetch_config.pl -g 6 -m >/dev/null 2>&1
15 3 * * * /usr/share/gestioip/bin/fetch_config.pl -g 7 -m >/dev/null 2>&1
15 3 * * * /usr/share/gestioip/bin/fetch_config.pl -g 8 -m >/dev/null 2>&1
3.5 Bulk changesThe CM Module allows to execute bulk changes for multiple devices. The bulk changes can only beexecuted from the command line by running the script fetch_config.pl.
To execute a bulk change you need to:
1. Create the adequate Jobs which should be executed.
2. Create a Job Group to group the Jobs to execute them together.
3. Assign the Job and the Device Job Group to the devices
4. Execute fetch_config.pl with the “g” (jobgroupid) – option from command line (see 3.4).
Example: Change the SNMP RO community string of multiple devices running Cisco IOS:
1. Create an adequate Job (in the XML file 1_cisco_ios.xml):
<changeSnmpRoCommunity>
<comment>Change SNMP RO community string</comment>
<jobType>task</jobType>
<command>conf t</command>
<return>(config)#</return>
<command>no snmp-server community public RO</command>
<return>(config)#</return>
<command>snmp-server community XXXX RO</command>
<return>(config)#</return>
<command>exit</command>
27

GestióIP 3.2 – Network Configuration Backup and Management Module
<return>[[ENABLE_PROMPT]]</return>
</changeSnmpRoCommunity>
2. Create a Job Group (“CM” “Job Groups”) (see → 2.2.3).
3. Assign the Job and the Device Job Group to the devices. You can use the massupdate feature forthis task (see 2.4.2).
4. Run fetch_config.pl from the command line (replace GID by the Job Group ID).$ /usr/share/gestioip/fetch_config.pl -g GID
5. Delete the password from the XML file.
4 XML files/Device Type GroupsThe XML files define the Device Type Group values for a device model. All Device Type Group specific configuration is made within the XML files.
The XML files define parameters like devices prompts, global commands like the “pager disable command” and the Jobs for the specific Device Type Group.
GestióIP comes with a several predefined XML files. If there is no XML file for your device model available you can create your own XML files (see 4.3).
The XML files are located in /usr/share/gestioip/var/devices/.
4.1 XML files parametersThe XML files offer the following attributes:
Main container
<deviceGroupValues>
Device Type Group Name - this value will be displayed in the Device Type Group select boxof the Web interface
Mandatory
<deviceGroupName>Cisco IOS</deviceGroupName>
Device Group ID - Internal ID of the Device Group - must be identical with XML file's serial number e.g. 17_MyOS.xml -> XML file's serial number = Device Type Group ID = 17
Device Type Group ID must be unique for every Device Type Group
Mandatory
28
GestióIP 3.2 – Network Configuration Backup and Management Module
<deviceGroupID>1</deviceGroupID>
List of models for which this XML file is compatible
Optional
<models>IOS,PIX/ASA 7.x/8.x</models>
Login Prompt - prompt which is displayed after login but which does not have
sufficient privileges to execute the commands. Leave this parameter blank if the
commands can be executed directly after logging-in without changing to
“enable”-mode (leave it blank if no command like “enable” is required).
Optional
<loginPrompt>></loginPrompt>
Enable Prompt – privileged prompt of level from which the commands can be executed.
Mandatory
<enablePrompt>#|(enable)</enablePrompt>
In the case that after a successful login appear a message which requires a confirmation instead of the login or enable prompt, configure an expression which matches this messagehere. The message will be confirmed by the fetch_config.pl script with an return
Optional
<loginConfirmationExpr>Terminal type?</loginConfirmationExpr>
Enable command - command to gain the privileges to execute the commands
Mandatory if both parameter <loginPrompt> and <enablePrompt> are set
(leave this parameter blank if only <enablePrompt> is set.
<enableCommand>enable</enableCommand>
Username expression - expression which matches logins 'username: ' string. The value of [[GENERIC_USERNAME_EXPR]] should match for most devices and needs normally not to be changed
Optional
<usernameExpr>[[GENERIC_USERNAME_EXPR]]</usernameExpr>
Password expression - expression which matches logins 'password: ' string . The value [[GENERIC_PASSWORD_EXPR]] should match for most devices and need normally not be changed
Optional
<passwordExpr>[[GENERIC_PASSWORD_EXPR]]</passwordExpr>
Logout Command - command to logout from the remote session
Mandatory
<logoutCommand>exit</logoutCommand>
29
GestióIP 3.2 – Network Configuration Backup and Management Module
Pager expression - Expression which indicates that there will come more command output
Optional
<pagerExpr>--More--</pagerExpr>
Pager Disable command - command to disable paging
Optional (Because some devices do not use paging. For devices which have paging enabled it is mandatory)
<pagerDisableCmd>terminal length 0</pagerDisableCmd>
Unsaved changes question - Expression that matches the question if the unsaved configuration changes should be saved before logging out
Optional
<unsavedChangesMessage>The system has unsaved changes|Would you like to save them now|Do you wish to save your configuration changes</unsavedChangesMessage>
Definition of the Jobs for the devices of this Device Type Group
<jobs>
Job short name - arbitrary Job name
Mandatory
<copyRunTftp>
Job comment - this value will be displayed in the "Job" select box of the Web interface
Mandatory
<comment>Backup running config via TFTP</comment>
Job Type – This attributes determines how the Job will be internally processed.
There are four Job Types available:
copy_file – Use this value if the Job should copy a configuration/a file from the device to the server. Example: backup the configuration of a device via FTP or TFTP.
fetch_command_output – Use this value if the Job should execute a command on the device and store the command's output. Example: fetch and store the output of the command “show arp”
task – Use this value if the Job should execute a command on the device without storing the command output. Example: bulk-change to change the password for multiple devices
copy_local – to copy a file which is already saved on the Backup Server locally to the backup directory. To integrate configuration files which can not be fetched by GestióIP within the Configuration Management Module. copy_local Jobs do not connect to the devicesnor execute commands on the devices. copy_local Jobs do only accept the attributes <comment>, <jobType>, <localSourceFile> and <localSourceCommand>. See 25_juniper_ive.xml and 35_pfsense.xml for examples.
copy_local allows also to executes local scripts:
Example:
#
30

GestióIP 3.2 – Network Configuration Backup and Management Module
<localSourceCommand>/usr/share/gestioip/bin/create_pfsense_backup.sh</localSourceCommand>
Would execute the command create_pfsense_backup.sh . The script downloads the configuration and copies it to a by parameter specified location . fetch_config.pl executes the script with the following arguments: device_ip backup_file_name user_name login_pass
NOTE: Upload Jobs (jobs which copy configurations from the backup server to the device, for example to restore a backuped configuration) MUST have the jobType “task”
Mandatory
<jobType>copy_file</jobType>
Saved configuration may only differ with actual configuration in an "unimportant" string like "saved_cfg_timestamp ...."
This option allows to configure a string which match lines which should not be compared when determining if the configuration has changed.
Optional
<diffConfigIgnore>saved_cfg_timestamp</diffConfigIgnore>
Command timeout - will replace the default command execution timeout of 92s
<commandTimeout>120</commandTimeout>
Backup file Extension - if you want to save the file with a specific extension (eg. tar.gz)on the Backup Server. Depending on the Job Type, the file will be automatically stored with the extension ".conf" (type "copy_file") or ".txt" (type "fetch_command_output"), independently of the extension of the original config file. Use this option to force the backupfile to be stored on the server with another extension than .conf or .txt.
Optional
<configExtension>tar.gz</configExtension>
The Date format parameter allows to specify the format of the date which should replace the [[DATE]] variable.
Supported date specifiers:
%d - Day of the month, zero-padded (01-31)
%H - Hour in 24h format (00-23)
%I - Hour in 12h format (01-12)
%m - Month as a decimal number (01-12)
%M - Minute (00-59)
%y - Year, last two digits (00-99)
%Y - Year, four digits (2014)
Example: with <dateFormat> set to "Y%m%d", ipso-backup_[[DATE]].tar.gz will be translatedto ipso-backup_20140425.tar.gz.
31
GestióIP 3.2 – Network Configuration Backup and Management Module
Optional
<dateFormat>%Y%m%d</dateFormat>
Name of the configuration file on the device. Normally the destination file will be specified with the [[CONFIG_NAME]] variable (e.g. “copy configs/device_cm.cfg tftp://[[SERVER_IP]]/[[CONFIG_NAME]]”). In the case that the device does not permit to specify the destination file name you must indicate the name of the configuration file which willbe copied to the device with the [[DEST_CONFIG_NAME]] variable. (e.g. “set backup remote manual [[DEST_CONFIG_NAME]] ftp-passwd [[SERVER_PASSWORD]]”).
[[DEST_CONFIG_NAME]] variable will be replaced by the value of the <destConfigName>-attribute.
Optional
<destConfigName>ipso-backup_[[DATE]].tgz</destConfigName>
You can use the following variables within the <command> and <return> attributes:
[ENABLE_PROMPT]] - Will be replaced by the enable prompt (which is defined above (enablePrompt))
[[CONFIG_NAME]] - Will be replaced by the correct name under which the configuration willbe stored on the Backup Server (dest file)
[[SERVER_IP]] - Will be replaced by the Backup Server's IP address
[[SERVER_USERNAME]] - Will be replaced by the Backup server's username
[[SERVER_PASSWORD]] - Will be replaced by the Backup server's password
[[UPLOAD_CONFIG_NAME]] - Will be replaced by the filename of the configuration or file which should be uploaded to a device (only required for configuration “upload” or file "upload" jobs)
[[DEVICE_USERNAME]] - Will be replaced by the username (as defined in the Device User Group)
[[IGNORE_ERRORS]] - The default behavior is that the command execution is stopped when a command output matches an error expression. Add this variable to a command, if the command execution should NOT be stopped after an error expression match.
Example: <command>delete configs/device_cm.cfg[[IGNORE_ERRORS]]</command>
[[SLEEPsss]] - Wait sss seconds after executing the command. This value can ONLY be used within the <command> attribute.
Example: <command>copy config backup server[[SLEEP60]]</command> - Wait 60s before executing the next command which comes after "copy config backup server"
[[FILE_CONTENT:/path/ascii_file]] - Will be replaced with the content of "/path/ascii_file"
[[DATE]] - Will be replaced by the date in the format specified in the <dateFormat></dateFormat> attribute. This variable can only be used within the <command> or <destConfigName> attribute. Requires the <dateFormat></dateFormat> attribute
[[DEST_CONFIG_NAME]] - Will be replaced by the value of the <destConfigName>-attribute
List of commands and returns
command – command which should be executed on the device
32
GestióIP 3.2 – Network Configuration Backup and Management Module
<command>copy running-config tftp:</command>
return – expression which matches the expected return from the executed command
<return>Address or name of remote host</return>
Example: Copy the running configuration of a Cisco IOS device to a TFTP server
<command>copy running-config tftp:</command>
<return>Address or name of remote host</return>
<command>[[SERVER_IP]]</command>
<return>Destination filename</return>
<command>[[CONFIG_NAME]]</command>
<return>!!\r*\n*.*bytes copied.*</return>
4.1.1 Using wildcards/special charactersThe XML attributes support wildcards. This is especially useful when creating the <return> expression, but wildcards can be used with any other attribute, too.
The following characters can be used as wildcards:
. (any character except newline)
* (match 0 or more times)
+ (match 1 or more times)
? (match 0 or 1 times)
\r\n (matches newline)
If you want to match for one of this characters you need to escape them.
Examples:
Expression/characters to match matchexpression
? \?
Transfer successful. Transfer successful\.
newline \r\n (use always \r\n together)
!! !!\r*\n*.*bytes copied.*
33
GestióIP 3.2 – Network Configuration Backup and Management Module
1030 bytes copied in 2.489 secs (395 bytes/sec)
Use the pipe “|” character to specify alternative expressions.
Example:<enablePrompt>#|(enable)</enablePrompt>
will match prompts likeSwitch-A> (enable)
or Switch-A#
4.2 Create new Jobs for an existing Device Type GroupTo create new Jobs for an existing Device Type Group open the XML file for this group with your favorite editor and add the new Job in the “Job” section of the file.
Mandatory parameters are the arbitrary Jobname, the JobType, the comment and at least one command and one return. A “command” attribute must always be followed by by a “return” attribute (number of commands and returns must be the same). See 4.1 for a full list of the availableparameters.
To best method to determine the commands and returns is to execute the commands which should be executed by the Job manually and create the commands and returns on the basis of the output of the commands.
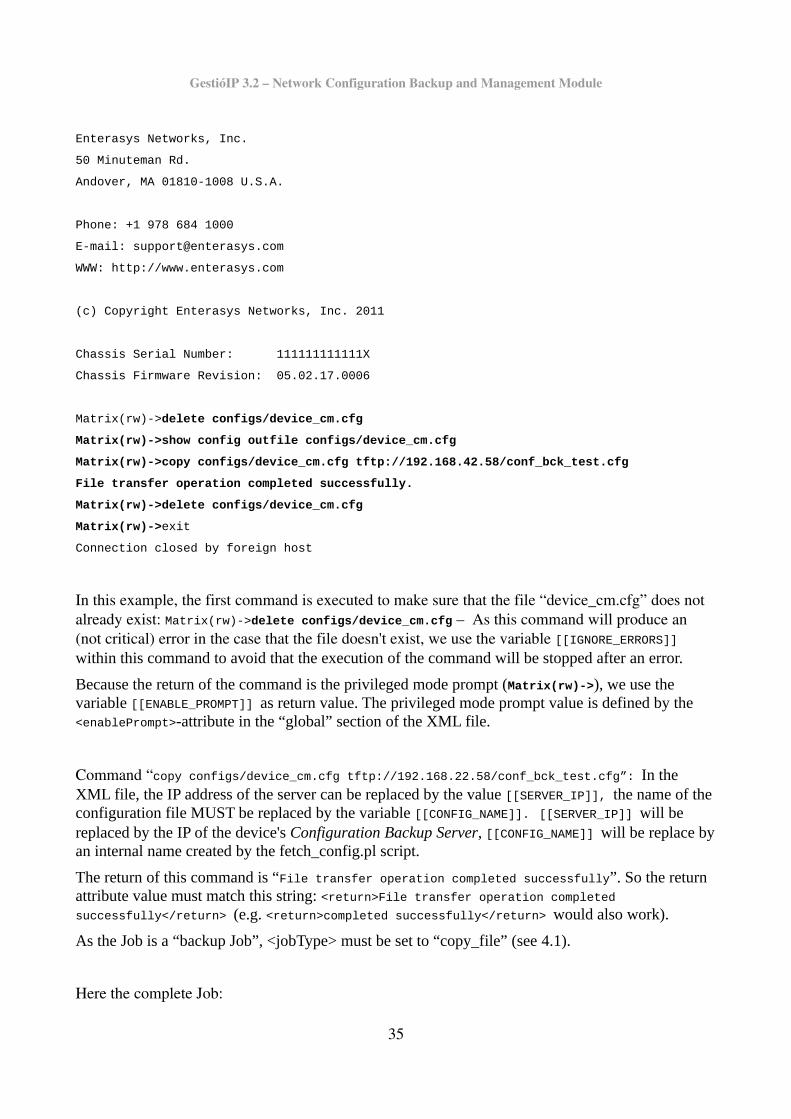
Example 1: create a backup Job for an Enterasys Matrix device
$ telnet 192.168.30.35
Trying 192.168.30.35...
Connected to 192.168.30.35.
Escape character is '^]'.
Username:admin
Password:********
Enterasys SecureStack C2
Command Line Interface
34
GestióIP 3.2 – Network Configuration Backup and Management Module
Enterasys Networks, Inc.
50 Minuteman Rd.
Andover, MA 01810-1008 U.S.A.
Phone: +1 978 684 1000
E-mail: [email protected]
WWW: http://www.enterasys.com
(c) Copyright Enterasys Networks, Inc. 2011
Chassis Serial Number: 111111111111X
Chassis Firmware Revision: 05.02.17.0006
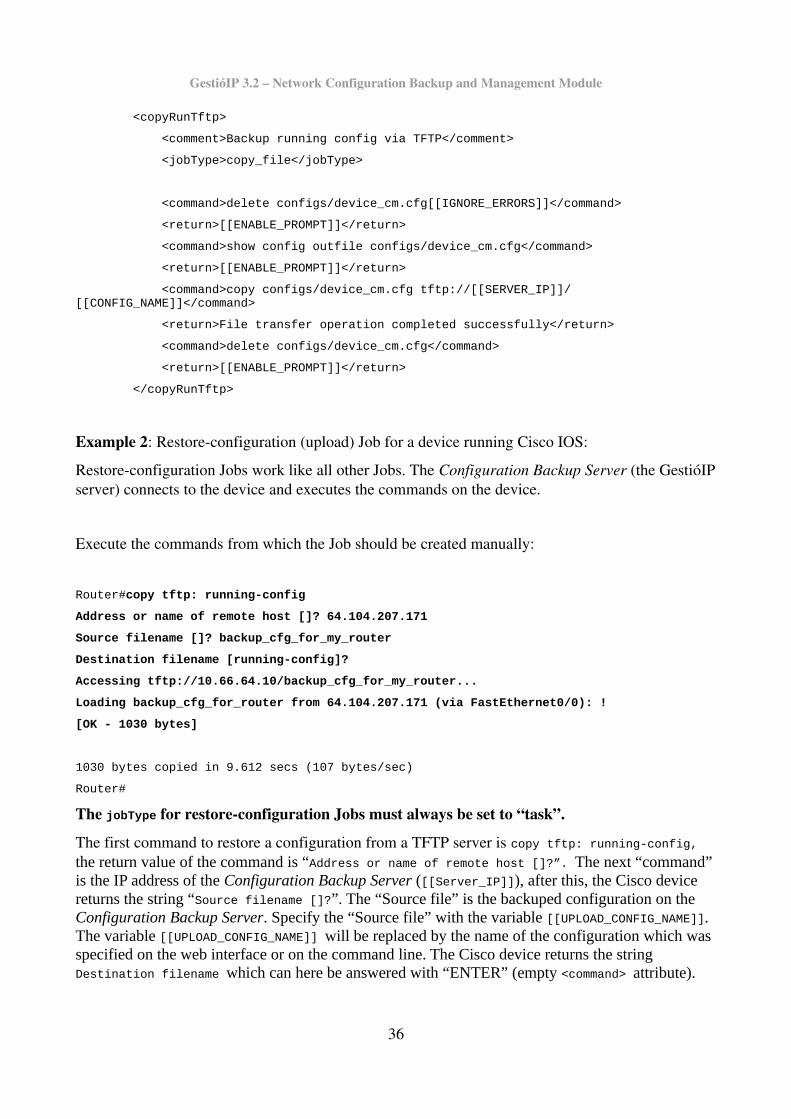
Matrix(rw)->delete configs/device_cm.cfg
Matrix(rw)->show config outfile configs/device_cm.cfg
Matrix(rw)->copy configs/device_cm.cfg tftp://192.168.42.58/conf_bck_test.cfg
File transfer operation completed successfully.
Matrix(rw)->delete configs/device_cm.cfg
Matrix(rw)->exit
Connection closed by foreign host
In this example, the first command is executed to make sure that the file “device_cm.cfg” does not already exist: Matrix(rw)->delete configs/device_cm.cfg – As this command will produce an (not critical) error in the case that the file doesn't exist, we use the variable [[IGNORE_ERRORS]] within this command to avoid that the execution of the command will be stopped after an error.
Because the return of the command is the privileged mode prompt (Matrix(rw)->), we use the variable [[ENABLE_PROMPT]] as return value. The privileged mode prompt value is defined by the <enablePrompt>-attribute in the “global” section of the XML file.
Command “copy configs/device_cm.cfg tftp://192.168.22.58/conf_bck_test.cfg”: In the XML file, the IP address of the server can be replaced by the value [[SERVER_IP]], the name of the configuration file MUST be replaced by the variable [[CONFIG_NAME]]. [[SERVER_IP]] will be replaced by the IP of the device's Configuration Backup Server, [[CONFIG_NAME]] will be replace byan internal name created by the fetch_config.pl script.
The return of this command is “File transfer operation completed successfully”. So the return attribute value must match this string: <return>File transfer operation completed successfully</return> (e.g. <return>completed successfully</return> would also work).
As the Job is a “backup Job”, <jobType> must be set to “copy_file” (see 4.1).
Here the complete Job:
35
GestióIP 3.2 – Network Configuration Backup and Management Module
<copyRunTftp>
<comment>Backup running config via TFTP</comment>
<jobType>copy_file</jobType>
<command>delete configs/device_cm.cfg[[IGNORE_ERRORS]]</command>
<return>[[ENABLE_PROMPT]]</return>
<command>show config outfile configs/device_cm.cfg</command>
<return>[[ENABLE_PROMPT]]</return>
<command>copy configs/device_cm.cfg tftp://[[SERVER_IP]]/[[CONFIG_NAME]]</command>
<return>File transfer operation completed successfully</return>
<command>delete configs/device_cm.cfg</command>
<return>[[ENABLE_PROMPT]]</return>
</copyRunTftp>
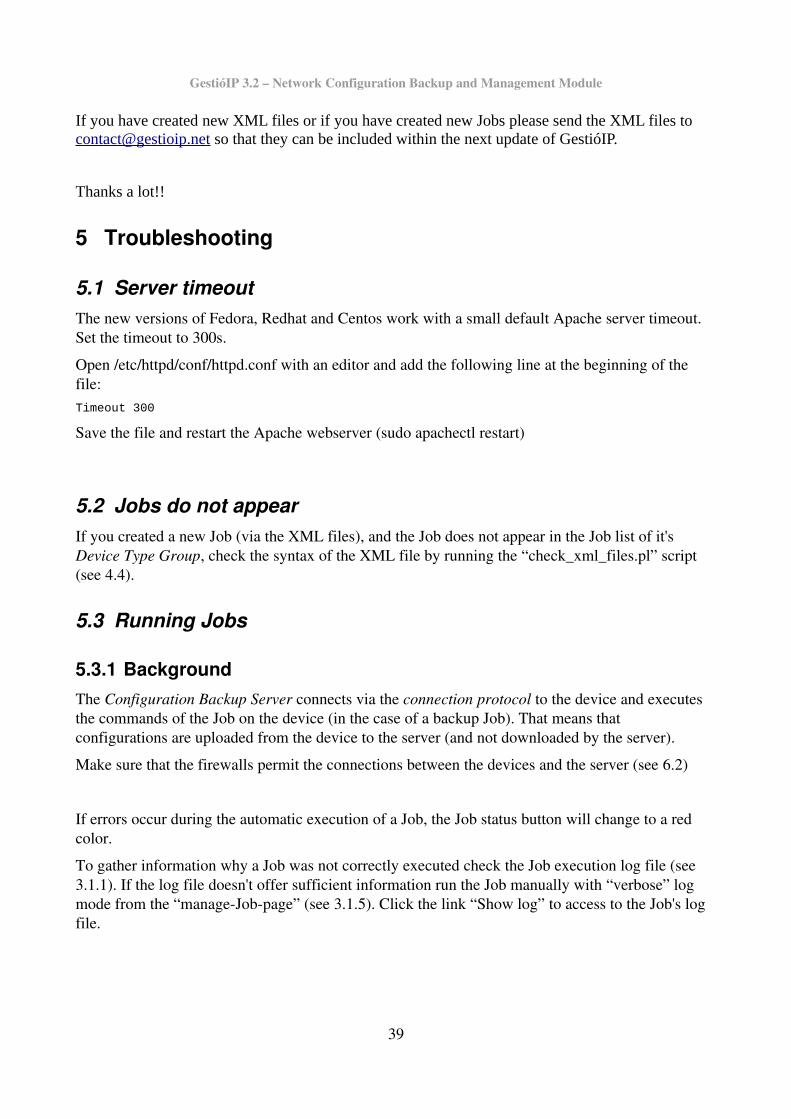
Example 2: Restoreconfiguration (upload) Job for a device running Cisco IOS:
Restoreconfiguration Jobs work like all other Jobs. The Configuration Backup Server (the GestióIPserver) connects to the device and executes the commands on the device.
Execute the commands from which the Job should be created manually:
Router#copy tftp: running-config
Address or name of remote host []? 64.104.207.171
Source filename []? backup_cfg_for_my_router
Destination filename [running-config]?
Accessing tftp://10.66.64.10/backup_cfg_for_my_router...
Loading backup_cfg_for_router from 64.104.207.171 (via FastEthernet0/0): !
[OK - 1030 bytes]
1030 bytes copied in 9.612 secs (107 bytes/sec)
Router#
The jobType for restoreconfiguration Jobs must always be set to “task”.
The first command to restore a configuration from a TFTP server is copy tftp: running-config, the return value of the command is “Address or name of remote host []?”. The next “command” is the IP address of the Configuration Backup Server ([[Server_IP]]), after this, the Cisco device returns the string “Source filename []?”. The “Source file” is the backuped configuration on the Configuration Backup Server. Specify the “Source file” with the variable [[UPLOAD_CONFIG_NAME]]. The variable [[UPLOAD_CONFIG_NAME]] will be replaced by the name of the configuration which was specified on the web interface or on the command line. The Cisco device returns the string Destination filename which can here be answered with “ENTER” (empty <command> attribute).
36

GestióIP 3.2 – Network Configuration Backup and Management Module
Here the complete Job: <copyTftpRun>
<comment>Backup running config via TFTP</comment>
<jobType>task</jobType>
<command>copy tftp: running-config</command>
<return>Address or name of remote host</return>
<command>[[SERVER_IP]]</command>
<return>Source filename</return>
<command>[[UPLOAD_CONFIG_NAME]]</command>
<return>Destination filename</return>
<command></command>
<return>OK</return>
</copyTftpRun>
Hint: After editing a XML file run always the script “check_xml_files.pl” which you find in the same directory as the XML files to check the XML file's syntax (see 4.4).
4.3 Create XML files/Create Device Type GroupsThe easiest way to create a new Device Type Group (a new XML file) is to copy an existing one and adapt it to the device's model specific parameters.
Give the XMLfile a significant name to be able to identify easily which Device Type Group is defined by this file (Example: 1_cisco_ios.xml for devices running Cisco IOS). The serial number must be unique and must be the same as the <deviceGroupID> attribute ( 1_cisco_ios.xml => <deviceGroupID>1</deviceGroupID>).
If you create new XML files use always serial numbers > 1000. This makes sure that new XML files which are included in the updates will not conflict with the serial numbers of self created XMLfiles.
Adapt the Device Type Group's global variables like <enablePrompt> and create the required Jobs (see 4.2).
The XML file must have the extension .xml.
4.4 Check XML files syntaxTo check the syntax of the XML files run the script “check_xml_files.pl” which you find in the
37

GestióIP 3.2 – Network Configuration Backup and Management Module
same directory as the XML files (/usr/share/gestioip/var/devices/check_xml_files.pl).
Run the script always after editing or creating a XML file.
Execute the script without arguments to check all XML files or specify a XML file as argument to check a specific file.
Example:$ /usr/share/gestioip/var/devices/check_xml_files.pl 19_f5_bigip.xml
Checking 19_f5_bigip.xml...
copyScfFtp: OK
>>>>>>ERROR: Job: copyUscScp: no jobType defined - Job will be ignored
copyScfFtpExport: OK
copyScfScp: OK
19_f5_bigip.xml OK
$
Note: The check_xml_files.pl script only checks the syntax of the XML file and not the syntax of the commands which should be executed on the device.
4.4.1 SupportThe project provides support for defining new Jobs and for the creation of new XML files.
If you have trouble creating XML files or define new Jobs send a mail to [email protected].
The mail with the support request MUST include the following information:
• The device vendor, model and OS/firmware version.
• The copy of the complete output of the session (from login to logout) with the successful execution of the commands of which the new Job should be created from (see session example in 4.2).
If you already have created the Job, execute it from the “ManageJobspage” in verbose mode and include also
• The XMLfile with the new Job which you have created.
• The two execution log files of the last run of the Job in verbose mode (….fetch_config.log and ....fetch_config.log_stdout)(see 3.4.2). To obtain the log files, execute the Job in verbosemode from the “manageJobspage” (see 3.3) or execute the Job from commadline (see 3.4).
4.4.2 Share your XML filePlease share your XML files.
38
GestióIP 3.2 – Network Configuration Backup and Management Module
If you have created new XML files or if you have created new Jobs please send the XML files to [email protected] so that they can be included within the next update of GestióIP.
Thanks a lot!!
5 Troubleshooting
5.1 Server timeoutThe new versions of Fedora, Redhat and Centos work with a small default Apache server timeout. Set the timeout to 300s.
Open /etc/httpd/conf/httpd.conf with an editor and add the following line at the beginning of the file:Timeout 300
Save the file and restart the Apache webserver (sudo apachectl restart)
5.2 Jobs do not appearIf you created a new Job (via the XML files), and the Job does not appear in the Job list of it's Device Type Group, check the syntax of the XML file by running the “check_xml_files.pl” script (see 4.4).
5.3 Running Jobs
5.3.1 BackgroundThe Configuration Backup Server connects via the connection protocol to the device and executes the commands of the Job on the device (in the case of a backup Job). That means that configurations are uploaded from the device to the server (and not downloaded by the server).
Make sure that the firewalls permit the connections between the devices and the server (see 6.2)
If errors occur during the automatic execution of a Job, the Job status button will change to a red color.
To gather information why a Job was not correctly executed check the Job execution log file (see3.1.1). If the log file doesn't offer sufficient information run the Job manually with “verbose” log mode from the “manageJobpage” (see 3.1.5). Click the link “Show log” to access to the Job's log file.
39

GestióIP 3.2 – Network Configuration Backup and Management Module
Hint: You also can also run fetch_config.pl manually from the command line (see 3.4).
If a Job which was executed manually from the “manageJobspage” runs in a timeout (resultpage does not load), this is probably a problem with the Job definition in th XML file. To debug this problem consult the logfiles (/usr/share/gestioip/var/log) and run check_xml_files.pl (see 4.4).
40
Figure 32: Job execution failed

GestióIP 3.2 – Network Configuration Backup and Management Module
6 Configuration Backup ServerThe Configuration Backup Server is always the server with the GestióIP installation.
Make sure that there is enough disk space available.
To receive configurations/command outputs there must be the adequate server software (FTP/TFTP/SSH server) on the GestióIP server installed and running.
Examples for Backup Server software:
FTP – vsftpd
TFTP tftpd
SCP – openssh
This servers are for all Linux distributions as package available.
6.1 Installation of the FTP, TFTP and SSH (SCP) server softwareThe installation of the server software can be made with the distribution specific packet manager. After the installation the owner and the permissions of the server root directory must be set.
Server Document Root Owner Document Root permissions
FTP ftp_backup_user:apache_server_group 770
TFTP tftp_server_user:apache_server_group 770
SSH (SCP) scp_backup_user:apache_server_group 770
6.1.1 Debian/UbuntuWorking with Ubuntu 14.04.
6.1.1.1 FTP server
Install the FTP serversudo apt-get install vsftpd
Create the server root directory (if not exists)sudo mkdir /srv/ftp
41
GestióIP 3.2 – Network Configuration Backup and Management Module
Create a user to connect to the serversudo useradd -G www-data -d /srv/ftp gestioip-bck
sudo passwd gestioip-bck
Change the owner and the permissions of the server root directorysudo chown gestioip-bck:www-data /srv/ftp/
sudo chmod 770 /srv/ftp/
Open /etc/vsftpd.conf with an editor and configure the following parameters:pam_service_name=ftp
listen=YES
local_enable=YES
local_umask=0002
anonymous_enabled=NO
write_enable=YES
Restart the FTP serversudo service vsftpd restart (>=12.04)
sudo /etc/init.d/vsftpd restart (10.04)
GestióIP Configuration Backup Server configuration:
Backup protocol: ftp
Server root directory: /srv/ftp
Username: gestioipbck
6.1.1.2 TFPT server
Install the TFTP serversudo apt-get install xinetd tftpd tftp
Create the configuration file /etc/xinetd.d/tftp with the following content (sudo vi /etc/xinetd.d/tftp):
service tftp
{
protocol = udp
42

GestióIP 3.2 – Network Configuration Backup and Management Module
port = 69
socket_type = dgram
wait = yes
user = nobody
server = /usr/sbin/in.tftpd
server_args = /var/lib/tftpboot -s
disable = no
}
Create the server root directory:sudo mkdir /var/lib/tftpboot
sudo chgrp -R www-data /var/lib/tftpboot
sudo chmod -R 775 /var/lib/tftpboot
Restart the TFTP server (vía xinetd):sudo service xinetd stop
sudo service xinetd start
GestióIP Configuration Backup Server configuration:
Backup protocol: tftp
Server root directory: /var/lib/tftpboot
6.1.1.3 SSH (SCP) server
If not already installed, install the openssh serversudo apt-get install openssh-server
Create the server root directory:sudo mkdir -p /home/gestioip-scp-bck/gestioip-backup
Create a user to connect to the server:sudo useradd -d /home/gestioip-scp-bck gestioip-scp-bck
sudo usermod -G www-data gestioip-scp-bck
sudo passwd gestioip-scp-bck
Change owner and permissions of the server root directory:sudo chown -R gestioip-scp-bck:www-data /home/gestioip-scp-bck
43
GestióIP 3.2 – Network Configuration Backup and Management Module
sudo chmod -R 770 /home/gestioip-scp-bck/
GestióIP Configuration Backup Server configuration:
Backup protocol: scp
Server root directory: /home/gestioipscpbck/gestioipbackup
Username: gestioipscpbck
6.1.2 OpenSuse
6.1.2.1 FTP server
Install the FTP server:sudo zypper install vsftpd xinetd
Edit /etc/xinetd.d/vsftpd: set “disable” to “no”.disable = no
Create a user to connect to the server:sudo /usr/sbin/useradd -d /srv/ftp gestioip-bck
sudo passwd gestioip-bck
Change the owner of the server root directory:sudo chown gestioip-bck:www /srv/ftp/
sudo chmod g+w /srv/ftp/
Open /etc/vsftpd.conf with an editor and configure the following parameters:pam_service_name=vsftpd
listen=NO
write_enable=YES
local_enable=YES
local_umask=0002
anonymous_enable=NO
Enable xinetd:sudo chkconfig xinetd on
44

GestióIP 3.2 – Network Configuration Backup and Management Module
Restart the TFTP server (via xinetd):sudo /usr/sbin/rcxinetd restart
GestióIP Configuration Backup Server configuration:
Backup protocol: ftp
Server root directory: /srv/ftp
Username: gestioipbck
6.1.2.2 TFTP server
Install the TFTP server with YAST2 (will install xinetd, too) or with zypper:zypper install tftp yast2-tftp-server xinetd
Edit /etc/xinetd.d/tftp: set “disable” to “no”.disable = no
Change ownership and set permissions for the server root directory:sudo chgrp -R www /srv/tftpboot
sudo chmod 775 /srv/tftpboot
Enable xinetd:sudo chkconfig xinetd on
Restart the TFTP server (via xinetd):
sudo /usr/sbin/rcxinetd restart
GestióIP Configuration Backup Server configuration:
Backup protocol: tftp
Server root directory: /srv/tftpboot
6.1.2.3 SSH (SCP) server
If not already installed, install the openssh server and start it:
45

GestióIP 3.2 – Network Configuration Backup and Management Module
sudo zypper install openssh
sudo service sshd start
Create the server root directory:sudo mkdir -p /home/gestioip-scp-bck/gestioip-backup
Create a user to connect to the server:sudo /usr/bin/useradd -d /home/gestioip-scp-bck gestioip-scp-bck
sudo /usr/sbin/usermod -G www gestioip-scp-bck
sudo passwd gestioip-scp-bck
Change owner and permissions of the server root directory:sudo chown -R gestioip-scp-bck:www /home/gestioip-scp-bck
sudo chmod -R 770 /home/gestioip-scp-bck/
GestióIP Configuration Backup Server configuration:
Backup protocol: scp
Server root directory: /home/gestioipscpbck/gestioipbackup
Username: gestioipscpbck
6.1.3 Fedora/Redhat/CentOS
6.1.3.1 FTP server
Install the FTP server:sudo yum install vsftpd
Create the server root directory (if not exists):sudo mkdir /srv/ftp
Create a user to connect to the server:sudo /usr/sbin/useradd -d /srv/ftp gestioip-bck
sudo passwd gestioip-bck
46
GestióIP 3.2 – Network Configuration Backup and Management Module
Change the owner of the server root directory:sudo chown gestioip-bck:apache /srv/ftp/
sudo chmod g+w /srv/ftp/
Open /etc/vsftpd/vsftpd.conf with an editor and configure the following parameters:pam_service_name=vsftpd
listen=YES
write_enable=YES
local_enable=YES
local_umask=0002
anonymous_enable=NO
Enable the FTP server on boot and start the FTP server:
Fedorasudo systemctl enable vsftpd.service
sudo systemctl start vsftpd.service
Redhat/Centossudo service vsftpd restartsudo chkconfig vsftpd on
GestióIP Configuration Backup Server configuration:
Backup protocol: ftp
Server root directory: /srv/ftp
Username: gestioipbck
6.1.3.2 TFPT server
Install the TFTP server:sudo yum install tftp-server
Edit /etc/xinetd.d/tftp: set “disable” to “no”.disable = no
Change ownership and set permissions for the server root directory:sudo chgrp -R apache /var/lib/tftpboot
sudo chmod -R 775 /var/lib/tftpboot
47

GestióIP 3.2 – Network Configuration Backup and Management Module
Start the tftp service:
Fedorasudo systemctl start xinetd.service
sudo systemctl enable xinetd.service
Redhat/Centossudo service xinetd start
sudo chkconfig xinetd on
GestióIP Configuration Backup Server configuration:
Backup protocol: tftp
Server root directory: /var/lib/tftpboot
6.1.3.3 SSH (SCP) server
If not already installed, install the openssh serversudo yum install openssh-server
Create the server root directory:sudo mkdir -p /home/gestioip-scp-bck/gestioip-backup
Create a user to connect to the server:sudo useradd -d /home/gestioip-scp-bck gestioip-scp-bck
sudo usermod -G apache gestioip-scp-bck
sudo passwd gestioip-scp-bck
Change owner and permissions of the server root directory:sudo chown -R gestioip-scp-bck:apache /home/gestioip-scp-bck/gestioip-backup
sudo chmod -R 770 /home/gestioip-scp-bck/
GestióIP Configuration Backup Server configuration:
Backup protocol: scp
Server root directory: /home/gestioipscp/gestioipbackup
Username: gestioipscpbck
48

GestióIP 3.2 – Network Configuration Backup and Management Module
6.2 FirewallThe firewall must permit that the server can logon to the device (connection protocol) as well as it must permit, that the device can copy it's configuration/the commandoutputs to the server (backup protocol). Make sure that the following connections are allowed by the firewalls.
server device:→ connection protocol
device server:→ backup protocol
Examples:
If the server connects with SSH to the device, the server must be able to reach the device on port 22 (TCP):
server device:22→
If the server connects with TELNET to the device, the server must be able to reach the device on port 23 (TCP):
If the device copies it's configuration via FTP to the server, the device must be able to reach the server on port 21 (TCP)
device server:21→
If the device copies it's configuration via TFTP to the server, the device must be able to reach the server on port 69 (UDP)
device server:69 (UDP)→
GestióIP Copyright © Marc Uebel 2017
49
Related Documents