Using the Self Service BMC Helpdesk IT Department

Using the Self Service BMC Helpdesk IT Department.
Mar 30, 2015
Welcome message from author
This document is posted to help you gain knowledge. Please leave a comment to let me know what you think about it! Share it to your friends and learn new things together.
Transcript

Using the Self Service BMC Helpdesk
IT Department

Overview
• BMC helpdesk is a customizable web-based application solution with an easy-to-use interface.
• This helpdesk application will allow the IT support unit to provide a better service as well as track recurring incidents and generate performance reports.

BMC Helpdesk Features
• User friendly• Browser-based, windows authentication within AUK
domain• Centralized reference: by allowing users to view,
create, update information, and track old tickets.• Self help through the knowledge search engines: it
helps clients to find solutions quickly and easily without calling the helpdesk which saves time and increases satisfaction.
• Receive IT posted messages through Whiteboard feature

Logging in to the AUK BMC Self Service
To log in to the AUK BMC Self Service module, all you must know is the following information:o The URL address of the Self Service module
http://aukhelpdesk.auk.edu.kwo Your client ID and password if you are accessing
the helpdesk from off-campus or from Auk website.• No username and password are required if you
are logged in inside AUK campus, since BMC self service is Windows authenticated, only type http://aukhelpdesk in your browser.

Working with Incidents
Use the Incidents tab for managing incidents:• Create, edit, and close incidents.• Search for and view incidents.

The Incidents tab has two menus:• The menu at the top of the tab provides
access to the following views:– Incidents– Quick Tickets: View and search quick tickets,
and create incidents from them.• The Actions menu provides functions that
you can perform, depending on which view is selected (incidents, or quick tickets)
Working with Incidents

New Incidents
You can create an incident in 2 different ways: From a template: • Quick Tickets are templates for common
problems and include standard information for the form fields.
• Quick Tickets have four fields of information: Quick Ticket ID: a unique identifier of the incident. Description: a short description of the incident. Incident Description: A standard, more detailed description of the
incident. Incident Resolution: A standard description of possible solutions.

From a blank incident form If you do not find a quick ticket that fits your
incident, you may create a new record using a blank incident form.
New Incidents

Creating an Incident from a blank form
The Support Type is directly linked to the Category, once you select an IT Category, “Information Technology” will be displayed in the Support Type field.

1- From the Actions menu in the Incidents tab, click New. The Open Incident form will appear. Your contact information will automatically fill the client fields.
2- Click Category, and select the appropriate category/subcategory.
Creating an Incident from a blank form

3- For the Convenient Timings field, fill in the suitable time for IT support staff to visit.
4- For Incident Description, fill in a description of the incident, such as when the problem occurred, what is affected,….
5- Bold fields are mandatory, and if not filled, your ticket will not be submitted
6- You can only add an attachment (maximum size limit of 1.44MB) after you have saved the incident by clicking Submit.
Creating an Incident from a blank form
Creating an Incident from a blank form
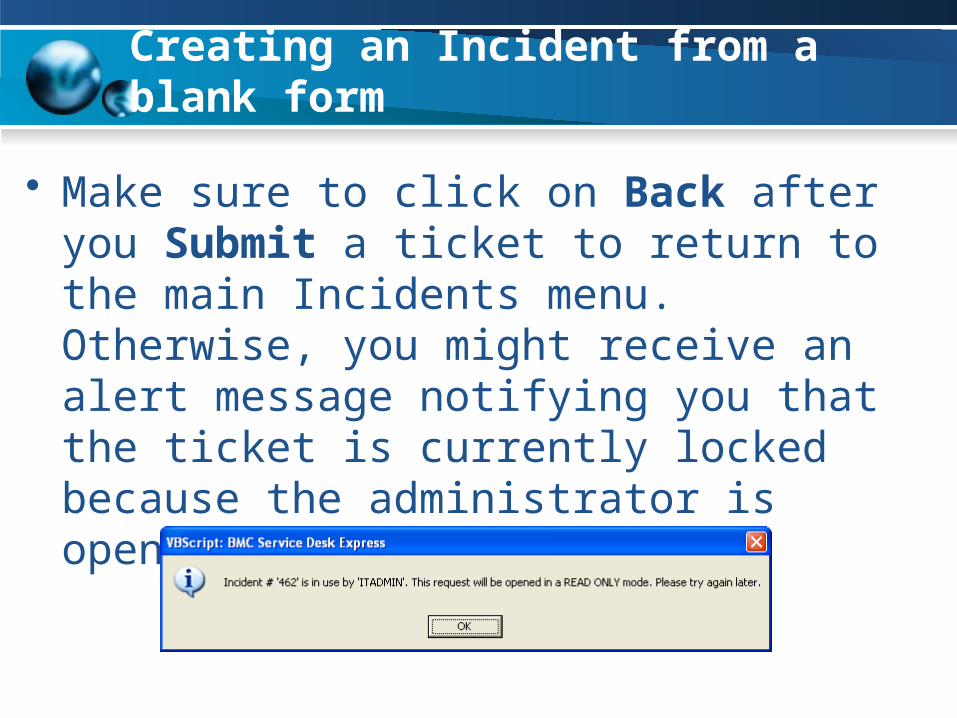
• Make sure to click on Back after you Submit a ticket to return to the main Incidents menu. Otherwise, you might receive an alert message notifying you that the ticket is currently locked because the administrator is opening it simultaneously.

• After submitting a ticket, you can always access it again, and only edit the Convenient Timings and the Description fields. You are not allowed to change the Category field once the ticket has been submitted.
• You may check ticket updates at any time, such as:– IT Reply– Assigned Staff– Resolution
To Edit your sent Incident

To Edit your sent Incident
• You may either overwrite or edit the Convenient Timings and the Description fields.
• A log of IT Replies, Convenient Timings and the Description fields will be saved in the below fields. Therefore, the communication trail will be saved.

Creating an Incident from a Quick Ticket
Quick Tickets Advantages:
Speed up data entry, Improve data accuracy, And ensures consistent reporting.

1- From the Incidents tab, click Quick Tickets.
A list of available quick tickets is displayed
2- Select the required quick ticket.
Creating an Incident from a Quick Ticket

3- From the Actions menu, click Next Step.
A new incident form appears with the description and other fields automatically filled in.
4- Change or add the fields as needed.
5- Make sure to select the appropriate Support Type.
6- Click Submit. The incident is saved and appears in the list of your open incidents.
Creating an Incident from a Quick Ticket

Email Notifications
• An automated e-mail will be sent to the ticket logger’s email account whenever any modification occurs to the IT Reply field.

• At the closure of the ticket, an e-mail will be also sent with the ticket resolution updated.
• Do not reply to this email if you think that your problem persists. Login to your BMC self-service account and open a new ticket.
Email Notifications

To Submit an Event Support Request

Surveys
• After logging a predefined number of tickets, you will be receiving an email with a link directing you to a survey questionnaire.
• Filling such surveys will contribute to improving IT services and performance.

Filtering Incidents
• By default, the Incidents tab displays all your open incidents. However, you may modify which incidents are listed:
• List open, closed, or both open and closed incidents.

• List incidents by a form field value. For example, you may list all incidents that have been opened on a particular date, that are in a specific category, or that have a specific number.
Filtering Incidents

Using the Knowledge Search Feature
1- From the Knowledge Tools tab, click Knowledge Search. The knowledge search window appears.
2- In the Search for Word(s) or Phrase field, type in the text you want to search on.

3 -Select the records to search:Search Knowledge Base: Search closed
incidents.Search External Documents: Search the
content of any document stored in an external location, such as tech notes or white papers. These files can be text files, Microsoft Word files, Excel files, and others.
4 -To limit the number of search results, type a positive number for Maximum Results.
5 -Click Search.
Using the Knowledge Search Feature

• Your Profile includes your name and contact information (location, extension, and email address,…).
Check your Client Information
• You should verify this information and inform IT to update it if needed.
• Keeping your profile updated is important to help serve you better.

Logging off the Self Service Module
To log off• From the upper-right corner of the window,
click Logoff. A confirmation message appears.
• Click OK. The log off window appears.• If there is no activity on BMC Self Service for
a certain amount of time, the following message scrolls across the top of the window: "Your session timed out due to lack of activity. You will have to login again."

Conclusion
With BMC helpdesk, we will:• Enforce best-practice processes • Improve key metrics such as first call resolution,
mean time to repair, recurring incidents • Reduce call volumes and encourage user self-
sufficiency by letting users search known solutions, and workarounds to common incidents
• Prevent future incidents from occurring • Increase customer satisfaction ratings

Thank You
Related Documents