Using NAGIOS as monitoring system Pre requisites #yum install httpd #yum install gcc #yum install glibc glibc-common #yum install gd gd-devel #wget nagios version no .tar.gz if need plugin download #tar -zxvf nagios-ver.tar.gz nagios plugins #tar -zxvf nagiosplugin-ver.tar.gz Compile and install. #./configure --with-nagios-user=nagios --with-nagios-group=nagios #make #make install default istallation dir in /usr/local #mkdir /usr/local/nagios #adduser nagios # groupadd nagios # usermod -G nagios apache Create a new nagcmd group for allowing external commands to be submitted through the web interface. Add both the nagios user and the apache user to the group. /usr/sbin/groupadd nagcmd /usr/sbin/usermod -G nagcmd nagios /usr/sbin/usermod -G nagcmd apache #./configure or Run the Nagios configure script, passing the name of the group you created earlier like so: ./configure --with-command-group=nagcmd #make all #make install This will install the Nagios core and the command files. At this moment Nagios doesn’t have any script files from where it can take information about hosts and services. You must, therefore, create the configuration files. The easiest way is to install the sample config files by running the following command from your nagios-ver directory #make install-config or #make install-webconf for configure web interface Create a nagiosadmin account for logging into the Nagios web interface. Remember the password you assign to this account - you'll need it later.

Welcome message from author
This document is posted to help you gain knowledge. Please leave a comment to let me know what you think about it! Share it to your friends and learn new things together.
Transcript

Using NAGIOS as monitoring system Pre requisites #yum install httpd #yum install gcc #yum install glibc glibc-common #yum install gd gd-devel #wget nagios version no .tar.gz if need plugin download #tar -zxvf nagios-ver.tar.gz nagios plugins #tar -zxvf nagiosplugin-ver.tar.gz Compile and install. #./configure --with-nagios-user=nagios --with-nagios-group=nagios #make #make install default istallation dir in /usr/local #mkdir /usr/local/nagios #adduser nagios # groupadd nagios # usermod -G nagios apache Create a new nagcmd group for allowing external commands to be submitted through the web interface. Add both the nagios user and the apache user to the group. /usr/sbin/groupadd nagcmd /usr/sbin/usermod -G nagcmd nagios /usr/sbin/usermod -G nagcmd apache #./configure or Run the Nagios configure script, passing the name of the group you created earlier like so: ./configure --with-command-group=nagcmd #make all #make install This will install the Nagios core and the command files. At this moment Nagios doesn’t have any script files from where it can take information about hosts and services. You must, therefore, create the configuration files. The easiest way is to install the sample config files by running the following command from your nagios-ver directory #make install-config or #make install-webconf for configure web interface Create a nagiosadmin account for logging into the Nagios web interface. Remember the password you assign to this account - you'll need it later.
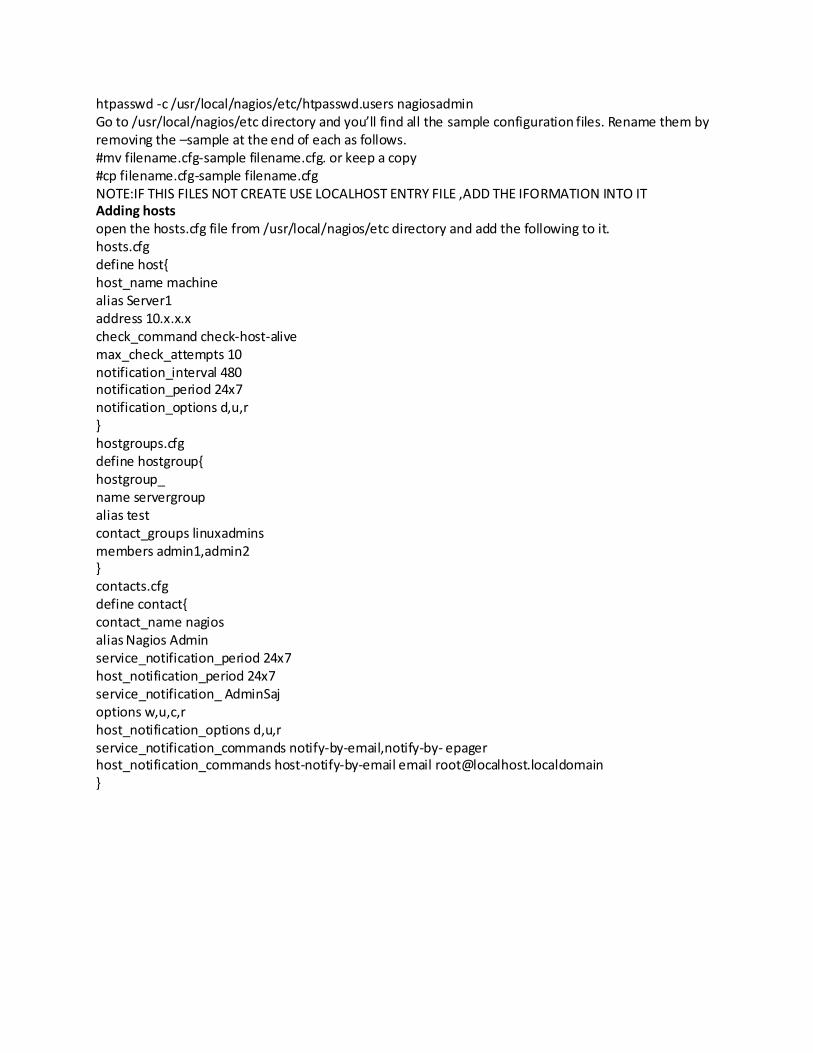
htpasswd -c /usr/local/nagios/etc/htpasswd.users nagiosadmin Go to /usr/local/nagios/etc directory and you’ll find all the sample configuration files. Rename them by removing the –sample at the end of each as follows. #mv filename.cfg-sample filename.cfg. or keep a copy #cp filename.cfg-sample filename.cfg NOTE:IF THIS FILES NOT CREATE USE LOCALHOST ENTRY FILE ,ADD THE IFORMATION INTO IT Adding hosts open the hosts.cfg file from /usr/local/nagios/etc directory and add the following to it. hosts.cfg define host{ host_name machine alias Server1 address 10.x.x.x check_command check-host-alive max_check_attempts 10 notification_interval 480 notification_period 24x7 notification_options d,u,r } hostgroups.cfg define hostgroup{ hostgroup_ name servergroup alias test contact_groups linuxadmins members admin1,admin2 } contacts.cfg define contact{ contact_name nagios alias Nagios Admin service_notification_period 24x7 host_notification_period 24x7 service_notification_ AdminSaj options w,u,c,r host_notification_options d,u,r service_notification_commands notify-by-email,notify-by- epager host_notification_commands host-notify-by-email email [email protected] }

contactgroups.cfg define contactgroup{ contactgroup_ name admins alias TESTADMIN Administrators members nagios, root } Configure Web interface To do this, first create an alias for the CGIs. By default, the Nagios configuration script searches for it in http://yourmachine/nagios/ cgi-bin/ directory. So, just add the following lines in your httpd.conf file. ScriptAlias /nagios/cgi-bin/ /usr/local/nagios/sbin/ <Directory “/usr/local/nagios/sbin/”> AllowOverride AuthConfig Options ExecCGI Allow from all Order allow,deny </Directory> Next create an alias for the html files by adding the following lines. Alias /nagios/ /usr/local/nagios/share/ <Directory “/usr/local/nagios/share”> Options None AllowOverride AuthConfig Order allow,deny Allow from all </Directory> services.cfg, define service{ host_name name server service_description PING is_volatile 0 check_period 24x7 max_check_attempts 3 normal_check_interval 5 retry_check_interval 1 contact_groups pcq-admins notification_interval 120 notification_period 24x7 notification_options w,u,c,r check_command check_ping! 100.0,20%! 500. 0,60% }

Here host_name is the name of the host on which the service will run, service_description is the description of the service and check_command contains the comands located in the /usr/local/nagios/libexec directory Start monitoring To start Nagios. Just restart the Web server and run the following command from /usr/local/nagios/bin directory. #./nagios ../etc/nagios.cfg #/usr/local/nagios/bin/nagios -v /usr/local/nagios/etc/nagios.cfg #service httpd start Open Web browser and type the following address. “http://machine or ip nagios server/nagios/index.html” Installed directories [root@nagios]# find -name nagios ./downloads/nagios-3.0a4/base/nagios [root@nagios]# cd /usr/local/nagios/ [root@nagios]# ls bin etc libexec sbin share var [root@nagios]# cd bin [root@bin]# ls nagios nagiostats [root@ bin]# cd ../etc [root@ etc]# ls cgi.cfg contacts.cfg htpasswd.users nagios.cfg services.cfg commands.cfg hostgroups.cfg linux.cfg printer.cfg switch.cfg contactgroups.cfg hosts.cfg localhost.cfg resource.cfg windows.cfg [root@etc]# cd ../libexec/ [root@libexec]# ls check_apt check_file_age check_log check_overcr check_tcp check_breeze check_flexlm check_mailq check_ping check_time check_by_ssh check_ftp check_mrtg check_pop check_udp check_clamd check_http check_mrtgtraf check_procs check_ups check_dhcp check_icmp check_nagios check_real check_users check_dig check_ifoperstatus check_nntp check_rpc check_wave check_disk check_ifstatus check_nt check_sensors negate check_disk_smb check_imap check_ntp check_smtp urlize check_dns check_ircd check_nwstat check_ssh utils.pm check_dummy check_load check_oracle check_swap utils.sh [root@domU-12-31-37-00-03-3F libexec]# cd ../sbin/ [root@sbin]# ls avail.cgi config.cgi history.cgi outages.cgi status.cgi statuswrl.cgi tac.cgi cmd.cgi extinfo.cgi notifications.cgi showlog.cgi statuswml.cgi summary.cgi [root@sbin]# cd ../share/
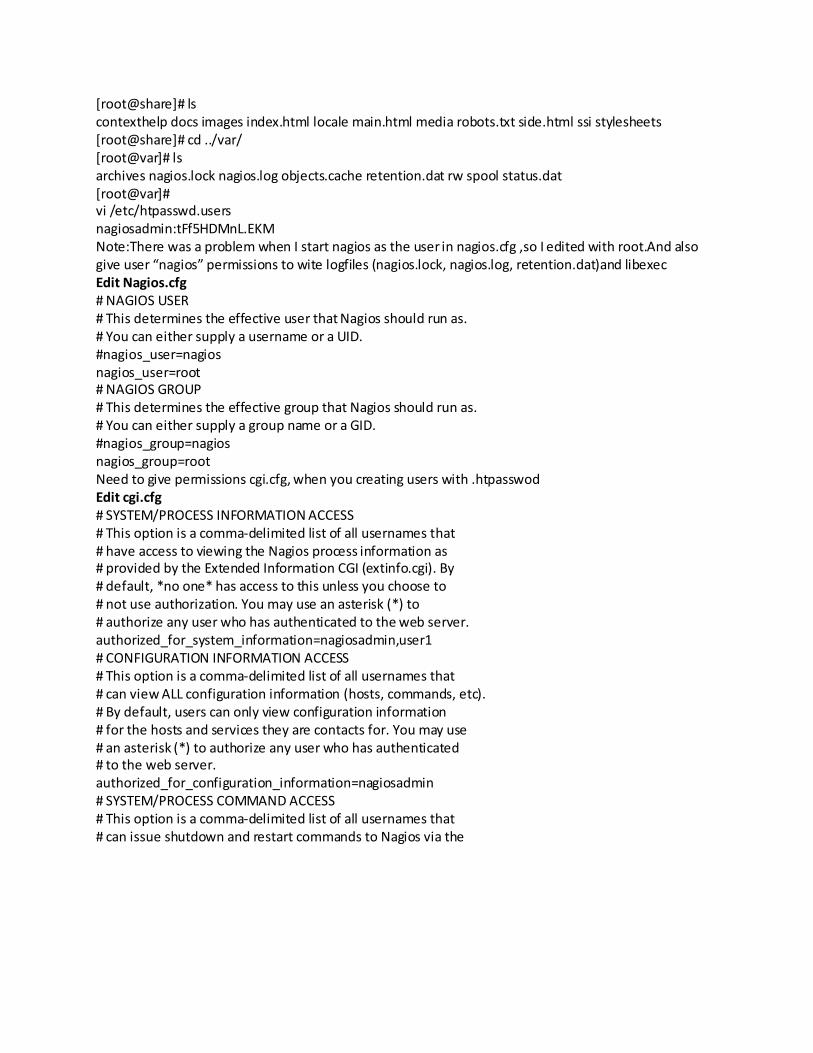
[root@share]# ls contexthelp docs images index.html locale main.html media robots.txt side.html ssi stylesheets [root@share]# cd ../var/ [root@var]# ls archives nagios.lock nagios.log objects.cache retention.dat rw spool status.dat [root@var]# vi /etc/htpasswd.users nagiosadmin:tFf5HDMnL.EKM Note:There was a problem when I start nagios as the user in nagios.cfg ,so I edited with root.And also give user “nagios” permissions to wite logfiles (nagios.lock, nagios.log, retention.dat)and libexec Edit Nagios.cfg # NAGIOS USER # This determines the effective user that Nagios should run as. # You can either supply a username or a UID. #nagios_user=nagios nagios_user=root # NAGIOS GROUP # This determines the effective group that Nagios should run as. # You can either supply a group name or a GID. #nagios_group=nagios nagios_group=root Need to give permissions cgi.cfg, when you creating users with .htpasswod Edit cgi.cfg # SYSTEM/PROCESS INFORMATION ACCESS # This option is a comma-delimited list of all usernames that # have access to viewing the Nagios process information as # provided by the Extended Information CGI (extinfo.cgi). By # default, *no one* has access to this unless you choose to # not use authorization. You may use an asterisk (*) to # authorize any user who has authenticated to the web server. authorized_for_system_information=nagiosadmin,user1 # CONFIGURATION INFORMATION ACCESS # This option is a comma-delimited list of all usernames that # can view ALL configuration information (hosts, commands, etc). # By default, users can only view configuration information # for the hosts and services they are contacts for. You may use # an asterisk (*) to authorize any user who has authenticated # to the web server. authorized_for_configuration_information=nagiosadmin # SYSTEM/PROCESS COMMAND ACCESS # This option is a comma-delimited list of all usernames that # can issue shutdown and restart commands to Nagios via the

# command CGI (cmd.cgi). Users in this list can also change # the program mode to active or standby. By default, *no one* # has access to this unless you choose to not use authorization. # You may use an asterisk (*) to authorize any user who has # authenticated to the web server. authorized_for_system_commands=nagiosadmin # GLOBAL HOST/SERVICE VIEW ACCESS # These two options are comma-delimited lists of all usernames that # can view information for all hosts and services that are being # monitored. By default, users can only view information # for hosts or services that they are contacts for (unless you # you choose to not use authorization). You may use an asterisk (*) # to authorize any user who has authenticated to the web server. authorized_for_all_services=nagiosadmin,user1 authorized_for_all_hosts=nagiosadmin,user1 # GLOBAL HOST/SERVICE COMMAND ACCESS # These two options are comma-delimited lists of all usernames that # can issue host or service related commands via the command # CGI (cmd.cgi) for all hosts and services that are being monitored. # By default, users can only issue commands for hosts or services # that they are contacts for (unless you you choose to not use # authorization). You may use an asterisk (*) to authorize any # user who has authenticated to the web server. authorized_for_all_service_commands=nagiosadmin authorized_for_all_host_commands=nagiosadmin In my nagios configuration I used ssh to collect data from other hosts. So my customizations are Hosts .cfg file #############################################################################
##
#############################################################################
##
#
# HOSTS
#
#############################################################################
##
#############################################################################
##
# Generic host definition template - This is NOT a real host, just a
template!
define host{
name generic-host ; The name of this host template
notifications_enabled 1 ; Host notifications are enabled
event_handler_enabled 1 ; Host event handler is enabled
flap_detection_enabled 1 ; Flap detection is enabled

failure_prediction_enabled 1 ; Failure prediction is enabled
process_perf_data 1 ; Process performance data
retain_status_information 1 ; Retain status information across program
restarts
retain_nonstatus_information 1 ; Retain non-status information across program
restarts
notification_period 24x7 ; Send host notifications at any time
register 0 ; DONT REGISTER THIS DEFINITION - ITS NOT A REAL HOST, JUST A
TEMPLATE!
}
# Linux host definition template - This is NOT a real host, just a template!
define host{
name linux-server ; The name of this host template
use generic-host ; This template inherits other values from the generic-host
template
check_period 24x7 ; By default, Linux hosts are checked round the clock
max_check_attempts 10 ; Check each Linux host 10 times (max)
check_command check-host-alive ; Default command to check Linux hosts
notification_period workhours ; Linux admins hate to be woken up, so we only
notify during the day
; Note that the notification_period variable is being overridden from
; the value that is inherited from the generic-host template!
notification_interval 120 ; Resend notification every 2 hours
notification_options d,u,r ; Only send notifications for specific host states
contact_groups admins ; Notifications get sent to the admins by default
register 0 ; DONT REGISTER THIS DEFINITION - ITS NOT A REAL HOST, JUST A
TEMPLATE!
}
# Linux box definition template - This is NOT a real host, just a template!
define host{
name linux-box ; The name of this host template
use generic-host ; This template inherits other values from the generic-host
template
check_period 24x7 ; By default, Linux hosts are checked round the clock
max_check_attempts 10 ; Check each Linux host 10 times (max)
check_command check-host-alive ; Default command to check Linux hosts
# check_command ssh_disk

notification_period workhours ; Linux admins hate to be woken up, so we only
notify during the day
; Note that the notification_period variable is being overridden from
; the value that is inherited from the generic-host template!
notification_interval 120 ; Resend notification every 2 hours
notification_options d,u,r ; Only send notifications for specific host states
contact_groups admins ; Notifications get sent to the admins by default
register 0 ; DONT REGISTER THIS DEFINITION - ITS NOT A REAL HOST, JUST A
TEMPLATE!
}
# Since this is a simple configuration file, we only monitor one host - the
# local host (this machine).
define host{
use linux-server ; Name of host template to use
; This host definition will inherit all variables that are defined
; in (or inherited by) the linux-server host template definition.
host_name Netmon Server
alias Netmon Server
address 127.0.0.1
}
define host{
use linux-box ; Name of host template to use
; This host definition will inherit all variables that are defined
; in (or inherited by) the linux-server host template definition.
host_name Test Server
alias Test Server
address ip address
}
Commands.cfg #############################################################################
###
#
# SAMPLE SERVICE CHECK COMMANDS
#
# These are some example service check commands. They may or may not work on
# your system, as they must be modified for your plugins. See the HTML
# documentation on the plugins for examples of how to configure command
definitions.
#
#############################################################################
###

#############################################################################
###
# NOTE: The following 'check_local_...' functions are designed to monitor
# various metrics on the host that Nagios is running on (i.e. this one).
#############################################################################
###
# 'check_local_disk' command definition
define command{
command_name check_local_disk
command_line $USER1$/check_disk -w $ARG1$ -c $ARG2$ -p $ARG3$
}
# 'check_local_load' command definition
define command{
command_name check_local_load
command_line $USER1$/check_load -w $ARG1$ -c $ARG2$
}
# 'check_local_procs' command definition
define command{
command_name check_local_procs
command_line $USER1$/check_procs -w $ARG1$ -c $ARG2$ -s $ARG3$
}
# 'check_local_users' command definition
define command{
command_name check_local_users
command_line $USER1$/check_users -w $ARG1$ -c $ARG2$
}
# 'check_local_mem' command definition
define command{
command_name check_local_mem
command_line $USER1$/check_mem -f -w $ARG1$ -c $ARG2$
}
#############################################################################
###
# NOTE: The following 'check_...' commands are used to monitor services on
# both local and remote hosts.
#############################################################################
###
# 'check_by_ssh' DISK command definition
define command{
command_name ssh_disk
command_line $USER1$/check_by_ssh -i /work/gsg-keypair -H $HOSTADDRESS$ -l
"root" -C "$USER1$/check_disk -w $ARG1$ -c $ARG2$ -p $ARG3$"
}
# 'ssh_check_users' command definition
define command{
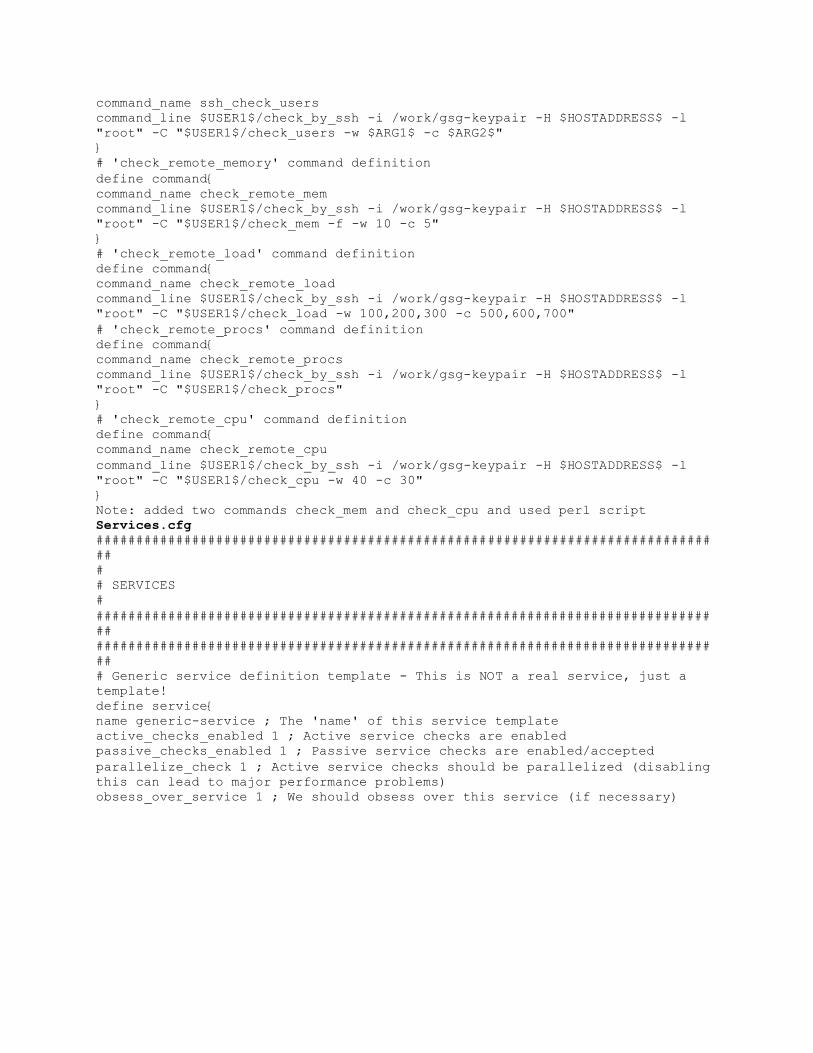
command_name ssh_check_users
command_line $USER1$/check_by_ssh -i /work/gsg-keypair -H $HOSTADDRESS$ -l
"root" -C "$USER1$/check_users -w $ARG1$ -c $ARG2$"
}
# 'check_remote_memory' command definition
define command{
command_name check_remote_mem
command_line $USER1$/check_by_ssh -i /work/gsg-keypair -H $HOSTADDRESS$ -l
"root" -C "$USER1$/check_mem -f -w 10 -c 5"
}
# 'check_remote_load' command definition
define command{
command_name check_remote_load
command_line $USER1$/check_by_ssh -i /work/gsg-keypair -H $HOSTADDRESS$ -l
"root" -C "$USER1$/check_load -w 100,200,300 -c 500,600,700"
# 'check_remote_procs' command definition
define command{
command_name check_remote_procs
command_line $USER1$/check_by_ssh -i /work/gsg-keypair -H $HOSTADDRESS$ -l
"root" -C "$USER1$/check_procs"
}
# 'check_remote_cpu' command definition
define command{
command_name check_remote_cpu
command_line $USER1$/check_by_ssh -i /work/gsg-keypair -H $HOSTADDRESS$ -l
"root" -C "$USER1$/check_cpu -w 40 -c 30"
}
Note: added two commands check_mem and check_cpu and used perl script
Services.cfg #############################################################################
##
#
# SERVICES
#
#############################################################################
##
#############################################################################
##
# Generic service definition template - This is NOT a real service, just a
template!
define service{
name generic-service ; The 'name' of this service template
active_checks_enabled 1 ; Active service checks are enabled
passive_checks_enabled 1 ; Passive service checks are enabled/accepted
parallelize_check 1 ; Active service checks should be parallelized (disabling
this can lead to major performance problems)
obsess_over_service 1 ; We should obsess over this service (if necessary)

check_freshness 0 ; Default is to NOT check service 'freshness'
notifications_enabled 1 ; Service notifications are enabled
event_handler_enabled 1 ; Service event handler is enabled
flap_detection_enabled 1 ; Flap detection is enabled
failure_prediction_enabled 1 ; Failure prediction is enabled
process_perf_data 1 ; Process performance data
retain_status_information 1 ; Retain status information across program
restarts
retain_nonstatus_information 1 ; Retain non-status information across program
restarts
is_volatile 0 ; The service is not volatile
register 0 ; DONT REGISTER THIS DEFINITION - ITS NOT A REAL SERVICE, JUST A
TEMPLATE!
}
# Local service definition template - This is NOT a real service, just a
template!
define service{
name local-service ; The name of this service template
use generic-service ; Inherit default values from the generic-service
definition
check_period 24x7 ; The service can be checked at any time of the day
max_check_attempts 4 ; Re-check the service up to 4 times in order to
determine its final (hard) state
normal_check_interval 5 ; Check the service every 5 minutes under normal
conditions
retry_check_interval 1 ; Re-check the service every minute until a hard state
can be determined
contact_groups admins ; Notifications get sent out to everyone in the
'admins' group
notification_options w,u,c,r ; Send notifications about warning, unknown,
critical, and recovery events
notification_interval 60 ; Re-notify about service problems every hour
notification_period 24x7 ; Notifications can be sent out at any time
register 0 ; DONT REGISTER THIS DEFINITION - ITS NOT A REAL SERVICE, JUST A
TEMPLATE!
}
# users on the local machine. Warning if > 20 users, critical
# if > 50 users.
define service{
use local-service ; Name of service template to use
host_name Netmon Server

service_description Current Users
check_command check_local_users!20!50
}
# Define a service to "check the memory" the local machine
define service{
use local-service ; Name of service template to use
host_name Netmon Server
service_description memory
check_command check_local_mem!3000!1000
# check_command check_local_mem -f -w 10 -c 5
}
# Define a service to check the number of currently running procs
# on the local machine. Warning if > 250 processes, critical if
# > 400 users.
define service{
use local-service ; Name of service template to use
host_name Netmon Server
service_description Total Processes
# check_command check_local_procs!250!400!RSZDT
check_command check_local_procs
}
#Define a service to check the load on the local machine.
define service{
use local-service ; Name of service template to use
host_name Netmon Server
service_description Current Load
check_command check_local_load!5.0,4.0,3.0!10.0,6.0,4.0
}
#Define a service to check the cpu usage on the local machine.
define service{
use local-service ; Name of service template to use
host_name Netmon Server
service_description Cpu usage
check_command check_local_cpu
}
#determined
# contact_groups admins ; Notifications get sent out to everyone in the
'admins' group
# notification_options w,u,c,r ; Send notifications about warning, unknown,
critical, and recovery events

# notification_interval 60 ; Re-notify about service problems every hour
# notification_period 24x7 ; Notifications can be sent out at any time
# register 0 ; DONT REGISTER THIS DEFINITION - ITS NOT A REAL SERVICE, JUST A
TEMPLATE!
# }
# Define a service to "ping" the local machine
define service{
use local-service ; Name of service template to use
host_name Netmon Server
service_description PING
check_command check_ping!100.0,20%!500.0,60%
}
# Define a service to check the disk space of the root partition
# on the local machine. Warning if < 20% free, critical if
# < 10% free space on partition.
define service{
use local-service ; Name of service template to use
host_name Netmon Server
service_description Root Partition
check_command check_local_disk!20%!10%!/
}
# Define a service to check the number of currently logged in
# users on the local machine. Warning if > 20 users, critical
# if > 50 users.
#define service{
# use local-service ; Name of service template to use
# host_name Netmon Server
# service_description Current Users
# check_command check_local_users!20!50
# }
# Define a service to check the number of currently running procs
# on the local machine. Warning if > 250 processes, critical if
# > 400 users.
#define service{
# use local-service ; Name of service template to use
# host_name Netmon Server
# service_description Total Processes
# check_command check_local_procs!250!400!RSZDT

# }
# Define a service to check the load on the local machine.
#define service{
# use local-service ; Name of service template to use
# host_name Netmon Server
# service_description Current Load
# check_command check_local_load!5.0,4.0,3.0!10.0,6.0,4.0
# }
# Define a service to check the disk space of the root partition
# on the local machine. Warning if < 20% free, critical if
# < 10% free space on partition.
define service{
use generic-service ; Use the generic template
host_name Test Server
service_description disk info
is_volatile 0
check_period 24x7
max_check_attempts 4
normal_check_interval 5
retry_check_interval 1
contact_groups admins
notification_options w,u,c,r
notification_interval 240
notification_period 24x7
check_command ssh_disk!20%!10%!/
}
# users on the remote machine. Warning if > 20 users, critical
# if > 50 users.
define service{
use generic-service ; Use the generic template
host_name Test Server
service_description logged in users
is_volatile 0
check_period 24x7
max_check_attempts 4
normal_check_interval 5
retry_check_interval 1
contact_groups admins
notification_options w,u,c,r
notification_interval 240
notification_period 24x7
check_command ssh_check_users!20!50
}

# Define a service to "check the memory" the remote machine
define service{
use generic-service ; Use the generic template
host_name Test Server
service_description memory
is_volatile 0
check_period 24x7
max_check_attempts 4
normal_check_interval 5
retry_check_interval 1
contact_groups admins
notification_options w,u,c,r
notification_interval 240
notification_period 24x7
check_command check_remote_mem!3000!1000
}
# Define a service to "check the cpu" on the remote machine
define service{
use generic-service ; Use the generic template
host_name Test Server
service_description Cpu Usage
is_volatile 0
check_period 24x7
max_check_attempts 4
normal_check_interval 5
retry_check_interval 1
contact_groups admins
notification_options w,u,c,r
notification_interval 240
notification_period 24x7
check_command check_remote_cpu
}
# Define a service to "check the load" on the remote machine
define service{
use generic-service ; Use the generic template
host_name Test Server
service_description Load Average
is_volatile 0
check_period 24x7
max_check_attempts 4
normal_check_interval 5
retry_check_interval 1
contact_groups admins
notification_options w,u,c,r
notification_interval 240
notification_period 24x7
check_command check_remote_load!5.0:4.0:3.0!10.0:6.0:4.0
# check_command check_remote_load
}
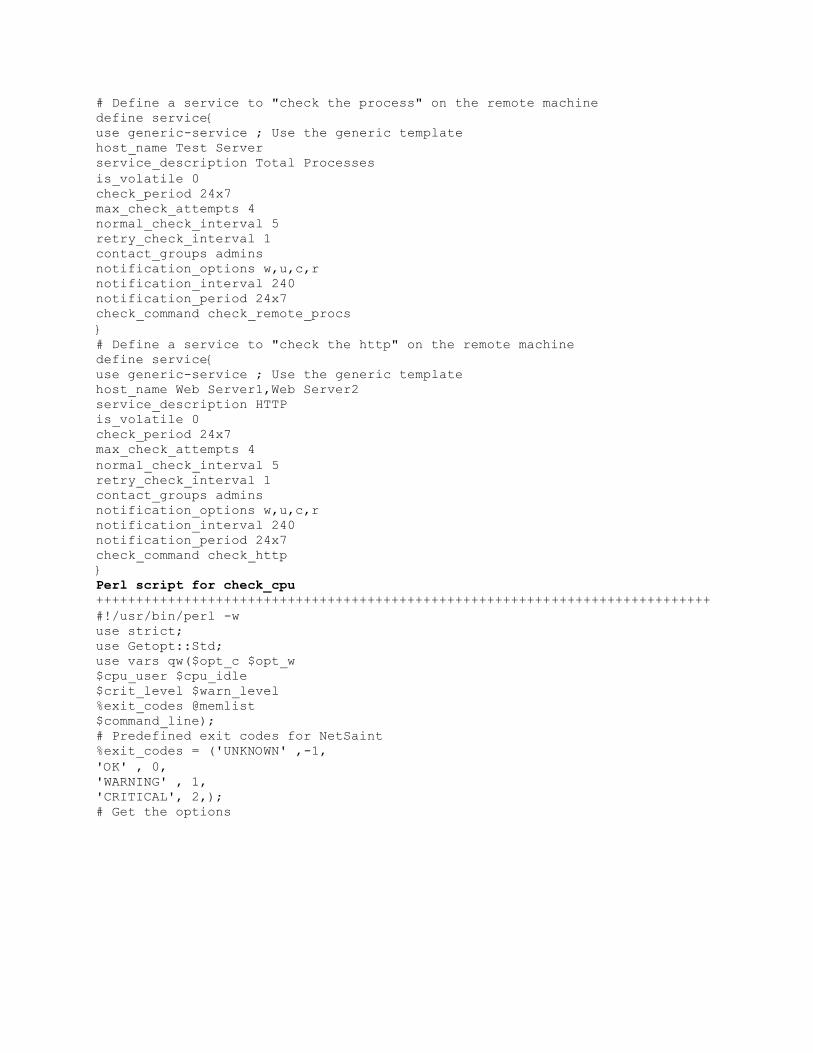
# Define a service to "check the process" on the remote machine
define service{
use generic-service ; Use the generic template
host_name Test Server
service_description Total Processes
is_volatile 0
check_period 24x7
max_check_attempts 4
normal_check_interval 5
retry_check_interval 1
contact_groups admins
notification_options w,u,c,r
notification_interval 240
notification_period 24x7
check_command check_remote_procs
}
# Define a service to "check the http" on the remote machine
define service{
use generic-service ; Use the generic template
host_name Web Server1,Web Server2
service_description HTTP
is_volatile 0
check_period 24x7
max_check_attempts 4
normal_check_interval 5
retry_check_interval 1
contact_groups admins
notification_options w,u,c,r
notification_interval 240
notification_period 24x7
check_command check_http
}
Perl script for check_cpu +++++++++++++++++++++++++++++++++++++++++++++++++++++++++++++++++++++++++++++
#!/usr/bin/perl -w
use strict;
use Getopt::Std;
use vars qw($opt_c $opt_w
$cpu_user $cpu_idle
$crit_level $warn_level
%exit_codes @memlist
$command_line);
# Predefined exit codes for NetSaint
%exit_codes = ('UNKNOWN' ,-1,
'OK' , 0,
'WARNING' , 1,
'CRITICAL', 2,);
# Get the options
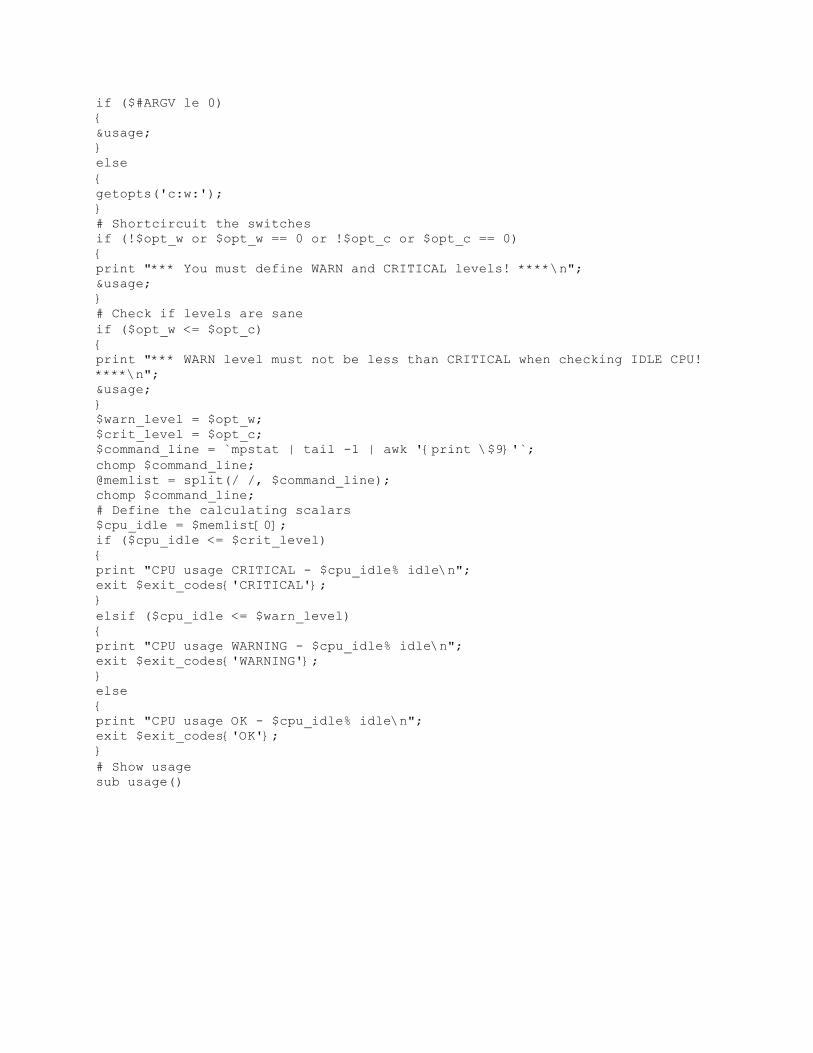
if ($#ARGV le 0)
{
&usage;
}
else
{
getopts('c:w:');
}
# Shortcircuit the switches
if (!$opt_w or $opt_w == 0 or !$opt_c or $opt_c == 0)
{
print "*** You must define WARN and CRITICAL levels! ****\n";
&usage;
}
# Check if levels are sane
if ($opt_w <= $opt_c)
{
print "*** WARN level must not be less than CRITICAL when checking IDLE CPU!
****\n";
&usage;
}
$warn_level = $opt_w;
$crit_level = $opt_c;
$command_line = `mpstat | tail -1 | awk '{print \$9}'`;
chomp $command_line;
@memlist = split(/ /, $command_line);
chomp $command_line;
# Define the calculating scalars
$cpu_idle = $memlist[0];
if ($cpu_idle <= $crit_level)
{
print "CPU usage CRITICAL - $cpu_idle% idle\n";
exit $exit_codes{'CRITICAL'};
}
elsif ($cpu_idle <= $warn_level)
{
print "CPU usage WARNING - $cpu_idle% idle\n";
exit $exit_codes{'WARNING'};
}
else
{
print "CPU usage OK - $cpu_idle% idle\n";
exit $exit_codes{'OK'};
}
# Show usage
sub usage()

{
my $mymsg=<<MYMSG
usage:
check_cpu.pl -<i|s|u> -w <warnlevel> -c <critlevel>\n
options:\n
-i Check IDLE cpu (default)
-w PERCENT Percent free/used when to warn
-c PERCENT Percent free/used when critical
-v Verbose output for debug
MYMSG
;
print "$mymsg";
exit $exit_codes{'UNKNOWN'};
}
+++++++++++++++++++++++++++++++++++++++++++++++++++++++++++++++++++++++++++++
Perl script for check_mem +++++++++++++++++++++++++++++++++++++++++++++++++++++++++++++++++++++++++++++
#!/usr/bin/perl -w
# $Id: check_mem.pl,v 1.1.1.1 2002/02/28 06:42:54 egalstad Exp $
# check_mem.pl Copyright (C) 2000 Dan Larsson <[email protected]>
#
# This program is free software; you can redistribute it and/or
# modify it under the terms of the GNU General Public License
# as published by the Free Software Foundation; either version 2
# of the License, or (at your option) any later version.
#
# This program is distributed in the hope that it will be useful,
# but WITHOUT ANY WARRANTY; without even the implied warranty
# of MERCHANTABILITY or FITNESS FOR A PARTICULAR PURPOSE. See the
# GNU General Public License for more details.
#
# you should have received a copy of the GNU General Public License
# along with this program (or with Nagios); if not, write to the
# Free Software Foundation, Inc., 59 Temple Place - Suite 330,
# Boston, MA 02111-1307, USA
# Tell Perl what we need to use
use strict;
use Getopt::Std;
use vars qw($opt_c $opt_f $opt_u $opt_w
$free_memory $used_memory $total_memory
$crit_level $warn_level
%exit_codes @memlist
$percent $fmt_pct
$verb_err $command_line);
# Predefined exit codes for Nagios
%exit_codes = ('UNKNOWN' ,-1,
'OK' , 0,
'WARNING' , 1,
'CRITICAL', 2,);
# Turn this to 1 to see reason for parameter errors (if any)
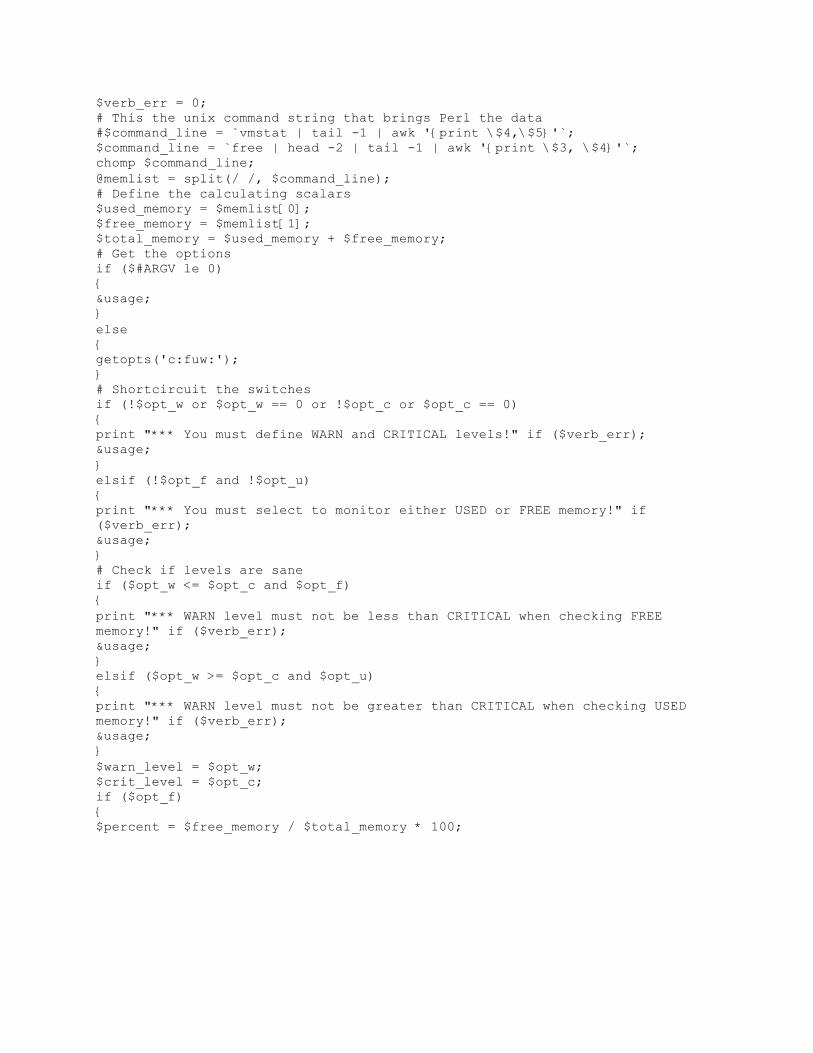
$verb_err = 0;
# This the unix command string that brings Perl the data
#$command_line = `vmstat | tail -1 | awk '{print \$4,\$5}'`;
$command_line = `free | head -2 | tail -1 | awk '{print \$3, \$4}'`;
chomp $command_line;
@memlist = split(/ /, $command_line);
# Define the calculating scalars
$used_memory = $memlist[0];
$free_memory = $memlist[1];
$total_memory = $used_memory + $free_memory;
# Get the options
if ($#ARGV le 0)
{
&usage;
}
else
{
getopts('c:fuw:');
}
# Shortcircuit the switches
if (!$opt_w or $opt_w == 0 or !$opt_c or $opt_c == 0)
{
print "*** You must define WARN and CRITICAL levels!" if ($verb_err);
&usage;
}
elsif (!$opt_f and !$opt_u)
{
print "*** You must select to monitor either USED or FREE memory!" if
($verb_err);
&usage;
}
# Check if levels are sane
if ($opt_w <= $opt_c and $opt_f)
{
print "*** WARN level must not be less than CRITICAL when checking FREE
memory!" if ($verb_err);
&usage;
}
elsif ($opt_w >= $opt_c and $opt_u)
{
print "*** WARN level must not be greater than CRITICAL when checking USED
memory!" if ($verb_err);
&usage;
}
$warn_level = $opt_w;
$crit_level = $opt_c;
if ($opt_f)
{
$percent = $free_memory / $total_memory * 100;

$fmt_pct = sprintf "%.1f", $percent;
if ($percent <= $crit_level)
{
print "Memory CRITICAL - $fmt_pct% ($free_memory kB) free\n";
exit $exit_codes{'CRITICAL'};
}
elsif ($percent <= $warn_level)
{
print "Memory WARNING - $fmt_pct% ($free_memory kB) free\n";
exit $exit_codes{'WARNING'};
}
else
{
print "Memory OK - $fmt_pct% ($free_memory kB) free\n";
exit $exit_codes{'OK'};
}
}
elsif ($opt_u)
{
$percent = $used_memory / $total_memory * 100;
$fmt_pct = sprintf "%.1f", $percent;
if ($percent >= $crit_level)
{
print "Memory CRITICAL - $fmt_pct% ($used_memory kB) used\n";
exit $exit_codes{'CRITICAL'};
}
elsif ($percent >= $warn_level)
{
print "Memory WARNING - $fmt_pct% ($used_memory kB) used\n";
exit $exit_codes{'WARNING'};
}
else
{
print "Memory OK - $fmt_pct% ($used_memory kB) used\n";
exit $exit_codes{'OK'};
}
}
# Show usage
sub usage()
{
print "\ncheck_mem.pl v1.0 - Nagios Plugin\n\n";
print "usage:\n";
print " check_mem.pl -<f|u> -w <warnlevel> -c <critlevel>\n\n";
print "options:\n";
print " -f Check FREE memory\n";
print " -u Check USED memory\n";
print " -w PERCENT Percent free/used when to warn\n";
print " -c PERCENT Percent free/used when critical\n";
print "\nCopyright (C) 2000 Dan Larsson <dl\@tyfon.net>\n";
print "check_mem.pl comes with absolutely NO WARRANTY either implied or
explicit\n";
print "This program is licensed under the terms of the\n";
print "GNU General Public License (check source code for details)\n";
exit $exit_codes{'UNKNOWN'};
}
+++++++++++++++++++++++++++++++++++++++++++++++++++++++++++++++++++++++++++++

Nagios plugins in remote hosts Create a new nagios user account and give it a password /usr/sbin/useradd nagios passwd nagios
Install the Nagios Plugins Create a directory for storing the downloads. mkdir ~/downloads cd ~/downloads
Download the source code tarball of the Nagios plugins (visit http://www.nagios.org/download/ for links to
the versions 1.4.9). Extract the Nagios plugins source code tarball. tar xzf nagios-plugins-1.4.9.tar.gz cd nagios-plugins-1.4.9
Compile and install the plugins. ./configure make make install
The permissions on the plugin directory and the plugins will need to be fixed at this point, so run the following commands. chown nagios.nagios /usr/local/nagios chown -R nagios.nagios /usr/local/nagios/libexec copy the check_mem file and give permissions copy the check_mem file to /usr/local/nagios/libexec chown nagios:nagios check_mem chmod 755 check_mem 7. copy the check_cpu file and give permissions copy the check_cpu file to /usr/local/nagios/libexec chown nagios:nagios check_cpu chmod 755 check_cpu 8.After remove downloads folder from machine Rm –rf ~/downloads

Open Web browser and type the following address. http://Netmon server/nagios/index.html
Related Documents