Using ClipBoard-2000 Charles Severance University of Michigan [email protected].
Dec 24, 2015
Welcome message from author
This document is posted to help you gain knowledge. Please leave a comment to let me know what you think about it! Share it to your friends and learn new things together.
Transcript


Installation
• Install camera if desired
• Install Quicktime 4.0
• Download the latest version from
www-personal.umich.edu/~csev/
• Extract with Stuffit - should be 5 files

Prepare PowerPoint
• PowerPoint-98 “Save as HTML”– img001.GIF … or img001.JPG ...
• PowerPoint-98 “Save As” select “GIF”– Slide1, Slide2, ...
• PowerPoint-97 on PC or VirtualPC “Save as HTML”– img001.GIF … or img001.JPG …
• Recommend GIF
Limitations
• PowerPoint-2000 - Not yet supported
• PowerPoint-98 seems to only produce a single size of GIF/JPG
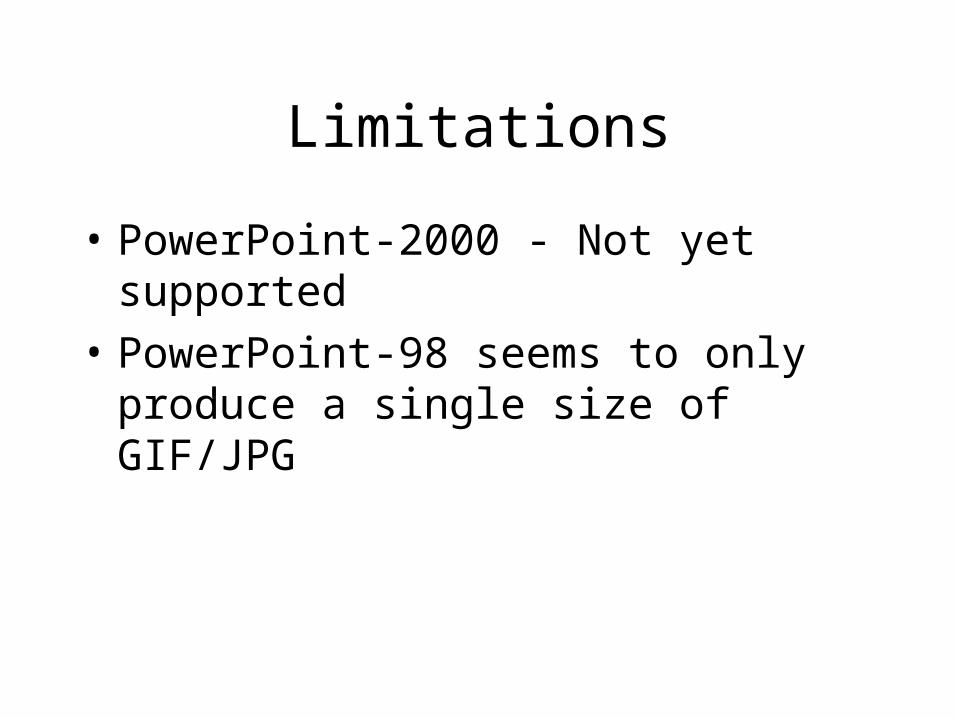
In this example, we will stay with the Mac-theme and use PowerPoint-98. In PowerPoint, Open the file, then select File | Save As … Then navigate to some directory (desktop in this example). Give a subdirectory name (howto in this example).
In the “Save File as Type” area, set it to GIF and press Save.
Use GIF to save the files, ClipBoard will lconvert them into JPG images during the lecture production process if the GIFs are too large.

The files will be saved into a directory called howto on the desktop. There will be one file for each slide. The slides are converted into GIF or JPG images and stored in files named Slide1, Slide2, Slide3, ...

Once you have the PowerPoint saved, you can run ClipBoard-2000

You can close or ignore this window

Navigate to the saves PowerPoint slides - use Lecture | Choose Directory navigate to the directory (howto in this example) you just created and single click (to select) on the directory then press Choose. If you mistakenly double click on the directory, simply use the drop-down at the top to navigate back up the hierarchy.

First make audio-only lecture - Lecture | Audio Only Followed by Lecture | Record The sound settings dialog will be presented. Make sure to set the Source/Input and the gain. Adjust gain so that you see some red bars while talking. I find that about 130 is a good gain level. Press OK. You also need to set the compression for the audio. Initially, try Qualcom PureVoice at 9:1 compression.

At this point, to start recording the lecture, press the Record button. Once recording has started, the other buttons will activate.

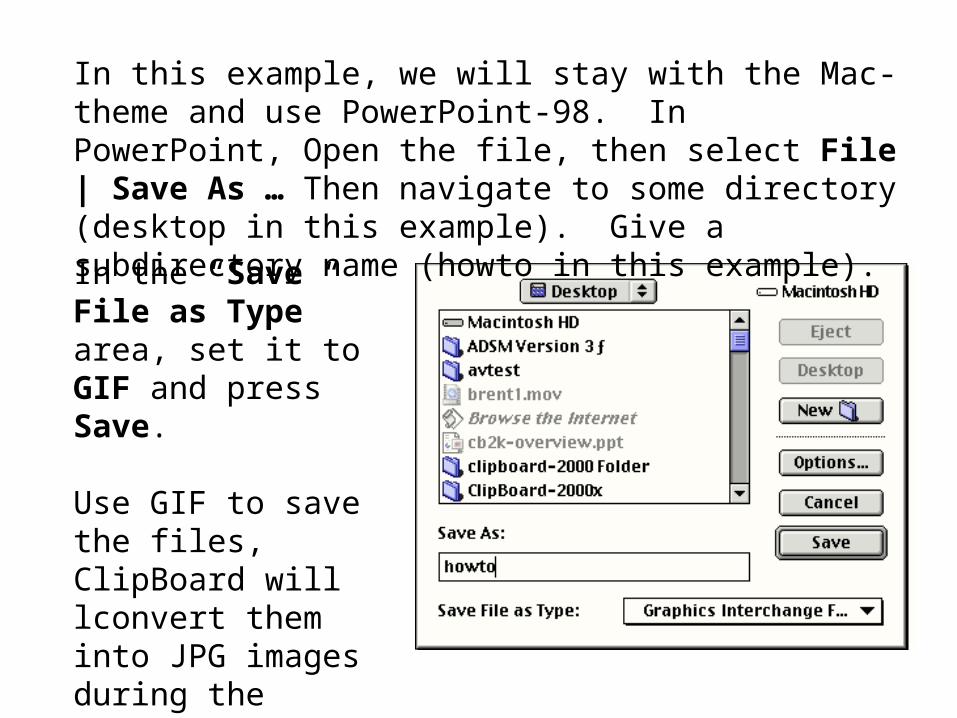
While recording, you can set your pointer to scribble, add text, and point to the materials. The “+” key advances to the next PowerPoint slide. You can control the color of the pen and text.
You can pause and restart during the recording. You can also bring up a blank slide to scribble on.
This is an example of scribbling and text

This is an example of creating a blank screen
Making and Playing Lectures
• Once you have recorded a lecture, it is time to make the lecture for later viewing
• This is done using Lecture | Make Lecture
• Several windows and progress bars will be displayed as the material is merged into the lecture

To play a lecture, go into File | Open - the proper directory and the file which contains the completed lecture will be selected - press Open.

This is an example of a lecture being played back

The folder contains a number of files. The original PowerPoint GIF files are named img001.GIF. The audio and video are stored in the file media.
The files which end in .txt contain the drawing, timing, and other information necessary to make the lecture.

Open the file in the Quicktime player and then use the Movie | Get Info option and navigate the drop-downs to fine the Sound Track and the General data. In this example, our audio track requires 21.5 KB/sec. Given that most modems operate at less than 6KB/sec this is too much data for web-delivery.

Recompression
• In order to serve the data over the web, we must compress it. Unfortunately, the best compression techniques run to slowly to allow us to record and compress at the same time.
• So we record in a high quality media and then compress down to a web-deliverable media
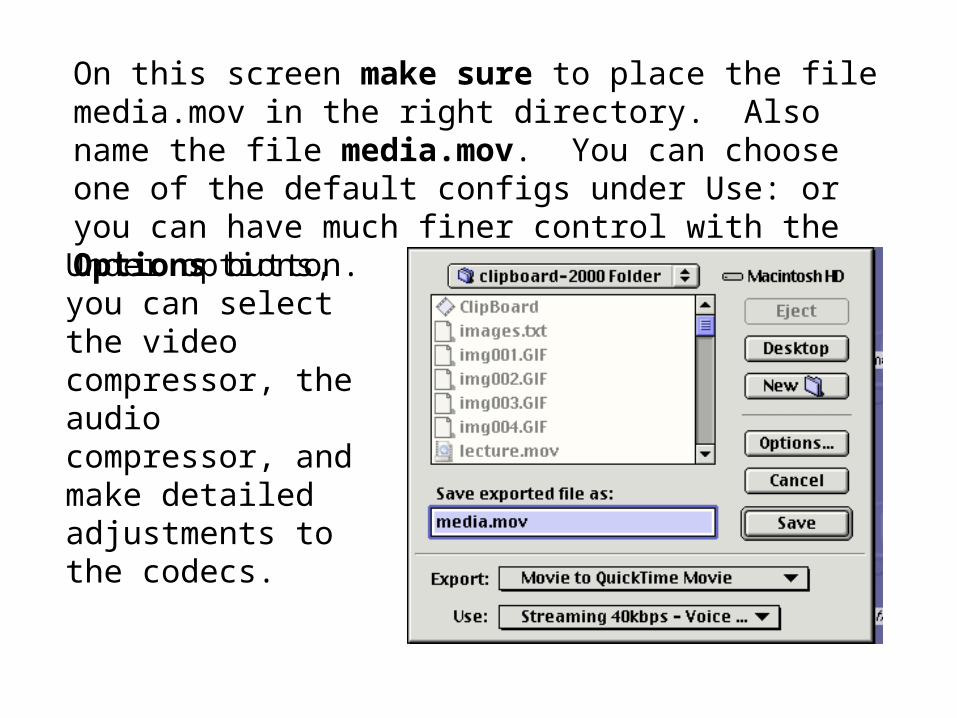
On this screen make sure to place the file media.mov in the right directory. Also name the file media.mov. You can choose one of the default configs under Use: or you can have much finer control with the Options button.
Under options, you can select the video compressor, the audio compressor, and make detailed adjustments to the codecs.

After recompression, the file media.mov should appear in the directory. The media file is still maintained so you can recompress and re-make the lecture repeatedly.
The file tmplec.mov is part of the lecture production process and can be removed.

Video Capture
• Video capture is similar to audio capture except that you see you recorded video as you make the lecture.
• The important thing is to get the medi settings correct.

Each codec is a tradeoff between quality, processor performance and disk space used per second. Photo JPEG at 8 frames per second, medium quality is a good choice.

As before, you must set the source, gain and compression for the audio. If you find a good audio compression with good quality and reasonable disk usage, drop me a note. For now, I use uncompressed or Qualcom PureVoice at 9:1. You need good quality and moderate compression.
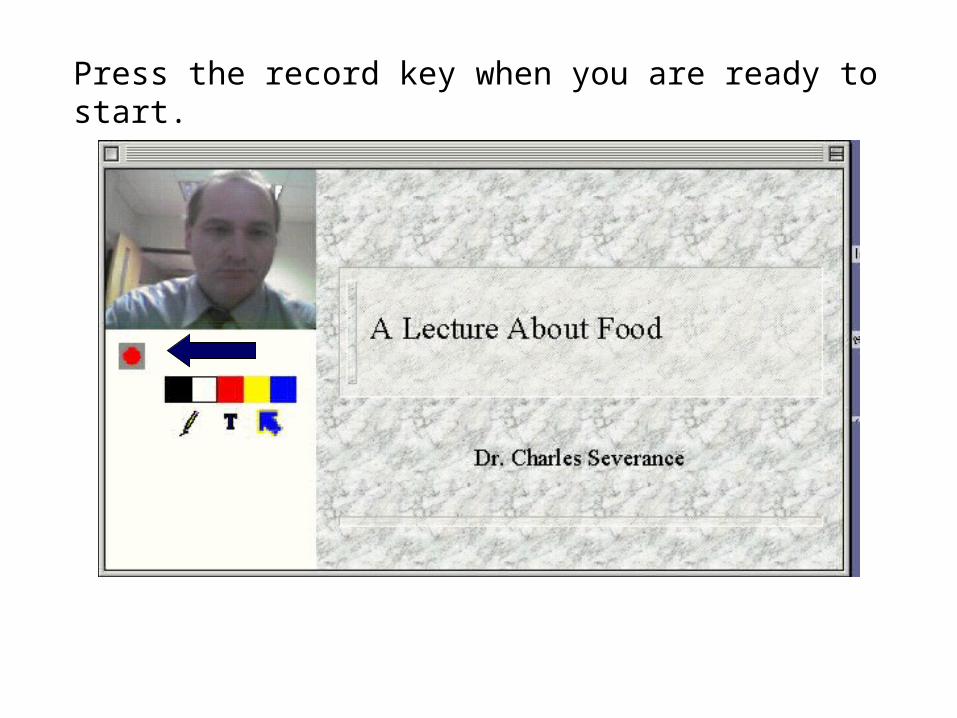
Press the record key when you are ready to start.

While recording, you use the same controls as in the audio-only mode. One additional feature is the preview of the next slide in the lower left. You can click on the image to advance the slide.

During playback the video is in the upper left corner - boy that guy looks happy.
Conclusion
• The ClipBoard-2000 is designed to be easily used.
• This early version may have some rough edges.
• Send E-Mail to [email protected] with bugs and feature requests
Related Documents