User’s Manual ENGLISH OS Ver. 2.52 MAN0001093 7 E

Welcome message from author
This document is posted to help you gain knowledge. Please leave a comment to let me know what you think about it! Share it to your friends and learn new things together.
Transcript

User
’s M
anua
l
ENGLISHOS Ver. 2.52MAN0001093
7E

• Read these instructions.
• Keep these instructions.
• Heed all warnings.
• Follow all instructions.
• Do not use this apparatus near water.
• Mains powered apparatus shall not be exposed to dripping orsplashing and that no objects filled with liquids, such as vases, shallbe placed on the apparatus.
• Clean only with dry cloth.
• Do not block any ventilation openings, install in accordance withthe manufacturer’s instructions.
• Do not install near any heat sources such as radiators, heat regis-ters, stoves, or other apparatus (including amplifiers) that produceheat.
• Do not defeat the safety purpose of the polarized or grounding-type plug. A polarized plug has two blades with one wider thanthe other. A grounding type plug has two blades and a thirdgrounding prong. The wide blade or the third prong are providedfor your safety. If the provided plug does not fit into your outlet,consult an electrician for replacement of the obsolete outlet. (forU.S.A. and Canada)
• Protect the power cord from being walked on or pinched particu-larly at plugs, convenience receptacles, and the point where theyexit from the apparatus.
• Only use attachments/accessories specified by the manufacturer.
• Unplug this apparatus during lightning storms or when unused forlong periods of time.
• Turning off the power switch does not completely isolate thisproduct from the power line so remove the plug from the socket ifnot using it for extended periods of time.
• Refer all servicing to qualified service personnel. Servicing isrequired when the apparatus has been damaged in any way, suchas power-supply cord or plug is damaged, liquid has been spilledor objects have fallen into the apparatus, the apparatus has beenexposed to rain or moisture, does not operate normally, or hasbeen dropped.
• Do not install this equipment on the far position from wall outletand/or convenience receptacle.
• Do not install this equipment in a confined space such as a box forthe conveyance or similar unit.
• Use only with the cart, stand, tripod, bracket, or table specified bythe manufacturer, or sold with the apparatus. When a cart is used,use caution when moving the cart/apparatus combination to avoidinjury from tip-over.
The lightning flash with arrowhead symbolwithin an equilateral triangle, is intended toalert the user to the presence of uninsulated“dangerous voltage” within the product’s enclo-sure that may be of sufficient magnitude to con-stitute a risk of electric shock to persons.
The exclamation point within an equilateral tri-angle is intended to alert the user to the pres-ence of important operating and maintenance(servicing) instructions in the literature accompa-nying the product.
CAUTIONDanger of explosion if battery is incorrectly replaced.
Replace only with the same or equivalent type.
Important safety instructions
THE FCC REGULATION WARNING (for U.S.A.)This equipment has been tested and found to comply with the limits for a Class B digital device, pursuant to Part 15 of the FCC Rules. These limits are designed to provide reasonable protection against harmful interference in a residential installation. This equipment generates, uses, and can radiate radio frequency energy and, if not installed and used in accordance with the instructions, may cause harmful interference to radio communications. However, there is no guarantee that interference will not occur in a particular installation. If this equipment does cause harmful interference to radio or television reception, which can be determined by turning the equipment off and on, the user is encouraged to try to correct the interference by one or more of the following measures:
• Reorient or relocate the receiving antenna.
• Increase the separation between the equipment and receiver.
• Connect the equipment into an outlet on a circuit different from that to which the receiver is connected.
• Consult the dealer or an experienced radio/TV technician for help.
Unauthorized changes or modification to this system can void the user’s authority to operate this equipment.
CE mark for European Harmonized StandardsCE mark which is attached to our company’s products of AC mains operated apparatus until December 31, 1996 means it conforms to EMC Directive (89/336/EEC) and CE mark Directive (93/68/EEC).
And, CE mark which is attached after January 1, 1997 means it conforms to EMC Directive (89/336/EEC), CE mark Directive (93/68/EEC) and Low Voltage Directive (73/23/EEC).
Also, CE mark which is attached to our company’s products of Battery operated apparatus means it conforms to EMC Directive (89/336/EEC) and CE mark Directive (93/68/EEC).
IMPORTANT NOTICE TO CONSUMERSThis product has been manufactured according to strict specifications and voltage requirements that are applicable in the country in which it is intended that this product should be used. If you have purchased this product via the internet, through mail order, and/or via a telephone sale, you must verify that this product is intended to be used in the country in which you reside.
WARNING: Use of this product in any country other than that for which it is intended could be dangerous and could invalidate the manufacturer's or distributor's warranty.
Please also retain your receipt as proof of purchase otherwise your product may be disqualified from the manufacturer's or distributor's warranty.

Data Handling
Data in memory may sometimes be lost due to incorrect useraction. Be sure to save important data to floppy disk or hard disk.Korg will not be responsible for damages caused by data loss.
Example screens
Some pages of the manuals show LCD screens along with anexplanation of functions and operations. All sound names,parameter names, and values are merely examples and may notalways match the actual display you are working on.
Cleaning the display
Use a soft cotton cloth to clean the screen. Some materials, suchas paper towels, could cause scratches and damage it. Computerwipes are also suggested, provided they are specifically designedfor LCD screens.
Do not spray any liquids on the LCD screen directly. Alwaysapply the solution to your cloth first, then clean the screen.
Trademarks
Akai is a registered trademark of Akai Professional Corporation.Macintosh is a registered trademark of Apple Computer, Inc.MS-DOS and Windows are registered trademarks of MicrosoftCorporation. TC-Helicon is a registered trademark of TC Elec-tronic, Inc. All other trademarks or registered trademarks are theproperty of their respective holders.
Disclaimer
The information contained in this manual have been carefullyrevised and checked through. Due to our constant efforts toimprove our products, the specifications might differ to those inthe manual. Korg is not responsible for any eventual differencesfound between the specifications and the contents of the instruc-tion manual – the specifications being subject to change withoutprior notice
Liability
Korg products are manufactured under strict specifications andvoltages required by each country. These products are warrantedby the Korg distributor only in each country. Any Korg productnot sold with a warranty card or carrying a serial number dis-qualifies the product sold from the manufacturer's/distributor'swarranty and liability. This requirement is for your own protec-tion and safety.
Service and User’s Assistance
For service, please contact your nearest Authorized Korg ServiceCenter. For more information on Korg products, and to findsoftware and accessories for your keyboard, please contact yourlocal Authorized Korg distributor. For up-to-date information,please point your web browser to www.korgpa.com.
Copyright © 2003-2005 KORG Italy Spa. Printed in Italy.

The BALANCE sliderWhen turning the instrument on, please be assured the BALANCE slider is set to the cen-ter. This sets both Sequencer 1 and Sequencer 2 to their maximum level. This will avoid
you start a Song without hearing anything.

1Table of Contents
IntroductionFront panel . . . . . . . . . . . . . . . . . . . . . . . . . . . . . . . . . . . 6
Rear panel . . . . . . . . . . . . . . . . . . . . . . . . . . . . . . . . . . 14
Welcome! . . . . . . . . . . . . . . . . . . . . . . . . . . . . . . . . . . . 16Live Performing . . . . . . . . . . . . . . . . . . . . . . . . . . . . . . . . . . . . . 16Useful links . . . . . . . . . . . . . . . . . . . . . . . . . . . . . . . . . . . . . . . . . 16What’s in the box . . . . . . . . . . . . . . . . . . . . . . . . . . . . . . . . . . . . 17About this manual . . . . . . . . . . . . . . . . . . . . . . . . . . . . . . . . . . . 17Making a backup copy of system files . . . . . . . . . . . . . . . . . . . . 17Loading the operating system . . . . . . . . . . . . . . . . . . . . . . . . . . 17Reloading the Factory Data . . . . . . . . . . . . . . . . . . . . . . . . . . . . 17
Start up . . . . . . . . . . . . . . . . . . . . . . . . . . . . . . . . . . . . 18Connecting the AC power cord . . . . . . . . . . . . . . . . . . . . . . . . . 18Turning the instrument on and off . . . . . . . . . . . . . . . . . . . . . . 18Controlling the Volume (Master&Acc/Seq) . . . . . . . . . . . . . . . 18The BALANCE slider . . . . . . . . . . . . . . . . . . . . . . . . . . . . . . . . . 18Headphones . . . . . . . . . . . . . . . . . . . . . . . . . . . . . . . . . . . . . . . . . 18Audio Outputs . . . . . . . . . . . . . . . . . . . . . . . . . . . . . . . . . . . . . . 18Audio Inputs . . . . . . . . . . . . . . . . . . . . . . . . . . . . . . . . . . . . . . . . 19MIDI connections . . . . . . . . . . . . . . . . . . . . . . . . . . . . . . . . . . . . 19Damper Pedal . . . . . . . . . . . . . . . . . . . . . . . . . . . . . . . . . . . . . . . 19Demo . . . . . . . . . . . . . . . . . . . . . . . . . . . . . . . . . . . . . . . . . . . . . . 19The music stand . . . . . . . . . . . . . . . . . . . . . . . . . . . . . . . . . . . . . 19
Glossary of Terms . . . . . . . . . . . . . . . . . . . . . . . . . . . . 20Sound . . . . . . . . . . . . . . . . . . . . . . . . . . . . . . . . . . . . . . . . . . . . . . 20Style . . . . . . . . . . . . . . . . . . . . . . . . . . . . . . . . . . . . . . . . . . . . . . . 20Keyboard tracks . . . . . . . . . . . . . . . . . . . . . . . . . . . . . . . . . . . . . 20Performance . . . . . . . . . . . . . . . . . . . . . . . . . . . . . . . . . . . . . . . . 21Sequencer . . . . . . . . . . . . . . . . . . . . . . . . . . . . . . . . . . . . . . . . . . . 21The LOGO decoder . . . . . . . . . . . . . . . . . . . . . . . . . . . . . . . . . . 21
Interface basics . . . . . . . . . . . . . . . . . . . . . . . . . . . . . . 22The Color TouchView™ graphical user interface . . . . . . . . . . 22Operative modes . . . . . . . . . . . . . . . . . . . . . . . . . . . . . . . . . . . . . 23Selected, highlighted items . . . . . . . . . . . . . . . . . . . . . . . . . . . . . 23Non-available, grayed-out parameters . . . . . . . . . . . . . . . . . . . 23
Quick GuideTurning the instrument on and listening to the demos . . . . . . . . . . . . . . . . . . . . . . . . . . . . . . . . . . . . . . 26Turning the instrument on, and viewing the main screen . . . 26Playing the demos . . . . . . . . . . . . . . . . . . . . . . . . . . . . . . . . . . . . 26
Playing Sounds . . . . . . . . . . . . . . . . . . . . . . . . . . . . . . 27Selecting a Sound and playing it on the keyboard . . . . . . . . . . 27Playing two or three Sounds at the same time . . . . . . . . . . . . . 29Playing different Sounds with your left and your right hand . 31Changing the split point . . . . . . . . . . . . . . . . . . . . . . . . . . . . . . . 32Raising or lowering the Upper octave . . . . . . . . . . . . . . . . . . . . 33Digital Drawbars . . . . . . . . . . . . . . . . . . . . . . . . . . . . . . . . . . . . . 33
Selecting and saving Performances . . . . . . . . . . . . . . 36Selecting a Performance . . . . . . . . . . . . . . . . . . . . . . . . . . . . . . . 36Saving your settings to a Performance . . . . . . . . . . . . . . . . . . . 37
Selecting and playing Styles . . . . . . . . . . . . . . . . . . . . 40Selecting and playing a Style . . . . . . . . . . . . . . . . . . . . . . . . . . . 40Tempo . . . . . . . . . . . . . . . . . . . . . . . . . . . . . . . . . . . . . . . . . . . . . 42Intro, Fill, Variation, Ending . . . . . . . . . . . . . . . . . . . . . . . . . . . 42
Single Touch Settings (STS) . . . . . . . . . . . . . . . . . . . . . . . . . . . . 43The Pads . . . . . . . . . . . . . . . . . . . . . . . . . . . . . . . . . . . . . . . . . . . . 44Adjusting volume balance between the Style and the
keyboard . . . . . . . . . . . . . . . . . . . . . . . . . . . . . . . . . . . . . . . . . . 44Adjusting volume of each single track . . . . . . . . . . . . . . . . . . . . 45Turning Style tracks on/off . . . . . . . . . . . . . . . . . . . . . . . . . . . . . 46Adding chords to your right-hand melody (ENSEMBLE
function) . . . . . . . . . . . . . . . . . . . . . . . . . . . . . . . . . . . . . . . . . . 46
Song Play . . . . . . . . . . . . . . . . . . . . . . . . . . . . . . . . . . 48Selecting a Song to play . . . . . . . . . . . . . . . . . . . . . . . . . . . . . . . . 48Playing back a Song . . . . . . . . . . . . . . . . . . . . . . . . . . . . . . . . . . . 50Changing tracks volume . . . . . . . . . . . . . . . . . . . . . . . . . . . . . . . 51Turning Song tracks on/off . . . . . . . . . . . . . . . . . . . . . . . . . . . . 53Mixing two Songs . . . . . . . . . . . . . . . . . . . . . . . . . . . . . . . . . . . . 54Listening to a CD . . . . . . . . . . . . . . . . . . . . . . . . . . . . . . . . . . . . . 55
The SongBook . . . . . . . . . . . . . . . . . . . . . . . . . . . . . . . 56Selecting the desired entry from the Main List . . . . . . . . . . . . . 56Displaying Artist or Genre . . . . . . . . . . . . . . . . . . . . . . . . . . . . . 57Sorting entries . . . . . . . . . . . . . . . . . . . . . . . . . . . . . . . . . . . . . . . 58Searching entries . . . . . . . . . . . . . . . . . . . . . . . . . . . . . . . . . . . . . 58Adding entries . . . . . . . . . . . . . . . . . . . . . . . . . . . . . . . . . . . . . . . 59Creating a Custom List . . . . . . . . . . . . . . . . . . . . . . . . . . . . . . . . 61Selecting and using a Custom List . . . . . . . . . . . . . . . . . . . . . . . 63Selecting a SongBook STS . . . . . . . . . . . . . . . . . . . . . . . . . . . . . . 63
Singing with a connected microphone . . . . . . . . . . . 64Connecting a microphone . . . . . . . . . . . . . . . . . . . . . . . . . . . . . 64Applying harmony to your voice . . . . . . . . . . . . . . . . . . . . . . . . 66Soloing your voice (TalkBack) . . . . . . . . . . . . . . . . . . . . . . . . . . 67Locking Voice Processor settings . . . . . . . . . . . . . . . . . . . . . . . . 67
Recording a new Song . . . . . . . . . . . . . . . . . . . . . . . . 68Entering Backing Sequence (Quick Record) mode . . . . . . . . . 68Preparing to record . . . . . . . . . . . . . . . . . . . . . . . . . . . . . . . . . . . 69Recording . . . . . . . . . . . . . . . . . . . . . . . . . . . . . . . . . . . . . . . . . . . 70Second-take recording (Overdubbing) . . . . . . . . . . . . . . . . . . . 71Saving a Song to disk . . . . . . . . . . . . . . . . . . . . . . . . . . . . . . . . . . 71
ReferenceSelecting elements . . . . . . . . . . . . . . . . . . . . . . . . . . . 74Sound Select window . . . . . . . . . . . . . . . . . . . . . . . . . . . . . . . . . 74Performance Select window . . . . . . . . . . . . . . . . . . . . . . . . . . . . 74Style Select window . . . . . . . . . . . . . . . . . . . . . . . . . . . . . . . . . . . 75Pad Select window . . . . . . . . . . . . . . . . . . . . . . . . . . . . . . . . . . . . 75STS Select . . . . . . . . . . . . . . . . . . . . . . . . . . . . . . . . . . . . . . . . . . . 75Song Select window . . . . . . . . . . . . . . . . . . . . . . . . . . . . . . . . . . . 76
Style Play operating mode . . . . . . . . . . . . . . . . . . . . 78Start-up settings . . . . . . . . . . . . . . . . . . . . . . . . . . . . . . . . . . . . . . 78How Styles, Performances and STSs are linked together . . . . . 78Main page (Normal view) . . . . . . . . . . . . . . . . . . . . . . . . . . . . . . 78Style Tracks view page . . . . . . . . . . . . . . . . . . . . . . . . . . . . . . . . . 80Volume panel . . . . . . . . . . . . . . . . . . . . . . . . . . . . . . . . . . . . . . . . 81STS Name panel . . . . . . . . . . . . . . . . . . . . . . . . . . . . . . . . . . . . . 82Mic panel . . . . . . . . . . . . . . . . . . . . . . . . . . . . . . . . . . . . . . . . . . . 82Sub-Scale panel . . . . . . . . . . . . . . . . . . . . . . . . . . . . . . . . . . . . . . 83Pad panel . . . . . . . . . . . . . . . . . . . . . . . . . . . . . . . . . . . . . . . . . . . 83Split panel . . . . . . . . . . . . . . . . . . . . . . . . . . . . . . . . . . . . . . . . . . . 83Edit menu . . . . . . . . . . . . . . . . . . . . . . . . . . . . . . . . . . . . . . . . . . . 84Edit page structure . . . . . . . . . . . . . . . . . . . . . . . . . . . . . . . . . . . 84
Table of Contents

2 Table of Contents
Mixer/Tuning: Volume/Pan . . . . . . . . . . . . . . . . . . . . . . . . . . . . 84Mixer/Tuning: FX Send . . . . . . . . . . . . . . . . . . . . . . . . . . . . . . . 85Mixer/Tuning: Tuning . . . . . . . . . . . . . . . . . . . . . . . . . . . . . . . . 86Mixer/Tuning: Sub Scale . . . . . . . . . . . . . . . . . . . . . . . . . . . . . . . 86Effects: FX Select . . . . . . . . . . . . . . . . . . . . . . . . . . . . . . . . . . . . . 87Effects: FX A…D . . . . . . . . . . . . . . . . . . . . . . . . . . . . . . . . . . . . . 88Track Controls: Mode . . . . . . . . . . . . . . . . . . . . . . . . . . . . . . . . . 88Track Controls: Drum Volume . . . . . . . . . . . . . . . . . . . . . . . . . 89Track Controls: Easy Edit . . . . . . . . . . . . . . . . . . . . . . . . . . . . . . 90Keyboard/Ensemble: Keyboard Control . . . . . . . . . . . . . . . . . . 91Keyboard/Ensemble: Key/Velocity Range . . . . . . . . . . . . . . . . . 91Keyboard/Ensemble: Ensemble . . . . . . . . . . . . . . . . . . . . . . . . . 92Style Controls: Drum/Fill . . . . . . . . . . . . . . . . . . . . . . . . . . . . . . 93Style Controls: Keyboard Range On/Off / Wrap Around . . . . 93Pad/Switch: Pad . . . . . . . . . . . . . . . . . . . . . . . . . . . . . . . . . . . . . . 94Pad/Switch: Assignable Switch . . . . . . . . . . . . . . . . . . . . . . . . . . 94Preferences: Style Preferences . . . . . . . . . . . . . . . . . . . . . . . . . . . 95Preferences: Global Setup . . . . . . . . . . . . . . . . . . . . . . . . . . . . . . 96Page menu . . . . . . . . . . . . . . . . . . . . . . . . . . . . . . . . . . . . . . . . . . 97Write Performance dialog box . . . . . . . . . . . . . . . . . . . . . . . . . . 98Write Single Touch Setting dialog box . . . . . . . . . . . . . . . . . . . 98Write Style Performance dialog box . . . . . . . . . . . . . . . . . . . . . 99Write Global-Style Play Setup dialog box . . . . . . . . . . . . . . . . . 99The DIRECT HD bank . . . . . . . . . . . . . . . . . . . . . . . . . . . . . . . . 99The DIRECT FD bank . . . . . . . . . . . . . . . . . . . . . . . . . . . . . . . . 100
Style Record mode . . . . . . . . . . . . . . . . . . . . . . . . . . .102The Style structure . . . . . . . . . . . . . . . . . . . . . . . . . . . . . . . . . . . 102Style Import/Export . . . . . . . . . . . . . . . . . . . . . . . . . . . . . . . . . 103Entering the Style Record mode . . . . . . . . . . . . . . . . . . . . . . . . 103Exit by saving or deleting changes . . . . . . . . . . . . . . . . . . . . . . 104Listening to the Style while in Edit mode . . . . . . . . . . . . . . . . 104List of recorded events . . . . . . . . . . . . . . . . . . . . . . . . . . . . . . . 104Main page - Record 1 . . . . . . . . . . . . . . . . . . . . . . . . . . . . . . . . 105Main page - Record 2 . . . . . . . . . . . . . . . . . . . . . . . . . . . . . . . . 108Style Record procedure . . . . . . . . . . . . . . . . . . . . . . . . . . . . . . . 108Edit menu . . . . . . . . . . . . . . . . . . . . . . . . . . . . . . . . . . . . . . . . . . 111Edit page structure . . . . . . . . . . . . . . . . . . . . . . . . . . . . . . . . . . . 111Event Edit: Event Edit . . . . . . . . . . . . . . . . . . . . . . . . . . . . . . . . 112Event Edit: Filter . . . . . . . . . . . . . . . . . . . . . . . . . . . . . . . . . . . . 114Style Edit: Quantize . . . . . . . . . . . . . . . . . . . . . . . . . . . . . . . . . . 114Style Edit: Transpose . . . . . . . . . . . . . . . . . . . . . . . . . . . . . . . . . 115Style Edit: Velocity . . . . . . . . . . . . . . . . . . . . . . . . . . . . . . . . . . . 115Style Edit: Cut . . . . . . . . . . . . . . . . . . . . . . . . . . . . . . . . . . . . . . 116Style Edit: Delete . . . . . . . . . . . . . . . . . . . . . . . . . . . . . . . . . . . . 117Style Edit: Delete All . . . . . . . . . . . . . . . . . . . . . . . . . . . . . . . . . 117Style Edit: Copy . . . . . . . . . . . . . . . . . . . . . . . . . . . . . . . . . . . . . 118Style Element Track Controls: Sound/Expression . . . . . . . . . 119Style Element Track Controls: Keyboard Range . . . . . . . . . . . 119Style Element Chord Table: Chord Table . . . . . . . . . . . . . . . . 120Style Track Controls: Type/Trigger/Tension . . . . . . . . . . . . . 120Import: Import Groove . . . . . . . . . . . . . . . . . . . . . . . . . . . . . . . 121Import: Import SMF . . . . . . . . . . . . . . . . . . . . . . . . . . . . . . . . . 121Export SMF . . . . . . . . . . . . . . . . . . . . . . . . . . . . . . . . . . . . . . . . 122Page menu . . . . . . . . . . . . . . . . . . . . . . . . . . . . . . . . . . . . . . . . . 123Write Style dialog box . . . . . . . . . . . . . . . . . . . . . . . . . . . . . . . . 123Copy Sounds dialog box . . . . . . . . . . . . . . . . . . . . . . . . . . . . . . 124Copy Expression dialog box . . . . . . . . . . . . . . . . . . . . . . . . . . . 124Copy Key Range dialog box . . . . . . . . . . . . . . . . . . . . . . . . . . . 124Copy Chord Table dialog box . . . . . . . . . . . . . . . . . . . . . . . . . 124Overdub Step Recording window . . . . . . . . . . . . . . . . . . . . . . 125
Pad Record mode . . . . . . . . . . . . . . . . . . . . . . . . . . . .126The Pad structure . . . . . . . . . . . . . . . . . . . . . . . . . . . . . . . . . . . 126Entering the Pad Record mode . . . . . . . . . . . . . . . . . . . . . . . . 126
Exit by saving or deleting changes . . . . . . . . . . . . . . . . . . . . . .127Listening to the Pad while in Record/Edit mode . . . . . . . . . .127Main page - Pad Record . . . . . . . . . . . . . . . . . . . . . . . . . . . . . .127Pad Record procedure . . . . . . . . . . . . . . . . . . . . . . . . . . . . . . . .129Edit menu . . . . . . . . . . . . . . . . . . . . . . . . . . . . . . . . . . . . . . . . . .129Edit page structure . . . . . . . . . . . . . . . . . . . . . . . . . . . . . . . . . . .129Event Edit: Event Edit . . . . . . . . . . . . . . . . . . . . . . . . . . . . . . . .130Pad Edit: Quantize . . . . . . . . . . . . . . . . . . . . . . . . . . . . . . . . . . .130Pad Edit: Transpose . . . . . . . . . . . . . . . . . . . . . . . . . . . . . . . . . .130Pad Edit: Velocity . . . . . . . . . . . . . . . . . . . . . . . . . . . . . . . . . . . .131Pad Edit: Cut . . . . . . . . . . . . . . . . . . . . . . . . . . . . . . . . . . . . . . .131Pad Edit: Delete . . . . . . . . . . . . . . . . . . . . . . . . . . . . . . . . . . . . .132Pad Edit: Delete All . . . . . . . . . . . . . . . . . . . . . . . . . . . . . . . . . .132Pad Edit: Copy from Style . . . . . . . . . . . . . . . . . . . . . . . . . . . . .132Pad Edit: Copy from Pad . . . . . . . . . . . . . . . . . . . . . . . . . . . . . .133Pad Track Controls: Sound/Expression . . . . . . . . . . . . . . . . . .133Pad Chord Table . . . . . . . . . . . . . . . . . . . . . . . . . . . . . . . . . . . .134Import: Import Groove . . . . . . . . . . . . . . . . . . . . . . . . . . . . . . .134Import: Import SMF . . . . . . . . . . . . . . . . . . . . . . . . . . . . . . . . .135Export: SMF . . . . . . . . . . . . . . . . . . . . . . . . . . . . . . . . . . . . . . . .135Page menu . . . . . . . . . . . . . . . . . . . . . . . . . . . . . . . . . . . . . . . . . .135Write Pad dialog box . . . . . . . . . . . . . . . . . . . . . . . . . . . . . . . . .136
Song Play operating mode . . . . . . . . . . . . . . . . . . . . 137Transport controls . . . . . . . . . . . . . . . . . . . . . . . . . . . . . . . . . . .137MIDI Clock . . . . . . . . . . . . . . . . . . . . . . . . . . . . . . . . . . . . . . . . .137Master Volume, Sequencer Volume, Balance . . . . . . . . . . . . .137Track parameters . . . . . . . . . . . . . . . . . . . . . . . . . . . . . . . . . . . .137Standard MIDI Files and Sounds . . . . . . . . . . . . . . . . . . . . . . .137NRPN Sound parameters . . . . . . . . . . . . . . . . . . . . . . . . . . . . .138Keyboard, Pad and Sequencer tracks . . . . . . . . . . . . . . . . . . . .138Main page . . . . . . . . . . . . . . . . . . . . . . . . . . . . . . . . . . . . . . . . . .139Song Tracks 1-8 and 9-16 pages . . . . . . . . . . . . . . . . . . . . . . . .142Volume panel . . . . . . . . . . . . . . . . . . . . . . . . . . . . . . . . . . . . . . .143Jukebox panel . . . . . . . . . . . . . . . . . . . . . . . . . . . . . . . . . . . . . . .143Lyrics & Markers panel . . . . . . . . . . . . . . . . . . . . . . . . . . . . . . .144STS Name panel . . . . . . . . . . . . . . . . . . . . . . . . . . . . . . . . . . . . .146Mic panel . . . . . . . . . . . . . . . . . . . . . . . . . . . . . . . . . . . . . . . . . .146Sub-Scale panel . . . . . . . . . . . . . . . . . . . . . . . . . . . . . . . . . . . . . .146Pad panel . . . . . . . . . . . . . . . . . . . . . . . . . . . . . . . . . . . . . . . . . . .146Split panel . . . . . . . . . . . . . . . . . . . . . . . . . . . . . . . . . . . . . . . . . .146Edit menu . . . . . . . . . . . . . . . . . . . . . . . . . . . . . . . . . . . . . . . . . .147Edit page structure . . . . . . . . . . . . . . . . . . . . . . . . . . . . . . . . . . .147Switching between sequencers during editing . . . . . . . . . . . . .147Mixer/Tuning: Volume/Pan . . . . . . . . . . . . . . . . . . . . . . . . . . .147Mixer/Tuning: FX Send . . . . . . . . . . . . . . . . . . . . . . . . . . . . . . .148Mixer/Tuning: Tuning . . . . . . . . . . . . . . . . . . . . . . . . . . . . . . . .149Effects: FX Select . . . . . . . . . . . . . . . . . . . . . . . . . . . . . . . . . . . .149Effects: FX A…D . . . . . . . . . . . . . . . . . . . . . . . . . . . . . . . . . . . .150Track Controls: Mode . . . . . . . . . . . . . . . . . . . . . . . . . . . . . . . .150Track Controls: Drum Volume . . . . . . . . . . . . . . . . . . . . . . . .150Track Controls: Easy Edit . . . . . . . . . . . . . . . . . . . . . . . . . . . . .150Keyboard/Ensemble: Keyboard Control . . . . . . . . . . . . . . . . .150Keyboard/Ensemble: Key/Velocity Range . . . . . . . . . . . . . . . .151Keyboard/Ensemble: Ensemble . . . . . . . . . . . . . . . . . . . . . . . .151Pad/Switch: Pad . . . . . . . . . . . . . . . . . . . . . . . . . . . . . . . . . . . . .151Pad/Switch: Assignable Switch . . . . . . . . . . . . . . . . . . . . . . . . .151Jukebox Editor . . . . . . . . . . . . . . . . . . . . . . . . . . . . . . . . . . . . . .151Groove Quantize . . . . . . . . . . . . . . . . . . . . . . . . . . . . . . . . . . . .152Preferences: Track Settings . . . . . . . . . . . . . . . . . . . . . . . . . . . .153Preferences: General Control . . . . . . . . . . . . . . . . . . . . . . . . . .153Page menu . . . . . . . . . . . . . . . . . . . . . . . . . . . . . . . . . . . . . . . . . .155Write Global-Song Play Setup dialog box . . . . . . . . . . . . . . . .156Playing back MP3 files . . . . . . . . . . . . . . . . . . . . . . . . . . . . . . . .156

3Table of Contents
Playing back Audio CD tracks . . . . . . . . . . . . . . . . . . . . . . . . . 156
SongBook . . . . . . . . . . . . . . . . . . . . . . . . . . . . . . . . . . 157Book . . . . . . . . . . . . . . . . . . . . . . . . . . . . . . . . . . . . . . . . . . . . . . 157Book Edit 1 . . . . . . . . . . . . . . . . . . . . . . . . . . . . . . . . . . . . . . . . 159Book Edit 2 . . . . . . . . . . . . . . . . . . . . . . . . . . . . . . . . . . . . . . . . 161Custom List . . . . . . . . . . . . . . . . . . . . . . . . . . . . . . . . . . . . . . . . 162List Edit . . . . . . . . . . . . . . . . . . . . . . . . . . . . . . . . . . . . . . . . . . . 162Lyrics/STS . . . . . . . . . . . . . . . . . . . . . . . . . . . . . . . . . . . . . . . . . 163Info . . . . . . . . . . . . . . . . . . . . . . . . . . . . . . . . . . . . . . . . . . . . . . . 164Page menu . . . . . . . . . . . . . . . . . . . . . . . . . . . . . . . . . . . . . . . . . 164
Sequencer operating mode . . . . . . . . . . . . . . . . . . . 166Transport controls . . . . . . . . . . . . . . . . . . . . . . . . . . . . . . . . . . 166The Songs and the Standard MIDI File format . . . . . . . . . . . 166Songs and Voice Processor Presets . . . . . . . . . . . . . . . . . . . . . 166Sequencer Play - Main page . . . . . . . . . . . . . . . . . . . . . . . . . . . 166Entering Record mode . . . . . . . . . . . . . . . . . . . . . . . . . . . . . . . 169Record mode: Multitrack Sequencer page . . . . . . . . . . . . . . . 169Record mode: Step Record page . . . . . . . . . . . . . . . . . . . . . . . 171Record mode: Backing Sequence (Quick Record) page . . . . 173Record mode: Step Backing Sequence page . . . . . . . . . . . . . . 176Edit menu . . . . . . . . . . . . . . . . . . . . . . . . . . . . . . . . . . . . . . . . . 178Edit page structure . . . . . . . . . . . . . . . . . . . . . . . . . . . . . . . . . . 178Mixer/Tuning: Volume/Pan . . . . . . . . . . . . . . . . . . . . . . . . . . 179Mixer/Tuning: FX Send . . . . . . . . . . . . . . . . . . . . . . . . . . . . . . 179Mixer/Tuning: Tuning . . . . . . . . . . . . . . . . . . . . . . . . . . . . . . . 180Mixer/Tuning: Sub Scale . . . . . . . . . . . . . . . . . . . . . . . . . . . . . 180Effects: FX Select . . . . . . . . . . . . . . . . . . . . . . . . . . . . . . . . . . . . 180Effects: FX A…D . . . . . . . . . . . . . . . . . . . . . . . . . . . . . . . . . . . . 181Track Controls: Mode . . . . . . . . . . . . . . . . . . . . . . . . . . . . . . . 181Track Controls: Drum Volume . . . . . . . . . . . . . . . . . . . . . . . . 181Track Controls: Easy Edit . . . . . . . . . . . . . . . . . . . . . . . . . . . . . 181Event Edit: Event Edit . . . . . . . . . . . . . . . . . . . . . . . . . . . . . . . . 181Event Edit: Filter . . . . . . . . . . . . . . . . . . . . . . . . . . . . . . . . . . . . 183Song Edit: Quantize . . . . . . . . . . . . . . . . . . . . . . . . . . . . . . . . . 183Song Edit: Transpose . . . . . . . . . . . . . . . . . . . . . . . . . . . . . . . . 184Song Edit: Velocity . . . . . . . . . . . . . . . . . . . . . . . . . . . . . . . . . . 184Song Edit: Cut/Insert Measures . . . . . . . . . . . . . . . . . . . . . . . . 185Song Edit: Delete . . . . . . . . . . . . . . . . . . . . . . . . . . . . . . . . . . . . 185Song Edit: Copy . . . . . . . . . . . . . . . . . . . . . . . . . . . . . . . . . . . . 185Song Edit: Move . . . . . . . . . . . . . . . . . . . . . . . . . . . . . . . . . . . . 186Preferences: Global Setup . . . . . . . . . . . . . . . . . . . . . . . . . . . . . 186Page menu . . . . . . . . . . . . . . . . . . . . . . . . . . . . . . . . . . . . . . . . . 187Write Global-Sequencer Setup dialog box . . . . . . . . . . . . . . . 188Song Select window . . . . . . . . . . . . . . . . . . . . . . . . . . . . . . . . . 188Save Song window . . . . . . . . . . . . . . . . . . . . . . . . . . . . . . . . . . 188
Sound operating mode . . . . . . . . . . . . . . . . . . . . . . . 190The MIDI channel . . . . . . . . . . . . . . . . . . . . . . . . . . . . . . . . . . 190How to select oscillators . . . . . . . . . . . . . . . . . . . . . . . . . . . . . . 190Sounds, Drum Kits, Digital Drawbars . . . . . . . . . . . . . . . . . . 190Main page . . . . . . . . . . . . . . . . . . . . . . . . . . . . . . . . . . . . . . . . . 190Digital Drawbars page . . . . . . . . . . . . . . . . . . . . . . . . . . . . . . . 192Edit menu . . . . . . . . . . . . . . . . . . . . . . . . . . . . . . . . . . . . . . . . . 193Edit page structure . . . . . . . . . . . . . . . . . . . . . . . . . . . . . . . . . . 193Basic: Sound Basic . . . . . . . . . . . . . . . . . . . . . . . . . . . . . . . . . . . 193Basic: OSC Basic . . . . . . . . . . . . . . . . . . . . . . . . . . . . . . . . . . . . 194Basic: Vel/Key Zone . . . . . . . . . . . . . . . . . . . . . . . . . . . . . . . . . 195DrumKit: Sample Setup (Drum Kits) . . . . . . . . . . . . . . . . . . . 195DrumKit: Voice Mixer (Drum Kits) . . . . . . . . . . . . . . . . . . . . 196Pitch: Pitch Mod . . . . . . . . . . . . . . . . . . . . . . . . . . . . . . . . . . . . 197Pitch: Pitch EG . . . . . . . . . . . . . . . . . . . . . . . . . . . . . . . . . . . . . 199Filter: Filter Type . . . . . . . . . . . . . . . . . . . . . . . . . . . . . . . . . . . 200Filter: Filter Mod . . . . . . . . . . . . . . . . . . . . . . . . . . . . . . . . . . . . 201Filter: Filter LFO . . . . . . . . . . . . . . . . . . . . . . . . . . . . . . . . . . . . 203
Filter: Filter EG . . . . . . . . . . . . . . . . . . . . . . . . . . . . . . . . . . . . . 203Amp: Amp Level/Pan . . . . . . . . . . . . . . . . . . . . . . . . . . . . . . . . 205Amp: Amp Mod . . . . . . . . . . . . . . . . . . . . . . . . . . . . . . . . . . . . 206Amp: Amp EG . . . . . . . . . . . . . . . . . . . . . . . . . . . . . . . . . . . . . . 206LFO: LFO1 . . . . . . . . . . . . . . . . . . . . . . . . . . . . . . . . . . . . . . . . . 208LFO: LFO2 . . . . . . . . . . . . . . . . . . . . . . . . . . . . . . . . . . . . . . . . . 210Effects: FX Select . . . . . . . . . . . . . . . . . . . . . . . . . . . . . . . . . . . . 210Effects: FX1 . . . . . . . . . . . . . . . . . . . . . . . . . . . . . . . . . . . . . . . . 210Effects: FX2 . . . . . . . . . . . . . . . . . . . . . . . . . . . . . . . . . . . . . . . . 210Page menu . . . . . . . . . . . . . . . . . . . . . . . . . . . . . . . . . . . . . . . . . 211Write Sound dialog box . . . . . . . . . . . . . . . . . . . . . . . . . . . . . . 211Copy Oscillator dialog box . . . . . . . . . . . . . . . . . . . . . . . . . . . . 212Copy FX dialog box . . . . . . . . . . . . . . . . . . . . . . . . . . . . . . . . . . 212Copy Drum Kit dialog box . . . . . . . . . . . . . . . . . . . . . . . . . . . . 212AMS (Alternate Modulation Source) list . . . . . . . . . . . . . . . . 213
Sampling operating mode . . . . . . . . . . . . . . . . . . . . 215Entering and exiting the Sampling mode . . . . . . . . . . . . . . . . 215The Record (Sampling) procedure . . . . . . . . . . . . . . . . . . . . . 215Edit menu . . . . . . . . . . . . . . . . . . . . . . . . . . . . . . . . . . . . . . . . . . 216Sampling: Record . . . . . . . . . . . . . . . . . . . . . . . . . . . . . . . . . . . 216Sampling: Edit . . . . . . . . . . . . . . . . . . . . . . . . . . . . . . . . . . . . . . 217Sampling: Loop Edit . . . . . . . . . . . . . . . . . . . . . . . . . . . . . . . . . 218Sampling: Sampling Info . . . . . . . . . . . . . . . . . . . . . . . . . . . . . 219Time Slice . . . . . . . . . . . . . . . . . . . . . . . . . . . . . . . . . . . . . . . . . . 220The Time Slice procedure . . . . . . . . . . . . . . . . . . . . . . . . . . . . . 222The Extend procedure . . . . . . . . . . . . . . . . . . . . . . . . . . . . . . . . 223Multisample: Edit MS . . . . . . . . . . . . . . . . . . . . . . . . . . . . . . . . 223Multisample: Key Assign . . . . . . . . . . . . . . . . . . . . . . . . . . . . . 224Page menu . . . . . . . . . . . . . . . . . . . . . . . . . . . . . . . . . . . . . . . . . 225Write Sample dialog box . . . . . . . . . . . . . . . . . . . . . . . . . . . . . . 226Write MultiSample dialog box . . . . . . . . . . . . . . . . . . . . . . . . . 226Write Slice dialog box . . . . . . . . . . . . . . . . . . . . . . . . . . . . . . . . 227Delete Sample dialog box . . . . . . . . . . . . . . . . . . . . . . . . . . . . . 227Delete Multisample dialog box . . . . . . . . . . . . . . . . . . . . . . . . 227Export Sample dialog box . . . . . . . . . . . . . . . . . . . . . . . . . . . . . 228Export Multisample dialog box . . . . . . . . . . . . . . . . . . . . . . . . 228
Global edit mode . . . . . . . . . . . . . . . . . . . . . . . . . . . 229What is it, and how the Global is structured . . . . . . . . . . . . . 229Main page . . . . . . . . . . . . . . . . . . . . . . . . . . . . . . . . . . . . . . . . . . 229Edit menu . . . . . . . . . . . . . . . . . . . . . . . . . . . . . . . . . . . . . . . . . . 229Edit page structure . . . . . . . . . . . . . . . . . . . . . . . . . . . . . . . . . . 229General Controls: Basic . . . . . . . . . . . . . . . . . . . . . . . . . . . . . . . 230General Controls: Transpose Control . . . . . . . . . . . . . . . . . . . 231General Controls: Scale . . . . . . . . . . . . . . . . . . . . . . . . . . . . . . . 231General Controls: Lock . . . . . . . . . . . . . . . . . . . . . . . . . . . . . . . 232General Controls: Interface . . . . . . . . . . . . . . . . . . . . . . . . . . . 234Controllers: Pedal/Switch . . . . . . . . . . . . . . . . . . . . . . . . . . . . . 235Controllers: Assignable Sliders . . . . . . . . . . . . . . . . . . . . . . . . . 235Controllers: EC5 . . . . . . . . . . . . . . . . . . . . . . . . . . . . . . . . . . . . 236MIDI: MIDI Setup / General Controls . . . . . . . . . . . . . . . . . . 236MIDI: MIDI In Control . . . . . . . . . . . . . . . . . . . . . . . . . . . . . . 237MIDI: MIDI In Channels . . . . . . . . . . . . . . . . . . . . . . . . . . . . . 238MIDI: MIDI Out Channels . . . . . . . . . . . . . . . . . . . . . . . . . . . 238MIDI: Filters . . . . . . . . . . . . . . . . . . . . . . . . . . . . . . . . . . . . . . . 239Audio Output: Sty/Kbd . . . . . . . . . . . . . . . . . . . . . . . . . . . . . . . 239Audio Output: Seq1 . . . . . . . . . . . . . . . . . . . . . . . . . . . . . . . . . 239Audio Output: Seq2 . . . . . . . . . . . . . . . . . . . . . . . . . . . . . . . . . 240Audio Output: Drums . . . . . . . . . . . . . . . . . . . . . . . . . . . . . . . 240Audio Output: Audio In . . . . . . . . . . . . . . . . . . . . . . . . . . . . . . 240Audio Output: Metro / S/PDIF . . . . . . . . . . . . . . . . . . . . . . . . 241Audio Output: MP3/CD . . . . . . . . . . . . . . . . . . . . . . . . . . . . . . 241Voice Processor Setup: Setup . . . . . . . . . . . . . . . . . . . . . . . . . . 242Voice Processor Setup: Lead Voice . . . . . . . . . . . . . . . . . . . . . 243

4 Table of Contents
Voice Processor Setup: Dynamics / EQ . . . . . . . . . . . . . . . . . . 243Voice Processor Setup: Talk . . . . . . . . . . . . . . . . . . . . . . . . . . . 244Voice Processor Preset: Preset . . . . . . . . . . . . . . . . . . . . . . . . . 245Voice Processor Preset: Thicken / Pitch . . . . . . . . . . . . . . . . . 246Voice Processor Preset: Voice Modeling . . . . . . . . . . . . . . . . . 247Voice Processor Preset: Harmony . . . . . . . . . . . . . . . . . . . . . . 248Voice Processor Preset: Harmony Voices . . . . . . . . . . . . . . . . 249Voice Processor Preset: Effects . . . . . . . . . . . . . . . . . . . . . . . . . 251Voice Processor Preset: Controls . . . . . . . . . . . . . . . . . . . . . . . 252Voice Processor: The optional Pitch Correction and
Voice Modeling modules . . . . . . . . . . . . . . . . . . . . . . . . . . . 252Harmony and Tuning with the Voice Processor . . . . . . . . . . 253Video Interface: Video Out . . . . . . . . . . . . . . . . . . . . . . . . . . . . 256Touch Panel Calibration . . . . . . . . . . . . . . . . . . . . . . . . . . . . . . 256Page menu . . . . . . . . . . . . . . . . . . . . . . . . . . . . . . . . . . . . . . . . . 257Write Global - Global Setup dialog box . . . . . . . . . . . . . . . . . 257Write Global - Midi Setup dialog box . . . . . . . . . . . . . . . . . . . 257Write Global - Talk Configuration dialog box . . . . . . . . . . . . 258Write Global - Voice Processor Setup dialog box . . . . . . . . . . 258Write Global - Voice Processor Preset dialog box . . . . . . . . . 258
Disk edit mode . . . . . . . . . . . . . . . . . . . . . . . . . . . . . .259Storage devices and internal memory . . . . . . . . . . . . . . . . . . . 259Selecting and deselecting files . . . . . . . . . . . . . . . . . . . . . . . . . . 259File types . . . . . . . . . . . . . . . . . . . . . . . . . . . . . . . . . . . . . . . . . . . 259Disk structure . . . . . . . . . . . . . . . . . . . . . . . . . . . . . . . . . . . . . . . 260Main page . . . . . . . . . . . . . . . . . . . . . . . . . . . . . . . . . . . . . . . . . . 260Page structure . . . . . . . . . . . . . . . . . . . . . . . . . . . . . . . . . . . . . . 260Navigation tools . . . . . . . . . . . . . . . . . . . . . . . . . . . . . . . . . . . . . 261Load . . . . . . . . . . . . . . . . . . . . . . . . . . . . . . . . . . . . . . . . . . . . . . 262Save . . . . . . . . . . . . . . . . . . . . . . . . . . . . . . . . . . . . . . . . . . . . . . . 265Copy . . . . . . . . . . . . . . . . . . . . . . . . . . . . . . . . . . . . . . . . . . . . . . 268Erase . . . . . . . . . . . . . . . . . . . . . . . . . . . . . . . . . . . . . . . . . . . . . . 270Format . . . . . . . . . . . . . . . . . . . . . . . . . . . . . . . . . . . . . . . . . . . . 270Utility . . . . . . . . . . . . . . . . . . . . . . . . . . . . . . . . . . . . . . . . . . . . . 271Preferences . . . . . . . . . . . . . . . . . . . . . . . . . . . . . . . . . . . . . . . . . 272USB/CD . . . . . . . . . . . . . . . . . . . . . . . . . . . . . . . . . . . . . . . . . . . 273USB/CD: USB . . . . . . . . . . . . . . . . . . . . . . . . . . . . . . . . . . . . . . 273USB/CD: CD . . . . . . . . . . . . . . . . . . . . . . . . . . . . . . . . . . . . . . . 274Page menu . . . . . . . . . . . . . . . . . . . . . . . . . . . . . . . . . . . . . . . . . 276Disk handling . . . . . . . . . . . . . . . . . . . . . . . . . . . . . . . . . . . . . . . 278Bonus software . . . . . . . . . . . . . . . . . . . . . . . . . . . . . . . . . . . . . . 279
MIDI . . . . . . . . . . . . . . . . . . . . . . . . . . . . . . . . . . . . . . .280What is MIDI? . . . . . . . . . . . . . . . . . . . . . . . . . . . . . . . . . . . . . . 280Standard MIDI Files . . . . . . . . . . . . . . . . . . . . . . . . . . . . . . . . . 280The General MIDI standard . . . . . . . . . . . . . . . . . . . . . . . . . . . 281The Global channel . . . . . . . . . . . . . . . . . . . . . . . . . . . . . . . . . . 281The Chord 1 and Chord 2 channels . . . . . . . . . . . . . . . . . . . . . 281The Control channel . . . . . . . . . . . . . . . . . . . . . . . . . . . . . . . . . 281MIDI Setup . . . . . . . . . . . . . . . . . . . . . . . . . . . . . . . . . . . . . . . . 281Connecting Pa1X to a Master keyboard . . . . . . . . . . . . . . . . . 281Connecting the Pa1X to a MIDI accordion . . . . . . . . . . . . . . 282Connecting the Pa1X to an external sequencer . . . . . . . . . . . 283Playing another instrument with the Pa1X . . . . . . . . . . . . . . . 284
AppendixFactory data . . . . . . . . . . . . . . . . . . . . . . . . . . . . . . . .286Styles . . . . . . . . . . . . . . . . . . . . . . . . . . . . . . . . . . . . . . . . . . . . . . 286Style Elements . . . . . . . . . . . . . . . . . . . . . . . . . . . . . . . . . . . . . . 290Single Touch Settings (STS) . . . . . . . . . . . . . . . . . . . . . . . . . . . 290Sounds . . . . . . . . . . . . . . . . . . . . . . . . . . . . . . . . . . . . . . . . . . . . 291
Drum Kits . . . . . . . . . . . . . . . . . . . . . . . . . . . . . . . . . . . . . . . . . .299Drum Kit maps . . . . . . . . . . . . . . . . . . . . . . . . . . . . . . . . . . . . . .300Multisamples . . . . . . . . . . . . . . . . . . . . . . . . . . . . . . . . . . . . . . .316Drum Samples . . . . . . . . . . . . . . . . . . . . . . . . . . . . . . . . . . . . . .319Performances . . . . . . . . . . . . . . . . . . . . . . . . . . . . . . . . . . . . . . .322Pads . . . . . . . . . . . . . . . . . . . . . . . . . . . . . . . . . . . . . . . . . . . . . . .324List of sounds assignable to the Pads in OS versions
previous to 2.0 . . . . . . . . . . . . . . . . . . . . . . . . . . . . . . . . . . . .327MIDI Setup . . . . . . . . . . . . . . . . . . . . . . . . . . . . . . . . . . . . . . . . .328
Effects . . . . . . . . . . . . . . . . . . . . . . . . . . . . . . . . . . . . 329Diagrams . . . . . . . . . . . . . . . . . . . . . . . . . . . . . . . . . . . . . . . . . . .329Dynamic Modulation sources . . . . . . . . . . . . . . . . . . . . . . . . . .329Filter/Dynamic . . . . . . . . . . . . . . . . . . . . . . . . . . . . . . . . . . . . . .330Pitch/Phase Mod. . . . . . . . . . . . . . . . . . . . . . . . . . . . . . . . . . . . .340Mod./P.Shift . . . . . . . . . . . . . . . . . . . . . . . . . . . . . . . . . . . . . . . .349ER/Delay . . . . . . . . . . . . . . . . . . . . . . . . . . . . . . . . . . . . . . . . . . .354Reverb . . . . . . . . . . . . . . . . . . . . . . . . . . . . . . . . . . . . . . . . . . . . .360Mono – Mono Chain . . . . . . . . . . . . . . . . . . . . . . . . . . . . . . . . .362
Assignable parameters . . . . . . . . . . . . . . . . . . . . . . . 378List of Footswitch and EC5 functions . . . . . . . . . . . . . . . . . . .378List of Assignable Pedal and Assignable Sliders functions . . .379List of Assignable Switches functions . . . . . . . . . . . . . . . . . . . .380List of functions assignable to Voice Processor’s
Continuous Controls . . . . . . . . . . . . . . . . . . . . . . . . . . . . . . .381List of functions assignable to Voice Processor’s Switch
Controls . . . . . . . . . . . . . . . . . . . . . . . . . . . . . . . . . . . . . . . . . .381Scales . . . . . . . . . . . . . . . . . . . . . . . . . . . . . . . . . . . . . . . . . . . . . .382
MIDI Data . . . . . . . . . . . . . . . . . . . . . . . . . . . . . . . . . . 383MIDI Controllers . . . . . . . . . . . . . . . . . . . . . . . . . . . . . . . . . . . .383Program Change messages used as remote commands . . . . .384MIDI Implementation Chart . . . . . . . . . . . . . . . . . . . . . . . . . .385
Parameters . . . . . . . . . . . . . . . . . . . . . . . . . . . . . . . . . 386Control panel and operating mode parameters . . . . . . . . . . .386Style, Pad and Song parameter . . . . . . . . . . . . . . . . . . . . . . . . .392
Recognized chords . . . . . . . . . . . . . . . . . . . . . . . . . . 393
Installing the hard disk (Pa1X only) . . . . . . . . . . . . . 395
Installing the Korg CDRW-1 Drive . . . . . . . . . . . . . . 397
Installing additional RAM . . . . . . . . . . . . . . . . . . . . . 399
Installing ROM expansions . . . . . . . . . . . . . . . . . . . . 401
Installing the Video Interface (VIF3) . . . . . . . . . . . . 403NTSC, PAL, SECAM . . . . . . . . . . . . . . . . . . . . . . . . . . . . . . . . .403Precautions . . . . . . . . . . . . . . . . . . . . . . . . . . . . . . . . . . . . . . . . .403Part listing . . . . . . . . . . . . . . . . . . . . . . . . . . . . . . . . . . . . . . . . . .403Installation on the Pa1X Pro . . . . . . . . . . . . . . . . . . . . . . . . . . .404Installation on the Pa1X . . . . . . . . . . . . . . . . . . . . . . . . . . . . . .405Connections and setup . . . . . . . . . . . . . . . . . . . . . . . . . . . . . . .406
Installing the MP3 Board (EXBP-MP3) . . . . . . . . . . . 407Precautions . . . . . . . . . . . . . . . . . . . . . . . . . . . . . . . . . . . . . . . . .407Part listing . . . . . . . . . . . . . . . . . . . . . . . . . . . . . . . . . . . . . . . . . .407Installation . . . . . . . . . . . . . . . . . . . . . . . . . . . . . . . . . . . . . . . . .408Recording an MP3 . . . . . . . . . . . . . . . . . . . . . . . . . . . . . . . . . . .410Notes . . . . . . . . . . . . . . . . . . . . . . . . . . . . . . . . . . . . . . . . . . . . . .410
Shortcuts . . . . . . . . . . . . . . . . . . . . . . . . . . . . . . . . . . 411
Troubleshooting . . . . . . . . . . . . . . . . . . . . . . . . . . . . 412
Technical specifications . . . . . . . . . . . . . . . . . . . . . . 414
Index . . . . . . . . . . . . . . . . . . . . . . . . . . . . . . . . . . . . . 416

Intr
oduc
tion

6 Front panel
Front panel
6
D
E F G H K
I
J
R
C
7
3
2
1
90AB
8L
45 6
D
E F G H K
I
J
R
C
732
1
90AB
8
L

7Front panel
Intr
oduct
ion
S T
Q
NM O P
U
V] `
[ \ e f h
g
da b c
L
R
YZ
WX45
S T
Q
NM O P
U
V] `
[ \ e f h
g
da b c
L
R
YZ
WX

8 Front panel
1 JOYSTICK
This joystick triggers different functions, depending on thedirection it is moved towards.
X (+/–) Move the joystick towards the left (–) to lower thepitch, or towards the right (+) to raise it. This isalso called Pitch Bend.
Y+ Move the joystick forward to trigger Modulation.
Y– Move the joystick backward, to trigger the func-tion assigned in Sound mode.
2 MASTER VOLUME
This slider controls the overall volume of the instrument, bothof the internal speakers (only Pa1X), the LEFT/MONO andRIGHT outputs, and the HEADPHONES output. It does notcontrol the volume of the 1 and 2 sub-outputs.
This slider also controls the volume of the signal entering theMIC input. It does not control the signal entering the line inputs(1 and 2).
Warning: At the maximum level, with rich-sounding Songs, Stylesor Sounds, the internal speakers of Pa1X could distort during signalpeaks. Should this happen, lower the Master Volume a little.
3 ACC/SEQ VOLUME
This slider controls the accompaniment tracks volume (StylePlay mode) or the Song tracks volume, excluding the Keyboardtracks (Song Play and Sequencer modes). This is a relative con-trol, whose effective maximum value is determined by the MAS-TER VOLUME slider position.
4 ASSIGNABLE SLIDERS
These are freely assignable sliders (see “Controllers: AssignableSliders” on page 235 for infomation on how to assign functionsto them). Four operating modes are available, and can beselected by pressing the SLIDER MODE button (see below).
If you keep the SHIFT button pressed, while the Upper,Style or Song tracks are shown in the display, you can move justone of the sliders to proportionally change the volume of all sim-ilar tracks. Slider Mode must be “Volume”.
• Keep SHIFT pressed and move one of the sliders control-ling the volume of one of the Upper tracks, to proportion-ally change the volume of all Upper tracks at the same time.This works in Style Play and Song Play mode.
• Keep SHIFT pressed and move one of the sliders control-ling the volume of one of the Style tracks, to proportionallychange the volume of all Style tracks at the same time. Thisworks in Style Play mode.
• Keep SHIFT pressed and move one of the sliders control-ling the volume of one of the Song tracks, to proportionallychange the volume of all Song tracks at the same time. Thisworks in Sequencer mode.
5 SLIDER MODE
Use this button to select one of the four available operatingmodes for the sliders.
VOLUME Each slider controls the volume of the corre-sponding track in the display.
DRAWBARS Each slider controls the corresponding drawbarof the selected Digital Drawbars Sound.
ASSIGN. A First set of freely assignable controls.
ASSIGN. B Second set of freely assignable controls.
6 MODE section
Each of these buttons recalls one of the instrument’s operatingmodes. When selected, each mode excludes the others.
STYLE PLAY Style Play mode, where you can play Styles (auto-matic accompaniments) and/or play up to fourKeyboard tracks.
In the main page, Keyboard tracks are shown inthe right half of the display. You can reach themain page by pressing EXIT from any of the StylePlay edit pages. If you are in a different operatingmode, press STYLE PLAY to recall the Style Playmode. If Keyboard tracks are not shown in thedisplay, press the TRK. SEL. button to see them.
This operating mode is automatically selectedwhen turning the instrument on.
SONG PLAY Song Play mode, where you can play back,directly from disk, Songs in Standard MIDI File(SMF) or (optionally) MP3 and Audio CD for-mat. Since the Pa1X is equipped with twosequencers, you can even play two Songs at thesame time, and mix them with the BALANCEslider.
In addition to the Song tracks, you can play oneto four Keyboard tracks, along with the Song(s).In the main page, Keyboard tracks are shown inthe right half of the display. You can reach themain page by pressing EXIT from any of the SongPlay edit pages. If you are in a different operatingmode, press SONG PLAY to recall the Song Playmode. Use the TRK. SEL. button to cycle betweenKeyboard and Song tracks.
SEQUENCER Sequencer mode, where you can play, record oredit a Song. The Backing Sequence mode lets yourecord a new Song based on the Keyboard andStyle tracks, and save it as a new Standard MIDIFile.
SOUND Sound mode, to play single Sounds on the key-board, or edit them. By pressing RECORD youcan enter the Sampling mode, Pa1X full-featuredsampler.
DEMO Press the STYLE PLAY and SONG PLAY buttonstogether to select the Demo mode. This mode letsyou listen to some Demo Songs, to let you under-stand the sonic power of the Pa1X.
7 GLOBAL
This button recalls the Global edit environment, where you canadjust various global settings. This edit environment overlapsany operating mode, that still remains active in the background.Press EXIT to go back to the underlying operating mode.
8 DISK
This button recalls the Disk edit environment, where you canexecute various operations on files and disks (Load, Save, For-
Gbl
SB

9Front panel
Intr
oduct
ion
mat, etc…). This edit environment overlaps any operatingmode, that still remains active in the background. Press EXIT togo back to the underlying operating mode.
9 MEMORY
This button turns the Lower and Chord Memory functions onor off. Go to the “Preferences: Style Preferences” edit page (StylePlay mode, see page 95) to decide if this button should be aChord Memory only, or a Lower/Chord Memory button. Whenit works as a Lower/Chord Memory:
Note: This function can be automatically activated by playingharder the keyboard. See “Velocity Control” on page 95.
On The sound on the left of the split point, and thechord for the automatic accompaniment, are keptin memory even when you raise your hand fromthe keyboard.
Off The sound and chords are released as soon as youraise your hand from the keyboard.
0 BASS INVERSION
This button turns the Bass Inversion function on or off.
Note: This function can be automatically activated by playingharder the keyboard. See “Velocity Control” on page 95.
On The lowest note of a chord played in invertedform will always be detected as the root note ofthe chord. Thus, you can specify to the arrangercomposite chords such as Am7/G or “F/C”.
Off The lowest note is scanned together with theother chord notes, and is not always consideredas the root note.
A MANUAL BASS
This button turns the Manual Bass function on or off.
Note: When you press the MANUAL BASS button, the Bass trackvolume is automatically set to its maximum value. The volume isautomatically set back to the original value when the MANUALBASS button is deactivated.
On The automatic accompaniment stops playing(apart for the Drum and Percussion tracks), andyou can manually play the Bass track on theLower part of the keyboard. You can start theautomatic accompaniment again by pressing oneof the CHORD SCANNING buttons.
Off The bass track is automatically played by theStyle.
B FADE IN/OUT
When the Style is not playing, press this button to start it with avolume fade-in (the volume goes from zero to the maximum).
When the Style is playing back, press this button to stop it with avolume fade-out (the volume gradually decreases).
You don’t need to press START/STOP to start or stop the Style.
C SINGLE TOUCH
This button turns the Single Touch and Variation/STS Linkfunctions on or off.
On When a different Style (or the same again) isselected, a Single Touch Setting (STS1) is auto-
matically selected. The Keyboard tracks andeffects will change, along with the Style tracksand effects. Pad tracks will change too.
Off When you select a different Style (or the sameagain), the Style tracks and effects are changed,while the Keyboard tracks, and effects are notchanged. Pad tracks will not change as well.
Flashing Variation/STS Link function activated. This func-tion makes each Variation recall the correspond-ing STS when selected. For example, selectVariation 2, and STS 2 will be automaticallyrecalled; select Variation 3, and STS 3 will beautomatically recalled.
D STYLE SELECT section
Use these buttons to open the Style Select window and select aStyle. See “Style Select window” on page 75.
The leftmost button lets you select the upper or lower row ofStyle banks, or the DIRECT HD Style banks (only if the harddisk is installed). Press it repeatedly to select one of the rows.(After both LEDs have turned on, press the button again to turnthem off).
Upper LED On Upper-row Styles selected.
Lower LED On Lower-row Styles selected.
Both LEDs On DIRECT HD Styles selected (if any). Direct HD Styles areaccessed by pressing buttons [1-9].
A word about Style banks and names. Styles from “8BEAT/16BEAT” to “WORLD 3”, and from “LATIN1” to “TRADITIONAL”are standard Styles, the user can’t normally overwrite with aLoad operation (unless you remove the protection; see “FactoryStyle and Pad Protect” on page 272).
“DIRECT FD” Styles are Styles directly accessed from floppydisk (no need to load from disk). See “The DIRECT FD bank”on page 100.
“DIRECT HD” Styles are directly accessed from the hard disk, ifinstalled (again, no need to load from disk). See “The DIRECTHD bank” on page 99.
Styles from “USER1” to “USER3” are location where you canload new Styles from disk.
Each button (Style bank) contains four pages, each with up toeight Styles. Repeatedly press a bank button to cycle between theavailable pages.
E INTRO 1-3/COUNT IN buttons
These buttons set the arranger in Intro mode. After pressing oneof these buttons, start the Style, and it will begin with theselected intro. The INTRO LED automatically goes off at the endof the intro.
Press them twice (LED blinking) to let them play in loop, andselect any other Style element (Fill, Intro, Variation…) to exit theloop.
Note: Intro 1 plays a short sequence with different chords, whileIntro 2 plays on the last recognized chord. Intro 3 is usually a one-bar Count In.
SB
SB
SB
Sty SB

10 Front panel
F ENDING 1-2 buttons
While the Style is running, these two buttons trigger an Ending,and stop the Style. Press one of them, and the Style will stop run-ning with an Ending. If pressed while the Style is stopped, theyact as an additional couple of Intros.
Press them twice (LED blinking) to let them play in loop, andselect any other Style element (Fill, Intro, Variation…) to exit theloop.
Note: Ending 1 plays a short sequence with different chords, whileEnding 2 plays on the last recognized chord.
G VARIATION 1-4 buttons
Each of these buttons select one of the four variations of the cur-rent Style. Each variation can vary in patterns and sounds.
H FILL 1-3/BREAK buttons
These buttons trigger a fill-in. Press them twice (LED blinking)to let them play in loop, and select any other Style element (Fill,Intro, Variation…) to exit the loop.
Note: Fill 3 is usually a Break.
Note: This function can be automatically activated by playingharder the keyboard. See “Velocity Control” on page 95.
I TAP TEMPO/RESET
This is a double-function button, acting in a different waydepending on the Style status (stop/play).
Tap Tempo: When the Style is not playing, you can “beat” thetempo on this button. At the end, the accompaniment startsplaying, using the “tapped in” tempo.
Reset: When you press this button while the Style is playingback, the Style pattern goes back to the previous strong beat.
J SYNCHRO START / STOP buttons
These buttons turn the Synchro Start and Synchro Stop func-tions on or off.
Start On, Stop Off
In this situation, just play a chord in the chordrecognition area (usually under the split point,see “CHORD SCANNING section” on page 11)to automatically start the Style. If you like, turnone of the INTROs on before starting the Style.
Start On, Stop On
When both LEDs are lit, raising your hand fromthe keyboard momentarily stops the Style run-ning. If you play a chord again, the Style startsagain.
Start Off, Stop Off
All Synchro functions are turned off.
K START/STOP
Starts or stops the Style running.
Note: This function can be automatically activated by playingharder the keyboard. See “Velocity Control” on page 95.
You can reset all ‘frozen’ notes and controllers on thePa1X and any instrument connected to its MIDI OUT, by using
the “Panic” key combination. Just press SHIFT + START/STOPto stop all notes and reset all controllers.
L RECORD
This button sets the instrument to Record or Sampling mode(depending on the current operating mode).
M TRK.SEL. (TRACK SELECT)
Depending on the operating mode, this button switches betweenthe various tracks view.
STYLE PLAY MODE
Toggles between Keyboard and Style tracks.
SONG PLAY MODE
Toggles between Keyboard tracks, Song tracks 1-8, and Song tracks 9-16.
SEQUENCER MODE
Toggles between Song tracks 1-8 and Song tracks9-16.
N SINGLE TOUCH SETTING buttons
These buttons allow to select up to four Single Touch Settings.Each of the Styles and SongBook entries includes a maximum offour Single Touch Settings (STS), to automatically configureKeyboard tracks and effects, and the Voice Processor, at thetouch of a finger. When the SINGLE TOUCH LED is lit, an STSis automatically selected when selecting a Style.
O SHIFT
With this button held down, pressing certain other buttonsaccesses to a second function.
P HELP
Press this button to open the context-sensitive Help.
Q COLOR TOUCHVIEW™ GRAPHICAL DISPLAY
Use this display to interact with the instrument.
R SEQUENCER 1 TRANSPORT CONTROLS
Pa1X is equipped with two sequencers (Sequencer 1 andSequencer 2), each with its own set of transport controls. TheSequencer 1 group is also used for the Sequencer mode.
<< and >> Rewind and Fast Forward commands. If you usethem while the Song is in play, they make it scrollback or forward.
When pressed once, these buttons move the Songto the previous or following measure. When keptpressed, they make the Song scrolling continu-ously, until you release them.
In Jukebox mode (Sequencer 1), keep theSHIFT button pressed, and press these buttons toscroll to the previous or next Song in the Jukeboxlist (see “Jukebox Editor” on page 151).
When playing back CD tracks, keep the SHIFTbutton pressed, and press these buttons to scrollto the previous or next track.
PAUSE Pauses the Song at the current position. PressPAUSE or PLAY/STOP to start the Song playingagain.
Sty SB
Sty SB
Sty SB
SB

11Front panel
Intr
oduct
ion
PLAY/STOP Starts or stops the current Song. When you stopthe Song, the Song Position goes back to measure1 (i.e., the beginning of the Song).
In Song Play mode, pressed while keep-ing SHIFT pressed, starts both sequencers at thesame time.
S BALANCE slider
In Song Play mode, this slider balances the volume of the twoon-board sequencers. When fully on the left, only the Sequencer1 can be heard. When fully on the right, only the Sequencer 2can be heard. When in the middle, both sequencers play at fullvolume.
T SEQUENCER 2 TRANSPORT CONTROLS
Transport controls for Sequencer 2. See instructions forSequencer 1 above.
U TEMPO/VALUE section
The DIAL and the DOWN/- and UP/+ buttons can be used tocontrol the Tempo, assign a different value to the selectedparameter in the display, or scroll a list of files in the Song Selectand Disk pages.
DIAL Turn the dial clockwise to increase the value ortempo. Turn it counter-clockwise to decrease thevalue or tempo.
When used while pressing the SHIFTbutton, this control always acts as a Tempo con-trol.
DOWN/- and UP/+DOWN/- decreases the value or tempo; UP/+increases the value or tempo.
Press both buttons together to reset the Tempo tothe value memorized in the selected Style.
V AUDIO IN LED
This LED shows the level of the audio signal entering the INPUTconnectors. Three different colors show the level.
Off No signal entering.
Green Low- to mid-level signal entering. If the LEDturns off too often, the input gain is too low. Usethe GAIN controls and/or the source device’s vol-ume to raise the input level.
Orange Optimum level. Try to keep the gain at this level.
Red Clipping is occurring at the input stage. This isfine if the LED goes to red only occasionally dur-ing a signal peak. If it turns red too often, theinput level is too high, and you should reduce itby using the GAIN controls and/or the sourcedevice’s volume control.
See page 15 for more information on the INPUTs and volumecontrol.
W EXIT
Use this button to perform various actions, leaving from the cur-rent status:
• exit the edit menu page, without selecting any item
• make the page menu disappear, without selecting anyitem
• return to the main page of the current operating mode• exit the Global or Disk edit environment, and return to
the current page of the current operating mode• exit from a Style, Performance or Sound Select window
X MENU
This button opens the edit menu page for the current operatingmode or edit mode. After opening an edit menu, you can jumpto one of the edit sections by touching the corresponding buttonin the display.
Otherwise, press EXIT to return to the main page of the currentoperating mode, or the current page of the underlying operatingmode.
See the relevant chapter devoted to each operating mode or editenvironment, to see their “maps” in detail.
Y TEMPO LOCK
This button turns the Tempo Lock function on or off.
On When you select a different Style or Performance,the tempo does not change. You can still manu-ally change it, by using the DIAL.
Off When you select a different Style or Performance,the memorized tempo is automatically selected.
Z DISPLAY HOLD
This button turns the Display Hold function on or off.
On When you open a temporary windows (like theSound Select window), it remains in the displayuntil you press EXIT or an operating mode but-ton.
Off Any temporary window closes after a certaintime, or after selecting an item in the window.
[ SONGBOOK
Press this button to recall the SongBook mode. While in thismode, you can browse through the music database.
You can jump to the SongBook > Custom List page bykeeping SHIFT pressed, and pressing the SONGBOOK button.
\ ENSEMBLE
This button turns the Ensemble function on or off. When on,the right-hand melody is harmonized with the left-hand chords.
Note: The Ensemble function works only when the keyboard is inSPLIT mode, and the LOWER Chord Scanning mode selected.
] CHORD SCANNING section
In Style Play and Sequencer-Backing Sequence mode, use thesebuttons to define the way chords are recognized by the arranger.
LOWER Chords are detected below the split point. Thenumber of notes you should play to form a chordis defined by the Chord Scanning Mode parame-ter (see “Chord Recognition Mode” on page 95).
UPPER Chords are detected above the split point. Youmust always play three or more notes to let thearranger recognize a chord.
Sty SB
SB
SB

12 Front panel
FULL (both LEDs On)Chords are detected on the full keyboard range.You must always play three or more notes to letthe arranger recognize a chord. (You can use thismode even when the Split Keyboard Mode isselected).
OFF No chords detected. After pressing START/STOP,only the Drum and Percussion accompanimenttracks can play.
` KEYBOARD MODE section
These buttons define how the four Keyboard tracks are posi-tioned on the keyboard.
SPLIT The Lower track plays below the split point, whilethe Upper 1, Upper 2 and Upper 3 tracks playabove it. By default, selecting this keyboard modeautomatically selects the Lower chord scanningmode (see “Chord Recognition Mode” onpage 95).
FULL UPPERThe Upper 1, Upper 2 and/or Upper 3 tracks playon the whole keyboard range. The Lower trackdoes not play. By default, selecting this keyboardmode automatically selects the Full chord scan-ning mode (see “Chord Recognition Mode” onpage 95).
a STYLE CHANGE
This button turns the Style Change function on or off.
On When you select a Performance, the Style couldchange, according to which Style number ismemorized onto the Performance.
Off When you select a Performance, the Style andStyle track settings remain unchanged. Only Key-board track settings are changed.
b PERFORMANCE SELECT
Press this button to use the SOUND/PERFORMANCE SELECTsection to select a Performance.
c SOUND SELECT
Press this button to use the SOUND/PERFORMANCE SELECTsection to select a Sound, and assign it to the selected track.
d SOUND/PERFORMANCE SELECT section
Use these buttons to open the Sound Select or PerformanceSelect window, and select a Sound or a Performance. See “SoundSelect window” on page 74, or “Performance Select window” onpage 74. For a list of available Sounds, see “Sounds” on page 291.
The leftmost button selects the upper or lower row of Sound orPerformance banks. Press it repeatedly to select one of the rows.
Upper LED On Upper row of Sounds or Performances selected.
Lower LED On Lower row of Sounds or Performances selected.
Both LEDs On Additional EXB card’s Sounds or Performancesselected.
On the front panel, Sound banks are identified by the instru-ment names, while Performance banks are identified by num-bers (1-10; 0=bank 10).
A note about Sound banks and names. Sounds from “PIANO”to “SFX” are standard Sounds, the user can’t directly modify.
Sounds “USER1” and “USER2” are locations where you can loadnew Sounds from disk.
“USER DK” is where you can load new Drum Kits.
Each Sound bank contains various pages, each with up to eightSounds. Repeatedly press a bank button to cycle between theavailable pages.
e ASSIGNABLE SWITCH (1-4)
You can assign any function to these switches. See “Pad/Switch:Assignable Switch” on page 94 for more information.
f PAD (1-4, STOP)
Each Pad corresponds to a dedicated Pad track. Use these but-tons to trigger up to four sounds or sequences at the same time.
• Press a single PAD button to trigger a single sound orsequence.
• Press more PAD buttons to trigger several sounds orsequences.
The sequences will play up to the end. Then, they will stop orcontinue repeating, depending on their “One Shot/Loop” status(see “Pad Type” on page 133).
You can stop all sequences, or just some of them, by pressing theSTOP button of the PAD section:
• Press STOP to stop all sequences at once.
• Keep STOP pressed and press one (or more) of the PADbuttons to stop the corresponding sequence(s).
Note: Pads share polyphony voices with the other tracks, so avoidusing too many of them together with a dense Style or Songarrangement.
About Pad synchronization. In Style Play mode, Pads are sync’dto the Style’s tempo. In Song Play mode, they are sync’d to thelast Sequencer you set to play. For example, assume you pressedSEQ2-PLAY; when pressing one of the PAD buttons, it will playin sync with Sequencer 2.
Note: There is no synchronization with MP3 files and Audio CDTracks. Pads can only be synchronized to Standard MIDI Files.Therefore, when an MP3 file or Audio CD Track is assigned to thelast select Sequencer, Pads will synchronize to the last StandardMIDI File that has been played back.
About Pads’ and the Sequencers’ Play command. When youpress one of the PLAY buttons to start the correspondingSequencer, all Pads will stop playing.
g TRANSPOSE
These buttons transpose the whole instrument in semitone steps(Master Transpose). The transposition value is usually shown onthe page header in the display.
Press both buttons together, to reset the Master Transpose tozero.
SB
Sty SB SB
SB
SB
Sty SB

13Front panel
Intr
oduct
ion
Note: The Master Transpose has no effect on tracks set to Drummode (and, even if set in a different status, on the Drum and Per-cussion tracks). See “Track Controls: Mode” on page 88, and“Track Controls: Mode” on page 150.
Lowers the Master Transpose a semitone.
Raises the Master Transpose a semitone.
h OCTAVE
These buttons transpose the selected track in steps of a wholeoctave (12 semitones; max ±2 octaves). The octave transpositionvalue is always shown (in octaves) next to a track’s name.
Press both buttons together, to reset the Octave Transpose tozero.
Note: The Octave Transpose has no effect on tracks set to Drummode (and, even if set in a different status, on the Drum and Per-cussion tracks).
– Lowers the selected track an octave.
+ Raises the selected track an octave.
SB

14 Rear panel
Rear panel
12
3 4 5 6 7 8 9 0 A B
12
3 4 5 6 7 8 9 0
A B

15Rear panel
Intr
oduct
ion
1 AC CABLE CONNECTOR
Plug the supplied AC cable into this connector.
2 POWER switch
Use this switch to turn the instrument on or off.
3 VIDEO OUT (optional)
If an optional VIF3 video interface is fitted, you can connect thePa1X to a TV or video monitor. The RCA connector is alreadyincluded with the instrument, even if the video interface is notinstalled. See “Installing the Video Interface (VIF3)” on page 403for more information.
4 LCD CONTRAST
Use this knob to adjust the display contrast.
5 DIGITAL OUTPUT
Use this 48 kHz S/PDIF output to connect the Pa1X to the S/PDIF input connector of another digital device, like a digitalmixer, audio card, DAT or stand-alone CD recorder. The samesignal output from the LEFT/MONO & RIGHT connectors issent by this connector. See “S/PDIF On/Off ” on page 241 formore information.
6 USB
This is a USB Type B (slave) connector. Use it to connect thePa1X to a personal computer, and transfer data to/from its harddisk. See “Hard Disk USB Connection” on page 273 for moreinformation.
7 MIDI INTERFACE
The MIDI interface allows your Pa1X to be connected to externalcontrollers (master keyboard, MIDI guitar, wind controller,MIDI accordion…), to a series of expanders, or to a computerrunning a sequencer or an editor. Two sets of IN and OUT con-nectors are provided. For more information on how to use theMIDI interface, see the “MIDI” chapter.
IN A/B These connectors receive MIDI data from a com-puter or a controller. Connect them to an exter-nal controller’s or computer’s MIDI OUT.
OUT A/B These connectors usually work as MIDI OUTs,but can be configured as MIDI THRU connec-tors. See “MIDI A Out/Thru Mode” and “MIDI BOut/Thru Mode” on page 237 for information onhow to change their settings.
When set to OUT, these connectors send MIDIdata generated by Pa1X’s keyboard, controllers,and/or the internal sequencer. Connect them toan expander’s or computer’s MIDI IN.
When set to THRU, these connectors send anexact copy of the data received on the IN connec-tor of the same group (A or B). Use them to cas-cade the Pa1X with other MIDI instruments.
8 EC5 MULTISWITCH
This connects to a Korg EC5 multiswitch, to control many func-tions in realtime. To program the EC5, see “EC5-A…E” onpage 236.
9 ASSIGN. PEDAL
Use this port to connect a continuous- or footswitch-type pedal,like the Korg EXP2 or XVP10. To program it, see “Pedal/Foot-switch” on page 235.
0 DAMPER PEDAL
Use this to connect a Damper pedal, like the Korg PS1, PS orDS1H. To change its polarity, see “Damper Polarity” onpage 235.
A OUTPUT
Use these unbalanced connectors to send the audio signal(sound) to a mixer, a PA system, a set of powered monitors, oryour hi-fi system.
To set the output for each track, or the routing for the audioinputs, see the “Audio Output” section, starting from page 239.
LEFT/MONO, RIGHT
These are the main stereo outputs. Use them tosend the final stereo mix to an external device. Setthe output level with the MASTER VOLUMEslider.
1, 2 These are the sub outputs. Use them to create astereo sub-mix of just some tracks, or to outputjust a single instrument to be mixed alone, or tobe processed or amplified externally.
Note: The MASTER VOLUME slider has no effecton these outputs. Signal is sent dry, with no effectsapplied.
B INPUT
Use these connectors to input a dynamic microphone, anotherkeyboard/synthesizer or a CD player.
1, 2 Only active when the 1/MIC switch is set to 1. Usethese unbalanced connectors to connect a line-level input source, such as a CD player or a syn-thesizer. The signal goes directly to the final mix.
1/MIC Use this switch to select the input. When “1” isselected, both line inputs 1 & 2 are active. When“MIC” is selected, only the microphone input isactive, and sent to the Voice Processor. See “AudioOutput: Audio In” on page 240 for more infor-mation.
GAIN Use this controls to adjust the input sensitivity ofthe MIC connector (from 20 to 55dB).
MIC Only active when the 1/MIC switch is set to MIC.Use this balanced connector to input a dynamicmicrophone, and send the signal to the VoiceProcessor. To connect a condenser microphone,you need an external phantom power supply(refer to your microphone user’s manual). Theinput signal is sent to the Voice Processor.
Use the GAIN knob to adjust the input gain, andsee the input level by watching at the AUDIO INLED on the control panel.

16 Welcome!Live Performing
Welcome to the world of Korg Pa1X and Korg Pa1X Pro Profes-sional Arranger! Pa1X is the most powerful arranger availabletoday, both for professional and home entertainment use.
Here are some of the features of your new instrument:
• RX Technology, the cutting edge engine that drives everyaspect of the Pa1X – from the synthesis to the display andhow it all works together.
• Powerful HI (Hyper Integrated) Korg sound generationsystem, as seen in our best professional synthesizers.
• OPOS (Objective Portable Operating System) multitaskingoperating system, to let you load data while playing yourinstrument.
• Operating System updates, to load new features from disk.Don’t let your instrument get old!
• Optional hardware expansions, to add a video out, moreRAM, a CD Player/Writer, up to two sound ROMs, anhardware MP3 encoder/decoder, an internal hard disk(standard on the Pa1X Pro). Get more and more for themoney!
• Solid State Disk (SSD), for any system update – a smart wayto replace the usual ROM memory.
• Direct Style access from floppy disk and hard disk.
• General MIDI Level 2 Sound-compatible.
• More than 870 Sounds, including more than 47 Drum Kits.
• Four multieffect processor for internal tracks, each with 89effect types plus a Vocoder available for FX D).
• 320 Performance locations, and more than 1,800 preloadedSingle Touch Settings (STS), for fast setting of keyboardsounds and effects.
• More than 450 preloaded Styles.
• Style Record and Edit
• XDS Double Sequencer with Crossfader.
• Full-featured 16-track sequencer
• Fully editable music database, for fast song retrieving, sup-plied by the SongBook
• Onboard sampling to create and edit new sounds andaudio grooves
• Sophisticated Voice Processor, with effects and a 4-voiceharmonizer, featuring voice technologies by TC-Helicon™.
• High-quality microphone preamplifier, with 20 ~ 55dB ofgain.
• High-quality input (ADC) and output (DAC) audio con-verters.
• Color TouchView™ Graphical User Interface.
• Eight fully-programmable sliders, to be used also as organdrawbars
• Pa1X only: Digital bi-amplification with Auto Loudnessand 4-way Bass Reflex system, for realistic sound reproduc-tion.
• Pa1X Pro only: Included hard disk, with preloaded RealDrums and Turkish/Arabic World sets.
Live Performing
Pa1X has been carefully designed to be used live. The “realtime”word has its full meaning in this instrument. Performancesallow the instant selection of all the tracks on the keyboard and asuitable Style; STSs allow an instant selection of the keyboardtracks; Styles are the realtime backing companions for your real-time playing; the SongBook is the quick way to select a songfrom a sophisticated music database.
Useful links
Your preferred Korg dealer not only carries this keyboard, butalso a whole bunch of hardware and software accessories. Youshould ask him for more Sounds, Styles, and other useful musicmaterials.
Each Korg distributor can give you useful information. Just givethem a call for additional services. In the English-speakingworld, here are the relevant addresses:
USA KORG USA, 316 South Service Road, Melville,New York, 11747, USA
Tel:1-516-333-9100, Fax:1-516-333-9108
Canada Jam Industries, 620 McCaffrey, St-Laurent, QC,Canada, H4T 1N1
Tel. (514) 738-3000, Fax (514) 737-5069
UK KORG UK Ltd, 9 Newmarket Court, Kingston,Milton Keynes, Buckinghamshire, MK10, 0AU
Tel.: 01908 857100
UK Technical Support Tel: 01908 857122, Fax:01908 857199
E-mail: [email protected]
Many Korg distributors also have their own web page on theinternet, where you can find infos and software. Useful webpages in English are the following:
www.korg.com
www.korg.co.uk
www.jam-industries.com
A place to find operating system updates and various system files (forexample, a full backup of the factory data) is at the following link:
www.korgpa.com
Other useful information can be found worldwide by accessingto other Korg web sites, like the following:
www.korg.co.jp
www.korgfr.net
Welcome!

17Welcome!What’s in the box
Intr
oduct
ion
www.korg.de
www.korg.it
www.letusa.es
What’s in the box
After you buy your Pa1X, please check all the following items areincluded in the package. if some of them are missing, immedi-ately contact your Korg dealer.
• Pa1X or Pa1X Pro
• Music stand
• Power cable
• Owner’s Manual
• CD assembling kit, including screws
• Pa1X only: HD mounting kit, including two mountingbrackets and eight M3x6 screws.
About this manual
This manual is divided in four sections:
• An Introduction, containing an overview of the instru-ment and of basic operations.
• A Quick Guide, containing a series of practical guides.
• A Reference Guide, with each page and parameterdescribed in detail.
• An Appendix, with a list of data and useful information forthe advanced user.
Within the manual, you will find the following abbreviations:
The parameter can be saved to a Performance byselecting the Write Performance command fromthe page menu.
The parameter can be saved to the current StylePerformance by selecting the Write Style Perfor-mance command from the page menu.
The parameter can be saved to one of the SingleTouch Settings of the current Style, by selectingthe Write STS command from the page menu.
The parameter can be saved to one of the SingleTouch Settings of a SongBook entry, by checkingthe Write STS option in the Book Edit page of theSongBook mode.
The parameter can be saved to the Global, byselecting one of the available Write Global com-mands from the page menu. Several Global areasare available, and a smaller symbol after the GBLabbreviation will appear for each relevant param-eter. More information is given in each Referencechapter.
Making a backup copy of system files
A backup of all data is already supplied with the hard diskinstalled on the Pa1X Pro. In case you modify some data, youcan make a new backup, to preserve your data from being acci-dentally lost.
If you own a standard Pa1X, not fitted with a hard disk right atthe factory, we suggest you make a backup copy of all data,including Sounds, Performances and Styles, to a set of floppydisks, in case the internal data is changed.
To backup the Operating System, please see “Save OS to FloppyDisk” on page 271.
To backup the Factory Data (Styles, Programs…), see “BackupResources” on page 271.
Loading the operating system
Your Pa1X can be constantly updated as new versions of theoperating system are released by Korg. You can download theoperating system from www.korgpa.com. Please, read theinstructions supplied with the operating system on the site.
You can see which version of the operating systems is installed inyour Pa1X by going to the “Utility” page of the Disk mode (see“OS Version Number” on page 272).
Reloading the Factory Data
Should you need the original Factory Data, a copy of them isalready supplied with the hard disk (on the Pa1X Pro). On thePa1X, you can create a set of backup disks (see “BackupResources” on page 271).
To restore data, see “Restore Resources” on page 271.
Sty
SB

18 Start upConnecting the AC power cord
Connecting the AC power cord
Connect the supplied power cordto the dedicated socket on therear of the instrument. Then,plug it into a wall socket. Youdon’t need to worry about thelocal voltage, since the Pa1X usesa universal power adapter.
Turning the instrument on and off
• Press the POWER switch on the rear panel to turn theinstrument on. The display will light up, showing the bootprocedure.
Note: When turning the instrument on, RAM PCM Samplesused by some User Sounds may be automatically loaded,depending on the status of the “PCM Autoload” parameter(see page 273). This may take some time for loading.
• Press again the POWER switch on the rear panel to turn theinstrument off.
Warning: When turning the instrument off, all data con-tained in RAM (Song recorded or edited in Sequencer mode,Samples in edit and not yet saved) will be lost. MIDI Groovesgenerated by the Time Slice function will be lost, too.
On the contrary, data contained in the SSD memory (Factorydata, User Sounds, Performances, Styles and Multisamples)will be preserved. Samples will be preserved, too.
Controlling the Volume (Master&Acc/Seq)
• Use the MASTER VOLUME slider tocontrol the overall volume of theinstrument. This slider controls thevolume of the sound going to theinternal speakers (Pa1X only), themain (LEFT/MONO & RIGHT )OUTPUTs, and the HEADPHONESconnector.
The 1 & 2 OUTPUT connectors arenot affected by this slider. So, use the mixer’s or speaker’slevel controls to adjust the volume.
Note: Begin with a moderate level, then raise the MASTERVOLUME up. Don’t keep the volume at an uncomfortablelevel for too long.
• Use the ACC/SEQ VOLUME slider to control the volume ofStyle tracks (drums, percussions, bass…). This slider alsocontrols both Sequencers tracks, leaving Keyboard tracksuntouched.
The BALANCE slider
The BALANCE slider sets the relative volume of the twoonboard sequencers (Sequencer1 and Sequencer 2).
• Move it fully left to set Sequencer 1 to the maximum leveland Sequencer 2 to zero.
• Move it fully right to set Sequencer 1 to zero and Sequencer2 to the maximum level.
• Move it to the center to set both Sequencer at the samelevel.
Note: When turning the instrument on, move this slider to the cen-ter, to avoid starting a Song at the minimum level.
Headphones
Connect a pair of headphones to the HEADPHONES output,under the left part of the keyboard (just under the joystick). Youcan use headphones with an impedance of 16-200Ω (50Ω sug-gested). Use a headphone amplification distributor to connectmore than one pair of headphones.
Audio Outputs
Audio outputs allows you to connect the Pa1X to an externalamplification system. Apart for headphones, this is the only wayto listen to the sound of the Pa1X Pro, since it is not fitted withinternal speakers.
Stereo. Connect two mono cables to the main (LEFT/MONO,RIGHT) OUTPUTs. Connect the other end of the cables to a ste-reo channel of your mixer, two mono channels, two poweredmonitors, or the TAPE/AUX input of your audio system. Don’tuse the PHONO inputs of your audio system!
Mono. Connect a mono cable to the LEFT/MONO OUTPUT.Connect the other end of the cable to a mono channel of yourmixer, a powered monitor, or a channel of your TAPE/AUXinput of a hi-fi system (you will hear that channel only, unlessyou can set the amplifier to Mono mode).
Separate outputs. You can connect your Pa1X to four channelsof a mixer. This is very useful when recording, or if you want tosend a sequencer’s or backing track to a separate channel. Forexample, by using the separate outputs, you may send the Drumor Bass track to an external compressor or reverb unit, or mixthe separate tracks on an external mixer.
Connect four mono cables to each of the main (LEFT/MONO,RIGHT) and 1, 2 OUTPUTs. To feed the sub-outputs (1, 2) youmust program the track(s) you wish to send them (see the“Audio Output” section in the Global, starting from page 239).
Start up

19Start upAudio Inputs
Intr
oduct
ion
Note: When a track is sent to the OUTPUT 1 or 2, it is removedfrom the main mix going to the internal speakers and the LEFT/MONO & RIGHT OUTPUTS.
Note: OUTPUTs 1 & 2 are not effected.
Adjust the volume of the LEFT/MONO & RIGHT OUTPUTswith the MASTER VOLUME slider. Adjust the volume of the 1 &2 OUTPUTs with the mixer’s or external speaker’s level controls.
Audio Inputs
Connect your microphone, guitar, or any other musical instru-ment, to the INPUTs on the back of the instrument. The micro-phone signal may also be sent to the Voice Processor forsophisticate processing.
Depending on the connected device(s), you must choose a suit-able signal routing, by using the 1/MIC switch in the INPUT sec-tion. Select the “MIC” position to connect a microphone to theMIC input, or the “1” position to connect a mono or stereo line-level source (like a synthesizer or an external CD player) to the 1& 2 INPUTs.
See the “Singing with a connected microphone” chapter onpage 64, and the “Audio Output: Audio In” section on page 240,for more information on connecting and setting the inputs andthe audio source.
MIDI connections
You can play the internal sounds of your Pa1X with an externalcontroller, i.e. a master keyboard, a MIDI guitar, a wind control-ler, a MIDI accordion, or a digital piano.
You can also control other MIDI devices with the Pa1X, or con-nect it to a computer for use with an external sequencer.
See the “MIDI” chapter for more information on MIDI connec-tions.
Damper Pedal
Connect a Damper (Sustain) pedal to the DAMPER connectoron the back panel. Use a Korg PS1, PS2 or DS1H footswitchpedal, or a compatible one. To switch the Damper polarity, see“Damper Polarity” on page 235
Demo
Listen to the built-in Demo Songs to appreciate the power of thePa1X. There are several Demo Songs to choose from.
1. Press the STYLE PLAY and SONG PLAY buttons together.Their LEDs start blinking.
At this point, if you don’t press any other button, all the DemoSongs will be played back.
2. Select one of the available options, to listen to a specifiedDemo Song.
3. Stop the Demo by pressing the STOP button on the display,or by exiting the Demo mode by pressing any MODE but-ton.
The music stand
A music stand comes standard with your Pa1X. Insert its legsinto the two dedicated holes on the rear panel.

20 Glossary of TermsSound
Before you begin, take a few moments to familiarize yourselfwith the names and terms we will be using to talk about the var-ious elements of the Pa1X.
In this section, you will find a brief description of various keyelements of the Pa1X. A professional arranger (Pa) keyboarduses different terminology than a traditional synthesizer orworkstation. By familiarizing yourself with the names and func-tions in this section, you will get a better understanding of howall the different parts of the Pa1X work together to create a real-istic musical performance. This will also help you to get the mostout of the rest of the User’s Manual.
Sound
A Sound is the most basic unit of an Arranger Keyboard perfor-mance. A Sound is basically a playable instrument timbre(piano, bass, sax, guitar…) that can be edited, saved, recalledand assigned to any track. An individual Sound can be played onthe keyboard in the Sound mode. In the Style Play mode orSequencer mode, Sounds may be freely assigned to Sequencertracks, Style tracks, or Keyboard tracks.
Style
The Style is the heart of a professional arranger keyboard. At itsbasic level, a Style will consist of up to eight parts, or “Tracks”.
Drums
The Drum track will provide a repeating rhythmic phrase,played by the standard instruments of a Drum Kit.
Percussion
An additional rhythmic phrase played by various percussioninstruments (conga, shaker, cowbell, etc.) is provided by the Per-cussion track.
The Drum and Percussion tracks will play the same phraserepeatedly, regardless of the notes and chords being played onthe keyboard, although it is possible to assign a different DrumKit to either part, or to edit the Kit itself.
Bass & Accompaniment
The Bass track and the (up to) five additional Style tracks willeach play musical phrases that are musically related to and insync with the Drum and Percussion tracks. However, the notesbeing played by these tracks will change to follow the chord pro-gression that you play on the keyboard.
Again, any Sound you choose may be assigned to any track in aStyle.
Variation
For each Style, there are four Variations. In general, each Varia-tion is a slightly different version of the others. As you progressfrom Variation one to Variation four, the arrangements willbecome more complex, and more parts (Tracks) may be added.This allows your performance to have a more dynamic arrange-ment, without losing the original “feel” of the Style.
Fill-in
During a performance, a drummer may often perform a “fill” -such as when transitioning from a verse to a chorus – addingextra dynamics and keeping the beat from getting too repetitive.The Pa1X offers three Fill-ins specifically programmed for eachStyle. A Fill-in may be drums alone, drums with instrumenta-tion, of even a silent “break”.
Intro & Ending
Each Style also allows you to embellish your performance with aset of musical introductions and endings. A long and short ver-sion of the Intro and Ending are usually provided, with theformer more harmonically elaborated, and the latter with a fixedchord. A “count-in” style Intro is also provided.
Keyboard tracks
In addition to the Style tracks, up to four additional parts can beplayed on the keyboard in real-time. Each of these Keyboardtracks can be limited to a particular range of keys or velocities,but in general three can be assigned to play above the split point(Upper), and one below (Lower). This allows the Upper Soundsto be layered together. The split point can be set to any note onthe keyboard. In addition to performing along with a Style, thesesame Keyboard tracks will allow you to play along with theSequencer.
STS (Single Touch Settings)
Single Touch Settings allow you to instantly change the soundsassigned to each of the Keyboard tracks with a single buttonpress, allowing for wide variation in sounds during a perfor-mance. Four STS (Single Touch Settings) can be saved with eachStyle or SongBook entry.
Ensemble
By turning the Ensemble feature on, a single note played on oneof the Keyboard tracks will be embellished by additional notes tocreate a complete chord voicing. The Ensemble knows whichnotes to add by looking at the chord that the Style is playing. Inaddition, the Ensemble parameters allow you to select the typeof voicing that will be added – from a simple one-note harmonyto a full “Brass” section – even a marimba-style trill!
Glossary of Terms

21Glossary of TermsPerformance
Intr
oduct
ion
PerformanceThe Performance is the most encompassing setting on the Pa1X– a single setting that can remember a Style (with all the appro-priate sounds), the Keyboard tracks (with all the appropriatesounds) and all their Single Touch Settings, Tempo, transposi-tion, etc… A Performance can be stored in one of the Perfor-mance Banks, or it can be saved in a “database” format using theSongBook function.
Sequencer
The Sequencer acts as a recorder, so you can capture and play-back your performances. The Pa1X sequencer can function indifferent modes. In the Backing Sequence mode, each Style ele-ment and each Real-Time (Keyboard and Pads) element can berecorded on a separate track in a single pass. This can be a bighelp in getting a song recorded quickly. The sequencer can alsobehave as a traditional 16-track linear sequencer, where eachtrack is recorded individually one at a time.
The LOGO decoder
On the front panel of your Pa1X you have probably noticedseven logos, and may have even wondered what they stand for.Well, here is a quick explanation of each one.
The SongBook provides a database thatallows you to instantly recall all the settings(Style, Performance, Sounds, Tempo, etc…)required to perform a particular song. TheSongBook comes with a number of entries,
but you are free to edit and remove any entry, as well as add anyof your own. The main advantage of the SongBook is that itallows you to search for a song using title, composer, musicalgenre, etc…
RX Technology is the cutting edge enginethat drives every aspect of the Pa1X – fromthe synthesis to the display and how it allworks together.
A variety of professionalvocal effects are provided bythe Pa1X – including reverb,
delay, compression, and even four-part vocal harmonies! Pitchcorrection and vocal modeling are available as optionalupgrades. All of the vocal effects are provided by TC Helicon, theleader in vocal processing technology.
The Solid State Disk (SSD) is protected digitalmemory that keeps the operating system andall the Pa1X resources (Sounds, Styles, Perfor-
mances, etc...) intact when the power is off. The SSD also allowsfor easy updating of the operating system via the floppy drive.
X-fade Dual Sequencer. That’s right! ThePa1X actually features TWO sequencers. ADJ-style Cross-fader (X-fader) allows you
to perform seamless transitions from one song to another, or topause one song, switch to another, and then come back and fin-ish the original. Mighty nice for live performances!
Object Portable Operating System allows thePa1X to perform multi-tasking capabilities, suchas loading a file from floppy into one of thesequencers as the other sequencer continues toplay.
General MIDI (GM) is a standard that ensuresthe compatibility of sounds and messagesbetween GM compatible instruments availablefrom different manufacturers. For example,
sequenced songs created on any GM equipped product andsaved in the GM format will playback correctly on the Pa1X.

22 Interface basicsThe Color TouchView™ graphical user interface
The Color TouchView™ graphical userinterface
Pa1X features an easy-to-use graphical user interface, based onKorg’s patented Color TouchView™ interface. Here are the basicelements of the user’s interface.
Pages
Parameters are grouped into separate pages, to be selected bytouching the corresponding tabs on the lower part of the display.
Menus and sections
Pages are grouped in sections, to be selected by touching the cor-responding buttons in the Edit menu that opens up when youpress the MENU button.
Overlapping windows
When you press a Sound, Style, or Song name, a selecting win-dow overlaps the current page. After you select an item in thewindow, or press the EXIT button, the window closes, and theunderlying page is shown again.
Dialog boxes
Similar to selecting windows, dialog boxes overlap the underlay-ing page. Press one of the button on the display to give Pa1X ananswer, and the dialog box will close.
Page menus
Press the icon on the upper right corner of each page, and amenu with suitable commands for the current page will appear.Touch one of the available commands to select it. (Or, press any-where else on the screen to make it disappear, with no commandselected).
Pop-up menus
When an arrow appears next to a parameter name, press it toopen a pop-up menu. Select any of the available options (or any-where else on the screen to make the menu disappear).
Checkboxes
This kind of parameters are on/off switches. Press them tochange their status.
Interface basics

23Interface basicsOperative modes
Intr
oduct
ion
Numeric fields
When a numeric value is underlined, press it a second time toopen the Numeric Keypad.
Alphabetic fields
When a textual option is underlined, press it a second time toopen a list of options.
Editable names
When the (Text Edit) button appears next to a name, press
it to open the Text Edit window and edit the name.
Lists and scrollbars
Files on disk, as well as other kinds of data, are shown as lists.Use the scrollbar to scroll the list content.
Icons
Various icons help identifying the type of a file, a Song, a folder.
Operative modes
Pa1X pages are divided into various operating modes. Eachmode is accessed by pressing the corresponding button in theMODE section on the control panel.
Each operating mode is marked with a different color code, thathelps you understand at first sight where you are.
Three special modes (Global, Disk, and SongBook) overlap thecurrent operating mode, that remains active in the background.The SongBook mode can recall the Style Play or Song Playmodes.
Selected, highlighted items
Any operation carried on on parameters, data or list entries, isexecuted on highlighted items. First select the parameter or item,then execute the operation.
Non-available, grayed-out parameters
When a parameter or command is not currently available, it isshown in grey on the display. This means it cannot be selected,but may become available when a different option is selected, oryou switch to a different page.
List
Scrollbar

24 Interface basicsNon-available, grayed-out parameters

Qui
ck G
uide

26 Turning the instrument on and listening to the demosTurning the instrument on, and viewing the main screen
First of all, turn the instrument on and familiarize yourself with the main screen. You can also listento the demos.
Turning the instrument on, and viewing the main screen
Turn the Pa1X on by pressing the POWER button, located on the back panel.
After you turn the POWER on, a welcome screen is shown for a few seconds, and then the main dis-play appears.
Playing the demos
A variety of demo songs have been included to demonstrate the sonic power of the Pa1X.
1 To open the Demo page, press the STYLE PLAY and SONG PLAY buttons atthe same time.
2 Follow the instructions in the display. That’s it!
Turning the instrument on and listening to the demos
Power switchDisplayDemo buttons
Volume sliders. They can be con-trolled using the Assignable Slid-
ers on the control panel(provided the VOLUME LED is
turned on)
Songs assigned to Sequencer 1and Sequencer 2
Style name
Style bank
Style meter
Tempo and beat counter
Selected Performance or STS
Play/Mute status
Upper Keyboard tracks status
Sounds assigned to the Upper Keyboard tracks
Recognized chord
Page menu
Lower Keyboard track status
Sound assigned to the Lower Keyboard track
Tabs
Style Elementmeasure number
Sound name
Sound bank

27Playing SoundsSelecting a Sound and playing it on the keyboard
Quic
k G
uid
e
You can play up to three sounds at the same time on the keyboard. You can also split the keyboardinto two parts, to play up to three sounds with your right hand (Upper), and one with your left hand(Lower).
Selecting a Sound and playing it on the keyboard
1 Be sure the Upper 1 track is selected and set to play.
Note: Be sure tracksUpper 2 and Upper 3 aremuted, and are not play-ing. If you hear morethan one sound, seepage 29 for how to mutetracks.
2 If you want to play the Sound on the whole keyboard, be sure the key-board is in Full Upper mode. If it is split in two parts, press the FULLUPPER button in the KEYBOARD MODE section on the control panel.
Playing Sounds
Sound Select section Keyboard mode (split/full) select buttons
i
A selected track is shown with a white background. In this example, the Upper 1 track is selected. If it is not selected, press it once to select it.
The status icon shows that the Upper 1 track is set to play. If it is muted, press the sta-tus icon to set it to play.
(Full) Upper

28 Playing SoundsSelecting a Sound and playing it on the keyboard
3 Press the Upper 1 track’s area in the display, to open the Sound Selectwindow.
Note: You can alsoopen the Sound Selectwindow by pressing oneof the buttons in thePERFORMANCE/SOUNDSELECT section – pro-vided the LED on theSOUND SELECT button ison. This will let you jumpdirectly to the desiredSound bank.
4 Select a Sound from the Sound Select window.
5 Play the Sound on the keyboard.
Note: Youcan leave theSound Selectwindow openin the display, even afterselecting a Sound. Justpress the DISPLAY HOLDbutton to turn its LEDon.
i
The selected Sound is high-lighted. Press a Sound’s name to
select it.
Press one of the side tabs toselect a different Sound bank.
Press one of the lower tabs toselect a different Sound page.
A Previous and Next Page pair of button may appear in this area, when more than four pages are available.
The currently selected Soundalso appears on the page
header.
Target track for the selected Sound
The triangle means you can touch this name to open a Select window
Sound bank
Sound’s name
The Sound Select window closes, and the main screen appears again, with the selected Sound assigned to the Upper 1 track.
i

29Playing SoundsPlaying two or three Sounds at the same time
Quic
k G
uid
e
Playing two or three Sounds at the same time
You can layer all three Upper tracks and play them on the keyboard.
1 Press the (Mute) icon in the Upper 2 status box, to set the Upper 2track to play.
2 Play the keyboard.
3 Press the (Mute) icon in the Upper 3 status box, to set the Upper 3track to play.
4 Play the keyboard.
Please note how the ‘M’ (Mute) icon appears in the Upper 2 and Upper 3 status boxes. These tracks will not be heard.
Note how the ‘Dark Pad’ sound (assigned to the Upper 2 track) has been layered with the ‘Grand Piano’ (assigned to the Upper 1 track).
Note how the ‘StringEns2’ sound (assigned to the Upper 3 track) has been added to the ‘Dark Pad’ (assigned to the Upper 2 track) and the ‘Grand Piano’ (assigned to the Upper 1 track).

30 Playing SoundsPlaying two or three Sounds at the same time
5 Press the (Play) icon in the Upper 3 status box, to mute the Upper 3track again.
6 Play the keyboard.
7 Press the (Play) icon in the Upper 2 status box, to mute the Upper 2track again.
8 Play the keyboard.
Note how the ‘StringEns2’ sound (assigned to the Upper 3 track) has been muted again. Only tracks Upper 1 and Upper 2 can be heard at this time.
Note how the ‘Dark Pad’ sound (assigned to the Upper 2 track) has been muted again. Only track Upper 1 can be heard at this time.

31Playing SoundsPlaying different Sounds with your left and your right hand
Quic
k G
uid
e
Playing different Sounds with your left and your right hand
You can play a single Sound with your left hand, in addition to playing up to three Sounds with yourright hand.
1 Press the SPLIT button in the KEYBOARD MODE section on the controlpanel, to split the keyboard into Lower (left hand) and Upper (right hand)parts.
2 Be sure the Lower track is set to play.
3 Play the keyboard.
Hint: You can select adifferent Sound for theLower part, by follow-ing the same procedureused for the Upper 1track. See page 27.
4 Return to the full keyboard playing mode by pressing the FULL UPPERbutton in the KEYBOARD MODE section on the control panel.
LowerUpper
If the Lower track is muted, press its icon status, and the play status icon will appear.
iNote how the keyboard is split into two parts, each playing dif-ferent sounds.
Lower Upper
(Full) Upper

32 Playing SoundsChanging the split point
5 Play the keyboard.
Changing the split point
If you are not comfortable with the selected split point, you may set the split point to any key.
1 Press the Split tab to see the Split Point panel.
2 Touch the keyboard in the display, then play a note on the keyboard. Or,press the Split Point parameter to select it, and use the DIAL to select thenew split point.
3 Press the Volume tab to go back to the Volume panel.
Note how the keyboard once again plays the Upper tracks for the entire length of the keyboard.
Upper

33Playing SoundsRaising or lowering the Upper octave
Quic
k G
uid
e
Raising or lowering the Upper octave
If all Upper tracks sound too high or too low, you can quickly change which octave they are playingin.
1 Use the UPPER OCTAVE buttons on the control panel, to transpose allUpper tracks at the same time.
Note: the OctaveTranspose value for eachUpper track is shown inthe correspondingtrack’s status box.
2 Press both UPPER OCTAVE buttons together to reset the octave.
Digital Drawbars
A special sound in the Pa1X is the “Digital Drawbars”. This sound simulates the classic tonewheelorgans of the past. You can use the Assignable Sliders of the Pa1X to adjust each drawbar, and thensave these settings to a Performance (see “Saving your settings to a Performance” on page 37).
1 Mute all Upper tracks, apart for the Upper 1 track. Select the Upper 1track.
2 Press the Sound name to open the Sound Select window.
Note: Youcan select aDigital Draw-bar Soundalso by pressing the DIG-ITAL DRAWBAR buttonin the PERFORMANCE/SOUND SELECT section.
i
Each press of this buttonwill lower the pitch by one
octave.
Each press of this button will raise the pitch by one octave.
The Upper 1 track is set to play and selected.
Upper 2 and 3 tracks are muted (they cannot be heard).
i

34 Playing SoundsDigital Drawbars
3 Select the Digi Organ bank, then choose the DigDrawbars Sound.
Due to the nature of these Sounds, there is only one Digital Drawbar Organ Sound. Differentdrawbar settings may be stored with each Performance. So, selecting a different Performance willselect different settings for the Digital Drawbar Organ.
4 As soon as the Drawbar Setting page appears in the display, the Assign-able Sliders will function as organ drawbars (the slider’s DRAWBAR LEDwill be lit). Move the Assignable Sliders to change the various drawbarsettings.
Note: You don’t needto be in the DigitalDrawbars page to usethe Assignable Sliders tochange the sound. Whena Drawbar Organ isassigned to a Keyboardtrack, the sound can bechanged also while inthe main page, pro-vided that the DRAW-BARS LED is turned on.
5 Select different parameters in this page, and change their settings to seehow each setting affects the sound.
Hint: As an alterna-tive to using AssignableSliders to change draw-bar values, you cantouch a drawbar in thedisplay, and use theTEMPO/VALUE controlsto change it.
6 When you have found some settings that you like, you can save them toa Performance, as described later in this section.
After you select the DigitalDrawbar Organ Sound, the
Drawbar Setting page appears.
i
To change the Digital Drawbar Organ settings by using the Assignable Sliders, the DRAWBARS LED must be turned on. Use the SLIDER MODE but-ton to turn it on.
i

35Playing SoundsDigital Drawbars
Quic
k G
uid
e
7 Press the EXIT button to go back to the main page.

36 Selecting and saving PerformancesSelecting a Performance
The Performance is the musical heart of the Pa1X. Unlike selecting single Sounds, selecting a Perfor-mance will recall several Sounds at the same time, the needed effects and transpositions, a suitableVoice Processor preset, plus many more parameters useful for playing in a musical situation.
You can save all control panel settings in a Performance (including your Digital Drawbar Organ set-tings). While many Performances are already supplied with the instrument, you can customize eachof them to your own taste, and then save them in their customized form.
Similar to Performances, you can also save your settings to a Single Touch Setting (STS), which willstore all the settings for the Keyboard tracks. Four STSs are supplied with each Style and SongBookentry, and can be selected with the four dedicated buttons under the display.
As far as Style tracks are concerned, you can save settings in a third object called the Style Perfor-mance.
Please note that settings saved in Performance 1 are automatically selected when the instrument isturned on. This means you can save your preferred startup settings to Performance 1.
Selecting a Performance
1 Press the Performance area in the display, to open the PerformanceSelect window.
Note: You can openthe Performance Selectwindow also by pressingone of the buttons in thePERFORMANCE/SOUNDSELECT section – pro-vided the LED on thePERFORMANCE SELECTbutton is on. This will letyou jump directly to thedesired Performancebank.
Selecting and saving Performances
Performance/Sound Select sectionSingle Touch Settings (STS) section
i
The selected Performance ishighlighted. Press a Perfor-
mance name to select it.
Press one of the side tabs toselect a different Performance
bank.
Press one of the lower tabs to select a different Performance page.

37Selecting and saving PerformancesSaving your settings to a Performance
Quic
k G
uid
e
2 Select one of the Performances in the Performance Select window.
3 Play the keyboard.
Note: Ifthe LED ofthe STYLECHANGE button isturned on, selecting aPerformance may auto-matically select a differ-ent Style and its settings(Sounds, effects, Draw-bar settings for the Styletracks…)
Saving your settings to a Performance
All the control panel settings, plus the Keyboard track settings, selected effects and Voice ProcessorPreset, can be saved to a single Performance, to be quickly recalled at a later time.
1 Press the page menu icon to open the page menu.
The Performance Select win-dow closes, and the main screen appears again (provided the DISPLAY HOLD LED is turned off). Sounds, effects, and other settings, change according to the setting memorized in the selected Performance.
iSettings memorized in the selected Performance have been selected. Sounds, effects and other settings have been recalled.
Page menu icon
Page menu

38 Selecting and saving PerformancesSaving your settings to a Performance
2 Select the ‘Write Performance’ command to open the Write Performancedialog box.
3 If you like, you may assign a new name to the Performance.
After choosing the Write Performancemenu item, the Write Performance dia-
log box appears.
Press the ‘T’ symbol to open the Text Edit dialog box.
Use alphabetical characters to enter text.
Use the ‘<’ and ‘>’ buttons to move the
cursor.
Use the SHIFT but-ton to switch between capitals and small charac-ters.
Press Clear to delete the whole string, Delete to
delete just a single charac-ter.
Press Symbol to enter special charac-hters.
When done, press OK to confirm the new name, or Cancel to abandon all changes.

39Selecting and saving PerformancesSaving your settings to a Performance
Quic
k G
uid
e
4 Select a Bank and Performance location in memory, where you wouldlike to save the Performance.
5 When you have changed the name to the Performance, and selected thetarget location, press OK to save the Performance to memory (or cancelto stop the operation).
Warning: Saving aPerformance to analready used locationoverwrites any existingdata at that location.
To select the target Bank and Performance location, select the Bank and Performance parameters, and use the TEMPO/VALUE section.
A)
B)
The selected Perfor-mance location is highlighted. Press a Performance’s name to select it.
Press one of the side tabs to select a different Performance bank.
Press one of the lower tabs to select a different Performance page.
or…
Note: A Performance can be saved to an ‘Empty’ location. An ‘Empty’ locations currently contains no data.
!

40 Selecting and playing StylesSelecting and playing a Style
Pa1X is an arranger, i.e. a musical instrument providing automatic accompaniments, or arrangements.Each arrangement style is called, as a consequence, “Style”.
A Style is made of several Style Elements (Intro, Variation, Fill, Ending), corresponding to the varioussections of a song. By selecting Style Elements, you can make your playing more varied and musical.
When selecting a Style, a Style Performance, with settings for the Style tracks, is also selected. If theSINGLE TOUCH LED is turned on, the first of the four Single Touch Settings (STS) associated withthe Style is selected, too, and Keyboard tracks, pads, effects and some other useful parameters areautomatically configured.
Use the Style controls to start or stop the Style.
Selecting and playing a Style
1 Press the Style area in the display. The Style Select window appears.
Note: You can openthe Style Select windowalso by pressing one ofthe buttons in the STYLESELECT section. This willlet you jump directly tothe desired Style bank.
Note: Youcan leave theStyle Selectwindow openin the display, even afterselecting a Style. Justpress the DISPLAY HOLDbutton to turn its LEDon.
Selecting and playing Styles
Style Select section
Style Elements Style Controls
i
The selected Style is highlighted.Press a Style’s name to select it.
Press one of the side tabs toselect a different Style bank.
Press one of the lower tabs to select a different Style page.
i
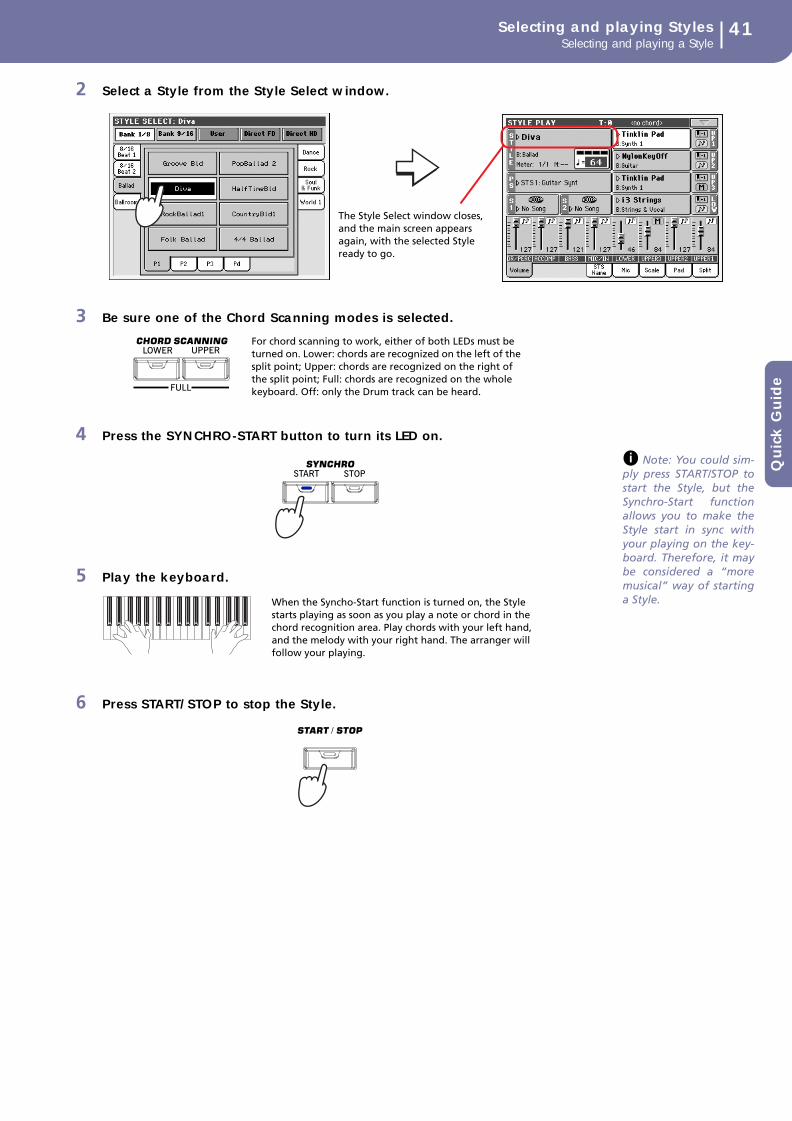
41Selecting and playing StylesSelecting and playing a Style
Quic
k G
uid
e
2 Select a Style from the Style Select window.
3 Be sure one of the Chord Scanning modes is selected.
4 Press the SYNCHRO-START button to turn its LED on.
Note: You could sim-ply press START/STOP tostart the Style, but theSynchro-Start functionallows you to make theStyle start in sync withyour playing on the key-board. Therefore, it maybe considered a “moremusical” way of startinga Style.
5 Play the keyboard.
6 Press START/STOP to stop the Style.
The Style Select window closes, and the main screen appears again, with the selected Style ready to go.
For chord scanning to work, either of both LEDs must be turned on. Lower: chords are recognized on the left of the split point; Upper: chords are recognized on the right of the split point; Full: chords are recognized on the whole keyboard. Off: only the Drum track can be heard.
i
When the Syncho-Start function is turned on, the Style starts playing as soon as you play a note or chord in the chord recognition area. Play chords with your left hand, and the melody with your right hand. The arranger will follow your playing.

42 Selecting and playing StylesTempo
Tempo
While a Tempo setting is saved with each Style or Performance, you can change it to be whatever youlike. You can use either of the following two methods.
• While the Tempo parameter is selected, use the TEMPO/VALUE controls tochange its value.
• When the Tempo parameter is not selected, keep the SHIFT buttonpressed, and use the DIAL to change the Tempo. The selected tempo willbe shown in a small window.
• Press the UP and DOWN buttons at the same time to recall the savedTempo.
Intro, Fill, Variation, Ending
When playing Styles, you can select various “Style Elements” to make your playing richer. A Style ismade of up to four basic patterns (Variations), three Intros (or two Intros and a Count-In), three Fills(or two Fills and a Break), and two Endings.
1 Make sure the SYNCHRO-START LED is turned on (otherwise, press thebutton to turn it on).
2 Press one of the INTRO buttons to set the corresponding Intro to play.
3 Play the keyboard.
The Style starts with the selected Intro. When the Intro is completed, the basic pattern (selected Variation) starts to play.

43Selecting and playing StylesSingle Touch Settings (STS)
Quic
k G
uid
e
4 While playing, press one of the FILL buttons to select a Fill.
Note: You do notneed to select a Fillbefore selecting a differ-ent Variation, but select-ing a Fill makes thetransition “smoother”and more musical.
5 Before the Fill ends, press one of the VARIATION buttons, to select a dif-ferent variation of the basic pattern.
Note: You do notneed to select a Varia-tion during a Fill, since aVariation may already beautomatically recalled atthe end of the Fill. See“Fill Mode (1…3)” onpage 93.
6 When you like to stop playing, press one of the ENDING buttons to stopthe Style with an Ending.
Single Touch Settings (STS)
Each Style or SongBook entry may come with up to four Keyboard track settings, called STS (shortfor “Single Touch Settings”). STS #1 is automatically selected when choosing a Style, provided theSINGLE TOUCH LED is turned on. STS#1 is also recalled when a SongBook entry is selected.
STSs are still available when switching to Song Play mode from Style play mode, to let you select a dif-ferent configuration of Keyboard tracks and a different Voice Processor Preset, while listening to theSongs.
Note: STSs are verysimilar to Performances,but they are fine-tunedto the Style they areassociated to.
1 Press one of the four STS buttons under the display.
2 Play the keyboard.
Hint: You may seethe name of the fouravailable STSs for thecurrent Style, by pressingthe STS Name tab.
3 Try all the other STSs, and see how settings change with each of them.
i
i
When the Fill ends, the selected Vari-ation will start playing.
When the Ending is fin-ished, the Style auto-matically stops.
i
Settings memorized in the selected STS have been selected. Sounds, effects and other settings have been recalled.
i

44 Selecting and playing StylesThe Pads
The Pads
Each Performance and STS can assign different sounds or patterns to the four PADS. These sounds orpatterns can be played along with the Keyboard and Style tracks.
Hint: You can seewhich sounds or patternsare associated to thefour Pads for the currentPerformance or STS, bypressing the Pad tab.
1 Press one of the four PADS.
2 If the selected PAD triggers an endless sound or pattern (i.e. theApplause), pressing STOP will cancel that sound.
3 Select a different Performance, and see how the sounds or patternsassigned to the PADS change.
You can even press more Pads at once, and play two or more sounds or patterns at the sametime. Pressing STOP stops them all at the same time. Keeping STOP pressed and pressing one ofthe PAD buttons only stops that sound or pattern.
Adjusting volume balance between the Style and the keyboard
Adjusting the volume of the Style tracks may be useful, to gently fade them while Keyboard tracks canstill be played at the normal volume.
• While the Style is playing, use the ACC/SEQ VOLUME slider to adjust theStyle volume. Keyboard track’s volume does not change when movingthe slider.
i

45Selecting and playing StylesAdjusting volume of each single track
Quic
k G
uid
e
Adjusting volume of each single track
You can adjust the volume of each of the Style and Keyboard tracks, for example to soften the bass alittle, or to make the keyboard solo louder.
1 Use the Assignable Sliders (be sure the VOLUME LED is turned on) toadjust each Keyboard track’s volume, as well as ‘grouped’ Style tracks.
2 To separately adjust each Style track, press the TRK. SEL. (TRACK SELECT)button to change track’s view.
Hint: As an alterna-tive, you can changeeach track’s volume, bytouching a track’s areato select it, then usingthe TEMPO/VALUE con-trols to change the vol-ume.
3 To return to Normal view, press the TRK. SEL. button again.
The LED on the TRK. SEL. button will turn off.
In Normal view, allStyle tracks are seen
as three ‘grouped’tracks.
To control the volume, the VOLUME LED must be turned on. If it is off, repeatedly press the SLIDER MODE button to change it. Please note that the SLIDER MODE status is saved with each Performance.
The LED indicatorof “grouped” Style
tracks and Key-board tracks turns
on.
i
In Style view, all sepa-rate Style tracks areshown, and can be
controlled using thecorresponding Assign-
able Sliders.
The LED indicatorof single Style
tracks turns on.

46 Selecting and playing StylesTurning Style tracks on/off
Turning Style tracks on/off
You may easily turn on or off any Style track while you are playing. For example, try muting allaccompaniment tracks, while drum and bass continue to play.
Note: While in theNormal view of the StylePlay mode, you can seeStyle tracks grouped injust three “complex”tracks. To see each Styletrack as individual tracks,just press the TRK. SEL.button.
1 While the Style is playing, touch anywhere in the ACCOMP track’s chan-nel strip to select the track (volume value highlighted), then touch it againto set the track to Mute.
2 To set tracks back to the Play status, press the Mute icon on the ACCOMPtrack.
3 To mute/unmute each single Style track, press TRK. SEL. to switch to theStyle Tracks view.
4 Press the TRK. SEL. button again to go back to the Normal view.
The LED on the TRK. SEL. button will turn off.
Adding chords to your right-hand melody (ENSEMBLE function)
Chords played with your left hand may be applied to the right-hand melody.
1 Press the SPLIT button in the KEYBOARD MODE section to split the key-bord.
The Ensemble function only works in Split mode.
i
Mute the ACCOMP track. All accompani-ment tracks will go silent (apart from Drum, Percussion and Bass).
Set the ACCOMP track to Play. All accompaniment tracks will return to their original vol-umes.

47Selecting and playing StylesAdding chords to your right-hand melody (ENSEMBLE function)
Quic
k G
uid
e
2 Press the ENSEMBLE button to turn its LED on.
3 Play chords with the left hand and single notes in the right hand.
4 To select a different harmonization style, keep the SHIFT button pressed,and press the ENSEMBLE button to open the Ensemble page.
This is a fast ‘shortcut’ to recall this page. The longer would have been entering the Edit mode bypressing the MENU button, then going to the Ensemble page.
5 When the right harmonization type has been selected, press the EXIT but-ton to go back to the main page.
6 Press the ENSEMBLE button again to turn its LED off. The automatic har-monization will be turned off.
Notice how the right hand is automatically harmonized, according to the chords composed with your left hand.
While the Ensemble parameter is selected, use the TEMPO/VALUE con-trols to select one of the available harmonization types.
While in an edit page, press EXIT to go back to the main page of the current operating mode.

48 Song PlaySelecting a Song to play
Pa1X is equipped with two onboard sequencers that can be run at the same time to mix between dif-ferent Songs. Songs are read directly from disk, so there is no need to load them to memory beforeplaying them back.
Pa1X can read Songs of various kinds: Standard MIDI Files (SMF), KAR, MP3 and Audio CD (MP3and Audio CD playback only available as options). Please remember that the Double Sequencer(XDS) function is not available with two MP3s or two CD tracks at the same time. You can, however,run a CD track on one sequencer, and an MP3 on the other one.
It may be of great interest to singers and guitar players to know that if a midifile contains lyrics andchords, they can be seen in the display. Lyrics can also be seen on an external video monitor, providedyou have the (optional) Video Interface installed.
Selecting a Song to play
1 Press the SONG PLAY button to switch to the Song Play mode.
Hint: In Style Playmode, you can pre-selectthe Songs to be assignedto both sequencers. Thisway, you will be ready tostart them, as soon asyou switch to Song Playmode.
Song Play
Sequencers controls
The SONG PLAY button
i
The Songs area of the Style Play main page.
After pressing the SONG PLAYbutton, the main page of the
Song Play mode appears.

49Song PlaySelecting a Song to play
Quic
k G
uid
e
2 Press the Sequencer 1 area to open the Song Select window (or press theSELECT button of the Sequencer 1 section on the control panel).
Hint: As an alterna-tive, you can open theSong Select window bypressing the SELECT but-ton in the SEQUENCER 1section on the controlpanel.
3 Scroll through the list and select the Song to play.
4 When the Song is selected, press the Select button to confirm your selec-tion, and close the Song Select window.
i
The selected Song is highlighted.Press a Song’s name to select it.
Use the scroll bar to see all Songs in the list. As an alternative, select an item and use the DIAL.
Use the Open and Close buttons to browse through the folders.
Use the Device pop-up menu to selectone of the available mass-storage
devices (floppy disk, hard drive…).
Use the Sync P. (Synchronized Path) button to see the selected Song again.
Press the Select button to select the highlighted Song, and assign it to Sequencer 1.
After pressing the Select button in the display, the main page of the Song Play mode appears again.
Selected Song

50 Song PlayPlaying back a Song
Playing back a Song
Once a Song has been selected, it may be played back by the sequencer.
1 Be sure the BALANCE slider is completely moved to the left (towardSequencer 1).
2 Press the (PLAY/STOP) button in the SEQUENCER 1 section to startplayback.
3 Use the SEQUENCER 1 control section to control the Song’s playback.
4 When you want to stop the song and go back to the first measure, pressthe (PLAY/STOP) button again.
Note: In any case, thesequencer will automati-cally stop when the endof the Song is reached.
After pressing the (PLAY/STOP) button, the button’s LED turns on, and the measure counter begins to show the current measure number.
Press the REWIND button once to go to thebeginning of the current measure. Keep it
pressed to go back several measures.
Press the FAST FORWARD button once to go to the beginning of the next measure. Keep it pressed to go forward several measures.
Press the PAUSE button to stop the Song at the current position. Press it again (or press
PLAY/STOP) to resume playback.
iWhen the Song is stopped, the LED on the PLAY/STOP button goes dark.

51Song PlayChanging tracks volume
Quic
k G
uid
e
Changing tracks volume
During playback, you may wish to change each track’s volume, to create a mix “on the fly”.
1 In Normal view, use the Assignable Sliders to adjust each Keyboardtrack’s volume (provided the VOLUME LED is turned on).
2 Press the TRK. SEL. (TRACK SELECT) button once to see tracks 1-8 (Track 1-8 view).
Note: Changes toSong tracks will not besaved, and will be reseteach time you press the
(PLAY/STOP) button.To save changes, youmust edit the Song inSequencer mode.
Keyboard tracks
VOLUME LED. Its sta-tus depends on the last selected Perfor-mance. If needed, repeatedly press the SLIDER MODE button to turn it on.
In Normal view(Keyboard
tracks shown)both LEDs are
turned off.
In Normal view(Keyboard
tracks shown)this LED isturned on.
i
In Track 1-8 view, thefirst 8 tracks of the
selected Song areshown, and can be
controlled using thecorresponding Assign-
able Sliders.
The LED indicatorof tracks 1-8 turns
on.
VOLUME LED turned on.

52 Song PlayChanging tracks volume
3 Press TRK. SEL. once again to see tracks 9-16 (Track 9-16 view).
Hint: As an alterna-tive, you can changeeach track’s volume, bytouching a track’s areato select it, then usingthe TEMPO/VALUE con-trols to change the vol-ume.
4 Press TRK. SEL. again, to return to the Normal view (Keyboard tracks).
5 Press the (PLAY/STOP) button to start the Song.
6 While listening to the Song, switch from Normal view to Track 1-8 andTrack 9-16 view, to see which tracks are playing.
Each track has a sound assigned to it, so look for the name of the Sounds you are listening to.
i
In Track 9-16 view, thesecond group of 8
tracks of the selectedSong are shown, and
can be controlledusing the correspond-ing Assignable Sliders.
The LED indicatorof tracks 9-16 turns
on.
VOLUME LED turned on.
Keyboard tracks

53Song PlayTurning Song tracks on/off
Quic
k G
uid
e
• Touch each track’s channel strip, to see each track’s detail in the TrackInfo line.
• Alternatively, you can see the Sound assigned to each track in the Soundarea of the Track 1-8 and Track 9-16 views.
Turning Song tracks on/off
Note: These changeswill not be saved to theSong. To save changes,edit the Song inSequencer mode.
During playback, you may wish to mute one or more tracks, for example to sing along with the Song,or play an instrumental part live on the keyboard.
Muting/unmuting Song tracks works exactly as with Style tracks. See “Turning Style tracks on/off” onpage 46 for more information.
Selected track Assigned Sound. Press it to open the Sound Select win-dow.
Sound bank Program Change (if activated - see “Show Program Change number” on page 234)
Octave Transpose
Sounds. Names are abbreviated, to fit the limited space. Press to open the Sound Select window.
i

54 Song PlayMixing two Songs
Mixing two Songs
You can select two Songs at the same time, and mix between them using the BALANCE slider.
1 Press the Sequencer 1 area to open the Song Select window and selectthe Song to be played by Sequencer 1. Press Select to confirm.
2 Once a song is assigned to Sequencer 1, press the Sequencer 2 area onceto select it, and a second time to open the Song Select window. Select aSong to be assigned to Sequencer 2, and press Select to confirm.
3 Keep the SHIFT button pressed, and press any of the two (PLAY/STOP)buttons, to start both Sequencers at the same time.
Hint: You don’t needto start both sequencersat the same time. Youcan start the first Song –then start the secondone when the first one isnear to the end. Thisway, you can use theBALANCE slider to gentlycrossfade between theend of one Song and thebeginning of the follow-ing one.
4 During playback, move the BALANCE slider, to mix between the two Songs.
5 During playback, you may control each Sequencer separately, by usingthe dedicated Sequencer controls.
6 Press the relevant (PLAY/STOP) button to stop the correspondingSequencer.
i

55Song PlayListening to a CD
Quic
k G
uid
e
Listening to a CD
If your Pa1X is fitted with the (optional) CDRW-1 CD Player, you can listen to songs from any AudioCD. Please note that, while you can assign a single CD track to either sequencers, you can mix it witha midifile assigned to the other sequencer.
1 Insert the CD into the CD Player.
2 Press a Sequencer area to open the Song Select window.
3 Use the Device pop-up menu to select the CD Player.
4 Select any of the tracks contained in the CD, and press Select to assign itto the selected Sequencer.
5 Use the Sequencer’s transport controls to play/stop the selected CD track.
You can jump to the following CD track by keeping the SHIFT button pressed, while pressingthe >> button. Keep SHIFT pressed and press << to jump to the previous CD track.
Device pop-up menu
Check the Alloption to listen to
all the tracks onthe CD, starting
from the selectedone. Press
(PLAY/STOP) tostart listening.

56 The SongBookSelecting the desired entry from the Main List
One of the most powerful features of the Pa1X is the onboard music database, that allows you to orga-nize your Styles and Songs (in SMF, KAR and – optionally – MP3 format) for easy retrieving. Eachentry of this database may include the artist, title, genre, number, key, tempo, and meter of a specifiedsong. When selecting one of the entries, the associated Style, MP3 or Standard MIDI File is automati-cally recalled.
In addition to helping you organizing your shows, the SongBook allows you to associate up to fourSTSs to each Standard MIDI File or MP3. This way, it is easy to recall a complete setup for Keyboardtracks, effects, and the Voice Processor, for realtime playing over a Standard MIDI File or MP3.
You can add your own entries to the SongBook, as well as edit the existing ones. Korg has already sup-plied some hundred entries as standard. Furthermore, the SongBook allows you to create various cus-tom lists, that may suit your different shows.
Selecting the desired entry from the Main List
A large database is already included with the instrument, and you can later customize it. You maybrowse through this database in a variety of ways.
1 While you are in Style Play or Song Play mode, press the SONGBOOKbutton to open the SongBook window.
2 Browse through the entries.
Icons in the Type column will help you identify the type of the entry. The Genre column isshown by default, but you can switch to the Artist column (see “Displaying Artist or Genre”below).
The SongBook
The SONGBOOK button
Press this check-box to turn the
view filter on.
Press this buttonto edit the view
filter.
Adds the selected entry to the Custom List (if activated – see page 61).
Press this button to select the current entry to play.
Use the scroll bar to see all entries in the list. As an alter-native, select an item and use the DIAL.SongBook Main
List
Style or Standard MIDI Files(s) currently assigned to the arranger or sequencer(s)

57The SongBookDisplaying Artist or Genre
Quic
k G
uid
e
3 When the entry is visible in the display, select it and press the Select but-ton in the display.
After selecting an entry, the corresponding Style, SMF, KAR file, or MP3 (optional) will berecalled, together with the relevant operating mode (Style Play or Song Play). Up to four STSswill also be recalled.
The selected Style, SMF, KAR file, or MP3 is shown in the higher part of the screen.
Displaying Artist or Genre
For space matter, either the Genre or Artist column can be seen in the display. You cannot see both atthe same time.
1 Press the page menu icon to open the page menu.
Note: The Artist andKey fields of all suppliedentries have been inten-tionally left empty.
2 Choose Show Artist (now Genre) to switch from Genre to Artist in the Listview. The Artist column will be shown.
3 Open the page menu again, and choose the Show Genre (now Artist)item. The Genre column will be shown again.
i

58 The SongBookSorting entries
Sorting entries
You can change the order entries are shown in the display.
1 Press the page menu icon to open the page menu.
2 Select one of the available sorting options.
The order of entries in the display changes, reflecting the selected sorting option.
Searching entries
The SongBook database may be really huge. You can, however, look for (say) specific artists or songtitles, using the filtering functions.
1 Press the Filter button in the display, to open the Filter dialog box.
2 Press the (Text Edit) button next to the search criteria (even morethan one) you want to enter.
For example, you may want to find all songs containing the word “love” in the title. If so, selectthe ‘Name’ criterion, and enter the word ‘love’. Capitals are not relevant for the search.
Choose one of the sortingoptions to change the list
view order. The selectedoption will be shown inred over the list of file.
Choose whether the listmust be seen in ascending
or descending order
Available search criteria. “Genre” and “Artist” are both consid-ered, even though only one of them may be shown in the List

59The SongBookAdding entries
Quic
k G
uid
e
3 Press OK in the display, and close the Text Edit dialog box. The enteredtext is now the search criteria.
4 Press OK to close the Filter dialog box and return to the SongBook page.
Once the Filter dialog box has been closed by pressing OK, the Filtered check box is automati-cally checked, and the filter is activated. Only entries matching the entered criterion are seen inthe Main List.
5 To see the whole SongBook database again, press the Filtered check boxagain, to make the check mark disappear.
Adding entries
You can add your own entries to the SongBook database.
1 Go to the Style Play or Song Play mode, depending on the type of entryyou want to add to the SongBook database.
2 Select the Style, Standard MIDI File or MP3 file (optional) to be added tothe SongBook.
Assign the selected Song to Sequencer 1. Songs assigned to Sequencer 2 will not be saved in theSongBook entry.
3 Edit Keyboard and Style tracks as you prefer, by selecting differentSounds and Effects, or editing any other parameter.
Please note that changes to a Standard MIDI File’s tracks will not be saved as SongBook data.Data included in the Standard MIDI File will always be considered.
4 Select a different Voice Processor Preset, if you like.

60 The SongBookAdding entries
5 When your entry is ready, press the SONGBOOK button, then the BookEdit 1 tab to see the Book Edit 1 page.
6 Press the New Song button in the display to add a new item to the Song-Book list.
7 Press the (Text Edit) button next to the field(s) you want to edit, andwrite the name. Set all other parameters.
You can write the genre, artist name, and name of the associated STS. Select a Tempo matchingthe song’s tempo, and select the Meter and Key of the song. You can also specify a Master Trans-pose value, to be automatically selected when selecting the entry.
8 After having filled up all the desired fields (be as comprehensive as youcan), press the Write button in the display to open the Write dialog box.
Entry’s name
Name of the Style, SMF, KAR or MP3 file, memo-rized with the entry (provided “Write Current Resource” is selected when saving it).
When checked, current settings for Styletracks, or the path for the SMF, KAR or
MP3 file, are saved with the entry. Ifunchecked, original Style track settings are
saved with the entry.This parameter is mandatory when creat-
ing a new entry by pressing the New Songbutton.
When checked, current Keyboard trackand Voice Processor settings are saved to
one of the four STSs available for eachentry. You can also exit the SongBook, editKeyboard tracks, then return to the Song-
Book and save the new settings to a differ-ent STS. Press the Text Edit icon to edit the
STS name.
One of the four STS available for each entry, where you can save the current settings for Keyboard tracks and the Voice Processor.
Press New Song to create a new entry.
Currently selected resource. If a different Style, SMF, KAR or MP3 file has been selected, it may differ from the saved resource (shown on top of the page).
Entry’s parameters

61The SongBookCreating a Custom List
Quic
k G
uid
e
9 Press the (Text Edit) button to assign a name to the new entry, thenpress OK to save the entry to the SongBook database.
Creating a Custom List
You can create several Custom Lists in the SongBook, to make a set of entries suitable for your variousshows. Before starting a new Custom List, be sure you have added all needed entries to the SongBookmain database (see “Adding entries” above).
1 While in SongBook mode, open the page menu and check the ‘Enable ListEdit’ item.
2 Select a Custom List to be edited.
To edit an existing list, press the Custom List tab to open the Custom List page, and select one ofthe available Custom Lists. To create a new list, press the List Edit tab to open the List Edit page,and press the New List button to create a new, blank list.
3 Press the Book tab to open the Book page and see the full database. Usethe various sorting, searching and filtering options (seen above) to find
Entry’s name. A good idea may be to assign the entry the samename of the associated Standard MIDI File or MP3 file, or a
name suitable for the use of the associated Style.
Select Rename/Overwrite to over-write an existing entry. Warning: the
older entry will be deleted!
Select New Song to add a new entryto the SongBook database. Thisoption is automatically selected
when a new entry has been created(by pressing the New Song button).
After you check the‘Enable List Edit’ item, the
List Edit page becomesavailable.

62 The SongBookCreating a Custom List
the entries you are looking for. Press the Add to List button when thedesired entry has been selected.
4 When finished adding entries to the Custom List, press the List Edit tab togo to the List Edit page, and use the various commands to edit the list.
5 When the Custom List is ready, press the Write button in the display tosave it to memory. If you like, assign a new name to the Custom List.
Press this check-box to turn the
view filter on (ifany).
Press this button to edit the view filter.
Use the scroll bar to see all entries in the list. As an alter-native, select an item and use the DIAL.SongBook list
Adds the highlighted entry to the Custom List.
Use the vertical arrowsto move the selectedentry up or down in
the list.
Press Del Song to delete the selected entry.
Press New List to create a new Custom List. Press Del List to delete the current Custom List. Warning: Del List will delete the cur-rent Custom List.
Press Write to save the current Custom List.
Select an entry on the list to edit
List name Scrollbar
Press the ‘T’ symbol to open the Text Edit dialog box.
Use alphabetic characters to enter text.
Use the ‘<’ and ‘>’ buttons to move the
cursor.
Use the SHIFT but-ton to switch between capitals and small charac-ters.
Press Clear to delete the whole string, Delete to
delete just a single charac-ter.
Press Symbol to enter special charac-hters.
When done, press OK to confirm the new name, or Cancel to abandon all changes.

63The SongBookSelecting and using a Custom List
Quic
k G
uid
e
Selecting and using a Custom List
After creating one or more Custom Lists, you can select one and use it for your show.
1 Press the Custom List tab to select the Custom List page.
2 Use the List pop-up menu to select one of the available Custom Lists.
3 Select one of the entries in the list (it turns blue), then press the Select but-ton in the display (the selected entry turns green) to start playing backfrom there.
Selecting a SongBook STS
Up to four STSs can be associated to an entry based on a Standard MIDI File or an MP3 file.
1 Press the Lyrics/STS tab to open the Lyrics/STS page and see the fourSTSs associated to the current SongBook entry.
2 Select the desired STS by touching its name in the display. As an alterna-tive, press the SINGLE TOUCH BUTTON corresponding to the desired STS.
The STS is selected. Keyboard tracks and Voice Processor settings may change.
Use the List pop-up menu toselect one of the available Cus-
tom Lists.
Press Next to select the next entry in the list. (This command can also be assigned to an Assignable Switch).
Press Select to set the highlighted entry to play (if different than the one automatically selected).
Entry in play. To select a different one, highlight it and press the Select button in the display.
STSs associated with the current entry.

64 Singing with a connected microphoneConnecting a microphone
Pa1X is fitted with a powerful digital voice processor, based on technologies developed by TC Helicon,including effects, four-part harmonization, and (optional) pitch correction and voice modeling.
Connecting a microphone
To sing along with the Pa1X, you must first connect a suitable microphone to its MIC input. Anydynamic microphone is directly supported. To connect a phantom-powered condenser microphone,you need an external phantom power supply. You can also connect the microphone though an exter-nal mixer, and connect one of the mixer’s line outputs to the line input IN1 of the Pa1X.
1 Lower the Audio In track volume by using the corresponding slider.
Note: Lowering theAudio In track volumehelps avoiding feedback.Feedback is caused byaudio generated by thePa1X, returning to theaudio circuitry via themicrophone.
2 Connect a microphone.
If you connect a microphone to the MIC input, move the MIC/IN1 switch to the MIC position.This allows the microphone signal to pass through the built-in high-quality preamp of the Pa1X.
If you connect a microphone to the IN1 input, passing through a mixer or a preamp, move theMIC/IN1 switch to the IN1 position. This will allow you to use the Pa1X as a powerful outboardeffect processor.
Singing with a connected microphone
Access Voice Processor editing from the main page (tab Mic) and the GLOBAL button (items Voice Processor Setup and
Voice.Processor Preset)
Microphone input Microphone input volume control
i
To control the volume, the VOLUME LED must be turned on. If it is off, repeatedly press the SLIDER MODE button to change it. Please note that the SLIDER MODE status is saved with each Performance.

65Singing with a connected microphoneConnecting a microphone
Quic
k G
uid
e
3 Go to the main page of the Style Play or Song Play mode, and select theMic tab. Uncheck all the “master” switches.
4 Sing into the microphone, and adjust the input gain and the Audio Intrack’s volume, until you achieve the correct settings.
Note: You have a cor-rect microphone volumesetting when the AUDIOIN LED turns red veryoften, and just duringthe signal peaks. TheAUDIO IN slider must beset accordingly, to com-pensate a too loud orweak incoming signal.
5 Turn on again all desired “master” switches.
6 Try the Play/Mute button of the Microphone panel, to mute/unmute thewhole microphone section.
Note: This is thesame play/mute controlyou can find in the “Mic/In” channel strip of theVolume panel.
Voice Processor “mas-ter” switches. To test the microphone level, uncheck Harm/Model, Pitch, Thicken, Effects, Talk, Mic Mute.
iAdjust the input level by using the MIC GAIN knob. Sing into the microphone, and watch at the AUDIO IN LED on the control panel. If it goes red too often, turn down the input gain; if it turns on green too often, increase the input gain. No hint of distortion should be heard in the audio sys-tem when you sing.
While you adjustthe gain, graduallyincrease the AudioIn track volume, by
using the corre-sponding slider.
i
Microphone muted Microphone set to play
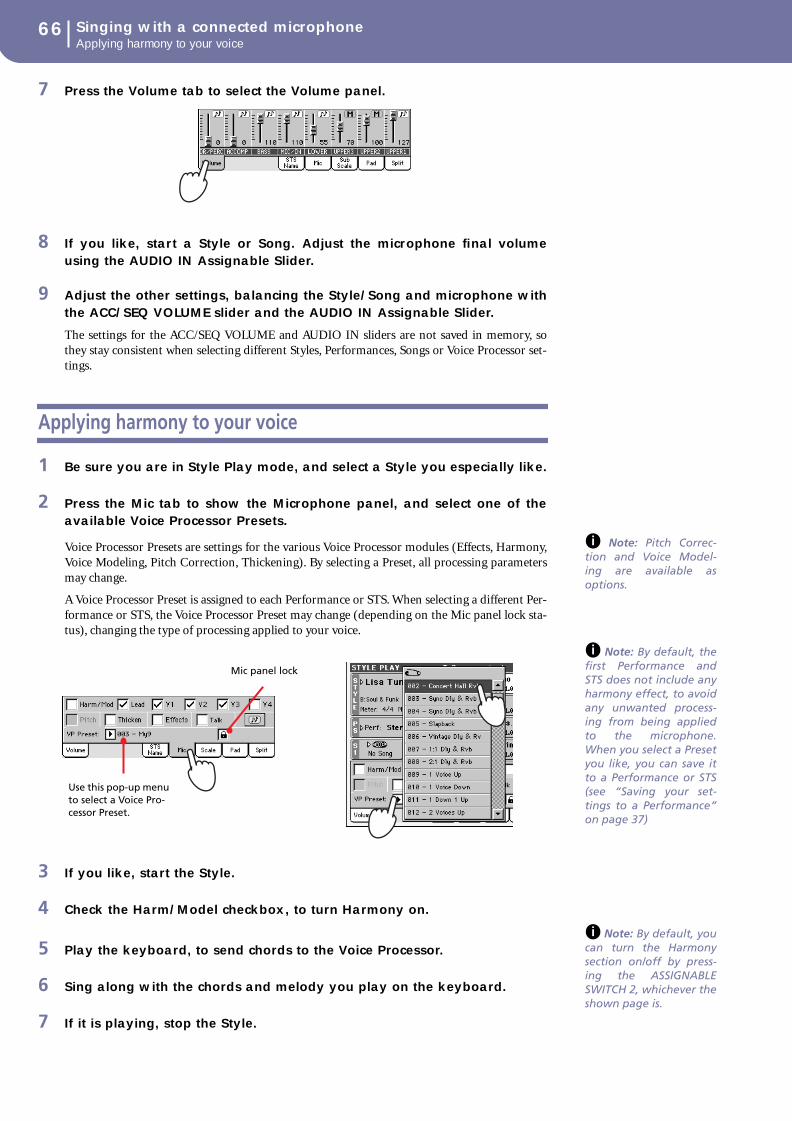
66 Singing with a connected microphoneApplying harmony to your voice
7 Press the Volume tab to select the Volume panel.
8 If you like, start a Style or Song. Adjust the microphone final volumeusing the AUDIO IN Assignable Slider.
9 Adjust the other settings, balancing the Style/Song and microphone withthe ACC/SEQ VOLUME slider and the AUDIO IN Assignable Slider.
The settings for the ACC/SEQ VOLUME and AUDIO IN sliders are not saved in memory, sothey stay consistent when selecting different Styles, Performances, Songs or Voice Processor set-tings.
Applying harmony to your voice
1 Be sure you are in Style Play mode, and select a Style you especially like.
2 Press the Mic tab to show the Microphone panel, and select one of theavailable Voice Processor Presets.
Note: Pitch Correc-tion and Voice Model-ing are available asoptions.
Voice Processor Presets are settings for the various Voice Processor modules (Effects, Harmony,Voice Modeling, Pitch Correction, Thickening). By selecting a Preset, all processing parametersmay change.
A Voice Processor Preset is assigned to each Performance or STS. When selecting a different Per-formance or STS, the Voice Processor Preset may change (depending on the Mic panel lock sta-tus), changing the type of processing applied to your voice.
Note: By default, thefirst Performance andSTS does not include anyharmony effect, to avoidany unwanted process-ing from being appliedto the microphone.When you select a Presetyou like, you can save itto a Performance or STS(see “Saving your set-tings to a Performance”on page 37)
3 If you like, start the Style.
4 Check the Harm/Model checkbox, to turn Harmony on.
Note: By default, youcan turn the Harmonysection on/off by press-ing the ASSIGNABLESWITCH 2, whichever theshown page is.
5 Play the keyboard, to send chords to the Voice Processor.
6 Sing along with the chords and melody you play on the keyboard.
7 If it is playing, stop the Style.
i
i
Use this pop-up menu to select a Voice Pro-cessor Preset.
Mic panel lock
i

67Singing with a connected microphoneSoloing your voice (TalkBack)
Quic
k G
uid
e
Soloing your voice (TalkBack)
Sometimes, during a live show, you might like to talk to your audience. Use the TalkBack function toattenuate the music, and let your voice pass through clean and clear.
1 While in the main page of the Style Play or Song Play mode, press theMic tab to see Voice Processor’s “master” switches.
2 During playback, press the Talk checkbox, making the check markappear.
Note: By default, youcan turn the TalkBackfunction on/off by press-ing the ASSIGNABLESWITCH 4, whichever theshown page is.
3 Sing or talk into the microphone.
You’ll hear background music has been made softer, while your voice will be heard loud andproud.
4 To turn the TalkBack function off, press the Talk checkbox again, makingthe check mark disappear.
The background music returns to the original volume.
Locking Voice Processor settings
If you like the selected Voice Processor Preset, and other settings you have made in the Microphonepanel, you can “lock” them, to prevent them from changing each time you select a Performance, Styleor STS that may be saved using different settings.
1 While the Microphone panel is shown in the display, press the lock iconto freeze it.
2 To unlock the settings, press the lock icon again.
i
Lock on. Voice Pro-cessor settings will not change when selecting a different Performance or STS.
Lock off. Voice Pro-cessor settings will change when select-ing a new Perfor-mance or STS.

68 Recording a new SongEntering Backing Sequence (Quick Record) mode
There are several ways to create a Song on the Pa1X. The easiest and fastest is to use the Styles torecord what you are playing in realtime on the keyboard, while the arranger gives you the accompani-ment tracks.
Entering Backing Sequence (Quick Record) mode
1 Press the SEQUENCER button to switch to the Sequencer mode.
2 Press the RECORD button to open the Song Record Mode Select dialogbox.
Recording a new Song
Style Select section
Style Elements Style Controls
The SEQUENCER button
Sequencer 1 controls
After pressing the SEQUENCERbutton, the main page of the
Sequencer mode appears.
Press the RECORD button, toopen the Song Record Mode
Select dialog box

69Recording a new SongPreparing to record
Quic
k G
uid
e
3 Select the Backing Sequence (Quick Record) option and press OK to enterthe Backing Sequence Record mode.
Preparing to record
When you enter Backing Sequence Record, the most recently used Style is already selected, and alltracks are ready to record. You could simply start recording as if you were playing in realtime with theStyles. However, there are some settings that you may wish to edit.
• If you like, adjust any editable parameter in the display.
After choosing the Backing Sequence(Quick Record) option, the Backing
Sequence Record page appears.
Press the Style param-eter (or one the STYLE
buttons) to open theStyle Select window,
and select a differentStyle (as seen on
page 40).
Track(s) status. ‘Rec’ means they are ready to record. ‘Play’ means they are recorded
and you can hear them. ‘Mute’ means they cannot be heard.
Measure counter. Neg-ative numbers (-2, -1) are the precount, after which you can start recording.
Style’s Tempo. Change it, if you like.
Grouped tracks. During Quick Record, you cannot access each separate Song track. For ease of use,
just two ‘master’ tracks are provided: Kbd/Pad (Key-board/Pads) and Ch/Acc (Chord/Accompaniment).
Style’s Meter. You can-not change it.
Press the Perf/STS parameter to open the Performance Select window, and select a different Per-formance (as seen on page 36). As an alter-native, you use the PERFORMANCE/SOUND or STS but-tons.

70 Recording a new SongRecording
Recording
1 Select the Style Element you wish to use before starting to play.
2 Start recording, by pressing the START/STOP button.
Note: If you do notwish to start the Songwith the Style playing,you can simply startrecording by pressingthe PLAY/STOP but-ton in the SEQUENCER 1section, and start theStyle only later. The Stylewill start at the nextstrong beat
3 Play as if you were performing live with the Styles.
During recording, select any Style Element (Intro, Variation, Fill, Ending…) you like. You canalso press START/STOP to stop the Style, and press it again to start the Style up again!
Please remember that, while recording in Backing Sequence Record mode, you cannot use theSYNCHRO, TAP TEMPO/RESET, ACC/SEQ VOLUME controls.
4 When finished recording your Song, press the (PLAY/STOP) button inthe SEQUENCER 1 section to exit recording, and return to the main pageof the Sequencer mode.
5 While in the main page of the Sequencer mode, press the (PLAY/STOP)button in the SEQUENCER 1 section to listen to the recorded Song.
The Backing Sequence Song has been converted to an ordinary Song. If you like it, you can saveit to disk, and read it in Song Play mode, or with any external sequencer.
6 To edit the Song, press MENU to enter the Edit mode (see instructionsstarting from page 178).
Select one of the Intros to start with an introduc-tion. Select any of the Variations before starting
to record.
i
After pressing the PLAY/STOP button, themain page of the Sequencer mode appears
again.

71Recording a new SongSecond-take recording (Overdubbing)
Quic
k G
uid
e
Second-take recording (Overdubbing)
You may wish to re-record, and add one of the two “grouped” tracks, or overwrite a bad recordingwith a new one. Usually, you will record all chord and Style Element changes during the first take, andrecord Keyboard tracks and Pads during the second take.
1 Press the REC button to enter Record again. When the Song Record ModeSelect dialog box appears, select Backing Sequence (Quick Record)again.
2 If you are recording just one of the “grouped” tracks, set the track to bepreserved to the Play mode.
3 Repeat the recording process, and press the (PLAY/STOP) button in theSEQUENCER 1 section to stop recording and to return to the main page ofthe Sequencer mode.
4 While in the main page of the Sequencer mode, press the (PLAY/STOP)button in the SEQUENCER 1 section to listen to the recorded Song.
Again, the Backing Sequence Song has been converted to an ordinary Song.
Saving a Song to disk
After recording a Song that you like, it is a good idea to save it to disk, to avoid losing it when theinstrument is turned off.
1 While in the main page of the Sequencer mode, press the page menuicon to open the page menu.
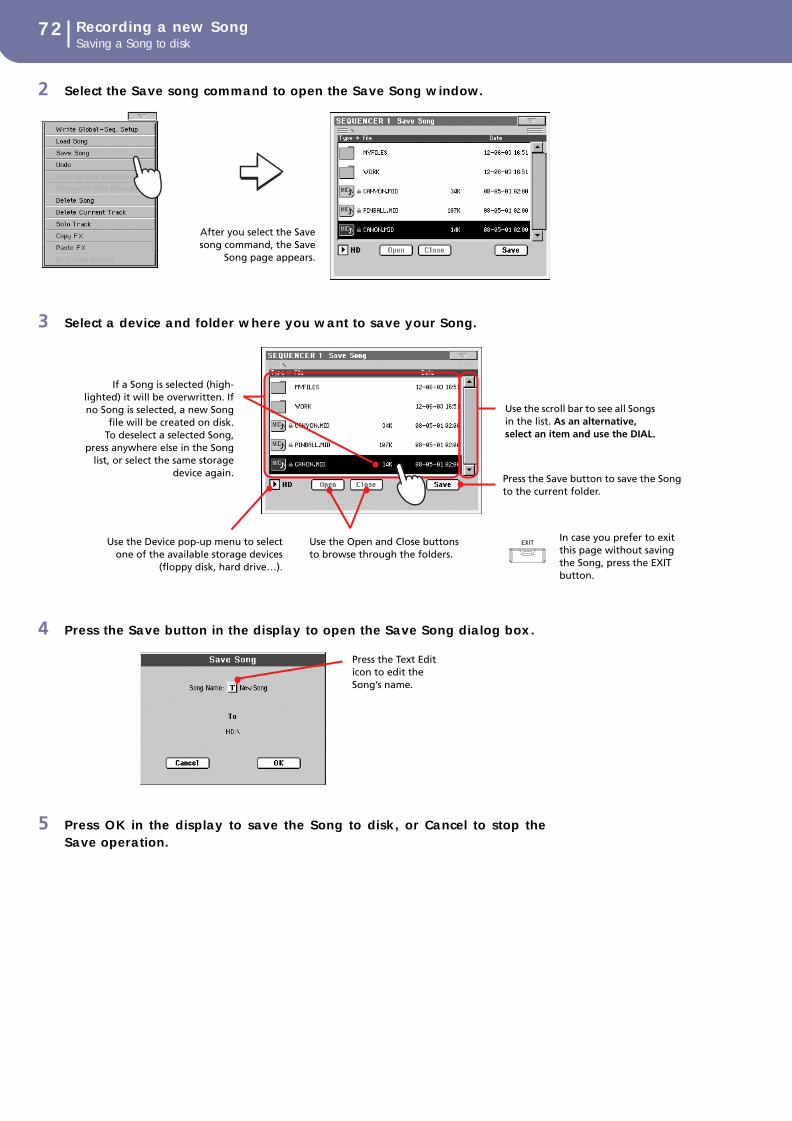
72 Recording a new SongSaving a Song to disk
2 Select the Save song command to open the Save Song window.
3 Select a device and folder where you want to save your Song.
4 Press the Save button in the display to open the Save Song dialog box.
5 Press OK in the display to save the Song to disk, or Cancel to stop theSave operation.
After you select the Savesong command, the Save
Song page appears.
If a Song is selected (high-lighted) it will be overwritten. Ifno Song is selected, a new Song
file will be created on disk.To deselect a selected Song,
press anywhere else in the Songlist, or select the same storage
device again.
Use the scroll bar to see all Songs in the list. As an alternative, select an item and use the DIAL.
Use the Open and Close buttons to browse through the folders.
Use the Device pop-up menu to selectone of the available storage devices
(floppy disk, hard drive…).
Press the Save button to save the Song to the current folder.
In case you prefer to exit this page without saving the Song, press the EXIT button.
Press the Text Edit icon to edit the Song’s name.

Refe
renc
e

74 Selecting elementsSound Select window
The following windows are shown in the various operatingmodes, whenever you try to select a Sound, Performance, Styleor Song.
Sound Select window
Press the Sound area whereas it appears in the display, or one ofthe SOUND SELECT buttons on the control panel (provided theSOUND SELECT LED is lit), to open the Sound Select window.Use the SOUND SELECT buttons to go directly to the selectedbank.
Press EXIT to exit from this page and go back to the previouspage without selecting any Sound.
Note: Depending on the status of the “Auto Performance/SoundSelect” parameter (see page 234), a Sound may be immediatelyselected when pressing one of the SOUND SELECT buttons. Thelatest selected Sound for that bank will be selected.
Bank groups
Selected group of banks.
Side tabs (banks)
Use these tabs to select a bank of Sounds. Each tab correspondsto one of the SOUND SELECT buttons on the control panel.
Lower tabs (pages)
Use these tabs to select one of the available pages in the selectedbank.
If you press again the same SOUND/PERFORMANCE SELECTbutton on the control panel, the next page in the same bank isselected. This way, you do not need to press one of the corre-sponding tabs in the display in order to select a different page.
Previous/Next tabs
Scroll the lower tabs to the left or the right, when additional tabsare available but cannot be seen in the display.
Sounds
Press one of these buttons in the display to select a Sound. Unlessthe DISPLAY HOLD LED is turned on, the window automati-cally closes short after you select a Sound.
Performance Select window
Press the Performance area whereas it appears in the display, orone of the PERFORMANCE SELECT buttons on the controlpanel (provided the PERFORMANCE SELECT LED is lit), toopen the Performance Select window. Use the PERFORMANCESELECT buttons to go directly to the selected bank.
Press EXIT to exit from this page and go back to the previouspage without selecting any Performance.
Note: Depending on the status of the “Auto Performance/SoundSelect” parameter (see page 234), a Performance may be immedi-ately selected when pressing one of the PERFORMANCE SELECTbuttons. The latest selected Performance for that bank will beselected.
Bank groups
Selected group of banks.
Side tabs (banks)
Use these tabs to select a bank of Performance. Each tab corre-sponds to one of the PERFORMANCE SELECT buttons on thecontrol panel.
Lower tabs (pages)
Use these tabs to select one of the available pages in the selectedbank.
If you press again the same SOUND/PERFORMANCE SELECTbutton on the control panel, the next page in the same bank isselected. This way, you do not need to press one of the corre-sponding tabs in the display in order to select a different page.
Selecting elements
Side tabs (banks)
Lower tabs (pages)
Bank groups
Sounds
If more than four pages are available, the Previous/Next tabs are shown
Side tabs (banks)
Lower tabs (pages)
Bank groups
Perfor-mances

75Selecting elementsStyle Select window
Ref
eren
ce
Previous/Next tabs
Scroll the lower tabs to the left or the right, when additional tabsare available but cannot be seen in the display.
Performances
Press one of these buttons in the display to select a Performance.Unless the DISPLAY HOLD LED is turned on, the window auto-matically closes short after you select a Performance.
Style Select window
Press the Style area whereas it appears in the display, or one ofthe STYLE buttons on the control panel, to open the Style Selectwindow. Use the STYLE buttons to go directly to the selectedbank.
Press EXIT to exit from this page and go back to the previouspage without selecting any Style.
Note: Depending on the status of the “Auto Style Select” parameter(see page 234), a Style may be immediately selected when pressingone of the STYLE SELECT buttons. The latest selected Style for thatbank will be selected.
Bank groups
Selected group of banks.
Side tabs (banks)
Use these tabs to select a bank of Styles. Each tab corresponds toone of the STYLE buttons on the control panel.
Lower tabs (pages)
Use these tabs to select one of the available pages in the selectedbank.
If you press again the same STYLE SELECT button on the con-trol panel, the next page in the same bank is selected. This way,you do not need to press one of the corresponding tabs in thedisplay in order to select a different page.
Styles
Press one of these buttons in the display to select a Style. Unlessthe DISPLAY HOLD LED is turned on, the window automati-cally closes short after you select a Style.
After selecting a Style from this window, its name begins to flash,meaning it is ready to start playing at the beginning of the nextmeasure.
Pad Select window
Press the Pad area whereas it appears in the display, to open thePad Select window.
Press EXIT to exit from this page and go back to the previouspage without selecting any Pad.
Bank groups
Selected group of banks, corresponding to different types ofPads. Hit are single-note, pre-programmed factory Pads.Sequence are sequence-based, pre-programmed factory Pads.User can be either single-note or sequence-based Pads, and canbe user-recorded or modified.
Side tabs (banks)
Use these tabs to select a bank of Pads.
Lower tabs (pages)
Use these tabs to select one of the available pages in the selectedbank.
Pad
Press one of these buttons in the display to select a Pad. Unlessthe DISPLAY HOLD LED is turned on, the window automati-cally closes short after you select a Pad.
STS Select
Use the four SINGLE TOUCH SETTING button on the controlpanel, to select one of the four STS associated with the currentStyle or the selected SongBook entry.
Press the STS tab on the main page of the Style Play and SongPlay mode, or the Info tab on the SongBook mode, to see thename of the available STSs.
Side tabs (banks)
Lower tabs (pages)
Bank groups
Styles
Side tabs (banks)
Lower tabs (pages)
Bank groups
Pads

76 Selecting elementsSong Select window
• In Style Play and Song Play mode:
• In SongBook mode:
Song Select window
This page appears when you press one of the Song areas in thedisplay, or one of the SELECT buttons in one of theSEQUENCER sections on the control panel.
Press EXIT to exit from this page and go back to the main pageof the Song Play operating mode without selecting a Song.
While in this page, select a Standard MIDI File, Karaoke, or MP3file (optional) for the selected Sequencer. A Jukebox file mayonly be assigned to Sequencer 1.
Note: There is a separate working directory for each onboardsequencer.
Song path
This line shows the current device path.
Directory
This is the list of the selected device’s content.
Use the scrollbar to scroll the list items.
As an alternative, you can select one of the items, and use theTEMPO/VALUE controls to scroll.
Keep the SHIFT button pressed, and press DOWN or UP, tojump to the previous or next alphabetical section.
A list can contain several different types of files or folders.
A file or folder may be in one of the following status. (See “Pro-tect” and “Unprotect” on page 277 for information on how tochange the file status).
Page menu icon
Press the page menu icon to open the menu. See “Song Selectpage menu” on page 77 for more information.
Song path Directory
Storage device
Page menu icon
Type icon File/folder type
Standard MIDI File (SMF)
Karaoke file (KAR)
MPEG Layer 3 (MP3)
Audio CD track
Jukebox file (JBX)
Folder
Status icon File/folder status
Protected
– Unprotected
Type of thefile or folder
File status
File or folder name
File size
Modification date
Scrollbar

77Selecting elementsSong Select window
Ref
eren
ce
Storage device
Use this pop-up menu to select one of the available storagedevices.
Open
Opens the selected folder (item whose icon looks like this one:
).
Close
Closes the current folder, returning to the parent (“upper”)folder.
Sync P. (Synchronized Path)
Press this button to see the Song assigned to the selectedSequencer. This is useful to quickly return to it, after you havebrowsed through long directories and dug into different folders.
Select
Selects the highlighted item in the display. If a Song is alreadyplaying, it stops, and the new Song is ready to play. You arereturned to the main page.
Play All
When this button is pressed, all midifiles and MP3 files con-tained in the current directory are added to a new Jukebox list,that is automatically assigned to Sequencer 1. The order inwhich they are played depends on the current sorting method,i.e., how the files are shown in the display.
You can use this Jukebox list as any other list of this type (i.e.,start the playback with SEQ1 PLAY/STOP, jump to the next Songin the list with SHIFT + >>, edit it in the Jukebox page…).
Note: A Jukebox list can include up to 127 Songs. If your folder con-tains more items, only the first 127 will be considered.
Hint: If you don’t want to lose the list when turning the instrumentoff, go to the Jukebox page and save it to disk as a “.JBX” file.
Selecting a Song by its ID number
Each Song in a folder on disk (up to 9,999) has a progressive IDnumber assigned. You can see this number before the Song’sname in the Song Select window. You can use this number toselect the Song by composing the corresponding number, speed-ing up the Song retrieval when you are using an hard disk filledwith midifiles.
While in the Song Select window, press the SELECT button toopen the keypad, and enter the number corresponding to theSong to be selected.
While in any page of the Song Play mode, press the SELECT but-ton twice to open the keypad.
Note: If no Song corresponds to the dialed number, the “Song notavailable” message will appear.
Warning: While the directory may contain more than 9999 files,you can’t select Songs outside the 0001-9999 range when using thenumeric keypad.
Song Select page menu
Press the page menu icon to open the menu. Press a command toselect it. Press anywhere in the display to close the menu withoutselecting a command.
Export Song List
Select this command to save the current list as a text file to afloppy disk. This way, you will be able to print a list of Songs, tosee which number matches each Song.
1. While in the Song Select window, select the folder whoseSong list you wish to save as a text file.
2. Select the Export Song List command from the page menu.
3. A dialog box will appear, asking you to select either a floppydisk or the hard disk.
4. Select an option.
• If you select the floppy disk, insert a floppy disk in thedisk drive, and press OK to confirm.
• If you select the hard disk, just press OK to confirm.
Note: The text file will contain a list of “*.mid”, “*.kar”, “.mp3” and“*.jbx” files only. Folders and different kinds of files will not beincluded.
When saved, the text file will be named after the selected folder. Forexample, a folder named “Dummy” will generate a “Dummy.txt”file. If a file with the same name already exists on the floppy disk, itwill be overwritten without waiting for any confirmation. A filecontaining the list of all valid files contained into the root of the diskwill generate a “Root.txt” file.
The list will include the progressive number assigned to each Song,file names in MS-DOS format (8.3), the total number of files in thelist.
For the correct display and printing of the list on a personal com-puter, use a fixed size (i.e., non-proportional) character in your texteditor.
Device Type
FD Floppy disk
HD Hard disk (optional of the Pa1X)
CD CD (optional)

78 Style Play operating modeStart-up settings
The Style Play mode is the boot-up operating mode. When inthis mode, you can play with Styles (i.e. automatic accompani-ments), while playing with one to four tracks (Upper 1-3 andLower) on the keyboard. You can select different Sounds andEffects by selecting Performances and STSs. A different VoiceProcessor Preset may be selected by a Performance or STS. Youcan also use the SongBook to automatically select Styles for adesired music genre.
Start-up settings
Since Performance 1 of Bank 1 (Performance 1-1) is automati-cally selected when turning the instrument on, you can save to ityour preferred start-up settings.
Just select the Sounds, Effects, MIDI channels, Voice ProcessorPreset, and other settings you would like to have automaticallyselected when turning the instrument on, and select the “WritePerformance” from the page menu. When the Write Perfor-mance window appears, save the settings to Performance 1 ofBank 1. (See “Write Performance dialog box” on page 98).
Note: If you like some settings are preserved even when selectingdifferent Performances, STSs and Styles, turn on the desired “locks”to avoid changes to the selected parameters (see “General Controls:Lock” on page 232). Save these locks to the Global (see “Write Glo-bal - Global Setup dialog box” on page 257).
How Styles, Performances and STSs arelinked together
Styles, Performances and STSs are linked in many ways.
• When the SINGLE TOUCH LED is on, selecting a Style alsochanges Keyboard tracks (STS 1 is automatically selected). Per-formance settings are overridden.
• When the STYLE CHANGE LED is on, selecting a Performancealso selects a Style (the one whose number is memorized withthe Performance).
• Current track settings can be saved either in a Performance, anSTS, or a Style Performance, depending on the page menu com-mand you select.
Main page (Normal view)
This is the page you see after you turn the instrument on.
To access this page from another operating mode, press theSTYLE PLAY button.
To return to this page from one of the Style Play edit pages, pressthe EXIT button.
To switch between Normal view (Keyboard tracks, groupedStyle tracks and Mic/In controls) and Style view (individualStyle tracks), use the TRK. SEL. (TRACK SELECT) button.(See “Style Tracks view page” and “Volume panel” startingfrom page 80).
Page header
This line shows the current operating mode, transposition andrecognized chord.
Operating mode name
Name of the current operating mode.
Master transpose
Master transpose value in semitones. This value can be changedusing the TRANSPOSE buttons on the control panel.
Note: Transpose may be automatically changed when selecting adifferent Performance or Style. It may also be changed when load-ing a Standard MIDI File generated with an instrument of the KorgPa series.
To avoid transposing, “lock” the Master Transpose parameter in theGlobal (see “General Controls: Lock” on page 232), then write theGlobal to memory (see “Write Global - Global Setup dialog box”on page 257).
Style Play operating mode
Style area Page header Page menu icon
Perfor-mance/
STSarea
Sequencer 1/2
area
Key-board tracks area
Panels
Operating modename
Master Transpose (in semitones)
Recognized chord
Sty

79Style Play operating modeMain page (Normal view)
Ref
eren
ce
Recognized chord
Displays the recognized chord, when you play a chord on thekeyboard. If no chord abbreviation is shown, no chord recogni-tion mode has been selected by using the CHORD SCANNINGbuttons (see page 11).
Page menu icon
Press the page menu icon to open the menu. See “Page menu” onpage 97 for more information.
Style area
This is where the Style name is shown, together with its tempoand meter parameters.
Style name
Currently selected Style. Press the Style name to open the StyleSelect window. As an alternative, use the STYLE SELECT sectionon the control panel.
Style bank
Bank the current Style belongs to.
Style Element meter
Meter of the current Style Element.
Current measure
Measure number of the current Style Element, that is currentlyplaying.
Current beat
Beat number of the current measure, that is currently playing.
Current tempo
Metronome tempo (from 30 to 250). Select this parameter anduse the TEMPO/VALUE controls to change the tempo.
As an alternative, you don’t need to select this parameter; justkeep the SHIFT button pressed and use the DIAL to change thetempo.
To recall the Tempo stored in the current Style, press theDOWN/- and UP/+ buttons at the same time.
Note: Tempo may change while a Style Element is playing. EachStyle Element may contain Tempo Change data.
Performance/STS area
This is where the latest selected Performance or STS name isshown.
Selected Performance or STS
This is the last selected Performance (PERF) or Single Touch Set-ting (STS).
Press the name to open the Performance Select window. As analternative, use the PERFORMANCE/SOUND SELECT sectionto select a different Performance.
To select a different STS, use the four SINGLE TOUCH SET-TING buttons under the display.
Sequencer 1/2 area
This is where Songs assigned to the two onboard sequencers areshown.
Song name
Name of Songs assigned to Sequencer 1 (S1) and Sequencer 2(S2). You can select Songs while playing Styles, to have themready when switching to Song Play mode.
The icon shows the type of the selected Song.
Standard MIDI File, often abbreviated as SMF(file extension: *.MID or *.KAR).
MP3 – available with the EXBP-MP3 optioninstalled (file extension: *.MP3).
Audio CD Track – available with the CDRW-1option installed.
Only assignable to Sequencer 1. A Jukebox file (fileextension: *.JBX) can be assigned to Sequencer 1,but its name is not shown in this area. The JBXicon appears, together with the name of the cur-rently selected Song in the Jukebox list.
Style name
Style Element meter
Style bank
Current Style Element measure
Current tempo
Current beat
Sty
Selected Performance or STS
Song name

80 Style Play operating modeStyle Tracks view page
Keyboard tracks area
This is where Keyboard tracks are shown.
Sound name
Name of the Sound assigned to the corresponding Keyboardtrack.
• If the track is already selected (white background), press theSound name to open the Sound Select window.
• If the track is not selected (dark background), first select it,then press the Sound name to open the Sound Select window.
Sound bank
Bank the current Sound belongs to.
Program Change
Program Change number. Shown only when the “Show ProgramChange number” parameter is turned on in Global mode. (Seepage 234).
Keyboard track name
Non editable. Name of the corresponding track:
UP1 Upper 1
UP2 Upper 2
UP3 Upper 3
LOW Lower
Keyboard track octave transpose
Non editable. Octave transpose of the corresponding track. Toindividually edit the octave transpose for each track, go to the“Mixer/Tuning: Tuning” edit page (see page 86).
You can also transpose all Upper tracks by using the UPPEROCTAVE buttons on the control panel.
Keyboard track status
Play/mute status of the current track. Select the track, then pressthis area to change the track status.
Play status. The track can be heard.
Mute status. The track cannot be heard.
/ When the icon of the Lower track is framed inyellow, the Bass & Lower Backing function isactive (see page 96).
Panels
The lower half of the main page contains the various panels, youcan select by pressing the corresponding tabs. See more informa-tion in the relevant sections, starting from page 81.
Style Tracks view page
Press the TRK. SEL. button to switch from the Normal view tothe Style Tracks view. In this view, individual Style tracks areshown in the lower half of the display, while the upper half of themain page changes, to show parameters for the Style tracks.
Press TRK. SEL. again to return to the Normal view (Keyboardtracks, grouped Style tracks, Mic/In controls).
Original Style Sounds
This parameter lets you select different Sounds for the Styletracks, other than those recorded in each Style Element pattern.Sounds assigned when this parameter is checked are shown inthe Sounds area of this page.
Note: This parameter can be saved with the Performance or StylePerformance, and is automatically set to On or Off when you selecta different Performance or Style, depending on its saved status.
On Style tracks always use the original Soundsrecorded in each Style Element. If you assign adifferent Sound to a Style track, this parameter isautomatically set to Off.
Off You can assign different Sounds to each Styletrack, and save them in a Performance or StylePerformance. This becomes the only track’sSound for all Style Elements.
Soundname
Track nameSoundbank
Track’s octave transpose
Track status
Volume panel
Tabs
Selected trackinfo area
Sounds area
Sty

81Style Play operating modeVolume panel
Ref
eren
ce
Selected Track Info area
This line lets you see the Sound assigned to the selected track.Not only it is shown on the main page, but also in several editpages.
Track name
Name of the selected track.
Sound name
Sound assigned to the selected track. Press anywhere in this areato open the Sound Select window, and select a different Sound.
Sound bank
Bank the selected Sound belongs to.
Program Change
Program Change number. Shown only when the “Show ProgramChange number” parameter is turned on. (See page 234).
Sounds area
This area lets you see Sounds and octave transposition for theeight Style tracks.
Style tracks octave transpose
Non editable. Octave transpose of the corresponding track. Toedit the octave transpose, go to the “Mixer/Tuning: Tuning” editpage (see page 86).
Sound name
Name of the Sound assigned to the track. Touch a name a firsttime to select the corresponding track (detailed information areshown on the Selected Track Info area, see above). Touch it a sec-ond time to open the Sound Select window.
Volume panel
Press the Volume tab to select this panel. This is where you canset the volume of each track, and mute/unmute tracks.
Use the TRK. SEL. (TRACK SELECT) button to switch fromNormal view (Keyboard and grouped Style tracks, Mic/In con-trols) to Style Tracks view (Style tracks).
If the VOLUME LED over the SLIDER MODE button is turnedon, the Assignable Sliders LEDs show which view is currentlyselected.
The Normal view shows grouped Style tracks, Mic/In controls,Keyboard tracks (upper sliders LED turned on):
The Style Tracks view shows individual Style tracks (lower slid-ers LED turned on):
Virtual sliders (track volume)
Virtual sliders are a graphical display of each track’s volume. Usethe Assignable Sliders to change this value (provided the VOL-UME LED is turned on above the SLIDER MODE button, seebelow).
As an alternative, press the track’s area to select a track, and useTEMPO/VALUE controls to change the value.
Assignable Sliders function
Use the SLIDER MODE button to select the function assigned tothe Assignable Sliders. When the VOLUME LED is turned on,each Assignable Slider controls the volume of the correspondingtrack.
Track name
Sound name
Sound bank
Program Change
Sty
Sty
Sty
Octave icon Sound name
Sty
Track status icon Virtual slider
Sty

82 Style Play operating modeSTS Name panel
The assigned function may be saved to a Performance or STS.Therefore, when selecting a Performance or STS, the assignedfunction may change.
Track status icons
Play/mute status of the current track. Select the track, then pressthe track area again to change its status.
Play status. The track can be heard.
Mute status. The track cannot be heard.
Track names
Under the sliders, a label for each track is shown. Use the TRK.SEL button to switch between the various track views.
MIC/IN Audio inputs. [*]
UPPER1…3 Upper tracks.
LOWER Lower track.
ACCOMP Grouped Accompaniment tracks. [*]
DR/PERC Grouped Drum and Percussion tracks. [*]
BASS Bass Style track.
DRUM Drum Style track.
PERC Percussion Style track.
ACC1…5 Accompaniment Style tracks.
[*] Volume for these tracks is not memorized.
STS Name panel
Press the STS Name tab to select this panel. While in this panel,you can see the name of the four Single Touch Settings (STS)belonging to the latest selected Style or SongBook entry. Touchone of the names to select the corresponding STS.
Note: You cannot edit STS names with this panel. To edit a name,select the STS to be renamed, then select the Write Single TouchSetting command from the page menu (see “Write Single TouchSetting dialog box” on page 98).
Mic panel
Press the Mic tab to select this panel. This is where you can turnon/off the various Voice Processor sections.
Harm/Mod (Harmony/Modeling)
Turns the Harmony or Modeling module on/off. (The Modelingmodule is optional).
Lead
Turns the Lead (singer’s) voice on/off. This switch only workswhen the Harmony module is turned on. if it is turned off, theLead voice will be always heard, whichever the status of thisswitch.
V1…V4
Turns each of the four Harmony voices on/off.
Pitch
Turns the Pitch Correct module on/off. (The Pitch Correctionmodule is optional).
Thicken
Turns the Thicken module on/off.
Effects
Turns the Effects module on/off.
Talk
Check this switch to soften all music generated by the Pa1X, andspeak on the microphone at normal level. This is useful to speakwith your audience, while automatically lowering the back-ground music volume.
While this switch is checked, all Voice Processor modules aremomentarily turned off, except for Thicken and Reverb, whoselevel is simply reduced to avoid losing clarity on the voice. Set-ting for the Talk function can be programmed on the Talk page(see “Voice Processor Setup: Talk” on page 244).
Uncheck this switch to return to the original settings.
Mic Mute
Check this switch to completely mute the microphone input.This is the same as the MIC/IN Play/Mute icon in the Main page(see “Track status icons” on page 82).
VP Preset
Use this pop-up menu to select one of the available Voice proces-sor Presets. Selecting a Preset may change all the above parame-ters, as well as other Voice Processor parameters. Presets can befreely edited (see “Voice Processor Preset: Preset” on page 245).
Sty
VPp
VPp
VPp
VPp
VPp
VPp
Tlk

83Style Play operating modeSub-Scale panel
Ref
eren
ce
VP lock icon
This lock avoids changing the Voice Processor Preset whenselecting a different Performance, STS or SongBook entry. Thisis useful if you want to use the same Preset while selecting differ-ent Performances, STSs or SongBook entries.
This lock is reset when turning the instrument off, unless youwrite Global settings to memory (see “Write Global - GlobalSetup dialog box” on page 257).
For more information on parameter locks, see “General Con-trols: Lock” on page 232.
Sub-Scale panel
Press the Sub-Scale tab to select this panel. This panel replicatesthe “Mixer/Tuning: Sub Scale” edit page (see page 86).
Pad panel
Press the Pad tab to select this panel. This is where you canassign a different Hit or Sequence Pad to each of the four pads,and see at a glance how pads are programmed. For moreoptions, go to the “Pad/Switch: Pad” page (see page 94).
Pad assignment
Name of the Hit or Sequence assigned to each Pad. Press the boxto make the Pad Select window appear (see “Pad Select window”on page 75).
Older sounds
To warrant compatibility with data generated prior to OS ver-sion 2.0, the name of the older sounds assigned to the Pads isshown under each Pad assignment box. As soon as you select anew Hit or Sequence, the name of the older sound disappears.
Volume … D Send
Volume, Pan, Send to the FX C and D values for each of the fourPads.
Pads lock icon
When locked, assignements to the pads remain unchanged whenselecting a different Performance or STS.
This lock is reset when turning the instrument off, unless youwrite Global settings to memory (see “Write Global - GlobalSetup dialog box” on page 257).
For more information on parameter locks, see “General Con-trols: Lock” on page 232.
Split panel
Press the Split tab to select this panel. This is where you can setthe split point and Chord Recognition mode.
Split Point
Use this parameter to select a different split point. A full-rangepiano keyboard is shown in the display, divided at the selectedsplit point. Upper tracks play on the right of this point, while theLower track plays on the left.
Keyboard diagram
Touch anywhere on the keyboard diagram. A message willappear, asking you to press the new split point on the keyboardof your Pa1X (or to press the EXIT button to close the messagewith no changes).
Chord Recognition Mode
This parameter allows you do decide how chords are recognizedby the auto-accompaniment engine. Please note that when inFull or Upper Chord Scanning mode, the Fingered 3 mode isalways selected, and you must always play at least three notes, tolet a chord be recognized.
For more information on the various options, see “Chord Rec-ognition Mode” on page 95.
Note: This parameter is the same you can find in the “Preferences:Style Preferences” page (see page 95).
Split Point and Chord Recognition lock icons
When locked, Split Point and Chord Recognition mode remainunchanged when selecting a different Performance or STS.
These locks are reset when turning the instrument off, unlessyou write Global settings to memory (see “Write Global - GlobalSetup dialog box” on page 257).
For more information on parameter locks, see “General Con-trols: Lock” on page 232.
Gbl
Oldersounds
Padassignment
SB
SB
SB
Gbl
Gbl

84 Style Play operating modeEdit menu
Edit menu
From any page, press the MENU button to open the Style Playedit menu. This menu gives access to the various Style Play editsections.
When in the menu, select an edit section, or press EXIT orSTYLE PLAY to exit the menu and return to the main page. Toreturn to the main page, you can also select the Main Page menuitem.
When in an edit page, press EXIT or the STYLE PLAY button toreturn to the main page of the Style Play operating mode.
Each item in this menu corresponds to an edit section. Each editsection groups various edit pages, that may be selected by press-ing the corresponding tab on the lower part of the display.
Edit page structure
All edit pages share some basic elements.
Operating mode
This indicates that the instrument is in Style Play mode.
Edit section
This identifies the current edit section, corresponding to one ofthe items of the edit menu (see “Edit menu” on page 84).
Page menu icon
Press this icon to open the page menu (see “Page menu” onpage 97).
Parameters area
Each page contains various parameters. Use the tabs to selectone of the available pages. For detailed information on the vari-ous types of parameters, see sections starting from page 84.
Tabs
Use tabs to select one of the edit pages of the current edit section.
Mixer/Tuning: Volume/Pan
This page lets you set the volume and pan for each of the Key-board or Style tracks. Volume settings are the same as in the Vol-ume panel of the main page.
Use the TRK. SEL. button to switch from the Keyboard to theStyle tracks, and vice versa.
Upper Volume Link
This parameter allows you to define if changing the volume forone of the Upper tracks, proportionally changes also the otherUpper tracks.
Note: This parameter is the same you can find in the “Preferences:Global Setup” page (see page 96).
On When changing volume to one of the Uppertracks, volume for the other Upper trackschanges in proportion.
Off When changing volume to one of the Uppertracks, only that track’s volume is changed. OtherUpper tracks are left unchanged.
Pan
Track position in the stereo field.
L-64…L-1 Left stereo channel.
Operating mode Edit section
Selected track info
Page menu icon
Parameters area
Tabs
Grouped Style tracks Keyboard tracks
IndividualStyle tracks
Sty
Sty
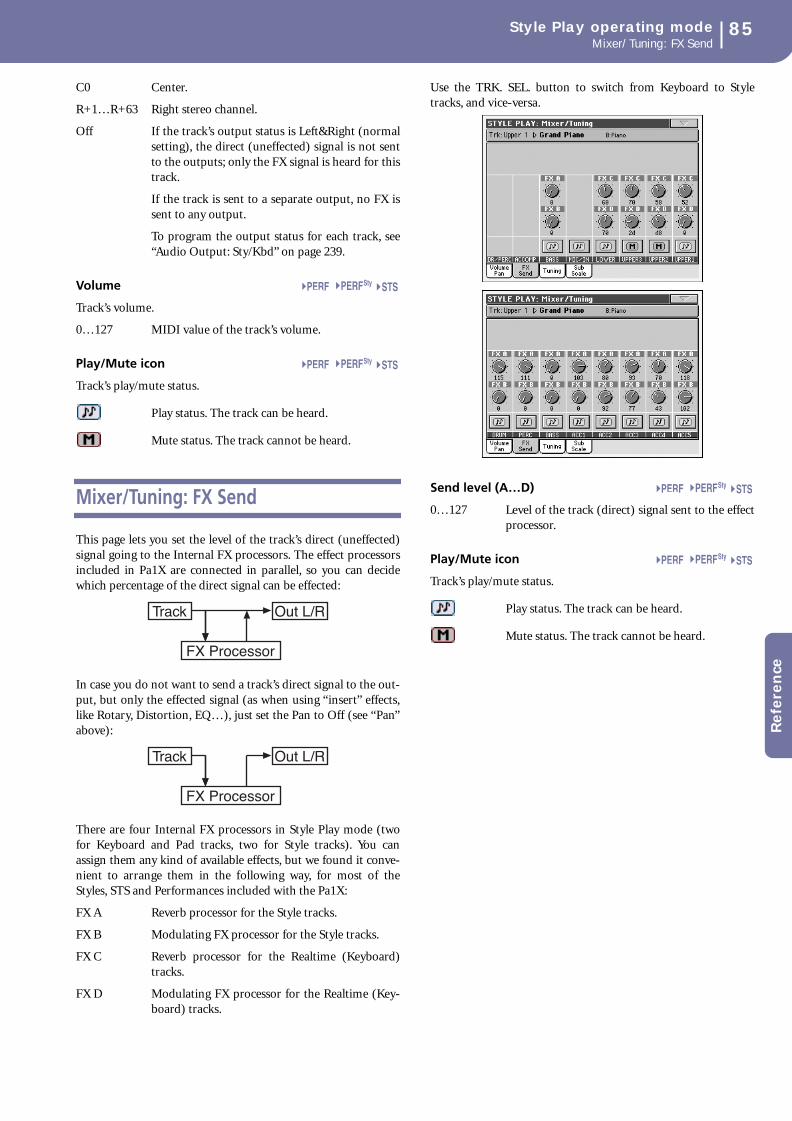
85Style Play operating modeMixer/Tuning: FX Send
Ref
eren
ce
C0 Center.
R+1…R+63 Right stereo channel.
Off If the track’s output status is Left&Right (normalsetting), the direct (uneffected) signal is not sentto the outputs; only the FX signal is heard for thistrack.
If the track is sent to a separate output, no FX issent to any output.
To program the output status for each track, see“Audio Output: Sty/Kbd” on page 239.
Volume
Track’s volume.
0…127 MIDI value of the track’s volume.
Play/Mute icon
Track’s play/mute status.
Play status. The track can be heard.
Mute status. The track cannot be heard.
Mixer/Tuning: FX Send
This page lets you set the level of the track’s direct (uneffected)signal going to the Internal FX processors. The effect processorsincluded in Pa1X are connected in parallel, so you can decidewhich percentage of the direct signal can be effected:
In case you do not want to send a track’s direct signal to the out-put, but only the effected signal (as when using “insert” effects,like Rotary, Distortion, EQ…), just set the Pan to Off (see “Pan”above):
There are four Internal FX processors in Style Play mode (twofor Keyboard and Pad tracks, two for Style tracks). You canassign them any kind of available effects, but we found it conve-nient to arrange them in the following way, for most of theStyles, STS and Performances included with the Pa1X:
FX A Reverb processor for the Style tracks.
FX B Modulating FX processor for the Style tracks.
FX C Reverb processor for the Realtime (Keyboard)tracks.
FX D Modulating FX processor for the Realtime (Key-board) tracks.
Use the TRK. SEL. button to switch from Keyboard to Styletracks, and vice-versa.
Send level (A…D)
0…127 Level of the track (direct) signal sent to the effectprocessor.
Play/Mute icon
Track’s play/mute status.
Play status. The track can be heard.
Mute status. The track cannot be heard.
Sty
Sty
Track Out L/R
FX Processor
Track Out L/R
FX Processor
Sty
Sty

86 Style Play operating modeMixer/Tuning: Tuning
Mixer/Tuning: Tuning
This page is where you can set the octave transpose and fine tun-ing for each track. Plus, you can program the Pitch Bend rangefor each track.
Use the TRK. SEL. button to switch from the Keyboard to theStyle tracks, and vice-versa.
PB Sensitivity
These parameters show the Pitch Bend range for each track, insemitones.
1…12 Maximum up/down pitch bend range (in semi-tones). 12 = ±1 octave.
0 No pitch bend allowed.
Octave Transpose
This is the octave transpose value.
-3 Lowest octave.
0 Standard tuning.
+3 Highest octave.
Detune
This is the fine tuning value.
-64 Lowest pitch.
00 Standard tuning.
+63 Highest pitch.
Play/Mute icon
Track’s play/mute status.
Play status. The track can be heard.
Mute status. The track cannot be heard.
Mixer/Tuning: Sub Scale
This page lets you program an alternative scale for the tracksselected with the “Scale Mode” parameter (see page 95). Theremaining tracks (if any) use the basic scale set in Globalmode (see “Main Scale” on page 231).
Note: A different Scale can be associated to each Performance orSTS.
Note: Quarter Tone selection can be received by MIDI (i.e., by anexternal sequencer or controller). Conversely, selection of QuarterTone settings can be sent by the Pa1X to an external MIDI recorderas System Exclusive data.
Scale
Selected scale. See “Scales” on page 382 for a list of the availablescales. When selecting the User scale, the keyboard diagram onthe right becomes active (see “How to fine tune each note of theUser scale” below).
Key This parameter is needed by some scales to set the preferredkey (see “Scales” on page 382).
Quarter Tone
Check the Quarter Tone parameter to make the keyboard dia-gram active. in the display, touch any note you want to lower aquarter tone, making a big dot appear on the note diagram.Touch the note again to make the dot disappear.
This control is momentary and not saved to memory, to allowfor fast scale alteration while playing. You can assign the QuarterTone function also to a footswitch, an EC5 switch or an Assign-able Switch.
See below “How to use the Quarter Tone function with a foot-switch, EC5 switch or Assignable Switch” for information on theuse of this function.
Keyboard diagram
When Quarter Tone is checked, or a User scale is selected, thisdiagram allows you to modify each note’s pitch.
Sty
Sty
Sty
Sty

87Style Play operating modeEffects: FX Select
Ref
eren
ce
Scale lock icon
When locked, Scale parameters remain unchanged when select-ing a different Performance or STS.
This lock is reset when turning the instrument off, unless youwrite Global settings to memory (see “Write Global - GlobalSetup dialog box” on page 257).
For more information on parameter locks, see “General Con-trols: Lock” on page 232.
How to fine tune each note of the Userscale
When the User scale is selected, the keyboard diagram becomesactive. You can then change each note tuning in cents of a semi-tone (within a range of ±99 cents, referred to Equal tuning). Thisway, you can create a custom scale, you can save to a Perfor-mance or STS.
After selecting the User scale, touch a note in the keyboard dia-gram, and use TEMPO/VALUE controls to adjust the selectednote tuning in cents.
How to use the Quarter Tone function witha footswitch, EC5 switch or AssignableSwitch
The Quarter Tone function allows you to program a customscale in realtime, for example those sudden scale change typicalof Arabic music. Changes are not saved anywhere, so the scale iseasily “wiped-out” when selecting a different Performance orSTS, or when pressing the Quarter Tone pedal again.
Note: You can create a custom scale, to be assigned to a Perfor-mance or STS, simply by selecting and editing a User scale, andsaving any change to a Performance or STS. See “Scale” above.
You can assign the “Quarter Tone” function to a footswitch, aKorg EC5 switch, or an Assignable Switch.
1. Program a footswitch, one of the EC5 pedals, or an Assign-able Switch, to be the Quarter Tone switch.
Simply go to the Global mode, and reach the “Controllers:Pedal/Switch” or “Controllers: EC5” page. There, you willfind the “Pedal/Footswitch” and “EC5-A…E” parameters,to which you can assign the Quarter Tone function.
While still in Global mode, select the Write Global-GlobalSetup command from the page menu, to save these settingsto the Global (see “Write Global - Global Setup dialog box”on page 257).
2. Lower some note pitches.
Keep the Quarter Tone pedal pressed. The keyboard willnot play at this time. Press the notes you want to lower aquarter tone. Release the pedal.
3. Play with your new scale.
Notes you pressed on step 2 are now lowered of a quartertone.
4. Reset the original scale.
Press and release the Quarter Tone pedal again, withoutplaying any note. All pitches will be reset, and the scaleselected by the Performance, STS will be recalled.
Effects: FX Select
This page allows you to select the A/B (Style) and C/D (Key-board and Pads) effects.
FX A…D
Effects assigned to the corresponding effect processors. Usually,A and C are reverbs, while B and D are modulating effects (cho-rus, flanger, delay…). For a list of the available effects, see“Effects” on page 329.
Effects from A to D can be saved to a Performance. Effect A/B(Style tracks) can be saved to a Style Performance. Effects C/D(Keyboard and Pad tracks) can be saved to an STS.
Wet/Dry
Mix between the effected (Wet) and direct (uneffected, Dry) sig-nal.
Dry Direct signal only.
Wet Effected signal only.
nn:nn Percentage of Wet/Dry signal.
B to A, D to C
Amount of the B effect going back to the input of the A effect, orof the D effect going back to the input of the C effect.
Mod.Track (Modulating Track)
Source track for modulating MIDI messages. You can modulatean effect parameter with a MIDI message generated by a physicalcontroller.
Gbl
Fine tuning values
Sty
Sty
Sty
Sty

88 Style Play operating modeEffects: FX A…D
Effects: FX A…D
These pages contain the editing parameters for the four effectprocessors. Here is an example of the FX A page, with the ReverbSmooth Hall effect assigned.
Selected effect
Select one of the available effects from this pop-up menu. This isequivalent to the “FX A…D” parameters found in the “Effects:FX Select” page (see above).
Note: Effects can be different for each of the four editing pages.
FX parameters
Parameters may be different, depending on the selected effect.See “Effects” on page 329 for a list of available parameters foreach effect type.
Wet/Dry
Mix between the effected (Wet) and direct (uneffected, Dry) sig-nal. This is the same as the “Wet/Dry” parameters found in the“Effects: FX Select” page (see above).
Src (Source)
Modulation source. To select the track generating this message,see the “Mod.Track (Modulating Track)” parameters found inthe “Effects: FX Select” page (see above). For a list of modulationsource, see the “Effects” chapter.
Track Controls: Mode
This page lets you connect each track to the internal sound gen-erator and to external MIDI devices. This is very useful to let aStyle track drive an external expander, or play a digital pianowith one of Pa1X’s Keyboard tracks. In addition, here you can setthe polyphony mode for each track.
Int./Ext. (Internal/External)
Internal The track plays the sounds generated by theinternal sound engine. It does not play an exter-nal instrument connected to the MIDI OUT.
External The track plays an external instrument connectedto the MIDI OUT. The connected device mustreceive on the MIDI channel associated with thistrack on the Pa1X (see “MIDI: MIDI Out Chan-nels” on page 238).
A track set to this status does not play the internalsounds, therefore saving polyphony.
Instead of the assigned Sound name, the <exter-nal> remark is shown on a track’s area in theMain page:
If the “Show Program Change name” is checked(see page 234), a strings of transmitted ControlChange and Program Change data is shown nextto the <external> remark. This will let you knowwhat the track is transmitting to the MIDI OUT.In the following example, CC#0 is the ControlChange 0 (Bank Select MSB), CC#32 is the Con-
Selected effect
FX param-eters
Sty SB
Sty SB
Sty SB
Sty SB
Sty
Control Change/Program Change area

89Style Play operating modeTrack Controls: Drum Volume
Ref
eren
ce
trol Change 32 (Bank Select LSB), PC is the Pro-gram Change:
When touching the Sound area, the numeric key-pad appears, instead of the Sound Select window.You can enter the Control Change/ProgramChange bundle shown above, separating the threeparts with a dot (.). If entering just one of thethree numbers, a Program Change message issent.
Both The track plays both the internal sounds and anexternal instrument connected to the MIDI OUT.
Type
Drum Drum/Percussion track. Set a track to Drummode if you wish to separately adjust the volumeand set a different output for each percussivefamily of the assigned Drum Kit Sound. (See“Track Controls: Drum Volume” on page 89, and“Audio Output: Sty/Kbd” on page 239).
Note: Tracks set to Drum or Percussion mode, whilein Style Record (see “Track Type” on page 120),cannot be edited here. This option appears in grey.Other Style tracks cannot be set to Drum modehere.
Poly Tracks of this kind are polyphonic, i.e. they canplay more than one note at the same time.
Mono Tracks of this kind are monophonic, i.e. each newnote stops the previous note.
Mono Right A Mono track, but with priority assigned to therightmost (highest) note.
Play/Mute icon
Track’s play/mute status.
Play status. The track can be heard.
Mute status. The track cannot be heard.
Track Controls: Drum Volume
In this page you can adjust the volume for each family of Drumand Percussion instrument for the selected track. A list of fami-lies is shown below.
These parameters can be accessed only on tracks set in Drummode (see above). Use them on tracks with a Drum Kit assigned,or you will not be able to hear any change.
Note: All values are referred to the value of the original Sounds.
Drum families
Kick Kick drums volume.
Snare Snare drums volume.
Tom Toms volume.
HiHat Hi-Hat volume.
Cymbal Ride, Crash and other cymbals volume.
Perc.1 Low-pitched percussions volume.
Perc.2 High-pitched percussions volume.
EFX Special effects volume.
Select
Use these buttons to select the track to edit. The button corre-sponding to the selected track turns green.
Reset Track
Press this button to reset all changes to percussive instrumentvolumes in the selected track.
Reset All Tracks
Press this button to reset all changes to percussive instrumentvolumes in all tracks.
CC#0 CC#32 PC
Sty
Sty
Sty

90 Style Play operating modeTrack Controls: Easy Edit
Play/Mute icon
Track’s play/mute status.
Play status. The track can be heard.
Mute status. The track cannot be heard.
How to adjust volume for a single DrumFamily
Here is a quick example of the use of the Drum Volume func-tion.
1. While in this page, press TRK. SEL. to see individual Styletracks.
2. Press the Select button, in the display, above the Drumtrack.
3. Press START/STOP to let the Style go.
4. While listening to the Style, select the Cymb. knob, and useTEMPO/VALUE controls to turn the volume completelyoff.
You’ll notice how all cymbals stops sounding.
5. Press the Reset Track button in the display to recall theoriginal cymbals volume.
Track Controls: Easy Edit
In this page you can edit the main parameters of the Soundsassigned to each track.
Note: All values refer to the value of the original Sound.
Parameters
Attack Attack time. This is the time during which thesound goes from zero (at the moment when youstrike a key) to it’s maximum level.
Decay Decay time. Time to go from the final Attack levelto the beginning of the Sustain.
Release Release time. This is the time during which thesound goes from the sustaining phase, to zero.The Release is triggered by releasing a key.
Cutoff Filter cutoff. This sets the sound brightness.
Resonance Use the Filter Resonance to boost the cutoff fre-quency.
LFO Depth Intensity of the Vibrato (LFO).
LFO Speed Speed of the Vibrato (LFO).
LFO Delay Delay time before the Vibrato (LFO) begins, afterthe sound starts.
Select
Use these buttons to select the track to edit. The button corre-sponding to the selected track turns green.
Reset Track
Press this button to reset all changes to Sound parameters in theselected track.
Reset All Tracks
Press this button to reset all changes to Sound parameters in alltracks.
Play/Mute icon
Track’s play/mute status.
Play status. The track can be heard.
Mute status. The track cannot be heard.
How to adjust sound parameters for a sin-gle Sound
Here is a quick example of the use of the Easy Sound Edit func-tion.
1. If needed, while in this page press TRK. SEL. to see Key-board tracks.
2. Press the Select button, in the display, above the Upper 1track.
3. While playing on the keyboard to hear the Sound, select theCutoff knob, and use TEMPO/VALUE controls to turn itsvalue completely off.
You’ll notice how the filter progressively cuts out high fre-quencies, making the sound darker and mellower.
4. Press the Reset Track button in the display to recall theoriginal Cutoff value.
Sty
Sty
Sty

91Style Play operating modeKeyboard/Ensemble: Keyboard Control
Ref
eren
ce
Keyboard/Ensemble: Keyboard Control
This page lets you enable/disable the Damper and Expressionpedals, plus the Joystick, for each of the Keyboard tracks.
Damper
On When you press the Damper pedal and releasethe keys, the track’s sound is kept sustained.
Off The Damper pedal is not active on any track setto this status.
Joystick X
This enables/disables the left/right movement of the Joystick(Pitch Bend, and sometimes a Sound parameter’s control; forPitch Bend settings, see “Mixer/Tuning: Tuning” on page 86).
Joystick Y
This enables/disables the front/rear movement of the Joystick(Y+: Modulation, and sometimes a different Sound parameter’scontrol; Y-: Various controls, or non-active).
Expression
This parameters allows you to switch the Expression control on/off on each individual Keyboard track. The Expression control isa relative level control, always subtracted from the Volume valueof the track.
As an example, imagine you have a Piano sound assigned toUpper 1, and a Strings sound assigned to Upper 2. If you turnthe Expression switch on on Upper 2, and off on Upper 1, youcan use a continuous pedal to control only the Strings’ volume,while the Piano remains unchanged.
To program a pedal or Assignable Slider to act as an Expressioncontrol, see “Controllers: Pedal/Switch” on page 235 or “Con-trollers: Assignable Sliders” on page 235. You can only assign thisfunction to a volume-type pedal, not to a switch-type one.Assign the “KB Expression” option to the pedal or AssignableSlider, then select Write Global-Global Setup from the pagemenu to save the setting to the Global.
Play/Mute icon
Track’s play/mute status.
Play status. The track can be heard.
Mute status. The track cannot be heard.
Keyboard/Ensemble: Key/Velocity Range
This page lets you program a key and dynamic (velocity) rangefor each of the Keyboard tracks.
Key range is useful to create a set of Keyboard tracks playing indifferent zones of the keyboard. For example, you may havefrench horns and woodwinds playing in the center range of thekeyboard, while only woodwinds play on the higher range.
Velocity range is useful to create a sound made of up to threedynamic layers, assigning each of the Upper tracks to a differentdynamic range.
As an example, you may assign the El.Piano 1 Program to theUpper 1, and the El.Piano 2 Program to the Upper 2 track. Then,set Upper 1 to [Bottom=0, Top=80], and Upper 2 to [Bot-tom=81, Top=127]. The El.Piano 1 will play when playing softer,the El.Piano 2 when playing louder.
Top/Bottom Key (Key Range)
This parameter pair sets the Top and Bottom key range for thetrack.
C-1…G9 Selected key.
Top/Bottom Vel. (Velocity Range)
This parameter pair sets the Top and Bottom dynamic range forthe track.
0 Lowest velocity value.
127 Highest velocity value.
Play/Mute icon
Track’s play/mute status.
Play status. The track can be heard.
Mute status. The track cannot be heard.

92 Style Play operating modeKeyboard/Ensemble: Ensemble
Keyboard/Ensemble: Ensemble
This page lets you program the Ensemble function. This func-tion harmonizes the right-hand melody (played in realtime)using the recognized chords of the left-hand.
Note: The Ensemble function only works in Style Play mode, withthe Split Keyboard Mode.
Ensemble
Harmonization type.
Duet Adds a single note to the melody.
Close Adds a closed-position chord to the melody.
Open 1 Adds an open-position chord to the melody.
Open 2 As the above, but with a different algorithm.
Block Block harmonization – very typical of jazz music.
Power Ensemble
Adds a fifth and an octave to the melody, as heardin hard rock.
Fourths LO Typical of jazz, this option adds a perfect fourthand a minor seventh under the melody.
Fourths UP As the above, but with notes added over the mel-ody.
Fifths This adds a series of Fifths below the originalnote.
Octave Adds one or more octaves to the melody.
Dual This option adds to the melody line a secondnote, at a fixed interval set with the “Note”parameter. When selecting this option, a transpo-sition value appears (-24…+24 semitones to theoriginal note).
Brass Typical Brass section harmonization.
Reed Typical Reed section harmonization.
Trill When two notes are played on the keyboard, thisoption trills them. If three or more notes areplayed, only the last two are trilled. You can setthe trill speed by using the Tempo parameter (seebelow).
Repeat The played note is repeated in sync with theTempo parameter (see below). When playing achord, only the last note is repeated.
Echo As the Repeat option, but with the repeated notesfading away after the time set with the Feedbackparameter (see below).
Note Velocity
This parameter sets the velocity difference between the right-hand melody and the added harmonization notes.
-10…0 Subtracted velocity value.
Tempo
Note: This parameter only appears when the Trill, Repeat or Echooptions are selected.
Note value for the Trill, Repeat or Echo Ensemble options. Thisis in sync with the Metronome Tempo.
Feedback
Note: This parameter only appears when the Echo option isselected.
This parameter sets how many times the original note/chord isrepeated by the Echo option.
Ensemble Track Assign
Use these parameters to separately set Upper tracks for theEnsemble function.
Off There is no harmonization on this track.
Normal This track is included in the harmonization.
Mute This track only plays the Ensemble notes, but notthe original note.
Play/Mute icon
Track’s play/mute status.
Play status. The track can be heard.
Mute status. The track cannot be heard.

93Style Play operating modeStyle Controls: Drum/Fill
Ref
eren
ce
Style Controls: Drum/Fill
In this page you can select various general parameters for theStyle.
Drum Mapping (Var.1…Var.4)
The Drum Mapping lets you select an alternative arrangement ofpercussive instruments for the selected Drum Kit, without anyadditional programming. Just select a Drum Map, and somepercussive instruments will be replaced with different instru-ments.
Off Standard mapping.
Drum Mapping 1…7
Drum Map number. Mapping 1 is “soft-sound-ing”, while mapping 7 is “loud-sounding”.
Kick and Snare Designation
The Kick Designation replaces the original Kick (Bass Drum)sound with a different Kick of the same Drum Kit, while theSnare Designation replaces the original Snare Drum sound witha different Snare of the same Drum Kit.
Hint: Select different Designations while listening to the Style, andsee how they affect the Style. When you like the result, save yoursetting to a Performance or Style Performance.
Off Original Kick or Snare.
Type 1…3 Kick or Snare replacing the original one.
Fill Mode (1…3)
These parameters set a Variation to be automatically selected atthe end of each of the three available Fills (1…3).
Off The same Variation, playing before selecting aFill, will be selected again.
V1&V2 … V3&V4The specified Variations will be alternativelyselected. For example, with the “V1&V2” option,Variation 1 and Variation 2 will be alternativelyselected after the end of the Fill.
Var.Up/Var.DownThe next higher/lower numbered Variation isselected, in cycle. After Variation 4, an Up com-mand will select Variation 1. After Variation 1, aDown command will select Variation 4.
Var.Inc/Var.DecThe next higher/lower numbered Variation is
selected. When Variation 4 is reached, an Inccommand will select Variation 4 again. WhenVariation 1 is reached, a Dec command will selectVariation 1 again.
To Var.1…To Var.4“Fill to Variation” (->1, ->2, ->3, ->4) automati-cally selects one of the four available Style Varia-tions at the end of the fill.
Fill Mode lock icon
This lock prevents the Fill Mode being changed when selecting adifferent Performance or Style.
This lock is reset when turning the instrument off, unless youwrite Global settings to memory (see “Write Global - GlobalSetup dialog box” on page 257).
For more information on parameter locks, see “General Con-trols: Lock” on page 232.
Track status
Track play/mute status. Press these icons to change it.
Play status. The track can be heard.
Mute status. The track cannot be heard.
Style Controls: Keyboard Range On/Off /Wrap Around
In this page you can program the Wrap Around point, and turnon/off the Keyboard Range included in each Style tracks.
Keyboard Range On/Off
This parameter is an on/off switch for the Key Range parametermemorized into each Style Element track.
On The Keyboard Range is considered – provided ithas been programmed (see “Style Element TrackControls: Keyboard Range” on page 119 in StyleRecord mode). When a track goes over the loweror higher Keyboard Range point, it is automati-cally transposed, to stay in the programmedrange.
Off No Keyboard Range used.
Sty
Sty
Sty
Gbl
Sty
Sty

94 Style Play operating modePad/Switch: Pad
Wrap Around
The wrap-around point is the highest register limit for the back-ing track. The accompaniment patterns will be transposedaccording to the detected chord. If the chord is too high, theStyle tracks might play in a register that is too high, and there-fore unnatural. If, however, it reaches the wrap-around point, itwill be automatically transposed an octave lower.
The wrap-around point can be individually set for each track insemitone steps up to a maximum of 12 semitones, relative to thechord root set in Style Record mode (see “Key/Chord” onpage 107).
It is advisable to set different Wrap Around points for each track,to avoid all tracks “jump” to a different octave at the same time.
1…12 Maximum transposition (in semitones) of thetrack, referred to the original key of the Style pat-tern.
Play/Mute icon
Track’s play/mute status.
Play status. The track can be heard.
Mute status. The track cannot be heard.
Pad/Switch: Pad
This page lets you select a different sound for each of the fourPAD buttons.
Note: You can also assign different Sounds from the Pad panel ofthe main page.
Pad assignment
Name of the Hit or Sequence assigned to each Pad. Press the boxto make the Pad Select window appear (see “Pad Select window”on page 75).
Older sounds
To warrant compatibility with data generated prior to OS ver-sion 2.0, the name of the older sounds assigned to the Pads isshown under each Pad assignment box. As soon as you select anew Hit or Sequence, the name of the older sound disappears.
Volume
Volume for each of the four Pad tracks.
Pan
Pan for each of the four Pad tracks.
-64…-1 Left stereo channel.
0 Center.
+1…+63 Right stereo channel.
C Send
Send level to the C Internal FX processor (usually reverb) foreach of the four Pad tracks.
D Send
Send level to the D Internal FX processor (usually modulatingeffect) for each of the four Pad tracks.
Pad lock icon
This lock avoids selecting a different Performance or STSchanges also the Hit or Sequence Pads assigned to the Pads.
This lock is reset when turning the instrument off, unless youwrite Global settings to memory (see “Write Global - GlobalSetup dialog box” on page 257).
For more information on parameter locks, see “General Con-trols: Lock” on page 232.
Pad/Switch: Assignable Switch
This page lets you select a different function for each of the fourASSIGN. SWITCH buttons.
Switch 1…4
Each of the four ASSIGN. SWITCH buttons. Use these pop-upmenus to assign a function to each switch. See “List of Assign-able Switches functions” on page 380.
Assignable Switch lock icon
This lock avoids selecting a different Performance or STSchanges also the functions assigned to the switches.
This lock is reset when turning the instrument off, unless youwrite Global settings to memory (see “Write Global - GlobalSetup dialog box” on page 257).
For more information on parameter locks, see “General Con-trols: Lock” on page 232.
Sty
Sty
Oldersounds
Padassignment
SB
SB
Gbl
Gbl

95Style Play operating modePreferences: Style Preferences
Ref
eren
ce
Preferences: Style Preferences
In this page you can set various general parameters for the Styleplay mode. Settings can be saved to a Performance, or STS.
Chord Recognition Mode
This parameter defines how chords are recognized by the auto-accompaniment engine. Please note that when in Full or UpperChord Scanning mode, the Fingered 3 mode is always selected,and you must always play at least three notes, to let a chord berecognized.
Note: This parameter is the same you can find in the main page(see “Split panel” on page 83).
Fingered 1 Play one or more notes, according to the selectedChord Scanning Mode. A full Major chord will berecognized even if only a single note is played.
Fingered 2 You must always play three or more notes for afull chord to be recognized. If you play just onenote, a unison will be played. If you play a sus-pended chord (a root+5th), a suspended chordwill be played. The full chord will be recognizedwhen you play three or more notes.
Fingered 3 You must always play three or more notes for achord to be recognized. This option is automati-cally selected when selecting the FULL ChordScanning mode.
One Finger You can also compose a chord using a simplifiedchord playing technique:
• If you play only one note, a Major chord is rec-ognized.
• Play the root note, plus a white key on the left,for a 7th. For example, play C3 + B2 for a C7.
• Play the root note, plus a black key on the left,for a Minor chord. For example, play C3 + Bb2for a C minor.
• Play the root note, plus a white and a black keyon the left, for a Minor 7th. For example, play C3+ B2 + Bb2 for a C min 7.
Expert This mode is an extension of the Fingered 2, add-ing rootless and slashed chord recognition, oftenused in jazz, fusion, modern pop and light music.
This type of chord recognition is very useful toplay piano chords typical of jazz piano players.You don’t need to play the root note, doubling thenote already played by the bass track.
Velocity Control
Set this parameter to trigger one of the following functions sim-ply by playing louder with your left hand. When playing with avelocity value higher than the value set by the “Velocity ControlValue” parameter (see page 96), the selected function will beactivated.
• This function only works in SPLIT Keyboard Mode, with theLOWER or no Chord Scanning mode selected.
• It does not work in FULL Chord Scanning mode, or in SPLITKeyboard Mode, with the UPPER Chord Scanning modeselected.
Off The function is turned off.
Break, Fill In 1, Fill In 2When playing with a velocity higher than thetrigger value on the Lower track, the selected ele-ment is automatically triggered.
Start/Stop You can start or stop the Style by playing harderon the keyboard.
Bass InversionWhen playing with a velocity higher than thetrigger value, the Bass Inversion function will beactivated.
Memory When playing with a velocity higher than thetrigger value, the Memory function will be acti-vated.
Scale Mode
This parameter defines which tracks are affected by the selectedalternative scale (see “Scale” on page 86).
Keyboard tracks
The scale will only affect Keyboard tracks.
Upper tracks The scale will only affect Upper 1-3 Keyboardtracks.
All Tracks The scale will affect all tracks (Keyboard, Style,Pads).
Memory Mode
This parameter sets the way the MEMORY button works.
Chord When its LED is on, the MEMORY button keepsthe recognized chord in memory. When its LEDis off, the chord is reset when raising the handfrom the keyboard.
Chord + Lower
When its LED is on, the MEMORY button keepsthe recognized chord in memory, and keeps theLower track held until the next note or chord isplayed. When its LED is off, the chord is resetwhen raising the hand from the keyboard, andthe Lower track is not sustained.
Fixed Arr. + Lower
When its LED is on, the MEMORY button keepsthe Lower track held until the next note or chordis played. When off, the Lower track is not sus-tained when raising the hand from the keyboard.The chord is always kept in memory.
SB

96 Style Play operating modePreferences: Global Setup
Lock icon
All parameters in this page may be protected from selecting adifferent Performance or STS.
This lock is reset when turning the instrument off, unless youwrite Global settings to memory (see “Write Global - GlobalSetup dialog box” on page 257).
For more information on parameter locks, see “General Con-trols: Lock” on page 232.
Preferences: Global Setup
In this page you can set various general parameters for the StylePlay mode.
Note: These settings are stored in the Style Play Setup area of theGlobal file (together with all the other parameters marked with the
abbreviation through the manual). After changing thesesettings, select the Write Global-Song Play Setup command fromthe page menu to save them to the Global.
Midi Setup
MIDI channels for the Style Play mode can be automaticallyconfigured by selecting a MIDI Setup with this parameter. See“MIDI” on page 280 for more information on using MIDI Set-ups.
Note: To automatically select a MIDI Setup when entering theStyle Play mode, select the Write Global-Style Setup commandfrom the page menu.
For detailed information on MIDI Setup settings, see “MIDISetup” on page 328.
Note: After selecting a MIDI Setup, you can go to the Global modeand apply any change to each channel setting. To store thesechanges to a MIDI Setup, while still in Global mode select the WriteGlobal-Midi Setup command from the page menu. All MIDI Setupcan be freely customized and overwritten.
Hint: To restore the original MIDI Setups, load the original Fac-tory data again (downloadable from www.korgpa.com).
Performance/Sound Default
Performance banks and Sound banks share the same buttons onthe control panel. Use this parameter to define whether the PER-FORMANCE SELECT or the SOUND SELECT LED must be onwhen you turn the instrument on.
Style Change On By Default
This parameter allows you to define the status of the STYLECHANGE button at startup.
On At startup, the LED of the STYLE CHANGE but-ton will automatically turn on.
Off At startup, the LED of the STYLE CHANGE but-ton will stay off.
Velocity Control Value
Use this parameter to set a velocity value over which to automat-ically trigger the Style Start/Stop or select a Style Element (see“Velocity Control” above).
Upper Volume Link
This parameter allows you to define if changing the volume forone of the Upper tracks, proportionally changes also the otherUpper tracks.
On When changing volume to one of the Uppertracks, volume for the other Upper trackschanges in proportion.
Off When changing volume to one of the Uppertracks, only that track’s volume is changed. OtherUpper tracks are left unchanged.
Bass & Lower Backing
When the SPLIT Keyboard Mode is selected, and the Style is notrunning, this function lets you play a simple accompanimentwith your left hand.
On If the Style is not playing, and you play chordswith your left hand, the Sound assigned to theLower track plays chord notes (even if the Lowertrack is muted), and a Bass sound plays the chordroot. When you start the Style, the normal behav-ior is restored.
When the Bass&Lower Backing function is active,the Play/Mute status icon of the Lower track isframed in yellow (see “Keyboard track status” onpage 80).
Off If the Style is not playing, and the Lower track ismuted, no sound can be heard when you playwith your left hand. If the Lower track is set toplay, you can hear the sound assigned to theLower track.
Gbl
Sty
Sty
Sty
Sty
Sty
Sty
Sty

97Style Play operating modePage menu
Ref
eren
ce
Page menu
Press the page menu icon to open the menu. Press a command toselect it. Press anywhere in the display to close the menu withoutselecting a command.
Write Performance
Select this command to open the Write Performance dialog box,and save most of the current control panel settings to a Perfor-mance.
See “Write Performance dialog box” on page 98 for more infor-mation.
Write Single Touch Setting
Select this command to open the Write Single Touch Setting(STS) dialog box, and save Keyboard track settings to one of theSingle Touch Settings (STS) of the current Style.
See “Write Single Touch Setting dialog box” on page 98 for moreinformation.
Write Current Style Performance
Select this command to open the Write Current Style Perfor-mance dialog box, and save Style track settings to the Style Per-formance of the current Style.
See “Write Single Touch Setting dialog box” on page 98 for moreinformation.
Write Global-Style Setup
Select this command to open the Write Global-Style Setup dia-log box, and save global settings that are unique to the Style Playmode. These settings are programmed on the “Preferences: Glo-bal Setup” page (see page 96).
See “Write Global-Style Play Setup dialog box” on page 99 formore information.
Solo Track
Select the track to be soloed, and check this item. You will hearonly the selected track, and the ‘Solo’ warning will flash on thepage header.
Uncheck this item to exit the Solo function.
The Solo functions works in a slightly different way, dependingon the selected track:
• Keyboard track: The selected Keyboard track is the only trackyou can hear when playing on the keyboard. All other Keyboardtracks are muted. The status of the Style tracks is unaffected.
• Style track: The selected track is the only Style track you canhear. All other Style tracks are muted. The status of the Keyboardtracks is unaffected.
Copy/Paste FX
You can copy a single, or all four effects, between Styles, Perfor-mances, STSs and Songs. To do this, choose the “Copy FX” and“Paste FX” commands from the page menu of the Style Play,Song Play or Sequencer modes.
To copy a single effect:
1. Select the source Song, Performance, Style or STS, then
• go to the page of the single effect you want to copy (FX A,FX B, FX C, or FX D), or
• go to the Effects > FX Select page, to copy all four effects.This may be useful if you want to copy each of the foureffects into different Performances, Styles or STSs.
2. Choose the “Copy FX” command from the page menu.
3. Select the target Performance, Style or STS, then go to thepage of the single effect you want to paste (FX A, FX B, FXC, or FX D).
4. Choose the “Paste FX” command from the page menu.
To copy all four effects:
1. Select the source Performance, Style or STS, then go to theEffects > FX Select page, to copy all four effects.
2. Choose the “Copy FX” command from the page menu.
3. Select the target Performance, Style or STS, then go to thepage of the Effects > FX Select page.
4. Choose the “Paste FX” command from the page menu.

98 Style Play operating modeWrite Performance dialog box
Write Performance dialog box
Open this window by selecting the Write Performance item fromthe page menu. Here, you can save all track settings, the selectedStyle number, various Style settings, and the selected Voice Pro-cessor Preset, to a Performance.
Parameters saved in the Performance are marked with the symbol through the user’s manual.
Name
Name of the Performance to be saved. Press the (Text Edit)
button next to the name to open the Text Edit window.
Perf Bank
Target bank of Performances. Each bank corresponds to one ofthe PERFORMANCE/SOUND buttons. Use TEMPO/VALUEcontrols to select a different bank.
Performance
Target Performance location in the selected bank. Use TEMPO/VALUE controls to select a different location.
Select… button
Press this button to open the Performance Select window, andselect a target location.
Write Single Touch Setting dialog box
Open this window by selecting the Write Single Touch Settingitem from the page menu. Here, you can save Keyboard tracksettings, and the selected Voice Processor Preset, to one of thefour single Touch Settings (STS) belonging to the current Style.
Parameters saved in the STS are marked with the symbolthrough the user’s manual.
Name
Name of the STS to be saved. Press the (Text Edit) button
next to the name to open the Text Edit window.
Current Style
Non editable. Settings are saved in one of the four STSs belong-ing to the current Style. This parameter displays the name of the“parent” Style.
STS
Target STS location. The name of the STS currently saved at thetarget location is shown. Use TEMPO/VALUE controls to selecta different location.

99Style Play operating modeWrite Style Performance dialog box
Ref
eren
ce
Write Style Performance dialog box
Open this window by selecting the Write Style Performance itemfrom the page menu. Here, you can save Style track settings tothe Style Performance of the current Style.
Parameters saved in the Style Performance are marked with the
symbol through the user’s manual.
Style Bank
Non editable. Bank of Styles the current Style belongs to. Eachbank corresponds to one of the STYLE buttons.
Current Style
Non editable. Name of the current Style.
Write Global-Style Play Setup dialog box
Open this window by selecting the Write Global-Style play Setupitem from the page menu. Here, you can save various Style Pref-erence settings (see “Preferences: Global Setup” on page 96), thatare saved to the Global file.
Parameters saved in the Style Play Setup area of the Global are
marked with the symbol through the user’s manual.
The DIRECT HD bank
You can expand the internal memory User Styles with nine addi-tional banks residing on the hard disk (optional on the Pa1Xwith speakers). When both LEDs of the leftmost STYLE buttonare lit, the DIRECT HD banks are selected. No loading isrequired.
Use the first nine STYLE bank buttons to select these banks.Each bank can include up to 32 Styles; browse them using thePAGE buttons.
The DIRECT HD Styles are contained in three folders, inside theDIRECTHD folder you can find in the hard disk’s root. Thesefolders, automatically created by the Pa1X, have fixed names:
Creating the DIRECT HD banks
There are two ways to create the DIRECT HD banks:
• While in Style Record mode, you can write the new oredited Style in the Direct HD banks, as an alternative to theUser Style banks. See the Style Record chapter for moreinformation.
• While in Disk mode, you can save any Style into theDIRECT HD folders. See below the relevant procedure.More information on the disk procedures are in the Diskchapter.
Note: The following procedure requires you overwrite theUser Style banks. Save these banks before proceeding, to avoidlosing important data.
1. Press DISK and go to the Load page.
2. Load three banks of Styles, to be transformed in DIRECTHD banks 1, 2 and 3, into the USER01, USER 02 andUSER03 banks.
Sty
Sty
Folder name DIRECT HD bank buttons
BANK123.SET 1, 2, 3
BANK456.SET 4, 5, 6
BANK789.SET 7, 8, 9

100 Style Play operating modeThe DIRECT FD bank
3. Go to the Save page.
4. While the “All” item is selected, press Open to open it. Theinternal memory content appears.
5. Select the “Style” folder, and press Save To, to make the tar-get device directory appear.
6. If it is not yet selected, select the hard disk (HD), by usingthe Device pop-up menu.
7. The hard disk directory appears. Select the DIRECTHDfolder and press Open to open it.
8. The DIRECTHD folder directory appears. Select the“BANK123.SET” folder, and press Save to save the banks.
9. Load other Styles into the USER01-USER03 banks. Savethem onto the “BANK456.SET” folder.
10. Load other Styles into the USER01-USER03 banks. Savethem onto the “BANK789.SET” folder.
The DIRECT FD bank
In addition to the internal memory and DIRECT HD Styles, youcan have DIRECT FD Styles, directly accessed from the floppydisk.
Just insert a disk, with Styles contained in the “DIRECTFD.SET”folder, and press the DIRECT FD Style bank button. The diskdrive will read the “DIRECTFD.SET” folder’s content, and willgive you direct access to the Styles (no loading required).
Note: Reading from floppy disk may take some seconds, before theStyles are shown.
When the Style Select window opens, browse through theDIRECT FD Styles. There are up to 12 pages, and up to 96DIRECT FD Style locations in a disk.
Note: Reading from floppy disk is a little slower than reading fromthe internal memory or the hard disk. So, there is a chance that youwill have to wait some beats, before the selected DIRECT FD Styleis ready to play. The Style will start at the next beginning of mea-sure.
Creating the DIRECT FD bank
To configure the DIRECT FD bank, create a “DIRECTFD.SET”folder in the floppy disk, and save your Styles to this folder.
Note: The following procedures requires you overwrite the UserStyle banks. Save these banks before proceeding, to avoid loosingimportant data.
1. Press DISK and go to the Load page.
2. Select a device where to load the Styles from, by pressingthe Device pop-up menu. Load three banks of Styles, to betransformed to the DIRECT FD bank.
3. Go to the Save page.
Device pop-up menu
Device pop-up menu

101Style Play operating modeThe DIRECT FD bank
Ref
eren
ce
4. While the “All” item is selected, press Open to open it. Theinternal memory content appears.
5. Select the “Style” folder, and press Save To, to make the tar-get device directory appear.
6. Insert the floppy disk in the disk drive.
7. If it is not yet selected, select the floppy disk (FD), by usingthe Device pop-up menu.
8. Press New SET to create a new “.SET” folder.
9. Press the (Text Edit) button. When the Text Edit dia-
log box opens, name the new folder “DIRECTFD”. PressOK to confirm.
10. Press OK to close the Create New SET Folder, and return tothe floppy disk directory.
11. With the “DIRECTFD” folder selected, press Save To tosave the banks.
12. Press the DIRECT FD button in the STYLE SELECT sec-tion, to gain direct access to the saved Styles.
Device pop-up menu

102 Style Record modeThe Style structure
By entering the Style Record mode, you can create your ownStyles, or edit an existing Style.
The Style structure
The term “Style” relates with music sequences automaticallyplayed by the arranger of the Pa1X. A Style consists of a pre-defined number of Style Elements (E) (Pa1X features twelve dif-ferent Style Elements: Variation 1-4, Intro 1-3, Fill 1-3, Ending1-2). When playing, these Style Elements can be selected directlyfrom the control panel, using the corresponding buttons.
To explain the Style structure, we can use a tree-structure, asshown in the following diagram:
Each Style Element is made up of smaller units, called ChordVariations (CV), but not all of them have the same number ofCVs. Variations 1-4 have up to 6 CVs each, while the other StyleElements have only up to 2 CVs.
When you play on the chord recognition area (Lower, Upper orFull, depending on the Chord Scanning section on the controlpanel), the arranger scans the keyboard and determines whichchord you are playing. Then, depending on the selected StyleElement, it determines which Chord Variation (CV) should beplayed for the scanned chord. Which Chord Variation corre-sponds to each scanned chord is a setting of the Style: the ChordVariation Table. Each Style Element contains a Chord VariationTable, whose prototype is the following:
After deciding what CV to play, the arranger triggers the rightsequence for each track. Since each sequence is written in a par-ticular key (for example, CMajor, GMajor or Emin), thearranger transposes it according to the scanned chord. Notes inthe sequence are carefully transposed according to the NoteTransposition Tables (NTT), to make them work fine with allrecognized chords. The NTT allows you to record just someChord Variations, and have all the notes play in the right place,avoiding dissonances and transposing the pattern notes to thenotes of the recognized chord.
Going deeper into the Style structure, we can see that eachChord Variation is made up of Track Sequences, and the Pa1Xsupports 8 different tracks. DRUM and PERC are used for drumand percussion sequences, BASS for bass and ACC1-5 are for
Style Record mode
Pop Ballad
Variation 1
C
umrcss
c3c4c5
CV2
CV3
CV4
CV5
CV6
Variation 2
Variation 3
Variation 4
Intro1
CV1
CV2
Intro 2
Intro 3/C.In
Fill 1
Fill 2
Fill 3/Break
Ending 1
Ending 2
Chord Chord Variations (CVs)
Variation 1-4 Intro 1-3, Fill 1-3, Ending 1-2
Maj
CV1 – CV6 CV1 – CV2
6
M7
M7b5
Sus4
Sus2
M7sus4
min
m6
m7
m7b5
mM7
7
7b5
7sus4
dim
dimM7
aug
aug7
augM7
no 3rd
no 3rd, no 5th

103Style Record modeStyle Import/Export
Ref
eren
ce
accompaniment sequences (string, guitar, piano or other accom-paniment instruments).
Just to summarize, when you play a chord on the chord recogni-tion area, the arranger determines which Style Element is used,then determines which Chord Variation should be used for theplayed chord, then Style sequences for every track of that ChordVariation are transposed from the original chord to the recog-nized chord using the NTT, and so on every time you play achord.
What to record
Recording a Style is a matter of recording tracks, inside a seriesof Chord Variations, inside a series of Style Elements, inside theStyle itself.
You don’t need to record all Chord Variations for all Style Ele-ments. It is often only needed to record just a Chord Variationfor each Style Element. Exceptions are the Intro 1 and Ending 1,where we suggest to record both a Major and minor Chord Vari-ations.
Pattern data vs. track data
While the Style Record mode is where you can create or editmusic patterns for the Style, track parameters (like Sounds, Vol-ume, Pan, Octave Transpose, FX settings…) have to be edited inStyle Play mode.
• After creating or editing music patterns in Style Recordmode, save them by selecting the Write Style commandfrom the page menu of the Style Record mode (see “WriteStyle dialog box” on page 123).
• After editing track parameters in Style Play mode, savethem to the Style Performance by selecting the Write StylePerformance command from the page menu of the StylePlay mode (see “Write Style Performance dialog box” onpage 99).
Style Import/Export
As an alternative to creating Styles on the Pa1X, you can useKorg’s Style To Midi application to import a Standard MIDIFiles (SMF) from your computer to a Pa1X’s Style. The applica-tion is freely downloadable from www.korgpa.com. Please readthe included instructions.
Entering the Style Record mode
While in the Style Play operating mode, press the REC button.The following page will appear in the display:
• Select Record/Edit Current Style to edit the current Style.If it is a Factory Style, you may not be able to save it at theoriginal location (depending on the status of the “FactoryStyle and Pad Protect” parameter, see page 272); you willselect a User Style instead.
When editing an existing Style, the original Style Perfor-mance is recalled, but the following parameters are reset totheir default values: Drum Mapping (Off), Kick & SnareDesignation (Off), Original Style Sound (On), KeyboardRange (On). This means that you can hear some differencesbetween the Style in play and the same Style being edited;for example, resetting the Drum Mapping may lead tosome instruments being replaced.
• Select Record New Style to start from a new, empty Style. Adefault Style Performance will be recalled. When finishedrecording, you will save the new Style onto a User Stylelocation. (Styles can be saved onto Factory Style locationsonly when the “Factory Style and Pad Protect” parameter isset to On – see page 272).
After editing the Style, please save it (see “Exit by saving or delet-ing changes” below) and exit the Style Record mode. Then, whilein Style Play mode, edit the Style Performance to adjust tracksettings (Tempo, Volume, Pan, FX Send… see page 84 and fol-lowing in the “Style Play operating mode” chapter) and save it byselecting the “Write Current Style Performance” from the pagemenu (see “Write Style Performance dialog box” on page 99).
Note: After a record or edit operation, the memory is automati-cally reorganized. Therefore, when you press START/STOPthere is a delay before you can actually listen to the Style. Thisdelay is higher with a Style containing more MIDI events.
Note: While in Record mode, the footswitch and EC5 pedals aredisabled. On the contrary, volume/expression-type pedals canbe used.
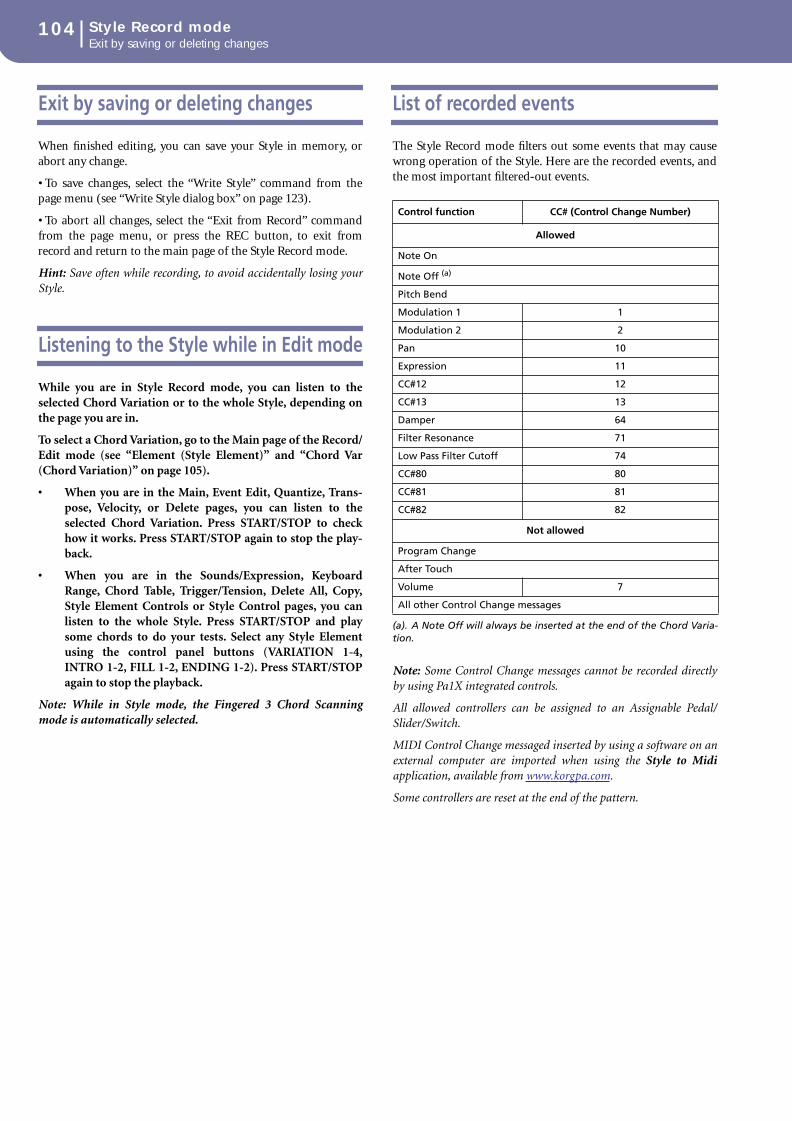
104 Style Record modeExit by saving or deleting changes
Exit by saving or deleting changes
When finished editing, you can save your Style in memory, orabort any change.
• To save changes, select the “Write Style” command from thepage menu (see “Write Style dialog box” on page 123).
• To abort all changes, select the “Exit from Record” commandfrom the page menu, or press the REC button, to exit fromrecord and return to the main page of the Style Record mode.
Hint: Save often while recording, to avoid accidentally losing yourStyle.
Listening to the Style while in Edit mode
While you are in Style Record mode, you can listen to theselected Chord Variation or to the whole Style, depending onthe page you are in.
To select a Chord Variation, go to the Main page of the Record/Edit mode (see “Element (Style Element)” and “Chord Var(Chord Variation)” on page 105).
• When you are in the Main, Event Edit, Quantize, Trans-pose, Velocity, or Delete pages, you can listen to theselected Chord Variation. Press START/STOP to checkhow it works. Press START/STOP again to stop the play-back.
• When you are in the Sounds/Expression, KeyboardRange, Chord Table, Trigger/Tension, Delete All, Copy,Style Element Controls or Style Control pages, you canlisten to the whole Style. Press START/STOP and playsome chords to do your tests. Select any Style Elementusing the control panel buttons (VARIATION 1-4,INTRO 1-2, FILL 1-2, ENDING 1-2). Press START/STOPagain to stop the playback.
Note: While in Style mode, the Fingered 3 Chord Scanningmode is automatically selected.
List of recorded events
The Style Record mode filters out some events that may causewrong operation of the Style. Here are the recorded events, andthe most important filtered-out events.
Note: Some Control Change messages cannot be recorded directlyby using Pa1X integrated controls.
All allowed controllers can be assigned to an Assignable Pedal/Slider/Switch.
MIDI Control Change messaged inserted by using a software on anexternal computer are imported when using the Style to Midiapplication, available from www.korgpa.com.
Some controllers are reset at the end of the pattern.
Control function CC# (Control Change Number)
Allowed
Note On
Note Off (a)
(a). A Note Off will always be inserted at the end of the Chord Varia-tion.
Pitch Bend
Modulation 1 1
Modulation 2 2
Pan 10
Expression 11
CC#12 12
CC#13 13
Damper 64
Filter Resonance 71
Low Pass Filter Cutoff 74
CC#80 80
CC#81 81
CC#82 82
Not allowed
Program Change
After Touch
Volume 7
All other Control Change messages

105Style Record modeMain page - Record 1
Ref
eren
ce
Main page - Record 1
After pressing the REC button, and having chosen whether youwant to edit an existing Style or create a new one, the main pageof the Style Record mode appears, with the tab “Record 1”selected.
Page header
This line shows the current operating mode, transposition andrecognized chord.
Operating mode name
Name of the current operating mode.
Master transpose
Master transpose value in semitones. This value can be changedusing the TRANSPOSE buttons on the control panel.
Page menu icon
Press this icon to open the page menu. See “Page menu” onpage 123.
Page sub-header
This area shows some performing info on the Style.
Style in record/edit
Name of the Style currently in edit or record.
Beat counter
This indicator shows the current beat inside the current mea-sure.
Measure number
Current measure you are recording.
Recording parameters area
Element (Style Element)
This parameter lets you select a Style Element for editing. EachStyle Element corresponds to a button on the control panel car-rying the same name. After selecting a Style Element, select aChord Variation for actual editing (see below).
Var1…CountIn
This is the selected Style Element
Chord Var (Chord Variation)
This parameter lets you select a Chord Variation for editing,after selecting the Style Element this Chord Variation belongs to.
Note: When this parameter and the assigned value is in small let-ters (cv1…cv6), the Chord Variation is empty; when it is in capitals(CV1…CV6), it is already recorded.
• If Style Element is Var1, Var2, Var 3 or Var4, you can select oneof 6 Chord Variations to edit.
• If Style Element is Intro1, Intro2, Intro3, Fill1, Fill2, Fill3,Ending1 or Ending2, you can select one of 2 Chord Variations toedit.
Resolution
Use this parameter to set the quantization during record-ing. Quantization is a way of correcting timing errors;notes played too soon or too later are moved to the nearestaxis of a rhythmic “grid”, set with this parameter, thusplaying perfectly in time.
Note: To quantize after recording, use the Quantize function in theEdit section (see “Style Edit: Quantize” on page 114).
High No quantization applied.
(1/32)… (1/8)
Grid resolution, in musical values. Forexample, when you select 1/16, all notes aremoved to the nearest 1/16 division. Whenyou select 1/8, all notes are moved to thenearest 1/8 division. A ‘3’ after the quantizationvalue means triplet.
Rec Length (Recording Length)
This parameter sets the recording length (in measures) of theselected track. Its value is always equal to, or a divider of, theChord Variation Length (see next parameter).
Page header Page menu icon
Selectedtrack info
area
Key/Chord
area
Track volume/status area
Recordingparame-ters area
Page sub-header
Operating modename
Master Transpose (in semitones)
Style in record/edit Beat counter Measure number
No quanti-zation
1/16
1/8

106 Style Record modeMain page - Record 1
This is not the total length of the Chord Variation, but just of thecurrent track. For example, you may have a Chord Variationeight measures long, with a drum pattern repeating each twomeasures. If so, set the CV Length parameter to “8”, and the RecLength parameter to “2” before starting recording the Drumtrack. When playing back the Style, saving it or executing anyedit operation on the Style, the 2-measures pattern will beextended to the full 8-measures length of the Chord Variation.
Warning: If you assign CV Length a value lower than RecLength, the value of Rec Length is not immediately updated inthe display. Therefore, you are still free of changing the value ofCV Length, before the measures exceeding its value are deleted(see warning in “CV Length (Chord Variation Length)” below).
However, if you press START/STOP to begin recording, the realRec Length value is changed to the new one, even if the displaystill shows the old value.
For example, you may have CV Length = 4 and Rec Length = 4.If you set CV Length to 2, and press START/STOP to beginrecording, Rec Length is still shown as 4, but it is in reality set to2, and recording will cycle for just 2 measures. After you pressSTART/STOP to stop recording, Rec Length is updated to 2, andall measures after the second measure are deleted.
CV Length (Chord Variation Length)
This parameter sets the total length (up to 32 measures) for theselected Chord Variation. When playing a Style, this will be thelength of the accompaniment pattern, when the chord corre-sponding to the Chord Variation is recognized on the keyboard.
Warning: If you reduce the Chord Variation Length afterrecording, any measure after the selected length will be deleted.Be very careful when setting the CV Length to a lower valueafter recording! If it happens, we suggest to exit from recordwithout saving (see “Exit from Record” on page 123).
Metro (Metronome)
This is where you can set the metronome.
Off No metronome click will be heard during record-ing. In any case, a one-bar precount will beplayed before starting recording.
On1 Metronome on, with a one-bar precount beforestarting recording.
On2 Metronome on, with a two-bar precount beforestarting recording.
Tempo
Select this parameter to use TEMPO/VALUE controls to set thetempo.
Hint: You can always change the Tempo, when other parametersare selected, by keeping the SHIFT button pressed, and rotating theDIAL.
Note: When recording tempo, old data is always replaced by thenew data.
Note: The actual tempo of the Style will be the one shown whensaving the Style Performance in Style Play mode (see “Currenttempo” on page 79).
Meter
This is the meter (time signature) of the Style Element. You canedit this parameter only when the Style Element is empty, i.e.before you begin recording anything.
NTT (Note Transposition Table)
The Note Transposition Table (NTT) determines how thearranger will transpose pattern notes, when a chord is recog-nized that does not exactly match the original chord of a ChordVariation. For example, if you only recorded a Chord Variationfor the CMaj chord, when a CMaj7 is recognized on the key-board the arranger must transpose some notes to create themissing 7th.
Note: To conform to Korg specifications, it is advisable to set theNTT to “No Transpose” on the Intro 1 and Ending 1.
Root The root note (in CMaj = C) is transposed to themissing notes.
Fifth The 5th note (in CMaj = G) is transposed to themissing notes.
i-Series All original patterns must be programmed on the“Maj7” or “min7” chords. When loading oldKorg i-Series Styles, this option is automaticallyselected.
NoTrnsp No transposition applied. The pattern will alwaysplay as recorded. This is the standard setting ofIntro 1 and Ending 1 in Korg’s original Styles.
Selected track info area
This line lets you see the Sound assigned to the selected track.
Track name
Name of the selected track.
Drum…Acc5 Style track.
Sound name
Sound assigned to the selected track. The triangle means you canpress the name to open the Sound Select window, and select adifferent Sound.
As recorded withNTT = Root or 5th(Key/Chord = CMaj)
When you play a CM7with NTT = Root
When you play a CM7with NTT = 5th
As recorded withNTT = i-Series(Key/Chord = CM7)
When you play a CMajwith NTT = i-Series
When you play a C7with NTT = i-Series
Track name
Sound name
Sound bank
Program Change

107Style Record modeMain page - Record 1
Ref
eren
ce
Sound bank
Bank the selected Sound belongs to.
Program Change
Program Change number. Shown only when the “Show ProgramChange number” parameter is turned on in Global mode. (Seepage 234).
Key/Chord area
Key/Chord
This parameter pair allows you to define the track’s original keyand chord type, for the current Chord Variation. When in StylePlay mode, this chord will be played back exactly as it wasrecorded, without any NTT processing (see above).
To record just one Chord Variation for a Style Element, the sug-gested original key/chord is “maj7” (with NTT = i-Series). Bevery careful to play the 7th+ note (i.e., with a “Cmaj7th” key/chord, the B), to avoid the lack of notes, or a bad NTT conver-sion when playing different chords.
Note: To conform to Korg specifications, it is advisable to recordboth the “Major” and “minor” Chord Variations for the Intro 1and Ending 1 Style Elements.
When you select a track, the original key/chord assigned to theselected track will be shown. All recorded tracks will play backon that key/chord. For example, if the original key/chord for theAcc1 track is A7th, when selecting the Acc1 track all the remain-ing tracks will play on the A7th key/chord.
In the example above, you will record the Acc1 track in the AMa-jor key, with notes pertaining to the A7th scale. This exact pat-tern will be recalled, when an A7th chord will be recognized.
Copy Key/Ch (Copy Key/Chord) button
Press this button in the display to copy Key/Chord settings of thecurrently selected track to all other tracks of the same ChordVariation, or to the whole Style. This function is useful to speed-up pattern programming, and to avoid having different tracks indifferent keys within the same Chord Variation.
Current Chord Variation Tracks
The Key/Chord of the current track will be cop-ied to all tracks of the current Chord Variation.
All Style Tracks
The Key/Chord of the current track will be cop-ied to all tracks of the Style (i.e., all Chord Varia-tions).
Delete Note button
When a track is selected, you can use this command to delete asingle note or a single percussive instrument.
If the Style is playing, this shortcut deletes the instrument onlywhile the key is kept pressed, leaving all other notes untouchedwithin the track.
Tracks volume/status area
Virtual sliders
Each virtual slider in the display corresponds to an AssignableSlider on the control panel. Use the Assignable Sliders to changeeach value, provided the VOLUME LED (over the SLIDERMODE button) is turned on. This LED status depends on thelast selected Performance, but can be changed anytime by usingthe SLIDER MODE button.
As an alternative, press the track’s area to select a track, and useTEMPO/VALUE controls to change the value.
Track status icons
Status of tracks. Press this icon to change the status.
Play status. The track can be heard.
Mute status. The track cannot be heard.
Record status. After starting recording, the trackwill receive notes from the keyboard and theMIDI IN connector.
Track names
Under the sliders, a label for each track is shown.
Drum…Acc5 Shown Style tracks.

108 Style Record modeMain page - Record 2
Main page - Record 2
While in the main page, press the “Record 2” tab to see this page.Most parameters in this page are the same as in “Main page -Record 1”. In addition, here you can see and select Sounds foreach Style track.
Sounds area
This area lets you see Sounds and octave transposition for theeight Style tracks.
Octave icon
Non editable. This indicator shows the track’s octave transposi-tion. To change this value, go to the “Mixer/Tuning: Tuning” editpage in the Style Play mode (see page 86). Save this value to theStyle Performance.
Sound name
Name of the Sound assigned to the track. Touch a name a firsttime to select the corresponding track (detailed information areshown on the Selected Track Info area, see above). Touch it a sec-ond time to open the Sound Select window.
Note: These Sounds can be replaced by Sounds selected by a Perfor-mance, provided the “Original Style Sounds” parameter is leftunchecked in Style Play mode (see page 80).
Style Record procedure
There are two different methods for recording a Style: Realtimeand Step.
• Realtime Recording allows you to record Style patterns inrealtime.
• Step Recording allows you to create a new Style by enteringsingle notes or chords in each track. This is very usefulwhen transcribing an existing score, or needing a highergrade of detail, and is particularly suitable to create drumand percussion tracks.
Preparing to record
1. If you like to edit an existing Style, select that Style.
2. Press the REC button to enter the Style Record mode. Youare prompted to select either the Current Style, or a NewStyle.
Select “record/edit Current Style” if you want to edit thecurrent Style, or make a new Style starting from an existingone. Select “Record New Style” if you want to start fromscratch with an empty Style.
3. After you select your preferred option, the main page of theStyle Record mode will appear.
4. Select the Element (Style Element) and Chord Var (ChordVariation) parameters, to select the Chord Variation to berecorded/edited.
Note: For more information on the Style Elements and ChordVariations, and the Style structure in general, see “The Stylestructure” on page 102.
5. Use the Rec Length (Recording Length) parameter to setthe length (in measures) of the pattern to record.
6. Use the Meter parameter to set the Style Element’s meter.
Note: You can edit this parameter only if you selected the“Record New Style” option when entering the Record mode,or when editing an empty Chord Variation.
7. Select the Tempo parameter and set the tempo.
8. Press the Record 2 tab to see the Sounds area. Here you canassign the right Sound to each Style track. You cannot selectDigital Drawbars Sounds. (For more details, see “Soundsarea” on page 108).
9. If needed, set the Octave Transpose for each track. Note:The Octave Transpose will affect only the notes coming fromthe keyboard, and not from the arranger.
10. At this point, if you want to do a Realtime Recording go onreading “Realtime Record procedure” below. Otherwise, ifyou prefer to do a Step Record, jump to “Step Record pro-cedure” on page 109.
Sounds area
Octave icon Sound name

109Style Record modeStyle Record procedure
Ref
eren
ce
Realtime Record procedure
1. Select the track to record. Its status icon will turn to‘Record’. (For more details, see “Tracks volume/status area”on page 107).
Note: When entering the Record mode, the last selectedtrack is already in Record status. When you press START/STOP after entering the Record mode, you can immedi-ately start recording.
If you like, you can try your part before recording:
• Mute the track, by repeatedly pressing its icon status, until
the (Mute) status icon appears.
• Press START/STOP to let any recorded track play back,and practice on the keyboard.
• When you have finished practicing, press START/STOP tostop the arranger, and unmute the track by repeatedly
pressing its icon status, until the (Record) status iconappears again.
2. While the shown status icon is Record, press START/STOPto begin recording. Depending on the “Metro” (metro-nome) option you selected, a 1- or 2-bars precount mayplay before the recording actually begins. When it begins,play freely. The pattern will last for some measures, accord-ing to the Rec Length value, then restart.
Since the recording will happen in overdub, you can addnotes on any following passage. This is very useful to recorddifferent percussive instruments at any cycle on a Drum orPercussion track.
Note: While recording, track’s Keyboard Range (seepage 119) is ignored, and the track can play over the wholekeyboard range. The Local parameter (see “Local ControlOn” on page 237) is also automatically set to On, to allowplaying on the keyboard.
3. When finished recording, press START/STOP to stop thearranger. Select a different track, and go on recording thefull Chord Variation.
Note: You can select a different track only when the arrangeris not running.
4. When finished recording the Chord Variation, select a dif-ferent Chord Variation or Style Element to go on recordingthe full Style.
5. When finished recording the new Style, select the “WriteStyle” command from the page menu, to open the WriteStyle dialog box (see “Write Style dialog box” on page 123)and save it to memory.
To exit the Style Record mode without saving any change,select the “Exit from Record” command from the pagemenu.
Step Record procedure
1. While in the main page of the Style Record mode, select the“Overdub Step Recording” command from the page menu,to enter the Overdub Step Record mode.
2. The “Pos” parameter shows the current position.
• If you do not want to insert a note or chord at the currentposition, insert a rest instead, as shown in step 4.
• To jump to the next measure, filling the remaining beatswith rests, press the Next M. button in the display.
3. To change the step value, use the “Step Time values” area inthe display.
4. Insert a note, rest or chord at the current position.
• To insert a single note, just play it on the keyboard. Theinserted note length will match the step length. You maychange the velocity and relative duration of the note, byediting the “Duration” and “Velocity” parameters (seepage 125).
• To insert a rest, just press the Rest button in the display. Itslength will match the step value.
• To tie the note to be inserted to the previous one, press theTie button in the display. A note will be inserted, tied to theprevious one, with exactly the same name. You don’t needto play it on the keyboard again.
• To insert a chord or a second voice, see “Chords and sec-ond voices in Step Record mode” below.
5. After inserting a new event, you may go back by pressingthe Back button in the display. This will delete the previ-ously inserted event, and set the step in edit again.
6. When the end of the pattern is reached, the “End of Loop”event is shown, and the recording restarts from the“001.01.000” position. Any note exceeding the patternlength, inserted at its end, will be reduced to fit the totallength of the pattern.
At this point, you may go on, inserting new events in over-dub mode (the previously inserted events will not bedeleted). This is very useful when recording a drum or per-cussion track, where you may want to record the bass drumon a first cycle, the snare drum on the second cycle, and thehi-hat and cymbals during the following cycles.
7. When finished recording, press the Done button in the dis-play to exit the Step Record mode.
When back to the main page of the Style Record mode, youmay turn all tracks to the play status, then press START/STOP to listen to the Style. Press START/STOP again tostop the playback.
8. From the main page of the Style Record mode, select eitherthe “Write Style” or the “Exit from Record” command toexit from the Style record mode, respectively by saving theStyle to memory, or by canceling any change (see “WriteStyle dialog box” on page 123).

110 Style Record modeStyle Record procedure
Chords and second voices in Step Recordmode
You are not obliged to insert single notes in a track. There areseveral ways to insert chords and double voices. Lets look atsome.
Entering a chord. Simply play a chord instead of a single note.The event name will be the first note of the chord you pressed,followed by the “…” abbreviation.
Entering a chord made of notes with different velocity values.You can make the upper or lower note of a chord, for example,louder than the remaining ones, to let the most important stand out from the chord. Here is how to insert a three-note chord:
1. Edit the first note’s Velocity value.
2. Press the first note and keep it pressed.
3. Edit the second note’s Velocity value.
4. Press the second note and keep it pressed.
5. Edit the third note’s Velocity value.
6. Press the third note, then release all notes.
Entering a second voice. You can insert passages where one noteis kept pressed, while another voice moves freely.
Ex. 1:
Ex.2:
Ex.3:
Step Time =
Step Time =
OnPress E and C
OnPress G
Off
OffRelease G and C
Release E (continue holding C)
Step Time = Step Time =
OnPress C
OnPress G (continue holding C)
OffRelease G and C
Tie
Step Time = Step Time = Step Time =
Press F and C Press G(continue holding C)
OffOn OnRelease F
(continue holding C)
Step Time = Step Time =
Press E(continue holding C)
OffOnRelease E and C
Step Time = Step Time =
Press D(continue holding C)
Off OnRelease G
(continue holding C)
Step Time =
OffRelease D
(continue holding C)

111Style Record modeEdit menu
Ref
eren
ce
Edit menu
From any page (apart for Step Record), press the MENU buttonto open the Style Record edit menu. This menu gives access tothe various Style Record edit sections.
When in the menu, select an edit section, or press EXIT to exitthe menu and return to the main page. To return to the mainpage, you can also select the Main Page menu item.
When in an edit page, press the EXIT button to return to themain page of the Style Record mode.
Note: While the Style is in play, you cannot access the Edit sectionpages from the main page (see page 105). Stop the playback beforepressing MENU.
Note: When switching from the Edit section pages (Quantize,Transpose, Velocity, Delete) to the other pages, or vice-versa, theStyle (if in play) is automatically stopped.
Edit page structure
Most edit pages share some basic elements.
Other pages have a slightly different structure.
Operating mode
This indicates that the instrument is in Style Record mode.
Edit section
This identifies the current edit section, corresponding to one ofthe items of the edit menu (see “Edit menu” on page 111).
Selected Style Element
In Style Record mode, edits always happen on the selected StyleElement.
Page menu icon
Press this icon to open the page menu (see “Page menu” onpage 123).
Parameters area
Each page contains various parameters. Use the tabs to selectone of the available pages. For detailed information on the vari-ous types of parameters, see sections starting from page 112.
Track status
Use these buttons to mute/unmute tracks while editing.
Tabs
Use tabs to select one of the edit pages of the current edit section.
Operating mode Edit section
Selected track info
Page menu icon
Parameters area
Tabs
Selected Style Element
Operating mode Edit section Page menu icon
Parameters area
Tabs
Track status

112 Style Record modeEvent Edit: Event Edit
Event Edit: Event Edit
The Event Edit is the page where you can edit each single MIDIevent of the selected Chord Variation. You can, for example,replace a note with a different one, or change its playing strength(i.e., velocity value). See “Event Edit procedure” on page 113 formore information on the event editing procedure.
Page header
See “Page header” on page 105.
Page menu icon
Press this icon to open the page menu. See “Page menu” onpage 123.
Page sub-header
This area shows some performing info on the Song.
Selected track
Name of the track in edit. Use the Track pop-up menu to selectone of the Style tracks.
SE/CV (Style Element/Chord Variation)
Selected Style Element and Chord Variation. This parametercannot be edited. To select a different Style Element and ChordVariation, press EXIT to go back to the main page of the StyleRecord mode (see “Main page - Record 1” on page 105).
Event list
Use the Event list to see all events contained in the selected trackin the selected Style Element.
Use the scrollbar to browse through the events. You can alsoscroll by using the SHIFT + DIAL combination.
Touch the event to be selected. Selected events are highlightedand can be heard.
Position
Position of the event, expressed in the form ‘aaa.bb.ccc’:
• ‘aaa’ is the measure• ‘bb’ is the beat• ‘ccc’ is the tick (each quarter beat = 384 ticks)
You can edit this parameter to move the event to a different posi-tion. You can edit a position in either of the following ways:
(a) select the parameter, and use the TEMPO/VALUE controlsto change the value, or
(b) select the parameter, then touch it again; the numeric key-pad will appear. Enter the new position by dialing in thethree parts of the number, separated by a dot. Zeroes at thebeginning can be omitted, as well as the least importantparts of the number. For example, to enter position002.02.193, dial “2.2.193”; to enter position 002.04.000 dial“2.4”; to enter position 002.01.000, simply dial “2”.
Type, Value 1, Value 2
Type and values of the event shown in the display. Depending onthe selected event, the value may change. This parameter alsoshows the (greyed-out, so non-editable) “CC#11” (Expression)event at the beginning of the pattern, and the “End Of Loop”marking, when the end of a track is reached.
To change the event type, select the Type parameter, then use theTEMPO/VALUE controls to select a different event type. A set ofdefault values will be automatically assigned to the event.
To select and edit the event’s value, select the correspondingparameter, and use TEMPO/VALUE controls.
Length
Length of the selected Note event. The value format is the sameas the Position value. This is only available for Note events.
Note: If you change a length of “000.00.000” to a different value,you can’t go back to the original value. This rather uncommonzero-length value may be found in some drum or percussion tracks.
Scrollbar
Use the scrollbar to browse the event through the list.
Other elements
Track pop-up menu
Use this pop-up menu to select the track to edit, inside the cur-rent Chord Variation.
Drum…Acc5 Style track.
Go Meas./Catch
This is a dual-function command.
Page header Page menu icon
Track pop-up menu
Tabs
Event list
Page sub-header
Scrollbar
Selected track Selected Style Element
Selected Chord Variation
Event type Value 1 Value 2
Note Note name Velocity
Ctrl Control Change number Control Change value
Bend Bending value –

113Style Record modeEvent Edit: Event Edit
Ref
eren
ce
• While the sequencer is not running, it works as a Go to Mea-sure command. Press it to open the Go to Measure dialog box:
When in this dialog box, select a target measure, and press OK.The first event available in the target measure will be selected.
• While the sequencer is running, it works as a Catch Locatorcommand. Press it to show the event that is currently playing.
Insert
Press the Insert button in the display to insert a new event at thecurrent shown Position. The default values are Type = Note,Pitch = C4, Velocity = 100, Length = 192.
Delete
Press the Delete button in the display to delete the event selectedin the display.
Event Edit procedure
Here is the general procedure to follow for the event editing.
1. Select the Style to edit, and press the REC button. Select the“Current Style” option to enter recording. The main pageof the Style Record mode will appear.
2. Select the “Element (Style Element)” and “Chord Var(Chord Variation)” parameters.
Note: For more information on the Style Elements and ChordVariations, and the Style structure in general, see “The Stylestructure” on page 102.
3. Press MENU, and select the Event Edit section. The EventEdit page appears (see “Event Edit: Event Edit” on page 112for more information).
4. Press START/STOP to listen to the selected Chord Varia-tion. Press START/STOP to stop it. Chord Scanning doesnot work, so you will listen the pattern at the original Key/Chord.
5. Press the Filter tab to select the Filter page, and uncheck thefilters for the event types you wish to see in the display (see“Event Edit: Filter” on page 114 for more information).
6. Press the Event Edit tab to go back to the Event Edit page.
7. Use the Track pop-up menu to select the track to edit (see“Track pop-up menu” on page 112).
8. The list of events contained in the selected track (inside theChord Variation selected on step 2) will appear in the dis-play. Some events on the beginning of the Chord Varia-tions, as well as the “EndOfTrk” event (marking its endingpoint) cannot be edited, therefore appearing in grey.
9. Scroll though the various events by using the scrollbar.
10. Select an event to be edited by touching it in the display.This is usually a note, that you can edit.
For more information on the event types and their val-ues, see “Event Edit: Event Edit” on page 112.
11. Edit the event.
• Select the “M” parameter. Use TEMPO/VALUE controlsto change the event’s position.
• Select the Type parameter. You may use TEMPO/VALUEcontrols to change the event type, as well as its Value 1 andValue 2.
• If a Note event is selected, select the Length parameter,and use TEMPO/VALUE controls to change the event’slength.
12. You may use the Go Meas. command to go to a differentmeasure (see “Go Meas./Catch” on page 112)
13. As described in step 4, you may press START/STOP to lis-ten how the pattern sounds after your changes. PressSTART/STOP again to stop the pattern running.
14. Press the Insert button in the display to insert an event atthe Position shown in the display (a Note event with defaultvalues will be inserted). Press the Delete button in the dis-play to delete the selected event.
15. When editing is complete, you may select a different trackto edit (go to step 7).
16. When finished editing the selected Chord Variation, pressEXIT to go back to the main page of the Style Recordmode, then go to step 2 to select and edit a different ChordVariation.
17. When finished editing the whole Style, select the “WriteStyle” command from the page menu to open the WriteStyle dialog box (see “Write Style dialog box” on page 123),or select the “Exit from Record” command to cancel allchanges.
• Press the (Text Edit) button to enter the Text Edit
dialog box. Enter a name and confirm by selecting OK.
• Select a target memory location where to save the Style.The name of the Style already existing at the selected loca-tion is shown after the Style Bank-Location number.
Warning: If you select an existing Style and confirm writing,the older Style is deleted and replaced by the new one. Savethe Styles you don’t want to loose on disk, before overwritingthem.
18. Press OK to save the Style to the internal memory, or Can-cel to delete any changes made in Style Record mode. Whenthe “Are you sure?” message appears, press OK to confirm,or Cancel to go back to the “Write Style” dialog box.

114 Style Record modeEvent Edit: Filter
Event Edit: Filter
This page is where you can select the event types to be shown inthe Event Edit page.
Turn On the filter for all event types you do not wish to see inthe Event Edit page.
Note: Some of the events are “ghosted”, and non editable, since thecorresponding events are not editable in a Style.
Note/RX Noise
Notes and RX Noises.
Control Control Change events. Only the following Con-trol Change numbers are allowed with Styles.
Tempo/Meter Tempo and Meter changes (Master Track only).
Pitch Bend Pitch Bend events.
Style Edit: Quantize
The quantize function may be used to correct any timing mis-take after recording, or to give the pattern a “groovy” feeling.
After setting the various parameters, press Execute.
Track
Use this parameter to select a track.
All All tracks selected.
Drum…Acc5 Selected track.
E / CV (Style Element/Chord Variation)
Use these parameters to select the Style Element and Chord Vari-ation for editing.
Resolution
This parameter sets the quantization after recording. For exam-ple, when you select 1/8, all notes are moved to the nearest 1/8division. When you select 1/4, all notes are moved to the nearest1/4 division.
(1/32)… (1/4)
Grid resolution, in musical values. A “b…f” char-acter added after the value means swing-quanti-zation. A “3” means triplet.
Start / End Tick
Use these parameters to set the starting and ending points of therange to quantize.
If a Chord Variation is four measures long, and you want toselect it all, the Start will be positioned at 1.01.000, and the Endat 5.01.000.
Bottom / Top Note
Use these parameters to set the bottom and top of the keyboardrange to quantize. If you select the same note as the Bottom andTop parameters, you can select a single percussive instrument ina Drum or Percussion track.
Control function CC# (Control Change Number)
Modulation 1 1
Modulation 2 2
Pan 10
Expression(a)
(a). Expression events cannot be inserted at the starting Position(001.01.000). An Expression value is already among the default“header” parameters of the Style Element.
11
CC#12 12
CC#13 13
Damper 64
Filter Resonance 71
Low Pass Filter Cutoff 74
CC#80 80
CC#81 81
CC#82 82
No quanti-zation
1/8
1/4
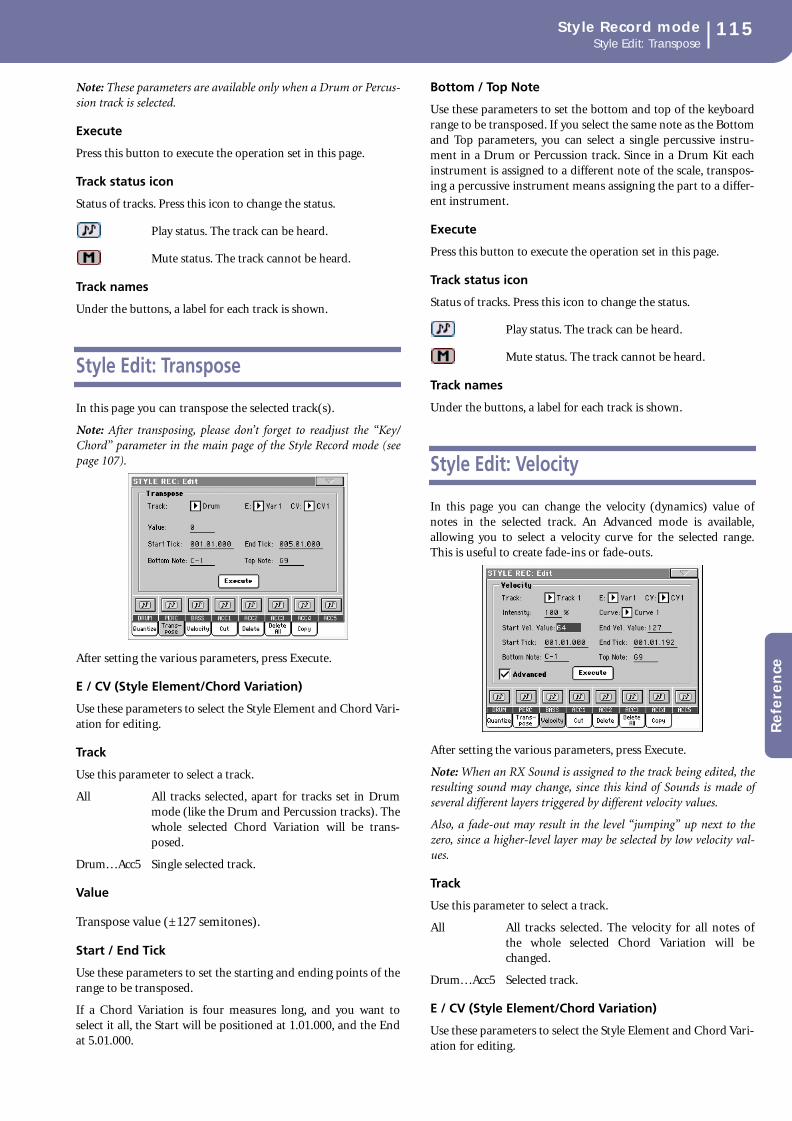
115Style Record modeStyle Edit: Transpose
Ref
eren
ce
Note: These parameters are available only when a Drum or Percus-sion track is selected.
Execute
Press this button to execute the operation set in this page.
Track status icon
Status of tracks. Press this icon to change the status.
Play status. The track can be heard.
Mute status. The track cannot be heard.
Track names
Under the buttons, a label for each track is shown.
Style Edit: Transpose
In this page you can transpose the selected track(s).
Note: After transposing, please don’t forget to readjust the “Key/Chord” parameter in the main page of the Style Record mode (seepage 107).
After setting the various parameters, press Execute.
E / CV (Style Element/Chord Variation)
Use these parameters to select the Style Element and Chord Vari-ation for editing.
Track
Use this parameter to select a track.
All All tracks selected, apart for tracks set in Drummode (like the Drum and Percussion tracks). Thewhole selected Chord Variation will be trans-posed.
Drum…Acc5 Single selected track.
Value
Transpose value (±127 semitones).
Start / End Tick
Use these parameters to set the starting and ending points of therange to be transposed.
If a Chord Variation is four measures long, and you want toselect it all, the Start will be positioned at 1.01.000, and the Endat 5.01.000.
Bottom / Top Note
Use these parameters to set the bottom and top of the keyboardrange to be transposed. If you select the same note as the Bottomand Top parameters, you can select a single percussive instru-ment in a Drum or Percussion track. Since in a Drum Kit eachinstrument is assigned to a different note of the scale, transpos-ing a percussive instrument means assigning the part to a differ-ent instrument.
Execute
Press this button to execute the operation set in this page.
Track status icon
Status of tracks. Press this icon to change the status.
Play status. The track can be heard.
Mute status. The track cannot be heard.
Track names
Under the buttons, a label for each track is shown.
Style Edit: Velocity
In this page you can change the velocity (dynamics) value ofnotes in the selected track. An Advanced mode is available,allowing you to select a velocity curve for the selected range.This is useful to create fade-ins or fade-outs.
After setting the various parameters, press Execute.
Note: When an RX Sound is assigned to the track being edited, theresulting sound may change, since this kind of Sounds is made ofseveral different layers triggered by different velocity values.
Also, a fade-out may result in the level “jumping” up next to thezero, since a higher-level layer may be selected by low velocity val-ues.
Track
Use this parameter to select a track.
All All tracks selected. The velocity for all notes ofthe whole selected Chord Variation will bechanged.
Drum…Acc5 Selected track.
E / CV (Style Element/Chord Variation)
Use these parameters to select the Style Element and Chord Vari-ation for editing.

116 Style Record modeStyle Edit: Cut
Value
Velocity change value (±127).
Start / End Tick
Use these parameters to set the starting and ending points of therange to be modified.
If a Chord Variation is four measures long, and you want toselect it all, the Start will be positioned at 1.01.000, and the Endat 5.01.000.
Bottom / Top Note
Use these parameters to set the bottom and top of the keyboardrange to be modified. If you select the same note as the Bottomand Top parameters, you can select a single percussive instru-ment in a Drum or Percussion track.
Advanced
When this checkbox is checked, the “Intensity”, “Curve”, “StartVelocity Value” and “End Velocity Value” parameters can beedited.
Intensity
(Only available in Advanced mode). Use this parameter to specifythe degree to which the velocity data will be adjusted toward thecurve you specify in “Curve”.
0…100% Intensity value. With a setting of 0 [%], the veloc-ity will not change. With a setting of 100 [%], thevelocity will be changed the most.
Curve
(Only available in Advanced mode). Use this parameter to selectone of the six curves, and to specify how the velocity will changeover time.
Start / End Vel. Value
(Only available in Advanced mode). Velocity change at the start-ing and ending ticks of the selected range.
0…100 Velocity change in percentage.
Execute
Press this button to execute the operation set in this page.
Track status icon
Status of tracks. Press this icon to change the status.
Play status. The track can be heard.
Mute status. The track cannot be heard.
Track names
Under the buttons, a label for each track is shown.
Style Edit: Cut
This function lets you quickly delete a selected measure (or aseries of measures) from the selected Chord Variation. All fol-lowing events are moved back, to replace the cut measure(s).
After setting the various parameters, press Execute.
E / CV (Style Element/Chord Variation)
Use these parameters to select the Style Element and Chord Vari-ation for editing.
Start
First measure to be cut.
Length
Number of measures to be cut.
Execute
Press this button to execute the operation set in this page.
Track status icon
Status of tracks. Press this icon to change the status.
Play status. The track can be heard.
Mute status. The track cannot be heard.
Track names
Under the buttons, a label for each track is shown.
StartValue
Curve 1
Velocity
Start Value = 0%, End Value = 100%
127
1EndValue
StartValue
Curve 2
Velocity
127
1EndValue
StartValue
Curve 3
Velocity
127
1EndValue
StartValue
Curve 4
Velocity
127
1EndValue
StartValue
Curve 5
Velocity
127
1EndValue
StartValue
Curve 6
Velocity RANDOM
127
1EndValue

117Style Record modeStyle Edit: Delete
Ref
eren
ce
Style Edit: Delete
This page is where you can delete MIDI events out of the Style.This function does not remove measures from the pattern. Toremove whole measure, use the Cut function (see “Style Edit:Cut” on page 116)
After setting the various parameters, press Execute.
E / CV (Style Element/Chord Variation)
Use these parameters to select the Style Element and Chord Vari-ation for editing.
Track
Use this parameter to select a track.
All All tracks selected. After deletion, the selectedChord Variation will remain empty.
Drum…Acc5 Selected track.
Event
Type of MIDI event to delete.
All All events. The measures are not removed fromthe Chord Variation.
Note All notes in the selected range.
Dup.Note All duplicate notes. When two notes with thesame pitch are encountered on the same tick, theone with the lowest velocity is deleted.
After Touch After Touch events.
Note: This kind of data is automatically removedduring recording.
Pitch Bend Pitch Bend events.
Prog.Change Program Change events, excluding the bundledControl Change #00 (Bank Select MSB) and #32(Bank Select LSB).
Note: This kind of data is automatically removedduring recording.
Ctl.Change All Control Change events, for example BankSelect, Modulation, Damper, Soft Pedal…
CC00/32…CC127Single Control Change events. Double ControlChange numbers (like 00/32) are MSB/LSB bun-dles.
Note: Some CC data are automatically removedduring recording. See the table on page 104 formore information on the allowed data.
Start / End Tick
Use these parameters to set the starting and ending points of therange to delete.
If a Chord Variation is four measures long, and you want toselect it all, the Start will be positioned at 1.01.000, and the Endat 5.01.000.
Bottom / Top Note
Use these parameters to set the bottom and top of the keyboardrange to delete. If you select the same note as the Bottom andTop parameters, you can select a single percussive instrument ina Drum or Percussion track.
Note: These parameters are available only when the All or Noteoption is selected.
Execute
Press this button to execute the operation set in this page.
Track status icon
Status of tracks. Press this icon to change the status.
Play status. The track can be heard.
Mute status. The track cannot be heard.
Track names
Under the buttons, a label for each track is shown.
Style Edit: Delete All
This function lets you quickly delete a selected Style Element orChord Variation, or the whole Style.
After setting the various parameters, press Execute.
Track
All All tracks of the selected Style, Style Element orChord Variation.
Drum-Acc5 Single track of the selected Style, Style Element orChord Variation.

118 Style Record modeStyle Edit: Copy
E / CV (Style Element/Chord Variation)
Use these parameters to select the Style Element and Chord Vari-ation for editing.
All All Style Elements, i.e. the whole Style. When E/Track=All and CV=All, the whole Style is deleted,and all parameters are set to the default status.
Var1…CountIn
Single Style Element.
V1-CV1…CI-CV2
Single Chord Variation.
Execute
Press this button to execute the operation set in this page.
Track status icon
Status of tracks. Press this icon to change the status.
Play status. The track can be heard.
Mute status. The track cannot be heard.
Track names
Under the buttons, a label for each track is shown.
Style Edit: Copy
Here you can copy a track, Chord Variation or Style Elementinside the same Style, or from a different one. Furthermore, youcan copy a whole Style.
Warning: The Copy operation deletes all data at the target location(overwrite).
After setting the various parameters, press Execute.
Note: If you copy too many events on the same “tick”, the “Toomany events!” message appears, and the copy operation is aborted.
Note: When you copy over an existing Chord Variation, ProgramChange data is not copied, to leave the original Sounds unchangedfor that Chord Variation.
From Style
Choose this option to select the source Style to copy the track,Chord Variation or Style Element from. Press the Select buttonto open the Style Select window and select the source Style.
From… To E/CV (Style Element/Chord Variation)
Use these parameters to select the source and target Style Ele-ments or Chord Variations.
Note: You can’t copy from a Variation to a different Style Element(or vice-versa), because of their different structure.
All All Style Elements, i.e. the whole Style. You can’tchange the target, that is automatically set to All.
Var1…End2 Single Style Element.
V1-CV1…E2-CV2
Single Chord Variation.
From… To Track
Use this parameter to select the source and target track to copy.You can double a track, to strengthen a pattern.
All All tracks of the selected Style, Style Element orChord Variation.
Drum-Acc5 Single track of the selected Style, Style Element orChord Variation.
Execute
Press this button to execute the operation set in this page.
Track status icon
Status of tracks. Press this icon to change the status.
Play status. The track can be heard.
Mute status. The track cannot be heard.
Track names
Under the buttons, a label for each track is shown.
Copying to a Chord Variation of a differentlength
You can copy a Chord Variation to a different one of a differentlength. Just keep in mind the following:
• If the source length is a divider of the target length, thesource Chord Variation will be multiplied to fit the targetChord Variation. For example, if the source is 4-measureslong, and the target 8-measures, the source will be copiedtwo times.
• If the source length is not a divider of the target length, thesource Chord Variation will be copied for as many mea-sures as can fit the target Chord Variation. For example, ifthe source is 6-measures long, and the target 8-measures,
1 2 3 4
1 2 3 4 1 2 3 4

119Style Record modeStyle Element Track Controls: Sound/Expression
Ref
eren
ce
the source will be copied once, then the fist 2 measures willbe copied to fit the remaining 2 measures.
Note: Avoid copying to a Chord Variation with a different meter,for example a 4/4 Chord Variation onto a 3/4 one.
Style Element Track Controls: Sound/Expression
In this page you can assign a different Sound to each track of theselected Style Element. Each Style Element can have differentSound; after saving the new Style, please don’t forget to checkthe “Original Style Sounds” parameter in the Style Play mode(see page 80), to let the Style select the Sound bypassing the StylePerformance settings.
In this page you can also modify the Expression (CC#11) valuefor each of the Style Element tracks. This lets you reduce the rel-ative level of a track in a single Style Element, without reducingthe overall Volume of the Style. This is a very useful control,when you have different Sounds assigned to the same track indifferent Style Elements, and the internal level of these Soundsmust be different.
When in this page, press the corresponding button on the con-trol panel to select a Style Element (VARIATION1 …ENDING2).
To copy the settings of this page to another Style Element, usethe “Copy Sound” and “Copy Expression” commands from thepage menu (see “Copy Sounds dialog box” and “Copy Expres-sion dialog box” starting from page 124).
Selected Track Info area
See “Selected track info area” on page 106 for detailed informa-tion.
Sounds area
See “Sounds area” on page 108 for detailed information.
Expression area
Use these knobs to set the Expression (CC#11) value for the cor-responding track. This value can be seen at the beginning of theEvent Edit list (see “Event Edit: Event Edit” on page 112).
Different Expression values can be defined for each Style Ele-ment. This way, you can set a different volume in each Style Ele-ment, relative to the general Volume value set in the StyleHeader.
Volume area
Use these controls to set the volume and status of each track. Seepage 107 for more information.
The Volume value is the same for the whole Style. Use theExpression controls to adjust the relative balance between tracksin each Style Element.
Style Element Track Controls: KeyboardRange
The Keyboard Range automatically transposes any pattern notethat would otherwise play too high or too low in pitch, com-pared to the original acoustic instrument, when transposed bythe arranger. This will result in a more natural sound for eachaccompaniment instrument.
For example, the lower limit for a guitar is E2. If you play a chordunder the E2, the transposed pattern could exceed this limit, andsound unnatural. A Bottom limit set to E2 for the guitar trackwill solve the problem.
Different Keyboard Range values can be set for each Style Ele-ment.
Note: The Keyboard Range is ignored while recording. The selectedtrack can play on the full range of the keyboard.
When in this page, press the corresponding button on the con-trol panel to select a Style Element (VARIATION1 …ENDING2).
To copy the settings of this page to another Style Element, usethe “Copy Keyboard Range” command from the page menu (see“Copy Key Range dialog box” on page 124).
Top/Bottom
Use these parameters to set the bottom and top of the keyboardrange for the corresponding track of the current Style Element.
1 2 3 4
1 2 3 4 5 6 1 2
5 6

120 Style Record modeStyle Element Chord Table: Chord Table
Volume area
Use these controls to set the volume and status of each track. Seepage 107 for more information.
Style Element Chord Table: Chord Table
This is the page where you can assign a Chord Variation to eachof the most important recognized chord. When a chord is recog-nized, the assigned Chord Variation will be automaticallyselected by the arranger to play the accompaniment.
When in this page, press the corresponding button on the con-trol panel to select a Style Element (VARIATION1 …ENDING2).
Chord / Chord Variation
Use these parameters to assign a Chord Variation to each of themost important chords.
Style Track Controls: Type/Trigger/Tension
In this page you can set the Mode, Retrigger mode for the Styletracks, and activate/deactivate the Tension for the Accompani-ment tracks.
When in this page, press the corresponding button on the con-trol panel to select a Style Element (VARIATION1 …ENDING2).
Track Type
Use this parameter to set the type of the corresponding track.
Drum Drum track. This type of track is not transposedby the arranger, and is used for Drum Kits madeof Drum sounds. It can be affected by the Drum
Mapping of the Style Play mode (see “DrumMapping (Var.1…Var.4)” on page 93).
Perc Percussion track. This type of track cannot betransposed, and is used for Drum Kit made ofPercussion sounds. It is NOT affected by theDrum Mapping.
Bass Bass track. This type of track always plays theroot when changing chord.
Acc Accompaniment track. This type of track can beused freely, for melodic or harmonic accompani-ment patterns.
Trigger Mode
This setting lets you define how Bass and Acc-type tracks areretriggered when the chord is changed.
Off Each time you play a new chord, current noteswill be stopped. The track will remain silent untila new note will be encountered in the pattern.
Rt (Retrigger) The sound will be stopped, and newnotes matching the recognized chord will beplayed back.
Rp (Repitch) New notes matching the recognizedchord will be played back, by repitching notesalready playing. There will be no break in thesound. This is very useful on Guitar and Basstracks.
Tension
Tension adds notes (a 9th, 11th and/or 13th) that have actuallybeen played to the accompaniment, even if they haven't beenwritten in the Style pattern. This parameter specifies whether ornot the Tension included in the recognized chord will be addedto the Acc-type tracks.
On The Tension will be added.
Off No Tension will be added.

121Style Record modeImport: Import Groove
Ref
eren
ce
Import: Import Groove
The Import Groove function allows the loading of MIDIGrooves (“.GRV” files) generated by the Slice function (see“Time Slice” on page 220 in the Sampling mode). By importingthese data to a track, and assigning the Sound based on the slicedsamples to the same track, you can play the original audiogroove, and freely change its tempo.
Note: After importing a groove generated by a melody line (not bya percussive groove), the imported groove and samples will not betransposed together with the other Style tracks. Audio data cannotbe transposed by the arranger.
Note: Please execute the Import Groove operation before turningthe instrument off. All “.GRV” files generated by a Time Slice oper-ation are deleted when turning the instrument off.
From
Use this parameter to select one of the MIDI Groove patterns(“.GRV” files) generated when saving data after a Time Sliceoperation.
To E/CV (Style Element/Chord Variation)
Use this parameter to select the target Style Element and ChordVariation.
To Track
Use this parameter to select the target track inside the selectedChord Variation. The Percussion track is usually suggested,since the Drum track is still suitable for standard Drum Kitsounds (count-in, break etc.). After importing the MIDI Groovepattern, assign the Sound, to which the sliced samples areassigned, to the track playing the MIDI Groove pattern.
Import: Import SMF
The Import SMF function allows you to import MIDI data froma Standard MIDI File (SMF) created on your preferred externalsequencer, and transform them in a Chord Variation.
Note: You cannot use this function to import data from any genericSong. The Standard MIDI File to be imported must be pro-grammed as if it was one of Pa1X’s Chord Variations.
When importing an SMF, parameters like CV Length, Meter,Tempo Changes, Program Changes and Expression are recog-nized. These parameters will be imported as the header of theStyle Element containing the Chord Variation, provided the“Initialize” parameter is checked, or the Style Element is empty.
Hint: It is a good idea to check the “Initialize” parameter whenimporting the first Chord Variation of a Style Element, anduncheck it when importing the following Chord Variations.
• Sounds assigned to each track can be imported, provided theProgram Change, Bank Select MSB and LSB events are on thefirst ‘tick’ of the SMF. These data are loaded in the Style Ele-ment’s header, and not as Sounds assigned to the Style Perfor-mance.
Note: Sounds in the Style Element header can be overridden bySounds assigned to the Style Performance, by checking the “Origi-nal Style Sound” parameter in the main page of the Style Playmode (Style Track view).
• If the above data was not found on the first ‘tick’ of theimported SMF, Sounds must be manually assigned to each track.You can do this in the “Record 1” or “Record 2”, or the “Sound/Expression” page of the Style Record mode,.
• Key/Chord, Chord Table, Expression, and any other Style Vari-ation parameter, must be manually programmed in the relevantStyle Record pages.
• The starting Tempo, and each track’s Volume, must be pro-grammed as Style Performance data, and then saved in the StylePerformance.
• Meter Change is not allowed, therefore not recognized.
• The Chord Variation length is the same as the imported SMF.You can change length by changing the value of the CV Lengthparameter, on the main page of the Style Record mode.
Hint: If a note extends beyond the last measure of the Chord Varia-tion, an additional measure is appended (for example, if a noteextends after the end of the fourth measure in a 4-measure pattern,a 5-measure Chord Variation will be generated). If so, change theCV Length value to reset the Chord Variation length. The exceedingnote will be cut, to fit the new pattern length.

122 Style Record modeExport SMF
When programming a Chord Variation on an externalsequencer, please assign each Style track to the correct MIDIchannel, according to the following table.
Note: Only SMF in format 0 can be loaded.
From Song
This is the name of the Standard MIDI File to be loaded. Pressthe Select button to open the file selector, and select an “.SMF”file.
Select
Press this button to open the file selector and load the SMF.
Initialize
Check this parameter if you want all settings of the target StyleElement (i.e., Key/Chord, Chord Table, Sounds…) are resetwhen loading the SMF.
Hint: It is a good idea to check the “Initialize” parameter whenimporting the first Chord Variation of a Style Element, anduncheck it when importing the following Chord Variations.
To E/CV
Use this parameter to select a target Chord Variation.
Execute
After setting all parameters in this page, press this button toimport the Standard MIDI File into the target Chord Variation.
Export SMF
The Export SMF function allows you to export a Chord Varia-tion as a Standard MIDI File (SMF), and edit it on your pre-ferred external sequencer.
To Song
This (non-editable) parameter shows the name of the StandardMIDI File to be generated. The (automatically assigned) namewill be the same of the exported Chord Variation.
From E/CV
Use this pop-up menu to select one of the available Chord Varia-tions from the current Style.
Execute
After selecting a Chord Variation, press this button to export it asa Standard MIDI File. A standard file selector will appear. Selectthe target device and directory, then press Save.
MIDI Channel(s) Pa1X Track
9 Bass
10 Drum
11 Percussion
12-16 Accompaniment 1-5

123Style Record modePage menu
Ref
eren
ce
Page menu
Press the page menu icon to open the page menu. Press a com-mand to select it. Press anywhere in the display to close themenu without selecting a command.
Write Style
Select this command to open the Write Style dialog box, and savethe Style to the internal memory.
See “Write Style dialog box” on page 123 for more information.
Undo
Only available in Record mode. While in Record mode, cancelsthe latest recorded data and restores the previous situation.Selected a second time, it restores recorded data again (“Redo”function).
Copy Sound
While the Style Element Track Control edit section is selected,use this command to open the Copy Sound dialog box and copyall Sounds assigned to the current Style Element tracks to a dif-ferent Style Element.
See “Copy Sounds dialog box” on page 124 for more informa-tion.
Copy Expression
While the Style Element Track Control edit section is selected,use this command to open the Copy Expression dialog box andcopy all Expression values assigned to the current Style Elementtracks to a different Style Element.
See “Copy Expression dialog box” on page 124 for more infor-mation.
Copy Keyboard Range
While the Style Element Track Control edit section is selected,use this command to open the Copy Keyboard Range dialog boxand copy all Keyboard Range values for the current Style Ele-ment tracks to a different Style Element.
See “Copy Key Range dialog box” on page 124 for more infor-mation.
Copy Chord Table
Only available while in the Style Element Chord Table page. Selectthis command to open the Cpy Chord Table dialog box (see“Copy Chord Table dialog box” on page 124).
Delete Current Track
Select this command to delete the selected track.
Overdub Step Recording
Select this command to open the Overdub Step recording win-dow (see “Overdub Step Recording window” on page 125).
Solo Track
Select the track to be soloed, then check this item. You will hearonly the selected track, and the ‘Solo’ warning will flash on thepage header.
Uncheck this item to exit the Solo function.
Exit from Record
Select this command to exit from Record without saving changesto the Style.
Write Style dialog box
Open this window by choosing the Write Style item from thepage menu. Here you can save the recorded or edited Style tomemory, by choosing either a User or Direct HD bank.
Parameters saved in the Style are marked with the symbolthrough the user’s manual.
Name
Name of the Style to be saved. Press the (Text Edit) button
next to the name to open the Text Edit window.
Style Bank
Target bank of Styles. Each bank corresponds to one of theSTYLE SELECT buttons. Use TEMPO/VALUE controls to selecta different bank.
Style
Target Style location in the selected bank. Use TEMPO/VALUEcontrols to select a different location.
Note: A User Style is usually prompted when writing a Style. How-ever, you can overwrite a Factory Style, when the “Factory Styleand Pad Protect” parameter is left unchecked (see page 272).

124 Style Record modeCopy Sounds dialog box
Select… button
Press this button to open the Style Select window, and select atarget location.
While in the Style Select window, use the buttons on top of thewindow to select either the User or the Direct HD banks.
Copy Sounds dialog box
Open this window by choosing the Copy Sounds item from thepage menu. Here you can copy all Sounds assigned to the cur-rent Style Element tracks to a different Style Element.
From Style Element
Non editable. Currently selected Style Element.
To Style Element
Target Style Element.
All Settings will be copied to all Style Variation of theStyle in edit.
Var1…CountIn
Single Style Element where to copy settings to.
Copy Expression dialog box
Open this window by choosing the Copy Expression item fromthe page menu. Here you can copy all Expression values assignedto the current Style Element tracks to a different Style Variation.
From Style Element
Non editable. Currently selected Style Element.
To Style Element
Target Style Element.
All Settings will be copied to all Style Variation of theStyle in edit.
Var1…CountIn
Single Style Element where to copy settings to.
Copy Key Range dialog box
Open this window by choosing the Copy Keyboard Range itemfrom the page menu. Here you can copy all Keyboard Range val-ues for the current Style Element tracks to a different Style Vari-ation.
From Style Element
Non editable. Currently selected Style Element.
To Style Element
Target Style Element.
All Settings will be copied to all Style Variation of theStyle in edit.
Var1…CountIn
Single Style Element where to copy settings to.
Copy Chord Table dialog box
Open this window by choosing the Copy Chord Table item fromthe page menu. Here you can copy the Chord Table of the cur-rent Style Element to a different Style Element.
To Style Element
Target Style Element.
All Settings will be copied to all Style Variation of theStyle in edit.
Var1…CountIn
Single Style Element where to copy settings to.

125Style Record modeOverdub Step Recording window
Ref
eren
ce
Overdub Step Recording window
The Step Record allows you to create a new Style by entering sin-gle notes or chords to each track, by playing them on the key-board one at a time, with no need to play on time. This is veryuseful when transcribing an existing score, or needing a highergrade of detail, and is particularly suitable to create drum andpercussion tracks.
To access this page, select the “Overdub Step Recording” com-mand from the page menu.
Track (Selected track)
Name of the selected track in record.
DRUM…ACC5
Style track.
SE (Selected Style Element)
See “Element (Style Element)” on page 105.
CV (Selected Chord Variation)
See “Chord Var (Chord Variation)” on page 105.
Pos (Position)
This is the position of the event (note, rest or chord) to beinserted.
Event list
Previously inserted events. You may delete this event, and set itin edit again, by pressing the Back button.
Step Time values
Length of the event to be inserted.
… Note value.
Standard (–) Standard value of the selected note.
Dot (.) Augments the selected note by one half of itsvalue.
Triplet (3) Triplet value of the selected note.
Meter
Meter of the current measure. This parameter cannot be edited.You can set the Meter in the main page of the Style Record mode,before actually starting recording (see step 6 on page 108 formore information).
Free Memory
Remaining memory for recording.
Duration
Relative duration of the inserted note. The percentage is alwaysreferred to the step value.
25% Staccatissimo.
50% Staccato.
85% Ordinary articulation.
100% Legato.
Velocity
Set this parameter before entering a note or chord. This will bethe playing strength (i.e., velocity value) of the event to beinserted.
Kbd Keyboard. You can select this parameter, by turn-ing all counter-clockwise the dial. When thisoption is selected, the playing strength of theplayed note is recognized and recorded.
1…127 Velocity value. The event will be inserted withthis velocity value, and the actual playingstrength of the note played on the keyboard willbe ignored.
Rest
Press this button to insert a rest.
Tie
Press this button to tie the note to be inserted to the previousnote.
Back
Goes to the previous step, erasing the inserted event.
Next M. (Next Measure)
Goes to the next measure, and fills the remaining space withrests.
Done
Exits the Step Record mode.

126 Pad Record modeThe Pad structure
By entering the Pad Record mode, you can create your own Pads,or edit an existing Pad.
The Pad structure
A Pad is basically a single-track Style. Most of what applies toStyle recording also applies to Pad recording.
There are two different categories of Pads:
• “Hit” Pads. While they aremostly used as non-transpos-ing events, they can also betransposing notes or chords.Basically, they are single-noteor single-chord Sequences(see below).
• “Sequence” Pads, i.e., com-plex single-track patterns,that can be transposed byplaying different chords onthe keyboard – exactly as aStyle track. They are roughlyequivalent to single-element,single-track, multi-chordvariation Styles (see illustration).
Each Pad is made up of up to six smaller units, called ChordVariations (CV). Each Chord Variation is made of a single track(the Pad track).
Exactly as with the Styles, when playing a chord in the chord rec-ognition area, the corresponding Chord Variation is recalled.Recorgnized chords are associated to a Chord Variationby meansof the Chord Variation Table. Each Pad contains a Chord Varia-tion Table.
As with the Styles, the Note Transposition Tables (NTT) appliesto the Pads.
What to record
Recording a Pad is a matter of recording a single track, inside aseries of Chord Variations, inside the Pad itself.
You don’t need to record all Chord Variations. It is often onlyneeded to record just a Chord Variation.
Pattern data vs. track data
While the Pad Record mode is where you can create or editmusic patterns for the Pad, track parameters (like Sounds, Vol-ume, Pan, Octave Transpose, FX settings…) have to be edited inStyle Play mode.
• After creating or editing music patterns in Pad Recordmode, save them by selecting the Write Pad command fromthe page menu of the Pad Record mode (see “Write Paddialog box” on page 136).
• After editing track parameters in Style Play mode, savethem to the Performance or STS by selecting the Write Per-
formance or Write STS command from the page menu ofthe Style Play mode (see “Write Performance dialog box”on page 98 or “Write Single Touch Setting dialog box” onpage 98).
Entering the Pad Record mode
To enter Pad Record mode, go to the Style Play mode and pressREC. The Style/Pad Record Select window appears.
• Select Record/Edit Pad to select an existing Pad to edit. If itis a Factory Pad, you may not be able to save it at the origi-nal location (depending on the status of the “Factory Styleand Pad Protect parameter in the ->Disk->Preferencespage); you will select a User Pad location instead.
• Select Record New Pad to start from a new, empty Pad.When finished recording, you will save the new Pad into aUser Pad location. (Pads can be saved into Factory Padlocations only when the “Factory Style and Pad Protect”parameter is set to Off).
When you have finished recording or editing the Hit orSequence Pad, please save it (see “Exit by saving or deletingchanges” below) and exit the Pad Record mode.
Then, go to the Pad page of the Style Play or Song Play mode,assign the new Hit or Sequence to a Pad button, and adjust thevarious track settings (Volume, Pan, and C/D FX Send… see“Pad/Switch: Pad” on page 94). Finally, save the Performance orSTS by selecting the “Write Performance” or “Write STS” com-mand from the page menu.
Note: While in Record mode, the footswitch and EC5 pedals aredisabled. On the contrary, volume/expression-type pedals canbe used.
Pad Record mode
Pad
CV1
Pad Track
CV2
CV3
CV4
CV5
CV6

127Pad Record modeExit by saving or deleting changes
Ref
eren
ce
Exit by saving or deleting changes
When finished editing, you can save your Pad in memory, orcancel any change.
• To save changes, select the “Write Pad” command from thepage menu (see “Write Pad dialog box” on page 136).
• To cancel all changes, select the “Exit from Record” commandfrom the page menu, or press the REC button, to exit fromrecord and return to the main page of the Style Record mode.
Hint: Save often while recording, to avoid accidentally losing yourPad.
Listening to the Pad while in Record/Editmode
While you are in Pad Record or Pad Edit mode, you can listen tothe selected Chord Variation. To select a Chord Variation, go tothe Main page of the Record/Edit mode.
• When you are in the Main, Event Edit, Quantize, Trans-pose, Velocity, or Delete pages, you can listen to the selectedChord Variation. Press START/STOP to check how itworks. Press START/STOP again to stop the playback.
• When you are in the Sounds/Expression, Keyboard Range,Chord Table, Trigger/Tension, Delete All, Copy, Style Ele-ment Controls or Style Control pages, you can listen to thewhole Pad. Press START/STOP and play some chords to doyour tests.
Note: In this mode, the pattern is always played back in loop, evenif the “Pad Type” parameter is set to “One Shot” (see page 133).
Note: While in Pad Record mode, the Fingered 3 Chord Scanningmode is automatically selected.
Main page - Pad Record
The Main page of the Pad Record mode looks like a simplifiedversion of the Main page of the Style Record mode, with just asingle track to be recorded and no Style Elements to be chosen.The only addition is the “Pad Sync” parameter.
Please look at the User’s Manual for more information on thevarious parameters. Only general information and differenceswith the Style Record mode are described here.
Recording parameters area
Chord Var (Chord Variation)
This parameter lets you select one of the six available ChordVariations (CV1 … CV6) for editing or recording.
Note: When this parameter and the assigned value is in small let-ters (cv1…cv6), the Chord Variation is empty; when it is in capitals(CV1…CV6), it is already recorded.
Resolution
Use this parameter to set the quantization during record-ing.
Pad Sync
This parameter allows you to set a synchronization mode for thePad’s pattern.
Off No synchronization. The sequence will start assoon as you press the PAD button.
Continued The pattern will start immediately, in sync withthe arranger’s or active sequencer’s tempo.Depending on the current position of the beatcounter, it might not start from its very begin-ning; instead, it will continue from the currentposition.
For example, if the arranger’s or sequencer’s beatcounter shows the third beat, and is playing tick91, the Pad will start from its third beat, at tick91.
This works exactly as if it was a Fill.
PAD
The beat counter

128 Pad Record modeMain page - Pad Record
Beat The sequence will start at the next beat, in syncwith the arranger’s or sequencer’s tempo. It willstart from its very beginning (i.e., tick 1 or mea-sure 1).
Rec Length (Recording Length)
This parameter sets the recording length (in measures) of thesequence. Its value is always equal to, or a divider of, the ChordVariation Length (see next parameter).
Warning: If you assign CV Length a value lower than RecLength, the value of Rec Length is not immediately updated inthe display. Therefore, you are still free of changing the value ofCV Length, before the measures exceeding its value are deleted(see warning in “CV Length (Chord Variation Length)” below).
However, if you press START/STOP to begin recording, the realRec Length value is changed to the new one, even if the displaystill shows the old value.
CV Length (Chord Variation Length)
This parameter sets the total length (up to 32 measures) for theselected Chord Variation. When playing a Style, this will be thelength of the accompaniment pattern, when the chord corre-sponding to the Chord Variation is recognized on the keyboard.
Warning: If you reduce the Chord Variation Length afterrecording, any measure after the selected length will be deleted.Be very careful when setting the CV Length to a lower valueafter recording! If it happens, we suggest to exit from recordwithout saving (see “Exit from Record” on page 136).
Metro (Metronome)
This is where you can set the metronome.
Off No metronome click will be heard during record-ing. In any case, a one-bar precount will beplayed before starting recording.
On1 Metronome on, with a one-bar precount beforestarting recording.
On2 Metronome on, with a two-bar precount beforestarting recording.
Tempo
Select this parameter to use TEMPO/VALUE controls to set thetempo.
Note: This value will not be recorded, and will only be used for test-ing the pattern at various speeds while editing or recording.
Hint: You can always change the Tempo, when other parametersare selected, by keeping the SHIFT button pressed, and rotating theDIAL.
Meter
This is the meter (time signature) of the sequence. You can editthis parameter only when the sequence is empty, i.e. before youbegin recording anything.
NTT (Note Transposition Table)
The Note Transposition Table (NTT) determines how thearranger will transpose pattern notes, when a chord is recog-nized that does not exactly match the original chord of a ChordVariation. For example, if you only recorded a Chord Variation
for the CMaj chord, when a CMaj7 is recognized on the key-board the arranger must transpose some notes to create themissing 7th.
Root The root note (in CMaj = C) is transposed to themissing notes.
Fifth The 5th note (in CMaj = G) is transposed to themissing notes.
i-Series The original pattern must be programmed on the“Maj7” or “min7” chords.
NoTrnsp No transposition table is applied. The pattern willalways play as recorded, with no added notes.However, it will be transposed to other keys,depending on the played chord.
Note: The NTT does not work if the “Track Type” parameter is setto “Drum”.
Pad Track info area
This line lets you see the Sound assigned to the selected track.
Sound name
Sound assigned to the Pad track. The triangle means you canpress the name to open the Sound Select window, and select adifferent Sound.
Sound bank
Bank the selected Sound belongs to.
Program Change
Program Change number. Shown only when the “Show ProgramChange number” parameter is turned on in Global mode.
Tracks volume/status area
Octave Transpose
This (non-editable) indicator shows the current octavetransposition. To change this value use the OCTAVETRANSPOSE buttons on the control panel.
While this value is not memorized with the Pad, the transposi-tion is used during recording. For example, if you play a C4 anda +1 octave transposition is selected, a C5 is recorded.
PAD
PAD
PAD
PAD
As recorded withNTT = Root or 5th(Key/Chord = CMaj)
When you play a CM7with NTT = Root
When you play a CM7with NTT = 5th
As recorded withNTT = i-Series(Key/Chord = CM7)
When you play a CMajwith NTT = i-Series
When you play a C7with NTT = i-Series
Sound name
Sound bank
Program Change
PAD
PAD
PAD

129Pad Record modePad Record procedure
Ref
eren
ce
Virtual slider
The virtual slider in the display shows the track’s volume.To change the volume, touch the slider and use TEMPO/VALUE controls to change the value.
This value is not saved with the Pad, and is only used to test thePad’s volume during editing or recording.
Track status icons
Status of the track. Press this icon to change the status.
Record status. After starting recording, the trackwill receive notes from the keyboard and theMIDI IN connector.
Mute status. The track cannot be heard.
Key/Chord area
Key/Chord
This parameter pair allows you to define the track’s original keyand chord type, for the current Chord Variation. When playingthe pattern back, this chord will be played back exactly as it wasrecorded, without any NTT processing (see above).
Delete Note button
When a track is selected, you can use this command to delete asingle note or a single percussive instrument.
If the Pad is playing, this shortcut deletes the instrument onlywhile the key is kept pressed, leaving all other notes untouchedwithin the track.
Pad Record procedure
Recording a Pad is very similar to recording a Style. Please seethe relevant chapter in the User’s manual.
Edit menu
When pressing the MENU button while in Pad Record mode,the Pad Record Edit Menu will appear.
Note: The Pad Edit pages are a simplified version of the Style Editpages. See the User’s manual for information on the variousparameters.
Note: While the Pad is in play, you cannot access the Edit sectionpages from the main page (see page 127). Stop the playback beforepressing MENU.
Note: When switching from the Edit section pages (Quantize,Transpose, Velocity, Delete) to the other pages, or vice-versa, thePad (if in play) is automatically stopped.
Edit page structure
Most edit pages share some basic elements.
PAD
Operating mode Edit section
Pad track info
Page menu icon
Parameters area
Tabs

130 Pad Record modeEvent Edit: Event Edit
Other pages exhibit a slightly different structure.
Operating mode
This indicates that the instrument is in Pad Record mode.
Edit section
This identifies the current edit section, corresponding to one ofthe items of the edit menu (see “Edit menu” on page 129).
Page menu icon
Press this icon to open the page menu (see “Page menu” onpage 135).
Parameters area
Each page contains various parameters. Use the tabs to selectone of the available pages. For detailed information on the vari-ous types of parameters, see sections starting from page 130.
Tabs
Use tabs to select one of the edit pages of the current edit section.
Event Edit: Event Edit
The Event Edit is the page where you can edit each single MIDIevent of the selected Chord Variation. You can, for example,replace a note with a different one, or change its playing strength(i.e., velocity value).
This is very similar to the Style Record’s Event Edit page. See theUser’s Manual for more information on the event editing proce-dure.
Pad Edit: Quantize
The quantize function may be used to correct any timing mis-take after recording, or to give the pattern a “groovy” feeling.
After setting the various parameters, press Execute.
CV (Chord Variation)
Use this parameters to select the Chord Variation for editing.
Resolution
This parameter sets the quantization after recording.
Start / End Tick
Use these parameters to set the starting and ending points of therange to quantize.
Bottom / Top Note
Use these parameters to set the bottom and top of the keyboardrange to quantize.
Execute
Press this button to execute the operation set in this page.
Pad Edit: Transpose
In this page you can transpose the selected track(s).
Note: After transposing, please don’t forget to readjust the “Key/Chord” parameter in the main page of the Pad Record mode (seepage 129).
After setting the various parameters, press Execute.
CV (Chord Variation)
Use this parameters to select the Chord Variation for editing.
Operating mode Edit section Page menu icon
Parameters area
Tabs
Page header Page menu icon
Tabs
Event list
Page sub-header
Scrollbar

131Pad Record modePad Edit: Velocity
Ref
eren
ce
Value
Transpose value (±127 semitones).
Start / End Tick
Use these parameters to set the starting and ending points of therange to be transposed.
Bottom / Top Note
Use these parameters to set the bottom and top of the keyboardrange to be transposed.
Execute
Press this button to execute the operation set in this page.
Pad Edit: Velocity
In this page you can change the velocity (dynamics) value ofnotes in the selected track.
After setting the various parameters, press Execute.
CV (Chord Variation)
Use this parameters to select the Chord Variation for editing.
Value
Velocity change value (±127).
Intensity
(Only available in Advanced mode). Use this parameter to specifythe degree to which the velocity data will be adjusted toward thecurve you specify in “Curve”.
Curve
(Only available in Advanced mode). Use this parameter to selectfrom six types of curve, and specify how the velocity will changeover time.
Start / End Vel. Value
(Only available in Advanced mode). Velocity change at the start-ing and ending ticks of the selected range.
Start / End Tick
Use these parameters to set the starting and ending points of therange to be modified.
Bottom / Top Note
Use these parameters to set the bottom and top of the keyboardrange to be modified.
Advanced
When this checkbox is checked, the “Intensity”, “Curve”, “StartVelocity Value” and “End Velocity Value” parameters can beedited.
Execute
Press this button to execute the operation set in this page.
Pad Edit: Cut
This function lets you quickly delete a selected measure (or aseries of measures) from the selected Chord Variation. All fol-lowing events are moved back, to replace the cut measure(s).
After setting the various parameters, press Execute.
CV (Chord Variation)
Use this parameters to select the Chord Variation for editing.
Start
First measure to be cut.
Length
Number of measures to be cut.
Execute
Press this button to execute the operation set in this page.

132 Pad Record modePad Edit: Delete
Pad Edit: Delete
This page is where you can delete MIDI events out of the Pad.This function does not remove measures from the pattern. Toremove whole measure, use the Cut function (see “Pad Edit:Cut” on page 131)
After setting the various parameters, press Execute.
CV (Chord Variation)
Use this parameters to select the Chord Variation for editing.
Event
Type of MIDI event to delete.
All All events. The measures are not removed fromthe Chord Variation.
Note All notes in the selected range.
Dup.Note All duplicate notes. When two notes with thesame pitch are encountered on the same tick, theone with the lowest velocity is deleted.
After Touch After Touch events.
Note: This kind of data is automatically removedduring recording.
Pitch Bend Pitch Bend events.
Prog.Change Program Change events, excluding the bundledControl Change #00 (Bank Select MSB) and #32(Bank Select LSB).
Note: This kind of data is automatically removedduring recording.
Ctl.Change All Control Change events, for example BankSelect, Modulation, Damper, Soft Pedal…
CC00/32…CC127Single Control Change events. Double ControlChange numbers (like 00/32) are MSB/LSB bun-dles.
Note: Some CC data are automatically removedduring recording. See the table in the User’s Man-ual for more information on the allowed data.
Start / End Tick
Use these parameters to set the starting and ending points of therange to delete.
Bottom / Top Note
Use these parameters to set the bottom and top of the keyboardrange to delete.
Note: These parameters are available only when the All or Noteoption is selected.
Execute
Press this button to execute the operation set in this page.
Pad Edit: Delete All
This function lets you quickly delete a single Chord Variation, orthe whole Pad.
After setting the various parameters, press Execute.
CV (Chord Variation)
Use this parameters to select the Chord Variation to be deleted.
All All Chord Variations, i.e. the whole Pad. Afterdeletion, all parameters are set to the default sta-tus.
CV1…CV6 Single Chord Variation.
Execute
Press this button to execute the operation set in this page.
Pad Edit: Copy from Style
Here you can copy a track from a Style, and transform it into aPad pattern.
Warning: The Copy operation deletes all data at the target location(overwrite).
After setting the various parameters, press Execute.

133Pad Record modePad Edit: Copy from Pad
Ref
eren
ce
Note: If you copy too many events on the same “tick”, the “Toomany events!” message appears, and the copy operation is aborted.
Note: When you copy over an existing Chord Variation, ProgramChange data is not copied, to leave the original Sounds unchangedfor that Chord Variation.
From Style
Choose this option to select the source Style to copy the trackfrom. Press the Select button to open the Style Select windowand select the source Style.
From E/CV (Style Element/Chord Variation)
Use this parameter to select the source Style Element and ChordVariation.
Var1…End2 A single Style Element, i.e., all Chord Variations.
V1-CV1…E2-CV2
A single Chord Variation.
From Track
Use this parameter to select the source track to copy.
Drum-Acc5 Single track of the selected Style Element orChord Variation.
To CV (Chord Variation)
Use this parameter to select a target Chord Variation inside thecurrent Pad.
CV1…CV6 Target Chord Variation.
Execute
Press this button to execute the operation set in this page.
Pad Edit: Copy from Pad
Here you can copy a Chord Variation from a different Pad. Fur-thermore, you can copy a whole Pad.
Warning: The Copy operation deletes all data at the target location(overwrite).
After setting the various parameters, press Execute.
Note: If you copy too many events on the same “tick”, the “Toomany events!” message appears, and the copy operation is aborted.
Note: When you copy over an existing Chord Variation, ProgramChange data is not copied, to leave the original Sounds unchangedfor that Chord Variation.
From Pad
Choose this option to select the source Pad to copy the ChordVariation from. Press the Select button to open the Pad Selectwindow and select the source Pad.
From CV (Chord Variation)
Use this parameter to select the source Chord Variation.
All All Chord Variations, i.e. the whole Pad. You can’tchange the target, that is automatically set to All.
CV1…CV6 Single Chord Variation.
To CV (Chord Variation)
Use this parameter to select a target Chord Variation inside thecurrent Pad.
CV1…CV6 Target Chord Variation. Automatically set to All itthe “From CV” parameter is also set to All.
Execute
Press this button to execute the operation set in this page.
Pad Track Controls: Sound/Expression
In this page you can assign a Sound to the Pad track, adjust itsVolume (CC#07) and Expression (CC#11) values, and set vari-ous other parameters, like the Keyboard Range, Track Type,Trigger Mode, Tension and Wrap Around.
Sound/Bank
Sound assigned to the Pad track.
Pad Type
Use this parameter to decide if the Pad will play once or if it willloop.
Note: While in Pad Record mode, the pattern is always played backin loop, even if this parameter is set to “One Shot”.
One Shot When you press one of the PAD buttons, the cor-responding Pad is only played once. This is usefulfor playing Hits or Sequences than must only playonce.
Loop When you press one of the PAD buttons, the cor-responding Pad plays up to the end, then contin-ues playing from the start. Press STOP in the PADsection to stop it playing. This is useful for play-ing cyclic sequences.
PAD
PAD

134 Pad Record modePad Chord Table
Expression
Use this knob to set the Expression (CC#11) value for the Padtrack. This value can be seen at the beginning of the Event Editlist.
The Expression is useful to balance the Pad with the other Pads.For example, if you want the Pad you are recording is mellowerthan the average, just lower the Expression value.
Volume
Use this slider to set the Volume (CC#07) value for the Pad track.This value is not saved with the Pad, and is only used to test thePad’s volume during editing or recording.
Keyboard Range
The Keyboard Range automatically transposes any pattern notethat would otherwise play too high or too low in pitch, com-pared to the original acoustic instrument, when transposed bythe arranger. This will result in a more natural sound for the Padinstrument.
Note: The Keyboard Range is ignored while recording. The Padtrack can play on the full range of the keyboard.
Trigger Mode
(Not available if Track Type = Drum). This setting lets you definehow Bass and Acc-type tracks are retriggered when the chord ischanged.
Off Each time you play a new chord, current noteswill be stopped. The track will remain silent untila new note will be encountered in the pattern.
Rt (Retrigger) The sound will be stopped, and newnotes matching the recognized chord will beplayed back.
Rp (Repitch) New notes matching the recognizedchord will be played back, by repitching notesalready playing. There will be no break in thesound. This is very useful on Guitar and Basstracks.
Track Type
Use this parameter to set the type of the Pad track.
Drum Drum track. This type of track is not transposedby the arranger, and is used for Drum Kits, or fortracks that you don’t want to be transposed whenplaying a different chord.
Bass Bass track. This type of track always plays theroot when changing chord.
Acc Accompaniment track. This type of track can beused freely, for melodic or harmonic accompani-ment patterns.
Tension
Tension adds notes (a 9th, 11th and/or 13th) that have actuallybeen played, even if they haven't been written in the Pad pattern.This parameter specifies whether or not the Tension included inthe recognized chord will be added to an Acc-type track.
On The Tension will be added.
Off No Tension will be added.
Wrap Around
The wrap-around point is the highest register limit for the Padtrack. The Pad pattern will be transposed according to thedetected chord. If the chord is too high, the Pad track might playin a register that is too high, and therefore unnatural. If, how-ever, it reaches the wrap-around point, it will be automaticallytransposed an octave lower.
The wrap-around point can be individually set in semitone stepsup to a maximum of 12 semitones, relative to the chord root setin the main page of the Pad Record mode (see “Key/Chord” onpage 129).
1…12 Maximum transposition (in semitones) of thetrack, referred to the original key of the Pad pat-tern.
Pad Chord Table
This is the page where you can assign a Chord Variation to eachof the most important recognized chord. When a chord is recog-nized, the assigned Chord Variation will be automaticallyselected by the arranger to play the Pad track.
Chord / Chord Variation
Use these parameters to assign a Chord Variation to each of themost important chords.
Import: Import Groove
The Import Groove function allows the loading of MIDIGrooves (“.GRV” files) generated by the Slice function (see“Time Slice” in the Sampling mode). By importing these data tothe Pad track, and assigning the Sound based on the sliced sam-ples to the same track, you can play the original audio groove,and freely change its tempo.
PAD
PAD
PAD
PAD
PAD
PAD
PAD

135Pad Record modeImport: Import SMF
Ref
eren
ce
From
Use this parameter to select one of the MIDI Groove patterns(“.GRV” files) generated when saving data after a Time Sliceoperation.
To CV (Chord Variation)
Use this parameter to select the target Chord Variation.
Import: Import SMF
The Import SMF function allows you to import MIDI data froma Standard MIDI File (SMF) created on your preferred externalsequencer, and transform them in a Chord Variation.
When programming a Chord Variation on the externalsequencer, please assign the Pad track to the MIDI channel #10.
Note: Only SMF in format 0 can be loaded.
From Song
This is the name of the Standard MIDI File to be loaded. Pressthe Select button to open the file selector, and select an “.SMF”file.
Select
Press this button to open the file selector and load the SMF.
Initialize
Check this parameter if you want all Pad settings (i.e., Key/Chord, Chord Table, Sound…) are reset when loading the SMF.
Hint: It is a good idea to check this parameter when importing thefirst Chord Variation of the Pad, and uncheck it when importingthe following Chord Variations.
To CV
Use this parameter to select a target Chord Variation.
Execute
After setting all parameters in this page, press this button toimport the Standard MIDI File into the target Chord Variation.
Export: SMF
The Export SMF function allows you to export a Chord Varia-tion as a Standard MIDI File (SMF), and edit it on your pre-ferred external sequencer.
To Song
This (non-editable) parameters shows the name of the StandardMIDI File to be generated. The (automatically assigned) namewill be the same of the exported Chord Variation.
From CV
Use this pop-up menu to select one of the available Chord Varia-tions from the current Pad.
Execute
After selecting a Chord Variation, press this button to export it asa Standard MIDI File. A standard file selector will appear. Selectthe target device and directory, then press Save.
Page menu
Press the page menu icon to open the page menu. Press a com-mand to select it. Press anywhere in the display to close themenu without selecting a command.
Write Pad
When done recording or editing a Pad, and you want to save thechanges, select this command to open the Write Pad dialog box,and save the Pad to the internal memory.
See “Write Pad dialog box” on page 136 for more information.
Undo
Only available in the Main page of the Pad Record mode, and insome Pad Edit pages. While in Record mode, cancels the latestrecorded data and restores the previous situation. Selected a sec-ond time, it restores recorded data again (“Redo” function).

136 Pad Record modeWrite Pad dialog box
Delete Pad Track
Only available in the Main page of the Pad Record mode. Selectthis command to delete the Pad track.
Overdub Step Recording
Only available in the Main page of the Pad Record mode. Selectthis command to open the Overdub Step recording window (seethe Style Record chapter in the User’s Manual for more informa-tion).
Exit from Record
Select this command to exit from Record without saving changesto the Pad.
Write Pad dialog box
Open this window by selecting the Write Pad item from the pagemenu. Here you can save the recorded or edited Pad to memory.
Parameters saved in the Pad are marked with the symbolthrough the user’s manual.
Name
Name of the Pad to be saved. Press the (Text Edit) button
next to the name to open the Text Edit window.
Pad Bank
Target Pad bank. Only User banks can be selected.
Pad
Target Pad location in the selected bank. Use TEMPO/VALUEcontrols to select a different location.
Note: A User Pad is usually prompted when writing a Pad. How-ever, you can overwrite a Factory Pad, when the “Factory Style andPad Protect” parameter is left unchecked (see page Disk->Prefer-ences).
Select… button
Press this button to open the Pad Select window, and select a tar-get location.
PAD
PAD

137Song Play operating modeTransport controls
Ref
eren
ce
The Song Play operating mode is where you can listen to Songs.Since the Pa1X is equipped with two onboard sequencers, youcan play two Songs at the same time. This is very useful to mixbetween two Songs during a live performance. Songs can be inStandard MIDI File, Karaoke™, MP3 or Audio CD format (MP3Player and Audio CD Player available as options).
You can play along with the Song with up to four Keyboardtracks (Upper 1-3, Lower). You can select different Sounds andEffects for Keyboard tracks by selecting Performances and STSs.A different Voice Processor Preset may be selected by a Perfor-mance or STS.
While in Song Play, you can use the SongBook to automaticallyselect Songs for a desired music genre. With each Song entry inthe SongBook, up to four STSs are associated.
Transport controls
You can use the separate transport controls for each of the twoonboard sequencers. Use the SEQUENCER 1 controls forSequencer 1, and SEQUENCER 2 controls for Sequencer 2. See“SEQUENCER 1 TRANSPORT CONTROLS” on page 10 formore information).
MIDI Clock
In Song Play mode the MIDI Clock is always generated by theinternal sequencer, even if the Clock parameter is set to MIDI(see “Clock Source” on page 236). While in this mode, Pa1Xcannot receive MIDI Clock messages from the MIDI IN.
Pa1X transmits to the MIDI OUT only the MIDI Clock messagegenerated by Sequencer 1.
Master Volume, Sequencer Volume,Balance
While the MASTER VOLUME slider controls the general volumeof the instrument, you can use the ACC/SEQ VOLUME slider tocontrol only Sequencer’s tracks volume. This lets you adjust theSequencer’s volume alone, while Keyboard tracks are notaffected by this slider.
Use the BALANCE slider to mix between Sequencer 1 andSequencer 2. Move it to the center for the maximum volume ofboth sequencers.
Track parameters
Keyboard track settings made in Song Play mode may be savedto a Performance. You can recall different settings by just select-ing a different Performance.
Settings for Song tracks, like pan, volume and FX sends, dependon the midifile.
Changes to Song tracks made in Song Play mode cannot besaved to the midifile, and are intended just for realtime editing.To permanently save changes to the various Song parameters,use Sequencer mode.
Standard MIDI Files and Sounds
The native Song file format of the Pa1X is the Standard MIDIFile (SMF), an universal standard set by all manufacturers. Youcan read these files with any musical instrument or computer.
A difference could be in the sound played by each track. If yourecorded a Song with the Pa1X (Sequencer mode), using onlyGeneral MIDI sounds, you can play the same Song on virtuallyany other musical instrument or computer. If you used Korgnative sounds, you cannot play back the same sounds on instru-ments from other brands.
When you read SMFs in Song Play mode, there is no problemreading files made using only General MIDI sounds. Soundscould be different when playing a Song made on a differentinstrument: despite the wide compatibility of Pa1X with other,non-standard formats, differences may arise.
If so, go to the Sequencer operating mode and load the SMF.Then, manually reassign the non-matching Sounds, replacingthem with similar Sounds on the Pa1X. Then, save the SMFagain, and you will be able to play it in Song Play mode with thecorrect Sounds.
Song Play operating mode
Overall instru-ment’s volume
Sequencers vol-ume (Keyboard tracks are unaf-fected
Sequencer 1 Sequencer 2

138 Song Play operating modeNRPN Sound parameters
NRPN Sound parameters
GM-compliant Standard MIDI Files can contain NRPN (#99,98) Control Change messages. These messages are used to mod-ify some Sound parameters before starting a Song. The followingNRPN messages are recognized by the Pa1X:
Note: These control s are reset when stopping the Song, or selectinga new Song.
Keyboard, Pad and Sequencer tracks
The Pa1X is equipped with a double sequencer. Each Song canplay a maximum of 16 tracks, for a total of 32 sequencer tracks.
In addition, you can play on the keyboard with four additionalKeyboard tracks (Upper 1-3 and Lower). You can edit the Vol-ume and Play/Mute status for these tracks on the main page ofthe Song Play mode (see illustration below).
While in Song Play mode, you can still select Performances orSTSs from the latest selected Style. To select a different set ofSTSs, you can first select a different Style.
In addition to Keyboard tracks, selecting a different Performanceor STS may change sounds assigned to the PADs.
When you enter Song Play mode from the Style Play mode, Key-board and Pad tracks are the same as in Style Play mode.
NRPNCC#99(MSB)
CC#98(LSB)
CC#06(Data Entry)
Vibrato Rate 1 8 0…127(a)
(a). 64 = No change to the original parameter’s value
Vibrato Depth 1 9 0…127(a)
Vibrato Decay 1 10 0…127(a)
Filter Cutoff 1 32 0…127(a)
Resonance 1 33 0…127(a)
EG Attack Time 1 99 0…127(a)
EG Decay Time 1 100 0…127(a)
EG Release Time 1 102 0…127(a)
Drum Filter Cutoff 20 dd(b)
(b). dd = Drum Instrument No. 0…127 (C0…C8)
0…127(a)
Drum Filter Resonance 21 dd(b) 0…127(a)
Drum EG Attack Time 22 dd(b) 0…127(a)
Drum EG Decay Time 23 dd(b) 0…127(a)
Drum Coarse Tune 24 dd(b) 0…127(a)
Drum Fine Tune 25 dd(b) 0…127(a)
Drum Volume 26 dd(b) 0…127
Drum Panpot 28 dd(b) 0…127(a)
Drum Rev Send (FX 1) 29 dd(b) 0…127(a)
Drum Mod Send (FX 2) 30 dd(b) 0…127(a)
Press here toselect a Per-
formance
Press here toselect a Style
Keyboardtrack’s vol-
ume and Play/Mute status
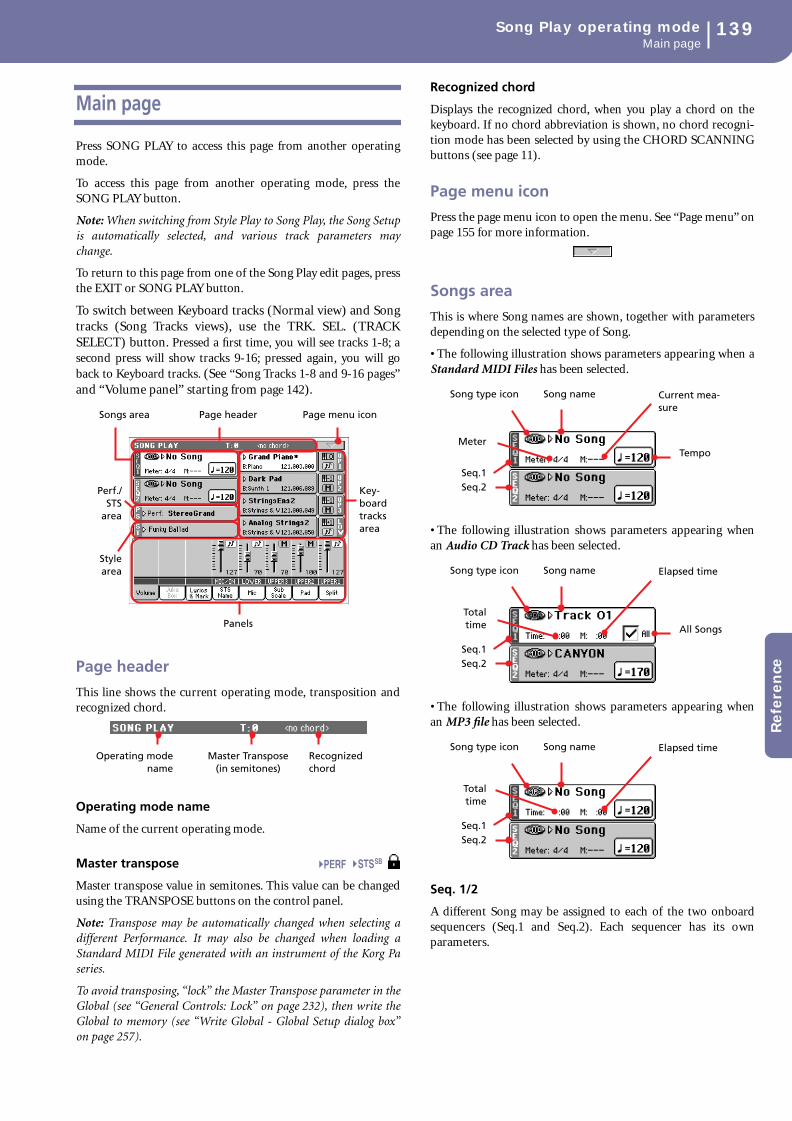
139Song Play operating modeMain page
Ref
eren
ce
Main page
Press SONG PLAY to access this page from another operatingmode.
To access this page from another operating mode, press theSONG PLAY button.
Note: When switching from Style Play to Song Play, the Song Setupis automatically selected, and various track parameters maychange.
To return to this page from one of the Song Play edit pages, pressthe EXIT or SONG PLAY button.
To switch between Keyboard tracks (Normal view) and Songtracks (Song Tracks views), use the TRK. SEL. (TRACKSELECT) button. Pressed a first time, you will see tracks 1-8; asecond press will show tracks 9-16; pressed again, you will goback to Keyboard tracks. (See “Song Tracks 1-8 and 9-16 pages”and “Volume panel” starting from page 142).
Page header
This line shows the current operating mode, transposition andrecognized chord.
Operating mode name
Name of the current operating mode.
Master transpose
Master transpose value in semitones. This value can be changedusing the TRANSPOSE buttons on the control panel.
Note: Transpose may be automatically changed when selecting adifferent Performance. It may also be changed when loading aStandard MIDI File generated with an instrument of the Korg Paseries.
To avoid transposing, “lock” the Master Transpose parameter in theGlobal (see “General Controls: Lock” on page 232), then write theGlobal to memory (see “Write Global - Global Setup dialog box”on page 257).
Recognized chord
Displays the recognized chord, when you play a chord on thekeyboard. If no chord abbreviation is shown, no chord recogni-tion mode has been selected by using the CHORD SCANNINGbuttons (see page 11).
Page menu icon
Press the page menu icon to open the menu. See “Page menu” onpage 155 for more information.
Songs area
This is where Song names are shown, together with parametersdepending on the selected type of Song.
• The following illustration shows parameters appearing when aStandard MIDI Files has been selected.
• The following illustration shows parameters appearing whenan Audio CD Track has been selected.
• The following illustration shows parameters appearing whenan MP3 file has been selected.
Seq. 1/2
A different Song may be assigned to each of the two onboardsequencers (Seq.1 and Seq.2). Each sequencer has its ownparameters.
Songs area Page header Page menu icon
Perf./STS
area
Stylearea
Key-board tracks area
Panels
Operating modename
Master Transpose (in semitones)
Recognized chord
SB
Song name
Meter
Current mea-sure
Tempo
Song type icon
Seq.1Seq.2
Song name
Totaltime
Elapsed time
All Songs
Song type icon
Seq.1Seq.2
Song name
Totaltime
Elapsed timeSong type icon
Seq.1Seq.2

140 Song Play operating modeMain page
Song type icon
Songs of different types can be assigned to the sequencers. Thisicon shows the file type.
Standard MIDI File, often abbreviated as SMF(file extension: *.MID or *.KAR). The SMF(*.MID) is the industry standard song format,used by Pa1X as its basic Song format whenrecording a new Song. A MIDI Karaoke File(*.KAR) is an extension of the SMF format.
MPEG Layer-3 format, or MP3 (file extension:*.MP3) – available with the EXBP-MP3 optioninstalled. Only assignable to one of the sequencersat a time. This is a compressed audio file, thatmay be generated on any personal computer, oron the Pa1X itself.
Note: If starting an MP3 file’s playback on aSequencer, another MP3 file running on the otherSequencer will be stopped. You cannot play twoMP3 files at the same time.
Note: If running an MP3 from a Data CD, and theCD is not spinning, it may take some time beforethe playback begins, since the CD needs a few sec-onds to start spinning again.
Audio CD Track – available with the CDRW-1option installed. Only assignable to one of thesequencers at a time
Only assignable to Sequencer 1. A Jukebox file (fileextension: *.JBX) can be assigned to Sequencer 1,but its name is not shown in this area. The JBXicon appears, together with the name of the cur-rently selected Song in the Jukebox list.
Note: To create or edit a Jukebox file, go to the Juke-box Edit page (see page 151).
Song name
Displays the name of the Song assigned to the correspondingsequencer.
• If the sequencer is already selected (white background), pressthe Song name to open the Song Select window.
• If the sequencer is not selected (dark background), first selectit, then press the Song name to open the Song Select window.
When the Song Select window appears, you can select a singleSong or a Jukebox file (see “Song Select window” on page 76).
If you select another Song while a Song is in play within the sameSequencer, the old Song stops, and the new Song will be selected,ready to play.
To select a Song, you can also press the SELECT button (on thecontrol panel) corresponding to the desired sequencer. PressSELECT a second time to select a Song by dialing in its ID num-ber (see “Selecting a Song by its ID number” on page 77).
Meter
This parameter appears when a Standard MIDI File (or a Karaokefile) has been selected.
Current Song meter.
Measure number
This parameter appears when a Standard MIDI File (or a Karaokefile) has been selected.
Current measure number.
Total time
This parameter appears when an Audio CD Track or an MP3 filehas been selected.
Total length (in minutes:seconds) of the selected Audio CDTrack or MP3 file.
Elapsed time
This parameter appears when an Audio CD Track or an MP3 filehas been selected.
Elapsed time (in minutes:seconds) of the Audio CD Track orMP3 file currently in play.
Tempo
This parameter appears when a Standard MIDI File (or a Karaokefile) has been selected.
Metronome tempo. Select this parameter and use the TEMPO/VALUE controls to change the tempo. As an alternative, youdon’t need to select this parameter; just keep the SHIFT buttonpressed and use the DIAL to change the tempo of the selectedsequencer.
Note: While in the main page, you can have the Tempo parameterof Sequencer 2 selected, while Sequencer 1 is selected. Use the DIALto change Tempo for Sequencer 2, and SHIFT + DIAL to changeTempo for Sequencer 1.
All Songs
This checkbox appears when an Audio CD Track has been selected.
Check this parameter to play all CD tracks, starting from theselected one.
Performance/STS area
This is where the Performance or STS name is shown.
Selected Performance or STS
This is the last selected Performance (PERF) or Single Touch Set-ting (STS).
Press the name to open the Performance Select window. As analternative, use the PERFORMANCE/SOUND SELECT sectionto select a different Performance.
To select a different STS, use the four SINGLE TOUCH SET-TING buttons under the display.
Selected Performance or STS

141Song Play operating modeMain page
Ref
eren
ce
Style area
Currently selected Style. You can select a Style while playingSongs, to have it ready when switching to Style Play mode.
Press the Style name to open the Style Select window. As analternative, use the STYLE SELECT section on the control panel.By selecting a different Style, you can also select a different set ofSTSs.
Keyboard tracks area
This is where Keyboard tracks are shown.
Sound name
Name of the Sound assigned to the corresponding Keyboardtrack.
• If the track is already selected (white background), press theSound name to open the Sound Select window.
• If the track is not selected (dark background), first select it,then press the Sound name to open the Sound Select window.
Sound bank
Bank the current Sound belongs to.
Program Change
Program Change number. Shown only when the “Show ProgramChange number” parameter is turned on in Global mode. (Seepage 234).
Keyboard track name
Non editable. Name of the corresponding track:
UP1 Upper 1
UP2 Upper 2
UP3 Upper 3
LOW Lower
Keyboard track octave transpose
Non editable. Octave transpose of the corresponding track. Toindividually edit the octave transpose for each track, go to the“Mixer/Tuning: Tuning” edit page of the Song Play mode (see“Mixer/Tuning: Tuning” on page 86 for more details).
You can also transpose all Upper tracks by using the UPPEROCTAVE buttons on the control panel.
Keyboard track status
Play/mute status of the current track. Press this icon to changethe status.
Note: You can save this setting into the Global-Song Play Setup (bychoosing the “Write Global-Song Play Setup” command from thepage menu), to leave the track status unchanged when selecting adifferent Standard MIDI File. This way, you can leave, for example,the bass track in mute, and let you bassist play it live.
However, the above is not true when reading a Standard MIDI Filecreated with a Pa-Series instrument. These files do include specialcommands to force the Play/Mute status of each track.
Play status. The track can be heard.
Mute status. The track cannot be heard.
Panels
The lower half of the main page contains the various panels, youcan select by pressing the corresponding tabs. See more informa-tion in the relevant sections, starting from page 143.
Selected Style
Soundname
Track nameSoundbank
Upper octave transpose
Track status
SB
SB
SB
SB
SB
Volume panel
Tabs

142 Song Play operating modeSong Tracks 1-8 and 9-16 pages
Song Tracks 1-8 and 9-16 pages
Repeatedly press the TRK. SEL. button to cycle between the Nor-mal, Song Tracks 1-8 and Song Tracks 9-16 view. In Song Trackviews, the upper half of the main page changes, to show parame-ters for the Song tracks.
Press TRK. SEL. again to return to Normal view (Keyboardtracks). (See “Main page” on page 139).
Songs area
Despite a different layout, it works as the Song area in the Nor-mal view.
Selected Track Info area
This line lets you see the Sound assigned to the selected track.Not only it is shown on the main page, but also in several editpages.
Track name
Name of the selected track.
Sound name
Sound assigned to the selected track. Press anywhere in this areato open the Sound Select window, and select a different Sound.
Sound bank
Bank the selected Sound belongs to.
Program Change
Program Change number. Shown only when the “Show ProgramChange number” parameter is turned on. in Global mode (seepage 234).
Sounds area
This area lets you see Sounds and octave transposition for theeight tracks currently displayed.
Song track octave transpose
Non editable. Octave transpose of the corresponding track. Toedit the octave transpose, go to the “Mixer/Tuning: Tuning” editpage of the Song Play mode (see “Mixer/Tuning: Tuning” onpage 86 for more details).
Sound name
Name of the Sound assigned to the track. Touch a name a firsttime to select the corresponding track (detailed information areshown on the Selected Track Info area, see above). Touch it a sec-ond time to open the Sound Select window.
Selected trackinfo area
Sounds area
Track name
Songs area
Track name
Sound name
Sound bank
Program Change
Song track octave transpose
Sound name

143Song Play operating modeVolume panel
Ref
eren
ce
Volume panel
Press the Volume tab to select this panel. This is where you canset the volume of each track, and mute/unmute tracks.
Use the TRK. SEL. (TRACK SELECT) button to switch fromNormal (Keyboard and Mic/In tracks) to Song Tracks 1-8 andSong Tracks 9-16 views.
If the VOLUME LED above the SLIDER MODE button is turnedon, the Assignable Sliders LEDs show which view is currentlyselected.
The Normal view shows grouped Style tracks, Mic/In controls,Keyboard tracks (upper sliders LED turned on):
The Song Tracks 1-8 view shows individual Song tracks 1-8(third sliders LED turned on):
The Song Tracks 9-16 view shows individual Song tracks 9-16(last sliders LED turned on):
Virtual sliders (track volume)
Virtual sliders are a graphical display of each track’s volume. Usethe Assignable Sliders to change this value (provided the VOL-UME LED is turned on above the SLIDER MODE button, seebelow).
As an alternative, press the track’s area to select a track, and useTEMPO/VALUE controls to change the value.
The volume of Keyboard tracks may be saved to a Performance.
Assignable Sliders function
Use the SLIDER MODE button to select the function assigned tothe Assignable Sliders. When the VOLUME LED is turned on,
each Assignable Slider controls the volume of the correspondingtrack.
The assigned function may be saved to a Performance. There-fore, when selecting a Performance, the assigned function maychange.
Track status icons
Play/mute status of the current track. Select the track, then pressthis area to change the track status. The status of Keyboardtracks may be saved to a Performance or STS.
See “Keyboard track status” on page 141 for more information.
Play status. The track can be heard.
Mute status. The track cannot be heard.
Track names
Under the sliders, a label for each track is shown. Use the TRK.SEL button to switch between the various track views.
MIC/IN Audio inputs. [*]
UPPER1…3 Upper tracks.
LOWER Lower track.
T01…T16 Song tracks. [*]
[*] Volume for these tracks is not memorized.
Jukebox panel
When a Jukebox (JBX) file is assigned to Sequencer 1, you canuse the list shown in this panel to browse the Jukebox list, andpress the Select button in the display to select a Song to play. Thisway, you can select any Song in the list as your starting Song, andmanually change the order of the Songs to play.
Note: A Jukebox file can be assigned to Sequencer 1 only.
Note: This panel is only available after loading a Jukebox file.
Hint: To create or edit a Jukebox file, go to the Jukebox Edit page(see page 151).
Warning: Should you delete a Song included in the Jukebox listcurrently in play, the sequencer will stop, and the “No Song” mes-sage will appear. At this point, you can select the JukeBox tab toopen the Jukebox panel, and select a different Song.
As an alternative, you can select the next Song by pressing SHIFT +>> (FAST FORWARD) in the SEQUENCER 1 section of the con-
Track status icon Virtual slider
SB
SB
SB

144 Song Play operating modeLyrics & Markers panel
trol panel, then press (PLAY/STOP) in the SEQUENCER 1 sec-tion again.
Song list
Use this list to browse through the Songs in the Jukebox list. Usethe scrollbar to scroll the list.
Selected Song
Name of the Song currently in play. You can select a differentSong from the list, and press the Select button in the display toselected it for playback.
Select button
Press this button to select the Song highlighted in the list, andassign it to Sequencer 1. If a Song is already playing, it will bestopped, and the selected Song will start playing back.
Jukebox file
Name of the selected Jukebox file. To edit this file, see “JukeboxEditor” on page 151.
Transport controls for the Jukebox
When you select a Jukebox file, Sequencer 1 transport controlswork in a slightly different way than with single Songs.
<< and >> Pressed alone, these buttons are the Rewind andFast Forward commands.
Keep the SHIFT button pressed, and pressthese buttons to scroll to the previous or nextSong in the Jukebox list.
PAUSE Pauses the Song at the current position. PressPAUSE or (PLAY/STOP) to start the Songplaying again.
(PLAY/STOP)
Starts or stops the current Song. When you stopthe Song, the sequencer goes back to measure 1 ofthe current Song.
If the Jukebox panel is open, you can select theSong from which to start. See “Jukebox panel”above.
Lyrics & Markers panel
Lyrics side tabs
These panels show the lyrics and chord abbreviations includedin a Song, or loaded as a “.TXT” file with the Song. You can seethe following types of Lyrics:
• Lyrics included in Standard MIDI Files
• Lyrics included in Karaoke™ files
• Lyrics included in MP3 files (in ID3 format – seewww.id3.org)
• Lyrics loaded as a “.TXT” file with a Standard MIDI File,Karaoke™ or MP3 file (see “Text files loaded with StandardMIDI Files and MP3 files” below)
Lyrics will be shown only if they are compatible with a standardformat that Pa1X can understand.
While the Song is playing, the text flows in the display. Chordabbreviations (if any) will appear above the lyrics, in time withthe music (depending on the “Show Chords” parameter status,under the Options side tab). Lyrics at the current position arehighlighted.
Song chords
Chords contained in the midifile (if any). This indicator may beeasier to read than chords shown within the lyrics.
Current measure
Current measure number.
Recognized chord
Chords played on the keyboard, and recognized by the chordscanning engine.
Selected sequencer (SEQ 1/SEQ 2)
Use these side tabs to select a sequencer whose Song to show.
Note: You can have Sequencer 2 selected in the Main page of theSong Play mode, and Sequencer 1 selected in the Lyrics page, orvice-versa. This way, you can select a Song whose lyrics to displayon the external video monitor, while selecting a different sequencerfor editing operations.
Song list Jukebox fileSelected Song
Song chords Current measure
Display options
Recorgnized chord
Selected sequencer
Song name
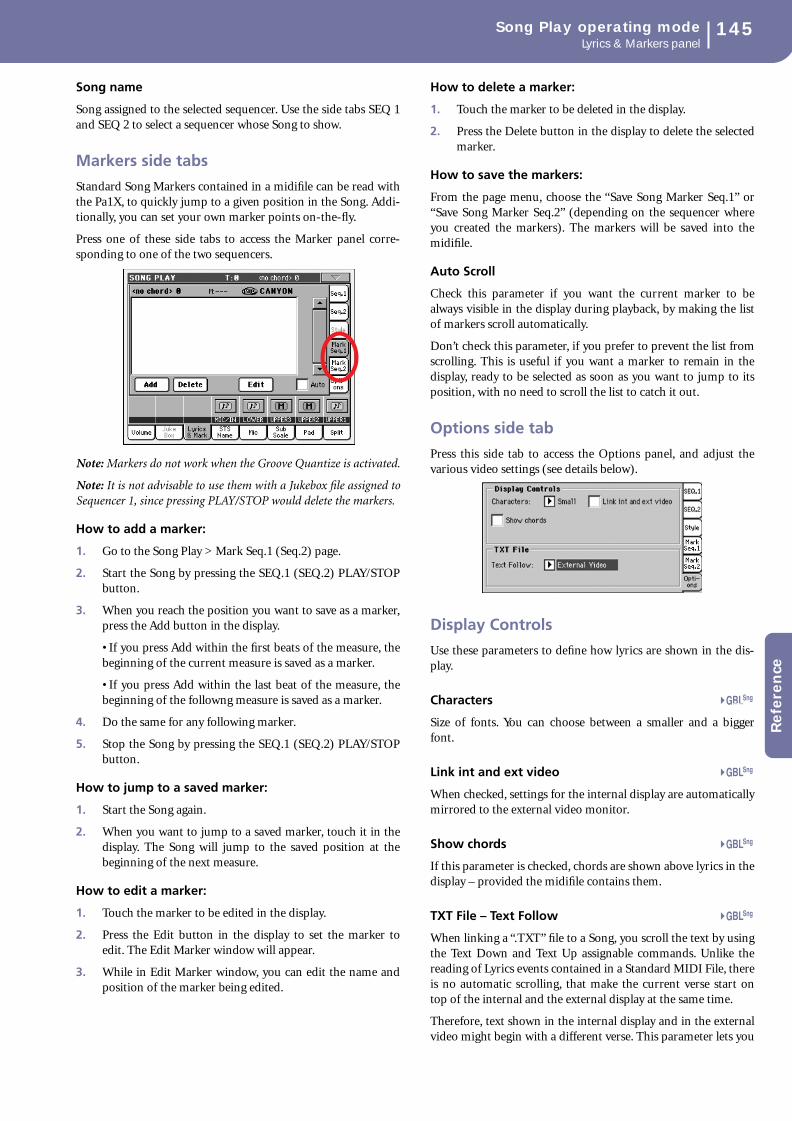
145Song Play operating modeLyrics & Markers panel
Ref
eren
ce
Song name
Song assigned to the selected sequencer. Use the side tabs SEQ 1and SEQ 2 to select a sequencer whose Song to show.
Markers side tabs
Standard Song Markers contained in a midifile can be read withthe Pa1X, to quickly jump to a given position in the Song. Addi-tionally, you can set your own marker points on-the-fly.
Press one of these side tabs to access the Marker panel corre-sponding to one of the two sequencers.
Note: Markers do not work when the Groove Quantize is activated.
Note: It is not advisable to use them with a Jukebox file assigned toSequencer 1, since pressing PLAY/STOP would delete the markers.
How to add a marker:
1. Go to the Song Play > Mark Seq.1 (Seq.2) page.
2. Start the Song by pressing the SEQ.1 (SEQ.2) PLAY/STOPbutton.
3. When you reach the position you want to save as a marker,press the Add button in the display.
• If you press Add within the first beats of the measure, thebeginning of the current measure is saved as a marker.
• If you press Add within the last beat of the measure, thebeginning of the followng measure is saved as a marker.
4. Do the same for any following marker.
5. Stop the Song by pressing the SEQ.1 (SEQ.2) PLAY/STOPbutton.
How to jump to a saved marker:
1. Start the Song again.
2. When you want to jump to a saved marker, touch it in thedisplay. The Song will jump to the saved position at thebeginning of the next measure.
How to edit a marker:
1. Touch the marker to be edited in the display.
2. Press the Edit button in the display to set the marker toedit. The Edit Marker window will appear.
3. While in Edit Marker window, you can edit the name andposition of the marker being edited.
How to delete a marker:
1. Touch the marker to be deleted in the display.
2. Press the Delete button in the display to delete the selectedmarker.
How to save the markers:
From the page menu, choose the “Save Song Marker Seq.1” or“Save Song Marker Seq.2” (depending on the sequencer whereyou created the markers). The markers will be saved into themidifile.
Auto Scroll
Check this parameter if you want the current marker to bealways visible in the display during playback, by making the listof markers scroll automatically.
Don’t check this parameter, if you prefer to prevent the list fromscrolling. This is useful if you want a marker to remain in thedisplay, ready to be selected as soon as you want to jump to itsposition, with no need to scroll the list to catch it out.
Options side tab
Press this side tab to access the Options panel, and adjust thevarious video settings (see details below).
Display Controls
Use these parameters to define how lyrics are shown in the dis-play.
Characters
Size of fonts. You can choose between a smaller and a biggerfont.
Link int and ext video
When checked, settings for the internal display are automaticallymirrored to the external video monitor.
Show chords
If this parameter is checked, chords are shown above lyrics in thedisplay – provided the midifile contains them.
TXT File – Text Follow
When linking a “.TXT” file to a Song, you scroll the text by usingthe Text Down and Text Up assignable commands. Unlike thereading of Lyrics events contained in a Standard MIDI File, thereis no automatic scrolling, that make the current verse start ontop of the internal and the external display at the same time.
Therefore, text shown in the internal display and in the externalvideo might begin with a different verse. This parameter lets you
Sng
Sng
Sng
Sng

146 Song Play operating modeSTS Name panel
choose the internal or the external display as the one that mustbe perfectly lined.
Int. Video When pressing the control corresponding to theText Down command, the first line of the currentpage of text is shown on top of the internal video.The external video might not be perfectly lined.Choose this option if you are reading verses fromthe internal display.
Ext. Video When pressing the control corresponding to theText Down command, the first line of the currentpage of text is shown on top of the external video.The internal video might not be perfectly lined.Choose this option is your audience is readingverses from an external video.
Note: When this option is selected, the text scrollbardisappears from the internal display.
Text files loaded with Standard MIDI Filesand MP3 files
When a “.TXT” file exists in the same directory as a StandardMIDI File or MP3 file, and shares exactly the same name, it willbe loaded with the “.MID” or “MP3” file, and can be seen in theLyrics page.
As an example, if the file “MYSONG.TXT” exists in the samedirectory as the “MYSONG.MID” or “MYSONG.MP3” file, it isloaded together with the matching “.MID” or “.MP3” file.
However, unlike ordinary Lyrics, the text will not scroll automat-ically while the Song is playing back. You must scroll it with theDIAL. As an alternative, you can use an assignable switch orfootswitch, with the Text Page Up or Text Page Down functionsassigned, to scroll (respectively) to the previous or next textpage.
Note: When a “.TXT” file is loaded with the Song, it overrides anyincluded Lyrics data.
STS Name panel
Select this panel to see the name of the four available STSs. See“STS Name panel” on page 82 for details.
Mic panel
Select this panel to set parameters for the microphone input. See“Mic panel” on page 82 for details.
Sub-Scale panel
Select this panel to select a secondary scale for the Keyboardtracks. See “Mixer/Tuning: Sub Scale” on page 86 for details.
Pad panel
Select this panel to see which Hit or Sequence Pads are assignedto the four Pads. See “Pad panel” on page 83 for details.
Split panel
Select this panel to adjust the split point for the Keyboard tracks.See “Split panel” on page 83 for details.

147Song Play operating modeEdit menu
Ref
eren
ce
Edit menu
From any page, press the MENU button to open the Song Playedit menu. This menu gives access to the various Song Play editsections for the currently selected sequencer (see “Songs area”on page 142).
When in the menu, select an edit section, or press EXIT orSONG PLAY to exit the menu.
When in an edit page, press the EXIT or SONG PLAY button togo back to the main page of the Song Play operating mode.
Each item in this menu corresponds to an edit section. Each editsection groups various edit pages, that may be selected by press-ing the corresponding tab on the lower part of the display.
Edit page structure
All edit pages share some basic elements.
Operating mode
This indicates that the instrument is in Song Play mode.
Selected sequencer
Before entering edit, select one of the two sequencers, by usingthe Song area of the main page (see “Switching betweensequencers during editing” below).
Edit section
This identifies the current edit section, corresponding to one ofthe items of the edit menu (see “Edit menu” on page 147).
Page menu icon
Press this icon to open the page menu (see “Page menu” onpage 155).
Parameters area
Each page contains various parameters. Use the tabs to selectone of the pages. For detailed information on the various typesof parameters, see sections starting from page 147.
Tabs
Use tabs to select one of the edit pages of the current edit section.
Switching between sequencers duringediting
When you enter Edit mode, you can edit the selected sequencer’sparameters. The selected sequencer is always shown on the pageheader.
To select a sequencer, go to the main page of the Song Playmode, and select the sequencers you wish to edit. The selectedsequencer is shown with a white background.
Mixer/Tuning: Volume/Pan
This page lets you set the volume and pan for each of the Key-board or Song tracks.
Note: Song parameters cannot be saved when saving to a Perfor-mance or STS.
Note: A muted track may be reset when selecting a different Song.
Operating modeSelected sequencer
Selected track info
Page menu icon
Parameters area
Tabs
Edit section

148 Song Play operating modeMixer/Tuning: FX Send
Use the TRK. SEL. button to switch from the Keyboard to theSong tracks, and vice versa.
Upper Volume Link
This parameter allows you to define if changing the volume forone of the Upper tracks, proportionally changes also the volumefor the other Upper tracks.
To save this parameter status, go to the Style Play mode, thenselect the Write Global-Style Play Setup from the page menu (see“Write Global-Song Play Setup dialog box” on page 156).
Note: This parameter is the same you can find in the “Preferences:Global Setup” page of the Style Play mode (see page 96).
On When changing volume to one of the Uppertracks, volume for the other Upper trackschanges in proportion.
Off When changing volume to one of the Uppertracks, only that track’s volume is changed. OtherUpper tracks are left unchanged.
Pan
Track position in the stereo field.
-64…-1 Left stereo channel.
0 Center.
+1…+63 Right stereo channel.
Off If the track’s output status is Left&Right (normalsetting), the direct (uneffected) signal is not sentto the outputs; only the FX signal is heard for thistrack.
If the track is sent to a separate output, no FX issent to any output.
To program the output status for each track, see“Audio Output: Seq1” and “Audio Output: Seq2”on page 239.
Volume
Track’s volume.
0…127 MIDI value of the track’s volume.
Play/Mute icon
Track’s play/mute status. See “Keyboard track status” onpage 141 for more information.
Play status. The track can be heard.
Mute status. The track cannot be heard.
Mixer/Tuning: FX Send
This page lets you set the level of the track’s direct (uneffected)signal going to the Internal FX processors.
Note: Song parameters cannot be saved when saving to a Perfor-mance or STS.
The effect processors included in Pa1X are connected in parallel,so you can decide which percentage of the direct signal can beeffected:
In case you do not want to send a track’s direct signal to the out-put, but only the effected signal (as when using “insert” effects,like Rotary, Distortion, EQ…), just set the Pan to Off (see “Pan”above):
There are four Internal FX processors in Song Play mode. Usu-ally, they are arranged as follows:
FX A Reverb processor for Sequencer 1 and 2.
FX B Modulating FX processor for Sequencer 1 and 2.
FX C Reverb processor for Keyboard tracks.
FX D Modulating FX processor for Keyboard tracks.
Depending on the status of the “Seq.2 FX Mode” parameter,Sequencer 2 might use the C/D effect pair (see page 154).
Furthermore, in Sequencer mode you can create Songs using allfour effects (see “Effects: FX Select” on page 180).
Sty
SB
SB
SB Sng
Track Out L/R
FX Processor
Track Out L/R
FX Processor

149Song Play operating modeMixer/Tuning: Tuning
Ref
eren
ce
Use the TRK. SEL. button to switch from Keyboard to Songtracks, and vice-versa.
Note: When you stop, then start the Song again, or select a differentSong, the default Song track settings are selected again. You can,however, pause the Song, change the effects, then exit fro pause andstart the Song again. Edit the Song in Sequencer mode to perma-nently change the effects.
Send level (A…D)
0…127 Level of the track (direct) signal sent to the effectprocessor.
Play/Mute icon
Track’s play/mute status. See “Keyboard track status” onpage 141 for more information.
Play status. The track can be heard.
Mute status. The track cannot be heard.
Mixer/Tuning: Tuning
Parameters in this page let you set various tuning settings. See“Mixer/Tuning: Tuning” on page 86 for details.
Parameters
Note: Song track values edited in this page are not saved, and areonly intended for realtime use.
Effects: FX Select
This page allows you to select effects to be assigned to the fourInternal FX processors (A-D).
Note: When you stop the Song, or select a different Song, thedefault effects are selected again. You can, however, stop the Song,change the effects, then start the Song again. Edit the Song inSequencer mode to permanently change the effects.
FX A…D
Effects assigned to the corresponding effect processors. Usually,A and C are reverbs, while B and D are modulating effects (cho-rus, flanger, delay…). For a list of the available effects, see“Effects” on page 329.
Wet/Dry
Mix between the effected (Wet) and direct (uneffected, Dry) sig-nal.
Dry Direct signal only.
Wet Effected signal only.
nn:nn Percentage of Wet/Dry signal.
B to A, D to C
Amount of the B effect going back to the input of the A effect, orof the D effect going back to the input of the C effect.
Mod.Track (Modulating Track)
Source track for modulating MIDI messages. You can modulatean effect parameter with a MIDI message generated by a physicalcontroller or a Song track.
SB
SB Sng
SB
SB Sng
SB Sng
SB Sng
Sng

150 Song Play operating modeEffects: FX A…D
Effects in Song Play mode
Pa1X is equipped with four effect processors, or DSPs (DigitalSignal Processors), to process MIDI tracks. In Song Play modeyou can have two or four effects at the same time, depending onthe midifile you are reading.
Effects A and B are usually reserved to both sequencers, whileeffects C and D are usually reserved to Keyboard tracks andPads.
Depending on the status of the “Seq.2 FX Mode” parameter,each effect pair could be reserved to a different Sequencer (seepage 154).
You can also create Songs that make use all four effects inSequencer mode.
• A Song created on the Pa1X (in Sequencer mode) can useup to 4 effects (usually 2 reverbs + 2 modulating effects);each track may use the A/B or C/D pair.
• A Standard MIDI File or Karaoke™ file will only use 2effects (usually 1 reverb + 1 modulating effect). This letsyou use the remaining 2 effects for the Realtime tracks.
• When using both sequencers at the same time, and the“Seq.2 FX Mode” is set to “AB” mode (see page 154), theyonly use the A/B pair, while the C/D pair is reserved to theKeyboard tracks.
• When using both sequencers at the same time, and the“Seq.2 FX Mode” is set to “CD” mode (see page 154),Sequencer 1 uses the A/B pair, while Sequencer 2 uses theC/D pair, sharing it with Keyboard tracks.
Effects: FX A…D
These pages contain the editing parameters for the four effectprocessors. Here is an example of the FX A page, with the ReverbSmooth Hall effect assigned.
Selected effect
Select one of the available effects from this pop-up menu. This isthe same as the “FX A…D” parameters found in the “Effects: FXSelect” page (see above).
FX parameters
Parameters may differ, depending on the selected effect. See“Effects” on page 329 for a list of available parameters for eacheffect type.
Wet/Dry
Mix between the effected (Wet) and direct (uneffected, Dry) sig-nal. This is the same as the “Wet/Dry” parameters found in the“Effects: FX Select” page (see above).
Src (Source)
Modulation source. To select the track generating this message,see the “Mod.Track (Modulating Track)” parameters found inthe “Effects: FX Select” page (see above). For a list of modulationsource, see the “Effects” chapter.
Track Controls: Mode
These parameters let you set the Internal/External, and the Poly/Mono status of Song tracks. See “Track Controls: Mode” onpage 88.
Parameters
Note: These parameters can be saved to the Global-Song PlaySetup, by selecting the Write Global-Song Play Setup commandfrom the page menu.
Track Controls: Drum Volume
These parameters let you adjust the volume for each percussiveinstrument family. See “Track Controls: Drum Volume” onpage 150.
Parameters
Note: Song track values edited in this page are not saved, and areonly intended for realtime use.
Track Controls: Easy Edit
These parameters let you “fine-tune” edit parameters for Soundsassigned to the tracks. See “Track Controls: Easy Edit” onpage 90.
Parameters
Note: Song track values edited in this page are not saved, and areonly intended for realtime use.
Keyboard/Ensemble: Keyboard Control
These parameters let you set parameters for the Keyboard tracks.See “Keyboard/Ensemble: Keyboard Control” on page 91.
Parameters
Selected effect
FX param-eters
SB Sng
SB Sng
SB Sng
SB Sng
SB Sng
SB
SB
SB

151Song Play operating modeKeyboard/Ensemble: Key/Velocity Range
Ref
eren
ce
Keyboard/Ensemble: Key/Velocity Range
These parameters let you select a note and velocity range for theKeyboard tracks. See “Keyboard/Ensemble: Key/Velocity Range”on page 91.
Parameters
Keyboard/Ensemble: Ensemble
See “Keyboard/Ensemble: Ensemble” on page 92.
Parameters
Pad/Switch: Pad
See “Pad/Switch: Pad” on page 94.
Parameters
Pad/Switch: Assignable Switch
See “Pad/Switch: Assignable Switch” on page 94.
Parameters
Jukebox Editor
The Jukebox function lets you play a list of Songs (127 max), atthe simple touch of a button. You can play a Jukebox file byassigning it to Sequencer 1, after having selected it in the SongSelect page, just as if it was an ordinary Song (see “Jukeboxpanel” on page 143).
In this page, you can create, edit and save a Jukebox file. A Juke-box list can contain Standard MIDI Files, Karaoke™ files, andMP3 files. (Note: MP3 files are only supported with the EXBP-MP3 option installed).
If a Jukebox file is already selected into a Sequencer, you willenter this page with that file ready to be edited. Otherwise, youwill enter this page with an empty list.
To create a new Jukebox file, press Del All to remove all Songs orthe current list. Add new Songs, then press Save and enter a dif-ferent name before confirming. A new Jukebox file will be savedto disk.
Move Up/Down
Use these button to move the selected item up or down in thelist.
Add
Adds a Song at the end of the current list. You can add up to 127Songs in a list.
Note: A Jukebox list can include only Songs contained in the samefolder.
Hint: Instead of a single Song, you can select a Jukebox file, andadd its whole content to the current Jukebox list.
Insert
Inserts a Song at the current position (i.e., between the selecteditem and the preceding one). All subsequent Songs are moved tothe next higher-numbered slot. You can add up to 127 Songs in alist.
Note: A Jukebox list can include only Songs contained in the samefolder.
Hint: Instead of a single Song, you can select a Jukebox file, andinsert its whole content to the current Jukebox list.
Delete
This command lets you delete the selected Song from the list.
Del All
Select this command to delete the whole Jukebox list.
Save
Press this button to save the Jukebox file to disk. The Save Juke-box File dialog box appears, allowing you to edit the name andsave your file to disk.
Press the (Text Edit) button to open the Text Edit window,
and edit the name.
If you are editing an existing list, and do not change its name, theold file is overwritten. If you change it, a new file will be createdon disk.
If you are saving a new list, the “NEWNAME.JBX” name is auto-matically assigned, and you can edit it.
Note: You can save your “.JBX” file only in the same folder as theSong files included in the list.
SB
SB
SB
SB

152 Song Play operating modeGroove Quantize
Groove Quantize
You can apply a realtime “groove-quantization” to Sequencer 1.Groove-quantization is a way of changing the music groove dur-ing the playback, moving notes to the nearest axis of a rhythmic“grid”. Please feel free to experiment: this function is a greatsource of musical inspiration.
To enable groove quantize, you can either use the command inthis page, or check the Groove Quantize Enable command in thepage menu.
Note: Groove Quantize parameters are not saved, as they are onlyintended for realtime use.
Enable
Enables/disables quantization. It is automatically set to Off eachtime the instrument is turned on, or when selecting a differentSong.
Hint: You can enable/disable the Groove Quantize also by selectingthe “Seq.1-Groove Quantize Enable” command from the pagemenu.
Note Start
Enables/disables quantization of the Note On event (i.e. begin-ning of the note).
Note Duration
Enables/disables quantization of the Note Off event (i.e. thelength of the note).
Resolution
Coarse quantize grid resolution. This parameter is the mainquantization value, to be varied with the Acc, Swing and Win-dow values.
(1/32)… (1/4)
Grid resolution, in musical values (a “3” after thevalue means “triplet”). For example, when youselect 1/8, all notes are moved to the nearest 1/8
division. When you select 1/4, all notes are movedto the nearest 1/4 division.
Accuracy
Accuracy percentage of quantize. For example, if Acc=50, andthe note is 20 tics away from the coarse grid, it is moved to thegrid of only 10 tics.
0 No accuracy. The quantize is not executed.
100 Maximum accuracy. The note is moved exactly atthe grid position.
Swing
Asymmetry of quantization. Grid axis are moved to the nearestgrid axis.
0 Even-numbered axis are totally moved over theprevious odd-numbered axis.
50 Axis are perfectly equidistant.
100 Even-numbered axis are totally moved over thefollowing odd-numbered axis.
Window
Area of quantize intervention, bordering the grid axis.
0 The quantize window corresponds to the axis. Noquantization happens.
100 The quantize window extends to the nearest win-dow; all events are quantized.
No quanti-zation
1/8
1/4
Swng=50
Swng=25
Swng=75
Win=0
Win=50
Win=100

153Song Play operating modePreferences: Track Settings
Ref
eren
ce
Preferences: Track Settings
In this page, you can set various general parameters referred toSong tracks.
Note: These settings are stored in the Song Play Setup area of theGlobal file (together with all the other parameters marked with the
abbreviation in the manual). After changing these settings,select the Write Global-Song Play Setup command from the pagemenu to save them to the Global.
Melody
This parameter selects the Song’s Melody track. This track can bemuted using the “Melody Mute” function, assignable to anAssignable Switch, Footswitch or EC5 pedal.
Drum
This parameter selects the Song’s Drum track. This track is leftset to play (together with the Bass track) when selecting the“Drum&Bass” function, assignable to an Assignable Switch,Footswitch or EC5 pedal.
Bass
This parameter selects the Song’s Bass track. This track is left setto play (together with the Drum track) when selecting the“Drum&Bass” function, assignable to an Assignable Switch,Footswitch or EC5 pedal.
Harmony Track
The Voice Processor gets the chord notes (as well as ProgramChange messages) from the track selected with this parameter.
Off No track sends notes to the Harmony module ofthe Voice processor. Chords can still be receivedfrom the MIDI IN.
Seq.1-Track 1…16
Chords are sent from one of Sequencer 1 tracks.
Seq.2-Track 1…16
Chords are sent from one of Sequencer 2 tracks.
Seq.1+2 Track 1…16
Notes are sent by a track with the same namefrom both Sequencer 1 and Sequencer 2.
Warning: If both sequencers are generating notes atthe same time, the harmonizer will receive notesfrom both sequencers. Be warned that notes are sentto the harmonizer even when the BALANCE slider
is totally moved away from a generating sequencer,and may interfere with the Song you are listeningto.
Global Chords are sent from the Chord Scanning area ofthe keyboard.
Preferences: General Control
In this page, you can set various general parameters.
Note: These settings are stored in the Song Play Setup area of theGlobal file (together with all the other parameters marked with the
abbreviation through the manual). After changing thesesettings, select the Write Global-Song Play Setup command fromthe page menu to save them to the Global.
Midi Setup
MIDI channels for the Song Play mode can be automaticallyconfigured by selecting a MIDI Setup with this parameter. See“MIDI” on page 280 for more information on using MIDI Set-ups.
Note: To automatically select a MIDI Setup when entering theSong Play mode, select the Write Global-Song Play Setup commandfrom the page menu.
For detailed information on MIDI Setup settings, see “MIDISetup” on page 328.
Note: After selecting a MIDI Setup, you can go to the Global modeand apply any change to each channel setting. To store thesechanges to a MIDI Setup, while still in Global mode select the WriteGlobal-Midi Setup command from the page menu. All MIDI Set-ups can be freely customized and overwritten.
Hint: To restore the original MIDI Setups, load the original Fac-tory data again (downloadable from www.korgpa.com).
Performance recalls FX CD
This parameter selects the effects mode for the Performance.
Off When selecting a Performance, no effect isselected.
On The Performance selects the C/D effect pair.
Note: When both this parameter and the “Seq.2 FXMode” parameter are set to select the C/D effectpair, Sequencer 2 shares its effects with Keyboardtracks. Therefore, these effects can be changed eitherselecting a Song for Sequencer 2, or selecting a Per-formance.
Sng
Sng
Sng
Sng
Sng
Sng
Sng
Sng

154 Song Play operating modePreferences: General Control
Lyrics/Markers Balance Link
This parameter allows you to use the BALANCE slider to selectthe Sequencer whose lyrics or markers will be shown in thebuilt-in display, and whose lyrics will be shown on the externalmonitor (provided the optional VIF-3 video interface card isinstalled).
Off When moving the BALANCE cross-fader, onlythe Song will be selected. The shown lyrics ormarkers will remain unchanged.
On When moving the BALANCE slider fully to theleft or the right, the corresponding Song willfade-in, and its lyrics and markers will be selectedand shown in the display or external monitor.
SEQ 1 Best GM SoundSEQ 2 Best GM Sound
When one of these options is checked, any GM-compliant soundin the corresponding sequencer is replaced by the best Pa1Xsounds, according to a factory-set table.
Note: This function does not work on songs created or edited withthe Korg Pa1X, or any other a Pa-Series instrument. This is to pre-vent changing the original user’s sound assignment.
Hint: General MIDI (GM) sounds ensure compatibility betweendifferent brands and models of musical instruments, but are hardlythe best-sounding presets. This option can substantially improveyour midifile’s playback, even if this is not always true. A littleexperimentation is recommended.
Link Mode
The two onboard Sequencers can work each with a differentTempo (Off), or use the same Tempo (Link modes).
Note: You can always start both sequencers simultaneously. Startboth sequencers simultaneously by keeping SHIFT held down whilepressing one of the (PLAY/STOP) controls.
Off The sequencers Tempo are not linked. Eachsequencer uses its own Tempo.
Measure The two sequencers Tempo are linked together.The Tempo data written into the Songs areignored. Adjust the Tempo using the TEMPO/VALUE controls.
Start one of the sequencers, by pressing its own (PLAY/STOP) control. Then, start the other
sequencer, by pressing the other (PLAY/STOP) control; the second sequencer starts at thenext measure.
Beat The two sequencers Tempo are linked together.The Tempo data written into the Songs areignored. Adjust the Tempo using the TEMPO/VALUE controls.
Start one of the sequencers, by pressing its own (PLAY/STOP) control. Then, start the other
sequencer, by pressing the other (PLAY/STOP) control; the second sequencer starts at thenext beat (quarter or octave, depending on theSong’s Time Signature).
Seq.2 FX Mode
This parameter selects the effects mode for Sequencer 2. When a4-effects Song is loaded, all four effects are used, independentlyfrom this setting.
AB The A and B effect pair is used. Sequencer 2shares its effects with Sequencer 1.
CD The C and D effect pair is used.
Note: When this parameter is set to CD, Sequencer2 shares its effects with Keyboard tracks, so theseeffects can be changed either selecting a Song forSequencer 2, or selecting a Performance (unless the“Performance recalls FX CD” parameter is leftunchecked – see above).
Fast Play
When checked, this function allows to skip the empty setupbeats at the beginning of a song, and immediately start from thefirst note. However, any setup data are read and considered.
Get HD Path
Press this button to see the current path of each sequencer. Thislets you know where currently selected Songs are located in thedisks.
If you save these paths to the Global, by selecting the “Write Glo-bal-Song Play Setup” command from the page menu, the firsttime you will open the Song Select window, after turning theinstrument on, the selected path will be selected by default.
Sng
LyricsMarkers
Seq.1
LyricsMarkersSeq.2
Sng
Sng
Sng
Sng
Sng
Sng

155Song Play operating modePage menu
Ref
eren
ce
Page menu
Press the page menu icon to open the menu. Press a command toselect it. Press anywhere in the display to close the menu withoutselecting a command.
Write Performance
Select this command to open the Write Performance dialog box,and save most of the current control panel settings to a Perfor-mance.
See “Write Performance dialog box” on page 98 for more infor-mation.
Write Global-Song Play Setup
Select this command to open the Write Global-Song Play Setupdialog box, and save global settings that are unique to the SongPlay mode.
See “Write Global-Song Play Setup dialog box” on page 156 formore information.
Save Song Marker Seq.1/2
Select this command to save the markers created in the corre-sponding sequencer (see “Markers side tabs” on page 145).
Export Jukebox List
Select this command to save the current Jukebox list as a text fileto a disk. Here is how it works.
1. While a Jukebox file is assigned to the sequencer, select theExport Jukebox List command from the page menu.
2. A dialog box will appear, asking you to select either a floppydisk or the hard disk.
3. Select an option.
• If you select the floppy disk, insert a floppy disk in thedisk drive, and press OK to confirm.
• If you select the hard disk, just press OK to confirm.
Note: When saved, the text file will be named after the selectedJukebox file. For example, a Jukebox file named “Dummy.jbx” willgenerate a “Dummy.txt” file. A new, unnamed Jukebox file willgenerate a “New_name.txt” file. If a file with the same namealready exists on the floppy disk, it will be overwritten withoutwaiting for any confirmation.
The list will include the progressive number assigned to each Song,file names in MS-DOS format (8.3), the total number of files in thelist.
For the correct display and printing of the list on a personal com-puter, use a fixed size (i.e., non-proportional) character in your texteditor.
Seq.1-Groove Quantize Enable
Enables/disables the groove quantize (see “Groove Quantize” onpage 152). It is automatically unchecked each time the instru-ment is turned on, or when selecting a different Song.
Note: Groove Quantize only works on Sequencer 1.
Solo Track
Select the track to be soloed, and check this item. You will hearonly the selected track, and the ‘Solo’ warning will flash on thepage header.
Uncheck this item to exit the Solo function.
The Solo functions works in a slightly different way, dependingon the selected track:
• Keyboard track: The selected Keyboard track is the only trackyou can hear when playing on the keyboard. All other Keyboardtracks are muted. Sequencer tracks are left in play status.
• Song track: The selected track is the only Song track you canhear. All other Song tracks are muted. Keyboard tracks are left inplay status.
Copy/Paste FX
You can copy a single, or all four effects, between Styles, Perfor-mances, STSs and Songs. To do this, choose the “Copy FX” and“Paste FX” commands from the page menu of the Style Play,Song Play or Sequencer modes.
To copy a single effect:
1. Select the source Song, Performance, Style or STS, then
• go to the page of the single effect you want to copy (FX A,FX B, FX C, or FX D), or
• go to the Effects > FX Select page, to copy all four effects.This may be useful if you want to copy each of the foureffects into different Performances, Styles or STSs.
2. Choose the “Copy FX” command from the page menu.
3. Select the target Performance, Style or STS, then go to thepage of the single effect you want to paste (FX A, FX B, FXC, or FX D).
4. Choose the “Paste FX” command from the page menu.
To copy all four effects:
1. Select the source Performance, Style or STS, then go to theEffects > FX Select page, to copy all four effects.
2. Choose the “Copy FX” command from the page menu.

156 Song Play operating modeWrite Global-Song Play Setup dialog box
3. Select the target Performance, Style or STS, then go to thepage of the Effects > FX Select page.
4. Choose the “Paste FX” command from the page menu.
Write Global-Song Play Setup dialog box
Open this dialog box by selecting the Write Global-Song PlaySetup item from the page menu. Here, you can save various SongPreference settings (see “Preferences: Track Settings” onpage 153), that are saved to the Global file.
Parameters saved in the Song Play Setup area of the Global are
marked with the symbol through the user’s manual.
Playing back MP3 files
Playing back an MP3 is the same as playing a Standard MIDIFile, with the following exceptions:
• You can play only one MP3 file at once.
• Tempo cannot be modified.
• Lyrics cannot be displayed.
• You need the EXBP-MP3 option to read MP3 files.
Playing back Audio CD tracks
Playing back an Audio CD Track is the same as playing a Stan-dard MIDI File, with the following exceptions:
• You can play only one Audio CD Track at once.
• Tempo cannot be modified.
• Lyrics cannot be displayed.
• You need the CDRW-1 option to read Audio CD Tracks.
• You can play a whole CD by selecting the All option whilein the main page of the Song Play mode (see “All Songs” onpage 140).
Sng

157SongBookBook
Ref
eren
ce
The SongBook is an onboard database that allows you to orga-nize various “musical resources” (Style, Standard MIDI Files,KAR files, and – optionally – MP3 files) for easy retrieving.
The SongBook mode overlaps the Style Play and Song Play oper-ating modes. When you select an entry from the database, theStyle Play or Song Play mode is automatically selected, depend-ing on the type of file associated with the entry.
In addition to helping you organize your shows, the SongBookallows you to associate up to four STSs to each Standard MIDIFile or MP3, played back in Song Play mode. This way, it is easyto recall a complete setup for Keyboard tracks, effects, and theVoice Processor, for realtime playing over a midifile or MP3.
For more information on using the SongBook, see the QuickGuide (starting from page 56).
Note: SongBook entries do not include actual data, but only apointer to a Style in memory, a Standard MIDI File, or an MP3file. When you copy a SongBook file, referenced files are not copiedwith it.
Warning: If you load a SongBook list from disk (“.SBD” file), theexisting one in memory is deleted. Save your old SongBook listbefore loading a new one.
Book
The Book page contains the full database of song entries (i.e., an“.SBD” file). While in this page, you can select an entry, and pressthe Select button in the display to start playback.
If the “Enable List Edit” command is selected in the page menu(see above), the “Add to list” button becomes available, to let youadd entries to the selected Custom List.
Each entry of this database may include the song’s author, name,genre, original key, tempo and meter. When selecting one of theentries, the associated Style, MP3 or Standard MIDI File is auto-matically recalled.
List Header
The List Header may change, depending on the type of dataassociated with the selected entry.
• When a Style is associated to the entry, the currentlyselected entry’s name is shown on the left (“N:”), and theassociated Style is shown on the right (“Style:”):
• When a Standard MIDI File or MP3 is associated to theentry, the list header is split into two parts, with the left halfreferring to Sequencer 1, and the right one referring toSequencer 2.
Information for the selected entry’s name (“N:”) and asso-ciated Standard MIDI File or MP3 (“S1:” or “S2:”) is givenfor each sequencer:
Note: If you select a different Style, Standard MIDI File orMP3, the entry’s name field (“N:”) returns blank (---),meaning the entry has been modified.
Main list
Full list of the SongBook database. Use the scrollbar to browsethrough the list.
You can touch one of the heading labels above the list to changethe order in which entries are shown. For example, by touchingthe “Name” label, the list is alphabetically re-ordered accordingto the file names. The selected label turns red, showing the cur-rently selected ordering.
The corresponding items in the page menu are automaticallyupdated to reflect these changes (see “Sort by Type/Name/Genre/Artist/Key/Tempo/Meter” on page 164).
Scrollbar
Use the scrollbar to scroll the entries.
Commands
Filtered
When this box is checked, only entries matching the selected fil-ter criteria are shown in the Main list. The box is automaticallychecked when you exit from the Filter dialog box by pressing OK(see below).
SongBook
Main list
Commands
List Header
Scrollbar

158 SongBookBook
Filter…
Press this button to open the Filter dialog box, and select one ormore filter criteria, to show a restricted set of entries in the mainlist.
Press the (Text Edit) button next to the search criteria you
want to edit (Name, Genre, or Artist). You can also select aMeter, or a range of Tempo values.
Press the Clear button next to the search criterion you want todelete or set to a default value.
Press Clear All to reset all search criteria, excluding Tempo.
Add to list
Select an entry, then press this button to add the selected entryto the current Custom List (see “Custom List” on page 162).
Select
Press this button to confirm selection of the highlighted entry inthe main list. After pressing this button, the name of the selectedentry appears in the left upper corner of the display (“N:”).
When you select a song in any of the SongBook lists, its nameappears in reversed text, over a dark-blue background. While inthis situation, the song is selected, but not yet in play.
When you press the Select button in the display, the song startsto play. The blue background turns to green, to show the Song isselected and currently in play.
Numeric selection of entries
When in SongBook mode, you can select a SongBook entry bymeans of an unique number. Numbers associated with eachentry are added in the Book Edit 2 page (see “Book Edit 2” onpage 161).
To see the numbers while in the Book page, select the “ShowSong Numbers (now Key)” command from the page menu:
After you select this command, the “Num” column appears:
To see the “Key” column again, select the “Show Key (now SongNumbers)” command from the page menu.
To select a SongBook entry by entering its number, press theSONGBOOK button again while you are in any page of theSongBook mode. The numeric keypad will appear, allowing youto enter the number corresponding to the desired entry.
Selecting SongBook entries via MIDI
SongBook entries can be selected via MIDI (through the specialControl channel), by using the NRPN dedicated Control Changemessages #99 (MSB, with value 2) and #98 (LSB, with value 64).
Setting the special Control MIDI channel
First of all, go to the Global > MIDI > Setup/General Controlpage and select a MIDI Setup to be used when you will remotelyselect SongBook entries.
Then go to the Global > MIDI > Midi In Channel page, to assigna MIDI channel to the special Control channel. Assign the Con-trol option to one of the sixteen available MIDI channels (usu-ally one of the higher-numbered ones).
When done, save this setting to the current MIDI Setup bychoosing the “Write Global-Midi Setup” command from thepage menu.
If you plan to use a different MIDI channel for the Style Play andSong Play modes, repeat the above to create a second MIDISetup.
Assigning a MIDI Setup to the Style Play and Song Playmodes
Since SongBook entries dynamically recall the Style Play or theSong Play modes, it is advisable to assign them the same MIDISetup, or two different MIDI Setups with the Control channelassigned to the same MIDI channel. This way, the same MIDIchannel will be used to select a SongBook entry in either theStyle Play or Song Play mode.
When one of the operating modes is recalled, the MIDI Setupmemorized in the Style Play Setup or in the Song Play Setup willbe automatically selected, and MIDI channels will be automati-cally configured.
To assign a MIDI Setup to each of the two operating modes:
• In Style Play mode, go to the Style Play > Preferences > StyleSetup page, and select a MIDI Setup. Select the Write Global-Style Setup command from the page menu.
• In Song Play mode, go to the Song Play > Preferences > Gen-eral Control page, and select the same MIDI Setup assigned to

159SongBookBook Edit 1
Ref
eren
ce
the Style Play mode. Select the Write Global-Song Play Setupcommand from the page menu.
Selecting SongBook entries via MIDI
When you are ready to remotely select SongBook entries, switchto the Style Play or Song Play mode.
At this point, Pa1X must receive on the special Control channelthe NRPN Control Change messages #99 (MSB, with value 2)and #98 (LSB, with value 64) in fast succession, as an initializa-tion string. This string must be sent only once, unless anotherNRPN control is sent on the same MIDI channel before selectinga different SongBook entry.
After the initialization string has been sent, you must send theselection string, made of two Control Change messages: CC#06(Data Entry MSB) for the thousands and hundreds, and CC#38(Data Entry LSB) for the tens and units. The range of the DataEntry controls, in this case, is 0~99 (instead of the typical0~127).
The following examples show some typical situations.
• Send the following string to select SongBook entry #77:
• Send the following string to select SongBook entry #100:
• Send the following string to select SongBook entry #8563:
Book Edit 1
The Book Edit 1 page is where you to add or modify SongBookentries.
Hint: Use the Filter in the Book page, to quickly find an entry to beedited.
The Book Edit 1 page with a Style-based entry:
The Book Edit 1 page with a Song-based entry:
Header
Name
Name of the selected song entry. The name is assigned after youpress the Write button to save the entry to the SongBook list.
Resource
Style, Standard MIDI File or MP3 associated with the savedentry.
Warning: If you replace this resource with a different one, carryingthe same disk path and name (in case of a Standard MIDI File orMP3) or memory location number (in case of a Style), the Song-Book entry will no longer point to the right data. Be careful not todelete or move a Style or a file associated with a SongBook entryfrom the original location.
Database Area
Genre
Music genre associated with the entry.
Artist
Name of the artist of the song associated with the entry.
Initialization string (CC#99, 98)
Thousands and hundreds (00xx)
Tens and units (xx77)
Initialization string (CC#99, 98)
Thousands and hundreds (01xx)
Tens and units (xx00)
Initialization string (CC#99, 98)
Thousands and hundreds (85xx)
Tens and units (xx63)

160 SongBookBook Edit 1
Key Info
Original key of the entry. The first field is the key name, the sec-ond one is the mode (major or minor).
Tempo
Basic tempo of the Style, or starting tempo of the Standard MIDIFile associated with the entry. This may change, if a TempoChange event is included with the associated resource.
Note: Even if you can edit this value, the starting value of a Stan-dard MIDI Files is always considered, and overrides this value.
Note: You can edit this value even if an MP3 is associated to theSongBook entry. However, this is just an indicative value, since youcannot change the MIDI Tempo of an MP3 file.
Meter Info
Basic meter of the Style, or starting meter of the Standard MIDIFile associated with the entry. This may change, if a MeterChange event is included with the associated resource.
M.Transp. (Master Transpose)
Master Transpose. When the entry is selected, the Master Trans-pose for the whole instrument is automatically changed (unlessthe Master Transpose is locked).
Note: The Master Transpose value saved with the SongBook entryoverrides any Master Transpose setting contained in the referencedSong.
Resource Area
Write Current Resource
When checked, a reference to the selected resource (the Style,SMF, KAR or MP3 file shown on the right of this parameter) issaved with the entry when pressing Write.
When unchecked, no new resource will be saved with the entry.The original resource associated with the entry will be preservedwhen pressing Write.
When pressing New Song to create a new, blank entry, thisparameter is automatically checked, and cannot be modified. Areference to the associated resource will be saved with the newentry.
Resource Name
Name of the currently selected Style, Standard MIDI File or MP3file. It may differ from the name of the saved resource, shown ontop of the page (see “Resource” above).
You can select a different resource, by just using the STYLESELECT section, or the two SELECT buttons on the controlpanel, to select a different Style, Standard MIDI File or MP3 file.
As an alternative, you can exit to the Style Play or Song Playmode, and select resources from there. Then, press the SONG-BOOK button to return to the Book Edit page.
When you press Write, a link to the selected resource(s) is savedwith the entry (provided “Write Current Resource” is selectedwhen saving). The resource(s) will be recalled when you selectedthe entry it is associated to.
Write STS
When saving a SongBook entry, and this parameter is checked,you can save a single STS or all four Style’s STSs.
<STS Name> A single STS is saved to the chosen SongBookSTS. The source are the Keyboard and Pad tracks,as they have been configured by selecting a Per-formance, Style STS, SongBook STS, or aftermanual editing.
When you press Write and choose the Rename/Overwrite option, only the new STS is overwrit-ten, while the others are left untouched.
All Current Style STS
All four STSs are saved to the current SongBookentry. The source STSs are those contained in theStyle currently selected in Style Play mode.
When you press Write and choose the Rename/Overwrite option, all STSs are overwritten.
Note: If the “Write STS” parameter is not checked, and you choosethe New Song option after having pressed Write, the four STSs ofthe last selected SongBook entry are saved in the new entry.
STS Name
Name of the current STS. Press the (Text Edit) button to
open the Text Edit window, and modify the name.
To STS Location
One of the four STS available for each entry, where you can savethe current settings for Keyboard tracks and the Voice Processor.
Buttons
New Song
Press this button to create a new entry. Settings are copied fromthe currently selected Style, Standard MIDI File or MP3. Theselected resource will be shown in the “Resource Name” field(see above).
Del Song
Press this button to delete the current entry.
Write
Press this button to open the Write Song dialog box, and save thecurrent entry to the main list of the SongBook.
To assign a different name to the entry, press the (Text Edit)
button to open the Text Edit window.
Select an option to add the new entry to the SongBook:

161SongBookBook Edit 2
Ref
eren
ce
• Select Rename/Overwrite to overwrite an existing entry,optionally changing its name. Warning: The older entry willbe deleted!
• Select New Song to save a new entry to the SongBook data-base.
Book Edit 2
The Book Edit 2 page is where you select Style options to bememorized, link a “.TXT” file, and assign a unique number tothe current entry.
Synchro Start / Synchro Stop / Memory
The status of these functions can be memorized in a SongBookentry.
Note: If the SongBook entry is based on a Song, Synchro Start andSynchro Stop appear in grey and cannot be modified, since theyhave no effect on a Song.
Unchanged When selecting this SongBook entry, the status ofthe corresponding function is left unchanged.
Off When selecting this SongBook entry, the status ofthe corresponding function is turned off.
On When selecting this SongBook entry, the status ofthe corresponding function is turned on.
Linked .TXT
You can select a text (.TXT) file, and link it to the Style or Songassociated with the current SongBook entry. When you selectthis entry, the text file is automatically loaded.
Text files can be seen in the display and in an external monitor(provided the VIF-3 Video Interface has been installed). Sincethere is no automatic synchronization between this kind of lyricsand the associated songs, you must scroll them manually. Thiscan be accomplished in either of two ways:
• When a “.TXT” file is selected, a special vertical scrollbarappears in the Lyrics/STS page of the SongBook mode.Touch it to scroll through the text during the performance.See “Lyrics/STS” on page 163.
• Scrolling is also possible by means of the Text Page Down/Up command, that can be assigned to a Footswitch, ECSwitch or Assignable Switch.
This section of the Book Edit 2 page contains two buttons:
Reset Press this buttons to unlink the text file from theentry.
Browse Press this button to open a standard File Selector,and select a “.TXT” file to be linked to the currentSongBook entry.
Song Selection Number
Here you can select a unique number (up to 9,999) to be associ-ated to the current SongBook entry. By typing this number afterpressing the SONGBOOK button again, you will be able toquickly recall an entry from the Book page (see “Numeric selec-tion of entries” on page 158).
Assigning a number is not mandatory, but may help you to orga-nize your entries. For example, you can use the different 100s tocreate a different way of categorizing your entries by genre orage.
Each number can correspond only to a single entry. You cannotassign the same number to two or more different entries. There-fore, if you try to save a modified entry without first selecting adifferent Song Selection Number, and select the New Songoption in the Write Song dialog box, the following error messagewill appear:
“This entry’s Song Selection Number has already been assigned.Please assign a different number”.
Should this happen, you will automatically be kept in the BookEdit 2 page. While there, assign a different number (while turn-ing the Dial or pressing the UP/DOWN buttons, you are onlyallowed to select numbers that are still free) and try to save theentry again.
Harmony Track
When selecting a SongBook entry (pointing to a Standard MIDIFile), the Harmony Track can be automatically selected.
Note: If the entry is based on a Style, this parameter is greyed out(non-selectable).
Unchanged The previously selected track is left unchanged.
Track Number The chosen track is selected when choosing the (SMF-based) SongBook entry.
SB
SB
SB

162 SongBookCustom List
Custom List
Use this page to select and use one of the available Custom Lists(i.e., one of the “.SBL” files saved in the same folder as the “.SBD”SongBook file). Custom Lists are lists made of entries extractedfrom the main SongBook list (as seen in the Book page). Theyallow the use of smaller, customized SongBook lists, suitable fora single gig or your own music tastes.
Hint: You can jump to this page by keeping SHIFT pressed, andpressing the SONGBOOK button.
List header
See “List Header” on page 157.
Custom list
List of files contained in the selected Custom List. Use the scroll-bar to browse through the list.
Scrollbar
Use the scrollbar to scroll the entries.
Commands
List pop-up menu
Use this pop-up menu to select one of the available lists.
Next
Press this button to select the next entry in the list.
Hint: You can assign this command to an Assignable Switch orAssignable Footswitch.
Select
Press this button to confirm selection of the highlighted entry inthe list. After pressing this button, the name of the selected entryappears in the left upper corner of the display (“N:”).
Hint: This command is useful to browse through the list, and selectan entry different than the following one in the list.
List Edit
This page is only available after checking the “Enable List Edit”command in the page menu (see page 164).
Use this page to edit the available Custom Lists. A Custom List isa set of SongBook entries, created by selecting items from theMain List.
To add entries to a Custom List, first create or select the list to beedited in this page. Then, go to the Book page, select the entry tobe added, and press the “Add to list” button. When finished add-ing entries, return to this page and edit the selected list.
List Name
Name of the selected list. To select a Custom List, go to the “Cus-tom List” page and use the List pop-up menu.
Custom list
List of songs contained in the selected Custom List. Use thescrollbar to browse through the list.
Scrollbar
Use the scrollbar to scroll the entries.
Commands
Move
Use these buttons to move the selected song entry up or down inthe list.
Del Song
Press this button to delete the selected song entry from the list.
New List
Press this button to create a new, empty Custom List.
Del List
Press this button to delete the current list.
Custom list
Commands
List Header
Scrollbar
Custom list
Commands
List Name
Scrollbar

163SongBookLyrics/STS
Ref
eren
ce
Write
Press this button to save changes to the selected Custom List.
To assign a different name to the selected list, press the
(Text Edit) button to open the Text Edit window.
Select an option to save the edited Custom List:
• Select Rename/Overwrite to overwrite an existing list,optionally changing its name. Warning: The older list willbe deleted!
• Select New List to save a new Custom List in memory. Thislist will be available in the “Custom List” page.
Lyrics/STS
The Lyrics/STS page is where you can see Lyrics and select STSs.
When a “.TXT” file is associated to the current song, a verticalscrollbar appears, allowing you to scroll to the previous orformer text page during the performance.
Note: You cannot scroll a single line of text at a time; you alwaysscroll by a whole page of text, either if you press on the scrollbar orone of the small scrolling arrows.
Lyrics as text files associated to a Song-Book entry
Lyrics can be associated to each SongBook entry (either Style orSong-based) as a “.TXT” file. See “Linked .TXT” on page 161 formore information on this issue.
As as consequence, there are four ways of seeing Lyrics on the Pa1X:
• In Song Play mode, you can see lyrics contained in a Stan-dard MIDI File as Lyrics events, or in an MP3 with Lyricsfile. To see this kind of lyrics you must press the Lyrics tabin the Song Play mode.
• In SongBook mode, you can see lyrics contained in a Stan-dard MIDI File as Lyrics events, or in an MP3 with Lyricsfile. To see this kind of lyrics you must press the Lyrics/STStab in the SongBook mode.
• In SongBook mode, you can see lyrics contained in a“.TXT” file associated with a Style-based SongBook entry.To see this kind of lyrics you must press the Lyrics/STS tabin the SongBook mode.
• In SongBook mode, you can see lyrics contained in a“.TXT” file associated with a Song-based SongBook entry.To see this kind of lyrics you must press the Lyrics/STS tabin the SongBook mode.
In the case of Song-based entries, this is the priority of lyricsdata shown in the display:
i) TXT file associated with the entry, overriding…
ii) TXT file contained in the same folder as the Standard MIDIFile or MP3 file, recalled by the entry, overriding…
iii) Lyrics events contained in the Standard MIDI File or MP3 file.
Press here to scroll to the next page

164 SongBookInfo
Info
Use the Info page to see the name of the selected entry, the asso-ciated resource(s), the total number of Songs in the SongBook,the number of filtered entries, the number of available CustomLists, and the number of Songs in the current list.
• In case of an entry based on a Style:
• In case of an entry based on Standard MIDI Files or MP3s:
Selected entry
This parameter shows the currently selected entry. If it is blank(---), the latest selected entry has been modified, or no entry hasbeen selected yet.
Associated resource
Style, Standard MIDI File or MP3 associated to the selectedentry.
Song number
Total number of entries in the SongBook list.
Filtered Song number
This parameter shows the number of entries shown in the Bookpage, after applying the selected filter. If no filter is selected, thismatches the total number of entries in the SongBook list (seeprevious parameter).
Custom List number
This parameter shows the number of available Custom Lists.
Songs in the Current List
Number of entries in the selected Custom List.
Page menu
Press the page menu icon to open the menu. Press a command toselect it. Press anywhere in the display to close the menu withoutselecting a command.
Artist/Genre
Select this command to toggle between the Artist and Genre col-umn on the SongBook list, appearing in the Book and CustomList page.
Ascending/Descending
Select this command to toggle between the ascending anddescending view order of the SongBook list. The sorting order isselected with one of the following commands.
Sort by Type/Name/Genre/Artist/Key/Tempo/Meter
Select one of these command to select the sorting order. Theselected option is shown in red above the entry list.
Enable List Edit
Select this command, and make the checkmark appear, to makethe List Edit page available.
Export as text file
Select this command to open the Export dialog box, and save theSongBook or Custom List as a text file. The selected filtering willbe applied to the exported list, assuming the Filter button ischecked.
The dialog box is a little different, depending on the page whereyou selected this command.
• Selected from the Book page:
• Selected from the Custom List page:
Selected entry
Associatedresource
Selected entryAssociated resource(s)

165SongBookPage menu
Ref
eren
ce
Press the (Text Edit) button to open the Text Edit window
and assign a name to the text file to be saved to disk.
Then, select either the floppy disk or the hard disk to save thefile.
• If you select the floppy disk, insert a floppy disk in the diskdrive, and press OK to confirm.
• If you select the hard disk, just press OK to confirm.

166 Sequencer operating modeTransport controls
The Sequencer operating mode is the full-featured onboardsequencer, where you can create a Song from scratch, or edit it.You can also use this mode to edit the initial parameters of aStandard MIDI File, either made with an external sequencer orwith Pa1X’s own sequencer.
You can save the new or edited Song as a Standard MIDI File(SMF, i.e., a file with the “.MID” extension), and play it backeither in Song Play or Sequencer mode – or on any externalsequencer.
Transport controls
To play back a Song, use SEQUENCER 1 transport controls.While in Sequencer mode, Sequencer 1 is used for all functions.See “SEQUENCER 1 TRANSPORT CONTROLS” on page 10 formore information.
Note: When pressing the (PLAY/STOP) button to stop the Songduring playback, Song parameters are not reset.
The Songs and the Standard MIDI Fileformat
The native Song format for Pa1X is the Standard MIDI File.
When saving a Song as a SMF, an empty measure in automati-cally inserted to the beginning of the Song. This measure con-tains various Song initialization parameters.
When an SMF is loaded, the empty measure is automaticallyremoved.
Songs and Voice Processor Presets
You can use the Voice Processor while in Sequencer mode. Forthis, just two settings are needed:
• Select the Song track where you are recording chords to besent to the Voice Processor (see “Harmony Track” onpage 186).
• Go to the Voice Processor Preset section of the Globalmode, and select the desired Voice Processor Preset.
Sequencer Play - Main page
Press SEQUENCER to access this page from another operatingmode. In this page you can load a Song, and play it back usingthe transport controls for SEQUENCER 1 (see “Transport con-trols” above).
Note: When switching from Style Play to Sequencer mode, theSequencer Setup is automatically selected, and various trackparameters may change.
To return to this page from one of the Sequencer edit pages,press the EXIT or SEQUENCER button.
To switch between Song tracks 1-8 and 9-16, use the TRK. SEL.button.
Page header
This line shows the current operating mode, transposition andrecognized chord.
Operating mode name
Name of the current operating mode.
Master transpose
Master transpose value in semitones. This value can be changedusing the TRANSPOSE buttons on the control panel.
Note: Transpose may be automatically changed when loading aStandard MIDI File generated with an instrument of the Korg Paseries.
To avoid transposing, “lock” the Master Transpose parameter in theGlobal (see “General Controls: Lock” on page 232), then write theGlobal to memory (see “Write Global - Midi Setup dialog box” onpage 257).
Sequencer operating mode
Song area Page header Page menu icon
Selectedtrack info
area
Soundsarea
Track volume/status area
Operating modename
Master Transpose (in semitones)

167Sequencer operating modeSequencer Play - Main page
Ref
eren
ce
Page menu icon
Press the page menu icon to open the menu. See “Page menu” onpage 187 for more information.
Song area
This is where Song name is shown, together with its tempo andmeter parameters, and the current measure.
Song type icon
In Sequencer mode, only Standard MIDI Files (files with the“.MID” or “.KAR” extension) can be loaded.
Song name
Displays the name of the selected Song. “No Song” means that anew (blank) Song is selected, and you can record it.
Touch the Song name to make the Song Select window appear,allowing for selection of a different Song (see “Song Select win-dow” on page 76).
To select a Song, you can also press the SELECT button in theSEQUENCER 1 section of the control panel. Press SELECT asecond time to select a Song by dialing in its ID number (see“Selecting a Song by its ID number” on page 77).
Meter
Current Song meter.
Measure number
Current measure number.
Tempo
Metronome tempo. Select this parameter and use the TEMPO/VALUE controls to change the tempo. As an alternative, when adifferent parameter is selected, or you are in a different page,keep the SHIFT button pressed and use the DIAL to change thetempo of the sequencer.
Metro
Check this box to turn the metronome on during playback.
Tempo (Tempo mode)
Use this menu to select the Tempo change mode.
Manual In this mode, you can change the Tempo usingTEMPO/VALUE section controls. The Song willbe played back using the manually selectedtempo.
Auto The Tempo recorded to the Song will be used.
Selected track info area
This line lets you see the Sound assigned to the selected track.Not only it is shown on the main page, but also in several editpages.
Track name
Name of the selected track.
Sound name
Sound assigned to the selected track. Press anywhere in this areato open the Sound Select window, and select a different Sound.
Sound bank
Bank the selected Sound belongs to.
Program Change
Program Change number. Shown only when the “Show ProgramChange number” parameter is turned on in Global mode (seepage 234).
Sounds area
This area lets you see Sounds and octave transposition for theeight tracks currently displayed.
Song track octave transpose
Non editable. Octave transpose of the corresponding track. Toedit the octave transpose, go to the “Mixer/Tuning: Tuning” editpage (see page 180).
Sound name
Name of the Sound assigned to the track. Touch a name a firsttime to select the corresponding track (detailed information areshown on the Selected Track Info area, see above). Touch it a sec-ond time to open the Sound Select window.
Track volume/status area
This area is where you can set the volume of each Song track,and mute/unmute tracks.
Use the TRK. SEL. (TRACK SELECT) button to switch betweenSong Tracks 1-8 and Song Tracks 9-16 views.
Song name
Meter
Current mea-sure
Tempo
Song type icon
Track name
Sound name
Sound bank
Program Change
Octave icon Sound name

168 Sequencer operating modeSequencer Play - Main page
If the VOLUME LED above the SLIDER MODE button is turnedon, the Assignable Sliders LEDs show which view is currentlyselected.
The Song Tracks 1-8 view shows individual Song tracks 1-8(third sliders LED turned on):
The Song Tracks 9-16 view shows individual Song tracks 9-16(last sliders LED turned on):
Virtual sliders (track volume)
Virtual sliders are a graphical display of each track’s volume. Usethe Assignable Sliders to change this value (provided the VOL-UME LED is turned on above the SLIDER MODE button, seebelow).
As an alternative, press the track’s area to select a track, and useTEMPO/VALUE controls to change the value.
Assignable Sliders function
Use the SLIDER MODE button to select the function assigned tothe Assignable Sliders. When the VOLUME LED is turned on,each Assignable Slider controls the volume of the correspondingtrack.
Note: While in Sequencer mode, you cannot save the SLIDERMODE status to a Performance, since Performances are disabledwhile in this mode.
Track status icons
Play/mute status of the current track. Select the track, then pressthis area to change the track status. The status of Song tracks issaved when saving the Song.
Play status. The track can be heard.
Mute status. The track cannot be heard.
Track names
Under the sliders, a label for each track is shown. Use the TRK.SEL button to switch between tracks 1-8 and 9-16.
T01…T16 Song tracks.
Track status icon Virtual slider
Seq

169Sequencer operating modeEntering Record mode
Ref
eren
ce
Entering Record mode
To enter Record mode, press the REC button while you are inSequencer mode. The following dialog box will appear:
Select one of the three available recording options and press OK(or Cancel if you don’t want to enter Record mode).
Multitrack Sequencer
Full-featured sequencer. Select this option forclassic multitrack recording. (See “Record mode:Multitrack Sequencer page” on page 169).
Backing Sequence (Quick Record)
Easy way of recording. Just play with Styles, andrecord your realtime performance.
Step Backing Sequence
Step-record. Enter chords and notes one at atime. Very useful if you are not a keyboard player.
Record mode: Multitrack Sequencerpage
While in Sequencer mode, press the REC button and select the“Multitrack Sequencer” option. The Multitrack Sequencer pageappears.
See “Multitrack recording procedure” on page 171 for informa-tion on the record procedure.
Page header
See “Page header” on page 166.
Page menu icon
See “Page menu icon” on page 167.
Page sub-header
This area shows some performing info on the Song.
Song name
Name of the Song in record.
Beat counter
This indicator shows the current beat inside the current mea-sure.
Measure number
Current measure you are recording.
Recording parameters area
Rec mode (Recording mode)
Set this parameter before starting record, to select a recordingmode.
Overdub The newly recorded events will be mixed to anyexisting events.
Page header Page menu icon
Selectedtrack info
area
Soundsarea
Tracks volume/status area
Recordingparame-ters area
Page sub-header
Song name Beat counter Measure number

170 Sequencer operating modeRecord mode: Multitrack Sequencer page
Overwrite The newly recorded events will replace any exist-ing events.
Auto Punch Recording will automatically begin at the “Start”position, and stop at the “End” position.
Note: The Auto Punch function will not work on anempty Song. At least one track must already berecorded.
PedalPunch Recording will begin when pressing a pedal set tothe “Punch In/Out” function, and will finishwhen pressing the same pedal again.
Note: The Pedal Punch function will not work onan empty Song. At least one track must already berecorded.
Free memory
Remaining memory available for recording.
Resolution
Use this parameter to set the quantization during record-ing. Quantization is a way of correcting timing errors;notes played too soon or too later are moved to the nearestaxis of a rhythmic “grid”, set with this parameter, thusplaying perfectly in time.
High No quantization applied.
(1/32)… (1/8)
Grid resolution, in musical values. Forexample, when you select 1/16, all notes aremoved to the nearest 1/16 division. Whenyou select 1/8, all notes are moved to thenearest 1/8 division.
Start/End
Start and End locators. These parameters area available onlywhen the “Auto Punch” recording mode is selected. They set thestarting and ending points of the Punch recording.
Metro (Metronome)
This is the metronome heard during recording.
Off No metronome click will be heard during record-ing. A one-bar precount will be played beforestarting recording.
On1 Metronome on, with a one-bar precount beforestarting recording.
On2 Metronome on, with a two-bar precount beforestarting recording.
Tempo
Select this parameter, and use the TEMPO/VALUE controls toset the tempo.
Note: You can always change the Tempo, when other parametersare selected, by keeping the SHIFT button pressed, and rotating theDIAL.
Note: The tempo is always recorded in overwrite mode (old data isreplaced by the new data).
Meter
This is the basic meter (or time signature) of the Song. You canedit this parameter only when the Song is empty, i.e., before youbegin recording anything. To insert a meter change in the middleof the Song, use the “Insert Measure” function (see page 185).
Tempo (Tempo mode)
This parameter sets the way tempo events are read or recorded.
Manual Manual reading. The latest manual Tempo setting(made using the TEMPO/VALUE controls) isconsidered the current Tempo value. No Tempochange events will be recorded. This is very usefulto record the Song much slower than its actualTempo.
Auto Auto reading. The Sequencer plays back allrecorded Tempo events. No Tempo change eventsare recorded.
Record All Tempo changes made during recording will berecorded to the Master Track.
Selected track info area
This line lets you see the Sound assigned to the selected track.See “Selected track info area” on page 167 for more information.
Sounds area
This area lets you see Sounds and octave transposition for theeight tracks currently displayed. See “Sounds area” on page 167for more information.
Track volume/status area
This area is where you can set the volume of each Song track,and change track status. See “Track volume/status area” onpage 167.
Track status icons
Play/mute/record status of the current track. Select the track,then press this area to change its status.
Play status. The track can be heard.
Mute status. The track cannot be heard.
Record status. After pressing (PLAY/STOP) tostart recording, the track will receive notes fromthe keyboard and the MIDI IN connector.
No quanti-zation
1/16
1/8

171Sequencer operating modeRecord mode: Step Record page
Ref
eren
ce
Multitrack recording procedure
Here is the general procedure to follow for the MultitrackRecording.
1. Press SEQUENCER to enter Sequence mode.
2. Press the REC button, and select the “MultitrackSequencer” option to enter the Multitrack Record mode.Now you can prepare your recording parameters. (Formore details, see “Record mode: Multitrack Sequencerpage” on page 169).
3. Be sure the Overdub or Overwrite recording options isselected (see “Rec mode (Recording mode)” on page 169).
4. Set the tempo. There are two ways of changing tempo:
• Keep the SHIFT button pressed, and use the TEMPO/VALUE controls to change the tempo.
• Move the cursor to the “Tempo” parameter, and use theTEMPO/VALUE controls to change tempo.
5. Use the TRK. SEL. button to switch between Song Tracks 1-8 and Song Tracks 9-16, and assign the right Sound to eachtrack (see “Sound name” on page 167).
6. Select the track to record. Its status icon will automaticallychange to Record (see “Track status icons” on page 170).
7. Press (PLAY/STOP) to start recording. Depending onthe Metro option you selected, a 1- or 2-bars precount mayplay before the recording actually begins. When it begins,play freely.
• If you selected the Auto Punch recording mode, therecording will begin only when reaching the Start point.
• If you selected the Pedal Punch recording mode, press thepedal when you want to begin recording. Press it again tofinish recording.
Note: The Punch functions will not work on an empty Song.At least one track must already be recorded.
8. When finished recording, press (PLAY/STOP) to stopthe sequencer. Select a different track, and go on recordingthe whole Song.
9. When finished recording the new Song, either press theREC button, or select the “Exit from Record” commandfrom the page menu (see page 187).
Warning: Save the Song to disk, to avoid it is lost when turn-ing the instrument off.
Note: When exiting the Record mode, the Octave Transpose isautomatically reset to “0”.
10. If you wish, edit the new Song, by pressing the MENU but-ton, and selecting the various edit pages.
Record mode: Step Record page
The Step Record allows you to create a new Song by entering sin-gle notes or chords to each track. This is very useful when tran-scribing an existing score, or needing a higher grade of detail,and is particularly suitable to create drum and percussion tracks.
To access this page, select the “Overdub Step Recording” or“Overwrite Step Recording” command from the page menu.
In Overdub Step Recording mode you will add to existing events,while in Overwrite Step Recording mode you will overwrite allexisting events.
See “Step Record procedure” below, for information on therecord procedure.
Page header
This line shows the current operating mode.
Page sub-header
Track
Name of the selected track in record.
S1Tr01…Tr16
Sequencer 1 track. In Sequencer mode, youalways work with Sequencer 1.
Pos (Position)
This is the position of the event (note, rest or chord) to beinserted.
Step Time area
Step Time
Length of the event to be inserted.
… Note value.
Standard (–) Standard value of the selected note.
Dot (.) Augments the selected note length by one half ofits value.
Triplet (3) Triplet value of the selected note.
Page header Note parameters
Steptime
Buttons
Page sub-header
Event list

172 Sequencer operating modeRecord mode: Step Record page
Note parameter area
Meter
Meter of the current measure. This parameter cannot be edited.You can set a Meter change by using the Insert function of theEdit menu, and inserting a new series of measures with a differ-ent Meter (see “Song Edit: Cut/Insert Measures” on page 185).
Free Memory
Available memory for recording.
Duration
Relative duration of the inserted note. The percentage is alwaysreferred to the step value.
50% Staccato.
85% Ordinary articulation.
100% Legato.
Velocity
Set this parameter before entering a note or chord. This will bethe playing strength (i.e., velocity value) of the event to beinserted.
Kbd Keyboard. You can select this parameter, by turn-ing all counter-clockwise the dial. When thisoption is selected, the playing strength of theplayed note is recognized and recorded.
1…127 Velocity value. The event will be inserted withthis velocity value, and the actual playingstrength of the note played on the keyboard willbe ignored.
Event list area
List of inserted events
Previously inserted events. You may delete the last of theseevents, and make it ready for a new event, by pressing the Backbutton in the display.
Position Position where the event has been inserted. Thevalue is shown in the “measure.beat.tick” format.
Note/RX Noise
Name of the inserted Note or RX Noise. Whenentering a chord, a series of dots is shown afterthe name of the root note.
Vel. Velocity of the inserted event.
Dur.% Percentage duration of the inserted event.
Buttons
Rest
Press this button to insert a rest.
Tie
Press this button to tie the note to be inserted to the previousone. A note with the same pitch, and the specified length, will becreated, and tied to the previous one.
Back
Goes to the previous step, erasing the inserted event.
Next M. (Next Measure)
Goes to the next measure, and fills the remaining space withrests.
Done
Exits the Step Record mode.
Step Record procedure
Here is the general procedure to follow for the Step Recording.
1. Press SEQUENCER to enter Sequencer mode.
2. Press the REC button, and select the “MultitrackSequencer” option to enter the Multitrack Record mode.From the page menu, select the “Overdub Step Recording”or “Overwrite Step Recording” mode. At this point, theStep Record window will appear in the display.
3. The next event will be entered at the position shown by thePos indicator in the upper right corner of the display.
• If you don’t want to insert a note at this position, insert arest instead, as shown in step 5.
• To jump to the next measure, filling the remaining beatswith rests, press the Next M. button in the display.
4. To change the step value, use the Step Time parameters.
5. Insert a note, rest or chord at the current position.
• To insert a single note, just play it on the keyboard. Theinserted note length will match the step length. You maychange the velocity and relative duration of the note, byediting the Velocity and Duration parameters. See “Veloc-ity” and “Duration” on page 172.
• To insert a rest, just press the Rest button in the display. Itslength will match the step value.
• To tie the note to be inserted to the previous one, press theTie button in the display. A note will be inserted, tied to theprevious one, with exactly the same pitch. You don’t needto play it on the keyboard again.
• To insert a chord or a second voice, see “Chords and sec-ond voices in Step Record mode” on page 110 of the “StyleRecord mode” chapter.
6. After inserting a new event, you may go back by pressingthe Back button in the display. This will delete the previ-ously inserted event, and set the step in edit again.
7. When finished recording, press the Done button in the dis-play. The main page of the Multitrack Recording mode willappear again.
8. From the main page of the Multitrack Recording mode,either select the “Exit from Record” command from thepage menu, or press the REC button to exit the Recordmode. While in the main page of the Sequencer mode, youmay press the (PLAY/STOP) button in theSEQUENCER 1 section to listen to the Song, or select theSave Song command from the page menu to save the Songto disk (see “Save Song window” on page 188).

173Sequencer operating modeRecord mode: Backing Sequence (Quick Record) page
Ref
eren
ce
Chords and second voices
With Pa1X, you are not obliged to insert single notes in a track.There are several ways to insert chords and double voices. Formore information, see “Chords and second voices in StepRecord mode” on page 110 of the “Style Record mode” chapter.
Record mode: Backing Sequence (QuickRecord) page
Backing Sequence (Quick Record) mode allows you to quicklyrecord your live performance with the Styles. To make thingseasier, just two grouped tracks are provided: Kbd/Pad (Keyboardand Pads) to record keyboard and pads, and Ch/Acc (Chords/Accompaniment) to record Style commands and chords playedon the keyboard.
While in Sequencer mode, press the REC button and select the“Backing Sequence (Quick Record)” option. The BackingSequence (Quick Record) page appears.
See “Backing Sequence (Quick Record) recording procedure” onpage 175 for information on the record procedure.
Page header
See “Page header” on page 166.
Page menu icon
See “Page menu icon” on page 167.
Page sub-header
See “Page sub-header” on page 169.
Recording parameters area
Style
This parameter shows the selected Style. Either press it, or pressone of the STYLE buttons, to open the Style Select window andselect a different Style (see “Style Select window” on page 75).
Free memory
Remaining memory for recording.
Resolution
Use this parameter to set the quantization during recording.Quantization is a way of correcting timing errors; notes playedtoo soon or too later are moved to the nearest axis of a rhythmic“grid”, set with this parameter, thus playing perfectly in time.
High No quantization applied.
Page header Page menu icon
Selectedtrack info
area
B.S.grouped
tracks area
Track volume/status area
Recordingparame-ters area
Page sub-header

174 Sequencer operating modeRecord mode: Backing Sequence (Quick Record) page
(1/32)… (1/8)
Grid resolution, in musical values. For example,when you select 1/8, all notes are moved to thenearest 1/8 division. When you select 1/4, allnotes are moved to the nearest 1/4 division.
Kbd/Pad, Ch/Acc
These parameters let you define grouped track status duringrecording. This status is reflected by the big status indicatorabove the track sliders.
RT/Pads: This Backing Sequence track includes the four Key-board tracks and the four Pads. After finishing recording, theywill be saved as Song tracks 1-8, as in the following table:
Ch/Acc: This Backing Sequence track groups all Style tracks,together with recognized chords and Style controls and StyleElements selection. After finishing recording, they will be savedas Song tracks 9-16.
Play The Backing Sequence track is set to play. If thereare recorded data, they will be heard whilerecording the other Backing Sequence track.
Mute The Backing Sequence track is muted. If thistracks has already been recorded, it will not beheard during recording of the other BackingSequence track.
Rec The Backing Sequence track is in record. All pre-viously recorded data will be deleted. After press-ing (PLAY/STOP) to start recording, the trackwill receive notes from the keyboard and theMIDI IN connector.
Metro (Metronome)
This parameter sets the metronome mode during recording.
Off No metronome click will be heard during record-ing. A one-bar precount will be played beforestarting recording.
On1 Metronome on, with a one-bar precount beforestarting recording.
On2 Metronome on, with a two-bar precount beforestarting recording.
Tempo
Metronome tempo. Select this parameter and use the TEMPO/VALUE controls to change the tempo. As an alternative, when adifferent parameter is selected, or you are in a different page,keep the SHIFT button pressed and use the DIAL to change thetempo of the sequencer.
Meter
(Non-editable). This parameter shows the meter of the selectedStyle for reference.
PERF or STS (Performance or STS)
This parameter shows the selected Performance or STS (depend-ing on the last item selected).
To select a Performance, either press it, or press one of the PER-FORMANCE/SOUND buttons (provided the PERFORMANCESELECT LED is turned on), to open the Style Select window andselect a different Performance (see “Style Select window” onpage 75).
To select an STS, use the four SINGLE TOUCH SETTING but-tons under the display.
Backing Sequence grouped tracks area
Grouped tracks status indicators
These giant indicators show the status of the Backing Sequencegrouped tracks. They reflect the status of the Kbd/Pad and Ch/Acc parameters (see “Kbd/Pad, Ch/Acc” above).
Selected track info area
This line lets you see the Sound assigned to the selected track.See “Selected track info area” on page 167 for more information.
Track volume/status area
This area is where you can set the volume of each single Key-board track, and mute/unmute tracks.
Virtual sliders (track volume)
Graphical display of each track’s volume. See “Virtual sliders(track volume)” on page 168 for more information.
Assignable Sliders function
See “Assignable Sliders function” on page 168 for more informa-tion.
Individual track status icons
While you can change the status of all Keyboard tracks at once,by using the Kbd/Pad Backing Sequence track, you can alsochange the status of each single track. Press this icon to changethe status of the corresponding individual track.
Play status. The track can be heard.
Mute status. The track cannot be heard.
RT/Pad track Song track/Channel
Upper 1 1
Upper 2 2
Upper 3 3
Lower 4
Pad 1 5
Pad 2 6
Pad 3 7
Pad 4 8
High (noquantiza-
tion)
1/16
1/8

175Sequencer operating modeRecord mode: Backing Sequence (Quick Record) page
Ref
eren
ce
Track names
Under the sliders, a label for each track is shown. Use the TRK.SEL button to switch between the various track views.
MIC/IN Audio inputs.
UPPER1…3 Upper tracks.
LOWER Lower track.
Backing Sequence (Quick Record) recordingprocedure
Here is the general procedure to follow for the Backing Sequence(Quick) Recording.
1. Press SEQUENCER to enter the Song mode.
2. Press the REC button, and select the “Backing Sequence(Quick Record)” option to enter the Backing Sequence(Quick Record) mode. Now you can prepare your record-ing parameters. (For more details, see “Record mode: Back-ing Sequence (Quick Record) page” on page 173).
3. The last selected Style is currently selected. Should it not bethe right one, select a different Style to start recording with.(See “Style Select window” on page 75).
4. The last selected Performance or STS is currently selected.If you prefer, select a different Performance or STS. (See“Performance Select window” on page 74, and “STS Select”on page 75).
5. Select the status of the Backing Sequence grouped tracks,using the Kbd/Pad and Ch/Acc parameters. (Kbd/Pad staysfor Keyboard and Pads; Ch/Acc stays for Chord andAccompaniment, i.e. the Style tracks). To record all youplay on the keyboard, plus the automatic accompaniment,leave their status to REC (see “Track status icons” onpage 170).
Warning: Tracks set to REC are automatically overwrittenwhen starting recording. Set a track to the PLAY or MUTEstatus, when you don’t want to delete it. For example, if youare recording a keyboard part on an existing Style track, setthe Ch/Acc parameter to PLAY, and the Kbd/Pad track toREC.
6. Start recording by pressing the left (PLAY/STOP) but-ton or the START/STOP button.
• By pressing the left (PLAY/STOP) button (or theSTART/STOP button), you can record a keyboard introwith no Style playing. After a count-in (see “Metro (Metro-nome)” on page 174), you can start recording.
Play a solo intro, then start the auto-accompaniment bypressing the START/STOP button.
• By pressing the START/STOP button you can start theStyle right at the beginning of the Song.
Since you can use any Style control, you could start withthe usual combinations (INTRO, ENDING, FILL… see“Selecting and playing a Style” on page 40 for more infor-mation).
Note: While in Backing Sequence mode, you can’t record theSYNCHRO, TAP TEMPO/RESET, MANUAL BASS,ACCOMPANIMENT VOLUME controls.
7. Play your music. You can even stop the Style by pressingSTART/STOP. If you stop the Style while recording, start itagain with the START/STOP button.
8. When finished recording your performance, press the (PLAY/STOP) button in the SEQUENCER 1 section. TheREC LED will turn off, and you will go back to theSequencer Play Main page (see “Sequencer Play - Mainpage” on page 166).
At this point, you may press the (PLAY/STOP) buttonin the SEQUENCER 1 section to listen to the new Song.
You may also edit the Song by pressing the MENU button(see “Edit menu” on page 178).
9. Save the song to disk (see “Save Song window” onpage 188).
Warning: The recorded Song is in RAM (Random AccessMemory), and will be deleted when turning the instrumentoff, switching to the Style Play or Song Play mode, or enteringRecord again. If you wish to preserve it, save the Song to disk.

176 Sequencer operating modeRecord mode: Step Backing Sequence page
Record mode: Step Backing Sequencepage
The Step Backing Sequence mode allows you to enter singlechords, to create or edit the Style (Chord/Acc) part of a Song.This mode lets you enter chords even if you are not a keyboardplayer, or fix any error made playing chords or selecting Stylecontrols, during a Backing Sequence (Quick Record) recording.
In this mode, you can only edit Songs created on the Pa1X.When saving a Song created using the Backing Sequence (QuickRecord) recording mode, all Chord/Acc data is preserved, andcan be loaded later, to be edited again by using the Step BackingSequence mode.
While in Sequencer mode, press the REC button and select the“Step Backing Sequence” option. The Step Backing Sequencewindow appears.
See “Step Backing Sequence procedure” on page 178 for infor-mation on the record procedure.
Page menu icon
Press the page menu icon to open the menu. See “Step BackingSequence page menu” on page 177 for more information.
Parameters area
Side arrow ( )
The small arrow next to a parameter means that its value is effec-tive at the current position. For example, if you are at the“003.01.000” position, and an arrow lights up next to the Chordparameter, this means that a chord change happens at the“003.01.000” position.
Measure
This parameter shows the current position of the Step Editor. Togo to a different position within the Song, use one of the follow-ing systems:
• Select this parameter, then use the TEMPO/VALUE con-trols to go to a different measure.
• Use the Measure buttons in the display to move to a differ-ent measure. Use the Step buttons in the display to move insteps of 1/8 (192 ticks). Use the Event buttons in the displayto jump to the next event.
The locator value is shown in the “measure.beat.tick” format.
Measure Measure or bar number.
Beat Divider in the Time Signature ratio (e.g., a quar-ter in a 3/4 time).
Tick Smallest position value. Both Pa1X internalsequencers feature a resolution of 384 ticks perquarter.
Style
This is the last selected Style. To insert a Style change at the cur-rent position, touch the Style name to open the Style Select win-dow, or follow the standard selecting procedure using thebuttons of the STYLE SELECT section.
Note: Any Style Change inserted after the beginning of the measure(i.e., to a position other than Mxxx.01.000) will be effective at thefollowing measure. For example, if a Style Change event has beeninserted at M004.03.000, the selected Style will be effectivelyselected at M005.01.000. (This works exactly as in Style Playmode).
Note: When inserting a Style Change, you may also insert a TempoChange at the same position. A Style Change will not automati-cally insert the Style’s Tempo.
Performance
This is the last selected Performance. Select a Performance torecall the Style it links to. To insert a Performance change at thecurrent position, touch the Performance name to open the Per-formance Select window, or follow the standard selecting proce-dure using the PERFORMANCE/SOUND SELECT section.
Note: The STYLE CHANGE LED is automatically turned on whenentering the Chord/Acc Step Mode. This means that selecting a Per-formance automatically selects the Style memorized in the Perfor-mance.
The SINGLE TOUCH and STS buttons are automatically dis-abled, meaning that you can’t change Keyboard tracks while inChord/Acc Step Mode.
Tempo
This is the Tempo Change parameter. To insert a Tempo Changeevent at the current position, select this parameter and use theTEMPO/VALUE controls to change its value.
Chord
The chord parameter is divided in four separate parts:
Select one of the parts, then use the TEMPO/VALUE controls tomodify it. As an alternative, you can play a chord, and it will beautomatically recognized. While recognizing a chord, the statusof the BASS INVERSION button will be considered.
The lack of a chord (--) means that the accompaniment will notplay at the current position (apart for the Drum and Percussiontracks). To select the “--” option, select the Name part of theChord parameter, then use TEMPO/VALUE controls to selectthe very last value (C…B, Off).
Parameters area
“Soft” transport buttons
Page menu icon
Name Type Tension Extension

177Sequencer operating modeRecord mode: Step Backing Sequence page
Ref
eren
ce
Note: If you replace a chord with a different one, please rememberthat the Lower track (if recorded) will not be automaticallychanged, and may cause a dissonance against the accompaniment.
Style Element
This is the Style Element (i.e., a Variation, Fill, Intro, or Ending).The length of the selected Style Element is always shown by the“Length” parameter (see below).
“Off” means that the accompaniment will not play at theselected position – only Keyboard and Pad tracks will play.
Hint: Insert a Style Element Off event exactly where the automaticaccompaniment must stop (at the end of the Song).
Length
This parameter will let you know where to place the followingStyle Element Change. For example, if you inserted an Introevent lasting for 4 measures, you can insert 4 empty measureafter this event, and a Variation event at the end of the Intro,beginning at the 4th empty measure.
Del (Delete) button
When a side arrow ( ) is shown next to a parameter, there is anevent at the current position. You can press the Del button nextto it, to delete the event at the current position.
Hint: To delete all events starting from the current position, selectthe “Delete from selected” command from the page menu (seebelow).
“Soft” transport buttons
Previous or Next Event
Use these buttons to move to the previous or next recordedevent.
Previous or Next Step
Use these buttons to go to the previous or next step (1/8, or 192ticks). If an event is located before the previous or next step, thelocator stops on that event. For example, if you are positionedon M001.01.000, and no event exists before M001.01.192, the >button moves to the M001.01.192 location. If an event exists onM001.01.010, the > button stops to the M001.01.010 location.
These commands are effective even if the Measure parameter isnot selected.
Previous or Next Measure
Use these buttons to move to the previous or following measure.These commands are effective even if the Measure parameter isnot selected.
Done button
Done
Press this button to exit the Step Backing Sequence mode. Allchanges will be saved to memory.
Hint: Save the Song to disk, by selection the “Save Song” commandfrom the page menu, to avoid losing it when turning the instrumentoff.
Step Backing Sequence page menu
Press the page menu icon to open the menu. Press a command toselect it. Press anywhere in the display to close the menu withoutselecting a command.
Insert Measure
Use this command to insert an empty measure starting from thecurrent measure. All Chord/Acc events contained in the currentmeasure will be moved to the following measure. The event atthe Mxxx.xx.000 position (i.e., exactly at the beginning of themeasure, like a Time Signature or Style change) will not bemoved.
Cut Measure
Use this command to delete the current measure. All Chord/Accevent contained in the following measures will be moved onemeasure back.
Delete All from Selected
Use this command to delete events of all types, starting from thecurrent position.
Note: All events on the very first tick (M001.01.000), like Perf,Style, Tempo, Chord, Style Element selection, cannot be deleted.
Delete All Styles/Perfs from Selected
Delete All Styles Elements from Selected
Delete All Chords from Selected
Delete All Tempos from Selected
Select one of these commands to delete all events of the corre-sponding type, starting from the current position to the end ofthe Song. To delete all events of the same type from the wholeSong, go back to the M001.01.000 position, and select one ofthese commands.
Note: All events on the very first tick (M001.01.000), like Perf,Style, Tempo, Chord, Style Element selection, cannot be deleted.

178 Sequencer operating modeEdit menu
Step Backing Sequence procedure
Here is the general Step Backing Sequencer recording procedure.
Hint: Before entering Step Backing Sequence mode to edit an exist-ing Song, select the “Save Song” command from the page menu,and save the Song to disk. This way, you will have a copy of theSong, in case you don’t like the results of your editing.
1. While in Sequencer mode, press the REC button, andchoose the “Step Backing Sequence” recording option.
2. Select the Measure parameter, and go to the desired posi-tion in the Song, by using the TEMPO/VALUE controls.Alternatively, you can move the locator using the “soft”transport buttons in the display. See ““Soft” transport but-tons” on page 177.
3. Select the parameter type (Style, Performance, Tempo…)to insert, edit or delete at the current position. If an arrow( ) appears next to a parameter, the shown event has beeninserted at the current position.
4. Use the TEMPO/VALUE controls to modify the selectedevent. Delete it by pressing the Del button next to the event.When editing a parameter without the arrow ( ) next to it,a new event is inserted at the current position.
5. Exit the Step Backing Sequence recording mode, by press-ing the Done button in the display.
6. Press (PLAY/STOP) in the SEQUENCER 1 section tolisten to the consequence of your editing. If they are fine,
save the Song to disk.
Edit menu
From any page, press the MENU button to open the Sequencer editmenu. This menu gives access to the various Sequencer edit sections.
When in the menu, select an edit section, or press EXIT to exitthe menu.
When in an edit page, press EXIT or the SEQUENCER button togo back to the main page of the Sequencer operating mode.
Each item in this menu corresponds to an edit section. Each editsection groups various edit pages, that may be selected by press-ing the corresponding tab on the lower part of the display.
Edit page structure
All edit pages share some basic elements.
Operating mode
This indicates that the instrument is in Sequencer mode.
Edit section
This identifies the current edit section, corresponding to one ofthe items of the edit menu (see “Edit menu” on page 178).
Page menu icon
Press this icon to open the page menu (see “Page menu” onpage 187).
Parameters area
Each page contains various parameters. Use the tabs to selectone of the pages. For detailed information on the various typesof parameters, see sections starting from page 179.
Tabs
Use tabs to select one of the edit pages of the current edit section.
Operating mode Edit section
Selected track info
Page menu icon
Parameters area
Tabs

179Sequencer operating modeMixer/Tuning: Volume/Pan
Ref
eren
ce
Mixer/Tuning: Volume/Pan
This page lets you set the volume and pan for each Song track.
Use the TRK. SEL. button to switch between Song tracks 1-8 and9-16.
Pan
Track position in the stereo field.
L-64…L-1 Left stereo channel.
C 00 Center.
R+1…R+63 Right stereo channel.
Off If the track’s output status is Left&Right (normalsetting), the direct (uneffected) signal is not sentto the outputs; only the FX signal is heard for thistrack.
If the track is sent to a separate output, no FX issent to any output.
To program the output status for each track, see“Audio Output: Sty/Kbd” on page 239.
Volume
Track’s volume.
0…127 MIDI value of the track’s volume.
Play/Mute icon
Track’s play/mute status.
Play status. The track can be heard.
Mute status. The track cannot be heard.
Mixer/Tuning: FX Send
This page lets you set the level of the track’s direct (uneffected)signal going to the Internal FX processors. The effect processorsincluded in Pa1X are connected in parallel, so you can decidewhich percentage of the direct signal can be effected:
In case you do not want to send a track’s direct signal to the out-put, but only the effected signal (as when using “insert” effects,like Rotary, Distortion, EQ…), just set the Pan to Off (see “Pan”above):
There are four Internal FX processors in Sequencer mode,grouped in two pairs (AB and CD). Usually you will create Songswith only a pair (preferably AB), but you can create Songs usingboth FX pairs. We suggest to use A and C as reverb processors,and B and D as modulating effect processors.
Use the TRK. SEL. button to switch between Song tracks 1-8 and9-16, and vice-versa.
FX Groups
Use this pop-up menu to select one of the two FX groups (AB orCD).
Send level
0…127 Level of the track (direct) signal sent to the effectprocessor.
Track Out L/R
FX Processor
Track Out L/R
FX Processor

180 Sequencer operating modeMixer/Tuning: Tuning
Play/Mute icon
Track’s play/mute status.
Play status. The track can be heard.
Mute status. The track cannot be heard.
Mixer/Tuning: Tuning
Parameters
See “Mixer/Tuning: Tuning” on page 86.
Mixer/Tuning: Sub Scale
This page lets you program an alternative scale for the selectedtracks (via the “Track Assign” parameter). The remainingtracks (if any) use the basic scale set in Global mode (see“Main Scale” on page 231).
Note: Quarter Tone selection and activation of the Sub-Scale oneach track of a Song, can be received by MIDI (i.e., by an externalsequencer or controller). Conversely, selection of Quarter Tone set-tings, or activation of the Sub-Scale on each track of the Song, canbe sent by the Pa1X to an external MIDI recorder as System Exclu-sive data.
Parameters
See “Mixer/Tuning: Sub Scale” on page 86.
Track Assign
Check the parameter corresponding to each track where theSub-Scale must be used.
Effects: FX Select
This page allows you to select effects to be assigned to the fourInternal FX processors (A-D).
Note: When you stop the Song, or select a different Song, thedefault effects are selected again. You can, however, stop the Song,change the effects, then start the Song again. Save the Song to per-manently change the effects.
FX A…D
Effects assigned to the corresponding effect processors. Usually,A and C are reverbs, while B and D are modulating effects (cho-rus, flanger, delay…). For a list of the available effects, see“Effects” on page 329.
Wet/Dry
Mix between the effected (Wet) and direct (uneffected, Dry) sig-nal.
Dry Direct signal only.
Wet Effected signal only.
nn:nn Percentage of Wet/Dry signal.
B to A, D to C
Amount of the B effect going back to the input of the A effect, orof the D effect going back to the input of the C effect.
Mod.Track (Modulating Track)
Source track for modulating MIDI messages. You can modulatean effect parameter with a MIDI message generated by a physicalcontroller.

181Sequencer operating modeEffects: FX A…D
Ref
eren
ce
Effects: FX A…D
These pages contain the editing parameters for the four effectprocessors. Here is an example of the FX A page, with the ReverbSmooth Hall effect assigned.
Selected effect
Select one of the available effects from this pop-up menu. This isequivalent to the “FX A…D” parameters found in the “Effects:FX Select” page (see above).
Parameters
Parameters may differ, depending on the selected effect. See“Effects” on page 329 for a list of available parameters for eacheffect type.
Track Controls: Mode
Parameter
See “Track Controls: Mode” on page 88.
Track Controls: Drum Volume
Parameter
See “Track Controls: Drum Volume” on page 181.
Track Controls: Easy Edit
Parameter
See “Track Controls: Easy Edit” on page 90.
Event Edit: Event Edit
The Event Edit is the page where you can edit each single MIDIevent of the selected track. You can, for example, replace a notewith a different one, or change its playing strength. See also“Event Edit procedure” on page 182 for more information onthe event editing procedure.
Position
Position of the event, expressed in the form ‘aaa.bb.ccc’:
• ‘aaa’ is the measure• ‘bb’ is the beat• ‘ccc’ is the tick (each quarter beat = 384 ticks)
You can edit this parameter to move the event to a different posi-tion. You can edit a position in either of the following ways:
(a) select the parameter, and use the TEMPO/VALUE controlsto change the value, or
(b) select the parameter, then touch it again; the numeric key-pad will appear. Enter the new position by dialing in thethree parts of the number, separated by a dot. Zeroes at thebeginning can be omitted, as well as the least importantparts of the number. For example, to enter position002.02.193, dial “2.2.193”; to enter position 002.04.000 dial“2.4”; to enter position 002.01.000, simply dial “2”.
Type
Type of the event shown in the display. To edit it, select theparameter and use the TEMPO/VALUE controls to change itsvalue.
Value 1 and 2
Values of the event shown in the display. Depending on theselected event, the value may change. This parameter also showsthe (non-editable) “End Of Track” marking, when the end of thetrack is reached.
Here are the events contained in ordinary tracks (1-16).
Type First value Second value
Note Note name Velocity
RX Noise Note name Velocity
Prog Program Change number –
Ctrl Control Change number Control Change value
Bend Bending value –
Aftt Mono (Channel) After-touch value
–
Scroll-bar

182 Sequencer operating modeEvent Edit: Event Edit
And here are the events contained in the Master track.
To edit the event Type and Values, select the parameter and usethe TEMPO/VALUE controls to change their value. In case ofnumeric values, you can also press them twice to open thenumeric keypad.
Length
Length of the selected Note event. The value format is the sameas the Position value. Edit it in the same way.
Note: If you change a length of “000.00.000” to a different value,you can’t go back to the original value. This rather uncommonzero-length value may be found in the drum and percussion tracksof Songs made in Backing Sequence mode.
Track
Use this pop-up menu to select the track to edit.
Track 1…16 One of the ordinary tracks of the Song. Thesetracks contains musical data, like notes and con-trollers.
Master This is a special track, containing Tempo changes,Meter changes, Scale and Transpose data, and theeffect parameters.
Scrollbar
Use the scrollbar to browse the event through the list. You canalso scroll by using the SHIFT + DIAL combination.
Go/Catch
This is a dual-function command.
• While the sequencer is not running, it works as a Go to Mea-sure command. Press it to open the Go to Measure dialog box:
When in this dialog box, select a target measure, and press OK.The first event available in the target measure will be selected.
• While the sequencer is running, it works as a Catch Locatorcommand. Press it to show the event that is currently playing.
Insert
Press the Insert button in the display to insert a new event at thecurrent shown Position. The default values are Type = Note,Pitch = C4, Velocity = 100, Length = 192.
Note: You can’t insert new events in an empty, non-recorded Song.To insert an event, you must first insert some empty measures byusing the Insert Measure function (see “Song Edit: Cut/Insert Mea-sures” on page 185).
Delete
Press the Delete button in the display to delete the event selectedin the display.
Note: The “End of Track” event cannot be deleted.
Event Edit procedure
Here is the general event editing procedure.
1. While in the Event Edit page, press (PLAY/STOP) in theSEQUENCER 1 section to listen to the Song. Press it againto stop the Song.
2. Select the Filter page, and turn “Off” the filter for the eventtypes you wish to see in the display (see “Event Edit: Filter”on page 183 for more information).
3. Return to the Event Edit page.
4. Use the “Track” pop-up menu to select the track to edit.The list of events contained in the selected track will appearin the display.
For more information on the event types and their val-ues, see above.
5. Select the “Position” parameter. Use the TEMPO/VALUEcontrols (or press the parameter again to open the numerickeypad) to change the event’s position.
6. Select the “Type” parameter and use the TEMPO/VALUEcontrols to change the event type. Select the “Value 1 and2” parameters and use the TEMPO/VALUE controls (orpress the parameter again to open the numeric keypad) tomodify the selected value.
7. In the case of a Note event, select the Length parameter,and use the TEMPO/VALUE controls (or press the parame-ter again to open the numeric keypad) to change the event’slength.
• While the sequencer is not running, you may press theGo/Catch button in the display to go to a different measure(see “Go/Catch” above)
PAft Note to which the After-touch is applied
Poly Aftertouch value
Type First value Second value
Tempo Tempo change –
Volume Master Volume value –
Meter Meter change(a)
(a). Meter changes can’t be edited or inserted separately from a mea-sure. To insert a Meter change, use the Insert function in the Edit sec-tion and insert a series of measures with the new meter. Existing datacan then be copied or entered to these measures
–
Scale One of the available pre-set Scales
Root note for the selected Scale
UScale (User Scale) Altered note Note alteration(b)
(b). To edit User Scale and Quarter Tone settings, select the first value,then select the scale’s degree to edit. Edit the second value to changethe tuning of the selected note of the scale.
QT (Quarter Tone) Altered note Note alteration
(0, 50)(b)
QT Clear (Quarter Tone Clearing)
Reset of all Quarter Tone (QT) changes
–
FXType One of the four available FX processors
Effect number(c)
(c). When selecting a different effect number during this edit, defaultsettings will be assigned to this event.
FXSend Feedback Send (B>A or D>C)
Feedback send level
Type First value Second value

183Sequencer operating modeEvent Edit: Filter
Ref
eren
ce
• While the sequencer is running, you may use the Go/Catch button in the display to see the currently playingevent in the display (see “Go/Catch” above).
• Use SEQUENCER 1 transport controls to listen to theSong.
8. Press the insert button in the display to insert an event atthe Position shown in the display (a Note event with defaultvalues will be inserted). Press the Delete button in the dis-play to delete the selected event.
9. When the editing is complete, you may select a differenttrack (go to step 4).
10. When finished editing the whole Song, select the Save Songcommand from the page menu to save the Song to disk. See“Save Song window” on page 188 for more information onsaving a Song.
Event Edit: Filter
This page is where you can select the event types to be shown inthe Event Edit page.
Turn On the filter for all event types you do not wish to see inthe Event Edit page.
Note/RX Noise
Notes and RX Noises.
Program Program Change events.
Control Control Change events.
Tempo/Meter Tempo and Meter changes (Master Track only).
After Touch Mono (Channel) Aftertouch events.
Poly After Touch
Poly Aftertouch events.
Pitch Bend Pitch Bend events.
Pa1X Controls
Controls exclusive of the Pa1X, like the FX andScale settings. These controls are recorded to theMaster Track, and saved as System Exclusive data.
Song Edit: Quantize
The quantize function corrects any rhythm error after recording.
After setting the various parameters, press Execute to start theoperation.
Track
Use this parameter to select a track.
All Quantize will apply to all tracks.
Track 1…16 Quantize will apply only to the selected track.
Resolution
This parameter sets the quantization value. For example, whenyou select (1/8), all notes are moved to the nearest 1/8 division.When you select 1/4, all notes are moved to the nearest 1/4 divi-sion.
(1/32)… (1/4)
Grid resolution, in musical values. A “b…f” char-acter added after the value means swing-quanti-zation. A “3” means triplet.
Start / End Tick
Use these parameters to set the starting and ending points of therange to be quantized.
If you wish to select a four-measure sequence starting at thebeginning of the Song, the Start will be positioned at 1.01.000,and the End at 5.01.000.
Bottom / Top Note
Use these parameters to set the bottom and top note of the key-board range to quantize. If you select the same note as the Bot-tom and Top parameters, you can select a single percussiveinstrument in a Drum track.
Note: These parameters are available only when a Drum track isselected.
No quanti-zation
1/8
1/4

184 Sequencer operating modeSong Edit: Transpose
Song Edit: Transpose
Here you can transpose the Song, a track or a part of a track.
After setting the various parameters, press Execute to start theoperation.
Track
Use this parameter to select a track.
All All tracks selected (apart for Drum tracks).
Track 1…16 Selected track.
Value
Transpose value (±127 semitones).
Start / End Tick
Use these parameters to set the starting and ending points of therange to transpose.
If you wish to select a four-measure sequence starting at thebeginning of the Song, the Start will be positioned at 1.01.000,and the End at 5.01.000.
Bottom / Top Note
Use these parameters to set the bottom and top of the keyboardrange to transpose. If you select the same note as the Bottom andTop parameters, you can select a single note, or a single percus-sive instrument in a Drum track.
Song Edit: Velocity
Here you can change the Velocity value for the notes. AnAdvanced mode is available, allowing you to select a velocitycurve for the selected range. This is useful to create fade-ins orfade-outs.
After setting the various parameters, press Execute to start theoperation.
Track
Use this parameter to select a track.
All All tracks selected.
Track 1…16 Selected track.
Value
Velocity change value.
Start / End Tick
Use these parameters to set the starting and ending points of therange to edit.
If you wish to select a four-measure sequence starting at thebeginning of the Song, the Start will be positioned at 1.01.000,and the End at 5.01.000.
Bottom / Top Note
Use these parameters to set the bottom and top of the keyboardrange to edit. If you select the same note as the Bottom and Topparameters, you can select a single percussive instrument in aDrum track.
Advanced
When this checkbox is checked, the “Intensity”, “Curve”, “StartVelocity Value” and “End Velocity Value” parameters can beedited.
Intensity
(Only available in Advanced mode). Use this parameter to specifythe degree to which the velocity data will be adjusted toward thecurve you specify in “Curve”.
0…100% Intensity value. With a setting of 0 [%], the veloc-ity will not change. With a setting of 100 [%], thevelocity will be changed the most.
Curve
(Only available in Advanced mode). Use this parameter to selectone of the six curves, and to specify how the velocity will changeover time.
Start / End Vel. Value
(Only available in Advanced mode). Velocity change at the start-ing and ending ticks of the selected range.
0…100 Velocity change in percentage.
StartValue
Curve 1
Velocity
Start Value = 0%, End Value = 100%
127
1EndValue
StartValue
Curve 2
Velocity
127
1EndValue
StartValue
Curve 3
Velocity
127
1EndValue
StartValue
Curve 4
Velocity
127
1EndValue
StartValue
Curve 5
Velocity
127
1EndValue
StartValue
Curve 6
Velocity RANDOM
127
1EndValue

185Sequencer operating modeSong Edit: Cut/Insert Measures
Ref
eren
ce
Song Edit: Cut/Insert Measures
In this page you can cut or insert measures from the Song.
After selecting the Start and Length parameters, press Execute tostart the operation.
After the Cut, the following measures are moved back, to fill thecut measures.
After the Insert, the following measures are pushed forward toaccommodate the inserted measures.
Start
First measure where to begin cutting/inserting.
Length
Number of measures to be cut/inserted.
Meter
Meter of the measures to be inserted.
Song Edit: Delete
This page is where you can delete MIDI events from the Song.
After setting the various parameters, press Execute to start theoperation.
Track
Use this parameter to select a track.
All All tracks selected.
Track 1…16 Selected track.
Master Master track. This is where the Tempo, Scale andEffect events are recorded.
Event
Type of MIDI event to delete.
All All events. Measures will not be removed fromthe Song, and will remain empty.
Note All notes in the selected range.
Dup.Note All duplicate notes. When two notes with thesame pitch are encountered on the same tick, theone with the lowest velocity is deleted.
After Touch After Touch events.
Pitch Bend Pitch Bend events.
Prog.Change Program Change events, excluding the bundledControl Change #00 (Bank Select MSB) and #32(Bank Select LSB).
Ctl.Change All Control Change events, for example BankSelect, Modulation, Damper, Soft Pedal…
CC00/32…CC127Single Control Change events. Double ControlChange numbers (like 00/32) are MSB/LSB bun-dles.
Start / End Tick
Use these parameters to set the starting and ending points of therange to edit.
If you wish to select a four-measure sequence starting at thebeginning of the Song, the Start will be positioned at 1.01.000,and the End at 5.01.000.
Bottom / Top Note
Use these parameters to set the bottom and top of the keyboardrange to delete. If you select the same note as the Bottom andTop parameters, you can select a single note, or a single percus-sive instrument in a Drum track.
Note: These parameters are available only when the All or Noteoptions are selected.
Song Edit: Copy
Here you can copy tracks or phrases.
After setting the various parameters, press Execute to start theoperation.
Note: If you copy too many events on the same “tick”, the “Toomany events!” message appears, and the copy operation is aborted.

186 Sequencer operating modeSong Edit: Move
Mode
Use this parameter to select the Copy mode.
Merge Copied data are merged with the data at the tar-get position.
Overwrite Copied data replace all data at the target position.
Warning: Deleted data cannot be recovered!
From Track… To Track
Use these parameters to select the source and target track tocopy.
All All tracks. The target track cannot be selected.
Track 1…16 Selected source and target tracks.
Start Measure… End Measure
These parameters are the starting and ending measure to copy.For example, if From Measure=1 and To Measure=4, the firstfour measures are copied.
To Measure
This parameter is the first of the target measures.
Repeat Times
Number of times the copy must be executed. Copies will be con-secutive.
Song Edit: Move
Here you can shift a track forward or backward by just a fewticks or whole measures.
After setting the various parameters, press Execute to completethe operation.
Track
Use these parameters to select the track you want to move.
Track 1…16 Selected track.
Start / End Tick
These parameters set the starting and ending point of the rangeto move.
To Tick
This parameter allows you to set the target starting point of themoved track.
Preferences: Global Setup
In this page, you can select a MIDI Setup and the Harmony trackfor the Sequencer mode.
Note: These settings are stored in the Sequencer Setup area of the
Global file. (Parameter of this kind are marked with the abbreviation through the manual). After changing these settings,select the Write Global-Sequencer Setup command from the pagemenu to save them to the Global.
Midi Setup
MIDI channels for the Sequencer mode can be automaticallyconfigured by selecting a MIDI Setup with this parameter. See“MIDI” on page 280 for more information on using MIDI Set-ups.
Note: To automatically select a MIDI Setup when entering theSequencer mode, select the Write Global-Sequencer Setup com-mand from the page menu.
For detailed information on MIDI Setup settings, see “MIDISetup” on page 328.
Note: After selecting a MIDI Setup, you can go to the Global modeand apply any change to each channel setting. To store thesechanges to a MIDI Setup, while still in Global mode select the WriteGlobal-Midi Setup command from the page menu. All MIDI Set-ups can be freely customized and overwritten.
Hint: To restore the original MIDI Setups, load the original Fac-tory data again (downloadable from www.korgpa.com).
Harmony Track
The Voice Processor gets the chord notes from the track selectedwith this parameter.
Hint: Go to the Voice Processor Preset section of the Global mode totry different Voice Processor Presets while creating or editing aSong.
Off No track sends notes to the Harmony module ofthe Voice processor. Chords can still be receivedfrom the MIDI IN.
Seq.1-Track 1…16
Chords are sent from one of Sequencer 1 tracks.
Seq
Seq
Seq

187Sequencer operating modePage menu
Ref
eren
ce
Page menu
Press the page menu icon to open the menu. Press a command toselect it. Press anywhere in the display to close the menu withoutselecting a command.
Write Global-Seq. Setup
Select this command to open the Write Global-Seq. Setup dialogbox, and save global settings that are unique to the Sequencermode. (See “Write Global-Sequencer Setup dialog box” onpage 188).
Load Song
Select this command to open the Song Select window, and load aSong to the sequencer. (See “Song Select window” on page 188).
Please note that in Sequencer mode the file is loaded to memory– contrary to Song Play mode, where Songs are read directlyfrom disk.
Save Song
Select this command to save the new or edited Song to disk as aStandard MIDI File. The file is automatically added the “.MID”extension. After selecting this command, the Save Song pageappears (see “Save Song window” on page 188).
Warning: Turning the instrument off will delete the Song frommemory. Save your Song to disk to avoid losing it.
Warning: The Song is also lost when switching from Sequencer toStyle Play or Song Play mode, without previously saving the Songto disk.
Undo
When selecting this command, the latest operation is canceled,and data are reverted to the previous situation.
Overdub Step Recording
Only available in Record mode. Select this command to enterOverdub Step Record mode. This recording mode lets you enterevents one at a time, adding events to the existing events. (See“Record mode: Step Record page” on page 171).
Overwrite Step Recording
Only available in Record mode. Select this command to enterOverwrite Step Record mode. This recording mode lets youenter events one at a time, overwriting all existing events. (See“Record mode: Step Record page” on page 171).
Delete Song
Select this command to delete the Song and create a new, blankSong.
Delete Current Track
Select this command to delete the track currently selected in theTrack area (see “Track volume/status area” on page 170).
Solo Track
Select the track to be soloed, and check this item. You will hearonly the selected track, and the ‘Solo’ warning will flash on thepage header.
Uncheck this item to exit the Solo function.
Copy/Paste FX
You can copy a single, or all four effects, between Styles, Perfor-mances, STSs and Songs. To do this, choose the “Copy FX” and“Paste FX” commands from the page menu of the Style Play,Song Play or Sequencer modes.
To copy a single effect:
1. Select the source Song, Performance, Style or STS, then
• go to the page of the single effect you want to copy (FX A,FX B, FX C, or FX D), or
• go to the Effects > FX Select page, to copy all four effects.This may be useful if you want to copy each of the foureffects into different Performances, Styles or STSs.
2. Choose the “Copy FX” command from the page menu.
3. Select the target Performance, Style or STS, then go to thepage of the single effect you want to paste (FX A, FX B, FXC, or FX D).
4. Choose the “Paste FX” command from the page menu.
To copy all four effects:
1. Select the source Performance, Style or STS, then go to theEffects > FX Select page, to copy all four effects.
2. Choose the “Copy FX” command from the page menu.
3. Select the target Performance, Style or STS, then go to thepage of the Effects > FX Select page.
4. Choose the “Paste FX” command from the page menu.
Exit from Record
Only available in Record mode. Select this command to exit theRecord mode, and go back to the Main page of the SequencerPlay mode (see “Sequencer Play - Main page” on page 166).
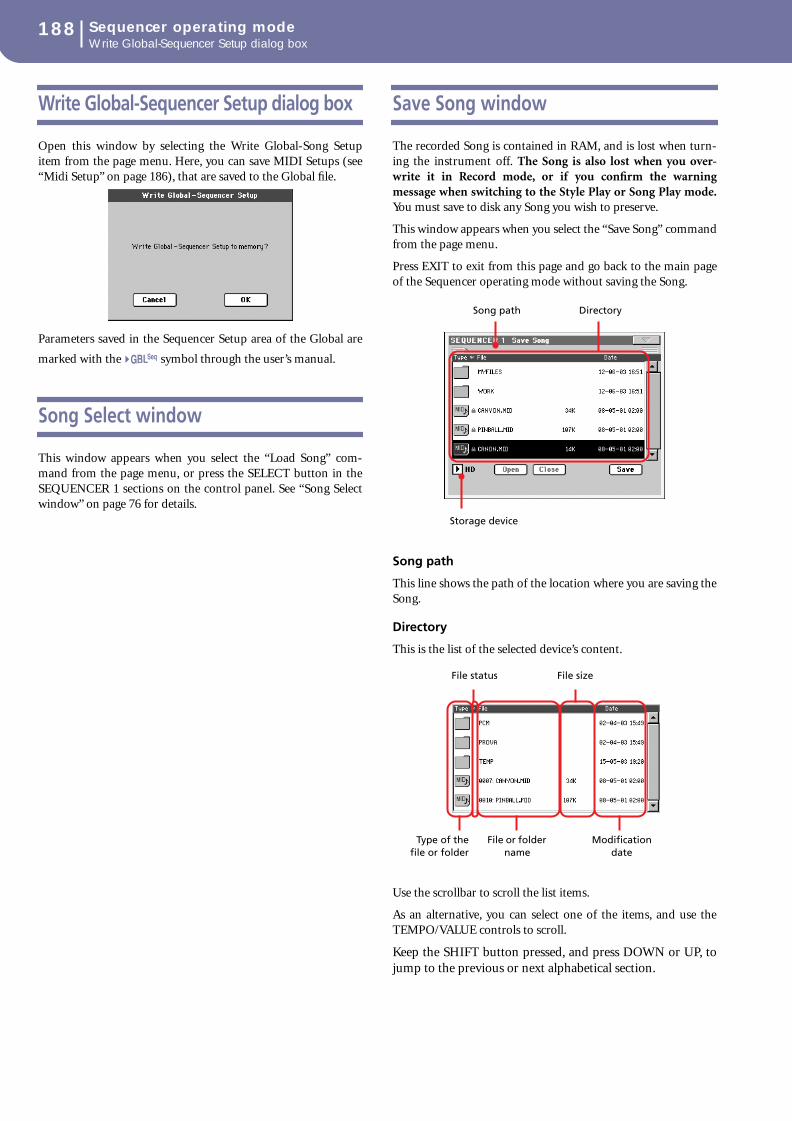
188 Sequencer operating modeWrite Global-Sequencer Setup dialog box
Write Global-Sequencer Setup dialog box
Open this window by selecting the Write Global-Song Setupitem from the page menu. Here, you can save MIDI Setups (see“Midi Setup” on page 186), that are saved to the Global file.
Parameters saved in the Sequencer Setup area of the Global are
marked with the symbol through the user’s manual.
Song Select window
This window appears when you select the “Load Song” com-mand from the page menu, or press the SELECT button in theSEQUENCER 1 sections on the control panel. See “Song Selectwindow” on page 76 for details.
Save Song window
The recorded Song is contained in RAM, and is lost when turn-ing the instrument off. The Song is also lost when you over-write it in Record mode, or if you confirm the warningmessage when switching to the Style Play or Song Play mode.You must save to disk any Song you wish to preserve.
This window appears when you select the “Save Song” commandfrom the page menu.
Press EXIT to exit from this page and go back to the main pageof the Sequencer operating mode without saving the Song.
Song path
This line shows the path of the location where you are saving theSong.
Directory
This is the list of the selected device’s content.
Use the scrollbar to scroll the list items.
As an alternative, you can select one of the items, and use theTEMPO/VALUE controls to scroll.
Keep the SHIFT button pressed, and press DOWN or UP, tojump to the previous or next alphabetical section.
Seq
Song path Directory
Storage device
Type of thefile or folder
File status
File or folder name
File size
Modification date

189Sequencer operating modeSave Song window
Ref
eren
ce
Storage device
Use this pop-up menu to select one of the available storagedevices where to save the Song.
Open
Opens the selected folder (item whose icon looks like this: ).
Close
Closes the current folder, returning to the parent (“upper”)folder.
Save
Press this button to open the Save Song dialog box, and save theSong to the current directory.
• If no file has been selected in the display, prior to pressing Save,the “NewSong” default name will be automatically assigned tothe Song.
Note: If a file is selected, just touch the storage device name to dese-lect it.
• If a file has been selected in the display, prior to pressing Save,the name of the selected file will be automatically assigned to theSong.
In any of the above situations, press the (Text Edit) button
to edit the Song name.
Warning: If a file with the same name is already in the currentdirectory, a message will warn you. If you confirm, the existing filewill be overwritten. Select a file before saving only if you want tooverwrite it (i.e., in case you are saving changes to an existing file).
Empty measure at the beginning of theStandard MIDI File
When saving a Song as an SMF, an empty measure is automati-cally inserted to the beginning of the Song. This measure con-tains various Song initialization parameters.
Play/Mute status saved with the Song
When saving a Song, the Play/Mute status is saved with the Song.This status is preserved also when playing back the same Song inSong Play mode.
Master Transpose saved with the Song
When saving a Song, the Master Transpose value is saved withthe Song. Since this value is saved as System Exclusive data, it ispreserved also when playing back the Song in Song Play mode.
Hint: Since the Master Transpose is a global parameter, loading aSong with a non-standard transposition may result in unwantedtransposing when loading other Songs that do not contain theirown transposition data. To transpose a Song it is advisable to usethe Transpose function in the Edit section of the Sequencer mode(see “Song Edit: Transpose” on page 184).
You may also lock the Master Transpose, to avoid unwanted trans-position. See “General Controls: Lock” on page 232 of the Globalchapter.
As a general rule, you should use the Master Transpose (TRANS-POSE buttons on the control panel) when you need to transposeKeyboard tracks together with the Song. You should use the Editmode Transpose function (see “Song Edit: Transpose” on page 184)when only the Song has to be transposed.
Note: The Master Transpose value is always shown on the pageheader:
Save Song procedure
1. If you are in Record mode, stop the sequencer and exitfrom the Record mode. Then go back to the main page ofthe Sequencer Play mode (see “Sequencer Play - Mainpage” on page 166).
2. Select the Save Song command from the page menu. TheSave Song page appears.
3. Select the folder where you want to save the Song into. Usethe Open and Close commands to browse open or closefolders. Use the scrollbar to browse through the files.
4. When you are in the directory where you want to save yourSong to, press the Save button in the display.
• To overwrite an existing file, select it before pressing Save.
• To create a new file, do not select any file before pressingSave. The “NewSong” (“NEWSONG.MID” on disk) namewill be automatically assigned to the Song.
5. After pressing the Save button, the Save Song dialog boxwill appear.
6. If you like, press the (Text Edit) button to edit the
name.
7. Press OK to confirm saving, or Cancel to stop the Saveoperation.
Device Type
FD Floppy disk
HD Hard disk (optional on the Pa1X with speakers)

190 Sound operating modeThe MIDI channel
The Sound operating mode is where you can listen to individualSounds, and edit them.
To select a Sound, see the “Basic operations” chapter.
In this mode, the selected Sound can always be played across thefull keyboard range.
While in a different operating mode, you can easily select theSound to be edited when switching to the Sound mode. Justselect the track the Sound to be edited is assigned to, then keepthe SHIFT button pressed while pressing the SOUND button.
Hint: This is useful to see the Bank Select/Program Change num-bers when programming a Song on an external sequencer.
Note: The Sound uses the same Scale of the latest selected Perfor-mance or STS.
The MIDI channel
In Sound mode, Pa1X receives and transmits on the same chan-nel of the Upper 1 track. If the Global channel is assigned, notescan be received also on this channel. See “MIDI: MIDI In Chan-nels” on page 238 and “MIDI: MIDI Out Channels” on page 238for more information.
How to select oscillators
While in an edit page requiring an oscillator to be selectedfor editing, use the vertical row of buttons on the right(1…5) to select one of the available oscillators. The num-ber of available oscillators depends on the “OscillatorMode” parameter (see page 193).
When oscillators cannot be select, since the parametercontained in the current page are global and valid for thewhole Sound, these buttons are greyed out, and cannot beselected.
Sounds, Drum Kits, Digital Drawbars
Pa1X features three different kinds of Sounds:
• Ordinary Sounds. These are normal instrument Sounds,like pianos, strings, basses.
• Drum Kits. These are drum and percussion kits, whereeach note of the keyboard is a different percussive instru-ment. You can find Drum Kits in the DRUM & PERC andUSER DK banks.
• Digital Drawbars. These are Sounds with a very complexstructure, and a special usage. See “Digital Drawbars page”on page 192 for more information.
Before pressing MENU to enter the edit environment, youshould select a Sound of the type you wish to edit or create.
Note: Notes pointing to special Drum Kit features are marked by
the icon.
Main page
Here is the main page of the Sound operating mode.
Page header
This line shows the current operating mode and transposition.
Operating mode name
Name of the current operating mode.
Master transpose
Master transpose value in semitones. This value can be changedusing the TRANSPOSE buttons on the control panel.
Page menu icon
Press the page menu icon to open the menu. See “Page menu” onpage 211 for more information.
Sound Info area
This is where basic details for the Sound are shown. Press any-where in this area to open the Sound Select window.
Sound name
Name of the Sound assigned to the corresponding Keyboardtrack.
Bank
Bank the current Sound belongs to.
Sound operating mode
Page header Page menu icon
RealtimeControls
area
FX areaVoice Assign Mode area
Sound Infoarea
Operating modename
Master Transpose (in semitones)

191Sound operating modeMain page
Ref
eren
ce
Bank Select / Program Change sequence
Bank Select MSB / Bank Select LSB / Program Change numbers,in the form “CC00.CC32.PC”.
CC00 This section shows the value of the ControlChange (CC) 00 message (or Bank Select MSB)for the selected Sound.
CC32 This section shows the value of the ControlChange (CC) 32 message (a.k.a. Bank Select LSB)for the selected Sound.
PC This section shows the value of the ProgramChange (PC) message for the selected Sound.Values are in the standard 0-127 MIDI number-ing format.
Note: Some manufacturers could use the 1-128numbering system; when connecting your Pa1X toan instrument of this kind, increment the PC valueby 1 unit.
Octave Transpose icon
Non editable. Octave transpose value.
Realtime Controls area
Controls in this area allow you to edit the main parameters ofthe Sounds assigned to each track.
While in this page, Assignable Sliders are linked to the corre-sponding Realtime Controls (a.k.a. Easy Sound Edit parame-ters).
Note: All values refer to the original values of the Sound.
Note: When selecting the Write Sound command from the pagemenu, current parameter values, after editing the Realtime Con-trols, are saved with the Sound. After saving, Realtime Controls areset back to the default position.
Note: After selecting a different Sound, Realtime Control values areautomatically set to zero.
Attack Attack time. This is the time during which thesound goes from zero (at the moment when youstrike a key) to it’s maximum level.
Decay Decay time. Time to go from the final Attack levelto the beginning of the Sustain.
Release Release time. This is the time during which thesound goes from the sustaining phase, to zero.The Release is triggered by releasing a key.
Cutoff Filter cutoff. This sets the sound brightness.
LFO Depth Intensity of the Vibrato (LFO).
LFO Speed Speed of the Vibrato (LFO).
LFO Delay Delay time before the Vibrato (LFO) begins, afterthe sound starts.
Resonance Use the Filter Resonance to boost the cutoff fre-quency.
Voice Assign Mode
Poly
The Sound will play polyphonically, allowing you play chords.
Mono
The Sound will play monophonically, producing only one noteat a time.
Hold
Use this parameter to keep the notes sustained even after releas-ing the keys.
Note: Please remember the Hold must be On before playing thenote to be held.
Legato
This parameter is available when the Mono option is selected.
Note: If “Legato” is On, certain multisamples or keyboard locationsmay produce an incorrect pitch.
On Legato is on. When multiple note-on’s occur, thefirst note-on will retrigger the sound, and the sec-ond and subsequent note-on’s will not retrigger.
When legato is on, multiple note-on’s will notretrigger the voice. If one note is already on andanother note is turned on, the first voice will con-tinue sounding. The oscillator sound, envelope,and LFO will not be reset, and only the pitch ofthe oscillator will be updated. This setting iseffective for wind instrument sounds and analogsynth-type sounds.
Off Legato is off. Notes will always be retriggeredwhen note-on occurs.
When legato is off, multiple note-on’s will retrig-ger the voice at each note-on. The oscillatorsound, envelope, and LFO will be reset (andretriggered) according to the settings of theSound.
FX Area
In Sound mode, the Sound uses its own effects instead of relyingon A-D effects. Two effect processors (FX1 and FX2) are avail-able.
On/Off
Use this button to turn on or off the corresponding effect.
Note: When an effect parameter is edited, this parameter is auto-matically set to On.
Note: If the FX1 and FX2 effects have been set to Off, FX Send val-ues are set to zero when saving the Sound.
Selected Effect
Non editable. This shows the effect assigned to the correspondingFX processor. To select a different effect, see “FX1/2” onpage 210.
Assignable Slider
Realtime Control
Assignable Slider
Realtime Control
1 Attack 5 LFO Depth
2 Decay 6 LFO Speed
3 Release 7 LFO Delay
4 Cutoff 8 Resonance

192 Sound operating modeDigital Drawbars page
Send
Use this knob to adjust the level of the corresponding effect.
Wet/Dry
Use this knob to adjust the mix between the wet (effected) anddry (uneffected) signal for the corresponding effect.
Digital Drawbars page
DIGITAL DRAWBARS are different from ordinary Sounds.Their parameters are not saved as a new Sound, but can be savedto a Performance. Therefore, when entering the Digital Draw-bars page, the MENU button is disabled.
Note: In Style Play and Backing Sequence mode, only a DigitalDrawbar Sound is available for the Keyboard tracks, and one forthe Style tracks. Save them to a Performance (see “Write Perfor-mance dialog box” on page 98).
Note: In Song Play mode, there is a Digital Drawbars Sound for theKeyboard tracks, one for Song tracks 1-8, another one for Songtracks 9-16.
Note: In Sequencer mode there is a Digital Drawbars Sound forSong tracks 1-8, one for Song tracks 9-16.
When you select the DIGITAL DRAWBARS bank, the DigitalDrawbar page appears, and the current setting is assigned to theselected track.
When entering this page, the SLIDER MODE button is automat-ically set to DRAWBARS, so you can use the sliders to changeeach foot volume. As an alternative, touch a foot and useTEMPO/VALUE controls to change its value.
Each foot refers to the pipe length in a pipe organ, in which thesound is produced by pipes of different length. Longer pipesmean a lower sound; therefore, the 16’ drawbar produces thelowest pitched sound, while the 1’ drawbar produces the highestpitched sound.
Percussion
The percussion adds a percussive sound to the attack segment ofthe organ sound.
On/Off
Use this parameter to turn percussion on or off.
Foot
Use this parameter to select a percussion register.
4’ Percussion added to the 4’ foot.
22/3’ Percussion added to the 22/3’ foot.
Mode (Percussion Mode)
This parameters lets you decide if the percussion sound has to betriggered on the first note of a group of held notes, or to allnotes.
All The percussive attack is played on all notes of achord.
1st The percussive attack is played only on the firstnote of a chord or a group of held notes. Releaseall notes to trigger the percussion again.
Volume (Percussion Volume)
Level of the percussive sound.
0…99 Level.
Length (Percussion Length)
Decay speed of the percussive sound.
0…99 Decay time.
Atk Noise (Attack Noise)
On/Off
Turns the noise component of the percussive attack on of off.
Volume
Level of the attack noise (from 0 to 7).
Wave (Drawbar Wave)
Waveshape of the drawbars.
Mellow A mellow-sounding synthetic wave.
Hard A harder-sounding synthetic wave.

193Sound operating modeEdit menu
Ref
eren
ce
Edit menu
From any page, press the MENU button to open the Sound editmenu. This menu gives access to the various Sound edit sections.
When in the menu, select an edit section, or press EXIT orSOUND to exit the menu and return to the main page. To returnto the main page, you can also select the Main Page menu item.
When in an edit page, press EXIT or the SOUND button toreturn to the main page of the Sound operating mode.
• When an ordinary Sound is selected:
• When a Drum Kit is selected, the “Basic” section is replacedby the “DrumKit” section:
Each item in this menu corresponds to an edit section. Each editsection groups various edit pages, that may be selected by press-ing the corresponding tab on the lower part of the display.
Edit page structure
All edit pages share some basic elements.
Operating mode
This indicates that the instrument is in Sound mode.
Edit section
This identifies the current edit section, corresponding to one ofthe items of the edit menu (see “Edit menu” on page 193).
Page menu icon
Press this icon to open the page menu (see “Page menu” onpage 211).
Selected oscillator
Use these buttons to select the oscillator to edit.
Parameters area
Each page contains various parameters. Use the tabs to selectone of the available pages. For detailed information on the vari-ous types of parameters, see sections starting from page 193.
Tabs
Use tabs to select one of the edit pages of the current edit section.
Basic: Sound Basic
Here you can make basic settings for the Sound, such as basicoscillator settings, the oscillator count, and the polyphonicmode.
Oscillator Mode
Use these radio buttons to specify the basic Sound type; whetherit will use one or more oscillators (up to five).
The total amount of polyphony varies depending on the numberof oscillators used by the Sound (a maximum of 62 with only 1oscillator, or a maximum of 12 with 5 oscillators).
Voice Assign Mode
This is the polyphonic mode of the Sound.
Poly The Sound will play polyphonically, allowing youplay chords.
Mono The Sound will play monophonically, producingonly one note at a time.
Single Trigger
This parameter is available when the selected mode is Poly.
Operating mode Edit section
Selected oscillator
Page menu icon
Parameters area
Tabs

194 Sound operating modeBasic: OSC Basic
On When the same note is played repeatedly, the pre-vious note will be silenced before the next note issounded, so that the notes do not overlap.
Off When the same note is played repeatedly, the pre-vious note will not be silenced before the nextnote is sounded.
Legato
This parameter is only available when the selected mode isMono. It is the same found on the main page of the Soundmode.
See “Legato” on page 191 for information on this parameter.
Priority
This parameter is available when the selected mode is Mono. Itspecifies which note will be given priority to play when two ormore notes are played simultaneously.
Low Lowest note will take priority.
High Highest note will take priority.
Last Last note will take priority.
Hold
Use this parameter to keep the notes sustained even after releas-ing the keys.
Sound Transpose Range
Use these parameters to set a range for transposition. Inside thisrange notes are transposed. Outside this range, they are nottransposed. This is useful to avoid RX Sounds being transposedwhen transposing a Sound.
Basic: OSC Basic
The multisample(s) on which the Sound will be based can beselected here for each of the five oscillators. Each oscillator canuse 1 or 2 multisamples, each one assigned to the High or Lowlayer.
OSC Multisample
High/Low Bank/Num
Use these parameters to select a different multisample for each ofthe High and Low layers. You can use velocity to switch betweenthe two multisamples. Offset, Reverse and Level can be adjustedindependently for the High and Low multisamples.
The High and Low pop-up menus is where you select the bank(ROM, RAM or EXB), while the numeric field under it is forselecting the multisample inside the selected bank. The Soundname appears on its right.
The multisample you select for the High layer will be triggeredby velocities higher than the value of the “Velocity MultisampleSwitch Low-High” parameter (see page 195). If you do not wishto use velocity switching, set the switch to a value of 001, andselect only the High multisample.
ROM The Flash-ROM bank. The internal Flash-ROMcontains 445 different multisamples (preset mul-tisamples), supplied by Korg as standard.
RAM RAM multisample, read from the RAM. Theseare user-loaded or created multisamples.
Note: If you create a new Sound based on a RAMmultisample, the RAM samples must be loadedfrom disk. See “PCM Autoload” and “Load PCMbutton” on page 273 (Disk mode) for informationon loading PCM samples, either at startup or witha dedicated command.
EXB1, EXB2 EXB1 or EXB2 multisample, loaded from the cor-responding optional EXB board (if installed).
Note: Each multisample has an upper note range limit, and cannotproduce sound when played above that limit.
2nd Offset
These parameters specify the point where the multisample(s)will begin to play. For some multisamples this parameter will notbe available.
On The sound will begin from the offset locationpre-determined for each multisample.
Off The sound will start from the beginning of themultisample waveform.
Reverse
The multisample will be played in reverse. In the case of Flash-ROM or optional (RAM or EXB) multisamples that were origi-nally specified to loop, the multisample will be played back in“one-shot” reverse mode. If the multisample was originally set toreverse, it will playback without change.
On The multisample will playback in reverse.
Off The multisample will play back normally.
Level
These parameters specify the level of each multisample.
0…127 Multisample level.
Note: Depending on the multisample, high settings of this parame-ter may cause the sound to distort when a chord is played. If thisoccurs, lower the level.
Pitch/Delay/Velocity Switch
Octave
Use this parameter to adjust the pitch of the selected oscillator inoctave units. The normal octave of the multisample is “0”.
-2…+1 Octave transposition.

195Sound operating modeBasic: Vel/Key Zone
Ref
eren
ce
Transpose
Use this parameter to adjust the pitch of the selected oscillator insemitone steps over a range of ±1 octave.
-12…+12 Transposition in semitones.
Tune
Use this parameter to adjust the pitch of the sample in one-centsteps (a semitone is 100 cents) over a range of ±1 octave.
-1200…+1200
Fine-tune value in cents.
Delay
This parameter sets a delay time from the note-on to the realbeginning of the sound. With a setting of KeyOff, the sound willbegin when note-off occurs. This is useful to create sounds suchas the “click” that is heard when a harpsichord note is released.In this case, set the “Sustain” parameter to 0 (see page 204).
Key Off The sound will begin when the note is released.
0…5000ms Delay time in milliseconds.
Velocity Multisample Switch Low-High
This is the velocity value dividing the High and Low layers forthe selected oscillator. Notes struck harder than this value will beplayed by the High multisample.
Basic: Vel/Key Zone
Here you can set a note and velocity range “window” for theselected oscillator.
Velocity Zone
Here you can specify the velocity range for the selected oscillator.
Note: You cannot set the Bottom Velocity higher than the TopVelocity, nor the Top Velocity lower than the Bottom Velocity.
0…127 Assigned velocity.
Keyboard Range
Here you can specify the note range for the selected oscillator.
Note: You cannot set the Bottom Key higher than the Top key, northe Top Key lower than the Bottom key.
C-1…G9 Assigned note.
Scaled Velocity
Use these parameters to scale velocity values received by theoscillator. By using the “Velocity Zone” function (see above), anoscillator may be limited to a restricted range (say, 10 to 20), thatmay result in weak dynamics when the associated sample is trig-gered.
By assigning a different value to these parameters, the restrictedrange will be converted to a wider range (for example, the lowestrange value of 10 may be converted to a Scaled Velocity value of0, and the highest range value of 20 may be converted to a ScaledVelocity value of 127). All values included between the mini-mum and maximum value are scaled accordingly.
As a consequence, you can create an RX Sound of guitar, byassigning the guitar fret noise to the 10~20 velocity range. Whena dynamics value between 10~20 is received, the real velocityvalue is scaled to the Scaled Velocity values, and plays louder.
0…127 Assigned velocity value.
DrumKit: Sample Setup (Drum Kits)
This page appears when you edit a Drum Kit. Here you canselect a different percussive sample for each key and layer.
Drum Kits use only one oscillator.
Key
Key
Key in edit. You can press a key on the keyboard, while thisparameter is selected, to select a key.
Layers
Number of layers assigned to the selected key. Depending on thenumber of selected layers, you can have a different number ofvelocity switches.
Assign
Use this parameter to turn the sample on/off.
On The sample is assigned to the selected key.
Off The sample is not assigned. The sample assignedto the next highest assigned key is used instead.
Selected Layer
VelocitySwitches
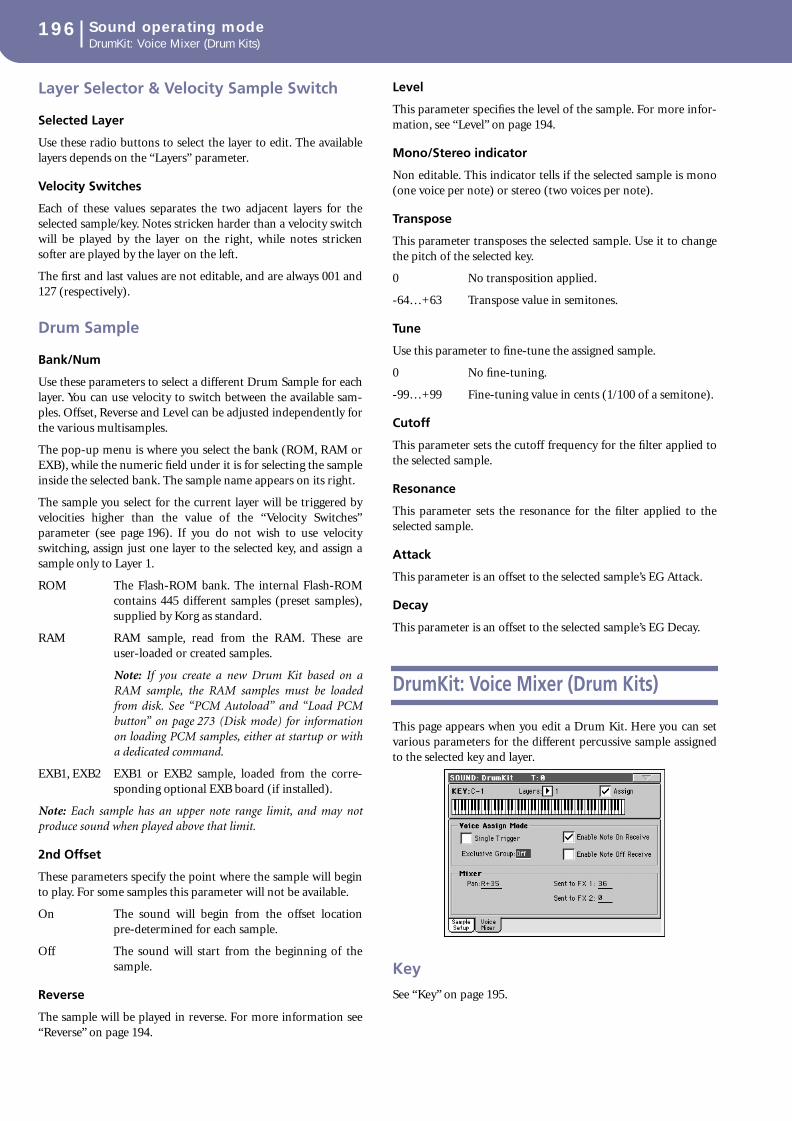
196 Sound operating modeDrumKit: Voice Mixer (Drum Kits)
Layer Selector & Velocity Sample Switch
Selected Layer
Use these radio buttons to select the layer to edit. The availablelayers depends on the “Layers” parameter.
Velocity Switches
Each of these values separates the two adjacent layers for theselected sample/key. Notes stricken harder than a velocity switchwill be played by the layer on the right, while notes strickensofter are played by the layer on the left.
The first and last values are not editable, and are always 001 and127 (respectively).
Drum Sample
Bank/Num
Use these parameters to select a different Drum Sample for eachlayer. You can use velocity to switch between the available sam-ples. Offset, Reverse and Level can be adjusted independently forthe various multisamples.
The pop-up menu is where you select the bank (ROM, RAM orEXB), while the numeric field under it is for selecting the sampleinside the selected bank. The sample name appears on its right.
The sample you select for the current layer will be triggered byvelocities higher than the value of the “Velocity Switches”parameter (see page 196). If you do not wish to use velocityswitching, assign just one layer to the selected key, and assign asample only to Layer 1.
ROM The Flash-ROM bank. The internal Flash-ROMcontains 445 different samples (preset samples),supplied by Korg as standard.
RAM RAM sample, read from the RAM. These areuser-loaded or created samples.
Note: If you create a new Drum Kit based on aRAM sample, the RAM samples must be loadedfrom disk. See “PCM Autoload” and “Load PCMbutton” on page 273 (Disk mode) for informationon loading PCM samples, either at startup or witha dedicated command.
EXB1, EXB2 EXB1 or EXB2 sample, loaded from the corre-sponding optional EXB board (if installed).
Note: Each sample has an upper note range limit, and may notproduce sound when played above that limit.
2nd Offset
These parameters specify the point where the sample will beginto play. For some samples this parameter will not be available.
On The sound will begin from the offset locationpre-determined for each sample.
Off The sound will start from the beginning of thesample.
Reverse
The sample will be played in reverse. For more information see“Reverse” on page 194.
Level
This parameter specifies the level of the sample. For more infor-mation, see “Level” on page 194.
Mono/Stereo indicator
Non editable. This indicator tells if the selected sample is mono(one voice per note) or stereo (two voices per note).
Transpose
This parameter transposes the selected sample. Use it to changethe pitch of the selected key.
0 No transposition applied.
-64…+63 Transpose value in semitones.
Tune
Use this parameter to fine-tune the assigned sample.
0 No fine-tuning.
-99…+99 Fine-tuning value in cents (1/100 of a semitone).
Cutoff
This parameter sets the cutoff frequency for the filter applied tothe selected sample.
Resonance
This parameter sets the resonance for the filter applied to theselected sample.
Attack
This parameter is an offset to the selected sample’s EG Attack.
Decay
This parameter is an offset to the selected sample’s EG Decay.
DrumKit: Voice Mixer (Drum Kits)
This page appears when you edit a Drum Kit. Here you can setvarious parameters for the different percussive sample assignedto the selected key and layer.
Key
See “Key” on page 195.

197Sound operating modePitch: Pitch Mod
Ref
eren
ce
Voice Assign Mode
Single Trigger
Use this parameter to set the sample as a single-triggered one.
On When the same key (note) is played repeatedly,the previous note will be stopped before the newnote is triggered, so that they will not overlap.
Off When the same key (note) is played repeatedly,the previous note will not be stopped before thenew note is triggered.
Exclusive Group
Exclusive Groups are sets of mutually exclusive keys, stoppingeach other. For example, if the Open Hi-Hat and Closed Hi-Hatare assigned the same Exclusive Group, playing an Open Hi-Hatwill stop the Closed Hi-Hat playing.
None No Exclusive Group assigned. The selected keywill not be stopped by any other key.
1…127 Exclusive Groups assigned to the selected key.When you play this key, all other keys assigned tothe same Exclusive Group will be stopped, andthis key will be stopped by other keys assigned tothe same Exclusive Group.
Enable Note On Receive
Use this parameter to enable/disable the reception of the NoteOn (Key On) message.
On The Note On message is normally received.
Off The Note On message is not received. Therefore,the corresponding key is muted.
Enable Note Off Receive
Use this parameter to enable/disable the reception of the NoteOff (Key Off) message.
On The sound will stop as soon as you release thekey.
Off The sound will continue playing up to the end ofthe sample. The Note Off message is ignored.
Mixer
Pan
This parameter sets the position in the stereo panorama of theselected key.
Send FX1
This parameter sets the FX1 send level for of the selected key.
Send FX2
This parameter sets the FX2 send level for of the selected key.
Pitch: Pitch Mod
Here you can make pitch settings for each oscillator. These set-tings specify how keyboard location will affect the pitch of eachoscillator, and select the controllers that will affect the oscillatorpitch and specify the depth of control. You can also specify theamount of pitch change produced by the Pitch EG and by LFO1and LFO2, switch portamento on/off and specify how it willapply.
Pitch
Pitch Slope
Normally you will leave this parameter at +1.0. Positive (+) val-ues will cause the pitch to rise as you play higher notes, and neg-ative (–) values will cause the pitch to fall as you play highernotes.
With a value of 0, there will be no change in pitch, and the C4pitch will sound regardless of the keyboard location you play.
The diagram shows how the Pitch Slope and pitch are related:
-1.0…+2.0 Pitch slope value.
JS (+X)
This parameter specifies how the pitch will change when the joy-stick is moved all the way to the right. A setting of 12 produces 1octave of change.
For example if you set this to +12 and move the joystick all theway to the right, the pitch will rise one octave above the originalpitch.
-60…+12 Maximum pitch change in semitones.
JS (–X)
This parameter specifies how the pitch will change when the joy-stick is moved all the way to the left. A setting of 12 produces 1octave of change.
For example, if you set this to -60 and move the joystick all theway to the left, the pitch will fall five octaves below the original
Pitch
Key
2oct1oct1oct
C4 C5
+2
+1
0
–1

198 Sound operating modePitch: Pitch Mod
pitch. This can be used to simulate the downward swoops that aguitarist produces using the tremolo arm.
-60…+12 Maximum pitch change in semitones.
AMS (Alternate Modulation Source)
This parameter selects the source that will modulate the pitch ofthe selected oscillator. See “AMS (Alternate Modulation Source)list” on page 213.
Intensity
This parameter specifies the depth and direction of the effectproduced by “AMS”. With a setting of 0, no modulation will beapplied. With a setting of 12.00, the pitch will change up to oneoctave.
For example, if you set “AMS” to After Touch and apply pressureto the keyboard, the pitch will rise if this parameter is set to apositive (+) value, or fall if this parameter is set to a negative (–)value. The range is a maximum of one octave.
-12.00…+12.00
Parameter value.
Pitch EG
The Pitch EG (Envelope Generator) is unique to all oscillators.
Velocity Intensity
This parameter specifies the depth and direction of the modula-tion that the pitch EG specified on “Pitch: Pitch EG” will applyto the pitch. With a setting of 12.00, the pitch will change a max-imum of ±1 octave.
-12.00…+12.00
Parameter value.
Pitch EG AMS (Alternate Modulation Source)
This parameter selects the source that will modulate the pitchEG of the selected oscillator. See “AMS (Alternate ModulationSource) list” on page 213).
Pitch EG Intensity
This parameter specifies the depth and direction of the effectthat “AMS” will have. For example, if you set “AMS” to Velocityand set this value to +12.00, the velocity will control the range ofpitch change produced by the pitch EG in a range of ±1 octave.As you play more softly, the pitch change will draw closer to thepitch EG levels.
Note: “Intensity” (Pitch EG) and AMS will be added to determinethe depth and direction of the pitch modulation applied by thepitch EG.
Portamento
Enabled
This parameter turns the portamento effect (smooth change inpitch from one note to the next) on/off, and specifies how it willbe applied.
Note: Portamento will also be switched when CC#65 (PortamentoSW) is received.
On Portamento will be applied.
Off Portamento will not be applied.
Fingered
This parameter specifies whether the portamento effect restartsor not with each note played.
On Portamento will restart with each note.
Off Portamento will not restart with each note.
Time
This parameter sets the portamento time. Increasing the valuewill produce a slower change in pitch.
000…127 Portamento time in MIDI value.
Pitch change (level)
Softly played(Intensity (Pitch EG) setting)
Strongly played with anegative (–) value
Strongly played witha positive (+) value
Note-onNote-off
Note-onNote-off
Note-onNote-off

199Sound operating modePitch: Pitch EG
Ref
eren
ce
Pitch: Pitch EG
Here you can make settings for the pitch EG, which creates time-variant changes in the pitch of the oscillators. The depth of pitchchange produced by these EG settings on the oscillators isadjusted by the “Intensity (AMS1/2 Intensity)” parameter (seepage 199).
Diagram
The diagram on top of the page shows the Pitch envelope line.
Level
These parameters specify the amount of pitch change. The actualamount of pitch change will depend on the “Intensity (AMS1/2Intensity)” parameter (see below). For example, with an “Inten-sity” setting of +12.00, a “Level” setting of +99 would raise thepitch one octave, and a “Level” setting of –99 would lower thepitch one octave.
Start Level
Specifies the amount of pitch change at note-on.
-99…+99 Parameter value.
Attack Level
Specifies the amount of pitch change when the attack time haselapsed.
-99…+99 Parameter value.
Release Level
Specifies the amount of pitch change when the release time haselapsed.
-99…+99 Parameter value.
Time
These parameters specify the time over which the pitch changewill occur.
See diagram above.
Attack Time
Specifies the time over which the pitch will change from note-onuntil it reaches the pitch specified as the attack level.
0…99 Parameter value.
Decay Time
Specifies the time over which the pitch will change after reachingthe attack level until it reaches the normal pitch.
0…99 Parameter value.
Release Time
Specifies the time over which the pitch will change from note-offuntil it reaches the pitch specified as the release level.
0…99 Parameter value.
Level Modulation
AMS1/2 (Alternate Modulation Source 1/2)
These parameters select the source that will control the pitch EG“Level” parameters (“AMS (Alternate Modulation Source) list”on page 213).
Intensity (AMS1/2 Intensity)
These parameters specify the depth and direction of the effectapplied by “AMS1”. With a setting of 0, the levels specified by“Level” will be used.
For example if “AMS1” is After Touch, pressing the keys to turnit on will change the “Level” parameters of the Pitch EG. As theabsolute value of “Intensity” is increased, the pitch EG levels willchange more greatly when the key pressure is released. Thedirection of the change is specified by “St (Start Level Swing)”and “At (Attack Level Swing)”. When the key pressure isreleased, the pitch EG levels will return to their own settings.
If “AMS1” is set to Velocity, increasing the absolute value of“Intensity” will produce increasingly wider change in pitch EGlevels for strongly-played notes. The direction of the change isspecified by “St (Start Level Swing)” and “At (Attack LevelSwing)”. As you play more softly, the pitch change will drawcloser to the pitch EG levels.
-99…+99 Parameter value.
St (Start Level Swing)
This parameter specifies the direction of change in “Start Level”caused by “AMS1/2”. If “Intensity” is a positive (+) value, a set-ting of + will raise the EG level, and a setting of – will decrease it.With a setting of 0 there will be no change.
Note-on Note-off
AttackTime
DecayTime
Start Level Release Level
Release Time
Attack Level+99 = approximately 1 octave
–99 = approximately 1 octave
0 = pitch whenkey is held(sustained)
Time
Time-varying pitch settings (when Pitch EG Intensity = +12.00)
Pitch EG change (level) (AMS=JS-Y/Velocity, Intensity= positive (+) value
Note-onNote-off
Note-onNote-off
Note-onNote-off
A note played softly with Start Level Swing set at 0, Attack Level Swing set to +, the Joystick pulled on
A note played strongly with Start Level Swing set to 0, Attack Level Swing set to +, the Joystick pulled on
A note played strongly with Start Level Swing set to 0, Attack Level Swing set to –, the Joystick pulled on
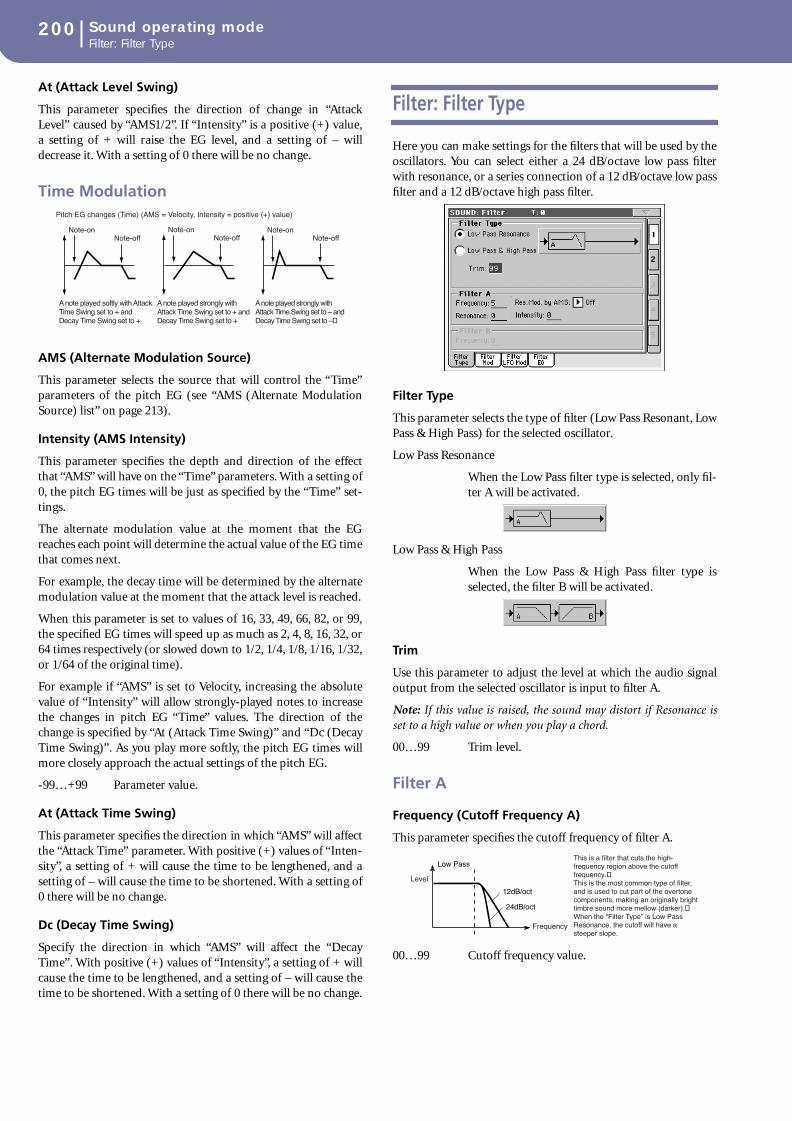
200 Sound operating modeFilter: Filter Type
At (Attack Level Swing)
This parameter specifies the direction of change in “AttackLevel” caused by “AMS1/2”. If “Intensity” is a positive (+) value,a setting of + will raise the EG level, and a setting of – willdecrease it. With a setting of 0 there will be no change.
Time Modulation
AMS (Alternate Modulation Source)
This parameter selects the source that will control the “Time”parameters of the pitch EG (see “AMS (Alternate ModulationSource) list” on page 213).
Intensity (AMS Intensity)
This parameter specifies the depth and direction of the effectthat “AMS” will have on the “Time” parameters. With a setting of0, the pitch EG times will be just as specified by the “Time” set-tings.
The alternate modulation value at the moment that the EGreaches each point will determine the actual value of the EG timethat comes next.
For example, the decay time will be determined by the alternatemodulation value at the moment that the attack level is reached.
When this parameter is set to values of 16, 33, 49, 66, 82, or 99,the specified EG times will speed up as much as 2, 4, 8, 16, 32, or64 times respectively (or slowed down to 1/2, 1/4, 1/8, 1/16, 1/32,or 1/64 of the original time).
For example if “AMS” is set to Velocity, increasing the absolutevalue of “Intensity” will allow strongly-played notes to increasethe changes in pitch EG “Time” values. The direction of thechange is specified by “At (Attack Time Swing)” and “Dc (DecayTime Swing)”. As you play more softly, the pitch EG times willmore closely approach the actual settings of the pitch EG.
-99…+99 Parameter value.
At (Attack Time Swing)
This parameter specifies the direction in which “AMS” will affectthe “Attack Time” parameter. With positive (+) values of “Inten-sity”, a setting of + will cause the time to be lengthened, and asetting of – will cause the time to be shortened. With a setting of0 there will be no change.
Dc (Decay Time Swing)
Specify the direction in which “AMS” will affect the “DecayTime”. With positive (+) values of “Intensity”, a setting of + willcause the time to be lengthened, and a setting of – will cause thetime to be shortened. With a setting of 0 there will be no change.
Filter: Filter Type
Here you can make settings for the filters that will be used by theoscillators. You can select either a 24 dB/octave low pass filterwith resonance, or a series connection of a 12 dB/octave low passfilter and a 12 dB/octave high pass filter.
Filter Type
This parameter selects the type of filter (Low Pass Resonant, LowPass & High Pass) for the selected oscillator.
Low Pass Resonance
When the Low Pass filter type is selected, only fil-ter A will be activated.
Low Pass & High Pass
When the Low Pass & High Pass filter type isselected, the filter B will be activated.
Trim
Use this parameter to adjust the level at which the audio signaloutput from the selected oscillator is input to filter A.
Note: If this value is raised, the sound may distort if Resonance isset to a high value or when you play a chord.
00…99 Trim level.
Filter A
Frequency (Cutoff Frequency A)
This parameter specifies the cutoff frequency of filter A.
00…99 Cutoff frequency value.
Pitch EG changes (Time) (AMS = Velocity, Intensity = positive (+) value)
Note-onNote-off
Note-onNote-off
Note-onNote-off
A note played softly with Attack Time Swing set to + and Decay Time Swing set to +
A note played strongly with Attack Time Swing set to + and Decay Time Swing set to +
A note played strongly with Attack Time Swing set to – and Decay Time Swing set to –
Frequency
Level
Low Pass
12dB/oct
24dB/oct
This is a filter that cuts the high-frequency region above the cutoff frequency.This is the most common type of filter, and is used to cut part of the overtone components, making an originally bright timbre sound more mellow (darker).When the “Filter Type” is Low Pass Resonance, the cutoff will have a steeper slope.

201Sound operating modeFilter: Filter Mod
Ref
eren
ce
Resonance (Resonance A)
The resonance emphasizes the overtone components that lie inthe region of the cutoff frequency specified by “Frequency”, pro-ducing a more distinctive sound. Increasing this value will pro-duce a stronger effect.
00…99 Resonance value.
Res. Mod. by AMS (Resonance modulated by AMS)
Selects the source that will control the “Resonance” level. See“AMS (Alternate Modulation Source) list” on page 213.
Intensity (AMS Intensity)
This parameter specifies the depth and direction of the effectthat “Res. Mod. by AMS (Resonance modulated by AMS)” willhave on the resonance level specified by “Resonance (ResonanceA)”.
For example if Velocity has been selected, changes in keyboardvelocity will affect the resonance.
With positive (+) values, the resonance will increase as you playmore strongly, and as you play more softly the resonance willapproach the level specified by the “Resonance” setting.
With negative (–) values, the resonance will decrease as you playmore strongly, and as you play more softly the resonance willapproach the level specified by the “Resonance” setting.
The resonance level is determined by adding the “Resonance”and “Intensity (AMS Intensity)” values.
-99…+99 Parameter value.
Filter B
Frequency (Cutoff Frequency B)
This parameter specifies the cutoff frequency of filter B. Thisparameter will be displayed when “Filter Type” is set to Low Pass& High Pass.
00…99 Cutoff frequency value.
Filter: Filter Mod
These settings let you apply modulation to the cutoff frequency(“Frequency”) of the filter for the selected oscillator to modifythe tone.
When “Filter Type” is Low Pass Resonance, parameters for filterB will not be editable (greyed out).
Keyboard Tracking
Key Low/High
These settings specify keyboard tracking for the cutoff frequencyof the filter for the selected oscillator. The way in which the cut-off frequency is affected by the keyboard location you play canbe specified by the “Key Low”, “Key High”, “Ramp Low” and“Ramp High” parameters.
Keyboard tracking will apply to the range below the specifiedLow note number, and above the specified High note number.
C–1…G9 Lowest/Highest note in the range.
Ramp Low/High
These parameter specifies the angle of keyboard tracking.
If “Intensity to A” and “Intensity to B” are set to +50, “RampLow” is set to –62 and “Ramp High” is set to +62, the angle ofthe change in cutoff frequency will correspond to the keyboardlocation (pitch). This means that the oscillation that occurswhen you increase the “Resonance (Resonance A)” will corre-spond to the keyboard location.
If you set “Ramp Low” to +43 and “Ramp High” to –43, the cut-off frequency will not be affected by keyboard location. Use thissetting when you do not want the cutoff frequency to change foreach note.
-99…+99 Angle value.
Here is how cutoff frequency is affected by keyboard locationand the Ramp setting (“Intensity to A” and “Intensity to B” =+50):
The effect of resonance
Low PassLevel
Low resonance value High resonance value
Level
Frequency
High Pass
This filter cuts the low-frequency range that lies below the cutoff frequency. By cutting the lower overtones, it lightens the tone.
12dB/oct
Cutoff frequency
Key
Low Ramp=+99
Low Ramp=+43
Low Ramp=0
Low Ramp=–62
Low Ramp=–99
High Ramp=+99
High Ramp=+62
High Ramp=0
High Ramp=–43
High Ramp=–99
Low Key High Key

202 Sound operating modeFilter: Filter Mod
Tracking to A/B
These parameters specify the note numbers at which keyboardtracking will begin to apply, and set the “Intensity to A” and“Intensity to B” parameters to specify the depth and direction ofthe change applied to filters A and B.
For the range of notes between “Key Low” and “Key High”, thecutoff frequency will change according to the keyboard location(pitch).
-99…+99 Parameter value.
Filter EG
Velocity to A
This parameter specifies the depth and direction of the effectthat velocity will have on the time-varying changes created bythe filter EG (as set on “Filter: Filter EG”) to control the filter Acutoff frequency.
With positive (+) values, playing more strongly will cause the fil-ter EG to produce greater changes in cutoff frequency. With neg-ative (–) values, playing more strongly will also cause the filterEG to produce greater changes in cutoff frequency, but with thepolarity of the EG inverted.
99…+99 Value of the Velocity to A parameter.
Velocity to B
This parameter specifies the depth and direction of the effectthat velocity will have on the time-varying changes created bythe filter EG to control the filter B cutoff frequency (see “Velocityto A”).
99…+99 Value of the Velocity to B parameter.
Int to A (Intensity to A)
Specifies the depth and direction of the effect that the time-vary-ing changes created by the filter 1 EG will have on the filter Acutoff frequency.
With positive (+) settings, the sound will become brighter whenthe EG levels set by Filter EG “Level” and “Time” parameters arein the “+” area, and darker when they are in the “–” area.
With negative (–) settings, the sound will become darker whenthe EG levels set by Filter EG “Level” and “Time” parameters arein the “+” area, and brighter when they are in the “–” area.
-99…+99 Parameter value.
Int to B (Intensity to B)
Specifies the depth and direction of the effect that the time-vary-ing changes created by the filter EG will have on the filter B cut-off frequency (see “Int to A (Intensity to A)”).
-99…+99 Parameter value.
AMS (EG Alternate Modulation Source)
Selects the source that will control the depth and direction of theeffect that the time-varying changes produced by the filter EGwill have on the cutoff frequency of filters A and B. See “AMS(Alternate Modulation Source) list” on page 213.
Int to A (Intensity to A)
Specifies the depth and direction of the effect that “AMS” willhave on filter A. For details on how this will apply, refer to “Int toA (Intensity to A)”.
Int to B (Intensity to B)
Specifies the depth and direction of the effect that “AMS” willhave on filter B. For details on how this will apply, refer to “Int toA (Intensity to A)”.
Note: The sum of the settings for “Velocity to A/B”, “Intensity to A/B”, and “(AMS) Intensity to A/B” will determine the depth anddirection of the effect produced by the filter EG.
Filter A/B Modulation
AMS1 (Alternate Modulation Source 1 for filter A/B)
Selects the source that will control modulation of the filter Acutoff frequency. See “AMS (Alternate Modulation Source) list”on page 213.
Note: The filter B parameters will be displayed when “Filter Type”on page 200 is Low Pass & High Pass.
Intensity (Intensity to AMS1)
Specifies the depth and direction of the effect that “AMS1” willhave.
When “AMS1” is JS X, a positive (+) value for this parameter willcause the cutoff frequency to rise when the joystick is movedtoward the right, and fall when the joystick is moved toward theleft. With a negative (–) value for this parameter, the oppositewill occur.
This value is added to the setting of the Filter A “Frequency”.
AMS2 (Alternate Modulation Source 2 for filter A/B)
Selects the source that will control modulation of the filter Acutoff frequency (see “AMS (Alternate Modulation Source) list”on page 213).
Intensity (Intensity to AMS2)
Specifies the depth and direction of the effect that the selectedsource will have (see “Intensity (Intensity to AMS1)” onpage 202).
Changes in cutoff frequency
Softly played Strongly playedSetting to –
Strongly playedSetting to +
Note-onNote-off
Note-onNote-off
Note-onNote-off

203Sound operating modeFilter: Filter LFO
Ref
eren
ce
Filter: Filter LFO
Here you can use the filter LFO to apply cyclic modulation to thecutoff frequency of the filter (for the selected oscillator) to createcyclical changes in tone.
LFO 1
Intensity to A
Specifies the depth and direction of the modulation that LFO1(set on “LFO: LFO1”) will have on the cutoff frequency of filterA. Negative (–) settings will invert the phase.
-99…+99 Parameter value.
Intensity to B
Specify the depth and direction of the modulation that LFO1will have on the cutoff frequency of filter B (see “Intensity to A”).
-99…+99 Parameter value.
JS (Joystick) –Y Intensity to A
By moving the joystick in the Y direction (toward yourself), youcan control the depth at which LFO1 modulates the cutoff fre-quency of filter A. This parameter specifies the depth and direc-tion of the control.
Higher settings of this parameter will produce greater increasesin the effect of LFO1 on the filter when the joystick is movedtoward yourself.
-99…+99 Parameter value.
JS (Joystick) –Y Intensity to B
By moving the joystick in the Y direction (toward yourself), youcan control the depth at which LFO1 modulates the cutoff fre-quency of filter B. This parameter specifies the depth and direc-tion of the control (see “JS (Joystick) –Y Intensity to A”).
AMS (Filter LFO1 Alternate Modulation Source)
Select a source that will control the depth and direction of cutofffrequency change for both filters A and B. See “AMS (AlternateModulation Source) list”.
Intensity to A
Specifies the depth and direction of the effect that “AMS” willhave on filter A.
For example if “AMS” is After Touch, higher settings of thisparameter will allow greater change to be applied to LFO1 whenyou apply pressure to the keyboard.
-99…+99 Parameter value.
Intensity to B
Specifies the depth and direction of the effect that “AMS” willhave on filter B (see “Intensity to A”).
LFO 2
Adjusts the depth of the cyclic modulation applied by LFO2 (seton “LFO: LFO2”) to the cutoff frequency of filters A and B. Formore information on the parameters see “LFO 1” above.
Filter: Filter EG
Here you can make settings for the EG that will produce time-varying changes in the cutoff frequency of filters A and B for theselected oscillator. The depth of the effect that these settings willhave on the filter cutoff frequency is determined by the “Veloc-ity” and “Intensity” parameters.
Diagram
The diagram on top of the page shows the Filter envelope line.
Filter envelope
Level
These are the envelope segment levels. The result will depend onthe filter that was selected in “Filter Type”. For example, with theLow Pass Resonance filter, positive (+) values of EG Intensitywill cause the tone to be brightened by positive (+) levels, anddarkened by negative (–) levels.
Change in cutoff
Low setting High setting
Note-on
Note-off
AttackTime
StartLevel Decay
TimeReleaseTime
ReleaseLevel
Attack Level
The specifiedcutoff frequency
Sustain Level
Time
BreakPointLevel
SlopeTime

204 Sound operating modeFilter: Filter EG
Start
This parameter specifies the change in cutoff frequency at thetime of note-on.
-99…+99 Level value.
Attack
This parameter specifies the change in cutoff frequency after theattack time has elapsed.
-99…+99 Level value.
Break (Break Point)
This parameter specifies the change in cutoff frequency after thedecay time has elapsed.
-99…+99 Level value.
Sustain
This parameter specifies the change in cutoff frequency that willbe maintained from after the slope time has elapsed until note-off occurs.
-99…+99 Level value.
Release
This parameter specifies the change in cutoff frequency that willoccur when the release time has elapsed.
-99…+99 Level value.
Time
These parameters specify the time over which the filter changewill occur.
Attack
This parameter specifies the time over which the level willchange from note-on until the attack level is reached.
0…99 Time value.
Decay
This parameter specifies the time over which the level willchange from the attack level to the break point level.
0…99 Time value.
Slope
This parameter specifies the time over which the level willchange after the decay time has elapsed until the sustain level isreached.
0…99 Time value.
Release
This parameter specifies the time over which the level willchange after note-on occurs until the release level is reached.
0…99 Time value.
Level Modulation
AMS (Alternate Modulation Source)
This parameter selects the source that will control the “Level”parameters of the filter EG (“AMS (Alternate ModulationSource) list” on page 213).
Intensity (AMS Intensity)
This parameter specifies the depth and direction of the effectapplied by “AMS”. With a setting of 0, the levels specified by“Frequency (Cutoff Frequency A)” will be used.
For example, if “AMS” is Velocity, and you set “St (Start LevelSwing)”, “At (Attack Level Swing)” and “Br (Break Level Swing)”to + and set “Intensity” to a positive (+) value, the EG levels willrise as you play more strongly. If “Intensity” is set to a negative (–) values, the EG levels will fall as you play more strongly.
-99…+99 Intensity value.
St (Start Level Swing)
This parameter specifies the direction in which “AMS” will affect“Start”. When “Intensity” has a positive (+) value, a setting of +for this parameter will allow “AMS” to raise the EG level, and asetting of – will allow “AMS” to lower the EG level. With a settingof 0 there will be no change.
At (Attack Level Swing)
This parameter specifies the direction in which “AMS” will affect“Attack”. When “Intensity” has a positive (+) value, a setting of +for this parameter will allow “AMS” to raise the EG level, and asetting of – will allow “AMS” to lower the EG level. With a settingof 0 there will be no change.
Br (Break Level Swing)
This parameter specifies the direction in which “AMS” will affect“Break (Break Point)”. When “Intensity” has a positive (+)value, a setting of + for this parameter will allow “AMS” to raisethe EG level, and a setting of – will allow “AMS” to lower the EGlevel. With a setting of 0 there will be no change.
Filter 1 EG changes (level) (AMS = Velocity, Intensity = a positive (+) value)
Note-onNote-off
Note-onNote-off
Note-onNote-off
Softly played note with Start Level Swing, Attack Level Swing, and Break Level Swing set to +
Strongly played note with Start Level Swing, Attack Level Swing, and Break Level Swing set to +
Strongly played note with Start Level Swing, Attack Level Swing, and Break Level Swing set to –

205Sound operating modeAmp: Amp Level/Pan
Ref
eren
ce
Time Modulation
AMS1/2
Use this parameter to select the source that will control the“Time” parameters of the filter EG. See “AMS (Alternate Modu-lation Source) list” on page 213.
Int (AMS Intensity)
This parameter specifies the depth and direction of the effectthat “AMS1/2” will have.
For example, if “AMS1/2” is set to FltKTr +/+, the EG “Time”parameters will be controlled by the Keyboard Tracking settings.With positive (+) values of this parameter, positive (+) values of“Ramp Low/High” will lengthen the EG times, and negative (–)values of “Ramp Low/High” will shorten the EG times. Thedirection of change is specified by “At (Attack Time Swing)”,“Dc (Decay Time Swing)”, “Sl (Slope Time Swing)”, and “Rl(Release Time Swing)”.
With a setting of 0, the times specified by “Frequency (CutoffFrequency A)” will be used.
If “AMS1/2” is set to Velocity, positive (+) values of this parame-ter will cause EG times to lengthen as you play more strongly,and negative (–) values will cause EG times to shorten as youplay more strongly.
-99…+99 Intensity value.
At (Attack Time Swing)
This parameter specifies the direction in which “AMS1/2” willaffect the attack time. With positive (+) values of “Intensity”, set-ting this parameter to + will allow AMS to lengthen the time,and setting this parameter to – will allow AMS to shorten thetime. With a setting of 0 there will be no change.
Dc (Decay Time Swing)
This parameter specifies the direction in which “AMS1/2” willaffect the decay time. With positive (+) values of “Intensity”, set-ting this parameter to + will allow AMS to lengthen the time,and setting this parameter to – will allow AMS to shorten thetime. With a setting of 0 there will be no change.
Sl (Slope Time Swing)
This parameter specifies the direction in which “AMS1/2” willaffect the slope time. With positive (+) values of “Intensity”, set-ting this parameter to + will allow AMS to lengthen the time,and setting this parameter to – will allow AMS to shorten thetime. With a setting of 0 there will be no change.
Rl (Release Time Swing)
This parameter specifies the direction in which “AMS1/2” willaffect the release time. With positive (+) values of “Intensity”,setting this parameter to + will allow AMS to lengthen the time,
and setting this parameter to – will allow AMS to shorten thetime. With a setting of 0 there will be no change.
Amp: Amp Level/Pan
These parameters control the volume and pan of the selectedoscillator.
Amp Level
Volume of the selected oscillator.
Note: The volume of a Sound can be controlled by CC#7 (volume)and #11 (expression). The resulting level is determined by multi-plying the values of CC#7 and #11. The Global MIDI channel isused for control.
0…127 Volume level.
Pan
Pan (stereo position) of the selected oscillator.
This parameter is not available when editing a Drum Kit.
Use the individual Pan control for each key (see “Pan” onpage 197).
Random The sound will be heard from a different locationat each note-on.
L001 Places the sound at far left.
C064 Places the sound in the center.
R127 Places the sound to far right.
Note: This can be controlled by CC#10 (panpot). A CC#10 value of0 or 1 will place the sound at the far left, a value of 64 will place thesound at the location specified by the “Pan” setting for each oscilla-tor, and a value of 127 will place the sound at the far right. This iscontrolled on the global MIDI channel.
Pan modulation
AMS (Alternate Modulation Source)
Selects the source that will modify pan (see “AMS (AlternateModulation Source) list” on page 213). This change will be rela-tive to the “Pan” setting.
Intensity
Specifies the depth of the effect produced by “AMS”. For exam-ple, if “Pan” is set to C064 and “AMS” is Note Number, positive(+) values of this parameter will cause the sound to move towardthe right as the note numbers increase beyond the C4 note (i.e.,
Filter 1 EG changes (Time) (AMS = Velocity, Intensity = a positive (+) value)
Note-onNote-off
Note-onNote-off
Note-onNote-off
Softly played note with Attack, Decay, Slope and Release Level Swings set to +
Strongly played note with Attack, Decay, Slope and Release Level Swings set to +
Strongly played note with Attack, Decay, Slope and Release Level Swings set to –

206 Sound operating modeAmp: Amp Mod
as you play higher), and toward the left as the note numbersdecrease (i.e., as you play lower). Negative (–) values of thisparameter will have the opposite effect.
-99…+99 Parameter value.
Amp: Amp Mod
These settings allow you to apply modulation to amp (for eachoscillator) to modulate the volume.
Keyboard Tracking
These parameters let you use keyboard tracking to adjust thevolume of the selected oscillator. Use the “Key” and “Ramp”parameters to specify how the volume will be affected by thekeyboard location that you play.
Key Low/High
These settings specify the note number at which keyboard track-ing will begin to apply. The volume will not change between“Key Low” and “Key High”.
Keyboard tracking will apply to the range below the specifiedLow note number, and above the specified Highy note number.
C–1…G9 Lowest/Highest note in the range.
Ramp Low/High
These parameters specify the angle of keyboard tracking.
With positive (+) values of the “Ramp Low” parameter, the vol-ume will increase as you play notes below the “Key Low” notenumber. With negative (–) values, the volume will decrease.
With positive (+) values of the “Ramp High” parameter, the vol-ume will increase as you play notes above the “Key High” notenumber. With negative (–) values, the volume will decrease.
-99…+99 Angle value.
Here is an example of volume changes produced by keyboardlocation and “Ramp” settings:
Amp Modulation
These parameters specify how the volume of the selected oscilla-tor will be affected by velocity.
Velocity Intensity
With positive (+) values, the volume will increase as you playmore strongly. With negative (–) values, the volume willdecrease as you play more strongly.
-99…+99 Intensity value.
AMS (Alternate Modulation Source)
Selects the source that will control the volume of the amp for theselected oscillator (See “AMS (Alternate Modulation Source)list” on page 213). “Velocity” cannot be selected.
Intensity
This parameter specifies the depth and direction of the effectthat “AMS” will have. The actual volume will be determined bymultiplying the value of the changes produced by the amp EGwith the values of Alternate Modulation etc., and if the levels ofthe amp EG are low, the modulation applied by Alternate Modu-lation will also be less.
For example, if “AMS” is set to After Touch, positive (+) values ofthis parameter will cause the volume to increase when pressure isapplied to the keyboard. However if the EG settings etc. havealready raised the volume to its maximum level, the volume can-not be increased further.
With negative (–) values of this parameter, the volume willdecrease when pressure is applied to the keyboard.
-99…+99 Intensity value.
Amp: Amp EG
These parameters let you create time-varying changes in the vol-ume of the selected oscillator.
Volume
Key
Ramp Low=+99
Ramp Low=0
Ramp Low=–99
Ramp High=+99
Ramp High=0
Ramp High=–99
Key Low Key High
Volume change (with positive (+) values of this parameter)
Softly played Strongly played
Note-onNote-off
Note-onNote-off

207Sound operating modeAmp: Amp EG
Ref
eren
ce
Diagram
The diagram on top of the page shows the Amplitude envelopeline.
Level
These parameters are the level of the envelope segment.
Start
This parameter specifies the volume level at note-on. If you wantthe note to begin at a loud level, set this to a high value.
0…99 Level value.
Attack
This parameter specifies the volume level that will be reachedafter the attack time has elapsed.
0…99 Level value.
Break
This parameter specifies the volume level that will be reachedafter the decay time has elapsed.
0…99 Level value.
Sustain
This parameter specifies the volume level that will be maintainedfrom after the slope time has elapsed until note-off occurs.
0…99 Level value.
Time
These parameters specify the time over which the volume changewill occur.
Attack
This parameter specifies the time over which the volume willchange after note-on until it reaches the attack level. If the startlevel is 0, this will be the rise time of the sound.
0…99 Time value.
Decay
This parameter specifies the time over which the volume willchange from when it reaches the attack level until it reaches thebreak point level.
0…99 Time value.
Slope
This parameter specifies the time over which the volume willchange from when it reaches the break point level until it reachesthe sustain level.
0…99 Time value.
Release
This parameter specifies the time over which the volume willchange after note-off until it reaches 0.
0…99 Time value.
Level Modulation
AMS (Alternate Modulation Source)
This parameter specifies the source that will control the “Level”parameters of the amp EG. See “AMS (Alternate ModulationSource) list” on page 213.
Intensity
This parameter specifies the depth and direction of the effectthat “AMS” will have. For example, if “AMS” is Velocity, setting“St (Start Level Swing)”, “At (Attack Level Swing)” and “Br(Break Point Level Swing)” to + and setting “Intensity” to a pos-itive (+) value will cause the amp EG volume levels to increase asyou play more strongly. Setting “Intensity” to a negative (–) val-ues will cause the amp EG volume levels to decrease as you playmore strongly. With a setting of 0, the levels will be as specifiedon “Amp: Amp EG”.
-99…+99 Intensity value.
St (Start Level Swing)
This parameter specifies the direction in which “AMS” willchange “Start”. If “Intensity” is set to a positive (+) value, settingthis parameter to + will allow AMS to increase the EG level, andsetting this parameter to – will allow AMS to decrease the EGlevel. With a setting of 0, no change will occur.
At (Attack Level Swing)
This parameter specifies the direction in which “AMS” willchange “Attack”. If “Intensity” is set to a positive (+) value, set-ting this parameter to + will allow AMS to increase the EG level,and setting this parameter to – will allow AMS to decrease theEG level. With a setting of 0, no change will occur.
Br (Break Point Level Swing)
This parameter specifies the direction in which “AMS” willchange “Break”. If “Intensity” is set to a positive (+) value, set-ting this parameter to + will allow AMS to increase the EG level,and setting this parameter to – will allow AMS to decrease theEG level. With a setting of 0, no change will occur.
Note-on
Note-off
AttackTime
DecayTime
Release Time
Attack Level
SustainLevel
Time
Break Point
StartLevel
SlopeTime
Amplifier EG
Volume
Amp 1 EG changes (Level) (AMS=Velocity, Intensity = a positive (+) value)
Note-onNote-off
Note-onNote-off
Note-onNote-off
Softly played note when Start Level Swing=0 and Attack Level Swing and Break Level Swing are set to +
Strongly played note when Start Level Swing=0 and Attack Level Swing and Break Level Swing are set to +
Strongly played note when Start Level Swing=0 and Attack Level Swing and Break Level Swing are set to +

208 Sound operating modeLFO: LFO1
Time Modulation
These parameters let you use an alternate modulation source tomodify the amp EG times that were specified in “Time” onpage 207.
AMS1 (Alternate Modulation Source 1 - Time)
This parameter specifies the source that will control the “Time”parameters of the amp EG (see “AMS (Alternate ModulationSource) list” on page 213). With a setting of Off, there will be nomodulation.
Intensity
This parameter specifies the depth and direction of the effectthat “AMS1” will have. For example, if “AMS1(T)” is Amp KTrk+/+, the (Amp) Keyboard Track settings (see “Keyboard Track-ing” on page 206) will control the EG “Time” parameters. Withpositive (+) values of this parameter, positive (+) values of“Ramp (Ramp Setting) will cause EG times to be lengthened,and negative (–) values of “Ramp (Ramp Setting)” will cause EGtimes to be shortened. The direction of the change is specified by“At (Attack Time Swing)”, “Dc (Decay Time Swing)”, “Sl (SlopeTime Swing)”, and “Rl (Release Time)”.
When “AMS1(T)” is Velocity, positive (+) values will cause EGtimes to lengthen as you play more strongly, and negative (–)values will cause EG times to shorten as you play more strongly.With a setting of 0, the EG times will be as specified by the“Level” parameters (see page 207).
At (Attack Time Swing)
This parameter specifies the direction of the effect that “AMS1”will have on “Attack”. With positive (+) values of “Intensity”, set-ting this parameter to + will allow AMS1 to lengthen the time,and setting it to – will allow AMS1 to shorten the time. With asetting of 0 there will be no effect.
Dc (Decay Time Swing)
This parameter specifies the direction of the effect that “AMS1”will have on “Decay”. With positive (+) values of “Intensity”, set-ting this parameter to + will allow AMS1 to lengthen the time,and setting it to – will allow AMS1 to shorten the time. With asetting of 0 there will be no effect.
Sl (Slope Time Swing)
This parameter specifies the direction of the effect that “AMS1”will have on “Slope”. With positive (+) values of “Intensity”, set-
ting this parameter to + will allow AMS1 to lengthen the time,and setting it to – will allow AMS1 to shorten the time. With asetting of 0 there will be no effect.
Rl (Release Time)
This parameter specifies the direction of the effect that “AMS1”will have on “Release”. With positive (+) values of “Intensity”,setting this parameter to + will allow AMS1 to lengthen the time,and setting it to – will allow AMS1 to shorten the time. With asetting of 0 there will be no effect.
AMS2 (Alternate Modulation Source 2)
This is another alternate modulation source for the Amp EG. Seeabove “AMS1” parameters.
LFO: LFO1
In this and the next page you can make settings for the LFO thatcan be used to cyclically modulate the Pitch, Filter, and Amp ofeach oscillator. There are two LFO units for each oscillator. Bysetting the LFO1 or LFO2 Intensity to a negative (–) value forPitch, Filter, or Amp, you can invert the LFO waveform.
Waveform
This parameter selects the LFO waveform. The numbers thatappear at the right of some of the LFO waveforms indicate thephase at which the waveform will begin.
Frequency
Set the LFO frequency. A setting of 99 is the fastest.
00…99 Frequency rate.
Amp 1 EG changes (Time) (AMS=Velocity, Intensity= a positive (+) value)
Amp 1 EG changes (Time)(AMS=Amp KTrk +/+, Intensity = a positive (+) value)(When Amp Keyboard Track “Low Ramp”= a positive (+) value, and “High Ramp” = a positive (+) value)
Note-onNote-off
Note-onNote-off
Note-onNote-off
Note-onNote-off
Note-onNote-off
Note-onNote-off
Low-pitched note played with Attack, Decay, Slope, and Release Time Swing at +
Softly played note with Attack, Decay, Slope and Release Time Swing at +
High -pitched note played with Attack, Decay, Slope, and Release Time Swing at –
Strongly played note with Attack, Decay, Slope and Release Time Swing at +
Strongly played note with Attack, Decay, Slope and Release Time Swing at –
Triangle wave
Phase will changerandomly at each key-in
Sawtooth down ↓
Square wave
Sine wave
Guitar vibrato
Triangle 0
Triangle 90
TriangleRandom
Saw 0
Saw 180
Square
Sine
Guitar
ExponentialTriangle
ExponentialSaw Down
ExponentialSaw Up
Step Triangle – 4
Step Triangle – 6
Step Saw – 4
Step Saw – 6
Random1 (S/H):Conventional sample & hold (S/H) in which the level changes randomly at fixed intervals of timeRandom2 (S/H):Both the levels and the time intervals will change randomly.Random3 (S/H):The maximum level and minimum level will alternate at random intervals of time (i.e., a square wave with random period).
Random4 (Vector)Random5 (Vector)Random6 (Vector)These types cause Random 1–3 to change smoothly. They can be used to simulate the instability of acoustic instruments etc.

209Sound operating modeLFO: LFO1
Ref
eren
ce
Offset
This parameter specifies the central value of the LFO waveform.For example, with a setting of 0 as shown in the following dia-gram, the vibrato that is applied will be centered on the note-onpitch. With a setting of +99, the vibrato will only raise the pitchabove the note-on pitch, in the way in which vibrato is appliedon a guitar.
When “Waveform” is set to Guitar, the modulation will occuronly in the positive (+) direction even if you set “Offset” to 0.
Here are offset settings and pitch change produced by vibrato:
-99…+99 Offset value.
Key Sync
This parameter specifies if the LFO is synchronized to keystrokes.
On The LFO will start each time you play a note, andan independent LFO will operate for each note.
Off The LFO effect that was started by the first-playednote will continue to be applied to each newly-played note. (In this case, Delay and Fade will beapplied only to the LFO when it is first started).
Fade
This parameter specifies the time from when the LFO begins toapply until it reaches the maximum amplitude. When “KeySync.” is Off, the fade will apply only when the LFO is firststarted.
Here is how “Fade” affects the LFO (when “Key Sync” is On):
00…99 Fade rate.
Delay
This parameter specifies the time from note-on until the LFOeffect begins to apply. When “Key Sync” is Off, the delay willapply only when the LFO is first started.
0…99 Delay time.
Frequency Modulation
You can use two alternate modulation sources to adjust thespeed of the LFO1 for the selected oscillator.
AMS1 (Alternate Modulation Source1)
Selects the source that will adjust the frequency of the selectedoscillator LFO1 (see “AMS (Alternate Modulation Source) list”on page 213). LFO1 can be modulated by LFO2.
Intensity (AMS1 Intensity)
This parameter specifies the depth and direction of the effectthat “AMS1(F)” will have. When this parameter is set to a valueof 16, 33, 49, 66, 82, or 99, the LFO frequency being can beincreased by a maximum of 2, 4, 8, 16, 32, or 64 times respec-tively (or decreased by 1/2, 1/4, 1/8, 1/16, 1/32, or 1/64 respec-tively).
For example, if “AMS1(F)” is Note Number, positive (+) valuesof this parameter will cause the oscillator LFO to speed up as youplay higher notes. Negative (–) values will cause the oscillatorLFO to slow down as you play higher notes. This change will becentered on the C4 note.
If “AMS1(F)” is set to JS +Y, raising the value of this parameterwill cause the oscillator LFO1 speed to increase as the joystick ismoved away from yourself. With a setting of +99, moving thejoystick all the way away from yourself will increase the LFOspeed by approximately 64 times.
-99…+99 Intensity value.
AMS2 (Alternate Modulation Source2)Intensity (AMS2 Intensity)
Make settings for a second alternate modulation source that willadjust the frequency of the oscillator LFO1 (see above “AMS1(Alternate Modulation Source1)” and “Intensity (AMS1 Inten-sity)”).
Frequency MIDI/Tempo Sync
MIDI/Tempo Sync
This parameter enables/disables the LFO synchronization withSequencer 1 Tempo.
On The LFO frequency will synchronize to the tempo(MIDI Clock) of Sequencer 1. In this case, thevalues you specified for “Frequency” (seepage 208) and “Frequency Modulation” (seepage 209) will be ignored.
Base Note
When “MIDI/Tempo Sync” is On, these parameters set a notelength relative to “ (Tempo)” and the multiple (“Times”) thatwill be applied to it. These parameters will determine the fre-quency of the LFO1. For example if “Base Note” is (quarternote) and “Times” is 04, the LFO will perform one cycle everyfour beats.
Even if you change the “ (Tempo)” setting of Sequencer 1, theLFO will always perform one cycle every four beats.
This parameter is not available when editing a Drum Kit.
, , , , , , , Note value.
Times
This parameter is not available when editing a Drum Kit.
1...16 Beats before restarting the cycle.
offset = –99 offset = 0 offset = +99Pitch
Pitch at note-on
Note-on Note-offFade
Delay

210 Sound operating modeLFO: LFO2
LFO: LFO2
Here you can make settings for the LFO2, which is the secondLFO that can be applied to the selected oscillator. See “LFO:LFO1” for more information on the parameters value.
However in “Frequency Modulation”, the LFO cannot beselected as a modulation source in “AMS1” or “AMS2.”
Effects: FX Select
Here you can select two effects for the whole Sound, switch themon/off, and specify chaining.
Note: For details on the effects, refer to the “Effects” chapter.
FX 1/2 Group
Send
Send level for each effect.
Drum samples have their own send level settings (see “Send
FX1” and “Send FX2” on page 197). Use this parameter toadjust the general offset of the Drum Kit.
000…127 Effect level.
FX1/2
Use these parameters to select the effect type for effect 1/2. Seethe “Effects” chapter for more information.
Note: If 000: No Effect is selected, the output from the master effectwill be muted.
Wet/Dry
Mix between the effected (Wet) and direct (uneffected, Dry) sig-nal.
Dry Direct signal only.
Wet Effected signal only.
nn:nn Percentage of Wet/Dry signal.
2>1
Use this parameter to send the output of effect 2 to the input ofeffect 1.
000…127 Level of the signal exiting the effect 2 going backto the effect 1.
Send to Master
This parameters allows you to decide if the direct + effected sig-nal must go to the Master, or just the effected signal.
On Only the effected signal will be sent to the AudioOutputs. The direct (non-effected) signal will notbe sent.
Off Both the effected signal and direct signals will besent to the Audio Outputs.
Effects: FX1
In this page you can edit the effected assigned to the FX1 (A orC) effect processor (usually reverb). See the “Effects” chapter formore information.
Effects: FX2
In this page you can edit the effected assigned to the FX2 (B orD) effect processor (usually modulating effect). See the “Effects”chapter for more information.

211Sound operating modePage menu
Ref
eren
ce
Page menu
Press the page menu icon to open the menu. Press a command toselect it. Press anywhere in the display to close the menu withoutselecting a command.
Write Sound
Select this command to open the Write Sound dialog box, andsave all editing parameters to a Sound.
See “Write Sound dialog box” on page 211 for more informa-tion.
Solo Oscillator
Select this command to solo the selected oscillator, and mute theother oscillators. Select it again to unmute the other oscillators.
When this function is activated, the “Solo OSC [n]” indicator (n= oscillator number) blinks on the page header. While in this sit-uation, you can select a different oscillator to be soloed.
Swap LFO
Select tis command to replace LFO1 with LFO2, and vice-versa.
Copy Oscillator
Select this command to copy all settings between oscillators.
See “Copy Oscillator dialog box” on page 212 for more informa-tion.
Copy FX
Select this command to copy all FX settings from anotherSound.
See “Copy FX dialog box” on page 212 for more information.
Copy Drum Kit
Select this command to copy the Drum Kit from a differentDrum Kit.
See “Copy Drum Kit dialog box” on page 212 for more informa-tion.
Init Sound
Select this command to delete all parameters, and set them to adefault value.
Compare
When this command is checked, original Sound parameter val-ues are temporarily recalled, to compare them with edited
parameters. You cannot edit the Sound while you are in Com-pare mode.
While this function is on, the Compare indicator blinks on thepage header.
Write Sound dialog box
Open this window by selecting the Write Sound item from thepage menu. Here, you can save all Sound parameters to a Soundlocation in memory.
Warning: If you write over an existing Sound, the Sound will bedeleted and replaced by the one you are saving (“overwrite”).Please save on disk any User Sound you don’t want to lose.
Note: DrumKits cannot be written over standard Sounds, nor viceversa.
Note: To save over a Factory Sound location, unckeck the FactorySound Protect parameter in Disk mode (see “Factory Sound Pro-tect” on page 272).
Warning: When replacing a Factory Sound, please be warnedthat all Performance, STSs, Styles and Songs making use of itwill be modified as well. Use this feature with great care!
To restore the original data, please reload the original MusicalResources (ver. 2.5 or higher), freely available from our web site(www.korgpa.com).
Name
Name of the Sound to be saved. Press the (Text Edit) button
next to the name to open the Text Edit window.
Sound Bank
Target bank of Sounds. Each bank corresponds to one of thePERFORMANCE/SOUND buttons. Use TEMPO/VALUE con-trols to select a different bank.
Sound
Target Sound location in the selected bank. Use TEMPO/VALUEcontrols to select a different location.
Select… button
Press this button to open the Sound Select window, and select atarget location.

212 Sound operating modeCopy Oscillator dialog box
Copy Oscillator dialog box
Open this window by selecting the Copy Oscillator item fromthe page menu. Here, you can copy all settings between oscilla-tors.
From Sound
Press this button to open the Sound Select window, and selectthe source Sound.
From Oscillator
Select the source oscillator to copy from.
To Oscillator
Target oscillator where to copy the source settings to.
Copy FX dialog box
Open this window by selecting the Copy FX item from the pagemenu. Here, you can copy all FX settings between FX processors.
From Sound
Press this button to open the Sound Select window, and selectthe source Sound.
From FX
Select the source effect to copy from.
To FX
Target effect where to copy the source settings to.
Copy Drum Kit dialog box
Open this window by selecting the Copy Drum Kit item fromthe page menu. Here, you can copy settings from a range of keysof a Drum Kit.
From Drum Kit
Press this button to open the Sound Select window, and selectthe source Drum Kit.
From Key
Select the source range of keys to copy from.
To Key
Target key. Settings are copied starting from this key, andupwards.
213Sound operating modeAMS (Alternate Modulation Source) list
Ref
eren
ce
AMS (Alternate Modulation Source) list
Flt KTrk +/+ (Filter Keyboard Track +/+)
Flt KTrk +/– (Filter Keyboard Track +/)
Flt KTrk 0/+ (Filter Keyboard Track 0/+)
Flt KTrk +/0 (Filter Keyboard Track +/0)
Amp KTrk +/+ (Amp Keyboard Track +/+)
Amp KTrk +/– (Amp Keyboard Track +/–)
Amp KTrk 0/+ (Amp Keyboard Track 0/+)
Amp KTrk +/0 (Amp Keyboard Track +/0)
+/+ The direction of the effect will be determined bythe sign (positive or negative) of the “Ramp Low”or “Ramp High” setting.
+/– The direction of the effect will be determined bythe sign of the “Ramp Low” setting, and by theopposite sign of the “Ramp High” setting (50 fora setting of +50, and +50 for a setting of 50).
0/+ “Ramp Low” will have no AMS effect. The sign ofthe “Ramp High” setting will determine thedirection of its effect.
Off Do not use Alternate Modulation
Pitch EG Pitch EG
Filter EG Filter EG within the same oscillator
Amp EG Amp EG within the same oscillator
LFO1 LFO1 within the same oscillator
LFO2 LFO2 within the same oscillator
Flt KTrk +/+ (Filter Keyboard Track +/+) Filter keyboard tracking within the same oscillator
Flt KTrk +/– (Filter Keyboard Track +/) Filter keyboard tracking within the same oscillator
Flt KTrk 0/+ (Filter Keyboard Track 0/+) Filter keyboard tracking within the same oscillator
Flt KTrk +/0 (Filter Keyboard Track +/0) Filter keyboard tracking within the same oscillator
Amp KTrk +/+ (Amp Keyboard Track +/+) Amp keyboard tracking within the same oscillator
Amp KTrk +/ (Amp Keyboard Track +/) Amp keyboard tracking within the same oscillator
Amp KTrk 0/+ (Amp Keyboard Track 0/+) Amp keyboard tracking within the same oscillator
Amp KTrk +/0 (Amp Keyboard Track +/0) Amp keyboard tracking within the same oscillator
Note Number Note number
Velocity Velocity
Poly AT (Poly After Touch) Polyphonic After Touch (transmitted from the Pa1X only as sequence data)
Channel AT (Channel After Touch) After Touch (Channel After Touch)
Joystick X Joystick X (horizontal) axis
Joystick +Y Joystick +Y (vertical upward) direction (CC#01)
Joystick Y Joystick Y (vertical downward) direction (CC#02)
JS+Y & AT/2 (Joy Stick +Y & After Touch/2) Joystick +Y (vertical upward) direction and After Touch
JS–Y & AT/2 (Joy Stick Y & After Touch/2) Joystick Y (vertical downward) direction and After Touch
Ass.Pedal Assignable foot pedal (CC#04)
CC#18 CC#18
CC#17 CC#17
CC#19 CC#19
CC#20 CC#20
CC#21 CC#21
Damper Damper pedal (CC#64)
CC#65 Portamento switch (CC#65)
Sostenuto Sostenuto pedal (CC#66)
CC#80 CC#80
CC#81 CC#81
CC#82 CC#82
CC#83 CC#83
Tempo Tempo (tempo data from Sequencer 1 clock or external MIDI clock)

214 Sound operating modeAMS (Alternate Modulation Source) list
+/0 The sign of the “Ramp Low” setting will deter-mine the direction of its effect. “Ramp High” willhave no AMS effect.
JS +Y & AT/2 (Joy Stick +Y & After Touch/2)
The effect will be controlled by the joystick +Y (verticallyupward) and by after touch. In this case, the effect of after touchwill be only half of the specified intensity.
JS Y & AT/2 (Joy Stick –Y & After Touch/2)
The effect will be controlled by the joystick Y (vertically down-ward) and by after touch. In this case, the effect of after touchwill be only half of the specified intensity.
Note Number
Amp
Key Low Key High
AMS = Amp KTrk +/+AMS Intensity = positive (+) value
Ramp Low= +50
Ramp High= +50
Depth and direction of modulation
zero
+ max
- max
example of Amp Keyboard Track settings
AMS = Amp KTrk +/–AMS Intensity = positive (+) value
Depth and direction of modulation
zero
+ max
- max
AMS = Amp KTrk 0/+AMS Intensity = positive (+) value
Depth and direction of modulation
zero
+ max
- max
AMS = Amp KTrk +/0AMS Intensity = positive (+) value
Depth and direction of modulation
zero
+ max
- max
215Sampling operating modeEntering and exiting the Sampling mode
Ref
eren
ce
Pa1X includes a full-featured sampler, with powerful tools forcreating (a) new sounds and (b) rhythm patterns, based onaudio grooves.
New Sounds. Sampling allows you to create new sounds, byrecording from an external source connected to Pa1X AudioInputs, or by loading files from disk. Pa1X can read commonformats, like WAV and AIFF files, Korg Trinity and Triton Sam-ples, Korg Trinity and Triton Multisamples, Korg Triton Pro-grams, and Akai™ S1000 and S3000 Samples and Programs.
To be used, Samples must then be assigned to a Multisample or aDrum Kit. A Multisample allows you to arrange samples intoseparate zones of the keyboard. Drum Kits allows you to assign adifferent sample to each note of the keyboard, with up to sixdynamic layers per note.
Multisamples can then be assigned to Sounds. Sounds createdwith this function can be used as any ordinary Sound, andassigned to any track.
The Load Sample function allows you to read samples (Korg“.KSF”, Akai® “.S1” or “.S3”, “.AIFF” and “.WAV”) from disk. TheImport function allows to read multisamples (Korg “.KMP” andAkai® “.P1” or “.P3”) from Korg Trinity and Triton, or AkaiS1000 or S3000 disks. Programs (“.PCG” files) can be importedfrom Korg Triton disks, and converted to Sounds.
Note: Akai data can only be importeed from CD.
You can also use the Export function to export samples (“.KSF”)and multisamples (“.KMP”) in Korg proprietary format.
Audio Grooves. Another powerful feature of the Sampling modeis the Time Slice. This feature lets you add realism to MIDItracks, by using sampled patterns as the rhythm track of a Style.
Cycling rhythm samples, or audio grooves, can be “sliced” intoseparate percussive instruments. Combined with MIDI tracks,the “sliced” audio groove can be kept in sync with the Tempo,and can play slower or faster than the original groove.
Note: Sampling is only available on instruments with the harddisk installed.
Warning: When loading a “.SET” folder containing Sounds associ-ated with PCM data, all existing PCM data in memory are deleted.Save them before loading the folder, by selecting the “PCM” optionduring a Save All operation (see “Saving the full memory content”on page 265).
To see if a “.SET” folder contains PCM data, open it and look for a“PCM” folder.
Note: When entering the Sampling mode, samples are automati-cally loaded from the (hidden) PCM folder on the hard disk. Thismay take some time before this mode becomes operative.
Note: No sound will be heard when you first enter the Samplingmode.
Note: Some demo audio grooves can be found on the Korg Pa1Xweb site (www.korgpa.com).
Entering and exiting the Sampling mode
• While in Sound mode, press the RECORD button to enter inSampling mode.
• While in Sampling mode, press the RECORD button to exit theSampling mode, and return to the Sound mode.
The Record (Sampling) procedure
Here is a short overview of a typical sampling procedure.
1. With the MASTER VOLUME slider set to zero, connect thesource to be sampled to one or both the Audio Inputs onthe rear of the Pa1X. When the source has been connected,raise the MASTER VOLUME slider to a position other thanzero.
2. Adjust the source volume.
• If recording from the MIC input, adjust the input level ofthe Pa1X using the GAIN knob next to the Audio Inputconnectors.
• If recording from the line inputs, adjust the source outputlevel. If possible, set its output level to the maximum.
Watch at the AUDIO IN LED to check the input level. Ide-ally, the LED should turn to red only on signal peaks, andshould usually stay orange (green means too low an inputsignal).
3. Press the SOUND button to enter the Sound mode, thenpress RECORD to enter the Record page.
4. Use the “Record Mode” parameter to select the audio inputto be sampled.
5. If you can, first start the source to be recorded, then pressthe Record button in the display to start recording.
As an alternative, press the Record button in the display,and immediately start the source to be recorded.
6. Press the Record button in the display again to stop record-ing. When the memory is full, the sampling automaticallystops. A maximum of 10.9 seconds is allowed for each sam-ple.
7. Play the keyboard to listen to the sampled sound.
8. If you are not satisfied with the recorded sound, press theRecord button in the display again, to repeat recording.Press Record again to stop recording. A new sample will beautomatically created.
9. When finished sampling your sound, you can either save it,or (if it is an audio groove) continue editing it with theTime Slice function.
• To save the sample, select the Write command from thepage menu. The Write Sample dialog box will appear (see“Write Sample dialog box” on page 226). Assign a name to
Sampling operating mode

216 Sampling operating modeEdit menu
the new Sample, and save it to the PCM folder on the harddisk.
• To create a series of separate percussive samples fro anaudio groove, and a MIDI Groove, go to the Time Slicepage. After creating a series of slices, use the Extend func-tion to refine your groove. Select the Write command fromthe page menu, to save the sliced samples and the MIDIGroove to disk.
10. After saving, press the MENU button and go to the “Multi-sample” section, to assign the sample(s) to a multisample.Assign each sample to a different keyboard zone of themultisample.
11. When finished editing the multisample, select the Writecommand from the page menu. The Write Multisampledialog box will appear (see “Write MultiSample dialog box”on page 226). Assign a name to the new multisample, andsave it to the internal memory (SSD).
12. Press RECORD to exit the Sampling mode and return tothe Sound mode.
• To access the new multisample, first select an ordinarySound. Press MENU and go to the “Basic: OSC Basic” page(see page 194). Select one of the available layers, then selectthe RAM bank of multisamples. Finally, select the newmultisample.
• To access the new sample(s), you must assign it to a DrumKit. First select a Drum Kit. Press MENU and go to the“DrumKit: Sample Setup (Drum Kits)” page (seepage 195). Select a key and a layer, then select the RAMbank of samples. Finally, select the new sample.
13. Select the Write Sound command from the page menu, andsave the Sound to an empty User location.
14. Assign the new Sound to a Style track (preferably, theDrum or Percussion track), then select the “Save CurrentStyle Perf.” command from the page menu, to save the StylePerformance.
15. If the new Sound is based on an audio groove, use the“Import: Import Groove” function in the Style Recordmode (see page 121) to import the generated MIDI Grooveto the Style track you assigned the new Sound to.
Warning: Generated MIDI Grooves will be deleted whenturning the instrument off. Import them to a Style trackbefore turning the instrument off.
Edit menu
From any page of the Sampling mode, press the MENU buttonto open the Sampling edit menu. This menu gives access to thevarious Sampling edit sections.
When in the menu, select an edit section, or press EXIT to exitthe menu and return to the Sample Edit / Sample Record page.To return to this page, you can also select the Sample Edit / Sam-ple Record menu item.
Each item in this menu corresponds to an edit section. Each editsection groups various edit pages, that may be selected by press-ing the corresponding tab on the lower part of the display.
Sampling: Record
This page allows you to record a 16-bit, 48kHz stereo or monosample.
SM (Sample)
Press this area to open the Choose Sample window, and selectone of the available samples in the RAM memory for editing.
Select one of the available samples. The window will be automat-ically closed after selecting.

217Sampling operating modeSampling: Edit
Ref
eren
ce
Level
Use these meters to see the level of the entering signal. When theCLIP indicator turns red, the signal is too hot. Lower it by reduc-ing the source output level, or by using the GAIN knob on therear panel of the Pa1X.
In case of mono sampling, only one of the indicators will work.
REC Setup
Record Mode
Use this parameter to select the audio input on the back of theinstrument.
Channel 1 (L) Only the Input 1 is selected. A mono sample willbe produced.
Channel 2 (R) Only the Input 2 is selected. A mono sample willbe produced.
Channel 1&2 (Stereo)
Both inputs will be selected. A stereo sample willbe produced.
Note: Whether you record or load a stereo or mono sample, thesample in memory will be treated as if it was stereo (the editor isalways a stereo editor). Mono samples will be saved as mono files.Stereo samples will be saved as two separate mono files, and will betreated as mono files when reloaded.
Left to Sample
Non editable. Remaining memory (in samples/seconds) for sam-pling. The maximum space available for samples is 524,288(mono or stereo) samples, or 10.9 seconds.
Sampled
Non editable. Used memory (in samples/seconds) for sampling.
Sampling Buffer
Non editable. Available memory (in samples/seconds) for sampleediting.
Record button
Press this button to start recording. Press it again to stop record-ing. Recording will automatically stop when the maximum avail-able space will end.
Note: Pa1X always samples at the maximum quality (16 bit,48,000Hz). Samples of a different quality may be loaded (8 or 16bit, 11,025Hz to 48,000Hz).
Sampling: Edit
This page allows you to cut, trim or normalize a sample, as wellas edit the loop points. The sample can played on the full key-board.
SM (Sample)
Selected sample. See “SM (Sample)” above.
Sample diagram
This is the graphical display of the selected sample waveform.The area included between the Start and End points is high-lighted (dark background).
Parameters
Start (Sample Start)
This is the sample start point (in samples). You may edit thispoint, as well as the End point, to shorten the sample. Changingthe Sample Start cuts out the attack portion of the sound.
Note: When moving the “Start” point forward, the “Loop Start”point is also moved forward.
Warning: When saving the edited sample (Write Sample opera-tion), the segments exceeding the Start and End points are perma-nently removed.
Loop Start
Note: Use the “Loop On” parameter on the “Sampling: Loop Edit”page to turn the loop on (see page 219).
Use this parameter to adjust the Loop Start point. When youadjust this parameter, an audible click may appear, due to a pitchand/or level mismatch between the starting and ending points ofthe loop. Move the Loop Start and Loop/Sample End point, sothat the click can no longer be heard.

218 Sampling operating modeSampling: Loop Edit
When editing audio grooves, the Loop Start should match theSample Start point. This parameter usually differs from the Sam-ple Start in ordinary sounds (i.e., a guitar, a piano, a voice…).
End (Sample/Loop End)
This is the sample and loop end point (in samples). You may editthis point, to shorten the sample.
Warning: When saving the edited sample (Write Sample opera-tion), the segments exceeding the Start and End points are perma-nently removed.
Snap to Zero
Turn this parameter on, to make all Sample and Loop Start andEnd selections fall on zero-crossing points (i.e., points where thewaveform crosses the x-axis, and goes from negative to positive,or from positive to negative values). This will make loops moreaccurate, and will reduce the risk of “clicks”.
OrigNote (Original Note)
Original pitch of the sampled note. While this parameter meansnothing in this page, it will be useful when assigning a sample tothe multisample, to identify the original pitch of the sample.
For example, if you sample a C4, set this parameter to “C4”.When the sample will be assigned to a keyboard zone of the mul-tisample, it will be transposed (if needed) according to thisparameter, to avoid a change of the original pitch.
Zoom
Use these buttons to change the size of the waveform shown inthe diagram. When a button is greyed-out, it means the maxi-mum or minimum value has been reached.
Increase the vertical size.
Decrease the vertical size.
Increase the horizontal size.
Decrease the horizontal size.
Full zoom in.
Full zoom out.
Changing the sample length and findinggood-sounding loop points
To adjust the sample length and loop points, check the “LoopOn” parameter, then use the “Start”, “Loop Start” and “End”parameters to create a fine sounding cycling loop.
For example, you may have sampled an audio groove of anexceeding length. Use the “End” parameter to cut the exceedingportion at the end of the sample, and adjust the starting point ofthe loop using the “Start” or “Loop Start” parameters.
Usually, checking the “Snap to Zero” parameter is a big help, toavoid the loop clicks due to level mismatches.
Sampling: Loop Edit
The loop is a cycling portion of a sampled sound, that maymatch with the whole sample. After the attack stage, mostsounds repeat the same waveform during their sustain stage. Youmay adjust the Loop Start point with the “Loop Start” parame-ter, and the Loop End point (always matching the Sample Endpoint) using the “End” parameter.
This page lets you fine tune the loop points, by watching at theLoop End and Loop Start points matching at the center of thediagram. A good-sounding loop is shown as a continuous, non-breaking line.
SM (Sample)
Selected sample. See “SM (Sample)” on page 216.
Loop diagram
This diagram shows the “End” (Loop End) point on the left half,and the “Loop Start” point on the right half of the screen. Usethe “End” and “Loop Start” parameters to adjust the loop.
Parameters
Start
See “Start (Sample Start)” on page 217.
Loop Start
See “Loop Start” on page 217.
End
See “End (Sample/Loop End)” on page 218.
Use Zero
See “Snap to Zero” on page 218.
Loop Lock
This fixes the length of the loop being edited.
Length
Sample End (E)Sample Start (S)
Loop
Loop End (E)Loop Start (L)

219Sampling operating modeSampling: Sampling Info
Ref
eren
ce
Off The “Loop S.” and “End” parameters can beedited separately.
On When the “Loop S.” or “End” parameter is edited,the other one will be automatically adjusted sothat the distance between them (i.e., the looplength) does not change. This is convenient whenyou are creating a rhythm loop to match a spe-cific tempo.
Loop On
Use this parameter to turn the loop on or off.
On The loop is turned on, and the portion of soundincluded between the Loop Start and Loop Endpoints will cycle until a key is kept pressed. If the“Loop Start” point matches the “Start” point, thewhole sample is cycled.
Off The loop is turned off. The sound will play fromthe Sample Start to the Sample End point onlyonce, even if you keep a key pressed on the key-board.
Crossfade
When looping the pitched sample of a complex sound such asstrings or woodwinds to make the sound sustain, it is necessaryto create a long loop to preserve the rich character of the sound.Crossfade Loop can be used to minimize the difference in pitchand level between the beginning and ending of the loop region,to create a natural-sounding loop. In order to solve such prob-lems, Crossfade Loop causes the sound to change gradually fromthe end to the beginning of the loop.
In practice, here is how it works. A specific length (the “Cross-fade Length” value) of the waveform immediately before thebeginning of the loop is taken and mixed with the end portion.At this time, the waveform level of the portion immediatelybefore the end (the length specified by “Crossfade Length”) willgradually decrease, and the waveform level immediately beforethe beginning of the loop will gradually increase as the two aremixed.
When the “Loop On” parameter is checked, and the “Start” and“Loop S.” parameters have different values, the “Crossfde” but-ton becomes available.
When you press the Crossfade button, the Crossfade Loop dialogbox appears:
Crossfade Length
In “Crossfade Length,” specify the length of the sample that youwish to crossfade. You can enter it either as the number of sam-ples, or a percentage (%). If you set this as a percentage, thenumber of samples will be calculated automatically.
If you set this to 50%, crossfade will be performed on the secondhalf of the region between loop start and loop end.
The “Crossfade Length” cannot be greater than the smallerlength between the Sample Start – Loop Start points, or theLoop Start – Sample End points.
Curve
Set “Curve” to specify how the volume will change in the cross-faded region.
Linear The volume will change linearly.
Power The volume will change non-linearly. Sometimesa setting of Linear will produce the impressionthat the volume has dropped in the middle of thecrossfade curve. In such cases, use Power.
Sampling: Sampling Info
Use this page to see detailed info on the sample in edit. Generalinformation for the RAM memory is also available.
SM (Sample)
Selected sample. See “SM (Sample)” on page 216.
Sampling Info
Samples
Number of samples in memory.
Drum Samples
Number of drum samples in memory.
Multisamples
Number of multisamples in memory.
Available Memory
RAM Bank 1/2
The Sample RAM memory is divided in two banks of 16 Mega-bytes (MB) each. Pa1X comes with 16MB of RAM alreadyinstalled, corresponding to Bank 1. You can install an additional(optional) module of 16MB, corresponding to Bank 2, for a totalof 32MB.
Note: A sample cannot be split between the two banks. It mustreside on just one bank.

220 Sampling operating modeTime Slice
Mono Time
Remaining sample memory (in seconds). This value is given formono samples. With stereo samples, this time has to be halved.
Bytes
Remaining memory for sampling (in Bytes). This value is givenfor mono samples. With stereo samples, this time has to behalved.
Sample Info
Selected Samples
Size of the selected sample (in samples).
Samples
Total size of the samples in memory (in samples).
Sampling Frequency
Sampling frequency of the selected sample (in Hertz).
Time Slice
The Time Slice function lets you transform a rhythm audiogroove in a series of single percussive samples, to be assigned to aStyle or Song Drum or Percussion track.
Some theory…
Analyzing and processing. This function detects the attacks(e.g., kick and snare) inside a rhythm audio groove (a samplethat loops a drum pattern), and automatically divides the audiogroove into individual percussive samples.
The divided percussive samples will be automatically assigned toa multisample, and the multisample to a Sound.
Within the generated multisample, a separate sample is assignedto a different note on the keyboard, starting from C#3. By play-ing an ascending chromatic scale with this multisample, youcould recreate the original audio groove.
A MIDI Groove will also be created, containing a sequence ofnotes triggering the sliced percussive samples in the same orderas in the original audio groove (i.e., it plays an ascending chro-matic scale starting from C#3).
When you will import this MIDI Groove to the percussive trackof a Style (see “Import: Import Groove” on page 121), thissequence will let you adjust the groove’s tempo without affectingthe pitch of the percussive samples.
In addition to changing the groove’s tempo without affecting itspitch, this lets you do the following:
• change the order in which notes are played
• change the timing
• edit the pattern notes to freely recreate a new rhythm loop.
Saving. After the slicing, you can select the Write commandfrom the page menu, to save the Sound based on sliced samples,and the MIDI Groove containing the corresponding MIDIsequence.
• The Sound will be saved to the selected location in the Userarea of the internal memory. You will be able to select it as anordinary Sound, and assign it to the Drum or Percussion track ofa Style.
• The Multisample will be automatically saved to the next freeavailable location.
• Samples will be permanently saved to the PCM folder on thehard disk. They can be automatically loaded when turning theinstrument on, by checking the “PCM Autoload” option in Diskmode (see page 273).
• The MIDI Groove will be temporarily saved to the SSD mem-ory, and will be available only when using the Import function ofthe Style Record mode (see “Import: Import Groove” onpage 121).
Warning: All MIDI Grooves will be delete each time the Pa1X isturned off.
Ex.1 - Generating samples and MIDI Groove data:
A multisample, a program and MIDI Groove data will be created automatically
Original pattern
Generated MIDI Groove
Play in Style Play mode
Execute the Time Slice command
Kick Kick KickSnare Snare
120BPM
120BPM
Sample1 Sample2 Sample3 Sample4 Sample5
C3
Original rhythm sample
Note: Sliced samples and MIDI data are saved with a Write operation.

221Sampling operating modeTime Slice
Ref
eren
ce
Ex.2 - Varying the groove’s tempo
Ex.3 - Recombining MIDI notes and samples
Sample diagram
This diagram shows the sample waveform and the slices. Here ishow the sample diagram appears before the Slice:
… and the same diagram after the Slice:
Metronome Information
Meter
Use this parameter to specify the Meter of the original sample.
Measures
Use this parameter to specify the number of measures of theoriginal sample. Usually, you will load a groove 1 or 2-measureslong.
BPM
This parameter specifies the tempo (in Beats Per Minute) of theoriginal sample. Pa1X automatically calculates this value basedon the Start, End (see page 217), Meter and Measures parame-ters.
The BPM can be only adjusted to values lower than the oneautomatically calculated. This can be useful, for example, whenthe actual sample is shorter than the entered Meter and Mea-sures values.
In the above example, the actual groove lasts only up to the firsthalf of Measure 2. The recognized tempo is 130, while the realtempo is 100. Set the BPM value to 100, and a rest will be addedto the end of the groove, to allow it to loop seamlessly.
Time Slice
See “The Time Slice procedure” on page 222 for more information.
Release
Adjust the value of this parameter to change the number of rec-ognized attacks, by varying the speed needed to the Slice engineto start working again. For example, in the following example, ifthe Release value is too high (i.e., too long), the second attackmay be lost:
Note: After changing the Release value, you must select the Slicecommand again.
Threshold
This parameter varies the threshold over which the attacks arerecognized (i.e., the Time Slice sensitivity). If it is too low,weaker attacks may be ignored.
Note: After changing the Threshold value, you are not obliged toselect the Slice command again. The Slices value is immediatelychanged.
Attacks
This (non-editable) parameter shows the number of attacks rec-ognized. More than one attack may be recognized in a singleslice. Adjust the Release and Threshold parameters to change thenumber of recognized attacks.
150BPM
90BPM
Played closer together, but pitch is unchanged
Played further apart, but pitch is unchanged
Note: To vary the groove’s tempo, you must first import the generated MIDI data into the Percussion track (Import func-tion of the Style Record mode), and assign the new generated Sound to the Percussion track.Gaps between sliced samples, when slowing down the tempo, can be automatically filled by the Extend function, smoothing each sample’s tail.
Edit the MIDI data
Note: To recombine notes inside the generated MIDI sequence, you must first import the MIDI data in Style Record mode, by using the “Import” function. Then, use the Event Edit to change the note order.
Meas.1 Meas.2

222 Sampling operating modeThe Time Slice procedure
Slices
This (non-editable) parameter shows the number of generatedslices, i.e. generated samples and notes in the midifile. To changethis value, edit the Release and Threshold parameters.
Note: You can have a maximum of 78 slices.
Slice button
Select this command to execute the Slice after entering the TimeSlice page, or changing the Release value. This command is“ghosted” (i.e., non-selectable) if no sample has been recordedof loaded yet.
The Time Slice operation is executed on the sample, from the“Start” to the “End” point set in the Sample Edit / SampleRecord section.
Extend
See “The Extend procedure” on page 223 for more information.
When using a sliced groove with a slow tempo, an annoying gapmay be heard between a sample and the following one. TheExtend function allows you to fix this problem by adding a “tail”to all samples, making their decay smoother and more musical.
Note: You can use the Extend function only after a Time Slice oper-ation.
Note: The Extend function increases the original sample size.
Note: If there is not enough buffer memory, the Extend functionmay not work. If this happens, please decrease the “By” value.
By
Use this parameter to set the length of the “tail” added to thesamples (in percentage). The higher this value, the greater thesize of the samples. A setting of 20-30% is usually suitable tomost grooves.
Mode
This parameter specifies if the added “tail” must decay in a linearway, or sustain for a longer time and then fall suddenly.
Normal This option is most suitable for percussive soundwith a short (but not immediate) decay. The“tail” envelope is linear, and the level decays fast.
Long This option is most suitable for cymbals, whosesound should be sustained up until the next note.The “tail” envelope is sustained and falls slowly,then falls suddenly next to the end.
Extend button
Press this button to execute the Extend command. After youselect it, it will return “ghosted”, meaning that you can’t select itagain. If you change any of the parameters in this page, it will beavailable again.
The Time Slice procedure
Before executing a Slice operation, you must record or load asample. Then, you may edit the sample on “Sampling: Record”,then execute the Slice operation on this sample.
1. After recording or loading a sample, go to the Time Slicepage.
2. Pa1X automatically calculates the BPM parameter, basedon the given Meter and Measures values. If you know thesedata, set the Meter, Measures and BPM (Beats Per Minute)parameters. This would make the slicing more accurate.
3. Select the “Slice” command.
The original sample will be sliced, and each generated sam-ple assigned to a different key:
Before extending…
…and after extending…
Added “tail”
Key Assigned sample/pattern Speed %
C2 Full pattern cycling at half the speed 50%
C#2
Full pattern cycling at various speeds
53%
D2 56%
D#2 60%
E2 63%
F2 67%
F#2 71%
G2 75%
G#2 80%
A2 84%
A#2 89%
B2 94%
C3 Full pattern cycling at the original speed 100%
C#3 and above
Separate sliced samples–
C2…B2: Full pattern at a slower speed
Separate sliced samples
C3: Full pattern at the original speed

223Sampling operating modeThe Extend procedure
Ref
eren
ce
A MIDI Groove with the original pattern will also begenerated. The screen will change, to show slices sepa-rated by vertical lines:
4. Test the generated sliced drum kit on the keyboard.
• To test the full pattern at different speed, play a note fromC2 (half speed) to C3 (original speed). See table above.
• To test the single sliced samples, play notes from C#3 andabove. If you play a full chromatic scale, the original pat-tern will be sounded.
Hint: If too many samples have been generated, and the key-board can’t fit them all, use the OCTAVE buttons to transposethe keyboard, and listen to samples exceeding the upper limit.
5. If the Slice didn’t produce satisfactory results, adjust theRelease parameter. If this does not produces good results,try adjusting the Threshold parameter, too. After adjustingthe Release parameter, you must execute the Time Sliceagain.
6. Since a tempo value rounding happens when making aTime Slice operation, and the loop may not be accurate,you may need to adjust both the “Start” and “End” parame-ters of the “Sampling: Edit” page, to make the groove loopflawlessly. After editing these parameters, you must executethe Time Slice again.
Go on experimenting different settings! Editing an audiogroove is a pure matter of experimentation.
7. When the Slice is completed, you can save the sliced sam-ples and the MIDI Groove to disk, or use the Extend func-tion to improve the quality of the slices.
Select the Write command from the page menu. The WriteSlice dialog box will appear (see “Write Slice dialog box” onpage 227). Assign a name to the new Sound, and save it toan User Sound location.
A MIDI Groove with the same name will also be saved to areserved area of the internal memory. Be warned, that thisarea will be deleted when turning the instrument off. Con-vert it to an internal Style pattern, by using the Importfunction of the Style Record mode, before turning theinstrument off.
• To improve the quality of the slices, use the Extend func-tion (see “Extend” below).
8. After saving, you may press RECORD to exit the Samplingmode.
9. After exiting the Sampling mode, you may load the gener-ated MIDI Groove by using the Import function of theStyle Record mode (see “Import: Import Groove” onpage 121 for more information).
The Extend procedure
1. Set the By parameter, according to the tempo of the grooveyou will use. If you will slow down the groove very much,assign higher values to this parameter, otherwise you mayassign lower values.
2. Select the Extend Mode. “Long” is more suitable for cym-bals.
3. Select the Extend command.
4. After the Extend operation is complete, test the full patternat different speed, by playing notes from C2 (half speed) toC3 (original speed). See table on page 222.
5. If the Extend didn’t produce satisfactory results, change thesettings. Any previously made change will be deleted.
6. When the Extend is completed, you can save the sliced andextended samples and the resulting MIDI Groove to theinternal memory.
Select the Write command from the page menu. The WriteSlice dialog box will appear (see “Write Slice dialog box” onpage 227). Assign a name to the new Sound, and save it toan User Sound location.
A MIDI Groove with the same name will also be saved to areserved area of the internal memory. Be warned, that thisarea will be deleted when turning the instrument off. Con-vert it to an internal Style pattern, by using the Importfunction of the Style Record mode, before turning theinstrument off.
7. After saving, you may press RECORD to exit the Samplingmode.
8. After exiting the Sampling mode, you may load the gener-ated MIDI Groove by using the Import function of theStyle Record mode (see “Import: Import Groove” onpage 121 for more information).
Multisample: Edit MS
The Multisample is a way of organizing several samples on thekeyboard. Each sample is assigned to a Keyboard Zone (orIndex), with a higher and a lower limit.
A Multisample is then assigned to a Sound (see “Basic: OSCBasic” on page 194), where it is enriched with several perfor-mance parameters, like Amplitude Envelope, LFO, Filters, etc…

224 Sampling operating modeMultisample: Key Assign
MS (MultiSample)
Press this area to open the Choose Multisample window, andselect one of the available multisamples in memory.
Keyboard diagram
This diagram shows the selected Index/Zone (highlighted), andits Original Note (in red). Use the big “–” and “+” button on itsside to scroll the diagram one octave lower or upper.
Multisample Setup
Index
Index number of the selected Zone of the multisample / totalnumber of Zones in the multisample. A Zone always corre-sponds to a single sample.
Sample Number / Name
Number / name of the sample assigned to the selected zone ofthe multisample.
Original Note
Use this parameter to automatically transpose the assigned sam-ple, to make it sound at the right pitch. It should match to the“OrigNote (Original Note)” value assigned when editing thesample (see page 218).
Level
Relative level of the selected zone.
Pitch
Fine tuning of the selected sample in cents (1 cent = 1/100 of asemitone).
From … To
Range of the selected Zone (or Index).
Buttons
Insert
Press this button to create a new zone (Index) after the selectedone.
Add
Press this button to add a new zone (Index) after the last one.
Delete
Press this button to delete the selected Zone/Index.
Multisample: Key Assign
Use this page to see and edit the samples assigned to each Key-board Range/Index in the multisample. This page gives a betterdisplay of the assigned samples and their range on the keyboard.
MS (MultiSample)
See “MS (MultiSample)” on page 224.
Sample list
List of samples assigned to the selected multisample. Use the bigbutton with an arrow on top and to the bottom of the list toscroll the list up or down.
Keyboard ranges
Next to each sample name the low and high Zone limits appear.Edit these values to change the Zone range. The Original Note isshown in red.
Sample list
Keyboard ranges

225Sampling operating modePage menu
Ref
eren
ce
Page menu
Press the page menu icon to open the menu. Press a command toselect it. Press anywhere in the display to close the menu withoutselecting a command.
Write
Select this command to open the Write Sample, Write Multisam-ple or Write Slice dialog box (depending on the page you are in),and save the sample(s) to the hard disk (PCM folder), and themultisample(s) or the Sound generated by the Time Slice func-tion to the internal memory (SSD).
See “Write Sample dialog box” on page 226, “Write MultiSampledialog box” on page 226, or “Write Slice dialog box” on page 227for more information.
Delete
Select this command to delete one or all samples and multisam-ples from memory.
See “Delete Sample dialog box” on page 227, or “Delete Multi-sample dialog box” on page 227 for more information.
Normalize
Select this command to automatically rescale the level of theselected sample. Peaks will be raised to -0dB (i.e., maximum vol-ume before clipping), while the remaining parts of the samplewill be proportionally raised.
Normalization optimizes the sample’s level relative to other sam-ples, making all samples sound more uniformly. It also helpsoptimizing signal/noise ratio, by preventing further stages ofamplification from increasing any residual noise.
Cut
Select this command to cut the selected part of the sample(inside the “Start” and “End” points).
Trim/Crop
Select this command to cut all parts of the sample out of theselected range (i.e., out of the “Start” and “End” points).
Select All
Use this command to select the whole sample.
Init Multisample
Only available in the Multisample page. Select this command tocreate a new, blank multisample. Only one Zone will be avail-able, with no sample assigned.
Load Sample
Use this command to load single samples (mono or stereo), inKSF, AIFF or WAVE format.
Warning: By loading new samples, all samples in RAM are deleted.Before loading, use the Write command to save older samples todisk.
The samples are loaded to the RAM memory. Before leaving theSampling mode, use the Write command to save samples to thehard disk (PCM folder) as New Samples.
• “KSF” is Korg’s native sample format, used by the Trinityand Triton series of workstations, as well as the Pa-seriesarrangers. The file name must have the “.KSF” extension.
• “S1” is Akai S1000, and “S3” is S3000 native sample format.
• “AIFF” is the Apple® Macintosh© preferred format foraudio. The file name must have the “.AIF” extension.
• “WAVE” is the Microsoft© Windows© preferred format foraudio. The file name must have the “.WAV” extension.
Note: Akai data can only be imported from CD.
Note: You can only load samples in a 8 or 16-bit resolution, and asampling frequency rate from 11,025 to 48,000Hz. Loaded samplesalways preserve their original resolution.
Note: If the sample exceeds the maximum size allowed by the Pa1X(524,288 samples, either mono or stereo), it will be truncated.
Import
Use the Import command to import sounds, multisamples andsamples from non-native (i.e., non-Korg) formats.
With this command, you can import the following formats:
• “PCG” is Korg’s native Program format, used by the Trinityand Triton series of workstations. The file name must havethe “.PCG” extension
• “KMP” is Korg’s native multisample format, used by theTrinity and Triton series of workstations. The file namemust have the “.KMP” extension.

226 Sampling operating modeWrite Sample dialog box
• “P” is Akai S1000 and S3000 native Program format(including the sample key assignation, or multisample).
Note: Akai data can only be imported from CD.
Imported Sounds and Multisamples are stored in the internalSSD memory, that cannot be deleted when turning the instru-ment off.
Imported Samples are stored in RAM, and are deleted whenturning the instrument off. Before turning the instrument off,save them to disk by selecting the Write command from the pagemenu while in any page of the Sample Edit / Sample Record sec-tion.
To automatically load samples when turning the instrument on,check the “PCM Autoload” function in Disk mode (seepage 273). To load samples after turning the instrument on,press the “Load PCM” button in the same page (see page 273).
Note: While Pa1X and Triton share most of their internal multi-samples, some of them may differ. While reading a PCG file, Pa1Xtries to use exactly the same multisamples as in Triton. If this is notpossible, it looks for a similar multisample. If this too is not possi-ble, an <empty> multisample will be selected. Enter the Sound Editmode, and select a multisample suitable for the imported Program.
Note: Not all Triton’s PCG data are imported. Insert FX, EQ,Arpeggio, Combi, Global and Drum Kit data are not loaded.
Note: You cannot import Drum Kits.
Note: Pa1X cannot read multisamples saved on more than a singlefloppy disk.
Note: Multisample may contain many different samples. They areassigned to the same keys as in the original file.
Hint: When importing a KMP file, take note of the selected multi-sample name; you will need it in Sound Edit mode, when assigningthe multisample to a new Sound.
Export
Depending on wheter you are in the “Sample Edit / SampleRecord” or “Multiample” section, this command allows you toexport a sample in one of two popular computer audio file for-mats, or a multisample in a Korg “.KMP” file.
See “Export Sample dialog box” on page 228, or “Export Multi-sample dialog box” on page 228 for more information.
Exit from Record
Choose this command to exit from the Sampling mode.
Write Sample dialog box
Open this dialog box by selecting the Write command from thepage menu, while in the Sample Edit / Sample Record section. Inthis dialog box you can save the sample to disk, inside the (hid-den) PCM folder. Please always remember to save PCM samplesinto a “.SET” folder, before turning the instrument off, or beforeloading or recording new samples.
To assign a different name to the sample, press the (Text
Edit) button to open the Text Edit window.
Select an option to select a memory location where to save thesample:
• Select “Save as a new Sample” to save to a new location.
• Select “Save to” to overwrite an existing location. Warning:The older sample at the same location will be deleted!
Write MultiSample dialog box
Open this dialog box by selecting the Write command from thepage menu, while in the Multisample section. In this dialog boxyou can save the multisample to the internal memory (SSD).Multisamples are a way to organize samples on the keyboard,and are used by Sounds as their basis.
Note: Multisamples are maintained in memory even when turningthe instrument off, but the associated samples are not. To automat-ically reload them to the RAM memory when turning the instru-ment on, check the “PCM Autoload” parameter in the Disk mode(see page 273).
To assign a different name to the multisample, press the
(Text Edit) button to open the Text Edit window.
Select an option to select a memory location where to save thesample:
• Select “Save as a new MultiSample” to save to a new loca-tion.
• Select “Save to” to overwrite an existing location. Warning:The older multisample at the same location will be deleted!

227Sampling operating modeWrite Slice dialog box
Ref
eren
ce
Write Slice dialog box
Open this dialog box by selecting the Write command from thepage menu, while in the Time Slice page. In this dialog box youcan save the Sound, sliced Samples and Multisample generatedby the Time Slice function, together with the generated MIDIGroove.
The Sound will be saved to the selected User bank location in theinternal, non-volatile memory (SSD). The Multisample will besaved to a free location in the internal memory (SSD). Sampleswill be saved in the PCM folder on the hard disk.
Note: The MIDI Groove is automatically saved in a reserved, tem-porary location on disk, and is automatically deleted when turningthe instrument off. So, import it (by using the “Import: ImportGroove” function in Style Record mode, see page 121), before turn-ing the instrument off.
Warning: The older Sound at the target location will be deleted!
Name
To assign a different name to the Sound, press the (Text
Edit) button to open the Text Edit window.
Sound Bank
Target bank of Sounds. Each bank corresponds to one of thePERFORMANCE/SOUND buttons. Use TEMPO/VALUE con-trols to select a different bank.
Sound
Target Sound location in the selected bank. Use TEMPO/VALUEcontrols to select a different location.
Select… button
Press this button to open the Sound Select window, and select atarget location.
Delete Sample dialog box
Open this dialog box by selecting the Delete command from thepage menu, while you are in any page of the Sample Edit/SampleRecord section.
• Select “Selected”, and select a sample number, to delete justone of the samples from memory.
• Select “Not assigned to any Multisample/Drumkit” todelete only samples not yet assigned to a multisample ordrumkit (see paragraphs on the “Multisample” section,starting from page 198).
Note: Use this option with care, since you may delete samplesyou would like to preserve, that have not yet been assigned toa multisample or drumkit. Use it only when you are sure alldesired samples have been assigned to a multisample ordrumkit.
• Select “All Samples, Multisamples, Drum Samples” todelete all samples, multisamples and drum samples frommemory. This operation completely resets the RAM, andmay be used to “clean-up” any trouble.
Delete Multisample dialog box
Open this dialog box by selecting the Delete command from thepage menu, while you are in any page of the Multisample sec-tion.
• Select “Selected”, and select a multisample number, todelete just one of the multisamples from memory.
Check the “Delete Unassigned Samples” option, to alsodelete all samples not assigned to a multisample.
Note: Use this option with care, since you may delete samplesyou would like to preserve, that have not yet been assigned toa multisample or drumkit. Use it only when you are sure alldesired samples have been assigned to a multisample ordrumkit.
• Select “MultiSamples” to delete all multisamples. No sam-ples will be deleted, including those associated with thedeleted multisamples.

228 Sampling operating modeExport Sample dialog box
• Select “All Samples, Multisamples, Drum Samples” todelete all samples, multisamples and drum samples frommemory. This operation completely resets the RAM, andmay be used to “clean-up” any trouble.
Export Sample dialog box
Open this dialog box by selecting the Export command from thepage menu, while you are in any page of the Sample Edit/SampleRecord section.
Original Name
Name of the sample being exported.
File Name
Name of the generated file on disk.
File Type
Either of the file types you can choose as the file format.
WAV Microsoft Wave format, very common on Win-dows PCs.
AIFF Apple’s Audio Interchange File Format, standardon the Macintosh.
Export Multisample dialog box
Open this dialog box by selecting the Export command from thepage menu, while you are in any page of the Multisample sec-tion.
By using this function, you can export from the internal mem-ory the multisample in edit in the Multisample section, and alllinked samples. The Export operation generates a “.KMP” file(Korg’s proprietary file format for multisamples), and a foldercontaining a series of “.KSF” files (Korg’s proprietary file formatfor samples) inside the same directory.
Note: You cannot export a multisamples on more than a singlefloppy disk. You can, however, export files of any size on the harddisk.
Note: When exporting a stereo multisample, be careful to assign adifferent name to the Left and Right channel files, to avoid over-writing. A “-L” and “-R” suffix is usually added after the name ofthis kind of files.

229Global edit modeWhat is it, and how the Global is structured
Ref
eren
ce
The Global edit environment is the place where you can set glo-bal functions, i.e. functions overriding the single Performance,STS or Style. This edit environment overlaps the current operat-ing mode (Style Play, Song Play, Sequencer, Sound Edit).
What is it, and how the Global is structured
The Global is a file that can be written to memory (and may sub-sequently be saved to disk), containing global parameters for thewhole instrument or each single operating mode.
Global parameters can be written to memory by selecting thevarious “Write Global…” commands from the page menus –each dedicated to one of the areas of the Global file. They can besaved to disk by using the ordinary Disk operations.
Note: Saving or loading a “.SET” folder also saves or loads the Glo-bal file. Parameter changing may be avoided by turning the Lock onfor any single parameter (or groups of parameters in the Lock pageof the Global mode, see “General Controls: Lock” on page 232).
There are separate areas in the Global file, that may be separatelywritten to memory, to avoid writing all global parameters atonce when not needed:
• Global Setup, containing global parameters not linked toany single operating mode.
• Style Play Setup, containing global parameters for the StylePlay mode, not linked to the single Performance, STS orStyle.
• Song Play Setup, containing global parameters for the SongPlay mode, not linked to the single Song.
• Sequencer Setup, containing global parameters for theSequencer mode, not linked to the single Song.
• Disk Preferences, containing preferences for the Diskmode.
• MIDI Setup, containing the available MIDI Setups, i.e., set-tings for MIDI communication.
• Voice Processor Setup, containing lead voice setups for theVoice Processor.
• Voice Processor Presets, containing single presets for theVoice Processor.
Main page
There is no main page in the Global edit mode. When pressingEXIT, you exit the Global mode, and the underlying operatingmode in the background is recalled.
Edit menu
From any page of the Global mode, press the MENU button toopen the Global edit menu. This menu gives access to the vari-ous Global edit sections.
When in the menu, select an edit section, or press EXIT to exitthe Global mode.
When in a page, press EXIT to go back to current operatingmode in the background (Style Play, Song Play, Sequencer,Sound).
Each item in this menu corresponds to an edit section. Each editsection groups various edit pages, that may be selected by press-ing the corresponding tab on the lower part of the display.
Note: The Global mode is not available while in Record mode(Style Record, Song Record, Sampling).
Edit page structure
All edit pages share some basic elements.
Edit mode
This indicates that the instrument is in Global mode.
Edit section
This identifies the current edit section, corresponding to one ofthe items of the edit menu (see “Edit menu” on page 229).
Global edit mode
Edit mode Edit section Page menu icon
Parameters area
Tabs

230 Global edit modeGeneral Controls: Basic
Page menu icon
Press this icon to open the page menu (see “Page menu” onpage 257).
Parameters area
Each page contains various parameters. Use the tabs to selectone of the available pages. For detailed information on the vari-ous types of parameters, see sections starting from page 230.
Tabs
Use tabs to select one of the edit pages of the current edit section.
General Controls: Basic
This page contains various general parameters, setting the statusof the keyboard, the fade in/out, and the accelerando/ritar-dando.
Keyboard Settings
Velocity Curve
This parameter sets the sensitivity of the keyboard to your touch.
Fix No dynamic control available. Dynamic valuesare fixed, as in a classic organ.
Soft1 … Hard3
Curves, from the lightest one to the hardest one.
A.Touch Curve
This parameter sets the sensitivity of the keyboard to the pres-sure you apply after first pressing a key.
Soft1 … Hard2
Curves, from the lightest to the hardest.
Off The aftertouch is turned off.
Global Tuning/Reverb
Master Tuning
This is the master tuning of the instrument (in cents of a semi-tone). Use it to adapt your keyboard tuning to an acousticinstrument, for example an acoustic piano.
-50 Lowest pitch.
0 Standard pitch (A4=440Hz).
+50 Highest pitch.
Reverb Offset
This is the master offset for all reverbs. Use it to adjust reverbtails to the room where you are playing. Use negative valueswhen you are in a very reverberant room, positive values if theroom is too dry.
By using this global control, you are not obliged to change thereverb time in each single Performance, STS, Style Performance,or Song.
-50 Less reverb.
0 Standard reverb.
+50 More reverb.
Fade In/Out Time
These parameters allows you to set the speed for the Fade In/Outfunction.
Fade In Time
Time for a full fade in (from zero to maximum volume), afteryou press the FADE IN/OUT button.
5…20 Fade time (in seconds).
Fade Out Time
Time for a full fade out (from maximum volume to zero), afteryou press the FADE IN/OUT button.
5…20 Fade time (in seconds).
Accelerando/Ritardando
These parameters lets you adjust the speed of the Accelerandoand Ritardando functions.
Step
Speed of the Tempo change (from 1 to 6). With higher values,the step change is greater, and the speed will change faster. Withlower values, the step change is smaller, and the speed willchange more slowly.
Curve
Accelerando/ritardando curves (from 1 to 3). Experiment thevarious options, to see the one that best fit your taste.
Glide
Glide is a function you can assign to a footswitch. When thepedal is pressed, affected notes on Upper tracks are bent down,according to settings for the Pitch Bend on the same tracks.When the pedal is released, notes return to the normal pitch, atthe speed defined by the “Time” parameter.
To change Pitch Bend values for each Upper track, see the “PBSensitivity” parameter in the Style Play mode (see page 86)
Time
Time needed to notes affected by the Glide to return to the nor-mal pitch.
Gbl
Gbl
Gbl
Gbl
Gbl
Gbl
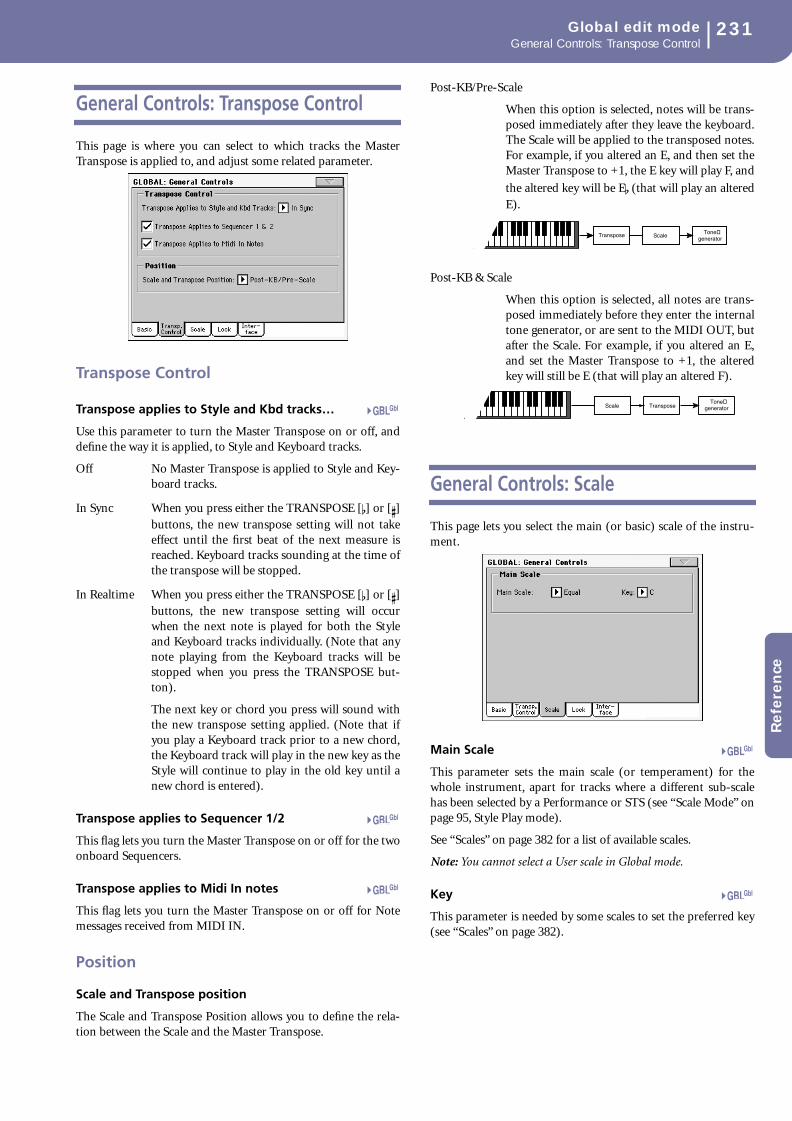
231Global edit modeGeneral Controls: Transpose Control
Ref
eren
ce
General Controls: Transpose Control
This page is where you can select to which tracks the MasterTranspose is applied to, and adjust some related parameter.
Transpose Control
Transpose applies to Style and Kbd tracks…
Use this parameter to turn the Master Transpose on or off, anddefine the way it is applied, to Style and Keyboard tracks.
Off No Master Transpose is applied to Style and Key-board tracks.
In Sync When you press either the TRANSPOSE [] or []buttons, the new transpose setting will not takeeffect until the first beat of the next measure isreached. Keyboard tracks sounding at the time ofthe transpose will be stopped.
In Realtime When you press either the TRANSPOSE [] or []buttons, the new transpose setting will occurwhen the next note is played for both the Styleand Keyboard tracks individually. (Note that anynote playing from the Keyboard tracks will bestopped when you press the TRANSPOSE but-ton).
The next key or chord you press will sound withthe new transpose setting applied. (Note that ifyou play a Keyboard track prior to a new chord,the Keyboard track will play in the new key as theStyle will continue to play in the old key until anew chord is entered).
Transpose applies to Sequencer 1/2
This flag lets you turn the Master Transpose on or off for the twoonboard Sequencers.
Transpose applies to Midi In notes
This flag lets you turn the Master Transpose on or off for Notemessages received from MIDI IN.
Position
Scale and Transpose position
The Scale and Transpose Position allows you to define the rela-tion between the Scale and the Master Transpose.
Post-KB/Pre-Scale
When this option is selected, notes will be trans-posed immediately after they leave the keyboard.The Scale will be applied to the transposed notes.For example, if you altered an E, and then set theMaster Transpose to +1, the E key will play F, and
the altered key will be E (that will play an alteredE).
Post-KB & Scale
When this option is selected, all notes are trans-posed immediately before they enter the internaltone generator, or are sent to the MIDI OUT, butafter the Scale. For example, if you altered an E,and set the Master Transpose to +1, the alteredkey will still be E (that will play an altered F).
General Controls: Scale
This page lets you select the main (or basic) scale of the instru-ment.
Main Scale
This parameter sets the main scale (or temperament) for thewhole instrument, apart for tracks where a different sub-scalehas been selected by a Performance or STS (see “Scale Mode” onpage 95, Style Play mode).
See “Scales” on page 382 for a list of available scales.
Note: You cannot select a User scale in Global mode.
Key
This parameter is needed by some scales to set the preferred key(see “Scales” on page 382).
Gbl
Gbl
Gbl
ScaleTone
generatorTranspose
ScaleTone
generatorTranspose
Gbl
Gbl

232 Global edit modeGeneral Controls: Lock
General Controls: Lock
This page, split in four panes that can be selected by means ofthe correspodning side tabs, contains all the available locks,sometimes grouped under just a single lock. Locks preventparameter values to be changed when loading data from disk, orselecting a different Performance, Style or STS.
Lock–Tuning pane
Lock–Control pane
Lock–FX & Voice Processor pane
Lock–Style pane
Locks
All the available locks. Lock them to prevent changes due toloading or selecting different elements. These locks are alsofound in various other pages, next to the locked parameter.
Hint: To save the status of the various parameters as a fixed statusfor the Pa1X, save all the parameters to Performance 1 of bank 1(automatically selected when turning on the instrument), and savethese locks to the Global.
Master Transpose
When locked, master transpose is not automati-cally changed when selecting a different Perfor-mance or style.
(See “Master transpose” on page 78).
Style Performance Master Transpose Lock
When closed, this lock prevents a Style change tomodify the Master Transpose. When open,changing a Style may also change the MasterTranspose.
(See “Master transpose” on page 78).
Hint: In order to avoid having the Master Trans-pose setting change when selecting a new Perfor-mance or STS, use the general Master TransposeLock (the first parameter in this page).
Note: When the Master Transpose Lock is closed,this parameter has no effect. However, the MasterTranspose Lock also locks the Style PerformanceTranspose.
Sub Scale/Quarter Tone
When locked, selecting a Performance or STS willnot change the Sub-Scale or Quarter Tone value.
(See “Sub-Scale panel” on page 83).
Auto Octave This lock lets you decide if the instrument willautomatically transpose the Upper tracks whenswitching between the FULL UPPER and theSPLIT Keyboard modes.
• If On, when switching to the FULL UPPER orSPLIT Keyboard Mode, the Upper tracks trans-position is left unchanged.
• If Off, when switching to the FULL UPPER Key-board Mode, the Upper tracks Octave Transposeis automatically set to “0”. When switching to theSPLIT Keyboard Mode, the Upper tracks OctaveTranspose is automatically set to “-1”.
Assignable Switches
When locked, selecting a Performance or STS willnot change the Assignable Switch assignment.
(See “Pad/Switch: Assignable Switch” onpage 94).
Slider Mode When locked, selecting a Performance or STS willnot change the selected status of the SLIDERMODE button.
(See “Assignable Sliders A 1-8, B 1-8” onpage 235).
Gbl
233Global edit modeGeneral Controls: Lock
Ref
eren
ce
Split Point When locked, selecting a Performance or STS willnot change the split point.
(See “Split Point” on page 83).
Pad When locked, selecting a Performance or STS willnot change the Pad assignment.
(See “Pad/Switch: Pad” on page 94).
Lower When this lock is closed, the Lower track remainsunchanged when a different Style, Performanceor STS is selected.
This is useful if, for example, you prefer to alwaysplay with the left hand muted and reserved onlyto playing chords for the arranger.
Hint: If you want the same Lower settings to beused during all your shows, save your preferredLower settings to Performance 1-1 (automaticallyselected on startup), then close this lock and choosethe “Write Global-Global Setup” from the pagemenu.
Keyboard Mode/Chord Scanning
When this lock is closed, the Keyboard Mode andChord Scanning remain unchanged when a dif-ferent Performance or STS is selected.
This is useful if, for example, you prefer to alwaysplay in Full Keyboard, with chords recognized onthe whole keyboard range.
Note: The Keyboard Mode and Chord Scanningsettings are reset when switching to a different oper-ating mode.
Hint: If you want the same Keyboard Mode andLower Scanning settings to be used during all yourshows, save your preferred settings to Performance1-1 (automatically selected on startup), then closethis lock and choose the “Write Global-GlobalSetup” from the page menu.
Voice Processor Preset
When locked, selecting a Performance or STS willnot change the Voice Processor Preset.
(See “VP Preset” on page 82).
Upper 1 FXs In Sound mode, you can assign a Sound twoeffects (FX1 and FX2). When you assign a newSound to the Upper 1 track, the FX1 and FX2 set-tings saved with that Sound can be automaticallyselected, overriding Performance/STS settings forthis track. Whether Sound or Performance/STSeffect parameters will be considered, depends onthe status of this lock.
• If the Upper 1 FX Lock is turned on, whenassigning a new Sound to the Upper 1 track, Per-formance/STS parameters are left untouched;selected effects, and FX Send values, are notchanged.
• If the Upper 1 FX Lock is turned off, whenassigning a new Sound to the Upper 1 track,Sound parameters are considered; selectedeffects, and FX Send values, are changed accord-ing to the Sound’s stored data.
Note: If effects associated to the selected Sound arenot compatible with effects already assigned to theCD FX block, C and/or D Send values on the otherKeyboard tracks will be automatically set to zero.
For example, assume a chorus effect is assigned tothe D effect processor. If the new Sound assigns adistortion effect to the D effect processor, the D Sendvalue on the Upper 2, Upper 3, and Lower trackswill be set to zero, to avoid these tracks sound in thewrong way. This way, the Upper 1 track (usuallythe most important one for solo playing) will soundwith the needed effect, while the other Keyboardtracks will just sound dry.
Style Preferences
When locked, selecting a Performance or STS willnot change the value of parameters contained inthe Style Preferences pages.
(See “Preferences: Style Preferences” on page 95,and “Preferences: Global Setup” on page 96).
Bass Inversion
When locked, selecting a Performance or STS willnot change the Bass Inversion status.
(See “BASS INVERSION” on page 9).
Manual Bass When locked, selecting a Performance or STS willnot change the Manual Bass status.
(See “MANUAL BASS” on page 9).
Fill Mode When locked, the selected Fill Mode will notchange when selecting a different Performance orStyle.
(See “Fill Mode (1…3)” on page 93).
Style Element When locked, selecting a different Style does notcause selecting a different Style Element.
Style Tracks Play/Mute Lock
When closed, this lock prevents a Style or Perfor-mance change to modify the Play/Mute status ofthe Style tracks. This way, you can, for example,turn the bass track off during a whole show, toallow your bassist to play it live. Also, you couldmute all Acc tracks, to only play with the Drumand Bass tracks.
(See “Track status icons” on page 82).
Style Tracks Volume
When this lock is closed, the volume of the Styletracks remains unchanged when a different Styleor Performance is selected.
This is useful if you create your own Styles, andlike to dynamically adjust the volume by usingthe sliders as a mixer. It is not recommended withFactory Styles, each one already mixed at its bestright at the factory.

234 Global edit modeGeneral Controls: Interface
General Controls: Interface
This page contains parameters related to the way messages areshown in the display.
Help/Message Language
Language
Use this pop-up menu to select one of the available languages forthe online help system. Operating System version 2.0 supportsthe English, French, German, Italian and Spanish languages.
Change button
Press this button to apply the selected language to the user’sinterface.
How to select the Help language
1. Since Pa1X must be reset at the end of this procedure, besure to first save all unsaved data.
2. While in this page, select a language from the pop-upmenu.
3. The Change button will start flashing in red. Press it.
4. You will be asked if you want to save the Global, and selectthe new language. Press Yes to confirm. The Global will beautomatically saved, and the language selected.
5. A message will advice you to reboot the Pa1X. Press OK toclose the message window.
6. Turn the Pa1X off, then on again.
Program Change
Show Program Change number
Program Change display next to Sound names can be turned onor off, to make the interface less cluttered with data.
Check this parameter to show Program Change numbers next toSound names in the main page of the Style Play and Song Playoperating modes, and in the various Single Track Info areas.
Note: Program Change numbers are always shown in Sound Editmode.
Track Activity
Show Track Activity
Use this parameter to turn on/off the Track Activity display.When it is turned on, you can monitor events coming from thetracks or the MIDI inputs. Incoming events are shown by thechanging color of each track’s label.
Here is the list of colors and their meaning:
Red Data coming from the MIDI IN ports.
Light Blue Internal data, generated by the keyboard, pads,the Arranger or one of the Sequencers.
Grey Either internally or externally generated data (orboth at the same time).
Dark Blue No data received.
Acc/Seq Slider
Acc/Seq Slider
The ACC/SEQ VOLUME slider on the control panel can controlthe volume of all Style or Song tracks, while leaving Keyboardand Pad tracks unchanged, or act as a balance control, mixingbetween the Keyboard and the Style or Song tracks.
Acc/Seq Volume
Choose this option to make the ACC/SEQ VOL-UME slider control the volume of all Style orSong tracks, while leaving Keyboard and Padtracks unchanged.
Acc/Seq-RealTime Balance
Choose this option to make the ACC/SEQ VOL-UME slider act as a balance control, mixingbetween the Keyboard and the Style or Song.These functions are respectively called Style/RTTrack Balance and Song/RT Track Balance.
Auto Select
Auto Style SelectAuto Performance/Sound Select
When one of these parameters is checked, the last selected Style,Performance or Sound selected in a bank is immediately selectedwhen pressing the bank button.
This way, you can assign your preferred Style, Performance orSound to each control panel’s button, and select it just with asingle press.
However, the Style/Perf/Sound Select window still appears whenyou press one of the bank buttons, so you can select a differentitem if desired.
Note: Unless you save your settings by means of the “Write Global-Auto Select Setup” page menu command, the memorized Style,
Gbl
Gbl
Gbl
Gbl
Gbl
Gbl

235Global edit modeControllers: Pedal/Switch
Ref
eren
ce
Performance or Sound is reset to the first one in each bank, whenturning the instrument off and then on again.
Hint: You can save your preferred Performances into the first loca-tion of each bank. This way, by turning on this parameter, you willselect your preferred Performance at the touch of a single button.
Also note that, by turning the “Factory Style and Pad Protect” an“Factory Sound Protect2 parameters off, you can do the same withthe Styles and Sounds.
Controllers: Pedal/Switch
This page lets you select a function to the Assignable Pedal/Foot-switch, and select the polarity for the Damper and AssignablePedal/Footswitch.
See page 378 for a list of the assignable functions. The first func-tions are switch-type functions, while the remaining (startingfrom Master Volume) are continuous-like functions.
Pedal/Footswitch
Continuous pedal, or footswitch, connected to the ASSIGN-ABLE PDL/SW connector.
Damper Polarity
Polarity of the Damper pedal.
Pedal/Switch Polarity
Polarity of the Assignable pedal or footswitch.
Controllers: Assignable Sliders
This page lets you program the Assignable Sliders. Two sets areavailable (Assignable Sliders A and Assignable Sliders B). Youcan assign the preferred set by using the SLIDER MODE buttonon the control panel, respectively selecting the ASSIGNABLE Aor ASSIGNABLE B mode. The status of the SLIDER MODE but-ton can be saved with the Performance or STS.
See “List of Assignable Pedal and Assignable Sliders functions”on page 379 for a list of the assignable functions. The first func-tions are switch-type functions, while the remaining (startingfrom Master Volume) are continuous-like functions. Only con-tinuous functions can be assigned to the sliders.
Assignable Sliders A 1-8, B 1-8
Function assigned to the corresponding slider on the controlpanel.
Gbl
Gbl
Gbl
Gbl

236 Global edit modeControllers: EC5
Controllers: EC5
This page lets you program each of the five switches of theKORG EC5 multiswitch controller.
See “List of Footswitch and EC5 functions” on page 378 for a listof the assignable functions. The first functions are switch-typefunctions, while the remaining (starting from Master Volume)are continuous-like functions. Only switch functions can beassigned to the EC5 switches.
EC5-A…E
Each of the switches of a KORG EC5 multiswitch.
MIDI: MIDI Setup / General Controls
This page allows you to select a MIDI Setup, convert ordinarynotes to RX Noises, and set global parameters for the MIDIcommunication.
Current MIDI Setup
MIDI Setup
MIDI channels can be automatically configured by selecting aMIDI Setup. Each of them lets you assign the best values to vari-ous MIDI parameters, to allow an easier connection with a par-ticular MIDI controller. See “MIDI” on page 280 for moreinformation on using MIDI Setups.
A different MIDI Setup may be automatically selected whenentering the Style Play, Song Play or Sequencer modes. To selecta MIDI Setup for these modes, see “Midi Setup” on page 96 forthe Style Play mode, “Midi Setup” on page 153 for the Song Playmode, and “Midi Setup” on page 186 for the Sequencer mode.
For detailed information on MIDI Setup settings, see “MIDISetup” on page 328.
Note: After selecting a MIDI Setup, you can apply any changes toeach channel’s settings. To store the changes in memory, select theWrite Global-Midi Setup command in the page menu to save it tomemory (see “Write Global - Midi Setup dialog box” on page 257).
Hint: To restore the original MIDI Setups, load the original Fac-tory data again (downloadable from www.korgpa.com).
Note to RX Noise
RX Noises are special sounds that make Sounds be more realis-tic. They are usually located above C7, depending on the Sound.
Enable
When this parameter is turned on, notes received from MIDI inthe RX Noises range are recognized. When off, notes are notreceived.
Note: This parameter is automatically turned off when turning theinstrument on again.
General Controls
Use these parameters to set MIDI Clock, Local Off, and MIDIOUT ports.
Clock Send
Use this parameter to turn the clock information on the MIDIOUT on or off. This parameter is common to all MIDI Setups.
Note: In Song Play mode, only the Sequencer 1 Tempo value will besent to the MIDI OUT.
Off The Pa1X cannot send the MIDI Clock signal.You cannot slave another instrument to the Pa1X,even when connected to the MIDI OUT.
On The Pa1X can send the MIDI Clock signal. Youcan slave another instrument to the Pa1X Tempo,Start/Stop and Play/Stop commands. Connectthe other instrument to the Pa1X MIDI OUTport.
Clock Source
This parameter selects the MIDI Clock source for the Style Playand Sequencer modes.
Note: In Song Play mode, the Internal clock is always used.
Note: The Clock parameter is always set to “Internal” each timeyou turn the instrument on.
Internal Internal, i.e. the clock generated by the Pa1XSequencer 1 internal metronome.
MIDI A External from MIDI IN A. In Style Play orSequencer mode, the Pa1X is slaved to an externaldevice, connected to its MIDI IN port. The Start/Stop and Play/Stop commands, as well as themetronome tempo, cannot be selected from thecontrol panel of the Pa1X. Use the external deviceto set the tempo and start or stop the sequenceror arranger.
MIDI B As above, but referred to MIDI IN B.
Gbl
Sty Sng Seq
Mid

237Global edit modeMIDI: MIDI In Control
Ref
eren
ce
Local Control On
The Local parameter turns the keyboard on or off.
Note: The Local parameter is automatically reactivated each timeyou turn the instrument on.
On When you play the keyboard, MIDI data is sent tothe internal sound generator. If tracks areassigned to a MIDI OUT channel, data is alsosent to the MIDI OUT port.
Off The keyboard is connected to the MIDI OUT, butcannot play the internal sound generator.
This is very useful when working with an externalsequencer, to send notes and various MIDI mes-sages from the integrated keyboard and control-lers to the external sequencer, and then let thesequencer send them back to the sound genera-tor, without overlapping. See the MIDI chapter.
MIDI A Out/Thru Mode
MIDI B Out/Thru Mode
Use these radio buttons to define if the MIDI OUT connectormust work as OUT or THRU connectors. (OUT ports send datagenerated by the Pa1X, while THRU connectors send the samedata received on the MIDI IN port).
MIDI: MIDI In Control
This page lets you program general parameters for the MIDI IN,like the Chord Recognition channel and MIDI parameters forthe Voice Processor.
Midi In Controls
Midi In Octave Transpose
Use this parameter to determine if the Octave Transpose isapplied also to notes received on the MIDI IN.
On Notes received on the MIDI IN are transposedaccording to the Octave Transpose setting foreach track.
Off Data received on the MIDI IN are not transposed.
Midi In Mute/Unmute
Use this parameter to determine if a muted track can still playdata received via MIDI.
On No data received via MIDI on a muted track canbe played by Pa1X.
Off Data received via MIDI on a muted track can stillplay on the Pa1X.
Chord 1 Midi Channel
Chord 2 Midi Channel
Notes entering these channels are sent to the Chord Recognitionengine.
There are two separate Chord channels. This is very useful whenyou must send chords to Pa1X on two different channels (likewith some MIDI accordions).
Upper Octave Transp (Transpose)
Octave transposition of data received on the MIDI IN for theUpper tracks. For example, if you select the +1 value, a receivedC4 will play a C5 on the Pa1X.
This parameter may be useful to many MIDI accordion players,whose MIDI interface may transmit on an unexpected octave.
Lower Octave Transp (Transpose)
Octave transposition of data received on the MIDI IN for theLower track. For example, if you select the +1 value, a receivedC4 will play a C5 on the Pa1X.
This parameter may be useful to many MIDI accordion players,whose MIDI interface may transmit on an unexpected octave.
Midi In Velocity Value
Use this parameter to set a fixed velocity (dynamics) value for allreceived MIDI notes. This is useful when playing the Pa1X withan organ or a MIDI Accordion.
Normal Normal velocity values are received.
40…127 All received velocity values are converted to theselected value.
Voice Processor Midi controls
Midi In Channel
Notes received on this channel are sent to the Harmony sectionof the Voice Processor.
Octave Transpose In
Octave transpose for all notes received via MIDI by the Har-mony section of the Voice Processor.
In Note Range-High
In Note Range-Low
These parameters are the lowest and highest notes received bythe Harmony section of the Voice Processor. Notes received outof this range are not recognized.
Mid
Mid
Mid
Mid
Mid
Mid
Mid
Mid
Mid
Mid
Mid
Mid
Mid

238 Global edit modeMIDI: MIDI In Channels
MIDI: MIDI In Channels
In this page, you can assign Pa1X tracks to any of the MIDI INchannels.
Channels
You can assign to each channel one of the following tracks:
Off No track assigned.
Lower Lower track.
Upper 1…3 One of the Upper tracks.
Drum Drum track.
Percussion Percussion track.
Bass Bass track.
Acc 1…5 One of the Auto-accompaniment tracks.
Seq.1 Tr 01…16
One of Sequencer 1 tracks.
Seq.2 Tr 01…16
One of Sequencer 2 tracks.
Global Special channel to simulate the Pa1X’s integratedcontrols (keyboard, pedals, joystick) with anexternal keyboard or controller. MIDI messagescoming on this channel are seen as if they weregenerated by Pa1X’s integrated controllers.
Control On this special channel, the Pa1X receives MIDImessages to remotely select Styles, Performances,STS and Style Elements. See tables on page 286and following for more information on thereceived data
MIDI: MIDI Out Channels
In this page, you can assign Pa1X tracks to any of the MIDI OUTchannels.
Channels
You can assign to each channel one of the following tracks:
Off No track assigned.
Lower Lower track.
Upper 1…3 One of the Upper tracks.
Drum Drum track.
Percussion Percussion track.
Bass Bass track.
Acc1…5 One of the Auto-accompaniment tracks.
Seq.1 Tr 01…16
One of Sequencer 1 tracks.
Seq.2 Tr 01…16
One of Sequencer 2 tracks.
Seq.1/2 Tr 01…16
Use these channels to send data generated by atrack with the same name on either or bothonboard sequencers at the same time.
Chord Use this channel to send notes recognized by theChord Recognition engine to the MIDI OUT.This is useful, for example, to control an externalHarmonizer from the Pa1X, using the Lowertrack to play chords, even if the track is muted.
Mid Mid

239Global edit modeMIDI: Filters
Ref
eren
ce
MIDI: Filters
Use this page to set up to 8 filters for the MIDI data received orsent by the Pa1X.
Midi In Filters
Selected MIDI IN filters.
Off No filter.
Pitch Bend Pitch Bend.
MonoTouch Mono (or Channel) After Touch.
PolyTouch Poly After Touch.
PrgChange Program Change.
SysExcl System Exclusive.
All CC All Control Change messages.
0…127 Control Change message #0…127. See “MIDIData” on page 383 for a list of available ControlChange messages.
Midi Out Filters
Selected MIDI OUT filters. See above for information on eachfilter type.
Audio Output: Sty/Kbd
This page lets you connect Style, Keyboard and Pad tracks to theaudio outputs.
Tracks
Use these parameters to assign an audio output (OUTPUT sec-tion, on the back of the instrument) to each track.
Left + Right The selected track is connected to the Left &Right outs, in stereo. The track is also sent to theInternal FX processors (A and B for the Styletracks, C and D for the Keyboard and Pad tracks).You can set the volume using the MASTER VOL-UME slider.
Out 1 + 2 The track is connected to the 1 & 2 sub-outs, instereo. It is not sent to the Internal FX processors.The MASTER VOLUME slider has no effect on it.
Out 1 The selected track is connected to the sub-out 1.It is mixed to mono. It is not sent to the InternalFX processors. The MASTER VOLUME slider hasno effect on it.
Out 2 The selected track is connected to the sub-out 2.It is mixed to mono. It is not sent to the InternalFX processors. The MASTER VOLUME slider hasno effect on it.
Audio Output: Seq1
This page lets you connect Sequencer 1 tracks to the audio out-puts. These setting are also applied to the Sequencer mode.
Tracks
Use these parameters to assign an audio output (OUTPUT sec-tion, on the back of the instrument) to each track.
See “Audio Output: Sty/Kbd” on page 239 for more information.
Mid
Mid
Gbl
Track L/Mono & Right
Internal FX
Track 1 & 2
Track 1
Track 2
Gbl

240 Global edit modeAudio Output: Seq2
Audio Output: Seq2
This page lets you connect Sequencer 2 tracks to the audio out-puts.
Tracks
Use these parameters to assign an audio output (OUTPUT sec-tion, on the back of the instrument) to each track.
See “Audio Output: Sty/Kbd” on page 239 for more information.
Audio Output: Drums
This page lets you route Drum Kit Sounds to the audio outputs.
See “Audio Output: Sty/Kbd” on page 239 for more informationabout the available audio outputs.
Drum Output
This parameter lets you decide if Drum Kit Sounds will be sentto the single output (or output pair) defined for the track theyare assigned to, or each drum category will be sent to a differentoutput.
Track When this option is selected, Drum Kits will besent to the output selected in one of the previouspages for the tracks they are assigned to.
Drum Category
When this option is selected, you can select a dif-ferent output for each category of Drum Kitsounds. Use the “Drum Category” box below, toselect an output for each category of percussivesounds.
Drum Category
Kick Bass Drum category.
Snare Snare Drum category.
Tom Tom category.
Hi-Hat Hi-Hat category.
Cymbals Cymbals category.
Perc.1 Low-pitched percussion category.
Perc.2 High-pitched percussion category.
Perc. FX Sound FX category.
Audio Output: Audio In
This page lets you connect the Audio Inputs and the Voice Pro-cessor to the audio outputs.
See “Audio Output: Sty/Kbd” on page 239 for more informationon the available audio outputs.
Rear SW (SELECT switch)
The status of this switch, located on the rear panel, is shown bythe Rear SW diagram. From its status depends the routing of theAudio In signal.
• When set to “MIC”, the MIC input goes to the Voice Pro-cessor, while line inputs 1 and 2 are directly connected tothe Left and Right outputs.
• When set to “1”, line input 1 goes to the Voice Processor,while line input 2 and the MIC input are deactivated.
Mic
The microphone input is alternative to the line input In 1,depending on the status of the SELECT switch on the rear panel.When selected, the signal coming from a connected microphonegoes to the Voice Processor, then is output in stereo togetherwith any processing made inside the Voice Processor.
In 1
The line input In 1 may be routed to the Left output, or to theVoice Processor, depending on the status of the SELECT switchon the rear panel.
• If the SELECT switch it is set to “MIC”, this input is sent tothe Left output.
• If the SELECT switch is set to “1”, it is sent to the Voice Pro-cessor.
Gbl
Gbl
Gbl

241Global edit modeAudio Output: Metro / S/PDIF
Ref
eren
ce
In 2
The line input In 2 may be routed to the Right output, or deacti-vated, depending on the status of the SELECT switch on the rearpanel.
• If the SELECT switch it is set to “MIC”, this input is sent tothe Right output.
• If the SELECT switch is set to “1”, it is deactivated.
Voice Processor Out
Use this parameter to assign an audio output (OUTPUT section,on the back of the instrument) to the Voice Processor.
In 1/2 Out
Non editable. These output are fixed, and cannot be changed.
Audio Output: Metro / S/PDIF
This page lets you define various parameters for the Metronome,the S/PDIF output, and the Speakers (for the Pa1X with inte-grated speakers).
Metronome
Mode
Use this parameter to activate the metronome for the Style Playand/or Song play operating modes.
Off No metronome is heard.
Style The metronome is always activated when playinga Style.
Song The metronome is always activated when playinga Song.
Style+Song The metronome is always activated when playinga Style or Song.
Volume
Use this parameter to set the volume of the metronome.
Click Out
The metronome’s click can be routed to any audio output.
Hint: When sending the click to your drum player, we suggest toselect one of the sub-outs Out 1 and 2, to avoid it is sent to the audi-ence through the Left+Right outputs.
Note: The selected Metronome Mode must not be Off, in order forthe click to be sent to an audio output during playback.
See “Tracks” on page 239 for detailed information on the avail-able outputs.
S/PDIF Out
S/PDIF On/Off
Use this parameter to turn the S/PDIF digital audio output on oroff.
Note: This parameter is automatically set to Off each time you turnthe instrument on.
On All tracks set to be sent to the Left+Right audiooutputs (see from page 239) are sent to the S/PDIF output. Together with the audio signal, theWord Clock sync signal is also output, with a fre-quency of 48kHz.
When in this mode, the Pa1X becomes the WordClock master. No other master device can be con-nected to the same digital audio system. Please,refer to the connected audio device (mixer, audiocard…) for information on how to set it as aWord Clock slave.
Off No signal is sent to the S/PDIF output.
Speakers
Speakers On/Off
Not available on the Pa1X Pro. On a Pa1X with integrated speak-ers, use this checkbox to turn speakers on or off. This option isuseful when the instrument is connected to an external amplifi-cation system, and you don’t need the speakers.
Audio Output: MP3/CD
In this page you can program the MP3 (EXBP-MP3) and AudioCD (CDRW-1) options.
MP3 Board
This section only appears when the optional EXBP-MP3 board hasbeen installed.
Gbl
Gbl
Gbl
Gbl
Gbl

242 Global edit modeVoice Processor Setup: Setup
Max Volume
Use this parameter to set the maximum volume of the MP3Player.
Audio Out
This (non-editable) parameter shows the fixed output for theMP3 Player (Left+Right).
CD Audio
This section only appears when the optional CDRW-1 CD drivehas been installed.
Max Volume
Use this parameter to set the maximum volume of the Audio CDPlayer.
Audio Out
This (non-editable) parameter shows the fixed output for theAudio CD (Left+Right).
Voice Processor Setup: Setup
In this page you can select a Voice Processor Setup, and set somegeneral parameters for the current Setup.
Setup
Voice Processor Setup
Use this parameter to select a Voice Processor Setup.
Setup parameters are global and do not change when a differentpreset is recalled. Setup parameters are all the parameters foundin the Voice Processor Setup edit section, including Lead inputlevel and pan, Compression/Gate, and EQ parameters amongmany others.
They are parameters that would typically be set for a given situa-tion based on the singer, microphone or studio configurationand then left that way as a basis for the presets within the VoiceProcessor. If you change your microphone (or singer!) the EQ/Compression settings need to only be adjusted once in the setupsection.
If you wish to save your setup settings, just select the “Write Glo-bal-Voice Processor Setup” command from the page menu (seepage 257).
Harmony Settings
These parameters are general settings for the Harmony sectionvoices, that are saved on the Voice Processor Setup.
Vibrato Mode
This parameter sets whether the vibrato follows the onset andattack of the model (Boost) or is instantaneous (Manual). Thejoystick controls the vibrato in both modes.
Boost The preset value for each voice (see “VibratoAmount” on page 250) is boosted when movingthe joystick.
Manual Vibrato starts from a value of 0, and is fully con-trolled by the joystick.
Vibrato Rx Enable
This parameter lets you turn vibrato reception on or off.
Octave Transpose
This transposes the harmony voices in Notes mode (see “Har-mony Mode” on page 248). The value corresponds to octaves.This is useful when used in conjunction with “In Note Range-High” and “In Note Range-Low” parameters (see page 237).
When receiving notes from MIDI, this value is summed to thevalue of the “Octave Transpose In” parameter, found in the“MIDI: MIDI In Control” page (see page 237).
Pitch Bend Range
Only available in Notes mode. Sets in semitones the range thatMIDI pitch bend information will alter the pitch of the harmo-nies in Notes mode.
Damper Mode
Use this parameter to define the effect of the Damper pedal onthe Voice Processor. The Damper message can be received fromthe Damper pedal connected to the DAMPER jack, or from theMIDI IN (CC#64).
Off Damper disabled.
Sustain Notes sent to the Voice Processor are sustained aslong as the pedal is kept pressed. Therefore,chords sent to the Harmony section do notchange until the pedal is released or a differentchord is recognized.
Harmony Hold
Harmony voices are sustained while you continueto sing through them. On activation (press andhold the Damper pedal), you can freeze whateverthe harmony voices are doing, and they will holdtheir notes (in a very natural way) until you letgo.
Note: The Harmony Hold function can also beassigned to an Assignable Footswitch or Switch.
Gbl
Gbl
Gbl
Gbl
VPs
VPs
VPs
VPs
VPs

243Global edit modeVoice Processor Setup: Lead Voice
Ref
eren
ce
Voice Processor Setup: Lead Voice
This page lets you adjust parameters for the Lead voice (i.e., thesinger’s voice).
Mic Input
Low Cut
Low cut filter. 12dB per octave. Cutoff frequency options include60, 80 and 120 Hz.
Delay Compensation
Turning this on delays the lead vocal so that the humanized har-mony voices will be randomly ahead and behind the lead voice.Turning this off results in minimum lead voice processing delay.
Pan/Volume
Pan knob
Adjusts panning for the lead voice. L64 (panned fully left) to R63(panned fully right).
Level knob
This parameter sets the Lead Voice level.
DryOff This setting mutes the dry input vocal, but allowsthe thickening voices to pass through the unit asif the lead level was set to 0dB.
Off Lead Voice is turned off.
-30dB … 0dB Lead Voice level.
Voice Processor Setup: Dynamics / EQ
In this page you can adjust parameters for the Compressor/Gateand Equalizer, applied to the Lead and Harmony voices.
Assign
Dyn
Compressor/Gate assignment. The options are Off, Lead + Har-mony, Harmony or Lead. The compressor has auto-makeupgain, so there are no output levels problems when selecting a dif-ferent option.
EQ
EQ assignment. The options are: Off, Lead + Harmony, Har-mony or Lead.
Dynamics
The Voice Processor has dynamics processing optimized forvocals.
Thresh knob
Compressor Threshold. Range: 0 to -60 dB.
Ratio knob
Compression ratio. Range: 1.1:1 to 64:1.
Gate knob
Gate Threshold. Range: Off, -70dB to 0dB
EQ
The Voice Processor has an extremely flexible 3-band EQ withfrequency and gain-adjustable high and low shelving bands, aswell as a fully parametric band with Q control.
Low Gain knob
Low Shelving Frequency cut/boost. Range: ±12 dB.
Low Frequency knob
Low Shelving Frequency center frequency. Range:80Hz…16kHz.
VPs
VPs
VPs
VPs
VPs
VPs
VPs
VPs
VPs
VPs
VPs

244 Global edit modeVoice Processor Setup: Talk
Mid Gain knob
Mid Band Frequency cut/boost. Range: ±12 dB.
Mid Frequency knob
Mid Band Frequency center frequency. Range: 80Hz…16kHz.
Mid Q knob
Resonance of the midband. Range is .1 (wide band) to 10 (verynarrow band).
High Gain knob
High Shelving Frequency cut/boost. Range: ±12 dB.
High Frequency knob
High Shelving Frequency center frequency. Range:80Hz…16kHz.
Voice Processor Setup: Talk
This page is where you can set the Talk function, to be used toaddress the audience, speaking over the background music.Parameter contained in this page are relative to programmingparameters, and are used to attenuate the music when speaking.
Talk
Talk
On/off switch for the Talk function. This is the same you canfind in the Mic panel of the Style Play and Song Play modes.
Mode
Auto (AutoTalk)
When this parameter is checked, the Talk function automaticallyengages when the Sequencer or Arranger is stopped. This way,you can talk to the audience between two songs, without theneed to press the Talk On/Off button.
Mixer
Ld to Rv (Lead to Reverb) knob
Use this knob to attenuate the reverb applied to the lead voice.0dB corresponds to no attenuation.
FX Lev (FX Level) knob
Use this knob to attenuate the effects level. 0dB corresponds tono attenuation.
Master Volume Attenuation knob
Use this knob to reduce the master volume. 0dB corresponds tono level reduction.
Reverb
Type
Use this parameter to choose a reverb to be automaticallyselected when turning the Talk function on.
PreDly (Pre Delay)
Use this parameter to delay the reverb, and separate it from thelead voice. With higher values, reverb may be perceived as anecho.
Decay
Use this parameter to set the reverb’s decay time (in seconds).The higher this value, the more difficult is to understand sepa-rate words.
Low Color
Reverb Low Color. Specifies the characteristics of the reverbs lowfrequencies.
High Color
Reverb High Color. Specifies the characteristics of the reverbshigh frequencies.
Thicken
On/Off
This checkbox allows enabling/disabling of lead voice thickeningparameters.
Det. (Detune)
Sets the amount of lead voice detuning.
Spread
Sets the amount that the detuned voices are panned. A value of100% results in the detuned voices being hard panned R and L.A value of 0% results in the detuned voices panned to center.
Level
Level knob
Use this knob to set the level of the voice thickening effect.
VPs
VPs
VPs
VPs
VPs
Tlk
Tlk
Tlk
Tlk
Tlk
Tlk
Tlk
Tlk
Tlk
Tlk
Tlk
Tlk
Tlk
Tlk

245Global edit modeVoice Processor Preset: Preset
Ref
eren
ce
Voice Processor Preset: Preset
This page allows you to select a Voice Processor Preset, as well asturning on or off the various Voice processor modules.
The ‘Buy Info’ buttons
Two optional softwaremodules are available forthe Voice Processor: PitchCorrection and VoiceModeling. These modulescan be purchased sepa-rately. Please see “Voice Processor: The optional Pitch Correc-tion and Voice Modeling modules” on page 252 for moreinformation on how to purchase them.
Using Pitch Correction and Voice Modelingin demo mode
Even if you have not yet bought the optionalsoftware modules, you can turn them on, andtry them (with some limitations) before you buy.While in demo mode, the audio signal will be interrupted every30 seconds, and the “VP Demo” indicator will flash on top of thescreen.
• To turn Voice Modeling on, select the corresponding radio-button.
• To turn Pitch Correction on, check the Pitch parameter.
Preset
Voice Processor Preset
Use this parameter to select a Voice Processor Preset. This Presetis saved when writing a Performance or STS to memory.
Preset parameters can be recalled by selecting a Performance orSTS. They can be found in the Voice Processor Preset edit sec-tion, including Harmony Voice settings, Pitch Correctionparameters, and Effect settings among many others.
If you wish to save your Preset settings, just select the “WriteGlobal-Voice Processor Preset” command from the page menu(see page 257).
Harmony/Modeling Select
Harmony/Voice Modeling
Use this radio-button to select either the Harmony or the VoiceModeling modules. They cannot be used at the same time in thesame Preset.
Note: The Voice Modeling module is optional, and may not beavailable in your instrument. Please contact your Korg distributor,or check on our site (www.korgpa.com), for information on thismodule.
Harmony On/Off
These are “switches” for the Lead voice and voices generated bythe Harmony section.
Note: These parameter are the same found in the Mic panel of themain page of the Style Play and Song Play modes.
Lead
This checkbox allows turning the lead voice On or Off, indepen-dent of the Lead Level knob in the Voice Processor Setup section(see “Level knob” on page 243). This is useful in creating presetswhere you want to hear harmony voices only.
Note: This parameter is only available when the Harmony sectionis turned on. If it is turned off, the Lead parameter is automaticallyset to On.
V1…V4
These checkboxes allow turning each of the four HarmonyVoices On or Off, independent of the Level knob in the Har-mony Voice page (see “Level knob” on page 250).
This is the same as the “Voice On/Off”checkbox (see page 249).
Master On/Off
These are “switches” for the various Voice Processor sections.
Note: These parameter are the same found in the Mic panel of themain page of the Style Play and Song Play modes.
Pitch
This checkbox allows the enabling/disabling of the Pitch Correc-tion module (available as an option).
Thicken
This checkbox allows the enabling/disabling of the Thickenmodule.
Harmony/Modeling
This checkbox allows the enabling/disabling of the Harmony orVoice Modeling module (available as an option).
Effects
This checkbox allows the enabling/disabling of the Voice Proces-sor Effects module.
SB
VPp
VPp
VPp
VPp
VPp
VPp
VPp

246 Global edit modeVoice Processor Preset: Thicken / Pitch
Voice Processor Preset: Thicken / Pitch
This page contains parameters for the Thicken and the PitchCorrection module (Pitch Correction available as an option – see“Voice Processor: The optional Pitch Correction and Voice Model-ing modules” on page 252).
Thicken
Thickening makes the Lead voice thicker, by adding two “ghost”voices to the singer’s voice.
On/Off
This checkbox allows enabling/disabling of lead voice thickeningparameters. It is the same control found on the “Preset” page.
Det. (Detune)
Sets the amount of lead voice detuning.
Spread
Sets the amount that the detuned voices are panned. A value of100% results in the detuned voices being hard panned R and L.A value of 0% results in the detuned voices panned to center.
Level
Level knob
Sets the volume level of the lead voice thickening effect.
Pitch Correction
Available as an option – see “Voice Processor: The optional PitchCorrection and Voice Modeling modules” on page 252.
The Voice Processor will listen to the pitch of your voice, com-pare it to the selected correction scale, and then apply pitch cor-rection in realtime. The amount of correction applied isgoverned by the various amount and timing settings available.
Pitch correcting your lead voice not only makes for great sound-ing lead vocals, it can also benefit your harmonies in that thepitch correction is applied prior to harmony voice generation.
Pitch Correction On/Off
Check this parameter to turn Pitch Correction on. This is thesame as the “Pitch” parameter in the Preset page (Voice Proces-sor Preset section), and in the Mic panel of the Style Play andSong Play modes (main page).
Root
Pitch Correction scale root.
Scale Type
Pitch Correction scale type: Major, Minor-Natural (naturalminor), Minor-Harmonic (harmonic minor), Minor-Ascend-ing (ascending melodic minor), Chromatic and Custom. Thissetting, in combination with Root, determines which notes yourinput vocal will be corrected to.
Attack
Pitch Correction attack rate. Sets the responsiveness of the cor-rection. 0% is slow, and 100% is fast. Settings of between 16%and 40% give the most transparent pitch correction. High set-tings can give you a robotic sounding effect.
Amount
Pitch Correction Amount. Scales the amount of automatic cor-rection applied to the input voice. The range is 0% to 100%.However, 0% does not mean that the correction is turned off.The amount of applied correction depends on how far out oftune the input note is. This allows for a very musical way of cor-recting pitch. It corrects the large pitch errors while preservingthe natural micro variations around the target pitch. For exam-ple:
• With the amount set to 100%, a 10 cent flat input will becorrected by 10 cents and a 50 cent flat input will be cor-rected by 50 cents.
• With the amount set to 80%, a 10 cent flat input will becorrected by approximately 5 cents and a 50 cent flat inputwill be corrected by approximately 40 cents.
• With the amount set to 0%, a 10 cent flat input will not becorrected and a 50 cent flat input will be corrected byapproximately 10 cents.
Window
Correction Window. Specifies the maximum distance (above orbelow) in cents an out-of-tune note can be from the closest cor-rection note and still be corrected. A very small window settingwill cause correction to occur only when the singer is singingvery close to the correct pitch. The maximum window size is 200cents or a whole tone above and below the target pitch.
Custom Scale
This diagram, available when the Custom Scale Type is selected,provides a chromatic list of notes beginning with the scale root.Checkmarks indicate which notes are in the pitch correct scaleand which are ignored. No checkmark means that the note isignored. Modified (custom) scales are stored with presets.
VPp
VPp
VPp
VPp
VPp
VPp
VPp
VPp
VPp
VPp
VPp

247Global edit modeVoice Processor Preset: Voice Modeling
Ref
eren
ce
Voice Processor Preset: Voice Modeling
Available as an option – see “Voice Processor: The optional PitchCorrection and Voice Modeling modules” on page 252.
Note: The Voice Modeling module is alternative to the Harmonymodule. They cannot be both active at the same time. Go to thePreset page (Voice Processor Preset section) to select the Voice Mod-eling option and make parameters in this page editable.
This page allows you to enable/disable, and edit, the Voice Mod-eling parameters.
Voice Modeling is essentially realtime resynthesis and reshapingof the human voice. It offers a variety of ways in which to processthe vocal input, including the ability to add breath, growl, rasp,head and chest resonance, inflection or vibrato.
The Voice Modeling can enhance or transform a voice. Forexample, a “thin” vocal into a “throaty” one, a “male” into a“female”. Complete control is possible through various modelingparameters of the voice: Resonance, Spectral, Growl and Vibrato.
Note: You can use the Voice Modeled (VM) Lead voice togetherwith the unprocessed Lead voice, by turning on the “Lead” parame-ter in the Preset page (Voice Processor Preset section).
Resonance
Resonance is how we model different vocal tract dimensions,and apply them to incoming vocals. Your favorite vocalists allhave unique pitch and glottal characteristics. Resonance changesthe tonal makeup of the sound by moving vocal formants, sothat the Voice Modeled (VM) Lead voice sounds quite differentthan the original. Formants are the harmonic combinations thathelp make our voices unique.
The styles have been given names that are easily identified whenassembling presets. The names may be associated with a particu-lar genre of music or sound. This way, you can associate a certainmodification with a name, similar to how we describe colors in apicture with names.
Some of the Resonance styles contain a built-in octave shift,either up or down. This is to accommodate a male singing in thefemale register, with a feminine timbre, or for a female to simu-late a male singing voice. These Resonance styles enable you tosing in a natural range and still hit the notes of your oppositegender comfortably; they are Style settings Transmute.
The Amt (Amount) parameter allows you to dial in the relativestrength of this effect on your VM voice; 0% for no effect, 100%for pure Resonance.
Spectral
The Spectral control is a set of equalizer response curvesintended to complement the Resonance selections. This equal-ization is different than those controlled via EQ in the Voice Pro-cessor Setup section. The Spectral styles reflect the naturalequalization equivalent to the native control a singer has over hisor her own voice. These modeled EQ curves are applied to theVoice Modeling (VM) voice. These styles may be used in con-junction with the resonances, or purely as additional tonal con-trol over the VM voice.
The Amt (Amount) parameter allows you to dial in the relativestrength of this effect on your VM voice; 0% for no effect, 100%for maximum effect.
Growl
Growl refers to the combination of complex sounds the humanvoice can make to change non-pitched aspects of the vocalsound. Consider these examples: the cool breathy sound of a Jazzor Folk singer, the legendary warm grumble of Blues from theMississippi Delta, the brazen sizzle of Rock and Alternative Rockor the growl of 60’s Soul.
The Growl settings contain three types of effects: Breathiness,Rasp, and Growl, arranged in various combinations in the stylelibrary. All of these are set to create percussive and expressivetextures in addition to the sung note. Experimentation is the keyto finding styles that work in your scenario, or are difficult tocreate in your scenario. The last few entries contain extreme andunreal Growl styles – no longer need you burn out your throatnight after night. Growl styles are created using the followingparameters:
Breathiness factors in ‘virtual air’ that gives the effect of beingclose to a sensitive condenser microphone. This intimate soundmay be used in some Jazz styles or for pop ballads, although itsapplication is not limited to these. Breathiness may also be usedto give a ‘tired’ or ‘strained’ sound, where the singer may bepushing a lot of air. You can also dial in ‘whisper’ or like texturesto simulate a specific singer’s style.
Rasp is an effect where the breath pushed through the throatcavity goes beyond mere breathiness, into a harsh sizzle or grind.These sounds are a combination of hard breath and friction inthe larynx, which are difficult for many singers to reproduce andare very damaging on the vocal cords. You can use Rasp on yournormal voice and achieve a grittier, rough delivery, sending aclean voice into an overdriven frenzy. In many forms of heavyrock music, this is an expressive and elusive performance com-ponent.
Growl describes another way that we can achieve Blues, Rock, orRhythm & Blues sounds with our normal voice. Growl refers to atype of grind or friction of the larynx and epiglottis, usuallyheard in Soul, R&B, and Blues music. Some of the styles are sen-sitive to the dynamics of the lead voice, meaning that when youraise the volume of a syllable, the Voice Processor ‘growls’ on thatsyllable.
As with the other Voice Modeling effects, the Amt (Amount)parameter controls the level of effect incorporated into the sig-nal.
VPp
VPp
VPp

248 Global edit modeVoice Processor Preset: Harmony
Inflection
The Inflection styles allow the singer to adjust the characteristicsof ‘scooping’ to the sung note. This is a stylistic effect in singingwhere a singer sweeps up a variable range of pitch to rest on theintended note. The Inflection settings use the following nomen-clature: Up/Down, Fast, Often.
Up/Down is the direction of Inflection – Up to a note, or Downto a note.
Fast is the speed at which the inflection ‘scoops’, either Slow,Medium or Fast.
Often is how regularly the Inflection occurs. The Voice Processorlistens for an Onset period before applying Inflection to thebeginning of the next phrase.
Vibrato
Vibrato is a pitch effect that singers often use in their delivery ofa piece of music. This effect is achieved by repeatedly altering thesize of the mouth and vocal tract in a pattern that varies aboveand below a central pitch in an oscillating fashion.
The Vibrato styles are based on real vocalist’s vibratos. We haveanalyzed a large set of parameters from a voice database and cre-ated various vibrato models. The Vibrato setting names reflectthe style of the vocals from which they were extracted. However,a vibrato modeled from a style or gender different from yourscan sound very good when applied to your voice. Experimenta-tion is the key to finding a style setting that best suits your appli-cation. You might begin incorporating Vibrato into your soundby setting the Amt (Amount) control to 50%. This settingmatches the depth level that we analyzed in our modeling sub-jects. You can then vary the effect from this middle range up ordown to suit your taste.
Level
Use this knob to set the level of the modelled voices.
Pan
Use this knob to set the position in the stereo field of the mod-elled voices.
Voice Processor Preset: Harmony
In this page you can define general parameters for the Harmonymodule.
Harmony
Harmony On/Off
This checkbox allows enabling/disabling of the Harmony mod-ule. It is the same control found on the “Preset” page.
Latch On/Off
When enabled in Chord mode, the last chord played remainsactive after the notes have been released from the keyboard.When enabled in Notes mode, the harmony voices will onlyrespond to note input when the number of notes being playedequals the harmony voices enabled. This ensures logical voiceassignment when voices change. When Latch is On, the envelopeparameters Attack and Release are not applicable.
Harmony Mode
Change the current harmony mode. Available parameters: Scalic(Scalic presets), Chord (Chordal presets), Shift, and Notes (Shiftand Notes presets).
See “Harmony and Tuning with the Voice Processor” onpage 253 for a full description of each harmony mode.
Root
In Scalic presets this sets the scale root.
Type
In Scalic presets this sets the scale type.
Human. (Humanization) Style
This is a list of humanization style types, each made up of acombination of Flextime™ based time randomization, pitchrandomization and pitch inflection (scoop).
Amount
The amount that the humanization style is applied to the har-mony voices.
Tuning
This gives the option of either Equal temperament, Just intona-tion, or Barbershop tuning modes. See “Harmony and Tuningwith the Voice Processor” on page 253 for a full description ofeach tuning mode.
Portamento
This is defined in milliseconds as the time to reach a target notewhen a harmony voice needs to change pitch.
PB Assign
Pitch Bend control assignment. Allows assignment of the pitchbend to Pitch (applicable in Notes and Chord harmony modes)or Gender.
Note: For this to work, a value different than zero must be assignedto the “Pitch Bend Range” in the “Voice Processor Setup: Setup”page (see page 242).
VPp
VPp
VPp
VPp
VPp
VPp
VPp
VPp
VPp
VPp
VPp
VPp
VPp
VPp

249Global edit modeVoice Processor Preset: Harmony Voices
Ref
eren
ce
Smooth
Sets how much of the input pitch nuance is applied to the outputvoice. Not applicable to Shift presets.
Harmony Note Input
In Style Play and Song Play mode, when the Harmony track isset to Global, the Voice Processor’s Harmony module can receivenotes and chords from a source different than the Arranger’sChord Scanning area. This way, you can continue sendingchords to the Arranger with your left hand, while, for example,sending chords or notes to the Harmony module with your righthand.
Source
This parameters allows you to select a source of notes or chordsfor the Harmony module of the Voice Processor.
Chord Scanning
With this option selected, notes or chords comefrom the same chord scanning area dedicated tothe Arranger. (This works exactly as in the previousversions of the operating system).
Lower Notes or chords come from the Lower area of thekeyboard.
Upper Notes or chords come from the Upper area of thekeyboard.
Full Keyb. Notes or chords come from the full range of thekeyboard.
Harmony Voices Envelope
The envelope lets you set a different Attack and Release time forthe harmony voices.
Note: The envelope can only work when the “Latch On/Off”parameter is turned off (see page 248).
Attack
Sets the envelope attack time for harmony voices. Available onlyin Notes and Chord mode.
Release
Sets the envelope release time for harmony voices. Available onlyin Notes and Chord mode.
Level
Level knob
Sets the overall harmony voices level.
Voice Processor Preset: Harmony Voices
The Voice Processor can add up to four Harmony Voices to theLead voice. Here you can adjust parameters for each individualvoice.
Voice Select buttons
V1…V4
Use these buttons to select one of the four available voices forediting.
Individual Voice Basic
Voice On/Off
This checkbox allows enabling/disabling of the selected Har-mony Voice. It is the same control found on the “Preset” page.
Gender
This parameter sets the formant of the Harmony Voice. Use it toalter the character of the voice ranging from -50 (a big personwith a deep voice) to 0 (no change) to +50 (mice/alien sound).
Voicing
This parameter is used to set the voicing of the selected voice.This parameter means different things depending on the har-mony mode of the preset.
Scale Mode Presets
In this mode the Voicing parameter specifies the interval of theharmony note with respect to the input note in the scale. Therange of values goes from --8, which is 2 octaves below the inputnote, to ++8 which is two octaves above the input note, or Cus-tom Map, which means custom voicing (See “Custom VoiceMapping” below). For example, a setting of +3 will result in aharmony voice a third above the input voice, related to the cur-rent scale.
Chord Mode Presets
In this mode the Voicing parameter specifies the relation of theharmony note to the input note with respect to the currentchord. In Chord mode presets, the harmony voices are alwaysnotes in the chord. A setting of Up1 will result in the harmonyvoice being the next note above the input voice in the chord. Forinstance, if the chord was C Major and the input note was an E,an Up1 setting would produce a G harmony voice, just above theinput E.
VPp
VPp
VPp
VPp
VPp
Voice Select buttons
VPp
VPp
VPp
VPp

250 Global edit modeVoice Processor Preset: Harmony Voices
The range of values goes from Down 5 to Unison to Up6. Addi-tional values are Root1 and Root2 which give the root of the rec-ognized chord as the harmony voice, and Bass1 and Bass2 (bassvoicing) which give the lowest note received. Root2 and Bass2are the higher pitch Root and Bass settings.
Shift Mode Presets
In this mode the voices are shifted relative to the input note. Thevalues range from -24 semitones to +24 semitones.
Notes Mode Presets
In this mode there is no selectable voicing, since harmony voicesexactly play received notes.
Vibrato Style
A list of Vibrato styles based on the analysis of real singers.
Vibrato Amount
The depth of vibrato applied to the voice.
Pan/Level
Level knob
Sets the output level of the selected voice. Please note that thereis also a master harmony voice level found in the “Harmony”page.
Pan knob
Adjusts the pan for the selected voice. L64 (panned fully left) toR63 (panned fully right).
Custom Voice Mapping
This area is only available in Scalic Mode.
Scale mode harmonies are basically pitch maps. For each inputnote in a scale you can define a resulting harmony note. TheVoice Processor has pre-defined pitch maps for all the offeredscale roots, types, and intervals.
The Custom voicing feature allows you to create your own pitchmaps. For example, you could define a pitch map so that a Cinput produces an E output and a D input produces an A output.The best way to work with custom voicing is as follows:
• For a given harmony voice, select the scale root, type, andinterval that most closely matches the desired voicing.
• Go to the “Note In” parameter and select the input note thatrequires a different harmony note.
• Go to the “Note Out” parameter and change the harmony noteas desired.
• Select various other input notes and remap as desired. Repeatthe above steps for each harmony voice. You can also copy a mapfrom a voice to other voices.
• The custom map can be transposed under the Harmony pageby changing the “Root” parameter.
Note In
Incoming note.
Note Out
Resulting note when applying the custom map.
±24 Number of semitones above or under thereceived note.
UNI Unison. The same note received on the input issent to the output.
NC No Change. The harmony voice will keep its pre-vious pitch until the lead voice pitch changes to anon “NC” note.
Copy to… button
Use this button to copy the current custom map to anothervoice. When you press the button, the Copy Custom Voice Map-ping dialog box appears:
Check all desired target voices, then press OK to confirm thecopy.
VPp
VPp
VPp
VPp
VPp
VPp
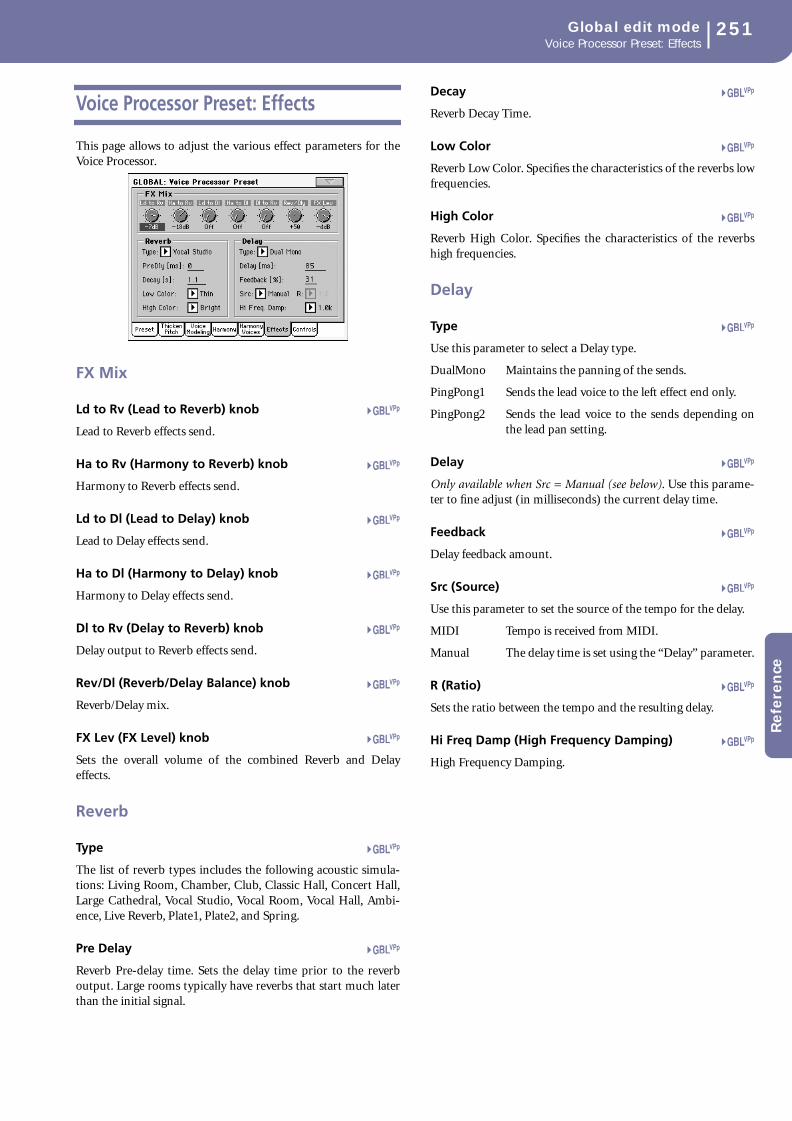
251Global edit modeVoice Processor Preset: Effects
Ref
eren
ce
Voice Processor Preset: Effects
This page allows to adjust the various effect parameters for theVoice Processor.
FX Mix
Ld to Rv (Lead to Reverb) knob
Lead to Reverb effects send.
Ha to Rv (Harmony to Reverb) knob
Harmony to Reverb effects send.
Ld to Dl (Lead to Delay) knob
Lead to Delay effects send.
Ha to Dl (Harmony to Delay) knob
Harmony to Delay effects send.
Dl to Rv (Delay to Reverb) knob
Delay output to Reverb effects send.
Rev/Dl (Reverb/Delay Balance) knob
Reverb/Delay mix.
FX Lev (FX Level) knob
Sets the overall volume of the combined Reverb and Delayeffects.
Reverb
Type
The list of reverb types includes the following acoustic simula-tions: Living Room, Chamber, Club, Classic Hall, Concert Hall,Large Cathedral, Vocal Studio, Vocal Room, Vocal Hall, Ambi-ence, Live Reverb, Plate1, Plate2, and Spring.
Pre Delay
Reverb Pre-delay time. Sets the delay time prior to the reverboutput. Large rooms typically have reverbs that start much laterthan the initial signal.
Decay
Reverb Decay Time.
Low Color
Reverb Low Color. Specifies the characteristics of the reverbs lowfrequencies.
High Color
Reverb High Color. Specifies the characteristics of the reverbshigh frequencies.
Delay
Type
Use this parameter to select a Delay type.
DualMono Maintains the panning of the sends.
PingPong1 Sends the lead voice to the left effect end only.
PingPong2 Sends the lead voice to the sends depending onthe lead pan setting.
Delay
Only available when Src = Manual (see below). Use this parame-ter to fine adjust (in milliseconds) the current delay time.
Feedback
Delay feedback amount.
Src (Source)
Use this parameter to set the source of the tempo for the delay.
MIDI Tempo is received from MIDI.
Manual The delay time is set using the “Delay” parameter.
R (Ratio)
Sets the ratio between the tempo and the resulting delay.
Hi Freq Damp (High Frequency Damping)
High Frequency Damping.
VPp
VPp
VPp
VPp
VPp
VPp
VPp
VPp
VPp
VPp
VPp
VPp
VPp
VPp
VPp
VPp
VPp
VPp

252 Global edit modeVoice Processor Preset: Controls
Voice Processor Preset: Controls
This page allows you to define four continuous and four switchdedicated controllers for the Voice Processor, to be assigned toany physical controller (pedal, footswitch, sliders…).
For example, you can first assign the Lead Voice Level to the“Cnt. Ctl. A” Voice Processor meta-controller, then assign the“Cnt. Ctl. A” option to an Assignable Pedal or Slider.
Cnt. Ctl A…D
Continuous controllers. See “List of functions assignable toVoice Processor’s Continuous Controls” on page 381 for a list ofassignable parameters.
Sw. Ctl A…D
Switch controllers. See “List of functions assignable to Voice Pro-cessor’s Switch Controls” on page 381 for a list of assignableparameters.
Voice Processor: The optional PitchCorrection and Voice Modeling modules
Two optional software modules are available for the Voice Pro-cessor: Pitch Correction and Voice Modeling. These algorithms,developed by TC•Helicon, are the most sophisticated tools avail-able today for voice shaping and correction.
You can purchase them as a single optional plug-in (SUG-TC1)from our web site www.korgpa.com, or by contacting your KorgDistributor.
To buy a licence for this software option, press the red Buy but-ton next to each of the parameter names (pages “Preset”,“Thicken/Pitch Correction” or “Voice Modeling”). The follow-ing dialog box will appear, showing you your Pa1X PurchaseCode:
Copy this code, and press Cancel to close the dialog box. Typethe code in the dedicated field of the purchase module (online oron paper, depending on your purchase option).
After receiving the authorization code, open the above dialog
box again, then press the (Text Edit) button in the display,
and type it in the Activation Key field.
Press OK to confirm. Your Pitch Correction and Voice Modelingmodules will become completely functional!
VPp
VPp

253Global edit modeHarmony and Tuning with the Voice Processor
Ref
eren
ce
Harmony and Tuning with the VoiceProcessor
Harmony
Here's where we can go into a little more depth about harmo-nies. We've tried to keep it practical, focusing on what Voice Pro-cessor can do for you.
Harmony Hold
Truly an innovation, the Harmony Hold feature lets you (on awhim) sustain the backing harmony voices while you continueto sing through them. On activation (press and hold theassigned Damper, Assignable Footswitch, Assignable Switch orEC5 switch), you can freeze whatever the harmony voices aredoing, and they will hold their notes (in a very natural way) untilyou let the pedal go.
See “Pedal/Footswitch” on page 235, “EC5-A…E” on page 236,and “Damper Mode” on page 242 for more information.
Harmony Modes
The Voice Processor has five different harmony modes, whichgive five unique methods of creating harmony. Once we get intodescribing the more complex harmony modes, we’ll be showingyou examples based on the C major scale. If you are unfamiliarwith this scale we’ve shown C major here.
Notes Mode
In this mode, you provide the Voice Processor with specific noteinformation to determine the pitch of the harmony voices. Thisis the most direct and flexible way of creating harmonies, allow-ing you to weave complex melodies and counter harmonies irre-spective of your lead vocal.
Shift Mode
Also known as “Fixed Interval”, this takes the pitch of your leadvoice and creates harmonies a set number of semitones away,based on that pitch. The method of creating harmonies, using afixed number of semitones relative to an input note or pitch, iscalled chromatic harmony, the theory of which we’ll go intolater. We consider this type of harmonizing to be non-intelligentbecause Voice Processor is not set to any particular key or scale.These are pure, parallel harmonies. The most common shift har-mony voices are the 5th (7 semitones) and octave (12 semi-tones), ranging from two octaves below the input to two octavesabove the input pitch.
Below is the C Major scale, showing third above chromatic scaleharmony, as used in Voice Processor Shift Mode.
Black = Lead, Grey = Harmony
Chord (Chordal) Mode
Chordal harmonies take your chord information to create intel-ligent, diatonic harmonies based on your voice. To make“Chordal” harmonies, you need to input in real time the chordsof the song. This may be done either by playing on the keyboard,via MIDI or through a programmed sequence of chordsincluded in the Harmony Track of a Song.
In Chordal mode the Voice Processor will only create harmonyvoices that fall on the notes of the chord. Chordal harmonies are“intelligent” because they decipher the chord you’re playing andthe note you’re singing to produce musically pleasing harmonies.When one note above is defined as a harmony voice (Up1), thenext note from the chord above the input note is output for thatharmony voice.
The subsequent illustration shows the harmony notes for the Cmajor scale with a voicing selection of a C major chord and asingle “one above”.
Root: C, Chord Type: Maj, Voicing: Up1
Black = Lead & Grey = Harmony
You might have noticed that each harmony note can cover morethan one input note, or that each input note doesn’t necessarilyhave a unique harmony note. For instance, C and D both have Eas the 3rd above, E and F share G, and so on. This gives a morestepped sound to the harmony as the changes are both greater inmagnitude and less frequent than when using other harmonymethods (shift mode for example). The benefit of this method isthat it is very easy to integrate vocal harmonies into your songs ifyou already know their chord progressions! The following liststhe chords available with respect to the root of “C”:
Major C E G
6 C E G A
Maj7 C E G B
M7sus4 C F G B
min C Eb G
min6 C Eb G A
min7 C Eb G Bb
min7b5 C Eb Gb Bb
dim C Eb Gb [Bbb (= A)]
7 C E G Bb
7b5 C E Gb Bb
aug C E G#
aug7 C E G# Bb
sus4 C F G
sus2 C D G
7sus4 C F G Bb

254 Global edit modeHarmony and Tuning with the Voice Processor
Scale (Scalic) mode
Harmonies use key and scale information to create musicallycorrect, diatonic harmonies. Most popular music uses a singlescale, so you usually only have to input the information at thebeginning of your song. “Scalic” harmonies are more dynamicthan the chordal harmonies because there are unique harmonynotes for each input note. The subsequent illustration shows theharmony notes for the C major scale with a voicing selection of aC major scale and a single “third above” harmony voice. You cansee from the next diagram that the “Scalic” harmonies are intelli-gent and closely follow your lead voice for a tighter sound.
Black = Lead, Grey = Harmony
Under the Harmony page, is a parameter called “Smooth”.When set to 100% the harmony voices follow your input pitch,errors and all, but when set to 0% the harmonies will jumpdirectly to the scalic harmony notes, kind of like a hard pitchcorrection on the harmony voice. Setting the Smooth parameterbetween 0 and 100% is like having variable amounts of pitchcorrection on the harmonies. Voice Processor has five prepro-grammed harmony scales: three major, three minor and onecustom per preset. To create a custom scale or pitch map see the
parameter description under “Custom Voice Mapping” onpage 250.
It is also tricky to pick out the key in some songs. An example is“Sweet Home Alabama”. Listening, you might think this song isin the key of “D”, as that’s the first chord, but the harmoniesactually work best in the key of “G” – try running the songthrough Voice Processor to hear for yourself.
Setting the scale can also take a bit of practice: for songs centeredaround the third or root of the scale it might not sound likethere’s any noticeable differences between the three major orthree minor scales. This is because your song doesn’t hit any ofthe scale’s altered notes. A melody centered around the fifth ofthe scale, (such as B in the key of E), highlights the differencesbetween the scales. Try the “Sha Lala Lala … La Tee Daa” chorusof Van Morrison’s “Brown Eyed Girl” (key: E, scale: major, 3rdabove voicing) with each major scale to hear the audible differ-ence between them. For the minor scales, Santana’s “Evil Ways”(key: G, scale: minor, 3rd above voicing) highlights the differ-ences between the three minor scales.
The following table illustrates the third and fifth above for agiven input note to illustrate the differences between the six dif-ferent scales. “nc” means no change, in that the harmony voicewill simply keep its previous pitch until the lead voice pitchchanges to a non “nc” note.
Lead Voice C C# D Eb E F F# G G# A Bb B
MAJ1 3rd above E nc F nc G A nc B nc C D D
5th above G nc A nc B C nc D nc E F F
MAJ2 3rd above E nc F nc G A nc C nc C D D
5th above G nc A nc C C nc E nc E F F
MAJ3 3rd above E nc F nc G A nc Bb nc C D D
5th above G nc A nc Bb C nc D nc E F F
MIN1 3rd above Eb nc F G nc Ab nc Bb C nc D nc
5th above G nc Bb Bb nc C nc D Eb nc F nc
MIN2 3rd above Eb nc F G nc A nc Bb C nc D nc
5th above G nc A Bb nc C nc D Eb nc F nc
MIN3 3rd above Eb nc F G nc Ab nc B C nc D nc
5th above G nc A Bb nc C nc D Eb nc F nc

255Global edit modeHarmony and Tuning with the Voice Processor
Ref
eren
ce
Diatonic and Chromatic
We've described scalic and chordal harmonies as diatonic, andshift harmonies as chromatic; but what do those words mean?Look at a piano keyboard. Between middle “C” and the next “C”there are twelve keys – 7 white keys and 5 black keys. Each ofthose keys are pitched one semitone apart for a total of, youguessed it, 12 semitones. The chromatic scale uses all twelvesemitone notes opposed to the diatonic scales. Thus there is onlyone chromatic scale, but 12 each of the major, minor, etc. dia-tonic scales (C major, C# major, D major, etc). Most of us havegrown up hearing the traditional “doh ray me fah so la tee doh”diatonic scale, so that harmonies based on the diatonic scalesound correct.
What does this mean, harmony-wise? Diatonic scale harmoniescan only use notes within specified scale or chord, so a “thirdabove” harmony voice actually varies between three and foursemitones above the lead note where the chromatic harmonywould stay exactly four semitones (a major 3rd) above each note.
To recap: we have three different harmony modes that use chro-matic or diatonic scales.
Shifting, which uses the chromatic, 12 semitone scale, changesthe input pitch by a fixed number of semitones:
Chordal, which uses the root, third, fifth and sometimes seventhof the many diatonic scales, pitches the harmony voice to theclosest note contained within the chord:
Scalic, which uses one of many diatonic scales, pitches the har-mony voice to the nearest note contained within the scale:
Theory aside, the best way to get great sound is to experimentwith all of Voice Processor' possible harmony modes. Not onlywill you develop an intuitive sonic sense of what works bestwhere, but by investigating different permutations and combina-tions you could discover some delightful sounds you might oth-erwise have missed.
Just Tuning
Why just tuning? Although probably no one has ever told youthis, your expensive grand piano and the last great keyboard syn-thesizer you bought are both out of tune! Well, to be fair we cansay instead that they are all tuned using Equal temperament.Harmony is the result of the interaction between differing audi-ble frequencies in ratios that sound musical to the human ear. Amore exact ratio leads to a nicer sounding harmony.
Most instruments (like the piano) are absolute by nature. Eachnote on the keyboard has a specific pitch. Equal temperamenttuning uses approximations for the tuning of each note, allowingus to easily alter the key of our music without re-tuning ourinstruments. Unfortunately, with this method of tuning we losethe ability to create perfect ratios when playing multiple notes.As a result, much of the harmony you’ve heard in music has notbeen perfectly in tune!
The bottom line is that the approximations of equal tempera-ment tuning are practical, but imperfect. Using the Voice Proces-sor with Just tuning will definitely expand your musicalhorizons!
Just tuning is practice of maintaining the relative (and perfect)ratios between pitches, creating perfect harmonies.
Singers, especially when performing multi-part a cappellamusic, base their tuning on how it harmonically sounds withother singers. The natural tendency, and what sounds best, is tosing with “just tuning” so that beating is minimized. One of thegoals in barbershop quartet singing is to strive for “just relativeintonation” so that a sub-frequency is audible. Achieving thisgoal results in what barbershop fans often describe as the cov-eted “ring and lock” sound. In barbershop music it is the leadsinger's responsibility to try to sing the melody as close to thetuning of a piano (equal temperament) as possible. The othersingers must then tune their harmonies to the melody using “justrelative intonation”. The Voice Processor is able to do this in boththe Just and Barbershop tuning modes.
When the Just or Barbershop Modes are selected in the VoiceProcessor, the harmony tunings are based on the following rela-tionships:
Minor 3rd 3 cycles for every 4 cycles of the input
Major 3rd 5 cycles for every 4 cycles of the input
5th 3 cycles for every 2 cycles of the input.
Barbershop differs from Just tuning in Chordal mode. Just tun-ing will use the root of the chord for the tuning reference, whileBarbershop tuning uses the input notes as the tuning reference.For this reason it is better to use Barbershop in an a-cappella sit-uation and Just when playing with other instruments, becauseJust tuning sounds more in-tune with the other instruments thatmost likely have equal temperament tuning.
Our best advice is to experiment and use your ears!

256 Global edit modeVideo Interface: Video Out
Video Interface: Video Out
If your Pa1X is fitted with a Video Interface Board (VIF3), usethis page to adjust its parameters.
System
Selects the video standard (PAL or NTSC).
Character
Select the character size (Big or Small).
Colors
Selects a color set for the lyrics and background.
1…6 Color set.
Position X/Y
These parameters lets you adjust the image position on theexternal video monitor.
Touch Panel Calibration
From time to time (for example, after loading a new operatingsystem), calibrating your Color TouchView™ display may benecessary to make pointing more precise. If so, use this page.
1. When in this page, first touch exactly inside the upper leftset of arrows.
2. Then, touch exactly inside the lower right set of arrows.
3. Press done to confirm the new calibration.
Touch Panel Calibration reset
In case the touch screen has become so misaligned, that it is verydifficult to use the Touch Panel Calibration function, you cancompletely reset it, then fine-tune the adjustment with the abovefunction.
To reset the touch panel, press GLOBAL to enter the Globalmode, then press it again, and keep it pressed, until the followingdialog box appears.
Press GLOBAL to execute the reset, or EXIT to close this dialogbox without any reset.
Gbl
Gbl
Gbl
Gbl

257Global edit modePage menu
Ref
eren
ce
Page menu
Press the page menu icon to open the menu. Press a command toselect it. Press anywhere in the display to close the menu withoutselecting a command.
Write Global-Global Setup
Select this command to open the Write Global-Global Setup dia-log box, and save global settings that are not tied to a singleoperative mode. These settings are programmed in the Globaledit mode.
See “Write Global - Global Setup dialog box” on page 257 forinformation on the dialog box.
Write Global-Midi Setup
Select this command to open the Write Global-Midi Setup dia-log box, and save the current MIDI settings to a MIDI Setup.
See “Write Global - Midi Setup dialog box” on page 257 formore information.
Write Global-Talk Configuration
Select this command to open the Write Global-Talk Configura-tion dialog box, and save the current Talk settings (see “VoiceProcessor Setup: Talk” on page 244).
See “Write Global - Talk Configuration dialog box” on page 258for more information.
Write Global-Voice Processor Setup
Select this command to open the Write Global-Voice ProcessorSetup dialog box, and save the current Voice Processor Setup set-tings (see from page 242).
See “Write Global - Voice Processor Setup dialog box” onpage 258 for more information.
Write Global-Voice Processor Preset
Select this command to open the Write Global-Voice ProcessorPreset dialog box, and save the current Voice Processor Presetsettings (see from page 245).
See “Write Global - Voice Processor Preset dialog box” onpage 258 for more information.
Write Global-Auto Select Setup
Choose this command to save the preferred Styles, Sounds andPerformances assigned to the control panel STYLE and PER-FORMANCE/SOUND buttons, via the Auto Select functions(see page 234).
This way, the next time you will turn the Pa1X on, the preferredStyles, Sounds and Performances will be still assigned to the rele-vant buttons.
Write Global - Global Setup dialog box
Open this window by selecting the Write Global-Global Setupitem from the page menu. Here, you can save most settings, pro-grammed in the Global edit mode, to the Global file in memory.
Parameters saved in the Global Setup area of the Global are
marked with the symbol through the user’s manual.
Write Global - Midi Setup dialog box
Open this window by selecting the Write Global-Midi Setupitem from the page menu. Here, you can save all MIDI settingsto a MIDI Setup, that is included in the Global file in memory.
Parameters saved in the MIDI Setup area of the Global are
marked with the symbol through the user’s manual.
Name
Name of the MIDI Setup to be saved. Press the (Text Edit)
button next to the name to open the Text Edit window and mod-ify the name.
Midi Setup
One of the 8 available MIDI Setup locations, where to save cur-rent MIDI settings.
Gbl
Mid

258 Global edit modeWrite Global - Talk Configuration dialog box
Write Global - Talk Configuration dialogbox
Open this window by selecting the Write Global-Talk Configura-tion item from the page menu. Here, you can save Voice proces-sor’s Talk settings (see “Voice Processor Setup: Talk” onpage 244).
Parameters saved in the Talk Configuration area of the Global
are marked with the symbol through the user’s manual.
Write Global - Voice Processor Setupdialog box
Open this window by selecting the Write Global-Voice ProcessorSetup item from the page menu. Here, you can save current set-tings for the Voice Processor Setup edit section (see starting frompage 242).
Parameters saved in the Voice Processor Setup area of the Global
are marked with the symbol through the user’s manual.
Name
Name of the VP Setup to be saved. Press the (Text Edit) but-
ton next to the name to open the Text Edit window and modifythe name.
Voice Setup
One of the 16 available Voice Setup locations, where to save cur-rent VP Setup settings.
Save and use as default
Check this option when saving a VP Setup, you would like to beautomatically selected when turning the instrument on.
Write Global - Voice Processor Presetdialog box
Open this window by selecting the Write Global-Voice ProcessorPreset item from the page menu. Here, you can save current set-tings for the Voice Processor Preset edit section (see startingfrom page 245).
Parameters saved in the Voice Processor Preset area of the Global
are marked with the symbol through the user’s manual.
Name
Name of the VP Preset to be saved. Press the (Text Edit)
button next to the name to open the Text Edit window and mod-ify the name.
Voice Preset
One of the 128 available Voice Preset locations, where to savecurrent VP Preset settings.
Tlk
VPs
VPsVPp

259Disk edit modeStorage devices and internal memory
Ref
eren
ce
The Disk edit mode is the place where you can manage files. Thisedit environment overlaps the current operating mode (StylePlay, Song Play, Sequencer, Sound Edit).
Storage devices and internal memory
During a Disk operation, files are usually exchanged between astorage device and the internal memory. The Pa1X can use threedifferent mass storage device types:
• Floppy Disk
• Hard Disk (optional on the Pa1X with speakers)
• CD (optional; only available for reading on version 1.0)
A device can be selected by using the Device pop-up menu,available on the lower left corner of most Disk pages:
Two internal memory areas are available: the SSD and RAM.
• The SSD (Solid State Disk) is the non-volatile memory,where Styles, Sounds, Performance, STSs and User Multi-samples are contained. This area is not deleted when turn-ing the instrument off.
• The RAM (Random Access Memory) is the volatile mem-ory, where Songs and User PCM Sample are contained.This area is deleted when the instrument is turned off.
Selecting and deselecting files
While a file list is shown in the display, you can select any item bytouching it. The selected item is highlighted.
You can deselect all items in any of the following ways:
• Touch an empty area in the file list (if available).
• Press the Device pop-up icon, and select the current deviceagain.
File types
The following tables describe all the file and folder types thePa1X can manage. Here are the files you can read or write on thePa1X.
The Pa1X can also read (but not write) the following types ofdata.
Disk edit mode
Device pop-up menu
Extension File/folder type
SET All the User data. (This is a folder containing other folders).
BKP Backup folder, created with the “Full Resource Backup” function of the Disk > Utility page. (This is a folder containing other folders).
GBL Global
VOC Voice Processor Presets
PRF Performance
PCG Sound
PCM Sample
STY Style
PAD Pad
SBD SongBook
SBL SongBook’s Custom List
JBX Jukebox
MID Midi file (Standard MIDI File, SMF)
MP3(a)
(a). To read and write MP3 files, the optional EXBP-MP3 board isrequired.
MP3 file
Extension File type
KAR Karaoke file
CDA(a)
(a). To read Audio CD Tracks, the optional CDRW-1 CD player/writer isrequired.
Audio CD Track
PCG Korg Triton Programs
KSF Korg Trinity/Triton Sample
KMP Korg Trinity/Triton Multisample
S Akai Sample
P Akai Program
AIF AIFF audio files
WAV WAVE audio files

260 Disk edit modeDisk structure
Disk structure
Each disk (and the internal memory) can contain files and fold-ers. The data in Pa1X is slightly more rigorously structured thanin a computer, due to the pre-configured kind of data inside theinstrument’s memory. The diagram below shows the globalstructure of a Pa1X disk.
Note: Style banks from 1 to 16 (Factory Styles) can be seen in Diskmode only when the “Factory Style and Pad Protect” parameter isset to Off (see page 272), and only when loading or saving a singleStyle bank.
Main page
There is no main page in the disk edit mode. When pressingEXIT, you exit the Disk mode, and the underlying operatingmode in the background is recalled.
Page structure
All edit pages share some basic elements.
Edit mode
This indicates that the instrument is in Disk mode.
Page menu icon
Press this icon to open the page menu (see “Page menu” onpage 276).
Disk path
Full path of the directory currently shown in the display.
List of files
This area shows the files and folder contained in the selecteddevice.
You can touch one of the heading label above the list to changethe order in which files are shown. For example, by touching the“Name” label, the list is alphabetically re-ordered according tothe file names. The selected label turns red, showing the cur-rently selected ordering.
The corresponding items in the page menu are automaticallyupdated to reflect these changes (see “Ordered by Name” and“Ordered by Type” on page 277).
Scrollbar
Use the scrollbar to scroll the list. Touching the arrows will scrollone step at a time, while touching the bar will scroll one page at atime.
Pressing the arrows while SHIFT is kept pressed jumps to theprevious or next alphabetical section, or file/folder type(depending on the selected display order).
Device pop-up menu
Use this menu to select one of the available storage devices.
MYDIR.SET
GLOBAL
PERFORM
SETUP.GBL
BANK01.PRF
1-1 Grand Piano…1-8 Full Strings
BANK02.PRF
2-1 Jazz Brass…2-8 Jazz Strings
BANK….PRF
BANK20.PRF
20-1 Rock Brass…20-8 Rock Strings
VPPRESET.VOC
SONGBOOK
SONGDB.SBD
SOUND
USER01.PCG
USERDK.PCG
STYLE
BANK01.STY
1-1 8 Beat 1…1-32 8 Beat 16
BANK….STY
USER01.STY
U1-1 User 1…U1-32 User 16
USER02.STY
U2-1 User 1…U2-32 User 16
USER03.STY
U3-1 User 1…U3-32 User 16
BANK16.STY
16-1 Traditional 1…16-32 Traditional 16
1 Piano 1…128 SynBrass22
1 Standard Kit…64 Orchestral Kit
USER02.PCG
1 SopranoSax…128 Noise
Edit mode
Disk path
Page menu icon
List of files
Tabs
Commands
Device pop-up menu
Scrollbar

261Disk edit modeNavigation tools
Ref
eren
ce
Commands
Commands may be different depending on the shown page.They are detailed in each relevant section.
Tabs
Use tabs to select one of the edit pages of the current edit section.
Navigation tools
When in a Disk page, you can use any of the following com-mands to browse through the files and folders.
Scrollbar
See “Scrollbar” above.
TEMPO/VALUE controls
Use these controls scroll the list up or down.
Device pop-up menu
See “Device pop-up menu” above.
Load/Save/Copy/Erase button
Executes the disk operation.
Open button
Opens the selected folder or directory (whose name begins with
the “ ” icon.
Close button
Closes the current folder or directory, returning to the parent(“upper”) level.

262 Disk edit modeLoad
Load
In this page you can load User data files (Performances, UserSounds, User Styles, the SongBook, User PCM, the Global) froma disk to the internal memory (SSD and RAM).
Note: While in this page, only data allowed for loading are shown.All other files are hidden.
Warning: When loading a “.SET” folder containing Sounds associ-ated with PCM data, all existing PCM data in memory are deleted.Save them before loading the folder.
Loading all the User data
You can load all the User data with a single operation.
1. If loading from floppy disk, insert the disk into the diskdrive.
2. Select the source device, by using the Device pop-up menu.When the device is selected, its content will appear in thedisplay.
3. If the folder you are looking for is inside another folder,select this latter and press the Open button to open it. Pressthe Close button to go back to the parent folder.
4. Select the “.SET” folder containing the data you wish toload, and press Load to confirm the selection.
Note: Most data loaded from disk is merged with dataalready existing in memory. For example, if there is datain all three USER Style banks in memory (USER01,USER02, USER03), and there is only the USER01 Stylebank on disk, the USER01 bank is overwritten, whileUSER02 and USER03 banks are left unchanged.
As a result, you will have a STYLE folder in memory con-taining the USER01 bank you just loaded, and the oldUSER02 and USER03 banks.
Warning: When loading a “.SET” folder containing PCMdata, all existing PCM data in memory are deleted. Savethem before loading the folder, by selecting the “PCM” optionduring a Save All operation (see “Saving the full memory con-tent” on page 265).
To see if a “.SET” folder contains PCM data, open it and lookfor a “PCM” folder.
Loading all data of a specified type
You can load all User data of a specified type with a single opera-tion.
1. If loading from floppy disk, insert the disk into the diskdrive.
2. Select the source device, by using the Device pop-up menu.When device is selected, its content will appear in the dis-play.
3. If the folder you are looking for is inside another folder,select the latter and press the Open button to open it. Pressthe Close button to go back to the parent folder.
4. Select the “.SET” folder containing the data you wish toload, and press Open to open the “.SET” folder. A list ofUser data appears (Global, Performance, SongBook,Sounds, Style…).
5. Select the folder containing the type of data you are lookingfor, and press Load to confirm your selection.
Note: Data loaded from disk, and data already in memoryare merged. For example, if there is data in all three USERStyle banks in memory (USER01, USER02, USER03), andthere is only the USER01 Style bank on disk, the USER01bank is overwritten, while USER02 and USER03 banksare left unchanged.
As a result, you will have a STYLE folder in memory con-taining the USER01 bank you just loaded, and the oldUSER02 and USER03 banks.

263Disk edit modeLoad
Ref
eren
ce
Loading a single bank
You can load a single bank of User data (User Sounds, UserStyles, Performances) with a single operation. A bank corre-sponds to a STYLE SELECT or PERFORMANCE/SOUNDSELECT button.
1. If loading from floppy disk, insert the disk into the diskdrive.
2. Select the source device, by using the Device pop-up menu.When device is selected, its content will appear in the dis-play.
3. If the folder you are looking for is inside another folder,select this latter and press the Open button to open it. Pressthe Close button to go back to the parent folder.
4. Select the “.SET” folder containing the data you wish toload, and press Open to open the “.SET” folder. A list ofUser data appears (Global, Performance, SongBook,Sounds, Style…).
5. Select the folder containing the type of data you are lookingfor, and press Open to open the selected folder. A list ofUser banks appears.
6. Select the bank you are looking for, and press Load to con-firm the selection. A dialog box appears, asking you toselect one of the available User banks in memory.
In the page above, the previously selected Style bank will beloaded into the bank 1 (USER1 button) in memory. Theexisting Styles in memory will be deleted and overwritten.
7. Select the target bank, and press OK to load the sourcebank.
Warning: After confirming, all User data contained in thebank in memory is deleted.
Loading a single item
You can load a single User item with a single operation.
1. If loading from floppy disk, insert the disk into the diskdrive.
2. Select the source device, by using the Device pop-up menu.When device is selected, its content will appear in the dis-play.
3. If the folder you are looking for is inside another folder,select this latter and press the Open button to open it. Pressthe Close button to go back to the parent folder.
4. Select the “.SET” folder containing the data you wish toload, and press Open to open the “.SET” folder. A list ofUser data appears (Global, Performance, SongBook,Sounds, Style…).
5. Select the folder containing the type of data you are lookingfor, and press Open to open the selected folder. A list ofUser banks appears.
6. Select the bank you are looking for, and press Open to openit. A list of User items appears.
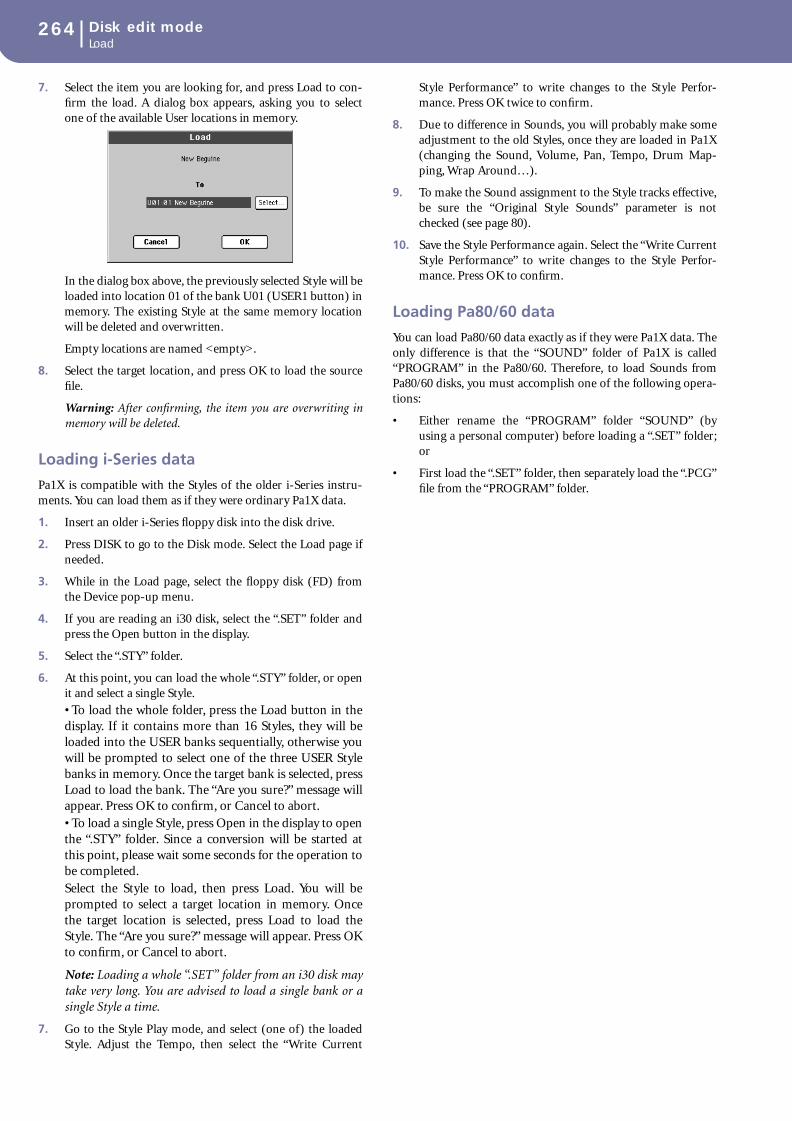
264 Disk edit modeLoad
7. Select the item you are looking for, and press Load to con-firm the load. A dialog box appears, asking you to selectone of the available User locations in memory.
In the dialog box above, the previously selected Style will beloaded into location 01 of the bank U01 (USER1 button) inmemory. The existing Style at the same memory locationwill be deleted and overwritten.
Empty locations are named <empty>.
8. Select the target location, and press OK to load the sourcefile.
Warning: After confirming, the item you are overwriting inmemory will be deleted.
Loading i-Series data
Pa1X is compatible with the Styles of the older i-Series instru-ments. You can load them as if they were ordinary Pa1X data.
1. Insert an older i-Series floppy disk into the disk drive.
2. Press DISK to go to the Disk mode. Select the Load page ifneeded.
3. While in the Load page, select the floppy disk (FD) fromthe Device pop-up menu.
4. If you are reading an i30 disk, select the “.SET” folder andpress the Open button in the display.
5. Select the “.STY” folder.
6. At this point, you can load the whole “.STY” folder, or openit and select a single Style.
• To load the whole folder, press the Load button in thedisplay. If it contains more than 16 Styles, they will beloaded into the USER banks sequentially, otherwise youwill be prompted to select one of the three USER Stylebanks in memory. Once the target bank is selected, pressLoad to load the bank. The “Are you sure?” message willappear. Press OK to confirm, or Cancel to abort.• To load a single Style, press Open in the display to openthe “.STY” folder. Since a conversion will be started atthis point, please wait some seconds for the operation tobe completed.Select the Style to load, then press Load. You will beprompted to select a target location in memory. Oncethe target location is selected, press Load to load theStyle. The “Are you sure?” message will appear. Press OKto confirm, or Cancel to abort.
Note: Loading a whole “.SET” folder from an i30 disk maytake very long. You are advised to load a single bank or asingle Style a time.
7. Go to the Style Play mode, and select (one of) the loadedStyle. Adjust the Tempo, then select the “Write Current
Style Performance” to write changes to the Style Perfor-mance. Press OK twice to confirm.
8. Due to difference in Sounds, you will probably make someadjustment to the old Styles, once they are loaded in Pa1X(changing the Sound, Volume, Pan, Tempo, Drum Map-ping, Wrap Around…).
9. To make the Sound assignment to the Style tracks effective,be sure the “Original Style Sounds” parameter is notchecked (see page 80).
10. Save the Style Performance again. Select the “Write CurrentStyle Performance” to write changes to the Style Perfor-mance. Press OK to confirm.
Loading Pa80/60 data
You can load Pa80/60 data exactly as if they were Pa1X data. Theonly difference is that the “SOUND” folder of Pa1X is called“PROGRAM” in the Pa80/60. Therefore, to load Sounds fromPa80/60 disks, you must accomplish one of the following opera-tions:
• Either rename the “PROGRAM” folder “SOUND” (byusing a personal computer) before loading a “.SET” folder;or
• First load the “.SET” folder, then separately load the “.PCG”file from the “PROGRAM” folder.

265Disk edit modeSave
Ref
eren
ce
Save
In this page, you can save User data from the internal memory toa disk. You can save single files, banks, or all the User files of theinternal memory (i.e., the SSD device).
Note: While in this page, only data allowed for saving are shown.All other files are hidden.
Here are the various types of files contained in the internalmemory:
Saving the full memory content
You can save the full memory content with a single operation.
1. If saving to a floppy disk, insert the disk into the disk drive.
2. The full content (“All”) of the internal memory is alreadyshown. Select it, and press Save to confirm the selection.The list of files of the target device is shown.
3. If needed, select a different target device, by using theDevice pop-up menu. When the target device is selected, itscontent will appear in the display.
4. At this point, you can:
• Press the New SET button and create a new “.SET” folder(see “Creating a new “.SET” folder” on page 268), or
• Select an existing “.SET” folder.
5. Press Save to confirm. A dialog box appears, asking you toselect the type of data to save:
In the above dialog box, check all data type you wish to saveto disk.
6. Press OK to confirm, or Cancel to abort.
Warning: After confirming, all data of the selected type inthe target folder is deleted.
The file/folder type…
…contains……and will create on disk…
All All the User data in memory
A .SET folder
Style The USER 01-03 Styles A STYLE folder inside a .SET folder
Sound The USER Sounds and Drum Kits
A SOUNDS folder inside a .SET folder
Perform (Per-formances)
The Performances A PERFORM folder inside a .SET folder
SongBook The SongBook database A SONGBOOK folder inside a .SET folder
PCM All the Multisamples contained in the SSD, and the Samples con-tained in RAM
A PCM folder inside a .SET folder
Global The Global. All parame-
ters marked with through the various chapters are saved in the Global. Voice Processor presets are saved too.
A GLOBAL folder inside a .SET folder. A .VOC file will be cre-ated inside the GLO-BAL folder, containing Voice Processor pre-sets

266 Disk edit modeSave
Saving all data of a specified type
In addition to the above, you can save all data of a specified typeby selecting the corresponding folder.
1. If saving to a floppy disk, insert the disk into the disk drive.
2. The full content (“All”) of the internal memory is alreadyshown. Select it, and press Open to open it. A list of Userdata types appear (each type is a separate folder).
3. Select the folder containing the type of data you wish tosave, and press Save To to confirm the selection. The list offiles of the target device is shown.
4. If needed, select a different target device, by using theDevice pop-up menu. When the target device is selected, itscontent will appear in the display.
5. At this point, you can:
• Press the New SET button and create a new “.SET” folder(see “Creating a new “.SET” folder” on page 268), or
• Select an existing “.SET” folder.
6. Press Save to confirm.
Warning: After confirming, all data of the selected type inthe target folder is deleted.
Saving a single bank
You can save a single User bank with a single operation. A bankcorresponds to a button on the control panel of the instrument(i.e. a button of the STYLE section).
1. If saving to a floppy disk, insert the disk into the disk drive.
2. The full content (“All”) of the internal memory is alreadyshown. Select it, and press Open to open it. A list of Userdata types appear (each type is a separate folder).
3. Select the folder containing the type of data you wish tosave, and press Open to open it. The list of contained banksis shown.
4. Select the bank to be saved, and press Save To to confirmthe selection. The list of files of the target device is shown.
5. If needed, select a different target device, by using theDevice pop-up menu. When the target device is selected, itscontent will appear in the display.
6. At this point, you can:
• Press the New SET button and create a new “.SET” folder(see “Creating a new “.SET” folder” on page 268), or
• Select an existing “.SET” folder.

267Disk edit modeSave
Ref
eren
ce
7. Press Save to confirm. A dialog box appears, asking you toselect one of the available User locations inside the folder:
In the dialog box above, the previously selected bank ofStyles will be saved to the bank User 01 (corresponding tothe USER1 button) inside the selected folder. Three Userbanks are available.
8. Press OK to confirm, or Cancel to abort.
Warning: After confirming, the same bank in the targetfolder is deleted.
Saving a single item
You can save a single User item with a single operation.
1. If saving on a floppy disk, insert the disk into the disk drive.
2. The full content (“All”) of the internal memory is alreadyshown. Select it, and press Open to open it. A list of Userdata types appear (each type is a separate folder).
3. Select the folder containing the type of data you wish tosave, and press Open to open it. The list of contained banksis shown.
4. Select the desired bank, and press Open to gain access tothe single files.
5. Once you have selected the file that you want to save, pressSave To to confirm the selection. The list of files of the tar-get device is shown.
6. If needed, select a different target device, by using theDevice pop-up menu. When the target device is selected, itscontent will appear in the display.
7. At this point, you can:
• Press the New SET button and create a new “.SET” folder(see “Creating a new “.SET” folder” on page 268), or
• Select an existing “.SET” folder.
8. Press Save to confirm. A dialog box appears, asking you toselect one of the available User locations inside the selectedfolder
In the dialog box above, the previously selected Style will besaved to location 01 inside the bank U01 (corresponding tothe USER1 button) inside the selected folder.
9. Press OK to confirm, or Cancel to abort.
Warning: After confirming, the same item in the targetfolder is deleted.

268 Disk edit modeCopy
Creating a new “.SET” folder
Pa1X proprietary data must be saved in special folder with the“.SET” extension. These special folders can be saved inside ordi-nary folders.
When saving, you can save onto existing “.SET” folders, or youcan create a new folder of this type. Here is how to do it.
1. When the directory of the target device is shown in the dis-play, the “New SET” button appears among the buttonsbelow the file list.
2. Press the New SET button. A dialog box appears, askingyou to enter a name for the new “.SET” folder.
3. Press the (Text Edit) button to open the Text Edit win-
dow. Enter the name, then press OK to confirm and closethe Text Edit window.
4. Press OK to create the new folder and exit the dialog box.
Copy
In this page you can copy files and folders. Folders can be genericor “.SET” folders. In addition, you can copy the content of thegeneric folder you are in. You can copy inside the same device, orfrom a device to a different one.
To preserve the data structure integrity, during Copy operationsyou can’t open “.SET” folders and copy only one of the files itcontains. You can only open generic folders.
Copying a folder’s content
If nothing is selected while a folder is open in the display, youcan copy the folder’s content, without copying the folder itself.
Note: During the Copy procedure, you can’t open a “.SET” folder.You can, however, open any generic folder.
1. If copying from or to a floppy disk, insert the disk into thedisk drive.
2. Select the source device, by using the Device pop-up menu.
3. If the folder you are looking for is inside another folder,select this latter and press the Open button to open it. Pressthe Close button to go back to the parent folder.
4. To copy the current folder’s content, without copying thefolder itself, do not select anything in the display.
5. Press Copy To to confirm. The target device appears.
Note: If the selected device is not available, the “Device notfound, or unknown format” message will appear. A differentdevice will be automatically selected.
6. If needed, select the target device, by using the Device pop-up menu.
7. If you want to select a different folder, use the Open andClose buttons to move through the directories.
• To copy into an existing generic folder (not a “.SET”folder), select that folder.
• To copy into the current folder, do not select anything.
8. Once the target is selected, press Copy.
If a file or folder with the same name of the source dataalready exists at the target location, the “Overwrite” dialogbox will appear (see “Overwriting existing files or folders”on page 269).

269Disk edit modeCopy
Ref
eren
ce
Copying a single file or folder
You can copy a single file or folder, from a generic folder to a dif-ferent one. The file or folder must be located in the root (themain/highest level in the disk hierarchy) or into a generic folder.You can’t copy single files or folders from inside a “.SET” folder.
1. If copying from or to a floppy disk, insert the disk into thedisk drive.
2. Select the source device, by using the Device pop-up menu.
3. Select the folder containing the file or folder you wish tocopy. If it is contained in another folder, press the Openbutton to open it. Press Close to go back to the previoushierarchic level.
4. Press Open to open the folder containing the file or folderto be copied.
5. Select the file or folder to be copied, then press Copy To toconfirm its selection. The target device appears.
Note: If the selected device is not available, the “Device notfound, or unknown format” message will appear. A differentdevice will be automatically selected.
6. If needed, select the target device, by using the Device pop-up menu.
7. When the target device content appears in the display,select the target folder. Press Open to open a folder, orClose to close it.
8. Once the target is selected, press Copy.
If a file or folder with the same name of the source dataalready exists at the target location, the “Overwrite” dialogbox will appear (see “Overwriting existing files or folders”below).
Multiple file selection
While in the Erase and Copy pages of the Disk mode, you canselect several files or folders at the same time before executingthe operation. Files or folders can be selected consecutively (i.e.,in a row), or discontinuously (i.e., with other files or folders inthe middle).
To choose either to select files in a consecutive or discontinueway, use the Mode button on the right of the page commandbuttons, to choose an option for the SHIFT button:
To select more files or folders consecutively:
1. Press the Mode button to choose the option for theSHIFT button.
2. Select the first file or folder to be selected.
3. Press and keep the SHIFT button pressed.
4. Select the last file or folder to be selected.
5. Release the SHIFT button.
To select more files or folders discontinuously:
1. Press the Mode button to choose the option for theSHIFT button.
2. Select the first file or folder to be selected.
3. Press and keep the SHIFT button pressed.
4. Select a second file or folder to be selected.
5. While keeping the SHIFT button pressed, continue select-ing the other files or folders to be selected.
6. Release the SHIFT button.
To deselect the files or folders:
• To deselect one or more file or folder, without deselectingeverything, keep SHIFT pressed and touch the file or folderto be deselected.
• To deselect everything, select any other file or folder. Allselected files and folders will be deselected.
Overwriting existing files or folders
When copying files, a file or folder with the same name of asource element might be found in the target device. In this case,Pa1X asks you if you want to overwrite it.
When a duplicate file or folder is met, the following dialog boxappears:
Cancel The procedure is interrupted.
No The file or folder is not overwritten. The sourcefile or folder is not copied. The procedure willcontinue with the other files and folders.
Yes The file or folder is overwritten. The procedurewill continue with the other files and folders.
Yes (to) All The file or folder is overwritten. Any followingduplicate file or folders will be overwritten aswell, without this dialog box appearing again.The procedure will continue with the other filesand folders.
Choose this option to select files or folders con-secutively (i.e., in a row).
Choose this option to select files or folders dis-continuously (i.e., with other files or folders inthe middle).

270 Disk edit modeErase
Erase
The Erase function lets you erase files and folders from the disks.
With the Erase function you will be able to select the internalmemory (SSD device), and erase files from there. You cannot,however, delete folders from the internal memory, since they areused by the operating system.
Erase procedure
1. If erasing from a floppy disk, insert the disk into the diskdrive.
2. If needed, select a different device, by using the Devicepop-up menu.
3. If the file or folder you are looking for is inside anotherfolder, select this latter and press the Open button to openit. Press the Close button to go back to the parent folder.
4. Select the file or folder to erase.
5. Press Erase to delete the selected item.
Multiple file selection
See “Multiple file selection” on page 269 for information on howto select more files or folders to be erased at the same time.
Format
The Format function lets you initialize a device.
Warning: When formatting a device, all data it contains is lost for-ever!
Volume Label
Use this parameter to assign a name to the device to be format-ted.
Press the (Text Edit) button to open the Text Edit window.
Enter the name, then press OK to confirm and close the TextEdit window.
Quick Format
This is a very fast format command, that you can use on previ-ously formatted disks. This command rewrites just the FAT (FileAllocation Table) of the disk, without actual reformatting of allsectors.
If it cannot be executed, the “Quick Format failed. Full Format?”message appears. Press Yes to proceed with the Full Format, orNo to cancel.
1. If formatting a floppy disk, insert a 3.5” HD or DD/DSfloppy disk into the disk drive, and select this option to for-mat it.
If formatting a CD-RW, insert it into the CD drive.
2. Select the Quick Format option.
3. Press the Execute button in the display to confirm format-ting.
4. The “If you confirm, all data in the HD/FD will be lost. Areyou sure?” message appears in the display. Press Yes to con-firm, or No to cancel.
Note: When formatting the hard disk, an additional warningappears, to avoid accidental data loss.
Full Format
This is the complete format command, where each sector of thedisk is formatted. It is slower than the Quick Format command,but sometimes more reliable.
See above for the procedure.
Execute button
Press this button, after setting all the options in this page, to exe-cute the Format command.

271Disk edit modeUtility
Ref
eren
ce
Utility
This page includes a set of backup utilities.
Save OS to Floppy Disk
This command starts an Operating System backup, to save acopy of the instrument’s Operating System on three floppy disks.
Note: Should you not do a back-up and your internal data becomesdamaged, you can download the data from www.korgpa.com, orask your local Korg dealer.
1. Prepare three formatted, empty disks (1.44MB, MS-DOSformatted). You can prepare this kind of disk using a PC orthe Pa1X itself (see “Format” on page 270). Clearly writethe disk progressive number on each disk label.
Note: You can’t prepare a Pa1X OS disk on a Macintosh. Afterformatting, the Mac includes some invisible files in the root,that may interfere with the Pa1X OS loading procedure.
2. Select the Save OS to Floppy Disk command, then press theExecute button in the display.
3. When asked, insert a disk and press OK.
If a disk is not formatted or empty, Pa1X asks if you want toformat it. Press Yes to format the disk. Pa1X first tries aQuick Format, then makes a Full Format if the former isnot possible.
4. When finished, save the disks in a safe place.
Backup Resources
This command starts a backup of all internal Factory and Userdata (Styles, Sounds, Performances…) excluding the OperatingSystem. A “.BKP” file is created on disk(s).
Note: Should you not do a back-up and your internal data becomesdamaged, you can download the original data fromwww.korgpa.com. On the Pa1X Pro, a backup file has been pro-vided on the hard disk, under the name “PA1X_100”.
1. If you are making a backup on floppy disks, prepare at leastsix disks. Disks don’t need to be formatted, because Pa1Xwill format them for you during the Backup procedure.
2. Select the Backup Resources command, then press Execute.The target device appears.
3. If backing up to floppy disks, insert the first backup disk.
4. If needed, select a different device, by using the Devicepop-up menu.
5. If you wish to save data inside another folder, select this lat-ter and press the Open button to open it. Press the Closebutton to go back to the parent folder.
6. Select the folder where to save data, and press Backup tosave it. If nothing is selected, data will be saved to the cur-rent directory.
After pressing Backup, a dialog box will appear, asking youto select a name for the backup file, and whether compres-sion must be turned on or off during the backup.
Press the (Text Edit) button to open the Text Edit win-
dow. Enter the name, and confirm by pressing OK.
We suggest you check Compression, to save space on thebackup device. However, with compression turned on, theoperation will last longer.
7. Press OK to start the backup.
8. If backing up to floppy disks, when the Pa1X asks for itinsert a new disk into the floppy disk drive. Write the disknumber on each disk’s label.
If a disk is not formatted or empty, Pa1X asks if you want toformat it. Press Yes to format the disk. Pa1X first tries aQuick Format, then makes a Full Format if the former isnot possible.
9. When finished, save the disks in a safe place.
Restore Resources
This command restores the backup of the internal Factory andUser data, created with the “Backup Resources” command.
Note: Should you not do a back-up and your internal data becomesdamaged, you can download the original data from

272 Disk edit modePreferences
www.korgpa.com. On the Pa1X Pro, a backup file has been pro-vided on the hard disk, under the name “PA1X_100”.
Warning: Don’t play the keyboard while restoring data, and stay inthe Disk mode. Wait until the “Wait” message disappears.
1. If you are restoring from a set of floppy disks or from a CD,prepare the disk(s) containing the backup file to berestored.
2. Select the Restore Resources command, then press Execute.The source device appears.
3. If restoring from floppy disks, insert the first backup disk. Ifrestoring from CD, insert it in the CD drive.
4. If needed, select a different device, by using the Devicepop-up menu.
5. Browse through the files to find the backup file.
6. When the backup file (“.BKP” file) is in the display, select itand press the Restore command.
7. If restoring from floppy disks, wait until the first backupdisk has been loaded. A message will appear, asking you toinsert the following disk. Insert the second backup disk andpress OK.
8. Repeat the same procedure with the following backupdisks. When the last backup disk has been loaded, thebackup data is restored into the internal memory.
9. Turn the instrument off, then on again to allow rebooting.
OS Version Number
This line shows the installed Operating System version. A newerversion may be available on www.korgpa.com.
Preferences
This page includes various protect options, plus the PCM Auto-load option and settings for the hard disk sleep time.
Global Protect
When loading a “.SET” file (see “Loading all the User data” onpage 262), this parameter (if On) prevents Global parametersfrom being reprogrammed when loading all data. All Globalparameters are therefore left unchanged.
When loading a single “.GLB” file, this parameter is ignored, andthe Global is overwritten by the loaded data.
Note: This parameter is saved to memory, but not to disk.
Hard Disk Protect
When on, this parameter protects the Hard Disk from writing.
Note: This parameter is saved to memory, but not to disk.
Factory Style and Pad Protect
When On, this parameter protects the Factory Styles (from the“8/16 BEAT 1” to the “TRADITIONAL” bank) and Factory Pads(named “Hit” and “Sequence” in the Pad Select window) frombeing overwritten when loading data from disk. Furthermore,you can’t access these banks when saving data.
When Off, you can load or save User Styles or Pads even into theFactory Style banks (from “8/16 BEAT 1” to “TRADITIONAL”)and Factory Pad banks (named “Hit” and “Sequence” in the PadSelect window). This way, you can personalize your Factory Styleand Pad banks.
Please note that the Save All procedure always saves only theUSER Style banks.
Note: This parameter is automatically set to On when turning theinstrument off.
Note: Should your accidentally delete some Factory Data, reloadthe Backup data, contact your Korg dealer or service center, ordownload the data from www.korgpa.com.
Factory Sound Protect
When On, this parameter prevents writing edited Sounds fromthe Edit Sound mode. When Off, you can freely save editedSounds either in the Factory or User Sound area. (See “WriteSound dialog box” on page 211 for more information).
Note: This parameter is automatically set to On when turning theinstrument off.
Dsk
Dsk

273Disk edit modeUSB/CD
Ref
eren
ce
Note: Should your accidentally delete some Factory Data, reloadthe Backup data, contact your Korg dealer or service center, ordownload the data from www.korgpa.com.
PCM Autoload
While most Sounds use samples, or PCM data, contained inROM – therefore always available –, some other Sounds may useexternal samples, that must be loaded to RAM to be used. TheseSounds may have been loaded from disk, or created in Samplingmode.
Since loading may take time, you can choose whether to auto-matically load or not these samples when turning the instrumenton.
If samples have not been loaded when turning the instrumenton, you can press the Load PCM button in this page to loadthem.
Warning: When loading PCM data, all existing PCM data inmemory are deleted. Save them before loading the folder, by select-ing the “PCM” option during a Save All operation (see “Saving thefull memory content” on page 265).
On When turning the instrument on, external sam-ples used by some Sounds are automaticallyloaded to RAM.
Off When turning the instrument on, external sam-ples used by some Sounds are not automaticallyloaded. Therefore, these Sound will be muted,until you use the Load PCM button to load themto RAM.
Load PCM button
Press this button to load to RAM all sample (or PCM data) usedby some Sounds loaded fro disk, or created in Sampling mode.Not available if no User PCM Samples are used by any Sound.
Hide Unknown Files
When this option is checked, non-proprietary files are hiddenwhen using Disk operations, therefore making browsing directo-ries easier.
HD Sleep Time
Use this parameter to set the number of seconds after which, ifinactive, the hard disk will stop. If Off, the hard disk will nevergo to sleep.
USB/CD
Use this page to enable or disable the USB interface, and to writea CD or a CD image file.
• For information on the use of the USB interface, see “USB/CD: USB” below.
• For information on CD writing, see “USB/CD: CD” onpage 274.
USB/CD: USB
The USB interface allows you to access the internal hard diskfrom a personal computer (Windows or Macintosh), by justconnecting the Pa1X to its USB interface. This way, you canquickly backup data from the internal hard disk of the Pa1X toyour personal computer, or exchange data between the Pa1X anda personal computer.
Note: Windows 2000 and XP, as well as Mac OSX, can be directlyconnected to the Pa1X. To connect a Windows 98 computer youneed a dedicated driver, available on www.korgpa.com.
Hint: While USB communication is enabled, you cannot accessother functions on the Pa1X. We suggest you use the USB just afterturning the instrument on, and turn the instrument off and onagain after using and disconnecting it, to be sure USB activities willnot interfere with other disk operations.
Hard Disk USB Connection
Normally, USB is not activated on the Pa1X. Press the Enablebutton to turn it on, or the Disable button (with all caveats) toturn it off.
Enable After connecting Pa1X to a personal computer byusing a standard USB cable (Pa1X is the B – orslave – device, while the personal computer is theA – or master – device), press this button toenable communication.
The DISK LED will start blinking, while the per-sonal computer reads the internal hard disk of thePa1X. When finished (this may take some min-utes, depending on the hard disk size), the icon of
Dsk

274 Disk edit modeUSB/CD: CD
the hard disk will appear among the other storagedevices connected to the computer:
Caveat: Do not modify “.SET” folders, or you willno longer be able to use them on the Pa1X. Only usethe USB connection for backup purpose, or to mod-ify ordinary folders.
Note: After starting USB connection, accessingPa1X data from the computer may take some time,depending on the size of the hard disk and con-tained data.
Disable Press this button to disconnect the USB connec-tion. Be careful to press it only when you aretotally sure data transfer has been completed.
Note: USB connection is also automatically discon-nected when disconnecting the USB communica-tion on the personal computer side.
To disconnect USB communication on a PC, youusually select the dedicated command by clickingon the USB device icon with the right mouse but-ton. On the Mac, select the USB device icon, thenselect the Eject command or drag it to the ejecticon in the Dock.
Hint: We suggest to disconnect USB connectionfrom the personal computer, instead of pressing thisbutton on the Pa1X.
Caveat: Do not disconnect USB communicationbefore the personal computer has really finishedtransferring files. Sometimes, the on-screen indica-tor tells the procedure has been completed,BEFORE it is actually finished.
Disconnecting USB communication (or discon-necting the USB cable) before data transfer hasbeen completed may cause loss of data.
USB/CD: CD
You can use the (optional) Korg CDRW-1 CD Player/Writer towrite data on CD and CD-RW disks.
Note: A hard disk must be installed for CD writing to work.
Note: Audio CDs cannot be written on the Pa1X/Pa1X Pro.
Write CD
Press this button to create a list of files, to be directly written toCD or saved as an image file. The image file can later be read
with the “Write from IMG” command on the Pa1X, or by com-mon CD-writing software applications on a personal computer.
After pressing this button, the “Select Files” page appears. See“Select Files page” below.
Write from IMG
Press this button to write a CD from an ISO image file (.ISO),either generated by the “Write CD” command on the Pa1X, or bya CD-burning software application on a personal computer.Pa1X complies with the ISO9660 Mode 1/2048 format (orCDROM format). It does not comply with Mode 2 (orCDROM-XA format).
Note: While image files can be generated by most CD-burningapplications, such as Ahead Software™ Nero®, Roxio™ Easy CDCreator®, or Roxio™ Toast®, we cannot warrant full compatibilitywith them, due to the fast-changing way their features are imple-mented.
If you create the “.ISO” image file on a computer, you must moveit to the internal hard disk of the Pa1X via the USB connection,prior to selecting this command. The needed ISO image filemust reside in the internal hard disk of the Pa1X.
After pressing this button, a standard File Selector appears,allowing you to select an image file. After the ISO image file hasbeen selected and the Select button has been pressed, the “WriteCD” dialog box will appear (see “Write CD dialog box” below).
Select Files page
After pressing the “Write CD” button in the Disk > USB/CDpage, this page appears.
While in this page, you can select files or folders, and press theSelect button in the display to add them to the list of files to bewritten on a CD.
After having selected all the desired files and/or folders, press theNext> button to go to the “Edit List” page. When in the “Edit
Pa1X in Windows Pa1X in Macintosh

275Disk edit modeUSB/CD: CD
Ref
eren
ce
List” page you will be able to return back to this page and con-tinue adding files or folders.
Device pop-up menu
Use this menu to select one of the available storage devices. Noteyou can also select removable devices, like a floppy disk or a CD,but you cannot remove them until the Pa1X has finished creat-ing the image file (see “Save IMG” below).
Open button
Opens the selected folder (whose name begins with the “ ”
icon.
Close button
Closes the current folder, returning to the parent (“upper”) level.
Select
Selects the highlighted file or folder, and adds it to the list of filesto be written to CD. Greyed-out until a file or folder is selected.
Next>
Jumps to the “Edit List” page. Greyed-out until a file or folder hasbeen added to the list.
Exit
Exits from the CD Writing mode, and returns to the “USB/CD”page. The mastering list will remain in memory.
Folders, Files, Total Size
These (non-editable) indicators show the total number of fold-ers and files included in the list, and their overall size.
When the total size of added data exceeds about 650 MB, theTotal Size parameter turns to red, showing that there are toomany data to fit in a normal CD.
Edit List page
While in this page, you can see and edit the list of files and/orfolders to be written to a CD or image file.
While in this page, you can delete files or folders by pressing theDelete or Del All button, or press the <Back button to go back tothe “Select Files” page and add other files.
When the list is done, you can either save it to disk as an imagefile by pressing the Save IMG button, or write a CD by pressingthe Write CD button.
CD Label
Press the (Text Edit) button to open the Text Edit window,
and assign a name to the CD. Enter the name, then press OK toconfirm and close the Text Edit window.
Del All
Press this button to delete the whole list.
Delete
Select an item in the list, then press this button to delete it.
Save IMG
Press this button to save an ISO image file to disk. The generatedimage complies with the ISO9660 Mode 1/2048 format (com-mon to most CD-burning applications, such as Ahead Soft-ware™ Nero®, Roxio™ Easy CD Creator®, or Roxio™ Toast®).
After you press this button, listed data are collected, and the“Writing ISO image file” message appears in the display.
Note: Please do not remove any removable media (such as floppydisks or CDs) during this phase.
This procedure may last for several minutes, depending on theamount of data to be written. It is split in three consecutivesteps:
1) Folders/files are scanned in the source devices.
2) The ISO image file is prepared.
3) The ISO image file is written to the hard disk.
A progress bar will inform you of the step’s status.
Write CD
Press this button to open the “Write CD” dialog box, and write aCD. See “Write CD dialog box” below.
<Back
Press this button to return to the “Select Files” page and addother files to the list.
Exit
Exits from the CD Writing mode, and returns to the “USB/CD”page. The mastering list will remain in memory.
Folders, Files, Total Size
These (non-editable) indicators show the total number of fold-ers and files included in the list, and their overall size.
When the total size of added data exceeds about 650 MB, theTotal Size parameter turns to red, showing that there are toomany data to fit in a normal CD.
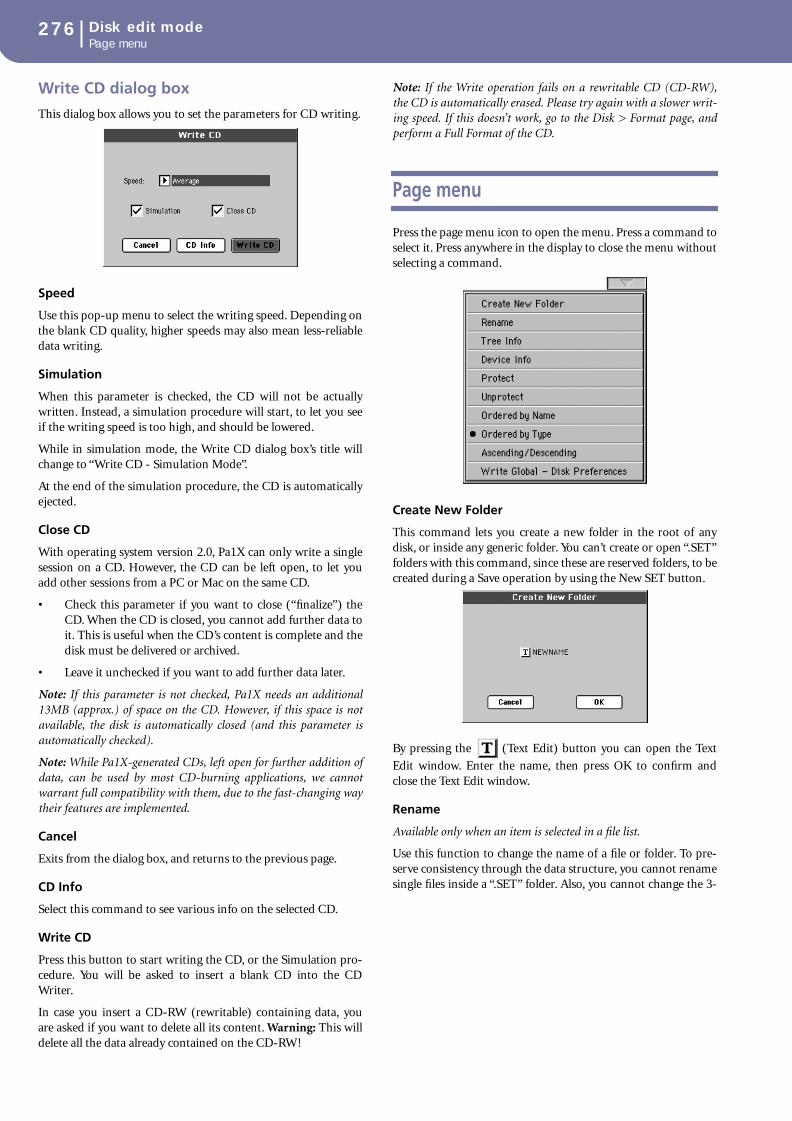
276 Disk edit modePage menu
Write CD dialog box
This dialog box allows you to set the parameters for CD writing.
Speed
Use this pop-up menu to select the writing speed. Depending onthe blank CD quality, higher speeds may also mean less-reliabledata writing.
Simulation
When this parameter is checked, the CD will not be actuallywritten. Instead, a simulation procedure will start, to let you seeif the writing speed is too high, and should be lowered.
While in simulation mode, the Write CD dialog box’s title willchange to “Write CD - Simulation Mode”.
At the end of the simulation procedure, the CD is automaticallyejected.
Close CD
With operating system version 2.0, Pa1X can only write a singlesession on a CD. However, the CD can be left open, to let youadd other sessions from a PC or Mac on the same CD.
• Check this parameter if you want to close (“finalize”) theCD. When the CD is closed, you cannot add further data toit. This is useful when the CD’s content is complete and thedisk must be delivered or archived.
• Leave it unchecked if you want to add further data later.
Note: If this parameter is not checked, Pa1X needs an additional13MB (approx.) of space on the CD. However, if this space is notavailable, the disk is automatically closed (and this parameter isautomatically checked).
Note: While Pa1X-generated CDs, left open for further addition ofdata, can be used by most CD-burning applications, we cannotwarrant full compatibility with them, due to the fast-changing waytheir features are implemented.
Cancel
Exits from the dialog box, and returns to the previous page.
CD Info
Select this command to see various info on the selected CD.
Write CD
Press this button to start writing the CD, or the Simulation pro-cedure. You will be asked to insert a blank CD into the CDWriter.
In case you insert a CD-RW (rewritable) containing data, youare asked if you want to delete all its content. Warning: This willdelete all the data already contained on the CD-RW!
Note: If the Write operation fails on a rewritable CD (CD-RW),the CD is automatically erased. Please try again with a slower writ-ing speed. If this doesn’t work, go to the Disk > Format page, andperform a Full Format of the CD.
Page menu
Press the page menu icon to open the menu. Press a command toselect it. Press anywhere in the display to close the menu withoutselecting a command.
Create New Folder
This command lets you create a new folder in the root of anydisk, or inside any generic folder. You can’t create or open “.SET”folders with this command, since these are reserved folders, to becreated during a Save operation by using the New SET button.
By pressing the (Text Edit) button you can open the Text
Edit window. Enter the name, then press OK to confirm andclose the Text Edit window.
Rename
Available only when an item is selected in a file list.
Use this function to change the name of a file or folder. To pre-serve consistency through the data structure, you cannot renamesingle files inside a “.SET” folder. Also, you cannot change the 3-

277Disk edit modePage menu
Ref
eren
ce
character extension of files and “.SET” folders, identifying thetype of file or folder.
Press the (Text Edit) button to open the Text Edit window.
Enter the new name, then press OK to confirm and close theText Edit window.
Object info
Select this command to see the size of any selected file or folderon disk. Also, the number of files and directories it contains areshown.
Note: The single file size is always shown on the right of the filename in any file list:
Device Info
Select this command to see various info on the selected device.To select a different device, use the Device pop-up menu on thelower left corner of most Disk pages.
Protect
Select this command to protect the selected file or folder fromwriting/erasing. The lock icon will appear next to the file orfolder name.
Unprotect
Select this command to unprotect the selected file or folder – ifprotected.
Ordered by Name
Select this display option to see the list of files and folders inrough alphabetical order, with different file types mixed in thelist. The File label, above the file list, is shown in red.
Ordered by Type
Select this display option to see the list of files and foldersordered by type. Inside any type group, files are still in alphabet-ical order. The Type label, above the file list, is shown in red.
Ascending/Descending
Use this command to switch between the ascending (Numbers,A…Z) and descending (Z…A, Numbers) order.
Write Global-Disk Preference
Select this command to open the Write Global-Disk Preferencesdialog box, and save settings executed in the Preferences page(see “Preferences” on page 272).
Parameters saved in the Disk Preferences area of the Global are
marked with the symbol through the user’s manual. Dsk

278 Disk edit modeDisk handling
Disk handling
The Pa1X can save most of the data contained in memory on theinternal hard disk (if fitted), or on a 3,5” DS-DD disk (720KBcapacity) or HD (1,44MB capacity), MS-DOS®-formatted. Hereare some precautions when handling disks.
Floppy disk write protection
You can protect a disk from the accidental overwriting of data,by opening the write protect hole. To protect the disk from over-writing, slide the protection flap so that the hole becomes visi-ble.
Hard disk write protection
You can protect your hard disk from writing, by using the soft-ware protection found in Disk mode (see “Hard Disk Protect”on page 272).
Inserting a floppy disk
Insert the disk delicately into the disk drive, with the label facingupwards and the metal part to the front. Press it in as far as it willgo.
Note: The Pa1X incorporates a new type of disk drive and you can-not hear “click” when the disk is inserted into place.
Removing a floppy disk
Before removing a disk, make sure that the disk activity indica-tor is off. If the LED is off, remove the disk by pressing the ejectbutton.
Warning: Do not remove the disk if the disk activity indicator is litup.
Cleaning the floppy disk heads
The disk drive read/write heads get dirty with use and becomeless accurate. You can clean the heads with a special cleaningdisk, you can purchase from any computer or musical instru-ment store. Use a 3.5” DS wet type head cleaning disk; and care-fully follow the instructions included with it.
Precautions
• Do not remove a floppy disk or move the instrument whilethe disk drive or hard disk is operating.
• Make a backup copy of the disks, in order not to lose dataforever in case of damage. You can backup your floppydisks to the internal hard disk or on a personal computer.The internal hard disk can be backed up on a personalcomputer’s hard disk, by using the USB connection.
• Do not open the metallic shutter on a floppy disk, and donot touch the surface of the magnetic media inside it. If themagnetic media becomes scratched or soiled, data can belost.
• Do not leave a disk in the disk drive while carrying theinstrument: the read/write heads may scratch the disk anddamage saved data.
• Keep the floppy disks or the instrument away from sourcesof magnetic fields, for example televisions, refrigerators,computers, monitors, speakers and transformers. Magneticfields can alter the contents of the disks.
• Do not keep floppy disks in very hot or wet places, do notexpose them to direct sunlight and do not store them with-out use in dusty or dirty places.
• Do not place heavy objects on top of the disks.
• After use, replace the disks in a case.
Possible problems
• In exceptional cases, a floppy disk can get stuck in the diskdrive. In order to avoid this happening, you should onlyuse high quality disks. If the disk does get stuck, do not tryto force it out using sharp objects. Contact your local dealeror your nearest Korg Service Center.
• Magnetic fields, dirt, humidity and usage can damage dataon disk. You can try to recover the data with disk repairutilities for personal computers. It is, however, advisable tomake a backup copy of data.
To write-protect the disk: movethe flap and open the hole
To write-enable the disk: move the flap to close the hole
Disk activityindicator
Opening for diskinsertion
Eject button
Disk activityindicator
Opening for diskinsertion
Eject but-ton

279Disk edit modeBonus software
Ref
eren
ce
Bonus software
With Pa1X Pro, three “.SET” folders have been saved in the inter-nal hard disk, with the whole content of Korg’s “Real Drums”and “Turkish/Arabic World” collections, formerly available asseparate cards for the Pa80/Pa60 series.
These are high quality sound sets, based on additional RAMPCM Samples. Go to www.korgpa.com for more information.
To load these sounds, select either the REALDRUM.SET orTA_WORLD.SET folder from the hard disk. By loading theBONUS_SW.SET folder, you can load both collections at thesame time.
Warning: When loading the above folders, all User data in mem-ory is deleted. Save important data to disk, before loading thebonus software.
Note: After turning the instrument off, all samples are deleted fromthe RAM memory. You can either have them automaticallyreloaded when turning the instrument on again (see “PCM Auto-load” on page 273), or manually load them (see “Load PCM but-ton” on page 273).

280 MIDIWhat is MIDI?
What is MIDI?
Here is a brief overview of MIDI, as related to the Pa1X. If inter-ested, you may find more information on the general use ofMIDI in the various specialized magazines and dedicated books.
In general
MIDI stands for Musical Instruments Digital Interface. Thisinterface lets you connect two musical instruments, or a com-puter and various musical instruments.
Physically, MIDI is composed of three different connectors. TheMIDI IN receives data from another device; the MIDI OUTsends data to another device; the MIDI THRU sends to anotherdevice exactly what was received on the MIDI IN (this is usefulto daisy-chain more instruments).
On the Pa1X there are two separate sets of MIDI ports, labeledIN A, OUT A, IN B, OUT B. Each OUT port may work as aTHRU port, depending on the status of the “MIDI A Out/ThruMode” and “MIDI B Out/Thru Mode” parameters in the Globalmode (see page 237).
Channels and messages
Basically, a MIDI cable transmits 16 channels of data. Think toeach MIDI channel as a TV channel: the receiver must be set onthe same channel of the transmitter. The same happens withMIDI messages: when you send a Note On message on channel1, it will be received on channel 1 only. This allows for multitim-bricity: you can have more than one sound playing on the sameMIDI instrument.
There are various messages, but here are the most commonlyused:
Note On – This message instructs an instrument to play a noteon a specific channel. Notes have both a name (C4 standing forthe center C) and a number (60 being the equivalent for C4). ANote Off message is often used to say the note has been released.In some case, a Note On with value “0” is used instead.
Together with the Note On message, a Velocity value is alwayssent. This value tells the instrument how loud the note mustplay.
After Touch – This message is generated by pressing on the key-board, after the note has been struck. It usually activates vibrato,or other sound parameters.
Pitch Bend (PB) – You can generate this message acting on thejoystick (X direction). The pitch is translated up or down.
Program Change (PC) – When you select a Sound, a ProgramChange message is generated on the channel. Use this message,together with Control Change 00 and 32, to remotely select Pa1Xdata from a sequencer or a master keyboard.
Control Change (CC) – This is a wide array of messages, con-trolling most of the instrument parameters. Some examples:
• CC00, or Bank Select MSB, and CC32, or Bank Select LSB.This message pair is used to select a Sound Bank. Togetherwith the Program Change message, they are used to select aSound.
• CC01, or Modulation. This is the equivalent of pressing upthe joystick. A vibrato effect is usually triggered on.
• CC07, or Master Volume. Use this controller to set thechannel’s volume.
• CC10, or Pan. This one sets the channel’s position on thestereo front.
• CC11, or Expression. Use this controller to set the relativevolume of tracks, with the maximum value matching thecurrent setting of the CC07 control.
• CC64, or Damper Pedal. Use this controller to simulate theDamper pedal.
Tempo
Tempo is a global MIDI message, that is not tied to a particularchannel. Each Song includes Tempo data.
Lyrics
Lyrics are non-standard MIDI events, made to display texttogether with the music. Pa1X can read many of the availableLyrics format on the market.
Standard MIDI Files
Midifiles, or Standard MIDI Files (a.k.a. SMF), are a practicalway of exchanging songs between different instruments andcomputers. Pa1X uses the SMF format as its default song format,so reading a song from a computer, or saving a song that a com-puter software can read, is not a problem at all.
The Pa1X sequencers are compatible with the SMF in format 0(all data in one track; it is the most common format) and 1(multitrack). It can read the SMF in Song Play mode and mod-ify/save them in Sequencer mode. It can save a song in SMF 0format in the Sequencer mode.
When in Song Play mode, the Pa1X can also display SMF lyricsin Solton, M-Live (Midisoft), Tune1000, Edirol, GMX, HitBit,and XF formats, and the chord abbreviations of SMF in Solton,M-live (Midisoft), GMX, and XF format.
Note: The above trademarks are the property of their respectiveholders. No endorsement is intended by inclusion in this list.
Standard MIDI Files usually have the “.MID” or “.KAR” filenameextension.
MIDI

281MIDIThe General MIDI standard
Ref
eren
ce
The General MIDI standard
Some years ago, the musical instruments world felt a need forsome further standardization. Then, the General MIDI Standard(GM) was born. This extension of the basic MIDI sets new rulesfor compatibility between instruments:
• A minimum of 16 MIDI channels was required.
• A basic set of 128 Sounds, correctly ordered, was manda-tory.
• The Drum Kit had a standard order.
• Channel 10 had to be devoted to the Drum Kit.
A most recent extension is the GM2, that further expands theSounds database. The Pa1X is soundwise-compatible with theGM2 standard.
The Global channel
Any channels with the Global option assigned (see “MIDI: MIDIIn Channels” on page 238) can simulate the Pa1X integratedkeyboard. When the Pa1X is connected to a master keyboard,transmission should take place over the Global channel of thePa1X.
The MIDI messages received over a Global channel and not overa standard channel are affected by the buttons of the KEY-BOARD MODE section, as well from the split point. Therefore,if the SPLIT button LED is lit up, the notes that arrive to thePa1X over this channel will be divided by the split point into theUpper (above the split point) and Lower (below the split point)parts.
The notes that arrive to a Global channel are used for the chordrecognition of the automatic accompaniment. If the KEY-BOARD MODE is SPLIT, only the notes below the split pointwill be used. These notes will be combined with the ones of thespecial Chord 1 and Chord 2 channels.
The Chord 1 and Chord 2 channels
You can set two special Chord channels (see page 238) to send tothe Pa1X notes for the chord recognition. The notes will be com-bined with the notes that go through the channel set as Global(Global notes are recognized only under the split point, if theSPLIT LED is lit up).
The Chord channels are not affected by the split point and theKEYBOARD MODE section of the control panel. All the notes –both above and below the split point – will be sent to the chordrecognition.
The buttons of the CHORD SCANNING section have a particu-lar effect on the Chord channels:
• if you have selected LOWER, the chord recognition modewill be set by the “Chord Recognition Mode” parameter inthe Style Play mode (see page 95);
• if you have selected UPPER or FULL, the chord recognitionmode will always be Fingered 2 (you need to play at leastthree notes in order for the chord to be detected).
These two channels are especially useful for accordion players toassign a different Chord channel to the chords and the bassplayed with the left hand. In this way, chords and bass will par-ticipate to the creation of chords for the chord recognition of theautomatic accompaniment.
The Control channel
You can set a MIDI IN channel as the Control channel (seepage 238), to select Styles and Performance from an externaldevice. See the Appendix for a list of messages corresponding toPa1X internal data.
MIDI Setup
You can play Pa1X with an external controller, and use it simplyas a powerful sound generator. To help you configure the MIDIchannels, we have provided a set of MIDI Setups (see “MidiSetup” on page 96 for the Style Play mode, “Midi Setup” onpage 153 for the Song Play mode, and “MIDI Setup” on page 236for the Global mode).
We recommend you to consider each MIDI Setup as a startingpoint you can freely tweak. Once you have selected the mostappropriate MIDI Setup for the connection to be made, you canmodify the parameters as necessary and save them in a MIDISetup (see “Write Global - Midi Setup dialog box” on page 257).
Connecting Pa1X to a Master keyboard
You can control the Pa1X with a master keyboard or any otherMIDI keyboard. You only need to connect the MIDI OUT con-nector of the master keyboard to the MIDI IN connector of thePa1X. The master keyboard will become the integrated keyboardof the Pa1X if it transmits over the same channel programmed asGlobal in the Pa1X.
If the master keyboard transmits over the Global channel of thePa1X, the split point and the status of the KEYBOARD MODE
MIDI IN
MIDI OUT

282 MIDIConnecting the Pa1X to a MIDI accordion
section in the control panel will affect the notes received fromthe master keyboard.
Connections and settings
To connect the master keyboard to the Pa1X follow this proce-dure:
1. Connect the MIDI OUT connector of the master keyboardto one of the MIDI IN connectors of the Pa1X (IN A sug-gested).
2. Program the master keyboard to transmit over the Globalchannel of the Pa1X (see “MIDI: MIDI In Channels” onpage 238).
For information on the master keyboard programming, seethe master keyboard own user’s manual.
3. Select the MIDI Setup parameter. You can do this by goingto the “MIDI: MIDI Setup / General Controls” page of theGlobal mode, or in the dedicated page of the Style Play,Song Play or Sequencer mode (see “Midi Setup” onpage 96, “Midi Setup” on page 153, and “Midi Setup” onpage 186).
Note: A different MIDI Setup may be selected for the StylePlay, Song Play and Sequencer modes. The “1-Default” MIDISetup is automatically selected when entering the Sound Editmode. MIDI settings are therefore modified when switching toa different operating mode. The current MIDI Setup is alsoshown in the Global mode.
4. Select the “Master Keyboard” MIDI Setup.
Note: Settings may change when new Global data is loadedfrom disk. To protect settings from loading, use the GlobalProtect function (see “Global Protect” on page 272).
5. To save the assigned MIDI Setup for the selected operativemode into the Global, select the “Write Global-StyleSetup”, the “Write Global-Song Play Setup”, the “WriteGlobal-Seq. Setup”, or the “Write Global-Global Setup”command from the page menu.
6. If needed, press one of the buttons in the MODE section togo to the desired operative mode.
Connecting the Pa1X to a MIDI accordion
There are various types of MIDI accordions, each one requiringdifferent MIDI settings. Pa1X is provided with a series of “Accor-dion” MIDI Setups, each one suitable for a different MIDI accor-dion (see page 236).
Connection and settings
To connect the accordion to the Pa1X follow this procedure:
1. Connect the MIDI OUT connector of the accordion to oneof the MIDI IN connectors of the Pa1X (IN A suggested).
2. Select the MIDI Setup parameter. You can do this by goingto the “MIDI: MIDI Setup / General Controls” page of theGlobal mode, or in the dedicated page of the Style Play,Song Play or Sequencer mode (see “Midi Setup” on page 96and “Midi Setup” on page 153).
Note: A different MIDI Setup may be selected for the StylePlay, Song Play and Sequencer modes. The “1-Default” MIDISetup is automatically selected when entering the Sound Editmode. MIDI settings are therefore modified when switching toa different operating mode. The current MIDI Setup is alsoshown in the Global mode.
3. Select one of the available “Accordion” MIDI Setups.
Note: Settings may change when new Global data is loadedfrom disk. To protect settings from loading, use the GlobalProtect function (see “Global Protect” on page 272).
4. To save the assigned MIDI Setup for the selected operativemode into the Global, select the “Write Global-StyleSetup”, the “Write Global-Song Play Setup”, the “WriteGlobal-Seq. Setup”, or the “Write Global-Global Setup”command from the page menu.
5. If needed, press one of the buttons in the MODE section togo to the desired operative mode.

283MIDIConnecting the Pa1X to an external sequencer
Ref
eren
ce
Connecting the Pa1X to an externalsequencer
You can program a new song on an external sequencer, usingPa1X as a multi-timbral expander.
Connections and settings
In order to connect the Pa1X to a computer, you need to have acomputer with the MIDI interface.
1. Connect the Pa1X and the computer as in the followingdiagram.
2. Activate the “MIDI Thru” function on the externalsequencer.
3. Press GLOBAL, and go to the “MIDI: MIDI Setup / GeneralControls” page. uncheck the “Local Control On” parameter(see page 237). This is called the “Local Off status”.
4. Press SEQUENCER to go to the Sequencer mode. Go to the“Preferences: Global Setup” page (see page 186). Select the“Extern.Seq.” MIDI Setup.
Note: Settings may change when new Global data is loadedfrom disk. To protect settings from loading, use the GlobalProtect function (see “Global Protect” on page 272).
5. Select the “Write Global-Seq. Setup” command from thepage menu to save the assigned MIDI Setup to the Global.
6. Play the keyboard. Notes played on the keyboard go fromthe MIDI OUT of the Pa1X to the MIDI IN of the com-puter/MIDI interface.
Notes generated by the computer (i.e. a song played by itssequencer) are sent through the MIDI OUT of the MIDIinterface to the MIDI IN connector of the Pa1X.
The Local Off
When the Pa1X is connected to an external sequencer, we rec-ommend you to set the Pa1X in Local Off mode (see “LocalControl On” on page 237) to avoid that the notes are simulta-neously played by the keyboard and by the MIDI events sent bythe external sequencer.
When the Pa1X is in Local Off, the Pa1X keyboard transmitsdata to the external sequencer, but not to the internal sound gen-eration. The sequencer will receive the notes played on the Pa1Xkeyboard and send them to the selected track of the song. Thetrack will transmit the data to the internal sound generation ofthe Pa1X.
Note: In order to send data to the Pa1X sound generation, the“MIDI Thru” function must be activated in the external sequencer(normally active; the name may be different according to the typeof sequencer). For more information refer to the instructions man-ual of the sequencer.
The Sounds
The song that is played back by the computer sequencer can
select Pa1X Sounds through the MIDI messages Bank SelectMSB, Bank Select LSB (bank selection, two messages), and Pro-gram Change (Sound selection). For a list of Sounds and MIDIvalues, see “Sounds” on page 291.
A suggestion for those who program songs on computer: Eventhough it is not essential, you usually set the bass on channel 2,melody on channel 4, drum kit on channel 10, control of thePa1X voice harmonizer on channel 5.
MIDI OUT
MIDI IN
MIDI OUTMIDI IN

284 MIDIPlaying another instrument with the Pa1X
Playing another instrument with thePa1X
You can use the Pa1X as the master controller for your MIDIsetup.
1. Connect one of Pa1X MIDI OUT connectors to the otherinstrument’s MIDI IN.
2. Set the other instrument to the same channels you want toplay from Pa1X. For example, if you wish to play the Upper1 and Upper 2 tracks with sounds of the other instrument,enable the other instrument to receive on the same chan-nels Pa1X is transmitting from tracks Upper 1 and Upper 2(by default, channels 1 and 2).
3. Set the master volume of the other instrument with its ownvolume controls.
4. Mute/unmute any track right from the Pa1X. Adjust eachtrack’s volume by using Pa1X sliders.
5. Play the keyboard of the Pa1X.
The Keyboard
Pa1X’s keyboard can drive up to four tracks via the MIDI OUT(Upper 1-3 and Lower). MIDI output channels are set in Globalmode (see “MIDI: MIDI Out Channels” on page 238).
As a default situation (“1-Default” MIDI Setup), each of Pa1XKeyboard tracks transmit on the following channels:
When a track is muted, it cannot transmit any MIDI data to anexternal expander or sequencer connected Pa1X’s MIDI OUT.
To hear only the expander’s sounds, you can lower the MASTERVOLUME control on the Pa1X, or set the Keyboard tracks to theExternal status (see “Track Controls: Mode” on page 181).
The Sequencer
Any Sequencer’s track can drive a channel on an external instru-ment. To set each track’s MIDI output channel, see “MIDI:MIDI Out Channels” on page 238.
To hear only the expander’s sounds, you can lower the MASTERVOLUME control on the Pa1X, or set the Song tracks to theExternal status (see “Track Controls: Mode” on page 181).
Select the “Sequencer 1” or “Sequencer 2” MIDI Setup (depend-ing on the Sequencer you are using on the Pa1X) to set the chan-nels as follows.
The Arranger
One of the most interesting aspect of MIDI, is that you can useyour Pa1X to play an external instrument with its onboardarranger. Yes, it’s hard to beat the audio quality of Pa1X, but youcould wish to use that old faithful synth you are still accustomedto…
To assign some of Pa1X Style tracks to an external instrument,set them to the External status (see “Track Controls: Mode” onpage 181).
Select the “Default” MIDI Setup to set the channels as follows(this is the default status of Pa1X).
Track Out Channel
Upper1 1
Upper2 2
Upper3 3
Lower 4
Track Out Channel
Song 1…16 1…16
Track Out Channel
Bass 9
Drums 10
Percussion 11
Acc1…5 12…16

Appe
ndix

286 Factory dataStyles
Styles
Note: You can remotely select Styles on the Pa1X, by sending it Bank Select MSB (CC#0), Bank Select LSB (CC#32) and Program Changemessages on the Control channel (see “MIDI: MIDI In Channels” on page 238).
Factory data
# CC#0 CC#32 PC Bank: 8/16 Beat 1 CC#0 CC#32 PC Bank: 8/16 Beat 2 CC#0 CC#32 PC Ballad
1 0 0 0 Moonlight Ballad 0 1 0 Kool Beat 0 2 0 Funky Ballad
2 1 Easy Beat 1 Unplugged 16 Bt 1 Easy Ballad 3
3 2 Slow HipHop 2 Real 16 Beat 2 Analog Ballad
4 3 Unplugged Gtr1 3 Guitar Beat 3 Groove Ballad
5 4 British Pop 1 4 Easy Pop 4 Unplugged Gtr 3
6 5 Pop Chart 1 5 Standard 16 Bt 1 5 Pop & Sea
7 6 Soft Ballad 6 Unplugged Rock 6 Meditando
8 7 Easy Ballad 1 7 Pop Hits 7 Unplugged Gtr 4
9 8 British Pop 2 8 Half Time Lite 8 Unplugged Gtr 5
10 9 Classic 8 Bt 1 9 Analog Beat 1 9 Serenade
11 10 Classic 8 Bt 2 10 Analog Beat 2 10 Unplugged Bld 1
12 11 Soft Beat 1 11 Guitar Ballad 1 11 Acoustic Ballad
13 12 Unplugged 8 Bt 1 12 Guitar Ballad 2 12 Unplugged Bld 2
14 13 Light Rock 1 13 8 Beat Analog 1 13 Pop Jazz
15 14 Light Rock 2 14 Analogyst 14 Diva
16 15 Easy Ballad 2 15 8 Beat Analog 2 15 Rock Ballad 1
17 16 Soft Beat 2 16 Trendy Beat 16 Folk Ballad
18 17 Pop Beat 2 17 Slow Ballad 17 Pop Ballad 2
19 18 Standard 8 Beat 18 6 Strings Beat 18 Half Time Ballad
20 19 Unplugged 8 Bt 2 19 Half Time Guitar 19 Country Ballad 1
21 20 Love 8 Beat 20 Standard 16 Bt 2 20 4/4 Ballad
22 21 Half Beat 21 Pop 16 Beat 1 21 Love Ballad
23 22 UK 8 Beat 22 Pop 16 Beat 2 22 Natural Beat
24 23 8 Beat Groove 23 Cinema Ballad 23 Celtic Ballad
25 24 UK R & B 24 Windy Beat 24 16 Beat Analog 1
26 25 Pop Ballad 1 25 Home Beat 25 Color Beat
27 26 HipHop Beat 26 26 Pop Ballad 3
28 27 Miami Beat 27 27 8 Beat Analog 3
29 28 Classic Beat 3 28 28 16 Beat Analog 2
30 29 Real 8 Beat 29 29
31 30 Easy Groove 30 30
32 31 31 31

287Factory dataStyles
Appen
dix
# CC#0 CC#32 PC Bank: Ballroom CC#0 CC#32 PC Bank: Dance CC#0 CC#32 PC Bank: Rock
1 0 3 0 Easy Listening 0 4 0 Dance Fever 0 5 0 Big Band Jump
2 1 Pop Shuffle 1 Groove It Up 1 English Rock
3 2 Slow Band 2 Club Latin 2 Open Rock 1
4 3 Foxtrot 1 3 Barry Dance 3 Open Rock 2
5 4 Organ Foxtrot 4 Sister & Girl 4 Pop Rock
6 5 Movie Ballad 5 Philly Disco 5 Fire Rock
7 6 Pop Chart 2 6 Oriental Dance 1 6 Hard Rock
8 7 Candy & Sweet 7 Twist 7 Heavy Rock
9 8 Organ Waltz 8 House Garage 8 South Strait
10 9 Slow Waltz 1 9 House 9 South Shuffle
11 10 Slow Waltz 2 10 Dream 10 Rock Shuffle
12 11 Slow Waltz 3 11 Techno 11 Rock Ballad 2
13 12 Slow Waltz 4 12 Underground 12 Half Time
14 13 Slow Waltz 5 13 Progressive 13 Rock 6/8
15 14 Slow 6/8 14 Jungle 14 Abbey Road
16 15 Slow Pop 15 Rap 15 Soft Rock
17 16 Slow Rock 1 16 HipHop 16 Surf Rock
18 17 Slow Rock 2 17 Disco 70 17 Pop Shuffle 1
19 18 Unpl. Slow Rock 18 80's Dance 18 Blues Shuffle
20 19 Big Band Fox 1 19 Love Disco 19 60's Rock
21 20 Big Band Fox 2 20 Disco Party 20 Rock & Roll
22 21 Big Band Fox 3 21 Disco Funky 21
23 22 Operetta 22 Disco Gully 22
24 23 Quick Step 1 23 Dance 80 23
25 24 Quick Step 2 24 24
26 25 New Jive 25 25
27 26 Charleston 26 26
28 27 Foxtrot 2 27 27
29 28 Slow Fox 28 28
30 29 Foxtrot 3 29 29
31 30 30 30
32 31 31 31
# CC#0 CC#32 PC Bank: Soul & Funk CC#0 CC#32 PC Bank: World 1 CC#0 CC#32 PC Bank: World 2
1 0 6 0 Kool Funk 0 7 0 Oberkr. Waltz 1 0 8 0 Hawaiian
2 1 Swing HipHop 1 Oberkr. Waltz 2 1 Country Beat
3 2 Funky Sisters 2 Oberkr. Waltz 3 2 Folk Beat
4 3 Steely Feel 3 Oberkr. Polka 1 3 Kountry Pop
5 4 Al Funk 4 Oberkr. Polka 2 4 Bluegrass
6 5 Elektrik Funk 5 German Polka 1 5 Country 8 Beat
7 6 Classic Funk 6 German Polka 2 6 Country 16 Beat
8 7 Talkin' Jazz 7 Oberkr. Polka 7 Country Beat
9 8 Pop Shuffle 8 Bavarian Pop 1 8 Modern Country
10 9 Easy Funk 9 Bavarian Pop 2 9 Country Boogie
11 10 Dance Funk 10 Polka Pop 1 10 Country Shuffle 1
12 11 Club Funk 11 Polka Pop 2 11 Country Shuffle 2
13 12 Blues Ballad 12 Party Polka 12 Country Ballad 2
14 13 Modern Gospel 1 13 Classic Flipper 13 Country 3/4
15 14 Modern Gospel 2 14 Flipper 6/8 14 Orleans
16 15 Gospel Shuffle 15 Flipper 4/4 15 Celtic Waltz
17 16 Rubber Funk 16 Dance Schlager 16 Mexican Waltz
18 17 Groove Funk 17 Fox Schlager 17 Norteno 1
19 18 Acid Jazz 1 18 Medium Schlager 18 Banda 2/4
20 19 Double Beat 19 Disco Schlager 19 Norteno 2
21 20 Groove 20 Schlager 1 20 Quebradita
22 21 Jazz Funk 21 Schlager 2 21 Tejano
23 22 Al Swing 22 Schlager 3 22 Cajun
24 23 HipHop Funk 23 Schlager 4 23 Zydeco
25 24 HipHop Soul 24 Pop Schlager 24 Celtic Dream
26 25 Motown Shuffle 25 Petry Rock 1 25
27 26 Pop Ballad 4 26 Petry Rock 2 26
28 27 Rhythm & Blues 27 Trucker 27
29 28 Soul 1 28 Schlager 5 28
30 29 Memphis 29 Volkst.Schlager 29
31 30 Motown 1 30 Sambamedley 30
32 31 Gospel 31 Partymix 31

288 Factory dataStyles
# CC#0 CC#32 PC Bank: World 3 CC#0 CC#32 PC Bank: Latin 1 CC#0 CC#32 PC Bank: Latin 2
1 0 9 0 Flamenco 0 10 0 Guitar Bossa 0 11 0 Salsa 1
2 1 Oriental Dance 2 1 Unplugged Bossa 1 Salsa 2
3 2 Oriental Ballad 2 Cool Bossa 2 Mambo 1
4 3 Hora 3 Orchestral Bossa 3 Mambo Party
5 4 Sevillana 1 4 Meditation Bossa 4 English Tango
6 5 Sevillana 2 5 Basic Bossa 5 Orchestral Tango
7 6 Jota 6 L.A. Bossa 6 Tango.it
8 7 Copla 7 Groove Bossa 7 Italian Tango
9 8 Classic 3/4 8 New Bossa 8 Habanera 1
10 9 Bolero 9 Lite Bossa 9 Habanera 2
11 10 Minuetto 10 Lite Beguine 10 Mambo 2
12 11 Baroque 11 Latin Pop 11 Mambo 3
13 12 New Age 12 Latin Rock 1 12 Mambo 2000
14 13 Tarantella 13 Latin Rock 2 13 Salsa 3
15 14 Raspa 14 Latin Funk 14 Salsa 4
16 15 Vahde 15 Unplugged Latin 15 Mariachi
17 16 Oriental 16 Cha Cha 1 16 Reggae 1
18 17 Roman 17 Pop Cha Cha 17 Happy Reggae
19 18 Ciftetelli 18 Disco Cha Cha 1 18 Reggae 2
20 19 19 Disco Cha Cha 2 19 Reggae 3
21 20 20 Cha Cha 2 20 Pasodoble 1
22 21 21 Funky Cha Cha 21 Pasodoble Banda
23 22 22 Beguine 1 22 Pasodoble 2
24 23 23 Pop Beguine 23 Argentina Tango
25 24 24 Tradit. Bolero 24
26 25 25 Slow Bolero 25
27 26 26 Sabor 26
28 27 27 27
29 28 28 28
30 29 29 29
31 30 30 30
32 31 31 31
# CC#0 CC#32 PC Bank: Latin Dance CC#0 CC#32 PC Bank: Jazz 1 CC#0 CC#32 PC Bank: Jazz 2
1 0 12 0 Brazilian Samba 0 13 0 Bigger Band 0 14 0 Fast Big Band 1
2 1 Andean 1 Big Band 1 1 Dance Band
3 2 Gipsy Dance 2 Soft Jazz 2 Show Time
4 3 Latin Dance 1 3 BeBop 1 3 Movie Swing
5 4 Slow Latin Rock 4 Jazz Brush 4 Xmas Swing
6 5 Samba 5 Medium Swing 5 Django
7 6 Sambalegre 6 Slow Swing 6 Hollywood 1
8 7 Disco Samba 7 Swing Ballad 1 7 Hollywood 2
9 8 Samba Funk 8 50's Swing 8 Broadway
10 9 Rhumba 1 9 Swing Ballad 2 9 Dixieland
11 10 Merengue 1 10 Unplug. Swing 1 10 Big Band 4
12 11 Merengue 2 11 Swing Ballad 3 11 Swing Shuffle
13 12 Cumbia 12 BeBop 2 12 Fast Big Band 2
14 13 Latin Dance 2 13 Big Band Medium 13 Latin Big Band
15 14 Batucada 14 Big Band 40's 14 Big Band Fox 4
16 15 Rhumba 2 15 Big Band 2 15 Acid Jazz 2
17 16 Gipsy 16 Jazz Waltz 1 16 New Jazz
18 17 Pop Rhumba 17 Jazz Waltz 2 17 Latin Jazz
19 18 Calypso 18 Jazz Waltz 3 18 Fusion
20 19 Lambada 19 5/4 Swing 19 Ragtime Piano
21 20 Meneito 20 Vocal Swing 20 Shuffle Piano
22 21 Macarena 21 Big Band 3 21 Boogie Piano
23 22 22 Mood Swing 22 Bossa Piano
24 23 23 Unplug. Swing 2 23
25 24 24 Big Band Ballad 24
26 25 25 25
27 26 26 26
28 27 27 27
29 28 28 28
30 29 29 29
31 30 30 30
32 31 31 31

289Factory dataStyles
Appen
dix
# CC#0 CC#32 PC Bank: Traditional CC#0 CC#32 PC Bank: User 1-3 CC#0 CC#32 PC Bank: Direct FD 1-3
1 0 15 0 Italian Waltz 1 0 17-19 0 0 20-22 0
2 1 German Waltz 1 1 1
3 2 Walzer Musette 2 2
4 3 Vienna Waltz 3 3
5 4 Viennese 4 4
6 5 Tradit. Polka 5 5
7 6 French March 6 6
8 7 March 7 7
9 8 Italian Waltz 2 8 8
10 9 Italian Waltz 3 9 9
11 10 Italian Waltz 4 10 10
12 11 Valzer 11 11
13 12 Italian Waltz 5 12 12
14 13 German Waltz 2 13 13
15 14 German Waltz 3 14 14
16 15 Laendler 15 15
17 16 Mazurka 1 16 16
18 17 Mazurka 2 17 17
19 18 Mazurka 3 18 18
20 19 Italian Polka 19 19
21 20 Polka 1 20 20
22 21 Polka 2 21 21
23 22 German Polka 22 22
24 23 Mazurka 4 23 23
25 24 Polka 3 24 24
26 25 25 25
27 26 26 26
28 27 27 27
29 28 28 28
30 29 29 29
31 30 30 30
32 31 31 31
# CC#0 CC#32 PC Bank: Direct HD 1-9
1 0 23-31 0 0 0
2 1 1 1
3 2 2 2
4 3 3 3
5 4 4 4
6 5 5 5
7 6 6 6
8 7 7 7
9 8 8 8
10 9 9 9
11 10 10 10
12 11 11 11
13 12 12 12
14 13 13 13
15 14 14 14
16 15 15 15
17 16 16 16
18 17 17 17
19 18 18 18
20 19 19 19
21 20 20 20
22 21 21 21
23 22 22 22
24 23 23 23
25 24 24 24
26 25 25 25
27 26 26 26
28 27 27 27
29 28 28 28
30 29 29 29
31 30 30 30
32 31 31 31

290 Factory dataStyle Elements
Style Elements
Note: You can remotely select the various Style Elements on the Pa1X, by sending it Program Change messages on the Control channel (see“MIDI: MIDI In Channels” on page 238).
Note: The above Program Change numbers are given according to the 0-127 numbering system.
Single Touch Settings (STS)
Note: You can remotely select Single Touch Settings (STS) on the Pa1X, by sending it Bank Select MSB (CC#0), Bank Select LSB (CC#32)and Program Change messages on the Control channel (see “MIDI: MIDI In Channels” on page 238). If a Style is already selected, just sendthe Program Change message.
PC Style Element PC Style Element PC Style Element PC Style Element PC Style Element
80 Variation 1 81 Variation 2 82 Variation 3 83 Variation 4 84 Intro 1
85 Intro 2 86 Fill 1 87 Fill 2 88 Ending 1 89 Ending 2
90 Fill 3/Break
CC#0 CC#32 PC STS PC STS PC STS PC STS
The same as the Style to which the STS belongs 64 STS 1 65 STS 2 66 STS 3 67 STS 4

291Factory dataSounds
Appen
dix
Sounds
The following table lists all Pa1X Factory Sounds in order ofBank Select-Program Change number.
Legend: The table also includes MIDI data used to remotely selectthe Sounds. CC00: Control Change 0, or Bank Select MSB. CC32:Control Change 32, or Bank Select LSB. PC: Program Change.Bank: Sound/Performance Select button.
CC00 CC32 PC Name Bank GM2
121 0 0 Acoustic Piano Piano √
121 1 0 Ac. Piano Wide Piano √
121 2 0 Ac. Piano Dark Piano √
121 3 0 Grand Piano Piano
121 4 0 Classic Piano Piano
121 5 0 L/R Piano Piano
121 6 0 Piano & Vibes Piano
121 7 0 Piano & Strings Piano
121 8 0 Grand Piano 2 Piano √
121 0 1 Bright Piano Piano √
121 1 1 Bright PianoWide Piano √
121 2 1 Piano Pad 1 Piano
121 3 1 Piano Pad 2 Piano
121 4 1 Piano StringPad Piano
121 0 2 E. Gran Piano Piano √
121 1 2 E. Grand Wide Piano √
121 2 2 M1 Piano Piano
121 3 2 90's Piano Piano
121 4 2 2000's Piano Piano
121 5 2 Chorus Piano Piano
121 6 2 Piano Layers Piano
121 0 3 Honky-Tonk Piano √
121 1 3 Honky Wide Piano √
121 0 4 Electric Piano 1 E. Piano √
121 1 4 Detuned EP 1 E. Piano √
121 2 4 EP1 Veloc.sw E. Piano √
121 3 4 60's E. Piano E. Piano √
121 4 4 Vintage EP E. Piano
121 5 4 Pro Dyno EP E. Piano
121 6 4 Pro Stage EP E. Piano
121 7 4 Studio EP E. Piano
121 8 4 R&B E. Piano E. Piano
121 9 4 Thin E. Piano E. Piano
121 10 4 Dyno Tine EP E. Piano
121 11 4 Club E. Piano E. Piano
121 12 4 Classic Wurly E. Piano
121 13 4 Soft Wurly E. Piano
121 14 4 Hard Wurly E. Piano
121 15 4 Vel. Wurly E. Piano
121 16 4 Tremolo Wurly E. Piano
121 0 5 Electric Piano 2 E. Piano √
121 1 5 Detuned EP 2 E. Piano √
121 2 5 EP2 Veloc.sw E. Piano √
121 3 5 EP Legend E. Piano √
121 4 5 EP Phase E. Piano √
121 5 5 Syn Piano X E. Piano
121 6 5 Stereo Dig. EP E. Piano
121 7 5 Classic Dig. EP E. Piano
121 8 5 Hybrid EP E. Piano
121 9 5 Classic Tines E. Piano
121 10 5 Phantom Tine E. Piano
121 11 5 DW8000 EP E. Piano
121 12 5 Sweeping EP E. Piano
121 13 5 White Pad EP E. Piano
121 0 6 Harpsichord Piano √
121 1 6 Harpsi Octave Piano √
121 2 6 Harpsi Wide Piano √
121 3 6 Harpsi Key Off Piano √
121 4 6 Harpsi Korg Piano
121 0 7 Clav Piano √
121 1 7 Pulse Clav Piano √
121 2 7 Clav Wah Piano
121 3 7 Clav Snap Piano
121 4 7 Sticky Clav Piano
121 0 8 Celesta Mallet & Bell √
121 0 9 Glocken Mallet & Bell √
121 1 9 Sistro Mallet & Bell
121 0 10 Music Box Mallet & Bell √
121 1 10 Orgel Mallet & Bell
121 0 11 Vibraphone 1 Mallet & Bell √
121 1 11 Vibrap. Wide Mallet & Bell √
121 2 11 Vibraphone 2 Mallet & Bell
121 0 12 Marimba Mallet & Bell √
121 1 12 Marimba Wide Mallet & Bell √
121 2 12 Marimba Key Off Mallet & Bell
121 3 12 Monkey Skuls Mallet & Bell
121 4 12 Log Drum Drum & Perc.
121 5 12 Mallet Clock Mallet & Bell
121 6 12 Balaphon Mallet & Bell
121 0 13 Xylophone Mallet & Bell √
121 0 14 Tubular Bell Mallet & Bell √
121 1 14 Church Bell 1 Mallet & Bell √
121 2 14 Carillon Mallet & Bell √
121 3 14 Church Bell 2 Mallet & Bell
121 0 15 Dulcimer Mallet & Bell √
121 1 15 Santur Mallet & Bell
121 0 16 Drawbars Organ1 Organ √
121 1 16 Det.DrawbarsOrg. Organ √
121 2 16 It. 60's Organ Organ √
121 3 16 Drawbars Organ2 Organ √
121 4 16 Dark Jazz Organ Organ
121 5 16 Iper Dark Organ Organ
121 6 16 Full Drawbars Organ
121 7 16 DWGS Organ Organ
121 8 16 Jazz Organ Organ
121 9 16 Gospel Organ Organ
121 10 16 Good Old B Organ
121 11 16 VOX Legend Organ
121 12 16 Arabian Organ Organ
121 13 16 Gospel Organ Vel Organ
121 14 16 Drawbars Organ3 Organ √
121 0 17 Perc. Organ 1 Organ √
121 1 17 Det.Perc.Organ Organ √
121 2 17 Perc. Organ 2 Organ √
121 3 17 Old Wheels Organ
121 4 17 Percuss. BX3 Organ
121 5 17 M1 Organ Organ
121 6 17 Techno Org.Bass Organ
121 7 17 BX3 Short Decay Organ
121 8 17 Rotary Organ Organ
121 9 17 Perc.StereoOrgan Organ
121 10 17 Perc. Organ 3 Organ √
121 0 18 Rock Organ Organ √
CC00 CC32 PC Name Bank GM2

292 Factory dataSounds
121 1 18 BX3 Vel. Sw Organ
121 2 18 Killer B Organ
121 3 18 Dirty B Organ
121 4 18 Classic Click Organ
121 5 18 Distortion Organ Organ
121 6 18 Super BX Perc. Organ
121 7 18 Dirty Jazz Organ Organ
121 8 18 Perc.Short Decay Organ
121 9 18 Perc. Wheels Organ
121 10 18 Jimmy Organ Organ
121 11 18 Rock Organ 2 Organ √
121 0 19 Church Organ Organ √
121 1 19 Church Oct. Mix Organ √
121 2 19 Detuned Church Organ √
121 3 19 Pipe Mixture Organ
121 4 19 Church Pipes Organ
121 5 19 Full Pipes Organ
121 6 19 Pipe Tutti 1 Organ
121 7 19 Positive Organ Organ
121 8 19 Pipe Tutti 2 Organ
121 9 19 Pipe Tutti 3 Organ
121 0 20 Reed Organ Organ √
121 1 20 Puff Organ Organ √
121 2 20 Small Pipe Organ
121 3 20 Flauto Pipes Organ
121 4 20 Pipe Flute Organ
121 0 21 Accordion 1 Accordion √
121 1 21 Accordion 2 Accordion √
121 2 21 Akordeon Accordion
121 3 21 Musette 1 Accordion
121 4 21 Musette 2 Accordion
121 5 21 Musette Clar. Accordion
121 6 21 Fisa 16, 8’ Accordion
121 7 21 Fisa 16, 4’ Accordion
121 8 21 Fisa Master Accordion
121 9 21 Cassotto Accordion
121 10 21 Arabic Accordion Accordion
121 11 21 Sweet Musette Accordion
121 12 21 Cassotto 16' Accordion
121 13 21 Cassotto Or.Tune Accordion
121 14 21 Cassotto NorTune Accordion
121 15 21 Detune Accordion Accordion
121 16 21 2 Voices Musette Accordion
121 17 21 3 Voices Musette Accordion
121 18 21 France Musette Accordion
121 19 21 Acc.Clarinet OT Accordion
121 20 21 Acc. Clarinet NT Accordion
121 21 21 Acc. Piccolo OT Accordion
121 22 21 Acc. Piccolo NT Accordion
121 23 21 Master Accordion Accordion
121 24 21 Accordion 3 Accord √
121 0 22 Harmonica 1 Accordion √
121 1 22 Sweet Harmonica Accordion
121 2 22 Harmonica 2 Accordion
121 3 22 Harmonica AT Accordion
121 4 22 Harmonica 3 Accord √
121 0 23 Tango Accordion Accordion √
121 1 23 Fisa Tango! Accordion
121 2 23 Accordion 16 8' Accordion
121 3 23 Accordion16 8 4' Accordion
121 4 23 Acc.16 8' & Bass Accordion
121 5 23 Accordion Bass Accordion
CC00 CC32 PC Name Bank GM2
121 6 23 Acc.Voice Change Accordion
121 7 23 Accordion 16 4' Accordion
121 8 23 Acc.16 8 4' Plus Accordion
121 9 23 Acc. & Acc. Bass Accordion
121 10 23 Tango Accordion2 Accord √
121 0 24 Nylon Guitar 1 Guitar √
121 1 24 Ukulele Guitar √
121 2 24 Nylon Key Off Guitar √
121 3 24 Nylon Guitar 3 Guitar √
121 4 24 Nylon Bossa Guitar
121 5 24 Ac.Guitar KeyOff Guitar
121 6 24 Spanish Guitar Guitar
121 7 24 Guitar Strings Guitar
121 8 24 Nylon Gtr Pro1 Guitar
121 9 24 Brazilian Guitar Guitar
121 10 24 Nylon Vel. Harm. Guitar
121 11 24 Nylon Gtr Pro2 Guitar
121 12 24 Nylon Gtr RX1 Guitar
121 13 24 Nylon Gtr RX2 Guitar
121 14 24 Nylon Slide Pro Guitar
121 15 24 Nylon Guitar 2 Guitar
121 0 25 Steel Guitar 1 Guitar √
121 1 25 12 Strings Gtr Guitar √
121 2 25 Mandolin Guitar √
121 3 25 Steel & Body Guitar √
121 4 25 Steel Guitar 2 Guitar
121 5 25 Steel 12 Strings Guitar
121 6 25 Hackbrett Guitar
121 7 25 Finger Key Off Guitar
121 8 25 Finger Tips Guitar
121 9 25 Steel Folk Gtr Guitar
121 10 25 Mandolin Key Off Guitar
121 11 25 Mandolin Trem. Guitar
121 12 25 Reso. Guitar Guitar
121 13 25 Steel Slide Pro1 Guitar
121 14 25 Steel Slide Pro2 Guitar
121 15 25 Steel Guitar RX1 Guitar
121 16 25 Steel Guitar RX2 Guitar
121 17 25 12 Strings Pro Guitar
121 18 25 12 Strings RX Guitar
121 19 25 Steel Guitar Pro Guitar
121 20 25 Steel Guitar 3 Guitar
121 21 25 Steel Guitar 4 Guitar √
121 0 26 Jazz Guitar Guitar √
121 1 26 Pedal Steel Gtr1 Guitar √
121 2 26 Club Jazz Gtr 1 Guitar
121 3 26 Club Jazz Gtr 2 Guitar
121 4 26 Pedal Steel Gtr2 Guitar
121 5 26 Soft Jazz Guitar Guitar
121 6 26 JazzGtr SlidePro Guitar
121 0 27 Clean Guitar 2 Guitar √
121 1 27 Det. Clean Gtr Guitar √
121 2 27 Mid Tone Gtr Guitar √
121 3 27 Chorus Guitar Guitar
121 4 27 Vintage S.2 Guitar
121 5 27 Proces.E.Guitar Guitar
121 6 27 Single Coil Guitar
121 7 27 New Stra.Guitar Guitar
121 8 27 Guitarish Guitar
121 9 27 L&R E.Guitar 1 Guitar
121 10 27 L&R E.Guitar 2 Guitar
121 11 27 Country Nu Guitar
CC00 CC32 PC Name Bank GM2

293Factory dataSounds
Appen
dix
121 12 27 Funky Wah Sw. Guitar
121 13 27 Clean Gtr Pro1 Guitar
121 14 27 Single Coil Pro Guitar
121 15 27 Clean Gtr Pro2 Guitar
121 16 27 Stra. Vel. Pro Guitar
121 17 27 Stra. Gtr Slide Guitar
121 18 27 Chorus Gtr Pro Guitar
121 19 27 Vintage S.1 Guitar
121 20 27 Clean Guitar 1 Guitar
121 21 27 Solid Guitar Guitar
121 22 27 Stein Guitar 1 Guitar
121 23 27 Stein Guitar 2 Guitar
121 24 27 Stein Guitar 3 Guitar
121 25 27 Clean Guitar 3 Guitar √
121 0 28 Muted Guitar Guitar √
121 1 28 Funky Cut Gtr Guitar √
121 2 28 Mute Vel. Gtr Guitar √
121 3 28 Jazz Man Guitar √
121 4 28 R&R Guitar Guitar
121 5 28 Stra. Chime Guitar
121 6 28 Clean Mute Gtr Guitar
121 7 28 Rhythm E.Guitar Guitar
121 8 28 Clean Funk Guitar
121 9 28 Disto Mute Guitar
121 10 28 Clean Funk RX1 Guitar
121 11 28 Clean Funk RX2 Guitar
121 12 28 Funk Stein RX1 Guitar
121 13 28 Funk Stein RX2 Guitar
121 14 28 Clean Guitar RX1 Guitar
121 15 28 Clean Guitar RX2 Guitar
121 16 28 Clean Guitar RX3 Guitar
121 17 28 Clean Guitar RX4 Guitar
121 18 28 Clean Guitar RX5 Guitar
121 19 28 Muted Guitar 2 Guitar √
121 0 29 Overdrive Guitar Guitar √
121 1 29 Guitar Pinch Guitar √
121 0 30 Distortion Gtr Guitar √
121 1 30 Feedback Guitar Guitar √
121 2 30 Dist.Rhytmic Gtr Guitar √
121 3 30 Joystick Gtr Y- Guitar
121 4 30 Power Chords Guitar
121 5 30 Mute Monster Guitar
121 6 30 Wet Dist. Guitar Guitar
121 7 30 Solo Dist. Guitar Guitar
121 8 30 Stereo Dist. Gtr Guitar
121 9 30 Dist. Guitar RX1 Guitar
121 10 30 Dist. Guitar RX2 Guitar
121 0 31 Guitar Harmonic Guitar √
121 1 31 Guitar Feedback Guitar √
121 2 31 E.Gtr Harmonics Guitar
121 0 32 Acoustic Bass Bass √
121 1 32 Ac. Bass Buzz Bass
121 2 32 Bass & Ride 2 Bass
121 3 32 Acous. Bass Pro1 Bass
121 4 32 Acous. Bass Pro2 Bass
121 5 32 DarkWoody A.Bass Bass
121 6 32 Bass & Ride 1 Bass
121 7 32 Acous. Bass RX Bass
121 8 32 Acoustic Bass 2 Bass √
121 0 33 Finger Bass 3 Bass √
121 1 33 Finger Slap 2 Bass √
121 2 33 Finger E.Bass1 Bass
CC00 CC32 PC Name Bank GM2
121 3 33 Finger E.Bass2 Bass
121 4 33 Finger E.Bass3 Bass
121 5 33 Stick Bass Bass
121 6 33 Finger Bass 1 Bass
121 7 33 Finger Bass 2 Bass
121 8 33 Chorus Fing.Bass Bass
121 9 33 Bright Finger B. Bass
121 10 33 Finger Bass Vel. Bass
121 11 33 More mid! Bass Bass
121 12 33 Finger Slap 1 Bass
121 13 33 Finger Bass RX Bass
121 14 33 FingerB.& Guitar Bass
121 15 33 Finger Bass 4 Bass √
121 0 34 Picked E.Bass 3 Bass √
121 1 34 Picked E.Bass 1 Bass
121 2 34 Picked E.Bass 2 Bass
121 3 34 Stein Bass Bass
121 4 34 Guitar Bass Bass
121 5 34 Bass Mute Bass
121 6 34 Bass&Gtr Double Bass
121 7 34 Pick Bass Vel.1 Bass
121 8 34 Pick Bass Vel.2 Bass
121 9 34 Ticktacing Bass Bass
121 10 34 Picked Bass RX Bass
121 11 34 Picked E. Bass 4 Bass √
121 0 35 Fretless Bass 1 Bass √
121 1 35 Fretless Bass2 Bass
121 2 35 Fretless Sw. Bass
121 3 35 Sweet Fretless Bass
121 4 35 Dark R&B Bass1 Bass
121 5 35 Dark R&B Bass2 Bass
121 6 35 Woofer Pusher B. Bass
121 7 35 Fretless Bass3 Bass √
121 0 36 Slap Bass 2 Bass √
121 1 36 Super Sw.Bass1 Bass
121 2 36 Super Sw.Bass2 Bass
121 3 36 FunkSlap Bass RX Bass
121 4 36 SlapFing Bass RX Bass
121 5 36 SlapPick Bass RX Bass
121 6 36 Slap Bass 4 Bass √
121 0 37 Slap Bass 3 Bass √
121 1 37 Thumb Bass Bass
121 2 37 Dyna Bass Bass
121 3 37 Slap Bass Vel. Bass
121 4 37 Chorus Slap Bass Bass
121 5 37 The Other Slap Bass
121 6 37 Slap Bass 1 Bass
121 7 37 Slap Bass 5 Bass √
121 0 38 Synth Bass 1 Bass √
121 1 38 Syn Bass Warm Bass √
121 2 38 Syn Bass Reso Bass √
121 3 38 Clav Bass Bass √
121 4 38 Hammer Bass √
121 5 38 30303 Bass Bass
121 6 38 30303 Square Bass
121 7 38 Bass Square Bass
121 8 38 Syn Bass Res Bass
121 9 38 Digi Bass 1 Bass
121 10 38 Digi Bass 2 Bass
121 11 38 Digi Bass 3 Bass
121 12 38 Blind as a Bat Bass
121 13 38 Jungle Bass Bass
CC00 CC32 PC Name Bank GM2

294 Factory dataSounds
121 14 38 Auto Pilot 1 Synth 2
121 15 38 Hybrid Bass Bass
121 16 38 Dr. Octave Bass
121 17 38 Drive Bass Bass
121 18 38 Synth Bass 3 Bass √
121 0 39 Synth Bass 2 Bass √
121 1 39 Attack Bass Bass √
121 2 39 Rubber Bass Bass √
121 3 39 Attack Pulse Bass √
121 4 39 Euro Bass Bass
121 5 39 Jungle Rez Bass
121 6 39 Nasty Bass Bass
121 7 39 Phat Bass Bass
121 8 39 Poinker Bass Bass
121 9 39 Synth Bass 80ish Bass
121 10 39 Autofilter Bass Bass
121 11 39 Monofilter Bass Bass
121 12 39 Reso Bass Bass
121 13 39 Auto Pilot 2 Bass
121 14 39 Bass4 Da Phunk Bass
121 15 39 Synth Bass 4 Bass √
121 0 40 Violin Strings & Vocal √
121 1 40 Slow Att.Violin Strings & Vocal √
121 2 40 Solo Violin Strings & Vocal
121 3 40 Slow Violin Strings & Vocal
121 0 41 Viola Strings & Vocal √
121 0 42 Cello Strings & Vocal √
121 0 43 Contrabass Strings & Vocal √
121 0 44 Tremolo Strings Strings & Vocal √
121 0 45 Pizzicato Str. Strings & Vocal √
121 1 45 Pizz. Ensemble Strings & Vocal
121 2 45 Pizz. Section Strings & Vocal
121 3 45 Double Strings Strings & Vocal
121 0 46 Orchestral Harp Strings & Vocal √
121 1 46 Yang Chin Strings & Vocal √
121 0 47 Timpani Drum & Perc. √
121 0 48 Strings Ens. 1 Strings & Vocal √
121 1 48 Strings & Brass Strings & Vocal √
121 2 48 60’s Strings Strings & Vocal √
121 3 48 Stereo Strings Strings & Vocal
121 4 48 Legato Strings Strings & Vocal
121 5 48 i3 Strings Strings & Vocal
121 6 48 N Strings Strings & Vocal
121 7 48 Arco Strings Strings & Vocal
121 8 48 Octave Strings Strings & Vocal
121 9 48 Strings Quartet Strings & Vocal
121 10 48 Symphonic Bows Strings & Vocal
121 11 48 Ensemble & Solo Strings & Vocal
121 12 48 Camera Strings Strings & Vocal
121 13 48 Arabic Strings Strings & Vocal
121 14 48 Orchestra Tutti1 Strings & Vocal
121 15 48 Strings & Horns Strings & Vocal
121 16 48 Orch. & Oboe 1 Strings & Vocal
121 17 48 Orch. & Oboe 2 Strings & Vocal
121 18 48 Strings & Glock. Strings & Vocal
121 19 48 Orchestra Tutti2 Strings & Vocal
121 20 48 Orchestra&Flute Strings & Vocal
121 21 48 Strings Ens. 3 Strings & Vocal √
121 0 49 Strings Ens. 2 Strings & Vocal √
121 1 49 Sweeper Strings Strings & Vocal
121 2 49 Full Strings Strings & Vocal
121 3 49 Strings Ens. 4 Strings & Vocal √
CC00 CC32 PC Name Bank GM2
121 0 50 Synth Strings 1 Strings & Vocal √
121 1 50 Synth Strings 3 Strings & Vocal √
121 2 50 Analog Strings 2 Strings & Vocal
121 3 50 Analog Velve Strings & Vocal
121 4 50 Odissey Strings & Vocal
121 5 50 Analog Strings 1 Strings & Vocal
121 6 50 Synth Strings 4 Strings & Vocal √
121 0 51 Synth Strings 2 Strings & Vocal √
121 1 51 Synth Strings 5 Strings & Vocal √
121 0 52 Choir Aahs 1 Strings & Vocal √
121 1 52 Choir Aahs 2 Strings & Vocal √
121 2 52 Oooh Voices Strings & Vocal
121 3 52 Oooh Slow Voice Strings & Vocal
121 4 52 Take Voices 1 Strings & Vocal
121 5 52 Take Voices 2 Strings & Vocal
121 6 52 Oooh Choir Strings & Vocal
121 7 52 Aaah Choir Strings & Vocal
121 8 52 Mmmh Choir Strings & Vocal
121 9 52 Oh-Ah Voices Strings & Vocal
121 10 52 Slow Choir Strings & Vocal
121 11 52 Grand Choir Strings & Vocal
121 12 52 Choir Light Strings & Vocal
121 13 52 Strings Choir Strings & Vocal
121 0 53 Voice Ooohs Strings & Vocal √
121 1 53 Humming Strings & Vocal √
121 2 53 Doolally Strings & Vocal
121 3 53 Airways Strings & Vocal
121 0 54 Synth Voice Strings & Vocal √
121 1 54 Analog Voice Strings & Vocal √
121 2 54 Vocalesque Strings & Vocal
121 3 54 Vocalscape Strings & Vocal
121 4 54 Classic Vox Strings & Vocal
121 5 54 Dream Voice Strings & Vocal
121 0 55 Orchestra Hit Brass √
121 1 55 Bass Hit Plus Brass √
121 2 55 6th Hit Brass √
121 3 55 Euro Hit Brass √
121 4 55 Brass Impact Brass
121 5 55 Hit in India SFX
121 6 55 Wild Arp Synth 2
121 7 55 Flip Blip Synth 2
121 8 55 Netherland Hit Brass
121 0 56 Trumpet 1 Trumpet & Trbn. √
121 1 56 Dark Trumpet Trumpet & Trbn. √
121 2 56 Trumpet 2 Trumpet & Trbn.
121 3 56 Mono Trumpet Trumpet & Trbn.
121 4 56 Trumpet Expr Trumpet & Trbn.
121 5 56 Trumpet Pitch Trumpet & Trbn.
121 6 56 Dual Trumpets Trumpet & Trbn.
121 7 56 Flugel Horn Trumpet & Trbn.
121 8 56 Warm Flugel Trumpet & Trbn.
121 9 56 BeBop Cornet Trumpet & Trbn.
121 10 56 Trumpet Pro 1 Trumpet & Trbn.
121 11 56 Trumpet Pro 2 Trumpet & Trbn.
121 12 56 Sweet FlugelHorn Trumpet & Trbn.
121 13 56 Flugel Horn Pro Trumpet & Trbn.
121 14 56 Trumpet 3 Trumpet & Trbn. √
121 0 57 Trombone 1 Trumpet & Trbn. √
121 1 57 Trombone 2 Trumpet & Trbn. √
121 2 57 Bright Trombone Trumpet & Trbn. √
121 3 57 Hard Trombone Trumpet & Trbn.
121 4 57 Soft Trombone Trumpet & Trbn.
CC00 CC32 PC Name Bank GM2

295Factory dataSounds
Appen
dix
121 5 57 Pitch Trombone Trumpet & Trbn.
121 6 57 Trombone Expr. 1 Trumpet & Trbn.
121 7 57 Trombone Expr. 2 Trumpet & Trbn.
121 8 57 Trombone Vel. 1 Trumpet & Trbn.
121 9 57 Trombone Vel. 2 Trumpet & Trbn.
121 10 57 Trombone Vel. 3 Trumpet & Trbn.
121 11 57 Trombone Pro Vel Trumpet & Trbn.
121 12 57 Trombone 3 Trumpet & Trbn. √
121 0 58 Tuba Trumpet & Trbn. √
121 1 58 Oberkr. Tuba Trumpet & Trbn.
121 2 58 Tuba Gold Trumpet & Trbn.
121 3 58 Dynabone Trumpet & Trbn.
121 0 59 Mute Trumpet 1 Trumpet & Trbn. √
121 1 59 Mute Trumpet 2 Trumpet & Trbn. √
121 2 59 Wah Trumpet Trumpet & Trbn.
121 3 59 Mute Ensemble 1 Brass
121 4 59 Mute Ensemble 2 Brass
121 0 60 French Horn 1 Brass √
121 1 60 French Horn 2 Brass √
121 2 60 French Section Brass
121 3 60 Classic Horns Brass
121 4 60 Horns & Ensemble Brass
121 0 61 Brass Section 1 Brass √
121 1 61 Brass Section 2 Brass √
121 2 61 Tight Brass 3 Brass
121 3 61 Glen & Friends Brass
121 4 61 Big Band Brass Brass
121 5 61 Sax & Brass Brass
121 6 61 Glen & Boys Brass
121 7 61 Trumpet & Brass Brass
121 8 61 Attack Brass Brass
121 9 61 Trumpet Ens. Brass
121 10 61 Trombone Ens. Brass
121 11 61 Trombones Brass
121 12 61 Tight Brass 4 Brass
121 13 61 Fat Brass Brass
121 14 61 Dyna Brass 1 Brass
121 15 61 Brass Expr. Brass
121 16 61 Brass Band Brass
121 17 61 Film Brass Brass
121 18 61 Brass Slow Brass
121 19 61 Fanfare Brass
121 20 61 Movie Brass Brass
121 21 61 Power Brass Brass
121 22 61 Dyna Brass 2 Brass
121 23 61 Sforzato Brass Brass
121 24 61 Double Brass Brass
121 25 61 Brass Hit Brass
121 26 61 Brass Fall Brass
121 27 61 Tight Brass 1 Brass
121 28 61 Tight Brass Pro Brass
121 29 61 Tight Brass 2 Brass
121 30 61 Brass of Power Brass
121 31 61 Brass Section 3 Brass √
121 0 62 Synth Brass 1 Brass √
121 1 62 Synth Brass 3 Brass √
121 2 62 Analog Brass 1 Brass √
121 3 62 Jump Brass Brass √
121 4 62 Electrik Brass Brass
121 5 62 Synth Brass 5 Brass
121 0 63 Synth Brass 2 Brass √
121 1 63 Synth Brass 4 Brass √
CC00 CC32 PC Name Bank GM2
121 2 63 Analog Brass 2 Brass √
121 3 63 Brass Pad Brass
121 4 63 Big Panner Synth 1
121 5 63 Synth Brass 6 Brass √
121 0 64 Soprano Sax Sax √
121 1 64 Sweet Soprano 3 Sax
121 2 64 Soprano Pro Sax
121 3 64 Sweet Soprano 1 Sax
121 4 64 Sweet Soprano 2 Sax
121 0 65 Alto Sax Sax √
121 1 65 Alto Breath Sax
121 2 65 Sax Ensemble Sax
121 3 65 Breathy Alto Sax Sax
121 4 65 Alto Sax Growl Sax
121 5 65 Sweet Alto Sax 1 Sax
121 6 65 Sweet Alto Sax 2 Sax
121 7 65 Soft Alto Sax Sax
121 8 65 Alto Sax Pro Sax
121 0 66 Tenor Sax Sax √
121 1 66 Tenor Sax Noise1 Sax
121 2 66 Soft Tenor Sax
121 3 66 Tenor Breath Sax
121 4 66 Tenor Growl Sax
121 5 66 Folk Sax Sax
121 6 66 Tenor Sax Noise2 Sax
121 7 66 Tenor Sax Expr.1 Sax
121 8 66 Tenor Sax Expr.2 Sax
121 9 66 Jazz Tenor Vel.1 Sax
121 10 66 Jazz Tenor Vel.2 Sax
121 11 66 Reed of Power Sax
121 0 67 Baritone Sax Sax √
121 1 67 Baritone Growl Sax
121 2 67 Breathy Baritone Sax
121 3 67 Baritone Sax Pro Sax
121 4 67 Baritone Sax 2 Sax √
121 0 68 Oboe Woodwind √
121 1 68 Double Reed Woodwind
121 0 69 English Horn 1 Woodwind √
121 1 69 English Horn 2 Woodwind
121 0 70 Bassoon Woodwind √
121 0 71 Clarinet Woodwind √
121 1 71 Jazz Clarinet Woodwind
121 2 71 Clarinet G Woodwind
121 3 71 Section Winds 1 Woodwind
121 4 71 Section Winds 2 Woodwind
121 5 71 Clarinet Ens. Woodwind
121 6 71 Woodwinds Woodwind
121 7 71 Folk Clarinet Woodwind
121 0 72 Piccolo Woodwind √
121 1 72 Small Orchestra Woodwind
121 2 72 Nay Woodwind
121 0 73 Flute 1 Woodwind √
121 1 73 Jazz Flute Woodwind
121 2 73 Flute Switch Woodwind
121 3 73 Flute Dyn. 5th Woodwind
121 4 73 Flute Frullato Woodwind
121 5 73 Orchestra Flute Woodwind
121 6 73 Flute Muted Brass
121 7 73 Wooden Flute Woodwind
121 8 73 Bambu Flute Woodwind
121 9 73 Flute 2 Woodwind
121 0 74 Recorder 1 Woodwind √
CC00 CC32 PC Name Bank GM2
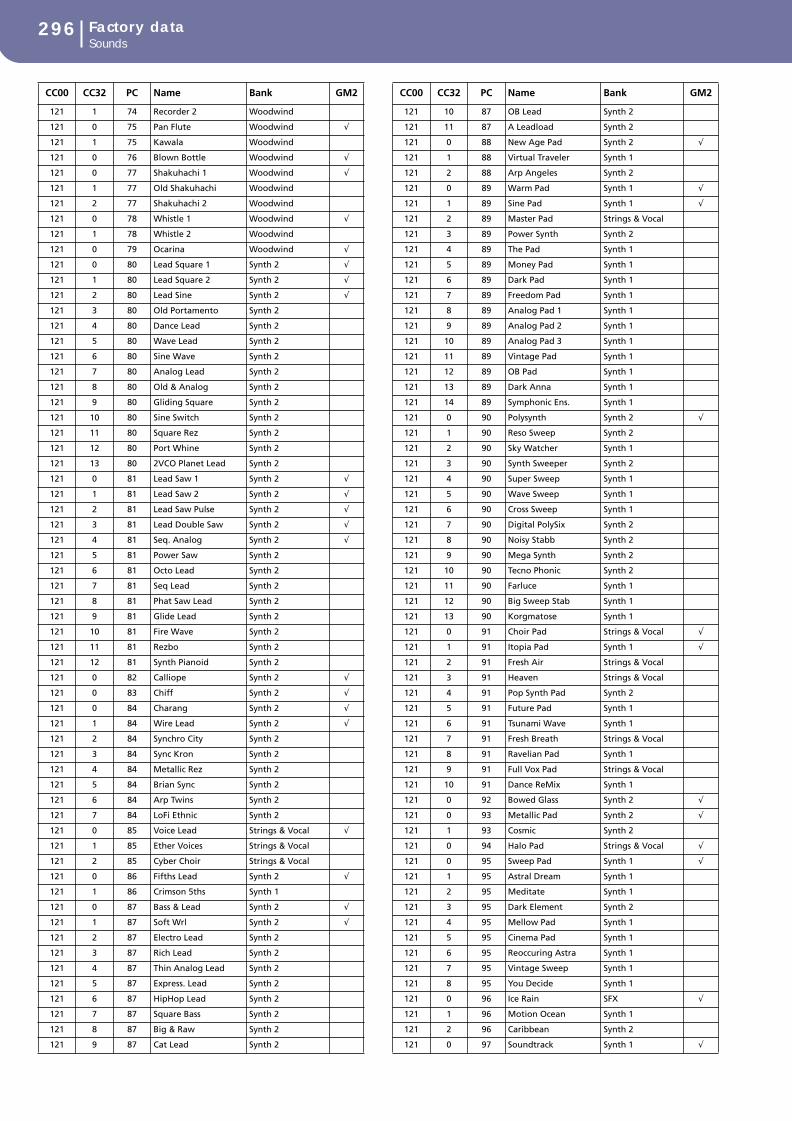
296 Factory dataSounds
121 1 74 Recorder 2 Woodwind
121 0 75 Pan Flute Woodwind √
121 1 75 Kawala Woodwind
121 0 76 Blown Bottle Woodwind √
121 0 77 Shakuhachi 1 Woodwind √
121 1 77 Old Shakuhachi Woodwind
121 2 77 Shakuhachi 2 Woodwind
121 0 78 Whistle 1 Woodwind √
121 1 78 Whistle 2 Woodwind
121 0 79 Ocarina Woodwind √
121 0 80 Lead Square 1 Synth 2 √
121 1 80 Lead Square 2 Synth 2 √
121 2 80 Lead Sine Synth 2 √
121 3 80 Old Portamento Synth 2
121 4 80 Dance Lead Synth 2
121 5 80 Wave Lead Synth 2
121 6 80 Sine Wave Synth 2
121 7 80 Analog Lead Synth 2
121 8 80 Old & Analog Synth 2
121 9 80 Gliding Square Synth 2
121 10 80 Sine Switch Synth 2
121 11 80 Square Rez Synth 2
121 12 80 Port Whine Synth 2
121 13 80 2VCO Planet Lead Synth 2
121 0 81 Lead Saw 1 Synth 2 √
121 1 81 Lead Saw 2 Synth 2 √
121 2 81 Lead Saw Pulse Synth 2 √
121 3 81 Lead Double Saw Synth 2 √
121 4 81 Seq. Analog Synth 2 √
121 5 81 Power Saw Synth 2
121 6 81 Octo Lead Synth 2
121 7 81 Seq Lead Synth 2
121 8 81 Phat Saw Lead Synth 2
121 9 81 Glide Lead Synth 2
121 10 81 Fire Wave Synth 2
121 11 81 Rezbo Synth 2
121 12 81 Synth Pianoid Synth 2
121 0 82 Calliope Synth 2 √
121 0 83 Chiff Synth 2 √
121 0 84 Charang Synth 2 √
121 1 84 Wire Lead Synth 2 √
121 2 84 Synchro City Synth 2
121 3 84 Sync Kron Synth 2
121 4 84 Metallic Rez Synth 2
121 5 84 Brian Sync Synth 2
121 6 84 Arp Twins Synth 2
121 7 84 LoFi Ethnic Synth 2
121 0 85 Voice Lead Strings & Vocal √
121 1 85 Ether Voices Strings & Vocal
121 2 85 Cyber Choir Strings & Vocal
121 0 86 Fifths Lead Synth 2 √
121 1 86 Crimson 5ths Synth 1
121 0 87 Bass & Lead Synth 2 √
121 1 87 Soft Wrl Synth 2 √
121 2 87 Electro Lead Synth 2
121 3 87 Rich Lead Synth 2
121 4 87 Thin Analog Lead Synth 2
121 5 87 Express. Lead Synth 2
121 6 87 HipHop Lead Synth 2
121 7 87 Square Bass Synth 2
121 8 87 Big & Raw Synth 2
121 9 87 Cat Lead Synth 2
CC00 CC32 PC Name Bank GM2
121 10 87 OB Lead Synth 2
121 11 87 A Leadload Synth 2
121 0 88 New Age Pad Synth 2 √
121 1 88 Virtual Traveler Synth 1
121 2 88 Arp Angeles Synth 2
121 0 89 Warm Pad Synth 1 √
121 1 89 Sine Pad Synth 1 √
121 2 89 Master Pad Strings & Vocal
121 3 89 Power Synth Synth 2
121 4 89 The Pad Synth 1
121 5 89 Money Pad Synth 1
121 6 89 Dark Pad Synth 1
121 7 89 Freedom Pad Synth 1
121 8 89 Analog Pad 1 Synth 1
121 9 89 Analog Pad 2 Synth 1
121 10 89 Analog Pad 3 Synth 1
121 11 89 Vintage Pad Synth 1
121 12 89 OB Pad Synth 1
121 13 89 Dark Anna Synth 1
121 14 89 Symphonic Ens. Synth 1
121 0 90 Polysynth Synth 2 √
121 1 90 Reso Sweep Synth 2
121 2 90 Sky Watcher Synth 1
121 3 90 Synth Sweeper Synth 2
121 4 90 Super Sweep Synth 1
121 5 90 Wave Sweep Synth 1
121 6 90 Cross Sweep Synth 1
121 7 90 Digital PolySix Synth 2
121 8 90 Noisy Stabb Synth 2
121 9 90 Mega Synth Synth 2
121 10 90 Tecno Phonic Synth 2
121 11 90 Farluce Synth 1
121 12 90 Big Sweep Stab Synth 1
121 13 90 Korgmatose Synth 1
121 0 91 Choir Pad Strings & Vocal √
121 1 91 Itopia Pad Synth 1 √
121 2 91 Fresh Air Strings & Vocal
121 3 91 Heaven Strings & Vocal
121 4 91 Pop Synth Pad Synth 2
121 5 91 Future Pad Synth 1
121 6 91 Tsunami Wave Synth 1
121 7 91 Fresh Breath Strings & Vocal
121 8 91 Ravelian Pad Synth 1
121 9 91 Full Vox Pad Strings & Vocal
121 10 91 Dance ReMix Synth 1
121 0 92 Bowed Glass Synth 2 √
121 0 93 Metallic Pad Synth 2 √
121 1 93 Cosmic Synth 2
121 0 94 Halo Pad Strings & Vocal √
121 0 95 Sweep Pad Synth 1 √
121 1 95 Astral Dream Synth 1
121 2 95 Meditate Synth 1
121 3 95 Dark Element Synth 2
121 4 95 Mellow Pad Synth 1
121 5 95 Cinema Pad Synth 1
121 6 95 Reoccuring Astra Synth 1
121 7 95 Vintage Sweep Synth 1
121 8 95 You Decide Synth 1
121 0 96 Ice Rain SFX √
121 1 96 Motion Ocean Synth 1
121 2 96 Caribbean Synth 2
121 0 97 Soundtrack Synth 1 √
CC00 CC32 PC Name Bank GM2

297Factory dataSounds
Appen
dix
121 1 97 Air Clouds Synth 1
121 2 97 Reso Down Synth 1
121 3 97 Tinklin Pad Synth 1
121 4 97 Pods In Pad Synth 1
121 5 97 Noble Pad Synth 1
121 6 97 Rave Synth 1
121 7 97 Elastick Pad Synth 1
121 0 98 Crystal Synth 2 √
121 1 98 Synth Mallet SFX √
121 2 98 Vs Bell Boy Mallet & Bell
121 3 98 Krystal Bell Mallet & Bell
121 4 98 Digi Bell Mallet & Bell
121 5 98 Moving Bell Synth 1
121 6 98 Bell Pad Synth 1
121 7 98 Bell Choir Synth 1
121 0 99 Atmosphere Synth 2 √
121 0 100 Brightness Synth 2 √
121 1 100 Lonely Spin Synth 1
121 2 100 Synth Ghostly Synth 1
121 0 101 Goblins SFX √
121 1 101 Motion Raver Synth 2
121 2 101 Digi Ice Pad Synth 1
121 3 101 VCF Modulation Synth 2
121 0 102 Echo Drops SFX √
121 1 102 Echo Bell SFX √
121 2 102 Echo Pan SFX √
121 3 102 Band Passed Synth 2
121 4 102 Pan Reso Synth 2
121 5 102 Moon Cycles Synth 1
121 0 103 Star Theme SFX √
121 0 104 Sitar 1 Guitar √
121 1 104 Sitar 2 Guitar √
121 2 104 Sitar Tambou Guitar
121 3 104 Indian Stars Guitar
121 4 104 Indian Frets Guitar
121 5 104 Bouzouki Guitar
121 6 104 Tambra Guitar
121 7 104 Sitar Sitar Guitar
121 0 105 Banjo Guitar √
121 1 105 Banjo Key Off Guitar
121 2 105 Oud Guitar
121 3 105 Jaw Harp SFX
121 0 106 Shamisen Guitar √
121 0 107 Koto Guitar √
121 1 107 Taisho Koto Guitar √
121 2 107 Kanun Guitar
121 3 107 Kanun Trem. Guitar
121 4 107 Kanun Mix Guitar
121 0 108 Kalimba Mallet & Bell √
121 1 108 Kalimba Vel. Mallet & Bell
121 0 109 Bag Pipes Woodwind √
121 1 109 War Pipes Woodwind
121 2 109 Uillean BagPipes Woodwind
121 3 109 HighlandBagPipes Woodwind
121 0 110 Fiddle Strings & Vocal √
121 0 111 Shanai Woodwind √
121 1 111 Zurna Woodwind
121 2 111 Hichiriki Woodwind
121 0 112 Tinkle Bell Mallet & Bell √
121 1 112 Gamelan Mallet & Bell
121 2 112 Bali Gamelan Mallet & Bell
121 3 112 Garbage Mall Mallet & Bell
CC00 CC32 PC Name Bank GM2
121 0 113 Agogo Drum & Perc. √
121 0 114 Steel Drums Mallet & Bell √
121 1 114 Warm Steel Mallet & Bell
121 0 115 Woodblock Drum & Perc. √
121 1 115 Castanets Drum & Perc. √
121 0 116 Taiko Drum Drum & Perc. √
121 1 116 Concert BassDrum Drum & Perc. √
121 0 117 Melodic Tom 1 Drum & Perc. √
121 1 117 Melodic Tom 2 Drum & Perc. √
121 2 117 Reverse Tom Drum & Perc.
121 0 118 Synth Drum Drum & Perc. √
121 1 118 Rhythm Box Tom Drum & Perc. √
121 2 118 Electric Drum Drum & Perc. √
121 3 118 Reverse Snare Drum & Perc.
121 0 119 Reverse Cymbal Drum & Perc. √
121 1 119 Dragon Gong Drum & Perc.
121 2 119 Reverse Cymbal 2 Drum & Perc. √
121 0 120 Guitar FretNoise SFX √
121 1 120 Guitar Cut Noise SFX √
121 2 120 Ac. Bass String SFX √
121 3 120 Vox Wah Chick Guitar
121 0 121 Breath Noise SFX √
121 1 121 Flute Click Woodwind √
121 0 122 Seashore SFX √
121 1 122 Rain SFX √
121 2 122 Thunder SFX √
121 3 122 Wind SFX √
121 4 122 Stream SFX √
121 5 122 Bubble SFX √
121 0 123 Bird Tweet 1 SFX √
121 1 123 Dog SFX √
121 2 123 Horse Gallop SFX √
121 3 123 Bird Tweet 2 SFX √
121 0 124 Telephone 1 SFX √
121 1 124 Telephone 2 SFX √
121 2 124 Door Creak SFX √
121 3 124 Door SFX √
121 4 124 Scratch SFX √
121 5 124 Wind Chime SFX √
121 0 125 Helicopter SFX √
121 1 125 Car Engine SFX √
121 2 125 Car Stop SFX √
121 3 125 Car Pass SFX √
121 4 125 Car Crash SFX √
121 5 125 Siren SFX √
121 6 125 Train SFX √
121 7 125 Jet Plane SFX √
121 8 125 Starship SFX √
121 9 125 Burst Noise SFX √
121 0 126 Applause SFX √
121 1 126 Laughing SFX √
121 2 126 Screaming SFX √
121 3 126 Punch SFX √
121 4 126 Heart Beat SFX √
121 5 126 Footsteps SFX √
121 6 126 Stadium SFX
121 0 127 Gun Shot SFX √
121 1 127 Machine Gun SFX √
121 2 127 Laser Gun SFX √
121 3 127 Explosion SFX √
121 127 16 Digital Drawbars Digi Organ
121 64 0-127 … User 1
CC00 CC32 PC Name Bank GM2

298 Factory dataSounds
121 65 0-127 … User 2
121 68 0-127 … EXB1 Bank 1
121 69 0-127 … EXB1 Bank 2
121 70 0-127 … EXB2 Bank 1
121 71 0-127 … EXB2 Bank 2
CC00 CC32 PC Name Bank GM2

299Factory dataDrum Kits
Appen
dix
Drum Kits
The following table lists all Pa1X Factory Drum Kits in order ofBank Select-Program Change number.
Legend: The table also includes MIDI data used to remotely selectthe Drum Kits. CC00: Control Change 0, or Bank Select MSB.CC32: Control Change 32, or Bank Select LSB. PC: ProgramChange.
CC00 CC32 PC Name GM2
120 0 0 Standard Kit RX1 √
120 0 1 Standard Kit RX2
120 0 2 Standard Kit RX3
120 0 3 Acoustic Kit
120 0 4 Pop Std. Kit RX
120 0 5 Standard Kit 1
120 0 6 Standard Kit 2
120 0 7 Standard Kit 3
120 0 8 Room Kit 1 √
120 0 9 HipHop Kit 1
120 0 10 Jungle Kit
120 0 11 Techno Kit 1
120 0 12 Room Kit 2
120 0 13 HipHop Kit 2
120 0 14 Techno Kit 2
120 0 15 Techno Kit 3
120 0 16 Power Kit 1 √
120 0 17 Power Kit 2
120 0 18 Power Kit RX1
120 0 19 Power Kit RX2
120 0 20-23 (remap to 16)
120 0 24 Electro Kit √
120 0 25 Analog Kit √
120 0 26 House Kit 1
120 0 27 House Kit 2
120 0 28 House Kit 3
120 0 29 House Kit 4
120 0 30 House Kit RX1
120 0 31 House Kit RX2
120 0 32 Jazz Kit RX1 √
120 0 33 Jazz Kit
120 0 34 Jazz Kit RX2
120 0 35 Jazz Kit RX3
120 0 36-39 (remap to 32)
120 0 40 Brush Kit 1 √
120 0 41 Brush Kit 2 VS
120 0 42 Brush Kit RX
120 0 43-47 (remap to 40)
120 0 48 Orchestra Kit √
120 0 49 (remap to 48)
120 0 50 Bdrum & Sdrum
120 0 51 Arabian Kit 1
120 0 52-55 (remap to 48)
120 0 56 SFX Kit √
120 0 57-63 (remap to 56)
120 0 64 Percussion Kit
120 0 65 Latin Perc. Kit
120 0 66 Trinity Perc.Kit
120 0 67 i30 Perc. Kit
120 0 68-71 (remap to 64)
120 0 72 Hip Hop Kit RX
120 0 73 Techno Kit RX
120 0 74 Dance Kit RX
120 0 75-87 (remap to 5)
120 0 88 Standard Kit 4
120 0 89 Pop Std. Kit 1
120 0 90 Pop Std. Kit 2
120 0 91-95 (remap to 5)
120 0 96 Elektro Kit 1
120 0 97 Elektro Kit 2
120 0 98-115 (remap to 5)
120 0 116 (remap to 51)
120 0 117 Arabian Kit 2
120 0 118 (remap to 5)
120 0 119 Standard Kit 5 √
120 0 120 Room Kit 3 √
120 0 121 Power Kit 3 √
120 0 122 Elektro Kit 2 √
120 0 123 Analog Kit 2 √
120 0 124 Jazz Kit 2 √
120 0 125 Brush Kit 3 √
120 0 126 Orchestra Kit 2 √
120 0 127 SFX Kit 2 √
120 64 0-63 User DrumKits (1-64)
120 68 0-63 EXB1 DrumKits (1-64)
120 70 0-63 EXB2 DrumKits (1-64)
CC00 CC32 PC Name GM2

300 Factory dataDrum Kit maps
Drum Kit maps
Legend: In the following Drum Kit tables, the number 120-x-x before each Drum Kit’s name represents the Bank Select MSB (CC00) - BankSelect LSB (CC32) - Program Change (PC) combo. The Sample columns contain each sample’s number and name. Excl is the Exlcusiveparameter: when a note is struck, all other notes with the same Exclusive number assigned are stopped. A number between round parenteses(n) means a velocity switch, and the number of used velocity layers.
120-0-0: Standard Kit RX1 120-0-1: Standard Kit RX2 120-0-2: Standard Kit RX3 120-0-3: Acoustic KitNote Sample Excl. Sample Excl. Sample Excl. Sample Excl.
0 C-1 45 SD Wood 2 pp Off 45 SD Wood 2 pp Off 45 SD Wood 2 pp Off 45 SD Wood 2 pp Off1 C#-1 60 SD Solid2 p Off 60 SD Solid2 p Off 60 SD Solid2 p Off 60 SD Solid2 p Off2 D-1 79 SD Brass2 mf Off 79 SD Brass2 mf Off 79 SD Brass2 mf Off 79 SD Brass2 mf Off3 D#-1 75 SD Brass1 p Off 75 SD Brass1 p Off 75 SD Brass1 p Off 75 SD Brass1 p Off4 E-1 69 SD Maple2 pp Off 69 SD Maple2 pp Off 69 SD Maple2 pp Off 69 SD Maple2 pp Off5 F-1 63 SD Maple1 pp Off 63 SD Maple1 pp Off 63 SD Maple1 pp Off 63 SD Maple1 pp Off6 F#-1 57 SD Solid1 p Off 57 SD Solid1 p Off 57 SD Solid1 p Off 57 SD Solid1 p Off7 G-1 53 SD Piccolo2 pp Off 53 SD Piccolo2 pp Off 53 SD Piccolo2 pp Off 53 SD Piccolo2 pp Off8 G#-1 5 BD Dry 1 Off 5 BD Dry 1 Off 5 BD Dry 1 Off 5 BD Dry 1 Off9 A-1 25 BD House 4 Off 25 BD House 4 Off 25 BD House 4 Off 25 BD House 4 Off
10 A#-1 228 99 SD Off 228 99 SD Off 228 99 SD Off 228 99 SD Off11 B-1 40 BD Deep 88 Off 40 BD Deep 88 Off 40 BD Deep 88 Off 226 88 BD Off12 C0 227 88 SD Off 227 88 SD Off 227 88 SD Off 227 88 SD Off13 C#0 53~56 SD Piccolo2 pp~f (4) Off 69~74 SD Maple2 pp~ff (6) Off 45~48 SD Wood 2 pp~f (4) Off 89 SD Off Center Off14 D0 49~52 SD Piccolo1 pp~f (4) Off 63~68 SD Maple1 pp~ff (6) Off 42~44 SD Wood 1 p~f (3) Off 100 SD Cracker Room Off15 D#0 10 BD Jazz (2) Off 10 BD Jazz (2) Off 10 BD Jazz (2) Off 11 BD Pillow Off16 E0 7 BD Dry 3 Off 1 BD Acoust.1 mf Off 1 BD Acoust.1 mf Off 38 BD Amb.Rocker Off17 F0 57~59 SD Solid1 p~f (3) Off 49~52 SD Piccolo1 pp~f (4) Off 63~68 SD Maple1 pp~ff (6) Off 91 SD Amb.Piccolo Off18 F#0 160~165 HH2 Closed pp~ff (6) Off 152~155 HH1 Closed pp~f (4) Off 152~155 HH1 Closed pp~f (4) Off 171 HH3 Closed2 119 G0 8 BD Normal Off 4 BD Acoust.2 f Off 4 BD Acoust.2 f Off 10 BD Jazz Off20 G#0 129 Rim Shot f Off 129 Rim Shot f Off 129 Rim Shot f Off 130 Side Stick Dry Off21 A0 45~48 SD Wood 2 pp~f (4) Off 60~62 SD Solid2 p~f (3) Off 53~56 SD Piccolo2 pp~f (4) Off 220 SD Orchestra 722 A#0 42~44 SD Wood 1 p~f (3) Off 57~59 SD Solid1 p~f (3) Off 49~52 SD Piccolo1 pp~f (4) Off 219 SD Orch. Roll 723 B0 132 Drum Stick Hit Off 132 Drum Stick Hit Off 132 Drum Stick Hit Off 132 Drum Stick Hit Off24 C1 78~80 SD Brass2 p~f (3) Off 78~80 SD Brass2 p~f (3) Off 78~80 SD Brass2 p~f (3) Off 220 SD Orchestra 725 C#1 81 SD Roll 7 81 SD Roll 7 81 SD Roll 7 219 SD Orch. Roll 726 D1 221 Finger Snaps Off 221 Finger Snaps Off 221 Finger Snaps Off 221 Finger Snaps Off27 D#1 270 Zap2 Off 270 Zap2 Off 270 Zap2 Off 270 Zap2 Off28 E1 410 Noise White Off 410 Noise White Off 410 Noise White Off 410 Noise White Off29 F1 272 DJ Scratch2 7 272 DJ Scratch2 7 272 DJ Scratch2 7 272 DJ Scratch2 730 F#1 272 DJ Scratch2 7 272 DJ Scratch2 7 272 DJ Scratch2 7 272 DJ Scratch2 731 G1 132 Drum Stick Hit Off 132 Drum Stick Hit Off 132 Drum Stick Hit Off 132 Drum Stick Hit Off32 G#1 269 Zap1 Off 269 Zap1 Off 269 Zap1 Off 269 Zap1 Off33 A1 376 Click Off 376 Click Off 376 Click Off 376 Click Off34 A#1 340 Triangle Open Off 340 Triangle Open Off 340 Triangle Open Off 340 Triangle Open Off35 B1 3~4 BD Acoust.2 mf~f (3) Off 0~2 BD Acoust.1 p~f (4) Off 0~2 BD Acoust.1 p~f (4) Off 8 BD Normal Off36 C2 0~2 BD Acoust.1 P~f (4) Off 3~4 BD Acoust.2 mf~f (3) Off 3~4 BD Acoust.2 mf~f (3) Off 11-5 BD Pillow-Dry 1 (2) Off37 C#2 128-129 Rim Shot p-f (2) Off 128-129 Rim Shot p-f (2) Off 128 Rim Shot p-f (2) Off 131 Side Stick Amb Off38 D2 69~74 SD Maple2 pp~ff (6) Off 45~48 SD Wood 2 pp~f (4) Off 60~62 SD Solid2 p~f (3) Off 86-87 SD Ghost p-f (2) Off39 D#2 230 88 Claps Off 230 88 Claps Off 230 88 Claps Off 225 Claps 4 Off40 E2 63~68 SD Maple1 pp~ff (6) Off 42~44 SD Wood 1 p~f (3) Off 57~59 SD Solid1 p~f (3) Off 86-87 SD Ghost p-f (2) Off41 F2 139-140 Tom1 Floor p-f (2) Off 139-140 Tom1 Floor p-f (2) Off 139-140 Tom1 Floor p-f (2) Off 145 Tom3 Floor Off42 F#2 160~165 HH2 Closed pp~ff (6) 1 152~155 HH1 Closed pp~f (4) 1 152~155 HH1 Closed pp~f (4) 1 174 HH3 Open 2 143 G2 137-138 Tom1 Low p-F (2) Off 137-138 Tom1 Low p-f (2) Off 137-138 Tom1 Low p-f (2) Off 145 Tom3 Floor Off44 G#2 166-167 HH2 Foot p-F (2) 1 156-157 HH1 Foot mp-mf (2) 1 156-157 HH1 Foot mp-mf (2) 1 178 HH4 Foot 145 A2 135-136 Tom1 Mid p-F (2) Off 135-136 Tom1 Mid p-f (2) Off 135-136 Tom1 Mid p-f (2) Off 144 Tom3 Low Off46 A#2 168-169 HH2 Open p-f (2) 1 158-159 HH1 Open mp-mf (2) 1 158-159 HH1 Open mp-mf (2) 1 173 HH3 Open 1 147 B2 135-136 Tom1 Mid p-f (2) Off 135-136 Tom1 Mid p-f (2) Off 135-136 Tom1 Mid p-f (2) Off 144 Tom3 Low Off48 C3 133-134 Tom1 Hi p-f (2) Off 133-134 Tom1 Hi p-f (2) Off 133-134 Tom1 Hi p-f (2) Off 143 Tom3 Hi Off49 C#3 195 Crash 19'open2 (2) Off 193 Crash 17'edge2 (2) Off 193 Crash 17'edge2 (2) Off 196 Crash 1 Off50 D3 133-134 Tom1 Hi p-f (2) Off 133-134 Tom1 Hi p-f (2) Off 133-134 Tom1 Hi p-f (2) Off 143 Tom3 Hi Off51 D#3 207-209 Ride 20' mp2-mf2 (2) Off 207-209 Ride 20' mp2-mf2 (2) Off 207 Ride 20' mp2 Off 213 Ride Edge 2 Off52 E3 198 China Off 198 China Off 198 China Off 198 China Off53 F3 215 Ride Cup Off 215 Ride Cup Off 215 Ride Cup Off 215 Ride Cup Off54 F#3 339 Tambourine Acc2 Off 339 Tambourine Acc2 Off 339 Tambourine Acc2 Off 339 Tambourine Acc2 Off55 G3 199 Splash 8'edge1 Off 199 Splash 8'edge1 Off 199 Splash 8'edge1 Off 201 Splash Off56 G#3 352 Cowbell Off 352 Cowbell Off 352 Cowbell Off 352 Cowbell Off57 A3 193 Crash 17'edge2 (2) Off 191 Crash 15'edge2 (2) Off 191 Crash 15'edge2 (2) Off 196 Crash 1 Off58 A#3 325 Vibraslap Off 325 Vibraslap Off 325 Vibraslap Off 325 Vibraslap Off59 B3 206-208 Ride 20' mp1-mf1 (2) Off 206-208 Ride 20' mp1-mf1 (2) Off 208 Ride 20' mf1 Off 214 Ride Jazz Off60 C4 298 Bongo Hi Open Off 298 Bongo Hi Open Off 298 Bongo Hi Open Off 298 Bongo Hi Open Off61 C#4 295 Bongo Lo Open Off 295 Bongo Lo Open Off 295 Bongo Lo Open Off 295 Bongo Lo Open Off62 D4 292 Conga Hi Slap2 Off 286 Conga Lo Mt Slap Off 286 Conga Lo Mt Slap Off 290 Conga Hi Mt Slap Off63 D#4 288 Conga Hi Open Off 288 Conga Hi Open Off 288 Conga Hi Open Off 288 Conga Hi Open Off64 E4 285 Conga Lo Open Off 285 Conga Lo Open Off 285 Conga Lo Open Off 285 Conga Lo Open Off65 F4 334 Timbale Hi Rim2 Off 334 Timbale Hi Rim2 Off 334 Timbale Hi Rim2 Off 334 Timbale Hi Rim2 Off66 F#4 329 Timbale Lo Open Off 329 Timbale Lo Open Off 329 Timbale Lo Open Off 329 Timbale Lo Open Off67 G4 351 Agogo Bell Off 351 Agogo Bell Off 351 Agogo Bell Off 351 Agogo Bell Off68 G#4 351 Agogo Bell Off 351 Agogo Bell Off 351 Agogo Bell Off 351 Agogo Bell Off69 A4 346 Cabasa Up Off 346 Cabasa Up Off 346 Cabasa Up Off 346 Cabasa Up Off70 A#4 309 Maracas Push Off 309 Maracas Push Off 309 Maracas Push Off 309 Maracas Push Off71 B4 361 Samba Whistle 2 361 Samba Whistle 2 361 Samba Whistle 2 361 Samba Whistle 2

301Factory dataDrum Kit maps
Appen
dix
72 C5 361 Samba Whistle 2 361 Samba Whistle 2 361 Samba Whistle 2 361 Samba Whistle 273 C#5 308 Guiro Short 3 308 Guiro Short 3 308 Guiro Short 3 308 Guiro Short 374 D5 307 Guiro Long 3 307 Guiro Long 3 307 Guiro Long 3 307 Guiro Long 375 D#5 326 Claves Off 326 Claves Off 326 Claves Off 326 Claves Off76 E5 327 Woodblock1 Off 327 Woodblock1 Off 327 Woodblock1 Off 327 Woodblock1 Off77 F5 327 Woodblock1 Off 327 Woodblock1 Off 327 Woodblock1 Off 327 Woodblock1 Off78 F#5 342 Cuica Hi 4 342 Cuica Hi 4 342 Cuica Hi 4 342 Cuica Hi 479 G5 343 Cuica Lo 4 343 Cuica Lo 4 343 Cuica Lo 4 343 Cuica Lo 480 G#5 341 Triangle Mute 5 341 Triangle Mute 5 341 Triangle Mute 5 341 Triangle Mute 581 A5 340 Triangle Open 5 340 Triangle Open 5 340 Triangle Open 5 340 Triangle Open 582 A#5 347 Cabasa Down Off 347 Cabasa Down Off 347 Cabasa Down Off 347 Cabasa Down Off83 B5 355 Sleigh Bell Off 355 Sleigh Bell Off 355 Sleigh Bell Off 355 Sleigh Bell Off84 C6 358 Marc Tree Off 358 Marc Tree Off 358 Marc Tree Off 358 Marc Tree Off85 C#6 305 Castanet Single Off 305 Castanet Single Off 305 Castanet Single Off 305 Castanet Single Off86 D6 330 Timbale Lo Mute 6 330 Timbale Lo Mute 6 330 Timbale Lo Mute 6 330 Timbale Lo Mute 687 D#6 329 Timbale Lo Open 6 329 Timbale Lo Open 6 329 Timbale Lo Open 6 329 Timbale Lo Open 688 E6 370 Stadium Off 370 Stadium Off 370 Stadium Off 370 Stadium Off
120-0-4: Pop Std.Kit RX 120-0-5 (75~87, 89~115, 118~127): Standard Kit 1 120-0-6: Standard Kit 2 120-0-7: Standard Kit 3Note Sample Excl. Sample Excl. Sample Excl. Sample Excl.
0 C-1 45 SD Wood 2 pp Off 45 SD Wood 2 pp Off 45 SD Wood 2 pp Off 45 SD Wood 2 pp Off1 C#-1 60 SD Solid2 p Off 60 SD Solid2 p Off 60 SD Solid2 p Off 60 SD Solid2 p Off2 D-1 79 SD Brass2 mf Off 79 SD Brass2 mf Off 79 SD Brass2 mf Off 79 SD Brass2 mf Off3 D#-1 75 SD Brass1 p Off 75 SD Brass1 p Off 75 SD Brass1 p Off 75 SD Brass1 p Off4 E-1 69 SD Maple2 pp Off 69 SD Maple2 pp Off 69 SD Maple2 pp Off 69 SD Maple2 pp Off5 F-1 63 SD Maple1 pp Off 63 SD Maple1 pp Off 63 SD Maple1 pp Off 63 SD Maple1 pp Off6 F#-1 57 SD Solid1 p Off 57 SD Solid1 p Off 57 SD Solid1 p Off 57 SD Solid1 p Off7 G-1 53 SD Piccolo2 pp Off 53 SD Piccolo2 pp Off 53 SD Piccolo2 pp Off 53 SD Piccolo2 pp Off8 G#-1 5 BD Dry 1 Off 5 BD Dry 1 Off 5 BD Dry 1 Off 5 BD Dry 1 Off9 A-1 18 BD Squash Off 25 BD House 4 Off 25 BD House 4 Off 25 BD House 4 Off
10 A#-1 115 SD Hip6 Off 228 99 SD Off 228 99 SD Off 228 99 SD Off11 B-1 226 88 BD Off 226 88 BD Off 226 88 BD Off 226 88 BD Off12 C0 52 SD Piccolo1 f Off 227 88 SD Off 227 88 SD Off 227 88 SD Off13 C#0 59 SD Solid1 f Off 88 SD Full Room Off 91 SD Amb.Piccolo Off 89 SD Off Center Off14 D0 52 SD Piccolo1 f Off 99 SD Processed 1 99 SD Processed Off 99 SD Processed Off15 D#0 36 BD Ambient Off 5 BD Dry 1 Off 11 BD Pillow Off 11 BD Pillow Off16 E0 16 BD Gated Off 17 BD Tight Off 38 BD Amb.Rocker Off 38 BD Amb.Rocker Off17 F0 59 SD Solid1 f Off 82 SD Dry 1 Off 90 SD Jazz Ring Off 93 SD Brush Hit Off18 F#0 161-162 HH2 Closed p-mp (2) 1 171 HH3 Closed2 1 171 HH3 Closed2 1 171 HH3 Closed2 119 G0 38 BD Amb.Rocker Off 7 BD Dry 3 Off 5 BD Dry 1 Off 10 BD Jazz Off20 G#0 130 Side Stick Dry Off 131 Side Stick Amb Off 130 Side Stick Dry Off 130 Side Stick Dry Off21 A0 67 SD Maple1 f 7 220 SD Orchestra 7 83 SD Dry 2 7 125 SD Brasser 722 A#0 68 SD Maple1 ff 7 219 SD Orch. Roll 7 100 SD Cracker Room 7 83 SD Dry 2 Off23 B0 132 Drum Stick Hit Off 132 Drum Stick Hit Off 132 Drum Stick Hit Off 132 Drum Stick Hit Off24 C1 59 SD Solid1 f 7 220 SD Orchestra 7 220 SD Orchestra 7 220 SD Orchestra 725 C#1 219 SD Orch. Roll 7 219 SD Orch. Roll 7 219 SD Orch. Roll 7 219 SD Orch. Roll 726 D1 221 Finger Snaps Off 221 Finger Snaps Off 221 Finger Snaps Off 221 Finger Snaps Off27 D#1 270 Zap2 Off 270 Zap2 Off 270 Zap2 Off 270 Zap2 Off28 E1 410 Noise White Off 410 Noise White Off 410 Noise White Off 410 Noise White Off29 F1 272 DJ Scratch2 7 272 DJ Scratch2 7 272 DJ Scratch2 7 272 DJ Scratch2 730 F#1 272 DJ Scratch2 7 272 DJ Scratch2 7 272 DJ Scratch2 7 272 DJ Scratch2 731 G1 132 Drum Stick Hit Off 132 Drum Stick Hit Off 132 Drum Stick Hit Off 132 Drum Stick Hit Off32 G#1 269 Zap1 Off 269 Zap1 Off 269 Zap1 Off 269 Zap1 Off33 A1 376 Click Off 376 Click Off 376 Click Off 376 Click Off34 A#1 340 Triangle Open Off 340 Triangle Open Off 340 Triangle Open Off 340 Triangle Open Off35 B1 38 BD Amb.Rocker Off 7 BD Dry 3 Off 17 BD Tight Off 5 BD Dry 1 Off36 C2 38 BD Amb.Rocker Off 5 BD Dry 1 Off 15 BD Tubby Off 15 BD Tubby Off37 C#2 129 Rim Shot f Off 131 Side Stick Amb Off 131 Side Stick Amb Off 131 Side Stick Amb Off38 D2 47~59 SD Wood 2-Solid1 p~f (6) Off 83 SD Dry 2 Off 89 SD Off Center Off 90 SD Jazz Ring Off39 D#2 230 88 Claps Off 225 Claps 4 Off 230 88 Claps Off 230 88 Claps Off40 E2 47~59 SD Wood 2-Solid1 p~f (6) Off 88 SD Full Room Off 89 SD Off Center Off 91 SD Amb.Piccolo Off41 F2 140 Tom1 Floor f Off 145 Tom3 Floor Off 145 Tom3 Floor Off 145 Tom3 Floor Off42 F#2 160~163 HH2 Closed pp~mf (4) 1 174 HH3 Open 2 1 170 HH3 Closed1 1 176 HH4 Closed1 143 G2 138 Tom1 Low f Off 145 Tom3 Floor Off 145 Tom3 Floor Off 145 Tom3 Floor Off44 G#2 157-156 HH1 Foot mf-mp (2) 1 178 HH4 Foot 1 172 HH3 Foot 1 178 HH4 Foot 145 A2 138 Tom1 Low f Off 144 Tom3 Low Off 144 Tom3 Low Off 144 Tom3 Low Off46 A#2 168-169 HH2 Open p-f (2) 1 173 HH3 Open 1 1 173 HH3 Open 1 1 173 HH3 Open 1 147 B2 136 Tom1 Mid f Off 144 Tom3 Low Off 144 Tom3 Low Off 144 Tom3 Low Off48 C3 134 Tom1 Hi f Off 143 Tom3 Hi Off 143 Tom3 Hi Off 143 Tom3 Hi Off49 C#3 196 Crash 1 Off 196 Crash 1 Off 196 Crash 1 Off 196 Crash 1 Off50 D3 134 Tom1 Hi f Off 143 Tom3 Hi Off 143 Tom3 Hi Off 143 Tom3 Hi Off51 D#3 207-209 Ride 20' mp2-mf2 (2) Off 213 Ride Edge 2 Off 213 Ride Edge 2 Off 213 Ride Edge 2 Off52 E3 198 China Off 198 China Off 198 China Off 198 China Off53 F3 206-208 Ride 20' mp1-mf1 (2) Off 214 Ride Jazz Off 214 Ride Jazz Off 214 Ride Jazz Off54 F#3 339 Tambourine Acc2 Off 339 Tambourine Acc2 Off 339 Tambourine Acc2 Off 339 Tambourine Acc2 Off55 G3 201 Splash Off 201 Splash Off 201 Splash Off 201 Splash Off56 G#3 352 Cowbell Off 352 Cowbell Off 352 Cowbell Off 352 Cowbell Off57 A3 196 Crash 1 Off 196 Crash 1 Off 196 Crash 1 Off 196 Crash 1 Off58 A#3 325 Vibraslap Off 325 Vibraslap Off 325 Vibraslap Off 325 Vibraslap Off59 B3 206 Ride 20' mp1 Off 213 Ride Edge 2 Off 213 Ride Edge 2 Off 213 Ride Edge 2 Off60 C4 298 Bongo Hi Open Off 298 Bongo Hi Open Off 298 Bongo Hi Open Off 298 Bongo Hi Open Off
120-0-0: Standard Kit RX1 120-0-1: Standard Kit RX2 120-0-2: Standard Kit RX3 120-0-3: Acoustic KitNote Sample Excl. Sample Excl. Sample Excl. Sample Excl.

302 Factory dataDrum Kit maps
61 C#4 295 Bongo Lo Open Off 295 Bongo Lo Open Off 295 Bongo Lo Open Off 295 Bongo Lo Open Off62 D4 290 Conga Hi Mt Slap Off 286 Conga Lo Mt Slap Off 286 Conga Lo Mt Slap Off 290 Conga Hi Mt Slap Off63 D#4 288 Conga Hi Open Off 288 Conga Hi Open Off 288 Conga Hi Open Off 288 Conga Hi Open Off64 E4 285 Conga Lo Open Off 285 Conga Lo Open Off 285 Conga Lo Open Off 285 Conga Lo Open Off65 F4 334 Timbale Hi Rim2 Off 334 Timbale Hi Rim2 Off 334 Timbale Hi Rim2 Off 334 Timbale Hi Rim2 Off66 F#4 329 Timbale Lo Open Off 329 Timbale Lo Open Off 329 Timbale Lo Open Off 329 Timbale Lo Open Off67 G4 351 Agogo Bell Off 351 Agogo Bell Off 351 Agogo Bell Off 351 Agogo Bell Off68 G#4 351 Agogo Bell Off 351 Agogo Bell Off 351 Agogo Bell Off 351 Agogo Bell Off69 A4 346 Cabasa Up Off 346 Cabasa Up Off 346 Cabasa Up Off 346 Cabasa Up Off70 A#4 309 Maracas Push Off 309 Maracas Push Off 309 Maracas Push Off 309 Maracas Push Off71 B4 361 Samba Whistle 2 361 Samba Whistle 2 361 Samba Whistle 2 361 Samba Whistle 272 C5 361 Samba Whistle 2 361 Samba Whistle 2 361 Samba Whistle 2 361 Samba Whistle 273 C#5 308 Guiro Short 3 308 Guiro Short 3 308 Guiro Short 3 308 Guiro Short 374 D5 307 Guiro Long 3 307 Guiro Long 3 307 Guiro Long 3 307 Guiro Long 375 D#5 326 Claves Off 326 Claves Off 326 Claves Off 326 Claves Off76 E5 327 Woodblock1 Off 327 Woodblock1 Off 327 Woodblock1 Off 327 Woodblock1 Off77 F5 327 Woodblock1 Off 327 Woodblock1 Off 327 Woodblock1 Off 327 Woodblock1 Off78 F#5 342 Cuica Hi 4 342 Cuica Hi 4 342 Cuica Hi 4 342 Cuica Hi 479 G5 343 Cuica Lo 4 343 Cuica Lo 4 343 Cuica Lo 4 343 Cuica Lo 480 G#5 341 Triangle Mute 5 341 Triangle Mute 5 341 Triangle Mute 5 341 Triangle Mute 581 A5 340 Triangle Open 5 340 Triangle Open 5 340 Triangle Open 5 340 Triangle Open 582 A#5 347 Cabasa Down Off 347 Cabasa Down Off 347 Cabasa Down Off 347 Cabasa Down Off83 B5 355 Sleigh Bell Off 355 Sleigh Bell Off 355 Sleigh Bell Off 355 Sleigh Bell Off84 C6 358 Marc Tree Off 358 Marc Tree Off 358 Marc Tree Off 358 Marc Tree Off85 C#6 305 Castanet Single Off 305 Castanet Single Off 305 Castanet Single Off 305 Castanet Single Off86 D6 330 Timbale Lo Mute 6 330 Timbale Lo Mute 6 330 Timbale Lo Mute 6 330 Timbale Lo Mute 687 D#6 329 Timbale Lo Open 6 329 Timbale Lo Open 6 329 Timbale Lo Open 6 329 Timbale Lo Open 688 E6 370 Stadium Off 370 Stadium Off 370 Stadium Off 370 Stadium Off89 F6 489 Empty Off90 F#6 489 Empty Off91 G6 489 Empty Off92 G#6 489 Empty Off93 A6 489 Empty Off94 A#6 489 Empty Off95 B6 489 Empty Off96 C7 489 Empty Off97 C#7 489 Empty Off98 D7 489 Empty Off99 D#7 489 Empty Off
100 E7 353 Chacha Bell Off101 F7 332 Timbale Hi Edge Off102 F#7 334 Timbale Hi Rim2 Off103 G7 333 Timbale Hi Rim1 Off104 G#7 285 Conga Lo Open (2) Off105 A7 286 Conga Lo Mt Slap Off106 A#7 288 Conga Hi Open (2) Off107 B7 291 Conga Hi Slap1 Off108 C8 292 Conga Hi Slap2 Off
120-0-8: Room Kit 1 120-0-9: HipHop Kit 1 120-0-10: Jungle Kit 120-0-11: Techno Kit 1Note Sample Excl. Sample Excl. Sample Excl. Sample Excl.
0 C-1 45 SD Wood 2 pp Off 45 SD Wood 2 pp Off 45 SD Wood 2 pp Off 45 SD Wood 2 pp Off1 C#-1 60 SD Solid2 p Off 60 SD Solid2 p Off 60 SD Solid2 p Off 60 SD Solid2 p Off2 D-1 79 SD Brass2 mf Off 79 SD Brass2 mf Off 79 SD Brass2 mf Off 79 SD Brass2 mf Off3 D#-1 75 SD Brass1 p Off 75 SD Brass1 p Off 75 SD Brass1 p Off 75 SD Brass1 p Off4 E-1 69 SD Maple2 pp Off 69 SD Maple2 pp Off 69 SD Maple2 pp Off 69 SD Maple2 pp Off5 F-1 63 SD Maple1 pp Off 63 SD Maple1 pp Off 63 SD Maple1 pp Off 63 SD Maple1 pp Off6 F#-1 57 SD Solid1 p Off 57 SD Solid1 p Off 57 SD Solid1 p Off 57 SD Solid1 p Off7 G-1 53 SD Piccolo2 pp Off 53 SD Piccolo2 pp Off 53 SD Piccolo2 pp Off 53 SD Piccolo2 pp Off8 G#-1 5 BD Dry 1 Off 5 BD Dry 1 Off 5 BD Dry 1 Off 5 BD Dry 1 Off9 A-1 18 BD Squash Off 18 BD Squash Off 18 BD Squash Off 32 BD Hip 3 Off
10 A#-1 115 SD Hip6 Off 115 SD Hip6 Off 115 SD Hip6 Off 115 SD Hip6 Off11 B-1 226 88 BD Off 226 88 BD Off 226 88 BD Off 226 88 BD Off12 C0 227 88 SD Off 227 88 SD Off 227 88 SD Off 227 88 SD Off13 C#0 112 SD Hip3 Off 112 SD Hip3 Off 112 SD Hip3 Off 112 SD Hip3 Off14 D0 114 SD Hip5 Off 114 SD Hip5 Off 114 SD Hip5 Off 114 SD Hip5 Off15 D#0 36 BD Ambient Off 36 BD Ambient Off 36 BD Ambient Off 36 BD Ambient Off16 E0 16 BD Gated Off 16 BD Gated Off 16 BD Gated Off 16 BD Gated Off17 F0 91 SD Amb.Piccolo Off 91 SD Amb.Piccolo Off 91 SD Amb.Piccolo Off 91 SD Amb.Piccolo Off18 F#0 174 HH3 Open 2 1 174 HH3 Open 2 1 174 HH3 Open 2 1 174 HH3 Open 2 119 G0 11 BD Pillow Off 11 BD Pillow Off 11 BD Pillow Off 11 BD Pillow Off20 G#0 130 Side Stick Dry Off 130 Side Stick Dry Off 130 Side Stick Dry Off 130 Side Stick Dry Off21 A0 98 SD Yowie 7 98 SD Yowie Off 98 SD Yowie Off 98 SD Yowie Off22 A#0 115 SD Hip6 7 115 SD Hip6 Off 115 SD Hip6 Off 115 SD Hip6 Off23 B0 132 Drum Stick Hit Off 132 Drum Stick Hit Off 132 Drum Stick Hit Off 132 Drum Stick Hit Off24 C1 220 SD Orchestra 7 220 SD Orchestra 7 220 SD Orchestra 7 220 SD Orchestra 725 C#1 219 SD Orch. Roll 7 219 SD Orch. Roll 7 219 SD Orch. Roll 7 219 SD Orch. Roll 726 D1 221 Finger Snaps Off 221 Finger Snaps Off 221 Finger Snaps Off 221 Finger Snaps Off27 D#1 270 Zap2 Off 270 Zap2 Off 270 Zap2 Off 270 Zap2 Off28 E1 410 Noise White Off 410 Noise White Off 410 Noise White Off 410 Noise White Off29 F1 272 DJ Scratch2 7 272 DJ Scratch2 7 272 DJ Scratch2 7 272 DJ Scratch2 7
120-0-4: Pop Std.Kit RX 120-0-5 (75~87, 89~115, 118~127): Standard Kit 1 120-0-6: Standard Kit 2 120-0-7: Standard Kit 3Note Sample Excl. Sample Excl. Sample Excl. Sample Excl.

303Factory dataDrum Kit maps
Appen
dix
30 F#1 272 DJ Scratch2 7 272 DJ Scratch2 7 272 DJ Scratch2 7 272 DJ Scratch2 731 G1 132 Drum Stick Hit Off 132 Drum Stick Hit Off 132 Drum Stick Hit Off 132 Drum Stick Hit Off32 G#1 269 Zap1 Off 269 Zap1 Off 269 Zap1 Off 269 Zap1 Off33 A1 376 Click Off 376 Click Off 376 Click Off 376 Click Off34 A#1 340 Triangle Open Off 340 Triangle Open Off 340 Triangle Open Off 340 Triangle Open Off35 B1 15 BD Tubby Off 39 BD Pop 99 Off 30 BD Hip 1 Off 18 BD Squash Off36 C2 38 BD Amb.Rocker Off 32 BD Hip 3 Off 40 BD Deep 88 Off 25 BD House 4 Off37 C#2 130 Side Stick Dry Off 229 88 Rim Shot Off 221 Finger Snaps Off 369 Comp Voice Noise Off38 D2 100 SD Cracker Room Off 116 SD Ringy Off 122 SD Vintage5 Off 228 99 SD Off39 D#2 230 88 Claps Off 230 88 Claps Off 230 88 Claps Off 230 88 Claps Off40 E2 88 SD Full Room Off 123 SD Vintage6 Off 117 SD Tiny Off 228 99 SD Off41 F2 145 Tom3 Floor Off 141 Tom2 Hi Off 141 Tom2 Hi Off 266 E.Tom Real Off42 F#2 170 HH3 Closed1 1 181 HH Old Close1 1 232 88 HH Open 1 183 HH Old TiteClose 143 G2 145 Tom3 Floor Off 141 Tom2 Hi Off 141 Tom2 Hi Off 266 E.Tom Real Off44 G#2 178 HH4 Foot 1 184 HH Old Close2 Off 188 HH Hip Off 189 HH Alpo Close Off45 A2 144 Tom3 Low Off 141 Tom2 Hi Off 141 Tom2 Hi Off 266 E.Tom Real Off46 A#2 180 HH4 Open 1 182 HH Old Open1 1 182 HH Old Open1 1 185 HH Old Open2 147 B2 144 Tom3 Low Off 141 Tom2 Hi Off 141 Tom2 Hi Off 266 E.Tom Real Off48 C3 143 Tom3 Hi Off 141 Tom2 Hi Off 141 Tom2 Hi Off 266 E.Tom Real Off49 C#3 196 Crash 1 Off 196 Crash 1 Off 235 88 Crash Off 196 Crash 1 Off50 D3 143 Tom3 Hi Off 141 Tom2 Hi Off 141 Tom2 Hi Off 266 E.Tom Real Off51 D#3 213 Ride Edge 2 Off 213 Ride Edge 2 Off 213 Ride Edge 2 Off 213 Ride Edge 2 Off52 E3 198 China Off 202 Crash Reverse Off 202 Crash Reverse Off 202 Crash Reverse Off53 F3 214 Ride Jazz Off 214 Ride Jazz Off 214 Ride Jazz Off 214 Ride Jazz Off54 F#3 339 Tambourine Acc2 Off 339 Tambourine Acc2 Off 339 Tambourine Acc2 Off 339 Tambourine Acc2 Off55 G3 201 Splash Off 201 Splash Off 201 Splash Off 198 China Off56 G#3 352 Cowbell Off 239 88 Cowbell Off 239 88 Cowbell Off 352 Cowbell Off57 A3 196 Crash 1 Off 196 Crash 1 Off 196 Crash 1 Off 196 Crash 1 Off58 A#3 325 Vibraslap Off 325 Vibraslap Off 325 Vibraslap Off 325 Vibraslap Off59 B3 213 Ride Edge 2 Off 213 Ride Edge 2 Off 213 Ride Edge 2 Off 213 Ride Edge 2 Off60 C4 298 Bongo Hi Open Off 298 Bongo Hi Open Off 298 Bongo Hi Open Off 298 Bongo Hi Open Off61 C#4 295 Bongo Lo Open Off 295 Bongo Lo Open Off 295 Bongo Lo Open Off 295 Bongo Lo Open Off62 D4 290 Conga Hi Mt Slap Off 290 Conga Hi Mt Slap Off 290 Conga Hi Mt Slap Off 290 Conga Hi Mt Slap Off63 D#4 288 Conga Hi Open Off 288 Conga Hi Open Off 288 Conga Hi Open Off 288 Conga Hi Open Off64 E4 285 Conga Lo Open Off 285 Conga Lo Open Off 285 Conga Lo Open Off 285 Conga Lo Open Off65 F4 334 Timbale Hi Rim2 Off 334 Timbale Hi Rim2 Off 334 Timbale Hi Rim2 Off 334 Timbale Hi Rim2 Off66 F#4 329 Timbale Lo Open Off 329 Timbale Lo Open Off 329 Timbale Lo Open Off 329 Timbale Lo Open Off67 G4 351 Agogo Bell Off 351 Agogo Bell Off 351 Agogo Bell Off 351 Agogo Bell Off68 G#4 351 Agogo Bell Off 351 Agogo Bell Off 351 Agogo Bell Off 351 Agogo Bell Off69 A4 346 Cabasa Up Off 346 Cabasa Up Off 346 Cabasa Up Off 346 Cabasa Up Off70 A#4 309 Maracas Push Off 185 HH Old Open2 Off 185 HH Old Open2 Off 309 Maracas Push Off71 B4 361 Samba Whistle 2 361 Samba Whistle 2 361 Samba Whistle 2 361 Samba Whistle 272 C5 361 Samba Whistle 2 361 Samba Whistle 2 361 Samba Whistle 2 361 Samba Whistle 273 C#5 308 Guiro Short 3 308 Guiro Short 3 308 Guiro Short 3 308 Guiro Short 374 D5 307 Guiro Long 3 307 Guiro Long 3 307 Guiro Long 3 307 Guiro Long 375 D#5 326 Claves Off 326 Claves Off 326 Claves Off 326 Claves Off76 E5 327 Woodblock1 Off 327 Woodblock1 Off 327 Woodblock1 Off 327 Woodblock1 Off77 F5 327 Woodblock1 Off 327 Woodblock1 Off 327 Woodblock1 Off 327 Woodblock1 Off78 F#5 342 Cuica Hi 4 342 Cuica Hi 4 342 Cuica Hi 4 342 Cuica Hi 479 G5 343 Cuica Lo 4 343 Cuica Lo 4 343 Cuica Lo 4 343 Cuica Lo 480 G#5 341 Triangle Mute 5 341 Triangle Mute 5 341 Triangle Mute 5 341 Triangle Mute 581 A5 340 Triangle Open 5 340 Triangle Open 5 340 Triangle Open 5 340 Triangle Open 582 A#5 347 Cabasa Down Off 347 Cabasa Down Off 347 Cabasa Down Off 347 Cabasa Down Off83 B5 355 Sleigh Bell Off 355 Sleigh Bell Off 355 Sleigh Bell Off 355 Sleigh Bell Off84 C6 358 Marc Tree Off 358 Marc Tree Off 358 Marc Tree Off 358 Marc Tree Off85 C#6 305 Castanet Single Off 305 Castanet Single Off 305 Castanet Single Off 305 Castanet Single Off86 D6 330 Timbale Lo Mute 6 330 Timbale Lo Mute 6 330 Timbale Lo Mute 6 330 Timbale Lo Mute 687 D#6 329 Timbale Lo Open 6 329 Timbale Lo Open 6 329 Timbale Lo Open 6 329 Timbale Lo Open 688 E6 370 Stadium Off 370 Stadium Off 370 Stadium Off 370 Stadium Off
120-0-12: Room Kit 2 120-0-13: HipHop Kit 2 120-0-14: Techno Kit 2 120-0-15: Techno Kit 3Note Sample Excl. Sample Excl. Sample Excl. Sample Excl.
0 C-1 45 SD Wood 2 pp Off 45 SD Wood 2 pp Off 45 SD Wood 2 pp Off 45 SD Wood 2 pp Off1 C#-1 60 SD Solid2 p Off 60 SD Solid2 p Off 60 SD Solid2 p Off 60 SD Solid2 p Off2 D-1 79 SD Brass2 mf Off 79 SD Brass2 mf Off 79 SD Brass2 mf Off 79 SD Brass2 mf Off3 D#-1 75 SD Brass1 p Off 75 SD Brass1 p Off 75 SD Brass1 p Off 75 SD Brass1 p Off4 E-1 69 SD Maple2 pp Off 69 SD Maple2 pp Off 69 SD Maple2 pp Off 69 SD Maple2 pp Off5 F-1 63 SD Maple1 pp Off 63 SD Maple1 pp Off 63 SD Maple1 pp Off 63 SD Maple1 pp Off6 F#-1 57 SD Solid1 p Off 57 SD Solid1 p Off 57 SD Solid1 p Off 57 SD Solid1 p Off7 G-1 53 SD Piccolo2 pp Off 53 SD Piccolo2 pp Off 53 SD Piccolo2 pp Off 53 SD Piccolo2 pp Off8 G#-1 5 BD Dry 1 Off 5 BD Dry 1 Off 5 BD Dry 1 Off 5 BD Dry 1 Off9 A-1 18 BD Squash Off 18 BD Squash Off 18 BD Squash Off 18 BD Squash Off
10 A#-1 115 SD Hip6 Off 115 SD Hip6 Off 115 SD Hip6 Off 115 SD Hip6 Off11 B-1 226 88 BD Off 226 88 BD Off 226 88 BD Off 226 88 BD Off12 C0 227 88 SD Off 227 88 SD Off 227 88 SD Off 227 88 SD Off13 C#0 112 SD Hip3 Off 112 SD Hip3 Off 112 SD Hip3 Off 112 SD Hip3 Off14 D0 114 SD Hip5 Off 114 SD Hip5 Off 114 SD Hip5 Off 114 SD Hip5 Off15 D#0 36 BD Ambient Off 36 BD Ambient Off 36 BD Ambient Off 36 BD Ambient Off16 E0 16 BD Gated Off 16 BD Gated Off 16 BD Gated Off 16 BD Gated Off17 F0 91 SD Amb.Piccolo Off 91 SD Amb.Piccolo Off 91 SD Amb.Piccolo Off 91 SD Amb.Piccolo Off18 F#0 174 HH3 Open 2 1 174 HH3 Open 2 1 174 HH3 Open 2 1 174 HH3 Open 2 1
120-0-8: Room Kit 1 120-0-9: HipHop Kit 1 120-0-10: Jungle Kit 120-0-11: Techno Kit 1Note Sample Excl. Sample Excl. Sample Excl. Sample Excl.

304 Factory dataDrum Kit maps
19 G0 11 BD Pillow Off 11 BD Pillow Off 11 BD Pillow Off 11 BD Pillow Off20 G#0 130 Side Stick Dry Off 130 Side Stick Dry Off 130 Side Stick Dry Off 130 Side Stick Dry Off21 A0 97 SD Big Rock Off 98 SD Yowie Off 98 SD Yowie Off 98 SD Yowie Off22 A#0 115 SD Hip6 Off 115 SD Hip6 Off 115 SD Hip6 Off 115 SD Hip6 Off23 B0 132 Drum Stick Hit Off 132 Drum Stick Hit Off 132 Drum Stick Hit Off 132 Drum Stick Hit Off24 C1 220 SD Orchestra 7 220 SD Orchestra 7 220 SD Orchestra 7 220 SD Orchestra 725 C#1 219 SD Orch. Roll 7 219 SD Orch. Roll 7 219 SD Orch. Roll 7 219 SD Orch. Roll 726 D1 221 Finger Snaps Off 221 Finger Snaps Off 221 Finger Snaps Off 221 Finger Snaps Off27 D#1 270 Zap2 Off 270 Zap2 Off 270 Zap2 Off 270 Zap2 Off28 E1 410 Noise White Off 410 Noise White Off 410 Noise White Off 410 Noise White Off29 F1 272 DJ Scratch2 7 272 DJ Scratch2 7 272 DJ Scratch2 7 272 DJ Scratch2 730 F#1 272 DJ Scratch2 7 272 DJ Scratch2 7 272 DJ Scratch2 7 272 DJ Scratch2 731 G1 132 Drum Stick Hit Off 132 Drum Stick Hit Off 132 Drum Stick Hit Off 132 Drum Stick Hit Off32 G#1 269 Zap1 Off 269 Zap1 Off 269 Zap1 Off 269 Zap1 Off33 A1 376 Click Off 376 Click Off 376 Click Off 376 Click Off34 A#1 340 Triangle Open Off 340 Triangle Open Off 340 Triangle Open Off 340 Triangle Open Off35 B1 17 BD Tight Off 36 BD Ambient Off 34 BD Pop Kick Off 34 BD Pop Kick Off36 C2 38 BD Amb.Rocker Off 35 BD Dance 99 Off 25 BD House 4 Off 25 BD House 4 Off37 C#2 130 Side Stick Dry Off 221 Finger Snaps Off 229 88 Rim Shot Off 267 Rim House1 Off38 D2 99 SD Processed Off 107 SD Rap Off 108 SD Noise Off 126 SD Chili Off39 D#2 230 88 Claps Off 464 Alkis Off 230 88 Claps Off 230 88 Claps Off40 E2 98 SD Yowie Off 111 SD Hip2 Off 270 Zap2 Off 227 88 SD Off41 F2 142 Tom2 Floor Off 141 Tom2 Hi Off 236 88 Tom Off 386 Tribe Off42 F#2 177 HH4 Closed2 1 181 HH Old Close1 1 183 HH Old TiteClose 1 233 99 HH Close 143 G2 142 Tom2 Floor Off 141 Tom2 Hi Off 236 88 Tom Off 402 Wind Off44 G#2 178 HH4 Foot 1 188 HH Hip Off 189 HH Alpo Close Off 184 HH Old Close2 Off45 A2 141 Tom2 Hi Off 141 Tom2 Hi Off 236 88 Tom Off 425 Amp Noise Off46 A#2 175 HH3 Sizzle 1 182 HH Old Open1 1 185 HH Old Open2 1 234 99 HH Open 147 B2 141 Tom2 Hi Off 141 Tom2 Hi Off 236 88 Tom Off 266 E.Tom Real Off48 C3 141 Tom2 Hi Off 141 Tom2 Hi Off 236 88 Tom Off 266 E.Tom Real Off49 C#3 196 Crash 1 Off 196 Crash 1 Off 196 Crash 1 Off 196 Crash 1 Off50 D3 141 Tom2 Hi Off 141 Tom2 Hi Off 236 88 Tom Off 266 E.Tom Real Off51 D#3 213 Ride Edge 2 Off 213 Ride Edge 2 Off 213 Ride Edge 2 Off 213 Ride Edge 2 Off52 E3 198 China Off 202 Crash Reverse Off 202 Crash Reverse Off 202 Crash Reverse Off53 F3 214 Ride Jazz Off 214 Ride Jazz Off 214 Ride Jazz Off 214 Ride Jazz Off54 F#3 339 Tambourine Acc2 Off 339 Tambourine Acc2 Off 339 Tambourine Acc2 Off 339 Tambourine Acc2 Off55 G3 201 Splash Off 201 Splash Off 201 Splash Off 407 Xylophone Spectr Off56 G#3 352 Cowbell Off 239 88 Cowbell Off 239 88 Cowbell Off 239 88 Cowbell Off57 A3 196 Crash 1 Off 196 Crash 1 Off 196 Crash 1 Off 196 Crash 1 Off58 A#3 325 Vibraslap Off 325 Vibraslap Off 325 Vibraslap Off 339 Tambourine Acc2 Off59 B3 213 Ride Edge 2 Off 213 Ride Edge 2 Off 213 Ride Edge 2 Off 213 Ride Edge 2 Off60 C4 298 Bongo Hi Open Off 298 Bongo Hi Open Off 237 88 Conga Off 298 Bongo Hi Open Off61 C#4 295 Bongo Lo Open Off 295 Bongo Lo Open Off 237 88 Conga Off 295 Bongo Lo Open Off62 D4 290 Conga Hi Mt Slap Off 290 Conga Hi Mt Slap Off 237 88 Conga Off 290 Conga Hi Mt Slap Off63 D#4 288 Conga Hi Open Off 288 Conga Hi Open Off 237 88 Conga Off 288 Conga Hi Open Off64 E4 285 Conga Lo Open Off 285 Conga Lo Open Off 237 88 Conga Off 285 Conga Lo Open Off65 F4 334 Timbale Hi Rim2 Off 334 Timbale Hi Rim2 Off 334 Timbale Hi Rim2 Off 334 Timbale Hi Rim2 Off66 F#4 329 Timbale Lo Open Off 329 Timbale Lo Open Off 329 Timbale Lo Open Off 329 Timbale Lo Open Off67 G4 351 Agogo Bell Off 351 Agogo Bell Off 351 Agogo Bell Off 351 Agogo Bell Off68 G#4 351 Agogo Bell Off 351 Agogo Bell Off 351 Agogo Bell Off 351 Agogo Bell Off69 A4 346 Cabasa Up Off 346 Cabasa Up Off 346 Cabasa Up Off 346 Cabasa Up Off70 A#4 309 Maracas Push Off 185 HH Old Open2 Off 309 Maracas Push Off 309 Maracas Push Off71 B4 361 Samba Whistle 2 361 Samba Whistle 2 361 Samba Whistle 2 361 Samba Whistle 272 C5 361 Samba Whistle 2 361 Samba Whistle 2 361 Samba Whistle 2 361 Samba Whistle 273 C#5 308 Guiro Short 3 308 Guiro Short 3 308 Guiro Short 3 308 Guiro Short 374 D5 307 Guiro Long 3 307 Guiro Long 3 307 Guiro Long 3 307 Guiro Long 375 D#5 326 Claves Off 326 Claves Off 326 Claves Off 326 Claves Off76 E5 327 Woodblock1 Off 327 Woodblock1 Off 327 Woodblock1 Off 327 Woodblock1 Off77 F5 327 Woodblock1 Off 327 Woodblock1 Off 327 Woodblock1 Off 327 Woodblock1 Off78 F#5 342 Cuica Hi 4 342 Cuica Hi 4 342 Cuica Hi 4 366 Uhh Off79 G5 343 Cuica Lo 4 343 Cuica Lo 4 342 Cuica Hi 4 364 Yeah! Off80 G#5 341 Triangle Mute 5 341 Triangle Mute 5 360 Flexatone 5 341 Triangle Mute 581 A5 340 Triangle Open 5 340 Triangle Open 5 360 Flexatone 5 340 Triangle Open 582 A#5 347 Cabasa Down Off 347 Cabasa Down Off 347 Cabasa Down Off 347 Cabasa Down Off83 B5 355 Sleigh Bell Off 355 Sleigh Bell Off 355 Sleigh Bell Off 355 Sleigh Bell Off84 C6 358 Marc Tree Off 358 Marc Tree Off 358 Marc Tree Off 358 Marc Tree Off85 C#6 305 Castanet Single Off 305 Castanet Single Off 305 Castanet Single Off 305 Castanet Single Off86 D6 330 Timbale Lo Mute 6 330 Timbale Lo Mute 6 330 Timbale Lo Mute 6 330 Timbale Lo Mute 687 D#6 329 Timbale Lo Open 6 329 Timbale Lo Open 6 469 Darbuka1 Tek2 6 329 Timbale Lo Open 688 E6 370 Stadium Off 370 Stadium Off 370 Stadium Off 370 Stadium Off
120-0-16 (20~23): Power Kit 1 120-0-17: Power Kit 2 120-0-18: Power Kit RX1 120-0-19: Power Kit RX2Note Sample Excl. Sample Excl. Sample Excl. Sample Excl.
0 C-1 45 SD Wood 2 pp Off 45 SD Wood 2 pp Off 45 SD Wood 2 pp Off 45 SD Wood 2 pp Off1 C#-1 60 SD Solid2 p Off 60 SD Solid2 p Off 60 SD Solid2 p Off 60 SD Solid2 p Off2 D-1 79 SD Brass2 mf Off 79 SD Brass2 mf Off 79 SD Brass2 mf Off 79 SD Brass2 mf Off3 D#-1 75 SD Brass1 p Off 75 SD Brass1 p Off 75 SD Brass1 p Off 75 SD Brass1 p Off4 E-1 69 SD Maple2 pp Off 69 SD Maple2 pp Off 69 SD Maple2 pp Off 69 SD Maple2 pp Off5 F-1 63 SD Maple1 pp Off 63 SD Maple1 pp Off 63 SD Maple1 pp Off 63 SD Maple1 pp Off6 F#-1 57 SD Solid1 p Off 57 SD Solid1 p Off 57 SD Solid1 p Off 57 SD Solid1 p Off7 G-1 53 SD Piccolo2 pp Off 53 SD Piccolo2 pp Off 53 SD Piccolo2 pp Off 53 SD Piccolo2 pp Off
120-0-12: Room Kit 2 120-0-13: HipHop Kit 2 120-0-14: Techno Kit 2 120-0-15: Techno Kit 3Note Sample Excl. Sample Excl. Sample Excl. Sample Excl.

305Factory dataDrum Kit maps
Appen
dix
8 G#-1 5 BD Dry 1 Off 5 BD Dry 1 Off 5 BD Dry 1 Off 5 BD Dry 1 Off9 A-1 35 BD Dance 99 Off 35 BD Dance 99 Off 18 BD Squash Off 18 BD Squash Off
10 A#-1 228 99 SD Off 228 99 SD Off 115 SD Hip6 Off 115 SD Hip6 Off11 B-1 226 88 BD Off 226 88 BD Off 226 88 BD Off 226 88 BD Off12 C0 227 88 SD Off 227 88 SD Off 52 SD Piccolo1 f Off 52 SD Piccolo1 f Off13 C#0 121 SD Vintage4 Off 121 SD Vintage4 Off 59 SD Solid1 f Off 59 SD Solid1 f Off14 D0 120 SD Vintage3 Off 120 SD Vintage3 Off 68 SD Maple1 ff Off 68 SD Maple1 ff Off15 D#0 38 BD Amb.Rocker Off 38 BD Amb.Rocker Off 36 BD Ambient Off 36 BD Ambient Off16 E0 30 BD Hip 1 Off 30 BD Hip 1 Off 16 BD Gated Off 16 BD Gated Off17 F0 89 SD Off Center Off 89 SD Off Center Off 52 SD Piccolo1 f Off 52 SD Piccolo1 f Off18 F#0 177 HH4 Closed2 1 177 HH4 Closed2 1 161-162 HH2 Closed p-mp (2) 1 161-162 HH2 Closed p-mp (2) 119 G0 18 BD Squash Off 18 BD Squash Off 38 BD Amb.Rocker Off 38 BD Amb.Rocker Off20 G#0 131 Side Stick Amb Off 131 Side Stick Amb Off 130 Side Stick Dry Off 130 Side Stick Dry Off21 A0 118 SD Vintage1 Off 118 SD Vintage1 Off 67 SD Maple1 f 7 67 SD Maple1 f 722 A#0 125 SD Brasser Off 125 SD Brasser Off 68 SD Maple1 ff 7 68 SD Maple1 ff 723 B0 132 Drum Stick Hit Off 132 Drum Stick Hit Off 132 Drum Stick Hit Off 132 Drum Stick Hit Off24 C1 220 SD Orchestra 7 220 SD Orchestra 7 56 SD Piccolo2 f 7 56 SD Piccolo2 f 725 C#1 219 SD Orch. Roll 7 219 SD Orch. Roll 7 219 SD Orch. Roll 7 219 SD Orch. Roll 726 D1 221 Finger Snaps Off 221 Finger Snaps Off 221 Finger Snaps Off 221 Finger Snaps Off27 D#1 270 Zap2 Off 270 Zap2 Off 270 Zap2 Off 270 Zap2 Off28 E1 410 Noise White Off 410 Noise White Off 410 Noise White Off 410 Noise White Off29 F1 272 DJ Scratch2 7 272 DJ Scratch2 7 272 DJ Scratch2 7 272 DJ Scratch2 730 F#1 272 DJ Scratch2 7 272 DJ Scratch2 7 272 DJ Scratch2 7 272 DJ Scratch2 731 G1 132 Drum Stick Hit Off 132 Drum Stick Hit Off 132 Drum Stick Hit Off 132 Drum Stick Hit Off32 G#1 269 Zap1 Off 269 Zap1 Off 269 Zap1 Off 269 Zap1 Off33 A1 376 Click Off 376 Click Off 376 Click Off 376 Click Off34 A#1 340 Triangle Open Off 340 Triangle Open Off 340 Triangle Open Off 340 Triangle Open Off35 B1 16 BD Gated Off 34 BD Pop Kick Off 38 BD Amb.Rocker Off 7 BD Dry 3 Off36 C2 14 BD Terminator Off 16 BD Gated Off 38 BD Amb.Rocker Off 38 BD Amb.Rocker Off37 C#2 131 Side Stick Amb Off 130 Side Stick Dry Off 129 Rim Shot f Off 129 Rim Shot f Off38 D2 101 SD Dance Off 99 SD Processed Off 45~52 SD Wood 2 pp~f (6) Off 53 SD Piccolo2 pp (2) Off39 D#2 225 Claps 4 Off 225 Claps 4 Off 230 88 Claps Off 230 88 Claps Off40 E2 100 SD Cracker Room Off 116 SD Ringy Off 46~56 SD Wood 2~Piccolo2 p~f (6) Off 46~56 SD Wood 2~Piccolo2 p~f (6) Off41 F2 148 Tom Processed Off 148 Tom Processed Off 140 Tom1 Floor f Off 140 Tom1 Floor f Off42 F#2 176 HH4 Closed1 1 177 HH4 Closed2 1 160~163 HH2 Closed pp~mf (4) 1 160~163 HH2 Closed pp~mf (4) 143 G2 148 Tom Processed Off 148 Tom Processed Off 138 Tom1 Low f Off 138 Tom1 Low f Off44 G#2 172 HH3 Foot 1 178 HH4 Foot 1 157-156 HH1 Foot mf-mp (2) 1 157-156 HH1 Foot mf-mp (2) 145 A2 148 Tom Processed Off 148 Tom Processed Off 138 Tom1 Low f Off 138 Tom1 Low f Off46 A#2 180 HH4 Open 1 180 HH4 Open 1 168-169 HH2 Open p-f (2) 1 168-169 HH2 Open p-f (2) 147 B2 148 Tom Processed Off 148 Tom Processed Off 136 Tom1 Mid f Off 136 Tom1 Mid f Off48 C3 148 Tom Processed Off 148 Tom Processed Off 134 Tom1 Hi f Off 134 Tom1 Hi f Off49 C#3 196 Crash 1 Off 196 Crash 1 Off 196 Crash 1 Off 196 Crash 1 Off50 D3 148 Tom Processed Off 148 Tom Processed Off 134 Tom1 Hi f Off 134 Tom1 Hi f Off51 D#3 213 Ride Edge 2 Off 213 Ride Edge 2 Off 207-209 Ride 20' mp2-mf2 (2) Off 207-209 Ride 20' mp2-mf2 (2) Off52 E3 198 China Off 198 China Off 198 China Off 198 China Off53 F3 214 Ride Jazz Off 214 Ride Jazz Off 206-208 Ride 20' mp1-mf1 (2) Off 206-208 Ride 20' mp1-mf1 (2) Off54 F#3 339 Tambourine Acc2 Off 339 Tambourine Acc2 Off 339 Tambourine Acc2 Off 339 Tambourine Acc2 Off55 G3 201 Splash Off 201 Splash Off 201 Splash Off 201 Splash Off56 G#3 352 Cowbell Off 352 Cowbell Off 352 Cowbell Off 352 Cowbell Off57 A3 196 Crash 1 Off 196 Crash 1 Off 196 Crash 1 Off 196 Crash 1 Off58 A#3 325 Vibraslap Off 325 Vibraslap Off 325 Vibraslap Off 325 Vibraslap Off59 B3 213 Ride Edge 2 Off 213 Ride Edge 2 Off 206 Ride 20' mp1 Off 206 Ride 20' mp1 Off60 C4 298 Bongo Hi Open Off 298 Bongo Hi Open Off 298 Bongo Hi Open Off 298 Bongo Hi Open Off61 C#4 295 Bongo Lo Open Off 295 Bongo Lo Open Off 295 Bongo Lo Open Off 295 Bongo Lo Open Off62 D4 290 Conga Hi Mt Slap Off 290 Conga Hi Mt Slap Off 290 Conga Hi Mt Slap Off 290 Conga Hi Mt Slap Off63 D#4 288 Conga Hi Open Off 288 Conga Hi Open Off 288 Conga Hi Open Off 288 Conga Hi Open Off64 E4 285 Conga Lo Open Off 285 Conga Lo Open Off 285 Conga Lo Open Off 285 Conga Lo Open Off65 F4 334 Timbale Hi Rim2 Off 334 Timbale Hi Rim2 Off 334 Timbale Hi Rim2 Off 334 Timbale Hi Rim2 Off66 F#4 329 Timbale Lo Open Off 329 Timbale Lo Open Off 329 Timbale Lo Open Off 329 Timbale Lo Open Off67 G4 351 Agogo Bell Off 351 Agogo Bell Off 351 Agogo Bell Off 351 Agogo Bell Off68 G#4 351 Agogo Bell Off 351 Agogo Bell Off 351 Agogo Bell Off 351 Agogo Bell Off69 A4 346 Cabasa Up Off 346 Cabasa Up Off 346 Cabasa Up Off 346 Cabasa Up Off70 A#4 309 Maracas Push Off 309 Maracas Push Off 309 Maracas Push Off 309 Maracas Push Off71 B4 361 Samba Whistle 2 361 Samba Whistle 2 361 Samba Whistle 2 361 Samba Whistle 272 C5 361 Samba Whistle 2 361 Samba Whistle 2 361 Samba Whistle 2 361 Samba Whistle 273 C#5 308 Guiro Short 3 308 Guiro Short 3 308 Guiro Short 3 308 Guiro Short 374 D5 307 Guiro Long 3 307 Guiro Long 3 307 Guiro Long 3 307 Guiro Long 375 D#5 326 Claves Off 326 Claves Off 326 Claves Off 326 Claves Off76 E5 327 Woodblock1 Off 327 Woodblock1 Off 327 Woodblock1 Off 327 Woodblock1 Off77 F5 327 Woodblock1 Off 327 Woodblock1 Off 327 Woodblock1 Off 327 Woodblock1 Off78 F#5 342 Cuica Hi 4 342 Cuica Hi 4 342 Cuica Hi 4 342 Cuica Hi 479 G5 343 Cuica Lo 4 343 Cuica Lo 4 343 Cuica Lo 4 343 Cuica Lo 480 G#5 341 Triangle Mute 5 341 Triangle Mute 5 341 Triangle Mute 5 341 Triangle Mute 581 A5 340 Triangle Open 5 340 Triangle Open 5 340 Triangle Open 5 340 Triangle Open 582 A#5 347 Cabasa Down Off 347 Cabasa Down Off 347 Cabasa Down Off 347 Cabasa Down Off83 B5 355 Sleigh Bell Off 355 Sleigh Bell Off 355 Sleigh Bell Off 355 Sleigh Bell Off84 C6 358 Marc Tree Off 358 Marc Tree Off 358 Marc Tree Off 358 Marc Tree Off85 C#6 305 Castanet Single Off 305 Castanet Single Off 305 Castanet Single Off 305 Castanet Single Off86 D6 330 Timbale Lo Mute 6 330 Timbale Lo Mute 6 330 Timbale Lo Mute 6 330 Timbale Lo Mute 687 D#6 329 Timbale Lo Open 6 329 Timbale Lo Open 6 329 Timbale Lo Open 6 329 Timbale Lo Open 688 E6 370 Stadium Off 370 Stadium Off 370 Stadium Off 370 Stadium Off
120-0-16 (20~23): Power Kit 1 120-0-17: Power Kit 2 120-0-18: Power Kit RX1 120-0-19: Power Kit RX2Note Sample Excl. Sample Excl. Sample Excl. Sample Excl.

306 Factory dataDrum Kit maps
120-0-24: Electro Kit 120-0-25: Analog Kit 120-0-26: House Kit 1 120-0-27: House Kit 2Note Sample Excl. Sample Excl. Sample Excl. Sample Excl.
0 C-1 45 SD Wood 2 pp Off 45 SD Wood 2 pp Off 45 SD Wood 2 pp Off 45 SD Wood 2 pp Off1 C#-1 60 SD Solid2 p Off 60 SD Solid2 p Off 60 SD Solid2 p Off 60 SD Solid2 p Off2 D-1 79 SD Brass2 mf Off 79 SD Brass2 mf Off 79 SD Brass2 mf Off 79 SD Brass2 mf Off3 D#-1 75 SD Brass1 p Off 75 SD Brass1 p Off 75 SD Brass1 p Off 75 SD Brass1 p Off4 E-1 69 SD Maple2 pp Off 69 SD Maple2 pp Off 69 SD Maple2 pp Off 69 SD Maple2 pp Off5 F-1 63 SD Maple1 pp Off 63 SD Maple1 pp Off 63 SD Maple1 pp Off 63 SD Maple1 pp Off6 F#-1 57 SD Solid1 p Off 57 SD Solid1 p Off 57 SD Solid1 p Off 57 SD Solid1 p Off7 G-1 53 SD Piccolo2 pp Off 53 SD Piccolo2 pp Off 53 SD Piccolo2 pp Off 53 SD Piccolo2 pp Off8 G#-1 5 BD Dry 1 Off 5 BD Dry 1 Off 5 BD Dry 1 Off 5 BD Dry 1 Off9 A-1 30 BD Hip 1 Off 400 Explosion Off 34 BD Pop Kick Off 34 BD Pop Kick Off
10 A#-1 228 99 SD Off 115 SD Hip6 Off 123 SD Vintage6 Off 228 99 SD Off11 B-1 226 88 BD Off 8 BD Normal Off 40 BD Deep 88 Off 40 BD Deep 88 Off12 C0 227 88 SD Off 98 SD Yowie Off 227 88 SD Off 227 88 SD Off13 C#0 89 SD Off Center Off 90 SD Jazz Ring Off 101 SD Dance Off 101 SD Dance Off14 D0 120 SD Vintage3 Off 127 SD Whopper Off 91 SD Amb.Piccolo Off 91 SD Amb.Piccolo Off15 D#0 34 BD Pop Kick Off 34 BD Pop Kick Off 36 BD Ambient Off 36 BD Ambient Off16 E0 36 BD Ambient Off 35 BD Dance 99 Off 14 BD Terminator Off 14 BD Terminator Off17 F0 115 SD Hip6 Off 125 SD Brasser Off 121 SD Vintage4 Off 121 SD Vintage4 Off18 F#0 231 88 HH Close 1 170 HH3 Closed1 1 270 Zap2 Off 270 Zap2 Off19 G0 25 BD House 4 Off 30 BD Hip 1 Off 33 BD Hip 4 Off 33 BD Hip 4 Off20 G#0 270 Zap2 Off 269 Zap1 Off 269 Zap1 Off 269 Zap1 Off21 A0 99 SD Processed Off 115 SD Hip6 Off 122 SD Vintage5 Off 122 SD Vintage5 Off22 A#0 121 SD Vintage4 Off 117 SD Tiny Off 429 Mouth Harp Off 429 Mouth Harp Off23 B0 132 Drum Stick Hit Off 132 Drum Stick Hit Off 132 Drum Stick Hit Off 132 Drum Stick Hit Off24 C1 220 SD Orchestra 7 220 SD Orchestra 7 220 SD Orchestra 7 220 SD Orchestra 725 C#1 219 SD Orch. Roll 7 219 SD Orch. Roll 7 219 SD Orch. Roll 7 219 SD Orch. Roll 726 D1 221 Finger Snaps Off 221 Finger Snaps Off 221 Finger Snaps Off 221 Finger Snaps Off27 D#1 270 Zap2 Off 270 Zap2 Off 270 Zap2 Off 270 Zap2 Off28 E1 410 Noise White Off 410 Noise White Off 410 Noise White Off 410 Noise White Off29 F1 272 DJ Scratch2 7 272 DJ Scratch2 7 272 DJ Scratch2 7 272 DJ Scratch2 730 F#1 272 DJ Scratch2 7 272 DJ Scratch2 7 272 DJ Scratch2 7 272 DJ Scratch2 731 G1 132 Drum Stick Hit Off 132 Drum Stick Hit Off 132 Drum Stick Hit Off 132 Drum Stick Hit Off32 G#1 269 Zap1 Off 269 Zap1 Off 269 Zap1 Off 269 Zap1 Off33 A1 376 Click Off 376 Click Off 376 Click Off 376 Click Off34 A#1 340 Triangle Open Off 340 Triangle Open Off 340 Triangle Open Off 340 Triangle Open Off35 B1 20 BD Dance 2 Off 40 BD Deep 88 Off 32 BD Hip 3 Off 32 BD Hip 3 Off36 C2 265 E.Tom FM Off 40 BD Deep 88 Off 36 BD Ambient Off 18 BD Squash Off37 C#2 268 Rim House2 Off 229 88 Rim Shot Off 268 Rim House2 Off 446 Rek Jingle Off38 D2 266 E.Tom Real Off 227 88 SD Off 117 SD Tiny Off 121 SD Vintage4 Off39 D#2 230 88 Claps Off 230 88 Claps Off 230 88 Claps Off 230 88 Claps Off40 E2 114 SD Hip5 Off 227 88 SD Off 228 99 SD Off 107 SD Rap Off41 F2 266 E.Tom Real Off 236 88 Tom Off 386 Tribe Off 145 Tom3 Floor Off42 F#2 174 HH3 Open 2 1 231 88 HH Close 1 233 99 HH Close 1 183 HH Old TiteClose 143 G2 266 E.Tom Real Off 236 88 Tom Off 148 Tom Processed Off 145 Tom3 Floor Off44 G#2 178 HH4 Foot 1 232 88 HH Open 1 180 HH4 Open Off 189 HH Alpo Close Off45 A2 266 E.Tom Real Off 236 88 Tom Off 226 88 BD Off 144 Tom3 Low Off46 A#2 173 HH3 Open 1 1 232 88 HH Open 1 234 99 HH Open 1 181 HH Old Close1 147 B2 266 E.Tom Real Off 236 88 Tom Off 266 E.Tom Real Off 144 Tom3 Low Off48 C3 266 E.Tom Real Off 236 88 Tom Off 266 E.Tom Real Off 143 Tom3 Hi Off49 C#3 196 Crash 1 Off 235 88 Crash Off 196 Crash 1 Off 196 Crash 1 Off50 D3 266 E.Tom Real Off 236 88 Tom Off 266 E.Tom Real Off 143 Tom3 Hi Off51 D#3 213 Ride Edge 2 Off 213 Ride Edge 2 Off 213 Ride Edge 2 Off 213 Ride Edge 2 Off52 E3 202 Crash Reverse Off 198 China Off 202 Crash Reverse Off 202 Crash Reverse Off53 F3 214 Ride Jazz Off 214 Ride Jazz Off 214 Ride Jazz Off 214 Ride Jazz Off54 F#3 339 Tambourine Acc2 Off 411 Noise FM Mod Off 339 Tambourine Acc2 Off 339 Tambourine Acc2 Off55 G3 201 Splash Off 201 Splash Off 198 China Off 198 China Off56 G#3 352 Cowbell Off 239 88 Cowbell Off 352 Cowbell Off 352 Cowbell Off57 A3 196 Crash 1 Off 196 Crash 1 Off 196 Crash 1 Off 196 Crash 1 Off58 A#3 325 Vibraslap Off 325 Vibraslap Off 325 Vibraslap Off 325 Vibraslap Off59 B3 213 Ride Edge 2 Off 213 Ride Edge 2 Off 213 Ride Edge 2 Off 213 Ride Edge 2 Off60 C4 298 Bongo Hi Open Off 237 88 Conga Off 298 Bongo Hi Open Off 298 Bongo Hi Open Off61 C#4 295 Bongo Lo Open Off 237 88 Conga Off 295 Bongo Lo Open Off 295 Bongo Lo Open Off62 D4 290 Conga Hi Mt Slap Off 237 88 Conga Off 290 Conga Hi Mt Slap Off 290 Conga Hi Mt Slap Off63 D#4 288 Conga Hi Open Off 236 88 Tom Off 288 Conga Hi Open Off 288 Conga Hi Open Off64 E4 285 Conga Lo Open Off 236 88 Tom Off 285 Conga Lo Open Off 285 Conga Lo Open Off65 F4 334 Timbale Hi Rim2 Off 334 Timbale Hi Rim2 Off 334 Timbale Hi Rim2 Off 334 Timbale Hi Rim2 Off66 F#4 329 Timbale Lo Open Off 329 Timbale Lo Open Off 329 Timbale Lo Open Off 329 Timbale Lo Open Off67 G4 351 Agogo Bell Off 351 Agogo Bell Off 351 Agogo Bell Off 351 Agogo Bell Off68 G#4 351 Agogo Bell Off 351 Agogo Bell Off 351 Agogo Bell Off 351 Agogo Bell Off69 A4 346 Cabasa Up Off 346 Cabasa Up Off 346 Cabasa Up Off 346 Cabasa Up Off70 A#4 309 Maracas Push Off 309 Maracas Push Off 188 HH Hip Off 336 Tambourine Push Off71 B4 361 Samba Whistle 2 361 Samba Whistle 2 361 Samba Whistle 2 361 Samba Whistle 272 C5 361 Samba Whistle 2 361 Samba Whistle 2 361 Samba Whistle 2 361 Samba Whistle 273 C#5 308 Guiro Short 3 308 Guiro Short 3 308 Guiro Short 3 308 Guiro Short 374 D5 307 Guiro Long 3 307 Guiro Long 3 307 Guiro Long 3 307 Guiro Long 375 D#5 326 Claves Off 238 88 Claves Off 326 Claves Off 326 Claves Off76 E5 327 Woodblock1 Off 327 Woodblock1 Off 327 Woodblock1 Off 327 Woodblock1 Off77 F5 327 Woodblock1 Off 327 Woodblock1 Off 327 Woodblock1 Off 327 Woodblock1 Off78 F#5 342 Cuica Hi 4 342 Cuica Hi 4 366 Uhh Off 342 Cuica Hi 479 G5 343 Cuica Lo 4 342 Cuica Hi 4 364 Yeah! Off 343 Cuica Lo 480 G#5 341 Triangle Mute 5 357 Finger Cymbal 5 341 Triangle Mute 5 341 Triangle Mute 581 A5 340 Triangle Open 5 357 Finger Cymbal 5 340 Triangle Open 5 340 Triangle Open 5

307Factory dataDrum Kit maps
Appen
dix
82 A#5 347 Cabasa Down Off 347 Cabasa Down Off 185 HH Old Open2 Off 347 Cabasa Down Off83 B5 355 Sleigh Bell Off 355 Sleigh Bell Off 355 Sleigh Bell Off 355 Sleigh Bell Off84 C6 358 Marc Tree Off 358 Marc Tree Off 358 Marc Tree Off 358 Marc Tree Off85 C#6 305 Castanet Single Off 305 Castanet Single Off 305 Castanet Single Off 305 Castanet Single Off86 D6 330 Timbale Lo Mute 6 330 Timbale Lo Mute 6 330 Timbale Lo Mute 6 330 Timbale Lo Mute 687 D#6 329 Timbale Lo Open 6 329 Timbale Lo Open 6 329 Timbale Lo Open 6 329 Timbale Lo Open 688 E6 370 Stadium Off 370 Stadium Off 370 Stadium Off 370 Stadium Off
120-0-28: House Kit 3 120-0-29: House Kit 4 120-0-30: House Kit RX1 120-0-31: House Kit RX2Note Sample Excl. Sample Excl. Sample Excl. Sample Excl.
0 C-1 45 SD Wood 2 pp Off 45 SD Wood 2 pp Off 45 SD Wood 2 pp Off 45 SD Wood 2 pp Off1 C#-1 60 SD Solid2 p Off 60 SD Solid2 p Off 60 SD Solid2 p Off 60 SD Solid2 p Off2 D-1 79 SD Brass2 mf Off 79 SD Brass2 mf Off 79 SD Brass2 mf Off 79 SD Brass2 mf Off3 D#-1 75 SD Brass1 p Off 75 SD Brass1 p Off 75 SD Brass1 p Off 75 SD Brass1 p Off4 E-1 69 SD Maple2 pp Off 69 SD Maple2 pp Off 69 SD Maple2 pp Off 69 SD Maple2 pp Off5 F-1 63 SD Maple1 pp Off 63 SD Maple1 pp Off 63 SD Maple1 pp Off 63 SD Maple1 pp Off6 F#-1 57 SD Solid1 p Off 57 SD Solid1 p Off 57 SD Solid1 p Off 57 SD Solid1 p Off7 G-1 53 SD Piccolo2 pp Off 53 SD Piccolo2 pp Off 53 SD Piccolo2 pp Off 53 SD Piccolo2 pp Off8 G#-1 5 BD Dry 1 Off 5 BD Dry 1 Off 5 BD Dry 1 Off 5 BD Dry 1 Off9 A-1 34 BD Pop Kick Off 34 BD Pop Kick Off 39 BD Pop 99 Off 40 BD Deep 88 Off
10 A#-1 228 99 SD Off 228 99 SD Off 111 SD Hip2 Off 112 SD Hip3 Off11 B-1 40 BD Deep 88 Off 40 BD Deep 88 Off 264 Boom Off 264 Boom Off12 C0 227 88 SD Off 227 88 SD Off 227 88 SD Off 228 99 SD Off13 C#0 101 SD Dance Off 101 SD Dance Off 105 SD House4 Off 122 SD Vintage5 Off14 D0 91 SD Amb.Piccolo Off 91 SD Amb.Piccolo Off 104 SD House3 Off 104 SD House3 Off15 D#0 36 BD Ambient Off 36 BD Ambient Off 24 BD House 3 Off 24 BD House 3 Off16 E0 14 BD Terminator Off 14 BD Terminator Off 29 BD Techno 2 Off 29 BD Techno 2 Off17 F0 121 SD Vintage4 Off 121 SD Vintage4 Off 106 SD Small Off 106 SD Small Off18 F#0 270 Zap2 Off 270 Zap2 Off 176 HH4 Closed1 1 180 HH4 Open Off19 G0 33 BD Hip 4 Off 33 BD Hip 4 Off 20 BD Dance 2 Off 20 BD Dance 2 Off20 G#0 269 Zap1 Off 269 Zap1 Off 131 Side Stick Amb Off 131 Side Stick Amb Off21 A0 122 SD Vintage5 Off 122 SD Vintage5 Off 111 SD Hip2 Off 116 SD Ringy Off22 A#0 429 Mouth Harp Off 429 Mouth Harp Off 92 SD Paper Off 90 SD Jazz Ring Off23 B0 132 Drum Stick Hit Off 132 Drum Stick Hit Off 132 Drum Stick Hit Off 267 Rim House1 Off24 C1 220 SD Orchestra 7 220 SD Orchestra 7 220 SD Orchestra 7 220 SD Orchestra 725 C#1 219 SD Orch. Roll 7 219 SD Orch. Roll 7 219 SD Orch. Roll 7 219 SD Orch. Roll 726 D1 221 Finger Snaps Off 221 Finger Snaps Off 221 Finger Snaps Off 221 Finger Snaps Off27 D#1 270 Zap2 Off 270 Zap2 Off 270 Zap2 Off 270 Zap2 Off28 E1 410 Noise White Off 410 Noise White Off 410 Noise White Off 108 SD Noise Off29 F1 272 DJ Scratch2 7 272 DJ Scratch2 7 272 DJ Scratch2 7 272 DJ Scratch2 730 F#1 272 DJ Scratch2 7 272 DJ Scratch2 7 272 DJ Scratch2 7 272 DJ Scratch2 731 G1 132 Drum Stick Hit Off 132 Drum Stick Hit Off 132 Drum Stick Hit Off 132 Drum Stick Hit Off32 G#1 269 Zap1 Off 269 Zap1 Off 269 Zap1 Off 269 Zap1 Off33 A1 376 Click Off 376 Click Off 376 Click Off 376 Click Off34 A#1 340 Triangle Open Off 340 Triangle Open Off 340 Triangle Open Off 340 Triangle Open Off35 B1 39 BD Pop 99 Off 32 BD Hip 3 Off 23 BD House 2 Off 39 BD Pop 99 Off36 C2 35 BD Dance 99 Off 16 BD Gated Off 22 BD House 1 Off 24 BD House 3 Off37 C#2 268 Rim House2 Off 131 Side Stick Amb Off 268 Rim House2 Off 229 88 Rim Shot Off38 D2 98 SD Yowie Off 82 SD Dry 1 Off 103 SD House2 Off 102 SD House1 Off39 D#2 230 88 Claps Off 230 88 Claps Off 230 88 Claps Off 223 Claps 2 Off40 E2 115 SD Hip6 Off 108 SD Noise Off 87 SD Ghost f Off 105 SD House4 Off41 F2 266 E.Tom Real Off 266 E.Tom Real Off 145 Tom3 Floor Off 145 Tom3 Floor Off42 F#2 231 88 HH Close 1 231 88 HH Close 1 233 99 HH Close 1 183 HH Old TiteClose 143 G2 266 E.Tom Real Off 266 E.Tom Real Off 141 Tom2 Hi Off 141 Tom2 Hi Off44 G#2 231 88 HH Close 1 232 88 HH Open Off 181 HH Old Close1 1 187 HH House Open2 145 A2 266 E.Tom Real Off 266 E.Tom Real Off 141 Tom2 Hi Off 141 Tom2 Hi Off46 A#2 232 88 HH Open 1 232 88 HH Open 1 186 HH House Open1 1 168 HH2 Open p 147 B2 266 E.Tom Real Off 266 E.Tom Real Off 141 Tom2 Hi Off 141 Tom2 Hi Off48 C3 266 E.Tom Real Off 266 E.Tom Real Off 141 Tom2 Hi Off 141 Tom2 Hi Off49 C#3 196 Crash 1 Off 235 88 Crash Off 196 Crash 1 Off 196 Crash 1 Off50 D3 266 E.Tom Real Off 266 E.Tom Real Off 141 Tom2 Hi Off 141 Tom2 Hi Off51 D#3 213 Ride Edge 2 Off 205 Ride Dance 99 Off 210 Ride Brush Off 210 Ride Brush Off52 E3 202 Crash Reverse Off 202 Crash Reverse Off 202 Crash Reverse Off 202 Crash Reverse Off53 F3 214 Ride Jazz Off 214 Ride Jazz Off 214 Ride Jazz Off 214 Ride Jazz Off54 F#3 339 Tambourine Acc2 Off 338 Tambourine Acc1 Off 336 Tambourine Push Off 339 Tambourine Acc2 Off55 G3 201 Splash Off 201 Splash Off 201 Splash Off 201 Splash Off56 G#3 352 Cowbell Off 239 88 Cowbell Off 352 Cowbell Off 352 Cowbell Off57 A3 196 Crash 1 Off 196 Crash 1 Off 196 Crash 1 Off 196 Crash 1 Off58 A#3 325 Vibraslap Off 325 Vibraslap Off 386 Tribe Off 386 Tribe Off59 B3 213 Ride Edge 2 Off 213 Ride Edge 2 Off 263 Perc. Ahh Off 263 Perc. Ahh Off60 C4 298 Bongo Hi Open Off 298 Bongo Hi Open Off 298 Bongo Hi Open Off 296 Bongo Lo Slap Off61 C#4 295 Bongo Lo Open Off 295 Bongo Lo Open Off 295 Bongo Lo Open Off 295 Bongo Lo Open Off62 D4 290 Conga Hi Mt Slap Off 290 Conga Hi Mt Slap Off 290 Conga Hi Mt Slap Off 290 Conga Hi Mt Slap Off63 D#4 288 Conga Hi Open Off 288 Conga Hi Open Off 288 Conga Hi Open Off 297 Bongo Lo Stick Off64 E4 285 Conga Lo Open Off 285 Conga Lo Open Off 285 Conga Lo Open Off 285 Conga Lo Open Off65 F4 334 Timbale Hi Rim2 Off 334 Timbale Hi Rim2 Off 334 Timbale Hi Rim2 Off 334 Timbale Hi Rim2 Off66 F#4 329 Timbale Lo Open Off 329 Timbale Lo Open Off 329 Timbale Lo Open Off 329 Timbale Lo Open Off67 G4 351 Agogo Bell Off 351 Agogo Bell Off 351 Agogo Bell Off 351 Agogo Bell Off68 G#4 351 Agogo Bell Off 351 Agogo Bell Off 351 Agogo Bell Off 351 Agogo Bell Off69 A4 346 Cabasa Up Off 346 Cabasa Up Off 346 Cabasa Up Off 346 Cabasa Up Off70 A#4 188 HH Hip Off 336 Tambourine Push Off 309 Maracas Push Off 309 Maracas Push Off
120-0-24: Electro Kit 120-0-25: Analog Kit 120-0-26: House Kit 1 120-0-27: House Kit 2Note Sample Excl. Sample Excl. Sample Excl. Sample Excl.

308 Factory dataDrum Kit maps
71 B4 361 Samba Whistle 2 361 Samba Whistle 2 361 Samba Whistle 2 361 Samba Whistle 272 C5 361 Samba Whistle 2 361 Samba Whistle 2 361 Samba Whistle 2 361 Samba Whistle 273 C#5 308 Guiro Short 3 308 Guiro Short 3 308 Guiro Short 3 308 Guiro Short 374 D5 307 Guiro Long 3 307 Guiro Long 3 307 Guiro Long 3 307 Guiro Long 375 D#5 326 Claves Off 326 Claves Off 326 Claves Off 326 Claves Off76 E5 327 Woodblock1 Off 327 Woodblock1 Off 327 Woodblock1 Off 327 Woodblock1 Off77 F5 327 Woodblock1 Off 327 Woodblock1 Off 327 Woodblock1 Off 327 Woodblock1 Off78 F#5 342 Cuica Hi Off 342 Cuica Hi 4 261 Syn. FX4 4 261 Syn. FX4 479 G5 342 Cuica Hi Off 342 Cuica Hi 4 262 Syn. FX5 4 262 Syn. FX5 480 G#5 360 Flexatone 5 360 Flexatone 5 341 Triangle Mute 5 341 Triangle Mute 581 A5 360 Flexatone 5 360 Flexatone 5 340 Triangle Open 5 340 Triangle Open 582 A#5 185 HH Old Open2 Off 347 Cabasa Down Off 211 Ride Rivet Off 349 Caxixi Hard Off83 B5 355 Sleigh Bell Off 355 Sleigh Bell Off 355 Sleigh Bell Off 355 Sleigh Bell Off84 C6 358 Marc Tree Off 358 Marc Tree Off 358 Marc Tree Off 358 Marc Tree Off85 C#6 305 Castanet Single Off 305 Castanet Single Off 255 Syn. Castanet Off 255 Syn. Castanet Off86 D6 330 Timbale Lo Mute 6 330 Timbale Lo Mute 6 330 Timbale Lo Mute 6 330 Timbale Lo Mute 687 D#6 329 Timbale Lo Open 6 329 Timbale Lo Open 6 329 Timbale Lo Open 6 329 Timbale Lo Open 688 E6 370 Stadium Off 370 Stadium Off 370 Stadium Off 370 Stadium Off
120-0-32 (36~39): Jazz Kit RX1 120-0-33: Jazz Kit 120-0-34: Jazz Kit RX2 120-0-35: Jazz Kit RX3Note Sample Excl. Sample Excl. Sample Excl. Sample Excl.
0 C-1 45 SD Wood 2 pp Off 45 SD Wood 2 pp Off 45 SD Wood 2 pp Off 45 SD Wood 2 pp Off1 C#-1 60 SD Solid2 p Off 60 SD Solid2 p Off 60 SD Solid2 p Off 60 SD Solid2 p Off2 D-1 79 SD Brass2 mf Off 79 SD Brass2 mf Off 79 SD Brass2 mf Off 79 SD Brass2 mf Off3 D#-1 75 SD Brass1 p Off 75 SD Brass1 p Off 75 SD Brass1 p Off 75 SD Brass1 p Off4 E-1 69 SD Maple2 pp Off 69 SD Maple2 pp Off 69 SD Maple2 pp Off 69 SD Maple2 pp Off5 F-1 63 SD Maple1 pp Off 63 SD Maple1 pp Off 63 SD Maple1 pp Off 63 SD Maple1 pp Off6 F#-1 57 SD Solid1 p Off 57 SD Solid1 p Off 57 SD Solid1 p Off 57 SD Solid1 p Off7 G-1 53 SD Piccolo2 pp Off 53 SD Piccolo2 pp Off 53 SD Piccolo2 pp Off 53 SD Piccolo2 pp Off8 G#-1 5 BD Dry 1 Off 5 BD Dry 1 Off 5 BD Dry 1 Off 5 BD Dry 1 Off9 A-1 25 BD House 4 Off 25 BD House 4 Off 25 BD House 4 Off 25 BD House 4 Off
10 A#-1 228 99 SD Off 228 99 SD Off 228 99 SD Off 228 99 SD Off11 B-1 40 BD Deep 88 Off 40 BD Deep 88 Off 40 BD Deep 88 Off 40 BD Deep 88 Off12 C0 227 88 SD Off 227 88 SD Off 227 88 SD Off 227 88 SD Off13 C#0 60~62 SD Solid2 p~f (3) Off 90 SD Jazz Ring Off 60~62 SD Solid2 p~f (3) Off 67 SD Maple1 f Off14 D0 57~59 SD Solid1 p~f (3) Off 91 SD Amb.Piccolo Off 57~59 SD Solid1 p~f (3) Off 66 SD Maple1 mf Off15 D#0 10 BD Jazz (2) Off 38 BD Amb.Rocker Off 10 BD Jazz (2) Off 38 BD Amb.Rocker Off16 E0 7 BD Dry 3 Off 11 BD Pillow Off 7 BD Dry 3 Off 11 BD Pillow Off17 F0 42~44 SD Wood 1 p~f (3) Off 88 SD Full Room Off 53‹56 SD Piccolo2 pp~f (4) Off 67 SD Maple1 f Off18 F#0 160~165 HH2 Closed pp~ff (6) Off 171 HH3 Closed2 1 160~165 HH2 Closed pp~ff (6) Off 171 HH3 Closed2 119 G0 8 BD Normal Off 5 BD Dry 1 Off 8 BD Normal Off 5 BD Dry 1 Off20 G#0 129 Rim Shot f Off 131 Side Stick Amb Off 129 Rim Shot f Off 131 Side Stick Amb Off21 A0 69-74 SD Maple2 pp~ff (6) Off 83 SD Dry 2 Off 69-74 SD Maple2 pp~ff (6) Off 51 SD Piccolo1 mf Off22 A#0 63~68 SD Maple1 pp~ff (6) Off 93 SD Brush Hit Off 63~68 SD Maple1 pp~ff (6) Off 93 SD Brush Hit Off23 B0 132 Drum Stick Hit Off 132 Drum Stick Hit Off 132 Drum Stick Hit Off 132 Drum Stick Hit Off24 C1 78~80 SD Brass2 p~f (3) Off 220 SD Orchestra 7 78~80-59 SD Brass2 p~f - Solid1 f (4) Off 76 SD Brass1 mf 725 C#1 81 SD Roll 7 219 SD Orch. Roll 7 81 SD Roll 7 81 SD Roll 726 D1 221 Finger Snaps Off 221 Finger Snaps Off 221 Finger Snaps Off 221 Finger Snaps Off27 D#1 270 Zap2 Off 270 Zap2 Off 270 Zap2 Off 270 Zap2 Off28 E1 410 Noise White Off 410 Noise White Off 410 Noise White Off 410 Noise White Off29 F1 272 DJ Scratch2 7 272 DJ Scratch2 7 272 DJ Scratch2 7 272 DJ Scratch2 730 F#1 272 DJ Scratch2 7 272 DJ Scratch2 7 272 DJ Scratch2 7 272 DJ Scratch2 731 G1 132 Drum Stick Hit Off 132 Drum Stick Hit Off 132 Drum Stick Hit Off 132 Drum Stick Hit Off32 G#1 269 Zap1 Off 269 Zap1 Off 269 Zap1 Off 269 Zap1 Off33 A1 376 Click Off 376 Click Off 376 Click Off 376 Click Off34 A#1 340 Triangle Open Off 340 Triangle Open Off 340 Triangle Open Off 340 Triangle Open Off35 B1 3~4 BD Acoust.2 mf~f (3) Off 10 BD Jazz Off 3~4 BD Acoust.2 mf~f (3) Off 10 BD Jazz Off36 C2 0~2 BD Acoust.1 p~f (4) Off 9 BD SoftRoom Off 0~2 BD Acoust.1 p~f (4) Off 3~4 BD Acoust.2 mf~f (3) Off37 C#2 128-129 Rim Shot p-f (2) Off 131 Side Stick Amb Off 128-129 Rim Shot p-f (2) Off 131 Side Stick Amb Off38 D2 53~56 SD Piccolo2 pp~f (4) Off 82 SD Dry 1 Off 53~56 SD Piccolo2 pp~f (4) Off 74 SD Maple2 ff Off39 D#2 230 88 Claps Off 230 88 Claps Off 230 88 Claps Off 230 88 Claps Off40 E2 49~52 SD Piccolo1 pp~f (4) Off 90 SD Jazz Ring Off 49~52 SD Piccolo1 pp~f (4) Off 64 SD Maple1 p Off41 F2 139-140 Tom1 Floor p-f (2) Off 150 Tom Jazz Floor Off 139-140 Tom1 Floor p-f (2) Off 150 Tom Jazz Floor Off42 F#2 160~165 HH2 Closed pp~ff (6) 1 176 HH4 Closed1 1 160~165 HH2 Closed pp~ff (6) 1 160~165 HH2 Closed pp~ff (6) 143 G2 137-138 Tom1 Low p-f (2) Off 150 Tom Jazz Floor Off 137-138 Tom1 Low p-f (2) Off 150 Tom Jazz Floor Off44 G#2 166-167 HH2 Foot p-f (2) 1 178 HH4 Foot 1 166-167 HH2 Foot p-f (2) 1 166-167 HH2 Foot p-f (2) 145 A2 135-136 Tom1 Mid p-f (2) Off 149 Tom Jazz Hi Off 135-136 Tom1 Mid p-f (2) Off 149 Tom Jazz Hi Off46 A#2 168-169 HH2 Open p-f (2) 1 175 HH3 Sizzle 1 168-169 HH2 Open p-f (2) 1 168-169 HH2 Open p-f (2) 147 B2 135-136 Tom1 Mid p-f (2) Off 149 Tom Jazz Hi Off 135-136 Tom1 Mid p-f (2) Off 149 Tom Jazz Hi Off48 C3 133-134 Tom1 Hi p-f (2) Off 149 Tom Jazz Hi Off 133-134 Tom1 Hi p-f (2) Off 149 Tom Jazz Hi Off49 C#3 193 Crash 17'edge2 (2) Off 196 Crash 1 Off 193 Crash 17'edge2 (2) Off 193 Crash 17'edge2 (2) Off50 D3 133-134 Tom1 Hi p-f (2) Off 149 Tom Jazz Hi Off 133-134 Tom1 Hi p-f (2) Off 149 Tom Jazz Hi Off51 D#3 207 Ride 20' mp2 (2) Off 213 Ride Edge 2 Off 207-209 Ride 20' mp2-mf2 (2) Off 207-209 Ride 20' mp2-mf2 (2) Off52 E3 198 China Off 198 China Off 198 China Off 198 China Off53 F3 215 Ride Cup Off 215 Ride Cup Off 214-215 Ride Jazz-Cup (2) Off 215 Ride Cup Off54 F#3 339 Tambourine Acc2 Off 339 Tambourine Acc2 Off 339 Tambourine Acc2 Off 339 Tambourine Acc2 Off55 G3 199 Splash 8'edge1 Off 197 Crash 2 Off 199 Splash 8'edge1 Off 197 Crash 2 Off56 G#3 352 Cowbell Off 352 Cowbell Off 352 Cowbell Off 352 Cowbell Off57 A3 191 Crash 15'edge2 (2) Off 196 Crash 1 Off 191 Crash 15'edge2 (2) Off 191 Crash 15'edge2 (2) Off58 A#3 325 Vibraslap Off 325 Vibraslap Off 325 Vibraslap Off 325 Vibraslap Off59 B3 206-208 Ride 20' mp1-mf1 (2) Off 212 Ride Edge 1 Off 206-208 Ride 20' mp1-mf1 (2) Off 212 Ride Edge 1 Off
120-0-28: House Kit 3 120-0-29: House Kit 4 120-0-30: House Kit RX1 120-0-31: House Kit RX2Note Sample Excl. Sample Excl. Sample Excl. Sample Excl.

309Factory dataDrum Kit maps
Appen
dix
60 C4 298 Bongo Hi Open Off 298 Bongo Hi Open Off 298 Bongo Hi Open Off 298 Bongo Hi Open Off61 C#4 295 Bongo Lo Open Off 295 Bongo Lo Open Off 295 Bongo Lo Open Off 295 Bongo Lo Open Off62 D4 292 Conga Hi Slap2 Off 292 Conga Hi Slap2 Off 292 Conga Hi Slap2 Off 292 Conga Hi Slap2 Off63 D#4 288 Conga Hi Open Off 288 Conga Hi Open Off 288 Conga Hi Open Off 288 Conga Hi Open Off64 E4 285 Conga Lo Open Off 285 Conga Lo Open Off 285 Conga Lo Open Off 285 Conga Lo Open Off65 F4 334 Timbale Hi Rim2 Off 334 Timbale Hi Rim2 Off 334 Timbale Hi Rim2 Off 334 Timbale Hi Rim2 Off66 F#4 329 Timbale Lo Open Off 329 Timbale Lo Open Off 329 Timbale Lo Open Off 329 Timbale Lo Open Off67 G4 351 Agogo Bell Off 351 Agogo Bell Off 351 Agogo Bell Off 351 Agogo Bell Off68 G#4 351 Agogo Bell Off 351 Agogo Bell Off 351 Agogo Bell Off 351 Agogo Bell Off69 A4 346 Cabasa Up Off 346 Cabasa Up Off 346 Cabasa Up Off 346 Cabasa Up Off70 A#4 309 Maracas Push Off 309 Maracas Push Off 309 Maracas Push Off 309 Maracas Push Off71 B4 361 Samba Whistle 2 361 Samba Whistle 2 361 Samba Whistle 2 361 Samba Whistle 272 C5 361 Samba Whistle 2 361 Samba Whistle 2 361 Samba Whistle 2 361 Samba Whistle 273 C#5 308 Guiro Short 3 308 Guiro Short 3 308 Guiro Short 3 308 Guiro Short 374 D5 307 Guiro Long 3 307 Guiro Long 3 307 Guiro Long 3 307 Guiro Long 375 D#5 326 Claves Off 326 Claves Off 326 Claves Off 326 Claves Off76 E5 327 Woodblock1 Off 327 Woodblock1 Off 327 Woodblock1 Off 327 Woodblock1 Off77 F5 327 Woodblock1 Off 327 Woodblock1 Off 327 Woodblock1 Off 327 Woodblock1 Off78 F#5 342 Cuica Hi 4 342 Cuica Hi 4 342 Cuica Hi 4 342 Cuica Hi 479 G5 343 Cuica Lo 4 343 Cuica Lo 4 343 Cuica Lo 4 343 Cuica Lo 480 G#5 341 Triangle Mute 5 341 Triangle Mute 5 341 Triangle Mute 5 341 Triangle Mute 581 A5 340 Triangle Open 5 340 Triangle Open 5 340 Triangle Open 5 340 Triangle Open 582 A#5 347 Cabasa Down Off 347 Cabasa Down Off 347 Cabasa Down Off 347 Cabasa Down Off83 B5 355 Sleigh Bell Off 355 Sleigh Bell Off 355 Sleigh Bell Off 355 Sleigh Bell Off84 C6 358 Marc Tree Off 358 Marc Tree Off 358 Marc Tree Off 358 Marc Tree Off85 C#6 305 Castanet Single Off 305 Castanet Single Off 305 Castanet Single Off 305 Castanet Single Off86 D6 330 Timbale Lo Mute 6 330 Timbale Lo Mute 6 330 Timbale Lo Mute 6 330 Timbale Lo Mute 687 D#6 329 Timbale Lo Open 6 329 Timbale Lo Open 6 329 Timbale Lo Open 6 329 Timbale Lo Open 688 E6 370 Stadium Off 370 Stadium Off 370 Stadium Off 370 Stadium Off
120-0-40 (43~47): Brush Kit 1 120-0-41: Brush Kit 2 VS 120-0-42: Brush Kit RX 120-0-48 (49, 52~55): Orchestra KitNote Sample Excl. Sample Excl. Sample Excl. Sample Excl.
0 C-1 5 BD Dry 1 Off 5 BD Dry 1 Off 5 BD Dry 1 Off 5 BD Dry 1 Off1 C#-1 5 BD Dry 1 Off 5 BD Dry 1 Off 5 BD Dry 1 Off 5 BD Dry 1 Off2 D-1 5 BD Dry 1 Off 5 BD Dry 1 Off 5 BD Dry 1 Off 5 BD Dry 1 Off3 D#-1 5 BD Dry 1 Off 5 BD Dry 1 Off 5 BD Dry 1 Off 5 BD Dry 1 Off4 E-1 5 BD Dry 1 Off 5 BD Dry 1 Off 5 BD Dry 1 Off 5 BD Dry 1 Off5 F-1 5 BD Dry 1 Off 5 BD Dry 1 Off 5 BD Dry 1 Off 5 BD Dry 1 Off6 F#-1 5 BD Dry 1 Off 5 BD Dry 1 Off 5 BD Dry 1 Off 5 BD Dry 1 Off7 G-1 5 BD Dry 1 Off 5 BD Dry 1 Off 5 BD Dry 1 Off 5 BD Dry 1 Off8 G#-1 5 BD Dry 1 Off 5 BD Dry 1 Off 5 BD Dry 1 Off 5 BD Dry 1 Off9 A-1 145 Tom3 Floor Off 145 Tom3 Floor Off 145 Tom3 Floor Off 5 BD Dry 1 Off
10 A#-1 145 Tom3 Floor Off 145 Tom3 Floor Off 145 Tom3 Floor Off 5 BD Dry 1 Off11 B-1 145 Tom3 Floor Off 145 Tom3 Floor Off 145 Tom3 Floor Off 5 BD Dry 1 Off12 C0 144 Tom3 Low Off 144 Tom3 Low Off 144 Tom3 Low Off 5 BD Dry 1 Off13 C#0 143 Tom3 Hi Off 143 Tom3 Hi Off 143 Tom3 Hi Off 5 BD Dry 1 Off14 D0 83 SD Dry 2 Off 83 SD Dry 2 Off 83 SD Dry 2 Off 5 BD Dry 1 Off15 D#0 10 BD Jazz Off 10 BD Jazz Off 10 BD Jazz Off 5 BD Dry 1 Off16 E0 11 BD Pillow Off 11 BD Pillow Off 11 BD Pillow Off 5 BD Dry 1 Off17 F0 221 Finger Snaps Off 221 Finger Snaps Off 221 Finger Snaps Off 5 BD Dry 1 Off18 F#0 170 HH3 Closed1 1 170 HH3 Closed1 1 170 HH3 Closed1 Off 5 BD Dry 1 Off19 G0 7 BD Dry 3 Off 7 BD Dry 3 Off 7 BD Dry 3 Off 5 BD Dry 1 Off20 G#0 130 Side Stick Dry Off 130 Side Stick Dry Off 130 Side Stick Dry Off 5 BD Dry 1 Off21 A0 94 SD Brush Tap1 7 94 SD Brush Tap1 7 94 SD Brush Tap1 7 5 BD Dry 1 Off22 A#0 94 SD Brush Tap1 7 94 SD Brush Tap1 7 94 SD Brush Tap1 7 5 BD Dry 1 Off23 B0 132 Drum Stick Hit Off 132 Drum Stick Hit Off 132 Drum Stick Hit Off 5 BD Dry 1 Off24 C1 220 SD Orchestra 7 220 SD Orchestra 7 220 SD Orchestra 7 220 SD Orchestra 725 C#1 219 SD Orch. Roll 7 219 SD Orch. Roll 7 219 SD Orch. Roll 7 219 SD Orch. Roll 726 D1 221 Finger Snaps Off 221 Finger Snaps Off 221 Finger Snaps Off 221 Finger Snaps Off27 D#1 270 Zap2 Off 270 Zap2 Off 270 Zap2 Off 170 HH3 Closed1 Off28 E1 410 Noise White Off 410 Noise White Off 410 Noise White Off 172 HH3 Foot Off29 F1 272 DJ Scratch2 7 272 DJ Scratch2 7 272 DJ Scratch2 7 173 HH3 Open 1 730 F#1 272 DJ Scratch2 7 272 DJ Scratch2 7 272 DJ Scratch2 7 212 Ride Edge 1 Off31 G1 132 Drum Stick Hit Off 132 Drum Stick Hit Off 132 Drum Stick Hit Off 132 Drum Stick Hit Off32 G#1 269 Zap1 Off 269 Zap1 Off 269 Zap1 Off 269 Zap1 Off33 A1 376 Click Off 376 Click Off 376 Click Off 376 Click Off34 A#1 340 Triangle Open Off 340 Triangle Open Off 340 Triangle Open Off 340 Triangle Open Off35 B1 11 BD Pillow Off 10 BD Jazz Off 10 BD Jazz Off 9 BD SoftRoom Off36 C2 10 BD Jazz Off 9-8 BD SoftRoom-Normal (2) Off 9-8 BD SoftRoom-Normal (2) Off 216 BD Orchestra Off37 C#2 131 Side Stick Amb Off 94 SD Brush Tap1 Off 94 SD Brush Tap1 Off 131 Side Stick Amb Off38 D2 94 SD Brush Tap1 Off 95-94 SD Brush Tap2-1 (2) Off 94 SD Brush Tap1 Off 220 SD Orchestra Off39 D#2 93 SD Brush Hit Off 93-90 SD Brush Hit-Jazz Ring (2) Off 93-59 SD Brush Hit-Solid1 f (2) Off 305 Castanet Single Off40 E2 96 SD Brush Swirl Off 96 SD Brush Swirl (2) Off 96 SD Brush Swirl (2) Off 220 SD Orchestra Off41 F2 151 Tom Brush Hi Off 151 Tom Brush Hi Off 151 Tom Brush Hi Off 218 Timpani Off42 F#2 174 HH3 Open 2 1 174 HH3 Open 2 1 160~165 HH2 Closed pp~ff (6) 1 218 Timpani Off43 G2 151 Tom Brush Hi Off 151 Tom Brush Hi Off 151 Tom Brush Hi Off 218 Timpani Off44 G#2 178 HH4 Foot 1 178 HH4 Foot 1 166-167 HH2 Foot p-f (2) 1 218 Timpani Off45 A2 151 Tom Brush Hi Off 151 Tom Brush Hi Off 151 Tom Brush Hi Off 218 Timpani Off46 A#2 179 HH4 FootOpen 1 179 HH4 FootOpen 1 168-169 HH2 Open p-f (2) 1 218 Timpani Off47 B2 151 Tom Brush Hi Off 151 Tom Brush Hi Off 151 Tom Brush Hi Off 218 Timpani Off48 C3 151 Tom Brush Hi Off 151 Tom Brush Hi Off 151 Tom Brush Hi Off 218 Timpani Off
120-0-32 (36~39): Jazz Kit RX1 120-0-33: Jazz Kit 120-0-34: Jazz Kit RX2 120-0-35: Jazz Kit RX3Note Sample Excl. Sample Excl. Sample Excl. Sample Excl.

310 Factory dataDrum Kit maps
49 C#3 196 Crash 1 Off 196 Crash 1 Off 193 Crash 17'edge2 (2) Off 218 Timpani Off50 D3 151 Tom Brush Hi Off 151 Tom Brush Hi Off 151 Tom Brush Hi Off 218 Timpani Off51 D#3 212 Ride Edge 1 Off 212 Ride Edge 1 Off 210 Ride Brush (2) Off 218 Timpani Off52 E3 198 China Off 198 China Off 198 China Off 218 Timpani Off53 F3 214 Ride Jazz Off 214 Ride Jazz Off 214 Ride Jazz Off 218 Timpani Off54 F#3 339 Tambourine Acc2 Off 339 Tambourine Acc2 Off 339 Tambourine Acc2 Off 339 Tambourine Acc2 Off55 G3 201 Splash Off 201 Splash Off 197 Crash 2 Off 201 Splash Off56 G#3 352 Cowbell Off 352 Cowbell Off 352 Cowbell Off 352 Cowbell Off57 A3 196 Crash 1 Off 196 Crash 1 Off 191 Crash 15'edge2 (2) Off 196 Crash 1 Off58 A#3 325 Vibraslap Off 325 Vibraslap Off 325 Vibraslap Off 325 Vibraslap Off59 B3 213 Ride Edge 2 Off 213 Ride Edge 2 Off 211 Ride Rivet (2) Off 217 Orchestra Cymbal Off60 C4 298 Bongo Hi Open Off 298 Bongo Hi Open Off 298 Bongo Hi Open Off 298 Bongo Hi Open Off61 C#4 295 Bongo Lo Open Off 295 Bongo Lo Open Off 295 Bongo Lo Open Off 295 Bongo Lo Open Off62 D4 290 Conga Hi Mt Slap Off 290 Conga Hi Mt Slap Off 290 Conga Hi Mt Slap Off 290 Conga Hi Mt Slap Off63 D#4 288 Conga Hi Open Off 288 Conga Hi Open Off 288 Conga Hi Open Off 288 Conga Hi Open Off64 E4 285 Conga Lo Open Off 285 Conga Lo Open Off 285 Conga Lo Open Off 285 Conga Lo Open Off65 F4 334 Timbale Hi Rim2 Off 334 Timbale Hi Rim2 Off 334 Timbale Hi Rim2 Off 334 Timbale Hi Rim2 Off66 F#4 329 Timbale Lo Open Off 329 Timbale Lo Open Off 329 Timbale Lo Open Off 329 Timbale Lo Open Off67 G4 351 Agogo Bell Off 351 Agogo Bell Off 351 Agogo Bell Off 351 Agogo Bell Off68 G#4 351 Agogo Bell Off 351 Agogo Bell Off 351 Agogo Bell Off 351 Agogo Bell Off69 A4 346 Cabasa Up Off 346 Cabasa Up Off 346 Cabasa Up Off 346 Cabasa Up Off70 A#4 309 Maracas Push Off 309 Maracas Push Off 309 Maracas Push Off 309 Maracas Push Off71 B4 361 Samba Whistle 2 361 Samba Whistle 2 361 Samba Whistle 2 361 Samba Whistle 272 C5 361 Samba Whistle 2 361 Samba Whistle 2 361 Samba Whistle 2 361 Samba Whistle 273 C#5 308 Guiro Short 3 308 Guiro Short 3 308 Guiro Short 3 308 Guiro Short 374 D5 307 Guiro Long 3 307 Guiro Long 3 307 Guiro Long 3 307 Guiro Long 375 D#5 326 Claves Off 326 Claves Off 326 Claves Off 326 Claves Off76 E5 327 Woodblock1 Off 327 Woodblock1 Off 327 Woodblock1 Off 327 Woodblock1 Off77 F5 327 Woodblock1 Off 327 Woodblock1 Off 327 Woodblock1 Off 327 Woodblock1 Off78 F#5 342 Cuica Hi 4 342 Cuica Hi 4 342 Cuica Hi 4 342 Cuica Hi 479 G5 343 Cuica Lo 4 343 Cuica Lo 4 343 Cuica Lo 4 343 Cuica Lo 480 G#5 341 Triangle Mute 5 341 Triangle Mute 5 341 Triangle Mute 5 341 Triangle Mute 581 A5 340 Triangle Open 5 340 Triangle Open 5 340 Triangle Open 5 340 Triangle Open 582 A#5 347 Cabasa Down Off 347 Cabasa Down Off 347 Cabasa Down Off 347 Cabasa Down Off83 B5 355 Sleigh Bell Off 355 Sleigh Bell Off 355 Sleigh Bell Off 355 Sleigh Bell Off84 C6 358 Marc Tree Off 358 Marc Tree Off 358 Marc Tree Off 358 Marc Tree Off85 C#6 305 Castanet Single Off 305 Castanet Single Off 305 Castanet Single Off 305 Castanet Single Off86 D6 330 Timbale Lo Mute 6 330 Timbale Lo Mute 6 330 Timbale Lo Mute 6 330 Timbale Lo Mute 687 D#6 329 Timbale Lo Open 6 329 Timbale Lo Open 6 329 Timbale Lo Open 6 329 Timbale Lo Open 688 E6 370 Stadium Off 370 Stadium Off 370 Stadium Off 370 Stadium Off
120-0-50: Bdrum & Sdrum 120-0-51 (116): Arabian Kit 1 120-0-56 (57~63): SFX Kit 120-0-64 (68~71): Percussion KitNote Sample Excl. Sample Excl. Sample Excl. Sample Excl.
0 C-1 386 Tribe Off 45 SD Wood 2 pp Off 5 BD Dry 1 Off1 C#-1 269 Zap1 Off 60 SD Solid2 p Off 5 BD Dry 1 Off2 D-1 236 88 Tom Off 79 SD Brass2 mf Off 5 BD Dry 1 Off3 D#-1 226 88 BD Off 75 SD Brass1 p Off 5 BD Dry 1 Off4 E-1 226 88 BD Off 69 SD Maple2 pp Off 5 BD Dry 1 Off5 F-1 33 BD Hip 4 Off 63 SD Maple1 pp Off 5 BD Dry 1 Off6 F#-1 34 BD Pop Kick Off 57 SD Solid1 p Off 5 BD Dry 1 Off7 G-1 30 BD Hip 1 Off 53 SD Piccolo2 pp Off 5 BD Dry 1 Off8 G#-1 26 BD House 5 Off 5 BD Dry 1 Off 5 BD Dry 1 Off9 A-1 39 BD Pop 99 Off 25 BD House 4 Off 5 BD Dry 1 Off
10 A#-1 226 88 BD Off 228 99 SD Off 5 BD Dry 1 Off11 B-1 265 E.Tom FM Off 226 88 BD Off 5 BD Dry 1 Off12 C0 39 BD Pop 99 Off 227 88 SD Off 5 BD Dry 1 Off13 C#0 38 BD Amb.Rocker Off 88 SD Full Room Off 5 BD Dry 1 Off14 D0 36 BD Ambient Off 99 SD Processed 1 308 Guiro Short Off15 D#0 35 BD Dance 99 Off 5 BD Dry 1 Off 336 Tambourine Push Off16 E0 34 BD Pop Kick Off 17 BD Tight Off 337 Tambourine Pull Off17 F0 33 BD Hip 4 Off 82 SD Dry 1 Off 338 Tambourine Acc1 Off18 F#0 32 BD Hip 3 Off 171 HH3 Closed2 1 338 Tambourine Acc1 Off19 G0 30 BD Hip 1 Off 7 BD Dry 3 Off 339 Tambourine Acc2 Off20 G#0 26 BD House 5 Off 131 Side Stick Amb Off 339 Tambourine Acc2 (2) Off21 A0 21 BD Dance 3 Off 132 Drum Stick Hit Off 336 Tambourine Push Off22 A#0 20 BD Dance 2 Off 412 Tubular Off 339 Tambourine Acc2 (2) Off23 B0 18 BD Squash Off 352 Cowbell Off 446 Rek Jingle Off24 C1 41 BD Klanger Off 352 Cowbell Off 5 BD Dry 1 Off 360 Flexatone Off25 C#1 40 BD Deep 88 Off 219 SD Orch. Roll Off 5 BD Dry 1 Off 357 Finger Cymbal Off26 D1 40 BD Deep 88 Off 221 Finger Snaps Off 5 BD Dry 1 Off 324 Tsuzumi Off27 D#1 226 88 BD Off 270 Zap2 Off 425 Amp Noise Off 299 Bongo Hi Slap Off28 E1 17 BD Tight Off 171 HH3 Closed2 Off 362 Chinese Gong Off 300 Bongo Hi Stick1 Off29 F1 40 BD Deep 88 Off 272 DJ Scratch2 Off 280 DJ BD Rub Off 297 Bongo Lo Stick Off30 F#1 25 BD House 4 Off 272 DJ Scratch2 Off 275 DJ Scratch5 Off 338 Tambourine Acc1 Off31 G1 19 BD Dance 1 Off 132 Drum Stick Hit Off 281 DJ SD Rub Off 351 Agogo Bell Off32 G#1 21 BD Dance 3 Off 292 Conga Hi Slap2 Off 272 DJ Scratch2 Off 402 Wind Off33 A1 31 BD Hip 2 Off 376 Click Off 415 Gtr Cut Noise1 Off 351 Agogo Bell Off34 A#1 37 BD Amb.Crackle Off 376 Click Off 416 Gtr Cut Noise2 Off 301 Bongo Hi Stick2 Off35 B1 40 BD Deep 88 Off 7 BD Dry 3 Off 421 E.Gtr Pick1 Off 327 Woodblock1 Off36 C2 25 BD House 4 Off 25 BD House 4 Off 423 Gtr Scratch1 Off 326 Claves Off37 C#2 34 BD Pop Kick Off 130 Side Stick Dry Off 419 Dist. Slide1 Off 328 Woodblock2 Off
120-0-40 (43~47): Brush Kit 1 120-0-41: Brush Kit 2 VS 120-0-42: Brush Kit RX 120-0-48 (49, 52~55): Orchestra KitNote Sample Excl. Sample Excl. Sample Excl. Sample Excl.

311Factory dataDrum Kit maps
Appen
dix
38 D2 17 BD Tight Off 84 SD Dry 3 Off 420 Dist. Slide2 Off 352 Cowbell Off39 D#2 6 BD Dry 2 Off 464 Alkis Off 270 Zap2 Off 327 Woodblock1 Off40 E2 7 BD Dry 3 Off 124 SD AmbiHop Off 396 Gun Shot1 Off 306 Castanet Double Off41 F2 12 BD Woofer Off 145 Tom3 Floor Off 271 DJ Scratch1 7 311 Baya Open Off42 F#2 8 BD Normal Off 172 HH3 Foot 1 272 DJ Scratch2 7 344 Shaker1 Off43 G2 5 BD Dry 1 Off 145 Tom3 Floor Off 132 Drum Stick Hit Off 313 Baya Mute1 Off44 G#2 15 BD Tubby Off 178 HH4 Foot 1 270 Zap2 Off 309 Maracas Push Off45 A2 8 BD Normal Off 144 Tom3 Low Off 376 Click Off 311 Baya Open Off46 A#2 5 BD Dry 1 Off 173 HH3 Open 1 1 351 Agogo Bell Off 346 Cabasa Up Off47 B2 8 BD Normal Off 144 Tom3 Low Off 418 Fret Noise Off 317 Tabla Open Off48 C3 11 BD Pillow Off 143 Tom3 Hi Off 415 Gtr Cut Noise1 Off 319 Tabla Mute1 Off49 C#3 216 BD Orchestra Off 196 Crash 1 Off 416 Gtr Cut Noise2 Off 325 Vibraslap Off50 D3 16 BD Gated Off 143 Tom3 Hi Off 415 Gtr Cut Noise1 Off 316 Tabla Na Off51 D#3 15 BD Tubby Off 213 Ride Edge 2 Off 221 Finger Snaps Off 341 Triangle Mute 352 E3 13 BD MondoKill Off 479 Hollo1 Off 373 Laughing Off 216 BD Orchestra Off53 F3 15 BD Tubby Off 480 Hollo2 Off 372 Scream Off 340 Triangle Open 354 F#3 14 BD Terminator Off 338 Tambourine Acc1 Off 385 Punch Off 308 Guiro Short Off55 G3 20 BD Dance 2 Off 472 Darbuka2 Off 384 Heart Beat Off 430 Jingle Bell Off56 G#3 265 E.Tom FM Off 352 Cowbell Off 375 Footsteps2 Off 307 Guiro Long Off57 A3 236 88 Tom Off 477 Darbuka D3 Off 374 Footsteps1 Off 359 Marc TreeLP Off58 A#3 40 BD Deep 88 Off 346 Cabasa Up Off 371 Applause Off 358 Marc Tree Off59 B3 21 BD Dance 3 Off 466 Bandir Closed Off 388 Door Creak Off 309 Maracas Push Off60 C4 84 SD Dry 3 Off 480 Hollo2 Off 389 Door Slam Off 225 Claps 4 Off61 C#4 88 SD Full Room Off 295 Bongo Lo Open Off 272 DJ Scratch2 Off 230 88 Claps Off62 D4 89 SD Off Center Off 480 Hollo2 Off 358 Marc Tree Off 271 DJ Scratch1 Off63 D#4 90 SD Jazz Ring Off 298 Bongo Hi Open Off 390 Car Engine Off 272 DJ Scratch2 Off64 E4 82 SD Dry 1 Off 437 Douf Rim Ak Off 391 Car Stop Off 277 DJ Hit Rub Off65 F4 92 SD Paper Off 471 Darbuka1 Closed Off 392 Car Pass Off 361 Samba Whistle Off66 F#4 121 SD Vintage4 Off 475 Darbuka D1 4 393 Car Crash Off 361 Samba Whistle Off67 G4 125 SD Brasser Off 473 Darbuka3 4 381 Crickets Off 292 Conga Hi Slap2 Off68 G#4 98 SD Yowie Off 476 Darbuka D2 Off 394 Train Off 293 Conga Heel Off69 A4 100 SD Cracker Room Off 468 Darbuka1 Tek1 Off 410 Noise White Off 288 Conga Hi Open Off70 A#4 97 SD Big Rock Off 468 Darbuka1 Tek1 Off 395 Helicopter Off 285 Conga Lo Open Off71 B4 115 SD Hip6 Off 470 Darbuka1 DumOp Off 427 Swish Terra Off 342 Cuica Hi Off72 C5 99 SD Processed Off 486 Tef1 Off 396 Gun Shot1 Off 343 Cuica Lo Off73 C#5 101 SD Dance Off 487 Tef2 Off 398 Machine Gun Off 335 Timbale Paila Off74 D5 108 SD Noise Off 447 Rik1 Off 399 Laser Gun Off 334 Timbale Hi Rim2 Off75 D#5 118 SD Vintage1 Off 449 Rik3 Off 400 Explosion Off 333 Timbale Hi Rim1 Off76 E5 98 SD Yowie Off 487 Tef2 Off 379 Dog Off 329 Timbale Lo Open Off77 F5 126 SD Chili Off 486 Tef1 Off 380 Gallop Off 238 88 Claves Off78 F#5 266 E.Tom Real Off 487 Tef2 Off 377 Bird1 Off 239 88 Cowbell Off79 G5 228 99 SD Off 445 Rek Dom Ak Off 387 Rainstick Off 221 Finger Snaps Off80 G#5 227 88 SD Off 486 Tef1 Off 401 Thunder Off 323 Taiko Rim Off81 A5 227 88 SD Off 448 Rik2 Off 402 Wind Off 322 Taiko Open Off82 A#5 228 99 SD Off 488 Tef3 Off 410 Noise White Off 270 Zap2 Off83 B5 111 SD Hip2 Off 487 Tef2 Off 403 Stream Off 219 SD Orch. Roll 584 C6 95 SD Brush Tap2 Off 431 Bells Open 2 404 Bubble Off 220 SD Orchestra 585 C#6 94 SD Brush Tap1 Off 450 Sagat Half Open 2 382 Cat Off 217 Orchestra Cymbal 686 D6 93 SD Brush Hit Off 451 Sagat Close 2 378 Bird2 Off 217 Orchestra Cymbal 687 D#6 93 SD Brush Hit Off 478 Davul Off 383 Growl Off 463 Udu f Open Off88 E6 93 SD Brush Hit Off 484 Ramazan DVL2 3 370 Stadium Off 282 Orchestra Hit Off89 F6 96 SD Brush Swirl Off 483 Ramazan DVL1 3 406 Telephone Ring Off 282 Orchestra Hit Off90 F#6 96 SD Brush Swirl Off 485 Ramazan DVL3 3 405 Church Bell Off 282 Orchestra Hit Off91 G6 96 SD Brush Swirl Off 482 Kup2 5 371 Applause Off 282 Orchestra Hit Off92 G#6 82 SD Dry 1 Off 149 Tom Jazz Hi 5 371 Applause Off 282 Orchestra Hit Off93 A6 84 SD Dry 3 Off 482 Kup2 5 370 Stadium Off 282 Orchestra Hit Off94 A#6 97 SD Big Rock Off 481 Kup1 Off 410 Noise White Off 282 Orchestra Hit Off95 B6 124 SD AmbiHop Off 7 BD Dry 3 Off 396 Gun Shot1 Off 282 Orchestra Hit Off96 C7 110 SD Hip1 Off 481 Kup1 Off 394 Train Off 282 Orchestra Hit Off97 C#7 118 SD Vintage1 Off 282 Orchestra Hit Off98 D7 112 SD Hip3 Off 282 Orchestra Hit Off99 D#7 123 SD Vintage6 Off 282 Orchestra Hit Off
100 E7 270 Zap2 Off 282 Orchestra Hit Off101 F7 114 SD Hip5 Off 282 Orchestra Hit Off102 F#7 127 SD Whopper Off 282 Orchestra Hit Off103 G7 125 SD Brasser Off 282 Orchestra Hit Off104 G#7 118 SD Vintage1 Off 282 Orchestra Hit Off105 A7 228 99 SD Off 282 Orchestra Hit Off106 A#7 127 SD Whopper Off 282 Orchestra Hit Off107 B7 127 SD Whopper Off 282 Orchestra Hit Off108 C8 101 SD Dance Off 282 Orchestra Hit Off109 C#8 101 SD Dance Off 419 Dist. Slide1 Off110 D8 228 99 SD Off 420 Dist. Slide2 Off111 D#8 228 99 SD Off 415 Gtr Cut Noise1 Off112 E8 116 SD Ringy Off 416 Gtr Cut Noise2 Off113 F8 421 E.Gtr Pick1 Off114 F#8 422 E.Gtr Pick2 Off115 G8 423 Gtr Scratch1 Off116 G#8 424 Gtr Scratch2 Off117 A8 418 Fret Noise Off118 A#8 417 Power Chord Off119 B8 417 Power Chord Off120 C9 425 Amp Noise Off
120-0-50: Bdrum & Sdrum 120-0-51 (116): Arabian Kit 1 120-0-56 (57~63): SFX Kit 120-0-64 (68~71): Percussion KitNote Sample Excl. Sample Excl. Sample Excl. Sample Excl.

312 Factory dataDrum Kit maps
120-0-65: Latin Perc Kit 120-0-66: Trinity Perc Kit 120-0-67: i30 Perc Kit 120-0-72: HipHop Kit RXNote Sample Excl. Sample Excl. Sample Excl. Sample Excl.
0 C-1 5 BD Dry 1 Off 5 BD Dry 1 Off 5 BD Dry 1 Off 45 SD Wood 2 pp Off1 C#-1 5 BD Dry 1 Off 5 BD Dry 1 Off 5 BD Dry 1 Off 60 SD Solid2 p Off2 D-1 5 BD Dry 1 Off 5 BD Dry 1 Off 5 BD Dry 1 Off 79 SD Brass2 mf Off3 D#-1 5 BD Dry 1 Off 5 BD Dry 1 Off 5 BD Dry 1 Off 75 SD Brass1 p Off4 E-1 5 BD Dry 1 Off 5 BD Dry 1 Off 5 BD Dry 1 Off 69 SD Maple2 pp Off5 F-1 5 BD Dry 1 Off 5 BD Dry 1 Off 5 BD Dry 1 Off 63 SD Maple1 pp Off6 F#-1 5 BD Dry 1 Off 5 BD Dry 1 Off 5 BD Dry 1 Off 57 SD Solid1 p Off7 G-1 5 BD Dry 1 Off 5 BD Dry 1 Off 5 BD Dry 1 Off 53 SD Piccolo2 pp Off8 G#-1 5 BD Dry 1 Off 5 BD Dry 1 Off 5 BD Dry 1 Off 5 BD Dry 1 Off9 A-1 5 BD Dry 1 Off 5 BD Dry 1 Off 5 BD Dry 1 Off 18 BD Squash Off
10 A#-1 5 BD Dry 1 Off 5 BD Dry 1 Off 5 BD Dry 1 Off 115 SD Hip6 Off11 B-1 5 BD Dry 1 Off 5 BD Dry 1 Off 5 BD Dry 1 Off 226 88 BD Off12 C0 5 BD Dry 1 Off 449 Rik3 Off 5 BD Dry 1 Off 227 88 SD Off13 C#0 5 BD Dry 1 Off 448 Rik2 Off 5 BD Dry 1 Off 112 SD Hip3 Off14 D0 5 BD Dry 1 Off 447 Rik1 Off 5 BD Dry 1 Off 246 Syn. SD1 Off15 D#0 5 BD Dry 1 Off 446 Rek Jingle Off 5 BD Dry 1 Off 36 BD Ambient Off16 E0 5 BD Dry 1 Off 445 Rek Dom Ak Off 337 Tambourine Pull Off 245 Syn. BD Buzz Off17 F0 5 BD Dry 1 Off 435 Djembe Bass Off 338 Tambourine Acc1 Off 246 Syn. SD1 Off18 F#0 367 Hit It Off 322 Taiko Open Off 338 Tambourine Acc1 Off 174 HH3 Open 2 119 G0 365 Yeah! Solo Off 444 Pand Pattern4 Off 339 Tambourine Acc2 Off 244 Syn. BD4 Off20 G#0 364 Yeah! Off 443 Pand Pattern3 Off 339-5 Tamb. Acc2-BD Dry 1 (2) Off 130 Side Stick Dry Off21 A0 368 Uhhhh Solo Off 442 Pand Pattern2 Off 336 Tambourine Push Off 248 Syn. SD3 Off22 A#0 341 Triangle Mute 7 441 Pand Pattern1 Off 339 Tambourine Acc2 Off 115 SD Hip6 Off23 B0 340 Triangle Open 7 440 Pand Open Off 316 Tabla Na Off 132 Drum Stick Hit Off24 C1 360 Flexatone Off 322-323 Taiko Open-Rim (2) Off 360 Flexatone Off 220 SD Orchestra 725 C#1 357 Finger Cymbal Off 324 Tsuzumi (2) Off 357 Finger Cymbal Off 219 SD Orch. Roll 726 D1 239 88 Cowbell Off 302 Djembe Open (2) Off 324 Tsuzumi Off 221 Finger Snaps Off27 D#1 306 Castanet Double Off 303-304 Djembe Mute-Slap (2) Off 299 Bongo Hi Slap Off 270 Zap2 Off28 E1 305 Castanet Single Off 311-312 Baya Open-Ghe (2) Off 300 Bongo Hi Stick1 Off 410 Noise White Off29 F1 221 Finger Snaps Off 314-313 Baya Mute2-Mute1 (2) Off 297 Bongo Lo Stick Off 272 DJ Scratch2 730 F#1 221 Finger Snaps Off 435-315 Djembe Bass-Baya Mute3 (2) Off 338 Tambourine Acc1 Off 272 DJ Scratch2 731 G1 183 HH Old TiteClose Off 317 Tabla Open (2) Off 351 Agogo Bell Off 132 Drum Stick Hit Off32 G#1 363 Metal Hit Off 321-318 Tabla Mute3-Tin (2) Off 402 Wind Off 269 Zap1 Off33 A1 324 Tsuzumi Off 320-319 Tabla Mute2-Mute1 (2) Off 351 Agogo Bell Off 376 Click Off34 A#1 324 Tsuzumi Off 320-316 Tabla Mute2-Na (2) 6 301 Bongo Hi Stick2 Off 340 Triangle Open Off35 B1 324 Tsuzumi Off 319 Tabla Mute1 Off 327 Woodblock1 Off 242 Syn. BD2 Off36 C2 216 BD Orchestra 1 216 BD Orchestra Off 326 Claves Off 241 Syn. BD1 Off37 C#2 216 BD Orchestra 1 386 Tribe Off 328 Woodblock2 Off 250 Syn. Rim Click Off38 D2 351 Agogo Bell Off 221 Finger Snaps Off 352 Cowbell Off 247 Syn. SD2 Off39 D#2 351 Agogo Bell Off 225 Claps 4 Off 327 Woodblock1 Off 230 88 Claps Off40 E2 285 Conga Lo Open Off 341 Triangle Mute 1 306 Castanet Double Off 249 Syn. SD4 Off41 F2 286 Conga Lo Mt Slap Off 340 Triangle Open 1 311 Baya Open Off 141 Tom2 Hi Off42 F#2 291 Conga Hi Slap1 Off 306 Castanet Double Off 344 Shaker1 Off 251 Syn. HH Closed 143 G2 292 Conga Hi Slap2 Off 305 Castanet Single Off 313 Baya Mute1 Off 141 Tom2 Hi Off44 G#2 240 88 Maracas Off 306 Castanet Double Off 309 Maracas Push Off 184 HH Old Close2 Off45 A2 288 Conga Hi Open Off 307 Guiro Long 2 311 Baya Open Off 141 Tom2 Hi Off46 A#2 341 Triangle Mute 2 308 Guiro Short 2 346 Cabasa Up Off 252 Syn. HH Open 147 B2 340 Triangle Open 2 307 Guiro Long 2 317 Tabla Open Off 141 Tom2 Hi Off48 C3 286 Conga Lo Mt Slap Off 325 Vibraslap Off 319 Tabla Mute1 Off 141 Tom2 Hi Off49 C#3 289 Conga Hi Mute Off 326 Claves Off 325 Vibraslap Off 196 Crash 1 Off50 D3 292 Conga Hi Slap2 Off 238 88 Claves Off 316 Tabla Na Off 141 Tom2 Hi Off51 D#3 338 Tambourine Acc1 Off 343 Cuica Lo (2) 3 341 Triangle Mute 3 210 Ride Brush Off52 E3 288 Conga Hi Open Off 342 Cuica Hi (2) Off 216 BD Orchestra Off 202 Crash Reverse Off53 F3 297 Bongo Lo Stick Off 329 Timbale Lo Open Off 340 Triangle Open 3 214 Ride Jazz Off54 F#3 297 Bongo Lo Stick Off 327 Woodblock1 Off 308 Guiro Short Off 339 Tambourine Acc2 Off55 G3 300 Bongo Hi Stick1 Off 331 Timbale Lo Rim Off 430 Jingle Bell Off 201 Splash Off56 G#3 329 Timbale Lo Open Off 327 Woodblock1 Off 307 Guiro Long Off 259 Syn. FX2 Off57 A3 301 Bongo Hi Stick2 Off 330 Timbale Lo Mute Off 359 Marc TreeLP Off 196 Crash 1 Off58 A#3 329 Timbale Lo Open Off 327 Woodblock1 Off 358 Marc Tree Off 325 Vibraslap Off59 B3 338 Tambourine Acc1 Off 332 Timbale Hi Edge Off 309 Maracas Push Off 211 Ride Rivet Off60 C4 335 Timbale Paila Off 334 Timbale Hi Rim2 Off 225 Claps 4 Off 253 Syn. Bongo1 Off61 C#4 332 Timbale Hi Edge Off 353 Chacha Bell Off 230 88 Claps Off 254 Syn. Bongo2 Off62 D4 335 Timbale Paila Off 333 Timbale Hi Rim1 Off 271 DJ Scratch1 Off 290 Conga Hi Mt Slap Off63 D#4 332 Timbale Hi Edge Off 354 Mambo Bell Off 272 DJ Scratch2 Off 288 Conga Hi Open Off64 E4 334 Timbale Hi Rim2 Off 335 Timbale Paila (2) Off 277 DJ Hit Rub Off 285 Conga Lo Open Off65 F4 333 Timbale Hi Rim1 Off 295 Bongo Lo Open Off 361 Samba Whistle Off 334 Timbale Hi Rim2 Off66 F#4 445 Rek Dom Ak Off 352 Cowbell Off 361 Samba Whistle Off 329 Timbale Lo Open Off67 G4 445 Rek Dom Ak Off 296 Bongo Lo Slap Off 292 Conga Hi Slap2 Off 258 Syn. FX1 Off68 G#4 445 Rek Dom Ak Off 352 Cowbell Off 293 Conga Heel Off 259 Syn. FX2 Off69 A4 446 Rek Jingle Off 298 Bongo Hi Open Off 288 Conga Hi Open Off 346 Cabasa Up Off70 A#4 354 Mambo Bell Off 301 Bongo Hi Stick2 Off 285 Conga Lo Open Off 256 Syn. Shaker Off71 B4 327 Woodblock1 Off 299 Bongo Hi Slap (2) Off 342 Cuica Hi Off 361 Samba Whistle 272 C5 328 Woodblock2 Off 285 Conga Lo Open (2) Off 343 Cuica Lo Off 361 Samba Whistle 273 C#5 352 Cowbell Off 287 Conga Lo Slap Off 335 Timbale Paila Off 308 Guiro Short 374 D5 309 Maracas Push Off 286 Conga Lo Mt Slap Off 334 Timbale Hi Rim2 Off 307 Guiro Long 375 D#5 354 Mambo Bell Off 290 Conga Hi Mt Slap Off 333 Timbale Hi Rim1 Off 326 Claves Off76 E5 346 Cabasa Up Off 288 Conga Hi Open (2) Off 329 Timbale Lo Open Off 327 Woodblock1 Off77 F5 344 Shaker1 Off 289 Conga Hi Mute Off 238 88 Claves Off 327 Woodblock1 Off78 F#5 352 Cowbell Off 293 Conga Heel Off 239 88 Cowbell Off 261 Syn. FX4 479 G5 347 Cabasa Down Off 291 Conga Hi Slap1 Off 221 Finger Snaps Off 262 Syn. FX5 480 G#5 347 Cabasa Down Off 294 Conga Toe Off 323 Taiko Rim Off 341 Triangle Mute 581 A5 347 Cabasa Down Off 292 Conga Hi Slap2 Off 322 Taiko Open Off 340 Triangle Open 5

313Factory dataDrum Kit maps
Appen
dix
82 A#5 461 Tambourin Open Off 351 Agogo Bell Off 270 Zap2 Off 211 Ride Rivet Off83 B5 460 Tambourin Mute2 5 351 Agogo Bell Off 219 SD Orch. Roll 5 355 Sleigh Bell Off84 C6 459 Tambourin Mute1 5 309-310 Maracas Push-Pull (2) Off 220 SD Orchestra 5 358 Marc Tree Off85 C#6 459 Tambourin Mute1 6 344 Shaker1 (2) Off 217 Orchestra Cymbal 6 255 Syn. Castanet Off86 D6 460 Tambourin Mute2 6 345 Shaker2 (2) Off 217 Orchestra Cymbal 6 330 Timbale Lo Mute 687 D#6 463 Udu f Open Off 347-348 Cabasa Down-Tap (2) Off 463 Udu f Open Off 329 Timbale Lo Open 688 E6 302 Djembe Open Off 348-346 Cabasa Tap-Up (2) Off 282 Orchestra Hit Off 370 Stadium Off89 F6 310 Maracas Pull Off 350-349 Caxixi Soft-Hard (2) Off 282 Orchestra Hit Off90 F#6 310 Maracas Pull Off 336 Tambourine Push Off 282 Orchestra Hit Off91 G6 342 Cuica Hi Off 338 Tambourine Acc1 (2) Off 282 Orchestra Hit Off92 G#6 307 Guiro Long 3 337 Tambourine Pull Off 282 Orchestra Hit Off93 A6 308 Guiro Short 3 339 Tambourine Acc2 Off 282 Orchestra Hit Off94 A#6 308 Guiro Short 3 355 Sleigh Bell (2) Off 282 Orchestra Hit Off95 B6 343 Cuica Lo Off 361 Samba Whistle 4 282 Orchestra Hit Off96 C7 326 Claves Off 361 Samba Whistle 4 282 Orchestra Hit Off97 C#7 361 Samba Whistle 4 356 Rap Sleigh Bell Off 282 Orchestra Hit Off98 D7 361 Samba Whistle 4 361 Samba Whistle 4 282 Orchestra Hit Off99 D#7 450 Sagat Half Open 5 358 Marc Tree 5 282 Orchestra Hit Off
100 E7 450 Sagat Half Open 5 361 Samba Whistle 4 282 Orchestra Hit Off101 F7 451 Sagat Close 5 431 Bells Open 5 282 Orchestra Hit Off102 F#7 430 Jingle Bell Off 387 Rainstick Off 282 Orchestra Hit Off103 G7 358 Marc Tree Off 362 Chinese Gong Off 282 Orchestra Hit Off104 G#7 358 Marc Tree Off 377 Bird1 Off 282 Orchestra Hit Off105 A7 355 Sleigh Bell 2 377 Bird1 Off 282 Orchestra Hit Off106 A#7 467 Bongo Roll 6 378 Bird2 Off 282 Orchestra Hit Off107 B7 267 Rim House1 Off 408 Cricket Spectrum Off 282 Orchestra Hit Off108 C8 267 Rim House1 Off 358 Marc Tree Off 282 Orchestra Hit Off109 C#8 25 BD House 4 Off 419 Dist. Slide1 Off110 D8 228 99 SD Off 341 Triangle Mute 3111 D#8 40 BD Deep 88 Off 340 Triangle Open 3112 E8 227 88 SD Off 360 Flexatone Off113 F8 90 SD Jazz Ring Off 431 Bells Open Off114 F#8 99 SD Processed Off 350 Caxixi Soft Off115 G8 5 BD Dry 1 Off 306 Castanet Double Off116 G#8 38 BD Amb.Rocker Off 306 Castanet Double Off117 A8 91 SD Amb.Piccolo Off 221 Finger Snaps Off118 A#8 170 HH3 Closed1 Off 221 Finger Snaps Off119 B8 11 BD Pillow Off 363 Metal Hit Off120 C9 131 Side Stick Amb Off 363 Metal Hit Off121 C#9 5 BD Dry 1 Off122 D9 5 BD Dry 1 Off123 D#9 5 BD Dry 1 Off124 E9 5 BD Dry 1 Off
120-0-73: Techno Kit RX 120-0-74: Dance Kit RX 120-0-88: Standard Kit 4 120-0-89: Pop Std. Kit 1Note Sample Excl. Sample Excl. Sample Excl. Sample Excl.
0 C-1 45 SD Wood 2 pp Off 45 SD Wood 2 pp Off 45 SD Wood 2 pp Off 45 SD Wood 2 pp Off1 C#-1 60 SD Solid2 p Off 60 SD Solid2 p Off 60 SD Solid2 p Off 60 SD Solid 2 p Off2 D-1 79 SD Brass2 mf Off 79 SD Brass2 mf Off 79 SD Brass2 mf Off 79 SD Brass 2 mf Off3 D#-1 75 SD Brass1 p Off 75 SD Brass1 p Off 75 SD Brass1 p Off 75 SD Brass 1 p Off4 E-1 69 SD Maple2 pp Off 69 SD Maple2 pp Off 69 SD Maple2 pp Off 69 SD Maple 2 pp Off5 F-1 63 SD Maple1 pp Off 63 SD Maple1 pp Off 63 SD Maple1 pp Off 63 SD Maple 1 pp Off6 F#-1 57 SD Solid1 p Off 57 SD Solid1 p Off 57 SD Solid1 p Off 57 SD Solid 1 p Off7 G-1 53 SD Piccolo2 pp Off 53 SD Piccolo2 pp Off 53 SD Piccolo2 pp Off 53 SD Piccolo 2 pp Off8 G#-1 5 BD Dry 1 Off 5 BD Dry 1 Off 5 BD Dry 1 Off9 A-1 39 BD Pop 99 Off 32 BD Hip 3 Off 25 BD House 4 Off 18 BD Squash Off
10 A#-1 228 99 SD Off 115 SD Hip6 Off 228 99 SD Off 115 SD Hip 6 Off11 B-1 265 E.Tom FM Off 226 88 BD Off 226 88 BD Off 226 88 BD Off12 C0 227 88 SD Off 227 88 SD Off 227 88 SD Off 52 SD Piccolo 1 f Off13 C#0 105 SD House4 Off 112 SD Hip3 Off 89 SD Off Center Off 59 SD Solid 1 f Off14 D0 104 SD House3 Off 114 SD Hip5 Off 99 SD Processed 1 52 SD Piccolo 1 f Off15 D#0 24 BD House 3 Off 36 BD Ambient Off 38 BD Amb.Rocker Off 36 BD Ambient Off16 E0 27 BD Liquid Off 22 BD House 1 Off 17 BD Tight Off 16 BD Gated Off17 F0 106 SD Small Off 91 SD Amb.Piccolo Off 90 SD Jazz Ring Off 59 SD Solid 1 f Off18 F#0 181 HH Old Close1 1 174 HH3 Open 2 1 171 HH3 Closed2 1 161-162 HH2 Closed p-mp (2) 119 G0 20 BD Dance 2 Off 23 BD House 2 Off 7 BD Dry 3 Off 38 BD Amb.Rocker Off20 G#0 131 Side Stick Amb Off 130 Side Stick Dry Off 130 Side Stick Dry Off 130 Side Stick Dry Off21 A0 111 SD Hip2 Off 98 SD Yowie Off 83 SD Dry 2 Off 67 SD Maple 1 f 722 A#0 227 88 SD Off 115 SD Hip6 Off 82 SD Dry 1 Off 68 SD Maple 1 ff 723 B0 268 Rim House2 Off 132 Drum Stick Hit Off 132 Drum Stick Hit Off 132 DrumStick Hit Off24 C1 220 SD Orchestra 7 220 SD Orchestra 7 220 SD Orchestra 7 59 SD Solid 1 f 725 C#1 219 SD Orch. Roll 7 219 SD Orch. Roll 7 219 SD Orch. Roll 7 219 SD Orch. Roll 726 D1 270 Zap2 Off 221 Finger Snaps Off 221 Finger Snaps Off 221 Finger Snaps Off27 D#1 270 Zap2 Off 270 Zap2 Off 270 Zap2 Off 270 Zap 2 Off28 E1 410 Noise White Off 410 Noise White Off 410 Noise White Off 410 Noise White Off29 F1 272 DJ Scratch2 7 272 DJ Scratch2 7 272 DJ Scratch2 7 272 DJ Scratch 2 730 F#1 272 DJ Scratch2 7 272 DJ Scratch2 7 272 DJ Scratch2 7 272 DJ Scratch 2 731 G1 132 Drum Stick Hit Off 132 Drum Stick Hit Off 132 Drum Stick Hit Off 132 DrumStick Hit Off32 G#1 269 Zap1 Off 269 Zap1 Off 269 Zap1 Off 269 Zap 1 Off33 A1 376 Click Off 376 Click Off 376 Click Off 376 Click Off34 A#1 340 Triangle Open Off 340 Triangle Open Off 340 Triangle Open Off 340 Triangle Open Off
120-0-65: Latin Perc Kit 120-0-66: Trinity Perc Kit 120-0-67: i30 Perc Kit 120-0-72: HipHop Kit RXNote Sample Excl. Sample Excl. Sample Excl. Sample Excl.

314 Factory dataDrum Kit maps
35 B1 26 BD House 5 Off 22 BD House 1 Off 7 BD Dry 3 Off 17 BD Tight Off36 C2 28 BD Techno 1 Off 23 BD House 2 Off 17 BD Tight Off 17 BD Tight Off37 C#2 229 88 Rim Shot Off 369 Comp Voice Noise Off 131 Side Stick Amb Off 129 Rim Shot f Off38 D2 103 SD House2 Off 228 99 SD Off 91 SD Amb.Piccolo Off 490 SD Rock Off39 D#2 230 88 Claps Off 230 88 Claps Off 230 88 Claps Off 230 88 Claps Off40 E2 228 99 SD Off 228 99 SD Off 88 SD Full Room Off 490 SD Rock Off41 F2 148 Tom Processed Off 266 E.Tom Real Off 145 Tom3 Floor Off 140 Tom 1 Floor f Off42 F#2 233 99 HH Close 1 183 HH Old TiteClose 1 174 HH3 Open 2 1 163-165 HH2 Closed mf-ff (2) 143 G2 148 Tom Processed Off 266 E.Tom Real Off 145 Tom3 Floor Off 138 Tom 1 Low f Off44 G#2 232 88 HH Open 1 189 HH Alpo Close Off 178 HH4 Foot 1 157-156 HH1 Foot mf-mp (2) 145 A2 148 Tom Processed Off 266 E.Tom Real Off 144 Tom3 Low Off 138 Tom 1 Low f Off46 A#2 186 HH House Open1 1 185 HH Old Open2 1 173 HH3 Open 1 1 168 HH2 Open p 147 B2 148 Tom Processed Off 266 E.Tom Real Off 144 Tom3 Low Off 136 Tom 1 Mid f Off48 C3 148 Tom Processed Off 266 E.Tom Real Off 143 Tom3 Hi Off 134 Tom 1 Hi f Off49 C#3 196 Crash 1 Off 196 Crash 1 Off 196 Crash 1 Off 196 Crash 1 Off50 D3 148 Tom Processed Off 266 E.Tom Real Off 143 Tom3 Hi Off 134 Tom 1 Hi f Off51 D#3 205 Ride Dance 99 Off 213 Ride Edge 2 Off 213 Ride Edge 2 Off 207-209 Ride 20' mp-mf 2 (2) Off52 E3 202 Crash Reverse Off 202 Crash Reverse Off 198 China Off 198 China Off53 F3 214 Ride Jazz Off 214 Ride Jazz Off 214 Ride Jazz Off 215 Ride Cup Off54 F#3 338 Tambourine Acc1 Off 339 Tambourine Acc2 Off 339 Tambourine Acc2 Off 339 Tambourine Acc 2 Off55 G3 201 Splash Off 198 China Off 201 Splash Off 201 Splash Off56 G#3 352 Cowbell Off 352 Cowbell Off 352 Cowbell Off 352 Cowbell Off57 A3 196 Crash 1 Off 196 Crash 1 Off 196 Crash 1 Off 196 Crash 1 Off58 A#3 386 Tribe Off 325 Vibraslap Off 325 Vibraslap Off 325 Vibraslap Off59 B3 263 Perc. Ahh Off 213 Ride Edge 2 Off 213 Ride Edge 2 Off 206 Ride 20' mp 1 Off60 C4 237 88 Conga Off 298 Bongo Hi Open Off 298 Bongo Hi Open Off 298 Bongo Hi Open Off61 C#4 237 88 Conga Off 295 Bongo Lo Open Off 295 Bongo Lo Open Off 295 Bongo Lo Open Off62 D4 237 88 Conga Off 290 Conga Hi Mt Slap Off 290 Conga Hi Mt Slap Off 290 Conga Hi MtSlap Off63 D#4 236 88 Tom Off 288 Conga Hi Open Off 288 Conga Hi Open Off 288 Conga Hi Open Off64 E4 236 88 Tom Off 285 Conga Lo Open Off 285 Conga Lo Open Off 285 Conga Lo Open Off65 F4 410 Noise White Off 334 Timbale Hi Rim2 Off 334 Timbale Hi Rim2 Off 334 Timbale Hi Rim 2 Off66 F#4 400 Explosion Off 329 Timbale Lo Open Off 329 Timbale Lo Open Off 329 Timbale Lo Open Off67 G4 351 Agogo Bell Off 351 Agogo Bell Off 351 Agogo Bell Off 351 Agogo Bell Off68 G#4 351 Agogo Bell Off 351 Agogo Bell Off 351 Agogo Bell Off 351 Agogo Bell Off69 A4 346 Cabasa Up Off 346 Cabasa Up Off 346 Cabasa Up Off 346 Cabasa Up Off70 A#4 309 Maracas Push Off 309 Maracas Push Off 309 Maracas Push Off 346 Cabasa Up Off71 B4 361 Samba Whistle 2 361 Samba Whistle 2 361 Samba Whistle 2 361 Samba Whistle 272 C5 361 Samba Whistle 2 361 Samba Whistle 2 361 Samba Whistle 2 361 Samba Whistle 273 C#5 308 Guiro Short 3 308 Guiro Short 3 308 Guiro Short 3 308 Guiro Short 374 D5 307 Guiro Long 3 307 Guiro Long 3 307 Guiro Long 3 307 Guiro Long 375 D#5 326 Claves Off 326 Claves Off 326 Claves Off 326 Claves Off76 E5 327 Woodblock1 Off 327 Woodblock1 Off 327 Woodblock1 Off 327 Woodblock 1 Off77 F5 327 Woodblock1 Off 327 Woodblock1 Off 327 Woodblock1 Off 327 Woodblock 1 Off78 F#5 261 Syn. FX4 4 342 Cuica Hi 4 342 Cuica Hi 4 342 Cuica Hi 479 G5 262 Syn. FX5 4 343 Cuica Lo 4 343 Cuica Lo 4 343 Cuica Lo 480 G#5 341 Triangle Mute 5 341 Triangle Mute 5 341 Triangle Mute 5 341 Triangle Mute 581 A5 340 Triangle Open 5 340 Triangle Open 5 340 Triangle Open 5 340 Triangle Open 582 A#5 345 Shaker2 Off 347 Cabasa Down Off 347 Cabasa Down Off 347 Cabasa Down Off83 B5 338 Tambourine Acc1 Off 355 Sleigh Bell Off 355 Sleigh Bell Off 355 Sleigh Bell Off84 C6 358 Marc Tree Off 358 Marc Tree Off 358 Marc Tree Off 358 Marc Tree Off85 C#6 255 Syn. Castanet Off 305 Castanet Single Off 305 Castanet Single Off 305 Castanet Single Off86 D6 266 E.Tom Real Off 330 Timbale Lo Mute 6 330 Timbale Lo Mute 6 330 Timbale Lo Mute 687 D#6 264 Boom Off 329 Timbale Lo Open 6 329 Timbale Lo Open 6 329 Timbale Lo Open 688 E6 370 Stadium Off 370 Stadium Off 370 Stadium Off 370 Stadium Off
120-0-90: Pop Std. Kit 2 120-0-96: Elektro Kit 1 120-0-97: Elektro Kit 2 120-0-117: Arabian Kit 2Note Sample Excl. Sample Excl. Sample Excl. Sample Excl.
0 C-1 45 SD Wood 2 pp Off 489 Empty Off 489 Empty Off 45 SD Wood 2 pp Off1 C#-1 60 SD Solid 2 p Off 60 SD Solid 2 p Off 60 SD Solid 2 p Off 60 SD Solid2 p Off2 D-1 79 SD Brass 2 mf Off 79 SD Brass 2 mf Off 79 SD Brass 2 mf Off 79 SD Brass2 mf Off3 D#-1 75 SD Brass 1 p Off 75 SD Brass 1 p Off 75 SD Brass 1 p Off 75 SD Brass1 p Off4 E-1 69 SD Maple 2 pp Off 69 SD Maple 2 pp Off 69 SD Maple 2 pp Off 69 SD Maple2 pp Off5 F-1 63 SD Maple 1 pp Off 63 SD Maple 1 pp Off 63 SD Maple 1 pp Off 63 SD Maple1 pp Off6 F#-1 57 SD Solid 1 p Off 57 SD Solid 1 p Off 57 SD Solid 1 p Off 57 SD Solid1 p Off7 G-1 53 SD Piccolo 2 pp Off 53 SD Piccolo 2 pp Off 53 SD Piccolo 2 pp Off 53 SD Piccolo2 pp Off8 G#-1 5 BD Dry 1 Off 5 BD Dry 1 Off 5 BD Dry 1 Off 5 BD Dry 1 Off9 A-1 18 BD Squash Off 30 BD Hip 1 Off 30 BD Hip 1 Off 25 BD House 4 Off
10 A#-1 115 SD Hip 6 Off 228 99 SD Off 228 99 SD Off 228 99 SD Off11 B-1 226 88 BD Off 226 88 BD Off 226 88 BD Off 226 88 BD Off12 C0 52 SD Piccolo 1 f Off 227 88 SD Off 227 88 SD Off 227 88 SD Off13 C#0 59 SD Solid 1 f Off 89 SD Off Center Off 89 SD Off Center Off 88 SD Full Room Off14 D0 52 SD Piccolo 1 f Off 120 SD Vintage3 Off 120 SD Vintage3 Off 99 SD Processed 115 D#0 36 BD Ambient Off 34 BD Pop Kick Off 34 BD Pop Kick Off 5 BD Dry 1 Off16 E0 16 BD Gated Off 36 BD Ambient Off 36 BD Ambient Off 17 BD Tight Off17 F0 59 SD Solid 1 f Off 115 SD Hip 6 Off 115 SD Hip 6 Off 82 SD Dry 1 Off18 F#0 161-162 HH2 Closed p-mp (2) 1 231 88 HH Close 1 231 88 HH Close 1 171 HH3 Closed2 119 G0 38 BD Amb.Rocker Off 25 BD House 4 Off 25 BD House 4 Off 7 BD Dry 3 Off20 G#0 130 Side Stick Dry Off 270 Zap 2 Off 270 Zap 2 Off 131 Side Stick Amb Off21 A0 67 SD Maple 1 f 7 99 SD Processed Off 99 SD Processed Off 132 Drum Stick Hit Off22 A#0 68 SD Maple 1 ff 7 121 SD Vintage4 Off 121 SD Vintage4 Off 412 Tubular Off23 B0 132 DrumStick Hit Off 132 DrumStick Hit Off 132 DrumStick Hit Off 352 Cowbell Off
120-0-73: Techno Kit RX 120-0-74: Dance Kit RX 120-0-88: Standard Kit 4 120-0-89: Pop Std. Kit 1Note Sample Excl. Sample Excl. Sample Excl. Sample Excl.

315Factory dataDrum Kit maps
Appen
dix
24 C1 59 SD Solid 1 f 7 220 SD Orchestra 7 220 SD Orchestra 7 352 Cowbell Off25 C#1 219 SD Orch. Roll 7 219 SD Orch. Roll 7 219 SD Orch. Roll 7 219 SD Orch. Roll Off26 D1 221 Finger Snaps Off 221 Finger Snaps Off 221 Finger Snaps Off 221 Finger Snaps Off27 D#1 270 Zap 2 Off 270 Zap 2 Off 270 Zap 2 Off 270 Zap2 Off28 E1 410 Noise White Off 410 Noise White Off 410 Noise White Off 171 HH3 Closed2 Off29 F1 272 DJ Scratch 2 7 272 DJ Scratch 2 7 272 DJ Scratch 2 7 272 DJ Scratch2 Off30 F#1 272 DJ Scratch 2 7 272 DJ Scratch 2 7 272 DJ Scratch 2 7 272 DJ Scratch2 Off31 G1 132 DrumStick Hit Off 132 DrumStick Hit Off 132 DrumStick Hit Off 132 Drum Stick Hit Off32 G#1 269 Zap 1 Off 269 Zap 1 Off 269 Zap 1 Off 292 Conga Hi Slap2 Off33 A1 376 Click Off 376 Click Off 376 Click Off 376 Click Off34 A#1 340 Triangle Open Off 340 Triangle Open Off 340 Triangle Open Off 376 Click Off35 B1 17 BD Tight Off 20 BD Dance 2 Off 20 BD Dance 2 Off 7 BD Dry 3 Off36 C2 17 BD Tight Off 265 E.Tom FM Off 265 E.Tom FM Off 17 BD Tight Off37 C#2 129 Rim Shot f Off 129 Rim Shot f Off 129 Rim Shot f Off 130 Side Stick Dry Off38 D2 491 SD Normal Off 490 SD Rock Off 491 SD Normal Off 84 SD Dry 3 Off39 D#2 230 88 Claps Off 230 88 Claps Off 230 88 Claps Off 225 Claps 4 Off40 E2 491 SD Normal Off 490 SD Rock Off 491 SD Normal Off 84 SD Dry 3 Off41 F2 140 Tom 1 Floor f Off 266 E.Tom Real Off 266 E.Tom Real Off 145 Tom3 Floor Off42 F#2 163-165 HH2 Closed mf-ff (2) 1 174-171 HH3 Open-Closed 2 (2) 1 174-171 HH3 Open-Closed 2 (2) 1 174 HH3 Open 2 143 G2 138 Tom 1 Low f Off 266 E.Tom Real Off 266 E.Tom Real Off 145 Tom3 Floor Off44 G#2 157-156 HH1 Foot mf-mp (2) 1 178 HH4 Foot 1 178 HH4 Foot 1 178 HH4 Foot 145 A2 138 Tom 1 Low f Off 266 E.Tom Real Off 266 E.Tom Real Off 144 Tom3 Low Off46 A#2 168 HH2 Open p 1 173 HH3 Open 1 1 173 HH3 Open 1 1 173 HH3 Open 1 147 B2 136 Tom 1 Mid f Off 266 E.Tom Real Off 266 E.Tom Real Off 144 Tom3 Low Off48 C3 134 Tom 1 Hi f Off 266 E.Tom Real Off 266 E.Tom Real Off 143 Tom3 Hi Off49 C#3 196 Crash 1 Off 196 Crash 1 Off 196 Crash 1 Off 196 Crash 1 Off50 D3 134 Tom 1 Hi f Off 266 E.Tom Real Off 266 E.Tom Real Off 143 Tom3 Hi Off51 D#3 207-209 Ride 20' mp-mf 2 (2) Off 213 Ride Edge 2 Off 213 Ride Edge 2 Off 213 Ride Edge 2 Off52 E3 198 China Off 202 Crash Reverse Off 202 Crash Reverse Off 433 Dbk Tky Open Off53 F3 215 Ride Cup Off 214 Ride Jazz Off 214 Ride Jazz Off 432 Dbk Tky Mute Off54 F#3 339 Tambourine Acc 2 Off 339 Tambourine Acc 2 Off 339 Tambourine Acc 2 Off 338 Tambourine Acc1 Off55 G3 201 Splash Off 201 Splash Off 201 Splash Off 434 Dbk Tky Rim Off56 G#3 352 Cowbell Off 352 Cowbell Off 352 Cowbell Off 352 Cowbell Off57 A3 196 Crash 1 Off 196 Crash 1 Off 196 Crash 1 Off 434 Dbk Tky Rim Off58 A#3 325 Vibraslap Off 325 Vibraslap Off 325 Vibraslap Off 346 Cabasa Up Off59 B3 206 Ride 20' mp 1 Off 213 Ride Edge 2 Off 213 Ride Edge 2 Off 436 Douf Dom Ak Off60 C4 298 Bongo Hi Open Off 298 Bongo Hi Open Off 298 Bongo Hi Open Off 439 Douf Tek Ak2 Off61 C#4 295 Bongo Lo Open Off 295 Bongo Lo Open Off 295 Bongo Lo Open Off 295 Bongo Lo Open Off62 D4 290 Conga Hi MtSlap Off 290 Conga Hi MtSlap Off 290 Conga Hi MtSlap Off 438 Douf Tek Ak1 Off63 D#4 288 Conga Hi Open Off 288 Conga Hi Open Off 288 Conga Hi Open Off 298 Bongo Hi Open Off64 E4 285 Conga Lo Open Off 285 Conga Lo Open Off 285 Conga Lo Open Off 437 Douf Rim Ak Off65 F4 334 Timbale Hi Rim 2 Off 334 Timbale Hi Rim 2 Off 334 Timbale Hi Rim 2 Off 455 Tabla Dom Off66 F#4 329 Timbale Lo Open Off 329 Timbale Lo Open Off 329 Timbale Lo Open Off 475 Darbuka D1 467 G4 351 Agogo Bell Off 351 Agogo Bell Off 351 Agogo Bell Off 458 Tabla Tak 468 G#4 351 Agogo Bell Off 351 Agogo Bell Off 351 Agogo Bell Off 456 Tabla Flam Off69 A4 346 Cabasa Up Off 346 Cabasa Up Off 346 Cabasa Up Off 457 Tabla Rim Off70 A#4 346 Cabasa Up Off 309 Maracas Push Off 309 Maracas Push Off 316 Tabla Na Off71 B4 361 Samba Whistle 2 361 Samba Whistle 2 361 Samba Whistle 2 318 Tabla Tin Off72 C5 361 Samba Whistle 2 361 Samba Whistle 2 361 Samba Whistle 2 445 Rek Dom Ak Off73 C#5 308 Guiro Short 3 308 Guiro Short 3 308 Guiro Short 3 448 Rik2 Off74 D5 307 Guiro Long 3 307 Guiro Long 3 307 Guiro Long 3 447 Rik1 Off75 D#5 326 Claves Off 326 Claves Off 326 Claves Off 449 Rik3 Off76 E5 327 Woodblock 1 Off 327 Woodblock 1 Off 327 Woodblock 1 Off 449 Rik3 Off77 F5 327 Woodblock 1 Off 327 Woodblock 1 Off 327 Woodblock 1 Off 446 Rek Jingle Off78 F#5 342 Cuica Hi 4 342 Cuica Hi 4 342 Cuica Hi 4 487 Tef2 Off79 G5 343 Cuica Lo 4 343 Cuica Lo 4 343 Cuica Lo 4 445 Rek Dom Ak Off80 G#5 341 Triangle Mute 5 341 Triangle Mute 5 341 Triangle Mute 5 486 Tef1 Off81 A5 340 Triangle Open 5 340 Triangle Open 5 340 Triangle Open 5 448 Rik2 Off82 A#5 347 Cabasa Down Off 347 Cabasa Down Off 347 Cabasa Down Off 449 Rik3 Off83 B5 355 Sleigh Bell Off 355 Sleigh Bell Off 355 Sleigh Bell Off 446 Rek Jingle Off84 C6 358 Marc Tree Off 358 Marc Tree Off 358 Marc Tree Off 431 Bells Open 285 C#6 305 Castanet Single Off 305 Castanet Single Off 305 Castanet Single Off 450 Sagat Half Open 286 D6 330 Timbale Lo Mute 6 330 Timbale Lo Mute 6 330 Timbale Lo Mute 6 451 Sagat Close 287 D#6 329 Timbale Lo Open 6 329 Timbale Lo Open 6 329 Timbale Lo Open 6 478 Davul Off88 E6 370 Stadium Off 370 Stadium Off 370 Stadium Off 302 Djembe Open 389 F6 302 Djembe Open 390 F#6 433 Dbk Tky Open 391 G6 431 Bells Open 592 G#6 450 Sagat Half Open 593 A6 451 Sagat Close 594 A#6 478 Davul Off95 B6 10 BD Jazz Off96 C7 488 Tef3 Off
120-0-90: Pop Std. Kit 2 120-0-96: Elektro Kit 1 120-0-97: Elektro Kit 2 120-0-117: Arabian Kit 2Note Sample Excl. Sample Excl. Sample Excl. Sample Excl.

316 Factory dataMultisamples
Multisamples
The following table lists all Pa1X Factory Multisamples available in ROM.
0 AcousticPiano_L
1 AcousticPiano_R
2 M1 Piano
3 El.GrandPiano
4 E.P. FM 1
5 E.P. FM 1LP
6 E.P. FM 2
7 E.P. Dyno Soft
8 E.P. Dyno SoftLP
9 E.P. StageHard
10 E.P. StageHardLP
11 E.P. Wurly Soft
12 E.P. Wurly Hard
13 E.P. Pad 1LP
14 E.P. Pad 2
15 Clav.
16 Harpsichord
17 GospelOrg.Slow_L
18 GospelOrg.Slow_R
19 GospelOrg.Fast_L
20 GospelOrg.Fast_R
21 E.Organ Perc 1
22 E.Organ Perc 2
23 E.Organ Perc 3
24 E.Organ 2'Perc
25 M1 Organ 1
26 M1 Organ 2
27 Organ 1
28 Organ 2
29 Organ 2LP
30 E.Organ Jazz
31 Bx3&Perc 3rd
32 E.Organ Vox
33 E.Organ Soft
34 E.Organ Full
35 E.Organ Dist
36 Rotary Org1
37 Rotary Org1LP
38 Rotary Org2
39 SuperBX3
40 SuperBX3LP
41 Pipe Flute_L
42 Pipe Flute_R
43 Pipe Positive
44 Pipe Mixture
45 Pipe Full 1_L
46 Pipe Full 1_R
47 Pipe Full 2
48 Kalimba
49 MusicBox
50 MusicBoxLP
51 Marimba
52 MarimbaLP
53 Xylophone
54 Vibraphone
55 VibraphoneLP
56 Celesta
57 CelestaLP
58 Glockenspiel
59 GlockenspielLP
60 Tubular Bell
61 Log Drum
62 SteelDr Hard
63 SteelDr HardLP
64 Gamelan
65 FM Bell
66 Flute
67 Flute Frull
68 Voice Flute
69 Jazz Flute
70 Piccolo
71 Pan Flute
72 Shakuhachi
73 Shakuhachi Atk
74 Bottle
75 Recorder
76 Ocarina
77 Clarinet
78 M1 DoubleReed
79 Oboe
80 English Horn
81 Bassoon
82 Bariton Sax mf
83 Bariton Sax f
84 Bariton Sax T1
85 Tenor SaxVibrato
86 Tenor Sax
87 Tenor Sax M1
88 Tenor Sax Expr.
89 Alto Sax Vibrato
90 Alto Sax p
91 Alto Sax mf
92 Alto Sax Growl
93 Alto Sax 01W
94 Soprano SaxVibr.
95 Soprano Sax
96 French Musette
97 Musette 1
98 Musette 1LP
99 Musette 2
100 Accordion 16'
101 Acc.16' OrigTune
102 Accordion 8'
103 Acc. 8' OrigTune
104 Accordion 4'
105 Acc. 4' OrigTune
106 Accordion 1
107 Accordion 2
108 Fisa Bassoon
109 Fisa Clarinet
110 Bandoneon
111 Accordion Bass
112 Acc.Noise KeyOn
113 Acc.Noise KeyOff
114 Acc.Change Voic
115 Harmonica
116 Harmonica Wah
117 Highland B.Pipes
118 Highland Drones
119 Uilleann Pipes
120 Bag Pipes
121 French Horn T1
122 French Horn Ens.
123 Flugel Vibrato
124 Flugel Horn M1
125 Tuba
126 Trombone Vibrato
127 Trombone1 mf
128 Trombone1 ff
129 Trombone2 Soft
130 Trombone2 Bright
131 Trombone SlurUp
132 Trombone Fall
133 Trumpet Medium
134 Trump. Overblown
135 Trumpet Expr.
136 Trumpet Muted
137 Trumpet Wah Wah
138 Trumpet Doit
139 Trumpet Fall
140 Brass Ens. 1
141 Brass Ens. 2
142 Brass Ens. 2LP
143 Voice Choir
144 Voice ChoirREV
145 Voice Pop Ooh
146 Voice Pop OohREV
147 Voice Pop Ah
148 Voice Pop AhREV
149 Doo Voice
150 Doo VoiceLP
151 String Ens.
152 String Ens.REV
153 Pizzicato Ens.
154 Violin
155 Viola
156 Cello&Contrabass
157 Violin & Cello
158 Pizzicato
159 SteelGtr Pick p
160 SteelGtr Pick mf
161 SteelGtr pick f
162 SteelGtr Mute
163 SteelGtr Slide

317Factory dataMultisamples
Appen
dix
164 A.Guitar Finger
165 A.Guitar Pick
166 A.Guitar Harmo.
167 Folk Guitar
168 Folk 12 Strings
169 Nylon Guitar mp
170 Nylon Guitar mf
171 Nylon Guitar ff
172 Nylon GuitarAtk
173 A.Gtr HiStrings
174 A.Gtr 12Strings
175 A.Gtr Harmonics
176 A.Gtr Noise
177 Clean Gtr1 Stra
178 Clean Gtr1 Mute
179 Clean Gtr2 Stra
180 Clean Gtr2 Mute
181 Clean Gtr3 Tele
182 Clean Gtr4 Str p
183 Clean Gtr4 Str f
184 Clean Gtr4 Mute
185 Clean Gtr4 Dead
186 Clean Gtr4 Slap
187 Clean Gtr4 Slide
188 E.Gtr Sberg p1
189 E.Gtr Sberg f1
190 E.Gtr Sberg p2
191 E.Gtr Sberg f2
192 E.Gtr Le Neck
193 E.Gtr Le Bridge
194 E.Gtr Le Mute p
195 E.Gtr Le Mute mf
196 E.Gtr Le Ghost1
197 E.Gtr Le Ghost2
198 E.Gtr Vintage p
199 E.Gtr Vintage mf
200 E.Gtr Solid p
201 E.Gtr Solid mf
202 E.Gtr Solid f
203 E.Gtr Harmonics
204 E.Gtr Gliss Down
205 E.Gtr Gliss Up
206 E.Gtr Noise
207 E.Gtr ShortNoise
208 E.Gtr FretNoise
209 Funky Gtr 1 Stra
210 Funky Gtr 2 Stra
211 Jazz Guitar1
212 Jazz Guitar2
213 Jazz Guitar3 p
214 Jazz Guitar3 mf
215 Jazz Guitar3 f
216 Pedal Steel Gtr
217 Reso Guitar
218 Overdrive Gtr
219 Dist Guitar
220 Dist Gtr1 Harmo.
221 Dist Gtr1 Mute
222 Dist Gtr2 Harmo.
223 Dist Gtr2 Mute1
224 Dist Gtr2 Mute2
225 Power Chord
226 A.Bass1
227 A.Bass2 mf
228 A.Bass2 f
229 E.Bass1 Finger
230 E.Bass2 P.B.1
231 E.Bass2 P.B.2
232 E.Bass2 LH Stop
233 E.Bass2 RH Stop
234 E.Bass2 Harmo.
235 E.Bass3 p
236 E.Bass3 mf
237 E.Bass3 f Slap
238 E.Bass4 Pick
239 E.Bass4 Harmo.
240 E.Bass4 Slap
241 E.Bass4 SlapHar
242 E.Bass4 LH Mute
243 E.Bass4 RH Mute
244 E.Bass Gliss
245 E.Bass Noise1
246 E.Bass Noise2
247 Finger Bass 1
248 Finger Bass 1LP
249 Finger Bass 2
250 Finger Bass 2LP
251 Finger Bass 3
252 Pick Bass
253 Pick Bass LP
254 Thumb Bass
255 SlapBassThumb
256 SlapBassThumbLP
257 SlapBass Pull
258 Fretless Bass
259 Bass Harmonics
260 Bass HarmoLP
261 Sitar
262 Santur
263 SanturLP
264 Tambura
265 TamburaLP
266 Bouzouki
267 BouzoukiLP
268 Ukulele
269 Oud
270 ClarinetLP
271 Kanun
272 Kanun Tremolo
273 Nay
274 Mandolin
275 MandolinLP
276 Banjo
277 BanjoLP
278 Shamisen
279 Koto
280 Harp
281 Mouth Harp 1
282 Mouth Harp 2
283 Mouth Harp 3
284 Mouth Harp 4
285 Mouth Harp 5
286 Syn Bass Reso 1
287 Syn Bass FM 1
288 Syn Bass FM 1LP
289 Syn Bass FM 2
290 Syn Bass FM 2LP
291 Syn Bass TB
292 RB Saw Bass
293 RB Square Bass
294 Chrom Res
295 DetunedSuper
296 DetunedSuperREV
297 Detuned PWM
298 Detuned PWM REV
299 An.Strings 1
300 An.Strings 1 REV
301 An.Strings 2
302 An.Strings 2 REV
303 Analog Vintage
304 White Pad
305 White Pad REV
306 N1 Air Vox
307 N1 Air Vox REV
308 Ether Bell
309 Ether BellLP
310 Lore
311 Lore NT
312 Space Lore
313 Space Lore REV
314 Wave Sweep 1
315 Wave Sweep 2
316 Wave Sweep 3
317 Syn Ghostly
318 Syn Ghostly REV
319 Syn Air Pad
320 Syn Air Pad REV
321 Dream Str
322 Dream Str REV
323 Syn AirVortexREV
324 Syn Clicker
325 Syn Clicker REV
326 Cricket Spectrum
327 Noise 1
328 Noise 2
329 Swish Terra
330 Gamelan XEQ
331 Saw 1
332 Saw 2
333 Saw 3
334 Pulse 02%
335 Pulse 05%
336 Pulse 08%
337 Pulse 16%
338 Pulse 33%
339 Pulse 40%
340 Square
341 Square MG
342 Square JP
343 Triangle MG

318 Factory dataMultisamples
344 Ramp
345 Ramp MG
346 Sine
347 DWGS Syn Sine 1
348 DWGS Syn Sine 2
349 DWGS Organ 1
350 DWGS Organ 2
351 DWGS Bell 1
352 DWGS Bell 2
353 DWGS Bell 3
354 DWGS Bell 4
355 DWGS Clav.
356 DWGS Digi 1
357 DWGS Digi 2
358 DWGS Wire 1
359 DWGS Wire 2
360 DWGS Sync 1
361 DWGS Sync 2
362 DWGS Sync 3
363 Orchestra Hit
364 Band Hit
365 Impact Hit
366 Brass Fall
367 Vox Wah Gtr
368 Vibe Chord
369 Zap 1
370 Zap 2
371 Stadium
372 Applause
373 Birds 1
374 Birds 1 REV
375 Birds 2
376 Crickets
377 Crickets REV
378 Church Bell
379 Church Bell REV
380 Thunder
381 Stream
382 Bubble
383 Bubble REV
384 Dog
385 Gallop
386 Gallop REV
387 Laughing
388 Telephone Ring
389 Tele Ring REV
390 Scream
391 Punch
392 Heart Beat
393 Footstep 1
394 Footstep 2
395 Door Creak
396 Door Slam
397 Car Engine
398 Car Engine LP
399 Car Stop
400 Car Pass
401 Car Crash
402 Train
403 Train REV
404 Helicopter
405 Helicopter REV
406 Gun Shot
407 Machine Gun
408 Machine Gun REV
409 Laser Gun
410 Explosion
411 Wind
412 Timpani
413 Crash
414 Crash Reverse
415 Orchestra Crash
416 Ride Jazz
417 Ride Edge 1
418 Ride Edge 2
419 HiHat Closed
420 88 HiHat Open
421 88 Cowbell
422 88 Tom
423 88 Conga
424 88 Crash
425 Tom
426 Tom Brush
427 Tom Process
428 Electric Tom
429 Flexatone
430 Tambourine
431 Agogo Bell
432 Marc Tree
433 Marc TreeLP
434 Cowbell
435 Click
436 Temple Blocks
437 Orchestra BD
438 Castanet
439 Taiko
440 Djembe Open
441 Djembe Mute
442 Chinese Gong
443 Snare Ghost
444 RainStick
445 Empty

319Factory dataDrum Samples
Appen
dix
Drum Samples
The following table lists all Pa1X Factory Drum Samples available in ROM.
0 BD Acoustic 1 p
1 BD Acoustic 1 mf
2 BD Acoustic 1 f
3 BD Acoustic 2 mf
4 BD Acoustic 2 f
5 BD Dry 1
6 BD Dry 2
7 BD Dry 3
8 BD Normal
9 BD SoftRoom
10 BD Jazz
11 BD Pillow
12 BD Woofer
13 BD MondoKill
14 BD Terminator
15 BD Tubby
16 BD Gated
17 BD Tight
18 BD Squash
19 BD Dance 1
20 BD Dance 2
21 BD Dance 3
22 BD House 1
23 BD House 2
24 BD House 3
25 BD House 4
26 BD House 5
27 BD Liquid
28 BD Techno 1
29 BD Techno 2
30 BD Hip 1
31 BD Hip 2
32 BD Hip 3
33 BD Hip 4
34 BD Pop Kick
35 BD Dance 99
36 BD Ambient
37 BD Amb.Crackle
38 BD Amb.Rocker
39 BD Pop 99
40 BD Deep 88
41 BD Klanger
42 SD Wood 1 p
43 SD Wood 1 mf
44 SD Wood 1 f
45 SD Wood 2 pp
46 SD Wood 2 p
47 SD Wood 2 mf
48 SD Wood 2 f
49 SD Piccolo 1 pp
50 SD Piccolo 1 p
51 SD Piccolo 1 mf
52 SD Piccolo 1 f
53 SD Piccolo 2 pp
54 SD Piccolo 2 p
55 SD Piccolo 2 mf
56 SD Piccolo 2 f
57 SD Solid 1 p
58 SD Solid 1 mf
59 SD Solid 1 f
60 SD Solid 2 p
61 SD Solid 2 mf
62 SD Solid 2 f
63 SD Maple 1 pp
64 SD Maple 1 p
65 SD Maple 1 mp
66 SD Maple 1 mf
67 SD Maple 1 f
68 SD Maple 1 ff
69 SD Maple 2 pp
70 SD Maple 2 p
71 SD Maple 2 mp
72 SD Maple 2 mf
73 SD Maple 2 f
74 SD Maple 2 ff
75 SD Brass 1 p
76 SD Brass 1 mf
77 SD Brass 1 f
78 SD Brass 2 p
79 SD Brass 2 mf
80 SD Brass 2 f
81 SD Roll
82 SD Dry 1
83 SD Dry 2
84 SD Dry 3
85 SD Ghost Roll
86 SD Ghost p
87 SD Ghost f
88 SD Full Room
89 SD Off Center
90 SD Jazz Ring
91 SD Amb.Piccolo
92 SD Paper
93 SD Brush Hit
94 SD Brush Tap 1
95 SD Brush Tap 2
96 SD Brush Swirl
97 SD Big Rock
98 SD Yowie
99 SD Processed
100 SD Cracker Room
101 SD Dance
102 SD House 1
103 SD House 2
104 SD House 3
105 SD House 4
106 SD Small
107 SD Rap
108 SD Noise
109 SD Reverse
110 SD Hip 1
111 SD Hip 2
112 SD Hip 3
113 SD Hip 4
114 SD Hip 5
115 SD Hip 6
116 SD Ringy
117 SD Tiny
118 SD Vintage1
119 SD Vintage2
120 SD Vintage3
121 SD Vintage4
122 SD Vintage5
123 SD Vintage6
124 SD AmbiHop
125 SD Brasser
126 SD Chili
127 SD Whopper
128 Rim Shot p
129 Rim Shot f
130 Side Stick Dry
131 Side Stick Amb
132 DrumStick Hit
133 Tom 1 Hi p
134 Tom 1 Hi f
135 Tom 1 Mid p
136 Tom 1 Mid f
137 Tom 1 Low p
138 Tom 1 Low f
139 Tom 1 Floor p
140 Tom 1 Floor f
141 Tom 2 Hi
142 Tom 2 Floor
143 Tom 3 Hi
144 Tom 3 Lo
145 Tom 3 Floor
146 Tom 4 Hi
147 Tom 4 Lo
148 Tom Processed
149 Tom Jazz Hi
150 Tom Jazz Floor
151 Tom Brush Hi
152 HH1 Closed pp
153 HH1 Closed p
154 HH1 Closed mf
155 HH1 Closed f
156 HH1 Foot mp
157 HH1 Foot mf
158 HH1 Open mp
159 HH1 Open mf
160 HH2 Closed pp
161 HH2 Closed p
162 HH2 Closed mp
163 HH2 Closed mf

320 Factory dataDrum Samples
164 HH2 Closed f
165 HH2 Closed ff
166 HH2 Foot p
167 HH2 Foot f
168 HH2 Open p
169 HH2 Open f
170 HH3 Closed 1
171 HH3 Closed 2
172 HH3 Foot
173 HH3 Open 1
174 HH3 Open 2
175 HH3 Sizzle
176 HH4 Closed 1
177 HH4 Closed 2
178 HH4 Foot
179 HH4 FootOpen
180 HH4 Open
181 HH Old Close 1
182 HH Old Open 1
183 HH Old TiteClose
184 HH Old Close 2
185 HH Old Open 2
186 HH House Open 1
187 HH House Open 2
188 HH Hip
189 HH Alpo Close
190 Crash 15' Edge 1
191 Crash 15' Edge 2
192 Crash 17' Edge 1
193 Crash 17' Edge 2
194 Crash 19' Open 1
195 Crash 19' Open 2
196 Crash 1
197 Crash 2
198 China
199 Splash 8' Edge 1
200 Splash 8' Edge 2
201 Splash
202 Crash Reverse
203 Crash Dance 99
204 Crash DDD-1
205 Ride Dance 99
206 Ride 20' mp 1
207 Ride 20' mp 2
208 Ride 20' mf 1
209 Ride 20' mf 2
210 Ride Brush
211 Ride Rivet
212 Ride Edge 1
213 Ride Edge 2
214 Ride Jazz
215 Ride Cup
216 BD Orchestra
217 Orchestra Cymbal
218 Timpani
219 SD Orch. Roll
220 SD Orchestra
221 Finger Snaps
222 Claps 1
223 Claps 2
224 Claps 3
225 Claps 4
226 88 BD
227 88 SD
228 99 SD
229 88 Rimshot
230 88 Claps
231 88 HH Close
232 88 HH Open
233 99 HH Close
234 99 HH Open
235 88 Crash
236 88 Tom
237 88 Conga
238 88 Claves
239 88 Cowbell
240 88 Maracas
241 Syn. BD 1
242 Syn. BD 2
243 Syn. BD 3
244 Syn. BD 4
245 Syn. BD Buzz
246 Syn. SD 1
247 Syn. SD 2
248 Syn. SD 3
249 Syn. SD 4
250 Syn. Rim Click
251 Syn. HH Closed
252 Syn. HH Open
253 Syn. Bongo 1
254 Syn. Bongo 2
255 Syn. Castanet
256 Syn. Shaker
257 Syn. Noise
258 Syn. FX 1
259 Syn. FX 2
260 Syn. FX 3
261 Syn. FX 4
262 Syn. FX 5
263 Perc. Ahh
264 Boom
265 E.Tom FM
266 E.Tom Real
267 Rim House 1
268 Rim House 2
269 Zap 1
270 Zap 2
271 DJ Scratch 1
272 DJ Scratch 2
273 DJ Scratch 3
274 DJ Scratch 4
275 DJ Scratch 5
276 DJ Scratch 6
277 DJ Hit Rub
278 DJ Vocal Rub 1
279 DJ Vocal Rub 2
280 DJ BD Rub
281 DJ SD Rub
282 Orchestra Hit
283 Band Hit
284 Impact Hit
285 Conga Lo Open
286 Conga Lo MtSlap
287 Conga Lo Slap
288 Conga Hi Open
289 Conga Hi Mute
290 Conga Hi MtSlap
291 Conga Hi Slap 1
292 Conga Hi Slap 2
293 Conga Heel
294 Conga Toe
295 Bongo Lo Open
296 Bongo Lo Slap
297 Bongo Lo Stick
298 Bongo Hi Open
299 Bongo Hi Slap
300 Bongo Hi Stick1
301 Bongo Hi Stick2
302 Djembe Open
303 Djembe Mute
304 Djembe Slap
305 Castanet Single
306 Castanet Double
307 Guiro Long
308 Guiro Short
309 Maracas Push
310 Maracas Pull
311 Baya Open
312 Baya Ghe
313 Baya Mute 1
314 Baya Mute 2
315 Baya Mute 3
316 Tabla Na
317 Tabla Open
318 Tabla Tin
319 Tabla Mute 1
320 Tabla Mute 2
321 Tabla Mute 3
322 Taiko Open
323 Taiko Rim
324 Tsuzumi
325 Vibraslap
326 Claves
327 Woodblock 1
328 Woodblock 2
329 Timbale Lo Open
330 Timbale Lo Mute
331 Timbale Lo Rim
332 Timbale Hi Edge
333 Timbale Hi Rim 1
334 Timbale Hi Rim 2
335 Timbale Paila
336 Tambourine Push
337 Tambourine Pull
338 Tambourine Acc 1
339 Tambourine Acc 2
340 Triangle Open
341 Triangle Mute
342 Cuica Hi
343 Cuica Lo

321Factory dataDrum Samples
Appen
dix
344 Shaker 1
345 Shaker 2
346 Cabasa Up
347 Cabasa Down
348 Cabasa Tap
349 Caxixi Hard
350 Caxixi Soft
351 Agogo Bell
352 Cowbell
353 Chacha Bell
354 Mambo Bell
355 Sleigh Bell
356 Rap Sleigh Bell
357 Finger Cymbal
358 Marc Tree
359 Marc Tree LP
360 Flexatone
361 Samba Whistle
362 Chinese Gong
363 Metal Hit
364 Yeah!
365 Yeah! Solo
366 Uhh
367 Hit It
368 Uhhhh Solo
369 Comp Voice Noise
370 Stadium
371 Applause
372 Scream
373 Laughing
374 Footsteps 1
375 Footsteps 2
376 Click
377 Bird 1
378 Bird 2
379 Dog
380 Gallop
381 Crickets
382 Cat
383 Growl
384 Heart Beat
385 Punch
386 Tribe
387 Rainstick
388 Door Creak
389 Door Slam
390 Car Engine
391 Car Stop
392 Car Pass
393 Car Crash
394 Train
395 Helicopter
396 Gun Shot 1
397 Gun Shot 2
398 Machine Gun
399 Laser Gun
400 Explosion
401 Thunder
402 Wind
403 Stream
404 Bubble
405 Church Bell
406 Telephone Ring
407 Xylophone Spectr
408 Cricket Spectrum
409 Air Vortex
410 Noise White
411 Noise FM Mod
412 Tubular
413 Gamelan
414 Tambura
415 Gtr CutNois 1
416 Gtr CutNois 2
417 Power Chord
418 Fret Noise
419 Dist. Slide 1
420 Dist. Slide 2
421 E.Gtr Pick 1
422 E.Gtr Pick 2
423 Gtr Scratch 1
424 Gtr Scratch 2
425 Amp Noise
426 Space Lore
427 Swish Terra
428 Hand Drill
429 Mouth Harp
430 Jingle Bell
431 Bells Open
432 Dbk Tky Mute
433 Dbk Tky Open
434 Dbk Tky Rim
435 Djembe Bass
436 Douf Dom Ak
437 Douf Rim Ak
438 Douf Tek Ak 1
439 Douf Tek Ak 2
440 Pand Open
441 Pand Pattern 1
442 Pand Pattern 2
443 Pand Pattern 3
444 Pand Pattern 4
445 Rek Dom Ak
446 Rek Jingle
447 Rik 1
448 Rik 2
449 Rik 3
450 Sagat Half Open
451 Sagat Close
452 Surdo L Mute
453 Surdo L Open
454 Tabla Medium
455 Tabla Dom
456 Tabla Flam
457 Tabla Rim
458 Tabla Tak
459 Tambourine Mute 1
460 Tambourine Mute 2
461 Tambourine Open
462 Timbales
463 Udu f open
464 Alkis
465 Bandir
466 Bandir Closed
467 Bongo Roll
468 Darbuka 1 Tek 1
469 Darbuka 1 Tek 2
470 Darbuka 1 DumOp
471 Darbuka 1 Closed
472 Darbuka 2
473 Darbuka 3
474 Darbuka 4
475 Darbuka D 1
476 Darbuka D 2
477 Darbuka D 3
478 Davul
479 Hollo 1
480 Hollo 2
481 Kup 1
482 Kup 2
483 Ramazan DVL 1
484 Ramazan DVL 2
485 Ramazan DVL 3
486 Tef 1
487 Tef 2
488 Tef 3
489 Empty
490 SD Rock
491 SD Normal

322 Factory dataPerformances
Performances
All Performances are user-editable. Use the following table as a model for your own Perfomance lists.
Note: You can remotely select Performances on the Pa1X, by sending it Bank Select MSB (CC#0), Bank Select LSB (CC#32) and ProgramChange messages on the Control channel (see “MIDI: MIDI In Channels” on page 238).
# CC#0 CC#32 PC Bank: 1 CC#0 CC#32 PC Bank: 2 CC#0 CC#32 PC Bank: 3 CC#0 CC#32 PC Bank: 4
1 1 0 0 1 1 0 1 2 0 1 3 0
2 1 1 1 1
3 2 2 2 2
4 3 3 3 3
5 4 4 4 4
6 5 5 5 5
7 6 6 6 6
8 7 7 7 7
9 8 8 8 8
10 9 9 9 9
11 10 10 10 10
12 11 11 11 11
13 12 12 12 12
14 13 13 13 13
15 14 14 14 14
16 15 15 15 15
CC#0 CC#32 PC Bank: 5 CC#0 CC#32 PC Bank: 6 CC#0 CC#32 PC Bank: 7 CC#0 CC#32 PC Bank: 8
1 1 4 0 1 5 0 1 6 0 1 7 0
2 1 1 1 1
3 2 2 2 2
4 3 3 3 3
5 4 4 4 4
6 5 5 5 5
7 6 6 6 6
8 7 7 7 7
9 8 8 8 8
10 9 9 9 9
11 10 10 10 10
12 11 11 11 11
13 12 12 12 12
14 13 13 13 13
15 14 14 14 14
16 15 15 15 15

323Factory dataPerformances
Appen
dix
CC#0 CC#32 PC Bank: 9 CC#0 CC#32 PC Bank: 10 CC#0 CC#32 PC Bank: 11 CC#0 CC#32 PC Bank: 12
1 1 8 0 1 9 0 1 10 0 1 11 0
2 1 1 1 1
3 2 2 2 2
4 3 3 3 3
5 4 4 4 4
6 5 5 5 5
7 6 6 6 6
8 7 7 7 7
9 8 8 8 8
10 9 9 9 9
11 10 10 10 10
12 11 11 11 11
13 12 12 12 12
14 13 13 13 13
15 14 14 14 14
16 15 15 15 15
CC#0 CC#32 PC Bank: 13 CC#0 CC#32 PC Bank: 14 CC#0 CC#32 PC Bank: 15 CC#0 CC#32 PC Bank: 16
1 1 12 0 1 13 0 1 14 0 1 15 0
2 1 1 1 1
3 2 2 2 2
4 3 3 3 3
5 4 4 4 4
6 5 5 5 5
7 6 6 6 6
8 7 7 7 7
9 8 8 8 8
10 9 9 9 9
11 10 10 10 10
12 11 11 11 11
13 12 12 12 12
14 13 13 13 13
15 14 14 14 14
16 15 15 15 15
CC#0 CC#32 PC Bank: 17 CC#0 CC#32 PC Bank: 18 CC#0 CC#32 PC Bank: 19 CC#0 CC#32 PC Bank: 20
1 1 16 0 1 17 0 1 18 0 1 19 0
2 1 1 1 1
3 2 2 2 2
4 3 3 3 3
5 4 4 4 4
6 5 5 5 5
7 6 6 6 6
8 7 7 7 7
9 8 8 8 8
10 9 9 9 9
11 10 10 10 10
12 11 11 11 11
13 12 12 12 12
14 13 13 13 13
15 14 14 14 14
16 15 15 15 15
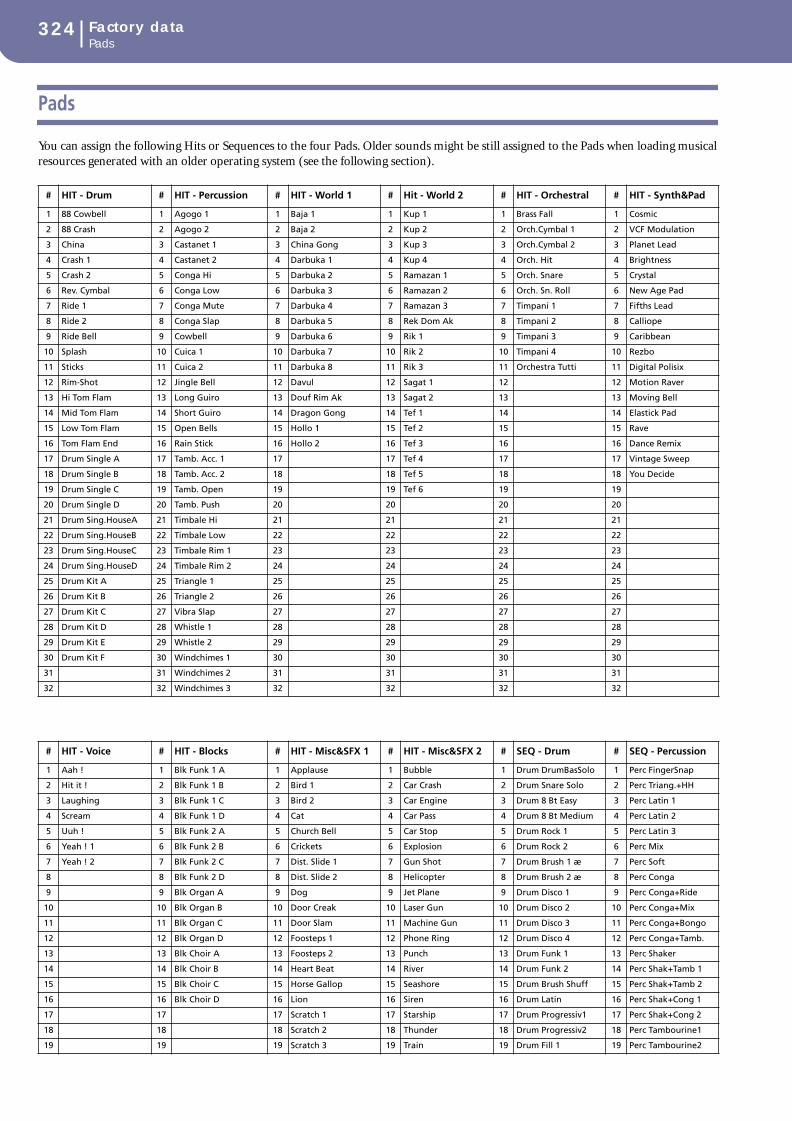
324 Factory dataPads
Pads
You can assign the following Hits or Sequences to the four Pads. Older sounds might be still assigned to the Pads when loading musicalresources generated with an older operating system (see the following section).
# HIT - Drum # HIT - Percussion # HIT - World 1 # Hit - World 2 # HIT - Orchestral # HIT - Synth&Pad
1 88 Cowbell 1 Agogo 1 1 Baja 1 1 Kup 1 1 Brass Fall 1 Cosmic
2 88 Crash 2 Agogo 2 2 Baja 2 2 Kup 2 2 Orch.Cymbal 1 2 VCF Modulation
3 China 3 Castanet 1 3 China Gong 3 Kup 3 3 Orch.Cymbal 2 3 Planet Lead
4 Crash 1 4 Castanet 2 4 Darbuka 1 4 Kup 4 4 Orch. Hit 4 Brightness
5 Crash 2 5 Conga Hi 5 Darbuka 2 5 Ramazan 1 5 Orch. Snare 5 Crystal
6 Rev. Cymbal 6 Conga Low 6 Darbuka 3 6 Ramazan 2 6 Orch. Sn. Roll 6 New Age Pad
7 Ride 1 7 Conga Mute 7 Darbuka 4 7 Ramazan 3 7 Timpani 1 7 Fifths Lead
8 Ride 2 8 Conga Slap 8 Darbuka 5 8 Rek Dom Ak 8 Timpani 2 8 Calliope
9 Ride Bell 9 Cowbell 9 Darbuka 6 9 Rik 1 9 Timpani 3 9 Caribbean
10 Splash 10 Cuica 1 10 Darbuka 7 10 Rik 2 10 Timpani 4 10 Rezbo
11 Sticks 11 Cuica 2 11 Darbuka 8 11 Rik 3 11 Orchestra Tutti 11 Digital Polisix
12 Rim-Shot 12 Jingle Bell 12 Davul 12 Sagat 1 12 12 Motion Raver
13 Hi Tom Flam 13 Long Guiro 13 Douf Rim Ak 13 Sagat 2 13 13 Moving Bell
14 Mid Tom Flam 14 Short Guiro 14 Dragon Gong 14 Tef 1 14 14 Elastick Pad
15 Low Tom Flam 15 Open Bells 15 Hollo 1 15 Tef 2 15 15 Rave
16 Tom Flam End 16 Rain Stick 16 Hollo 2 16 Tef 3 16 16 Dance Remix
17 Drum Single A 17 Tamb. Acc. 1 17 17 Tef 4 17 17 Vintage Sweep
18 Drum Single B 18 Tamb. Acc. 2 18 18 Tef 5 18 18 You Decide
19 Drum Single C 19 Tamb. Open 19 19 Tef 6 19 19
20 Drum Single D 20 Tamb. Push 20 20 20 20
21 Drum Sing.HouseA 21 Timbale Hi 21 21 21 21
22 Drum Sing.HouseB 22 Timbale Low 22 22 22 22
23 Drum Sing.HouseC 23 Timbale Rim 1 23 23 23 23
24 Drum Sing.HouseD 24 Timbale Rim 2 24 24 24 24
25 Drum Kit A 25 Triangle 1 25 25 25 25
26 Drum Kit B 26 Triangle 2 26 26 26 26
27 Drum Kit C 27 Vibra Slap 27 27 27 27
28 Drum Kit D 28 Whistle 1 28 28 28 28
29 Drum Kit E 29 Whistle 2 29 29 29 29
30 Drum Kit F 30 Windchimes 1 30 30 30 30
31 31 Windchimes 2 31 31 31 31
32 32 Windchimes 3 32 32 32 32
# HIT - Voice # HIT - Blocks # HIT - Misc&SFX 1 # HIT - Misc&SFX 2 # SEQ - Drum # SEQ - Percussion
1 Aah ! 1 Blk Funk 1 A 1 Applause 1 Bubble 1 Drum DrumBasSolo 1 Perc FingerSnap
2 Hit it ! 2 Blk Funk 1 B 2 Bird 1 2 Car Crash 2 Drum Snare Solo 2 Perc Triang.+HH
3 Laughing 3 Blk Funk 1 C 3 Bird 2 3 Car Engine 3 Drum 8 Bt Easy 3 Perc Latin 1
4 Scream 4 Blk Funk 1 D 4 Cat 4 Car Pass 4 Drum 8 Bt Medium 4 Perc Latin 2
5 Uuh ! 5 Blk Funk 2 A 5 Church Bell 5 Car Stop 5 Drum Rock 1 5 Perc Latin 3
6 Yeah ! 1 6 Blk Funk 2 B 6 Crickets 6 Explosion 6 Drum Rock 2 6 Perc Mix
7 Yeah ! 2 7 Blk Funk 2 C 7 Dist. Slide 1 7 Gun Shot 7 Drum Brush 1 æ 7 Perc Soft
8 8 Blk Funk 2 D 8 Dist. Slide 2 8 Helicopter 8 Drum Brush 2 æ 8 Perc Conga
9 9 Blk Organ A 9 Dog 9 Jet Plane 9 Drum Disco 1 9 Perc Conga+Ride
10 10 Blk Organ B 10 Door Creak 10 Laser Gun 10 Drum Disco 2 10 Perc Conga+Mix
11 11 Blk Organ C 11 Door Slam 11 Machine Gun 11 Drum Disco 3 11 Perc Conga+Bongo
12 12 Blk Organ D 12 Foosteps 1 12 Phone Ring 12 Drum Disco 4 12 Perc Conga+Tamb.
13 13 Blk Choir A 13 Foosteps 2 13 Punch 13 Drum Funk 1 13 Perc Shaker
14 14 Blk Choir B 14 Heart Beat 14 River 14 Drum Funk 2 14 Perc Shak+Tamb 1
15 15 Blk Choir C 15 Horse Gallop 15 Seashore 15 Drum Brush Shuff 15 Perc Shak+Tamb 2
16 16 Blk Choir D 16 Lion 16 Siren 16 Drum Latin 16 Perc Shak+Cong 1
17 17 17 Scratch 1 17 Starship 17 Drum Progressiv1 17 Perc Shak+Cong 2
18 18 18 Scratch 2 18 Thunder 18 Drum Progressiv2 18 Perc Tambourine1
19 19 19 Scratch 3 19 Train 19 Drum Fill 1 19 Perc Tambourine2

325Factory dataPads
Appen
dix
20 20 20 Scratch 4 20 Wind 20 Drum Fill 2 20 Perc Tamb+Conga1
21 21 21 Scratch 5 21 21 Drum Break 21 Perc Tamb+Conga2
22 22 22 Scratch 6 22 22 Drum End 22 Perc Guiro+Bongo
23 23 23 Stadium 23 23 23 Perc Cowbel+Tamb
24 24 24 24 24 24 Perc æ
25 25 25 25 25 25 Perc 6/8
26 26 26 26 26 26
27 27 27 27 27 27
28 28 28 28 28 28
29 29 29 29 29 29
30 30 30 30 30 30
31 31 31 31 31 31
32 32 32 32 32 32
# SEQ - Groove # SEQ - Bass # SEQ - Piano # SEQ - Guitar # SEQ - Orchestral # SEQ - Solo
1 Grv Drum 1 1 Bass Pick Easy 1 Piano Accomp 1 1 Gtr Steel Strum1 1 Timpani Roll 1 1 Solo Marimba
2 Grv Drum 2 2 Bass Pick Med. 2 Piano Accomp 2 2 Gtr Steel Strum2 2 Timpani Roll 2 2 Solo Kalimba 1
3 Grv Brush 3 Bass Pick Busy 3 Piano Accomp 3 3 Gtr Steel Strum3 3 Orch. Tutti 1 3 Solo Kalimba 2
4 Grv Jazzy 4 Bass Finger Easy 4 Piano Accomp 4 4 Gtr Steel Strum4 4 Orch. Tutti 2 4 Solo Steel Drums
5 Grv Latin 5 Bass Finger Med. 5 Piano Accomp 5 5 Gtr Steel Strum5 5 Orch. Tutti 3 5 Solo Vibes
6 Grv HipHop 1 6 Bass Finger Walk 6 Piano Accomp 6 6 Gtr Steel Strum6 6 Orch. Tutti 4 6 Solo Gtr Dist.
7 Grv HipHop 2 7 Bass Latin 7 Piano Accomp 7 7 GtSteelStrum æ 7 Orch. Harp 1 7 Solo Slide Steel
8 Grv HipHop 3 8 Bass Slap 8 Piano Accomp 8 8 Gtr Steel Arp 1 8 Orch. Harp 2 8 Solo Banjo
9 Grv HipHop 4 9 Bass Digital 9 Piano Accomp 9 9 Gtr Steel Arp 2 9 Orch. Harp 3 9 Solo Violin
10 Grv HipHop 5 10 Bass Synth 10 Piano Arpeg. 1 10 Gtr Steel Arp 3 10 Orch. Harp 4 10 Solo Harpsi æ
11 Grv HipHop 6 11 Bass DigiFilter1 11 Piano Arpeg. 2 11 GtrSteel Arp 6/8 11 Orch. Harp 5 11 Solo Harpsi 4/4
12 Grv Funk 1 12 Bass DigiFilter2 12 Piano Arp 1 æ 12 Gtr Steel Mute 1 12 French Horns 1 12 Solo Gtr Funk
13 Grv Funk 2 13 Bass DigiFilter3 13 Piano Arp 2 æ 13 Gtr Steel Mute 2 13 French Horns 2 13 Solo Piano 1
14 Grv Funk 3 14 14 Piano Arp Down 14 Guitar Country 14 Strings 1 14 Solo Piano 2
15 Grv House 1 15 15 Piano Arp Up 15 Gtr Nylon Strum1 15 Strings 2 15 Solo Piano 3
16 Grv House 2 16 16 Piano Rhythm 1/8 16 Gtr Nylon Strum2 16 Strings 3 16 Solo Piano 4
17 Grv Analog 17 17 Piano Rhythm1/8T 17 Gtr Nylon Strum3 17 Strings 4 17 Solo Synth 1
18 Grv Garage 1 18 18 Piano Latin Rock 18 Gtr Nylon Strum4 18 Strings 5 18 Solo Synth 2
19 Grv Garage 2 19 19 Piano Salsa 1 19 Gtr Nylon Strum5 19 Strings 6 19 Solo Synth 3
20 Grv Dance 1 20 20 Piano Salsa 2 20 Gtr Nylon Strum6 20 Strings 7 20 Solo Synth 4
21 Grv Dance 2 21 21 Pno GlissDwnWhit 21 Gtr Nylon Arp 1 21 21 Solo Synth 5
22 Grv Techno 1 22 22 Pno GlissUpWhite 22 Gtr Nylon Arp 2 22 22 Solo Synth 6
23 Grv Techno 2 23 23 Pno GlissDwnBlak 23 Gtr Nylon Arp 3 23 23 Solo Guitar 1
24 24 24 Pno GlissUpBlack 24 GtrNylon Arp æ 24 24 Solo Guitar 2
25 25 25 Honky End 25 25 25 Solo Guitar 3
26 26 26 26 26 26
27 27 27 27 27 27
28 28 28 28 28 28
29 29 29 29 29 29
30 30 30 30 30 30
31 31 31 31 31 31
32 32 32 32 32 32
# SEQ - Synth&Pad # SEQ - Misc&SFX # # # #
1 Synth Seq 1 1 Military 1 1 1 1 1
2 Synth Seq 2 2 Military 2 2 2 2 2
3 Synth Seq 3 3 Military 3 3 3 3 3
4 Synth Seq 4 4 Military 4 4 4 4 4
5 Synth Seq 5 5 Horror 1 5 5 5 5
6 Synth Seq 6 6 Horror 2 6 6 6 6
7 Synth Seq 7 7 Horror 3 7 7 7 7
8 Synth Seq 8 8 Horror 4 8 8 8 8
9 Synth Seq 9 9 Lullaby 1 9 9 9 9
10 Synth Seq 10 10 Lullaby 2 10 10 10 10

326 Factory dataPads
11 Synth Seq 11 11 Nature - River 11 11 11 11
12 Synth Portam. 1 12 Nature - Storm 12 12 12 12
13 Synth Portam. 2 13 Metronome æ 13 13 13 13
14 Synth Portam. 3 14 PreCount æ 14 14 14 14
15 Synth Portam. 4 15 Metronome 4/4 15 15 15 15
16 Synth Filter 1 16 PreCount 4/4 16 16 16 16
17 Synth Filter 2 17 PreCount 4/4 Dbl 17 17 17 17
18 Synth Pad Panned 18 Toccata 18 18 18 18
19 Synth Master Pad 19 5th Intro 19 19 19 19
20 Synth Dark Pad 20 Primavera 20 20 20 20
21 21 Circus 1 21 21 21 21
22 22 Circus 2 22 22 22 22
23 23 23 23 23 23
24 24 24 24 24 24
25 25 25 25 25 25
26 26 26 26 26 26
27 27 27 27 27 27
28 28 28 28 28 28
29 29 29 29 29 29
30 30 30 30 30 30
31 31 31 31 31 31
32 32 32 32 32 32

327Factory dataList of sounds assignable to the Pads in OS versions previous to 2.0
Appen
dix
List of sounds assignable to the Pads in OS versions previous to 2.0
With OS versions prior to 2.0, you could assign the following sounds to the Pads. When loading older data, these sounds could still beassigned to the Pads. You can replace them with any of the Hit or Sequence resources listed in the previous section.
SOUND NAME SOUND NAME SOUND NAME SOUND NAME
1 ChinaGong 36 DistSlid2 71 Darbuka1 106 HeartBeat
2 Crash 1 37 Sticks 72 Darbuka2 107 Footstep1
3 Crash 2 38 Cowbell 73 Darbuka3 108 Footstep2
4 88 Crash 39 Agogo 1 74 Darbuka4 109 Stadium
5 Ride 1 40 Agogo 2 75 Darbuka5 110 DoorCreak
6 Ride 2 41 Whistle 1 76 Darbuka6 111 DoorSlam
7 China 42 Whistle 2 77 Darbuka7 112 CarEngine
8 Ride Bell 43 Sh. Guiro 78 Darbuka8 113 Car Stop
9 Splash 44 LongGuiro 79 DoufRimAk 114 Car Pass
10 RevCymbal 45 Cuica 1 80 Tef 1 115 Car Crash
11 DragonGng 46 Cuica 2 81 Tef 2 116 Crickets
12 OrchCymb1 47 Triangle1 82 Tef 3 117 Train
13 OrchCymb2 48 Triangle2 83 Tef 4 118 Helicopt
14 OrcSdRoll 49 88Cowbell 84 Tef 5 119 Gun Shot
15 OrchSnare 50 TimbLow 85 Tef 6 120 MachinGun
16 Timpani 1 51 TimbHi 86 Rik 1 121 Laser Gun
17 Timpani 2 52 TimbRim1 87 Rik 2 122 Explosion
18 Timpani 3 53 TimbRim2 88 Rik 3 123 Dog
19 Timpani 4 54 CongaLow 89 RekDomAk 124 H. Gallop
20 Orch. Hit 55 CongaHi 90 OpenBells 125 Birds 1
21 BrassFall 56 CongaSlap 91 Sagat 1 126 Birds 2
22 Ch. Bell 57 CongaMute 92 Sagat 2 127 Thunder
23 JingleBel 58 Tamb.Acc1 93 Davul 128 Sea Shore
24 WindChim1 59 Tamb.Acc2 94 Ramazan 1 129 River
25 WindChim2 60 Tamb.Push 95 Ramazan 2 130 Bubble
26 WindChim3 61 TambOpen 96 Ramazan 3 131 Cat
27 VibraSlap 62 Castanet1 97 Kup 1 132 Lion
28 RainStick 63 Castanet2 98 Kup 2 133 PhoneRing
29 Scratch 1 64 Aah ! 99 Kup 3 134 Applause
30 Scratch 2 65 Uuh ! 100 Kup 4 135 Wind
31 Scratch 3 66 Yeah ! 1 101 Baya 1 136 Starship
32 Scratch 4 67 Yeah ! 2 102 Baya 2 137 Jetplane
33 Scratch 5 68 Hit It ! 103 Laughing 138 Siren
34 Scratch 6 69 Hollo 1 104 Scream 139 Cosmic
35 DistSlid1 70 Hollo 2 105 Punch

328 Factory dataMIDI Setup
MIDI Setup
Default Master Kbd Sequencer1 Sequencer 2 Accordion 1 Accordion 2 Accordion 3 Ext. Seq
MIDI IN Channel
1 S1_Tr 1 Global S1_Tr 1 S2_Tr 1 Global Upp1 Upp1 S1_Tr 1
2 S1_Tr 2 Control S1_Tr 2 S2_Tr 2 Lower Lower Lower S1_Tr 2
3 S1_Tr 3 - S1_Tr 3 S2_Tr 3 Bass - Bass S1_Tr 3
4 S1_Tr 4 - S1_Tr 4 S2_Tr 4 - Upp2 Upp2 S1_Tr 4
5 S1_Tr 5 - S1_Tr 5 S2_Tr 5 - Upp3 Upp3 S1_Tr 5
6 S1_Tr 6 - S1_Tr 6 S2_Tr 6 - - - S1_Tr 6
7 S1_Tr 7 - S1_Tr 7 S2_Tr 7 - - - S1_Tr 7
8 S1_Tr 8 - S1_Tr 8 S2_Tr 8 - - - S1_Tr 8
9 S1_Tr 9 - S1_Tr 9 S2_Tr 9 - Bass - S1_Tr 9
10 S1_Tr 10 - S1_Tr 10 S2_Tr 10 Drum Drum Drum S1_Tr 10
11 S1_Tr 11 - S1_Tr 11 S2_Tr 11 Perc Perc Perc S1_Tr 11
12 S1_Tr 12 - S1_Tr 12 S2_Tr 12 Acc1 Acc1 Acc1 S1_Tr 12
13 S1_Tr 13 - S1_Tr 13 S2_Tr 13 Acc2 Acc2 Acc2 S1_Tr 13
14 S1_Tr 14 - S1_Tr 14 S2_Tr 14 Acc3 Acc3 Acc3 S1_Tr 14
15 S1_Tr 15 - S1_Tr 15 S2_Tr 15 Acc4 Acc4 Acc4 S1_Tr 15
16 S1_Tr 16 - S1_Tr 16 S2_Tr 16 Acc5 Acc5 Acc5 S1_Tr 16
MIDI OUT Channel
1 1 Upp1 Upp1 S1_Tr 1 S2_Tr 1 Upp1 S1_Tr 1 S2_Tr 1 Upp. 1
2 Upp2 Upp2 S1_Tr 2 S2_Tr 2 Upp2 S1_Tr 2 S2_Tr 2 -
3 Upp3 Upp3 S1_Tr 3 S2_Tr 3 Upp3 S1_Tr 3 S2_Tr 3 -
4 Lower Lower S1_Tr 4 S2_Tr 4 Lower S1_Tr 4 S2_Tr 4 -
5 - - S1_Tr 5 S2_Tr 5 - S1_Tr 5 S2_Tr 5 -
6 - - S1_Tr 6 S2_Tr 6 - S1_Tr 6 S2_Tr 6 -
7 - - S1_Tr 7 S2_Tr 7 - S1_Tr 7 S2_Tr 7 -
8 - - S1_Tr 8 S2_Tr 8 - S1_Tr 8 S2_Tr 8 -
9 Bass Bass S1_Tr 9 S2_Tr 9 Bass S1_Tr 9 S2_Tr 9 -
10 Drum Drum S1_Tr 10 S2_Tr 10 Drum S1_Tr 10 S2_Tr 10 -
11 Perc Perc S1_Tr 11 S2_Tr 11 Perc S1_Tr 11 S2_Tr 11 -
12 Acc1 Acc1 S1_Tr 12 S2_Tr 12 Acc1 S1_Tr 12 S2_Tr 12 -
13 Acc2 Acc2 S1_Tr 13 S2_Tr 13 Acc2 S1_Tr 13 S2_Tr 13 -
14 Acc3 Acc3 S1_Tr 14 S2_Tr 14 Acc3 S1_Tr 14 S2_Tr 14 -
15 Acc4 Acc4 S1_Tr 15 S2_Tr 15 Acc4 S1_Tr 15 S2_Tr 15 -
16 Acc5 Acc5 S1_Tr 16 S2_Tr 16 Acc5 S1_Tr 16 S2_Tr 16 -
Chord 1 Chann. Off 1 Off Off 2 2 2 Off
Chord 2 Chann. Off Off Off Off 3 3 Off Off
Harm. Chann. 1 1 1 1 2 2 2 Off
Harm. Octave 1 1 1 1 -1 -1 -1 1
Harm. Range HI G9 G9 G9 G9 G9 G9 G9 G9
Harm. Range LO C -1 C -1 C -1 C -1 C -1 C -1 C -1 C -1
MIDI IN Velocity Normal Normal Normal Normal 110 110 Normal Normal
MIDI IN Oct. Trp. √ √ √ √ √ √ √ √
MIDI IN Mute/Un. √ √ – – √ √ √ √
Upper Oct. Trp. 0 0 0 0 0 0 0 0
Lower Oct. Trp. 0 0 0 0 0 0 0 0

329EffectsDiagrams
Appen
dix
Pa1X is equipped with four powerful Effect Processors. You cansend them the internal tracks, or any signal entering the AudioInputs.
Diagrams
The following instructions show the signal path diagram foreach of the effect types. The signal coming from the tracks(Send) is mono. Before entering an effect processor, it is split intwo “wires” (Left and Right), and processed in stereo. The signalis then output in stereo from the effect processor, and sent to theMix output (Left&Right, the heaphones or the internal speak-ers).
Dynamic Modulation sources
When the symbol is encoutered, a Dynamic Modulationcan be applied to the corresponding parameter. The followingtable shows the available modulation sources.
Some notes on the Gate parameters follow.
Gate1, Gate1+Dmpr (Gate1+Damper)
The effect is at maximum during note-on, and will stop when allkeys are released. With Gate1 + Dmpr, the effect will remain atmaximum even after the keys are released, as long as the damper(sustain) pedal is pressed.
Gate2, Gate2+Dmpr (Gate2+Damper)
This is essentially the same as for Gate 1 or Gate 1 + Dmpr.However when Gate 2 or Gate 2 + Dmpr are used as a dynamicmodulation source for the EG of 022: St. Envelope Flanger etc.or the AUTOFADE of 027: Stereo Vibrato, a trigger will occur ateach note-on. (In the case of Gate 1 and Gate 1 + Dmpr, the trig-ger occurs only for the first note-on.)
Effects
Modulation source Note
Off No modulation
Gate1
Gate1+Dmpr
Gate2
Gate2+Dmpr
Note Nr Note Number
Velocity Note Velocity
AfterTouch After Touch
JS X Joystick Left/Right
JS+Y: CC#01 Joystick Forward
JS-Y: CC#02 Joystick Backward
MIDI(CC#04)
MIDI(CC#12)
MIDI(CC#13)
MIDI(CC#16)
MIDI(CC#18)
MIDI(CC#17)
MIDI(CC#19)
MIDI(CC#20)
MIDI(CC#21)
Damper: #64
Prta.SW: #65 Portamento Switch
Effect Block
DiagramSend
Left
Right
Sostenu: #66 Sostenuto Pedal
MIDI(CC#80)
MIDI(CC#81)
MIDI(CC#82)
MIDI(CC#83)
Tempo
Modulation source Note
Gate1,Gate1+Dmpr
Gate1
Note
Dmpr1 2 31 2 3
Damper Pedal
Gate1+Dmpr
Time
OnOff
Gate2,Gate2+Dmpr
Gate2
Note
Dmpr1 2 31 2 3
Damper Pedal
Gate2+Dmpr
Time
OnOff

330 EffectsFilter/Dynamic
Filter/Dynamic
Filter and dynamics control effects
000: No Effect
Select this option when you do not use any effects. When thisoption is selected, the effect is muted.
001: Amp. Simulation
This effect simulates the frequency response characteristics ofguitar amplifiers. It is also effective for organ and drum sounds.
002: Compressor
This effect compresses the input signal to regulate the level andgive a “punchy” effect. It is useful for guitar, piano, and drumsounds. This is a stereo compressor. You can link left and rightchannels, or use each channel separately.
a: Envelope Select
This parameter selects whether the left and right channels arelinked to control both signals simultaneously, or whether eachchannel is controlled independently.
b: Sensitivity, f: Output Level
The “Sensitivity” parameter sets the sensitivity of the compressor.If this parameter is set to a higher value, lower level sounds willbe boosted. With a higher Sensitivity, the overall volume level ishigher. To adjust the final volume level, use the “Output Level”parameter.
aAmplifier TypeSelects the type of guitar amplifier
Solid State, British(EL84), American
(6L6)
b
Wet/Dry Dry, 1:99...99:1, WetSets the balance between the effect and dry sounds
Src Off...TempoSelects the modulation source of the effect balance
AmtSets the modulation amount of the effect balance
–100...+100
Left
Right
Wet / Dry
Wet / Dry
Stereo In - Stereo Out
Amp Simulation Filter
Amp Simulation Filter
aEnvelope Select L/R Mix, L/R IndividuallyDetermines whether the left and right channels are linked or used separately
b SensitivitySets the sensitivity
1...100
c AttackSets the attack level
1...100
d EQ TrimSets the EQ input level
0...100
e
Pre LEQ Gain [dB]Sets the gain of Low EQ
–15.0...+15.0dB
Pre HEQ Gain [dB]Sets the gain of High EQ
–15.0...+15.0dB
f
Output LevelSets the output level of the compressor
0...100,
Src Off...TempoSelects the modulation source for the compressor output level
Amt –100...+100Sets the modulation amount of the compressor output level
g
Wet/Dry Dry, 1:99...99:1, WetTable , “Sets the balance between the effect and dry sounds,” on page 330
Src Off...TempoTable , “Selects the modulation source of the effect balance,” on page 330
AmtTable , “Sets the modulation amount of the effect bal-ance,” on page 330
–100...+100
Left
Right
Wet / Dry
Wet / Dry
Stereo In - Stereo Out
EQ Trim
EQ Trim
LEQ HEQ
LEQ HEQCompressor
Compressor
Envelope Select
Output Level
Output Level
Envelope - Control
Envelope - Control
Sensitivity=100
Sensitivity=40Dry
Wet
Time
LevelCompressor - Sensitivity
Lo
ud
er

331EffectsFilter/Dynamic
Appen
dix
c: Attack
This parameter controls the attack level.
003: Limiter
The Limiter regulates the input signal level. It is similar to theCompressor, except that the Limiter compresses only signals thatexceed the specified level to lower unnecessary peak signals. TheLimiter applies a peaking-type EQ to the trigger signal (whichcontrols the degree of the Limiter effect), allowing you to set anyband width to be covered. This effect is a stereo limiter. You canlink left and right channels, or use each channel individually.
a: Envelope Select
When L/R Mix is selected for this parameter, the left and rightchannels are linked to control the Limiter using the mixed signal.If L Only (or R Only) is selected, the left and right channels arelinked, and the Limiter is controlled via only the left (or right)channel.With L/R individually, the left and right channels control the Lim-iter individually.
b: Ratio, c: Threshold [dB], e: Gain Adjust [dB]
This parameter sets the signal compression “Ratio”. Compressionis applied only when the signal level exceeds the “Threshold”value.Adjust the output level using the “Gain Adjust” parameter, sincecompression causes the entire level to be reduced.
d: Attack, d: Release
These parameters set the attack time and release time. A higherattack time will cause the compression to be applied more slowly.
f: Side PEQ Insert, g: Side PEQ Cutoff [Hz], g: Q, g: Gain[dB]
These parameters are used to set the EQ applied to the triggersignal.The Limiter determines whether the compression is applied ornot, based on the post-EQ trigger signal. Setting the equalizerallows you to set the Limiter to respond to any frequency band.
f: Trigger Monitor
Setting this parameter On will cause the trigger signal to be out-put, instead of the effect sound. Use this parameter to check thetrigger signal with EQ applied.Usually, set this to Off.
a
Envelope Select L/R Mix, L Only, R Only, L/R IndividuallySelects from linking both channels, controlling only from left channel, only from the right channel, or controlling each channel individually
b Ratio 1.0:1...50.0:1, Inf:1Sets the signal compression ratio
c Threshold [dB] –40...0dBSets the level above which the compressor is applied
d
AttackSets the attack time
1...100
ReleaseSets the release time
1...100
e
Gain Adjust [dB]Sets the output gain
–Inf, –38...+24dB,
SrcSelects the modulation source for the output gain
Off...Tempo
AmtSets the modulation amount of the output gain
–63...+63
f
Side PEQ InsertToggles between on/off of the trigger signal’s EQ
Off, On
Trigger Monitor Off, OnSwitches between effect output monitor and trigger signal monitor
g
Side PEQ Cutoff [Hz] 20...12.00kHzSets the EQ center frequency for the trigger signal
QSets the EQ bandwidth for the trigger signal
0.5...10.0
Gain [dB]Sets the EQ gain for the trigger signal
–18.0...+18.0dB
h
Wet/Dry Dry, 1:99...99:1, WetTable , “Sets the balance between the effect and dry sounds,” on page 330
Src Off...TempoTable , “Selects the modulation source of the effect balance,” on page 330
AmtTable , “Sets the modulation amount of the effect bal-ance,” on page 330
–100...+100
Dry
Wet
Time
Level
Attack=80
Attack=20
Compressor - Attack
Left
Right
Wet / Dry
Wet / Dry
Stereo In - Stereo Out
Limiter
Limiter
Envelope Select
Gain Adjust
Gain Adjust
Side PEQEnvelope - Control
Envelope - Control
Trigger Monitor+
Input Level
Output Level
Threshold
Ratio=1.0 : 1
Ratio=2.0 : 1
Ratio=4.0 : 1
Ration=Inf : 1
Louder
Lo
ud
er
Time
Level
Threshold
Ratio=Inf : 1
Ratio=2.0 : 1Ratio=4.0 : 1
Dry Ratio=1.0 : 1
Limiter - Threshold / Ratio
Threshold
Ratio=Inf : 1Attack=1Release=1
Ratio=Inf : 1Attack=100Release=100
Dry
Wet
Wet
Release
Attack
Limiter - Attack / Release

332 EffectsFilter/Dynamic
004: Multiband Limiter
This effect applies the Limiter to the low range, mid range, andhigh range of the input signal. You can control dynamics foreach range to adjust the sound pressure of the low range, midrange, and high range in a different way from the EQ.
e: Low Offset [dB], f: Mid Offset [dB], g: High Offset [dB]
These parameters set the gain of the trigger signal.For example, if you do not want to apply compression to the highrange, reduce the “High Offset” value down below the “Thresh-old” level. In this way, the high range limiter will not respond,and compression will not be applied.
005: Gate
This effect mutes the input signal if its level is lower than thespecified level. It also reverses the on and off operation of thegate, and uses Note On and Off messages to turn the gate on andoff.
a: Envelope Select, a: Src
The “Envelope Select” parameter selects whether the gate on/offis triggered by the level of the input signal, or controlled directlyby the modulation source. The Src parameter specifies the modu-lation source, selected from Off to Gate2+Dpmr.With “Envelope Select” = L/R Mix, the left and right channel sig-nal mixture will trigger the gate on/off. When L Only or R Only isselected, the gate is controlled by either of the channel signals.
b: Polarity
This parameter reverses the Gate on/off operation. With a nega-tive value, the gate is closed when the input signal level exceedsthe Threshold. The gate operation controlled by the modulationsource is also reversed.
c: Threshold, d: Attack, d: Release
This parameter sets the signal level below which Gate is appliedwhen “Envelope Select” is set to L/R Mix, L Only, or R Only.
a Ratio 1.0:1...50.0:1, Inf:1Sets the signal compression ratio Fx:003
b Threshold [dB] –40...0dBSets the level above which the compressor is applied Fx:003
c AttackSets the attack time
1...100 Fx:003
d ReleaseSets the release time
1...100 Fx:003
e Low Offset [dB]Gain of the low-range trigger signal
–40...0dB
f Mid Offset [dB]Gain of the mid-range trigger signal
–40...0dB
g High Offset [dB]Gain of the high-range trigger signal
–40...0dB
h
Gain Adjust [dB] –Inf, –38...+24dBSets the output gain Fx:003,
SrcSelects the modulation source for the output gain
Off...Tempo
AmtSets the modulation amount of the output gain
–63...+63
i
Wet/Dry Dry, 1:99...99:1, WetTable , “Sets the balance between the effect and dry sounds,” on page 330
Src Off...TempoTable , “Selects the modulation source of the effect balance,” on page 330
AmtTable , “Sets the modulation amount of the effect bal-ance,” on page 330
–100...+100
Left
Right
Wet / Dry
Wet / Dry
Wet: Mono In - Mono Out / Dry: Stereo In - Stereo Out
Gain AdjustMid Offset
Low Offset
High Offset
Limiter
Envelope - Control
Envelope - Control
Envelope - Control
Limiter
Limiter
Low
Mid
High
Band-Pass Filters
+
a
Envelope Select D-mod, L/R Mix, L Only, R OnlySelects from Control via the modulation source, mixing the left and right sig-nals, Only left, and Only right ,
Src Off...Gate2+DmprSelects the modulation source that controls the gate when Envelope Select = D-mod
b Polarity +, –Switches between non-reversed and reversed Gate on/off
c ThresholdSets the level to which the Gate is applied
0...100
d
AttackSets the attack time
1...100
ReleaseSets the release time
1...100
e Delay Time [msec]Sets the delay time of the gate input
0...100msec
f
Wet/Dry Dry, 1:99...99:1, WetTable , “Sets the balance between the effect and dry sounds,” on page 330
Src Off...TempoTable , “Selects the modulation source of the effect balance,” on page 330
AmtTable , “Sets the modulation amount of the effect bal-ance,” on page 330
–100...+100
Left
Right
Wet / Dry
Wet / Dry
Stereo In - Stereo Out
+
Gate
Gate
Envelope Select
Envelope - Control
Envelope - Control
Delay
Delay
Gate+Sus

333EffectsFilter/Dynamic
Appen
dix
The Attack and Release parameters set the Gate attack time andrelease time.
e: Delay Time
This parameter sets the delay time of the Gate input. If the soundhas a very fast attack, increase the delay time so that the signalwill be input after the Gate is opened. This will preserve theattack part of the sound.
006: OD - Hi Gain Wah (Overdrive/Hi.Gain Wah)
This distortion effect utilizes an Overdrive mode and a Hi-Gainmode. Controlling the wah effect, the 3-band EQ, and the ampsimulation will allow you to create versatile distortion sounds.This effect is suitable for guitar and organ sounds.
a: Wah
The Wah parameter switches the wah effect on/off.
a: Sw
This parameter sets how the wah effect is switched on and off viathe modulation source.When “Sw” = Moment, the wah effect is usually turned off. It isturned on only when you press the pedal or operate the joystick.
When a value for the modulation source is less than 64, “off” speed is selected, and when the value is 64 or higher, “on” is selected.
When “Sw” = Toggle, the wah effect is switched between on andoff each time you press the pedal or operate the joystick.
The switch will be turned on/off each time the value of the modulation source exceeds 64.
b: Wah Sweep Range, b: Wah Sweep Src
This parameter sets the sweep range of the wah center fre-quency. A negative value will reverse the direction of sweep. Thewah center frequency can be controlled by the modulationsource specified in the “Wah Sweep Src” parameter.
d: Drive, e: Output Level
The degree of distortion is determined by the level of input sig-nal and the setting of “Drive”. Raising the “Drive” setting willcause the entire volume level to increase. Use the “Output Level”parameter to adjust the volume level. The “Output Level” param-eter uses the signal level input to the 3-Band EQ. If clippingoccurs at the 3-Band EQ, adjust the “Output Level” parameter.
d: Pre Low-cut
Cutting the signal in the low range before it is input to the Dis-tortion will create a sharp distortion.
g: Q, h: Q
These parameters set the bandwidth of each equalizer. Thehigher the value, the narrower the band becomes.
a
WahSwitches Wah on/off
Off, On,
Src Off...TempoSelects the modulation source that switches the Wah on and off
Sw Toggle, MomentSelects the switching mode for the modulation source that switches the Wah on and off
b
Wah Sweep RangeSets the range of Wah
–10...+10,
Wah Sweep Src Off...TempoSelects the modulation source that controls the Wah
c Drive Mode Overdrive, Hi-GainSwitches between overdrive and hi-gain distortion
d
DriveSets the degree of distortion
1...100
Pre Low-cut 0...10Sets the low range cut amount of the distortion input
e
Output LevelSets the output level
0...50,
SrcSelects the modulation source for the output level
Off...Tempo
AmtSets the modulation amount of the output level
–50...+50
Input Level
Output Level
Threshold
Louder L
ou
der
Threshold
Attack=1Release=1
Attack=100Release=100
Dry
Wet
Wet
Attack Release
Gate - Attack / Release
Gate - Threshold
Left
Right
Wet / Dry
Wet / Dry
Wet: Mono In - Mono Out / Dry: Stereo In - Stereo Out
+ Amp Simulation3 Band PEQ
Output Level
Direct Mix
Pre Low-cut
D-mod
Wah
Mode: Overdrive / Hi-GainDrive
Driver
f
Low Cutoff [Hz] 20...1.0kHzSets the center frequency for Low EQ (shelving type)
Gain [dB]Table , “Sets the gain of Low EQ,” on page 330
–18...+18dB
g
Mid1 Cutoff [Hz] 300...10.00kHzSets the center frequency for Mid/High EQ 1 (peaking type)
QSets the band width of Mid/High EQ 1
0.5...10.0
Gain [dB]Sets the gain of Mid/High EQ 1
–18...+18dB
h
Mid2 Cutoff [Hz] 500...20.00kHzSets the center frequency for Mid/High EQ 2 (peaking type)
QSets the band width of Mid/High EQ 2
0.5...10.0
Gain [dB]Sets the gain of Mid/High EQ 2
–18...+18dB
i
Direct Mix 0...50Sets the amount of the dry sound mixed to the distortion
Speaker SimulationSwitches the speaker simulation on/off
Off, On
j
Wet/Dry Dry, 1:99...99:1, WetTable , “Sets the balance between the effect and dry sounds,” on page 330
Src Off...TempoTable , “Selects the modulation source of the effect balance,” on page 330
AmtTable , “Sets the modulation amount of the effect bal-ance,” on page 330
–100...+100

334 EffectsFilter/Dynamic
007: Parametric 4EQ (Parametric 4-Band EQ)
This is a stereo 4-band parametric equalizer. You can select peak-ing type or shelving type for Band 1 and 4. The gain of Band 2can be controlled by dynamic modulation.
b: Band1 Type, c: Band4 Type
Selects a filter type for Band 1 and 4.
d: Band2 Dynamic Gain Src, d: Amt [dB], f: Gain [dB]
You can control the gain of Band 2 using the modulation source.
008: Graphic 7EQ (Graphic 7 Band EQ)
This is a stereo 7-band graphic equalizer. The bar graph of thegain setting for each band gives you a clear, visual idea of fre-quency responses. You can select a center frequency setting foreach band from twelve types, according to the sound.
a: Type
This parameter selects a combination of center frequencies foreach band. Each center frequency is shown on the right edge ofthe LCD.You can configure a 21-Band Graphic EQ ranging from 80Hz to18kHz if you route three Graphic 7Band EQ effects in series, witha setting of 7:Low, 9:Mid, and 11:High for each EQ.
a TrimSets the input level
0...100
b Band1 Type Peaking, Shelving-LowSelects the type of Band 1
c Band4 Type Peaking, Shelving-HighSelects the type of Band 4
d
Band2 Dynamic Gain SrcSelects the modulation source of the Band 2 gain
Off...Tempo
Amt [dB]Sets the modulation amount of Band 2 gain
–18...+18dB
e
Band1 Cutoff [Hz]Sets the center frequency of Band 1
20...1.00kHz
QSets the bandwidth of Band 1
0.5...10.0 Fx:006
Gain [dB]Sets the gain of Band 1
–18.0...+18.0dB
f
Band2 Cutoff [Hz]Sets the center frequency of Band 2
50...10.00kHz
QSets the bandwidth of Band 2
0.5...10.0 Fx:006
Gain [dB]Sets the gain of Band 2
–18.0...+18.0dB,
g
Band3 Cutoff [Hz]Sets the center frequency of Band 3
300...10.00kHz
QSets the bandwidth of Band 3
0.5...10.0 Fx:006
Gain [dB]Sets the gain of Band 3
–18.0...+18.0dB
h
Band4 Cutoff [Hz]Sets the center frequency of Band 4
500...20.00kHz
QSets the bandwidth of Band 4
0.5...10.0 Fx:006
Gain [dB]Sets the gain of Band 4
–18.0...+18.0dB
i
Wet/Dry Dry, 1:99...99:1, WetTable , “Sets the balance between the effect and dry sounds,” on page 330
Src Off...TempoTable , “Selects the modulation source of the effect balance,” on page 330
AmtTable , “Sets the modulation amount of the effect bal-ance,” on page 330
–100...+100
Left
Right
Wet / Dry
Wet / Dry
Stereo In - Stereo Out
Band1 Band2 Band3 Band4PEQ PEQ PEQ PEQ
LEQ
LEQ
HEQ
HEQ
PEQ PEQ PEQ PEQ
Trim
Trim
D-mod
3dB
3dB
Band1 Cutoff Band4 Cutoff
0dB
+Gain
–Gain Band1 Type=PeakingBand1 Type=Shelving Low
Band4 Type=PeakingBand4 Type=Shelving High
Parametric 4EQ - Band1, Band4 Type
aType1:Wide 1, 2:Wide 2, 3:Wide 3, 4:Half Wide 1, 5:Half Wide 2, 6:Half Wide 3, 7:Low, 8:Wide Low, 9:Mid, 10:Wide Mid, 11:High, 12:Wide HighSelects a combination of center frequencies for each band
b TrimSets the input level
0...100
c Band1 [dB]Sets the gain of Band 1
–18.0...+18.0dB
d Band2 [dB]Sets the gain of Band 2
–18.0...+18.0dB
e Band3 [dB]Sets the gain of Band 3
–18.0...+18.0dB
f Band4 [dB]Sets the gain of Band 4
–18.0...+18.0dB
g Band5 [dB]Sets the gain of Band 5
–18.0...+18.0dB
h Band6 [dB]Sets the gain of Band 6
–18.0...+18.0dB
i Band7 [dB]Sets the gain of Band 7
–18.0...+18.0dB
j
Wet/Dry Dry, 1:99...99:1, WetTable , “Sets the balance between the effect and dry sounds,” on page 330
Src Off...TempoTable , “Selects the modulation source of the effect balance,” on page 330
AmtTable , “Sets the modulation amount of the effect bal-ance,” on page 330
–100...+100
Band2 Cutoff
Band2 Cutoff
0dB
+6dB
+15dB
Band2 Gain[dB]= +6.0Band2 Dynamic Gain Amt[dB]= +9.0
D-mod
0dB
+6dB
–9dB
Band2 Gain[dB]= +6.0Band2 Dynamic Gain Amt[dB]= –15.0
D-mod
Parametric 4EQ - Band2 Dynamic Gain Control
Left
Right
Wet / Dry
Wet / Dry
Stereo In - Stereo Out
Band1 Band2 Band3 Band4Trim
Trim
Band5 Band6 Band7
Band1 Band2 Band3 Band4 Band5 Band6 Band7

335EffectsFilter/Dynamic
Appen
dix
009: Wah/AutoWah
This stereo wah effect allows you to create sounds from vintagewah pedal simulation to auto-wah simulation, and muchbroader range settings.
a: Frequency Bottom, a: Frequency Top
The sweep width and direction of the wah filter are determinedby the “Frequency Top” and “Frequency Bottom” settings.
b: Sweep Mode
This parameter changes the wah control mode. Setting “SweepMode” to Auto will select an auto-wah that sweeps according toenvelope changes in the input signal level. Auto-wah is fre-quently used for funk guitar parts and clav sounds.When “Sweep Mode” is set to D-mod, you can control the filterdirectly via the modulation source in the same way as a wahpedal.When “Sweep Mode” is set to LFO, the effect uses LFO to sweepin cycle.
c: Envelope Sens (Envelope Sensitivity)
This parameter sets the sensitivity of auto-wah. Increase the valueif the input signal is too low to sweep. Reduce the value if theinput signal is so high that the filter is stopped temporarily.
c: Envelope Shape
This parameter determines the sweep curve for auto-wah.
d: LFO Frequency [Hz], e: BPM/MIDI Sync
When “BPM/MIDI Sync”=Off, the LFO speed uses the LFO Fre-quency parameter setting. When “BPM/MIDI Sync”=On, the LFOspeed follows the “BPM”, “Base Note”, and “Times” settings.
e: BPM, e: Base Note, e: Times
One cycle of LFO sweep is obtained by multiplying the length of anote (…) (selected for “Base Note”, in relation to the tempospecified in (“BPM”, or the MIDI Clock tempo if “BPM” is set toMIDI) by the number specified in the Times parameter.
a
Frequency BottomSets the lower limit of the wah center frequency
0...100
Frequency TopSets the upper limit of the wah center frequency
0...100
b
Sweep Mode Auto, D-mod, LFOSelects the control from auto-wah, modulation source, and LFO
,
Src Off...TempoSelects the modulation source for the wah when Sweep Mode=D-mod
Response 0...100Sets the response speed when Sweep Mode = Auto or D-mod
c
Envelope Sens (Envelope Sensitivity)Sets the sensitivity of auto-wah
0...100
Envelope ShapeSets the sweep curve of auto-wah
–100...+100
d
LFO Frequency [Hz]Sets the LFO speed
0.02...20.00Hz,
SrcSelects the modulation source of LFO speed
Off...Tempo
Amt –20.00...+20.00HzSets the modulation amount of LFO speed
e
BPM/MIDI Sync Off, OnSwitches between using the frequency of the LFO speed and using the tempo and notes ,
BPMSelects MIDI Clock and assigns tempo
MIDI, 40...240
Base Note , , , , , , , Selects the type of notes that specify the LFO speed
Times x1...x16Sets the number of notes that specify the LFO speed
f
ResonanceSets the resonance amount
0...100
Low Pass FilterSwitches the Wah Low Pass Filter on and off
Off, On
g
Wet/Dry Dry, 1:99...99:1, WetTable , “Sets the balance between the effect and dry sounds,” on page 330
Src Off...TempoTable , “Selects the modulation source of the effect balance,” on page 330
AmtTable , “Sets the modulation amount of the effect bal-ance,” on page 330
–100...+100
Stereo In - Stereo Out
D-mod
Envelope Sens
Envelope ShapeResponse
Wet / Dry
WahSweep Mode
D-modAuto
Left
RightWet / Dry
LFO
LFOWah
+
Frequency
Bottom=25
Top=75
Hig
her
MaxZeroHigher D-mod
Frequency
Bottom=60
Top=30
Hig
her
MaxZeroHigher D-mod
Sweep Mode=D-mod
Frequency
Bottom=25
Top=75
Hig
her
Frequency
Bottom=75
Top=25
Hig
her
Sweep Mode=Auto
Envelope EnvelopeTime
Wah
Woo Woo
Woo
Envelope
Wah Wah
Time
Woo
Woo
Wah
Wah
Time
Level
Envelope
value = 0...–100
value = 0...+100
Envelope Shape
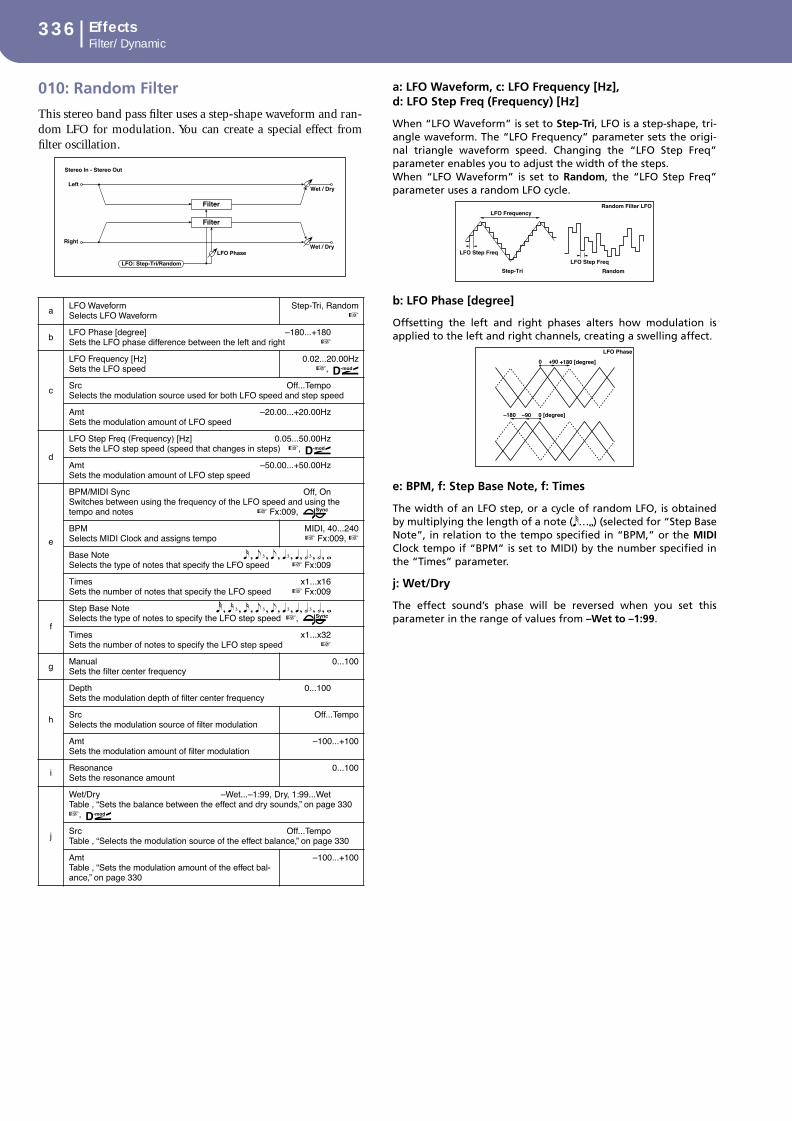
336 EffectsFilter/Dynamic
010: Random Filter
This stereo band pass filter uses a step-shape waveform and ran-dom LFO for modulation. You can create a special effect fromfilter oscillation.
a: LFO Waveform, c: LFO Frequency [Hz], d: LFO Step Freq (Frequency) [Hz]
When “LFO Waveform” is set to Step-Tri, LFO is a step-shape, tri-angle waveform. The “LFO Frequency” parameter sets the origi-nal triangle waveform speed. Changing the “LFO Step Freq”parameter enables you to adjust the width of the steps.When “LFO Waveform” is set to Random, the “LFO Step Freq”parameter uses a random LFO cycle.
b: LFO Phase [degree]
Offsetting the left and right phases alters how modulation isapplied to the left and right channels, creating a swelling affect.
e: BPM, f: Step Base Note, f: Times
The width of an LFO step, or a cycle of random LFO, is obtainedby multiplying the length of a note (…) (selected for “Step BaseNote”, in relation to the tempo specified in “BPM,” or the MIDIClock tempo if “BPM” is set to MIDI) by the number specified inthe “Times” parameter.
j: Wet/Dry
The effect sound’s phase will be reversed when you set thisparameter in the range of values from –Wet to –1:99.
a LFO WaveformSelects LFO Waveform
Step-Tri, Random
b LFO Phase [degree] –180...+180Sets the LFO phase difference between the left and right
c
LFO Frequency [Hz]Sets the LFO speed
0.02...20.00Hz,
Src Off...TempoSelects the modulation source used for both LFO speed and step speed
Amt –20.00...+20.00HzSets the modulation amount of LFO speed
d
LFO Step Freq (Frequency) [Hz] 0.05...50.00HzSets the LFO step speed (speed that changes in steps) ,
Amt –50.00...+50.00HzSets the modulation amount of LFO step speed
e
BPM/MIDI Sync Off, OnSwitches between using the frequency of the LFO speed and using the tempo and notes Fx:009,
BPMSelects MIDI Clock and assigns tempo
MIDI, 40...240 Fx:009,
Base Note Selects the type of notes that specify the LFO speed Fx:009
Times x1...x16Sets the number of notes that specify the LFO speed Fx:009
f
Step Base Note Selects the type of notes to specify the LFO step speed ,
Times x1...x32Sets the number of notes to specify the LFO step speed
g ManualSets the filter center frequency
0...100
h
Depth 0...100Sets the modulation depth of filter center frequency
SrcSelects the modulation source of filter modulation
Off...Tempo
AmtSets the modulation amount of filter modulation
–100...+100
i ResonanceSets the resonance amount
0...100
j
Wet/Dry –Wet...–1:99, Dry, 1:99...WetTable , “Sets the balance between the effect and dry sounds,” on page 330,
Src Off...TempoTable , “Selects the modulation source of the effect balance,” on page 330
AmtTable , “Sets the modulation amount of the effect bal-ance,” on page 330
–100...+100
Filter
Left
Right
Wet / Dry
Wet / Dry
Stereo In - Stereo Out
Filter
LFO Phase
LFO: Step-Tri/Random
Random Filter LFO
LFO Step Freq
LFO Frequency
LFO Step Freq
Step-Tri Random
LFO Phase
0 +90 +180 [degree]
0 [degree]–90–180

337EffectsFilter/Dynamic
Appen
dix
011: Exciter/Enhancer
This effect is a combination of the Exciter, which adds a punchto the sound and the Enhancer, which adds spread and presence.
a: Exciter Blend
This parameter sets the depth (intensity) of the Exciter effect.Positive values give a frequency pattern (to be emphasized) dif-ferent from negative values.
b: Emphatic Point
This parameter sets the frequency to be emphasized. Higher val-ues will emphasize lower frequencies.
c: Enhancer Dly L [msec], d: Enhancer Dly R [msec]
These parameters set the delay time for the Enhancer left andright channel. Specifying a slightly different delay time for theleft and right channel will add a stereo image, depth, and widthto the sound.
012: Sub Oscillator
This effect adds very low frequencies to the input signal. It isvery useful when simulating a roaring drum sound or emphasiz-ing powerful low range. This effect is different from the equalizerin that you can add very low range harmonics. You can alsoadjust the oscillator frequency to match a particular note num-ber, for use as an octaver.
a: OSC Mode, b: Note Interval, b: Note Fine
The “OSC Mode” parameter selects the oscillator operationmode. When Note (Key Follow) is selected, the oscillator’s fre-quency is determined based on the note number, allowing you touse it as an octaver. The “Note Interval” parameter sets the pitchoffset from the original note number by semitone steps. The“Note Fine” parameter allows you to fine-tune in steps of cents.
d: Envelope Pre LPF
This parameter sets the upper limit of the frequency range towhich very low harmonics are added. Adjust this parameter if youdo not want to add lower harmonics to the higher range.
a
Exciter BlendSets the intensity (depth) of the Exciter effect
–100...+100,
Src Off...TempoSelects the modulation source of the Exciter intensity
Amt –100...+100Sets the modulation amount of the Exciter intensity
b
Emphatic PointSets the frequency to be emphasized
0...70,
Src Off...TempoSelects the modulation source of the frequency to be emphasized
Amt –70...+70Sets the amount of modulation of the frequency to be emphasized
c Enhancer Dly L (Enhancer Delay L) [msec]Sets the delay time for the Enhancer left channel
0.0...50.0msec
d Enhancer Dly R (Enhancer Delay R) [msec] 0.0...50.0msecSets the delay time for the Enhancer right channel
e
Enhancer Depth 0...100Sets the determines to what degree the Enhancer effect is applied
Src Off...TempoSelects the modulation source of the Enhancer width
Amt –100...+100Sets the modulation amount of the Enhancer width
f EQ TrimSets the 2-band EQ input level
0...100
g
Pre LEQ Gain [dB]Table , “Sets the gain of Low EQ,” on page 330
–15.0...+15.0dB
Pre HEQ Gain [dB]Table , “Sets the gain of High EQ,” on page 330
–15.0...+15.0dB
h
Wet/Dry Dry, 1:99...99:1, WetTable , “Sets the balance between the effect and dry sounds,” on page 330
Src Off...TempoTable , “Selects the modulation source of the effect balance,” on page 330
AmtTable , “Sets the modulation amount of the effect bal-ance,” on page 330
–100...+100
Left
Right
Wet / Dry
Wet / Dry
Stereo In - Stereo Out
EQ Trim
LEQ HEQ
EQ Trim
Delay
Delay
Depth
D-mod
Exciter
ExciterEnhancer
aOSC Mode Note (Key Follow), FixedDetermines whether the oscillator frequency follows the note number or whether it is fixed
b
Note Interval –48...0Sets the pitch difference from the note number when OSC Mode=Note (Key Follow)
Note FineFine adjustment of the oscillator frequency
–100...+100
c
Fixed Frequency [Hz] 10.0...80.0HzSets the oscillator frequency when OSC Mode=Fixed
Src Off...TempoSelects the modulation source for the oscillator frequency when OSC Mode=Fixed
Amt –80...+80HzSets the oscillator frequency modulation amount when OSC Mode=Fixed
dEnvelope Pre LPF 1...100Sets the upper limit of the frequency range for which very low harmonics are added
e
Envelope Sens (Envelope Sensitivity) 0...100Sets the sensitivity with which very low harmonics are added
Envelope ShapeSets the oscillator’s volume envelope curve
–100...+100
f
Wet/Dry Dry, 1:99...99:1, WetTable , “Sets the balance between the effect and dry sounds,” on page 330
Src Off...TempoTable , “Selects the modulation source of the effect balance,” on page 330
AmtTable , “Sets the modulation amount of the effect bal-ance,” on page 330
–100...+100
Wet / Dry
Note No.
OSC Mode
Fixed
Note (Key Follow)
Sine OscillatorFixed Frequency
Pitch
Note Interval, Fine
Stereo In - Stereo Out
Left
RightWet / Dry
Envelope Sens
Envelope Shape
Envelope Shape
D-mod
Pre LPF
Envelope Sens Pre LPF

338 EffectsFilter/Dynamic
013: Talking Modulator
This effect adds an unusual character, like a human voice, to theinput signal. Modulating the tone via dynamic modulation, youcan create an interesting effect that sounds as if the guitar or syn-thesizer is talking.
c: Voice Top, d: Voice Center, e: Voice Bottom
These parameters assign vowels to the top, center, and bottomposition of the controller.E.g.: When “Voice Top”=A, “Voice Center”=I, and “Voice Bot-tom”=U:If Sweep Mode is set to LFO, the sound will change cyclically from“a” to “i,” “u,” “i,” then “a.”
h: Formant Shift
This parameter adjusts the frequency level to which the effect isapplied. If you wish to apply the effect to a higher-range sound,set this parameter to a higher value; to apply the effect to alower-range sound, set this to a lower value.
h: Resonance
This parameter sets the intensity of resonance for the voice pat-tern. A larger value will add more character to the sound.
aSweep Mode D-mod, LFOSwitches between modulation source control and LFO control
b
Manual Voice Control Bottom, 1...49, Center, 51...99, TopVoice pattern control
Src Off...TempoSelects the modulation source that controls the voice pattern
c Voice TopSelects a vowel sound at the top end of control
A, I, U, E, O
d Voice CenterSelects a vowel sound in the center of control
A, I, U, E, O
e Voice Bottom A, I, U, E, OSelects a vowel sound at the bottom end of control
f
LFO Frequency [Hz] 0.02...20.00HzSets the LFO speed Fx:009,
SrcSelects the modulation source of LFO speed
Off...Tempo
Amt –20.00...+20.00HzSets the modulation amount of LFO speed
g
BPM/MIDI Sync Off, OnSwitches between using the frequency of the LFO speed and using the tempo and notes Fx:009,
BPMSelects MIDI Clock and assigns tempo
MIDI, 40...240 Fx:009
Base Note Selects the type of notes that specify the LFO speed Fx:009
Times x1...x16Sets the number of notes that specify the LFO speed Fx:009
h
Formant Shift –100...+100Sets the frequency to which the effect is applied
ResonanceSets the Level of resonance of the voice pattern
0...100
i
Wet/Dry Dry, 1:99...99:1, WetTable , “Sets the balance between the effect and dry sounds,” on page 330
Src Off...TempoTable , “Selects the modulation source of the effect balance,” on page 330
AmtTable , “Sets the modulation amount of the effect bal-ance,” on page 330
–100...+100
Wet: Mono In - Mono Out / Dry: Stereo In - Stereo Out
Left
Right
Wet / Dry
Wet / Dry
+
D-modVoice Top: A
Voice Center: IVoice Bottom: U
A - I - U - E - OTalking Modulator
LFO
D-modLFO
Sweep Mode + MaxZeroD-mod
– Max
Voice Bottom Voice Center Voice Top
U
I
AA
O
E
JS XRibbonJS +YJS –Yetc…
Zero+ Max
Talking Modulator Control

339EffectsFilter/Dynamic
Appen
dix
014: Decimator
This effect creates a rough sound like a cheap sampler by lower-ing the sampling frequency and data bit length. You can alsosimulate noise unique to a sampler (aliasing).
a: Pre LPF
If a sampler with a very low sampling frequency receives veryhigh-pitched sound that could not be heard during playback, itcould generate pitch noise that is unrelated to the originalsound. Set “Pre LPF” to ON to prevent this noise from being gen-erated.If you set the “Sampling Freq” to about 3kHz and set “Pre LPF” toOFF, you can create a sound like a ring modulator.
e: Resolution, f: Output Level
If you set a smaller value for the “Resolution” parameter, thesound may be distorted. The volume level may also be changed.Use “Output Level” to adjust the level.
015: Analog Record
This effect simulates the noise caused by scratches and dust onanalog records. It also reproduces some of the modulationcaused by a warped turntable.
b: Flutter
This parameter enables you to set the depth of the modulationcaused by a warped turntable.
e: Click Level
This parameter enables you to set the level of the click noise thatoccurs once every rotation of the turntable. This simulationreproduces record noise, and the noise generated after the musicon a vinyl record finishes.
a
Pre LPF Off, OnSelects whether the harmonic noise caused by a decrease in sampling fre-quency is generated or not
High Damp [%]Sets the ratio of cut of the high range
0...100%
b
Sampling Freq (Sampling Frequency) [Hz]Sets the sampling frequency
1.00k...48.00kHz
Src Off...TempoSelects the modulation source of the sampling frequency
Amt –48.00k...+48.00kHzSets the modulation amount of the sampling frequency
c
LFO Frequency [Hz]Sets the LFO speed
0.02...20.00Hz
SrcSelects the modulation source of LFO speed
Off...Tempo
Amt –20.00...+20.00HzSets the modulation amount of LFO speed
d
Depth 0...100Sets the depth of the sampling frequency LFO modulation
Src Off...TempoSelects the LFO modulation source of the sampling frequency
Amt –100...+100Sets the LFO modulation amount of the sampling frequency
e ResolutionSets the data bit length
4...24
f
Output LevelSets the output level
0...100,
SrcSelects the modulation source for the output level
Off...Tempo
AmtSets the modulation amount of the output level
–100...+100
g
Wet/Dry Dry, 1:99...99:1, WetTable , “Sets the balance between the effect and dry sounds,” on page 330
Src Off...TempoTable , “Selects the modulation source of the effect balance,” on page 330
AmtTable , “Sets the modulation amount of the effect bal-ance,” on page 330
–100...+100
Left
Right
Wet / Dry
Wet / Dry
Stereo In - Stereo Out
Pre LPF
Pre LPF
High Damp Output Level
High Damp Output Level
Sampling Frequency
Decimator
Decimator
D-mod
LFO
Resolution
Resolution
a Speed [RPM]Sets the r.p.m. of a record
33 1/3, 45, 78
b FlutterSets the modulation depth
0...100
c
Noise DensitySets the noise density
0...100
Noise ToneSets the noise tone
0...100
d
Noise LevelSets the noise level
0...100
SrcSelects the modulation source for the noise level
Off...Tempo
AmtSets the modulation amount of the noise level
–100...+100
e
Click LevelSets the click noise level
0...100,
Src Off...TempoSelects the modulation source for the click noise level
Amt –100...+100Sets the modulation amount of the click noise level
f EQ TrimTable , “Sets the EQ input level,” on page 330
0...100
g
Pre EQ Cutoff [Hz]Sets the EQ center frequency
300...10.00kHz
QSets the EQ band width
0.5...10.0
Gain [dB]Sets the EQ gain
–18.0...+18.0dB
h
Wet/Dry Dry, 1:99...99:1, WetTable , “Sets the balance between the effect and dry sounds,” on page 330
Src Off...TempoTable , “Selects the modulation source of the effect balance,” on page 330
AmtTable , “Sets the modulation amount of the effect bal-ance,” on page 330
–100...+100
Left
Right
Wet / Dry
Wet / Dry
Stereo In - Stereo Out
Analog RecordSimulation
Pre EQ
Pre EQ
EQ Trim
EQ Trim

340 EffectsPitch/Phase Mod.
Pitch/Phase Mod.
Pitch/phase modulation effects
016: Chorus
This effect adds thickness and warmth to the sound by modulat-ing the delay time of the input signal. You can add spread to thesound by offsetting the phase of the left and right LFOs fromeach other.
e: L Pre Delay [msec], f: R Pre Delay [msec]
Setting the left and right delay time individually allows you tocontrol the stereo image.
017: Harmonic Chorus
This effect applies chorus only to higher frequencies. This can beused to apply a chorus effect to a bass sound without making thesound thinner. You can also use this chorus block with feedbackas a flanger.
g: High/Low Split Point
This parameter sets the frequency that splits the high and lowrange. Only the high range will be sent to the chorus block.
h: Feedback
Sets the feedback amount of the chorus block. Increasing thefeedback will allow you to use the effect as a flanger.
a LFO WaveformSelects LFO Waveform
Triangle, Sine
b LFO Phase [degree] –180...+180Sets the LFO phase difference between the left and right Fx:010
c
LFO Frequency [Hz] 0.02...20.00HzSets the LFO speed Fx:009,
SrcSelects the modulation source of LFO speed
Off...Tempo
Amt –20.00...+20.00HzSets the modulation amount of LFO speed
d
BPM/MIDI Sync Off, OnSwitches between using the frequency of the LFO speed and using the tempo and notes Fx:009,
BPMSelects MIDI Clock and assigns tempo
MIDI, 40...240 Fx:009
Base Note Selects the type of notes that specify the LFO speed Fx:009
Times x1...x16Sets the number of notes that specify the LFO speed Fx:009
e L Pre Delay [msec]Sets the delay time for the left channel
0.0...50.0msec
f R Pre Delay [msec]Sets the delay time for the right channel
0.0...50.0msec
g
DepthSets the depth of LFO modulation
0...100
Src Off...TempoSelects the modulation source of the LFO modulation depth
Amt –100...+100Sets the modulation amount of the LFO modulation depth
h EQ TrimTable , “Sets the EQ input level,” on page 330
0...100
i
Pre LEQ Gain [dB]Table , “Sets the gain of Low EQ,” on page 330
–15.0...+15.0dB
Pre HEQ Gain [dB]Table , “Sets the gain of High EQ,” on page 330
–15.0...+15.0dB
j
Wet/Dry –Wet...–1:99, Dry, 1:99...WetTable , “Sets the balance between the effect and dry sounds,” on page 330
Fx:010,
Src Off...TempoTable , “Selects the modulation source of the effect balance,” on page 330
AmtTable , “Sets the modulation amount of the effect bal-ance,” on page 330
–100...+100
Chorus
Chorus
Left
Right
LFO Phase
Wet / Dry
Wet / Dry
Stereo In - Stereo Out
EQ Trim
EQ Trim
LEQ HEQ
LEQ HEQ
LFO: Tri / Sine
a LFO WaveformSelects LFO Waveform
Triangle, Sine
b LFO Phase [degree] –180...+180Sets the LFO phase difference between the left and right Fx:010
c
LFO Frequency [Hz] 0.02...20.00HzSets the LFO speed Fx:009,
SrcSelects the modulation source of LFO speed
Off...Tempo
Amt –20.00...+20.00HzSets the modulation amount of LFO speed
d
BPM/MIDI Sync Off, OnSwitches between using the frequency of the LFO speed and using the tempo and notes Fx:009,
BPMSelects MIDI Clock and assigns tempo
MIDI, 40...240 Fx:009
Base Note Selects the type of notes that specify the LFO speed Fx:009
Times x1...x16Sets the number of notes that specify the LFO speed Fx:009
e Pre Delay [msec]Sets the delay time from the original sound
0.0...50.0msec
f
DepthSets the depth of LFO modulation
0...100
Src Off...TempoSelects the modulation source of the LFO modulation depth
Amt –100...+100Sets the modulation amount of the LFO modulation depth
g High/Low Split Point 1...100Sets the frequency split point between the low and high range
h
FeedbackSets the feed back amount of the chorus block
–100...+100
High Damp [%] 0...100%Sets the high range damping amount of the chorus block
i
Low LevelSets the low range output level
0...100
High LevelSets the high range (chorus) output level
0...100
j
Wet/Dry Dry, 1:99...99:1, WetTable , “Sets the balance between the effect and dry sounds,” on page 330
Src Off...TempoTable , “Selects the modulation source of the effect balance,” on page 330
AmtTable , “Sets the modulation amount of the effect bal-ance,” on page 330
–100...+100
Left
Right
Feedback
LFO Phase
LFO: Tri / Sine
Wet / Dry
Wet / Dry
High Damp
Stereo In - Stereo Out
Low Level
Low Level
High Level
High Level
High/Low Split PointHigh Damp
Chorus/Flanger
Chorus/Flanger
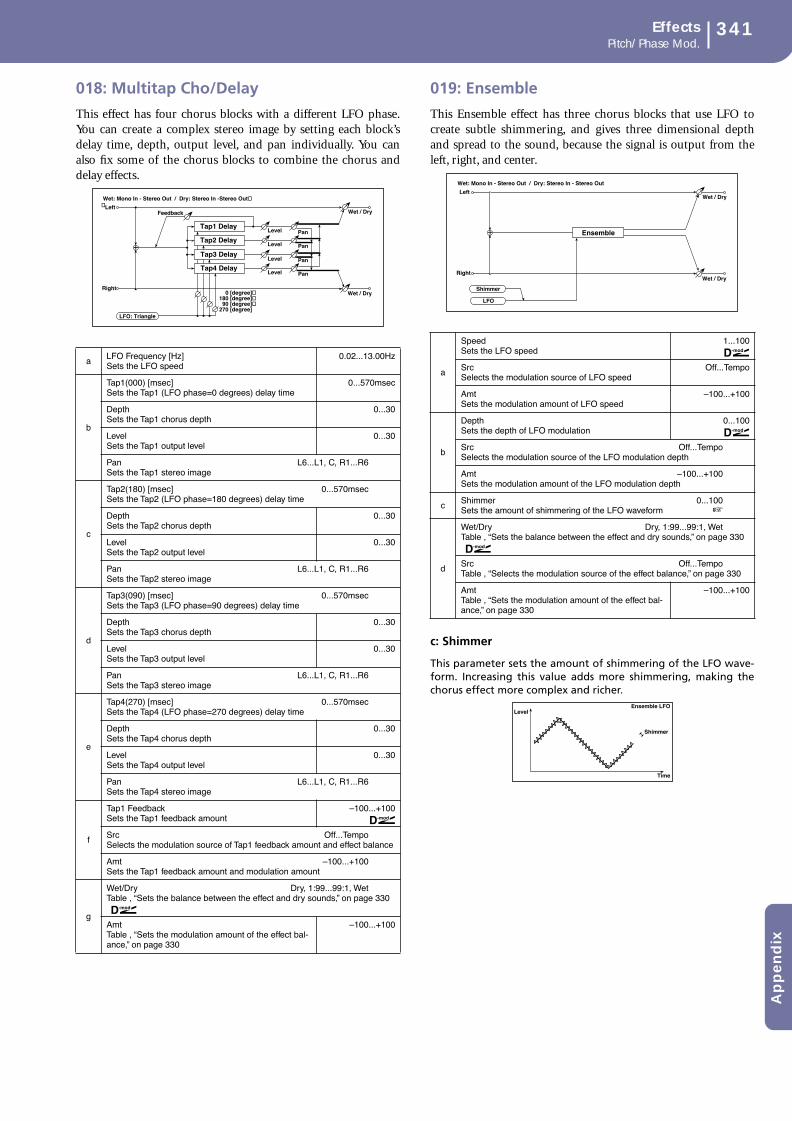
341EffectsPitch/Phase Mod.
Appen
dix
018: Multitap Cho/Delay
This effect has four chorus blocks with a different LFO phase.You can create a complex stereo image by setting each block’sdelay time, depth, output level, and pan individually. You canalso fix some of the chorus blocks to combine the chorus anddelay effects.
019: Ensemble
This Ensemble effect has three chorus blocks that use LFO tocreate subtle shimmering, and gives three dimensional depthand spread to the sound, because the signal is output from theleft, right, and center.
c: Shimmer
This parameter sets the amount of shimmering of the LFO wave-form. Increasing this value adds more shimmering, making thechorus effect more complex and richer.
a LFO Frequency [Hz]Sets the LFO speed
0.02...13.00Hz
b
Tap1(000) [msec]Sets the Tap1 (LFO phase=0 degrees) delay time
0...570msec
DepthSets the Tap1 chorus depth
0...30
LevelSets the Tap1 output level
0...30
Pan L6...L1, C, R1...R6Sets the Tap1 stereo image
c
Tap2(180) [msec] 0...570msecSets the Tap2 (LFO phase=180 degrees) delay time
DepthSets the Tap2 chorus depth
0...30
LevelSets the Tap2 output level
0...30
Pan L6...L1, C, R1...R6Sets the Tap2 stereo image
d
Tap3(090) [msec] 0...570msecSets the Tap3 (LFO phase=90 degrees) delay time
DepthSets the Tap3 chorus depth
0...30
LevelSets the Tap3 output level
0...30
Pan L6...L1, C, R1...R6Sets the Tap3 stereo image
e
Tap4(270) [msec] 0...570msecSets the Tap4 (LFO phase=270 degrees) delay time
DepthSets the Tap4 chorus depth
0...30
LevelSets the Tap4 output level
0...30
Pan L6...L1, C, R1...R6Sets the Tap4 stereo image
f
Tap1 FeedbackSets the Tap1 feedback amount
–100...+100
Src Off...TempoSelects the modulation source of Tap1 feedback amount and effect balance
Amt –100...+100Sets the Tap1 feedback amount and modulation amount
g
Wet/Dry Dry, 1:99...99:1, WetTable , “Sets the balance between the effect and dry sounds,” on page 330
AmtTable , “Sets the modulation amount of the effect bal-ance,” on page 330
–100...+100
Left
Right
Feedback Wet / Dry
Wet / Dry
Wet: Mono In - Stereo Out / Dry: Stereo In -Stereo Out
+ Level
Level
Level
Level
Pan
Pan
Pan
Pan
LFO: Triangle
Tap1 Delay
Tap2 Delay
Tap3 Delay
Tap4 Delay
0 [degree]180 [degree]
90 [degree]270 [degree]
a
SpeedSets the LFO speed
1...100
SrcSelects the modulation source of LFO speed
Off...Tempo
AmtSets the modulation amount of LFO speed
–100...+100
b
DepthSets the depth of LFO modulation
0...100
Src Off...TempoSelects the modulation source of the LFO modulation depth
Amt –100...+100Sets the modulation amount of the LFO modulation depth
c Shimmer 0...100Sets the amount of shimmering of the LFO waveform
d
Wet/Dry Dry, 1:99...99:1, WetTable , “Sets the balance between the effect and dry sounds,” on page 330
Src Off...TempoTable , “Selects the modulation source of the effect balance,” on page 330
AmtTable , “Sets the modulation amount of the effect bal-ance,” on page 330
–100...+100
Left
Right
Wet / Dry
Wet / Dry
Wet: Mono In - Stereo Out / Dry: Stereo In - Stereo Out
LFO
Shimmer
+ Ensemble
Time
LevelEnsemble LFO
Shimmer

342 EffectsPitch/Phase Mod.
020: Flanger
This effect gives a significant swell and movement of pitch to thesound. It is more effective when applied to a sound with a lot ofharmonics. This is a stereo flanger. You can add spread to thesound by offsetting the phase of the left and right LFOs fromeach other.
b: LFO Shape
Changing the LFO waveform shape controls the peak sweep offlanging effects.
g: Feedback, h: Wet/Dry
The peak shape of the positive and negative “Feedback” value isdifferent. The harmonics will be emphasized when the effectsound is mixed with the dry sound if you set a positive value forboth “Feedback” and “Wet/Dry”, and if you set a negative valuefor both “Feedback” and “Wet/Dry”.
g: High Damp [%]
This parameter sets the amount of damping of the feedback inthe high range. Increasing the value will cut high-range harmon-ics.
021: Random Flanger
The stereo effect uses a step-shape waveform and random LFOfor modulation, creating a unique flanging effect.
a Delay Time [msec]Sets the delay time from the original sound
0.0...50.0msec
b
LFO WaveformSelects LFO Waveform
Triangle, Sine
LFO Shape –100...+100Determines how much the LFO waveform is changed
c LFO Phase [degree] –180...+180Sets the LFO phase difference between the left and right Fx:010
d
LFO Frequency [Hz] 0.02...20.00HzSets the LFO speed Fx:009,
SrcSelects the modulation source of LFO speed
Off...Tempo
Amt –20.00...+20.00HzSets the modulation amount of LFO speed
e
BPM/MIDI Sync Off, OnSwitches between using the frequency of the LFO speed and using the tempo and notes Fx:009,
BPMSelects MIDI Clock and assigns tempo
MIDI, 40...240 Fx:009
Base Note Selects the type of notes that specify the LFO speed Fx:009
Times x1...x16Sets the number of notes that specify the LFO speed Fx:009
f DepthSets the depth of LFO modulation
0...100
g
FeedbackSets the feedback amount
–100...+100
High Damp [%] 0...100%Sets the feedback damping amount in the high range
h
Wet/Dry –Wet...–1:99, Dry, 1:99...WetTable , “Sets the balance between the effect and dry sounds,” on page 330
Fx:010,
Src Off...TempoTable , “Selects the modulation source of the effect balance,” on page 330
AmtTable , “Sets the modulation amount of the effect bal-ance,” on page 330
–100...+100
Flanger
Flanger
Left
Right
Feedback
LFO Shape
LFO Phase
LFO: Tri / Sine
Wet / Dry
Wet / Dry
High Damp
Stereo In - Stereo Out
a Delay Time [msec]Sets the delay time from the original sound
0.0...50.0msec
b LFO WaveformSelects LFO Waveform
Step-Tri, Random Fx:010
c LFO Phase [degree] –180...+180Sets the LFO phase difference between the left and right Fx:010
d
LFO Frequency [Hz] 0.02...20.00HzSets the LFO speed Fx:010,
Src Off...TempoSelects the modulation source used for both LFO speed and step speed
Amt –20.00...+20.00HzSets the modulation amount of LFO speed
e
LFO Step Freq (Frequency) [Hz] 0.05...50.00HzSets the LFO step speed (speed that changes in steps)
Fx:010,
Amt –50.00...+50.00HzSets the modulation amount of LFO step speed
f
BPM/MIDI Sync Off, OnSwitches between using the frequency of the LFO speed and using the tempo and notes Fx:009,
BPMSelects MIDI Clock and assigns tempo
MIDI, 40...240 Fx:009, 010
Base Note Selects the type of notes that specify the LFO speed Fx:009
Times x1...x16Sets the number of notes that specify the LFO speed Fx:009
g
Step Base Note Selects the type of notes to specify the LFO step speed
Fx:010,
Times x1...x32Sets the number of notes to specify the LFO step speed Fx:010
h DepthSets the depth of LFO modulation
0...100
LFO Shape
LFO Shape = 0...+100 LFO Shape = 0...–100
LFO Waveform=Sine
LFO: Step-Tri/Random
Left
Right
Feedback
LFO Phase
Wet / Dry
Wet / Dry
High Damp
Stereo In - Stereo Out
Flanger
Flanger

343EffectsPitch/Phase Mod.
Appen
dix
022: Envelope Flanger
This Flanger uses an envelope generator for modulation. Youwill obtain the same pattern of flanging each time you play. Youcan also control the Flanger directly using the modulationsource.
c: Sweep Mode, c: Src
This parameter switches the flanger control mode. With “SweepMode” = EG, the flanger will sweep using the envelope genera-tor. This envelope generator is included in the envelope flanger,and not related to the Pitch EG, Filter EG, or Amp EG.The “Src” parameter selects the source that starts the envelopegenerator. If you select, for example, Gate, the envelope genera-tor will start when the note-on message is received.
When “Sweep Mode” = D-mod, the modulation source can con-trol the flanger directly. Select the modulation source using the“Src” parameter.
The effect is off when a value for the modulation source speci-fied for the “Src” parameter is smaller than 64, and the effect is on when the value is 64 or higher. The Envelope Generator is triggered when the value changes from 63 or smaller to 64 or higher.
d: EG Attack, d: EG Decay
Attack and Decay speed are the only adjustable parameters onthis EG.
023: Phaser
This effect creates a swell by shifting the phase. It is very effectiveon electric piano sounds. You can add spread to the sound byoffsetting the phase of the left and right LFOs from each other.
i
FeedbackSets the feedback amount
–100...+100 Fx:020
High Damp [%] 0...100%Sets the feedback damping amount in the high range Fx:020
j
Wet/Dry –Wet...–1:99, Dry, 1:99...WetTable , “Sets the balance between the effect and dry sounds,” on page 330
Fx:010, 020,
Src Off...TempoTable , “Selects the modulation source of the effect balance,” on page 330
AmtTable , “Sets the modulation amount of the effect bal-ance,” on page 330
–100...+100
a
L Dly Bottom [msec] (L Delay Bottom)0.0...50.0msecSets the lower limit of the delay time on the left channel Fx:009
L Dly Top [msec] (L Delay Top)0.0...50.0msecSets the upper limit of the delay time on the left channel Fx:009
b
R Dly Bottom [msec] (R Delay Bottom)0.0...50.0msecSets the lower limit of the delay time on the right channel Fx:009
R Dly Top [msec] (R Delay Top)0.0...50.0msecSets the upper limit of the delay time on the right channel Fx:009
c
Sweep ModeEG, D-modDetermines whether the flanger is controlled by the envelope gen-erator or by the modulation source,
SrcOff...TempoSelects the modulation source that triggers the EG (when EG is selected for Sweep Mode), or modulation source that causes the flanger to sweep (when D-mod is selected for Sweep Mode)
d
EG AttackSets the EG attack speed
1...100
EG DecaySets the EG decay speed
1...100
e FeedbackSets the feedback amount
–100...+100 Fx:020
f High Damp [%]0...100%Sets the feedback damping amount in the high range Fx:020
g
Wet/Dry–Wet...–1:99, Dry, 1:99...WetTable , “Sets the balance between the effect and dry sounds,” on page 330010, 020,
SrcOff...TempoTable , “Selects the modulation source of the effect balance,” on page 330
AmtTable , “Sets the modulation amount of the effect balance,” on page 330
–100...+100
EG Attack/DecayEG
D-mod
Sweep ModeD-mod
Flanger
Flanger
Left
Right
Feedback
Wet / Dry
Wet / Dry
High Damp
Stereo In - Stereo Out
a
LFO WaveformSelects LFO Waveform
Triangle, Sine
LFO Shape –100...+100Determines how much the LFO waveform is changed Fx:020
b LFO Phase [degree] –180...+180Sets the LFO phase difference between the left and right Fx:010
c
LFO Frequency [Hz] 0.02...20.00HzSets the LFO speed Fx:009,
SrcSelects the modulation source of LFO speed
Off...Tempo
Amt –20.00...+20.00HzSets the modulation amount of LFO speed
d
BPM/MIDI Sync Off, OnSwitches between using the frequency of the LFO speed and using the tempo and notes Fx:009,
BPM MIDI, 40...240Selects MIDI Clock and assigns tempo Fx:009
Base Note Selects the type of notes that specify the LFO speed Fx:009
Times x1...x16Sets the number of notes that specify the LFO speed Fx:009
e ManualSets the frequency to which the effect is applied
0...100
f
DepthSets the depth of LFO modulation
0...100
Src Off...TempoSelects the modulation source for the LFO modulation depth
Amt –100...+100Sets the modulation amount of the LFO modulation depth
g
ResonanceSets the resonance amount
–100...+100
High Damp [%] 0...100%Sets the resonance damping amount in the high range
h
Wet/Dry –Wet...–1:99, Dry, 1:99...WetTable , “Sets the balance between the effect and dry sounds,” on page 330
Fx:010,
Src Off...TempoTable , “Selects the modulation source of the effect balance,” on page 330
AmtTable , “Sets the modulation amount of the effect bal-ance,” on page 330
–100...+100
Left
Right
Resonance
LFO Shape
LFO Phase
LFO: Tri / Sine
Wet / Dry
Wet / Dry
High Damp
Stereo In - Stereo Out
Phaser
Phaser

344 EffectsPitch/Phase Mod.
g: Resonance, h: Wet/Dry
The peak shape of the positive and negative Feedback value isdifferent. The harmonics will be emphasized when the effectsound is mixed with the dry sound, if you set a positive value forboth “Resonance” and “Wet/Dry”, and if you set a negative valuefor both “Resonance” and “Wet/Dry”.
g: High Damp [%]
This parameter sets the amount of damping of the resonance inthe high range. Increasing the value will cut high-range harmon-ics.
024: Random Phaser
This is a stereo phaser. The effect uses a step-shape waveformand random LFO for modulation, creating a unique phasingeffect.
025: Envelope Phaser
This stereo phaser uses an envelope generator for modulation.You will obtain the same pattern of phasing each time you play.You can also control the Phaser directly using the modulationsource.
a LFO Waveform Step-Tri, Step-Sin, RandomSelects LFO Waveform Fx:010
b LFO Phase [degree] –180...+180Sets the LFO phase difference between the left and right Fx:010
c
LFO Frequency [Hz] 0.02...20.00HzSets the LFO speed Fx:010,
Src Off...TempoSelects the modulation source commonly used for LFO speed and step speed
Amt –20.00...+20.00HzSets the modulation amount of LFO speed
d
LFO Step Freq (Frequency) [Hz] 0.05...50.00HzSets the LFO step speed Fx:010,
Amt –50.00...+50.00HzSets the modulation amount of LFO step speed
e
BPM/MIDI Sync Off, OnSwitches between using the frequency of the LFO speed and using the tempo and notes Fx:009,
BPMSelects MIDI Clock and assigns tempo
MIDI, 40...240009, 010
Base Note Selects the type of notes that specify the LFO speed Fx:009
Times x1...x16Sets the number of notes that specify the LFO speed Fx:009
f
Step Base Note Selects the type of notes to specify the LFO step speed
Fx:010,
Times x1...x32Sets the number of notes to specify the LFO step speed Fx:010
g ManualSets the frequency to which the effect is applied
0...100
h DepthSets the depth of LFO modulation
0...100
i
ResonanceSets the resonance amount
–100...+100 Fx:023
High Damp [%] 0...100%Sets the resonance damping amount in the high range Fx:023
LFO: Step-Tri/Random
Left
Right
Resonance
LFO Phase
Wet / Dry
Wet / Dry
High Damp
Stereo In - Stereo Out
Phaser
Phaser
j
Wet/Dry –Wet...–1:99, Dry, 1:99...WetTable , “Sets the balance between the effect and dry sounds,” on page 330
Fx:010, 023,
Src Off...TempoTable , “Selects the modulation source of the effect balance,” on page 330
AmtTable , “Sets the modulation amount of the effect bal-ance,” on page 330
–100...+100
a
L Manu Bottom (L Manual Bottom) 0...100Sets the lower limit of the frequency range for the effect on the left channel Fx:009
L Manu Top (L Manual Top) 0...100Sets the upper limit of the frequency range for the effect on the left channel Fx:009
b
R Manu Bottom (R Manual Bottom) 0...100Sets the lower limit of the frequency range for the effect on the right channel Fx:009
R Manu Top (R Manual Top) 0...100Sets the upper limit of the frequency range for the effect on the right channel Fx:009
c
Sweep Mode EG, D-modDetermines whether the flanger is controlled by the envelope generator or by the modulation source Fx:022,
Src Off...TempoSelects the modulation source that triggers the EG (when EG is selected for Sweep Mode), or modulation source that causes the flanger to sweep (when D-mod is selected for Sweep Mode)
d
EG AttackSets the EG attack speed
1...100 Fx:022
EG DecaySets the EG decay speed
1...100 Fx:022
e ResonanceSets the resonance amount
–100...+100 Fx:023
f High Damp [%] 0...100%Sets the resonance damping amount in the high range Fx:023
g
Wet/Dry –Wet...–1:99, Dry, 1:99...WetTable , “Sets the balance between the effect and dry sounds,” on page 330
Fx:010, 023,
Src Off...TempoTable , “Selects the modulation source of the effect balance,” on page 330
AmtTable , “Sets the modulation amount of the effect bal-ance,” on page 330
–100...+100
EG Attack/DecayEG
D-mod
Sweep ModeD-mod
Phaser
Phaser
Left
Right
Resonance
Wet / Dry
Wet / Dry
High Damp
Stereo In - Stereo Out

345EffectsPitch/Phase Mod.
Appen
dix
026: Biphase Mod. (Biphase Modulation)
This stereo chorus effect adds two different LFOs together. Youcan set the Frequency and Depth parameters for each LFO indi-vidually. Depending on the setting of these LFOs, very complexwaveforms will create an analog-type, unstable modulatedsound.
027: Vibrato
This effect causes the pitch of the input signal to shimmer. Usingthe AutoFade allows you to increase or decrease the shimmeringspeed.
d: LFO Frequency Mod, a: AUTOFADE Src, a: Fade-In Rateb: Fade-In Delay [msec]
When “LFO Frequency Mod” is set to AUTOFADE, you can use themodulation source selected in “AUTO FADE Src” as a trigger toautomatically fade in the modulation amount. When “BPM/MIDISync” is set to On, you cannot use this.The “Fade-in Rate” parameter specifies the rate of fade-in. The“Fade-in Delay” parameter determines the time from AutoFademodulation source ON until the fade-in starts.The following is an example of fade-in where the LFO speed isincreased from “1.0Hz” to “4.0Hz” when a note-on message isreceived.“AUTOFADE Src”=Gate1, “LFO Frequency [Hz]”=1.0
a
LFO1 WaveformSelects LFO1 waveform
Triangle, Sine
LFO2 WaveformSelects LFO2 waveform
Triangle, Sine
b LFO Phase Sw 0 degree, 180 degreeSwitches the LFO phase difference between left and right
c
LFO1 Frequency [Hz]Sets the LFO1 speed
0.02...30.00Hz
SrcSelects the modulation source of LFO1&2 speed
Off...Tempo
AmtSets the modulation amount of LFO1 speed
–30.00...+30.00
d
LFO2 Frequency [Hz]Sets the LFO2 speed
0.02...30.00Hz
AmtSets the modulation amount of LFO2 speed
–30.00...+30.00
e
Depth1Sets the depth of LFO1 modulation
0...100
Src Off...TempoSelects the modulation source of LFO1&2 modulation depth
Amt –100...+100Sets the modulation amount of LFO1 modulation depth
f
Depth2Sets the depth of LFO2 modulation
0...100
Amt –100...+100Sets the modulation amount of LFO2 modulation depth
g L Pre Delay [msec]Sets the delay time for the left channel
0.0...50.0msec Fx:016
h R Pre Delay [msec]Sets the delay time for the right channel
0.0...50.0msec Fx:016
i
FeedbackSets the feedback amount
–100...+100 Fx:017
High Damp [%]Sets the damping amount in the high range
0...100%
j
Wet/Dry –Wet...–1:99, Dry, 1:99...WetTable , “Sets the balance between the effect and dry sounds,” on page 330
Fx:010,
Src Off...TempoTable , “Selects the modulation source of the effect balance,” on page 330
AmtTable , “Sets the modulation amount of the effect bal-ance,” on page 330
–100...+100
Chorus/Flanger
Left
Right
Feedback
180 [degree]
Wet / Dry
Wet / Dry
High Damp
Stereo In - Stereo Out
LFO1: Tri / Sine
LFO2: Tri / Sine
Chorus/Flanger
High Damp
LFO1
LFO2
Bi-Phase Modulation LFO
Depth1
Depth2
+
a
AUTOFADE Src Off...TempoSelects the modulation source that starts AutoFade ,
Fade-In RateSets the rate of fade-in
1...100
b Fade-In Delay [msec]Sets the fade-in delay time
00...2000msec
c
LFO WaveformSelects LFO Waveform
Triangle, Sine
LFO Shape –100...+100Determines how much the LFO waveform is changed Fx:020
dLFO Frequency Mod D-mod, AUTOFADESwitches between D-mod and AUTOFADE for the LFO frequency modula-tion
e
LFO Frequency [Hz] 0.02...20.00HzSets the LFO speed Fx:009,
SrcSelects the modulation source of LFO speed
Off...Tempo
Amt –20.00...+20.00HzSets the modulation amount of LFO speed
f
BPM/MIDI Sync Off, OnSwitches between using the frequency of the LFO speed and using the tempo and notes Fx:009,
BPMSelects MIDI Clock and assigns tempo
MIDI, 40...240 Fx:009
Base Note Selects the type of notes that specify the LFO speed Fx:009
Times x1...x16Sets the number of notes that specify the LFO speed Fx:009
g
DepthSets the depth of LFO modulation
0...100
Src Off...TempoSelects the modulation source of the LFO modulation depth
Amt –100...+100Sets the modulation amount of the LFO modulation depth
h
Wet/Dry Dry, 1:99...99:1, WetTable , “Sets the balance between the effect and dry sounds,” on page 330
Src Off...TempoTable , “Selects the modulation source of the effect balance,” on page 330
AmtTable , “Sets the modulation amount of the effect bal-ance,” on page 330
–100...+100
Vibrato
Vibrato
Left
Right
Wet / Dry
Wet / Dry
Stereo In - Stereo Out
LFO: Tri / Sine LFO Shape
Fade-In Delay LFO FrequencyAutoFade

346 EffectsPitch/Phase Mod.
“LFO Frequency Mod”=AUTOFADE, “Amt”=3.0
The effect is off when a value for the dynamic modulation source specified for the “AUTOFADE Src” parameter is smaller than 64, and the effect is on when the value is 64 or higher. The AutoFade function is triggered when the value changes from 63 or smaller to 64 or higher.
028: Auto Fade Mod.(Auto Fade Modulation)
This stereo chorus/flanger effect enables you to control the LFOspeed and effect balance using auto fade, and you can spread thesound by offsetting the phase of the left and right LFOs fromeach other.
029: 2-Voice Resonator
This effect resonates the input signal at a specified pitch. You canset the pitch, output level, and pan settings for two resonatorsindividually. You can control the resonance intensity via an LFO.
a
AUTOFADE Src Off...TempoSelects the modulation source that starts AutoFade
Fx:027,
RateSets the rate of fade-in
1...100 Fx:027
Fade-In Dly (Fade-In Delay) [msec]Sets the fade-in delay time
00...2000msec Fx:027
b
LFO WaveformSelects LFO Waveform
Triangle, Sine
LFO Shape –100...+100Determines how much the LFO waveform is changed Fx:020
c LFO Phase [degree] –180...+180Sets the LFO phase difference between the left and right Fx:010
dLFO Frequency Mod D-mod, AUTOFADESwitches between D-mod and AUTOFADE for the LFO frequency modula-tion Fx:027
e
LFO Frequency [Hz]Sets the LFO speed
0.02...20.00Hz
SrcSelects the modulation source of LFO speed
Off...Tempo
Amt –20.00...+20.00HzSets the modulation amount of LFO speed
f
L Delay Time [msec]Sets the left channel delay time
0.0...500.0msec
R Delay Time [msec]Sets the right channel delay time
0.0...500.0msec
g DepthSets the depth of LFO modulation
0...200
h
FeedbackSets the feedback amount
–100...+100 Fx:020
High Damp [%] 0...100%Sets the feedback damping amount in the high range Fx:020
iWet/Dry Mod D-mod, AUTOFADESwitches between D-mod and AUTOFADE for the effect balance modulation Fx:027
AUTOFADE AutoFade
Note On All Note Off
Fade-In Rate
AUTOFADE Src=Gate1LFO Frequency[Hz]=1.0LFO Freq. Mod=AUTOFADEAmt=+3.0
LFO Frequency=1.0+3.0=4.0Hz
LFO Frequency=1.0Hz
Gate1 Signal
AUTOFADEFade-In Dealy
AutoFade LFO Frequency
Wet / Dry
Delay
Delay
Left
Right
Feedback
LFO Shape
LFO Phase
LFO: Tri / Sine
Wet / Dry
Wet / Dry
High Damp
Stereo In - Stereo Out
j
Wet/Dry –Wet...–1:99, Dry, 1:99...WetTable , “Sets the balance between the effect and dry sounds,” on page 330
Fx:010, 020,
Src Off...TempoTable , “Selects the modulation source of the effect balance,” on page 330
AmtTable , “Sets the modulation amount of the effect bal-ance,” on page 330
–100...+100
a
Control Mode Manual, LFO, D-modSwitches the controls of resonance intensity ,
LFO/D-mod Invert Off, OnReverses the Voice 1 and 2 control when LFO/D-mod is selected
b
LFO Frequency [Hz]Sets the LFO speed
0.02...20.00Hz
D-mod Src Off...TempoSelects the modulation source that controls resonance intensity
c
Mod. Depth –100...+100Sets the amount of resonance intensity control via LFO/D-mod
TrimSets the input level at the resonator
0...100
d
Voice1: PitchSets the voice1 Pitch for resonance
C0...B8
Fine [cent] –50...+50Fine-adjusts the voice 1 pitch for resonance
e
Voice1: Resonance –100...+100Sets the intensity of resonance when Control Mode = Manual
High Damp [%] 0...100%Sets the damping amount of resonant sound in the high range
f
Voice1: LevelSets the Voice1 output level
0...100
PanSets the Voice1 stereo image
L6...R6
g
Voice2: PitchSets the Voice2 Pitch for resonance
C0...B8
Fine [cent]Fine-adjusts the voice 2 pitch for resonance
–50...+50
h
Voice2: Resonance –100...+100Sets the intensity of resonance when Control Mode = Manual
High Damp [%] 0...100%Sets the damping amount of resonant sound in the high range
i
Voice2: LevelSets the Voice2 output level
0...100
PanSets the Voice2 stereo image
L6...R6
j
Wet/Dry Dry, 1:99...99:1, WetTable , “Sets the balance between the effect and dry sounds,” on page 330
Src Off...TempoTable , “Selects the modulation source of the effect balance,” on page 330
AmtTable , “Sets the modulation amount of the effect bal-ance,” on page 330
–100...+100
Left
Right
Resonance
Wet / Dry
Wet / Dry
Wet: Mono In - Stereo Out / Dry: Stereo In - Stereo Out
High Damp
High Damp
Trim
Trim
+
Level
Level Pan
Pan
Control Mode
D-mod
LFO
Manual
Invert: On/Off
Resonator
Resonator
Pitch, Fine [cent]

347EffectsPitch/Phase Mod.
Appen
dix
a: Control Mode, e: Voice1: Resonance, h: Voice2:Resonance
This parameter determines the resonance intensity.When “Control Mode” = Manual, the “Resonance” parametersets the intensity of resonance. If the “Resonance” parameter hasa negative value, harmonics will be changed, and resonance willoccur at a pitch one octave lower.When “Control Mode” = LFO, the intensity of resonance variesaccording to the LFO. The LFO sways between positive and nega-tive values, causing resonance to occur between specified pitchesan octave apart in turn.When “Control Mode” = D-mod, the resonance is controlled bythe dynamic modulation source. If JS X is assigned as the modula-tion source, the pitch an octave higher and lower can be con-trolled, similar to when LFO is selected for Control Mode.
a: LFO/D-mod Invert
When “Control Mode” = LFO or D-mod, the controlled phase ofeither Voice 1 or 2 will be reversed. When the resonance pitch isset for Voice 1 (Resonance has a positive value), Voice 2 will reso-nate at a pitch an octave below (Resonance has a negative value).
d: Voice1: Pitch, d: Fine [cent], g: Voice2: Pitch, g: Fine[cent]
The Pitch parameter specifies the pitch of resonance by notename. The “Fine” parameter allows for fine adjustment in stepsof cents.
e: High Damp [%], h: High Damp [%]
This parameter sets the damping amount of resonant sound inthe high range. Lower values will make a metallic sound with ahigher range of harmonics.
030: Doppler
This effect simulates the “Doppler effect” of a moving soundwith a changing pitch, similar to the siren of an passing ambu-lance. Mixing the effect sound with the dry sound will create aunique chorus effect.
a: LFO Mode, a: Src, b: LFO Sync
The “LFO Mode” parameter switches LFO operation mode. WhenLoop is selected, the Doppler effect will be created repeatedly. If“LFO Sync” is set to On, the LFO will be reset when the modula-tion source specified with the “Src” parameter is turned on.When “LFO Mode” is set to 1-Shot, the Doppler effect is createdonly once when the modulation source specified in the “Src” fieldis turned on. At this time if you do not set the “Src” parameter,the Doppler effect will not be created, and no effect sound willbe output.
a
LFO ModeSwitches LFO operation mode
Loop, 1-Shot,
Src Off...TempoWhen LFO Mode is set to 1-Shot, this modulation source triggers the LFO
b LFO Sync Off, OnSwitches between LFO reset on and off when LFO Mode is set to Loop
c
LFO Frequency [Hz] 0.02...20.00HzSets the LFO speed Fx:009,
SrcSelects the modulation source of LFO speed
Off...Tempo
Amt –20.00...+20.00HzSets the modulation amount of LFO speed
d
BPM/MIDI Sync Off, OnSwitches between using the frequency of the LFO speed and using the tempo and notes Fx:009,
BPMSelects MIDI Clock and assigns tempo
MIDI, 40...240 Fx:009
Base Note Selects the type of notes that specify the LFO speed Fx:009
Times x1...x16Sets the number of notes that specify the LFO speed Fx:009
e
Pitch DepthSets the pitch variation of the moving sound
0...100,
SrcSelects the modulation source of pitch variation
Off...Tempo
AmtSets the modulation amount of pitch variation
–100...+100
f
Pan DepthSets the panning of the moving sound
–100...+100,
SrcSelects the modulation source of panning
Off...Tempo
AmtSets the modulation amount of panning
–100...+100
g
Wet/Dry Dry, 1:99...99:1, WetTable , “Sets the balance between the effect and dry sounds,” on page 330
Src Off...TempoTable , “Selects the modulation source of the effect balance,” on page 330
AmtTable , “Sets the modulation amount of the effect bal-ance,” on page 330
–100...+100
Left
Right
Wet / Dry
Wet / Dry
Wet: Mono In - Stereo Out / Dry: Stereo In - Stereo Out
Pan Depth
D-mod
+
Trigger LFO Mode = 1-Shot
Doppler
LFO

348 EffectsPitch/Phase Mod.
The effect is off when a value for the modulation source speci-fied for the “Src” parameter is smaller than 64, and the effect is on when the value is 64 or higher. The Doppler effect is trig-gered when the value changes from 63 or smaller to 64 or higher.
e: Pitch Depth
With the Doppler effect, the pitch is raised when the soundapproaches, and the pitch is lowered when the sound goes away.This parameter sets this pitch variation.
f: Pan Depth
This parameter sets the width of the stereo image of the effectsound. With larger values, the sound seems to come and go frommuch further away. With positive values, the sound moves fromleft to right; with negative values, the sound moves from right toleft.
031: Scratch
This effect is applied by recording the input signal and movingthe modulation source. It simulates the sound of scratches youcan make using a turntable.
a: Scratch Source, b: Response
The Scratch Source parameter enables you to select the modula-tion source that controls simulation. The value of the modulationsource corresponds to the playback position. The Responseparameter enables you to set the speed of the response to themodulation source.
c: Envelope Select, c: Src, d: Threshold
When “Envelope Select” is set to D-mod, the input signal will berecorded only when the modulation source value is 64 or higher.When “Envelope Select” is set to Input, the input signal will berecorded only when its level is over the Threshold value.The maximum recording time is 1365msec. If this is exceeded, therecorded data will start being erased from the top.
e: Response
This parameter enables you to set the speed of the response tothe end of recording. Set a smaller value when you are recordinga phrase or rhythm pattern, and set a higher value if you arerecording only one note.
f: Direct Mix
With Always On, a dry sound is usually output. With Always Off,dry sounds are not output. With Cross Fade, a dry sound is usuallyoutput, and it is muted only when scratching.Set Wet/Dry to Wet to use this parameter effectively.
a Scratch Source Off...TempoSelects the modulation source for simulation control ,
b Response 0...100Sets the speed of the response to the Scratch Source
c
Envelope Select D-mod, InputSelects whether the start and end of recording is controlled via the modula-tion source or the input signal level ,
Src Off...TempoSelects the modulation source that controls recording when Envelope Select is set to D-mod
dThreshold 0...100Sets the recording start level when Envelope Select is set to Input
e Response 0...100Sets the speed of the response to the end of recording
f Direct Mix Always On, Always Off, Cross FadeSelects how a dry sound is mixed
g
Wet/Dry Dry, 1:99...99:1, WetTable , “Sets the balance between the effect and dry sounds,” on page 330
Src Off...TempoTable , “Selects the modulation source of the effect balance,” on page 330
AmtTable , “Sets the modulation amount of the effect bal-ance,” on page 330
–100...+100
Pitch
Hig
her
Doppler - Pitch / Pan Depth
Lo
wer
Original Pitch
Left Center Right
Pitch Depth
Pan Depth< < < < < <<<<<< >>>>>> > > > > >
VolumeLouder Louder
Pan Depth= (–) value
Pan Depth= (+) value
Input
D-mod
Envelope Select
D-modEnvelope Control
Left
Right
Wet / Dry
Wet / Dry
Wet: Mono In - Mono Out / Dry: Stereo In - Stereo Out
+ ScratchDirect
Mix
D-mod
Rec Control Scratch
+ MaxZero
Scratch!
D-mod
– MaxJS XRibbon
JS+YJS–Yetc…
Zero + Max
Scratch Source
Recorded Sound
Scratch Source
Start Playback Position End
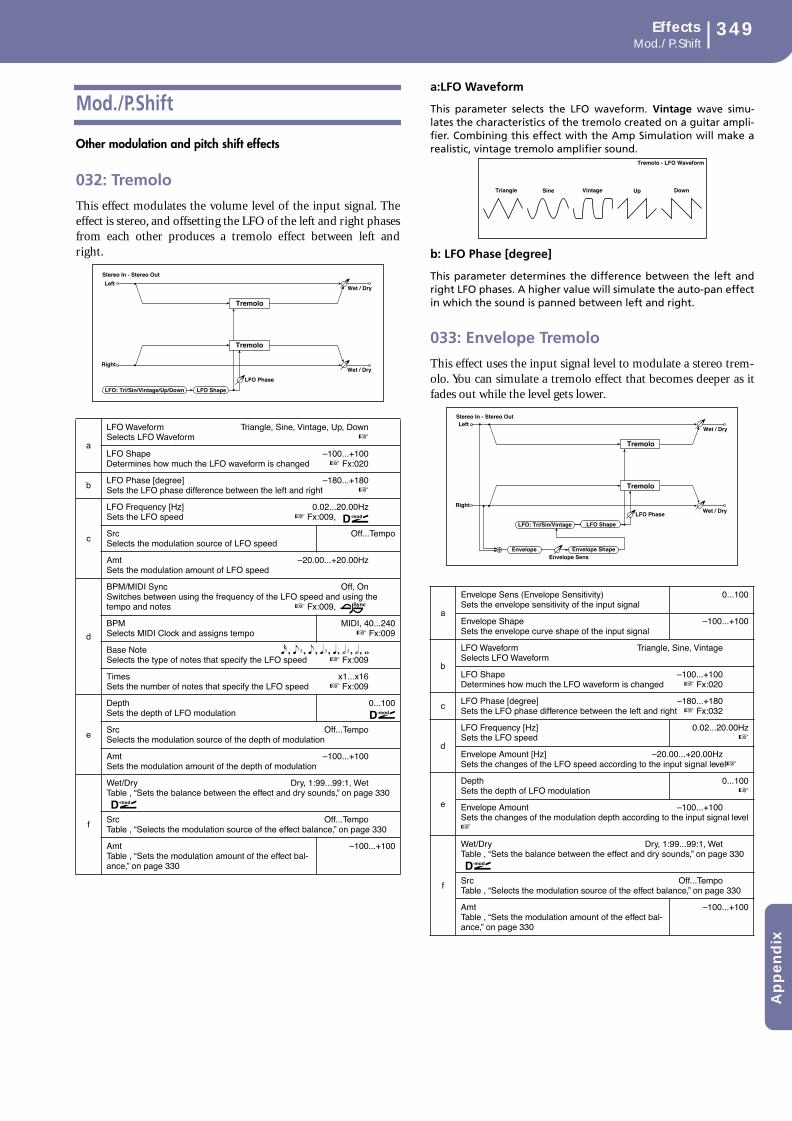
349EffectsMod./P.Shift
Appen
dix
Mod./P.Shift
Other modulation and pitch shift effects
032: Tremolo
This effect modulates the volume level of the input signal. Theeffect is stereo, and offsetting the LFO of the left and right phasesfrom each other produces a tremolo effect between left andright.
a:LFO Waveform
This parameter selects the LFO waveform. Vintage wave simu-lates the characteristics of the tremolo created on a guitar ampli-fier. Combining this effect with the Amp Simulation will make arealistic, vintage tremolo amplifier sound.
b: LFO Phase [degree]
This parameter determines the difference between the left andright LFO phases. A higher value will simulate the auto-pan effectin which the sound is panned between left and right.
033: Envelope Tremolo
This effect uses the input signal level to modulate a stereo trem-olo. You can simulate a tremolo effect that becomes deeper as itfades out while the level gets lower.
a
LFO Waveform Triangle, Sine, Vintage, Up, DownSelects LFO Waveform
LFO Shape –100...+100Determines how much the LFO waveform is changed Fx:020
b LFO Phase [degree] –180...+180Sets the LFO phase difference between the left and right
c
LFO Frequency [Hz] 0.02...20.00HzSets the LFO speed Fx:009,
SrcSelects the modulation source of LFO speed
Off...Tempo
Amt –20.00...+20.00HzSets the modulation amount of LFO speed
d
BPM/MIDI Sync Off, OnSwitches between using the frequency of the LFO speed and using the tempo and notes Fx:009,
BPMSelects MIDI Clock and assigns tempo
MIDI, 40...240 Fx:009
Base Note Selects the type of notes that specify the LFO speed Fx:009
Times x1...x16Sets the number of notes that specify the LFO speed Fx:009
e
DepthSets the depth of LFO modulation
0...100
Src Off...TempoSelects the modulation source of the depth of modulation
Amt –100...+100Sets the modulation amount of the depth of modulation
f
Wet/Dry Dry, 1:99...99:1, WetTable , “Sets the balance between the effect and dry sounds,” on page 330
Src Off...TempoTable , “Selects the modulation source of the effect balance,” on page 330
AmtTable , “Sets the modulation amount of the effect bal-ance,” on page 330
–100...+100
Left
Right
Wet / Dry
Wet / Dry
Stereo In - Stereo Out
LFO Phase
LFO: Tri/Sin/Vintage/Up/Down LFO Shape
Tremolo
Tremolo
a
Envelope Sens (Envelope Sensitivity)Sets the envelope sensitivity of the input signal
0...100
Envelope ShapeSets the envelope curve shape of the input signal
–100...+100
b
LFO Waveform Triangle, Sine, VintageSelects LFO Waveform
LFO Shape –100...+100Determines how much the LFO waveform is changed Fx:020
c LFO Phase [degree] –180...+180Sets the LFO phase difference between the left and right Fx:032
d
LFO Frequency [Hz]Sets the LFO speed
0.02...20.00Hz
Envelope Amount [Hz] –20.00...+20.00HzSets the changes of the LFO speed according to the input signal level
e
DepthSets the depth of LFO modulation
0...100
Envelope Amount –100...+100Sets the changes of the modulation depth according to the input signal level
f
Wet/Dry Dry, 1:99...99:1, WetTable , “Sets the balance between the effect and dry sounds,” on page 330
Src Off...TempoTable , “Selects the modulation source of the effect balance,” on page 330
AmtTable , “Sets the modulation amount of the effect bal-ance,” on page 330
–100...+100
Tremolo - LFO Waveform
Triangle Sine Vintage Up Down
Left
Right
Wet / Dry
Wet / Dry
Stereo In - Stereo Out
LFO Phase
LFO Shape
Envelope Sens+ Envelope
LFO: Tri/Sin/Vintage
Envelope Shape
Tremolo
Tremolo
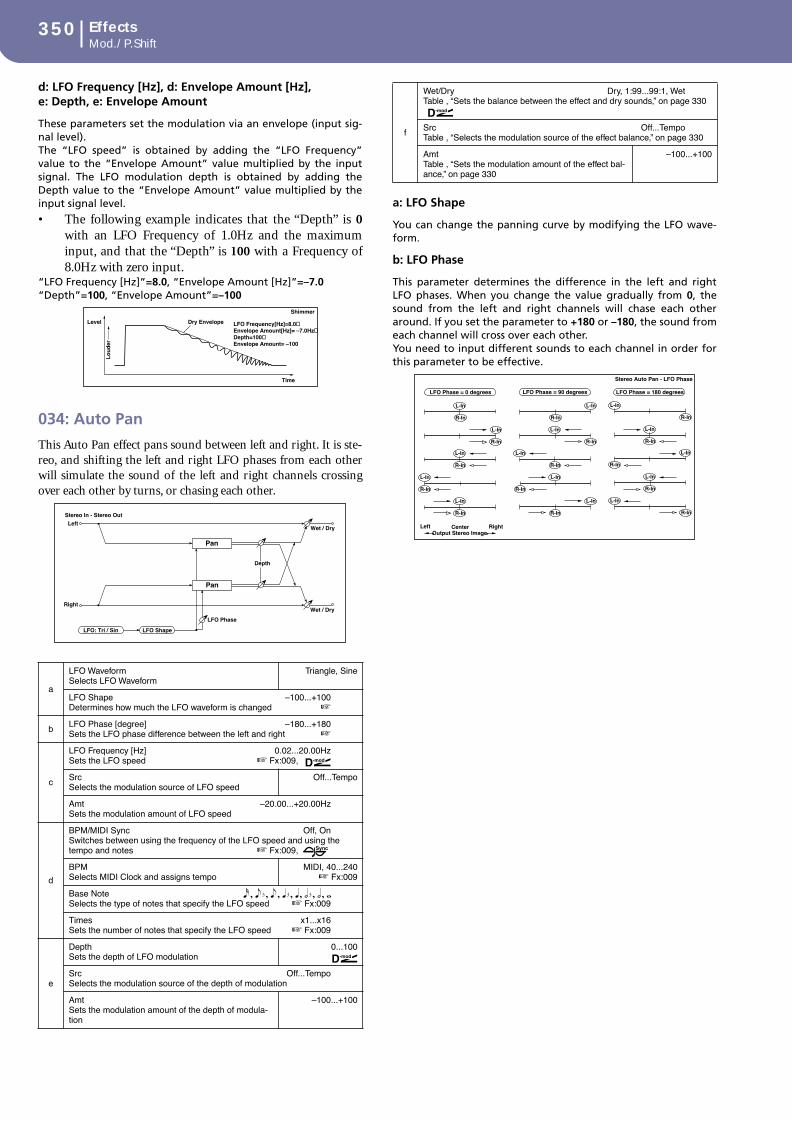
350 EffectsMod./P.Shift
d: LFO Frequency [Hz], d: Envelope Amount [Hz], e: Depth, e: Envelope Amount
These parameters set the modulation via an envelope (input sig-nal level).The “LFO speed” is obtained by adding the “LFO Frequency”value to the “Envelope Amount” value multiplied by the inputsignal. The LFO modulation depth is obtained by adding theDepth value to the “Envelope Amount” value multiplied by theinput signal level.
• The following example indicates that the “Depth” is 0with an LFO Frequency of 1.0Hz and the maximuminput, and that the “Depth” is 100 with a Frequency of8.0Hz with zero input.
“LFO Frequency [Hz]”=8.0, “Envelope Amount [Hz]”=–7.0“Depth”=100, “Envelope Amount”=–100
034: Auto Pan
This Auto Pan effect pans sound between left and right. It is ste-reo, and shifting the left and right LFO phases from each otherwill simulate the sound of the left and right channels crossingover each other by turns, or chasing each other.
a: LFO Shape
You can change the panning curve by modifying the LFO wave-form.
b: LFO Phase
This parameter determines the difference in the left and rightLFO phases. When you change the value gradually from 0, thesound from the left and right channels will chase each otheraround. If you set the parameter to +180 or –180, the sound fromeach channel will cross over each other.You need to input different sounds to each channel in order forthis parameter to be effective.
a
LFO WaveformSelects LFO Waveform
Triangle, Sine
LFO Shape –100...+100Determines how much the LFO waveform is changed
b LFO Phase [degree] –180...+180Sets the LFO phase difference between the left and right
c
LFO Frequency [Hz] 0.02...20.00HzSets the LFO speed Fx:009,
SrcSelects the modulation source of LFO speed
Off...Tempo
Amt –20.00...+20.00HzSets the modulation amount of LFO speed
d
BPM/MIDI Sync Off, OnSwitches between using the frequency of the LFO speed and using the tempo and notes Fx:009,
BPMSelects MIDI Clock and assigns tempo
MIDI, 40...240 Fx:009
Base Note Selects the type of notes that specify the LFO speed Fx:009
Times x1...x16Sets the number of notes that specify the LFO speed Fx:009
e
DepthSets the depth of LFO modulation
0...100
Src Off...TempoSelects the modulation source of the depth of modulation
AmtSets the modulation amount of the depth of modula-tion
–100...+100
Level
Lo
ud
er
Time
Shimmer
LFO Frequency[Hz]=8.0Envelope Amount[Hz]= –7.0HzDepth=100Envelope Amount= –100
Dry Envelope
Left
Right
Wet / Dry
Wet / Dry
Stereo In - Stereo Out
LFO Phase
LFO Shape
Pan
Pan
LFO: Tri / Sin
Depth
f
Wet/Dry Dry, 1:99...99:1, WetTable , “Sets the balance between the effect and dry sounds,” on page 330
Src Off...TempoTable , “Selects the modulation source of the effect balance,” on page 330
AmtTable , “Sets the modulation amount of the effect bal-ance,” on page 330
–100...+100
L-In
Left Center RightOutput Stereo Image
R-In
L-In
R-In
L-In
R-In
L-In
R-In
L-In
R-In
L-In
R-In
L-In
R-In
L-In
R-In
L-In
R-In
L-In
R-In
L-In
R-In
L-In
R-In
L-In
R-In
L-In
R-In
L-In
R-In
LFO Phase = 0 degrees LFO Phase = 90 degrees LFO Phase = 180 degrees
Stereo Auto Pan - LFO Phase

351EffectsMod./P.Shift
Appen
dix
035: Phaser - Tremolo
This effect has a stereo phaser and tremolo LFOs linked together.Swelling phaser modulation and tremolo effects synchronizewith each other, creating a soothing modulation effect. It is suit-able for electric piano type sounds.
a: Type, a: LFO Phase [degree]
Select the type of phaser LFO and tremolo LFO for the “Type”parameter. How the effect sound moves or rotates depends onthe type of LFO. Selecting “LFO Phase” enables you to offset thetiming of the phaser peak and control a subtle movement androtation of the sound.
f: Phaser WetDry, i: Wet/Dry
The “Phaser Wet/Dry” parameter sets the balance between thephaser output and the dry sound. The “Wet/Dry” parameter setsthe balance between the final phaser and tremolo output leveland the dry sound.
036: Ring Modulator
This effect creates a metallic sound by applying the oscillators tothe input signal. Use the LFO or Dynamic Modulation to modu-late the oscillator to create a radical modulation. Matching theoscillator frequency with a note number will produce a ringmodulation effect in specific key ranges.
a
Type: Phs - Trml...Phs LR - Trml LRSelects the type of the tremolo and phaser LFOs
LFO Phase [degree] –180...+180Sets the phase difference between the tremolo and phaser LFOs
b
LFO Frequency [Hz] 0.02...20.00HzSets the LFO speed Fx:009,
SrcSelects the modulation source of LFO speed
Off...Tempo
Amt –20.00...+20.00HzSets the modulation amount of LFO speed
c
BPM/MIDI Sync Off, OnSwitches between using the frequency of the LFO speed and using the tempo and notes Fx:009,
BPMSelects MIDI Clock and assigns tempo
MIDI, 40...240 Fx:009
Base Note Selects the type of notes that specify the LFO speed Fx:009
Times x1...x16Sets the number of notes that specify the LFO speed Fx:009
d
Phaser ManualSets the phaser frequency range
0...100
ResonanceSets the phaser resonance amount
–100...+100
e
Phaser DepthSets the phaser modulation depth
0...100
Src Off...TempoSelects the modulation source for the phaser modulation depth
Amt –100...+100Sets the modulation amount for the phaser modulation depth
f Phaser Wet/Dry –Wet...–2:99, Dry, 2:99...WetSets the balance between the phaser effect and dry sounds
g Tremolo ShapeSets the degree of the tremolo LFO shaping
–100...+100 Fx:020
h
Tremolo DepthSets the tremolo modulation depth
0...100
Src Off...TempoSelects the modulation source for the tremolo modulation depth
Amt –100...+100Sets the modulation amount of the tremolo modulation depth
i
Wet/Dry Dry, 1:99...99:1, WetTable , “Sets the balance between the effect and dry sounds,” on page 330,
Src Off...TempoTable , “Selects the modulation source of the effect balance,” on page 330
AmtTable , “Sets the modulation amount of the effect bal-ance,” on page 330
–100...+100
Phaser
Phaser
Left
Right
Resonance
LFO Type
Wet / Dry
Wet / Dry
Stereo In - Stereo Out
Phaser Wet / Dry
Phaser Wet / Dry
LFOLFO Phase
LFO Shape
Tremolo
Tremolo
a Pre LPF 0...100Sets the damping amount of the high range input to the ring modulator
bOSC Mode Fixed, Note (Key Follow)Switching between specifying the oscillator frequency and using a note number
c
Fixed Frequency [Hz] 0...12.00kHzSets the oscillator frequency when OSC Mode is set to Fixed
,
Src Off...TempoSelects the modulation source for the oscillator frequency when OSC Mode is set to Fixed
Amt –12.00...+12.00kHzSets the modulation amount of the oscillator frequency when OSC Mode is set to Fixed
d
Note Offset –48...+48Sets the pitch difference from the original note when OSC Mode is set to Note (Key Follow)
Note FineFine-adjusts the oscillator frequency
–100...+100
e
LFO Frequency [Hz] 0.02...20.00HzSets the LFO speed of the oscillator frequency modulation
Fx:009,
SrcSelects the modulation source of LFO speed
Off...Tempo
Amt –20.00...+20.00HzSets the modulation amount of LFO speed
f
BPM/MIDI Sync Off, OnSwitches between using the frequency of the LFO speed and using the tempo and notes Fx:009,
BPMSelects MIDI Clock and assigns tempo
MIDI, 40...240 Fx:009
Base Note Selects the type of notes that specify the LFO speed Fx:009
Times x1...x16Sets the number of notes that specify the LFO speed Fx:009
g
LFO Depth 0...100Sets the depth of LFO modulation for the oscillator frequency
Src Off...TempoSelects the modulation source of the depth of modulation
Amt –100...+100Sets the modulation amount of the depth of modulation
Left
Right
Wet / Dry
Wet / Dry
Stereo In - Stereo Out
Pre LPF
Ring Modulator
Pre LPF
Ring Modulator
Note No.OSC Mode
Fixed
Note (Key Follow)
Fixed FrequencyPitch
Note Offset, Fine
Sine Oscillator
LFO

352 EffectsMod./P.Shift
a: Pre LPF
This parameter enables you to set the damping amount of thehigh range sound input to the ring modulator. If the input soundcontains lots of harmonics, the effect may sound dirty. In thiscase, cut a certain amount of high range.
b: OSC Mode
This parameter determines whether or not the oscillator fre-quency follows the note number.
c: Fixed Frequency [Hz]
This parameter sets the oscillator frequency when “OSC Mode” isset to Fixed.
d: Note Offset, d: Note Fine
These parameters for the oscillator are used when “OSC Mode” isset to Note (Key Follow). The “Note Offset” sets the pitch differ-ence from the original note in semitone steps. The “Note Fine”parameter fine-adjusts the pitch in cent steps. Matching the oscil-lator frequency with the note number produces a ring modula-tion effect in the correct key.
037: Detune
Using this effect, you can obtain a detune effect that offsets thepitch of the effect sound slightly from the pitch of the input sig-nal. Compared to the chorus effect, a more natural sound thick-ness will be created.
d: Input Level Dmod [%], d: Src
This parameter sets the dynamic modulation of the input level.
038: Pitch Shifter
This effect changes the pitch of the input signal. You can selectfrom three types: Fast (quick response), Medium, and Slow (pre-serves tonal quality). You can also create an effect in which thepitch is gradually raised (or dropped) using the delay with feed-back.
a: Mode
This parameter switches the pitch shifter operating mode. WithSlow, tonal quality will not be changed too much. With Fast, theeffect becomes a Pitch Shifter that has a quick response, but maychange the tone. Medium is in between these two. If you do notneed to set too much pitch shift amount, set this parameter toSlow. If you wish to change the pitch significantly, use Fast.
h
Wet/Dry Dry, 1:99...99:1, WetTable , “Sets the balance between the effect and dry sounds,” on page 330
Src Off...TempoTable , “Selects the modulation source of the effect balance,” on page 330
AmtTable , “Sets the modulation amount of the effect bal-ance,” on page 330
–100...+100
a
Pitch Shift [cent]Sets the pitch difference from the input signal
–100...+100cent
SrcSelects the modulation source of the pitch shift
Off...Tempo
AmtSets the modulation amount of the pitch shift
–100...+100cent
b Delay Time [msec]Sets the delay time
0...1000msec
c
FeedbackSets the feedback amount
–100...+100
High Damp [%]Sets the damping amount in the high range
0...100%
d
Input Level Dmod [%]Sets the modulation amount of the input level
–100...+100,
SrcSelects the modulation source for the input level
Off...Tempo
e
Wet/Dry Dry, 1:99...99:1, WetTable , “Sets the balance between the effect and dry sounds,” on page 330
Src Off...TempoTable , “Selects the modulation source of the effect balance,” on page 330
AmtTable , “Sets the modulation amount of the effect bal-ance,” on page 330
–100...+100
Left
Right
Wet / Dry
Wet / Dry
Wet: Mono In - Mono Out / Dry: Stereo In - Stereo Out
Input Level
Input Level
+High Damp
Delay
Feedback
Detune
a Mode Slow, Medium, FastSwitches Pitch Shifter mode
b
Pitch Shift [1/2tone] –24...+24Sets the pitch shift amount by steps of a semitone ,
Src Off...TempoSelects the modulation source of pitch shift amount
AmtSets the modulation amount of pitch shift amount
–24...+24
c
Fine [cent]Sets the pitch shift amount by steps of a cent
–100...+100cent,
AmtSets the modulation amount of pitch shift amount
–100...+100cent
d Delay Time [msec]Sets the delay time
0...1000msec
e Feedback PositionSwitches the feedback connection.
Pre, Post
f
FeedbackSets the feedback amount
–100...+100
High Damp [%]Sets the damping amount in the high range
0...100%
g
Input Level Dmod [%] –100...+100Sets the modulation amount of the input level Fx:037,
SrcSelects the modulation source for the input level
Off...Tempo Fx:037
h
Wet/Dry Dry, 1:99...99:1, WetTable , “Sets the balance between the effect and dry sounds,” on page 330
Src Off...TempoTable , “Selects the modulation source of the effect balance,” on page 330
AmtTable , “Sets the modulation amount of the effect bal-ance,” on page 330
–100...+100
Input Level
Lo
ud
er
MaxZero
Higher D-mod
Input Level
MaxZero
Higher D-mod
x1.0
x0.5
Amt= +100
Amt= +50
Lo
ud
er
x1.0
x0.5
Amt= –100
Amt= –50
Input Level D-mod
Left
Right
Wet / Dry
Wet / Dry
Wet: Mono In - Mono Out / Dry: Stereo In - Stereo Out
Input Level
Input Level
+High Damp
Delay
Feedback
Pitch Shifter
Feedback Position
Pre Post

353EffectsMod./P.Shift
Appen
dix
b: Pitch Shift [1/2tone], b: Src, b: Amt, c: Fine [cent], c: Amt
The amount of pitch shift will use the value of the “Pitch Shift”plus the “Fine” value. The amount of modulation will use the c:Amt value plus d: “Amt.”Modulation Source is used both for “Pitch Shift” and “Fine.”
e: Feedback Position, f: Feedback
When “Feedback Position” is set to Pre, the pitch shifter output isagain input to the pitch shifter. Therefore, if you specify a highervalue for the Feedback parameter, the pitch will be raised (orlowered) more and more each time feedback is repeated.If “Feedback Position” is set to Post, the feedback signal will notpass through the pitch shifter again. Even if you specify a highervalue for the Feedback parameter, the pitch-shifted sound will berepeated at the same pitch.
039: Pitch Shift Mod. (Pitch Shift Modulation)
This effect modulates the detuned pitch shift amount using anLFO, adding a clear spread and width to the sound by panningthe effect sound and dry sound to the left and right. This is espe-cially effective when the effect sound and dry sound output fromstereo speakers are mixed.
a: Pitch Shift [cent], e: Depth
These parameters set the amount of pitch shift and amount ofmodulation by means of the LFO.
f: Pan, g: Wet/Dry
The Pan parameter pans the effect sound and dry sound to theleft and right. With L, the effect sound is panned left, and the drysound is panned right. With a Wet/Dry = Wet setting, the effectand dry sound will be output in a proportion of 1:1.
040: Rotary Speaker
This effect simulates a rotary speaker, and obtains a more realis-tic sound by simulating the rotor in the low range and the hornin the high range separately. The effect also simulates the stereomicrophone settings.
a Pitch Shift [cent]Sets the pitch difference from the input signal
–100...+100cent
b LFO WaveformSelects LFO Waveform
Triangle, Square
c
LFO Frequency [Hz] 0.02...20.00HzSets the LFO speed Fx:009,
SrcSelects the modulation source of LFO speed
Off...Tempo
Amt –20.00...+20.00HzSets the modulation amount of LFO speed
d
BPM/MIDI Sync Off, OnSwitches between using the frequency of the LFO speed and using the tempo and notes Fx:009,
BPMSelects MIDI Clock and assigns tempo
MIDI, 40...240 Fx:009
Base Note Selects the type of notes that specify the LFO speed Fx:009
Times x1...x16Sets the number of notes that specify the LFO speed Fx:009
e
Depth –100...+100Sets the LFO modulation depth for pitch shift amount ,
Src Off...TempoSelects the modulation source of the depth of modulation
Amt –100...+100Sets the modulation amount of the depth of modulation
f Pan L, 1:99...99:1, RSets the panning effect sound and dry sound separately
g
Wet/Dry Dry, 1:99...99:1, WetTable , “Sets the balance between the effect and dry sounds,” on page 330,
Src Off...TempoTable , “Selects the modulation source of the effect balance,” on page 330
AmtTable , “Sets the modulation amount of the effect bal-ance,” on page 330
–100...+100
Left
Right
Wet / Dry
Wet / Dry
Wet: Mono In - Stereo Out / Dry: Stereo In - Stereo Out
LFO: Tri / Sqr
Pitch Shifter
Pan
+
a
Mode SwitchSwitches between speaker rotation and stop
Rotate, Stop
Src Off...TempoSelects the modulation source that toggles between rotation and stop
Sw Toggle, MomentSelects switching mode of the modulation source that toggles between rota-tion and stop
b
Speed Switch Slow, FastSwitches the speaker rotation speed between slow and fast
Src Off...TempoSelects the modulation source that toggles between slow and fast
Sw Toggle, MomentSelects switching mode of the modulation source that toggles between slow and fast
cManual Speed Ctrl (Manual Speed Control) Off...TempoSelects the modulation source in case the rotation speed is changed directly ,
d
Horn Acceleration 0...100How quickly the horn rotation speed in the high range is switched
Horn Ratio Stop, 0.50...2.00Adjusts the (high-range side) horn rotation speed. Standard value is 1.00. Selecting “Stop” will stop the rotation
e
Rotor Acceleration 0...100Determines how quickly the rotor rotation speed in the low range is switched
Rotor Ratio Stop, 0.50...2.00Adjusts the (low-range side) rotor rotation speed. Standard value is 1.00. Selecting “Stop” will stop the rotation
f Horn/Rotor Balance Rotor, 1...99, HornSets the level balance between the high-range horn and low-range rotor
g
Mic Distance 0...100Sets the distance between the microphone and rotary speaker
Mic SpreadSets the angle of left and right microphones
0...100
Pitch
Hig
her
Pitch Shift Mod - Pitch Shift / Depth
Lo
wer
Original PitchPitch Shift (+ value)
LFO Waveform=TriangleDepth (+value)
LFO Waveform=SquareDepth (–value)
Left
Right
Wet / Dry
Wet / Dry
Wet: Mono In - Stereo Out / Dry: Stereo In - Stereo Out
D-mod
D-mod
D-mod
Mode Switch: Rotate/Stop
Speed Switch: Slow/Fast
Manual Speed Control
Speaker Simulation
Mic DistanceMic Spread
Horn/RotorBalance
Horn
Rotary Speaker
Rotor
+

354 EffectsER/Delay
a: Sw
This parameter sets how the modulation source switchesbetween rotation and stop.When “Sw” = Toggle, the speaker rotates or stops alternatelyeach time you press the pedal or operate the joystick.
Each time the value for the modulation source exceeds 64, the speaker rotates or stops alternately.
When “Sw” = Moment, the speaker is rotating. It stops onlywhen you press the pedal or operate the joystick.
Rotation will occur when the value of the modulation source is less than 64, and will stop when the value is 64 or greater.
b: Sw
This parameter sets how the rotation speed (slow and fast) isswitched via the modulation source.When “Sw” = Toggle, the speed is switched between slow andfast each time you press the pedal or operate the joystick.
Slow/fast will alternate each time the value of the modulation source exceeds 64.
When “Sw” = Moment, the speed is usually slow. It becomes fastonly when you press the pedal or operate the joystick.
When a value for the modulation source is less than 64, “slow” speed is selected, and when the value is 64 or higher, “fast” is selected.
c: Manual Speed Ctrl
If you wish to control the speaker rotation speed manually, notswitching between Slow and Fast, select the modulation source inthe “Manual Speed Ctrl” field. If manual control is not necessary,set this field to Off.
d: Horn Acceleration, e: Rotor Acceleration
On a real rotary speaker, the rotation speed is accelerated ordecelerated gradually after you switch the speed. The “HornAcceleration” parameter sets the speed at which the rotation isaccelerated or decelerated.
g: Mic Distance, g: Mic Spread
This is a simulation of stereo microphone settings.
ER/Delay
Early reflection and delay effects
041: Early Reflections
This effect is only the early reflection part of a reverberationsound, and adds presence to the sound. You can select one of thefour decay curves.
a: Type
This parameter selects the decay curve for the early reflection.
h
Wet/Dry Dry, 1:99...99:1, WetTable , “Sets the balance between the effect and dry sounds,” on page 330
Src Off...TempoTable , “Selects the modulation source of the effect balance,” on page 330
AmtTable , “Sets the modulation amount of the effect bal-ance,” on page 330
–100...+100
Mic SpreadMicrophoneMicrophone
Mic Distance Mic Distance
Rotary Speaker (Top View)
Rotary Speaker - Mic Placement
a Type Sharp, Loose, Modulated, ReverseSelects the decay curve for the early reflection
b ER Time [msec]Sets the time length of early reflection
10...800msec
c Pre Delay [msec] 0...200msecSets the time taken from the original sound to the first early reflection
d EQ Trim 0...100Sets the input level of EQ applied to the effect sound
e
Pre LEQ Gain [dB]Table , “Sets the gain of Low EQ,” on page 330
–15.0...+15.0dB
Pre HEQ Gain [dB]Table , “Sets the gain of High EQ,” on page 330
–15.0...+15.0dB
f
Wet/Dry Dry, 1:99...99:1, WetTable , “Sets the balance between the effect and dry sounds,” on page 330
Src Off...TempoTable , “Selects the modulation source of the effect balance,” on page 330
AmtTable , “Sets the modulation amount of the effect bal-ance,” on page 330
–100...+100
Left
Right
Wet / Dry
Wet / Dry
Wet: Mono In - Stereo Out / Dry: Stereo In - Stereo Out
EQ Trim
+
EQ Trim
Pre Delay Early ReflectionsLEQ HEQ
Sharp
Loose
Modulated
Early Reflections - Type
Reverse
Dry Pre Delay ER Time

355EffectsER/Delay
Appen
dix
042: Auto Reverse
This effect records the input signal and automatically plays it inreverse (the effect is similar to a tape reverse sound).
a: Rec Mode, b: Reverse Time
When ”Rec Mode“ is set to Single, you can set up to 1320msec for“Reverse Time. ”If recording starts during the reverse playback,the playback will be interrupted.When “Rec Mode” is set to Multi, you can make another record-ing during the reverse playback. However, the maximum ReverseTime is limited to 660msec.If you wish to record a phrase or rhythm pattern, set “Rec Mode”to Single. If you record only one note, set “Rec Mode” to Multi.The “Reverse Time” parameter specifies the maximum durationof the reverse playback. The part in excess of this limit will not beplayed in reverse. If you wish to add short pieces of the reverseplayback of single notes, make the “Reverse Time” shorter.
c: Envelope Select, c: Src, d: Threshold
These parameters select the source to control the start and end ofrecording.
When “Envelope Select” is set to D-mod, the input signal will berecorded only when the value of the modulation source selectedby the Src parameter is 64 or higher.When “Envelope Select” is set to Input, the input signal will berecorded only when its level exceeds the Threshold level.When recording is completed, reverse playback starts immedi-ately.
043: L/C/R Delay
This multitap delay outputs three Tap signals to the left, right,and center respectively. You can also adjust the left and rightspread of the delay sound.
e: High Damp [%], e: Low Damp [%]
These parameters set the damping amount of high range andlow range. The tone of the delayed sound becomes darker andlighter as it feeds back.
g: Spread
This parameter sets the pan width of the effect sound. The stereoimage is widest with a value of 50, and the effect sound of bothchannels is output from the center with a value of 0.
a Rec ModeSets the recording mode
Single, Multi
b Reverse Time [msec] 20...1320msecSets the maximum duration of the reverse playback
c
Envelope Select D-mod, InputSelects whether the start and end of recording is controlled via the modula-tion source or the input signal level ,
Src Off...TempoSelects the modulation source that controls recording when Envelope Select is set to D-mod
dThreshold 0...100Sets the recording start level when Envelope Select is set to Input
e Response 0...100Sets the speed of the response to the end of recording Fx:031
f Direct Mix Always On, Always Off, Cross FadeSelects how a dry sound is mixed Fx:031
g
Wet/Dry Dry, 1:99...99:1, WetTable , “Sets the balance between the effect and dry sounds,” on page 330
Src Off...TempoTable , “Selects the modulation source of the effect balance,” on page 330
AmtTable , “Sets the modulation amount of the effect bal-ance,” on page 330
–100...+100
Input
D-mod
Envelope Select
D-modEnvelope Control
Left
Right
Wet / Dry
Wet / Dry
Wet: Mono In - Mono Out / Dry: Stereo In - Stereo Out
+ Auto ReverseDirect
MixRec/Reverse Play
Control
RecRec
Rec Mode/Reverse Time
Input
Rec Mode = Single
Rec Mode = Multi
Time
Reverse Time Reverse Time
Envelope Select = InputReverse Reverse
a
L Delay Time [msec]Sets the delay time of TapL
0...1360msec
LevelSets the output level of TapL
0...50
b
C Delay Time [msec]Sets the delay time of TapC
0...1360msec
LevelSets the output level of TapC
0...50
c
R Delay Time [msec]Sets the delay time of TapR
0...1360msec
LevelSets the output level of TapR
0...50
d
Feedback (C Delay)Sets the feedback amountof TapC
–100...+100
Src Off...TempoSelects the modulation source of the TapC feedback amount
Amt –100...+100Sets the modulation amount of the TapC feedback amount
e
High Damp [%]Sets the damping amount in the high range
0...100%
Low Damp [%]Sets the damping amount in the low range
0...100%
f
Input Level Dmod [%] –100...+100Sets the modulation amount of the input level Fx:037,
SrcSelects the modulation source for the input level
Off...Tempo Fx:037
g Spread 0...50Sets the width of the stereo image of the effect sound
h
Wet/Dry Dry, 1:99...99:1, WetTable , “Sets the balance between the effect and dry sounds,” on page 330
Src Off...TempoTable , “Selects the modulation source of the effect balance,” on page 330
AmtTable , “Sets the modulation amount of the effect bal-ance,” on page 330
–100...+100
C Delay
R Delay
Left
Right
Feedback
Spread
Wet / Dry
Wet / Dry
Wet: Mono In - Stereo Out / Dry: Stereo In -Stereo Out
Input Level D-mod
High Damp Low Damp
L DelayInput Level D-mod
+Level
Level
Level

356 EffectsER/Delay
044: Cross Delay
This is a stereo delay, and can by used as a cross-feedback delayeffect in which the delay sounds cross over between the left andright by changing the feedback routing.
045: Multitap Delay
The left and right Multitap Delays have two taps respectively.Changing the routing of feedback and tap output allows you tocreate various patterns of complex effect sounds.
a: Mode
You can change how the left and right delay signals are pannedby modifying the routing of the left and right delay as shown inthe figure above. You need to input different sounds to eachchannel in order for this parameter to be effective.
d: Tap1 Level
This parameter sets the output level of Tap1. Setting a differentlevel from Tap2 will add a unique touch to a monotonous delayand feedback.
a Stereo/Cross Stereo, CrossSwitches between stereo delay and cross-feedback delay
b L Delay Time [msec]Sets the delay time for the left channel
0.0...680.0msec
c R Delay Time [msec]Sets the delay time for the right channel
0.0...680.0msec
d
L FeedbackSets the feedback amount for the left channel
–100...+100
Src Off...TempoSelects the modulation source of feedback amount
Amt L –100...+100Sets the modulation amount of the left channel feedback
e
R FeedbackSets the feedback amount for the right channel
–100...+100
Amt R –100...+100Sets the modulation amount of the right channel feedback
f High Damp [%]Sets the damping amount in the high range
0...100% Fx:043
g Low Damp [%]Sets the damping amount in the low range
0...100% Fx:043
h
Input Level Dmod [%] –100...+100Sets the modulation amount of the input level Fx:037,
SrcSelects the modulation source for the input level
Off...Tempo Fx:037
i Spread –50...+50Sets the width of the stereo image of the effect sound Fx:043
j
Wet/Dry Dry, 1:99...99:1, WetTable , “Sets the balance between the effect and dry sounds,” on page 330
Src Off...TempoTable , “Selects the modulation source of the effect balance,” on page 330
AmtTable , “Sets the modulation amount of the effect bal-ance,” on page 330
–100...+100
Delay
Delay
Stereo/Cross
Left
Right
Feedback
Wet / Dry
Wet / Dry
Stereo In - Stereo Out
Input Level D-mod
Input Level D-mod
High Damp Low Damp
High Damp Low Damp
Spread
Stereo/Cross
a Mode Normal, Cross Feedback, Cross Pan1, Cross Pan2Switches the left and right delay routing
b Tap1 Time [msec]Sets the Tap1 delay time
0.0...680.0msec
c Tap2 Time [msec]Sets the Tap2 delay time
0.0...680.0msec
d Tap1 LevelSets the Tap1 output level
0...100
e
Feedback (Tap2)Sets the Tap2 feedback amount
–100...+100
Src Off...TempoSelects the modulation source of the Tap2 feedback amount
Amt –100...+100Sets the modulation amount of the Tap2 feedback amount
f High Damp [%]Sets the damping amount in the high range
0...100% Fx:043
g Low Damp [%]Sets the damping amount in the low range
0...100% Fx:043
h
Input Level Dmod [%] –100...+100Sets the modulation amount of the input level Fx:037,
SrcSelects the modulation source for the input level
Off...Tempo Fx:037
i
Spread –100...+100Sets the width of the stereo image of the effect sound
Fx:043,
Src Off...TempoSelects the modulation source of the effect sound’s stereo image width
Amt –100...+100Sets the modulation amount of the effect sound’s stereo image width
j
Wet/Dry Dry, 1:99...99:1, WetTable , “Sets the balance between the effect and dry sounds,” on page 330
Src Off...TempoTable , “Selects the modulation source of the effect balance,” on page 330
AmtTable , “Sets the modulation amount of the effect bal-ance,” on page 330
–100...+100
Left
Right
Feedback
Spread
Wet / Dry
Wet / Dry
Stereo In - Stereo Out
Input Level D-mod
Input Level D-mod
High Damp Low Damp
High Damp Low Damp
Delay
Delay
Feedback
Tap1 Level ModeMode(1)
(2)
(1)(2)
Tap1=(1)Tap2=(2)
Mode: Normal Mode: Cross Feedback Mode: Cross Pan1 Mode: Cross Pan2

357EffectsER/Delay
Appen
dix
046: Modulation Delay
This stereo delay uses an LFO to sweep the delay time. The pitchalso varies. You will obtain a delay sound with swell and shim-mering. You can also control the delay time using a modulationsource.
b: D-mod Modulation
When the modulation source is used for control, this parameterreverses the left and right modulation direction.
e: LFO Sync, e: Src, f: L LFO Phase [degree], f: R LFO Phase [degree]
The LFO can be reset via a modulation source.The “Src” parameter sets the modulation source that resets theLFO. For example, you can assign Gate as a modulation source sothat the sweep always starts from the specified point.“L LFO Phase” and “R LFO Phase” set the phase obtained whenthe left and right LFOs are reset. In this way, you can createchanges in pitch sweep for the left and right channels individu-ally.
The effect is off when a value of the modulation source speci-fied in the “Src” parameter is 63 or smaller, and the effect is on when the value is 64 or higher. The LFO is triggered and reset to the “L LFO Phase” and “R LFO Phase” settings when the value changes from 63 or smaller to 64 or higher.
047: Dynamic Delay
This stereo delay controls the level of delay according to theinput signal level. You can use this as a ducking delay that appliesdelay to the sound only when you play keys at a high velocity oronly when the volume level is low.
a: Control Target
This parameter selects no level control, delay output control(effect balance), or feedback amount control.
a Modulation Mode LFO, D-modSwitches between LFO modulation control and modulation source control
b
D-mod ModulationReversed L/R control by modulation source
L/R:+/+, L/R:+/– ,
Src Off...TempoSelects the modulation source that controls delay time
Response 0...30Sets the rate of response to the modulation source
c
LFO WaveformSelects LFO Waveform
Triangle, Sine
LFO Shape –100...+100Determines how much the LFO waveform is changed Fx:020
d LFO Frequency [Hz]Sets the LFO speed
0.02...20.00Hz
e
LFO SyncSwitches LFO reset off/on
Off, On,
Src Off...TempoSelects the modulation source that resets the LFO
f
L LFO Phase [degree] –180...+180Sets the phase obtained when the left LFO is reset
R LFO Phase [degree] –180...+180Sets the phase obtained when the right LFO is reset
g
L DepthSets the depth of the left LFO modulation
0...200
R DepthSets the depth of the right LFO modulation
0...200
h
L Delay Time [msec]Sets the left delay time
0.0...500.0
R Delay Time [msec]Sets the right delay time
0.0...500.0
i
L FeedbackSets the feedback amount of left delay
–100...+100
R FeedbackSets the feedback amount of right delay
–100...+100
j
Wet/Dry –Wet...–1:99, Dry, 1:99...WetTable , “Sets the balance between the effect and dry sounds,” on page 330
Fx:010,
Src Off...TempoTable , “Selects the modulation source of the effect balance,” on page 330
AmtTable , “Sets the modulation amount of the effect bal-ance,” on page 330
–100...+100
Left
Right
Feedback
LFO Phase
Wet / Dry
Wet / Dry
Stereo In - Stereo Out
LFO: Tri / Sine
Modulation Mode
D-mod
LFO
D-mod
Delay
Delay
L/R: +/+ +/–
LFO Shape
Response
LFO Sync
a
Control TargetSelects from no control, output, and feedback
None, Out, FB
PolarityReverses level control
+, –
b
ThresholdSets the level to which the effect is applied
0...100
OffsetSets the offset of level control
0...100
c AttackSets the attack time of level control
1...100
d ReleaseSets the release time of level control
1...100
e L Delay Time [msec]Sets the delay time for the left channel
0.0...680.0msec
f R Delay Time [msec]Sets the delay time for the right channel
0.0...680.0msec
g FeedbackSets the feedback amount
–100...+100
h
High Damp [%]Sets the damping amount in the high range
0...100% Fx:043
Low Damp [%]Sets the damping amount in the low range
0...100% Fx:043
i Spread –100...+100Sets the width of the stereo image of the effect sound Fx:043
j
Wet/Dry Dry, 1:99...99:1, WetTable , “Sets the balance between the effect and dry sounds,” on page 330
Src Off...TempoTable , “Selects the modulation source of the effect balance,” on page 330
AmtTable , “Sets the modulation amount of the effect bal-ance,” on page 330
–100...+100
Delay
Left
Right
Feedback Spread
Wet / Dry
Wet / Dry
Stereo In - Stereo Out
High Damp Low Damp
High Damp Low Damp
Threshold+
Delay
FB Out
Control TargetAttack, ReleaseEnvelope

358 EffectsER/Delay
a: Polarity, b: Threshold, b: Offset, c: Attack, d: Release
The “Offset” parameter specifies the value for the “Control Tar-get” parameter (that is set to None), expressed as the ratio rela-tive to the parameter value (the “Wet/Dry” value with “ControlTarget”=Out, or the “Feedback” value with “Control Tar-get”=FB).When “Polarity” is positive, the “Control Target” value isobtained by multiplying the parameter value by the “Offset”value (if the input level is below the threshold), or equals theparameter value if the input level exceeds the threshold.When “Polarity” is negative, Control Target value equals theparameter value if the input level is below the threshold, or isobtained by multiplying the parameter value by the “Offset”value if the level exceeds the threshold.The “Attack” and “Release” parameters specify attack time andrelease time of delay level control.
048: Autopan Delay
This stereo delay effect pans the delay sound left and right usingthe LFO.
Dynamic Delay
ThresholdDry
Envelope
Wet
Control Target=OutPolarity= (–)
Wet
Control Target=OutPolarity= (+)
Delay Time
Time
(Ducking Delay)
Release
Attack
Level
Left
Right
Wet / Dry
Wet / Dry
Stereo In - Stereo Out
LFO Phase
LFO Shape
Pan
Pan
LFO: Tri / Sin
Depth
Delay
Delay
High Damp Low Damp
High Damp Low Damp
Feedback
a
L Delay Time [msec]Sets the delay time for the left channel
0.0...680.0msec
L FeedbackSets the feedback amount for the left channel
–100...+100
b
R Delay Time [msec]Sets the delay time for the right channel
0.0...680.0msec
R FeedbackSets the feedback amount for the right channel
–100...+100
c
High Damp [%]Sets the damping amount in the high range
0...100% Fx:043
Low Damp [%]Sets the damping amount in the low range
0...100% Fx:043
d
LFO WaveformSelects LFO Waveform
Triangle, Sine
LFO Shape –100...+100Determines how much the LFO waveform is changed Fx:020
e LFO Phase [degree] –180...+180Sets the LFO phase difference between the left and right Fx:034
f Panning Frequency [Hz]Sets the panning speed
0.02...20.00Hz
g
Panning DepthSets the panning width
0...100
Src Off...TempoSelects the modulation source for the panning width
AmtSet the modulation amount of the panning width
–100...+100
h
Wet/Dry Dry, 1:99...99:1, WetTable , “Sets the balance between the effect and dry sounds,” on page 330
Src Off...TempoTable , “Selects the modulation source of the effect balance,” on page 330
AmtTable , “Sets the modulation amount of the effect bal-ance,” on page 330
–100...+100

359EffectsER/Delay
Appen
dix
049: L/C/R BPM Delay
The L/C/R delay enables you to match the delay time with thesong tempo. You can also synchronize the delay time with thearpeggiator or sequencer. If you program the tempo before per-formance, you can achieve a delay effect that synchronizes withthe song in real-time. Delay time is set by notes.
Note: With extreme values, the sync may be lost.
a: BPM, b: L Delay Base Note, b: Times, c: C Delay BaseNote,c: Times, d: R Delay Base Note, d: Times
The delay time is the length of the note obtained by multiplyingthe “Base Note” parameter by the Times value, in relation to thetempo specified by the “BPM” parameter (or the MIDI Clocktempo if “BPM” is set to MIDI).
050: BPM Delay
This stereo delay enables you to set the delay time to match thesong tempo.
Note: With extreme values, the sync may be lost.
a BPMSelects MIDI Clock and assigns tempo
MIDI, 40...240,
b
L Delay Base Note Selects the type of notes to specify the delay time for TapL
,
Times x1...x16Sets the number of notes to specify the delay time for TapL
LevelSets the output level of TapL
0...50
c
C Delay Base Note Selects the type of notes to specify the delay time for TapC
,
Times x1...x16Sets the number of notes to specify the delay time for TapC
LevelSets the output level of TapC
0...50
d
R Delay Base Note Selects the type of notes to specify the delay time for TapR
,
Times x1...x16Sets the number of notes to specify the delay time for TapR
LevelSets the output level of TapR
0...50
e
Feedback (C Delay)Sets the feedback amount of TapC
–100...+100
Src Off...TempoSelects the modulation source for the TapC feedback
Amt –100...+100Sets the modulation amount of the TapC feedback
f
High Damp [%]Sets the damping amount in the high range
0...100% Fx:043
Low Damp [%]Sets the damping amount in the low range
0...100% Fx:043
g
Input Level Dmod [%] –100...+100Sets the modulation amount of the input level Fx:037,
SrcSelects the modulation source for the input level
Off...Tempo Fx:037
h Spread 0...50Sets the width of the stereo image of the effect sound Fx:043
i
Wet/Dry Dry, 1:99...99:1, WetTable , “Sets the balance between the effect and dry sounds,” on page 330
Src Off...TempoTable , “Selects the modulation source of the effect balance,” on page 330
AmtTable , “Sets the modulation amount of the effect bal-ance,” on page 330
–100...+100
C Delay
R Delay
Left
Right
Feedback
Spread
Wet / Dry
Wet / Dry
Wet: Mono In - Stereo Out / Dry: Stereo In -Stereo Out
Input Level D-mod
High Damp Low Damp
L DelayInput Level D-mod
+Level
Level
Level
Tempo
BPMBPM Base Note x Times
Base Note x Times
Base Note x Times
a
BPM MIDI, 40...240Selects MIDI Clock and assigns tempo Fx:049,
R > ----, OVER!!Display the error message if the right channel delay time exceeds the upper limit
b
L Delay Base Note Selects the type of notes to specify the left channel delay time
Fx:049,
Times x1...x16Sets the number of notes to specify the left channel delay time
Fx:049
Adjust [%]Fine-adjust the left channel delay time
–2.50...+2.50%
c
R Delay Base Note Selects the type of notes to specify the right channel delay time
Fx:049,
Times x1...x16Sets the number of notes to specify the right channel delay time
Fx:049
Adjust [%]Fine-adjust the right channel delay time
–2.50...+2.50%
d
L FeedbackSets the feedback amount for the left channel
–100...+100
Src Off...TempoSelects the modulation source of feedback amount
Amt L –100...+100Sets the modulation amount of the left channel feedback
e
R FeedbackSets the feedback amount for the right channel
–100...+100
Amt R –100...+100Sets the modulation amount of the right channel feedback
f High Damp [%]Sets the damping amount in the high range
0...100% Fx:043
g Low Damp [%]Sets the damping amount in the low range
0...100% Fx:043
h
Input Level Dmod [%] –100...+100Sets the modulation amount of the input level Fx:037,
SrcSelects the modulation source for the input level
Off...Tempo Fx:037
i
Wet/Dry Dry, 1:99...99:1, WetTable , “Sets the balance between the effect and dry sounds,” on page 330
Src Off...TempoTable , “Selects the modulation source of the effect balance,” on page 330
AmtTable , “Sets the modulation amount of the effect bal-ance,” on page 330
–100...+100
Left
Right
Feedback
Wet / Dry
Wet / Dry
Stereo In - Stereo Out
Input Level D-mod
Input Level D-mod
High Damp Low Damp
High Damp Low Damp
Tempo
BPMBPM Base Note x Times
Base Note x Times
Adjust [%]
Adjust [%]
Delay
Delay

360 EffectsReverb
051: Sequence Delay
This four-tap delay enables you to select a tempo and rhythmpattern to set up each tap.
a: BPM, b: Rhythm Pattern
With the tempo specified by the “BPM” parameter (or the MIDIClock tempo if “BPM” is set to MIDI), the length of one beatequals the feedback delay time, and the interval between tapsbecomes equal. Selecting a rhythm pattern will automaticallyturn the tap outputs on and off. When “BPM” is set to MIDI, thelower limit of the “BPM” is 44.
Reverb
Reverb effects
These effects simulate the ambience of reverberation in concerthalls.
052: Reverb Hall
This hall-type reverb simulates the reverberation of mid-sizeconcert halls or ensemble halls.
053: Reverb Smooth Hall
This hall-type reverb simulates the reverberation of larger hallsand stadiums, and creates a smooth release.
054: Reverb Wet Plate
This plate reverb simulates warm (dense) reverberation.
055: Reverb Dry Plate
This plate reverb simulates dry (light) reverberation.
a BPMSelects MIDI Clock and assigns tempo
MIDI, 44...240,
b Rhythm PatternSelects a rhythm pattern
– – – ... 3,
c
Tap1 PanSets the panning of Tap1
L, 1...99, R
Tap2 PanSets the panning of Tap2
L, 1...99, R
Tap3 PanSets the panning of Tap3
L, 1...99, R
Tap4 PanSets the panning of Tap4
L, 1...99, R
d
FeedbackSets the feedback amount
–100...+100
Src Off...TempoSelects the modulation source of feedback amount
AmtSets the modulation amount of the feedback
–100...+100
e
High Damp [%]Sets the damping amount in the high range
0...100% Fx:043
Low Damp [%]Sets the damping amount in the low range
0...100% Fx:043
f
Input Level Dmod [%] –100...+100Sets the modulation amount of the input level Fx:037,
SrcSelects the modulation source for the input level
Off...Tempo Fx:037
g
Wet/Dry Dry, 1:99...99:1, WetTable , “Sets the balance between the effect and dry sounds,” on page 330
Src Off...TempoTable , “Selects the modulation source of the effect balance,” on page 330
AmtTable , “Sets the modulation amount of the effect bal-ance,” on page 330
–100...+100
Delay
Left
Right
Feedback
Wet / Dry
Wet / Dry
Wet: Mono In - Stereo Out / Dry: Stereo In -Stereo Out
Input Level D-mod
High Damp Low Damp
Input Level D-mod
+
Tempo
BPMBPM
Rythm Pattern
Pan
a
Reverb Time [sec]Sets the reverberation time
0.1...10.0sec
High Damp [%]Sets the damping amount in the high range
0...100%
b
Pre Delay [msec]Sets the delay time from the dry sound
0...200msec
Pre Delay Thru [%]Sets the mix ratio of non-delay sound
0...100%
c EQ TrimTable , “Sets the EQ input level,” on page 330
0...100
d
Pre LEQ Gain [dB]Table , “Sets the gain of Low EQ,” on page 330
–15...+15dB
Pre HEQ Gain [dB]Table , “Sets the gain of High EQ,” on page 330
–15...+15dB
e
Wet/Dry Dry, 1:99...99:1, WetTable , “Sets the balance between the effect and dry sounds,” on page 330
Src Off...TempoTable , “Selects the modulation source of the effect balance,” on page 330
AmtTable , “Sets the modulation amount of the effect bal-ance,” on page 330
–100...+100
Left
Right
Wet / Dry
Wet / Dry
Wet: Mono In - Stereo Out / Dry: Stereo In - Stereo Out
EQ Trim
+
EQ Trim
LEQ HEQPre Delay Reverb
Pre Delay Thru

361EffectsReverb
Appen
dix
b: Pre Delay [msec], b: Pre Delay Thru [%]
The “Pre Delay” sets the delay time to the reverb input, allowingyou to control spaciousness.Using the “Pre Delay Thru” parameter, you can mix the dry soundwithout delay, emphasizing the attack of the sound.
056: Reverb Room
This room-type reverb emphasizes the early reflections thatmake the sound tighter. Changing the balance between the earlyreflections and reverb sound allows you to simulate nuances,such as the type of walls of a room.
057: Reverb Bright Room
This room-type reverb emphasizes the early reflections thatmake the sound brighter. See 056: Reverb Room.
c: ER Level, d: Reverb Level
These parameters set the early reflection level and reverb level.Changing these parameter values allows you to simulate the typeof walls in the room. That is, a larger “ER Level” simulates a hardwall, and a larger “Reverb Level” simulates a soft wall.
Reverb - Hall / Plate Type
Time
LevelL
ou
der
Dry
Reverb
Pre Delay Thru
Pre Delay Reverb Time
a
Reverb Time [sec]Sets the reverberation time
0.1...3.0sec
High Damp [%]Sets the damping amount in the high range
0...100%
b
Pre Delay [msec]Sets the delay time from the dry sound
0...200msec Fx:052
Pre Delay Thru [%]Sets the mix ratio of non-delay sound
0...100% Fx:052
c ER LevelSets the level of early reflections
0...100
d Reverb LevelSets the reverberation level
0...100
e EQ TrimTable , “Sets the EQ input level,” on page 330
0...100
f
Pre LEQ Gain [dB]Table , “Sets the gain of Low EQ,” on page 330
–15...+15dB
Pre HEQ Gain [dB]Table , “Sets the gain of High EQ,” on page 330
–15...+15dB
g
Wet/Dry Dry, 1:99...99:1, WetTable , “Sets the balance between the effect and dry sounds,” on page 330
Src Off...TempoTable , “Selects the modulation source of the effect balance,” on page 330
AmtTable , “Sets the modulation amount of the effect bal-ance,” on page 330
–100...+100
Left
Right
Wet / Dry
Wet / Dry
Wet: Mono In - Stereo Out / Dry: Stereo In - Stereo Out
EQ Trim
+
EQ Trim
LEQ HEQ
Pre Delay Reverb Reverb Level
ER Level
ER Level
Pre Delay Thru
ERs
ERs
Reverb - Room Type
Time
Level
Lo
ud
er
ER(Early Reflections)
Dry
Reverb
Pre Delay Thru
Pre Delay Reverb Time

362 EffectsMono – Mono Chain
Mono – Mono Chain
Effects that combine two mono effects connected in series
058: P4EQ - Exciter(Parametric 4-Band EQ – Exciter)
This effect combines a mono-type four-band parametric equal-izer and an exciter.
059: Par4Eq-Wah(Parametric 4-Band EQ – Wah/Auto Wah)
This effect combines a mono-type four-band parametric equal-izer and a wah. You can change the order of the connection.
a [E] TrimSets the parametric EQ input level
0...100
b
[E] Band1 Cutoff [Hz]Sets the center frequency of Band 1
20...1.00kHz
QSets the bandwidth of Band 1
0.5...10.0 Fx:006
Gain [dB]Sets the gain of Band 1
–18...+18dB
c
[E] Band2 Cutoff [Hz]Sets the center frequency of Band 2
50...5.00kHz
QSets the bandwidth of Band 2
0.5...10.0 Fx:006
Gain [dB]Sets the gain of Band 2
–18...+18dB
d
[E] Band3 Cutoff [Hz]Sets the center frequency for Band 3
300...10.00kHz
QSets the bandwidth of Band 3
0.5...10.0 Fx:006
Gain [dB]Sets the gain of Band 3
–18...+18dB
e
[E] Band4 Cutoff [Hz]Sets the center frequency for Band 4
500...20.00kHz
QSets the bandwidth of Band 4
0.5...10.0 Fx:006
Gain [dB]Sets the gain of Band 4
–18...+18dB
f [X] Exciter BlendSets the intensity (depth) of the Exciter effect
–100...+100 Fx:011
g [X] Emphatic PointSets the frequency range to be emphasized
0...70 Fx:011
h
Wet/Dry Dry, 1:99...99:1, WetTable , “Sets the balance between the effect and dry sounds,” on page 330
Src Off...TempoTable , “Selects the modulation source of the effect balance,” on page 330
AmtTable , “Sets the modulation amount of the effect bal-ance,” on page 330
–100...+100
Left
Right
Wet / Dry
Wet / Dry
Wet: Mono In - Mono Out / Dry: Stereo In - Stereo Out
Trim+ Exciter
Parametric 4Band EQ Exciter
a [E] TrimSets the parametric EQ input level
0...100
b
[E] Band1 Cutoff [Hz]Sets the center frequency of Band 1
20...1.00kHz
QSets the bandwidth of Band 1
0.5...10.0 Fx:006
Gain [dB]Sets the gain of Band 1
–18...+18dB
c
[E] Band2 Cutoff [Hz]Sets the center frequency of Band 2
50...5.00kHz
QSets the bandwidth of Band 2
0.5...10.0 Fx:006
Gain [dB]Sets the gain of Band 2
–18...+18dB
d
[E] Band3 Cutoff [Hz]Sets the center frequency for Band 3
300...10.00kHz
QSets the bandwidth of Band 3
0.5...10.0 Fx:006
Gain [dB]Sets the gain of Band 3
–18...+18dB
e
[E] Band4 Cutoff [Hz]Sets the center frequency for Band 4
500...20.00kHz
QSets the bandwidth of Band 4
0.5...10.0 Fx:006
Gain [dB]Sets the gain of Band 4
–18...+18dB
f
[W] Frequency BottomSets the lower limit of the wah center frequency
0...100 Fx:009
Frequency TopSets the upper limit of the wah center frequency
0...100 Fx:009
g
[W] Sweep Mode Auto, D-mod, LFOSelects the control from auto-wah, modulation source, and LFO
Fx:009,
Src Off...TempoSelects the modulation source for the wah when Sweep Mode=D-mod
h
[W] LFO Frequency [Hz]Sets the LFO speed
0.02...20.00Hz
ResonanceSets the resonance amount
0...100
LPFSwitches the wah low pass filter on and off
Off, On
i Routing PEQ → WAH, WAH → PEQChanges the order of the parametric equalizer and wah connection
j
Wet/Dry Dry, 1:99...99:1, WetTable , “Sets the balance between the effect and dry sounds,” on page 330
Src Off...TempoTable , “Selects the modulation source of the effect balance,” on page 330
AmtTable , “Sets the modulation amount of the effect bal-ance,” on page 330
–100...+100
Left
Right
Wet / Dry
Wet / Dry
Wet: Mono In - Mono Out / Dry: Stereo In - Stereo Out
Trim+
Parametric 4Band EQRouting
Wah/Auto Wah
Wah
D-mod
EnvelopeSweep Mode
D-modAuto
LFOLFO

363EffectsMono – Mono Chain
Appen
dix
060: P4EQ - Cho/Flng
This effect combines a mono-type four-band parametric equal-izer and a chorus/flanger.
i: Output Mode
When Wet Invert is selected, the right channel phase of the cho-rus/flanger effect sound is inverted. This creates pseudo-stereoeffects and adds spread.However, if a mono-input type effect is connected after thiseffect, the left and right sounds may cancel each other, eliminat-ing the chorus/flanger effects.
061: P4EQ - Phaser
This effect combines a mono-type four-band parametric equal-izer and a phaser.
a [E] TrimSets the parametric EQ input level
0...100
b
[E] Band1 Cutoff [Hz]Sets the center frequency of Band 1
20...1.00kHz
QSets the bandwidth of Band 1
0.5...10.0 Fx:006
Gain [dB]Sets the gain of Band 1
–18...+18dB
c
[E] Band2 Cutoff [Hz]Sets the center frequency of Band 2
50...5.00kHz
QSets the bandwidth of Band 2
0.5...10.0 Fx:006
Gain [dB]Sets the gain of Band 2
–18...+18dB
d
[E] Band3 Cutoff [Hz]Sets the center frequency for Band 3
300...10.00kHz
QSets the bandwidth of Band 3
0.5...10.0 Fx:006
Gain [dB]Sets the gain of Band 3
–18...+18dB
e
[E] Band4 Cutoff [Hz]Sets the center frequency for Band 4
500...20.00kHz
QSets the bandwidth of Band 4
0.5...10.0 Fx:006
Gain [dB]Sets the gain of Band 4
–18...+18dB
f [F] Delay Time [msec]Sets the delay time
0.0...50.0msec
g
[F] LFO Frequency [Hz]Sets the LFO speed
0.02...20.00Hz
LFO WaveformSelects LFO Waveform
Triangle, Sine
h
[F] DepthSets the depth of LFO modulation
0...100
FeedbackSets the feedback amount
–100...+100 Fx:020
i
[F] Cho/Flng Wet/Dry –Wet...–2:98, Dry, 2:98...WetSets the effect balance of the chorus/flanger Fx:010, 020
Output Mode Normal, Wet InvertSelects the output mode for the chorus/flanger
j
Wet/Dry Dry, 1:99...99:1, WetTable , “Sets the balance between the effect and dry sounds,” on page 330
Src Off...TempoTable , “Selects the modulation source of the effect balance,” on page 330
AmtTable , “Sets the modulation amount of the effect bal-ance,” on page 330
–100...+100
Left
Right
Wet / Dry
Wet: Mono In - Stereo Out / Dry: Stereo In - Stereo Out
Trim
+
Parametric 4Band EQ Chorus/Flanger
Wet / Dry
Chorus/Flanger
Feedback
LFO: Tri / Sine
Cho/Flng Wet / Dry
Normal
Wet InvertOutput Mode
–+
a [E] TrimSets the parametric EQ input level
0...100
b
[E] Band1 Cutoff [Hz]Sets the center frequency of Band 1
20...1.00kHz
QSets the bandwidth of Band 1
0.5...10.0 Fx:006
Gain [dB]Sets the gain of Band 1
–18...+18dB
c
[E] Band2 Cutoff [Hz]Sets the center frequency of Band 2
50...5.00kHz
QSets the bandwidth of Band 2
0.5...10.0 Fx:006
Gain [dB]Sets the gain of Band 2
–18...+18dB
d
[E] Band3 Cutoff [Hz]Sets the center frequency for Band 3
300...10.00kHz
QSets the bandwidth of Band 3
0.5...10.0 Fx:006
Gain [dB]Sets the gain of Band 3
–18...+18dB
e
[E] Band4 Cutoff [Hz]Sets the center frequency for Band 4
500...20.00kHz
QSets the bandwidth of Band 4
0.5...10.0 Fx:006
Gain [dB]Sets the gain of Band 4
–18...+18dB
f
[P] LFO Frequency [Hz]Sets the LFO speed
0.02...20.00Hz
LFO WaveformSelects LFO Waveform
Triangle, Sine
g [P] ManualSets the frequency to which the effect is applied
0...100
h
[P] DepthSets the depth of LFO modulation
0...100
ResonanceSets the resonance amount
–100...+100 Fx:023
i
[P] Phaser Wet/Dry –Wet...–2:98, Dry, 2:98...WetSets the phaser effect balance Fx:010, 023
Output Mode Normal, Wet InvertSelects the phaser output mode Fx:060
j
Wet/Dry Dry, 1:99...99:1, WetTable , “Sets the balance between the effect and dry sounds,” on page 330
Src Off...TempoTable , “Selects the modulation source of the effect balance,” on page 330
AmtTable , “Sets the modulation amount of the effect bal-ance,” on page 330
–100...+100
Left
Right
Wet / Dry
Wet / Dry
Wet: Mono In - Stereo Out / Dry: Stereo In - Stereo Out
Trim+
Parametric 4Band EQ Phaser
Phaser
Resonance
LFO: Tri / Sine
Phaser Wet / Dry
Normal
Wet Invert
Output Mode–+

364 EffectsMono – Mono Chain
062: P4EQ - Mt. Delay (Parametric 4-Band EQ – Multitap Delay)
This effect combines a mono-type four-band parametric equal-izer and a multitap delay.
063: Comp - Wah(Compressor – Wah/Auto Wah)
This effect combines a mono-type compressor and a wah. Youcan change the order of the connection.
a [E] TrimSets the parametric EQ input level
0...100
b
[E] Band1 Cutoff [Hz]Sets the center frequency of Band 1
20...1.00kHz
QSets the bandwidth of Band 1
0.5...10.0 Fx:006
Gain [dB]Sets the gain of Band 1
–18...+18dB
c
[E] Band2 Cutoff [Hz]Sets the center frequency of Band 2
50...5.00kHz
QSets the bandwidth of Band 2
0.5...10.0 Fx:006
Gain [dB]Sets the gain of Band 2
–18...+18dB
d
[E] Band3 Cutoff [Hz]Sets the center frequency for Band 3
300...10.00kHz
QSets the bandwidth of Band 3
0.5...10.0 Fx:006
Gain [dB]Sets the gain of Band 3
–18...+18dB
e
[E] Band4 Cutoff [Hz]Sets the center frequency for Band 4
500...20.00kHz
QSets the bandwidth of Band 4
0.5...10.0 Fx:006
Gain [dB]Sets the gain of Band 4
–18...+18dB
f
[D] Tap1 Time [msec]Sets the Tap1 delay time
0...680msec
Tap1 LevelSets the Tap1 output level
0...100 Fx:045
g
[D] Tap2 Time [msec]Sets the Tap2 delay time
0...680msec
FeedbackSets the Tap2 feedback amount
–100...+100
h
[D] Mt.Delay Wet/DryDry, 2:98...98:2, WetSets the multitap delay effect balance
High Damp [%]Sets the damping amount in the high range
0...100% Fx:043
i
Wet/DryDry, 1:99...99:1, WetTable , “Sets the balance between the effect and dry sounds,” on page 330
SrcOff...TempoTable , “Selects the modulation source of the effect balance,” on page 330
AmtTable , “Sets the modulation amount of the effect balance,” on page 330
–100...+100
Left
Right
Wet / Dry
Wet / Dry
Wet: Mono In - Mono Out / Dry: Stereo In - Stereo Out
Trim+
Parametric 4Band EQ Multitap Delay
Feedback
High Damp
Delay(2)
(1)Mt.Dly Wet / Dry
a [C] SensitivitySets the sensitivity
1...100 Fx:002
b
[C] AttackTable , “Sets the attack level,” on page 330
1...100 Fx:002
Output LevelSets the compressor output level
0...100 Fx:002
c [C] EQ TrimTable , “Sets the EQ input level,” on page 330
0...100
d
[C] Pre LEQ Gain [dB]Table , “Sets the gain of Low EQ,” on page 330
–15...+15dB
Pre HEQ Gain [dB]Table , “Sets the gain of High EQ,” on page 330
–15...+15dB
e
[W] Frequency BottomSets the lower limit of the wah center frequency
0...100 Fx:009
Frequency TopSets the upper limit of the wah center frequency
0...100 Fx:009
f
[W] Sweep Mode Auto, D-mod, LFOSelects the control from auto-wah, modulation source, and LFO
Fx:009,
Src Off...TempoSelects the modulation source for the wah when Sweep Mode=D-mod
g [W] LFO Frequency [Hz]Sets the LFO speed
0.02...20.00Hz
h
[W] ResonanceSets the resonance amount
0...100
Low Pass FilterSwitches the wah low pass filter on and off
Off, On
i Routing CMP → WAH, WAH → CMPSwitches the order of the compressor and wah connection
j
Wet/Dry Dry, 1:99...99:1, WetTable , “Sets the balance between the effect and dry sounds,” on page 330
Src Off...TempoTable , “Selects the modulation source of the effect balance,” on page 330
AmtTable , “Sets the modulation amount of the effect bal-ance,” on page 330
–100...+100
Left
Right
Wet / Dry
Wet / Dry
Wet: Mono In - Mono Out / Dry: Stereo In - Stereo Out
+
CompressorRouting
Wah/Auto Wah
Wah
D-mod
EnvelopeSweep Mode
D-modAuto
LFO
LFO
LEQ HEQEQ Trim
CompOutput Level
Envelope - Control

365EffectsMono – Mono Chain
Appen
dix
064: Comp - Amp Sim(Compressor – Amp Simulation)
This effect combines a mono-type compressor and an amp sim-ulation. You can change the order of the effect connection.
065: Comp - OD/HiGain(Compressor – Overdrive/Hi.Gain)
This effect combines a mono-type compressor and an overdrive/high-gain distortion. You can change the order of the effect con-nection.
a [C] SensitivitySets the sensitivity
1...100 Fx:002
b
[C] AttackTable , “Sets the attack level,” on page 330
1...100 Fx:002
Output LevelSets the compressor output level
0...100 Fx:002
c [C] EQ TrimTable , “Sets the EQ input level,” on page 330
0...100
d
[C] Pre LEQ Gain [dB]Table , “Sets the gain of Low EQ,” on page 330
–15...+15dB
Pre HEQ Gain [dB]Table , “Sets the gain of High EQ,” on page 330
–15...+15dB
e[A] Amplifier TypeSelects the type of guitar amplifier
Solid State, British(EL84), American
(6L6)
f Routing CMP → AMP, AMP → CMPSwitches the order of the compressor and amp simulation connection
g
Wet/Dry Dry, 1:99...99:1, WetTable , “Sets the balance between the effect and dry sounds,” on page 330
Src Off...TempoTable , “Selects the modulation source of the effect balance,” on page 330
AmtTable , “Sets the modulation amount of the effect bal-ance,” on page 330
–100...+100
Left
Right
Wet / Dry
Wet / Dry
Wet: Mono In - Mono Out / Dry: Stereo In - Stereo Out
+
CompressorRouting
Amp Simulation
Amp Simulation FilterLEQ HEQEQ Trim
Output Level
Envelope - Control
Comp
a [C] SensitivitySets the sensitivity
1...100 Fx:002
b
[C] AttackTable , “Sets the attack level,” on page 330
1...100 Fx:002
Output LevelSets the compressor output level
0...100 Fx:002
c
[O] Drive Mode Overdrive, Hi-GainSwitches between overdrive and high-gain distortion
DriveSets the degree of distortion
1...100 Fx:006
d
[O] Output Level 0...50Sets the overdrive output level Fx:006,
Src Off...TempoSelects the modulation source for the overdrive output level
Amt –50...+50Sets the modulation amount of the overdrive output level
e
[O] Low Cutoff [Hz] 20...1.00kHzSets the center frequency for Low EQ (shelving type)
Gain [dB]Table , “Sets the gain of Low EQ,” on page 330
–18...+18dB
f
[O] Mid1 Cutoff [Hz] 300...10.00kHzSets the center frequency for Mid/High EQ 1 (peaking type)
QSets the band width of Mid/High EQ 1
0.5...10.0 Fx:006
Gain [dB]Sets the gain of Mid/High EQ 1
–18...+18dB
g
[O] Mid2 Cutoff [Hz] 500...20.00kHzSets the center frequency for Mid/High EQ 2 (peaking type)
QSets the band width of Mid/High EQ 2
0.5...10.0 Fx:006
Gain [dB]Sets the gain of Mid/High EQ 2
–18...+18dB
h Routing CMP → OD, OD → CMPSwitches the order of the compressor and overdrive connection
i
Wet/Dry Dry, 1:99...99:1, WetTable , “Sets the balance between the effect and dry sounds,” on page 330
Src Off...TempoTable , “Selects the modulation source of the effect balance,” on page 330
AmtTable , “Sets the modulation amount of the effect bal-ance,” on page 330
–100...+100
Left
Right
Wet / Dry
Wet / Dry
Wet: Mono In - Mono Out / Dry: Stereo In - Stereo Out
+
RoutingOverdrive / Hi-Gain
3 Band PEQ
Output Level
Mode: Overdrive / Hi-GainDrive
Driver
Compressor
Output Level
Envelope - Control
Comp

366 EffectsMono – Mono Chain
066: Comp - P4EQ(Compressor – Parametric 4-Band EQ)
This effect combines a mono-type compressor and a four-bandparametric equalizer. You can change the order of the effect con-nection.
067: Comp - ChoFlng(Compressor – Chorus/Flanger)
This effect combines a mono-type compressor and a chorus/flanger. You can change the order of the effect connection.
h: Output Mode, i: Routing
When Wet Invert is selected, the right channel phase of the cho-rus/flanger effect sound is inverted. This creates pseudo-stereoeffects and adds spread.However, if a mono-input type effect is connected after thiseffect, the left and right sounds may cancel each other, eliminat-ing the chorus/flanger effects.When “Routing” is set to FLNG→CMP, “Output Mode” will be setto Normal.
a [C] SensitivitySets the sensitivity
1...100 Fx:002
b
[C] AttackTable , “Sets the attack level,” on page 330
1...100 Fx:002
Output LevelSets the compressor output level
0...100 Fx:002
c [E] TrimSets the parametric EQ input level
0...100
d
[E] Band1 Cutoff [Hz]Sets the center frequency of Band 1
20...1.00kHz
QSets the bandwidth of Band 1
0.5...10.0 Fx:006
Gain [dB]Sets the gain of Band 1
–18...+18dB
e
[E] Band2 Cutoff [Hz]Sets the center frequency of Band 2
50...5.00kHz
QSets the bandwidth of Band 2
0.5...10.0 Fx:006
Gain [dB]Sets the gain of Band 2
–18...+18dB
f
[E] Band3 Cutoff [Hz]Sets the center frequency for Band 3
300...10.00kHz
QSets the bandwidth of Band 3
0.5...10.0 Fx:006
Gain [dB]Sets the gain of Band 3
–18...+18dB
g
[E] Band4 Cutoff [Hz]Sets the center frequency for Band 4
500...20.00kHz
QSets the bandwidth of Band 4
0.5...10.0 Fx:006
Gain [dB]Sets the gain of Band 4
–18...+18dB
h Routing CMP → PEQ, PEQ → CMPSwitches the order of the compressor and parametric EQ connection
i
Wet/Dry Dry, 1:99...99:1, WetTable , “Sets the balance between the effect and dry sounds,” on page 330
Src Off...TempoTable , “Selects the modulation source of the effect balance,” on page 330
AmtTable , “Sets the modulation amount of the effect bal-ance,” on page 330
–100...+100
Left
Right
Wet / Dry
Wet / Dry
Wet: Mono In - Mono Out / Dry: Stereo In - Stereo Out
+
RoutingCompressor
Trim
Parametric 4Band EQ
Output Level
Envelope - Control
Comp
a [C] SensitivitySets the sensitivity
1...100 Fx:002
b
[C] AttackTable , “Sets the attack level,” on page 330
1...100 Fx:002
Output LevelSets the compressor output level
0...100 Fx:002
c [C] EQ TrimTable , “Sets the EQ input level,” on page 330
0...100
d
[C] Pre LEQ Gain [dB]Table , “Sets the gain of Low EQ,” on page 330
–15...+15dB
Pre HEQ Gain [dB]Table , “Sets the gain of High EQ,” on page 330
–15...+15dB
e [F] Delay Time [msec]Sets the delay time
0.0...50.0msec
f
[F] LFO Frequency [Hz]Sets the LFO speed
0.02...20.00Hz
LFO WaveformSelects LFO Waveform
Triangle, Sine
g
[F] DepthSets the depth of LFO modulation
0...100
FeedbackSets the feedback amount
–100...+100 Fx:020
h
[F] Cho/Flng Wet/Dry –Wet...–2:98, Dry, 2:98...WetSets the effect balance of the chorus/flanger Fx:010, 020
Output Mode Normal, Wet InvertSelects the output mode for the chorus/flanger
iRouting CMP → FLNG, FLNG → CMPSwitches the order of the compressor and chorus/flanger connection
j
Wet/Dry Dry, 1:99...99:1, WetTable , “Sets the balance between the effect and dry sounds,” on page 330
Src Off...TempoTable , “Selects the modulation source of the effect balance,” on page 330
AmtTable , “Sets the modulation amount of the effect bal-ance,” on page 330
–100...+100
Left
Right
Wet / Dry
Wet / Dry
Wet: Mono In - Stereo Out / Dry: Stereo In - Stereo Out
+
RoutingCompressor Chorus/Flanger
Chorus/Flanger
Feedback
LFO: Tri / Sine
Cho/Flng Wet / Dry
Normal
Wet Invert
Output Mode–+
LEQ HEQEQ TrimComp
Output Level
Envelope - Control

367EffectsMono – Mono Chain
Appen
dix
068: Comp - Phaser(Compressor – Phaser)
This effect combines a mono-type compressor and a phaser. Youcan change the order of the effect connection.
069: Comp - Mt. Delay(Compressor – Multitap Delay)
This effect combines a mono-type compressor and a multitapdelay. You can change the order of the effect connection.
a [C] SensitivitySets the sensitivity
1...100 Fx:002
b
[C] AttackTable , “Sets the attack level,” on page 330
1...100 Fx:002
Output LevelSets the compressor output level
0...100 Fx:002
c [C] EQ TrimTable , “Sets the EQ input level,” on page 330
0...100
d
[C] Pre LEQ Gain [dB]Table , “Sets the gain of Low EQ,” on page 330
–15...+15dB
Pre HEQ Gain [dB]Table , “Sets the gain of High EQ,” on page 330
–15...+15dB
e
[P] LFO Frequency [Hz]Sets the LFO speed
0.02...20.00Hz
LFO WaveformSelects LFO Waveform
Triangle, Sine
f [P] ManualSets the frequency to which the effect is applied
0...100
g
[P] DepthSets the depth of LFO modulation
0...100
ResonanceSets the resonance amount
–100...+100 Fx:023
h
[P] Phaser Wet/Dry –Wet...–2:98, Dry, 2:98...WetSets the phaser effect balance Fx:010, 023
Output Mode Normal, Wet InvertSelects the phaser output mode Fx:067
iRouting CMP→PHS, PHS→CMPSwitches the order of the compressor and phaser connection
Fx:067
j
Wet/Dry Dry, 1:99...99:1, WetTable , “Sets the balance between the effect and dry sounds,” on page 330
Src Off...TempoTable , “Selects the modulation source of the effect balance,” on page 330
AmtTable , “Sets the modulation amount of the effect bal-ance,” on page 330
–100...+100
Left
Right
Wet / Dry
Wet / Dry
Wet: Mono In - Stereo Out / Dry: Stereo In - Stereo Out
+
RoutingCompressor
LEQ HEQEQ Trim
Comp
Output Level
Envelope - Control
Phaser
Phaser
Resonance
LFO: Tri / Sine
Phaser Wet / Dry
Normal
Wet InvertOutput Mode
–+
a [C] SensitivitySets the sensitivity
1...100 Fx:002
b
[C] AttackTable , “Sets the attack level,” on page 330
1...100 Fx:002
Output LevelSets the compressor output level
0...100 Fx:002
c [C] EQ TrimTable , “Sets the EQ input level,” on page 330
0...100
d
[C] Pre LEQ Gain [dB]Table , “Sets the gain of Low EQ,” on page 330
–15...+15dB
Pre HEQ Gain [dB]Table , “Sets the gain of High EQ,” on page 330
–15...+15dB
e
[D] Tap1 Time [msec]Sets the Tap1 delay time
0...680msec
Tap1 LevelSets the Tap1 output level
0...100 Fx:045
f
[D] Tap2 Time [msec]Sets the Tap2 delay time
0...680msec
FeedbackSets the Tap2 feedback amount
–100...+100
g [D] High Damp [%]Sets the damping amount in the high range
0...100% Fx:043
h [D] Mt.Delay Wet/Dry Dry, 1:99...99:1, WetSets the multitap delay effect balance
i Routing CMP→DLY, DLY→CMPSwitches the order of the compressor and multitap delay connection
j
Wet/Dry Dry, 1:99...99:1, WetTable , “Sets the balance between the effect and dry sounds,” on page 330
Src Off...TempoTable , “Selects the modulation source of the effect balance,” on page 330
AmtTable , “Sets the modulation amount of the effect bal-ance,” on page 330
–100...+100
Left
Right
Wet / Dry
Wet / Dry
Wet: Mono In - Mono Out / Dry: Stereo In - Stereo Out
+
RoutingCompressor
LEQ HEQEQ Trim
Output Level
Envelope - Control
Multitap Delay
Feedback
High Damp
Delay(2)
(1)Mt.Dly Wet / Dry
Comp

368 EffectsMono – Mono Chain
070: Limiter - P4EQ(Limiter – Parametric 4-Band EQ)
This effect combines a mono-type limiter and a four-band para-metric equalizer. You can change the order of the effect connec-tion.
071: Limiter - Cho/Flang(Limiter – Chorus/Flanger)
This effect combines a mono-type limiter and a chorus/flanger.You can change the order of the effect connection.
a
[L] Ratio 1.0:1...50.0:1, Inf:1Sets the signal compression ratio Fx:003
Threshold [dB] –40...0dBSets the level above which the compressor is applied Fx:003
b
[L] AttackSets the attack time
1...100 Fx:003
ReleaseSets the release time
1...100 Fx:003
c [L] Gain Adjust [dB]Sets the limiter output gain
–Inf, –38...+24dB Fx:003
d [E] TrimSets the parametric EQ input level
0...100
e
[E] Band1 Cutoff [Hz]Sets the center frequency of Band 1
20...1.00kHz
QSets the bandwidth of Band 1
0.5...10.0 Fx:006
Gain [dB]Sets the gain of Band 1
–18...+18dB
f
[E] Band2 Cutoff [Hz]Sets the center frequency of Band 2
50...5.00kHz
QSets the bandwidth of Band 2
0.5...10.0 Fx:006
Gain [dB]Sets the gain of Band 2
–18...+18dB
g
[E] Band3 Cutoff [Hz]Sets the center frequency for Band 3
300...10.00kHz
QSets the bandwidth of Band 3
0.5...10.0 Fx:006
Gain [dB]Sets the gain of Band 3
–18...+18dB
h
[E] Band4 Cutoff [Hz]Sets the center frequency for Band 4
500...20.00kHz
QSets the bandwidth of Band 4
0.5...10.0 Fx:006
Gain [dB]Sets the gain of Band 4
–18...+18dB
i Routing LMT→PEQ, PEQ→LMTSwitches the order of the limiter and parametric EQ connection
j
Wet/Dry Dry, 1:99...99:1, WetTable , “Sets the balance between the effect and dry sounds,” on page 330
Src Off...TempoTable , “Selects the modulation source of the effect balance,” on page 330
AmtTable , “Sets the modulation amount of the effect bal-ance,” on page 330
–100...+100
Left
Right
Wet / Dry
Wet / Dry
Wet: Mono In - Mono Out / Dry: Stereo In - Stereo Out
+
RoutingLimiter
Trim
Parametric 4Band EQ
Limiter
Gain Adjust
Envelope - Control
a
[L] Ratio 1.0:1...50.0:1, Inf:1Sets the signal compression ratio Fx:003
Threshold [dB] –40...0dBSets the level above which the compressor is applied Fx:003
b
[L] AttackSets the attack time
1...100 Fx:003
ReleaseSets the release time
1...100 Fx:003
c [L] Gain Adjust [dB]Sets the limiter output gain
–Inf, –38...+24dB Fx:003
d
[F] LFO Frequency [Hz]Sets the LFO speed
0.02...20.00Hz
LFO WaveformSelects LFO Waveform
Triangle, Sine
e
[F] Delay Time [msec]Sets the delay time
0.0...50.0msec
DepthSets the depth of LFO modulation
0...100
FeedbackSets the feedback amount
–100...+100 Fx:020
f [F] EQ TrimTable , “Sets the EQ input level,” on page 330
0...100
g
[F] Pre LEQ Gain [dB]Table , “Sets the gain of Low EQ,” on page 330
–15...+15dB
Pre HEQ Gain [dB]Table , “Sets the gain of High EQ,” on page 330
–15...+15dB
h
[F] Cho/Flng Wet/Dry –Wet...–2:98, Dry, 2:98...WetSets the effect balance of the chorus/flanger Fx:010, 020
Output Mode Normal, Wet InvertSelects the output mode for the chorus/flanger Fx:067
iRouting LMT→FLNG, FLNG→LMTSwitches the order of the limiter and chorus/flanger connection
Fx:067
j
Wet/Dry Dry, 1:99...99:1, WetTable , “Sets the balance between the effect and dry sounds,” on page 330
Src Off...TempoTable , “Selects the modulation source of the effect balance,” on page 330
AmtTable , “Sets the modulation amount of the effect bal-ance,” on page 330
–100...+100
Left
Right
Wet / Dry
Wet / Dry
Wet: Mono In - Stereo Out / Dry: Stereo In - Stereo Out
+
RoutingChorus/Flanger
FeedbackCho/Flng Wet / Dry
Normal
Wet InvertOutput Mode
–+
Limiter
Limiter
Gain Adjust
Envelope - Control
LEQ HEQEQ TrimChorus/Flanger
LFO: Tri / Sine

369EffectsMono – Mono Chain
Appen
dix
072: Limiter - Phaser
This effect combines a mono-type limiter and a phaser. You canchange the order of the effect connection.
073: Limiter - Mt. Delay (Limiter – Multitap Delay)
This effect combines a mono-type limiter and a multitap delay.You can change the order of the effect connection.
074: Exciter - Comp (Exciter – Compressor)
This effect combines a mono-type exciter and a compressor. Youcan change the order of the effect connection.
a
[L] Ratio 1.0:1...50.0:1, Inf:1Sets the signal compression ratio Fx:003
Threshold [dB] –40...0dBSets the level above which the compressor is applied Fx:003
b
[L] AttackSets the attack time
1...100 Fx:003
ReleaseSets the release time
1...100 Fx:003
c [L] Gain Adjust [dB]Sets the limiter output gain
–Inf, –38...+24dB Fx:003
d
[P] LFO Frequency [Hz]Sets the LFO speed
0.02...20.00Hz
LFO WaveformSelects LFO Waveform
Triangle, Sine
e [P] ManualSets the frequency to which the effect is applied
0...100
f
[P] DepthSets the depth of LFO modulation
0...100
ResonanceSets the resonance amount
–100...+100 Fx:023
g
[P] Phaser Wet/Dry –Wet...–2:98, Dry, 2:98...WetSets the phaser effect balance Fx:010, 023
Output Mode Normal, Wet InvertSelects the phaser output mode Fx:067
h Routing LMT→PHS, PHS→LMTSwitches the order of the limiter and phaser connection Fx:067
i
Wet/Dry Dry, 1:99...99:1, WetTable , “Sets the balance between the effect and dry sounds,” on page 330
Src Off...TempoTable , “Selects the modulation source of the effect balance,” on page 330
AmtTable , “Sets the modulation amount of the effect bal-ance,” on page 330
–100...+100
a
[L] Ratio 1.0:1...50.0:1, Inf:1Sets the signal compression ratio Fx:003
Threshold [dB] –40...0dBSets the level above which the compressor is applied Fx:003
Left
Right
Wet / Dry
Wet / Dry
Wet: Mono In - Stereo Out / Dry: Stereo In - Stereo Out
+
RoutingLimiter
LimiterGain Adjust
Envelope - Control
Phaser
Phaser
Resonance
LFO: Tri / Sine
Phaser Wet / Dry
Normal
Wet InvertOutput Mode
–+
Left
Right
Wet / Dry
Wet / Dry
Wet: Mono In - Mono Out / Dry: Stereo In - Stereo Out
+
RoutingMultitap Delay
Feedback
High Damp
Delay(2)
(1)Mt.Dly Wet / Dry
Limiter
LimiterGain Adjust
Envelope - Control
b
[L] AttackSets the attack time
1...100 Fx:003
ReleaseSets the release time
1...100 Fx:003
c [L] Gain Adjust [dB]Sets the limiter output gain
–Inf, –38...+24dB Fx:003
d
[D] Tap1 Time [msec]Sets the Tap1 delay time
0...680msec
Tap1 LevelSets the Tap1 output level
0...100 Fx:045
e
[D] Tap2 Time [msec]Sets the Tap2 delay time
0...680msec
Feedback (Tap2)Sets the Tap2 feedback amount
–100...+100
f
[D] Mt.Delay Wet/Dry Dry, 1:99...99:1, WetSets the multitap delay effect balance
High Damp [%]Sets the damping amount in the high range
0...100% Fx:043
g Routing LMT→DLY, DLY→LMTSwitches the order of the limiter and multitap delay connection
h
Wet/Dry Dry, 1:99...99:1, WetTable , “Sets the balance between the effect and dry sounds,” on page 330
Src Off...TempoTable , “Selects the modulation source of the effect balance,” on page 330
AmtTable , “Sets the modulation amount of the effect bal-ance,” on page 330
–100...+100
a [X] Exciter BlendSets the intensity (depth) of the Exciter effect
–100...+100 Fx:011
b [X] Emphatic PointSets the frequency range to be emphasized
0...70 Fx:011
c [X] EQ TrimTable , “Sets the EQ input level,” on page 330
0...100
d
[X] Pre LEQ Gain [dB]Table , “Sets the gain of Low EQ,” on page 330
–15...+15dB
Pre HEQ Gain [dB]Table , “Sets the gain of High EQ,” on page 330
–15...+15dB
e [C] SensitivitySets the sensitivity
1...100 Fx:002
f
[C] AttackTable , “Sets the attack level,” on page 330
1...100 Fx:002
Output LevelSets the compressor output level
0...100 Fx:002
g Routing XCT→CMP, CMP→XCTSwitches the order of the exciter and compressor connection
h
Wet/Dry Dry, 1:99...99:1, WetTable , “Sets the balance between the effect and dry sounds,” on page 330
Src Off...TempoTable , “Selects the modulation source of the effect balance,” on page 330
AmtTable , “Sets the modulation amount of the effect bal-ance,” on page 330
–100...+100
Left
Right
Wet / Dry
Wet / Dry
Wet: Mono In - Mono Out / Dry: Stereo In - Stereo Out
+
RoutingCompressor
LEQ HEQEQ Trim
CompOutput Level
Envelope - Control
Exciter
Exciter

370 EffectsMono – Mono Chain
075: Exciter - Limiter(Exciter – Limiter)
This effect combines a mono-type exciter and a limiter. You canchange the order of the effect connection.
076: Exciter - Cho/Flng(Exciter – Chorus/Flanger)
This effect combines a mono-type limiter and a chorus/flanger.
a [X] Exciter BlendSets the intensity (depth) of the Exciter effect
–100...+100 Fx:011
b [X] Emphatic PointSets the frequency range to be emphasized
0...70 Fx:011
c [X] EQ TrimTable , “Sets the EQ input level,” on page 330
0...100
d
[X] Pre LEQ Gain [dB]Table , “Sets the gain of Low EQ,” on page 330
–15...+15dB
Pre HEQ Gain [dB]Table , “Sets the gain of High EQ,” on page 330
–15...+15dB
e [L] Ratio 1.0:1...50.0:1, Inf:1Sets the signal compression ratio Fx:003
f [L] Threshold [dB] –40...0dBSets the level above which the compressor is applied Fx:003
g
[L] AttackSets the attack time
1...100 Fx:003
ReleaseSets the release time
1...100 Fx:003
h [L] Gain Adjust [dB]Sets the limiter output gain
–Inf, –38...+24dB Fx:003
i Routin XCT→LMT, LMT→XCTSwitches the order of the exciter and limiter connection
j
Wet/Dry Dry, 1:99...99:1, WetTable , “Sets the balance between the effect and dry sounds,” on page 330
Src Off...TempoTable , “Selects the modulation source of the effect balance,” on page 330
AmtTable , “Sets the modulation amount of the effect bal-ance,” on page 330
–100...+100
Left
Right
Wet / Dry
Wet / Dry
Wet: Mono In - Mono Out / Dry: Stereo In - Stereo Out
+
Routing
LEQ HEQEQ Trim
Exciter
Exciter Limiter
Limiter
Gain Adjust
Envelope - Control
a [X] Exciter BlendSets the intensity (depth) of the Exciter effect
–100...+100 Fx:011
b [X] Emphatic PointSets the frequency range to be emphasized
0...70 Fx:011
c [X] EQ TrimTable , “Sets the EQ input level,” on page 330
0...100
d
[X] Pre LEQ Gain [dB]Table , “Sets the gain of Low EQ,” on page 330
–15...+15dB
Pre HEQ Gain [dB]Table , “Sets the gain of High EQ,” on page 330
–15...+15dB
e [F] Delay Time [msec]Sets the delay time
0.0...50.0msec
f
[F] LFO Frequency [Hz]Sets the LFO speed
0.02...20.00Hz
LFO WaveformSelects LFO Waveform
Triangle, Sine
g
[F] DepthSets the depth of LFO modulation
0...100
FeedbackSets the feedback amount
–100...+100 Fx:020
h
[F] Cho/Flng Wet/Dry –Wet...–2:98, Dry, 2:98...WetSets the effect balance of the chorus/flanger Fx:010, 020
Output Mode Normal, Wet InvertSelects the output mode for the chorus/flanger Fx:060
i
Wet/Dry Dry, 1:99...99:1, WetTable , “Sets the balance between the effect and dry sounds,” on page 330
Src Off...TempoTable , “Selects the modulation source of the effect balance,” on page 330
AmtTable , “Sets the modulation amount of the effect bal-ance,” on page 330
–100...+100
Left
Right
Wet / Dry
Wet / Dry
Wet: Mono In - Stereo Out / Dry: Stereo In - Stereo Out
+
Chorus/Flanger
Chorus/Flanger
Feedback
LFO: Tri / Sine
Cho/Flng Wet / Dry
Normal
Wet InvertOutput Mode
–+
LEQ HEQEQ Trim
Exciter
Exciter

371EffectsMono – Mono Chain
Appen
dix
077: Exciter - Phaser(Exciter – Phaser)
This effect combines a mono-type limiter and a phaser.
078: Exciter - Mt. Delay(Exciter – Multitap Delay)
This effect combines a mono-type exciter and a multitap delay.
a [X] Exciter BlendSets the intensity (depth) of the Exciter effect
–100...+100 Fx:011
b [X] Emphatic PointSets the frequency range to be emphasized
0...70 Fx:011
c [X] EQ TrimTable , “Sets the EQ input level,” on page 330
0...100
d
[X] Pre LEQ Gain [dB]Table , “Sets the gain of Low EQ,” on page 330
–15...+15dB
Pre HEQ Gain [dB]Table , “Sets the gain of High EQ,” on page 330
–15...+15dB
e
[P] LFO Frequency [Hz]Sets the LFO speed
0.02...20.00Hz
LFO WaveformSelects LFO Waveform
Triangle, Sine
f [P] ManualSets the frequency to which the effect is applied
0...100
g
[P] DepthSets the depth of LFO modulation
0...100
ResonanceSets the resonance amount
–100...+100 Fx:023
h
[P] Phaser Wet/Dry –Wet...–2:98, Dry, 2:98...WetSets the phaser effect balance Fx:010, 023
Output Mode Normal, Wet InvertSelects the phaser output mode Fx:060
i
Wet/Dry Dry, 1:99...99:1, WetTable , “Sets the balance between the effect and dry sounds,” on page 330
Src Off...TempoTable , “Selects the modulation source of the effect balance,” on page 330
AmtTable , “Sets the modulation amount of the effect bal-ance,” on page 330
–100...+100
Left
Right
Wet / Dry
Wet / Dry
Wet: Mono In - Stereo Out / Dry: Stereo In - Stereo Out
+LEQ HEQEQ Trim
Exciter
Exciter Phaser
Phaser
Resonance
LFO: Tri / Sine
Phaser Wet / Dry
Normal
Wet InvertOutput Mode
–+
a [X] Exciter BlendSets the intensity (depth) of the Exciter effect
–100...+100 Fx:011
b [X] Emphatic PointSets the frequency range to be emphasized
0...70 Fx:011
c [X] EQ TrimTable , “Sets the EQ input level,” on page 330
0...100
d
[X] Pre LEQ Gain [dB]Table , “Sets the gain of Low EQ,” on page 330
–15...+15dB
Pre HEQ Gain [dB]Table , “Sets the gain of High EQ,” on page 330
–15...+15dB
e
[D] Tap1 Time [msec]Sets the Tap1 delay time
0...680msec
Tap1 LevelSets the Tap1 output level
0...100 Fx:045
f
[D] Tap2 Time [msec]Sets the Tap2 delay time
0...680msec
Feedback (Tap2)Sets the Tap2 feedback amount
–100...+100
g [D] High Damp [%]Sets the damping amount in the high range
0...100% Fx:043
h [D] Mt.Delay Wet/Dry Dry, 1:99...99:1, WetSets the multitap delay effect balance
i
Wet/Dry Dry, 1:99...99:1, WetTable , “Sets the balance between the effect and dry sounds,” on page 330
Src Off...TempoTable , “Selects the modulation source of the effect balance,” on page 330
AmtTable , “Sets the modulation amount of the effect bal-ance,” on page 330
–100...+100
Left
Right
Wet / Dry
Wet / Dry
Wet: Mono In - Mono Out / Dry: Stereo In - Stereo Out
+
Multitap Delay
Feedback
High Damp
Delay(2)
(1)Mt.Dly Wet / Dry
LEQ HEQEQ Trim
Exciter
Exciter

372 EffectsMono – Mono Chain
079: OD/HG - Amp Sim(Overdrive/Hi.Gain – Amp Simulation)
This effect combines a mono-type overdrive/high-gain distor-tion and an amp simulation. You can change the order of theeffect connection.
080: OD/HG - Cho/Flng(Overdrive/Hi.Gain – Chorus/Flanger)
This effect combines a mono-type overdrive/high-gain distor-tion and a chorus/flanger. You can change the order of the effectconnection.
a
[O] Drive Mode Overdrive, Hi-GainSwitches between overdrive and high-gain distortion
DriveSets the degree of distortion
1...100 Fx:006
b
[O] Output Level 0...50Sets the overdrive output level Fx:006,
Src Off...TempoSelects the modulation source for the overdrive output level
Amt –50...+50Sets the modulation amount of the overdrive output level
c
[O] Low Cutoff [Hz] 20...1.00kHzSets the center frequency for Low EQ (shelving type)
Gain [dB]Table , “Sets the gain of Low EQ,” on page 330
–18...+18dB
d
[O] Mid1 Cutoff [Hz] 300...10.00kHzSets the center frequency for Mid/High EQ 1 (peaking type)
QSets the band width of Mid/High EQ 1
0.5...10.0 Fx:006
Gain [dB]Sets the gain of Mid/High EQ 1
–18...+18dB
e
[O] Mid2 Cutoff [Hz] 500...20.00kHzSets the center frequency for Mid/High EQ 2 (peaking type)
QSets the band width of Mid/High EQ 2
0.5...10.0 Fx:006
Gain [dB]Sets the gain of Mid/High EQ 2
–18...+18dB
f[A] Amplifier TypeSelects the type of guitar amplifier
Solid State, British(EL84), American
(6L6)
g Routing OD→AMP, AMP→ODSwitches the order of the overdrive and amp simulation connection
h
Wet/Dry Dry, 1:99...99:1, WetTable , “Sets the balance between the effect and dry sounds,” on page 330
Src Off...TempoTable , “Selects the modulation source of the effect balance,” on page 330
AmtTable , “Sets the modulation amount of the effect bal-ance,” on page 330
–100...+100
Left
Right
Wet / Dry
Wet / Dry
Wet: Mono In - Mono Out / Dry: Stereo In - Stereo Out
+
RoutingAmp Simulation
Amp Simulation Filter
Overdrive / Hi-Gain
3 Band PEQ
Output Level
Mode: Overdrive / Hi-GainDrive
Driver
a
[O] Drive Mode Overdrive, Hi-GainSwitches between overdrive and high-gain distortion
DriveSets the degree of distortion
1...100 Fx:006
b
[O] Output Level 0...50Sets the overdrive output level Fx:006,
Src Off...TempoSelects the modulation source for the overdrive output level
Amt –50...+50Sets the modulation amount of the overdrive output level
c
[O] Low Cutoff [Hz] 20...1.00kHzSets the center frequency for Low EQ (shelving type)
Gain [dB]Table , “Sets the gain of Low EQ,” on page 330
–18...+18dB
d
[O] Mid1 Cutoff [Hz] 300...10.00kHzSets the center frequency for Mid/High EQ 1 (peaking type)
QSets the band width of Mid/High EQ 1
0.5...10.0 Fx:006
Gain [dB]Sets the gain of Mid/High EQ 1
–18...+18dB
e
[O] Mid2 Cutoff [Hz] 500...20.00kHzSets the center frequency for Mid/High EQ 2 (peaking type)
QSets the band width of Mid/High EQ 2
0.5...10.0 Fx:006
Gain [dB]Sets the gain of Mid/High EQ 2
–18...+18dB
f
[F] LFO Frequency [Hz]Sets the LFO speed
0.02...20.00Hz
LFO WaveformSelects LFO Waveform
Triangle, Sine
g
[F] Delay Time [msec]Sets the delay time
0.0...50.0msec
DepthSets the depth of LFO modulation
0...100
FeedbackSets the feedback amount
–100...+100 Fx:020
h
[F] Cho/Flng Wet/Dry –Wet...–2:98, Dry, 2:98...WetSets the effect balance of the chorus/flanger Fx:010, 020
Output Mode Normal, Wet InvertSelects the output mode for the chorus/flanger Fx:067
iRouting OD → FLNG, FLNG → ODSwitches the order of the overdrive and chorus/flanger connection
Fx:067
j
Wet/Dry Dry, 1:99...99:1, WetTable , “Sets the balance between the effect and dry sounds,” on page 330
Src Off...TempoTable , “Selects the modulation source of the effect balance,” on page 330
AmtTable , “Sets the modulation amount of the effect bal-ance,” on page 330
–100...+100
Left
Right
Wet / Dry
Wet / Dry
Wet: Mono In - Stereo Out / Dry: Stereo In - Stereo Out
+
RoutingChorus/Flanger
Chorus/Flanger
Feedback
LFO: Tri / Sine
Cho/Flng Wet / Dry
Normal
Wet Invert
Output Mode–+
Overdrive / Hi-Gain
3 Band PEQ
Output Level
Mode: Overdrive / Hi-GainDrive
Driver

373EffectsMono – Mono Chain
Appen
dix
081: OD/HG - Phaser(Overdrive/Hi.Gain – Phaser)
This effect combines a mono-type overdrive/high-gain distor-tion and a phaser. You can change the order of the effect connec-tion.
082: OD/HG - Mt. Delay (Overdrive/Hi.Gain – Multitap Delay)
This effect combines a mono-type overdrive/high-gain distor-tion and a multitap delay.
a
[O] Drive Mode Overdrive, Hi-GainSwitches between overdrive and high-gain distortion
DriveSets the degree of distortion
1...100 Fx:006
b
[O] Output Level 0...50Sets the overdrive output level Fx:006,
Src Off...TempoSelects the modulation source for the overdrive output level
Amt –50...+50Sets the modulation amount of the overdrive output level
c
[O] Low Cutoff [Hz] 20...1.00kHzSets the center frequency for Low EQ (shelving type)
Gain [dB]Table , “Sets the gain of Low EQ,” on page 330
–18...+18dB
d
[O] Mid1 Cutoff [Hz] 300...10.00kHzSets the center frequency for Mid/High EQ 1 (peaking type)
QSets the band width of Mid/High EQ 1
0.5...10.0 Fx:006
Gain [dB]Sets the gain of Mid/High EQ 1
–18...+18dB
e
[O] Mid2 Cutoff [Hz] 500...20.00kHzSets the center frequency for Mid/High EQ 2 (peaking type)
QSets the band width of Mid/High EQ 2
0.5...10.0 Fx:006
Gain [dB]Sets the gain of Mid/High EQ 2
–18...+18dB
f
[P] LFO Frequency [Hz]Sets the LFO speed
0.02...20.00Hz
LFO WaveformSelects LFO Waveform
Triangle, Sine
g
[P] ManualSets the frequency to which the effect is applied
0...100
DepthSets the depth of LFO modulation
0...100
ResonanceSets the resonance amount
–100...+100 Fx:023
h
[P] Phaser Wet/Dry –Wet...–2:98, Dry, 2:98...WetSets the phaser effect balance Fx:010, 023
Output Mode Normal, Wet InvertSelects the phaser output mode Fx:067
iRouting OD → PHS, PHS → ODSwitches the order of the overdrive and phaser connection
Fx:067
j
Wet/Dry Dry, 1:99...99:1, WetTable , “Sets the balance between the effect and dry sounds,” on page 330
Src Off...TempoTable , “Selects the modulation source of the effect balance,” on page 330
AmtTable , “Sets the modulation amount of the effect bal-ance,” on page 330
–100...+100
Left
Right
Wet / Dry
Wet / Dry
Wet: Mono In - Stereo Out / Dry: Stereo In - Stereo Out
+
RoutingOverdrive / Hi-Gain
3 Band PEQ
Output Level
Mode: Overdrive / Hi-GainDrive
Driver
Phaser
Phaser
Resonance
LFO: Tri / Sine
Phaser Wet / Dry
Normal
Wet InvertOutput Mode
–+
a
[O] Drive Mode Overdrive, Hi-GainSwitches between overdrive and high-gain distortion
DriveSets the degree of distortion
1...100 Fx:006
b
[O] Output Level 0...50Sets the overdrive output level Fx:006,
Src Off...TempoSelects the modulation source for the overdrive output level
Amt –50...+50Sets the modulation amount of the overdrive output level
c
[O] Low Cutoff [Hz] 20...1.00kHzSets the center frequency for Low EQ (shelving type)
Gain [dB]Table , “Sets the gain of Low EQ,” on page 330
–18...+18dB
d
[O] Mid1 Cutoff [Hz] 300...10.00kHzSets the center frequency for Mid/High EQ 1 (peaking type)
QSets the band width of Mid/High EQ 1
0.5...10.0 Fx:006
Gain [dB]Sets the gain of Mid/High EQ 1
–18...+18dB
e
[O] Mid2 Cutoff [Hz] 500...20.00kHzSets the center frequency for Mid/High EQ 2 (peaking type)
QSets the band width of Mid/High EQ 2
0.5...10.0 Fx:006
Gain [dB]Sets the gain of Mid/High EQ 2
–18...+18dB
f
[D] Tap1 Time [msec]Sets the Tap1 delay time
0...680msec
Tap1 LevelSets the Tap1 output level
0...100 Fx:045
g
[D] Tap2 Time [msec]Sets the Tap2 delay time
0...680msec
FeedbackSets the Tap2 feedback amount
–100...+100
h
[D] Mt.Delay Wet/Dry Dry, 2:98...98:2, WetSets the multitap delay effect balance
High Damp [%]Sets the damping amount in the high range
0...100% Fx:043
i
Wet/Dry Dry, 1:99...99:1, WetTable , “Sets the balance between the effect and dry sounds,” on page 330
Src Off...TempoTable , “Selects the modulation source of the effect balance,” on page 330
AmtTable , “Sets the modulation amount of the effect bal-ance,” on page 330
–100...+100
Left
Right
Wet / Dry
Wet / Dry
Wet: Mono In - Mono Out / Dry: Stereo In - Stereo Out
+
Multitap Delay
Feedback
High Damp
Delay(2)
(1)
Mt.Dly Wet / Dry
Overdrive / Hi-Gain
3 Band PEQ
Output Level
Mode: Overdrive / Hi-GainDrive
Driver

374 EffectsMono – Mono Chain
083: Wah - Amp Sim(Wah/Auto Wah – Amp Simulation)
This effect combines a mono-type wah and an amp simulation.You can change the order of the effect connection.
084: Decimator - Amp(Decimator – Amp Simulation)
This effect combines a mono-type decimator and an amp simu-lation. You can change the order of the effect connection.
085: Decimator - Comp(Decimator – Compressor)
This effect combines a mono-type decimator and a compressor.You can change the order of the effect connection.
a
[W] Frequency BottomSets the lower limit of the wah center frequency
0...100 Fx:009
Frequency TopSets the upper limit of the wah center frequency
0...100 Fx:009
b
[W] Sweep Mode Auto, D-mod, LFOSelects the control from auto-wah, modulation source, and LFO
Fx:009,
Src Off...TempoSelects the modulation source for the wah when Sweep Mode=D-mod
c [W] LFO Frequency [Hz]Sets the LFO speed
0.02...20.00Hz
d
[W] ResonanceSets the resonance amount
0...100
Low Pass FilterSwitches the wah low pass filter on and off
Off, On
e[A] Amplifier TypeSelects the type of guitar amplifier
Solid State, British(EL84), American
(6L6)
f Routing WAH → AMP, AMP → WAHSwitches the order of the wah and amp simulation connection
g
Wet/Dry Dry, 1:99...99:1, WetTable , “Sets the balance between the effect and dry sounds,” on page 330
Src Off...TempoTable , “Selects the modulation source of the effect balance,” on page 330
AmtTable , “Sets the modulation amount of the effect bal-ance,” on page 330
–100...+100
Left
Right
Wet / Dry
Wet / Dry
Wet: Mono In - Mono Out / Dry: Stereo In - Stereo Out
+
RoutingAmp Simulation
Amp Simulation Filter
Wah/Auto Wah
Wah
D-mod
EnvelopeSweep Mode
D-modAuto
LFO
LFO
a
[D] Pre LPFOff, OnTurn the harmonic noise caused by lowered sampling on and off
Fx:014
High Damp [%]Sets the ratio of high-range damping
0...100%
b
[D] Sampling Freq [Hz] (Sampling Frequency)Sets the sampling frequency
1.00k...48.00kHz
ResolutionSets the data bit length
4...24 Fx:014
c [D] Output LevelSets the decimator output level
0...100 Fx:014
d[A] Amplifier TypeSelects the type of guitar amplifier
Solid State, Brit-ish (EL84),
American (6L6)
e RoutingDECI→AMP, AMP→DECISwitches the order of the wah and amp simulation connection
f
Wet/DryDry, 1:99...99:1, WetTable , “Sets the balance between the effect and dry sounds,” on page 330
SrcOff...TempoTable , “Selects the modulation source of the effect balance,” on page 330
AmtTable , “Sets the modulation amount of the effect balance,” on page 330
–100...+100
a
[D] Pre LPF Off, OnTurn the harmonic noise caused by lowered sampling on and off
Fx:014
High Damp [%]Sets the ratio of high-range damping
0...100%
b
[D] Sampling Freq [Hz] (Sampling Frequency)Sets the sampling frequency
1.00k...48.00kHz
ResolutionSets the data bit length
4...24 Fx:014
c [D] Output LevelSets the decimator output level
0...100 Fx:014
d [C] SensitivitySets the sensitivity
1...100 Fx:002
e
[C] AttackTable , “Sets the attack level,” on page 330
1...100 Fx:002
Output LevelSets the compressor output level
0...100 Fx:002
f Routing DECI→CMP, CMP→DECISwitches the order of the decimator and compressor connection
Left
Right
Wet / Dry
Wet / Dry
Wet: Mono In - Mono Out / Dry: Stereo In - Stereo Out
+
DecimatorRouting
Pre LPF High Damp
Output Level
DecimatorResolution
Compressor
CompOutput Level
Envelope - Control

375EffectsMono – Mono Chain
Appen
dix
086: AmpSim - Tremolo(Amp Simulation – Tremolo)
This effect combines a mono-type amp simulation and a trem-olo.
087: Cho/Flng - Mt.Dly(Chorus/Flanger – Multitap Delay)
This effect combines a mono-type chorus/flanger and a multitapdelay.
g
Wet/Dry Dry, 1:99...99:1, WetTable , “Sets the balance between the effect and dry sounds,” on page 330
Src Off...TempoTable , “Selects the modulation source of the effect balance,” on page 330
AmtTable , “Sets the modulation amount of the effect bal-ance,” on page 330
–100...+100
a[A] Amplifier TypeSelects the type of guitar amplifier
Solid State, British(EL84), American
(6L6)
b
[T] LFO Waveform Triangle, Sine, Vintage, Up, DownSelects LFO Waveform Fx:032
LFO Shape –100...+100Determines how much the LFO waveform is changed Fx:020
c [T] LFO Frequency [Hz]Sets the LFO speed
0.02...20.00Hz
d [T] DepthSets the depth of LFO modulation
0...100
e
Wet/Dry Dry, 1:99...99:1, WetTable , “Sets the balance between the effect and dry sounds,” on page 330
Src Off...TempoTable , “Selects the modulation source of the effect balance,” on page 330
AmtTable , “Sets the modulation amount of the effect bal-ance,” on page 330
–100...+100
Left
Right
Wet / Dry
Wet / Dry
Wet: Mono In - Mono Out / Dry: Stereo In - Stereo Out
+
Amp Simulation Tremolo
Amp Simulation Filter Tremolo
LFO: Tri/Sin/Vintage/Up/Down LFO Shape
a [F] Delay Time [msec]Sets the delay time
0.0...50.0msec
b
[F] LFO Frequency [Hz]Sets the LFO speed
0.02...20.00Hz
LFO WaveformSelects LFO Waveform
Triangle, Sine
c
[F] DepthSets the depth of LFO modulation
0...100
FeedbackSets the feedback amount
–100...+100 Fx:020
d [F] EQ TrimTable , “Sets the EQ input level,” on page 330
0...100
e
[F] Pre LEQ Gain [dB]Table , “Sets the gain of Low EQ,” on page 330
–15...+15dB
Pre HEQ Gain [dB]Table , “Sets the gain of High EQ,” on page 330
–15...+15dB
f [F] Cho/Flng Wet/Dry –Wet...–2:98, Dry, 2:98...WetSets the effect balance of the chorus/flanger Fx:010, 020
g
[D] Tap1 Time [msec]Sets the Tap1 delay time
0...680msec
Tap1 LevelSets the Tap1 output level
0...100 Fx:045
h
[D] Tap2 Time [msec]Sets the Tap2 delay time
0...680msec
Feedback (Tap2)Sets the Tap2 feedback amount
–100...+100
i
[D] Mt.Delay Wet/Dry Dry, 1:99...99:1, WetSets the multitap delay effect balance
High Damp [%]Sets the damping amount in the high range
0...100% Fx:043
j
Wet/Dry Dry, 1:99...99:1, WetTable , “Sets the balance between the effect and dry sounds,” on page 330
Src Off...TempoTable , “Selects the modulation source of the effect balance,” on page 330
AmtTable , “Sets the modulation amount of the effect bal-ance,” on page 330
–100...+100
Left
Right
Wet / Dry
Wet / Dry
Wet: Mono In - Mono Out / Dry: Stereo In - Stereo Out
+LEQ HEQEQ
Trim
Multitap Delay
Feedback
High Damp
Delay(2)
(1)
Chorus/Flanger
Cho/FlngWet / Dry
Mt.DlyWet / Dry
Chorus/Flanger
Feedback
LFO: Tri / Sine

376 EffectsMono – Mono Chain
088: Phaser - Cho/Flng(Phaser – Chorus/Flanger)
This effect combines a mono-type phaser and a chorus/flanger.
089: Reverb - Gate(Reverb – Gate)
This effect combines a mono-type reverb and a gate.
f: Envelope Select, f: Src, g: Input Reverb Mix, g:Threshold
The “Envelope Select” parameter enables you to select whetherturning the gate on and off is triggered by the input signal levelor controlled directly by the modulation source. You can selectfrom Off to Gate2+Dmpr for the Src parameter to specify themodulation source. When “Envelope Select” is set to Input, the gate is controlled bythe level of signals that are the combination of the dry sound andthe reverb sound. When the signal level exceeds the threshold,the gate opens and the reverb sound is output.Normally, set “Input Reverb Mix” to Dry (the gate is controlledonly by the dry sound). If you wish to extend the gate time, setthe “Input Reverb Mix” value higher and adjust the “Threshold”value.
a
[P] LFO Frequency [Hz]Sets the LFO speed
0.02...20.00Hz
LFO WaveformSelects LFO Waveform
Triangle, Sine
b
[P] ManualSets the frequency to which the effect is applied
0...100
DepthSets the depth of LFO modulation
0...100
ResonanceSets the resonance amount
–100...+100 Fx:023
c [P] Phaser Wet/Dry –Wet...–2:98, Dry, 2:98...WetSets the phaser effect balance Fx:010, 023
d
[F] LFO Frequency [Hz]Sets the LFO speed
0.02...20.00Hz
LFO WaveformSelects LFO Waveform
Triangle, Sine
e
[F] Delay Time [msec]Sets the delay time
0.0...50.0msec
DepthSets the depth of LFO modulation
0...100
FeedbackSets the feedback amount
–100...+100 Fx:020
f [F] EQ TrimTable , “Sets the EQ input level,” on page 330
0...100
g
[F] Pre LEQ Gain [dB]Table , “Sets the gain of Low EQ,” on page 330
–15...+15dB
Pre HEQ Gain [dB]Table , “Sets the gain of High EQ,” on page 330
–15...+15dB
h
[F] Cho/Flng Wet/Dry –Wet...–2:98, Dry, 2:98...WetSets the effect balance of the chorus/flanger Fx:010, 020
Output Mode Normal, Wet InvertSelects the output mode for the chorus/flanger Fx:060
i
Wet/Dry Dry, 1:99...99:1, WetTable , “Sets the balance between the effect and dry sounds,” on page 330
Src Off...TempoTable , “Selects the modulation source of the effect balance,” on page 330
AmtTable , “Sets the modulation amount of the effect bal-ance,” on page 330
–100...+100
Left
Right
Wet / Dry
Wet / Dry
Wet: Mono In - Stereo Out / Dry: Stereo In - Stereo Out
+
Chorus/Flanger
Cho/FlngWet / Dry
LEQHEQEQTrim
Chorus/Flanger
Feedback
Phaser
PhaserWet / Dry
Phaser
Resonance
LFO: Tri / Sine LFO: Tri / Sine
Normal
Wet InvertOutput Mode
–+
a
[R] Reverb Time [sec]Sets the reverberation time
0.1...10.0sec
High Damp [%]Sets the damping amount in the high range
0...100%
b [R] Pre Delay [msec] 0...200msecSets the delay time of the reverb sound and gate control signal
c [R] EQ TrimTable , “Sets the EQ input level,” on page 330
0...100
d
[R] Pre LEQ Gain [dB]Table , “Sets the gain of Low EQ,” on page 330
–15...+15dB
Pre HEQ Gain [dB]Table , “Sets the gain of High EQ,” on page 330
–15...+15dB
e [R] Reverb Balance Dry, 1:99...99:1, WetSets the reverb effect balance
f
[G] Envelope Select D-mod, InputSwitches between modulation source control and input signal control
Src Off...Gate2+DmprSelects the modulation source that controls the gate when Envelope Select is set to D-mod
g
[G] Input Reverb Mix Dry, 1:99...99:1, WetSets the balance between the dry and reverb sounds of the gate control sig-nal.
ThresholdSets the gate threshold level
0...100
h[G] Polarity +, –Switches between non-invert and invert of the gate on/off state
Fx:005
i
[G] AttackSets the attack time
1...100 Fx:005
ReleaseSets the release time
1...100 Fx:005
j
Wet/Dry Dry, 1:99...99:1, WetTable , “Sets the balance between the effect and dry sounds,” on page 330
Src Off...TempoTable , “Selects the modulation source of the effect balance,” on page 330
AmtTable , “Sets the modulation amount of the effect bal-ance,” on page 330
–100...+100
Left
Right
Wet / Dry
Wet / Dry
ReverbBalance
Wet: Mono In - Mono Out / Dry: Stereo In - Stereo Out
+LEQ HEQ
EQ Trim
ReverbPre Delay
Envelope - ControlD-mod
Input
Envelope Select
Gate
Input Reverb Mix
Reverb
GateGate+Dmpr

377EffectsMono – Mono Chain
Appen
dix
090: Vocoder
This effect can be assigned only to the D FX processor (usually,the modulating effect for the Keyboard tracks). When this effectis selected, the microphone input no longer goes to the VoiceProcessor, but is routed to the D FX processor.
When programming the Vocoder, you can use one of the spe-cially programmed “Vocoder” Performances (in the SFX bank)as templates.
Before using the Vocoder, you must connect a microphone and,set the 1/MIC selector to the MIC position.
This effect applies the character of the microphone signal (Mod-ulator) to the track’s oscillator signal input (Carrier). Therefore,the voice can modulate one of the sounds of the Pa1X. A com-mon use of this effect is to produce the sound of various instru-ments by inputting a voice to the Modulator via a microphone.A special effect is also achieved by using rhythm or effect sounds.Strings or distortion guitar sounds with a lot of harmonics aresuitable as a Carrier.
c: Formant Shift
By offsetting the Carrier filter, you can adjust the height of thefrequency range to which the vocoder effect is applied. The tonalquality will change significantly.
f: Modulator Mix
This parameter sets the high-range output level of the rightchannel sound (Modulator). If the modulator is a human voice, itwill make the words more clear.The “Vocoder/Carrier” parameter sets the balance between thevocoder sound and the left channel sound (Carrier). The “Wet/Dry” parameter sets the balance between the effect and drysound.If you wish to change the intensity of the vocoder effect, selectWet for “Wet/Dry”, and adjust the balance using the “Vocoder/Carrier” parameter.
Note: When you assign the Vocoder effect to the D FX processor, thedirect input can no longer be heard. The input signal goes entirelyto the FX processor. To listen to the direct signal, you can still usethe “Wet/Dry” parameter to increase the level of the direct signal(Dry).
Please remember to set the tracks Pan value to Off, and the Sendvalue to 127.
You can add reverb to the Vocoder, by way of the “D to C” parame-ter.
Hint: To create a new Song making use of the Vocoder, enter theSequencer-Backing Sequence mode with a Performance thatincludes the Vocoder effect.
a Osc (Carrier) TrimSets the input level of the oscillator (Carrier)
0...100
b Mic (Modulator) TrimSets the input level of the microphone (Modulator)
0...100
c Formant Shift –2...+2Sets the height of the frequency for the vocoder effect
d Response 0...100Sets the speed of the response to the modulator input
g
Low Gain [dB]Sets the low-range output level of the vocoder
–12...+12
High Gain [dB]Sets the high-range output level of the vocoder
–12...+12
f Modulator MixSets the high-range output level of the modulator
0...100
hVocoder/Carrier Carrier, 1:99...99:1, VocoderSets the balance between the vocoder output and the Carrier
i
Wet/Dry Dry, 1:99...99:1, WetSets the balance between the effect and dry sounds
Src Off...TempoSelects the modulation source of the effect balance
AmtSets the modulation amount of the effect balance
–100...+100
Osc
Mic
Wet / Dry
Wet / Dry
Wet: Stereo In - Mono Out / Dry: Stereo In - Stereo Out
Band Pass Filter
Envelope
+
Modulator
Carrier
Osc (Carrier)Trim
Mic (Modulator)Trim
Modulator High Mix
Vocoder /Carrier
+

378 Assignable parametersList of Footswitch and EC5 functions
List of Footswitch and EC5 functions
The following functions can be assigned to a footswitch or KorgEC5’s switch pedal.
Assignable parameters
Function Meaning
Off No function assigned
Style Start/Stop
Same functions of the control panel but-tons with the same name
Play Stop Seq1
Play Stop Seq2
Pause Seq1
Pause Seq2
Synchro Start
Synchro Stop
Tap Tempo/Reset
Tempo Lock
Ritardando Progressively increases the Tempo value
Accelerando Progressively decreases the Tempo value
Tempo Up Increases the Tempo value
Tempo Down Decreases the Tempo value
Intro 1
Same functions of the control panel but-tons with the same name
Intro 2
Intro 3 / Count In
Ending 1
Ending 2
Fill 1
Fill 2
Fill 3 / Break
Variation 1
Variation 2
Variation 3
Variation 4
Variation Up Selects the next Variation
Variation Down Selects the previous Variation
Fade In/Out
Same functions of the control panel but-tons with the same name
Memory
Bass Inversion
Manual Bass
Style Up Selects the next Style
Style Down Selects the previous Style
Single Touch
Same functions of the control panel but-tons with the same name
STS1
STS2
STS3
STS4
STS Up Selects the next STS
STS Down Selects the previous STS
Perform. Up Selects the next Performance
Perform. Down Selects the previous Performance
Style Change Style number
Sound Up Selects the next Sound
Sound Down Selects the previous Sound
Transpose Down
Same functions of the control panel but-tons with the same name
Transpose Up
Upper Octave Up
Upper Octave Down
Punch In/Out Turns Punch Recording on/off
FX A Mute
FX B Mute
FX C Mute
FX D Mute
FX All Mute
Style-Upper1 Mute
Style-Upper2 Mute
Style-Upper3 Mute
Style-Lower Mute
Style-Drum Mute
Style-Percussion Mute
Style-Bass Mute
Style-Acc1 Mute
Style-Acc2 Mute
Style-Acc3 Mute
Style-Acc4 Mute
Style-Acc5 Mute
Style-Acc1-5 Mute
Song-Melody Mute Mute of Song track 4 (usually, the Mel-ody track)
Song-Drum&Bass Mode Mute of all tracks, apart for track 2 (usu-ally Bass) and 10 (usually Drum)
Solo Selected Track
Damper Pedal
Soft Pedal
Sostenuto Pedal
Bass&Lower Backing Mutes all tracks, except for Bass and Lower
Ensemble On/Off
QuarterTone Turns Quarter Tone on/off
Chord Latch Holds the recognized chord until the pedal is released
Chord Latch + Damper Holds the recognized chord until the pedal is released, and sustains the tracks where the Damper has been turned on
Glide When the pedal is pressed, affected notes on Upper tracks are bent down, according to settings for the Pitch Bend on the same tracks. When the pedal is released, notes return to the normal pitch, at the speed defined by the “Time” parameter (see “Glide” on page 230).
Audio In Mute
Function Meaning

379Assignable parametersList of Assignable Pedal and Assignable Sliders functions
Appen
dix
List of Assignable Pedal and AssignableSliders functions
The following functions can be assigned to a continuous pedalor to the Assignable Sliders.
Microphone Talkback Turns all Voice Processor effects down, to let you address the audience. See “Voice Processor Setup: Talk” on page 244.
Voice Proc. Sw. A Tgl Toggle-style switch controls assigned to the Voice Processor. Press once to acti-vate , a second time to deactivate. See “Voice Processor Preset: Controls” on page 252, for information on the assigned Voice Processor parameters.
Voice Proc. Sw. B Tgl
Voice Proc. Sw. C Tgl
Voice Proc. Sw. D Tgl
Voice Proc. Sw. A Mom Momentary switch controls assigned to the Voice Processor. Press to activated, release to deactivate. See “Voice Proces-sor Preset: Controls” on page 252, for information on the assigned Voice Pro-cessor parameters.
Voice Proc. Sw. B Mom
Voice Proc. Sw. C Mom
Voice Proc. Sw. D Mom
FX CC12 SwitchStandard FX controllers
FX CC13 Switch
Rotary Spkr On/Off
Rotary Spkr Fast/Slow
Drawbar Perc On/Off
Drawbar Noise On/Off
Text Page Up These options let you move to the previ-ous or next page, when reading a text file loaded with a Song (see “Text files loaded with Standard MIDI Files and MP3 files” on page 146) or Song Book entry (see “Lyrics as text files associated to a SongBook entry” on page 163).
Text Page Down
SongBook Next Moves to the next SongBook entry in the selected Custom List.
Pad 1
Same functions of the control panel but-tons with the same name
Pad 2
Pad 3
Pad 4
Pad Stop
Function Meaning
Function Meaning
Off No function assigned
Master Volume
Acc. Volume Accopaniment Volume
Keyboard Expression
Joystick +X Joystick right
Joystick -X Joystick left
Joystick +Y Joystick forward
Joystick -Y Joystick backward
Upper VDF Cutoff Filter cutoff (for Sounds assigned to the Upper tracks)
Upper VDF Resonance Filter resonance (for Sounds assigned to the Upper tracks)
Voice Proc. Cnt.Ctl A Continuous controls assigned to the Voice Processor. See “Voice Processor Pre-set: Controls” on page 221, for informa-tion on the assigned Voice Processor parameters.
Voice Proc. Cnt.Ctl B
Voice Proc. Cnt.Ctl C
Voice Proc. Cnt.Ctl D
Mic In Volume
FX CC12 CtlStandard FX controllers
FX CC13 Ctl
Max CD Volume [%]
Max MP3 Volume [%]
Pad Volume With this function assigned, you can con-trol the proportional volume of all four Pads at the same time. Please note that the status of the Pad’s volume, after hav-ing been modified with a pedal or slider, is made current, and will be saved in a Performance or STS by using the relevant Write procedure.

380 Assignable parametersList of Assignable Switches functions
List of Assignable Switches functions
The following functions can be assigned to the AssignableSwitches.
Function Meaning
Off No function assigned
Ritardando Progressively increases the Tempo value
Accelerando Progressively decreases the Tempo value
Style Up Selects the next Style
Style Down Selects the previous Style
Perform. Up Selects the next Performance
Perform. Down Selects the previous Performance
FX A Mute
FX B Mute
FX C Mute
FX D Mute
FX All Mute
Style-Upper1 Mute
Style-Upper2 Mute
Style-Upper3 Mute
Style-Lower Mute
Style-Drum Mute
Style-Percussion Mute
Style-Bass Mute
Style-Acc1 Mute
Style-Acc2 Mute
Style-Acc3 Mute
Style-Acc4 Mute
Style-Acc5 Mute
Style-Acc1-5 Mute
Song-Melody Mute Mute of Song track 4 (usually, the Mel-ody track)
Song-Drum&Bass Mode Mute of all tracks, apart for track 2 (usu-ally Bass) and 10 (usually Drum)
Solo Selected Track
Bass&Lower Backing Mutes all tracks, except for the Bass and Lower tracks
QuarterTone Turns Quarter Tone on/off
Audio In Mute
Microphone Talkback Turns all Voice Processor effects down, to let you address the audience. See “Voice Processor Setup: Talk” on page 244.
Voice Proc. Sw. A Tgl Toggle-style switch controls assigned to the Voice Processor. Press once to acti-vate , a second time to deactivate. See “Voice Processor Preset: Controls” on page 252, for information on the assigned Voice Processor parameters.
Voice Proc. Sw. B Tgl
Voice Proc. Sw. C Tgl
Voice Proc. Sw. D Tgl
Voice Proc. Sw. A Mom Momentary switch controls assigned to the Voice Processor. Press to activated, release to deactivate. See “Voice Proces-sor Preset: Controls” on page 252, for information on the assigned Voice Pro-cessor parameters.
Voice Proc. Sw. B Mom
Voice Proc. Sw. C Mom
Voice Proc. Sw. D Mom
FX CC12 SwitchStandard FX controllers
FX CC13 Switch
Rotary Spkr On/Off
Rotary Spkr Fast/Slow
Drawbar Perc On/Off
Drawbar Noise On/Off
Text Page Up These options let you move to the previ-ous or next page, when reading a text file loaded with a Song (see “Text files loaded with Standard MIDI Files and MP3 files” on page 146) or Song Book entry (see “Lyrics as text files associated to a SongBook entry” on page 163).
Text Page Down
SongBook Next Moves to the next SongBook entry in the selected Custom List.
Function Meaning

381Assignable parametersList of functions assignable to Voice Processor’s Continuous Controls
Appen
dix
List of functions assignable to Voice Processor’s Continuous Controls
The following Voice Processor functions can be assigned to a continuous pedal or to the Assignable Slider, by using one of the four cor-responding <Cnt> “meta-functions” available on the “Voice Processor Preset: Controls” page of the Global mode (see “Voice ProcessorPreset: Controls”).
Lead Voice Level
Harmony Output Level
Voice 1 Level
Voice 1 Gender
Voice 2 Level
Voice 2 Gender
Voice 3 Level
Voice 3 Gender
Voice 4 Level
Voice 4 Gender
Harmony Smooth
Human Style Amount
Thicken Level
Thicken Detune
Thicken Spread
Vibrato Depth
Lead to Reverb
Harmony to Reverb
Lead to Delay
Harmony to Delay
Delay to Reverb
Reverb/Delay Balance
Effect Level
Voice Modeling Level
List of functions assignable to Voice Processor’s Switch Controls
The following Voice Processor functions can be assigned to a footswitch, to an Assignable Switch, or to and EC5 swtich pedal, by usingone of the four corresponding <Sw> “meta-functions” available on the “Voice Processor Preset: Controls” page of the Global mode (see“Voice Processor Preset: Controls”).
Lead On/Off
Harm/Model On/Off
Effect On/Off
Thicken On/Off
Latch On/Off
Harmony Hold
Voice 1 On/Off
Voice 2 On/Off
Voice 3 On/Off
Voice 4 On/Off
Harmony/Modeling Switch
Pitch Correction On/Off

382 Assignable parametersScales
Scales
The following is a list of scales (or tunings) you can select in var-ious operating modes.
Equal Equal tuning, the standard scale for modernWestern music. It is made of 12 identical semi-tones.
Pure Major Major chords in the selected key are perfectlytuned.
Pure Minor Minor chords in the selected key are perfectedtuned.
Arabic An arabic scale, using quarters of tone. Set theKey parameter as follow:
C - for the “rast C/bayati D” scale
D - for the “rast D/bayati E” scale
F - for the “rast F/bayati G” scale
G - for the “rast G/bayati A” scale
A# - for the “rast Bb/bayati C” scale
Pythagorean Pythagorean scale, based on the music theories ofthe great Greek philosopher and matematician. Itis most suitable for melodies.
Werckmeister
Late Baroque/Classic Age scale. Very suitable forXVIII Century music.
Kirnberger Harpsichord scale, very common during theXVIII Century.
Slendro Scale of the Indonesian Gamelan. The octave isdivided in 5 notes (C, D, F, G, A). The remainingnotes are tuned as in the Equal tuning.
Pelog Scale of the Indonesian Gamelan. The octave isdivided in 7 notes (all white keys, when Key is =C). The black keys are tuned as in the Equal tun-ing.
Stretch Simulates the “stretched” tuning of an acousticpiano. Basically an equal tuning, the lowest notesare slightly lower, while the highest notes areslightly higher than the standard.
User User scale, i.e. scale programmed by the user forthe Style Play, Backing Sequence and Song Playmodes. The user scale can be saved to a Perfor-mance, Style Performance, STS or Song. You can’tselect a User scale in Global mode.

383MIDI DataMIDI Controllers
Appen
dix
MIDI Controllers
The following is a table including all Control Change messages,and their effect on various Pa1X functions.
(*) The following NRPN messages are recognized by the Pa1X:
Note: These controls are reset when stopping the Song, or choosinga new Song.
MIDI Data
CC# CC Name Pa1X Function
0 Bank Select Program selection
1 Mod1 (Y+) Joystick forward
2 Mod2 (Y-) Joystick backward
3 Undef. ctl
4 Foot ctl
5 Port.time
6 Data ent.
7 Volume Track volume
8 Balance
9 Undef. ctl
10 Pan Pot Track panning
11 Expression Expression
12 Fx Ctl 1
13 Fx Ctl 2
14-15 Undef. ctl
16 Gen.pc.1
17 Gen.pc.2
18 Slider
19 Gen.pc.4
20-31 Undef. ctl
Control Change #32-63 are the LSB (Least Significant Bytet) of Con-trol Change #0-31, i.e. the MSB (Most Significant Byte), and are changed according to their MSB counterparts.
64 Damper Damper pedal
65 Portamento
66 Sostenuto Sostenuto pedal
67 Soft pedal Soft pedal
68 Legato
69 Hold 2
70 Sustin level
71 F.Res.Hp Filter resonance
72 Release Release time
73 Attack Attack time
74 F.CutOff Filter cutoff (Brilliance)
75 Decay T. Decay time
76 Lfo1 Sp. Vibrato speed
77 Lfo1 Dpt Vibrato depth
78 Lfo1 Dly Vibrato initial delay
79 FilterEg
80 Gen.pc.5
81 Gen.pc.6
82 Gen.pc.7
83 Gen.pc.8
84 Port.ctl
85-90 Undef. ctl
91 Fx A/C A/C (reverb) send level
92 Fx 2 ctl
93 Fx B/D B/D (modul.) send level
94 Fx 4 ctl
95 Fx 5 ctl
96 Data Inc
97 Data Dec
98 NRPN Lsb See table below(*)
99 NRPN Msb* See table below(*)
100 RPN Lsb
101 RPN Msb
102-119 Undefined ctl
120 AllSOff
121 Res Ctl Reset All Controllers
122 LocalCt
123 NoteOff
124 OmniOff
125 Omni On
126 Mono On
127 Poly On
NRPNCC#99(MSB)
CC#98(LSB)
CC#06(Data Entry)
Vibrato Rate 1 8 0…127(a)
(a). 64 = No change to the original parameter’s value
Vibrato Depth 1 9 0…127(a)
Vibrato Decay 1 10 0…127(a)
Filter Cutoff 1 32 0…127(a)
Resonance 1 33 0…127(a)
EG Attack Time 1 99 0…127(a)
EG Decay Time 1 100 0…127(a)
EG Release Time 1 102 0…127(a)
Drum Filter Cutoff 20 dd(b)
(b). dd = Drum Instrument No. 0…127 (C0…C8)
0…127(a)
Drum Filter Resonance 21 dd(b) 0…127(a)
Drum EG Attack Time 22 dd(b) 0…127(a)
Drum EG Decay Time 23 dd(b) 0…127(a)
Drum Coarse Tune 24 dd(b) 0…127(a)
Drum Fine Tune 25 dd(b) 0…127(a)
Drum Volume 26 dd(b) 0…127
Drum Panpot 28 dd(b) 0…127(a)
Drum Rev Send (FX 1) 29 dd(b) 0…127(a)
Drum Mod Send (FX 2) 30 dd(b) 0…127(a)
CC# CC Name Pa1X Function

384 MIDI DataProgram Change messages used as remote commands
Program Change messages used as remote commands
The following is a table including all Program Change messages, used as remote Style and Sequencer controls. These messages are to besent on the Control channel (see “MIDI: MIDI In Channels” on page 238).
Note: The above Program Change numbers are given according to the 0-127 numbering system.
PC Function PC Function PC Function PC Function PC Function
91 Fade In/Out 92 Memory 93 Bass Inversion 94 Manual Bass 95 Tempo Lock
96 Single Touch 97 Style Change 98 Intro 3/Count In 99 Start/Stop (Style) 100 Play/Stop (Seq 1)
101 Play/Stop (Seq 2)

385MIDI DataMIDI Implementation Chart
Appen
dix
MIDI Implementation Chart
Function Transmitted Recognized Remarks
Basic ChannelDefault 1–16 1–16 Memorized
Changed 1–16 1–16
Mode
Default 3
Messages X X
Altered ****************
Note Number:
0–127 0–127
True Voice **************** 0–127
VelocityNote On O 9n, V=1–127 O 9n, V=1–127
Note Off X V=64 X
AftertouchPoly (Key) O O Sequencer data only *A
Mono (Channel) O O *A
Pitch Bend O O
Control Change
0, 32 O O Bank Select (MSB, LSB) *A
1, 2 O O Modulations *A
6 O O Data Entry MSB *A
38 X O Data Entry LSB *A
7, 11 O O Volume, Expression *A
10, 91, 93 O O Panpot, A/C FX Send, B/D FX Send *A
64, 66, 67 O O Damper, Sostenuto, Soft *A
65, 5 O O Portamento On/Off, Portamento Time *A
71, 72, 73 O O Harmonic Content, EG time (Release, Attack) *A
74, 75 O O Brightness, Decay Time *A
76, 77, 78 O O Vibrato Rate, Depth, Delay *A
98, 99 O O NRPN (LSB, MSB) *A, 1
100, 101 O O RPN (LSB, MSB) *A, 2
120, 121 X O All sounds off, Reset all controllers *A
Program Change
O 0–127 O 0–127 *A
True # **************** 0–127
System Exclusive X X *3
SystemCommon
Song Position X X
Song Select X X
Tune X X
SystemReal Time
Clock O O *4
Commands O O *4
AuxMessages
Local On/Off X X
All Notes Off X O (123–127)
Active Sense O O
Reset X X
Notes
*A: Sent and received when MIDI Filters In and Out are set to Off in Global mode.*1: Drawbars settings, Sound parameters, Selection of SongBook entries.*2: LSB, MSB = 00,00: Pitch Bend range, =01,00: Fine Tune, =02,00: Course Tune.*3: Includes Inquiry and Master Volume messages, FX settings, Quarter Tone settings.*4: Transmitted only when the Clock Send parameter (Global mode) is set to on.
Mode 1:OMNI ON, POLYMode 3:OMNI OFF, POLY
Mode 2:OMNI ON, MONOMode 4:OMNI OFF, MONO
O: YesX: No
KORG Pa1XOS Version 2.5 - May. 15, 2005

386 ParametersControl panel and operating mode parameters
Control panel and operating mode parameters
The following table shows the parameters you can save to memory when selecting one of the “Write” commands from the Style Play,Song Play, Sequencer, Global and Disk mode page menu, as well as when pressing the “Write” button in the SongBook > Book Edit 1page.
Legend: Perf (Performance), STS (Style’s STS), Sty Perf (Style Performance), STS SB (SongBook’s STS), SB (SongBook Entry), Sty Stp (StylePlay Setup), Sng Stp (Song Play Setup), Glb Stp (Global Setup), Mid Stp (MIDI Setup), VP Stp (Voice Processor Setup), VP Tlk (Voice Pro-cessor Talk Setup), VP Pst (Voice Processor Preset), Dsk Stp (Disk Setup).
Parameters
Page Parameter Perf STS Sty Perf STS SB SBGlobal
NoteSty Stp Sng Stp Seq Stp Glb Stp Mid Stp VP Stp VP Tlk VP Pst Dsk Stp
Control Panel
–
Master Volume (Slider) Analog controlAcc./Seq Volume (Slider) St/SgAssign. Slider Functions √
GSlider Mode √ √ √ L5Drawbar Settings √ √ √ √ √Selected Operating Mode Style Play selected at startupMemory √Bass Inversion √ √ √ L7Manual Bass √ √ √ L10Fade In/OutSelected Style Number √Single Touch Set to “On” at startupTap Tempo / ResetSynchro Start/Stop √ Set to “Off” at startupStart/StopStyle Element (Intro 1-3, Ending 1/2, Var 1-4, Fill 1-3)
√ √ √ G
Sequencer 1/2 TransportBalance (Slider)Selected STS STS#1 selected when selecting a Style (with SINGLE TOUCH = On)Tempo √ √ √ G
Tempo Lock Set to “Off” at startupDisplay Hold Set to “Off” at startupChord Scanning √ √ √
GKeyboard Mode √ √ √Style Change Set to “Off” at startupPerf./Sound Select √Selected Performance Performance 1-1 selected at startupSelected Sound K/St K St K St TSongBookEnsemble On/Off √ √ √
GAssign. Switch Functions √ √ √ L4Pads √ √ √ L3Master Transpose √ √ √ L1Upper Octave Transpose U U U T
Style Play Mode
Main (Kbd Trk)
Selected Style √ √ G
Meter Saved in the Style patternTempo √ √ √Selected Perf/STS G
Selected SongsKeyboard Sounds K K KUpper Trk Octave Transp. U U UMaster Transpose √ √ √ L1 G
Main (Sty Trk)Original Style Sounds √ √ √ SGStyle Trk Octave Transp. St St St
TStyle Trk Sounds St St St Selected when “Original Style Sounds” is set to “Off”
Main • VolumeTrack Volume K/St K St K StPlay/Mute K/St K St K St L8
Main • STS Name Selected STS STS#1 selected when selecting a Style (with SINGLE TOUCH = On)
Main • Mic
Harmony/Modeling √
G
Lead √V1-V4 √Pitch √Thicken √Effects √Talk √Play/MuteVP Preset √ √ √ L2VP Lock √
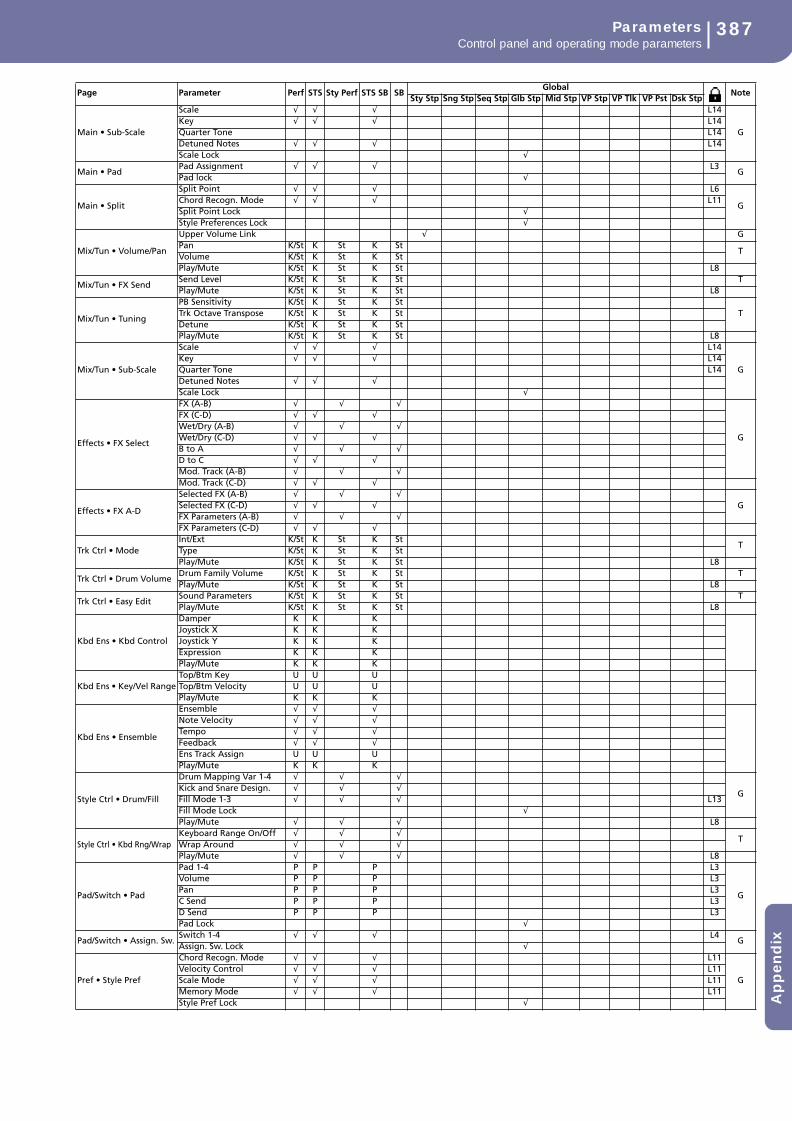
387ParametersControl panel and operating mode parameters
Appen
dix
Main • Sub-Scale
Scale √ √ √ L14
GKey √ √ √ L14Quarter Tone L14Detuned Notes √ √ √ L14Scale Lock √
Main • PadPad Assignment √ √ √ L3
GPad lock √
Main • Split
Split Point √ √ √ L6
GChord Recogn. Mode √ √ √ L11Split Point Lock √Style Preferences Lock √
Mix/Tun • Volume/Pan
Upper Volume Link √ GPan K/St K St K St
TVolume K/St K St K StPlay/Mute K/St K St K St L8
Mix/Tun • FX SendSend Level K/St K St K St TPlay/Mute K/St K St K St L8
Mix/Tun • Tuning
PB Sensitivity K/St K St K StTTrk Octave Transpose K/St K St K St
Detune K/St K St K StPlay/Mute K/St K St K St L8
Mix/Tun • Sub-Scale
Scale √ √ √ L14
GKey √ √ √ L14Quarter Tone L14Detuned Notes √ √ √Scale Lock √
Effects • FX Select
FX (A-B) √ √ √
G
FX (C-D) √ √ √Wet/Dry (A-B) √ √ √Wet/Dry (C-D) √ √ √B to A √ √ √D to C √ √ √Mod. Track (A-B) √ √ √Mod. Track (C-D) √ √ √
Effects • FX A-D
Selected FX (A-B) √ √ √GSelected FX (C-D) √ √ √
FX Parameters (A-B) √ √ √FX Parameters (C-D) √ √ √
Trk Ctrl • ModeInt/Ext K/St K St K St
TType K/St K St K StPlay/Mute K/St K St K St L8
Trk Ctrl • Drum VolumeDrum Family Volume K/St K St K St TPlay/Mute K/St K St K St L8
Trk Ctrl • Easy EditSound Parameters K/St K St K St TPlay/Mute K/St K St K St L8
Kbd Ens • Kbd Control
Damper K K KJoystick X K K KJoystick Y K K KExpression K K KPlay/Mute K K K
Kbd Ens • Key/Vel RangeTop/Btm Key U U UTop/Btm Velocity U U UPlay/Mute K K K
Kbd Ens • Ensemble
Ensemble √ √ √Note Velocity √ √ √Tempo √ √ √Feedback √ √ √Ens Track Assign U U UPlay/Mute K K K
Style Ctrl • Drum/Fill
Drum Mapping Var 1-4 √ √ √
GKick and Snare Design. √ √ √Fill Mode 1-3 √ √ √ L13Fill Mode Lock √Play/Mute √ √ √ L8
Style Ctrl • Kbd Rng/WrapKeyboard Range On/Off √ √ √
TWrap Around √ √ √Play/Mute √ √ √ L8
Pad/Switch • Pad
Pad 1-4 P P P L3
G
Volume P P P L3Pan P P P L3C Send P P P L3D Send P P P L3Pad Lock √
Pad/Switch • Assign. Sw.Switch 1-4 √ √ √ L4
GAssign. Sw. Lock √
Pref • Style Pref
Chord Recogn. Mode √ √ √ L11
GVelocity Control √ √ √ L11Scale Mode √ √ √ L11Memory Mode √ √ √ L11Style Pref Lock √
Page Parameter Perf STS Sty Perf STS SB SBGlobal
NoteSty Stp Sng Stp Seq Stp Glb Stp Mid Stp VP Stp VP Tlk VP Pst Dsk Stp

388 ParametersControl panel and operating mode parameters
Pref • Global Setup
Midi Setup √
GPerf/Sound Default √Velocity Control Value √Upper Volume Link √Bass & Lower Backing √
Song Play Mode
Main (Kbd Trk)
Selected SongsMeter Saved in the SongTempo Saved in the SongSelected Perf/STS √
GSelected StyleKeyboard Sounds K KUpper Trk Octave Transp. U UMaster Transpose √ √ L1 G
Main (Sng Trk 1-8, 9-16)Song Trk Octave Transp.
TSong Trk Sounds
Main • VolumeTrack Volume K K
TPlay/Mute K K Sg
Main • Jukebox Selected Song
Main • Lyrics-Options
Characters √
GLink int/Ext Video √Show Chords √Text Follow √
Main • STS Name Selected STS STS#1 selected when selecting a Style (with SINGLE TOUCH = On)
Main • Mic
Harmony/Modeling √
G
Lead √V1-V4 √Pitch √Thicken √Effects √Talk √Play/MuteVP Preset √ √ L2VP Lock √
Main • Sub-Scale
Scale √ √ L14
GKey √ √ L14Quarter Tone L14Detuned Notes √ √ L14Scale Lock √
Main • PadPad Assignment √ √ L3
GPad lock √
Main • Split
Split Point √ √ L6
GChord Recogn. Mode √ √ L11Split Point Lock √Style Preferences Lock √
Mix/Tun • Volume/Pan
Upper Volume Link √ GPan K KVolume K KPlay/Mute K K Sg
Mix/Tun • FX SendSend Level K KPlay/Mute K K Sg
Mix/Tun • Tuning
PB Sensitivity K K
TTrk Octave Transpose K KDetune K KPlay/Mute K K Sg
Effects • FX Select
FX (A-B) √
G
FX (C-D) √(*) √(*) √(**)
Wet/Dry (A-B) √
Wet/Dry (C-D) √(*) √(*) √(**)
B to A √
D to C √(*) √(*) √(**)
Mod. Track (A-B) √
Mod. Track (C-D) √(*) √(*) √(**)
Effects • FX A-D
Selected FX (A-B) √
GSelected FX (C-D) √(*) √(*) √(**)
FX Parameters (A-B) √
FX Parameters (C-D) √(*) √(*) √(**)
(*) Depends on the “Perf. Recalls FX CD” parameter — (**) Depends on the “Seq.2 FX Mode” parameter
Trk Ctrl • ModeInt/Ext K K Sg
TType K KPlay/Mute K K Sg
Trk Ctrl • Drum VolumeDrum Family Volume K K
TPlay/Mute K K Sg
Trk Ctrl • Easy EditSound Parameters K K
TPlay/Mute K K Sg
Kbd Ens • Kbd Control
Damper K KJoystick X K KJoystick Y K KExpression K KPlay/Mute K K Sg
Kbd Ens • Key/Vel RangeTop/Btm Key U UTop/Btm Velocity U UPlay/Mute K K Sg T
Page Parameter Perf STS Sty Perf STS SB SBGlobal
NoteSty Stp Sng Stp Seq Stp Glb Stp Mid Stp VP Stp VP Tlk VP Pst Dsk Stp

389ParametersControl panel and operating mode parameters
Appen
dix
Kbd Ens • Ensemble
Ensemble √ √Note Velocity √ √Tempo √ √Feedback √ √Ens Track Assign U UPlay/Mute K K Sg T
Pad/Switch • Pad
Pad 1-4 P P L3
G
Volume P P L3Pan P P L3C Send P P L3D Send P P L3Pad Lock √
Pad/Switch • Assign. Sw.Switch 1-4 √ √ L4
GAssign. Sw. Lock √
Jukebox Editor Saved as a .JBX fileGroove Quantize Various Parameters
Pref • Track Settings
Melody √
GDrum √Bass √Harmony Track √
Pref • General Control
Midi Setup √
G
Perf recalls FX CD √Lyrics/Marker Balance Link √Seq.1/2 Best GM Sound √Fast Play √Link Mode √Seq.2 FX Mode √HD Path √
SongBook ModeSongBook List Saved into an .SBD file
Book Edit 1
Genre, Artist, Key info, Tempo, Meter Info, Mas-ter Transpose
√
Style/Song Reference √STS Data √
Book Edit 2
Synchro Start, Synchro Stop, Memory √
TXT File Reference √Song Selection Number √Harmony Track √
SongBook Custom List Saved into an .SBL fileSequencer ModeSong Data See table “Style, Pad and Song parameter” on page 392Main Play/Mute Sg T
Pref • Global SetupMidi Setup √
GHarmony Track √
Sound ModeSound Data Saved into a SoundGlobal Mode
Gen Ctrl • Basic
Velocity Curve √
G
A.Touch Curve √Master Tuning √Reverb Offset √Fade In Time √Fade Out Time √Acc/Rit Step √Acc/Rit Curve √Glide Time √
Gen Ctrl • Transp Ctrl
Transp applies to Sty/Kbd √
GTransp applies to Seq 1/2 √Transp applies to Midi In √Scale and Transp Position √
Gen Ctrl • ScaleMain Scale √
GKey √
Gen Ctrl • Lock Locks √ G
Gen Ctrl • Interface
Language √
GShow PC Number √Show Track Activity √Auto Style Select √Auto Perf/Sound Select √
Ctrl • Pedal/SwitchPedal/Footswitch √
GDamper Polarity √Pedal/Switch Polarity √
Ctrl • Assignable Sliders Assign. Sliders A1-8, B1-8 √ GCtrl • EC5 EC A-E √ G
MIDI • Midi Stp/GenCtrl
Midi Setup √ √ √GNote to RX Noise Enable
Clock Send √Clock Source Set to “Int” at startupLocal Control On Set to “On” at startupMIDI A Out/Thru Mode √
GMIDI B Out/Thru Mode √
Page Parameter Perf STS Sty Perf STS SB SBGlobal
NoteSty Stp Sng Stp Seq Stp Glb Stp Mid Stp VP Stp VP Tlk VP Pst Dsk Stp

390 ParametersControl panel and operating mode parameters
MIDI • Midi In Control
Midi In Oct Transp √
G
Midi In Mute/Unmute √Chord 1 Midi Channel √Chord 2 Midi Channel √Upper Octave Transp √Lower Octave Transp √Midi In Velocity Value √VP Midi In Channel √VP Oct Transp In √VP In Note Range H/L √
MIDI • Midi In Ch. Channels √T
MIDI • Midi Out Ch. Channels √
MIDI • FiltersMidi In Filters √
GMidi Out Filters √
Audio Out • Sty/Kbd Tracks √ TAudio Out • Seq 1 Tracks √ TAudio Out • Seq 2 Tracks √ T
Audio Out • DrumsDrum Output √
GDrum Category √
Audio Out • Audio In VP Out √ G
Audio Out • Metro/SP
Metronome Mode √
GMetronome Volume √Click Out √SPDIF On/Off √Speaker On/Off √
Audio Out • MP3/CDMP3 Max Volume √
GCD Max Volume √
VP Setup • Setup
VP Setup √
G
Vibrato Mode √Vibrato RX Enable √Octave Transpose √Pitch Bend Range √Damper Mode √
VP Setup • Lead Voice
Mic In Low Cut √
GDelay Compensation √Pan √Level √
VP Setup • Dyn/EQ
Dyn Assign √
G
EQ Assign √Dyn-Threshold √Dyn-Ratio √Dyn-Gate √EQ-Low Gain √EQ-Low Freq √EQ-Mid Gain √EQ-Mid Freq √EQ-Mid Q √EQ-High Gain √EQ-High Freq √
VP Setup • Talk
Talk On/Off √
G
Auto Talk √Ld to Rev √FX Lev √Master Vol. Attenuation √Rev-Type √Rev-PreDelay √Rev-Decay √Rev-Low Color √Rev-High Color √Thicken On/Off √Thicken-Detune √Thicken-Spread √Level √
VP Preset • Preset
VP Preset √ √ √
G
Harmony/Modeling Sw. √Lead On/Off √V1-V4 On/Off √Pitch On/Off √Thicken On/Off √Harm./Model. On/Off √Effects On/Off √VP Preset Lock √
VP Preset • Thick/Pitch
Thk-On/Off √
G
Thk-Detune √Thk-Spread √Thk-Level √Ptch-On/Off √Ptch-Root √Ptch-Scale Type √Ptch-Attack √Ptch-Amount √Ptch-Window √Ptch-Custom Scale √
Page Parameter Perf STS Sty Perf STS SB SBGlobal
NoteSty Stp Sng Stp Seq Stp Glb Stp Mid Stp VP Stp VP Tlk VP Pst Dsk Stp

391ParametersControl panel and operating mode parameters
Appen
dix
List of abbreviations used in the above tableG = General parametersSG = Style tracks, globallyT = Selected tracksU = Upper tracks onlyK = Keyboard tracks onlyRt = Realtime tracks onlySt = Style tracks onlySg = Song tracks onlyP = Pad tracks onlyL[n] = Subject to the corresponding Lock (see diagram)
VP Preset • V. Modeling
Resonance / Amount √
G
Spectral / Amount √Growl / Amount √Inflection / Amount √Vibrato / Amount √Level √Pan √
VP Preset • Harmony
On/Off √
G
Latch On/Off √Harmony Mode √Root √Type √Human. Style √Amount √Tuning √Portamento √PB Assign √Smooth √Harm Note Input Source √Attack √Release √Level √
VP Preset • Harm. Voices
Voice On/Off √
G
Gender √Voicing √Vibrato Style √Vibrato Amount √Level √Pan √CV Map-Note In √CV Map-Note Out √
VP Preset • Effects
Lead to Rev √
G
Harm/Model to Rev √Harm/Model to Dly √Lead to Dly √Dly to Rev √Rev/Dly Balance √FX Level √Rev-Type √Rev-PreDelay √Rev-Decay √Rev-Low Color √Rev-High Color √Dly-Type √Dly-Delay √Dly-Feedback √Dly-Source √Dly-R(atio) √Dly-Hi Freq Damp √
VP Preset • ControlsCnt.Ctl A-D √
GSw.Ctl A-D √
Video Interface
System √
GCharacters √Colors √Position X/Y √
Touch Screen Calib Calibration Reserved memory areaDisk Mode
Preferences
Global Protect √Hard Disk Protect √Factory Styles/Pad Protect Set to “On” at startupPCM Autoload √Hide Unknown Files √HD Sleep Time √
Page Parameter Perf STS Sty Perf STS SB SBGlobal
NoteSty Stp Sng Stp Seq Stp Glb Stp Mid Stp VP Stp VP Tlk VP Pst Dsk Stp
L1
L3
L5
L7
L2
L4
L6
L8
L9
L11
L13
L15
L10
L12
L14
L16

392 ParametersStyle, Pad and Song parameter
Style, Pad and Song parameter
The following table shows the parameters you can save into the Style when selecting the “Write Style” command from the Style Recordmode page menu; into the Pad when selecting the “Write Pad” command from the Pad Record mode page menu; and into the Songwhen selecting the “Save Song” command from the Sequencer mode page menu.
ParameterStyle Pad Song
Header Tracks Master Track Header Track Header Tracks Master Track
Volume (GM Master Volume)(a)
(a). Saved as SysEx data.
√ √
Tempo √Uses Arranger/Sequencer’s
Tempo √ √
Meter (Time Signature) √ √ √ √
Sounds(b)
(b). For these Sounds to be used in a Style, the “Original Style Sounds” parameter must be checked in the Style Play mode. See “OriginalStyle Sounds” on page 80.
√ √ √ √
Note On/Off √ √ √Pitch Bend √ √ √After Touch √
Control Change(c)
(c). Not all Control Change messages are allowed in Styles/Pads. Please see “List of recorded events” on page 104 for more information.
√ √ √
Quarter Tone(a)
Quarter Tone Reset(a)√√
Pad Sync √Pad Type √Chord Variation Length √ √Original Key/Chord √ √NTT √ √Wrap Around √Expression √ √ √ √ √ √Keyboard Range √ √Chord Variation Table √ √Track Type (Drum/Perc/Bass/Acc) √ √Trigger Mode √ √Tension √ √
Play/Mute status(a) √ √ √
Master Transpose(a) √
Volume √ √Pan √ √
FX Block(a) √
FX Send √ √Detune √ √
Scale(a)
KeyNoteDetune
√√√√
√√√√
Scale Yes/No(a) √
Pitch Bend Range √ √
FX Select (A, B, C, D)(a) √ √
Modulation Track(a) √
FX Feedback Send (B>A or D>C)(a) √ √
FX Parameters (A, B, C, D) √

393Recognized chords
Appen
dix
The following pages show the most important chords recognized by the Pa1X, when the selected Chord Recognition mode is Fingered 2(see “Chord Recognition Mode” on page 95). Recognized chords may vary with a different Chord Recognition mode.
Recognized chords
2-note
T
T
T
T
3-note
T
T
T T
T
Major2-note4-note
T
T
Major 6th
3-note
T
4-note
T
T
Major 7th2-note
T
T= constituent notes of the chord = can be used as tension
3-note
T
T
Sus 42-note 3-note
Sus 2
3-note
T T
T T
2-note
T T
T
4-note
T T
TT T
Dominant 7th
4-note
T
T
Dominant 7th Sus 43-note
T
T T T
T T
4-noteDominant 7th 5
4-note
T
T
Major 7th Sus 4
T
4-noteMajor 7th 5

394 Recognized chords
T= constituent notes of the chord = can be used as tension
4-note
T T
Minor 7th3-note
T
4-note
T T
Minor-Major 7th3-note
T
3-note
T
T
Diminished4-note
T T
Diminished Major 7th
4-note
T T T
Minor 7th 5
3-note
T
T
Augmented4-note
TT T
T
Augmented 7th4-note
TT T
T
Augmented Major 7th
No 3rd, no 5thNo 3rd1-note2-note
3-note
T T
Minor2-note
T
4-note
T T
Minor 6th

395Installing the hard disk (Pa1X only)
Appen
dix
You can install a 2.5” ATA hard disk drive into your Pa1X, forquick and easy data storage and retrieval. Please contact yourKorg dealer for more information. Before you begin, turn theinstrument off, and disconnect the power cable.
Warning: Installation of the hard disk drive is done as the user’sown risk. Korg will assume no responsibility for any damage orinjury resulting from its improper installation or use.
Note: To install the hard disk, you will need a cross-point screw-driver.
1. Turn the instrument upside down, and remove the eightscrews (a), to open the cover (A) and gain access to theoption compartment.
Note: Block any possible access to the inside of the instrumentduring installation to prevent any items from falling inside. Inthe event something does fall into the instrument, pleaseimmediately contact your nearest Service Center.
2. As you face the option compartment opening, locate thearea dedicated to the hard disk, i.e., the one with the foursmall vertical spacers and the cable (B). Unscrew the screw(b) and remove the clip (c), securing the cable (B) to one ofthe spacers. Save the screw and the clip, you will need themto complete the hard disk installation.
3. Connect the two mounting brackets (D) to the hard disk(C), by using four of the M3x6 screws (b). (Both the
mounting brackets and the M3x6 screws should have beensupplied with your Pa1X).
4. Place the assembled hard disk unit over the four spacers inthe option compartment, as shown in the diagram. Securethe hard disk unit to the spacers using the remaining fourM3x6 screws (b). Be sure to fix the clip (c), previouslyremoved, to the original spacer, as shown in the diagram.Connect the data cable (B) to the hard disk (C), then securethe cable (B) with the clip (c).
5. Close and secure the compartment cover by reversing theprocedure described in step 1.
Installing the hard disk (Pa1X only)
aA
a
aa
a
aa
a
b+c
B
D
b
b
b
DC
b
b
C
bb+c
b
B

396 Installing the hard disk (Pa1X only)
Formatting the hard disk
When the installation is finished, reconnect the power cable andturn the instrument on. You must format the hard disk before itcan be used.
1. Press DISK to access the Disk edit mode.
2. Select the “Format” page.
3. Use the Device selector to select the hard disk (“HD”).
4. Press the (Text Edit) button in the display to assign a
label (name) to the hard disk.
5. Select the Full Format option, then press the Execute but-ton, and follow the instructions that appear in the display.
Device selector

397Installing the Korg CDRW-1 Drive
Appen
dix
Please note: Follow these instructions if your Pa1X (a) does notinclude a small screw under the CD-RW slot (shown in the diagram),and (b) does not include a mounting tray inside the slot itself.
If the above is not true, please follow the instructions you can down-load from our website (www.korgpa.com).
A Korg CDRW-1 CD player/writer can be installed into your Pa1X. Installation will require a “+” (cross-point) screwdriver. Please con-tact your Korg dealer for more information on how to obtain this option.
Warning: Installation of the CD drive is done at the user’s own risk. Korg will assume no responsibility for any damage or injury resultingfrom improper installation or use.
Installing the Korg CDRW-1 Drive
Pa1X Pro Pa1X
1) Before you begin, turn the instrument off, and disconnect the power cable.2) Push the small unlock button with the tip of a pen, to open the CD drive’s (A) cover, and remove the paper protection.
3) With the help of a cross-point screwdriver, remove the two screws (a) securing the floppy disk drive cover (B), and remove the cover itself.
3) With the help of a cross-point screwdriver, remove the two screws (a) securing the CD slot cover (B), and remove the cover itself.
a
a
push
A
A
push
A
A
a
a
B
a aB

398 Installing the Korg CDRW-1 Drive
We suggest saving all removed components in a safe place for future use.
4) Slide the CD drive (A) into the instrument. Push it all the way in, to make sure that the CD drive mounts to the connector inside the Pa1X (two ‘clicks’ should be felt on your fingers when the connector on the CD drive is correctly inserted).
5) Turn the instrument on. Go to the Disk mode, and select the CD device by using the Device pop-up on the lower left corner of the Load, Save, Copy, and Erase pages. If it works, go on with the next step to complete installation.6) Screw screw (b) to secure the CD drive in place. Apply the cover (C) supplied with the Pa1X, and secure it with the two previously extracted screws (a).
Pa1X Pro Pa1X
AA
a
a b
C
aa
b
C

399Installing additional RAM
Appen
dix
Pa1X comes equipped with 16MB of RAM already installed, which can be used for storing samples and Song editing. You can install anadditional 16MB of RAM in the form of a single 72-pin SIMM module (for a list of tested SIMMs, see www.korgpa.com). Please contactyour Korg dealer for more information.
1. Before you begin, turn the instrument off, and disconnect the power cable.
2. Turn the instrument upside down, and remove the screws (a), toopen the cover (A) and gain access to the option compartment.
Note: Block any possible access to the inside of the instrument dur-ing installation to prevent any items from falling inside. In theevent something does fall into the instrument, please immediatelycontact your nearest Service Center.
3. As you face the option compartment opening, locate the twoRAM slots. A 16MB SIMM module is already present in one ofthe slots.
4. Lightly push out on the two securing clamps (one on each end).
Installing additional RAM
aaaaa
a
aA
aA
a
aa
a
aa
a
Pa1X Pro
Pa1X

400 Installing additional RAM
5. Remove the existing module (B), by gently rotating it forward asshown in the diagram.
6. Insert the new SIMM module (C) into the slot that was origi-nally empty, as shown in the diagram. Line up the lower side ofthe module with the slot base, then rotate the module up, anddelicately push until it is firmly seated in place. Be sure the mod-ule is correctly inserted. If not, extract it and repeat the opera-tion.
7. Now re-insert the SIMM module (B) that you removed in step5, using the same method as used with the new module (C).
8. Close and secure the compartment cover by reversing the opera-tions seen on step 2.
B
C
B

401Installing ROM expansions
Appen
dix
Pa1X can be fitted with up to two dedicated Sound expansion boards. Please, check on www.korgpa.com, or contact your Korg dealerfor more information on the available options.
1. Before you begin, turn the instrument off, and disconnect the power cable.
2. Turn the instrument upside down, and remove the screws (a), toopen the cover (A) and gain access to the option compartment.
Note: Block any possible access to the inside of the instrument dur-ing installation to prevent any items from falling inside. In theevent something does fall into the instrument, please immediatelycontact your nearest Service Center.
3. As you face the option compartment opening, locate the twoROM slots.
Installing ROM expansions
aaaaa
a
aA
aA
a
aa
a
aa
a
Pa1X Pro
Pa1X

402 Installing ROM expansions
4. Insert the first ROM expansion module (B) – the only one, if itis the only one you purchased – in the slot farther from you, asshown in the diagram. Line up the lower side of the modulewith the slot base, then rotate the module up, and delicatelypush until it is firmly seated in place. Be sure the module is cor-rectly inserted. If not, extract it and repeat the operation.
Note: You could also install the module in the other slot, but thisway installing a second module later will be easier.
5. If you purchased a second ROM sound module (C), install it byfollowing the same procedure seen for the first module (B).
6. Close and secure the compartment cover by reversing the opera-tions seen on step 2.
B

403Installing the Video Interface (VIF3)NTSC, PAL, SECAM
Appen
dix
You can install a Korg VIF3 Video Interface into your Pa1X orPa1X Pro. This interface will let you connect a video monitor orvideo projector, to read lyrics on an external device. The cardcan be installed by the user. Korg is not responsible for anydamage or injury caused by incorrect installation of this cardby unauthorized personnel.
NTSC, PAL, SECAM
The following instruction refer both to the VIF3-PAL and VIF3-NTSC versions of the board. When connecting the VIF3-PAL toa SECAM-compliant TV, the image will be shown in black andwhite.
Precautions
• Installation of the card is done at the user’s own risk. Korg willassume no responsibility for any damage or injury resultingfrom its improper installation or use.
• Be sure to disconnect the instrument from the AC plug, beforeopening it.
• To prevent your body’s static electricity from damaging theboard’s components, touch an unpainted metallic componentbefore proceeding with the installation.
Part listing
Before beginning with the installation, please be sure all the fol-lowing parts are included with your kit. Some parts are neededonly when installing the board on a particular model, but not onothers. In addition, you will need a cross-point screwdriver anda pair of pliers (not supplied).
Note: The checkmark means the part is needed for the correspond-ing instrument. Some components are only for the Pa80 and Pa60,therefore are not needed on the Pa1X or Pa1X Pro.
Installing the Video Interface (VIF3)
Part name Pa1X Pro Pa1X
A Video card √ √ × 1
B Plastic spacers √ × 2
C Cable holder clip √ × 1
D Ground cable (not needed) × 1
E Video card cable (not needed) × 1
F Video cable (not needed) × 1
G Nuts √ × 2
H 2.9 x 9.5 self-threading screw (not needed) × 2
A
B
C
D
E
FG
H

404 Installing the Video Interface (VIF3)Installation on the Pa1X Pro
Installation on the Pa1X Pro
1. Turn the instrument upside down, and remove the sevenscrews (d), to open the cover (c) and gain access to theoption compartment.
Note: Block any possible access to the inside of the instrumentduring installation to prevent any items from falling inside. Inthe event something does fall into the instrument, pleaseimmediately contact your nearest Service Center.
2. As you face the option compartment opening, locate thearea reserved for the video interface, i.e., the one with thetwo small vertical spacers and the cable (e), secured by twoclips. Unfasten the cable (e) from the clip (C), and rewirethe clip around the unfastened cable.
3. Examine the video interface (A) included with the kit. Notehow the IC board (f) is joined to the support (g) by meansof the two screws (b). Unscrew the two screws (b) to sepa-rate them. You will not need the removed screws (b) and
support (g) for the installation on the Pa1X Pro, neverthe-less we suggest to save them for any future use.
4. Insert the two plastic spacers (B) into the correspondingscrews on the option compartment cover, as shown in thediagram. Secure the IC board (f) to the two spacers (B),using the two self-locking nuts (G). Connect the terminallug of the cable (e) and the terminal lug without a ring (F)to the corresponding connectors on the IC board. Unscrewthe screw (b) from the connector board in the option com-partment, then re-insert it after securing to it the clip (C)included with the accessory kit. Use the clip to lock the ringof the free cable terminal lug (F). Connect this terminal tothe RCA connector on the connector board, as shown inthe diagram.
5. Close and secure the compartment cover by reversing theprocedure described in step 1.
cd
d d d d d
d
Ce
bA
f
b
g
bb
e G
GB
Bf F
b+C

405Installing the Video Interface (VIF3)Installation on the Pa1X
Appen
dix
Installation on the Pa1X
1. Turn the instrument upside down, and remove the eightscrews (d), to open the cover (c) and gain access to theoption compartment.
Note: Block any possible access to the inside of the instrumentduring installation to prevent any items from falling inside. Inthe event something does fall into the instrument, pleaseimmediately contact your nearest Service Center.
2. As you face the option compartment opening, locate thearea reserved for the video interface, i.e., the one with thetwo small vertical spacers, the cable (e), secured by twoclips, and the cable (F), secured by the clip (C). Note howthe clip (C) is secured to one of the two vertical spacers bymeans of the screw (b). Unscrew the screw (b) and removethe clip (C). Then unfasten the cable (e) from the clip (C),as shown in the diagram. Save the screw and the clip, youwill need them to complete the video interface installation.
3. Note how the IC board (f) is joined to the support (g) bymeans of the two screws (b). Unscrew the two screws (b) toseparate them. You will not need the removed support (g)for the installation on the Pa1X, nevertheless we suggest to
save them for any future use. On the contrary, the removedscrews will be needed in the following step.
4. Secure the IC board (f) to the two vertical spacers using thetwo screws (b), previously removed. Please remember tore-insert the clip (C) at its original position. Connect theterminal lug of the cable (F) to the corresponding connec-tor on the IC board. Secure the cable to the clip (C). Finally,connect the cable (e) to the IC board, and secure it usingthe previously loosened clip (C).
5. Close and secure the compartment cover by reversing theprocedure described in step 1.
c
dd
dd
dd
dd
b+C
e
F
C
bA
f
b
g
bb
b+C
e F
f
bC

406 Installing the Video Interface (VIF3)Connections and setup
Connections and setup
1. Connect the instrument’s video output to the video inputof the television set. Depending on the type of televisionset, you can use a cable of the type “RCA-to-RCA” (if thetelevision set is equipped with a Video Composite input),or “RCA-to-SCART” (if the television set is equipped witha SCART connector). You can buy the needed cables at astore that sells television equipment.
2. Turn the instrument on, and press the GLOBAL button togain access to the Global edit mode. Go to the “Video Inter-face: Video Out” page, and select the video standard (PALor NTSC) depending to the installed video board (VIF3-PAL or VIF3-NTSC).
3. Select the “Write Global-Global Setup” command from thepage menu to save the settings in memory. The Write Glo-bal-Global Setup dialog box will appear. Press OK to con-firm.
4. Turn the television set on, and tune it on the AV1 or AV2input.
5. In the same page of the Global, use the Colors parameter tochoose the preferred set of colors for the lyrics and thebackground.
RCA
RCA
SCART

407Installing the MP3 Board (EXBP-MP3)Precautions
Appen
dix
You can install a Korg EXBP-MP3 board into your Pa1X or Pa1XPro. This user-installable card will let your Pa1X and Pa1X Proplay and record MP3 files, allowing for easy music data exchangewith any personal computer or stand-alone MP3 player.
Please note Korg is not responsible for any damage or injury caused byincorrect installation of this card by unauthorized personnel.
Precautions
• Installation of the card is done at the user’s own risk. Korg will assume noresponsibility for any damage or injury resulting from its improper installa-tion or use.
• Be sure to disconnect the instrument from the AC plug, before opening it.
• To prevent your body’s static electricity from damaging the board’s compo-nents, touch an unpainted metallic component before proceeding with theinstallation.
Part listing
Before beginning with the installation, please be sure all the following partsare included with your kit. Some parts are needed only when installing theboard on a particular model, but not on others. In addition, you will need across-point screwdriver (Pa1X/Pa1X Pro) and a 5.5mm hexagon wrench or apair of pliers (Pa1X Pro) (not supplied).
Note: The checkmark means the part is needed for the correspond-ing instrument.
Installing the MP3 Board (EXBP-MP3)
Part name Pa1X Pro Pa1X
A Self-locking nuts √ × 2
B Plastic spacers √ × 4
C MP3 card √ √ × 1
D M3×6 screws √ × 2
A B
CD

408 Installing the MP3 Board (EXBP-MP3)Installation
Installation
Pa1X Pro1. Turn the instrument upside down, and remove the seven
screws (a), to open the cover (b) and gain access to the optioncompartment.
Note: Block any possible access to the inside of the instrumentduring installation to prevent any items from falling inside. Inthe event something does fall into the instrument, pleaseimmediately contact your nearest Service Center.
2. As you face the option compartment opening, locate the areareserved for the MP3 board, i.e., the one with the four smallvertical columns, the MP3 audio cable (c) and the video cable(d). Please note how the video cable (d) is fastened by twoclamps (f) to two columns, by means of two self-locking nuts(A). Remove both nuts (A), taking care not to remove the twoclamps from their position, and unfasten the audio cable (c)from the clamp (e).
3. Insert the four plastic spacers (B) into the corresponding col-umns on the option compartment cover, as shown in the dia-gram. Please be sure to lay the flat size of the spacers onto theoption compartment cover, and to keep both clamps (f) underthe spacers (B), as shown in the following diagram.
4. Insert the MP3 board (C) over the four spacers, with the compo-nents on the upper side (as shown in the diagram). Secure it tothe spacers by using the four self-locking nuts (A). Connect theterminal lug of the cable (c) to the corresponding connector onthe MP3 board, by folding the cable as shown in the diagram.
5. Close and secure the compartment cover by reversing theprocedure described in step 1.
b
a aa
a a a
a
A+f A+f
c de
BB
BB
f f
c A
AAAC

409Installing the MP3 Board (EXBP-MP3)Installation
Appen
dix
Pa1X1. Turn the instrument upside down, and remove the eight
screws (a), to open the cover (b) and gain access to the optioncompartment.
Note: Block any possible access to the inside of the instru-ment (for example, the openings of the nearby RAM expan-sion slots) during installation to prevent any items fromfalling inside. In the event something does fall into the instru-ment, please immediately contact your nearest Service Cen-ter.
2. As you face the option compartment opening, locate the areareserved for the MP3 board, i.e., the one with the four smallvertical spacers, the MP3 audio cable (c) and the video cable(d). Please note how the video cable (d) is fastened by twoclamps (f) to two of the spacers, by means of two M3 screws(D). Remove both screws (D), taking care not to remove thetwo clamps from their position, and unfasten the audio cable(c) from the clamp (e).
3. Insert the MP3 board (C) over the four spacers, with the compo-nents on the upper side (as shown in the diagram). Secure it tothe spacers by using the four M3 screws (D). Connect the termi-nal lug of the cable (c) to the corresponding connector on theMP3 board, by folding the cable as shown in the diagram.
4. Close and secure the compartment cover by reversing theprocedure described in step 1.
b
aa
aa
aa
aa
D+fD+f
ecd
DD
c
DD
C

410 Installing the MP3 Board (EXBP-MP3)Recording an MP3
Recording an MP3
If your Pa1X is fitted with the optional MP3 Board (EXBP-MP3)and a hard disk (optional on the Pa1X with speakers), you canrecord your performance as an MP3 file.
Note: You cannot enter MP3 Record mode while in Sequencer orDisk mode.
• All you play on the keyboard, the Styles and the Standard MIDIFiles performed by the sequencer will be recorded. Audio enter-ing the Audio Input 1 (microphone input, or mono line-levelinput), and harmony voices generated by the Voice Processorwill be recorded as well.
• Playback of MP3 files and Audio CD tracks will not berecorded.
To enter recording, keep the SHIFT button pressed, and pressthe REC button. The following dialog box will appear.
Select the preferred MP3 audio quality option, by means of theQuality pop-up menu. The higher the sound quality, the largerthe MP3 file that will be generated.
When done, press the Rec button in the display to startrecording. The Rec button changes to Stop, and can bepressed again to stop recording. During recording, a bigred ‘R’ will flash in the display.
If you like, you can press the EXIT button to exit this dialog box.To enter it again, and see the file length or stop recording, pressSHIFT+REC again.
During recording, you can use this dialog box to see the Record-ing time, file length, and the remaining space on disk. Maximumrecording time depends on the available space on the hard disk.
After pressing Stop, recording will stop, and the following dialogbox will appear:
Press the (Text Edit) button to assign a name to the MP3
File. Press the Browse button to select a device and directorywhere to save the file. Press the Save button to save the file.
After saving, you can listen to the MP3 file in Song Play mode, asyou did with any other Song.
The MP3 file can also be moved to a personal computer for fur-ther editing, via the USB interface.
Notes
Operating system version• To use the EXBP-MP3, your Pa1X must be fitted with Operating Sys-
tem 1.51 or higher.
Audio outputs• After installing the EXBP-MP3 board, the audio output level (both on
the OUTPUT connectors and the internal speakers) is increased ofabout 3dB. Readjust the master volume accordingly.
• Audio generated by the MP3 board is only output on the Left+Rightanalog outputs. It cannot be routed to the digital output.
Playback• MP3 files recorded with lower sampling rates may not sound very
good. This is an unavoidable problem with MP3 files.
• You can assign an MP3 file to both sequencers, but starting one stopsthe other (if it is playing).
• When reading MP3 files from a data CD, and the CD has been auto-matically paused for having been inactive for some time, starting play-back may require some seconds, because the CD has to start spinningagain.
Recording• You can record as an MP3 file everything you play with the Pa1X,
including your vocals (in other words, you can record your whole per-formance). However, you cannot record MP3 files or convert AudioCD Tracks.
• You can listen to Audio CD tracks during MP3 recording, but they willnot be recorded.
Hard disk• To record MP3 files, your Pa1X must be fitted with a hard disk.
• It is not advisable to fill the hard disk too much during recording. Fill-ing the hard disk may cause troubles with the recorded file.
• Regular care is recommended with your hard disk. Defragmenting andrepairing can be made with any PC utility, while the Pa1X is connectedvia USB.

411Shortcuts
Appen
dix
You can keep the SHIFT button pressed, and press another but-ton on the control panel to directly jump to an edit page. Here isthe list of “shortcuts”.
Another available shortcut is the following one, not requiringthe SHIFT button being pressed.
Shortcuts
Shift + Functions
Any operating modes
Dial Tempo Change
Scroll Arrows, orUp/Down
When a list of Songs or SongBook entries is shown: Next/Previous alphabetical section.It also works in Disk mode, when the Name sorting is selected.
Sound Sends the Sound assigned to the selected track to the Sound mode
Global Selects the Setup/General Controls page, MIDI section, of the Global mode. This is a quick way to jump to MIDI editing pages.
Disk Selects the Preferences page of the Disk mode
Start/Stop Panic
Slider Mode Selects the Assignable Sliders page, Control-lers section, of the Global mode
Fade In/Out Selects the Fade In/Out parameter in the Basic page, Preferences section, of the Global mode
Synchro (either) Selects the MIDI Setup parameter in the Setup/General Controls page, MIDI section, of the Global mode
Tempo Lock Selects the Lock page, General Controls sec-tion, of the Global mode
Display Hold Selects the Interface page, General Controls section, of the Global mode
SongBook Selects the Custom List page of the SongBook mode
Transpose (either) Selects the Transpose Control page, General Controls section, of the Global mode
Style Play mode
Style Play Selects the Style Setup page (Preferences sec-tion)
Memory Selects the Style Preferences page (Prefer-ences section)
Var or Fill Selects the corresponding Style Element in the Drum/Fill page (Style Controls section)
Chord Scanning (either)
Selects the Chord Recognition parameter in the Split panel, Main Page
Keyboard Mode (either)
Selects the Key Velocity page (Keyboard/Ensemble section)
Ensemble Selects the Ensemble Type parameter in the Ensemble page, (Keyboard/Ensemble section)
Pad (any) Selects the Pad page (Pad/Assignable Switches section)
Assignable Switch (any)
Selects the Switch page (Pad/Assignable Switches section)
Upper Octave (either)
Selects the Tuning page (Mixer/Tuning sec-tion)
Song Play mode
Song Play Selects the General Control page (Preferences section)
Play/Stop–Seq 1 or 2
Sync Start of either sequencers
>> Play the next Audio CD track
<< Play the previous Audio CD track
Upper Octave (either)
Selects the Tuning page (Mixer/Tuning sec-tion)
Keyboard Mode (either)
Selects the Key Velocity page (Keyboard/Ensemble section)
Pad (any) Selects the Pad page (Pad/Assignable Switches section)
Assignable Switch (any)
Selects the Switch page (Pad/Assignable Switches section)
JukeBox mode
>> Play the next Song in the JukeBox list
<< Play the previous Song in the JukeBox list
Sequencer mode
Sequencer Selects the Sequencer Setup page (Prefer-ences section)
Upper Octave (either)
Selects the Tuning page (Mixer/Tuning sec-tion)
Style Play mode
Up/Down (together)
Original Tempo
Shift + Functions

412 Troubleshooting
TroubleshootingProblem Solution Page
General problems
Power does not turn on Make sure that (1) the power cable is plugged into the outlet, (2) the cable is plugged into the connector on the back of the instrument, (3) and is not damaged, (4) there are no problems with the mains.
Is the power switch turned ON?
If the power still does not turn on, contact your dealer or the nearest KORG Service Center.
No sound Is a jack connected to the HEADPHONES connector? This would disable the internal speakers. 18
Check the connections to your amp or mixer. 18
Make sure that all the components of the amplifying system are turned on.
Is the MASTER VOLUME slider of the Pa1X set to a position other than “0”? 18
Is the Local parameter set to Off? Turn it On. 237
Is the Speaker parameter set to Off? Turn it On. 241
Is the Attack parameter value too high? Set it to a lower value, to let the sound start faster. Is the Volume parameter too low? Set it to a higher value.
84, 90
Lowest note are not played When the SPLIT button is lit up, the keyboard will be divided into the Lower part (low notes, below the split point) and the Upper part (high notes, above the split point). Is the Lower track muted? Unmute it.
27
Wrong sounds Do the USER banks contain modified data? Load the appropriate data for the Song or the Style you wish to playback.
262
Has one of the USER Drum Kits been modified? Load the appropriate Drum Kits. 262
Have the Styles or Performances been modified? Load the appropriate data (Styles or Perfor-mances).
262
Sound does not stop Make sure that the damper switch polarity parameter is set correctly. 235
The selected Style or Song cannot start
Make sure that the Clock parameter is set to Internal. If you are using the MIDI Clock of another device, you must set the MIDI Clock parameter to MIDI A or MIDI B (depending on the port the Pa1X is hooked to the other device through) and make sure that the external device transmits MIDI Clock data.
236
Does not respond to MIDI mes-sages
Make sure that all MIDI cables are connected correctly. 280
Make sure that the external device is transmitting through MIDI channels enabled to receive in the Pa1X.
238
Make sure that the MIDI IN Filters of the Pa1X do not prevent the reception of messages. 239
Percussive instruments are not played correctly
Make sure that the Drum track is set to Drum Mode and the external device has not transposi-tion applied.
88, 181
Some “clicks” can be heard when playing a percussive instrument
This is part of the sound, and not a problem.
A background noise can be heard after selecting a Performance, Style or STS
The selected Performance, Style or STS recalled the effect “15 Analog Record”, simulating the noise of a old vinyl recording.
The Voice Processor cannot be heard
The Vocoder effect has been assigned to the D FX processor. This deactivates the Voice proces-sor.
377
Voice processor effects an only be applied to the microphone (MIC) input

413Troubleshooting
Appen
dix
Disk related problems
Cannot format a floppy disk Are you using a 3.5 inch 2DD or 2HD floppy disk? You must use one of these types.
Is the disk inserted correctly? 278
Is the write protect tab of the disk in the protect position? 278
Cannot save data to a floppy disk Is the disk formatted? 270
Is the disk inserted correctly? 278
Is the write protect tab of the disk in the protect position? 278
Cannot load data from a floppy disk
Is the disk inserted correctly? 278
Does the disk contain data compatible with the Pa1X? 259
Problem Solution Page

414 Technical specifications
Technical specifications
Model Pa1X Pro Pa1X
Keyboard 76 keys, semi-weighted, with velocity and mono aftertouch. 61 keys, semi-weighted, with velocity and mono aftertouch.
Operating System KORG OPOS (Objective Portable Operating System) and RX (Real eXperience) Technology. Multitasking, Load-While-Play feature. SSD (Solid State Disk)-resident. Upgradable from floppy disk.
Display 320 × 240 pixels, Color TouchView™ graphic touch screen
Help Hypertextual, context-sensitive help system. Multilingual starting from OS Rel. 1.5.
Data storage 1.44MB Floppy Disk Drive (MS-DOS® compatible), Optional CD-RW (KORG CDRW-1), Standard 2.5" ATA Hard Disk Drive
1.44MB Floppy Disk Drive (MS-DOS® compatible), Optional CD-RW (KORG CDRW-1), Optional 2.5" ATA Hard Disk Drive
Sound generation system KORG HI - Hyper Integrated.
Polyphony 62 voices, 62 oscillators. Filters with resonance.
Multitimbricity 40 tracks (2 x 16 Sequencer, 4 Keyboard, 4 Pads)
Sounds Factory: >870, including a Stereo Piano and GM Level 2-compatible Programs, 48 Drum KitsUser: 256 Sounds, 64 Drum Kits.
Digital Drawbars 8 Footages. Realtime control, using the Assignable Sliders
Sound Edit Onboard full editing for Sounds and Drum Kits
Sampling Record, Edit, Time Slice (compatible with Korg, Wav, Aiff and Akai files)
PCM RAM Memory 16MB standard, expandable up to 32MB with an optional 16MB SIMM module
PCM ROM Expansion 2 slots available, for up to 32MB of additional samples (up to 512 extra Sounds and 128 Drum Kits)
Effects 4 stereo digital multi-effect processors (with 89 effect types each, plus Vocoder). Voice Processor by TC•Helicon™.
Voice Processor Voice technology by TC•Helicon™. Four-parts harmonizer, Reverb, Delay, Compressor, EQ. Pitch Correction and Voice Modeling avail-able as options.
Realtime Tracks Four Keyboard tracks (Upper 1, 2, 3, Lower), 4 Pad tracks
Performances 320 Realtime Performance locations.
Single Touch Settings (STS) Memorize Realtime tracks and Voice Processor settings. Up to 4 × 608 Styles. Up to 4 × each SongBook entry.
Styles More than 450 preloaded Styles, SSD-resident, freely reconfigurable. Up to 608 available Style locations. Eight Style tracks, 4 Single Touch Settings and one Style Performance per-Style.Direct Disk (up to 96 Styles) and Direct Hard Disk (up to 288 Styles) functions. Compatible with old i-Series and Pa80/60-series Styles. Style Record with Edit functions, Step Edit, Event Edit. Up to 96 User Style locations.
Style controls 4 Variations, 2 Fills, 2 Intros, 2 Endings, Intro 3/Count In, Fill 3/Break, Synchro Start/Stop, Tap Tempo/Reset, Fade In/Out, Bass Inversion, Manual Bass, Tempo Lock, Memory, Accompaniment Volume, Accompaniment Mute, Drum Mapping, Snare & Kick Designation, Single Touch.
General controls Master Volume, Ensemble, Octave Transpose, Master Transpose, Split Point, Style Change, Tracks Volume, Quarter Tone (pedal func-tion), Assignable Sliders, Assignable Switches, Joystick, Dial.
Pads 4 Assignable Pads + Stop button
Song Play Patented XDS Crossfade Dual Sequencer player - 2 Sequencers with separate Select, Start/Stop, Pause, << (Rewind) and >> (Fast For-ward) controls. Balance control.Lyrics data can be displayed on-screen, or on an external video monitor. Jukebox function. SMF Direct Player (formats 0 and 1). Reads Audio CDs and MP3 files (both optional).
Sequencer Quick, Multitrack and Step Record functions. Full-featured sequencer. 16 tracks. Up to 200,000 events. SMF native format.
MP3 Player/Recorder MP3 Player/Recorder (optional). Requires a KORG EXBP-MP3 expansion board.
CD Audio Player/Writer Optional. Requires a KORG CDRW-1 drive. Reads audio and data, writes data (ISO 9660 disks).
SongBook Fully programmable music database, with automatic selection of Style Play and Song Play modes. Different custom lists can be cre-ated.
Pedals Damper, Assignable (continuous, footswitch), EC5
Realtime controllers Joystick (pitch + modulation), Assignable Sliders, Assignable Switches, Pads
MIDI 2 × IN, 2 × OUT (toggle as THRU ports). Individual track assignment. Auto-setup functions (MIDI Setup)
USB USB 1.1 connector (Type B/Slave)
Audio Inputs 2 × Line In, 1 × Mic In with Gain control
Audio Outputs 2 Main (Left/Mono, Right), 2 Sub (1, 2), 1 48kHz S/PDIF digital coaxial (mirroring Main Outputs)
Headphone Front 6.3 mm 1/4" jack connection
Amplification – Bi-amped 2 × 35 Watt (Woofer) + 2 × 12 Watt
Speakers – 4 Speakers (13 cm Woofer + Dome Tweeter), 2-way, Bass Reflex Box
Power Supply Universal 100 ~ 240V AC power supply
Power Consumption 35 W 65 W
Dimensions W: 1330 mm / 52.36", D: 366 mm / 14.40", H: 136 mm / 5.35" (with-out music stand)
W: 1123 mm / 44.21”, D: 428 mm / 16.85”, H: 189 mm / 7.44” (with-out music stand)
Weight 19.5 kg / 44.99 lbs 22 kg / 48.5 lbs
Accessories User’s Manual, AC Power Cable, Music Stand, CDRW installation kit

415Technical specifications
Appen
dix
Options EC5 Multiswitch ControllerEXP-2 Expression/Volume PedalXVP-10 Expression/Volume PedalPS-1 FootswitchDS-1H Damper Pedal
SUG-TC1 Pitch Correction/Voice Modeling Software Upgrade (by TC•Helicon)
CDRW-1 CD Player/Writer (user installable)EXBP-MP3 MP3 Player/Recorder Board (user installable)VIF3 NTSC/PAL Video Interface (user installable)
1 × 16MB, 72-pin SIMM module (user installable)2 × EXBP-series ROM expansions (user installable)
– 2.5" ATA Hard disk (user installable)
Model Pa1X Pro Pa1X

416 Index
AAcc/Seq Volume 8, 18Aftertouch Curve 230AIFF file format 225Akai™ 215, 225Amp EG 207AMS(Alternate Modulation Source)
Amp EG 207Filter Cutoff 202Filter EG 202Filter LFO 203Pan 205Pitch 198Pitch EG 200Resonance 201
Arabic Scale 83, 86Assignable Sliders 8, 235Attack Level
Amp EG 207Attack Time
Filter EG 205Audio Inputs 11, 15, 19, 240Audio Outputs 15, 18, 239–241Auto Style/Perf/Sound Select 234
Write 257
BBackup 17, 271Balance 11, 18Bank Select 283Bank123.SET, Bank456.SET, Bank789.SET (Direct HD) 99Bass & Lower Backing 96BPM
MIDI/Tempo Sync., LFO 209
CCD 48, 55, 139, 140, 156
Installing 397Selecting 259Volume 242Writing 274–276
Chord Scanning 11Lock 233
Cutoff Frequency 201
DDamper 19, 91
Polarity 235Decay Time
Filter EG 205Delay
LFO 209
Demo 19Digital Drawbars 192Direct FD 100Direct HD 99Disk 259–279
Backup 271Format 270Write protection 278
Display Hold 11Double Sequencer 10, 147Drum tracks 89, 93, 240
EEC5 236Effects
Copy 97, 155, 187Sequencer mode 179, 180Song Play mode 148, 149, 150Style Play mode 85, 87, 180
Ending 10Ensemble 92
FFade (Sound parameter)
LFO 209Fade In/Out 230Fill 10Filter
Cutoff Frequency 201Filter Type 200
Filter Cutoff 202Filter EG 202Filter LFO 203Footswitch 235
Polarity 235Format 270
GGeneral MIDI 281Global 229–258
WriteGlobal Setup 257MIDI Setup 257Sequencer Setup 188Song Play Setup 156Style Play Setup 99Talk Configuration 258Voice Processor Preset 258Voice Processor Setup 258
Global channel 281Groove Quantize 152
Index
417Index
HHarmony track (Voice Processor) 153, 186
in SongBook entries 161MIDI channel 237Note Input Source 249
IInputs 11, 15, 19, 240Intro 9
JJukebox 143, 151
KKeyboard Mode 12
Lock 233KMP file format 225KSF file format 225
LLevel (Sound parameter)
Trim 200LFO
Waveform, LFO waveform 208Local Off 237, 283Lower Lock 233Lyrics 144, 163
MMarkers 145Master Transpose 12, 231Master Tune 230Master Volume 8, 18Menu 11MIDI
Clock 137, 236General MIDI 281Global channel 281IN channels 238Interface 15, 283OUT channels 238Setup 96, 153, 186, 236, 281Standard MIDI File 137, 166
MIDI interface 15, 283MIDI Setup 96, 153, 186, 236, 281
Write 257Midifile 137, 166, 280Mode
Pad Record 126–136Sampling 215–228Sequencer 166–189Song Play 137–156SongBook 157–165Sound 190–214Style Play 78–101Style Record 102–125
MP3 48, 56, 137, 139, 140, 144, 151, 156, 157, 163Installation 407Recording 410
Volume 241
OOctave Transpose 13, 86
Auto Octave 232Midi In 237
OffsetOffset, LFO 209
Operating Modes 8OS (Operating System)
Backup 17, 271Update 17
Outputs 15, 18, 239–241
PPads 12, 94Pan
Pads 94Song tracks 148, 179Sound 197, 205Style tracks 84
PANIC (SHIFT+START/STOP) 10PCG file format 225PCM Autoload 226, 273Pedals 235Performance 12, 78
Selecting 12, 74Selecting (Auto) 234Writing 98
Pitch 198Pitch Bend 86, 180Pitch EG 200Portamento
AMS 213Program Change 283
QQuarter Tone 83, 86
RResonance 201
SSampling 215–228Sampling mode 215–228Scale
Main scale 231Sequencer
Link mode 154Sequencer 2 FX mode 154Transport controls 10, 11
Sequencer mode 166–189Shift 10Single Touch 9, 10Single Touch Setting (STS) 10
Selecting 10, 75Writing 98
SongMarkers 145

418 Index
Play from disk 76, 188Recording 169–178Selecting 76, 188Standard MIDI File 280
Song Play mode 137–156SongBook 157–165Sound
Editing 90, 150, 181Selecting 12, 74Selecting (Auto) 234Writing 211
Sound mode 190–214Split Point 83, 281Standard MIDI File 137, 166, 280STS, See Single Touch SettingStyle
Ending 10Fill 10Intro 9Recording 102–125Selecting 9, 75Selecting (Auto) 234Style Performance 78Variation 10
Style PerformanceSelecting, see StyleWriting 99
Style Play mode 78–101Style Record mode 102–125Sync.
Key Sync., LFO 209MIDI/Tempo, LFO 209
Synchro Start/Stop 10
TTalk
Auto On/Off 244On/Off 82Settings 244Write settings 258
Tap Tempo 10Tempo/Value section 11Touch Panel
Calibration 256Reset 256
Track Select 10Tracks
Drum/Percussion 89, 93, 240Keyboard tracks 12, 78, 138Octave Transpose 13
Sounds 12Volume 84, 147, 179
Transpose 12, 13, 86Auto Octave 232Midi In 237
Trinity 215, 225Triton 215, 225Tune
Tune (Sound parameter) 195
UUpper Volume Link 84, 96USB 273
VVALUE slider
AMS 213Variation 10Velocity
AMS 213Velocity Intensity, Amp Mod. 206Velocity, Filter EG 202
Velocity Curve 230Video Interface 15, 256, 403Vocoder 377Voice Processor
Harmony Track 153, 161, 186MIDI channel 237Note Input Source 249
Voice Processor PresetEditing 245Lock 233Writing 258
Voice Processor SetupEditing 242Writing 258
VolumeAcc/Seq 8, 18, 137Balance 18Individual tracks
Sequencer 179Song Play 147Style Play 84
Master 8, 18, 137
WWAVE file format 225


AddressKORG ITALY SpaVia Cagiata, 85I-60027 Osimo (An)Italy
Web servers
www.korg.co.jpwww.korg.comwww.korg.co.ukwww.korgcanada.comwww.korgfr.netwww.korg.dewww.korg.itwww.letusa.es
www.korgpa.com
© KORG Italy 2005. All rights reservedPART NUMBER: MAN0001093
Related Documents


