User's Guide Printing Copying Scanning Maintaining the Printer Solving Problems NPD6446-00 EN

Welcome message from author
This document is posted to help you gain knowledge. Please leave a comment to let me know what you think about it! Share it to your friends and learn new things together.
Transcript

User's Guide
Printing
Copying
Scanning
Maintaining the Printer
Solving Problems
NPD6446-00 EN
Contents
Guide to This ManualIntroduction to the Manuals. . . . . . . . . . . . . . . . . . .6Searching for Information. . . . . . . . . . . . . . . . . . . . 6Printing Only the Pages You Need. . . . . . . . . . . . . . 7About This Manual. . . . . . . . . . . . . . . . . . . . . . . . . 7
Marks and Symbols. . . . . . . . . . . . . . . . . . . . . . . 7Notes on Screenshots and Illustrations. . . . . . . . . 8Operating System References. . . . . . . . . . . . . . . . 8
Trademarks. . . . . . . . . . . . . . . . . . . . . . . . . . . . . . . 8Copyright. . . . . . . . . . . . . . . . . . . . . . . . . . . . . . . . 9
Important InstructionsSafety Instructions. . . . . . . . . . . . . . . . . . . . . . . . . 12
Safety Instructions for Ink. . . . . . . . . . . . . . . . . 12Printer Advisories and Warnings. . . . . . . . . . . . . . 12
Advisories and Warnings for Setting Up thePrinter. . . . . . . . . . . . . . . . . . . . . . . . . . . . . . . .13Advisories and Warnings for Using the Printer. . 13Advisories and Warnings for Using thePrinter with a Wireless Connection. . . . . . . . . . .14Advisories and Warnings for Transporting orStoring the Printer. . . . . . . . . . . . . . . . . . . . . . . 14
Protecting Your Personal Information. . . . . . . . . . . 14
Part Names and FunctionsPart Names and Functions. . . . . . . . . . . . . . . . . . . 16
Guide to the Control PanelButtons and Functions. . . . . . . . . . . . . . . . . . . . . . 19Checking Lights and Printer Status. . . . . . . . . . . . . 20
Loading PaperPaper Handling Precautions. . . . . . . . . . . . . . . . . . 24List of Paper Type. . . . . . . . . . . . . . . . . . . . . . . . . 24Loading Paper in the Rear Paper Feeder. . . . . . . . . 25Loading Envelopes in the Rear Paper Feeder. . . . . . 27Loading Various Paper. . . . . . . . . . . . . . . . . . . . . . 28
Loading Pre-punched Paper. . . . . . . . . . . . . . . . 28Loading Long Papers. . . . . . . . . . . . . . . . . . . . . 29
Placing OriginalsPlacing Originals on the Scanner Glass. . . . . . . . . . 31
PrintingPrinting Documents. . . . . . . . . . . . . . . . . . . . . . . .34
Printing from a Computer - Windows. . . . . . . . . 34Printing from a Computer - Mac OS. . . . . . . . . . 52Printing Documents from Smart Devices (iOS). . 57Printing Documents from Smart Devices(Android). . . . . . . . . . . . . . . . . . . . . . . . . . . . . 58
Printing on Envelopes. . . . . . . . . . . . . . . . . . . . . . 58Printing on Envelopes from a Computer(Windows). . . . . . . . . . . . . . . . . . . . . . . . . . . . 58Printing on Envelopes from a Computer(Mac OS). . . . . . . . . . . . . . . . . . . . . . . . . . . . . .59
Printing Web Pages. . . . . . . . . . . . . . . . . . . . . . . . 59Printing Web Pages from a Computer. . . . . . . . . 59Printing Web Pages from Smart Devices. . . . . . . 59
Printing Using a Cloud Service. . . . . . . . . . . . . . . . 60
CopyingCopying Basics. . . . . . . . . . . . . . . . . . . . . . . . . . . 63Making Multiple Copies. . . . . . . . . . . . . . . . . . . . . 63
ScanningBasic Information on Scanning. . . . . . . . . . . . . . . . 65
What is a "Scan"?. . . . . . . . . . . . . . . . . . . . . . . . 65Scanning Uses. . . . . . . . . . . . . . . . . . . . . . . . . . 65Available Scanning Methods. . . . . . . . . . . . . . . .65Recommended File Formats to Suit YourPurpose. . . . . . . . . . . . . . . . . . . . . . . . . . . . . . .66Recommended Resolutions to Suit YourPurpose. . . . . . . . . . . . . . . . . . . . . . . . . . . . . . .67
Scanning Originals to a Computer. . . . . . . . . . . . . 67Scanning from the Control Panel. . . . . . . . . . . . 67Scanning from a Computer. . . . . . . . . . . . . . . . .68
Scanning Originals to a Smart Device. . . . . . . . . . . 69Advanced Scanning. . . . . . . . . . . . . . . . . . . . . . . . 69
Scanning Multiple Photos at the Same Time. . . . 69
Maintaining the PrinterChecking the Ink Levels. . . . . . . . . . . . . . . . . . . . . 72Improving Print, Copy, and Scan Quality. . . . . . . . .72
Checking and Cleaning the Print Head. . . . . . . . 72Running Power Cleaning. . . . . . . . . . . . . . . . . . 74Preventing nozzle clogging. . . . . . . . . . . . . . . . . 75Aligning the Print Head. . . . . . . . . . . . . . . . . . . 75
2

Cleaning the Paper Path for Ink Smears. . . . . . . .76Cleaning the Scanner Glass. . . . . . . . . . . . . . . . .76
Cleaning the Printer. . . . . . . . . . . . . . . . . . . . . . . .77Cleaning Spilled ink. . . . . . . . . . . . . . . . . . . . . . . . 78Checking the Total Number of Pages FedThrough the Printer. . . . . . . . . . . . . . . . . . . . . . . . 78Saving Power. . . . . . . . . . . . . . . . . . . . . . . . . . . . . 78
Saving Power - Windows. . . . . . . . . . . . . . . . . . 78Saving Power - Mac OS. . . . . . . . . . . . . . . . . . . 79
Installing or Uninstalling Applications Separately. . 79Installing the Applications Separately. . . . . . . . . 79Adding the Printer (for Mac OS Only). . . . . . . . .82Uninstalling Applications. . . . . . . . . . . . . . . . . . 82Updating Applications and Firmware. . . . . . . . . 84
Transporting and Storing the Printer. . . . . . . . . . . .84
Solving ProblemsThe Printer Does Not Work as Expected. . . . . . . . . 89
The Printer Does Not Turn On or Off. . . . . . . . . 89Power Turns Off Automatically. . . . . . . . . . . . . . 89Paper Does Not Feed Properly. . . . . . . . . . . . . . 90Cannot Print. . . . . . . . . . . . . . . . . . . . . . . . . . . 92Cannot Start Scanning. . . . . . . . . . . . . . . . . . . 108Cannot Operate the Printer as Expected. . . . . . 117
Checking Lights and Printer Status. . . . . . . . . . . . 118Paper Gets Jammed. . . . . . . . . . . . . . . . . . . . . . . 121
Removing Jammed Paper. . . . . . . . . . . . . . . . . 121Preventing Paper Jams. . . . . . . . . . . . . . . . . . . 124
It is Time to Refill the Ink. . . . . . . . . . . . . . . . . . . 124Ink Bottle Handling Precautions. . . . . . . . . . . . 124Refilling the Ink Tanks. . . . . . . . . . . . . . . . . . . 125
Printing, Copying, and Scanning Quality is Poor. . 129Print Quality is Poor. . . . . . . . . . . . . . . . . . . . .129Copy Quality is Poor. . . . . . . . . . . . . . . . . . . . 137Scanned Image Problems. . . . . . . . . . . . . . . . . 142
Cannot Solve Problem. . . . . . . . . . . . . . . . . . . . . 144Cannot Solve Printing or Copying Problems. . . 145
Adding or Replacing the Computer or DevicesConnecting to a Printer that has beenConnected to the Network. . . . . . . . . . . . . . . . . . 147
Using a Network Printer from a SecondComputer. . . . . . . . . . . . . . . . . . . . . . . . . . . . 147Using a Network Printer from a Smart Device. . 148
Re-setting the Network Connection. . . . . . . . . . . 148When Replacing the Wireless Router. . . . . . . . .148
When Changing the Computer. . . . . . . . . . . . . 149Changing the Connection Method to theComputer. . . . . . . . . . . . . . . . . . . . . . . . . . . . 149Making Wi-Fi Settings from the Control Panel. .150
Connecting a Smart Device and Printer Directly(Wi-Fi Direct). . . . . . . . . . . . . . . . . . . . . . . . . . . 152
About Wi-Fi Direct. . . . . . . . . . . . . . . . . . . . . 153Connecting to Devices Using Wi-Fi Direct. . . . 153
Checking the Network Connection Status. . . . . . . 154Checking the Network Status Using NetworkLight. . . . . . . . . . . . . . . . . . . . . . . . . . . . . . . . 154Printing a Network Connection Report. . . . . . . 155Printing a Network Status Sheet. . . . . . . . . . . . 160Checking the Network of the Computer(Windows only). . . . . . . . . . . . . . . . . . . . . . . . 160
Product InformationPaper Information. . . . . . . . . . . . . . . . . . . . . . . . 163
Available Paper and Capacities. . . . . . . . . . . . . 163Unavailable Paper Types. . . . . . . . . . . . . . . . . . 165
Consumable Products Information. . . . . . . . . . . . 166Ink Bottle Codes. . . . . . . . . . . . . . . . . . . . . . . 166
Software Information. . . . . . . . . . . . . . . . . . . . . . 167Software for Printing. . . . . . . . . . . . . . . . . . . . 167Software for Scanning. . . . . . . . . . . . . . . . . . . .170Software for Package Creation. . . . . . . . . . . . . .171Software for Making Settings. . . . . . . . . . . . . . 171Software for Updating. . . . . . . . . . . . . . . . . . . 173
Product Specifications. . . . . . . . . . . . . . . . . . . . . 174Printer Specifications. . . . . . . . . . . . . . . . . . . . 174Scanner Specifications. . . . . . . . . . . . . . . . . . . 175Interface Specifications. . . . . . . . . . . . . . . . . . . 176Network Specifications. . . . . . . . . . . . . . . . . . . 176Dimensions. . . . . . . . . . . . . . . . . . . . . . . . . . . 177Electrical Specifications. . . . . . . . . . . . . . . . . . 177Environmental Specifications. . . . . . . . . . . . . . 178System Requirements. . . . . . . . . . . . . . . . . . . . 178
Regulatory Information. . . . . . . . . . . . . . . . . . . . 179Standards and Approvals. . . . . . . . . . . . . . . . . 179Restrictions on Copying. . . . . . . . . . . . . . . . . . 179
Where to Get HelpTechnical Support Web Site. . . . . . . . . . . . . . . . . .182Contacting Epson Support. . . . . . . . . . . . . . . . . . 182
Before Contacting Epson. . . . . . . . . . . . . . . . . 182Help for Users in Europe. . . . . . . . . . . . . . . . . .182Help for Users in Taiwan. . . . . . . . . . . . . . . . . .182Help for Users in Australia. . . . . . . . . . . . . . . . 183
3

Help for Users in New Zealand. . . . . . . . . . . . . 183Help for Users in Singapore. . . . . . . . . . . . . . . 184Help for Users in Thailand. . . . . . . . . . . . . . . . 184Help for Users in Vietnam. . . . . . . . . . . . . . . . 185Help for Users in Indonesia. . . . . . . . . . . . . . . .185Help for Users in Hong Kong. . . . . . . . . . . . . . 188Help for Users in Malaysia. . . . . . . . . . . . . . . . 189Help for Users in India. . . . . . . . . . . . . . . . . . . 189Help for Users in the Philippines. . . . . . . . . . . . 189
4
Guide to This Manual
Introduction to the Manuals. . . . . . . . . . . . . . . . . . . . . . . . . . . . . . . . . . . . . . . . . . . 6
Searching for Information. . . . . . . . . . . . . . . . . . . . . . . . . . . . . . . . . . . . . . . . . . . . . 6
Printing Only the Pages You Need. . . . . . . . . . . . . . . . . . . . . . . . . . . . . . . . . . . . . . . 7
About This Manual. . . . . . . . . . . . . . . . . . . . . . . . . . . . . . . . . . . . . . . . . . . . . . . . . . 7
Trademarks. . . . . . . . . . . . . . . . . . . . . . . . . . . . . . . . . . . . . . . . . . . . . . . . . . . . . . . 8
Copyright. . . . . . . . . . . . . . . . . . . . . . . . . . . . . . . . . . . . . . . . . . . . . . . . . . . . . . . . .9

Introduction to the ManualsThe following manuals are supplied with your Epson printer. As well as the manuals, see the help included in thevarious Epson software applications.
❏ Important Safety Instructions (paper manual)Provides you with instructions to ensure the safe use of this printer.
❏ Start Here (paper manual)Provides you with information on setting up the printer and installing the software.
❏ User's Guide (digital manual)This manual. This manual is available as PDF and Web manuals. Provides overall information and instructionson using the printer, on network settings when using the printer on a network, and on solving problems.
You can obtain the latest versions of the above manuals with the following methods.
❏ Paper manualVisit the Epson Europe support website at http://www.epson.eu/support, or the Epson worldwide supportwebsite at http://support.epson.net/.
❏ Digital manualTo view the Web manual, visit the following website, enter the product name, and then go to Support.http://epson.sn
Searching for InformationThe PDF manual allows you to search for information you are looking for by keyword, or jump directly to specificections using the bookmarks. This section explains how to use a PDF manual that has been opened in AdobeAcrobat Reader DC on your computer.
Searching by keyword
Click Edit > Advanced Search. Enter the keyword (text) for information you want to find in the search window,and then click Search. Hits are displayed as a list. Click one of the displayed hits to jump to that page.
Jumping directly from bookmarks
Click a title to jump to that page. Click + or > to view the lower level titles in that section. To return to the previouspage, perform the following operation on your keyboard.
❏ Windows: Hold down Alt. and then press ←.
Guide to This Manual > Searching for Information
6

❏ Mac OS: Hold down the command key, and then press ←.
Printing Only the Pages You NeedYou can extract and print only the pages you need. Click Print in the File menu, and then specify the pages youwant to print in Pages in Pages to Print.
❏ To specify a series of pages, enter a hyphen between the start page and the end page.Example: 20-25
❏ To specify pages that are not in series, divide the pages with commas.Example: 5, 10, 15
About This ManualThis section explains the meaning of marks and symbols, notes on descriptions, and operating system referenceinformation used in this manual.
Marks and Symbols
!Caution:
Instructions that must be followed carefully to avoid bodily injury.
cImportant:
Instructions that must be observed to avoid damage to your equipment.
Note:Provides complementary and reference information.
Guide to This Manual > About This Manual > Marks and Symbols
7

Related Information
& Links to related sections.
Notes on Screenshots and Illustrations❏ Screenshots of the printer driver are from Windows 10 or macOS High Sierra. The content displayed on the
screens varies depending on the model and situation.
❏ Illustrations used in this manual are examples only. Although there may be slight differences depending onthemodel, the method of operation is the same.
Operating System References
Windows
In this manual, terms such as "Windows 10", "Windows 8.1", "Windows 8", "Windows 7", "Windows Vista","Windows XP", "Windows Server 2019", "Windows Server 2016", "Windows Server 2012 R2", "Windows Server2012", "Windows Server 2008 R2", "Windows Server 2008", "Windows Server 2003 R2", and "Windows Server2003" refer to the following operating systems. Additionally, "Windows" is used to refer to all versions.
❏ Microsoft® Windows® 10 operating system
❏ Microsoft® Windows® 8.1 operating system
❏ Microsoft® Windows® 8 operating system
❏ Microsoft® Windows® 7 operating system
❏ Microsoft® Windows Vista® operating system
❏ Microsoft® Windows® XP operating system
❏ Microsoft® Windows® XP Professional x64 Edition operating system
❏ Microsoft® Windows Server® 2019 operating system
❏ Microsoft® Windows Server® 2016 operating system
❏ Microsoft® Windows Server® 2012 R2 operating system
❏ Microsoft® Windows Server® 2012 operating system
❏ Microsoft® Windows Server® 2008 R2 operating system
❏ Microsoft® Windows Server® 2008 operating system
❏ Microsoft® Windows Server® 2003 R2 operating system
❏ Microsoft® Windows Server® 2003 operating system
Mac OS
In this manual, "Mac OS" is used to refer to Mac OS X v10.6.8 or later.
Trademarks❏ EPSON® is a registered trademark, and EPSON EXCEED YOUR VISION or EXCEED YOUR VISION is a
trademark of Seiko Epson Corporation.
Guide to This Manual > Trademarks
8

❏ Epson Scan 2 software is based in part on the work of the Independent JPEG Group.
❏ libtiffCopyright © 1988-1997 Sam LefflerCopyright © 1991-1997 Silicon Graphics, Inc.Permission to use, copy, modify, distribute, and sell this software and its documentation for any purpose ishereby granted without fee, provided that (i) the above copyright notices and this permission notice appear inall copies of the software and related documentation, and (ii) the names of Sam Leffler and Silicon Graphicsmay not be used in any advertising or publicity relating to the software without the specific, prior writtenpermission of Sam Leffler and Silicon Graphics.THE SOFTWARE IS PROVIDED "AS-IS" AND WITHOUT WARRANTY OF ANY KIND, EXPRESS,IMPLIED OR OTHERWISE, INCLUDING WITHOUT LIMITATION, ANY WARRANTY OFMERCHANTABILITY OR FITNESS FOR A PARTICULAR PURPOSE.IN NO EVENT SHALL SAM LEFFLER OR SILICON GRAPHICS BE LIABLE FOR ANY SPECIAL,INCIDENTAL, INDIRECT OR CONSEQUENTIAL DAMAGES OF ANY KIND, OR ANY DAMAGESWHATSOEVER RESULTING FROM LOSS OF USE, DATA OR PROFITS, WHETHER OR NOT ADVISEDOF THE POSSIBILITY OF DAMAGE, AND ON ANY THEORY OF LIABILITY, ARISING OUT OF OR INCONNECTION WITH THE USE OR PERFORMANCE OF THIS SOFTWARE.
❏ QR Code is a registered trademark of DENSO WAVE INCORPORATED in Japan and other countries.
❏ Microsoft®, Windows®, Windows Server®, and Windows Vista® are registered trademarks of MicrosoftCorporation.
❏ Apple, Mac, macOS, OS X, Bonjour, ColorSync, Safari, iPad, iPhone, iPod touch, and iTunes are trademarks ofApple Inc., registered in the U.S. and other countries.
❏ Chrome, Google Play, and Android are trademarks of Google LLC.
❏ Adobe, Acrobat, and Reader are either registered trademarks or trademarks of Adobe in the United Statesand/or other countries.
❏ Firefox is a trademark of the Mozilla Foundation in the U.S. and other countries.
❏ General Notice: Other product names used herein are for identification purposes only and may be trademarksof their respective owners. Epson disclaims any and all rights in those marks.
CopyrightNo part of this publication may be reproduced, stored in a retrieval system, or transmitted in any form or by anymeans, electronic, mechanical, photocopying, recording, or otherwise, without the prior written permission ofSeiko Epson Corporation. No patent liability is assumed with respect to the use of the information containedherein. Neither is any liability assumed for damages resulting from the use of the information herein. Theinformation contained herein is designed only for use with this Epson product. Epson is not responsible for anyuse of this information as applied to other products.
Neither Seiko Epson Corporation nor its affiliates shall be liable to the purchaser of this product or third parties fordamages, losses, costs, or expenses incurred by the purchaser or third parties as a result of accident, misuse, orabuse of this product or unauthorized modifications, repairs, or alterations to this product, or (excluding the U.S.)failure to strictly comply with Seiko Epson Corporation's operating and maintenance instructions.
Seiko Epson Corporation and its affiliates shall not be liable for any damages or problems arising from the use ofany options or any consumable products other than those designated as Original Epson Products or EpsonApproved Products by Seiko Epson Corporation.
Guide to This Manual > Copyright
9

Seiko Epson Corporation shall not be held liable for any damage resulting from electromagnetic interference thatoccurs from the use of any interface cables other than those designated as Epson Approved Products by SeikoEpson Corporation.
© 2020 Seiko Epson Corporation
The contents of this manual and the specifications of this product are subject to change without notice.
Guide to This Manual > Copyright
10

Important Instructions
Safety Instructions. . . . . . . . . . . . . . . . . . . . . . . . . . . . . . . . . . . . . . . . . . . . . . . . . 12
Printer Advisories and Warnings. . . . . . . . . . . . . . . . . . . . . . . . . . . . . . . . . . . . . . . 12
Protecting Your Personal Information. . . . . . . . . . . . . . . . . . . . . . . . . . . . . . . . . . . 14
Safety InstructionsRead and follow these instructions to ensure safe use of this printer. Make sure you keep this manual for futurereference. Also, be sure to follow all warnings and instructions marked on the printer.
❏ Some of the symbols used on your printer are to ensure safety and proper use of the printer. Visit the followingWeb site to learn the meaning of the symbols.http://support.epson.net/symbols
❏ Use only the power cord supplied with the printer and do not use the cord with any other equipment. Use ofother cords with this printer or the use of the supplied power cord with other equipment may result in fire orelectric shock.
❏ Be sure your AC power cord meets the relevant local safety standard.
❏ Never disassemble, modify, or attempt to repair the power cord, plug, printer unit, scanner unit, or options byyourself, except as specifically explained in the printer's manuals.
❏ Unplug the printer and refer servicing to qualified service personnel under the following conditions:The power cord or plug is damaged; liquid has entered the printer; the printer has been dropped or the casingdamaged; the printer does not operate normally or exhibits a distinct change in performance. Do not adjustcontrols that are not covered by the operating instructions.
❏ Place the printer near a wall outlet where the plug can be easily unplugged.
❏ Do not place or store the printer outdoors, near excessive dirt or dust, water, heat sources, or in locationssubject to shocks, vibrations, high temperature or humidity.
❏ Take care not to spill liquid on the printer and not to handle the printer with wet hands.
❏ Keep the printer at least 22 cm away from cardiac pacemakers. Radio waves from this printer may adverselyaffect the operation of cardiac pacemakers.
Safety Instructions for Ink❏ Be careful not to touch any ink when you handle the ink tanks, ink tank caps, and opened ink bottles or ink
bottle caps.
❏ If ink gets on your skin, wash the area thoroughly with soap and water.
❏ If ink gets into your eyes, flush them immediately with water. If discomfort or vision problems continue aftera thorough flushing, see a doctor immediately.
❏ If ink gets into your mouth, see a doctor right away.
❏ Do not shake an ink bottle too vigorously or subject it to strong impacts as this can cause ink to leak.
❏ Keep ink bottles out of the reach of children. Do not allow children to drink from the ink bottles.
Printer Advisories and WarningsRead and follow these instructions to avoid damaging the printer or your property. Make sure you keep thismanual for future reference.
Important Instructions > Printer Advisories and Warnings
12
Advisories and Warnings for Setting Up the Printer❏ Do not block or cover the vents and openings in the printer.
❏ Use only the type of power source indicated on the printer's label.
❏ Avoid using outlets on the same circuit as photocopiers or air control systems that regularly switch on and off.
❏ Avoid electrical outlets controlled by wall switches or automatic timers.
❏ Keep the entire computer system away from potential sources of electromagnetic interference, such asloudspeakers or the base units of cordless telephones.
❏ The power-supply cords should be placed to avoid abrasions, cuts, fraying, crimping, and kinking. Do not placeobjects on top of the power-supply cords and do not allow the power-supply cords to be stepped on or run over.Be particularly careful to keep all the power-supply cords straight at the ends and the points where they enterand leave the transformer.
❏ If you use an extension cord with the printer, make sure that the total ampere rating of the devices plugged intothe extension cord does not exceed the cord's ampere rating. Also, make sure that the total ampere rating of alldevices plugged into the wall outlet does not exceed the wall outlet's ampere rating.
❏ If you plan to use the printer in Germany, the building installation must be protected by a 10 or 16 amp circuitbreaker to provide adequate short-circuit protection and over-current protection for the printer.
❏ When connecting the printer to a computer or other device with a cable, ensure the correct orientation of theconnectors. Each connector has only one correct orientation. Inserting a connector in the wrong orientationmay damage both devices connected by the cable.
❏ Place the printer on a flat, stable surface that extends beyond the base of the printer in all directions. The printerwill not operate properly if it is tilted at an angle.
❏ Allow space above the printer so that you can fully raise the document cover.
❏ Leave enough space in front of the printer for the paper to be fully ejected.
❏ Avoid places subject to rapid changes in temperature and humidity. Also, keep the printer away from directsunlight, strong light, or heat sources.
Advisories and Warnings for Using the Printer❏ Do not insert objects through the slots in the printer.
❏ Do not put your hand inside the printer during printing.
❏ Do not touch the white flat cable and ink tubes inside the printer.
❏ Do not use aerosol products that contain flammable gases inside or around the printer. Doing so may cause fire.
❏ Do not move the print head by hand; otherwise, you may damage the printer.
❏ Be careful not to trap your fingers when closing the scanner unit.
❏ Do not press too hard on the scanner glass when placing the originals.
❏ Prolonged use of the printer when the ink level is below the lower line could damage the printer. Fill the inktank to the upper line while the printer is not operating. To display the correct ink level estimates, reset the inklevel after filling the tank.
❏ Always turn the printer off using the P button. Do not unplug the printer or turn off the power at the outletuntil the P light stops flashing.
❏ If you are not going to use the printer for a long period, be sure to unplug the power cord from the electricaloutlet.
Important Instructions > Printer Advisories and Warnings > Advisories and Warnings for Using the Printer
13

Advisories and Warnings for Using the Printer with a WirelessConnection❏ Radio waves from this printer may negatively affect the operation of medical electronic equipment, causing
them to malfunction. When using this printer inside medical facilities or near medical equipment, followdirections from the authorized personnel representing the medical facilities, and follow all posted warnings anddirections on the medical equipment.
❏ Radio waves from this printer may negatively affect the operation of automatically controlled devices such asautomatic doors or fire alarms, and could lead to accidents due to malfunction. When using this printer nearautomatically controlled devices, follow all posted warnings and directions on these devices.
Advisories and Warnings for Transporting or Storing the Printer❏ When storing or transporting the printer, avoid tilting it, placing it vertically, or turning it upside down;
otherwise ink may leak.
❏ Before transporting the printer, make sure that the print head is in the home (far right) position.
Protecting Your Personal InformationIf you give the printer to someone else or dispose of it, restore the default network settings by using the printer'sbuttons.
Related Information
& “Buttons and Functions” on page 19
Important Instructions > Protecting Your Personal Information
14

Part Names and Functions
Part Names and Functions. . . . . . . . . . . . . . . . . . . . . . . . . . . . . . . . . . . . . . . . . . . .16
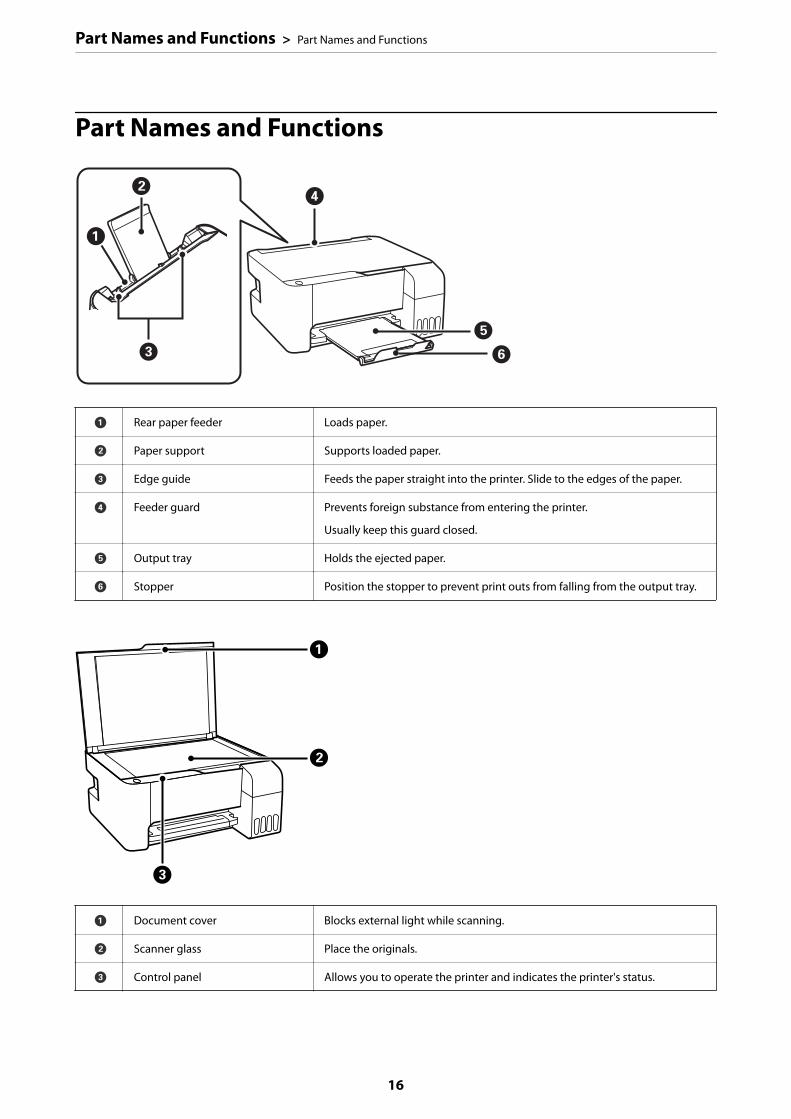
Part Names and Functions
A Rear paper feeder Loads paper.
B Paper support Supports loaded paper.
C Edge guide Feeds the paper straight into the printer. Slide to the edges of the paper.
D Feeder guard Prevents foreign substance from entering the printer.
Usually keep this guard closed.
E Output tray Holds the ejected paper.
F Stopper Position the stopper to prevent print outs from falling from the output tray.
A Document cover Blocks external light while scanning.
B Scanner glass Place the originals.
C Control panel Allows you to operate the printer and indicates the printer's status.
Part Names and Functions > Part Names and Functions
16

A Scanner unit Scans placed originals. Open to remove jammed paper. This unit shouldusually be kept closed.
B Ink tank cap Open to refill the ink tank.
C Ink tank cover
D Ink tank unit Contains the ink tanks.
E Ink reservoir tank (Ink tank) Supplies ink to the print head.
F Front cover Open when removing jammed paper inside the printer.
G Scanner unit support Supports the scanner unit when opening it.
H Print head Ink is ejected from the print head nozzles underneath.
A AC inlet Connects the power cord.
B USB port Connects a USB cable to connect with a computer.
Part Names and Functions > Part Names and Functions
17
Guide to the Control Panel
Buttons and Functions. . . . . . . . . . . . . . . . . . . . . . . . . . . . . . . . . . . . . . . . . . . . . . .19
Checking Lights and Printer Status. . . . . . . . . . . . . . . . . . . . . . . . . . . . . . . . . . . . . 20

Buttons and Functions
A Turns the printer on or off.
Unplug the power cord after checking that the power light is off.
B When a network error occurs, pressing this button cancels the error. Hold this button down for more than 5seconds to perform Wi-Fi auto setup using the WPS push button.
C Prints a network connection report allowing you to determine the causes of any problems you may have using theprinter on a network. If you need more detailed network settings and connection status, hold this button down forat least 7 seconds to print a network status sheet.
D Starts monochrome copying on A4 size plain paper. To increase the number of copies (by up to 20 copies), pressthis button within one second intervals.
E Starts color copying on A4 size plain paper. To increase the number of copies (by up to 20 copies), press thisbutton within one second intervals.
F Stops the current operation.
Hold this button down for five seconds until the P button flashes to run print head cleaning.
Functions of Button Combinations
Additional functions are available with different combinations of buttons.
+ Check Scanned Images
Press the and buttons simultaneously to run software on a USB-connected computerand check scanned images.
+ or Copy in Draft Mode
Press the y and the or buttons simultaneously to copy in draft mode.
For users in Western Europe, draft mode is not available.
+ PIN Code Setup (WPS)
Hold down the and buttons simultaneously to start PIN Code Setup (WPS).
+ Wi-Fi Direct (Simple AP) Setup
Hold down the and buttons simultaneously to start Wi-Fi Direct (Simple AP) Setup.
+ Restore Default Network Settings
Turn the printer on while holding down the button to restore the default network settings.When the network settings are restored, the printer turns on and the network status lights flashalternately.
Guide to the Control Panel > Buttons and Functions
19
+ Print Nozzle Check Pattern
Turn the printer on while holding down the y button to print the nozzle check pattern.
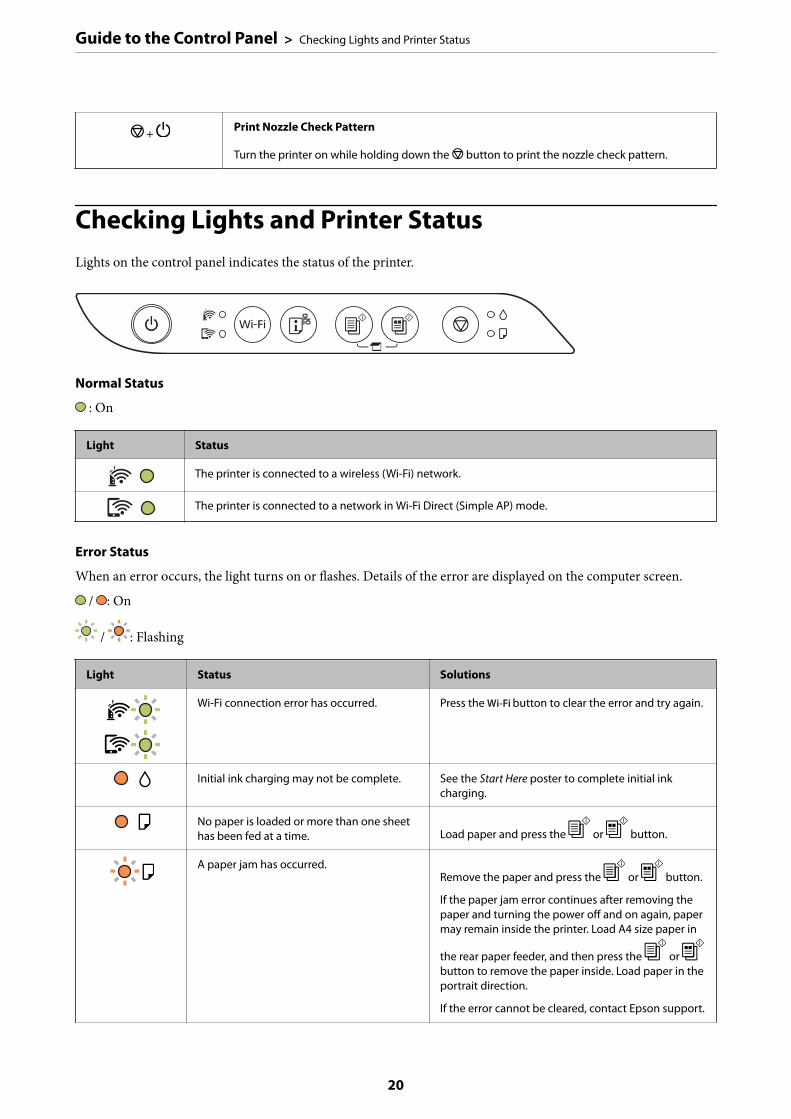
Checking Lights and Printer StatusLights on the control panel indicates the status of the printer.
Normal Status
: On
Light Status
The printer is connected to a wireless (Wi-Fi) network.
The printer is connected to a network in Wi-Fi Direct (Simple AP) mode.
Error Status
When an error occurs, the light turns on or flashes. Details of the error are displayed on the computer screen.
/ : On
/ : Flashing
Light Status Solutions
Wi-Fi connection error has occurred. Press the button to clear the error and try again.
Initial ink charging may not be complete. See the Start Here poster to complete initial inkcharging.
No paper is loaded or more than one sheethas been fed at a time. Load paper and press the or button.
A paper jam has occurred.Remove the paper and press the or button.
If the paper jam error continues after removing thepaper and turning the power off and on again, papermay remain inside the printer. Load A4 size paper in
the rear paper feeder, and then press the or button to remove the paper inside. Load paper in theportrait direction.
If the error cannot be cleared, contact Epson support.
Guide to the Control Panel > Checking Lights and Printer Status
20

Light Status Solutions
❏ The printer was not turned off correctly.*
❏ Because the printer was turned off whileoperating, the nozzles may have driedand clogged.
* The power was turned off with a powerstrip or breaker, the plug was pulled out ofthe outlet, or an electrical failure occurred.
❏ After clearing the error by pressing the or
button, we recommend performing a nozzlecheck. Cancel any pending print jobs.
❏ To turn off the printer, make sure you press the Pbutton.
When the H light and the b light flashsimultaneously
An ink pad is nearing or at the end of itsservice life.
The ink pads need to be replaced.
Contact Epson or an authorised Epson serviceprovider to replace the ink pad *1. It is not a user-serviceable part.
When a message saying that you can continue
printing is displayed on the computer, press the
or button to continue printing. The lights stopflashing for the time being, however, they willcontinue to flash at regular intervals until the ink padis replaced.
When the H light and the b light flashalternately
A borderless printing ink pad is nearing or atthe end of its service life.
The borderless printing ink pad need to be replaced.
Contact Epson or an authorised Epson serviceprovider to replace the ink pad *2. It is not a user-serviceable part.
When a message saying that you can continue
printing is displayed on the computer, press the
or button to continue printing. The lights stopflashing for the time being, however, they willcontinue to flash at regular intervals until the ink padis replaced.
Borderless printing is not available, but printing witha border is available.
The printer has started in recovery modebecause the firmware update failed.
Follow the steps below to try to update the firmwareagain.
1. Connect the computer and the printer with a USBcable. (During recovery mode, you cannot update thefirmware over a network connection.)
2. Visit your local Epson website for furtherinstructions.
A printer error has occurred. Remove any paper inside the printer. Turn the poweroff and on again.
If the error continues to occur after turning the poweroff and on again, contact Epson support.
Guide to the Control Panel > Checking Lights and Printer Status
21

*1 In some print cycles a very small amount of surplus ink may be collected in the ink pad. To prevent ink leakagefrom the pad, the printer is designed to stop printing when the pad has reached its limit. Whether and how oftenthis is required will vary according to the number of pages you print, the type of material that you print and thenumber of cleaning cycles that the printer performs. The need for replacement of the pad does not mean that yourprinter has ceased to operate in accordance with its specifications. The printer will advise you when the padrequires replacing and this can only be performed by an authorised Epson Service provider. The Epson warrantydoes not cover the cost of this replacement.
*2 In some print cycles a very small amount of surplus ink may be collected in the borderless printing ink pad. Toprevent ink leakage from the pad, the product is designed to stop borderless printing when the pad has reached itslimit. Whether and how often this is required will vary according to the number of pages you print using theborderless print option. The need for replacement of the pad does not mean that your printer has ceased to operatein accordance with its specifications. The printer will advise you when the pad requires replacing and this can onlybe performed by an authorised Epson Service provider. The Epson warranty does not cover the cost of thisreplacement.
Related Information
& “Removing Jammed Paper” on page 121& “Contacting Epson Support” on page 182
Guide to the Control Panel > Checking Lights and Printer Status
22
Loading Paper
Paper Handling Precautions. . . . . . . . . . . . . . . . . . . . . . . . . . . . . . . . . . . . . . . . . . 24
List of Paper Type. . . . . . . . . . . . . . . . . . . . . . . . . . . . . . . . . . . . . . . . . . . . . . . . . . 24
Loading Paper in the Rear Paper Feeder. . . . . . . . . . . . . . . . . . . . . . . . . . . . . . . . . . 25
Loading Envelopes in the Rear Paper Feeder. . . . . . . . . . . . . . . . . . . . . . . . . . . . . . .27
Loading Various Paper. . . . . . . . . . . . . . . . . . . . . . . . . . . . . . . . . . . . . . . . . . . . . . 28

Paper Handling Precautions❏ Read the instruction sheets supplied with the paper.
❏ To achieve high-quality printouts with genuine Epson paper, use the paper in the environment stated on thesheets supplied with the paper.
❏ Fan and align the edges of the paper before loading. Do not fan or curl photo paper. Doing so may damage theprintable side.
❏ If the paper is curled, flatten it or curl it slightly in the opposite direction before loading. Printing on curledpaper may cause paper jams and smears on the printout.
❏ Paper feed problems may occur frequently for manual 2-sided printing when printing on one side of pre-printed paper. Reduce the number of sheets to half or less, or load one sheet of paper at a time if paper jamscontinue.
❏ Make sure you are using long-grain paper. If you are not sure what type of paper you are using, check the paperpackaging or contact the manufacturer to confirm the paper specifications.
❏ Fan and align the edges of the envelopes before loading. When the stacked envelopes are puffed up with air,press them down to flatten them before loading.
List of Paper TypeTo obtain optimum printing results, select the paper type that suits the paper.
Media Name Media Type
Epson Bright White Ink Jet Paper Plain paper
Loading Paper > List of Paper Type
24

Media Name Media Type
Epson Ultra Glossy Photo Paper
Epson Value Glossy Photo Paper
Epson Ultra Glossy
Epson Premium Glossy Photo Paper Epson Premium Glossy
Epson Premium Semigloss Photo Paper Epson Premium Semigloss
Epson Photo Paper Glossy Photo Paper Glossy
Epson Matte Paper-Heavyweight
Epson Double-Sided Matte Paper
Epson Matte
Epson Photo Quality Ink Jet Paper
Epson Double-sided Photo Quality Ink Jet Paper
Epson Photo Quality Ink Jet
Loading Paper in the Rear Paper Feeder1. Open the feeder guard and pull out the paper support.
2. Slide the edge guides.
Loading Paper > Loading Paper in the Rear Paper Feeder
25

3. Load paper at the center of the paper support with the printable side facing up.
cImportant:
❏ Do not load more than the maximum number of sheets specified for the paper. For plain paper, do not loadabove the line just under the d symbol inside the edge guide.
❏ Load paper short edge first. However, when you have set the long edge as the width of the user defined size,load paper long edge first.
4. Slide the edge guides to the edges of the paper.
Close the feeder guard after sliding the edge guides.
cImportant:
Do not place objects on the feeder guard. Doing so may prevent paper from feeding.
5. Slide out the output tray.
Note:Return the remaining paper to its package. If you leave it in the printer, the paper may curl or the print quality maydecline.
Loading Paper > Loading Paper in the Rear Paper Feeder
26
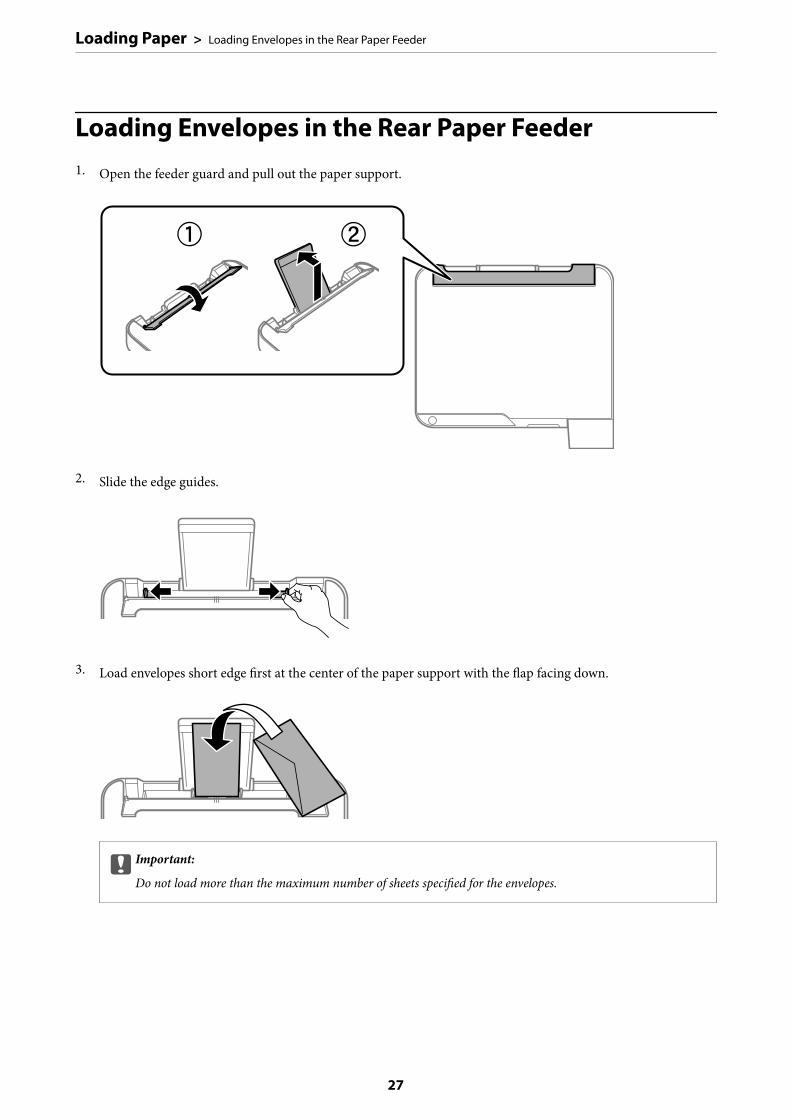
Loading Envelopes in the Rear Paper Feeder1. Open the feeder guard and pull out the paper support.
2. Slide the edge guides.
3. Load envelopes short edge first at the center of the paper support with the flap facing down.
cImportant:
Do not load more than the maximum number of sheets specified for the envelopes.
Loading Paper > Loading Envelopes in the Rear Paper Feeder
27

4. Slide the edge guides to the edges of the envelopes.
Close the feeder guard after sliding the edge guides.
cImportant:
Do not place objects on the feeder guard. Doing so may prevent paper from feeding.
5. Slide out the output tray.
Loading Various Paper
Loading Pre-punched PaperLoad paper at the center arrow mark of the paper support with the printable side facing up.
Load a single sheet of defined size plain paper with binding holes at the left or right. Adjust the print position ofyour file to avoid printing over the holes.
Loading Paper > Loading Various Paper > Loading Pre-punched Paper
28

Loading Long PapersWhen loading paper longer than legal size, store the paper support, and then flatten the leading edge of the paper.
Loading Paper > Loading Various Paper > Loading Long Papers
29

Placing Originals
Placing Originals on the Scanner Glass. . . . . . . . . . . . . . . . . . . . . . . . . . . . . . . . . . .31

Placing Originals on the Scanner Glass1. Open the document cover.
2. Remove any dust or stains on the surface of the scanner glass using a soft, dry, clean cloth.
Note:If there is any trash or dirt on the scanner glass, the scanning range may expand to include it, so the image of theoriginal may be displaced or reduced.
3. Place the original face-down and slide it to the corner mark.
Note:A range of 1.5 mm from the corner of the scanner glass is not scanned.
4. Close the cover gently.
cImportant:
❏ When placing bulky originals such as books, prevent exterior light from shining directly onto the scannerglass.
❏ Do not apply too much force to the scanner glass or the document cover. Otherwise, they may be damaged.
Placing Originals > Placing Originals on the Scanner Glass
31

5. Remove the originals after scanning.
Note:If you leave the originals on the scanner glass for a long time, they may stick to the surface of the glass.
Related Information
& “Scanner Specifications” on page 175
Placing Originals > Placing Originals on the Scanner Glass
32
Printing
Printing Documents. . . . . . . . . . . . . . . . . . . . . . . . . . . . . . . . . . . . . . . . . . . . . . . . 34
Printing on Envelopes. . . . . . . . . . . . . . . . . . . . . . . . . . . . . . . . . . . . . . . . . . . . . . . 58
Printing Web Pages. . . . . . . . . . . . . . . . . . . . . . . . . . . . . . . . . . . . . . . . . . . . . . . . . 59
Printing Using a Cloud Service. . . . . . . . . . . . . . . . . . . . . . . . . . . . . . . . . . . . . . . . 60

Printing Documents
Printing from a Computer - Windows
Printing Using Easy Settings
Note:Operations may differ depending on the application. See the application's help for details.
1. Load paper in the printer.
“Loading Paper in the Rear Paper Feeder” on page 25
2. Open the file you want to print.
3. Select Print or Print Setup from the File menu.
4. Select your printer.
Printing > Printing Documents > Printing from a Computer - Windows
34

5. Select Preferences or Properties to access the printer driver window.
6. Change the settings as necessary.
You can see the online help for explanations of the setting items. Right-clicking an item displays Help.
7. Click OK to close the printer driver window.
8. Click Print.
Related Information
& “Available Paper and Capacities” on page 163& “List of Paper Type” on page 24
Printing > Printing Documents > Printing from a Computer - Windows
35
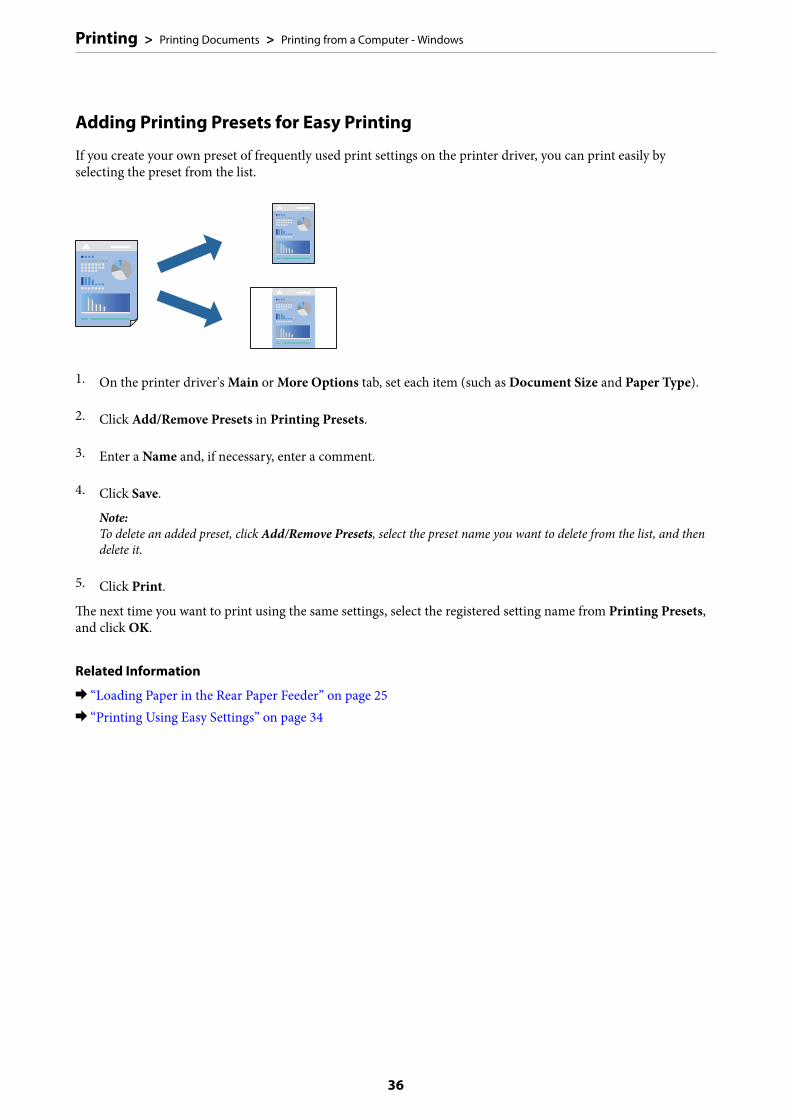
Adding Printing Presets for Easy Printing
If you create your own preset of frequently used print settings on the printer driver, you can print easily byselecting the preset from the list.
1. On the printer driver's Main or More Options tab, set each item (such as Document Size and Paper Type).
2. Click Add/Remove Presets in Printing Presets.
3. Enter a Name and, if necessary, enter a comment.
4. Click Save.
Note:To delete an added preset, click Add/Remove Presets, select the preset name you want to delete from the list, and thendelete it.
5. Click Print.
The next time you want to print using the same settings, select the registered setting name from Printing Presets,and click OK.
Related Information
& “Loading Paper in the Rear Paper Feeder” on page 25& “Printing Using Easy Settings” on page 34
Printing > Printing Documents > Printing from a Computer - Windows
36

Printing on 2-Sides
The printer driver will automatically print odd pages and even pages separately. When the odd pages have beenprinted, turn over the paper according to the instructions and print the even pages.
Note:❏ This feature is not available for borderless printing.
❏ If you do not use paper that is suitable for 2-sided printing, the print quality may decline and paper jams may occur.“Paper for 2-Sided Printing” on page 165
❏ Depending on the paper and the data, ink may bleed through to the other side of the paper.
❏ You cannot perform manual 2-sided printing unless EPSON Status Monitor 3 is enabled. If EPSON Status Monitor 3 isdisabled, access the printer driver window, click Extended Settings on the Maintenance tab, and then select EnableEPSON Status Monitor 3.
❏ However, it may not be available when the printer is accessed over a network or is used as a shared printer.
1. On the printer driver's Main tab, select the method of 2-Sided Printing.
2. Click Settings, make the appropriate settings, and then click OK.
3. Set the other items on the Main and More Options tabs as necessary, and then click OK.
4. Click Print.
When the first side has finished printing, a pop-up window is displayed on the computer. Follow the on-screeninstructions.
Related Information
& “Available Paper and Capacities” on page 163& “Loading Paper in the Rear Paper Feeder” on page 25& “Printing Using Easy Settings” on page 34
Printing > Printing Documents > Printing from a Computer - Windows
37

Printing a Booklet
You can also print a booklet that can be created by re-ordering the pages and folding the printout.
Note:❏ This feature is not available with borderless printing.
❏ If you do not use paper that is suitable for 2-sided printing, the print quality may decline and paper jams may occur.“Paper for 2-Sided Printing” on page 165
❏ Depending on the paper and the data, ink may bleed through to the other side of the paper.
❏ You cannot perform manual 2-sided printing unless EPSON Status Monitor 3 is enabled. If EPSON Status Monitor 3 isdisabled, access the printer driver window, click Extended Settings on the Maintenance tab, and then select EnableEPSON Status Monitor 3.
❏ However, it may not be available when the printer is accessed over a network or is used as a shared printer.
1. On the printer driver's Main tab, select the type of long-edge binding you want to use from 2-Sided Printing.
2. Click Settings, select Booklet, and then select Center Binding or Side Binding.
❏ Center Binding: Use this method when printing a small number of pages that can be stacked and easilyfolded in half.
❏ Side Binding. Use this method when printing one sheet (four pages) at a time, folding each in half, and thenputting them together in one volume.
3. Click OK.
4. Set the other items on the Main and More Options tabs as necessary, and then click OK.
5. Click Print.
Related Information
& “Available Paper and Capacities” on page 163& “Loading Paper in the Rear Paper Feeder” on page 25& “Printing Using Easy Settings” on page 34
Printing > Printing Documents > Printing from a Computer - Windows
38

Printing Several Pages on One Sheet
You can print several pages of data on a single sheet of paper.
Note:This feature is not available with borderless printing.
1. On the printer driver's Main tab, select 2-Up, 4-Up, 6-Up, 8-Up, 9-Up, or 16-Up as the Multi-Page setting.
2. Click Layout Order, make the appropriate settings, and then click OK.
3. Set the other items on the Main and More Options tabs as necessary, and then click OK.
4. Click Print.
Related Information
& “Loading Paper in the Rear Paper Feeder” on page 25& “Printing Using Easy Settings” on page 34
Printing to Fit the Paper Size
Select the paper size you loaded in the printer as the Destination Paper Size setting.
Printing > Printing Documents > Printing from a Computer - Windows
39

Note:This feature is not available with borderless printing.
1. On the printer driver's More Options tab, make the following settings.
❏ Document Size: Select the size of the paper you set in the application setting.
❏ Output Paper: Select the paper size you loaded in the printer.Fit to Page is automatically selected.
Note:Click Center to print the reduced image in the middle of the paper.
2. Set the other items on the Main and More Options tabs as necessary, and then click OK.
3. Click Print.
Related Information
& “Loading Paper in the Rear Paper Feeder” on page 25& “Printing Using Easy Settings” on page 34
Printing a Reduced or Enlarged Document at any Magnification
You can reduce or enlarge the size of a document by a specific percentage.
Note:This feature is not available with borderless printing.
1. On the printer driver's More Options tab, select the document size from the Document Size setting.
2. Select the paper size you want to print on from the Output Paper setting.
3. Select Reduce/Enlarge Document, Zoom to, and then enter a percentage.
4. Set the other items on the Main and More Options tabs as necessary, and then click OK.
Printing > Printing Documents > Printing from a Computer - Windows
40

5. Click Print.
Related Information
& “Loading Paper in the Rear Paper Feeder” on page 25& “Printing Using Easy Settings” on page 34
Printing One Image on Multiple Sheets for Enlargement (Creating a Poster)
This feature allows you to print one image on multiple sheets of paper. You can create a larger poster by tapingthem together.
1. On the printer driver's Main tab, select 2x1 Poster, 2x2 Poster, 3x3 Poster, or 4x4 Poster as the Multi-Pagesetting.
2. Click Settings, make the appropriate settings, and then click OK.
Note:Print Cutting Guides allows you to print a cutting guide.
3. Set the other items on the Main and More Options tabs as necessary, and then click OK.
4. Click Print.
Related Information
& “Loading Paper in the Rear Paper Feeder” on page 25& “Printing Using Easy Settings” on page 34
Printing > Printing Documents > Printing from a Computer - Windows
41
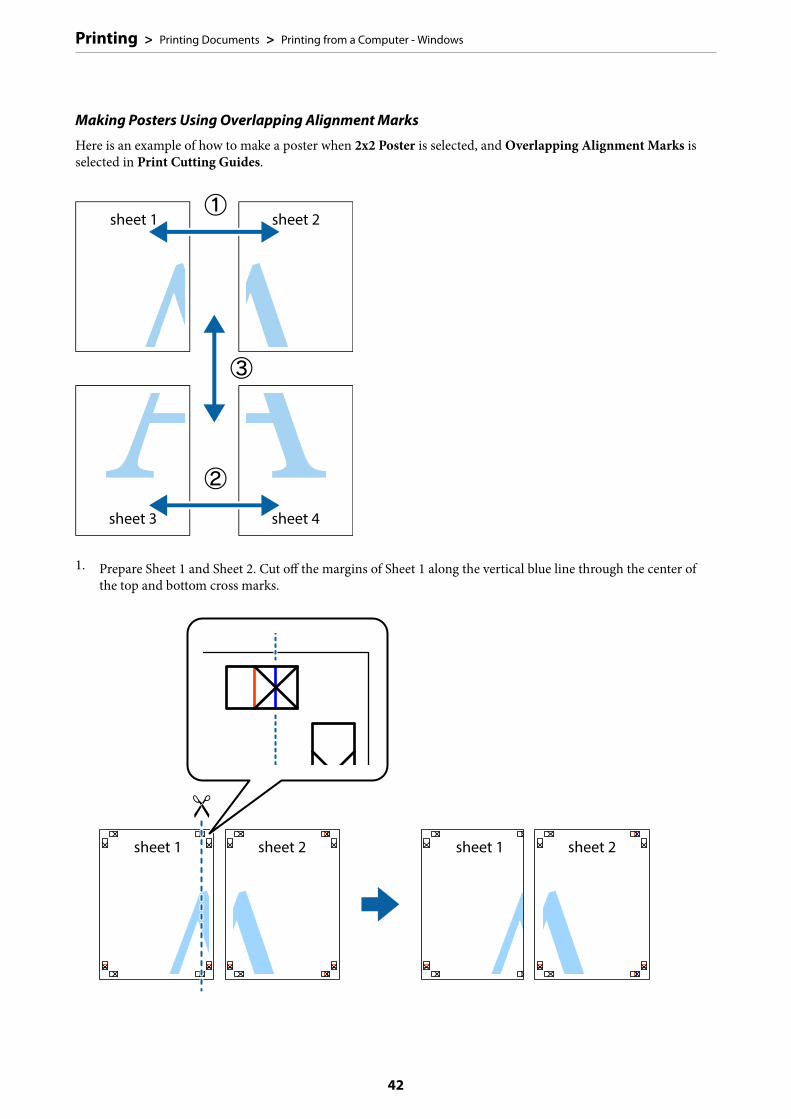
Making Posters Using Overlapping Alignment Marks
Here is an example of how to make a poster when 2x2 Poster is selected, and Overlapping Alignment Marks isselected in Print Cutting Guides.
1. Prepare Sheet 1 and Sheet 2. Cut off the margins of Sheet 1 along the vertical blue line through the center ofthe top and bottom cross marks.
Printing > Printing Documents > Printing from a Computer - Windows
42

2. Place the edge of Sheet 1 on top of Sheet 2 and align the cross marks, then temporarily tape the two sheetstogether from the back.
3. Cut the taped sheets in two along the vertical red line through the alignment markers (this time, the line to theleft of the cross marks).
Printing > Printing Documents > Printing from a Computer - Windows
43

4. Tape the sheets together from the back.
5. Repeat steps 1 to 4 to tape Sheet 3 and Sheet 4 together.
6. Cut off the margins of Sheet 1 and Sheet 2 along the horizontal blue line through the center of the left and rightside cross marks.
Printing > Printing Documents > Printing from a Computer - Windows
44
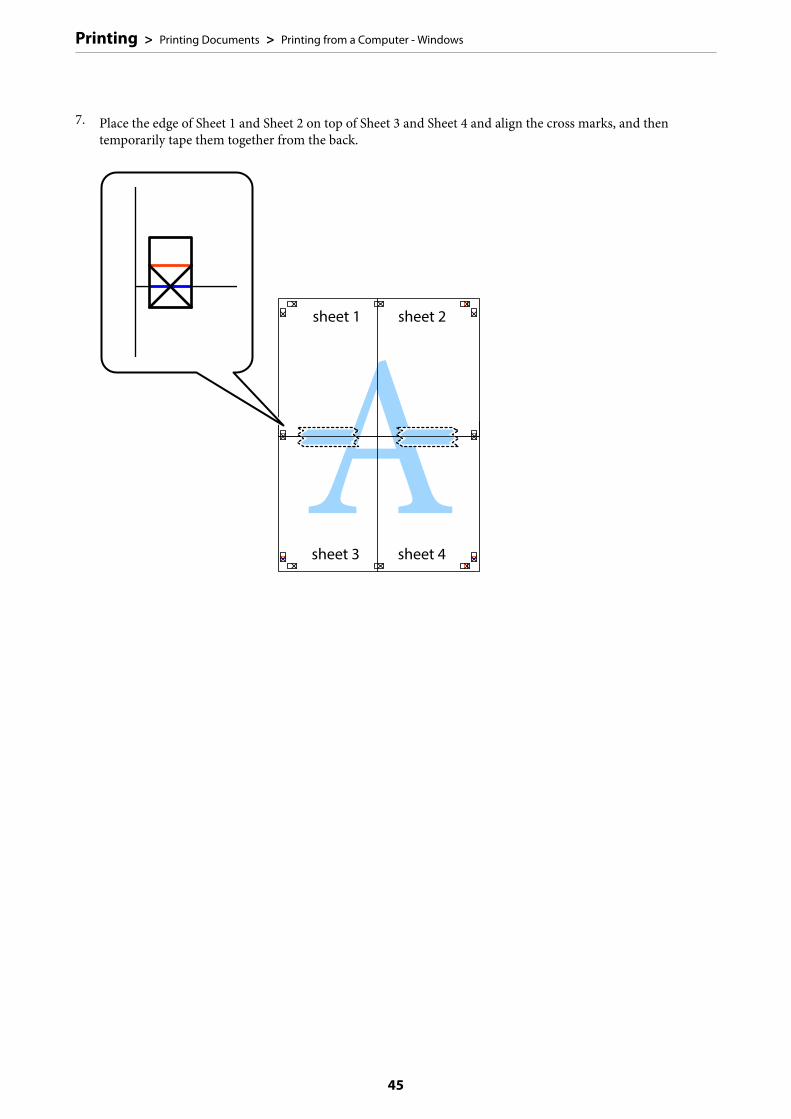
7. Place the edge of Sheet 1 and Sheet 2 on top of Sheet 3 and Sheet 4 and align the cross marks, and thentemporarily tape them together from the back.
Printing > Printing Documents > Printing from a Computer - Windows
45

8. Cut the taped sheets in two along the horizontal red line through the alignment markers (this time, the lineabove the cross marks).
9. Tape the sheets together from the back.
Printing > Printing Documents > Printing from a Computer - Windows
46

10. Cut off the remaining margins along the outer guide.
Printing with a Header and Footer
You can print information such as a user name and printing date in headers or footers.
1. On the printer driver's More Options tab, click Watermark Features, and then select Header/Footer.
Printing > Printing Documents > Printing from a Computer - Windows
47

2. Settings, and then select the items you want to print and then click OK.
Note:❏ To specify the first page number, select Page Number from the position you want to print in the header or footer, and
then select the number in Starting number.
❏ If you want to print text in the header or footer, select the position you want to print, and then select Text. Enter thetext you want to print in the text input field.
3. Set the other items on the Main and More Options tabs as necessary, and then click OK.
4. Click Print.
Related Information
& “Loading Paper in the Rear Paper Feeder” on page 25& “Printing Using Easy Settings” on page 34
Printing a Watermark
You can print a watermark such as "Confidential" or an anti-copy pattern on your printouts. If you print with ananti-copy pattern, the hidden letters appear when photocopied in order to distinguish the original from the copies.
Anti-Copy Pattern is available under the following conditions:
❏ Paper Type: Plain paper
❏ Borderless: Not selected
❏ Quality: Standard
❏ 2-Sided Printing: Off, Manual (Long-edge binding), or Manual (Short-edge binding)
❏ Color Correction: Automatic
❏ Short Grain Paper: Not selected
Note:You can also add your own watermark or anti-copy pattern.
1. On the printer driver's More Options tab, click Watermark Features, and then select Anti-Copy Pattern orWatermark.
2. Click Settings to change details such as the size, density, or position of the pattern or the mark.
3. Set the other items on the Main and More Options tabs as necessary, and then click OK.
4. Click Print.
Printing > Printing Documents > Printing from a Computer - Windows
48

Related Information
& “Loading Paper in the Rear Paper Feeder” on page 25& “Printing Using Easy Settings” on page 34
Printing Multiple Files Together
Job Arranger Lite allows you to combine several files created by different applications and print them as a singleprint job. You can specify the print settings for combined files, such as multi-page layout, and 2-sided printing.
1. On the printer driver's Main tab, select Job Arranger Lite.
2. Click Print.
When you start printing, the Job Arranger Lite window is displayed.
3. With the Job Arranger Lite window opened, open the file that you want to combine with the current file, andthen repeat the above steps.
4. When you select a print job added to Print Project Lite in the Job Arranger Lite window, you can edit the pagelayout.
5. Click Print from the File menu to start printing.
Note:If you close the Job Arranger Lite window before adding all the print data to the Print Project, the print job you arecurrently working on is canceled. Click Save from the File menu to save the current job. The extension of the saved filesis "ecl".
To open a Print Project, click Job Arranger Lite on the printer driver's Maintenance tab to open the Job Arranger Litewindow. Next, select Open from the File menu to select the file.
Related Information
& “Loading Paper in the Rear Paper Feeder” on page 25& “Printing Using Easy Settings” on page 34
Printing > Printing Documents > Printing from a Computer - Windows
49
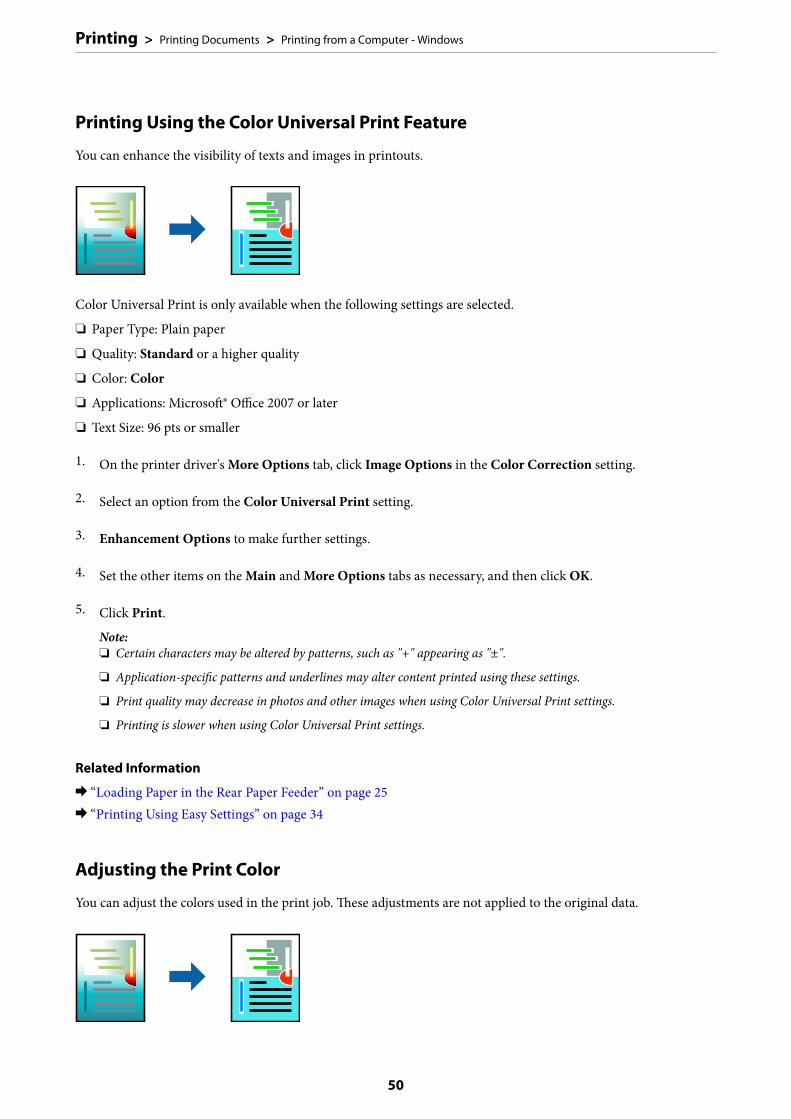
Printing Using the Color Universal Print Feature
You can enhance the visibility of texts and images in printouts.
Color Universal Print is only available when the following settings are selected.
❏ Paper Type: Plain paper
❏ Quality: Standard or a higher quality
❏ Color: Color
❏ Applications: Microsoft® Office 2007 or later
❏ Text Size: 96 pts or smaller
1. On the printer driver's More Options tab, click Image Options in the Color Correction setting.
2. Select an option from the Color Universal Print setting.
3. Enhancement Options to make further settings.
4. Set the other items on the Main and More Options tabs as necessary, and then click OK.
5. Click Print.
Note:❏ Certain characters may be altered by patterns, such as "+" appearing as "±".
❏ Application-specific patterns and underlines may alter content printed using these settings.
❏ Print quality may decrease in photos and other images when using Color Universal Print settings.
❏ Printing is slower when using Color Universal Print settings.
Related Information
& “Loading Paper in the Rear Paper Feeder” on page 25& “Printing Using Easy Settings” on page 34
Adjusting the Print Color
You can adjust the colors used in the print job. These adjustments are not applied to the original data.
Printing > Printing Documents > Printing from a Computer - Windows
50

PhotoEnhance produces sharper images and more vivid colors by automatically adjusting the contrast, saturation,and brightness of the original image data.
Note:PhotoEnhance adjusts the color by analyzing the location of the subject. Therefore, if you have changed the location of thesubject by reducing, enlarging, cropping, or rotating the image, the color may change unexpectedly. Selecting the borderlesssetting also changes the location of the subject resulting in changes in color. If the image is out of focus, the tone may beunnatural. If the color is changed or becomes unnatural, print in a mode other than PhotoEnhance.
1. On the printer driver's More Options tab, select the method of color correction from the Color Correctionsetting.
❏ Automatic: This setting automatically adjusts the tone to match the paper type and print quality settings.
❏ Custom: Click Advanced, you can make your own settings.
2. Set the other items on the Main and More Options tabs as necessary, and then click OK.
3. Click Print.
Related Information
& “Loading Paper in the Rear Paper Feeder” on page 25& “Printing Using Easy Settings” on page 34
Printing to Emphasize Thin Lines
You can thicken thin lines that are too thin to print.
1. On the printer driver's More Options tab, click Image Options in the Color Correction setting.
2. Select Emphasize Thin Lines.
3. Set the other items on the Main and More Options tabs as necessary, and then click OK.
4. Click Print.
Related Information
& “Loading Paper in the Rear Paper Feeder” on page 25& “Printing Using Easy Settings” on page 34
Printing > Printing Documents > Printing from a Computer - Windows
51

Printing Clear Bar Codes
You can print a bar code clearly and make it easy to scan. Only enable this feature if the bar code you printedcannot be scanned.
You can use this feature under the following conditions.
❏ Paper Type: Plain paper, Envelope
❏ Quality: Standard
1. On the printer driver's Maintenance tab, click Extended Settings, and then select Barcode mode.
2. Set the other items on the Main and More Options tabs as necessary, and then click OK.
3. Click Print.
Note:Deblurring may not always be possible depending on the circumstances.
Related Information
& “Loading Paper in the Rear Paper Feeder” on page 25& “Printing Using Easy Settings” on page 34
Printing from a Computer - Mac OS
Printing Using Easy Settings
Note:Operations and screens differ depending on the application. See the application's help for details.
1. Load paper in the printer .
2. Open the file you want to print.
Printing > Printing Documents > Printing from a Computer - Mac OS
52

3. Select Print from the File menu or another command to access the print dialog.
If necessary, click Show Details or d to expand the print window.
4. Select your printer.
5. Select Print Settings from the pop-up menu.
6. Change the settings as necessary.
7. Click Print.
Related Information
& “Available Paper and Capacities” on page 163& “List of Paper Type” on page 24
Printing > Printing Documents > Printing from a Computer - Mac OS
53

Adding Printing Presets for Easy Printing
If you create your own preset of frequently used print settings on the printer driver, you can print easily byselecting the preset from the list.
1. Set each item such as Print Settings and Layout (Paper Size, Media Type, and so on).
2. Click Presets to save the current settings as a preset.
3. Click OK.
Note:To delete an added preset, click Presets > Show Presets, select the preset name you want to delete from the list, and thendelete it.
4. Click Print.
The next time you want to print using the same settings, select the registered preset name from the Presets.
Related Information
& “Loading Paper in the Rear Paper Feeder” on page 25& “Printing Using Easy Settings” on page 52
Printing Several Pages on One Sheet
You can print several pages of data on a single sheet of paper.
Printing > Printing Documents > Printing from a Computer - Mac OS
54
1. Select Layout from the pop-up menu.
2. Set the number of pages in Pages per Sheet, the Layout Direction (page order), and Border.
3. Set the other items as necessary.
4. Click Print.
Related Information
& “Loading Paper in the Rear Paper Feeder” on page 25& “Printing Using Easy Settings” on page 52
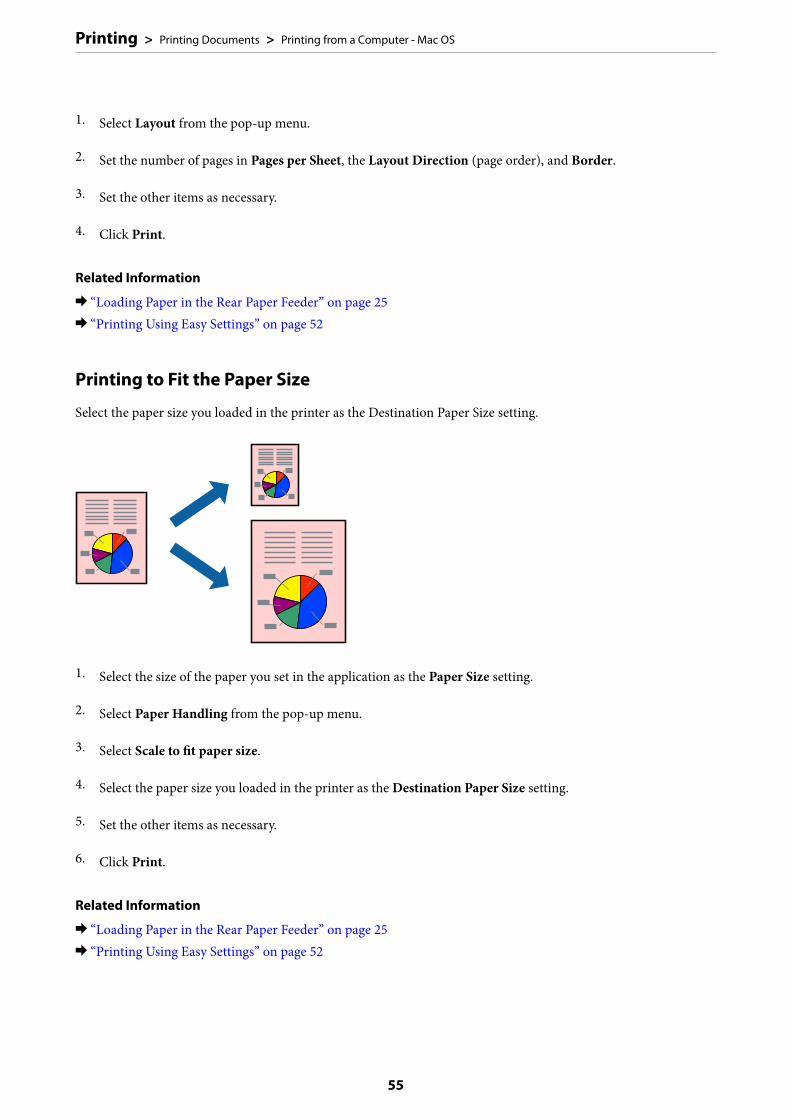
Printing to Fit the Paper Size
Select the paper size you loaded in the printer as the Destination Paper Size setting.
1. Select the size of the paper you set in the application as the Paper Size setting.
2. Select Paper Handling from the pop-up menu.
3. Select Scale to fit paper size.
4. Select the paper size you loaded in the printer as the Destination Paper Size setting.
5. Set the other items as necessary.
6. Click Print.
Related Information
& “Loading Paper in the Rear Paper Feeder” on page 25& “Printing Using Easy Settings” on page 52
Printing > Printing Documents > Printing from a Computer - Mac OS
55

Printing a Reduced or Enlarged Document at any Magnification
You can reduce or enlarge the size of a document by a specific percentage.
1. Select Print from the File menu or another command to access the print dialog.
2. Select Page Setup from the File menu of the application.
3. Select Printer, Paper Size, enter percentage in Scale, and then click OK.
Note:Select the paper size you set in the application as the Paper Size setting.
4. Set the other items as necessary.
5. Click Print.
Related Information
& “Loading Paper in the Rear Paper Feeder” on page 25& “Printing Using Easy Settings” on page 52
Adjusting the Print Color
You can adjust the colors used in the print job. These adjustments are not applied to the original data.
PhotoEnhance produces sharper images and more vivid colors by automatically adjusting the contrast, saturation,and brightness of the original image data.
Printing > Printing Documents > Printing from a Computer - Mac OS
56

Note:PhotoEnhance adjusts the color by analyzing the location of the subject. Therefore, if you have changed the location of thesubject by reducing, enlarging, cropping, or rotating the image, the color may change unexpectedly. Selecting the borderlesssetting also changes the location of the subject resulting in changes in color. If the image is out of focus, the tone may beunnatural. If the color is changed or becomes unnatural, print in a mode other than PhotoEnhance.
1. Select Color Matching from the pop-up menu, and then select EPSON Color Controls.
2. Select Color Options from the pop-up menu, and then select one of the available options.
3. Click the arrow next to Advanced Settings and make the appropriate settings.
4. Set the other items as necessary.
5. Click Print.
Related Information
& “Loading Paper in the Rear Paper Feeder” on page 25& “Printing Using Easy Settings” on page 52
Printing Documents from Smart Devices (iOS)You can print documents from a smart device such as a smartphone or tablet.
Printing Documents Using Epson Smart Panel
Note:Operations may differ depending on the device.
1. If Epson Smart Panel is not installed, install it.
“Application for Easily Operating the Printer from a Smart device (Epson Smart Panel)” on page 170
2. Start Epson Smart Panel.
3. Select the print document menu on the home screen.
4. Select the document you want to print.
5. Start printing.
Printing > Printing Documents > Printing Documents from Smart Devices (iOS)
57
Printing Documents from Smart Devices (Android)You can print documents from a smart device such as a smartphone or tablet.
Printing Documents Using Epson Smart Panel
Note:Operations may differ depending on the device.
1. If Epson Smart Panel is not installed, install it.
“Application for Easily Operating the Printer from a Smart device (Epson Smart Panel)” on page 170
2. Start Epson Smart Panel.
3. Select the print document menu on the home screen.
4. Select the document you want to print.
5. Start printing.
Printing Documents Using Epson Print Enabler
Note:Operations may differ depending on the device.
1. On your Android device, install the Epson Print Enabler plug-in from Google Play.
2. Go to Settings on your Android device, select Printing, and then enable Epson Print Enabler.
3. From an Android application such as Chrome, tap the menu icon and print whatever is on the screen.
Note:If you do not see your printer, tap All Printers and select your printer.
Printing on Envelopes
Printing on Envelopes from a Computer (Windows)
1. Load envelopes in the printer.
“Loading Envelopes in the Rear Paper Feeder” on page 27
Printing > Printing on Envelopes > Printing on Envelopes from a Computer (Windows)
58

2. Open the file you want to print.
3. Access the printer driver window.
4. Select the envelope size from Document Size on the Main tab, and then select Envelope from Paper Type.
5. Set the other items on the Main and More Options tabs as necessary, and then click OK.
6. Click Print.
Printing on Envelopes from a Computer (Mac OS)
1. Load envelopes in the printer.
“Loading Envelopes in the Rear Paper Feeder” on page 27
2. Open the file you want to print.
3. Select Print from the File menu or another command to access the print dialog.
4. Select the size as the Paper Size setting.
5. Select Print Settings from the pop-up menu.
6. Select Envelope as the Media Type setting.
7. Set the other items as necessary.
8. Click Print.
Printing Web Pages
Printing Web Pages from a ComputerEpson Photo+ allows you to display web pages, crop the specified area, and then edit and print them. See theapplication’s help for details.
Printing Web Pages from Smart DevicesNote:Operations may differ depending on the device.
1. Set up your printer for wireless printing.
Printing > Printing Web Pages > Printing Web Pages from Smart Devices
59

2. If Epson Smart Panel is not installed, install it.
“Application for Easily Operating the Printer from a Smart device (Epson Smart Panel)” on page 170
3. Connect your smart device to the same wireless network as your printer.
4. Open the web page you want to print in your web browser app.
5. Tap Share from the menu of the web browser application.
6. Select Smart Panel.
7. Tap Print.
Printing Using a Cloud ServiceBy using Epson Connect service available on the Internet, you can print from your smartphone, tablet PC, orlaptop, anytime and practically anywhere. To use this service, you need to register the user and the printer inEpson Connect.
The features available on the Internet are as follows.
❏ Email PrintWhen you send an email with attachments such as documents or images to an email address assigned to theprinter, you can print that email and the attachments from remote locations such as your home or office printer.
❏ Epson iPrintThis Application is for iOS and Android, and allows you to print or scan from a smartphone or tablet. You canprint documents, images, and web sites by sending them directly to a printer on the same wireless LAN.
Printing > Printing Using a Cloud Service
60

❏ Remote Print DriverThis is a shared driver supported by Remote Print Driver. When printing using a printer in a remote location,you can print by changing the printer on the usual applications window.
See the Epson Connect web portal for details on how to setup or print.
https://www.epsonconnect.com/
http://www.epsonconnect.eu (Europe only)
Printing > Printing Using a Cloud Service
61
Copying
Copying Basics. . . . . . . . . . . . . . . . . . . . . . . . . . . . . . . . . . . . . . . . . . . . . . . . . . . . 63
Making Multiple Copies. . . . . . . . . . . . . . . . . . . . . . . . . . . . . . . . . . . . . . . . . . . . . 63
Copying BasicsYou can copy on A4-size paper at the same magnification. Margins with a width of 3 mm appear around the edgesof the paper regardless of whether or not the original has margins around the edges of the paper. When copyingoriginals smaller than A4-size, margins will be wider than 3 mm depending on the position where you place theoriginal.
1. Load paper in the printer.
“Loading Paper in the Rear Paper Feeder” on page 25
2. Place the originals.
“Placing Originals on the Scanner Glass” on page 31
3. Press the or button.
Note:❏ The color, size, and border of the copied image are slightly different from the original.
Making Multiple CopiesYou can make multiple copies at a time. You can specify up to 20 copies. Margins with a width of 3 mm appeararound the edges of the paper.
1. Load the same number of sheets of A4-size paper as the number of copies you want to copy.
“Loading Paper in the Rear Paper Feeder” on page 25
2. Place the originals.
“Placing Originals on the Scanner Glass” on page 31
3. Press the or button the same number of times as the number of copies you want to make. For
example, if you want to make 10 copies in color, press the button 10 times.
Note:Press the button within one second to change the number of copies. If the button is pressed after one second, the numberof copies is set and copying starts.
Related Information
& “Copying Basics” on page 63
Copying > Making Multiple Copies
63
Scanning
Basic Information on Scanning. . . . . . . . . . . . . . . . . . . . . . . . . . . . . . . . . . . . . . . . 65
Scanning Originals to a Computer. . . . . . . . . . . . . . . . . . . . . . . . . . . . . . . . . . . . . . 67
Scanning Originals to a Smart Device. . . . . . . . . . . . . . . . . . . . . . . . . . . . . . . . . . . .69
Advanced Scanning. . . . . . . . . . . . . . . . . . . . . . . . . . . . . . . . . . . . . . . . . . . . . . . . .69

Basic Information on Scanning
What is a "Scan"?A "scan" is the process of converting the optical information of paper data (such as documents, magazine clippings,photos, handwritten illustrations, and so on) into digital image data.
You can save scanned data as a digital image such as a JPEG or PDF.
You can then print the image, send it by email, and so on.
Scanning UsesYou can use scanning in a variety of ways to make your life more convenient.
❏ By scanning a paper document and turning it into digital data, you can read it on a computer or a smart device.
❏ By scanning tickets or flyers into digital data, you can dispose of the originals and reduce clutter.
❏ By scanning important documents, you can back them up to cloud services or another storage medium, just incase they get lost.
❏ You can send the scanned photos or documents to friends by email.
❏ By scanning hand-drawn illustrations and so on, you can share them on social media at a much higher qualitythan by just taking a photo on your smart device.
❏ By scanning your favorite pages from newspapers or magazines, you can save them and dispose of the originals.
Available Scanning MethodsYou can use any of the following methods to scan using this printer.
Scanning to a Computer
There are two methods of scanning originals to a computer; scanning using the printer’s control panel, andscanning from the computer.
Scanning > Basic Information on Scanning > Available Scanning Methods
65

You can scan easily from the control panel.
Use the scanning application Epson ScanSmart to scan from the computer. You can edit images after scanning.
Scanning Directly from Smart Devices
You can save scanned images directly to a smart device such as a smart phone or tablet by using the Epson SmartPanel application on the smart device.
Recommended File Formats to Suit Your PurposeGenerally speaking, the JPEG format is suitable for photos while the PDF format is suitable for documents.
See the following descriptions to choose the best format for what you want to do.
File Format Description
JPEG (.jpg) A file format that allows you to compress the data to be saved. If the compression ratiois high, the image quality declines, and you cannot convert the image back to theoriginal quality.
This is the standard image format for digital cameras. This format is suitable for imagesthat have many colors.
Scanning > Basic Information on Scanning > Recommended File Formats to Suit Your Purpose
66
File Format Description
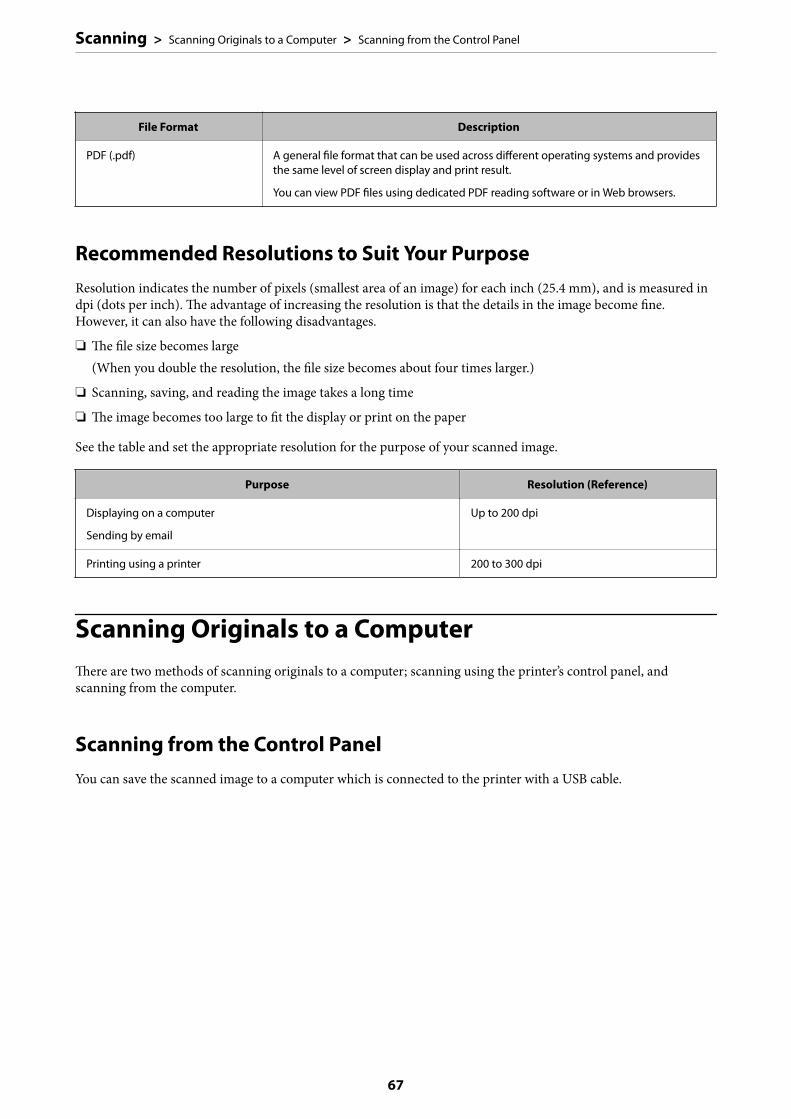
PDF (.pdf) A general file format that can be used across different operating systems and providesthe same level of screen display and print result.
You can view PDF files using dedicated PDF reading software or in Web browsers.
Recommended Resolutions to Suit Your PurposeResolution indicates the number of pixels (smallest area of an image) for each inch (25.4 mm), and is measured indpi (dots per inch). The advantage of increasing the resolution is that the details in the image become fine.However, it can also have the following disadvantages.
❏ The file size becomes large(When you double the resolution, the file size becomes about four times larger.)
❏ Scanning, saving, and reading the image takes a long time
❏ The image becomes too large to fit the display or print on the paper
See the table and set the appropriate resolution for the purpose of your scanned image.
Purpose Resolution (Reference)
Displaying on a computer
Sending by email
Up to 200 dpi
Printing using a printer 200 to 300 dpi
Scanning Originals to a ComputerThere are two methods of scanning originals to a computer; scanning using the printer’s control panel, andscanning from the computer.
Scanning from the Control PanelYou can save the scanned image to a computer which is connected to the printer with a USB cable.
Scanning > Scanning Originals to a Computer > Scanning from the Control Panel
67

Note:To use this feature, make sure the following applications are installed on your computer.
❏ Epson ScanSmart (Windows 7 or later, or OS X El Capitan or later)
❏ Epson Event Manager (Windows Vista/Windows XP, or OS X Yosemite/OS X Mavericks/OS X Mountain Lion/Mac OSX v10.7.x/Mac OS X v10.6.8)
❏ Epson Scan 2 (application required to use the scanner feature)
See the following to check for installed applications.
Windows 10: Click the start button, and then check the Epson Software folder > Epson ScanSmart, and the EPSON folder> Epson Scan 2.
Windows 8.1/Windows 8: Enter the application name in the search charm, and then check the displayed icon.
Windows 7: Click the start button, and then select All Programs. Next, check the Epson Software folder > EpsonScanSmart, and the EPSON folder > Epson Scan 2.
Windows Vista/Windows XP: Click the start button, and then select All Programs or Programs. Next, check the EpsonSoftware folder > Epson Event Manager, and the EPSON folder > Epson Scan 2.
Mac OS: Select Go > Applications > Epson Software.
1. Place the originals.
“Placing Originals on the Scanner Glass” on page 31
2. Press the button and the button simultaneously to start scanning.
When using Windows 7 or later, or OS X El Capitan or later: Epson ScanSmart automatically starts on yourcomputer, and scanning starts.
Note:❏ See the Epson ScanSmart help for detailed operation information for the software. Click Help on the Epson
ScanSmart screen to open the help.
❏ You can not only start scanning from the printer but also from your computer by using Epson ScanSmart.
Scanning from a ComputerYou can scan from a computer by using Epson ScanSmart.
This application allows you to scan documents and photos easily, and then save the scanned images in simple steps.
1. Place the originals.
“Placing Originals on the Scanner Glass” on page 31
2. Start Epson ScanSmart.
❏ Windows 10Click the start button, and then select Epson Software > Epson ScanSmart.
❏ Windows 8.1/Windows 8Enter the application name in the search charm, and then select the displayed icon.
❏ Windows 7Click the start button, and then select All Programs > Epson Software > Epson ScanSmart.
Scanning > Scanning Originals to a Computer > Scanning from a Computer
68
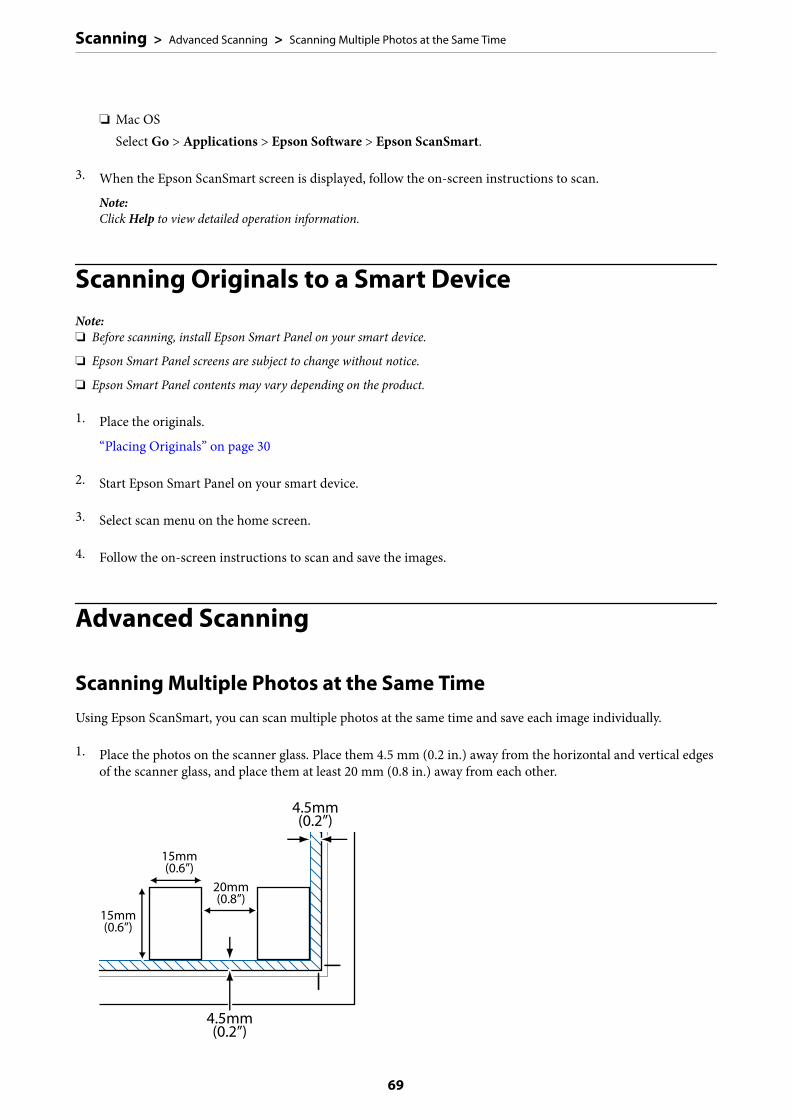
❏ Mac OSSelect Go > Applications > Epson Software > Epson ScanSmart.
3. When the Epson ScanSmart screen is displayed, follow the on-screen instructions to scan.
Note:Click Help to view detailed operation information.
Scanning Originals to a Smart DeviceNote:❏ Before scanning, install Epson Smart Panel on your smart device.
❏ Epson Smart Panel screens are subject to change without notice.
❏ Epson Smart Panel contents may vary depending on the product.
1. Place the originals.
“Placing Originals” on page 30
2. Start Epson Smart Panel on your smart device.
3. Select scan menu on the home screen.
4. Follow the on-screen instructions to scan and save the images.
Advanced Scanning
Scanning Multiple Photos at the Same TimeUsing Epson ScanSmart, you can scan multiple photos at the same time and save each image individually.
1. Place the photos on the scanner glass. Place them 4.5 mm (0.2 in.) away from the horizontal and vertical edgesof the scanner glass, and place them at least 20 mm (0.8 in.) away from each other.
Scanning > Advanced Scanning > Scanning Multiple Photos at the Same Time
69

Note:The photos should be larger than 15×15 mm (0.6×0.6 in.).
2. Start Epson ScanSmart.
❏ Windows 10Click the start button, and then select Epson Software > Epson ScanSmart.
❏ Windows 8.1/Windows 8Enter the application name in the search charm, and then select the displayed icon.
❏ Windows 7Click the start button, and then select All Programs > Epson Software > Epson ScanSmart.
❏ Mac OSSelect Go > Applications > Epson Software > Epson ScanSmart.
3. When the Epson ScanSmart screen is displayed, follow the on-screen instructions to scan.
Scanned photos are saved as individual images.
Scanning > Advanced Scanning > Scanning Multiple Photos at the Same Time
70

Maintaining the Printer
Checking the Ink Levels. . . . . . . . . . . . . . . . . . . . . . . . . . . . . . . . . . . . . . . . . . . . . 72
Improving Print, Copy, and Scan Quality. . . . . . . . . . . . . . . . . . . . . . . . . . . . . . . . . 72
Cleaning the Printer. . . . . . . . . . . . . . . . . . . . . . . . . . . . . . . . . . . . . . . . . . . . . . . . 77
Cleaning Spilled ink. . . . . . . . . . . . . . . . . . . . . . . . . . . . . . . . . . . . . . . . . . . . . . . . 78
Checking the Total Number of Pages Fed Through the Printer. . . . . . . . . . . . . . . . . . 78
Saving Power. . . . . . . . . . . . . . . . . . . . . . . . . . . . . . . . . . . . . . . . . . . . . . . . . . . . . 78
Installing or Uninstalling Applications Separately. . . . . . . . . . . . . . . . . . . . . . . . . . . 79
Transporting and Storing the Printer. . . . . . . . . . . . . . . . . . . . . . . . . . . . . . . . . . . . 84

Checking the Ink LevelsTo confirm the actual ink remaining, visually check the ink levels in all of the printer's tanks.
cImportant:
Prolonged use of the printer when the ink level is below the lower line could damage the printer.
Related Information
& “Refilling the Ink Tanks” on page 125
Improving Print, Copy, and Scan Quality
Checking and Cleaning the Print HeadIf the nozzles are clogged, the printouts become faint, there is visible banding, or unexpected colors appear. If thenozzles are severely clogged, a blank sheet will be printed. When print quality has declined, first use the nozzlecheck feature to check if the nozzles are clogged. If the nozzles are clogged, clean the print head.
cImportant:
❏ Do not open the front cover or turn off the printer during head cleaning. If the head cleaning is incomplete, youmay not be able to print.
❏ Head cleaning consumes ink and should not be performed more than necessary.
❏ When ink is low, you may not be able to clean the print head.
❏ If print quality has not improved after repeating nozzle check and head cleaning 3 times, wait for at least 12hours without printing, and then run the nozzle check again and repeat the head cleaning if necessary. Werecommend turning off the printer by using the P button. If print quality has still not improved, run PowerCleaning.
❏ To prevent the print head from drying out, do not unplug the printer while the power is on.
You can check and clean the print head by using the printer's control panel.
1. Load A4-size plain paper in the printer.
2. Press the P button to turn off the printer.
Maintaining the Printer > Improving Print, Copy, and Scan Quality > Checking and Cleaning the Print Head
72

3. Turn the printer on while holding the y button down, and then release the buttons when the power lightflashes.
The nozzle check pattern is printed.
Note:It may take some time to start printing the nozzle check pattern.
4. Check the printed pattern to see if the print head nozzles are clogged.
❏ A:All lines are printed. No further steps are needed.
❏ B or close to B
Some nozzles are clogged. Hold the y button down for five seconds until the power light starts flashing.Print head cleaning starts.
Note:It may take some time to start print head cleaning.
❏ C or close to CIf most lines are missing or not printed, this indicates most nozzles are clogged. Run Power Cleaning. Fordetails, see "Related information" below.
5. When the power light stops flashing, print a nozzle check pattern again. Repeat cleaning and printing thepattern until all lines are printed completely.
Maintaining the Printer > Improving Print, Copy, and Scan Quality > Checking and Cleaning the Print Head
73

cImportant:
If print quality has not improved after repeating nozzle check and head cleaning 3 times, wait for at least 12 hourswithout printing, and then run the nozzle check again and repeat the head cleaning if necessary. We recommendturning off the printer by using the P button. If print quality has still not improved, run Power Cleaning.
Note:You can also check and clean the print head from the printer driver.
❏ WindowsClick Print Head Nozzle Check on the Maintenance tab.
❏ Mac OSApple menu > System Preferences > Printers & Scanners (or Print & Scan, Print & Fax) > Epson(XXXX) > Options& Supplies > Utility > Open Printer Utility > Print Head Nozzle Check
Related Information
& “Running Power Cleaning” on page 74
Running Power CleaningThe Power Cleaning utility allows you to replace all of the ink inside the ink tubes. In the following situations, youmay need to use this feature to improve the print quality.
❏ You printed or performed head cleaning when the ink levels were too low to be seen in the ink tank windows.
❏ You performed the nozzle check and head cleaning several times and then waited for at least 12 hours withoutprinting, but print quality still did not improve.
Before running this feature, read the following instructions.
cImportant:
Make sure that there is enough ink in the ink tanks.
Visually check all ink tanks are at least a third full. Low ink levels during Power Cleaning could damage theproduct.
cImportant:
An interval of 12 hours is required between each Power Cleaning.
Normally, a single Power Cleaning should resolve the print quality issue within 12 hours. Therefore, to avoidunnecessary ink usage, you must wait 12 hours before you try it again.
cImportant:
This feature effects the service life of the ink pads. The ink pads reach their capacity earlier by running this feature. Ifthe ink pads have reached the end of their service life, contact Epson Support to request replacement.
Note:When the ink levels are insufficient for Power Cleaning, you cannot run this feature. Even in this case, the levels for printingmay remain.
Maintaining the Printer > Improving Print, Copy, and Scan Quality > Running Power Cleaning
74

Related Information
& “Checking and Cleaning the Print Head” on page 72
Running Power Cleaning (Windows)
1. Access the printer driver window.
2. Click Power Cleaning on the Maintenance tab.
3. Follow the on-screen instructions.
Running Power Cleaning (Mac OS)
1. Select System Preferences from the Apple menu > Printers & Scanners (or Print & Scan, Print & Fax) andthen select the printer.
2. Click Options & Supplies > Utility > Open Printer Utility.
3. Click Power Cleaning.
4. Follow the on-screen instructions.
Preventing nozzle cloggingAlways use the power button when turning the printer on and off.
Check that the power light is off before you disconnect the power cord.
The ink itself can dry out if it is not covered. Just like placing a cap on a fountain pen or an oil pen to prevent itfrom drying, make sure the print head is capped properly to prevent the ink from drying.
When the power cord is unplugged or a power outage occurs while the printer is in operation, the print head maynot be capped properly. If the print head is left as it is, it will dry out causing nozzles (ink outlets) to clog.
In these cases, turn the printer on and off again as soon as possible to cap the print head.
Aligning the Print HeadIf you notice a misalignment of vertical lines or blurred images, align the print head.
Aligning the Print Head - Windows
1. Load A4-size plain paper in the printer.
2. Access the printer driver window.
3. Click Print Head Alignment on the Maintenance tab.
Maintaining the Printer > Improving Print, Copy, and Scan Quality > Aligning the Print Head
75

4. Follow the on-screen instructions.
Aligning the Print Head - Mac OS
1. Load A4-size plain paper in the printer.
2. Select System Preferences from the Apple menu > Printers & Scanners (or Print & Scan, Print & Fax), andthen select the printer.
3. Click Options & Supplies > Utility > Open Printer Utility.
4. Click Print Head Alignment.
5. Follow the on-screen instructions.
Cleaning the Paper Path for Ink SmearsWhen the printouts are smeared or scuffed, clean the roller inside.
cImportant:
Do not use tissue paper to clean the inside of the printer. The print head nozzles may be clogged with lint.
1. Make sure there is no dust or stains on the scanner glass and the document cover.
2. Load A4-size plain paper in the printer.
3. Start copying without placing the original.
Note:Repeat this procedure until the paper is not smeared with ink.
Cleaning the Scanner GlassWhen the copies or scanned images are smeared, clean the scanner glass.
cImportant:
Never use alcohol or thinner to clean the printer. These chemicals can damage the printer.
Maintaining the Printer > Improving Print, Copy, and Scan Quality > Cleaning the Scanner Glass
76
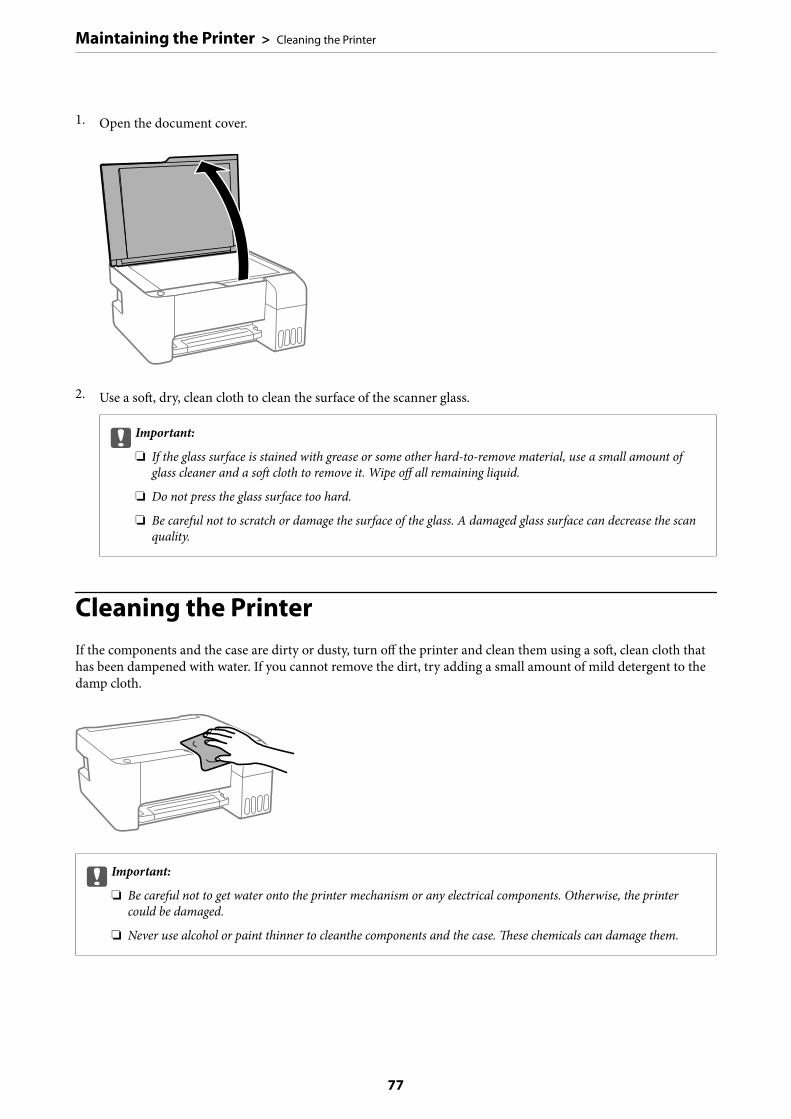
1. Open the document cover.
2. Use a soft, dry, clean cloth to clean the surface of the scanner glass.
cImportant:
❏ If the glass surface is stained with grease or some other hard-to-remove material, use a small amount ofglass cleaner and a soft cloth to remove it. Wipe off all remaining liquid.
❏ Do not press the glass surface too hard.
❏ Be careful not to scratch or damage the surface of the glass. A damaged glass surface can decrease the scanquality.
Cleaning the PrinterIf the components and the case are dirty or dusty, turn off the printer and clean them using a soft, clean cloth thathas been dampened with water. If you cannot remove the dirt, try adding a small amount of mild detergent to thedamp cloth.
cImportant:
❏ Be careful not to get water onto the printer mechanism or any electrical components. Otherwise, the printercould be damaged.
❏ Never use alcohol or paint thinner to cleanthe components and the case. These chemicals can damage them.
Maintaining the Printer > Cleaning the Printer
77
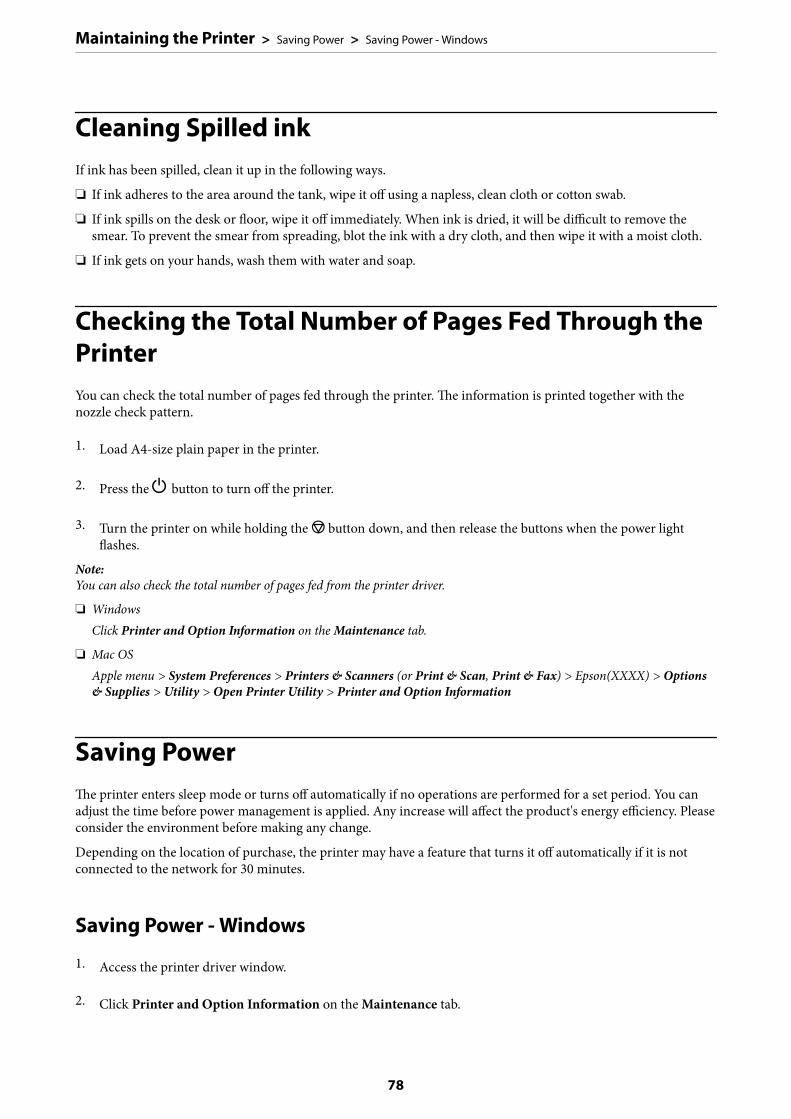
Cleaning Spilled inkIf ink has been spilled, clean it up in the following ways.
❏ If ink adheres to the area around the tank, wipe it off using a napless, clean cloth or cotton swab.
❏ If ink spills on the desk or floor, wipe it off immediately. When ink is dried, it will be difficult to remove thesmear. To prevent the smear from spreading, blot the ink with a dry cloth, and then wipe it with a moist cloth.
❏ If ink gets on your hands, wash them with water and soap.
Checking the Total Number of Pages Fed Through thePrinterYou can check the total number of pages fed through the printer. The information is printed together with thenozzle check pattern.
1. Load A4-size plain paper in the printer.
2. Press the P button to turn off the printer.
3. Turn the printer on while holding the y button down, and then release the buttons when the power lightflashes.
Note:You can also check the total number of pages fed from the printer driver.
❏ WindowsClick Printer and Option Information on the Maintenance tab.
❏ Mac OSApple menu > System Preferences > Printers & Scanners (or Print & Scan, Print & Fax) > Epson(XXXX) > Options& Supplies > Utility > Open Printer Utility > Printer and Option Information
Saving PowerThe printer enters sleep mode or turns off automatically if no operations are performed for a set period. You canadjust the time before power management is applied. Any increase will affect the product's energy efficiency. Pleaseconsider the environment before making any change.
Depending on the location of purchase, the printer may have a feature that turns it off automatically if it is notconnected to the network for 30 minutes.
Saving Power - Windows
1. Access the printer driver window.
2. Click Printer and Option Information on the Maintenance tab.
Maintaining the Printer > Saving Power > Saving Power - Windows
78

3. Do one of the following.
Note:Your product may have the Power Off Timer feature or Power Off If Disconnected and Power Off If Disconnectedfeatures depending on the location of purchase.
❏ Select the time period before the printer enters sleep mode as the Sleep Timer setting, and click Send. Tomake the printer turn off automatically, select the time period as the Power Off Timer setting, and clickSend.
❏ Select the time period before the printer enters sleep mode as the Sleep Timer setting, and click Send. Tomake the printer turn off automatically, select the time period in the Power Off If Inactive or Power Off IfDisconnected setting, and then click Send.
4. Click OK.
Saving Power - Mac OS
1. Select System Preferences from the Apple menu > Printers & Scanners (or Print & Scan, Print & Fax), andthen select the printer.
2. Click Options & Supplies > Utility > Open Printer Utility.
3. Click Printer Settings.
4. Do one of the following.
Note:Your product may have the Power Off Timer feature or Power Off If Inactive and Power Off If Disconnected featuresdepending on the location of purchase.
❏ Select the time period before the printer enters sleep mode as the Sleep Timer setting, and click Apply. Tomake the printer turn off automatically, select the time period as the Power Off Timer setting, and clickApply.
❏ Select the time period before the printer enters sleep mode as the Sleep Timer setting, and click Apply. Tomake the printer turn off automatically, select the time period in the Power Off If Inactive or Power Off IfDisconnected setting, and then click Apply.
Installing or Uninstalling Applications SeparatelyConnect your computer to the network and install the latest version of applications from the website. Log in toyour computer as an administrator. Enter the administrator password if the computer prompts you.
Installing the Applications SeparatelyNote:When reinstalling an application, you need to uninstall it first.
1. Make sure the printer and the computer are available for communication, and the printer is connected to theInternet.
Maintaining the Printer > Installing or Uninstalling Applications Separately > Installing the Applications Separ…
79

2. Start EPSON Software Updater.
The screenshot is an example on Windows.
3. For Windows, select your printer, and then click to check for the latest available applications.
4. Select the items you want to install or update, and then click the install button.
cImportant:
Do not turn off or unplug the printer until the update is complete. Doing so may result in malfunction of theprinter.
Note:❏ You can download the latest applications from the Epson website.
http://www.epson.com
❏ If you use Windows Server operating systems, you cannot use Epson Software Updater. Download the latestapplications from the Epson website.
Related Information
& “Application for Updating Software and Firmware (EPSON Software Updater)” on page 173& “Uninstalling Applications” on page 82
Checking if a genuine Epson printer driver is installed - Windows
You can check if a genuine Epson printer driver is installed on your computer by using one of the followingmethods.
Select Control Panel > View devices and printers (Printers, Printers and Faxes), and then do the following toopen the print server properties window.
Maintaining the Printer > Installing or Uninstalling Applications Separately > Installing the Applications Separ…
80

❏ Windows Windows 10/Windows 8.1/Windows 8/Windows 7/Windows Server 2019/Windows Server 2016/Windows Server 2012 R2/Windows Server 2012/Windows Server 2008 R2Click the printer icon, and then click Print server properties at the top of the window.
❏ Windows Vista/Windows Server 2008Right-click on the Printers folder, and then click Run as administrator > Server Properties.
❏ Windows XP/Windows Server 2003 R2/Windows Server 2003From the File menu, select Server Properties.
Click the Driver tab. If your printer name is displayed in the list, a genuine Epson printer driver is installed onyour computer.
Related Information
& “Installing the Applications Separately” on page 79
Checking if a genuine Epson printer driver is installed - Mac OS
You can check if a genuine Epson printer driver is installed on your computer by using one of the followingmethods.
Maintaining the Printer > Installing or Uninstalling Applications Separately > Installing the Applications Separ…
81

Select System Preferences from the Apple menu > Printers & Scanners (or Print & Scan, Print & Fax), and thenselect the printer. Click Options & Supplies, and if the Options tab and Utility tab are displayed on the window, agenuine Epson printer driver is installed on your computer.
Related Information
& “Installing the Applications Separately” on page 79
Adding the Printer (for Mac OS Only)
1. Select System Preferences from the Apple menu > Printers & Scanners (or Print & Scan, Print & Fax).
2. Click +, and then select Add Other Printer or Scanner.
3. Select your printer, and then select your printer from the Use.
4. Click Add.
Note:If your printer is not listed, check that it is correctly connected to the computer and that the printer is on.
Uninstalling ApplicationsLog in to your computer as an administrator. Enter the administrator password if the computer prompts you.
Uninstalling Applications - Windows
1. Press the P button to turn off the printer.
2. Quit all running applications.
Maintaining the Printer > Installing or Uninstalling Applications Separately > Uninstalling Applications
82

3. Open Control Panel:
❏ Windows 10/Windows Server 2019/Windows Server 2016Click on the start button, and then select Windows System > Control Panel.
❏ Windows 8.1/Windows 8/Windows Server 2012 R2/Windows Server 2012Select Desktop > Settings > Control Panel.
❏ Windows 7/Windows Vista/Windows XP/Windows Server 2008 R2/Windows Server 2008/Windows Server2003 R2/Windows Server 2003Click the start button and select Control Panel.
4. Open Uninstall a program (or Add or Remove Programs):
❏ Windows 10/Windows 8.1/Windows 8/Windows 7/Windows Vista/Windows Server 2019/Windows Server2016/Windows Server 2012 R2/Windows Server 2012/Windows Server 2008 R2/Windows Server 2008Select Uninstall a program in Programs.
❏ Windows XP/Windows Server 2003 R2/Windows Server 2003Click Add or Remove Programs.
5. Select the application you want to uninstall.
You cannot uninstall the printer driver if there is any print jobs. Delete or wait to be printed the jobs beforeuninstalling.
6. Uninstall the applications:
❏ Windows 10/Windows 8.1/Windows 8/Windows 7/Windows Vista/Windows Server 2019/Windows Server2016/Windows Server 2012 R2/Windows Server 2012/Windows Server 2008 R2/Windows Server 2008Click Uninstall/Change or Uninstall.
❏ Windows XP/Windows Server 2003 R2/Windows Server 2003Click Change/Remove or Remove.
Note:If the User Account Control window is displayed, click Continue.
7. Follow the on-screen instructions.
Uninstalling Applications - Mac OS
1. Download the Uninstaller using EPSON Software Updater.
Once you have downloaded the Uninstaller, you do not need to download it again each time you uninstall theapplication.
2. Press the P button to turn off the printer.
3. To uninstall the printer driver, select System Preferences from the Apple menu > Printers & Scanners (orPrint & Scan, Print & Fax), and then remove the printer from the enabled printers list.
4. Quit all running applications.
Maintaining the Printer > Installing or Uninstalling Applications Separately > Uninstalling Applications
83

5. Select Go > Applications > Epson Software > Uninstaller.
6. Select the application you want to uninstall, and then click Uninstall.
cImportant:
The Uninstaller removes all drivers for Epson inkjet printers on the computer. If you use multiple Epson inkjetprinters and you only want to delete some drivers, delete all of them first, and then install the necessary printerdriver again.
Note:If you cannot find the application you want to uninstall in the application list, you cannot uninstall using theUninstaller. In this situation, select Go > Applications > Epson Software, select the application you want to uninstall,and then drag it to the trash icon.
Related Information
& “Application for Updating Software and Firmware (EPSON Software Updater)” on page 173
Updating Applications and FirmwareYou may be able to clear certain problems and improve or add functions by updating the applications and thefirmware. Make sure you use the latest version of the applications and firmware.
1. Make sure that the printer and the computer are connected, and the computer is connected to the internet.
2. Start EPSON Software Updater, and update the applications or the firmware.
cImportant:
Do not turn off the computer or the printer until the update is complete; otherwise, the printer maymalfunction.
Note:If you cannot find the application you want to update in the list, you cannot update using the EPSON Software Updater.Check for the latest versions of the applications from your local Epson website.
http://www.epson.com
Transporting and Storing the PrinterWhen you need to store the printer or transport it when moving or for repairs, follow the steps below to pack theprinter.
1. Turn off the printer by pressing the P button.
Maintaining the Printer > Transporting and Storing the Printer
84

2. Make sure the power light turns off, and then unplug the power cord.
cImportant:
Unplug the power cord when the power light is off. Otherwise, the print head does not return to the homeposition causing the ink to dry, and printing may become impossible.
3. Disconnect all cables such as the power cord and USB cable.
4. Remove all of the paper from the printer.
5. Make sure there are no originals on the printer.
6. Make sure to install the cap onto the ink tank securely.
7. Close the ink tank cover securely.
8. Prepare to pack the printer as shown below.
Maintaining the Printer > Transporting and Storing the Printer
85

9. Place the printer in the plastic bag and fold it closed.
10. Pack the printer in its box using the protective materials.
Maintaining the Printer > Transporting and Storing the Printer
86

cImportant:
❏ When storing or transporting the printer, place the printer in the plastic bag and fold it closed. Avoid tilting theprinter, placing it vertically, or turning it upside down; otherwise ink may leak.
❏ When storing or transporting an ink bottle, do not tilt the bottle and do not subject it to impacts or temperaturechanges. Otherwise, ink may leak even if the cap on the ink bottle is tightened securely. Be sure to keep the inkbottle upright when tightening the cap, and take precautions to prevent ink from leaking when transporting thebottle, for example, putting the bottle in a bag.
❏ Do not put opened ink bottles in the box with printer.
If print quality has declined the next time you print, clean and align the print head.
Related Information
& “Checking and Cleaning the Print Head” on page 72& “Aligning the Print Head” on page 75
Maintaining the Printer > Transporting and Storing the Printer
87

Solving Problems
The Printer Does Not Work as Expected. . . . . . . . . . . . . . . . . . . . . . . . . . . . . . . . . .89
Checking Lights and Printer Status. . . . . . . . . . . . . . . . . . . . . . . . . . . . . . . . . . . . .118
Paper Gets Jammed. . . . . . . . . . . . . . . . . . . . . . . . . . . . . . . . . . . . . . . . . . . . . . . . 121
It is Time to Refill the Ink. . . . . . . . . . . . . . . . . . . . . . . . . . . . . . . . . . . . . . . . . . . 124
Printing, Copying, and Scanning Quality is Poor. . . . . . . . . . . . . . . . . . . . . . . . . . .129
Cannot Solve Problem. . . . . . . . . . . . . . . . . . . . . . . . . . . . . . . . . . . . . . . . . . . . . . 144

The Printer Does Not Work as Expected
The Printer Does Not Turn On or Off
Power Does Not Turn OnThe following causes can be considered.
The power cord is not plugged in properly to the electrical outlet.
Solutions
Make sure the power cord is securely plugged in.
The P button was not pressed for long enough.
Solutions
Hold down the P button for a little longer.
Power Does Not Turn Off
The P button was not pressed for long enough.
Solutions
Hold down the P button for a little longer. If you still cannot turn off the printer, unplug the power cord.To prevent the print head from drying out, turn the printer back on and turn it off by pressing the Pbutton.
Power Turns Off Automatically
The Power Off Timer feature or Power Off If Inactive and Power Off If Disconnected feature isenabled.
Solutions
❏ WindowsClick Printer and Option Information on the printer driver's Maintenance tab.
❏ Disable the Power Off If Inactive and Power Off If Disconnected settings.
❏ Disable the Power Off Timer setting.
❏ Mac OSSelect System Preferences from the Apple menu > Printers & Scanners (or Print & Scan, Print &Fax), and then select the printer. Click Options & Supplies > Utility > Open Printer Utility, and thenclick Printer Settings.
❏ Disable the Power Off If Inactive and Power Off If Disconnected settings.
❏ Disable the Power Off Timer setting.
Solving Problems > The Printer Does Not Work as Expected > The Printer Does Not Turn On or Off
89

Note:Your product may have the Power Off Timer feature or Power Off If Inactive and Power Off If Disconnectedfeatures depending on the location of purchase.
Paper Does Not Feed Properly
No Paper FeedsThe following causes can be considered.
The installation location is inappropriate.
Solutions
Place the printer on a flat surface and operate in the recommended environmental conditions.
& “Environmental Specifications” on page 178
Unsupported paper is being used.
Solutions
Use paper supported by this printer.
& “Available Paper and Capacities” on page 163& “Unavailable Paper Types” on page 165
Paper handling is inappropriate.
Solutions
Follow paper handling precautions.
& “Paper Handling Precautions” on page 24
Too many sheets are loaded in the printer.
Solutions
Do not load more than the maximum number of sheets specified for the paper. For plain paper, do notload above the line indicated by the triangle symbol on the edge guide.
& “Available Paper and Capacities” on page 163
Paper Feeds at a SlantThe following causes can be considered.
The installation location is inappropriate.
Solutions
Place the printer on a flat surface and operate in the recommended environmental conditions.
& “Environmental Specifications” on page 178
Solving Problems > The Printer Does Not Work as Expected > Paper Does Not Feed Properly
90
Unsupported paper is being used.
Solutions
Use paper supported by this printer.
& “Available Paper and Capacities” on page 163& “Unavailable Paper Types” on page 165
Paper handling is inappropriate.
Solutions
Follow paper handling precautions.
& “Paper Handling Precautions” on page 24
The paper is loaded incorrectly.
Solutions
Load paper in the correct direction, and slide the edge guide against the edge of the paper.
& “Loading Paper in the Rear Paper Feeder” on page 25
Too many sheets are loaded in the printer.
Solutions
Do not load more than the maximum number of sheets specified for the paper. For plain paper, do notload above the line indicated by the triangle symbol on the edge guide.
& “Available Paper and Capacities” on page 163
Several Sheets of Paper are Fed at a TimeThe following causes can be considered.
The installation location is inappropriate.
Solutions
Place the printer on a flat surface and operate in the recommended environmental conditions.
& “Environmental Specifications” on page 178
Unsupported paper is being used.
Solutions
Use paper supported by this printer.
& “Available Paper and Capacities” on page 163& “Unavailable Paper Types” on page 165
Solving Problems > The Printer Does Not Work as Expected > Paper Does Not Feed Properly
91

Paper handling is inappropriate.
Solutions
Follow paper handling precautions.
& “Paper Handling Precautions” on page 24
The paper is moist or damp.
Solutions
Load new paper.
Static electricity is causing sheets of paper to stick to each other.
Solutions
Fan the paper before loading. If the paper still does not feed, load one sheet of paper at a time.
Too many sheets are loaded in the printer.
Solutions
Do not load more than the maximum number of sheets specified for the paper. For plain paper, do notload above the line indicated by the triangle symbol on the edge guide.
& “Available Paper and Capacities” on page 163
Multiple sheets of paper are loaded.
Solutions
Load one sheet of paper at a time.
Multiple sheets of paper feed at the same time during manual 2-sided printing.
Solutions
Remove any paper that is loaded in the paper source before you reload the paper.
Paper Out Error Occurs
Paper is not loaded in the center of the rear paper feeder.
Solutions
When a paper out error occurs although paper is loaded in the rear paper feeder, reload paper in thecenter of the rear paper feeder.
Cannot Print
Cannot Print from Windows
Make sure the computer and the printer are connected correctly.
The cause and solution to the problem differ depending on whether or not they are connected.
Solving Problems > The Printer Does Not Work as Expected > Cannot Print
92

Checking the Connection Status
Use Epson Printer Connection Checker to check the connection status for the computer and the printer. You maybe able to solve the problem depending on the results of the check.
1. Double-click the Epson Printer Connection Checker icon on the desktop.
Epson Printer Connection Checker starts.
If there is no icon on the desktop, follow the methods below to start Epson Printer Connection Checker.
❏ Windows 10Click the start button, and then select Epson Software > Epson Printer Connection Checker.
❏ Windows 8.1/Windows 8Enter the application name in the search charm, and then select the displayed icon.
❏ Windows 7Click the start button, and then select All Programs > Epson Software > Epson Printer ConnectionChecker.
2. Follow the on-screen instructions to check.
Note:If the printer name is not displayed, install a genuine Epson printer driver.
“Checking if a genuine Epson printer driver is installed - Windows” on page 80
When you have identified the problem, follow the solution displayed on the screen.
When you cannot solve the problem, check the following according to your situation.
❏ The printer is not recognized over a network connection“Cannot connect to a Network” on page 93
❏ The printer is not recognized using a USB connection“The Printer Cannot Connect by USB (Windows)” on page 95
❏ The printer is recognized, but printing cannot be performed.“Cannot Print Even Though a Connection has been Established (Windows)” on page 96
Cannot connect to a NetworkThe problem could be one of the following issues.
Something is wrong with the network devices for Wi-Fi connection.
Solutions
Turn off the devices you want to connect to the network. Wait for about 10 seconds, and then turn on thedevices in the following order; wireless router, computer or smart device, and then printer. Move the
Solving Problems > The Printer Does Not Work as Expected > Cannot Print
93

printer and computer or smart device closer to the wireless router to help with radio wavecommunication, and then try to make network settings again.
Devices cannot receive signals from the wireless router because they are too far apart.
Solutions
After moving the computer or the smart device and the printer closer to the wireless router, turn off thewireless router, and then turn it back on.
When changing the wireless router, the settings do not match the new router.
Solutions
Make the connection settings again so that they match the new wireless router.
The SSIDs connected from the computer or smart device and computer are different.
Solutions
When you are using multiple wireless routers at the same time or the wireless router has multiple SSIDsand devices are connected to different SSIDs, you cannot connect to the wireless router.
Connect the computer or smart device to the same SSID as the printer.
❏ Example of connecting to different SSIDs
Solving Problems > The Printer Does Not Work as Expected > Cannot Print
94
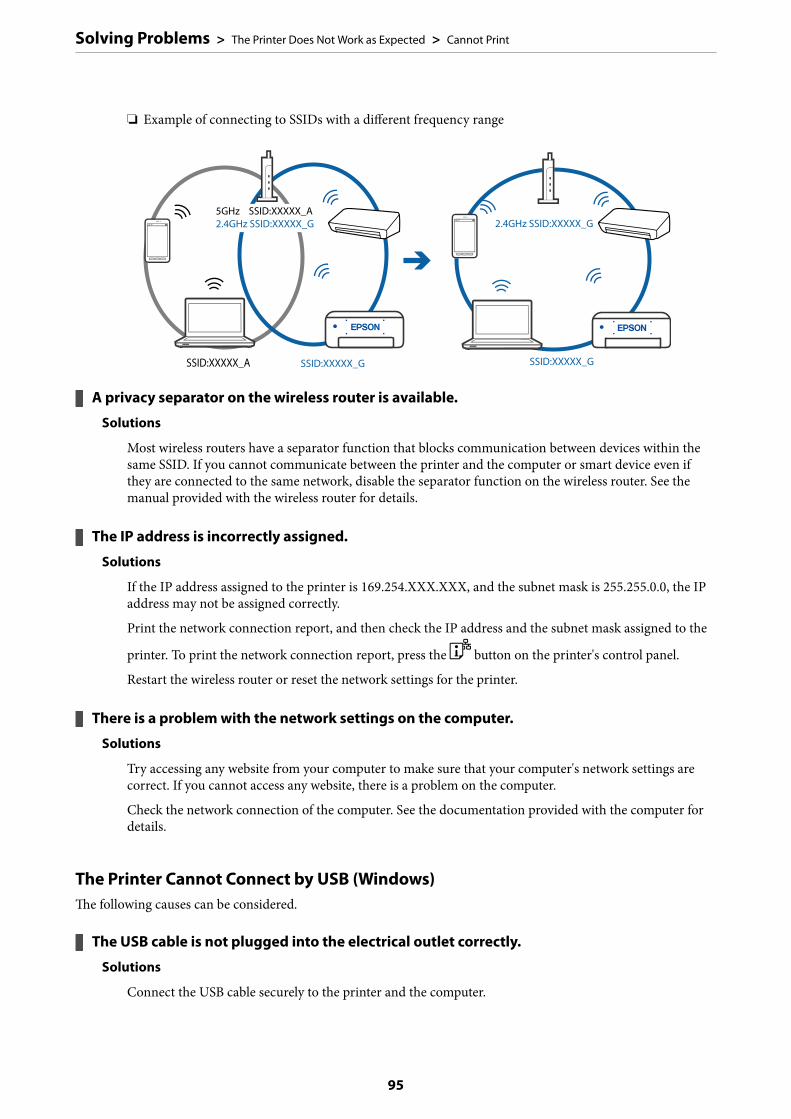
❏ Example of connecting to SSIDs with a different frequency range
A privacy separator on the wireless router is available.
Solutions
Most wireless routers have a separator function that blocks communication between devices within thesame SSID. If you cannot communicate between the printer and the computer or smart device even ifthey are connected to the same network, disable the separator function on the wireless router. See themanual provided with the wireless router for details.
The IP address is incorrectly assigned.
Solutions
If the IP address assigned to the printer is 169.254.XXX.XXX, and the subnet mask is 255.255.0.0, the IPaddress may not be assigned correctly.
Print the network connection report, and then check the IP address and the subnet mask assigned to the
printer. To print the network connection report, press the button on the printer's control panel.
Restart the wireless router or reset the network settings for the printer.
There is a problem with the network settings on the computer.
Solutions
Try accessing any website from your computer to make sure that your computer's network settings arecorrect. If you cannot access any website, there is a problem on the computer.
Check the network connection of the computer. See the documentation provided with the computer fordetails.
The Printer Cannot Connect by USB (Windows)The following causes can be considered.
The USB cable is not plugged into the electrical outlet correctly.
Solutions
Connect the USB cable securely to the printer and the computer.
Solving Problems > The Printer Does Not Work as Expected > Cannot Print
95
There is a problem with the USB hub.
Solutions
If you are using a USB hub, try to connect the printer directly to the computer.
There is a problem with the USB cable or the USB inlet.
Solutions
If the USB cable cannot be recognized, change the port, or change the USB cable.
Cannot Print Even Though a Connection has been Established (Windows)The following causes can be considered.
There is a problem with the software or data.
Solutions
❏ Make sure that a genuine Epson printer driver (EPSON XXXXX) is installed. If a genuine Epsonprinter driver is not installed, the available functions are limited. We recommend using a genuineEpson printer driver.
❏ If you are printing a large data size image, the computer may run out of memory. Print the image at alower resolution or a smaller size.
❏ If you have tried all of the solutions and have not solved the problem, try uninstalling and thenreinstalling the printer driver.
❏ You may be able to clear the problem by updating the software to the latest version. To check thesoftware status, use the software update tool.
& “Checking if a genuine Epson printer driver is installed - Windows” on page 80& “Checking if a genuine Epson printer driver is installed - Mac OS” on page 81& “Installing or Uninstalling Applications Separately” on page 79& “Updating Applications and Firmware” on page 84
There is a problem with the printer's status.
Solutions
Click EPSON Status Monitor 3 on the printer driver's Maintenance tab, and then check the printerstatus. If EPSON Status Monitor 3 is disabled, click Extended Settings on the Maintenance tab, andthen select Enable EPSON Status Monitor 3.
Solving Problems > The Printer Does Not Work as Expected > Cannot Print
96

There is still a job waiting to be printed.
Solutions
Click Print Queue on the printer driver's Maintenance tab. If unnecessary data remains, select Cancel alldocuments from the Printer menu.
The printer is pending or offline.
Solutions
Click Print Queue on the printer driver's Maintenance tab.
If the printer is offline or pending, clear the offline or pending setting from the Printer menu.
The printer is not selected as the default printer.
Solutions
Right-click the printer icon in Control Panel > View devices and printers (or Printers, Printers andFaxes) and click Set as default printer.
Note:If there are multiple printer icons, see the following to select the correct printer.
Example)
USB connection: EPSON XXXX Series
Network connection: EPSON XXXX Series (network)
If you install the printer driver multiple times, copies of the printer driver may be created. If copies suchas "EPSON XXXX Series (copy 1)" are created, right-click the copied driver icon, and then click RemoveDevice.
Solving Problems > The Printer Does Not Work as Expected > Cannot Print
97

The printer port is not set correctly.
Solutions
Click Print Queue on the printer driver's Maintenance tab.
Make sure the printer port is set correctly as shown below in Property > Port from the Printer menu.
USB connection: USBXXX, Network connection: EpsonNet Print Port
Suddenly the Printer Cannot Print over a Network ConnectionThe problem could be one of the following issues.
The network environment has been changed.
Solutions
When you have changed the network environment, such as the wireless router or provider, try makingnetwork settings for the printer again.
Connect the computer or smart device to the same SSID as the printer.
Something is wrong with the network devices for Wi-Fi connection.
Solutions
Turn off the devices you want to connect to the network. Wait for about 10 seconds, and then turn on thedevices in the following order; wireless router, computer or smart device, and then printer. Move theprinter and computer or smart device closer to the wireless router to help with radio wavecommunication, and then try to make network settings again.
The printer is not connected to the network.
Solutions
Press the button to print the network connection report. If the report shows that the networkconnection failed, check the network connection report and then follow the printed solutions.
There is a problem with the network settings on the computer.
Solutions
Try accessing any website from your computer to make sure that your computer's network settings arecorrect. If you cannot access any website, there is a problem on the computer.
Check the network connection of the computer. See the documentation provided with the computer fordetails.
Solving Problems > The Printer Does Not Work as Expected > Cannot Print
98

There is still a job waiting to be printed.
Solutions
Click Print Queue on the printer driver's Maintenance tab. If unnecessary data remains, select Cancel alldocuments from the Printer menu.
The printer is pending or offline.
Solutions
Click Print Queue on the printer driver's Maintenance tab.
If the printer is offline or pending, clear the offline or pending setting from the Printer menu.
The printer is not selected as the default printer.
Solutions
Right-click the printer icon in Control Panel > View devices and printers (or Printers, Printers andFaxes) and click Set as default printer.
Note:If there are multiple printer icons, see the following to select the correct printer.
Example)
USB connection: EPSON XXXX Series
Network connection: EPSON XXXX Series (network)
If you install the printer driver multiple times, copies of the printer driver may be created. If copies suchas "EPSON XXXX Series (copy 1)" are created, right-click the copied driver icon, and then click RemoveDevice.
Solving Problems > The Printer Does Not Work as Expected > Cannot Print
99
The printer port is not set correctly.
Solutions
Click Print Queue on the printer driver's Maintenance tab.
Make sure the printer port is set correctly as shown below in Property > Port from the Printer menu.
USB connection: USBXXX, Network connection: EpsonNet Print Port
Cannot Print from Mac OS
Make sure the computer and the printer are connected correctly.
The cause and solution to the problem differ depending on whether or not they are connected.
Checking the Connection Status
Use EPSON Status Monitor to check the connection status for the computer and the printer.
1. Select System Preferences from the Apple menu > Printers & Scanners (or Print & Scan, Print & Fax), andthen select the printer.
2. Click Options & Supplies > Utility > Open Printer Utility.
3. Click EPSON Status Monitor.
When the remaining ink levels are displayed, a connection has been successfully established between the computerand the printer.
Check the following if a connection has not been established.
❏ The printer is not recognized over a network connection“Cannot connect to a Network” on page 100
❏ The printer is not recognized using a USB connection“The Printer Cannot Connect by USB (Mac OS)” on page 103
Check the following if a connection has been established.
❏ The printer is recognized, but printing cannot be performed.“Cannot Print Even Though a Connection has been Established (Mac OS)” on page 103
Cannot connect to a NetworkThe problem could be one of the following issues.
Something is wrong with the network devices for Wi-Fi connection.
Solutions
Turn off the devices you want to connect to the network. Wait for about 10 seconds, and then turn on thedevices in the following order; wireless router, computer or smart device, and then printer. Move the
Solving Problems > The Printer Does Not Work as Expected > Cannot Print
100

printer and computer or smart device closer to the wireless router to help with radio wavecommunication, and then try to make network settings again.
Devices cannot receive signals from the wireless router because they are too far apart.
Solutions
After moving the computer or the smart device and the printer closer to the wireless router, turn off thewireless router, and then turn it back on.
When changing the wireless router, the settings do not match the new router.
Solutions
Make the connection settings again so that they match the new wireless router.
The SSIDs connected from the computer or smart device and computer are different.
Solutions
When you are using multiple wireless routers at the same time or the wireless router has multiple SSIDsand devices are connected to different SSIDs, you cannot connect to the wireless router.
Connect the computer or smart device to the same SSID as the printer.
❏ Example of connecting to different SSIDs
Solving Problems > The Printer Does Not Work as Expected > Cannot Print
101
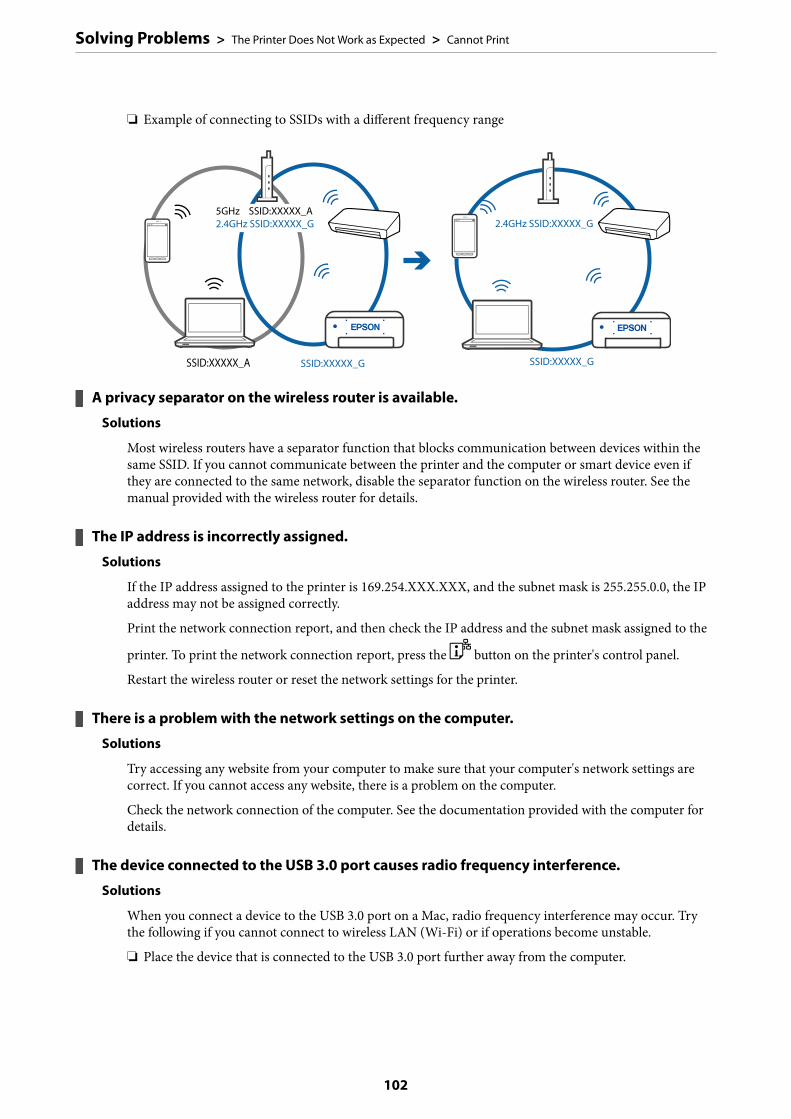
❏ Example of connecting to SSIDs with a different frequency range
A privacy separator on the wireless router is available.
Solutions
Most wireless routers have a separator function that blocks communication between devices within thesame SSID. If you cannot communicate between the printer and the computer or smart device even ifthey are connected to the same network, disable the separator function on the wireless router. See themanual provided with the wireless router for details.
The IP address is incorrectly assigned.
Solutions
If the IP address assigned to the printer is 169.254.XXX.XXX, and the subnet mask is 255.255.0.0, the IPaddress may not be assigned correctly.
Print the network connection report, and then check the IP address and the subnet mask assigned to the
printer. To print the network connection report, press the button on the printer's control panel.
Restart the wireless router or reset the network settings for the printer.
There is a problem with the network settings on the computer.
Solutions
Try accessing any website from your computer to make sure that your computer's network settings arecorrect. If you cannot access any website, there is a problem on the computer.
Check the network connection of the computer. See the documentation provided with the computer fordetails.
The device connected to the USB 3.0 port causes radio frequency interference.
Solutions
When you connect a device to the USB 3.0 port on a Mac, radio frequency interference may occur. Trythe following if you cannot connect to wireless LAN (Wi-Fi) or if operations become unstable.
❏ Place the device that is connected to the USB 3.0 port further away from the computer.
Solving Problems > The Printer Does Not Work as Expected > Cannot Print
102

The Printer Cannot Connect by USB (Mac OS)The following causes can be considered.
The USB cable is not plugged into the electrical outlet correctly.
Solutions
Connect the USB cable securely to the printer and the computer.
There is a problem with the USB hub.
Solutions
If you are using a USB hub, try to connect the printer directly to the computer.
There is a problem with the USB cable or the USB inlet.
Solutions
If the USB cable cannot be recognized, change the port, or change the USB cable.
Cannot Print Even Though a Connection has been Established (Mac OS)The following causes can be considered.
There is a problem with the software or data.
Solutions
❏ Make sure that a genuine Epson printer driver (EPSON XXXXX) is installed. If a genuine Epsonprinter driver is not installed, the available functions are limited. We recommend using a genuineEpson printer driver.
❏ If you are printing a large data size image, the computer may run out of memory. Print the image at alower resolution or a smaller size.
❏ If you have tried all of the solutions and have not solved the problem, try uninstalling and thenreinstalling the printer driver.
❏ You may be able to clear the problem by updating the software to the latest version. To check thesoftware status, use the software update tool.
& “Checking if a genuine Epson printer driver is installed - Windows” on page 80& “Checking if a genuine Epson printer driver is installed - Mac OS” on page 81& “Installing or Uninstalling Applications Separately” on page 79& “Updating Applications and Firmware” on page 84
There is a problem with the status of the printer.
Solutions
Make sure the printer status is not Pause.
Select System Preferences from the Apple menu > Printers & Scanners (or Print & Scan, Print & Fax),and then double-click the printer. If the printer is paused, click Resume.
Solving Problems > The Printer Does Not Work as Expected > Cannot Print
103
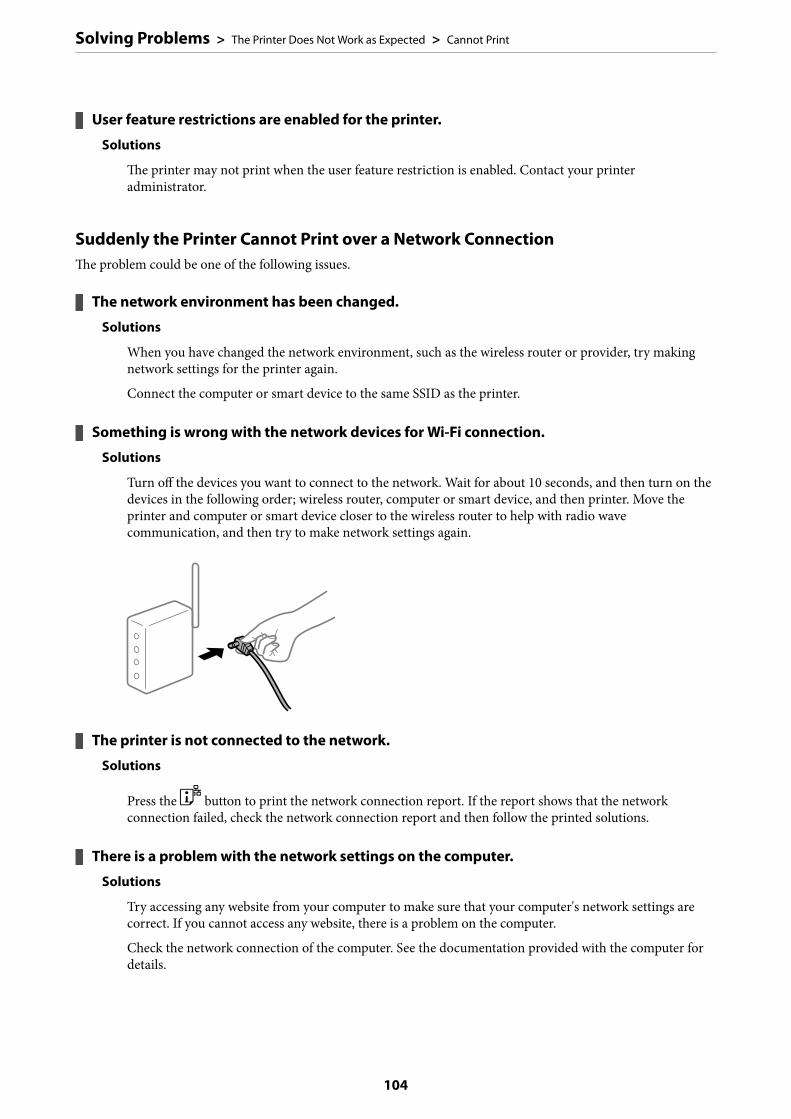
User feature restrictions are enabled for the printer.
Solutions
The printer may not print when the user feature restriction is enabled. Contact your printeradministrator.
Suddenly the Printer Cannot Print over a Network ConnectionThe problem could be one of the following issues.
The network environment has been changed.
Solutions
When you have changed the network environment, such as the wireless router or provider, try makingnetwork settings for the printer again.
Connect the computer or smart device to the same SSID as the printer.
Something is wrong with the network devices for Wi-Fi connection.
Solutions
Turn off the devices you want to connect to the network. Wait for about 10 seconds, and then turn on thedevices in the following order; wireless router, computer or smart device, and then printer. Move theprinter and computer or smart device closer to the wireless router to help with radio wavecommunication, and then try to make network settings again.
The printer is not connected to the network.
Solutions
Press the button to print the network connection report. If the report shows that the networkconnection failed, check the network connection report and then follow the printed solutions.
There is a problem with the network settings on the computer.
Solutions
Try accessing any website from your computer to make sure that your computer's network settings arecorrect. If you cannot access any website, there is a problem on the computer.
Check the network connection of the computer. See the documentation provided with the computer fordetails.
Solving Problems > The Printer Does Not Work as Expected > Cannot Print
104

The Print Settings Menu is Not Displayed.The following causes can be considered.
The Epson Printer Driver has Not been Installed Correctly
Solutions
If the Print Settings menu is not displayed on macOS Catalina (10.15) or later, macOS High Sierra(10.13), macOS Sierra (10.12), OS X El Capitan (10.11), OS X Yosemite (10.10), OS X Mavericks (10.9),OS X Mountain Lion (10.8), the Epson printer driver has not been installed correctly. Enable it from thefollowing menu.
Select System Preferences from the Apple menu > Printers & Scanners (or Print & Scan, Print & Fax),remove the printer, and then add the printer again. See the following to add a printer.
“Adding the Printer (for Mac OS Only)” on page 82
macOS Mojave (10.14) cannot access Print Settings in applications made by Apple such as TextEdit.
Cannot Print from Smart Device
Make sure the smart device and the printer are connected correctly.
The cause and solution to the problem differ depending on whether or not they are connected.
Check the connection with the smart device
Use Epson Smart Panel to check the connection between the smart device and the printer.
Open the Epson Smart Panel. If you cannot connect to the printer, tap [+] at the top of the screen to reset.
If you are not using Epson Smart Panel, see the link below.
http://epson.sn
Cannot connect to a NetworkThe problem could be one of the following issues.
Something is wrong with the network devices for Wi-Fi connection.
Solutions
Turn off the devices you want to connect to the network. Wait for about 10 seconds, and then turn on thedevices in the following order; wireless router, computer or smart device, and then printer. Move theprinter and computer or smart device closer to the wireless router to help with radio wavecommunication, and then try to make network settings again.
Solving Problems > The Printer Does Not Work as Expected > Cannot Print
105

Devices cannot receive signals from the wireless router because they are too far apart.
Solutions
After moving the computer or the smart device and the printer closer to the wireless router, turn off thewireless router, and then turn it back on.
When changing the wireless router, the settings do not match the new router.
Solutions
Make the connection settings again so that they match the new wireless router.
The SSIDs connected from the computer or smart device and computer are different.
Solutions
When you are using multiple wireless routers at the same time or the wireless router has multiple SSIDsand devices are connected to different SSIDs, you cannot connect to the wireless router.
Connect the computer or smart device to the same SSID as the printer.
❏ Example of connecting to different SSIDs
❏ Example of connecting to SSIDs with a different frequency range
Solving Problems > The Printer Does Not Work as Expected > Cannot Print
106

A privacy separator on the wireless router is available.
Solutions
Most wireless routers have a separator function that blocks communication between devices within thesame SSID. If you cannot communicate between the printer and the computer or smart device even ifthey are connected to the same network, disable the separator function on the wireless router. See themanual provided with the wireless router for details.
The IP address is incorrectly assigned.
Solutions
If the IP address assigned to the printer is 169.254.XXX.XXX, and the subnet mask is 255.255.0.0, the IPaddress may not be assigned correctly.
Print the network connection report, and then check the IP address and the subnet mask assigned to the
printer. To print the network connection report, press the button on the printer's control panel.
Restart the wireless router or reset the network settings for the printer.
There is a problem with the network settings on the smart device.
Solutions
Try accessing any website from your smart device to make sure that your smart device's network settingsare correct. If you cannot access any website, there is a problem on the smart device.
Check the network connection of the computer. See the documentation provided with the smart devicefor details.
Suddenly the Printer Cannot Print over a Network ConnectionThe problem could be one of the following issues.
The network environment has been changed.
Solutions
When you have changed the network environment, such as the wireless router or provider, try makingnetwork settings for the printer again.
Connect the computer or smart device to the same SSID as the printer.
Something is wrong with the network devices for Wi-Fi connection.
Solutions
Turn off the devices you want to connect to the network. Wait for about 10 seconds, and then turn on thedevices in the following order; wireless router, computer or smart device, and then printer. Move the
Solving Problems > The Printer Does Not Work as Expected > Cannot Print
107

printer and computer or smart device closer to the wireless router to help with radio wavecommunication, and then try to make network settings again.
The printer is not connected to the network.
Solutions
Press the button to print the network connection report. If the report shows that the networkconnection failed, check the network connection report and then follow the printed solutions.
There is a problem with the network settings on the smart device.
Solutions
Try accessing any website from your smart device to make sure that your smart device's network settingsare correct. If you cannot access any website, there is a problem on the smart device.
Check the network connection of the computer. See the documentation provided with the smart devicefor details.
Cannot Start Scanning
Cannot Start Scanning from Windows
Make sure the computer and the printer are connected correctly.
The cause and solution to the problem differ depending on whether or not they are connected.
Checking the Connection Status
Use Epson Printer Connection Checker to check the connection status for the computer and the printer. You maybe able to solve the problem depending on the results of the check.
1. Double-click the Epson Printer Connection Checker icon on the desktop.
Epson Printer Connection Checker starts.
If there is no icon on the desktop, follow the methods below to start Epson Printer Connection Checker.
❏ Windows 10Click the start button, and then select Epson Software > Epson Printer Connection Checker.
❏ Windows 8.1/Windows 8Enter the application name in the search charm, and then select the displayed icon.
Solving Problems > The Printer Does Not Work as Expected > Cannot Start Scanning
108
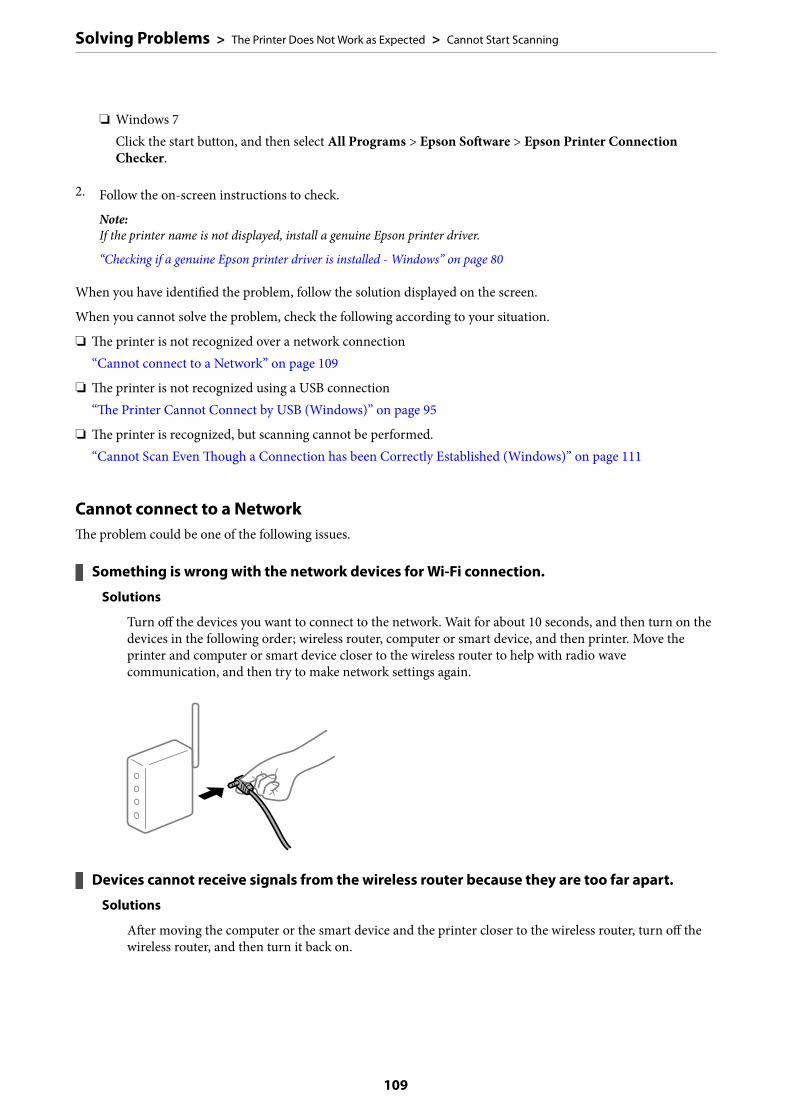
❏ Windows 7Click the start button, and then select All Programs > Epson Software > Epson Printer ConnectionChecker.
2. Follow the on-screen instructions to check.
Note:If the printer name is not displayed, install a genuine Epson printer driver.
“Checking if a genuine Epson printer driver is installed - Windows” on page 80
When you have identified the problem, follow the solution displayed on the screen.
When you cannot solve the problem, check the following according to your situation.
❏ The printer is not recognized over a network connection“Cannot connect to a Network” on page 109
❏ The printer is not recognized using a USB connection“The Printer Cannot Connect by USB (Windows)” on page 95
❏ The printer is recognized, but scanning cannot be performed.“Cannot Scan Even Though a Connection has been Correctly Established (Windows)” on page 111
Cannot connect to a NetworkThe problem could be one of the following issues.
Something is wrong with the network devices for Wi-Fi connection.
Solutions
Turn off the devices you want to connect to the network. Wait for about 10 seconds, and then turn on thedevices in the following order; wireless router, computer or smart device, and then printer. Move theprinter and computer or smart device closer to the wireless router to help with radio wavecommunication, and then try to make network settings again.
Devices cannot receive signals from the wireless router because they are too far apart.
Solutions
After moving the computer or the smart device and the printer closer to the wireless router, turn off thewireless router, and then turn it back on.
Solving Problems > The Printer Does Not Work as Expected > Cannot Start Scanning
109

When changing the wireless router, the settings do not match the new router.
Solutions
Make the connection settings again so that they match the new wireless router.
The SSIDs connected from the computer or smart device and computer are different.
Solutions
When you are using multiple wireless routers at the same time or the wireless router has multiple SSIDsand devices are connected to different SSIDs, you cannot connect to the wireless router.
Connect the computer or smart device to the same SSID as the printer.
❏ Example of connecting to different SSIDs
❏ Example of connecting to SSIDs with a different frequency range
A privacy separator on the wireless router is available.
Solutions
Most wireless routers have a separator function that blocks communication between devices within thesame SSID. If you cannot communicate between the printer and the computer or smart device even ifthey are connected to the same network, disable the separator function on the wireless router. See themanual provided with the wireless router for details.
Solving Problems > The Printer Does Not Work as Expected > Cannot Start Scanning
110

The IP address is incorrectly assigned.
Solutions
If the IP address assigned to the printer is 169.254.XXX.XXX, and the subnet mask is 255.255.0.0, the IPaddress may not be assigned correctly.
Print the network connection report, and then check the IP address and the subnet mask assigned to the
printer. To print the network connection report, press the button on the printer's control panel.
Restart the wireless router or reset the network settings for the printer.
There is a problem with the network settings on the computer.
Solutions
Try accessing any website from your computer to make sure that your computer's network settings arecorrect. If you cannot access any website, there is a problem on the computer.
Check the network connection of the computer. See the documentation provided with the computer fordetails.
The Printer Cannot Connect by USB (Windows)The following causes can be considered.
The USB cable is not plugged into the electrical outlet correctly.
Solutions
Connect the USB cable securely to the printer and the computer.
There is a problem with the USB hub.
Solutions
If you are using a USB hub, try to connect the printer directly to the computer.
There is a problem with the USB cable or the USB inlet.
Solutions
If the USB cable cannot be recognized, change the port, or change the USB cable.
Cannot Scan Even Though a Connection has been Correctly Established (Windows)
Scanning at a high resolution over a network.
Solutions
Try scanning at a lower resolution.
Cannot Start Scanning from Mac OS
Make sure the computer and the printer are connected correctly.
The cause and solution to the problem differ depending on whether or not they are connected.
Solving Problems > The Printer Does Not Work as Expected > Cannot Start Scanning
111

Checking the Connection Status
Use EPSON Status Monitor to check the connection status for the computer and the printer.
1. Select System Preferences from the Apple menu > Printers & Scanners (or Print & Scan, Print & Fax), andthen select the printer.
2. Click Options & Supplies > Utility > Open Printer Utility.
3. Click EPSON Status Monitor.
When the remaining ink levels are displayed, a connection has been successfully established between the computerand the printer.
Check the following if a connection has not been established.
❏ The printer is not recognized over a network connection“Cannot connect to a Network” on page 112
❏ The printer is not recognized using a USB connection“The Printer Cannot Connect by USB (Mac OS)” on page 103
Check the following if a connection has been established.
❏ The printer is recognized, but scanning cannot be performed.“Cannot Scan Even Though a Connection has been Correctly Established (Mac OS)” on page 114
Cannot connect to a NetworkThe problem could be one of the following issues.
Something is wrong with the network devices for Wi-Fi connection.
Solutions
Turn off the devices you want to connect to the network. Wait for about 10 seconds, and then turn on thedevices in the following order; wireless router, computer or smart device, and then printer. Move theprinter and computer or smart device closer to the wireless router to help with radio wavecommunication, and then try to make network settings again.
Devices cannot receive signals from the wireless router because they are too far apart.
Solutions
After moving the computer or the smart device and the printer closer to the wireless router, turn off thewireless router, and then turn it back on.
Solving Problems > The Printer Does Not Work as Expected > Cannot Start Scanning
112
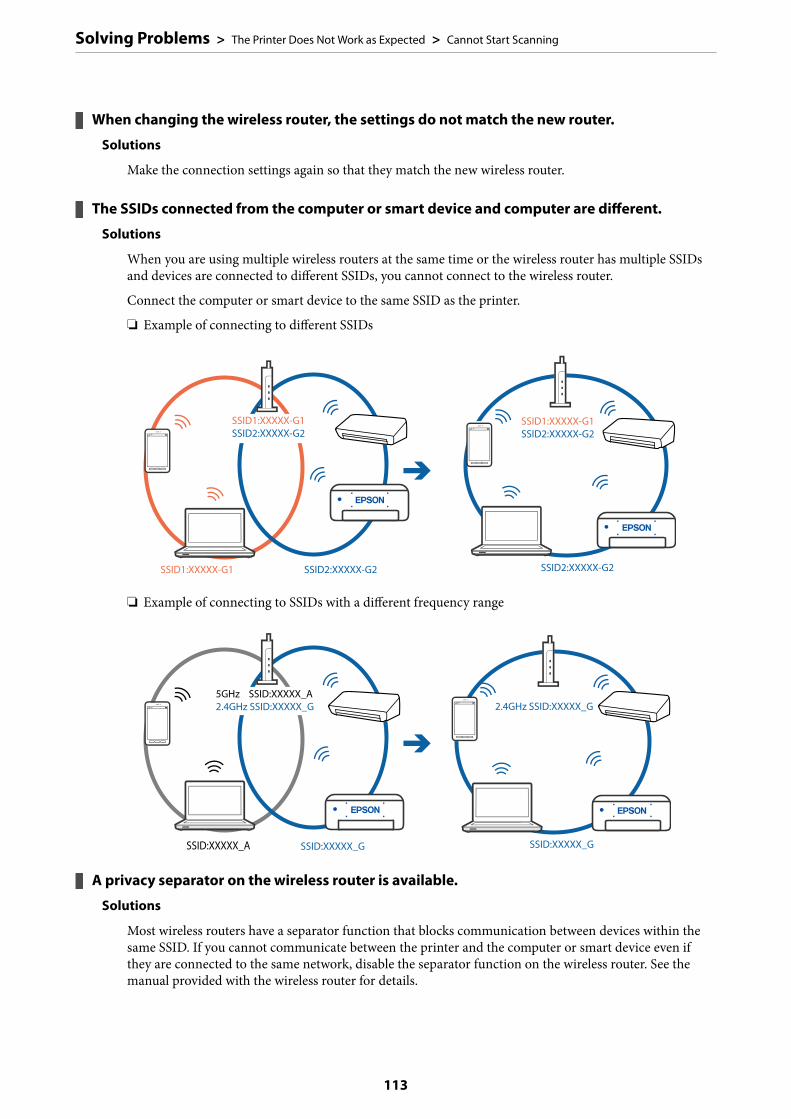
When changing the wireless router, the settings do not match the new router.
Solutions
Make the connection settings again so that they match the new wireless router.
The SSIDs connected from the computer or smart device and computer are different.
Solutions
When you are using multiple wireless routers at the same time or the wireless router has multiple SSIDsand devices are connected to different SSIDs, you cannot connect to the wireless router.
Connect the computer or smart device to the same SSID as the printer.
❏ Example of connecting to different SSIDs
❏ Example of connecting to SSIDs with a different frequency range
A privacy separator on the wireless router is available.
Solutions
Most wireless routers have a separator function that blocks communication between devices within thesame SSID. If you cannot communicate between the printer and the computer or smart device even ifthey are connected to the same network, disable the separator function on the wireless router. See themanual provided with the wireless router for details.
Solving Problems > The Printer Does Not Work as Expected > Cannot Start Scanning
113

The IP address is incorrectly assigned.
Solutions
If the IP address assigned to the printer is 169.254.XXX.XXX, and the subnet mask is 255.255.0.0, the IPaddress may not be assigned correctly.
Print the network connection report, and then check the IP address and the subnet mask assigned to the
printer. To print the network connection report, press the button on the printer's control panel.
Restart the wireless router or reset the network settings for the printer.
There is a problem with the network settings on the computer.
Solutions
Try accessing any website from your computer to make sure that your computer's network settings arecorrect. If you cannot access any website, there is a problem on the computer.
Check the network connection of the computer. See the documentation provided with the computer fordetails.
The device connected to the USB 3.0 port causes radio frequency interference.
Solutions
When you connect a device to the USB 3.0 port on a Mac, radio frequency interference may occur. Trythe following if you cannot connect to wireless LAN (Wi-Fi) or if operations become unstable.
❏ Place the device that is connected to the USB 3.0 port further away from the computer.
The Printer Cannot Connect by USB (Mac OS)The following causes can be considered.
The USB cable is not plugged into the electrical outlet correctly.
Solutions
Connect the USB cable securely to the printer and the computer.
There is a problem with the USB hub.
Solutions
If you are using a USB hub, try to connect the printer directly to the computer.
There is a problem with the USB cable or the USB inlet.
Solutions
If the USB cable cannot be recognized, change the port, or change the USB cable.
Cannot Scan Even Though a Connection has been Correctly Established (Mac OS)
Scanning at a high resolution over a network.
Solutions
Try scanning at a lower resolution.
Solving Problems > The Printer Does Not Work as Expected > Cannot Start Scanning
114

Cannot Start Scanning from Smart Device
Make sure the smart device and the printer are connected correctly.
The cause and solution to the problem differ depending on whether or not they are connected.
Check the connection with the smart device
Use Epson Smart Panel to check the connection between the smart device and the printer.
Open the Epson Smart Panel. If you cannot connect to the printer, tap [+] at the top of the screen to reset.
If you are not using Epson Smart Panel, see the link below.
http://epson.sn
Cannot connect to a NetworkThe problem could be one of the following issues.
Something is wrong with the network devices for Wi-Fi connection.
Solutions
Turn off the devices you want to connect to the network. Wait for about 10 seconds, and then turn on thedevices in the following order; wireless router, computer or smart device, and then printer. Move theprinter and computer or smart device closer to the wireless router to help with radio wavecommunication, and then try to make network settings again.
Devices cannot receive signals from the wireless router because they are too far apart.
Solutions
After moving the computer or the smart device and the printer closer to the wireless router, turn off thewireless router, and then turn it back on.
When changing the wireless router, the settings do not match the new router.
Solutions
Make the connection settings again so that they match the new wireless router.
The SSIDs connected from the computer or smart device and computer are different.
Solutions
When you are using multiple wireless routers at the same time or the wireless router has multiple SSIDsand devices are connected to different SSIDs, you cannot connect to the wireless router.
Solving Problems > The Printer Does Not Work as Expected > Cannot Start Scanning
115
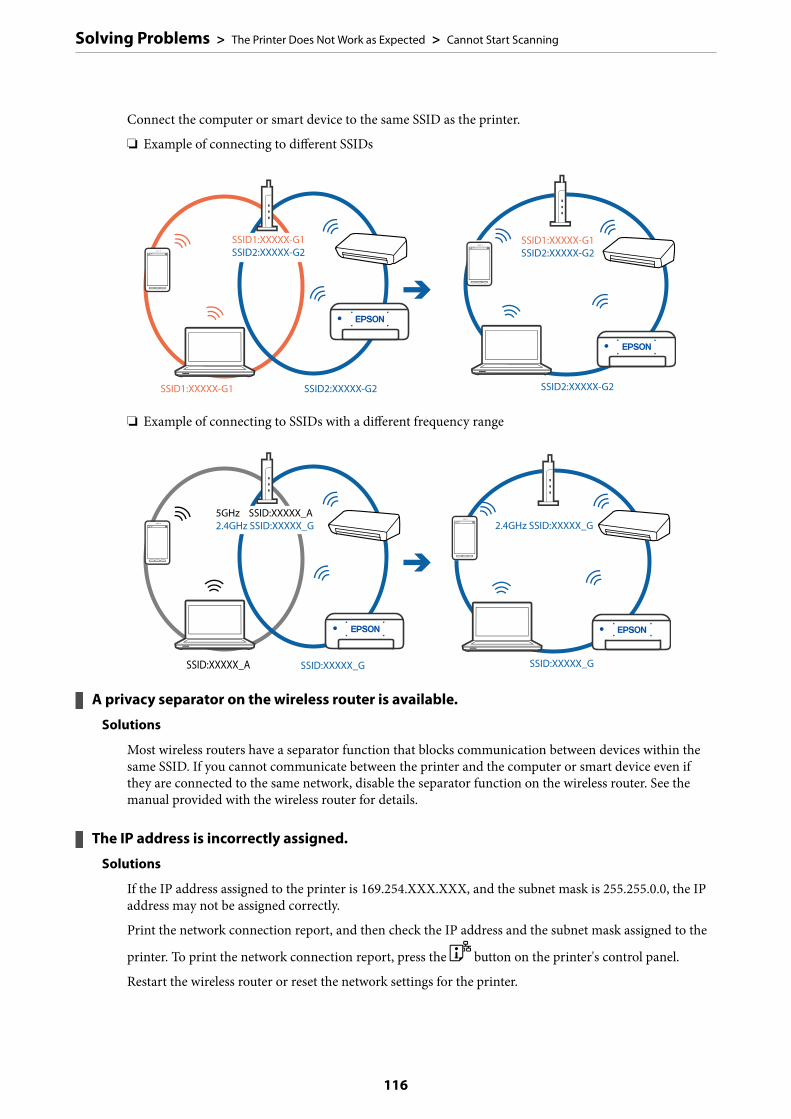
Connect the computer or smart device to the same SSID as the printer.
❏ Example of connecting to different SSIDs
❏ Example of connecting to SSIDs with a different frequency range
A privacy separator on the wireless router is available.
Solutions
Most wireless routers have a separator function that blocks communication between devices within thesame SSID. If you cannot communicate between the printer and the computer or smart device even ifthey are connected to the same network, disable the separator function on the wireless router. See themanual provided with the wireless router for details.
The IP address is incorrectly assigned.
Solutions
If the IP address assigned to the printer is 169.254.XXX.XXX, and the subnet mask is 255.255.0.0, the IPaddress may not be assigned correctly.
Print the network connection report, and then check the IP address and the subnet mask assigned to the
printer. To print the network connection report, press the button on the printer's control panel.
Restart the wireless router or reset the network settings for the printer.
Solving Problems > The Printer Does Not Work as Expected > Cannot Start Scanning
116
There is a problem with the network settings on the smart device.
Solutions
Try accessing any website from your smart device to make sure that your smart device's network settingsare correct. If you cannot access any website, there is a problem on the smart device.
Check the network connection of the computer. See the documentation provided with the smart devicefor details.
Cannot Operate the Printer as Expected
Operations are Slow
Printing Is Too SlowThe following causes can be considered.
Unnecessary applications are running.
Solutions
Close any unnecessary applications on your computer or smart device.
The print quality is set to high.
Solutions
Lower the quality setting.
Bidirectional printing is disabled.
Solutions
Enable the bidirectional (or high speed) setting. When this setting is enabled, the print head prints whilemoving in both directions, and the printing speed increases.
❏ WindowsSelect Bidirectional Printing on the printer driver's More Options tab.
❏ Mac OSSelect System Preferences from the Apple menu > Printers & Scanners (or Print & Scan, Print &Fax), and then select the printer. Click Options & Supplies > Options (or Driver). Select On as theBidirectional Printing setting.
Quiet Mode is enabled.
Solutions
Disable Quiet Mode. The printing speed slows down when the printer is running in Quiet Mode.
❏ WindowsSelect Off as the Quiet Mode setting on the printer driver's Main tab.
Solving Problems > The Printer Does Not Work as Expected > Cannot Operate the Printer as Expected
117

❏ Mac OSSelect System Preferences from the Apple menu > Printers & Scanners (or Print & Scan, Print &Fax), and then select the printer. Click Options & Supplies > Options (or Driver). Select Off as theQuiet Mode setting.
Printing Slows Down Dramatically During Continuous Printing
The function that prevents the printer mechanism from overheating and being damaged isoperating.
Solutions
You can continue printing. To return to normal printing speed, leave the printer idle for at least 30minutes. Printing speed does not return to normal if the power is off.
Scanning Speed Is Slow
Scanning at a high resolution.
Solutions
Try scanning at a lower resolution.
Operation Sounds Are Loud
Quiet Mode is disabled.
Solutions
If operations sounds are too loud, enable Quiet Mode. Enabling this feature may reduce printing speed.
❏ Windows printer driverEnable Quiet Mode on the Main tab.
❏ Mac OS printer driverSelect System Preferences from the Apple menu > Printers & Scanners (or Print & Scan, Print &Fax), and then select the printer. Click Options & Supplies > Options (or Driver). Select On as theQuiet Mode setting.
Checking Lights and Printer StatusLights on the control panel indicates the status of the printer.
Normal Status
: On
Solving Problems > Checking Lights and Printer Status
118
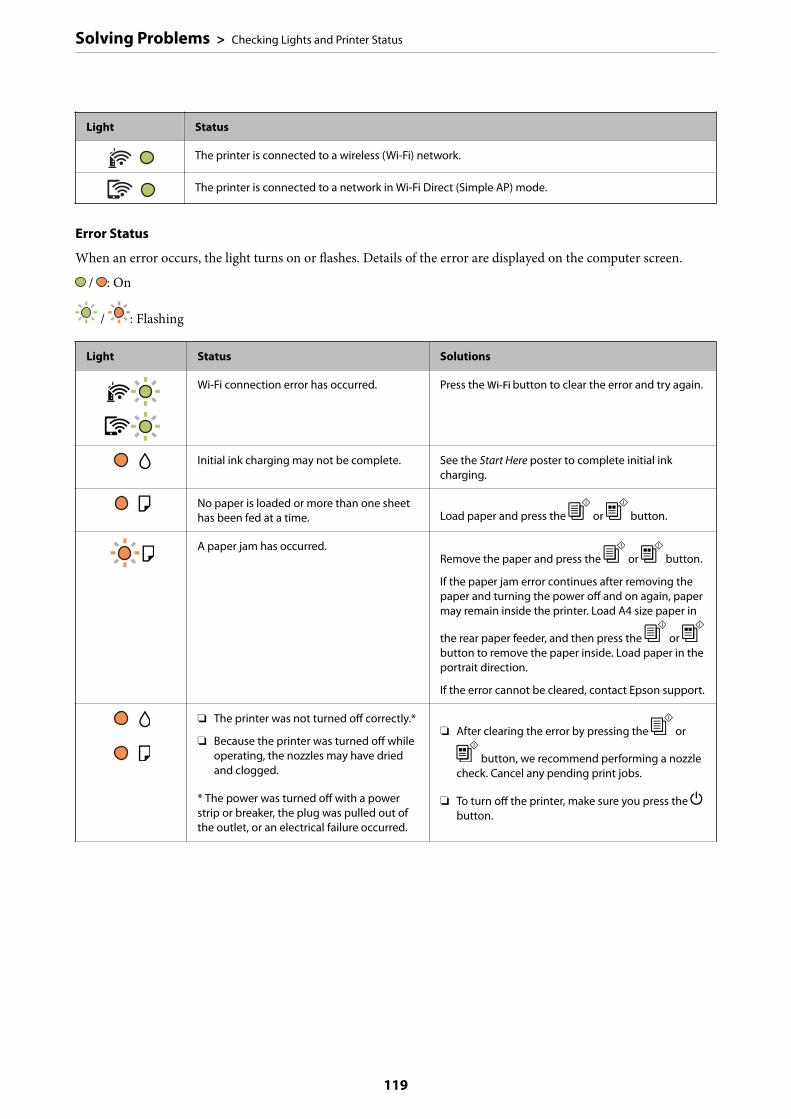
Light Status
The printer is connected to a wireless (Wi-Fi) network.
The printer is connected to a network in Wi-Fi Direct (Simple AP) mode.
Error Status
When an error occurs, the light turns on or flashes. Details of the error are displayed on the computer screen.
/ : On
/ : Flashing
Light Status Solutions
Wi-Fi connection error has occurred. Press the button to clear the error and try again.
Initial ink charging may not be complete. See the Start Here poster to complete initial inkcharging.
No paper is loaded or more than one sheethas been fed at a time. Load paper and press the or button.
A paper jam has occurred.Remove the paper and press the or button.
If the paper jam error continues after removing thepaper and turning the power off and on again, papermay remain inside the printer. Load A4 size paper in
the rear paper feeder, and then press the or button to remove the paper inside. Load paper in theportrait direction.
If the error cannot be cleared, contact Epson support.
❏ The printer was not turned off correctly.*
❏ Because the printer was turned off whileoperating, the nozzles may have driedand clogged.
* The power was turned off with a powerstrip or breaker, the plug was pulled out ofthe outlet, or an electrical failure occurred.
❏ After clearing the error by pressing the or
button, we recommend performing a nozzlecheck. Cancel any pending print jobs.
❏ To turn off the printer, make sure you press the Pbutton.
Solving Problems > Checking Lights and Printer Status
119

Light Status Solutions
When the H light and the b light flashsimultaneously
An ink pad is nearing or at the end of itsservice life.
The ink pads need to be replaced.
Contact Epson or an authorised Epson serviceprovider to replace the ink pad *1. It is not a user-serviceable part.
When a message saying that you can continue
printing is displayed on the computer, press the
or button to continue printing. The lights stopflashing for the time being, however, they willcontinue to flash at regular intervals until the ink padis replaced.
When the H light and the b light flashalternately
A borderless printing ink pad is nearing or atthe end of its service life.
The borderless printing ink pad need to be replaced.
Contact Epson or an authorised Epson serviceprovider to replace the ink pad *2. It is not a user-serviceable part.
When a message saying that you can continue
printing is displayed on the computer, press the
or button to continue printing. The lights stopflashing for the time being, however, they willcontinue to flash at regular intervals until the ink padis replaced.
Borderless printing is not available, but printing witha border is available.
The printer has started in recovery modebecause the firmware update failed.
Follow the steps below to try to update the firmwareagain.
1. Connect the computer and the printer with a USBcable. (During recovery mode, you cannot update thefirmware over a network connection.)
2. Visit your local Epson website for furtherinstructions.
A printer error has occurred. Remove any paper inside the printer. Turn the poweroff and on again.
If the error continues to occur after turning the poweroff and on again, contact Epson support.
*1 In some print cycles a very small amount of surplus ink may be collected in the ink pad. To prevent ink leakagefrom the pad, the printer is designed to stop printing when the pad has reached its limit. Whether and how oftenthis is required will vary according to the number of pages you print, the type of material that you print and thenumber of cleaning cycles that the printer performs. The need for replacement of the pad does not mean that yourprinter has ceased to operate in accordance with its specifications. The printer will advise you when the padrequires replacing and this can only be performed by an authorised Epson Service provider. The Epson warrantydoes not cover the cost of this replacement.
*2 In some print cycles a very small amount of surplus ink may be collected in the borderless printing ink pad. Toprevent ink leakage from the pad, the product is designed to stop borderless printing when the pad has reached its
Solving Problems > Checking Lights and Printer Status
120

limit. Whether and how often this is required will vary according to the number of pages you print using theborderless print option. The need for replacement of the pad does not mean that your printer has ceased to operatein accordance with its specifications. The printer will advise you when the pad requires replacing and this can onlybe performed by an authorised Epson Service provider. The Epson warranty does not cover the cost of thisreplacement.
Related Information
& “Removing Jammed Paper” on page 121& “Contacting Epson Support” on page 182
Paper Gets JammedCheck the error displayed on the control panel and follow the instructions to remove the jammed paper includingany torn pieces. Next, clear the error.
cImportant:
❏ Remove the jammed paper carefully. Removing the paper vigorously may cause damage to the printer.
❏ When removing jammed paper, avoid tilting the printer, placing it vertically, or turning it upside down;otherwise ink may leak.
Removing Jammed Paper
!Caution:
Never touch the buttons on the control panel while your hand is inside the printer. If the printer starts operating, itcould cause an injury. Be careful not to touch the protruding parts to avoid injury.
1. Remove the jammed paper.
Solving Problems > Paper Gets Jammed > Removing Jammed Paper
121

2. Open the front cover.
3. Open the scanner unit until it clicks.
cImportant:
Do not touch the parts shown in the illustration inside the printer. Doing so may cause a malfunction.
4. Remove the jammed paper.
Solving Problems > Paper Gets Jammed > Removing Jammed Paper
122

cImportant:
Do not touch the parts shown in the illustration inside the printer. Doing so may cause a malfunction.
5. Close the scanner unit.
For safety, the scanner unit is closed in two steps.
Note:The scanner unit must be closed completely before it can be opened again.
Solving Problems > Paper Gets Jammed > Removing Jammed Paper
123

6. Close the front cover.
Preventing Paper JamsCheck the following if paper jams occur frequently.
❏ Place the printer on a flat surface and operate in the recommended environmental conditions.“Environmental Specifications” on page 178
❏ Use the paper supported by this printer.“Available Paper and Capacities” on page 163
❏ Follow paper handling precautions.“Paper Handling Precautions” on page 24
❏ Load paper in the correct direction, and slide the edge guide against the edge of the paper.“Loading Paper in the Rear Paper Feeder” on page 25
❏ Do not load more than the maximum number of sheets specified for paper.
❏ Load one sheet of paper at a time if you have loaded several sheets of paper.
It is Time to Refill the Ink
Ink Bottle Handling PrecautionsRead the following instructions before refilling ink.
Storing precautions for ink
❏ Keep the ink bottles out of direct sunlight.
❏ Do not store the ink bottles in high or freezing temperatures.
❏ Epson recommends using the ink bottle before the date printed on the package.
❏ When storing or transporting an ink bottle, do not tilt the bottle and do not subject it to impacts or temperaturechanges. Otherwise, ink may leak even if the cap on the ink bottle is tightened securely. Be sure to keep the inkbottle upright when tightening the cap, and take precautions to prevent ink from leaking when transporting thebottle, for example, putting the bottle in a bag.
❏ After bringing an ink bottle inside from a cold storage site, allow it to warm up at room temperature for at leastthree hours before using it.
Solving Problems > It is Time to Refill the Ink > Ink Bottle Handling Precautions
124

❏ Do not open the ink bottle package until you are ready to fill the ink tank. The ink bottle is vacuum packed tomaintain its reliability. If you leave an ink bottle unpacked for a long time before using it, normal printing maynot be possible.
❏ Once you open an ink bottle, we recommend using it as soon as possible.
Handling precautions for refilling ink
❏ For optimum print results do not maintain low ink levels for extended periods of time.
❏ Use ink bottles with the correct part code for this printer.
❏ The ink for this printer must be handled carefully. Ink may splatter when the ink tanks are being filled or refilledwith ink. If ink gets on your clothes or belongings, it may not come off.
❏ Do not shake too vigorously or squeeze the ink bottles.
❏ If the ink tank is not filled up to the lower line, refill the ink soon. Prolonged use of the printer when the inklevel is below the lower line could damage the printer.
Ink consumption
❏ To maintain optimum print head performance, some ink is consumed from all ink tanks during maintenanceoperations such as print head cleaning. Ink may also be consumed when you turn the printer on.
❏ When printing in monochrome or grayscale, color inks instead of black ink may be used depending on thepaper type or print quality settings. This is because a mixture of color inks is used to create black.
❏ The ink in the ink bottles supplied with your printer is partly used during initial setup. In order to produce highquality printouts, the print head in your printer will be fully charged with ink. This one-off process consumes aquantity of ink and therefore these bottles may print fewer pages compared to subsequent ink bottles.
❏ Quoted yields may vary depending on the images that you are printing, the paper type that you are using, thefrequency of your prints and environmental conditions such as temperature.
Refilling the Ink Tanks
1. Open the ink tank cover.
Solving Problems > It is Time to Refill the Ink > Refilling the Ink Tanks
125
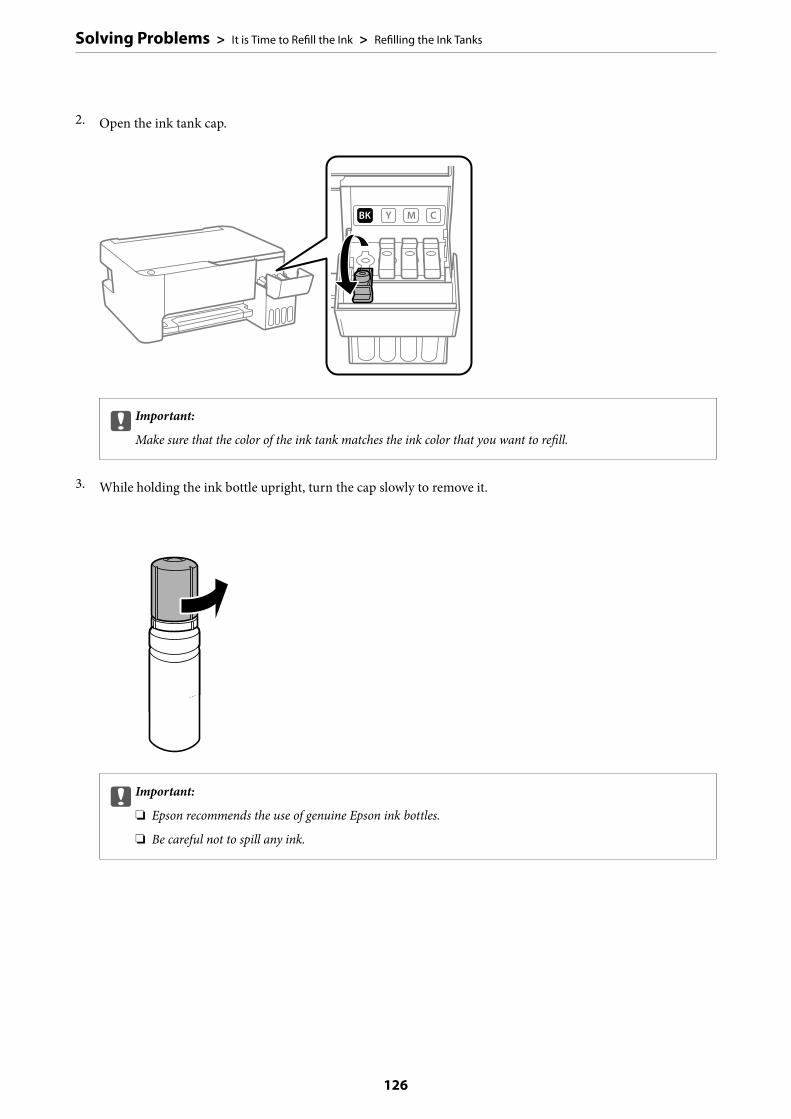
2. Open the ink tank cap.
cImportant:
Make sure that the color of the ink tank matches the ink color that you want to refill.
3. While holding the ink bottle upright, turn the cap slowly to remove it.
cImportant:
❏ Epson recommends the use of genuine Epson ink bottles.
❏ Be careful not to spill any ink.
Solving Problems > It is Time to Refill the Ink > Refilling the Ink Tanks
126

4. Check the upper line (a) in the ink tank.
5. Align the top of the ink bottle with the filling port, and then insert it straight into the port to fill ink until itstops automatically at the upper line.
When you insert the ink bottle into the filling port for the correct color, ink starts pouring and the flow stopsautomatically when the ink reaches the upper line.
If the ink does not start flowing into the tank, remove the ink bottle and reinsert it. However, do not removeand reinsert the ink bottle when the ink has reached the upper line; otherwise ink may leak.
Solving Problems > It is Time to Refill the Ink > Refilling the Ink Tanks
127

6. When you have finished refilling the ink, remove the ink bottle, and then close the ink tank cap securely.
cImportant:
Do not leave the ink bottle inserted; otherwise the bottle may be damaged or ink may leak.
Note:If any ink remains in the ink bottle, tighten the cap and store the bottle upright for later use.
7. Close the ink tank cover firmly.
Related Information
& “Ink Bottle Codes” on page 166& “Ink Bottle Handling Precautions” on page 124& “Cleaning Spilled ink” on page 78
Solving Problems > It is Time to Refill the Ink > Refilling the Ink Tanks
128
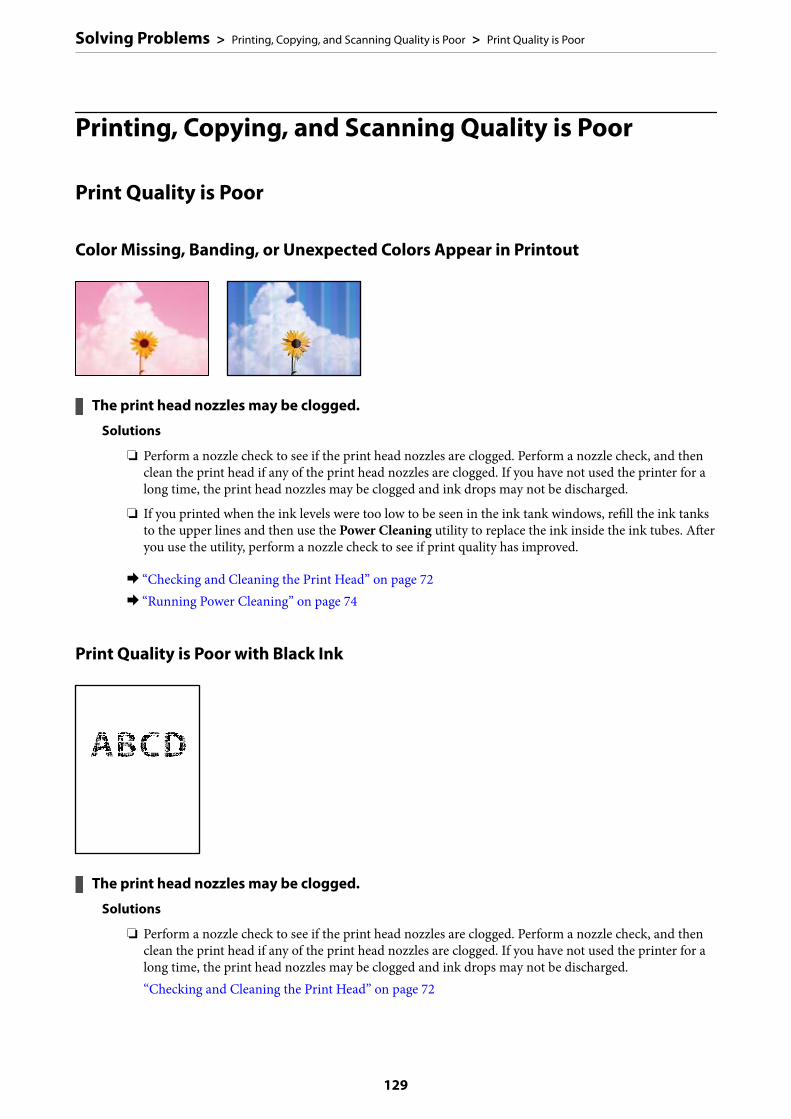
Printing, Copying, and Scanning Quality is Poor
Print Quality is Poor
Color Missing, Banding, or Unexpected Colors Appear in Printout
The print head nozzles may be clogged.
Solutions
❏ Perform a nozzle check to see if the print head nozzles are clogged. Perform a nozzle check, and thenclean the print head if any of the print head nozzles are clogged. If you have not used the printer for along time, the print head nozzles may be clogged and ink drops may not be discharged.
❏ If you printed when the ink levels were too low to be seen in the ink tank windows, refill the ink tanksto the upper lines and then use the Power Cleaning utility to replace the ink inside the ink tubes. Afteryou use the utility, perform a nozzle check to see if print quality has improved.
& “Checking and Cleaning the Print Head” on page 72& “Running Power Cleaning” on page 74
Print Quality is Poor with Black Ink
The print head nozzles may be clogged.
Solutions
❏ Perform a nozzle check to see if the print head nozzles are clogged. Perform a nozzle check, and thenclean the print head if any of the print head nozzles are clogged. If you have not used the printer for along time, the print head nozzles may be clogged and ink drops may not be discharged.“Checking and Cleaning the Print Head” on page 72
Solving Problems > Printing, Copying, and Scanning Quality is Poor > Print Quality is Poor
129

❏ If you cannot solve the problem using head cleaning, you can print immediately with a mixture ofcolor inks to create composite black by changing the following settings in Windows.Click Extended Settings on the printer driver's Maintenance tab. If you select Use a Mixture of ColorInks to Create Black, you can print at Standard print quality when the Paper Type is Plain paper orEnvelope.Note that this feature cannot solve nozzle clogging. To solve nozzle clogging, we recommendcontacting Epson support for repairs.
Colored Banding Appears at Intervals of Approximately 2.5 cm
The following causes can be considered.
The paper type setting does not match the paper loaded.
Solutions
Select the appropriate paper type setting for the type of paper loaded in the printer.
& “List of Paper Type” on page 24
The print quality is set to low.
Solutions
When printing on plain paper, print using a higher quality setting.
❏ WindowsSelect High from Quality on the printer driver's Main tab.
❏ Mac OSSelect Fine as Print Quality from the print dialog's Print Settings menu.
The print head position is out of alignment.
Solutions
Align the print head.
❏ WindowsClick Print Head Alignment on the printer driver's Maintenance tab.
❏ Mac OSSelect System Preferences from the Apple menu > Printers & Scanners (or Print & Scan, Print &Fax), and then select the printer. Click Options & Supplies > Utility > Open Printer Utility, and thenclick Print Head Alignment.
Solving Problems > Printing, Copying, and Scanning Quality is Poor > Print Quality is Poor
130

Blurry Prints, Vertical Banding, or Misalignment
The following causes can be considered.
The print head position is out of alignment.
Solutions
Align the print head.
❏ WindowsClick Print Head Alignment on the printer driver's Maintenance tab.
❏ Mac OSSelect System Preferences from the Apple menu > Printers & Scanners (or Print & Scan, Print &Fax), and then select the printer. Click Options & Supplies > Utility > Open Printer Utility, and thenclick Print Head Alignment.
The bidirectional printing setting is enabled.
Solutions
If print quality does not improve even after aligning the print head, disable the bidirectional setting.
During bidirectional (or high speed) printing, the print head prints while moving in both directions, andvertical lines may be misaligned. Disabling this setting may slow down printing speed but improve printquality.
❏ WindowsClear Bidirectional Printing on the printer driver’s More Options tab.
❏ Mac OSSelect System Preferences from the Apple menu > Printers & Scanners (or Print & Scan, Print &Fax), and then select the printer. Click Options & Supplies > Options (or Driver). Select Off as theBidirectional Printing setting.
Printout Comes Out as a Blank Sheet
Solving Problems > Printing, Copying, and Scanning Quality is Poor > Print Quality is Poor
131
The print head nozzles may be clogged.
Solutions
Perform the nozzle check, and then try Power Cleaning if the print head nozzles are clogged.
& “Checking and Cleaning the Print Head” on page 72& “Running Power Cleaning” on page 74
Multiple sheets of paper are fed into the printer at the same time.
Solutions
See the following to prevent multiple sheets of paper being fed into the printer at the same time.
& “Several Sheets of Paper are Fed at a Time” on page 91
Paper Is Smeared or Scuffed
The following causes can be considered.
Paper is loaded incorrectly.
Solutions
When horizontal banding (perpendicular to the printing direction) appears, or the top or bottom of thepaper is smeared, load paper in the correct direction and slide the edge guides to the edges of the paper.
& “Loading Paper in the Rear Paper Feeder” on page 25
The paper path is smeared.
Solutions
When vertical banding (horizontal to the printing direction) appears, or the paper is smeared, clean thepaper path.
& “Cleaning the Paper Path for Ink Smears” on page 76
The paper is curled.
Solutions
Place the paper on a flat surface to check if it is curled. If it is, flatten it.
The print head is rubbing the surface of the paper.
Solutions
When printing on thick paper, the print head is close to the printing surface and the paper may bescuffed. In this case, enable the reduce scuff setting. If you enable this setting, print quality may decline orprinting may slow down.
Solving Problems > Printing, Copying, and Scanning Quality is Poor > Print Quality is Poor
132
Windows
Click Extended Settings on the printer driver's Maintenance tab, and then select Short Grain Paper.
The back of the paper was printed before the side that had already been printed was dry.
Solutions
When performing manual 2-sided printing, make sure that the ink is completely dry before reloading thepaper.
Printed Photos are Sticky
The print was made on the wrong side of the photo paper.
Solutions
Make sure you are printing on the printable side. When printing on the wrong side of the photo paper,you need to clean the paper path.
& “Cleaning the Paper Path for Ink Smears” on page 76
Images or Photos are Printed in Unexpected Colors
The following causes can be considered.
The print head nozzles may be clogged.
Solutions
Perform a nozzle check to see if the print head nozzles are clogged. Perform a nozzle check, and thenclean the print head if any of the print head nozzles are clogged. If you have not used the printer for along time, the print head nozzles may be clogged and ink drops may not be discharged.
Color correction has been applied.
Solutions
When printing from the Windows printer driver, the Epson auto photo adjustment setting is applied bydefault depending on the paper type. Try change the setting.
Solving Problems > Printing, Copying, and Scanning Quality is Poor > Print Quality is Poor
133
On the More Options tab, select Custom in Color Correction, and then click Advanced. Change theScene Correction setting from Automatic to any other option. If changing the setting does not work, useany color correction method other than PhotoEnhance in Color Management.
& “Adjusting the Print Color” on page 50
Cannot Print Without Margins
Borderless is not set in the print settings.
Solutions
Make borderless setting in the print settings. If you select a paper type that does not support borderlessprinting, you cannot select Borderless. Select a paper type that supports borderless printing.
❏ WindowsSelect Borderless on the printer driver's Main tab.
❏ Mac OSSelect a borderless paper size from Paper Size.
& “Paper for Borderless Printing” on page 165
Edges of the Image are Cropped During Borderless Printing
Because the image is slightly enlarged, the protruding area is cropped.
Solutions
Select a smaller enlargement setting.
❏ WindowsClick Settings next to the Borderless checkbox on the printer driver's Main tab, and then change thesettings.
❏ Mac OSChange the Expansion setting from the print dialog's Print Settings menu.
Solving Problems > Printing, Copying, and Scanning Quality is Poor > Print Quality is Poor
134

The Position, Size, or Margins of the Printout Are Incorrect
The following causes can be considered.
The paper is loaded incorrectly.
Solutions
Load paper in the correct direction, and slide the edge guide against the edge of the paper.
& “Loading Paper in the Rear Paper Feeder” on page 25
The size of the paper is set incorrectly.
Solutions
Select the appropriate paper size setting.
The margin setting in the application software is not within the print area.
Solutions
Adjust the margin setting in the application so that it falls within the printable area.
& “Printable Area” on page 174
Printed Characters Are Incorrect or Garbled
The following causes can be considered.
The USB cable is not connected correctly.
Solutions
Connect the USB cable securely to the printer and the computer.
There is a job waiting to be printed.
Solutions
Cancel any paused print jobs.
Solving Problems > Printing, Copying, and Scanning Quality is Poor > Print Quality is Poor
135
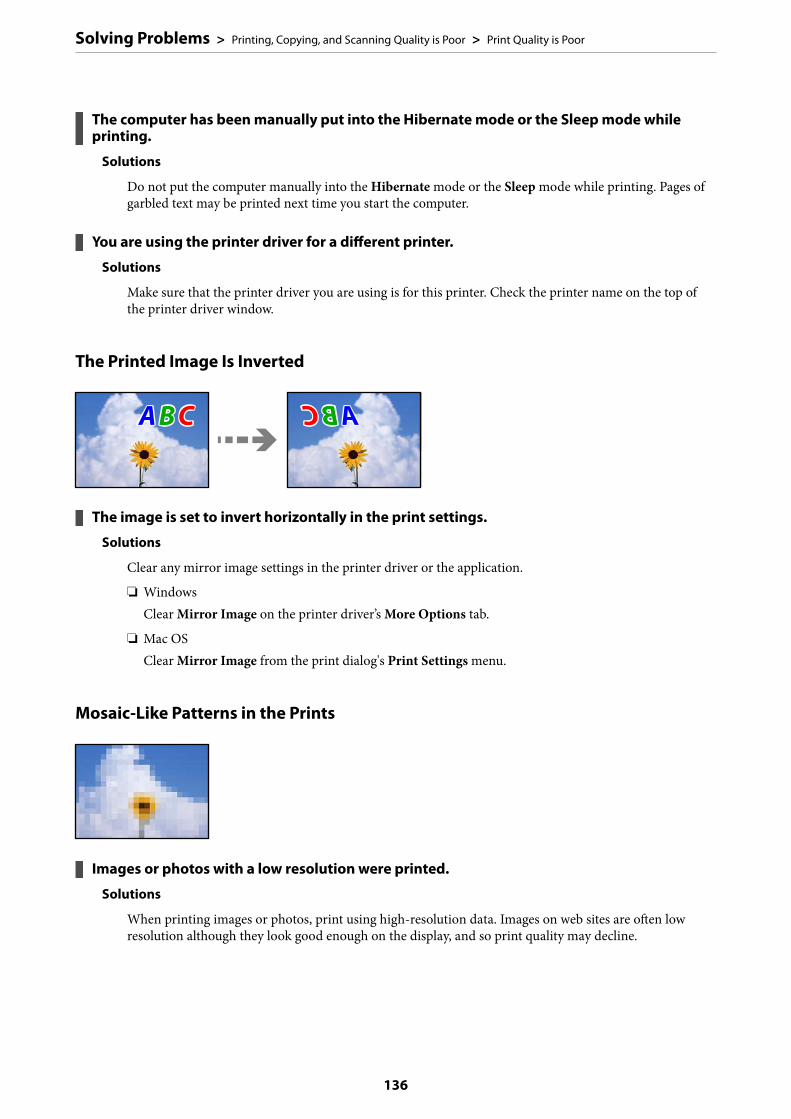
The computer has been manually put into the Hibernate mode or the Sleep mode whileprinting.
Solutions
Do not put the computer manually into the Hibernate mode or the Sleep mode while printing. Pages ofgarbled text may be printed next time you start the computer.
You are using the printer driver for a different printer.
Solutions
Make sure that the printer driver you are using is for this printer. Check the printer name on the top ofthe printer driver window.
The Printed Image Is Inverted
The image is set to invert horizontally in the print settings.
Solutions
Clear any mirror image settings in the printer driver or the application.
❏ WindowsClear Mirror Image on the printer driver’s More Options tab.
❏ Mac OSClear Mirror Image from the print dialog's Print Settings menu.
Mosaic-Like Patterns in the Prints
Images or photos with a low resolution were printed.
Solutions
When printing images or photos, print using high-resolution data. Images on web sites are often lowresolution although they look good enough on the display, and so print quality may decline.
Solving Problems > Printing, Copying, and Scanning Quality is Poor > Print Quality is Poor
136

Copy Quality is Poor
Color Missing, Banding, or Unexpected Colors Appear in Copies
The print head nozzles may be clogged.
Solutions
❏ Perform a nozzle check to see if the print head nozzles are clogged. Perform a nozzle check, and thenclean the print head if any of the print head nozzles are clogged. If you have not used the printer for along time, the print head nozzles may be clogged and ink drops may not be discharged.
❏ If you printed when the ink levels were too low to be seen in the ink tank windows, refill the ink tanksto the upper lines and then use the Power Cleaning utility to replace the ink inside the ink tubes. Afteryou use the utility, perform a nozzle check to see if print quality has improved.
& “Checking and Cleaning the Print Head” on page 72& “Running Power Cleaning” on page 74
You have made a copy in draft mode.
Solutions
If you press the y and the or buttons simultaneously, the printer copies in draft mode.
Simply press the the or button on their own.
Note:For users in Western Europe, the draft mode is not available.
Colored Banding Appears at Intervals of Approximately 2.5 cm
The following causes can be considered.
Solving Problems > Printing, Copying, and Scanning Quality is Poor > Copy Quality is Poor
137
The paper type setting does not match the paper loaded.
Solutions
Select the appropriate paper type setting for the type of paper loaded in the printer.
& “List of Paper Type” on page 24
The print head position is out of alignment.
Solutions
Align the print head.
❏ WindowsClick Print Head Alignment on the printer driver's Maintenance tab.
❏ Mac OSSelect System Preferences from the Apple menu > Printers & Scanners (or Print & Scan, Print &Fax), and then select the printer. Click Options & Supplies > Utility > Open Printer Utility, and thenclick Print Head Alignment.
Blurry Copies, Vertical Banding, or Misalignment
The following causes can be considered.
The print head position is out of alignment.
Solutions
Align the print head.
❏ WindowsClick Print Head Alignment on the printer driver's Maintenance tab.
❏ Mac OSSelect System Preferences from the Apple menu > Printers & Scanners (or Print & Scan, Print &Fax), and then select the printer. Click Options & Supplies > Utility > Open Printer Utility, and thenclick Print Head Alignment.
The bidirectional printing setting is enabled.
Solutions
If print quality does not improve even after aligning the print head, disable the bidirectional setting.
During bidirectional (or high speed) printing, the print head prints while moving in both directions, andvertical lines may be misaligned. Disabling this setting may slow down printing speed but improve printquality.
Solving Problems > Printing, Copying, and Scanning Quality is Poor > Copy Quality is Poor
138

❏ WindowsClear Bidirectional Printing on the printer driver’s More Options tab.
❏ Mac OSSelect System Preferences from the Apple menu > Printers & Scanners (or Print & Scan, Print &Fax), and then select the printer. Click Options & Supplies > Options (or Driver). Select Off as theBidirectional Printing setting.
Printout Comes Out as a Blank Sheet
The print head nozzles may be clogged.
Solutions
Perform the nozzle check, and then try Power Cleaning if the print head nozzles are clogged.
& “Checking and Cleaning the Print Head” on page 72& “Running Power Cleaning” on page 74
Multiple sheets of paper are fed into the printer at the same time.
Solutions
See the following to prevent multiple sheets of paper being fed into the printer at the same time.
& “Several Sheets of Paper are Fed at a Time” on page 91
Paper Is Smeared or Scuffed
The following causes can be considered.
Solving Problems > Printing, Copying, and Scanning Quality is Poor > Copy Quality is Poor
139
Paper is loaded incorrectly.
Solutions
When horizontal banding (perpendicular to the printing direction) appears, or the top or bottom of thepaper is smeared, load paper in the correct direction and slide the edge guides to the edges of the paper.
& “Loading Paper in the Rear Paper Feeder” on page 25
The paper path is smeared.
Solutions
When vertical banding (horizontal to the printing direction) appears, or the paper is smeared, clean thepaper path.
& “Cleaning the Paper Path for Ink Smears” on page 76
The paper is curled.
Solutions
Place the paper on a flat surface to check if it is curled. If it is, flatten it.
The Position, Size, or Margins of the Copies are Incorrect
The following causes can be considered.
The paper is loaded incorrectly.
Solutions
Load paper in the correct direction, and slide the edge guide against the edge of the paper.
& “Loading Paper in the Rear Paper Feeder” on page 25
The size of the paper is set incorrectly.
Solutions
Select the appropriate paper size setting.
The originals are not placed correctly.
Solutions
❏ Make sure the original is placed correctly against the alignment marks.
Solving Problems > Printing, Copying, and Scanning Quality is Poor > Copy Quality is Poor
140

❏ If the edge of the scanned image is missing, move the original slightly away from the edge of thescanner glass. You cannot scan the area within approximately 1.5 mm (0.06 in.) from the edge of thescanner glass.
& “Placing Originals on the Scanner Glass” on page 31
There is dust or dirt on the scanner glass.
Solutions
When placing the originals on the scanner glass, remove any dust or dirt that has stuck to the originals,and clean the scanner glass. If there is dust or stains on the glass, the copy area may extend to include thedust or stains, resulting in the wrong copying position or small images.
& “Cleaning the Scanner Glass” on page 76
Uneven Colors, Smears, Dots, or Straight Lines Appear in the Copied Image
The following causes can be considered.
The paper path is dirty.
Solutions
Load and eject paper without printing to clean the paper path.
There is dust or dirt on the originals or the scanner glass.
Solutions
Remove any dust or dirt that adheres to the originals, and clean the scanner glass.
& “Cleaning the Scanner Glass” on page 76
The original was pressed with too much force.
Solutions
If you press with too much force, blurring, smudges, and spots may occur.
Do not press with too much force on the original or the document cover.
& “Placing Originals on the Scanner Glass” on page 31
Solving Problems > Printing, Copying, and Scanning Quality is Poor > Copy Quality is Poor
141

Moiré (Cross-Hatch) Patterns Appear in the Copied Image
If the original is a printed document such as a magazine or a catalog, a dotted moiré patternappears.
Solutions
Place the original at a slightly different angle.
An Image of the Reverse Side of the Original Appears in the Copied Image
The following causes can be considered.
When scanning thin originals, images on the back may be scanned at the same time.
Solutions
Place the original on the scanner glass and then place a piece of black paper over it.
& “Placing Originals on the Scanner Glass” on page 31
Scanned Image Problems
Uneven Colors, Dirt, Spots, and so on Appear when Scanning from the ScannerGlass
Solving Problems > Printing, Copying, and Scanning Quality is Poor > Scanned Image Problems
142

There is dust or dirt on the originals or the scanner glass.
Solutions
Remove any dust or dirt that adheres to the originals, and clean the scanner glass.
& “Cleaning the Scanner Glass” on page 76
The original was pressed with too much force.
Solutions
If you press with too much force, blurring, smudges, and spots may occur.
Do not press with too much force on the original or the document cover.
& “Placing Originals on the Scanner Glass” on page 31
Offset Appears in the Background of Scanned Images
When scanning thin originals, images on the back may be scanned at the same time.
Solutions
When scanning from the scanner glass, place black paper or a desk pad over the original.
& “Placing Originals on the Scanner Glass” on page 31
Cannot Scan the Correct Area on the Scanner Glass
The originals are not placed correctly.
Solutions
❏ Make sure the original is placed correctly against the alignment marks.
❏ If the edge of the scanned image is missing, move the original slightly away from the edge of thescanner glass. You cannot scan the area within approximately 1.5 mm (0.06 in.) from the edge of thescanner glass.
& “Placing Originals on the Scanner Glass” on page 31
Solving Problems > Printing, Copying, and Scanning Quality is Poor > Scanned Image Problems
143

There is dust or dirt on the scanner glass.
Solutions
Remove any trash or dirt from the scanner glass and document cover. If there is any trash or dirt aroundthe original, the scanning range expands to include it.
& “Cleaning the Scanner Glass” on page 76
When scanning multiple originals using Epson ScanSmart, there is not enough of a gapbetween the originals.
Solutions
When placing multiple originals on the scanner glass, make sure there is a gap of at least 20 mm (0.8 in.)between the originals.
Cannot Solve Problems in the Scanned ImageCheck the following if you have tried all of the solutions and have not solved the problem.
There are problems with the scanning software settings.
Solutions
Use Epson Scan 2 Utility to initialize the settings for the scanner software.
Note:Epson Scan 2 Utility is an application supplied with the scanner software.
1. Start the Epson Scan 2 Utility.
❏ Windows 10Click the start button, and then select EPSON > Epson Scan 2 Utility.
❏ Windows 8.1/Windows 8Enter the application name in the search charm, and then select the displayed icon.
❏ Windows 7/Windows Vista/Windows XPClick the start button, and then select All Programs or Programs > EPSON > Epson Scan 2 >Epson Scan 2 Utility.
❏ Mac OSSelect Go > Applications > Epson Software > Epson Scan 2 Utility.
2. Select the Other tab.
3. Click Reset.
If initialization does not solve the problem, uninstall and re-install the scanner software.
& “Installing or Uninstalling Applications Separately” on page 79
Cannot Solve ProblemIf you cannot solve the problem after trying all of the solutions, contact Epson support.
Solving Problems > Cannot Solve Problem
144

If you cannot solve printing or copying problems, see the following related information.
Related Information
& “Cannot Solve Printing or Copying Problems” on page 145
Cannot Solve Printing or Copying ProblemsTry the following problems in order starting at the top until you solve the problem.
❏ Make sure you match the paper type loaded in the printer to the paper type settings in the printer driver.
❏ Use a higher quality setting on the printer driver.
❏ To check the actual ink remaining, visually check the ink levels in the printer's tanks. Refill the ink tanks if theink levels are below the lower lines.
❏ Align the print head.“Aligning the Print Head” on page 75
❏ Run a nozzle check to see if the print head nozzles are clogged.If there are missing segments in the nozzle check pattern, the nozzles may be clogged. Repeat head cleaning andthe nozzle check alternately 3 times and check if the clogging has cleared.Note that print head cleaning uses some ink.“Checking and Cleaning the Print Head” on page 72
❏ Turn off the printer, wait for at least 12 hours, and then check if the clogging has cleared.If the problem is clogging, leaving the printer for a while without printing may solve the problem.You can check the following items while the printer is off.
❏ Check that you are using genuine Epson ink bottles.Try to use genuine Epson ink bottles. The use of non-genuine ink bottles may cause print quality to decline.
❏ Make sure that there are no paper fragments left inside the printer.When you remove the paper, do not touch the translucent film with your hand or the paper.
❏ Check the paper.Check if the paper is curled or loaded with the printable side facing up.“Paper Handling Precautions” on page 24“Available Paper and Capacities” on page 163“Unavailable Paper Types” on page 165
❏ If you turn off the printer, wait for at least 12 hours, and if print quality has still not improved, run PowerCleaning.“Running Power Cleaning” on page 74
If you cannot solve the problem by checking the solutions above, you may need to request repairs. Contact Epsonsupport.
Related Information
& “Before Contacting Epson” on page 182& “Contacting Epson Support” on page 182
Solving Problems > Cannot Solve Problem > Cannot Solve Printing or Copying Problems
145

Adding or Replacing the Computer orDevices
Connecting to a Printer that has been Connected to the Network. . . . . . . . . . . . . . .147
Re-setting the Network Connection. . . . . . . . . . . . . . . . . . . . . . . . . . . . . . . . . . . . 148
Connecting a Smart Device and Printer Directly (Wi-Fi Direct). . . . . . . . . . . . . . . .152
Checking the Network Connection Status. . . . . . . . . . . . . . . . . . . . . . . . . . . . . . . .154

Connecting to a Printer that has been Connected tothe NetworkWhen the printer has already been connected to the network, you can connect a computer or a smart device to theprinter over the network.
Using a Network Printer from a Second ComputerWe recommend using the installer to connect the printer to a computer. You can run the installer using one of thefollowing methods.
❏ Setting up from the websiteAccess the following website, and then enter the product name. Go to Setup, and then start setting up.http://epson.sn
❏ Setting up using the software disc (only for the models that come with a software disc and users with Windowscomputers with disc drives.)Insert the software disc into the computer, and then follow the on-screen instructions.
Selecting the Printer
Follow the on-screen instructions until the following screen is displayed, select the printer name you want toconnect to, and then click Next.
Follow the on-screen instructions.
Adding or Replacing the Computer or Devices > Connecting to a Printer that has been Connected t…
147

Using a Network Printer from a Smart DeviceYou can connect a smart device to the printer using one of the following methods.
Connecting over a wireless router
Connect the smart device to the same Wi-Fi network (SSID) as the printer.
See the following for more details.
“Making Settings for Connecting to the Smart Device” on page 148
Connecting by Wi-Fi Direct
Connect the smart device to the printer directly without a wireless router.
See the following for more details.
“Connecting a Smart Device and Printer Directly (Wi-Fi Direct)” on page 152
Re-setting the Network ConnectionThis section explains how to make the network connection settings and change the connection method whenreplacing the wireless router or the computer.
When Replacing the Wireless RouterWhen you replace the wireless router, make settings for the connection between the computer or the smart deviceand the printer.
You need to make these settings if you change your Internet service provider and so on.
Making Settings for Connecting to the Computer
We recommend using the installer to connect the printer to a computer. You can run the installer using one of thefollowing methods.
❏ Setting up from the websiteAccess the following website, and then enter the product name. Go to Setup, and then start setting up.http://epson.sn
❏ Setting up using the software disc (only for the models that come with a software disc and users with Windowscomputers with disc drives.)Insert the software disc into the computer, and then follow the on-screen instructions.
Making Settings for Connecting to the Smart Device
You can use the printer from a smart device when you connect the printer to the same Wi-Fi network (SSID) as thesmart device. To use the printer from a smart device, set up from the following website. Access to the website fromthe smart device that you want to connect to the printer.
http://epson.sn > Setup
Adding or Replacing the Computer or Devices > Re-setting the Network Connection > When Repl…
148

When Changing the ComputerWhen changing the computer, make connection settings between the computer and the printer.
Making Settings for Connecting to the Computer
We recommend using the installer to connect the printer to a computer. You can run the installer using one of thefollowing methods.
❏ Setting up from the websiteAccess the following website, and then enter the product name. Go to Setup, and then start setting up.http://epson.sn
❏ Setting up using the software disc (only for the models that come with a software disc and users with Windowscomputers with disc drives.)Insert the software disc into the computer, and then follow the on-screen instructions.
Follow the on-screen instructions.
Changing the Connection Method to the ComputerThis section explains how to change the connection method when the computer and the printer have beenconnected.
Changing from USB to a Network Connection
Using the installer and re-set up in a different connection method.
❏ Setting up from the websiteAccess the following website, and then enter the product name. Go to Setup, and then start setting up.http://epson.sn
❏ Setting up using the software disc (only for the models that come with a software disc and users with Windowscomputers with disc drives.)Insert the software disc into the computer, and then follow the on-screen instructions.
Selecting Change the Connection Methods
Follow the on-screen instructions until the following screen is displayed.
Adding or Replacing the Computer or Devices > Re-setting the Network Connection > Changing t…
149

Select the network connection that you want to use, Connect via wireless network (Wi-Fi) or Connect via wiredLAN (Ethernet), and then click Next.
Note:The displayed connection method differs depending on the model.
Follow the on-screen instructions.
Making Wi-Fi Settings from the Control PanelYou can make network settings from the printer's control panel in several ways. Choose the connection methodthat matches the environment and conditions that you are using.
If the wireless router supports WPS, you can make settings by using push button setup.
After connecting the printer to the network, connect to the printer from the device that you want to use (computer,smart device, tablet, and so on.)
Related Information
& “Making Wi-Fi Settings by Push Button Setup” on page 150& “Making Wi-Fi Settings by PIN Code Setup (WPS)” on page 152
Making Wi-Fi Settings by Push Button Setup
You can automatically set up a Wi-Fi network by pressing a button on the wireless router. If the followingconditions are met, you can set up by using this method.
Adding or Replacing the Computer or Devices > Re-setting the Network Connection > Making Wi-…
150

❏ The wireless router is compatible with WPS (Wi-Fi Protected Setup).
❏ The current Wi-Fi connection was established by pressing a button on the wireless router.
Note:If you cannot find the button or you are setting up using the software, see the documentation provided with the wirelessrouter.
1. Hold down the [WPS] button on the wireless router until the security light flashes.
If you do not know where the [WPS] button is, or there are no buttons on the wireless router, see thedocumentation provided with your wireless router for details.
2. Hold down the button on the printer for at least five seconds until the light and the light flashalternately.
The connection setting will start. When a connection is established, the light turns on.
Note:
The printer is in a connection error status when the light and the light flash simultaneously. After clearingthe printer error by pressing the button on the printer, reboot the wireless router, place it close to the printer and tryagain. If it still does not work, print a network connection report and check the solution.
Related Information
& “Checking the Network Connection Status” on page 154& “Printing a Network Connection Report” on page 155
Adding or Replacing the Computer or Devices > Re-setting the Network Connection > Making Wi-…
151

Making Wi-Fi Settings by PIN Code Setup (WPS)
You can connect to an wireless router by using a PIN code that is printed on the network status sheet. You can usethis method to set up if an wireless router is capable of WPS (Wi-Fi Protected Setup). Use a computer to enter aPIN code into the wireless router.
1. Load papers.
2. Hold down the button on the printer for at least seven seconds.
The network status sheet is printed.
3. While holding down the button, press the button until the light and the light flashalternately.
4. Use your computer to enter the PIN code (an eight digit number) printed on [WPS-PIN Code] column of thenetwork status sheet into the wireless router within two minutes.
When a connection is established, the light turns on.
Note:❏ See the documentation provided with your wireless router for details on entering a PIN code.
❏ The printer is in a connection error status when the light and the light flash simultaneously. Afterclearing the printer error by pressing the button on the printer, reboot the wireless router, place it close to theprinter and try again. If it still does not work, print a network connection report and check the solution.
Related Information
& “Printing a Network Status Sheet” on page 160& “Checking the Network Connection Status” on page 154& “Printing a Network Connection Report” on page 155
Connecting a Smart Device and Printer Directly (Wi-FiDirect)Wi-Fi Direct (Simple AP) allows you to connect a smart device directly to the printer without a wireless router andprint from the smart device.
Adding or Replacing the Computer or Devices > Connecting a Smart Device and Printer Directly (Wi…
152
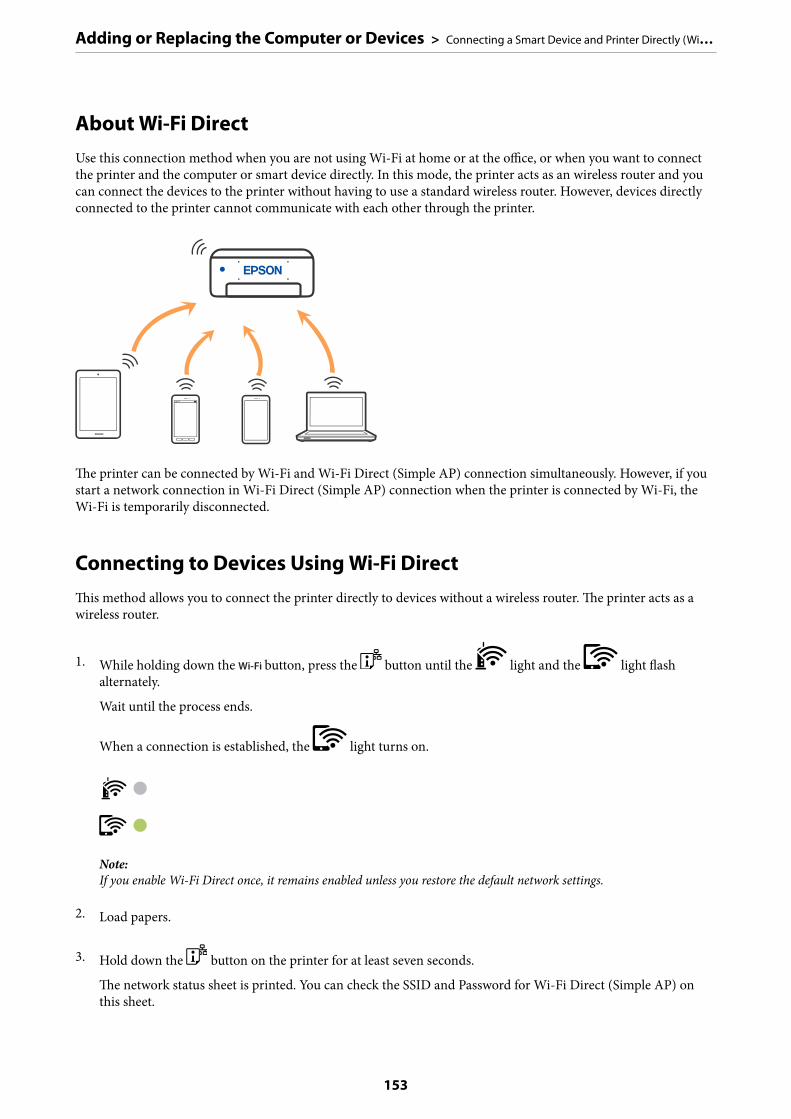
About Wi-Fi DirectUse this connection method when you are not using Wi-Fi at home or at the office, or when you want to connectthe printer and the computer or smart device directly. In this mode, the printer acts as an wireless router and youcan connect the devices to the printer without having to use a standard wireless router. However, devices directlyconnected to the printer cannot communicate with each other through the printer.
The printer can be connected by Wi-Fi and Wi-Fi Direct (Simple AP) connection simultaneously. However, if youstart a network connection in Wi-Fi Direct (Simple AP) connection when the printer is connected by Wi-Fi, theWi-Fi is temporarily disconnected.
Connecting to Devices Using Wi-Fi DirectThis method allows you to connect the printer directly to devices without a wireless router. The printer acts as awireless router.
1. While holding down the button, press the button until the light and the light flashalternately.
Wait until the process ends.
When a connection is established, the light turns on.
Note:If you enable Wi-Fi Direct once, it remains enabled unless you restore the default network settings.
2. Load papers.
3. Hold down the button on the printer for at least seven seconds.
The network status sheet is printed. You can check the SSID and Password for Wi-Fi Direct (Simple AP) onthis sheet.
Adding or Replacing the Computer or Devices > Connecting a Smart Device and Printer Directly (Wi…
153

4. On the computer's network connection screen or the smart device's Wi-Fi screen, select the same SSID shownon the network status sheet to connect.
5. Enter the password printed on the network status sheet into the computer or smart device.
You can confirm the status of Wi-Fi Direct on the network status sheet.
Note:When you connect from a smart device using Wi-Fi Direct connection (for Android)
When you are using an Android device and connect to the printer using Wi-Fi Direct, the light and light flashsimultaneously on the printer.
Press the button to allow the connection request.
Press the button if you want to reject the connection request.
Related Information
& “Printing a Network Status Sheet” on page 160& “Checking the Network Connection Status” on page 154
Checking the Network Connection StatusYou can check the network connection status in the following way.
Related Information
& “Checking the Network Status Using Network Light” on page 154& “Printing a Network Connection Report” on page 155
Checking the Network Status Using Network LightYou can check the network connection status using the network light on the printer’s control panel.
Related Information
& “Checking Lights and Printer Status” on page 20
Adding or Replacing the Computer or Devices > Checking the Network Connection Status > Chec…
154

Printing a Network Connection ReportYou can print a network connection report to check the status between the printer and the wireless router.
1. Load papers.
2. Press the button.
The network connection report is printed.
Messages and Solutions on the Network Connection Report
Check the messages and error codes on the network connection report, and then follow the solutions.
a. Error code
b. Messages on the Network Environment
Related Information
& “E-1” on page 156& “E-2, E-3, E-7” on page 156& “E-5” on page 157& “E-6” on page 157
Adding or Replacing the Computer or Devices > Checking the Network Connection Status > Printi…
155
& “E-8” on page 157& “E-9” on page 158& “E-10” on page 158& “E-11” on page 158& “E-12” on page 159& “E-13” on page 159& “Message on the Network Environment” on page 160
E-1
Solutions:
❏ Make sure your hub or other network device is turned on.
❏ If you want to connect the printer by Wi-Fi, make Wi-Fi settings for the printer again because it is disabled.
E-2, E-3, E-7
Solutions:
❏ Make sure your wireless router is turned on.
❏ Confirm that your computer or device is connected correctly to the wireless router.
❏ Turn off the wireless router. Wait for about 10 seconds, and then turn it on.
❏ Place the printer closer to your wireless router and remove any obstacles between them.
❏ If you have entered the SSID manually, check if it is correct. Check the SSID from the Network Status part onthe network connection report.
❏ If an wireless router has multiple SSIDs, select the SSID that is displayed. When the SSID is using a non-compliant frequency, the printer does not display them.
❏ If you are using push button setup to establish a network connection, make sure your wireless router supportsWPS. You cannot use push button setup if your wireless router does not support WPS.
❏ Makes sure your SSID uses only ASCII characters (alphanumeric characters and symbols). The printer cannotdisplay an SSID that contains non-ASCII characters.
❏ Makes sure you know your SSID and password before connecting to the wireless router. If you are using awireless router with its default settings, the SSID and password are located on a label on the wireless router. Ifyou do not know your SSID and password, contact the person who set up the wireless router, or see thedocumentation provided with the wireless router.
❏ If you are connecting to an SSID generated from a tethering smart device, check for the SSID and password inthe documentation provided with the smart device.
❏ If your Wi-Fi connection suddenly disconnects, check for the conditions below. If any of these conditions areapplicable, reset your network settings by downloading and running the software from the following website.http://epson.sn > Setup
❏ Another smart device was added to the network using push button setup.
❏ The Wi-Fi network was set up using any method other than push button setup.
Adding or Replacing the Computer or Devices > Checking the Network Connection Status > Printi…
156
Related Information
& “Making Settings for Connecting to the Computer” on page 149& “Making Wi-Fi Settings from the Control Panel” on page 150
E-5
Solutions:
Make sure the wireless router’s security type is set to one of the following. If it is not, change the security type onthe wireless router, and then reset the printer’s network settings.
❏ WEP-64 bit (40 bit)
❏ WEP-128 bit (104 bit)
❏ WPA PSK (TKIP/AES)*
❏ WPA2 PSK (TKIP/AES)*
❏ WPA (TKIP/AES)
❏ WPA2 (TKIP/AES)
❏ WPA3-SAE (AES)
* WPA PSK is also known as WPA Personal. WPA2 PSK is also known as WPA2 Personal.
E-6
Solutions:
❏ Check if MAC address filtering is disabled. If it is enabled, register the printer’s MAC address so that it is notfiltered. See the documentation provided with the wireless router for details. You can check the printer’s MACaddress from the Network Status part on the network connection report.
❏ If your wireless router is using shared authentication with WEP security, make sure the authentication key andindex are correct.
❏ If the number of connectable devices on the wireless router is less than the number of network devices that youwant to connect, make settings on the wireless router to increase the number of connectable devices. See thedocumentation provided with the wireless router to make settings.
Related Information
& “Making Settings for Connecting to the Computer” on page 149
E-8
Solutions:
❏ Enable DHCP on the wireless router if the printer’s Obtain IP Address setting is set to Auto.
❏ If the printer’s Obtain IP Address setting is set to Manual, the IP address you manually set is invalid due to outof range (for example: 0.0.0.0). Set a valid IP address from the printer’s control panel.
Adding or Replacing the Computer or Devices > Checking the Network Connection Status > Printi…
157

Related Information
& “Printing a Network Status Sheet” on page 160
E-9
Solutions:
Check the following.
❏ Devices are turned on.
❏ You can access the Internet and other computers or network devices on the same network from the devices youwant to connect to the printer.
If still does not connect your printer and network devices after confirming the above, turn off the wireless router.Wait for about 10 seconds, and then turn it on. Then reset your network settings by downloading and running theinstaller from the following website.
http://epson.sn > Setup
Related Information
& “Making Settings for Connecting to the Computer” on page 149
E-10
Solutions:
Check the following.
❏ Other devices on the network are turned on.
❏ Network addresses (IP address, subnet mask, and default gateway) are correct if you have set the printer’sObtain IP Address to Manual.
Reset the network address if they are incorrect. You can check the IP address, subnet mask, and default gatewayfrom the Network Status part on the network connection report.
If DHCP is enabled, change the printer’s Obtain IP Address setting to Auto. If you want to set the IP addressmanually, check the printer’s IP address from the Network Status part on the network connection report, and thenselect Manual on the network settings screen. Set the subnet mask to [255.255.255.0].
If still does not connect your printer and network devices, turn off the wireless router. Wait for about 10 seconds,and then turn it on.
Related Information
& “Printing a Network Status Sheet” on page 160
E-11
Solutions:
Check the following.
Adding or Replacing the Computer or Devices > Checking the Network Connection Status > Printi…
158

❏ The default gateway address is correct if you set the printer’s TCP/IP Setup setting to Manual.
❏ The device that is set as the default gateway is turned on.
Set the correct default gateway address. You can check the default gateway address from the Network Status parton the network connection report.
Related Information
& “Printing a Network Status Sheet” on page 160
E-12
Solutions:
Check the following.
❏ Other devices on the network are turned on.
❏ The network addresses (IP address, subnet mask, and default gateway) are correct if you are entering themmanually.
❏ The network addresses for other devices (subnet mask and default gateway) are the same.
❏ The IP address does not conflict with other devices.
If still does not connect your printer and network devices after confirming the above, try the following.
❏ Turn off the wireless router. Wait for about 10 seconds, and then turn it on.
❏ Make network settings again using the installer. You can run it from the following website.http://epson.sn > Setup
❏ You can register several passwords on a wireless router that uses WEP security type. If several passwords areregistered, check if the first registered password is set on the printer.
Related Information
& “Printing a Network Status Sheet” on page 160& “Making Settings for Connecting to the Computer” on page 149
E-13
Solutions:
Check the following.
❏ Network devices such as a wireless router, hub, and router are turned on.
❏ The TCP/IP Setup for network devices has not been set up manually. (If the printer’s TCP/IP Setup is setautomatically while the TCP/IP Setup for other network devices is performed manually, the printer’s networkmay differ from the network for other devices.)
If it still does not work after checking the above, try the following.
❏ Turn off the wireless router. Wait for about 10 seconds, and then turn it on.
Adding or Replacing the Computer or Devices > Checking the Network Connection Status > Printi…
159
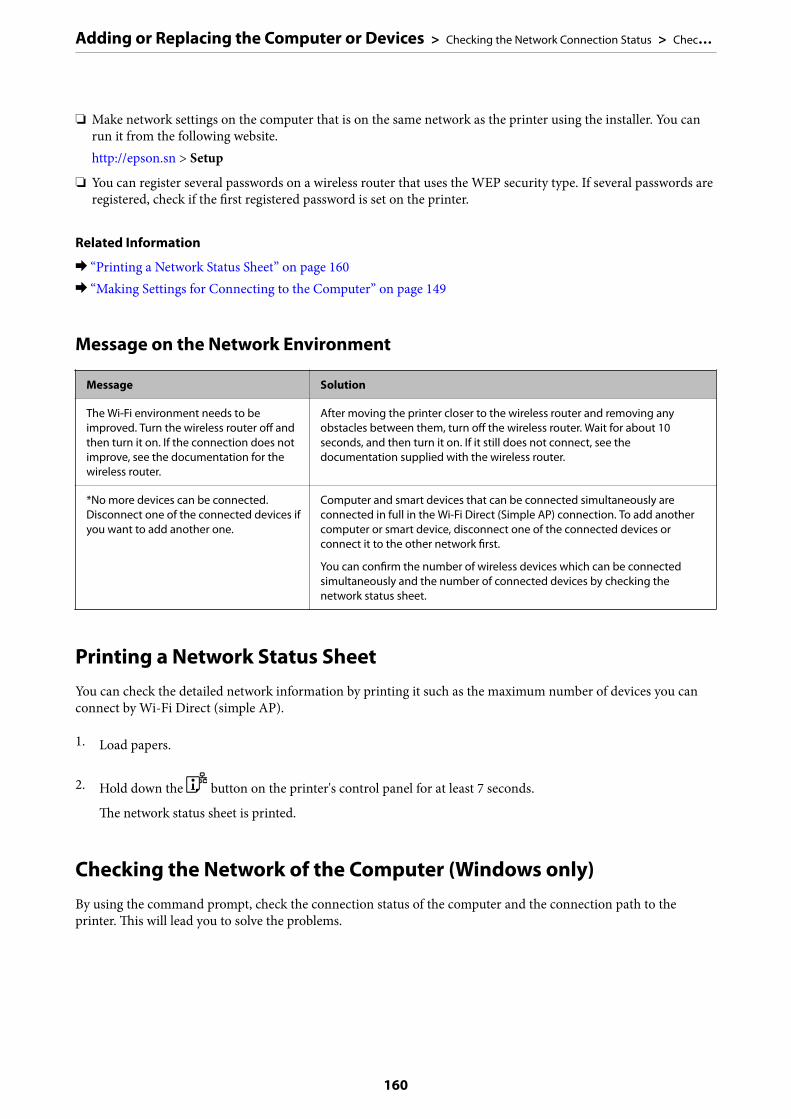
❏ Make network settings on the computer that is on the same network as the printer using the installer. You canrun it from the following website.http://epson.sn > Setup
❏ You can register several passwords on a wireless router that uses the WEP security type. If several passwords areregistered, check if the first registered password is set on the printer.
Related Information
& “Printing a Network Status Sheet” on page 160& “Making Settings for Connecting to the Computer” on page 149
Message on the Network Environment
Message Solution
The Wi-Fi environment needs to beimproved. Turn the wireless router off andthen turn it on. If the connection does notimprove, see the documentation for thewireless router.
After moving the printer closer to the wireless router and removing anyobstacles between them, turn off the wireless router. Wait for about 10seconds, and then turn it on. If it still does not connect, see thedocumentation supplied with the wireless router.
*No more devices can be connected.Disconnect one of the connected devices ifyou want to add another one.
Computer and smart devices that can be connected simultaneously areconnected in full in the Wi-Fi Direct (Simple AP) connection. To add anothercomputer or smart device, disconnect one of the connected devices orconnect it to the other network first.
You can confirm the number of wireless devices which can be connectedsimultaneously and the number of connected devices by checking thenetwork status sheet.
Printing a Network Status SheetYou can check the detailed network information by printing it such as the maximum number of devices you canconnect by Wi-Fi Direct (simple AP).
1. Load papers.
2. Hold down the button on the printer's control panel for at least 7 seconds.
The network status sheet is printed.
Checking the Network of the Computer (Windows only)By using the command prompt, check the connection status of the computer and the connection path to theprinter. This will lead you to solve the problems.
Adding or Replacing the Computer or Devices > Checking the Network Connection Status > Chec…
160
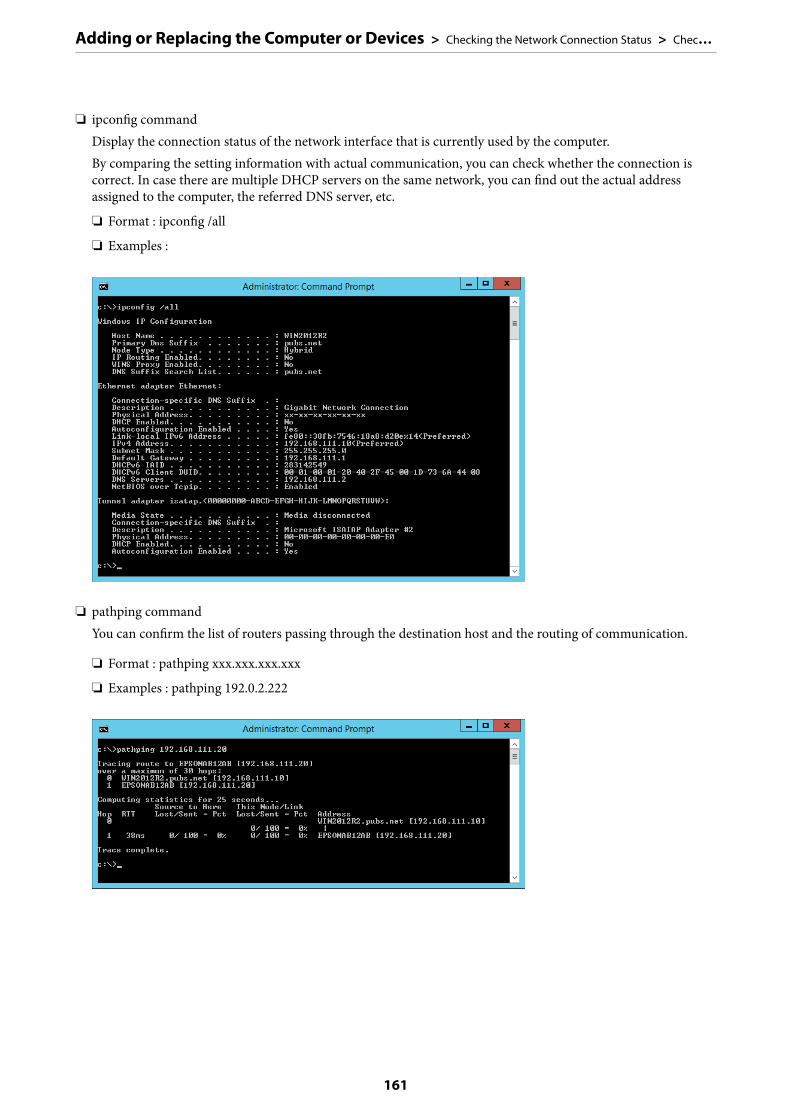
❏ ipconfig commandDisplay the connection status of the network interface that is currently used by the computer.By comparing the setting information with actual communication, you can check whether the connection iscorrect. In case there are multiple DHCP servers on the same network, you can find out the actual addressassigned to the computer, the referred DNS server, etc.
❏ Format : ipconfig /all
❏ Examples :
❏ pathping commandYou can confirm the list of routers passing through the destination host and the routing of communication.
❏ Format : pathping xxx.xxx.xxx.xxx
❏ Examples : pathping 192.0.2.222
Adding or Replacing the Computer or Devices > Checking the Network Connection Status > Chec…
161
Product Information
Paper Information. . . . . . . . . . . . . . . . . . . . . . . . . . . . . . . . . . . . . . . . . . . . . . . . .163
Consumable Products Information. . . . . . . . . . . . . . . . . . . . . . . . . . . . . . . . . . . . .166
Software Information. . . . . . . . . . . . . . . . . . . . . . . . . . . . . . . . . . . . . . . . . . . . . . 167
Product Specifications. . . . . . . . . . . . . . . . . . . . . . . . . . . . . . . . . . . . . . . . . . . . . . 174
Regulatory Information. . . . . . . . . . . . . . . . . . . . . . . . . . . . . . . . . . . . . . . . . . . . . 179
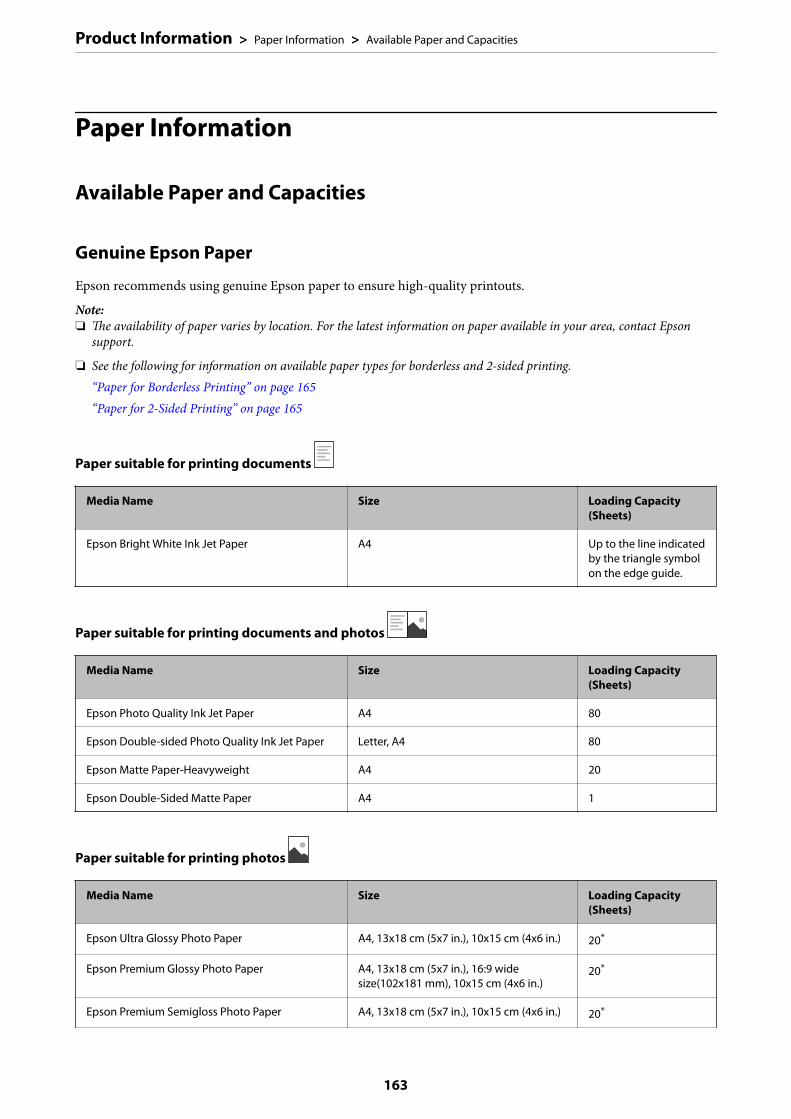
Paper Information
Available Paper and Capacities
Genuine Epson Paper
Epson recommends using genuine Epson paper to ensure high-quality printouts.
Note:❏ The availability of paper varies by location. For the latest information on paper available in your area, contact Epson
support.
❏ See the following for information on available paper types for borderless and 2-sided printing.“Paper for Borderless Printing” on page 165“Paper for 2-Sided Printing” on page 165
Paper suitable for printing documents
Media Name Size Loading Capacity(Sheets)
Epson Bright White Ink Jet Paper A4 Up to the line indicatedby the triangle symbolon the edge guide.
Paper suitable for printing documents and photos
Media Name Size Loading Capacity(Sheets)
Epson Photo Quality Ink Jet Paper A4 80
Epson Double-sided Photo Quality Ink Jet Paper Letter, A4 80
Epson Matte Paper-Heavyweight A4 20
Epson Double-Sided Matte Paper A4 1
Paper suitable for printing photos
Media Name Size Loading Capacity(Sheets)
Epson Ultra Glossy Photo Paper A4, 13x18 cm (5x7 in.), 10x15 cm (4x6 in.) 20*
Epson Premium Glossy Photo Paper A4, 13x18 cm (5x7 in.), 16:9 widesize(102x181 mm), 10x15 cm (4x6 in.)
20*
Epson Premium Semigloss Photo Paper A4, 13x18 cm (5x7 in.), 10x15 cm (4x6 in.) 20*
Product Information > Paper Information > Available Paper and Capacities
163

Media Name Size Loading Capacity(Sheets)
Epson Photo Paper Glossy A4, 13x18 cm (5x7 in.), 10x15 cm (4x6 in.) 20*
Epson Value Glossy Photo Paper A4, 10x15 cm (4x6 in.) 20*
* Load one sheet of paper at a time if the paper does not feed correctly or if the printout has uneven colors or smears.
Various other paper types
Media Name Size Loading Capacity(Sheets)
Epson Photo Quality Self Adhesive Sheets A4 1
Commercially Available Paper
Note:See the following for information on available paper types for borderless and 2-sided printing.
“Paper for Borderless Printing” on page 165
“Paper for 2-Sided Printing” on page 165
Plain papers
Plain paper includes copy paper.
Size Loading Capacity (Sheets)
Letter, A4, B5, A5, A6, B6, 16K (195×270 mm) Up to the line indicated by the triangle symbol onthe edge guide.*1
Legal, 8.5×13 in., Indian-Legal 1
User Defined*2(mm)
54x86 to 215.9x1200
1
*1 Load one sheet of paper at a time if the paper does not feed correctly or if the printout has uneven colors or smears.
*2 Only printing from computer is available.
Envelope
Size Loading Capacity (Envelopes)
Envelope #10, Envelope DL, Envelope C6 10
Product Information > Paper Information > Available Paper and Capacities
164
Paper for Borderless Printing
Genuine Epson Paper
❏ Epson Ultra Glossy Photo Paper (10x15 cm (4x6 in.) )
❏ Epson Premium Glossy Photo Paper (10x15 cm (4x6 in.), 16:9 wide size(102x181 mm))
❏ Epson Premium Semigloss Photo Paper (10x15 cm (4x6 in.) )
❏ Epson Photo Paper Glossy (10x15 cm (4x6 in.) )
❏ Epson Value Glossy Photo Paper (10x15 cm (4x6 in.) )
Related Information
& “Available Paper and Capacities” on page 163
Paper for 2-Sided Printing
Genuine Epson Paper
❏ Epson Bright White Ink Jet Paper
❏ Epson Double-sided Photo Quality Ink Jet Paper
❏ Epson Double-Sided Matte Paper
Related Information
& “Available Paper and Capacities” on page 163
Commercially Available Paper
❏ Plain paper, Copy paper
Related Information
& “Available Paper and Capacities” on page 163
Unavailable Paper TypesDo not use the following papers. Using these types of paper causes paper jams and smears on the printout.
❏ Papers that are wavy
❏ Papers that are torn or cut
❏ Papers that are folded
❏ Papers that are damp
❏ Papers that are too thick or too thin
❏ Papers that have stickers
Product Information > Paper Information > Unavailable Paper Types
165

Do not use the following envelopes. Using these types of envelope causes paper jams and smears on the printout.
❏ Envelopes that are curled or folded
❏ Envelopes with adhesive surfaces on the flaps or window envelopes
❏ Envelopes that are too thinThey may curl during printing.
Consumable Products Information
Ink Bottle CodesEpson recommends the use of genuine Epson ink bottles.
The following are the codes for genuine Epson ink bottles.
cImportant:
❏ Epson warranty does not cover damage caused by inks other than those specified, including any genuine Epsonink not designed for this printer or any third party ink.
❏ Other products not manufactured by Epson may cause damage that is not covered by Epson’s warranties, andunder certain circumstances, may cause erratic printer behavior.
Note:❏ Ink bottle codes may vary by location. For the correct codes in your area, contact Epson support.
❏ Although the ink bottles may contain recycled materials, this does not affect printer function or performance.
❏ Specifications and appearance of the ink bottle are subject to change without prior notice for improvement.
For Europe
Product BK: Black C: Cyan M: Magenta Y: Yellow
ET-2810 Series 104 104 104 104
L3250 Series 103 103 103 103
Note:Visit the following website for information on Epson's ink bottle yields.
http://www.epson.eu/pageyield
For Australia and New Zealand
BK: Black C: Cyan M: Magenta Y: Yellow
522 522 522 522
Product Information > Consumable Products Information > Ink Bottle Codes
166

For Asia
BK: Black C: Cyan M: Magenta Y: Yellow
003 003 003 003
Software InformationThis section introduces the network services and software products available for your printer from the Epsonwebsite.
Software for Printing
Application for Printing from a Computer (Windows Printer Driver)
The printer driver controls the printer according to the commands from an application. Making settings on theprinter driver provides the best printing results. You can also check the status of the printer or keep it in topoperating condition using the printer driver utility.
Note:You can change the language of the printer driver. Select the language you want to use from the Language setting on theMaintenance tab.
Accessing the printer driver from applications
To make settings that apply only to the application you are using, access from that application.
Select Print or Print Setup from the File menu. Select your printer, and then click Preferences or Properties.
Note:Operations differ depending on the application. See the application's help for details.
Accessing the printer driver from the control panel
To make settings that apply to all of the applications, access from the control panel.
❏ Windows 10/Windows Server 2019/Windows Server 2016Click on the start button, and then select Windows System > Control Panel > View devices and printers inHardware and Sound. Right-click on your printer, or press and hold it and then select Printing preferences
❏ Windows 8.1/Windows 8/Windows Server 2012 R2/Windows Server 2012Select Desktop > Settings > Control Panel > View devices and printers in Hardware and Sound. Right-clickon your printer, or press and hold it and then select Printing preferences
❏ Windows 7/Windows Server 2008 R2Click the start button, and select Control Panel > View devices and printers in Hardware and Sound. Right-click on your printer and select Printing preferences.
❏ Windows Vista/Windows Server 2008Click the start button, and select Control Panel > Printers in Hardware and Sound. Right-click on your printerand select Printing preferences.
Product Information > Software Information > Software for Printing
167
❏ Windows XP/Windows Server 2003 R2/Windows Server 2003Click the start button, and select Control Panel > Printers and Other Hardware > Printers and Faxes. Right-click on your printer and select Printing preferences.
Accessing the printer driver from the printer icon on the task bar
The printer icon on the desktop task bar is a shortcut icon allowing you to quickly access the printer driver.
If you click the printer icon and select Printer Settings, you can access the same printer settings window as the onedisplayed from the control panel. If you double-click this icon, you can check the status of the printer.
Note:If the printer icon is not displayed on the task bar, access the printer driver window, click Monitoring Preferences on theMaintenance tab, and then select Register the shortcut icon to the taskbar.
Starting the utility
Access the printer driver window. Click the Maintenance tab.
Making Operation Settings for the Windows Printer Driver
You can make settings such as enabling EPSON Status Monitor 3.
1. Access the printer driver window.
2. Click Extended Settings on the Maintenance tab.
3. Make the appropriate settings, and then click OK.
See the online help for explanations of the setting items.
Related Information
& “Application for Printing from a Computer (Windows Printer Driver)” on page 167
Application for Printing from a Computer (Mac OS Printer Driver)
The printer driver controls the printer according to the commands from an application. Making settings on theprinter driver provides the best printing results. You can also check the status of the printer or keep it in topoperating condition using the printer driver utility.
Accessing the printer driver from applications
Click Page Setup or Print on the File menu of your application. If necessary, click Show Details (or d) to expandthe print window.
Note:Depending on the application being used, Page Setup may not be displayed in the File menu, and the operations fordisplaying the print screen may differ.See the application's help for details.
Starting the utility
Select System Preferences from the Apple menu > Printers & Scanners (or Print & Scan, Print & Fax), and thenselect the printer. Click Options & Supplies > Utility > Open Printer Utility.
Product Information > Software Information > Software for Printing
168
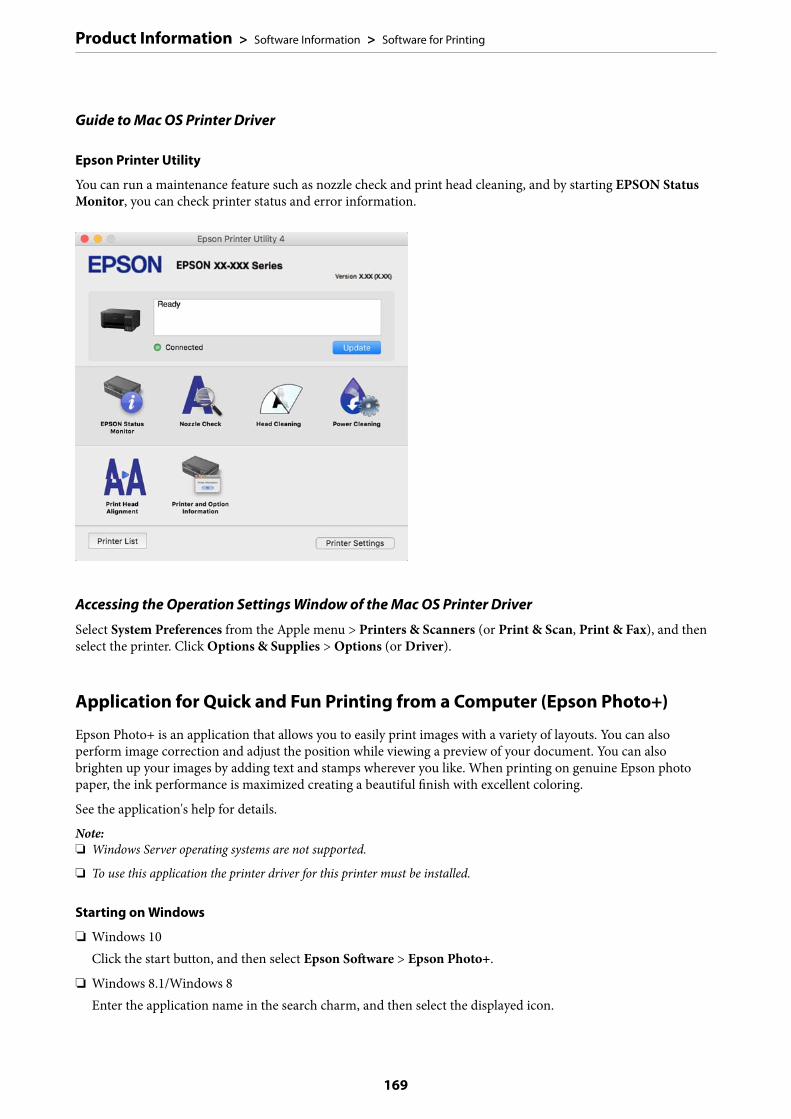
Guide to Mac OS Printer Driver
Epson Printer Utility
You can run a maintenance feature such as nozzle check and print head cleaning, and by starting EPSON StatusMonitor, you can check printer status and error information.
Accessing the Operation Settings Window of the Mac OS Printer Driver
Select System Preferences from the Apple menu > Printers & Scanners (or Print & Scan, Print & Fax), and thenselect the printer. Click Options & Supplies > Options (or Driver).
Application for Quick and Fun Printing from a Computer (Epson Photo+)
Epson Photo+ is an application that allows you to easily print images with a variety of layouts. You can alsoperform image correction and adjust the position while viewing a preview of your document. You can alsobrighten up your images by adding text and stamps wherever you like. When printing on genuine Epson photopaper, the ink performance is maximized creating a beautiful finish with excellent coloring.
See the application's help for details.
Note:❏ Windows Server operating systems are not supported.
❏ To use this application the printer driver for this printer must be installed.
Starting on Windows
❏ Windows 10Click the start button, and then select Epson Software > Epson Photo+.
❏ Windows 8.1/Windows 8Enter the application name in the search charm, and then select the displayed icon.
Product Information > Software Information > Software for Printing
169

❏ Windows 7/Windows Vista/Windows XPClick the start button, and select All Programs or Programs > Epson Software > Epson Photo+.
Starting on Mac OS
Select Go > Applications > Epson Software > Epson Photo+.
Related Information
& “Installing the Applications Separately” on page 79
Application for Easily Operating the Printer from a Smart device (Epson SmartPanel)
Epson Smart Panel is an application that allows you to perform printer operations easily including printing,copying, or scanning from a smart device such as a smartphone or tablet. You can connect the printer and smartdevice over a wireless network, check the ink levels and printer status, and check for solutions if an error occurs.You can also copy easily by registering a copy favorite.
Search for and install Epson Smart Panel from App Store or Google Play.
Application for Printing Easily from an Android Application (Epson PrintEnabler)
Epson Print Enabler is an application that allows you to wirelessly print your documents, emails, photos, and webpages right from your Android phone or tablet (Android v4.4 or later). With a few taps, your Android device willdiscover an Epson printer that is connected to the same wireless network.
Search for and install Epson Print Enabler from Google Play.
Software for Scanning
Application for Scanning from a Computer (Epson ScanSmart)
This application allows you to scan documents and photos easily, and then save the scanned images in simple steps.
See the Epson ScanSmart help for details on using the features.
Starting on Windows
❏ Windows 10Click the start button, and then select Epson Software > Epson ScanSmart.
❏ Windows 8.1/Windows 8Enter the application name in the search charm, and then select the displayed icon.
Product Information > Software Information > Software for Scanning
170
❏ Windows 7Click the start button, and then select All Programs > Epson Software > Epson ScanSmart.
Starting on Mac OS
Select Go > Applications > Epson Software > Epson ScanSmart.
Software for Package Creation
Application for Creating Driver Packages (EpsonNet SetupManager)
EpsonNet SetupManager is a software to create a package for a simple printer installation, such as installing theprinter driver, installing EPSON Status Monitor and creating a printer port. This software allows the administratorto create unique software packages and distribute them among groups.
For more information, visit your regional Epson website.
http://www.epson.com
Software for Making Settings
Application for Configuring Printer Operations (Web Config)
Web Config is an application that runs in a web browser, such as Internet Explorer and Safari, on a computer orsmart device. You can confirm the printer status or change the network service and printer settings. To use theWeb Config, connect the printer and the computer or device to the same network.
The following browsers are supported.
Microsoft Edge, Internet Explorer 8 or later, Firefox*, Chrome*, Safari*
* Use the latest version.
Note:The initial value of the Web Config administrator password is the product serial number. Check the product serial numberon the label on the printer.
Running Web Config on a Web Browser
1. Check the printer's IP address.
Select the network icon on the printer's home screen, and then select the active connection method to confirmthe printer's IP address.
Note:You can also check the IP address by printing the network connection report.
2. Launch a Web browser from a computer or smart device, and then enter the printer's IP address.
Format:
IPv4: http://the printer's IP address/
Product Information > Software Information > Software for Making Settings
171
IPv6: http://[the printer's IP address]/
Examples:
IPv4: http://192.168.100.201/
IPv6: http://[2001:db8::1000:1]/
Note:Using the smart device, you can also run Web Config from the product information screen of the Epson Smart Panel.
Since the printer uses a self-signed certificate when accessing HTTPS, a warning is displayed on the browserwhen you start Web Config; this does not indicate a problem and can be safely ignored.
Related Information
& “Printing a Network Connection Report” on page 155
Running Web Config on Windows
When connecting a computer to the printer using WSD, follow the steps below to run Web Config.
1. Open the printer list on the computer.
❏ Windows 10Click on the start button, and then select Windows System > Control Panel > View devices and printersin Hardware and Sound.
❏ Windows 8.1/Windows 8Select Desktop > Settings > Control Panel > View devices and printers in Hardware and Sound (orHardware).
❏ Windows 7Click the start button, and select Control Panel > View devices and printers in Hardware and Sound.
❏ Windows VistaClick the start button, and select Control Panel > Printers in Hardware and Sound.
2. Right-click on your printer and select Properties.
3. Select the Web Service tab and click the URL.
Since the printer uses a self-signed certificate when accessing HTTPS, a warning is displayed on the browserwhen you start Web Config; this does not indicate a problem and can be safely ignored.
Running Web Config on Mac OS
1. Select System Preferences from the Apple menu > Printers & Scanners (or Print & Scan, Print & Fax), andthen select the printer.
2. Click Options & Supplies> Show Printer Webpage.
Since the printer uses a self-signed certificate when accessing HTTPS, a warning is displayed on the browserwhen you start Web Config; this does not indicate a problem and can be safely ignored.
Product Information > Software Information > Software for Making Settings
172

Application for Setting up the Device on a Network (EpsonNet Config)
EpsonNet Config is an application that allows you to set the network interface addresses and protocols. See theoperations guide for EpsonNet Config or the application's help for more details.
Starting on Windows
❏ Windows 10/Windows Server 2019/Windows Server 2016Click the start button, and then select EpsonNet > EpsonNet Config.
❏ Windows 8.1/Windows 8/Windows Server 2012 R2/Windows Server 2012Enter the application name in the search charm, and then select the displayed icon.
❏ Windows 7/Windows Vista/Windows XP/Windows Server 2008 R2/Windows Server 2008/Windows Server2003 R2/Windows Server 2003Click the start button, and select All Programs or Programs > EpsonNet > EpsonNet Config SE > EpsonNetConfig.
Starting on Mac OS
Go > Applications > Epson Software > EpsonNet > EpsonNet Config SE > EpsonNet Config.
Related Information
& “Installing the Applications Separately” on page 79
Software for Updating
Application for Updating Software and Firmware (EPSON Software Updater)
EPSON Software Updater is an application that installs new software, and updates firmware over the Internet. Ifyou want to check for update information regularly, you can set the interval for checking for updates in EPSONSoftware Updater's Auto Update Settings.
Note:Windows Server operating systems are not supported.
Starting on Windows
❏ Windows 10Click the start button, and then select Epson Software > EPSON Software Updater.
❏ Windows 8.1/Windows 8Enter the application name in the search charm, and then select the displayed icon.
❏ Windows 7/Windows Vista/Windows XPClick the start button, and then select All Programs (or Programs) > Epson Software > EPSON SoftwareUpdater.
Note:You can also start EPSON Software Updater by clicking the printer icon on the task bar on the desktop, and then selectingSoftware Update.
Product Information > Software Information > Software for Updating
173

Starting on Mac OS
Select Go > Applications > Epson Software > EPSON Software Updater.
Related Information
& “Installing the Applications Separately” on page 79
Product Specifications
Printer Specifications
Print Head Nozzle Placement Black ink nozzles: 180
Color ink nozzles: 59 for each color
Weight of Paper* Plain Paper 64 to 90 g/m2(17 to 24lb)
Envelopes Envelope #10, DL, C6: 75 to 100 g/m2 (20 to 27 lb)
* Even when the paper thickness is within this range, the paper may not feed in the printer or the print quality may declinedepending on the paper properties or quality.
Printable Area
Printable Area for Single Sheets
Print quality may decline in the shaded areas due to the printer's mechanism.
Printing with borders
A 3.0 mm (0.12 in.)
B 3.0 mm (0.12 in.)
C 41.0 mm (1.61 in.)
D 37.0 mm (1.46 in.)
Product Information > Product Specifications > Printer Specifications
174
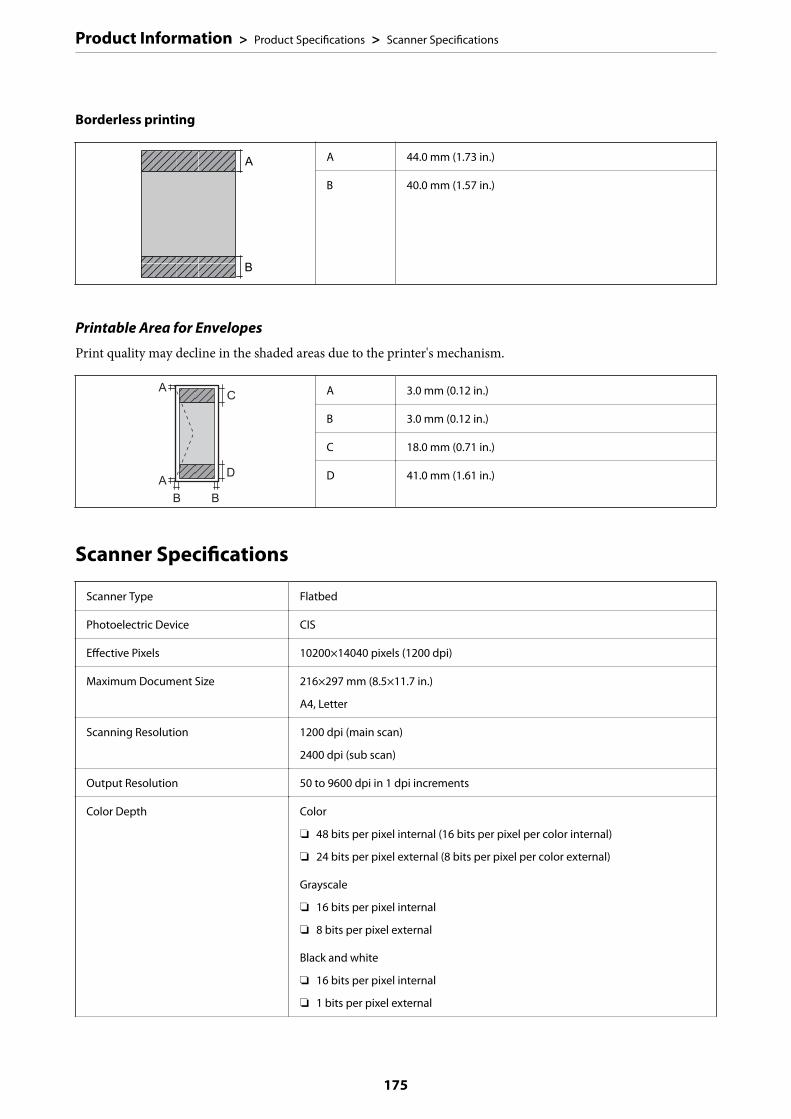
Borderless printing
A 44.0 mm (1.73 in.)
B 40.0 mm (1.57 in.)
Printable Area for Envelopes
Print quality may decline in the shaded areas due to the printer's mechanism.
A 3.0 mm (0.12 in.)
B 3.0 mm (0.12 in.)
C 18.0 mm (0.71 in.)
D 41.0 mm (1.61 in.)
Scanner Specifications
Scanner Type Flatbed
Photoelectric Device CIS
Effective Pixels 10200×14040 pixels (1200 dpi)
Maximum Document Size 216×297 mm (8.5×11.7 in.)
A4, Letter
Scanning Resolution 1200 dpi (main scan)
2400 dpi (sub scan)
Output Resolution 50 to 9600 dpi in 1 dpi increments
Color Depth Color
❏ 48 bits per pixel internal (16 bits per pixel per color internal)
❏ 24 bits per pixel external (8 bits per pixel per color external)
Grayscale
❏ 16 bits per pixel internal
❏ 8 bits per pixel external
Black and white
❏ 16 bits per pixel internal
❏ 1 bits per pixel external
Product Information > Product Specifications > Scanner Specifications
175

Light Source LED
Interface Specifications
For Computer Hi-Speed USB*
* USB 3.0 cables are not supported.
Network Specifications
Wi-Fi Specifications
Standards IEEE802.11b/g/n*1
Frequency Range 2.4 GHz
Coordination Modes Infrastructure, Wi-Fi Direct (Simple AP)*2*3
Wireless Securities*4 WEP (64/128bit), WPA2-PSK (AES)*5, WPA3-SAE (AES)
*1 IEEE802.11n is only available for the HT20.
*2 Not supported for IEEE 802.11b.
*3 Simple AP mode is compatible with a Wi-Fi connection (infrastructure).
*4 Wi-Fi Direct supports WPA2-PSK (AES) only.
*5 Complies with WPA2 standards with support for WPA/WPA2 Personal.
Network Functions and IPv4/IPv6
Functions Supported Remarks
Network Printing EpsonNet Print (Windows) IPv4 ✓ -
Standard TCP/IP (Windows) IPv4, IPv6 ✓ -
WSD Printing (Windows) IPv4, IPv6 ✓ Windows Vista orlater
Bonjour Printing (Mac OS) IPv4, IPv6 ✓ -
IPP Printing (Windows, MacOS)
IPv4, IPv6 ✓ -
PictBridge Printing (Wi-Fi) IPv4 - Digital camera
Epson Connect (Email Print,Remote Print)
IPv4 ✓ -
Product Information > Product Specifications > Network Specifications
176
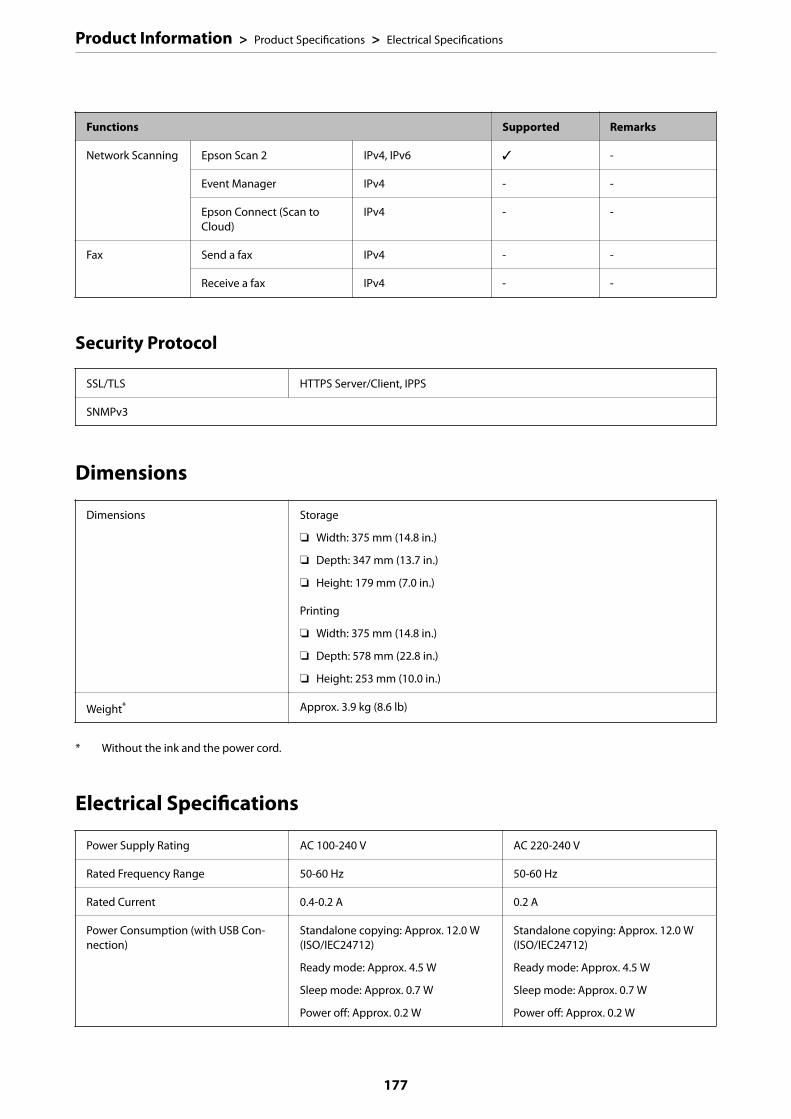
Functions Supported Remarks
Network Scanning Epson Scan 2 IPv4, IPv6 ✓ -
Event Manager IPv4 - -
Epson Connect (Scan toCloud)
IPv4 - -
Fax Send a fax IPv4 - -
Receive a fax IPv4 - -
Security Protocol
SSL/TLS HTTPS Server/Client, IPPS
SNMPv3
Dimensions
Dimensions Storage
❏ Width: 375 mm (14.8 in.)
❏ Depth: 347 mm (13.7 in.)
❏ Height: 179 mm (7.0 in.)
Printing
❏ Width: 375 mm (14.8 in.)
❏ Depth: 578 mm (22.8 in.)
❏ Height: 253 mm (10.0 in.)
Weight* Approx. 3.9 kg (8.6 lb)
* Without the ink and the power cord.
Electrical Specifications
Power Supply Rating AC 100-240 V AC 220-240 V
Rated Frequency Range 50-60 Hz 50-60 Hz
Rated Current 0.4-0.2 A 0.2 A
Power Consumption (with USB Con-nection)
Standalone copying: Approx. 12.0 W(ISO/IEC24712)
Ready mode: Approx. 4.5 W
Sleep mode: Approx. 0.7 W
Power off: Approx. 0.2 W
Standalone copying: Approx. 12.0 W(ISO/IEC24712)
Ready mode: Approx. 4.5 W
Sleep mode: Approx. 0.7 W
Power off: Approx. 0.2 W
Product Information > Product Specifications > Electrical Specifications
177

Note:❏ Check the label on the printer for its voltage.
❏ For European users, see the following Website for details on power consumption.http://www.epson.eu/energy-consumption
Environmental Specifications
Operation Use the printer within the range shown in the following graph.
Temperature: 10 to 35°C (50 to 95°F)
Humidity: 20 to 80% RH (without condensation)
Storage Temperature: -20 to 40°C (-4 to 104°F)*
Humidity: 5 to 85% RH (without condensation)
* You can store for one month at 40°C (104°F).
Environmental Specifications for Ink Bottles
Storage Temperature -20 to 40 °C (-4 to 104 °F)*
Freezing Temperature -15 °C (5 °F)
Ink thaws and is usable after approximately 2 hours at 25 °C (77 °F).
* You can store for one month at 40 °C (104 °F).
System Requirements❏ Windows
Windows Vista, Windows 7, Windows 8/8.1, Windows 10 or later (32-bit, 64-bit)Windows XP SP3 (32-bit)Windows XP Professional x64 Edition SP2Windows Server 2003 (SP2) or later
❏ Mac OSMac OS X v10.6.8 or later
Note:❏ Mac OS may not support some applications and features.
❏ The UNIX File System (UFS) for Mac OS is not supported.
Product Information > Product Specifications > System Requirements
178

Regulatory Information
Standards and Approvals
Standards and Approvals for European Model
For European users
Hereby, Seiko Epson Corporation declares that the following radio equipment model is in compliance withDirective 2014/53/EU. The full text of the EU declaration of conformity is available at the following website.
http://www.epson.eu/conformity
C634H
For use only in Ireland, UK, Austria, Germany, Liechtenstein, Switzerland, France, Belgium, Luxemburg,Netherlands, Italy, Portugal, Spain, Denmark, Finland, Norway, Sweden, Iceland, Croatia, Cyprus, Greece,Slovenia, Malta, Bulgaria, Czech, Estonia, Hungary, Latvia, Lithuania, Poland, Romania, and Slovakia.
Epson cannot accept responsibility for any failure to satisfy the protection requirements resulting from a non-recommended modification of the products.
Frequency Maximum Radio-Frequency Power Transmitted
2400-2483.5 MHz 20 dBm (EIRP)
Standards and Approvals for Australian Model
EMC AS/NZS CISPR32 Class B
Epson hereby declares that the following equipment Models are in compliance with the essential requirements andother relevant provisions of AS/NZS4268:
C634H
Epson cannot accept responsibility for any failure to satisfy the protection requirements resulting from a non-recommended modification of the products.
Restrictions on CopyingObserve the following restrictions to ensure the responsible and legal use of the printer.
Copying of the following items is prohibited by law:
❏ Bank bills, coins, government-issued marketable securities, government bond securities, and municipalsecurities
❏ Unused postage stamps, pre-stamped postcards, and other official postal items bearing valid postage
Product Information > Regulatory Information > Restrictions on Copying
179
❏ Government-issued revenue stamps, and securities issued according to legal procedure
Exercise caution when copying the following items:
❏ Private marketable securities (stock certificates, negotiable notes, checks, etc.), monthly passes, concessiontickets, etc.
❏ Passports, driver’s licenses, warrants of fitness, road passes, food stamps, tickets, etc.
Note:Copying these items may also be prohibited by law.
Responsible use of copyrighted materials:
Printers can be misused by improperly copying copyrighted materials. Unless acting on the advice of aknowledgeable attorney, be responsible and respectful by obtaining the permission of the copyright holder beforecopying published material.
Product Information > Regulatory Information > Restrictions on Copying
180
Where to Get Help
Technical Support Web Site. . . . . . . . . . . . . . . . . . . . . . . . . . . . . . . . . . . . . . . . . . 182
Contacting Epson Support. . . . . . . . . . . . . . . . . . . . . . . . . . . . . . . . . . . . . . . . . . . 182

Technical Support Web SiteIf you need further help, visit the Epson support website shown below. Select your country or region and go to thesupport section of your local Epson website. The latest drivers, FAQs, manuals, or other downloadables are alsoavailable from the site.
http://support.epson.net/
http://www.epson.eu/support (Europe)
If your Epson product is not operating properly and you cannot solve the problem, contact Epson support servicesfor assistance.
Contacting Epson Support
Before Contacting EpsonIf your Epson product is not operating properly and you cannot solve the problem using the troubleshootinginformation in your product manuals, contact Epson support services for assistance. If Epson support for your areais not listed below, contact the dealer where you purchased your product.
Epson support will be able to help you much more quickly if you give them the following information:
❏ Product serial number(The serial number label is usually on the back of the product.)
❏ Product model
❏ Product software version(Click About, Version Info, or a similar button in the product software.)
❏ Brand and model of your computer
❏ Your computer operating system name and version
❏ Names and versions of the software applications you normally use with your product
Note:Depending on the product, network settings may be stored in the product’s memory. Due to breakdown or repair of aproduct, settings may be lost. Epson shall not be responsible for the loss of any data, for backing up or recovering settingseven during a warranty period. We recommend that you make your own backup data or take notes.
Help for Users in EuropeCheck your Pan-European Warranty Document for information on how to contact Epson support.
Help for Users in TaiwanContacts for information, support, and services are:
World Wide Web
http://www.epson.com.tw
Where to Get Help > Contacting Epson Support > Help for Users in Taiwan
182

Information on product specifications, drivers for download, and products enquiry are available.
Epson HelpDesk
Phone: +886-2-80242008
Our HelpDesk team can help you with the following over the phone:
❏ Sales enquiries and product information
❏ Product usage questions or problems
❏ Enquiries on repair service and warranty
Repair service center:
http://www.tekcare.com.tw/branchMap.page
TekCare corporation is an authorized service center for Epson Taiwan Technology & Trading Ltd.
Help for Users in AustraliaEpson Australia wishes to provide you with a high level of customer service. In addition to your product manuals,we provide the following sources for obtaining information:
Internet URL
http://www.epson.com.au
Access the Epson Australia World Wide Web pages. Worth taking your modem here for the occasional surf! Thesite provides a download area for drivers, Epson contact points, new product information and technical support (e-mail).
Epson Helpdesk
Phone: 1300-361-054
Epson Helpdesk is provided as a final backup to make sure our clients have access to advice. Operators on theHelpdesk can aid you in installing, configuring and operating your Epson product. Our Pre-sales Helpdesk staffcan provide literature on new Epson products and advise where the nearest dealer or service agent is located. Manytypes of queries are answered here.
We encourage you to have all the relevant information on hand when you ring. The more information you prepare,the faster we can help solve the problem. This information includes your Epson product manuals, type ofcomputer, operating system, application programs, and any information you feel is required.
Transportation of Product
Epson recommends retaining product packaging for future transportation. Securing the ink tank with tape andkeeping the product upright is also recommended.
Help for Users in New ZealandEpson New Zealand wishes to provide you with a high level of customer service. In addition to your productdocumentation, we provide the following sources for obtaining information:
Where to Get Help > Contacting Epson Support > Help for Users in New Zealand
183

Internet URL
http://www.epson.co.nz
Access the Epson New Zealand World Wide Web pages. Worth taking your modem here for the occasional surf!The site provides a download area for drivers, Epson contact points, new product information and technicalsupport (e-mail).
Epson Helpdesk
Phone: 0800 237 766
Epson Helpdesk is provided as a final backup to make sure our clients have access to advice. Operators on theHelpdesk can aid you in installing, configuring and operating your Epson product. Our Pre-sales Helpdesk staffcan provide literature on new Epson products and advise where the nearest dealer or service agent is located. Manytypes of queries are answered here.
We encourage you to have all the relevant information on hand when you ring. The more information you prepare,the faster we can help solve the problem. This information includes your Epson product documentation, type ofcomputer, operating system, application programs, and any information you feel is required.
Transportation of Product
Epson recommends retaining product packaging for future transportation. Securing the ink tank with tape andkeeping the product upright is also recommended.
Help for Users in SingaporeSources of information, support, and services available from Epson Singapore are:
World Wide Web
http://www.epson.com.sg
Information on product specifications, drivers for download, Frequently Asked Questions (FAQ), Sales Enquiries,and Technical Support via e-mail are available.
Epson HelpDesk
Toll Free: 800-120-5564
Our HelpDesk team can help you with the following over the phone:
❏ Sales enquiries and product information
❏ Product usage questions or problem troubleshooting
❏ Enquiries on repair service and warranty
Help for Users in ThailandContacts for information, support, and services are:
World Wide Web
http://www.epson.co.th
Information on product specifications, drivers for download, Frequently Asked Questions (FAQ), and e-mail areavailable.
Where to Get Help > Contacting Epson Support > Help for Users in Thailand
184

Epson Call Centre
Phone: 66-2685-9899
Email: [email protected]
Our Call Centre team can help you with the following over the phone:
❏ Sales enquiries and product information
❏ Product usage questions or problems
❏ Enquiries on repair service and warranty
Help for Users in VietnamContacts for information, support, and services are:
Epson Service Center
65 Truong Dinh Street, District 1, Ho Chi Minh City, Vietnam.
Phone(Ho Chi Minh City): 84-8-3823-9239, 84-8-3825-6234
29 Tue Tinh, Quan Hai Ba Trung, Hanoi City, Vietnam
Phone(Hanoi City): 84-4-3978-4785, 84-4-3978-4775
Help for Users in IndonesiaContacts for information, support, and services are:
World Wide Web
http://www.epson.co.id
❏ Information on product specifications, drivers for download
❏ Frequently Asked Questions (FAQ), Sales Enquiries, questions through e-mail
Epson Hotline
Phone: +62-1500-766
Fax: +62-21-808-66-799
Our Hotline team can help you with the following over the phone or fax:
❏ Sales enquiries and product information
❏ Technical support
Where to Get Help > Contacting Epson Support > Help for Users in Indonesia
185

Epson Service Center
Province Company Name Address Phone
JAKARTA Epson Sales andService Jakarta(SUDIRMAN)
Wisma Keiai Lt. 1 Jl. JenderalSudirman Kav. 3 Jakarta Pusat - DKIJAKARTA 10220
021-5724335
SERPONG Epson Sales andService Serpong
Ruko Melati Mas Square Blok A2No.17 Serpong-Banten
082120090084 / 082120090085
SEMARANG Epson Sales andService Semarang
Komplek Ruko Metro Plaza BlockC20 Jl. MT Haryono No. 970Semarang -JAWA TENGAH
024 8313807 / 024 8417935
JAKARTA Epson Sales andService Jakarta(MANGGA DUA)
Ruko Mall Mangga Dua No. 48 Jl.Arteri Mangga Dua, Jakarta Utara -DKI JAKARTA
021 623 01104
BANDUNG Epson Sales andService Bandung
Jl. Cihampelas No. 48 A BandungJawa Barat 40116
022 420 7033
MAKASSAR Epson Sales andService Makassar
Jl. Cendrawasih NO. 3A, kunjungmae, mariso, MAKASSAR - SULSEL90125
0411- 8911071
MEDAN Epson ServiceCenter Medan
Jl. Bambu 2 Komplek Graha NiagaNomor A-4, Medan - SUMUT
061- 42066090 / 42066091
PALEMBANG Epson ServiceCenter Palembang
Jl. H.M Rasyid Nawawi No. 249Kelurahan 9 Ilir PalembangSumatera Selatan
0711 311 330
PEKANBARU Epson ServiceCenter PekanBaru
Jl. Tuanku Tambusai No. 459 A Kel.Tangkerang barat Kec Marpoyandamai Pekanbaru - Riau 28282
0761- 8524695
PONTIANAK Epson ServiceCenter Pontianak
Komp. A yani Sentra Bisnis G33, Jl.Ahmad Yani - PontianakKalimantan Barat
0561- 735507 / 767049
SAMARINDA Epson ServiceCenter Samarinda
Jl. KH. Wahid Hasyim (M. Yamin)Kelurahan Sempaja SelatanKecamatan Samarinda UTARA -SAMARINDA - KALTIM
0541 7272 904
Where to Get Help > Contacting Epson Support > Help for Users in Indonesia
186

Province Company Name Address Phone
SURABAYA Epson Sales &Service Surabaya(barat)
Jl. Haji Abdul Wahab Saimin, RukoVilla Bukit Mas RM-11, Kec. DukuhPakis, Surabaya - 60225
031- 5120994
YOGYAKARTA Epson ServiceCenter Yogyakarta
YAP Square, Block A No. 6 Jl. CSimanjutak Yogyakarta - DIY
0274 581 065
JEMBER Epson ServiceCenter Jember
JL. Panglima Besar Sudirman Rukono.1D Jember-Jawa Timur (DepanBalai Penelitian & PengolahanKakao)
0331- 488373 / 486468
MANADO EPSON SALES ANDSERVICE Manado
Jl. Piere Tendean Blok D No 4Kawasan Mega Mas Boulevard -Manado 95111
0431- 8805896
CIREBON EPSON SERVICECENTER Cirebon
Jl. Tuparev No. 04 ( Depan HotelApita ) Cirebon, JAWA BARAT
0231– 8800846
CIKARANG EPSON SALES ANDSERVICE CIKARANG
Ruko Metro Boulevard B1Jababeka cikarang - Jawa Barat,
021- 89844301 / 29082424
MADIUN EPSON SERVICECENTER MADIUN
Jl. Diponegoro No.56, MADIUN -JAWA TIMUR
0351- 4770248
PURWOKERTO EPSON SALES ANDSERVICE Purwokerto
Jl. Jendral Sudirman No. 4 KranjiPurwokerto - JAWA TENGAH
0281- 6512213
BOGOR EPSON SALES ANDSERVICE Bogor
Jl.Pajajaran No 15B Kel BantarjatiKec Bogor Utara - JAWA BARAT16153
0251- 8310026
SERANG EPSON SERVICECENTER Serang
Jl. Ahmad Yani No.45C, SERANG -BANTEN
0254- 7912503
PALU EPSON SALES ANDSERVICE Palu
Jl. Juanda No. 58, Palu - Sulteng 0451- 4012 881
Where to Get Help > Contacting Epson Support > Help for Users in Indonesia
187
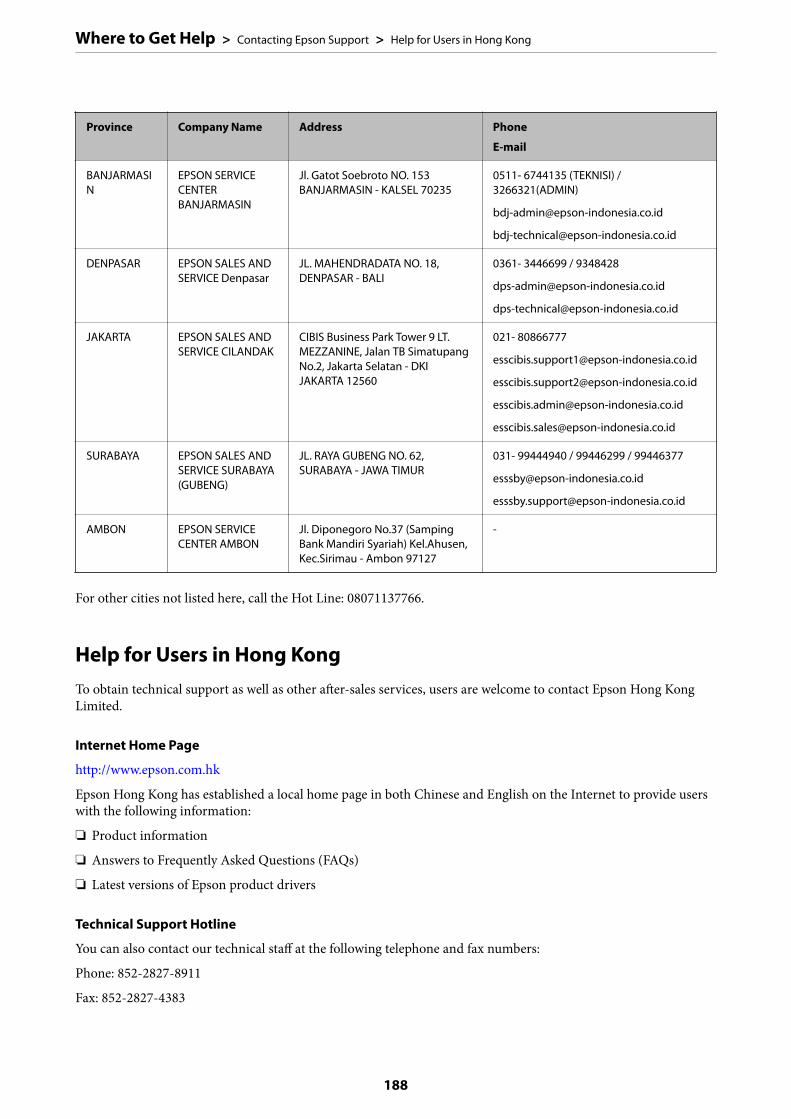
Province Company Name Address Phone
BANJARMASIN
EPSON SERVICECENTERBANJARMASIN
Jl. Gatot Soebroto NO. 153BANJARMASIN - KALSEL 70235
0511- 6744135 (TEKNISI) /3266321(ADMIN)
DENPASAR EPSON SALES ANDSERVICE Denpasar
JL. MAHENDRADATA NO. 18,DENPASAR - BALI
0361- 3446699 / 9348428
JAKARTA EPSON SALES ANDSERVICE CILANDAK
CIBIS Business Park Tower 9 LT.MEZZANINE, Jalan TB SimatupangNo.2, Jakarta Selatan - DKIJAKARTA 12560
021- 80866777
SURABAYA EPSON SALES ANDSERVICE SURABAYA(GUBENG)
JL. RAYA GUBENG NO. 62,SURABAYA - JAWA TIMUR
031- 99444940 / 99446299 / 99446377
AMBON EPSON SERVICECENTER AMBON
Jl. Diponegoro No.37 (SampingBank Mandiri Syariah) Kel.Ahusen,Kec.Sirimau - Ambon 97127
-
For other cities not listed here, call the Hot Line: 08071137766.
Help for Users in Hong KongTo obtain technical support as well as other after-sales services, users are welcome to contact Epson Hong KongLimited.
Internet Home Page
http://www.epson.com.hk
Epson Hong Kong has established a local home page in both Chinese and English on the Internet to provide userswith the following information:
❏ Product information
❏ Answers to Frequently Asked Questions (FAQs)
❏ Latest versions of Epson product drivers
Technical Support Hotline
You can also contact our technical staff at the following telephone and fax numbers:
Phone: 852-2827-8911
Fax: 852-2827-4383
Where to Get Help > Contacting Epson Support > Help for Users in Hong Kong
188
Help for Users in MalaysiaContacts for information, support, and services are:
World Wide Web
http://www.epson.com.my
❏ Information on product specifications, drivers for download
❏ Frequently Asked Questions (FAQ), Sales Enquiries, questions through e-mail
Epson Call Centre
Phone: 1800-81-7349 (Toll Free)
Email: [email protected]
❏ Sales enquiries and product information
❏ Product usage questions or problems
❏ Enquiries on repair services and warranty
Head Office
Phone: 603-56288288
Fax: 603-5628 8388/603-5621 2088
Help for Users in IndiaContacts for information, support, and services are:
World Wide Web
http://www.epson.co.in
Information on product specifications, drivers for download, and products enquiry are available.
Helpline
❏ Service, product information, and ordering consumables (BSNL Lines)Toll-free number: 18004250011Accessible 9am to 6pm, Monday through Saturday (Except public holidays)
❏ Service (CDMA & Mobile Users)Toll-free number: 186030001600Accessible 9am to 6pm, Monday through Saturday (Except public holidays)
Help for Users in the PhilippinesTo obtain technical support as well as other after sales services, users are welcome to contact the Epson PhilippinesCorporation at the telephone, fax numbers and e-mail address below:
Where to Get Help > Contacting Epson Support > Help for Users in the Philippines
189

World Wide Web
http://www.epson.com.ph
Information on product specifications, drivers for download, Frequently Asked Questions (FAQ), and E-mailEnquiries are available.
Epson Philippines Customer Care
Toll Free: (PLDT) 1-800-1069-37766
Toll Free: (Digital) 1-800-3-0037766
Metro Manila: (632) 8441 9030
Web Site: https://www.epson.com.ph/contact
E-mail: [email protected]
Accessible 9am to 6pm, Monday through Saturday (Except public holidays)
Our Customer Care team can help you with the following over the phone:
❏ Sales enquiries and product information
❏ Product usage questions or problems
❏ Enquiries on repair service and warranty
Epson Philippines Corporation
Trunk Line: +632-706-2609
Fax: +632-706-2663
Where to Get Help > Contacting Epson Support > Help for Users in the Philippines
190
Related Documents