1 User's Guide and Reference for IBM z/OS® Remote Access Programs August 2, 2021 International Business Machines Corporation IBM Z Dallas ISV Center Dallas, TX USA This document is intended for the sole use of participants in an IBM Z Dallas ISV Center Remote Development or Early Test Program and is not to be distributed to non-participants or used for purposes other than intended. © Copyright International Business Machines Corporation 2019. All rights reserved.

Welcome message from author
This document is posted to help you gain knowledge. Please leave a comment to let me know what you think about it! Share it to your friends and learn new things together.
Transcript

1
User's Guide and Reference
for IBM z/OS®
Remote Access Programs
August 2, 2021
International Business Machines Corporation
IBM Z Dallas ISV Center
Dallas, TX USA
This document is intended for the sole use of participants in an IBM Z Dallas ISV Center Remote
Development or Early Test Program and is not to be distributed to non-participants or used for purposes
other than intended.
© Copyright International Business Machines Corporation 2019. All rights reserved.

2
Table of Contents
1 Preface .................................................................................................................................................... 4
1.1 Links ................................................................................................................................................. 4
2 Overview – Remote Access Environment ........................................................................................... 5
2.1 Hardware / Software Platform .......................................................................................................... 5
2.2 Introduction to the Virtual Machine Concept ................................................................................... 5
2.3 z/OS Remote Access Environment ................................................................................................... 5
2.4 Printers .............................................................................................................................................. 7
2.5 System Availability........................................................................................................................... 7
2.6 Maintenance Windows ..................................................................................................................... 7
2.7 Remote Access System Backup ........................................................................................................ 8
3 Accessing the IBM Z Dallas ISV Center Server ................................................................................. 9
4 IPL of the Guest z/OS System ............................................................................................................ 12
4.1 How to IPL the Guest z/OS System (Quick Steps) ........................................................................ 12
4.2 How to IPL the Guest z/OS System (Detailed Description)........................................................... 12
4.2.1 Log on the z/VM Control User ID............................................................................................... 12
4.2.2 Initialize (IPL) the Guest z/OS System ....................................................................................... 13
4.2.3 Disconnect the z/VM Control User ID ........................................................................................ 15
4.2.4 Reconnect the z/VM Control User ID ......................................................................................... 15
5 How to Shut Down a Guest z/OS System .......................................................................................... 16
6 Managing the Guest z/OS System with “SLEEP” and “BEGIN” .................................................. 18
6.1 Putting the Guest System to Sleep From the Control User ID ....................................................... 18
6.2 Putting the Guest System to Sleep From a TSO Session................................................................ 19
6.3 Using “BEGIN” to Awaken the Guest System ............................................................................... 19
7 Connecting to the Guest z/OS System ............................................................................................... 20
7.1 Connecting Using z/VM “DIAL” ................................................................................................... 20
7.2 Connect a TN3270 Client Session Directly to an IP Address ......................................................... 21
7.3 Connect Directly to an IP Address Using Telnet ............................................................................ 21
7.4 Connect Using FTP ........................................................................................................................ 21
7.5 Connect Using SSH ........................................................................................................................ 21
8 Accessing TSO ..................................................................................................................................... 22
8.1 Logging on to TSO ......................................................................................................................... 22
8.2 Logging off of TSO ........................................................................................................................ 23
9 Return to z/VM When Using z/VM “DIAL” .................................................................................... 24
10 Guest z/OS System Administration ................................................................................................. 24
10.1 Adding More TSO User IDs ......................................................................................................... 24
10.2 Backing Up and Restoring User Data........................................................................................... 25
10.2.1 Backing Up User Data Steps ..................................................................................................... 25
10.2.2 Restoring User Data Steps ......................................................................................................... 26

3
10.3 IPCS .............................................................................................................................................. 27
10.4 Issuing CP Commands .................................................................................................................. 27
10.5 Accounting Information ................................................................................................................ 28
10.5.1 Obtaining Program Account Information .................................................................................. 28
10.6 Switching the z/VM Control User ID ........................................................................................... 29
11 Tape Handling Procedures ............................................................................................................... 30
11.1 Using Tapes .................................................................................................................................. 30
11.2 Mounting Tapes ............................................................................................................................ 30
11.2.1 z/OS Tape Device Definitions ................................................................................................... 31
11.2.2 Method 1 – From the z/VM Control User ID ............................................................................ 32
11.2.3 Method 2 – From TSO ............................................................................................................... 33
11.3 Sending/Receiving Tapes to/from the IBM Z Dallas ISV Center ................................................ 33
11.4 Listing the Tapes Available to Your System................................................................................. 34
12 Guest z/OS System Structure ........................................................................................................... 35
12.1 DASD Configuration .................................................................................................................... 35
12.1.1 System Managed Storage .......................................................................................................... 36
12.2 IBM Z Dallas ISV Center Provided Data Sets ............................................................................. 37
12.3 Default LINKLIST Concatenation ............................................................................................... 39
12.4 Default LPA List ........................................................................................................................... 39
12.5 Default PROCLIB Concatenation ................................................................................................ 39
12.6 CATALOG Structure ................................................................................................................... 39
12.7 Highlights from LVL0.PARMLIB ............................................................................................... 40
12.8 SMP/E Data Sets and Maintenance Information .......................................................................... 40
12.9 RACF Information ........................................................................................................................ 41
12.10 VTAM Definitions...................................................................................................................... 42
12.11 JES2 Information ........................................................................................................................ 43
12.12 TSO Logon Procedures and Data Set Concatenation ................................................................. 44
12.12.1 Sample Jobs and CLIST/REXX Availability .......................................................................... 45
13 Help for Common Problems ............................................................................................................ 46
14 Other Information ............................................................................................................................. 50
14.1 Terms and Definitions .................................................................................................................. 50
14.2 Trademarks ................................................................................................................................... 51
14.3 Notices .......................................................................................................................................... 52
14.4 Technical Support ......................................................................................................................... 53
14.5 z/OS System Customization ......................................................................................................... 53
4
1 Preface
This document is intended to assist the user in accessing and using the z/OS Remote Development or
Early Test system. This is version 5.0 of the User's Guide and Reference for IBM z/OS Remote Access
Programs document. For terminology used in this document, please refer to Terms and Definitions on
page 50 (for assistance, please refer to 14.4 Technical Support, on page 53).
1.1 Links
Here you will find links that will enhance the use of the remote development program guest z/OS
systems:
IBM Z Dallas ISV Center:
http://dtsc.dfw.ibm.com/
Getting Started at IBM Z Dallas ISV Center:
http://dtsc.dfw.ibm.com/MVSDS/'HTTPD2.DSN01.PUBLIC.SHTML(HEADSTAR)'
Basic Skills Information Center:
http://www.ibm.com/support/knowledgecenter/zosbasics/com.ibm.zos.zbasics/homepage.html
LookAt – z/OS message lookup:
http://www-03.ibm.com/systems/z/os/zos/bkserv/lookat/
z/OS Internet Library:
http://www-03.ibm.com/systems/z/os/zos/bkserv/
IBM Redbooks online:
http://www.redbooks.ibm.com/
TecDocs – IBM Technical Sales Library:
http://www-1.ibm.com/support/techdocs/atsmastr.nsf/Web/TechDocs
5
2 Overview – Remote Access Environment
The remote access environment is provided by the IBM Z Dallas ISV Center organization in
conjunction with various IBM development laboratories. z/OS is an operating system from IBM which
runs on IBM Z® server hardware.
2.1 Hardware / Software Platform
The remote access program is implemented on an IBM Z server which is accessible to Solution
Developers participating in the remote access program via the INTERNET. The IBM Z server runs the
IBM z/VM® (Virtual Machine) operating system which supports multiple guest systems, each capable
of supporting multiple users in a unique environment. Each remote access participant is provided with a
dedicated guest system, which appears to the user as an IBM Z server running a native z/OS operating
system1.
2.2 Introduction to the Virtual Machine Concept
Virtual Machine (VM) is a software facility that allows one physical processor complex to be
configured with multiple "virtual" processors or machines. Each virtual machine, known as a guest,
runs independently of every other virtual machine and can run any IBM Z operating system (z/OS,
VSE, z/ VM, Linux, CMS, etc.) and software.
Please refer to the IBM Redbook Introduction to the New Mainframe: z/VM Basics:
http://www.redbooks.ibm.com/redbooks/pdfs/sg247316.pdf
2.3 z/OS Remote Access Environment
z/OS is available as part of the remote access program as a "dedicated" second-level guest system on
the z/VM platform. The guest z/OS system will Initial Program Load (IPL) automatically when an
authorized z/VM Personal user ID logs on and issues the “SVXLOG” command to start the process.
Please see 4.2.2 Initialize (IPL) the Guest z/OS System, on page 12, for additional information. Users
can request to be added to an autostart program that will be run after scheduled system recycles. Please
contact the IBM Z Dallas ISV Center support team using one of the methods described in 14.4
Technical Support, on page 53 to be added to the autostart program.
1. Remote access program participants will be required to logon to the z/VM host system and perform a limited number of
z/VM tasks in order to IPL and access their guest z/OS system in it's virtual machine environment. Required z/VM
commands and tasks are described in this document; no previous knowledge of the z/VM operating system is required.

6
Each Solution Developer is assigned a “virtual machine” under IBM’s z/VM operating system, which
runs continuously and accumulates CPU time REGARDLESS of actual use by interactive users,
batch jobs, etc. The Solution Developer’s account will be charged for CPU time used by the virtual
machine even if no users are logged on and no batch activity recorded. The amount of work units
(CPU time) consumed by the virtual machine is available via the “SESSREPT” command (See 10.5.1
Obtaining Program Account Information, page 28). To avoid unnecessary charges, always
remember to stop the guest z/OS system’s virtual machine when not using it by either putting it to
sleep or shutting it down and logging it off (See 6.1 Putting the Guest z/OS System to Sleep From
z/OS Control User ID, on page 18, and 5. How to Shut Down a Guest z/OS System, on page 16).
Solution Developers must logoff the guest z/OS system’s virtual machine or put it to sleep.
Otherwise, the machine will continue to run (idle) and the Solution Developer will be charged for the
time used by the virtual machine.
Users will be responsible for performing z/OS console operations (such as issuing commands to start
tasks associated with IBM IMS™, IBM DB2®, IBM CICS®, etc. as needed), TSO user ID
administration, security administration (if desired), etc. The operator commands required to perform
basic initialization, operation and termination of the system are included in this document. For
additional information regarding console operations, refer to IBM publication z/OS MVS System
Commands.
The z/OS manuals are available on the IBM z/OS Internet Library:
https://www-01.ibm.com/servers/resourcelink/svc00100.nsf/pages/zosInternetLibrary?OpenDocument
The guest z/OS system and z/OS console are confined within a virtual machine "owned" by the
Solution Developer. Use is dedicated and restricted to the assigned Solution Developer and is not
accessed by the support staff at the IBM Z Dallas ISV Center without prior permission (detailed
information of this z/OS system may be found in 12. Guest z/OS System Structure, on page 35).
IMPORTANT NOTICE

7
2.4 Printers
There are no real printers attached to the IBM Z server. Each guest z/OS system has unit 002
defined as a virtual printer for JES. All printers are drained at IPL and starting a printer will cause
JES to write the output to the virtual printer. This just means it will move from one SPOOL to
another but will not physically print on paper.
In a JES2 environment, use SDSF, the “TSO OUTPUT” command or ISPF OUTLIST utility (option
3.8) to browse printer files online. In a JES3 environment, use the “TSO OUTPUT” command or ISPF
OUTLIST utility (option 3.8) to browse printer files online. The “TSO OUTPUT” command and ISPF
OUTLIST utility require the system output be in a HOLD queue. Typically, this is defined as SYSOUT
class "H" (see 12.11 JES2 Information, on page 43, for specific information).
2.5 System Availability
The remote access program host systems are generally available 24 hours per day, 7 days per
week (except for scheduled maintenance windows). Technical and administrative support is
available from 07:00 to 19:00 Central Standard Time (UTC-6), Monday – Friday only.
2.6 Maintenance Windows
The IBM Z Dallas ISV Center has implemented the following policy regarding maintenance windows:
Every Sunday between the hours of 09:30 and 15:30 Central Standard Time (UTC-6), the IBM Z
Dallas ISV Center may choose to make any of the processors unavailable. This time will be used to
perform system IPL's and to implement new or updated releases of software. All Solution Developers
requiring an orderly guest z/OS system shutdown should perform the shutdown prior to that time and
should not plan to resume operations until after 15:30 Central Standard Time (UTC-6) on Sunday.
A maintenance window will not be required every Sunday. Therefore, Solution Developers may choose
to work during this time, but only at their own risk. Notices will be posted whenever possible (via host
system broadcast messages) but all activity during this window is subject to immediate interruption.
Solution Developers with special requirements for this time period should contact the IBM Z Dallas
ISV Center as early as possible.

8
2.7 Remote Access System Backup
The z/VM disks that contain the remote access system are backed up to tape every week and are
available for 3 months. The intent of these backups is to enable us to recover from a DASD failure. The
backup and restore process operates only at the z/VM disk level, therefore the restoration of individual
files from these backups is difficult and time-consuming and not generally available (for information
on how you can back up your data, please refer to 10.2 Backing Up and Restoring User Data, on page
25).
All participants in IBM Z Dallas ISV Center programs are encouraged to maintain a copy of their data /
information on another system physically located at another site. Although the staff managing the IBM
Z Dallas ISV Center complex, in accordance with the program agreements, may maintain a copy of
each participant's system on tape, it is always possible that an issue with the backup process or backup
media would invalidate the copy. Please also note: the backups of the entire volumes of each system are
performed externally to the system and are not kept off-site.
The techniques used for saving data will vary depending on the guest operating system in use and may
be discussed in the User's Guide and Reference applicable to your guest operating system. To obtain
details of the backups for the remote access system, or to change the frequency of the backups, please
contact the IBM Z Dallas ISV Center.

9
3 Accessing the IBM Z Dallas ISV Center Server
Before utilizing the guest z/OS system, Solution Developers must first follow the steps below to access
the IBM Z server (for example, SVSCDR2) and initialize (IPL) the guest z/OS system. Access to the
IBM Z server requires access to the Internet. The method, line speed, and choice of Internet Service
Provider are determined by the Solution Developer.
First, a word about user IDs. There are several different user IDs described in this document:
• Guest-System ID – z/VM ID which executes z/OS. This ID is the guest z/OS system. All
Solution Developers have been provided a Guest-System ID which again is the guest z/OS
system.
• z/VM Personal User ID – z/VM user ID used as an individual identifier for security verification
when accessing the z/OS virtual machine (via the “DIAL” command). We expect you to use one
ID per person using your system.
• z/VM Control User ID – The term z/VM Control User ID is used to reference the specific z/VM
Personal User ID used to initialize the guest z/OS system and currently holds the ability to
perform functions for the guest z/OS system. It’s important to note that a Control User ID is
also a Personal User ID.
In this guide, we will refer to the example Guest-System ID as ETPGJON. The z/VM Personal User ID
and z/VM Control User ID was ETPDESY.
All of the z/VM Personal User IDs provided as part of this program have the authority to activate the
Guest-System IDs by using the “SVXLOG” command. Once the Solution Developer activates the guest
z/OS system, the user ID that does the activation becomes the z/VM Control User ID. This z/VM
Control User ID is the only ID that can send commands to the guest z/OS system. This is done via the
z/VM “SEND” command. The z/VM Control User ID will remain the same ID until it is changed by
someone with proper authority to do so or until the Guest-System ID is shut down. (please see 10.6
Switching the z/VM Control User ID, on page 29)
Also, as applicable, Solution Developers may have:
• TSO User ID – used to access TSO within a guest z/OS system.
• CICS User ID – used to access CICS within a guest z/OS system.
If not previously supplied with passwords for the z/VM Personal User IDs, contact the Dallas ISV Z
User's Guide and Reference for IBM z/OS Remote Access Programs 10 Center and request to have the
z/VM Personal User IDs resumed and an initial password set.

10
IBM Corporation has taken steps to enhance the security of the internet connections to the IBM Z
Dallas ISV Center remote access systems, by blocking various ports from inbound traffic. More
Information about the blocked ports can be found on the IBM Z Dallas ISV Center website at:
http://dtsc.dfw.ibm.com/MVSDS/'HTTPD2.DSN01.PUBLIC.SHTML(BLKPORTS).
Second, a word about TN3270 emulators:
• Consult the TN3270 emulator documentation to determine the appropriate key sequences
required for the ‘ENTER’, ‘PA2’, ‘F12’ and ‘CLEAR’ keys.
• The TN3270 emulator must be TLS 1.2 capable.
NOTE
To access the IBM Z server, an Internet connection must first be established. Once that is established,
perform the following steps:
Step 1. Direct an TLS 1.2 enabled TN3270 connection to the IBM Z Dallas ISV Center Secure Portal
at: dtsc.dfw.ibm.com:65512 (port 65512). For additional information on configuring IBM Personnel
Communication 3270 Emulator Software, please refer to the IBM Z Dallas ISV Center public website:
http://dtsc.dfw.ibm.com/.
Step 2. Type from the list of available processors (DR2, for example). Once the connection is set up,
the Remote Access Portal screen (below) will be shown. Choose the system identified in the delivery
email by entering in the system name and pressing the ‘ENTER’ key. DR2 (SVSCDR2) will be our
example processor moving forward in the guide.
Step 3. The next screen displayed will be the IBM Z Dallas ISV Center system Logon Screen,
indicating that the IBM Z Dallas ISV Center server has been reached.
Step 4. On the Logon Screen, logon to a z/VM Personal User ID by typing in a z/VM Personal User
ID and password and pressing the ‘ENTER’ key.
The password will be expired upon first use of the z/VM Personal User ID or anytime after the IBM Z
Dallas ISV Center has reset the password. The system will prompt you to change the password. Enter a
new password in the format of xxxxxxxx/xxxxxxxx and press the ‘ENTER’ key. The text you type will
not be visible to help assure the privacy of the z/VM Personal User ID password.
11
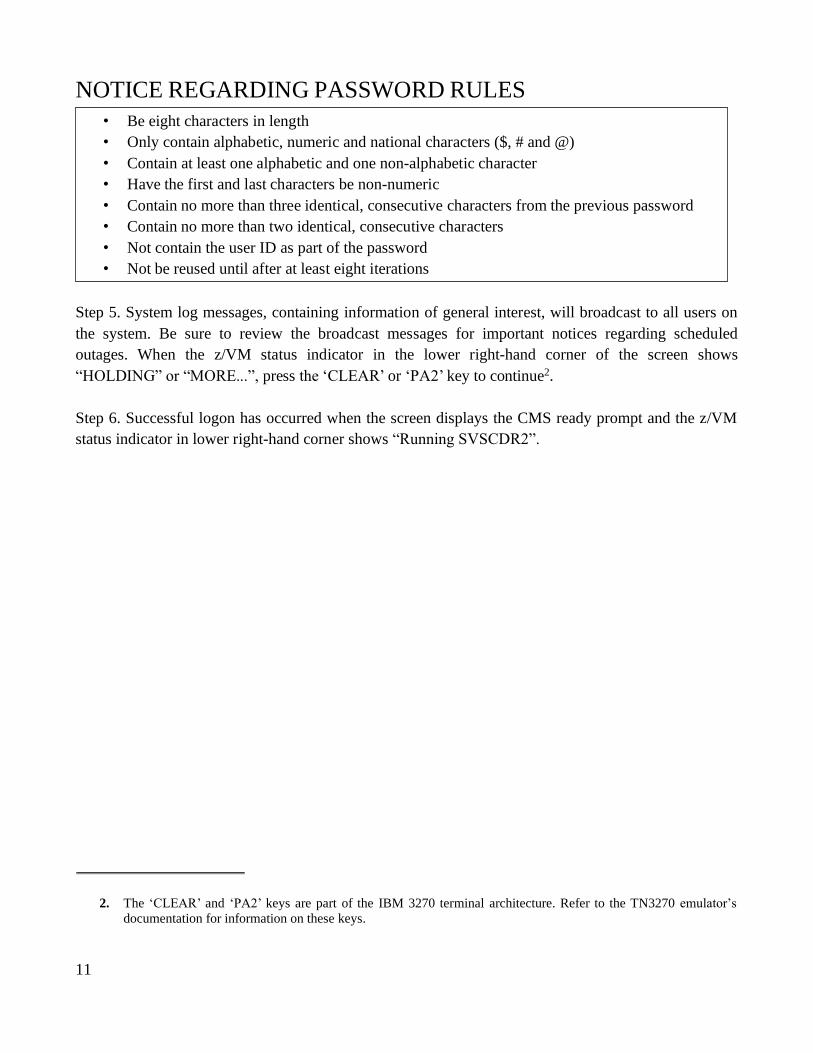
• Be eight characters in length
• Only contain alphabetic, numeric and national characters ($, # and @)
• Contain at least one alphabetic and one non-alphabetic character
• Have the first and last characters be non-numeric
• Contain no more than three identical, consecutive characters from the previous password
• Contain no more than two identical, consecutive characters
• Not contain the user ID as part of the password
• Not be reused until after at least eight iterations
NOTICE REGARDING PASSWORD RULES
Step 5. System log messages, containing information of general interest, will broadcast to all users on
the system. Be sure to review the broadcast messages for important notices regarding scheduled
outages. When the z/VM status indicator in the lower right-hand corner of the screen shows
“HOLDING” or “MORE...”, press the ‘CLEAR’ or ‘PA2’ key to continue2.
Step 6. Successful logon has occurred when the screen displays the CMS ready prompt and the z/VM
status indicator in lower right-hand corner shows “Running SVSCDR2”.
2. The ‘CLEAR’ and ‘PA2’ keys are part of the IBM 3270 terminal architecture. Refer to the TN3270 emulator’s
documentation for information on these keys.

12
4 IPL of the Guest z/OS System
4.1 How to IPL the Guest z/OS System (Quick Steps)
This section provides a list of quick steps to IPL a z/OS system. The section 4.2 How to IPL the Guest z/OS System (Detailed Description), below, provides detailed instructions (including examples to
initialize a system).
Step 1. Access the IBM Z server over the Internet through the IBM Z Dallas ISV Center Secure Portal
using an TLS enabled TN3270 emulator. See 3. Accessing the IBM Z Dallas ISV Center Server, on
page 9, for detailed instructions.
Step 2. Log on a z/VM Personal User ID which will be used to control the guest z/OS system. The
user ID is now referred to as the z/VM Control User ID. Do NOT log on to the guest z/OS system ID.
Step 3. Initialize the guest z/OS system with the command “SVXLOG Guest-System ID”:
“SVXLOG ETPGJON”
Step 4. Open the service processor console interface to the z/OS system. Look for the message:
“IEE389I MVS COMMAND PROCESSING AVAILABLE,” then enter the following command:
“SEND ETPGJON \CP VI VMSG V CN(*),ACT”
4.2 How to IPL the Guest z/OS System (Detailed Description)
4.2.1 Log on the z/VM Control User ID
The messages which result from the initialization of the system cover more than one screen. In this
documentation, be careful to review all of the screen examples associated with a particular event. Each
part contains important information describing the IPL of the guest z/OS system in this environment.
Before continuing, please follow the directions in 3. Accessing the IBM Z Dallas ISV Center Server,
on page 9, for information on establishing a session and logging on to the z/VM Personal User ID that
will be used for initialization of the Guest-System ID.
NOTE
The ‘F12’ key has been defined to retrieve the last command(s) entered. This will be handy as several
of the next steps require that you enter various z/OS commands prefixed by the same z/VM command
syntax.

13
4.2.2 Initialize (IPL) the Guest z/OS System
Step 1. After logging on to the z/VM Personal User ID, initialize (IPL) the guest z/OS system by
typing the “SVXLOG Guest-System ID” command at the CMS Ready Prompt and then press the
‘ENTER’ key. For the example Guest-System ID ETPGJON, the command would go as follows:
“SVXLOG ETPGJON”
Once the “SVXLOG” command is entered, this z/VM Personal User ID becomes the z/VM Control
User ID for the Guest-System ID.
NOTE: You can enter an alternate IPL parm to the “SVXLOG” command. Issue the command
“'\SVXLOG ?” for additional information about specifying an alternate parm. The guest z/OS system
will return messages to the z/VM Control User ID screen.
At this point in the IPL of the Guest-System ID, there is a brief pause before more messages are
displayed. Once the messages start flowing again, watch for the following message: IEE389I MVS
COMMAND PROCESSING AVAILABLE.
Step 2. After seeing the IEE389I message above, open the Hardware Console Interface (HWCIF) to
allow the remaining IPL messages to flow to the z/VM Control User ID and to allow z/OS commands
to be sent to the Guest-System ID for execution. Type the following z/VM command and press the
‘ENTER’ key.
“SEND ETPGJON \CP VI VMSG V CN(*),ACT”
The z/OS will return with the following message: ETPGJON: IEE712I VARY CN PROCESSING
COMPLETE.
By opening the HWCIF interface, there may also be other messages presented to the z/VM Control
User ID. The Guest-System ID sending the message is always written to the left of the message itself.
The more guest z/OS systems to which the HWCIF interface is open, the larger the volume of message
traffic particularly during the initial stages of IPL.
There are situations when messages similar to those listed below will appear during IPL:
*$HASP478 CONFIRM INITIAL CHECKPOINT READ FROM CKPT1
(SYS1.HASPCKPT ON VPSPOL)
LAST WRITTEN TUESDAY, 16 MAY 2000 AT 23:00:38 (LOCAL TIME)
COMPANION DATA SET IS CKPT2 (SYS1.HASPCKP2 ON VPSPOM)
LAST WRITTEN TUESDAY, 16 MAY 2000 AT 23:00:38 (LOCAL TIME)
*01 $HASP441 REPLY 'Y' TO CONTINUE INITIALIZATION OR 'N' TO TERMINATE
IN RESPONSE TO MESSAGE HASP478

14
Until the HASP441 message is answered, JES2 will not start. When required, answer HASP441 with
the following command:
“SEND ETPGJON \CP VI VMSG $$,Y”
Where “$$” is the number immediately preceding $HASP441.
The following messages below may also appear during the IPL. Although they may be highlighted,
they are not usually cause for concern. No additional actions are required.
*ASB010I THE SUBSYSTEM JES2 EXISTS BUT IT IS NOT ACTIVE.
*$HASP493 JES2 ALL-MEMBER WARM START IS IN PROGRESS
*$HASP400 ENTER REQUESTS
*IEA405E WTO BUFFER SHORTAGE – 80% FULL
Step 3. Depending on when the HWCIF interface is opened, multiple messages from the IPL process
may be received. Once the messages seem to have stopped, use the following z/VM command to check
for outstanding messages (ensure you replace ETPGJON with your Guest-System ID):
“SEND ETPGJON \CP VI VMSG D R,L”
The response should be as shown below.
IEE112I 13.36.22 PENDING REQUESTS 790
RM=0 IM=0 CEM=0 EM=0 RU=0 IR=0 NOAMRF
NO MESSAGES OUTSTANDING
When the response is a HASP441 message as shown below, respond as instructed in the previous step.
*01 $HASP441 REPLY 'Y' TO CONTINUE INITIALIZATION OR 'N' TO TERMINATE
IN RESPONSE TO MESSAGE HASP478
Step 4. Monitor the console messages during IPL and look for the ALL task to start (NOTE: On z/OS
1.9 and later systems, this task may be started automatically.), if it does not, then look for the message:
BPXI004I OMVS INITIALIZATION COMPLETE, then enter the following z/VM command
below to start it:
“SEND ETPGJON \CP VI VMSG S ALL”
15
Continue to use the z/VM Control User ID to control the guest z/OS system with IBM MVS™ and JES
commands using the same method shown previously during IPL.
Step 5. While it is preferable to access the guest z/OS system from another TN3270 emulator session, it
is not required. When using a TN3270 terminal emulator that only provides for one session, disconnect
from the z/VM Control User ID so that the same session can be used to access the guest z/OS system
(see 4.2.3 Disconnect the z/VM Control User ID, below).
The guest z/OS system is now up and running. TSO is up on the guest z/OS system and can be utilized
(as described in 7. Connecting to the Guest z/OS System, on page 20). z/OS commands can be sent to
any guest z/OS system where the HWCIF interface is open. The z/VM Control User ID will also
receive messages from the z/OS system.
After disconnecting the z/VM Control User ID, follow the instructions in 4.2.4 Reconnect the z/VM
Control User ID, below, to reconnect to the z/VM Control User ID.
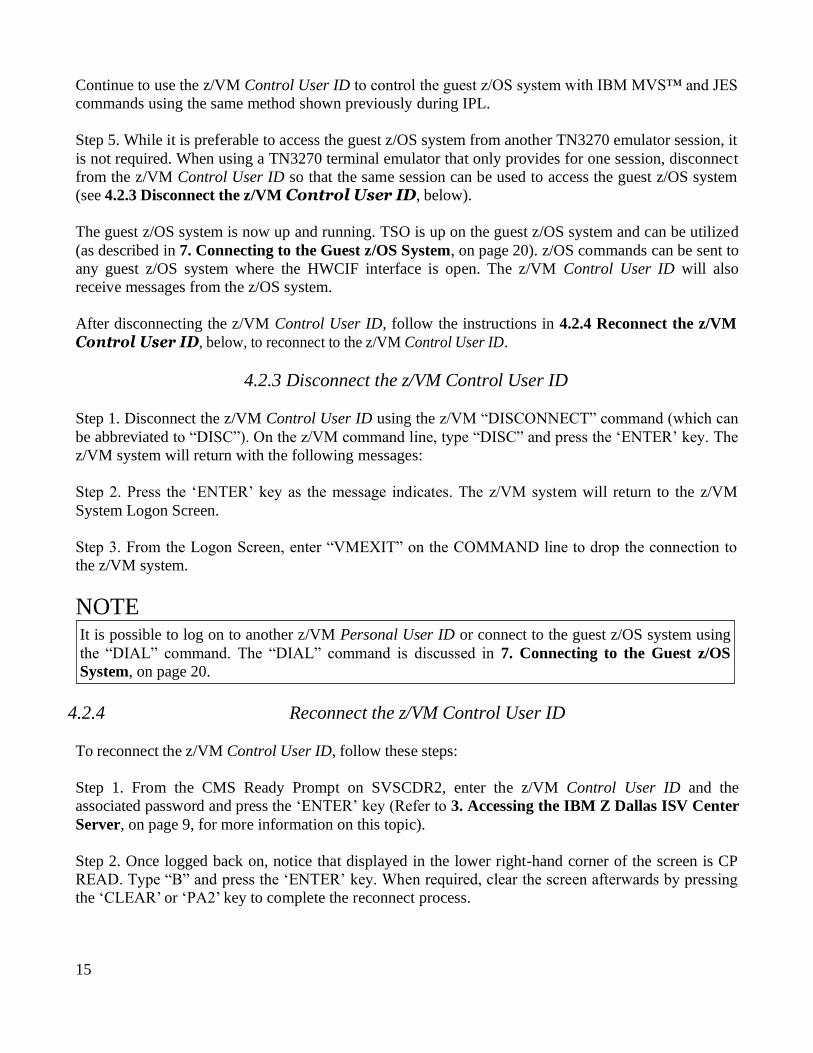
4.2.3 Disconnect the z/VM Control User ID
Step 1. Disconnect the z/VM Control User ID using the z/VM “DISCONNECT” command (which can
be abbreviated to “DISC”). On the z/VM command line, type “DISC” and press the ‘ENTER’ key. The
z/VM system will return with the following messages:
Step 2. Press the ‘ENTER’ key as the message indicates. The z/VM system will return to the z/VM
System Logon Screen.
Step 3. From the Logon Screen, enter “VMEXIT” on the COMMAND line to drop the connection to
the z/VM system.
NOTE
4.2.4 Reconnect the z/VM Control User ID
To reconnect the z/VM Control User ID, follow these steps:
Step 1. From the CMS Ready Prompt on SVSCDR2, enter the z/VM Control User ID and the
associated password and press the ‘ENTER’ key (Refer to 3. Accessing the IBM Z Dallas ISV Center
Server, on page 9, for more information on this topic).
Step 2. Once logged back on, notice that displayed in the lower right-hand corner of the screen is CP
READ. Type “B” and press the ‘ENTER’ key. When required, clear the screen afterwards by pressing
the ‘CLEAR’ or ‘PA2’ key to complete the reconnect process.
It is possible to log on to another z/VM Personal User ID or connect to the guest z/OS system using
the “DIAL” command. The “DIAL” command is discussed in 7. Connecting to the Guest z/OS
System, on page 20.

16
5 How to Shut Down a Guest z/OS System
The process described below orderly terminates the guest z/OS system. To force error recovery or to
terminate only a portion of the system to reduce the charges, please contact the IBM Z Dallas ISV
Center for assistance.
NOTE
Step 1. Logon to the z/VM Control User ID (as described in 4.2.1 Log on the z/VM Control User ID,
on page 12).
Step 2. Enable the Hardware Console Integration Facility interface with the following command:
“SEND ETPGJON \CP VI VMSG V CN(*),ACT”
The guest z/OS system will return with the following message:
ETPGJON : IEE712I VARY CN PROCESSING COMPLETE
Step 3. Terminate any applications and subsystems that may have been started (such as IMS, DB2, or
CICS).
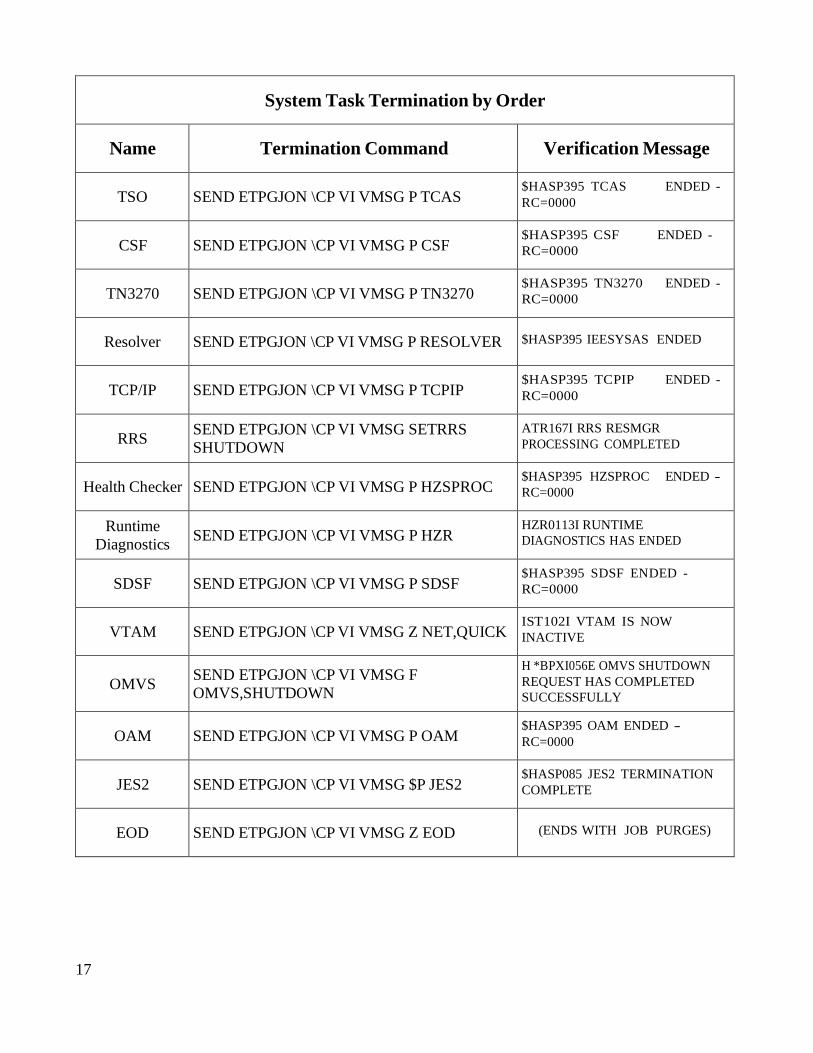
Step 4. Terminate any system tasks that are currently up and running on the guest z/OS system. Please
note that depending on the RDP/ETP program, some tasks may not exist. See System Task
Termination by Order on page 17 for a list of system tasks to end and the order by which to end them.
Step 5. Flush all SMF data to the SMF data sets and write a record in the SMF data sets indicating an
orderly system shutdown with the command:
“SEND ETPGJON \CP VI VMSG Z EOD”
The message IEE334I HALT EOD SUCCESSFUL will be returned by the system.
Step 6. Logoff the guest z/OS system with the command:
“SEND ETPGJON \CP LOGOFF”
Step 7. When leaving the guest z/OS system in a dormant state for a period of time, issue the
“LOGOFF” command and, once back to the z/VM Logon Screen, enter “VMEXIT” in the
COMMAND line and press the ‘ENTER’ key.
To save typing time, use the ‘F12’ key while logged on to the z/VM Control User ID to recall
previous commands entered. Then type over the part following the word VMSG.
17
System Task Termination by Order
Name Termination Command Verification Message
TSO SEND ETPGJON \CP VI VMSG P TCAS $HASP395 TCAS ENDED -
RC=0000
CSF SEND ETPGJON \CP VI VMSG P CSF $HASP395 CSF ENDED -
RC=0000
TN3270 SEND ETPGJON \CP VI VMSG P TN3270 $HASP395 TN3270 ENDED -
RC=0000
Resolver SEND ETPGJON \CP VI VMSG P RESOLVER $HASP395 IEESYSAS ENDED
TCP/IP SEND ETPGJON \CP VI VMSG P TCPIP $HASP395 TCPIP ENDED -
RC=0000
RRS SEND ETPGJON \CP VI VMSG SETRRS
SHUTDOWN
ATR167I RRS RESMGR
PROCESSING COMPLETED
Health Checker SEND ETPGJON \CP VI VMSG P HZSPROC $HASP395 HZSPROC ENDED -
RC=0000
Runtime
Diagnostics SEND ETPGJON \CP VI VMSG P HZR
HZR0113I RUNTIME
DIAGNOSTICS HAS ENDED
SDSF SEND ETPGJON \CP VI VMSG P SDSF $HASP395 SDSF ENDED -
RC=0000
VTAM SEND ETPGJON \CP VI VMSG Z NET,QUICK IST102I VTAM IS NOW
INACTIVE
OMVS SEND ETPGJON \CP VI VMSG F
OMVS,SHUTDOWN
H *BPXI056E OMVS SHUTDOWN
REQUEST HAS COMPLETED
SUCCESSFULLY
OAM SEND ETPGJON \CP VI VMSG P OAM $HASP395 OAM ENDED -
RC=0000
JES2 SEND ETPGJON \CP VI VMSG $P JES2 $HASP085 JES2 TERMINATION
COMPLETE
EOD SEND ETPGJON \CP VI VMSG Z EOD (ENDS WITH JOB PURGES)

18
6 Managing the Guest z/OS System with
“SLEEP” and “BEGIN”
It is possible, running under z/VM, to put the guest z/OS system to sleep at any given point (overnight,
for example) without having to drain, halt or quiesce (pause) the guest z/OS system. The effect of the
z/VM “CP SLEEP” command is that of temporarily "freezing" the guest z/OS system at any given
point with the ability to resume at that same point at a later time and with the benefit of not using CPU
cycles when they are not needed.
Once a virtual machine is placed into the CP SLEEP state it will remain inactive until it is awakened
with the “CP BEGIN” command.
To verify that the guest z/OS system is sleeping, issue the “QSLEEP” (Query SLEEP) command from
any one of the z/VM Personal User IDs or the z/VM Control User ID. Put the guest z/OS system to
sleep as usual, wait at least 60 seconds and then issue the “QSLEEP” command from the CMS Ready
prompt of the z/VM Personal User ID. For example:
“QSLEEP ETPGJON”
While it is possible to place the virtual machine in an inactive state at any given moment, it is highly
recommended that all batch and interactive activity be quiesced first, and that subsystems be halted or
quiesced if possible to reduce the "shock" of waking up several hours (or days) later. The effect is
similar to pushing the ‘STOP’ button on the processor system console. The base z/OS system and IBM
subsystems recover with no problems, however the IBM Z Dallas ISV Center cannot be responsible for
adverse side effects in vendor software systems under these circumstances.
IMPORTANT NOTICE
There are two methods for putting a virtual machine into sleep mode. They are both described below.
6.1 Putting the Guest System to Sleep From the Control User ID
From the z/VM Control User ID, issue the following command:
“SEND ETPGJON \CP SLEEP”
Never put the system to sleep with an attached tape device, detach the tape devices. Failure to do so
will result in an automatic forced detach of the tape device from the system after five minutes. When
this is done, it often results in a permanent I/O error condition which causes the virtual tape device to
become unusable after the system is reconnected.

19
6.2 Putting the Guest System to Sleep From a TSO Session
It is possible to put the guest z/OS system to sleep from a TSO session without the inconvenience of
logging off TSO.
Type “%SLEEP” from an ISPF command line and logoff from TSO within the next 60 seconds.
“%SLEEP” is a REXX exec which submits a batch job from a TSO session. The batch job waits a
specified amount of time and then issues the appropriate z/VM CP commands to put the system to
sleep. The time delay may be specified as a parameter on the “%SLEEP” command (the default is 60
seconds).
When other terminals are connected to the system, the “%SLEEP” command will prompt to either
continue or quit (cancel) before submitting the batch job. Another prompt will be issued if there are
attached tape devices on the system (AGAIN: never put the system to sleep with attached tape devices).
Next, log off TSO normally and subsequently put the system to sleep using the technique described in
6.1 Putting the Guest System to Sleep From the Control User ID, on page 18.
NOTE
WARNING
6.3 Using “BEGIN” to Awaken the Guest System
From the z/VM Control User ID, issue the following command:
“SEND ETPGJON \CP BEGIN”
Be careful not to modify the system in any way (such as installing certain JES exits) which will cause
the batch job submitted by “%SLEEP” to fail, as this would cause the system to continue running
after issuing “%SLEEP”.
Accidentally issuing the “%SLEEP” command and failing to log off TSO before the time delay
expires, causes the guest z/OS system to stop and the TSO session will appear to go dead. To recover
from this situation, locate an alternate terminal or terminal session and wake up the sleeping system
as described in 6.3 Using “BEGIN” to Awaken the Guest System, below.

20
7 Connecting to the Guest z/OS System
There are two types of applications on a guest z/OS system. One type of application is accessed
through a full screen interface and the other through a line mode interface. The following sections
describe using the z/VM “DIAL” command or a TN3720 client session connected directly to an IP
address for accessing applications through a full screen interface. The sections continue by describing
Telnet for accessing applications through a line mode interface.
For Early Test Program (ETP) systems, users are required to dial to the individual Guest-System IDs in
order to interact with applications such as TSO, CICS or IMS running on that guest z/OS system.
7.1 Connecting Using z/VM “DIAL”
Step 1. Connect to the IBM Z Dallas ISV Center Secure Portal, as covered in 3. Accessing the IBM Z
Dallas ISV Center Server, on page 9.
Step 2. Select the IBM Z server on which the guest z/OS system was started.
Step 3. There are two methods when using the “DIAL” command. Both are described below:
A) Enter the z/VM “DIAL” command on the COMMAND line of the IBM Z SVSCDR2 Logon
Screen specifying the name of the Guest-System ID. The system will automatically connect
the terminal to the first available VTAM terminal in the guest z/OS system. For example, to
dial to system name ETPGJON, type the following command:
“DIAL ETPGJON”
“D” may be used as an abbreviation for the “DIAL” command.
B) To use data transfer (IND$FILE) from a TN3270 emulator, specify an address in the range of
F00-F07 to the end of the “DIAL” command. For example, to dial to system name ETPGJON
using specific terminal address F04, type the following command:
“DIAL ETPGJON F04”
Respond to message E120001: Enter your USERID: with the z/VM Personal User ID.
See the system delivery email for the list of z/VM Personal User IDs assigned for use in accessing the
guest z/OS system. Respond to message Enter your password: with the password associated
with that z/VM Personal User ID.4
NOTE
Passwords for the z/VM Personal User IDs have been set to expire immediately and must be changed
during first logon, and every 60 days thereafter. See the system delivery password email for details.

21
7.2 Connect a TN3270 Client Session Directly to an IP Address
Refer to the system delivery email to obtain the assigned TCP/IP address. If the assigned IP address
requires the use of Client VPN, please refer to the system delivery email for instructions for
downloading the Cisco VPN Client software and using it to log into the VPN.
Configure a TN3270 client session using the assigned IP address and port 623. Do Not configure or
enable SSL support for this session. Once the session is configured, select the option to connect to the
system.
7.3 Connect Directly to an IP Address Using Telnet
There are several options available for line mode clients. The instructions below describe how to
connect to the system using Telnet through a command line interface.
From a workstation command prompt, enter “telnet” followed by your IP address. For example:
“telnet 192.168.1.1”
Before connecting with Telnet, the INETD daemon must first be started on the guest z/OS system using
the following command from the z/VM Control User ID:
“SEND ETPGJON \CP VI VMSG S INETD”
7.4 Connect Using FTP
Using any FTP client to connect to z/OS FTPD, issue the following command:
“FTP 000.000.0.0”
Replace 000.000.0.0 with your guest z/OS system IP address.
You will be prompted for your TSO User ID and password. Change the directory to an MVS data set
name or UNIX file name by enclosing the MVS data set or UNIX file name in quotes.
7.5 Connect Using SSH
Issue the following command from the z/VM Control User ID to start SSHD:
“SEND ETPGJON \CP VI VMSG S SSHD”
Once SSHD is started, use any SSH client to connect to the guest z/OS system.
4. If message HCPDIA056E appears instead, see 13. Help For Common Problems, on page 46.

22
8 Accessing TSO
Below are instructions for logging on to and logging off of TSO on the guest z/OS system.
8.1 Logging on to TSO
All remote access guest z/OS systems are predefined with one TSO User ID, called IBMUSER, for use
by the Solution Developer's system administrator. This user ID has full TSO ACCOUNT, OPERATOR,
and SPECIAL authorities. Use it to add additional TSO User IDs to the guest z/OS system (see 10.1 Adding More TSO User IDs, on page 24). The initial password for IBMUSER is set to IBMUSER.
This password has been set to expire immediately and must be changed during first logon.
To reset the password for IBMUSER, issue the following command from the z/VM Control User ID:
“SEND ETPGJON \CP VI VMSG S RACFUR”
This will reset the password to IBMUSER, which will expire immediately upon logon. Please note that
All TSO User IDs will be revoked after 6 consecutive unsuccessful logon attempts.
NOTE
Step 1. After connecting to the guest z/OS system using z/VM “DIAL” or a TN3270 client, the z/OS
VTAM Logon Screen will be presented:
Connecting a TN3270 client directly to the IP address assigned to the guest z/OS system will present a
similar z/OS VTAM Logon Screen. Type “TSO” and press the ‘ENTER’ key. Any of the other TSO
selections may also be picked, based on the screen size configured in the TN3270 session (this option is
only available when connected using z/VM “DIAL”). Message IKJ56700A ENTER user ID will
prompt for a TSO User ID. Reply with the TSO User ID and press the ‘ENTER’ key. The standard TSO
logon screen will be presented.
Step 2. Type in the TSO password and press the ‘ENTER’ key. Continue to press the ‘ENTER’ key
when the screen fills and *** appears on the last line displayed.
A second TSO User ID, SVTSCU, has been included in the guest z/OS system for use by the IBM Z
Dallas ISV Center to provide maintenance to the system and to assist in the event of a problem that
requires access to the system. It is recommended that this user ID is NOT be removed as the IBM Z
Dallas ISV Center staff may be unable to assist in the event of a problem requiring access to the
system. Access to this user ID is strictly controlled by the IBM Z Dallas ISV Center and the user ID
will not be used without permission.
23
NOTE
After successful logon to TSO, the ISPF Primary Option Menu5 will be presented. Press the ‘ENTER’
key to clear the copyright information on the ISPF Option Menu. Press F8 and F7 to page forward and
backward through additional ISPF Primary Menu options.
The first TSO logon after any IPL will cause the following messages to be generated.
IEF196I IEF237I 0CD0 ALLOCATED TO SYS00005
IOS000I 0CD0,98,WRI,05,0200,,00010000,VPCOMA,CATALOG , 586
800200002800000000000010320000042301641900420F0000004CE100000000
IEF196I IEF237I 0CD0 ALLOCATED TO SYS00006
IOS000I 0CD0,98,WRI,05,0200,,00010000,VPCOMA,CATALOG , 588
800200002800000000000010320000042301641900420F0000004CE100000000
IEF196I IEF237I 0CD0 ALLOCATED TO SYS00007
IOS000I 0CD0,98,WRI,05,0200,,00010000,VPCOMA,CATALOG , 590
800200002800000000000010320000042301641900420F0000004CE100000000
The messages can be ignored. They appear because many of the data sets in the system are configured
on read-only disk volumes. The read-only disk volumes allow the IBM Z Dallas ISV Center to correct
problems and deliver maintenance with a minimal amount of disruptions to participants.
8.2 Logging off of TSO
To log off TSO, press the ‘F3’ key until you are back to the ISPF Primary Option Menu. Type “X” on
the OPTION line and press the ‘ENTER’ key.
In some cases, the following screen will be presented after typing “X” and pressing the ‘ENTER’ key.
This screen requires your desired disposition of log data set information. The normal response is to
enter “2” followed by the ‘ENTER’ key. on the process options line. Normally, there is no need to
retain the USERID.SPFLOG2.LIST data set.
The next screen will be the READY prompt, type in “LOGOFF” and press the ‘ENTER’ key.
5. The presence of an IBM product on an ISPF selection panel does not necessarily indicate the presence of the
product within the system.
Logon PROC SPFPROCE is the default logon procedure. For information on access to DB2 libraries
for the specific version of DB2 running on the guest z/OS system, please contact the IBM Z Dallas
ISV Center.
24
9 Return to z/VM When Using z/VM “DIAL”
This section describes how to return to z/VM when connected using z/VM “DIAL”.
In order to allow users to return to the first level z/VM system from the VTAM Logon Screen, a VTAM
application program called EXITMVS has been installed to issue a “CP RESET” command upon
session disconnect, allowing you to return to the z/VM Logon Screen.
After logging off of the guest z/OS system and returning to the VTAM Logon Screen, type
“EXITMVS” and press the ‘ENTER’ key.
To disconnect from the z/VM Logon Screen, type “VMEXIT” on the next screen and press the
‘ENTER’ key. “VMEXIT” will drop the connection to the IBM Z Dallas ISV Center Secure Portal.
10 Guest z/OS System Administration
The following topics will cover basic guest z/OS system administration functions required to maintain
the system.
10.1 Adding More TSO User IDs
To add TSO User IDs:
Step 1. log into TSO with the TSO User ID IBMUSER.
Step 2: Type “%ADDUROM” at the TSO READY prompt. Every parameter can be specified. There
are default values that can be taken (see 12.9 RACF Information, on page 41 for more information
before executing this command).
Step 3: After executing the “%ADDUROM” CLIST, create the OMVS home directory in the following
format /u/xxxxxxx (where 'xxxxxxx' is the user ID you’re creating). We also recommend that you
create your own UNIX file system to be mounted on this directory.
When more than one user will be using the guest z/OS system, it is recommended to run the RACF
DSMON (Data Security Monitor program) and review the system SETROPTS parameters, making
adjustments as necessary to define the system as required.
NOTE
System Security and Isolation: RACF protection is not needed to protect the resources from other
users in other guest z/OS systems – they are isolated from this guest z/OS system by the z/VM
operating system and the z/VM security system (RACF).

25
10.2 Backing Up and Restoring User Data
There may be times when the Solution Developer will need to backup user data and compress it to send
off-site. It may also be necessary to restore data that has been previously backed up. This section will
provide guidelines to accomplish these tasks.
The following programs will be used in this section to help us in our data backup and restoration:
TRSMAIN
TRSMAIN is a utility program to compress and decompress data. Output from TRSMAIN creates
fixed-length 1024 byte records. TRSMAIN also includes information in the fixed-length records to
rebuild data in its original format. The fixed-length records make the data easily transportable using
FTP. When the data arrives at the target system and the fixed-length, 1024 byte records are recreated,
the original data can be rebuilt.
FTP
FTP can be used to upload or download the TRSMAIN packed data.
DFSMSdss
DFSMSdss Logical Dump and Restore will be used to backup and restore user data. Sample JCL is
listed below for both backup and restore processes.
10.2.1 Backing Up User Data Steps
Step 1. DFSMSdss Logical Dump – To backup user data, use DFSMSdss Logical Dump Format.
Below is sample JCL for performing this function:
//ST1 EXEC PGM=ADRDSSU
//SYSPRINT DD SYSOUT=*
//OUTPUT DD DSN=User.data.LDUMP,UNIT=SYSDA,
// DISP=(NEW,CATLG),
// SPACE=(CYL,(xxx,yyy),RLSE),VOL=SER=(VPWRKx))
//SYSIN DD *
DUMP DS (INCLUDE( -
User.DATA.** -
) -
EXC(SYS1.VTOCIX.** - SYS1.VVDS.** -
)) -
ODD(OUTPUT) -
CANCELERROR ALLDATA(*) ALLEXCP COM TOL(ENQFAILURE) SHR

26
The ALLDATA(*) and ALLEXCP parameters mean the data sets will be restored as allocated.
Step 2. TRSMAIN – Use sample JCL member TRSMAINP found in data set LVL0.SVSC.CNTL to
perform the pack.
Step 3. Downloading data using FTP – The following text assumes that the FTP server is located on the
guest z/OS system.
Output that has been packed can be transmitted from the guest z/OS system using FTP. Log on to the
z/OS FTP daemon (refer to section 7.4 Connect Using FTP, on page 21) and use the “GET” command
to retrieve a packed output file. Be sure to set the transfer type to BINARY before using the “GET”
commands as shown on the following page.
Additional information regarding use of the “GET” command can be found in the z/OS
Communications Server IP User's Guide and Commands manual.
“ftp> bin”
“ftp> get terse.dump”
“ftp> exit”
10.2.2 Restoring User Data Steps
To restore user data, use DFSMSdss Restore format. First upload the compressed data set using FTP to
the system and then use the TRSMAIN program to unpack it before performing the restore.
Step1. Uploading data using FTP – the following text assumes that the FTP server is located on the
guest z/OS system. FTP to the guest z/OS system using the “PUT” command:
Output that has been packed can be transmitted to the guest z/OS system using FTP. Log on to the z/OS
FTP daemon (refer to section 7.4 Connect Using FTP, on page 21) and use the “PUT” command to
send a packed backup file. Be sure to set the transfer type to BINARY before using the “PUT”
commands as shown below.
Additional information regarding use of “PUT” commands can be found in the z/OS Communications
Server IP User's Guide and Commands manual.
“ftp> bin”
“ftp> quote site cyl pri=xxx sec=yyy”
“ftp> quote site lrecl=1024 blksize=55296 recfm=fb”
“ftp> quote site unit=3390 volume=VPWRKx”
“ftp> put terse.dump
“ftp> quit”
Step 2. TRSMAIN – use sample JCL member TRSMAINU found in data set LVL0.SVSC.CNTL to
perform the unpack.

27
Step 3. DFSMSdss Restore – below is sample JCL for performing a restore.
//ST4 EXEC PGM=ADRDSSU
//SYSPRINT DD SYSOUT=*
//TAPE DD DSN=user.data.LDUMP,
// DISP=(OLD,KEEP),UNIT=3390,
// VOL=SER=VPWRKx
//SYSIN DD *
RESTORE DS(INC( -
user.DATA.** -
) -
EXC(SYS1.** -
)) ODY(VPWRKx) IDD(TAPE) CAN -
NULLSTORCLAS BYPASSACS(**) TOL(ENQF)
/*
10.3 IPCS
Prior to using IPCS for the first time, each user must specify the volume that IPCS will use. Issue the
following command from the ISPF command line:
“TSO BLSCDDIR VOLUME(VPxxxx)”
VPxxxx = volume to be specified.
Once this command has been issued, start IPCS using ISPF option IP.
10.4 Issuing CP Commands
CP commands can be issued in one of two ways, from the z/VM Control User ID or from the TSO
environment using REXCPCMD. CP is the Control Program which operates within the first-level
z/VM system.
Any CP commands issued on behalf of a guest z/OS system from the z/VM Control User ID follows
the format:
“SEND Guest-System ID \CP command”
command = CP command you wish to send to the guest z/OS system.

28
For example, to query the tape drives attached to Guest-System ID ETPGJON, issue the following
command from the z/VM Control User ID:
“SEND ETPGJON \CP Q V TAPE”
Any CP commands issued on behalf of a guest z/OS system from a TSO environment will follow the
format REXCPCMD command. Here’s an example of the same tape drive query commands issued
from a TSO environment:
“REXCPCMD Q V TAPE”
10.5 Accounting Information
Many of the IBM Z Dallas ISV Center Remote Access Program fees include a specified amount of
CPU work units in the base fee. Any extra work units used for a month are charged at a specified per
work unit rate.
The number of work units included in the base fee and the additional per work unit rate are documented
in the Program Charges section of the Exhibit included in the program enrollment package. The session
report (“SESSREPT”) command is provided for you to monitor the work unit usage of your Guest-
System ID. Accounting records are stored for each Guest-System ID that has had usage during the
twelve hour period ending at 07:00 and at 19:00 Central Standard Time (UTC-6) each day.
10.5.1 Obtaining Program Account Information
Work unit accounting information may be obtained for the guest z/OS system, for a specified date
range by issuing the following CP command from a z/VM Personal User ID.
“MSG SVUTIL SESSREPT ETPGJON FDATE LDATE”
FDATE = the first date in the range.
LDATE = the last date in the range.
An explanation of the syntax is provided in the SESSREPT help text which is retrieved with the
command:
“MSG SVUTIL HELP SESSREPT”
SVUTIL: SVUTIL SESSREPT COMMAND SYNTAX:
SVUTIL:
SVUTIL: "MSG SVUTIL SESSREPT UUUUUUUU FDATE LDATE" SVUTIL:
SVUTIL: WHERE UUUUUUUU = USERID FOR SESSION REPORT SVUTIL: FDATE =
FIRST DATE TO BE REPORTED (MM/DD/YY) SVUTIL: LDATE = LAST DATE TO BE
REPORTED (MM/DD/YY) SVUTIL:
SVUTIL: ALL PARAMETERS ARE REQUIRED. DATES MUST BE BETWEEN 1989
AND THE CURRENT DATE. ONE OR TWO DIGITS OK FOR MONTH AND DAY.

29
After a short time, the SVUTIL service machine will send a detailed usage report to the z/VM Reader
of the z/VM Personal User ID that sent the command. When the report is returned, a message will be
displayed on the z/VM Personal User ID’s CMS screen with an identifying file number. To view the
contents of the file, enter the command:
“PEEK filenum (FOR *”
filenum = file number displayed on Personal User ID’s CMS screen.
Alternatively, access the file using the z/VM ReadList command:
“RL”
From the list of reader files, cursor to the line of the file to view and press ‘F11’ to peek. While peeking
at the file, it may be easier to view after entering “V 1 78” on the command line. Use ‘F7’ and ‘F8’ to
scroll the file forward and backward. Use ‘F3’ to quit looking at the file.
10.6 Switching the z/VM Control User ID
The z/VM Control User ID for a system can be changed using one of three methods. In the below
examples, ETPGJON is the guest system ID and ETPDESY is the desired new z/VM Control User ID:
Method 1: From the current z/VM Control User ID, issue the following command:
“SEND ETPGJON \CP SET SECUSER ETPDESY”
Method 2: From any z/VM Personal User ID owned by the customer, issue the following command:
“MSG SVUTIL SECUSER ETPGJON ETPDESY”
Method 3: From ISPF main menu in TSO, select option 6 and then enter the following command:
“REXCPCMD SET SECUSER ETPDESY”
NOTE
SVUTIL is a service machine that does a variety of things. To find out what it does, issue the
command “MSG SVUTIL ?“. To get the syntax of any of the options, issue command “MSG SVUTIL
HELP ###” (where ### is the option).

30
11 Tape Handling Procedures
11.1 Using Tapes
Please be a responsible user and help others by detaching tape devices as soon as they are no longer
needed, thank you.
NOTICE REGARDING HOURS OF OPERATION
If you have questions regarding handling tapes, please refer to 14.4 Technical Support, on page 53.
Problems with pending tape mounts can be reported from 07:00 to 19:00 Central Standard Time (UTC-
6) Monday through Friday, except on IBM USA holidays. Please send an email to [email protected]
describing the problem. Include all appropriate messages, the guest z/OS system name, and contact
information.
Tape devices are a limited real resource and are only attached to the guest z/OS system when needed to
satisfy a tape mount request. When the tape is loaded on the tape drive by the tape operator, the mount
request will be satisfied.
Always detach tape devices before putting the system to sleep. Failure to do so will result in an
automatic forced detach of the tape device from the system after five minutes. When this is done, it will
result in a permanent I/O error condition which causes the virtual tape address to become unusable until
the system undergoes another IPL.
Scratch Tapes: The IBM Z Dallas ISV Center does not provide scratch tapes. Scratch tapes are the
responsibility of the Solution Developer and should be handled the same as any tape (i.e. product tape)
during the duration of the Test Program.
11.2 Mounting Tapes
There are two methods described below, by which to request a tape mount. Although the methods are
different, the underlying process is the same. Here is a brief outline of the process followed by a
description of the two tape mounting methods:
Step 1. The tape is received by the IBM Z Dallas ISV Center, logged and stored in a secure room. An
email notification will be sent when the tape is available for use.
Tape operators will mount tapes from 07:00 to 19:00, Monday - Friday, and from 07:00 to 15:00 on
the 1st, 2nd, 3rd and 5th Saturdays of the month. All times are Central Standard Time (UTC-6) and there
are no mounts overnight or on the 4th Saturday of each month. There will be occasional exceptions to
this schedule due to holidays, and other circumstances. For tape mounts at a particular time of day,
please contact the IBM Z Dallas ISV Center.

31
Step 2. A mount request is sent in the form of a message to a z/VM service machine called SVUTIL
using one of the two methods we will cover here.
Step 3. The SVUTIL service machine reads the message. When the tape number requested is in the
virtual tape library, the SVUTIL service machine will:
• Verify that the request is from an authorized user ID.
• Translate the requested tape number to a physical rack number.
• Attach a tape drive to the requesting system at the requested address.
• Send a message to the tape operator requesting that the tape be mounted on the attached drive.
• Send informational messages to the SYSLOG on the guest z/OS system.
Step 4. A message is displayed on the Master Console of the requesting system:
DEVICE <vdev> IS NOW READY FOR USE.
vdev = requested virtual tape device number.
Step 5. The Solution Developer issues the “VARY <vdev>, ONLINE” command and then may submit
their job.
Step 6. The tape operator retrieves the tape from the physical tape library and mounts the tape on the
tape drive displayed in the message generated by the mount request. This may take a few minutes.
Step 7. The job runs.
Step 8. The Solution Developer issues the “VARY <vdev>, OFFLINE” command when finished with
the tape device.
Step 9. The Solution Developer detaches the tape device from the guest z/OS system.
11.2.1 z/OS Tape Device Definitions
Tape device numbers for a guest z/OS system are defined in the table below:
Tape Drive Type Device Number Range Comments
3592A 550 – 55F 3592-E05 (TS1120 Tape Drive)
3592B 550 – 55F 3592-E07 (TS1140 Tape Drive)

32
11.2.2 Method 1 – From the z/VM Control User ID
To mount:
To request a tape mount, issue the following from the z/VM Control User ID:
“SEND ETPGJON \CP MSG SVUTIL MOUNT <refno> ON <vdev> <mode> <devtype>
<refno> = the reference number assigned to the tape.
<vdev> = the virtual tape device number in the guest z/OS system on which to mount.
<mode> = either R/O or R/W indicating READ ONLY or READ/WRITE.
<devtype> = the correct device type for the media being used.
For example, to mount the tape with reference number ETP123 on virtual tape device 550 R/O, enter
the following command:
“SEND ETPGJON \CP MSG SVUTIL MOUNT ETP123 ON 550 R/O 3592A”
This command will send a message to the SVUTIL service machine requesting a tape mount for the
guest z/OS system from which the request was issued. An error response (if there is one) will be sent
back within seconds in the form of a z/VM message to the z/VM Control User ID. Some of the more
common error messages with, suggested responses, may be found in 13. Help for Common Problems,
on page 46.
To display syntax help for “MOUNT”, enter the CP command:
“MSG SVUTIL HELP MOUNT”
When the following message is displayed on the Master Console of the requesting system:
DEVICE <vdev> IS NOW READY FOR USE, issue the “VARY ONLINE” command as follows:
“SEND ETPGJON \CP VI VMSG V <vdev>,ONLINE”
To remount the same tape, simply reissue the original mount request to SVUTIL. It is also possible to mount a different tape on the same device in this manner.

33
To detach:
When finished with the tape(s) and the tape device, issue the CP commands to vary offline and detach
the virtual device from the guest z/OS system. For example, to vary offline and detach virtual device
590, enter the following commands:
“SEND ETPGJON \CP VI VMSG V 590,OFFLINE”
“SEND ETPGJON \CP DETACH 590”
11.2.3 Method 2 – From TSO
To mount:
Tape mount requests can be issued from a TSO session with “%MOUNT”. “%MOUNT” is a REXX
exec which internally sends the "MSG SVUTIL MOUNT" CP command to the z/VM SVUTIL service
machine, which processes the mount request.
The “%MOUNT” command uses the same syntax as the “MSG SVUTIL MOUNT” command
described above in Method 1, and performs some syntax and error checking before internally issuing
the proper command to SVUTIL. Errors found by the REXX exec result in messages sent to the TSO
terminal user. Note that it is not possible to perform all error checking from the %MOUNT exec, and as
a result some error messages will still be sent to the z/OS console user ID.
Type “%MOUNT HELP” or “%MOUNT ?” from any TSO ISPF command line for a brief description
and syntax information.
To detach:
Once finished with the tape(s) a tape device, it must be varied offline and detached from the guest z/OS
system so that other users may attach it to their systems and use it to mount their tapes. The easiest way
to do this from a TSO session is with the “%DETACH” command. “%DETACH” is a REXX exec
which internally issues the appropriate CP command or commands required to detach the virtual tape
device(s) from the guest z/OS system.
There is only one parameter to the “%DETACH” command – the virtual tape device address (ex:
590) or the keyword "ALL" which is a request to detach all attached tape devices from the system.
Type “%DETACH HELP” or “%DETACH ?” from any TSO ISPF command line for a brief description
and syntax information.
11.3 Sending/Receiving Tapes to/from the IBM Z Dallas ISV Center
Please attach an external reference number that is easily identifiable and unique to each tape sent to
IBM. This reference number will be used when requesting a tape mount for the guest z/OS system.
All tapes (including scratch tapes) to be used on the system should be mailed to:
IBM Corporation
34
Attn: ETP Administration
z ISV Lab 3rd Floor
1000 Belleview St.
Dallas, TX. 75215
Proper Tape Identification: Please include the following information with ALL TAPES (product,
scratch, etc.) mailed to IBM for use in the Remote Access Program.
• Remote Access Program Name and Guest System (IPL Console) ID
• External Reference Number (to be used when requesting a tape mount)
• Company Name, Program Contact, Phone Number and Email Address
• Company Return Address
Reference Number: Remember to attach an external reference number that is easily identifiable and
unique to each tape sent to IBM. It may (but need not be) the same as the volume ID for an IBM
standard label tape. The reference number must be 1-10 alpha-numeric characters with no embedded
blanks or special characters. This reference number will be used when requesting a tape mount for the
guest z/OS system.
Please allow sufficient lead time for the tape to be received and logged in the tape library. IBM
(RDP/ETP Administration) will contact via email to verify receipt of the tape.
Note: The IBM Z Dallas ISV Center can’t support 3420 tape reels, 3480 cartridges or 3490 cartridges.
11.4 Listing the Tapes Available to Your System
To retrieve a listing of all the tapes in the IBM Z Dallas ISV Center Tape Library available
to your system ETPGJON, log on to the z/VM Control User ID and issue the following command:
“SEND ETPGJON \CP VI MSG SVUTIL LISTTAPES”
A complete list of tapes will be written to z/VM Control User ID console as in the following example:
“SEND ETPGJON \CP VI MSG SVUTIL LISTTAPES”
Ready; T=0.01/0.01 16:41:47
ETPGJON : SVUTIL: List Tape Inventory for: ETPGJON in Group: ACCOUNT
ETPGJON : SVUTIL: TAP001 Your Company comments mm/dd/yy
ETPGJON : SVUTIL: TAP003 Your Company comments mm/dd/yy
ETPGJON : SVUTIL: TAP004 Your Company comments mm/dd/yy
ETPGJON : SVUTIL: TAP005 Your Company comments mm/dd/yy
ETPGJON : SVUTIL: TAP006 Your Company comments mm/dd/yy

35
12 Guest z/OS System Structure
This section contains specific information about the virtual machine environment and customized
features of the guest z/OS system.
12.1 DASD Configuration
A guest z/OS system is comprised of the 3390 DASD volumes shown in Table 1. Other volumes may
be available to the guest z/OS system. To display the volumes in the guest z/OS system, use ISMF or
enter the following command from the SDSF log display:
“/D U,DASD,ONLINE,,256”
The following table lists the DASD Volume Serial Labels in the guest z/OS System.
Volume Serial Access VOLSTATE Description
VPMVSB
Read/Write
PRIV/RSDNT
z/OS data sets including the Master Catalog,
SMF data sets, Dump data sets which must be
available to the guest z/OS system in write
mode.
VPMVSC
Read/Write
STRG/RSDNT
Approximately 213 MB of free disk space for
user data sets. (252 cylinders on a 3390 DASD
unit). This volume contains participant data that
has been customized for the remote access
program. In many cases, this volume can be
moved to other programs facilitating productive
data transitions.
VPMVSE
Read/Write
STRG/RSDNT
Approximately 420 MB of free disk space for
user data sets. (420 MB is approximately 495
cylinders on a 3390 DASD unit). This volume
contains participant data that has been
customized for the remote access program. In
many cases, this volume can be moved to other
programs facilitating productive data transitions.
VPMVSD
Read/Write
PRIV/RSDNT
Data sets which have the high level qualifier of
VENDOR. These data sets are integrated into the
system to assist participants with the
customization of the system. This volume
contains participant data that has been
customized for the remote access program. In
many cases, this volume can be moved to other
programs facilitating productive data transitions.

36
VPHFSB
Read/Write
PRIV/RSDNT
Small amount of free disk space under the
control of DFSMS. This volume contains HFS
files for OpenEdition.
VPSMSB
Read/Write
PRIV/RSDNT
Small amount of free disk space under the
control of DFSMS. This volume contains the
couple data sets required in a sysplex and some
of the HFS files for OpenEdition.
VPSMSC
Read/Write
PRIV/RSDNT
Small amount of free disk space under the
control of DFSMS. This volume is for user data
sets like HFS files. This volume contains
participant data that has been customized for the
remote access program. In many cases, this
volume can be moved to other programs
facilitating productive data transitions.
VPSMSD Read/Write PRIV/RSDNT Small amount of free disk space under the
control of DFSMS.
VPSPOL Read/Write PRIV/RSDNT JES2 Spool and Checkpoint volume.
VPSPOM Read/Write PRIV/RSDNT JES2 Duplex Checkpoint volume.
VPPAGA Read/Write PRIV/RSDNT PLPA, Common and Local page data sets.
VPPAGB Read/Write PRIV/RSDNT Local page data set.
VPPAGC Read/Write PRIV/RSDNT Local page data set.
12.1.1 System Managed Storage
• System Managed Storage (SMS) is active in the system.
• The member IEFSSNSM in LVL0.PARMLIB activates SMS at IPL.
• The member IEASYSLV in LVL0.PARMLIB contains the parameter SMS=SM to activate the
IGDSMSSM member in LVL0.PARMLIB.
• The member IGDSMSSM in LVL0.PARMLIB contains the SMS configuration parameters.
• Three small SMS DASD volumes are provided with the system. This volume is initialized with
a VTOC, indexed VTOC, and VVDS. The volume serial labels are VPSMSB, VPSMSC,
VPSMSD.
• The JCL in data set LVL0.SVSC.CNTL(DEFSCDS) allocated the SCDS data set
SMS.SCDS1.SCDS.
• The JCL in data set LVL0.SVSC.CNTL(DEFACDS) allocated the ACDS data set
SMS.ACDS1.ACDS.

37
• The JCL in data set LVL0.SVSC.CNTL(DEFCOMM) allocated the COMMDS data set
SMS.COMMDS1.COMMDS.
• The system ACDS is named SMS.ACDS1.ACDS.
• The system COMMDS is named SMS.COMMDS1.COMMDS.
• The only SCDS is named SMS.SCDS1.SCDS.
• The system has one storage group, SG1. It is connected to one volume, VPSMSB.
• The system has one storage class, SC1. It has the guaranteed space attribute set to yes.
• The system has one management class, MCDEF. It is the system default management class.
• The system has no data classes.
• The member ACSSTORG of LVL0.SVSC.CNTL contains the source for the Storage Group
ACS routine. This routine points all request to storage group SG1.
• The member ACSSTORC of LVL0.SVSC.CNTL contains the source for the Storage Class ACS
routine. The routine does the following tasks.
◦ Ignores all data sets with a high level qualifier (HLQ) of SYS1.
◦ Manages all data sets with a HLQ of MANAGED assigning them to storage class SC1. For
example, a data set named MANAGED.JCL.DATA will be assigned to storage class SC1. ◦ Honors any storage class specified in JCL for data sets not covered by rules 1 and 2.
• The system contains no management class ACS routine.
• The system contains no data class ACS routine.
12.2 IBM Z Dallas ISV Center Provided Data Sets
Most of the data sets listed below are located on the disk volume labeled VPMVSD. Volume VPMVSD
is available to the system in Read/Write mode. There are also data sets on volume VPMVSB which
influence the operation of the guest z/OS system. Most other volumes are available to the system in
Read/Only. Data sets on Read/Only volumes cannot be modified.

38
Data Set Name Intended Usage
VENDOR.PARMLIB
PDS for users' provided parameters. Useful to hold "SYSIN" data for
PROCLIB members.
VENDOR.PROCLIB
Empty procedure library in the JES2 default procedure concatenation for
user created procedures (PROCS.)
VENDOR.ISPLLIB
Empty ISPF messages data set in the ISPF default ISPMLIB DD
concatenation for user ISPF messages.
VENDOR.ISPMLIB
Empty ISPF messages data set in the ISPF default ISPMLIB DD
concatenation for user ISPF messages.
VENDOR.ISPPLIB
Empty ISPF panel data set in the ISPF default ISPPLIB DD concatenation
for user panels.
VENDOR.ISPSLIB
Empty ISPF skeleton data set in the ISPF default ISPSLIB DD concatenation
for user ISPF skeletons.
VENDOR.ISPTLIB
Empty ISPF table data set in the ISPF default ISPTLIB DD concatenation for
user tables.
VENDOR.CLIST
TSO CLIST data set in the TSO default SYSPROC DD concatenation for
user provided global CLISTs.
USERID.CLIST
TSO CLIST data set, when found at logon will be included in the TSO
default SYSPROC DD concatenation for individual user CLISTs.
VENDOR.HELP
Empty data set in the default SYSHELP DD concatenation for user HELP
text.
VENDOR.LPALIB
Empty data set included in the LPA list concatenation for user provided
modules which need to be in PLPA. This data set has also been APF
authorized.
VENDOR.LINKLIB
Empty data set included in the link list concatenation for user provided
modules which need to be in the link list. This data set has also been APF
authorized.
VENDOR.SYSEXEC
Empty data set in the default SYSEXEC DD concatenation for user REXX
language EXEC source.

39
VENDOR.VTAMLIB
Empty data set included in VTAMLIB concatenation in member VTAM for
user supplied VTAM exits, USS tables, etc..
VENDOR.VTAMLST
Empty data set included in VTAMLST concatenation in member VTAM for
user supplied VTAM exits, USS tables, etc..
12.3 Default LINKLIST Concatenation
This system implements dynamic linklist. Please see the PROG= parameter in
LVL0.PARMLIB(IEASYSLV). The easiest way to review the linklist is with the operator command:
“D PROG,LNKLST”
The PROG= parameter is used for APF authorization also. Please be sure to review all the PROGxx
members referenced in the PROG= parameter. The easiest way to review the APF list is with the
Operator command:
“D PROG,APF,ALL”
12.4 Default LPA List
To determine the LPALST concatenation please review the LPA= parameter of
LVL0.PARMLIB(IEASYSLV).
12.5 Default PROCLIB Concatenation
The following list describes the PROCLIB concatenation as initially delivered, in order of
concatenation:
• VENDOR.PROCLIB
• SVTSC.PROCLIB
• LVL0.PROCLIB
• SYS1.PROCLIB
12.6 CATALOG Structure
The master catalog is named MASTERV.CATALOG. All user catalogs have a high level qualifier of
CATALOG. Most data sets will get cataloged in the master catalog unless additional aliases are added.

40
12.7 Highlights from LVL0.PARMLIB
This system exploits the concatenated PARMLIB feature. All changes traditionally implemented by
changing members in SYS1.PARMLIB should be made in VENDOR.PARMLIB. All references
through out this document to SYS1.PARMLIB should be considered as references to the PARMLIB
concatenation
Member IEASYS00 contains very few parameters and the IBM Z Dallas ISV Center expects these to
be static. The one parameter that might be changed is CLPA.
Member IEASYSLV contains most of the parameters used to influence system initialization. Member
CLOCKSV is set to Central Standard Time (UTC-6). Modify this to a different time zone if desired.
Member JES2420A contains the JES2 initialization parameters.
12.8 SMP/E Data Sets and Maintenance Information
The SMP/E control information for z/OS and other closely related products can be referenced in
MVS.GLOBAL.CSI.
NOTICE
Listed below is an example of the messages which are issued to TSO users during the initial access of
the SMP/E data set MVS.GLOBAL.CSI using the ISPF SMP/E Dialogs.
IEC251I 037(246,000,IGG0CLHA)-006,SVTSCU,SPFPROCESPFPROCE,SMPCSI,,,
IEC251I MVS.GLOBAL.CSI,MVS.GLOBAL.CSI.DATA,CATALOG.OS390
IEC251I 037(246,000,IGG0CLHA)-006,SVTSCU,SPFPROCESPFPROCE,SMPCSI,,,
IEC251I MVS.GLOBAL.CSI,MVS.GLOBAL.CSI.INDEX,CATALOG.OS390
Listed below are examples of the messages which are issued to the z/OS operator console during the
same initial access of the SMP/E data set MVS.GLOBAL.CSI using the ISPF SMP/E Dialogs. Each of
these messages will be issued several times.
IEF196I IEC331I 050-018(00201110),SVTSCU ,SPFPROCE,,IGG0CLE2
IOS000I 222,16,WRI,05,0200,80020000C4BC2000,02BC0000,VDMVSB,SVTSCU
IOS000I 222,16,WRI,05,0200,80020000C4BF2000,02BF0000,VDMVSB,CATALOG
IEC331I 050-018(00201110),SVTSCU ,SPFPROCE,,IGG0CLE2
IEC251I 037(246,000,IGG0CLHA)-006,SVTSCU,SPFPROCESPFPROCE,SMPCSI,,,
IEC251I MVS.GLOBAL.CSI,MVS.GLOBAL.CSI.DATA,CATALOG.OS390
Because these VSAM data sets are located on Read/Only disk volumes, several error messages will
be issued during data set opening and closing. These messages have no effect on the retrieval of
information from the data sets and may be ignored.
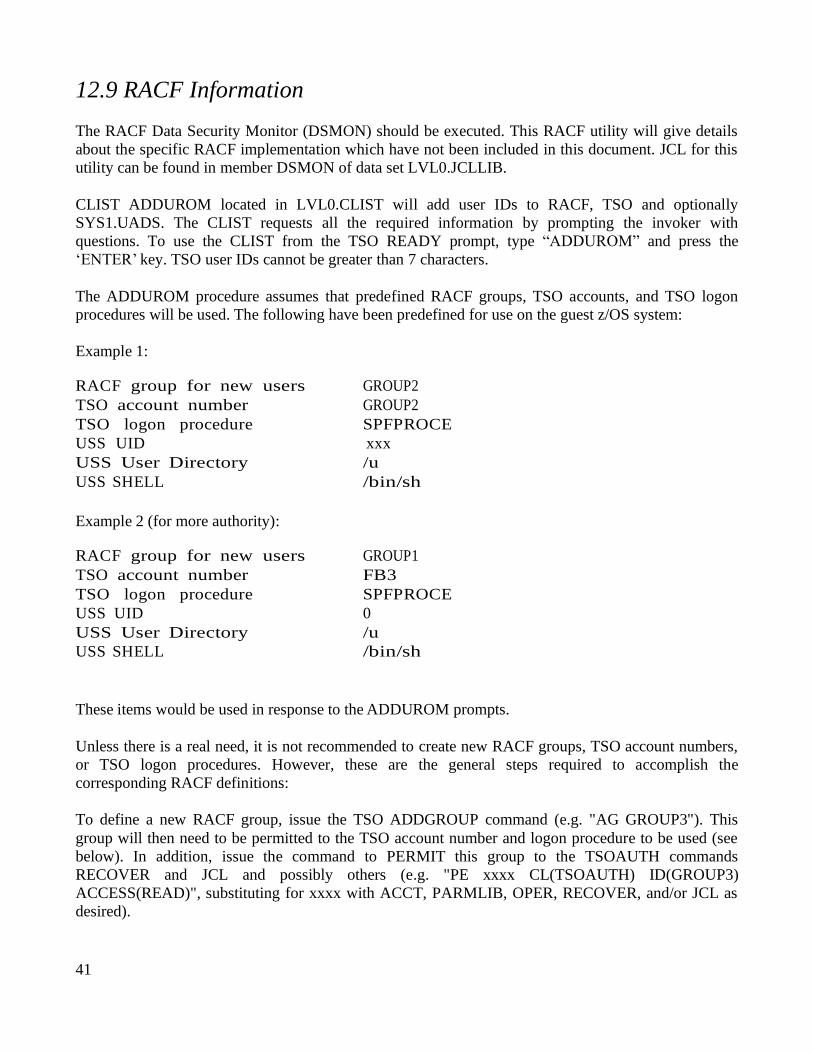
41
12.9 RACF Information
The RACF Data Security Monitor (DSMON) should be executed. This RACF utility will give details
about the specific RACF implementation which have not been included in this document. JCL for this
utility can be found in member DSMON of data set LVL0.JCLLIB.
CLIST ADDUROM located in LVL0.CLIST will add user IDs to RACF, TSO and optionally
SYS1.UADS. The CLIST requests all the required information by prompting the invoker with
questions. To use the CLIST from the TSO READY prompt, type “ADDUROM” and press the
‘ENTER’ key. TSO user IDs cannot be greater than 7 characters.
The ADDUROM procedure assumes that predefined RACF groups, TSO accounts, and TSO logon
procedures will be used. The following have been predefined for use on the guest z/OS system:
Example 1:
RACF group for new users GROUP2
TSO account number GROUP2
TSO logon procedure SPFPROCE
USS UID xxx
USS User Directory /u
USS SHELL /bin/sh
Example 2 (for more authority):
RACF group for new users GROUP1
TSO account number FB3
TSO logon procedure SPFPROCE
USS UID 0
USS User Directory /u
USS SHELL /bin/sh
These items would be used in response to the ADDUROM prompts.
Unless there is a real need, it is not recommended to create new RACF groups, TSO account numbers,
or TSO logon procedures. However, these are the general steps required to accomplish the
corresponding RACF definitions:
To define a new RACF group, issue the TSO ADDGROUP command (e.g. "AG GROUP3"). This
group will then need to be permitted to the TSO account number and logon procedure to be used (see
below). In addition, issue the command to PERMIT this group to the TSOAUTH commands
RECOVER and JCL and possibly others (e.g. "PE xxxx CL(TSOAUTH) ID(GROUP3)
ACCESS(READ)", substituting for xxxx with ACCT, PARMLIB, OPER, RECOVER, and/or JCL as
desired).

42
To define a new TSO account, first issue the TSO RDEFINE command (e.g. "RDEF ACCTNUM
GROUP3"), then issue the TSO PERMIT command (e.g. "PE GROUP3 CL(ACCTNUM)
ID(GROUP3) ACCESS(READ)"), and then issue the TSO SETROPTS command to refresh the in-
storage profiles (e.g. "SETR RACLIST(ACCTNUM) REFRESH").
To define a new TSO logon procedure, first issue the TSO RDEFINE command (e.g. "RDEF
TSOPROC PROCXX"), then issue the TSO PERMIT command (e.g. "PE PROCXX CL(TSOPROC)
ID(GROUP3) ACCESS(READ)"), and then issue the TSO SETROPTS command to refresh the in-
storage profiles (e.g. "SETR RACLIST(TSOPROC) REFRESH").
The user password interval is 60 days. The initial password for IBMUSER is IBMUSER. RACF will
require the initial password to be changed the first time this user ID is logged on. Note that all TSO
user IDs will be revoked after 6 consecutive unsuccessful logon attempts.
RACF Exit Routines:
• ICHRDSNT – The RACF data set name table specifies the RACF database names as
SYS1.RACFPRM1 for the primary and SYS1.RACFBCK1 for the backup.
• CHRIN03 – The RACF started task table associates an user ID and group with all started tasks.
Member ICHRIN03 in LVL0.SVSC.CNTL contains the source. Member ICHRIN3@ will
assemble and link edit a new table.
RACF Groups:
• SYS1
• GROUP1
• GROUP2 (empty)
• GROUPZ
• SYSCTLG
• VSAMDSET
• Run DSMON to determine the hierarchy.
RACF General Resource Class TSOPROC is active. The only profile is SPFPROCE.
RACF General Resource Class ACCTNUM is active. The only profiles are FB3 and GROUP2.
RACF General Resource Class PERFGRP is active. No profiles have been defined.
RACF General Resource Class TSOAUTH is active. Profiles for this class are ACCT, JCL, MOUNT,
OPER, PARMLIB, and RECOVER.
12.10 VTAM Definitions
The terminals defined at E00-E07 do not have the extended data stream attribute. Specifically, the
VTAM parameters FEATUR2=MODEL2 and DLOGMOD=S3270 have been coded in the VTAM
terminal definition. The terminals defined at F00-F07 have the extended data stream attribute.

43
Specifically, the VTAM parameters FEATUR2=EDATS and DLOGMOD=NSX32702 have been coded
in the VTAM terminal definition. Use this for data transfer (IND$FILE) from a TN3270 emulator.
VTAM USS Tables – Only one VTAM USS table exists in the system. Member USSTAB1 in
LVL0.SVSC.CNTL contains the source. Member USSTAB1@ will assemble and link edit a new table.
Below are pieces from LVL0.PROCLIB(VTAM):
//VTAMLST DD DISP=SHR,DSN=VENDOR.VTAMLST
// DD DISP=SHR,DSN=SVTSC.VTAMLST
// DD DISP=SHR,DSN=LVL0.VTAMLST
// DD DISP=SHR,DSN=SYS1.VTAMLST
//VTAMLIB DD DISP=SHR,DSN=VENDOR.VTAMLIB
// DD DISP=SHR,DSN=SVTSC.VTAMLIB
// DD DISP=SHR,DSN=LVL0.VTAMLIB
// DD DISP=SHR,DSN=SYS1.VTAMLIB
Using this structure, custom changes for VTAMLST should be placed in VENDOR.VTAMLST.
Changes for VTAMLIB should be placed in VENDOR.VTAMLIB.
12.11 JES2 Information
Initiators 1-5 and 9 are activated at JES2 initialization. These initiators service execution classes A, B,
H, K, L, S, 4, and 7. The default output class is A. The default HOLD output class is H. Use this output
class to place TSO and batch job output in a HOLD queue for browsing with the TSO OUTPUT
command and the ISPF OUTLIST utility (option 3.8).
There are no installation required job card parameters.
WARNING REGARDING JES2 AUTOMATIC PURGE
Output class Z is defined as a JES2 purge class – all output directed to this class will be automatically
purged immediately. Use this output class with care.
Output classes D and W are periodically purged by a JES2 automatic command output directed to
these classes will be automatically purged at the next automatic command interval (every 60 minutes
for class W, every 2.5 hours for class D). Some of the system started tasks (such as TCAS) direct
their output to class W. This output will remain in the output queue for a period of time and then will
be purged permanently. Use these output classes with care.
Note: The JES2 automatic commands may be found at the bottom of the JES2 PARMLIB member
SYS1.PARMLIB(JES2420A).

44
Printer 1 at address 002 is defined as a 3211 to z/OS and z/VM. It is placed in a drained status during
JES2 initialization. This is a virtual printer, and should normally remain drained. Starting a virtual
printer will write the output to the z/VM SPOOL (where it will be inaccessible from the guest z/OS
system.) The data will not actually print on a real printer.
12.12 TSO Logon Procedures and Data Set Concatenation
There are two TSO logon procedures defined in LVL0.PROCLIB. These members are named
SPFPROCE and IKJACCNT. These logon procedures contain very few DD statements. Most data set
allocation is completed through CLIST/REXX procedures invoked at logon. Additional procedures
may exist for other software products like DB2.
Listed below, in the order of invocation, are the CLIST/REXX procedures which get executed during
logon. Beside each procedure is a brief description of its function. All CLIST/REXX procedures are
located in LVL0.CLIST, except as noted.
CLIST/REXX Function
SETUP Invoked from the logon procedure. Invokes the other CLIST/REXX described below
and then PDF.
SYSPROC Invoked by the CLIST SETUP. Creates the SYSPROC DD concatenation.
SYSEXEC Invoked by the CLIST SETUP. Creates the SYSEXEC DD concatenation.
SYSHELP Invoked by the CLIST SETUP. Creates the SYSHELP DD concatenation.
LOGMSG
Invoked by the CLIST SETUP. Delivers any messages that the IBM Z Dallas ISV
Center needs to broadcast to users. Please do not override this CLIST or the call to
this CLIST.
ISPPROF Invoked by the CLIST SETUP. Allocates the ISPF/PDF profile data set.
ISPFDS Invoked by the CLIST SETUP. Allocates the ISPF/PDF DD concatenations for
ISPLLIB, ISPPLIB, ISPMLIB, and ISPSLIB.
ISPFTAB Invoked by the CLIST SETUP. Allocates the ISPF/PDF DD concatenations for
ISPTABL, SMPTABL, and ISPTLIB.
VENDORC
Invoked by the CLIST SETUP. This REXX is provided by the IBM Z Dallas ISV
Center in VENDOR.CLIST. This REXX is the place during TSO LOGON where the
user should perform any customizations.

45
12.12.1 Sample Jobs and CLIST/REXX Availability
• Task CLRLGREC located in LVL0.PROCLIB will clear SYS1.sysname.LOGREC. To use this
task from the z/OS console, type the command “START CLRLGREC” and press the ‘ENTER’
key.
• Task CLRMAN1 located in LVL0.PROCLIB will clear the SYS1.sysname.MAN1 SMF data
set. To use this task from the z/OS console, type the command “START CLRMAN1” and press
the ‘ENTER’ key.
• Task CLRMAN2 located in LVL0.PROCLIB will clear the SYS1.sysname.MAN2 SMF data
set. To use this task from the z/OS console, type the command “START CLRMAN2” and press
the ‘ENTER’ key.
• Task RACFUR located in LVL0.PROCLIB will resume the IBMUSER TSO User ID and set the
initial password back to IBMUSER. This may be used if access to the IBMUSER user ID is
required and the user ID has been revoked by RACF.
WARNING
• Dynamic system dump data sets have been enabled in the guest z/OS system. The dump data set
names have the format MVS1.SVCDUMP.&SYSNAME..D&DATE..T&TIME..S&SEQ.
For example: MVS1.SVCDUMP.S0W2.D941230.T221214.S00001 contains an SVC
dump from system S0W2 on 12/30/94 at 22:12:14. The dump data sets are written to DASD
volume VPMVSB.
• REXX exec MOUNT in LVL0.SYSEXEC is used to issue tape mount requests to the SVUTIL
service machine. See “Mount...“ on page 54 for more information on use of the MOUNT exec.
• REXX exec DETACH in LVL0.SYSEXEC is used to issue commands to detach one or more
tape devices. See “Detach...“ on page 54 for more information on use of the DETACH exec.
• REXX exec SLEEP in LVL0.SYSEXEC is used to issue commands to put the guest z/OS
system to sleep after a specified time delay. See “Putting the guest z/OS system to
• SLEEP from a TSO session“ on page 30 for more information on use of the SLEEP exec.
When security internal to the guest z/OS system is required (i.e. between users of the guest z/OS
system), remove or otherwise protect this procedure from casual use as it enables access to a RACF
SPECIAL user ID. To effectively remove the procedure, create a dummy procedure of the same name
and place it in the VENDOR.PROCLIB data set.
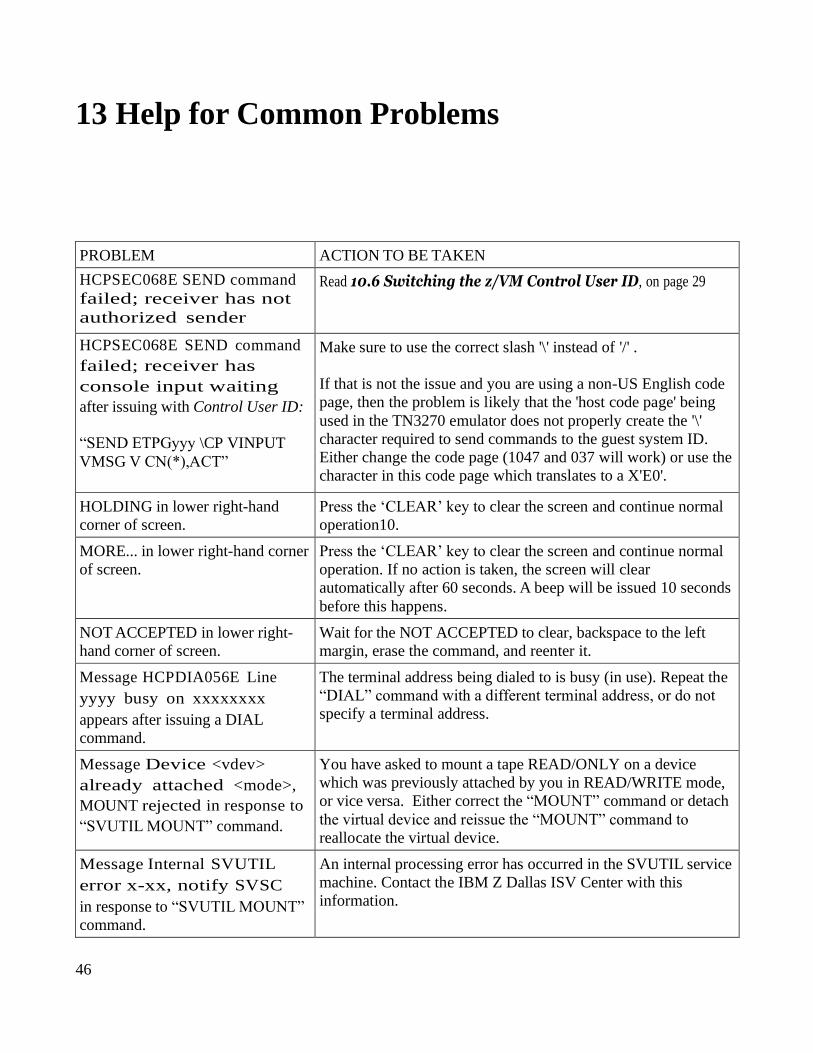
46
13 Help for Common Problems
PROBLEM ACTION TO BE TAKEN
HCPSEC068E SEND command
failed; receiver has not
authorized sender
Read 10.6 Switching the z/VM Control User ID, on page 29
HCPSEC068E SEND command
failed; receiver has
console input waiting
after issuing with Control User ID:
“SEND ETPGyyy \CP VINPUT
VMSG V CN(*),ACT”
Make sure to use the correct slash '\' instead of '/' .
If that is not the issue and you are using a non-US English code
page, then the problem is likely that the 'host code page' being
used in the TN3270 emulator does not properly create the '\'
character required to send commands to the guest system ID.
Either change the code page (1047 and 037 will work) or use the
character in this code page which translates to a X'E0'.
HOLDING in lower right-hand
corner of screen.
Press the ‘CLEAR’ key to clear the screen and continue normal
operation10.
MORE... in lower right-hand corner
of screen.
Press the ‘CLEAR’ key to clear the screen and continue normal
operation. If no action is taken, the screen will clear
automatically after 60 seconds. A beep will be issued 10 seconds
before this happens.
NOT ACCEPTED in lower right-
hand corner of screen.
Wait for the NOT ACCEPTED to clear, backspace to the left
margin, erase the command, and reenter it.
Message HCPDIA056E Line
yyyy busy on xxxxxxxx
appears after issuing a DIAL
command.
The terminal address being dialed to is busy (in use). Repeat the
“DIAL” command with a different terminal address, or do not
specify a terminal address.
Message Device <vdev>
already attached <mode>,
MOUNT rejected in response to
“SVUTIL MOUNT” command.
You have asked to mount a tape READ/ONLY on a device
which was previously attached by you in READ/WRITE mode,
or vice versa. Either correct the “MOUNT” command or detach
the virtual device and reissue the “MOUNT” command to
reallocate the virtual device.
Message Internal SVUTIL
error x-xx, notify SVSC
in response to “SVUTIL MOUNT”
command.
An internal processing error has occurred in the SVUTIL service
machine. Contact the IBM Z Dallas ISV Center with this
information.

47
Message Tape xxxxxx not
found. Check typing, use
'MSG SVUTIL LISTTAPES'
to review list of tapes,
or notify SVSC in response to
“SVUTIL MOUNT” command.
The tape requested was not found in the tape library database for
the user/account requesting the tape mount. Ensure the reference
number was typed correctly. Use the SVUTIL LISTTAPES
function to display a list of tapes in the database (see 11. Tape
Handling Procedures, on page 30). If necessary, contact the
IBM Z Dallas ISV Center for assistance.
Message IEE362A SMF ENTER
DUMP FOR
SYS1.SYSNAME.MANx
ON vvvvvv appears on MVS
console and system log.
Use the SMF dump program to dump the data set for future
processing. If SMF data does not need to be retained, clear the
condition by starting task CLRMAN1 for
SYS1.SYSNAME.MAN1 or CLRMAN2 for
SYS1.SYSNAME.MAN2. See 12.12.1 Sample Jobs and
CLIST/REXX Availability, on page 45 for additional details
about CLRMAN1 and CLRMAN2.
Note: Only the inactive SMF data set may be cleared. Use the "I
SMF" MVS command to switch SMF data sets if necessary.
Message IOS152E DEVICE
dddd BOXED BY SUBCHANNEL
RECOVERY appears on MVS
console and system log.
For tape devices, this message is usually caused by putting the
system to sleep without first detaching the attached tape device
(Always vary offline and detach the tape device before putting
the guest z/OS system to sleep). The tape device was forcibly
detached without first being varied offline to MVS, resulting in
the boxed condition. The device address will be unusable until
the next IPL. Substitute another tape device address for the next
tape mount request (e.g. if you were using address 590 and now
550 is boxed, use 551).
Messages $HASP488,
$HASP479, and $HASP454
appear on the MVS console and
system log.
Reply "Y" to message $HASP454 to bypass the multi-system
integrity lock and allow JES2 to continue initialization (the
actual command entered would be "R nn,Y" where "nn" is the
reply number to the left of message $HASP454).
Message $HASP601 appears on
the MVS console and system log.
Enter the "$S A,ALL" command to restart JES2 automatic
command processing. This message may appear as a result of an
extended period during which the system was halted (for
example, put to sleep over a weekend). The JES2 automatic
commands are used to periodically cleanup unwanted SPOOL
output files from TCAS, etc.
Message UNABLE TO
ESTABLISH SESSION – INIT
SELF FAILED WITH
SENSE 08570002 appears after
typing "TSO" on the MVS VTAM
screen to access TSO.
The TSO application is not active. On the MVS Master Console,
start the TSO application with the "START TCAS" command.
After TSO has started (messages IKT005I and IKT007I appear),
reenter the "TSO" command.
Note: It is not necessary to clear the screen or re access the
VTAM logo – type "TSO" on the same screen with the UNABLE
TO ESTABLISH SESSION error message.

48
Message HCPGIR450W CP
entered; disabled wait
PSW 000A0000 000000xx
appears after attempting to IPL a
guest z/OS system (xx is usually 32,
33, or 64).
“LOGOFF” and then “LOGON” to retry the IPL (possibly
several times if needed). If the problem persists, contact the IBM
Z Dallas ISV Center for assistance.
HCPSEC068E “SEND” command
failed; receiver has console input
waiting
Be sure you are using a backward slash (\) preceding CP in the
“SEND” command.
If you are using a backward slash (\) and receiving this message,
try setting the code page associated with your session emulator
to 1047
HCPLGA054E Already logged on
disconnected
The guest z/OS system is already up and running. Refer to 6.
Managing the Guest z/OS System with “SLEEP” and
“BEGIN”, on page 18, to see if the system is in SLEEP mode.
HCPLGA054E Already logged on
LUNAME ... when logging onto a
z/VM Personal User ID
Type “LOGOFF” and press the ‘ENTER’ key to return to the
logo screen. On the logo screen, tab to the COMMAND line and
type “L ETPDESY HERE” and press the ‘ENTER’ key.
Guest z/OS system fails to complete
IPL
or
$HASP454 SHOULD JES2
BYPASS THE MULTI-MEMBER
INTEGRITY LOCK? ('Y' OR
'N')
Issue the command:
“SEND ETPGJON \CP VI VMSG D R,L”
Look for $HASP454 message. Respond 'Y' to this message
“SEND ETPGyyy \CP VI VMSG R 2,y”
Please complete the remaining steps to IPL the guest z/OS system. Review the information in section 4.2 How to IPL the Guest z/OS System (Detailed Description), on page 12.
Trouble accessing the Remote
Development system from a remote
application.
Information about blocked ports can be found on the IBM Z
Dallas ISV Center Website at URL:
http://dtsc.dfw.ibm.com/MVSDS/'HTTPD2.DSN01.PUBLIC.SH
TML%28BLKPORTS%29'
$HASP050 JES2 RESOURCE
SHORTAGE To verify the problem, issue the command:
“$DSPL”
To cleanup all spool older than 7 days, issue the command:
“$POJOBQ,ALL,PROTECTED,DAYS>7”
Automatic cleanup of syslog output can be done to help prevent

49
$HASP050 JES2 RESOURCE
SHORTAGE (Continued… )
the spool space full condition. This can be done by placing the
following command at the bottom of the JES2 parameter deck:
“$TA,T=00.30,I=86400,'$POJOBQ,Q=C,DAYS>7”
This will delete any class C output every 24 hours at 00:30 am,
that is greater than 7 days old.
Class C output is the normal class specified in IEASYSLV in
LVL0.PARMLIB for the syslog output class. If the class is
changed then the command will need to be modified as well.
Unable to log on to TSO, or IEA602I ADDRESS SPACE
This condition is caused by a shortage of slots in the Auxiliary
storage configuration. This can be resolved by removing
CREATE FAILED. A STORAGE unneeded tasks that are currently running. If you require all
SHORTAGE EXISTS tasks, contact the IBM Z Dallas ISV Center to obtain additional
storage needed.
or
Prior to logoff and restarting the guest z/OS system for problem
IRA200E AUXILIARY determination, please issue the following commands:
STORAGE SHORTAGE
“D ASM” “D R,L” “D A,L”
“W”
Unable to connect to the guest z/OS
system
Please see section 6. Managing the Guest z/OS system with
“SLEEP” and “BEGIN”, on page 18.
Please review the information in section 4.2 How to IPL the Guest z/OS System (Detailed Description), on page 12.
If you are still unable to connect, please contact the IBM Z
Dallas ISV Center referencing section 14.4 Technical Support,
on page 53.

50
14 Other Information
14.1 Terms and Definitions
Guest system An operating system running in a virtual machine managed by the z/VM Control
program.
Control User ID The term z/VM Control User ID is used to reference the specific z/VM Personal
User ID used to initialize the guest z/OS system and currently holds the ability to
perform functions for the system.
Virtual Machine A functional equivalent of either a System/370 computing system, a System/370-
XA (Extended Architecture) computing system, a System/370-ESA (Enterprise
Systems Architecture), or a System/390 computing system. Each virtual machine
is controlled by an operating system.
z/VM Virtual Machine. A software facility which enables multiple users to
share the resources of a single physical processor complex such that each user
appears to have the equivalent of a dedicated processor.
The following are CP and CMS Status Indicators – these indicators may at times appear in the lower
right hand corner of the display.
CP READ Means that CP issued a read request to the display and is waiting for something
to be entered before it continues processing.
VM READ Similar to CP READ but issued from CMS (Conversational Monitor System, a
component of z/VM).
RUNNING Means that CP or CMS either is ready for the next CP or CMS command or is
processing a previously entered command.
MORE... Means that the output display area is full and that CMS or CP has more lines to
display. The data currently on the screen will be displayed for one minute. To get
to the next screen, press ‘CLEAR’ or ‘PA2’. To keep the current information on
the screen, press the ‘ENTER’ key. The HOLDING indicator then appears in the
status area. If you do not respond to the MORE... indicator within 1 minute, the
next screen will automatically be displayed (your display device will beep 10
seconds prior to display of the next screen).
HOLDING Means that the ‘ENTER’ key was pressed in response to a MORE... status
indicator, or that the display screen contains priority messages from CP. To get to
the next screen, press ‘CLEAR’ or ‘PA2’.

51
Special Keys The ‘PA1’, ‘PA2’, and ‘CLEAR’ keys are part of the IBM 3270 terminal
architecture, and may be emulated by a different key or combination of keys
depending on the actual terminal or personal computer emulation package being
used.
NOT ACCEPTED Means that previous input has not yet been processed. Recommended response is
to wait for the NOT ACCEPTED to clear, backspace to the left margin, erase the
command, and reenter it.
14.2 Trademarks
The following terms are trademarks or registered trademarks of International Business Machines
Corporation in the United States, other countries, or both. If these and other IBM trademarked terms
are marked on their first occurrence in this information with a trademark symbol (® or ™), these
symbols indicate U.S. registered or common law trademarks owned by IBM at the time this
information was published. Such trademarks may also be registered or common law trademarks in
other countries. A current list of IBM trademarks is available on the Web at “Copyright and trademark
information” at www.ibm.com/legal/copytrade.shtml.
ADSP
CICS®
DB2®
DFSMS
IBM®
IMS™
MVS™
RACF®
REXX
RMF™
IBM Z®
VTAM®
z/OS®
z/VM®
Microsoft, Windows, Windows NT, and the Windows logo are trademarks of Microsoft
Corporation in the United States, other countries, or both. UNIX is a registered trademark of The Open
Group in the United States and other countries. Other company, product, or service names may be
trademarks or service marks of others.

52
14.3 Notices
This information was developed for products and services offered in the U.S.A.
IBM may not offer the products, services, or features discussed in this document in other
countries. Consult your local IBM representative for information on the products and services
currently available in your area. Any reference to an IBM product, program, or service is not
intended to state or imply that only that IBM product, program, or service may be used. Any
functionally equivalent product, program, or service that does not infringe any IBM intellectual
property right may be used instead. However, it is the user's responsibility to evaluate and verify
the operation of any non-IBM product, program, or service.
IBM may have patents or pending patent applications covering subject matter described in this
document. The furnishing of this document does not give you any license to these patents. You
can send license inquiries, in writing, to:
IBM Director of Licensing, IBM Corporation, North Castle Drive, Armonk, NY 10504-1785
U.S.A.
The following paragraph does not apply to the United Kingdom or any other country
where such provisions are inconsistent with local law: INTERNATIONAL BUSINESS
MACHINES CORPORATION PROVIDES THIS PUBLICATION "AS IS" WITHOUT
WARRANTY OF ANY KIND, EITHER EXPRESS OR IMPLIED, INCLUDING, BUT NOT
LIMITED TO, THE IMPLIED WARRANTIES OF NON-INFRINGEMENT,
MERCHANTABILITY OR FITNESS FOR A PARTICULAR PURPOSE. Some states do not
allow disclaimer of express or implied warranties in certain transactions, therefore, this statement may
not apply to you.
This information could include technical inaccuracies or typographical errors. Changes are
periodically made to the information herein; these changes will be incorporated in new editions
of the publication. IBM may make improvements and/or changes in the product(s) and/or the
program(s) described in this publication at any time without notice.

53
14.4 Technical Support
Technical Support is provided our User Group (IBM Z Dallas ISV Center) at URL
https://ibm.biz/DallasISVCommunity. To join this User Group, please follow these instructions.
Join the IBM Z Dallas ISV Community Website
This secure user group is a place for partners to collaborate, ask questions, trade tips and tricks. Your
membership will not be approved if you are not enrolled in an active program in the IBM Z Dallas ISV
environment.
To join, you will first need to join the IBM Z and LinuxONE Community. You can use the following
invite link to do this. https://ibm.com/community/z/join
• Sign in with an IBMid
If you do not have an IBMid, you may create one by clicking on the link below the login box that says
Don’t have an account? Create an IBM id.
• Select your preference for discussion notifications
• Click Yes join the group
Once you have joined the IBM Z and LinuxONE community, please use this form to request access to
the IBM Z Dallas ISV Center Community: https://www.ibm.com/community/z/ibm-z-dallas-isv-center-
request-membership/
Once approved, you will receive an email containing a unique link to join the group.
Hours of attended operation are 07:00 to 19:00 US Central time Monday through Friday except IBM
USA holidays. Emails received after hours, on weekends, or on holidays will be processed the next
business day. If you require technical support, please follow the instructions on
http://dtsc.dfw.ibm.com/contact.html
If confidential support is needed, please e-mail us at [email protected].
14.5 z/OS System Customization
The User's Guide and Reference contains basic information about working with the guest z/OS system.
For more detailed information about customizing the guest z/OS, please visit the “Getting Started at
IBM Z Dallas ISV Center” link on the IBM Z Dallas ISV Center website at URL http://
dtsc.dfw.ibm.com/
Related Documents