www.lexmark.com User’s Guide July 2005 Lexmark and Lexmark with diamond design are trademarks of Lexmark International, Inc., registered in the United States and/or other countries. © 2005 Lexmark International, Inc. All rights reserved. 740 West New Circle Road Lexington, Kentucky 40550 E120, E120n

Welcome message from author
This document is posted to help you gain knowledge. Please leave a comment to let me know what you think about it! Share it to your friends and learn new things together.
Transcript
www.lexmark.com
User’s Guide
July 2005
Lexmark and Lexmark with diamond design are trademarks of Lexmark International, Inc.,registered in the United States and/or other countries.© 2005 Lexmark International, Inc. All rights reserved.740 West New Circle RoadLexington, Kentucky 40550
E120, E120n
2
Edition: July 2005
The following paragraph does not apply to any country where such provisions are inconsistent with local law: LEXMARK INTERNATIONAL, INC., PROVIDES THIS PUBLICATION “AS IS” WITHOUT WARRANTY OF ANY KIND, EITHER EXPRESS OR IMPLIED, INCLUDING, BUT NOT LIMITED TO, THE IMPLIED WARRANTIES OF MERCHANTABILITY OR FITNESS FOR A PARTICULAR PURPOSE. Some states do not allow disclaimer of express or implied warranties in certain transactions; therefore, this statement may not apply to you.This publication could include technical inaccuracies or typographical errors. Changes are periodically made to the information herein; these changes will be incorporated in later editions. Improvements or changes in the products or the programs described may be made at any time.Comments about this publication may be addressed to Lexmark International, Inc., Department F95/032-2, 740 West New Circle Road, Lexington, Kentucky 40550, U.S.A. In the United Kingdom and Eire, send to Lexmark International Ltd., Marketing and Services Department, Westhorpe House, Westhorpe, Marlow Bucks SL7 3RQ. Lexmark may use or distribute any of the information you supply in any way it believes appropriate without incurring any obligation to you. You can purchase additional copies of publications related to this product by calling 1-800-553-9727. In the United Kingdom and Eire, call +44 (0)8704 440 044. In other countries, contact your point of purchase.References in this publication to products, programs, or services do not imply that the manufacturer intends to make these available in all countries in which it operates. Any reference to a product, program, or service is not intended to state or imply that only that product, program, or service may be used. Any functionally equivalent product, program, or service that does not infringe any existing intellectual property right may be used instead. Evaluation and verification of operation in conjunction with other products, programs, or services, except those expressly designated by the manufacturer, are the user’s responsibility.© 2005 Lexmark International, Inc.All rights reserved.UNITED STATES GOVERNMENT RIGHTSThis software and any accompanying documentation provided under this agreement are commercial computer software and documentation developed exclusively at private expense.
Trademarks
Lexmark and Lexmark with diamond design are trademarks of Lexmark International, Inc. Details relating to compatibility are included in the Technical Reference.Other trademarks are the property of their respective owners.
Safety information
• Connect the power cord to a properly grounded electrical outlet that is near the product and easily accessible.CAUTION: Do not set up this product or make any electrical or cabling connections, such as the power cord or telephone, during a lightning storm.
• Refer service or repairs, other than those described in the operating instructions, to a professional service person.
• This product is designed, tested, and approved to meet strict global safety standards with the use of specific Lexmark components. The safety features of some parts may not always be obvious. Lexmark is not responsible for the use of other replacement parts.CAUTION: Make sure that all external connections are properly installed in their marked plug-in ports, such as Ethernet and telephone system connections.
• Your product uses a laser. CAUTION: Use of controls or adjustments or performance of procedures other than those specified herein may result in hazardous radiation exposure.
• Your product uses a printing process that heats the print media, and the heat may cause the media to release emissions. You must understand the section in your operating instructions that discusses the guidelines for selecting print media to avoid the possibility of harmful emissions.
3
Contents
Chapter 1: Overview ........................................................................................................... 5
Chapter 2: Using the operator panels ............................................................................... 8Overview of the Lexmark E120 operator panel ................................................................................................ 9
Understanding the Lexmark E120 operator panel lights ........................................................................ 10Operator panel codes for the Lexmark E120 .......................................................................................... 12
Overview of the Lexmark E120n operator panel ............................................................................................ 25
Understanding the Lexmark E120n operator panel lights ...................................................................... 26Operator panel codes for the Lexmark E120n ........................................................................................ 28Using the printer resident Web page ...................................................................................................... 43
Printing the menu settings and network setup page ...................................................................................... 44
Restoring factory defaults .............................................................................................................................. 44
Chapter 3: Print media tasks and tips ............................................................................. 45Types of print media ...................................................................................................................................... 46
Choosing appropriate print media .................................................................................................................. 46Paper ...................................................................................................................................................... 46Preprinted forms and letterhead ............................................................................................................. 47Transparencies ....................................................................................................................................... 47Envelopes ............................................................................................................................................... 47Labels ..................................................................................................................................................... 47Card stock .............................................................................................................................................. 48
Storing print media ......................................................................................................................................... 48
Loading print media into Tray 1 ..................................................................................................................... 48
Loading print media into the priority feeder ................................................................................................... 51
Preventing jams ............................................................................................................................................. 52
Clearing jams ................................................................................................................................................. 53
Chapter 4: Printing tasks ................................................................................................. 58Printing from the priority feeder ..................................................................................................................... 59
From a Windows computer ..................................................................................................................... 59From a Macintosh computer ................................................................................................................... 60
Printing on both sides of the paper (manual duplex) ..................................................................................... 61
Printing multiple page images on one page (N-up printing) ........................................................................... 62From a Windows computer ..................................................................................................................... 62From a Macintosh computer ................................................................................................................... 63
Printing on letterhead ..................................................................................................................................... 63From a Windows computer ..................................................................................................................... 63From a Macintosh computer ................................................................................................................... 63
Canceling a print job ...................................................................................................................................... 64From printer operator panel .................................................................................................................... 64From a Windows computer ..................................................................................................................... 64From a Macintosh computer ................................................................................................................... 64
4
Contents
Chapter 5: Supplies information ..................................................................................... 65Supply items needed ..................................................................................................................................... 66
Assessing supply needs ................................................................................................................................ 67
Changing the toner cartridge ......................................................................................................................... 68
Changing the long-life photoconductor kit ..................................................................................................... 71
Lexmark Return Program .............................................................................................................................. 74
Refilled toner cartridge notice ................................................................................................................. 74Recycling Lexmark products .......................................................................................................................... 74
Chapter 6: Troubleshooting ............................................................................................. 75General problems .......................................................................................................................................... 76
Print quality problems .................................................................................................................................... 78
Notices ................................................................................................................................ 82Licensing Notice ............................................................................................................................................ 82
Conventions ............................................................................................................................................ 82Electronic emission notices .................................................................................................................... 82
Noise emission levels .................................................................................................................................... 83
ENERGY STAR ............................................................................................................................................. 83
Waste from Electrical and Electronic Equipment (WEEE) directive ............................................................... 83
Laser notice ................................................................................................................................................... 84
Statement of Limited Warranty for Lexmark E120 and Lexmark E120n ........................................................ 84
Index .................................................................................................................................... 86
Overview5
1 Overview
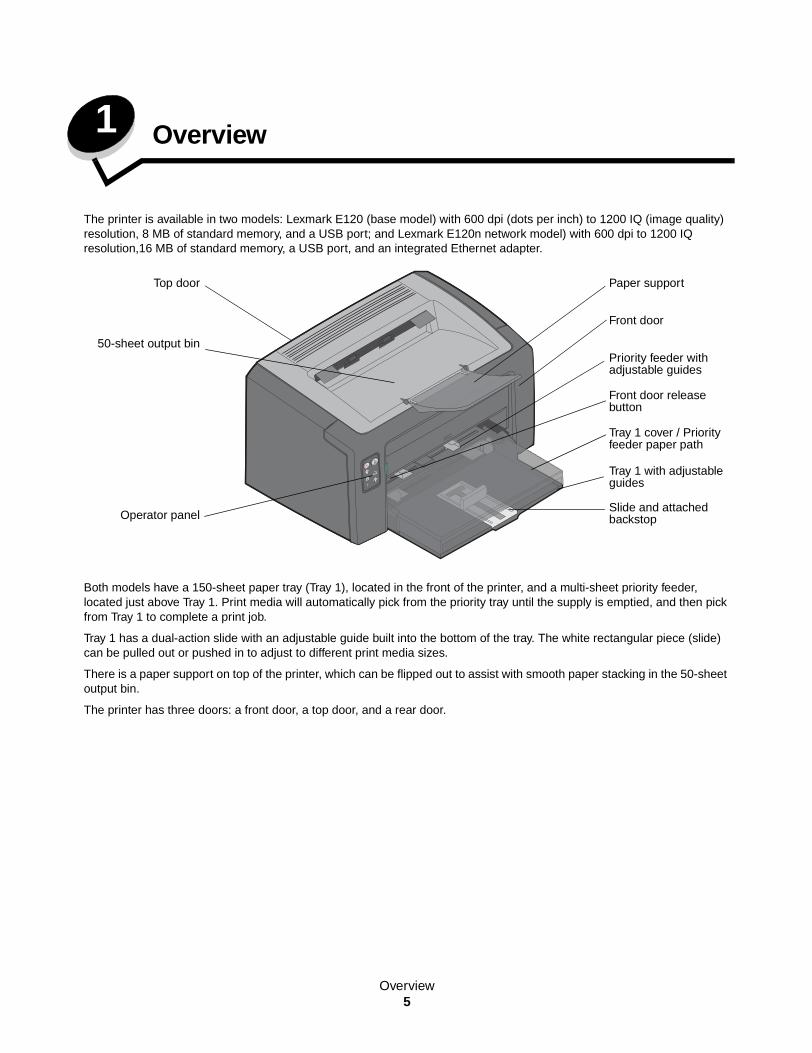
The printer is available in two models: Lexmark E120 (base model) with 600 dpi (dots per inch) to 1200 IQ (image quality) resolution, 8 MB of standard memory, and a USB port; and Lexmark E120n network model) with 600 dpi to 1200 IQ resolution,16 MB of standard memory, a USB port, and an integrated Ethernet adapter.
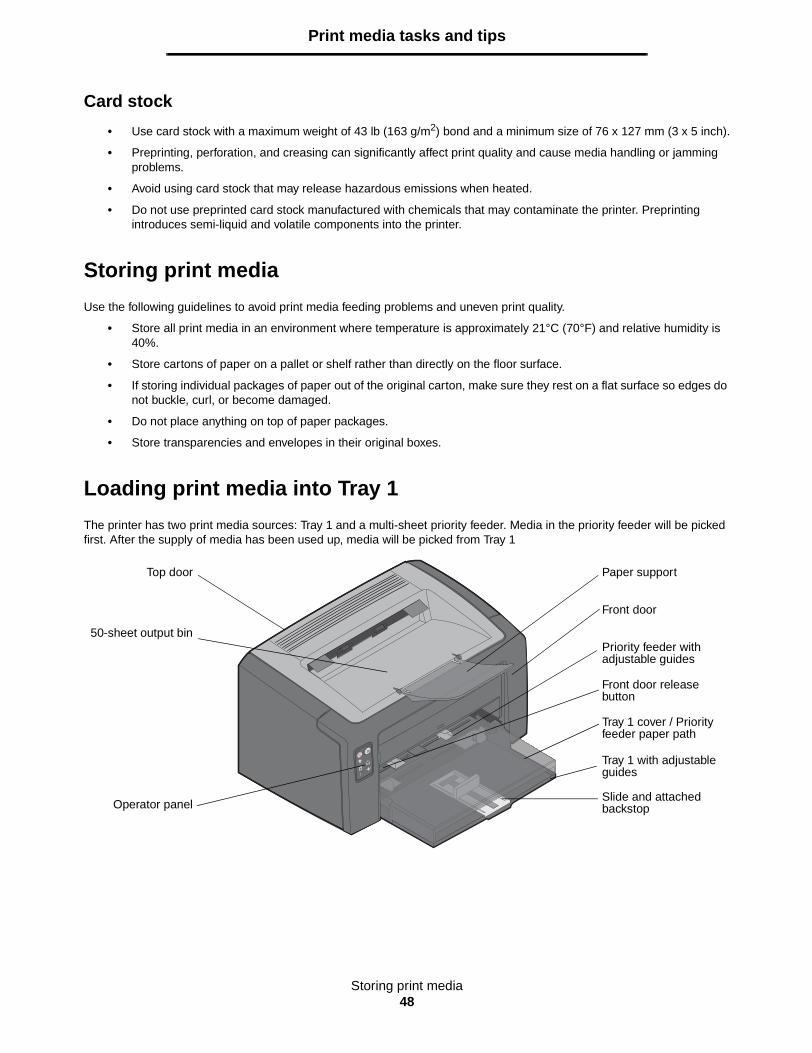
Both models have a 150-sheet paper tray (Tray 1), located in the front of the printer, and a multi-sheet priority feeder, located just above Tray 1. Print media will automatically pick from the priority tray until the supply is emptied, and then pick from Tray 1 to complete a print job.
Tray 1 has a dual-action slide with an adjustable guide built into the bottom of the tray. The white rectangular piece (slide) can be pulled out or pushed in to adjust to different print media sizes.
There is a paper support on top of the printer, which can be flipped out to assist with smooth paper stacking in the 50-sheet output bin.
The printer has three doors: a front door, a top door, and a rear door.
Tray 1 with adjustable guides
Slide and attached backstop
Front door release button
Front door
50-sheet output bin
Operator panel
Top door
Tray 1 cover / Priority feeder paper path
Priority feeder with adjustable guides
Paper support
Overview6
Overview
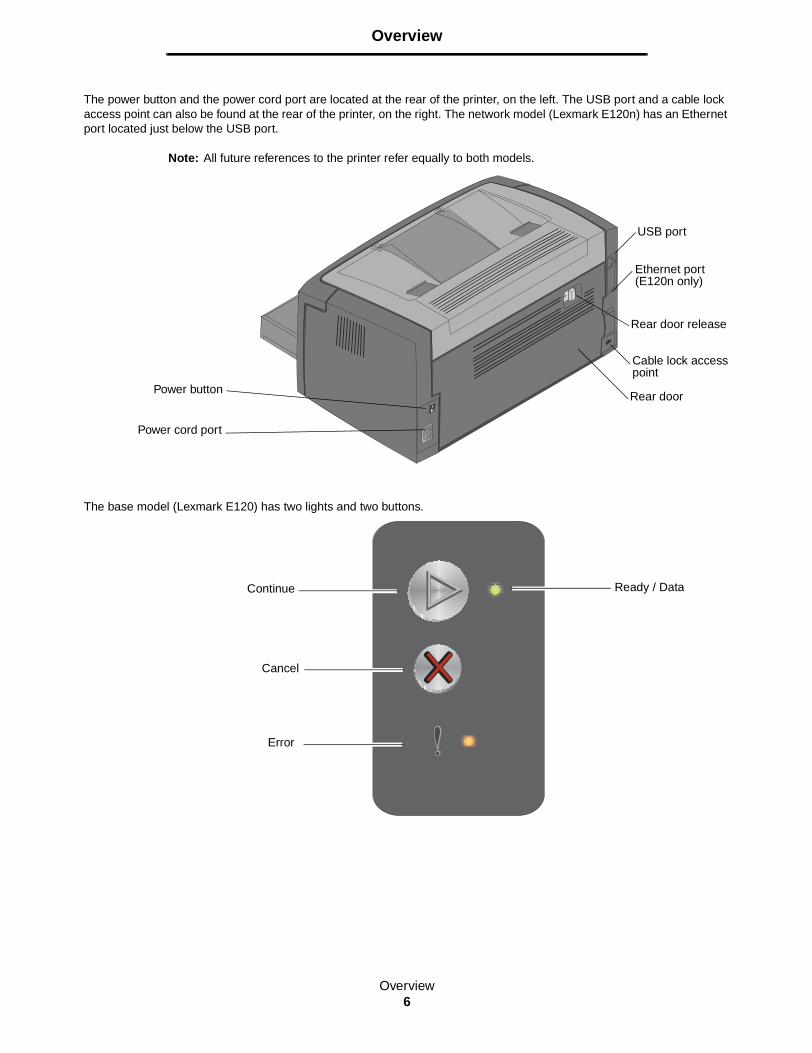
The power button and the power cord port are located at the rear of the printer, on the left. The USB port and a cable lock access point can also be found at the rear of the printer, on the right. The network model (Lexmark E120n) has an Ethernet port located just below the USB port.
Note: All future references to the printer refer equally to both models.
The base model (Lexmark E120) has two lights and two buttons.
Rear door release
Power button
Power cord port
USB port
Ethernet port (E120n only)
Cable lock access point
Rear door
Cancel
Error
Continue Ready / Data

Overview7
Overview
The network model (Lexmark E120n) has six lights and two buttons.
Note: The Continue button also functions as a light on the E120n model.
• Press and release Continue to resume printing.
• Press the Continue button from the Ready state to print menu and network setup pages.
• Press and release Cancel to cancel the current job.
• Press and hold Cancel until all lights come on to reset.
Ready / Data
Load / Remove Paper
Error
ContinueCancel
Toner Low/Replace PC Kit
Paper Jam

Using the operator panels8
2 Using the operator panels
Section Page
Overview of the Lexmark E120 operator panel 9
Understanding the Lexmark E120 operator panel lights 10
Operator panel codes for the Lexmark E120 12
Overview of the Lexmark E120n operator panel 25
Understanding the Lexmark E120n operator panel lights 26
Operator panel codes for the Lexmark E120n 28
Using the printer resident Web page 43
Printing the menu settings and network setup page 44
Restoring factory defaults 44
Overview of the Lexmark E120 operator panel9
Using the operator panels
Overview of the Lexmark E120 operator panel
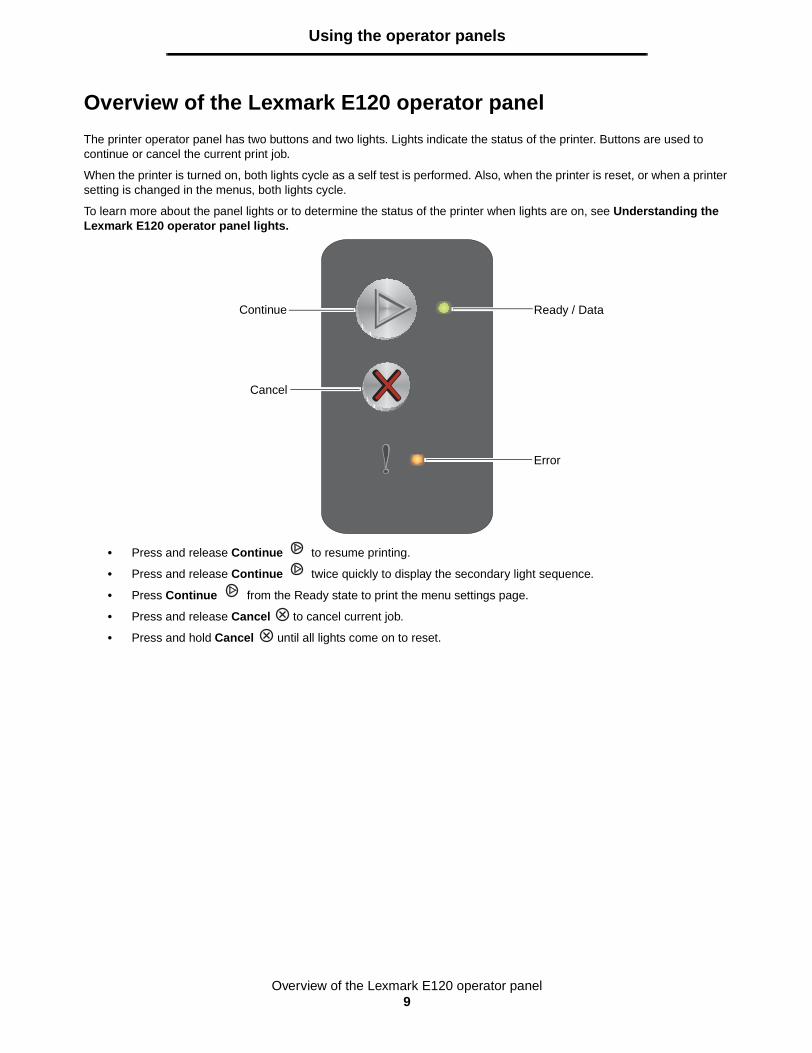
The printer operator panel has two buttons and two lights. Lights indicate the status of the printer. Buttons are used to continue or cancel the current print job.
When the printer is turned on, both lights cycle as a self test is performed. Also, when the printer is reset, or when a printer setting is changed in the menus, both lights cycle.
To learn more about the panel lights or to determine the status of the printer when lights are on, see Understanding the Lexmark E120 operator panel lights.
• Press and release Continue to resume printing.
• Press and release Continue twice quickly to display the secondary light sequence.
• Press Continue from the Ready state to print the menu settings page.
• Press and release Cancel to cancel current job.
• Press and hold Cancel until all lights come on to reset.
Ready / Data
Error
Cancel
Continue
Overview of the Lexmark E120 operator panel10
Using the operator panels
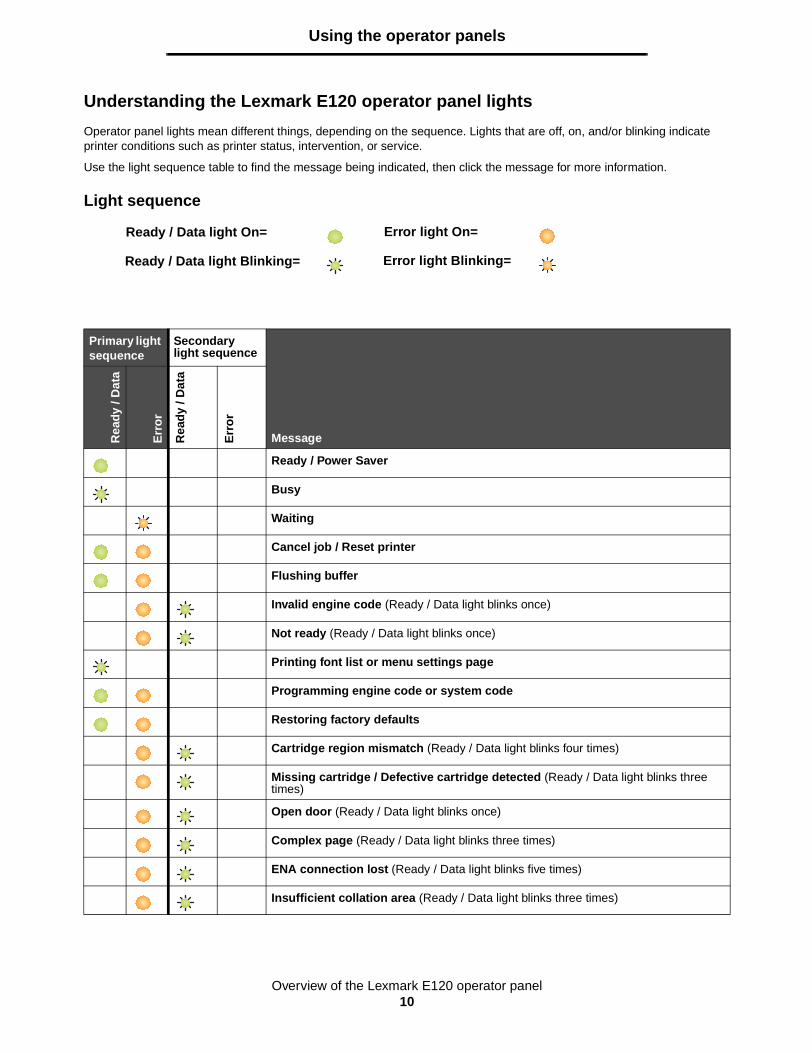
Understanding the Lexmark E120 operator panel lights
Operator panel lights mean different things, depending on the sequence. Lights that are off, on, and/or blinking indicate printer conditions such as printer status, intervention, or service.
Use the light sequence table to find the message being indicated, then click the message for more information.
Light sequence
Primary light sequence
Secondary light sequence
MessageRea
dy
/ Dat
a
Err
or
Rea
dy
/ Dat
a
Err
or
Ready / Power Saver
Busy
Waiting
Cancel job / Reset printer
Flushing buffer
Invalid engine code (Ready / Data light blinks once)
Not ready (Ready / Data light blinks once)
Printing font list or menu settings page
Programming engine code or system code
Restoring factory defaults
Cartridge region mismatch (Ready / Data light blinks four times)
Missing cartridge / Defective cartridge detected (Ready / Data light blinks three times)
Open door (Ready / Data light blinks once)
Complex page (Ready / Data light blinks three times)
ENA connection lost (Ready / Data light blinks five times)
Insufficient collation area (Ready / Data light blinks three times)
Ready / Data light On=
Ready / Data light Blinking=
Error light On=
Error light Blinking=

Overview of the Lexmark E120 operator panel11
Using the operator panels
Load media (Ready / Data light blinks once)
Print side two of a duplex job (Ready / Data light blinks once)
Memory full (Ready / Data light blinks three times)
Host interface disabled (Ready / Data light blinks five times)
Jam in the printer paper path (Ready / Data light blinks ten times)
Jam in Tray 1 / priority feeder (Ready / Data light blinks four times)
Short paper (Ready / Data light blinks three times)
Toner low (Ready / Data light blinks eight times)
Replace long-life photoconductor kit (Ready / Data light blinks once)
Service error (secondary Ready / Data light blinks ten times)
Primary light sequence
Secondary light sequence
MessageRea
dy /
Dat
a
Err
or
Rea
dy /
Dat
a
Err
or
Overview of the Lexmark E120 operator panel12
Using the operator panels
Operator panel codes for the Lexmark E120
Following are explanations of the primary and secondary light sequences, and what can be done to clear them.
Primary Codes
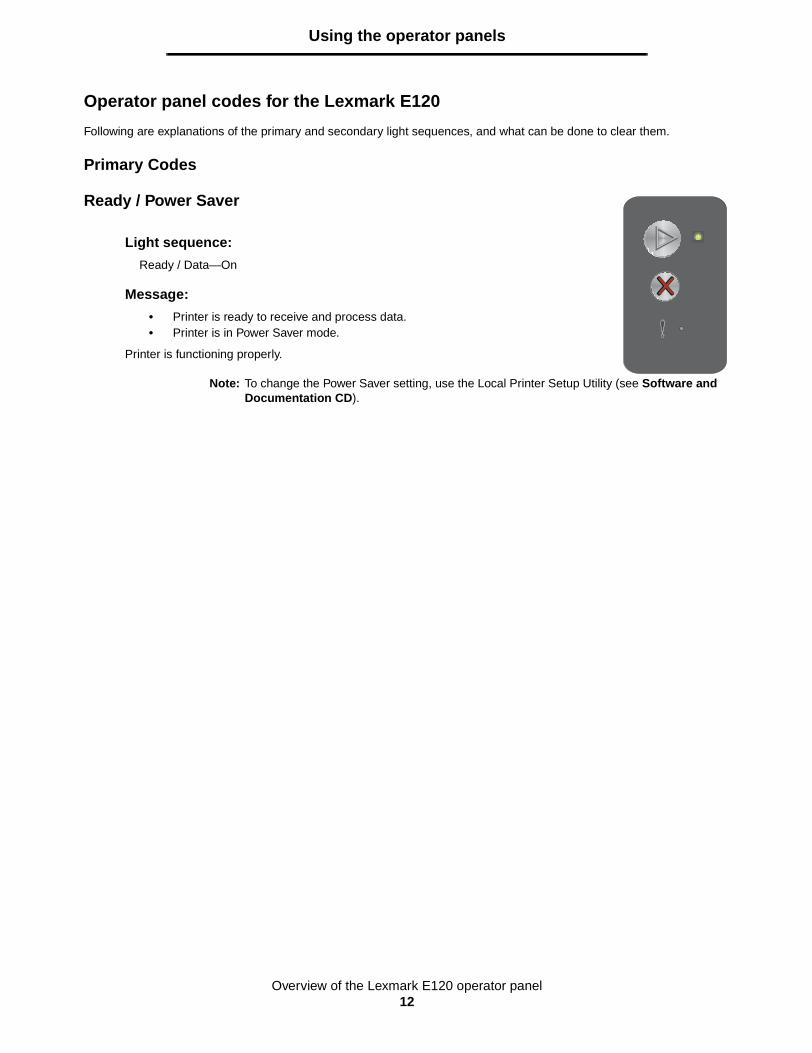
Ready / Power Saver
Light sequence:
Ready / Data—On
Message:
• Printer is ready to receive and process data.• Printer is in Power Saver mode.
Printer is functioning properly.
Note: To change the Power Saver setting, use the Local Printer Setup Utility (see Software and Documentation CD).
Overview of the Lexmark E120 operator panel13
Using the operator panels
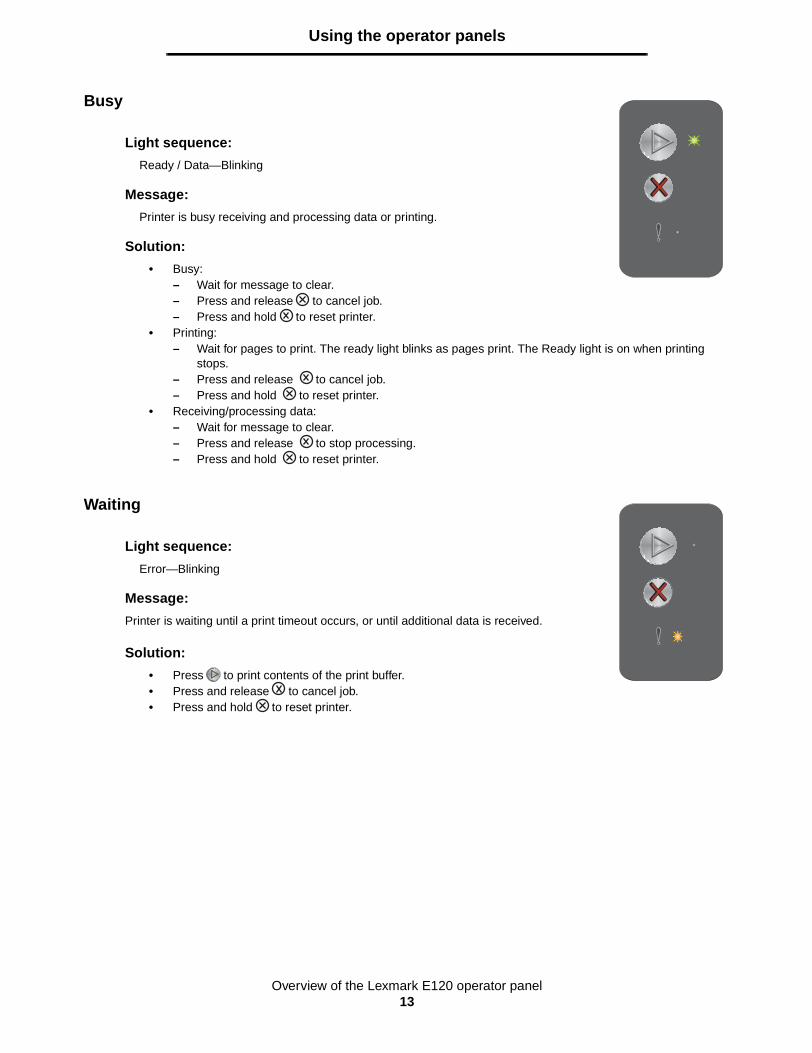
Busy
Waiting
Light sequence:
Ready / Data—Blinking
Message:
Printer is busy receiving and processing data or printing.
Solution:
• Busy:– Wait for message to clear.– Press and release to cancel job.– Press and hold to reset printer.
• Printing:– Wait for pages to print. The ready light blinks as pages print. The Ready light is on when printing
stops.– Press and release to cancel job.– Press and hold to reset printer.
• Receiving/processing data:– Wait for message to clear.– Press and release to stop processing.– Press and hold to reset printer.
Light sequence:
Error—Blinking
Message:
Printer is waiting until a print timeout occurs, or until additional data is received.
Solution:
• Press to print contents of the print buffer.• Press and release to cancel job.• Press and hold to reset printer.
Overview of the Lexmark E120 operator panel14
Using the operator panels
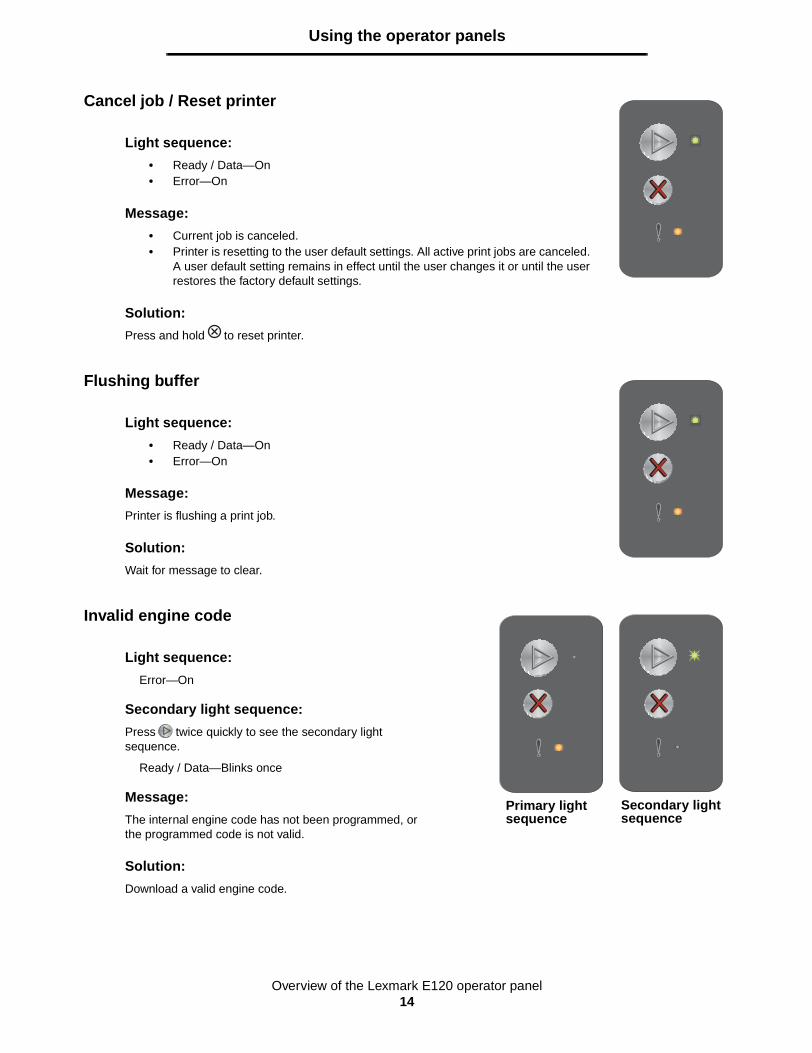
Cancel job / Reset printer
Flushing buffer
Invalid engine code
Light sequence:
• Ready / Data—On• Error—On
Message:
• Current job is canceled.• Printer is resetting to the user default settings. All active print jobs are canceled.
A user default setting remains in effect until the user changes it or until the user restores the factory default settings.
Solution:
Press and hold to reset printer.
Light sequence:
• Ready / Data—On• Error—On
Message:
Printer is flushing a print job.
Solution:
Wait for message to clear.
Light sequence:
Error—On
Secondary light sequence:
Press twice quickly to see the secondary light sequence.
Ready / Data—Blinks once
Message:
The internal engine code has not been programmed, orthe programmed code is not valid.
Solution:
Download a valid engine code.
Primary light sequence
Secondary light sequence

Overview of the Lexmark E120 operator panel15
Using the operator panels
Not ready
Printing font list or menu settings page
Programming engine code or system code
Light sequence:
Error—On
Secondary light sequence:
Press twice quickly to see the secondary light sequence.
Ready / Data—Blinks once
Message:
Printer is not ready to receive or process data, or printer port is offline.
Solution:
• Press to return to Ready or Busy state.• Press and release to cancel job.• Press and hold to reset printer.
Light sequence:
Ready / Data—Blinking
Message:
The font list or menu settings page is being printed.
Solution:
Wait for message to clear.
Light sequence:
• Ready / Data—On• Error—On
Message:
New code is being programmed into the engine or firmware.
Solution:
Wait for message to clear. When printer has finished programming the code, it returns to ready.
Note: No button is active while this message is displayed.
Primary light sequence
Secondary light sequence
Overview of the Lexmark E120 operator panel16
Using the operator panels
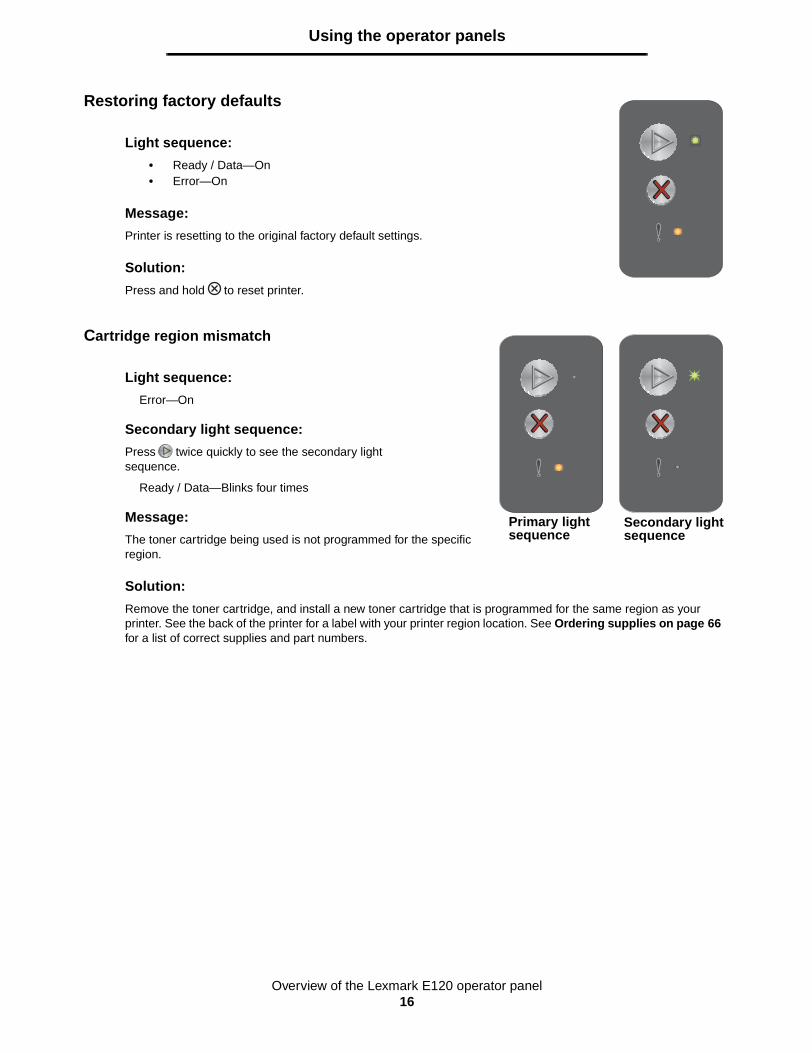
Restoring factory defaults
Cartridge region mismatch
Light sequence:
• Ready / Data—On• Error—On
Message:
Printer is resetting to the original factory default settings.
Solution:
Press and hold to reset printer.
Light sequence:
Error—On
Secondary light sequence:
Press twice quickly to see the secondary light sequence.
Ready / Data—Blinks four times
Message:
The toner cartridge being used is not programmed for the specific region.
Solution:
Remove the toner cartridge, and install a new toner cartridge that is programmed for the same region as your printer. See the back of the printer for a label with your printer region location. See Ordering supplies on page 66 for a list of correct supplies and part numbers.
Primary light sequence
Secondary light sequence

Overview of the Lexmark E120 operator panel17
Using the operator panels
Missing cartridge / Defective cartridge detected
Open door
Light sequence:
Error—On
Secondary light sequence:
Press twice quickly to see the secondary lightsequence.
Ready / Data—Blinks three times
Message:
Either the toner cartridge is missing, the long-life photoconductor kit is missing, or a defective toner cargridge is detected.
Solution:
First, check to see if a toner cartridge is installed. If the toner cartridge is properly installed, check to see if a long-life photoconductor kit is installed. If the toner cartridge or the long-life photoconductor kit is missing, install the missing item. If both are properly installed, then remove the defective toner cartridge.
Light sequence:
Error—On
Secondary light sequence:
Press twice quickly to see the secondary light sequence.
Ready / Data—Blinks once
Message:
Door is open.
Solution:
Close the open door.
Primary light sequence
Secondary light sequence
Primary light sequence
Secondary light sequence
Overview of the Lexmark E120 operator panel18
Using the operator panels
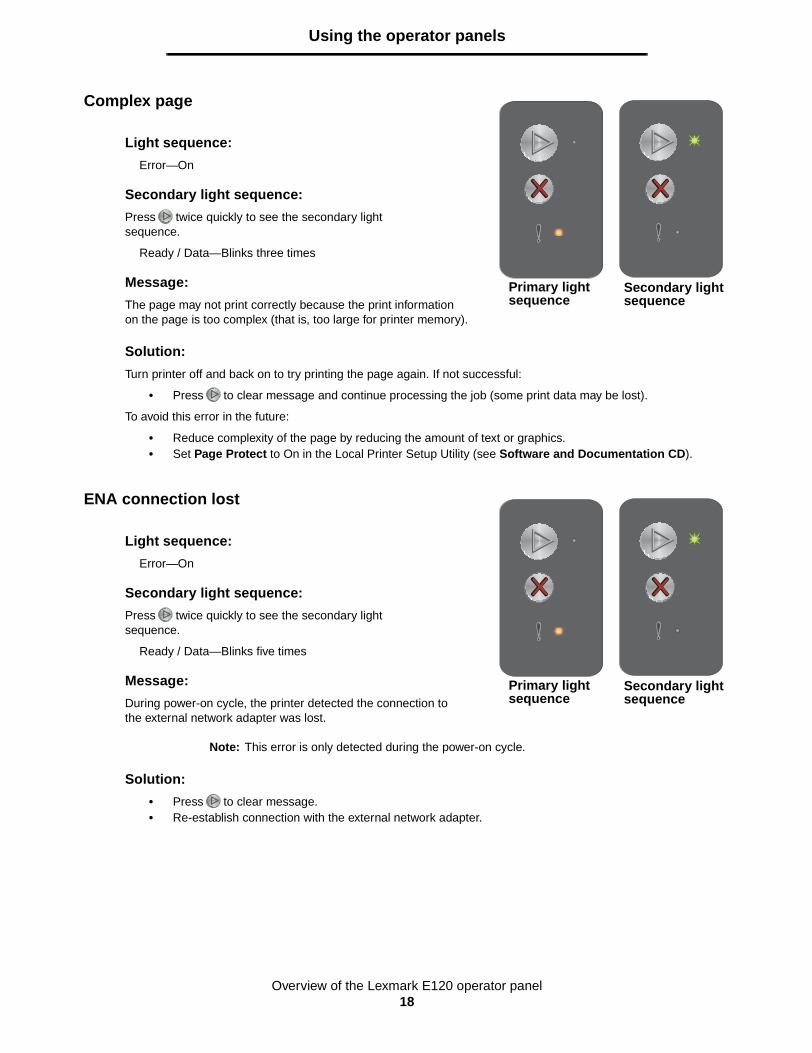
Complex page
ENA connection lost
Light sequence:
Error—On
Secondary light sequence:
Press twice quickly to see the secondary light sequence.
Ready / Data—Blinks three times
Message:
The page may not print correctly because the print information on the page is too complex (that is, too large for printer memory).
Solution:
Turn printer off and back on to try printing the page again. If not successful:
• Press to clear message and continue processing the job (some print data may be lost).
To avoid this error in the future:
• Reduce complexity of the page by reducing the amount of text or graphics.• Set Page Protect to On in the Local Printer Setup Utility (see Software and Documentation CD).
Light sequence:
Error—On
Secondary light sequence:
Press twice quickly to see the secondary light sequence.
Ready / Data—Blinks five times
Message:
During power-on cycle, the printer detected the connection to the external network adapter was lost.
Note: This error is only detected during the power-on cycle.
Solution:
• Press to clear message.• Re-establish connection with the external network adapter.
Primary light sequence
Secondary light sequence
Primary light sequence
Secondary light sequence
Overview of the Lexmark E120 operator panel19
Using the operator panels
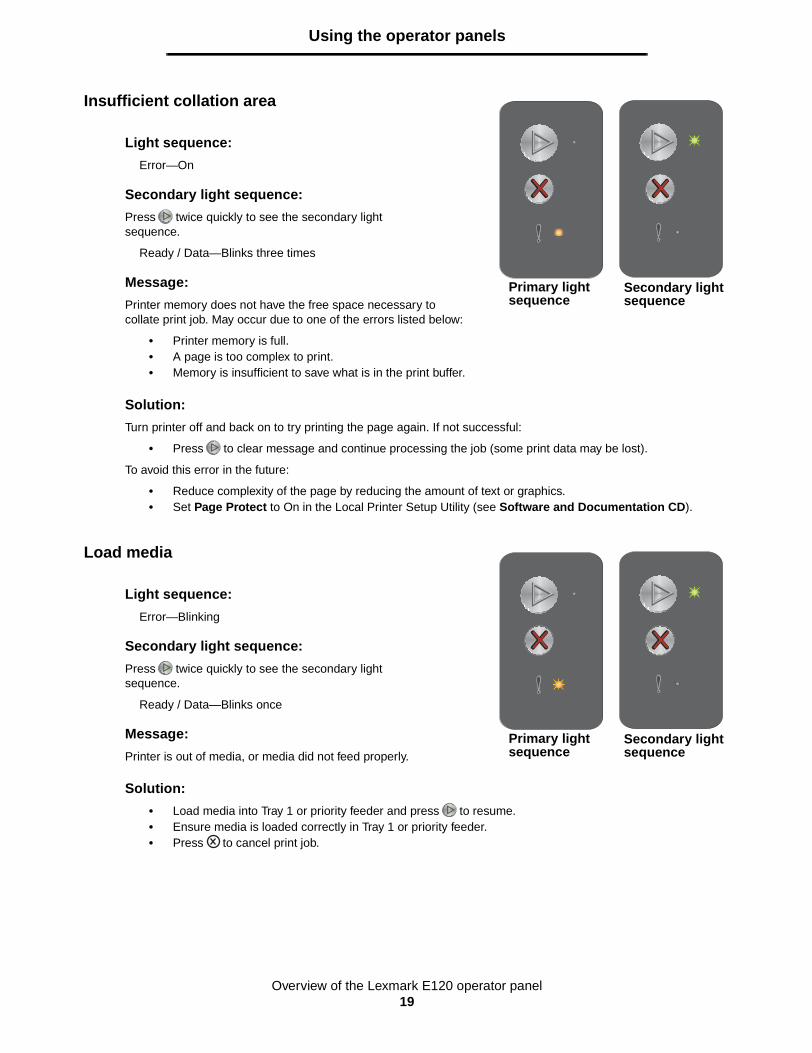
Insufficient collation area
Load media
Light sequence:
Error—On
Secondary light sequence:
Press twice quickly to see the secondary light sequence.
Ready / Data—Blinks three times
Message:
Printer memory does not have the free space necessary to collate print job. May occur due to one of the errors listed below:
• Printer memory is full.• A page is too complex to print.• Memory is insufficient to save what is in the print buffer.
Solution:
Turn printer off and back on to try printing the page again. If not successful:
• Press to clear message and continue processing the job (some print data may be lost).
To avoid this error in the future:
• Reduce complexity of the page by reducing the amount of text or graphics.• Set Page Protect to On in the Local Printer Setup Utility (see Software and Documentation CD).
Light sequence:
Error—Blinking
Secondary light sequence:
Press twice quickly to see the secondary light sequence.
Ready / Data—Blinks once
Message:
Printer is out of media, or media did not feed properly.
Solution:
• Load media into Tray 1 or priority feeder and press to resume.• Ensure media is loaded correctly in Tray 1 or priority feeder.• Press to cancel print job.
Primary light sequence
Secondary light sequence
Primary light sequence
Secondary light sequence
Overview of the Lexmark E120 operator panel20
Using the operator panels
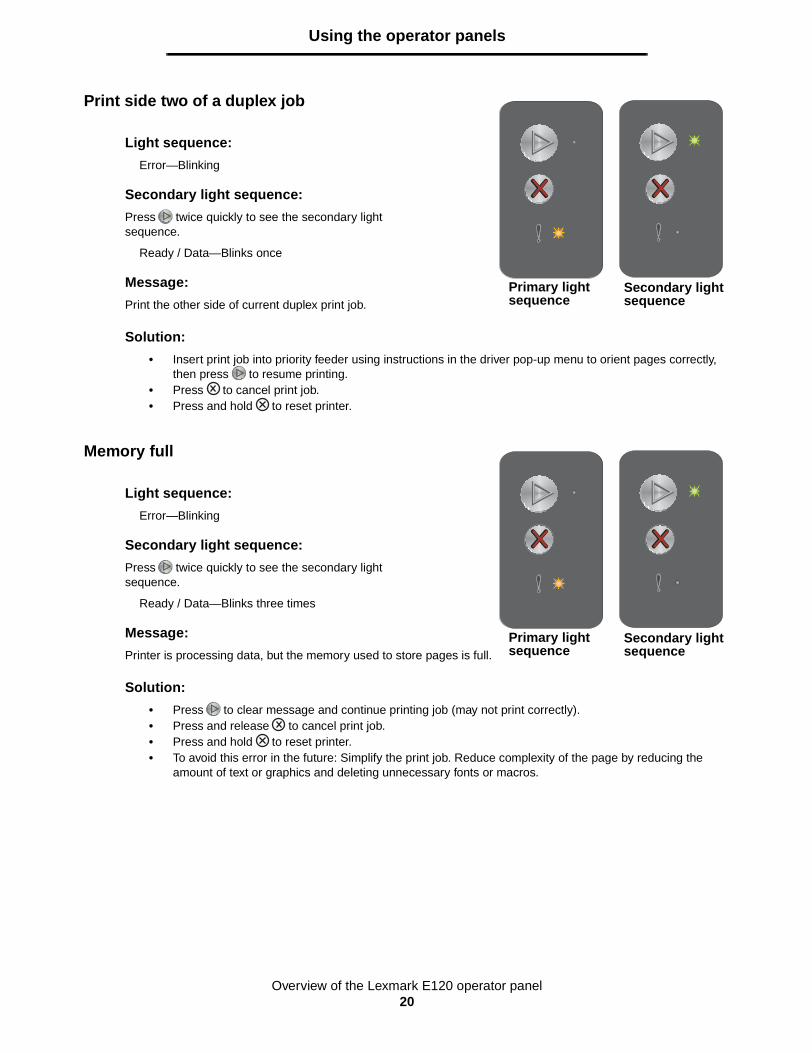
Print side two of a duplex job
Memory full
Light sequence:
Error—Blinking
Secondary light sequence:
Press twice quickly to see the secondary light sequence.
Ready / Data—Blinks once
Message:
Print the other side of current duplex print job.
Solution:
• Insert print job into priority feeder using instructions in the driver pop-up menu to orient pages correctly, then press to resume printing.
• Press to cancel print job.• Press and hold to reset printer.
Light sequence:
Error—Blinking
Secondary light sequence:
Press twice quickly to see the secondary light sequence.
Ready / Data—Blinks three times
Message:
Printer is processing data, but the memory used to store pages is full.
Solution:
• Press to clear message and continue printing job (may not print correctly).• Press and release to cancel print job.• Press and hold to reset printer.• To avoid this error in the future: Simplify the print job. Reduce complexity of the page by reducing the
amount of text or graphics and deleting unnecessary fonts or macros.
Primary light sequence
Secondary light sequence
Primary light sequence
Secondary light sequence

Overview of the Lexmark E120 operator panel21
Using the operator panels
Host interface disabled
Jam in the printer paper path
Note: All jams show the same primary code. To determine the jam location, view the secondary light sequence.
Light sequence:
Error—Blinking
Secondary light sequence:
Press twice quickly to see the secondary light sequence.
Ready / Data—Blinks five times
Message:
Printer USB or network port disabled.
Solution:
• Press to clear message. Printer discards all jobs previously sent.• Enable the USB port by selecting a value other than Disabled for the USB Buffer item in the Local Printer
Setup Utility (see Software and Documentation CD).
Light sequence:
Error—Blinking
Secondary light sequence:
Press twice quickly to see the secondary light sequence.
• Ready / Data—Blinks ten times• Error—On
Message:
A jam has occurred at the input sensor, at the exit sensor, or between the input and exit sensors.
Solution:
See Clearing jams on page 53 for instructions.
Primary light sequence
Secondary light sequence
Primary light sequence
Secondary light sequence
Overview of the Lexmark E120 operator panel22
Using the operator panels
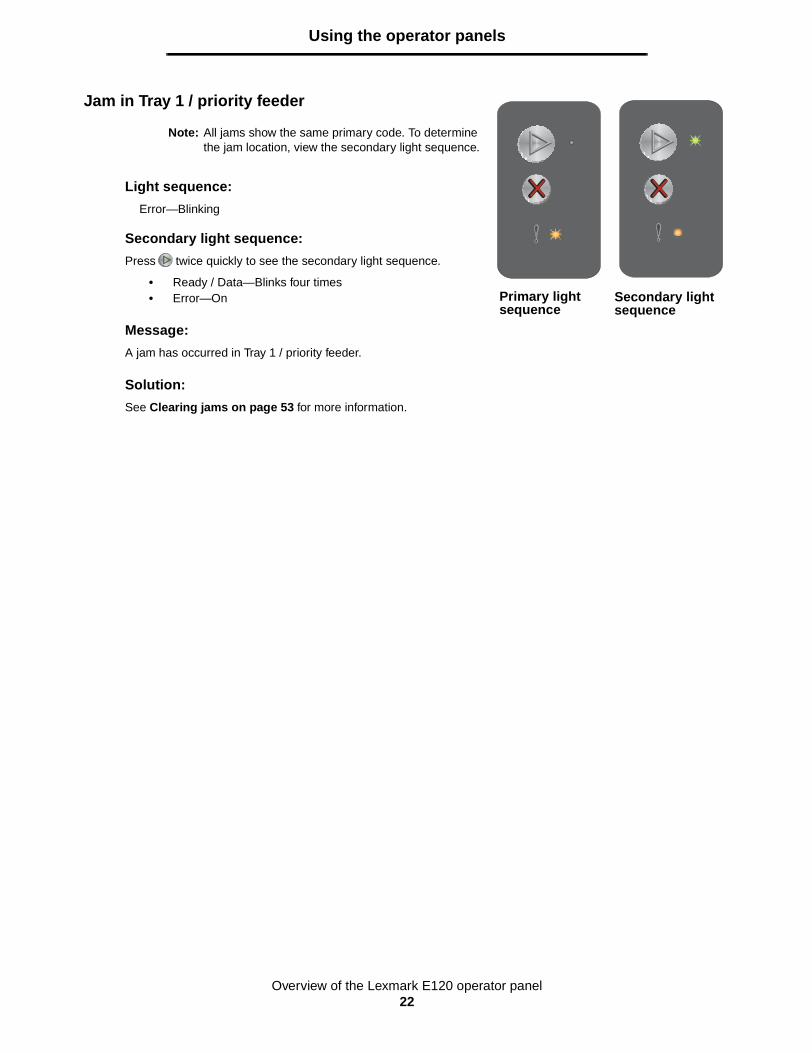
Jam in Tray 1 / priority feeder
Note: All jams show the same primary code. To determine the jam location, view the secondary light sequence.
Light sequence:
Error—Blinking
Secondary light sequence:
Press twice quickly to see the secondary light sequence.
• Ready / Data—Blinks four times• Error—On
Message:
A jam has occurred in Tray 1 / priority feeder.
Solution:
See Clearing jams on page 53 for more information.
Primary light sequence
Secondary light sequence
Overview of the Lexmark E120 operator panel23
Using the operator panels
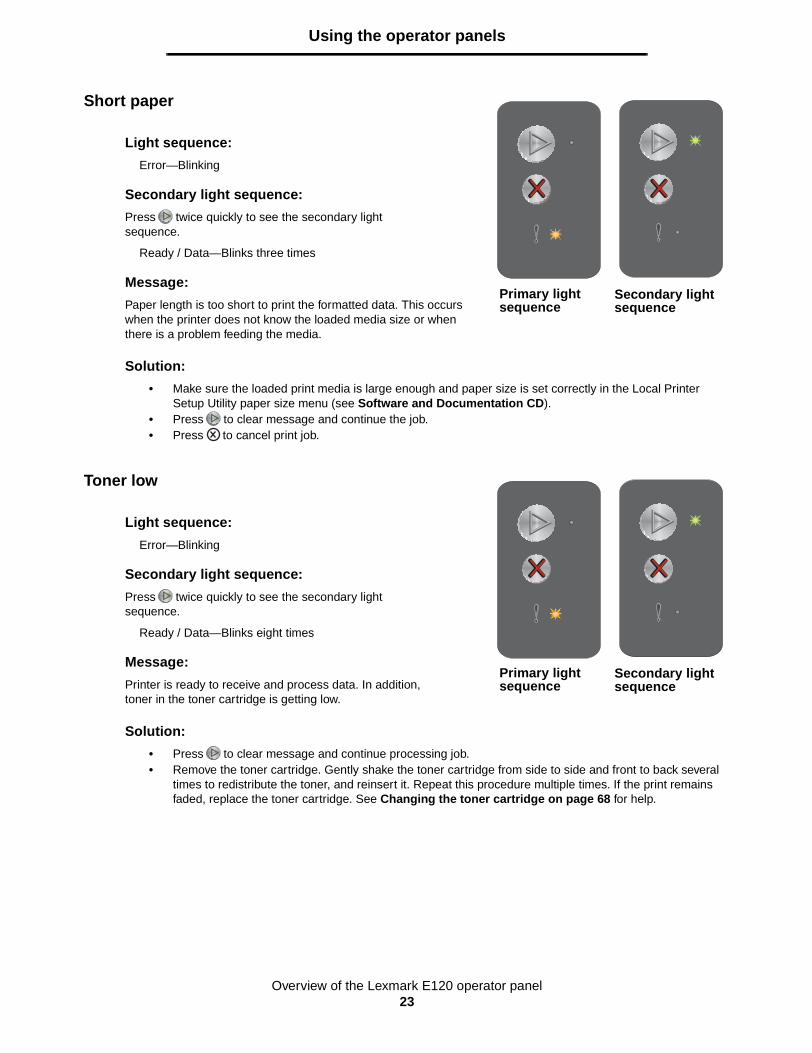
Short paper
Toner low
Light sequence:
Error—Blinking
Secondary light sequence:
Press twice quickly to see the secondary light sequence.
Ready / Data—Blinks three times
Message:
Paper length is too short to print the formatted data. This occurswhen the printer does not know the loaded media size or when there is a problem feeding the media.
Solution:
• Make sure the loaded print media is large enough and paper size is set correctly in the Local Printer Setup Utility paper size menu (see Software and Documentation CD).
• Press to clear message and continue the job. • Press to cancel print job.
Light sequence:
Error—Blinking
Secondary light sequence:
Press twice quickly to see the secondary light sequence.
Ready / Data—Blinks eight times
Message:
Printer is ready to receive and process data. In addition, toner in the toner cartridge is getting low.
Solution:
• Press to clear message and continue processing job.• Remove the toner cartridge. Gently shake the toner cartridge from side to side and front to back several
times to redistribute the toner, and reinsert it. Repeat this procedure multiple times. If the print remains faded, replace the toner cartridge. See Changing the toner cartridge on page 68 for help.
Primary light sequence
Secondary light sequence
Primary light sequence
Secondary light sequence
Overview of the Lexmark E120 operator panel24
Using the operator panels
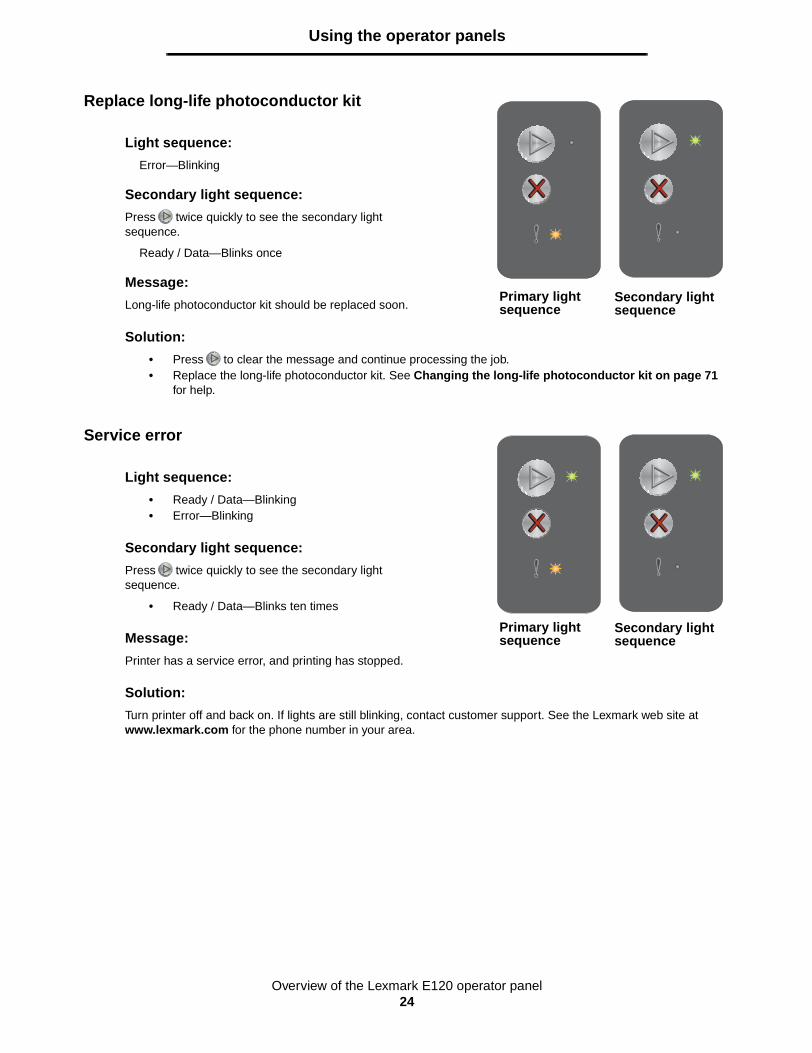
Replace long-life photoconductor kit
Service error
Light sequence:
Error—Blinking
Secondary light sequence:
Press twice quickly to see the secondary light sequence.
Ready / Data—Blinks once
Message:
Long-life photoconductor kit should be replaced soon.
Solution:
• Press to clear the message and continue processing the job.• Replace the long-life photoconductor kit. See Changing the long-life photoconductor kit on page 71
for help.
Light sequence:
• Ready / Data—Blinking• Error—Blinking
Secondary light sequence:
Press twice quickly to see the secondary light sequence.
• Ready / Data—Blinks ten times
Message:
Printer has a service error, and printing has stopped.
Solution:
Turn printer off and back on. If lights are still blinking, contact customer support. See the Lexmark web site at www.lexmark.com for the phone number in your area.
Primary light sequence
Secondary light sequence
Primary light sequence
Secondary light sequence
Overview of the Lexmark E120n operator panel25
Using the operator panels
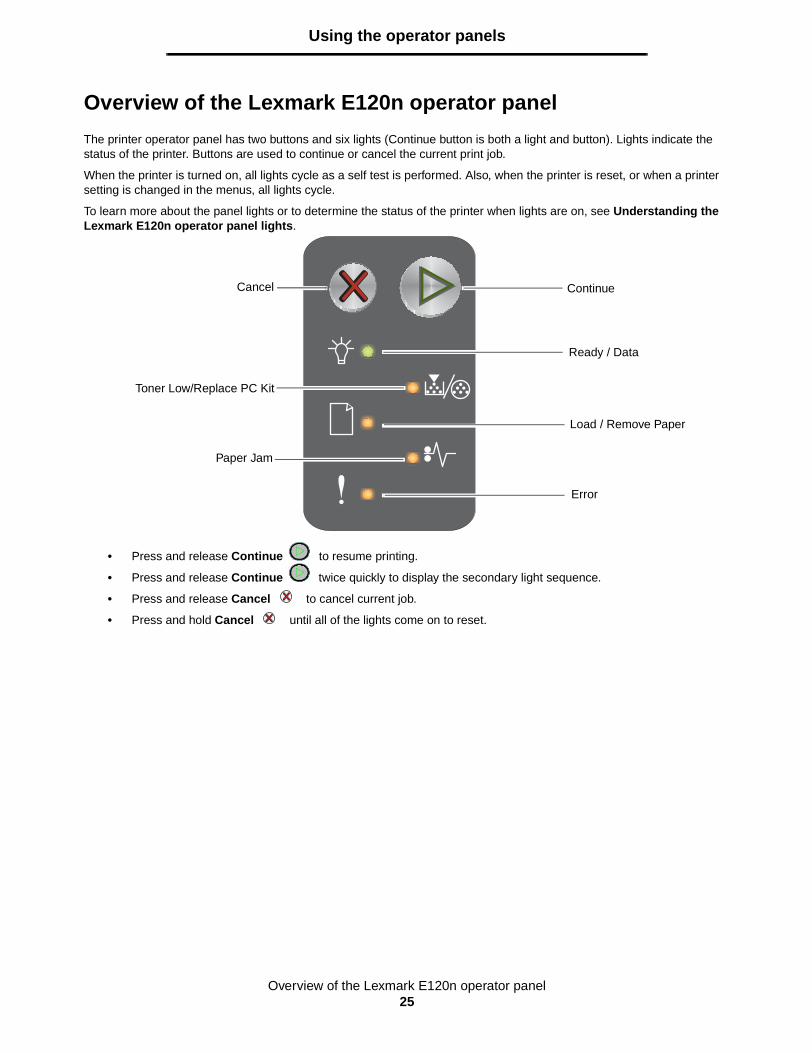
Overview of the Lexmark E120n operator panel
The printer operator panel has two buttons and six lights (Continue button is both a light and button). Lights indicate the status of the printer. Buttons are used to continue or cancel the current print job.
When the printer is turned on, all lights cycle as a self test is performed. Also, when the printer is reset, or when a printer setting is changed in the menus, all lights cycle.
To learn more about the panel lights or to determine the status of the printer when lights are on, see Understanding the Lexmark E120n operator panel lights.
• Press and release Continue to resume printing.
• Press and release Continue twice quickly to display the secondary light sequence.
• Press and release Cancel to cancel current job.
• Press and hold Cancel until all of the lights come on to reset.
Ready / Data
Toner Low/Replace PC Kit
Load / Remove Paper
Paper Jam
ContinueCancel
Error
Overview of the Lexmark E120n operator panel26
Using the operator panels
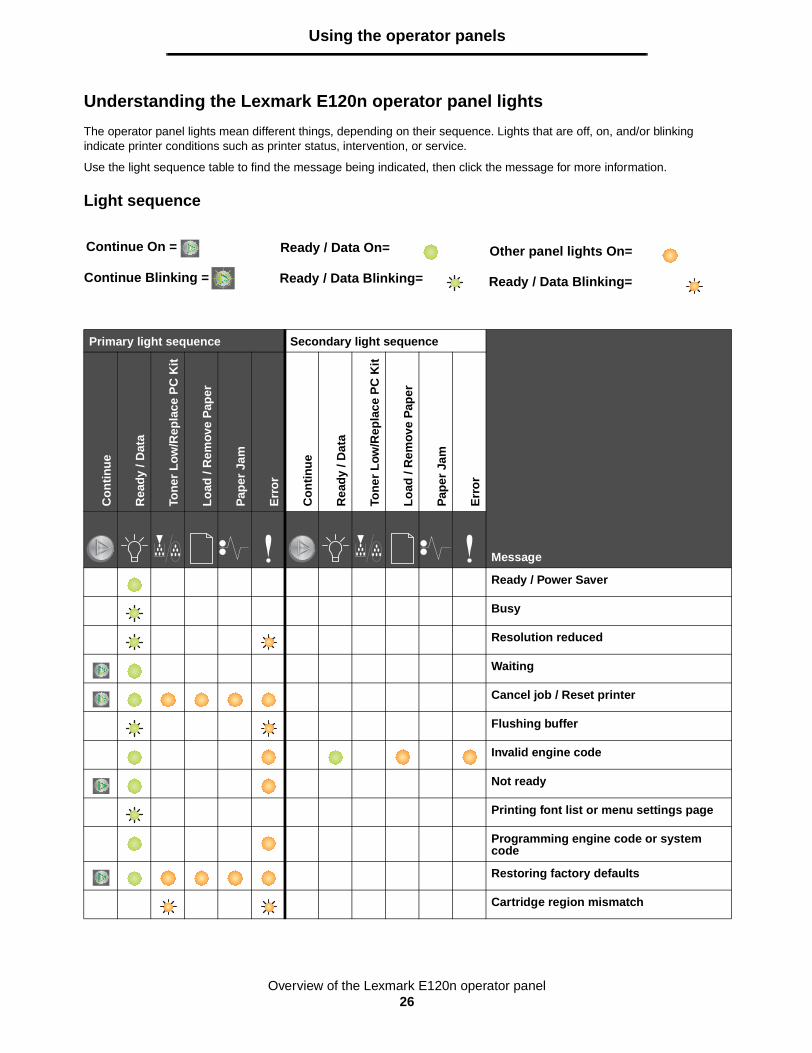
Understanding the Lexmark E120n operator panel lights
The operator panel lights mean different things, depending on their sequence. Lights that are off, on, and/or blinking indicate printer conditions such as printer status, intervention, or service.
Use the light sequence table to find the message being indicated, then click the message for more information.
Light sequence
Primary light sequence Secondary light sequence
Message
Co
nti
nu
e
Rea
dy
/ Dat
a
Ton
er L
ow/R
epla
ce P
C K
it
Lo
ad /
Rem
ove
Pap
er
Pap
er J
am
Err
or
Co
nti
nu
e
Rea
dy
/ Dat
a
Ton
er L
ow/R
epla
ce P
C K
it
Lo
ad /
Rem
ove
Pap
er
Pap
er J
am
Err
or
Ready / Power Saver
Busy
Resolution reduced
Waiting
Cancel job / Reset printer
Flushing buffer
Invalid engine code
Not ready
Printing font list or menu settings page
Programming engine code or system code
Restoring factory defaults
Cartridge region mismatch
Continue On =
Continue Blinking =
Ready / Data On=
Ready / Data Blinking=
Other panel lights On=
Ready / Data Blinking=
Overview of the Lexmark E120n operator panel27
Using the operator panels
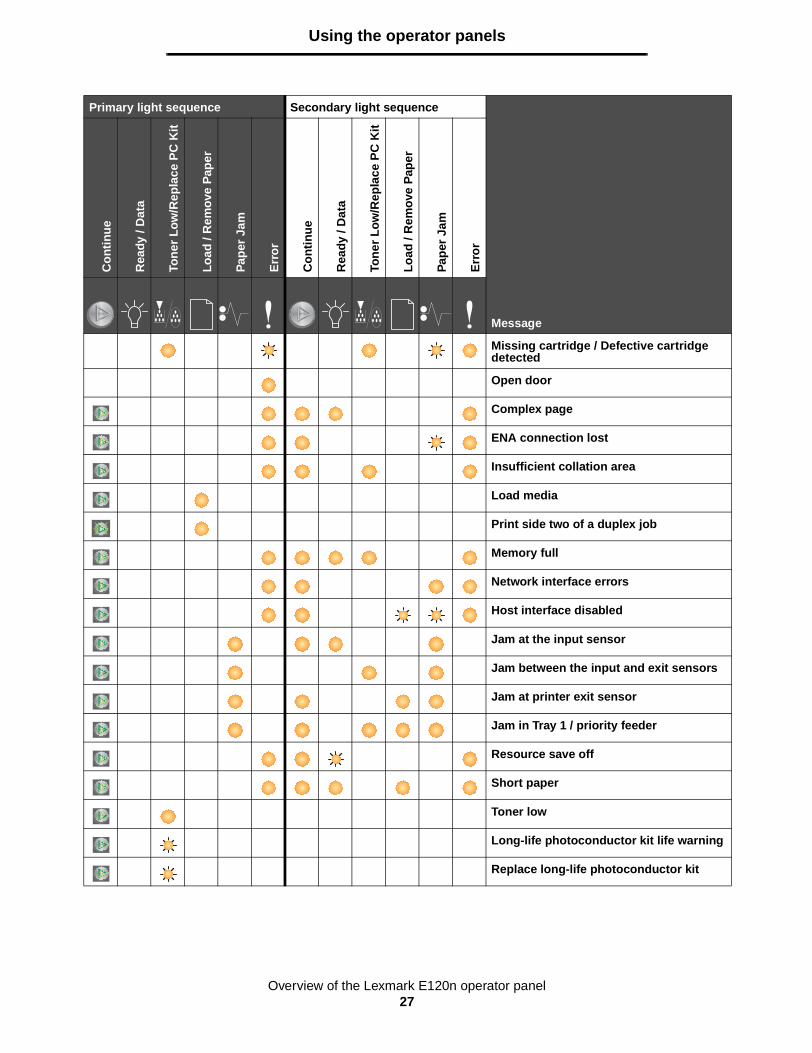
Missing cartridge / Defective cartridge detected
Open door
Complex page
ENA connection lost
Insufficient collation area
Load media
Print side two of a duplex job
Memory full
Network interface errors
Host interface disabled
Jam at the input sensor
Jam between the input and exit sensors
Jam at printer exit sensor
Jam in Tray 1 / priority feeder
Resource save off
Short paper
Toner low
Long-life photoconductor kit life warning
Replace long-life photoconductor kit
Primary light sequence Secondary light sequence
Message
Co
nti
nu
e
Rea
dy
/ Dat
a
Ton
er L
ow
/Rep
lace
PC
Kit
Lo
ad /
Rem
ove
Pap
er
Pap
er J
am
Err
or
Co
nti
nu
e
Rea
dy
/ Dat
a
Ton
er L
ow
/Rep
lace
PC
Kit
Lo
ad /
Rem
ove
Pap
er
Pap
er J
am
Err
or
Overview of the Lexmark E120n operator panel28
Using the operator panels
Operator panel codes for the Lexmark E120n
Following are explanations of the primary and secondary light sequences, and what can be done to clear them.
Primary Codes
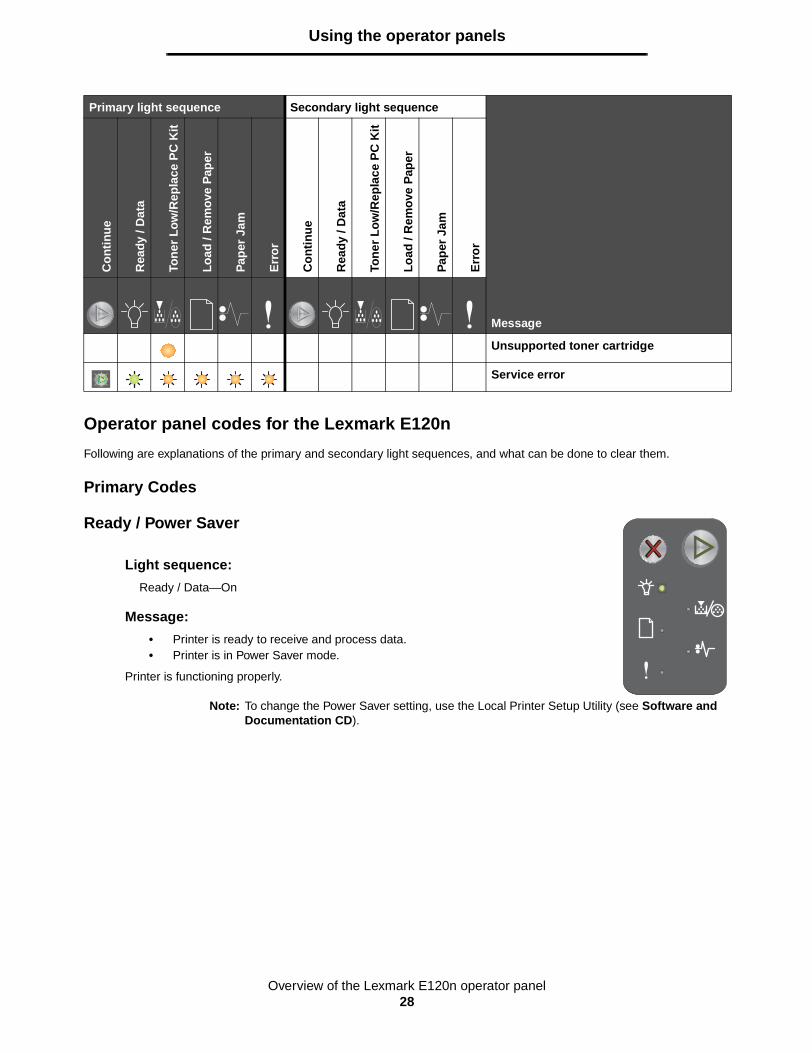
Ready / Power Saver
Unsupported toner cartridge
Service error
Light sequence:
Ready / Data—On
Message:
• Printer is ready to receive and process data.• Printer is in Power Saver mode.
Printer is functioning properly.
Note: To change the Power Saver setting, use the Local Printer Setup Utility (see Software and Documentation CD).
Primary light sequence Secondary light sequence
Message
Co
nti
nu
e
Rea
dy
/ Dat
a
Ton
er L
ow
/Rep
lace
PC
Kit
Lo
ad /
Rem
ove
Pap
er
Pap
er J
am
Err
or
Co
nti
nu
e
Rea
dy
/ Dat
a
Ton
er L
ow
/Rep
lace
PC
Kit
Lo
ad /
Rem
ove
Pap
er
Pap
er J
am
Err
or
Overview of the Lexmark E120n operator panel29
Using the operator panels
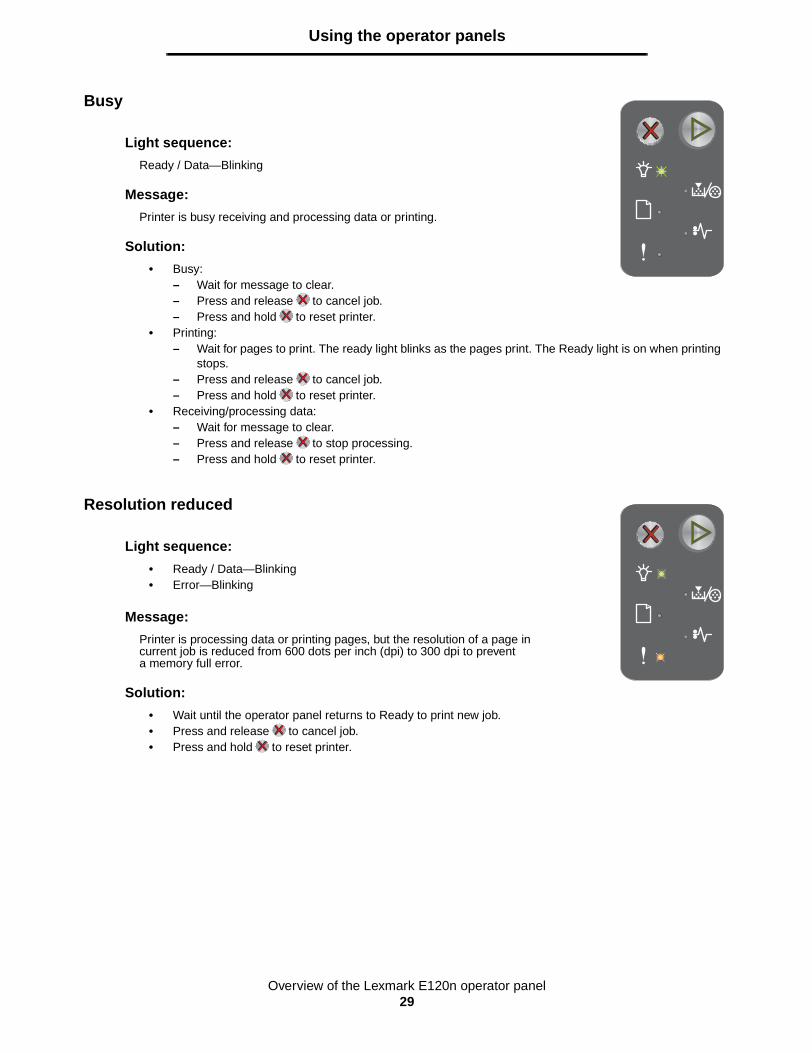
Busy
Resolution reduced
Light sequence:
Ready / Data—Blinking
Message:
Printer is busy receiving and processing data or printing.
Solution:
• Busy:– Wait for message to clear.– Press and release to cancel job.– Press and hold to reset printer.
• Printing:– Wait for pages to print. The ready light blinks as the pages print. The Ready light is on when printing
stops.– Press and release to cancel job.– Press and hold to reset printer.
• Receiving/processing data:– Wait for message to clear.– Press and release to stop processing.– Press and hold to reset printer.
Light sequence:
• Ready / Data—Blinking• Error—Blinking
Message:
Printer is processing data or printing pages, but the resolution of a page in current job is reduced from 600 dots per inch (dpi) to 300 dpi to prevent a memory full error.
Solution:
• Wait until the operator panel returns to Ready to print new job.• Press and release to cancel job.• Press and hold to reset printer.
Overview of the Lexmark E120n operator panel30
Using the operator panels
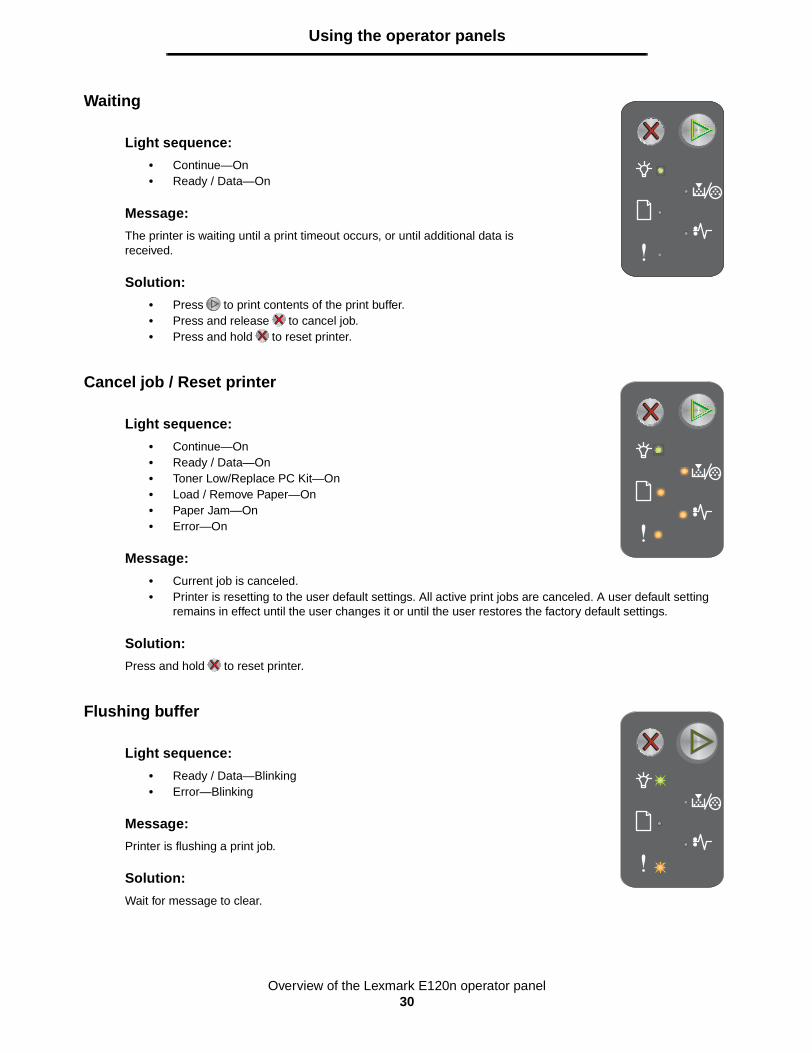
Waiting
Cancel job / Reset printer
Flushing buffer
Light sequence:
• Continue—On• Ready / Data—On
Message:
The printer is waiting until a print timeout occurs, or until additional data is received.
Solution:
• Press to print contents of the print buffer.• Press and release to cancel job.• Press and hold to reset printer.
Light sequence:
• Continue—On• Ready / Data—On• Toner Low/Replace PC Kit—On• Load / Remove Paper—On• Paper Jam—On• Error—On
Message:
• Current job is canceled.• Printer is resetting to the user default settings. All active print jobs are canceled. A user default setting
remains in effect until the user changes it or until the user restores the factory default settings.
Solution:
Press and hold to reset printer.
Light sequence:
• Ready / Data—Blinking• Error—Blinking
Message:
Printer is flushing a print job.
Solution:
Wait for message to clear.
Overview of the Lexmark E120n operator panel31
Using the operator panels
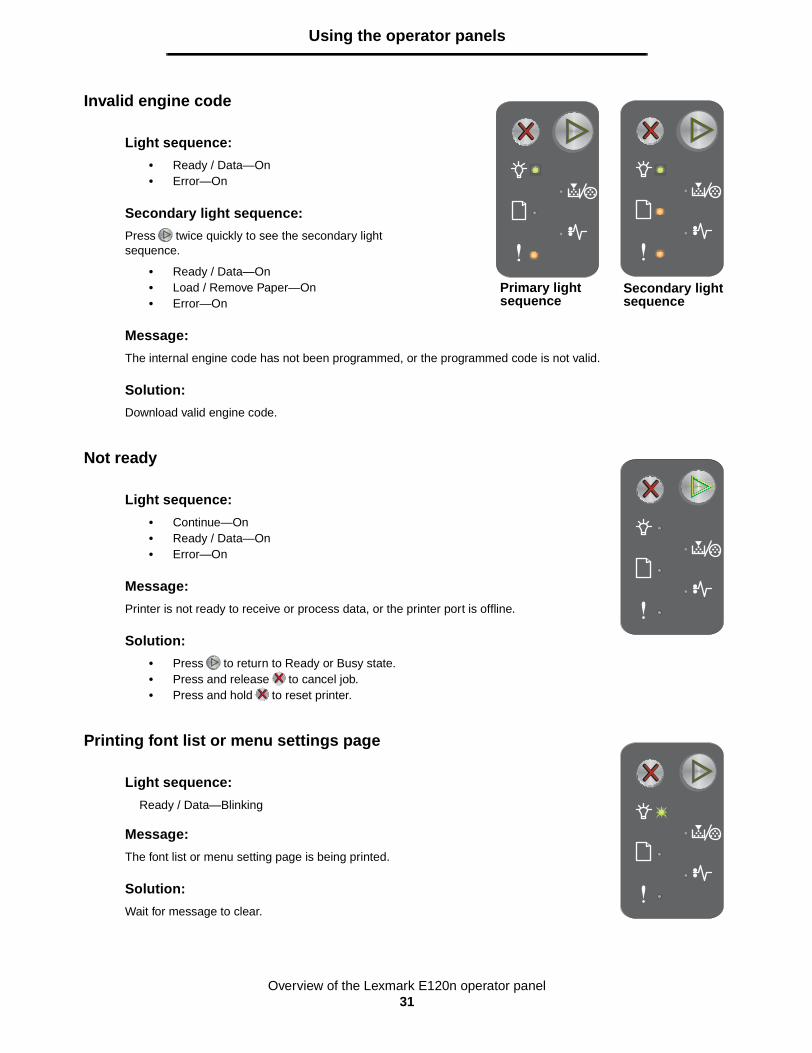
Invalid engine code
Not ready
Printing font list or menu settings page
Light sequence:
• Ready / Data—On• Error—On
Secondary light sequence:
Press twice quickly to see the secondary light sequence.
• Ready / Data—On• Load / Remove Paper—On• Error—On
Message:
The internal engine code has not been programmed, or the programmed code is not valid.
Solution:
Download valid engine code.
Light sequence:
• Continue—On• Ready / Data—On• Error—On
Message:
Printer is not ready to receive or process data, or the printer port is offline.
Solution:
• Press to return to Ready or Busy state.• Press and release to cancel job.• Press and hold to reset printer.
Light sequence:
Ready / Data—Blinking
Message:
The font list or menu setting page is being printed.
Solution:
Wait for message to clear.
Primary light sequence
Secondary light sequence

Overview of the Lexmark E120n operator panel32
Using the operator panels
Programming engine code or system code
Restoring factory defaults
Cartridge region mismatch
Light sequence:
• Ready / Data—On• Error—On
Message:
New code is being programmed into the engine or firmware.
Solution:
Wait for message to clear. When printer has finished programming the code, it returns to ready.
Note: No buttons are active while this message is displayed.
Light sequence:
• Continue—On• Ready / Data—On• Toner Low/Replace PC Kit—On• Load / Remove Paper—On• Paper Jam—On• Error—On
Message:
Printer is resetting to the original factory default settings.
Solution:
Wait for message to clear.
Light sequence:
• Toner Low/Replace PC Kit—Blinking• Error—Blinking
Message:
The toner cartridge being used is not programmed for the specific region.
Solution:
Remove the toner cartridge, and install a new toner cartridge that is programmed for the same region as your printer. See the back of the printer for a label with your printer region location. See Ordering supplies on page 66 for a list of correct supplies and part numbers.
Overview of the Lexmark E120n operator panel33
Using the operator panels
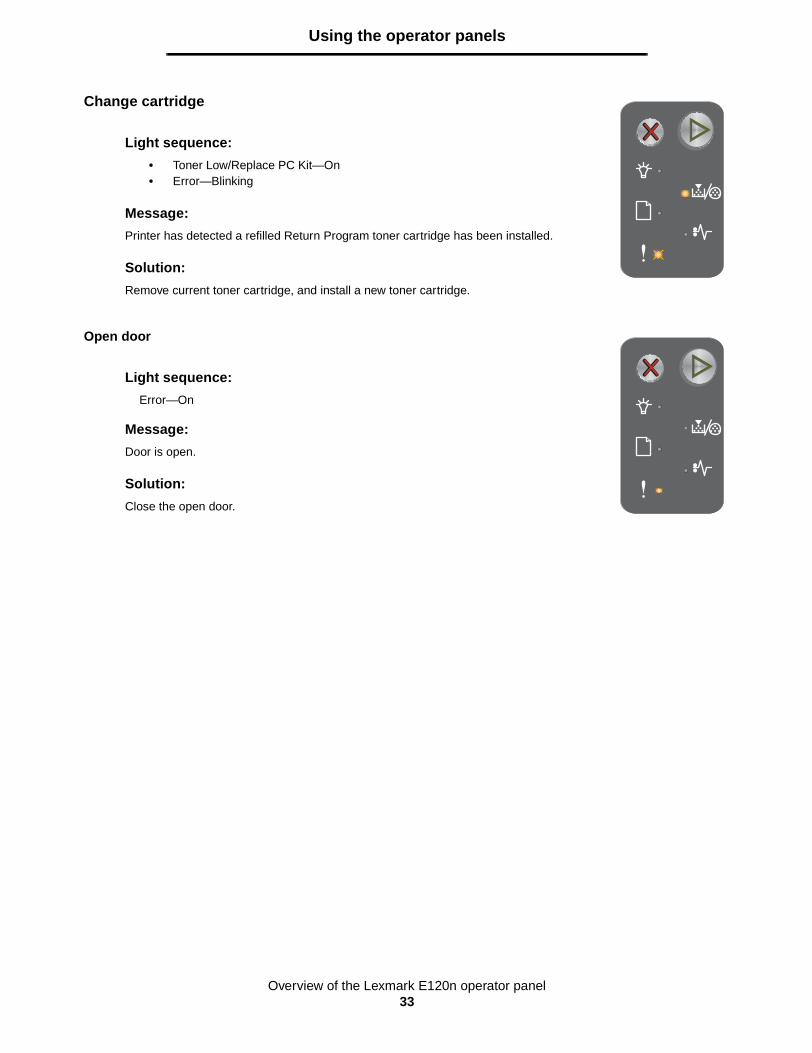
Change cartridge
Open door
Light sequence:
• Toner Low/Replace PC Kit—On• Error—Blinking
Message:
Printer has detected a refilled Return Program toner cartridge has been installed.
Solution:
Remove current toner cartridge, and install a new toner cartridge.
Light sequence:
Error—On
Message:
Door is open.
Solution:
Close the open door.
Overview of the Lexmark E120n operator panel34
Using the operator panels
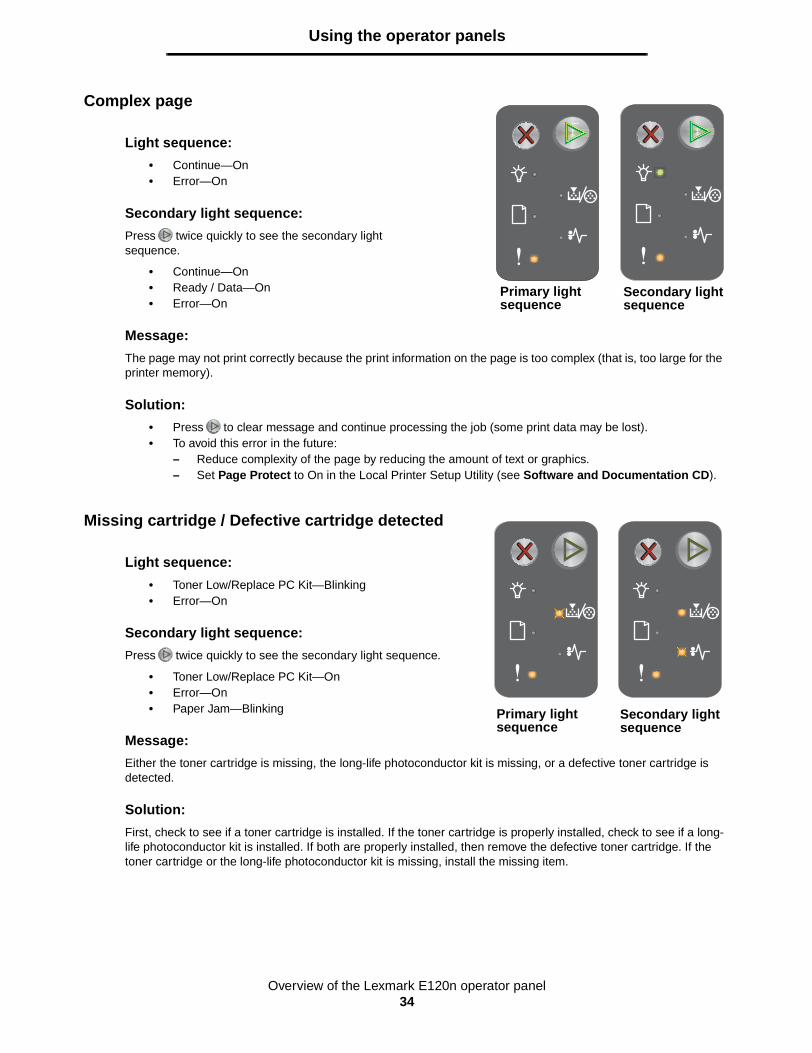
Complex page
Missing cartridge / Defective cartridge detected
Light sequence:
• Continue—On• Error—On
Secondary light sequence:
Press twice quickly to see the secondary light sequence.
• Continue—On• Ready / Data—On• Error—On
Message:
The page may not print correctly because the print information on the page is too complex (that is, too large for the printer memory).
Solution:
• Press to clear message and continue processing the job (some print data may be lost).• To avoid this error in the future:
– Reduce complexity of the page by reducing the amount of text or graphics.– Set Page Protect to On in the Local Printer Setup Utility (see Software and Documentation CD).
Light sequence:
• Toner Low/Replace PC Kit—Blinking• Error—On
Secondary light sequence:
Press twice quickly to see the secondary light sequence.
• Toner Low/Replace PC Kit—On• Error—On• Paper Jam—Blinking
Message:
Either the toner cartridge is missing, the long-life photoconductor kit is missing, or a defective toner cartridge is detected.
Solution:
First, check to see if a toner cartridge is installed. If the toner cartridge is properly installed, check to see if a long-life photoconductor kit is installed. If both are properly installed, then remove the defective toner cartridge. If the toner cartridge or the long-life photoconductor kit is missing, install the missing item.
Primary light sequence
Secondary light sequence
Primary light sequence
Secondary light sequence
Overview of the Lexmark E120n operator panel35
Using the operator panels
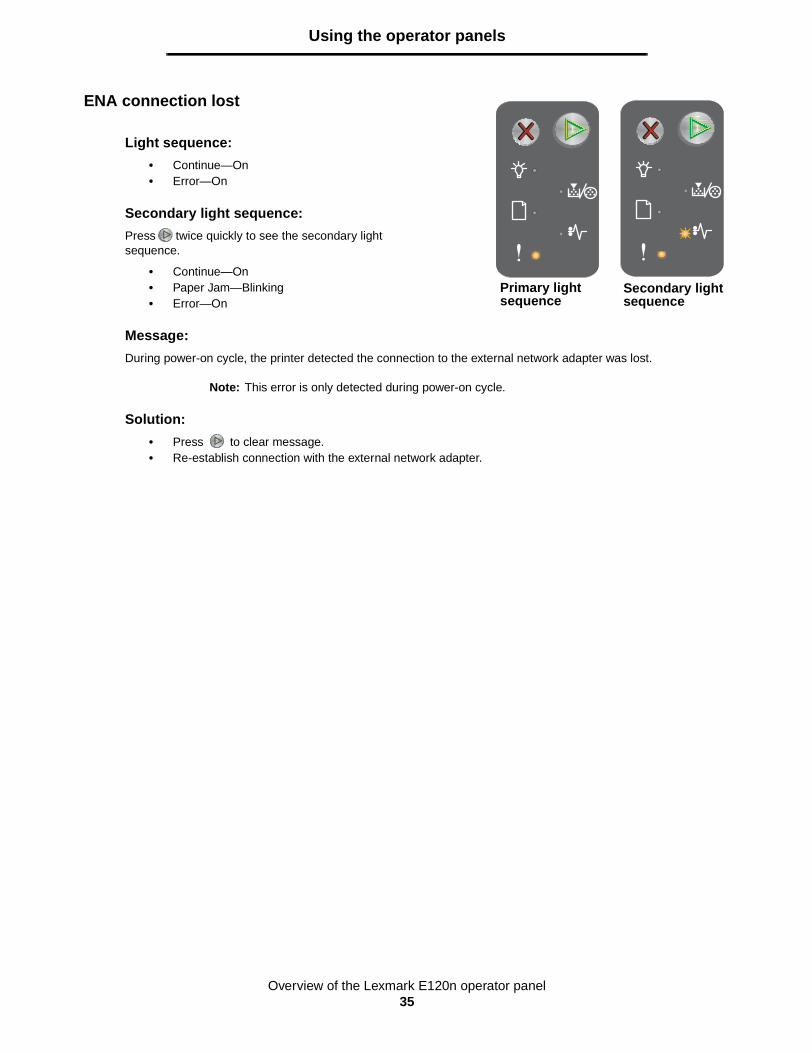
ENA connection lost
Light sequence:
• Continue—On• Error—On
Secondary light sequence:
Press twice quickly to see the secondary light sequence.
• Continue—On• Paper Jam—Blinking• Error—On
Message:
During power-on cycle, the printer detected the connection to the external network adapter was lost.
Note: This error is only detected during power-on cycle.
Solution:
• Press to clear message.• Re-establish connection with the external network adapter.
Primary light sequence
Secondary light sequence
Overview of the Lexmark E120n operator panel36
Using the operator panels
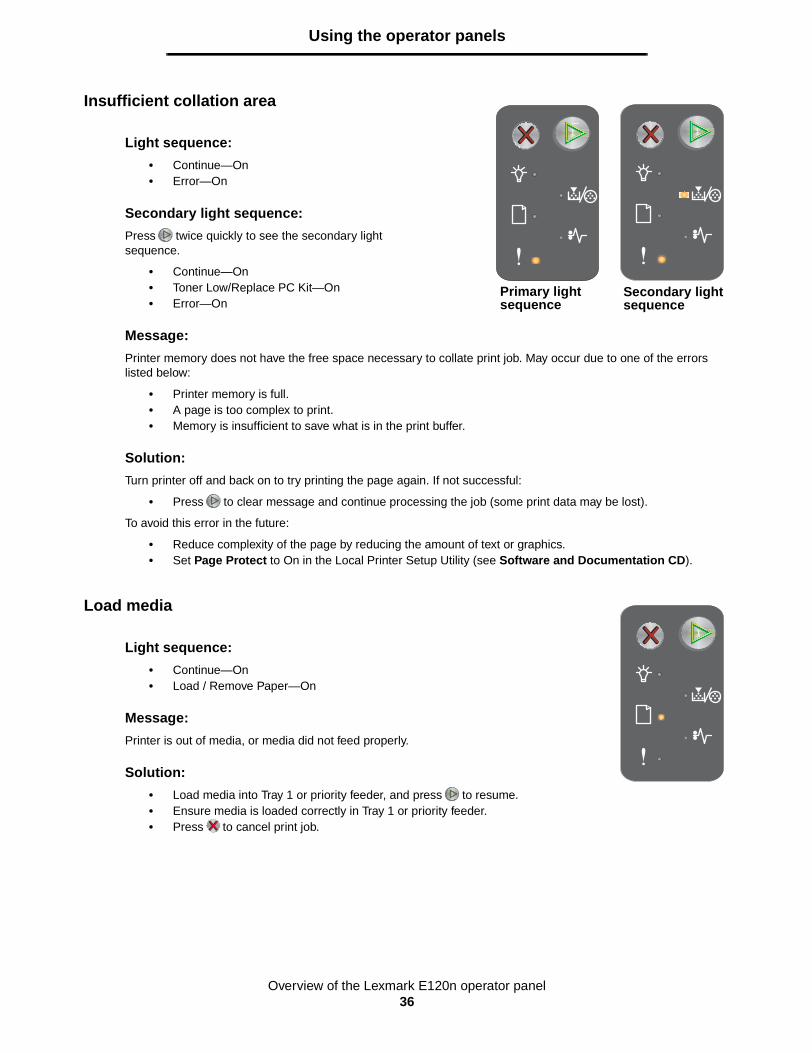
Insufficient collation area
Load media
Light sequence:
• Continue—On• Error—On
Secondary light sequence:
Press twice quickly to see the secondary light sequence.
• Continue—On• Toner Low/Replace PC Kit—On• Error—On
Message:
Printer memory does not have the free space necessary to collate print job. May occur due to one of the errors listed below:
• Printer memory is full.• A page is too complex to print.• Memory is insufficient to save what is in the print buffer.
Solution:
Turn printer off and back on to try printing the page again. If not successful:
• Press to clear message and continue processing the job (some print data may be lost).
To avoid this error in the future:
• Reduce complexity of the page by reducing the amount of text or graphics.• Set Page Protect to On in the Local Printer Setup Utility (see Software and Documentation CD).
Light sequence:
• Continue—On• Load / Remove Paper—On
Message:
Printer is out of media, or media did not feed properly.
Solution:
• Load media into Tray 1 or priority feeder, and press to resume.• Ensure media is loaded correctly in Tray 1 or priority feeder.• Press to cancel print job.
Primary light sequence
Secondary light sequence

Overview of the Lexmark E120n operator panel37
Using the operator panels
Print side two of a duplex job
Memory full
Light sequence:
• Continue—Blinking• Load / Remove Paper—On
Message:
Print the other side of current duplex print job.
Solution:
• Insert print job into priority feeder using instructions in the driver pop-up menu to orient pages correctly, then press to resume printing.
• Press to cancel print job.• Press and hold to reset printer.
Light sequence:
• Continue—On• Error—On
Secondary light sequence:
Press twice quickly to see the secondary light sequence.
• Continue—On• Ready / Data—On• Toner Low/Replace PC Kit—On• Error—On
Message:
Printer is processing data, but the memory used to store pages is full.
Solution:
• Press to clear message and continue printing job (may not print correctly).• Press and release to cancel print job.• Press and hold to reset printer (may need to send the print job again).• To avoid this error in the future: Simplify print job. Reduce complexity of the page by reducing the amount
of text or graphics and deleting unnecessary fonts or macros.
Primary light sequence
Secondary light sequence
Overview of the Lexmark E120n operator panel38
Using the operator panels
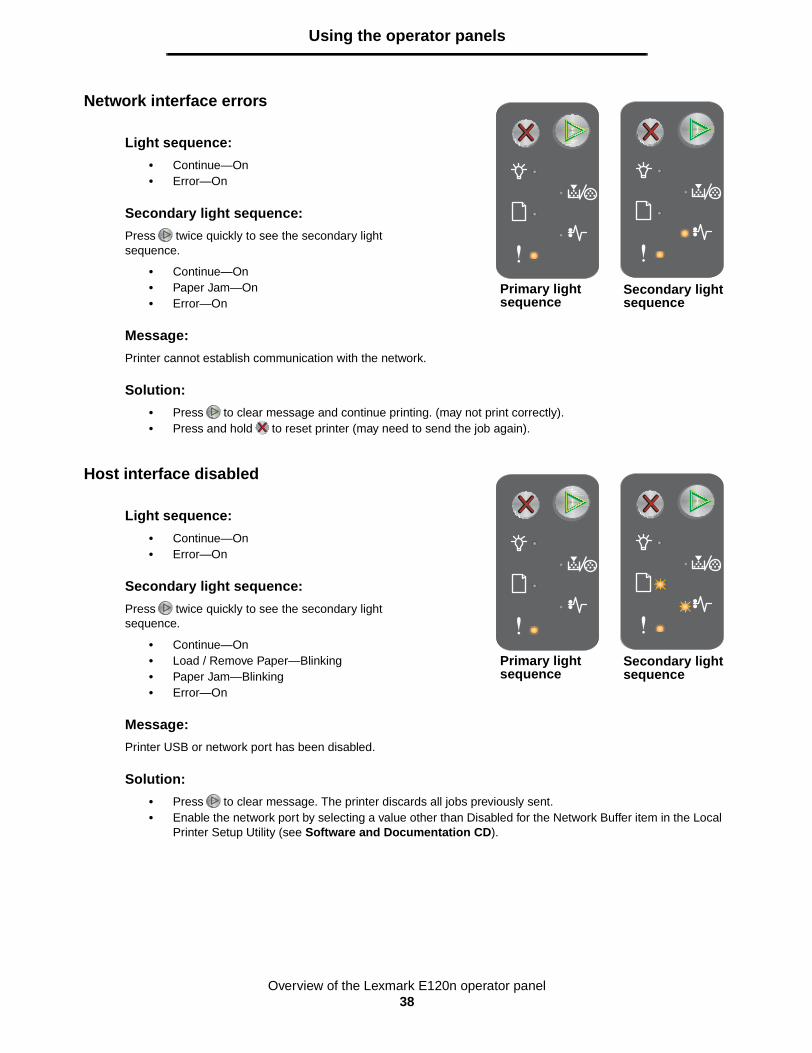
Network interface errors
Host interface disabled
Light sequence:
• Continue—On• Error—On
Secondary light sequence:
Press twice quickly to see the secondary light sequence.
• Continue—On• Paper Jam—On• Error—On
Message:
Printer cannot establish communication with the network.
Solution:
• Press to clear message and continue printing. (may not print correctly).• Press and hold to reset printer (may need to send the job again).
Light sequence:
• Continue—On• Error—On
Secondary light sequence:
Press twice quickly to see the secondary light sequence.
• Continue—On• Load / Remove Paper—Blinking• Paper Jam—Blinking• Error—On
Message:
Printer USB or network port has been disabled.
Solution:
• Press to clear message. The printer discards all jobs previously sent.• Enable the network port by selecting a value other than Disabled for the Network Buffer item in the Local
Printer Setup Utility (see Software and Documentation CD).
Primary light sequence
Secondary light sequence
Primary light sequence
Secondary light sequence
Overview of the Lexmark E120n operator panel39
Using the operator panels
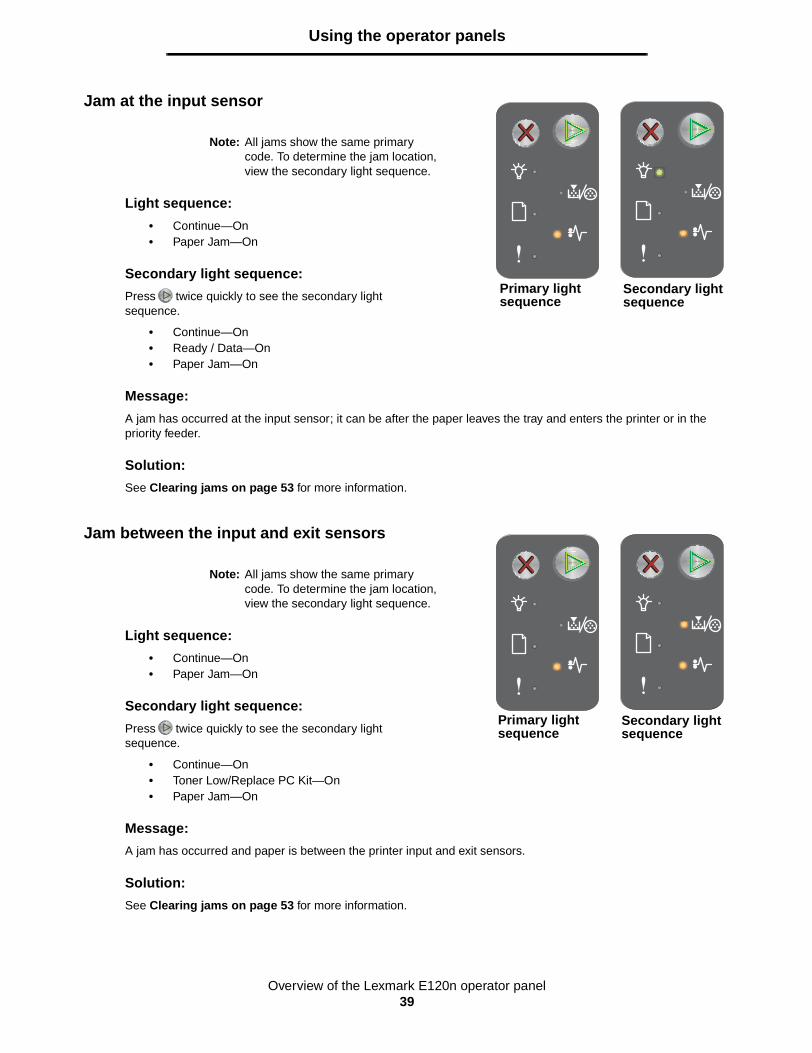
Jam at the input sensor
Jam between the input and exit sensors
Note: All jams show the same primary code. To determine the jam location,view the secondary light sequence.
Light sequence:
• Continue—On• Paper Jam—On
Secondary light sequence:
Press twice quickly to see the secondary light sequence.
• Continue—On• Ready / Data—On• Paper Jam—On
Message:
A jam has occurred at the input sensor; it can be after the paper leaves the tray and enters the printer or in the priority feeder.
Solution:
See Clearing jams on page 53 for more information.
Note: All jams show the same primary code. To determine the jam location,view the secondary light sequence.
Light sequence:
• Continue—On• Paper Jam—On
Secondary light sequence:
Press twice quickly to see the secondary light sequence.
• Continue—On• Toner Low/Replace PC Kit—On• Paper Jam—On
Message:
A jam has occurred and paper is between the printer input and exit sensors.
Solution:
See Clearing jams on page 53 for more information.
Primary light sequence
Secondary light sequence
Primary light sequence
Secondary light sequence
Overview of the Lexmark E120n operator panel40
Using the operator panels
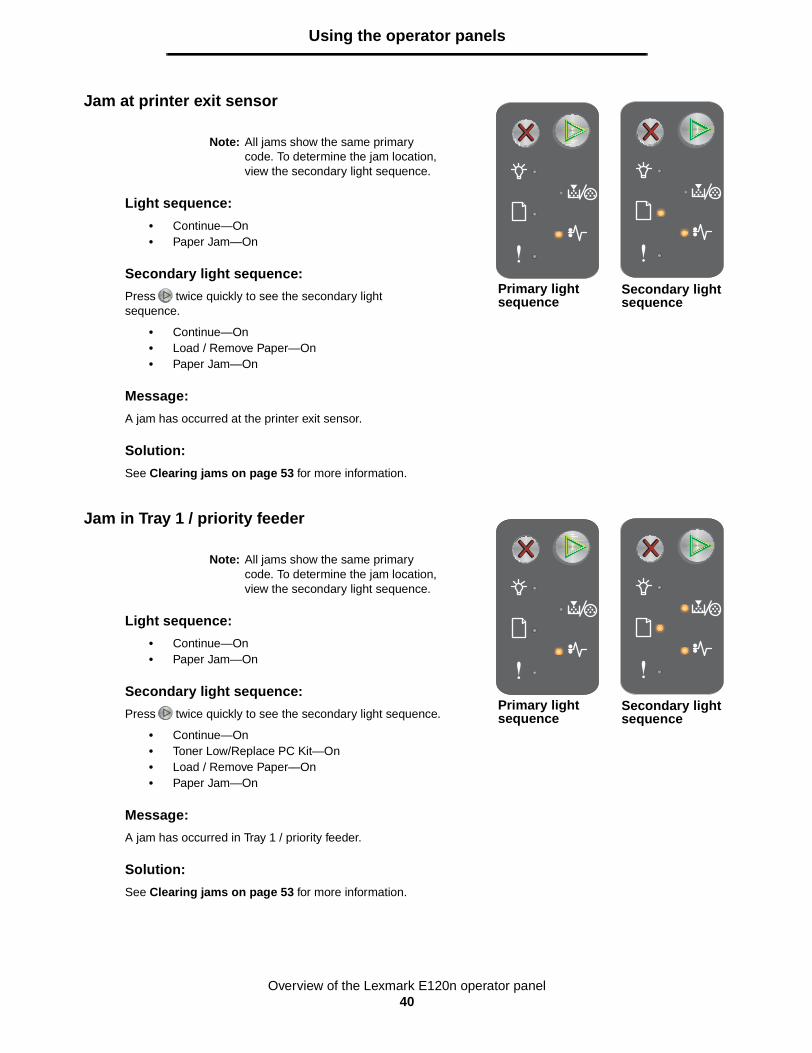
Jam at printer exit sensor
Jam in Tray 1 / priority feeder
Note: All jams show the same primary code. To determine the jam location,view the secondary light sequence.
Light sequence:
• Continue—On• Paper Jam—On
Secondary light sequence:
Press twice quickly to see the secondary light sequence.
• Continue—On• Load / Remove Paper—On• Paper Jam—On
Message:
A jam has occurred at the printer exit sensor.
Solution:
See Clearing jams on page 53 for more information.
Note: All jams show the same primary code. To determine the jam location,view the secondary light sequence.
Light sequence:
• Continue—On• Paper Jam—On
Secondary light sequence:
Press twice quickly to see the secondary light sequence.
• Continue—On• Toner Low/Replace PC Kit—On• Load / Remove Paper—On• Paper Jam—On
Message:
A jam has occurred in Tray 1 / priority feeder.
Solution:
See Clearing jams on page 53 for more information.
Primary light sequence
Secondary light sequence
Primary light sequence
Secondary light sequence
Overview of the Lexmark E120n operator panel41
Using the operator panels
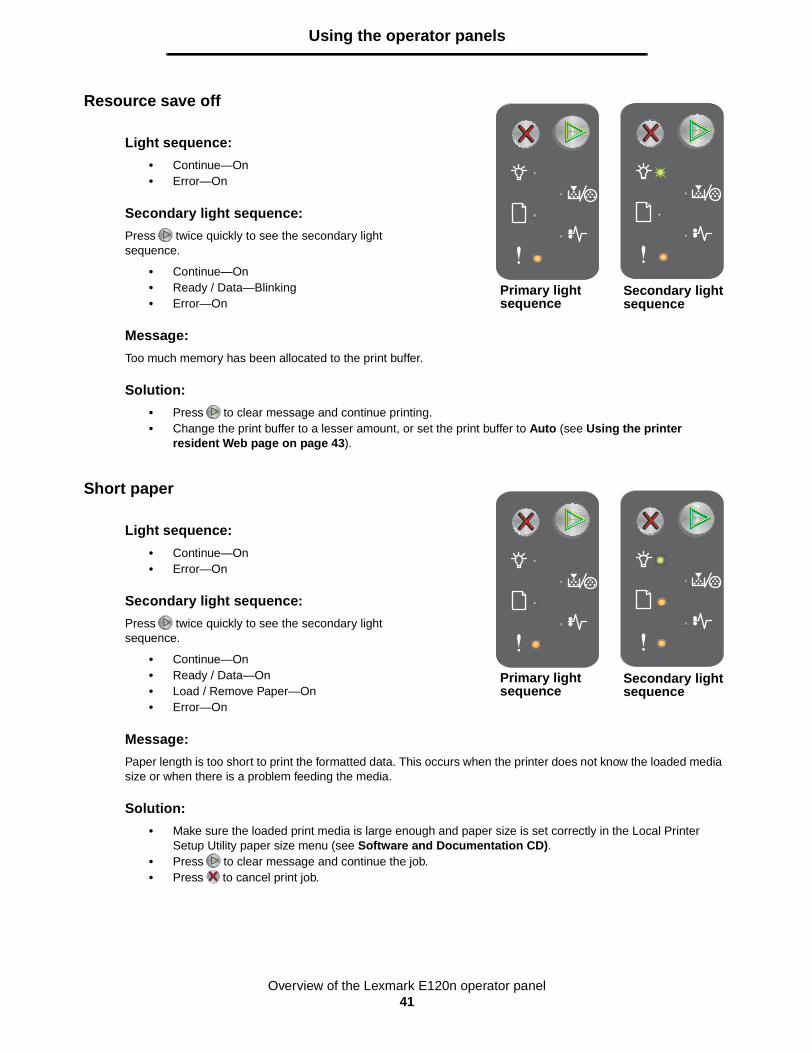
Resource save off
Short paper
Light sequence:
• Continue—On• Error—On
Secondary light sequence:
Press twice quickly to see the secondary light sequence.
• Continue—On• Ready / Data—Blinking• Error—On
Message:
Too much memory has been allocated to the print buffer.
Solution:
• Press to clear message and continue printing. • Change the print buffer to a lesser amount, or set the print buffer to Auto (see Using the printer
resident Web page on page 43).
Light sequence:
• Continue—On• Error—On
Secondary light sequence:
Press twice quickly to see the secondary light sequence.
• Continue—On• Ready / Data—On• Load / Remove Paper—On• Error—On
Message:
Paper length is too short to print the formatted data. This occurs when the printer does not know the loaded media size or when there is a problem feeding the media.
Solution:
• Make sure the loaded print media is large enough and paper size is set correctly in the Local Printer Setup Utility paper size menu (see Software and Documentation CD).
• Press to clear message and continue the job. • Press to cancel print job.
Primary light sequence
Secondary light sequence
Primary light sequence
Secondary light sequence
Overview of the Lexmark E120n operator panel42
Using the operator panels
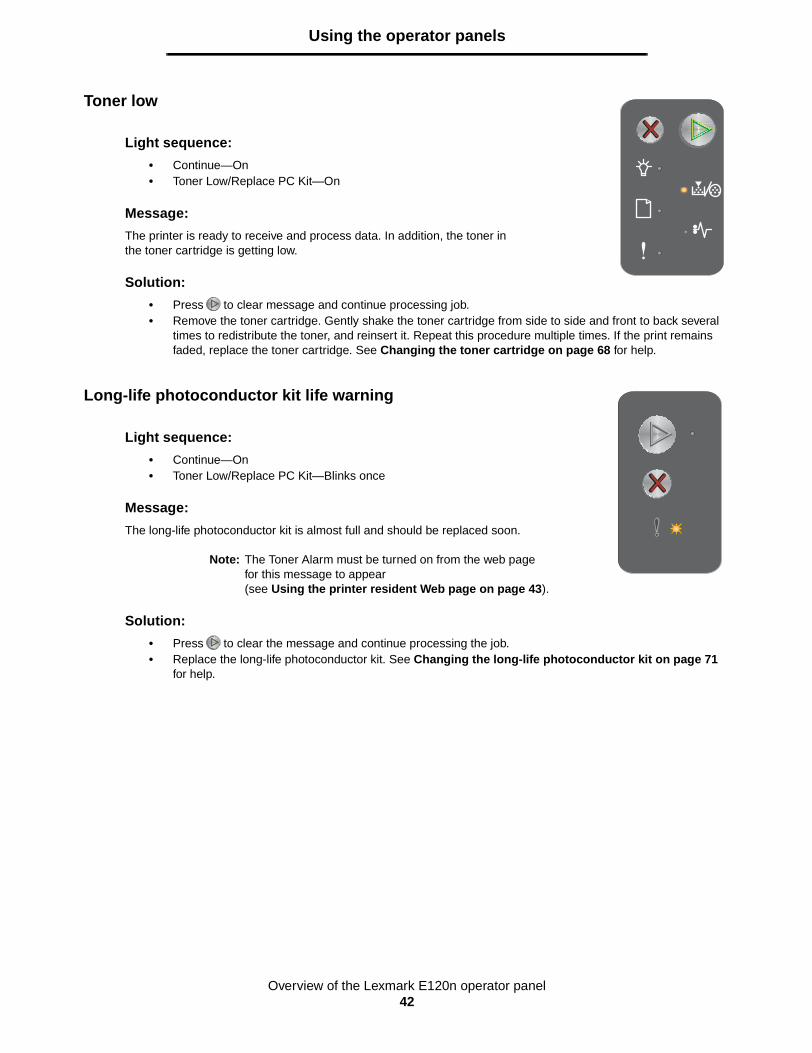
Toner low
Long-life photoconductor kit life warning
Light sequence:
• Continue—On• Toner Low/Replace PC Kit—On
Message:
The printer is ready to receive and process data. In addition, the toner inthe toner cartridge is getting low.
Solution:
• Press to clear message and continue processing job.• Remove the toner cartridge. Gently shake the toner cartridge from side to side and front to back several
times to redistribute the toner, and reinsert it. Repeat this procedure multiple times. If the print remains faded, replace the toner cartridge. See Changing the toner cartridge on page 68 for help.
Light sequence:
• Continue—On• Toner Low/Replace PC Kit—Blinks once
Message:
The long-life photoconductor kit is almost full and should be replaced soon.
Note: The Toner Alarm must be turned on from the web pagefor this message to appear (see Using the printer resident Web page on page 43).
Solution:
• Press to clear the message and continue processing the job.• Replace the long-life photoconductor kit. See Changing the long-life photoconductor kit on page 71
for help.
Overview of the Lexmark E120n operator panel43
Using the operator panels
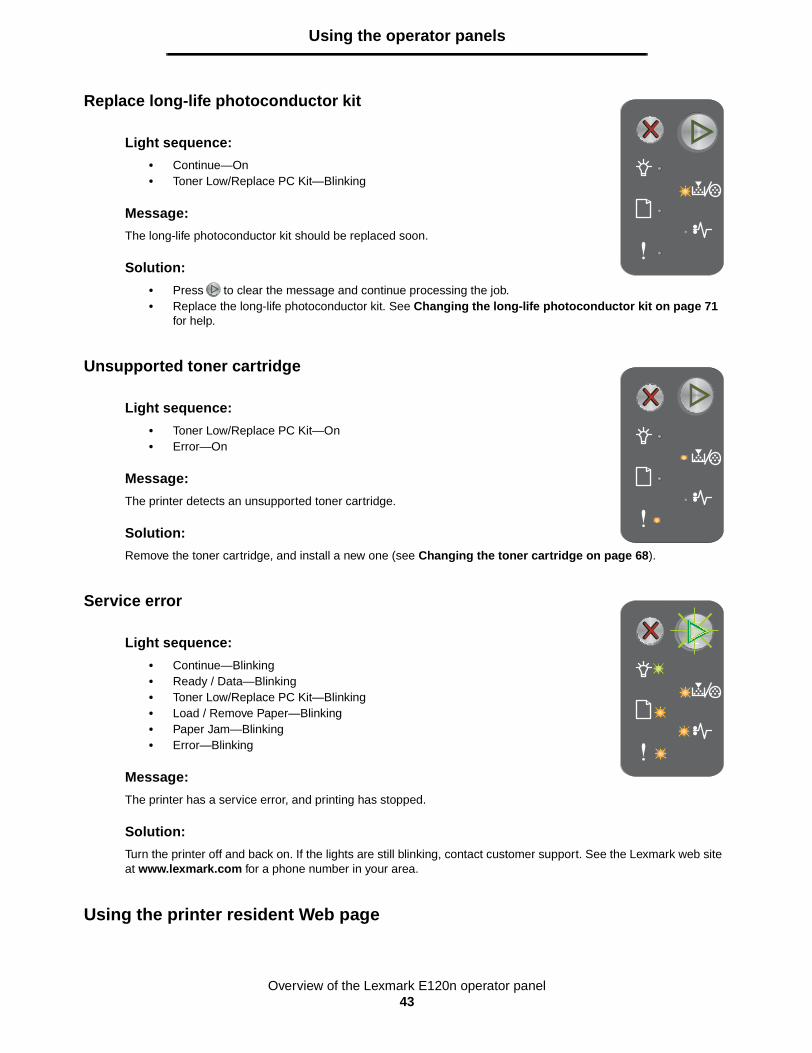
Replace long-life photoconductor kit
Unsupported toner cartridge
Service error
Using the printer resident Web page
Light sequence:
• Continue—On• Toner Low/Replace PC Kit—Blinking
Message:
The long-life photoconductor kit should be replaced soon.
Solution:
• Press to clear the message and continue processing the job.• Replace the long-life photoconductor kit. See Changing the long-life photoconductor kit on page 71
for help.
Light sequence:
• Toner Low/Replace PC Kit—On• Error—On
Message:
The printer detects an unsupported toner cartridge.
Solution:
Remove the toner cartridge, and install a new one (see Changing the toner cartridge on page 68).
Light sequence:
• Continue—Blinking• Ready / Data—Blinking• Toner Low/Replace PC Kit—Blinking• Load / Remove Paper—Blinking• Paper Jam—Blinking• Error—Blinking
Message:
The printer has a service error, and printing has stopped.
Solution:
Turn the printer off and back on. If the lights are still blinking, contact customer support. See the Lexmark web site at www.lexmark.com for a phone number in your area.
Printing the menu settings and network setup page44
Using the operator panels
The Lexmark E120n (network model), has a resident Web page, which can be accessed from the browser. To access the resident Web page, type the printer’s IP address in the URL address field of the browser (for example, http://192.168.236.24). If you do not know the IP address of your printer, it can be found on the network setup page. See Printing the menu settings and network setup page.
Some resident Web page features include a real-time status window of the printer and details of the printer’s configuration, such as current memory and engine code levels. If you have administrative rights, you can also change printer settings.
Printing the menu settings and network setup page
To print the menu settings and network setup pages, press the Continue button from the Ready state. The printer automatically prints the menu settings and network setup page.
A list of the printer settings and the current default values are printed on the menu settings page. The current default settings are marked with an asterisk. The network setup page confirms the network Status is “Connected” and lists the current network settings.
Restoring factory defaults
This function will return most of the settings back to their factory values. The display language and the settings in the Network and USB menus are not returned to the factory defaults.
To restore the printer to the original factory defaults, press and hold the Cancel button for more than three seconds.
Note: Before restoring the factory defaults, make sure the host computer or network has stopped sending information to the printer.
Print media tasks and tips45
3 Print media tasks and tips
Section Page
Types of print media 46
Choosing appropriate print media 46
Storing print media 48
Loading print media into Tray 1 48
Loading print media into the priority feeder 51
Preventing jams 52
Clearing jams 53
Types of print media46
Print media tasks and tips
Types of print media
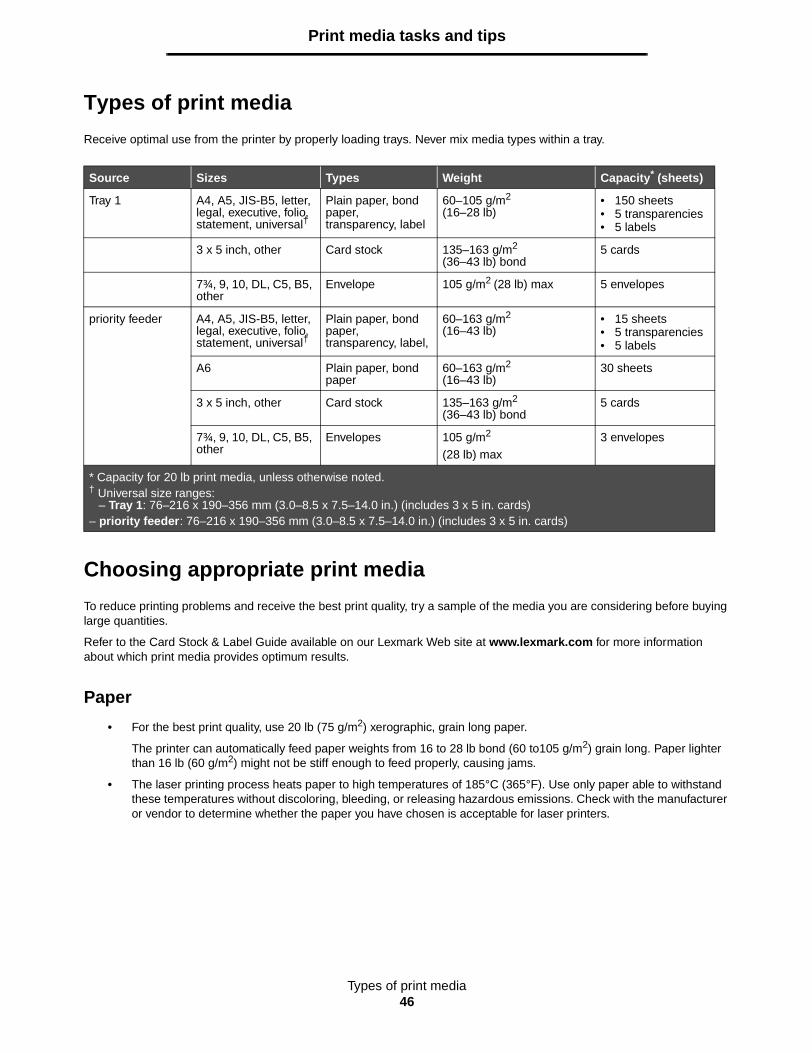
Receive optimal use from the printer by properly loading trays. Never mix media types within a tray.
Choosing appropriate print media
To reduce printing problems and receive the best print quality, try a sample of the media you are considering before buying large quantities.
Refer to the Card Stock & Label Guide available on our Lexmark Web site at www.lexmark.com for more information about which print media provides optimum results.
Paper
• For the best print quality, use 20 lb (75 g/m2) xerographic, grain long paper.
The printer can automatically feed paper weights from 16 to 28 lb bond (60 to105 g/m2) grain long. Paper lighter than 16 lb (60 g/m2) might not be stiff enough to feed properly, causing jams.
• The laser printing process heats paper to high temperatures of 185°C (365°F). Use only paper able to withstand these temperatures without discoloring, bleeding, or releasing hazardous emissions. Check with the manufacturer or vendor to determine whether the paper you have chosen is acceptable for laser printers.
Source Sizes Types Weight Capacity* (sheets)
Tray 1 A4, A5, JIS-B5, letter, legal, executive, folio, statement, universal†
Plain paper, bond paper, transparency, label
60–105 g/m2
(16–28 lb)• 150 sheets• 5 transparencies• 5 labels
3 x 5 inch, other Card stock 135–163 g/m2
(36–43 lb) bond5 cards
7¾, 9, 10, DL, C5, B5, other
Envelope 105 g/m2 (28 lb) max 5 envelopes
priority feeder A4, A5, JIS-B5, letter, legal, executive, folio, statement, universal†
Plain paper, bond paper, transparency, label,
60–163 g/m2
(16–43 lb)• 15 sheets• 5 transparencies• 5 labels
A6 Plain paper, bond paper
60–163 g/m2
(16–43 lb)30 sheets
3 x 5 inch, other Card stock 135–163 g/m2
(36–43 lb) bond5 cards
7¾, 9, 10, DL, C5, B5, other
Envelopes 105 g/m2
(28 lb) max3 envelopes
* Capacity for 20 lb print media, unless otherwise noted.† Universal size ranges:
– Tray 1: 76–216 x 190–356 mm (3.0–8.5 x 7.5–14.0 in.) (includes 3 x 5 in. cards)– priority feeder: 76–216 x 190–356 mm (3.0–8.5 x 7.5–14.0 in.) (includes 3 x 5 in. cards)
Choosing appropriate print media47
Print media tasks and tips
Preprinted forms and letterhead
• Use only forms and letterhead printed using an offset lithographic or engraved printing process.
• Choose forms and letterhead types that absorb ink, but do not bleed.
• Avoid rough or heavily textured surfaces.
Use media printed with heat-resistant inks designed for use in xerographic copiers. The ink must withstand temperatures of 185°C (365°F) without melting or releasing hazardous emissions. Use inks that are not affected by the resin in toner. Inks that are oxidation-set or oil-based should meet these requirements; latex inks might not. If you are in doubt, contact the supplier.
Transparencies
• Use transparencies designed specifically for laser printers. Transparencies must be able to withstand temperatures of 185°C (365°F) without melting, discoloring, offsetting, or releasing hazardous emissions.
We recommend Lexmark laser printer transparencies: part number 70X7240 for letter size transparencies; part number 12A5010 for A4 size transparencies.
• To prevent print quality problems, avoid getting fingerprints on transparencies.
Envelopes
• Use envelopes made from 24 lb (90 g/m2) bond paper, or with a maximum weight of 28 lb (105 g/m2)
• Use envelopes that can withstand temperatures of 185°C (365°F) without:
– sealing– excessive curling– wrinkling– releasing hazardous emissions
• Do not use envelopes that:
– Have excessive curl– Are stuck together– Are damaged in any way– Contain windows, holes, perforations, cutouts, or embossments– Have metal clasps, string ties, or metal folding bars– Have postage stamps attached– Have exposed adhesive when the flap is in the sealed position– Are self-sealing
If uncertain about the envelopes being considered for use, check with the supplier.
• A combination of high humidity (over 60%) and high printing temperatures may seal envelopes.
Labels
• Use labels that can withstand temperatures of 185°C (365°F) without sealing, excessive curling, wrinkling, or releasing hazardous emissions. Label adhesives, face sheet (printable stock), and topcoats must also be able to withstand 25 pounds per square inch (psi) (172 kilopascals) pressure.
• Do not use labels with exposed adhesive.
• Do not print a large number of labels continuously.
• Do not use vinyl labels.
Storing print media48
Print media tasks and tips
Card stock
• Use card stock with a maximum weight of 43 lb (163 g/m2) bond and a minimum size of 76 x 127 mm (3 x 5 inch).
• Preprinting, perforation, and creasing can significantly affect print quality and cause media handling or jamming problems.
• Avoid using card stock that may release hazardous emissions when heated.
• Do not use preprinted card stock manufactured with chemicals that may contaminate the printer. Preprinting introduces semi-liquid and volatile components into the printer.
Storing print media
Use the following guidelines to avoid print media feeding problems and uneven print quality.
• Store all print media in an environment where temperature is approximately 21°C (70°F) and relative humidity is 40%.
• Store cartons of paper on a pallet or shelf rather than directly on the floor surface.
• If storing individual packages of paper out of the original carton, make sure they rest on a flat surface so edges do not buckle, curl, or become damaged.
• Do not place anything on top of paper packages.
• Store transparencies and envelopes in their original boxes.
Loading print media into Tray 1
The printer has two print media sources: Tray 1 and a multi-sheet priority feeder. Media in the priority feeder will be picked first. After the supply of media has been used up, media will be picked from Tray 1
Tray 1 with adjustable guides
Slide and attached backstop
Front door release button
Front door
50-sheet output bin
Operator panel
Top door
Tray 1 cover / Priority feeder paper path
Priority feeder with adjustable guides
Paper support
Loading print media into Tray 149
Print media tasks and tips
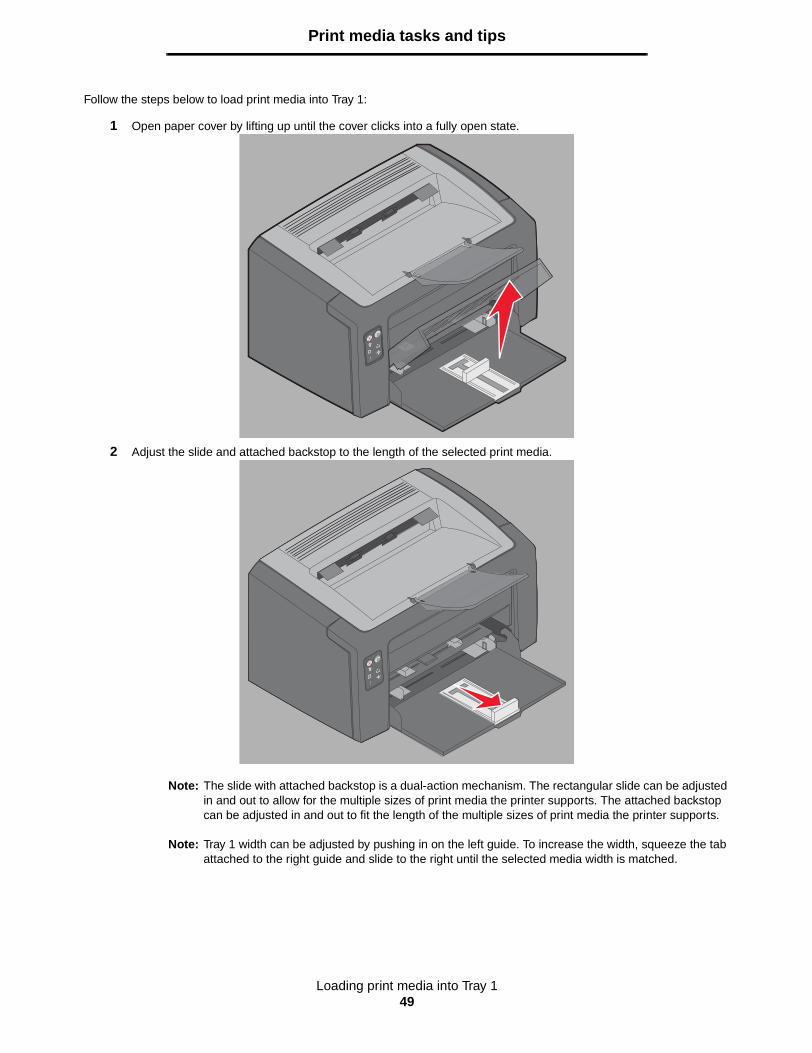
Follow the steps below to load print media into Tray 1:
1 Open paper cover by lifting up until the cover clicks into a fully open state.
2 Adjust the slide and attached backstop to the length of the selected print media.
Note: The slide with attached backstop is a dual-action mechanism. The rectangular slide can be adjusted in and out to allow for the multiple sizes of print media the printer supports. The attached backstop can be adjusted in and out to fit the length of the multiple sizes of print media the printer supports.
Note: Tray 1 width can be adjusted by pushing in on the left guide. To increase the width, squeeze the tab attached to the right guide and slide to the right until the selected media width is matched.

Loading print media into Tray 150
Print media tasks and tips
Prepare a stack of print media for loading by flexing or fanning it back and forth. Straighten the edges on a level surface.
3 Place the prepared stack of print media into the tray and push the attached backstop lightly against the end of the loaded stack.
4 Push the guides lightly against the loaded stack of print media.
Note: Use care not to overfill. Placing more than 150 sheets into Tray 1 may cause jams.

Loading print media into the priority feeder51
Print media tasks and tips
5 Close the paper cover.
Loading print media into the priority feeder
The priority feeder is located at the front of the printer, just above Tray 1. Use the priority feeder to make quick runs of print media types or sizes that are not currently loaded in Tray 1.
For information on acceptable print media and quantity for use in the priority feeder, see Types of print media on page 46. Using only specified print media helps prevent jams and print quality problems.
1 Adjust the guides to the width of the print media.
2 Place selected print media, with side to be printed face up, at the center of the priority feeder, resting on the Tray 1 paper cover.
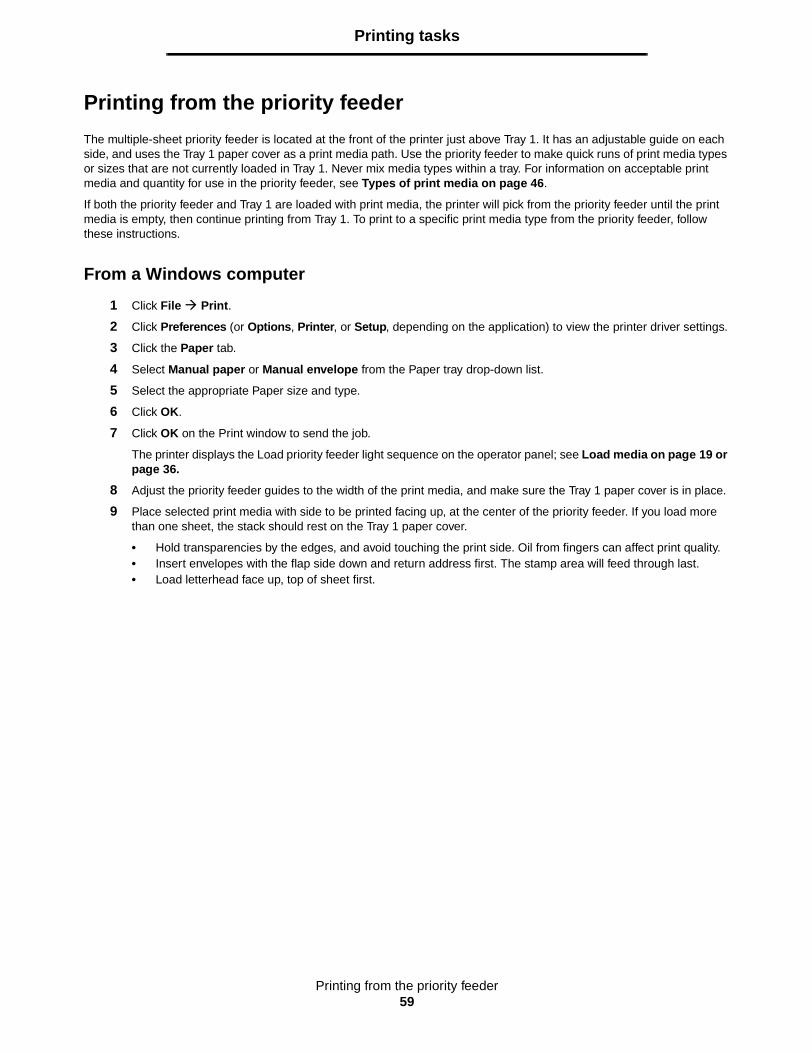
3 Push selected print media into the printer until the print media stops.
Note: Do not force print media into the feeder. Forcing media causes jams.
• Insert envelopes with flap side down and return address first. The stamp area will feed through last.
• Hold transparencies by the edges, and avoid touching the print side. Oil from fingers can affect print quality.
• Load letterhead face up, top of sheet first.

Preventing jams52
Print media tasks and tips
Preventing jams
Avoid most jams by correctly loading print media.
• Do not load wrinkled, creased, or damp print media.
• Never mix media types within a tray.
• Flex, fan, and straighten paper before loading.
• Do not exceed maximum stack height.
• Make sure guides and backstop are positioned lightly against the loaded print media.
• Before loading transparencies, fan the stack to prevent sheets from sticking together.
• Do not use envelopes that:
– Have excessive curl– Are stuck together– Are damaged in any way– Contain windows, holes, perforations, cutouts, or embossments– Have metal clasps, string ties, or metal folding bars– Have postage stamps attached– Have exposed adhesive when the flap is in the sealed position– Are self-sealing
• Use only recommended print media. See the Card Stock & Label Guide available on our Lexmark Web site at www.lexmark.com for more information about which print media provides optimum results for your printing environment.
• See the Card Stock & Label Guide for detailed information prior to purchasing large quantities of customized print media.
Clearing jams53
Print media tasks and tips
Clearing jams
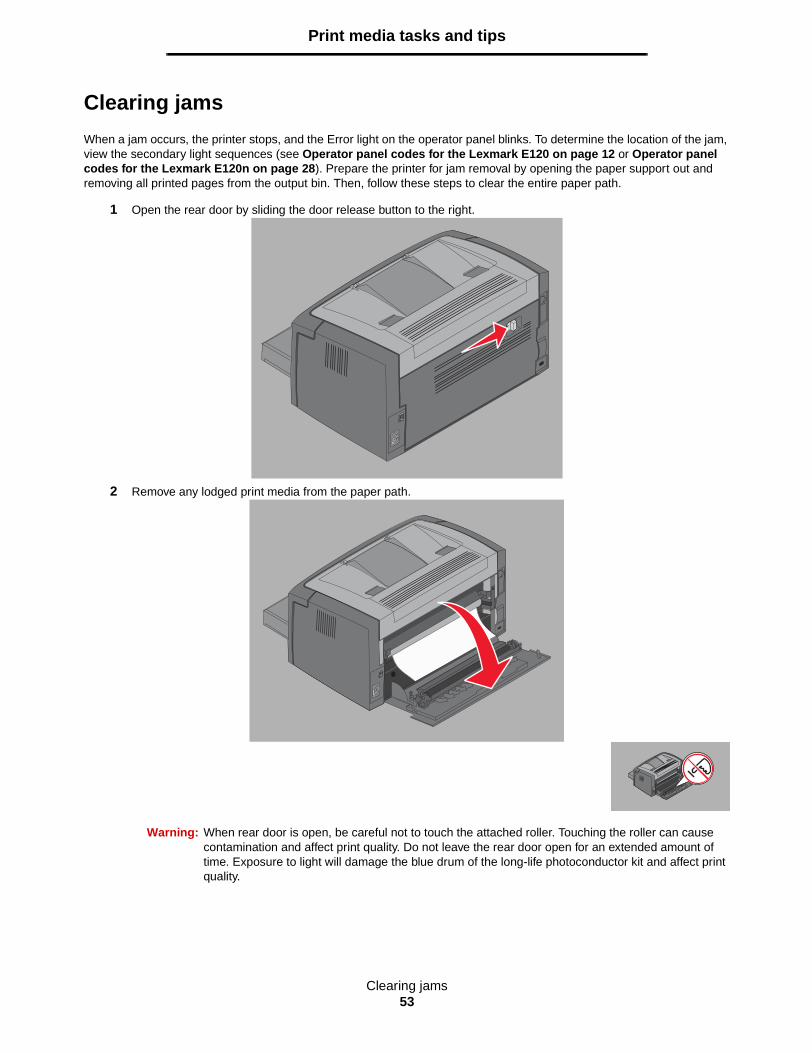
When a jam occurs, the printer stops, and the Error light on the operator panel blinks. To determine the location of the jam, view the secondary light sequences (see Operator panel codes for the Lexmark E120 on page 12 or Operator panel codes for the Lexmark E120n on page 28). Prepare the printer for jam removal by opening the paper support out and removing all printed pages from the output bin. Then, follow these steps to clear the entire paper path.
1 Open the rear door by sliding the door release button to the right.
2 Remove any lodged print media from the paper path.
Warning: When rear door is open, be careful not to touch the attached roller. Touching the roller can cause contamination and affect print quality. Do not leave the rear door open for an extended amount of time. Exposure to light will damage the blue drum of the long-life photoconductor kit and affect print quality.
Clearing jams54
Print media tasks and tips
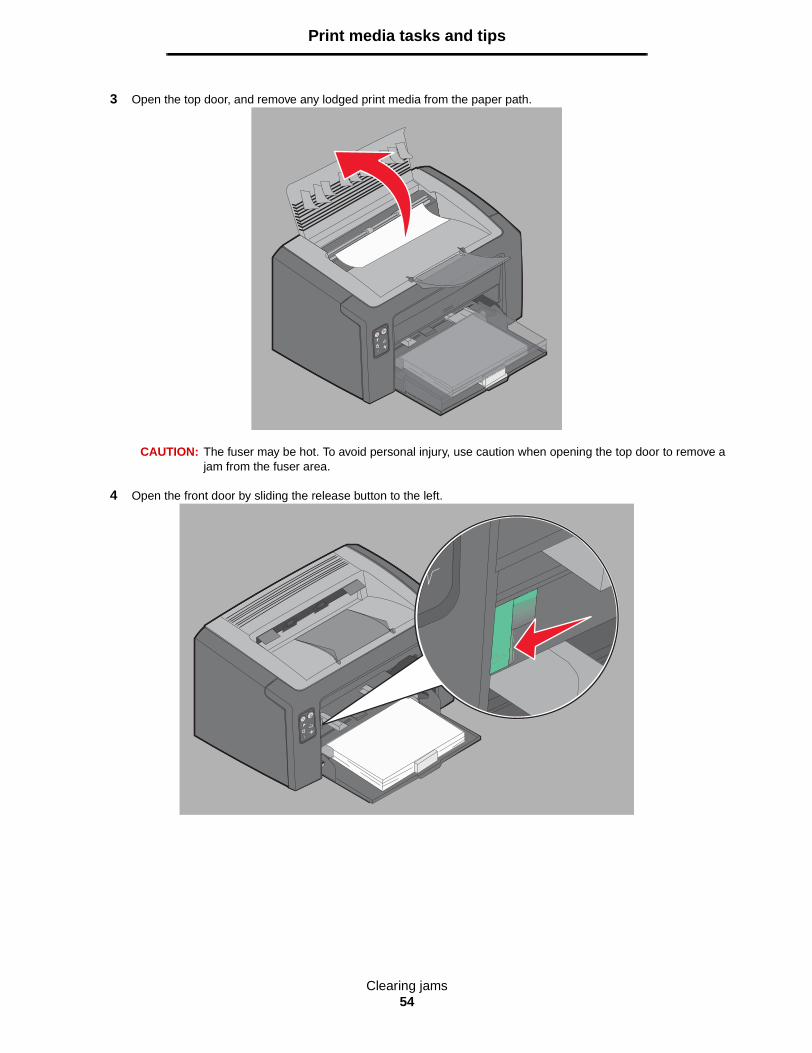
3 Open the top door, and remove any lodged print media from the paper path.
CAUTION: The fuser may be hot. To avoid personal injury, use caution when opening the top door to remove a jam from the fuser area.
4 Open the front door by sliding the release button to the left.
Clearing jams55
Print media tasks and tips
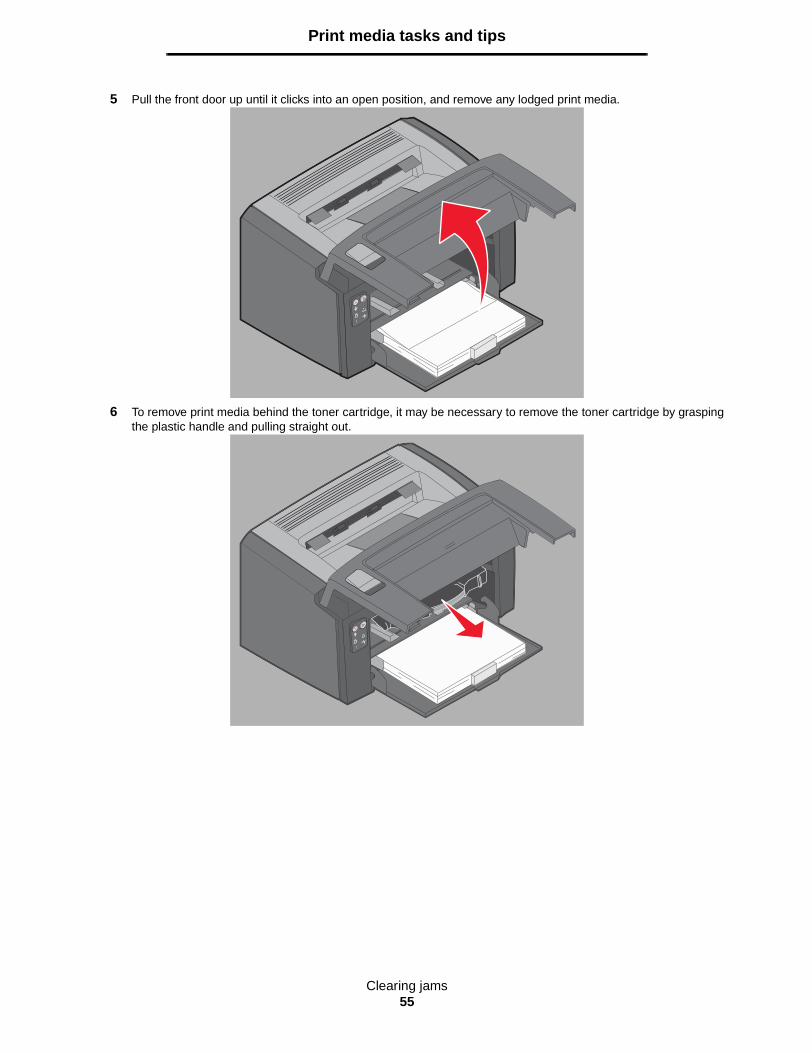
5 Pull the front door up until it clicks into an open position, and remove any lodged print media.
6 To remove print media behind the toner cartridge, it may be necessary to remove the toner cartridge by grasping the plastic handle and pulling straight out.
Clearing jams56
Print media tasks and tips
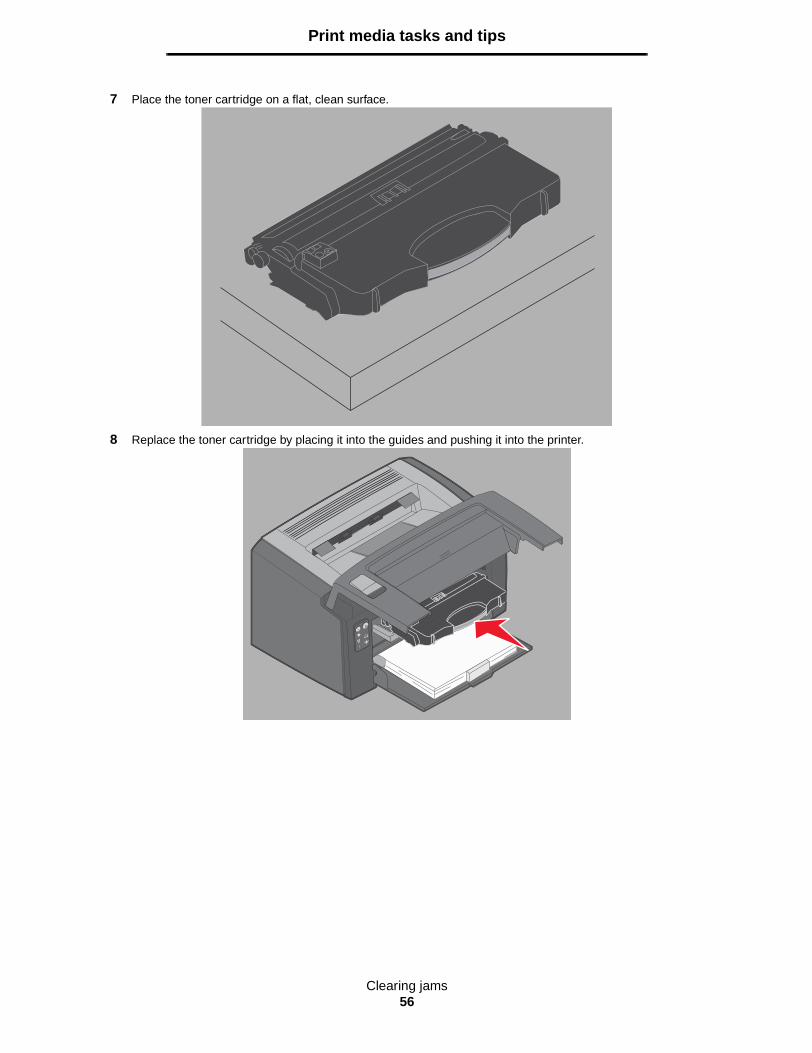
7 Place the toner cartridge on a flat, clean surface.
8 Replace the toner cartridge by placing it into the guides and pushing it into the printer.
Clearing jams57
Print media tasks and tips
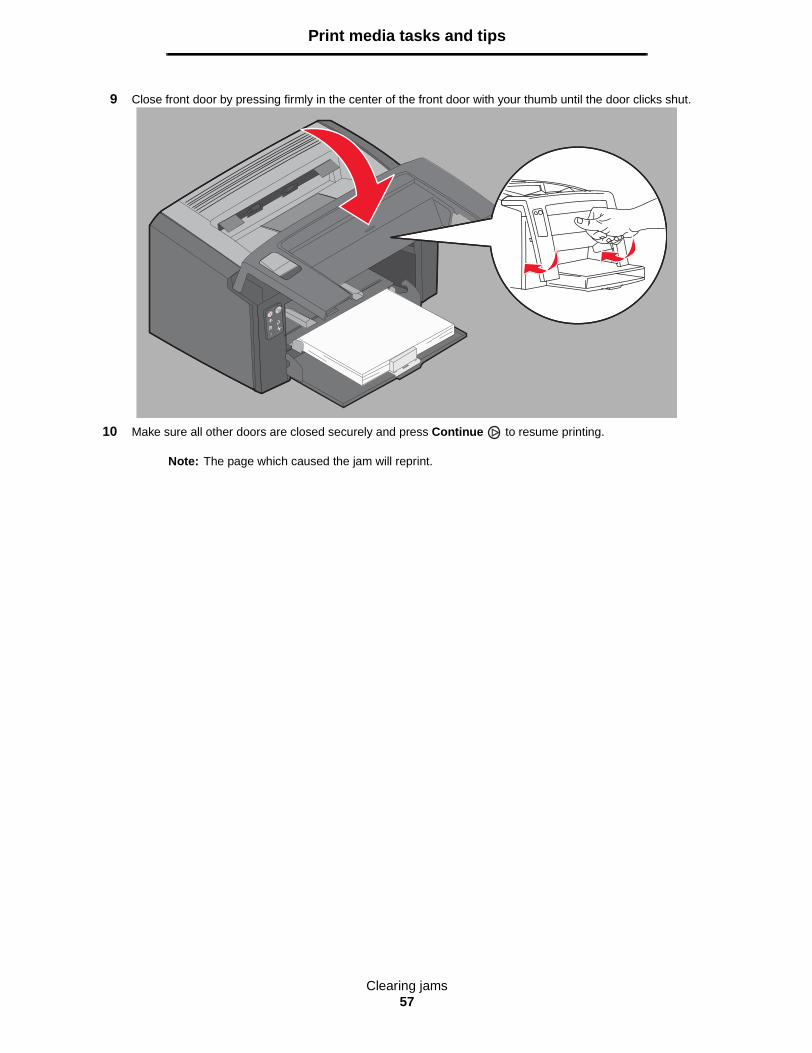
9 Close front door by pressing firmly in the center of the front door with your thumb until the door clicks shut.
10 Make sure all other doors are closed securely and press Continue to resume printing.
Note: The page which caused the jam will reprint.
Printing tasks58
4 Printing tasks
Section Page
Printing from the priority feeder 59
Printing on both sides of the paper (manual duplex) 61
Printing multiple page images on one page (N-up printing) 62
Printing on letterhead 63
Canceling a print job 64
Printing from the priority feeder59
Printing tasks
Printing from the priority feeder
The multiple-sheet priority feeder is located at the front of the printer just above Tray 1. It has an adjustable guide on each side, and uses the Tray 1 paper cover as a print media path. Use the priority feeder to make quick runs of print media types or sizes that are not currently loaded in Tray 1. Never mix media types within a tray. For information on acceptable print media and quantity for use in the priority feeder, see Types of print media on page 46.
If both the priority feeder and Tray 1 are loaded with print media, the printer will pick from the priority feeder until the print media is empty, then continue printing from Tray 1. To print to a specific print media type from the priority feeder, follow these instructions.
From a Windows computer
1 Click File Print.
2 Click Preferences (or Options, Printer, or Setup, depending on the application) to view the printer driver settings.
3 Click the Paper tab.
4 Select Manual paper or Manual envelope from the Paper tray drop-down list.
5 Select the appropriate Paper size and type.
6 Click OK.
7 Click OK on the Print window to send the job.
The printer displays the Load priority feeder light sequence on the operator panel; see Load media on page 19 or page 36.
8 Adjust the priority feeder guides to the width of the print media, and make sure the Tray 1 paper cover is in place.
9 Place selected print media with side to be printed facing up, at the center of the priority feeder. If you load more than one sheet, the stack should rest on the Tray 1 paper cover.
• Hold transparencies by the edges, and avoid touching the print side. Oil from fingers can affect print quality.• Insert envelopes with the flap side down and return address first. The stamp area will feed through last.• Load letterhead face up, top of sheet first.
Printing from the priority feeder60
Printing tasks
10 Hold both sides of the print media close to the priority feeder and push into the printer until the media stops.
Note: Do not force the print media into feeder. Forcing media causes jams.
11 Press the flashing Continue button to print the job.
From a Macintosh computer
1 Click File Page Setup.
2 From the Format for pop-up, choose your Printer.
3 From the Paper Size pop-up, choose your paper size.
4 Click OK.
5 From the computer software application, select File Print.
6 From the Copies & Pages pop-up, choose Paper.
7 From the Paper Type pop-up, choose your paper type.
8 From the Paper pop-up, choose Paper Feed.
9 Select Manual Paper or Manual Envelope as appropriate.
10 Adjust the priority feeder guides to the width of the print media, and make sure the Tray 1 paper cover is in place.
11 Place selected print media with side to be printed facing up, at the center of the priority feeder. If you load more than one sheet, the stack should rest on the Tray 1 paper cover.
• Hold transparencies by the edges, and avoid touching the print side. Oil from fingers can affect print quality.• Insert envelopes with the flap side down and return address first. The stamp area will feed through last.• Load letterhead face up, top of sheet first.
Hold both sides of the print media close to the priority feeder and push into the printer until the media stops.
12 Press Print.
Printing on both sides of the paper (manual duplex)61
Printing tasks
Printing on both sides of the paper (manual duplex)
Printing on both sides of the paper reduces total printing costs and is environmentally friendly.
Macintosh does not support manual duplex printing. Follow the directions below to print on both sides of the paper (manual duplex) from Windows.
Use Tray 1 to print the first side of a duplex job. Load the already-printed print media through either the priority feeder or Tray 1 to print the second side.
Choose how the job is duplexed: Long Edge or Short Edge.
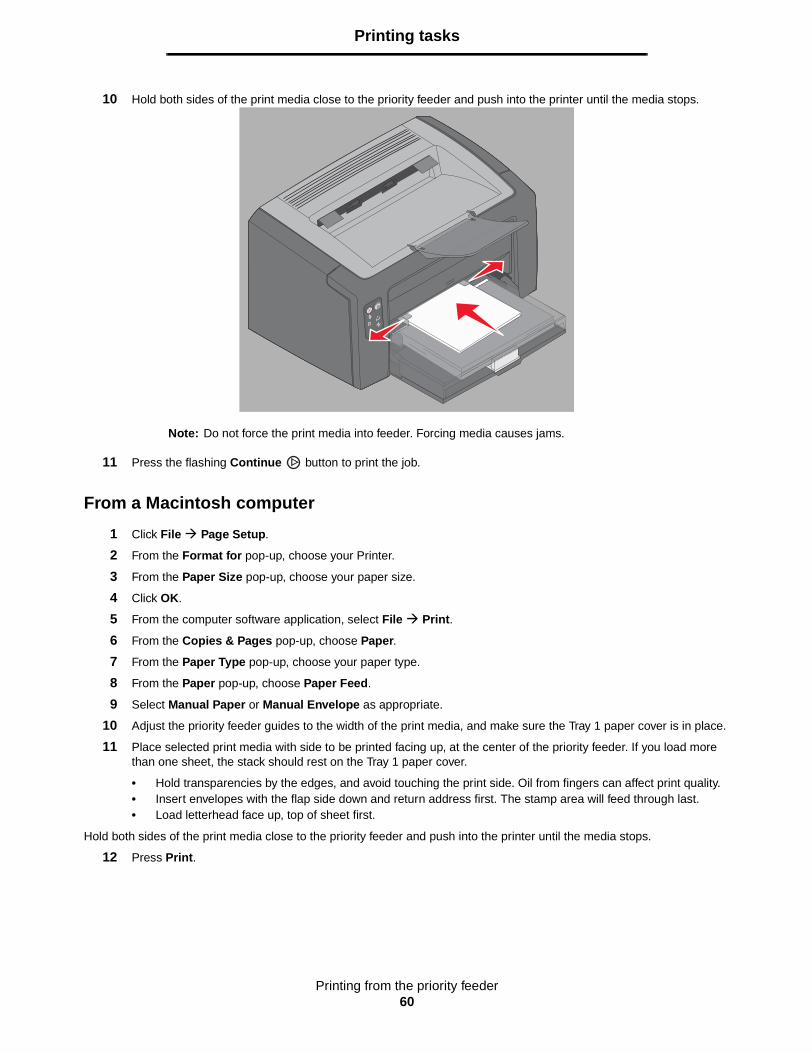
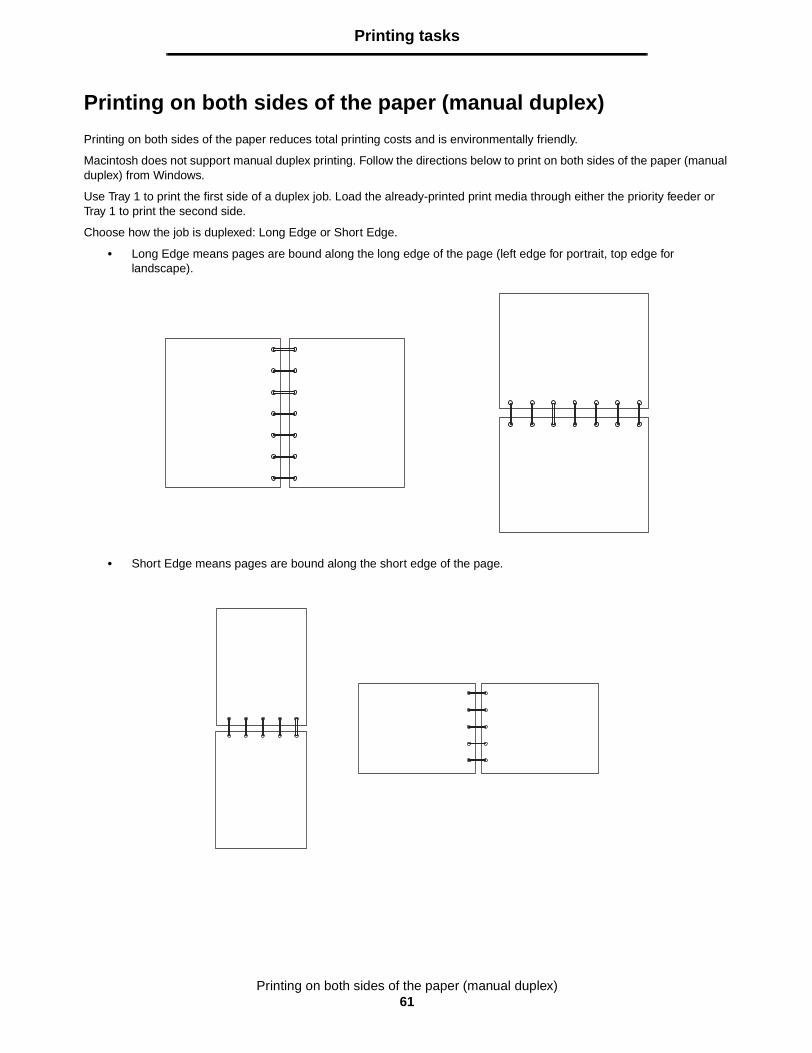
• Long Edge means pages are bound along the long edge of the page (left edge for portrait, top edge for landscape).
• Short Edge means pages are bound along the short edge of the page.

Printing multiple page images on one page (N-up printing)62
Printing tasks
To manually duplex a print job from a Windows computer:
1 Click File Print.
2 Click Preferences (or Options, Printer, or Setup, depending on the application) to view printer driver settings.
3 From the Page Layout tab, select 2-sided printing.
4 Select either Long Edge or Short Edge.
5 Select Manual 2-sided printing.
6 Click the Paper tab.
7 Select appropriate Input options for the job.
8 Click OK.
9 Click OK on the Print window.
The printer prints every other page of the document first. Once the first side of a job prints, the Load Paper and Continue lights blink (see Print side two of a duplex job on page 20 or 37).
10 Load the printed page into Tray 1 or the priority feeder with the already-printed side down and the top of the page toward the front of the tray.
Printing multiple page images on one page (N-up printing)
The Multipage Printing (N-up) setting is used to print multiple page images on a single page. For example, 2-up means two page images are printed on one page, 4-up means four page images are printed on one page, and so on.
The printer uses the Multipage Order, Multipage View, and Multipage Border settings to determine the order and orientation of page images, and whether a border is printed around each page image. Follow the directions below to print multiple page images on one page.
From a Windows computer
1 From the computer software application, select File Print.
2 Click Preferences (or Options, Printer, or Setup, depending on the application) to view printer driver settings.
3 From the Page Layout tab, select the number of images per sheet (from the Multipage printing section) and the orientation.
Positioning depends on the number of images and whether the images are portrait or landscape in orientation.
For example, if 4-Up multipage printing and portrait orientation are selected, the results differ depending on the Multipage Order value selected:
Across Down
21
43
31
42
Printing on letterhead63
Printing tasks
4 To print a visible border around each page image, select Print page borders.
5 Click OK.
6 Click OK on the Print window to send the job to print.
From a Macintosh computer
1 From the computer software application, select File Print.
2 From the Copies & Pages pop-up, select Layout.
3 From the Pages per Sheet pop-up, choose the appropriate pages per sheet, layout direction, and border.
4 Click Print (if using the priority feeder, press the Continue button on the printer).
Printing on letterhead
To print on letterhead, make sure paper is loaded with the proper orientation.
• Tray 1—Load letterhead with the design side facing up and the top (logo) edge inserted first.• priority feeder—Load letterhead with the design side facing up with the top (logo) edge inserted first.).
From a Windows computer
1 Click File Print.
2 Click Preferences (or Options, Printer, or Setup, depending on the application) to view printer driver settings.
3 Click the Paper tab.
4 Select Letterhead from the Paper type drop-down list.
5 Select the appropriate paper size and tray.
6 Click OK.
7 Click OK on the Print window to send the job to print.
8 Click OK.
From a Macintosh computer
1 Click File Print.
2 From the Copies & Pages pop-up, select Paper.
3 From the Paper type pop-up, select Letterhead.
4 Click Print.

Canceling a print job64
Printing tasks
Canceling a print job
A print job can be canceled from the operator panel or from the computer. The Cancel job light sequence appears on the operator panel when a job is canceled (see Cancel job / Reset printer on page 14 or 30).
From printer operator panel
Press and release Cancel to cancel the current print job. Press and hold the Cancel button for more than three seconds to reset the printer.
From a Windows computer
1 Click Start Settings Printers.
2 Double-click the printer being used to print the current job.
A list of print jobs appears.
3 Right-click the current document, and click Cancel.
From a Macintosh computer
When a job is sent to print, the printer icon appears on the desktop.
1 Click Applications.
2 Click Utilities
3 Double-click Printer Setup Utility.
A list of print jobs appears.
4 Double-click the printer name for a list of print jobs.
5 Click on the print job you wish to cancel.
6 From the tool bar, click the Delete button.
Supplies information65
5 Supplies information
Section Page
Supply items needed 66
Ordering supplies 66
Storing supplies 67
Conserving supplies 67
Assessing supply needs 67
Checking toner cartridge and long-life photoconductor kit levels 67
Changing the toner cartridge 68
Changing the long-life photoconductor kit 71
Lexmark Return Program 74
Recycling Lexmark products 74
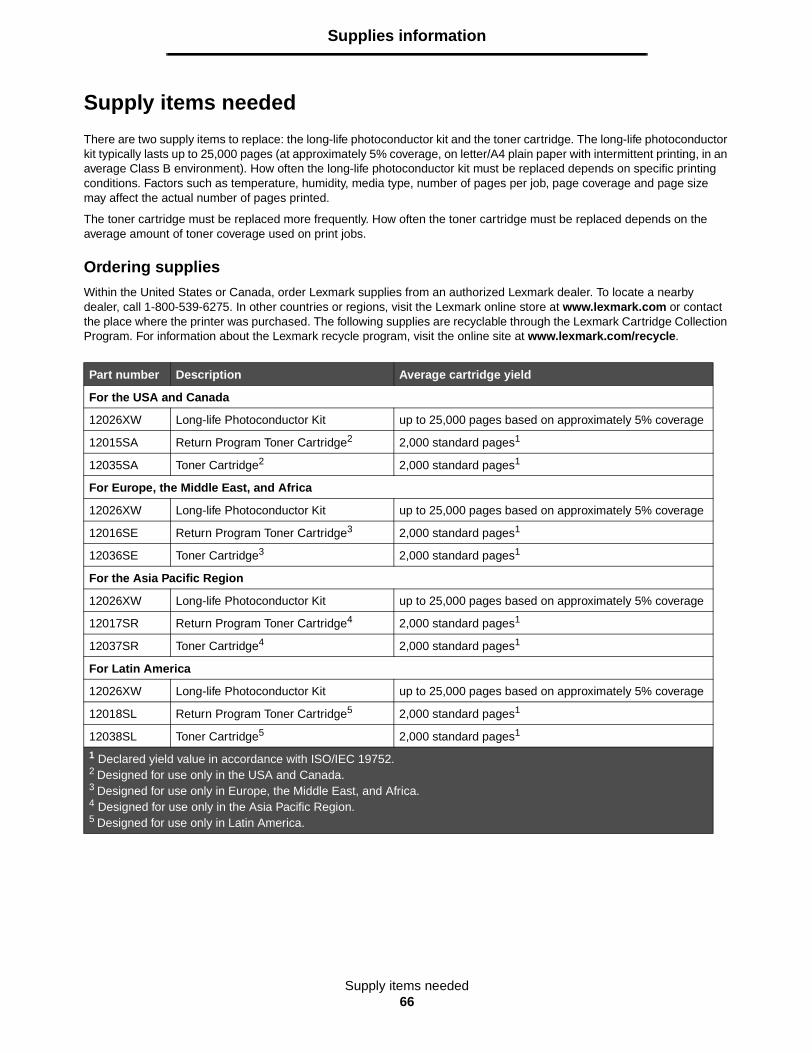
Supply items needed66
Supplies information
Supply items needed
There are two supply items to replace: the long-life photoconductor kit and the toner cartridge. The long-life photoconductor kit typically lasts up to 25,000 pages (at approximately 5% coverage, on letter/A4 plain paper with intermittent printing, in an average Class B environment). How often the long-life photoconductor kit must be replaced depends on specific printing conditions. Factors such as temperature, humidity, media type, number of pages per job, page coverage and page size may affect the actual number of pages printed.
The toner cartridge must be replaced more frequently. How often the toner cartridge must be replaced depends on the average amount of toner coverage used on print jobs.
Ordering supplies
Within the United States or Canada, order Lexmark supplies from an authorized Lexmark dealer. To locate a nearby dealer, call 1-800-539-6275. In other countries or regions, visit the Lexmark online store at www.lexmark.com or contact the place where the printer was purchased. The following supplies are recyclable through the Lexmark Cartridge Collection Program. For information about the Lexmark recycle program, visit the online site at www.lexmark.com/recycle.
Part number Description Average cartridge yield
For the USA and Canada
12026XW Long-life Photoconductor Kit up to 25,000 pages based on approximately 5% coverage
12015SA Return Program Toner Cartridge2 2,000 standard pages1
12035SA Toner Cartridge2 2,000 standard pages1
For Europe, the Middle East, and Africa
12026XW Long-life Photoconductor Kit up to 25,000 pages based on approximately 5% coverage
12016SE Return Program Toner Cartridge3 2,000 standard pages1
12036SE Toner Cartridge3 2,000 standard pages1
For the Asia Pacific Region
12026XW Long-life Photoconductor Kit up to 25,000 pages based on approximately 5% coverage
12017SR Return Program Toner Cartridge4 2,000 standard pages1
12037SR Toner Cartridge4 2,000 standard pages1
For Latin America
12026XW Long-life Photoconductor Kit up to 25,000 pages based on approximately 5% coverage
12018SL Return Program Toner Cartridge5 2,000 standard pages1
12038SL Toner Cartridge5 2,000 standard pages1
1 Declared yield value in accordance with ISO/IEC 19752.2 Designed for use only in the USA and Canada.3 Designed for use only in Europe, the Middle East, and Africa.4 Designed for use only in the Asia Pacific Region.5 Designed for use only in Latin America.
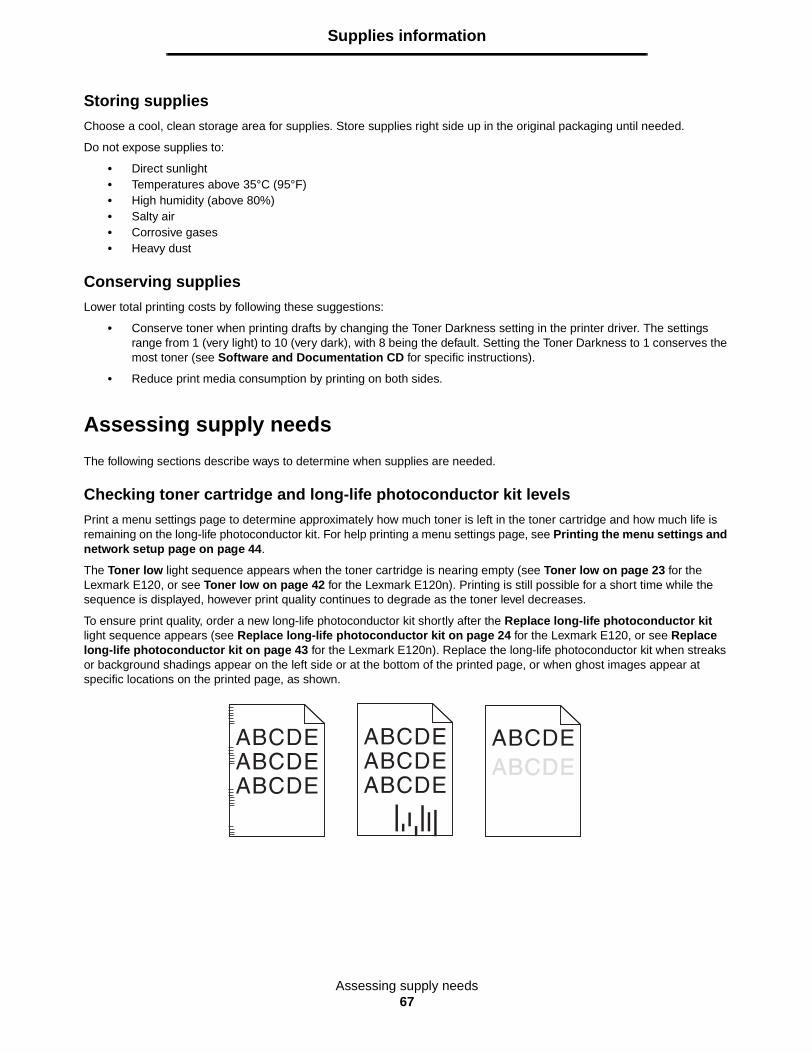
Assessing supply needs67
Supplies information
Storing supplies
Choose a cool, clean storage area for supplies. Store supplies right side up in the original packaging until needed.
Do not expose supplies to:
• Direct sunlight• Temperatures above 35°C (95°F)• High humidity (above 80%)• Salty air• Corrosive gases• Heavy dust
Conserving supplies
Lower total printing costs by following these suggestions:
• Conserve toner when printing drafts by changing the Toner Darkness setting in the printer driver. The settings range from 1 (very light) to 10 (very dark), with 8 being the default. Setting the Toner Darkness to 1 conserves the most toner (see Software and Documentation CD for specific instructions).
• Reduce print media consumption by printing on both sides.
Assessing supply needs
The following sections describe ways to determine when supplies are needed.
Checking toner cartridge and long-life photoconductor kit levels
Print a menu settings page to determine approximately how much toner is left in the toner cartridge and how much life is remaining on the long-life photoconductor kit. For help printing a menu settings page, see Printing the menu settings and network setup page on page 44.
The Toner low light sequence appears when the toner cartridge is nearing empty (see Toner low on page 23 for the Lexmark E120, or see Toner low on page 42 for the Lexmark E120n). Printing is still possible for a short time while the sequence is displayed, however print quality continues to degrade as the toner level decreases.
To ensure print quality, order a new long-life photoconductor kit shortly after the Replace long-life photoconductor kit light sequence appears (see Replace long-life photoconductor kit on page 24 for the Lexmark E120, or see Replace long-life photoconductor kit on page 43 for the Lexmark E120n). Replace the long-life photoconductor kit when streaks or background shadings appear on the left side or at the bottom of the printed page, or when ghost images appear at specific locations on the printed page, as shown.
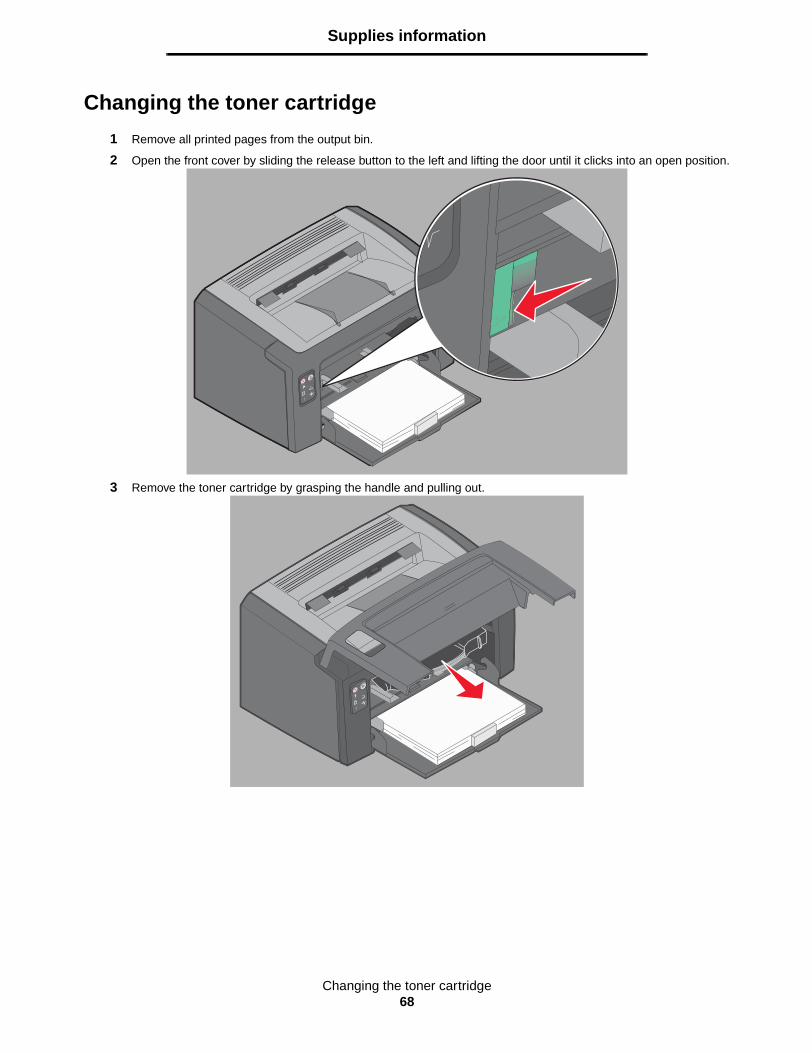
Changing the toner cartridge68
Supplies information
Changing the toner cartridge
1 Remove all printed pages from the output bin.
2 Open the front cover by sliding the release button to the left and lifting the door until it clicks into an open position.
3 Remove the toner cartridge by grasping the handle and pulling out.
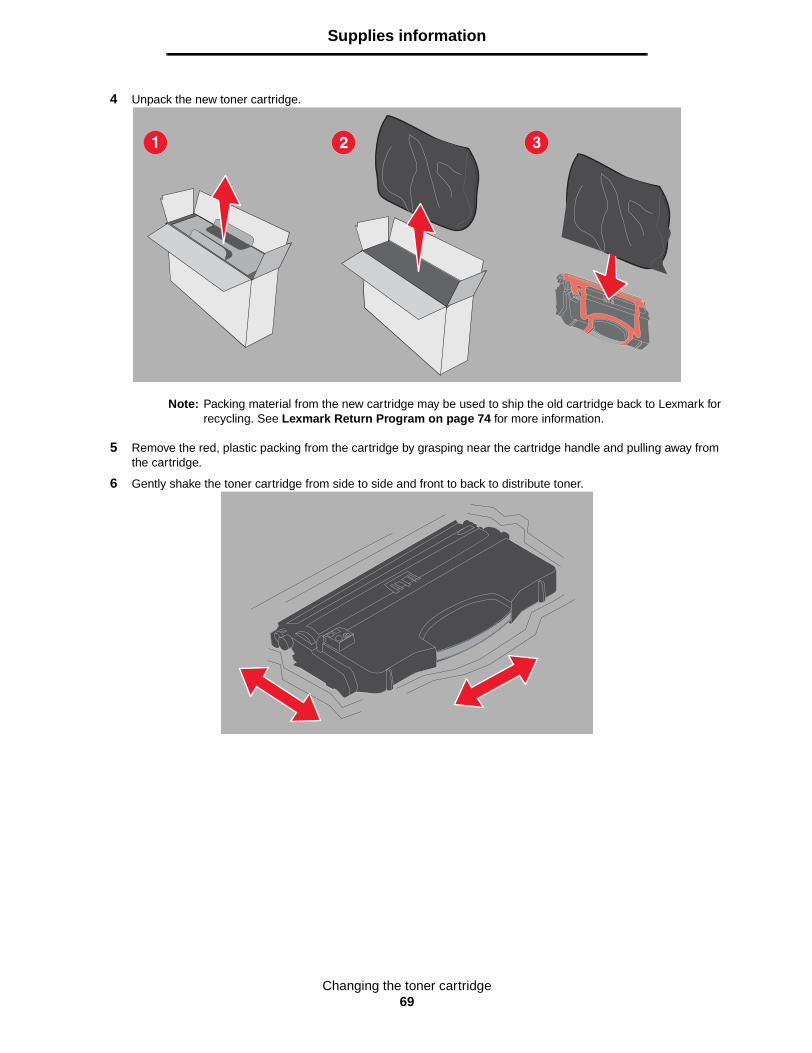
Changing the toner cartridge69
Supplies information
4 Unpack the new toner cartridge.
Note: Packing material from the new cartridge may be used to ship the old cartridge back to Lexmark for recycling. See Lexmark Return Program on page 74 for more information.
5 Remove the red, plastic packing from the cartridge by grasping near the cartridge handle and pulling away from the cartridge.
6 Gently shake the toner cartridge from side to side and front to back to distribute toner.
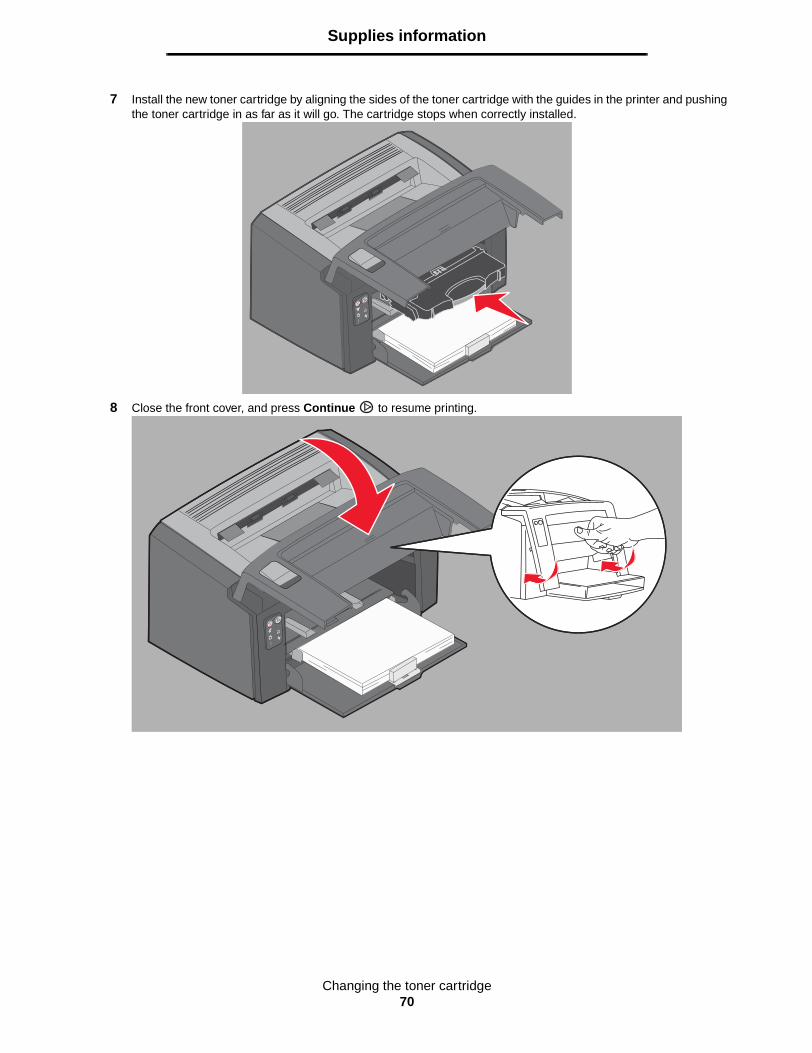
Changing the toner cartridge70
Supplies information
7 Install the new toner cartridge by aligning the sides of the toner cartridge with the guides in the printer and pushing the toner cartridge in as far as it will go. The cartridge stops when correctly installed.
8 Close the front cover, and press Continue to resume printing.
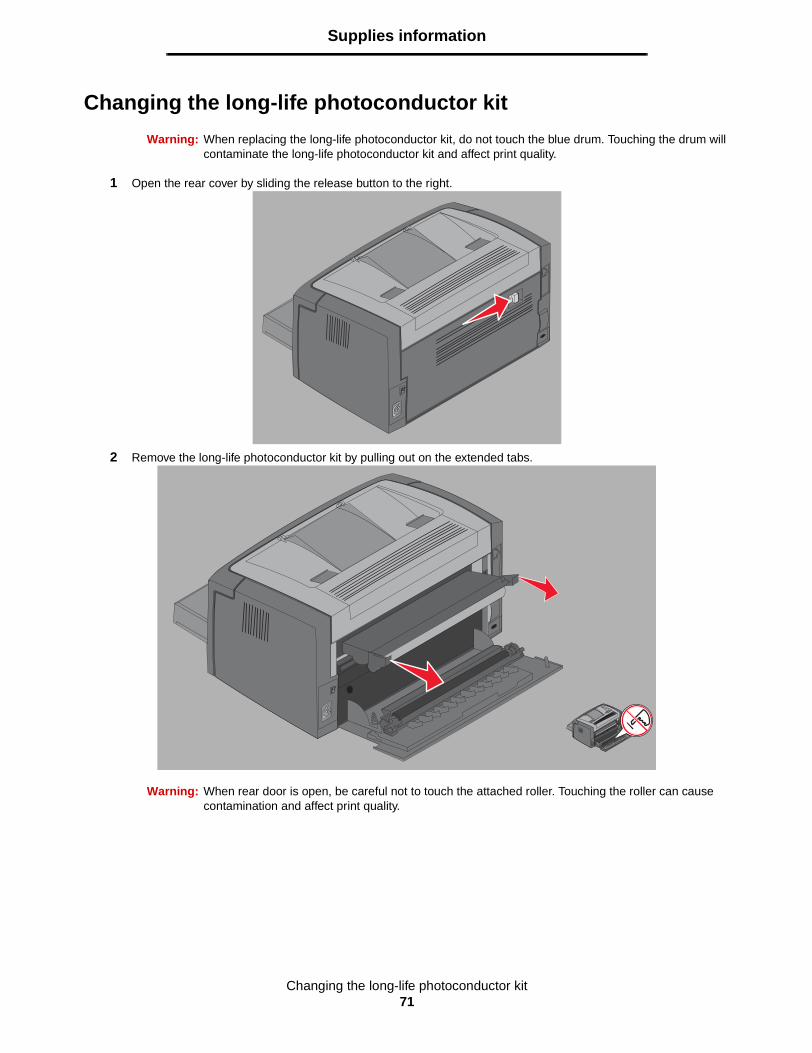
Changing the long-life photoconductor kit71
Supplies information
Changing the long-life photoconductor kit
Warning: When replacing the long-life photoconductor kit, do not touch the blue drum. Touching the drum will contaminate the long-life photoconductor kit and affect print quality.
1 Open the rear cover by sliding the release button to the right.
2 Remove the long-life photoconductor kit by pulling out on the extended tabs.
Warning: When rear door is open, be careful not to touch the attached roller. Touching the roller can cause contamination and affect print quality.
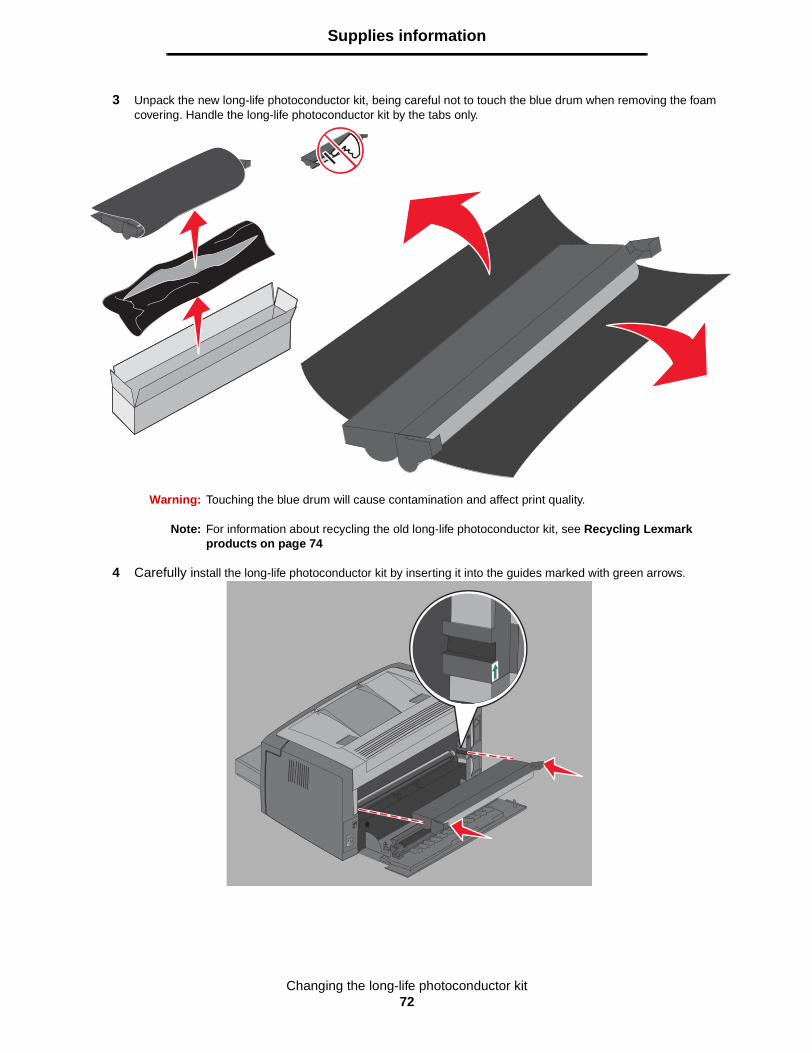
Changing the long-life photoconductor kit72
Supplies information
3 Unpack the new long-life photoconductor kit, being careful not to touch the blue drum when removing the foam covering. Handle the long-life photoconductor kit by the tabs only.
Warning: Touching the blue drum will cause contamination and affect print quality.
Note: For information about recycling the old long-life photoconductor kit, see Recycling Lexmark products on page 74
4 Carefully install the long-life photoconductor kit by inserting it into the guides marked with green arrows.
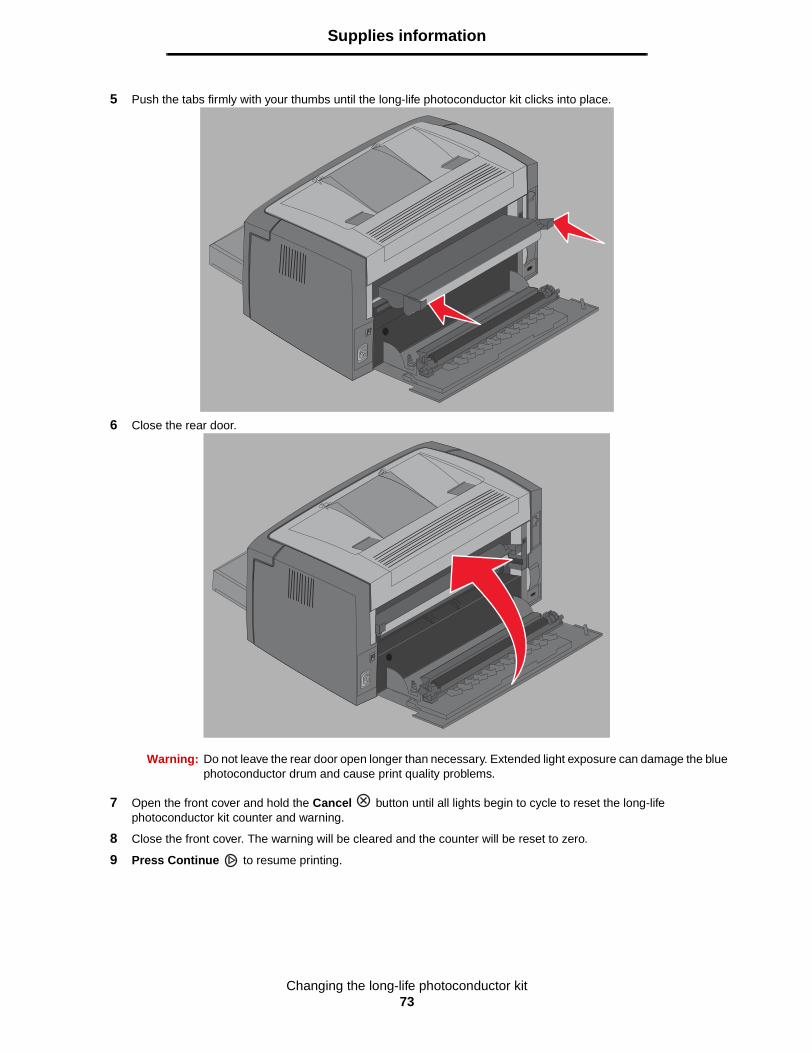
Changing the long-life photoconductor kit73
Supplies information
5 Push the tabs firmly with your thumbs until the long-life photoconductor kit clicks into place.
6 Close the rear door.
Warning: Do not leave the rear door open longer than necessary. Extended light exposure can damage the blue photoconductor drum and cause print quality problems.
7 Open the front cover and hold the Cancel button until all lights begin to cycle to reset the long-life photoconductor kit counter and warning.
8 Close the front cover. The warning will be cleared and the counter will be reset to zero.
9 Press Continue to resume printing.
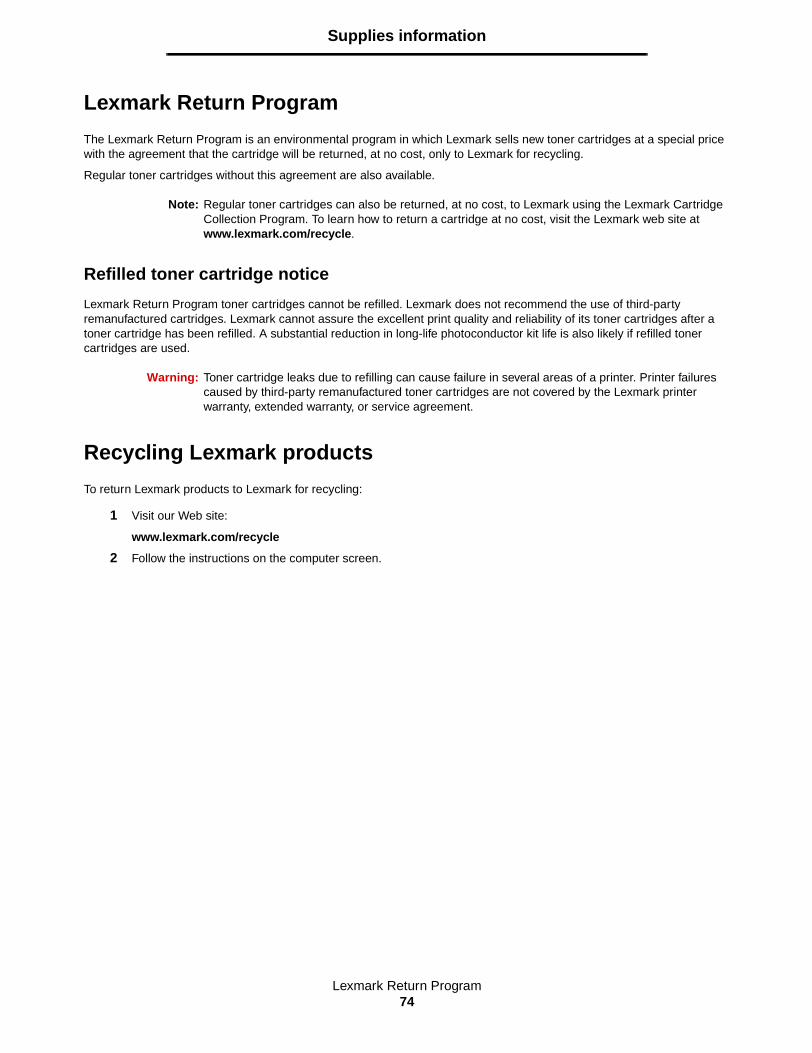
Lexmark Return Program74
Supplies information
Lexmark Return Program
The Lexmark Return Program is an environmental program in which Lexmark sells new toner cartridges at a special price with the agreement that the cartridge will be returned, at no cost, only to Lexmark for recycling.
Regular toner cartridges without this agreement are also available.
Note: Regular toner cartridges can also be returned, at no cost, to Lexmark using the Lexmark Cartridge Collection Program. To learn how to return a cartridge at no cost, visit the Lexmark web site at www.lexmark.com/recycle.
Refilled toner cartridge notice
Lexmark Return Program toner cartridges cannot be refilled. Lexmark does not recommend the use of third-party remanufactured cartridges. Lexmark cannot assure the excellent print quality and reliability of its toner cartridges after a toner cartridge has been refilled. A substantial reduction in long-life photoconductor kit life is also likely if refilled toner cartridges are used.
Warning: Toner cartridge leaks due to refilling can cause failure in several areas of a printer. Printer failures caused by third-party remanufactured toner cartridges are not covered by the Lexmark printer warranty, extended warranty, or service agreement.
Recycling Lexmark products
To return Lexmark products to Lexmark for recycling:
1 Visit our Web site:
www.lexmark.com/recycle
2 Follow the instructions on the computer screen.
Troubleshooting75
6 Troubleshooting
Section Page
General problems 76
Print quality problems 78

General problems76
Troubleshooting
General problems
Problem Solution / Answer
Lights begin blinking. See Understanding the Lexmark E120 operator panel lights on page 10.
Characters missing when printing to envelopes
Check printer driver settings to make sure Envelope has been selected from the Paper Type menu.
If Envelope is selected, try selecting a rougher texture setting. Sometimes toner does not adhere well to smooth-textured envelopes. From the printer driver, select Custom 6-Rough Env from Paper Type menu.To change Custom 6 back to its default settings for Paper Type, Paper Texture, and Paper Weight, use Local Printer Setup Utility on the Software and Documentation CD. If you have installed printer drivers and utilities, skip to step 7.1 Insert the Software and Documentation CD into the computer.2 Click Printer Software.3 Click Agree.4 Select Local Printer Install, then click Next.5 Select the printer and port, and check Local Printer Setup Utility.6 Click Finish.
The Utility will be installed on the computer under Program Files (unless a different directory is chosen).
7 Open Local Printer Setup Utility.8 From the Paper Menu, scroll through the menu items for the Custom menu setting.9 Click Custom.10Scroll down to Custom 6 Paper Type.11Select envelope for Custom 6 paper type, heavy for Custom 6 paper weight, and rough for
Custom 6 paper texture. 12From the tool bar, click Actions.13Click Apply to save changes.14Click File Exit to close.
Follow these instructions from a Macintosh:1 From Applications, click Utilities.2 Select Lexmark Utilities, and double-click Printer Settings.3 Click Edit Printer List (if the printer is not displayed in the pop-up).4 Choose Edit Printer List.5 Select appropriate printer from the list.6 Click Add.7 Click Done.8 Click Edit Printer List again and choose appropriate printer.9 Select envelope for Custom 6 paper type, heavy for Custom 6 paper weight, and rough for
Custom 6 paper texture. 10Click Quit Printer Settings.
Jam occurs 1 Open the top door. Remove any paper caught in the fuser unit.2 Open the rear door by sliding the door release button to the right. Remove any paper
caught in the paper path. Do not leave the rear door open for an extended length of time. Extended exposure to light can damage the blue photoconductor drum and cause print quality problems.
3 Open the front door by sliding the door release button to the left. Pull door up until it clicks into an open position. Remove any paper caught in the paper path. Removal of the toner cartridge may be necessary to remove paper caught behind the toner cartridge. To remove the toner cartridge, grasp the handle and pull straight out.
4 Place the toner cartridge on a flat, clean surface. Replace the toner cartridge by sliding along the guides into the printer.
5 Close all the doors, and press the Continue button to resume the print job.
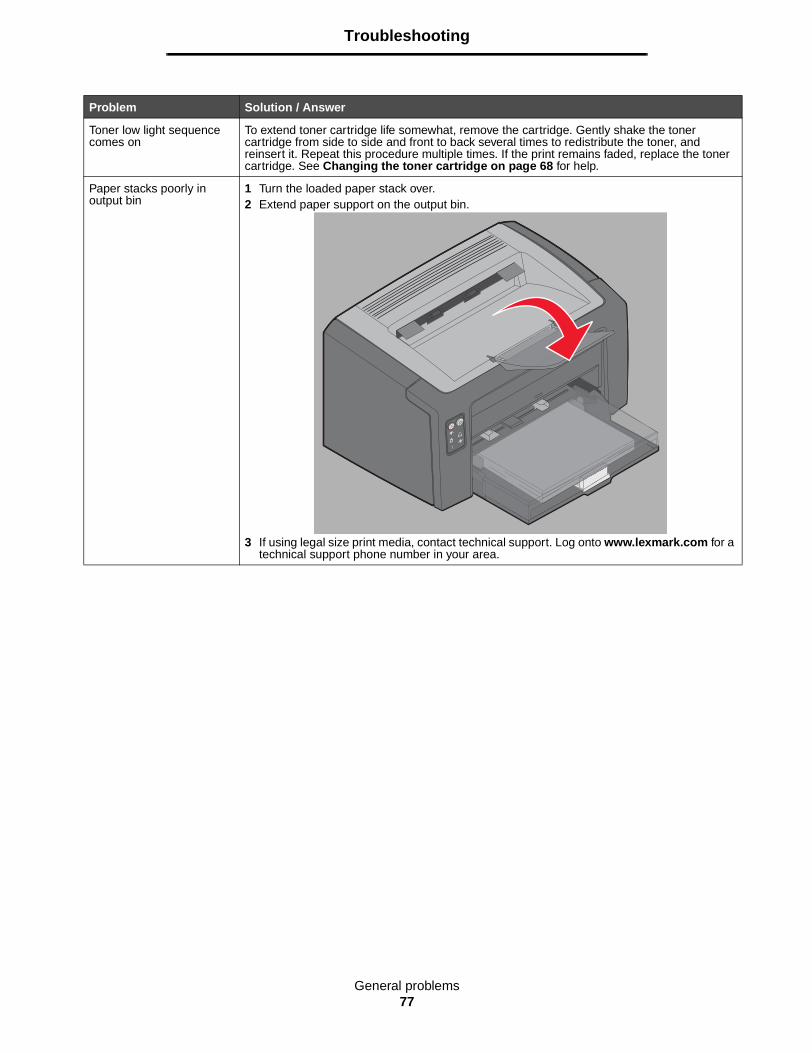
General problems77
Troubleshooting
Toner low light sequence comes on
To extend toner cartridge life somewhat, remove the cartridge. Gently shake the toner cartridge from side to side and front to back several times to redistribute the toner, and reinsert it. Repeat this procedure multiple times. If the print remains faded, replace the toner cartridge. See Changing the toner cartridge on page 68 for help.
Paper stacks poorly in output bin
1 Turn the loaded paper stack over.2 Extend paper support on the output bin.
3 If using legal size print media, contact technical support. Log onto www.lexmark.com for a technical support phone number in your area.
Problem Solution / Answer
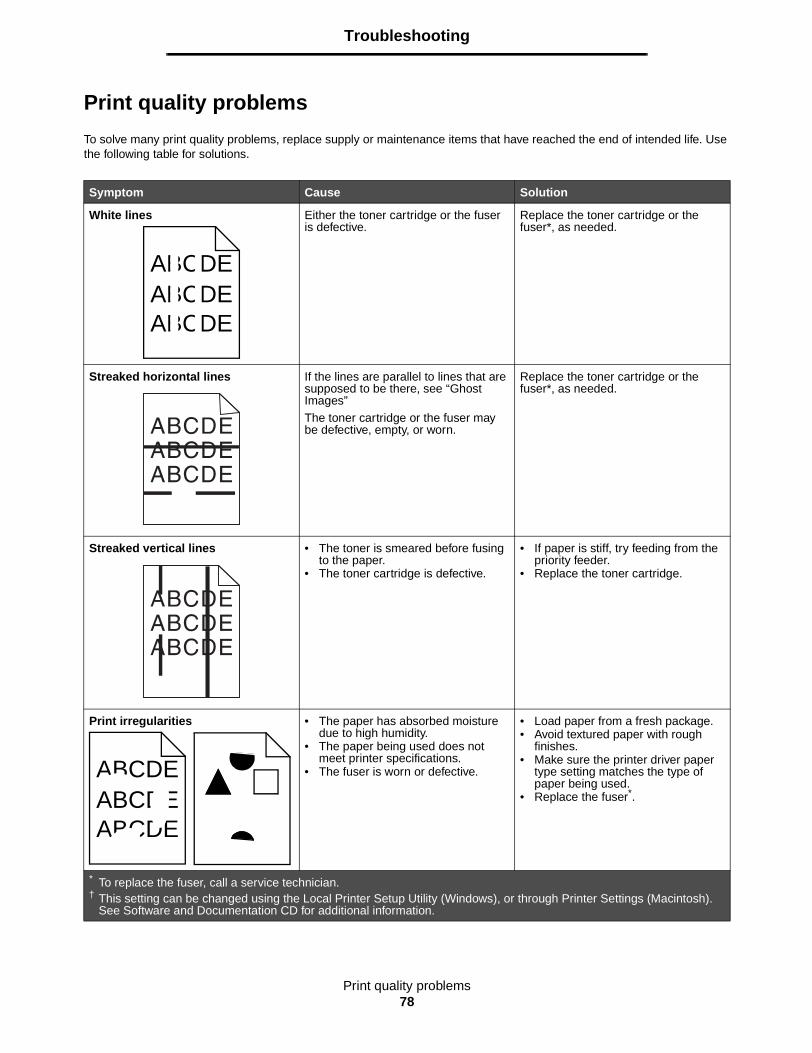
Print quality problems78
Troubleshooting
Print quality problems
To solve many print quality problems, replace supply or maintenance items that have reached the end of intended life. Use the following table for solutions.
Symptom Cause Solution
White lines Either the toner cartridge or the fuser is defective.
Replace the toner cartridge or the fuser*, as needed.
Streaked horizontal lines If the lines are parallel to lines that are supposed to be there, see “Ghost Images”The toner cartridge or the fuser may be defective, empty, or worn.
Replace the toner cartridge or the fuser*, as needed.
Streaked vertical lines • The toner is smeared before fusing to the paper.
• The toner cartridge is defective.
• If paper is stiff, try feeding from the priority feeder.
• Replace the toner cartridge.
Print irregularities • The paper has absorbed moisture due to high humidity.
• The paper being used does not meet printer specifications.
• The fuser is worn or defective.
• Load paper from a fresh package.• Avoid textured paper with rough
finishes.• Make sure the printer driver paper
type setting matches the type of paper being used.
• Replace the fuser*.
* To replace the fuser, call a service technician. † This setting can be changed using the Local Printer Setup Utility (Windows), or through Printer Settings (Macintosh).
See Software and Documentation CD for additional information.
ABCDEABCDEABCDE
ABCDEABCDEABCDE
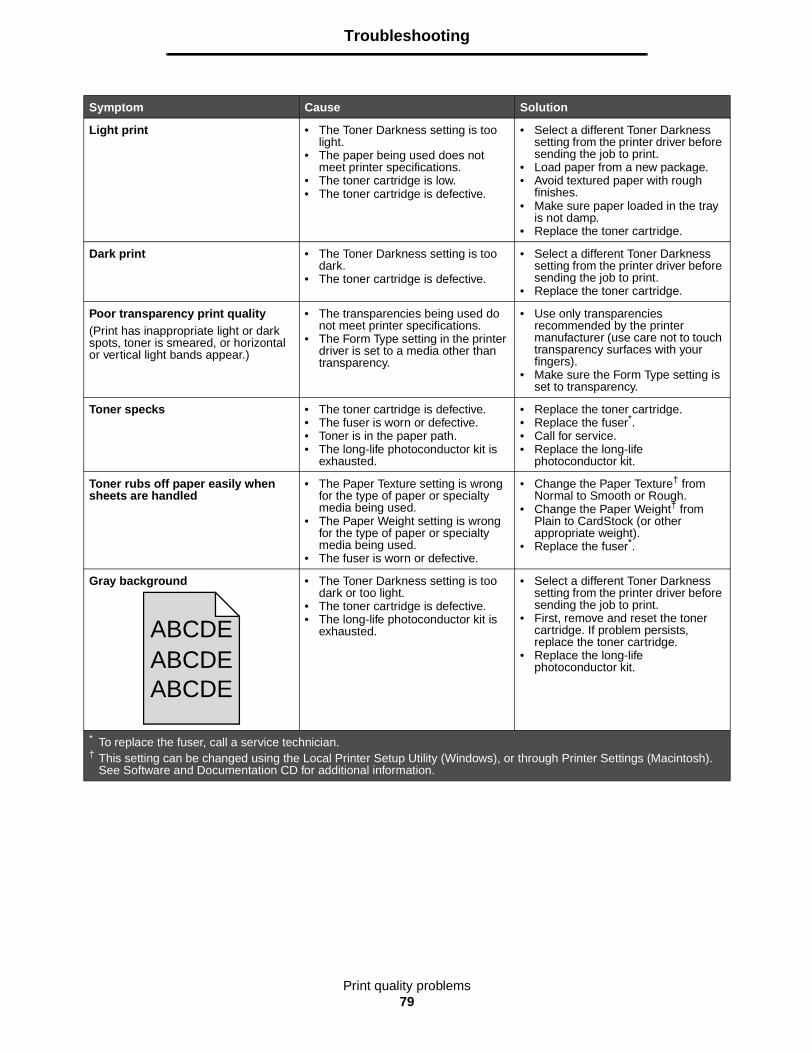
Print quality problems79
Troubleshooting
Light print • The Toner Darkness setting is too light.
• The paper being used does not meet printer specifications.
• The toner cartridge is low.• The toner cartridge is defective.
• Select a different Toner Darkness setting from the printer driver before sending the job to print.
• Load paper from a new package.• Avoid textured paper with rough
finishes.• Make sure paper loaded in the tray
is not damp.• Replace the toner cartridge.
Dark print • The Toner Darkness setting is too dark.
• The toner cartridge is defective.
• Select a different Toner Darkness setting from the printer driver before sending the job to print.
• Replace the toner cartridge.
Poor transparency print quality(Print has inappropriate light or dark spots, toner is smeared, or horizontal or vertical light bands appear.)
• The transparencies being used do not meet printer specifications.
• The Form Type setting in the printer driver is set to a media other than transparency.
• Use only transparencies recommended by the printer manufacturer (use care not to touch transparency surfaces with your fingers).
• Make sure the Form Type setting is set to transparency.
Toner specks • The toner cartridge is defective.• The fuser is worn or defective.• Toner is in the paper path.• The long-life photoconductor kit is
exhausted.
• Replace the toner cartridge.• Replace the fuser*.• Call for service.• Replace the long-life
photoconductor kit.
Toner rubs off paper easily when sheets are handled
• The Paper Texture setting is wrong for the type of paper or specialty media being used.
• The Paper Weight setting is wrong for the type of paper or specialty media being used.
• The fuser is worn or defective.
• Change the Paper Texture† from Normal to Smooth or Rough.
• Change the Paper Weight† from Plain to CardStock (or other appropriate weight).
• Replace the fuser*.
Gray background • The Toner Darkness setting is too dark or too light.
• The toner cartridge is defective.• The long-life photoconductor kit is
exhausted.
• Select a different Toner Darkness setting from the printer driver before sending the job to print.
• First, remove and reset the toner cartridge. If problem persists, replace the toner cartridge.
• Replace the long-life photoconductor kit.
Symptom Cause Solution
* To replace the fuser, call a service technician. † This setting can be changed using the Local Printer Setup Utility (Windows), or through Printer Settings (Macintosh).
See Software and Documentation CD for additional information.
ABCDEABCDEABCDE
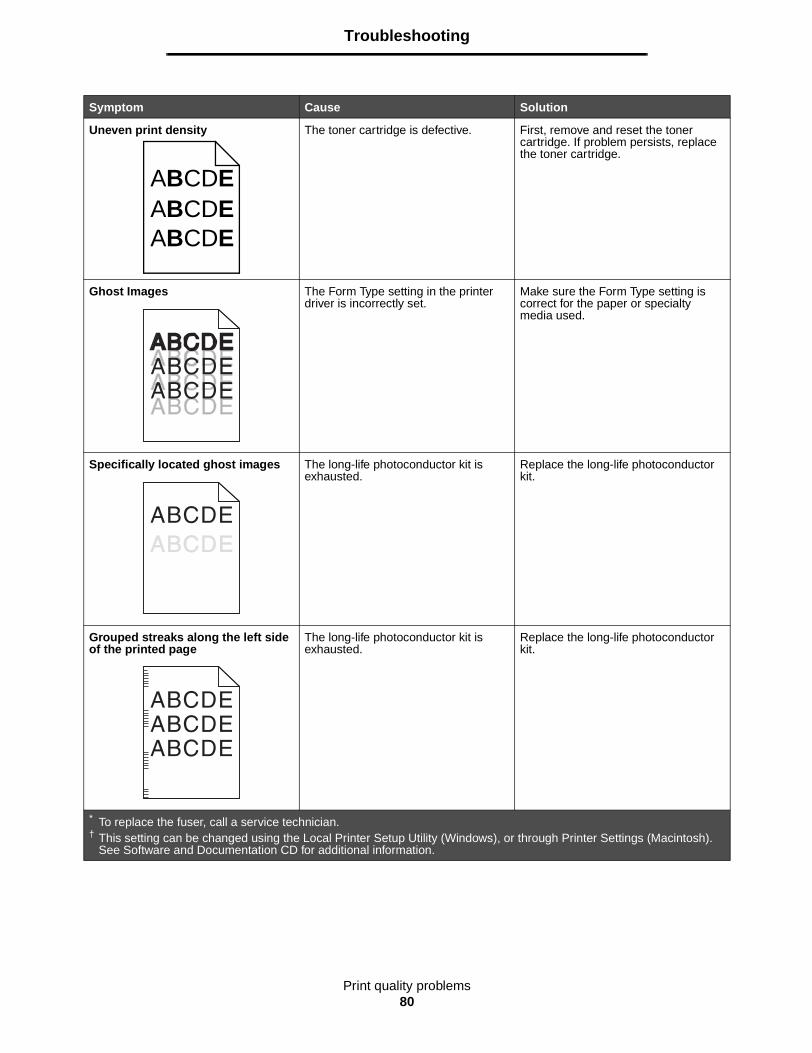
Print quality problems80
Troubleshooting
Uneven print density The toner cartridge is defective. First, remove and reset the toner cartridge. If problem persists, replace the toner cartridge.
Ghost Images The Form Type setting in the printer driver is incorrectly set.
Make sure the Form Type setting is correct for the paper or specialty media used.
Specifically located ghost images The long-life photoconductor kit is exhausted.
Replace the long-life photoconductor kit.
Grouped streaks along the left side of the printed page
The long-life photoconductor kit is exhausted.
Replace the long-life photoconductor kit.
Symptom Cause Solution
* To replace the fuser, call a service technician. † This setting can be changed using the Local Printer Setup Utility (Windows), or through Printer Settings (Macintosh).
See Software and Documentation CD for additional information.
ABCDEABCDEABCDE
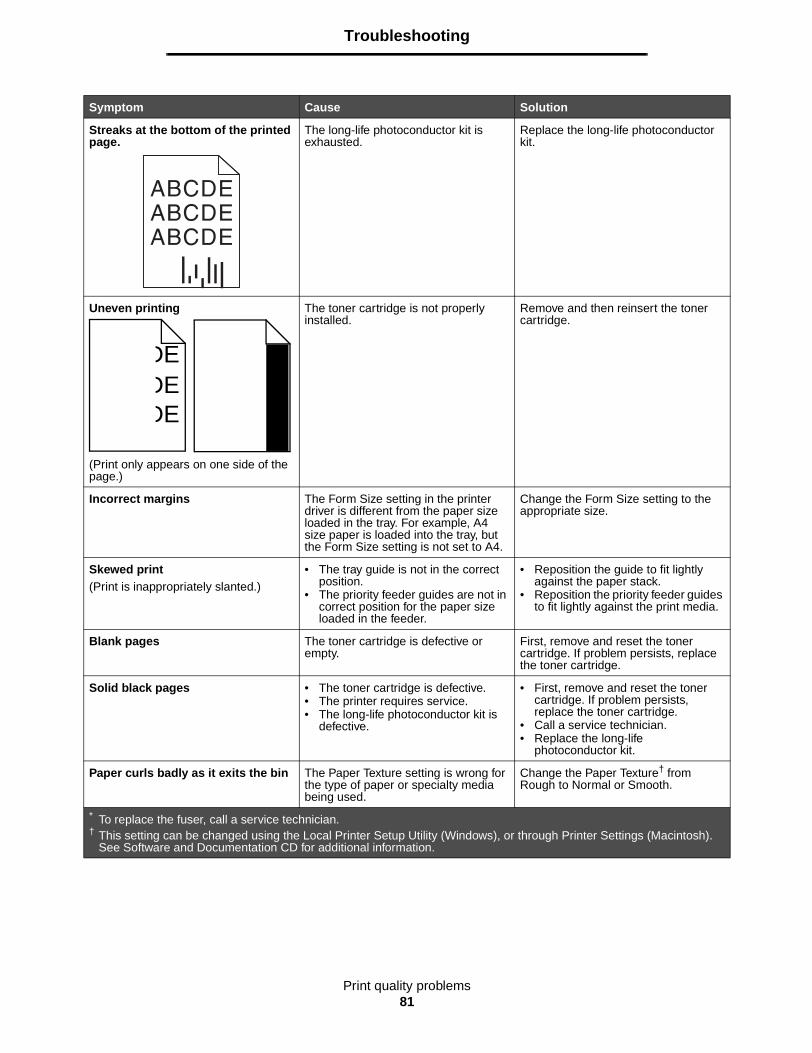
Print quality problems81
Troubleshooting
Streaks at the bottom of the printed page.
The long-life photoconductor kit is exhausted.
Replace the long-life photoconductor kit.
Uneven printing
(Print only appears on one side of the page.)
The toner cartridge is not properly installed.
Remove and then reinsert the toner cartridge.
Incorrect margins The Form Size setting in the printer driver is different from the paper size loaded in the tray. For example, A4 size paper is loaded into the tray, but the Form Size setting is not set to A4.
Change the Form Size setting to the appropriate size.
Skewed print(Print is inappropriately slanted.)
• The tray guide is not in the correct position.
• The priority feeder guides are not in correct position for the paper size loaded in the feeder.
• Reposition the guide to fit lightly against the paper stack.
• Reposition the priority feeder guides to fit lightly against the print media.
Blank pages The toner cartridge is defective or empty.
First, remove and reset the toner cartridge. If problem persists, replace the toner cartridge.
Solid black pages • The toner cartridge is defective.• The printer requires service.• The long-life photoconductor kit is
defective.
• First, remove and reset the toner cartridge. If problem persists, replace the toner cartridge.
• Call a service technician.• Replace the long-life
photoconductor kit.
Paper curls badly as it exits the bin The Paper Texture setting is wrong for the type of paper or specialty media being used.
Change the Paper Texture† from Rough to Normal or Smooth.
Symptom Cause Solution
* To replace the fuser, call a service technician. † This setting can be changed using the Local Printer Setup Utility (Windows), or through Printer Settings (Macintosh).
See Software and Documentation CD for additional information.
DEDEDE
Notices82
Notices
Licensing Notice
The printer resident software contains software developed and copyrighted by Lexmark.In addition, the printer resident software may contain:
• Lexmark modified software licensed under the provisions of the GNU General Public License version 2 and/or the GNU Lesser General Public License version 2.1
• Software licensed under the BSD license• Software licensed under other licenses
Click the title of the document you want to review:• BSD License and Warranty statements• GNU General Public License• Open Source License
The Lexmark modified third-party software covered by these third-party licenses is free software; you can redistribute it and/or modify it under the terms of the licenses referenced above. These licenses do not provide you any rights to the Lexmark copyrighted software in this printer.Since the third-party licensed software the Lexmark modifications are based on is supplied explicitly without warranty, use of the Lexmark modified version is similarly provided without warranty. See the warranty disclaimers in the referenced licenses for additional details.To obtain source code files for the Lexmark modified GNU licensed software, launch the Software and Documentation CD that shipped with the printer, and click Contact Lexmark.For source code that is required to be made available with the product, see the Software and Documentation CD.
Conventions
Note: A note identifies something that could help you.CAUTION: A caution identifies something that could cause you harm.Warning: A warning identifies something that could damage your product hardware or software.
Electronic emission notices
Federal Communications Commission (FCC) compliance information statement
The Lexmark E120, Machine Type 4506-100 and Lexmark E120n, Machine Type 4506-110 have been tested and found to comply with the limits for a Class B digital device, pursuant to Part 15 of the FCC Rules. Operation is subject to the following two conditions: (1) devices may not cause harmful interference, and (2) devices must
accept any interference received, including interference that may cause undesired operation.The FCC Class B limits are designed to provide reasonable protection against harmful interference in a residential installation. This equipment generates, uses, and can radiate radio frequency energy and, if not installed and used in accordance with the instructions, may cause harmful interference to radio communications. However, there is no guarantee that interference will not occur in a particular installation. If this equipment does cause harmful interference to radio or television reception, which can be determined by turning the equipment off and on, the user is encouraged to try to correct the interference by one or more of the following measures:
• Reorient or relocate the receiving antenna.• Increase the separation between the equipment and
receiver.• Connect the equipment into an outlet on a circuit different
from that to which the receiver is connected.• Consult your point of purchase or service representative for
additional suggestions.The manufacturer is not responsible for any radio or television interference caused by using other than recommended cables or by unauthorized changes or modifications to this equipment. Unauthorized changes or modifications could void the user's authority to operate this equipment.Note: To assure compliance with FCC regulations on electromagnetic interference for a Class B computing device, use a properly shielded and grounded cable such as Lexmark part number 12A2405 for USB attach. Use of a substitute cable not properly shielded and grounded may result in a violation of FCC regulations.Any questions regarding this compliance information statement should be directed to:
Director of Lexmark Technology & ServicesLexmark International, Inc.740 West New Circle RoadLexington, KY 40550(859) 232-3000
Industry Canada compliance statement
This Class B digital apparatus meets all requirements of the Canadian Interference-Causing Equipment Regulations.Avis de conformité aux normes de l’industrie du CanadaCet appareil numérique de la classe B respecte toutes les exigences du Règlement sur le matériel brouilleur du Canada.
Notices83
Notices
European Community (EC) directives conformity
A declaration of conformity with the requirements of the directives has been signed by the Director of Manufacturing and Technical Support, Lexmark International, S.A., Boigny, France.This product satisfies the Class B limits of EN 55022 and safety requirements of EN 60950.
Japanese VCCI notice
If this symbol appears on your product, the accompanying statement is applicable.
Korean MIC statement
If this symbol appears on your product, the accompanying statement is applicable.
This equipment has undergone EMC registration as a household product. It can be used in any area, including a residential area.
Noise emission levels
The following measurements were made in accordance with ISO 7779 and reported in conformance with ISO 9296.
ENERGY STAR
The EPA ENERGY STAR Office Equipment program is a partnership effort with office equipment manufacturers to promote the introduction of energy-efficient products and to reduce air pollution caused by power generation.Companies participating in this program introduce products that power down when they are not being used. This feature will cut the energy used by up to 50 percent. Lexmark is proud to be a participant in this program.As an ENERGY STAR Partner, Lexmark International, Inc. has determined that this product meets the ENERGY STAR guidelines for energy efficiency.
Waste from Electrical and Electronic Equipment (WEEE) directive
The WEEE logo signifies specific recycling programs and procedures for electronic products in countries of the European Union. We encourage the recycling of our products. If you have further questions about recycling options, visit the Lexmark Web site at www.lexmark.com for your local sales office phone number.
Laser advisory label
A laser notice label may be affixed to this printer.
LUOKAN 1 LASERLAITE
VAROITUS! Laitteen käyttäminen muulla kuin tässä käyttoohjeessa mainitulla tavalla saattaa altistaa käyttäjän turvallisuusluokan 1 ylittävälle näkymättömälle lasersäteilylle.
KLASS 1 LASER APPARAT
VARNING! Om apparaten används på annat sätt än i denna bruksanvisning specificerats, kan avnändaren utsättas för osynlig laserstrålning, som överskrider gränsen för laserklass 1.
1-meter average sound pressure, dBA
Printing49 - Machine types 4506-100, 4506-110
Idling 30
Notices84
Notices
Laser notice
The printer is certified in the U.S. to conform to the requirements of DHHS 21 CFR Subchapter J for Class I (1) laser products, and elsewhere is certified as a Class I laser product conforming to the requirements of IEC 60825-1.Class I laser products are not considered to be hazardous. The printer contains internally a Class IIIb (3b) laser that is nominally a 5 milliwatt gallium arsenide laser operating in the wavelength region of 770-795 nanometers. The laser system and printer are designed so there is never any human access to laser radiation above a Class I level during normal operation, user maintenance, or prescribed service condition.
Statement of Limited Warranty for Lexmark E120 and Lexmark E120n
Lexmark International, Inc. Lexington, KY
This limited warranty applies to the United States and Canada. For customers outside the U.S., refer to the country-specific warranty information that came with your product.This limited warranty applies to this product only if it was originally purchased for your use, and not for resale, from Lexmark or a Lexmark Remarketer, referred to in this statement as “Remarketer.”
Limited warranty
Lexmark warrants that this product:• Is manufactured from new parts, or new and serviceable
used parts, which perform like new parts• Is, during normal use, free from defects in material and
workmanshipIf this product does not function as warranted during the warranty period, contact a Remarketer or Lexmark for repair or replacement (at Lexmark's option).If this product is a feature or option, this statement applies only when that feature or option is used with the product for which it was intended. To obtain warranty service, you may be required to present the feature or option with the product.If you transfer this product to another user, warranty service under the terms of this statement is available to that user for the remainder of the warranty period. You should transfer proof of original purchase and this statement to that user.
Limited warranty service
The warranty period starts on the date of original purchase as shown on the purchase receipt and ends 12 months later provided that the warranty period for any supplies and for any maintenance items included with the printer shall end earlier if it, or its original contents, are substantially used up, depleted, or consumed. To obtain warranty service you may be required to present proof of original purchase. You may be required to deliver your product to the Remarketer or Lexmark, or ship it prepaid and suitably packaged to a Lexmark designated location. You are responsible
for loss of, or damage to, a product in transit to the Remarketer or the Lexmark designated location.When warranty service involves the exchange of a product or part, the item replaced becomes the property of the Remarketer or Lexmark. The replacement may be a new or repaired item.The replacement item assumes the remaining warranty period of the original product.Replacement is not available to you if the product you present for exchange is defaced, altered, in need of a repair not included in warranty service, damaged beyond repair, or if the product is not free of all legal obligations, restrictions, liens, and encumbrances.Before you present this product for warranty service, remove all print cartridges, programs, data, and removable storage media (unless directed otherwise by Lexmark).For further explanation of your warranty alternatives and the nearest Lexmark authorized servicer in your area contact Lexmark on the World Wide Web at http://support.lexmark.com.Remote technical support is provided for this product throughout its warranty period. For products no longer covered by a Lexmark warranty, technical support may not be available or only be available for a fee.
Extent of limited warranty
Lexmark does not warrant uninterrupted or error-free operation of any product or the durability or longevity of prints produced by any product.Warranty service does not include repair of failures caused by:
• Modification or unauthorized attachments• Accidents, misuse, abuse or use inconsistent with Lexmark
user’s guides, manuals, instructions or guidance• Unsuitable physical or operating environment• Maintenance by anyone other than Lexmark or a Lexmark
authorized servicer• Operation of a product beyond the limit of its duty cycle• Use of printing media outside of Lexmark specifications• Refurbishment, repair, refilling or remanufacture by a third
party of products, supplies or parts• Products, supplies, parts, materials (such as toners and
inks), software, or interfaces not furnished by LexmarkTO THE EXTENT PERMITTED BY APPLICABLE LAW, NEITHER LEXMARK NOR ITS THIRD PARTY SUPPLIERS OR REMARKETERS MAKE ANY OTHER WARRANTY OR CONDITION OF ANY KIND, WHETHER EXPRESS OR IMPLIED, WITH RESPECT TO THIS PRODUCT, AND SPECIFICALLY DISCLAIM THE IMPLIED WARRANTIES OR CONDITIONS OF MERCHANTABILITY, FITNESS FOR A PARTICULAR PURPOSE, AND SATISFACTORY QUALITY. ANY WARRANTIES THAT MAY NOT BE DISCLAIMED UNDER APPLICABLE LAW ARE LIMITED IN DURATION TO THE WARRANTY PERIOD. NO WARRANTIES, EXPRESS OR IMPLIED, WILL APPLY AFTER THIS PERIOD. ALL INFORMATION, SPECIFICATIONS, PRICES, AND SERVICES ARE SUBJECT TO CHANGE AT ANY TIME WITHOUT NOTICE.
Limitation of liability
Your sole remedy under this limited warranty is set forth in this document. For any claim concerning performance or nonperformance of Lexmark or a Remarketer for this product under
Notices85
Notices
this limited warranty, you may recover actual damages up to the limit set forth in the following paragraph.Lexmark's liability for actual damages from any cause whatsoever will be limited to the amount you paid for the product that caused the damages. This limitation of liability will not apply to claims by you for bodily injury or damage to real property or tangible personal property for which Lexmark is legally liable. IN NO EVENT WILL LEXMARK BE LIABLE FOR ANY LOST PROFITS, LOST SAVINGS, INCIDENTAL DAMAGE, OR OTHER ECONOMIC OR CONSEQUENTIAL DAMAGES. This is true even if you advise Lexmark or a Remarketer of the possibility of such damages. Lexmark is not liable for any claim by you based on a third party claim.This limitation of remedies also applies to claims against any Suppliers and Remarketers of Lexmark. Lexmark's and its Suppliers' and Remarketers' limitations of remedies are not cumulative. Such Suppliers and Remarketers are intended beneficiaries of this limitation.
Additional rights
Some states do not allow limitations on how long an implied warranty lasts, or do not allow the exclusion or limitation of incidental or consequential damages, so the limitations or exclusions contained above may not apply to you.This limited warranty gives you specific legal rights. You may also have other rights that vary from state to state.
86
Index
Bbusy 13, 29buttons 6, 7, 25, 32
CCable lock 6canceling a print job
from a Windows computer 64from printer operator panel 64
card stock 48cartridge region mismatch 16, 32change cartridge 17, 33Choosing appropriate print media 46clear jams 53Complex page 18, 34
Ddefaults, restore 44defective cartridge 17, 34dual-action slide 5duplex 20, 37, 61
EE120 6E120n 6envelopes 47Error light 14, 15, 16, 17, 21, 22, 24, 30, 31, 32, 33, 39, 40,
43See also operator panel, secondary error codes
Ethernet 2, 5, 6
FFlushing buffer 14, 30fuser 54, 76, 78, 79
Ggeneral problems 76
HHost interface disabled 21, 38
IInvalid engine code 14, 31
JJam
at printer exit sensor 40at the input sensor 39between the input and exit sensors 39in the printer paper path 21in Tray 1 / priority feeder 22
jamsclearing 53preventing 52
Llabels 47letterhead 47, 63Lexmark Cartridge Collection Program 74Lexmark Return Program 74lights 10, 26loading
letterhead 63priority feeder 51
long-life photoconductor kitchanging 71level 67recycling 74replacing 24, 43
MMacintosh 60, 61, 63, 64, 76, 78manual duplex
light sequence 20, 37printing 61
Memory full 20, 37menu settings page 44messages
See operator panel light sequencesmultiple page printing 62
Nnetwork model 5, 6, 44network settings page 44N-up printing 62
OOpen door 33operator panel 13
base model 6light sequences

87
Index
Busy 13, 29Canceling job 14, 30cartridge region mismatch 16, 32Close door 31Error 14, 15, 16, 17, 21, 22, 24, 30, 31, 32, 33, 39,
40, 43Load media 36Manual duplex 20, 37Not ready 15, 31Offline 15, 31Open door 15, 17, 33Print side two 20, 37Programming engine code 15, 32Programming system code 15, 32Ready/Power Saver 12, 28Resetting printer 14, 30Restoring factory defaults 14, 30Service error 24, 43Toner low 23, 24, 42, 43Unsupported toner cartridge 43Waiting 13, 30
lights 10, 26network model 7
Ppaper 46
choosing 46loading 51
Paper jamat printer exit sensor 40at the input sensor 39between printer input and exit sensor 39
power button 6preprinted forms 47print media 5
choosing 46loading 46sizes 46storing 46types 46
print quality problems 76, 78printer models 5printer resident Web page 43printing
duplex 61letterhead 63menu settings 44multi-page (N-up) 62network settings 44
Printing Font List or Menu Settings Page 15, 31priority feeder 51priority tray 5problems
print quality 78
Rrecycling supplies 74resource save off 41restore factory defaults 44
Ssafety information 2secondary error codes
Complex page 18, 34Insufficient collation area 19, 36Memory full 20, 37Network interface errors 38Short paper 23, 41
service error lights 24, 43Short paper 23, 41standard memory
16 MB 58 MB 5
suppliesassessing 67conserving 67ordering 66recycling 74storing 67
Ttoner cartridge
changing 68error 43recycling 74toner level 67
Toner low 77Toner Low light 23, 24, 42, 43transparencies 46, 47, 51troubleshooting 75, 76
print quality 78
UUSB 5, 6, 21, 38, 44, 82
WWaiting light 13, 30warranty 84, 85Windows 59, 61, 62, 63, 64, 78
Related Documents