USER MANUAL _STAGE-73 V2

Welcome message from author
This document is posted to help you gain knowledge. Please leave a comment to let me know what you think about it! Share it to your friends and learn new things together.
Transcript
USER MANUAL
_STAGE-73 V2
Special Thanks
DIRECTIONFrédéric Brun Kevin Molcard
DEVELOPMENTPierre-lin Laneyrie
Mathieu Nocenti
Baptiste Aubry
Raynald Dantigny
Corentin Comte
Timothée Behety
Marie Pauli
Simon Conan
Alexandre Adam
Loris De Marco
Yann Burrer
Antoine Moreau
Cyril Lepinette
Markus Bollinger
Jonathan Adams Leonard
Stephano D'Angelo
Alessandro De Cecco
Samuel Limier
Kevin Arcas
Geoffrey Gormond
Fanny Roche
Marc Antigny
Rasmus Kurstein
Arnaud Barbier
Germain Marzin
Thomas Barbier
Florian Marin
Matthieu Bosshardt
Maxime Audfray
DESIGNPierre Pfister
Florian Rameau
Shaun Ellwood
Morgan Perrier
Yannick Bonnefoy
SOUND DESIGNJonathan Adams Leonard Jerry Kovarsky Dennis Hamm
BETA TEST TEAMFernando Manuel
Rodrigues
Gary Morgan
Mat Jones
Marco «Koshdukai» Correia
Terry Marsden
Chuck Zwicky
Paolo Negri
Tony Flying Squirrel
George Ware
Guillaume Hernandez-
Pagnier
Dwight Davies
Peter Tomlinson
Charles Capsis IV
Angel Alvarado
Jay Janssen
Gustavo Bravetti
MANUALStephan Vankov
Camille Dalemans
Roger Lyons
Minoru KOIKE
Vincent LE HEN
Charlotte METAIS
Gala Khalifé
Holger STEINBRINK
Jack VAN
© ARTURIA SA – 2020 – All rights reserved.26 avenue Jean Kuntzmann38330 Montbonnot-Saint-Martin - FRANCEwww.arturia.com
Information contained in this manual is subject to change without notice and does notrepresent a commitment on the part of Arturia. The software described in this manual isprovided under the terms of a license agreement or non-disclosure agreement. The softwarelicense agreement specifies the terms and conditions for its lawful use. No part of thismanual may be reproduced or transmitted in any form or by any purpose other thanpurchaser’s personal use, without the express written permission of ARTURIA S.A. All otherproducts, logos or company names quoted in this manual are trademarks or registeredtrademarks of their respective owners.
Product version: 2.0

Revision date: 15 February 2021

Thank you for purchasing our virtual electricpiano, Stage-73 V2!
We are certain it will give you many hours of inspiration and enjoyment.
Stage-73 V2 is the newest addition to our extensive family of instruments that recreate hard-to-find classic keyboards and synths. In addition to bringing the authentic sound of thisessential instrument to your music, we have added some 21st century features that werenever available in the original!
The instrument upon which this virtual model is based became an indispensable part of pop,soul and jazz music after its introduction in the mid-1960s. Its sound remains popular today,having survived the onslaught of a certain digital synthesizer in the 1980s.
But since maintaining and transporting an actual unit poses many challenges, we’reconfident Stage-73 V2 will bring you all of the benefits with none of the hassle!

Table Of Contents1. INTRODUCTION............................................................................................................................................................. 2
1.1. What is Stage-73 V2? .......................................................................................................................................................... 2
1.2. History of the original instrument .............................................................................................................................. 3
1.3. The road to fame................................................................................................................................................................... 4
1.4. What does Stage-73 V2 add to the original?...................................................................................................... 4
1.5. What's new in V2? ............................................................................................................................................................... 5
2. Activation & First Start .............................................................................................................................................. 62.1. Register and Activate .......................................................................................................................................................... 6
2.2. Initial setup............................................................................................................................................................................... 62.2.1. Audio and MIDI settings: Windows ................................................................................................................................................................. 6
2.2.2. Audio and MIDI settings: Mac OS X................................................................................................................................................................ 8
2.2.3. Stage-73 V2 as a plug-in ........................................................................................................................................................................................ 8
3. USER INTERFACE ......................................................................................................................................................... 93.1. Virtual keyboard..................................................................................................................................................................... 9
3.2. The Upper Toolbar ............................................................................................................................................................ 103.2.1. The menu........................................................................................................................................................................................................................ 10
3.2.2. Browsing Presets ...................................................................................................................................................................................................... 12
3.2.3. Stage / Suitcase selector ..................................................................................................................................................................................... 12
3.2.4. Open / close Advanced panel........................................................................................................................................................................... 13
3.2.5. Open / close FX panel............................................................................................................................................................................................ 14
3.2.6. Side Panel ...................................................................................................................................................................................................................... 14
3.3. The Lower Toolbar............................................................................................................................................................. 15
3.4. Side Panel................................................................................................................................................................................ 143.4.1. MIDI controller configuration............................................................................................................................................................................. 16
3.4.2. Assigning / Un-assigning controls .................................................................................................................................................................. 17
3.4.3. Min / Max value sliders .......................................................................................................................................................................................... 17
3.4.4. Relative control option ........................................................................................................................................................................................... 18
3.4.5. Unassigning or "un-learning" a MIDI mapping ..................................................................................................................................... 19
3.5. The Preset Browser in Detail .................................................................................................................................... 203.5.1. Browse Presets With MIDI Controller......................................................................................................................................................... 20
3.5.2. Playlists............................................................................................................................................................................................................................ 21
4. Stage-73 V Control Panel ..................................................................................................................................... 224.1. Front Panel Controls ......................................................................................................................................................... 22
4.1.1. The Suitcase model................................................................................................................................................................................................... 22
4.1.2. The Stage model........................................................................................................................................................................................................ 24
4.2. Advanced Panel.................................................................................................................................................................. 254.2.1. Physical components ............................................................................................................................................................................................. 25
4.2.2. Model ................................................................................................................................................................................................................................ 26
4.2.3. Tuning .............................................................................................................................................................................................................................. 26
4.2.4. Hammer Hardness.................................................................................................................................................................................................. 26
4.2.5. Output .............................................................................................................................................................................................................................. 26
4.2.6. Pickup Distance......................................................................................................................................................................................................... 26
4.2.7. Pickup Alignment....................................................................................................................................................................................................... 27
4.2.8. Damper Duration....................................................................................................................................................................................................... 27
4.2.9. Noise Gate...................................................................................................................................................................................................................... 27
4.2.10. Pickup Noise .............................................................................................................................................................................................................. 27
4.2.11. Hammer Noise ........................................................................................................................................................................................................... 27
4.2.12. Tine Noise...................................................................................................................................................................................................................... 27
4.2.13. Damper Noise ............................................................................................................................................................................................................ 27
4.2.14. Dynamics...................................................................................................................................................................................................................... 27
4.2.15. Tonebar Resonance ............................................................................................................................................................................................... 27
4.2.16. Velocity Curve ........................................................................................................................................................................................................... 28
4.3. FX Panel................................................................................................................................................................................... 294.3.1. Effects ............................................................................................................................................................................................................................... 29
4.3.2. Amp.................................................................................................................................................................................................................................... 47
4.3.3. Room............................................................................................................................................................................................................................... 50
5. SOFTWARE LICENCE AGREEMENT .................................................................................................................. 51
1. INTRODUCTION
Stage-73 V2 is the latest update to our popular modelled electric piano instrument, partof our extensive family of instruments that recreate hard-to-find classic keyboards andsynths. In addition to bringing the authentic sound of this essential instrument to your music,this update brings significant enhancements including optimized modelling and expandedeffects to make Stage-73 V2 an even more powerful tool in your audio arsenal.
1.1. What is Stage-73 V2?
Stage-73 V2 is a software version of the classic electric piano manufactured by Fender inthe late 20th century.
First we thoroughly analyzed the physical and mechanical properties of both the Stageand Suitcase versions of this instrument. Then we constructed a mathematical model torepresent every aspect in perfect detail, from the resonance of the tines to the way thecomposition of the hammers affects the tone.
Then using the original schematics we recreated the electrical characteristics of everyversion of every component, from the pickups to the preamps.
Throughout each stage of development we constantly compared our results with thephysical units and made adjustments as needed. We also recorded an IR (impulseresponse) of the spring reverb of a Fender Deluxe Reverb amplifier, the one most oftenpaired with the Stage model piano, so the end result is incredibly authentic.
Stage-73 V2 runs both as a standalone instrument on Windows and Mac OS X and as a plug-in in all major formats inside your DAW. It has easy MIDI learn functionality for hands-oncontrol of many of its parameters, and as a plug-in also allows parameter automation forgreater creative control.
2 Arturia - User Manual Stage-73 V2 - INTRODUCTION
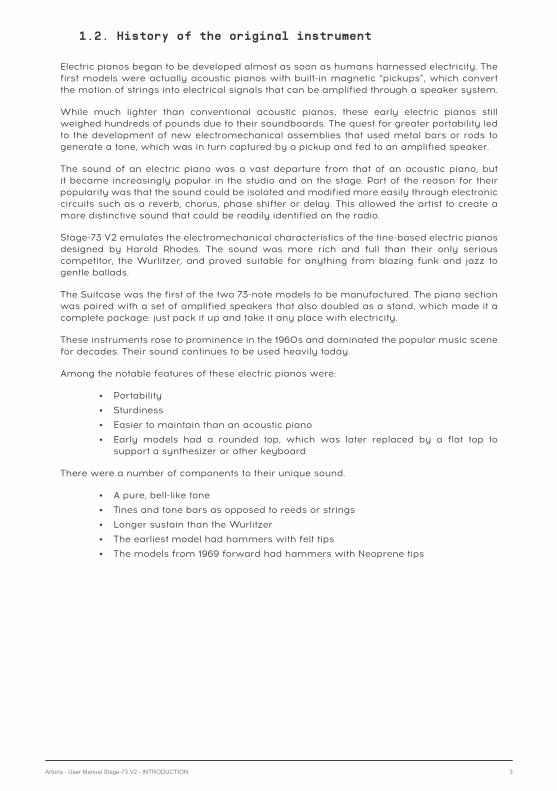
1.2. History of the original instrument
Electric pianos began to be developed almost as soon as humans harnessed electricity. Thefirst models were actually acoustic pianos with built-in magnetic “pickups”, which convertthe motion of strings into electrical signals that can be amplified through a speaker system.
While much lighter than conventional acoustic pianos, these early electric pianos stillweighed hundreds of pounds due to their soundboards. The quest for greater portability ledto the development of new electromechanical assemblies that used metal bars or rods togenerate a tone, which was in turn captured by a pickup and fed to an amplified speaker.
The sound of an electric piano was a vast departure from that of an acoustic piano, butit became increasingly popular in the studio and on the stage. Part of the reason for theirpopularity was that the sound could be isolated and modified more easily through electroniccircuits such as a reverb, chorus, phase shifter or delay. This allowed the artist to create amore distinctive sound that could be readily identified on the radio.
Stage-73 V2 emulates the electromechanical characteristics of the tine-based electric pianosdesigned by Harold Rhodes. The sound was more rich and full than their only seriouscompetitor, the Wurlitzer, and proved suitable for anything from blazing funk and jazz togentle ballads.
The Suitcase was the first of the two 73-note models to be manufactured. The piano sectionwas paired with a set of amplified speakers that also doubled as a stand, which made it acomplete package: just pack it up and take it any place with electricity.
These instruments rose to prominence in the 1960s and dominated the popular music scenefor decades. Their sound continues to be used heavily today.
Among the notable features of these electric pianos were:
• Portability
• Sturdiness
• Easier to maintain than an acoustic piano
• Early models had a rounded top, which was later replaced by a flat top tosupport a synthesizer or other keyboard
There were a number of components to their unique sound.
• A pure, bell-like tone
• Tines and tone bars as opposed to reeds or strings
• Longer sustain than the Wurlitzer
• The earliest model had hammers with felt tips
• The models from 1969 forward had hammers with Neoprene tips
Arturia - User Manual Stage-73 V2 - INTRODUCTION 3
1.3. The road to fame
The sound of the tine-based electric pianos was a perfect complement for many styles ofmusic, with a tone that ranged from shimmering to biting, even with minimal processing.Its relatively compact size ensured that bands, studios and rehearsal rooms would wantto have one, and it began to enjoy common use on musical recordings and in liveperformances.
Notable users and songs:
• The Beatles: "Get Back"
• Chick Corea: "Spain", "La Fiesta"
• Doobie Brothers: “Minute by Minute”
• The Doors: "Riders on the Storm"
• Eagles: "New Kid in Town", "I Can't Tell You Why"
• Earth, Wind & Fire: “Shining Star”, “Reasons”
• Peter Frampton: "Baby, I Love Your Way"
• Herbie Hancock: "Chameleon"
• Billy Joel: "Just the Way You Are"
• Elton John: "Daniel", "Little Jeannie"
• One Day as a Lion: "Wild International"
• Pink Floyd: "Breathe"
• Linda Ronstadt: “Blue Bayou”
• Steely Dan: "Peg"
• Stevie Wonder: "You Are the Sunshine of My Life", "Isn't She Lovely"
1.4. What does Stage-73 V2 add to the original?
Recreating an instrument in software allows us to add more advanced features, while ofcourse remaining true to the original hardware! But there are a number of features inStage-73 V2 that were difficult to adjust or simply didn’t exist on the original:
• Two models available at the flip of a switch: Stage or Suitcase
• Presets! Change every parameter instantly, including the effects, by selecting anew preset.
• Instant access to tone-shaping features that were ‘under the hood’ and usuallymaintained by a technician:
◦ Master tuning
◦ Dynamic range
◦ Pickup distance and alignment
◦ Hammer noise and hardness: variable from felt to neoprene
◦ Damper distance from the tines
◦ Tone bar resonance: how long they will sustain
• Velocity curve shaping and presets
• Stomp-box effects units with variable routing order
• Output routing: direct or through a modeled amplifier
4 Arturia - User Manual Stage-73 V2 - INTRODUCTION
1.5. What's new in V2?
Stage73-V2 brings about many exciting and powerful updates and enhancements:
• New engine with optimized emulations of the classic hardware
• Updated pedal rig with 13 effects pedals, including Analog Phaser and Cry Wah.
• Amp module with Twin Amp and Rotary Speaker emulations available for bothkeyboard models
• High-quality convolution module with 9 types of reverb, including real spacesand vintage gear
• New Library with enhanced user experience
• Macros for adjusting multiple parameters from a single control
• Enhanced Model presets that recreate tone characteristics of various versions ofthe original hardware
Arturia - User Manual Stage-73 V2 - INTRODUCTION 5
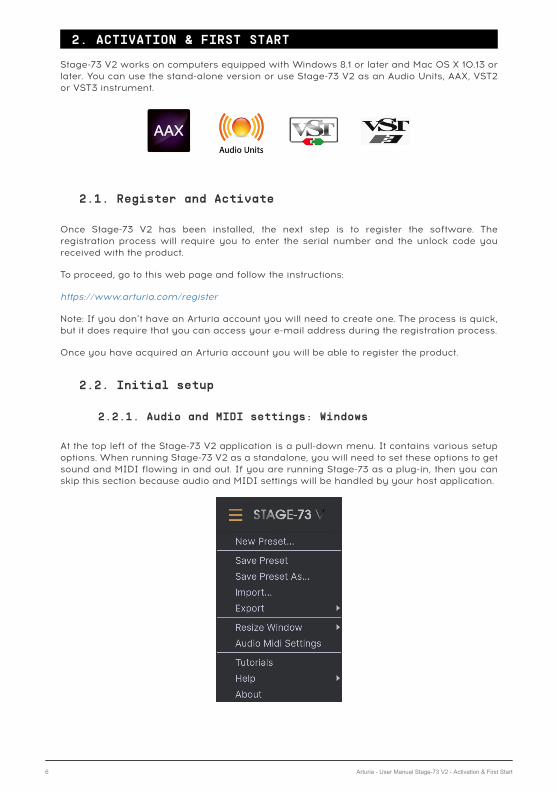
2. ACTIVATION & FIRST START
Stage-73 V2 works on computers equipped with Windows 8.1 or later and Mac OS X 10.13 orlater. You can use the stand-alone version or use Stage-73 V2 as an Audio Units, AAX, VST2or VST3 instrument.
2.1. Register and Activate
Once Stage-73 V2 has been installed, the next step is to register the software. Theregistration process will require you to enter the serial number and the unlock code youreceived with the product.
To proceed, go to this web page and follow the instructions:
https://www.arturia.com/register
Note: If you don’t have an Arturia account you will need to create one. The process is quick,but it does require that you can access your e-mail address during the registration process.
Once you have acquired an Arturia account you will be able to register the product.
2.2. Initial setup
2.2.1. Audio and MIDI settings: Windows
At the top left of the Stage-73 V2 application is a pull-down menu. It contains various setupoptions. When running Stage-73 V2 as a standalone, you will need to set these options to getsound and MIDI flowing in and out. If you are running Stage-73 as a plug-in, then you canskip this section because audio and MIDI settings will be handled by your host application.
6 Arturia - User Manual Stage-73 V2 - Activation & First Start
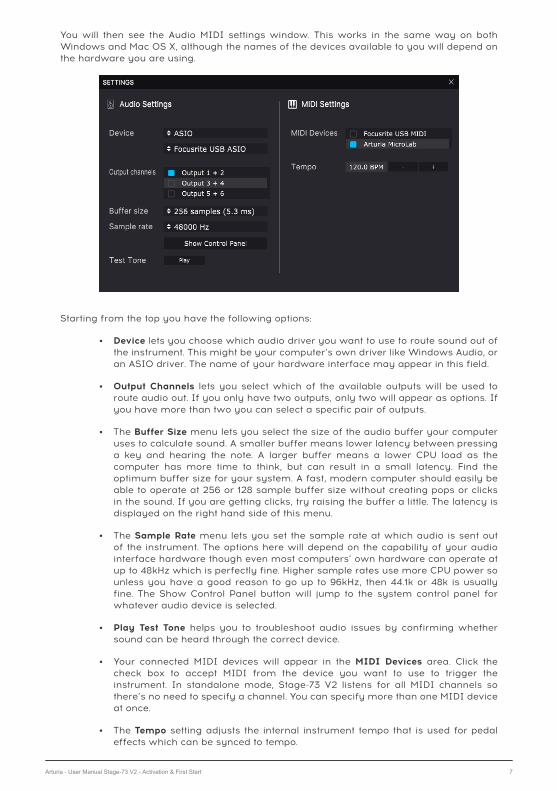
You will then see the Audio MIDI settings window. This works in the same way on bothWindows and Mac OS X, although the names of the devices available to you will depend onthe hardware you are using.
Starting from the top you have the following options:
• Device lets you choose which audio driver you want to use to route sound out ofthe instrument. This might be your computer’s own driver like Windows Audio, oran ASIO driver. The name of your hardware interface may appear in this field.
• Output Channels lets you select which of the available outputs will be used toroute audio out. If you only have two outputs, only two will appear as options. Ifyou have more than two you can select a specific pair of outputs.
• The Buffer Size menu lets you select the size of the audio buffer your computeruses to calculate sound. A smaller buffer means lower latency between pressinga key and hearing the note. A larger buffer means a lower CPU load as thecomputer has more time to think, but can result in a small latency. Find theoptimum buffer size for your system. A fast, modern computer should easily beable to operate at 256 or 128 sample buffer size without creating pops or clicksin the sound. If you are getting clicks, try raising the buffer a little. The latency isdisplayed on the right hand side of this menu.
• The Sample Rate menu lets you set the sample rate at which audio is sent outof the instrument. The options here will depend on the capability of your audiointerface hardware though even most computers’ own hardware can operate atup to 48kHz which is perfectly fine. Higher sample rates use more CPU power sounless you have a good reason to go up to 96kHz, then 44.1k or 48k is usuallyfine. The Show Control Panel button will jump to the system control panel forwhatever audio device is selected.
• Play Test Tone helps you to troubleshoot audio issues by confirming whethersound can be heard through the correct device.
• Your connected MIDI devices will appear in the MIDI Devices area. Click thecheck box to accept MIDI from the device you want to use to trigger theinstrument. In standalone mode, Stage-73 V2 listens for all MIDI channels sothere’s no need to specify a channel. You can specify more than one MIDI deviceat once.
• The Tempo setting adjusts the internal instrument tempo that is used for pedaleffects which can be synced to tempo.
Arturia - User Manual Stage-73 V2 - Activation & First Start 7
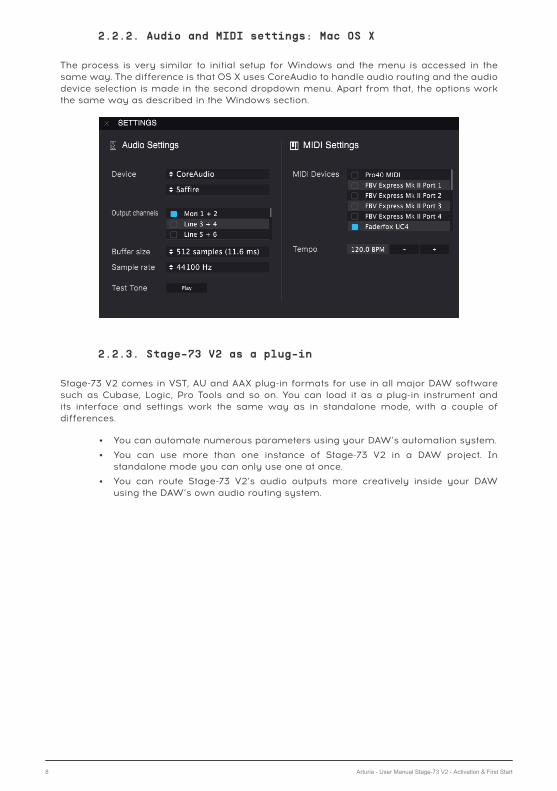
2.2.2. Audio and MIDI settings: Mac OS X
The process is very similar to initial setup for Windows and the menu is accessed in thesame way. The difference is that OS X uses CoreAudio to handle audio routing and the audiodevice selection is made in the second dropdown menu. Apart from that, the options workthe same way as described in the Windows section.
2.2.3. Stage-73 V2 as a plug-in
Stage-73 V2 comes in VST, AU and AAX plug-in formats for use in all major DAW softwaresuch as Cubase, Logic, Pro Tools and so on. You can load it as a plug-in instrument andits interface and settings work the same way as in standalone mode, with a couple ofdifferences.
• You can automate numerous parameters using your DAW’s automation system.
• You can use more than one instance of Stage-73 V2 in a DAW project. Instandalone mode you can only use one at once.
• You can route Stage-73 V2’s audio outputs more creatively inside your DAWusing the DAW’s own audio routing system.
8 Arturia - User Manual Stage-73 V2 - Activation & First Start
3. USER INTERFACE
Stage-73 V2 is packed with great features, and in this chapter we’ll make sure you knowwhat each one does. We think you’ll be amazed by the huge range of sounds that can bemade with this instrument.
And while Stage-73 V2 is very flexible, there’s nothing complicated about it. That will alwaysbe the main focus of every Arturia product: to unleash your creativity while remaining easyto use.
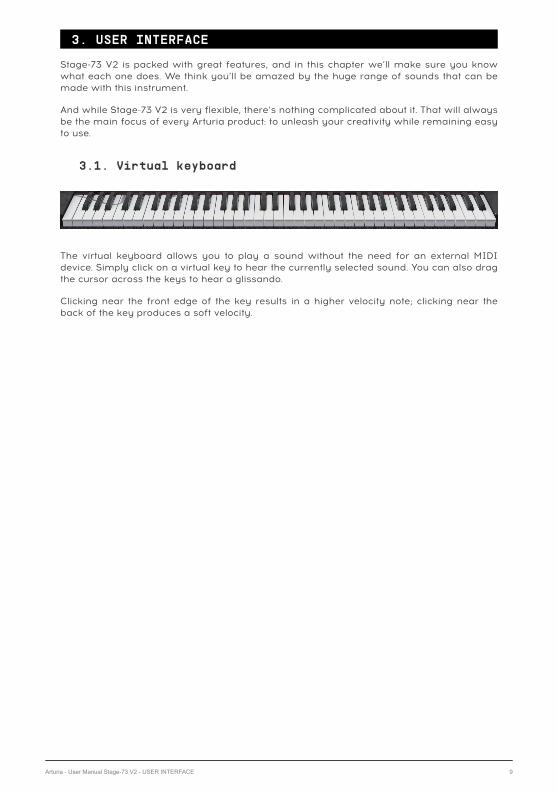
3.1. Virtual keyboard
The virtual keyboard allows you to play a sound without the need for an external MIDIdevice. Simply click on a virtual key to hear the currently selected sound. You can also dragthe cursor across the keys to hear a glissando.
Clicking near the front edge of the key results in a higher velocity note; clicking near theback of the key produces a soft velocity.
Arturia - User Manual Stage-73 V2 - USER INTERFACE 9
3.2. The Upper Toolbar
The toolbar that runs along the top of the instrument provides access to many usefulfeatures including the Stage-73 V2 menu, preset browsing features, access to the "advanced"Screen mode and lastly the gear button which opens the side panel giving access to variousMIDI functions including global MIDI channel and mapping features.
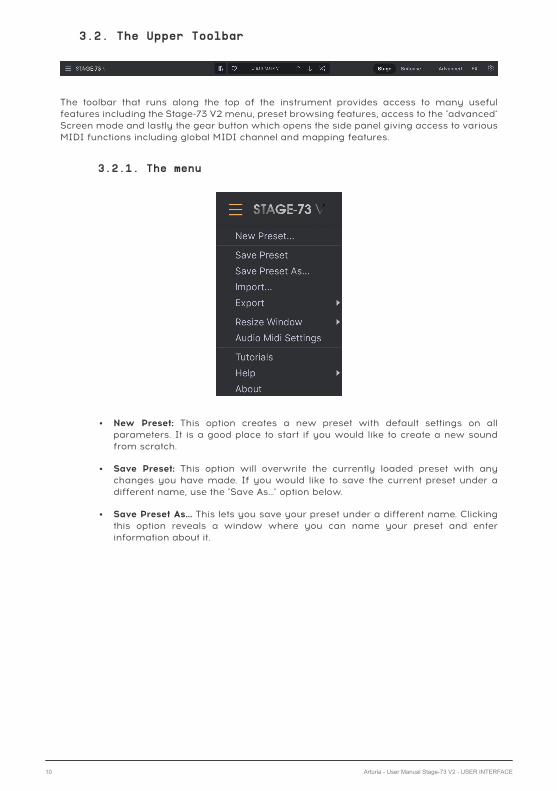
3.2.1. The menu
• New Preset: This option creates a new preset with default settings on allparameters. It is a good place to start if you would like to create a new soundfrom scratch.
• Save Preset: This option will overwrite the currently loaded preset with anychanges you have made. If you would like to save the current preset under adifferent name, use the "Save As…" option below.
• Save Preset As… This lets you save your preset under a different name. Clickingthis option reveals a window where you can name your preset and enterinformation about it.
10 Arturia - User Manual Stage-73 V2 - USER INTERFACE
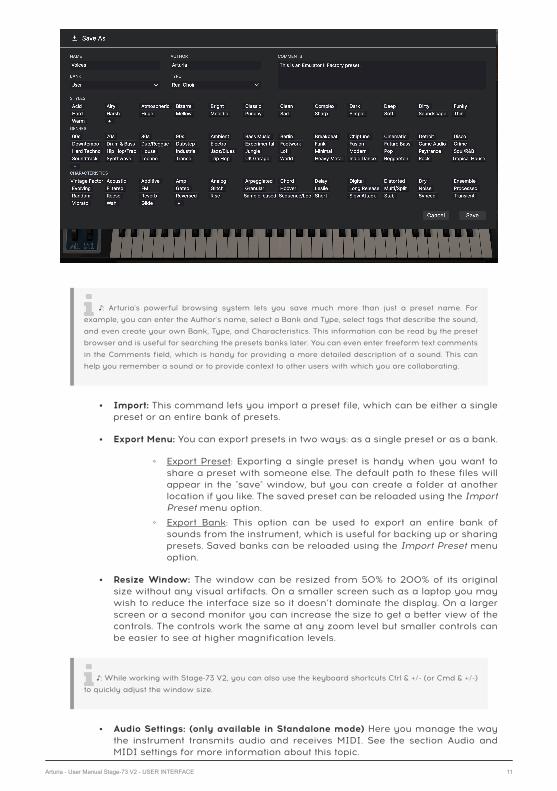
♪: Arturia's powerful browsing system lets you save much more than just a preset name. For
example, you can enter the Author's name, select a Bank and Type, select tags that describe the sound,
and even create your own Bank, Type, and Characteristics. This information can be read by the preset
browser and is useful for searching the presets banks later. You can even enter freeform text comments
in the Comments field, which is handy for providing a more detailed description of a sound. This can
help you remember a sound or to provide context to other users with which you are collaborating.
• Import: This command lets you import a preset file, which can be either a singlepreset or an entire bank of presets.
• Export Menu: You can export presets in two ways: as a single preset or as a bank.
◦ Export Preset: Exporting a single preset is handy when you want toshare a preset with someone else. The default path to these files willappear in the "save" window, but you can create a folder at anotherlocation if you like. The saved preset can be reloaded using the ImportPreset menu option.
◦ Export Bank: This option can be used to export an entire bank ofsounds from the instrument, which is useful for backing up or sharingpresets. Saved banks can be reloaded using the Import Preset menuoption.
• Resize Window: The window can be resized from 50% to 200% of its originalsize without any visual artifacts. On a smaller screen such as a laptop you maywish to reduce the interface size so it doesn’t dominate the display. On a largerscreen or a second monitor you can increase the size to get a better view of thecontrols. The controls work the same at any zoom level but smaller controls canbe easier to see at higher magnification levels.
♪: While working with Stage-73 V2, you can also use the keyboard shortcuts Ctrl & +/- (or Cmd & +/-)
to quickly adjust the window size.
• Audio Settings: (only available in Standalone mode) Here you manage the waythe instrument transmits audio and receives MIDI. See the section Audio andMIDI settings for more information about this topic.
Arturia - User Manual Stage-73 V2 - USER INTERFACE 11
!: The Audio Settings menu is only available in when using Stage-73 V2 in Standalone mode. When
using it as a plugin, the host software handles all of the parameters in this menu including audio and
MIDI routing, buffer size settings, and more.
• Tutorials: Stage-73 V2 comes with tutorials that walk you through differentfeatures of the instrument. Select one of the tutorials to get step-by-stepdescriptions of how to make the most of the Stage-73 V2 features.
• Help: This section provides handy links to the Stage-73 V2 User Guide andFrequently Asked Questions page on Arturia’s website. Note that accessing thesepages will require an Internet connection.
• About: Here you can view the software version and developer credits. Click theAbout window again to close it.
3.2.2. Browsing Presets
Stage-73 V comes packed with lots of great-sounding factory presets and we hope you'llcreate many more of your own custom presets. To help you search through large numbersof presets, we have a powerful preset browser with a number of features to help you findsounds quickly.
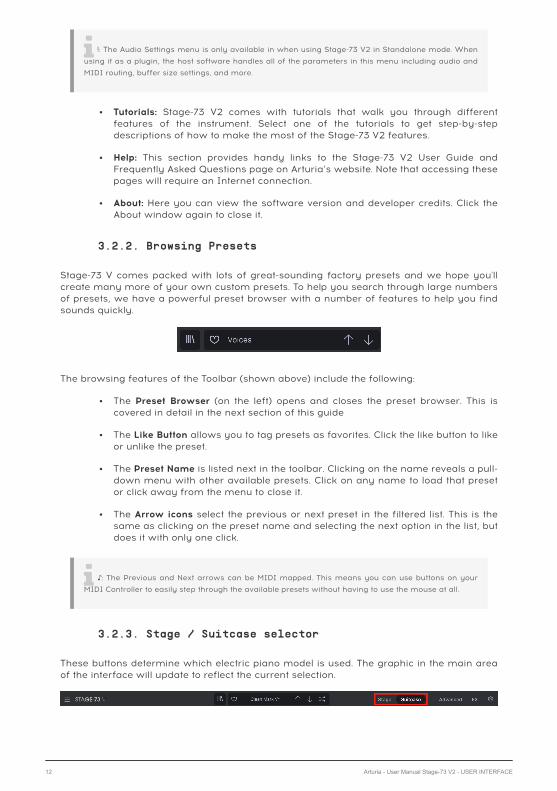
The browsing features of the Toolbar (shown above) include the following:
• The Preset Browser (on the left) opens and closes the preset browser. This iscovered in detail in the next section of this guide
• The Like Button allows you to tag presets as favorites. Click the like button to likeor unlike the preset.
• The Preset Name is listed next in the toolbar. Clicking on the name reveals a pull-down menu with other available presets. Click on any name to load that presetor click away from the menu to close it.
• The Arrow icons select the previous or next preset in the filtered list. This is thesame as clicking on the preset name and selecting the next option in the list, butdoes it with only one click.
♪: The Previous and Next arrows can be MIDI mapped. This means you can use buttons on your
MIDI Controller to easily step through the available presets without having to use the mouse at all.
3.2.3. Stage / Suitcase selector
These buttons determine which electric piano model is used. The graphic in the main areaof the interface will update to reflect the current selection.
12 Arturia - User Manual Stage-73 V2 - USER INTERFACE
3.2.4. Open / close Advanced panel
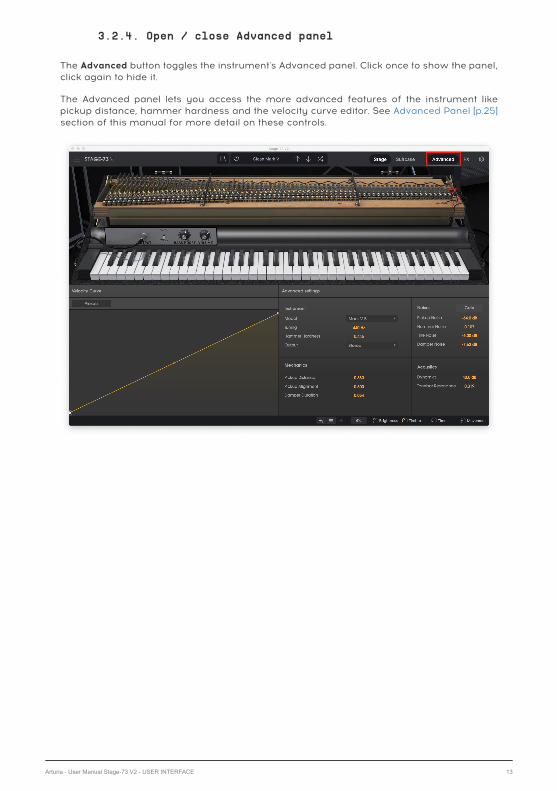
The Advanced button toggles the instrument's Advanced panel. Click once to show the panel,click again to hide it.
The Advanced panel lets you access the more advanced features of the instrument likepickup distance, hammer hardness and the velocity curve editor. See Advanced Panel [p.25]section of this manual for more detail on these controls.
Arturia - User Manual Stage-73 V2 - USER INTERFACE 13
3.2.5. Open / close FX panel
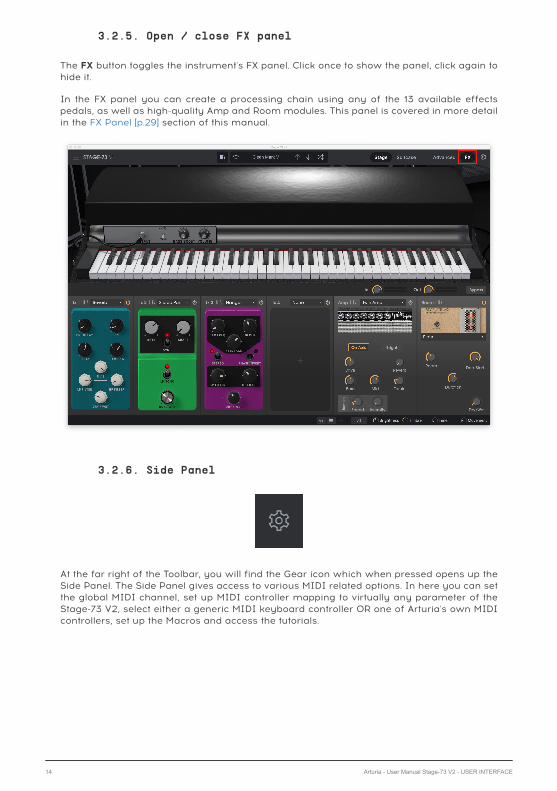
The FX button toggles the instrument's FX panel. Click once to show the panel, click again tohide it.
In the FX panel you can create a processing chain using any of the 13 available effectspedals, as well as high-quality Amp and Room modules. This panel is covered in more detailin the FX Panel [p.29] section of this manual.
3.2.6. Side Panel
At the far right of the Toolbar, you will find the Gear icon which when pressed opens up theSide Panel. The Side Panel gives access to various MIDI related options. In here you can setthe global MIDI channel, set up MIDI controller mapping to virtually any parameter of theStage-73 V2, select either a generic MIDI keyboard controller OR one of Arturia's own MIDIcontrollers, set up the Macros and access the tutorials.
14 Arturia - User Manual Stage-73 V2 - USER INTERFACE
3.3. The Lower Toolbar
The Lower Toolbar runs along the bottom of the user interface and provides quick access toseveral important parameters and useful bits of information.
• Parameter Name on the left displays the name of the parameter as you adjustcontrols. The current value of the control is listed in a tooltip that appears next tothe control.
• Undo undoes the last change.
• Redo redoes the last change.
!: The Undo and Redo buttons only become visible AFTER you have started editing on the Main Panel.
Try moving the Freq (or any other) control now and you'll notice the Undo button will magically appear.
• Undo History lets you to see a list of recent changes. Click on a change to restorethe patch to that state. This can be useful in the event you happened to go too farin your sound design and want to revert to an earlier configuration.
• CPU Meter-Panic Button displays the current CPU usage of the instrument andwhen pressed it resets all MIDI signals in the event of stuck notes or other issues.
!: If the CPU meter is high, you may hear clicks, pops and other audible glitches in playback. In
this case, consider increasing the audio buffer size setting. This is found under Audio Settings when
working in Standalone Mode or in your host music software's preferences menu. Alternatively, you can
limit polyphony with the Poly and Unison settings.
Arturia - User Manual Stage-73 V2 - USER INTERFACE 15
3.4. Side Panel
The Gear icon at the top right side of the upper toolbar opens up the Side Panel.
• Settings this sets the global MIDI channel for the Stage-73 V2
♪: By default, Stage-73 V2 will receive MIDI data on all 16 MIDI channels (All setting). You can change
this by selecting a specific channel here. You will need to do this if, for example, you want to use an
external controller with multiple instances of Stage-73 V2. In this situation, every instance can be set
to a unique channel, and you can change the preset or MIDI channel on your controller to control the
different instances of Stage-73 V2.
• MIDI this section lets you set the MIDI controller you are using and setup themapping of MIDI CC commands.
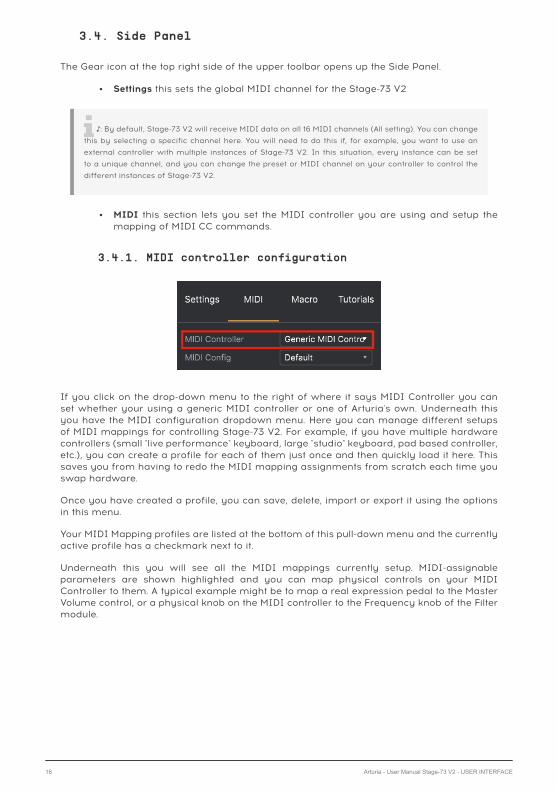
3.4.1. MIDI controller configuration
If you click on the drop-down menu to the right of where it says MIDI Controller you canset whether your using a generic MIDI controller or one of Arturia's own. Underneath thisyou have the MIDI configuration dropdown menu. Here you can manage different setupsof MIDI mappings for controlling Stage-73 V2. For example, if you have multiple hardwarecontrollers (small "live performance" keyboard, large "studio" keyboard, pad based controller,etc.), you can create a profile for each of them just once and then quickly load it here. Thissaves you from having to redo the MIDI mapping assignments from scratch each time youswap hardware.
Once you have created a profile, you can save, delete, import or export it using the optionsin this menu.
Your MIDI Mapping profiles are listed at the bottom of this pull-down menu and the currentlyactive profile has a checkmark next to it.
Underneath this you will see all the MIDI mappings currently setup. MIDI-assignableparameters are shown highlighted and you can map physical controls on your MIDIController to them. A typical example might be to map a real expression pedal to the MasterVolume control, or a physical knob on the MIDI controller to the Frequency knob of the Filtermodule.
16 Arturia - User Manual Stage-73 V2 - USER INTERFACE
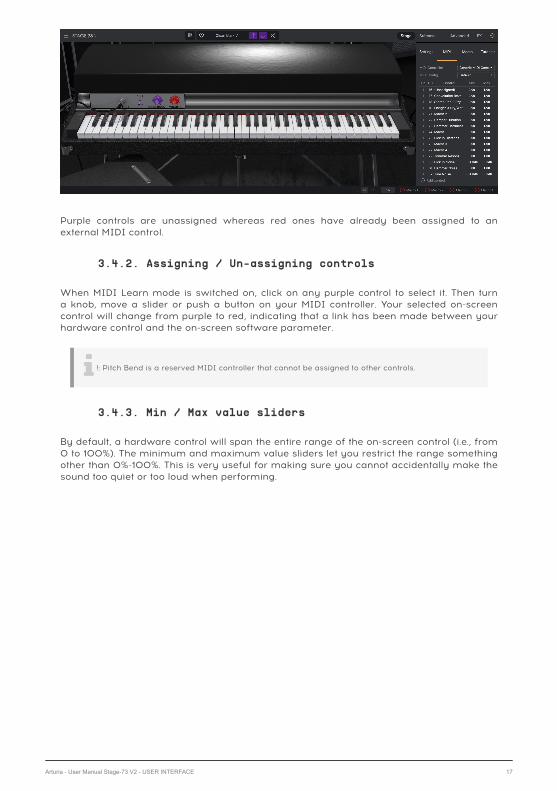
Purple controls are unassigned whereas red ones have already been assigned to anexternal MIDI control.
3.4.2. Assigning / Un-assigning controls
When MIDI Learn mode is switched on, click on any purple control to select it. Then turna knob, move a slider or push a button on your MIDI controller. Your selected on-screencontrol will change from purple to red, indicating that a link has been made between yourhardware control and the on-screen software parameter.
!: Pitch Bend is a reserved MIDI controller that cannot be assigned to other controls.
3.4.3. Min / Max value sliders
By default, a hardware control will span the entire range of the on-screen control (i.e., from0 to 100%). The minimum and maximum value sliders let you restrict the range somethingother than 0%-100%. This is very useful for making sure you cannot accidentally make thesound too quiet or too loud when performing.
Arturia - User Manual Stage-73 V2 - USER INTERFACE 17

3.4.4. Relative control option
If you right click on a mapped parameter in the list, you can make a parameter "absolute" or"relative". Only change to "relative" if your hardware MIDI control is sending "relative" MIDImessages. If the MIDI controller is sending out "absolute" messages leave it set to "absolute"(this is the more common behavior).
A "relative" change instructs the receiving device to increase or decrease its current value.The receiving device (Stage-73 V2 in this case) interprets this command as "increase/decrease your current value." This type of control is often implemented on "endless" or "360degree" knobs that do not have hard stops at the ends of their range. The advantage ofthis is that physical knobs always remain in sync with on-screen controls. However, not allhardware devices support this mode of operation which is why both options are availablein Stage-73 V2.
♪: There are two common types of messages when working with MIDI knobs: Absolute and Relative.
Absolute positioning sends the exact position of the knob as a specific numerical value (i.e., "Set value
to 54, 55, 56, etc.") when you turn the knob on your hardware controller. This is the most common
implementation and is almost always used when using potentiometer knobs with "hard" stops at the
ends. One downside to this implementation is that if you change presets, your physical knob and on-
screen control will be "out of sync" with each other and turning the physical control can cause the on-
screen control to suddenly jump to that position.
18 Arturia - User Manual Stage-73 V2 - USER INTERFACE
3.4.5. Unassigning or "un-learning" a MIDI mapping
Click on an assigned parameter to highlight it then press the delete button on the keyboardto disconnect.
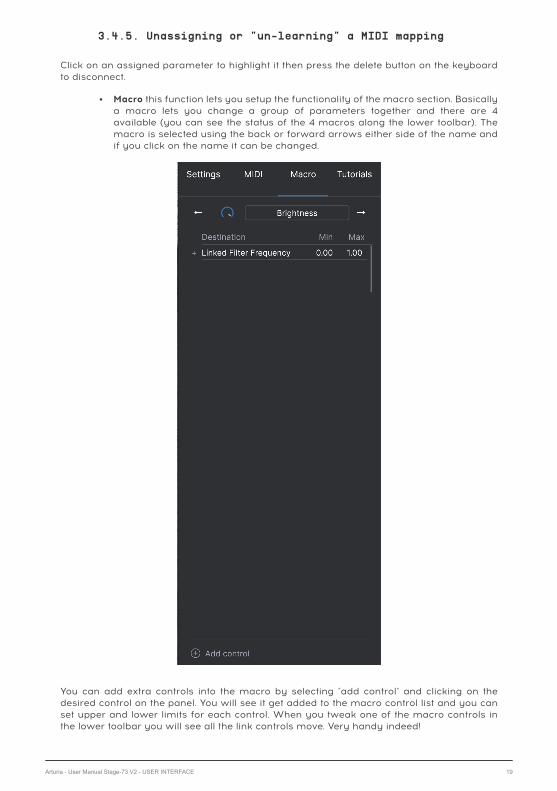
• Macro this function lets you setup the functionality of the macro section. Basicallya macro lets you change a group of parameters together and there are 4available (you can see the status of the 4 macros along the lower toolbar). Themacro is selected using the back or forward arrows either side of the name andif you click on the name it can be changed.
You can add extra controls into the macro by selecting "add control" and clicking on thedesired control on the panel. You will see it get added to the macro control list and you canset upper and lower limits for each control. When you tweak one of the macro controls inthe lower toolbar you will see all the link controls move. Very handy indeed!
Arturia - User Manual Stage-73 V2 - USER INTERFACE 19
3.5. The Preset Browser in Detail
The Preset Browser is where you can search through all of the presets. Open the PresetBrowser by clicking the library symbol on the toolbar. To close the Preset Browser and returnto the main screen, click the "X" that appears in the Toolbar.
To narrow down your choice and help you find the sounds you want, you can enterkeywords in the search bar. You can narrow your search further by clicking on one of thedrop down menus under the search bar which lists categories and has tags to point you inthe right direction. You can cancel the list by pressing "clear all".
The results of your search are listed in the middle column. You can easily audition anydisplayed preset by clicking on it and playing a connected MIDI keyboard. You can sort thelist results in various ways by clicking the column headers directly above the preset names.If you’re feeling spontaneous, click the Shuffle button at the top right to randomly select onepreset from the results list. This is a fun and quick way to audition sounds without having tostep through the list one-by-one.
Details about the currently selected preset are listed in the right column.
♪: Factory presets cannot be modified, deleted or overwritten. Only “User” (user generated) presets
can be deleted, overwritten or saved under a different name. This is done by using the “Delete” “Save”
or “Save As” buttons at the bottom of the right column. If you have modified a Factory preset and would
like to save it, you must save your modified preset under a different name (only the “Save As” option
appears in this case since you cannot delete or overwrite factory sounds).
3.5.1. Browse Presets With MIDI Controller
This option allows you to browse presets using the Browse knobs on Arturia MIDIControllers. This makes it incredibly efficient to quickly audition sounds without having toreach for the mouse. To use this feature, select your Arturia controller from the menu and itsBrowse knob will be automatically mapped to preset browsing.
20 Arturia - User Manual Stage-73 V2 - USER INTERFACE
3.5.2. Playlists
In the lower left corner of the Preset Browser window is a feature titled Playlists. This is usedto collect presets into collection groups, such as a set list for a particular performance or aset of presets related to a particular studio project.
3.5.2.1. Add a playlist
To create a playlist, click the + New Playlist button. Give the playlist a name and it will appearin the Playlists menu. To rename the playlist at any time, double click on the name.
3.5.2.2. Add a preset to the playlist
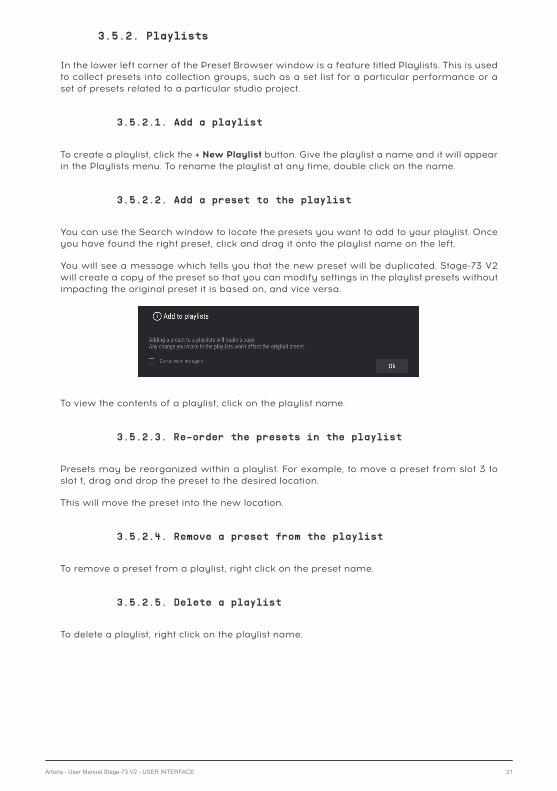
You can use the Search window to locate the presets you want to add to your playlist. Onceyou have found the right preset, click and drag it onto the playlist name on the left.
You will see a message which tells you that the new preset will be duplicated. Stage-73 V2will create a copy of the preset so that you can modify settings in the playlist presets withoutimpacting the original preset it is based on, and vice versa.
To view the contents of a playlist, click on the playlist name.
3.5.2.3. Re-order the presets in the playlist
Presets may be reorganized within a playlist. For example, to move a preset from slot 3 toslot 1, drag and drop the preset to the desired location.
This will move the preset into the new location.
3.5.2.4. Remove a preset from the playlist
To remove a preset from a playlist, right click on the preset name.
3.5.2.5. Delete a playlist
To delete a playlist, right click on the playlist name.
Arturia - User Manual Stage-73 V2 - USER INTERFACE 21
4. STAGE-73 V CONTROL PANEL
4.1. Front Panel Controls
The front panel of Stage-73 V2 is as streamlined as the original instruments. There aretwo main models, Suitcase and Stage, that can be accessed by clicking the correspondingbutton in the upper toolbar. There are slight differences in the front panel controls of eachmodel, but they have the identical features ‘under the hood’ in the Advanced section.
It’s important to know that there is more to each model than its appearance. Variations inthe features were often accompanied by modifications to the signal path, or the hardware,or both. We have painstakingly modeled every nuance of every version of theseinstruments, from the pre-amps to the hammers, from the tremolo to the sound board.
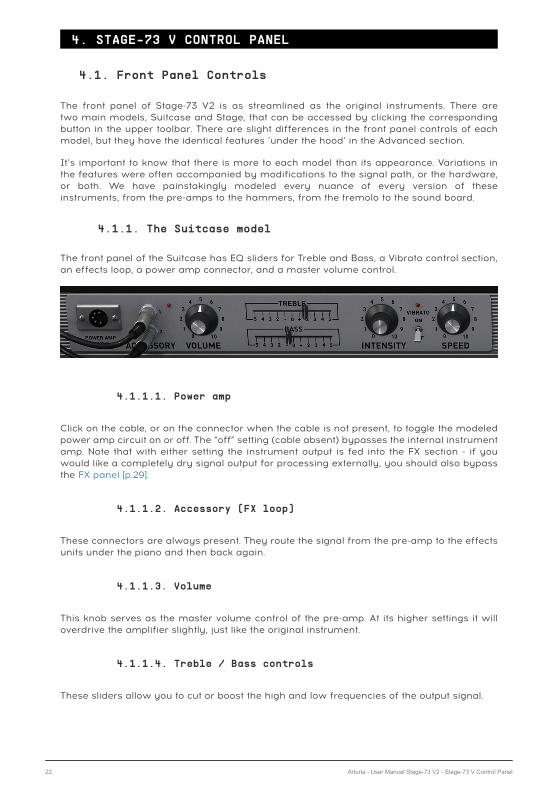
4.1.1. The Suitcase model
The front panel of the Suitcase has EQ sliders for Treble and Bass, a Vibrato control section,an effects loop, a power amp connector, and a master volume control.
4.1.1.1. Power amp
Click on the cable, or on the connector when the cable is not present, to toggle the modeledpower amp circuit on or off. The “off” setting (cable absent) bypasses the internal instrumentamp. Note that with either setting the instrument output is fed into the FX section - if youwould like a completely dry signal output for processing externally, you should also bypassthe FX panel [p.29].
4.1.1.2. Accessory (FX loop)
These connectors are always present. They route the signal from the pre-amp to the effectsunits under the piano and then back again.
4.1.1.3. Volume
This knob serves as the master volume control of the pre-amp. At its higher settings it willoverdrive the amplifier slightly, just like the original instrument.
4.1.1.4. Treble / Bass controls
These sliders allow you to cut or boost the high and low frequencies of the output signal.
22 Arturia - User Manual Stage-73 V2 - Stage-73 V Control Panel
4.1.1.5. Vibrato switch / Intensity / Speed
The “vibrato” is actually a tremolo effect because it alters the amplitude of the signal, notthe pitch. But in the interest of authenticity we kept the labels as they were for the originalinstrument.
Click the switch in the middle to toggle the Vibrato effect on and off. The LED will light whenVibrato is active.
The Intensity knob controls the depth of the vibrato. The effect adds a subtle motion to thesound as it alternately changes the volume of each side. At its maximum the audio signalwill seem to bounce between the left and right channels.
The Speed knob controls the rate of the vibrato.
Arturia - User Manual Stage-73 V2 - Stage-73 V Control Panel 23

4.1.2. The Stage model
Stage-73 V2 includes two versions of the Stage model, selectable by the left-side switchpictured below. And while there are slight differences in the front panel controls between thetwo, the major difference is actually in the circuitry being modelled. We took great care torecreate the characteristics of both.
4.1.2.1. ’73 / ’74 switch
Click this switch to toggle between the ’73 controls and the ’74 controls.
4.1.2.2. Tone (’73 and earlier)
The Tone control is present only in the ’73 version. It is a multi-band EQ which cuts andboosts the high and low frequencies at the same time.
4.1.2.3. Bass Boost (’74 and later)
This control boosts and cuts only the lower frequencies of the electric piano.
4.1.2.4. Volume (both)
This knob serves as the master volume control of the pre-amp. At its higher settings it willoverdrive the amplifier slightly, just like the original instrument.
24 Arturia - User Manual Stage-73 V2 - Stage-73 V Control Panel
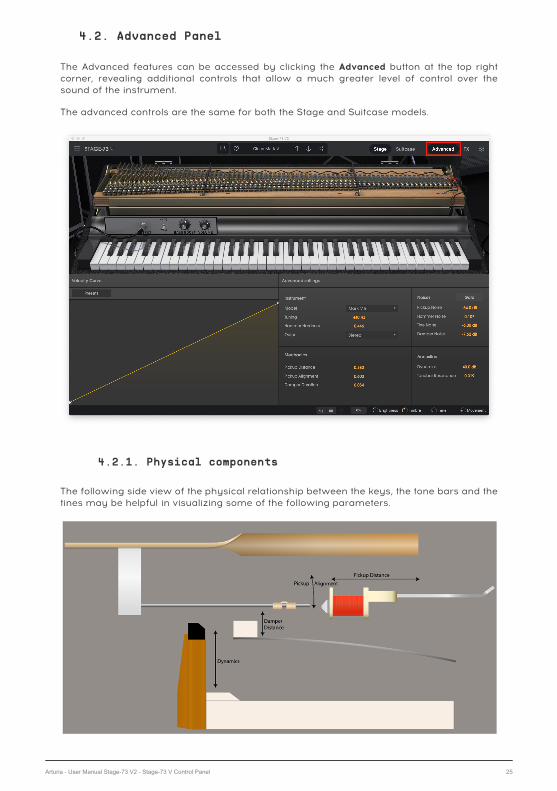
4.2. Advanced Panel
The Advanced features can be accessed by clicking the Advanced button at the top rightcorner, revealing additional controls that allow a much greater level of control over thesound of the instrument.
The advanced controls are the same for both the Stage and Suitcase models.
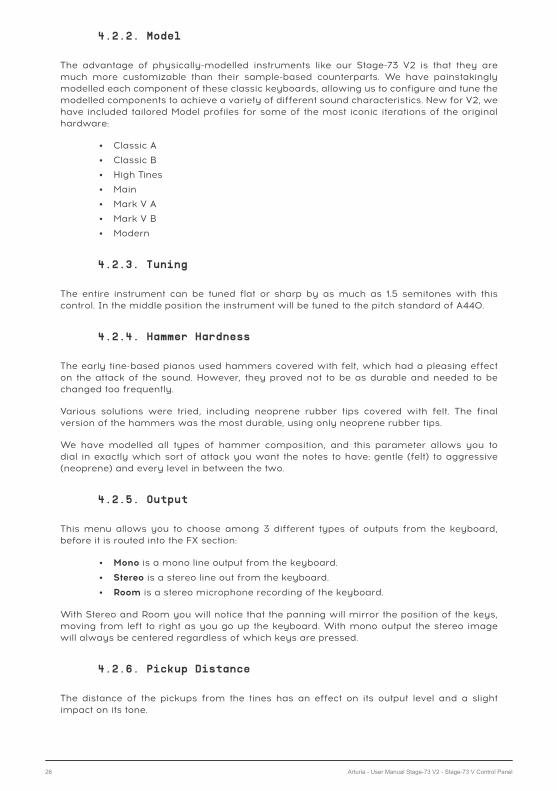
4.2.1. Physical components
The following side view of the physical relationship between the keys, the tone bars and thetines may be helpful in visualizing some of the following parameters.
Arturia - User Manual Stage-73 V2 - Stage-73 V Control Panel 25
4.2.2. Model
The advantage of physically-modelled instruments like our Stage-73 V2 is that they aremuch more customizable than their sample-based counterparts. We have painstakinglymodelled each component of these classic keyboards, allowing us to configure and tune themodelled components to achieve a variety of different sound characteristics. New for V2, wehave included tailored Model profiles for some of the most iconic iterations of the originalhardware:
• Classic A
• Classic B
• High Tines
• Main
• Mark V A
• Mark V B
• Modern
4.2.3. Tuning
The entire instrument can be tuned flat or sharp by as much as 1.5 semitones with thiscontrol. In the middle position the instrument will be tuned to the pitch standard of A440.
4.2.4. Hammer Hardness
The early tine-based pianos used hammers covered with felt, which had a pleasing effecton the attack of the sound. However, they proved not to be as durable and needed to bechanged too frequently.
Various solutions were tried, including neoprene rubber tips covered with felt. The finalversion of the hammers was the most durable, using only neoprene rubber tips.
We have modelled all types of hammer composition, and this parameter allows you todial in exactly which sort of attack you want the notes to have: gentle (felt) to aggressive(neoprene) and every level in between the two.
4.2.5. Output
This menu allows you to choose among 3 different types of outputs from the keyboard,before it is routed into the FX section:
• Mono is a mono line output from the keyboard.
• Stereo is a stereo line out from the keyboard.
• Room is a stereo microphone recording of the keyboard.
With Stereo and Room you will notice that the panning will mirror the position of the keys,moving from left to right as you go up the keyboard. With mono output the stereo imagewill always be centered regardless of which keys are pressed.
4.2.6. Pickup Distance
The distance of the pickups from the tines has an effect on its output level and a slightimpact on its tone.
26 Arturia - User Manual Stage-73 V2 - Stage-73 V Control Panel
4.2.7. Pickup Alignment
The alignment of the pickups has a significant effect on the overall tone of the instrument.As the pickups move further off-axis they are able to reproduce more of the fundamentalfrequencies of each note, resulting in a richer tone.
4.2.8. Damper Duration
This parameter controls the distance of the dampers from the tines, which affects howquickly a tine will stop vibrating after a key is released.
4.2.9. Noise Gate
While turned on, pickup noise will only be present while a key is held down. While turnedoff, pickup noise will be present at all times.
4.2.10. Pickup Noise
Controls the volume of noise in the pickups.
4.2.11. Hammer Noise
This parameter controls the relative level of noise generated by the hammers when theystrike the tines. The combined use of this and the Hammer hardness parameter can resultin a tone completely devoid of hammer noise or completely dominated by it.
4.2.12. Tine Noise
Adds a bright, bell-like resonance to the tines when keys are pressed.
4.2.13. Damper Noise
Adds the noise of the damper falling on the tines when keys are released.
4.2.14. Dynamics
This parameter models what happens when the hammers are moved closer to or fartherfrom the tines. The closer they are to the tines, the less dynamic range there will be.
This has almost a compressor-like effect, as notes played softly will be relatively loud andtheir overtones will be heard more clearly.
4.2.15. Tonebar Resonance
This parameter adjusts the sustain time of the tines by simulating changes in thecharacteristics of the metal tone bars. A more resonant tine will sustain longer, while a lessresonant tine will not sustain as long.
Arturia - User Manual Stage-73 V2 - Stage-73 V Control Panel 27
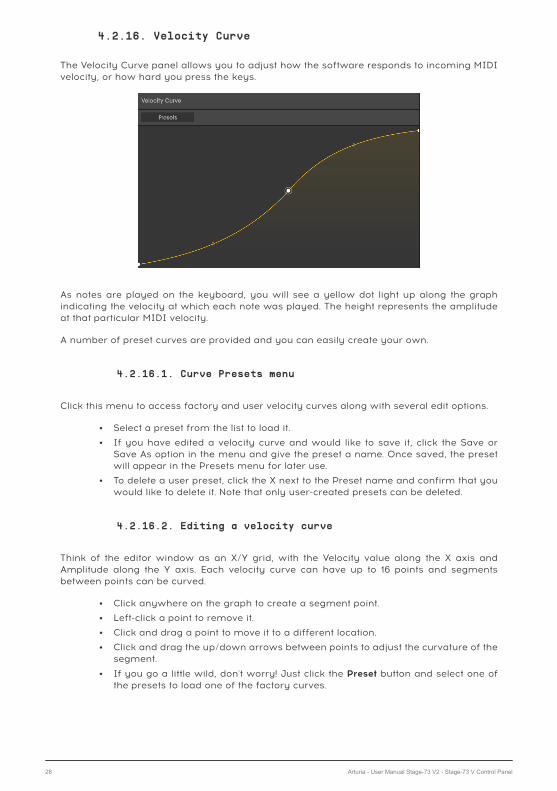
4.2.16. Velocity Curve
The Velocity Curve panel allows you to adjust how the software responds to incoming MIDIvelocity, or how hard you press the keys.
As notes are played on the keyboard, you will see a yellow dot light up along the graphindicating the velocity at which each note was played. The height represents the amplitudeat that particular MIDI velocity.
A number of preset curves are provided and you can easily create your own.
4.2.16.1. Curve Presets menu
Click this menu to access factory and user velocity curves along with several edit options.
• Select a preset from the list to load it.
• If you have edited a velocity curve and would like to save it, click the Save orSave As option in the menu and give the preset a name. Once saved, the presetwill appear in the Presets menu for later use.
• To delete a user preset, click the X next to the Preset name and confirm that youwould like to delete it. Note that only user-created presets can be deleted.
4.2.16.2. Editing a velocity curve
Think of the editor window as an X/Y grid, with the Velocity value along the X axis andAmplitude along the Y axis. Each velocity curve can have up to 16 points and segmentsbetween points can be curved.
• Click anywhere on the graph to create a segment point.
• Left-click a point to remove it.
• Click and drag a point to move it to a different location.
• Click and drag the up/down arrows between points to adjust the curvature of thesegment.
• If you go a little wild, don't worry! Just click the Preset button and select one ofthe presets to load one of the factory curves.
28 Arturia - User Manual Stage-73 V2 - Stage-73 V Control Panel
4.3. FX Panel
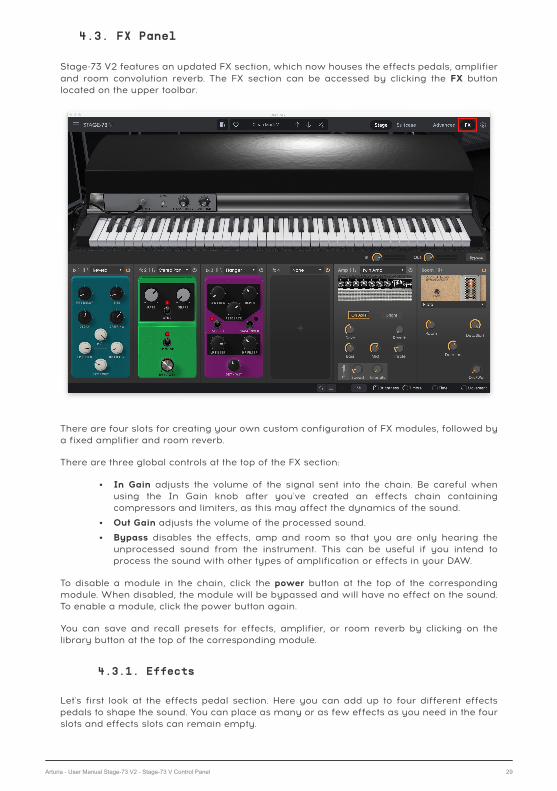
Stage-73 V2 features an updated FX section, which now houses the effects pedals, amplifierand room convolution reverb. The FX section can be accessed by clicking the FX buttonlocated on the upper toolbar.
There are four slots for creating your own custom configuration of FX modules, followed bya fixed amplifier and room reverb.
There are three global controls at the top of the FX section:
• In Gain adjusts the volume of the signal sent into the chain. Be careful whenusing the In Gain knob after you've created an effects chain containingcompressors and limiters, as this may affect the dynamics of the sound.
• Out Gain adjusts the volume of the processed sound.
• Bypass disables the effects, amp and room so that you are only hearing theunprocessed sound from the instrument. This can be useful if you intend toprocess the sound with other types of amplification or effects in your DAW.
To disable a module in the chain, click the power button at the top of the correspondingmodule. When disabled, the module will be bypassed and will have no effect on the sound.To enable a module, click the power button again.
You can save and recall presets for effects, amplifier, or room reverb by clicking on thelibrary button at the top of the corresponding module.
4.3.1. Effects
Let's first look at the effects pedal section. Here you can add up to four different effectspedals to shape the sound. You can place as many or as few effects as you need in the fourslots and effects slots can remain empty.
Arturia - User Manual Stage-73 V2 - Stage-73 V Control Panel 29
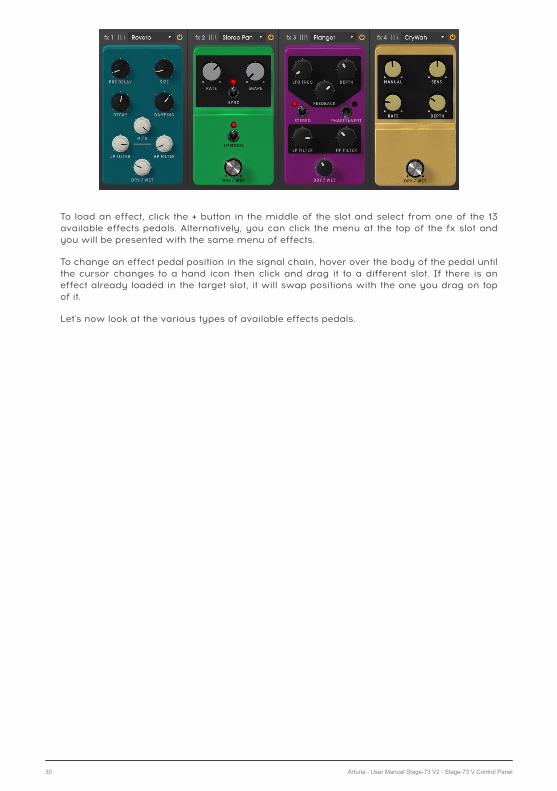
To load an effect, click the + button in the middle of the slot and select from one of the 13available effects pedals. Alternatively, you can click the menu at the top of the fx slot andyou will be presented with the same menu of effects.
To change an effect pedal position in the signal chain, hover over the body of the pedal untilthe cursor changes to a hand icon then click and drag it to a different slot. If there is aneffect already loaded in the target slot, it will swap positions with the one you drag on topof it.
Let's now look at the various types of available effects pedals.
30 Arturia - User Manual Stage-73 V2 - Stage-73 V Control Panel
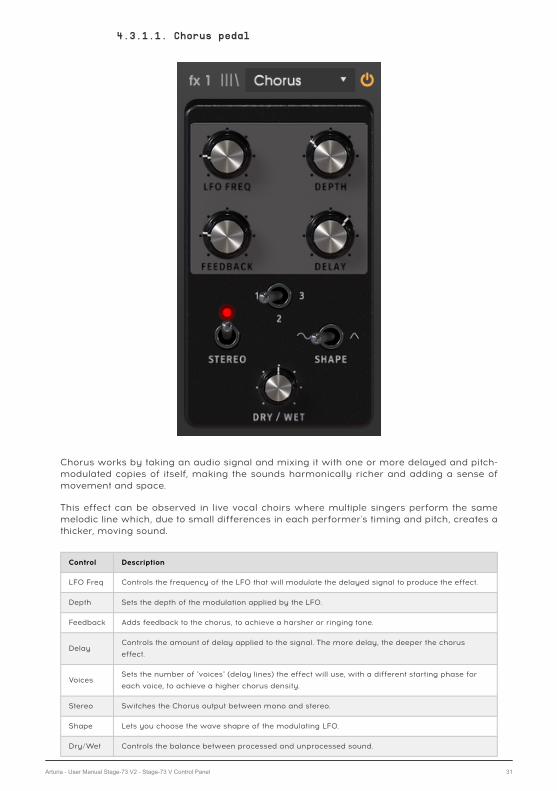
4.3.1.1. Chorus pedal
Chorus works by taking an audio signal and mixing it with one or more delayed and pitch-modulated copies of itself, making the sounds harmonically richer and adding a sense ofmovement and space.
This effect can be observed in live vocal choirs where multiple singers perform the samemelodic line which, due to small differences in each performer's timing and pitch, creates athicker, moving sound.
Control Description
LFO Freq Controls the frequency of the LFO that will modulate the delayed signal to produce the effect.
Depth Sets the depth of the modulation applied by the LFO.
Feedback Adds feedback to the chorus, to achieve a harsher or ringing tone.
DelayControls the amount of delay applied to the signal. The more delay, the deeper the chorus
effect.
VoicesSets the number of "voices" (delay lines) the effect will use, with a different starting phase for
each voice, to achieve a higher chorus density.
Stereo Switches the Chorus output between mono and stereo.
Shape Lets you choose the wave shapre of the modulating LFO.
Dry/Wet Controls the balance between processed and unprocessed sound.
Arturia - User Manual Stage-73 V2 - Stage-73 V Control Panel 31
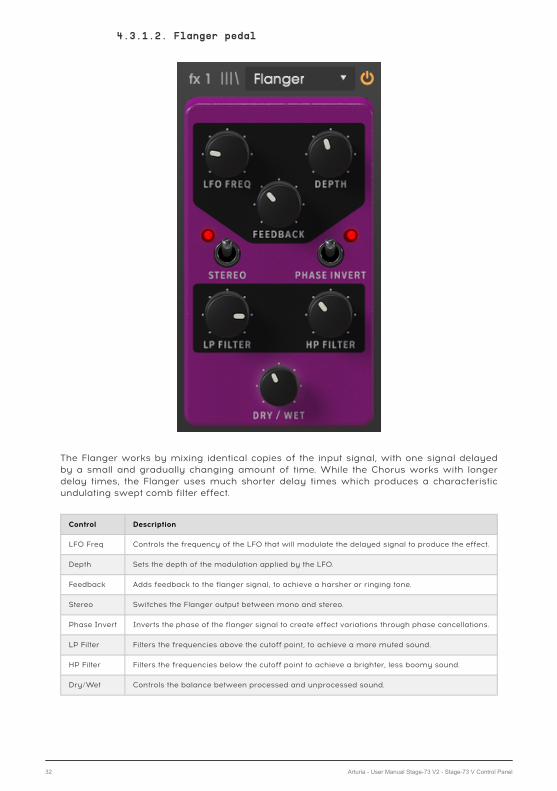
4.3.1.2. Flanger pedal
The Flanger works by mixing identical copies of the input signal, with one signal delayedby a small and gradually changing amount of time. While the Chorus works with longerdelay times, the Flanger uses much shorter delay times which produces a characteristicundulating swept comb filter effect.
Control Description
LFO Freq Controls the frequency of the LFO that will modulate the delayed signal to produce the effect.
Depth Sets the depth of the modulation applied by the LFO.
Feedback Adds feedback to the flanger signal, to achieve a harsher or ringing tone.
Stereo Switches the Flanger output between mono and stereo.
Phase Invert Inverts the phase of the flanger signal to create effect variations through phase cancellations.
LP Filter Filters the frequencies above the cutoff point, to achieve a more muted sound.
HP Filter Filters the frequencies below the cutoff point to achieve a brighter, less boomy sound.
Dry/Wet Controls the balance between processed and unprocessed sound.
32 Arturia - User Manual Stage-73 V2 - Stage-73 V Control Panel
4.3.1.3. Compressor pedal
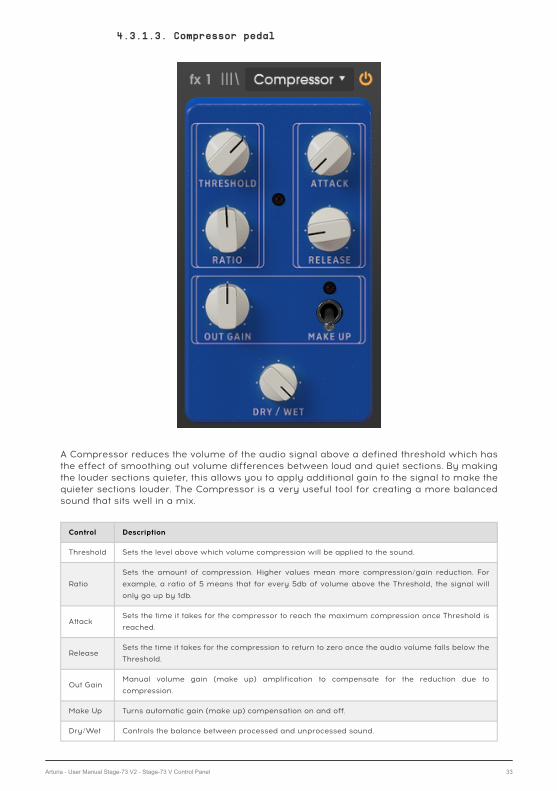
A Compressor reduces the volume of the audio signal above a defined threshold which hasthe effect of smoothing out volume differences between loud and quiet sections. By makingthe louder sections quieter, this allows you to apply additional gain to the signal to make thequieter sections louder. The Compressor is a very useful tool for creating a more balancedsound that sits well in a mix.
Control Description
Threshold Sets the level above which volume compression will be applied to the sound.
Ratio
Sets the amount of compression. Higher values mean more compression/gain reduction. For
example, a ratio of 5 means that for every 5db of volume above the Threshold, the signal will
only go up by 1db.
AttackSets the time it takes for the compressor to reach the maximum compression once Threshold is
reached.
ReleaseSets the time it takes for the compression to return to zero once the audio volume falls below the
Threshold.
Out GainManual volume gain (make up) amplification to compensate for the reduction due to
compression.
Make Up Turns automatic gain (make up) compensation on and off.
Dry/Wet Controls the balance between processed and unprocessed sound.
Arturia - User Manual Stage-73 V2 - Stage-73 V Control Panel 33

4.3.1.4. Analog Phaser pedal
Phasing is the psychedelic sweeping effect that was popular in the 1960s and 70s and addsa sense of movement and swirling to the sound. It works by creating a copy of the inputsignal, feeding it through a series of all pass filters which create peaks and valleys in thefrequency spectrum, then mixing it back with the original signal. As the all pass filters aremodulated, frequencies that are out of phase cancel each other, producing the phaser'scharacteristis "whoosh" sweeping effect.
Control Description
Rate Controls the speed of the LFO that will modulate the phasing effect.
Depth Controls the amount of modulation applied by the LFO.
Feedback Controls the amount of phase resonance by adding feedback to the signal.
PolesDetermines the steepness (number of poles) of the all-pass filters that will process the
modulation signal.
SyncSynchronizes the modulation speed to the internal tempo, or your DAW's tempo when using as
a plug-in.
Mono/
StereoDetermines whether the output from the pedal will be stereo or mono.
Dry/Wet Controls the balance between processed and unprocessed sound.
34 Arturia - User Manual Stage-73 V2 - Stage-73 V Control Panel
4.3.1.5. Delay pedal
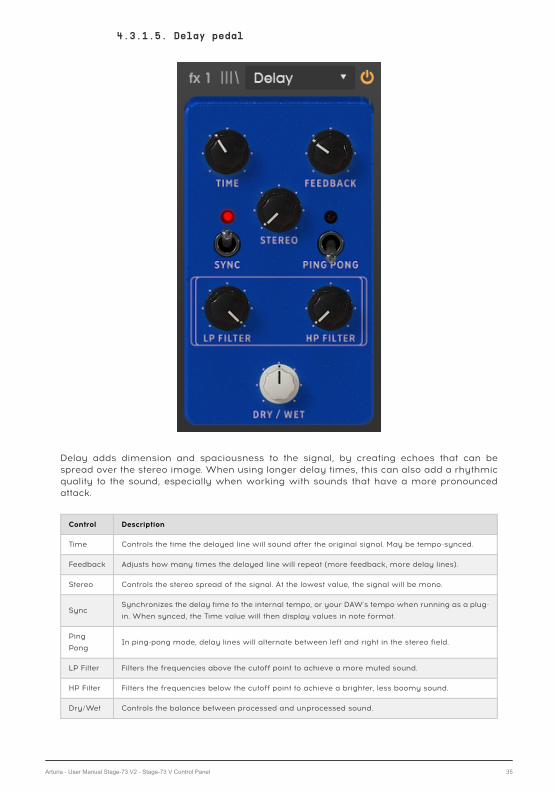
Delay adds dimension and spaciousness to the signal, by creating echoes that can bespread over the stereo image. When using longer delay times, this can also add a rhythmicquality to the sound, especially when working with sounds that have a more pronouncedattack.
Control Description
Time Controls the time the delayed line will sound after the original signal. May be tempo-synced.
Feedback Adjusts how many times the delayed line will repeat (more feedback, more delay lines).
Stereo Controls the stereo spread of the signal. At the lowest value, the signal will be mono.
SyncSynchronizes the delay time to the internal tempo, or your DAW's tempo when running as a plug-
in. When synced, the Time value will then display values in note format.
Ping
PongIn ping-pong mode, delay lines will alternate between left and right in the stereo field.
LP Filter Filters the frequencies above the cutoff point to achieve a more muted sound.
HP Filter Filters the frequencies below the cutoff point to achieve a brighter, less boomy sound.
Dry/Wet Controls the balance between processed and unprocessed sound.
Arturia - User Manual Stage-73 V2 - Stage-73 V Control Panel 35
4.3.1.6. Distortion pedal
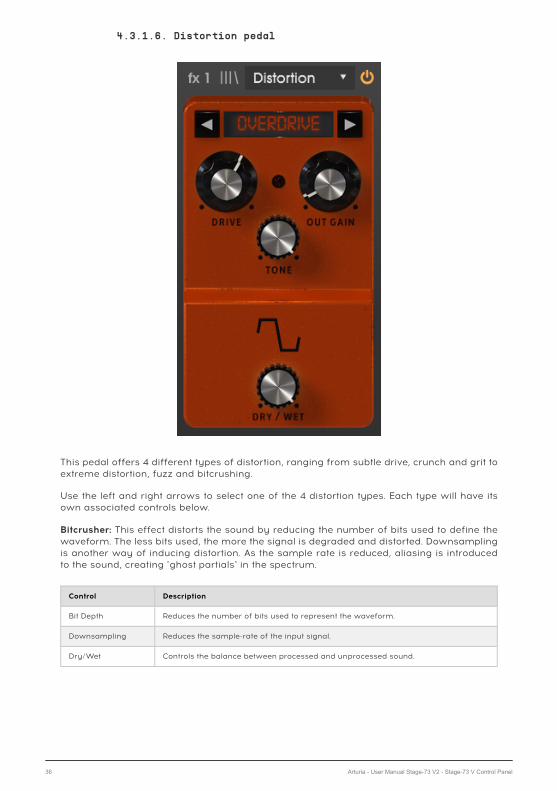
This pedal offers 4 different types of distortion, ranging from subtle drive, crunch and grit toextreme distortion, fuzz and bitcrushing.
Use the left and right arrows to select one of the 4 distortion types. Each type will have itsown associated controls below.
Bitcrusher: This effect distorts the sound by reducing the number of bits used to define thewaveform. The less bits used, the more the signal is degraded and distorted. Downsamplingis another way of inducing distortion. As the sample rate is reduced, aliasing is introducedto the sound, creating "ghost partials" in the spectrum.
Control Description
Bit Depth Reduces the number of bits used to represent the waveform.
Downsampling Reduces the sample-rate of the input signal.
Dry/Wet Controls the balance between processed and unprocessed sound.
36 Arturia - User Manual Stage-73 V2 - Stage-73 V Control Panel
Overdrive: The Overdrive effect is well known by guitar players and adds a "fuzziness" to thesound. This effect is modelled after a solid-state circuit.
Control Description
Drive Controls the distortion intensity.
Out Gain Controls the volume of the processed signal output.
Tone Controls the brightness of the resulting signal.
Dry/Wet Controls the balance between processed and unprocessed sound.
Wavefolder: This is a type of distortion effect where the signal is amplified until it clips,then the peaks above the clip point are folded downward. Usually, this type of distortionenriches the spectrum with high-frequency content and can produce complex frequenciesout of simple waveforms.
Control Description
Drive Controls the distortion intensity.
Out Gain Controls the volume of the processed signal output.
Type Controls the shape of the wavefolding. Hard produces more distortion.
Dry/Wet Controls the balance between processed and unprocessed sound.
Waveshaper: This distortion effect applies a mathematical shaping function to the inputsignal to produce a modified output. The result may be anything between subtle overdriveto pure noise.
Control Description
Drive Controls the distortion intensity.
Out Gain Controls the volume of the processed signal output.
Dry/Wet Controls the balance between processed and unprocessed sound.
Arturia - User Manual Stage-73 V2 - Stage-73 V Control Panel 37
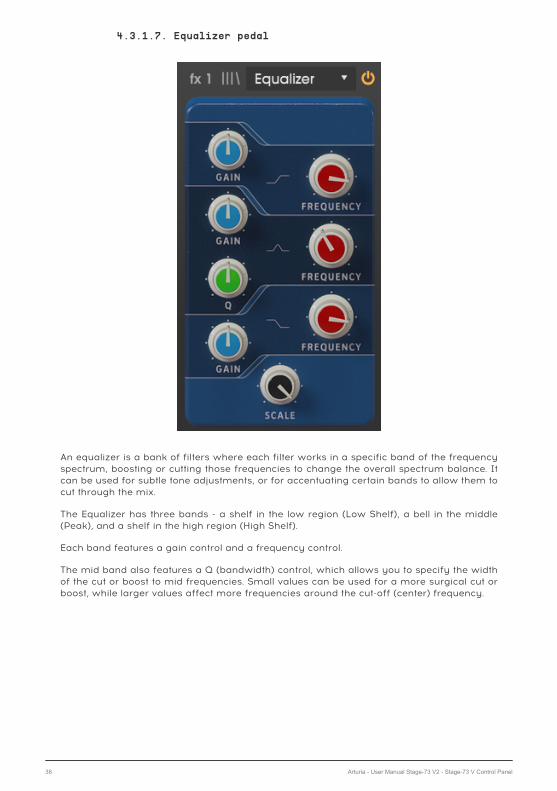
4.3.1.7. Equalizer pedal
An equalizer is a bank of filters where each filter works in a specific band of the frequencyspectrum, boosting or cutting those frequencies to change the overall spectrum balance. Itcan be used for subtle tone adjustments, or for accentuating certain bands to allow them tocut through the mix.
The Equalizer has three bands - a shelf in the low region (Low Shelf), a bell in the middle(Peak), and a shelf in the high region (High Shelf).
Each band features a gain control and a frequency control.
The mid band also features a Q (bandwidth) control, which allows you to specify the widthof the cut or boost to mid frequencies. Small values can be used for a more surgical cut orboost, while larger values affect more frequencies around the cut-off (center) frequency.
38 Arturia - User Manual Stage-73 V2 - Stage-73 V Control Panel

Control Description
Low Shelf Gain Controls the gain/attenuation (between -15 dB and 15 dB) of the Low Shelf band.
Low Shelf Frequency Controls the shelf frequency of the Low Shelf band (between 50 Hz and 500 Hz).
Peak Gain Controls the gain/attenuation (between -15 dB and 15 dB) of the Peak band.
Peak Frequency Controls the peak frequency of the Peak band (between 40 Hz and 20 kHz).
Peak Q Controls the Q (bandwidth) of the Peak band (between 0.001 and 15.0).
High Shelf Gain Controls the gain/attenuation (between -15 dB and 15 dB) of the High Shelf band.
High Shelf Frquency Controls the shelf frequency of the High Shelf band (between 1 kHz and 10 kHz).
Scale Controls the depth of the equalization effect.
Arturia - User Manual Stage-73 V2 - Stage-73 V Control Panel 39
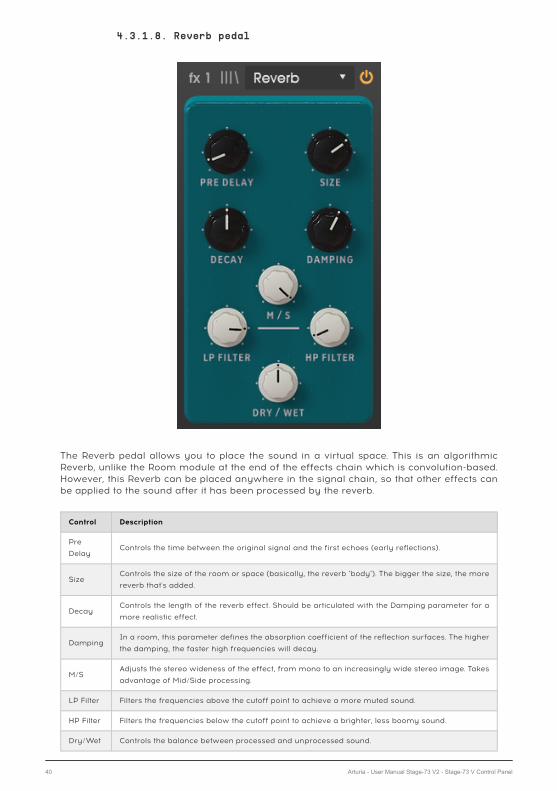
4.3.1.8. Reverb pedal
The Reverb pedal allows you to place the sound in a virtual space. This is an algorithmicReverb, unlike the Room module at the end of the effects chain which is convolution-based.However, this Reverb can be placed anywhere in the signal chain, so that other effects canbe applied to the sound after it has been processed by the reverb.
Control Description
Pre
DelayControls the time between the original signal and the first echoes (early reflections).
SizeControls the size of the room or space (basically, the reverb "body"). The bigger the size, the more
reverb that's added.
DecayControls the length of the reverb effect. Should be articulated with the Damping parameter for a
more realistic effect.
DampingIn a room, this parameter defines the absorption coefficient of the reflection surfaces. The higher
the damping, the faster high frequencies will decay.
M/SAdjusts the stereo wideness of the effect, from mono to an increasingly wide stereo image. Takes
advantage of Mid/Side processing.
LP Filter Filters the frequencies above the cutoff point to achieve a more muted sound.
HP Filter Filters the frequencies below the cutoff point to achieve a brighter, less boomy sound.
Dry/Wet Controls the balance between processed and unprocessed sound.
40 Arturia - User Manual Stage-73 V2 - Stage-73 V Control Panel
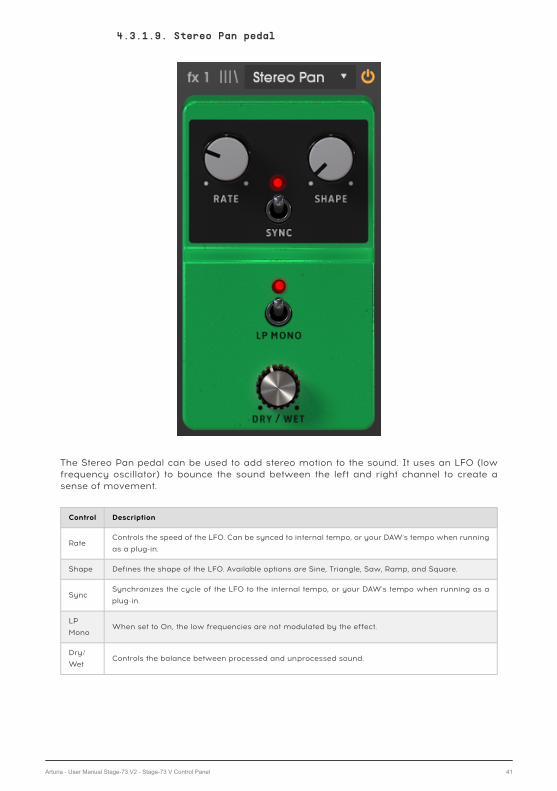
4.3.1.9. Stereo Pan pedal
The Stereo Pan pedal can be used to add stereo motion to the sound. It uses an LFO (lowfrequency oscillator) to bounce the sound between the left and right channel to create asense of movement.
Control Description
RateControls the speed of the LFO. Can be synced to internal tempo, or your DAW's tempo when running
as a plug-in.
Shape Defines the shape of the LFO. Available options are Sine, Triangle, Saw, Ramp, and Square.
SyncSynchronizes the cycle of the LFO to the internal tempo, or your DAW's tempo when running as a
plug-in.
LP
MonoWhen set to On, the low frequencies are not modulated by the effect.
Dry/
WetControls the balance between processed and unprocessed sound.
Arturia - User Manual Stage-73 V2 - Stage-73 V Control Panel 41

4.3.1.10. Analog Delay pedal
Analog Delay is another type of delay pedal with a slightly different sound. The principleis the same - the input audio is recorded and played back after a small amount of time.A feedback circuit then introduces more copies of the delayed audio back into the originalsignal.
This particular delay pedal is great for more dubby sounds with lots of feedback. Since thisdelay is modeled after analog hardware, it will introduce more coloration than the otherDelay pedal options.
42 Arturia - User Manual Stage-73 V2 - Stage-73 V Control Panel
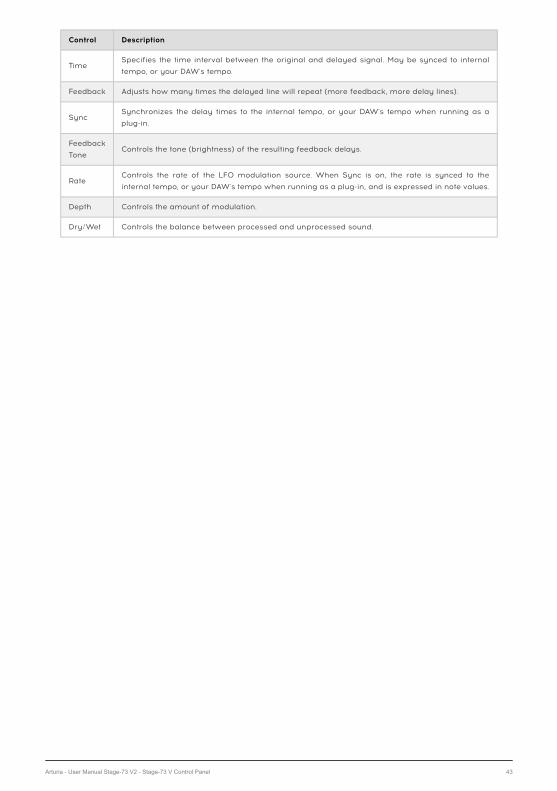
Control Description
TimeSpecifies the time interval between the original and delayed signal. May be synced to internal
tempo, or your DAW's tempo.
Feedback Adjusts how many times the delayed line will repeat (more feedback, more delay lines).
SyncSynchronizes the delay times to the internal tempo, or your DAW's tempo when running as a
plug-in.
Feedback
ToneControls the tone (brightness) of the resulting feedback delays.
RateControls the rate of the LFO modulation source. When Sync is on, the rate is synced to the
internal tempo, or your DAW's tempo when running as a plug-in, and is expressed in note values.
Depth Controls the amount of modulation.
Dry/Wet Controls the balance between processed and unprocessed sound.
Arturia - User Manual Stage-73 V2 - Stage-73 V Control Panel 43
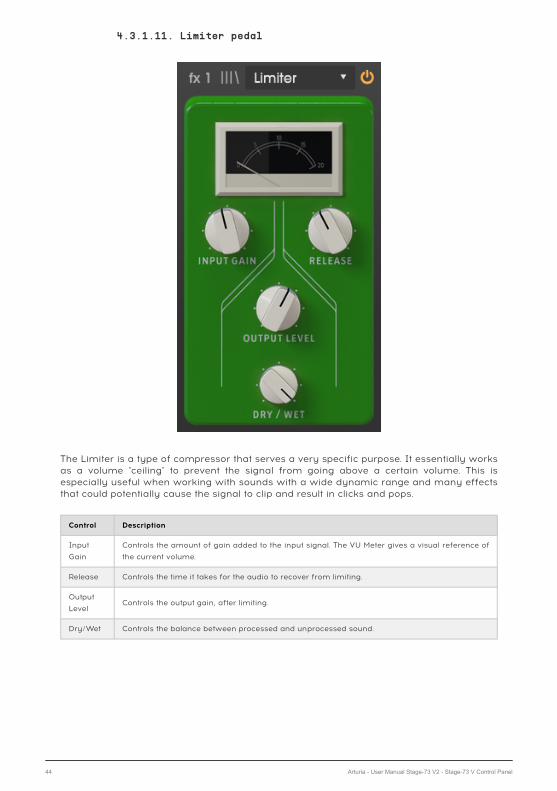
4.3.1.11. Limiter pedal
The Limiter is a type of compressor that serves a very specific purpose. It essentially worksas a volume "ceiling" to prevent the signal from going above a certain volume. This isespecially useful when working with sounds with a wide dynamic range and many effectsthat could potentially cause the signal to clip and result in clicks and pops.
Control Description
Input
Gain
Controls the amount of gain added to the input signal. The VU Meter gives a visual reference of
the current volume.
Release Controls the time it takes for the audio to recover from limiting.
Output
LevelControls the output gain, after limiting.
Dry/Wet Controls the balance between processed and unprocessed sound.
44 Arturia - User Manual Stage-73 V2 - Stage-73 V Control Panel
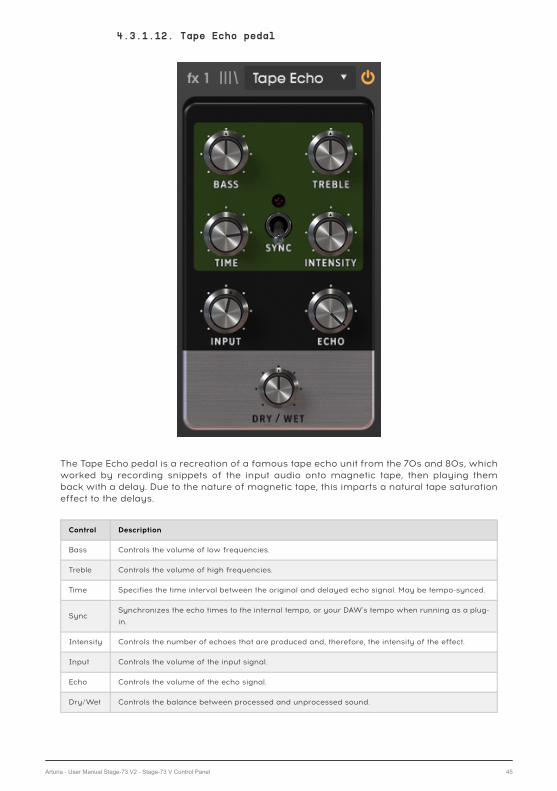
4.3.1.12. Tape Echo pedal
The Tape Echo pedal is a recreation of a famous tape echo unit from the 70s and 80s, whichworked by recording snippets of the input audio onto magnetic tape, then playing themback with a delay. Due to the nature of magnetic tape, this imparts a natural tape saturationeffect to the delays.
Control Description
Bass Controls the volume of low frequencies.
Treble Controls the volume of high frequencies.
Time Specifies the time interval between the original and delayed echo signal. May be tempo-synced.
SyncSynchronizes the echo times to the internal tempo, or your DAW's tempo when running as a plug-
in.
Intensity Controls the number of echoes that are produced and, therefore, the intensity of the effect.
Input Controls the volume of the input signal.
Echo Controls the volume of the echo signal.
Dry/Wet Controls the balance between processed and unprocessed sound.
Arturia - User Manual Stage-73 V2 - Stage-73 V Control Panel 45
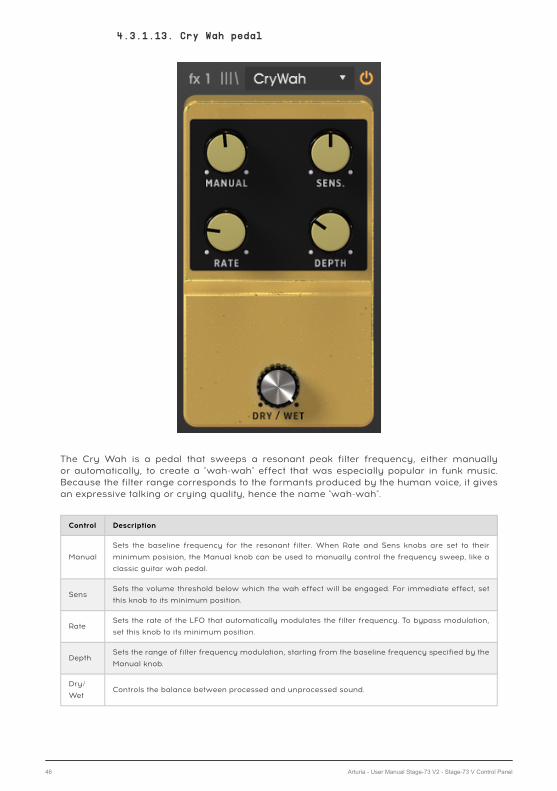
4.3.1.13. Cry Wah pedal
The Cry Wah is a pedal that sweeps a resonant peak filter frequency, either manuallyor automatically, to create a "wah-wah" effect that was especially popular in funk music.Because the filter range corresponds to the formants produced by the human voice, it givesan expressive talking or crying quality, hence the name "wah-wah".
Control Description
Manual
Sets the baseline frequency for the resonant filter. When Rate and Sens knobs are set to their
minimum posision, the Manual knob can be used to manually control the frequency sweep, like a
classic guitar wah pedal.
SensSets the volume threshold below which the wah effect will be engaged. For immediate effect, set
this knob to its minimum position.
RateSets the rate of the LFO that automatically modulates the filter frequency. To bypass modulation,
set this knob to its minimum position.
DepthSets the range of filter frequency modulation, starting from the baseline frequency specified by the
Manual knob.
Dry/
WetControls the balance between processed and unprocessed sound.
46 Arturia - User Manual Stage-73 V2 - Stage-73 V Control Panel
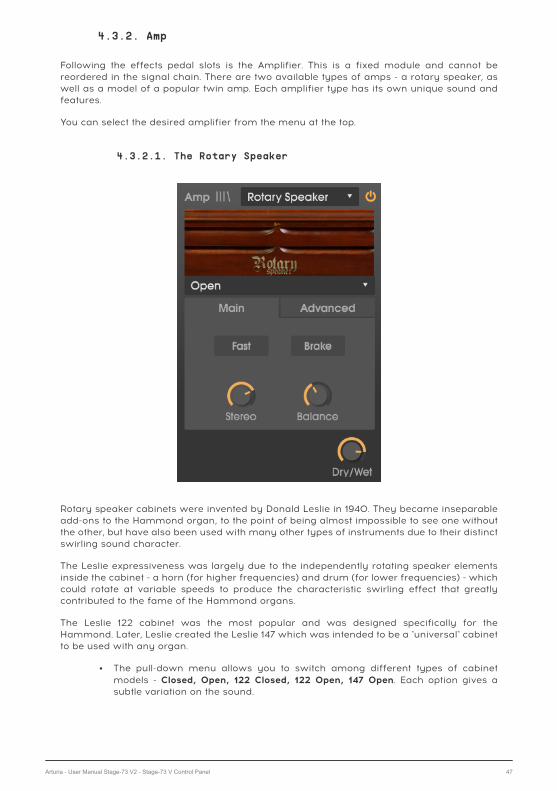
4.3.2. Amp
Following the effects pedal slots is the Amplifier. This is a fixed module and cannot bereordered in the signal chain. There are two available types of amps - a rotary speaker, aswell as a model of a popular twin amp. Each amplifier type has its own unique sound andfeatures.
You can select the desired amplifier from the menu at the top.
4.3.2.1. The Rotary Speaker
Rotary speaker cabinets were invented by Donald Leslie in 1940. They became inseparableadd-ons to the Hammond organ, to the point of being almost impossible to see one withoutthe other, but have also been used with many other types of instruments due to their distinctswirling sound character.
The Leslie expressiveness was largely due to the independently rotating speaker elementsinside the cabinet - a horn (for higher frequencies) and drum (for lower frequencies) - whichcould rotate at variable speeds to produce the characteristic swirling effect that greatlycontributed to the fame of the Hammond organs.
The Leslie 122 cabinet was the most popular and was designed specifically for theHammond. Later, Leslie created the Leslie 147 which was intended to be a "universal" cabinetto be used with any organ.
• The pull-down menu allows you to switch among different types of cabinetmodels - Closed, Open, 122 Closed, 122 Open, 147 Open. Each option gives asubtle variation on the sound.
Arturia - User Manual Stage-73 V2 - Stage-73 V Control Panel 47
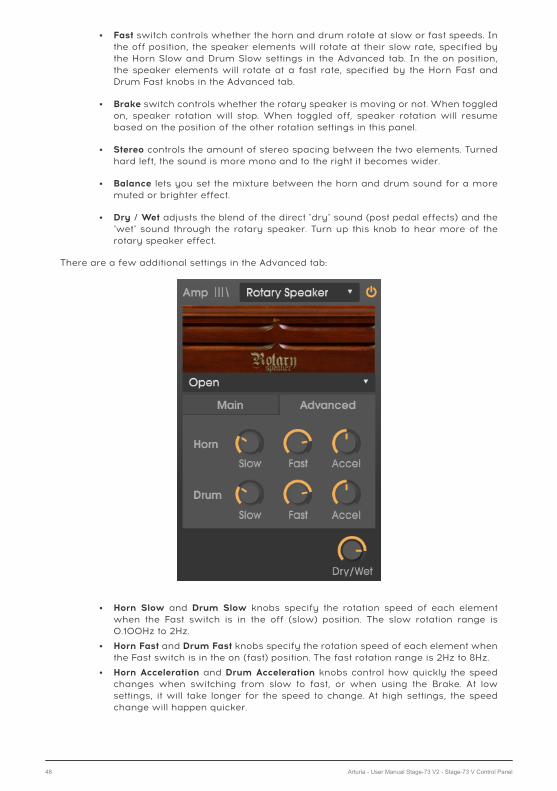
• Fast switch controls whether the horn and drum rotate at slow or fast speeds. Inthe off position, the speaker elements will rotate at their slow rate, specified bythe Horn Slow and Drum Slow settings in the Advanced tab. In the on position,the speaker elements will rotate at a fast rate, specified by the Horn Fast andDrum Fast knobs in the Advanced tab.
• Brake switch controls whether the rotary speaker is moving or not. When toggledon, speaker rotation will stop. When toggled off, speaker rotation will resumebased on the position of the other rotation settings in this panel.
• Stereo controls the amount of stereo spacing between the two elements. Turnedhard left, the sound is more mono and to the right it becomes wider.
• Balance lets you set the mixture between the horn and drum sound for a moremuted or brighter effect.
• Dry / Wet adjusts the blend of the direct "dry" sound (post pedal effects) and the"wet" sound through the rotary speaker. Turn up this knob to hear more of therotary speaker effect.
There are a few additional settings in the Advanced tab:
• Horn Slow and Drum Slow knobs specify the rotation speed of each elementwhen the Fast switch is in the off (slow) position. The slow rotation range is0.100Hz to 2Hz.
• Horn Fast and Drum Fast knobs specify the rotation speed of each element whenthe Fast switch is in the on (fast) position. The fast rotation range is 2Hz to 8Hz.
• Horn Acceleration and Drum Acceleration knobs control how quickly the speedchanges when switching from slow to fast, or when using the Brake. At lowsettings, it will take longer for the speed to change. At high settings, the speedchange will happen quicker.
48 Arturia - User Manual Stage-73 V2 - Stage-73 V Control Panel
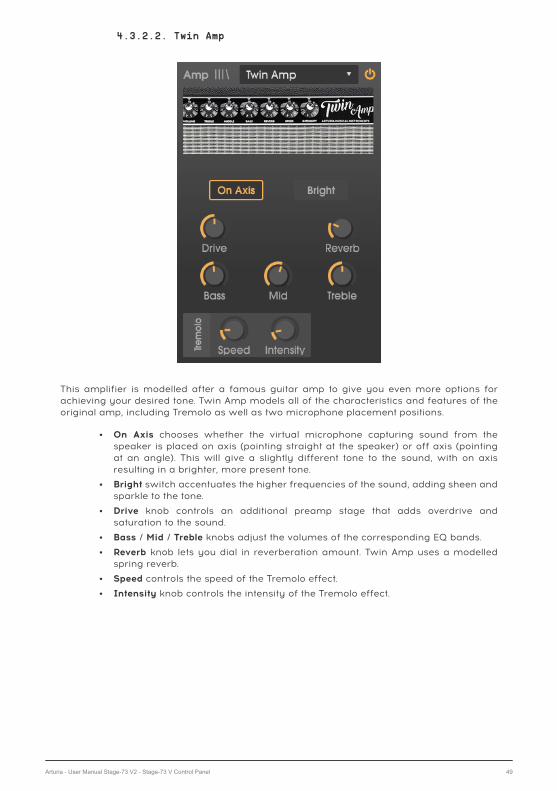
4.3.2.2. Twin Amp
This amplifier is modelled after a famous guitar amp to give you even more options forachieving your desired tone. Twin Amp models all of the characteristics and features of theoriginal amp, including Tremolo as well as two microphone placement positions.
• On Axis chooses whether the virtual microphone capturing sound from thespeaker is placed on axis (pointing straight at the speaker) or off axis (pointingat an angle). This will give a slightly different tone to the sound, with on axisresulting in a brighter, more present tone.
• Bright switch accentuates the higher frequencies of the sound, adding sheen andsparkle to the tone.
• Drive knob controls an additional preamp stage that adds overdrive andsaturation to the sound.
• Bass / Mid / Treble knobs adjust the volumes of the corresponding EQ bands.
• Reverb knob lets you dial in reverberation amount. Twin Amp uses a modelledspring reverb.
• Speed controls the speed of the Tremolo effect.
• Intensity knob controls the intensity of the Tremolo effect.
Arturia - User Manual Stage-73 V2 - Stage-73 V Control Panel 49
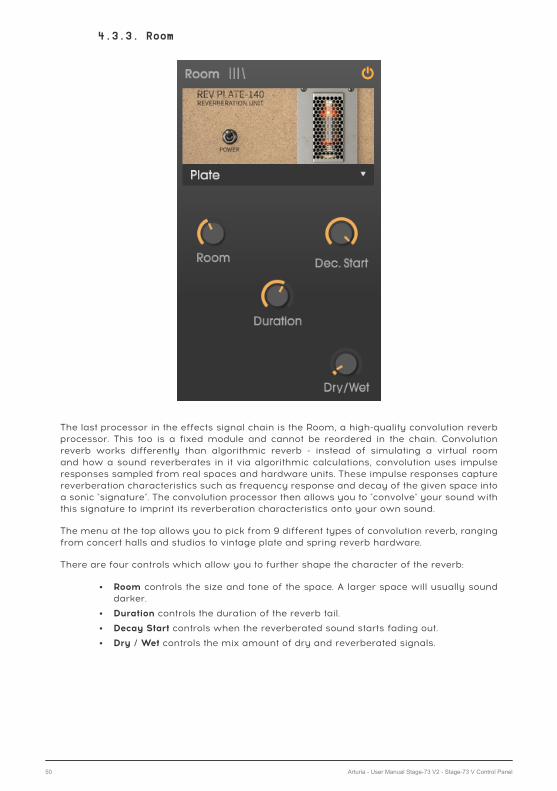
4.3.3. Room
The last processor in the effects signal chain is the Room, a high-quality convolution reverbprocessor. This too is a fixed module and cannot be reordered in the chain. Convolutionreverb works differently than algorithmic reverb - instead of simulating a virtual roomand how a sound reverberates in it via algorithmic calculations, convolution uses impulseresponses sampled from real spaces and hardware units. These impulse responses capturereverberation characteristics such as frequency response and decay of the given space intoa sonic "signature". The convolution processor then allows you to "convolve" your sound withthis signature to imprint its reverberation characteristics onto your own sound.
The menu at the top allows you to pick from 9 different types of convolution reverb, rangingfrom concert halls and studios to vintage plate and spring reverb hardware.
There are four controls which allow you to further shape the character of the reverb:
• Room controls the size and tone of the space. A larger space will usually sounddarker.
• Duration controls the duration of the reverb tail.
• Decay Start controls when the reverberated sound starts fading out.
• Dry / Wet controls the mix amount of dry and reverberated signals.
50 Arturia - User Manual Stage-73 V2 - Stage-73 V Control Panel
5. SOFTWARE LICENCE AGREEMENT
In consideration of payment of the Licensee fee, which is a portion of the price you paid,Arturia, as Licensor, grants to you (hereinafter termed “Licensee”) a nonexclusive right touse this copy of the SOFTWARE.
All intellectual property rights in the software belong to Arturia SA (hereinafter: “Arturia”).Arturia permits you only to copy, download, install and use the software in accordance withthe terms and conditions of this Agreement.
The product contains product activation for protection against unlawful copying. The OEMsoftware can be used only following registration.
Internet access is required for the activation process. The terms and conditions for use of thesoftware by you, the end-user, appear below. By installing the software on your computeryou agree to these terms and conditions. Please read the following text carefully in itsentirety. If you do not approve these terms and conditions, you must not install this software.In this event give the product back to where you have purchased it (including all writtenmaterial, the complete undamaged packing as well as the enclosed hardware) immediatelybut at the latest within 30 days in return for a refund of the purchase price.
1. Software Ownership Arturia shall retain full and complete title to the SOFTWARE recordedon the enclosed disks and all subsequent copies of the SOFTWARE, regardless of the mediaor form on or in which the original disks or copies may exist. The License is not a sale of theoriginal SOFTWARE.
2. Grant of License Arturia grants you a non-exclusive license for the use of the softwareaccording to the terms and conditions of this Agreement. You may not lease, loan or sub-license the software. The use of the software within a network is illegal where there is thepossibility of a contemporaneous multiple use of the program. You are entitled to preparea backup copy of the software which will not be used for purposes other than storagepurposes. You shall have no further right or interest to use the software other than the limitedrights as specified in this Agreement. Arturia reserves all rights not expressly granted.
3. Activation of the Software Arturia may use a compulsory activation of the software anda compulsory registration of the OEM software for license control to protect the softwareagainst unlawful copying. If you do not accept the terms and conditions of this Agreement,the software will not work. In such a case the product including the software may only bereturned within 30 days following acquisition of the product. Upon return a claim accordingto § 11 shall not apply.
4. Support, Upgrades and Updates after Product Registration You can only receive support,upgrades and updates following the personal product registration. Support is providedonly for the current version and for the previous version during one year after publicationof the new version. Arturia can modify and partly or completely adjust the nature ofthe support (hotline, forum on the website etc.), upgrades and updates at any time. Theproduct registration is possible during the activation process or at any time later throughthe Internet. In such a process you are asked to agree to the storage and use of yourpersonal data (name, address, contact, email-address, and license data) for the purposesspecified above. Arturia may also forward these data to engaged third parties, in particulardistributors, for support purposes and for the verification of the upgrade or update right.
5. No Unbundling The software usually contains a variety of different files which in itsconfiguration ensure the complete functionality of the software. The software may be usedas one product only. It is not required that you use or install all components of the software.You must not arrange components of the software in a new way and develop a modifiedversion of the software or a new product as a result. The configuration of the software maynot be modified for the purpose of distribution, assignment or resale.
Arturia - User Manual Stage-73 V2 - SOFTWARE LICENCE AGREEMENT 51
6. Assignment of Rights You may assign all your rights to use the software to anotherperson subject to the conditions that (a) you assign to this other person (i) this Agreementand (ii) the software or hardware provided with the software, packed or preinstalledthereon, including all copies, upgrades, updates, backup copies and previous versions,which granted a right to an update or upgrade on this software, (b) you do not retainupgrades, updates, backup copies und previous versions of this software and (c) therecipient accepts the terms and conditions of this Agreement as well as other regulationspursuant to which you acquired a valid software license. A return of the product due to afailure to accept the terms and conditions of this Agreement, e.g. the product activation, shallnot be possible following the assignment of rights.
7. Upgrades and Updates You must have a valid license for the previous or more inferiorversion of the software in order to be allowed to use an upgrade or update for the software.Upon transferring this previous or more inferior version of the software to third partiesthe right to use the upgrade or update of the software shall expire. The acquisition of anupgrade or update does not in itself confer any right to use the software. The right ofsupport for the previous or inferior version of the software expires upon the installation ofan upgrade or update.
8. Limited Warranty Arturia warrants that the disks on which the software is furnished isfree from defects in materials and workmanship under normal use for a period of thirty (30)days from the date of purchase. Your receipt shall be evidence of the date of purchase. Anyimplied warranties on the software are limited to thirty (30) days from the date of purchase.Some states do not allow limitations on duration of an implied warranty, so the abovelimitation may not apply to you. All programs and accompanying materials are provided “asis” without warranty of any kind. The complete risk as to the quality and performance of theprograms is with you. Should the program prove defective, you assume the entire cost of allnecessary servicing, repair or correction.
9. Remedies Arturia's entire liability and your exclusive remedy shall be at Arturia's optioneither (a) return of the purchase price or (b) replacement of the disk that does not meet theLimited Warranty and which is returned to Arturia with a copy of your receipt. This limitedWarranty is void if failure of the software has resulted from accident, abuse, modification,or misapplication. Any replacement software will be warranted for the remainder of theoriginal warranty period or thirty (30) days, whichever is longer.
10. No other Warranties The above warranties are in lieu of all other warranties, expressedor implied, including but not limited to, the implied warranties of merchantability and fitnessfor a particular purpose. No oral or written information or advice given by Arturia, its dealers,distributors, agents or employees shall create a warranty or in any way increase the scopeof this limited warranty.
11. No Liability for Consequential Damages Neither Arturia nor anyone else involved inthe creation, production, or delivery of this product shall be liable for any direct, indirect,consequential, or incidental damages arising out of the use of, or inability to use this product(including without limitation, damages for loss of business profits, business interruption, lossof business information and the like) even if Arturia was previously advised of the possibilityof such damages. Some states do not allow limitations on the length of an implied warrantyor the exclusion or limitation of incidental or consequential damages, so the above limitationor exclusions may not apply to you. This warranty gives you specific legal rights, and youmay also have other rights which vary from state to state.
52 Arturia - User Manual Stage-73 V2 - SOFTWARE LICENCE AGREEMENT
Related Documents