www.segway.com The manufacturer reserves the right to make changes to the miniPRO, release firmware updates, and update this manual at any time. Visit www.segway.com to download the latest user materials and watch the safety video. You must install the Ninebot by Segway App to follow the New Rider Tutorial, activate your miniPRO, and obtain the latest updates and safety instructions. USER MANUAL 25018-00001 ac Go to www.segway.com to watch the safety video. Rendez-vous sur www.segway.com pour télécharger le manuel d’utilisation. Vaya a www.segway.com para descargar el manual del usuario. Visite www.segway.com para baixar o manual do usuário.

Welcome message from author
This document is posted to help you gain knowledge. Please leave a comment to let me know what you think about it! Share it to your friends and learn new things together.
Transcript
www.segway.com
The manufacturer reserves the right to make changes to the miniPRO, release firmware updates, and update this manual at
any time. Visit www.segway.com to download the latest user materials and watch the safety video. You must install the
Ninebot by Segway App to follow the New Rider Tutorial, activate your miniPRO, and obtain the latest updates and safety
instructions.
USER MANUAL
25018-00001 ac
Go to www.segway.com to watch the safety video.
Rendez-vous sur www.segway.com pour télécharger le manuel d’utilisation.Vaya a www.segway.com para descargar el manual del usuario.
Visite www.segway.com para baixar o manual do usuário.
1 Packing List
5 Assembling Your miniPro
4 Dashboard Icons
Contents
01
02
04
05
06
07
08
08
10
1 2
7 Charging
10 Remote Control (R/C) Mode
8 Learning to Ride
9 Warning
3 Diagram
2 Riding Safety
6 First Ride
12 Maintenance
14 Trademark and Legal Statement
13 Specifications
1 3
16
14
17
18
19
15 Certifications
11 Lifting and Power Assist Mode
16 Contact
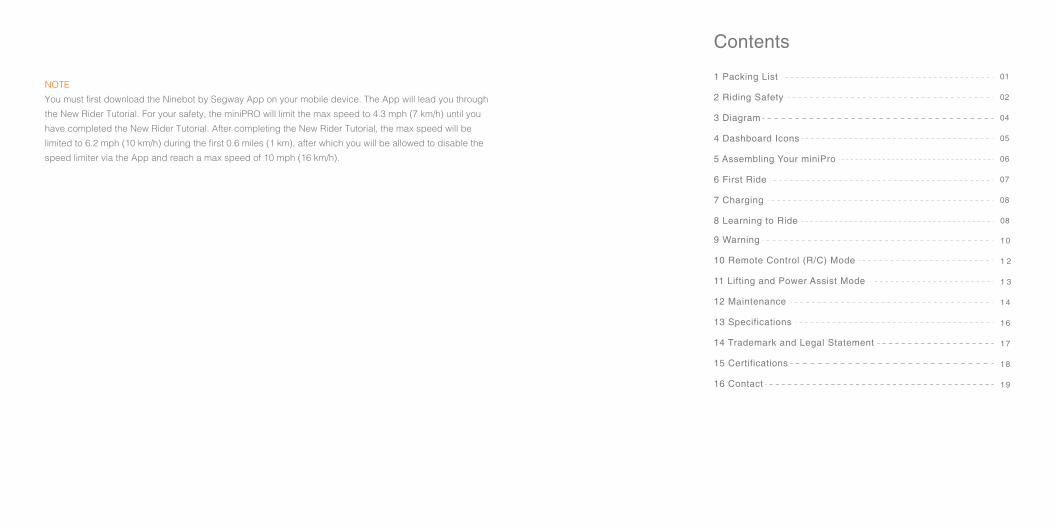
NOTE
You must first download the Ninebot by Segway App on your mobile device. The App will lead you through
the New Rider Tutorial. For your safety, the miniPRO will limit the max speed to 4.3 mph (7 km/h) until you
have completed the New Rider Tutorial. After completing the New Rider Tutorial, the max speed will be
limited to 6.2 mph (10 km/h) during the first 0.6 miles (1 km), after which you will be allowed to disable the
speed limiter via the App and reach a max speed of 10 mph (16 km/h).
01
1 Packing List
Mainframe
Steering Bar
Valve Stem Extension
Charger, Power Cord
User Materials
Accessories Box
Accessories in the Box
LIMITED WARRANTY
QUICK START
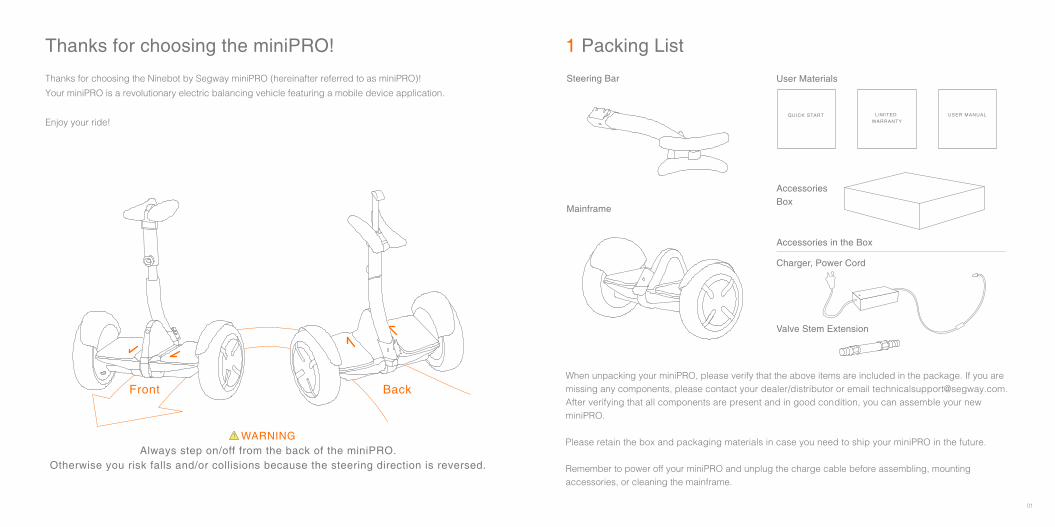
Thanks for choosing the miniPRO!
Thanks for choosing the Ninebot by Segway miniPRO (hereinafter referred to as miniPRO)!
Your miniPRO is a revolutionary electric balancing vehicle featuring a mobile device application.
Enjoy your ride!
Front Back
WARNINGAlways step on/off from the back of the miniPRO.
Otherwise you risk falls and/or collisions because the steering direction is reversed.
When unpacking your miniPRO, please verify that the above items are included in the package. If you are missing any components, please contact your dealer/distributor or email [email protected]. After verifying that all components are present and in good condition, you can assemble your new miniPRO.
Please retain the box and packaging materials in case you need to ship your miniPRO in the future.
Remember to power off your miniPRO and unplug the charge cable before assembling, mounting accessories, or cleaning the mainframe.
USER MANUAL
9. Be alert! Scan both far ahead and in front of your miniPRO — your eyes are your best tool for safely
avoiding obstacles and low traction surfaces (including, but not limited to, wet ground, loose sand,
loose gravel, and ice).
10. To reduce risk of injury, you must read and follow all “CAUTION” and “WARNING” notices in this
document. Do not ride at an unsafe speed. Under no circumstance should you ride on roads with motor
vehicles. Always follow these safety instructions:
A. The following people should not ride the miniPRO:
i. Anyone under 16 years old or above 60 years old. Riders between 16-18 years old should ride
under adult supervision.
ii. Anyone under the influence of alcohol or drugs.
iii. Anyone who suffers from disease that puts them at risk if they engage in strenuous physical
activity.
iv. Anyone who has problems with balance or with motor skills that would interfere with their ability
to maintain balance.
v. Anyone whose height or weight is outside the stated limits (see Specifications).
B. Comply with local laws and regulations when riding this product. Do not ride where prohibited by
local laws.
C. To ride safely, you must be able to clearly see what is in front of you and you must be clearly
visible to others.
D. Do not ride in the snow, in the rain, or on roads which are wet, muddy, icy, or that are slippery for
any reason. Do not ride over obstacles (sand, loose gravel, or sticks). Doing so could result in a
loss of balance or traction and could cause a fall.
E. Do not accelerate or decelerate suddenly. Do not accelerate when the miniPRO tilts back or
sounds an alarm. Do not attempt to override the speed limiter.
11. Do not insert the power cord if the charge port is wet.
12. Use a surge protector when charging to help protect your miniPRO from damage due to power surges
and voltage spikes. Only use the Ninebot by Segway supplied charger. Do not use a charger from any
other product.
13. Use only Ninebot by Segway approved parts and accessories. Do not modify your miniPRO.
Modifications to your miniPRO could interfere with the operation of the miniPRO, could result in serious
injury and/or damage, and could void the Limited Warranty.
14. Do not sit on the steering bar. Doing so could result in serious injury and/or damage to your miniPRO.02 03
1. The miniPRO is a recreational product, which is different from motor vehicles driven on the road.
Before mastering riding skills, you need to practice. Neither Ninebot Inc. nor Segway Inc. is
responsible for any injuries or damage caused by a rider's inexperience or failure to follow the
instructions in this document.
2. Please understand that you can reduce the risk by following all the instructions and warnings in this
manual, but you cannot eliminate all the risks. Remember that whenever you ride the miniPRO you
risk injury or death from loss of control, collisions, and falls. When entering into public spaces always
comply with the local laws and regulations. As with other vehicles, faster speeds require longer
braking distance. Sudden braking on smooth surfaces could lead to wheel slip, loss of balance, or
falls. Be cautious and always keep a safe distance between you and other people or vehicles when
riding. Be alert and slow down when entering unfamiliar areas.
3. Respect pedestrians by always yielding the right of way. Pass on the left whenever possible. When
approaching a pedestrian from the front, stay to the right and slow down. Avoid startling pedestrians.
When approaching from behind, announce yourself and slow down to walking speed when passing.
4. In places without laws and regulations governing self-balancing electric vehicles, comply with the
safety guidelines outlined in this manual. Neither Ninebot Inc. nor Segway Inc. is responsible for any
property damage, personal injury/death, accidents, or legal disputes caused by violations of the
safety instructions.
5. Do not allow anyone to ride the miniPRO on his/her own unless they have carefully read this manual,
watched the safety video, and followed the New Rider Tutorial on the Ninebot by Segway App. The
safety of new riders is your responsibility. Spot new riders until they are comfortable with the basic
operation of the miniPRO. Make sure each new rider wears a helmet and other protective gear.
6. Before each ride check for loose fasteners, damaged components, and low tire pressure. If the
miniPRO makes abnormal sounds or signals an alarm, immediately stop riding. Diagnose your
miniPRO via the Ninebot by Segway App and call your dealer/distributor for service.
7. Always wear a helmet when riding. Use an approved bicycle or skateboard helmet that fits properly
with the chin strap in place, and provides protection for the back of your head.
8. Do not attempt your first ride in any area where you might encounter children, pedestrians, pets,
vehicles, bicycles, or other obstacles and potential hazards.
2 Riding Safety
04 05
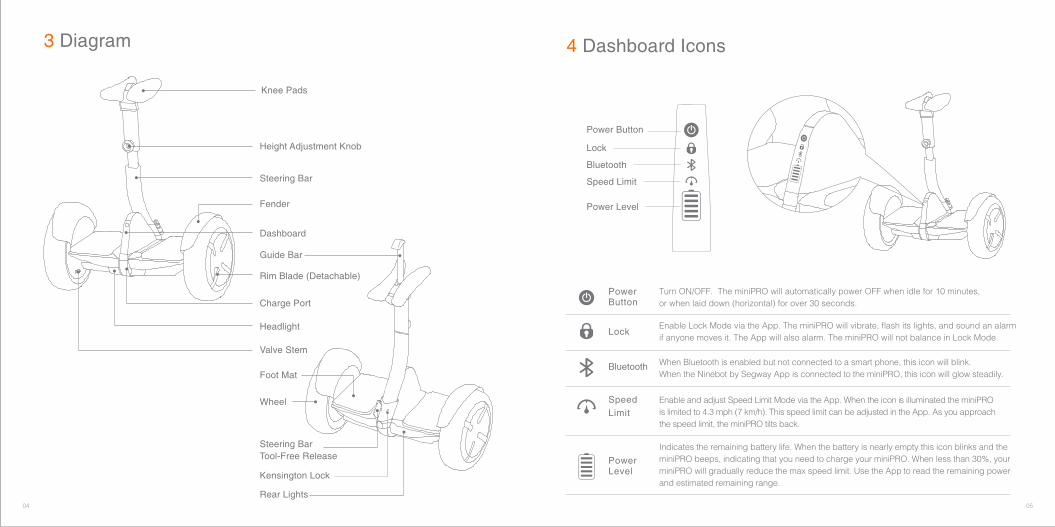
Knee Pads
When Bluetooth is enabled but not connected to a smart phone, this icon will blink.When the Ninebot by Segway App is connected to the miniPRO, this icon will glow steadily.
Bluetooth
Enable and adjust Speed Limit Mode via the App. When the icon is illuminated the miniPROis limited to 4.3 mph (7 km/h). This speed limit can be adjusted in the App. As you approach the speed limit, the miniPRO tilts back.
Speed Limit
Lock
Power Button
Turn ON/OFF. The miniPRO will automatically power OFF when idle for 10 minutes, or when laid down (horizontal) for over 30 seconds.
Power Level
Enable Lock Mode via the App. The miniPRO will vibrate, flash its lights, and sound an alarm if anyone moves it. The App will also alarm. The miniPRO will not balance in Lock Mode.
Indicates the remaining battery life. When the battery is nearly empty this icon blinks and the miniPRO beeps, indicating that you need to charge your miniPRO. When less than 30%, your miniPRO will gradually reduce the max speed limit. Use the App to read the remaining power and estimated remaining range.
Power Button
Lock
Bluetooth
Speed Limit
Power Level
4 Dashboard Icons
Height Adjustment Knob
Charge Port
Headlight
Valve Stem
Dashboard
Kensington Lock
Guide Bar
Steering Bar
Fender
Rim Blade (Detachable)
3 Diagram
Wheel
Steering BarTool-Free Release
Foot Mat
Rear Lights

06 07
Check the Power ON/OFF status after assembly. For your safety, your miniPRO is not activated at this time and will beep occasionally after Power ON.Until activated, the miniPRO maintains a very low riding speed and steering sensitivity, and should not be ridden. Install the Ninebot by Segway App on your mobile device (with Bluetooth 4.0 or above), connect to the miniPRO with Bluetooth, and follow the App instructions to activate your miniPRO and follow the training procedures.
6 First Ride5 Assembling Your miniPRO
Scan to download the App (iOS 5 or above, Android 4.3 or above)
Use your mobile device (Android or iOS) to install the Ninebot by Segway App, read the Safety Instructions, then follow the New Rider Tutorial before your first ride. Go to the Apple App Store (iOS) or the Google Play Store (Android) and search for "Ninebot" to download and install the App.
1 Install App and register/login. Power ON the miniPRO. The Bluetooth icon blinking indicates the miniPRO is waiting for a connection.
2
3
1 2 3
Click “Search device” to connect to your miniPRO. The miniPRO will beep when the connection is successful. The Bluetooth icon will stop blinking and remain illuminated.
Follow the App instructions to learn how to ride safely. Have fun!
There are safety risks when learning to ride the miniPRO. You must read the Safety Instructions and follow the New Rider Tutorial in the Ninebot by Segway App before your first ride. Go to www.segway.com to watch the safety video.
Open the tool-free release as shown.
Insert the steering bar into the mainframe steering socket.
Close the tool-freerelease to secure.
Rotate height adjustmentknob counter-clockwise.
Lift the knee pads to desired height.Rotate height adjustment knob clockwise to tighten.
Lift the guide bar to help steer the miniPRO without a rider when powered on. Do not use to lift or carry the miniPRO.
Adjust the knee pad height
Install the steering bar
Android
iOSWhen your miniPRO intermittently sounds an alarm, stop riding and check the App for details.
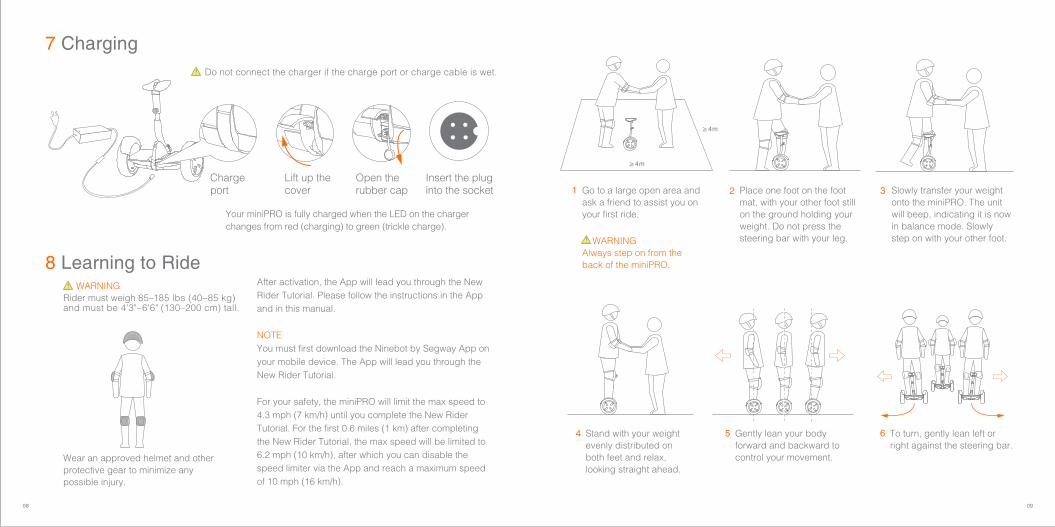
Go to a large open area and ask a friend to assist you on your first ride.
WARNING Always step on from the back of the miniPRO.
1
08 09
8 Learning to RideAfter activation, the App will lead you through the New Rider Tutorial. Please follow the instructions in the App and in this manual.
NOTEYou must first download the Ninebot by Segway App on your mobile device. The App will lead you through the New Rider Tutorial.
For your safety, the miniPRO will limit the max speed to 4.3 mph (7 km/h) until you complete the New Rider Tutorial. For the first 0.6 miles (1 km) after completing the New Rider Tutorial, the max speed will be limited to 6.2 mph (10 km/h), after which you can disable the speed limiter via the App and reach a maximum speed of 10 mph (16 km/h).
≥4m
≥4m
Slowly transfer your weight onto the miniPRO. The unit will beep, indicating it is now in balance mode. Slowly step on with your other foot.
Place one foot on the foot mat, with your other foot still on the ground holding your weight. Do not press the steering bar with your leg.
2
4 Gently lean your body forward and backward to control your movement.
Stand with your weight evenly distributed on both feet and relax, looking straight ahead.
5 To turn, gently lean left or right against the steering bar.
6
Wear an approved helmet and other protective gear to minimize any possible injury.
3
7 Charging
Chargeport
Lift up the cover
Open the rubber cap
Insert the pluginto the socket
Do not connect the charger if the charge port or charge cable is wet.
Your miniPRO is fully charged when the LED on the charger changes from red (charging) to green (trickle charge).
WARNINGRider must weigh 85–185 lbs (40–85 kg) and must be 4'3"–6'6" (130–200 cm) tall.
10 11
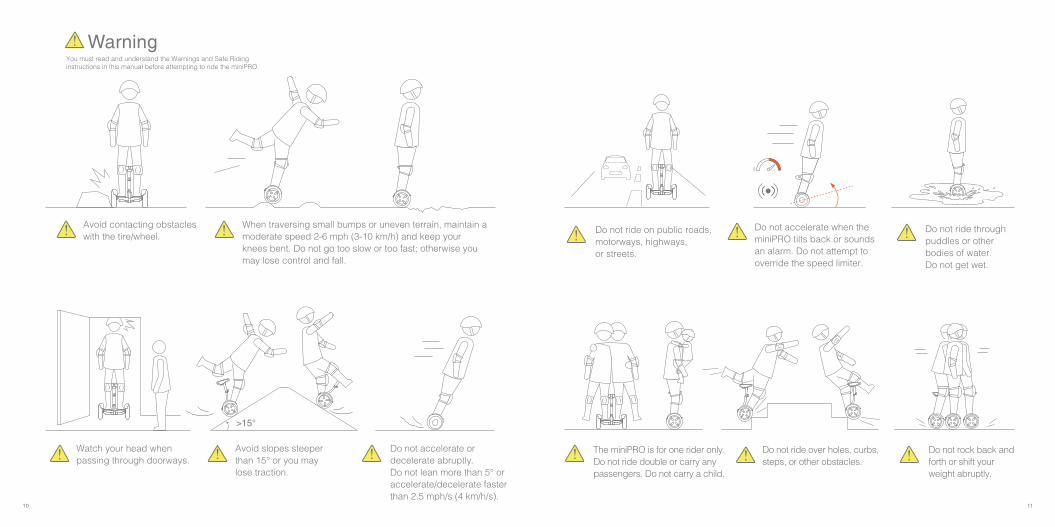
Do not rock back andforth or shift your weight abruptly.
Do not ride throughpuddles or other bodies of water.Do not get wet.
Do not ride on public roads,motorways, highways, or streets.
The miniPRO is for one rider only.Do not ride double or carry any passengers. Do not carry a child.
Do not ride over holes, curbs, steps, or other obstacles.
Do not accelerate when the miniPRO tilts back or sounds an alarm. Do not attempt to override the speed limiter.
Watch your head when passing through doorways.
Do not accelerate or decelerate abruptly. Do not lean more than 5° or accelerate/decelerate faster than 2.5 mph/s (4 km/h/s).
Avoid contacting obstacles with the tire/wheel.
When traversing small bumps or uneven terrain, maintain a moderate speed 2-6 mph (3-10 km/h) and keep your knees bent. Do not go too slow or too fast; otherwise you may lose control and fall.
Avoid slopes steeper than 15° or you may lose traction.
>15°
WarningYou must read and understand the Warnings and Safe Riding instructions in this manual before attempting to ride the miniPRO.
0
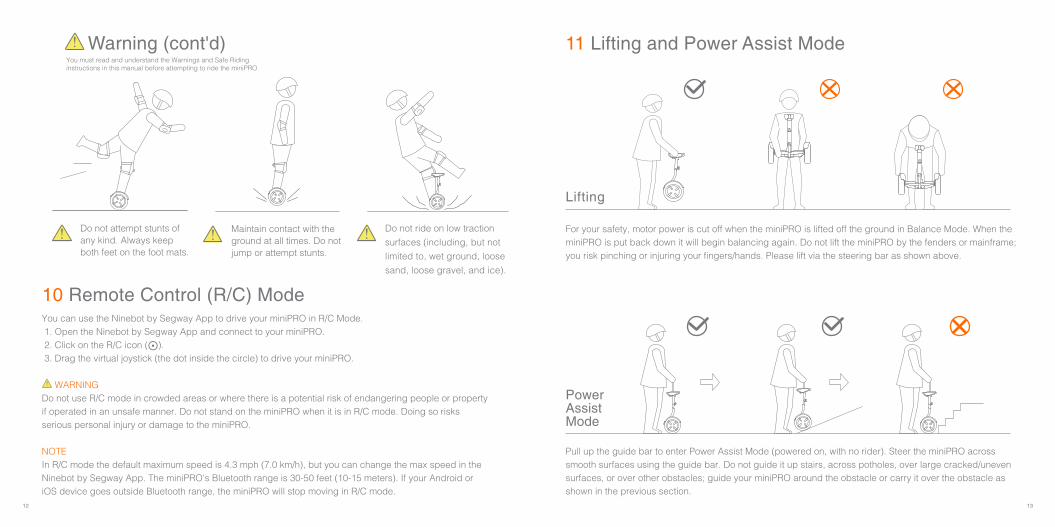
Warning (cont'd)
12 13
For your safety, motor power is cut off when the miniPRO is lifted off the ground in Balance Mode. When the miniPRO is put back down it will begin balancing again. Do not lift the miniPRO by the fenders or mainframe; you risk pinching or injuring your fingers/hands. Please lift via the steering bar as shown above.
11 Lifting and Power Assist Mode
Lifting
Pull up the guide bar to enter Power Assist Mode (powered on, with no rider). Steer the miniPRO across smooth surfaces using the guide bar. Do not guide it up stairs, across potholes, over large cracked/uneven surfaces, or over other obstacles; guide your miniPRO around the obstacle or carry it over the obstacle as shown in the previous section.
Power Assist Mode
Do not ride on low traction
surfaces (including, but not
limited to, wet ground, loose
sand, loose gravel, and ice).
Do not attempt stunts ofany kind. Always keepboth feet on the foot mats.
Maintain contact with theground at all times. Do notjump or attempt stunts.
You must read and understand the Warnings and Safe Riding instructions in this manual before attempting to ride the miniPRO.
10 Remote Control (R/C) ModeYou can use the Ninebot by Segway App to drive your miniPRO in R/C Mode. 1. Open the Ninebot by Segway App and connect to your miniPRO. 2. Click on the R/C icon ( ). 3. Drag the virtual joystick (the dot inside the circle) to drive your miniPRO.
WARNINGDo not use R/C mode in crowded areas or where there is a potential risk of endangering people or property if operated in an unsafe manner. Do not stand on the miniPRO when it is in R/C mode. Doing so risks serious personal injury or damage to the miniPRO.
NOTEIn R/C mode the default maximum speed is 4.3 mph (7.0 km/h), but you can change the max speed in the Ninebot by Segway App. The miniPRO's Bluetooth range is 30-50 feet (10-15 meters). If your Android or iOS device goes outside Bluetooth range, the miniPRO will stop moving in R/C mode.
Do not store or charge the battery at temperatures outside the stated limits (see Specifications). Do not discard or destroy the battery. For more battery information, refer to the sticker on the battery itself, located on the bottom of the miniPRO. Refer to your local laws and regulations regarding battery recycling and/or disposal.
A well maintained battery can perform well even after many miles of riding. Charge the battery after each ride and avoid draining the battery completely. When used at room temperature (70°F [22°C]) the battery range and performance is at its best; whereas using it at temperatures below 32°F (0°C) can decrease range and performance. Typically, at -4°F (-20°C) range can be half that of the same battery at 70°F (22°C). Battery range will recover when temperature rises. More details are available in the App.
NOTETypically, a fully charged battery should retain charge for 120-180 days in Standby Mode. A low-power battery should retain charge for 30-60 days in Standby Mode. Remember to charge the battery after each use. Completely draining the battery may cause permanent damage to the battery. Electronics inside the battery record the charge-discharge condition of the battery; damage caused by over-discharge or under-discharge will not be covered by the Limited Warranty.
WARNINGRisk of fire. No user serviceable parts. Do not attempt to disassemble the battery.
WARNINGWe strongly recommend against riding when the ambient temperature is below 23°F (-5°C) because low temperature will limit the maximum power/torque. Doing so could cause personal injury or property damage due to slips or falls.
Use a soft, wet cloth to wipe the mainframe clean. Hard to remove dirt can be scrubbed with a toothbrush and toothpaste, then cleaned with a soft, wet cloth. Scratches on plastic parts can be polished with extra fine grit abrasive paper.
NOTE Do not wash your miniPRO with alcohol, gasoline, acetone, or other corrosive/volatile solvents. These substances may damage the appearance and internal structure of your miniPRO. Do not wash your miniPRO with a power washer or high pressure hose.
WARNING Make sure the miniPRO is powered OFF, the charging cable is unplugged, and the rubber cap on the charge port is tightly sealed before cleaning; otherwise you may expose yourself to electric shock or damage the electronic components.
Store your miniPRO in a cool, dry place. Do not store it outdoors for extended periods of time. Exposure to sunlight and temperature extremes (both hot and cold) will accelerate the aging process of the plastic components and may reduce battery life.
Tire Pressure Inflate tires to 45–50 psi. Inflate both tires equally.
14 15
12 MaintenanceCleaning and Storing Your miniPRO Battery Pack Maintenance
Ninebot™ and the shape icon are trademarks of Ninebot Inc.; Segway® is the registered trademark of Segway Inc.; Ninebot by Segway™ is a trademark of Segway Inc.; iPhone and iOS, that of Apple Inc.; Android, that of Google Inc. The respective owners reserve the rights of their trademarks referred to in this manual.
Ninebot is the owner or licensee of various patents relating to Ninebot personal transportation robots, with other patents pending. This manual is prepared by Ninebot who reserves all its copyrights. No institute or individual shall copy or disseminate this manual in whole or in part, or make use of the aforesaid patents without the consent of Ninebot in writing.
The miniPRO is covered by U.S. and foreign patents. For patent information go to http://www.segway.com. Ninebot (Tianjin) Technology Co. Ltd. manufactures and sells the miniPRO under a license from DEKA Products Limited Partnership.
We have attempted to include descriptions and instructions for all the functions of the miniPRO at the time ofprinting. However, your miniPRO may differ slightly from the one shown in this document. Visit the Apple App Store (iOS) or the Google Play Store (Android) to download and install the Ninebot by Segway App.
Please note that there are multiple Ninebot by Segway models with different functions, and some of the functions mentioned herein may not be applicable to your unit. The manufacturer reserves the right to change the design and functionality of the miniPRO product and documentation without prior notice.
All rights reserved. Copyright Segway 2016.
14 Trademark and Legal Statement
16 17
13 Specifications
[1] Mainframe height: distance from the ground to the highest part of the mainframe.[2] Typical Range: tested while riding under full power, 154 lbs (70 kg) load, 77°F (25°C), 9.3 mph (15 km/h) average speed on pavement. [3] Continuous Discharge Power: tested while under full power at 77°F (25°C). The value changes with temperature and remaining battery capacity. For example, the continuous discharge power drops to ~80% of the maximum value at 10% remaining battery capacity, and the continuous discharge power drops to ~70% of the maximum value at 32°F (0°C).NOTE: The tilde symbol (~) indicates that the following number is an approximation.
Charger
120 W
Input Voltage
Output Voltage
Output Current
Nominal Power
Charge Time
100–240 VAC @ 50/60 Hz
59.5 VDC
2 A
4 hours
Jin Xin Yu Power (Shenzhen) Supply Co., Ltd.
Supplier
Manufacturer
Ninebot (Tianjin) Tech Co., Ltd.
XVE-5950200Model Number HT-A10-120W-59.5V
Chingmi (Beijing) Technology Co., Ltd.
120 W
100–240 VAC @ 50/60 Hz
59.5 VDC2 A
4 hours
Chingmi (Beijing) Technology Co., Ltd.
Compliance CCC / FCC / UL FCC / UL
Charging Temp. 32–77°F (0–25°C) 32–104°F (0–40°C)
Index Items
Dimensions
Weight
Machine Parameters
Battery
Motors
85–185 lbs (40–85 kg)
Length × Width
Mainframe Height1
Payload
Net
Rider Requirements
Applicable Age
Applicable Height
Max. Speed
Typical Range2
Max. Climbing Angle
Beginner Mode
Operation Temp.Storage Temp. IP Rating
Applicable Terrain
Max. Charging Voltage
Nominal Capacity
Smart BMS
Nominal Voltage
Nominal Power
Max. Power
N3M320 Parameters10.3 × 21.5 in (262 × 546 mm)
20–34 in (611–866 mm)
~ 28 lbs (12.8 kg)
13.8 mi (25 km)
~ 15°
54.3 VDC
14–104°F (-10–40°C)-4–122°F (-20–50°C)
59.5 VDC
310 Wh
400×2 W
Overvoltage / Undervoltage / Short Circuit / Overheating Protection, Auto-Sleep / Wake-up / Detailed battery information can be checked with the Ninebot App
16–60 yrs
4'3"–6'6" (130–200 cm)
Can be disabled or enabled via App after 0.6 mi (1 km) of riding.
IP54
Pavement, packed dirt, slopes <15°, obstacles < 0.4 in (1 cm), gaps < 1.2 in (3 cm)
~ 10 mph (16 km/h)
Continuous Discharge Power3 1000 W Max
800×2 W
Charging Temp. 32–104°F (0–40°C)
18 19
Contact us if you experience issues relating to riding, maintenance and safety, or errors/faults with your miniPRO.
www.segway.com
16 ContactSafety — Cells and battery pack have passed UN/DOT38.3 test and certification — 2014/35/EU: EN 60950-1:2006/A2:2013 — UL 60950-1, Ed. 2 (2007) + AM1 + AM2 — UL 1642 — UL 2272
EMC — FCC part 15 subpart c — FCC part 15.247 — 2014/30/EU: EN 61000-6-1:2007, EN 61000-6-3:2007/A1:2011 — 1995/5/EC: ETSI EN 300 328 V1.8.1 (2012-06); ETSI EN 301 489-1 V1.9.2 (2011-09); ETSI EN 301 489-17 V2.2.1 (2012-09) — SAR: EN 62479:2010
Other — REACH: 2012/19/EU — EN 60034-1:2010/AC:2010
This device complies with part 15 of the FCC Rules. Operation is subject to the following two conditions: (1) This device may not cause harmful interference, and (2) this device must accept any interference received, including interference that may cause undesired operation.
Note: This equipment has been tested and found to comply with the limits for a Class B digital device, pursuant to part 15 of the FCC Rules. These limits are designed to provide reasonable protection against harmful interference in a residential installation. This equipment generates, uses and can radiate radio frequency energy and, if not installed and used in accordance with the instructions, may cause harmful interference to radio communications. However, there is no guarantee that interference will not occur in a particular installation. If this equipment does cause harmful interference to radio or television reception, which can be determined by turning the equipment off and on, the user is encouraged to try to correct the interference by one or more of the following measures: — Reorient or relocate the receiving antenna. — Increase the separation between the equipment and receiver. — Connect the equipment into an outlet on a circuit different from that to which the receiver is connected. — Consult the dealer or an experienced radio/TV technician for help.
CAN ICES-3 (B)/NMB-3(B)Ninebot is not responsible for any changes or modifications not expressly approved by Ninebot. Such modifications could void the user's authority to operate the equipment.
FCC ID: 2AF2B-NBIC: 20915-NB01
Model Number: N3M320
Segw ay Inc.14 Technology Drive, Bedford, NH 03110Te l : 1-603-222-6000Fax: 1-603-222-6001Toll Free: 1-866-473-4929E-mail Sales: [email protected] Service: [email protected]: www.segway.com
15 Certifications
Have your miniPRO's serial number on hand when contacting Segway.
You can find your serial number at the top of the steering bar between the knee pads or in the App under More Settings –> Basic Information.

www.segway.com
The manufacturer reserves the right to make changes to the miniPRO, release firmware updates, and update this manual at
any time. Visit www.segway.com to download the latest user materials and watch the safety video. You must install the
Ninebot by Segway App to follow the New Rider Tutorial, activate your miniPRO, and obtain the latest updates and safety
instructions.
USER MANUAL
25018-00001 ac
Go to www.segway.com to watch the safety video.
Rendez-vous sur www.segway.com pour télécharger le manuel d’utilisation.Vaya a www.segway.com para descargar el manual del usuario.
Visite www.segway.com para baixar o manual do usuário.
第 张
比 例
共 张
重 量
校 对
审 核
图样标记
1:1
物料编码1
技术说明
1、材料(楞形\克重配比):105g哑粉纸2、工艺:订和3、印刷颜色:Pantone Cool Gray 9C Pantone1505C4、其他特殊说明:
公 差
(无特殊说明下)
常规 ±x.xmm
Rx.xmm
±0.1°
80°-0°+5°开槽
角度
圆角半径
(无特殊说明下)
名 称 Mini segway -使用说明(英语版)
数 量内/外模切方向
图纸方向
外尺寸(mm)
印刷面
140×140
设 计
绘 图
1 Packing List
5 Assembling Your miniPro
4 Dashboard Icons
Contents
01
02
04
05
06
07
08
08
10
1 2
7 Charging
10 Remote Control (R/C) Mode
8 Learning to Ride
9 Warning
3 Diagram
2 Riding Safety
6 First Ride
12 Maintenance
14 Trademark and Legal Statement
13 Specifications
1 3
16
14
17
18
19
15 Certifications
11 Lifting and Power Assist Mode
16 Contact
NOTE
You must first download the Ninebot by Segway App on your mobile device. The App will lead you through
the New Rider Tutorial. For your safety, the miniPRO will limit the max speed to 4.3 mph (7 km/h) until you
have completed the New Rider Tutorial. After completing the New Rider Tutorial, the max speed will be
limited to 6.2 mph (10 km/h) during the first 0.6 miles (1 km), after which you will be allowed to disable the
speed limiter via the App and reach a max speed of 10 mph (16 km/h).
01
1 Packing List
Mainframe
Steering Bar
Valve Stem Extension
Charger, Power Cord
User Materials
Accessories Box
Accessories in the Box
LIMITED WARRANTY
QUICK START
Thanks for choosing the miniPRO!
Thanks for choosing the Ninebot by Segway miniPRO (hereinafter referred to as miniPRO)!
Your miniPRO is a revolutionary electric balancing vehicle featuring a mobile device application.
Enjoy your ride!
Front Back
WARNINGAlways step on/off from the back of the miniPRO.
Otherwise you risk falls and/or collisions because the steering direction is reversed.
When unpacking your miniPRO, please verify that the above items are included in the package. If you are missing any components, please contact your dealer/distributor or email [email protected]. After verifying that all components are present and in good condition, you can assemble your new miniPRO.
Please retain the box and packaging materials in case you need to ship your miniPRO in the future.
Remember to power off your miniPRO and unplug the charge cable before assembling, mounting accessories, or cleaning the mainframe.
USER MANUAL
9. Be alert! Scan both far ahead and in front of your miniPRO — your eyes are your best tool for safely
avoiding obstacles and low traction surfaces (including, but not limited to, wet ground, loose sand,
loose gravel, and ice).
10. To reduce risk of injury, you must read and follow all “CAUTION” and “WARNING” notices in this
document. Do not ride at an unsafe speed. Under no circumstance should you ride on roads with motor
vehicles. Always follow these safety instructions:
A. The following people should not ride the miniPRO:
i. Anyone under 16 years old or above 60 years old. Riders between 16-18 years old should ride
under adult supervision.
ii. Anyone under the influence of alcohol or drugs.
iii. Anyone who suffers from disease that puts them at risk if they engage in strenuous physical
activity.
iv. Anyone who has problems with balance or with motor skills that would interfere with their ability
to maintain balance.
v. Anyone whose height or weight is outside the stated limits (see Specifications).
B. Comply with local laws and regulations when riding this product. Do not ride where prohibited by
local laws.
C. To ride safely, you must be able to clearly see what is in front of you and you must be clearly
visible to others.
D. Do not ride in the snow, in the rain, or on roads which are wet, muddy, icy, or that are slippery for
any reason. Do not ride over obstacles (sand, loose gravel, or sticks). Doing so could result in a
loss of balance or traction and could cause a fall.
E. Do not accelerate or decelerate suddenly. Do not accelerate when the miniPRO tilts back or
sounds an alarm. Do not attempt to override the speed limiter.
11. Do not insert the power cord if the charge port is wet.
12. Use a surge protector when charging to help protect your miniPRO from damage due to power surges
and voltage spikes. Only use the Ninebot by Segway supplied charger. Do not use a charger from any
other product.
13. Use only Ninebot by Segway approved parts and accessories. Do not modify your miniPRO.
Modifications to your miniPRO could interfere with the operation of the miniPRO, could result in serious
injury and/or damage, and could void the Limited Warranty.
14. Do not sit on the steering bar. Doing so could result in serious injury and/or damage to your miniPRO.02 03
1. The miniPRO is a recreational product, which is different from motor vehicles driven on the road.
Before mastering riding skills, you need to practice. Neither Ninebot Inc. nor Segway Inc. is
responsible for any injuries or damage caused by a rider's inexperience or failure to follow the
instructions in this document.
2. Please understand that you can reduce the risk by following all the instructions and warnings in this
manual, but you cannot eliminate all the risks. Remember that whenever you ride the miniPRO you
risk injury or death from loss of control, collisions, and falls. When entering into public spaces always
comply with the local laws and regulations. As with other vehicles, faster speeds require longer
braking distance. Sudden braking on smooth surfaces could lead to wheel slip, loss of balance, or
falls. Be cautious and always keep a safe distance between you and other people or vehicles when
riding. Be alert and slow down when entering unfamiliar areas.
3. Respect pedestrians by always yielding the right of way. Pass on the left whenever possible. When
approaching a pedestrian from the front, stay to the right and slow down. Avoid startling pedestrians.
When approaching from behind, announce yourself and slow down to walking speed when passing.
4. In places without laws and regulations governing self-balancing electric vehicles, comply with the
safety guidelines outlined in this manual. Neither Ninebot Inc. nor Segway Inc. is responsible for any
property damage, personal injury/death, accidents, or legal disputes caused by violations of the
safety instructions.
5. Do not allow anyone to ride the miniPRO on his/her own unless they have carefully read this manual,
watched the safety video, and followed the New Rider Tutorial on the Ninebot by Segway App. The
safety of new riders is your responsibility. Spot new riders until they are comfortable with the basic
operation of the miniPRO. Make sure each new rider wears a helmet and other protective gear.
6. Before each ride check for loose fasteners, damaged components, and low tire pressure. If the
miniPRO makes abnormal sounds or signals an alarm, immediately stop riding. Diagnose your
miniPRO via the Ninebot by Segway App and call your dealer/distributor for service.
7. Always wear a helmet when riding. Use an approved bicycle or skateboard helmet that fits properly
with the chin strap in place, and provides protection for the back of your head.
8. Do not attempt your first ride in any area where you might encounter children, pedestrians, pets,
vehicles, bicycles, or other obstacles and potential hazards.
2 Riding Safety
04 05
Knee Pads
When Bluetooth is enabled but not connected to a smart phone, this icon will blink.When the Ninebot by Segway App is connected to the miniPRO, this icon will glow steadily.
Bluetooth
Enable and adjust Speed Limit Mode via the App. When the icon is illuminated the miniPROis limited to 4.3 mph (7 km/h). This speed limit can be adjusted in the App. As you approach the speed limit, the miniPRO tilts back.
Speed Limit
Lock
Power Button
Turn ON/OFF. The miniPRO will automatically power OFF when idle for 10 minutes, or when laid down (horizontal) for over 30 seconds.
Power Level
Enable Lock Mode via the App. The miniPRO will vibrate, flash its lights, and sound an alarm if anyone moves it. The App will also alarm. The miniPRO will not balance in Lock Mode.
Indicates the remaining battery life. When the battery is nearly empty this icon blinks and the miniPRO beeps, indicating that you need to charge your miniPRO. When less than 30%, your miniPRO will gradually reduce the max speed limit. Use the App to read the remaining power and estimated remaining range.
Power Button
Lock
Bluetooth
Speed Limit
Power Level
4 Dashboard Icons
Height Adjustment Knob
Charge Port
Headlight
Valve Stem
Dashboard
Kensington Lock
Guide Bar
Steering Bar
Fender
Rim Blade (Detachable)
3 Diagram
Wheel
Steering BarTool-Free Release
Foot Mat
Rear Lights
06 07
Check the Power ON/OFF status after assembly. For your safety, your miniPRO is not activated at this time and will beep occasionally after Power ON.Until activated, the miniPRO maintains a very low riding speed and steering sensitivity, and should not be ridden. Install the Ninebot by Segway App on your mobile device (with Bluetooth 4.0 or above), connect to the miniPRO with Bluetooth, and follow the App instructions to activate your miniPRO and follow the training procedures.
6 First Ride5 Assembling Your miniPRO
Scan to download the App (iOS 5 or above, Android 4.3 or above)
Use your mobile device (Android or iOS) to install the Ninebot by Segway App, read the Safety Instructions, then follow the New Rider Tutorial before your first ride. Go to the Apple App Store (iOS) or the Google Play Store (Android) and search for "Ninebot" to download and install the App.
1 Install App and register/login. Power ON the miniPRO. The Bluetooth icon blinking indicates the miniPRO is waiting for a connection.
2
3
1 2 3
Click “Search device” to connect to your miniPRO. The miniPRO will beep when the connection is successful. The Bluetooth icon will stop blinking and remain illuminated.
Follow the App instructions to learn how to ride safely. Have fun!
There are safety risks when learning to ride the miniPRO. You must read the Safety Instructions and follow the New Rider Tutorial in the Ninebot by Segway App before your first ride. Go to www.segway.com to watch the safety video.
Open the tool-free release as shown.
Insert the steering bar into the mainframe steering socket.
Close the tool-freerelease to secure.
Rotate height adjustmentknob counter-clockwise.
Lift the knee pads to desired height.Rotate height adjustment knob clockwise to tighten.
Lift the guide bar to help steer the miniPRO without a rider when powered on. Do not use to lift or carry the miniPRO.
Adjust the knee pad height
Install the steering bar
Android
iOSWhen your miniPRO intermittently sounds an alarm, stop riding and check the App for details.
Go to a large open area and ask a friend to assist you on your first ride.
WARNING Always step on from the back of the miniPRO.
1
08 09
8 Learning to RideAfter activation, the App will lead you through the New Rider Tutorial. Please follow the instructions in the App and in this manual.
NOTEYou must first download the Ninebot by Segway App on your mobile device. The App will lead you through the New Rider Tutorial.
For your safety, the miniPRO will limit the max speed to 4.3 mph (7 km/h) until you complete the New Rider Tutorial. For the first 0.6 miles (1 km) after completing the New Rider Tutorial, the max speed will be limited to 6.2 mph (10 km/h), after which you can disable the speed limiter via the App and reach a maximum speed of 10 mph (16 km/h).
≥4m
≥4m
Slowly transfer your weight onto the miniPRO. The unit will beep, indicating it is now in balance mode. Slowly step on with your other foot.
Place one foot on the foot mat, with your other foot still on the ground holding your weight. Do not press the steering bar with your leg.
2
4 Gently lean your body forward and backward to control your movement.
Stand with your weight evenly distributed on both feet and relax, looking straight ahead.
5 To turn, gently lean left or right against the steering bar.
6
Wear an approved helmet and other protective gear to minimize any possible injury.
3
7 Charging
Chargeport
Lift up the cover
Open the rubber cap
Insert the pluginto the socket
Do not connect the charger if the charge port or charge cable is wet.
Your miniPRO is fully charged when the LED on the charger changes from red (charging) to green (trickle charge).
WARNINGRider must weigh 85–185 lbs (40–85 kg) and must be 4'3"–6'6" (130–200 cm) tall.
10 11
Do not rock back andforth or shift your weight abruptly.
Do not ride throughpuddles or other bodies of water.Do not get wet.
Do not ride on public roads,motorways, highways, or streets.
The miniPRO is for one rider only.Do not ride double or carry any passengers. Do not carry a child.
Do not ride over holes, curbs, steps, or other obstacles.
Do not accelerate when the miniPRO tilts back or sounds an alarm. Do not attempt to override the speed limiter.
Watch your head when passing through doorways.
Do not accelerate or decelerate abruptly. Do not lean more than 5° or accelerate/decelerate faster than 2.5 mph/s (4 km/h/s).
Avoid contacting obstacles with the tire/wheel.
When traversing small bumps or uneven terrain, maintain a moderate speed 2-6 mph (3-10 km/h) and keep your knees bent. Do not go too slow or too fast; otherwise you may lose control and fall.
Avoid slopes steeper than 15° or you may lose traction.
>15°
WarningYou must read and understand the Warnings and Safe Riding instructions in this manual before attempting to ride the miniPRO.
0
Warning (cont'd)
12 13
For your safety, motor power is cut off when the miniPRO is lifted off the ground in Balance Mode. When the miniPRO is put back down it will begin balancing again. Do not lift the miniPRO by the fenders or mainframe; you risk pinching or injuring your fingers/hands. Please lift via the steering bar as shown above.
11 Lifting and Power Assist Mode
Lifting
Pull up the guide bar to enter Power Assist Mode (powered on, with no rider). Steer the miniPRO across smooth surfaces using the guide bar. Do not guide it up stairs, across potholes, over large cracked/uneven surfaces, or over other obstacles; guide your miniPRO around the obstacle or carry it over the obstacle as shown in the previous section.
Power Assist Mode
Do not ride on low traction
surfaces (including, but not
limited to, wet ground, loose
sand, loose gravel, and ice).
Do not attempt stunts ofany kind. Always keepboth feet on the foot mats.
Maintain contact with theground at all times. Do notjump or attempt stunts.
You must read and understand the Warnings and Safe Riding instructions in this manual before attempting to ride the miniPRO.
10 Remote Control (R/C) ModeYou can use the Ninebot by Segway App to drive your miniPRO in R/C Mode. 1. Open the Ninebot by Segway App and connect to your miniPRO. 2. Click on the R/C icon ( ). 3. Drag the virtual joystick (the dot inside the circle) to drive your miniPRO.
WARNINGDo not use R/C mode in crowded areas or where there is a potential risk of endangering people or property if operated in an unsafe manner. Do not stand on the miniPRO when it is in R/C mode. Doing so risks serious personal injury or damage to the miniPRO.
NOTEIn R/C mode the default maximum speed is 4.3 mph (7.0 km/h), but you can change the max speed in the Ninebot by Segway App. The miniPRO's Bluetooth range is 30-50 feet (10-15 meters). If your Android or iOS device goes outside Bluetooth range, the miniPRO will stop moving in R/C mode.
Do not store or charge the battery at temperatures outside the stated limits (see Specifications). Do not discard or destroy the battery. For more battery information, refer to the sticker on the battery itself, located on the bottom of the miniPRO. Refer to your local laws and regulations regarding battery recycling and/or disposal.
A well maintained battery can perform well even after many miles of riding. Charge the battery after each ride and avoid draining the battery completely. When used at room temperature (70°F [22°C]) the battery range and performance is at its best; whereas using it at temperatures below 32°F (0°C) can decrease range and performance. Typically, at -4°F (-20°C) range can be half that of the same battery at 70°F (22°C). Battery range will recover when temperature rises. More details are available in the App.
NOTETypically, a fully charged battery should retain charge for 120-180 days in Standby Mode. A low-power battery should retain charge for 30-60 days in Standby Mode. Remember to charge the battery after each use. Completely draining the battery may cause permanent damage to the battery. Electronics inside the battery record the charge-discharge condition of the battery; damage caused by over-discharge or under-discharge will not be covered by the Limited Warranty.
WARNINGRisk of fire. No user serviceable parts. Do not attempt to disassemble the battery.
WARNINGWe strongly recommend against riding when the ambient temperature is below 23°F (-5°C) because low temperature will limit the maximum power/torque. Doing so could cause personal injury or property damage due to slips or falls.
Use a soft, wet cloth to wipe the mainframe clean. Hard to remove dirt can be scrubbed with a toothbrush and toothpaste, then cleaned with a soft, wet cloth. Scratches on plastic parts can be polished with extra fine grit abrasive paper.
NOTE Do not wash your miniPRO with alcohol, gasoline, acetone, or other corrosive/volatile solvents. These substances may damage the appearance and internal structure of your miniPRO. Do not wash your miniPRO with a power washer or high pressure hose.
WARNING Make sure the miniPRO is powered OFF, the charging cable is unplugged, and the rubber cap on the charge port is tightly sealed before cleaning; otherwise you may expose yourself to electric shock or damage the electronic components.
Store your miniPRO in a cool, dry place. Do not store it outdoors for extended periods of time. Exposure to sunlight and temperature extremes (both hot and cold) will accelerate the aging process of the plastic components and may reduce battery life.
Tire Pressure Inflate tires to 45–50 psi. Inflate both tires equally.
14 15
12 MaintenanceCleaning and Storing Your miniPRO Battery Pack Maintenance
Ninebot™ and the shape icon are trademarks of Ninebot Inc.; Segway® is the registered trademark of Segway Inc.; Ninebot by Segway™ is a trademark of Segway Inc.; iPhone and iOS, that of Apple Inc.; Android, that of Google Inc. The respective owners reserve the rights of their trademarks referred to in this manual.
Ninebot is the owner or licensee of various patents relating to Ninebot personal transportation robots, with other patents pending. This manual is prepared by Ninebot who reserves all its copyrights. No institute or individual shall copy or disseminate this manual in whole or in part, or make use of the aforesaid patents without the consent of Ninebot in writing.
The miniPRO is covered by U.S. and foreign patents. For patent information go to http://www.segway.com. Ninebot (Tianjin) Technology Co. Ltd. manufactures and sells the miniPRO under a license from DEKA Products Limited Partnership.
We have attempted to include descriptions and instructions for all the functions of the miniPRO at the time ofprinting. However, your miniPRO may differ slightly from the one shown in this document. Visit the Apple App Store (iOS) or the Google Play Store (Android) to download and install the Ninebot by Segway App.
Please note that there are multiple Ninebot by Segway models with different functions, and some of the functions mentioned herein may not be applicable to your unit. The manufacturer reserves the right to change the design and functionality of the miniPRO product and documentation without prior notice.
All rights reserved. Copyright Segway 2016.
14 Trademark and Legal Statement
16 17
13 Specifications
[1] Mainframe height: distance from the ground to the highest part of the mainframe.[2] Typical Range: tested while riding under full power, 154 lbs (70 kg) load, 77°F (25°C), 9.3 mph (15 km/h) average speed on pavement. [3] Continuous Discharge Power: tested while under full power at 77°F (25°C). The value changes with temperature and remaining battery capacity. For example, the continuous discharge power drops to ~80% of the maximum value at 10% remaining battery capacity, and the continuous discharge power drops to ~70% of the maximum value at 32°F (0°C).NOTE: The tilde symbol (~) indicates that the following number is an approximation.
Charger
120 W
Input Voltage
Output Voltage
Output Current
Nominal Power
Charge Time
100–240 VAC @ 50/60 Hz
59.5 VDC
2 A
4 hours
Jin Xin Yu Power (Shenzhen) Supply Co., Ltd.
Supplier
Manufacturer
Ninebot (Tianjin) Tech Co., Ltd.
XVE-5950200Model Number HT-A10-120W-59.5V
Chingmi (Beijing) Technology Co., Ltd.
120 W
100–240 VAC @ 50/60 Hz
59.5 VDC2 A
4 hours
Chingmi (Beijing) Technology Co., Ltd.
Compliance CCC / FCC / UL FCC / UL
Charging Temp. 32–77°F (0–25°C) 32–104°F (0–40°C)
Index Items
Dimensions
Weight
Machine Parameters
Battery
Motors
85–185 lbs (40–85 kg)
Length × Width
Mainframe Height1
Payload
Net
Rider Requirements
Applicable Age
Applicable Height
Max. Speed
Typical Range2
Max. Climbing Angle
Beginner Mode
Operation Temp.Storage Temp. IP Rating
Applicable Terrain
Max. Charging Voltage
Nominal Capacity
Smart BMS
Nominal Voltage
Nominal Power
Max. Power
N3M320 Parameters10.3 × 21.5 in (262 × 546 mm)
20–34 in (611–866 mm)
~ 28 lbs (12.8 kg)
13.8 mi (25 km)
~ 15°
54.3 VDC
14–104°F (-10–40°C)-4–122°F (-20–50°C)
59.5 VDC
310 Wh
400×2 W
Overvoltage / Undervoltage / Short Circuit / Overheating Protection, Auto-Sleep / Wake-up / Detailed battery information can be checked with the Ninebot App
16–60 yrs
4'3"–6'6" (130–200 cm)
Can be disabled or enabled via App after 0.6 mi (1 km) of riding.
IP54
Pavement, packed dirt, slopes <15°, obstacles < 0.4 in (1 cm), gaps < 1.2 in (3 cm)
~ 10 mph (16 km/h)
Continuous Discharge Power3 1000 W Max
800×2 W
Charging Temp. 32–104°F (0–40°C)
18 19
Contact us if you experience issues relating to riding, maintenance and safety, or errors/faults with your miniPRO.
www.segway.com
16 ContactSafety — Cells and battery pack have passed UN/DOT38.3 test and certification — 2014/35/EU: EN 60950-1:2006/A2:2013 — UL 60950-1, Ed. 2 (2007) + AM1 + AM2 — UL 1642 — UL 2272
EMC — FCC part 15 subpart c — FCC part 15.247 — 2014/30/EU: EN 61000-6-1:2007, EN 61000-6-3:2007/A1:2011 — 1995/5/EC: ETSI EN 300 328 V1.8.1 (2012-06); ETSI EN 301 489-1 V1.9.2 (2011-09); ETSI EN 301 489-17 V2.2.1 (2012-09) — SAR: EN 62479:2010
Other — REACH: 2012/19/EU — EN 60034-1:2010/AC:2010
This device complies with part 15 of the FCC Rules. Operation is subject to the following two conditions: (1) This device may not cause harmful interference, and (2) this device must accept any interference received, including interference that may cause undesired operation.
Note: This equipment has been tested and found to comply with the limits for a Class B digital device, pursuant to part 15 of the FCC Rules. These limits are designed to provide reasonable protection against harmful interference in a residential installation. This equipment generates, uses and can radiate radio frequency energy and, if not installed and used in accordance with the instructions, may cause harmful interference to radio communications. However, there is no guarantee that interference will not occur in a particular installation. If this equipment does cause harmful interference to radio or television reception, which can be determined by turning the equipment off and on, the user is encouraged to try to correct the interference by one or more of the following measures: — Reorient or relocate the receiving antenna. — Increase the separation between the equipment and receiver. — Connect the equipment into an outlet on a circuit different from that to which the receiver is connected. — Consult the dealer or an experienced radio/TV technician for help.
CAN ICES-3 (B)/NMB-3(B)Ninebot is not responsible for any changes or modifications not expressly approved by Ninebot. Such modifications could void the user's authority to operate the equipment.
FCC ID: 2AF2B-NBIC: 20915-NB01
Model Number: N3M320
Segw ay Inc.14 Technology Drive, Bedford, NH 03110Te l : 1-603-222-6000Fax: 1-603-222-6001Toll Free: 1-866-473-4929E-mail Sales: [email protected] Service: [email protected]: www.segway.com
15 Certifications
Have your miniPRO's serial number on hand when contacting Segway.
You can find your serial number at the top of the steering bar between the knee pads or in the App under More Settings –> Basic Information.
Related Documents