Q-PLM, 538379-LLP-1-2013-AT-LEONARDO-LMP User Manual for the Q-PLM software September 2015 This project has been funded with support from the European Commission. This publication [communication] reflects the views only of the author, and the Commission cannot be held responsible for any use which may be made of the information contained therein. This project is supported by the Austrian Ministry of Education and Women, as well as the European Commission.

Welcome message from author
This document is posted to help you gain knowledge. Please leave a comment to let me know what you think about it! Share it to your friends and learn new things together.
Transcript
Q-PLM, 538379-LLP-1-2013-AT-LEONARDO-LMP
User Manual
for
the Q-PLM software
September 2015
This project has been funded with support from the European Commission.
This publication [communication] reflects the views only of the author, and the Commission cannot be held responsible for any use which may be made of the information contained therein.
This project is supported by the Austrian Ministry of Education and Women, as well as the European Commission.
Q-PLM - 538379-LLP-1-2013-AT-LEONARDO-LMP 2
Table of Contents
1 PLM in VET as a chance ................................................................................................................... 3
2 Target groups of the Q-PLM software ............................................................................................. 4
3 Use and application of the Q-PLM software ................................................................................... 5
3.1 Login ....................................................................................................................................... 6
3.2 Product and Rating ............................................................................................................... 7
3.3 Reporting .............................................................................................................................. 12
3.4 Weightings ........................................................................................................................... 20
3.5 Edit Lists ............................................................................................................................... 23
3.6 Import .................................................................................................................................... 25
3.7 Settings................................................................................................................................. 26
3.8 Translation ........................................................................................................................... 27
3.9 User management .............................................................................................................. 28
3.10 Logout ................................................................................................................................... 29
Q-PLM - 538379-LLP-1-2013-AT-LEONARDO-LMP 3
1 PLM in VET as a chance
Active product lifecycle management, including the use of suitable PLM software, is a tool to
monitor and control the product portfolio of an educational institution. It can be recommended
not only for reasons of quality assurance, but also for the facilitation of product development,
for more transparency in the strategic business areas and, last but not least, for the
maintenance of the competitiveness of VET providers. Services and products on the
vocational education and training (VET) market are being influenced by a vast number of
factors and variables. VET products have a certain product lifecycle, as do all products on
the economic market – and PLM is a conceptual approach which takes into consideration the
entire lifetime of a product. A PLM software system enables VET providers to facilitate the
control of product life cycles and to manage the wide range of product data in an efficient
way. Optimally coordinated processes across multiple locations allow a quick response to
changes in market demand. Thus, the right product, at the right time, is brought to market at
the right price.
The project’s main objective was to, in an adapted form, transfer the product lifecycle
management that is primarily being used in the industrial and IT area to the field of further
education. Active PLM facilitates product control, planning, adaptation and innovation, thus
enabling a market-orientated approach of the portfolios in further education. This project
foresees the development of an IT-based tool for an integrated product lifecycle
management for VET providers.
Active product lifecycle management, including the use of suitable PLM software, is a useful
tool for monitoring and controlling the product portfolio of an educational institution. It can be
recommended not only for reasons of quality assurance, but also for the facilitation of the
product development, for more transparency in the strategic business areas and, last but not
least, for the maintenance of the competitiveness of VET providers.

Q-PLM - 538379-LLP-1-2013-AT-LEONARDO-LMP 4
2 Target groups of the Q-PLM software
The PLM-software should be used for the coordination of training programs in the VET
market and for the control of the processes and product portfolios of the training providers,
thus making it easier to monitor and better visualize the business processes and the VET
offers and products.
Within the Q-PLM project some hundred European target groups and stakeholders, who
should guarantee a sustainable use and exploitation of the project, could be identified within
an exploitation questionnaire. The main target groups and stakeholders proposed by the
partnership for the exploitative use of the project are the following ones:
European networks for the quality assurance in VET, like the EQARF (The European Quality Assurance Reference Framework)
European VET- providers at all levels (professional schools, vocational education providers, universities of applied sciences, universities, postgraduate universities,…)
VET providers at all geographic levels: local, regional, national, European
European project managers
VET providers participating in European projects
National Agencies
National boards of education and training
Management staff in VET organizations
Head of departments in VET organizations
Head of training centres, schools, universities
Product developers for VET programs
Competence centres in VET
Marketing managers in the VET sector
Members of the national feedback panels
Members and stakeholders of the partner organizations
Staff in the partner organizations
Academics and researchers
Trainers and teachers
Associations, associated partners of all partner organizations
Professional associations
Public authorities
Research centres
Social partners and unions
Governmental and non-governmental organizations
Q-PLM - 538379-LLP-1-2013-AT-LEONARDO-LMP 5
3 Use and application of the Q-PLM software
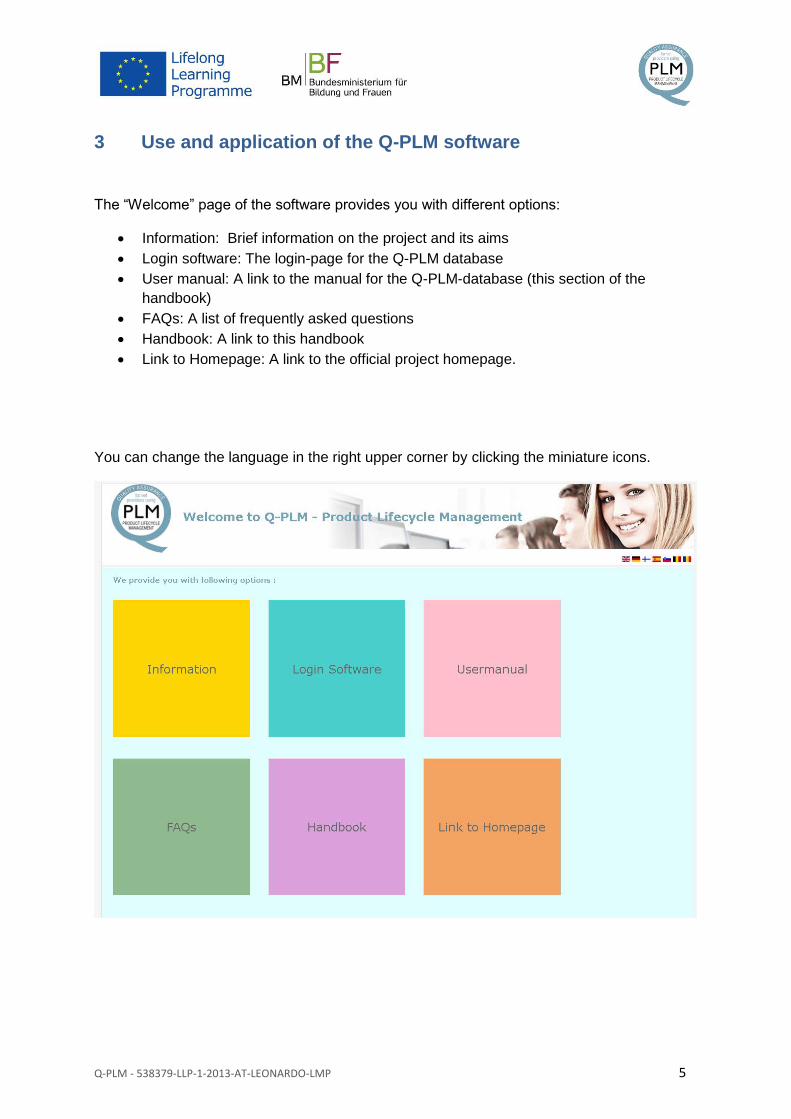
The “Welcome” page of the software provides you with different options:
Information: Brief information on the project and its aims
Login software: The login-page for the Q-PLM database
User manual: A link to the manual for the Q-PLM-database (this section of the
handbook)
FAQs: A list of frequently asked questions
Handbook: A link to this handbook
Link to Homepage: A link to the official project homepage.
You can change the language in the right upper corner by clicking the miniature icons.
Q-PLM - 538379-LLP-1-2013-AT-LEONARDO-LMP 6
3.1 Login
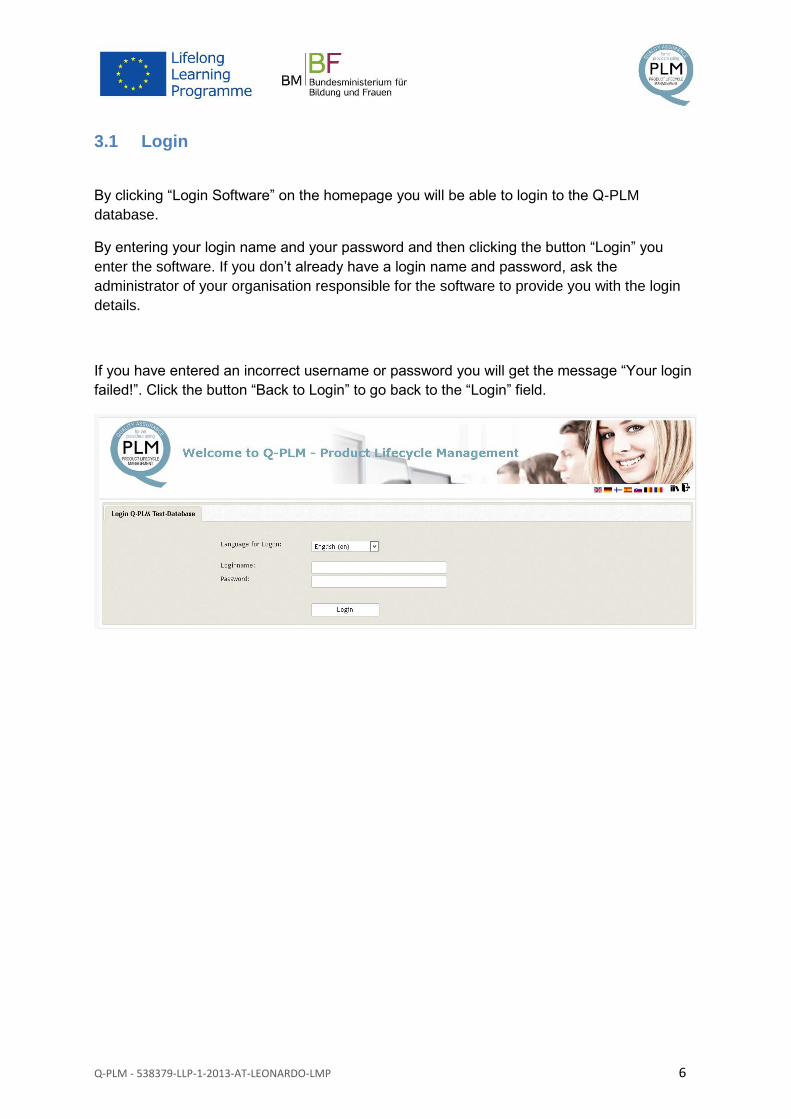
By clicking “Login Software” on the homepage you will be able to login to the Q-PLM
database.
By entering your login name and your password and then clicking the button “Login” you
enter the software. If you don’t already have a login name and password, ask the
administrator of your organisation responsible for the software to provide you with the login
details.
If you have entered an incorrect username or password you will get the message “Your login
failed!”. Click the button “Back to Login” to go back to the “Login” field.
Q-PLM - 538379-LLP-1-2013-AT-LEONARDO-LMP 7
3.2 Product and Rating
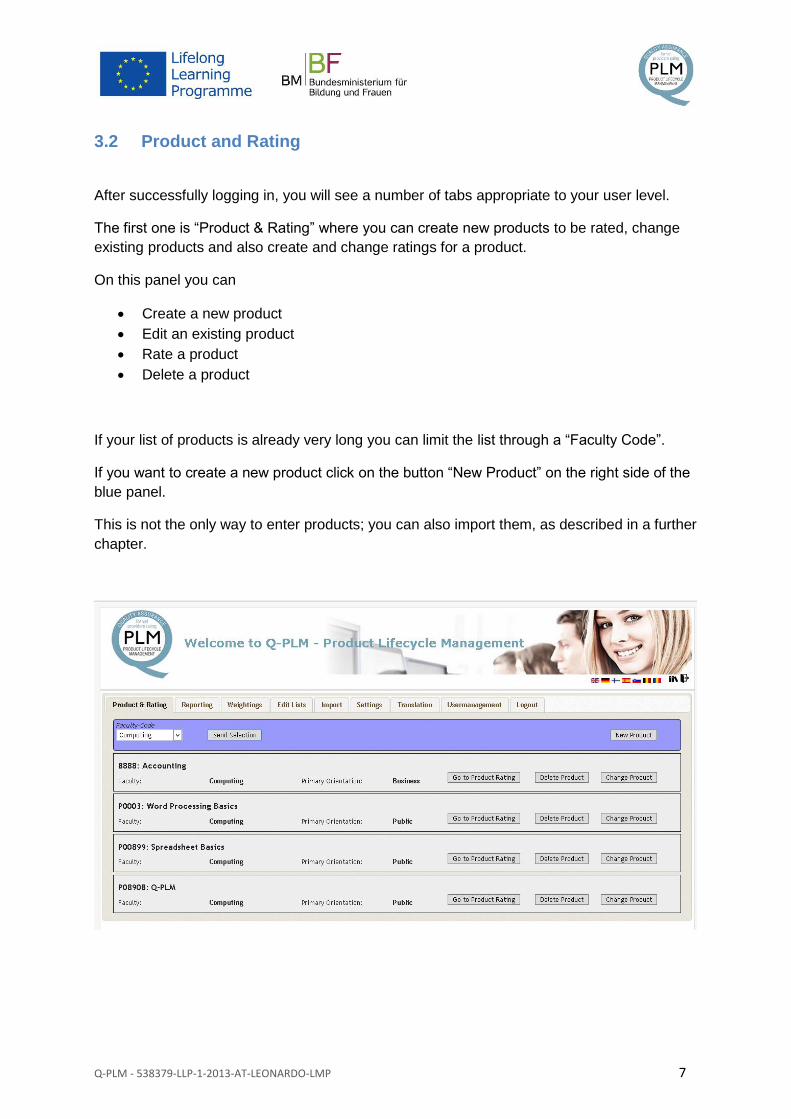
After successfully logging in, you will see a number of tabs appropriate to your user level.
The first one is “Product & Rating” where you can create new products to be rated, change
existing products and also create and change ratings for a product.
On this panel you can
Create a new product
Edit an existing product
Rate a product
Delete a product
If your list of products is already very long you can limit the list through a “Faculty Code”.
If you want to create a new product click on the button “New Product” on the right side of the
blue panel.
This is not the only way to enter products; you can also import them, as described in a further
chapter.
Q-PLM - 538379-LLP-1-2013-AT-LEONARDO-LMP 8
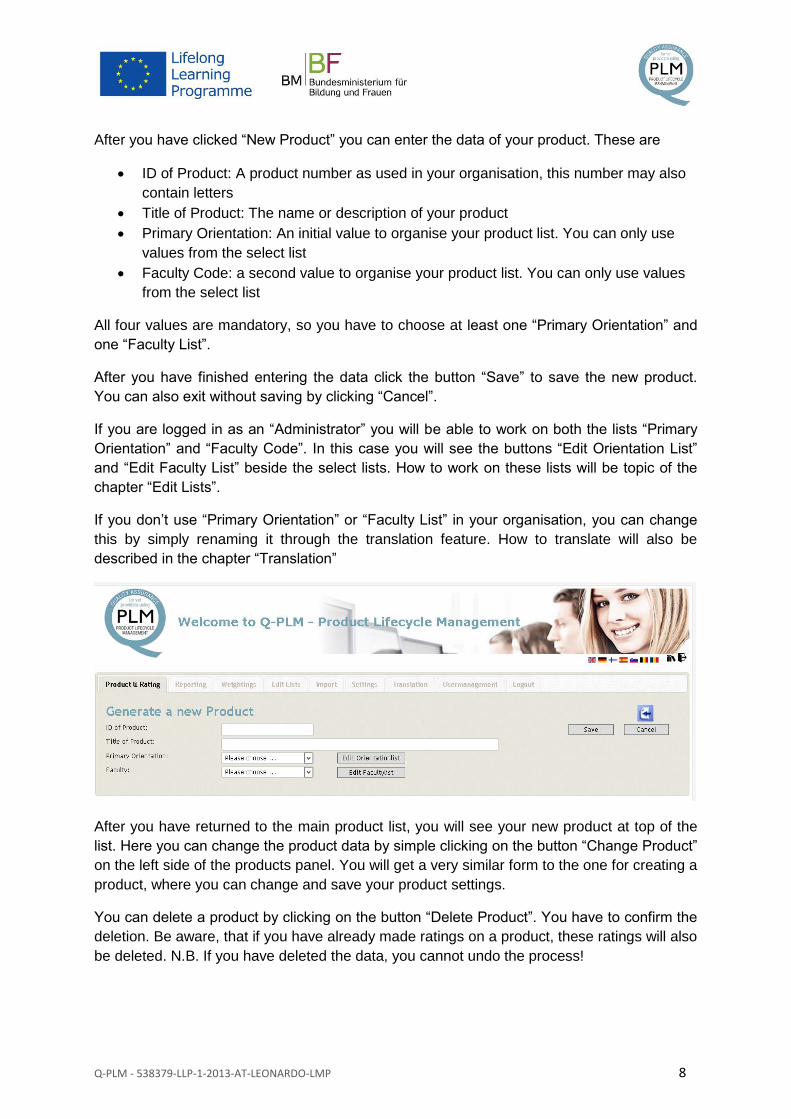
After you have clicked “New Product” you can enter the data of your product. These are
ID of Product: A product number as used in your organisation, this number may also
contain letters
Title of Product: The name or description of your product
Primary Orientation: An initial value to organise your product list. You can only use
values from the select list
Faculty Code: a second value to organise your product list. You can only use values
from the select list
All four values are mandatory, so you have to choose at least one “Primary Orientation” and
one “Faculty List”.
After you have finished entering the data click the button “Save” to save the new product.
You can also exit without saving by clicking “Cancel”.
If you are logged in as an “Administrator” you will be able to work on both the lists “Primary
Orientation” and “Faculty Code”. In this case you will see the buttons “Edit Orientation List”
and “Edit Faculty List” beside the select lists. How to work on these lists will be topic of the
chapter “Edit Lists”.
If you don’t use “Primary Orientation” or “Faculty List” in your organisation, you can change
this by simply renaming it through the translation feature. How to translate will also be
described in the chapter “Translation”
After you have returned to the main product list, you will see your new product at top of the
list. Here you can change the product data by simple clicking on the button “Change Product”
on the left side of the products panel. You will get a very similar form to the one for creating a
product, where you can change and save your product settings.
You can delete a product by clicking on the button “Delete Product”. You have to confirm the
deletion. Be aware, that if you have already made ratings on a product, these ratings will also
be deleted. N.B. If you have deleted the data, you cannot undo the process!
Q-PLM - 538379-LLP-1-2013-AT-LEONARDO-LMP 9
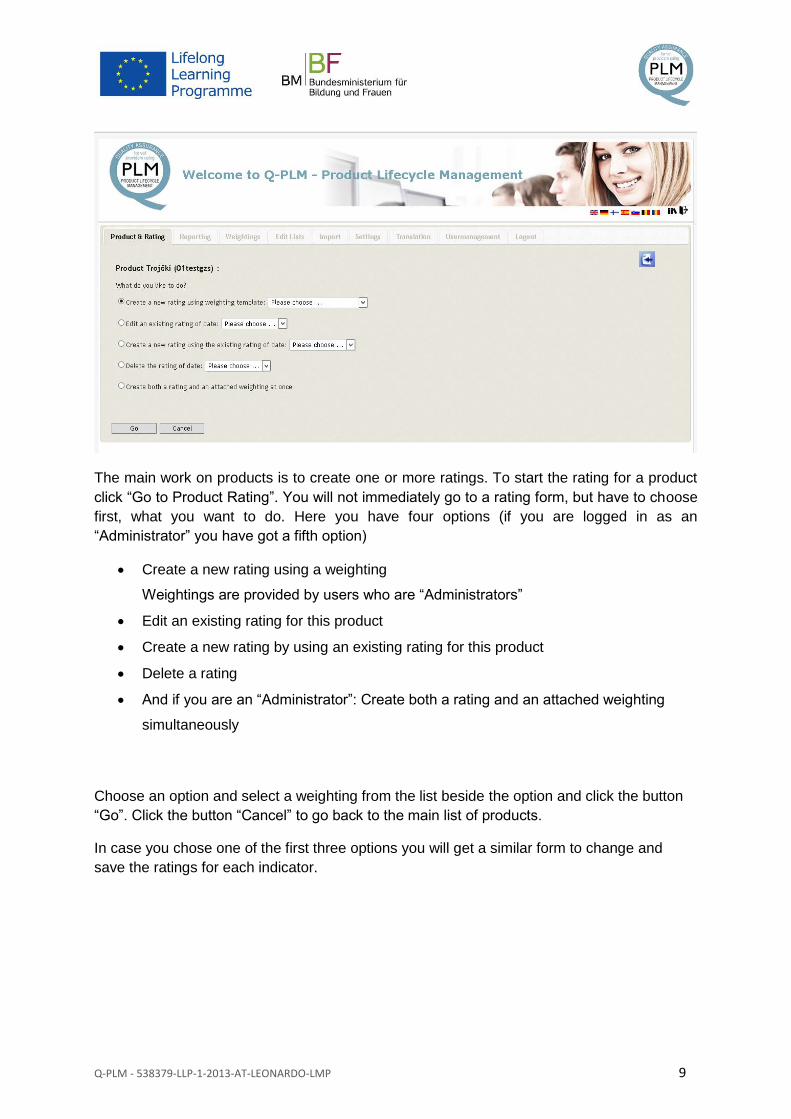
The main work on products is to create one or more ratings. To start the rating for a product
click “Go to Product Rating”. You will not immediately go to a rating form, but have to choose
first, what you want to do. Here you have four options (if you are logged in as an
“Administrator” you have got a fifth option)
Create a new rating using a weighting
Weightings are provided by users who are “Administrators”
Edit an existing rating for this product
Create a new rating by using an existing rating for this product
Delete a rating
And if you are an “Administrator”: Create both a rating and an attached weighting
simultaneously
Choose an option and select a weighting from the list beside the option and click the button
“Go”. Click the button “Cancel” to go back to the main list of products.
In case you chose one of the first three options you will get a similar form to change and
save the ratings for each indicator.
Q-PLM - 538379-LLP-1-2013-AT-LEONARDO-LMP 10
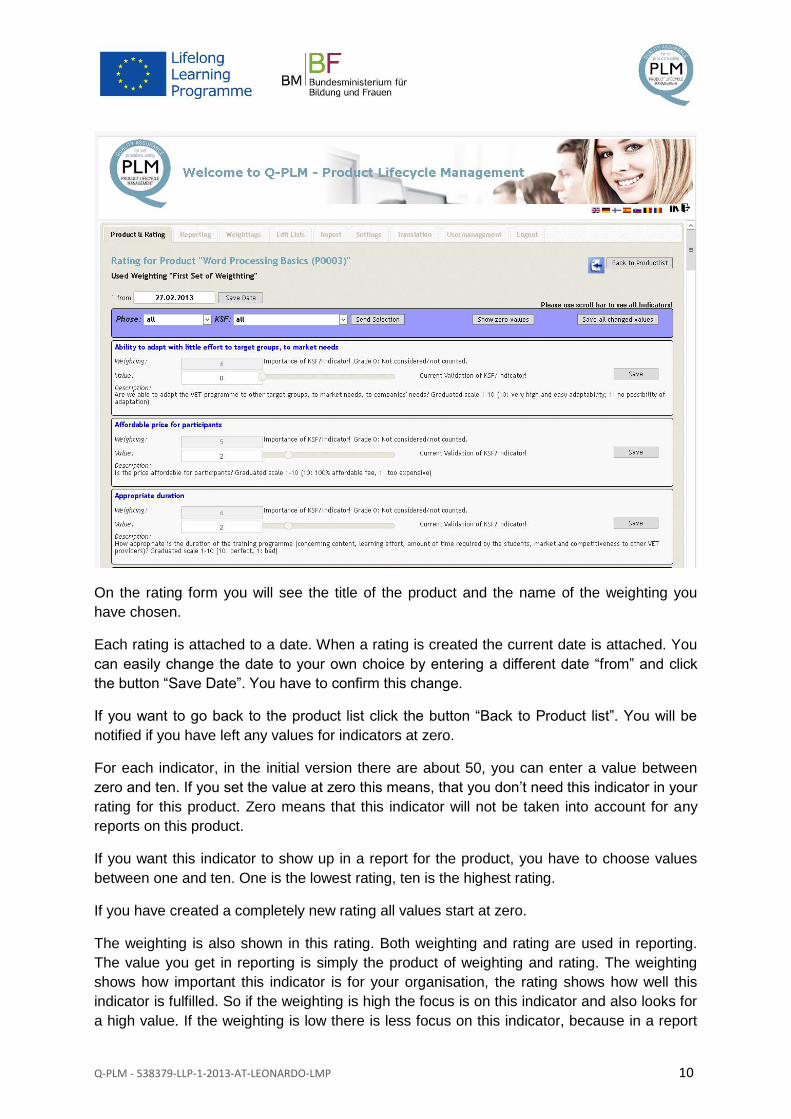
On the rating form you will see the title of the product and the name of the weighting you
have chosen.
Each rating is attached to a date. When a rating is created the current date is attached. You
can easily change the date to your own choice by entering a different date “from” and click
the button “Save Date”. You have to confirm this change.
If you want to go back to the product list click the button “Back to Product list”. You will be
notified if you have left any values for indicators at zero.
For each indicator, in the initial version there are about 50, you can enter a value between
zero and ten. If you set the value at zero this means, that you don’t need this indicator in your
rating for this product. Zero means that this indicator will not be taken into account for any
reports on this product.
If you want this indicator to show up in a report for the product, you have to choose values
between one and ten. One is the lowest rating, ten is the highest rating.
If you have created a completely new rating all values start at zero.
The weighting is also shown in this rating. Both weighting and rating are used in reporting.
The value you get in reporting is simply the product of weighting and rating. The weighting
shows how important this indicator is for your organisation, the rating shows how well this
indicator is fulfilled. So if the weighting is high the focus is on this indicator and also looks for
a high value. If the weighting is low there is less focus on this indicator, because in a report

Q-PLM - 538379-LLP-1-2013-AT-LEONARDO-LMP 11
the calculated value, the product of weighing and value, will not be high even if the value you
have entered is high.
You cannot change the weighting at the rating stage of a product. You must be
“Administrator” to be able to do both.
You can enter the value as a number or use the slider beside.
After you have entered a value you can save it by clicking the button “Save” in the panel of
the indicator. Which indicator you have changed and not yet saved is shown by a reddish
colour in the background of the indicators panel. You can also first change all indicators and
then save them simultaneously by using the button “Save all changed Values” at the top of
the indicator list.
You can use three filters on the list of indicators. You can set these filters through select lists
and buttons positioned at the top of the list.
Phase: choose one of the four phases and click “Send Selection”
KSF: choose one of the ten Key Success Factors and click “Send Selection”
Click the button “Show zero Values” if you want to see only those indicators you have
not rated yet
You can set all three filters at the same time.
Q-PLM - 538379-LLP-1-2013-AT-LEONARDO-LMP 12
3.3 Reporting
The second part of the evaluation process and therefore of the software, is the reporting and
comparison of the ratings different products and different stages of a product.
In the software this is realized by two concepts: Filters and Grouping
Filters: you can select one or more filters to limit the result of the report to a product, a
phase, a key success factor, a period and so on
Grouping: how should the result be presented? Do you want to break down the report
into phases, key success factors or indicators? Or do you want to combine two of
them? Or do you want to compare the ratings of two products? Or of one product
during different stages?
Q-PLM - 538379-LLP-1-2013-AT-LEONARDO-LMP 13
Q-PLM - 538379-LLP-1-2013-AT-LEONARDO-LMP 14
You will have to get familiar with reporting to get the results you are interested in.
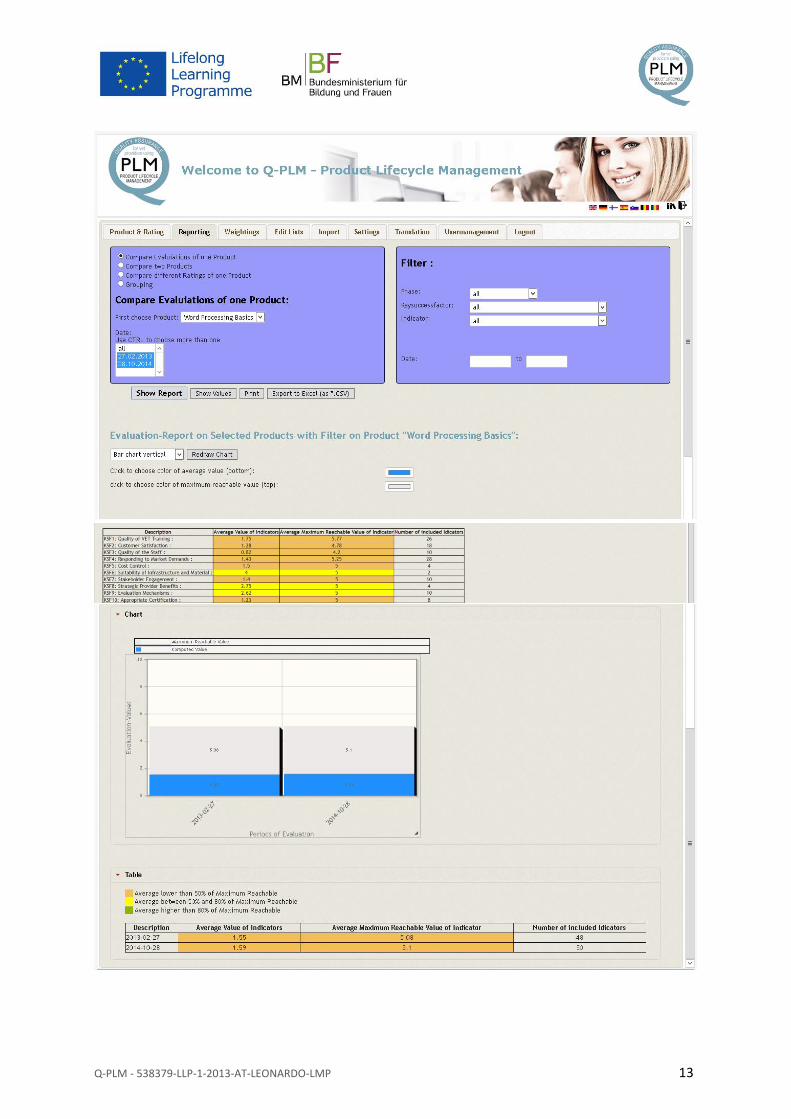
The results are shown both as a chart and as a table below. If you use “Grouping 1” and
“Grouping 2” the result will only be shown as a table.
The chart shows the current result value in blue.
You can choose between the different diagrams by using the select list “Select chart”. You
may choose between
bar chart vertical
bar chart horizontal
line chart
The columns in the resulting table are:
Description: the name or description of the result value
Average value of indicators: all result values, that is value X weighting divided by 10,
computed as an average of all single result values
Average Maximum Reachable Value of Indicator: this is an average of all weightings
or, if you want, the average of all products weighting X 10, the maximum value,
divided by 10
Number of included Indicators: how many indicators are used to compute the values
in the columns before

Q-PLM - 538379-LLP-1-2013-AT-LEONARDO-LMP 15
Click the button “Show Report” to show the results.
In the panel on the left side you can choose the filters you need. Please feel free to set all
combinations of filters. The more filters you set the more restricted the result will be.
In the panel on the left side you can choose the presentation of the results. You have three
options:
Compare evaluations of one product: choose a product and the ratings to be
compared
Compare two products: choose two products to be compared
Compare different ratings of one product: choose ratings from different dates of one
product to be compared
Grouping: simple report of one result set or two result sets combined.
Default: one result set broken down into key success factors

Q-PLM - 538379-LLP-1-2013-AT-LEONARDO-LMP 16
If you select the option “Compare Evaluations of one Product” you have to choose a product
and the ratings of this product to be compared.
If you select the option “Compare two Products” you have to choose two products to be
compared. You will get two results, a chart and a table for each of the products. You may
choose a special date of a rating, if you want to compare only two ratings and not all ratings
combined.
You can also choose the grouping for this report. The available options are:
Key success factor
Phase
Indicator
Q-PLM - 538379-LLP-1-2013-AT-LEONARDO-LMP 17
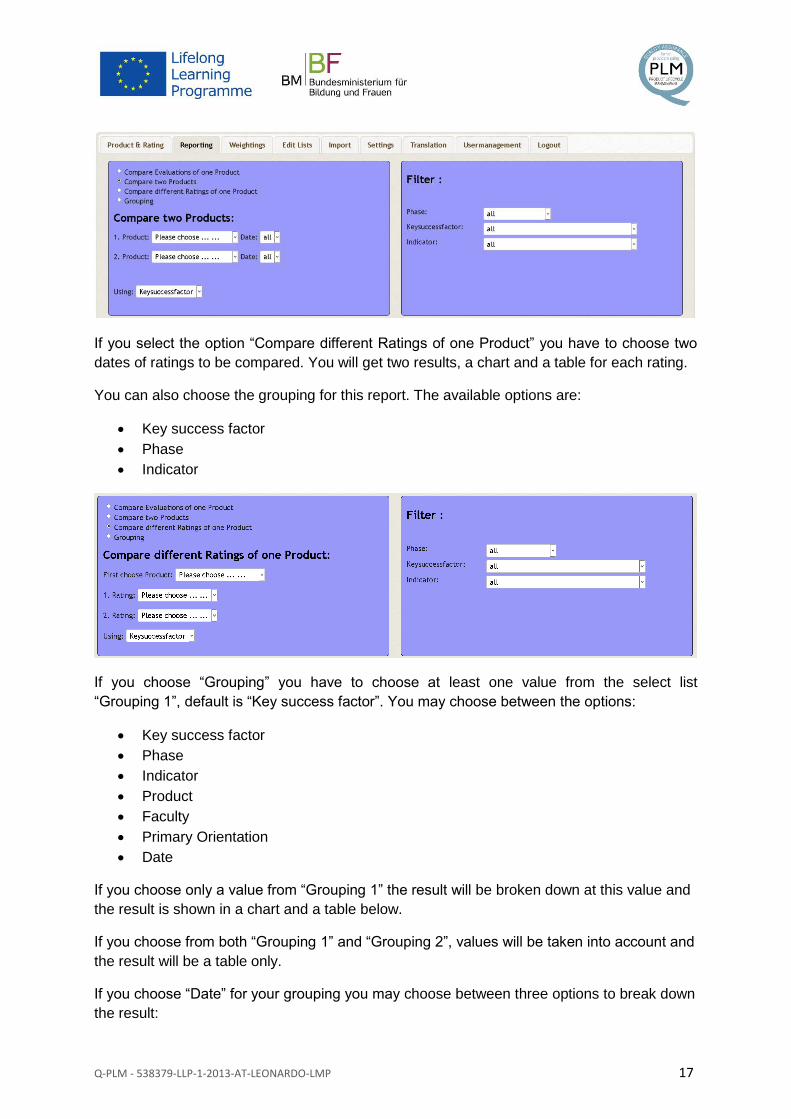
If you select the option “Compare different Ratings of one Product” you have to choose two
dates of ratings to be compared. You will get two results, a chart and a table for each rating.
You can also choose the grouping for this report. The available options are:
Key success factor
Phase
Indicator
If you choose “Grouping” you have to choose at least one value from the select list
“Grouping 1”, default is “Key success factor”. You may choose between the options:
Key success factor
Phase
Indicator
Product
Faculty
Primary Orientation
Date
If you choose only a value from “Grouping 1” the result will be broken down at this value and
the result is shown in a chart and a table below.
If you choose from both “Grouping 1” and “Grouping 2”, values will be taken into account and
the result will be a table only.
If you choose “Date” for your grouping you may choose between three options to break down
the result:
Q-PLM - 538379-LLP-1-2013-AT-LEONARDO-LMP 18
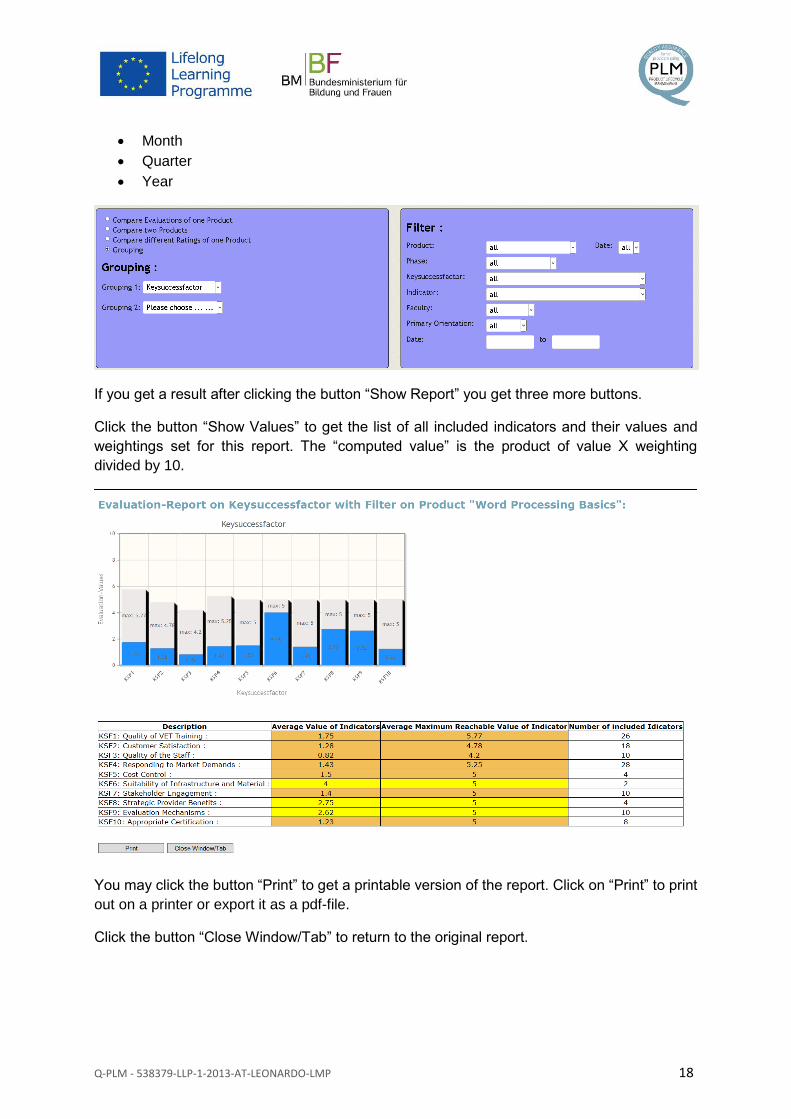
Month
Quarter
Year
If you get a result after clicking the button “Show Report” you get three more buttons.
Click the button “Show Values” to get the list of all included indicators and their values and
weightings set for this report. The “computed value” is the product of value X weighting
divided by 10.
You may click the button “Print” to get a printable version of the report. Click on “Print” to print
out on a printer or export it as a pdf-file.
Click the button “Close Window/Tab” to return to the original report.
Q-PLM - 538379-LLP-1-2013-AT-LEONARDO-LMP 19
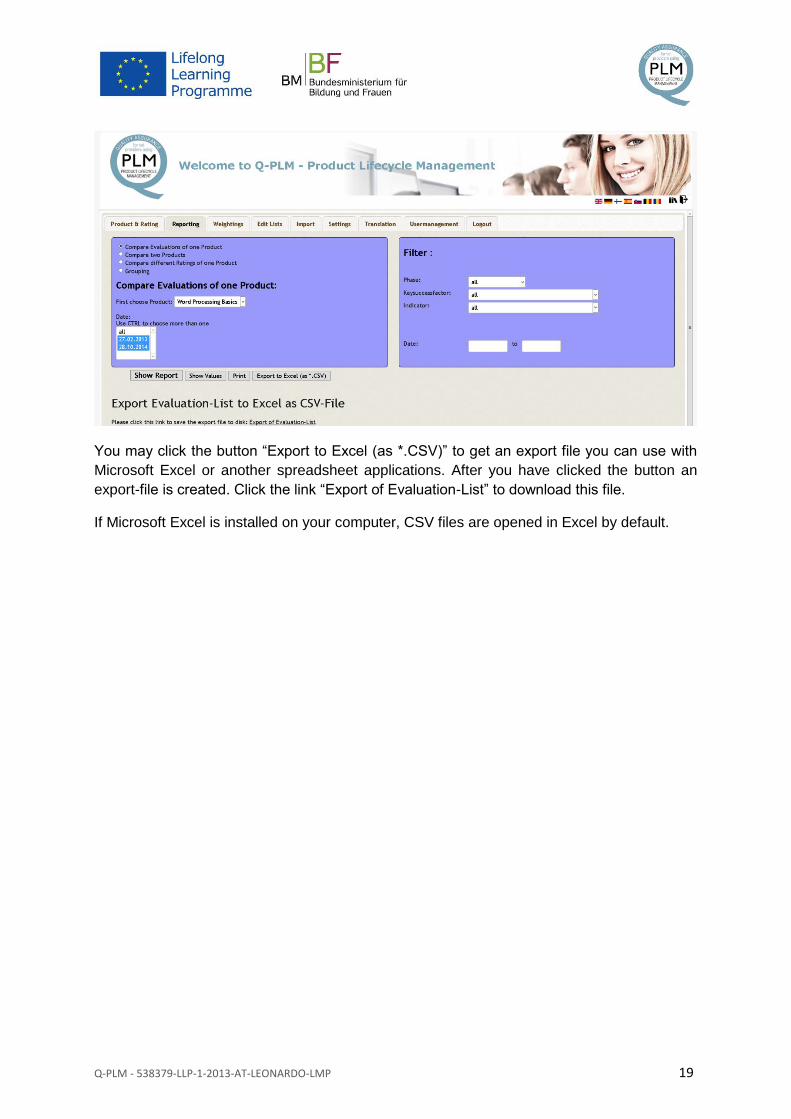
You may click the button “Export to Excel (as *.CSV)” to get an export file you can use with
Microsoft Excel or another spreadsheet applications. After you have clicked the button an
export-file is created. Click the link “Export of Evaluation-List” to download this file.
If Microsoft Excel is installed on your computer, CSV files are opened in Excel by default.
Q-PLM - 538379-LLP-1-2013-AT-LEONARDO-LMP 20
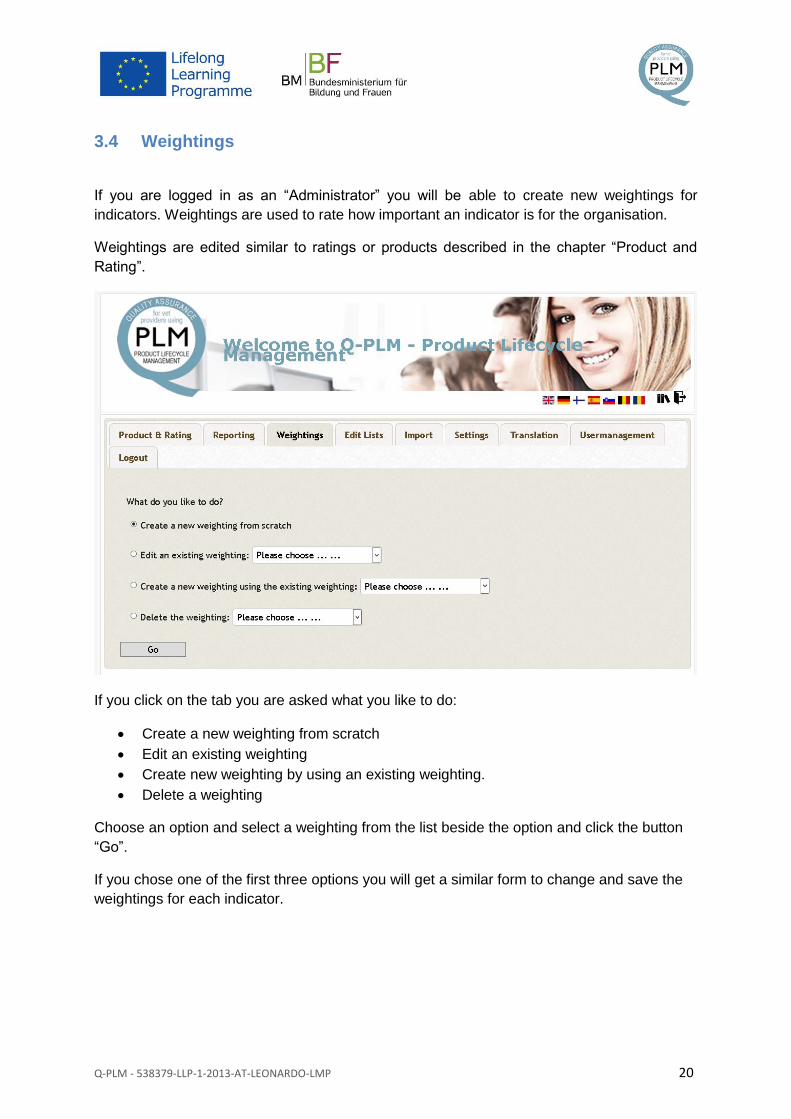
3.4 Weightings
If you are logged in as an “Administrator” you will be able to create new weightings for
indicators. Weightings are used to rate how important an indicator is for the organisation.
Weightings are edited similar to ratings or products described in the chapter “Product and
Rating”.
If you click on the tab you are asked what you like to do:
Create a new weighting from scratch
Edit an existing weighting
Create new weighting by using an existing weighting.
Delete a weighting
Choose an option and select a weighting from the list beside the option and click the button
“Go”.
If you chose one of the first three options you will get a similar form to change and save the
weightings for each indicator.
Q-PLM - 538379-LLP-1-2013-AT-LEONARDO-LMP 21
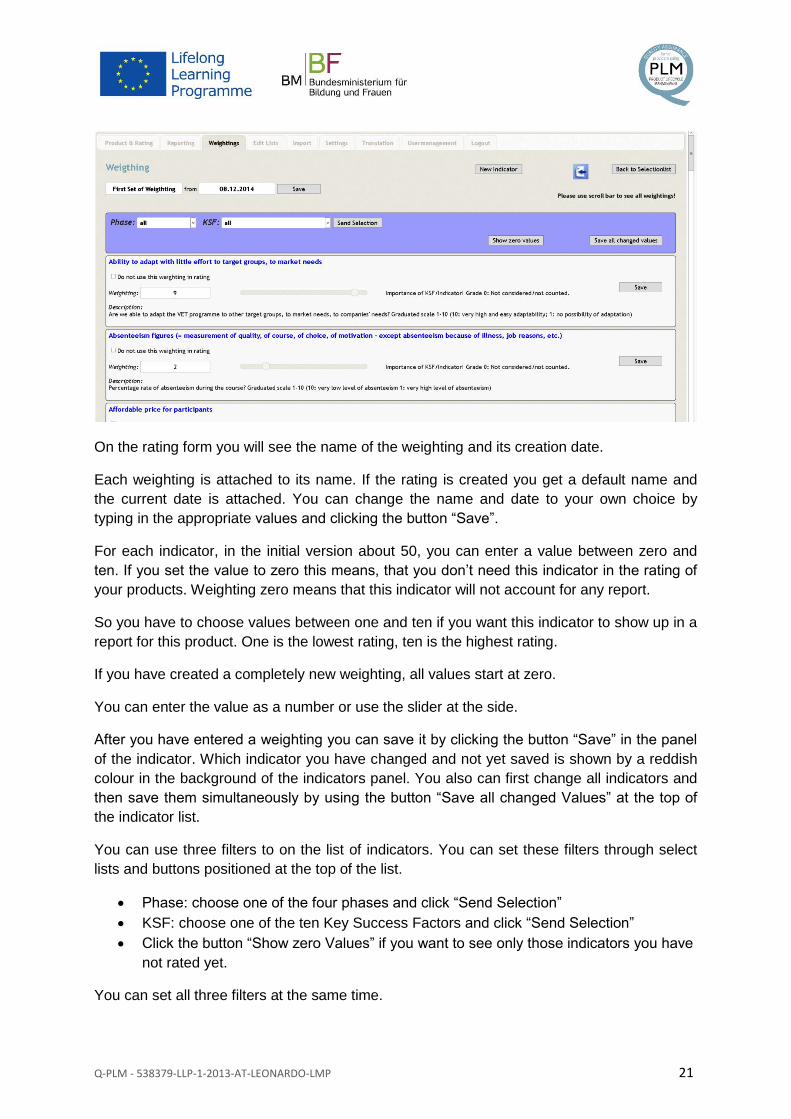
On the rating form you will see the name of the weighting and its creation date.
Each weighting is attached to its name. If the rating is created you get a default name and
the current date is attached. You can change the name and date to your own choice by
typing in the appropriate values and clicking the button “Save”.
For each indicator, in the initial version about 50, you can enter a value between zero and
ten. If you set the value to zero this means, that you don’t need this indicator in the rating of
your products. Weighting zero means that this indicator will not account for any report.
So you have to choose values between one and ten if you want this indicator to show up in a
report for this product. One is the lowest rating, ten is the highest rating.
If you have created a completely new weighting, all values start at zero.
You can enter the value as a number or use the slider at the side.
After you have entered a weighting you can save it by clicking the button “Save” in the panel
of the indicator. Which indicator you have changed and not yet saved is shown by a reddish
colour in the background of the indicators panel. You also can first change all indicators and
then save them simultaneously by using the button “Save all changed Values” at the top of
the indicator list.
You can use three filters to on the list of indicators. You can set these filters through select
lists and buttons positioned at the top of the list.
Phase: choose one of the four phases and click “Send Selection”
KSF: choose one of the ten Key Success Factors and click “Send Selection”
Click the button “Show zero Values” if you want to see only those indicators you have
not rated yet.
You can set all three filters at the same time.
Q-PLM - 538379-LLP-1-2013-AT-LEONARDO-LMP 22
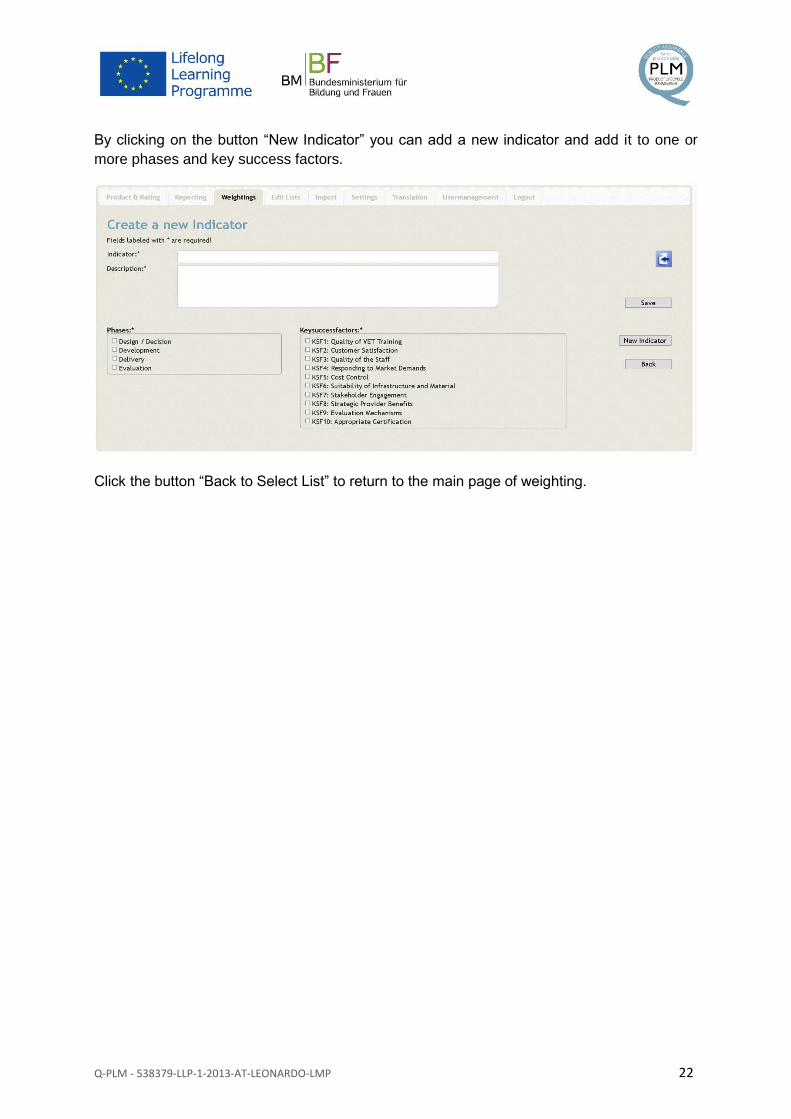
By clicking on the button “New Indicator” you can add a new indicator and add it to one or
more phases and key success factors.
Click the button “Back to Select List” to return to the main page of weighting.
Q-PLM - 538379-LLP-1-2013-AT-LEONARDO-LMP 23
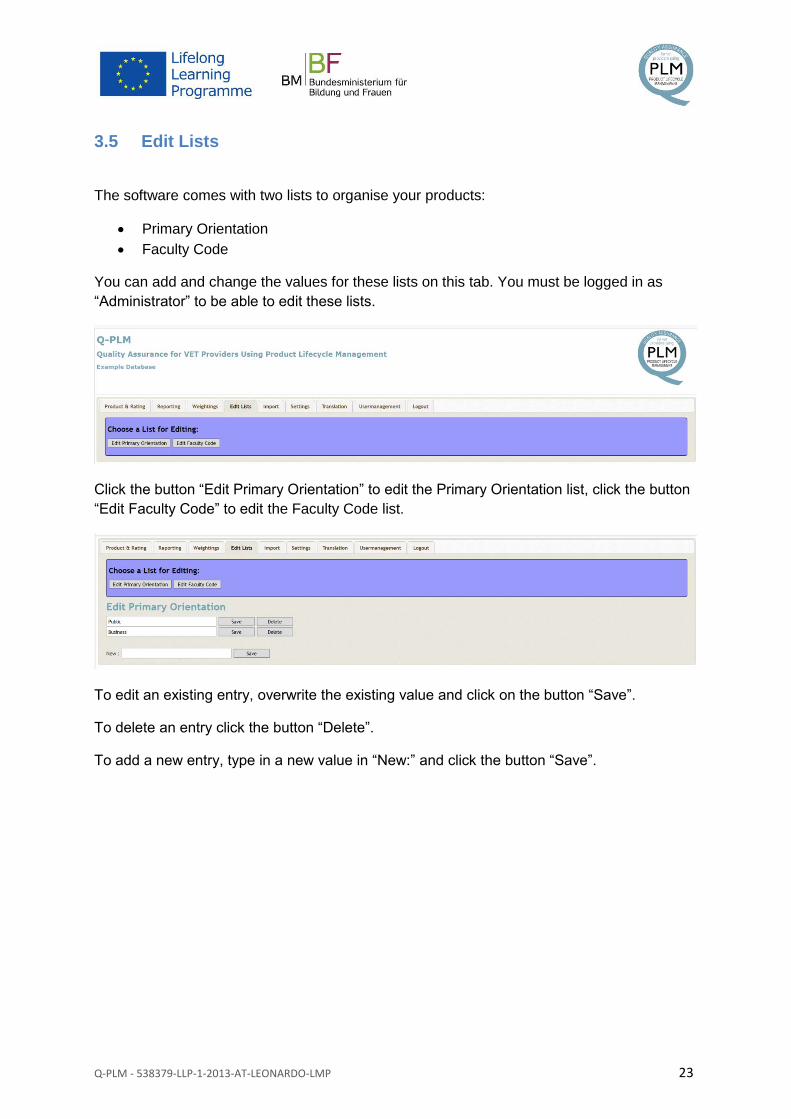
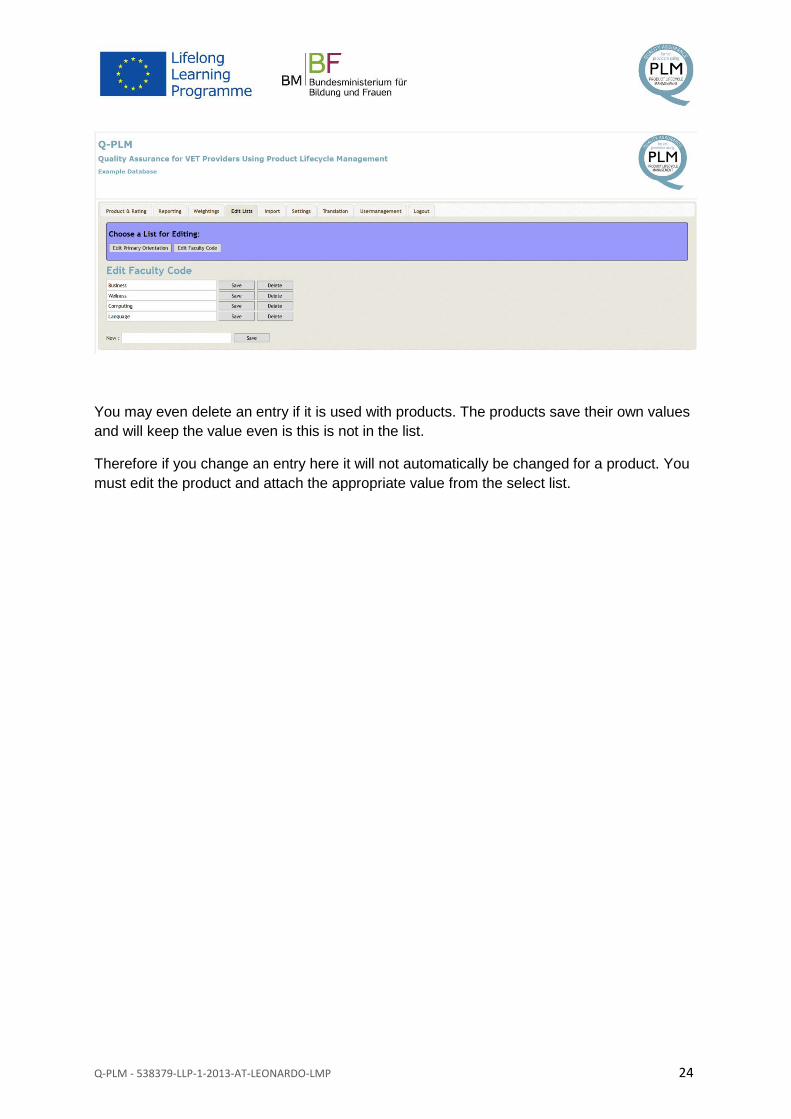
3.5 Edit Lists
The software comes with two lists to organise your products:
Primary Orientation
Faculty Code
You can add and change the values for these lists on this tab. You must be logged in as
“Administrator” to be able to edit these lists.
Click the button “Edit Primary Orientation” to edit the Primary Orientation list, click the button
“Edit Faculty Code” to edit the Faculty Code list.
To edit an existing entry, overwrite the existing value and click on the button “Save”.
To delete an entry click the button “Delete”.
To add a new entry, type in a new value in “New:” and click the button “Save”.
Q-PLM - 538379-LLP-1-2013-AT-LEONARDO-LMP 24
You may even delete an entry if it is used with products. The products save their own values
and will keep the value even is this is not in the list.
Therefore if you change an entry here it will not automatically be changed for a product. You
must edit the product and attach the appropriate value from the select list.
Q-PLM - 538379-LLP-1-2013-AT-LEONARDO-LMP 25
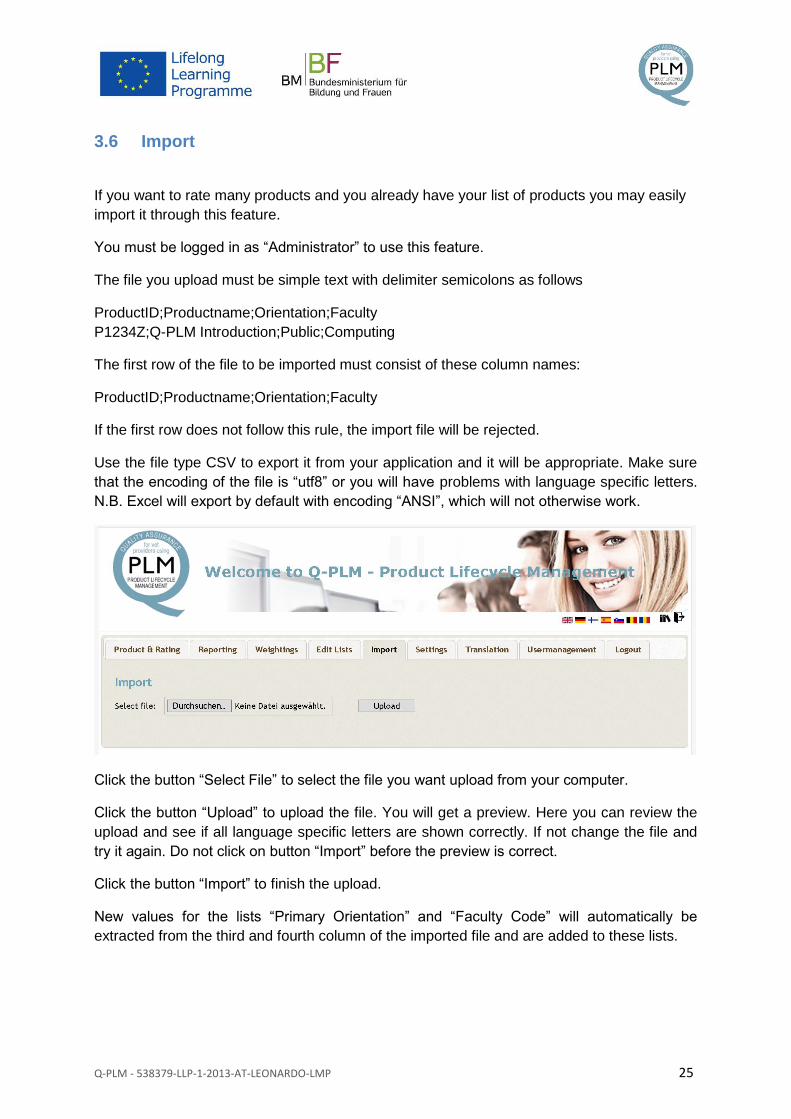
3.6 Import
If you want to rate many products and you already have your list of products you may easily
import it through this feature.
You must be logged in as “Administrator” to use this feature.
The file you upload must be simple text with delimiter semicolons as follows
ProductID;Productname;Orientation;Faculty
P1234Z;Q-PLM Introduction;Public;Computing
The first row of the file to be imported must consist of these column names:
ProductID;Productname;Orientation;Faculty
If the first row does not follow this rule, the import file will be rejected.
Use the file type CSV to export it from your application and it will be appropriate. Make sure
that the encoding of the file is “utf8” or you will have problems with language specific letters.
N.B. Excel will export by default with encoding “ANSI”, which will not otherwise work.
Click the button “Select File” to select the file you want upload from your computer.
Click the button “Upload” to upload the file. You will get a preview. Here you can review the
upload and see if all language specific letters are shown correctly. If not change the file and
try it again. Do not click on button “Import” before the preview is correct.
Click the button “Import” to finish the upload.
New values for the lists “Primary Orientation” and “Faculty Code” will automatically be
extracted from the third and fourth column of the imported file and are added to these lists.
Q-PLM - 538379-LLP-1-2013-AT-LEONARDO-LMP 26
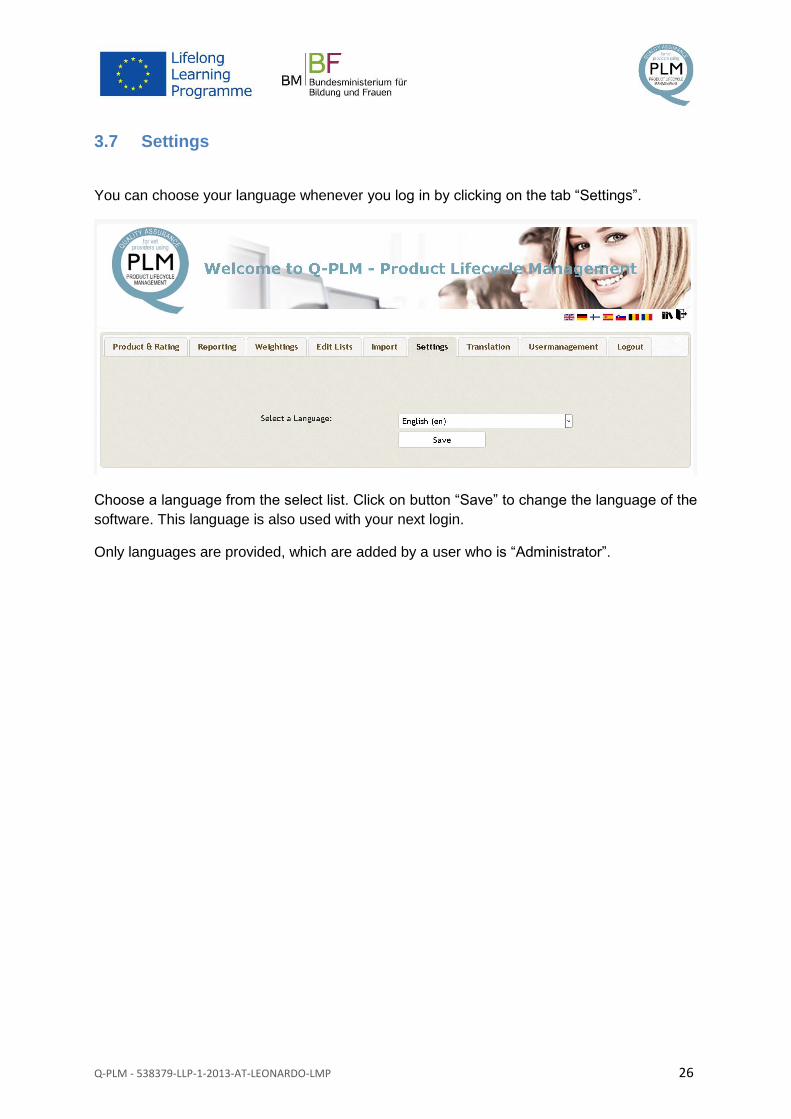
3.7 Settings
You can choose your language whenever you log in by clicking on the tab “Settings”.
Choose a language from the select list. Click on button “Save” to change the language of the
software. This language is also used with your next login.
Only languages are provided, which are added by a user who is “Administrator”.
Q-PLM - 538379-LLP-1-2013-AT-LEONARDO-LMP 27
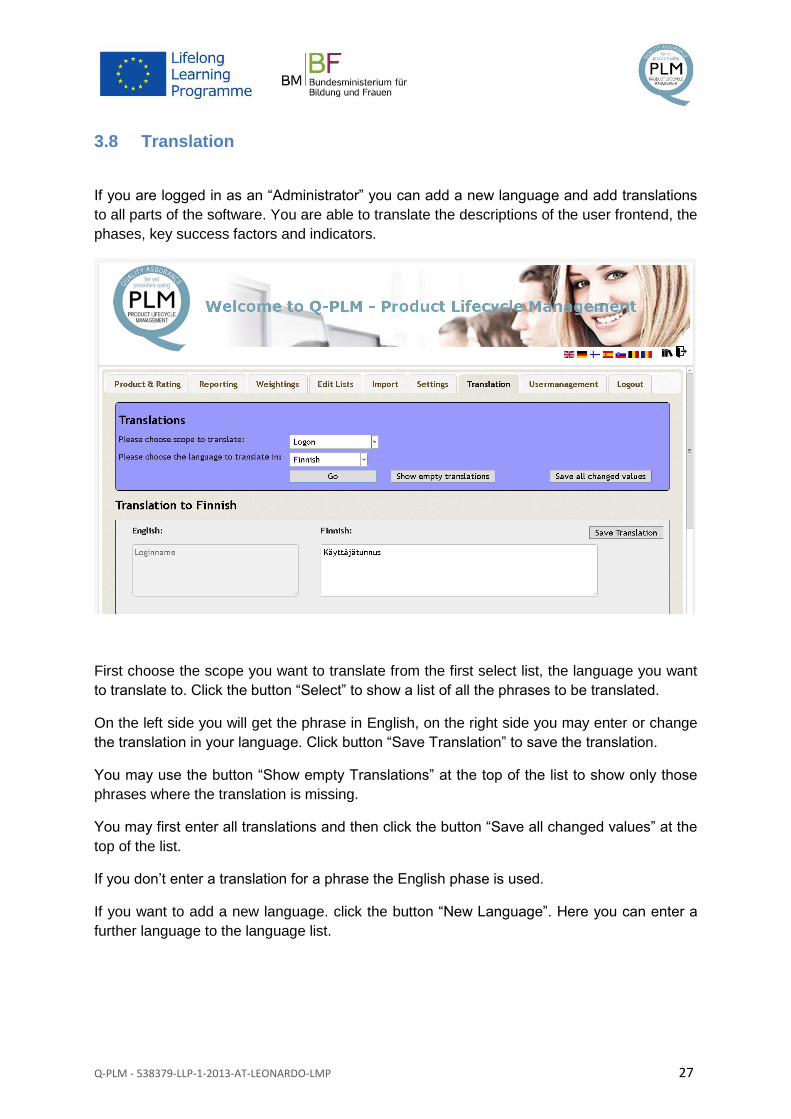
3.8 Translation
If you are logged in as an “Administrator” you can add a new language and add translations
to all parts of the software. You are able to translate the descriptions of the user frontend, the
phases, key success factors and indicators.
First choose the scope you want to translate from the first select list, the language you want
to translate to. Click the button “Select” to show a list of all the phrases to be translated.
On the left side you will get the phrase in English, on the right side you may enter or change
the translation in your language. Click button “Save Translation” to save the translation.
You may use the button “Show empty Translations” at the top of the list to show only those
phrases where the translation is missing.
You may first enter all translations and then click the button “Save all changed values” at the
top of the list.
If you don’t enter a translation for a phrase the English phase is used.
If you want to add a new language. click the button “New Language”. Here you can enter a
further language to the language list.
Q-PLM - 538379-LLP-1-2013-AT-LEONARDO-LMP 28
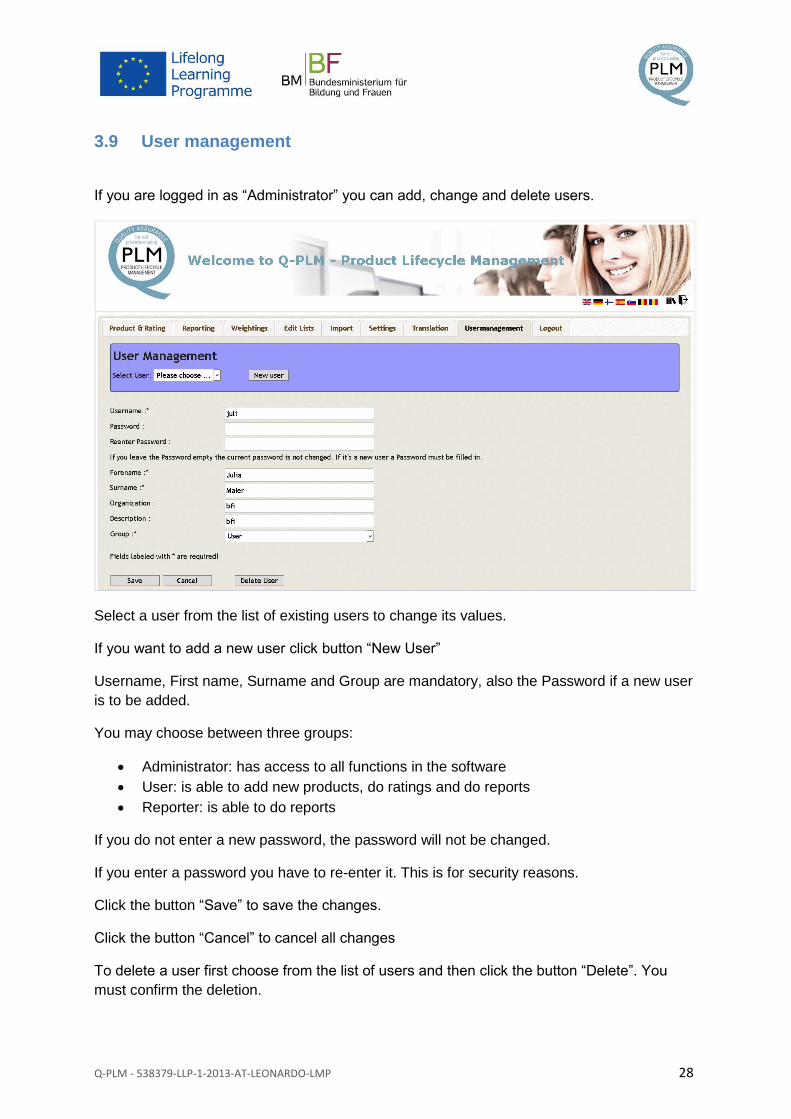
3.9 User management
If you are logged in as “Administrator” you can add, change and delete users.
Select a user from the list of existing users to change its values.
If you want to add a new user click button “New User”
Username, First name, Surname and Group are mandatory, also the Password if a new user
is to be added.
You may choose between three groups:
Administrator: has access to all functions in the software
User: is able to add new products, do ratings and do reports
Reporter: is able to do reports
If you do not enter a new password, the password will not be changed.
If you enter a password you have to re-enter it. This is for security reasons.
Click the button “Save” to save the changes.
Click the button “Cancel” to cancel all changes
To delete a user first choose from the list of users and then click the button “Delete”. You
must confirm the deletion.
Q-PLM - 538379-LLP-1-2013-AT-LEONARDO-LMP 29
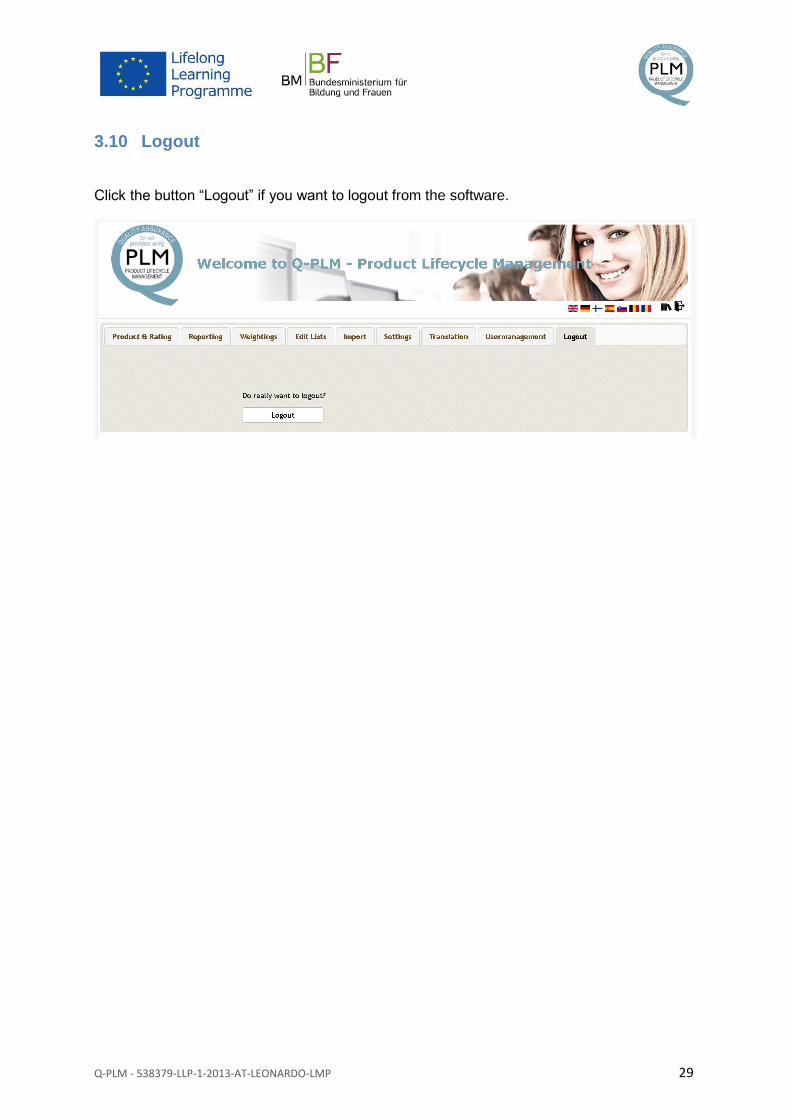
3.10 Logout
Click the button “Logout” if you want to logout from the software.
Related Documents