Register your product and get support at www.philips.com/TVsupport User Manual 43PUS7956 50PUS7956 55PUS7956 65PUS7956 70PUS7956 7956 Series

Welcome message from author
This document is posted to help you gain knowledge. Please leave a comment to let me know what you think about it! Share it to your friends and learn new things together.
Transcript
Register your product and get support at
www.philips.com/TVsupport
User Manual43PUS795650PUS795655PUS795665PUS795670PUS7956
7956 Series
Contents
1 Home Screen 41.1 Home Screen and Channels 41.2 Open the Home Screen 41.3 Home Screen Update 4
2 Setting Up 62.1 Read Safety 62.2 TV Stand and Wall Mounting 62.3 Tips on Placement 62.4 Power Cable 62.5 Antenna Cable 72.6 Satellite Dish 7
3 Remote Control 83.1 Key Overview 83.2 IR Sensor 103.3 Batteries 103.4 Cleaning 10
4 Switching On and Off 115 Channel Installation 125.1 First Time to Install Channels 125.2 Install Digital or Analogue Channels 125.3 Satellite 125.4 Antenna 135.5 Cable Installation 145.6 Channel Installation Options 145.7 Update Channels 15
6 Channels 176.1 About Channels and Switch Channels 176.2 Channel Lists 176.3 Watching channels 186.4 Favourite Channels 196.5 Interactive TV 20
7 Connect Devices 217.1 About Connections 217.2 CAM with Smart Card - CI+ 227.3 Home Theatre System - HTS 227.4 Video Device 237.5 Audio Device 237.6 USB Flash Drive 247.7 Computer 24
8 Bluetooth 258.1 What You Need 258.2 Pairing a Device 258.3 Select a Device 258.4 Rename a Device 258.5 Remove a Device 25
9 Connect your Android TV 279.1 Network and Internet 279.2 Google Account 28
10 Apps 29
10.1 About Apps 2910.2 Google Play 2910.3 Start or Stop an App 3010.4 Manage Apps 30
11 Sources 3111.1 Switch to a device 31
12 Settings 3212.1 Picture Settings 3212.2 Sound Settings 3312.3 Power Settings 3412.4 Advanced Options 3412.5 Other settings 3512.6 Reboot 3712.7 Factory Reset 3712.8 Clock and Language Settings 3712.9 Accessibility Settings 38
13 Ambilight 3913.1 Ambilight Style 3913.2 Custom colour 3913.3 Brightness and Saturation 3913.4 Wall Colour Behind the TV 3913.5 TV Switch Off 39
14 Videos, Photos, Music & Text 4014.1 From a USB Connection 4014.2 Play your Videos 4014.3 View your Photos 4014.4 Play your Music 4114.5 View your Text 41
15 TV Guide 4215.1 TV Guide Data 4215.2 Using the TV Guide 42
16 Smartphones and Tablets 4316.1 Google Cast 43
17 Freeview Play 4418 Netflix 4519 Software 4619.1 Update Software 4619.2 Software Version 4619.3 Open Source Licenses 46
20 Specifications 4720.1 Environmental 4720.2 Power 4720.3 Operating System 4820.4 Reception 4820.5 Display Type 4820.6 Display Input Resolution 4820.7 Connectivity 4820.8 Sound 4820.9 Multimedia 48
2

21 Help and Support 5021.1 Register your TV 5021.2 Troubleshooting 5021.3 Online Help 5221.4 Support and Repair 52
22 Safety and Care 5322.1 Safety 5322.2 Screen Care 54
23 Terms of Use 5524 Copyrights 5624.1 HDMI 5624.2 Dolby Vision and Dolby Atmos 5624.3 DTS-HD 5624.4 Wi-Fi Alliance 5624.5 Kensington 5624.6 Other Trademarks 56
25 Disclaimer regarding servicesand/or software offered by thirdparties
57
Index 58
3
1
Home Screen1.1
Home Screen and Channels
The Home launcher
To enjoy the benefits of your Android TV, connect theTV to the Internet. Press Home on your remotecontrol to get your new Android Home screen. Like onyour Android smartphone or tablet, the Home screenis the centre of your TV. From here you can decidewhat to watch by browsing entertainment optionsfrom app and live TV. Your Home has channels to letyou discover great contents from your favourite apps.You can also add additional channels or find newapps to get more contents.
The Home screen is organized in channels. Apps maypopulate their recommendation (if available)according to their own choice as an individualchannels in the home screen.
Apps
Your favourite Apps are placed on the first row. Thisrow contains number of apps pre-installed. The orderof these apps are according to business agreementswith content service providers. You can also add moreapps as favourite from the Apps page, such as theLive TV and MMP (MultiMediaPlayer). The Apps pagecan be opened by clicking the Apps icon at the leftend of the Apps row.
Live TV
The Live TV row shows the currently runningprogrammes from the installed channels. It containsup to 10 channels as the recommendation for you toselect the TV channels. The first channel on Live TVrow is the channel you are watching, and thefollowing channels will be the channels on yourfavourite list*.* Note: If there are still more spaces available on LiveTV row, it will include the channels from your DTV(digital TV) source.
Play Next channel
You can always know what to watch next from PlayNext channel on the Home screen. Start watchingfrom where you left off and get notifications aboutnew episodes in the Play Next channel. Press andhold Select on a movie or TV show to add it directlyto the Play Next channel.
Google Play Movies & TV channel
Rent movies or TV shows on this channel from Google Play Movies & TV.
YouTube channel
This channel contains your Recommended,Subscriptions or Trending YouTube videos.
Customize channels
Click the Customize channels button to add andremove channels from your Home screen.
See also www.support.google.com/androidtv
Accessing settings from Home
You can access Settings menu via the icon at the topright corner.
Accessing USB flash drive from Home
To view the files from the USB flash drive, you needto add the MMP (MultiMediaPlayer) app to the Homepage first. Press Home, clicking the Apps icon at theleft end of the Apps row. You can add MMP appsfrom the Apps page.
System bar on Home screen
The System bar on the top of Home screen containsfollowing features. - Search button: to trigger Google search with voice*or text input. The search result and its order arerendered according to business agreements withcontent service providers. - Notifications: to provide you the messages aboutyour Smart TV system. - Input source: to launch the input source list andswitch to any of the connected devices. - Settings: to access all setting menu and adjust theTV settings. - Clock: to indicate the system clock.
* Note: In order to take advantage of Google Assistantin case of a remote control without microphone,please use the Android TV Remote Control appavailable in Google Play Store for Android and AppleApp store for iOS devices.
1.2
Open the Home ScreenTo open the Home screen and open an item…
1 - Press Home.2 - Select an item and press OK to open or start it.3 - Press Back continuously or press Home cango back to Home screen.
When opening the Home screen, the backgroundapplication/content playback will stop. You have toselect the application or content from the Homescreen to resume.
4

1.3
Home Screen UpdateYou may receive the update notification from Googleand have new version of Home launcher installed.With the new Home launcher, you will have a newlook and features on TV’s Home screen.
New highlights on your home screen
With multiple tabs like Home, Discover, Apps and Search, you can discover movies and shows fromyour services and popular apps. Sign in to yourGoogle Account to get personalisedrecommendations from your streaming servicesbased on what you have watched and what interestsyou.
New look, new navigation
Decide what to watch next with easy-to-usenavigation. Browse your personalisedrecommendations, pick up where you left off, orquickly find a certain app using the new tab system.
Discover personalised recommendations
Browse shows and movies that you will love on allyour favourite media services. Sign in to your GoogleAccount to get started.
Get recommendations across Google
Your services are saved to your Google Account soyou can get better recommendations across Google.
5
2
Setting Up2.1
Read SafetyRead the safety instructions first before you use theTV.
To read the safety instructions, go to Safety and Caresection on this Help manual for the information.
2.2
TV Stand and Wall Mounting
TV Stand
You can find the instructions for mounting the TVstand in the Quick Start Guide that came with the TV.In case you lost this guide, you can download itfrom www.philips.com/TVsupport.
Use the model number of the TV to look forthe Quick Start Guide to download.
Wall Mounting
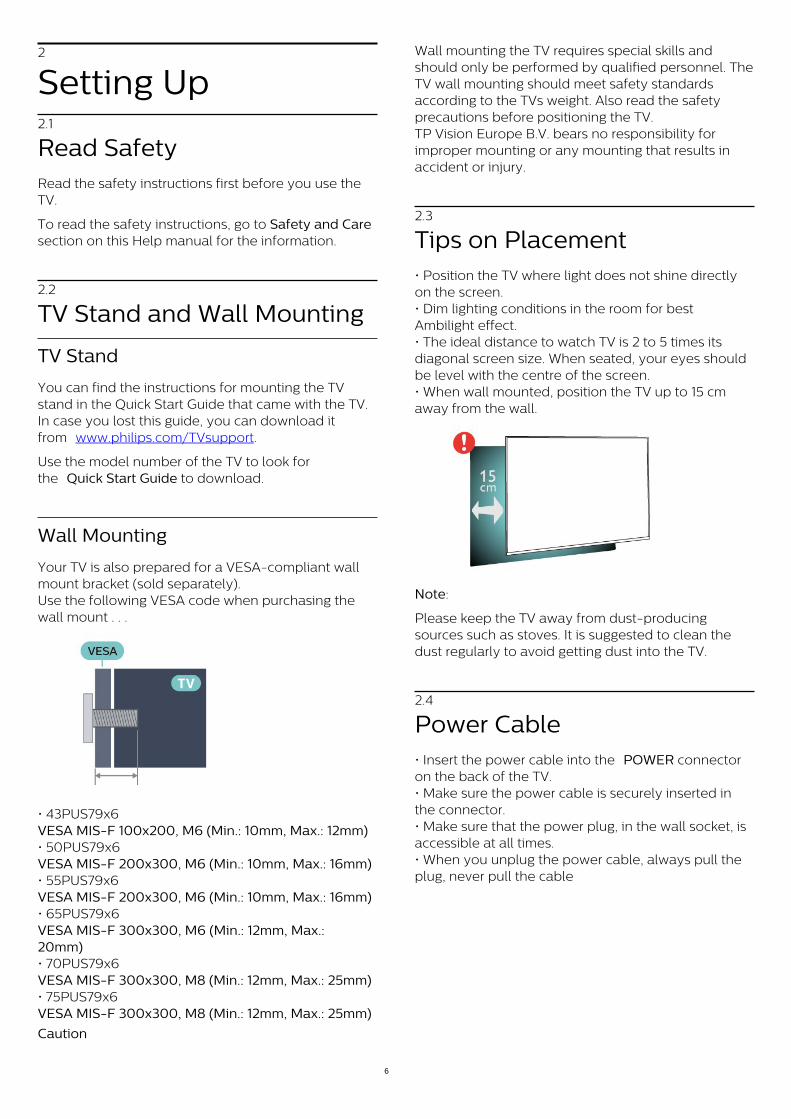
Your TV is also prepared for a VESA-compliant wallmount bracket (sold separately).Use the following VESA code when purchasing thewall mount . . .
• 43PUS79x6VESA MIS-F 100x200, M6 (Min.: 10mm, Max.: 12mm)• 50PUS79x6VESA MIS-F 200x300, M6 (Min.: 10mm, Max.: 16mm)• 55PUS79x6VESA MIS-F 200x300, M6 (Min.: 10mm, Max.: 16mm)• 65PUS79x6VESA MIS-F 300x300, M6 (Min.: 12mm, Max.:20mm)• 70PUS79x6VESA MIS-F 300x300, M8 (Min.: 12mm, Max.: 25mm)• 75PUS79x6VESA MIS-F 300x300, M8 (Min.: 12mm, Max.: 25mm)
Caution
Wall mounting the TV requires special skills andshould only be performed by qualified personnel. TheTV wall mounting should meet safety standardsaccording to the TVs weight. Also read the safetyprecautions before positioning the TV.TP Vision Europe B.V. bears no responsibility forimproper mounting or any mounting that results inaccident or injury.
2.3
Tips on Placement• Position the TV where light does not shine directlyon the screen.• Dim lighting conditions in the room for bestAmbilight effect.• The ideal distance to watch TV is 2 to 5 times itsdiagonal screen size. When seated, your eyes shouldbe level with the centre of the screen.• When wall mounted, position the TV up to 15 cmaway from the wall.
Note:
Please keep the TV away from dust-producingsources such as stoves. It is suggested to clean thedust regularly to avoid getting dust into the TV.
2.4
Power Cable• Insert the power cable into the POWER connectoron the back of the TV.• Make sure the power cable is securely inserted inthe connector.• Make sure that the power plug, in the wall socket, isaccessible at all times.• When you unplug the power cable, always pull theplug, never pull the cable
6
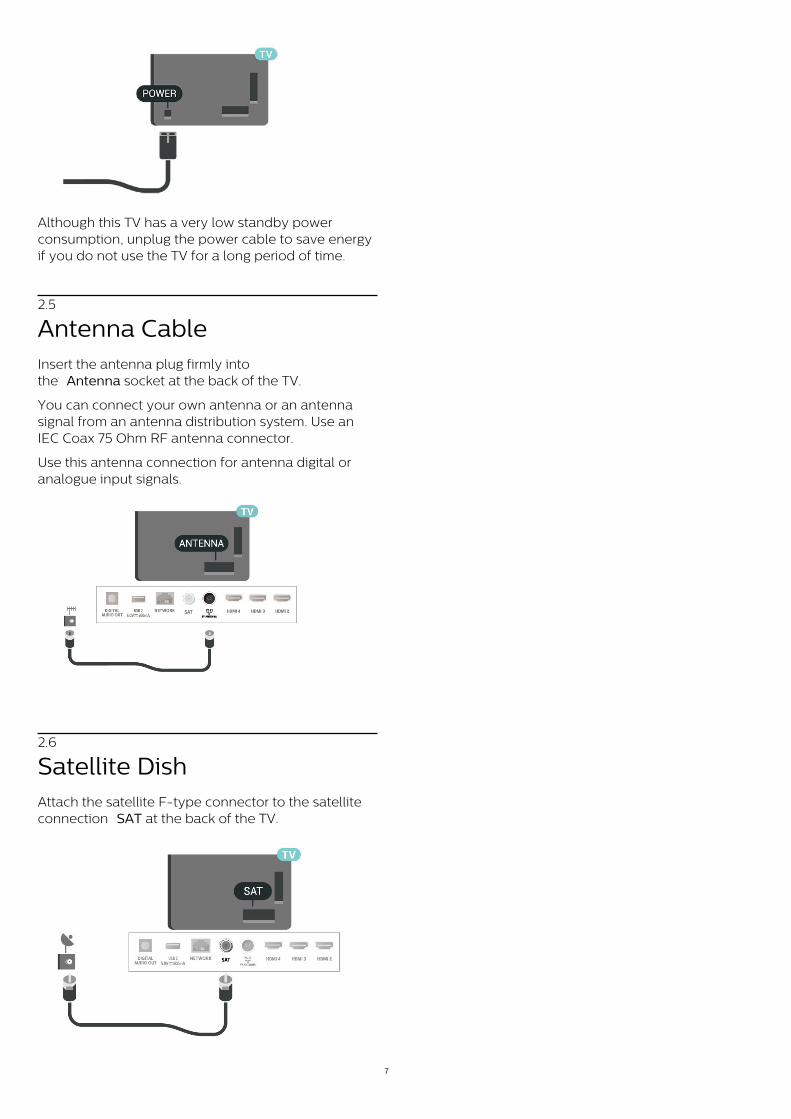
Although this TV has a very low standby powerconsumption, unplug the power cable to save energyif you do not use the TV for a long period of time.
2.5
Antenna CableInsert the antenna plug firmly intothe Antenna socket at the back of the TV.
You can connect your own antenna or an antennasignal from an antenna distribution system. Use anIEC Coax 75 Ohm RF antenna connector.
Use this antenna connection for antenna digital oranalogue input signals.
2.6
Satellite DishAttach the satellite F-type connector to the satelliteconnection SAT at the back of the TV.
7
3
Remote Control3.1
Key Overview
Top
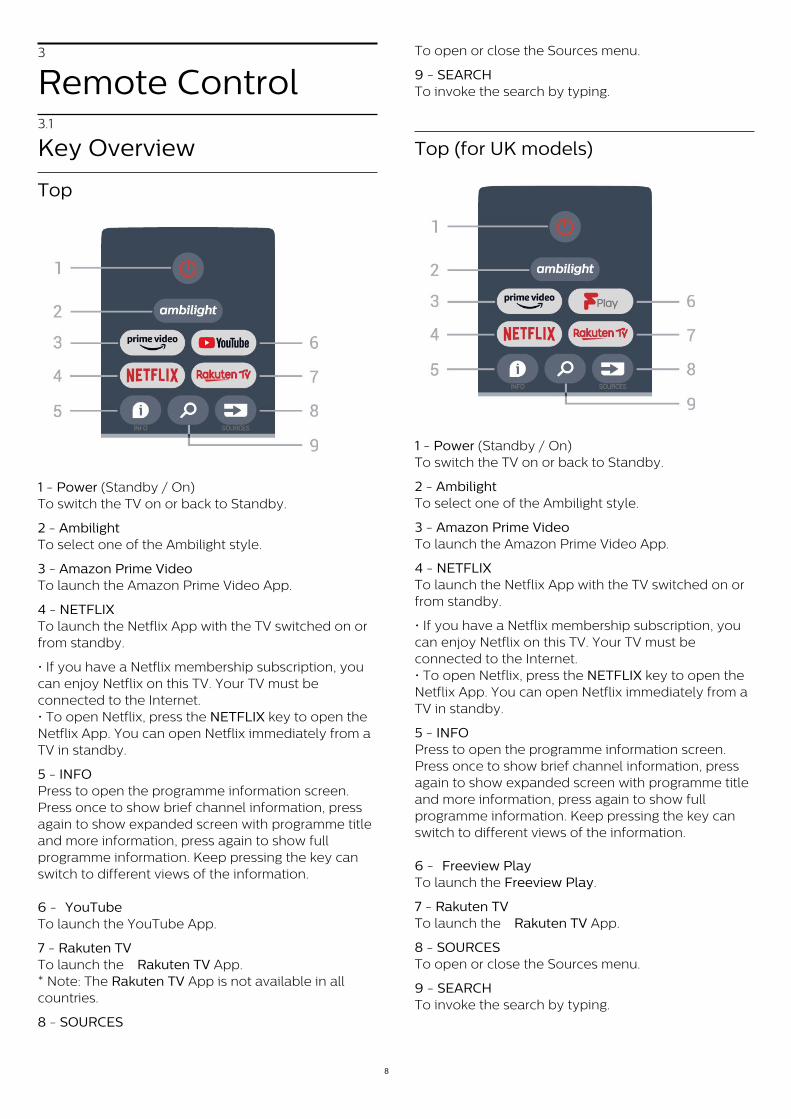
1 - Power (Standby / On)To switch the TV on or back to Standby.
2 - AmbilightTo select one of the Ambilight style.
3 - Amazon Prime VideoTo launch the Amazon Prime Video App.
4 - NETFLIXTo launch the Netflix App with the TV switched on orfrom standby.
• If you have a Netflix membership subscription, youcan enjoy Netflix on this TV. Your TV must beconnected to the Internet.• To open Netflix, press the NETFLIX key to open theNetflix App. You can open Netflix immediately from aTV in standby.
5 - INFOPress to open the programme information screen.Press once to show brief channel information, pressagain to show expanded screen with programme titleand more information, press again to show fullprogramme information. Keep pressing the key canswitch to different views of the information.
6 - YouTubeTo launch the YouTube App.
7 - Rakuten TVTo launch the Rakuten TV App.* Note: The Rakuten TV App is not available in allcountries.
8 - SOURCES
To open or close the Sources menu.
9 - SEARCHTo invoke the search by typing.
Top (for UK models)
1 - Power (Standby / On)To switch the TV on or back to Standby.
2 - AmbilightTo select one of the Ambilight style.
3 - Amazon Prime VideoTo launch the Amazon Prime Video App.
4 - NETFLIXTo launch the Netflix App with the TV switched on orfrom standby.
• If you have a Netflix membership subscription, youcan enjoy Netflix on this TV. Your TV must beconnected to the Internet.• To open Netflix, press the NETFLIX key to open theNetflix App. You can open Netflix immediately from aTV in standby.
5 - INFOPress to open the programme information screen.Press once to show brief channel information, pressagain to show expanded screen with programme titleand more information, press again to show fullprogramme information. Keep pressing the key canswitch to different views of the information.
6 - Freeview PlayTo launch the Freeview Play.
7 - Rakuten TVTo launch the Rakuten TV App.
8 - SOURCESTo open or close the Sources menu.
9 - SEARCHTo invoke the search by typing.
8
Middle
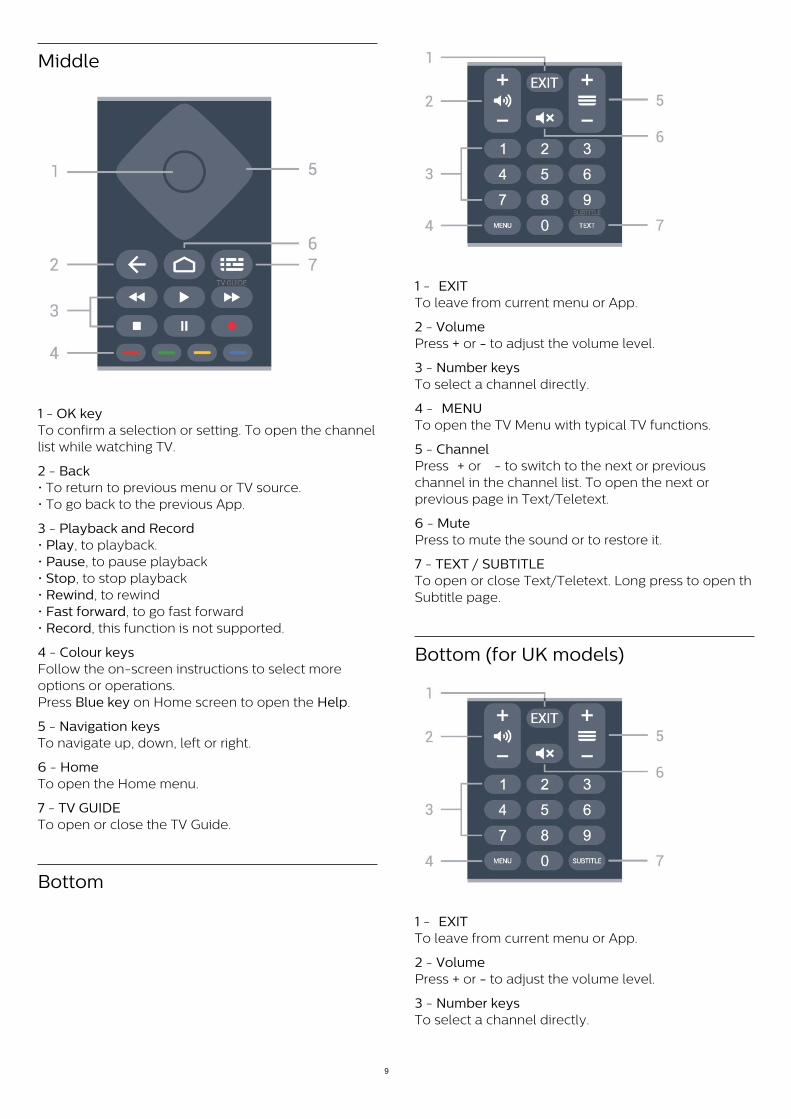
1 - OK keyTo confirm a selection or setting. To open the channellist while watching TV.
2 - Back• To return to previous menu or TV source.• To go back to the previous App.
3 - Playback and Record• Play, to playback.• Pause, to pause playback• Stop, to stop playback• Rewind, to rewind• Fast forward, to go fast forward• Record, this function is not supported.
4 - Colour keysFollow the on-screen instructions to select moreoptions or operations.Press Blue key on Home screen to open the Help.
5 - Navigation keysTo navigate up, down, left or right.
6 - HomeTo open the Home menu.
7 - TV GUIDETo open or close the TV Guide.
Bottom
1 - EXITTo leave from current menu or App.
2 - VolumePress + or - to adjust the volume level.
3 - Number keysTo select a channel directly.
4 - MENUTo open the TV Menu with typical TV functions.
5 - ChannelPress + or - to switch to the next or previouschannel in the channel list. To open the next orprevious page in Text/Teletext.
6 - MutePress to mute the sound or to restore it.
7 - TEXT / SUBTITLE To open or close Text/Teletext. Long press to open thSubtitle page.
Bottom (for UK models)
1 - EXITTo leave from current menu or App.
2 - VolumePress + or - to adjust the volume level.
3 - Number keysTo select a channel directly.
9
4 - MENUTo open the TV Menu with typical TV functions.
5 - ChannelPress + or - to switch to the next or previouschannel in the channel list. To open the next orprevious page in Text/Teletext.
6 - MutePress to mute the sound or to restore it.
7 - SUBTITLE To open Subtitle page.
3.2
IR SensorThe TV can receive commands from a remote controlthat uses IR (infrared) to send commands. If you usesuch a remote control, always make sure you pointthe remote control at the infrared sensor on the frontof the TV.
Warning
Do not put any objects in front of IR sensor of the TV,it may block the IR signal.
3.3
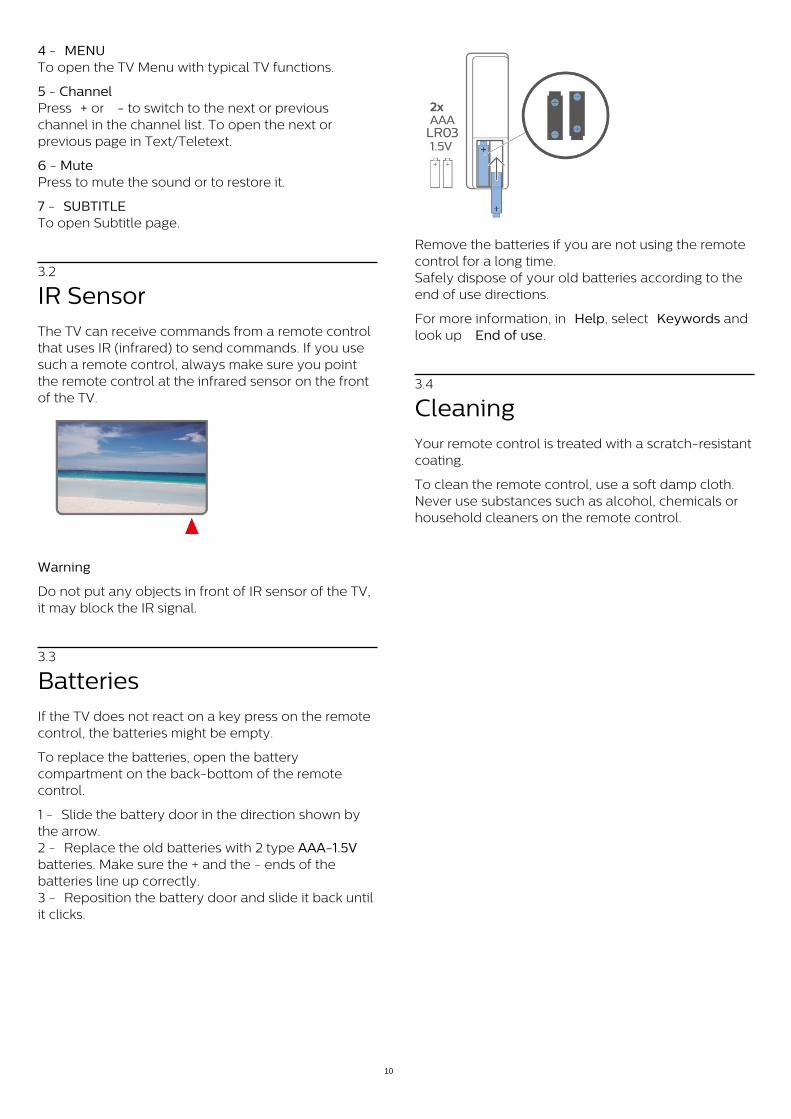
BatteriesIf the TV does not react on a key press on the remotecontrol, the batteries might be empty.
To replace the batteries, open the batterycompartment on the back-bottom of the remotecontrol.
1 - Slide the battery door in the direction shown bythe arrow.2 - Replace the old batteries with 2 type AAA-1.5Vbatteries. Make sure the + and the - ends of thebatteries line up correctly.3 - Reposition the battery door and slide it back untilit clicks.
Remove the batteries if you are not using the remotecontrol for a long time.Safely dispose of your old batteries according to theend of use directions.
For more information, in Help, select Keywords andlook up End of use.
3.4
CleaningYour remote control is treated with a scratch-resistantcoating.
To clean the remote control, use a soft damp cloth.Never use substances such as alcohol, chemicals orhousehold cleaners on the remote control.
10

4
Switching On andOffMake sure the TV is connected to the mains ACpower. The indicator light at the bottom of the TVlights up.
Switch on
Press Power on the remote control to switch the TVon. You can also press the small joystick key on thebottom of the TV to switch the TV on in case you can'tfind the remote control or its batteries are empty.
Switch to standby
To switch the TV to standby, press Power on theremote control. You can also press the small joystickkey on the bottom of the TV.
In standby mode, the TV is still connected to themains power but consumes very little energy.
To switch off the TV completely, disconnect thepower plug.When disconnecting the power plug, always pull thepower plug, never the cord. Ensure that you have fullaccess to the power plug, power cord and outletsocket at all times.
11
5
Channel Installation5.1
First Time to Install Channels
Install channels during the first TV installation
On the first TV installation, you can follow on-screeninstructions to set the menu language, networkconnection, sign in Google account, select yourcountry and complete other basic settings for the TV.Moreover, you can also install channels during thefirst TV installation.
To install channels during the first TV installation…
1 - The first TV installation starts from Welcomescreen with language setting options, follow on-screen instruction to complete multiple TV settingsuntil the channel installation part.2 - The channel installation during the first TVinstallation starts from* Satellite installation, press Start if you want to install satellite channels. Press Skip to skip the satellite installation and goto Antenna or Cable installation page.3 - Follow on-screen instructions to complete one ofthe channel installation types as your selection. Youcan install other types of channel installation lateron MENU > TV options > Settings > Channel.
* Note: The sequence of channel installation typesmay be different depending on the country settingyou just selected. The Antenna and Cable installationcould be the priority options. In this case, the Satelliteinstallation will be available after the Skip is selected.
For more details about Satellite, Antenna and Cablechannel installation, please refer to respectiveinstallation instruction sections.
5.2
Install Digital or AnalogueChannelsWhen scan and install channels, only current TVsource channels will be scanned. If you current TVsource is DTV, the channel scan applied to digitalchannels. If you current TV source is ATV, the channelscan applied to analogue channels.
To set or change TV source, press SOURCES andselect DTV or ATV.
5.3
Satellite
Satellite Installation
Please note that before installing channels, youshould first change the Channel Installation Mode tothe one you want to install. For the Satellite channelinstallation, you need to change Channel InstallationMode to General Satellite or Preferred Satellite firstand then start the installation.
To install Satellite channels…
1 - Press Home > Settings > Channel > ChannelInstallation Mode and press OK.2 - Select General Satellite or Preferred Satellite andthen go back to Channel.3 - Select Channels > Satellite re-scan or SatelliteManual Tuning and press OK.
Alternatively, while watching a TV channel, you canperform the channel scan by...
MENU > Navigation Keys up > Channels > Channel
Satellite Re-scan and SatelliteManual Tuning
Scan channels with Satellite re-scan
To start Satellite re-scan…
1 - Press Home > Settings > Channel > ChannelInstallation Mode and press OK.2 - Select General Satellite or Preferred Satellite andthen go back to Channel.3 - Select Channels > Satellite re-scan andpress OK.4 - Select Next to proceed the scan or select Moreto find more scan types for different satellite systems.Depending on your satellite system, there are 5 typesof Satellite scan modes to select.
• Single - Scan the channels from single satellite.• Tone Burst - Scan the channels from up to 2satellites.• DiSEqC 1.0 - Scan the channels from up to 4satellites.• Unicable I - Scan the channels from up to 2satellites with up to 8 User Band Number.• Unicable II - Scan the channels from up to 4satellites with up to 32 User Band Number.5 - Select Next to start the scan immediately withcurrent satellite settings.
12
6 - Select the Satellite name to view and change thesatellite settings. Once the satellite settings areconfirmed, press Back and select Next to start thescan.
The satellite setting items include all information ofsatellites.
• Satellite Status - The item is not allowed to modifywhen you select Preferred satellite, but allowed in General satellite. Press Navigation keys left or rightto set the Status on or off of the selected satellite.• Satellite selection - The item is only for indicatingthe name of satellite, not allowed to modify.• Scan mode - Press Navigation keys left or right toset the scan mode to Full or Network .• Scan type - Press Navigation keys left or right to setthe scan type to All, Only Encrypted Channels or Only Free Channels.• Store type - Press Navigation keys left or right to setthe store type to All, Only Digital Channels or OnlyRadio Channels.• LNB configurations - Press OK to view or adjust theLNB configurations for the LNB Power, LNBFrequency, Tone 22KHz, Signal quality and Signallevel.• Transponder - Press OK to adjust the Transpondersettings for the Frequency, Symbol Rate and Polarization.• Signal quality - View the signal quality of thesatellite displayed by the value between 0 and 100.• Signal level - View the signal level of the satellitedisplayed by the value between 0 and 100.
Scan channels with Satellite manual tuning
Satellite Manual Tuning is used to scan only onesatellite by setting the Transponder of selectedsatellite. In this condition of scanning, onlyTransponder adjustment is allowed, other settingitems are disabled.
Unicable Setup
The Unicable System
You can use a Single Cable system or Unicablesystem to connect the antenna dish to the TV. ASingle Cable system uses one cable to connect thesatellite dish to all satellite tuners in its system. ASingle Cable system is typically used in apartmentbuildings. If you use a Unicable system, the TV will askyou to assign a user band number and correspondingfrequency during the installation.
If you notice some missing channels after a Unicableinstallation, another installation might have beendone at the same moment on the Unicable system.Do the installation again to install the missingchannels.
User Band Number
In a Unicable system, each connected satellite tunermust be numbered (e.g. 0, 1, 2 or 3 etc.).
You can find the available user bands and theirnumber on the Unicable switchbox. User band issometimes shortened as UB. If you select Unicable inthe settings, the TV will ask you to assign the uniqueuser band number for each built-in satellite tuners. Asatellite tuner cannot have the same user bandnumber as another satellite tuner in the Unicablesystem.
User Band Frequency
Next to the unique user band number, the built-insatellite receiver needs the frequency of the selecteduser band number. These frequencies are mostlyshown next to the user band number on a Unicableswitchbox.
Satellite CAM
If you use a CAM (CI+) – a Conditional Access Modulewith a smart card – to watch satellite channels, werecommend to do the satellite installation with theCAM inserted in the TV.
Most CAMs are used to descramble channels.
Newest generation CAMs can install all the satellitechannels by themselves on your TV. The CAM willinvite you to install its satellite(s) and channels. TheseCAMs not only install and descramble the channelsbut also handle regular channel updates.
To open the CAM (CI+) menu...
Press MENU > TV options > CI Card and press OK.
5.4
Antenna
Antenna Installation
Please note that before installing channels, youshould first change the Channel Installation Mode tothe one you want to install. For the Antenna channelinstallation, you need to change Channel InstallationMode to Antenna first and then start the installation.
To install Antenna channels…
1 - Press Home > Settings > Channel > ChannelInstallation Mode and press OK.2 - Select Antenna and then go back to Channel.
13
3 - Select Channels > Channel Scan andpress OK.
Alternatively, while watching a TV channel, you canperform the channel scan by...
MENU > Navigation Keys up> Channels > Channel
Favourite Network Select
To select the favourite network...
1 - While watching TV, press MENU > TVoptions > Settings > Channel > Channels andpress OK.2 - Select Favourite Network Select and press OK.3 - Follow the on-screen instructions.4 - Press Back, repeatedly if necessary, to close themenu.
5.5
Cable InstallationPlease note that before installing channels, youshould first change the Channel Installation Mode tothe one you want to install. For the Cable channelinstallation, you need to change Channel InstallationMode to Cable first and then start the installation.
To install Cable channels…
1 - Press Home > Settings > Channel > ChannelInstallation Mode and press OK.2 - Select Cable and then go back to Channel.3 - Select Channels > Channel Scan andpress OK.4 - Press Navigation keys left or right to select ascan mode.
Full scan 1 - Select Full.2 - Select Scan and press OK to start. This cantake a few minutes.
Quick or Advance scan 1 - Select Quick or Advance.2 - You can set the Frequency (KHz) and NetworkID.3 - Select Scan and press OK to start. This cantake a few minutes.
Alternatively, while watching a TV channel, you canperform the channel scan by...
MENU > Navigation Keys up > Channels >
Channel
5.6
Channel Installation Options
Single RF Scan and Reception Quality
You can check the quality and signal strength of adigital channel. If you have your own antenna, youcan reposition the antenna to try and improve thereception.
To check the reception quality of a digital channel… 1 - While watching TV, press MENU > TV options > Settings > Channel > Channels > Single RF Scan andpress OK.2 - Select RF Channel.3 - Press Navigation keys left or right to select achannel and press OK. The signal level and signalquality is shown for this channel.4 - Press Back, repeatedly if necessary, to close themenu.
Channel Scan or Store Type
You can set the channel type for scanned or stored.
To set the channel scan type... 1 - While watching TV, press MENU > TVoptions > Settings > Channel > Channels andpress OK.2 - Select Channel Scan Type and press OK.3 - Select the scan type you want and press OK.4 - Press Back, repeatedly if necessary, to close themenu.
To set the channel store type... 1 - While watching TV, press MENU > TVoptions > Settings > Channel > Channels andpress OK.2 - Select Channel Store Type and press OK.3 - Select the store type you want and press OK.4 - Press Back, repeatedly if necessary, to close themenu.
Channel Skip
You can skip the channels you do not want to watch.
To set the skipped channels ... 1 - While watching TV, press MENU > TVoptions > Settings > Channel > Channels andpress OK.2 - Select Channel Skip* and press OK.3 - Select the channels you want to skip andpress OK. The check mark is shown.4 - Press Back, repeatedly if necessary, to close the
14
menu.
* Note: You cannot skip the current watching channel.
Channel Sort
You can swap the position on the channel list foreach channel.
To swap the channel number... 1 - While watching TV, press MENU > TVoptions > Settings > Channel > Channels andpress OK.2 - Select Channel Sort* and press OK.3 - Press OK to select a channel, and then press Navigation keys up or down to select anotherchannel. The position of first selected channel andthe second selected channel will be swapped to eachother.4 - Press Blue key Exit to finish the operation.5 - Press Yellow key Go To Channel and input thechannel number to jump to the channel.6 - Press Back, repeatedly if necessary, to close themenu.
* Note: Depending on your installation country oroperator setting, Channel Sort option is not alwaysavailable.
Channel Move
You can change the channels order as you like.
To move channels ... 1 - While watching TV, press MENU > TVoptions > Settings > Channel > Channels andpress OK.2 - Select Channel Move* and press OK.3 - Follow the on-screen description to select.4 - Press Back, repeatedly if necessary, to close themenu.
* Note: Depending on your installation country oroperator setting, Channel Move option is not alwaysavailable.
Channel Edit
You can edit the channels from the channel list.
To edit the channels ... 1 - While watching TV, press MENU > TVoptions > Settings > Channel > Channels andpress OK.
2 - Select Channel Edit and press OK.3 - Use the Navigation keys to select the channeland press Yellow key for Select.4 - Edit the channel number* and channel name.5 - Press Back, repeatedly if necessary, to close themenu.
* Note: Depending on your installation country oroperator setting, channel number editing is notalways available.
Analogue Manual Scan
Analogue TV channels can be manually installed.
To install analogue channels manually… 1 - While watching TV, press MENU > TVoptions > Settings > Channel > Channels andpress OK.2 - Select Analogue Manual Scan and press OK.
Analogue Channel Fine Tune
Analogue TV channels can be manually fine tuned.
To fine tune a channel... 1 - While watching TV, press MENU > TVoptions > Settings > Channel > Channels andpress OK.2 - Select Analogue Channel Fine-tune andpress OK.3 - You can fine tune the channel.4 - Press Back, repeatedly if necessary, to close themenu.
5.7
Update Channels
Automatic Channel Update
If you receive digital channels, you can set the TV toautomatically update these channels.
Once a day, the TV updates the channels and storesnew channels. The TV must be in standby toautomatically update channels. You can switch offautomatic update.
To switch off the automatic update…
1 - While watching TV, press MENU > TV options> Settings > Channel.2 - Enter your PIN code if necessary.3 - Select Auto Channel Update and press OK.4 - Press Back, repeatedly if necessary, to close themenu.
In certain countries, the Automatic channel update isdone while watching TV or on any moment when the
15
TV is in standby.
Channel Update Message
Once the automatic channel update is done, anotification will be displayed when TV leaving fromstandby mode.
To switch off the message of channel update…
1 - While watching TV, press MENU > TV options> Settings > Channel.2 - Enter your PIN code if necessary.3 - Select Channel Update Message and press OK.4 - Press Back, repeatedly if necessary, to close themenu.
Manual Channel Update
You can always start a channel update yourself.
To start a channel update manually…
1 - While watching TV, press MENU > TV options> Settings > Channel > Channels and select one ofbelow options.Channel Scan - this kind of scan will auto installdigital channels or analogue channels depending onyour current TV source setting is DTV or ATV .Update Scan - refers to an incremental scan, whichonly scans the frequencies that Channel Scan has notscanned.Analog Manual Scan - allow user to input analoguefrequency to start manual scan.Single RF Scan - is digital manual scan, this allow userto scan specific frequency by pressing left or rightNavigation Key on the RF Channel item.Manual Service Update - is used to start backgroundscan that new channels can be scanned withoutchanging the existing channels.2 - Enter your PIN code if necessary.3 - The channel scan will start immediately. This cantake a few minutes to complete the channel update.4 - Press Back, repeatedly if necessary, to close themenu.
16
6
Channels6.1
About Channels and SwitchChannels
To watch TV channels • Press SOURCES and select DTV to watch digitalchannels or ATV to watch analogue channels.• Alternatively, you can Press Home > Live TV andpress OK to watch current TV source channels. IfLive TV is not on your Apps row, you can press + iconon the end of the row to add the app.
To switch TV channels • Press Channel + or Channel - to switch channels.• If you know the channel number, type in the numberwith the number keys. Press OK after you enteredthe number to switch channels.
To switch to a channel from a channel list • While watching a TV channel, press OK to open thechannel lists. The channel list only includes thechannels from current broadcast source like GeneralSatellite, Preferred Satellite, Antenna or Cable .• To view different channel list from other broadcastsource, press MENU > Navigation Keys up > Channels> Channel > Channel Installation Mode and selectother broadcast source you want to watch channelsand view the channel list.• The channel list can have several pages withchannels. To view the next or previous page, followthe on-screen instruction.• To close the channel lists without switchingchannels, press Back.
Radio channels
If digital broadcasting is available, digital radiostations are installed during installation. Switch to aradio channel just like you switch to a TV channel.
TV may not work properly with some operators ofdigital television , non-compliance with requirementsof the standard in full.
6.2
Channel Lists
About Channel Lists
After a channel installation, all channels appear onthe All channel list. The channels displayed in AllChannel list is listed based on genre*. For example:Premium, Premium News, Premium Local, Children,Sport and etc. The Premium genre are top broadcastchannels positioned with market share above 3%.Channels are shown with their name if thisinformation is available.
With a channel list selected, press Navigation keysup or down to select a channel, then press OK towatch the selected channel.
* Note: The listed by genre function is only apply toGermany.
Radio channels
If digital broadcasting is available, digital radiostations are installed during installation. Switch to aradio channel just like you switch to a TV channel.
TV may not work properly with some operators ofdigital television , non-compliance with requirementsof the standard in full.
Open a Channel List
Next to the list with all channels, you can select afiltered list or you can select one of the favourite listsyou created.
To open the current channel list… 1 - While watching TV, press OK to open the currentchannel list.2 - The channel list only includes the channels fromcurrent broadcast source like General Satellite, Preferred Satellite, Antenna or Cable.3 - To view different channel list from otherbroadcast source, press MENU > Navigation Keys up> Channels > Channel > Channel Installation Modeand select other broadcast source you want to watchchannels and view the channel list.4 - Press Back to close the channel list.
To change the type of channel list… 1 - While watching TV, press OK to open the currentchannel list.2 - Press Yellow key for Select More and then select Select Type (for example, Broadcast or Favourites) toimmediately change the channel list to your preferredlist.3 - Press Back to close the channel list.
17
Search for a Channel
You can search for a channel to find it in a long list ofchannels.
To search for a channel… 1 - Press OK to open the current channel list.2 - Press Yellow key for Select More.3 - Select Operation > Find and press OK to opena text field. You can use the remote control keyboard(if available) or the on-screen keyboard to enter text.4 - Enter a number, a name or part of a name andpress OK. The TV will search for matching channelnames in the list you selected.
Search results are listed with current channel list typeyou have selected (for example, Broadcast or Favourites). The search will return the matchingchannel name with the result arranged in alphabeticalorder. The search results disappear once you selectanother channel list or close the list with searchresults.
Channel List Sorting
You can do channel list sorting with all channels. Youcan set the channel list to show only TV channels oronly Radio stations. For Antenna channels you canset the list to show the Free or the Scrambledchannels.
To set a filter on a list with all channels… 1 - Press OK to open the current channel list.2 - Press Yellow key for Select More.3 - Select Operation > Sort and press OK.4 - Select the filter you want and press OK toactivate. The name of the filter appears as part of thechannel list name on top of the channel list.5 - Press Back to close the channel list.
Channel List on Freeview Play
There will be a specific channel list operation for UK Freeview Play.
After a channel installation, all channels appear onthe channel list. Channels are shown with their nameif this information is available.
To open the current channel list… 1 - While watching TV, press OK to open the currentchannel list.2 - Press Back to close the channel list.
With a channel list selected, press Navigation keysup or down to select a channel, then press OK towatch the selected channel. Press Navigation keysleft or right to change the filter on the channel list.You can set the channel list to show All channels,
Favourite channels, or other types of channels.
On channel list page, press different colour keys to domore operations...
• Red key Page Up – Jump one page up on channellist.• Green key Page Down – Jump one page down onchannel list.• Yellow key Players– Go and select other Players toget more programmes. You need to connect your TVto Internet first to have this feature.
• Blue key Add/Remove Favourite – Add or removeselected channel from Favourite channel list.
* Freeview Play is only for UK models.
6.3
Watching channels
Tune to a Channel
To start watching TV channels, press SOURCES. TheTV tunes to the channel you last watched.
Alternatively, you can select Live TV from the Homescreen.
Switch Channels
To switch channels, press Channel + or Channel -.If you know the channel number, type in the numberwith the number keys. Press OK after you enteredthe number to switch immediately.
You can also tune to channels from a Channel Listby pressing OK.
Parental Controls
Lock and Unlock a Channel
To prevent children from watching a channel, you canlock a channel. To watch a locked channel, you mustenter the 4 digit PIN code first. You cannot lockprogrammes from connected devices.
To lock or unlock a channel… 1 - Press MENU > Settings > Channel > ParentalControls and press OK.2 - Enter your PIN code if necessary.3 - Select Channels Blocked and press OK.4 - Press Navigation keys up or down to select thechannel you want to lock or unlock, and press OK.5 - A locked channel is marked with a lock icon.6 - Press Back, repeatedly if necessary, to close themenu.
18
Programme Restrictions
To prevent children from watching a programme thatmay not suitable for them, you can set a rating.
Digital channels can have their programmes rated.When the rating of a programme is equal to or higherthan the rating you have set, the programme will belocked. To watch a locked programme, you mustenter the PIN code first.
To set a rating… 1 - Press MENU > Settings > Channel > ParentalControls and press OK.2 - Enter your PIN code if necessary.3 - Select Programme Restrictions and press OK.4 - Select On to set the rating.5 - Select Ratings and press OK.6 - Set the restrictions for your children.7 - Press Back, repeatedly if necessary, to close themenu.
To switch off the parental rating, select None.However, in some countries you must set a rating.
For some broadcasters/operators, the TV only locksprogrammes with a higher rating. The parental ratingis set for all channels.
Inputs Blocked
To prevent from using connected devices, you canlock an input source. To connect a locked inputsource, you must enter the 4 digit PIN code first.
To lock or unlock an input source… 1 - Press MENU > Settings > Channel > ParentalControls and press OK.2 - Enter your PIN code if necessary.3 - Select Input Blocked and press OK.4 - Press Navigation keys up or down to select thesource you want to lock or unlock, and press OK.5 - A locked source is marked with a lock icon.6 - Press Back, repeatedly if necessary, to close themenu.
Change PIN
Set new or reset PIN code. The PIN code is used tolock or unlock channels or programmes.
1 - Press MENU > Settings > Channel > ParentalControls and press OK.2 - Enter your PIN code if necessary.3 - Select Change PIN and press OK.4 - Enter the current PIN code and new PIN code.5 - Press Back, repeatedly if necessary, to close themenu.
6.4
Favourite Channels
About Favourite Channels
In a favourite channel list, you can collect thechannels you like.
You can create 4 different lists* of favourite channelsfor easy channel zapping.
With a Favourites List selected, press the Navigationkeys up or down to select a channel, thenpress OK to watch the selected channel.
* Note: Only one favourite channel list is availablewhen the installation country is UK.
Edit a Favourites List - Digital TV
To add a channel to the favourite list… 1 - While watching TV, press OK to open the currentchannel list.2 - Press Navigation keys up or down to select achannel.3 - Press Blue key to add the channel to a favouriteslist (default list is Favourtites1). Press Blue key againwill remove the channel from the favourite list.4 - Press Back to close the menu.
To create a favourite channels list… 1 - While watching TV, press OK to open the currentchannel list.2 - Press Yellow key for Select More.3 - Select Select Type > Favourites and then press Navigation keys up or down to select a list of Favourites1* to Favourites4 that you want to add.4 - Press Yellow key for Select More and then select Select Type to change the channel list to yourpreferred list.5 - Press Blue key to add the channel to thefavourites list you just selected. Press Blue key againwill remove the channel from the favourite list.6 - Press Back to close the menu.
To move or remove a channel from the favourites
list… 1 - Select a list of Favourites1* to Favourites4 youwant to edit.2 - Press Yellow key for Select More.3 - Select Operation > Move to move the channelpositions on the favourite channel list.4 - Select Operation > Delete to remove thechannels from the favourite channel list.5 - Press Back, repeatedly if necessary, to close themenu.
19
* Note: Only one favourite channel list is availablewhen the installation country is UK.
Edit a Favourites List - Analogue TV
To add a channel to the favourite list… 1 - While watching Analogue TV, press OK to openthe current channel list.2 - Press Navigation keys up or down to select achannel.3 - Press Blue key to add the channel to a favouriteslist (default list is Favourtites1). Press Blue key againwill remove the channel from the favourite list.4 - Press Back to close the menu.
To create a favourite channels list… 1 - While watching Analogue TV, press OK to openthe current channel list.2 - Press Yellow key for Favourites.3 - Press Navigation keys left or right to select a listof Favourites1* to Favourites4 that you want to add.4 - Press Back to see the channel list is changed toyour preferred list.5 - Press Blue key to add the channel to thefavourites list you just selected. Press Blue key againwill remove the channel from the favourite list.6 - Press Back to close the menu.
To move or remove a channel from the favourites
list… 1 - Select a list of Favourites1* to Favourites4 youwant to edit.2 - Press Yellow key for Favourites.3 - Select Move to move the channel positions onthe favourite channel list.4 - Select Delete to remove the channels from thefavourite channel list.5 - Press Back to close the menu.
* Note: Only one favourite channel list is availablewhen the installation country is UK.
6.5
Interactive TV
About iTV
With interactive TV, some digital broadcasterscombine their normal TV programme with informationor entertainment pages. On some pages, you canrespond to a programme or vote, do online shoppingor pay for a video-on-demand programme.
Interactive TV is sometimes referred to as Digital Textor Red button. But each system is distinct.
Visit the broadcaster's Internet website for moreinformation.
What You Need
Interactive TV is only available on digital TV channels.To enjoy the full benefits of Interactive TV, you needa high-speed (broadband) Internet connection to theTV.
HbbTV
If a TV channel offers HbbTV pages, you must firstswitch on HbbTV in the TV settings to view the pages.
To switch on the HBBTV support
MENU > TV options > Advanced options > HbbTVsettings
Use iTV
Open iTV pages
Most channels that offer HbbTV or iTV invite you topress the colour key or OK key to open theirinteractive programme.
Navigate iTV pages
You can use the arrow and colour keys, the numberkeys and the Back key to navigate the iTV pages.You can use the Play, Pause and Stop keys towatch videos within iTV pages.
Close iTV pages
Most iTV pages inform you which key to use to close.To force an iTV page to close, switch to the next TVchannel and press Back.
20
7
Connect Devices7.1
About Connections
Connectivity Guide
Always connect a device to the TV with the highestquality connection available. Also, use good qualitycables to ensure a good transfer of picture andsound.
When you connect a device, the TV recognizes itstype and gives each device a correct type name. Youcan change the type name if you wish. If a correcttype name for a device is set, the TV automaticallyswitches to the ideal TV settings when you switch tothis device in the Sources menu.
Antenna port
If you have a Set-top box (a digital receiver) orRecorder, connect the antenna cables to run theantenna signal through the Set-top box and/orRecorder first before it enters the TV. In this way, theantenna and the Set-top box can send possibleadditional channels to the Recorder to record.
HDMI ports
HDMI Quality
An HDMI connection has the best picture and soundquality. One HDMI cable combines video and audiosignals. Use an HDMI cable for High Definition (HD)TV signals.
For best signal quality transfer, use a High speedHDMI cable and do not use an HDMI cable longerthan 5 m.
Copy protection
HDMI ports support HDCP 2.2 (High-bandwidthDigital Content Protection). HDCP is a copy protectionsignal that prevents copying content from a DVD discor Blu-ray Disc. Also referred to as DRM (DigitalRights Management).
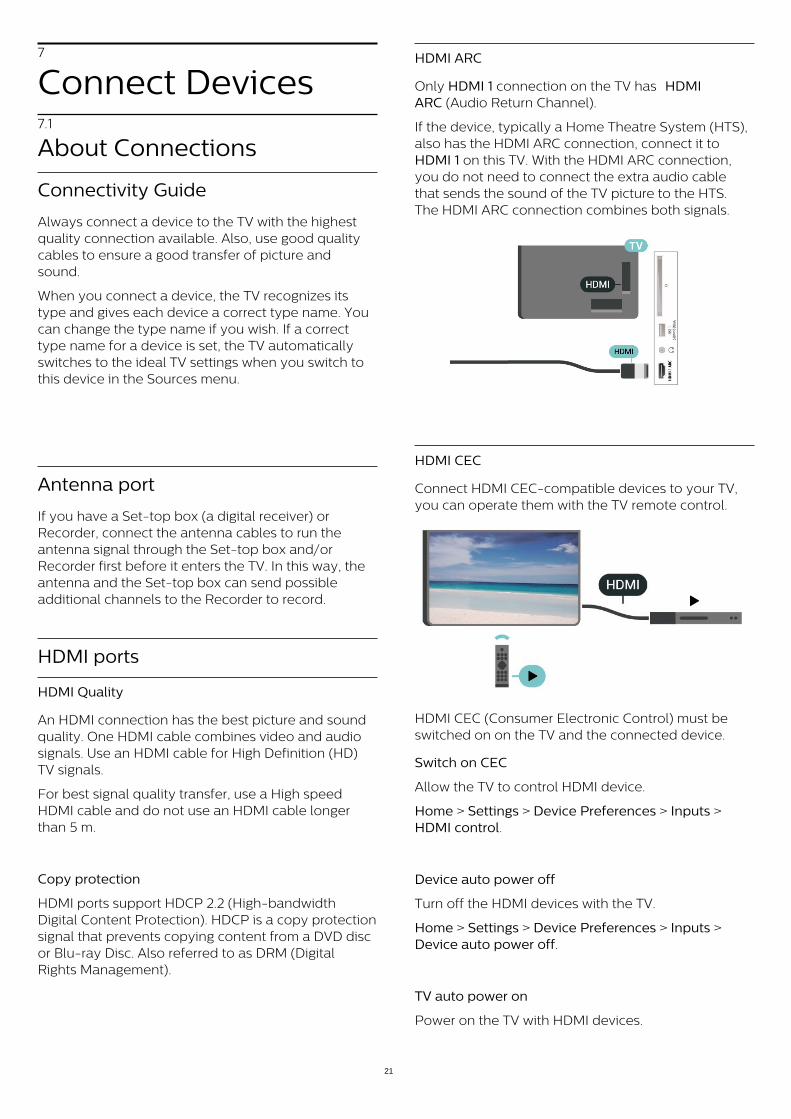
HDMI ARC
Only HDMI 1 connection on the TV has HDMIARC (Audio Return Channel).
If the device, typically a Home Theatre System (HTS),also has the HDMI ARC connection, connect it to HDMI 1 on this TV. With the HDMI ARC connection,you do not need to connect the extra audio cablethat sends the sound of the TV picture to the HTS.The HDMI ARC connection combines both signals.
HDMI CEC
Connect HDMI CEC-compatible devices to your TV,you can operate them with the TV remote control.
HDMI CEC (Consumer Electronic Control) must beswitched on on the TV and the connected device.
Switch on CEC
Allow the TV to control HDMI device.
Home > Settings > Device Preferences > Inputs > HDMI control.
Device auto power off
Turn off the HDMI devices with the TV.
Home > Settings > Device Preferences > Inputs > Device auto power off.
TV auto power on
Power on the TV with HDMI devices.
21
Home > Settings > Device Preferences > Inputs > TVauto power on.
HDMI EDID Version
Check the HDMI EDID version number.
Home > Settings > Device Preferences > Inputs> HDMI EDID Version.
CEC Device List
Check the connected HDMI CEC device list.
Home > Settings > Device Preferences > Inputs> CEC device list.
Note:
• HDMI CEC might not work with devices from otherbrands.• The HDMI CEC functionality has different names ondifferent brands. Some examples are: Anynet, AquosLink, Bravia Theatre Sync, Kuro Link, Simplink andViera Link. Not all brands are fully compatible withEasyLink. Example HDMI CEC branding names areproperty of their respective owners.
7.2
CAM with Smart Card - CI+
CI+
This TV is ready for the CI+ Conditional Access .
With CI+ you can watch premium HD programmes,like movies and sports, offered by digital TV operatorsin your region. These programmes are scrambled bythe TV operator and descrambled with a prepaid CI+module.Digital TV operators provide a CI+ module(Conditional Access Module - CAM) and anaccompanying smart card, when you subscribe totheir premium programmes. These programmes havea high level of copy protection.
Contact a digital TV operator for more information onterms & conditions.
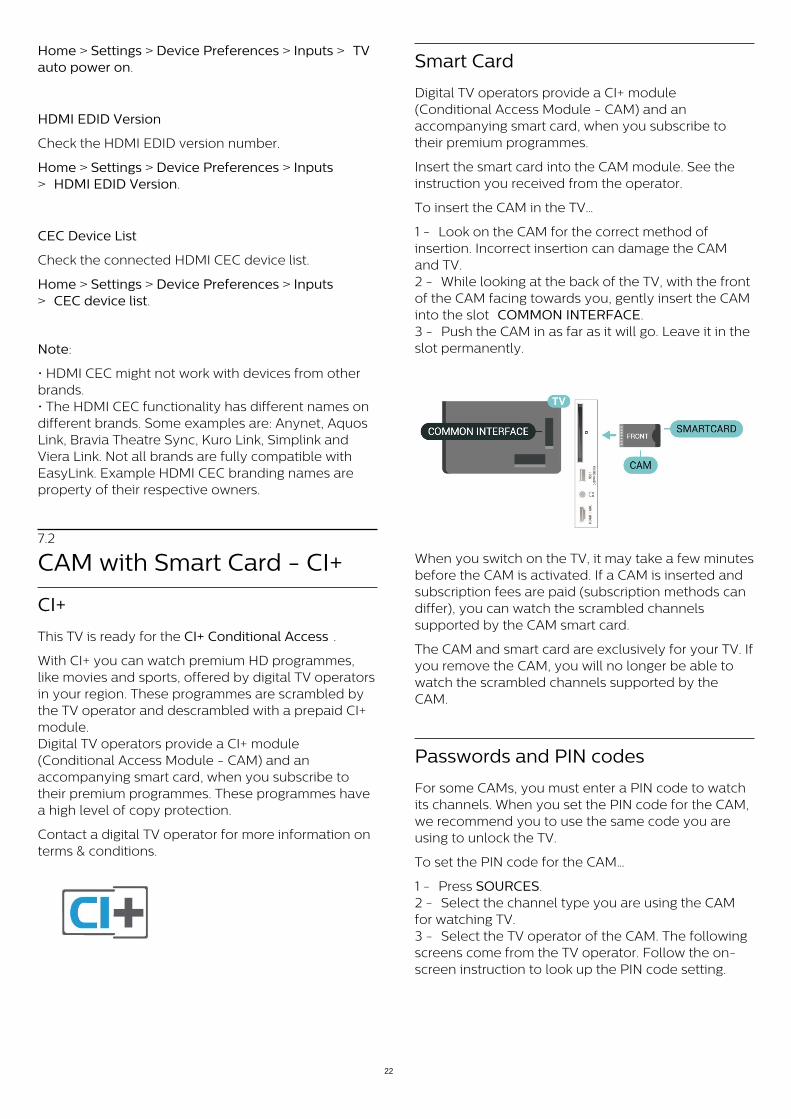
Smart Card
Digital TV operators provide a CI+ module(Conditional Access Module - CAM) and anaccompanying smart card, when you subscribe totheir premium programmes.
Insert the smart card into the CAM module. See theinstruction you received from the operator.
To insert the CAM in the TV…
1 - Look on the CAM for the correct method ofinsertion. Incorrect insertion can damage the CAMand TV.2 - While looking at the back of the TV, with the frontof the CAM facing towards you, gently insert the CAMinto the slot COMMON INTERFACE.3 - Push the CAM in as far as it will go. Leave it in theslot permanently.
When you switch on the TV, it may take a few minutesbefore the CAM is activated. If a CAM is inserted andsubscription fees are paid (subscription methods candiffer), you can watch the scrambled channelssupported by the CAM smart card.
The CAM and smart card are exclusively for your TV. Ifyou remove the CAM, you will no longer be able towatch the scrambled channels supported by theCAM.
Passwords and PIN codes
For some CAMs, you must enter a PIN code to watchits channels. When you set the PIN code for the CAM,we recommend you to use the same code you areusing to unlock the TV.
To set the PIN code for the CAM…
1 - Press SOURCES.2 - Select the channel type you are using the CAMfor watching TV.3 - Select the TV operator of the CAM. The followingscreens come from the TV operator. Follow the on-screen instruction to look up the PIN code setting.
22
7.3
Home Theatre System - HTS
Connect with HDMI ARC
Use an HDMI cable to connect a Home TheatreSystem (HTS) to the TV. You can connect a PhilipsSoundbar or an HTS with a built-in disc player.
HDMI ARC
If your Home Theatre System has an HDMI ARCconnection, you can use HDMI ARC connection onthe TV to connect. With HDMI ARC, you do not needto connect the extra audio cable. The HDMI ARCconnection combines both signals.Since HDMI 1 on the TV can offer the Audio ReturnChannel (ARC) signal, the TV can only send the ARCsignal to this HDMI connection.
Audio to video synchronisation (sync)
If the sound does not match the video on screen, youcan set a delay on most Home Theatre Systems witha disc player to match the sound with the video.
Connect with HDMI
Use an HDMI cable to connect a Home TheatreSystem (HTS) to the TV. You can connect a PhilipsSoundbar or an HTS with a built-in disc player.
If the Home Theatre System has no HDMI ARCconnection, add an optical audio cable to send thesound of the TV picture to the Home Theatre System.
Audio to video synchronisation (sync)
If the sound does not match the video on screen, youcan set a delay on most Home Theatre Systems witha disc player to match the sound with the video.
7.4
Video Device
HDMI
Use a High speed HDMI cable to connect with bestpicture and sound quality.
For best signal quality transfer, use a High speedHDMI cable and do not use an HDMI cable longerthan 5 m, and also connect devices supporting HDRon any one of HDMI connections.
Copy protection
HDMI ports support HDCP (High-bandwidth DigitalContent Protection). HDCP is a copy protection signalthat prevents copying content from a DVD disc or Blu-ray Disc. Also referred to as DRM (Digital RightsManagement).
7.5
Audio Device
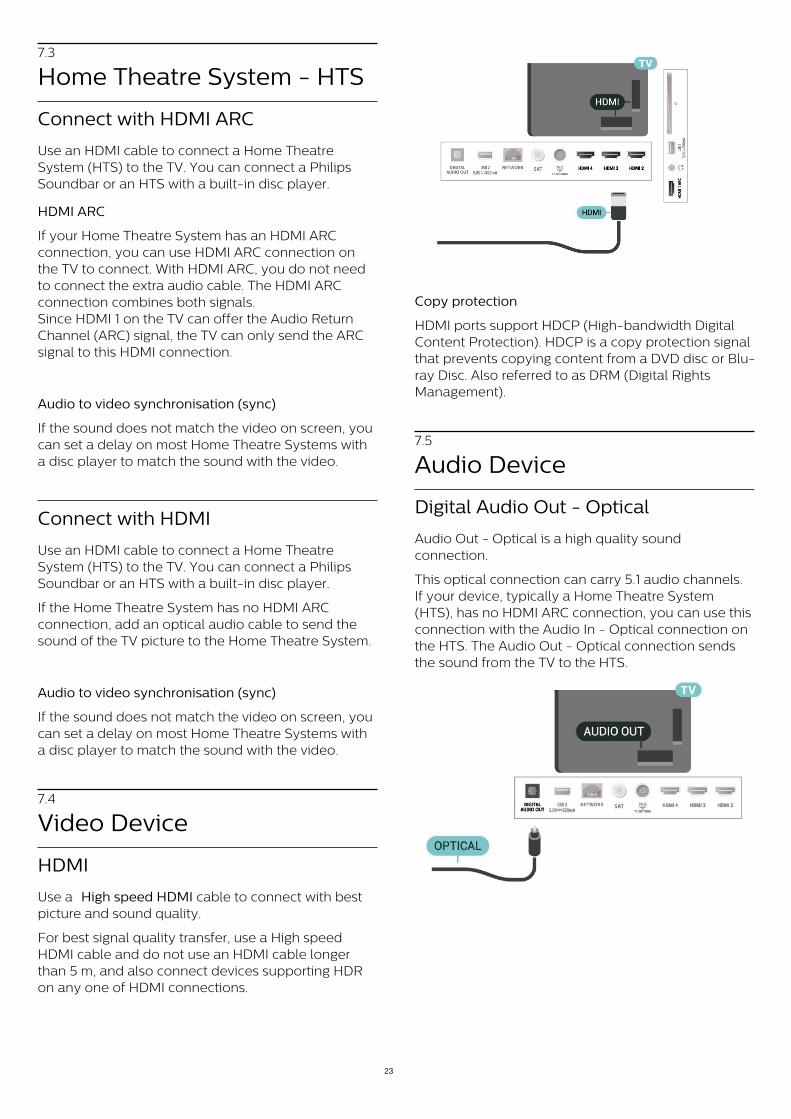
Digital Audio Out - Optical
Audio Out - Optical is a high quality soundconnection.
This optical connection can carry 5.1 audio channels.If your device, typically a Home Theatre System(HTS), has no HDMI ARC connection, you can use thisconnection with the Audio In - Optical connection onthe HTS. The Audio Out - Optical connection sendsthe sound from the TV to the HTS.
23
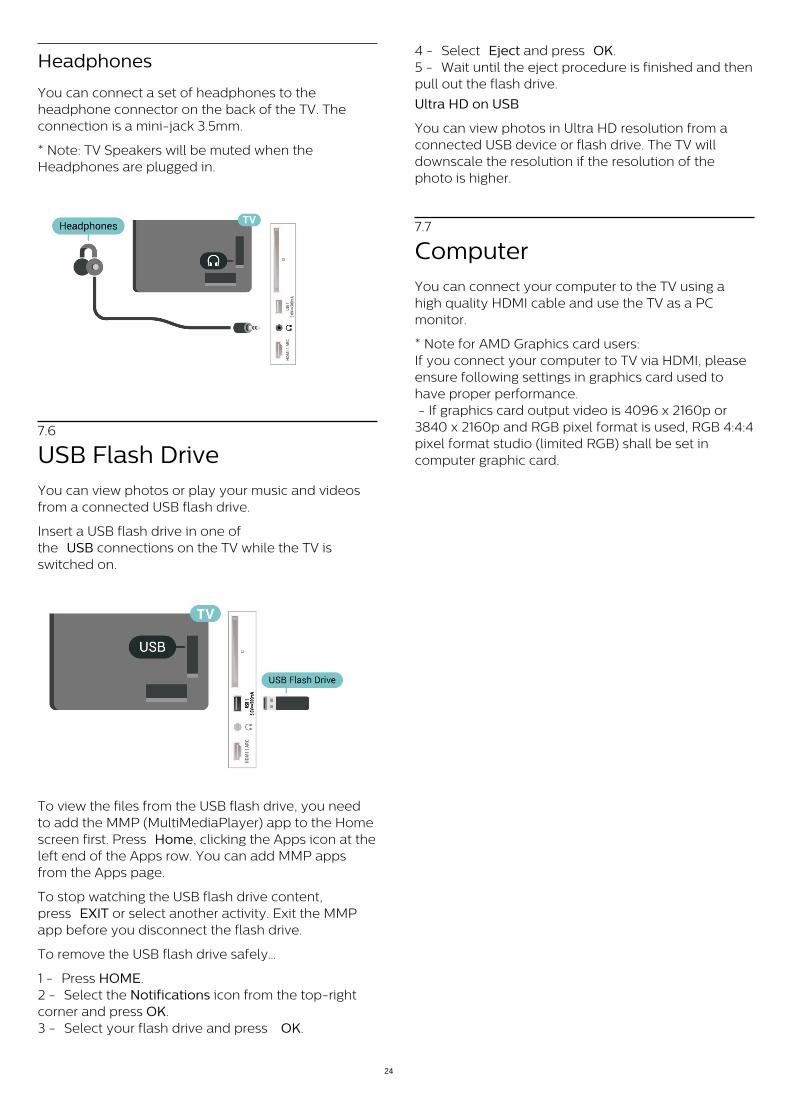
Headphones
You can connect a set of headphones to theheadphone connector on the back of the TV. Theconnection is a mini-jack 3.5mm.
* Note: TV Speakers will be muted when theHeadphones are plugged in.
7.6
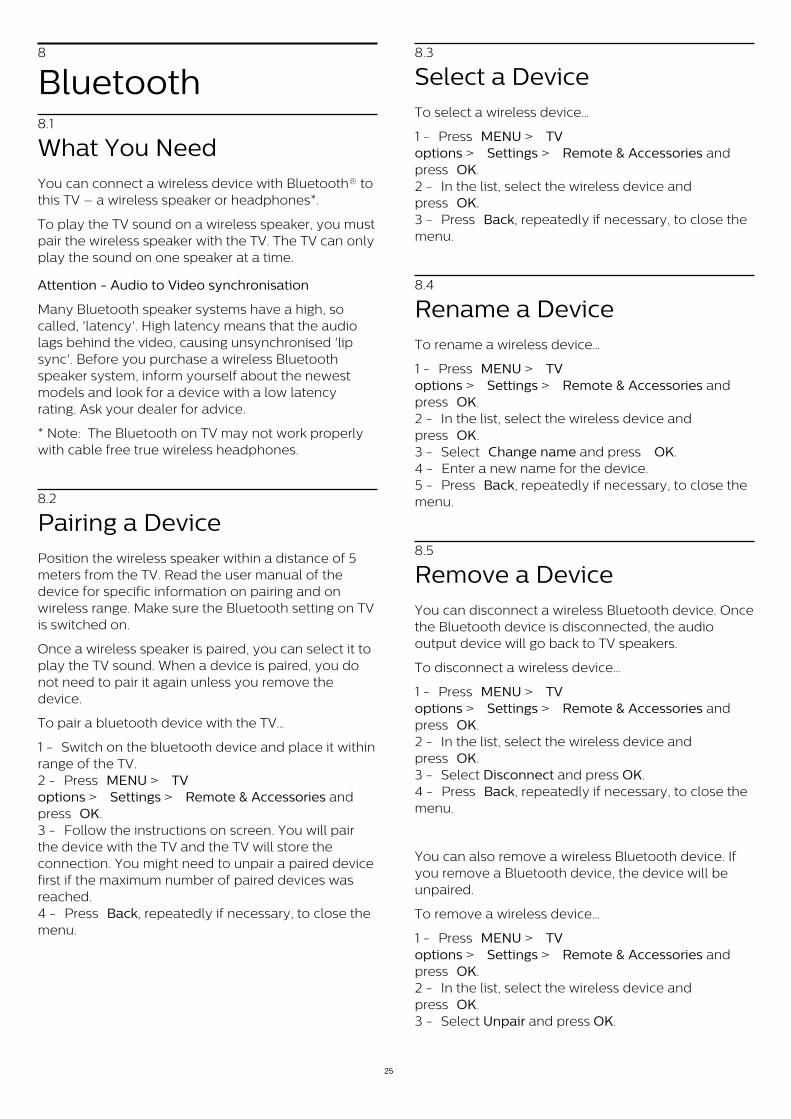
USB Flash DriveYou can view photos or play your music and videosfrom a connected USB flash drive.
Insert a USB flash drive in one ofthe USB connections on the TV while the TV isswitched on.
To view the files from the USB flash drive, you needto add the MMP (MultiMediaPlayer) app to the Homescreen first. Press Home, clicking the Apps icon at theleft end of the Apps row. You can add MMP appsfrom the Apps page.
To stop watching the USB flash drive content,press EXIT or select another activity. Exit the MMPapp before you disconnect the flash drive.
To remove the USB flash drive safely…
1 - Press HOME.2 - Select the Notifications icon from the top-rightcorner and press OK.3 - Select your flash drive and press OK.
4 - Select Eject and press OK.5 - Wait until the eject procedure is finished and thenpull out the flash drive.
Ultra HD on USB
You can view photos in Ultra HD resolution from aconnected USB device or flash drive. The TV willdownscale the resolution if the resolution of thephoto is higher.
7.7
ComputerYou can connect your computer to the TV using ahigh quality HDMI cable and use the TV as a PCmonitor.
* Note for AMD Graphics card users:If you connect your computer to TV via HDMI, pleaseensure following settings in graphics card used tohave proper performance. - If graphics card output video is 4096 x 2160p or3840 x 2160p and RGB pixel format is used, RGB 4:4:4pixel format studio (limited RGB) shall be set incomputer graphic card.
24
8
Bluetooth8.1
What You NeedYou can connect a wireless device with Bluetooth® tothis TV – a wireless speaker or headphones*.
To play the TV sound on a wireless speaker, you mustpair the wireless speaker with the TV. The TV can onlyplay the sound on one speaker at a time.
Attention - Audio to Video synchronisation
Many Bluetooth speaker systems have a high, socalled, 'latency'. High latency means that the audiolags behind the video, causing unsynchronised 'lipsync'. Before you purchase a wireless Bluetoothspeaker system, inform yourself about the newestmodels and look for a device with a low latencyrating. Ask your dealer for advice.
* Note: The Bluetooth on TV may not work properlywith cable free true wireless headphones.
8.2
Pairing a DevicePosition the wireless speaker within a distance of 5meters from the TV. Read the user manual of thedevice for specific information on pairing and onwireless range. Make sure the Bluetooth setting on TVis switched on.
Once a wireless speaker is paired, you can select it toplay the TV sound. When a device is paired, you donot need to pair it again unless you remove thedevice.
To pair a bluetooth device with the TV…
1 - Switch on the bluetooth device and place it withinrange of the TV.2 - Press MENU > TVoptions > Settings > Remote & Accessories andpress OK.3 - Follow the instructions on screen. You will pairthe device with the TV and the TV will store theconnection. You might need to unpair a paired devicefirst if the maximum number of paired devices wasreached.4 - Press Back, repeatedly if necessary, to close themenu.
8.3
Select a DeviceTo select a wireless device…
1 - Press MENU > TVoptions > Settings > Remote & Accessories andpress OK.2 - In the list, select the wireless device andpress OK.3 - Press Back, repeatedly if necessary, to close themenu.
8.4
Rename a DeviceTo rename a wireless device…
1 - Press MENU > TVoptions > Settings > Remote & Accessories andpress OK.2 - In the list, select the wireless device andpress OK.3 - Select Change name and press OK.4 - Enter a new name for the device.5 - Press Back, repeatedly if necessary, to close themenu.
8.5
Remove a DeviceYou can disconnect a wireless Bluetooth device. Oncethe Bluetooth device is disconnected, the audiooutput device will go back to TV speakers.
To disconnect a wireless device…
1 - Press MENU > TVoptions > Settings > Remote & Accessories andpress OK.2 - In the list, select the wireless device andpress OK.3 - Select Disconnect and press OK.4 - Press Back, repeatedly if necessary, to close themenu.
You can also remove a wireless Bluetooth device. Ifyou remove a Bluetooth device, the device will beunpaired.
To remove a wireless device…
1 - Press MENU > TVoptions > Settings > Remote & Accessories andpress OK.2 - In the list, select the wireless device andpress OK.3 - Select Unpair and press OK.
25

4 - Press Back, repeatedly if necessary, to close themenu.
26
9
Connect yourAndroid TV9.1
Network and Internet
Home Network
To enjoy the full capabilities of your Philips AndroidTV, your TV must be connected to the Internet.
Connect the TV to a home network with a high-speedInternet connection. You can connect your TVwirelessly or wired to your network router.
Connect to Network
Wireless Connection
What You Need
To connect the TV to the Internet wirelessly, you needa Wi-Fi router with a connection to the Internet.
Use a high-speed (broadband) connection to theInternet.
Turn Wi-Fi On or Off
MENU > TV options > Settings > Network &internet > Wi-Fi.
Make the Connection
MENU > TV options > Settings > Network &internet > Wi-Fi.
1 - In the list of found networks, select on yourwireless network. If your network is not in the listbecause the network name is hidden (you switchedoff the SSID broadcast of the router), select Add newnetwork to enter the network name yourself.2 - Follow the on-screen instruction.3 - A message will be shown when the connection issuccessful.
Problems
Wireless network not found or distorted • Microwave ovens, DECT phones or other Wi-Fi802.11b/g/n devices in your proximity might disturbthe wireless network.• Make sure that the firewalls in your network allowaccess to the TV's wireless connection.• If the wireless network does not work properly inyour home, try the wired network installation.
Internet does not work • If the connection to the router is OK, check therouter connection to the Internet.
The PC and Internet connection are slow • Look in your wireless router's user manual forinformation on indoor range, transfer rate and otherfactors of signal quality.• Use a high-speed (broadband) Internet connectionfor your router.
DHCP • If the connection fails, you can check the DHCP(Dynamic Host Configuration Protocol) setting of therouter. DHCP should be switched on.
Wired Connection
What You Need
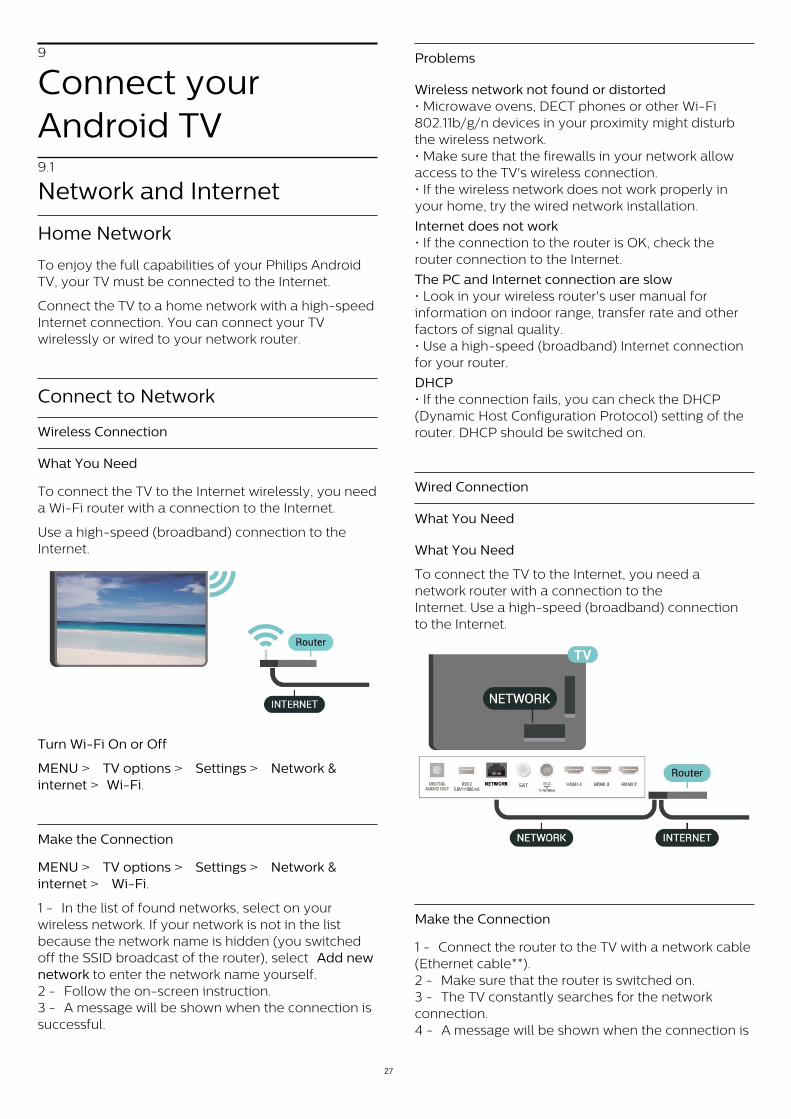
What You Need
To connect the TV to the Internet, you need anetwork router with a connection to theInternet. Use a high-speed (broadband) connectionto the Internet.
Make the Connection
1 - Connect the router to the TV with a network cable(Ethernet cable**).2 - Make sure that the router is switched on.3 - The TV constantly searches for the networkconnection.4 - A message will be shown when the connection is
27
successful.
If the connection fails, you can check the DHCPsetting of the router. DHCP should be switched on.
**To fulfill EMC regulations, use a shielded FTP Cat.5E Ethernet cable.
Network Settings
Proxy settings
MENU > TV options > Settings > Network &internet > Proxy settings.
Enter a valid proxy hostname manually by selecting Manual.
Network Configuration - IP settings
MENU > TV options > Settings > Network &internet > IP settings.
If the connection fails, you can check the DHCPsetting of the router.Alternatively, if you are an advanced user and want toinstall your network with static IP addressing, set theTV to Static IP.
9.2
Google Account
Sign In
To enjoy the full capabilities of your Philips AndroidTV, you can sign in to Google with your GoogleAccount.
By signing in you'll be able to play your favouritegames across phone, tablet and TV. You'll also getcustomized video and music recommendations onyour TV home screen as well as access to YouTube,Google Play and other apps.
Sign In
Use your existing Google Account to sign in toGoogle on your TV. A Google Account consists of anemail address and a password. If you don't have aGoogle Account yet, use your computer or tablet tocreate one (accounts.google.com). To play gameswith Google Play, you need a Google+ profile. If youdid not sign in during the first TV installation, you canalways sign in later.
To sign in after you did the TV installation…
1 - Select Settings.2 - Select Account & Sign-In and press OK.3 - Select Sign In and press OK.
4 - Select Use your remote and press OK.5 - With the on-screen keyboard, enter your emailaddress and press OK.6 - Enter your password and press OK to sign in.7 - Press Navigation keys left repeatedly ifnecessary, to close the menu.
Android Settings
You can set or view several Android specific settingsor information. You can find the list of apps installedon your TV and the storage space they need. You canconfigure the onscreen keyboard or allow apps to useyour location. Explore the different Android settings.You can goto www.support.google.com/androidtv for moreinformation on these settings.
To open these settings…
1 - Select Settings and press OK.2 - Explore the different Android settings.3 - Press Back if necessary, to close the menu.
28
10
Apps10.1
About AppsYou can find your favourite Apps on Apps row in theHome menu.
Like apps on your smartphone or tablet, the apps onyour TV offer specific functions for an enriched TVexperience. Apps like YouTube, games, video storesor weather forecasts (a.o.).
Apps can come from the Google Play™ Store . Toget you started, some practical apps are pre-installedon your TV.
To install apps from the Google Play™ Store , the TVmust be connected to the Internet. You must sign inwith a Google Account to use the Google Play appsand Google Play™ Store .
10.2
Google Play
Movies and TV
With Google Play Movies & TV , you can rent or buymovies and TV shows to watch on TV.
What You Need • your TV must be connected with the Internet• you must sign in with your Google Account on TV• add a credit card to your Google Account topurchase movies and TV shows
To rent or buy a movie or TV show…
1 - Press Home.2 - Select Google Play Movies & TV.3 - Select a movie or TV show and press OK.4 - Select the purchase you want and press OK. Youwill be taken through the purchase procedure.
To watch a rented or bought movie or TV show…
1 - Press Home.2 - Select Google Play Movies & TV.3 - Select the movie or TV show from your library inthe app, select the title and press OK.4 - You can use the Stop, Pause, Rewind or Fastforward keys on the remote control. 5 - To stop the Movies & TVapp, press Back repeatedly or press EXIT.
If the App is not on you Home screen, you can addvia the Apps page or by the Add app to favouritesitem on the Apps row. Some Google Play productsand features aren't available in all countries.
Find more informationon www.support.google.com/androidtv
Music
With YouTube Music you can play your favouritemusic on TV and buy new music on your computer ormobile device. Or, on your TV, you can sign up for AllAccess, the YouTube Musicsubscription. Alternatively, you can play the musicyou already own, stored on your computer.
What You Need • your TV must be connected with the Internet• you must sign in with your Google Account on TV • add a credit card to your Google Account to take amusic subscription
To start YouTube Music…
1 - Press Home.2 - Select YouTube Music.3 - Select the music you want and press OK.4 - To stop the Music app, press Back repeatedly orpress EXIT.
If the App is not on you Home screen, you can addvia the Apps page or by the Add app to favouritesitem on the Apps row. Some Google Play productsand features aren't available in all countries.
Find more informationon www.support.google.com/androidtv
Games
With Google Play Games, you can play games on TV.Online or offline.
You can see what your friends are playing currently oryou can join the game and compete. You can trackyour achievements or start wherever you left off.
What You Need • your TV must be connected with the Internet• you must sign in with your Google Account on TV • add a credit card to your Google Account topurchase new games
Start the Google Play Games app to select and installnew game apps on your TV. Some games are free ofcharge. A message appears if a particular game needsa gamepad to play the game.
To start or stop a Google Play Game…
1 - Press Home.2 - Select Google Play Games.3 - Select a game to play or select a new game toinstall and press OK.4 - When done, press Back repeatedly orpress EXIT or stop the app with its dedicated
29
exit/stop button.
If the App is not on you Home screen, you can addvia the Apps page or by the Add app to favouritesitem on the Apps row. Some Google Play productsand features aren't available in all countries.
Find more informationon www.support.google.com/androidtv
Google Play Store
From the Google Play Store you can download andinstall new apps. Some apps are free of charge.
What You Need • your TV must be connected with the Internet• you must sign in with your Google Account on TV• add a credit card to your Google Account topurchase apps
To install a new app…
1 - Press Home.2 - Select Google Play Store and press OK.3 - Select the app you want to install and press OK.4 - To close the Google Play Store,press Back repeatedly or press EXIT.
Parental controls
In the Google Play Store, you can hide appsaccording to users/buyers maturity. You need to entera PIN code to select or change the level of maturity.
To set the parental control…
1 - Press Home.2 - Select Google Play Store and press OK.3 - Select Settings > Parental controls.4 - Select the level of maturity you want.5 - On request, enter the PIN code.6 - To close the Google Play Store,press Back repeatedly or press EXIT.
If the App is not on you Home screen, you can addvia the Apps page or by the Add app to favouritesitem on the Apps row. Some Google Play productsand features aren't available in all countries.
Find more informationon www.support.google.com/androidtv
Payments
To make a payment on Google Play on TV, you mustadd a form of payment - a credit card (outside theUnited States) - to your Google Account. When youpurchase a movie or TV show, you will be charged onthis credit card.
To add a credit card …
1 - On your computer, go to accounts.google.com
and sign in with the Google Account you will use withGoogle Play on TV.2 - Go to wallet.google.com to add a card to yourGoogle Account.3 - Enter your credit card data and accept the termsand conditions.
10.3
Start or Stop an AppYou can start an app from the Home screen.
To start an app…
1 - Press Home.2 - Move to Apps row, select the app you want andpress OK.3 - To stop an app, press Back or press EXIT orstop the app with its dedicated exit/stop button.
When opening the Home screen, the backgroundapplication/content playback will stop. You have toselect the application or content from the Homescreen to resume.
A note to start the Live TV appIf you have installed the Live TV app on Home screen,please note that the HDMI sources are regard asApp’s sources. When the Live TV app is started, it willopen with current source, which includes TV andHDMI sources.
10.4
Manage AppsIf you stop an app and return to the Home menu, theapp is not really stopped. The app is still running inthe background to be readily available when you startit again. To run fluently, most apps need to save somedata in the cache memory of the TV. It might be goodto stop an app completely or clear the cache data ofa particular app to optimise the overall performanceof apps and to keep memory usage low on yourAndroid TV. Also, it is best to uninstall apps that youare not using anymore.
30
11
Sources11.1
Switch to a deviceFrom the list of Sources, you can switch to any of theconnected devices. You can switch to a tuner towatch TV or switch to your connected devices towatch their programme, a digital receiver or a Blu-rayDisc player.
To switch to a connected device…
1 - Press SOURCES to open the Sources menu.2 - Select one of the item in the source list andpress OK. The TV will show the programme orcontent of the device.
One Touch Play
With the TV in standby, you can switch on a discplayer with your TV remote control.To switch on both disc player and TV from standbyand start playing the disc immediately,press Play on the TV remote control. The devicemust be connected with an HDMI cable and both TVand device must have HDMI CEC switched on.
31
12
Settings12.1
Picture Settings
Picture Mode
Select a style
MENU > TV options > Picture > Picture mode.
For easy picture adjustment, you can select a presetpicture style.
• User - The picture preferences you set during thefirst start up.• Standard - Most energy conscious setting - Factorysetting• Vivid - Ideal for daylight viewing• Sport - Ideal for sport • Movie - Ideal for watching movies with originalstudio effect• Game* - Ideal for playing games
* Picture mode - Game is not available for somevideo sources.
When TV receives Dolby Vision HDR signal, select apicture style below:
• Dolby Vision Bright• Dolby Vision Dark• Dolby Vision Vivid
Dolby Vision Notification
MENU > TV options > Picture > Dolby VisionNotification and press OK.
Switch On or Off the Dolby Vision notificationwhen Dolby Vision content begins to play on your TV.
Display Mode
If the picture is not filling the whole screen, if blackbars are showing on the top or bottom or at bothsides, you can adjust the picture to fill the screencompletely.
To select one of the basic settings to fill the screen…
MENU > TV options > Picture > Display mode.
Automatic
Automatically zooms in the picture to fit the screenwith original aspect ratio. No content lost visible.
Super zoom
Remove the black bars on the sides of 4:3 broadcasts.Not recommended for HD or PC.
4:3
Display the classic 4:3 format.
Movie expand 14:9
Scale 4:3 format to 14:9. Not recommended for HD orPC.
Movie expand 16:9
Scale 4:3 format to 16:9. Not recommended for HD orPC.
Wide screen
Stretches the picture to a 16:9 format.
Full
Automatically enlarges the picture to fill the screen.Picture distortion is minimal, subtitles remain visible.Not suitable for PC input. Some extreme picturecontent can still show black bars. Picture contentaspect ratio may change.
Original
Provide maximum detail for PC.
Other Picture Settings
MENU > TV options > Picture and press OK.
Backlight
Adjust the video backlight intensity.
Brightness
Set the level of brightness of the picture signal.
Note: Setting of brightness much away fromreference value (50) may result lower contrast.
Contrast
Adjust the contrast value of the picture.
Saturation
Adjust the colour saturation value of the picture.
Hue
Adjust the hue value of the picture.
Sharpness
Adjust the level of sharpness in fine detail of thepicture.
Gamma
Set a non-linear setting for picture luminance andcontrast. This is a setting intended for expert users.
Colour Temperature
32
Set the picture to a preset colour temperature oradjust the setting yourself.
Light sensor
Select On to adjust the picture settings automaticallyto the lighting conditions of the room.
Advanced video
Set the advance settings.
• DNRDigital Noise Reduction, image noise reduction filtersto reduces the image noise.• MPEG NRMPEG Noise Reduction feature to improve the qualityof pictures by reducing the noise withoutcompromising the picture resolution.• Adaptive Luma ControlDynamic video contrast enhancement to adjust theLuma level of the picture signal automatically. If thePC Mode setting is On, this feature will be off.• Local Contrast ControlEnhance the contrast level in local area for the image.• Game ModeSwitch TV to Game mode to have fast response time.• PC ModeSwitch TV to PC mode to have original picture look.• HDMI Auto Game ModeAllow TV to automatically switch to Game modewhen the game content is notified by source.
Colour Tuner
Fine tune the colour setting yourself.
11 Point White Balance Alignment
Customize the whitepoint balance based on theselected colour temperature of the picture.
Reset to Default
Reset the current picture settings to default.
12.2
Sound Settings
Sound Mode
MENU > TV options > Sound > Sound Mode > andpress OK.
For easy sound adjustment, you can select a presetsetting with sound mode.
• Game - Ideal for gaming• Movie - Ideal for watching movies• Music - Ideal for listening to music• Dialogue - Ideal for speech
• AI mode - Select AI mode for intelligent switchingof sound mode base on audio content.• User - The sound preferences you set during thefirst start up
Other Sound Settings
MENU > TV options > Sound and press OK.
Speakers
Set the TV to play the sound on TV or on theconnected audio system.
You can select where you want to hear the TV soundand how you want to control it.• If you select TV speakers off, you permanentlyswitch off the TV speakers.• If you select TV speakers, the TV speakers arealways on.
With an audio device connected with HDMI CEC,select HDMI sound system. The TV will switch offthe TV speakers when the device is playing thesound.
* Note: TV Speakers will be muted when theHeadphones are plugged in.
USB Audio
Turn On or Off for the audio output through USBaudio device if there is a USB audio peripheralattached to the TV USB port.
Digital Output
Digital output settings are available for optical andHDMI ARC sound signals.
Set the audio out signal of the TV to fit the soundcapabilities of the connected Home Theatre System.
Digital Output Delay
For some Home Theatre Systems you might need toadjust the audio sync delay to synchronise the audioto the video. Select 0 if a sound delay is set on yourHome Theatre System.
DTS night mode
Select DTS night Mode for a more comfortable quietlistening experience when watching content with DTSMaster Audio.
Dolby audio processing
Set the advance settings.
• Volume Leveler: select On to adjust the volumeautomatically.• Dialogue Enhancer: select to get an improved soundquality for speech programme.• Surround Virtualizer: select On to create a virtualsurround sound experience.• Dolby Atmos: select On to enable Dolby Atmos,
33
which can add height dimension in sound. Withheight dimension, sound can be precisely placed andmoved in three-dimensional space.
Reset to Default
Reset the current sound settings to default.
12.3
Power SettingsMENU > TV options > Power.
Set Sleep timer
Power > Sleep timer.
TV switches to standby mode automatically after apreset time. You may stop the timer when thenotification pop-up at last two minutes.
Set screen off to save energy consumption
Power > Picture off.
Select Picture off, the TV screen is switched off, toswitch the TV screen back on, press any key on theremote control.
Set TV switch off timer
Power > Switch off timer.
Select Switch off timer, the TV switches offautomatically at a preset time to save energy. Thetimer will not stop unless the setting is changed to Off.
No signal auto power off
Power > No signal auto power off.
Press Navigation keys up or down to set thevalue. Select Off to deactivate the automatic switchoff.
* If you use the TV as a monitor or use a digitalreceiver to watch TV (a Set-Top Box - STB) and youdo not use the remote control of the TV, you shoulddeactivate this automatic switch off, to set the valueto Off.
Set auto sleep timer
Power > Auto sleep.
TV switches to standby mode automatically after apreset time if the TV does not receive any commandfrom remote control.
12.4
Advanced Options
Audio
Set audio preference language
MENU > TV options > Advanced Options > AudioLanguage/Primary Audio/Secondary Audio or AudioChannel.
The TV channels can broadcast audio with severalspoken languages for a programme. You can set apreferred primary and secondary audio language. Ifaudio in one of these languages is available, the TVwill switch to this audio.
Blue Mute
MENU > TV options > Advanced Options > BlueMute.
Switch the blue mute on or off.
Interaction Channel
MENU > TV options > Advanced Options > Interaction Channel.
Switch the interaction channel on or off. Interactionchannel provides interactive services frombroadcaster via broadcast transmission or IPconnection.
MHEG PIN Protection
MENU > TV options > Advanced Options > MHEGPIN Protection.
Set to turn on or off the Pin protection of MHEGfeature. If it is turned on, a PIN dialogue will ask toenter the PIN code before starting the service.
HBBTV Settings
MENU > TV options > AdvancedOptions > HBBTV settings.
Switch on HbbTV
HBBTV settings > On.
Set the HbbTV History Tracking
HBBTV settings > Do Not Track.
Set the options according to your preference.
34
Set the HbbTV Cookies
HBBTV settings > Cookie Settings.
Set the options according to your preference.
Set other options
HBBTV settings > Persistent Storage, Block TrackingSites, or Device ID.
Select one of the options and switch it to on or off.
Reset HbbTV Device ID
HBBTV settings > Reset Device ID.
You can reset your TV unique device identifier. A newidentifier will be created. This will replace your DeviceID with a new identifier.
Freeview Play Settings
MENU > TV options > Advanced Options > Freeview Play Settings.
Switch the Freeview Play* on or off. Toenjoy Freeview Play, you need to connect your TV toInternet first.
Freeview Play offers:
• Watch TV programmes you missed from the lastseven days.• Watch live TV and on demand, all in one placewithout entering an app, you can search FreeviewPlay programmes in TV Guide.• Watch over 70 standard channels and upto 15 HDchannels.• Enjoy on demand services like BBC iPlayer, the ITVHub, All 4, Demand 5, BBC NEWS and BBC SPORT.• There are no contracts and no monthly costs, you’rein control.
For detail, please visit: https://www.freeview.co.uk
* Freeview Play is only for UK models.
Subtitle
MENU > TV options > AdvancedOptions > Subtitle.
Digital channels can offer several subtitle languagesfor a programme. You can set a preferred primary andsecondary subtitle language. If subtitles in one ofthese languages are available, the TV will show thesubtitles you selected.
Press SUBTITLE key on the remote control to
display the subtitle page.
Teletext
MENU > TV options > AdvancedOptions > Teletext.
Some digital TV broadcasters have several Textlanguages available. To open Text/Teletextpress TEXT, while you are watching TV channels.Press TEXT for second time will open the dual screenmode. Press TEXT again on dual screen mode toleave the Teletext screen.
Text language and decoding
To set your Text language . . .
1 - Select MENU > TV options > AdvancedOptions > Teletext and press OK. 2 - Select Digital Teletext Language to set the Textlanguage settings.3 - Select Decoding Page Language to set thelanguage decoding.4 - On your preferred languages settings, press OK toset.5 - Press Back, repeatedly if necessary, to close themenu.
TTX Presentation Level
If available, Level 2.5 offers more colours and bettergraphics.
To switch between Level 2.5 and Level 1.5 . . .
1 - Select MENU > TV options > AdvancedOptions > Teletext > TTX Presentation Level andpress OK. 2 - Select the level from TTX Presentation Level andpress OK to set.3 - Press Back, repeatedly if necessary, to close themenu.
System information
MENU > TV options > AdvancedOptions > System information.
To check the system information, including Signallevel, Frequency, Service ID, and etc.
35
12.5
Other settings
Device Preferences
Home > Settings > Device Preferences.
System update
Update TV software from local update or from theInternet.
About
To show the information about this TV or performFactory reset operation for the TV.
Date & time
Adjust the date and time settings.
Timer
Set TV switch on or off timer.
Language
Set or change the menu language.
Keyboard
Set the on-screen keyboard type.
Inputs
Rename the Inputs name and adjust the settings forConsumer Electronic Control (CEC).
Power
Set the timers for saving energy.
Picture
Adjust the picture settings.
Sound
Adjust the sound settings.
Ambilight
Adjust the Ambilight settings.* Ambilight setting is only for models which support
Ambilight function.
Storage
Check the device storage.
Home screen
Customize the home screen. You can enable ordisable the video and audio previews. Reorder theapps and games. Read the Open-source licenses.
Retail mode
Switch On or Off the retail mode. If you set the retailmode to on. You can set the retail message type anddemo.
Google Assistant
Adjust the settings for Google Assistant. You can alsoview the Open-source licenses.
Chromecast built-in
Adjust the settings for Chromecast built-in. You canview the Open-source licenses and the versionnumber.
Screen saver
Adjust the screen saver setting for your preference.
Location
Set the location status.
Usage & Diagnostics
Set to on for automatically send diagnosticinformation to Google, such as crash reports andusage data from your device, apps and Chromecastbuilt in.
Accessibility
Activate special functions for hearing and visuallyimpaired people.
Reboot
Reboot your TV for better performance when needed.
36
Remote and Accessories
Home > Settings > Remote and Accessories.
You can select the stored bluetooth connection fromthe list.
If you cannot find your accessory, select Addaccessory to search for bluetooth connections.
12.6
RebootHome > Settings > Device Preferences > Reboot.
Note: • Disconnect the external USB hard disc beforerebooting.• Wait for few seconds, the TV restart automatically.
This will remove unnecessary data and information inthe memory.
If your TV runs low performance when using Apps,such as the video and audio are not synchronised orthe App is running slow, reboot your TV for betterperformance.
12.7
Factory Reset
Reset all settings value to original TV settings
Home > Settings > Device Preferences > About > Factory reset.
This will erase all data from your device's internalstorage, including: your Google account, system appdata, download apps, and settings. All settings willbe reset and installed channels will be erased.
12.8
Clock and Language Settings
Menu Language
Change the language of the TV menu
Home > Settings > DevicePreferences > Language.
1 - Press Home to go to Home screen.2 - Select Device Preferences > Language.3 - Select your language and press OK.4 - Press Back or EXIT repeatedly to close themenu.
Audio Language
Set audio preference language
MENU > TV options > Advanced Options > AudioLanguage/Primary Audio/Secondary Audio or AudioChannel.
The TV channels can broadcast audio with severalspoken languages for a programme. You can set apreferred primary and secondary audio language. Ifaudio in one of these languages is available, the TVwill switch to this audio.
Subtitle Language
Digital broadcasts can have subtitles for theirprogrammes.
Set subtitle preference language
MENU > TV options > AdvancedOptions > Subtitle.
Digital channels can offer several subtitle languagesfor a programme. You can set a preferred primary andsecondary subtitle language. If subtitles in one ofthese languages are available, the TV will show thesubtitles you selected.
Press SUBTITLE key on the remote control to displaythe subtitle page.
Set the subtitle language settings • Digital Subtitle• Subtitle Tracks• Digital Subtitle Language• 2nd Digital Subtitle Language• Subtitle Type
Set teletext preference language
MENU > TV options > AdvancedOptions > Teletext.
Some digital TV broadcasters have several Textlanguages available.
Clock
Home > Settings > Device Preferences > Date &time.
Correct clock automatically
Automatic date & time > Use network-providedtime.
• The standard setting for the TV clock is automatic.The time information comes from the broadcasted
37
UTC - Coordinated Universal Time information.
Correct clock manually
Automatic date & time > Off.
Select Set date and Set time to adjust the value.
Note:
If none of the automatic settings display the timecorrectly, you can set the time manually.
Set time zone or set a time offset for your region
Date & time > Set time zone.
Select the time zone of your preference.
Set the time format to 24-hour
Date & time > Use 24-hour format.
Enable to show the system time in 24-hour format,else show in 12-hour format time.
Timer
Set TV switch on or off timer
Home > Settings > Device Preferences > Timer.
Set Power on time type or Power off type to On or Once.
12.9
Accessibility SettingsThe TV is prepared for use of the deaf, hard ofhearing, blind or partially sighted people.
Accessibility for blind or partially sighted people
Home > Settings > Device Preferences >Accessibility > Audio Type.
Digital TV channels can broadcast special audiocommentary describing what is happening on screen.You can set the audio type with below settings.
• Normal• Audio Description• Spoken Subtitle• Hearing Impaired• Audio Description and Spoken Subtitle
Visually Impaired
When Audio Description is on, more Visually Impairedoptions are available. Set the speaker, headphone
volume of the normal audio with the audiocommentary or set the extra audio effects in thecommentary audio. You can adjust th effect withbelow settings.
• Speaker• Headphone• Volume• Pan and Fade• Audio for Visually Impaired• Fader Control
AC4 Dialogue Enhancement
Turn on/off or set the level of dialogue enhancementto increase the intelligibility of dialogue andcommentary when the audio stream is AC4 type.
38

13
Ambilight13.1
Ambilight StyleYou can set Ambilight to follow the video dynamics ofa TV programme. Alternatively, you can set Ambilightto show a preset colour style or you can switchAmbilight off.
Follow Video
If you select Follow Video, you can select one of thestyles that follow the dynamics of the picture on yourTV screen.
To set the Ambilight Style…
1 - Press ambilight key.2 - Enable the Ambilight.3 - You can select from Follow Video and Loungelight styles.4 - Select the style you want and press OK.
The available Follow Video styles are…
• Standard - Ideal for day to day TV watching• Natural - Follows the picture or sound as truthfulas possible• Sports - Ideal for sports programme• Vivid - Ideal for daylight conditions
• Game - Ideal for gaming
The available Lounge light styles are…
• Hot Lava - Red colour variations• Deep Water - Blue colour variations• Fresh Nature - Green colour variations• Warm white - Static colour• Cool white - Static colour• Custom colour - Static colour of your choice. To setthe colour for Ambilight static light, go to Home> Settings > Device Preferences > Ambilight >Custom colour and pick a colour you like.
13.2
Custom colour
Custom colour
Home > Settings > Device Preferences >Ambilight > Custom colour.
To set the colour for Ambilight static light of yourchoice. You can pick a colour you like from the colourpalette.
To set the colour for Ambilight static light…
1 - Press ambilight key.
2 - Enable the Ambilight.3 - Set Ambilight style to Custom colour.4 - Go to Home > Settings > Device Preferences > Ambilight > Custom colour to pick a colour.5 - Select a colour you want and press OK.
13.3
Brightness and Saturation
Adjust the Ambilight brightness
Home > Settings > Device Preferences >Ambilight > Brightness.
When Ambilight is enabled, press the arrows right orleft to set the level of Ambilight brightness.
Adjust the Ambilight saturation
Home > Settings > Device Preferences >Ambilight > Saturation.
When Ambilight is enabled, press the arrows right orleft to set the level of Ambilight saturation.
13.4
Wall Colour Behind the TV
Set the wall colour behind the TV
Home > Settings > Device Preferences >Ambilight > Wall colour behind the TV.
You can select your wall colour to compensateAmbilight colours so that the perceived Ambilightcolours are correct again.
13.5
TV Switch Off
Set the wall colour behind the TV
Home > Settings > Device Preferences >Ambilight > TV switch Off.
Select Fade out or Immediate to let the Ambilightslowly fade out or turn off immediately when TV isswitching off.
39
14
Videos, Photos,Music & Text14.1
From a USB ConnectionYou can view your photos or play your music andvideos from a connected USB flash drive.
With the TV switched on, plug in a USB flash drive toone of the USB connections.
1 - Press Home, select MMP from the Apps list andpress OK.2 - Use Navigation keys to select the file type.3 - Follow the on-screen instructions to play thefiles.
14.2
Play your Videos
Play a video 1 - Press Home, select MMP from the Apps list andpress OK.2 - Use Navigation keys to select Video.3 - Select one of the videos, and press OK to play.
During the video playback... • Press MENU to show the options.
Play, Pause
Press OK to play or pause the video.
Repeat
Play videos repeatedly or once.
Show Info
Display the information of the video file.
Display Mode
Adjust the display mode.
Picture
Adjust the picture settings.
Sound
Adjust the sound settings.
Sound Tracks
Display the soundtracks.
Last Memory
When set to On, you can play the video where youleft last time. Set to Off to turn off the function.
14.3
View your Photos
View Photos
View a photo 1 - Press Home, select MMP from the Apps list andpress OK.2 - Use Navigation keys to select Photo.3 - Select one of the photos, and press OK.
When browsing photo thumbnails, press MENU to...
Sort
Sort the photo files by your preference.
Media type
Sort the files by media type.
Thumbnail size
Change the thumbnail viewing size.
Copy
Copy the file and place it to your prefered folder.
Paste
Place the copied file to your prefered folder.
Delete
Delete the selected file.
Recursive parser
Select from the Recursive parser or Normal parser.
Photo Frame
Select to start the Photo Frame mode.
Photo Options
When viewing photo files, press MENU to...
Pause
Press OK to pause the photos.
Repeat
View the pictures repeatedly or once only.
Shuffle on, Shuffle off
View the pictures in sequential order, or at random.
Duration
Set the speed of the slideshow.
Effect
Set the transition from one picture to the next.
Show info
40

Display the information of the picture file.
Photo Frame image
Set the picture as Photo Frame image.
Picture
Adjust the picture settings.
14.4
Play your Music
Play music 1 - Press Home, select MMP from the Apps list andpress OK.2 - Use Navigation keys to select Audio.3 - Select one of the audio, and press OK to play.
During the audio playback... • Press MENU to show the options.
Play, Pause
Press OK to play or pause the music.
Repeat
Play music repeatedly or once.
Shuffle On, Shuffle Off
Play audio in sequential order, or at random.
Show Info
Display the information of the music file.
Lyric Options
Select the options when the lyrics are available.
Picture Off
Close the screen when play the music for energysaving.
Sound
Adjust the sound settings.
14.5
View your Text
View text 1 - Press Home, select MMP from the Apps list andpress OK.2 - Use Navigation keys to select Text.3 - Select one of the text file, and press OK topreview.
During the preview... • Each file lasts 3 seconds for preview. Press OK topause the preview to read.• Press MENU to show the options.
Play, Pause
Press OK to play or pause the text file preview.
Repeat
Preview the text files repeatedly or once.
Shuffle On, Shuffle Off
Preview the text files in sequential order, or atrandom.
Font
Adjust the text Size, Style, and Colour.
Show Info
Display the information of the text file.
41
15
TV Guide15.1
TV Guide DataWith the TV Guide you can view a list of the currentand scheduled TV programmes of your channels. Notall channels offer TV Guide information.
The TV Guide receives information (data) frombroadcasters. The TV can collect TV Guideinformation for the channels that are installed on theTV. The TV cannot collect the TV Guide informationfor channels viewed from a digital receiver ordecoder.
15.2
Using the TV GuideTo open the TV Guide, press TV GUIDE key on theremote control. The TV Guide shows the channels ofthe selected tuner. Press TV GUIDE again to close
Alternately, while watching TV, press MENU > Navigation keys up > Channels > Program Guideto open the TV Guide.
The TV Guide receives information (data) frombroadcasters. In some regions and for some channels,TV Guide information might not be available.
42
16
Smartphones andTablets16.1
Google Cast
What You Need
If an app on your mobile device has Google Cast, youcan cast your app on this TV. On the mobile app, lookfor the Google Cast icon. You can use your mobiledevice to control what's on TV. Google Cast works onAndroid and iOS.
Your mobile device must be connected to the sameWi-Fi home network as your TV.
Apps with Google Cast
New Google Cast apps come available everyday. You can already try it with YouTube, Chrome,Netflix, Photowall … or Big Web Quiz forChromecast. See also google.com/cast
Some Google Play products and features aren'tavailable in all countries.
Find more information on www.support.google.com/androidtv
Cast to Your TV
To cast an app to the TV screen…
1 - On your smartphone or tablet, open an app thatsupports Google Cast.2 - Tab the Google Cast icon.3 - Select the TV you would like to cast to.4 - Press play on your smartphone or tablet. Whatyou selected should start playing on TV.
43
17
Freeview PlayTo enjoy Freeview Play*, you need to connect yourTV to Internet first.
Freeview Play offers:
• Watch TV programmes you missed from the lastseven days.• Watch live TV and on demand, all in one placewithout entering an app, you can search FreeviewPlay programmes in TV Guide.• Watch over 70 standard channels and upto 15 HDchannels.• Enjoy on demand services like BBC iPlayer, the ITVHub, All 4, Demand 5, BBC NEWS and BBC SPORT.• There are no contracts and no monthly costs, you’rein control.
For detail, please visit: https://www.freeview.co.uk
* Freeview Play is only for UK models.
44
18
NetflixIf you have a Netflix membership subscription, youcan enjoy Netflix on this TV. Your TV must beconnected to the Internet. In your region, Netflixmight only come available with future softwareupdates.
To open Netflix, press NETFLIX on the remote controlto open the Netflix App. You can open Netfliximmediately from a TV in standby.
www.netflix.com
45
19
Software19.1
Update Software
Local Updates
You need a computer with an high-speed Internetconnection and a USB flash drive to upload thesoftware on the TV. Use a USB flash drive with at least2GB free space. Make sure that write protection isswitched off.
1 - Press Home > Settings > Device Preferences > System update > Local Updates and press OK.2 - Follow the instructions on screen.
Update from Internet
If the TV is connected to the Internet, you may receivea message to update the TV software. You need ahigh-speed (broadband) Internet connection. If youreceive this message, we recommend you to carry outthe update.
1 - Press Home > Settings > Device Preferences > System update > Internet and press OK.2 - Follow the instructions on screen.
19.2
Software VersionTo view the current TV software version…
1 - Select Home > Settings > Device Preferences > About > Software version.2 - The version, release notes and creation date areshown. Also, the Netflix ESN Number is shown ifavailable.3 - Press Back if necessary, to close the menu.
19.3
Open Source LicensesTo view the Open-source licenses…
1 - Select Home > Settings > Channel, orselect Home > Settings > Device Preferences >Google Assistant.2 - Select Open-source licences and press OK.3 - Press Back if necessary, to close the menu.
46
20
Specifications20.1
Environmental
European Energy Label
The European Energy Label informs you on theenergy efficiency class of this product. The greenerthe energy efficiency class of this product is, thelower the energy it consumes.On the label, you can find the energy efficiency class,the average power consumption of this product in useand the average energy consumption per 1000 hours.You can also find the power consumption values forthis product on the Philips website for your country atwww.philips.com/TVsupport.
EPREL Registration Number
EPREL registration number
43PUS7906 : 44122650PUS7906 : 45965555PUS7906 : 55929365PUS7906 : 55930870PUS7906 : 58713075PUS7906 : 657755
43PUS7956 : 44132750PUS7956 : 45972955PUS7956 : 55930365PUS7956 : 55931370PUS7956 : 587504
End of Use
Disposal of your old product and batteries
Your product is designed and manufactured with highquality materials and components, which can berecycled and reused.
When this crossed-out wheeled bin symbol isattached to a product it means that the product iscovered by the European Directive 2012/19/EU.
Please inform yourself about the local separatecollection system for electrical and electronicproducts.
Please act according to your local rules and do notdispose of your old products with your normalhousehold waste. Correct disposal of your oldproduct helps to prevent potential negativeconsequences for the environment and humanhealth.
Your product contains batteries covered by theEuropean Directive 2006/66/EC, which cannot bedisposed with normal household waste.
Please find out for yourself about the local rules onseparate collection of batteries because correctdisposal will help to prevent negative consequencesfor the environment and human health.
UK Declaration of Conformity
Hereby, TP Vision Europe B.V. declares that thistelevision is in compliance with the essentialrequirements and other relevant provisions ofDirectives Radio Equipment Regulations 2017 and theEcodesign for Energy-Related Products and EnergyInformation (Amendment) (EU Exit) Regulations 2019and the Restriction of the Use of Certain HazardousSubstances in Electrical and Electronic EquipmentRegulations 2012.
20.2
PowerProduct specifications are subject to change withoutnotice. For more specification details of this product,see www.philips.com/TVsupport
Power • Mains power : AC 220-240V +/-10%• Ambient temperature : 5°C to 35°C• Power saving features : Sleep timer, Switch off timer,
47
Picture off, No Signal Auto Power Off, Auto sleep.
20.3
Operating SystemAndroid OS:
Android 10
20.4
Reception• Aerial input : 75 ohm coaxial (IEC75)• Tuner bands : Hyperband, S-Channel, UHF, VHF• DVB : DVB-T2, DVB-C (cable) QAM• Analogue video playback : SECAM, PAL• Digital video playback : MPEG2 SD/HD (ISO/IEC13818-2), MPEG4 SD/HD (ISO/IEC 14496-10), HEVC• Digital audio playback (ISO/IEC 13818-3)• Satellite aerial input : 75 ohm F-type• Input frequency range : 950 to 2150MHz• Input level range : 25 to 65 dBm• DVB-S/S2 QPSK, symbol rate 2 to 45M symbols,SCPC and MCPC• LNB : Unicable 1/2, DiSEqC 1.0, 1 to 4 LNBssupported, Polarity selection 13/18V, Band selection22kHz, Tone burst mode, LNB current 300mA max
20.5
Display Type
Diagonal screen size • 108 cm / 43 inch• 126 cm / 50 inch• 139 cm / 55 inch• 164 cm / 65 inch• 177 cm / 70 inch• 189 cm / 75 inch
Display resolution • 3840 x 2160
20.6
Display Input Resolution
Supported Video only resolution
Resolution — Refresh rate
• 480i - 60 Hz• 576i - 50 Hz• 1080i - 50 Hz, 60 Hz
Supported Computer/Video resolution
Resolution — Refresh rate
• 640 x 480 - 60Hz• 576p - 50Hz • 720p - 50 Hz, 60 Hz• 1920 x 1080p - 24 Hz, 25 Hz, 30 Hz, 50 Hz, 60 Hz• 2560 x 1440 - 60 Hz• 3840 x 2160p - 24 Hz, 25 Hz, 30 Hz, 50 Hz, 60 Hz
20.7
Connectivity
TV Side • Common Interface slot: CI+/CAM• USB 1: USB 2.0• Headphones: Stereo mini-jack 3.5mm• HDMI 1 in: ARC - Ultra HD - HDR
TV Bottom • Digital Audio out: Optical• USB 2: USB 2.0• Network LAN: RJ45• Satellite tuner• Antenna (75 ohm)• HDMI 2 in: Ultra HD - HDR• HDMI 3 in: Ultra HD - HDR• HDMI 4 in: Ultra HD - HDR
20.8
SoundOutput power (RMS) : 20WDolby MS12 V2.5• Dolby Atmos• DTS – HD (M6)• Surround Virtualizer + Height Virtualizer• Dolby Bass Enhancement• Dolby Dialogue Enhancement• Dolby Volume (AVL/Night Mode)• AI Sound
20.9
Multimedia
Connections • USB 2.0• Ethernet LAN RJ-45• Wi-Fi 802.11n Dual Band (built-in)• BT 5.0
Supported USB file systems • FAT 16, FAT 32, NTFS
Playback formats • Containers: PS, TS, M2TS, TTS, AVCHD, MP4, M4V,MKV, ASF, AVI, 3GP, Quicktime• Video Codecs : AVI, MKV, HEVC, H264/MPEG-4AVC, MPEG-1, MPEG-2, MPEG-4, VP9, HEVC (H.265),
48

AV1• Audio Codecs : MP3, WAV, AAC, WMA (v2 up tov9.2), WMA-PRO (v9 and v10)• Subtitles :– Formats : SRT, SMI, SSA, SUB, ASS, TXT– Character encodings : UTF-8(Unicode), UTF-16,Simplified Chinese, Central Europe, Cyrillic, WesternEurope, Greek, Turkish, Hebrew, Korean• Maximum Supported Data Rate :– MPEG-4 AVC (H.264) is supported up to HighProfile @ L5.1. 30Mbps– H.265 (HEVC) is supported up to Main / Main 10Profile up to Level 5.1 40Mbps• Image Codecs : JPEG, GIF, PNG, BMP, HEIF
49
21
Help and Support21.1
Register your TVRegister your TV and enjoy a range of benefitsincluding full support (including downloads),privileged access to information about new products,exclusive offers and discounts, the chance to winprizes and even participate in special surveys aboutnew releases.
Go to www.philips.com/TVsupport
21.2
Troubleshooting
Switch On and Remote Control
The TV does not switch on • Disconnect the power cable from the power outlet.Wait for one minute then reconnect it.• Make sure that the power cable is securelyconnected.
Creaking sound at startup or switch off
When you are switching the TV on, off or to standby,you hear a creaking sound from the TV chassis. Thecreaking sound is due to the normal expansion andcontraction of the TV as it cools and warms up. Thisdoes not affect performance.
TV does not respond to the remote control
The TV requires some time to start up. During thistime, the TV does not respond to the remote controlor TV controls. This is normal behaviour.If the TV continues to be unresponsive to the remotecontrol, you can check if the remote control is workingby means of a mobile phone camera. Put the phonein camera mode and point the remote control to thecamera lens. If you press any key on the remotecontrol and you notice the infra red LED flickerthrough the camera, the remote control is working.The TV needs to be checked.If you do not notice the flickering, the remote controlmight be broken or its batteries are low.This method of checking the remote control is notpossible with remote controls which are wirelesslypaired with the TV.
The TV goes back to standby after showing the
Philips startup screen
When the TV is in standby, a Philips startup screen isdisplayed, then the TV returns to standby mode. Thisis normal behaviour. When the TV is disconnected
and reconnected to the power supply, the startupscreen is displayed at the next startup. To switch onthe TV from standby, press power key on the remotecontrol or on the TV.
The standby light keeps on blinking
Disconnect the power cable from the power outlet.Wait 5 minutes before you reconnect the powercable. If the blinking reoccurs, contact Philips TVConsumer Care.
Channels
No digital channels found during the installation
See the technical specifications to make sure thatyour TV supports digital channels in your country. Make sure that all cables are properly connected andthat the correct network is selected.
Previously installed channels are not in the channel
list
Make sure that the correct channel list is selected.
PIN Code
The PIN code can be set to lock the channels orprotect from unauthorized operations, e.g. reinstallingthe TV and resetting the PIN code. If you forgot yourPIN code, you can override the current one by usingthe code 8888 and entering a new one.
Picture
No picture / distorted picture • Make sure that the antenna is properly connected tothe TV.• Make sure that the correct device is selected as thedisplay source.• Make sure that the external device or source isproperly connected.
Sound but no picture • Change to other video sources and then changeback to current source, then do picture style restore inPicture settings or do Factory reset in General settingsoption.
Poor antenna reception • Make sure that the antenna is properly connected tothe TV.• Loud speakers, unearthed audio devices, neonlights, high buildings and other large objects caninfluence reception quality. If possible, try to improvethe reception quality by changing the antennadirection or moving devices away from the TV.• If reception on only one channel is poor, fine-tune
50
this channel with Manual Installation.
Poor picture from a device • Make sure that the device is connected properly.Make sure the device's output video setting is thehighest possible resolution if applicable.• Restore picture style or change to other picturestyles.
Picture settings change after a while
Make sure that Retail mode is set to Off . You canchange and save settings in this mode.
A commercial banner appears
Make sure that Retail mode is set to Off . Press Home > Settings > Device Preferences > Retailmode and press OK
Picture does not fit the screen • Change to a different picture format.• Change Display mode to Automatic.
Picture position is incorrect • Picture signals from some devices may not fit thescreen correctly. Check the signal output of theconnected device.• Change Display mode to Automatic.
Computer picture is not stable • Make sure that your PC uses the supportedresolution and refresh rate.• Make sure HDMI video source is not supported HDRcontent.
Sound
No sound or poor sound quality
If no audio signal is detected, the TV automaticallyswitches the audio output off — this does not indicatemalfunction.
• Make sure that the sound settings are correctly set.• Make sure that all cables are properly connected.• Make sure that the volume is not muted or set tozero.• Make sure that the TV audio output is connected tothe audio input on the Home Theatre System. Sound should be heard from the HTS speakers.• Some devices may require you to manually enableHDMI audio output. If HDMI audio is already enabled,but you still do not hear audio, try changing the digitalaudio format of the device to PCM (Pulse CodeModulation). Refer to the documentationaccompanying your device for instructions.
HDMI and USB
HDMI • Note that HDCP (High-bandwidth Digital ContentProtection) support can delay the time taken for a TVto display content from an HDMI device.• If the TV does not recognise the HDMI device andno picture is displayed, switch the source from onedevice to another and back again.• If the picture and sound of a device connected toHDMI is distorted, connect the device to anotherHDMI port on TV and power reboot your sourcedevice.• If there are intermittent sound disruptions, makesure that output settings from the HDMI device arecorrect.• If you use an HDMI-to-DVI adapter or HDMI-to-DVIcable, make sure that an additional audio cable isconnected to AUDIO IN (mini-jack only), if available.
HDMI EasyLink does not work • Make sure that your HDMI devices are HDMI-CECcompatible. EasyLink features only work with devicesthat are HDMI-CEC compatible.
No volume icon shown • When an HDMI-CEC audio device is connected andyou use the TV Remote Control to adjust the volumelevel from the device, this behaviour is normal.Photos, videos and music from a USB device do not
show • Make sure that the USB storage device is set to MassStorage Class compliant, as described in the storagedevice's documentation.• Make sure that the USB storage device is compatiblewith the TV.• Make sure that the audio and picture file formats aresupported by the TV.
Choppy playback of USB files • The transfer performance of the USB storage devicemay limit the data transfer rate to the TV whichcauses poor playback.
Network
Wi-Fi network not found or distorted • Microwave ovens, DECT phones or other Wi-Fi802.11b/g/n devices in your proximity might disturbthe wireless network.• Make sure that the firewalls in your network allowaccess to the TV's wireless connection.• If the wireless network does not work properly inyour home, try the wired network installation.
Internet does not work • If the connection to the router is OK, check therouter connection to the Internet.
The PC and Internet connection are slow • Look in your wireless router's user manual for
51
information on indoor range, transfer rate and otherfactors of signal quality.• Use a high-speed (broadband) Internet connectionfor your router.
DHCP • If the connection fails, you can check the DHCP(Dynamic Host Configuration Protocol) setting of therouter. DHCP should be switched on.
Bluetooth
Unable to pair • Make sure the device is in pairing mode. Read theuser manual of the device.• Keep the wireless speaker as close to the TV aspossible.• Trying to pair several devices with the TV at thesame time, may not work.
Bluetooth lost connection • Always position the wireless speaker within a rangeof 5 meters from the TV.
Bluetooth Audio and Video synchronisation • Before you purchase a wireless Bluetooth speaker,inform yourself about its quality of Audio to Videosynchronisation, commonly called 'lip sync'. Not allBluetooth devices perform correctly. Ask your dealerfor advice.
Wrong Menu Language
Change the language back to your language 1 - Press Home to go to Home screen.2 - Press MENU.3 - Press Navigation key - down for 4 times andpress OK.4 - Press Navigation key - down for 4 times andpress OK.5 - Select your language and press OK.6 - Press Back or EXIT repeatedly to close themenu.
21.3
Online HelpTo solve any Philips TV related problem, you canconsult our online support. You can select yourlanguage and enter your product model number.
Go to www.philips.com/TVsupport
On the support site you can find your country'stelephone number to contact us as well as answers tofrequently asked questions (FAQs). In some countries,you can chat with one of our collaborators and ask
your question directly or send a question by email.You can download new TV software or the manual toread on your computer.
21.4
Support and RepairFor support and repair, call the Consumer Carehotline in your country. Our service engineers will takecare of a repair, if necessary.
Find the telephone number in the printeddocumentation that came with the TV.Or consult ourwebsite www.philips.com/TVsupport and selectyour country if needed.
TV model number and serial number
You might be asked to provide the TV product modelnumber and serial number. Find these numbers onthe packaging label or on the type label on the backor bottom of the TV.
Warning
Do not attempt to repair the TV yourself. This maycause severe injury, irreparable damage to your TV orvoid your warranty.
52
22
Safety and Care22.1
Safety
Important
Read and understand all safety instructions beforeyou use the TV. If damage is caused by failure tofollow instructions, the warranty does not apply.
Risk of Electric Shock or Fire
• Never expose the TV to rain or water. Never placeliquid containers, such as vases, near the TV. If liquids are spilt on or into the TV, disconnect the TVfrom the power outlet immediately. Contact Philips TV Consumer Care to have the TVchecked before use.• Never expose the TV, remote control or batteries toexcessive heat. Never place them near burningcandles, naked flames or other heat sources,including direct sunlight.• Never insert objects into the ventilation slots or otheropenings on the TV.• Never place heavy objects on the power cord.• Avoid force coming onto power plugs. Loose powerplugs can cause arcing or fire. Ensure that no strain isexerted on the power cord when you swivel the TVscreen.• To disconnect the TV from the mains power, thepower plug of the TV must be disconnected. Whendisconnecting the power, always pull the power plug,never the cord. Ensure that you have full access tothe power plug, power cord and outlet socket at alltimes.
Risk of Injury or Damage to the TV
• Two people are required to lift and carry a TV thatweighs more than 25 kg or 55 lbs.• If you mount the TV on a stand, only use thesupplied stand. Secure the stand to the TV tightly. Place the TV on a flat, level surface that can supportthe weight of the TV and the stand.• When wall mounted, ensure that the wall mount cansafely bear the weight of the TV set. TP Vision bearsno responsibility for improper wall mounting thatresults in accident, injury or damage.• Parts of this product are made of glass. Handle withcare to avoid injury or damage.
Risk of damage to the TV !
Before you connect the TV to the power outlet,
ensure that the power voltage matches the valueprinted on the back of the TV. Never connect the TVto the power outlet if the voltage is different.
Stability Hazards
A television set may fall, causing serious personalinjury or death. Many injuries, particularly to children,can be avoided by taking simple precautions such as:
• ALWAYS ensure the television set is not overhangingthe edge of the supporting furniture.• ALWAYS use cabinets or stands or mountingmethods recommended by the manufacturer of thetelevision set.• ALWAYS use furniture that can safely support thetelevision set.• ALWAYS educate children about the dangers ofclimbing on furniture to reach the television set or itscontrols.• ALWAYS route cords and cables connected to yourtelevision so they cannot be tripped over, pulled orgrabbed.• NEVER place a television set in an unstable location.• NEVER place the television set on tall furniture (forexample, cupboards or bookcases) without anchoringboth the furniture and the television set to a suitablesupport.• NEVER place the television set on cloth or othermaterials that may be located between the televisionset and supporting furniture.• NEVER place items that might tempt children toclimb, such as toys and remote controls, on the top ofthe television or furniture on which the television isplaced.
If the existing television set is going to be retainedand relocated, the same considerations as aboveshould be applied.
Risk of Batteries
• Do not ingest the battery. Chemical burn hazard.• The remote control may contains a coin/button cellbattery. If the coin/button cell battery is swallowed, itcan cause severe internal burns in just 2 hours andcan lead to death.• Keep new and used batteries away from children.• If the battery compartment does not close securely,stop using the product and keep it away fromchildren.• If you think batteries might have been swallowed orplaced inside any part of the body, seek immediatemedical attention.• Risk of fire or explosion if the battery is replaced byan incorrect type.• Replacement of a battery with an incorrect type thatcan defeat a safeguard (for example, in the case of
53
some lithium battery types).• Disposal of a battery into fire or a hot oven, ormechanically crushing or cutting of a battery, that canresult in an explosion.• Leaving a battery in an extremely high temperaturesurrounding environment that can result in anexplosion or the leakage of flammable liquid or gas.• A battery subjected to extremely low air pressurethat may result in an explosion or the leakage offlammable liquid or gas.
Risk of Overheating
Never install the TV in a confined space. Always leavea space of at least 10 cm or 4 inches around the TVfor ventilation. Ensure curtains or other objects nevercover the ventilation slots on the TV.
Lightning Storms
Disconnect the TV from the power outlet and antennabefore lightning storms. During lightning storms, never touch any part of theTV, power cord or antenna cable.
Risk of Hearing Damage
Avoid using earphones or headphones at highvolumes or for prolonged periods of time.
Low Temperatures
If the TV is transported in temperatures below 5°C or41°F, unpack the TV and wait until the TV temperaturereaches room temperature before connecting the TVto the power outlet.
Humidity
In rare occasions, depending on temperature andhumidity, minor condensation can occur on the insideof the TV glass front (on some models). To preventthis, do not expose the TV to direct sunlight, heat orextreme humidity. If condensation occurs, it willdisappear spontaneously while the TV is playing for afew hours. The condensation moisture will not harm the TV orcause malfunction.
22.2
Screen Care• Never touch, push, rub or strike the screen with anyobject.• Unplug the TV before cleaning.• Clean the TV and frame with a soft damp cloth andwipe gently. Avoid touching the Ambilight* LEDs onthe backside of the TV. Never use substances such asalcohol, chemicals or household cleaners on the TV.• To avoid deformations and colour fading, wipe offwater drops as quickly as possible.• Avoid stationary images as much as possible.Stationary images are images that remain onscreenfor extended periods of time. Stationary imagesinclude onscreen menus, black bars, time displays,etc. If you must use stationary images, reduce screencontrast and brightness to avoid screen damage.
* Ambilight LED is only for models which supportAmbilight function.
54
23
Terms of Use2021 © TP Vision Europe B.V. All rights reserved.
This product was brought to the market by TP VisionEurope B.V. or one of its affiliates, hereinafter referredto as TP Vision, which is the manufacturer of theproduct. TP Vision is the warrantor in relation to theTV with which this booklet was packaged. Philips andthe Philips Shield Emblem are registered trademarksof Koninklijke Philips N.V.
Specifications are subject to change without notice.Trademarks are the property of Koninklijke Philips N.Vor their respective owners. TP Vision reserves the rightto change products at any time without being obligedto adjust earlier supplies accordingly.
The written material packaged with the TV and themanual stored in the memory of the TV ordownloaded from the Philipswebsite www.philips.com/TVsupport are believed tobe adequate for the intended use of the system.
The material in this manual is believed adequate forthe intended use of the system. If the product, or itsindividual modules or procedures, are used forpurposes other than those specified herein,confirmation of their validity and suitability must beobtained. TP Vision warrants that the material itselfdoes not infringe any United States patents. Nofurther warranty is expressed or implied. TP Visioncannot be held responsible neither for any errors inthe content of this document nor for any problems asa result of the content in this document. Errorsreported to Philips will be adapted and published onthe Philips support website as soon as possible.
Terms of warranty - Risk of injury, damage to TV orvoid of warranty!Never attempt to repair the TV yourself. Use the TVand accessories only as intended by themanufacturer. The caution sign printed on the back ofthe TV indicates risk of electric shock. Never removethe TV cover. Always contact Philips TV CustomerCare for service or repairs. Find the telephone numberin the printed documentation that came with theTV. Or consult our website www.philips.com/TVsupport and select your countryif needed. Any operation expressly prohibited in thismanual, or any adjustments and assemblyprocedures not recommended or authorised in thismanual, shall void the warranty.
Pixel characteristicsThis TV product has a high number of colour pixels.Although it has effective pixels of 99.999% or more,black dots or bright points of light (red, green or blue)may appear constantly on the screen. This is astructural property of the display (within commonindustry standards) and is not a malfunction.
CE complianceHereby, TP Vision Europe B.V. declares that thistelevision is in compliance with the essentialrequirements and other relevant provisions ofDirectives 2014/53/EU (RED), 2009/125/EC (EcoDesign) and 2011/65/EC (RoHS).
Compliance with EMFTP Vision manufactures and sells many productstargeted at consumers which, like any electronicapparatus, in general have the ability to emit andreceive electromagnetic signals. One of TP Vision’sleading business principles is to take all necessaryhealth and safety measures for our products, tocomply with all applicable legal requirements and tostay well within the Electro Magnetic Field (EMF)standards applicable at the time of producing theproducts.
TP Vision is committed to developing, producing andmarketing products that cause no adverse healtheffects. TP Vision confirms that, as long as its productsare handled properly for their intended use, they aresafe to use according to scientific evidence availabletoday. TP Vision plays an active role in thedevelopment of international EMF and safetystandards, enabling TP Vision to anticipate furtherdevelopments in standardisation for early integrationin its products.
55

24
Copyrights24.1
HDMI
HDMI
The terms HDMI, HDMI High-Definition MultimediaInterface, and the HDMI Logo are trademarks orregistered trademarks of HDMI LicensingAdministrator, Inc.
24.2
Dolby Vision and DolbyAtmos
Dolby Vision and Dolby Atmos
Dolby, Dolby Vision, Dolby Atmos, Dolby Audio, andthe double-D symbol are registered trademarks ofDolby Laboratories Licensing Corporation.Manufactured under license from Dolby Laboratories.Confidential unpublished works. Copyright ©2012–2021 Dolby Laboratories.All rights reserved.
24.3
DTS-HD
DTS-HD
For DTS patents, see http://patents.dts.com.Manufactured under license from DTS LicensingLimited. DTS, the Symbol, DTS and the Symboltogether, DTS-HD, and the DTS-HD logo areregistered trademarks or trademarks of DTS, Inc. inthe United States and/or other countries. © DTS, Inc.ALL RIGHTS RESERVED.
24.4
Wi-Fi Alliance
Wi-Fi
The Wi-Fi CERTIFIED™ Logo is a registered trademarkof Wi-Fi Alliance®.
24.5
Kensington
(If applicable)
Kensington and Micro Saver are registered UStrademarks of ACCO World Corporation with issuedregistrations and pending applications in othercountries throughout the world.
24.6
Other TrademarksAll other registered and unregistered trademarks arethe property of their respective owners.
56

25
Disclaimer regardingservices and/orsoftware offered bythird partiesServices and/or software offered by third parties maybe changed, suspended, or terminated without priornotice. TP Vision does not bear any responsibility inthese sorts of situations.
57
Index
A Accessibility settings 38 Age Rating 19 Ambilight 39 Android Settings 28 Antenna 7 Antenna, Manual Installation 15 Apps 29 Audio Language 37 Automatic Channel Update 15
B Bluetooth 25 Bluetooth, Devices 25 Bluetooth, Remove device 25 Bluetooth, Select device 25
C Channel 17 Channel Install, Antenna 13 Channel Install, Cable 14 Channel Install, Satellite 12 Channel List 17 Channel List sorting 18 Channel List, open 17 Channel Lists 17 Channel, age rating 19 Channel, Automatic Channel Update 15 Channel, Installation 15 Channel, Manual channel update 16 Channel, switch to a channel 18 Channel, TV guide 42 Channel, Update 15 Connectivity Guide 21 Consumer Care 52 Contact Philips 52
D Digital Text 35 Display mode 32 Disposal of TV or batteries 47
E Eco Settings 34 End of use 47
F Factory Reset 37 Freeview Play 44 Freeview Play, Channel list 18
H HbbTV 20 Home 4
I Input blocked 19 Interactive TV 20 Interactive TV, about 20
I iTV 20
L
Lock channel 18
M Manual Installation 15 Media 40 Media files, from a USB drive 40
N Network connection 27 Network, setting 28 Network, Wired 27 Network, Wireless 27
O Online support 52
P Parental Controls 18 Parental Rating 19 Photos, Videos and Music 40 Picture Setting 32 Picture, picture format 32 Power cable 6 Problems, Channel 50 Problems, Connection, Internet 51 Problems, Connection, Wi-Fi 51 Problems, HDMI Connection 51 Problems, Picture 50 Problems, Remote control 50 Problems, Sound 51 Problems, USB Connection 51 Problems, Wrong menu language 52 Product Fiche 47
R Radio station 17 Reception Quality 14 Register your product 50 Remote control, batteries 10 Repair 52
S Safety Instructions 53 Screen care 54 Search for a Channel 18 Set PIN Code 19 Software, Update 46 Sound Mode 33 Sound, style setting 33 Subtitle Language 37 Support, online 52 Switching On 11
T Teletext 35 Terms of Use 55 Test Reception 14 Troubleshooting 50 TV Guide 42 TV Guide Data 42 TV placement 6 TV, standby 11
V
58

Viewing distance 6
W Watch TV 18 Wi-Fi 27 Wired connection 27 Wireless connection 27
59

Related Documents