Register your product and get support at 6654 series www.philips.com/TVsupport User Manual 55PUT6654 65PUT6654

Welcome message from author
This document is posted to help you gain knowledge. Please leave a comment to let me know what you think about it! Share it to your friends and learn new things together.
Transcript

Register your product and get support at 6654 serieswww.philips.com/TVsupport
User Manual55PUT665465PUT6654
Contents
1 Get Support 31.1 Identify and Register your TV 31.2 TV Help and User Manual 31.3 On-line Help and User Manual 31.4 Consumer Care / Repair 3
2 Software 52.1 Update Software 52.2 Software Version 5
3 Quick Guide 63.1 Remote Control 63.2 IR sensor 73.3 Joystick - Local Control 7
4 Setting Up 84.1 Read Safety 84.2 TV Placement 84.3 Turn on TV 8
5 Connections 105.1 Connectivity guide 105.2 Antenna 105.3 Video Device 105.4 Audio Device 105.5 Mobile Device 115.6 Other Device 125.7 Bluetooth 13
6 Switch Source 156.1 Source List 156.2 Rename Device 15
7 Channels 167.1 About Channels and Switch Channels 167.2 Install Channel 167.3 Channel List 197.4 Favourite Channels 207.5 Text / Teletext 21
8 TV Guide 238.1 What You Need 238.2 Using the TV Guide 23
9 Recording and Pause TV 259.1 Recording 259.2 Pause TV 26
10 Videos, Photos and Music 2710.1 From a USB Connection 2710.2 Photos 2710.3 360 Photo 2710.4 Videos 2810.5 Music 28
11 Open TV Setting Menus 2911.1 Home Menu Overview 2911.2 Frequent settings and All settings 2911.3 All Settings 29
12 Wireless and Networks 3912.1 Home Network 3912.2 Connect to Network 3912.3 Wireless and Network Settings 40
13 Smart TV 42
13.1 Setup Smart TV 4213.2 Smart TV Start Page 4213.3 App Gallery 42
14 Video on Demand 43
15 Netflix 44
16 Amazon Prime Video 45
17 YouTube 46
18 Environmental 4718.1 End of Use 47
19 Specifications 4819.1 Power 4819.2 Reception 4819.3 Display Resolution 4819.4 Supported Input Resolution - Video 4819.5 Supported Input Resolution - Computer 4819.6 Sound 4819.7 Multimedia 4919.8 Connectivity 49
20 Troubleshooting 5020.1 Tips 5020.2 Switch On 5020.3 Remote Control 5020.4 Channels 5020.5 Picture 5120.6 Sound 5220.7 HDMI - UHD 5220.8 USB 5220.9 Wi-Fi and Internet 5220.10 Wrong Menu Language 53
21 Safety and Care 5421.1 Safety 5421.2 Screen Care 55
22 Terms of Use 56
23 Copyrights 5723.1 HDMI 5723.2 Dolby Audio 5723.3 Dolby Vision and Dolby Atmos 5723.4 DTS-HD (italics) 5723.5 Wi-Fi Alliance 5723.6 Other Trademarks 57
24 Open Source 5824.1 Open Source Software 5824.2 Open Source License 58
25 Disclaimer regarding services and/orsoftware offered by third parties 62
Index 63
2
1
Get Support1.1
Identify and Register your TVIdentify your TV - TV model number and serial
number
You might be asked to provide the TV product modelnumber and serial number. Find these numbers onthe packaging label or on the type label on the backor bottom of the TV.
Register your TV
Register your TV and enjoy a range of benefitsincluding full support (including downloads),privileged access to information about new products,exclusive offers and discounts, the chance to winprizes and even participate in special surveys aboutnew releases.
Go to www.philips.com/TVsupport
1.2
TV Help and User Manual (Home) > Settings > Help
You can use Help function to diagnose and get moreinformation about your TV.
• How to - You can see instructions on how toinstall channels, sort channels, update TV software,connect external devices and use Smart functions onyour TV.
• Check the TV - You can check if the picture, sound,Ambilight* are working fine during playing a shortvideo clip.• Check the network - Check the networkconnection.• View weak signal history - Display the list ofchannel numbers that were automatically savedwhen signal strength was weak.• Update software - Check available softwareupdates.• User manual - Read the user manual for TVinformation.• Troubleshooting - Find a solution for frequent askquestions. • Factory settings - Reset all settings to factorysettings.• Reinstall TV - Reinstall and redo the complete TVinstallation.• Contact info - Show the telephone number or webaddress for your country or region.
* Ambilight setting is only for models which support
Ambilight function.
1.3
On-line Help and UserManualTo solve any Philips TV related problem, you canconsult our online support. You can select yourlanguage and enter your product model number.
Go to www.philips.com/TVsupport.
On the support site you can find your country'stelephone number to contact us as well as answers tofrequently asked questions (FAQs). In some countries,you can chat with one of our collaborators and askyour question directly or send a question by email.You can download new TV software or the manual toread on your computer.
For more TV troubleshooting and frequently askedquestions (FAQs)...
Goto http://philips-tvconsumercare.kxondemand.com/portal/en/ModelSelect
TV Help on your tablet, smartphone or computer
To carry out extended sequences of instructions moreeasily, you can download the TV Help in PDF formatto read on your smartphone, tablet orcomputer. Alternatively, you can print the relevantHelp page from your computer.To download the Help (user manual) goto www.philips.com/TVsupport
1.4
Consumer Care / RepairFor support and repair, call the Consumer Carehotline in your country. Our service engineers will takecare of a repair, if necessary.
Find the telephone number in the printeddocumentation that came with the TV.Or consult ourwebsite www.philips.com/TVsupport and selectyour country if needed.
TV model number and serial number
You might be asked to provide the TV product modelnumber and serial number. Find these numbers onthe packaging label or on the type label on the backor bottom of the TV.
Warning
Do not attemp to repair the TV yourself. This may
3

cause severe injury, irrepairable damage to your TV orvoid your warranty.
4
2
Software2.1
Update Software
Search for Updates
Update from Internet
(Home) > Settings > Update software > Searchfor updates > Internet (Recommended)
Look for a software update yourself.
• If the TV is connected to the Internet, you mayreceive a message to update the TV software. Youneed a high-speed (broadband) Internetconnection. If you receive this message, werecommend you to carry out the update.• During the software update, there is no picture andthe TV will switch off and on again. This might happenseveral times. The update can take a few minutes.• Wait until the TV picture comes back up. Do notpress the power switch on the TV or on theremote control during the software update.
Update from USB
(Home) > Settings > Updatesoftware > Search for updates > USB
• You need a computer with an high-speed Internetconnection and a USB memory device to upload thesoftware on the TV.• Use a USB memory device with 512MB free space.Make sure that write protection is switched off.1 - Start the update on TVSelect Update software > Search for updates > USB, then press OK.2 - Identify the TVInsert the USB memory into one of the USBconnections of the TV.Select Start and press OK. An identification file iswritten on the USB memory device.3 - Download the TV software- Insert the USB memory into your computer.- On the USB memory device, locate thefile update.html and double click it.- Click on Send ID.- If new software is available, download the .zip file.- After the download, unzip the file and copy thefile autorun.upg onto the USB memory device. - Do not place this file in a folder.4 - Update the TV softwareInsert the USB memory into the TV again. The updatestarts automatically. The TV switches itself off for 10 seconds and then
back on again. Please wait.
Do not . . .
• use the remote control• remove the USB memory device from the TV• press twice• press the power switch on the TVThe TV switches itself off (for 10 seconds) and thenback on again. Please wait.
The TV software has been updated. You can use theTV again.To prevent an accidental update of the TV software,delete the autorun.upg file from the USB memorydevice.
Local Updates
(Home) > Settings > Updatesoftware > Search for updates > USB > Localupdates.
For dealers and expert users.
Look for OAD updates (Over-the-airDownload)
(Home) > Settings > Updatesoftware > Search for updates > Look for OADupdates.
Scan to search for an Over-the-air software update.
2.2
Software Version (Home) > Settings > Updatesoftware > Current software info
To view the current TV software version.
5

3
Quick Guide3.1
Remote Control
Batteries and Cleaning
Replace batteries
If the TV does not react on a key press on the remotecontrol, the batteries might be empty.
To replace the batteries, open the batterycompartment on the back of the remote control.
1 - Slide the battery door in the direction shown bythe arrow.2 - Replace the old batteries with 2type AAA-R03-1.5V batteries. Make sure the + andthe - ends of the batteries line up correctly.
3 - Reposition the battery door and slide it back untilit clicks.• Remove the batteries if you are not using the remotecontrol for a long time.• Safely dispose of your old batteries according to theend of use directions.
Cleaning
Your remote control is treated with a scratch-resistantcoating.
To clean the remote control, use a soft damp cloth.Never use substances such as alcohol, chemicals orhousehold cleaners on the remote control.
Key Overview
Top
1 - Standby / OnTo switch the TV on or back to Standby.
2 - INFOTo open or close programme info.
3 - SOURCESTo open the Sources menu.
4 - SearchTo open the Smart TV searches page.
Middle
1 - OK keyTo confirm a selection or setting. To open the channellist while watching TV if Interactive Service is notavailable.
2 - BACKTo close a menu without changing a setting.
3 - Playback and Record• Play , to playback.• Pause , to pause playback• Stop , to stop playback• Rewind , to rewind• Fast forward , to go fast forward• Record , to start recording
4 - Colour keysDirect selection of options. Blue key , opens Help.
5 - Arrow / navigation keysTo navigate up, down, left or right.
6 - HomeTo open the Home menu.
6
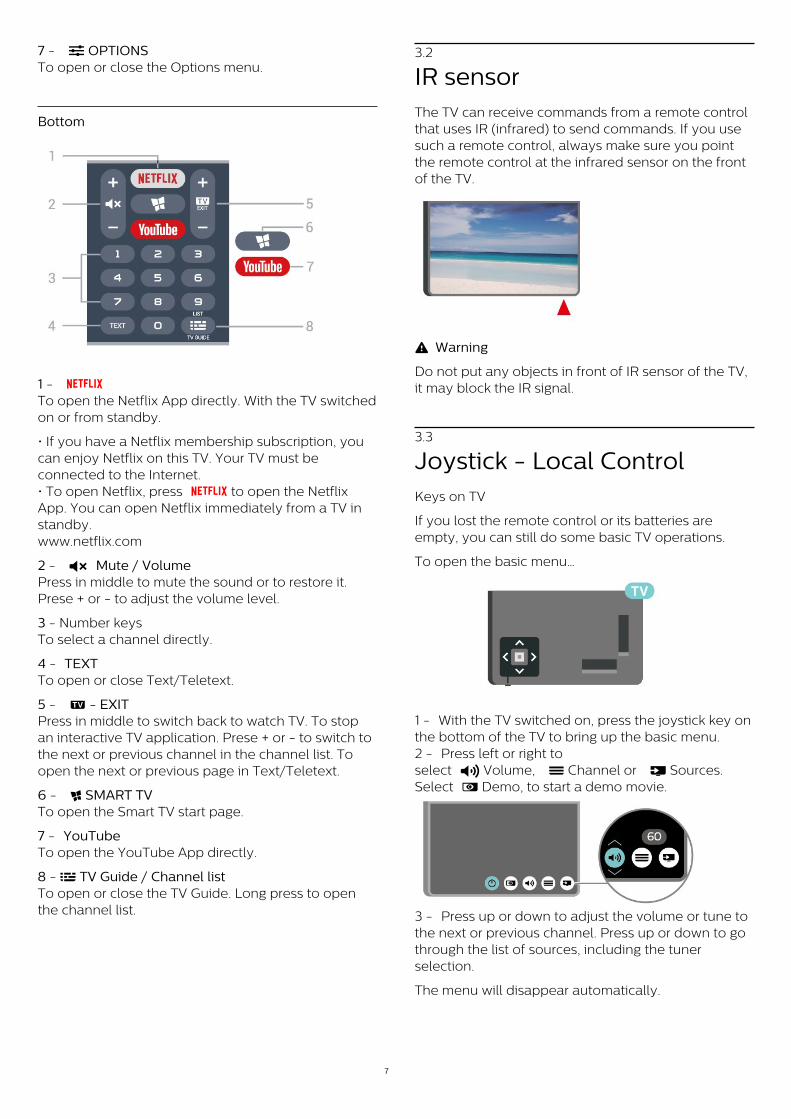
7 - OPTIONSTo open or close the Options menu.
Bottom
1 - To open the Netflix App directly. With the TV switchedon or from standby.
• If you have a Netflix membership subscription, youcan enjoy Netflix on this TV. Your TV must beconnected to the Internet.• To open Netflix, press to open the NetflixApp. You can open Netflix immediately from a TV instandby.www.netflix.com
2 - Mute / VolumePress in middle to mute the sound or to restore it.Prese + or - to adjust the volume level.
3 - Number keysTo select a channel directly.
4 - TEXTTo open or close Text/Teletext.
5 - - EXITPress in middle to switch back to watch TV. To stopan interactive TV application. Prese + or - to switch tothe next or previous channel in the channel list. Toopen the next or previous page in Text/Teletext.
6 - SMART TVTo open the Smart TV start page.
7 - YouTubeTo open the YouTube App directly.
8 - TV Guide / Channel list To open or close the TV Guide. Long press to openthe channel list.
3.2
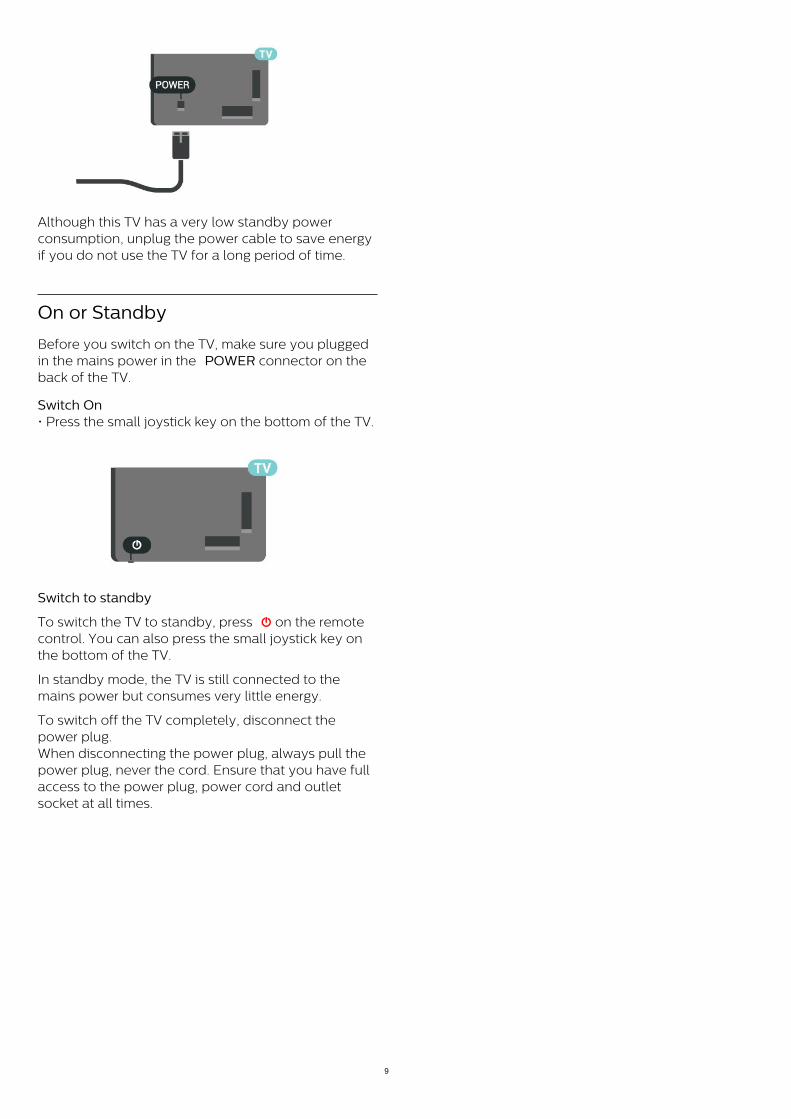
IR sensorThe TV can receive commands from a remote controlthat uses IR (infrared) to send commands. If you usesuch a remote control, always make sure you pointthe remote control at the infrared sensor on the frontof the TV.
Warning
Do not put any objects in front of IR sensor of the TV,it may block the IR signal.
3.3
Joystick - Local ControlKeys on TV
If you lost the remote control or its batteries areempty, you can still do some basic TV operations.
To open the basic menu…
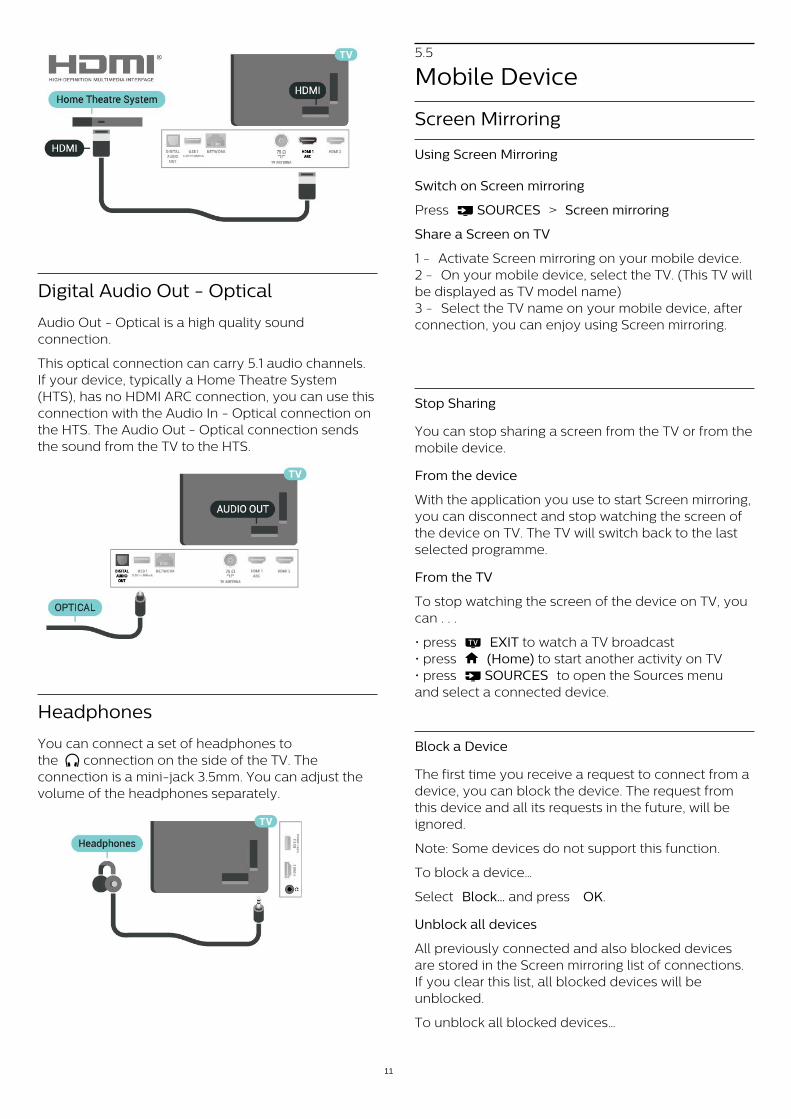
1 - With the TV switched on, press the joystick key onthe bottom of the TV to bring up the basic menu.2 - Press left or right toselect Volume, Channel or Sources.Select Demo, to start a demo movie.
3 - Press up or down to adjust the volume or tune tothe next or previous channel. Press up or down to gothrough the list of sources, including the tunerselection.
The menu will disappear automatically.
7

4
Setting Up4.1
Read SafetyRead the safety instructions first before you use theTV.
To read the instructions, in Help > User manual,press the colour key Keywords and lookup Safety and Care.
4.2
TV Placement
Tips on Placement
• Position the TV where light does not shine directlyon the screen.• Position the TV up to 15 cm away from the wall.• The ideal distance to watch Ultra HD TV is 2 to 5times of its screen height. When seated, your eyesshould be level with the centre of the screen.
Note:
Please keep the TV away from dust-producingsources such as stoves. It is suggested to clean thedust regularly to avoid getting dust into the TV.
TV Stand
You can find the instructions for mounting the TVstand in the Quick Start Guide that came with the TV.In case you lost this guide, you can download itfrom www.philips.com/TVsupport.
Use the model number of the TV to look forthe Quick Start Guide to download.
Wall Mounting
Your TV is also prepared for a VESA-compliant wallmount bracket (sold separately).Use the following VESA code when purchasing thewall mount . . .
• 55PUT6654VESA MIS-F 200x200, M6 (Minimum 14 mm,Maximum 16 mm)• 65PUT6654VESA MIS-F 300x300, M6 (Minimum 17 mm,Maximum 25 mm)
Preparation
Make sure that the metal screws, to mount the TV tothe VESA-compliant bracket, go about 10mm deepinside the threaded bushes of the TV.
Caution
Wall mounting the TV requires special skills andshould only be performed by qualified personnel. TheTV wall mounting should meet safety standardsaccording to the TVs weight. Also read the safetyprecautions before positioning the TV.TP Vision Europe B.V. bears no responsibility forimproper mounting or any mounting that results inaccident or injury.
4.3
Turn on TV
Connect Power Cable
• Insert the power cable into the POWER connectoron the back of the TV.• Make sure the power cable is securely inserted inthe connector.• Make sure that the power plug, in the wall socket, isaccessible at all times.• When you unplug the power cable, always pull theplug, never pull the cable.
8
Although this TV has a very low standby powerconsumption, unplug the power cable to save energyif you do not use the TV for a long period of time.
On or Standby
Before you switch on the TV, make sure you pluggedin the mains power in the POWER connector on theback of the TV.
Switch On • Press the small joystick key on the bottom of the TV.
Switch to standby
To switch the TV to standby, press on the remotecontrol. You can also press the small joystick key onthe bottom of the TV.
In standby mode, the TV is still connected to themains power but consumes very little energy.
To switch off the TV completely, disconnect thepower plug.When disconnecting the power plug, always pull thepower plug, never the cord. Ensure that you have fullaccess to the power plug, power cord and outletsocket at all times.
9

5
Connections5.1
Connectivity guideAlways connect a device to the TV with the highestquality connection available. Also, use good qualitycables to ensure a good transfer of picture andsound.
When you connect a device, the TV recognizes itstype and gives each device a correct type name. Youcan change the type name if you wish. If a correcttype name for a device is set, the TV automaticallyswitches to the ideal TV settings when you switch tothis device in the Sources menu.
5.2
AntennaInsert the antenna plug firmly intothe Antenna socket at the back of the TV.
You can connect your own antenna or an antennasignal from an antenna distribution system. Use anIEC Coax 75 Ohm RF antenna connector.
5.3
Video Device
HDMI
An HDMI connection has the best picture and soundquality.
For best signal quality transfer, use a High speedHDMI cable and do not use an HDMI cable longerthan 5 m, and also connect devices supporting HDRon any one of HDMI connections.
Copy protection
HDMI ports support HDCP (High-bandwidth DigitalContent Protection). HDCP is a copy protection signalthat prevents copying content from a DVD disc or Blu-ray Disc. Also referred to as DRM (Digital RightsManagement).
Composite
CVBS - Composite Video is a standard qualityconnection. Next to the CVBS signal adds the AudioLeft and Right signals for sound.
5.4
Audio Device
HDMI ARC
Only HDMI 1 on the TV have HDMI ARC (AudioReturn Channel).
If the device, typically a Home Theatre System (HTS),also has the HDMI ARC connection, connect itto HDMI 1 connection on this TV. With the HDMIARC connection, you do not need to connect theextra audio cable that sends the sound of the TVpicture to the HTS. The HDMI ARC connectioncombines both signals.
10
Digital Audio Out - Optical
Audio Out - Optical is a high quality soundconnection.
This optical connection can carry 5.1 audio channels.If your device, typically a Home Theatre System(HTS), has no HDMI ARC connection, you can use thisconnection with the Audio In - Optical connection onthe HTS. The Audio Out - Optical connection sendsthe sound from the TV to the HTS.
Headphones
You can connect a set of headphones tothe connection on the side of the TV. Theconnection is a mini-jack 3.5mm. You can adjust thevolume of the headphones separately.
5.5
Mobile Device
Screen Mirroring
Using Screen Mirroring
Switch on Screen mirroring
Press SOURCES > Screen mirroring
Share a Screen on TV
1 - Activate Screen mirroring on your mobile device.2 - On your mobile device, select the TV. (This TV willbe displayed as TV model name)3 - Select the TV name on your mobile device, afterconnection, you can enjoy using Screen mirroring.
Stop Sharing
You can stop sharing a screen from the TV or from themobile device.
From the device
With the application you use to start Screen mirroring,you can disconnect and stop watching the screen ofthe device on TV. The TV will switch back to the lastselected programme.
From the TV
To stop watching the screen of the device on TV, youcan . . .
• press EXIT to watch a TV broadcast• press (Home) to start another activity on TV• press SOURCES to open the Sources menuand select a connected device.
Block a Device
The first time you receive a request to connect from adevice, you can block the device. The request fromthis device and all its requests in the future, will beignored.
Note: Some devices do not support this function.
To block a device…
Select Block… and press OK.
Unblock all devices
All previously connected and also blocked devicesare stored in the Screen mirroring list of connections.If you clear this list, all blocked devices will beunblocked.
To unblock all blocked devices…
11
(Home) > Settings > All settings > Network > Reset Screen mirroring connections .
Blocking a previously connected device
If you want to block a device that you previouslyconnected, you need to clear the Screen mirroringconnections list first. If you clear this list, you will haveto confirm or block the connection for every deviceagain.
Reset Screen mirroring connections
All previously connected devices are stored in theScreen mirroring list of connections.
To clear all connected Screen mirroring devices…
(Home) > Settings > Allsettings > Network > Reset Screen mirroringconnections.
Screen Delay
The normal delay when sharing a screen with Screenmirroring is about 1 second. The delay might be longerif you are using older devices with less processingpower.
Apps - Philips TV Remote App
With the TV Remote App, you master your mediaaround you. Send photos, music or videos to your bigTV screen or watch any of your TV channels live onyour tablet or phone. Look up what you want towatch on the TV Guide and watch it on your phone orTV. With the TV Remote App you can use your phoneas a remote control*.
Download the Philips TV Remote App from yourfavourite app store today.
The Philips TV Remote App is available for iOS andAndroid and is free of charge.
* When use your phone as a remote control, TVcannot be switched on or off via your phone.
5.6
Other Device
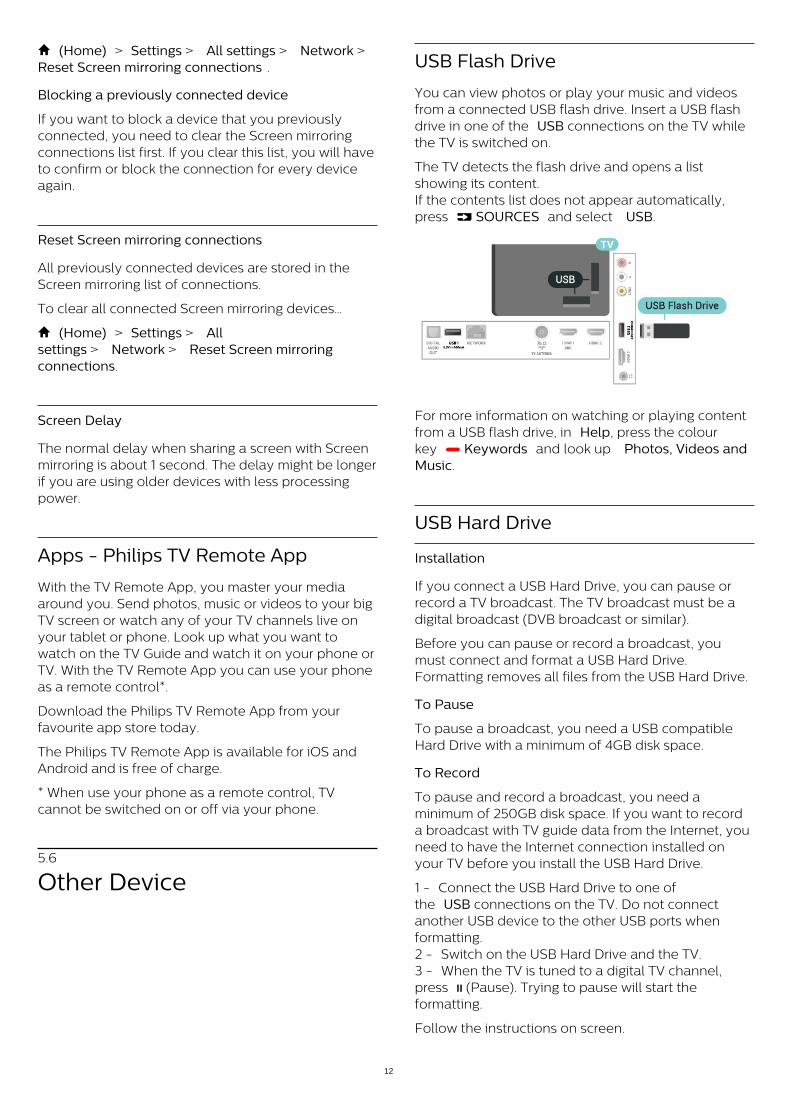
USB Flash Drive
You can view photos or play your music and videosfrom a connected USB flash drive. Insert a USB flashdrive in one of the USB connections on the TV whilethe TV is switched on.
The TV detects the flash drive and opens a listshowing its content.If the contents list does not appear automatically,press SOURCES and select USB.
For more information on watching or playing contentfrom a USB flash drive, in Help, press the colourkey Keywords and look up Photos, Videos andMusic.
USB Hard Drive
Installation
If you connect a USB Hard Drive, you can pause orrecord a TV broadcast. The TV broadcast must be adigital broadcast (DVB broadcast or similar).
Before you can pause or record a broadcast, youmust connect and format a USB Hard Drive.Formatting removes all files from the USB Hard Drive.
To Pause
To pause a broadcast, you need a USB compatibleHard Drive with a minimum of 4GB disk space.
To Record
To pause and record a broadcast, you need aminimum of 250GB disk space. If you want to recorda broadcast with TV guide data from the Internet, youneed to have the Internet connection installed onyour TV before you install the USB Hard Drive.
1 - Connect the USB Hard Drive to one ofthe USB connections on the TV. Do not connectanother USB device to the other USB ports whenformatting.2 - Switch on the USB Hard Drive and the TV.3 - When the TV is tuned to a digital TV channel,press (Pause). Trying to pause will start theformatting.
Follow the instructions on screen.
12

When the USB Hard Drive is formatted, leave itconnected permanently.
Warning
The USB Hard Drive is formatted exclusively for thisTV, you cannot use the stored recordings on anotherTV or PC. Do not copy or change recording files onthe USB Hard Drive with any PC application. This willcorrupt your recordings. When you format anotherUSB Hard Drive, the content on the former will be lost.A USB Hard Drive installed on your TV will needreformatting for use with a computer.
To read the instructions, in Help, press the colourkey Keywords and look up USB Hard Drive.
Formatting
Before you can pause or record a broadcast, youmust connect and format a USB Hard Drive.Formatting removes all files from the USB HardDrive. If you want to record broadcasts with TV Guidedata from the Internet, you must setup the Internetconnection first before you install the USB Hard Drive.
Warning
The USB Hard Drive is formatted exclusively for thisTV, you cannot use the stored recordings on anotherTV or PC. Do not copy or change recording files onthe USB Hard Drive with any PC application. This willcorrupt your recordings. When you format anotherUSB Hard Drive, the content on the former will be lost.A USB Hard Drive installed on your TV will needreformatting for use with a computer.
To format a USB Hard Drive…
1 - Connect the USB Hard Drive to one ofthe USB connections on the TV. Do not connectanother USB device to the other USB ports whenformatting.2 - Switch on the USB Hard Drive and the TV.3 - When the TV is tuned to a digital TV channel,press (Pause). Trying to pause will start theformatting. Follow the instructions on screen.4 - The TV will ask if you want to use the USB HardDrive to store apps, agree to the question if you do.5 - When the USB Hard Drive is formatted, leave itconnected permanently.
5.7
Bluetooth
What You Need
You can connect a wireless device with Bluetooth® tothis TV – a wireless speaker or headphones.
To play the TV sound on a wireless speaker, you mustpair the wireless speaker with the TV. The TV can onlyplay the sound on one speaker at a time.
Attention - Audio to Video synchronisation
Many Bluetooth speaker systems have a high, socalled, 'latency'. High latency means that the audiolags behind the video, causing unsynchronised 'lipsync'. Before you purchase a wireless Bluetoothspeaker system, inform yourself about the newestmodels and look for a device with a low latencyrating. Ask your dealer for advice.
Pairing a Device
Position the wireless speaker within a distance of 5meters from the TV. Read the user manual of thedevice for specific information on pairing and onwireless range. Make sure the Bluetooth setting on TVis switched on.
When a wireless speaker is paired, you can select it toplay the TV sound. When a device is paired, you donot need to pair it again unless you remove thedevice.
To pair a bluetooth device with the TV…
1 - Switch on the bluetooth device and place it withinrange of the TV.2 - Select (Home) > Settings > Allsettings > Wireless and Networks andpress (right) to enter the menu.3 - Select Bluetooth > Search Bluetooth Device,and press OK.4 - Select Search and press OK. Follow theinstuctions on screen. You will pair the device with theTV and the TV will store the connection. You mightneed to unpair a paired device first if the maximum
13
number of paired devices was reached.5 - Select the type of device and press OK.6 - Press (left) repeatedly if necessary, to closethe menu.
Select a Device
To select a wireless device…
1 - Select (Home) > Settings > Allsettings > Wireless and Networks and press OK.2 - Select Bluetooth > Search BluetoothDevice and press OK.3 - In the list, select the wireless device andpress OK.4 - Press (left) repeatedly if necessary, to closethe menu.
You can also select connected device ...
1 - Select (Home) > Settings > Audio out andpress OK.2 - In the list, select the wireless device and pressOK.
Remove a Device
You can connect or disconnect a wireless Bluetoothdevice. You can also remove a wireless Bluetoothdevice. If you remove a Bluetooth device, the devicewill be unpaired.
To remove or disconnect a wireless device…
1 - Select (Home) > Settings > Allsettings > Wireless and Networks and press OK.2 - Select Bluetooth > Remove Bluetoothdevice and press OK.3 - In the list, select the wireless device andpress OK.4 - Select Disconnect or Remove and press OK.5 - Select OK and press OK to confirm.6 - Press (left) repeatedly if necessary, to closethe menu.
14
6
Switch Source6.1
Source List• To open the sources menu, press SOURCES .• To switch to a connected device, select the devicewith the arrows (Right) or (Left) and press OK.• To view the technical information of the connecteddevice you are watching, press OPTIONS andselect Device info.• To close the source menu without switching to adevice, press SOURCES again.
6.2
Rename Device• Only CVBS, YPbPr, HDMI sources can be renamed orreplace device icon.
(Home) > Settings > All settings > Generalsettings > Input sources > Source > Edit
1 - Select one of the device icons and press OK, thepreset name appears in the typing field.2 - Press (up) to move to the typing field, press OK, then enter new name using on-screen keyboard.- Press (red) key to enter with lower-case- Press (green) key to enter with upper-case- Press (yellow) key to enter number andsymbol- Press (blue) key to delete a character3 - Select Enter when complete the editing.
15
7
Channels7.1
About Channels and SwitchChannels
To watch TV channels • Press . The TV tunes to the TV channel you lastwatched.• Press (Home) > TV > Channels andpress OK.• Press + or - to switch channels.• If you know the channel number, type in the numberwith the number keys. Press OK after you enteredthe number to switch channels.• To switch back to the previously tuned channel,press BACK .
To switch to a channel from a channel list • While watching a TV channel, press OK to open thechannel lists.• The channel list can have several pages withchannels. To view the next or previous page, press + or -.• To close the channel lists without switchingchannels, press BACK or EXIT .
Channel icons
After an Automatic channel update of the channel list,newly found channels are marked with a (star).If you lock a channel, it will be marked witha (lock).
Radio channels
If digital broadcasting is available, digital radiostations are installed during installation. Switch to aradio channel just like you switch to a TV channel.
This TV can receive digital television standard DVB. TVmay not work properly with some operators of digitaltelevision , non-compliance with requirements of thestandard in full.
7.2
Install Channel
Antenna Install
Manually Search for Channels and Channel Settings
Search for Channels
Update channels
(Home) > Settings > InstallChannels > Antenna installlation > Search for
channels
1 - Select Start now and press OK.2 - Select Update channels to only add new digitalchannels.3 - Select Start and press OK to update channels.This can take a few minutes.
Quick reinstall
(Home) > Settings > InstallChannels > Antenna installlation > Search forchannels
1 - Select Start now and press OK.2 - Select Quick reinstall to install all channels againwith default settings.3 - Select Start and press OK to update channels.This can take a few minutes.
Advanced reinstall
(Home) > Settings > InstallChannels > Antenna installlation > Search forchannels
1 - Select Start now and press OK.2 - Select Advanced reinstall to do a full re-installation which takes you through each step.3 - Select Start and press OK to update channels.This can take a few minutes.
Channel Settings
(Home) > Settings > InstallChannels > Antenna installlation > Search forchannels > Advanced reinstall
1 - Select Start now and press OK.2 - Select Advanced reinstall to do a full re-installation which takes you through each step.3 - Select Start and press OK.4 - Select the country where you are now andpress OK.5 - Select Antenna (DVB-T), and select one itemyou need to re-install.6 - Select Digital and analogue channels, Onlydigital channels, or Only analogue channels.7 - Select Settings and press OK.8 - Press Reset to reset, or press Done whencomplete the settings.
Frequency scanSelect the method of searching for channels.
• Quick: select the faster method and use thepredefined settings used by most cable providers inyour country.• Full: If this results in having no channels installed orif some channels are missing, you can select theextended Full method. This method will take moretime to search for and install channels.
• Advanced: If you received a specific network
16
frequency value to search for channels,select Advanced.
Frequency step sizeThe TV searches for channels in steps of 8MHz.If this results in having no channels installed or ifsome channels are missing, you can search in smallersteps of 1MHz. Using the 1MHz steps will take moretime to search for and install channels.
Network frequency modeIf you intend to use the fast Quick methodin Frequency scan to search for channels,select Automatic. The TV will use 1 of the predefinednetwork frequencies (or HC - homing channel) asused by most cable providers in your country.If you received a specific network frequency value tosearch for channels, select Manual.
Network frequencyWith the Network frequency mode set to Manual,you can enter the network frequency value receivedfrom your cable provider here. To enter the value,use the number keys.
Network IDEnter the network ID supplied by your cableprovider.
Symbol rate modeIf your cable provider did not give you aspecific symbol rate value to install the TV channels,leave the Symbol rate mode setting on Automatic.If you received a specific symbol rate value,select Manual.
Symbol rateWith the Symbol rate mode set to Manual, you canenter the symbol rate value by using the numberkeys.
Digital: Reception Test
(Home) > Settings > InstallChannels > Antenna installlation > Digital:reception test
The digital frequency is shown for this channel. If thereception is poor, you can reposition your antenna.To check the signal quality of this frequency again,select Search and press OK.To enter a specific digital frequency yourself, use theremote control digit keys. Alternatively, select thefrequency, position the arrows on a numberwith and and change the numberwith and . To check the frequency,select Search and press OK.
Analogue: Manual Installation
(Home) > Settings > InstallChannels > Antenna installlation > Analogue:manual installation
Analogue TV channels can be manually installed,channel by channel.
• SystemTo set up the TV system, select System.Select your country or the part of the world whereyou are now and press OK.
• Search ChannelTo find a channel, select Search Channel andpress OK. You can enter a frequency yourself to finda channel or let the TV search for a channel.Press OK, select Search and press OK to searchfor a channel automatically. The found channel isshown on screen and if the reception is poor,press Search again. If you want to store the channel,select Done and press OK.
• Fine tuneTo fine tune a channel, select Fine tune andpress OK. You can fine tune the channelwith or .If you want to store the channel found,select Done and press OK.
• StoreYou can store the channel on the current channelnumber or as a new channel number.Select Store and press OK. The new channelnumber is shown briefly.
You can redo these steps until you have found allavailable analogue TV channels.
Channel List copy
Introduction
Channel list copy is intended for dealers and expertusers.
With Channel list copy, you can copy the channelsinstalled on one TV onto another Philips TV of thesame range. With Channel list copy, you avoid thetime-consuming channel search by uploading apredefined channel list on a TV. Use a USB flash driveof minimum 1 GB.
Conditions • Both TVs are from the same year range.• Both TVs have the same hardware type. Check thehardware type on the TV type plate on the back of
17

the TV.• Both TVs have compatible software versions.
Copy a Channel List, Check Channel List Version
Copy a channel list to USB flash drive
(Home) > Settings > All settings > Channels > Expert mode settings > Channel listcopy > Copy to USB
Check channel list version
(Home) > Settings > All settings > Channels > Expert mode settings > Channel listcopy > Current version
Upload a Channel List
To not Installed TVs
Depending on whether your TV is already installed ornot, you must use a different method to upload achannel list.
To a TV that is not yet installed 1 - Plug in the power plug to start the installation andselect language and country. You can skip thechannel search. Finish the installation.2 - Plug in the USB flash drive that holds the channellist of the other TV.3 - To start the channel list upload,press (Home) > Settings > Allsettings > Channels > Expert modesettings > Channel List Copy > Copy to TV andpress OK. Enter your PIN code if necessary.4 - The TV notifies you if the channel list is copied tothe TV successfully. Unplug the USB flash drive.
To Installed TVs
Depending on whether your TV is already installed ornot, you must use a different method to upload achannel list.
To an already installed TV 1 - Verify the country setting of the TV. (To verify thissetting, see chapter Re-install channels. Start thisprocedure until you reach the country setting.Press BACK to cancel the installation.)If the country is correct continue with step 2.If the country is not correct, you need to start areinstallation. See chapter Re-install channels andstart the installation. Select the correct country andskip the channels search. Finish the installation. Whendone, continue with step 2.2 - Plug in the USB flash drive that holds the channellist of the other TV.
3 - To start the channel list upload,press (Home) > Settings > Allsettings > Channels > Expert modesettings > Channel List Copy > Copy to TV andpress OK. Enter your PIN code if necessary.4 - The TV notifies you if the channel list is copied tothe TV successfully. Unplug the USB flash drive.
Channel Options
Open Options
While watching a channel, you can set some options.
Depending on the type of channel you are watchingor depending on the TV settings you made, someoptions are available.
To open the options menu…
1 - While watching a channel, press OPTIONS.2 - Press OPTIONS again to close.
Programme info
Select Programme info to view the information of theprogramme you are watching.
Subtitles
To switch on Subtitles, press OPTIONS and select Subtitles.
You can switchsubtitles Subtitle on or Subtitle off . Alternativelyyou can select Automatic.
Automatic
If language information is part of the digital broadcastand the broadcasted programme is not in yourlanguage (the language set on TV), the TV can showsubtitles automatically in one of your preferredsubtitle languages. One of these subtitle languagesmust also be part of the broadcast.
You can select your preferred subtitle languagesin Subtitle language.
Subtitles Language
If none of the preferred subtitle languages areavailable, you can select another subtitle language ifavailable. If no subtitle languages are available, youcannot select this option.
To read more information, in Help, press the colourkey Keywords and look up Subtitle Language.
18
Audio Language
If none of the preferred audio languages areavailable, you can select another audio language ifavailable. If no audio languages are available, youcannot select this option.
To read more information, in Help, press the colourkey Keywords and look up Audio Language.
Dual I-II
If an audio signal contains two audio languages butone language or both has no language indication, thisoption is available.
Mono / Stereo
You can switch the sound of an analogue channel toMono or Stereo.
To switch to Mono or Stereo…
Tune to an analoge channel.
1 - Press OPTIONS, select Mono/Stereo andpress (right).2 - Select Mono or Stereo and press OK.3 - Press (left) repeatedly if necessary, to closethe menu.
Channel info
Select Channel info to view the technical informationof the channel.
Universal Access
Only available when Universal access set to On.
(Home) > Settings > All settings > Universalaccess > Universal access > On.
To read more information, in Help, press the colourkey Keywords and look up Universal Access.
Video Selection
Digital TV channels can offer multi video signals (multi-feed broadcast), different camera viewpoints orangles of the same event or different programmes onone TV channel. The TV shows a message if any suchTV channels are available.
7.3
Channel List
Open Channel List
To open the current channel list…
1 - Press , to switch to TV.2 - Press OK to open the channel list if InteractiveService is not available, or long press TV Guide toopen the channel list.3 - Press OPTIONS > Select channel list.4 - Select one channel list you want to watch.5 - Press BACK to close the channel list.
Channel List Options
Open Option Menu
To open the channel list option menu...
• Press , to switch to TV.• Press OK to open the current channel list.• Press OPTIONS , and select one of options.• Press BACK to close the channel list.
Rename Channel
1 - Press , to switch to TV.2 - Press OK to open the current channel list.3 - Select one channel you want to rename.4 - Press OPTIONS > Rename channel, andpress OK.5 - In the typing field, press OK to open on-screenkeyboard, or press BACK to hide the on-screenkeyboard.6 - Use navigation keys to select a character, thenpress OK.- Press (red) key to enter with lower-case- Press (green) key to enter with upper-case- Press (yellow) key to enter number andsymbol- Press (blue) key to delete a character7 - Select Done when complete the editing.8 - Press BACK to close the channel list.
Select Channel Filter
1 - Press , to switch to TV.2 - Press OK to open the current channel list.3 - Press OPTIONS > Digital/analogue4 - Select one of channel combinations showing inthe channel list.
19
Create or Edit Favourites Channel List
> OK > OPTIONS > Create favourites list
Select a channel then press OK to add in afavourites channel list, once completed,press Done.
> OK > OPTIONS > Edit favourites
Select a channel then press OK to add in or removefrom a favourites channel list, once completed, press Done.
Select Channel Range
> OK > OPTIONS > Select channel range
Select a range of channels in a favourites channellist, once completed, press OK.
Select Channel List
> OK > OPTIONS > Select channel list
Select a range of channels in a favourites channellist, once completed, press OK.
Search Channels
> OK > OPTIONS > Search channel
You can search for a channel to find it in a long list ofchannels.
1 - Press , to switch to TV.2 - Press OK to open the current channel list.3 - Press OPTIONS > Search channel, andpress OK.4 - In the typing field, press OK to open on-screenkeyboard, or press BACK to hide the on-screenkeyboard.5 - Use navigation keys to select a character, thenpress OK.- Press (red) key to enter with lower-case- Press (green) key to enter with upper-case- Press (yellow) key to enter number andsymbol- Press (blue) key to delete a character- Select Enter to start the searching6 - Select Done when the searching iscompleted.7 - Press BACK to close the channel list.
Lock or Unlock Channel
> OK > OPTIONS > Lock channel, Unlockchannel
To prevent children from watching a channel, you can
lock a channel. To watch a locked channel, you mustenter the 4 digit Child Lock PIN code first. Youcannot lock programmes from connected devices.
The locked channel will have next to the channellogo.
Remove Favourite List
> OK > OPTIONS > Remove favourite list
To remove existing favourite list, select Yes.
7.4
Favourite Channels
About Favourite Channels
You can create a favourite channel list that only holdsthe channels you want to watch. With the Favouritechannel list selected, you will only see your favouritechannels when you switch through channels.
Create a Favourites List
1 - While watching a TV channel, press OK to openthe channel list.2 - Select the channel, and press Mark asfavourites to mark as favourite.3 - The selected channel is marked with a .4 - To finish, press BACK . The channels areadded to the Favourites list.
Remove Channel from the FavouritesList
To remove a channel from the favourites list, selectthe channel with , then press Unmark asfavourite again to unmark as favourite.
Reorder Channels
You can reorder — reposition — channels in theFavourite channel list.
1 - While watching a TV channel, press OK > OPTIONS > Select channel list.2 - Select Antenna favourite, andpress OPTIONS .3 - Select Reorder channels, select the channel youwant to reorder, and press OK.4 - Press the Navigation buttons to move thehighlighted channel to another location andpress OK.
20
5 - Once completed, press Done.
Favourites List on TV Guide
You can link the TV Guide for your Favourite List.
1 - While watching a TV channel,press OK > OPTIONS > Select channel list.2 - Select Antenna favourite, and press OK.3 - Press TV GUIDE to open it.
With the TV Guide you can view a list of the currentand scheduled TV programmes of your favouritechannels. Along with your favourite channels, the first3 most used channels from the broadcasters’ defaultlist will be appended after your favourite channels foryour preview. You need to add these channels intoyour favourite list to enable its operation (refer to "TVGuide" chapter).
On each page of TV Guide, there is a "Did you know"grid inserted on your favourite channel list. The "Didyou know"-channel provides useful tips to improvethe way you use your TV.
7.5
Text / Teletext
Subtitles from Text
If you tune to an analogue channel, you need tomake the subtitles available for each channelmanually.
1 - Switch to a channel and press TEXT to openText.2 - Enter the page number for subtitles, usually 888.3 - Press TEXT again, to close Text.
If you select On in the Subtitle menu when watchingthis analogue channel, subtitles will be shown ifavailable.
To know if a channel is analogue or digital, switch tothe channel and press INFO .
Text Pages
To open Text/Teletext press TEXT, while you arewatching TV channels.To close Text, press TEXT again.
Select a Text page
To select a page . . .
1 - Enter the page number with the number keys.2 - Use the arrow keys to navigate.3 - Press a colour key to select a colour-coded
subject at the bottom of the screen.
Text sub-pages
A Text page number can hold several subpages. Thesubpage numbers are shown on a bar next to themain page number.To select a subpage, press or .
T.O.P. Text pages
Some broadcasters offer T.O.P. Text.To open T.O.P. Text pages within Text,press OPTIONS and select T.O.P. overview.
* The teletext can only be reached when the channelsare installed directly on the TV’s internal tuner andthe set is on TV mode. If a set-top box is being used,the teletext will be unavailable via TV. In that case,the set-top box’s teletext can be used instead.
Text Options
In Text/Teletext, press OPTIONS to select thefollowing…
• Freeze pageTo stop the automatic rotation of subpages.• Dual screen / Full screenTo show the TV channel and Text alongside eachother.• T.O.P. overviewTo open T.O.P. Text.• EnlargeTo enlarge the Text page for comfortable reading.• RevealTo unhide hidden information on a page.• LanguageTo switch the group of characters that Text uses todisplay correctly.• Text 2.5To activate the Text 2.5 for more colours and bettergraphics.
Text Setup
Text language
Some digital TV broadcasters have several Textlanguages available.
Set teletex preference language
(Home) > Settings > All settings > Region andlanguage > Language > Primary text, Secondarytext
Text 2.5
If available, Text 2.5 offers more colours and bettergraphics. Text 2.5 is activated as a standard factorysetting.To switch off Text 2.5…
21

1 - Press TEXT.2 - With Text/Teletext open on screen,press OPTIONS.3 - Select Text 2.5 > Off.4 - Press (left) repeatedly if necessary, to closethe menu.
22
8
TV Guide8.1
What You NeedWith the TV guide you can view a list of the currentand scheduled TV programmes of your channels.Depending on where the TV guide information (data)is coming from, analogue and digital channels or onlydigital channels are shown. Not all channels offer TVguide information.
The TV can collect TV guide information for thechannels that are installed on the TV (e.g thechannels you watch with Watch TV). The TV cannotcollect the TV guide information for channels viewedfrom a digital receiver.
8.2
Using the TV Guide
Open the TV Guide
To open the TV guide, press TV GUIDE.
Press TV GUIDE again to close.
The first time you open the TV Guide, the TV scans allTV channels for programme information. This maytake several minutes. TV guide data is stored on TV.
Tune to a Programme
Switch to a programme • From the TV guide, you can switch to a currentprogramme. • To select a programme, use the arrow keys tohighlight the programme name.• Navigate to the right to view programmes scheduledlater that day.• To switch to the programme (channel), select theprogramme and press OK.
View programme details
To call up the details of the selected programme,press INFO .
Change Day
If the TV guide information comes from thebroadcaster, you can press + to view theschedule of one of the next days. Press - to goback to the previous day.
Alternatively, you can press OPTIONS andselect Change day.
Set a Reminder
You can set a reminder for a programme. A messagewill alert you at the start of the programme. You cantune to this channel immediately.
In the TV Guide a programme with a reminder ismarked with a (clock).
To set a reminder…
1 - Press TV GUIDE and select an upcomingprogramme.2 - Press Set reminder and press OK.
To clear a reminder…
1 - Press TV GUIDE and select a programmewith the reminder, which is marked with a (clock).2 - Press Clear reminder, and select Yes, thenpress OK.
Search by Genre
If the information is available, you can look upscheduled programmes by genre like movies, sports,etc.
To search for programmes by genre,press OPTIONS and select Search by genre.Select a genre and press OK. A list with the foundprogrammes appears.
List of Reminders
You can view a list of the reminders you have set.
List of Reminders
To open the list of reminders…
1 - Press TV GUIDE.2 - Press OPTIONS and select All reminders.3 - In the list of reminders, select the reminder youwant to remove, the selected reminder is markedas .4 - Select Clear selected and press OK.5 - Select Close to close the list of reminders.
23
Set a Recording
You can set a recording in the TV Guide.
To record a programme…
1 - Press TV GUIDE and select a future orongoing programme.2 - Press the colour key Record .
To cancel a recording…
1 - Press TV GUIDE and select the programmeset for recording.2 - Press the colour key Clear recording .
To see the recording list, press Recordings , aprogramme set to be recorded is marked witha (red dot) on the front of the programme name.
24
9
Recording andPause TV9.1
Recording
What You Need
You can record a digital TV broadcast and watch itlater.
To record a TV programme you need…
• a connected USB Hard Drive formatted on this TV• digital TV channels installed on this TV• to receive channel information for the on screen TVGuide• a reliable TV clock setting. If you reset the TV clockmanually, recordings may fail.
You cannot record when you are using Pause TV.
In terms enforcement of copyright legislation, someDVB providers can apply different restriction bymeans of DRM (Digital Right Management)technology. In case of broadcasting protectedchannels, recording, record validity or number ofviews may be restricted. Recording may becompletely prohibited. In case of trying to record aprotected broadcasting or play back an expiredrecording, an error message can appear.
Record a Programme
Record Now
To record the programme you are watching right now,press (Record) on the remote control. Therecording will start immediately.
To stop the recording, press (Stop).
When TV Guide data is available, the programme youare watching will be recorded from the moment youpressed the recording key until the programme ends.
• If you receive TV guide information from thebroadcaster, the recording starts immediately. Youcan adjust the end time of the recording in the list ofrecordings.
Schedule a Recording
You can schedule a recording of an upcomingprogramme for today or a few days from today(maximum of 8 days away). The TV will use the datafrom the TV Guide to start and end the recording.
To record a programme…
1 - Press TV GUIDE.2 - On the TV guide, select the channel andprogramme you wish to record. Press (Right)or (Left) to scroll through the programmes of achannel.3 - With the programme highlighted, press the colourkey Record . The programme is scheduled forrecording. A warning will show automatically whenoverlapping recordings are scheduled. If you plan torecord a programme in your absence, remember toleave the TV switched to Standby and the USB HardDrive switched on.
List of Recordings
You can view and manage your recordings in the listof recordings. Next to the list of recordings, there is aseparate list for scheduled recordings and reminders.
To open the list or recordings…
Press TV GUIDE.
1 - Press the colour key Recordings .2 - In the list of recordings, select thetabs New, Watched or Expired and press OK tofilter your view.3 - With a recording selected in the list, you canremove the recording with the colourkey Remove . You can rename a recordingwith the colour key Rename.
Broadcasters can limit the number of days a recordingcan be viewed. When this period expires, therecording will be marked as expired. A recording inthe list can show the number of days before it expires.
When a scheduled recording was prevented by thebroadcaster or when the broadcast was interrupted, arecording is marked as Failed.
Manual recording
You can schedule a recording that is not linked to aTV programme. You set the tuner type, channel andthe start and end time yourself.
To schedule a recording manually…
1 - Press TV GUIDE.2 - Press the colour key Recordings .3 - Press the colour key Schedule andpress OK.4 - Select the tuner from where you want to recordand press OK.5 - Select the channel to record from and press OK.6 - Select the day of the recording and press OK.7 - Set the start and end time of the recording. Selecta button and use the (up) or (down) keys toset the hours and minutes.
25
8 - Select Schedule and press OK to schedule themanual recording.
The recording will appear in the list of scheduledrecordings and reminders.
Watch a Recording
To watch a recording…
1 - Press TV GUIDE.2 - Press the colour key Recordings .3 - In the list of recordings, select the recording youneed and press OK to start watching.4 - You can use thekeys (pause), (play), (rewind), (fastforward) or (stop).5 - To switch back to watch TV, press EXIT.
9.2
Pause TV
What You Need
To pause a TV programme you need…
• a connected USB Hard Drive formatted on this TV• digital TV channels installed on this TV• to receive channel information for the on screen TVguide
With the USB Hard Drive connected and formatted,the TV continuously stores the TV broadcast you arewatching. When you switch to another channel, thebroadcast of the former channel is cleared. Alsowhen you switch the TV to standby the broadcast iscleared.
You cannot use Pause TV when you are recording.
Pause a Programme
To pause and resume a broadcast…
• To pause a broadcast, press (Pause). A progressbar at the bottom of the screen appears briefly.• To call up the progress bar, press (Pause) again.• To resume watching, press (Play).
With the progress bar on screen, press (Rewind)or press (Forward) to select from where you wantto start viewing the paused broadcast. Press thesekeys repeatedly to change speed.
To switch back to the actual TV broadcast,press (Stop).
Replay
Since the TV stores the broadcast you are watching,you can mostly replay the broadcast for a fewseconds.
To replay a current broadcast…
1 - Press (Pause)2 - Press (Rewind). You canpress repeatedly to select from where you wantto start viewing the paused broadcast. Press thesekeys repeatedly to change speed. At one point youwill reach the start of the broadcast storage or themaximum time span.3 - Press (Play) to watch the broadcast again.4 - Press (Stop) to watch the broadcast live.
26
10
Videos, Photos andMusic10.1
From a USB ConnectionYou can view your photos or play your music andvideos from a connected USB flash drive or USB HardDrive.
With the TV switched on, plug in a USB flash drive or aUSB Hard Drive to one of the USB connections.
Press SOURCES, then select USB, you canbrowse your files in folder structure you haveorganised on the USB Hard Drive.
Warning
If you try to pause or record a programme with a USBHard Drive connected, the TV will ask you to formatthe USB Hard Drive. This formatting will delete allcurrent files on the USB Hard Drive.
10.2
Photos
View Photos
1 - Press SOURCES, select USB andpress OK.2 - Select USB Flash Drive and press (right)to select the USB device you need.3 - Select Photo, you can press Sort tobrowse your photos by date, month, year oralphabetically by name.4 - Select one of photos, and press OK to view theselected photo.• To view photos, select Photos in the menu bar,select a photo thumbnail and press OK.• If there are several photos in the same folder, selecta photo and press Slide show to start a slideshow of all photos in this folder.• Watch a photo and press INFO to show below:Progress bar, Playback control bar, (Jump to theprevious photo in a folder), (Jump to the next photoin a folder), (Start slideshow playback), (Pausethe playback), (Start slideshow), (Rotatephoto)
Photo Options
With a photo on screen, press OPTIONS to…
List/ThumbnailsView photos with list view or thumbnails view.
Shuffle off, Shuffle onView the pictures in sequential order, or at random.
Repeat, Play onceView the pictures repeatedly or once only.
Stop musicStop the music if the music playback is in progress.
Slideshow speedSet the speed of the slideshow.
Slideshow transitionsSet the transition from one picture to the next.
10.3
360 Photo
View 360 Photos
1 - Press SOURCES, select USB andpress OK.2 - Select USB Flash Drive and press (right)to select the USB device you need.3 - Select 360 Photos, you can press Sort tobrowse your 360 photos by date, month, year oralphabetically by name.4 - Select one of 360 photos, and press OK to viewthe selected 360 photo.• To view photos, select 360 Photos in the menu bar,select a photo thumbnail and press OK.• If there are several 360 photos in the same folder,select a 360 photo and press Slide show to starta slide show of all 360 photos in this folder.• Watch a photo and press INFO to show below:Progress bar, Playback control bar, (Jump to theprevious photo in a folder), (Jump to the next photoin a folder), (Start slideshow playback), (Pausethe playback), (Play all/Play one), (LittlePlanet), (Auto Mode/Manual mode).
- Little Planet: Little Planet is an alternate and funview of 360 photo. When Little Planet view is started,the 360 photo will be rendered in a wrapped aroundview like a planet.- Auto Mode/Manual mode: when the 360 player isstarted, it will auto pan the selected 360 photo fromleft to right (0 to 360 degrees) in 360 view. Whenmanual mode is entered, the 360 player will stopauto panning/rotating to allowmanually panning/rotating with the remote controlkeys.
27
360 Photo Options
With a 360 photo on screen, press OPTIONS to…
List/ThumbnailsView 360 photos with list view or thumbnails view.
Shuffle off, Shuffle onView the pictures in sequential order, or at random.
Repeat, Play onceView the pictures repeatedly or once only.
Stop musicStop the music if the music playback is in progress.
10.4
Videos
Play Videos
To play a video on TV…
Select Videos , and select the file name andpress OK.
• To pause the video, press OK. Press OK again tocontinue.• To rewind or go fast forward, press or . Pressthe keys several times to speed up - 2x, 4x, 8x, 16x,32x.• To jump to the next video in a folder, press OK topause and select on screen and press OK.• To stop the video playback, press (Stop).• To go back to the folder, press .
Open video folder 1 - Press SOURCES, select USB andpress OK.2 - Select USB Flash Drive and press (right)to select the USB device you need.3 - Select Videos and select one of video, youcan press OK to play the selected video.• Select a video and press INFO to show fileinformation.• Playback a video and press INFO to showbelow:Progress bar, Playback control bar, (Jump to theprevious video in a folder), (Jump to the nextvideo in afolder), (Playback), (Rewind), (Fastforward), (Pause the playback), (Play all/Playone), (Shuffle on/Shuffle off)
Video Options
During the video playback, press OPTIONS to…
List/ThumbnailsView video files with list view or thumbnails view.
SubtitlesDisplay the subtitles if available, select On, Off,or On during mute.
Shuffle off, Shuffle onPlay videos in sequential order, or at random.
Repeat, Play oncePlay videos repeatedly or once.
10.5
Music
Play Music
Open music folder
1 - Press SOURCES, select USB andpress OK.2 - Select USB Flash Drive and press (right)to select the USB device you need.3 - Select Music and select one of music, youcan press OK to play the selected music.• Select a music and press INFO to show fileinformation.• Playback a music and press INFO to showbelow:Progress bar, Playback control bar, (Jump to theprevious music in a folder), (Jump to the nextmusic in afolder), (Playback), (Rewind), (Fastforward), (Pause the playback), (Play all/Playone)
Music Options
During the music playback, press OPTIONS to…
Shuffle off, Shuffle onPlay songs in sequential order, or at random.
Repeat, Play oncePlay songs repeatedly or once.
28
11
Open TV SettingMenus11.1
Home Menu OverviewPress (Home) to select one of below menus, thenpress OK.
Sources
This row contains available sources in this TV.
Watch TV
This row contains TV functions which are available foruser.
Apps
This row contains number of apps pre-installed.
Search
This row contains an interface to perform the searchwithin this TV.
Settings
This row contains settings which are available foruser.
You can reorder the icons on Home menus. Toreposition icons, press OK. Alternatively, you canselect the icon you want to reorder, and hold the OKkey for 3 seconds until the arrows appear around theicon. Use navigation keys to move the highlightedicon to another location, then press OK. Press theBACK key to exit.
11.2
Frequent settings and Allsettings
Settings menu:
Press (Home) > Settings key on the remotecontrol to find frequent settings.
• How to - Instructions on how to install channels,sort channels, update TV software, connect externaldevices and use Smart functions on your TV.• Install channels - Update channels or start acomplete new channel installation.• Picture style - Select one of preset picture stylesfor ideal picture viewing.• Picture format - Select one of preset pictureformat which fits the screen.• Sound style - Select one of preset sound styles for
ideal sound settings.• Audio out - Set the TV to play the sound on TV oron the connected audio system.• Ambilight style* - Select one of preset Ambilightstyles.• Ambilight+hue* - Switch Ambilight+hue on or off.• Sleep timer - Set the TV to switch to standbyautomatically after a preset time.• Screen off - If you only listen to music on TV, youcan switch off the TV screen.
• Wireless and networks - Connect to your homenetwork or adjust the network settings.• Picture settings - Adjust all picture settings.• All settings - View all settings menu.• Help - Diagnose and get more information aboutyour TV. For more information, in Help, press thecolour key Keywords and look up HelpMenu for more information.
All settings menu:
Press (home) key on the remote control,select Settings > All settings, and press OK.
* Ambilight setting is only for models which supportAmbilight function.
11.3
All Settings
Picture Settings
Picture Style
Select a style
For easy picture adjustment, you can select a presetpicture style.
(Home) > Settings > Picture style, press OK tochange to next available option.
The available Picture styles are ...
• Personal - The picture preferences you set duringthe first start up• Vivid - Ideal for daylight viewing• Natural - Natural picture settings• Standard - Most energy conscious setting• Movie - Ideal for watching movies with originalstudio effect• Game - Ideal for gaming*• Monitor - Ideal for computer monitor**
* Picture style - Game is not available for some videosources.** Picture style - Monitor is only available when HDMIsource video is applicable for PC application. HDR is
29
not supported in Monitor mode. The TV is able to playHDR video in Monitor mode but no HDR processingwill be applied.
Custom a style
You can adjust and stored picture settings in in thecurrently selected picture style,like Colour, Contrast or Sharpness.
Restore a style
To restore the style to its original setting, goto (Home) > Settings > Allsettings > Picture > Picture style, thenpress Restore style.
• The TV can play HDR programmes from any one ofHDMI connections, broadcasting, from an Internetsource (e.g. Netflix) or from a connected USB memorydevice.• The TV will automatically switched to HDR modewith indication. TV supports following HDR formats: Hybrid Log Gamma, HDR10, HDR10+, and DolbyVision but it is subject to the availability of such HDRformat in content providers.
For HDR content (Hybrid Log Gamma, HDR10 andHDR10+)
The styles for HDR (Hybrid Log Gamma, HDR10 andHDR10+) content are...
• HDR Personal • HDR Vivid • HDR Natural • HDR Movie • HDR Game
For Dolby Vision HDR content
The styles for Dolby Vision HDR content are...
• HDR Personal• HDR Vivid • Dolby Vision Bright• Dolby Vision Dark• HDR Game
Colour, Contrast, Sharpness, Brightness
Adjust the picture colour
(Home) > Settings > Allsettings > Picture > Colour
Press the arrows (up) or (down) to adjust thecolour saturation value of the picture.
Adjust the picture contrast
(Home) > Settings > Allsettings > Picture > Contrast
Press the arrows (up) or (down) to adjust thecontrast value of the picture.
You can decrease contrast value to reduce powerconsumption.
Adjust the picture sharpness
(Home) > Settings > Allsettings > Picture > Sharpness
Press the arrows (up) or (down) to adjust thesharpness value of the picture.
Adjust the picture brightness
(Home) > Settings > Allsettings > Picture > Brightness
Press the arrows (up) or (down) to set thelevel of brightness of the picture signal.
Note: Setting of brightness much away fromreference value (50) may result lower contrast.
Expert mode picture settings
Colour Settings
(Home) > Settings > Allsettings > Picture > Expert mode settings
Adjust the tint seting
(Home) > Settings > Allsettings > Picture > Expert mode settings > Tint
Press the arrows (up) or (down) to adjust thevalue of tint setting.
Adjust the colour enhancement
(Home) > Settings > Allsettings > Picture > Expert modesettings > Colour enhancement
Select Maximum, Medium, or Minimum to set thelevel of the colour intensity and the details in brightcolours.
Select the preset colour temperature
(Home) > Settings > Allsettings > Picture > Expert modesettings > Colour temperature
30
Select Normal, Warm, or Cool to set the colourtemperature for your preference.
Customise colour temperature
(Home) > Settings > Allsettings > Picture > Expert modesettings > Colour temperature > Custom colourtemperature
Select Custom in Colour temperature menuto customise a colour temperature yourself. Pressthe arrows (up) or (down) to adjust the value.
Contrast Settings
Contrast Modes
(Home) > Settings > Allsettings > Picture > Expert modesettings > Contrast mode
Select Normal, Optimized for picture, Optimized forenergy saving to set the TV automatically reducesthe contrast, for best power consumption or for bestpicture experience, or select Off to switch off theadjustment.
HDR Settings
(Home) > Settings > Allsettings > Picture > Expert mode settings > HDRPlus
Set HDR Plus to Off, Minimum, Medium, Maximum or Automatic to set the level at which theTV automatically shows superior contrast andbrightness effect for HDR content.
Note: Available when HDR (High-Dynamic Range)signal is detected.
• The TV can play HDR programmes from any one ofHDMI connections, broadcasting, from an Internetsource (e.g. Netflix) or from a connected USB memorydevice.• The TV will automatically switched to HDR modewith indication. TV supports following HDR formats: Hybrid Log Gamma, HDR10, HDR10+, and DolbyVision but it is subject to the availability of such HDRformat in content providers.
Dynamic Contrast
(Home) > Settings > Allsettings > Picture > Expert modesettings > Dynamic contrast
Select Maximum, Medium, or Minimum to set thelevel at which the TV automatically enhances thedetails in the dark, middle and light areas of thepicture.
Video Contrast, Gamma
Video contrast
(Home) > Settings > Allsettings > Picture > Expert mode settings > Videocontrast
Press the arrows (up) or (down) to adjust thevideo contrast level.
Gamma
(Home) > Settings > Allsettings > Picture > Expert modesettings > Gamma
Press the arrows (up) or (down) to set a non-linear setting for picture luminance and contrast.
Ultra Resolution
(Home) > Settings > Allsettings > Picture > Expert mode settings > Ultraresolution
Select On to have a superior sharpness in lineedges and details.
Picture Clean
Noise reduction
(Home) > Settings > Allsettings > Picture > Expert mode settings > Noisereduction
Select Maximum, Medium, Minimum to set thelevel for removing the noise in video content.Noise is mostly visible as small moving dots in on-screen picture.
MPEG Artefact Reduction
(Home) > Settings > Allsettings > Picture > Expert modesettings > MPEG Artefact Reduction
Select Maximum, Medium, Minimum to havedifferent degress of smoothing the artefects in digitalvideo content.MPEG artefacts are mostly visible as small blocks orjagged edges in on-screen images.
31
Motion Settings
Motion Styles
(Home) > Settings > Allsettings > Picture > Expert modesettings > Motion Styles
Motion styles provides optimised motion settingmodes for different video content.
Select Off to switch off or select one of the motionstyles to have different viewing experience on motionvideo.(Movie, Sports, Standard, Smooth or Personal)
Not available for below cases:
• (Home) > Settings > All settings > Picturestyle > Game.• (Home) > Settings > All settings > Picturestyle > Monitor.
Natural Motion
(Home) > Settings > Allsettings > Picture > Expert modesettings > Natural Motion
Natural Motion makes any movement smooth andfluent.
• Select Maximum, Medium, Minimum to havedifferent degress for reducing the motion judder,visible in movies on TV.• Select Minimum or Off when noise appears inplaying moving picture on-screen.
Note: Only available when Motion styles setto Personal.
Picture Format
(Home) > Settings > Allsettings > Picture > Picture format
If the picture is not filling the whole screen, if blackbars are showing on the top or bottom or at bothsides, you can adjust the picture to fill the screencompletely.
To select one of the basic settings to fill the screen…
• Wide screen – automatically zooms in the pictureto 16:9 full screen. Picture content aspect ratio maychange.• Fill screen – automatically enlarges the picture tofill the screen. Picture distortion is minimal, subtitlesremain visible. Not suitable for PC input. Someextreme picture formats can still show black bars.Picture content aspect ratio may change.• Fit to screen – automatically zooms in the pictureto fill the screen without distortion. Black bars may bevisible. Not supported for PC input.
• Original – automatically zooms in the picture to fitthe screen with original aspect ratio. No content lostvisible.
(Home) > Settings > Allsettings > Picture > Picture format > Advanced
To format the picture manually…
• Shift – select on the arrows to shift the picture. Youcan only shift the picture when it is zoomed in.• Zoom – select on the arrows to zoom in.• Stretch – select on the arrows to stretch thepicture vertically or horizontally.• Undo – select to return to the picture format youstarted with.
Dolby Vision Notification
(Home) > Settings > All settings > Picture > Dolby Vision Notification
Switch On or Off the Dolby Vision notification whenDolby Vision content begins to play on your TV.
Quick Picture Settings
(Home) > Settings > Allsettings > Picture > Quick picture settings
• During the first installation, you did some picturesettings in a few easy steps. You can redo these stepswith Quick picture settings menu.• Select the picture setting you prefer and go to thenext setting.• To do these steps, make sure the TV can tune to aTV channel or can show a programme from aconnected device.
Sound Settings
Sound Style
Select a style
For easy sound adjustment, you can select a presetsound style.
(Home) > Settings > Allsettings > Sound > Sound style
The available sound styles are ...
• AI mode - Select AI mode for intelligent switchingof sound style based on audio content.
• Original - Most neutral sound setting• Movie - Ideal for watching movies• Music - Ideal for listening to music• Game - Ideal for gaming• News - Ideal for speech
32
• Personal mode - Select to check more advancedsound settings
Restore Personal mode 1 - Set the sound style to Personal mode.2 - Press the colour key Restore Style, andpress OK. The style is restored.
Customise Personal style 1 - Set the sound style to Personal mode.2 - Press the colour key Customise, and press OKto change advanced sound settings.
Personal Mode Sound Settings
Speaker virtualizer
(Home) > Settings > Allsettings > Sound > Personal mode settings >Speaker virtualizer
Select On or Auto (Dolby Atmos) to enable DolbyAtmos which can add height dimension in sound.With height dimension, sound can be precisely placedand moved in three-dimensional space.
Clear dialogue
(Home) > Settings > Allsettings > Sound > Personal modesettings > Clear dialogue
Select On to improve the sound for speech. Ideal fornews programmes.
Equalizer
(Home) > Settings > Allsettings > Sound > Personal modesettings > Equalizer
Press the arrows (up) or (down) to adjust theequalizer settings.
* Note: To restore the Personal mode to its originalsetting, select back to Sound style, thenpress Restore style.
TV Placement
(Home) > Settings > All settings > Sound > TVplacement
Select On a TV stand or On the wall to have bestsound reproduction according to the setting.
Advanced sound settings
Volume Control
Auto volume
(Home) > Settings > Allsettings > Sound > Advanced > Auto volume
Select On to automatically level out sudden volumedifferences. Typically when you are switchingchannels. Select Night mode for a morecomfortable quiet listening experience.
Delta volume
(Home) > Settings > Allsettings > Sound > Advanced > Delta volume
The Delta volume setting can be used to adjust tobalance the sound level difference between the TVchannel and the HDMI source input. Press thearrows (up) or (down) to adjust the deltavalue for TV speaker volume.
* Note: Delta volume is available when the inputsource is set to HDMI or Analogue sources and theAudio out is set to TV speakers or HDMI soundsystem.
Audio Out Settings
(Home) > Settings > Allsettings > Sound > Advanced > Audio out
Set the TV to play the sound on TV or on theconnected audio system.
You can select where you want to hear the TV soundand how you want to control it.• If you select TV Speakers off, you permanentlyswitch off the TV speakers.• If you select TV Speakers, the TV speakers arealways on. All the sound related settings areapplicable to this mode.• If you select Headphones, the sound will be playedthrough headphones.• If you select TV Speakers + Headphones, the soundwill be played through TV speakers andheadphones.
To adjust the volume of TV speakers or headphones,press Volume and press the arrows (right) or (left) to select the output source you want to adjust.Press the arrows (up) or (down) to adjust thevolume.
With an audio device connected with HDMI CEC,select HDMI sound system. The TV will switch offthe TV speakers when the device is playing thesound.
33
Digital Output Settings
Digital output settings are available for SPDIF output(optical) and HDMI ARC sound signals.
Digital out fomat
(Home) > Settings > Allsettings > Sound > Advanced > Digital out format
Set the audio out signal of the TV to fit the soundcapabilities of the connected Home Theatre System.
• Stereo (uncompressed): If your audio playbackdevices have no multichannel sound processing,select to only output stereo content to your audioplayback devices.• Multichannel: Select to output multichannel audiocontent (compressed multichannel sound signal) orstereo audio content to your audio playback devices.• Multichannel (bypass): Select to send originalbitstream from HDMI ARC to the connected HDMISound System.
- Make sure your audio playback devices supportDolby Atmos feature.
- SPDIF output (DIGITAL AUDIO OUT) will bedisabled when streaming Dolby Digital Plus content.
Digital out levelling
(Home) > Settings > Allsettings > Sound > Advanced > Digital outlevelling
Adjust the loudness level from device which isconnected to digital audio output (SPDIF) or HDMI.
• Select More to have louder volume.• Select Less to have softer volume.
Digital out delay
(Home) > Settings > Allsettings > Sound > Advanced > Digital out delay
For some Home Theatre Systems you might need toadjust the audio sync delay to synchronise the audioto the video. Select Off if a sound delay is set onyour Home Theatre System.
Digital out offset (Only available when Digital out
delay set to On)
(Home) > Settings > Allsettings > Sound > Advanced > Digital out offset
• If you cannot set a delay on the Home TheatreSystem, you can set the TV to sync the sound.• You can set an offset that compensates for the timenecessary for the Home Theatre System to processthe sound of the TV picture.
• You can set the value in steps of 5ms. Maximumsetting is 60ms.
Channels
General Settings
Connection Related Settings
Format USB Hard Drive
(Home) > Settings > All settings > Generalsettings > Format USB Hard Drive
You need to set up and format a USB Hard Drivebefore you record a channel.
USB Keyboard Settings
(Home) > Settings > All settings > Generalsettings > USB keyboard settings
To install the USB keyboard, switch on the TV andconnect the USB keyboard to one ofthe USB connections on the TV. When the TVdetects the keyboard for the first time, you can selectyour keyboard lay-out and test your selection.
Mouse Settings
(Home) > Settings > All settings > Generalsettings > Mouse settings
Adjust the motion speed of the USB mouse.
HDMI-CEC Connection - EasyLink
Connect HDMI CEC-compatible devices to your TV,you can operate them with the TV remotecontrol. EasyLink HDMI CEC must be switched on onthe TV and the connected device.
Switch on EasyLink
(Home) > Settings > All settings > Generalsettings > EasyLink > EasyLink > On
34

Operate HDMI CEC-compatible devices with TV
remote control
(Home) > Settings > All settings > Generalsettings > EasyLink > EasyLink remotecontrol > On
Note:
- EasyLink might not work with devices from otherbrands.
- The HDMI CEC functionality has different names ondifferent brands. Some examples are: Anynet, AquosLink, Bravia Theatre Sync, Kuro Link, Simplink andViera Link. Not all brands are fully compatible withEasyLink. Example HDMI CEC branding names areproperty of their respective owners.
HDMI Ultra HD
(Home) > Settings > All settings > Generalsettings > Input sources > HDMI (port) > HDMI UltraHD
This TV can display Ultra HD signals. Some devices -connected with HDMI - do not recognise a TV withUltra HD and might not work correctly or showdistorted picture or sound.
To avoid the malfunctioning of such a device, you canadjust HDMI Ultra HD setting when TV is in the HDMIsource. Recommended setting for legacy device is Standard.
• The setting Optimal allows maximum up to Ultra HD(50Hz or 60Hz) RGB 4:4:4 or YCbCr 4:4:4/4:2:2/4:2:0signals.• The setting Standard allows maximum up to UltraHD (50Hz or 60Hz) YCbCr 4:2:0 signals.
Maximum supported video timing format for HDMIUltra HD options:
• Resolution: 3840 x 2160• Frame rate (Hz): 50Hz, 59.94Hz, 60Hz• Video data sub-sampling (bit-depth)- 8 bit: YCbCr 4:2:0, YCbCr 4:2:2*, YCbCr 4:4:4*, RGB4:4:4*- 10 bit: YCbCr 4:2:0*, YCbCr 4:2:2*- 12 bit: YCbCr 4:2:0*, YCbCr 4:2:2*
* Supported only when HDMI Ultra HD is setto Optimal.
Note: To watch HDR10+ or Dolby Vision content fromHDMI source, you may need to power off your playerand power on again when the player connected to TVplaying such content for the first time. HDR10+ orDolby Vision content is supported only when HDMI
Ultra HD is set to Optimal .
Eco Settings
Set energy saving level
(Home) > Settings > All settings > Generalsettings > Eco settings > Energy saving
Select Minimium, Medium, or Maximium to havedifferent degress for energy saving, or select Off toswitch off energy saving mode.
Set screen off to save energy consumption
(Home) > Settings > All settings > Generalsettings > Eco settings > Screen off
Select Screen off, the TV screen is switched off, toswitch the TV screen back on, press any key on theremote control.
Set TV switch off timer
(Home) > Settings > All settings > Generalsettings > Eco settings > Switch off timer
Press the arrows (up) or (down) to adjust thevalue. The value 0 (Off) deactivates the automaticswitch off.
Select Switch off timer, the TV switches offautomatically to save energy.
• TV switches off if receiving a TV signal but you don'tpress a key on the remote control during a 4 hourperiod.• TV switches off if not receiving a TV signal nor aremote control command for 10 minutes.• If you use the TV as a monitor or use a digitalreceiver to watch TV (a Set-Top Box - STB) and youdo not use the remote control of the TV, you shoulddeactivate this automatic switch off, to set the valueto 0.
Location - Home or Shop
(Home) > Settings > All settings > General
settings > Location • Select the location of your TV• Select Shop, the picture style is switched backto Vivid, and can adjust shop settings.• Shop mode is for in-store promotion.
35
Shop Setup
(Home) > Settings > All settings > Generalsettings > Shop setup
If the TV is set to Shop, you can view feature logos orset the availablility of a specific demo for in store use.
Adjust Picture and audio
(Home) > Settings > All settings > Generalsettings > Shop setup > Picture and audio
Select Optimized to shop or Custom settings forpicture and audio settings.
Logos and banner
(Home) > Settings > All settings > Generalsettings > Shop setup > Logos and banner
Set to display Feature logos and Promotional banner.
Demo Me autostart
(Home) > Settings > All settings > Generalsettings > Shop setup > Demo Me autostart
Turn On/Off the Demo Me autostart.
Manage demos
(Home) > Apps > Demo me > Manage demos
If the TV is set to Shop, you can manage the demovideos in Demo me app.
Play demo video
(Home) > Apps > Demo me > Manage demos > PlaySelect a demo video file and play.
Copy demo file
(Home) > Apps > Demo me > Manage demos > Copy to USBCopy demo file to USB drive.
Delete demo file
(Home) > Apps > Demo me > Manage demos > DeleteDelete demo file from your TV.
Configuration of demo
(Home) > Apps > Demo me > Manage demos > ConfigurationSet the TV to Main TV or Sub TV.
Download new demo file
(Home) > Apps > Demo me > Manage demos > Download newIf the Configuration is set to Main TV, you candownload new demo file.
Auto delay setting
(Home) > Apps > Demo me > Manage demos > Auto delay settingSet the Auto delay time from 15 seconds to 5 minutes.
Auto loop selection
(Home) > Apps > Demo me > Manage demos > Auto loop selectionSelect a demo file for auto loop playing.
HDMI Auto game mode
(Home) > Settings > All settings > Generalsettings > Input sources > HDMI (port) > HDMI Autogame mode
Set HDMI Auto game mode to On, if you want TV toautomatically set Picture style to Game whenever it isinformed by the HDMI device connected to TV. Thisfeature is only selectable when HDMI Ultra HD set to Optimal.
Reset TV Settings and Reinstall TV
Reset all settings value to original TV settings
(Home) > Settings > All settings > Generalsettings > Factory settings
Redo full TV installation , and set TV status back to
the first time you switch on
(Home) > Settings > All settings > Generalsettings > Reinstall TV
Enter PIN code and select Yes, the TV will reinstallcompletely. All settings will be reset and installedchannels will be replaced. The installation can take afew minute
Region and Language Settings
Language
(Home) > Settings > All settings > Region andlanguage > Language
Change the language of the TV menu and
messages
36

(Home) > Settings > All settings > Region andlanguage > Language > Menu language
Set audio preference language
(Home) > Settings > All settings > Region andlanguage > Language > Primary audio, Secondaryaudio
Digital TV channels can broadcast audio with severalspoken languages for a programme. You can set apreferred primary and secondary audio language. Ifaudio in one of these languages is available, the TVwill switch to this audio.
Set subtitle preference language
(Home) > Settings > All settings > Region andlanguage > Language > Primarysubtitle, Secondary subtitle
Digital channels can offer several subtitle languagesfor a programme. You can set a preferred primary andsecondary subtitle language. If subtitles in one ofthese languages are available, the TV will show thesubtitles you selected.
Set teletex preference language
(Home) > Settings > All settings > Region andlanguage > Language > Primary text, Secondarytext
Some digital TV broadcasters have several Textlanguages available.
Clock
(Home) > Settings > All settings > Region andlanguage > Clock
Correct clock automatically
(Home) > Settings > All settings > Region andlanguage > Clock > Auto clock mode
• The standard setting for the TV clock is Automatic.The time information comes from the broadcastedUTC - Coordinated Universal Time information.• If the clock is not correct, you can set the TV clockto Country dependent.• When select Country dependent, you can set thetime for Automatic or Standard time.
Correct clock manually
(Home) > Settings > All settings > Region andlanguage > Clock > Auto clock mode > Manual
(Home) > Settings > All settings > Region andlanguage > Clock > Date, Time
Go to previous menu, and select Date and Time toadjust the value.
Note:
• If none of the automatic settings display the timecorrectly, you can set the time manually.• If you schedule recordings from the TV Guide, werecommend not to change the time and datemanually.
Set time zone or set a time offset for your region
(Home) > Settings > All settings > Region andlanguage > Clock > Time zone
Select one of the time zones.
Set the TV to switch to Standby automatically after a
preset time
(Home) > Settings > All settings > Region andlanguage > Clock > Sleep timer.
Set the TV to switch to Standby automatically after apreset time. With the slider bar you can set the timeto up to 180 minutes in increments of 5 minutes. If setto 0 minutes, the sleep timer is switched off. You canalways switch off your TV earlier or reset the timeduring the countdown
Postal Code
(Home) > Settings > All settings > Region andlanguage > Postal code
The Early Warning System (EWS) is to warn thegeneral public when the natural disasters aredetected within the postal code area.
The TV will display the respective warningmessages/alerts when triggered by the Broadcasters.
Note: This is for Indonesia only.
Universal Access Settings
(Home) > Settings > All settings > Universalaccess
With Universal Access switched on, the TV isprepared for use for the deaf, hard of hearing, blind orpartially sighted people.
Switch on universal access settings
(Home) > Settings > All settings > Universalaccess > Universal access > On.
37
Universal access for hearing impaired people
(Home) > Settings > All settings > Universalaccess > Hearing impaired > On
• Some digital TV channels broadcast special audioand subtitles adapted for the hard of hearing or deafpeople. • Switched on, the TV automatically switches to theadapted audio and subtitles, if available.
Universal access for blind or partially sighted
people
(Home) > Settings > All settings > Universalaccess > Audio description > Audio description > On
Digital TV channels can broadcast special audiocommentary describing what is happening on screen.
(Home) > Settings > All settings > Universalaccess > Audio description > Audiodescription > Mixed volume, Audio effects, Speech
• Select Mixed volume, you can mix the volume ofthe normal audio with the audio commentary. Pressthe arrows (up) or (down) to adjust the value.• Set Audio effect to On for extra audio effects inthe commentary audio, like stereo or fading sound.• Select Speech to set speechpreference, Descriptive or Subtitles.
Dialogue enhancement
(Home) > Settings > All settings > Universalaccess > Dialogue enhancement
Increase the intelligibility of dialogue andcommentary.
Lock Settings
Set Code and Change Code
(Home) > Settings > All settings > Child
lock > Set code, Change code
Set new code or reset change code. The child lockcode is used to lock or unlock channels orprogrammes.
Note: If you forgot your PIN code, you can overridethe current code use 8888 and enter a new code.
Lock for Programme
(Home) > Settings > All settings > Child
lock > Parental rating
Set a minumum age to watch rated programmes.
App lock
(Home) > Settings > All settings > Child
lock > App lock
You can lock apps unsuited for children. The App lockwill ask for a PIN code when you try to start an 18+rated app. This lock is only valid for 18+ rated appsfrom the Philips apps.
38

12
Wireless andNetworks12.1
Home NetworkTo enjoy the full capabilities of your Philips Smart TV,your TV must be connected to the Internet.
Connect the TV to a home network with a high-speedInternet connection. You can connect your TVwirelessly or wired to your network router.
12.2
Connect to Network
Wireless Connection
What You Need
To connect the TV to the Internet wirelessly, you needa Wi-Fi router with a connection to the Internet. Usea high-speed (broadband) connection to the Internet.
Turn Wi-Fi On or Off
(Home) > Settings > All settings > Wireless andnetworks > Wi-Fi On/Off
Make the Connection
Make the Connection - Wireless
(Home) > Settings > All settings > Wirelessand networks > Connect to network > Wireless
1 - In the list of found networks, select on yourwireless network. If your network is not in the listbecause the network name is hidden (you switchedoff the SSID broadcast of the router), select Add NewNetwork to enter the network name yourself.2 - Depending on the type of router, enter yourencryption key - WEP, WPA or WPA2. If you enteredthe encryption key for this network before, you can
select OK to make the connection immediately.3 - A message will be shown when the connection issuccessful.
Make the Connection - WPS
(Home) > Settings > All settings > Wireless andnetworks > Connect to network > WPS
If your router has WPS, you can directly connect tothe router without scanning for networks. If you havedevices in your wireless network that use the WEPsecurity encryption system, you cannot use WPS.
1 - Go to the router, press the WPS button and returnto the TV within 2 minutes.2 - Select Connect to make the connection.3 - A message will be shown when the connection issuccessful.
Make the Connection - WPS with PIN Code
(Home) > Settings > All settings > Wirelessand networks > Connect to network > WPS withPIN Code
If your router has WPS with a PIN code, you candirectly connect to the router without scanning fornetworks. If you have devices in your wirelessnetwork that use the WEP security encryption system,you cannot use WPS.
1 - Write down the 8-digit PIN code shown on screenand enter it in the router software on your PC. Consultthe router manual on where to enter the PIN code inthe router software.2 - Select Connect to make the connection.3 - A message will be shown when the connection issuccessful.
Wired Connection
What You Need
To connect the TV to the Internet, you need anetwork router with a connection to theInternet. Use a high-speed (broadband) connectionto the Internet.
39
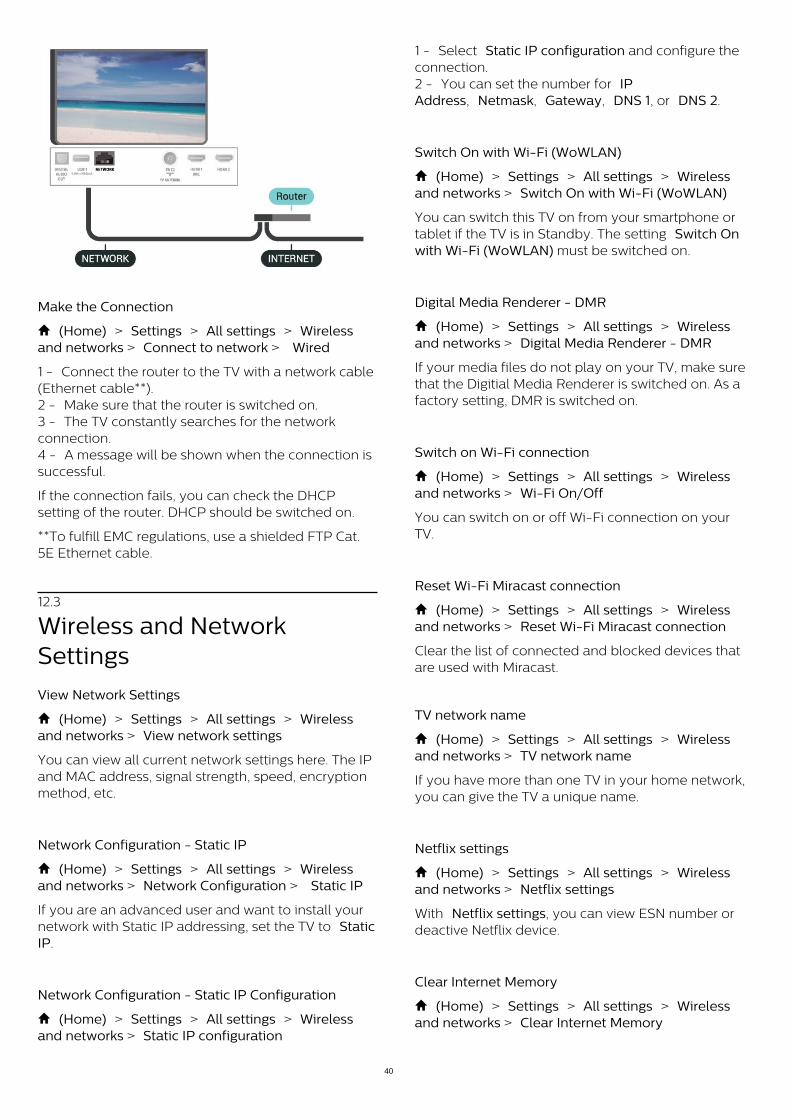
Make the Connection
(Home) > Settings > All settings > Wirelessand networks > Connect to network > Wired
1 - Connect the router to the TV with a network cable(Ethernet cable**).2 - Make sure that the router is switched on.3 - The TV constantly searches for the networkconnection.4 - A message will be shown when the connection issuccessful.
If the connection fails, you can check the DHCPsetting of the router. DHCP should be switched on.
**To fulfill EMC regulations, use a shielded FTP Cat.5E Ethernet cable.
12.3
Wireless and NetworkSettings
View Network Settings
(Home) > Settings > All settings > Wirelessand networks > View network settings
You can view all current network settings here. The IPand MAC address, signal strength, speed, encryptionmethod, etc.
Network Configuration - Static IP
(Home) > Settings > All settings > Wirelessand networks > Network Configuration > Static IP
If you are an advanced user and want to install yournetwork with Static IP addressing, set the TV to StaticIP.
Network Configuration - Static IP Configuration
(Home) > Settings > All settings > Wirelessand networks > Static IP configuration
1 - Select Static IP configuration and configure theconnection.2 - You can set the number for IPAddress, Netmask, Gateway, DNS 1, or DNS 2.
Switch On with Wi-Fi (WoWLAN)
(Home) > Settings > All settings > Wirelessand networks > Switch On with Wi-Fi (WoWLAN)
You can switch this TV on from your smartphone ortablet if the TV is in Standby. The setting Switch Onwith Wi-Fi (WoWLAN) must be switched on.
Digital Media Renderer - DMR
(Home) > Settings > All settings > Wirelessand networks > Digital Media Renderer - DMR
If your media files do not play on your TV, make surethat the Digitial Media Renderer is switched on. As afactory setting, DMR is switched on.
Switch on Wi-Fi connection
(Home) > Settings > All settings > Wirelessand networks > Wi-Fi On/Off
You can switch on or off Wi-Fi connection on yourTV.
Reset Wi-Fi Miracast connection
(Home) > Settings > All settings > Wirelessand networks > Reset Wi-Fi Miracast connection
Clear the list of connected and blocked devices thatare used with Miracast.
TV network name
(Home) > Settings > All settings > Wirelessand networks > TV network name
If you have more than one TV in your home network,you can give the TV a unique name.
Netflix settings
(Home) > Settings > All settings > Wirelessand networks > Netflix settings
With Netflix settings, you can view ESN number ordeactive Netflix device.
Clear Internet Memory
(Home) > Settings > All settings > Wirelessand networks > Clear Internet Memory
40

With Clear Internet Memory you clear your Philipsserver registration and parental rating settings, yourvideo store app logins, all Philips App Galleryfavourites, Internet bookmarks and history. InteractiveMHEG applications can also save so-called 'cookies',on your TV. These files will also be cleared.
Bluetooth
(Home) > Settings > All settings > Wirelessand networks > Bluetooth
You can connect, disconnect, or removed a wirelessBluetooth device.
41
13
Smart TV13.1
Setup Smart TVThe first time you open Smart TV, you need toconfigure your connection. Read and agree to theterms and conditions to continue.
The Smart TV start page is one of your links to theInternet.
Open Smart TV
To open the Smart TV start page, press Smart TV .Alternatively, you can press (Home) > Apps,select Smart TV and press OK.
The TV connects to the Internet and opens the SmartTV start page. This may take a few seconds.
Close Smart TV
To close the Smart TV start page, press EXIT.
TP Vision Europe B.V. bears no responsibilityregarding the content and the quality of the contentprovided by the content service providers.
13.2
Smart TV Start Page
Your Apps
You start Apps from the Smart TV start page.
Internet
The Internet App opens the World Wide Web on yourTV.On your TV, you can view any Internet website butmost of them are not tailored for a TV screen.- Some plug-ins (e.g. to view pages or videos) are notavailable on your TV.- Internet pages are shown one page at a time andfull screen.
13.3
App GalleryOpen the App Gallery in home screen to browsethe Apps, the collection of tailored websites for TV.
Find the App for YouTube videos, a nationalnewspaper, an online photo album, etc. There areApps to rent a video from an online video store andApps for watching programmes you missed. If theApp gallery does not hold what you are looking for,try the World Wide Web and surf the Internet on TV.
Search
With Search, you can search the App Gallery forrelevant Apps.Enter a keyword in the text field, select andpress OK to start searching. You can enter names,titles, genres and description keywords to search.Alternatively, you can leave the text field empty andsearch for the most popular searches/keywords for arange of categories. In the list of found keywords,select a keyword and press OK to search for itemswith that keyword.
42

14
Video on DemandVideo on Demand
(Home) > Apps > Video on Demand
You can rent movies from an online rental video store.
43

15
NetflixIf you have a Netflix menbership subscription, youcan enjoy Netflix on this TV. Your TV must beconnected to the Internet.
To open Netflix, press to open the NetflixApp. You can open Netflix immediately from a TV instandby.
www.netflix.com
44

16
Amazon PrimeVideoWith an Amazon prime membership, you gain accessto thousands of popular movies and TV show,including exclusive Prime Originals.
Press the app icon to open the Amazon Prime Videoapp. Your TV must be connected to the Internet touse the app. For more information about AmazonPrime Video, please visit www.primevideo.com.
45

17
YouTubeYouTube provides a platform to connect to the world.Watch and discover popular videos that uploaded byYouTube users around the world. Use the YouTubeapp to explore the latest topics on music, news, andmore.
Press the app icon to open the YouTube app. Your TVmust be connected to the Internet to use the app. For more information about YouTube, please visitwww.youtube.com.
46

18
Environmental18.1
End of Use
Disposal of your old product and batteries
Your product is designed and manufactured with highquality materials and components, which can berecycled and reused.
When this crossed-out wheeled bin symbol isattached to a product it means that the product iscovered by the European Directive 2012/19/EU.
Please inform yourself about the local separatecollection system for electrical and electronicproducts.
Please act according to your local rules and do notdispose of your old products with your normalhousehold waste. Correct disposal of your oldproduct helps to prevent potential negativeconsequences for the environment and humanhealth.
Your product contains batteries covered by theEuropean Directive 2006/66/EC, which cannot bedisposed with normal household waste.
Please find out for yourself about the local rules onseparate collection of batteries because correctdisposal will help to prevent negative consequencesfor the environment and human health.
47

19
Specifications19.1
PowerProduct specifications are subject to change withoutnotice. For more specification details of this product,see www.philips.com/TVsupport
Power • Mains power : AC 110-240V +/-10%• Ambient temperature : 5°C to 35°C
19.2
Reception• Aerial input : 75 ohm coaxial (IEC75)• Tuner bands : Hyperband, UHF, VHF• DVB : DVB-T2• Analogue video playback : SECAM, PAL• Digital video playback : MPEG2 SD/HD (ISO/IEC13818-2), MPEG4 SD/HD (ISO/IEC 14496-10)• Digital audio playback (ISO/IEC 13818-3)
19.3
Display Resolution
Diagonal screen size • 55PUT6654 : 139 cm / 55 inch• 65PUT6654 : 164 cm / 65 inch
Display resolution • 3840 x 2160
19.4
Supported Input Resolution -Video
Support Timing
Video support timing also includes field/frame rate23.976Hz, 29.97Hz and 59.94Hz.
HDMI
• 480i• 480p• 576i• 576p• 720p• 1080i
• 1080p• 3840 x 2160p - 24Hz, 25Hz, 30Hz, 50Hz, 60Hz
HDMI - UHD
(Home) > Settings > General settings > Inputsources > HDMI (port) > HDMI Ultra HD
This TV can display Ultra HD signals. Some devices -connected with HDMI - do not recognise a TV withUltra HD and might not work correctly or showdistorted picture or sound.
To avoid the malfunctioning of such a device, you canset the signal quality to a level the device can handle.If the device is not using Ultra HD signals, you canswitch off Ultra HD for this HDMI connection.
• The setting Optimal allows maximum up to Ultra HD(50Hz or 60Hz) RGB 4:4:4 or YCbCr 4:4:4/4:2:2/4:2:0signals.• The setting Standard allows maximum up to UltraHD (50Hz or 60Hz) YCbCr 4:2:0 signals.
Composite
Composite
• PAL, NTSC, SECAM
19.5
Supported Input Resolution -Computer• 640 x 480 - 60Hz• 800 x 600 - 60Hz• 1024 x 768 - 60Hz• 1280 x 800 - 60Hz• 1280 x 960 - 60Hz• 1280 x 1024 - 60Hz• 1366 x 768 - 60Hz• 1440 x 900 - 60Hz• 1920 x 1080 - 60Hz• 3840 x 2160 - 60Hz
Note: For HDMI Input only
19.6
Sound• Dolby Atmos® Virtualizer• Clear Dialogue• A.I Sound• 5 Band Equalizer• Output power (RMS) : 20W• Dolby® Audio
48
• DTS®
19.7
Multimedia
Connections • USB 2.0 / USB 3.0• Ethernet LAN RJ-45• Wi-Fi 802.11n (built-in)
Supported USB file systems • FAT, NTFS
Playback formats • Video Codec : AVI, MKV, H.264/MPEG-4 AVC,MPEG1, MPEG2, MPEG4, WMV9/VC1, VP9, HEVC(H.265)• Audio Codec : MP3, WAV, AAC, WMA (v2 up tov9.2), WMA-PRO (v9 and v10)• Subtitles :- Format: SRT, SMI, SSA, SUB, ASS, TXT- Character encodings : UTF-8, Central Europe andEastern Europe (Windows-1250), Cyrillic(Windows-1251), Greek (Windows-1253), Turkish(Windows-1254), Western Europe (Windows-1252)• Maximum Supported Data Rate :– MPEG-4 AVC (H.264) is supported up to HighProfile @ L5.1. 30Mbps– H.265 (HEVC) is supported up to Main / Main 10Profile up to Level 5.1 40Mbps– VC-1 is supported up to Advanced Profile @ L3• Image Codec : JPEG, GIF, PNG, BMP, HEIF, 360photo
Wi-Fi Certified
This TV supports Wi-Fi certified devices.
Performance may vary, depending on the capabilitiesof the mobile device and the software used.
19.8
Connectivity
TV Side • CVBS: CVBS, Audio L/R• USB 2: USB 3.0• HDMI 3 in: UHD - HDR• Headphones: Stereo mini-jack 3.5mm
TV Bottom • Digital Audio out: Optical• USB 1: USB 2.0• Network LAN: RJ45• Antenna (75 ohm)• HDMI 1 in: ARC - UHD - HDR• HDMI 2 in: UHD - HDR
49

20
Troubleshooting20.1
TipsIf you can't find a solution for your TV problem in Troubleshooting, you can use Keywords in Help> User manual to find the information you are lookingfor. Select a keyword to go the most relevant page inthe User manual.
If the User manual doen't answer your question, youcan go to the support website of Philips.
To solve any Philips TV related problem, you canconsult our online support. You can select yourlanguage and enter your product model number.
Go to www.philips.com/TVsupport.
On the support site you can find your country'stelephone number to contact us as well as answers tofrequently asked questions (FAQs). In some countries,you can chat with one of our collaborators and askyour question directly or send a question by email.You can download new TV software or the manual toread on your computer.
For more TV troubleshooting and frequently askedquestions (FAQs)...
Goto http://philips-tvconsumercare.kxondemand.com/portal/en/ModelSelect
TV Help on your tablet, smartphone or computer
To carry out extended sequences of instructions moreeasily, you can download the TV Help in PDF formatto read on your smartphone, tablet orcomputer. Alternatively, you can print the relevantHelp page from your computer.To download the Help (user manual) goto www.philips.com/TVsupport
20.2
Switch On
The TV does not switch on • Disconnect the power cable from the power outlet.Wait for one minute then reconnect it. Make sure thatthe power cable is securely connected. Try switchingon again.• Connect the TV to another wall mains socket and tryswitching on.• Disconnect all connected devices from the TV andtry switching on.• If the standby light on TV is on, the TV might not
respond to the remote control.
Creaking sound at startup or switch off
When you are turning the TV on or standby, you heara creaking sound from the TV chassis. The creakingsound is due to the normal expansion andcontraction of the TV as it cools and warms up. Thisdoes not affect performance.
The TV goes back to standby after showing the
Philips startup screen
When the TV is in standby, a Philips startup screen isdisplayed, then the TV returns to standby mode. Thisis normal behaviour. When the TV is disconnectedand reconnected to the power supply, the startupscreen is displayed at the next startup. To switch onthe TV from standby, press (Standby / On) theremote control or the TV.
The standby light keeps on blinking
Disconnect the power cable from the power outlet.Wait 5 minutes before you reconnect the powercable. If the blinking reoccurs, contact Philips TVConsumer Care.In Help > User manual, press the colourkey Keywords and look up Contact Info.
TV switches off by itself
If the TV switches off suddenly, the setting Switch offtimer might be switched on. With Switch offtimer the TV switches off after 4 hours if no remotecontrol signals were received. To avoid this automaticswitch off, you can deactivate this switch off.In Help > User manual, press the colourkey Keywords and look up Switch Off Timer. Also, if the TV does not receive a TV signal nor aremote control command for 10 minutes, the TVswitches off automatically.
20.3
Remote Control
TV does not respond to the remote control • The TV requires some time to start up. During thistime, the TV does not respond to the remote controlor TV controls. This is normal behaviour.• The batteries of the remote control might be empty.Replace the batteries with new ones.
20.4
Channels
No digital channels found during the installation • Check if the TV was connected with an antenna or isusing a provider signal. Check the cable connections. • Check if the country where you install the TV, has
50

digital channels available.• Check if you selected the correct DVB (Digital VideoBroadcast) system.• Redo the installation and check if you select thecorrect country.
No analogue channels found during the installation • Check if the TV was connected with an antenna.Check the cable connections. • Check if you selected the correct DVB (Digital VideoBroadcast) system. Select DVB-T (terrestrial) whenyou use an antenna or common antenna.• Redo the installation and select Digital andanalogue channels during the installation.Some channels disappeared, cannot find all or some
previously installed channels • Check if you selected the correct Channellist or Favourites list you normally use.• Some channels might be moved or even deleted bythe broadcaster. In the normal channels list, try tosearch for the channel you're missing. If the channel isstill available, you can put it back in the favouriteslist.• A channel can be deleted from the channellist during Automatic channel update. Theseautomatic updates are done overnight if the TV is onstandby.Channels that do not exist anymore are deleted andnew channels will be added to the channel list.Exceptionally, a channel can be deleted because theTV could not find it while checking for its presence. Itmight not broadcast at night.To avoid channels being deleted duringthe Automatic channel update because the TVcould not find them although these channels are stillthere, you can switch off Automatic channel update. (Home) > Settings > All Settings > Channels > Antenna installlation > Automatic channel update
DVB-T2 HEVC channel • See the technical specifications to make sure thatyour TV supports DVB-T2 HEVC in your country andreinstall DVB-T channel.
20.5
Picture
No picture / distorted picture • Check if the TV is connected with an antenna or isusing a provider signal. Check the cable connections.• Check if the correct source/input is selected in thesources menu. Press Sources and select thesource/input you need.• Check if the the external device or source isproperly connected.• Check if the reception is poor.• Check if the picture is set to a minimal value.Select Picture style and select a style and press OK. (Home) > Settings > All
settings > Picture > Picture style• To check if the TV is broken, try to play a video clip.Press (Home) > Settings > Help > Check the TV.If the video clip stays black, call Philips. Wait until theclip ends and select Contact info in the Help menu.Call the telephone number for your country.
Sound but no picture • Change to other video sources and then changeback to current source.• Select Picture style and select a style andpress OK. (Home) > Settings > Allsettings > Picture > Picture style• Restore picture style, select back to Picture style,then press Restore style.• Reset all TV settings, goto (Home) > Settings > All settings > Generalsettings > Reinstall TV.• Check the connections of the source/input devices.
Poor reception
If the TV picture is distorted or variable in quality, theinput signal might be poor. A weak digital signal isseen as a picture that is breaking up in square blocksand freezes occasionally. Much sooner than a badanalogue signal, a bad digital signal will fall away.
• Check if the antenna cable is properly connected.• Large loudspeakers, unearthed audio devices, neonlights, high buildings and other large objects caninfluence reception quality when you are using anantenna. Try to improve the reception by changingthe antenna direction or moving devices away fromthe TV. Bad weather might deteriorate the reception.• Check if all connections, to and from your devices,are properly connected.• If reception on only one channel is poor, fine-tunethis channel with Analogue: manual installation. (Onlyfor analogue channels) (Home) > Settings > InstallChannels > Antenna/cableinstalllation > Analogue: manual installation• Check if the incoming digital signal is sufficientlystrong. While watching a digital channel,press OPTIONS and select Status andpress OK. Check the Signal strenght and Signalquality.
Poor picture from a device • Make sure that the device is connected properly.Make sure that the device's output video setting is thehighest possible resolution if applicable.• Restore picture style or change to another picturestyle.
Picture settings change after a while
Make sure that Location is set to Home . You canchange and save settings in this mode. (Home) > Settings > All settings > Generalsettings > Location
A banner appears
51

If an on screen promotion banner appearsoccasionally or the Picture style automaticallyswitches back to Vivid at startup, the TV is in Shoplocation. Set the TV to Home location for use athome. (Home) > Settings > All settings > Generalsettings > Location
Picture does not fit the screen / Wrong or unstable
picture size / Picture position is incorrect • If the picture size - its aspect ratio - does not fit thescreen, with black bars on the top and bottom or leftand right side of the screen, press (Home) > Settings > All settings > Picture > Picture Format > Fill screen.• If the picture size changes all thetime, press (Home) > Settings > All settings > Picture > Picture Format > Fit to screen.• If the position of the picture is incorrect on thescreen, try to check the signal resolution and outputtype of the connected device,press (Home) > Settings > All settings > Picture > Picture Format > Original.
Computer picture is not stable
Make sure that your PC uses the supported resolutionand refresh rate.
(Home) > Settings > All settings > Picture >
20.6
Sound
No sound or poor sound quality • Check if the sound settings of the TV are OK, pressthe volume or mute key.• If you use a digital receiver (set-top box), check ifthe volume on this receiver is not set to zero or mute.• Check if the TV - the audio signal - is properlyconnected with the Home Theatre System, if you usesuch a system for the TV sound. Check if youconnected the HDMI cable to an HDMI1ARC connection on the Home Theatre System.• Make sure that the TV audio output is connected tothe audio input on the Home Theatre System. Sound should be heard from the HTS (Home TheatreSystem) speakers.
Sound with loud noise
If you watch a video from a plugged in USB flash driveor connected computer, the sound from your HomeTheatre System might be distorted. This noise is heardwhen the audio or video file has DTS sound but theHome Theatre System has no DTS sound processing.You can fix this by setting the Digital out format ofthe TV to Stereo.Press (Home) > Settings > Allsettings > Sound > Advanced > Digital out format
20.7
HDMI - UHD
HDMI • Note that HDCP (High-bandwidth Digital ContentProtection) support can delay the time taken for a TVto display content from an HDMI device.• If the TV does not recognise the HDMI device andno picture is displayed, switch the source from onedevice to another and back again.• This is an Ultra HD TV. Some older devices -connected with HDMI - do not recognise an Ultra HDTV electronically and might not work correctly orshow distorted picture or sound. To avoid themalfunctioning of such a device, you can set thesignal quality to a level the device can handle. If thedevice is not using Ultra HD signals, you can switchoff Ultra HD for this HDMI connection.If the picture and sound of a device connected withHDMI is distorted, check if a different HDMI UltraHD setting can solve this problem. In Help > Usermanual, press the colour key Keywords andlook up HDMI Ultra HD.• If there are intermittent sound disruptions, makesure that output settings from the HDMI device arecorrect.
HDMI EasyLink does not work • Check if your HDMI devices are HDMI-CECcompatible. EasyLink features only work with devicesthat are HDMI-CEC compatible.
No volume icon shown • When an HDMI-CEC audio device is connected andyou use the TV Remote Control to adjust the volumelevel from the device, this behaviour is normal.
20.8
USBPhotos, videos and music from a USB device do not
show • Check if the USB storage device is set to MassStorage Class compliant, as described in the storagedevice's documentation.• Check if the USB storage device is compatible withthe TV.• Check if the audio and picture file formats aresupported by the TV. For more information, in Help,press the colour key Keywords and lookup Multimedia.
Choppy playback of USB files • The transfer performance of the USB storage devicemay limit the data transfer rate to the TV whichcauses poor playback.
52
20.9
Wi-Fi and Internet
Wi-Fi network not found or distorted • Check if the firewalls in your network allow accessto the TV's wireless connection.• If the wireless network does not work properly inyour home, try the wired network installation.
Internet does not work • If the connection to the router is OK, check therouter connection to the Internet.
The PC and Internet connection are slow • Look in your wireless router's user manual forinformation on indoor range, transfer rate and otherfactors of signal quality.• Use a high-speed (broadband) Internet connectionfor your router.
DHCP • If the connection fails, you can check the DHCP(Dynamic Host Configuration Protocol) setting of therouter. DHCP should be switched on.
20.10
Wrong Menu Language
Change the language back to your language. 1 - Press (Home), select Settings > Region andlanguage > Languages > Menu language and press OK.2 - Select on the language you need and press OK.3 - Press BACK to close the menu.
53
21
Safety and Care21.1
Safety
Important
Read and understand all safety instructions beforeyou use the TV. If damage is caused by failure tofollow instructions, the warranty does not apply.
Risk of Electric Shock or Fire
• Never expose the TV to rain or water. Never placeliquid containers, such as vases, near the TV. If liquids are spilt on or into the TV, disconnect the TVfrom the power outlet immediately. Contact Philips TV Consumer Care to have the TVchecked before use.• Never expose the TV, remote control or batteries toexcessive heat. Never place them near burningcandles, naked flames or other heat sources,including direct sunlight.• Never insert objects into the ventilation slots or otheropenings on the TV.• Never place heavy objects on the power cord.• Avoid force coming onto power plugs. Loose powerplugs can cause arcing or fire. Ensure that no strain isexerted on the power cord when you swivel the TVscreen.• To disconnect the TV from the mains power, thepower plug of the TV must be disconnected. Whendisconnecting the power, always pull the power plug,never the cord. Ensure that you have full access tothe power plug, power cord and outlet socket at alltimes.
Risk of Injury or Damage to the TV
• Two people are required to lift and carry a TV thatweighs more than 25 kg or 55 lbs.• If you mount the TV on a stand, only use thesupplied stand. Secure the stand to the TV tightly. Place the TV on a flat, level surface that can supportthe weight of the TV and the stand.• When wall mounted, ensure that the wall mount cansafely bear the weight of the TV set. TP Vision bearsno responsibility for improper wall mounting thatresults in accident, injury or damage.• Parts of this product are made of glass. Handle withcare to avoid injury or damage.
Risk of damage to the TV !
Before you connect the TV to the power outlet,
ensure that the power voltage matches the valueprinted on the back of the TV. Never connect the TVto the power outlet if the voltage is different.
Risk of Injury to Children
Follow these precautions to prevent the TV fromtoppling over and causing injury to children:
• Never place the TV on a surface covered by a clothor other material that can be pulled away.• Ensure that no part of the TV hangs over the edge ofthe mounting surface.• Never place the TV on tall furniture, such as abookcase, without anchoring both the furniture andTV to the wall or a suitable support.• Teach children about the dangers of climbing onfurniture to reach the TV.
Risk of swallowing batteries !
The remote control may contain coin-type batterieswhich can easily be swallowed by small children.Keep these batteries out of reach of children at alltimes.
Risk of Overheating
Never install the TV in a confined space. Always leavea space of at least 10 cm or 4 inches around the TVfor ventilation. Ensure curtains or other objects nevercover the ventilation slots on the TV.
Lightning Storms
Disconnect the TV from the power outlet and antennabefore lightning storms. During lightning storms, never touch any part of theTV, power cord or antenna cable.
Risk of Hearing Damage
Avoid using earphones or headphones at highvolumes or for prolonged periods of time.
Low Temperatures
If the TV is transported in temperatures below 5°C or41°F, unpack the TV and wait until the TV temperaturereaches room temperature before connecting the TVto the power outlet.
54
Humidity
In rare occasions, depending on temperature andhumidity, minor condensation can occur on the insideof the TV glass front (on some models). To preventthis, do not expose the TV to direct sunlight, heat orextreme humidity. If condensation occurs, it willdisappear spontaneously while the TV is playing for afew hours. The condensation moisture will not harm the TV orcause malfunction.
21.2
Screen Care
Clean
• Never touch, push, rub or strike the screen with anyobject.• Unplug the TV before cleaning.• Clean the TV and frame with a soft damp cloth andwipe gently. Never use substances such as alcohol,chemicals or household cleaners on the TV.• To avoid deformations and colour fading, wipe offwater drops as quickly as possible.• Avoid stationary images as much as possible.Stationary images are images that remain onscreenfor extended periods of time. Stationary imagesinclude onscreen menus, black bars, time displays,etc. If you must use stationary images, reduce screencontrast and brightness to avoid screen damage.
55
22
Terms of Use2019 © TP Vision Europe B.V. All rights reserved.
This product was brought to the market by TP VisionEurope B.V. or one of its affiliates, hereinafter referredto as TP Vision, which is the manufacturer of theproduct. TP Vision is the warrantor in relation to theTV with which this booklet was packaged. Philips andthe Philips Shield Emblem are registered trademarksof Koninklijke Philips N.V.
Specifications are subject to change without notice.Trademarks are the property of Koninklijke Philips N.Vor their respective owners. TP Vision reserves the rightto change products at any time without being obligedto adjust earlier supplies accordingly.
The written material packaged with the TV and themanual stored in the memory of the TV ordownloaded from the Philipswebsite www.philips.com/TVsupport are believed tobe adequate for the intended use of the system.
The material in this manual is believed adequate forthe intended use of the system. If the product, or itsindividual modules or procedures, are used forpurposes other than those specified herein,confirmation of their validity and suitability must beobtained. TP Vision warrants that the material itselfdoes not infringe any United States patents. Nofurther warranty is expressed or implied. TP Visioncannot be held responsible neither for any errors inthe content of this document nor for any problems asa result of the content in this document. Errorsreported to Philips will be adapted and published onthe Philips support website as soon as possible.
Terms of warranty - Risk of injury, damage to TV orvoid of warranty!Never attempt to repair the TV yourself. Use the TVand accessories only as intended by themanufacturer. The caution sign printed on the back ofthe TV indicates risk of electric shock. Never removethe TV cover. Always contact Philips TV CustomerCare for service or repairs. Find the telephone numberin the printed documentation that came with theTV. Or consult ourwebsite www.philips.com/TVsupport and selectyour country if needed. Any operation expresslyprohibited in this manual, or any adjustments andassembly procedures not recommended orauthorised in this manual, shall void the warranty.
Pixel characteristicsThis TV product has a high number of colour pixels.Although it has effective pixels of 99.999% or more,black dots or bright points of light (red, green or blue)may appear constantly on the screen. This is astructural property of the display (within commonindustry standards) and is not a malfunction.
TP Vision is committed to developing, producing andmarketing products that cause no adverse healtheffects. TP Vision confirms that, as long as its productsare handled properly for their intended use, they aresafe to use according to scientific evidence availabletoday. TP Vision plays an active role in thedevelopment of safety standards, enabling TP Visionto anticipate further developments in standardisationfor early integration in its products.
56

23
Copyrights23.1
HDMIThe terms HDMI and HDMI High-DefinitionMultimedia Interface, and the HDMI Logo aretrademarks or registered trademarks of HDMILicensing Administrator, Inc. in the United States andother countries.
23.2
Dolby Audio
Dolby Audio
Dolby, Dolby Audio, and the double-D symbol aretrademarks of Dolby Laboratories. Manufacturedunder license from Dolby Laboratories. Confidentialunpublished works. Copyright © 1992-2015 DolbyLaboratories. All rights reserved.
23.3
Dolby Vision and DolbyAtmos
Dolby Vision and Dolby Atmos
Dolby, Dolby Atmos, Dolby Audio, Dolby Vision, andthe double-D symbol are trademarks of DolbyLaboratories. Manufactured under license from DolbyLaboratories. Confidential unpublished works.Copyright © 1992-2018 Dolby Laboratories. All rightsreserved.
23.4
DTS-HD (italics)
DTS
For DTS patents, see http://patents.dts.com.Manufactured under license from DTS LicensingLimited. DTS, the Symbol, DTS and the Symboltogether, DTS-HD, and the DTS-HD logo areregistered trademarks and/or trademarks of DTS, Inc.in the United States and/or other countries. © DTS,Inc. All Rights Reserved.
23.5
Wi-Fi AllianceWi-Fi®, the Wi-Fi CERTIFIED logo, the Wi-Fi logo areregistered trademarks of the Wi-Fi Alliance.
23.6
Other TrademarksAll other registered and unregistered trademarks arethe property of their respective owners.
57
24
Open Source24.1
Open Source SoftwareThis television contains open source software. TPVision Europe B.V. hereby offers to deliver, uponrequest, a copy of the complete correspondingsource code for the copyrighted open sourcesoftware packages used in this product for which suchoffer is requested by the respective licences.
This offer is valid up to three years after productpurchase to anyone in receipt of this information.To obtain the source code, please write in English to .. .
24.2
Open Source License
About Open Source License
README for the source code of the parts of TP VisionNetherlands B.V. TV software that fall under opensource licenses.
This is a document describing the distribution of thesource code used on the TP Vision Netherlands B.V.TV, which fall either under the GNU General PublicLicense (the GPL), or the GNU Lesser General PublicLicense (the LGPL), or any other open source license.Instructions to obtain copies of this software can befound in the Directions For Use.
TP Vision Netherlands B.V. MAKES NO WARRANTIESWHATSOEVER, EITHER EXPRESS OR IMPLIED,INCLUDING ANY WARRANTIES OFMERCHANTABILITY OR FITNESS FOR A PARTICULARPURPOSE, REGARDING THIS SOFTWARE. TP VisionNetherlands B.V. offers no support for this software.The preceding does not affect your warranties andstatutory rights regarding any TP Vision NetherlandsB.V. product(s) you purchased. It only applies to thissource code made available to you.
Open Source
bash (3.2.48)Bash is the shell, or command language interpreter,that will appear in the GNU operating system.Bash is an sh-compatible shell that incorporatesuseful features from the Korn shell (ksh) and C shell(csh).It is intended to conform to the IEEE POSIX
P1003.2/ISO 9945.2 Shell and Tools standard.It offers functional improvements over sh for bothprogramming and interactive use.In addition, most sh scripts can be run by Bashwithout modification.Source: http://www.gnu.org/software/bash/
c-ares (1.10.0)c-ares is a C library that performs DNS requests andname resolves asynchronously.Source: http://c-ares.haxx.se/
coreutils (6.9)The GNU Core Utilities are the basic file, shell and textmanipulation utilities of the GNU operating system.These are the core utilities which are expected toexist on every operating system.Source: http://www.gnu.org/software/coreutils/
e2fsprogs (2.12.2)e2fsprogs provides the filesystem utilities for use withthe ext2 filesystem, it also supports the ext3 and ext4filesystems.This piece of software is made available under theterms and conditions of the e2fsprogs license, whichcan be found below.Source: http://e2fsprogs.sourceforge.net/
Expat (2.01)xml paser; Expat is an XML parser library written in C.It is a stream-oriented parser in which an applicationregisters handlers for things the parser might find inthe XML document (like start tags). An introductoryarticle on using.This piece of software is made available under theterms and conditions of the Expat license, which canbe found below.Source: http://expat.sourceforge.net/
DFB (4.2.31)It is a software library for GNU/Linux/UNIX basedoperating system with a small memory footprint thatprovides graphics acceleration, input device handlingand abstraction layer, and integrated windowingsystem with support for translucent windows andmultiple display layers on top of the Linuxframebuffer without requiring any kernelmodificationsSource: http://sourceforge.net/projects/jointspace/files/remote_applications_SDK/remote_spplications_SDK_v1.3.1/DirectFB141_source_1.3.1.7z/download
SAWMANSaWMan, the Shared application and WindowManager, is a new window manager module for usewith DirectFB.Source: http://www.directfb.org/index.php?path=Main%2FDownloads&page=1
findutils (4.2.31)
58
The GNU Find Utilities are the basic directorysearching utilities of the GNU operating system.These programs are typically used in conjunction withother programs to provide modular and powerfuldirectory search and file locating capabilities to othercommands.Source: http://www.gnu.org/software/findutils/
Freetype (2.4.3)FreeType is a software font engine that is designed tobe small, efficient, highly customizable, and portablewhile capable of producing high-quality output(glyph images).Source: http://freetype.sourceforge.net
fuse (2.8.4)Fuse is a simple interface for userspace programs toexport a virtual filesystem to the linux kernel.This piece of software is made available under theterms and conditions of the fuse license, which canbe found below.Source: http://fuse.sourceforge.net/
gawk (3.1.5)If you are like many computer users, you wouldfrequently like to make changes in various text fileswherever certain patterns appear, or extract data fromparts of certain lines while discarding the rest.To write a program to do this in a language such as Cor Pascal is a time-consuming inconvenience thatmay take many lines of code.The job is easy with awk, especially the GNUimplementation: gawk.Source: http://www.gnu.org/software/gawk/
glibc (2.12.2)Any Unix-like operating system needs a C library: thelibrary which defines the “system calls” and otherbasic facilities such as open, malloc, printf, exit...TheGNU C library is used as the C library in the GNUsystem and most systems with the Linux kernelThis piece of software is made available under theterms and conditions of the glibc license, which canbe found below.Source: http://www.gnu.org/software/libc/
grep (2.5.1a)The grep command searches one or more input filesfor lines containing a match to a specified pattern. Bydefault, grep prints the matching lines.Source: http://www.gnu.org/software/grep/
gzip (1.3.12)GNU Gzip is a popular data compression programoriginally written by Jean-loup Gailly for the GNUproject. Mark Adler wrote the decompression part.Source: http://www.gnu.org/software/gzip/
inetutils (1.4.2)Inetutils is a collection of common network programs.
Source: http://www.gnu.org/software/inetutils/
iptables (1.4.15)For Cross connection.Source: http://www.netfilter.org/projects/iptables/
iputils (s20101006)The iputils package is set of small useful utilities forLinux networking. It was originally maintained byAlexey Kuznetsov.Source: http://www.skbuff.net/iputils/
Libcurl (7.30.0)HTTP client;libcurl is a free and easy-to-use client-side URL transfer library, supporting FTP, FTPS, HTTP,HTTPS, SCP, SFTP, TFTP, TELNET, DICT, LDAP,LDAPS, FILE, IMAP, SMTP, POP3 and RTSP. libcurlsupports SSL certificates, HTTP POST, HTTP PUT, FTPuploading, HTTP form based upload, proxies, cookies,user+password authentication (Basic, Digest, NTLM,Negotiate, Kerberos4), file transfer resume, http proxytunneling and more!This piece of software is made available under theterms and conditions of the Libcurl license, which canbe found below.Source: http://curl.haxx.se/
libiconv (1.11.1)This library provides an iconv() implementation, foruse on systems which don't have one, or whoseimplementation cannot convert from/to Unicode. .This piece of software is made available under theterms and conditions of the libiconv license, whichcan be found below.Source: http://ftp.gnu.org/pub/gnu/libiconv
libmtp (0.3.6)libmtp is an Initiator implementation of the MediaTransfer Protocol (MTP) in the form of a librarysuitable primarily for POSIX compliant operatingsystems. We implement MTP Basic, the stuffproposed for standardization.Source: http://libmtp.sourceforge.net/
libjpg (6b)This library is used to perform JPEG decoding tasks.This piece of software is made available under theterms and conditions of the libjpg license, which canbe found below.Source: http://www.ijg.org/
libusbThis is the home of libusb, a library that gives userlevel applications uniform access to USB devicesacross many different operating systems. libusb is anopen source project licensed under the GNU LesserGeneral Public License version 2.1.Many participants in the libusb community havehelped and continue to help with ideas,implementation, support and improvements for
59
libusb.This piece of software is made available under theterms and conditions of the libusb license, which canbe found below.Source:http://libusb.wiki.sourceforge.nethttp://www.libusb.org/
libusb-compatLibrary to enable user space application programs tocommunicate with USB devices.This piece of software is made available under theterms and conditions of the libusb-compat license,which can be found below.Source:http://libusb.wiki.sourceforge.net/LibusbCompat0.1
libpng (1.2.43)libpng -THE reference library for reading, displaying,writing and examining png Image Network Graphics.This piece of software is made available under theterms and conditions of the libpng license, which canbe found below.Source: http://sourceforge.net/projects/libpng/files/
Libxml2 (2.7.8)The "libxml2" library is used in AstroTV as a supportfor the execution of NCL application. This library wasdeveloped for the GNOME software suite and isavailable under a "MIT" license.Source: http://www.xmlsoft.org
Linux Kernel (3.1)The Linux kernel is an operating system kernel usedby the Linux family of Unix-like operating systems.This piece of software is made available under theterms and conditions of the Linux Kernel license,which can be found below.Source: http://www.kernel.org
Linux Fusion (8.7.0)Source: GNU
liveMedia (2011.06.12)c++ runtime library for RTSP requirementSource: www.live555.com
lvm2 (2.02.89)Userspace toolset that provide logical volumemanagement facilities on linux.This piece of software is made available under theterms and conditions of the lvm2 license, which canbe found below.Source: ftp://sources.redhat.com/pub/lvm2/releases/
module-init-tools (3.12)Provides developer documentation for the utilitiesused by Linux systems to load and manage kernelmodules (commonly referred to as "drivers").Source: https://modules.wiki.kernel.org/index.php/M
ain_Page
mtd-utilsThe aim of the system is to make it simple to providea driver for new hardware, by providing a genericinterface between the hardware drivers and the upperlayers of the system. Hardware drivers need to knownothing about the storage formats used, such as FTL,FFS2, etc., but will only need to provide simpleroutines for read, write and erase. Presentation of thedevice's contents to the user in an appropriate formwill be handled by the upper layers of the system.This piece of software is made available under theterms and conditions of the mtd-utils license, whichcan be found below.Source: http://www.linux-mtd.infradead.org/index.html
ncurses (5.7)The ncurses (new curses) library is a free softwareemulation of curses in System V Release 4.0 (SVr4),and more. It uses terminfo format, supports pads andcolor and multiple highlights and forms charactersand function-key mapping, and has all the otherSVr4-curses enhancements over BSD curses. SVr4curses is better known today as X/Open Curses.Source: http://www.gnu.org/software/ncurses/
net-tools (1.6)The Net-tools?package is a collection of programs forcontrolling the network subsystem of the Linux kernel.Source: http://www.linuxfromscratch.org/blfs/view/6.3/basicnet/net-tools.html
NTFS-3G Read/Write Driver (2010.5.22)NTFS-3G is an open source cross-platformimplementation of the Microsoft Windows NTFS filesystem with read-write support. NTFS-3G often usesthe FUSE file system interface, so it can rununmodified on many different operating systems. It isrunnable on Linux, FreeBSD, NetBSD, OpenSolaris,BeOS, QNX, WinCE, Nucleus, VxWorks,Haiku,MorphOS, and Mac OS X It is licensed undereither the GNU General Public License or aproprietary license. It is a partial fork of ntfsprogs andis under active maintenance and development.This piece of software is made available under theterms and conditions of the NTFS-3G Read/WriteDriver license, which can be found below.Source: http://www.tuxera.com
openssl (1.0.1j)OpenSSL is an open source implementation of theSSL and TLS protocols. The core library (written in theC programming language) implements the basiccryptographic functions and provides various utilityfunctions. Wrappers allowing the use of the OpenSSLlibrary in a variety of computer languages areavailable.Source: http://www.openssl.org/
60
procps (ps, top) (3.2.8)procps is the package that has a bunch of smalluseful utilities that give information about processesusing the /proc filesystem.The package includes the programs ps, top, vmstat, w,kill, free, slabtop, and skill.Source: http://procps.sourceforge.net/index.html
samba (3.0.37)Samba is the standard Windows interoperability suiteof programs for Linux and Unix.Source: http://www.samba.org/
SaWMan (1.5.3)SaWMan, the Shared application and WindowManager, is a new window manager module for usewith DirectFB.Source: http://www.directfb.org
sed (4.1.5)sed (stream editor) isn't an interactive text editor.Instead, it is used to filter text, i.e., it takes text input,performs some operation (or set of operations) on it,and outputs the modified text.sed is typically used for extracting part of a file usingpattern matching or substituting multiple occurrencesof a string within a file.Source: http://www.gnu.org/software/sed/
SQLite3 (2.12.2)SQLite is a in-process library that implements a self-contained, serverless, zero-configuration,transactional SQL database engine.This piece of software is made available under theterms and conditions of the SQLite3 license, whichcan be found below.Source: http://www.sqlite.org/
SquashFSSquashFS is a compressed read-only file system forLinux. SquashFS compresses files, inodes anddirectories, and supports block sizes up to 1 MB forgreater compression. SquashFS is also the name offree/open software, licensed under the GPL, foraccessing SquashFS filesystems.This piece of software is made available under theterms and conditions of the SquashFS license, whichcan be found below.Source: http://squashfs.sourceforge.net/
tar (1.17)GNU Tar provides the ability to create tar archives, aswell as various other kinds of manipulation.For example, you can use Tar on previously createdarchives to extract files, to store additional files, or toupdate or list files which were already stored.Source: http://www.gnu.org/software/tar/
u-Boot (2011.12)The uboot will load the linux kerenl to dram,and jump
to run .This piece of software is made available under theterms and conditions of the u-Boot loader license,which can be found below.Source: http://www.denx.de
udhcpc (0.9.8cvs20050303-3)Source: http://udhcp.sourcearchive.com/downloads/0.9.8cvs20050303-3/
uDirectFB (1.5.3)Source: http://www.directfb.org
uriparser (0.7.7)Uriparser is a strictly RFC 3986 compliant URI parsingand handling library written in C. uriparser is cross-platform, fast, supports Unicode and is licensed underthe New BSD license.Source: http://uriparser.sourceforge.net/
util-linux-ng (2.18)Various system utilities.Source: http://userweb.kernel.org/~kzak/util-linux-ng/
wget (1.10.2)GNU Wget is a free software package for retrievingfiles using HTTP, HTTPS and FTP, the most widely-used Internet protocols.It is a non-interactive commandline tool, so it mayeasily be called from scripts,?cron?jobs, terminalswithout X-Windows support, etc.Source: http://ftp.gnu.org/gnu/wget/wget-1.10.2.tar.gz
wpa_supplicant v0.8(wext)/v2.3(cfg80211)wpa_supplicant is a WPA Supplicant for Linux, BSD,Mac OS X, and Windows with support for WPA andWPA2 (IEEE 802.11i / RSN). It is suitable for bothdesktop/laptop computers and embedded systems.Supplicant is the IEEE 802.1X/WPA component that isused in the client stations. It implements keynegotiation with a WPA Authenticator and it controlsthe roaming and IEEE 802.11authentication/association of the wlan driver.Source: https://w1.fi/wpa_supplicant/
xerces-c++ (3.1.1)Source: http://xerces.apache.org/
zlib (6b)The 'zlib' compression library provides in-memorycompression and decompression functions, includingintegrity checks of the uncompressed data.This piece of software is made available under theterms and conditions of the zlib license, which can befound below.Source: http://www.zlib.net/
61

25
Disclaimer regardingservices and/orsoftware offered bythird partiesServices and/or software offered by third parties maybe changed, suspended, or terminated without priornotice. TP Vision does not bear any responsibility inthese sorts of situations.
62
Index
AAdvanced Picture Settings 30Advanced Sound Settings 33App Gallery 42App lock 38Audio Language 36Audio Out Menu 33Auto Clock Mode 37
BBatteries 6Bluetooth 13Bluetooth, Devices 13Bluetooth, Remove device 14Bluetooth, Select device 14
CChannel List 19Channel List Copy 17Channel Options 18Channel, Channel Filter 19Channel, Rename Channel 19Channels 16Child Lock 38Child Lock, Change Code 38Child Lock, Set Code 38Clear dialogue 33Clear Internet Memory 40Clock 37Colour 30Colour Enhancement 30Colour Settings 30Colour Temperature 30Composite / CVBS 10Connect Device 10Connection - Antenna 10Connection - Power Cable 8Consumer Care 3Contact Info 3Contrast 30
DDate 37Dialogue enhancement 37Digital Audio Out 11Digital Media Renderer - DMR 40Digital Out Delay 34Digital Out Format 34Digital Out Levelling 34Digital Out Menu 34Digital Out Offset 34Dynamic Contrast 31
EEnd of Use 47Energy Saving 35Equalizer 33
FFavourite Channel, Channel Range 20Favourite Channel, Create 20Favourite Channel, Edit 20Favourite Channels 20
Flash Drive 12
GGamma 31General Settings 34Get Support 3
HHDMI 10HDMI - ARC 10HDMI - CEC 34HDMI Sound System 33HDMI Ultra HD 35HDR 31Headphone 11Headphones 33Help Menu 3Home Menu 29Home or Shop 35
IIdentify TV 3Input Resolution 48Install Channel - Antenna 16
KKeys on TV 7
LLocation 35Lock Channel 20
MMenu Languages 36Mouse Settings 34Multimedia 49
NNetflix Settings 40Network - Wired 39Network - Wireless 39Network Settings 39Network Settings Menu 40
OOn-line User Manual 3
PParental Rating 38Pause TV 26Philips Support 3Philips TV Remote App 12Photos, Videos and Music 27Picture Clean, Noise Reduction 31Picture Contrast Menu 31Picture Contrast Mode 31Picture Format 32Picture Motion 32Picture Motion Style 32Picture Style 29Picture, Colour 30Picture, Contrast 30Picture, Sharpness 30Postal code 37
63

Problems 50
QQuick Picture Settings 32Quick Settings Menu 29
RRecordings 25Register TV 3Remote Control 6Remote Control - IR Sensor 7Remote Control and Batteries 6Remote Control Key 6Rename or replace device icon 15Repair 3Reset Settings 36
SSafety and Care 54Screen Mirroring Connection 11Screen Off 35Sharpness 30Shop Setup 36Sleep Timer 37Smart TV 42Software Version 5Sound Menu 32Sound Style 32Sound, Auto Volume Levelling 33Sound, Delta Volume 33Source List 15Static IP 40Subtitle Language 36Switch Off Timer 35Switch On with Wi-Fi 40
TTeletext 21Text 21Time 37Time Zone 37Troubleshooting 50TV Guide 23TV Network Name 40TV Placement 33TV Reception 48TV Speaker 33
UUltra resolution 31Universal Access 37Universal Access, Audio Description 37Universal Access, Audio Effects 37Universal Access, Hearing Impaired 37Universal Access, Mixed Volume 37Universal Access, Speech 37Unlock Channel 20Update Software 5Update Software - Internet 5Update Software - Local Updates 5Update Software - OAD 5Update Software - USB 5USB Hard Drive 34USB Hard Drive - Format 13USB Hard Drive - Install 12USB Hard Drive Connection 12USB Keyboard Settings 34User Manual 3
VVideo Contrast 31Video on Demand 43View Network Settings 40Viewing Distance 8
WWi-Fi 40
64

Related Documents