Mobility, Intelligent Traffic Systems Sopers Lane, Poole, Dorset, BH17 7ER Security classification Unrestricted Page 1 of 146 Version 5 Status Released Last Editor dave.martin Date 07-Dec-2016 Document Name User Interface Handbook Document No. 667/HU/46000/000 Copyright © Siemens plc 2016. All Rights Reserved. Mobility is a division of Siemens Plc User Interface Handbook 667/HU/46000/000 for ST950 and Stratos Outstation THIS DOCUMENT IS ELECTRONICALLY APPROVED AND HELD IN THE SIEMENS DOCUMENT CONTROL TOOL All PAPER COPIES ARE DEEMED UNCONTROLLED COPIES Prepared By Checked and Released Division/BU Mobility, Intelligent Traffic Systems Mobility, Intelligent Traffic Systems Department Engineering Engineering Name Kevin Napper D.A.Martin Function Lead Firmware Engineer Engineering Manger Date February 2016 February 2016 COPYRIGHT STATEMENT The information contained herein is the property of Siemens plc. and is supplied without liability for errors or omissions. No part may be reproduced or used except as authorised by contract or other written permission. The copyright and the foregoing restriction on reproduction and use extend to all media in which the information may be embodied. Copyright Siemens plc 2016 All Rights Reserved

Welcome message from author
This document is posted to help you gain knowledge. Please leave a comment to let me know what you think about it! Share it to your friends and learn new things together.
Transcript

Mobility, Intelligent Traffic Systems
Sopers Lane, Poole, Dorset, BH17 7ER
Security classification Unrestricted Page 1 of 146
Version 5 Status Released
Last Editor dave.martin Date 07-Dec-2016
Document Name User Interface Handbook Document No. 667/HU/46000/000
Copyright © Siemens plc 2016. All Rights Reserved. Mobility is a division of Siemens Plc
User Interface Handbook
667/HU/46000/000
for
ST950 and Stratos Outstation
THIS DOCUMENT IS ELECTRONICALLY APPROVED
AND HELD IN THE SIEMENS DOCUMENT CONTROL TOOL
All PAPER COPIES ARE DEEMED UNCONTROLLED COPIES
Prepared By Checked and Released
Division/BU Mobility, Intelligent Traffic Systems Mobility, Intelligent Traffic Systems
Department Engineering Engineering
Name Kevin Napper D.A.Martin
Function Lead Firmware Engineer Engineering Manger
Date February 2016 February 2016
COPYRIGHT STATEMENT
The information contained herein is the property of Siemens plc. and is supplied without
liability for errors or omissions. No part may be reproduced or used except as authorised by
contract or other written permission. The copyright and the foregoing restriction on
reproduction and use extend to all media in which the information may be embodied.
Copyright Siemens plc 2016 All Rights Reserved
Mobility Division, Traffic Solutions
Sopers Lane, Poole, Dorset, BH17 7ER
Security classification Unrestricted Page 2 of 146
Version 5 Status Released
Last Editor dave.martin Date 07-Dec-2016
Document Name User Interface Handbook Document No. 667/HU/46000/000
Copyright © Siemens plc 2016. All Rights Reserved. Mobility is a division of Siemens Plc
Change History:
Issue Change Reference Date
1 First Issued Sep 2013
2 Add language, SSH, HTTPS
Order of sections reversed so loading an IC4 configuration is
listed before owning the Heart, with more information provided
on loading an IC4 configuration.
May 2014
3 Add Stratos Outstation. Most sections are now generic and
platform specific information is highlighted with additional
platform specific sections at the end of the document.
Feb 2015
4 RFC TS008011 - Updates for ST950 SR2, including addition
of SiteUI and Real Time View sections, and various updates
June 2015
5 Add changes for Stratos and minor corrections & additions November
2016
The electronic version of this handbook can be found on the Siemens website
www.siemens.co.uk/traffic in the Handbooks section under Downloads.

Mobility Division, Traffic Solutions
Sopers Lane, Poole, Dorset, BH17 7ER
Security classification Unrestricted Page 3 of 146
Version 5 Status Released
Last Editor dave.martin Date 07-Dec-2016
Document Name User Interface Handbook Document No. 667/HU/46000/000
Copyright © Siemens plc 2016. All Rights Reserved. Mobility is a division of Siemens Plc
Contents
1 Introduction .............................................................................................................. 6 1.1 Contact Us ............................................................................................................. 6 1.2 Abbreviations ......................................................................................................... 7 1.3 Third Party Information........................................................................................... 8 1.4 Trademarks ............................................................................................................ 8
2 Indicators ................................................................................................................. 9
3 User Connection ...................................................................................................... 9 3.1 Protection Against Malicious Software ................................................................... 9 3.2 USB Handset Port Driver Installation ................................................................... 10 3.3 USB Host Port ..................................................................................................... 11 3.4 WiFi Hotspot ........................................................................................................ 11 3.5 Ethernet Configuration ......................................................................................... 11
4 Web Interface ......................................................................................................... 14 4.1 Connection........................................................................................................... 15 4.2 Android ................................................................................................................ 17 4.3 Common Features ............................................................................................... 18 4.4 Home Page .......................................................................................................... 22 4.5 Status and Configuration Page ............................................................................ 23 4.6 System Page ....................................................................................................... 27 4.7 System Log .......................................................................................................... 30 4.8 Fault Table ........................................................................................................... 33 4.9 Site Log ............................................................................................................... 34 4.10 Terminal .......................................................................................................... 35 4.11 Access Level ................................................................................................... 38
5 WIZ Interface ......................................................................................................... 39 5.1 MENU NAVIGATION ........................................................................................... 39 5.2 MODIFYING DATA .............................................................................................. 40 5.3 STATUS / CONFIG .............................................................................................. 41 5.4 Active Faults ........................................................................................................ 42 5.5 Tester .................................................................................................................. 42 5.6 System Log .......................................................................................................... 44 5.7 Load Sys Config .................................................................................................. 45 5.8 Save Log ............................................................................................................. 46 5.9 Save Site Info ...................................................................................................... 47 5.10 Fetch Sys Config ............................................................................................. 47 5.11 Upgrade .......................................................................................................... 48 5.12 Digital IO ......................................................................................................... 48 5.13 Reboot ............................................................................................................ 48 5.14 TCP Dump ...................................................................................................... 48 5.15 Heart ............................................................................................................... 49 5.16 IC4 Import ....................................................................................................... 49
6 GVP Handset Interface .......................................................................................... 50

Mobility Division, Traffic Solutions
Sopers Lane, Poole, Dorset, BH17 7ER
Security classification Unrestricted Page 4 of 146
Version 5 Status Released
Last Editor dave.martin Date 07-Dec-2016
Document Name User Interface Handbook Document No. 667/HU/46000/000
Copyright © Siemens plc 2016. All Rights Reserved. Mobility is a division of Siemens Plc
7 WiFi Hotspot .......................................................................................................... 51 7.1 Configuration ....................................................................................................... 51 7.2 Determining WPA Key ......................................................................................... 51 7.3 Connecting........................................................................................................... 51
8 Asset Information ................................................................................................... 53 8.1 Applications ......................................................................................................... 53 8.2 Loadable Packages ............................................................................................. 53 8.3 Devices ................................................................................................................ 54 8.4 Firmware .............................................................................................................. 54 8.5 Platform ............................................................................................................... 55
9 Site Information Export ........................................................................................... 56 9.1 Form of exported information ............................................................................... 56 9.2 Requesting Export ............................................................................................... 57 9.3 Examining the Contents ....................................................................................... 58
10 Licensing ................................................................................................................ 60 10.1 Distribution and Storage of Licences ............................................................... 61 10.2 Installing Licences ........................................................................................... 61 10.3 Licence Manager ............................................................................................. 61
11 Firmware Upgrade ................................................................................................. 64 11.1 Updating CPU Card Firmware ......................................................................... 64 11.2 Updating GSPI Peripheral Firmware ................................................................ 66
12 Real Time View and IO Status ............................................................................... 68 12.1 Introduction ..................................................................................................... 68 12.2 Speech ............................................................................................................ 69 12.3 Opening the Real Time View ........................................................................... 69 12.4 Plot Settings and Controls ............................................................................... 72 12.5 Real Time Graph Types .................................................................................. 73
13 Language ............................................................................................................... 75 13.1 Loading Language Packs ................................................................................ 75 13.2 Selecting Language ......................................................................................... 76
14 ST950 Controller Specific Features ........................................................................ 77 14.1 ST950 Indicators ............................................................................................. 77 14.2 ST950 Controller Handset Interface ................................................................ 79 14.3 ST950 Web Interface: Controller Level 3 Data................................................. 80 14.4 ST950 Web Interface: Status & Configuration Web Pages .............................. 83 14.5 ST950 Loading An IC4 Configuration .............................................................. 88 14.6 ST950 Heart of the Controller .......................................................................... 97 14.7 ST950 Firmware Upgrade ............................................................................. 106 14.8 SiteUI ............................................................................................................ 108 14.9 ST950 Real Time View .................................................................................. 124
15 Stratos Outstation Specific Features .................................................................... 126 15.1 Stratos Outstation Indicators ......................................................................... 126

Mobility Division, Traffic Solutions
Sopers Lane, Poole, Dorset, BH17 7ER
Security classification Unrestricted Page 5 of 146
Version 5 Status Released
Last Editor dave.martin Date 07-Dec-2016
Document Name User Interface Handbook Document No. 667/HU/46000/000
Copyright © Siemens plc 2016. All Rights Reserved. Mobility is a division of Siemens Plc
15.2 Stratos Outstation Web I/F: Status & Configuration Web Pages .................... 129 15.3 Stratos Outstation Heart / System Backup ..................................................... 134 15.4 Stratos Outstation - Wiping Configuration and Firmware ............................... 137
16 Security ................................................................................................................ 139 16.1 User Authentication & Identification ............................................................... 139 16.2 Outstation User Credentials........................................................................... 140
17 Connection to Other Systems ............................................................................... 142 17.1 Connection to Stratos .................................................................................... 142 17.2 Connection to Systems Other than Stratos .................................................... 144

Mobility Division, Traffic Solutions
Sopers Lane, Poole, Dorset, BH17 7ER
Security classification Unrestricted Page 6 of 146
Version 5 Status Released
Last Editor dave.martin Date 07-Dec-2016
Document Name User Interface Handbook Document No. 667/HU/46000/000
Copyright © Siemens plc 2016. All Rights Reserved. Mobility is a division of Siemens Plc
1 INTRODUCTION This document describes the general aspects of the interface between the user and the
ST950 Traffic Controller or Gemini 3 Stratos Outstation.
The interface between the user and the unit (i.e. the ST950 Traffic Controller or the
Stratos Outstation) comprises the following:
Summary visual status indications through LEDs
Monitoring and control through web pages, menus and command mnemonics
Temporarily connected items e.g. USB devices
Detail is included here where it is not covered in other handbooks. In many cases the
layout and operation of web pages and commands relating to specific features are
described along with those features e.g. in the ST950 Facility Handbook
(667/HB/46000/001).
The information is generally independent of the platform being used. Where there are
differences, platform specific information is clearly identified e.g.
This text relates to the ST950 Traffic Controller platform.
This text relates to the Stratos Outstation platform.
or else is covered in sections 14 for the ST950 and 15 for the Stratos Outstation.
This document is maintained to reflect the current latest released version of the
equipment. In most cases existing features do not change significantly between
versions but it is likely that users without the latest version may find that some of the
items and features described are not present on their equipment. Updating equipment
to the latest released version will make those items & features available.
1.1 Contact Us If you have any comments on this handbook, or need any further information, you can
contact us at [email protected].
ST950
Stratos OS
Mobility Division, Traffic Solutions
Sopers Lane, Poole, Dorset, BH17 7ER
Security classification Unrestricted Page 7 of 146
Version 5 Status Released
Last Editor dave.martin Date 07-Dec-2016
Document Name User Interface Handbook Document No. 667/HU/46000/000
Copyright © Siemens plc 2016. All Rights Reserved. Mobility is a division of Siemens Plc
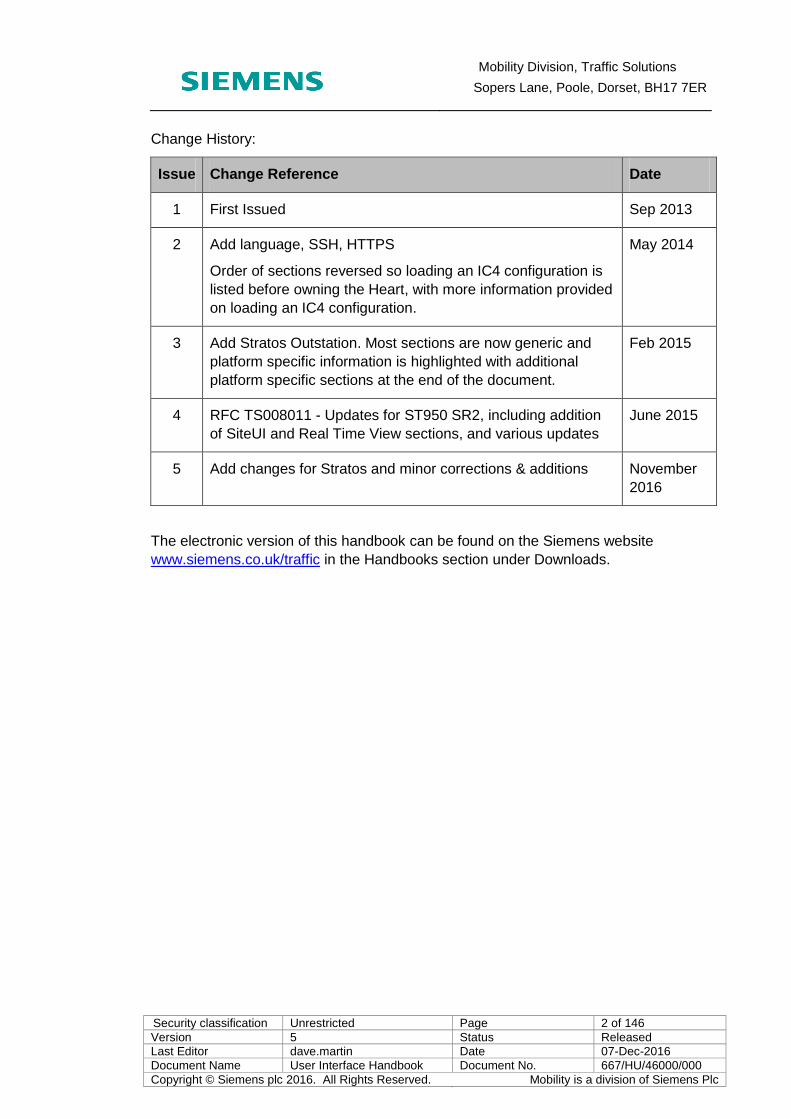
1.2 Abbreviations CLF Cableless Linking Facility
CPU
CRL
Central Processing Unit
Certificate Revocation List
DFM Detector Fault Monitor
ELV
ESP
Extra Low Voltage
Enhanced Serial Protocol
FAT File Allocation Table
GSPI Generic Serial Peripheral Interface
GPS Global Positioning System
HTTP Hypertext Transfer Protocol
HTTPS Hypertext Transfer Protocol Secure
I/O Input/Output
IC4 Intersection Configurator version 4
LED Light Emitting Diode
LRT Light Rail Transit
LSLS Lamp Switch Low-Voltage Serial
mA milliamps
MOVA Microprocessor Optimised Vehicle Actuation
ms milliseconds
NTP
OCSP
OSS
Network Time Protocol
Online Certificate Status Protocol
Outstation Support Server – this may be a stand-alone product or
functionality within Stratos
OTU Outstation Transmission Unit
PCB Printed Circuit Board
RLM Red Lamp Monitoring
SDE/SA Speed Discrimination Equipment / Speed Assessment
SSH Secure Shell
SSL
TLS
UDP
Secure Sockets Layer
Transport Layer Security
User Datagram Protocol
UTC Urban Traffic Control

Mobility Division, Traffic Solutions
Sopers Lane, Poole, Dorset, BH17 7ER
Security classification Unrestricted Page 8 of 146
Version 5 Status Released
Last Editor dave.martin Date 07-Dec-2016
Document Name User Interface Handbook Document No. 667/HU/46000/000
Copyright © Siemens plc 2016. All Rights Reserved. Mobility is a division of Siemens Plc
VA Vehicle Actuated
wrt With Respect To
1.3 Third Party Information Embedded in this product are free software files that you may copy, distribute and/or
modify under the terms of their respective licenses, such as the GNU General Public
License, the GNU Lesser General Public License, the modified BSD license and the
MIT license. In the event of conflicts between Siemens license conditions and the Open
Source Software license conditions, the Open Source Software conditions shall prevail
with respect to the Open Source Software portions of the software.
On written request within three years from the date of product purchase and against
payment of our expenses we will supply source code in line with the terms of the
applicable license. For this, please contact us at:
Open Source Clearing
Product Development
Engineering Department
Siemens Mobility Intelligent Traffic Systems
Sopers Lane
Poole
Dorset
BH17 7ER
UK
Generally, these embedded free software files are distributed in the hope that they will
be useful, but WITHOUT ANY WARRANTY, without even implied warranty such as for
MERCHANTABILITY or FITNESS FOR A PARTICULAR PURPOSE, and without
liability for any Siemens entity other than as explicitly documented in your purchase
contract.
All open source software components used within the product are listed on the unit's
web and mass storage device interfaces.
1.4 Trademarks The following terms used in this document are trademarks of their respective owners:
Android is a trademark of Google Inc.
Firefox is a registered trademark of the Mozilla Foundation.
SD is a trademark of SD-3C, LLC in the United States, other countries or both.
USB is a trademark of USB Implementers Forum, Inc.
Windows is a registered trademark of Microsoft Corporation in the United States and other countries.
Mobility Division, Traffic Solutions
Sopers Lane, Poole, Dorset, BH17 7ER
Security classification Unrestricted Page 9 of 146
Version 5 Status Released
Last Editor dave.martin Date 07-Dec-2016
Document Name User Interface Handbook Document No. 667/HU/46000/000
Copyright © Siemens plc 2016. All Rights Reserved. Mobility is a division of Siemens Plc
2 INDICATORS
The ST950 CPU card LED status indicators are detailed in section 14.1.
The Stratos Outstation indicators are detailed in section 15.1.
3 USER CONNECTION Connection to the unit can be made in a number of ways:
USB Handset Port. The USB Handset port allows a Windows 7 PC to be connected using a standard USB A to B cable.
WiFi Hotspot. The USB Host ports will accept a defined range of Wi-Fi dongles that provide a conventional Wi-fi HotSpot style connection.
RS232 to USB convertor. The RS232 to USB convertor allows traditional handheld character terminals to access the GVP handset interface.
Ethernet port. The Ethernet port allows a user to be connected over a network.
25 way RS232 port. A 25 Way D Type connector on the front of the CPU Card provides a means to access the controller via the well established handset interface. Allows connection of a standard 20 character by 4 lines display handset or terminal emulation software. This interface does not support non ASCII characters. This interface only allows access to the controller handset commands and the WIZ command; it does not support other GVP handset commands or a web interface. See section 14.2.2 for baud rates etc.
There are several different styles of user interface available, as listed below.
Web (section 4)
WIZ menu (section 5)
Controller handset (section 14.2)
GVP handset# (section 6)
# On the Stratos Outstation, the XXC command can be used to access the controller
connected serially to the Outstation.
3.1 Protection Against Malicious Software Files are loaded in and read out of the unit as part of its normal operation e.g.:
Attachments to the site log
Configuration files
Log files
In order to prevent infected files being uploaded to the unit and so possibly spreading
to other connected devices it is important that all equipment connected to the unit has
ST950
Stratos OS
ST950
Stratos OS
Stratos OS
Mobility Division, Traffic Solutions
Sopers Lane, Poole, Dorset, BH17 7ER
Security classification Unrestricted Page 10 of 146
Version 5 Status Released
Last Editor dave.martin Date 07-Dec-2016
Document Name User Interface Handbook Document No. 667/HU/46000/000
Copyright © Siemens plc 2016. All Rights Reserved. Mobility is a division of Siemens Plc
up to date protection against viruses and other malicious software e.g. virus checker
installed and running on PCs and USB memory sticks being scanned before use.
3.2 USB Handset Port Driver Installation The USB drivers need to be installed before using the USB Handset Port. The USB
drivers are held on a virtual CD drive on the unit. When the unit is plugged into a PC
USB port for the first time the PC will automatically install two virtual CD drives:
‘SiemensDrivers’ - holds the USB drivers for the interface and Third Party Information
‘SiemensST950’ or ‘SiemensStratos’ - holds files that the user might find useful, for example: MOVA shortcuts.
Windows will also automatically try to install drivers for the newly found interface. This
will not succeed and the user should install the drivers from the ‘SiemensDrivers’ drive
as follows.
Open Control Panel –> System –> Device Manager
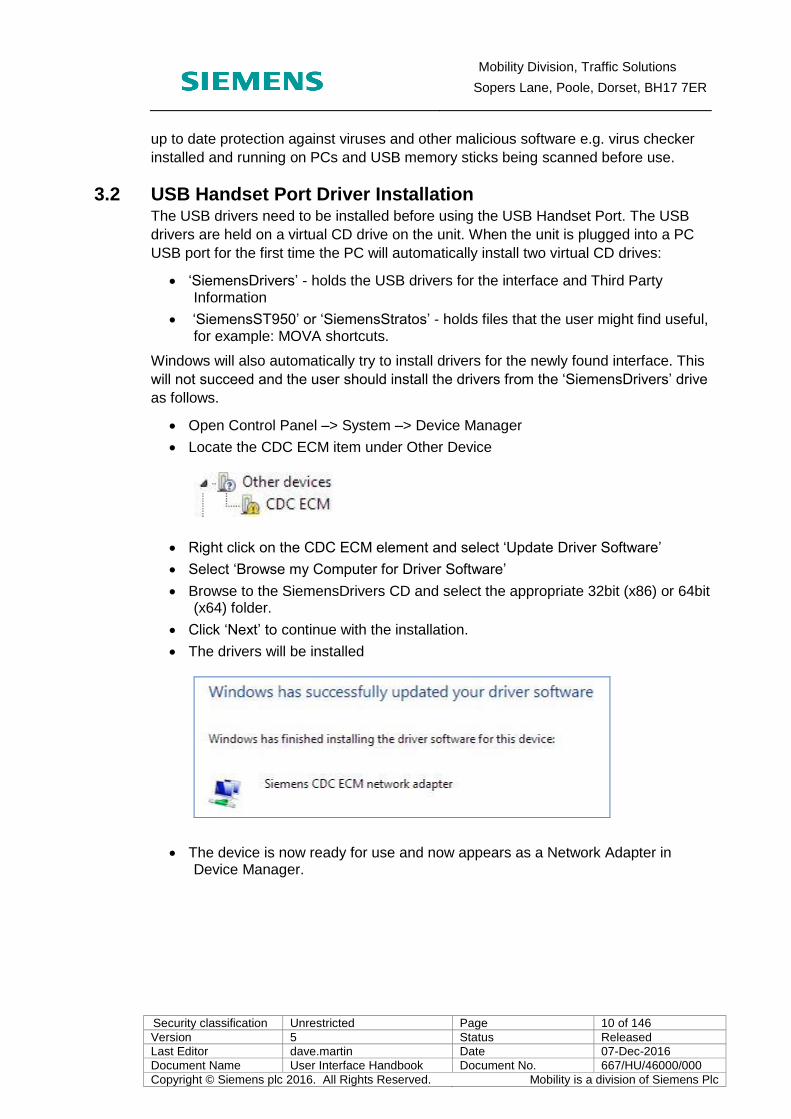
Locate the CDC ECM item under Other Device
Right click on the CDC ECM element and select ‘Update Driver Software’
Select ‘Browse my Computer for Driver Software’
Browse to the SiemensDrivers CD and select the appropriate 32bit (x86) or 64bit (x64) folder.
Click ‘Next’ to continue with the installation.
The drivers will be installed
The device is now ready for use and now appears as a Network Adapter in Device Manager.

Mobility Division, Traffic Solutions
Sopers Lane, Poole, Dorset, BH17 7ER
Security classification Unrestricted Page 11 of 146
Version 5 Status Released
Last Editor dave.martin Date 07-Dec-2016
Document Name User Interface Handbook Document No. 667/HU/46000/000
Copyright © Siemens plc 2016. All Rights Reserved. Mobility is a division of Siemens Plc
3.3 USB Host Port The unit has a number of USB host ports on the front and rear of the CPU card.
Various USB devices can be connected to these ports including:
USB memory stick
USB smart card reader
USB WiFi device
RS232 to USB convertor.
The unit flashes the Busy (BSY) LED while data is being written to devices connected to the USB host ports. It is important that devices are not disconnected or the power interrupted during this write operation otherwise data corruption and / or device failure may occur.
USB memory sticks formatted with the FAT file system should be used. Encrypted USB memory sticks and those formatted with file systems other than FAT are not supported.
3.4 WiFi Hotspot The unit can provide a WiFi hotspot allowing wireless connection. In order to use this
hotspot a suitable WiFi device should be connected to the USB Host port on the unit. A
list of compatible devices can be obtained from Siemens.
Section 7 contains more information on the WiFi HotSpot.
3.5 Ethernet Configuration It is necessary to configure Ethernet before using it to connect to other systems. Two
methods are supported:
DHCP
Full manual configuration
Which is appropriate depends on the system(s) being connected to.
See also section 17 for further details on connecting to other systems including Stratos.
3.5.1 Configuring Ethernet IP to use DHCP
Check that the Ethernet port is not connected during configuration to avoid
network clashes
Check / set the Ethernet IP mode is set to DHCP
Connect the Ethernet port to a network which has connectivity to a DHCP
service
Ethernet IP Mode
The Ethernet IP mode can be checked on the System – Settings – Comms – DSL /
Fibre web page.
Stratos OS

Mobility Division, Traffic Solutions
Sopers Lane, Poole, Dorset, BH17 7ER
Security classification Unrestricted Page 12 of 146
Version 5 Status Released
Last Editor dave.martin Date 07-Dec-2016
Document Name User Interface Handbook Document No. 667/HU/46000/000
Copyright © Siemens plc 2016. All Rights Reserved. Mobility is a division of Siemens Plc
3.5.2 Manual Configuration of Ethernet IP
If DHCP cannot be used then the Ethernet interface needs to be fully configured prior
to use.
The network parameters should be supplied by the network administrator. It is important that these parameters are entered correctly as incorrect settings may affect other devices connected to the network.
Check that the Ethernet port is not connected during configuration to avoid network
clashes.
The Ethernet parameters that need to be configured are:
IP Mode
IP Address
IP Netmask
IP Broadcast
IP Gateway
Where the unit is to be connected to Stratos, the following also needs to be set up:
DNS Nameserver
Where the unit is to be connected to a non-Stratos OSS, the following also need to be
set up:
OSS Address
Enable OSS
Enable OSS Backup
These items can be configured using the web interface (section 4) or the WIZ interface
(section 5).
Mobility Division, Traffic Solutions
Sopers Lane, Poole, Dorset, BH17 7ER
Security classification Unrestricted Page 13 of 146
Version 5 Status Released
Last Editor dave.martin Date 07-Dec-2016
Document Name User Interface Handbook Document No. 667/HU/46000/000
Copyright © Siemens plc 2016. All Rights Reserved. Mobility is a division of Siemens Plc
Once configured, the unit can be accessed via the Ethernet Interface at the configured
IP address.

Mobility Division, Traffic Solutions
Sopers Lane, Poole, Dorset, BH17 7ER
Security classification Unrestricted Page 14 of 146
Version 5 Status Released
Last Editor dave.martin Date 07-Dec-2016
Document Name User Interface Handbook Document No. 667/HU/46000/000
Copyright © Siemens plc 2016. All Rights Reserved. Mobility is a division of Siemens Plc
4 WEB INTERFACE The primary interface for interacting with the unit is a web based interface available
through the USB Handset and Ethernet ports and over WiFi when using a USB WiFi
device. The web interface utilises HTML5 features and so an HTML5 compliant
browser is required to obtain full functionality. Limitations in browser support for HTML5
may limit the operation of some aspects of the web interface.
The following combinations of operating system and web browser have been tested
with the web interface:
Windows 7
Internet Explorer (versions 10 and 11, versions earlier than 10 not supported)
Firefox
Google Chrome
Android (Nexus 5 SmartPhone, Samsung Galaxy Note 10.1 tablet)
Firefox
Google Chrome
If using Internet Explorer, toggle the ‘Compatibility View’ icon in the address bar to ensure it is grey (off) and not blue (on), otherwise the ‘Status and Configuration’ menu will not appear in the left-hand pane of the web interface.
The address at which the web interface can be accessed depends upon the means of
connection.
Means of Connection Address
Ethernet IP address configured in unit
USB Handset Port siemens.
172.29.100.1
WiFi siemens.
172.28.100.1
Table 1 Web interface addresses
Mobility Division, Traffic Solutions
Sopers Lane, Poole, Dorset, BH17 7ER
Security classification Unrestricted Page 15 of 146
Version 5 Status Released
Last Editor dave.martin Date 07-Dec-2016
Document Name User Interface Handbook Document No. 667/HU/46000/000
Copyright © Siemens plc 2016. All Rights Reserved. Mobility is a division of Siemens Plc
4.1 Connection
In ST950 firmware package version 5 and earlier the HTTP protocol is used to provide
the web interface. In firmware package version 6 and later this is changed to HTTP
over SSL (HTTPS) to provide greater security and protection from threats. If required
then the HTTP protocol can be enabled on version 6 and later using the "Use Insecure"
item on the System - Advanced - Network - HTTP web page.
The Stratos Outstation uses the secure HTTPS protocol by default. If required then the
HTTP protocol can be enabled using the "Use Insecure" item on the System -
Advanced - Network - HTTP web page.
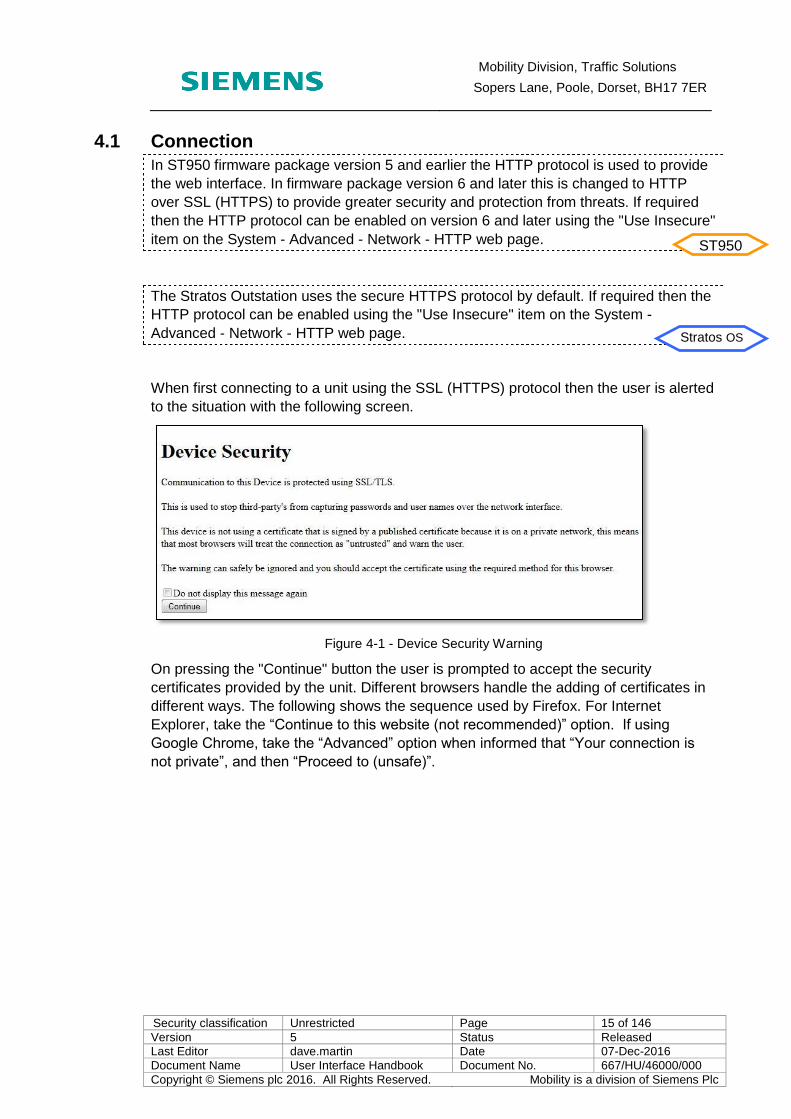
When first connecting to a unit using the SSL (HTTPS) protocol then the user is alerted
to the situation with the following screen.
Figure 4-1 - Device Security Warning
On pressing the "Continue" button the user is prompted to accept the security
certificates provided by the unit. Different browsers handle the adding of certificates in
different ways. The following shows the sequence used by Firefox. For Internet
Explorer, take the “Continue to this website (not recommended)” option. If using
Google Chrome, take the “Advanced” option when informed that “Your connection is
not private”, and then “Proceed to (unsafe)”.
ST950
Stratos OS
Mobility Division, Traffic Solutions
Sopers Lane, Poole, Dorset, BH17 7ER
Security classification Unrestricted Page 16 of 146
Version 5 Status Released
Last Editor dave.martin Date 07-Dec-2016
Document Name User Interface Handbook Document No. 667/HU/46000/000
Copyright © Siemens plc 2016. All Rights Reserved. Mobility is a division of Siemens Plc
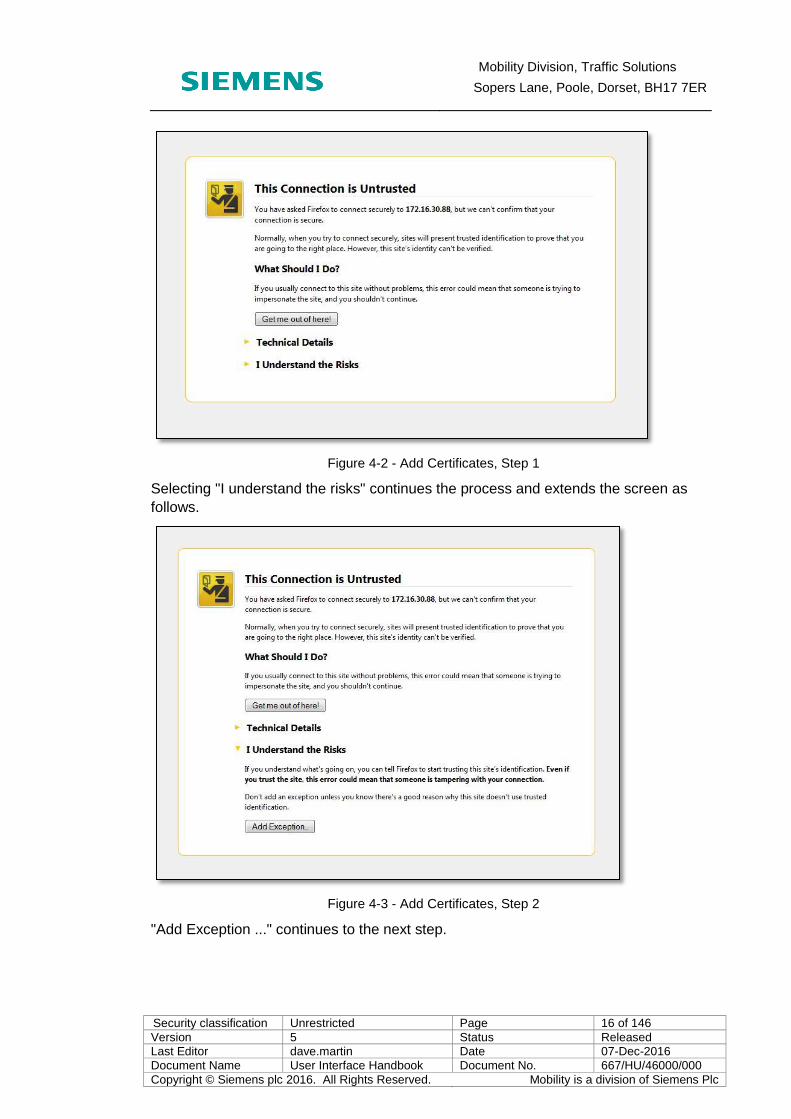
Figure 4-2 - Add Certificates, Step 1
Selecting "I understand the risks" continues the process and extends the screen as
follows.
Figure 4-3 - Add Certificates, Step 2
"Add Exception ..." continues to the next step.

Mobility Division, Traffic Solutions
Sopers Lane, Poole, Dorset, BH17 7ER
Security classification Unrestricted Page 17 of 146
Version 5 Status Released
Last Editor dave.martin Date 07-Dec-2016
Document Name User Interface Handbook Document No. 667/HU/46000/000
Copyright © Siemens plc 2016. All Rights Reserved. Mobility is a division of Siemens Plc
Figure 4-4 - Add Certificates - Step 3
The sequence is completed by pressing the "Confirm Security Exception" button.
If the browser is used to connect to a unit using HTTP after using HTTPS, the address
prefix will need to be manually changed from https back to http in order to obtain a
connection.
4.2 Android The basic Android operating system released by Google and available on many tablet
devices does not include some of the applications required to fully utilise the unit’s
functionality. Manufacturers often customise their devices so some of these
applications may be available on some devices. Not all pre-installed applications
communicate in a way that allows the unit’s functions to be fully utilized. The following
list identifies applications which have been tested with the unit’s interface to give
maximum functionality. These can be freely downloaded from the Google Play Store.
Firefox† web browser
Google Chrome† web browser
File manager which integrates with Firefox e.g. OI File Manager†. This is required in order to find and view files downloaded from the unit and to allow selection of files to be uploaded to the unit through Firefox.
Archive manager e.g. ZArchiver†. This is required in order to extract information from the compressed site information archive which can be exported from the unit.
Text file viewer e.g. Jota+†. This is required to view text files downloaded from the unit e.g. exported system logs.
Mobility Division, Traffic Solutions
Sopers Lane, Poole, Dorset, BH17 7ER
Security classification Unrestricted Page 18 of 146
Version 5 Status Released
Last Editor dave.martin Date 07-Dec-2016
Document Name User Interface Handbook Document No. 667/HU/46000/000
Copyright © Siemens plc 2016. All Rights Reserved. Mobility is a division of Siemens Plc
Virtual terminal client such as ConnectBot† for Telnet and SSH. This is required if a virtual terminal connection to the unit is desired.
† Siemens is not responsible for and accepts no liability in respect of the content of
external sites or any material downloaded from them.
The inclusion of recommended 3rd party Apps from an external website should not be
understood to be an endorsement of that content or the site's owners (or their
products/services).
These sites will most often be free to access, but users may sometimes be asked to
register or subscribe before viewing and / or downloading content.
Some of our external links may be to websites which also offer commercial services,
such as online purchases.
4.2.1 Configuring Firefox on Android
By default on Android, Firefox does not report when the connection to the server is lost
but instead continues to display pages which it has cached. While this behaviour is
most useful when browsing the web over a mobile connection which might be
unreliable, it is most unhelpful when up to date and timely information is required from
the unit. The behaviour of Firefox on Android can be modified so that it immediately
reports when the server connection is lost by setting the value of Firefox’s
network.manage-offline-status configuration item to false. This can be done as follows:
Open Firefox on the Android device
Enter “about:config” into the address bar
Enter “network.manage-offline-status” into the search box
Observe the current value of this configuration item
If the value is true then set it to false by pressing the toggle button
Making this change will ensure that if Firefox cannot obtain a web page from the unit
then it will report a problem rather than presenting a probably out of date cached
version.
4.3 Common Features
4.3.1 Banner Menu
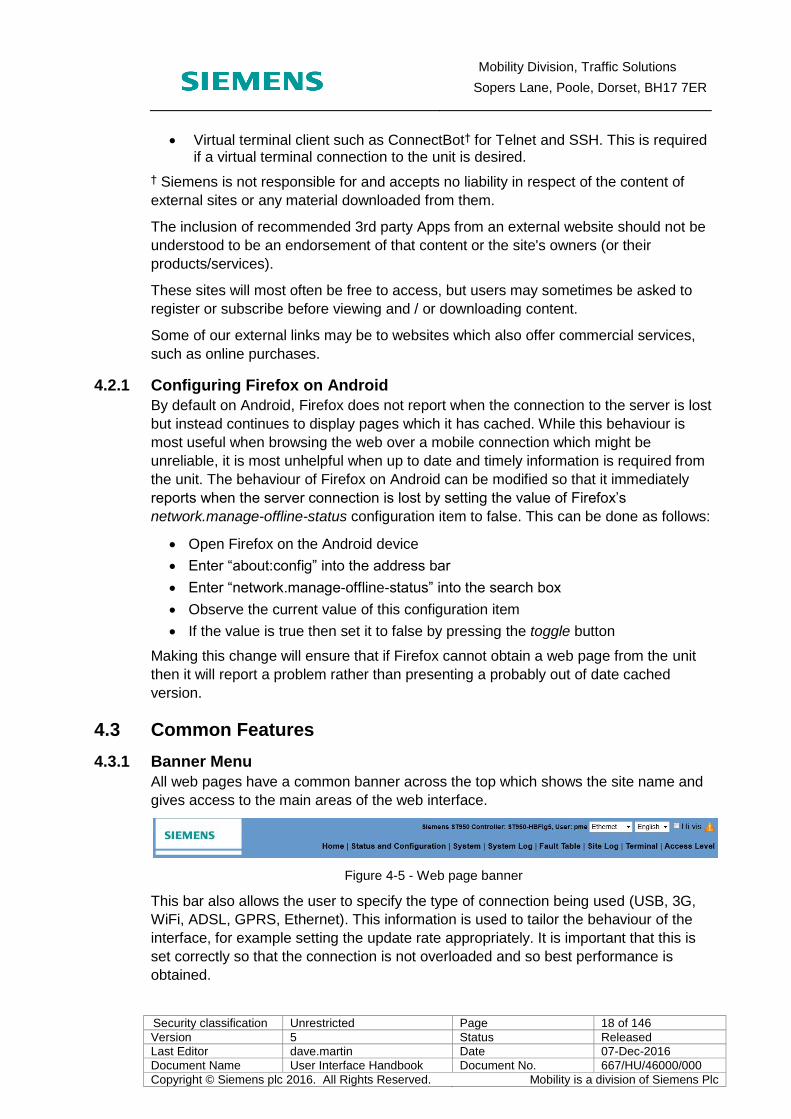
All web pages have a common banner across the top which shows the site name and
gives access to the main areas of the web interface.
Figure 4-5 - Web page banner
This bar also allows the user to specify the type of connection being used (USB, 3G,
WiFi, ADSL, GPRS, Ethernet). This information is used to tailor the behaviour of the
interface, for example setting the update rate appropriately. It is important that this is
set correctly so that the connection is not overloaded and so best performance is
obtained.
Mobility Division, Traffic Solutions
Sopers Lane, Poole, Dorset, BH17 7ER
Security classification Unrestricted Page 19 of 146
Version 5 Status Released
Last Editor dave.martin Date 07-Dec-2016
Document Name User Interface Handbook Document No. 667/HU/46000/000
Copyright © Siemens plc 2016. All Rights Reserved. Mobility is a division of Siemens Plc
It is important to select the appropriate connection type, especially on slower links, in order to optimise response time for user actions.
A high visibility mode can also be enabled through this banner. This alters the colours
used on the web pages to make them more readable in difficult lighting conditions.
A warning triangle will appear in the top-right corner if there are any Faults or
Notifications present in the Fault Table, which is described later in section 4.8.
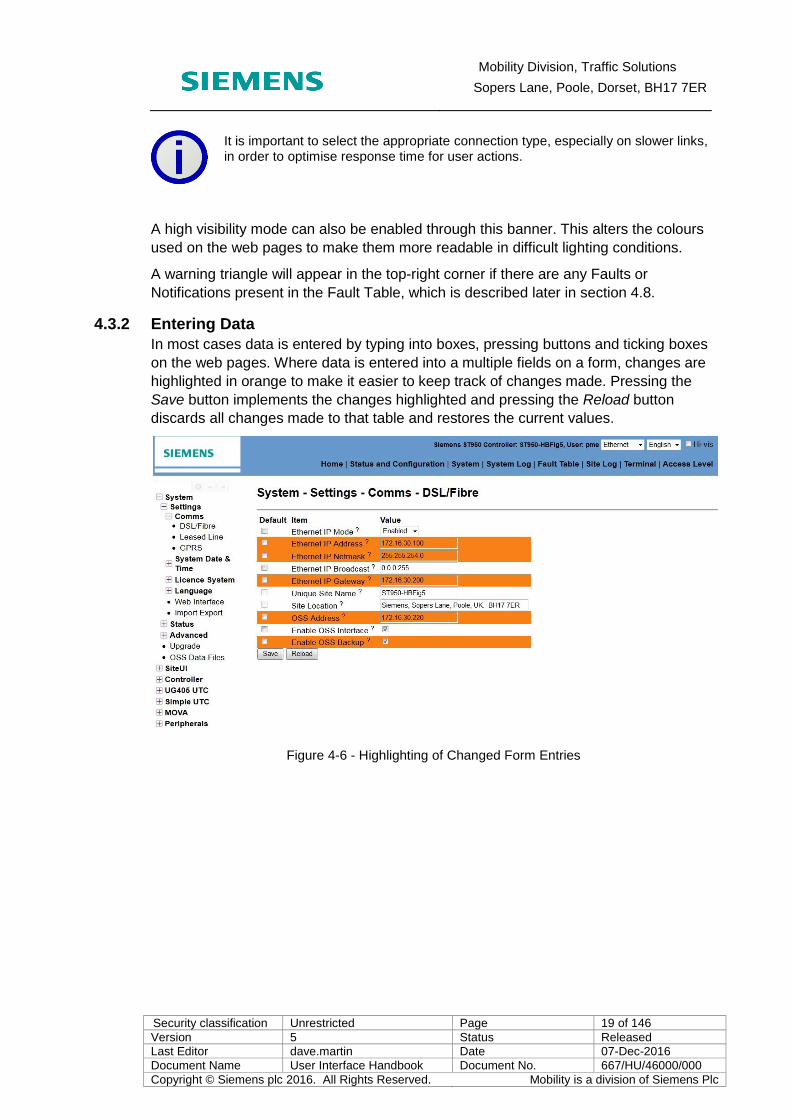
4.3.2 Entering Data
In most cases data is entered by typing into boxes, pressing buttons and ticking boxes
on the web pages. Where data is entered into a multiple fields on a form, changes are
highlighted in orange to make it easier to keep track of changes made. Pressing the
Save button implements the changes highlighted and pressing the Reload button
discards all changes made to that table and restores the current values.
Figure 4-6 - Highlighting of Changed Form Entries
Mobility Division, Traffic Solutions
Sopers Lane, Poole, Dorset, BH17 7ER
Security classification Unrestricted Page 20 of 146
Version 5 Status Released
Last Editor dave.martin Date 07-Dec-2016
Document Name User Interface Handbook Document No. 667/HU/46000/000
Copyright © Siemens plc 2016. All Rights Reserved. Mobility is a division of Siemens Plc
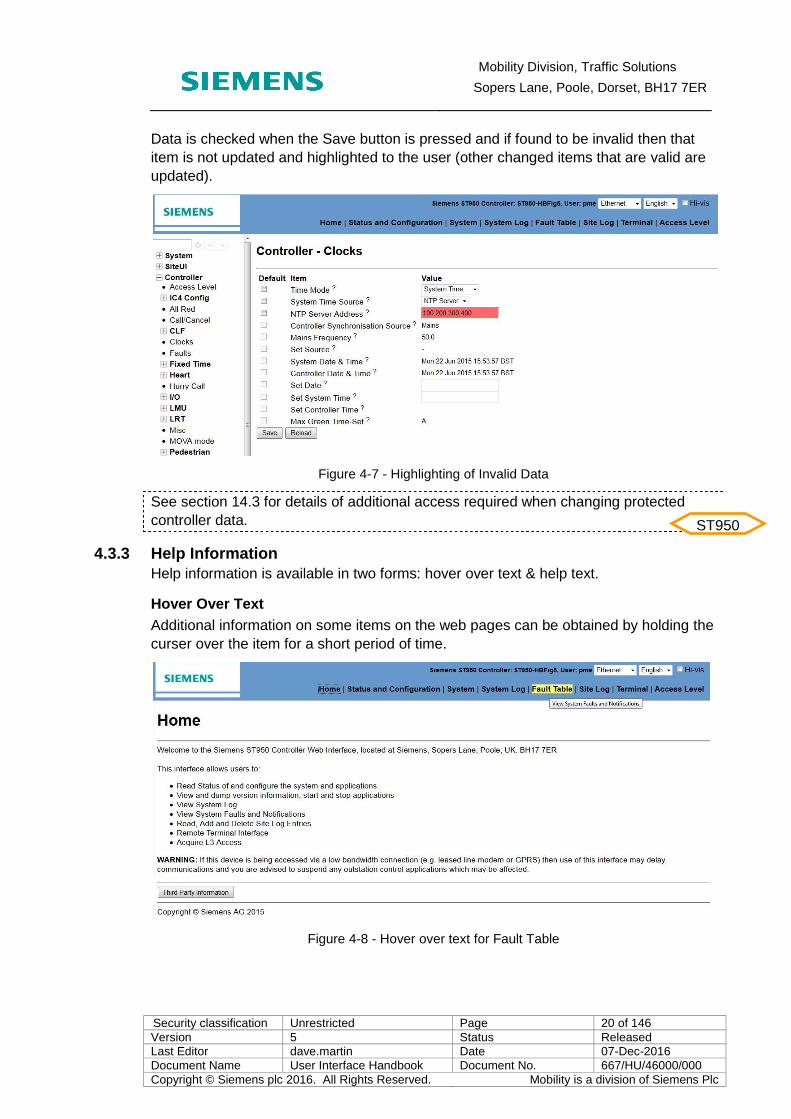
Data is checked when the Save button is pressed and if found to be invalid then that
item is not updated and highlighted to the user (other changed items that are valid are
updated).
Figure 4-7 - Highlighting of Invalid Data
See section 14.3 for details of additional access required when changing protected
controller data.
4.3.3 Help Information
Help information is available in two forms: hover over text & help text.
Hover Over Text
Additional information on some items on the web pages can be obtained by holding the
curser over the item for a short period of time.
Figure 4-8 - Hover over text for Fault Table
ST950

Mobility Division, Traffic Solutions
Sopers Lane, Poole, Dorset, BH17 7ER
Security classification Unrestricted Page 21 of 146
Version 5 Status Released
Last Editor dave.martin Date 07-Dec-2016
Document Name User Interface Handbook Document No. 667/HU/46000/000
Copyright © Siemens plc 2016. All Rights Reserved. Mobility is a division of Siemens Plc
Help Text
Most items within the Status and Configuration area have help text associated with
them. This help text can be obtained by clicking on the question mark next to an item.
The help text is displayed in a separate box which can be moved around the screen if
necessary. A scroll bar allows scrolling where the amount of information is too great to
fit in the box.
Figure 4-9 Help text for the Time Mode field on the Controller - Clocks web page

Mobility Division, Traffic Solutions
Sopers Lane, Poole, Dorset, BH17 7ER
Security classification Unrestricted Page 22 of 146
Version 5 Status Released
Last Editor dave.martin Date 07-Dec-2016
Document Name User Interface Handbook Document No. 667/HU/46000/000
Copyright © Siemens plc 2016. All Rights Reserved. Mobility is a division of Siemens Plc
4.3.4 Multi Row Pages
The number of rows displayed on multi row pages can be changed by changing the
rows value at the bottom of the page. Where there are more rows than can be
displayed on a single page, the pages can be cycled through using the Next and
Previous buttons.
Figure 4-10 Multi row page
4.4 Home Page
Figure 4-11 Home web page
The home page provides some basic information about the unit and a button which can
be used to display third party information. (Note that the unit Site Location is specified
using the System – Settings – Comms – DSL/Fibre web page).

Mobility Division, Traffic Solutions
Sopers Lane, Poole, Dorset, BH17 7ER
Security classification Unrestricted Page 23 of 146
Version 5 Status Released
Last Editor dave.martin Date 07-Dec-2016
Document Name User Interface Handbook Document No. 667/HU/46000/000
Copyright © Siemens plc 2016. All Rights Reserved. Mobility is a division of Siemens Plc
It is possible to display a user defined message on this home page to alert users to
unusual or significant information about the unit, and also an image of the junction or
site to aid identification. This information is set up using the System - Settings - Web
Interface web page. The format of the image must be GIF, JPG or PNG. The image will
be preserved and backed-up as part of the system's configuration data so a small file
size is recommended, e.g. less than 250 kilobytes.
Figure 4-12 Site Image and User Message displayed on Home web page
4.5 Status and Configuration Page
Figure 4-13 Status and Configuration web page
Much of the monitoring and configuration of the system is performed through the Status
and Configuration web page. Clicking on an item in the menu on the left hand side of
the page causes that menu to expand revealing further items which may themselves be
expandable. Clicking on an expanded item will cause it to collapse back to a single line.
Items which can be expanded in this way are presented in a bold font and prefixed with

Mobility Division, Traffic Solutions
Sopers Lane, Poole, Dorset, BH17 7ER
Security classification Unrestricted Page 24 of 146
Version 5 Status Released
Last Editor dave.martin Date 07-Dec-2016
Document Name User Interface Handbook Document No. 667/HU/46000/000
Copyright © Siemens plc 2016. All Rights Reserved. Mobility is a division of Siemens Plc
a or depending upon whether they are currently “open” or “closed”. Menu items
which cannot be expanded are presented in normal font prefixed with .
If using Internet Explorer, toggle the ‘Compatibility View’ icon in the address bar to ensure it is grey (off) and not blue (on), otherwise the ‘Status and Configuration’ menu will not appear in the left-hand pane of the web interface.
Text can be entered into the box above the menu to quickly find items within the menu
structure which match that text. If a menu item which contains the entered text is found
then the menu is expanded to show that item and the corresponding page is displayed.
If more than one match is found then the items found can be cycled through using the
arrow buttons to the right of the text box. Pressing the "x" button between the text box
and the arrow buttons clears the text box and returns the menu to its normal operation.
Figure 4-14 First menu item found for text "mova"
Figure 4-15 Second menu item found for text "mova"
The following sections give a brief overview of the use of the general options available
in the Status and Configuration menu. More detailed descriptions are given in the
sections which describe the facilities themselves.

Mobility Division, Traffic Solutions
Sopers Lane, Poole, Dorset, BH17 7ER
Security classification Unrestricted Page 25 of 146
Version 5 Status Released
Last Editor dave.martin Date 07-Dec-2016
Document Name User Interface Handbook Document No. 667/HU/46000/000
Copyright © Siemens plc 2016. All Rights Reserved. Mobility is a division of Siemens Plc
The Status & Configuration page also contains application specific entries. These are
described separately.
See section 14.4 for details of status and configuration web pages which are specific to
the controller:
- SiteUI: section 14.4.1
- Controller: section 14.4.2
- UTMC RM: section 14.4.3
See section 15.2 for details of status and configuration web pages which are specific to
the Stratos Outstation.
- Controller Monitor: section 15.2.1
- Controller Serial Link: section 15.2.2
- Heart: section 15.2.3
- Support Battery: section 15.2.4
- Intelligent Parking: section 15.2.5
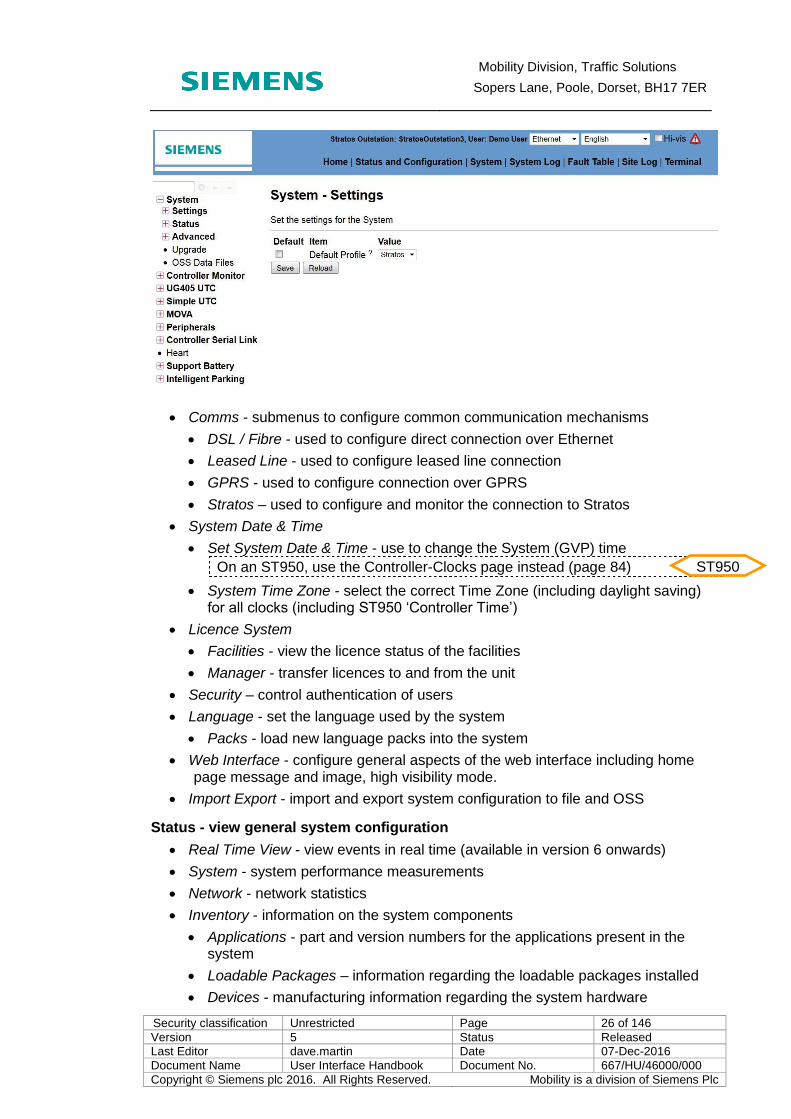
4.5.1 Status & Configuration - System
General system configuration and monitoring is performed through the web pages
found under the System menu item.
Settings - general system configuration
The profile to be used is defined on this page. A profile defines the value of a number
of items in order to configure the equipment suitably for its role. This can include
inhibiting user changes of certain items for security reasons. Currently two profiles are
defined:
Default: allows full manual configuration
Stratos: applies configuration and security restrictions to allow connection to
Stratos
Select the Stratos profile if connection to Stratos is required otherwise select the
Default profile.
ST950
Stratos OS
Mobility Division, Traffic Solutions
Sopers Lane, Poole, Dorset, BH17 7ER
Security classification Unrestricted Page 26 of 146
Version 5 Status Released
Last Editor dave.martin Date 07-Dec-2016
Document Name User Interface Handbook Document No. 667/HU/46000/000
Copyright © Siemens plc 2016. All Rights Reserved. Mobility is a division of Siemens Plc
Comms - submenus to configure common communication mechanisms
DSL / Fibre - used to configure direct connection over Ethernet
Leased Line - used to configure leased line connection
GPRS - used to configure connection over GPRS
Stratos – used to configure and monitor the connection to Stratos
System Date & Time
Set System Date & Time - use to change the System (GVP) time
On an ST950, use the Controller-Clocks page instead (page 84)
System Time Zone - select the correct Time Zone (including daylight saving) for all clocks (including ST950 ‘Controller Time’)
Licence System
Facilities - view the licence status of the facilities
Manager - transfer licences to and from the unit
Security – control authentication of users
Language - set the language used by the system
Packs - load new language packs into the system
Web Interface - configure general aspects of the web interface including home page message and image, high visibility mode.
Import Export - import and export system configuration to file and OSS
Status - view general system configuration
Real Time View - view events in real time (available in version 6 onwards)
System - system performance measurements
Network - network statistics
Inventory - information on the system components
Applications - part and version numbers for the applications present in the system
Loadable Packages – information regarding the loadable packages installed
Devices - manufacturing information regarding the system hardware
ST950

Mobility Division, Traffic Solutions
Sopers Lane, Poole, Dorset, BH17 7ER
Security classification Unrestricted Page 27 of 146
Version 5 Status Released
Last Editor dave.martin Date 07-Dec-2016
Document Name User Interface Handbook Document No. 667/HU/46000/000
Copyright © Siemens plc 2016. All Rights Reserved. Mobility is a division of Siemens Plc
Firmware - part and version numbers for the firmware running on the devices in the system
Platform - release information regarding the system platform
Wifi Hotspot - WPA pre-share key for the Wifi hotspot (only available when Wifi device fitted)
Advanced - advanced system configuration
To be used only under specific direction.
Upgrade - system firmware upgrade
Initiate a system firmware upgrade from file or OSS.
OSS Data Files
Trigger the upload of various information to the OSS or local PC.
4.5.2 Status & Configuration - UG405 UTC
These web pages are described in the UTMC OTU Handbook 667/HB/46000/004.
4.5.3 Status & Configuration - Simple UTC
These web pages are described in the UTMC OTU Handbook 667/HB/46000/004.
4.5.4 Status & Configuration - MOVA
These web pages are described in the MOVA Handbook 667/HB/46000/003.
4.5.5 Status & Configuration - Peripherals
Update the firmware installed on the GSPI peripheral cards. During this process the
GSPI peripheral cards become unavailable to the system so it is important to consider
the effect of this before carrying out an update. For example, if IO cards are connected
then during the update their inputs will not be available to the system and their outputs
will be set to their default state. If either these inputs or outputs control important
features of this or a connected system then the timing of the update needs to be
carefully considered.
4.6 Disturbance to the power during an upgrade could result in one or more peripherals to require replacement so it is important to ensure that power and cabling are not disturbed during the update.System Page The System web page provides:
Information about the applications, plugins and platform.
The ability to start and stop the applications to match the requirements of the installation.
A means of extracting important site information for viewing off site.
A means of rebooting the EFC.
IMPORTANT: Depending on the configured Reserve State settings, the traffic
signals may extinguish while the EFC reboots. ST950

Mobility Division, Traffic Solutions
Sopers Lane, Poole, Dorset, BH17 7ER
Security classification Unrestricted Page 28 of 146
Version 5 Status Released
Last Editor dave.martin Date 07-Dec-2016
Document Name User Interface Handbook Document No. 667/HU/46000/000
Copyright © Siemens plc 2016. All Rights Reserved. Mobility is a division of Siemens Plc
Figure 4-16 System web page
4.6.1 Applications
The starting and stopping of applications should only be undertaken with care when the full implications are understood.
In general different applications are available on different products although many
applications may be available on more than one product. This is illustrated in the lists in
the following figures taken from a Stratos Outstation and an ST950.
It is important to ensure that the correct application(s) required for a specific installation
are started e.g.
UTMCFullUTC or UTMCSimpleUTC where UTC is required.
One or more MOVA applications where MOVA is required.
ControllerMonitor where controller status is to be monitored and reported in the
fault and notification tables. This will also automatically configure the controller
serial link.
IntelligentParking for monitoring and reporting of parking spaces to Stratos.

Mobility Division, Traffic Solutions
Sopers Lane, Poole, Dorset, BH17 7ER
Security classification Unrestricted Page 29 of 146
Version 5 Status Released
Last Editor dave.martin Date 07-Dec-2016
Document Name User Interface Handbook Document No. 667/HU/46000/000
Copyright © Siemens plc 2016. All Rights Reserved. Mobility is a division of Siemens Plc
Figure 4-17 Stratos Outstation Applications
Figure 4-18 ST950 Applications

Mobility Division, Traffic Solutions
Sopers Lane, Poole, Dorset, BH17 7ER
Security classification Unrestricted Page 30 of 146
Version 5 Status Released
Last Editor dave.martin Date 07-Dec-2016
Document Name User Interface Handbook Document No. 667/HU/46000/000
Copyright © Siemens plc 2016. All Rights Reserved. Mobility is a division of Siemens Plc
4.7 System Log Important events are recorded in the System Log.
Figure 4-19 System Log web page
4.7.1 Event Format
The source of the event and the time at which the event occurred is recorded along
with an indication of its severity:
E - error
N - notice
W - warning
I - information
Usually only errors and notices are stored in the log but if required this can be changed
using the System - Advanced - Logging web page. The following examples illustrate
the various parts of the event.
Date and Time of Occurrence
Mon 17 Mar 2014 15:33:08 GMT Notice CtlrLog NDIM FLF 38:0 (Cleared)
Thu 13 Mar 2014 16:54:02 GMT Error CtlrLog NDIM FLF 38:255 (Set)

Mobility Division, Traffic Solutions
Sopers Lane, Poole, Dorset, BH17 7ER
Security classification Unrestricted Page 31 of 146
Version 5 Status Released
Last Editor dave.martin Date 07-Dec-2016
Document Name User Interface Handbook Document No. 667/HU/46000/000
Copyright © Siemens plc 2016. All Rights Reserved. Mobility is a division of Siemens Plc
Severity of Event
Mon 17 Mar 2014 15:33:08 GMT Notice CtlrLog NDIM FLF 38:0 (Cleared)
Thu 13 Mar 2014 16:54:02 GMT Error CtlrLog NDIM FLF 38:255 (Set)
Source of Event
Mon 17 Mar 2014 15:33:08 GMT Notice CtlrLog NDIM FLF 38:0 (Cleared)
Thu 13 Mar 2014 16:54:02 GMT Error CtlrLog NDIM FLF 38:255 (Set)
Event Details
Mon 17 Mar 2014 15:33:08 GMT Notice CtlrLog NDIM FLF 38:0 (Cleared)
Thu 13 Mar 2014 16:54:02 GMT Error CtlrLog NDIM FLF 38:255 (Set)
The Event Details for log entries relating to data changes are accompanied by an
indication of the connection method and mechanism via which the change was
enacted. Depending on the platform and firmware version, the identity of the user
making the change is shown, e.g. “(Alex Smith)” for changes made via a web based
interface, or “(RS232)” for changes made via the ST950 RS232 handset port.
for a change made via a web page:
Mon 15 Jun 2015 15:22:44 BST Notice ConfigWatcher The System Configuration was changed (Alex Smith)
for a change made via a Controller web page:
Mon 15 Jun 2015 15:22:44 BST Notice CtlrHandset Web Interface change 'DET 000=1' was '2' (Alex Smith)
for a change made via Handset commands entered on a web Terminal:
Mon 15 Jun 2015 13:28:50 BST
Notice CtlrHandset Handset command entered 'DET0=1' was 'DET 0 AX:2' (Alex Smith)
for a change made via the RS232 handset:
Mon 15 Jun 2015 15:21:44 BST Notice CtlrHandset Handset command entered 'DET0=1' was 'DET 0 AX:2' (RS232)
ST950
ST950
ST950

Mobility Division, Traffic Solutions
Sopers Lane, Poole, Dorset, BH17 7ER
Security classification Unrestricted Page 32 of 146
Version 5 Status Released
Last Editor dave.martin Date 07-Dec-2016
Document Name User Interface Handbook Document No. 667/HU/46000/000
Copyright © Siemens plc 2016. All Rights Reserved. Mobility is a division of Siemens Plc
4.7.2 View Control
Several aspects of the view of System Log can be configured using the controls above
the logged events themselves. These options affect only the items displayed and do
not alter what is written into the log.
Filter by Module - select the desired module from the list and press the Redisplay button. Only events from that module will be displayed.
Filter by Severity - select the desired severity from the list and press the Redisplay button. Only those events with the severity selected or more serious will be displayed.
Number of Display Lines - select the number of lines of log to be displayed per web page.
Newest / Oldest at top of page - select whether the events should be ordered with the newest or the oldest at the top of the page.
Oldest / Older / Newer / Newest - navigate through the pages of the log. The current page and number of pages in the log are shown just below these buttons.
Oldest - the earliest available events in the log
Older - the events immediately previous to those currently displayed
Newer - the events immediately following those currently displayed
Newest - the most recent event available in the log.
Colour - display events in colour according to severity:
Error – red
Warning – orange
Redisplay - refresh the display of the log.
Export Log File - extract the log as a plain text file. This is an unformatted plain text file and can be viewed with a text editor or similar tool such as WordPad on Windows and Jota+ on Android.
Mobility Division, Traffic Solutions
Sopers Lane, Poole, Dorset, BH17 7ER
Security classification Unrestricted Page 33 of 146
Version 5 Status Released
Last Editor dave.martin Date 07-Dec-2016
Document Name User Interface Handbook Document No. 667/HU/46000/000
Copyright © Siemens plc 2016. All Rights Reserved. Mobility is a division of Siemens Plc
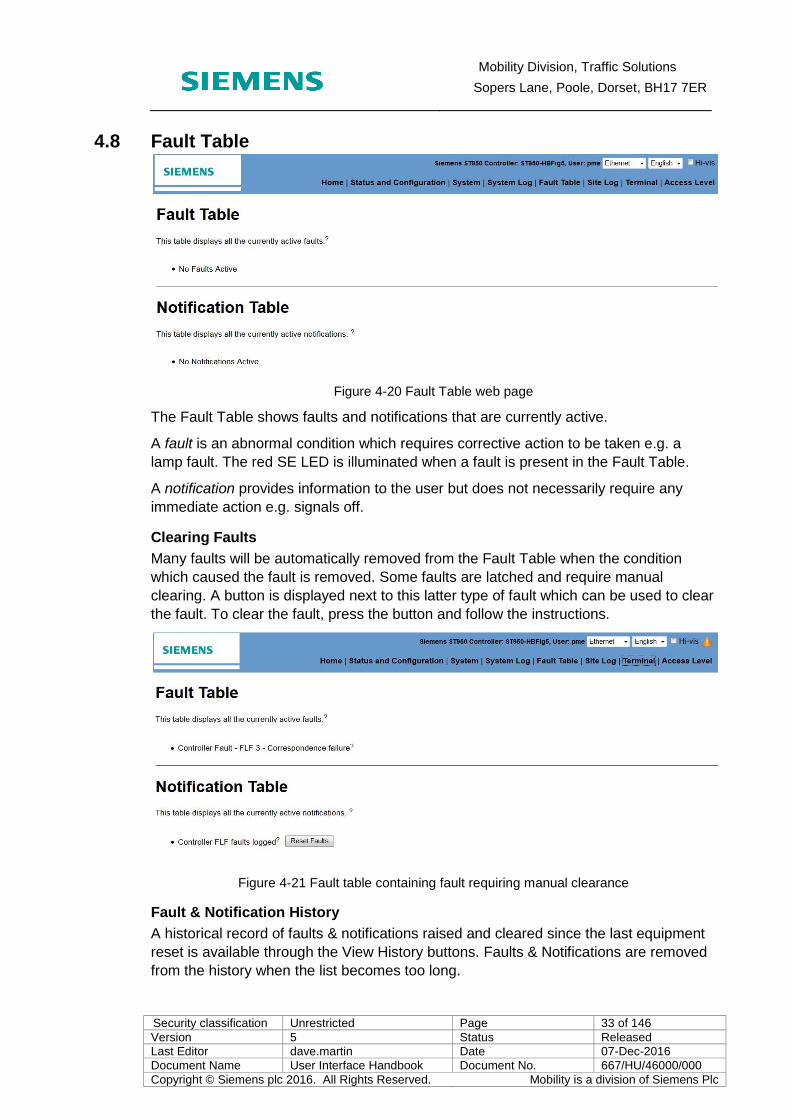
4.8 Fault Table
Figure 4-20 Fault Table web page
The Fault Table shows faults and notifications that are currently active.
A fault is an abnormal condition which requires corrective action to be taken e.g. a
lamp fault. The red SE LED is illuminated when a fault is present in the Fault Table.
A notification provides information to the user but does not necessarily require any
immediate action e.g. signals off.
Clearing Faults
Many faults will be automatically removed from the Fault Table when the condition
which caused the fault is removed. Some faults are latched and require manual
clearing. A button is displayed next to this latter type of fault which can be used to clear
the fault. To clear the fault, press the button and follow the instructions.
Figure 4-21 Fault table containing fault requiring manual clearance
Fault & Notification History
A historical record of faults & notifications raised and cleared since the last equipment
reset is available through the View History buttons. Faults & Notifications are removed
from the history when the list becomes too long.

Mobility Division, Traffic Solutions
Sopers Lane, Poole, Dorset, BH17 7ER
Security classification Unrestricted Page 34 of 146
Version 5 Status Released
Last Editor dave.martin Date 07-Dec-2016
Document Name User Interface Handbook Document No. 667/HU/46000/000
Copyright © Siemens plc 2016. All Rights Reserved. Mobility is a division of Siemens Plc
4.9 Site Log
Figure 4-22 Site Log web page
The Site Log records significant site events. The following are automatically recorded:
System firmware update
IC4 configuration load (8ZP file is stored as an attachment)
It is also possible for the user to create records, either with or without an file
attachment. To create a site log entry:
Enter name in the User box
Enter the details of the log entry in the Text box

Mobility Division, Traffic Solutions
Sopers Lane, Poole, Dorset, BH17 7ER
Security classification Unrestricted Page 35 of 146
Version 5 Status Released
Last Editor dave.martin Date 07-Dec-2016
Document Name User Interface Handbook Document No. 667/HU/46000/000
Copyright © Siemens plc 2016. All Rights Reserved. Mobility is a division of Siemens Plc
If desired, navigate to and select a file to attach
Press the Add to Site Log button
Attachments can be useful to record site details through diagrams, photographs,
documents, etc.
Attachments are not checked for viruses or other malicious software by the unit so it is important that devices used to attach and read attachments are equipped with suitable protection e.g. virus checker installed and running on a PC.
The maximum size for an attachment is 1MB. Any attempt to attach a larger
attachment will produce an on screen error and the record is created without the
attachment.
It is not possible to delete an entry from the site log although attached files can be
deleted in order to save space.
4.10 Terminal
4-23 - Terminal Window
The Terminal Window offers a virtual Handset session to the user that accepts GVP
handset interface commands. This avoids having to install a bespoke terminal
application on the PC/mobile device.
The banner message that appears above the SIEMENS prompt includes

Mobility Division, Traffic Solutions
Sopers Lane, Poole, Dorset, BH17 7ER
Security classification Unrestricted Page 36 of 146
Version 5 Status Released
Last Editor dave.martin Date 07-Dec-2016
Document Name User Interface Handbook Document No. 667/HU/46000/000
Copyright © Siemens plc 2016. All Rights Reserved. Mobility is a division of Siemens Plc
a statement about the number of Other Active Terminal sessions, which
includes any handset sessions via any appropriate connection. This makes the
user aware of concurrent access.
the Site Name
an instruction to use the ‘exit’ command to close this session. (The number of
other active sessions will not be updated for several minutes if ‘exit’ is not
used).
The number of active Handset Terminals is also given by a Notification in the Fault
Table.
The XXC command can be used to switch to the Controller Handset, allowing use of
the Controller Handset and WIZ commands.
Use EXIT (or the XXO command) to exit from the Controller Handset session and to
return to the GVP session, as instructed, otherwise it may take several minutes before
Level 3 access can be granted to another Active terminal session via the PME=249
command.
The “Show Keyboard” button can be used to present a keyboard for character input.
This is intended for use on touch-screen devices where the device keyboard may not
be offered when tapping in the Terminal window.
4-24 - Terminal Window with shown Keyboard
The “Hide Keyboard” button can be used to remove the keyboard.
Tip: On Android devices, the “Hacker’s Keyboard” App may be enabled and used
instead of the default keyboard, if preferred.

Mobility Division, Traffic Solutions
Sopers Lane, Poole, Dorset, BH17 7ER
Security classification Unrestricted Page 37 of 146
Version 5 Status Released
Last Editor dave.martin Date 07-Dec-2016
Document Name User Interface Handbook Document No. 667/HU/46000/000
Copyright © Siemens plc 2016. All Rights Reserved. Mobility is a division of Siemens Plc
Limitation: the ‘Shown’ keyboard has no case shifting key, which is required for some
GVP handset commands.
If using Internet Explorer, toggle the ‘Compatibility View’ icon in the address bar to ensure it is grey (off) and not blue (on), otherwise the ‘Show Keyboard’ button will not work.
Limitation: When Internet Explorer is being used with the ‘Compatibility View’ icon in
the address bar grey (off), as advised above, the Enter key on the PC keyboard may
not work when entering commands into the Terminal window. Use ‘Show Keyboard’ to
obtain access to an ‘Enter’ key when typing commands on a PC keyboard.
Limitation: Pasting text into the Terminal Window has to be performed through the
paste box activated using the Paste Box button.

Mobility Division, Traffic Solutions
Sopers Lane, Poole, Dorset, BH17 7ER
Security classification Unrestricted Page 38 of 146
Version 5 Status Released
Last Editor dave.martin Date 07-Dec-2016
Document Name User Interface Handbook Document No. 667/HU/46000/000
Copyright © Siemens plc 2016. All Rights Reserved. Mobility is a division of Siemens Plc
4.11 Access Level
This menu option is specific to the ST950 and covered in section 14.3.
ST950

Mobility Division, Traffic Solutions
Sopers Lane, Poole, Dorset, BH17 7ER
Security classification Unrestricted Page 39 of 146
Version 5 Status Released
Last Editor dave.martin Date 07-Dec-2016
Document Name User Interface Handbook Document No. 667/HU/46000/000
Copyright © Siemens plc 2016. All Rights Reserved. Mobility is a division of Siemens Plc
5 WIZ INTERFACE The WIZ facility is a menu driven handset facility which allows the user to perform
various system functions and access various status and configuration items.
On the ST950, WIZ is available on both Controller and GVP handset interface.
WIZ requires level PME access and remains enabled whilst PME access is enabled.
Invoking WIZ without PME access results in the access error “WIZ*A”.
Figure 5-1 WIZ menu structure
5.1 MENU NAVIGATION Apart from the initial WIZ command itself, all menu items are uniquely selectable via a
numeric prefix.
Since WIZ must operate on a standard 4-line display, the number of menu items is
restricted to four to fit the display.
Capture WiFi Capture USB Capture PPP
Capture Ethernet
Status Inventory
Date and Time Basic Config
Platform Devices
Applications System
DST Offset Timezone DST End DST Start
Enable OSS Backup Enable OSS OSS Address Site Name
Eth IP Gateway Eth IP Broadcast Eth IP Netmask
Eth IP Address Eth IP Mode
CPU Load Total Disk Blocks Free Disk Blocks
Total RAM Free RAM
OSS USB Drive
Monitor Outputs Monitor Inputs
USB Drive
USB Drive
USB Drive
USB Drive
Restore Own Heart
IC 4 Import Heart
TCP Dump Reboot
Digital IO Upgrade
Fetch Sys Config Save Site Info
Save Log Load Sys Config
System Log Tester
Active Faults Status / Config
ST950
Mobility Division, Traffic Solutions
Sopers Lane, Poole, Dorset, BH17 7ER
Security classification Unrestricted Page 40 of 146
Version 5 Status Released
Last Editor dave.martin Date 07-Dec-2016
Document Name User Interface Handbook Document No. 667/HU/46000/000
Copyright © Siemens plc 2016. All Rights Reserved. Mobility is a division of Siemens Plc
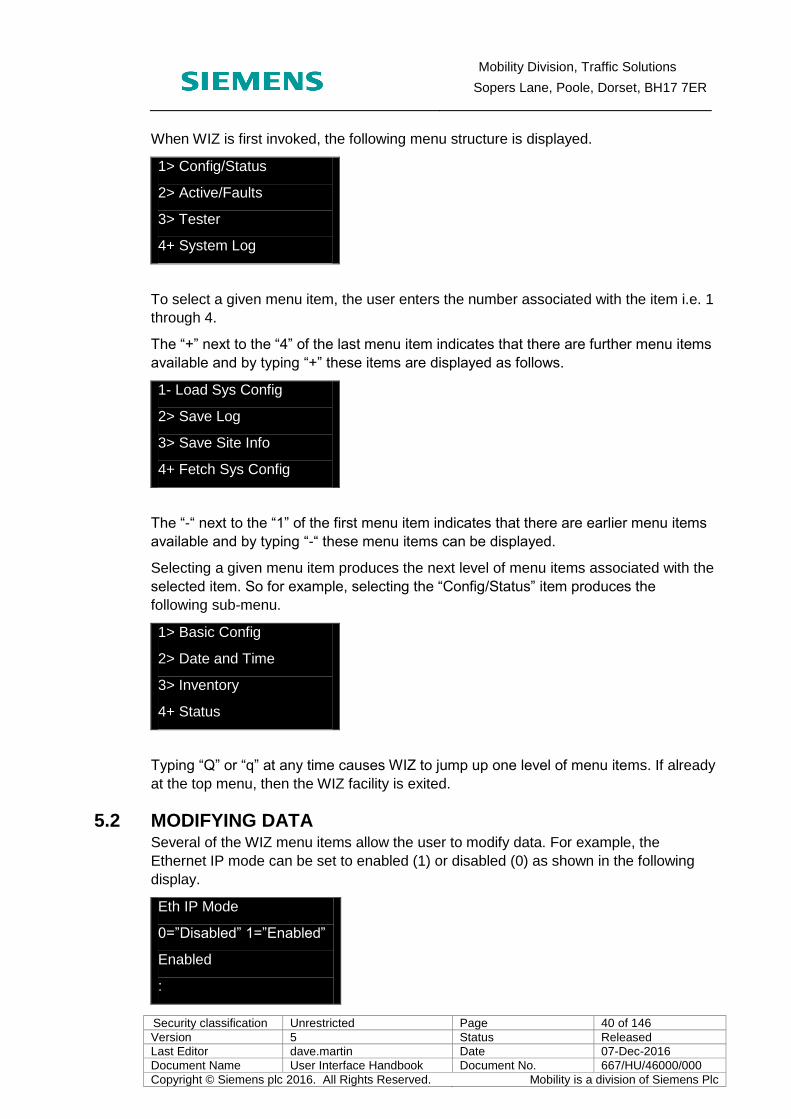
When WIZ is first invoked, the following menu structure is displayed.
1> Config/Status
2> Active/Faults
3> Tester
4+ System Log
To select a given menu item, the user enters the number associated with the item i.e. 1
through 4.
The “+” next to the “4” of the last menu item indicates that there are further menu items
available and by typing “+” these items are displayed as follows.
1- Load Sys Config
2> Save Log
3> Save Site Info
4+ Fetch Sys Config
The “-“ next to the “1” of the first menu item indicates that there are earlier menu items
available and by typing “-“ these menu items can be displayed.
Selecting a given menu item produces the next level of menu items associated with the
selected item. So for example, selecting the “Config/Status” item produces the
following sub-menu.
1> Basic Config
2> Date and Time
3> Inventory
4+ Status
Typing “Q” or “q” at any time causes WIZ to jump up one level of menu items. If already
at the top menu, then the WIZ facility is exited.
5.2 MODIFYING DATA Several of the WIZ menu items allow the user to modify data. For example, the
Ethernet IP mode can be set to enabled (1) or disabled (0) as shown in the following
display.
Eth IP Mode
0=”Disabled” 1=”Enabled”
Enabled
:
Mobility Division, Traffic Solutions
Sopers Lane, Poole, Dorset, BH17 7ER
Security classification Unrestricted Page 41 of 146
Version 5 Status Released
Last Editor dave.martin Date 07-Dec-2016
Document Name User Interface Handbook Document No. 667/HU/46000/000
Copyright © Siemens plc 2016. All Rights Reserved. Mobility is a division of Siemens Plc
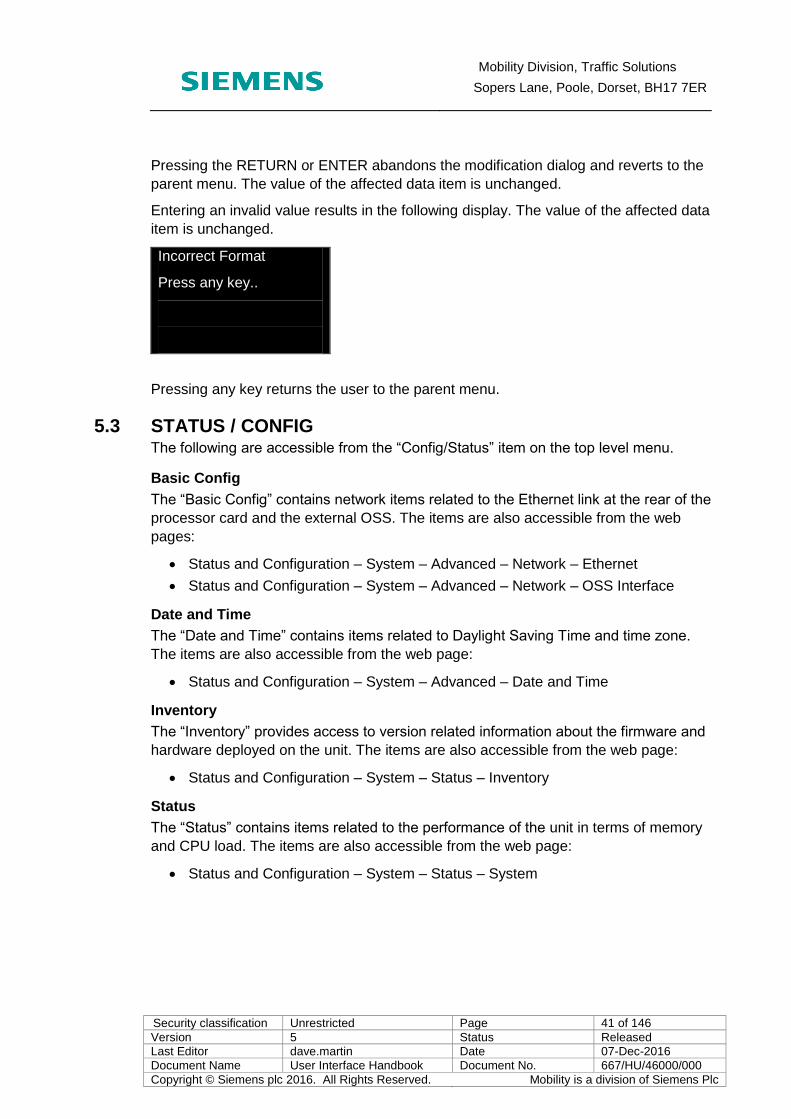
Pressing the RETURN or ENTER abandons the modification dialog and reverts to the
parent menu. The value of the affected data item is unchanged.
Entering an invalid value results in the following display. The value of the affected data
item is unchanged.
Incorrect Format
Press any key..
Pressing any key returns the user to the parent menu.
5.3 STATUS / CONFIG The following are accessible from the “Config/Status” item on the top level menu.
Basic Config
The “Basic Config” contains network items related to the Ethernet link at the rear of the
processor card and the external OSS. The items are also accessible from the web
pages:
Status and Configuration – System – Advanced – Network – Ethernet
Status and Configuration – System – Advanced – Network – OSS Interface
Date and Time
The “Date and Time” contains items related to Daylight Saving Time and time zone.
The items are also accessible from the web page:
Status and Configuration – System – Advanced – Date and Time
Inventory
The “Inventory” provides access to version related information about the firmware and
hardware deployed on the unit. The items are also accessible from the web page:
Status and Configuration – System – Status – Inventory
Status
The “Status” contains items related to the performance of the unit in terms of memory
and CPU load. The items are also accessible from the web page:
Status and Configuration – System – Status – System

Mobility Division, Traffic Solutions
Sopers Lane, Poole, Dorset, BH17 7ER
Security classification Unrestricted Page 42 of 146
Version 5 Status Released
Last Editor dave.martin Date 07-Dec-2016
Document Name User Interface Handbook Document No. 667/HU/46000/000
Copyright © Siemens plc 2016. All Rights Reserved. Mobility is a division of Siemens Plc
5.4 Active Faults This option presents the user with a list of the currently active faults in the unit. Where
no faults are present the following is output.
No Faults Active
Press any key..
The following is an example of an active fault.
Controller Fault -
FLF 2:10 -
SEC/PHP/LSC check
failed
The user must keep pressing any key to scroll through the list of current faults. When
there are no further faults to list, the user is returned to the parent menu.
5.5 Tester This option is used to interact with the Tester application. By default the Tester
application is not started when the unit is power on and the following is output.
Please start the
Tester application
Press any key
Pressing any key returns the user to the parent menu.
The Tester application is started via the “System” Web page. Once Tester has been
started, selecting this option invokes a further level of menus as shown below.

Mobility Division, Traffic Solutions
Sopers Lane, Poole, Dorset, BH17 7ER
Security classification Unrestricted Page 43 of 146
Version 5 Status Released
Last Editor dave.martin Date 07-Dec-2016
Document Name User Interface Handbook Document No. 667/HU/46000/000
Copyright © Siemens plc 2016. All Rights Reserved. Mobility is a division of Siemens Plc
Figure 5-2 WIZ Tester menus
The “Run”, “Loop On” and “Loop Off” options present the user with a list of tests which
are supported by the Tester application. Individual tests or all tests can be selected to
run on a once only basis (“Run”) or loop forever (“Loop On”). Tests which have been
put into run forever mode can subsequently be stopped (“Loop Off”).
The “Status” option allows the user to interrogate the Tester application to determine
the execution status of the tests. This status is expressed in terms of tests which are
currently “Running”, tests which have already run and have “Passed” or “Failed” and
test which have “Not Run”.
The following is a list of tests which could appear in any of the selected status
categories.
1> Heart
2> Licence Rdr
3> Licence Card
4+ Licence Inventor
If there are no tests which satisfy the selected status category then the output is similar
to the following.
Loop Off
Loop On
Status
Run
All Tests
Not Run
Failed
Passed
Running
Fail Flash
SEC
Primary
GSPI
System Version
Aux 3
Aux 2
Aux 1
Aux 0
Modem
PcPing
Network Inventory
Ethernet Ping
SmartCard Inventory
USB Card Reader
Licence Inventory
Licence Card
Save Log
Licence Rdr
USB Drive
Heart
All Tests Tester

Mobility Division, Traffic Solutions
Sopers Lane, Poole, Dorset, BH17 7ER
Security classification Unrestricted Page 44 of 146
Version 5 Status Released
Last Editor dave.martin Date 07-Dec-2016
Document Name User Interface Handbook Document No. 667/HU/46000/000
Copyright © Siemens plc 2016. All Rights Reserved. Mobility is a division of Siemens Plc
There are no tests
With status Not Run
Press any key
Pressing any key returns the user to the parent menu.
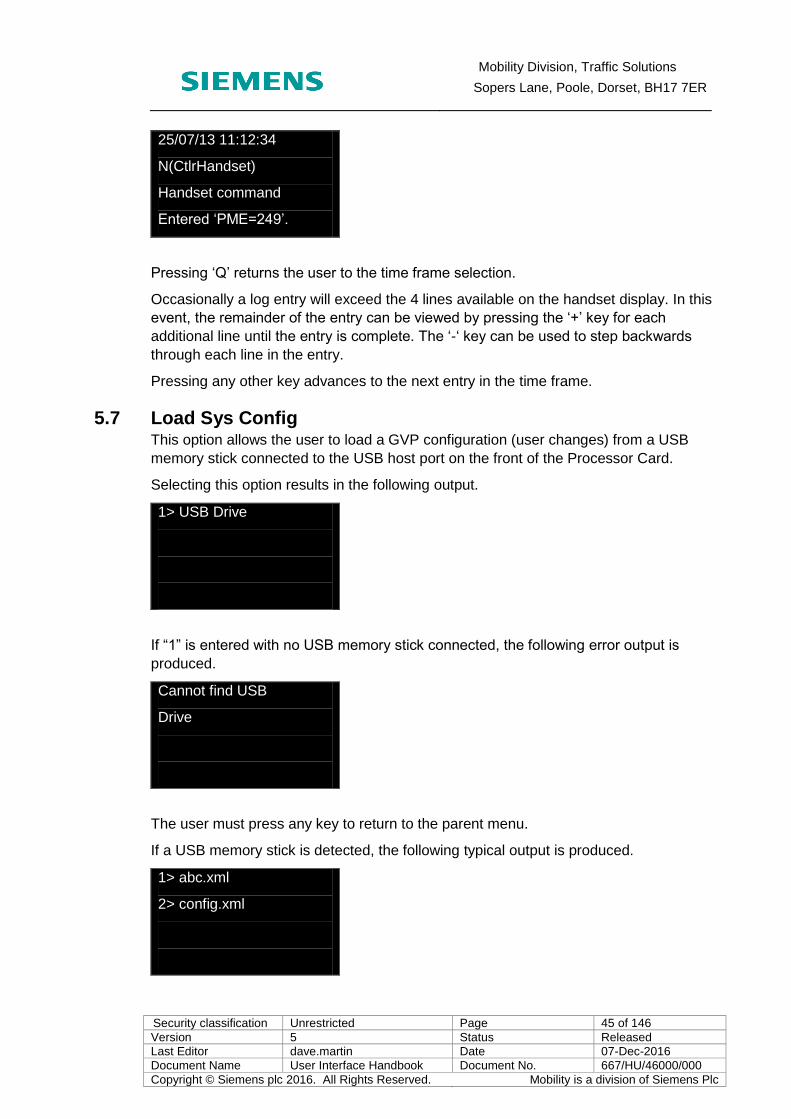
5.6 System Log This option allows the user to view the contents of the System Log.
Selecting this option results in the following output.
1> Error Filter
2> Notice Filter
3> Warning Filter
4> Info Filter
The filters allow the user to view log entries by severity level, where the Error level is
the highest and Info level is the lowest. Higher levels exclude all entries from lower
levels.
Once a filter is selected, the following is output.
Viewing Page 12/12
25/07/13 11:12:34
23/07/13 23:15:21
[OUDN]
This informs the user that by continuing, 20 log entries will be displayed starting from
the first time stamp 25/07/13 11:12:34 and ending at 23/07/13 23:15:21.
If the time frame is not acceptable the user can select one of the four keys ‘O’, ‘U’, ‘D’
or ‘N’ to navigate to a different time frame (key is case insensitive).
‘O’ = Oldest entries.
‘U’ = Up one page.
‘D’ = Down one page.
‘N’ = Newest entries.
Pressing ‘Q’ returns the user to the parent menu.
Pressing any other key outputs the first entry in the selected time frame (an example is
show below).
Mobility Division, Traffic Solutions
Sopers Lane, Poole, Dorset, BH17 7ER
Security classification Unrestricted Page 45 of 146
Version 5 Status Released
Last Editor dave.martin Date 07-Dec-2016
Document Name User Interface Handbook Document No. 667/HU/46000/000
Copyright © Siemens plc 2016. All Rights Reserved. Mobility is a division of Siemens Plc
25/07/13 11:12:34
N(CtlrHandset)
Handset command
Entered ‘PME=249’.
Pressing ‘Q’ returns the user to the time frame selection.
Occasionally a log entry will exceed the 4 lines available on the handset display. In this
event, the remainder of the entry can be viewed by pressing the ‘+’ key for each
additional line until the entry is complete. The ‘-‘ key can be used to step backwards
through each line in the entry.
Pressing any other key advances to the next entry in the time frame.
5.7 Load Sys Config This option allows the user to load a GVP configuration (user changes) from a USB
memory stick connected to the USB host port on the front of the Processor Card.
Selecting this option results in the following output.
1> USB Drive
If “1” is entered with no USB memory stick connected, the following error output is
produced.
Cannot find USB
Drive
The user must press any key to return to the parent menu.
If a USB memory stick is detected, the following typical output is produced.
1> abc.xml
2> config.xml

Mobility Division, Traffic Solutions
Sopers Lane, Poole, Dorset, BH17 7ER
Security classification Unrestricted Page 46 of 146
Version 5 Status Released
Last Editor dave.martin Date 07-Dec-2016
Document Name User Interface Handbook Document No. 667/HU/46000/000
Copyright © Siemens plc 2016. All Rights Reserved. Mobility is a division of Siemens Plc
Selecting a file to input produces the following output.
Imported
Pressing any key returns the user to the parent menu.
5.8 Save Log This option allows the user to save the System Log to a USB memory stick connected
to the USB host port on the front of the Processor Card. The saved log is an ASCII
readable file in Microsoft Wordpad format which can be viewed offline.
A save typically takes a couple of seconds.
Selecting this option results in the following output.
1> USB Drive
If “1” is entered with no USB memory stick connected, the following error output is
produced.
Cannot find USB
Drive
The user must press any key to return to the parent menu.
If a USB memory stick is detected, the following output is produced.
Saving File
Please Wait

Mobility Division, Traffic Solutions
Sopers Lane, Poole, Dorset, BH17 7ER
Security classification Unrestricted Page 47 of 146
Version 5 Status Released
Last Editor dave.martin Date 07-Dec-2016
Document Name User Interface Handbook Document No. 667/HU/46000/000
Copyright © Siemens plc 2016. All Rights Reserved. Mobility is a division of Siemens Plc
Log File Saved
The user must press any key to return to the parent menu.
5.9 Save Site Info See section 9 “Site Information Export” for the use of this option.
5.10 Fetch Sys Config This option allows the user to fetch the latest GVP configuration (user changes) from
the OSS.
If the OSS has not been enabled, the following is output.
Fetching Latest...
Failed
OSS Disabled
Press any key..
If the OSS has been enabled and the configuration is retrieved from the OSS, the
following is output.
Fetching Latest...
Success
Press any key..
If the OSS has been enabled and no configuration is retrieved from the OSS, the
following is output.
Fetching Latest...
Failed
Cannot Fetch.
Press any key..
The user must press any key to return to the parent menu.
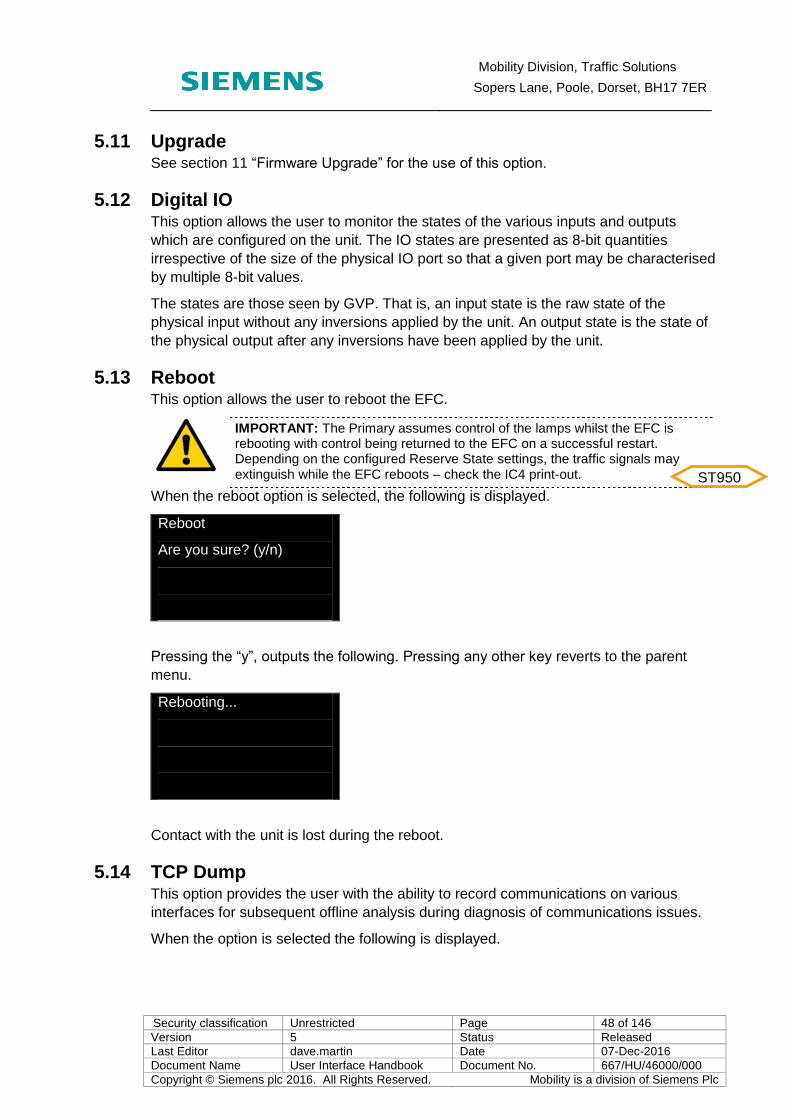
Mobility Division, Traffic Solutions
Sopers Lane, Poole, Dorset, BH17 7ER
Security classification Unrestricted Page 48 of 146
Version 5 Status Released
Last Editor dave.martin Date 07-Dec-2016
Document Name User Interface Handbook Document No. 667/HU/46000/000
Copyright © Siemens plc 2016. All Rights Reserved. Mobility is a division of Siemens Plc
5.11 Upgrade See section 11 “Firmware Upgrade” for the use of this option.
5.12 Digital IO This option allows the user to monitor the states of the various inputs and outputs
which are configured on the unit. The IO states are presented as 8-bit quantities
irrespective of the size of the physical IO port so that a given port may be characterised
by multiple 8-bit values.
The states are those seen by GVP. That is, an input state is the raw state of the
physical input without any inversions applied by the unit. An output state is the state of
the physical output after any inversions have been applied by the unit.
5.13 Reboot This option allows the user to reboot the EFC.
IMPORTANT: The Primary assumes control of the lamps whilst the EFC is rebooting with control being returned to the EFC on a successful restart. Depending on the configured Reserve State settings, the traffic signals may extinguish while the EFC reboots – check the IC4 print-out.
When the reboot option is selected, the following is displayed.
Reboot
Are you sure? (y/n)
Pressing the “y”, outputs the following. Pressing any other key reverts to the parent
menu.
Rebooting...
Contact with the unit is lost during the reboot.
5.14 TCP Dump This option provides the user with the ability to record communications on various
interfaces for subsequent offline analysis during diagnosis of communications issues.
When the option is selected the following is displayed.
ST950

Mobility Division, Traffic Solutions
Sopers Lane, Poole, Dorset, BH17 7ER
Security classification Unrestricted Page 49 of 146
Version 5 Status Released
Last Editor dave.martin Date 07-Dec-2016
Document Name User Interface Handbook Document No. 667/HU/46000/000
Copyright © Siemens plc 2016. All Rights Reserved. Mobility is a division of Siemens Plc
1> Capture Ethernet
2> Capture PPP
3> Capture USB
4> Capture Wi-Fi
Data capture requires a USB memory stick to be inserted into the USB host port on the
front of the Processor Card.
Selecting “Capture Ethernet” option results in the following.
Capturing packets.
Press any key to
stop
Pressing any key will stop the data capture and the user is informed of the name of the
file on the USB memory stick which contains the data.
Similar outcomes are generated for the other data capture options.
5.15 Heart
See section 14.6 for the use of this facility on the controller.
See section 15.3 for the use of this facility on the Stratos Outstation.
5.16 IC4 Import
See section 14.5 “Loading IC4 Configuration” for the use of this option.
ST950
Stratos OS
ST950
Mobility Division, Traffic Solutions
Sopers Lane, Poole, Dorset, BH17 7ER
Security classification Unrestricted Page 50 of 146
Version 5 Status Released
Last Editor dave.martin Date 07-Dec-2016
Document Name User Interface Handbook Document No. 667/HU/46000/000
Copyright © Siemens plc 2016. All Rights Reserved. Mobility is a division of Siemens Plc
6 GVP HANDSET INTERFACE The GVP handset interface is available using a virtual terminal connection over the
USB handset port, Ethernet port and WiFi hotspot.
The GVP handset interface commands are described in 667/HB/31760/000.

Mobility Division, Traffic Solutions
Sopers Lane, Poole, Dorset, BH17 7ER
Security classification Unrestricted Page 51 of 146
Version 5 Status Released
Last Editor dave.martin Date 07-Dec-2016
Document Name User Interface Handbook Document No. 667/HU/46000/000
Copyright © Siemens plc 2016. All Rights Reserved. Mobility is a division of Siemens Plc
7 WIFI HOTSPOT The unit is able to act as a temporary WiFi hotspot to allow wireless connection to the
unit for short periods of time e.g. during a site maintenance visit. This facility should not
be used for permanent wireless connection. The WiFi link supports all facilities
available on the USB serial handset.
Each WiFi device has a WPA pre-share key associated with it which will be valid for the
device no matter which unit it is connected to. Before using a WiFi device for the first
time, this WPA pre-share key must be obtained using a non-WiFi connection (section
7.2). Once obtained, this WPA pre-share key can be used when connecting to the WiFi
hotspot provided by the unit.
7.1 Configuration The WiFi hotspot SSID is set to “Siemens Hotspot” by default. Where two or more units
are within WiFi range of each other this should be changed so that they can be
distinguished when connecting. This SSID can be configured using the System –
Advanced – Network – Wifi Hotspot web page.
Figure 7-1 - Setting the WiFi hotspot SSID
7.2 Determining WPA Key Each WiFi dongle has its own WPA key. The WPA key is fixed for a dongle and
different dongles may have different keys. To determine the WPA key for a WiFi
dongle:
Connect to the unit’s web interface e.g. using the USB handset port.
Plug the WiFi dongle in to the unit.
View the System – Status – Wifi HotSpot web page. The WPA key is given in the “Value” column.
7.3 Connecting Connection from a device is performed in the same way as connection to any other
WiFi network. The details vary depending on the operating system in use on the device
but tend to follow the following sequence.
Search for available WiFi networks.
Select the WiFi network for the unit (default SSID “Siemens Hotspot”).
Enter WPA key
Wait for connection to be completed.
Mobility Division, Traffic Solutions
Sopers Lane, Poole, Dorset, BH17 7ER
Security classification Unrestricted Page 52 of 146
Version 5 Status Released
Last Editor dave.martin Date 07-Dec-2016
Document Name User Interface Handbook Document No. 667/HU/46000/000
Copyright © Siemens plc 2016. All Rights Reserved. Mobility is a division of Siemens Plc
Once connected via WiFi the web pages can be viewed by entering one of the
following in the browser address bar:
http://siemens/
http://172.28.100.1/

Mobility Division, Traffic Solutions
Sopers Lane, Poole, Dorset, BH17 7ER
Security classification Unrestricted Page 53 of 146
Version 5 Status Released
Last Editor dave.martin Date 07-Dec-2016
Document Name User Interface Handbook Document No. 667/HU/46000/000
Copyright © Siemens plc 2016. All Rights Reserved. Mobility is a division of Siemens Plc
8 ASSET INFORMATION The asset information is available on demand through the web interface and is also
contained in the exported Site Information.
8.1 Applications A number of applications are installed on the unit. The details of these are listed on the
System – Status – Inventory – Applications web page.
Figure 8-1 - Applications inventory information
8.2 Loadable Packages Details of the installed loadable packages are available on the System – Status –
Inventory – Loadable Packages web page.
Figure 8-2 – Loadable package inventory information

Mobility Division, Traffic Solutions
Sopers Lane, Poole, Dorset, BH17 7ER
Security classification Unrestricted Page 54 of 146
Version 5 Status Released
Last Editor dave.martin Date 07-Dec-2016
Document Name User Interface Handbook Document No. 667/HU/46000/000
Copyright © Siemens plc 2016. All Rights Reserved. Mobility is a division of Siemens Plc
8.3 Devices Details of the devices (CPU card hardware and peripheral card hardware) are available
on the System – Status – Inventory – Devices web page.
In the example below some devices contain dummy asset information and others do
not support asset information.
Figure 8-3 - Devices inventory information
8.4 Firmware Details of the firmware installed in the devices is available on the System – Status –
Inventory – Firmware web page.
Figure 8-4 - Firmware inventory information

Mobility Division, Traffic Solutions
Sopers Lane, Poole, Dorset, BH17 7ER
Security classification Unrestricted Page 55 of 146
Version 5 Status Released
Last Editor dave.martin Date 07-Dec-2016
Document Name User Interface Handbook Document No. 667/HU/46000/000
Copyright © Siemens plc 2016. All Rights Reserved. Mobility is a division of Siemens Plc
8.5 Platform Details of the underlying platform are available on the System – Status – Inventory –
Platform web page.
Figure 8-5 - Platform inventory information
Mobility Division, Traffic Solutions
Sopers Lane, Poole, Dorset, BH17 7ER
Security classification Unrestricted Page 56 of 146
Version 5 Status Released
Last Editor dave.martin Date 07-Dec-2016
Document Name User Interface Handbook Document No. 667/HU/46000/000
Copyright © Siemens plc 2016. All Rights Reserved. Mobility is a division of Siemens Plc
9 SITE INFORMATION EXPORT Information about the site can be exported, quickly and easily. It provides a snapshot of
the state of the unit.
This information is therefore very useful in the following situations:
As part of the hand-over and approval process between installation engineers and customers.
The Controller Data page contains important controller settings (e.g. intergreen timings & conflicts) that the customer ought to review as part of an acceptance procedure.
The information may also be useful at PI visits (Periodic Inspection), quickly capturing and recording the status of the unit and inventory information on that visit. This is why this feature is sometimes referred to as the ‘PI Dump’.
If a problem cannot be resolved and further assistance is required, it is recommended that this information is extracted from the unit and further assistance sort.
For problem resolution on the controller, the snapshot contains the current state and trace records from the lamp monitor.
9.1 Form of exported information The information is exported as a ZIP file with a filename in the form:
<Site name>-<date>T<time>.zip
Where:
The site name is that manually configured.
By default the ST950 site name is the EM-Number (part of the CIC String) of the IC4 configuration, prefixed by ‘ST950’, e.g. ‘ST950-e12345’.
The date and time is in the numerical form ‘yyyymmdd’ and ‘hhmmss’, separated by the character ‘T’, e.g. ‘20130716T182630’ for 16th July 2013 at time 18:26:30. This is the date and time according to the unit, not the time according to the PC used to extract the information for example.
ST950
ST950
ST950

Mobility Division, Traffic Solutions
Sopers Lane, Poole, Dorset, BH17 7ER
Security classification Unrestricted Page 57 of 146
Version 5 Status Released
Last Editor dave.martin Date 07-Dec-2016
Document Name User Interface Handbook Document No. 667/HU/46000/000
Copyright © Siemens plc 2016. All Rights Reserved. Mobility is a division of Siemens Plc
9.2 Requesting Export Export of site information can be requested through the web interface and WIZ.
9.2.1 Export Using Web Interface
From the ‘System’ web page, it is possible locally or remotely to export the file and
store it on the users device (PC, laptop, smart phone, tablet, etc.). This will use the
browser’s standard approach for downloading and saving a file, e.g. a dialog box
asking the user whether they want to open or save the document. Given a choice,
select save and find a suitable directory in which to store the file.
Figure 9-1 - Site Information Export on System web page
9.2.2 Export Using WIZ
It is also possible to obtain this file on site without needing a PC. Insert a USB memory
stick into the socket on the front of the Processor Card, attach a handset terminal and
use the WIZ handset command.
USB memory sticks formatted with the FAT file system should be used. Encrypted USB memory sticks and those formatted with file systems other than FAT are not supported.
The WIZ options used are shown in bold:
1> Config/Status
2> Active Faults
3> Tester
4+ System Log
1- Load Sys Config
2> Save Log
3> Save Site Info
4+ Fetch Sys Config
1> USB Drive

Mobility Division, Traffic Solutions
Sopers Lane, Poole, Dorset, BH17 7ER
Security classification Unrestricted Page 58 of 146
Version 5 Status Released
Last Editor dave.martin Date 07-Dec-2016
Document Name User Interface Handbook Document No. 667/HU/46000/000
Copyright © Siemens plc 2016. All Rights Reserved. Mobility is a division of Siemens Plc
After selecting 1 the following is displayed:
Saving File
Please Wait
Site Info Store
Saved
If there is not space on the USB memory stick to store the file then the handset
command indicates failure. If a file already exists with this same filename then it is
overwritten without warning, although this is unlikely because the filename includes the
date and time.
9.3 Examining the Contents The ZIP file contains a number of separate files.
The file is a standard ZIP file and can be opened & files extracted using a standard archive manager such as 7zip for Windows and ZArchiver for Android.
The first thing to do is to extract all the files to a convenient location. By default the files
are extracted to a subdirectory also named ‘sitename-date-T-time’ so a number of ZIP
files can be extracted to the same location with the contents of each filed separately in
directories based on the site name and time obtained.
Then open the file called ‘index.html’, which opens a short index page in your default
browser.
The options available from the index are as follows. In most cases, the information
provided is similar to the view available via the web interface on the unit.
System Log – The same view as when the log is exported from the System Log web page.
Status Database – Currently for engineering use only.
Fault Table and Notification Table – Contains the active faults and notifications.
Site Log – This is a copy of the Site Log table, a similar view to that available via the web interface. It also includes attachments.
Tip: If the browser does not access or open an attachment directly from this log view, the attachment file can be located manually. The attachments are

Mobility Division, Traffic Solutions
Sopers Lane, Poole, Dorset, BH17 7ER
Security classification Unrestricted Page 59 of 146
Version 5 Status Released
Last Editor dave.martin Date 07-Dec-2016
Document Name User Interface Handbook Document No. 667/HU/46000/000
Copyright © Siemens plc 2016. All Rights Reserved. Mobility is a division of Siemens Plc
also extracted from the ZIP file and stored in a sub-directory named ‘sitelog’.
Inventory – A list of hardware and firmware inventory information (e.g. part numbers and issue states)
System Configuration File – Currently for engineering use only. Note: The IC4 Configuration files are recorded in the Site Log and can be obtained via that option.
Licence Facilities – A list of licences installed on the unit, e.g. the details of the MOVA licences installed.
Controller Data – A summary of the controller configuration. This includes fundamental timings such as the minimum and maximums green times, intergreen times, phase delays, DFM times. It also lists the lamp monitor loads and lamp faults. It also displays the safety configuration settings used for conflict and correspondence monitoring.
LMU Trace – Captures the lamp monitor diagnostic information. Refer to the details on the KTR handset command for more information.
ST950
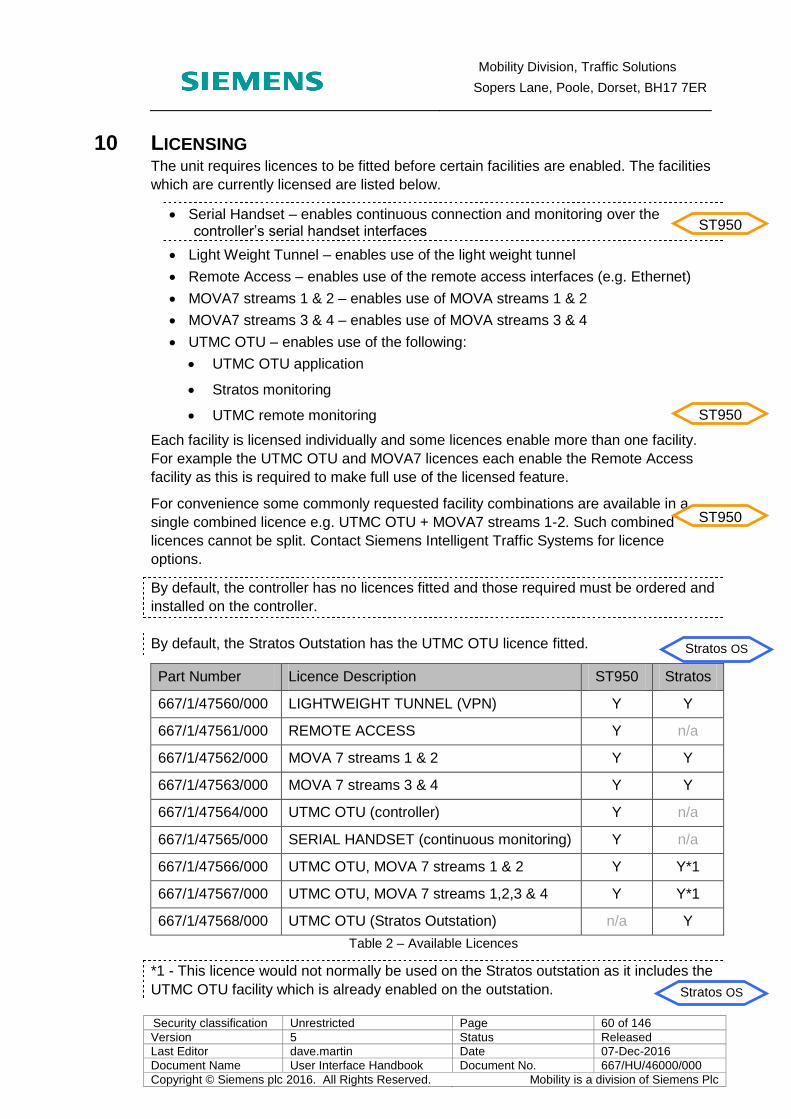
Mobility Division, Traffic Solutions
Sopers Lane, Poole, Dorset, BH17 7ER
Security classification Unrestricted Page 60 of 146
Version 5 Status Released
Last Editor dave.martin Date 07-Dec-2016
Document Name User Interface Handbook Document No. 667/HU/46000/000
Copyright © Siemens plc 2016. All Rights Reserved. Mobility is a division of Siemens Plc
10 LICENSING The unit requires licences to be fitted before certain facilities are enabled. The facilities
which are currently licensed are listed below.
Serial Handset – enables continuous connection and monitoring over the controller’s serial handset interfaces
Light Weight Tunnel – enables use of the light weight tunnel
Remote Access – enables use of the remote access interfaces (e.g. Ethernet)
MOVA7 streams 1 & 2 – enables use of MOVA streams 1 & 2
MOVA7 streams 3 & 4 – enables use of MOVA streams 3 & 4
UTMC OTU – enables use of the following:
UTMC OTU application
Stratos monitoring
UTMC remote monitoring
Each facility is licensed individually and some licences enable more than one facility.
For example the UTMC OTU and MOVA7 licences each enable the Remote Access
facility as this is required to make full use of the licensed feature.
For convenience some commonly requested facility combinations are available in a
single combined licence e.g. UTMC OTU + MOVA7 streams 1-2. Such combined
licences cannot be split. Contact Siemens Intelligent Traffic Systems for licence
options.
By default, the controller has no licences fitted and those required must be ordered and
installed on the controller.
By default, the Stratos Outstation has the UTMC OTU licence fitted.
Part Number Licence Description ST950 Stratos
667/1/47560/000 LIGHTWEIGHT TUNNEL (VPN) Y Y
667/1/47561/000 REMOTE ACCESS Y n/a
667/1/47562/000 MOVA 7 streams 1 & 2 Y Y
667/1/47563/000 MOVA 7 streams 3 & 4 Y Y
667/1/47564/000 UTMC OTU (controller) Y n/a
667/1/47565/000 SERIAL HANDSET (continuous monitoring) Y n/a
667/1/47566/000 UTMC OTU, MOVA 7 streams 1 & 2 Y Y*1
667/1/47567/000 UTMC OTU, MOVA 7 streams 1,2,3 & 4 Y Y*1
667/1/47568/000 UTMC OTU (Stratos Outstation) n/a Y
Table 2 – Available Licences
*1 - This licence would not normally be used on the Stratos outstation as it includes the
UTMC OTU facility which is already enabled on the outstation.
ST950
Stratos OS
Stratos OS
ST950
ST950

Mobility Division, Traffic Solutions
Sopers Lane, Poole, Dorset, BH17 7ER
Security classification Unrestricted Page 61 of 146
Version 5 Status Released
Last Editor dave.martin Date 07-Dec-2016
Document Name User Interface Handbook Document No. 667/HU/46000/000
Copyright © Siemens plc 2016. All Rights Reserved. Mobility is a division of Siemens Plc
10.1 Distribution and Storage of Licences Licences are distributed and held on Smart Cards. For distribution either a full size
(credit card size) or SIM size Smart Card can be used. On the installed unit, a SIM size
Smart Card is used and is fitted in the Smart Card holder on the CPU Card.
In addition to licences, Smart Card of version 2 onwards also hold the credentials
required for the equipment to connect to Stratos. A Licence Smart card of at least this
version is required to support connections to Stratos.
The version of the Licence Smartcard fitted can be checked on the System – Settings –
Comms – Stratos configuration web page.
10.2 Installing Licences If no Licence Smart Card is fitted in the unit then the licence is installed by fitting the
supplied Licence Smart Card into the Smart Card holder on the CPU Card.
If a Licence Smart Card is already fitted to the unit then the licence is installed using
the Licence Manager to transfer the licence from the Smart Card used for distribution to
the Smart Card fitted to the unit.
10.3 Licence Manager The Licence Manager can be used to:
View licences installed on the unit
Transfer a licence to the unit
Transfer a licence off the unit
The Licence Manager is found on the System - Settings - Licence System - Manager
web page. To view the licence information, press the Read Licences button.

Mobility Division, Traffic Solutions
Sopers Lane, Poole, Dorset, BH17 7ER
Security classification Unrestricted Page 62 of 146
Version 5 Status Released
Last Editor dave.martin Date 07-Dec-2016
Document Name User Interface Handbook Document No. 667/HU/46000/000
Copyright © Siemens plc 2016. All Rights Reserved. Mobility is a division of Siemens Plc
Figure 10-1 - Licence Manager web page with no external reader fitted
10.3.1 Transferring Licences to and from the Equipment
To transfer a licence:
Ensure a Licence Smart Card is fitted to the unit.
Fit a Licence Smart Card into a USB Smart Card reader.
Connect the USB Smart Card reader to the USB port on the front of the CPU Card.
View the Licence Manager web page.
Press the Read Licences button.
Figure 10-2 - Licence Manager web page with external reader fitted
The Currently Installed Licences table shows the licences currently installed in the unit
(contained in the Licence Smart Card fitted to the CPU Card). The example above

Mobility Division, Traffic Solutions
Sopers Lane, Poole, Dorset, BH17 7ER
Security classification Unrestricted Page 63 of 146
Version 5 Status Released
Last Editor dave.martin Date 07-Dec-2016
Document Name User Interface Handbook Document No. 667/HU/46000/000
Copyright © Siemens plc 2016. All Rights Reserved. Mobility is a division of Siemens Plc
shows that the unit currently has two licences installed: Remote Access and a
combined OTU & MOVA licence. Each installed licence has an associated Uninstall
button which can be used to transfer the licence from the unit to the Licence Smart
Card in the external USB Smart Card reader. Pressing this button results in the licence
being removed from the Currently Installed Licences table and added to the Plug-in
Card Reader table and the facility becoming unlicensed.
The Plug-In Card Reader table shows the licences contained in the Licence Smart
Card fitted in the external USB Smart Card Reader. This Licence Smart Card holds a
number of licences. Any of these can be transferred to the unit by pressing the Install
button associated with the licence. In the example above, the unit already has a
Remote Access licence fitted, so transferring this licence to the unit would not enable
any additional facilities (it would just end up with two of the same licence). Transferring
a LwTunnel licence to the unit would permit the lightweight tunnel facility.
When a licence is installed, it is removed from the list of licences held on the Licence
Smart Card in the external USB Smart Card reader and added to the list of currently
installed licences. Once a licence has been installed, the associated facility can be
operated without restriction.
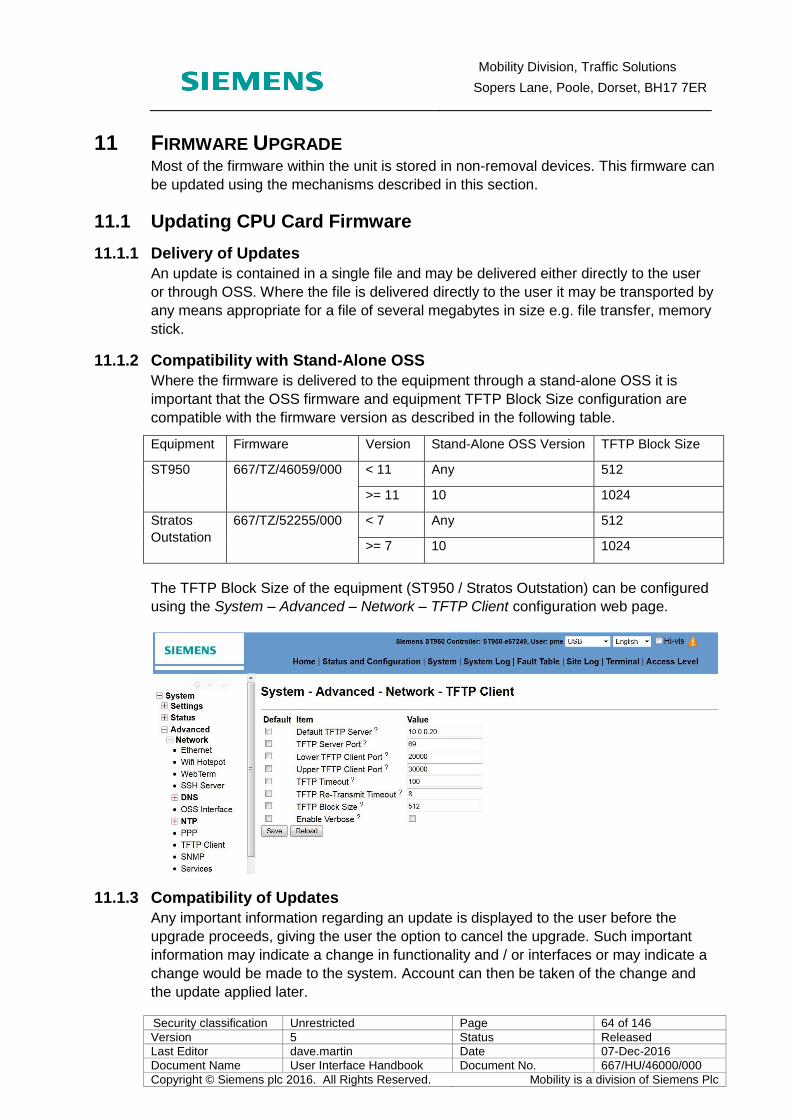
Mobility Division, Traffic Solutions
Sopers Lane, Poole, Dorset, BH17 7ER
Security classification Unrestricted Page 64 of 146
Version 5 Status Released
Last Editor dave.martin Date 07-Dec-2016
Document Name User Interface Handbook Document No. 667/HU/46000/000
Copyright © Siemens plc 2016. All Rights Reserved. Mobility is a division of Siemens Plc
11 FIRMWARE UPGRADE Most of the firmware within the unit is stored in non-removal devices. This firmware can
be updated using the mechanisms described in this section.
11.1 Updating CPU Card Firmware
11.1.1 Delivery of Updates
An update is contained in a single file and may be delivered either directly to the user
or through OSS. Where the file is delivered directly to the user it may be transported by
any means appropriate for a file of several megabytes in size e.g. file transfer, memory
stick.
11.1.2 Compatibility with Stand-Alone OSS
Where the firmware is delivered to the equipment through a stand-alone OSS it is
important that the OSS firmware and equipment TFTP Block Size configuration are
compatible with the firmware version as described in the following table.
Equipment Firmware Version Stand-Alone OSS Version TFTP Block Size
ST950 667/TZ/46059/000 < 11 Any 512
>= 11 10 1024
Stratos
Outstation
667/TZ/52255/000 < 7 Any 512
>= 7 10 1024
The TFTP Block Size of the equipment (ST950 / Stratos Outstation) can be configured
using the System – Advanced – Network – TFTP Client configuration web page.
11.1.3 Compatibility of Updates
Any important information regarding an update is displayed to the user before the
upgrade proceeds, giving the user the option to cancel the upgrade. Such important
information may indicate a change in functionality and / or interfaces or may indicate a
change would be made to the system. Account can then be taken of the change and
the update applied later.

Mobility Division, Traffic Solutions
Sopers Lane, Poole, Dorset, BH17 7ER
Security classification Unrestricted Page 65 of 146
Version 5 Status Released
Last Editor dave.martin Date 07-Dec-2016
Document Name User Interface Handbook Document No. 667/HU/46000/000
Copyright © Siemens plc 2016. All Rights Reserved. Mobility is a division of Siemens Plc
It may not be possible to update from the version for firmware running to the version
desired. This is only likely if the upgrade skips many intermediate firmware versions. In
such cases it will be necessary to perform the upgrade in two or more steps, first going
to intermediate version before going to the final desired version.
11.1.4 Initiating an Update
An update can be initiated through the web interface or the WIZ interface as follows.
Update from OSS using web interface
Visit the System – Upgrade web page. The updates available from OSS are listed under the title “Outstation Support Server – Platform Package Upgrade”.
Click on “Use” next to the required package.
Update from file using web interface
Visit the System – Upgrade web page.
Under the title “File Upgrade”, browse to the location of the file and select the file.
Click on “Start Upgrade”.
Figure 11-1 System - Upgrade web page
Update from OSS using WIZ interface
When using the WIZ interface, the latest update is selected automatically. If an update
other than the latest is required then the web interface should be used.
Type WIZ at the chevron prompt
Press “+” until “Upgrade” appears in the list of available options
Press the number corresponding to “Upgrade”
Press the number corresponding to “OSS”

Mobility Division, Traffic Solutions
Sopers Lane, Poole, Dorset, BH17 7ER
Security classification Unrestricted Page 66 of 146
Version 5 Status Released
Last Editor dave.martin Date 07-Dec-2016
Document Name User Interface Handbook Document No. 667/HU/46000/000
Copyright © Siemens plc 2016. All Rights Reserved. Mobility is a division of Siemens Plc
Update from file using WIZ interface
USB memory sticks formatted with the FAT file system should be used. Encrypted USB memory sticks and those formatted with file systems other than FAT are not supported.
Copy the update file to a USB memory stick. The file should be placed at the top level and not in a subdirectory.
Insert the USB memory stick into the USB port on the front of the CPU card.
Type WIZ at the chevron prompt.
Press “+” until “Upgrade” appears in the list of available options.
Press the number corresponding to “Upgrade”.
Press the number corresponding to “USB Drive”.
Observe that the update files available on the USB memory stick are listed. Pressing ‘+’ and ‘-‘ cycles through the available update files where there are more on the USB memory stick than can be listed on a single WIZ page.
Press the number corresponding to the update file to be used.
Each of these sequences will cause the update to be loaded into the unit and actioned.
There are additional considerations when upgrading the ST950 and these are
described in section 14.7
11.2 Updating GSPI Peripheral Firmware It is possible to update the firmware running in the peripherals connected to the CPU
card via the Generic Serial Peripheral Interface. Time taken to update a peripheral
varies depending on peripheral type but it is typically less than one minute per
peripheral. Operation of the peripherals is stopped during this process so are
unavailable to the unit and its applications for the duration of the upgrade process.
11.2.1 Delivery of Updates
The firmware for the GSPI peripherals is held within the EFC file system and so any
update of unit firmware could contain an update to the firmware for one or more types
of GSPI peripheral. Consult the release information for the firmware update for details
of the changes it contains and the actions which should be taken.
The following procedure can be used if at any time it is necessary to compare the
version of the GSPI peripheral firmware held within the EFC file system with that
currently running in the GSPI peripherals.
Determine the version of firmware running in the GSPI peripherals using the System – Status – Inventory – Firmware web page. The screen shot below shows one GSPI peripheral running 667/TZ/32998/000 issue 4.0 and one GSPI peripheral running 667/TZ/45350/000 issue 3.8.
ST950

Mobility Division, Traffic Solutions
Sopers Lane, Poole, Dorset, BH17 7ER
Security classification Unrestricted Page 67 of 146
Version 5 Status Released
Last Editor dave.martin Date 07-Dec-2016
Document Name User Interface Handbook Document No. 667/HU/46000/000
Copyright © Siemens plc 2016. All Rights Reserved. Mobility is a division of Siemens Plc
Figure 11-2 System - Status - Inventory - Firmware web page
Determine the version of firmware available as an upgrade using the Peripherals – F/W Update web page. The following screen shot shows that firmware upgrade is available for two types of firmware: 667/TZ/32998/000 and 667/TZ/45350/000 at 4.0 and 3.8 respectively.
Figure 11-3 Peripherals - F/W Update web page

Mobility Division, Traffic Solutions
Sopers Lane, Poole, Dorset, BH17 7ER
Security classification Unrestricted Page 68 of 146
Version 5 Status Released
Last Editor dave.martin Date 07-Dec-2016
Document Name User Interface Handbook Document No. 667/HU/46000/000
Copyright © Siemens plc 2016. All Rights Reserved. Mobility is a division of Siemens Plc
11.2.2 Performing An Update
If it is determined that an update is required then the following should be considered
before performing the update:
Is the unit connected such that loss of the GSPI peripherals for a few minutes could cause a problem? An example of what might cause a problem is if IO outputs from the unit are used to control the state of another controller. In such a case it may be that the loss of IO on this unit might cause one or more connected controllers to turn off their signals.
Is the current state of the junction such that the loss of the GSPI peripherals for a few minutes will cause a problem? An example of what might cause a problem is if loss of detector inputs connected to the unit IO makes the controller operation unsuitable for the prevailing traffic conditions.
Is the local power supply currently stable and unlikely to be interrupted? An interruption to the power during a GSPI peripheral update may result in one or more of the GSPI peripherals requiring repair.
When a suitable time for the upgrade has been determined and reached then the
upgrade can be initiated by pressing the “Start” button on the Peripherals – F/W
Update web page. Progress information will be displayed during the upgrade with the
page returning to its initial state a little while after the upgrade completes.
11.2.3 Updating Loadable Packages
Some equipment functionality is provided through loadable packages which can be
updated independently of the main firmware. The primary means of updating a
loadable package is as part of a firmware update (which will always contain the current
version at the time of release) or through Stratos. It is also possible to load a loadable
package through the Advanced configuration web pages.
12 REAL TIME VIEW AND IO STATUS
12.1 Introduction The Real Time View can be used to view I/O events and other state changes in a web
browser as they occur in real time, as event/time Plots. This view is available on the
System – Status menu, and the following events can be monitored against time:
System Parameters, giving a graphical view of the CPU Load, and the 24V logic
supply voltage
System I/O, showing the state of I/O Port Input bits (Active/Inactive)
Controller I/O, showing the state of the Detector bits (Active/Inactive)
Phases, giving a graphical representation of the phase state as the aspects
change
The Peripherals menu also offers a view of the state of the System I/O Input bits, via
the Real Time IO Status View.
The Real Time View is also available under the Controller – I/O menu.
ST950
ST950
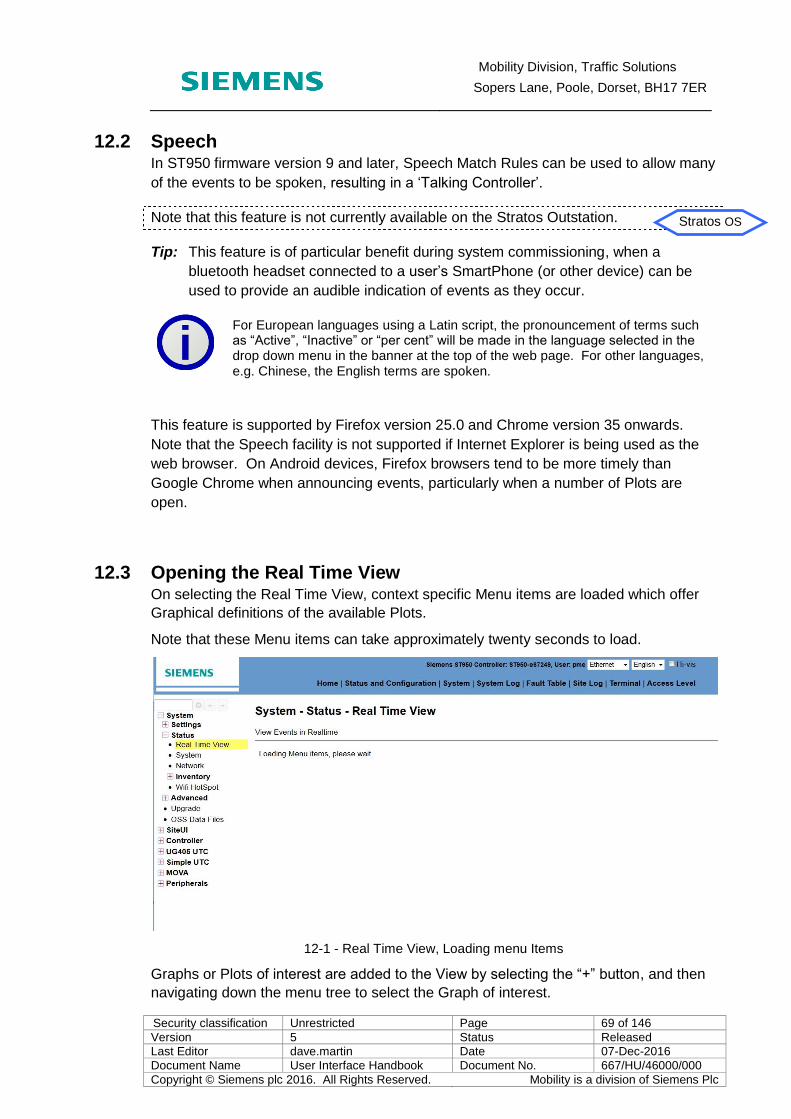
Mobility Division, Traffic Solutions
Sopers Lane, Poole, Dorset, BH17 7ER
Security classification Unrestricted Page 69 of 146
Version 5 Status Released
Last Editor dave.martin Date 07-Dec-2016
Document Name User Interface Handbook Document No. 667/HU/46000/000
Copyright © Siemens plc 2016. All Rights Reserved. Mobility is a division of Siemens Plc
12.2 Speech In ST950 firmware version 9 and later, Speech Match Rules can be used to allow many
of the events to be spoken, resulting in a ‘Talking Controller’.
Note that this feature is not currently available on the Stratos Outstation.
Tip: This feature is of particular benefit during system commissioning, when a
bluetooth headset connected to a user’s SmartPhone (or other device) can be
used to provide an audible indication of events as they occur.
For European languages using a Latin script, the pronouncement of terms such as “Active”, “Inactive” or “per cent” will be made in the language selected in the drop down menu in the banner at the top of the web page. For other languages, e.g. Chinese, the English terms are spoken.
This feature is supported by Firefox version 25.0 and Chrome version 35 onwards.
Note that the Speech facility is not supported if Internet Explorer is being used as the
web browser. On Android devices, Firefox browsers tend to be more timely than
Google Chrome when announcing events, particularly when a number of Plots are
open.
12.3 Opening the Real Time View On selecting the Real Time View, context specific Menu items are loaded which offer
Graphical definitions of the available Plots.
Note that these Menu items can take approximately twenty seconds to load.
12-1 - Real Time View, Loading menu Items
Graphs or Plots of interest are added to the View by selecting the “+” button, and then
navigating down the menu tree to select the Graph of interest.
Stratos OS

Mobility Division, Traffic Solutions
Sopers Lane, Poole, Dorset, BH17 7ER
Security classification Unrestricted Page 70 of 146
Version 5 Status Released
Last Editor dave.martin Date 07-Dec-2016
Document Name User Interface Handbook Document No. 667/HU/46000/000
Copyright © Siemens plc 2016. All Rights Reserved. Mobility is a division of Siemens Plc
12-2 - Add new Graph window
On selecting a Graph, the Add new Graph window is closed and an additional Plot is
added to the Real Time View, with current time scaled appropriately on the x-axis and
the Event value/state represented on the y-axis. The web browser stores the historic
data for display in the Real Time View.
The button can be used to close the Add new Graph window if no plot is selected.
12-3 - Additional Plot Added
Tip: There is no limitation on the number of Plots which can be added. However,
browser performance and usability may be affected by the number of Plots
currently open.

Mobility Division, Traffic Solutions
Sopers Lane, Poole, Dorset, BH17 7ER
Security classification Unrestricted Page 71 of 146
Version 5 Status Released
Last Editor dave.martin Date 07-Dec-2016
Document Name User Interface Handbook Document No. 667/HU/46000/000
Copyright © Siemens plc 2016. All Rights Reserved. Mobility is a division of Siemens Plc
Tip: It is recommended that the Real Time View Is opened from the Status and
Configuration menu in a new web browser tab or instance. This will avoid
inadvertently navigating away from the Real Time View and losing the Plots,
when other web pages are being accessed.

Mobility Division, Traffic Solutions
Sopers Lane, Poole, Dorset, BH17 7ER
Security classification Unrestricted Page 72 of 146
Version 5 Status Released
Last Editor dave.martin Date 07-Dec-2016
Document Name User Interface Handbook Document No. 667/HU/46000/000
Copyright © Siemens plc 2016. All Rights Reserved. Mobility is a division of Siemens Plc
12.4 Plot Settings and Controls The settings and controls for each Plot are provided by a column of buttons appearing
to the left of the y-axis, if supported by the particular Plot and web browser being used.
Selecting this button closes the Plot
This button opens the Plot Settings window, which defines the manner in
which the ‘Talking Controller’ announces event changes for this particular Plot.
This icon indicates that Speech output is disabled. Speech can be enabled
by pressing this button, at which time the icon is displayed. The browser
will then announce Event/state changes as they occur, according to the Plot
Settings window. Note that there may be a small delay between activating the
speech icon and the speech starting to be announced.
Selecting this results in the Plot displaying current data. This button is
displayed after zooming or scrolling to show historic data.
The displayed Plot data can be horizontally scrolled to show previously displayed data
by selecting and dragging across the Plot window. If a mouse is being used, left-clicks
can be used to zoom in, or scrolling with a mouse wheel can be used to rescale the x-
axis. Note that Pinch zoom behaviour on touch screen devices to re-scale the x-axis is
currently not supported.
12.4.1 Plot Settings Window
This window defines the Rules by which the ‘Talking Controller’ announces event
changes for each Plot, in terms of Speech Match Rules and the Speech Output
Override. Note that the Speech match rules are specific to each type of Graph.
The Speech Match Rules define how and when events are to be spoken, and are
applied to the events in top-down order. Multiple Rules can be selected, which may
result in multiple announcements of the same event.
Each plot has a default spoken expression. The Speech Output Override can be used
to specify an alternative expression, which will be announced for each matching rule.
Changes to the Plot Settings window are effective as soon as they are made.
Use the button to close the Settings window.
12-4 - Plot Settings Window

Mobility Division, Traffic Solutions
Sopers Lane, Poole, Dorset, BH17 7ER
Security classification Unrestricted Page 73 of 146
Version 5 Status Released
Last Editor dave.martin Date 07-Dec-2016
Document Name User Interface Handbook Document No. 667/HU/46000/000
Copyright © Siemens plc 2016. All Rights Reserved. Mobility is a division of Siemens Plc
12.5 Real Time Graph Types The following Graph Types are supported, and Plots for any type of Graph can be
opened on the Real Time View in any order.
Tip: Plots can be vertically rearranged within the View by selecting and dragging to
the desired location.
The Controller I/O and Phases groups are described in section 14.9.
12.5.1 System Parameters
The CPU Load can be displayed as a plot against various time-bases, ranging from a
ten second view to one week. If speech is enabled and the default Speech match
Rules used, the browser will announce the CPU Load value as it changes.
Under normal operating conditions the CPU Load may reach 100%, e.g. when
background activities are running or user interfaces are open, and this is not a cause
for concern.
12-5 - CPU Load, Speech Match Rules, with Speech Output Override set for one Plot
The 24V Line logic supply voltage can be displayed as a plot against various time
bases. Note that only the display of values for 24V Line plots is supported, speech
cannot be enabled.
ST950

Mobility Division, Traffic Solutions
Sopers Lane, Poole, Dorset, BH17 7ER
Security classification Unrestricted Page 74 of 146
Version 5 Status Released
Last Editor dave.martin Date 07-Dec-2016
Document Name User Interface Handbook Document No. 667/HU/46000/000
Copyright © Siemens plc 2016. All Rights Reserved. Mobility is a division of Siemens Plc
12.5.2 System I/O
These plots can be used to monitor the I/O at a System Communications level.
An Active bit state (i.e. System I/O Bit at state 1) is indicated by the Plot line going high.
An Inactive bit state (i.e. System I/O Bit at state 0) is indicated by the Plot line going
low.
The Speech Match Rules are set by default to allow the Name of a Bit to be announced
when it goes Active.
12-6 - System I/O, Speech Match Rules
The “Input Going Active” and/or “Input Going Inactive” rules can be specified to
announce “Active” or “Inactive” when the state of the Port Bit changes, and this is
announced after any speech which matches earlier rules.
Tip: With an ST950 controller it is easier to locate and identify controller detectors
using the dedicated ‘Controller I/O’ group (section 14.9.1), rather than this
generic ‘System I/O’ group.
ST950

Mobility Division, Traffic Solutions
Sopers Lane, Poole, Dorset, BH17 7ER
Security classification Unrestricted Page 75 of 146
Version 5 Status Released
Last Editor dave.martin Date 07-Dec-2016
Document Name User Interface Handbook Document No. 667/HU/46000/000
Copyright © Siemens plc 2016. All Rights Reserved. Mobility is a division of Siemens Plc
13 LANGUAGE Alternative languages are supported through loading and selecting "language packs".
The selected language is used for the web and handset interfaces. It is important to
ensure that the unit and software used to access these interfaces is capable of
displaying the characters used by the chosen language. Non ASCII characters are not
supported on the 25 way RS232 port.
Note that a change of language only affects items created after the language change;
the language of some items such as historic system log entries is not affected.
13.1 Loading Language Packs Language packs are loaded through the System - Settings - Language - Packs web
page.
Figure 13-1 - Loading Language Pack
The language packs which are currently loaded are listed and additional packs can be
loaded as follows:
Press the "Add Row" button to add an additional row to the table
Press the "Browse" button on the appropriate row and navigate to and select the required language pack
Press the "Save" button

Mobility Division, Traffic Solutions
Sopers Lane, Poole, Dorset, BH17 7ER
Security classification Unrestricted Page 76 of 146
Version 5 Status Released
Last Editor dave.martin Date 07-Dec-2016
Document Name User Interface Handbook Document No. 667/HU/46000/000
Copyright © Siemens plc 2016. All Rights Reserved. Mobility is a division of Siemens Plc
13.2 Selecting Language The languages available can be viewed and selected using the drop down menu in the
banner at the top of the web page. This field only appears if alternate languages are
available.
Figure 13-2 - Language Selection

Mobility Division, Traffic Solutions
Sopers Lane, Poole, Dorset, BH17 7ER
Security classification Unrestricted Page 77 of 146
Version 5 Status Released
Last Editor dave.martin Date 07-Dec-2016
Document Name User Interface Handbook Document No. 667/HU/46000/000
Copyright © Siemens plc 2016. All Rights Reserved. Mobility is a division of Siemens Plc
14 ST950 CONTROLLER SPECIFIC FEATURES
14.1 ST950 Indicators LEDs are located on the front of the Processor Card and immediately behind the
handset port. These are used to convey controller operational states and other
information to the user.
14.1.1 Front of Processor Card
There are nine LEDs on the front of the Processor Card as shown below (viewed from
the front of the Processor Card).
The function of each LED is described below.
WD – Watchdog (Red)
Illuminated when the Primary CPU is not running or an internal fault has been detected.
HB – Heartbeat (Green)
Heartbeat flash: Primary CPU software is operating normally.
Slowly flash (once per second): Controller self test.
Fast flash (several times per second): Non normal operation e.g. startup.
SE - System Error (Red)
Permanently on: Fault is present, e.g. one or more entries present in the Fault Table.
Slow flash with Heartbeat LED flashing in a heartbeat pattern: Reserve State
Fast flash with Heartbeat LED flashing in a heartbeat pattern: Reserve State is latched; manual reset required.
Fast flash with fast flash Heartbeat LED: Fault with the Primary CPU, e.g. self test fault found.
Fast flash at power-up with the Heartbeat LED not flashing: RTC faulty, e.g. backup support expired.
SD – Shutdown (Red)
Illuminated when the controller is in the Shutdown Mode i.e. signals are not being
controlled.
FF – Fail Flash (Yellow)
Flashes when hardware fail flash is active.
PRG – Program (Blue)
Flashes to indicate programming of an IC4 configuration or new firmware is pending or
in progress.
Single pulse:
IC4 configuration available for programming.
WD HB SE SD FF PRG SYS COM BSY
BSYBSY

Mobility Division, Traffic Solutions
Sopers Lane, Poole, Dorset, BH17 7ER
Security classification Unrestricted Page 78 of 146
Version 5 Status Released
Last Editor dave.martin Date 07-Dec-2016
Document Name User Interface Handbook Document No. 667/HU/46000/000
Copyright © Siemens plc 2016. All Rights Reserved. Mobility is a division of Siemens Plc
Double pulse:
Firmware upgrade available.
Heart restore pending.
Wipe request pending.
Fast flash: Programming in progress.
Solid on: Programming complete, power cycle required.
SYS – System (Green)
Flashes to indicate status.
Slow flash: Normal operation.
Medium flash: Normal operation, Fault present.
Very fast flash: Restricted mode.
COM – Communications (Green)
On: Under UTC control, pulses off indicate receipt of messages.
Off: Not under UTC control, pulses on indicate receipt of messages.
BSY – Busy (Red)
Flashes to indicate the system is busy performing an operation that must not be
interrupted, for example start up, upgrade, USB "memory stick" style interface is busy.
Do not remove USB device or switch off the controller while this LED is flashing.
14.1.2 Behind Handset Connector
There is a pair of multicolour LEDs behind the handset connector are as shown below
(viewed from the front of the Processor Card).
The function of each LED is described below.
SEC – SEC Status
Green flash, long on, short off: Awaiting start request from Primary
Green flash, equal on and off: Normal operation
Green flash, short on, long off: Shutdown
Red: SEC requested controller shutdown
FF – Fail Flash Status
Green flash, equal on and off: Normal operation
SEC FF

Mobility Division, Traffic Solutions
Sopers Lane, Poole, Dorset, BH17 7ER
Security classification Unrestricted Page 79 of 146
Version 5 Status Released
Last Editor dave.martin Date 07-Dec-2016
Document Name User Interface Handbook Document No. 667/HU/46000/000
Copyright © Siemens plc 2016. All Rights Reserved. Mobility is a division of Siemens Plc
14.2 ST950 Controller Handset Interface The controller handset interface is available directly through the 25 way RS232 port
and by virtual terminal connection via the USB handset port, Ethernet port and WiFi
hotspot.
The controller handset interface commands are described in 667/HH/46000/000.
14.2.1 ST950 Handset Virtual Terminal
When using a virtual terminal connection there are several means available for
connection:
IP Port 22 (standard SSH port). This connects to the GVP handset port where the command XXC can be used to switch to the Controller handset port. SSH gives greater security and provides support for languages using characters other than those in the ASCII character set. This port is enabled by default from version 6 onwards of the firmware package. This port is disabled when the Stratos profile is selected (section 16.1.1).
IP Port 23 (standard telnet port). This connects to the GVP handset port where the command XXC can be used to switch to the Controller handset port. This port is enabled by default in version 5 and earlier of the firmware package. It is blocked by default in version 6 and later of the firmware package, but can be unblocked through the System - Advanced - Network - Telnet Server web page. This port is disabled when the Stratos profile is selected (section 16.1.1).
User defined IP port (default 60023). When enabled this connects directly to the Controller handset port. This port can be enabled and the port number defined through the Controller – Advanced Status and Configuration web page.
Web interface web terminal (section 4.10). This connects to the GVP handset port where the command XXC can be used to switch to the Controller handset port.
14.2.2 ST950 Handset RS232 Port
The RS232 interface provides automatic baud rate detection for 1200, 9600 and 19200
Baud and uses full RS232 handshaking to control data flow. The default RS232
parameters are 1200 Baud, 7 Bits, 1 Stop Bit, Even Parity. Other baud rates are
detected when the user first plugs the handset device in and issues a number of
Carriage Return characters. When the controller has recognized the baud rate it will
provide the prompt:
Siemens
>
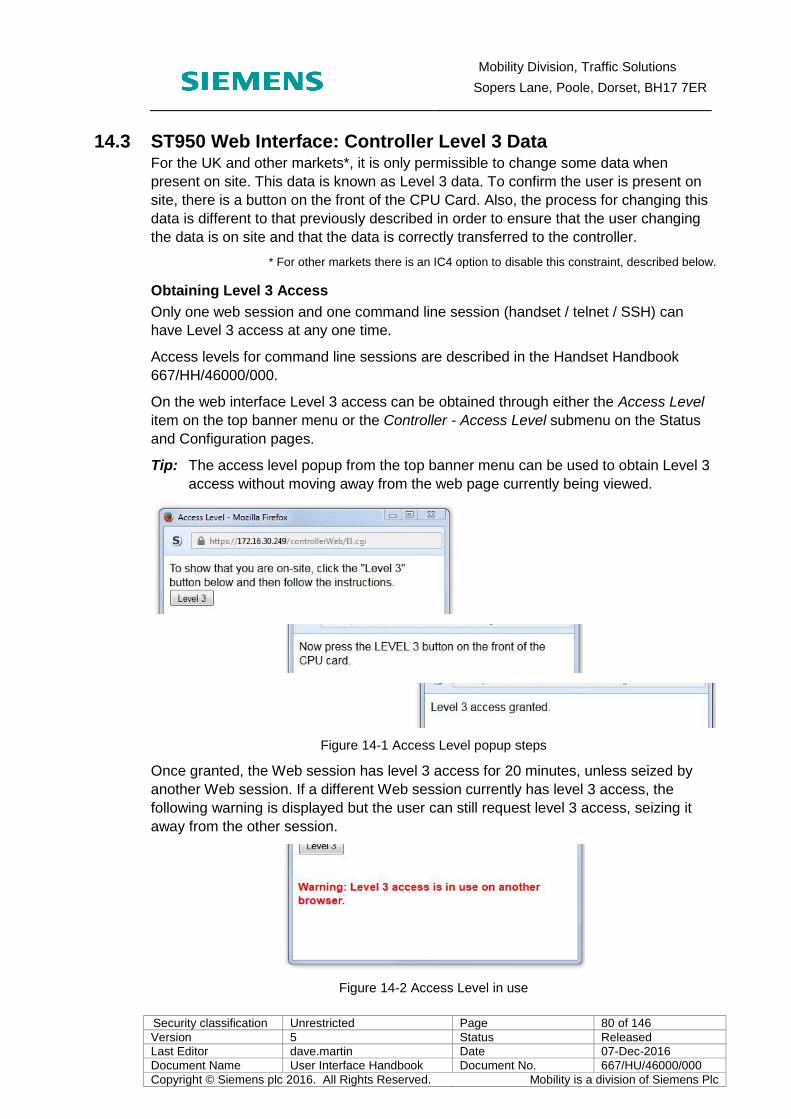
Mobility Division, Traffic Solutions
Sopers Lane, Poole, Dorset, BH17 7ER
Security classification Unrestricted Page 80 of 146
Version 5 Status Released
Last Editor dave.martin Date 07-Dec-2016
Document Name User Interface Handbook Document No. 667/HU/46000/000
Copyright © Siemens plc 2016. All Rights Reserved. Mobility is a division of Siemens Plc
14.3 ST950 Web Interface: Controller Level 3 Data For the UK and other markets*, it is only permissible to change some data when
present on site. This data is known as Level 3 data. To confirm the user is present on
site, there is a button on the front of the CPU Card. Also, the process for changing this
data is different to that previously described in order to ensure that the user changing
the data is on site and that the data is correctly transferred to the controller.
* For other markets there is an IC4 option to disable this constraint, described below.
Obtaining Level 3 Access
Only one web session and one command line session (handset / telnet / SSH) can
have Level 3 access at any one time.
Access levels for command line sessions are described in the Handset Handbook
667/HH/46000/000.
On the web interface Level 3 access can be obtained through either the Access Level
item on the top banner menu or the Controller - Access Level submenu on the Status
and Configuration pages.
Tip: The access level popup from the top banner menu can be used to obtain Level 3
access without moving away from the web page currently being viewed.
Figure 14-1 Access Level popup steps
Once granted, the Web session has level 3 access for 20 minutes, unless seized by
another Web session. If a different Web session currently has level 3 access, the
following warning is displayed but the user can still request level 3 access, seizing it
away from the other session.
Figure 14-2 Access Level in use

Mobility Division, Traffic Solutions
Sopers Lane, Poole, Dorset, BH17 7ER
Security classification Unrestricted Page 81 of 146
Version 5 Status Released
Last Editor dave.martin Date 07-Dec-2016
Document Name User Interface Handbook Document No. 667/HU/46000/000
Copyright © Siemens plc 2016. All Rights Reserved. Mobility is a division of Siemens Plc
For Non-UK markets, web session Level-3 access can be obtained remotely by
enabling the ‘Download To Level 3’ option in the IC4 Configuration. With this
configuration option selected, Level-3 access is now granted when requested through
the web interface – the user does not need to press the button the front of the CPU
Card.
Figure 14-3 Access Level in use
Changing Level 3 Data
Until Level 3 access is obtained, it is not possible to change any Level 3 data on a web
page (non Level 3 data can be changed in the usual manner). If a web page containing
Level 3 data is viewed without Level 3 access then a message is displayed to indicate
that there is data which cannot be changed and those items which cannot be changed
are shown in a bold font (as highlighted in the image below).
Figure 14-4 - User does not have Level 3 access
After obtaining Level 3 access the Level 3 data is shown in a text entry box and the
Save button is changed to a Submit button. (If Level 3 access is obtained while viewing
a page then it may be necessary to press the Reload button to refresh the page and so
display the text entry boxes.)
Figure 14-5 View of web page containing editable Level 3 items

Mobility Division, Traffic Solutions
Sopers Lane, Poole, Dorset, BH17 7ER
Security classification Unrestricted Page 82 of 146
Version 5 Status Released
Last Editor dave.martin Date 07-Dec-2016
Document Name User Interface Handbook Document No. 667/HU/46000/000
Copyright © Siemens plc 2016. All Rights Reserved. Mobility is a division of Siemens Plc
It is now possible to enter new values for the Level 3 items and changes are shown
highlighted.
Figure 14-6 Level 3 items changes ready for submission
Updates to the page now undergo a two-stage submission process to ensure that the
data is changed as the user intends. This process is initiated by pressing the Submit
button. This causes a confirmation page to be displayed.
Figure 14-7 Confirmation page for Level 3 item changes
The changes are shown in bold and can be reviewed to ensure that they are as
desired. The Confirm button can be pressed to accept the changes. To discard the
changes and return to the current values press the Reload button.
Mobility Division, Traffic Solutions
Sopers Lane, Poole, Dorset, BH17 7ER
Security classification Unrestricted Page 83 of 146
Version 5 Status Released
Last Editor dave.martin Date 07-Dec-2016
Document Name User Interface Handbook Document No. 667/HU/46000/000
Copyright © Siemens plc 2016. All Rights Reserved. Mobility is a division of Siemens Plc
14.4 ST950 Web Interface: Status & Configuration Web Pages
14.4.1 Status & Configuration - SiteUI
A live site map is supported through the web pages found under the SiteUI menu item
(available in version 9 onwards), presenting the status of key items (Features), such as
phases and detectors, in real time: see section 14.8 for further details.
View Map - opens the Site UI diagram. Also allows the representation and
location of the Features to be modified to better reflect site operation.
Initialisation – data for the Site UI diagram can be configured from the IC4
Emulator tool output using this web page
Feature List – the Features (objects) represented on the Site UI diagram are
listed, and can also be modified via this page.
14.4.2 Status & Configuration – Controller
Configuration and monitoring of the controller functionality is performed through the
web pages found under the Controller menu item of Status and Configuration.
Access Level
Level 3 access is obtained by pressing the Level 3 button on this page followed by the
Level 3 button on the controller Processor Card. Only one user session is permitted to
have Level 3 access at any one time. This menu option provides the same functionality
as the Access Level option on the top banner menu, but without using a pop-up
window.
IC4 Config
Details of IC4 configuration currently in use.
Import Config - load an IC4 configuration
All Red
Monitor & configure the All Red facility
Call / Cancel
Monitor and configure the Call / Cancel facility
CLF
Monitor and configure the Cable-less Linking Facility
Plans – For each Plan accessing the configured cycle time, offset, entry and exit times, Smooth CLF options, and the selected Influence set.
Plan Times – One page per Plan accessing the group times for the Plan.
Influences – One page per Influence Set, allowing the functions and stages of each group (step) of each set (plan) to changed. Note that one Influence Set may be being used by more than one CLF Plan.
Status – view the current status of CLF mode, showing the current Plan and cycle time for example.
Groups – shows the group active on each stream, and the time remaining for that group.
Mobility Division, Traffic Solutions
Sopers Lane, Poole, Dorset, BH17 7ER
Security classification Unrestricted Page 84 of 146
Version 5 Status Released
Last Editor dave.martin Date 07-Dec-2016
Document Name User Interface Handbook Document No. 667/HU/46000/000
Copyright © Siemens plc 2016. All Rights Reserved. Mobility is a division of Siemens Plc
Clocks
There are two clocks within the system:
System - used for non-controller applications
Controller - used by the controller application
These clocks can run independently or be joined together to match the way in which
the controller is being used. This relationship between the clocks is called the Time
Mode. There are three options for Time Mode, used as follows:
System Time - controller clock is synchronised to system clock. Use this mode where NTP or GPS is providing the source of time to the system and synchronisation to other controllers (e.g. for CLF) is not required.
Controller Time - system clock is synchronised to the controller clock. Use this mode where there is no NTP or GPS time source and the system is to generate its own time (usually mains synchronised).
Dual Time - system and controller clocks keep independent time. Use this mode where the system must be synchronised to NTP or GPS but the controller needs to be synchronised to other controllers e.g. to support CLF.
Faults
Allows remote reboot and management of detector faults.
Remote reboot allows the controller to be recovered from a shutdown but only under
strict conditions:
The controller is shutdown
The feature is permitted by a hardware link fitted on the Processor Card
The controller has been running for at least ten minutes
There has not been a previous unsuccessful remote reboot attempt
The correct Remote Reboot Code is provided
Fixed Time
Standard – view the fixed time configuration and update the stage times.
Linked – view the combination of stages across the streams for each step and update the step times.
Heart
Ownership - The Heart must be associated with the controller before the signals can be illuminated. The process of associating the Heart with the controller is known as ownership. This page displays the ownership status and if not owned, provides the means to initiate ownership. By owning the Heart, it allows the system to detect when the CPU PCB (or Heart SD Card) is changed.
Backup & Restore - The system periodically saves a snapshot of the system software and configuration to the Heart. This snapshot is known as a Restore Point. Each snapshot updates the latest Restore Point. The latest Restore Point may be saved so it no longer gets overwritten. This makes it a retained Restore Point. This page lists the restore points which are present on the Heart and provides options to:

Mobility Division, Traffic Solutions
Sopers Lane, Poole, Dorset, BH17 7ER
Security classification Unrestricted Page 85 of 146
Version 5 Status Released
Last Editor dave.martin Date 07-Dec-2016
Document Name User Interface Handbook Document No. 667/HU/46000/000
Copyright © Siemens plc 2016. All Rights Reserved. Mobility is a division of Siemens Plc
Create a latest Restore Point if one doesn't already exist
Operations on latest Restore Point:
Restore - initiate the restore from Heart process which replaces the software and configuration currently in the controller with that stored in the latest Restore Point
Delete - delete the latest Restore Point
Refresh - generate a new Restore Point and overwrite the latest restore point
Retain - move the Restore Point to the list of retained restore points
Operations on retained Restore Point:
Restore - initiate the restore from Heart process which replaces the software and configuration currently in the controller with that stored in this retained Restore Point
Delete - delete this retained Restore Point
Hurry Call
Review and update the delay, hold and prevent times for each of the Hurry Call units.
I/O
Lines - view and update the IO states
Faults - view and update the IO fault action
Allocation - view and update the IO allocation
Ports - view the IO port states
Cards - view and update the IO cards required
DFM Groups - view and update the DFM group timings
U / D - view and update uni-directional loops
Real Time View - view I/O and other events in real time (sections 12 and 14.9)
LMU
General - view and update general lamp monitoring parameters
Reset/Learning - request full lamp monitor reset and monitor overall learning
RLM Faults - trigger a recheck of Red Lamp Monitor faults that have extinguished the signals (KRD=1)
Sensors - view and update the sensors’ configuration, including the selection of Load Types and Last Lamp profiles.
Readings - monitor the lamp monitor status of the various sensors, including whether a Lamp Fault has been detected.
Last Lamp - Profiles - configuration of Last Lamp Monitoring
Last Lamp - Status - view live currents, thresholds and fault indications
LRT
General Timing
Prepare Actions
Advance Actions
Compensation Times

Mobility Division, Traffic Solutions
Sopers Lane, Poole, Dorset, BH17 7ER
Security classification Unrestricted Page 86 of 146
Version 5 Status Released
Last Editor dave.martin Date 07-Dec-2016
Document Name User Interface Handbook Document No. 667/HU/46000/000
Copyright © Siemens plc 2016. All Rights Reserved. Mobility is a division of Siemens Plc
Status
Misc
Enable / disable the mimic LEDs (ELV only) and manual mode.
MOVA mode
Pedestrian
RLM - number of Red Lamp Monitor channels on each stand-alone stream
Phase - pedestrian demand and clearance times
Standalone - overall options for stand-alone pedestrian controllers
Streams - settings for individual stand-alone pedestrian streams, including the pedestrian all-red (PAR) periods and pelican intergreen times (PIT).
Linking - PV1 and PV settings
Phase Delay
View and update the delays applied to phases when moving between stages.
Phases
Times - view and update the various phase timings (minimums, maximums, etc)
Status - monitor the current status of the phases (and streams)
Intergreen - view and update phase intergreen timings
Intergreen Matrix - view a matrix showing the intergreen timings between all phases
Intergreen Delays - view the configuration and adjust the timings
Lamp Test - illuminate single aspects during testing and commissioning
Priority
View and update the [Bus] Priority and Emergency Vehicle facility.
General – demand enable/disable, monitoring and reversion
Times – delay, extension, inhibit, maximum times
Inhibit – interaction between units
VA – demands from the street to be allowed or ‘enforced’ (introduced).
Special Conditioning
Always refer to the site-specific information (e.g. IC4 print-out) to determine what
Special Conditioning features, faults and timers are provided.
Facilities – enable/disable conditioning facilities (CFE)
Faults – view the state of the various conditioning fault flags
Timers – view and adjust the conditioning time periodsSDE / SA
Assessors – monitor the counts and speed detected by the SDE / SA assessors
Phases – monitor this influence of SDE / SA on the controller activity
Stages
Settings – review and update general stage related configuration
Mobility Division, Traffic Solutions
Sopers Lane, Poole, Dorset, BH17 7ER
Security classification Unrestricted Page 87 of 146
Version 5 Status Released
Last Editor dave.martin Date 07-Dec-2016
Document Name User Interface Handbook Document No. 667/HU/46000/000
Copyright © Siemens plc 2016. All Rights Reserved. Mobility is a division of Siemens Plc
Window Times – limit when ‘Type 3’ demand-dependant phases can appear in each stage
Supply
Monitor and configure mains power supply and dimming.
Timetable
Special Day
Special Holiday
Time Switch
UTC Mode
UTC mode settings, such as force bit watchdog and max green/window time operation.
Advanced
Configure for unusual circumstances. Only modify these settings if explicitly requested
by Siemens Poole.
Wipe Config
Wipe the system of all stored configuration and log information – return to factory
settings.
14.4.3 Status & Configuration – UTMC RM
Network
View and configure the network settings for UTMC Remote Monitoring.
Poll Rates
View and configure the frequency at which states are monitored in order to detect
changes that trigger Inform Notification Events.
MOVA
If MOVA isn’t used or there is a one-to-one mapping between Controller streams and
the MOVA Applications (e.g. MOVA1 controls Stream 0 through to MOVA4 controlling
Stream 3) then this page can be ignored. However, if the mapping is different use this
page to map MOVA status information for each MOVA Application to the correct
controller stream information in the RM-MIB.
I/O Mapping
View and configure the I/O mapping setting for UTMC Remote Monitoring.

Mobility Division, Traffic Solutions
Sopers Lane, Poole, Dorset, BH17 7ER
Security classification Unrestricted Page 88 of 146
Version 5 Status Released
Last Editor dave.martin Date 07-Dec-2016
Document Name User Interface Handbook Document No. 667/HU/46000/000
Copyright © Siemens plc 2016. All Rights Reserved. Mobility is a division of Siemens Plc
14.5 ST950 Loading An IC4 Configuration An IC4 configuration can be loaded into the controller using either the web interface or
the WIZ command. In both cases the controller assesses the difference between the
configuration currently running and that being loaded and will either perform a full
initialisation or a Quiet Initialisation.
Before loading a new IC4 Configuration, remember that even a Quiet Initialisation will
still ‘initialise’ the controller. Loading a new IC4 configuration...
Will erase any changes made to handset alterable controller timings and
settings. Consider using the IC4 View Differences facility to detect differences
between these settings in the controller and the IC4 configuration.
Will clear any controller fault indications. Check the Fault Table before
proceeding.
May also reset the Lamp Monitor, which will automatically start learning. After
the configuration has been loaded, check all lamps are working and learning
completes correctly.
When a new IC4 configuration is loaded, an entry is automatically added to the Site
Log, see section 4.9. These log entries include the imported IC4 configuration files as
attachments, which can be accessed by selecting the Attachment name in the Site Log,
or as part of the Export of site information, see section 9.
14.5.1 Delivery of IC4 Configuration
In all cases the IC4 configuration is delivered to the controller in the form of an 8ZP file
generated by IC4. The means of transporting this to the controller depends on whether
the web interface or WIZ is to be used to load the configuration into the controller.
Where the web interface is to be used the 8ZP file can be stored at any location that the device displaying the web pages has access to.
Where WIZ is to be used the 8ZP file must be stored on a USB memory stick.
14.5.2 Initiation of IC4 Configuration Update Using the Web Interface
Acquire Level 3 Access
Level 3 access can be obtained using either the Access Level option on the web page
banner or the Controller - Access Level web page.
Specify the file to be loaded
View the Controller - IC4 Config - Import Config web page, click on the Browse button
and navigate to the 8ZP file to be loaded then press the Submit button.

Mobility Division, Traffic Solutions
Sopers Lane, Poole, Dorset, BH17 7ER
Security classification Unrestricted Page 89 of 146
Version 5 Status Released
Last Editor dave.martin Date 07-Dec-2016
Document Name User Interface Handbook Document No. 667/HU/46000/000
Copyright © Siemens plc 2016. All Rights Reserved. Mobility is a division of Siemens Plc
Figure 14-8 Web page to select IC4 8ZP file for loading
Review the changes
The configuration currently in use and that to be loaded is displayed. If the change is as
desired then press the Import Configuration button.
Figure 14-9 Web page to confirm import of IC4 configuration
Implement the change
The updated 8ZP file has now been loaded onto the controller file system but has not
yet been implemented. At this point the controller checks to determine whether or not
the change can be implemented by Quiet Initialisation. A web page appropriate to what
is found is displayed.

Mobility Division, Traffic Solutions
Sopers Lane, Poole, Dorset, BH17 7ER
Security classification Unrestricted Page 90 of 146
Version 5 Status Released
Last Editor dave.martin Date 07-Dec-2016
Document Name User Interface Handbook Document No. 667/HU/46000/000
Copyright © Siemens plc 2016. All Rights Reserved. Mobility is a division of Siemens Plc
14.5.3 Implementation by Quiet Initialisation
Quiet Initialisation is possible, press the OK button to start the procedure. Access to the
web pages will be interrupted while the controller reboots.
Important: Although many controllers will be configured with a Reserve
State that keeps the traffic signals illuminated and cycling in Fixed Time
mode, Reserve State can be configured to extinguish the signals in a
controlled manner – check the IC4 Printout.
Figure 14-10 Web page to start Quiet Initialisation
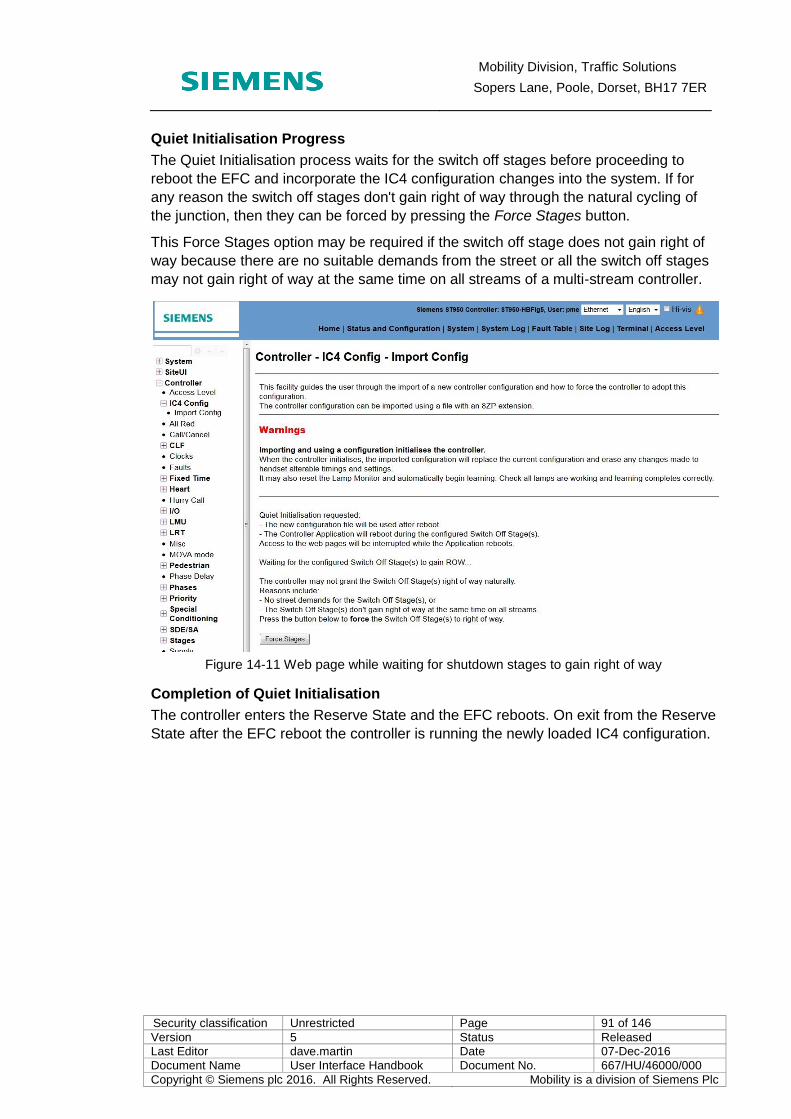
Mobility Division, Traffic Solutions
Sopers Lane, Poole, Dorset, BH17 7ER
Security classification Unrestricted Page 91 of 146
Version 5 Status Released
Last Editor dave.martin Date 07-Dec-2016
Document Name User Interface Handbook Document No. 667/HU/46000/000
Copyright © Siemens plc 2016. All Rights Reserved. Mobility is a division of Siemens Plc
Quiet Initialisation Progress
The Quiet Initialisation process waits for the switch off stages before proceeding to
reboot the EFC and incorporate the IC4 configuration changes into the system. If for
any reason the switch off stages don't gain right of way through the natural cycling of
the junction, then they can be forced by pressing the Force Stages button.
This Force Stages option may be required if the switch off stage does not gain right of
way because there are no suitable demands from the street or all the switch off stages
may not gain right of way at the same time on all streams of a multi-stream controller.
Figure 14-11 Web page while waiting for shutdown stages to gain right of way
Completion of Quiet Initialisation
The controller enters the Reserve State and the EFC reboots. On exit from the Reserve
State after the EFC reboot the controller is running the newly loaded IC4 configuration.
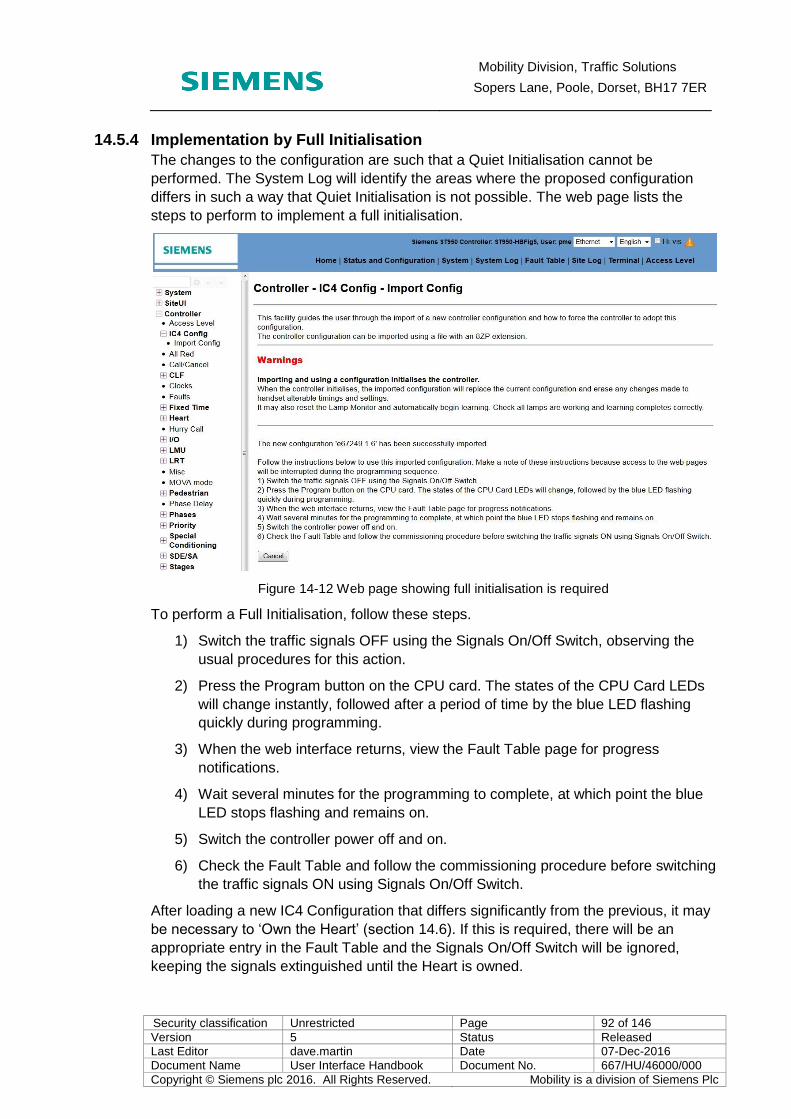
Mobility Division, Traffic Solutions
Sopers Lane, Poole, Dorset, BH17 7ER
Security classification Unrestricted Page 92 of 146
Version 5 Status Released
Last Editor dave.martin Date 07-Dec-2016
Document Name User Interface Handbook Document No. 667/HU/46000/000
Copyright © Siemens plc 2016. All Rights Reserved. Mobility is a division of Siemens Plc
14.5.4 Implementation by Full Initialisation
The changes to the configuration are such that a Quiet Initialisation cannot be
performed. The System Log will identify the areas where the proposed configuration
differs in such a way that Quiet Initialisation is not possible. The web page lists the
steps to perform to implement a full initialisation.
Figure 14-12 Web page showing full initialisation is required
To perform a Full Initialisation, follow these steps.
1) Switch the traffic signals OFF using the Signals On/Off Switch, observing the
usual procedures for this action.
2) Press the Program button on the CPU card. The states of the CPU Card LEDs
will change instantly, followed after a period of time by the blue LED flashing
quickly during programming.
3) When the web interface returns, view the Fault Table page for progress
notifications.
4) Wait several minutes for the programming to complete, at which point the blue
LED stops flashing and remains on.
5) Switch the controller power off and on.
6) Check the Fault Table and follow the commissioning procedure before switching
the traffic signals ON using Signals On/Off Switch.
After loading a new IC4 Configuration that differs significantly from the previous, it may
be necessary to ‘Own the Heart’ (section 14.6). If this is required, there will be an
appropriate entry in the Fault Table and the Signals On/Off Switch will be ignored,
keeping the signals extinguished until the Heart is owned.

Mobility Division, Traffic Solutions
Sopers Lane, Poole, Dorset, BH17 7ER
Security classification Unrestricted Page 93 of 146
Version 5 Status Released
Last Editor dave.martin Date 07-Dec-2016
Document Name User Interface Handbook Document No. 667/HU/46000/000
Copyright © Siemens plc 2016. All Rights Reserved. Mobility is a division of Siemens Plc
14.5.5 Initiation of IC4 Configuration Update Using WIZ
To initiate an IC4 configuration change using WIZ, first copy the required 8ZP file onto
a USB memory stick (do not place in sub directory on the memory stick) and insert the
memory stick into the USB connector on the front of the CPU card.
USB memory sticks formatted with the FAT file system should be used. Encrypted USB memory sticks and those formatted with file systems other than FAT are not supported.
Next run WIZ and select the options highlighted in bold in the following:
1> Config/Status
2> Active Faults
3> Tester
4+ System Log
1- Load Sys Config
2> Save Log
3> Save Site Info
4+ Fetch Sys Config
1- Upgrade
2> Digital IO
3> Reboot
4+ TCPDump
1- Heart
2> IC4 Import
1> USB Drive
The controller now lists the IC4 configurations available on the USB memory stick.
During the following sequence information is often displayed with the user then asked
to press a key to continue. This sequence is to ensure that the user has the opportunity
to view the information on a four line display before it is scrolled out of view.
Select the desired configuration.
1> e2PhLV_SDE.8ZP
2> eEMC-ST950ELV-QI
3> eEMC-ST950ELV-QI

Mobility Division, Traffic Solutions
Sopers Lane, Poole, Dorset, BH17 7ER
Security classification Unrestricted Page 94 of 146
Version 5 Status Released
Last Editor dave.martin Date 07-Dec-2016
Document Name User Interface Handbook Document No. 667/HU/46000/000
Copyright © Siemens plc 2016. All Rights Reserved. Mobility is a division of Siemens Plc
The controller now provides further information and asks for confirmation.
1> Imp EMCELV 0.5
Press 1 to continue. The controller now asks for confirmation:
Import:
eEMC-ST950ELV-QI1.8ZP
Y/N
Press Y to confirm and the controller reports progress while it loads the 8ZP file from
the memory stick:
Importing:
eEMC-ST950ELV-QI1.8ZP
Please wait...
Imported:
eEMC-ST950ELV-QI1.8ZP
Press any key
Press a key to continue. The controller now checks the differences between the IC4
configuration running and that loaded from the memory stick to determine if a Quiet
Initialisation can be performed with the sequence continuing accordingly.

Mobility Division, Traffic Solutions
Sopers Lane, Poole, Dorset, BH17 7ER
Security classification Unrestricted Page 95 of 146
Version 5 Status Released
Last Editor dave.martin Date 07-Dec-2016
Document Name User Interface Handbook Document No. 667/HU/46000/000
Copyright © Siemens plc 2016. All Rights Reserved. Mobility is a division of Siemens Plc
14.5.6 WIZ Quiet Initialisation
Quiet Init
available
Press any key
Press any key to continue, there is now one final opportunity to abort the operation:
1> Can EMCELV 0.5
2> Quiet Init
Important: Although many controllers will be configured with a Reserve
State that keeps the traffic signals illuminated and cycling in Fixed Time
mode, Reserve State can be configured to extinguish the signals in a
controlled manner – check the IC4 Printout.
Press 2 to continue (or 1 to cancel):
Quiet Init
Press L3 Button
Press the Level 3 button on the front of the CPU board.
Initiating:
Quiet Init
Please wait...
Initiated:
Quiet Init
Press any key
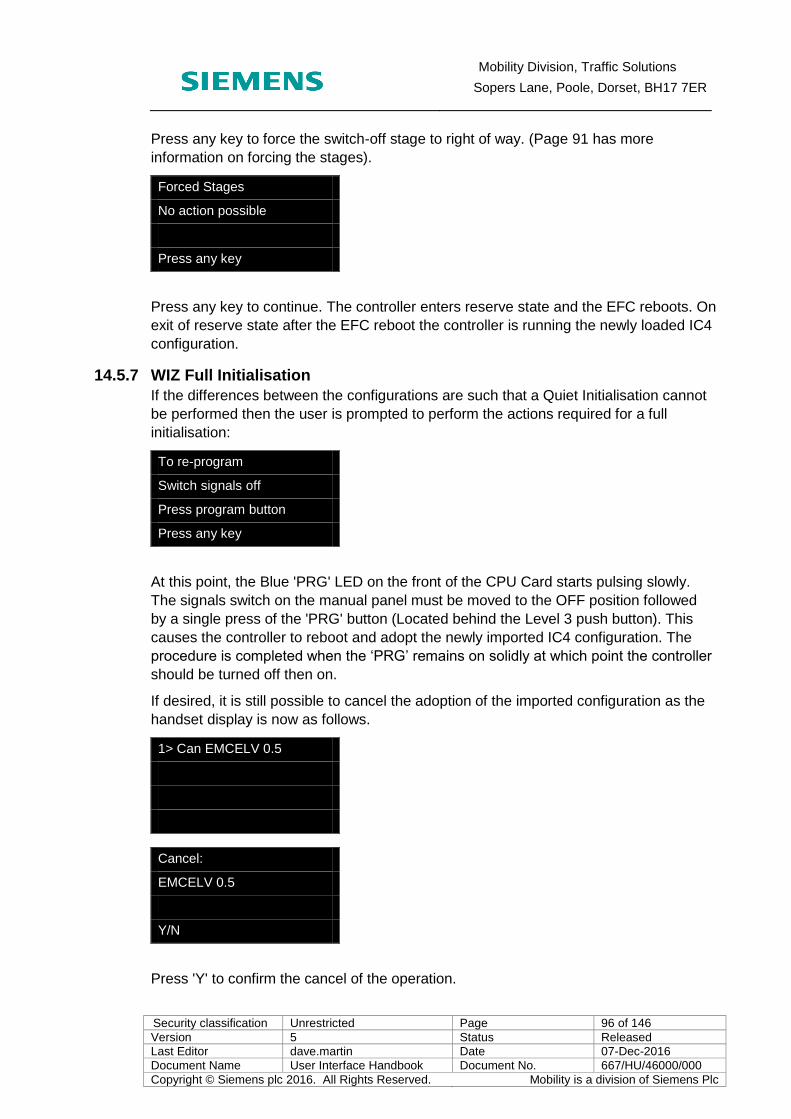
Mobility Division, Traffic Solutions
Sopers Lane, Poole, Dorset, BH17 7ER
Security classification Unrestricted Page 96 of 146
Version 5 Status Released
Last Editor dave.martin Date 07-Dec-2016
Document Name User Interface Handbook Document No. 667/HU/46000/000
Copyright © Siemens plc 2016. All Rights Reserved. Mobility is a division of Siemens Plc
Press any key to force the switch-off stage to right of way. (Page 91 has more
information on forcing the stages).
Forced Stages
No action possible
Press any key
Press any key to continue. The controller enters reserve state and the EFC reboots. On
exit of reserve state after the EFC reboot the controller is running the newly loaded IC4
configuration.
14.5.7 WIZ Full Initialisation
If the differences between the configurations are such that a Quiet Initialisation cannot
be performed then the user is prompted to perform the actions required for a full
initialisation:
To re-program
Switch signals off
Press program button
Press any key
At this point, the Blue 'PRG' LED on the front of the CPU Card starts pulsing slowly.
The signals switch on the manual panel must be moved to the OFF position followed
by a single press of the 'PRG' button (Located behind the Level 3 push button). This
causes the controller to reboot and adopt the newly imported IC4 configuration. The
procedure is completed when the ‘PRG’ remains on solidly at which point the controller
should be turned off then on.
If desired, it is still possible to cancel the adoption of the imported configuration as the
handset display is now as follows.
1> Can EMCELV 0.5
Cancel:
EMCELV 0.5
Y/N
Press 'Y' to confirm the cancel of the operation.

Mobility Division, Traffic Solutions
Sopers Lane, Poole, Dorset, BH17 7ER
Security classification Unrestricted Page 97 of 146
Version 5 Status Released
Last Editor dave.martin Date 07-Dec-2016
Document Name User Interface Handbook Document No. 667/HU/46000/000
Copyright © Siemens plc 2016. All Rights Reserved. Mobility is a division of Siemens Plc
Cancelling:
EMCELV 0.5
Please wait...
Cancelled:
EMCELV 0.5
Press any key
The blue 'PRG' LED stops pulsing at this point.
14.6 ST950 Heart of the Controller The Heart of the Controller (also referred to as simply the ‘Heart’) holds a backup of the
system which can be used to:
Clone the system onto a replacement Processor Card if the original requires replacement.
Return the system to an earlier state.
All aspects of the system are recorded in the backup including firmware, configuration,
system log, site log and all changes made to the point at which the backup was taken.
The Heart is implemented using an SD card fitted to the Processor Card.
Backups are created and written to the Heart periodically, usually at 00:30am but this
can be changed if required using the System - Advanced - Backup web page. Backups
can also be created and ‘retained’ on demand.
14.6.1 Ownership
It is important both that the Heart is fitted and working in a controller (to ensure that the
system is backed up) and that the correct Heart is fitted to the correct controller (to
ensure that another controller's backup is not accidently restored). Ownership is the
means by which this is achieved.
When a controller is started with a new or unrecognised Heart, illumination of the
signals will be disabled to prevent a replacement Processor Card running with a
configuration from a different site and to ensure that the ownership process takes place
correctly. This state is reported in the Fault Table.

Mobility Division, Traffic Solutions
Sopers Lane, Poole, Dorset, BH17 7ER
Security classification Unrestricted Page 98 of 146
Version 5 Status Released
Last Editor dave.martin Date 07-Dec-2016
Document Name User Interface Handbook Document No. 667/HU/46000/000
Copyright © Siemens plc 2016. All Rights Reserved. Mobility is a division of Siemens Plc
Figure 14-13 - Fault Table indicating that the Heart is not recognised
And the Active Faults on WIZ reports:
Change of heart or
significant config
change detected -
signals on/off
The action to be taken depends on the reason for the Heart not being recognised. If a
new or replacement SD has been placed in the Processor Card then the Heart should
be owned. If a new or significantly different IC4 configuration has just been loaded then
the Heart should be owned. If a Heart from an existing site has been placed in a
replacement Processor Card then a restoration from the Heart should be performed.
14.6.2 Owning the Heart
Before using a new SD as a Heart it must be owned. This operation can be carried out
either using the web pages or using WIZ, as described in the following sections.

Mobility Division, Traffic Solutions
Sopers Lane, Poole, Dorset, BH17 7ER
Security classification Unrestricted Page 99 of 146
Version 5 Status Released
Last Editor dave.martin Date 07-Dec-2016
Document Name User Interface Handbook Document No. 667/HU/46000/000
Copyright © Siemens plc 2016. All Rights Reserved. Mobility is a division of Siemens Plc
14.6.3 Owning the Heart Using Web Pages
Figure 14-14 - Web page used to own the Heart
The Heart is owned using the Controller - Heart - Ownership web page. To start the
process, press the Own Heart button. It is important to confirm that the operation is
being performed on site (to ensure that the Heart / Processor combination has been
reviewed and the correct decision been made) so it is necessary to press the Level 3
button as instructed.
Figure 14-15 - Request to press Level 3 button during Heart ownership sequence
The ownership sequence is completed by turning the controller off and then on. This is
reported in the Fault Table.

Mobility Division, Traffic Solutions
Sopers Lane, Poole, Dorset, BH17 7ER
Security classification Unrestricted Page 100 of 146
Version 5 Status Released
Last Editor dave.martin Date 07-Dec-2016
Document Name User Interface Handbook Document No. 667/HU/46000/000
Copyright © Siemens plc 2016. All Rights Reserved. Mobility is a division of Siemens Plc
Figure 14-16 - Fault Table indication that the controller must be turned off then on to complete
the Heart ownership
14.6.4 Owning the Heart using WIZ
In WIZ there are two options within the Heart menu:
1> Own Heart
2> Restore
Select the first of these for this operation and the following will be displayed:
Signals are not
controlled unless
Heart is owned
Press any key.
Press any key and the following is displayed:
To own Heart press
any key, then the
LEVEL 3 button
within 3 seconds.
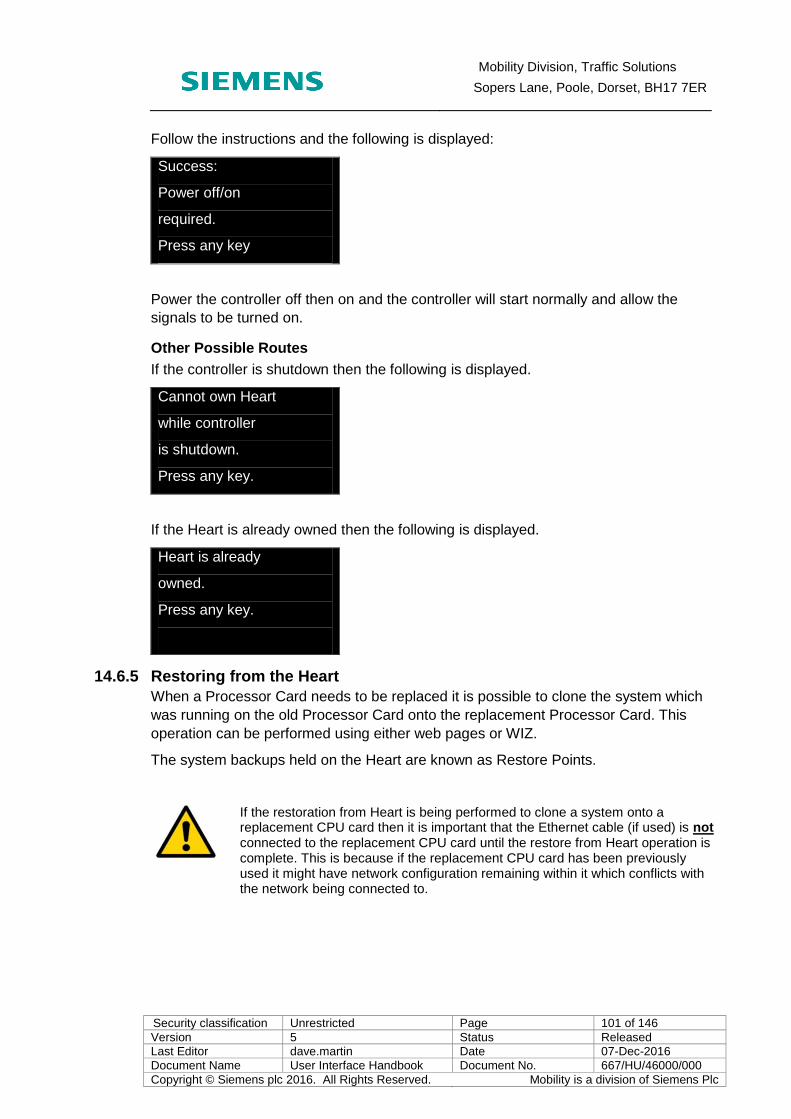
Mobility Division, Traffic Solutions
Sopers Lane, Poole, Dorset, BH17 7ER
Security classification Unrestricted Page 101 of 146
Version 5 Status Released
Last Editor dave.martin Date 07-Dec-2016
Document Name User Interface Handbook Document No. 667/HU/46000/000
Copyright © Siemens plc 2016. All Rights Reserved. Mobility is a division of Siemens Plc
Follow the instructions and the following is displayed:
Success:
Power off/on
required.
Press any key
Power the controller off then on and the controller will start normally and allow the
signals to be turned on.
Other Possible Routes
If the controller is shutdown then the following is displayed.
Cannot own Heart
while controller
is shutdown.
Press any key.
If the Heart is already owned then the following is displayed.
Heart is already
owned.
Press any key.
14.6.5 Restoring from the Heart
When a Processor Card needs to be replaced it is possible to clone the system which
was running on the old Processor Card onto the replacement Processor Card. This
operation can be performed using either web pages or WIZ.
The system backups held on the Heart are known as Restore Points.
If the restoration from Heart is being performed to clone a system onto a replacement CPU card then it is important that the Ethernet cable (if used) is not connected to the replacement CPU card until the restore from Heart operation is complete. This is because if the replacement CPU card has been previously used it might have network configuration remaining within it which conflicts with the network being connected to.

Mobility Division, Traffic Solutions
Sopers Lane, Poole, Dorset, BH17 7ER
Security classification Unrestricted Page 102 of 146
Version 5 Status Released
Last Editor dave.martin Date 07-Dec-2016
Document Name User Interface Handbook Document No. 667/HU/46000/000
Copyright © Siemens plc 2016. All Rights Reserved. Mobility is a division of Siemens Plc
14.6.6 Restoring from the Heart Using Web Pages
Figure 14-17 - Restore Points available for use
The Restore Points available are shown on the Controller - Heart - Backup & Restore
web page. Restoration to one of the listed Restore Points is initiated by:
Turning off the signals
Pressing the Restore button associated with the Restore Point.
Pressing the Program Button on the Processor Card within 30 seconds of the previous step.
Figure 14-18 - Restoration instruction screen

Mobility Division, Traffic Solutions
Sopers Lane, Poole, Dorset, BH17 7ER
Security classification Unrestricted Page 103 of 146
Version 5 Status Released
Last Editor dave.martin Date 07-Dec-2016
Document Name User Interface Handbook Document No. 667/HU/46000/000
Copyright © Siemens plc 2016. All Rights Reserved. Mobility is a division of Siemens Plc
Figure 14-19 - Restoration progress screen
The EFC now reboots, performs the restoration then programs the Primary, SEC and
Fail Flash processors in order to restore their state to that requested. The operation is
completed by turning the power to the controller off then on and owning the Heart if
required (see 14.6.3).
Figure 14-20 - Fault Table on completion of restoration from Heart
14.6.7 Restoring from the Heart Using WIZ
It is only possible to restore the most recent Restore Point when using WIZ. To start
the operation, invoke WIZ from the handset command line and select the Heart menu
item from the top level WIZ menu.
The user is presented with a sub-menu containing the following two options.
1> Own Heart
2> Restore
Select option 2.
The controller reads the available restore points from the Heart and outputs the
following. NOTE : The restore point name shown below is representative of a typical
restore point.

Mobility Division, Traffic Solutions
Sopers Lane, Poole, Dorset, BH17 7ER
Security classification Unrestricted Page 104 of 146
Version 5 Status Released
Last Editor dave.martin Date 07-Dec-2016
Document Name User Interface Handbook Document No. 667/HU/46000/000
Copyright © Siemens plc 2016. All Rights Reserved. Mobility is a division of Siemens Plc
Restore from:
ST950-LV32B
Y/N?
Selecting “N” will display the following.
Restore not
started.
Press any key
Pressing any key returns to the original sub-menu. If no key is pressed, the user is
automatically returned to the sub-menu after a few seconds.
Selecting “Y” will display the following.
Switch signals off
and press the PRG
button.
Press any key
The blue LED on the front of the Processor Card starts pulsing in a heartbeat fashion
for 30 seconds. The user has this period in which to ensure the signals switch is turned
OFF and to press the program button on the front of the Processor Card. If the program
button is pressed whilst the signals switch is ON or after the blue LED has
extinguished, the restore operation is not started.
The original WIZ menu is displayed irrespective of whether the user presses any key.
The restore operation takes several minutes to complete during which time the
controller reboots. Contact via the handset is not possible whilst the restore is in
progress. Completion is indicated by the blue LED remaining permanently lit (on but
not flashing).
The process is completed by turning the controller off then on.
14.6.8 Creating Restore Points
A Restore Point is created periodically by the controller. This Restore Point is known as
the Latest Restore Point. If the Latest Restore Point exists at the time of the periodic
creation then it is overwritten with the new system snapshot.
A Restore Point can also be created on demand by the user if there is not already a
Latest Restore Point.

Mobility Division, Traffic Solutions
Sopers Lane, Poole, Dorset, BH17 7ER
Security classification Unrestricted Page 105 of 146
Version 5 Status Released
Last Editor dave.martin Date 07-Dec-2016
Document Name User Interface Handbook Document No. 667/HU/46000/000
Copyright © Siemens plc 2016. All Rights Reserved. Mobility is a division of Siemens Plc
The following operations are possible on the Latest Restore Point:
Restore - restore the system to that stored in the Restore Point
Delete - delete the Restore Point. It is not possible to recover the Restore Point after deletion.
Refresh - update the Restore Point with a snapshot of the current system.
Retain - move the Restore Point to the list of Retained Restore Points so it is not overwritten by the next scheduled backup.
Figure 14-21 - Latest and list of Retained Restore Points
There can be many Retained Restore Points, up to the capacity of the SD card being
used for the Heart. The following operations are possible on a Retained Restore Point:
Restore - restore the system to that stored in the Restore Point
Delete - delete the Restore Point. It is not possible to recover the Restore Point after deletion.
Restore Point operations can take a little time to complete. During this time the
following web page is displayed unless there is a more operation specific page to
display.
Figure 14-22 - Restore Point busy page
Mobility Division, Traffic Solutions
Sopers Lane, Poole, Dorset, BH17 7ER
Security classification Unrestricted Page 106 of 146
Version 5 Status Released
Last Editor dave.martin Date 07-Dec-2016
Document Name User Interface Handbook Document No. 667/HU/46000/000
Copyright © Siemens plc 2016. All Rights Reserved. Mobility is a division of Siemens Plc
14.7 ST950 Firmware Upgrade Most of the firmware within the ST950 controller is stored in non-removal devices. This
firmware can be updated using the mechanisms described in this section. The following
firmware can be upgraded in this way:
CPU card
EFC firmware
Primary firmware
SEC firmware
Fail Flash firmware
GSPI peripheral card (e.g. Serial I/O Cards)
GSPI peripheral firmware
The following firmware is stored in a removable device and if upgrade is required then
the device must be replaced with a part containing the new firmware:
CPU card
PHP firmware
The following firmware is stored in a non-removable device and is not upgradable by
the user:
LSLS card
14.7.1 Updating CPU Card Firmware
There are four devices on the CPU card which can be updated using this process:
EFC
Primary
SEC
Fail Flash
An update may change the firmware in either the EFC alone or in all four devices.
During an upgrade the controller detects which devices are affected and performs
varies the procedure accordingly.
The controller implements a firmware update in one of two ways depending upon the
extent of the change, as described below.
14.7.2 Immediate Implementation
For most “EFC-only” updates the update is implemented immediately and the EFC
restarted. This will cause the controller to enter Reserve State. The controller will leave
Reserve State and the signals return to their normal operation once the restart of the
EFC is complete.
Mobility Division, Traffic Solutions
Sopers Lane, Poole, Dorset, BH17 7ER
Security classification Unrestricted Page 107 of 146
Version 5 Status Released
Last Editor dave.martin Date 07-Dec-2016
Document Name User Interface Handbook Document No. 667/HU/46000/000
Copyright © Siemens plc 2016. All Rights Reserved. Mobility is a division of Siemens Plc
14.7.3 Delayed Implementation
Update of the Primary, SEC and Fail Flash always results in the signals going off so is
not implemented immediately but held until an appropriate time is determined by
somebody on site. Some EFC only changes might be considered extensive enough to
also warrant an on-site presence. That an update is pending in this manner is indicated
by the following:
A status of “Update on Hold” reported on the System – Upgrade web page.
Entries in the Notification Table indicating how to proceed with or cancel the update.
The blue LED on the CPU board flashing with a double beat.
Power cycling the controller does not abort the upgrade as the upgrade is held pending across a power cycle.
To proceed with this update, perform the following:
When safe to do so, turn off the signals using the signals on / off switch.
Press the programming button on the CPU board.
This action causes the EFC to reboot then program the Primary, SEC and Fail Flash
(although if the Fail Flash switch is in the ON position, the Fail Flash CPU will not be
reprogrammed but continue to flash the signals). On completion of this programming
operation the blue LED on the CPU board stops flashes quickly and remains on solid.
At this point the update is completed by powering the controller off then on.
Important: Firmware upgrade and programming will take several
minutes. Do not power off/on until the programming operation has
completed and the blue LED remains on.

Mobility Division, Traffic Solutions
Sopers Lane, Poole, Dorset, BH17 7ER
Security classification Unrestricted Page 108 of 146
Version 5 Status Released
Last Editor dave.martin Date 07-Dec-2016
Document Name User Interface Handbook Document No. 667/HU/46000/000
Copyright © Siemens plc 2016. All Rights Reserved. Mobility is a division of Siemens Plc
14.8 SiteUI The Site UI Diagram or Map shows the status of the signal heads and detectors
(Features) as their state varies in real time.
The number, identity and type of the displayed Features are initially based on the
Controller Configuration, and stored with their location and size in a Feature List. The
Map is drawn when opened using the Feature values from this List.
The Features (and any duplicate Features) can be automatically located on the Site UI
Map in positions similar to that shown by the IC4 Emulator tool. This is done by
importing an IC4 Emulator Project file (.8PJ), which if used must also include a ‘bitmap’
background image for the site.
The representation of the Features can be modified either directly on the map, or by
modifying entries in the Feature List, to give a more intuitive view of site operation.
Note that the resulting Feature List and background image definition are considered
part of the System Configuration written to the Restore Points on the Heart or
imported/exported to file and the OSS.
14.8.1 SiteUI – View Map
The Site UI Map displays the signal heads and detectors referenced in the controller
configuration, via the Features List, and opens by default in View Mode. It incorporates
a Timeline Slider for historic data display and the pausing of data recording, and a set
of Map Modification buttons. The signal heads and detectors are considered as Map
Features which can be modified, re-positioned, duplicated and hidden to allow different
aspects of site operation to be reviewed.
Should an IC4 Emulator Project file not have been specified (or the Features are not
placed within the area of the background image), then unplaced Features are located
on the Map towards the top left of the Map, adjacent to the Modification buttons.
14-23 - Site UI Map, with no IC4 Emulator Project file loaded

Mobility Division, Traffic Solutions
Sopers Lane, Poole, Dorset, BH17 7ER
Security classification Unrestricted Page 109 of 146
Version 5 Status Released
Last Editor dave.martin Date 07-Dec-2016
Document Name User Interface Handbook Document No. 667/HU/46000/000
Copyright © Siemens plc 2016. All Rights Reserved. Mobility is a division of Siemens Plc
Detectors are represented by circles on the map, enclosing the corresponding Detector
counts. A currently active Detector appears black , an inactive detector white .
Phases can be represented in a variety of ways on the Map, as Signal Heads, Stop
Lines or as STS symbols. The typical phase Type representations are shown below.
Signal Heads Head: 3-Aspect
Head: Ped with Wait
Head: Green Arrow
Head: LRT (Ahead)
or for other states:
Head: LRT (Left)
or for other states:
Head: LRT (Right)
or for other states:
Head: Wig-Wag (F/Red)
Stop Line Stop Line and Arrow
Stop Line and Arrow (Left)
Stop Line and Arrow (Right)
Stop Line (Crossing)
STS STS (Standard)
STS Left Arrow
STS Right Arrow
STS Ahead Arrow (drawn
on left)
STS Ahead Arrow (drawn
on right)
14-24 – Typical Phase representations

Mobility Division, Traffic Solutions
Sopers Lane, Poole, Dorset, BH17 7ER
Security classification Unrestricted Page 110 of 146
Version 5 Status Released
Last Editor dave.martin Date 07-Dec-2016
Document Name User Interface Handbook Document No. 667/HU/46000/000
Copyright © Siemens plc 2016. All Rights Reserved. Mobility is a division of Siemens Plc
Limitation: Switched Signs are presented as ‘Head: 3-Aspect” Features, mapped from
their respective Controller Outputs on the phase hardware (Lamp Switch Cards).
Limitation: The SiteUI Map may not operate correctly on some Android devices using
Firefox. If Features are not consistently shown, check for Firefox updates or consider
using a Chrome browser.
14.8.2 Map Settings Window
The Map Settings window can be opened by selecting the button, and is used to
specify which types of Features are displayed on the Map. By default all Feature types
are displayed.
14-25 - SiteUI Map - Map Settings window
Unticking a Feature type and then selecting “Save settings” results in that type of
Feature being removed from the SiteUI Map display.
Changing the Map Settings does not result in any changes being made to the Feature
List. Selecting “Reset Features” on the SiteUI – Initialisation web page results in the
Map Settings being returned to their defaults whereby all Features are displayed.
The button can be used to close the Map Settings window without saving the
modified settings.

Mobility Division, Traffic Solutions
Sopers Lane, Poole, Dorset, BH17 7ER
Security classification Unrestricted Page 111 of 146
Version 5 Status Released
Last Editor dave.martin Date 07-Dec-2016
Document Name User Interface Handbook Document No. 667/HU/46000/000
Copyright © Siemens plc 2016. All Rights Reserved. Mobility is a division of Siemens Plc
14.8.3 Timeline Slider
14-26 - Default Timeline Slider, playing and recording live states
The Timeline Slider can be used to pause live recording by selecting the button.
14-27 - Timeline Slider, recording and playing live states Paused
To resume live data recording and display, select the button.
To review historic recorded data, drag the Timeline slider across the bar.
14-28 – Timeline slider dragged to review Historic recorded data
14.8.4 SiteUI – Initialisation
This web page provides initial data settings for the Features and can be used to
configure and size the Site UI Map from the IC4 Emulator tool output.
14-29 - Site UI Initialisation web page
The following selections are available:
“Reset Features” – this can be used to repopulate the Feature List from the
controller configuration, discarding any changes made via the Site UI Map.
“Include I/O Outputs” - I/O Outputs that are not present in the imported IC4
Emulator project file can be added to the Feature List and shown on the Site UI
Map by selecting this option. All Outputs will be drawn to the Map when it is
next opened. By default, Outputs are not included to avoid clutter.
“Import New IC4 Emulator Project” – this allows a Project file (.8PJ) saved by
the IC4 Emulator tool to be imported to locate and orientate the Features in

Mobility Division, Traffic Solutions
Sopers Lane, Poole, Dorset, BH17 7ER
Security classification Unrestricted Page 112 of 146
Version 5 Status Released
Last Editor dave.martin Date 07-Dec-2016
Document Name User Interface Handbook Document No. 667/HU/46000/000
Copyright © Siemens plc 2016. All Rights Reserved. Mobility is a division of Siemens Plc
similar positions to that shown in the IC4 Emulator. It also imports the Bitmap
background image for display as the Site UI Map background. Note that the
dimensions of the background image are used to size the map area.
“Update IC4 Emulator Project Background” - this can be used to import the
Bitmap background image for display as the Site UI Map background, but will
not result in modifying the location or orientation of the Features. However, the
new image will be used to size the map area, so the feature positions may
change if the new image is of a different size.
“Map Background Image” – an image file (.GIF, .JPG or .JPEG) can be
imported as the background image using this option, if no IC4 Emulator Project
file is available. The recommended image size is 768 x 384 pixels.
The Site UI – Initialisation web page does not auto-refresh; use the Reload button to
confirm any changes made.
Figure 14-30 shows the Site UI with nothing imported from the IC4 Emulator and no
Background Image set.
14-30 - Site UI with no Project File or Background Image imported
Figure 14-31 shows the result of mapping an IC4 Emulator Project File. Note that it
can take a minute or so to process the bitmap image and redefine the Features in the
Feature List, during which time the message “The requested map is regenerating,
please wait” will be displayed when the Site UI Map is opened.
14-31 - Site UI Importing an Emulator Project File
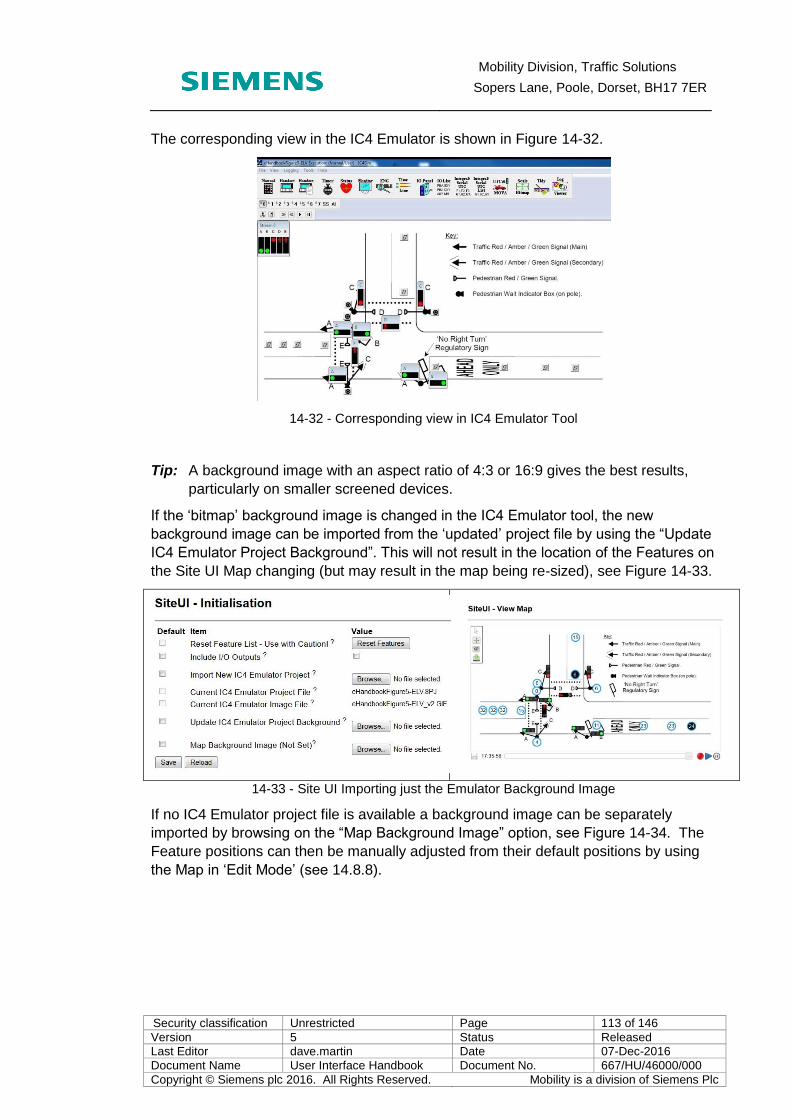
Mobility Division, Traffic Solutions
Sopers Lane, Poole, Dorset, BH17 7ER
Security classification Unrestricted Page 113 of 146
Version 5 Status Released
Last Editor dave.martin Date 07-Dec-2016
Document Name User Interface Handbook Document No. 667/HU/46000/000
Copyright © Siemens plc 2016. All Rights Reserved. Mobility is a division of Siemens Plc
The corresponding view in the IC4 Emulator is shown in Figure 14-32.
14-32 - Corresponding view in IC4 Emulator Tool
Tip: A background image with an aspect ratio of 4:3 or 16:9 gives the best results,
particularly on smaller screened devices.
If the ‘bitmap’ background image is changed in the IC4 Emulator tool, the new
background image can be imported from the ‘updated’ project file by using the “Update
IC4 Emulator Project Background”. This will not result in the location of the Features on
the Site UI Map changing (but may result in the map being re-sized), see Figure 14-33.
14-33 - Site UI Importing just the Emulator Background Image
If no IC4 Emulator project file is available a background image can be separately
imported by browsing on the “Map Background Image” option, see Figure 14-34. The
Feature positions can then be manually adjusted from their default positions by using
the Map in ‘Edit Mode’ (see 14.8.8).
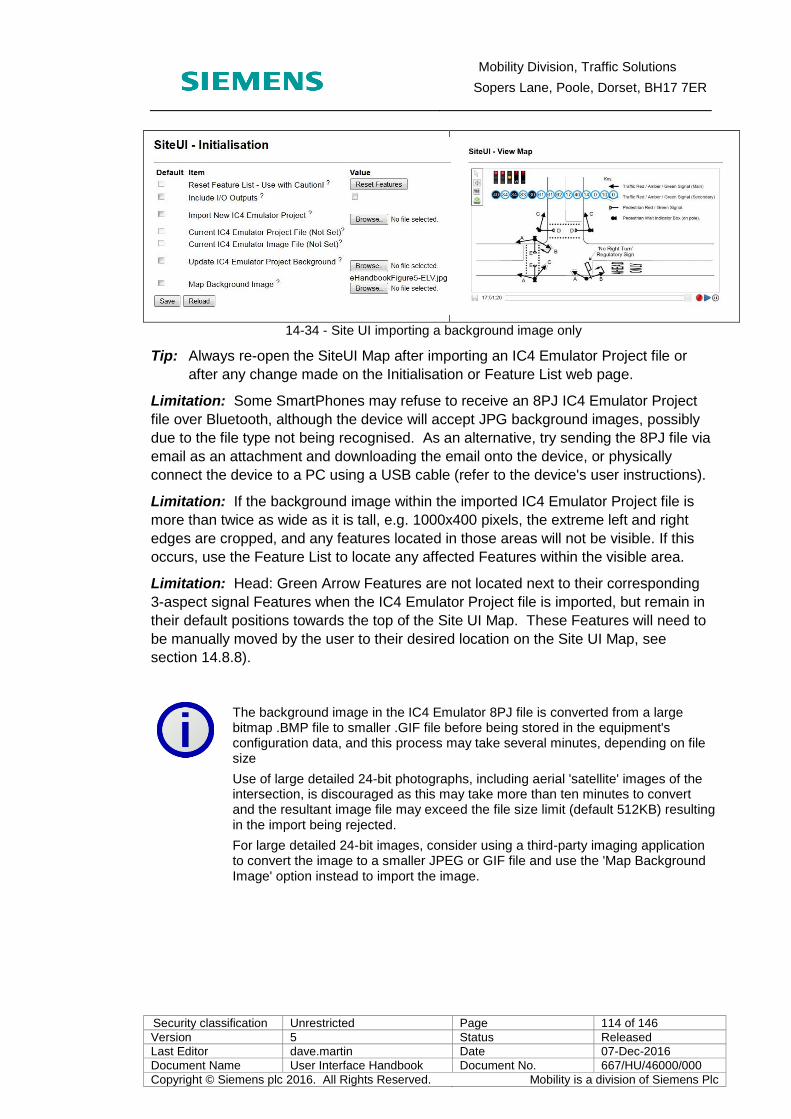
Mobility Division, Traffic Solutions
Sopers Lane, Poole, Dorset, BH17 7ER
Security classification Unrestricted Page 114 of 146
Version 5 Status Released
Last Editor dave.martin Date 07-Dec-2016
Document Name User Interface Handbook Document No. 667/HU/46000/000
Copyright © Siemens plc 2016. All Rights Reserved. Mobility is a division of Siemens Plc
14-34 - Site UI importing a background image only
Tip: Always re-open the SiteUI Map after importing an IC4 Emulator Project file or
after any change made on the Initialisation or Feature List web page.
Limitation: Some SmartPhones may refuse to receive an 8PJ IC4 Emulator Project
file over Bluetooth, although the device will accept JPG background images, possibly
due to the file type not being recognised. As an alternative, try sending the 8PJ file via
email as an attachment and downloading the email onto the device, or physically
connect the device to a PC using a USB cable (refer to the device's user instructions).
Limitation: If the background image within the imported IC4 Emulator Project file is
more than twice as wide as it is tall, e.g. 1000x400 pixels, the extreme left and right
edges are cropped, and any features located in those areas will not be visible. If this
occurs, use the Feature List to locate any affected Features within the visible area.
Limitation: Head: Green Arrow Features are not located next to their corresponding
3-aspect signal Features when the IC4 Emulator Project file is imported, but remain in
their default positions towards the top of the Site UI Map. These Features will need to
be manually moved by the user to their desired location on the Site UI Map, see
section 14.8.8).
The background image in the IC4 Emulator 8PJ file is converted from a large bitmap .BMP file to smaller .GIF file before being stored in the equipment's configuration data, and this process may take several minutes, depending on file size
Use of large detailed 24-bit photographs, including aerial 'satellite' images of the intersection, is discouraged as this may take more than ten minutes to convert and the resultant image file may exceed the file size limit (default 512KB) resulting in the import being rejected.
For large detailed 24-bit images, consider using a third-party imaging application to convert the image to a smaller JPEG or GIF file and use the 'Map Background Image' option instead to import the image.

Mobility Division, Traffic Solutions
Sopers Lane, Poole, Dorset, BH17 7ER
Security classification Unrestricted Page 115 of 146
Version 5 Status Released
Last Editor dave.martin Date 07-Dec-2016
Document Name User Interface Handbook Document No. 667/HU/46000/000
Copyright © Siemens plc 2016. All Rights Reserved. Mobility is a division of Siemens Plc
14.8.5 SiteUI – Feature List
This web page provides a list of the Features (objects) shown on the Site UI diagram.
The Feature List is initially populated from the controller configuration information when
the “Reset Features” button is selected. The size of the map area is configured from a
Map Background image, if supplied, which may be imported from an IC4 Emulator
Project file. This project file also contains the location of any duplicated Features.
The display properties for each Feature can be modified on the Feature List or on the
Site UI Map. Changes saved from the Site UI Map can be viewed in the Feature List
by selecting the “Reload” button, or by reopening the Feature List. Note that the Site
UI Map needs to be re-opened to import changes saved from the Feature List.
Features can be edited and deleted using this web page, but should not be added,
(even though the web page includes an ‘Add Row’ button). Use the Site UI Map in Edit
Mode to add any additional Duplicate Features, or to change the displayed Type of a
Feature.
14-35 - Feature List showing all Features
Detectors are listed first in the Feature List, followed by phases.
The Feature IDs are formatted as follows:
For detectors, det-<Detector Number>-<index>
For phases, phase-<Phase letter>-<index>
Duplicate Features are given an index > 0.
Help Text is provided on the web page to guide the user.

Mobility Division, Traffic Solutions
Sopers Lane, Poole, Dorset, BH17 7ER
Security classification Unrestricted Page 116 of 146
Version 5 Status Released
Last Editor dave.martin Date 07-Dec-2016
Document Name User Interface Handbook Document No. 667/HU/46000/000
Copyright © Siemens plc 2016. All Rights Reserved. Mobility is a division of Siemens Plc
Tip: Features can be ‘hidden’ from view on the Site UI Map by ticking the Hide box.
Use this in preference to Deleting Features, as the deletion of a feature can only
be ‘undone’ by use of the “Reset features” button on the Initialisation web page.
This will result in the loss of any Feature modifications made via the Feature List
or Site UI Map. The option to ‘hide’ a feature is available on the Feature List table
as well as the map’s Edit Feature Window (section 14.8.7)

Mobility Division, Traffic Solutions
Sopers Lane, Poole, Dorset, BH17 7ER
Security classification Unrestricted Page 117 of 146
Version 5 Status Released
Last Editor dave.martin Date 07-Dec-2016
Document Name User Interface Handbook Document No. 667/HU/46000/000
Copyright © Siemens plc 2016. All Rights Reserved. Mobility is a division of Siemens Plc
14.8.6 Changing Features via the SiteUI - Map
Changes to the Features displayed on the Map can be made either on the Map itself,
or via the Feature List (see section 14.8.5).
The Site UI Map opens in ‘View Mode’. In ‘View Mode’, the Features on the Map can
be modified or hidden from the Map. The location, orientation and size of the Features
can only be changed when the Site UI Map is in ‘Edit Mode’. This is to avoid the
inadvertent moving or resizing of Features when using a touch screen device.
14-36 - SiteUI Map in default View Mode
The Map Modification buttons have the following behaviour with the Map in View Mode.
selects View Mode
selects Edit Mode (see 14.8.8)
opens Map Settings window (see 14.8.2)
Auto save feature is ON (Green)
Auto save feature is OFF (Red)
14-37 - Map Modification buttons in View Mode
Changes made on the Map are automatically saved to the Feature List if the ‘Auto save
feature’ is shown ON. Selecting this button toggles the Auto save.

Mobility Division, Traffic Solutions
Sopers Lane, Poole, Dorset, BH17 7ER
Security classification Unrestricted Page 118 of 146
Version 5 Status Released
Last Editor dave.martin Date 07-Dec-2016
Document Name User Interface Handbook Document No. 667/HU/46000/000
Copyright © Siemens plc 2016. All Rights Reserved. Mobility is a division of Siemens Plc
When Auto save is OFF, the ‘Save feature properties’ button adjacent to the
Timeline Slider at the bottom left of the Map can be selected, when highlighted , to
save any changes to the Feature List.
Tip: If the ‘Save feature properties’ button is displayed as , then a save to the
Feature List has failed, possibly due to the Network Connection being lost.
Correct the underlying issue before making further changes.
Tip: If the ‘Save feature properties button is permanently highlighted when Auto
save is ON, then the Auto save cannot complete, possibly due to the Network
Connection being lost. Correct the underlying issue before making further
changes.
In View Mode, selecting a Feature opens the ‘Edit Feature’ window. This can be used
to change the Name, Description and display Type of a Feature, and also whether to
‘Hide this feature’ from the Map.
Limitation: Use of the ‘pen’ pointer device supplied with a tablet device (e.g.
Samsung Galaxy Note 10.1) is not recommended. Depending on the browser being
used the ‘pen’ may not reliably select/deselect Features and Map Modification buttons.
With a Chrome browser, it is difficult to get the pointer to drop a feature once it is
selected, e.g. for Rotation or resize. With Firefox, use of the pointer may cause Firefox
to freeze or the browser response to slow significantly.
Limitation: Hover text for Phase Features may be offset slightly to the left when using
Chrome and Internet Explorer browsers. When selecting a Feature using these
browsers, point and select towards the left of the Feature. Note that hover text is
correctly positioned when using Firefox.

Mobility Division, Traffic Solutions
Sopers Lane, Poole, Dorset, BH17 7ER
Security classification Unrestricted Page 119 of 146
Version 5 Status Released
Last Editor dave.martin Date 07-Dec-2016
Document Name User Interface Handbook Document No. 667/HU/46000/000
Copyright © Siemens plc 2016. All Rights Reserved. Mobility is a division of Siemens Plc
14.8.7 Edit Feature Window
The Name and Description of a Feature
can be changed by entering text into the
appropriate fields.
The representation of the Feature Type on
the Map can be changed by selecting an
entry from the drop-down list.
Ticking ‘Hide this feature’ results in the
Feature being hidden on the Map.
14-38 - SiteUI Map - Edit Feature window
Note that the Name of the Feature is the text that appears in the hover text for the
Feature on the Site UI Map.
Selecting the button saves the change to the Map.
Selecting the button can be used to close the Edit Feature window without saving
the changes to the Map.
Any changes made may be ‘Auto saved’ or manually saved to the Feature List.

Mobility Division, Traffic Solutions
Sopers Lane, Poole, Dorset, BH17 7ER
Security classification Unrestricted Page 120 of 146
Version 5 Status Released
Last Editor dave.martin Date 07-Dec-2016
Document Name User Interface Handbook Document No. 667/HU/46000/000
Copyright © Siemens plc 2016. All Rights Reserved. Mobility is a division of Siemens Plc
14.8.8 SiteUI Map in Edit Mode
Selecting the button puts the Site UI Map into Edit Mode.
14-39 SiteUI Map in Edit Mode
The Map Modification buttons have the following behaviour with the Map in Edit Mode.
Note that the duplication of selected features and their deletion is only available if the
‘Auto save’ feature is ON.
Selects View Mode Duplicate selected Feature
Selects Edit Mode Delete selected duplicate
Opens the Map Settings window (see 14.8.2)
Auto save feature is ON
Auto save feature is OFF
Opens the Edit Feature window (see 14.8.7)
14-40 - Map Modification buttons in Edit Mode
Changes made on the Map are automatically saved to the Feature List if the ‘Auto save
feature’ is shown ON. Selecting this button toggles the Auto save.

Mobility Division, Traffic Solutions
Sopers Lane, Poole, Dorset, BH17 7ER
Security classification Unrestricted Page 121 of 146
Version 5 Status Released
Last Editor dave.martin Date 07-Dec-2016
Document Name User Interface Handbook Document No. 667/HU/46000/000
Copyright © Siemens plc 2016. All Rights Reserved. Mobility is a division of Siemens Plc
Limitation: With Auto save OFF, selecting a Feature and then selecting another
without making any changes may result in the ‘Save feature properties’ button adjacent
to the Timeline Slider being highlighted .
A Feature can be moved, rotated and resized on the Map by selecting the Feature
whilst in Edit Mode. On selecting a Feature, the Feature is greyed out and can then be
moved across the Map by selecting it and dragging to the required location.
14-41 Phase A selected and moved to top of Arrow
A ‘Grab Arrow’ is also displayed. The Feature can be resized and rotated by
dragging the ‘Grab Arrow’ and moving it relative to the centre of the Feature.
14-42 - Phase A rotated and resized

Mobility Division, Traffic Solutions
Sopers Lane, Poole, Dorset, BH17 7ER
Security classification Unrestricted Page 122 of 146
Version 5 Status Released
Last Editor dave.martin Date 07-Dec-2016
Document Name User Interface Handbook Document No. 667/HU/46000/000
Copyright © Siemens plc 2016. All Rights Reserved. Mobility is a division of Siemens Plc
By selecting the “Edit selected feature” button , the Feature type can be changed, if
desired, and then the Feature re-selected and placed in its final location.
14-43 - Phase A Changed to STS (Standard) and finally positioned
Tip: Make sure that all changes made to the Site UI map have been saved to the
Feature List before leaving the web page. Check that the “Save feature
properties” button is not highlighted , and that a Feature is not currently
selected (greyed out) before leaving SiteUI.
Tip: The Feature List can be used to harmonize the size of the Features (section
14.8.5).
14-44 - All Phases changed to STS (Standard) symbols and relocated

Mobility Division, Traffic Solutions
Sopers Lane, Poole, Dorset, BH17 7ER
Security classification Unrestricted Page 123 of 146
Version 5 Status Released
Last Editor dave.martin Date 07-Dec-2016
Document Name User Interface Handbook Document No. 667/HU/46000/000
Copyright © Siemens plc 2016. All Rights Reserved. Mobility is a division of Siemens Plc
Features can be duplicated on the Site UI Map in Edit Mode.
To duplicate a Feature, select the Feature and then select the “Duplicate
selected feature” button. A duplicate will be created and placed on the Site UI
Map adjacent to the original. This can then be selected and moved to the
desired location.
14-45 - Phase E duplicated, duplicate Feature then moved
Duplicate Features are created with the next available index number for that Feature.
Duplicate Features can be deleted by selecting the Feature and then selecting
the “Delete selected duplicate” button. Only duplicated Features can be deleted
from the Site UI Map. If no instances of a Feature (Phase or Detector) are
required on the map, use the ‘hide’ option.
When sufficient Features have been duplicated, moved and resized to give a
representative view of the Site Operation, the Site UI Map is ready for use.
14-46 - Final Site UI Map and Feature List
Limitation: If the Edit Mode button is selected when the SiteUI Map is opening
before the features are displayed, then the Map may open in Select Mode but with the
Map Modification buttons presented in Edit Mode. If this occurs, re-open the Site UI
Map and wait for the Features to be displayed before putting the Map into Edit Mode.
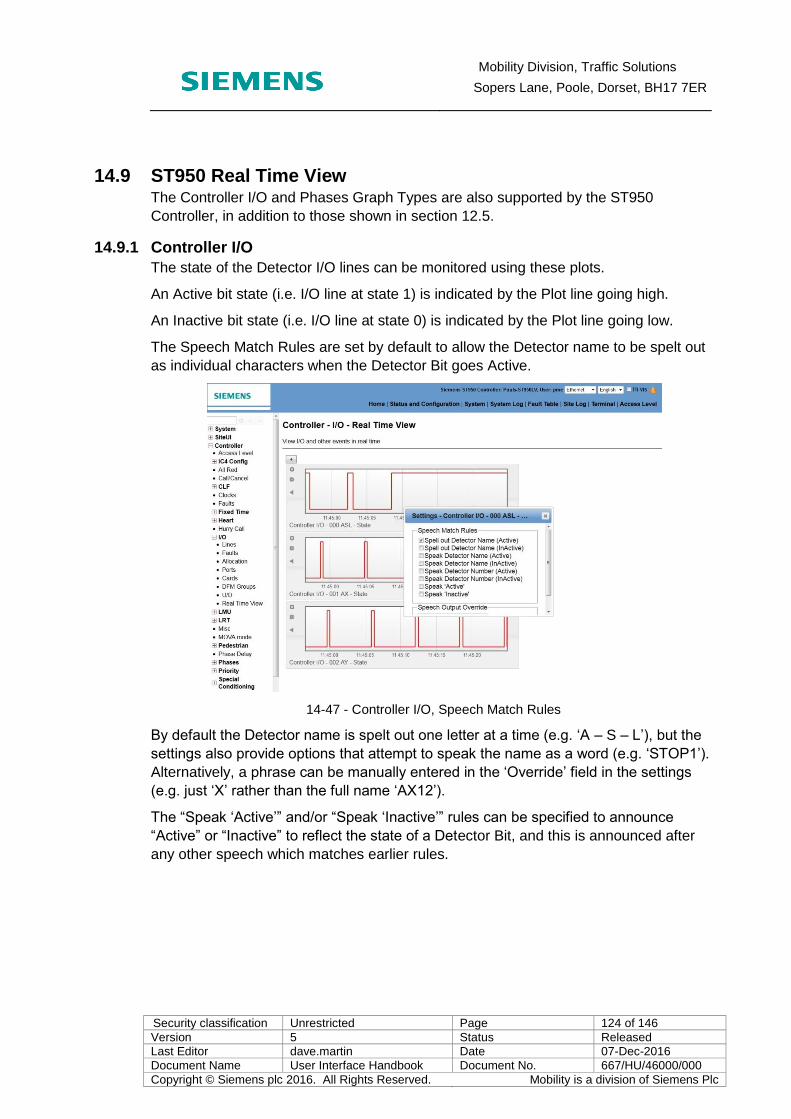
Mobility Division, Traffic Solutions
Sopers Lane, Poole, Dorset, BH17 7ER
Security classification Unrestricted Page 124 of 146
Version 5 Status Released
Last Editor dave.martin Date 07-Dec-2016
Document Name User Interface Handbook Document No. 667/HU/46000/000
Copyright © Siemens plc 2016. All Rights Reserved. Mobility is a division of Siemens Plc
14.9 ST950 Real Time View The Controller I/O and Phases Graph Types are also supported by the ST950
Controller, in addition to those shown in section 12.5.
14.9.1 Controller I/O
The state of the Detector I/O lines can be monitored using these plots.
An Active bit state (i.e. I/O line at state 1) is indicated by the Plot line going high.
An Inactive bit state (i.e. I/O line at state 0) is indicated by the Plot line going low.
The Speech Match Rules are set by default to allow the Detector name to be spelt out
as individual characters when the Detector Bit goes Active.
14-47 - Controller I/O, Speech Match Rules
By default the Detector name is spelt out one letter at a time (e.g. ‘A – S – L’), but the
settings also provide options that attempt to speak the name as a word (e.g. ‘STOP1’).
Alternatively, a phrase can be manually entered in the ‘Override’ field in the settings
(e.g. just ‘X’ rather than the full name ‘AX12’).
The “Speak ‘Active’” and/or “Speak ‘Inactive’” rules can be specified to announce
“Active” or “Inactive” to reflect the state of a Detector Bit, and this is announced after
any other speech which matches earlier rules.

Mobility Division, Traffic Solutions
Sopers Lane, Poole, Dorset, BH17 7ER
Security classification Unrestricted Page 125 of 146
Version 5 Status Released
Last Editor dave.martin Date 07-Dec-2016
Document Name User Interface Handbook Document No. 667/HU/46000/000
Copyright © Siemens plc 2016. All Rights Reserved. Mobility is a division of Siemens Plc
14.9.2 Phases
Phase aspect states can be monitored using these plots as the aspects change.
The Real Time View allocates a numeric value to each aspect state, as indicated in the
Speech Match Rules, these values being assigned to the y-axis on the resulting Plots.
In Figure 14-48, Phase A is cycling through the normal traffic sequence of Red, Red-
Amber, Green, Leaving Amber, Red.
14-48 - Phases, Speech Match Rules
By default, the Speech Match Rules assume all lit Phase aspects are to be spoken
when they occur, if speech is enabled.
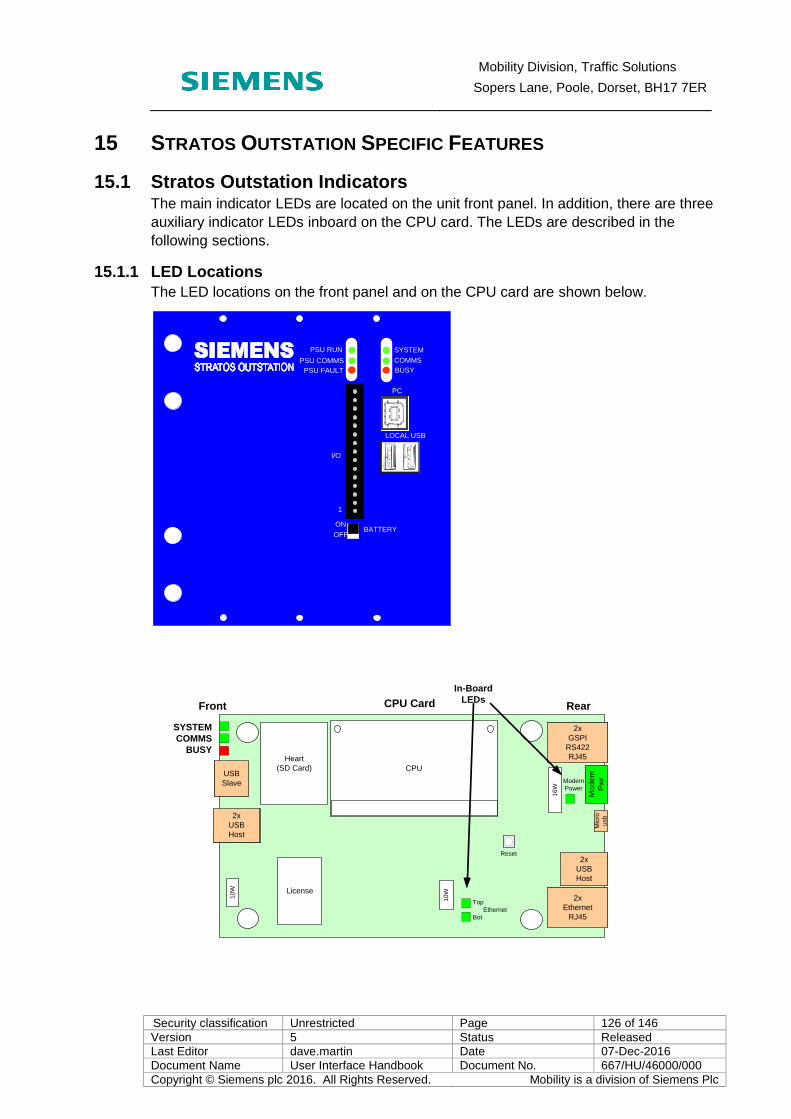
Mobility Division, Traffic Solutions
Sopers Lane, Poole, Dorset, BH17 7ER
Security classification Unrestricted Page 126 of 146
Version 5 Status Released
Last Editor dave.martin Date 07-Dec-2016
Document Name User Interface Handbook Document No. 667/HU/46000/000
Copyright © Siemens plc 2016. All Rights Reserved. Mobility is a division of Siemens Plc
15 STRATOS OUTSTATION SPECIFIC FEATURES
15.1 Stratos Outstation Indicators The main indicator LEDs are located on the unit front panel. In addition, there are three
auxiliary indicator LEDs inboard on the CPU card. The LEDs are described in the
following sections.
15.1.1 LED Locations
The LED locations on the front panel and on the CPU card are shown below.
PSU RUN
ON
OFF BATTERY
PC
I/O
1
PSU COMMS
BUSY
SYSTEM
COMMS
PSU FAULT
LOCAL USB
10
W
Mo
de
m
Pw
rM
icro
usb
2x
GSPI
RS422
RJ45
2x
Ethernet
RJ45
2x
USB
Host
USB
Slave
2x
USB
Host
CPU
Heart
(SD Card)
License
Reset
Top
Ethernet
Bot
16
W
10
W
CPU Card
SYSTEM
COMMS
BUSY
Modem
Power
Front Rear
In-Board
LEDs

Mobility Division, Traffic Solutions
Sopers Lane, Poole, Dorset, BH17 7ER
Security classification Unrestricted Page 127 of 146
Version 5 Status Released
Last Editor dave.martin Date 07-Dec-2016
Document Name User Interface Handbook Document No. 667/HU/46000/000
Copyright © Siemens plc 2016. All Rights Reserved. Mobility is a division of Siemens Plc
15.1.2 CPU LED Status Indications
BUSY
SYSTEM
COMMS
CPU Front Panel LEDs
LED State Description
SYSTEM
(Green)
Slow flash Normal operation
Medium flash Normal operation, Fault present
Very fast flash
Restricted mode - no applications running *
COMMS
Communications
(Green)
On Under UTC control, pulses off indicate receipt of messages
Off Not under UTC control, pulses on indicate receipt of messages
BUSY
(Red)
Off Normally off
Flashing Flashes to indicate the system is busy performing an operation that must not be interrupted, for example start up, upgrade, USB "memory stick" style interface is busy. Do not remove USB device or switch off the outstation while this LED is flashing.
Table 3 – CPU Front Panel LED States
* Restricted mode is similar to safe mode on a PC where the user can access the unit to examine logs, diagnose problems and perform firmware updates.
In-Board Ethernet LEDs
LED State Description
Ethernet
Connectivity
(2x Green
inboard)
On / Flashing Indicate activity for the two Ethernet interfaces,
corresponding to the Top (eth1) and Bottom (eth0)
Ethernet RJ45 sockets.
Instation comms is normally via the bottom RJ45.
Table 4 – CPU In-Board Ethernet LED States
TOP
BOT
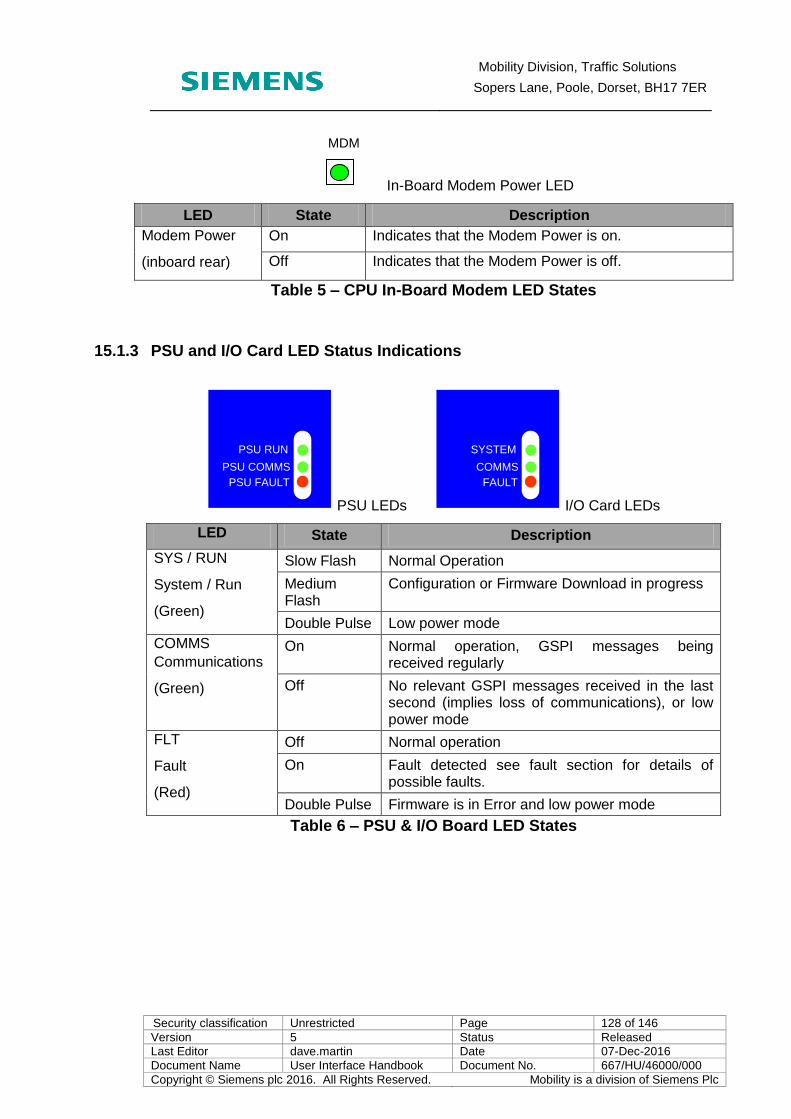
Mobility Division, Traffic Solutions
Sopers Lane, Poole, Dorset, BH17 7ER
Security classification Unrestricted Page 128 of 146
Version 5 Status Released
Last Editor dave.martin Date 07-Dec-2016
Document Name User Interface Handbook Document No. 667/HU/46000/000
Copyright © Siemens plc 2016. All Rights Reserved. Mobility is a division of Siemens Plc
In-Board Modem Power LED
LED State Description
Modem Power
(inboard rear)
On Indicates that the Modem Power is on.
Off Indicates that the Modem Power is off.
Table 5 – CPU In-Board Modem LED States
15.1.3 PSU and I/O Card LED Status Indications
PSU RUN
PSU COMMS
PSU FAULT
PSU LEDs
SYSTEM
COMMS
FAULT
I/O Card LEDs
LED State Description
SYS / RUN
System / Run
(Green)
Slow Flash Normal Operation
Medium Flash
Configuration or Firmware Download in progress
Double Pulse Low power mode
COMMS
Communications
(Green)
On Normal operation, GSPI messages being received regularly
Off No relevant GSPI messages received in the last second (implies loss of communications), or low power mode
FLT
Fault
(Red)
Off Normal operation
On Fault detected see fault section for details of possible faults.
Double Pulse Firmware is in Error and low power mode
Table 6 – PSU & I/O Board LED States
MDM

Mobility Division, Traffic Solutions
Sopers Lane, Poole, Dorset, BH17 7ER
Security classification Unrestricted Page 129 of 146
Version 5 Status Released
Last Editor dave.martin Date 07-Dec-2016
Document Name User Interface Handbook Document No. 667/HU/46000/000
Copyright © Siemens plc 2016. All Rights Reserved. Mobility is a division of Siemens Plc
15.2 Stratos Outstation Web I/F: Status & Configuration Web Pages The status and configuration web pages which are specific to the Stratos Outstation
are described in the following sections.
15.2.1 Status & Configuration - Controller Monitor
Command Response Matching
It is not usual to have to make changes on this page. If necessary, the conditions which
are considered errors on the interface to a monitored controller can be tailored on this
page.
Controller Port
It is only necessary to make changes on this page where a controller which is not
supported by the Controller Monitor is connected.
If the Controller Monitor is unable to recognise the attached controller then it leaves the
controller port at the baud rate specified. This allows access to the controllers handset
port (using the command xxc) even for unrecognised controller types. ESP will not be
used for an unrecognised controller unless enabled on this page.
It is also possible to prevent the Controller Monitor from attempting to recognise the
connected controller if it is known that it is of an unsupported type. This is not
necessary but does reduce the time taken before xxc can be used.

Mobility Division, Traffic Solutions
Sopers Lane, Poole, Dorset, BH17 7ER
Security classification Unrestricted Page 130 of 146
Version 5 Status Released
Last Editor dave.martin Date 07-Dec-2016
Document Name User Interface Handbook Document No. 667/HU/46000/000
Copyright © Siemens plc 2016. All Rights Reserved. Mobility is a division of Siemens Plc
Monitored Supply
Monitoring of the connected voltage can be enabled and a threshold set on this page.
15.2.2 Status & Configuration - Controller Serial Link
Prior to firmware v7, configuration of the serial link between the Stratos Outstation and
the controller is performed through the web page found under the Controller Serial Link
menu item of Status and Configuration.
From firmware v7 onwards, configuration of the serial link between the Stratos
Outstation and the controller is performed by the Controller Monitor – see section
15.2.1.
The format of this page is different for firmware pre & post version 7.
Figure 15-1 – Controller Serial Link page prior to firmware version 7

Mobility Division, Traffic Solutions
Sopers Lane, Poole, Dorset, BH17 7ER
Security classification Unrestricted Page 131 of 146
Version 5 Status Released
Last Editor dave.martin Date 07-Dec-2016
Document Name User Interface Handbook Document No. 667/HU/46000/000
Copyright © Siemens plc 2016. All Rights Reserved. Mobility is a division of Siemens Plc
Figure 15-2 – Controller Serial Link page firmware version 7 onwards
Enable Semi-Integral Link to Siemens Controller
Select to Enable the Semi-Integral Link to Siemens Controller. The semi-
integral link carries data for UTC, MOVA, detectors, faults and controller
handset. Disable for freestanding OTU. Default Enabled.
Freestanding Controller Serial Port Baud Rate
Select the baud rate for the serial handset interface to a freestanding controller.
For Semi-Integral Link to Siemens controller, the value is not used.
Controller Diagnostics Upload Interval
Defines the time interval between each retrieval of the controllers Current Fault
Flags, and Historic Fault Log. Range 5 to 1440 minutes. Current fault flags are
asserted in the main Gemini Fault Table. The Historic Fault Log may be found
in the Controller Log tab. Default 10 minutes.
Max Controller Historic Fault Log Records
Defines the maximum number of records from the controllers Historic Fault Log
to be saved on the outstation file system. Each record holds either date, time or
fault data. Range 800 to 12000. Default 800.

Mobility Division, Traffic Solutions
Sopers Lane, Poole, Dorset, BH17 7ER
Security classification Unrestricted Page 132 of 146
Version 5 Status Released
Last Editor dave.martin Date 07-Dec-2016
Document Name User Interface Handbook Document No. 667/HU/46000/000
Copyright © Siemens plc 2016. All Rights Reserved. Mobility is a division of Siemens Plc
Controller Settings Files Upload Interval
Defines the time interval between each automatic retrieval of the controllers
8UL file and UDD file. Range 10 to 10080 minutes. The 8UL file is an IC4
compatible compressed version of the original controller configuration file, for
back up purposes. The UDD file contains a subset of controller settings, and
may be viewed and edited in Convert. It may then be sent back to the controller
to effect settings changes. Default 1440 minutes (24 hours).
ESP Override State
For test & simulation purposes only. Allows the use of ESP on the connection to be
overridden.Enable MOVA Sim Compatible
For test & simulation purposes only. Set this to 123 to allow MOVA Sim to be
used.
Inhibit Upload / Download Messages
Allows the use of upload download messages to be inhibited when the Siemens
Enhanced Serial Protocol is used.
Controller Log
Displays a recent extract of the controller historic log. Only supported for
modern Siemens controllers.
Controller Files
Presents a recent snapshot of some important controller files. Only supported
for modern Siemens controllers.

Mobility Division, Traffic Solutions
Sopers Lane, Poole, Dorset, BH17 7ER
Security classification Unrestricted Page 133 of 146
Version 5 Status Released
Last Editor dave.martin Date 07-Dec-2016
Document Name User Interface Handbook Document No. 667/HU/46000/000
Copyright © Siemens plc 2016. All Rights Reserved. Mobility is a division of Siemens Plc
15.2.3 Status & Configuration - Heart
Use of the heart web page for system backup and restore is described in section 15.3.
15.2.4 Status & Configuration - Support Battery
Configuration of the unit support battery is performed through the web page found
under the Support Battery menu item of Status and Configuration.
Enable Battery Reports
Setting this configuration option enables reporting of battery test results.
When this option is false, the battery fault reports and notifications are inhibited.
The support battery is used to supply power to the unit when the mains electricity
supply fails (e.g. so that the power fail event can be reported to a central instation).
Default Enabled.
Notify Running On Battery

Mobility Division, Traffic Solutions
Sopers Lane, Poole, Dorset, BH17 7ER
Security classification Unrestricted Page 134 of 146
Version 5 Status Released
Last Editor dave.martin Date 07-Dec-2016
Document Name User Interface Handbook Document No. 667/HU/46000/000
Copyright © Siemens plc 2016. All Rights Reserved. Mobility is a division of Siemens Plc
When this option is true, a notification table entry is generated on detection of mains
power fail, when the unit is being powered from a support battery. An entry is also
placed in the system log.
When this option is false, the notifications are inhibited. Default Enabled.
Battery Capacity Low Threshold
This is the threshold value for notifying of support battery capacity low.
It is the time in minutes for which the battery is expected to maintain voltage when on
test load discharge. Range 0 to 60. Default 60.
The battery capacity is tested every 30 days (approx). The test is delayed if the
temperature is outside range or if there has been a mains failure in the previous 12
hours.
Battery Voltage Drop Threshold
This is the threshold value for notifying of support battery voltage drop test fail.
It is the max voltage drop expected from the battery when the test load is initially
applied. Range 0.0 to 19.9. Default 1.0.
The battery voltage drop is tested at the same time as battery capacity (every 30 days).
15.2.5 Status & Configuration - Intelligent Parking
Configuration of Intelligent Parking is described in 667/HB/52800/000 User Manual for
IPS On Street Equipment.
15.3 Stratos Outstation Heart / System Backup The Heart holds a backup of the system which can be used to:
Clone the system onto a replacement Processor Card if the original requires replacement.
Return the system to an earlier state.
All aspects of the system are recorded in the backup including firmware, configuration,
system log, site log and all changes made to the point at which the backup was taken.
The Heart is implemented using an SD card fitted to the Processor Card.
Backups are created and written to the Heart periodically, usually at 00:30am but this
can be changed if required using the System - Advanced - Backup web page. Backups
can also be created and ‘retained’ on demand.
15.3.1 Restoring from the Heart
When a Processor Card needs to be replaced it is possible to clone the system which
was running on the old Processor Card onto the replacement Processor Card.
The system backups held on the Heart are known as Restore Points.
When restoring to an old Restore Point, any configuration changes, system log entries and site log entries which were made after that point will be lost.

Mobility Division, Traffic Solutions
Sopers Lane, Poole, Dorset, BH17 7ER
Security classification Unrestricted Page 135 of 146
Version 5 Status Released
Last Editor dave.martin Date 07-Dec-2016
Document Name User Interface Handbook Document No. 667/HU/46000/000
Copyright © Siemens plc 2016. All Rights Reserved. Mobility is a division of Siemens Plc
15.3.2 Restoring from the Heart
Figure 15-3 - Restore Points available for use
The Restore Points available are shown on the Status and Configuration - Heart web
page. Restoration to one of the listed Restore Points is initiated by pressing the
Restore button associated with the Restore Point.
The EFC now reboots and performs the restoration.
15.3.3 Creating Restore Points
A Restore Point is created periodically. This Restore Point is known as the Latest
Restore Point. If the Latest Restore Point exists at the time of the periodic creation then
it is overwritten with the new system snapshot.
A Restore Point can also be created on demand by the user if there is not already a
Latest Restore Point.
The following operations are possible on the Latest Restore Point:
Restore - restore the system to that stored in the Restore Point
Delete - delete the Restore Point. It is not possible to recover the Restore Point after deletion.
Refresh - update the Restore Point with a snapshot of the current system.
Retain - move the Restore Point to the list of Retained Restore Points so it is not overwritten by the next scheduled backup.
There can be many Retained Restore Points, up to the capacity of the SD card being
used for the Heart. The following operations are possible on a Retained Restore Point:
Restore - restore the system to that stored in the Restore Point
Delete - delete the Restore Point. It is not possible to recover the Restore Point after deletion.

Mobility Division, Traffic Solutions
Sopers Lane, Poole, Dorset, BH17 7ER
Security classification Unrestricted Page 136 of 146
Version 5 Status Released
Last Editor dave.martin Date 07-Dec-2016
Document Name User Interface Handbook Document No. 667/HU/46000/000
Copyright © Siemens plc 2016. All Rights Reserved. Mobility is a division of Siemens Plc

Mobility Division, Traffic Solutions
Sopers Lane, Poole, Dorset, BH17 7ER
Security classification Unrestricted Page 137 of 146
Version 5 Status Released
Last Editor dave.martin Date 07-Dec-2016
Document Name User Interface Handbook Document No. 667/HU/46000/000
Copyright © Siemens plc 2016. All Rights Reserved. Mobility is a division of Siemens Plc
15.4 Stratos Outstation - Wiping Configuration and Firmware There are two levels of initialisation, each of which is described below. It is important to
follow the procedure correctly to activate the desired level of initialisation.
Configuration Wiping
This initialisation sequence will completely erase all working data, system logs, site
logs and configuration settings.
CAUTION: Wiping will completely initialise the unit, clearing all working
data, system logs, site logs and configuration settings. Once a unit has
been wiped, remote access to it is lost and it will need to be re-configured
locally to restore network access.
Any system backups which have already been created on the Heart mass
storage device are not affected by the configuration wipe, and so can be
used to restore all the files to that point if required.
Un-installing Firmware
This initialisation sequence will perform a configuration wipe as described above and in
addition, the application firmware will be un-installed and the unit will return a base
level of execution.
CAUTION: Do not follow this sequence without having a means of
reprogramming the unit with new firmware e.g. USB stick image.
Procedure
1. Ensure the unit is powered off. 2. Press and hold the reset button located in the middle of the CPU card, slightly
toward the rear. 3. Power on the unit. 4. Continue to hold the reset button (while the red “BUSY” LED starts flashing)
until the red “BUSY” LED is illuminated and steady – this takes approximately 15 seconds.
BUSY
SYSTEM
COMMS
5. Release the reset button briefly and then press it again. 6. Continue to hold the reset button until either:-
- after 5 seconds, one green CPU LED is illuminated and steady – for configuration wiping
BUSY
SYSTEM
COMMS
- after 10 seconds, both green CPU LED’s are illuminated and steady – for firmware un-install
BUSY
SYSTEM
COMMS

Mobility Division, Traffic Solutions
Sopers Lane, Poole, Dorset, BH17 7ER
Security classification Unrestricted Page 138 of 146
Version 5 Status Released
Last Editor dave.martin Date 07-Dec-2016
Document Name User Interface Handbook Document No. 667/HU/46000/000
Copyright © Siemens plc 2016. All Rights Reserved. Mobility is a division of Siemens Plc
7. Release the reset button. 8. The unit will now reboot and perform the initialisation.
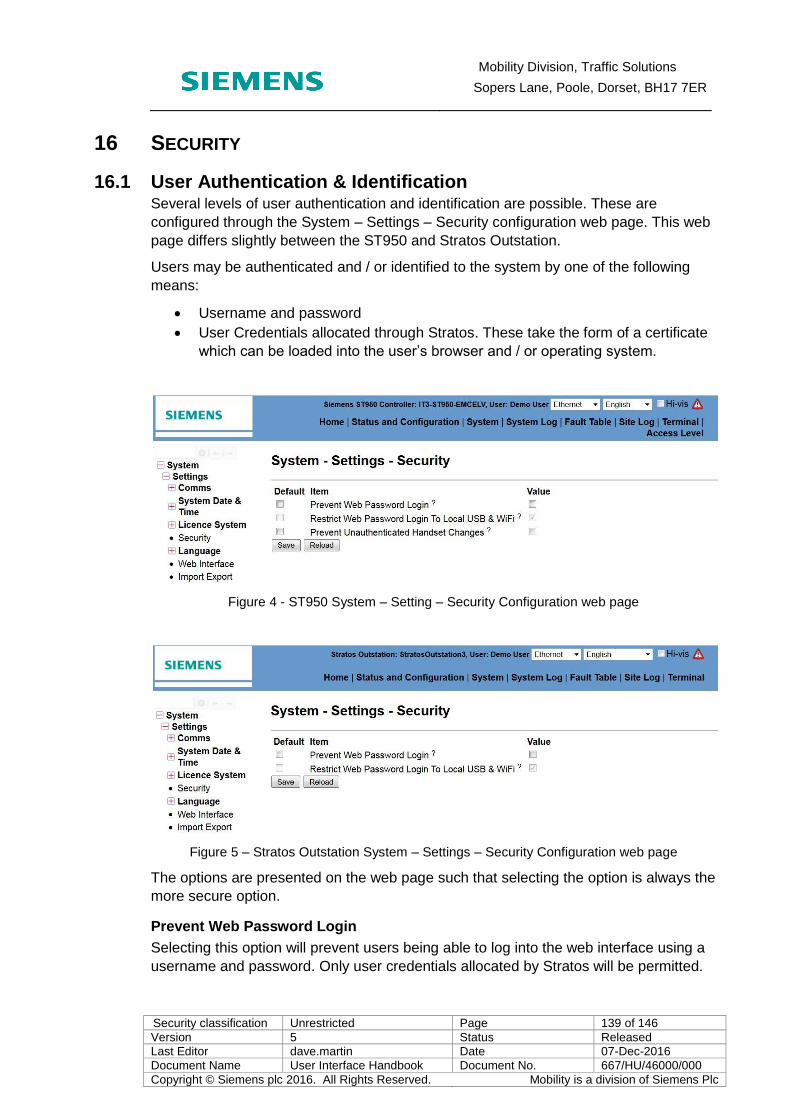
Mobility Division, Traffic Solutions
Sopers Lane, Poole, Dorset, BH17 7ER
Security classification Unrestricted Page 139 of 146
Version 5 Status Released
Last Editor dave.martin Date 07-Dec-2016
Document Name User Interface Handbook Document No. 667/HU/46000/000
Copyright © Siemens plc 2016. All Rights Reserved. Mobility is a division of Siemens Plc
16 SECURITY
16.1 User Authentication & Identification Several levels of user authentication and identification are possible. These are
configured through the System – Settings – Security configuration web page. This web
page differs slightly between the ST950 and Stratos Outstation.
Users may be authenticated and / or identified to the system by one of the following
means:
Username and password
User Credentials allocated through Stratos. These take the form of a certificate
which can be loaded into the user’s browser and / or operating system.
Figure 4 - ST950 System – Setting – Security Configuration web page
Figure 5 – Stratos Outstation System – Settings – Security Configuration web page
The options are presented on the web page such that selecting the option is always the
more secure option.
Prevent Web Password Login
Selecting this option will prevent users being able to log into the web interface using a
username and password. Only user credentials allocated by Stratos will be permitted.

Mobility Division, Traffic Solutions
Sopers Lane, Poole, Dorset, BH17 7ER
Security classification Unrestricted Page 140 of 146
Version 5 Status Released
Last Editor dave.martin Date 07-Dec-2016
Document Name User Interface Handbook Document No. 667/HU/46000/000
Copyright © Siemens plc 2016. All Rights Reserved. Mobility is a division of Siemens Plc
Restrict Web Password Login to Local USB & WiFi
Selecting this option will prevent remote users being able to log into the web interface
using a username and password. Only user credentials allocated by Stratos will be
permitted for remote users. Local users connected by USB or WiFi will still be able to
log in using username and password.
Prevent Unauthenticated Handset Changes
Selecting this option will prevent write operations being performed using the ST950 25
way handset interface.
16.1.1 Effect of Stratos Profile on User Authentication and Identification Settings
User authentication is one area in which a policy is enforced when the Stratos profile is
selected on the System – Settings configuration web page. When this selection is
made, remote access is restricted to the web interface only and the web password
login is restricted to local USB and WiFi connections only. This option is shown as
ticked on the web page and cannot be changed by the user unless the Stratos profile is
deselected on the System – Settings web page.
16.2 Outstation User Credentials The following information can also be found in 667/HQ/46000/007 ST950 / Stratos
Outstation User Credentials Quick Start Guide.
Outstation user credentials are an alternative to the traditional username and password
used to identify and authenticate users to equipment. This feature is supported by
Stratos v3, ST950 v11 and Stratos Outstation v7 onwards.
16.2.1 Creation of Outstation User Credentials
Stratos outstation user credentials can be issued to any Stratos user through the user
management screens in Stratos. These credentials can then be used by a user to
identify and authenticate with an outstation without the need to enter a username or
password. At present Stratos supports a single type of credentials for all customer
tenants so a user with these credentials will be able to identify and authenticate with all
equipment.
16.2.2 Distribution of Outstation User Credentials
The primary means of distribution is by email containing a certificate along with a
transportation pass phrase supplied in an SMS text. The certificate is loaded into the
user’s computer or browser as appropriate, a process during which the transportation
pass phrase will be requested in order to decrypt & authenticate the certificate. The
details of this process depend on the computer / operating system / browser but
generally follow the following sequence:
User is prompted for certificate
User browses to location where certificate has been stored from email and
submits certificate
User is prompted for transport pass phrase
Certificate is incorporated into list of certificates held by computer / operating
system / browser
ST950

Mobility Division, Traffic Solutions
Sopers Lane, Poole, Dorset, BH17 7ER
Security classification Unrestricted Page 141 of 146
Version 5 Status Released
Last Editor dave.martin Date 07-Dec-2016
Document Name User Interface Handbook Document No. 667/HU/46000/000
Copyright © Siemens plc 2016. All Rights Reserved. Mobility is a division of Siemens Plc
Example certificate import screen from Firefox 45.2.0:
16.2.3 Use Of Outstation User Credentials
Once installed in the user’s computer / browser, the credentials allow the user to
authenticate and identify themself to ST950 and Stratos Outstation equipment without
the need to use a username and password. Depending on the operating system /
browser, the credentials may be used automatically or the user may be prompted to
select the credentials to be used.
This method of authentication is considered more secure and continues to be available
when equipment security / identification levels are set to more enhanced levels which
cause the username / password mechanism to be disabled. For example, when an
outstation is configured to be in Stratos mode, all non-local access must be
authenticated using credentials (local access (USB handset port & WiFi) may still use
username and password).
Any prompt for credentials when connecting to ST950 or Stratos Outstation running
firmware which does not support this feature (earlier than v11 & v7) should be
cancelled. This will return to the username & password authentication method.
16.2.4 Lifetime of Outstation User Credentials
Outstation User Credentials are created with a limited lifetime so will need to be
renewed periodically. Stratos will automatically send updates before expiry so it is
important to keep contact details up to date in Stratos.

Mobility Division, Traffic Solutions
Sopers Lane, Poole, Dorset, BH17 7ER
Security classification Unrestricted Page 142 of 146
Version 5 Status Released
Last Editor dave.martin Date 07-Dec-2016
Document Name User Interface Handbook Document No. 667/HU/46000/000
Copyright © Siemens plc 2016. All Rights Reserved. Mobility is a division of Siemens Plc
17 CONNECTION TO OTHER SYSTEMS The equipment may need to be connected to other systems such as Stratos and / or
UTC or maybe simply to gain access to the user interface from a remote location. Such
access is usually achieved using the Ethernet interface which first has to be configured
as described in section 3.5.
17.1 Connection to Stratos The guidance in this section is sufficient when only connecting to Stratos. If connecting
to other systems in addition to Stratos (e.g. UTC) then the considerations described in
section 17.2 also need to be taken into account.
17.1.1 Effect of Connecting to Stratos
When the connection profile is set to Stratos (see section 17.1.3) the equipment
enforces certain restrictions in order to ensure the security of the system. These
restrictions include:
Telnet & ssh are disabled. If terminal access is required then instead use the
web terminal described in section 4.10.
Username / password authentication is disabled for remote access. Instead use
Outstation User Credentials as described in section 16.2. Note:
o Outstation User Credentials are not required when accessing the
equipment through Stratos
o Outstation User Credentials need to be installed on all systems used for
remote access not through Stratos including personal computers, UTC
systems, tablets, phones.
Remote use of the TRL Movacomm tool is prohibited. Instead use the built-in
movacomm command as described in 667/HB/46000/003.
17.1.2 Requirements for Connection to Stratos
Equipment
ST950 CPU board 667/1/46010/101 is required in order to support connection to
Stratos. 667/1/46010/001 does not support connection to Stratos so will need to be
replaced if connection is required.
There is no restriction on Stratos Outstation hardware for connection to Stratos.
Network Configuration
In order to connect to Stratos, the following internet services must be accessible to the
equipment:
DHCP (UDP 67 & 68)
DNS (UDP 53)
NTP (UDP 123)
o pool.ntp.org
HTTPS (TCP 443)
o www.stratostraffic.com (TLS trusted time)
o www.stratosemerge.com (CRLs)
o ovpn1.stratostraffic.com (OpenVPN)

Mobility Division, Traffic Solutions
Sopers Lane, Poole, Dorset, BH17 7ER
Security classification Unrestricted Page 143 of 146
Version 5 Status Released
Last Editor dave.martin Date 07-Dec-2016
Document Name User Interface Handbook Document No. 667/HU/46000/000
Copyright © Siemens plc 2016. All Rights Reserved. Mobility is a division of Siemens Plc
HTTP or HTTPS (TCP 80 or 443)
o OCSP authenticator for stratosemerge HTTPS certificate (OCSP)
Other applications and features of the equipment may require access to additional
services either on the internet or on a local network. The documentation for these
applications and features record these requirements.
Licence Card
A Licence Smartcard version 2 is required to support connections to Stratos. The
version of the Licence Smartcard fitted can be checked on the System – Settings –
Comms – Stratos configuration web page.
The UTMC OTU licence controls whether or not connection to Stratos is permitted –
see section 10.
17.1.3 Configuring for Connection to Stratos
To connect the unit to Stratos perform the following:
1. Set the date and time (System - Settings - System Date & Time - Set System
Date & Time web page).
2. On the System - Settings - Comms – Stratos web page:
Set the Tenant Pass Phrase.
Set the Site Location.
Set the Site Name.
3. Set the profile to Stratos (System – Settings web page).
4. Check that Ethernet is suitably configured (System - Settings - Comms -
DSL/Fibre web page). Using the Stratos profile sets this to DHCP. If this not
suitable then configure as described in section 3.5.2.
5. Connect the Ethernet port to a network which has connectivity to the services
described above.
Setting the Site Name, Site Location & Tenant Pass Phrase
These items are set on the System – Settings – Comms – Stratos configuration web
page.

Mobility Division, Traffic Solutions
Sopers Lane, Poole, Dorset, BH17 7ER
Security classification Unrestricted Page 144 of 146
Version 5 Status Released
Last Editor dave.martin Date 07-Dec-2016
Document Name User Interface Handbook Document No. 667/HU/46000/000
Copyright © Siemens plc 2016. All Rights Reserved. Mobility is a division of Siemens Plc
Specifying a Tenant Pass Phrase prior to initial connection allows the equipment to be
automatically allocated to the specified tenant on initial connection to Stratos. If the
Tenant Pass Phrase is not specified at the time of initial connection then the equipment
will be allocated to the Siemens Support team who can then make the allocation when
required based on the outstation name, unique site id and destination tenant. This item
has no effect after initial connection to Stratos.
Setting the profile to Stratos
Equipment is supplied configured for use in non-Stratos systems. To configure it for
use with Stratos, visit the System – Settings configuration web page and set the Profile
to Stratos.
17.2 Connection to Systems Other than Stratos
17.2.1 General Considerations
When set to the Stratos profile and connected to Stratos only, the equipment provides
suitable security to allow it to be connected to the Internet. If either of these conditions
is not met (i.e. the Stratos profile isn’t selected and / or the unit is connected to systems
other than Stratos e.g. UTC systems) then a suitable analysis should be performed to

Mobility Division, Traffic Solutions
Sopers Lane, Poole, Dorset, BH17 7ER
Security classification Unrestricted Page 145 of 146
Version 5 Status Released
Last Editor dave.martin Date 07-Dec-2016
Document Name User Interface Handbook Document No. 667/HU/46000/000
Copyright © Siemens plc 2016. All Rights Reserved. Mobility is a division of Siemens Plc
ensure that there are no security vulnerabilities in the network configuration and / or
equipment used. Hard rules cannot be given here because the details will depend on
the networks and connections involved and will change over time. What is considered
appropriate security now may not be so in a year’s time and is unlikely to be adequate
in five or ten year’s time. The following are examples of what should be considered:
General:
o Are the reasons for connection clear?
o Has the system (including all equipment and interconnections) been
reviewed for vulnerability / susceptibility weakness appropriate to the
environment in which it is used?
o Has a plan been drawn up to ensure that the findings of this analysis are
implemented and maintained?
Configuration:
o Does the configuration meet the needs for connection and no more?
o Is configuration of equipment suitably protected?
o Are only the services & features which are necessary enabled?
o Is encryption used where privacy is required?
o Is authentication used where trust is required?
o Are the endpoints of trusted and / or private links in appropriate places?
o Are firewalls in place to ensure traffic only flows as desired (and cannot
flow elsewhere)?
Maintenance:
o Is all equipment running the latest firmware available for the
manufacturer?
o Is there a plan and means to apply security fixes to firmware used in all
elements of the system?
o Are secrets (e.g. passwords, encryption / authentication keys) held
securely?
o Is there a plan and means to update secrets as required (e.g. password
update & strength)?
o Is there a plan to regularly review the system to determine if it is still
secure?
Disposal:
o Is equipment which is replaced or no longer required disposed of in a
way which does not compromise the system (e.g. through leakage of
secrets, configuration, etc.)?
Note that this consideration applies to all types of networks including those considered
“private”. Often “private” networks will have external connections to some services and
may also have some internal threats. These need to be identified and considered in
order to ensure that the system is secure.
17.2.2 Example Specification
Below is an example specification which might be drawn up for the connection of
equipment to an instation. This is an example only and should not be taken as
complete or suitable for any particular purpose.
All communications between equipment and instation shall be over VPN.
Mobility Division, Traffic Solutions
Sopers Lane, Poole, Dorset, BH17 7ER
Security classification Unrestricted Page 146 of 146
Version 5 Status Released
Last Editor dave.martin Date 07-Dec-2016
Document Name User Interface Handbook Document No. 667/HU/46000/000
Copyright © Siemens plc 2016. All Rights Reserved. Mobility is a division of Siemens Plc
Where IPSEC is used as the VPN, the following ciphers or stronger shall be
used (weaker ciphers shall not be used):
o SHA256
o AES128/AES256
Where PKI is used to secure the VPN link, the following shall be the minimum
used:
o 2048 Kbit Private keys
o The CA shall be the responsibility of, managed and maintained by the
customer. Siemens shall review the customer’s proposal for this process
to ensure adequate and acceptable.
Where a shared secret is used to secure the VPN link:
o The Security key shall be unique for each connection e.g a separate
shared key shall be used for each connection.
o The shared secrets shall be the responsibility of, secured by, managed
and maintained by the customer. Siemens shall review the customer’s
proposal for this process to ensure adequate and acceptable.
All equipment shall:
Be running latest firmware available from the manufacturer.
Have firmware updated at least every three months if an update is available.
Have all passwords set to non-default values unique to that equipment
Not have Admin Web interface available on WAN interface
Be returned to Siemens when no longer required (e.g. replaced,
decommissioned) for secure disposal
All routers shall:
Be configured with an acceptable firewall to prevent unauthorized access from
WAN
Have no additional services available on the WAN interface (SNMP, Telnet,
SSH)
Have UPNP disabled
Have no port forwarding from the WAN to the ST950 / Stratos Outstation shall
be used.
The ST950 / Stratos Outstation:
Shall have the Firewall setup to include rules to only accept known traffic from
the known Instation IP address.
Related Documents