Relay ™ Communications Hub Version 2.0 User Guide

Welcome message from author
This document is posted to help you gain knowledge. Please leave a comment to let me know what you think about it! Share it to your friends and learn new things together.
Transcript
Relay™ Communications HubVersion 2.0
User Guide
1 - About This Guide
Version History 4Related Documentation 4
2 - Overview
Template features 6Examples of enhanced jobs 8
3 - Getting Started
Signing in to the Relay Communications Hub 11Signing Out 12Help 13Changing the display language 13
4 - Using My Print Streams
Creating a Job 15
5 - Viewing Job Reports
Job Reports 22Finding the jobs you wish to see 23What to do if your job fails 25Removing your Job 26
6 - Updating your profile
Editing your profile (US and Canada) 28Editing your profile (Rest of World) 30
Signing out 32
7 - Desktop Client
Downloading the Desktop Client 34Unpacking the zip file 35Opening the Desktop Client 36Desktop Client's Hot folders 39Appendix A: More Information
Copyright 42Trademarks 42Technical Support 43
Table of Contents
1 - About This GuideThis User Guide describes the operation of the Relay CommunicationsHub Web Client and Desktop Client. By following the procedures given inthis guide you will be able to:
• Upload a data file to the Relay Communications Hub Client• Apply a Template to that file• Download the resulting PDF and related files from the Relay Hub Client• View reports on completed jobs.• Manage user access• Invite others to use Relay Communications Hub• Add money to your account• Edit your profile• Download the Desktop Client• Use hot folders to automatically process files
In this section
Version History 4Related Documentation 4
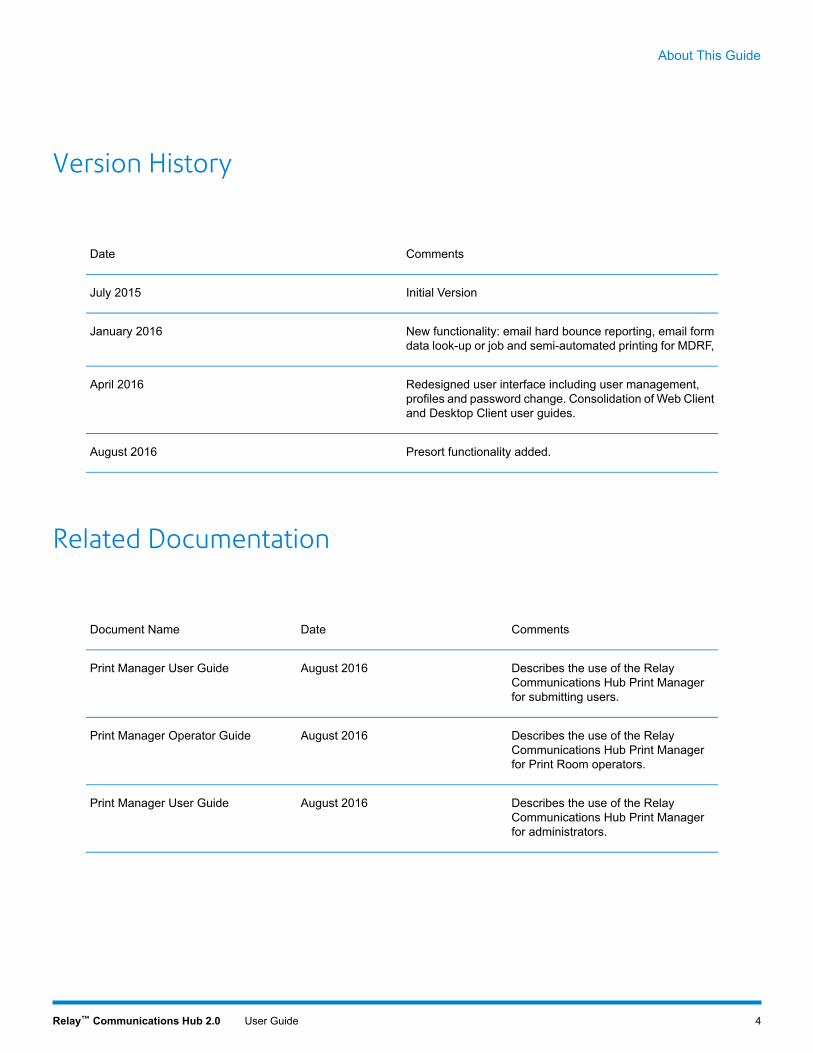
Version History
CommentsDate
Initial VersionJuly 2015
New functionality: email hard bounce reporting, email formdata look-up or job and semi-automated printing for MDRF,
January 2016
Redesigned user interface including user management,profiles and password change. Consolidation of Web Clientand Desktop Client user guides.
April 2016
Presort functionality added.August 2016
Related Documentation
CommentsDateDocument Name
Describes the use of the RelayCommunications Hub Print Managerfor submitting users.
August 2016Print Manager User Guide
Describes the use of the RelayCommunications Hub Print Managerfor Print Room operators.
August 2016Print Manager Operator Guide
Describes the use of the RelayCommunications Hub Print Managerfor administrators.
August 2016Print Manager User Guide
4Relay™ Communications Hub 2.0 User Guide
About This Guide
2 - OverviewRelay Hub Client provides you with the facility to modify jobs. These jobsare contained in a data file and are uploaded to the Relay Hub in which aspecific Template is applied and the results can then be downloaded.Templates are a set of actions performed as a result of tests on specificsections of the data file (pages, sides, textural elements, feed statements,PDL comments or the existence of resources with specific names). Scriptscontrol how a Template is applied to a data file in order to modify your jobs.
Templates are created specifically for your company, each one tailored toyour requirements and using your own resources and material. TheTemplates available to you are governed by your login credentials.
Relay Communication Hub allows you to upload your files from a WebClient and a Desktop Client. You may use the Web Client directly, ordownload the Desktop Client, which provides a directory structure containinga hot folder for each or you Templates. Drop a file into a hot folder for therelevant Template and you job is processed automatically.
In this section
Template features 6Examples of enhanced jobs 8
Template features
Relay Communications Hub capabilities are available in packages. To offer one or a combinationof these, specific Templates are created for you for specific jobs to take advantage of the featuresof these packages. Template are created by the PB “on-boarding” team.
When a single file is uploaded and processed, this is referred to as a “Template”.
When two or more files are uploaded and combined, or used together, for example, reprint, this isreferred to as a “bundled template”. Print driver jobs are collected together for processing, this isalso referred to as a “bundled template”.
Templates output one or more of the following:
• a data file for download• mail pieces for printing and insertion into envelopes• emails sent• files archived.
Package overviews
The following packages are currently available:
Input files can be enhanced with the addition of forms, tables, graphics and highlights.An example of this can be seen in Examples of enhanced jobs.
Enhancement
Combine mail pieces for the same recipient. This is known as Grouping if the inputis a single data file or House Holding if multiple input files are combined and thensorted.
Mailing
In addition, the Addressing functions enables the use of email addresses within thedata file or from look up tables. These are used as recipient addresses to which thejob in the data file will be sent. In addition, it enables replacement of email addresseswhere they are different from those given in the data file.
Once the data file is uploaded and the Template applied, emails are sent. The JobReports facility then provides information on which emails were sent, which wereblocked by the recipient and which were not received.
This is similar to mailing and differs only in that the mail pieces are emailed to therecipients rather than being printed, inserted and sent by post.
Emailing
Email cannot be purchased separately, but only with another package.Note:
Conversion of one print format to another, for example, PDF to PostScript.Printing
6Relay™ Communications Hub 2.0 User Guide
Overview
An OMR (optical mark recognition), 1D or 2D barcode is added to each page. Theseare scanned for a variety of confirmation tests.
Integrity
OMR is the most basic. In its simplest form it indicates start and end pages of amail piece. A more advanced OMR has a rolling counter on each page to enabledetection of missing sheets.
1D Barcodes can store more information than an OMR. For example, the informationcontained in the barcode could contain: the total pages in a mail piece, the currentpage in a mail piece and a rolling counter on each page to detect missing sheets.
2D Barcodes can store even more information. In addition to the information storedby 1D barcodes, they have a unique identifier for the original file. They can alsostore address information.
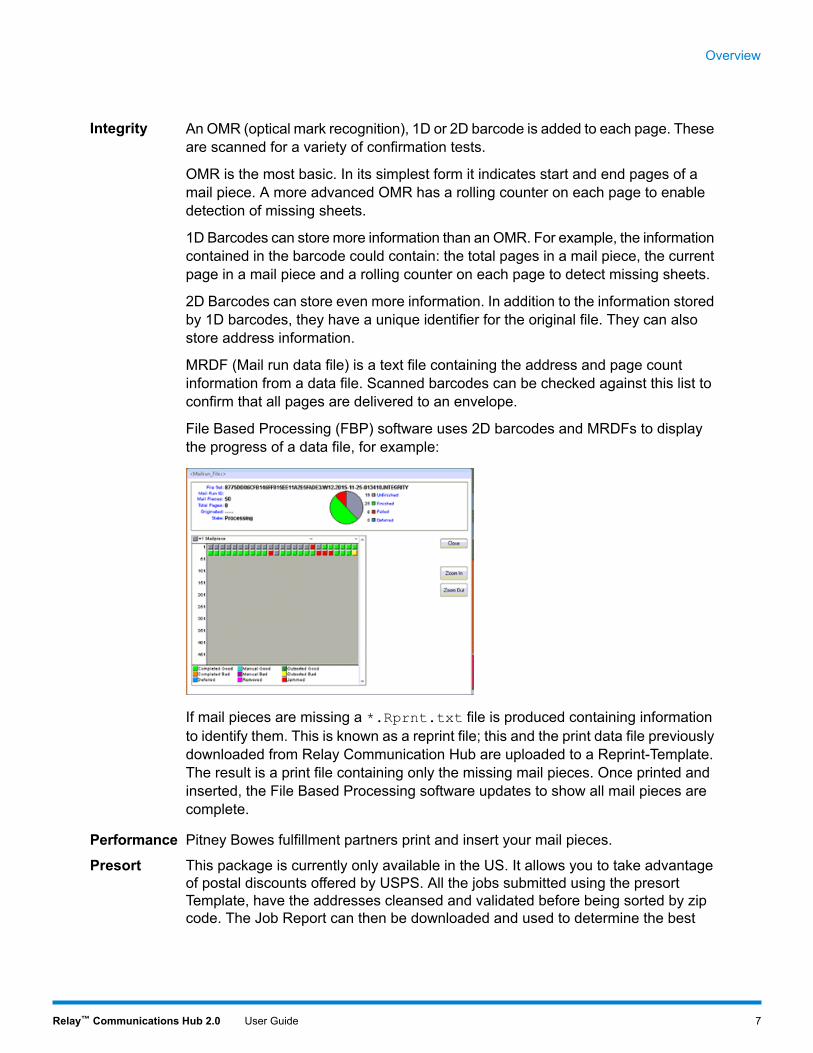
MRDF (Mail run data file) is a text file containing the address and page countinformation from a data file. Scanned barcodes can be checked against this list toconfirm that all pages are delivered to an envelope.
File Based Processing (FBP) software uses 2D barcodes and MRDFs to displaythe progress of a data file, for example:
If mail pieces are missing a *.Rprnt.txt file is produced containing informationto identify them. This is known as a reprint file; this and the print data file previouslydownloaded from Relay Communication Hub are uploaded to a Reprint-Template.The result is a print file containing only the missing mail pieces. Once printed andinserted, the File Based Processing software updates to show all mail pieces arecomplete.
Pitney Bowes fulfillment partners print and insert your mail pieces.Performance
This package is currently only available in the US. It allows you to take advantageof postal discounts offered by USPS. All the jobs submitted using the presort
Presort
Template, have the addresses cleansed and validated before being sorted by zipcode. The Job Report can then be downloaded and used to determine the best
7Relay™ Communications Hub 2.0 User Guide
Overview
Deposit Date on which to print and mail individual mail pieces in order to achievethe lowest cost of postage.
Examples of enhanced jobs
Examples of enhanced jobs are given below. Templates have been applied which add predefinedelements.
Local Improvement District Bill
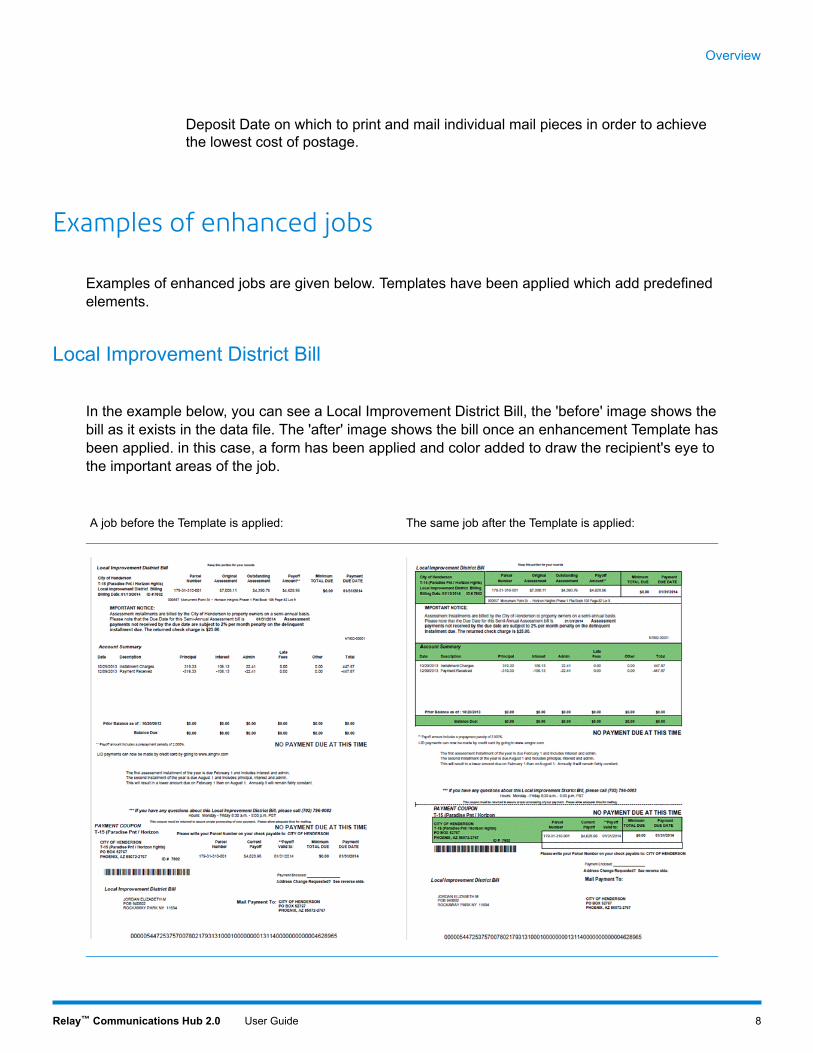
In the example below, you can see a Local Improvement District Bill, the 'before' image shows thebill as it exists in the data file. The 'after' image shows the bill once an enhancement Template hasbeen applied. in this case, a form has been applied and color added to draw the recipient's eye tothe important areas of the job.
The same job after the Template is applied:A job before the Template is applied:
8Relay™ Communications Hub 2.0 User Guide
Overview
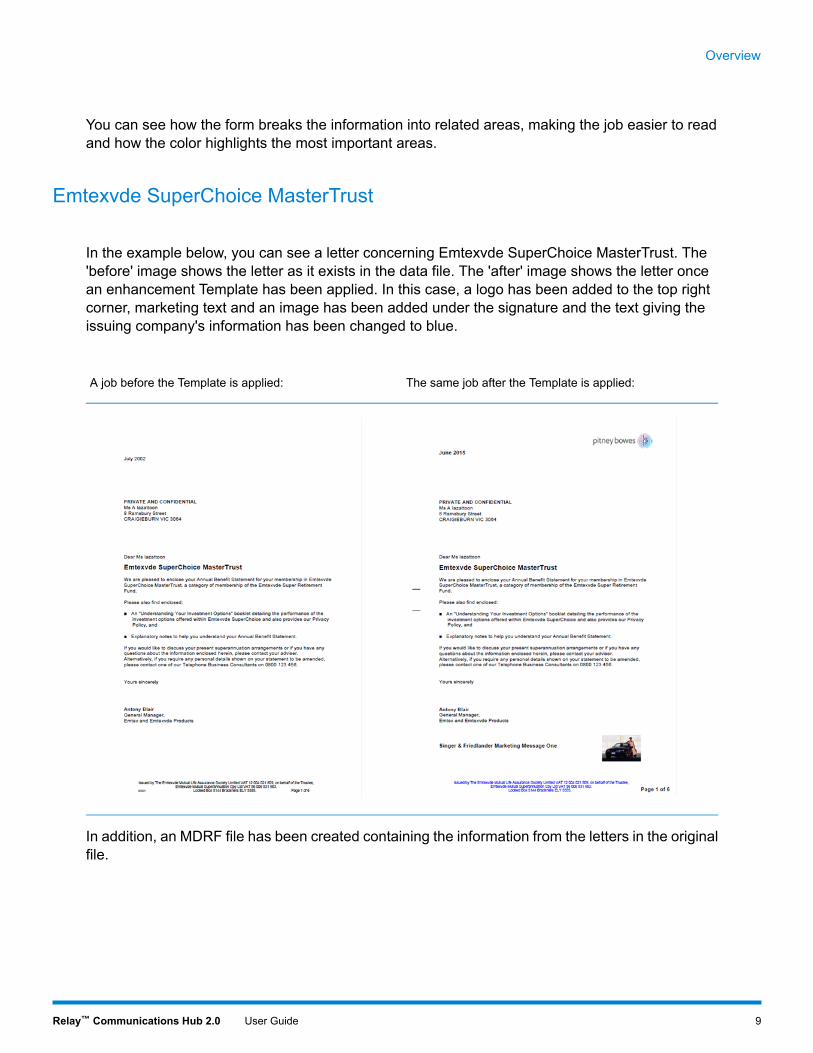
You can see how the form breaks the information into related areas, making the job easier to readand how the color highlights the most important areas.
Emtexvde SuperChoice MasterTrust
In the example below, you can see a letter concerning Emtexvde SuperChoice MasterTrust. The'before' image shows the letter as it exists in the data file. The 'after' image shows the letter oncean enhancement Template has been applied. In this case, a logo has been added to the top rightcorner, marketing text and an image has been added under the signature and the text giving theissuing company's information has been changed to blue.
The same job after the Template is applied:A job before the Template is applied:
In addition, an MDRF file has been created containing the information from the letters in the originalfile.
9Relay™ Communications Hub 2.0 User Guide
Overview
3 - Getting StartedThis section describes how to open and log into the Relay CommunicationsHub.
In this section
Signing in to the Relay Communications Hub 11Signing Out 12Help 13Changing the display language 13
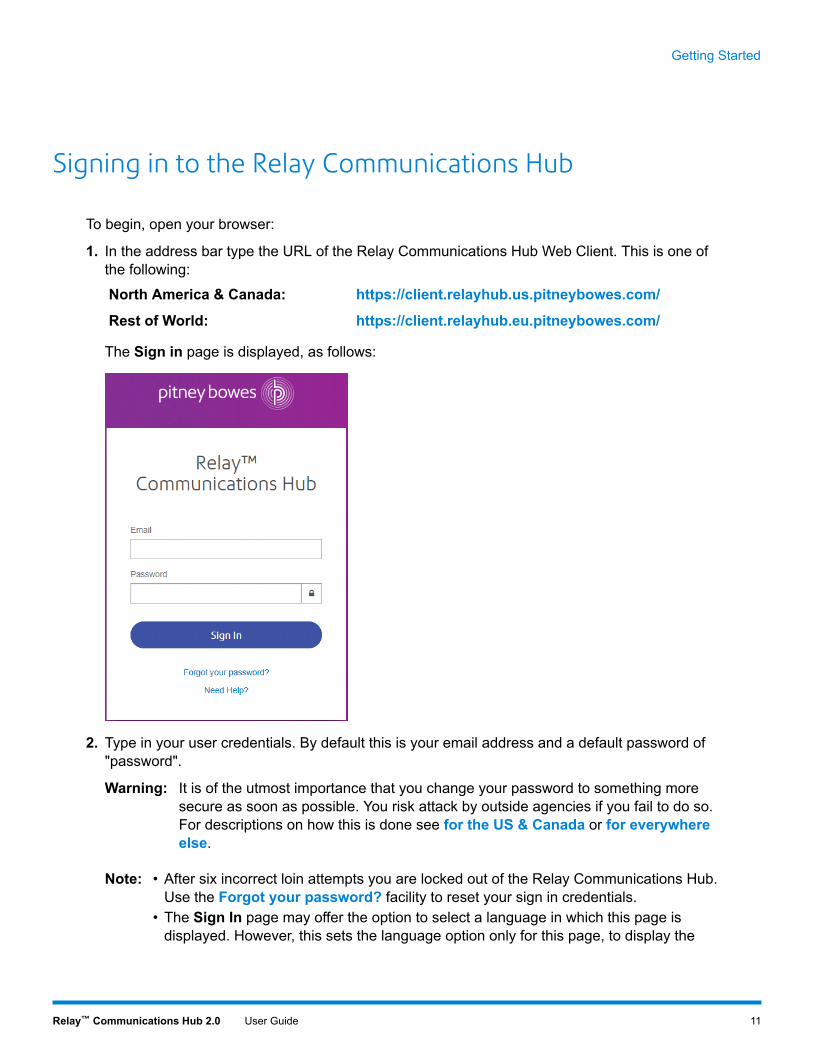
Signing in to the Relay Communications Hub
To begin, open your browser:
1. In the address bar type the URL of the Relay Communications Hub Web Client. This is one ofthe following:
https://client.relayhub.us.pitneybowes.com/North America & Canada:
https://client.relayhub.eu.pitneybowes.com/Rest of World:
The Sign in page is displayed, as follows:
2. Type in your user credentials. By default this is your email address and a default password of"password".
It is of the utmost importance that you change your password to something moresecure as soon as possible. You risk attack by outside agencies if you fail to do so.
Warning:
For descriptions on how this is done see for the US & Canada or for everywhereelse.
Note: • After six incorrect loin attempts you are locked out of the Relay Communications Hub.Use the Forgot your password? facility to reset your sign in credentials.
• The Sign In page may offer the option to select a language in which this page isdisplayed. However, this sets the language option only for this page, to display the
11Relay™ Communications Hub 2.0 User Guide
Getting Started
remainder of the website in a different language see Changing the display languageon page 13.
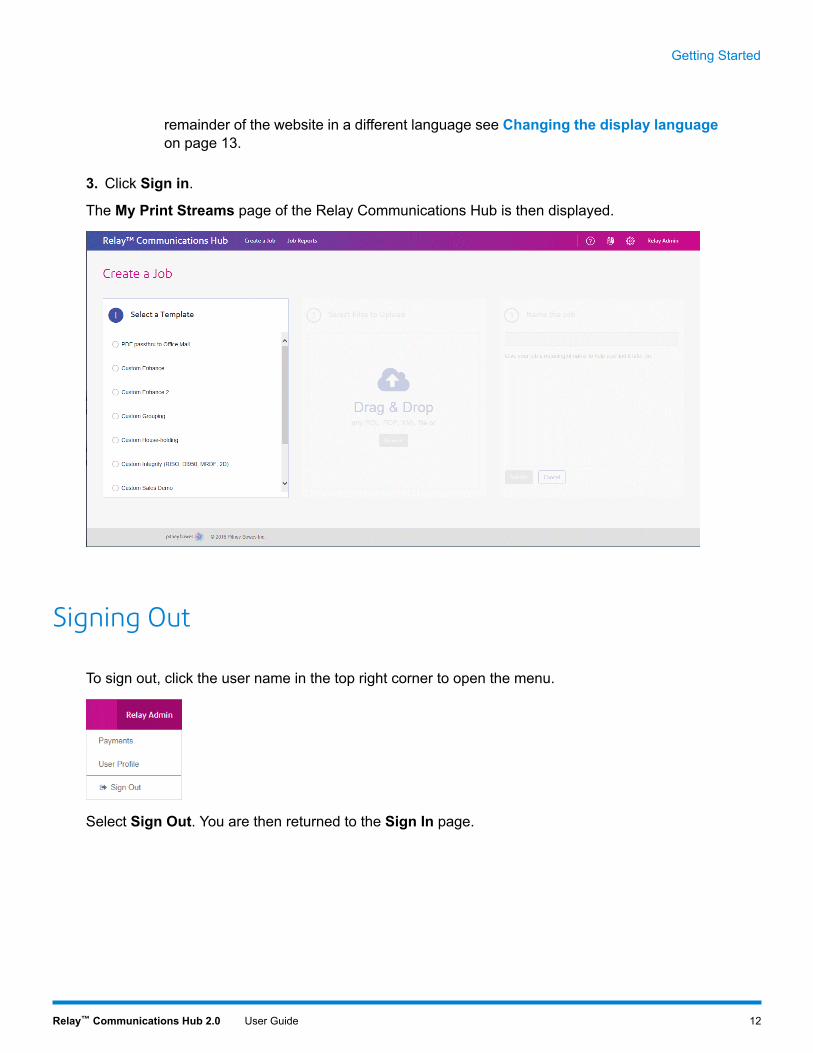
3. Click Sign in.
The My Print Streams page of the Relay Communications Hub is then displayed.
Signing Out
To sign out, click the user name in the top right corner to open the menu.
Select Sign Out. You are then returned to the Sign In page.
12Relay™ Communications Hub 2.0 User Guide
Getting Started
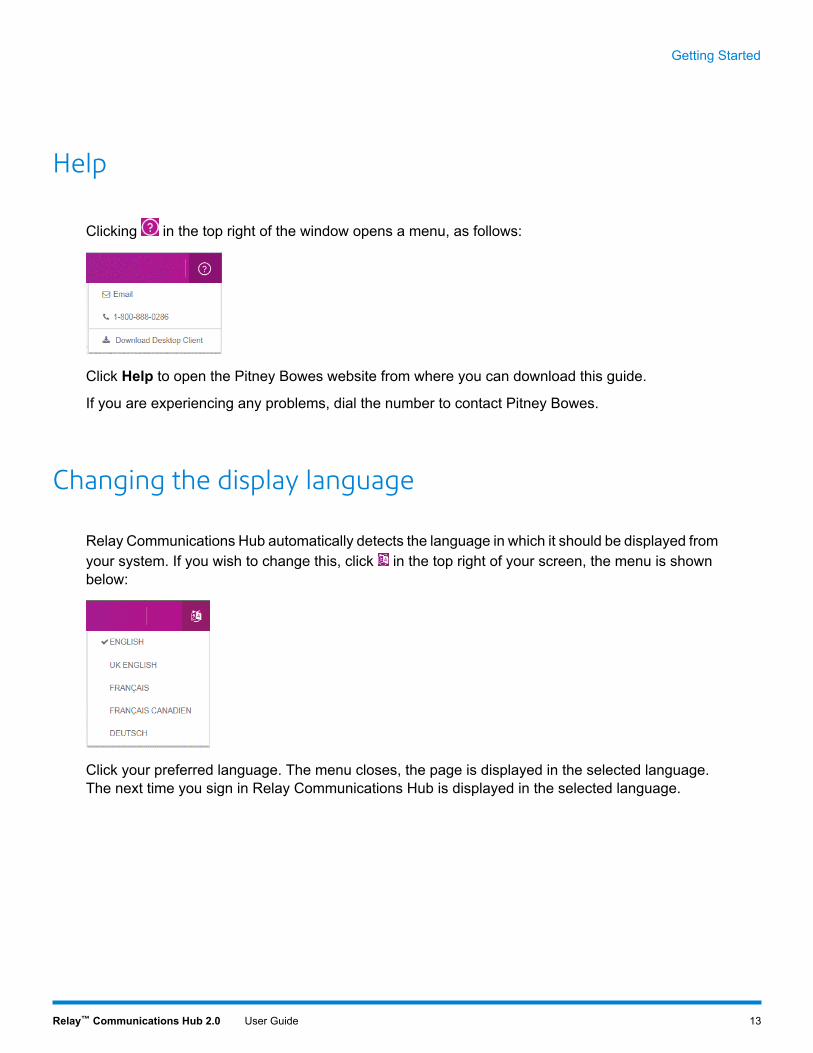
Help
Clicking in the top right of the window opens a menu, as follows:
Click Help to open the Pitney Bowes website from where you can download this guide.
If you are experiencing any problems, dial the number to contact Pitney Bowes.
Changing the display language
Relay Communications Hub automatically detects the language in which it should be displayed fromyour system. If you wish to change this, click in the top right of your screen, the menu is shownbelow:
Click your preferred language. The menu closes, the page is displayed in the selected language.The next time you sign in Relay Communications Hub is displayed in the selected language.
13Relay™ Communications Hub 2.0 User Guide
Getting Started
4 - Using My PrintStreamsThis section is for Operators and how to use Relay Communications Hub'sMy Print Streams to create triggers your jobs, apply Templates anddownload jobs.
In this section
Creating a Job 15

Creating a Job
Relay Communications Hub's Create a Job page is shown below:
To begin the process of applying a Template to a data file you must first upload the file to the RelayCommunications Hub. To do this, follow the steps below:
1. In Select a Template, shown next, select the one required.
15Relay™ Communications Hub 2.0 User Guide
Using My Print Streams
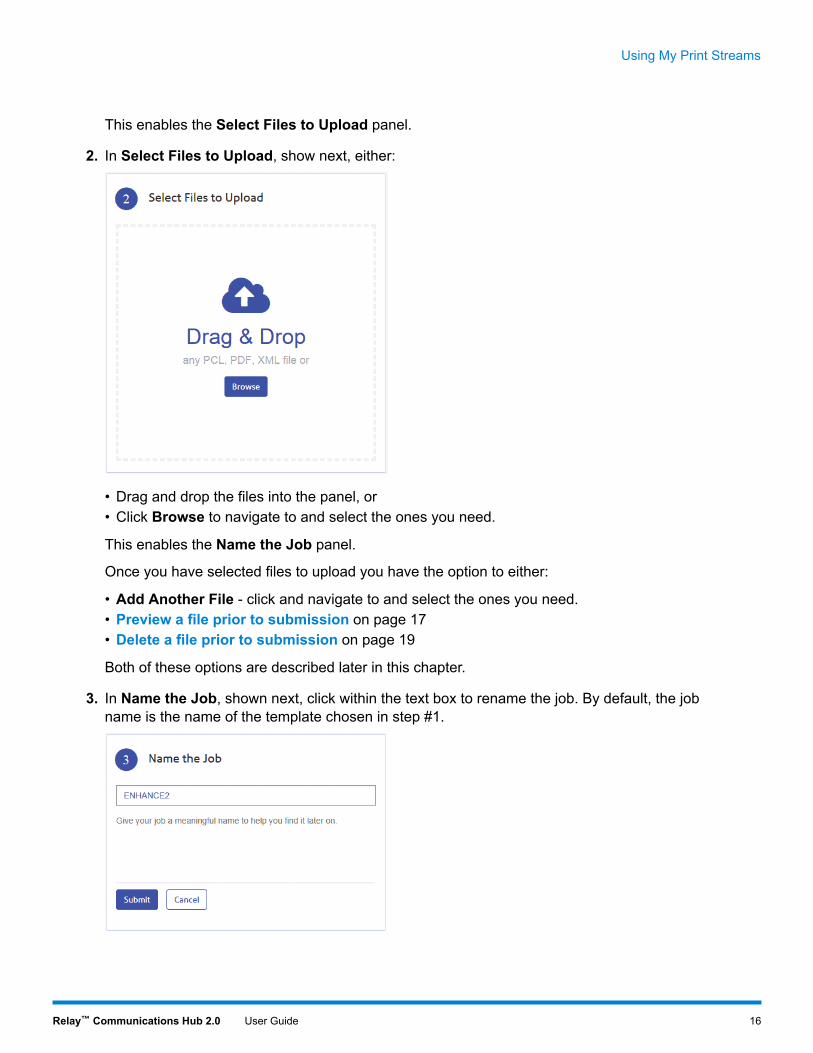
This enables the Select Files to Upload panel.
2. In Select Files to Upload, show next, either:
• Drag and drop the files into the panel, or• Click Browse to navigate to and select the ones you need.
This enables the Name the Job panel.
Once you have selected files to upload you have the option to either:
• Add Another File - click and navigate to and select the ones you need.• Preview a file prior to submission on page 17• Delete a file prior to submission on page 19
Both of these options are described later in this chapter.
3. In Name the Job, shown next, click within the text box to rename the job. By default, the jobname is the name of the template chosen in step #1.
16Relay™ Communications Hub 2.0 User Guide
Using My Print Streams

If your press Enter while the text box for entering the job name has focus the job issubmitted, without the need to click Submit.
Note:
4. Either:
• Press Enter, or• Click Submit.
A progress bar just below the header indicates how the job is processing.
Once submission is completed, the following is shown:
Click Job Reports to see the progress of your job or begin the process again to create a furtherjob.
Preview a file prior to submission
This is only available if your document is a PDF.Note:
Once you have selected the files you wish to upload, as described in Creating a Job on page 15in the Create a job page, the Select Files to Upload panel displays the selected files, as exampleis shown next:
you can preview a file by clicking the adjacent to the file name. This opens the following:
17Relay™ Communications Hub 2.0 User Guide
Using My Print Streams
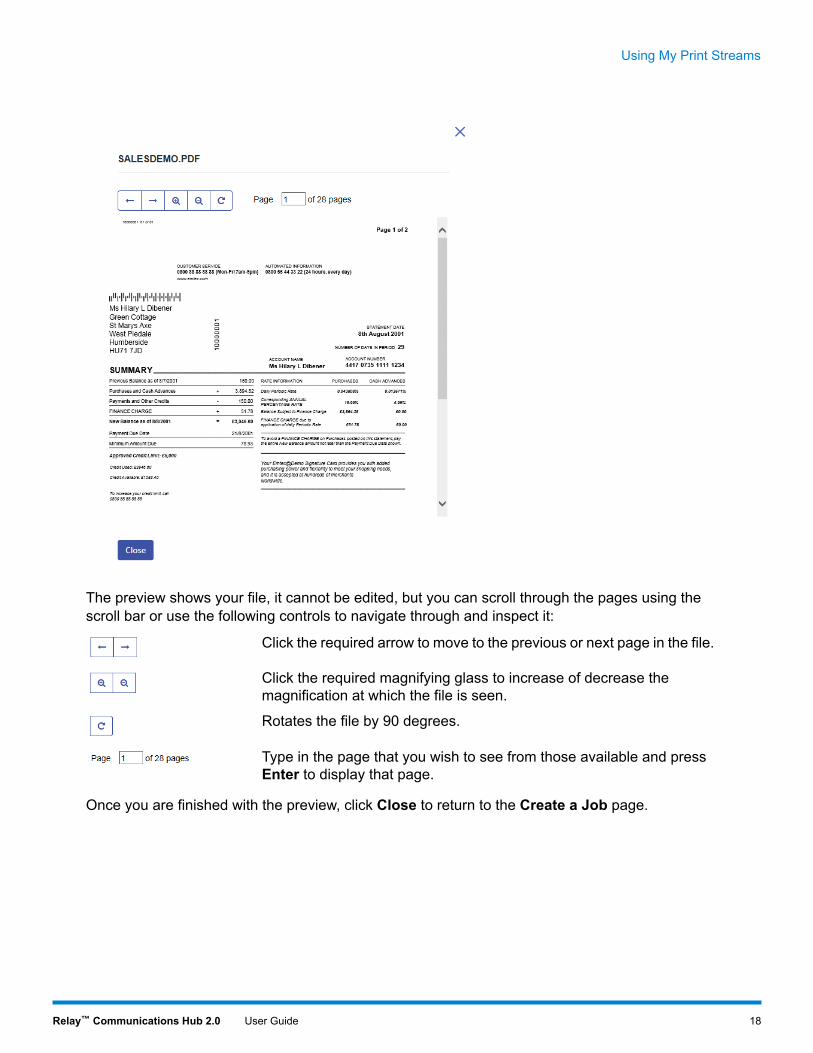
The preview shows your file, it cannot be edited, but you can scroll through the pages using thescroll bar or use the following controls to navigate through and inspect it:
Click the required arrow to move to the previous or next page in the file.
Click the required magnifying glass to increase of decrease themagnification at which the file is seen.
Rotates the file by 90 degrees.
Type in the page that you wish to see from those available and pressEnter to display that page.
Once you are finished with the preview, click Close to return to the Create a Job page.
18Relay™ Communications Hub 2.0 User Guide
Using My Print Streams
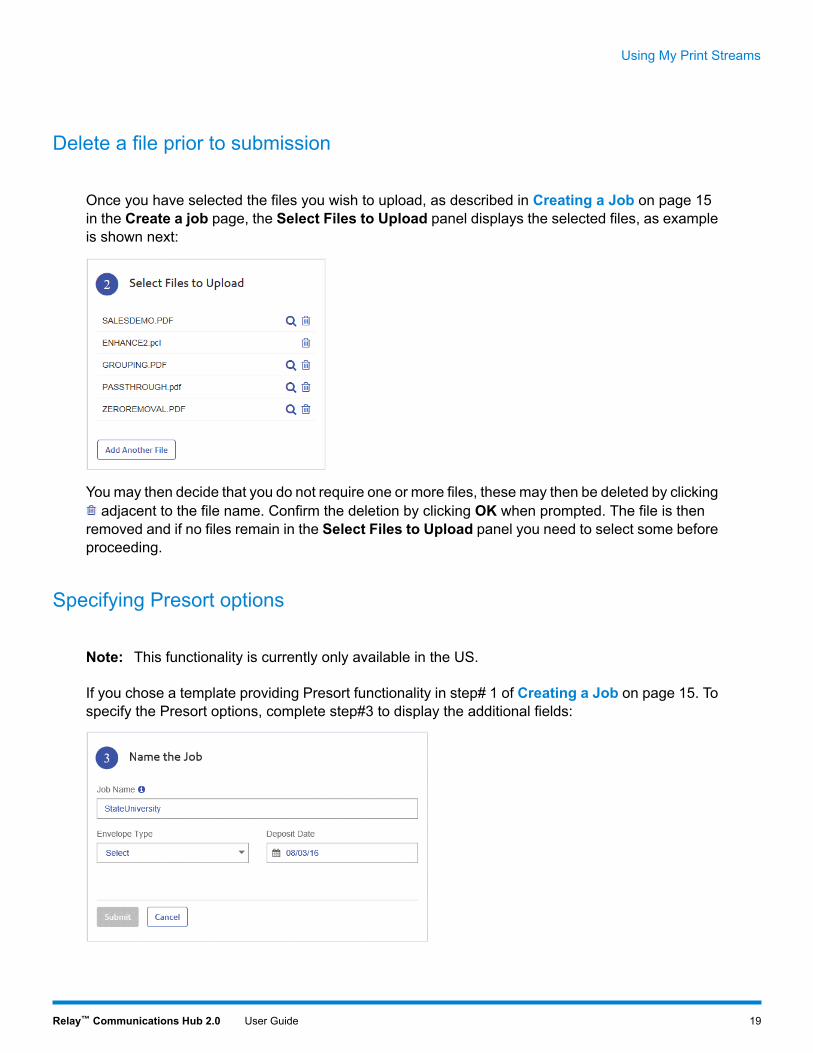
Delete a file prior to submission
Once you have selected the files you wish to upload, as described in Creating a Job on page 15in the Create a job page, the Select Files to Upload panel displays the selected files, as exampleis shown next:
You may then decide that you do not require one or more files, these may then be deleted by clickingadjacent to the file name. Confirm the deletion by clicking OK when prompted. The file is then
removed and if no files remain in the Select Files to Upload panel you need to select some beforeproceeding.
Specifying Presort options
This functionality is currently only available in the US.Note:
If you chose a template providing Presort functionality in step# 1 of Creating a Job on page 15. Tospecify the Presort options, complete step#3 to display the additional fields:
19Relay™ Communications Hub 2.0 User Guide
Using My Print Streams
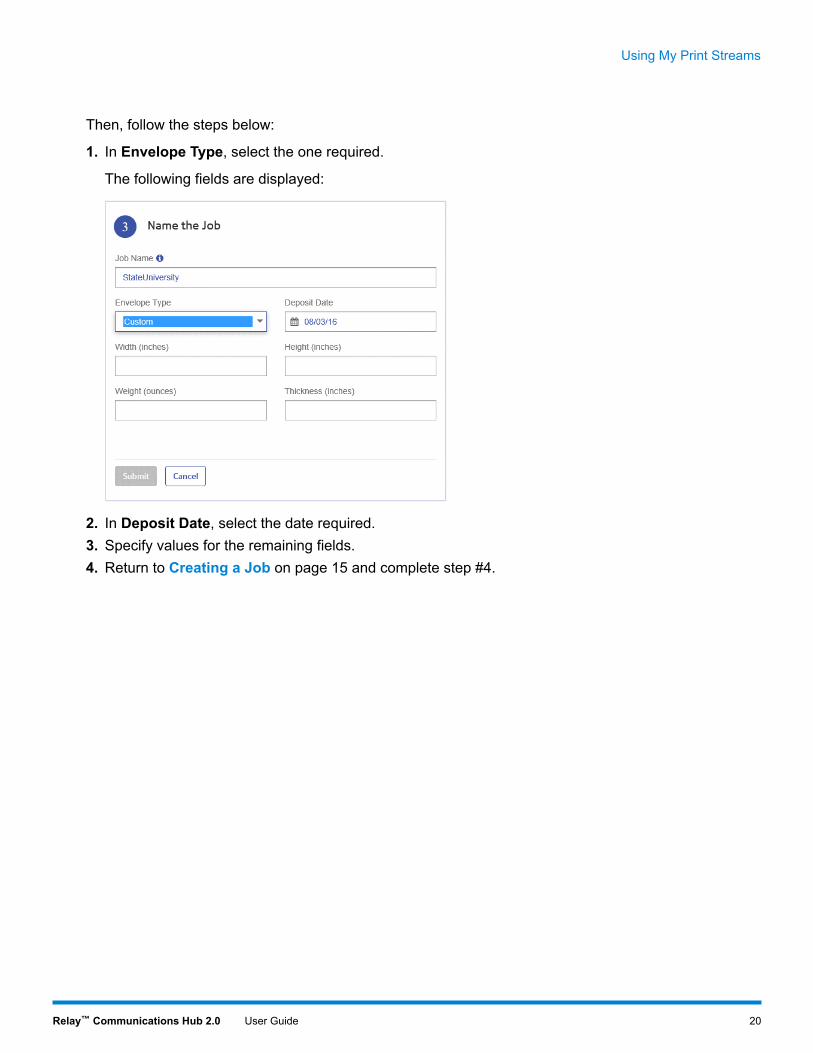
Then, follow the steps below:
1. In Envelope Type, select the one required.
The following fields are displayed:
2. In Deposit Date, select the date required.3. Specify values for the remaining fields.4. Return to Creating a Job on page 15 and complete step #4.
20Relay™ Communications Hub 2.0 User Guide
Using My Print Streams
5 - Viewing JobReportsJob Reports gives you access to the jobs you have submitted. This isopened by clicking Job Reports in the Relay Communications Hub webclient. The jobs are listed in chronological order with the most recent jobto be submitted at the top. By default the first job in the list is selected andit has completed processing, its Job Summary is displayed.
Job Reports provides you with the ability to:
• Search for jobs by specific criteria• Filter jobs by date or a range of dates• View job summaries• View an email deliverability report• Download a report of undelivered emails
Note: • Administrator can see all the jobs submitted by their team, eachjob displays the user name of the submitting user. Other Usersare only able to see their own jobs.
• If you do not have access to the Job Reports website, see ViewingYour Submitted Documents.
In this section
Job Reports 22Finding the jobs you wish to see 23What to do if your job fails 25Removing your Job 26
Job Reports
Job Reports lets you view a list of the jobs you have submitted for printing. Administrators are ableto see the jobs of all the users for whom they are responsible, in which case the user name is alsogiven.
Immediately after uploading a job it is shown as processing; no data is shown in the Job Summarysection. Click to ensure the list is up-to-date.
The jobs are listed in chronological order with the most recent job to be submitted at the top. Bydefault the first job in the list is selected and when has completed processing, its Job Summary isdisplayed.
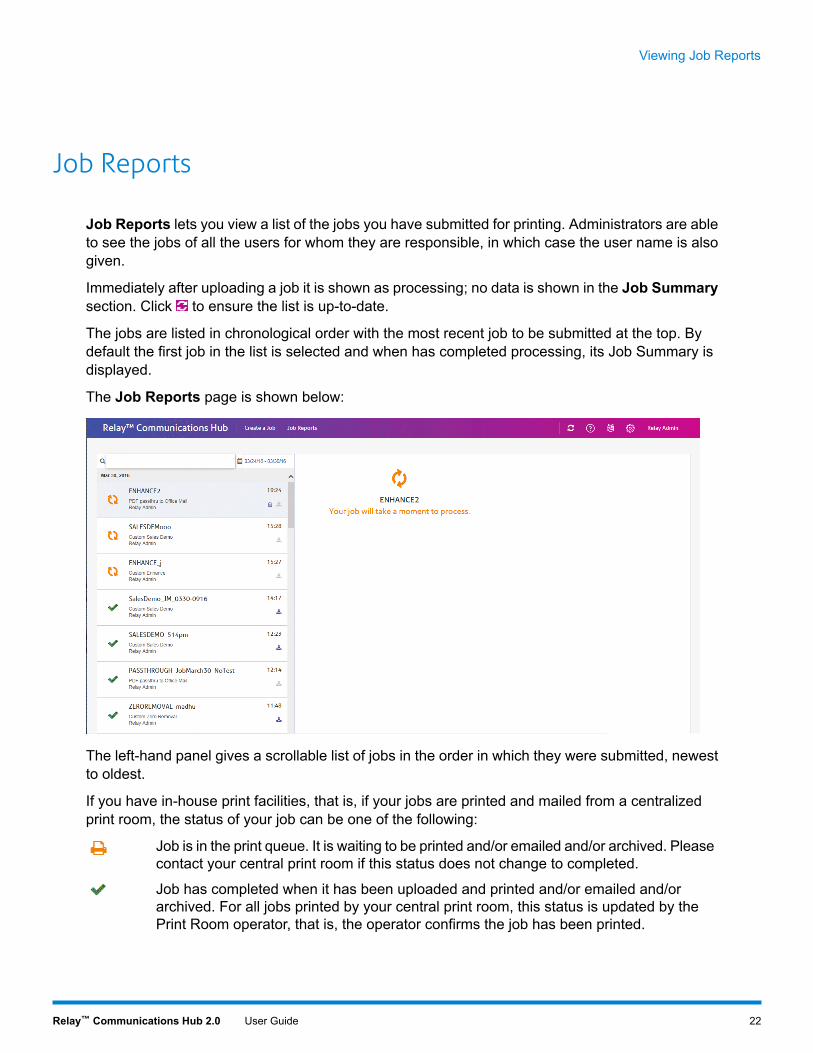
The Job Reports page is shown below:
The left-hand panel gives a scrollable list of jobs in the order in which they were submitted, newestto oldest.
If you have in-house print facilities, that is, if your jobs are printed and mailed from a centralizedprint room, the status of your job can be one of the following:
Job is in the print queue. It is waiting to be printed and/or emailed and/or archived. Pleasecontact your central print room if this status does not change to completed.
Job has completed when it has been uploaded and printed and/or emailed and/orarchived. For all jobs printed by your central print room, this status is updated by thePrint Room operator, that is, the operator confirms the job has been printed.
22Relay™ Communications Hub 2.0 User Guide
Viewing Job Reports
Job error. Speak with your Print Room Operator.
For all jobs printed by your central print room, the status is updated by the Print RoomOperator responsible for your job. Your job is displayed as until it has been marked asotherwise by the Print Room Operator.
Note:
If you do use a third-party print facility rather than an in-house print room, the status of your job canbe one of the following:
Job is processing. This means that your job is uploading to Relay CommunicationsHub.
Job uploaded now is now available for download.
Job error.
Finding the jobs you wish to see
The job filter has two areas which allow you to find only the jobs you wish to see, both are describedin greater detail in this section.
Job reports are created for all jobs that have passed through the Relay Communications Hub, thatis, with a status of Completed.
Searching for jobs
To search for a job, follow these steps:
1. From within the Job Reports page, click in the Search for a job box, shown below:
2. Type in the letters for which you wish to search. To find "Blood Test Results", you need type onlypart of the text you wish to find, for example, "blood" or "test" or "results".
3. To begin the search, either:
• Click , or• Press Enter.
To return to the previous list of jobs, delete the characters in the Search for a job box. By default,the Job Summary is shown for the first job in the left-hand panel.
23Relay™ Communications Hub 2.0 User Guide
Viewing Job Reports
Filter jobs by date
You can filter the jobs by a predefined period or by a date range you define yourself. To filter the ajob list, follow these steps:
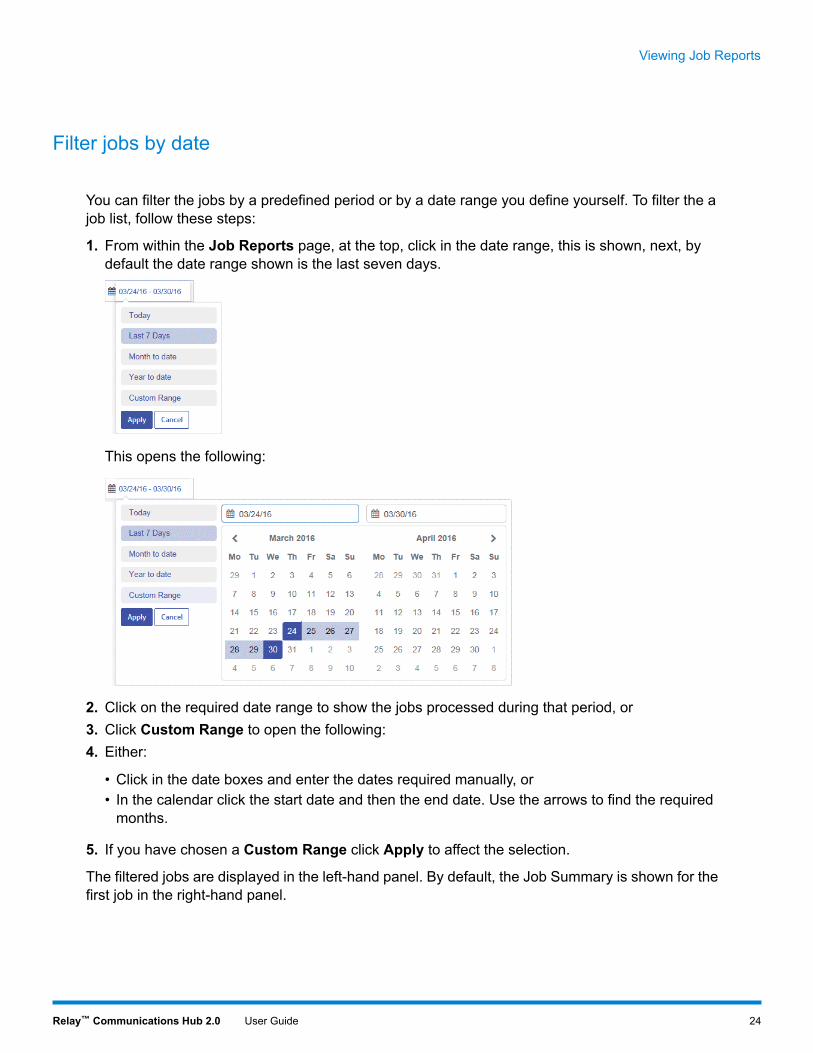
1. From within the Job Reports page, at the top, click in the date range, this is shown, next, bydefault the date range shown is the last seven days.
This opens the following:
2. Click on the required date range to show the jobs processed during that period, or3. Click Custom Range to open the following:4. Either:
• Click in the date boxes and enter the dates required manually, or• In the calendar click the start date and then the end date. Use the arrows to find the requiredmonths.
5. If you have chosen a Custom Range click Apply to affect the selection.
The filtered jobs are displayed in the left-hand panel. By default, the Job Summary is shown for thefirst job in the right-hand panel.
24Relay™ Communications Hub 2.0 User Guide
Viewing Job Reports
Exporting a report
Once you have specified the required date range for the jobs displayed, you can export the informationshown as a CSV file. This report gives details of all jobs sent within that time and is particularly usefulif you wish to report on jobs submitted over long periods. You can only create a report on the jobsyou have submitted, Administrators can create reports on all jobs submitted by all users. To do this,follow the procedure, below:
1. Click to ensure you have the most up to date information.2. Select the required job in the left-hand panel.
3. Click4. In the Save as dialog, navigate to the required location, give the file a meaningful name and click
Save.
The file is then downloaded to the specified location and is available to used as required.
Downloading your job
Once you have uploaded your job and it has completed processing, you may download it to seehow the Template has been applied. To do this, follow the procedure, below:
1. Click to ensure you have the most up to date information.2. Select the required job in the left-hand panel.3. Either:
• Click• Click Download Files in the Job Summary.
4. In the Save as dialog, navigate to the required location, give the file a meaningful name and clickSave.
The file is then downloaded to the specified location and is available to used as required.
What to do if your job fails
Jobs which fail processing are shown in the left hand panel with a icon. No Job Summary isdisplayed for these.
25Relay™ Communications Hub 2.0 User Guide
Viewing Job Reports
If one of your jobs fails we suggest that you resubmit it, as described in Creating a Job on page15. If your job still does not process to completion, refer to your System administrator. If all elsefails contact Pitney Bowes Customer Support.
Removing your Job
This function is only available if you are using a third-party print facility rather than acentralized print room to process your jobs. If you are using a centralized print room toprocess your jobs The Print Room Operator deletes completed jobs.
Note:
Once you have downloaded your job and it is no longer required, you may remove it from RelayCommunications Hub.
Note: • You may delete any job while it is processing, that is, it is annotated with a• Where more than one document is associated with a job, all of the documents for the jobare removed
• Deleting in both the job list and the Job Summary are disabled until the job is complete
We recommend that all downloaded files are removed to avoid confusion in the future.
To remove your files follow the procedure, below:
1. Ensure you are in the Job Reports page.2. Click to ensure you have the most up to date information.3. Select the required job from the left-hand panel.
This opens the Job Summary in the right-hand panel.
4. Either:
• Click next to the job name in the job list, or• Click Delete Job in the Job Summary.
5. You are prompted to confirm the removal. Click OK.
The file(s) is then removed from Relay Communications Hub. If you find that you need it again, youmust upload it, as described in Creating a Job on page 15.
26Relay™ Communications Hub 2.0 User Guide
Viewing Job Reports
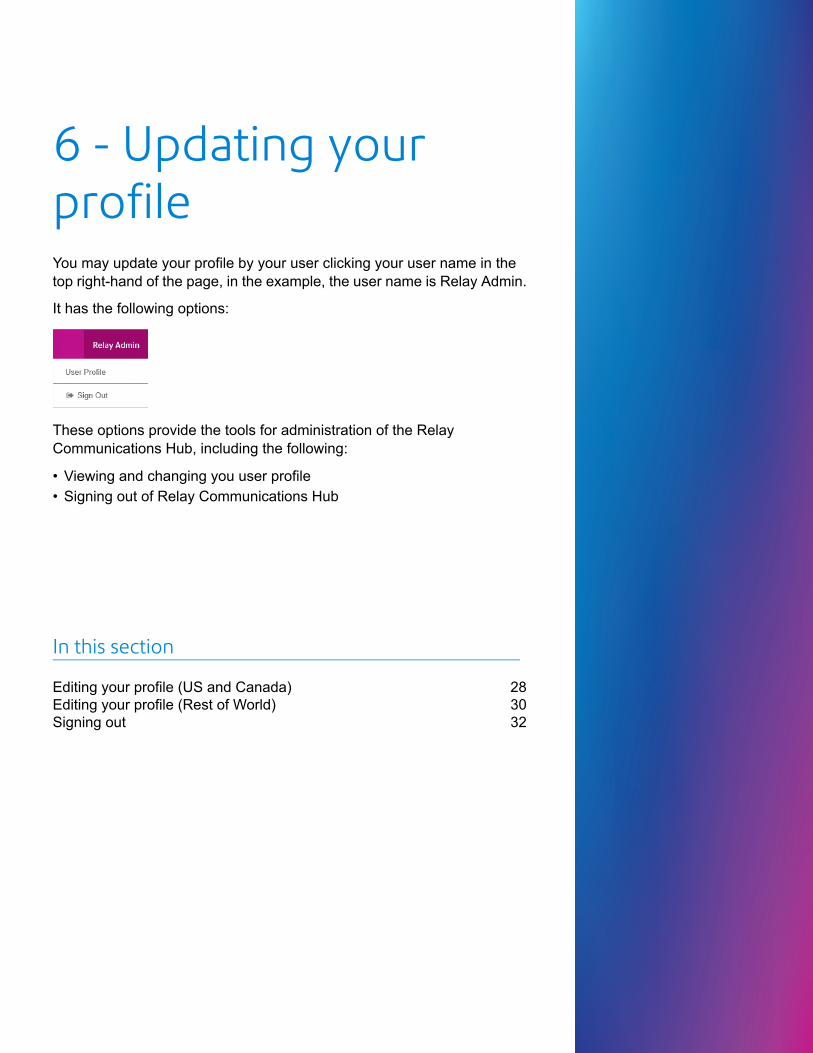
6 - Updating yourprofileYou may update your profile by your user clicking your user name in thetop right-hand of the page, in the example, the user name is Relay Admin.
It has the following options:
These options provide the tools for administration of the RelayCommunications Hub, including the following:
• Viewing and changing you user profile• Signing out of Relay Communications Hub
In this section
Editing your profile (US and Canada) 28Editing your profile (Rest of World) 30Signing out 32
Editing your profile (US and Canada)
The functions described in this section are currently ONLY available in the US andCanada.
Warning:
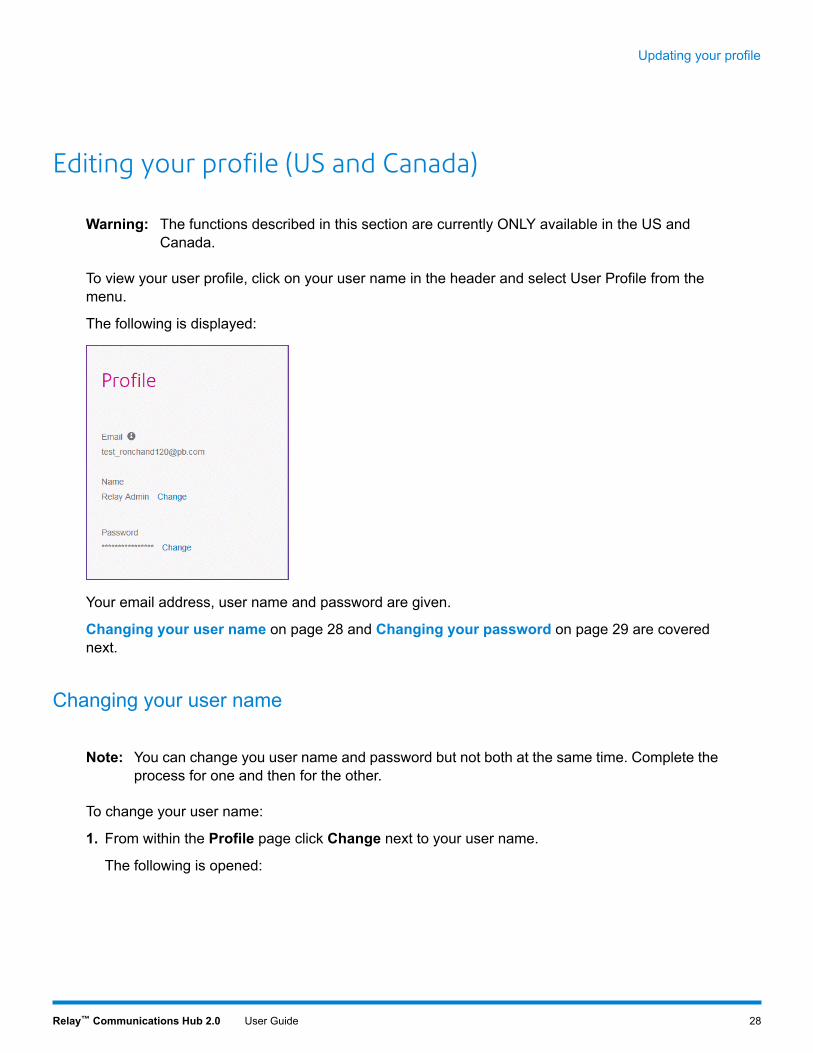
To view your user profile, click on your user name in the header and select User Profile from themenu.
The following is displayed:
Your email address, user name and password are given.
Changing your user name on page 28 and Changing your password on page 29 are coverednext.
Changing your user name
You can change you user name and password but not both at the same time. Complete theprocess for one and then for the other.
Note:
To change your user name:
1. From within the Profile page click Change next to your user name.
The following is opened:
28Relay™ Communications Hub 2.0 User Guide
Updating your profile
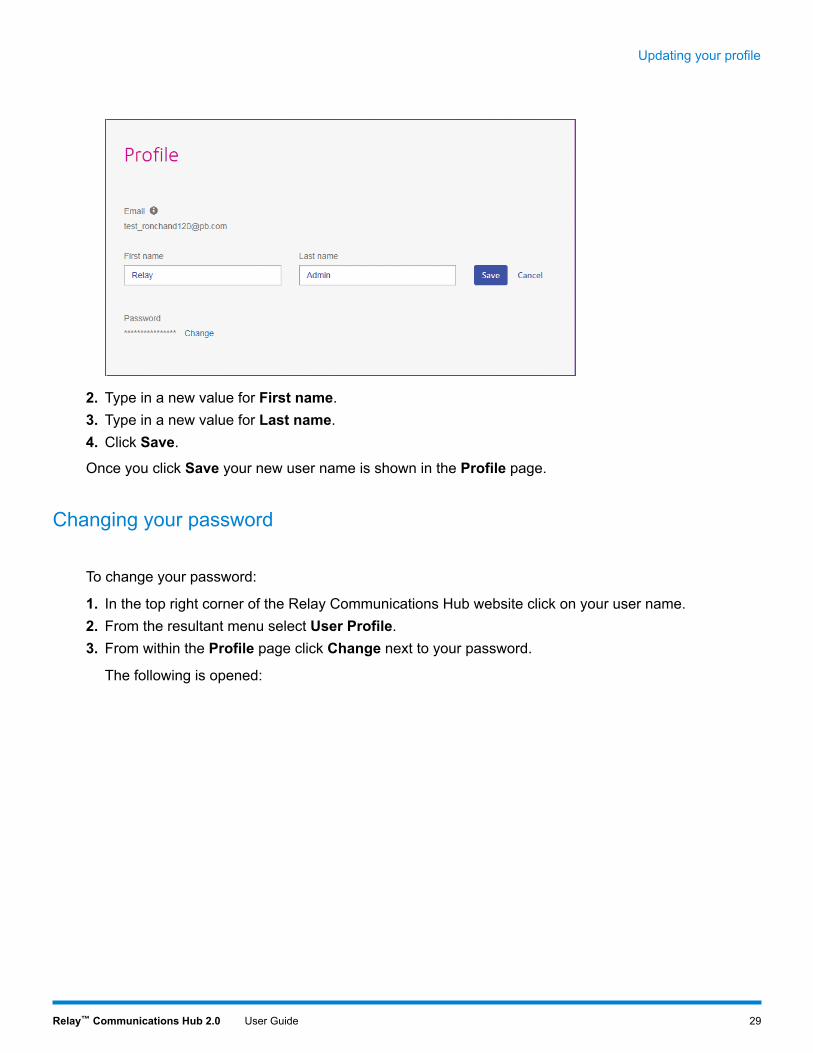
2. Type in a new value for First name.3. Type in a new value for Last name.4. Click Save.
Once you click Save your new user name is shown in the Profile page.
Changing your password
To change your password:
1. In the top right corner of the Relay Communications Hub website click on your user name.2. From the resultant menu select User Profile.3. From within the Profile page click Change next to your password.
The following is opened:
29Relay™ Communications Hub 2.0 User Guide
Updating your profile

4. Type in a new value for New Password.5. Type in the same new value for Re-enter password.6. Click Save.
Once you click Save your password is changed. You will need to use it the next time you sign in toRelay Communications Hub..
Editing your profile (Rest of World)
The functions described in this section are currently NOT available in the US and Canada.Warning:
First, you need to sign in to the Relay Communications Hub user website.
Changing your password on page 31 is covered next. To change your user name, you need tospeak to your Administrator.
Signing in to Relay Communication Hub
The Relay Communications Hub Administrator in your organization will provide you with credentialswith which you can sign into both the My documents website and the Printer Driver.
To sign in to follow the procedure below:
1. In the address bar type the URL of the Relay Communications Hub. This is:
https://relayhub.eu.pitneybowes.com/
This opens the My Documents website in a new tab. The Sign in page is displayed.
30Relay™ Communications Hub 2.0 User Guide
Updating your profile

2. Type in your user credentials. By default this is your email address and a default password of"password".
It is of the utmost importance that you change your password to something moresecure as soon as possible. You risk attack by outside agencies if you fail to do so.
Warning:
3. In addition, you may check the Remember me box. This means that if you close the browserwithout logging out, and open it again within seven days, your user name and password areremembered and you will not need to sign in.
After five incorrect sign in attempts you are locked out of the website for ten minutes.After this time, use the Forgotten your password facility to reset your sign in credentials.
Note:
4. Click Sign in.
The Relay Communication Hub user web site is then displayed.
Changing your password
To change your password:
1. Click on your user name in the top right corner of the page.
The following is opened:
2. Type in a new value for New Password.3. Type in the same new value for Re-enter password.4. Click Save.
Once you click Save your password is changed. You will need to use it the next time you sign in toRelay Communications Hub.
31Relay™ Communications Hub 2.0 User Guide
Updating your profile
Signing out
To sign out from Relay Communications Hub, click your user name in the header and select Signout from the menu. You are then returned to the Sign in page.
32Relay™ Communications Hub 2.0 User Guide
Updating your profile
7 - Desktop ClientThis section describes the functions, installation and use of the RelayCommunications Hub Desktop Client. It can run on either PC or Applemachines. Only the installation process is different, the operation is thesame for both.
The Desktop Client uses a hot folder, which has a \download\printstreams sub-folder where all print streams all downloaded.
Note: • The operation of the Desktop Client is assigned to one nameduser within your company during configuration of your RelayCommunications Hub by Pitney Bowes. This user is known as theService User and is responsible for downloading all the printstreams for your company. The duplication of downloaded, andsubsequent printing, of print streams is avoided by allowing onlyone person this role. The named Service User may hold otherroles in addition to this one.
• You may wish to automate the process of moving print streamsfrom the Desktop Client hot folders to your printer. This is not withinthe remit of Pitney Bowes, however we may be able to help withthis process if changes are required to your configuration of RelayCommunications Hub.
• If you are using Microsoft Word to create your document files,please refer toConfiguringMicrosoftWord to ensure you achievethe best output.
In this section
Downloading the Desktop Client 34Unpacking the zip file 35Opening the Desktop Client 36Desktop Client's Hot folders 39
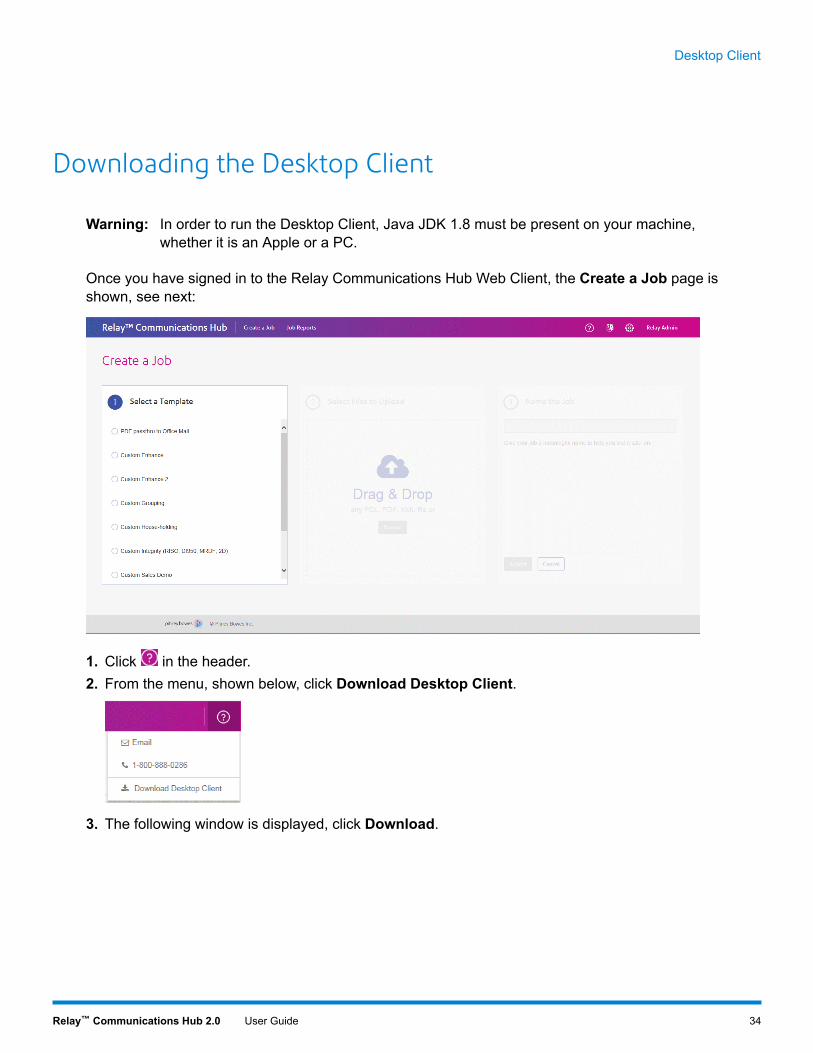
Downloading the Desktop Client
In order to run the Desktop Client, Java JDK 1.8 must be present on your machine,whether it is an Apple or a PC.
Warning:
Once you have signed in to the Relay Communications Hub Web Client, the Create a Job page isshown, see next:
1. Click in the header.2. From the menu, shown below, click Download Desktop Client.
3. The following window is displayed, click Download.
34Relay™ Communications Hub 2.0 User Guide
Desktop Client
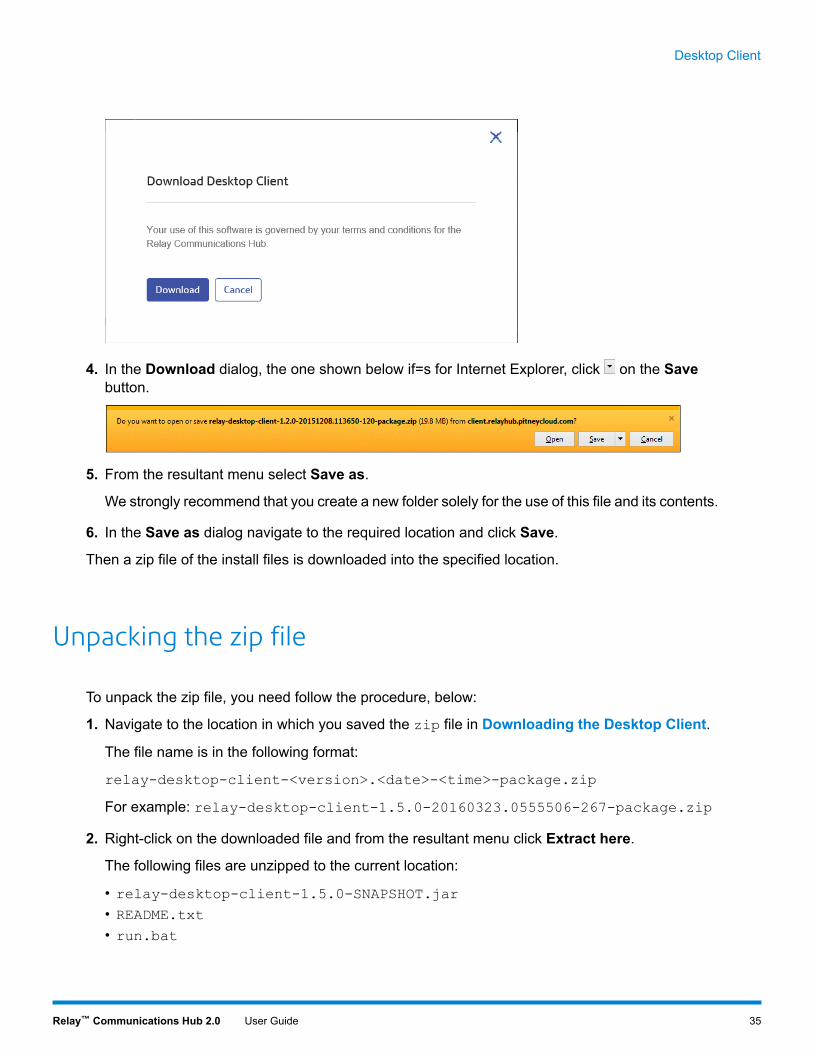
4. In the Download dialog, the one shown below if=s for Internet Explorer, click on the Savebutton.
5. From the resultant menu select Save as.
We strongly recommend that you create a new folder solely for the use of this file and its contents.
6. In the Save as dialog navigate to the required location and click Save.
Then a zip file of the install files is downloaded into the specified location.
Unpacking the zip file
To unpack the zip file, you need follow the procedure, below:
1. Navigate to the location in which you saved the zip file in Downloading the Desktop Client.
The file name is in the following format:
relay-desktop-client-<version>.<date>-<time>-package.zip
For example: relay-desktop-client-1.5.0-20160323.0555506-267-package.zip
2. Right-click on the downloaded file and from the resultant menu click Extract here.
The following files are unzipped to the current location:
• relay-desktop-client-1.5.0-SNAPSHOT.jar• README.txt• run.bat
35Relay™ Communications Hub 2.0 User Guide
Desktop Client
These files are now ready to use for installing the Desktop Client.
Opening the Desktop Client
This section describes how to sign in the Desktop Client. Once you have completed the installationprocess, the Desktop Client window is automatically opened.
Shutting down or logging out of your machine also closes the Desktop Client.
If you need to exit the Desktop Client, right-click in the System Tray and select Exit from theresultant menu.
Opening the Desktop Client on an Apple
To open the Desktop Client on an Apple machine, double-click on the jar file.
The Desktop Client is opened. The first time you sign in, you need to complete the its fields, describedin First time sign in.
Opening the Desktop Client on a PC
Before opening the Desktop Client on a PC you need to ensure you have the correctpermissions to use the Run.bat file. You only need to complete the permissions steponce.
Warning:
1. Right-click the Run.bat file.2. From the resultant menu select Properties.
This opens the Properties dialog.
3. In the Permissions dialog, open the Security tab.
36Relay™ Communications Hub 2.0 User Guide
Desktop Client
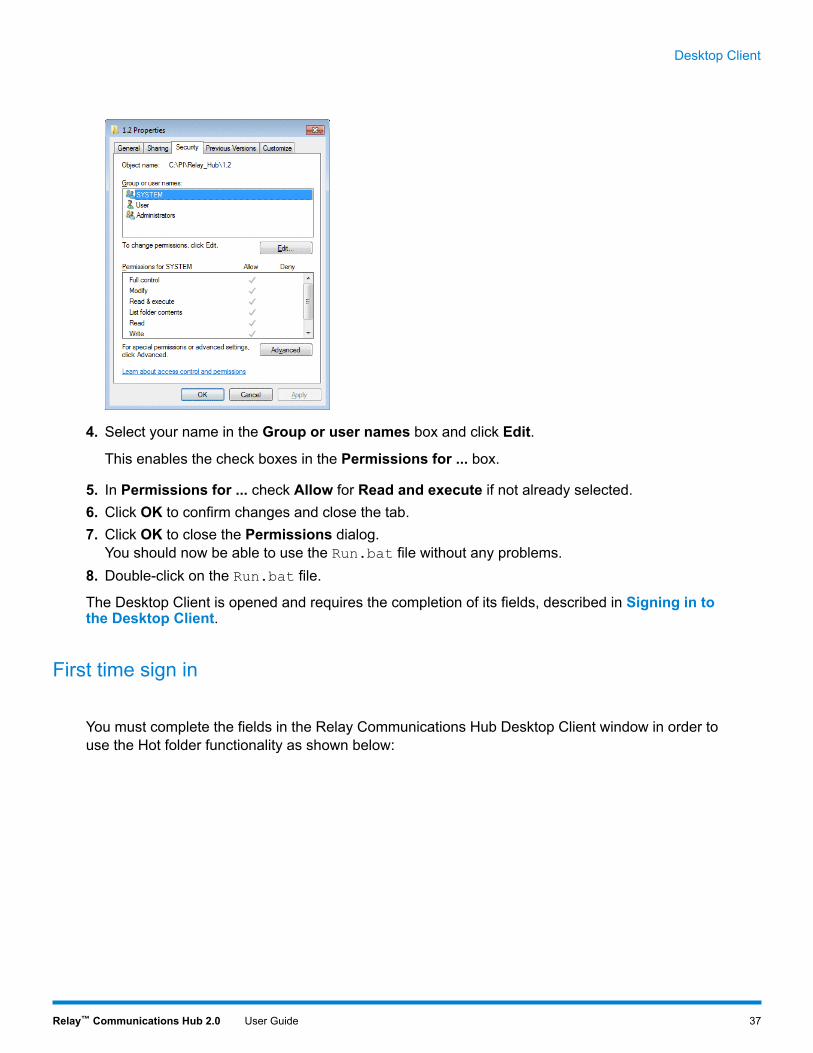
4. Select your name in the Group or user names box and click Edit.
This enables the check boxes in the Permissions for ... box.
5. In Permissions for ... check Allow for Read and execute if not already selected.6. Click OK to confirm changes and close the tab.7. Click OK to close the Permissions dialog.
You should now be able to use the Run.bat file without any problems.8. Double-click on the Run.bat file.
The Desktop Client is opened and requires the completion of its fields, described in Signing in tothe Desktop Client.
First time sign in
You must complete the fields in the Relay Communications Hub Desktop Client window in order touse the Hot folder functionality as shown below:
37Relay™ Communications Hub 2.0 User Guide
Desktop Client
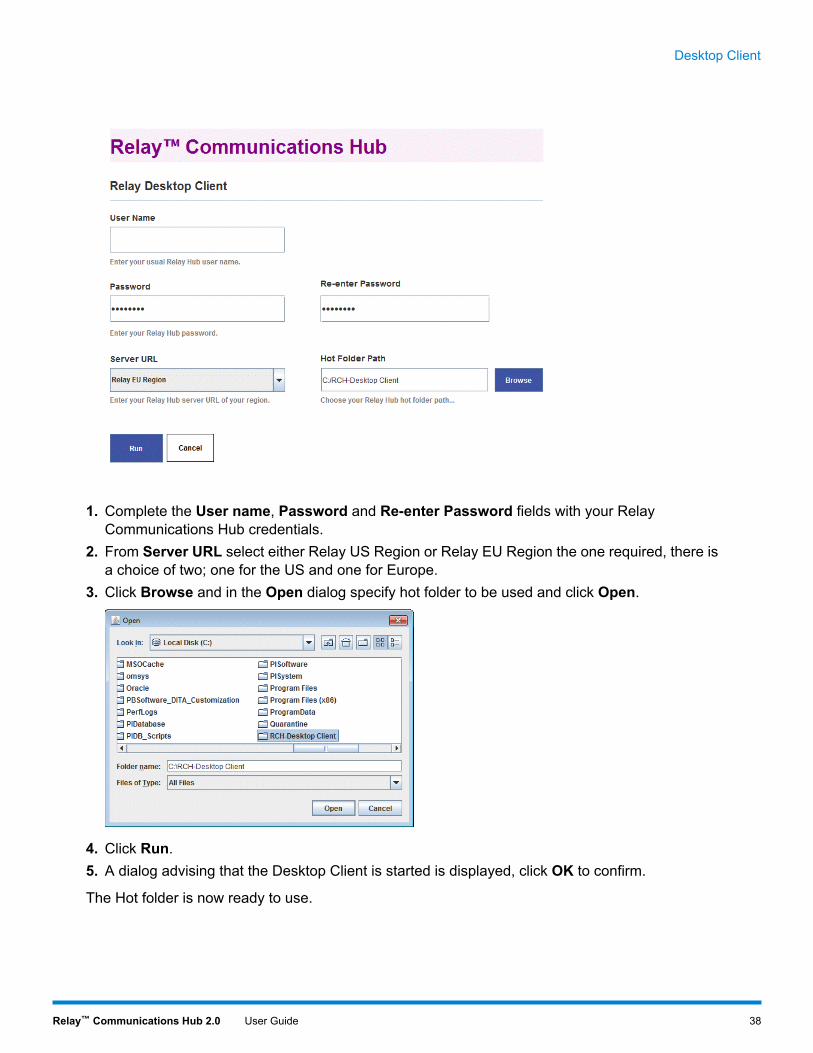
1. Complete the User name, Password and Re-enter Password fields with your RelayCommunications Hub credentials.
2. From Server URL select either Relay US Region or Relay EU Region the one required, there isa choice of two; one for the US and one for Europe.
3. Click Browse and in the Open dialog specify hot folder to be used and click Open.
4. Click Run.5. A dialog advising that the Desktop Client is started is displayed, click OK to confirm.
The Hot folder is now ready to use.
38Relay™ Communications Hub 2.0 User Guide
Desktop Client

Subsequently, double-click run.bat to open the open the Desktop Client to enable the hotfolders. You are not required to specify the above information again, unless you wish tochange that previously given..
Note:
Desktop Client's Hot folders
Once you have completed the steps in the previous chapter, the hot folder is ready for use. If younavigate to the location specified during configuration, you will find that the hot folder contains asub-folder called \download\Print Streams. In the example the hot folder C:\RCH-DesktopClient has been assumed, but you will need to replace this with the path to your own hot folder:
Your Service User's task is to download the print streams and distribute them among operators toprint and mail. The process for doing this will be defined by your Administrator. Your company willhave only one Service User in order to prevent downloading and printing of duplicate print streams.
You may wish to automate the process of moving print streams from the Desktop Client hot foldersto your printer. This is not within the remit of Pitney Bowes, however we may be able to help withthis process if changes are required to your configuration of Relay Communications Hub.
Download Hot Folders
Navigate to the location specified during configuration, to find the sub-folder called \download.
An example folder structure is as follows, your folders will have names representing your templatelist, including one called \Printstreams.You will need to replace the path shown with the path toyour own Hot folder:
39Relay™ Communications Hub 2.0 User Guide
Desktop Client
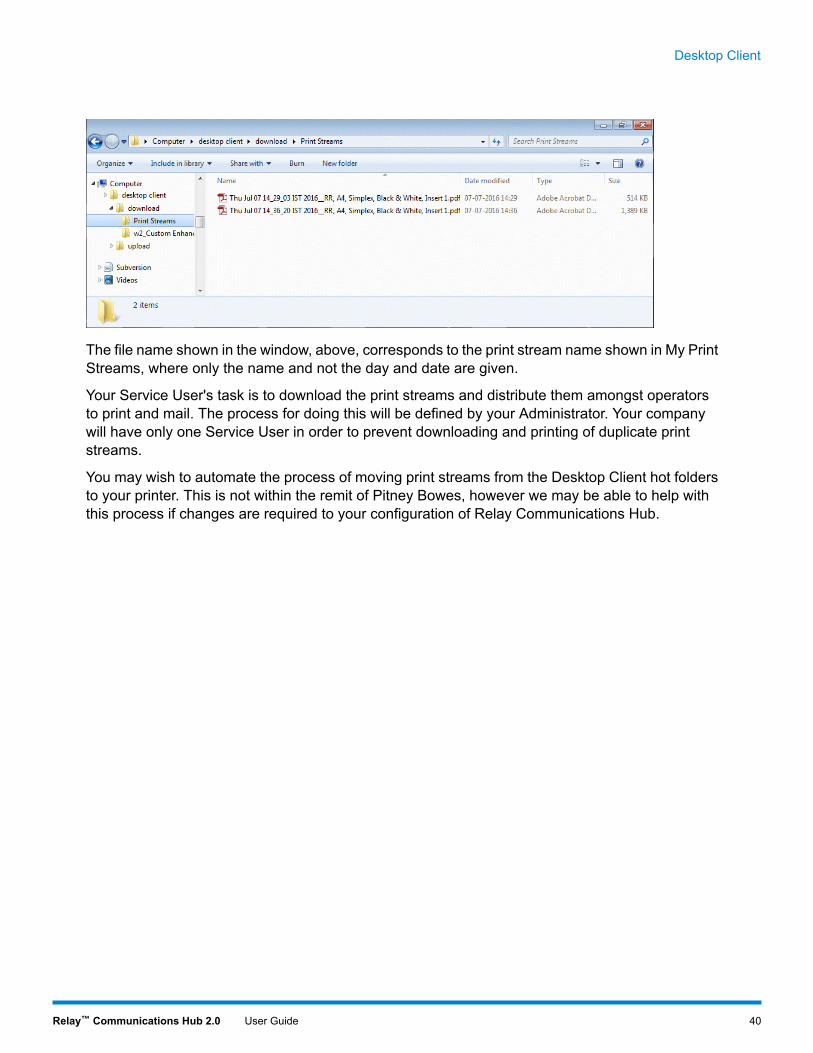
The file name shown in the window, above, corresponds to the print stream name shown in My PrintStreams, where only the name and not the day and date are given.
Your Service User's task is to download the print streams and distribute them amongst operatorsto print and mail. The process for doing this will be defined by your Administrator. Your companywill have only one Service User in order to prevent downloading and printing of duplicate printstreams.
You may wish to automate the process of moving print streams from the Desktop Client hot foldersto your printer. This is not within the remit of Pitney Bowes, however we may be able to help withthis process if changes are required to your configuration of Relay Communications Hub.
40Relay™ Communications Hub 2.0 User Guide
Desktop Client

A - More Information
In this section
Copyright 42Trademarks 42Technical Support 43
Copyright
Pitney Bowes is making this document available to you, free of charge, for use with the software,in order to make your experience more convenient. Every effort has been made to ensure theaccuracy and usefulness of this document reflecting our experience. Product information may changeafter publication without notice.
This document is being distributed on an “as is” basis and wemake no representations or warranties,express or implied, with respect to its accuracy, reliability or completeness and the entire risk of itsuse shall be assumed by you. In no event shall we be liable to you or any other person, regardlessof the cause, for the effectiveness or accuracy of this document or for any special, indirect, incidentalor consequential damages arising from or occasioned by your use, even if advised of the possibilityof such damages.
All software described in this document is either our software and/or our licensed property. Nolicense either expressed or implied is granted for the use of the software by providing this documentand/or content.
Under copyright law, neither this document nor the softwaremay be copied, photocopied, reproduced,transmitted, or reduced to any electronic medium or machine-readable form, in whole or in part,without our prior written consent.
We will continue to maintain this document and we welcome any clarifications or additional informationregarding its content. Address comments concerning the content of this publication to:
Pitney Bowes6 Hercules WayLeavesdenWatfordWD25 7GSUK
Wemay use or distribute the information supplied in any way we deem appropriate without incurringany obligation to the submitter of the information. © 2016. Pitney Bowes Inc. All Rights Reserved.
Trademarks
Relay Communication Hub is the property of Pitney Bowes Inc. or one of its subsidiaries or divisions.All other trademarks are the property of their respective owners.
42Relay™ Communications Hub 2.0 User Guide
More Information
Technical Support
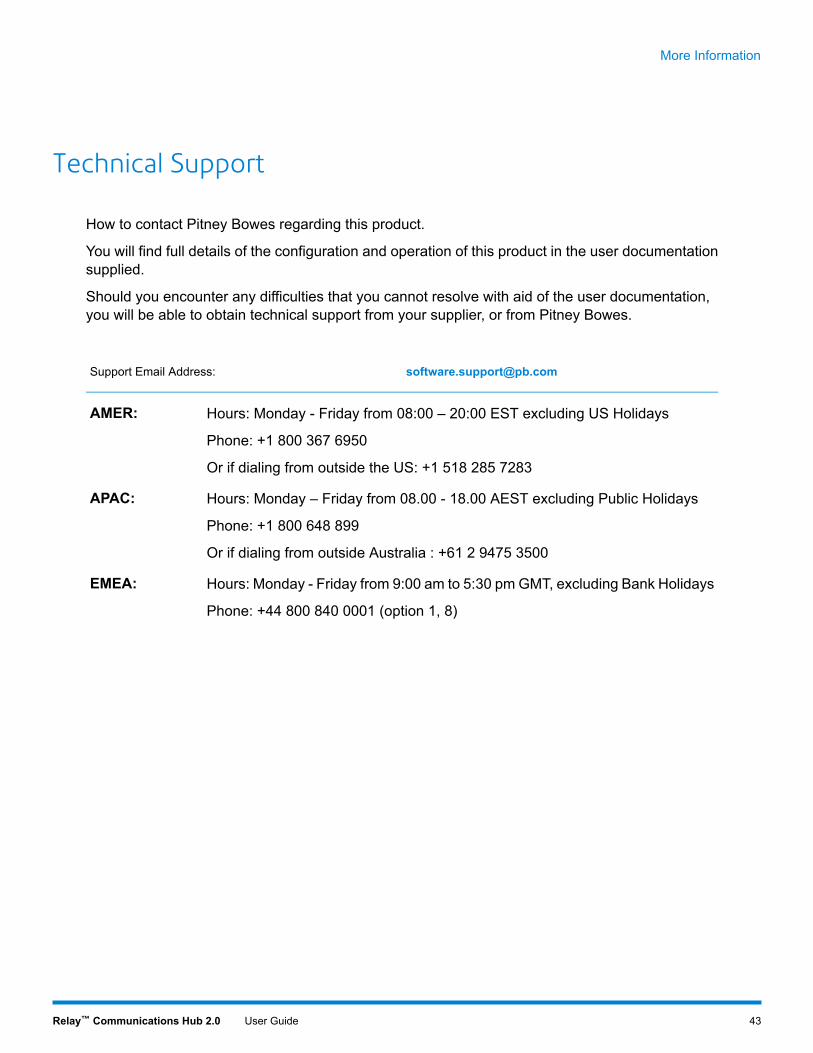
How to contact Pitney Bowes regarding this product.
You will find full details of the configuration and operation of this product in the user documentationsupplied.
Should you encounter any difficulties that you cannot resolve with aid of the user documentation,you will be able to obtain technical support from your supplier, or from Pitney Bowes.
[email protected] Email Address:
Hours: Monday - Friday from 08:00 – 20:00 EST excluding US HolidaysAMER:
Phone: +1 800 367 6950
Or if dialing from outside the US: +1 518 285 7283
Hours: Monday – Friday from 08.00 - 18.00 AEST excluding Public HolidaysAPAC:
Phone: +1 800 648 899
Or if dialing from outside Australia : +61 2 9475 3500
Hours: Monday - Friday from 9:00 am to 5:30 pm GMT, excluding Bank HolidaysEMEA:
Phone: +44 800 840 0001 (option 1, 8)
43Relay™ Communications Hub 2.0 User Guide
More Information

3001 Summer Street
Stamford CT 06926-0700
USA
www.pitneybowes.com
© 2016 Pitney Bowes Software Inc.
All rights reserved
Related Documents


