PDF2ID ® v3.5 User Guide 1 PDF2ID ® Standard/Professional Version 3.5 For InDesign CS4 ~ CS6 Macintosh/Windows User Guide

User Guide PDF to INDD
Dec 10, 2015
cómo pasar un pdf a InDesing. Instructivo
Welcome message from author
This document is posted to help you gain knowledge. Please leave a comment to let me know what you think about it! Share it to your friends and learn new things together.
Transcript

PDF2ID® v3.5 User Guide
1
PDF2ID® Standard/Professional Version 3.5
For InDesign CS4 ~ CS6
Macintosh/Windows User Guide

PDF2ID® v3.5 User Guide
2
Table of Contents Copyrights and Notices .............................................................................................................................. 3
Welcome to PDF2ID .................................................................................................................................... 4
Installation Notes ......................................................................................................................................... 5
User Guide Notes .......................................................................................................................................... 5
Technology Notes ........................................................................................................................................ 6
What's New in PDF2ID v3.5 ...................................................................................................................... 7
Scope of Conversion .................................................................................................................................... 8
PDF2ID Features .......................................................................................................................................... 9
System Requirements ............................................................................................................................. 10
Integration with InDesign ...................................................................................................................... 11
Using PDF2ID .............................................................................................................................................. 11 Opening a PDF/XPS document directly within InDesign ............................................................................. 11
Processing Type and Conversion Options........................................................................................ 14 Available Processing Types .................................................................................................................................. 15 “Full Format” and “Extract Only Text” processing types ........................................................................... 15
Graphics Options ............................................................................................................................................................................. 17 Advanced Options and Font Substitution ............................................................................................................................... 19
“Extract Only Images” processing type ............................................................................................................ 21 “Extract PDF/XPS Annotations only” processing type ................................................................................. 23 Page Range ............................................................................................................................................................... 24 Parallel Processing .................................................................................................................................................. 25 Password-protected PDF documents ................................................................................................................. 26
Conversion Presets .................................................................................................................................. 27
PDF/XPS Inspector ................................................................................................................................... 29
Typeface Library ....................................................................................................................................... 31 Overview ................................................................................................................................................................... 31 Typeface Library controls .................................................................................................................................... 32 Font Substitution panel Typeface Library Controls Revisited .................................................................... 32
Customizing PDF2ID’s Behavior .......................................................................................................... 34 General ................................................................................................................................................................................................ 35 Annotations ....................................................................................................................................................................................... 37 Color Profiles and Graphics ........................................................................................................................................................ 39 Default Font Mappings ................................................................................................................................................................. 40 Formatting Options ......................................................................................................................................................................... 41 Others .................................................................................................................................................................................................. 42 Saving Preferences ......................................................................................................................................................................... 43
PDF2ID Version Information ................................................................................................................ 44
About Font Matching, Substitution and Size Scaling .................................................................... 45
Troubleshooting Tips .............................................................................................................................. 46
PDF2ID® v3.5 User Guide
3
Copyrights and Notices No part of this publication may be reproduced, transmitted, stored in a retrieval system, or translated into human or computer language in any form or by any means—electronic, mechanical, magnetic, optical, chemical, manual, or otherwise—without the prior written permission of the copyright owner, Recosoft Corporation. Copyright infringement is a serious offense under United States and foreign copyright laws. Recosoft Corporation makes no warranty of any kind with regard to this document, including, but not limited to, the implied warranties of merchantability and fitness for a particular purpose, or non-infringement. Recosoft Corporation shall not be liable for errors contained herein or direct, indirect, special, incidental, or consequential damages in connection with the furnishings, performance, or use of this material even if advised of the possibilities of such damages. Every effort has been made to ensure that the information available in this user guide is accurate. This publication may contain technical inaccuracies or typographical errors. Changes are periodically added to the information herein; these changes will be incorporated in new editions of the publication. Information in this document is subject to change without notice. Recosoft Corporation may make improvements and/or changes to the product(s) and/or the program(s) described in this publication at any time without notice. The PDF2ID logo is a trademark of Recosoft Corporation. Use of the PDF2ID logo without the prior written consent of Recosoft Corporation constitutes trademark infringement in violation of international, U.S. federal and state laws. PDF2ID, PDFtoID is a trademark or registered trademark of Recosoft Corporation, in the United Stated and other countries. Adobe and InDesign are either registered trademarks or trademarks of Adobe Systems Incorporated in the United States and/or other countries. All other trademarks are the property of their respective owners. © Copyright 2007-2012 Recosoft Corporation. All Rights Reserved.

PDF2ID® v3.5 User Guide
4
Welcome to PDF2ID PDF2ID is a comprehensive PDF and XPS document conversion plug-in for Adobe InDesign. PDF2ID converts PDF and XPS documents into fully editable InDesign documents by recreating the intended construction and layout of the document—forming paragraphs, applying styles, regrouping independent graphic elements, extracting images, creating tables, recovering annotations, bookmarks, hyperlinks, transitions and other information automatically—without any manual intervention. PDF2ID also provides options for converting or extracting data from a range of pages in a PDF or XPS document. You can extract text or images, or convert the entire document to InDesign format. Every page in a PDF or XPS file is converted to a corresponding page in the resulting InDesign file. PDF2ID enables you to reuse and recover the contents stored in PDF or XPS documents, making them available for use by anyone. Since PDF2ID is a plug-in for Adobe InDesign, it is not necessary to acquire and install additional PDF or XPS editing software and tools, resulting in huge cost savings both in time and money.

PDF2ID® v3.5 User Guide
5
Installation Notes During the installation process for PDF2ID, a PDF2ID plug-in is installed in the “Plug-Ins” subfolder under the InDesign folder. This plug-in must reside in this folder for PDF2ID to operate and function properly. Additionally, a folder called ‘PDF2ID v3.5’ is created that contains associated files (by default in the C drive's Program Files folder for Windows and in the Applications folder for Mac OS X). All of these files play important roles and should not be removed or placed anywhere else arbitrarily. Warning: There is absolutely no need to open or manipulate any of the files contained in the PDF2ID Folder
(besides this User Guide, the Read Me First file and License Agreement). Doing so may require you to reinstall PDF2ID.
User Guide Notes This user guide has been designed to cover both Macintosh and Windows versions of PDF2ID (though the Macintosh and Windows products are separate products). Screen images that appear in this guide were taken only from the Macintosh version of PDF2ID to keep the user guide concise. Furthermore, this user guide covers the Standard and Professional editions of PDF2ID v3.5. The Professional edition is a superset of the Standard edition. Wherever a feature is available only in the Professional edition a note has been provided indicating this. Note: PDF2ID operates and behaves the same on both the Macintosh and Windows platforms. The Windows
version offers a Windows look and feel; the Macintosh version offers a Macintosh look and feel. Throughout this document platform-specific references are made where required.
PDF2ID® v3.5 User Guide
6
Technology Notes PDF2ID is based on a modern client-server computing architecture. When a PDF or XPS file is being converted, the actual conversion is performed by an application software called “PDF2ID Desktop Server”. PDF2ID Desktop Server is a faceless background application. It does not provide a user interface like you would see in any typical application software. PDF2ID Desktop Server is automatically launched (in the background when a file is selected for conversion), performs the conversion, and then communicates back with the results. Using PDF2ID Desktop Server and the client-server architecture offers tremendous benefits, which are listed below:
• Multi-Core Processor Savvy With the advent of modern multi-core processor CPUs, PDF2ID is able to take advantage of multi-core processors since a conversion can execute on a specific “core” of the CPU.
• Separate Memory Space
PDF2ID Desktop Server uses its own memory space. Thus, it does not interfere or add to the requirements of Adobe InDesign.
• Protection for Adobe InDesign
If PDF2ID Desktop Server misbehaves during the conversion process, InDesign is insulated and protected.
Note: After a conversion is finished, PDF2ID Desktop Server will not terminate. It remains in the background waiting for new conversion requests. When no conversion is being performed, “PDF2ID Desktop Server” does not affect your system or its performance in any way.
Note: You cannot run “PDF2ID Desktop Server” directly. This means that double-clicking PDF2ID
Desktop Server or trying to launch it via other means is not possible.
PDF2ID® v3.5 User Guide
7
What's New in PDF2ID v3.5
• Integration with InDesign CS6 PDF2ID has been enhanced to operate and function with InDesign CS6. InDesign CS4, CS5 and CS5.5 are supported as well.
• XPS File Conversion PDF2ID now recognizes and processes Windows XPS files. XPS files are now converted to fully formatted and editable InDesign files.
• Hybrid 32/64-bit PDF/XPS v6.0 engine
PDF2ID v3.5 now uses a hybrid 32/64-bit PDF/XPS v6.0 engine. The conversion core is 64-bit savvy and ready.
• Enhanced Image conversion support
The image conversion options have been enhanced so that Lab/Grayscale/Indexed Color images without color profiles can now be converted to a specific format independently of RGB/CMYK images.
• Layout Reconstruction Core Enhancement
The layout reconstruction core has been thoroughly enhanced dramatically improving the fidelity of the conversion. In particular Table formation, Complex Vector Graphics to image conversion, Paragraph Formation, Frames reduction, Graphics processing and many other areas have been completely enhanced.
• Enhanced Character and Paragraph Style generation
The Character and Paragraph style generation mechanism has been enhanced effectively reducing the number of Paragraph and Character styles being created by about 20%.

PDF2ID® v3.5 User Guide
8
Scope of Conversion PDF2ID attempts to recreate the intended construction and layout of the file by analyzing the contents of the PDF or XPS document. PDF2ID extracts text to form lines, then groups the lines to make paragraphs; applies text fonts and styles such as bold and underline where possible; regroups independent graphic elements; and creates tables. Furthermore, it performs contextual analysis so that related data are correlated and remain together. As part of the conversion process, PDF2ID also transforms gradients in a PDF or XPS file to an equivalent gradient in InDesign, applies clipping paths to images, and sets the appropriate InDesign property. It also converts text that is on a path to an equivalent InDesign representation. Finally, transparencies and graphic transformations such as rotations, shearing and scaling are also converted to an equivalent InDesign data type. PDF2ID doesn't make InDesign a PDF or XPS file-editing tool. PDF2ID also doesn’t provide round-tripping of a PDF or XPS file to/from an editable InDesign file type. Rather, the primary scope and objective of PDF2ID is to provide a seamless and transparent mechanism for PDF and XPS data recovery and reuse within InDesign. To achieve this, PDF2ID does its best to preserve the layout while reconstructing data along with the respective property and elements wherever possible. PDF2ID has been designed to provide flexible editing rather than a true 100% reconstruction of a PDF or XPS file to the InDesign format. Unsupported PDF Documents and features PDF2ID does not support Type 3 fonts and user-defined dictionaries embedded in PDF files. Moreover, PDF2ID does not perform Optical Character Recognition/Analysis. Scanned pages of printouts stored in PDF documents are usually images. PDF2ID therefore treats such data as images. It also does not process PDF forms, graphics filters, 3-D data in PDF files, JBIG2 images and certain graphics operations. Finally, PDF2ID doesn’t process externally linked files or embedded fonts. Note: At present, PDF files that are password-protected using AES or PKCS encryption cannot be converted.

PDF2ID® v3.5 User Guide
9
PDF2ID Features • Open and Convert PDF or XPS documents directly in Adobe InDesign CS4 ~ CS6
PDF2ID is a plug-in for Adobe InDesign that enables you to directly open and convert PDF or XPS documents within Adobe InDesign CS4 ~ CS6, and supports both the Macintosh and Windows platforms.
• Specify Conversion Options
PDF2ID provides detailed conversion controls such as converting an entire PDF or XPS file; extracting only text; recovering only images and annotations contained in a PDF or XPS document enabling you to fine-tune the conversion process.
• Familiar Interface
PDF2ID uses the standard Adobe InDesign interface for opening a PDF or XPS document, so there’s no need to learn anything new.
• Quick
PDF2ID converts a PDF or XPS file to Adobe InDesign format within seconds. • Password-protected PDF documents
Convert password-protected PDF documents. • Multi-Language/Asian Language Support
Supports English, Japanese, Chinese, Korean, Western European, Greek and Russian-language data contained in PDF or XPS documents.

PDF2ID® v3.5 User Guide
10
System Requirements Windows
Standard and Professional editions Hardware: Pentium III @ 800 MHz or higher Operating System: Windows XP, Vista, Server 2003/2008, Windows 7, and as per
InDesign CS4 ~ CS6 requirements RAM: 512 MB Application Software: Adobe InDesign CS4 ~ CS6
Macintosh
Standard and Professional editions Hardware: Intel-based Mac with a minimum 1.4 GHz processor Operating System: Mac OS X 10.5.8 and above, and as per InDesign CS4 ~ CS6
requirements RAM: 512 MB Application Software: Adobe InDesign CS4 ~ CS6

PDF2ID® v3.5 User Guide
11
Integration with InDesign PDF2ID provides seamless integration with Adobe InDesign CS4 ~ CS6, enabling you to open PDF or XPS documents directly within it. An “Open PDF/XPS file” command is added to the File menu of InDesign.
Additionally, a Recosoft menu with the command “PDF2ID - Convert PDF/XPS file” also exists.
Using PDF2ID Opening a PDF/XPS document directly within InDesign To Open a PDF or XPS document within InDesign
• Choose the “Open PDF/XPS file” command from the File menu of InDesign or the “PDF2ID – Convert PDF/XPS file”
command from the Recosoft menu.
The “PDF/XPS files” window appears.

PDF2ID® v3.5 User Guide
12
1. Set the file type to either All Documents (or All Files) or PDF/XPS File – Open via
PDF2ID. Then select a PDF or XPS file to open. 2. Click the Open button.
The PDF2ID – Options window appears.

PDF2ID® v3.5 User Guide
13
3. Confirm or specify the settings in the PDF2ID – Options window and click OK. (For
details about the options refer to the section Processing Type and Conversion Options.)
A Conversion Progress window appears indicating the status of converting the PDF or XPS document to InDesign format.
4. Once PDF2ID converts the PDF or XPS document the converted file is opened in
InDesign.
Note: PDF2ID converts the PDF/XPS document to InDesign format when first opening the PDF document, and then saves the converted file to a destination folder. The converted file is actually stored in a subfolder in the Destination folder. The name of the subfolder is the name of the PDF or XPS file being converted. This folder also contains any associated images that are referenced by the converted InDesign file.

PDF2ID® v3.5 User Guide
14
Processing Type and Conversion Options PDF2ID allows you to control the conversion process and specify certain conversion options when converting a PDF or XPS document to InDesign format. The entire process is controlled and managed using the PDF2ID – Options window that appears in InDesign.
Conversion options available when converting a PDF or XPS file to InDesign format
Clicking the Processing Type pop-up menu/drop-down list shows the various processing types available.
Processing types available

PDF2ID® v3.5 User Guide
15
Processing Types enable you to control the kind of conversion required. Each Processing Type offers conversion options that serve a specific purpose.
The following sections explain the various Processing Types and their respective usages along with the options available. Available Processing Types
The table below explains each Processing Type and its respective usage.
Available Processing Types and their Usages
Processing Type Usage
Full Format Converts a PDF or XPS document by recreating the intended construction and layout of the document—forming paragraphs, applying styles, regrouping independent graphic elements, extracting images, and creating tables. This option is selected by default.
Extract Only Text Extracts only the text in a PDF or XPS document.
Extract Only Images Extracts only the images in a PDF or XPS document.
Extract PDF/XPS Annotations only Extracts only the annotations in a PDF or XPS document
“Full Format” and “Extract Only Text” processing types
This section details the processing options available for Full Format and Extract Only Text processing types.
Processing options available when using the “Full Format” processing type.

PDF2ID® v3.5 User Guide
16
Processing options available when using the “Extract Only Text” processing type.
The table below explains each Processing Option and its respective usage.
Processing Options for “Full Format” and “Extract Only Text” processing types
Processing Option Usage
Link Text Frames within a page
Identifies and links text frames that are logically related within a page. Linked text frames enables text to flow from one frame to another and provides selection of text across multiple frames within a page.
Reduce Text Frames Reduces the number of text frames that will be generated. If this option is not selected, every paragraph is put into a separate text frame. For Extract Only Text processing, this option will only be available if the option Maintain Text Position is selected.
Document Information Specifies whether document information such as the document’s author should be processed and transferred to the output file.
Create separate layers for text, tables and graphics
Specifies whether separate Layers should be created for Text, Tables and Graphics. When this is selected the Graphics layer will be the bottom-most, followed by the Tables layer and finally the Text layer in the converted document. This option is only available for the “Full Format” processing type.
Recover PDF Transitions Specifies whether Transition properties that exist in a PDF file should be applied to the corresponding pages in the resulting InDesign file. This option is only available for the “Full Format” processing type.
Maintain Text Position This controls whether the text location should be maintained during the conversion process. If this option is not selected, all text is collected in a single text frame and the position of each text piece is not maintained.

PDF2ID® v3.5 User Guide
17
This option is only available for the “Extract Only Text” processing type.
Link Text Frames across pages
Identifies and links text frames that are logically related across pages. Linked text frames enables text to flow from one frame to another and provides selection of text across pages.
Include Transformed Text Specifies whether text that has been transformed (rotation, shearing, scaling, etc. applied) should be included during the conversion process.
Embed PDF/XPS Annotations
Processes annotations stored in PDF or XPS documents and inserts them into a separate layer in the resulting InDesign file.
Group Overlapping elements This will group data such as text, graphics and images that overlap and intersect (in the same layer). The converted InDesign file will have the “Group” property set for such data.
Recover Bookmarks and URLs
Specifies whether Bookmarks and URLs contained should be recovered and propagated into the resulting InDesign file.
Color Space This pop-up menu/drop-down list allows you to specify the color space to use for the converted elements. Available choices are Document color space, RGB color space, CMYK color space and Lab color space. Document color space retains the original color properties (be it RGB, CMYK or Lab) and converts it to the equivalent InDesign color property. RGB color space will convert all colors to RGB format. CMYK color space will convert all colors to CMYK format, and Lab color space will convert all colors to Lab format. The default setting in PDF2ID Professional is “Document color space”. This menu item is not available in PDF2ID Standard (the default color space in PDF2ID Standard is set internally to “RGB color space”).
Graphics Options The Full Format processing type enables you to specify graphics options. These are explained below.
Graphics Options for “Full Format” processing type
Graphic Option Usage
Convert RGB/CMYK images with ICC profiles to
This pop-up menu/drop-down list allows you to specify the image type to convert to for RGB/CMYK images with an associated ICC profile. The supported types are JPEG, PNG, TIFF-RGB, TIFF-CMYK and TIFF-RGB/CMYK. When TIFF-RGB/CMYK is selected, RGB images remain as RGB and CMYK images remain as CMYK. TIFF-CMYK and TIFF-RGB/CMYK are only available in PDF2ID Professional. In PDF2ID Standard the default is set to TIFF-RGB.

PDF2ID® v3.5 User Guide
18
In PDF2ID Professional the default is set to TIFF-RGB/CMYK.
Preserve profile This checkbox allows you to embed the Device Profile associated with an RGB/CMYK image into the target image format. This is only available when the image format to convert to is set to TIFF-RGB, TIFF-CMYK or TIFF-RGB/CMYK. This is selected by default.
Convert non-RGB/CMYK images with ICC profiles to
This pop-up menu/drop-down list allows you to specify the image type to convert to for images that are not RGB/CMYK but have an associated ICC profile. The supported types are JPEG, PNG, TIFF-RGB and TIFF-CMYK. The default is set to TIFF-RGB. TIFF-CMYK is only available in PDF2ID Professional.
Convert RGB/CMYK images with no ICC profiles to
This pop-up menu/drop-down list allows you to specify the image type to convert to for RGB/CMYK images that don’t have an associated ICC profile. The supported types are JPEG, PNG, TIFF-RGB, TIFF-CMYK and TIFF-RGB/CMYK. TIFF-CMYK and TIFF-RGB/CMYK are only available in PDF2ID Professional. The default is set to TIFF-RGB for PDF2ID Standard. The default is set to TIFF-RGB/CMYK for PDF2ID Professional.
Convert non-RGB/CMYK images with no ICC profiles to
This pop-up menu/drop-down list allows you to specify the image type to convert to for non-RGB/CMYK images that don’t have an associated ICC profile. The supported types are JPEG, PNG, TIFF-RGB and TIFF-CMYK. TIFF-CMYK is only available in PDF2ID Professional. The default is set to TIFF-RGB.
Compression This pop-up menu/drop-down list allows you to specify the compression quality of converted images. It is only available when the image type for any of the above three conversion options is set to JPEG. Available options are Least, Medium and Best.
Resolution This pop-up menu/drop-down list allows you to specify the resolution of the converted images. You can maintain the same image resolution as the originals or specify a value from 72, 96, 144, 200 and 300 dpi.
Convert complex vector graphics to
When this option is set, complex vector graphics (graphics composed of many data points) are converted to an image. The image types that Complex vector graphics can be converted to are PNG-Alpha and TIFF-RGB. In the Windows version the TIFF-RGB option is not available.
Image Resolution The image resolution pop-up menu/drop-down list allows you to specify the resolution of the resulting image when converting Complex vector graphics to an image type. Available values are 200, 250, 300 and 400 dpi.
Image File name Allows specifying a naming convention for all images that are linked.

PDF2ID® v3.5 User Guide
19
Advanced Options and Font Substitution The Full Format and Extract Only Text processing types also enable you to specify advanced options and font substitution. These are explained below.
The Advanced Options allow you to control elements related to hyphenation, font substitution, character/paragraph styles, and the ability to recognize mathematical formulas.
The table below explains each Advanced Option and its respective usage.
Advanced Options for “Full Format” and “Extract Only Text” processing types
Advanced Option Usage
Remove Hyphens Removes the hyphen mark detected in between hyphenated words at the end of a line.
Retain Hyphens Retains the hyphen mark detected in between hyphenated words at the end of a line.
Don't Process Hyphens No processing will be done on hyphenated words, which may at times leave "white space" on either side of the hyphen mark of hyphenated words at the end of a line.
Form mathematical formulas where possible
This option controls whether mathematical formulas should be formed, if they can. This option is only available for the “Full Format” processing type.
Substitute fonts that don't map Substitutes fonts that could not be matched in a PDF or XPS document with the installed fonts on your computer with those specified in the Font Substitution panel.
Scale font size to match original layout
Controls whether the font size of the substituted fonts should be scaled in size so that it closely matches the layout fidelity of the
PDF2ID® v3.5 User Guide
20
original document.
Don’t scale fonts matched via Typeface Library
Controls whether fonts that have been mapped via the Typeface Library should be scaled or not. Refer to the section Typeface Library for further details.
Create Character styles Controls whether Character styles should be created. If this option is not selected, style properties are applied directly to the associated data.
Character style name Allows specifying a naming convention for Character styles.
Create Paragraph styles Controls whether Paragraph styles should be created. If this option is not selected, paragraph properties are applied directly to the associated data.
Paragraph style name Allows specifying a naming convention for Paragraph styles.
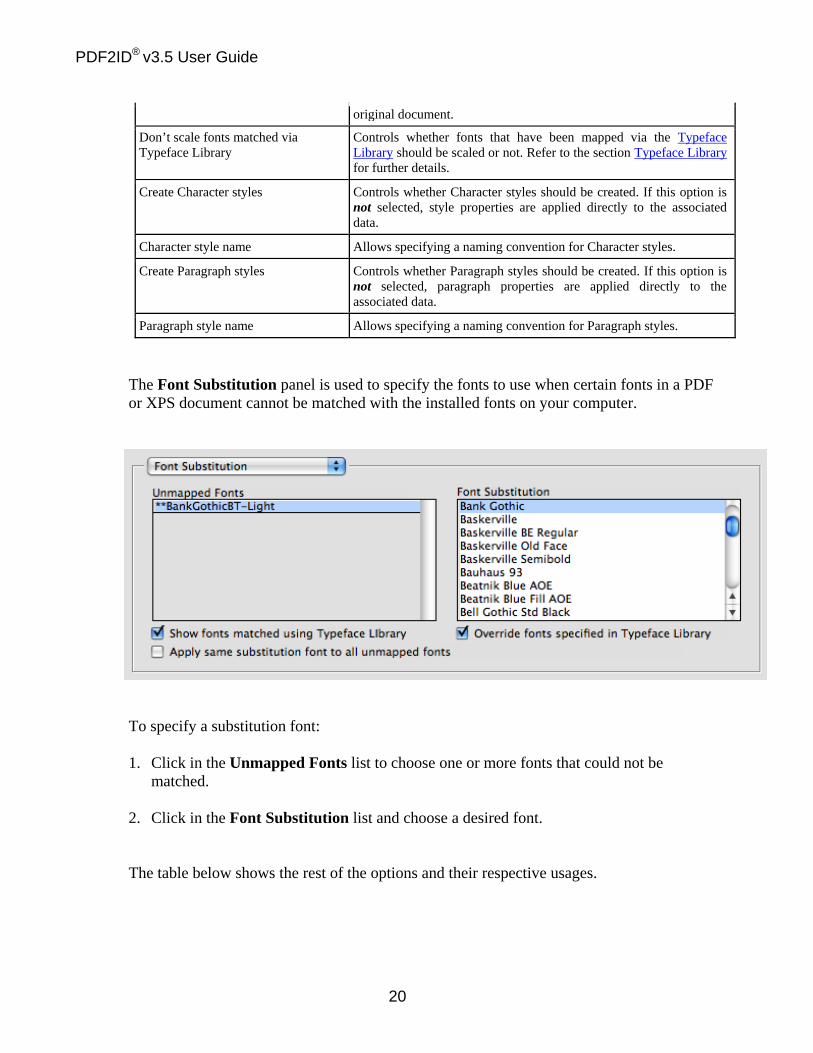
The Font Substitution panel is used to specify the fonts to use when certain fonts in a PDF or XPS document cannot be matched with the installed fonts on your computer.
To specify a substitution font: 1. Click in the Unmapped Fonts list to choose one or more fonts that could not be
matched.
2. Click in the Font Substitution list and choose a desired font. The table below shows the rest of the options and their respective usages.

PDF2ID® v3.5 User Guide
21
Font Substitution Options for “Full Format” and “Extract Only Text” processing types
Font Substitution Option Usage
Show fonts matched using Typeface Library
Shows the fonts that were matched via the Typeface Library. Refer to the section Typeface Library for further details.
Override fonts specified in Typeface Library
Allows specifying a different font mapping then the one specified already by the Typeface Library Refer to the section Typeface Library for further details.
Apply same substitution font to all unmapped fonts
Applies the same substitution font to all fonts that could not be matched for the particular encoding/language.
Tip: You can specify a different substitution font for every font that could not be matched. Simply
repeat the above procedure for each font. You can also select multiple fonts to map to a common one on your computer by using the “Shift” and/or “Ctrl”/”Command” keys when clicking on font names in the Unmapped Fonts list.
Note: Font substitution is controlled by the "Substitute fonts that don't map" checkbox located in the
Advanced Options panel. If this checkbox is not selected, then font substitution will not occur. Tip: Refer to the section About Font Matching, Substitution and Size Scaling for detailed information
about the effects of Font substitution. “Extract Only Images” processing type
This section details the processing options available for the Extract Only Images processing type.
Processing options available when using the “Extract Only Images” processing type.
PDF2ID® v3.5 User Guide
22
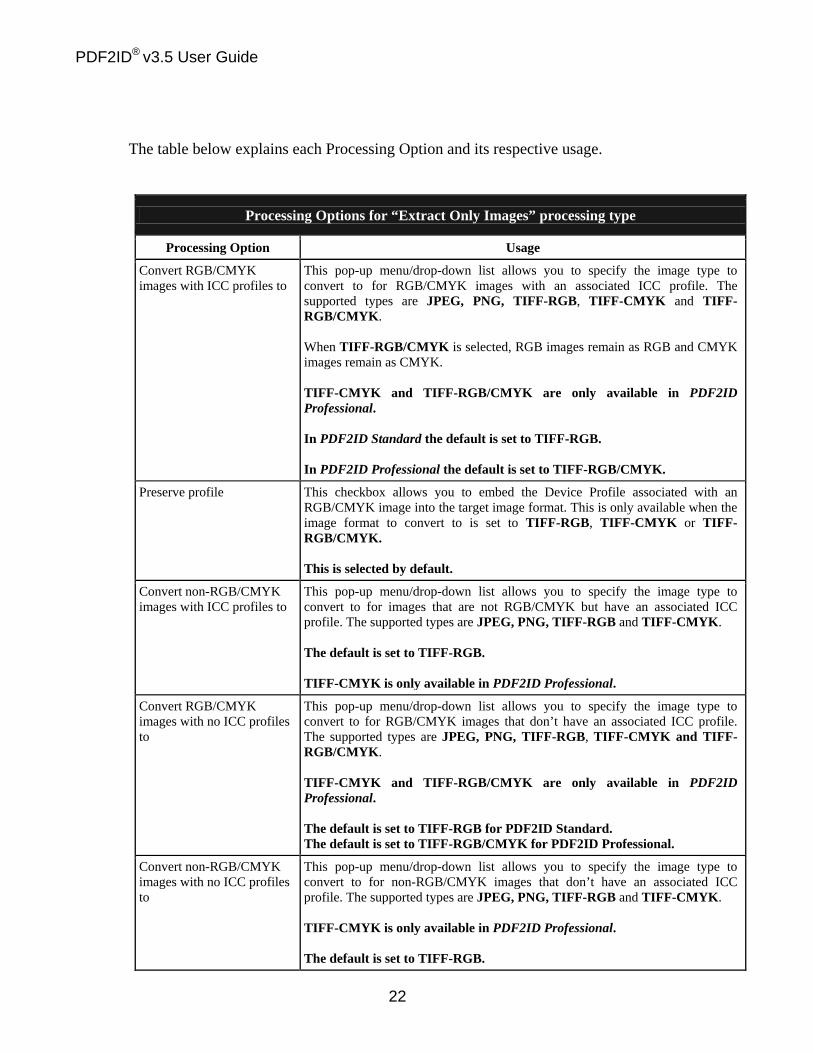
The table below explains each Processing Option and its respective usage.
Processing Options for “Extract Only Images” processing type
Processing Option Usage
Convert RGB/CMYK images with ICC profiles to
This pop-up menu/drop-down list allows you to specify the image type to convert to for RGB/CMYK images with an associated ICC profile. The supported types are JPEG, PNG, TIFF-RGB, TIFF-CMYK and TIFF-RGB/CMYK. When TIFF-RGB/CMYK is selected, RGB images remain as RGB and CMYK images remain as CMYK. TIFF-CMYK and TIFF-RGB/CMYK are only available in PDF2ID Professional. In PDF2ID Standard the default is set to TIFF-RGB. In PDF2ID Professional the default is set to TIFF-RGB/CMYK.
Preserve profile This checkbox allows you to embed the Device Profile associated with an RGB/CMYK image into the target image format. This is only available when the image format to convert to is set to TIFF-RGB, TIFF-CMYK or TIFF-RGB/CMYK. This is selected by default.
Convert non-RGB/CMYK images with ICC profiles to
This pop-up menu/drop-down list allows you to specify the image type to convert to for images that are not RGB/CMYK but have an associated ICC profile. The supported types are JPEG, PNG, TIFF-RGB and TIFF-CMYK. The default is set to TIFF-RGB. TIFF-CMYK is only available in PDF2ID Professional.
Convert RGB/CMYK images with no ICC profiles to
This pop-up menu/drop-down list allows you to specify the image type to convert to for RGB/CMYK images that don’t have an associated ICC profile. The supported types are JPEG, PNG, TIFF-RGB, TIFF-CMYK and TIFF-RGB/CMYK. TIFF-CMYK and TIFF-RGB/CMYK are only available in PDF2ID Professional. The default is set to TIFF-RGB for PDF2ID Standard. The default is set to TIFF-RGB/CMYK for PDF2ID Professional.
Convert non-RGB/CMYK images with no ICC profiles to
This pop-up menu/drop-down list allows you to specify the image type to convert to for non-RGB/CMYK images that don’t have an associated ICC profile. The supported types are JPEG, PNG, TIFF-RGB and TIFF-CMYK. TIFF-CMYK is only available in PDF2ID Professional. The default is set to TIFF-RGB.

PDF2ID® v3.5 User Guide
23
Compression This pop-up menu/drop-down list allows you to specify the compression quality of converted images. It is only available when the image type for any of the above three conversion options is set to JPEG. Available options are Least, Medium and Best.
Resolution This pop-up menu/drop-down list allows you to specify the resolution of the converted images. You can maintain the same image resolution as the originals or specify a value from 72, 96, 144, 200 and 300 dpi.
Group Overlapping Images Groups images that overlap or intersect.
Apply Clipping Paths Applies a clipping path (if any exists) to the image.
Keep Original Size / Scale to
The Keep Original Size option controls whether the original image size should be used. Image sizes can be scaled using the Scale to option. The sizes allowed can be from 10.0% to 200.0%. When an image is scaled, any clipping path included is also scaled to match the image scaling.
Image File name Allows specifying a naming convention for all images that are linked.
“Extract PDF/XPS Annotations only” processing type
This section details the processing options available for the Extract PDF/XPS Annotations only processing type.
Processing options available when using the “Extract PDF/XPS Annotations only” processing type
The table below explains each Processing Option and its respective usage.

PDF2ID® v3.5 User Guide
24
Processing Options for “Extract PDF/XPS Annotations only” processing type
Processing Option Usage
Collect All Annotations in a single text frame
All Annotations will be collected into a single text frame. The locations of the annotations are not maintained with this option. This option is not available if Annotations are converted to InDesign notes. Refer to the Annotations section in the Preferences for more information.
Create separate text frames/notes for all Annotations and maintain location
All converted Annotations will be placed in separate text frames or InDesign notes.
Extract Annotations into an existing window
Extracts the annotations stored in a PDF or XPS file and applies them to an existing InDesign window. When this checkbox is selected, all windows open in InDesign appear in the list underneath. You can then select a window from the list that is shown.
Page Range The Page Range area in the Conversion Options panel is used to control the range of pages to convert.
The All Pages button converts all pages in the PDF or XPS document. The Page Range button is used to specify a specific range of pages to convert.
To specify a range of pages:
1. Click Page Range. 2. Enter the Start page number, e.g., 1. 3. Enter the End page number, e.g., 5.
The Skip pages that don’t convert checkbox controls whether the whole document should still be converted even if some pages cannot be converted.
Note: By default, the "Skip Pages that don’t convert" checkbox is selected (we recommend that this
always be selected). If certain pages cannot be converted, a message appears indicating the pages that could not be converted.

PDF2ID® v3.5 User Guide
25
The Convert Blank Pages to empty InDesign pages checkbox controls whether blank pages in a PDF or XPS document should be converted to corresponding blank pages in the resulting InDesign file. Page Orientation Details provides valuable information on whether all pages in the PDF or XPS file are Portrait or Landscape or a combination of both. Since InDesign CS4 only supports one page orientation per file, this is useful in determining whether to convert the whole document or to split the conversions according to the page orientations.
Parallel Processing
This section applies only to PDF2ID Professional. Modern computers can be equipped with more than one CPU (such as dual processor or quad processor machines). Furthermore, each processor can have 1, 2, 4, 8 or even 16 cores. Each “core,” in effect, acts like an independent CPU; as long as the application can take advantage of this situation. These additional cores and CPUs translate into extra computing power. The conversion engine in PDF2ID Professional takes advantage of such modern computing power by executing the conversion process in parallel. An example is of a conversion occurring in parallel is while the text is being processed, the graphics are simultaneously processed, yielding even faster conversion speeds; or even processing multiple different pages of a PDF or XPS file simultaneously. Thus, conversion of PDF or XPS files to InDesign conversion can execute in parallel. This built-in parallel capability can yield up to a 700% performance increase on a dual processor machine where each processor contains 4 cores. PDF2ID Professional provides an Enable Parallel Processing checkbox that when selected enables parallel processing, and when not selected disables parallel processing. By default this checkbox is selected and we recommend keeping it this way.
However, there may be times when you might want to turn off the parallel processing feature. Because parallel processing can consume most of the computational capability of the computer, at times it could slow down other tasks or applications that are also computing intensively. For example you may be running a complex filter in a graphics application on a large file or

PDF2ID® v3.5 User Guide
26
you may be performing complicated frame editing using a video editing application, or even running multifaceted queries on a large database. In these situations, you may wish to turn off the parallel conversion capability of PDF2ID so the extra computational power is evenly distributed to other applications. Note: The “Enable Parallel Processing” checkbox is available for all processing types.
Password-protected PDF documents PDF2ID automatically detects whether a PDF document requires a password or not. When it detects that a password is required, PDF2ID displays a Password window in which to enter a password before converting the file.
Simply enter the password for the document and click OK. PDF2ID will process the PDF document as long as the entered password is correct.
PDF2ID® v3.5 User Guide
27
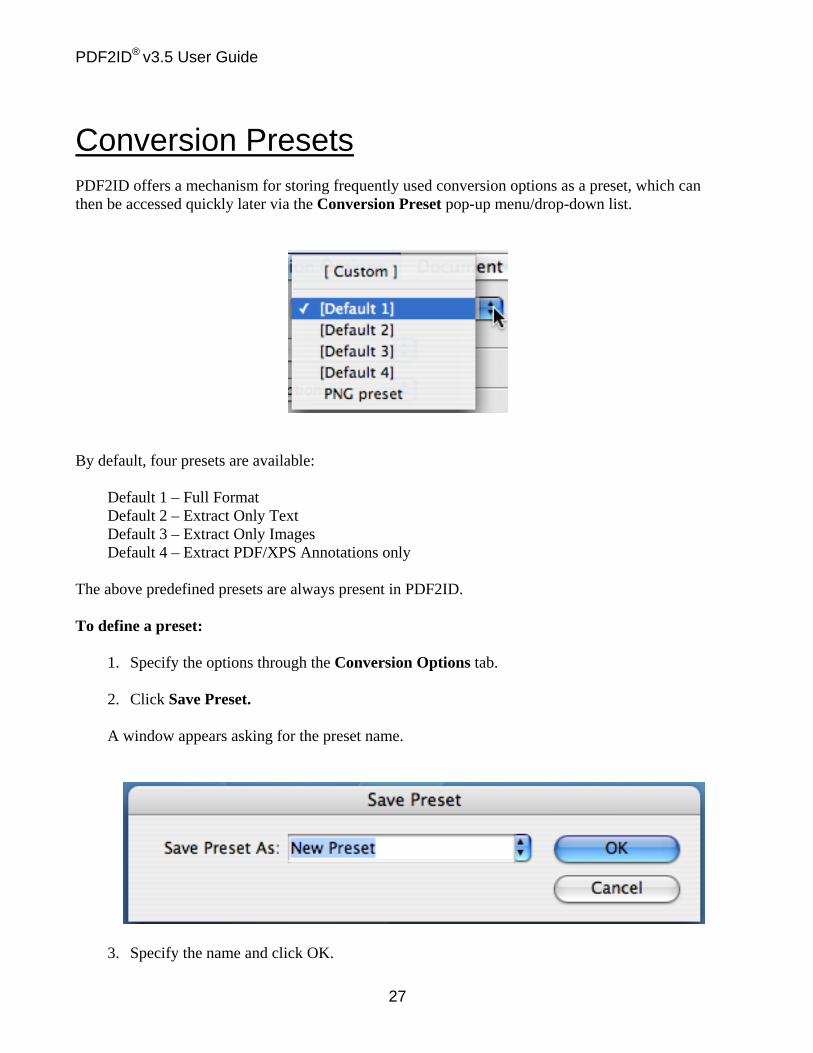
Conversion Presets PDF2ID offers a mechanism for storing frequently used conversion options as a preset, which can then be accessed quickly later via the Conversion Preset pop-up menu/drop-down list.
By default, four presets are available:
Default 1 – Full Format Default 2 – Extract Only Text Default 3 – Extract Only Images Default 4 – Extract PDF/XPS Annotations only
The above predefined presets are always present in PDF2ID. To define a preset:
1. Specify the options through the Conversion Options tab. 2. Click Save Preset. A window appears asking for the preset name.
3. Specify the name and click OK.

PDF2ID® v3.5 User Guide
28
The preset is saved and now accessible via the Conversion Preset pop-up menu/drop-down list.
Note: All Presets are stored in a Conversion Preset library that is maintained by PDF2ID. You cannot
directly manipulate the contents of the Conversion Preset library. To remove a preset:
1. Choose the preset from the Conversion Preset pop-up menu/drop-down list. 2. Click Remove Preset.
A Window appears that asks for confirmation for deletion/removal of the preset.
3. Click OK and the preset is permanently removed.
Note: You cannot remove/delete any of the predefined presets.

PDF2ID® v3.5 User Guide
29
PDF/XPS Inspector PDF2ID allows you to inspect the details of a PDF/XPS document. These details are the:
a. Meta-Information (Description): author, keywords, creating application b. Document Restrictions: operations allowed with the document c. Font List: fonts used in creating the document
To inspect the details of a PDF or XPS document, click the PDF/XPS Inspector tab of the PDF2ID – Options window. Details about the PDF/XPS file are listed in the PDF/XPS Inspector tab.

PDF2ID® v3.5 User Guide
30
Note: At times several fields in the Description area may not be present. This occurs when the PDF or
XPS file does not contain all of the required information. PDF/XPS Inspector provides valuable information about the construction of a PDF or XPS document. For example, if the application used to produce the document was a page layout software such as Quark then you can use that information in deciding the best Processing Type to use. Furthermore, since the font list provides information about the fonts that cannot be matched, you can use that to refine the font substitution process. For more information about Font Substitution, refer to the section About Font Matching, Substitution and Size Scaling.

PDF2ID® v3.5 User Guide
31
Typeface Library Overview PDF2ID provides a comprehensive mechanism for managing and storing font substitutions. All font substitutions made are stored in the Typeface Library database. The Typeface Library is a repository that records, stores and retrieves all font substitutions made. By using the Typeface Library, repetitive font substitutions become obsolete. The Typeface Library operates in conjunction with the Font Substitution panel in the Conversion Options tab. When a font substitution is made, the original PDF or XPS font name along with the specified mapping is stored in the Typeface Library database. Thus, whenever the same PDF font name is encountered, PDF2ID will identify the font via the Typeface Library and automatically substitute it with the stored mapping. This entire storage, identification and mapping process is seamless and transparent; however, PDF2ID provides advanced features that allow full control over the Typeface Library settings. The Typeface Library is managed via the Typeface Library tab in the “PDF2ID – Options” window.

PDF2ID® v3.5 User Guide
32
Typeface Library controls Set Typeface Library Folder is used to specify the location of the Typeface library database. The path and folder are shown in the Typeface Library area. If the Typeface Library database does not exist in the specified folder, a new empty Typeface Library database is created. Note: Although you can choose a different folder for the Typeface Library, doing so will deactivate the current
Typeface Library database (i.e., only one Typeface Library database can be active at a time). The Typeface Library Fonts list contains all font names stored in the Typeface Library database. The Fonts list shows all available active fonts in the system. Clicking an item in the Typeface Library Fonts list will show which font it has been mapped to. To make changes to existing font mappings:
1. Click on an item in the Typeface Library Fonts list. 2. Choose a font in the Fonts list. 3. Click Save Changes to store the recent changes.
Clicking Revert Changes will undo all newly defined mappings that have not been saved. Selecting the Add font substitutions made into Typeface Library checkbox will store all font substitutions made via the Font Substitution panel. This item is made available only if the Activate and Use Typeface Library checkbox is selected. The Typeface Library database is used only if the Activate and Use Typeface Library checkbox is selected. If this item is not selected, font substitutions made are not stored and recorded in the Typeface Library database; furthermore, the Typeface Library database is ignored during the font mapping process. If the When overriding fonts matched via the Typeface Library replace existing font mapping checkbox is selected, then any new mappings made to the existing ones through the Font Substitution panel will replace the existing Typeface Library mappings. . Font Substitution panel Typeface Library Controls Revisited As previously mentioned, the Font Substitution panel under the Conversion Options tab contains two controls that interface with the Typeface Library.
Show fonts matched using Typeface Library Shows the fonts that were matched via the Typeface Library. Override fonts specified in Typeface Library Allows specifying a different font mapping then the one specified already by the Typeface

PDF2ID® v3.5 User Guide
33
Library. The above options play an important role in the Font Matching and Substitution process. This is because when the Show fonts matched using the Typeface Library checkbox is selected, the fonts that were matched using the Typeface Library database are shown in the Unmapped Fonts list. If there is ever a need to override or change the existing mappings temporarily, the Override fonts specified in Typeface Library checkbox needs to be selected and then a different font chosen from the Font Substitution list.

PDF2ID® v3.5 User Guide
34
Customizing PDF2ID’s Behavior You can customize the behavior of PDF2ID through the Preferences tab. The Preferences panel is accessed from the “PDF2ID – Options” window.
To customize the settings: 1. Make sure that the “PDF2ID – Options” window is displayed, which appears when first
opening a PDF or XPS file to convert. 2. Click the Preferences tab.
3. The Preferences panel appears.

PDF2ID® v3.5 User Guide
35
The Preferences panel allows you to specify General, Annotations, Color Profiles and Graphics, Default Font Mappings, Formatting Options, and Others settings. General PDF2ID provides detailed control with respect to the converted PDF or XPS file. Images that are converted from the PDF or XPS file can either be embedded in the resulting file or stored separately and then referenced from the InDesign file.
Selecting the Embed images in converted file checkbox results in the images being stored in the final InDesign file. If this option is not selected, a separate image file for each image is created (e.g., named as image1, image2, etc.) and a reference from the InDesign file is made to the images. Selecting the Store linked images in page-specific subfolders checkbox results in images that are linked being stored in subfolders on a page-by-page basis. When PDF2ID converts a PDF or XPS document, the converted file is saved to a destination folder. The destination folder can be changed using the “Set destination folder” button in the Converted file options area.
Clicking Set destination folder displays a window where you can specify a folder in which to save the converted file. Note:If neither the “Embed images in converted file” nor the “Save Converted file in destination folder”
checkbox is selected, the images are stored in an external file in the Destination folder.

PDF2ID® v3.5 User Guide
36
To set the destination folder, select a folder (or create a new folder) where the converted file should be saved, and click OK/Select. If the Overwrite existing file option is set, PDF2ID deletes the file with the same name that exists in the destination folder after converting the file and before writing the new file. If the Assign unique name option is set, PDF2ID modifies the file name of the converted file if a file with the same name already exists in the destination folder. The modified name is created by appending a unique number to the end of the file name.

PDF2ID® v3.5 User Guide
37
The Default Character style name box allows you to define a preferred name for character styles. The Add Character property to name inserts character properties such as Font Name, Style and Size to the character style name. The Default Paragraph style name box allows you to define a preferred name for paragraph styles. The Add Paragraph property to name inserts paragraph properties such as indentation and justification to the paragraph style name. The Default Image name box allows you to define a preferred name for image files that are externally linked. The Add Image property to file name inserts the Image width and height to the file name.
Selecting the Show scanned/faxed document tip checkbox implies that whenever PDF2ID detects that a scanner or fax machine created the PDF or XPS file (being converted), the appropriate information should be displayed. Selecting the Show Unmapped fonts tip checkbox instructs PDF2ID to display a message when fonts could not be matched in a PDF or XPS file with those present in the system. Selecting the Don't show Unmapped fonts tip if fonts were matched via Typeface Library checkbox instructs PDF2ID to suppress display of the Unmapped fonts tip if the fonts that could not be matched via the system fonts were mapped completely via the Typeface Library. Selecting the Remember last used options checkbox implies that the default conversion settings should reflect the previously used values.
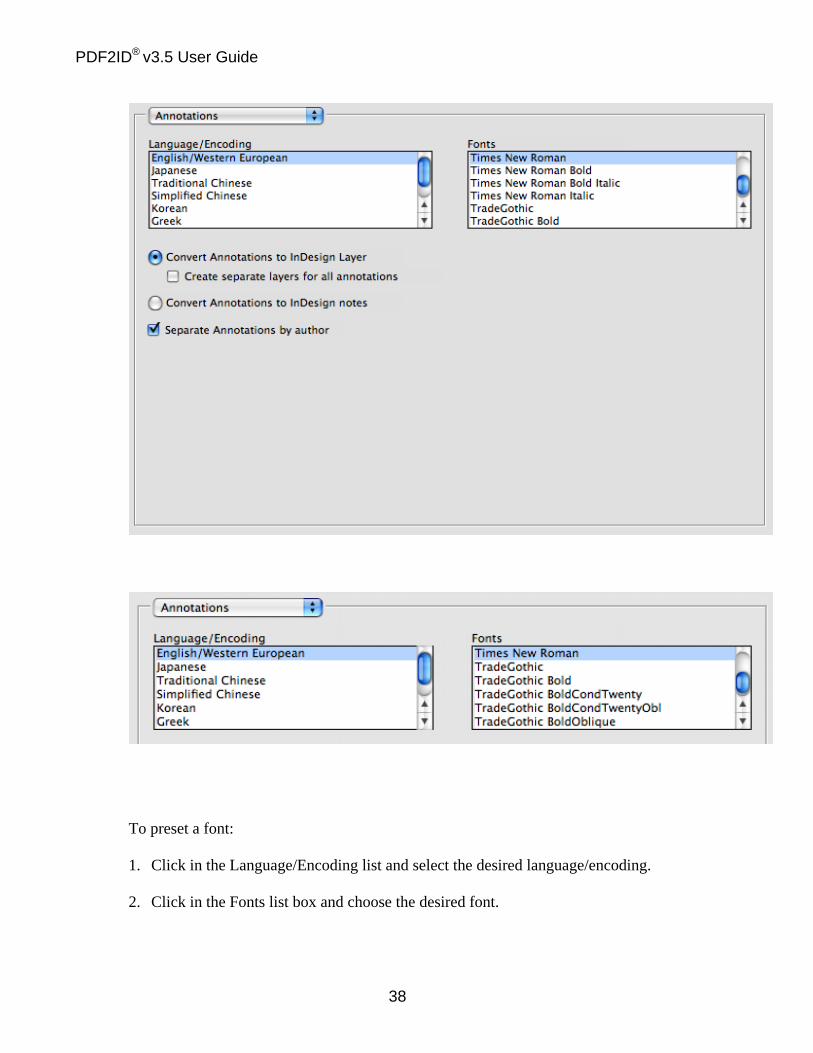
Annotations PDF2ID also provides control over the way PDF and XPS annotations are formatted in the resulting InDesign document. Annotation fonts can be set and the final representation the PDF or XPS annotations will be transformed to can be specified.
PDF2ID® v3.5 User Guide
38
To preset a font:
1. Click in the Language/Encoding list and select the desired language/encoding. 2. Click in the Fonts list box and choose the desired font.

PDF2ID® v3.5 User Guide
39
If the Convert Annotations to InDesign Layer option is set, annotations are converted to an InDesign layer. Additionally, if the Create separate layers for all annotations checkbox is selected, each annotation is converted to a unique layer. If the Convert Annotations to InDesign notes option is set, annotations are converted to InDesign notes. If the Separate Annotations by author checkbox is selected, each author’s annotation is stored in a separate layer. Color Profiles and Graphics The Color Profiles and Graphics settings allow you to specify default Color Profiles to use when converting colors from CMYK/Lab to the RGB space or from RGB/Lab to the CMYK space.

PDF2ID® v3.5 User Guide
40
Simply click on the pop-up menu/drop-down list to specify the default profiles. The color profiles available in InDesign appear.
Note: Setting a color profile when converting to the CMYK space is only available in PDF2ID
Professional.
The Graphics settings are used to control image-related issues. The Up-sample images that are checkbox controls whether the resolution of the images being converted should be amplified or not. The low-resolution pop-up menu/drop-down list is used to specify the maximum image dpi that is considered low in resolution for the resolution to be increased. The target resolution pop-up menu/drop-down list is used to specify the final resolution it should be increased to. Selecting Mark Up-sampled images with a note in a new layer checkbox instructs PDF2ID to add a note into a distinct layer specifying that the image resolution was increased. Selecting Mark images that have been recombined with a note in a new layer checkbox instructs PDF2ID to add a note into a distinct layer specifying that the image was re-composed from many smaller images. Selecting Mark vector graphics converted to an image with a note in a new layer checkbox instructs PDF2ID to add a note into a distinct layer specifying that the image was constructed from a complex set of vector graphic data points.
Default Font Mappings PDF2ID allows you to specify the default font mappings for a specific language/encoding. The default language/encoding font mappings determine the fallback fonts to use when a particular substitution font cannot be applied or when the font name contained in the PDF or XPS file can’t be matched against a system font.

PDF2ID® v3.5 User Guide
41
To preset the font:
1. Click in the Language/Encoding list and select the desired language/encoding. 2. Click in the Fonts list box and choose the desired font.
Formatting Options PDF2ID allows you to specify the default formatting for Tables, Frames, Paragraphs and Styles.
PDF2ID® v3.5 User Guide
42
The Border Type and Weight pop-up menu/drop-down list allows you to specify a default border width and type. The default is set to Use Calculated value. If the option Use Specified from the menu/list is chosen, a preferred Weight and Type can be assigned. The Horizontal Justification pop-up menu/drop-down list allows you to specify the horizontal placement of the data in table cells. The default is set to Use Calculated value. The Vertical Justification pop-up menu/drop-down list allows you to specify the horizontal placement of the data in table cells. The default is set to Use Calculated value.
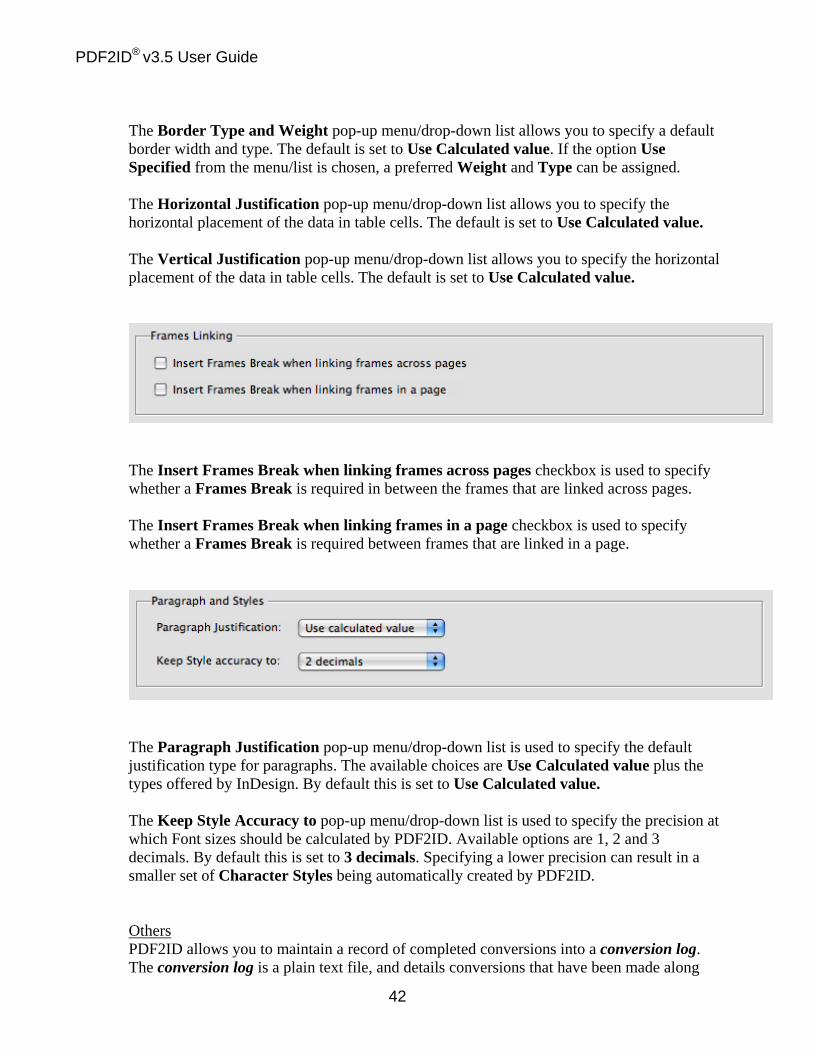
The Insert Frames Break when linking frames across pages checkbox is used to specify whether a Frames Break is required in between the frames that are linked across pages. The Insert Frames Break when linking frames in a page checkbox is used to specify whether a Frames Break is required between frames that are linked in a page.
The Paragraph Justification pop-up menu/drop-down list is used to specify the default justification type for paragraphs. The available choices are Use Calculated value plus the types offered by InDesign. By default this is set to Use Calculated value. The Keep Style Accuracy to pop-up menu/drop-down list is used to specify the precision at which Font sizes should be calculated by PDF2ID. Available options are 1, 2 and 3 decimals. By default this is set to 3 decimals. Specifying a lower precision can result in a smaller set of Character Styles being automatically created by PDF2ID.
Others PDF2ID allows you to maintain a record of completed conversions into a conversion log. The conversion log is a plain text file, and details conversions that have been made along

PDF2ID® v3.5 User Guide
43
with the options used.
Selecting Record conversions into a conversion log file checkbox results in the conversions being recorded into a conversion log. The Set Conversion Log button is used to specify the location where the conversion log should be stored. The Create New Log button is used to create a new conversion log. Saving Preferences To save any changes made to the preferences settings, click Apply.
Upon clicking Apply, an InDesign confirmation dialog box appears.
Click OK to save the settings. Click Cancel if you do not want to save the changes.
PDF2ID® v3.5 User Guide
44
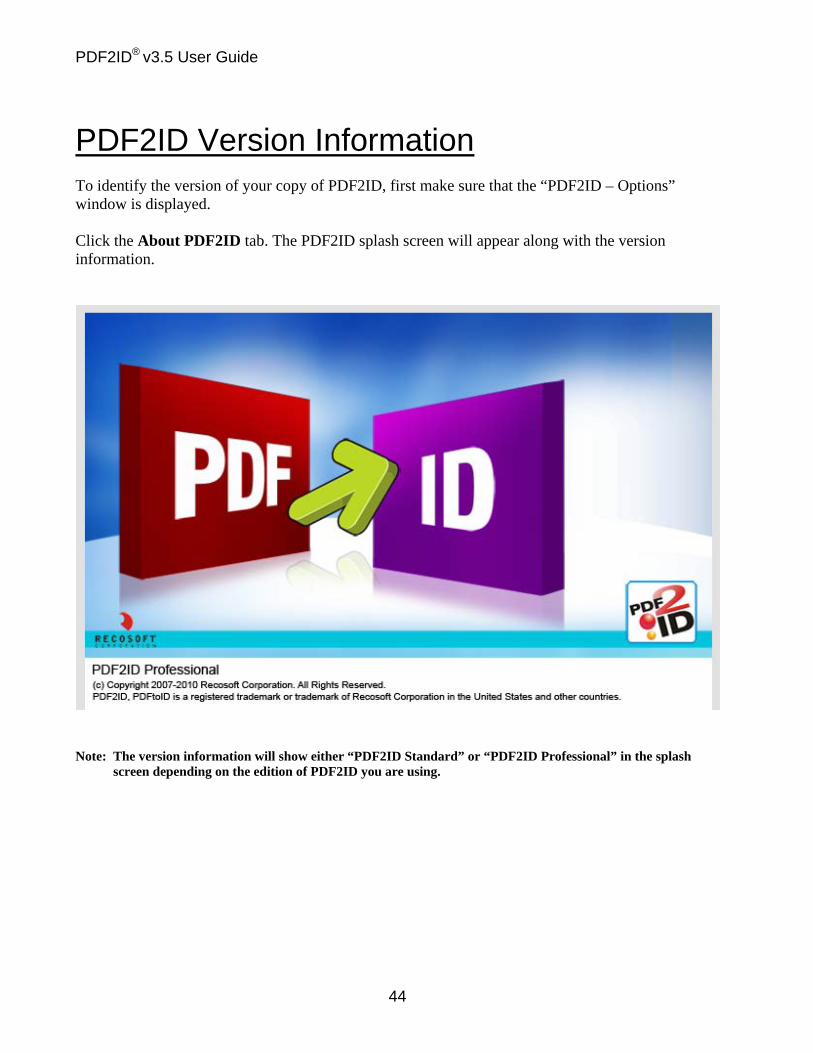
PDF2ID Version Information To identify the version of your copy of PDF2ID, first make sure that the “PDF2ID – Options” window is displayed. Click the About PDF2ID tab. The PDF2ID splash screen will appear along with the version information.
Note: The version information will show either “PDF2ID Standard” or “PDF2ID Professional” in the splash
screen depending on the edition of PDF2ID you are using.

PDF2ID® v3.5 User Guide
45
About Font Matching, Substitution and Size Scaling Matching a font in a PDF or XPS file with a font in the system is not a straightforward process. A PDF file generally contains PostScript fonts where the original font names have been substituted with its PostScript equivalent. Identifying the original name from a PostScript font name is sometimes not possible. The same is applicable for XPS files where at times the original font names can’t be deciphered. PDF2ID contains a large database of font names and their equivalent PostScript names. It first tries to match the fonts in the PDF or XPS file using this database. If the database match fails, it then generates Postscript font names for the fonts installed in the system and uses those to match with the fonts in the PDF file. But it still may not be able to match the fonts since not every system contains all fonts. Fonts play an important role because they dictate the placement of text and affect the layout of converted files. PDF2ID provides a Font Substitution mechanism whereby if a font in a PDF or XPS file cannot be matched with any of the fonts in the system, the font is substituted by a preset one of your choice. To help make this process easier, PDF2ID contains within it a comprehensive Typeface Library that eliminates repeated font substitutions. However, simply substituting a font sometimes may not yield ideal conversion results since each font has different characteristics, such as the character width and height of the original font. An important feature that has been provided with PDF2ID is "font size scaling." By inspecting details of the PDF or XPS document, PDF2ID adjusts the size of the text when font substitution occurs so that the width and height characteristics closely match the original font used. In general, when performing conversions, we strongly recommend turning on the Font Substitution mechanism (Conversion Options tab – Advanced Options panel – “Substitute fonts that don't map”), and utilizing the font sizing mechanism (Conversion Options tab – Advanced Options panel – “Scale font size to match original layout”). Furthermore, it is recommended to use "Times New Roman" for the substitution font for English/Western European language text (Conversion Options tab – Font Substitution panel from the pop-up menu/drop-down list) because in many instances it yields the best results. Note: Both "font substitution" and "font size scaling" can be turned on or off, giving the user full control of
these features.
PDF2ID® v3.5 User Guide
46
Troubleshooting Tips #1. I am using InDesign CS4 and have a document that has both landscape and portrait pages. The converted output is not properly formatted. What should I do? Answer: Try opening the PDF or XPS document by opening consecutive landscape and portrait pages separately. For example, first open portrait pages 1–3, then landscape pages 4–5, then portrait page 6, and so on, making sure to open only one type of page at a time. Finally, reassemble them together in one window. #2. Are tables not properly formatted? Answer: There can be many reasons why tables may not format properly. One possible reason is that the table had borders that were hidden or cells that were not connected. In such cases PDF2ID can’t determine the table precisely and may capture the data as a graphic. #3. Are graphics not being processed properly? Answer: PDF2ID supports most graphics operations in PDF and XPS documents and converts them to equivalent InDesign properties. However, support for graphics filters is not available at present.
Related Documents