USER GUIDE INDEPENDENCE KIT 70 ENGLISH DEUTSCH ESPAÑOL FRANÇAIS PORTUGUÊS This manual contains important safety information. Before using the slackline read this manual carefully and make sure you understand and agree to all warnings, cautions, instructions, and safety recommendations. Periodically review the information in this manual and inspect your slackline regularly for signs of damage. Do not use the slackline unless you accept all risk of injury and/or death that may result from your use.

Welcome message from author
This document is posted to help you gain knowledge. Please leave a comment to let me know what you think about it! Share it to your friends and learn new things together.
Transcript

GIBBON MANUAL - ENGLISH
USER GUIDEINDEPENDENCE KIT 70
ENGLISH DEUTSCH
ESPAÑOL
FRANÇAIS
PORTUGUÊS
This manual contains important safety information. Before using the slackline read this manual carefully and make sure you understand and agree to all warnings, cautions, instructions, and safety
recommendations. Periodically review the information in this manual and inspect your slackline regularly for signs of damage. Do not use the slackline unless you accept all risk of injury and/or death
that may result from your use.
GIBBON MANUAL - ENGLISH
1. WARNING! THE SLACKLINE IS A DANGEROUS PIECE OF EQUIPMENT EVEN WHEN USED PROPERLY: PARENTS OF MINORS AND MINORS: Minors should not use the slackline unless they are under constant competent adult supervision. Make sure that the slackline is only installed in areas where minors cannot access the slackline without such adult supervision. Minors should never use the ratchet or adjust the ten-sion of the slackline at any time.
The slackline was developed solely for one adult to improve his or her balance by slowly walking across the slackline over a flat, even and soft landing area without any obstacles, people, projections, or hazards nearby. The slackline must only be used in the manner described in this Manual. USING A SLACKLINE CAN BE A DANGEROUS ACTIVITY THAT MAY RESULT IN SERIOUS INJURY AND/OR DEATH EVEN WHEN USED PROPERLY. USE AT YOUR OWN RISK AND ALWAYS USE COMMON SENSE.
Make sure that the slackline is fixed only to anchors as described in section 3.1 and 3.2 below. Do NOT attach the slackline to any anchor point that is too weak to safely anchor and use the slackline or that is not fixed. For example, do NOT attach the slackline to one or more cars. www.gibbonslacklines.com (USA) and www.gibbon-slacklines.com (INT) contains additional information.Make sure that the ground and landing area over which the slackline is suspended is flat, even, and soft. You will be falling onto it!DO NOT set the slackline at any height above 18 inches / 50 centimeters.
Make sure that there are no obstacles, hazards, people, or projections near the slackline that could injure you in a fall. Only use the slackline at locations without any hazards and/or dangers.
• Always wear sturdy, tightly laced athletic shoes with flat rubber soles. • Do NOT walk the slackline barefoot or in sandals or using shoes with lugged soles.• Keep all spectators at least 3 meters (9 feet) from the slackline.• Never use the slackline at dusk or night or in wet or icy conditions.• Do NOT allow more than one person to use the slackline at any time.• Do NOT exceed 220 pounds (100 kg) in weight on the slackline at any time. • THIS SLACKLINE IS NOT INTENDED FOR PERFORMING ANY TRICKS, INCLUDING BUT NOT LIM-
ITED TO JUMPING, FLIPPING, ETC. RISK OF INJURY AND/OR DEATH INCREASES • SIGNIFICANTLY WHEN TRICKS ARE ATTEMPTED OR PERFORMED.
This slackline is not impervious to damage. THE SLACKLINE MUST BE PROPERLY MAINTAINED AND IN-SPECTED BEFORE EVERY USE. FAILURE TO INSPECT AND MAINTAIN THE SLACKLINE BEFORE EACH USE MAY RESULT IN INJURY AND/OR DEATH. THE USE OF ANY PARTS NOT PROVIDED BY THE MANU-FACTURER ARE NOT RECOMMENDED AND MAY DAMAGE THE SLACKLINE, IMPACT PERFORMANCE, SHORTEN THE LIFESPAN OF THE PRODUCT, AND CAUSE INJURY AND/OR DEATH.
1.1 NATURAL WEAR NOT RELATED TO WARRANTY CLAIMS: Wear on the loop protection is not taken into warranty consideration – In usage the slackline is confronted with permant dynamic stresses. Wear on the loop protection hence does not get considered for warranty claims. Wear on A-Frames do to leaving in the rain as well as wear on coating due to contact with Slackline is not to be considered for warranty claims but are defined as natural wear of product. Related to the topic above the wear on the print of the slackline is excluded from warranty claim. Wear on the Slackline that is caused by incorrect usage like for example when wrapping the slackline around sharp corners can not be claimed for warranty. The Slackline is a sportsproduct and under usage naturally is con-fronted with wear.
1.2 WASHING AND MAINTENANCE INSTRUCTIONS:For ideal maintenance we recommend cleaning the ratchet and seal it with standard machine lubricant. Please rinse entire Slackline with clear freshwater after usage in saltwater. Before every usage of the Slackline please check all parts for damage. Please only wash with medium warm clear water. To avoid wear on A-Frames please make sure that you do not leave them in the rain. Deinstall after use and store in a dry environment.
GIBBON MANUAL - ENGLISH
1.3 ADDITIONAL SAFETY REGULATIONS:The Slackline system is only allowed to be tensioned by hand and by one person only.The chosen Anchors neither are allowed to have any sharp corners or be in a condition to potentially harm the slackline.Is only allowed to be installed with protective flooring underneath.Is never to be tensioned with other means (such as cars) than the equipment provided inside the set.Please do not leave the slackline unnattended when derigged. Small children could get tangled up in the slackline.The slackline is not allowed to be modified in length by using knots.
1.4 FAILURE TO:• USE COMMON SENSE, • USE THE SLACKLINE AS RECOMMENDED IN THIS MANUAL, AND/OR • HEED THE WARNINGS AND INSTRUCTIONS IN THIS MANUAL• SIGNIFICANTLY INCREASES THE RISK OF SERIOUS INJURY AND/OR DEATH.• WHEN ASSEMBLED, THE SLACKLINE IS UNDER SIGNIFICANT TENSION WHICH MAY EQUAL OR
EXCEED 1500 lbs (7 kN/700 kg). DUE TO THE HIGH TENSION OF THE SLACKLINE, GREAT CARE MUST BE EXERCISED WHEN USING THE SLACKLINE TO DECREASE THE RISK OF INJURY AND/OR DEATH. OVERLOADING THE SLACKLINE WITH MORE THAN 220 POUNDS (100 kg) AND/OR MORE THAN ONE PERSON INCREASES THE TENSION AND MAY CAUSE THE SLACKLINE AND/OR RATCHET TO FAIL RESULTING IN INJURY AND/OR DEATH.
Check local laws regarding slacklines to see where and how you may lawfully use the slackline. In some cit-ies and states slacklining use on public property is illegal, restricted, or banned. You may see people on TV or on the Internet performing tricks or stunts on a slackline. These are people who have been practicing for a long time, who are highly skilled, and who accept the risk of all injury and/or death. DO NOT ATTEMPT TO PERFORM ANY TRICKS ON THIS SLACKLINE UNLESS YOU ACCEPT ALL RISK OF INJURY AND/OR DEATH.
THE MANUFACTURER AND RESELLERS OF THIS SLACKLINE EXPLICITLY DISCLAIM ANY AND ALL RE-SPONSIBILITY AND LIABILITY FOR ANY DEATH, PARALYSIS, INJURY, AND/OR DAMAGE TO ANY PER-SON OR PROPERTY THAT MAY OCCUR THAT ARISES OUT OF OR IS IN ANY WAY RELATED TO THE USE OF THIS PRODUCT.
1.5 WARRANTY:This product is warranted against any material or manufacturing defect for two (2) years from the pur-chase date as stated on a valid receipt. THIS WARRANTY DOES NOT COVER OR INCLUDE ANY DAMAGE OR DEFECT CAUSED BY: NORMAL WEAR AND TEAR, MODIFICATIONS OR ALTERATIONS, INCORRECT STORAGE, POOR MAINTENANCE, AND/OR DAMAGE DUE TO ACCIDENTS, NEGLIGENCE, OR MISUSE (INCLUDING BUT NOT LIMITED TO ANY USE NOT EXPLICITLY APPROVED IN THIS MANUAL). Be sure to thoroughly dry the slackline before storing.
Other than as described above, THE MANUFACTURER, SELLERS, AND RESELLERS OF THIS PRODUCT MAKE NO OTHER REPRESENTATIONS AND/OR WARRANTIES, EITHER EXPRESS OR IMPLIED, REGARD-ING THE PRODUCT, INCLUDING WITHOUT LIMITATION, ANY WARRANTIES AS TO MERCHANTABILITY, QUALITY, OR FITNESS FOR A PARTICULAR PURPOSE. THE MANUFACTURER, SELLERS, AND RESELL-ERS SHALL NOT BE LIABLE IN ANY WAY WHATSOEVER FOR SPECIAL, INDIRECT, CONSEQUENTIAL, OR INCIDENTAL DAMAGES, WHETHER BASED ON BREACH OF CONTRACT, BREACH OF WARRANTY, TORT (INCLUDING NEGLIGENCE), PRODUCT LIABILITY OR OTHERWISE, EVEN IF THEY HAVE BEEN ADVISED OF THE POSSIBILITY OF SUCH DAMAGES. THE SLACKLINE USER AGREES THAT HIS OR HER FULL REMEDY AGAINST THE MANUFACTURER, SELLERS, AND RESELLERS FOR ANY LIABILITY, CLAIMS, OR DAMAGES, SHALL BE LIMITED TO THE PURCHASE PRICE OF THE SLACKLINE, AND IRREVOCABLY WAIVE ALL CLAIMS FOR ANY OTHER DAMAGES THAT SUCH SLACKLINE USER MAY HAVE.

GIBBON MANUAL - ENGLISH
2. FURTHER WARNINGS: ATTENTION! Do not use any other parts or materials to install the slackline or in connection with the use of the slackline other than the parts and materials provided by Gibbon Slacklines. USE OF THE RATCHET IS DANGEROUS AND MAY LEAD TO INJURY AND/OR DEATH. THE RATCHET MUST NEVER BE USED BY MINORS AND EXTREME CARE AND CAUTION MUST BE TAKEN WHEN USED BY ADULTS. THE SLACKLINE STRAP MUST NOT EXCEED TWO AND A HALF ROTATIONS AROUND THE AXLE OF THE RATCHET. (See subsection 3.4 below.) The tension on the lever of the ratchet must not exceed 85 pounds (approx. 378N/38.5kg) to prevent sei-zure and/or failure of the slackline system resulting in serious injury and/or death. NEVER USE YOUR LEGS OR ANY DEVICE OR BODY PART OTHER THAN YOUR HANDS TO OPERATE THE RATCHET. This slackline must not be attached or assembled between vehicles (e.g., cars or trucks) for various rea-sons, including because the tension can easily exceed the safety limit of 85 pounds (approx. 378N/38.5kg). This slackline must not be assembled or used at any height above 18 inches (50 cm). Slacklining is a beautiful sport, but its dangers, including serious injury and/or death, are significant and must never be underestimated!
Set contains: (as seen in image 1)
A) The ratchet with looped ratchet bandA* Optionally - short retchet band for retrofitting - needed: 2 spanners in size 19B) The webbing: 2” (5cm) wide with looped endC) 2 x a-frames with three height optionsD) 2 x ground screws for anchoring the system
Not included: (as seen in image 2)
E) turning pole Please use a strong and sturdy metal pole or a strong wooden pole for turning the ground screws into the ground.
x 2x 22
AB
CD
E
A*
SETUP VIDEO https://vimeo.com/92235778
3. ASSEMBLY:The Gibbon Slackline is designed for quick and easy assembly if you follow the directions in this manual. The slackline consists of the following components:
3.1 SETTING UP THE INDEPENDENCE KIT 70Start by looking for a suitable place for turning the ground screws into the ground. Take into account that the anchor needs always at least twice the distance to the a-frame in relation to the desired setup height.
You will find a setup video in the internet https://vimeo.com/92235778
Example A: 10m (32ft) setup at 70cm (2.3ft) height needs an additional 2x 140cm (2x 5ft) added for defining the distance of the ground screws.
=> Total distance from anchor to anchor: 12,8m (42ft) with the long ratchet strap!
It is also possible to set up the system at shorter distances and lower setup heights.
Example B: 4m (12ft) distance at 30cm (1ft) setup height: 4m (2x60cm) = minimum distance between anchor points: at least 5,2m (16ft). It is also possible to readjust the setup length by simply shortening the distnace between the a-frames allowing you to adjust the distance while the system is installed.
GIBBON MANUAL - ENGLISH
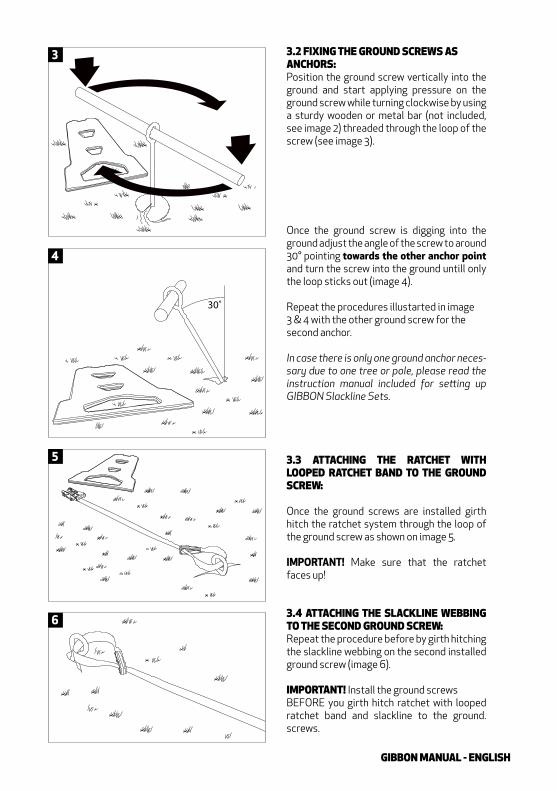
3.2 FIXING THE GROUND SCREWS AS ANCHORS:Position the ground screw vertically into the ground and start applying pressure on the ground screw while turning clockwise by using a sturdy wooden or metal bar (not included, see image 2) threaded through the loop of the screw (see image 3).
Once the ground screw is digging into the ground adjust the angle of the screw to around 30° pointing towards the other anchor point and turn the screw into the ground untill only the loop sticks out (image 4).
Repeat the procedures illustarted in image 3 & 4 with the other ground screw for the second anchor.
In case there is only one ground anchor neces-sary due to one tree or pole, please read the instruction manual included for setting up GIBBON Slackline Sets.
3.3 ATTACHING THE RATCHET WITH LOOPED RATCHET BAND TO THE GROUND SCREW:
Once the ground screws are installed girth hitch the ratchet system through the loop of the ground screw as shown on image 5.
IMPORTANT! Make sure that the ratchet faces up!
3.4 ATTACHING THE SLACKLINE WEBBING TO THE SECOND GROUND SCREW:Repeat the procedure before by girth hitching the slackline webbing on the second installed ground screw (image 6).
IMPORTANT! Install the ground screws BEFORE you girth hitch ratchet with looped ratchet band and slackline to the ground. screws.
30˚
4
5
6
3

GIBBON MANUAL - ENGLISH
3.5 ADDING THE A-FRAMESPosition the a frames by laying them on the ground an start threading the slackline through the desired slot to achieve the desired setup height (image 7).
IMPORTANT! Make sure that the ratchet is placed between the ground screw and the a -frame, so that the ratchet is outside the area of usage (also see image 13).
3.6 TENSIONING THE SLACKLINEThread the slackline through the slot of the ratchet facing up (image 8) and pull through the excess webbing till there is as much ten-sion on the line that is possible by hand (image 9).
Release lever “A” of the ratchet and open up the ratchet lever handle for tensioning.
Hold excess webbing and line firmly together to avoid the pre tension from releasing (image 10).
Start tensioning the slackline by moving the ratchet lever forth and back. (image 10)
7
8
A
9
10
GIBBON MANUAL - ENGLISH
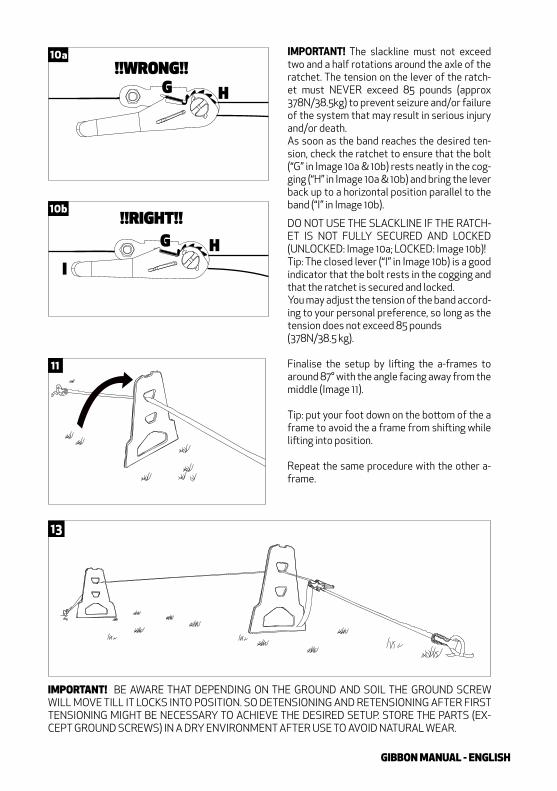
IMPORTANT! The slackline must not exceed two and a half rotations around the axle of the ratchet. The tension on the lever of the ratch-et must NEVER exceed 85 pounds (approx 378N/38.5kg) to prevent seizure and/or failure of the system that may result in serious injury and/or death.As soon as the band reaches the desired ten-sion, check the ratchet to ensure that the bolt (“G” in Image 10a & 10b) rests neatly in the cog-ging (“H” in Image 10a & 10b) and bring the lever back up to a horizontal position parallel to the band (“I” in Image 10b).
DO NOT USE THE SLACKLINE IF THE RATCH-ET IS NOT FULLY SECURED AND LOCKED (UNLOCKED: Image 10a; LOCKED: Image 10b)!Tip: The closed lever (“I” in Image 10b) is a good indicator that the bolt rests in the cogging and that the ratchet is secured and locked.You may adjust the tension of the band accord-ing to your personal preference, so long as the tension does not exceed 85 pounds(378N/38.5 kg).
Finalise the setup by lifting the a-frames to around 87° with the angle facing away from the middle (Image 11).
Tip: put your foot down on the bottom of the a frame to avoid the a frame from shifting while lifting into position.
Repeat the same procedure with the other a- frame.
IMPORTANT! BE AWARE THAT DEPENDING ON THE GROUND AND SOIL THE GROUND SCREW WILL MOVE TILL IT LOCKS INTO POSITION. SO DETENSIONING AND RETENSIONING AFTER FIRST TENSIONING MIGHT BE NECESSARY TO ACHIEVE THE DESIRED SETUP. STORE THE PARTS (EX-CEPT GROUND SCREWS) IN A DRY ENVIRONMENT AFTER USE TO AVOID NATURAL WEAR.
11
13
I
!!RIGHT!!G H
G H!!WRONG!!
10a
b10

GIBBON MANUAL - ENGLISH
5. WALKING THE SLACKLINE:Tips: Look at the anchor point of the band in front of you for balance. Move your arms to correct imbalances. Keep your knees bent.IMPORTANT: For safety reasons there should never be more than one person on the slack-line! NEVER RUN on the slackline!
www.gibbon-slacklines.com
6. DISMANTLING THE SLACKLINETo release the ratchet pull the safety lever (“A” in Image 14) to unlatch the ratchet and open the main lever (“B“ in Image 14) until the safety lever detaches from the cogwheel (“C” in Im-age 14) and the band is released.
IMPORTANT! The band is under tension and injury and/or death may occur if not carefully dismantled. Make sure the rachet is open fully before releasing the band (Image 14).
Once the band is released, detach the band from the ratchet (Image 15). Inspect the band for abrasions and damage, make sure the webbing is clean and dry and and store in a dry place. Remove and store both ratchets and tree protectors.
13
B
A
C
14
B
15
IMPORTANT! STORE THE PARTS (EXCEPT GROUND SCREWS) IN A DRY ENVIRONMENT AFTER USE TO AVOID NATURAL WEAR.

GIBBON MANUAL - ESPANOL
BEDIENUNGSANLEITUNGINDEPENDENCE KIT 70
ENGLISH
DEUTSCHESPAÑOL
FRANÇAIS
PORTUGUÊS
Dieses Handbuch enthält wichtige Sicherheitsinformationen. Lesen sie bitte das Handbuch vor der Verwendung dieses Produktes sorgfältig durch und stellen sie sicher, dass sie alles verstehen und
allen Warnungen, Instruktionen, und Sicherheitsempfehlungen zustimmen. Lesen sie regelmäßig die Information in diesem Handbuch nach. Untersuchen sie ihre Slackline regelmäßig auf Anzeichen von Schäden. Verwenden sie die Slackline nicht wenn sie nicht die ganze Gefahr von Verletzungen und/
oder der möglichen Konsequenzen akzeptieren, die sich aus ihrem Gebrauch ergeben kann.
IMPORTANT! STORE THE PARTS (EXCEPT GROUND SCREWS) IN A DRY ENVIRONMENT AFTER USE TO AVOID NATURAL WEAR.

GIBBON BEDIENUNGSANLEITUNG - DEUTSCH
1.0 WARNUNG! EINE SLACKLINE KANN SELBST BEI RICHTIGER VERWENDUNG GEFÄHRLICH SEIN:ELTERN VON MINDERJÄHRIGEN UND MINDERJÄHRIGE: Minderjährige sollten die Slackline niemals ohnedie Aufsicht von Erwachsenen verwenden. Stellen Sie sicher, dass die Slackline nur an Orten installiertwird, wo Minderjährige unter Aufsicht von Erwachsene darauf zugreifen können. Minderjährige sollten dieRatsche niemals bedienen und die Spannung der Slackline damit regulieren.
Die Slackline sollte nur über ebenen, flachen und weich zu landenden Untergrund in einer niedrigen Höhegespannt werden. Jegliche Hindernisse, Menschen oder sonstige Gefahren in der Nähe der Slackline sol-lten vermieden werden! Auf der Slackline stets langsam laufen. Die Slackline darf nur auf die in diesemHandbuch näher beschriebene Art und Weise verwendet werden. DAS VERWENDEN EINER SLACKLINEKANN EINE GEFÄHRLICHE TÄTIGKEIT SEIN, DIE ERNSTE VERLETZUNGEN UND/ODER TOD ZUR FOLGEHABEN KANN; SELBST WENN SIE RICHTIG VERWENDET WIRD . DIE VERWENDUNG DER SLACKLINEGESCHIEHT AUF IHRE EIGENE GEFAHR: BENUTZEN SIE IMMER IHREN GESUNDEN MENSCHENVER-STAND.Stellen Sie sicher, dass die Slackline nur an Fixpunkten befestigt wird wie im Abschnitt 3.1 und 3.2beschrieben. Befestigen Sie die Slackline niemals an Ankern, die zu schwach für eine sichere Befestigungder Slackline sind. Beispiel: Befestigung an Autos, Laternenpfosten, dünne Bäume (Durchmesser <30cm),etc. Weitere Infos finden Sie unter www.gibbon-slacklines.com. Spannen Sie die Slackline keinesfalls höherals Schritthöhe und/oder maximal 50 Zentimeter.
Stellen Sie sicher, dass es keine Hindernisse, Menschen, Ecken, Kanten, spitze Gegenstände oder sonstigeGefahren in der Nähe Ihrer gespannten Slackline gibt, an denen Sie oder andere Personen sich verletzenkönnten . Verwenden Sie die Slackline nur an Stellen ohne jegliche Gefahren.• Tragen Sie bei der Benutzung der Slackline immer festes Schuhwerk mit flachen, rutschfesten Sohlen.• Das Laufen mit Sandalen, Flipflops und sonstigem losen Schuhwerk sowie barfuß kann gefährlich sein und sollte vermieden werden.• Halten Sie alle Zuschauer mindestens 3 Meter von der Slackline entfernt.• Verwenden Sie die Slackline nie an dunklen Orten, bei Nacht oder in nassen oder eisigen Bedingungen.• Erlauben Sie nie mehr als einer Person die Slackline zu verwenden.• Überschreiten Sie niemals das Gewicht von 100 Kg auf der Slackline.• Diese Slackline ist nicht zum Springen und Durchführen von Tricks geeignet.• Sollten diese dennoch durchgeführt werden, ist mit einem enormen Anstieg des Verletzungsrisikos zu rechnen!Diese Slackline und das Zubehör sind nicht frei von Verschleiß.ÜBERPRÜFEN SIE SLACKLINE, DIE A-FRAMES UND RATSCHE SORGFÄLTIG VOR JEDEM GEBRAUCH.EINE NICHTÜBERPRÜFUNG KANN AUF VERLETZUNGEN UND/ODER TOD HINAUSLAUFEN. DERGEBRAUCH ANDERER ALS IN DIESEM SET ENTHALTENER TEILE IST UNZULÄSSIG (ES SEI DENN DERHERSTELLER WEIST AUF DIE NUTZUNG HIN), DA SIE DIE SLACKLINE BESCHÄDIGEN, DEREN PERFOR-MANCE BEEINTRÄCHTIGEN, DIE LEBENSDAUER DES PRODUKTES VERKÜRZEN UND VERLETZUNGVERURSACHEN KÖNNEN.
1.1 NATÜRLICHE ABNUTZUNG:Eine natürliche Abnutzung der Slackline ist von den Garantieansprüchen ausgenommen. Die Slackline istein Sportgerät und wird durch die permanenten, dynamischen Belastungen automatisch in der Anwendungabgenutzt. Abnutzungserscheinungen an der Schlaufe, am Schlaufenschutz, am Druck, an der Ratsche, etc.sind von den Garantieansprüchen ebenso ausgenommen und werden nicht als Reklamation anerkannt. Genauso wird Abnutzung am A-Frame durch Reibung an der Slackline und aufquellen der Holzschichten wetterbedingt als natürliche Abnutzung definiert und wird nicht ersetzt.
1.2 WASCHANLEITUNG UND HINWEISE ZUR KORREKTEN INSTANDHALTUNG:Für eine maximale Lebensdauer der Ratsche empfehlen wir die regelmäßige Verwendung von handelsübli-chen Schmierölen. Nach jedem Kontakt mit Salzwasser, Sand, etc. die Ratsche mit klarem, lauwarmenWasser abspülen. Vor jeder weiteren Verwendung bitte Slackline und Ratsche gründlich auf Schäden un-tersuchen. Zur Reinigung der Slackline lauwarmes Wasser verwenden. Um ein verquellen der A-frames zu vermeiden deinstallieren sie die Slackline nach Gebrauch und lagern Sie die A-frames im Trockenen.

GIBBON BEDIENUNGSANLEITUNG - DEUTSCH
1.3 ZUSÄTZLICH SICHERHEITSHINWEISE:Die Slackline ist nur per Hand und nur durch eine Person anzuspannen.Externe Hilfsmittel wie Autos oder zusätzliche Hebel sind unter keinen Umständen für das Spannen derSlackline einzusetzen. Die Slackline ist nur mit der/den im Set inbegriffenen Ratsche(n) anzuspannen.Anschlagspunkte mit Ecken und Kanten welche die Slackline in jeglicher Weise beschädigen könnten sindzu vermeiden.Bei Kleinkindern ist zu beachten, dass die Slackline weder im aufgebauten noch im abgebauten Zustandunbeaufsichtigt gelassen wird, um die Gefahr des Erdrosselns zu vermeiden. Die Slackline darf nicht mitKnoten modifiziert werden.
1.4 ACHTUNG:• BENUTZEN SIE IMMER IHREN GESUNDEN MENSCHENVERSTAND,• VERWENDEN SIE DIE SLACKLINE NUR WIE IN DIESEM HANDBUCH EMPFOHLEN• BEACHTEN SIE DIE DARIN ENTHALTENEN WARNUNGEN UND INSTRUKTIONEN UM DIE GEFAHR VON ERNSTEN VERLETZUNGEN UND/ODER DES TOD ZU VERMEIDEN.• AUFGEBAUT BEFINDET SICH DIE SLACKLINE UNTER EINER ENORMEN SPANNUNG, DIE 7 kN/700 KG ÜBERSCHREITEN KANN. WEGEN DIESER HOCHSPANNUNG MUSS GRÖSSTMÖGLICHE SORGFALT AUSGEÜBT WERDEN UM DIE GEFAHR VON VERLETZUNGEN ZU VERMINDERN.• EINE ÜBERBELASTUNG DER SLACKLINE MIT MEHR ALS 100 KG UND/ODER ÜBERBELASTUNG DURCH MEHR ALS EINE PERSON VERGRÖSSERT DIE SPANNUNG UND KANN DIE SLACKLINE BESCHÄDIGEN UND/ODER DIE FUNKTION DER RATSCHE SO BEEINTRÄCHTIGEN, DASS DIE GEFAHR VON VERLETZUNGEN ENTSTEHT.
Befolgen Sie die lokalen Gesetze bezüglich der Verwendung von Slacklines. In einigen Städten und Staaten ist die Benutzung von Slacklines auf öffentlichen Flächen eingeschränkt oder verboten. Vielleicht sehen Sie im Fernsehen, im Internet oder in sonstigen Medien Menschen, dieKunststücke auf der Sackline ausü-ben. Diese Menschen sind in der Regel Profis, die lange dafür trainiert haben, die hoch qualifiziert sind und die sich der Gefahr durch Verletzung und/oder Todes bewusst sind und diese akzeptieren. VERSUCHEN SIE NICHT, DIESE KUNSTSTÜCKE NACHZUAHMEN ODER SONSTIGE TRICKS AUF DER SLACKLINE AUSZUFÜHREN, ES SEI DENN, SIE SIND SICH BEWUSST, DASS DARAUS VERLETZUNGEN UND/ODER TOD RESULTIEREN KÖNNEN UND AKZEPTIEREN DIESE TATSACHE. DER HERSTELLER UND DIE WIED-ERVERKÄUFER DIESER SLACKLINE LEHNEN JEGLICHE VERANTWORTUNG UND VERBINDLICHKEITEN FÜR JEDEN TOD, LÄHMUNG, VERLETZUNG, UND/ODER SONSTIGE SCHÄDEN JEDER PERSON ODER EIGENTUMS AB, DER DURCH DEN GEBRAUCH DIESES PRODUKTES ENTSTANDEN IST.
1.5 GARANTIE:DIESES PRODUKT VERFÜGT ÜBER EINE GARANTIE VON 2 JAHREN AB DEM KAUFDATUM FESTGE-HALTEN AUF DER QUITTING. INNERHALB DIESER GARANTIEZEIT WERDEN, DURCH REPERATUR ODER AUSTAUSCH DES GERÄTES ALLE MÄNGEL, DIE AUF MATERIAL- ODER HERSTELLUNGSFEHLERNBERUHEN, BESEITIGT. VON DER GARANTIE AUSGENOMMEN SIND ALLE SCHÄDEN, DIE DURCH NOR-MALE ABNUTZUNG, MODIFIZIERUNGEN, FALSCHE LAGERUNG, SCHLECHTE WARTUNG, UNFÄLLE, NACHLÄSSIGKEIT ODER UNSACHGEMÄßEM GEBRAUCH (SIEHE HANDBUCH) ENTSTEHEN. EIN GAR-ANTIEANSPRUCH KANN NUR MIT EINER RECHNUNG, AM ORT DES KAUFES, GELTENDGEMACHT WERDEN. Sowohl Hersteller, Verkäufer als auf Wiederverkäufer geben keine Garantieleistun-gen in Bezug auf Produkt, Service, Qualität oder Zustand, welche ausserhalb der in dieser Bedienungsan-leitung festgehaltenen Verwendungsrichtlinien liegen.
Der Hersteller, die Verkäufer, und die Wiederverkäufer sind von der Haftung ausgeschlossen, bei jeglichenspeziellen, indirekten, folgenreichen oder beiläufigen Schäden, welche ausserhalb der hier gewährtenGarantieleistungen, dem klagbaren delikt (einschließlich der Nachlässigkeit), der Produkthaftung, liegen,selbst wenn auf die Möglichkeit solcher Schäden hingewiesen wurde. Der Slackline Benutzer bestätigt,dass Ansprüche gegen den Hersteller, die Verkäufer, und die Wiederverkäufer für jegliche Verbindlichkeit,Ansprüche, oder Schäden, auf den Kaufpreis der Slackline beschränkt werden, und dass er unwiderruflichauf alle Ansprüche aus jeglichen Schäden verzichtet.
GIBBON BEDIENUNGSANLEITUNG - DEUTSCH
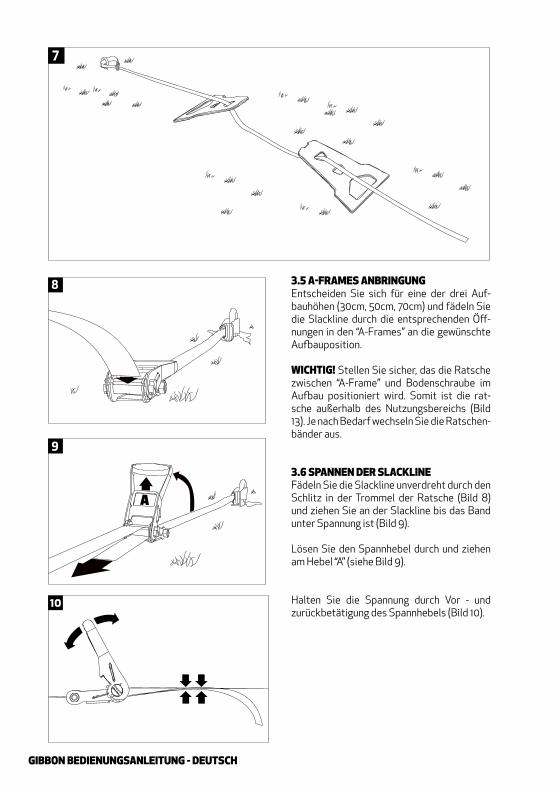
2. WEITERE WARNUNGEN: ACHTUNG! Verwenden Sie zum Aufbau Ihrer GIBBON Slackline keine weiteren Teile oder Materialien, dienicht von GIBBON Slacklines zur Verfügung gestellt sind. DER GEBRAUCH DER RATSCHE IST GEFÄHR-LICH UND KANN ZU VERLETZUNG UND/ODER TOD FÜHREN. DIE RATSCHE DARF VON MINDER-JÄHRIGEN NICHT BETÄTIGT WERDEN. DIE BEDIENUNG DER RATSCHE SOLLTE IMMER NUR DURCH ERWACHSENE GESCHEHEN UND ERST NACH AUSFÜHRLICHER ÜBERPRÜFUNG AUF EVENTUELLE SCHÄDEN MIT GRÖßTMÖGLICHER SORGFALT BEDIENT WERDEN. Die SLACKLINE DARF NICHT MEHRALS ZWEIEINHALB UMDREHUNGEN UM DIE ACHSE DER RATSCHE gewickelt werden. (Siehe Paragraph3.4 unten.) Die Spannung auf dem Hebel der Ratsche darf 385N/38.5kg nicht überschreiten, um eineFehlfunktion des Slackline Systems zu verhindern, die auf ernste Verletzung und/oder Tod hinauslaufenkönnen. VERWENDEN SIE NIE IHRE BEINE ODER ANDERE KÖRPERTEILE SOWIE ZWECKENTFREMDETEGERÄTE AUßER IHREN HÄNDEN, UM DIE RATSCHE ZU BEDIENEN. Die Slackline darf niemals zwischen Fahrzeugen (z.B, Autos oder Lastwagen) gespannt werden, weil die Spannung die Sicherheitsgrenze von 385N/38.5kg leicht überschreiten kann. Die Slackline niemals höher als Schritthöhe und maximal 50 cm aufbauen. Slacklining ist ein schöner Sport, aber die Ausübung sollte nur erfolgen, wenn man sich der Ge-fahr, einschließlich ernster Verletzungen und/oder Tod bewusst ist und diese nicht unterschätzt wird!
Das Set beinhaltet (siehe Bild 1)
A) eine Ratsche mit Schlauffenband (2,5m)A* Extra kurzes RatschenbandB) Slackline: 5cm Breite mit SchlauffenendeC) 2 x “A-Frames” mit 3 HöheneinstellungenD) 2 x Bodneschrauben als Anker
Nicht im Set inbegriffen (Bild 2)
E) Drehstab. Bitte verwenden Sie einen sta-bilen Stah - oder Holzstab zum Eindrehen der Schrauben.Schraubschlüssel mit Größe 19. Zum wecheln des Ratschenbandes.
x 2x 22
AB
CD
E
A*
3. ZUSAMMENBAU:Alle Slacklines von GIBBON sind für einen schnellen Auf-und Abbau entworfen. Folgen Sie den Anweisun-gen in diesem Handbuch. Folgende Teile beinhalten das Set:
Unser Aufbauvideo im Internet erleichtert Ihnen den Aufbau. Unter folgendem Link ist dieses anzuschauen. = > https://vimeo.com/92235778
3.1 AUFBAU DES INDEPENDENCE KIT 70Um die Bodenschrauben in den Boden einzudrehen suchen Sie sich nach einem geeigneten Platz. Das Erdreich solllte bestmöglich mit wenig Steinen versehen sein, um ein einfaches Eindrehen der Boden-schraube zu ermöglichen. Bedenken Sie, dass der Abstand vom Ankerpunkt zum “A-Frame” mindestens doppelt Abstand zur Aufbauhöhe haben muss.
Beispiel :Bei einer Slacklinelänge von 10m und einer gewählten Slacklinehöhe von 70cm, benötigt man zusätzlich mindestens 140cm Abstand von A-Frame zur Bodenschraube.=> Komplett Distanz bei 10m: Mindestens 12,8 m
Die Aufbaudistanz ist frei wählbar. Kürzere Distanzen mit diedrigerer Aufbauhöhe sind möglich. Bsp. Auf-baudistanz 4m bei 30cm Aufbauhöhe: 4m (2 x 60cm) = 5,2m von Bodenschraube zu Bodenschraube. Die “A-Frames” können auch bei längerer Aufbaulänge verstellt werden um kürzer Distanzen zu ermöglichen.

GIBBON BEDIENUNGSANLEITUNG - DEUTSCH
3.2 FIXIERUNG DER BODENSCHRAUBE ALS ANKER:Positionieren Sie die Bodenschraube verti-kal in den Boden. Fädeln Sie die Drehstange (nicht enthalten - siehe Bild 2) durch die Öse der Schraube. Drehen Sie im Uhrzeigersinn mit gleichzeitigem Druck nach unten die Schraube in den Boden.
Sobald der Teller der Bodenschraube voll-ständig im Boden eingeschraubt wurde, nei-gen Sie die Schraube um 30° in Richtung zum anderen geplanten Ankerpunkt (siehe Bild 4) und schrauben Sie den Bodenschraube voll-ständig in den Boden bis nur noch die Öse aus dem Boden ragt (siehe Bild 5). Wiederholen Sie die Schritte aus den Darstellungen 3 und 4 mit der zweiten Bodenschraube und stellen Sie sicher das diese auch wieder in Richtung der ersten Bodenschraube geneigt wird.
Falls nur ein Ankerpunkt als Bodenschraube benötigt wird, lesen Sie bitte die beigelegte Gebracuhsanleitung zum allgemeinen Aufbau von GIBBON Slackline Sets.
3.3 VERBINDEN DER RATSCHE MIT SCHLAUFENBAND AN DER BODEN-SCHRAUBE:
Sobald die Bodenschrauben installiert sind, fixiert man das Schlaufenband der Ratsche per Ankerstich durch die Öse der Boden-schraube wie in Bild 5 dargstellt.
WICHTIG! Stellen Sie sicher das die Ratsche nach oben zeigt.
3.4 VERBINDEN DER SLACKLINE AN DER ZWEITEN BODENSCHRAUBE:Wie bei der Ratsche wiederholen Sie den Schritt per Ankerstich um die Slackline an der Öse der zweiten Bodenschraube zu fixieren (Bild 6).
WICHTIG! Bitte befolgen Sie Aufbaureihen-folge!
30˚
4
5
6
3
GIBBON BEDIENUNGSANLEITUNG - DEUTSCH
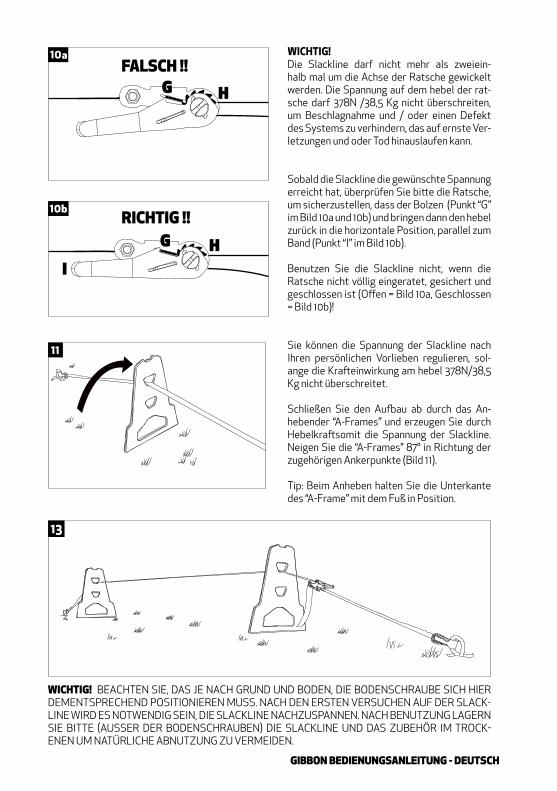
3.5 A-FRAMES ANBRINGUNGEntscheiden Sie sich für eine der drei Auf-bauhöhen (30cm, 50cm, 70cm) und fädeln Sie die Slackline durch die entsprechenden Öff-nungen in den “A-Frames” an die gewünschte Aufbauposition.
WICHTIG! Stellen Sie sicher, das die Ratsche zwischen “A-Frame” und Bodenschraube im Aufbau positioniert wird. Somit ist die rat-sche außerhalb des Nutzungsbereichs (Bild 13). Je nach Bedarf wechseln Sie die Ratschen-bänder aus.
3.6 SPANNEN DER SLACKLINEFädeln Sie die Slackline unverdreht durch den Schlitz in der Trommel der Ratsche (Bild 8) und ziehen Sie an der Slackline bis das Band unter Spannung ist (Bild 9).
Lösen Sie den Spannhebel durch und ziehen am Hebel “A” (siehe Bild 9).
Halten Sie die Spannung durch Vor - und zurückbetätigung des Spannhebels (Bild 10).
7
8
A
9
10
GIBBON BEDIENUNGSANLEITUNG - DEUTSCH
WICHTIG!Die Slackline darf nicht mehr als zweiein-halb mal um die Achse der Ratsche gewickelt werden. Die Spannung auf dem hebel der rat-sche darf 378N /38,5 Kg nicht überschreiten, um Beschlagnahme und / oder einen Defekt des Systems zu verhindern, das auf ernste Ver-letzungen und oder Tod hinauslaufen kann.
Sobald die Slackline die gewünschte Spannung erreicht hat, überprüfen Sie bitte die Ratsche, um sicherzustellen, dass der Bolzen (Punkt “G” im Bild 10a und 10b) und bringen dann den hebel zurück in die horizontale Position, parallel zum Band (Punkt “I” im Bild 10b).
Benutzen Sie die Slackline nicht, wenn die Ratsche nicht völlig eingeratet, gesichert und geschlossen ist (Offen = Bild 10a, Geschlossen = Bild 10b)!
Sie können die Spannung der Slackline nach Ihren persönlichen Vorlieben regulieren, sol-ange die Krafteinwirkung am hebel 378N/38,5 Kg nicht überschreitet.
Schließen Sie den Aufbau ab durch das An-hebender “A-Frames” und erzeugen Sie durch Hebelkraftsomit die Spannung der Slackline. Neigen Sie die “A-Frames” 87° in Richtung der zugehörigen Ankerpunkte (Bild 11).
Tip: Beim Anheben halten Sie die Unterkante des “A-Frame” mit dem Fuß in Position.
WICHTIG! BEACHTEN SIE, DAS JE NACH GRUND UND BODEN, DIE BODENSCHRAUBE SICH HIER DEMENTSPRECHEND POSITIONIEREN MUSS. NACH DEN ERSTEN VERSUCHEN AUF DER SLACK-LINE WIRD ES NOTWENDIG SEIN, DIE SLACKLINE NACHZUSPANNEN. NACH BENUTZUNG LAGERN SIE BITTE (AUSSER DER BODENSCHRAUBEN) DIE SLACKLINE UND DAS ZUBEHÖR IM TROCK-ENEN UM NATÜRLICHE ABNUTZUNG ZU VERMEIDEN.
11
13
I
!!RIGHT!!G H
G H!!WRONG!!
10a
b10
FALSCH !!
RICHTIG !!
GIBBON BEDIENUNGSANLEITUNG - DEUTSCH
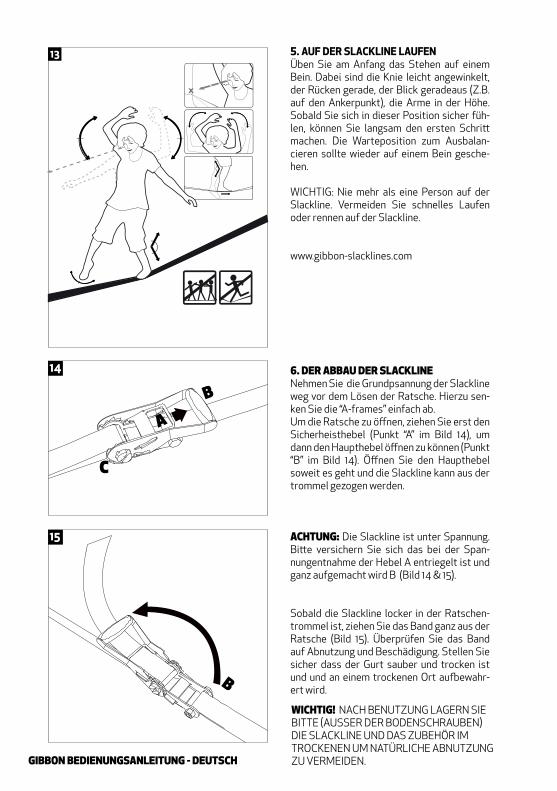
5. AUF DER SLACKLINE LAUFENÜben Sie am Anfang das Stehen auf einem Bein. Dabei sind die Knie leicht angewinkelt, der Rücken gerade, der Blick geradeaus (Z.B. auf den Ankerpunkt), die Arme in der Höhe. Sobald Sie sich in dieser Position sicher füh-len, können Sie langsam den ersten Schritt machen. Die Warteposition zum Ausbalan-cieren sollte wieder auf einem Bein gesche-hen.
WICHTIG: Nie mehr als eine Person auf der Slackline. Vermeiden Sie schnelles Laufen oder rennen auf der Slackline.
www.gibbon-slacklines.com
6. DER ABBAU DER SLACKLINENehmen Sie die Grundpsannung der Slackline weg vor dem Lösen der Ratsche. Hierzu sen-ken Sie die “A-frames” einfach ab. Um die Ratsche zu öffnen, ziehen Sie erst den Sicherheisthebel (Punkt “A” im Bild 14), um dann den Haupthebel öffnen zu können (Punkt “B” im Bild 14). Öffnen Sie den Haupthebel soweit es geht und die Slackline kann aus der trommel gezogen werden.
ACHTUNG: Die Slackline ist unter Spannung. Bitte versichern Sie sich das bei der Span-nungentnahme der Hebel A entriegelt ist und ganz aufgemacht wird B (Bild 14 & 15).
Sobald die Slackline locker in der Ratschen-trommel ist, ziehen Sie das Band ganz aus der Ratsche (Bild 15). Überprüfen Sie das Band auf Abnutzung und Beschädigung. Stellen Sie sicher dass der Gurt sauber und trocken ist und und an einem trockenen Ort aufbewahr-ert wird.
13
B
A
C
14
B
15
WICHTIG! NACH BENUTZUNG LAGERN SIE BITTE (AUSSER DER BODENSCHRAUBEN) DIE SLACKLINE UND DAS ZUBEHÖR IM TROCKENEN UM NATÜRLICHE ABNUTZUNG ZU VERMEIDEN.

EL MANUALINDEPENDENCE KIT 70
ENGLISH
DEUTSCH
ESPAÑOLFRANÇAIS
PORTUGUÊS
Este manual contiene información importante en cuanto a seguridad. antes de utilizar la cinta de equilibrio lea cuidadosamente este manual y cerciórese de que comprende y conviene a todas las
advertencias, precauciones, instrucciones y recomendaciones de seguridad. Revise periódicamen-te la información contenida en este manual e inspeccione regularmente su cinta de equilibrio por
indicios de deterioro. No utilice la cinta de equilibrio a menos que acepte todos los riesgos de lesión y/o muerte que pudieran resultar a consecuencia de su uso.
WICHTIG! NACH BENUTZUNG LAGERN SIE BITTE (AUSSER DER BODENSCHRAUBEN) DIE SLACKLINE UND DAS ZUBEHÖR IM TROCKENEN UM NATÜRLICHE ABNUTZUNG ZU VERMEIDEN.

GIBBON MANUAL - ESPANOL
1. ¡ADVERTENCIA! LA CINTA DE EQUILIBRIO ES UNA PIEZA DE EQUIPO PELIGROSA INCLUSO UTILIZÁN-DOLA CORRECTAMENTE:LOS PADRES DE LOS MENORES Y LOS MENORES: Los menores no deben utilizar la cinta de equilibrio a menos que estén bajo la supervisión constante de un adulto competente. Asegúrese de que la cinta de equilibrio se instala únicamente en áreas a las cuales los menores no pueden acceder sin dicha supervisión por un adulto. Los menores nunca deben utilizar el tensor ni ajustar la tensión de la cinta de equilibrio en cualquier momento.La cinta de equilibrio fue desarrollada únicamente para que un adulto mejore su equilibrio caminando len-tamente a lo largo de la cinta de equilibrio sobre un área de aterrizaje plano, regular y suave sin ningún tipo de obstáculo, gente, salientes o peligros en las proximidades. La cinta de equilibrio debe utilizarse únicamente en la forma descrita en este Manual. EL USO DE UNA CINTA DE EQUILIBRIO PUEDE SER UNA ACTIVIDAD PELIGROSA QUE PODRÍA CONLLEVAR A UNA LESIÓN GRAVE Y/O LA MUERTE INCLUSO AL UTILIZARLA CORRECTAMENTE. UTILICE A SU PROPIO RIESGO Y APLIQUE SIEMPRE SENTIDO COMÚN.
Asegúrese de que la cinta de equilibrio se fije sólo a anclajes tales como los que se describen en las secci-ones 3.1 y 3.2 a continuación. NO sujete la cinta de equilibrio a cualquier punto de anclaje que sea demasiado débil para anclar seguramente y utilice la cinta de equilibrio ni sujete la cinta a cualquier punto de anclaje que no sea fijo. Por ejemplo, NO sujete la cinta de equilibrio a uno o mas automóviles. Asegúrese que el piso y el área de aterrizaje sobre el cual está suspendida la cinta de equilibrio sea plano, regular y suave. ¡Usted caerá sobre él! NO coloque la cinta de equilibro a una altura superior a 50 centímet-ros. Asegúrese de que no hay obstáculos, peligros, personas o salientes cerca de la cinta de equilibrio que pudieran lastimarlo en caso de caída. Utilice la cinta de equilibrio únicamente en lugares donde no existan riesgos y/o peligros.
Utilice siempre zapatos de deporte fuertes, bien amarrados y con suelas de goma lisas.• NO camine sobre la cinta de equilibrio descalzo o con sandalias o con calzado con suelas deformadas.• Mantenga a los espectadores a 3 metros por lo menos de la cinta de equilibrio.• No utilice nunca la cinta de equilibrio al atardecer o de noche o en ambientes mojados o con hielo.• NO permita que más de una persona utilice la cinta de equilibrio al mismo tiempo.• NO supere los 100 kg de peso sobre la cinta de equilibrio en cualquier momento.• ESTA CINTA DE EQUILIBRIO NO TIENE POR OBJETO HACER CUALQUIER TIPO DE ACROBACIA,
INCLUYENDO, SIN LIMITARSE A, SALTAR, VOLTEARSE, ETC. EL RIESGO DE LESIÓN Y/O MUERTE AUMENTA SIGNIFICATIVAMENTE CUANDO SE INTENTAN O HACEN ACROBACIAS.
Esta cinta de equilibrio es susceptible a dañarse. LA CINTA DE EQUILIBRIO DEBE MANTENERSE ADECU-ADAMENTE E INSPECCIONARSE ANTES DE CADA USO. LA FALTA DE INSPECCIONAR Y MANTENER LA CINTA DE EQUILIBRIO ANTES DE CADA USO PODRÍA CONLLEVAR A LESIÓN Y/O MUERTE. EL USO DE CUALESQUIERA PARTES NO PROPORCIONADAS POR EL FABRICANTE NO SE RECOMIENDA Y PODRÍA DAÑAR LA CINTA DE EQUILIBRIO, TENER UN IMPACTO SOBRE EL RENDIMIENTO, ACORTAR LA VIDA ÚTIL DEL PRODUCTO Y CAUSAR LESIÓN Y/O MUERTE.
1.1 VIDA ÚTILEl desgaste natural no está cubierto por la garantía:En su uso la slackline está sometida a tensiones permanentes dinámicas. Por lo tanto, la protección del anillo no se considera para el reembolso en la garantía.Así mismo, el desgaste del estampado de la slackline está excluido de la garantía. El desgaste de la slackline que es causada por un uso inadecuado, como cuando se empaqueta la slackline sin prestar atención a los bordes afilados, no puede incluírse en la garantía. La slackline es un producto deportivo y su uso está naturalmente sujetos a desgaste.
1.2 INTRUCCIONES DE LAVADO Y MANUTENCIÓNSe recomienda de limpiar la carraca y cerrarla con un lubricante de máquina standard para una manuten-ción ideal. Aclarar la slackline por entero con agua dulce después del utilizo en agua salada. Antes de usar la Slackline controlar que no haya ningún daño. Lavar con agua a temperatura tibia.

GIBBON MANUAL - ESPANOL
1.3 NORMAS ADICIONALES DE SEGURIDAD:El sistema Slackline sólo puede ser tensado a mano y por una sola persona. Los anclajes seleccionados no pueden tener las esquinas afiladas o estar en condiciones de dañar potencialmente la slackline. Sólo puede ser instalada sobre suelo con protección debajo.. ¿Es que nunca se tensan con otros medios (como un coche) que el equipo ha suministrado dentro de la unidad. Por favor, no deje la slackline sin supervisión cuándo al momento de desmontarla. Los niños pequeños pueden enredarse en la slackline. No se puede modificar la slackline en longitud mediante el uso de nudos.
1.4 LA FALTA DE:• UTILIZAR SENTIDO COMÚN,• UTILIZAR LA CINTA DE EQUILIBRIO EN LA FORMA RECOMENDADA EN ESTE MANUAL, Y/O• ACATAR LAS ADVERTENCIAS E INSTRUCCIONES CONTENIDAS EN ESTE MANUAL• INCREMENTAN SIGNIFICATIVAMENTE EL RIESGO DE LESIÓN GRAVE Y/O MUERTE.• CUANDO ESTÁ ENSAMBLADA, LA CINTA DE EQUILIBRIO SE ENCUENTRA BAJO UNA TENSIÓN
SIGNIFICATIVA QUE PODRÍA IGUALAR O EXCEDER LOS 7 kN/700 kg. DEBIDO A LA ALTA TENSIÓN DE LA CINTA DE EQUILIBRIO, DEBE PONERSE MUCHO CUIDADO AL UTILIZAR UNA CINTA DE EQUILIBRIO PARA MINIMIZAR EL RIESGO DE LESIÓN Y/O MUERTE. SOBRECARGAR LA CINTA DE EQUILIBRIO CON MÁS DE 100 kg Y/O MÁS DE UNA PERSONA AUMENTA LA TENSIÓN Y PODRÍA CONLLEVAR A QUE LA CINTA DE EQUILIBRIO O EL TENSOR FALLEN OCASIONANDO UNA LESIÓN Y/O LA MUERTE.
Consulte las leyes locales con respecto a cintas de equilibrio para verificar dónde y cómo puede Ud. legal-mente utilizar la cinta de equilibrio. En algunas ciudades y estados el uso de cintas de equilibrio en áreas públicas es ilegal, está restringido o prohibido.Es posible que usted vea en televisión o en Internet a personas haciendo trucos o acrobacias sobre una cinta de equilibrio. Éstas son personas que han estado practicando durante mucho tiempo, que tienen una gran habilidad y quienes aceptan el riesgo de cualquier tipo de lesión y/o muerte. NO INTENTE REALIZAR CUALQUIER TIPO DE ACROBACIA SOBRE ESTA CINTA DE EQUILIBRIO A MENOS QUE ACEPTE TODO RIESGO DE LESIÓN Y/O MUERTE. EL FABRICANTE Y LOS REVENDEDORES DE ESTA CINTA DE EQUI-LIBRIO EXPLÍCITAMENTE RENUNCIAN A TODA Y CUALQUIER RESPONSABILIDAD U OBLIGACIÓN POR CUALQUIER MUERTE, PARÁLISIS, LESIÓN Y/O PERJUICIO A CUALQUIER PERSONA O PROPIEDAD QUE PUDIERA OCURRIR QUE SURJA A CONSECUENCIA DE O ESTÉ DE FORMA ALGUNA RELACIONADO CON EL USO DE ESTE PRODUCTO.
1.5 GARANTÍA:Este producto está garantizado contra cualquier defecto de material o de fabricación por un período de dos (2) años a partir de su fecha de compra según figure en un recibo válido. ESTA GARANTÍA NO ABARCA O INCLUYE CUALQUIER DAÑO O DEFECTO CAUSADO POR: USO Y DESGASTE NORMAL, MODIFICA-CIONES O ALTERACIONES, ALMACENAJE INCORRECTO, MANTENIMIENTO DEFICIENTE Y/O DAÑOS DEBIDOS A ACCIDENTES, NEGLIGENCIA O USO INAPROPIADO (INCLUYENDO, SIN LIMITARSE A, CUALQUIER USO NO EXPLÍCITAMENTE APROBADO EN ESTE MANUAL). Asegúrese de secar muy bien la cinta de equilibrio antes de almacenarla. A excepción de lo antes descrito, EL FABRICANTE, LOS VENDE-DORES Y REVENDEDORES DE ESTE PRODUCTO NO OFRECEN NINGUNAS OTRAS DECLARACIONES Y/O GARANTÍAS, BIEN SEA EXPRESAS O IMPLÍCITAS, CON RESPECTO AL PRODUCTO, INCLUYENDO, SIN LIMITARSE A, CUALESQUIERA GARANTÍAS EN CUANTO A COMERCIABILIDAD, CALIDAD O ADE-CUACIDAD PARA CUALQUIER PROPÓSITO ESPECÍFICO. EL FABRICANTE, LOS VENDEDORES Y LOS REVENDEDORES NO SERÁN DE FORMA ALGUNA RESPONSABLES POR DAÑOS Y PERJUICIOS IN-DIRECTOS, EMERGENTES O INCIDENTALES, BASADOS BIEN SEA SOBRE UN INCUMPLIMIENTO DE CONTRATO, INCUMPLIMIENTO DE GARANTÍA, AGRAVIO (INCLUYENDO NEGLIGENCIA), RESPONSABI-LIDAD DEL PRODUCTO O DE OTRA FORMA, INCLUSIVE SI HAN SIDO NOTIFICADOS EN CUANTO A LA POSIBILIDAD DE TALES DAÑOS Y PERJUICIOS. EL USUARIO DE LA CINTA DE EQUILIBRIOD CONVIENE QUE SU ÚNICO RECURSO CONTRA EL FABRICANTE, LOS VENDEDORES Y LOS REVENDEDORES POR CUALQUIER RESPONSABILIDAD, RECLAMOS O DAÑOS Y PERJUICIOS SE LIMITARÁ AL PRECIO DE COMPRA DE LA CINTA DE EQUILIBRIO Y RENUNCIA IRREVOCABLEMENTE A TODO TIPO DE RECLAMO POR CUALESQUIERA OTROS DAÑOS Y PERJUICIOS QUE DICHO USUARIO DE LA CINTA DE EQUILIBRIO PUDIERA INVOCAR.
GIBBON MANUAL - ESPANOL
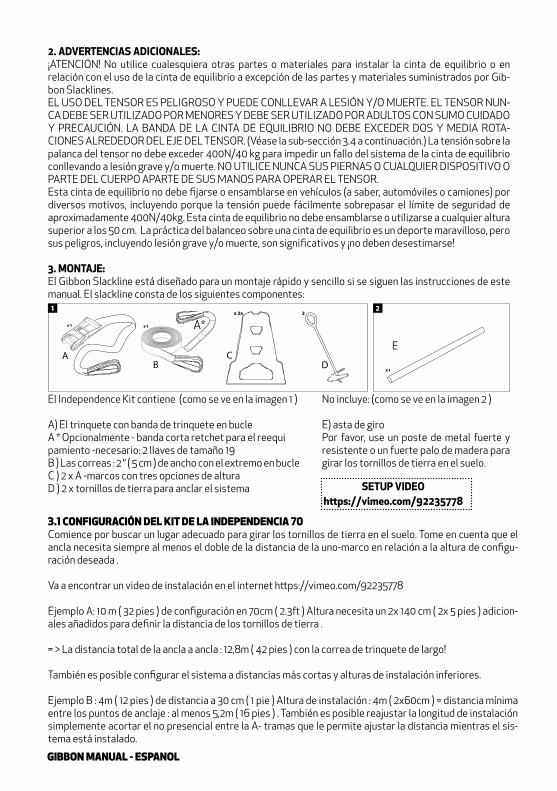
2. ADVERTENCIAS ADICIONALES:¡ATENCIÓN! No utilice cualesquiera otras partes o materiales para instalar la cinta de equilibrio o en relación con el uso de la cinta de equilibrio a excepción de las partes y materiales suministrados por Gib-bon Slacklines.EL USO DEL TENSOR ES PELIGROSO Y PUEDE CONLLEVAR A LESIÓN Y/O MUERTE. EL TENSOR NUN-CA DEBE SER UTILIZADO POR MENORES Y DEBE SER UTILIZADO POR ADULTOS CON SUMO CUIDADO Y PRECAUCIÓN. LA BANDA DE LA CINTA DE EQUILIBRIO NO DEBE EXCEDER DOS Y MEDIA ROTA-CIONES ALREDEDOR DEL EJE DEL TENSOR. (Véase la sub-sección 3.4 a continuación.) La tensión sobre la palanca del tensor no debe exceder 400N/40 kg para impedir un fallo del sistema de la cinta de equilibrio conllevando a lesión grave y/o muerte. NO UTILICE NUNCA SUS PIERNAS O CUALQUIER DISPOSITIVO O PARTE DEL CUERPO APARTE DE SUS MANOS PARA OPERAR EL TENSOR.Esta cinta de equilibrio no debe fijarse o ensamblarse en vehículos (a saber, automóviles o camiones) por diversos motivos, incluyendo porque la tensión puede fácilmente sobrepasar el límite de seguridad de aproximadamente 400N/40kg. Esta cinta de equilibrio no debe ensamblarse o utilizarse a cualquier altura superior a los 50 cm. La práctica del balanceo sobre una cinta de equilibrio es un deporte maravilloso, pero sus peligros, incluyendo lesión grave y/o muerte, son significativos y ¡no deben desestimarse!
3. MONTAJE:El Gibbon Slackline está diseñado para un montaje rápido y sencillo si se siguen las instrucciones de este manual. El slackline consta de los siguientes componentes:
El Independence Kit contiene (como se ve en la imagen 1 )
A) El trinquete con banda de trinquete en bucleA * Opcionalmente - banda corta retchet para el reequi pamiento -necesario: 2 llaves de tamaño 19B ) Las correas : 2 “ ( 5 cm ) de ancho con el extremo en bucleC ) 2 x A -marcos con tres opciones de alturaD ) 2 x tornillos de tierra para anclar el sistema
No incluye: (como se ve en la imagen 2 )
E) asta de giroPor favor, use un poste de metal fuerte y resistente o un fuerte palo de madera para girar los tornillos de tierra en el suelo.
x 2x 22
AB
CD
E
A*
SETUP VIDEO https://vimeo.com/92235778
3.1 CONFIGURACIÓN DEL KIT DE LA INDEPENDENCIA 70Comience por buscar un lugar adecuado para girar los tornillos de tierra en el suelo. Tome en cuenta que el ancla necesita siempre al menos el doble de la distancia de la uno-marco en relación a la altura de configu-ración deseada .
Va a encontrar un video de instalación en el internet https://vimeo.com/92235778
Ejemplo A: 10 m ( 32 pies ) de configuración en 70cm ( 2.3ft ) Altura necesita un 2x 140 cm ( 2x 5 pies ) adicion-ales añadidos para definir la distancia de los tornillos de tierra .
= > La distancia total de la ancla a ancla : 12,8m ( 42 pies ) con la correa de trinquete de largo!
También es posible configurar el sistema a distancias más cortas y alturas de instalación inferiores.
Ejemplo B : 4m ( 12 pies ) de distancia a 30 cm ( 1 pie ) Altura de instalación : 4m ( 2x60cm ) = distancia mínima entre los puntos de anclaje : al menos 5,2m ( 16 pies ) . También es posible reajustar la longitud de instalación simplemente acortar el no presencial entre la A- tramas que le permite ajustar la distancia mientras el sis-tema está instalado.
GIBBON MANUAL - ESPANOL
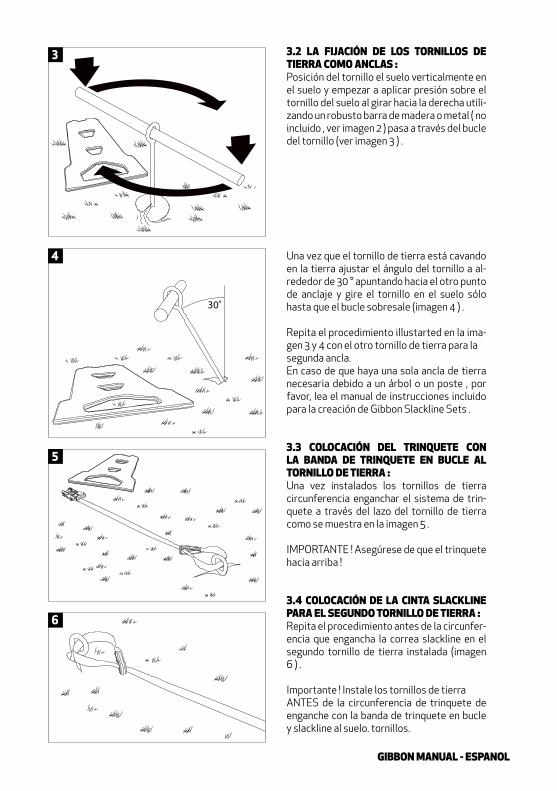
3.2 LA FIJACIÓN DE LOS TORNILLOS DE TIERRA COMO ANCLAS :Posición del tornillo el suelo verticalmente en el suelo y empezar a aplicar presión sobre el tornillo del suelo al girar hacia la derecha utili-zando un robusto barra de madera o metal ( no incluido , ver imagen 2 ) pasa a través del bucle del tornillo (ver imagen 3 ) .
Una vez que el tornillo de tierra está cavando en la tierra ajustar el ángulo del tornillo a al-rededor de 30 ° apuntando hacia el otro punto de anclaje y gire el tornillo en el suelo sólo hasta que el bucle sobresale (imagen 4 ) .
Repita el procedimiento illustarted en la ima-gen 3 y 4 con el otro tornillo de tierra para lasegunda ancla.En caso de que haya una sola ancla de tierra necesaria debido a un árbol o un poste , por favor, lea el manual de instrucciones incluido para la creación de Gibbon Slackline Sets .
3.3 COLOCACIÓN DEL TRINQUETE CON LA BANDA DE TRINQUETE EN BUCLE AL TORNILLO DE TIERRA :Una vez instalados los tornillos de tierra circunferencia enganchar el sistema de trin-quete a través del lazo del tornillo de tierra como se muestra en la imagen 5 .
IMPORTANTE ! Asegúrese de que el trinquete hacia arriba !
3.4 COLOCACIÓN DE LA CINTA SLACKLINE PARA EL SEGUNDO TORNILLO DE TIERRA :Repita el procedimiento antes de la circunfer-encia que engancha la correa slackline en el segundo tornillo de tierra instalada (imagen 6 ) .
Importante ! Instale los tornillos de tierraANTES de la circunferencia de trinquete de enganche con la banda de trinquete en bucle y slackline al suelo. tornillos.
30˚
4
5
6
3
GIBBON MANUAL - ESPANOL
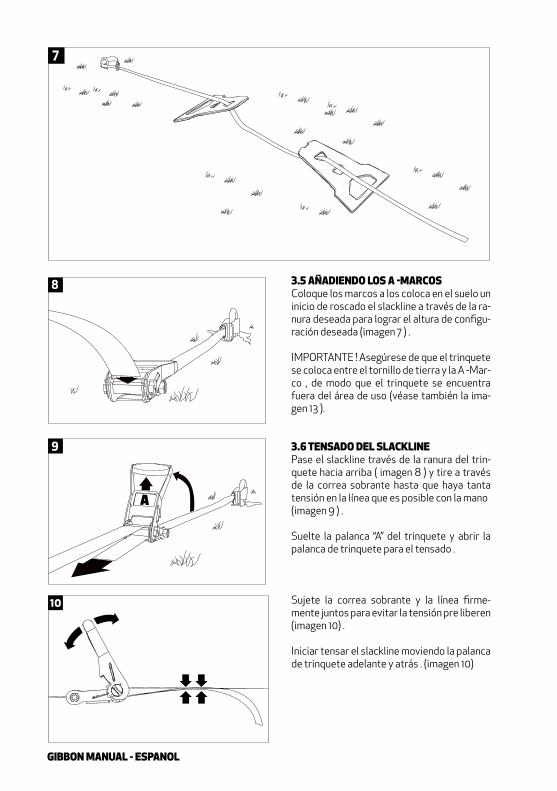
3.5 AÑADIENDO LOS A -MARCOSColoque los marcos a los coloca en el suelo un inicio de roscado el slackline a través de la ra-nura deseada para lograr el altura de configu-ración deseada (imagen 7 ) .
IMPORTANTE ! Asegúrese de que el trinquete se coloca entre el tornillo de tierra y la A -Mar-co , de modo que el trinquete se encuentra fuera del área de uso (véase también la ima-gen 13 ).
3.6 TENSADO DEL SLACKLINEPase el slackline través de la ranura del trin-quete hacia arriba ( imagen 8 ) y tire a través de la correa sobrante hasta que haya tanta tensión en la línea que es posible con la mano(imagen 9 ) .
Suelte la palanca “A” del trinquete y abrir la palanca de trinquete para el tensado .
Sujete la correa sobrante y la línea firme-mente juntos para evitar la tensión pre liberen (imagen 10) .
Iniciar tensar el slackline moviendo la palanca de trinquete adelante y atrás . (imagen 10)
7
8
A
9
10

GIBBON MANUAL - ESPANOL
IMPORTANTE! El slackline no debe superar las rotaciones de dos y medio alrededor del eje del trinquete. La tensión en la palanca del trin-quete NUNCA debe exceder 85 libras (aprox 378N / 38.5kg) para prevenir convulsiones y / o fallo del sistema que pueden provocar lesiones graves y / o muerte.
Tan pronto como la banda llega a la tensión deseada, compruebe el trinquete para asegu-rar que el perno (“G” en la 10a Imagen y 10b) se apoya de forma ordenada en el dentado (“H” en la 10a Imagen y 10b) y llevar la palanca hacia atrás hasta una posición horizontal paralelo a la banda (“I” en 10b Image). NO UTILICE EL SLACKLINE SI EL TRINQUETE NO ESTÁ COM-PLETAMENTE seguro y cerrado (UNLOCKED: Imagen 10 bis; BLOQUEADO: Imagen 10b)!Consejo: La palanca cerrada (“I” en la Imagen 10b) es un buen indicador de que el perno se apoya en el dentado y que el trinquete está asegurado y bloqueado. Usted puede ajustar la tensión de la banda de acuerdo a sus preferen-cias personales, siempre que la tensión no sea superior a 85 libras(378N / 38,5 kg).
Finalizar la configuración mediante el levan-tamiento de las a-marcos a alrededor de 87 ° con el ángulo opuesto a la media (Image 11).
Sugerencia: poner su pie en el suelo en la parte inferior del un marco para evitar el un marco de desplazamientos durante el levantamiento en su posición.Repita el mismo procedimiento con el otro marco.
IMPORTANTE! TENGA EN CUENTA QUE EN FUNCION DE LA TIERRA Y SUELO DEL TORNILLO DE TIERRA SE MUEVA HASTA que encaje . SO destensado Y retensado TRAS PRIMERA TENSIÓN podría ser necesario para lograr el ajuste deseado .
11
13
I
!!RIGHT!!G H
G H!!WRONG!!
10a
b10

GIBBON MANUAL - ESPANOL
5. CAMINANDO EL SLACKLINE :Consejos: Mire el punto de anclaje de la banda en frente de usted para mantener el equilibrio . Mueva sus brazos para corregir desequilibri-os. Mantenga las rodillas dobladas.IMPORTANTE: Por razones de seguridad nunca debe haber más de una persona en el slackline ! Nunca se quede en el slackline !
www.gibbon-slacklines.com
6. DESMONTAJE DEL SLACKLINEPara liberar el trinquete tire de la palanca de seguridad (“A” en la Imagen 14 ) para desengan-char el trinquete y abra la palanca principal ( “B “ en la Imagen 14 ) hasta que la palanca de seguridad se separa de la rueda dentada (“C “ en la Imagen 14) y se libera la banda.
IMPORTANTE! La banda está bajo tensión y lesiones y / o muerte puede ocurrir si no se desmanteló cuidadosamente . Asegúrese de que el trinquete está abierta por completo an-tes de la liberación de la banda ( Imagen 14 ) .
Una vez que se libera la banda, separe la banda desde el trinquete (Imagen 15 ) . Inspeccione la banda para las abrasiones y daños , asegúrese de que la cinta esté limpia y seca y y guárdelo en un lugar seco . Retire y guarde los dos trin-quetes y protectores de los árboles.
13
B
A
C
14
B
15

GIBBON MANUAL - FRANCAIS
MODE D‘EMPLOIINDEPENDENCE KIT 70
ENGLISH
DEUTSCH
ESPAÑOL
FRANÇAISPORTUGUÊS
Ce manuel d’utilisation contient d’importantes informations sur la sécurité du produit. Avant d’utiliser la slackline, lisez attentivement ce manuel et veillez à bien comprendre et à appliquer toutes les instructions, précautions et mesures de sécurité. Pensez à relire de temps à autre ce manuel et contrôlez régulièrement votre slackline afin d’y détecter tout signe d’usure ou de dé-térioration. N’utilisez pas la slackline si vous n’acceptez pas les risques de blessures ou de mort
pouvant résulter de l’utilisation de ce produit.

GIBBON MANUAL - FRANCAIS
1. ATTENTION ! MÊME LORS D’UNE UTILISATION ADEQUATE, LA SLACKLINE PEUT S’AVERER DANGEREUSE.PARENTS D’ENFANTS MINEURS ET MINEURS : Les personnes mineures ne doivent pas utiliser la slack-line sans la surveillance d’un adulte compétent. Veillez à ce que la slackline soit installée uniquement dans un endroit supervisé par un adulte responsable. Une personne mineure ne doit en aucun cas utiliser le ten-deur à cliquet ou tendre la slackline.
Veillez à ce que la slackline soit uniquement attachée à des points d’ancrage solides, comme décrit ci-dessous dans les sections 3.1 et 3.2. Ne PAS attacher la slackline à des points d’ancrage insuffisamment solides qui ne permettraient pas l’utilisation du produit. Par exemple, n’attachez jamais la slackline entre deux voitures. www.gibbonslacklines.com, www.gibbon-slacklines.com/fr (France) contient des informa-tions supplémentaires. Veillez à ce que la zone sur laquelle vous atterrissez et au-dessus de laquelle vous attachez la slackline soit plate, régulière et molle. Vous pourrez tomber sur cette surface!N’INSTALLEZ pas la slackline à une hauteur de plus de 18 pouces (50 centimètres).
Veillez à ce qu’il n’y ait ni obstacles, ni saillies ou personnes à proximité de la slackline qui puissent vous blesser si vous tombez. N’utilisez la slackline que dans des lieux sans dangers ni risques.
• Ne portez que des chaussures solides, bien nouées, munies de semelles plates et en caoutchouc.• Ne marchez pas sur la slackline pieds nus, avec des sandales ou avec des chaussures munies de se-
melles à crampons.• Tenez tout spectateur à au moins 3 mètres (9 pieds) de la slackline.• N’utilisez jamais la slackline au crépuscule, la nuit ou par temps humide ou verglacé.• N’autorisez pas que plus d’une personne utilise la slackline en même temps.• Le poids sur la slackline ne doit jamais dépasser 220 pounds (100 kg).
CETTE SLACKLINE N’EST DESTINÉE À L’EXÉCUTION DE FIGURES, TELLES QUE LES SAUTS, SAUTS PÉRILLEUX… LES RISQUES DE BLESSURES OU DE MORT AUGMENTENT CONSIDÉRABLEMENT LOR-SQUE VOUS TENTEZ OU EXÉCUTEZ DE TELLES FIGURES.
Cette slackline n’est pas infaillible et peut être sujette à des détériorations. LA SLACKLINE DOIT ÊTRE COR-RECTEMENT ENTRETENUE ET CONTRÔLÉE AVANT CHAQUE UTILISATION. NÉGLIGER D’INSPECTER LA SLACKLINE AVANT TOUTE UTILISATION PEUT PROVOQUER DES BLESSURES ET LA MORT DE SES US-AGERS. L’utilisation de composantes non fournies par le fabricant n’est pas recommandÉe et est suscepti-ble d’endommageR la slackline, d’en diminuer la performance, DE rÉduire la durÉe de vie du produit et peut provoquer blessures et/ ou Être mortelle.
1.1 DURÉE DE VIELes pièces ne sont pas garanties contre l’usure naturelle. L´usure du cadre A-frame ou de son revêtements résultant d´une exposition aux éléments (pluie, soleil, neige) ne seront pas pris en compte pour toute ré-clamations mais seront considérés comme résultant de l´utilisation normale du produit.
1.2 MANUEL DE NETTOYAGE ET DE MAINTENANCEPour une utilisation optimale, il est recommandé de nettoyer le cliquet et de le sceller en appliquant un lubrifiant standard. Veuillez rincer l’intégralité de la slackline à l’eau claire après une utilisation dans l’eau salée. Veuillez vérifier l’état de chaque pièce avant toute utilisation. Veuillez rincer uniquement à l’ eau claire tiède. Afin de prévenir l´usure sur les A-frames assurez vous de ne pas les laisser exposés aux in-tempéries. Démontez après chaque utilisation et conservez dans un endroit sec.
GIBBON MANUAL - FRANCAIS
NE PAS :• FAIRE PREUVE DE BON SENS, • UTILISER LA SLACKLINE DE LA FAçON RECOMMANDÉE DANS CE MANUEL ET/OU• TENIR COMPTE DES AVERTISSEMENTS ET DES INSTRUCTIONS CONTENUES DANS CE MANUEL-
ACCROÎT DE FAçON SIGNIFICATIVE LES RISQUES DE BLESSURES GRAVES OU DE MORT.
Lorsqu’elle est assemblÉe, la slackline est sous une tension ÉlevÉe, qui peut Être Égale ou supÉrieure À 1500 lbs (7 kN/700 kg). À cause de cette FORTE tension, l’utilisation de la slackline doit s’accompagner d’une grande attention afin de diminuer les risques de blessureS et/ou de mort. Si la slackline supporte un poids supÉrieur À 220 POUNDS (100 kg) ou si plus d’une personne utilisEnt la slackline en mÊme temps, la tension augmente, ce qui peut provoquer le non-fonctionnement du tendeur À cliquet, et par lÀ-mÊme causer des blessures et s’avÉrer mortel.
Pensez à vérifier les lois locales réglementant l’utilisation de la slackline pour savoir où et comment vous avez le droit d’utiliser la slackline. Dans certaines villes et certains états, faire de la slackline dans les lieux publics est illégal, restreint ou interdit. Vous pouvez voir, à la télévision ou sur des sites internet, des per-sonnes exécutant sur la slackline toutes sortes de figures, parfois très périlleuses. Il s’agit de personnes qui se sont entraînées très longtemps, sont très douées et acceptent tout risque de blessures ou de mort. N’ESSAYER PAS D’EXÉCUTER CES FIGURES SUR LA SLACKLINE, À MOINS QUE VOUS N’ACCEPTIEZ TOUT RISQUE DE BLESSURES OU DE MORT.
LES FABRICANTS ET DÉTAILLANTS DE CETTE SLACKLINE DÉCLINENT TOUTE RESPONSABILITÉ EN CAS DE MORT, PARALYSIE, BLESSURE OU TORTS DE TOUTE PERSONNE OU PROPRIÉTÉ RÉSULTANT DE L’UTILISATION DE CE PRODUIT.
GARANTIE:Ce produit est garanti contre tout défaut de fabrication sur une période de deux (2) ans à compter de la date d’achat figurant sur le ticket de caisse ou un reçu valide. CETTE GARANTIE NE COUVRE ET N’INCLUT PAS TOUTE DÉTÉRIORATION OU DÉFAUT RÉSULTANT DE: L’USURE NORMALE, MODIFICATIONS OU AL-TERATIONS, STOCKAGE INCORRECT, ENTRETIEN NÉGLIGEANT, ET/OU DÉTÉRIORATIONS DUES À DES ACCIDENTS, À DE LA NÉGLIGENCE, OU UNE MAUVAISE UTILISATION (ENTRE AUTRES UNE UTILISA-TION NON EXPLICITEMENT ACCEPTÉE DANS CE MANUEL). Veillez à sécher complètement la slackline avant de la ranger.
LA GARANTIE LIMITÉE DÉCRITE CI-DESSUS EST L’UNIQUE GARANTIE CONCÉDÉE PAR LE FABRICANT, LES VENDEURS ET LES REVENDEURS DE CE PRODUIT. AUCUNE AUTRE GARANTIE N’EST CONCÉDÉE QUANT AU PRODUIT, Y COMPRIS DES GARANTIES SANS RESTRICTION, QUANT À LA VALEUR COM-MERCIALE, LA QUALITÉ, OU LA FORME PHYSIQUE À UNE FIN PARTICULIÈRE.LE FABRICANT, LES VENDEURS ET LES REVENDEURS NE POURRONT PAS ÊTRE TENUS POUR RE-SPONSABLES EN CAS DE DOMMAGES ET INTÉRÊTS SPÉCIAUX, SECONDAIRES, CONSÉCUTIFS, OU FORTUITS, QU’ILS SOIENT FONDÉS SUR UNE RUPTURE DE CONTRAT, UNE RUPTURE DE GARANTIE, UN DÉLIT (Y COMPRIS LES NÉGLIGENCES), LA RESPONSABILITÉ DU FABRICANT ET AUTRES, MÊME S’ILS ONT ÉTÉ INFORMÉS DE LA POSSIBILITÉ DE TELS DOMMAGES ET INTÉRÊTS.L’UTILISATEUR DE LA SLACKLINE RECONNAÎT QUE SON SEUL RECOURS CONTRE LE FABRICANT, LES VENDEURS ET LES REVENDEURS CONCERNANT TOUTE RESPONSABILITÉ, RÉCLAMATION, OU TOUS DOMMAGES ET INTÉRÊTS, SERA LIMITÉ AU PRIX D’ACHAT DE LA SLACKLINE ET RENONCERA IRRÉVO-CABLEMENT À TOUTES LES RÉCLAMATIONS POUR TOUT AUTRES DOMMAGES ET INTÉRÊTS QU’UN TEL UTILISATEUR DE LA SLACKLINE PEUT AVOIR.
GIBBON MANUAL - FRANCAIS
AUTRES MISES EN GARDE: ATTENTION ! N’utilisez aucunes composantes ni aucuns matériaux pour installer la slackline autres que les composantes et matériaux fournis par Gibbon Slacklines. L’UTILISATION DU TENDEUR À CLIQUET EST DANGEREUSE ET PEUT CONDUIRE À DES BLESSURES OU À LA MORT. LE TENDEUR À CLIQUET NE DOIT JAMAIS ÊTRE UTILISÉ PAR DES PERSONNES MINEURES ET LES ADULTES DOIVENT L’UTILISER AVEC GRAND SOIN ET PRÉCAUTION. Il est important de ne pas donner à la sangle plus de deux tours et demi autour de l’axe du tendeur. (Voir paragraphe 3.4 ci-dessous.) La tension sur le levier du tendeur à cliquet ne doit pas excéder 85 pounds (approx. 378N/38.5kg) pour empêcher tout dysfonctionnement du système, pouvant provoquer des blessures graves et être mortel. N’UTILISER JAMAIS VOS JAMBES, QUEL QU’OBJET QUE CE SOIT OU D’AUTRES PARTIES DE VOTRE CORPS AFIN DE FAIRE FONCTIONNER LE TENDEUR À CLIQUET.Cette slackline ne soit pas être attachée entre des véhicules (voitures, camions) pour différentes raisons, notamment car la tension peut facilement excéder la limite sécuritaire de 85 pounds (approx. 378N/38.5kg). Cette slackline ne doit pas être installée et utilisée à une hauteur supérieure à 18 pouces (50 cm). Le slack-line est un magnifique sport, mais ses dangers (blessure graves et/ou mort) sont réels et ne doivent pas être sous-estimés.
L’ensemble comprend les éléments suivants:(voir image 1)
A) Le cliquet avec sangle et œillet renforcéeB) La Sangle de Slackline : 2cm de large avec œillet ren-forcéeC) 2 « A-Frames » - Cadres en bois offrant hauteurs d’installation différentes D) 2 « Ground Screws » (Vis pour sols) - Points d’ancrage u système
Eléments non inclus et nécessaires pour réaliser l’installation (voir image 2)
E) Une barre en métal ou bois permettant de visser Utiliser un morceau solide et résistant pour visser les Ground Screws dans le sol
x 2x 22
AB
CD
E
A*
Vidéo d’installationhttps://vimeo.com/92235778
3. ASSEMBLAGE:Votre Slackline Gibbon est conçue pour permettre un assemblage simple et rapide si vous suivez les in-structions contenues dans ce livret.
3.1 INSTALLATION DU INDEPENDENCE KIT 70Commencez par trouver un endroit idéal pour enfoncer les “ Ground Screws “ (vis pour sols) dans la terre. Prenez en compte qu’il faut laisser un distance entre les vis et le A-Frame (cadre en bois) au moins égal a deux fois la hauteur d’installation souhaitée. Nous vous recommandons fortement de visionner une vidéo expliquant l’installation sur internet : http://vimeo.com/92235778
Exemple A: Pour une installation mesurant 10m de long à 70cm de hauteur, assurez-vous que les points d’ancrage sont au moins a 140cm (2 x 70cm) des cadres.
=> La longueur totale de l’installation sera alors: 12,8m!
Il est aussi possible de mettre en place l’installation sur des distances plus courtes a une hauteur différente.
Exemple B: Pour une installation mesurant 4m de long a 30cm de hauteur, assurez-vous que les points d’ancrage sont au moins a 60 cm (2 x 30cm) des cadres. L’installation totale mesurera alors 5m20. Il est toujo-urs possible de corriger l’installation en raccourcissant la distance entre les cadres.

GIBBON MANUAL - FRANCAIS
3.2 FIXER LES VIS POUR SOL EN TANT QUE POINTS D’ANCRAGEPositionner le Ground Screw au vertical au-dessus du sol et commencer a l’enfoncer tout en tournant la vis dans le sens des aiguilles d’une montre en utilisant un morceau de bois ou une barre métallique (pas inclus - cf. image 2) insérée a travers l’anneau de la vis (voir im-age 3).
Des que la vis commence a creuser un trou, ajuster l’angle de celle-ci d’a peu prés 30° par rapport au sol, l’anneau orientée vers le A-Frame, et continuez a visser dans le sol jusqu’a ce qu’il ne reste que l’anneau dépassant (voir image 4)
Répéter la procédure illustrée dans les im-ages 3 & 4 pour le deuxième point d’ancrage.
Dans le cas ou vous n’avez besoin que d’une seule vis en raison de l’existence d’un ar-bre ou autre point d’ancrage, lire le livret d’instruction inclus expliquant comment in-staller un kit de Slackline GIBBON.
3.3 ATTACHER LE CLIQUET A L’ANNEAU DE LA VIS GRÂCE A LA SANGLE COMPORTANT UN ŒILLET.Une fois les points d’ancrage installés, faites passer la sangle qui est attachée au cliquet à travers l’anneau puis le cliquet a travers l’œil tissé (Nœud en Tête d’Alouette) tel qu’illustré dans l’image 5.
IMPORTANT! Assurer que la poignée du cli-quet est orientée vers le haut!
3.4 ATTACHER LA SANGLE DE SLACKLINE AU DEUXIÈME POINT D’ANCRAGE:Repeat the procedure before by girth hitching the slackline webbing on the second installed ground screw (image 6).
IMPORTANT! INSTALLER LES DEUX GROUND SCREWS AVANT D’Y ATTACHER VOTRE SLACKLINE OU CLIQUET!
30˚
4
5
6
3
GIBBON MANUAL - FRANCAIS
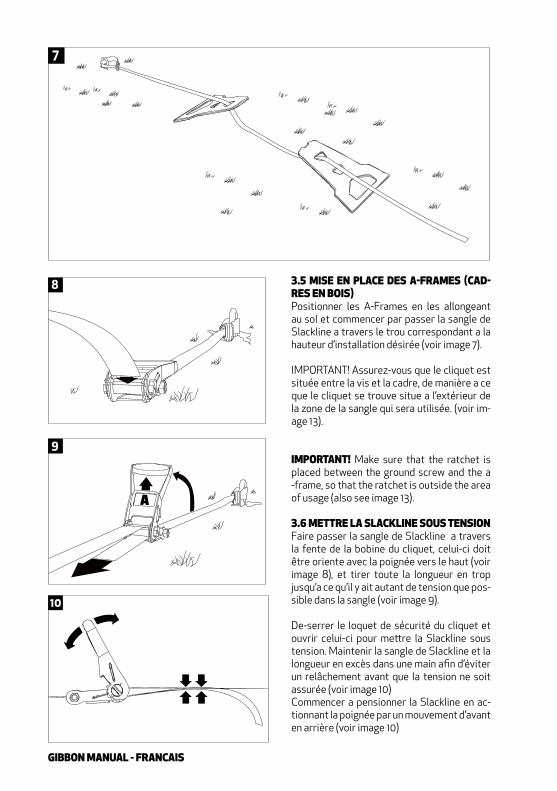
3.5 MISE EN PLACE DES A-FRAMES (CAD-RES EN BOIS)Positionner les A-Frames en les allongeant au sol et commencer par passer la sangle de Slackline a travers le trou correspondant a la hauteur d’installation désirée (voir image 7).
IMPORTANT! Assurez-vous que le cliquet est située entre la vis et la cadre, de manière a ce que le cliquet se trouve situe a l’extérieur de la zone de la sangle qui sera utilisée. (voir im-age 13).
IMPORTANT! Make sure that the ratchet is placed between the ground screw and the a -frame, so that the ratchet is outside the area of usage (also see image 13).
3.6 METTRE LA SLACKLINE SOUS TENSION Faire passer la sangle de Slackline a travers la fente de la bobine du cliquet, celui-ci doit être oriente avec la poignée vers le haut (voir image 8), et tirer toute la longueur en trop jusqu’a ce qu’il y ait autant de tension que pos-sible dans la sangle (voir image 9).
De-serrer le loquet de sécurité du cliquet et ouvrir celui-ci pour mettre la Slackline sous tension. Maintenir la sangle de Slackline et la longueur en excès dans une main afin d’éviter un relâchement avant que la tension ne soit assurée (voir image 10)Commencer a pensionner la Slackline en ac-tionnant la poignée par un mouvement d’avant en arrière (voir image 10)
7
8
A
9
10

GIBBON MANUAL - FRANCAIS
IMPORTANT! La sangle de Slackline ne doit jamais dépasser deux tours et demi (2 1/2) autour de la bobine d’enroulement. La pres-sion exercée sur la poignée du cliquet NE DOIT JAMAIS excéder 40 kg afin d’éviter un blocage ou rupture du système qui pourrait résulter par une blessure et/ou la mort de l’utilisateurDes que la sangle est ajustée a la tension sou-haitée, vérifier le cliquet et assurer que le frein (pièce G dans l’image 10a & 10b) repose cor-rectement dans l’écrou de sécurité (‘H’ dans l’image 10a & 10b) et ramener le levier de la poignée en position horizontale parallèle a la sangle. („I” dans l’image 10b)
NE PAS UTILISER LA SLACKLINE SI LE CLI-QUET N’EST PAS CORRECTEMENT SECURISé ET VERROUILLé (Déverrouillé : Image 10a; VERROUILLé: Image 10b)!Conseil: Le levier fermé („I” dans l’image 10b) est un indicateur fiable que le frein repose dans l’écrou et que le cliquet est correctement verrouillé et sécurisé.
Vous pouvez ajuster la tension de la sangle selon votre préférence personnelle tant que cette tension exercée sur le poignet du levier ne dépasse jamais 40kgFinaliser l’installation en soulevant les cadres a un angle de 87° (pas tout a fait vertical mais légèrement inclinée en direction du point d’ancrage)Conseil: Gardez un pied contre le cadre en bois lorsque vous le soulevez afin d’éviter qu’il glisse et ne reste pas en position.Répéter la même procédure pour le deuxième cadre
IMPORTANT! SELON LE TYPE E SOL ET SA FERMETÉ, LE GROUND SCREW BOUGERA PLUS AU MOINS DANS UN PREMIER TEMPS JUSQU’ À TROUVER SA POSITION D’ANCRAGE. IL PEUT ETRE NECESSAIRE DE DÉTENSIONNER ET RETENSIONNER L’INSTALLATION QUELQUES FOIS JUSQU’A PARVENIR A L’INSTALLATION SOUHAITÉE. RANGEZ LES PIÈCES (SAUF LE GROUND SCREW) DANS UN ENDROIT SEC APRÈS CHAQUE UTILISATION POUR PRÉVENIR L´USURE NORMALE DU PRO-DUIT.
11
13
I
!!RIGHT!!G H
G H!!WRONG!!
10a
b10

GIBBON MANUAL - PORTUGUÊS
13
B
A
C
14
B
15
MARCHER SUR LA SLACKLINE CONSEILS : REGARDEZ LE POINT D’ANCRAGE DE LA SANGLE DEVANT VOUS. CELA VOUS AIDERA À MAINTENIR VOTRE ÉQUILIBRE. BOUGEZ LES BRAS SI VOUS ÊTES DÉSÉQUILIBRÉ. GARDEZ LES GENOUX FLÉCHIS. IMPORTANT: PAR MESURE DE SÉCURITÉ, IL NE DEVRAIT JAMAIS Y AVOIR PLUS D’UNE PERSONNE SUR LA SLACKLINE! NE JAMAIS COURIR SUR LA SLACKLINE !
DÉSASSEMBLER LA SLACKLINE:Pour relâcher le tendeur à cliquet, tirez le lev-ier de sécurité (“A” sur l’image 14) pour déver-rouiller le tendeur à cliquet et ouvrir le levier principal (“B“ dans l’image 14) jusqu’à ce que le levier de sécurité soit détaché de la dent d’engrenage (“C” sur l’image 14) et que la san-gle soit relâchée (image 15).IMPORTANT! La sangle est sous tension et il peut y avoir des risques de blessures ou de mort si la slackline n’est pas désassemblée avec précaution.
Une fois que la sangle est relâchée, enlevez la sangle du tendeur à cliquet, contrôlez la san-gle pour y détecter d’éventuelles détériora-tions ou abrasions. Veillez à ce que la sangle soit propre et sèche, enroulez-la et mettez-là dans le sac prévu à cet effet.
Trouvez plus d´information sur:
International:www.gibbon-slacklines.com
GIBBON MANUAL - FRANCAIS
IMPORTANT! RANGEZ LES PIÈCES (SAUF LE GROUND SCREW) DANS UN ENDROIT SEC APRÈS CHAQUE UTILISATION POUR PRÉVENIR L´USURE NORMALE DU PRO-DUIT.

GIBBON MANUAL - PORTUGUÊS
MODO DE EMPREGOINDEPENDENCE KIT 70
ENGLISH
DEUTSCH
ESPAÑOL
FRANÇAIS
PORTUGUÊS
Este manual contém informações importantes sobre segurança. Antes de usar o slackline leia este manual cuidadosamente e tenho certeza que você entende e concorda em todos os avisos, precau-ções, instruções e recomendações de segurança. Periodicamente a informação neste manual e sua slackline inspecionar regularmente por sinais de danos. Não use o slackline menos que você aceita
todos os riscos de prejuízo e / ou morte que possam resultar do seu uso.

GIBBON MANUAL - PORTUGUÊS
1. ATENÇÃO! O SLACKLINE É UM EQUIPAMENTO PERIGOSO MESMO QUANDO USADO APROPRIADA-MENTE: PAIS DE MENORES E MENORES: Menores não devem usar o slackline a menos que eles estejam sob supervisão constante de um adulto. Tenha certeza que o slackline seja instalado apenas em lugares onde menores não tenham acesso ao slackline sem a supervisão de um adulto. Menores nunca devem utilizar a catraca ou ajustar a tensão do slackline em nenhum momento.
O slackline foi desenvolvido unicamente por um adulto para melhorar seu(sua) equilíbrio através de caminhadas devagar e suave sobre a fita plana, mesmo em lugares confortáveis sem nenhum obstáculos, pessoas projeções ou riscos nas proximidades. O slackline deve ser usado apenas conforme descrito neste manual. A UTILIZAÇÃO DO SLACKLINE PODE SER UMA ATIVIDADE PERIGOSA QUE PODE RESUL-TAR EM SÉRIAS E/OU MORTE MESMO QUANDO USADO CORRETAMENTE. USE PELO SEU PRÓPRIO RISCO E SEMPRE TENHA O BOM SENSO. Tenha certeza que o slackline está montado apenas em ancoragens conforme descrito na seção 3.1 e 3.2 abaixo. E para prática do slackline ou que não seja fixo. Por exemplo, não monte o slackline em um ou mais carros. Tenha certeza que o terreno e a área do slackline seja completamente plana, uniforme e macia. Você irá cair sobre isto! NÃO monte o slackline em nenhuma altura acima de 50 centímetros.
Tenha certeza que não existe nenhum obstáculo, riscos ou projeções perto do slackline que possa ocasio-nar lesão na queda. Use o slackline apenas em locais sem riscos e/ou perigos.
• Sempre use tênis fortes, caçados finos e de solas planas e com aderência.• Não ande de slackline descalço, de sandálias ou com tênis que não tenham solas planas.• Mantenha todos os espectadores no mínimo a 3 metros do slackline.• Nunca use o slackline na escuridão ou noite ou também em condições de chuva e gelo.• Nunca permita mais de uma pessoa a usar o slackline por vez.• Nunca exceda o peso de 100kg no slackline por vez.• ESTE SLACKLINE NÃO FOI DESENVOLVIDO PARA PERFORMANCES OU MANOBRAS, INCLUINDOSALTOS, FLIPES E ETC. RISCOS DE LESÕES OU MORTES PODEM ACONTECER.• SIGNIFICAVELMENTE QUANDO MANOBRAS SÃO TENTADAS OU ACERTADAS.
O slackline não é insensível a danos. O SLACKLINE DEVE TER MANUTENÇÃO PERIODICA E INSPECIO-NADO ANTES DE CADA USO. FALHAS NA INSPEÇÃO E MANUTENÇÃO DO SLACKLINE ANTES DE CADA USO PODE OCASIONAR EM LESÕES E/OU MORTE. O USO DE PEÇAS NÃO PROVIDENCIADOS PELO FABRICANTE NÃO SÃO RECOMENDADOS E PODE DANIFICAR O SLACKLINE, IMPACTAR NA PERFOR-MANCE, DIMINUIR A VIDA UTIL DO EQUIPAMENTO E CAUSAR LESÕES E/OU MORTES.
1.1 DESGASTE NATURAL NÃO RELACIONADO COM A GARANTIA:Desgaste na proteção do loop não é considero parte da garantia – O uso do slackline está permanente-mente em confronto com o estresse dinâmico. Desgaste na proteção do loop consequentemente não é considerado para pedidos de garantia.
Relacionado ao tópico acima o desgaste na impressão do slackline está excluído de pedidos de garantia. Desgaste no slackline que é causado por uso incorreto como o exemplo quando o slackline é montado ao redor de paredes pontudas não podem ser solicitado a garantia. O slakline é um produto esportivo e naturalmente o desgaste ocorre.
1.2 INSTRUÇÕES DE LAVAGEM E MANUTENÇÃO: Para uma manutenção ideal nós recomendamos a limpeza da catraca com um produto de lubrificação para metais. Por favor verifique todas as peças a procura de danos. Por favor, apenas lave com agua cor-rente.

GIBBON MANUAL - PORTUGUÊS
1.3 INFORMAÇÃO DE SEGURANÇA ADICIONAL: O sistema de slackline só é permitido ser tensionado com as mãos e por apenas uma pessoa. A escolha dos pontos de ancoragem também não devem ter nenhum ponto de atrito ou estar em condição que possa danificar o slackline potencialmente.Só é permitido montar com proteção sobre o ponto de ancoragem.Nunca deve ser tensionado com outros equipamentos (como carro) além do equipamento disponibilizadopodem se enroscar no slackline.O slackline não deve ser modificado seu comprimento utilizando nós.
1.4 FALHAS:• USE O BOM SENSO,• USE O SLACKLINE COMO RECOMENDADO NESTE MANUAL E/OU• PRESTE ATENÇÃO NOS AVISOS E INSTRUÇÕES DESSE MANUAL• AUMENTA SIGNIFICATIVAMENTE O RISCO DE SÉRIAS LESÕES E/OU MORTE• QUANDO MONTADO, O SLACKLINE ESTÁ SOBRE SIGNIFICANTE TENSÃO QUE PODE SER IGUAL OU SUPERIOR 7Kn/700kg. DEVIDO A ALTA TENSÃO DO SLACKLINE, MUITO CUIDADO DEVE SER EXERCIDO QUANDO UTLIZADO O SLACKLINE PARA DIMINUIR O RISCO DE LESÃO E/OU MORTE. SOBRECARREGAR O SLACKLINE COM MAIS DE 100kg E/OU MAIS DE UMA PESSOA AUMENTA A TENSÃO E PODE OCASIONAR A FALHA DO SLACKLINE E/OU CATRACA RESULTANDO EM LESÃO E/OU MORTE.
Verifique as leis locais de slackline para saber onde e como você pode estar totalmente correto na práticado slackline. Em algumas cidades ou estados a pratica do slackline em lugares público é ilegal ou restrita.praticam slackline por muito tempo, possuem grandes habilidades e aceitam o risco de todo tipo de lesãoe/ou morte. NÃO TENTE REALIZAR NENHUM TIPO DE MANOBRA OU ACROBACIA AO MENOS QUE VOCÊ ACEITE TODO TIPO DE LESÃO E/OU MORTE.
O FABRICANTE E OS REVENDEDORES DESTE SLACKLINE RENUNCIAM EXPLICITAMENTE TODA E QUALQUER RESPONSABILIDADE POR MORTE, PARALISIA, LESÃO E/OU DANOS EM QUALQUER PES-SOA OU PROPRIEDADE QUE POSSA OCORRER DECORRENTE DESTA OU QUALQUER OUTRA FORMA RELACIONADA COM O USO DESTE PRODUTO.
1.5 GARANTIA:Este produto tem a garantia contra qualquer defeito de material ou produção por dois (2) anos a partir dadata de compra em um recibo válido e legal. ESTA GARANTIA NÃO COBRE OU INCLUI NENHUM DANO OU DEFEITO CAUSADO POR: DESGASTE NATURAL OU DEPRECIAÇÃO, MODIFICAÇÕES OU ALTER-AÇÕES, ARMAZENAGEM INCORRETA, FALTA DE MANUTENÇÃO E/OU DANOS CAUSADOS POR ACIDENTES, NEGLIGÊNCIA OU USO INCORRETO (INCLUINDO E NÃO LIMITANDO TODO E QUALQUER USO EXPLICITAMENTE CONTIDO NESTE MANUAL). Esteja certo de manter seu slackline seco antes de guarda-lo.
Além do descrito acima, O FABRICANTE, DISTRIBUIDORES E REVENDEDORES DESTE PRODUTO NÃO TEM NENHUMA OUTRA REPRESENTAÇÃO E/OU GARANTIAS, ALÉM DAS EXPRESSAS OU IMPLÍCITAS, DE ACORDO NESTE PRODUTO, INCLUINDO SEM LIMITAÇÃO, QUALQUER GARANTIAS DE COMER-CIALIZAÇÃO, QUALIDADE OU FITNESS PARA FINS PARTICULARES. O FABRICANTE, DISTRIBUIDORES E REVENDEDORES NÃO SERÁ RESPONSÁVEL POR QUALQUER FORMA ESPECIAL, INDIRETA, CONSE-QUENTE OU DANOS INCIDENTES, SEJA POR QUEBRA DE CONTRATO, QUEBRA DE GARANTIA, DELITO (INCLUINDO NEGLIGÊNCIA), RESPONSABILIDADE DO PRODUTO OU DE OUTRA FORMA, MESMO QUE TENHAM SIDO INFORMADOS DA POSSIBILIDADE DE TAIS DANOS. O USUÁRIO DO SLACKLINE CONCORDA QUE É DE SUA(SEU) TOTAL RESPONSABILIDADE RECURSOS CONTRA O FABRICANTE, DISTRIBUIDORES, REVENDEDORES POR QUALQUER RESPONSABILIDADE, RECLAMAÇÕES OU DA-NOS, SERÁ LIMITADO AO PREÇO DE COMPRA DO SLACKLINE E IRREVOGAVELMENTE RENUNCIAM A QUALQUER PEDIDO DE QUAISQUER OUTROS DANOS QUE O USUÁRIO DO SLACKLINE POSSA TER.

GIBBON MANUAL - PORTUGUÊS
2. MAIS AVISOS:ATENÇÃO! Não use nenhuma outra peça ou material para montar e/ou conectar seu slackline a não ser quesejam peças ou materiais disponibilizados pela Gibbon Slacklines.O USO DA CATRACA É PERIGOSO E PODE CAUSAR LESÕES E/OU MORTES. A CATRACA NUNCA DEVESER UTILIZADA POR MENORES E DEVE TER MUITA CAUTELA E CUIDADO QUANDO UTILIZADA PORADULTO. A FITA DE SLACKLINE NÃO DEVE EXCEDER 2 VOLTAS E MEIA NA BUBINA DA CATRACA. (veja sub seção 3.4 abaixo.)A tensão na alavanca da catraca não deve exceder 38.5kg (378kN) para prevenir travamento e/ou falha dosistema de slackline resultando em serias lesões e/ou mortes. NUNCA USE SUAS PERNAS OU NENHUMDISPOSITIVO OU PARTES DO CORPO A NÃO SER SUAS MÃOS PARA UTIILIZAR A CATRACA.Este slackline não deve ser montado entre veículos (ex: carros ou caminhonetes) por diversas razões, inclu-sive porque a tensão pode facilmente exceder o limite de segurança de 38.5kg (378kN). Este slackline não deve ser montado ou utilizado em nenhuma altura superior a 50cm. Slackline é um esporte lindo, porém perigoso, e pode causar serias lesões e/ou mortes, que são significantes e nunca devem ser subestimadas!
Conteúdo do kit: (como se vê na imagem 1)
A) A catraca com a fita de de loop da catracaA*Opcionalmente - banda retchet curto para adaptação -necessário: 2 chaves inglesas em tamanho 19B) A fita: 2” (5cm) de largura com loop no finalC) 2 x estruturas com 3 opções de alturaD) 2 x parafusos de aterramento para ancoragem
Não incluso: (como se vê na imagem 2)
E) Barra de ferroPor favor utilize uma barra de ferro forte e robusta ou uma madeira forte para girar o parafuso
x 2x 22
AB
CD
E
A*
SETUP VIDEO https://vimeo.com/92235778
3. MONTAGEM:O Slackline GIBBON foi desenvolvido para uma rápida e fácil montagem se você seguir as dicas deste manual.
3.1 MONTANDO O KIT INDEPENDENCE 70:Comece encontrando um lugar confortável para montar os parafusos de aterramento no chão. Leve em con-sideração que a ancoragem precisa sempre de duas vezes mais distância da estrutura de acordo com a altura escolhida.
Você vai encontrar um vídeo de instalação na internet https://vimeo.com/92235778
EXEMPLO A:10m de fita montado a uma altura de 70cm precisa de 2 x 140cm adicionais para definir a distância entre os parafusos de aterramento.
=> Distância total de ancoragem a ancoragem: 12,8m.

GIBBON MANUAL - PORTUGUÊS
3.2 COLOCANDO OS PARAFUSOS DE ATER-RAMENTO COMO ANCORAGEM:Posicione o parafuso de aterramento vertical-mente no terreno e comece a aplicar pressão no parafuso de aterramento enquanto gire em sentido horário utilizando uma barra de ferro forte ou uma madeira robusta (não incluso, veja imagem 2) através do buraco do parafuso (veja imagem 3.)
Uma vez que o parafuso estiver colocado no terreno ajuste o ângulo do parafuso em torno de 30º graus na direção do outro ponto de ancoragem e gire o parafuso em direção ao terreno até que apenas o loop fique para fora (imagem 4). Repita o processo ilustrado na imagem 3 & 4 com o outro parafuso de ater-ramento no outro lado da ancoragem.Em caso de precisar de apenas um parafuso de aterramento devido a uma árvore ou um poste, por favor leia o manual de instrução incluso para montagem dos kits de slackline Gibbon.
3.3 COLOCANDO A CATRACA COM A FITA ELOOP DA CATRACA NO PARAFUSO DE ATER-RAMENTO:Uma vez que o parafuso de aterramento es-tiver instalado passe a fita da catraca pelo loop do parafuso e da fita de catraca con-forme na imagem 5.
IMPORTANTE! Tenha certeza que a catraca esteja montada com a alavanca para cima.
3.4 COLOCANDO A FITA DE SLACKLINE NOSEGUNDO PARAFUSO DE ATERRAMENTO:Repita o procedimento anterior passando o loop da fita do slackline por dentro do loop do parafuso de aterramento da segunda ancor-agem (imagem 6).
IMPORTANTE! I Instale os parafusos de ater-ramento ANTES de passar a fita da catraca e o slackline no parafuso de aterramento.
30˚
4
5
6
3

GIBBON MANUAL - PORTUGUÊS
3.5 ADICIONANDO A ESTRUTURAPosicione as estruturas deixando-as deitadas no terreno e comece passando o slackline através da fenda de altura desejável na es-trutura (imagem 7).
IMPORTANTE! Tenha certeza que a catracaestá posicionada entre o parafuso de ater-ramento e a estrutura em A, desta forma a catraca fica posicionada fora da área que será utilizada (veja também na imagem 13).
3.6 TENSIONANDO O SLACKLINEPasse o slackline pelo buraco da catraca aponapontada para cima (imagem 8) e puxe todo o excesso da fita até tencionar o máximo possível com as mãos (imagem 9).
Libere a alavanca “A” da catraca e abra a ala-vanca para tencionar.
Segure o excesso da fita junto com a fita firmemente para manter e não liberar a pré tensão (imagem 10).
Comece tencionando o slackline movendo aalavanca da catraca para frente e para trás (imagem 10)
7
8
A
9
10

GIBBON MANUAL - PORTUGUÊS
IMPORTANTE! O slackline não deve exceder duas duas rotações e meia no eixo da catraca. A tensão na alavanca da catraca nunca deve ex-ceder 38,5kg et must NEVER exceed 85 pounds (approx 378kN) para prevenir erros e falhas no sistema que podem resultar em séria lesão e/ou morte.Assim que a fita atingir a tensão desejada,verifique a catraca para ter certeza que a trava(“G” na imagem 10a & 10b) está alinhada correta-mente na engrenagem (“H” na imagem 10ª & 10b) e feche a alavanca da catraca horizontalmente em paralelo com a fita (“I” na imagem 10b).NÃO USE O SLACKLINE SE A CATRACA NÃOESTIVER TOTALTAMENTE SEGURA E TRAVADA (DESTRAVADA: Imagem 10a; TRAVADA: imagem 10b)! Dica: A alavanca fechada (“I” na imagem 10b) é uma boa indicação que a trava está correta-mente na engrenagem e que a catraca está seg-ura e travada. Você pode ajustar a tensão da fita de acordo com sua preferência pessoal, porém a tensão não deve exceder 38,5kg (378kN).
Finalize a montagem levantando a estruturator-no de 87º graus com o ângulo direcionado para o meio (Imagem 11).
Dica: Coloque seus pés no fundo da estruturapara evitar que a estrutura se mova quandocoloca-la na posição correta.
Repita o mesmo procedimento com a outraestrutura.
IMPORTANTE ! TENHA CUIDADO POIS DEPENDENDO DO TERRENO E DO SOLO O PARAFUSO DEATERRAMENTO PODE MOVER-SE ATÉ QUE ELE TRAVE NA POSIÇÃO. DESTENCIONAR E TENSIO-NAR A FITA APÓS A PRIMEIRA MONTAGEM PODE SER NECESSÁRIO PARA OBTER A MONTAGEM DESEJADA.
11
13
I
!!RIGHT!!G H
G H!!WRONG!!
10a
b10

GIBBON MANUAL - PORTUGUÊS
B
A
C14
B
15
WALKING THE SLACKLINE:Dicas: Olhe para o ponto de ancoragem da banda na frente de vocês para o equilíbrio. Mova os braços para corrigir os desequilíbri-os. Mantenha os joelhos dobrados. IMPORTANTE: Por razões de segurança não deve nunca ser mais do que uma pessoa no slackline! NUNCA MAIS na slackline!
DESMONTAGEM DO SLACKLINEPara liberar a catraca puxar a alavanca de se-gurança ( “A” na imagem 14) para destravar a catraca e abra a alavanca principal ( “B” à ima-gem de 14) até a segurança destaca alavanca da engrenagem ( “C” na imagem 14) e a banda é liberado (Imagem 15).
IMPORTANTE! A banda está sob tensão e pre-juízo e / ou morte pode ocorrer se não forem desmontados.
Uma vez que a banda está liberado, separar a banda da catraca, inspecionar a banda para escoriações e danos, certifique-se a banda está limpa e seca, e roll-up da banda e colocá-lo em seu saco de armazenamento.
13
Related Documents


![[Pdf&vce]braindump2go 70 467 training kit pdf 41-50](https://static.cupdf.com/doc/110x72/58a4d04d1a28ab480e8b696f/pdfvcebraindump2go-70-467-training-kit-pdf-41-50.jpg)