User Guide Business Names

Welcome message from author
This document is posted to help you gain knowledge. Please leave a comment to let me know what you think about it! Share it to your friends and learn new things together.
Transcript

User Guide
Business Names

2
OCP - Business Name
This user guide acts as a reference for Applicants to manage OCP Accounts.
Use this manual to manage:
- Registering a Business Name
- Returned Business Name
- Rejected Business Name
- Viewing an Approved Business Name
- Changing Business Name Details
- Ceasing a Business Name
- Renewing a Business Name
- Lodge General Form
- Searching Business Name (Internal User)
- Search Business Name (External User)
The following acronyms are used frequently:
If you have any questions or issues while using OCP, please call us at +673-2380505 or
send an email to [email protected]
PURPOSE
GLOSSARY
FURTHER ASSISTANCE
Term Meaning
OCP One Common Portal
ROCBN Registry of Companies and Business Names

3
Topics Page
Introduction 2
Registering a Business Name 4
Returned Business Name 27
Rejected Business Name 34
Viewing An Approved Business Name 37
Changing Business Name Details 42
Ceasing a Business Name 71
Renewing a Business Name 77
Lodge General Form 87
Search Business Name (Internal User) 97
Search Business Name (External User) 101
Table of Content
OCP - Business Name

4
REGISTERING A
BUSINESS NAME
Applicant
Online User
OCP - Business Name
1. Click on the button.
The Create Your First Business page will appear.
1
2. Click on the button.
2
Navigate to the OCP dashboard.

5
OCP - Business Name
The Register a Business Name page will appear.
3
3. Read through the important information and click on the
checkbox.
4. Click on the button.
4

6
OCP - Business Name
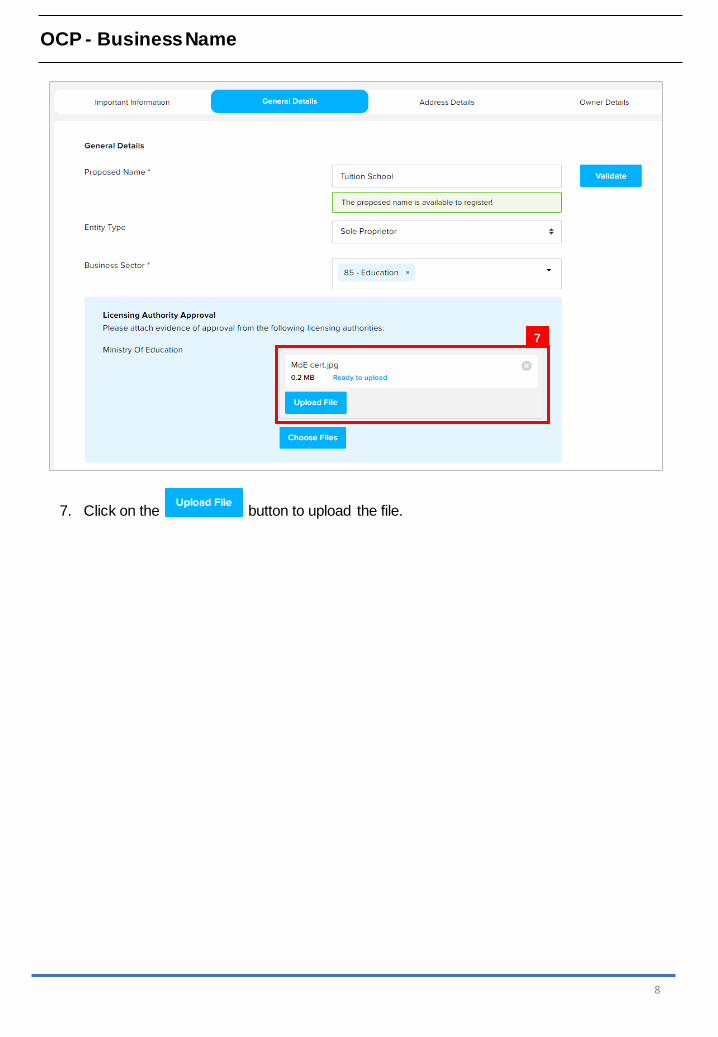
The General Details section will appear.
5
5. Enter the details for General Details section as per the example below.
NOTE
6
Field Example
Proposed Name Tuition School
Entity Type Sole Proprietor
Business Sector 85 - Education

7
OCP - Business Name
Note :
• A business name does not need to contain any specific suffix such as “Limited”, “Bhd”,
“Sdn”, etc.
• The system will auto-validate proposed Business Name and will display one of the
following messages:
• If the proposed name is similar or identical to an existing registered / proposed Business
Name, the following section will appear:
User is advised to upload a proof of consent that the proposed business name can be used.
6. Depending on the selected Business Sector, user may be required to upload evidence
of approval from the relevant authorities.
Click on the button and select evidence of approval document.
Message Meaning
The proposed name is available to register! The proposed name is available.
The proposed name you have entered
contains restricted word. Your application may be rejected due to the use of this word.
The proposed name user have entered
contains restricted word.
Advised to change proposed name.
The proposed name is similar or identical to
an existing registered / proposed Business Name. Please note that the proposed name
will be subject to Registrar review and may
be subsequently rejected.
The proposed name is similar or identical
to an existing registered / proposed Business Name.
Need to provide proof of consent for using proposed Business Name.
8
OCP - Business Name
7. Click on the button to upload the file.
7

9
OCP - Business Name
To download the uploaded file.
To delete the uploaded file.
To upload additional file.
To go back to the previous section.
To save application as draft and exit the registration page.
To cancel registration.
The file will be uploaded.
8
8. Click on the button.

10
OCP - Business Name
The Address Details section will appear.
9
9. Enter the details for Address Details section as per the example below.
10
Field Example
Address Type Physical Address
Address 54, SPG 64, Jalan Indera Jaya, STKRJ
Postal Code
KA1531
Filling in the postal code will auto populate the
Mukim and Village field.
Mukim Kuala Belait
Village Kg Mumong A
District Belait

11
OCP - Business Name
10. Click on the button.
The added address will be displayed on the right side of the page.
11
NOTE
Note:
• Repeat steps 8 – 9 to add additional addresses.
• The second (and more) addresses will be automatically be categorized as
Additional Address.
11. Click on the button.
To edit the added address.
To delete the added address.
To go back to the previous section.
To save application as draft and exit the registration page.
To cancel registration.

12
OCP - Business Name
The Owner Details section will appear.
12
13
13
OCP - Business Name
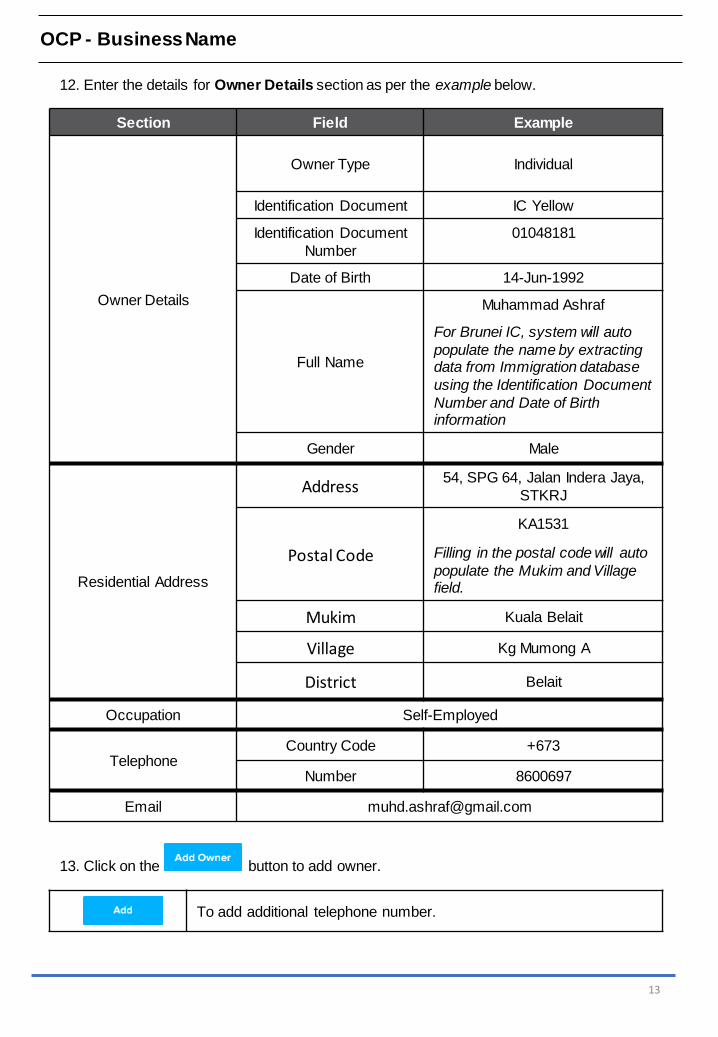
12. Enter the details for Owner Details section as per the example below.
Section Field Example
Owner Details
Owner Type Individual
Identification Document IC Yellow
Identification Document
Number
01048181
Date of Birth 14-Jun-1992
Full Name
Muhammad Ashraf
For Brunei IC, system will auto
populate the name by extracting data from Immigration database
using the Identification Document
Number and Date of Birth information
Gender Male
Residential Address
Address54, SPG 64, Jalan Indera Jaya,
STKRJ
Postal Code
KA1531
Filling in the postal code will auto
populate the Mukim and Village field.
Mukim Kuala Belait
Village Kg Mumong A
District Belait
Occupation Self-Employed
TelephoneCountry Code +673
Number 8600697
Email [email protected]
13. Click on the button to add owner.
To add additional telephone number.

14
OCP - Business Name
The added owner will be displayed on the right side of the page.
14
14. For Owner Type: Individual, it is mandatory to upload only ID Evidence.
Click on the button to select ID document.

15. Click on the button to upload the file.
The file will be uploaded.
15
OCP - Business Name
16. Click on the button.
15
16
To download the uploaded file.
To delete the uploaded file.
To upload additional file.
To go back to the previous section.
To save application as draft and exit the registration page.
To cancel registration.

16
OCP - Business Name
The Review section will appear.
17
20
18
17. Click on the individual sections to view the separate sections or click on the
button to view all the sections.
Click on the button edit the specific sections.
18. Click on the
checkbox after all the sections have been reviewed.
19. Click on the
checkbox after user have read through the Declaration and Consent.
20. Click on the button.
19

17
OCP - Business Name
The Payment page will appear.
NOTE
Note:
• The page will display the application request that user have made, and the
payment required for the application request.
• There are two forms of payment method.

18
OCP - Business Name
Payment Method –Credit Card
Note:
• For payment via credit card, refer to the User Guide on Payments which can be
found under OCP’s Homepage, Resources and Guides.

19
OCP - Business Name
Payment Method –Pay Over The Counter
NOTE
Note:
• For payment over the counter, take note of the Application ID and total payment
and visit the ROCBN counter to make the payment.
21. Click on the button.
21

20
OCP - Business Name
The OCP dashboard page will appear.
NOTE
Note:
• The unpaid application Register a Business Name will be displayed under the
Unfinished Business section.
• The button indicates that the application is currently pending payment.
• Click on the button to go back to the payment page to make payment via
credit card (or) visit the ROCBN counter to make payment over the counter.

21
OCP - Business Name
After payment has been made:
NOTE
Note:
• After payment has been made, the icon will become .
• This indicates that the application has been paid and has been submitted for
review/approval to ROCBN.

22
OCP - Business Name
After approval has been made, applicant will receive an email Registration of Business
Name.

23
OCP - Business Name
Also attached in the email will be the Certificate of Registration and Business Name Extract.
22
22. Click on the attachments to view the documents.

24
OCP - Business Name
The Certificate of Registration.

25
OCP - Business Name
The Business Name Extract.

26
OCP - Business Name
After approval has been made:
NOTE
Note:
• After approval has been made, the business name will be displayed under the My
Entities section with the status .
• After approval has been made, the business name will be displayed under the
Finished Business section with the status .
NOTE

27
RETURNED BUSINESS NAMEApplicant
Online User
OCP - Business Name
1
Applicant will receive an email notification if their application has been returned.
Log in to your email and open the e-mail Returned –Registration For Business Name in
your inbox.
Note:
• The email will detail:
▪ When the application was returned.
▪ The reason(s) why the application was returned.
▪ The next action(s) for the applicant.
▪ The due date for the re-submission of the application.
NOTE

28
OCP - Business Name
Note: The Unfinished Businesses section will display the work items that are pending
review / pending payment / returned / draft.
1. Click on a work item with the description Register a Business Name and status .
1
Navigate to the OCP dashboard. Returned applications will be displayed in the Unfinished
Businesses section.
NOTE
To expand the list.
To display the work items in a list.
To display the work items in a grid.

29
OCP - Business Name
The Register a Business Name page will appear.
2
2. Read through the important information and click on the
checkbox.
3. Update the application as per the reason(s) detailed in the notification email.
For this example, click on the section.
3

30
OCP - Business Name
The Owner Details section will appear.
4
4. For Owner Type: Individual, it is mandatory to upload only ID Evidence.
Click on the button to upload additional ID document.

5. Click on the button to upload the file.
The file will be uploaded.
31
OCP - Business Name
To download the uploaded file.
To delete the uploaded file.
To delete all uploaded additional file.
To upload additional file.
5
If all the required updates have been done, proceed to the Review section.
6. Click on the section.
6

32
OCP - Business Name
The Review section will appear.
10
7. Click on the individual sections to view the separate sections or click on the
button to view all the sections.
Click on the button edit the specific sections.
8. Click on the
checkbox after all the sections have been reviewed.
9. Click on the
checkbox after user have read through the Declaration and Consent.
10. Click on the button.
8
9
7

33
OCP - Business Name
You will be directed to the OCP dashboard page.
NOTE
Note:
• The application Register a Business Name will be displayed under the Unfinished
Business section
• The status icon will become .
• This indicates that the application submitted for review/approval to ROCBN.
• Submitting a returned application does not require additional payment.
34
REJECTED BUSINESS NAMEApplicant
Online User
OCP - Business Name
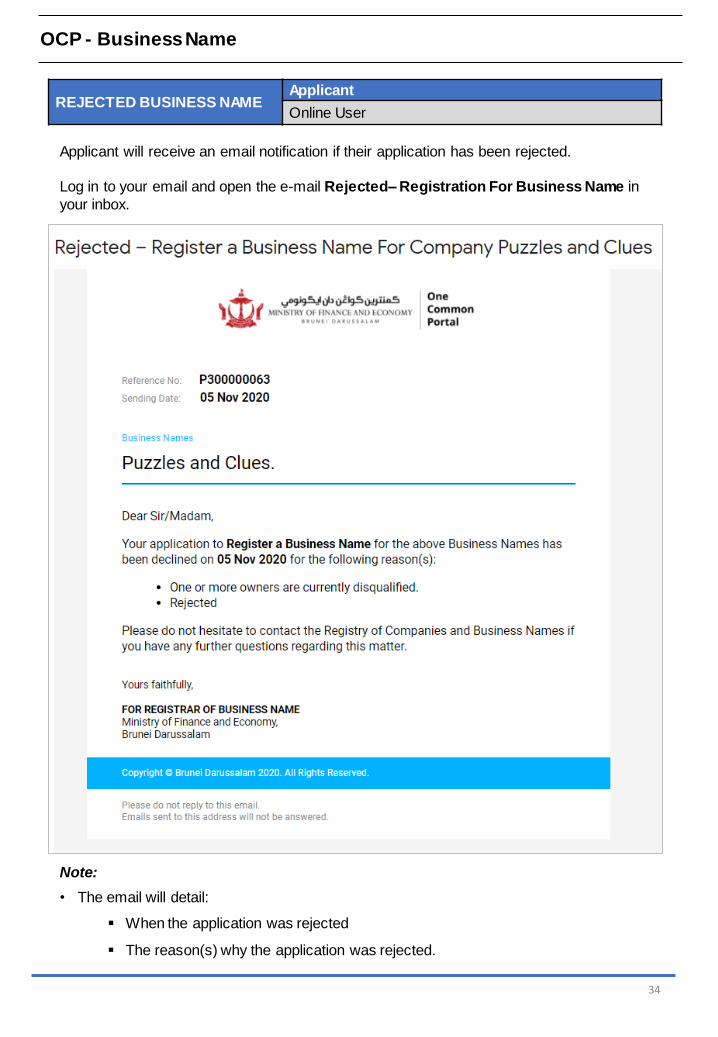
Applicant will receive an email notification if their application has been rejected.
Log in to your email and open the e-mail Rejected–Registration For Business Name in
your inbox.
Note:
• The email will detail:
▪ When the application was rejected
▪ The reason(s) why the application was rejected.
NOTE

35
OCP - Business Name
Note: The Finished Businesses section will display the work items that are approved /
rejected.
1. Click on one of the Rejected applications.
Navigate to the OCP dashboard. Rejected applications will be displayed in the Finished
Businesses section.
NOTE
To expand the list.
To display the work items in a list.
To display the work items in a grid.
1

36
OCP - Business Name
Note: The Finished Businesses section will display the work items that are approved /
rejected.
Navigate to the OCP dashboard. Rejected applications will be displayed in the Finished
Businesses section.
NOTE
To expand the list.
To display the work items in a list.
To display the work items in a grid.

37
VIEWING AN APPROVED
BUSINESS NAME
Applicant
Online User
OCP - Business Name
Registered business name will be displayed under the My Entities section.
1. Click on a registered Business Name
1
Navigate to the OCP dashboard.

38
OCP - Business Name
The General Details page will be displayed.
2
Note: The General Details page will display the following information –
• Business Number
• Business Name
• Entity Status• Business Name Type
• Registration Date• Renewal Due Date
• Business Sector
2. Click on the section.

39
OCP - Business Name
The Addresses page will be displayed.
3
Note: The Addresses page will display the following information –
• Principal Place of Business
• Secondary Place of Business (if available)
• Click on the button to display historical addresses (if available).
3. Click on the section.

40
OCP - Business Name
The Owners page will be displayed.
4
Note:
• The Owners page will display the information of the current owner (Individual /
Registered Company / Limited Liability Partnership / Other Incorporated Entity)
• Click on the button to display historical owners (if available).
4. Click on the section.

41
OCP - Business Name
The Registry Filings page will be displayed.
Note:
• The Registry Filings page will display the list of applications that have been submitted
and paid –
o Registration of Business Names.
o Change Business Name Details.
o Cease a Business Name.
o Renew a Business Name .
o Lodgement of Documents
• Click on the individual application to view the filing details.
42
CHANGING BUSINESS
NAME DETAILS
Applicant
Online User
OCP - Business Name
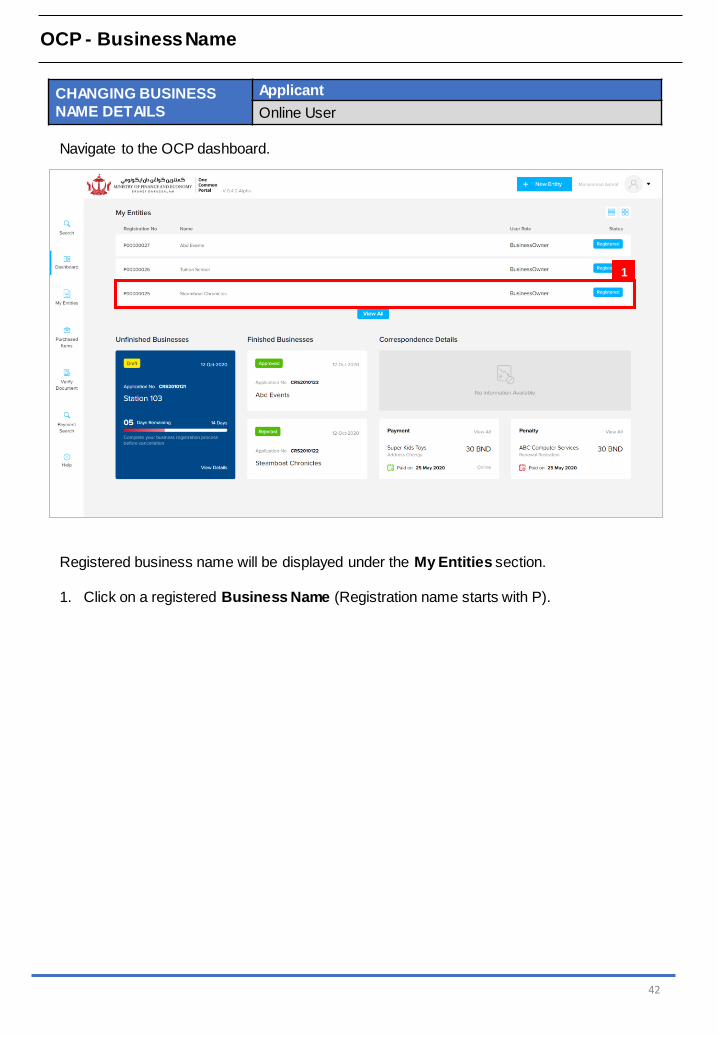
Registered business name will be displayed under the My Entities section.
1. Click on a registered Business Name (Registration name starts with P).
1
Navigate to the OCP dashboard.

43
OCP - Business Name
The General Details page will be displayed.
2
2. Click on the tab and click on .

44
OCP - Business Name
The Change Business Name Details page will appear.
3
3. Click on the radio button to change the business name.
4. Update the details for General Details section as per the example below.
4
Field Example
Proposed Name Steamboat Chronicles and Friends
Business Sector
Wholesale and retail trade and repair of motor
vehicles and motorcycle
Manufacture of motor vehicle, trailers and semi-
trailer
Date of Change
12-Oct-2020
Date must be greater than the registration date
and cannot be a future date.
5

45
OCP - Business Name
Note :
• The system will auto-validate proposed Business Name and will display one of the following
messages:
• If the proposed name is similar or identical to an existing registered / proposed Business
Name, the following section will appear:
User is advised to upload a proof of consent that the proposed business name can be used.
• Depending on the selected Business Sector, user may be required to upload evidence of
approval from the relevant authorities.
Click on the button and select evidence of approval document.
Refer to pages 7-9 for more information.
• The Date of Change must be greater than the registration date and can’t be a future date.
Message Meaning
The proposed name is available to register! The proposed name is available.
The proposed name is similar or identical to
an existing registered / proposed Business Name. Please note that the proposed name
will be subject to Registrar review and may
be subsequently rejected.
The proposed name is similar or identical
to an existing registered / proposed Business Name.
Need to provide proof of consent of using existing name.
The proposed name you have entered
contains restricted word. Your application may be rejected due to the use of this word.
The proposed name user have entered
contains restricted word.
Advised to change proposed name.
5. Click on the button.

User can save Additional Address for the business name.
6. Enter the details for Address Details section as per the example below.
7. Click on the button.
46
OCP - Business Name
The Address Details section will appear.
6
Field Example
Address No 99, Jalan Parak
Postal Code
KB1133
Filling in the postal code will auto populate the
Mukim and Village field.
Mukim Seria
Village Kg Panaga
District Seria
7

47
OCP - Business Name
Note: The added address will be displayed on the right side of the page as address 3.
NOTE
User can change Address of the business name.
8. Click on the button.
9. Update the details for Address Details section as per the example below.
10. Click on the button.
Field Example
Address 42, SPG 64, Jalan Jaya Indera, STKRJ
Postal Code
KA1531
Filling in the postal code will auto populate the
Mukim and Village field.
Mukim Kuala Belait
Village Kg Mumong A
District Belait
8
9
10

48
OCP - Business Name
Note: The updated address will be displayed on the right side of the page.
NOTE
11
12
13
User can cease Additional Place of Business of the business name.
11. Click on the button.
12. Enter the details for Cease Date as per the example below.
13. Click on the button.
Field Example
Cease Date
12-Oct-2020
Date must be greater than the registration date
and cannot be a future date.

49
OCP - Business Name
Note:
• The ceased address will still be displayed on the right side of the page.
• Click on the button if user wish to un-cease the address.
NOTE
15
14
14. Enter the details for Date of Change as per the example below.
Field Example
Date of Change
12-Oct-2020
Date must be greater than the registration date
and cannot be a future date.

50
OCP - Business Name
Note :
• Principal Place of Business cannot be ceased. Only Additional Place of
Business can be ceased.
• Principal Place of Business can only be changed. Previous Principal Place of
Business will be recorded in the Historical Addresses section.
• Additional Place of Business that has been approved by ROCBN back-office
officers cannot be deleted. It can only be changed or ceased.
• Additional Place of Business that has been ceased will be removed after the
change has been submitted and approved by ROCBN back-office officers. Ceased
Additional Place of Business will be recorded in the Historical Addresses
section.
• Additional Place of Business that has not been approved by ROCBN back-office
officers yet can be edited or deleted.
15. Click on the button.

51
OCP - Business Name
The Owner Details section will appear.
17
18
16
User can update the Owner details.
16. Click on the button.

52
OCP - Business Name
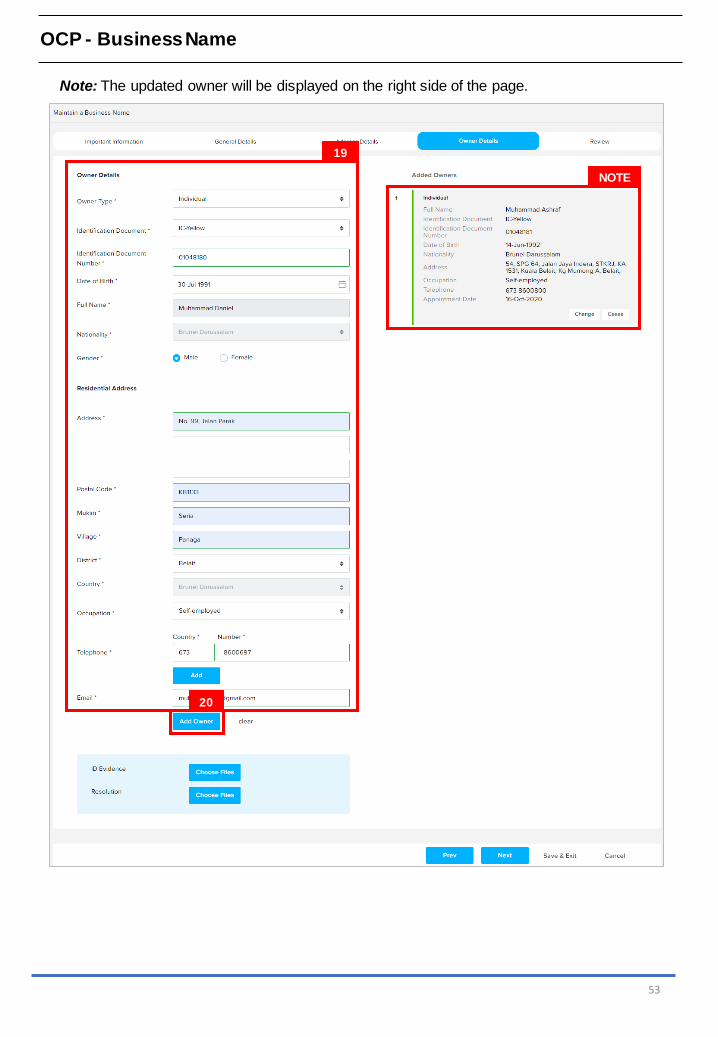
17. Update details for Owner Details section as per the example below.
Section Field Example
Owner Details
Owner Type Individual
Identification Document IC Yellow
Identification Document
Number
01048181
Date of Birth 14-Jun-1992
Full Name
Muhammad Ashraf
For Brunei IC, system will auto
populate the name by extracting data from Immigration database
using the Identification Document
Number and Date of Birth information
Gender Male
Residential Address
Address54, SPG 64, Jalan Indera Jaya,
STKRJ
Postal Code
KA1531
Filling in the postal code will auto
populate the Mukim and Village field.
Mukim Kuala Belait
Village Kg Mumong A
District Belait
Occupation Self-Employed
TelephoneCountry Code +673
Number 8600800
Email [email protected]
18. Click on the button to add owner.
To add additional telephone number.
53
OCP - Business Name
Note: The updated owner will be displayed on the right side of the page.
19
NOTE
20

54
OCP - Business Name
Section Field Example
Owner Details
Owner Type Individual
Identification Document IC Yellow
Identification Document
Number
01048180
Date of Birth 30-Jul-1991
Full Name
Muhammad Daniel
For Brunei IC, system will auto
populate the name by extracting data from Immigration database
using the Identification Document
Number and Date of Birth information
Gender Male
Residential Address
Address No. 99, Jalan Parak
Postal Code
KB1133
Filling in the postal code will auto
populate the Mukim and Village field.
Mukim Seria
Village Panaga
District Belait
Occupation Self-Employed
TelephoneCountry Code +673
Number 8600697
Email [email protected]
20. Click on the button to add new owner.
To add additional telephone number.
User can add new Owner for the business name.
19. Enter the details for Address Details section as per the example below

55
OCP - Business Name
Note: The updated owner will be displayed on the right side of the page, Owner 2.
22
NOTE
21
23

56
OCP - Business Name
For Business Name Type : Sole Proprietor, there cannot be more than one owner.
21. Click on the button to cease the previous owner.
22. Enter the details for Retirement Date as per the example below.
23. Click on the button.
Field Example
Cease Date
16-Oct-2020
Retirement Date must be equal or greater than
appointment date.
Retirement Date must be equal or less than current date.
Note:
• The ceased owner will still be displayed on the right side of the page.
• Click on the button if user wish to un-cease the address.
• If the previous owner is not ceased, the Business Name Type will change to
Partnership after the application is approved by ROCBN officers.
NOTE

57
OCP - Business Name
25
To download the uploaded file.
To delete the uploaded file.
To upload additional file.
For adding new Owner Type: Individual, it is mandatory to upload ID Evidence.
24. Click on the button to select ID document.
25. Click on the button to upload the file.
The file will be uploaded.
24
Note :
• ID Evidence / Resolution is only required to be uploaded if a new Owner is added.
58
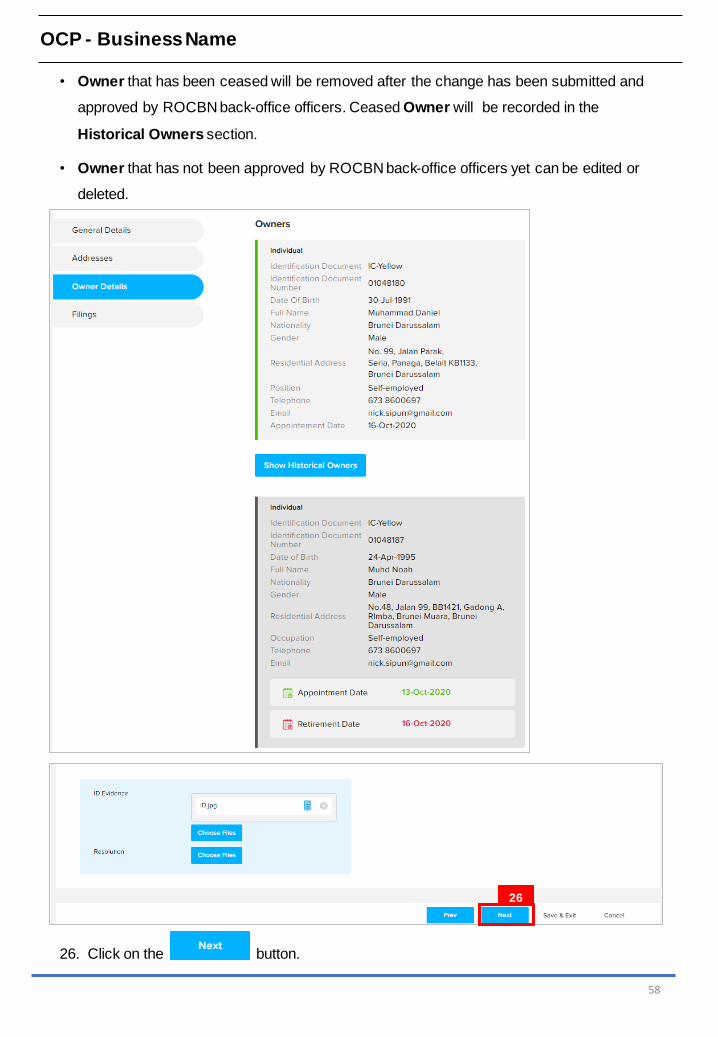
OCP - Business Name
• Owner that has been ceased will be removed after the change has been submitted and
approved by ROCBN back-office officers. Ceased Owner will be recorded in the
Historical Owners section.
• Owner that has not been approved by ROCBN back-office officers yet can be edited or
deleted.
26. Click on the button.
26

59
OCP - Business Name
The Review section will appear.
27
30
28
27. Click on the individual sections to view the separate sections or click on the
button to view all the sections.
Click on the button edit the specific sections.
28. Click on the
checkbox after all the sections have been reviewed.
29. Click on the
checkbox after user have read through the Declaration and Consent.
30. Click on the button.
29
60
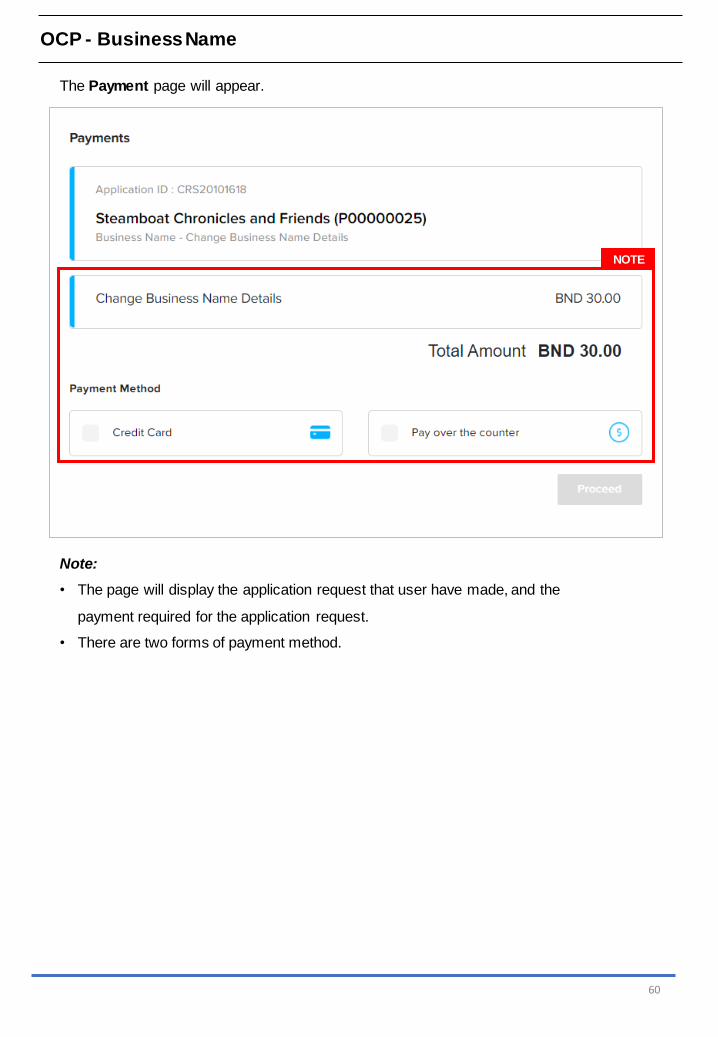
OCP - Business Name
The Payment page will appear.
NOTE
Note:
• The page will display the application request that user have made, and the
payment required for the application request.
• There are two forms of payment method.

61
OCP - Business Name
Payment Method –Credit Card
Note:
• For payment via credit card, refer to the User Guide on Payments which can be
found under OCP’s Homepage, Resources and Guides.

62
OCP - Business Name
Payment Method –Pay Over The Counter
NOTE
Note:
• For payment over the counter, take note of the Application ID and total payment
and visit the ROCBN counter to make the payment.
31. Click on the button.
31
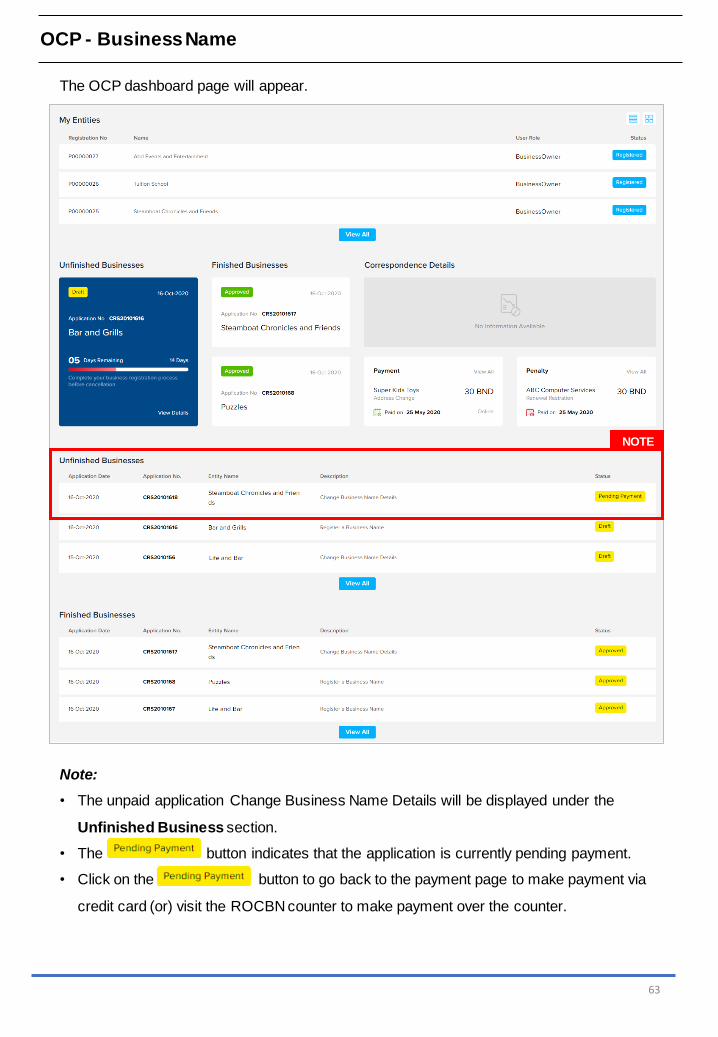
63
OCP - Business Name
The OCP dashboard page will appear.
NOTE
Note:
• The unpaid application Change Business Name Details will be displayed under the
Unfinished Business section.
• The button indicates that the application is currently pending payment.
• Click on the button to go back to the payment page to make payment via
credit card (or) visit the ROCBN counter to make payment over the counter.

64
OCP - Business Name
After payment has been made:
NOTE
Note:
• After payment has been made, the icon will become .
• This indicates that the application has been paid and has been submitted for
review/approval to ROCBN.

65
OCP - Business Name
After payment has been made, applicant will receive an email Submitted – Change
Business Name Details.

66
OCP - Business Name
Also attached in the email will be the Receipt of payment.
32
32. Click on the attachments to view the document.

67
OCP - Business Name
After approval has been made, applicant will receive an email Change of Details

68
OCP - Business Name
Also attached in the email will be the Receipt of payment.
33
33. Click on the attachments to view the document.

69
OCP - Business Name
The Certificate of Registration.

70
OCP - Business Name
After approval has been made:
Note:
• After approval has been made, the business name will be displayed under the My
Entities section with the status .
• After approval has been made, the business name will be displayed under the
Finished Business section with the status .
NOTE
NOTE

71
CEASE BUSINESS NAMEApplicant
Online User
OCP - Business Name
Registered business name will be displayed under the My Entities section.
1. Click on a registered Business Name (Registration name starts with P).
1
Navigate to the OCP dashboard.

72
OCP - Business Name
The General Details page will be displayed.
2
2. Click on the tab and click on .

73
OCP - Business Name
The Change Business Name Details page will appear.
3
3. Enter the details for Cease a Business Name section as per the example below.
4. Click on the to upload the Letter of Cessation.
5. Click on the button.
4
Field Example
Reason for Cessation Ceased to carry on business
Declaration Date
17-Oct-2020
Default to today’s date.
Date must be greater than registration date.
Date cannot be future date.
5

74
OCP - Business Name
You will be redirected to the OCP dashboard page.
NOTE
Note:
• The submitted application Cease a Business Name will be displayed under the
Unfinished Business section.
• The button indicates that the application is currently pending review.
• This indicates that the application has been paid and has been submitted for
review/approval to ROCBN.

75
OCP - Business Name
After approval has been made, applicant will receive an email Approved – Cease Business
Name.

76
OCP - Business Name
After approval has been made:
NOTE
NOTE
Note:
• After approval has been made, the business name will be displayed under the My
Entities section with the status .
• After approval has been made, the business name will be displayed under the Finished
Business section with the status .
• The business name will be available to be used and registered as a new business name.

77
RENEW BUSINESS NAMEApplicant
Online User
OCP - Business Name
Registered business name will be displayed under the My Entities section.
1. Click on a registered Business Name (Registration name starts with P).
1
Navigate to the OCP dashboard.

78
OCP - Business Name
The General Details page will be displayed.
2
2. Click on the tab and click on .

79
OCP - Business Name
The Renew a Business Name page will appear.
3
4
5
6
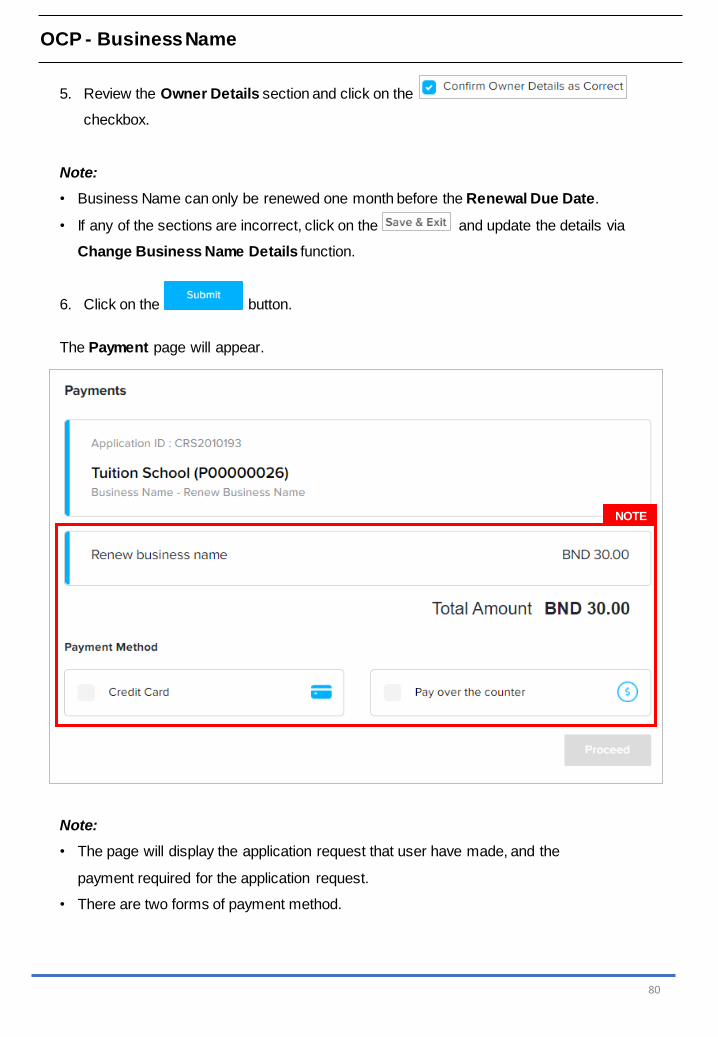
3. Review the General Details section and click on the
checkbox.
4. Review the Addresses section and click on the
checkbox.
80
OCP - Business Name
5. Review the Owner Details section and click on the
checkbox.
Note:
• Business Name can only be renewed one month before the Renewal Due Date.
• If any of the sections are incorrect, click on the and update the details via
Change Business Name Details function.
6. Click on the button.
The Payment page will appear.
NOTE
Note:
• The page will display the application request that user have made, and the
payment required for the application request.
• There are two forms of payment method.

81
OCP - Business Name
Payment Method –Credit Card
Note:
• For payment via credit card, refer to the User Guide on Payments which can be
found under OCP’s Homepage, Resources and Guides.

82
OCP - Business Name
Payment Method –Pay Over The Counter
NOTE
Note:
• For payment over the counter, take note of the Application ID and total payment
and visit the ROCBN counter to make the payment.
7. Click on the button.
7

83
OCP - Business Name
The OCP dashboard page will appear.
NOTE
Note:
• The unpaid application Renew Business Name will be displayed under the Unfinished
Business section.
• The button indicates that the application is currently pending payment.
• Click on the button to go back to the payment page to make payment via
credit card (or) visit the ROCBN counter to make payment over the counter.

84
OCP - Business Name
After payment has been made:
NOTE
Note:
• After payment has been made, the business name will be displayed under the
Finished Business section with the status .
• Renewing Business Name requires no approval from ROCBN.

85
OCP - Business Name
After payment has been made, applicant will receive an email Submitted – Renewed
Business Name.

86
OCP - Business Name
Also attached in the email will be the Receipt of payment.
8. Click on the attachments to view the document.
8

87
LODGE GENERAL FORMApplicant
Online User
OCP - Business Name
Registered business name will be displayed under the My Entities section.
1. Click on a registered Business Name (Registration name starts with P).
1
Navigate to the OCP dashboard.

88
OCP - Business Name
The General Details page will be displayed.
2
2. Click on the tab and click on .

89
OCP - Business Name
The Lodgement of Documents page will appear.
3
4
3. Enter the details for Lodgement of Documents section as per the example below.
Field Example
Document Name Business Name Registry
Effective Date Today’s date will be auto-populated as default.
Date must be equal to or after the incorporation
date.
4. It is compulsory to upload the General Form of Application to the Register.
Click on the button to upload the document.

5. Click on the button to upload the file.
The file will be uploaded.
90
OCP - Business Name
To download the uploaded file.
To delete the uploaded file.
To delete all uploaded additional file.
To upload additional file.
5
6. Click on the section.
6

91
OCP - Business Name
The Payment page will appear.
NOTE
Note:
• The page will display the application request that user have made, and the
payment required for the application request.
• There are two forms of payment method.

92
OCP - Business Name
Payment Method –Credit Card
Note:
• For payment via credit card, refer to User Guide – Payment.

93
OCP - Business Name
Payment Method –Pay Over The Counter
NOTE
Note:
• For payment over the counter, take note of the Application ID and total payment
and visit the ROCBN counter to make the payment.
7. Click on the button.
7

94
OCP - Business Name
The OCP dashboard page will appear.
NOTE
Note:
• The unpaid application Renew Business Name will be displayed under the Unfinished
Business section.
• The button indicates that the application is currently pending payment.
• Click on the button to go back to the payment page to make payment via
credit card (or) visit the ROCBN counter to make payment over the counter.
After payment has been made, NOTE
Note:
• After payment has been made, the business name will be displayed under the
Finished Business section with the status .
• Lodge General Form requires no approval from ROCBN.

95
OCP - Business Name
After payment has been made, applicant will receive an email Submitted – Lodge General
Form of Application.

96
OCP - Business Name
Also attached in the email will be the Receipt of payment.
8. Click on the attachments to view the document.
8

97
SEARCH BUSINESS NAME
(INTERNAL USER)
Applicant
Online User
OCP - Business Name
1. Click on the icon and click .
1
Internal User / Authorised External User / Unauthorised External User / User without OCP
Account can search for entities (Business Names, Companies or Limited Liability Partnership) registered in OCP.
Navigate to the OCP dashboard.
User Definition
Authorised External User Public user searching for entities that is related to
the user
Unauthorised External User Public user searching for entities that is not
related to the user
User without OCP Account Public user that has no OCP account, using the
search function on the OCP front page

98
OCP - Business Name
The Register Search page will be displayed.
2
3
2. Enter the details for Register Search section as per the example below to search
for existing Business Name.
3. Click on the button.
Field Example
Item Name or Number Leave this field blank to display the full list of
Business Name
Register Type Business Name
To clear the fields.

99
OCP - Business Name
4
The Search Results will be displayed below the Register Search section.
NOTE
Note:
• For the search results, the following information are displayed:
o Entity Name
o Entity Numbero Registration Date
o Entity Typeo Entity Status
o Principal Place of Business
• Internal User / Authorised External User will be able to click on the Business Name
to view the entity details.
4. Click on the business name link.

100
OCP - Business Name
The General Details page will be displayed.
Note: Internal User will be able to view the following details of the business name:
• General Details
• Addresses
• Owner Details
• Filings

101
SEARCH BUSINESS NAME
(EXTERNAL USER)
Applicant
Online User
OCP - Business Name
1. Click on the icon.
1
Internal User / Authorised External User / Unauthorised External User / User without OCP
Account can search for entities (Business Names, Companies or Limited Liability Partnership) registered in OCP.
Navigate to the OCP dashboard.
User Definition
Authorised External User Public user searching for entities that is related to
the user/business/company
Unauthorised External User Public user searching for entities that is not
related to the user/business/company
User without OCP Account Public user that has no OCP account, using the
search function on the OCP front page

102
OCP - Business Name
The Register Search page will be displayed.
2
3
2. Enter the details for Register Search section as per the example below to search
for existing Business Name.
3. Click on the button.
Field Example
Item Name or Number Leave this field blank to display the full list of
Business Name
Register Type Business Name
To clear the fields.

103
OCP - Business Name
4
The Search Results will be displayed below the Register Search section.
NOTE
Note:
• For the search results, the following information are displayed:
o Entity Name
o Entity Numbero Registration Date
o Entity Typeo Entity Status
o Principal Place of Business
• Only Authorized External User will be able to click on the Business Name to view
the entity details. See page 89-90.
• Both Authorized External User and Unauthorized External User can request for
information of any business name.
4. Click on the button.

104
OCP - Business Name
The Business Name Extracts section will appear.
Note: External User can purchase the following information of a business name:
• Request of Information - Business Names Profile
• Historical – Business Name Profile
5. Click on the button.
The selected cost of information will be added to the shopping cart.
6. Click on the icon.
5
6

105
OCP - Business Name
The Shopping Cart section will appear.
9
NOTE
Note:
• This list will display the list of item(s) that the user will be paying for.
7. Enter the email address of the requestor as per below.
8. Click on the checkbox to acknowledge the purchase that is going to be made.
9. Click on the button.
The Payment page will appear.
For payment via credit card, refer to User Guide – Payment.
For payment over the counter, take note of the Application ID and total payment and
visit the ROCBN counter to make the payment.
To delete an item from the item list.
To clear the shopping cart.
To cancel the purchase.
8
7
Field Example
Email address [email protected]
Related Documents