CENTRAL LOCKING SYSTEM CL2000 2 door standard CL4000 4 door standard CK2000 2 door with remote CK4000 4 door with remote CA2000 2 door with alarm CA4000 4 door with alarm USER GUIDE AND INSTALLATION MANUAL INSTALLATION Button 1 Button 2 Button 3 Button 4 Remote Transmitter ACTUATOR MOUNTING 1. Remove all the handles, fittings, and arm rests from the door. 2. Remove the door's interior panel by inserting a screw driver between the door, and door panel. Once inserted pry off the door panel by pushing or pulling on the screwdriver (Figure1). 3. Carefully remove the clear PVC protective sheet from the door. 4. Locate your factory lock and unlock rod. This rod will be connected to your unlock and lock button. When you pull or push this rod it will lock or unlock your door. This rod maybe horizontal or vertical. 5. Locate a safe position to mount the door lock actuator parallel to the factory door lock rod using the screws given (Figure 2). You can mount the actuator directly to the door, or use the bracket to cross a part of the door were there is no metal (Figure 2). In some cases, it is necessary to bend the actuator rod in order to reach the factory rod. In these cases, bend the rod so that the beginning and the end of the rod are horizontal (Figure 4). Make sure there is plenty of room for the motor to travel up and down. Check to make sure the motor will not interfere with the window mechanisms. 6. Lock the door, then push the door actuator all the way down. 7. Place the actuator rod through the eye of the door lock plunger. 8. Attach the rod adapter to the actuators rod and tighten the screw (Figure 3). 9. Connect the rod adapter to the factory door lock rod and secure by tightening the screw (Figure 3). 10. Run the wires out of the door using the factory rubber tube to hide the wires in the door jam. Make sure the wires do not get in the way of the window mechanism. 11. Repeat steps 1-10 for each door. WIRING 1. Run all the wires to the location of the door lock module. Be sure to mount the module in a dry place (under the dash). 2. Connect the 5 wires from the actuator to the wire harness in accordance with the same color. 3. Connect the separate black wire with the "U" shaped terminal to a chassis ground (body metal). 4. Connect the separate red wire to a constant 12 volts positive power source (battery). CONTROL MODULE INSTALLATION 1. Connect the keyless entry units negative "-" LOCK output wire (BLUE/WHITE) to the BROWN wire. 2. Connect the keyless entry units negative "-" UNLOCK output wire (GREEN/WHITE) to the WHITE wire. 3. Connect the keyless entry units BLACK wire to a chassis ground (body metal). 4. Install the fuse and connect the keyless entry units RED wire to a constant 12 volts positive power source (battery). 5. (Optional) Use AutoLoc's power trunk kit for remote opening of your trunk (part # PT1000). TESTING 1. From the outside of the car, lock the drivers door. If the drivers and passengers doors both lock then the system lock is working. 2. Now unlock the drivers door and if the passengers door is unlocked the system unlock is working. 3. If you encounter a problem adjust the rod adopter to allow for more or less travel on the factory rod. CA2000/CA4000 Please refer to alarm instructions for alarm specific wiring directions.

Welcome message from author
This document is posted to help you gain knowledge. Please leave a comment to let me know what you think about it! Share it to your friends and learn new things together.
Transcript

CENTRAL LOCKING SYSTEMCL2000 2 door standardCL4000 4 door standardCK2000 2 door with remoteCK4000 4 door with remoteCA2000 2 door with alarmCA4000 4 door with alarm
USER GUIDE AND INSTALLATION MANUAL
INSTALLATION
Button 1 Button 2
Button 3 Button 4
Remote Transmitter
ACTUATOR MOUNTING1. Remove all the handles, fittings, and arm rests from the door.
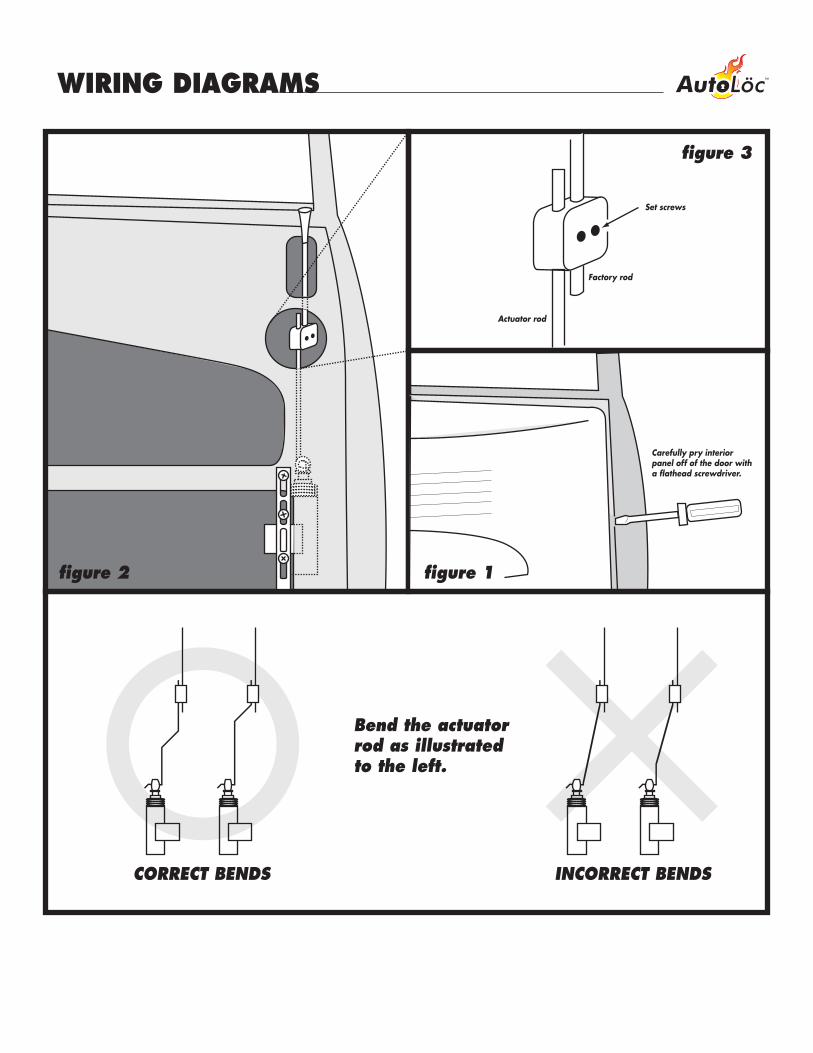
2. Remove the door's interior panel by inserting a screw driver between the door, and door panel. Once inserted pry off the door panel by pushing or pulling on the screwdriver (Figure1).
3. Carefully remove the clear PVC protective sheet from the door.
4. Locate your factory lock and unlock rod. This rod will be connected to your unlock and lock button. When you pull or push this rod it will lock or unlock your door. This rod maybe horizontal or vertical.
5. Locate a safe position to mount the door lock actuator parallel to the factory door lock rod using the screws given (Figure 2). You can mount the actuator directly to the door, or use the bracket to cross a part of the door were there is no metal (Figure 2). In some cases, it is necessary to bend the actuator rod in order to reach the factory rod. In these cases, bend the rod so that the beginning and the end of the rod are horizontal (Figure 4). Make sure there is plenty of room for the motor to travel up and down. Check to make sure the motor will not interfere with the window mechanisms.
6. Lock the door, then push the door actuator all the way down.
7. Place the actuator rod through the eye of the door lock plunger.
8. Attach the rod adapter to the actuators rod and tighten the screw (Figure 3).
9. Connect the rod adapter to the factory door lock rod and secure by tightening the screw (Figure 3).
10. Run the wires out of the door using the factory rubber tube to hide the wires in the door jam. Make sure the wires do not get in the way of the window mechanism.
11. Repeat steps 1-10 for each door.
WIRING1. Run all the wires to the location of the door lock module. Be sure to mount the module in a dry place (under the dash).
2. Connect the 5 wires from the actuator to the wire harness in accordance with the same color.3. Connect the separate black wire with the "U" shaped terminal to a chassis ground (body metal).
4. Connect the separate red wire to a constant 12 volts positive power source (battery).
CONTROL MODULE INSTALLATION1. Connect the keyless entry units negative "-" LOCK output wire (BLUE/WHITE) to the BROWN wire.
2. Connect the keyless entry units negative "-" UNLOCK output wire (GREEN/WHITE) to the WHITE wire.
3. Connect the keyless entry units BLACK wire to a chassis ground (body metal).
4. Install the fuse and connect the keyless entry units RED wire to a constant 12 volts positive power source (battery).
5. (Optional) Use AutoLoc's power trunk kit for remote opening of your trunk (part # PT1000).
TESTING1. From the outside of the car, lock the drivers door. If the drivers and passengers doors both lock then the system lock is working.
2. Now unlock the drivers door and if the passengers door is unlocked the system unlock is working.
3. If you encounter a problem adjust the rod adopter to allow for more or less travel on the factory rod.
CA2000/CA4000Please refer to alarm instructionsfor alarm specific wiring directions.

BROWN/BLACK
door lock control box
remotecontrolreceiver
BLUE/WHITE
GREEN/WHITE
BLACK
RED
WHITE
15 AMPFUSE
BROWNGREEN
GREEN
BLUE
BLUE
BLA
CK
RED
ACT
UAT
OR
ACT
UAT
OR
ACT
UAT
OR
ACT
UAT
OR
OPTIONALRefer to alarm or keyless installation instructions.
TRUNK/SHAVED DOOR HANDLE TRIGGER
USER GUIDE AND INSTALLATION MANUAL
NOTE: If parking lights are negative trigger, then connect 30 to chassis ground.
OPTIONAL FOR CL, CK, CA400 KITS
•BROWN
• WHITE
WIRING DIAGRAMS
figure 2
Bend the actuator rod as illustratedto the left.
CORRECT BENDS
Carefully pry interior panel off of the door with a flathead screwdriver.
Actuator rod
Factory rod
Set screws
figure 1
figure 3
INCORRECT BENDS
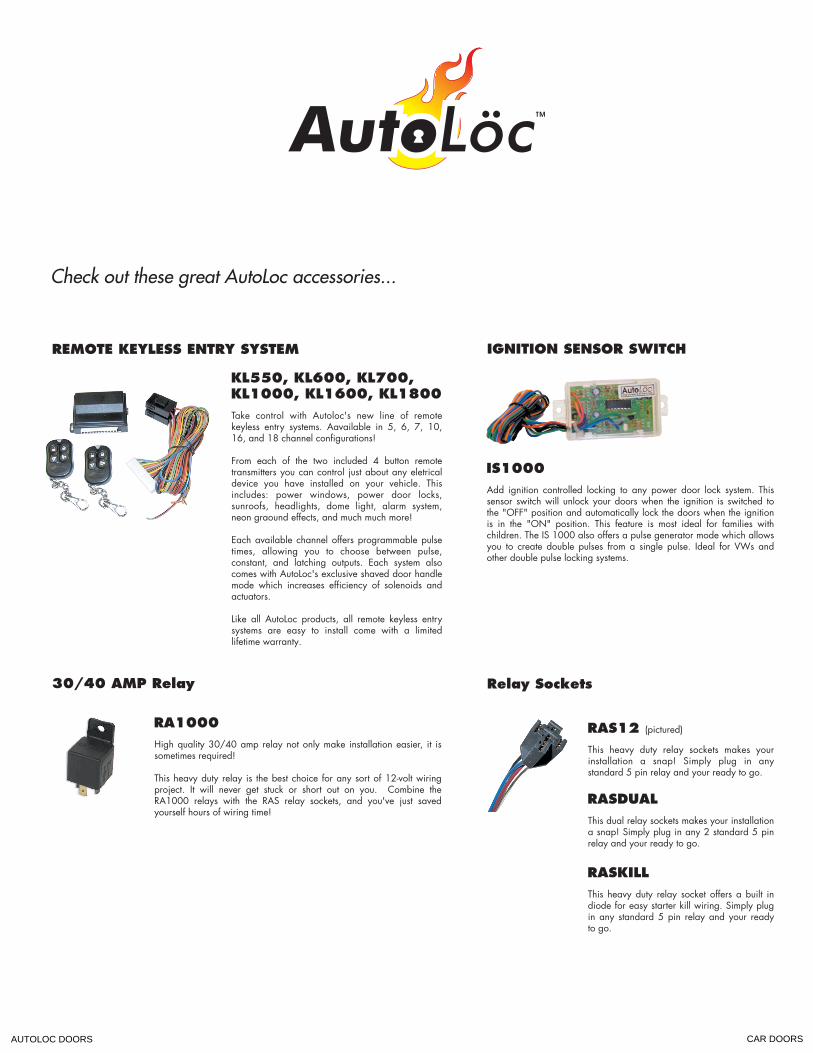
Check out these great AutoLoc accessories...
REMOTE KEYLESS ENTRY SYSTEM IGNITION SENSOR SWITCH
Relay Sockets
KL550, KL600, KL700, KL1000, KL1600, KL1800Take control with Autoloc's new line of remote keyless entry systems. Aavailable in 5, 6, 7, 10, 16, and 18 channel configurations!
From each of the two included 4 button remote transmitters you can control just about any eletrical device you have installed on your vehicle. This includes: power windows, power door locks, sunroofs, headlights, dome light, alarm system, neon graound effects, and much much more!
Each available channel offers programmable pulse times, allowing you to choose between pulse, constant, and latching outputs. Each system also comes with AutoLoc's exclusive shaved door handle mode which increases efficiency of solenoids and actuators.
Like all AutoLoc products, all remote keyless entry systems are easy to install come with a limited lifetime warranty.
IS1000Add ignition controlled locking to any power door lock system. This sensor switch will unlock your doors when the ignition is switched to the "OFF" position and automatically lock the doors when the ignition is in the "ON" position. This feature is most ideal for families with children. The IS 1000 also offers a pulse generator mode which allows you to create double pulses from a single pulse. Ideal for VWs and other double pulse locking systems.
RAS12 (pictured)
This heavy duty relay sockets makes your installation a snap! Simply plug in any standard 5 pin relay and your ready to go.
RASDUALThis dual relay sockets makes your installation a snap! Simply plug in any 2 standard 5 pin relay and your ready to go.
RASKILLThis heavy duty relay socket offers a built in diode for easy starter kill wiring. Simply plug in any standard 5 pin relay and your ready to go.
30/40 AMP Relay
RA1000High quality 30/40 amp relay not only make installation easier, it is sometimes required!
This heavy duty relay is the best choice for any sort of 12-volt wiring project. It will never get stuck or short out on you. Combine the RA1000 relays with the RAS relay sockets, and you've just saved yourself hours of wiring time!
AUTOLOC DOORS CAR DOORS
Related Documents