CERN-THESIS-2016-303 27/06/2016 FACULTY OF ENGINEERING TECHNOLOGY TECHNOLOGY CAMPUS GEEL Upgrading the Interface and Developer Tools of the Trigger Supervisor Software Framework of the CMS experiment at CERN Glenn DIRKX Supervisor: Peter Karsmakers Master Thesis submitted to obtain the degree of Master of Science in Engineering Technology: Co-supervisor: Christos Lazaridis Master of Science in Electronics Engineering Internet Computing Academic Year 2015 - 2016

Welcome message from author
This document is posted to help you gain knowledge. Please leave a comment to let me know what you think about it! Share it to your friends and learn new things together.
Transcript

CER
N-T
HES
IS-2
016-
303
27/0
6/20
16
FACULTY OF ENGINEERING TECHNOLOGY
TECHNOLOGY CAMPUS GEEL
Upgrading the Interface and DeveloperTools of the Trigger Supervisor SoftwareFramework of the CMS experimentat CERN
Glenn DIRKX
Supervisor: Peter Karsmakers Master Thesis submitted to obtain the degree ofMaster of Science in Engineering Technology:
Co-supervisor: Christos Lazaridis Master of Science in Electronics EngineeringInternet Computing
Academic Year 2015 - 2016

This page is intentionally left almost blank

c© Copyright KU Leuven
Without written permission of the supervisor(s) and the author(s) it is forbidden to reproduce oradapt in any form or by any means any part of this publication. Requests for obtaining the rightto reproduce or utilise parts of this publication should be addressed to KU Leuven, TechnologyCampus Geel, Kleinhoefstraat 4, B-2440 Geel, +32 14 56 23 10 or via e-mail [email protected].
A written permission of the supervisor(s) is also required to use the methods, products, schematicsand programs described in this work for industrial or commercial use, and for submitting thispublication in scientific contests.

This page is intentionally left almost blank
Acknowledgements
I would like to thank the following people for their assistance during this project:
Christos Lazaridis for being a great mentor and for not getting mad when I break the nightliesor even SVN itself.
Alessandro Thea for his advice on how to proceed with implementing new functionalities andhis supply of motivation and inspiration.
Evangelos Paradas for his guidance trough the architecture of the TS and pointing me to usefulresources.
Simone Bologna for his enthusiasm and patience when finding bugs, and his steady supplyof ideas.
Furthermore I would like to express my thanks to the entire Online Software team for the freedomand trust I’ve been given that allowed this project to get as far as it has.
V

This page is intentionally left almost blank

Abstract
The Compact Muon Solenoid (CMS) Trigger Supervisor (TS) is a software framework that has beendesigned to handle the CMS Level-1 trigger setup, configuration and monitoring during data takingas well as all communications with the main run control of CMS.
The interface consists of a web-based GUI rendered by a back-end C++ framework (AjaXell) anda front-end JavaScript framework (Dojo). These provide developers with the tools they need to towrite their own custom control panels.
However, currently there is much frustration with this framework given the age of the Dojo libraryand the various hacks needed to implement modern use cases.
The task at hand is to renew this library and its developer tools, updating it to use the neweststandards and technologies, while maintaining full compatibility with legacy code.
This document describes the requirements, development process, and changes to this frameworkthat were included in the upgrade from v2.x to v3.x.
Keywords: CERN, CMS, L1 Trigger, C++, Polymer, Web Components.
VII

This page is intentionally left almost blank
Contents
1 The Compact Muon Solenoid experiment 1
1.1 The structure of CMS . . . . . . . . . . . . . . . . . . . . . . . . . . . . . . . . . . 1
1.1.1 Silicon Tracker . . . . . . . . . . . . . . . . . . . . . . . . . . . . . . . . . 1
1.1.2 Electromagnetic Calorimeter . . . . . . . . . . . . . . . . . . . . . . . . . . 2
1.1.3 Hadronic Calorimeter . . . . . . . . . . . . . . . . . . . . . . . . . . . . . . 2
1.1.4 Superconducting Solenoid . . . . . . . . . . . . . . . . . . . . . . . . . . . 3
1.1.5 Muon Chambers . . . . . . . . . . . . . . . . . . . . . . . . . . . . . . . . 3
2 The Level-1 Trigger Online Software 5
2.1 The Level-1 Trigger . . . . . . . . . . . . . . . . . . . . . . . . . . . . . . . . . . . 5
2.2 The CMS Experiment Control System . . . . . . . . . . . . . . . . . . . . . . . . . 7
2.3 The Trigger Supervisor . . . . . . . . . . . . . . . . . . . . . . . . . . . . . . . . . 7
2.4 SWATCH . . . . . . . . . . . . . . . . . . . . . . . . . . . . . . . . . . . . . . . . 7
3 Problems with TS 2.0 9
3.1 Browser compatibility . . . . . . . . . . . . . . . . . . . . . . . . . . . . . . . . . . 9
3.1.1 Evergreen browsers . . . . . . . . . . . . . . . . . . . . . . . . . . . . . . 9
3.1.2 Interface degradation . . . . . . . . . . . . . . . . . . . . . . . . . . . . . . 10
3.1.3 Dojo 0.4 . . . . . . . . . . . . . . . . . . . . . . . . . . . . . . . . . . . . . 11
3.2 Increasing development time . . . . . . . . . . . . . . . . . . . . . . . . . . . . . . 11
3.2.1 Maintainability . . . . . . . . . . . . . . . . . . . . . . . . . . . . . . . . . . 12
3.2.2 Large input problem . . . . . . . . . . . . . . . . . . . . . . . . . . . . . . 12
4 TS 3.0 upgrade requirements 15
4.1 Legacy code compatibility . . . . . . . . . . . . . . . . . . . . . . . . . . . . . . . 15
4.2 Ability to migrate code . . . . . . . . . . . . . . . . . . . . . . . . . . . . . . . . . 15
4.3 Future proof . . . . . . . . . . . . . . . . . . . . . . . . . . . . . . . . . . . . . . 15
4.3.1 Polyfills . . . . . . . . . . . . . . . . . . . . . . . . . . . . . . . . . . . . . 16
4.4 Rich functionality . . . . . . . . . . . . . . . . . . . . . . . . . . . . . . . . . . . . 16
4.5 Faster development . . . . . . . . . . . . . . . . . . . . . . . . . . . . . . . . . . 16
4.6 Stability . . . . . . . . . . . . . . . . . . . . . . . . . . . . . . . . . . . . . . . . . 17
IX
X CONTENTS
4.7 Reduced code footprint . . . . . . . . . . . . . . . . . . . . . . . . . . . . . . . . . 17
4.8 Better maintainability . . . . . . . . . . . . . . . . . . . . . . . . . . . . . . . . . . 17
4.9 Better documentation . . . . . . . . . . . . . . . . . . . . . . . . . . . . . . . . . . 17
4.10 i18n . . . . . . . . . . . . . . . . . . . . . . . . . . . . . . . . . . . . . . . . . . . 17
4.11 Browser compatibility . . . . . . . . . . . . . . . . . . . . . . . . . . . . . . . . . . 18
5 TS upgrade options 19
5.1 Server-side interface engine . . . . . . . . . . . . . . . . . . . . . . . . . . . . . . 19
5.2 Client-side interface library . . . . . . . . . . . . . . . . . . . . . . . . . . . . . . . 19
5.2.1 Upgrading Dojo . . . . . . . . . . . . . . . . . . . . . . . . . . . . . . . . . 19
5.2.2 jQuery . . . . . . . . . . . . . . . . . . . . . . . . . . . . . . . . . . . . . . 20
5.2.3 AngularJS . . . . . . . . . . . . . . . . . . . . . . . . . . . . . . . . . . . . 21
5.2.4 Web Components . . . . . . . . . . . . . . . . . . . . . . . . . . . . . . . . 22
5.2.5 React.js . . . . . . . . . . . . . . . . . . . . . . . . . . . . . . . . . . . . . 24
5.3 Chosen upgrade path . . . . . . . . . . . . . . . . . . . . . . . . . . . . . . . . . 24
5.3.1 Front-end library . . . . . . . . . . . . . . . . . . . . . . . . . . . . . . . . 24
5.3.2 Back-end C++ codebase . . . . . . . . . . . . . . . . . . . . . . . . . . . . 24
6 TS upgrade roadmap 27
6.1 Interface upgrade . . . . . . . . . . . . . . . . . . . . . . . . . . . . . . . . . . . . 27
6.1.1 The legacy interface structure . . . . . . . . . . . . . . . . . . . . . . . . . 27
6.1.2 The new page structure . . . . . . . . . . . . . . . . . . . . . . . . . . . . . 29
6.1.3 Emulation of the legacy structure in the new page . . . . . . . . . . . . . . . 29
6.2 New session management . . . . . . . . . . . . . . . . . . . . . . . . . . . . . . . 29
6.2.1 Material Design . . . . . . . . . . . . . . . . . . . . . . . . . . . . . . . . . 29
6.3 Handling large input . . . . . . . . . . . . . . . . . . . . . . . . . . . . . . . . . . 30
6.4 Additions to the page builder classes . . . . . . . . . . . . . . . . . . . . . . . . . 30
6.5 Upgraded event system . . . . . . . . . . . . . . . . . . . . . . . . . . . . . . . . 31
6.6 New JSON library . . . . . . . . . . . . . . . . . . . . . . . . . . . . . . . . . . . 31
6.7 Memory-leak problem . . . . . . . . . . . . . . . . . . . . . . . . . . . . . . . . . 31
6.7.1 Memory-leak patterns . . . . . . . . . . . . . . . . . . . . . . . . . . . . . 31
6.7.2 Memory leaks in Dojo . . . . . . . . . . . . . . . . . . . . . . . . . . . . . . 33
6.7.3 Memory leaks in Polymer . . . . . . . . . . . . . . . . . . . . . . . . . . . . 34
7 Development process 37
7.1 Scrum . . . . . . . . . . . . . . . . . . . . . . . . . . . . . . . . . . . . . . . . . 37
7.1.1 Kanban . . . . . . . . . . . . . . . . . . . . . . . . . . . . . . . . . . . . . 38
7.1.2 Workflow . . . . . . . . . . . . . . . . . . . . . . . . . . . . . . . . . . . . 38
7.2 Version Control . . . . . . . . . . . . . . . . . . . . . . . . . . . . . . . . . . . . . 39
8 Polymer 41

CONTENTS XI
8.1 From C++ to Polymer . . . . . . . . . . . . . . . . . . . . . . . . . . . . . . . . . . 41
8.2 From Polymer to C++ . . . . . . . . . . . . . . . . . . . . . . . . . . . . . . . . . . 41
8.3 Polymer features . . . . . . . . . . . . . . . . . . . . . . . . . . . . . . . . . . . . 43
8.3.1 Properties . . . . . . . . . . . . . . . . . . . . . . . . . . . . . . . . . . . . 43
8.3.2 Data binding . . . . . . . . . . . . . . . . . . . . . . . . . . . . . . . . . . 44
8.3.3 Lifecycle callbacks . . . . . . . . . . . . . . . . . . . . . . . . . . . . . . . 44
8.3.4 Styling . . . . . . . . . . . . . . . . . . . . . . . . . . . . . . . . . . . . . . 44
8.3.5 Events . . . . . . . . . . . . . . . . . . . . . . . . . . . . . . . . . . . . . 45
8.3.6 Behaviors . . . . . . . . . . . . . . . . . . . . . . . . . . . . . . . . . . . . 45
9 The renewed panel SDK 47
9.1 Packages available to panel developers . . . . . . . . . . . . . . . . . . . . . . . . 47
9.1.1 Bower Components . . . . . . . . . . . . . . . . . . . . . . . . . . . . . . . 47
9.1.2 common-elements . . . . . . . . . . . . . . . . . . . . . . . . . . . . . . . 49
9.1.3 JsonCpp . . . . . . . . . . . . . . . . . . . . . . . . . . . . . . . . . . . . 52
9.2 New Cell structure . . . . . . . . . . . . . . . . . . . . . . . . . . . . . . . . . . . 53
9.3 Separation of Concerns . . . . . . . . . . . . . . . . . . . . . . . . . . . . . . . . 53
9.4 Grunt build system . . . . . . . . . . . . . . . . . . . . . . . . . . . . . . . . . . . 54
9.4.1 JavaScript processing . . . . . . . . . . . . . . . . . . . . . . . . . . . . . 54
9.4.2 CSS processing . . . . . . . . . . . . . . . . . . . . . . . . . . . . . . . . . 54
9.4.3 HTML processing . . . . . . . . . . . . . . . . . . . . . . . . . . . . . . . . 55
9.5 Templates . . . . . . . . . . . . . . . . . . . . . . . . . . . . . . . . . . . . . . . 55
9.6 Panel registration system . . . . . . . . . . . . . . . . . . . . . . . . . . . . . . . . 55
9.6.1 Eager loading and lazy loading . . . . . . . . . . . . . . . . . . . . . . . . . 55
10 Documentation 57
10.1 Inline documentation . . . . . . . . . . . . . . . . . . . . . . . . . . . . . . . . . . 57
10.1.1 JSDocs . . . . . . . . . . . . . . . . . . . . . . . . . . . . . . . . . . . . . 57
10.2 Global level . . . . . . . . . . . . . . . . . . . . . . . . . . . . . . . . . . . . . . . 58
10.2.1 Goals . . . . . . . . . . . . . . . . . . . . . . . . . . . . . . . . . . . . . . 58
10.2.2 Sphinx . . . . . . . . . . . . . . . . . . . . . . . . . . . . . . . . . . . . . 58
10.3 Package level . . . . . . . . . . . . . . . . . . . . . . . . . . . . . . . . . . . . . . 58
10.3.1 Goals . . . . . . . . . . . . . . . . . . . . . . . . . . . . . . . . . . . . . . 58
10.3.2 Grunt . . . . . . . . . . . . . . . . . . . . . . . . . . . . . . . . . . . . . . 58
10.4 Element level . . . . . . . . . . . . . . . . . . . . . . . . . . . . . . . . . . . . . . 60
10.4.1 Goals . . . . . . . . . . . . . . . . . . . . . . . . . . . . . . . . . . . . . . 60
10.4.2 iron-component-page . . . . . . . . . . . . . . . . . . . . . . . . . . . . . . 60
11 Browser testing 63
11.1 Selenium . . . . . . . . . . . . . . . . . . . . . . . . . . . . . . . . . . . . . . . . 63
XII CONTENTS
11.2 Web-component-tester . . . . . . . . . . . . . . . . . . . . . . . . . . . . . . . . . 63
12 Results 65
12.1 Loading times . . . . . . . . . . . . . . . . . . . . . . . . . . . . . . . . . . . . . 65
12.2 CPU consumption . . . . . . . . . . . . . . . . . . . . . . . . . . . . . . . . . . . 66
12.3 Memory consumption . . . . . . . . . . . . . . . . . . . . . . . . . . . . . . . . . 66
12.4 Functionality . . . . . . . . . . . . . . . . . . . . . . . . . . . . . . . . . . . . . . 66
12.5 SDK improvements . . . . . . . . . . . . . . . . . . . . . . . . . . . . . . . . . . . 67
12.6 Developed panels . . . . . . . . . . . . . . . . . . . . . . . . . . . . . . . . . . . 67
12.6.1 Commands . . . . . . . . . . . . . . . . . . . . . . . . . . . . . . . . . . . 67
12.6.2 Operations . . . . . . . . . . . . . . . . . . . . . . . . . . . . . . . . . . . 68
12.6.3 Flashlists . . . . . . . . . . . . . . . . . . . . . . . . . . . . . . . . . . . . 69
13 Future 71
13.1 Dojo-free TS release . . . . . . . . . . . . . . . . . . . . . . . . . . . . . . . . . . 71
13.2 HTML5 WebSocket . . . . . . . . . . . . . . . . . . . . . . . . . . . . . . . . . . . 71
13.3 PRPL . . . . . . . . . . . . . . . . . . . . . . . . . . . . . . . . . . . . . . . . . . 72
13.3.1 HTTP/2 Server Push . . . . . . . . . . . . . . . . . . . . . . . . . . . . . . 72
13.3.2 HTML5 Service Worker . . . . . . . . . . . . . . . . . . . . . . . . . . . . . 72
14 Conclusion 75
A Sphinx Documentation 79
B Paper 233

List of Figures
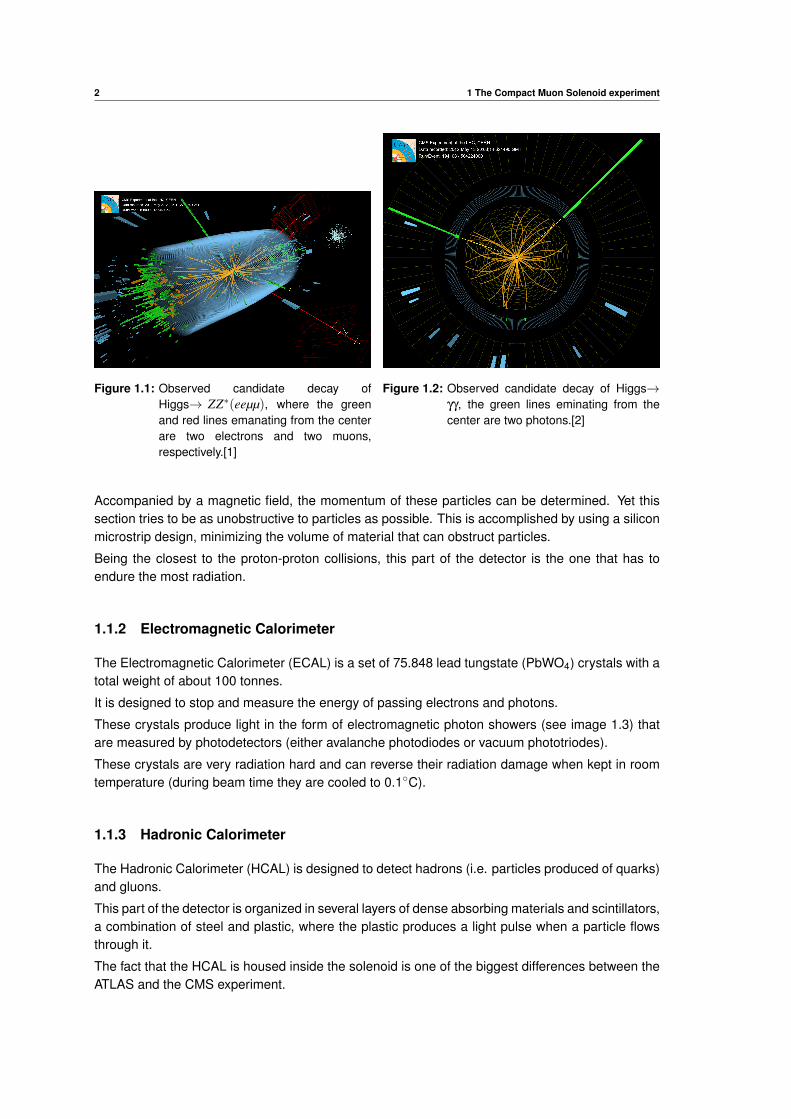
1.1 Observed candidate decay of Higgs→ ZZ∗(eeµµ), where the green and red linesemanating from the center are two electrons and two muons, respectively.[1] . . . . . 2
1.2 Observed candidate decay of Higgs→ γγ, the green lines eminating from the centerare two photons.[2] . . . . . . . . . . . . . . . . . . . . . . . . . . . . . . . . . . . 2
1.3 A transversal slice through the CMS detector, demonstrating the various sections ofthe detector and their designed functions.[3] . . . . . . . . . . . . . . . . . . . . . . 3
2.1 Conceptual drawing of the L1 trigger hardware loop . . . . . . . . . . . . . . . . . . 6
2.2 An example of the Trigger Supervisor Cell structure . . . . . . . . . . . . . . . . . . 8
3.1 Overview of major version releases of Mozilla Firefox and Google Chrome over time . 10
3.2 The modal dialog in Firefox 38 . . . . . . . . . . . . . . . . . . . . . . . . . . . . . 10
3.3 The modal dialog in Firefox 44 . . . . . . . . . . . . . . . . . . . . . . . . . . . . . 10
3.4 The ECMAScript compatibility table project . . . . . . . . . . . . . . . . . . . . . . 11
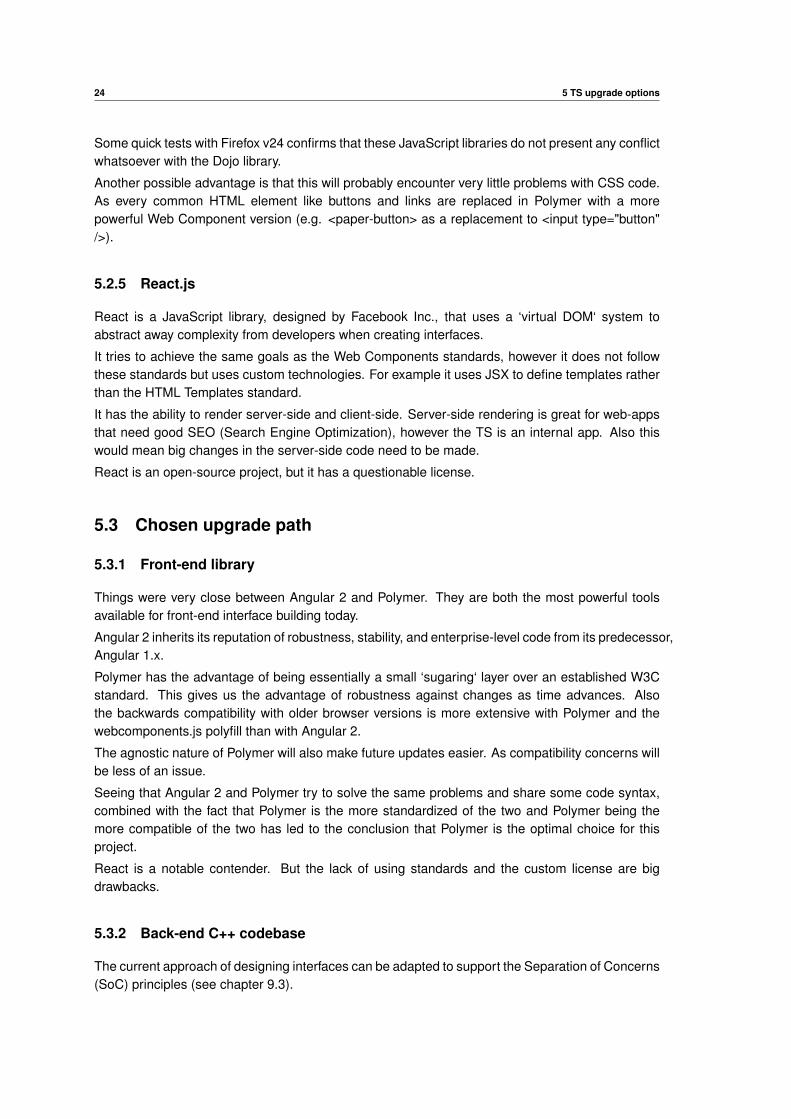
6.1 Screenshot of TS v2.x with main components highlighted. . . . . . . . . . . . . . . 28
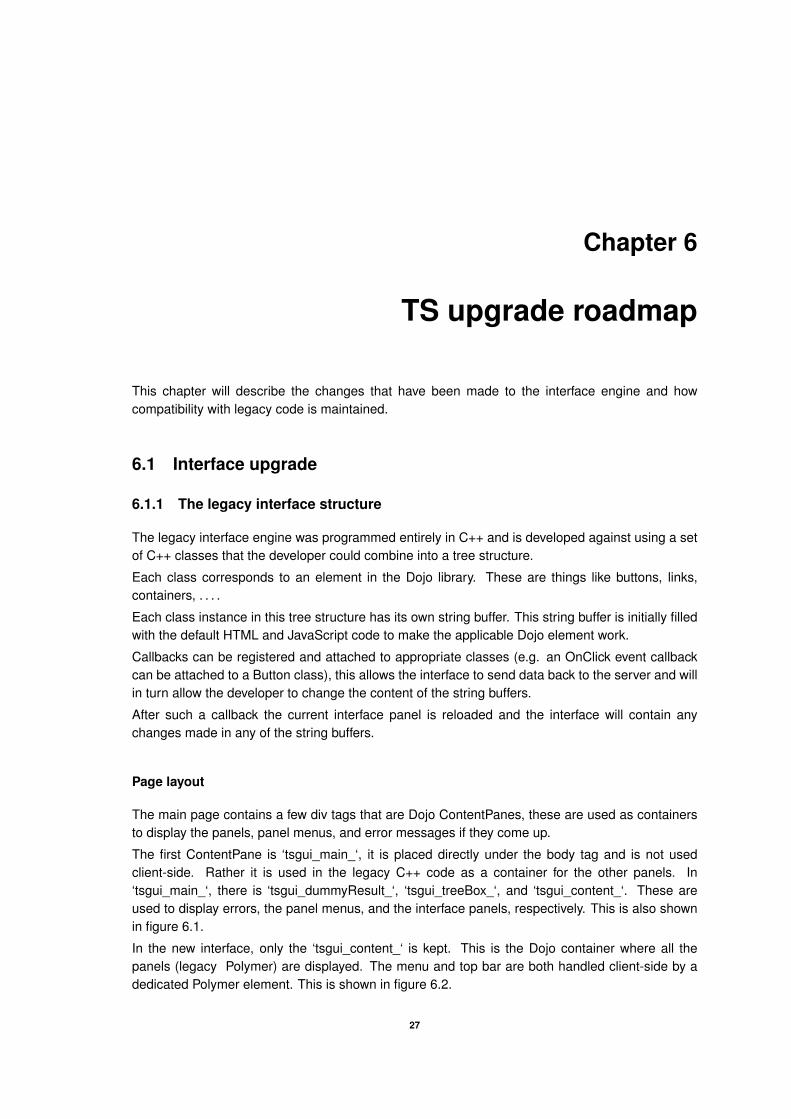
6.2 Screenshot of TS v3.x with main components highlighted. . . . . . . . . . . . . . . 28
6.3 A circular reference . . . . . . . . . . . . . . . . . . . . . . . . . . . . . . . . . . . 32
6.4 TS 2.x interface memory usage test . . . . . . . . . . . . . . . . . . . . . . . . . . 34
6.5 TS 3.x interface memory usage test with a legacy panel . . . . . . . . . . . . . . . 35
6.6 TS 3.x interface memory usage test with a Polymer panel . . . . . . . . . . . . . . . 35
7.1 Screenshot of the Trello Kanban board used during development . . . . . . . . . . . 39
9.1 Trigger Supervisor folder stucture . . . . . . . . . . . . . . . . . . . . . . . . . . . 53
10.1 Documentation page of the common-elements package . . . . . . . . . . . . . . . 59
10.2 Documentation page of the command-input element . . . . . . . . . . . . . . . . . 61
11.1 Console output when running tests with web-component-tester . . . . . . . . . . . . 64
12.1 TS 2.x commands panel . . . . . . . . . . . . . . . . . . . . . . . . . . . . . . . . 68
12.2 TS 3.x commands panel . . . . . . . . . . . . . . . . . . . . . . . . . . . . . . . . 68
12.3 TS 2.x operations panel . . . . . . . . . . . . . . . . . . . . . . . . . . . . . . . . 69
XIII

XIV LIST OF FIGURES
12.4 TS 3.x operations panel . . . . . . . . . . . . . . . . . . . . . . . . . . . . . . . . 69
12.5 TS 2.x flashlists panel . . . . . . . . . . . . . . . . . . . . . . . . . . . . . . . . . 70
12.6 TS 3.x flashlists panel . . . . . . . . . . . . . . . . . . . . . . . . . . . . . . . . . 70
13.1 A common request/response diagram when using a HTTP/1.1 server . . . . . . . . 72
13.2 A common request/response diagram when using a HTTP/2 server with Server Push 72
13.3 Logical location of the Service Worker in a web browser . . . . . . . . . . . . . . . 73
List of Tables
12.1 Page loading times for TS 2.x and 3.x . . . . . . . . . . . . . . . . . . . . . . . . . 65
12.2 Memory usage for TS 2.x and 3.x in Mozilla Firefox and Google Chrome . . . . . . . 67
XV

This page is intentionally left almost blank
List of Symbols
Acronyms
CERN European Organization for Nuclear ResearchLHC Large Hadron ColliderCMS Compact Muon SolenoidATLAS A Toroidal LHC ApparatuSALICE A Large Ion Collider ExperimentLHCB Large Hadron Collider beauty ExperimentQCD Quantum ChromoDynamicsECAL Electromagnetic CalorimeterHCAL Hadron CalorimeterL1 Level-1L1A Level-1 AcceptTPG Trigger Primitive GeneratorFPGA Field-Programmable Gate ArrayTS Trigger SupervisorFSM Finite State MachineESR Extended Support ReleaseXDAQ Cross Data AcquisitionXAAS XDAQ as a ServiceVM Virtual MachineW3C World Wide Web ConsortiumRERO Release Early, Release OftenES6 ECMAScript 6, also known as ECMAScript 2015AJAX Asynchronous JavaScript And XMLSLC Scientific Linux CERNSVN Apache SubversionSEO Search Engine Optimization
XVII

This page is intentionally left almost blank

Chapter 1
The Compact Muon Solenoidexperiment
The Compact Muon Solenoid (CMS) experiment is one of the main particle detectors at the LHCcurrently in use at CERN, along with ATLAS, ALICE, and LHCb.
It is a general purpose detector, i.e., it is designed to observe all particle interactions in a collision.CMS is also designed to be a hermetic detector, i.e., it attempts to let no known particles escapethe detector undetected. This is because the decay of particles can produce new, neutral, particlesthat do not interact with any part of the detector. With the hermetic design, imbalance in momentumand energy can be detected, and the production of these non-interacting particles can be inferred.
The current goals of the CMS detector are to provide precise measurements of the propertiesof the recently discovered Higgs boson, as well as to search for new physics (also referred toas physics beyond the Standard Model) and thereby answer currently open questions in particlephysics. What are the properties of QCD (Quantum ChromoDynamics) in extreme conditions?What are the differences between matter and antimatter particles?
It was credited with the discovery of the Higgs boson in 2012, together with the ATLAS (A ToroidalLHC ApparatuS) detector. One of the events displaying a candidate Higgs decay into two electronsand two muons is displayed in figure 1.1.
CMS is designed to be capable to observe particles resulting from proton-proton collisions with acenter-of-mass energy of
√s = 14TeV produced by the Large Hadron Collider (LHC). Currently the
LHC provides collisions with a center-of-mass energy of√
s = 13TeV.
More information about the LHC experiments can be found in the book ‘The CERN Large HadronCollider: Accelerator and Experiments‘[4].
1.1 The structure of CMS
1.1.1 Silicon Tracker
The tracker can reconstruct the path of passing muons, electrons, and charged hadrons. Becauseit is closest to the collisions, the decays of very short-lived particles (e.g. beauty quarks)[5] can bedetected.
It makes very precise measurements on the location of particles (with an accuracy up to 10µm).
1
2 1 The Compact Muon Solenoid experiment
Figure 1.1: Observed candidate decay ofHiggs→ ZZ∗(eeµµ), where the greenand red lines emanating from the centerare two electrons and two muons,respectively.[1]
Figure 1.2: Observed candidate decay of Higgs→γγ, the green lines eminating from thecenter are two photons.[2]
Accompanied by a magnetic field, the momentum of these particles can be determined. Yet thissection tries to be as unobstructive to particles as possible. This is accomplished by using a siliconmicrostrip design, minimizing the volume of material that can obstruct particles.
Being the closest to the proton-proton collisions, this part of the detector is the one that has toendure the most radiation.
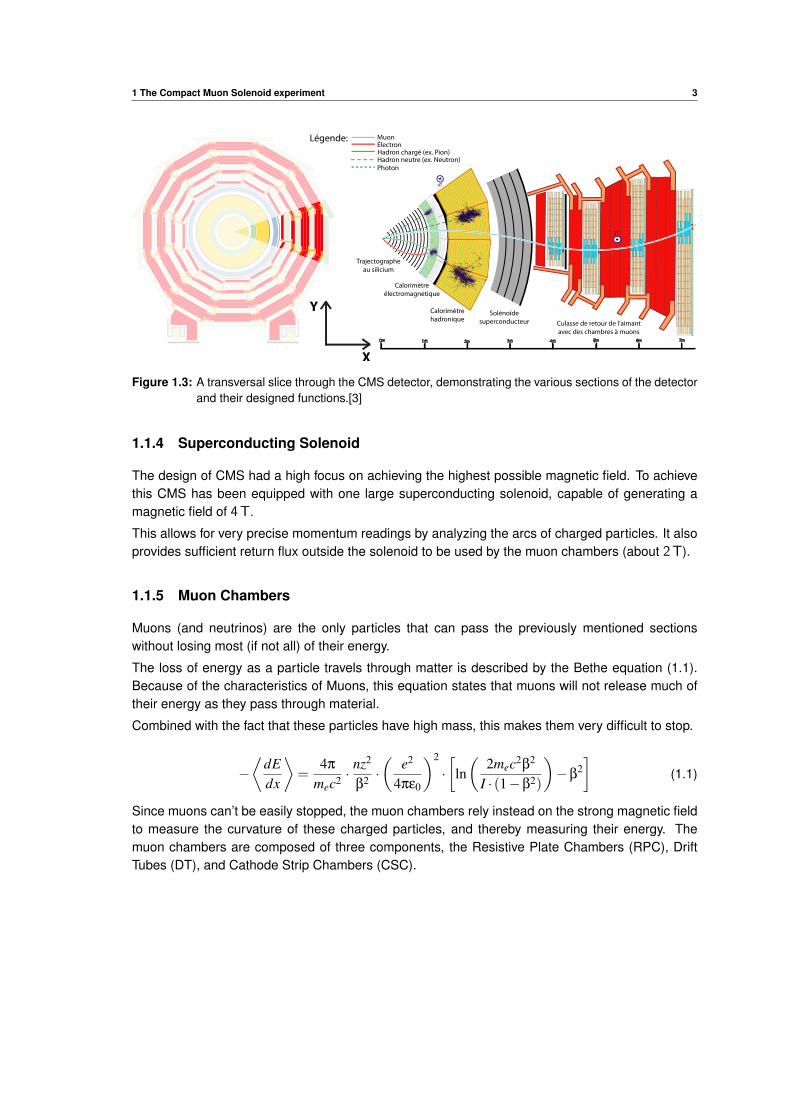
1.1.2 Electromagnetic Calorimeter
The Electromagnetic Calorimeter (ECAL) is a set of 75.848 lead tungstate (PbWO4) crystals with atotal weight of about 100 tonnes.
It is designed to stop and measure the energy of passing electrons and photons.
These crystals produce light in the form of electromagnetic photon showers (see image 1.3) thatare measured by photodetectors (either avalanche photodiodes or vacuum phototriodes).
These crystals are very radiation hard and can reverse their radiation damage when kept in roomtemperature (during beam time they are cooled to 0.1◦C).
1.1.3 Hadronic Calorimeter
The Hadronic Calorimeter (HCAL) is designed to detect hadrons (i.e. particles produced of quarks)and gluons.
This part of the detector is organized in several layers of dense absorbing materials and scintillators,a combination of steel and plastic, where the plastic produces a light pulse when a particle flowsthrough it.
The fact that the HCAL is housed inside the solenoid is one of the biggest differences between theATLAS and the CMS experiment.
1 The Compact Muon Solenoid experiment 3
1m 2m 3m 4m 5m 6m 7m0m
2T
4T
Légende:ÉlectronHadron chargé (ex. Pion)
Muon
PhotonHadron neutre (ex. Neutron)
Trajectographeau silicium
Calorimètreélectromagnetique
Calorimètrehadronique
Solénoïdesuperconducteur Culasse de retour de l’aimant
avec des chambres à muons
Y
X
Figure 1.3: A transversal slice through the CMS detector, demonstrating the various sections of the detectorand their designed functions.[3]
1.1.4 Superconducting Solenoid
The design of CMS had a high focus on achieving the highest possible magnetic field. To achievethis CMS has been equipped with one large superconducting solenoid, capable of generating amagnetic field of 4T.
This allows for very precise momentum readings by analyzing the arcs of charged particles. It alsoprovides sufficient return flux outside the solenoid to be used by the muon chambers (about 2T).
1.1.5 Muon Chambers
Muons (and neutrinos) are the only particles that can pass the previously mentioned sectionswithout losing most (if not all) of their energy.
The loss of energy as a particle travels through matter is described by the Bethe equation (1.1).Because of the characteristics of Muons, this equation states that muons will not release much oftheir energy as they pass through material.
Combined with the fact that these particles have high mass, this makes them very difficult to stop.
−⟨
dEdx
⟩=
4π
mec2 ·nz2
β2 ·(
e2
4πε0
)2
·[
ln(
2mec2β2
I · (1−β2)
)−β
2]
(1.1)
Since muons can’t be easily stopped, the muon chambers rely instead on the strong magnetic fieldto measure the curvature of these charged particles, and thereby measuring their energy. Themuon chambers are composed of three components, the Resistive Plate Chambers (RPC), DriftTubes (DT), and Cathode Strip Chambers (CSC).

This page is intentionally left almost blank

Chapter 2
The Level-1 Trigger Online Software
2.1 The Level-1 Trigger
The online software is designed to setup, configure, and monitor the electronics responsible foranalyzing and filtering data from the CMS experiment as the LHC provides it with sets of proton-protoncollisions in the center of the detector at a rate of 40MHz.
The current luminosity of the beam in LHC gives an average of 4̃0-50 proton-proton collisions perbunch crossing, resulting in around 2MB[6] of data generated by the sensor electronics.
At a rate of 40MHz this will effectively produce a data stream of 80TB/s. This is too much for anystorage system to handle, so a system is needed to filter this data so that only interesting eventsare retained.
To make the data rate manageable a set of (very fast) algorithms are executed on hardware justoutside the detector as events occur to filter out ‘uninteresting‘ data, i.e. physics events that arealready known and well-defined. This because collision experiments have been performed for manyyears now and many observable physics processes in them have already been thoroughly studied.
This filter is called the Level-1 (L1) trigger and will reduce the ‘event rate‘ (i.e. bunch crossingcontaining proton-proton collisions) from 40MHz to a relative rate of 1̃00kHz.
The output data stream of the L1 trigger is then forwarded to the high-level trigger (HLT), whichwill reduce the event rate from 100kHz to 100Hz. The output data from the HLT is then stored forfurther analysis by the Worldwide LHC Computing Grid (WLCG). More information about the HLTcan be found in the Phase II technical proposal [7].
The calculations of the L1 trigger are performed on FPGA (field-programmable gate array) hardware.These hardware boards follow a common firmware pipeline. The L1 trigger is designed to makea decision every 4µs, the time it takes for 160 bunch crossings to occur. The trigger will issue aLevel-1 Accept (L1A) if this set of bunch crossings is deemed interesting.
The trigger is composed of four levels.
The lowest level, called the Local Triggers or Trigger Primitive Generators (TPG), is a set ofhardware boards deployed in the calorimeters as well as the muon chambers, where they aredesigned to analyze the energy readings and recognize patterns. This level contains the ElectromagneticCalorimeter (ECAL), the Hadron Calorimeter (HCAL), the Cathode Strip Chambers (CSC), theResistive Plate Chambers (RPC), and the Drift Tube (DT).
The second level combines the information of the Local Triggers and try to make basic reconstructions
5
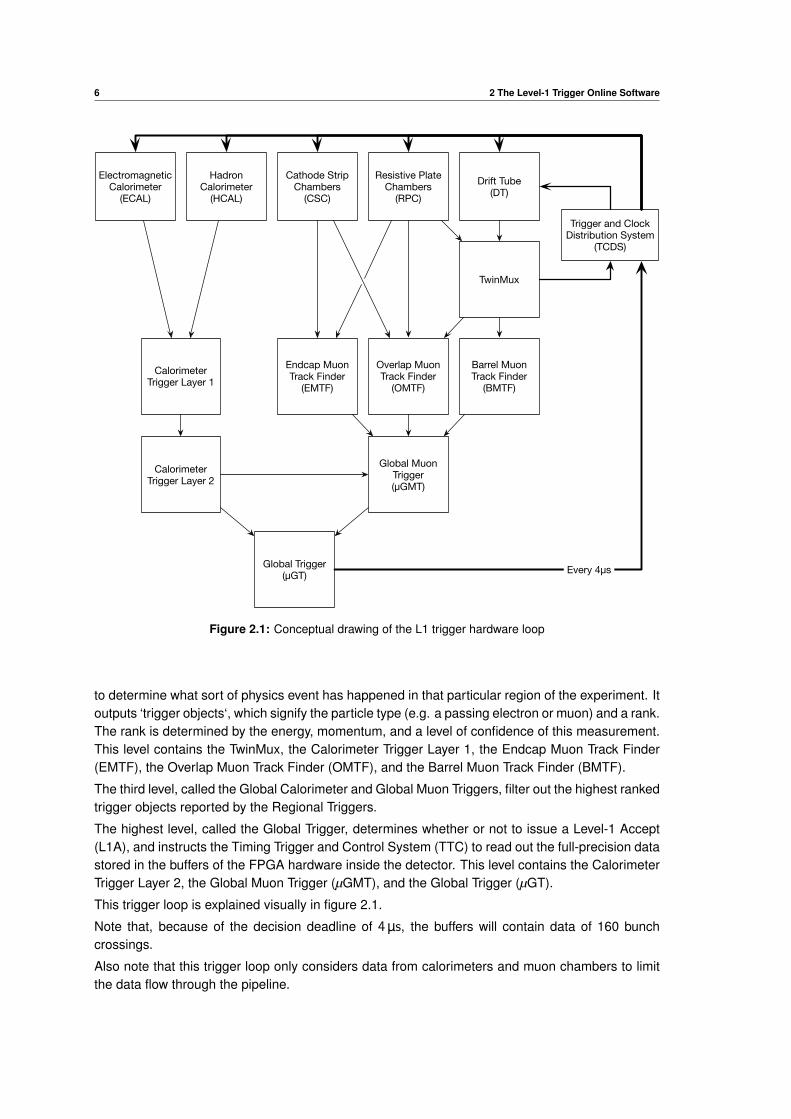
6 2 The Level-1 Trigger Online Software
Global Trigger(µGT)
Global Muon Trigger(µGMT)
Calorimeter Trigger Layer 2
Calorimeter Trigger Layer 1
Electromagnetic Calorimeter
(ECAL)
Hadron Calorimeter
(HCAL)Drift Tube
(DT)Resistive Plate
Chambers(RPC)
Cathode Strip Chambers
(CSC)
TwinMux
Endcap Muon Track Finder
(EMTF)
Overlap Muon Track Finder
(OMTF)
Barrel Muon Track Finder
(BMTF)
Trigger and Clock Distribution System
(TCDS)
Every 4µs
Figure 2.1: Conceptual drawing of the L1 trigger hardware loop
to determine what sort of physics event has happened in that particular region of the experiment. Itoutputs ‘trigger objects‘, which signify the particle type (e.g. a passing electron or muon) and a rank.The rank is determined by the energy, momentum, and a level of confidence of this measurement.This level contains the TwinMux, the Calorimeter Trigger Layer 1, the Endcap Muon Track Finder(EMTF), the Overlap Muon Track Finder (OMTF), and the Barrel Muon Track Finder (BMTF).
The third level, called the Global Calorimeter and Global Muon Triggers, filter out the highest rankedtrigger objects reported by the Regional Triggers.
The highest level, called the Global Trigger, determines whether or not to issue a Level-1 Accept(L1A), and instructs the Timing Trigger and Control System (TTC) to read out the full-precision datastored in the buffers of the FPGA hardware inside the detector. This level contains the CalorimeterTrigger Layer 2, the Global Muon Trigger (µGMT), and the Global Trigger (µGT).
This trigger loop is explained visually in figure 2.1.
Note that, because of the decision deadline of 4µs, the buffers will contain data of 160 bunchcrossings.
Also note that this trigger loop only considers data from calorimeters and muon chambers to limitthe data flow through the pipeline.

2 The Level-1 Trigger Online Software 7
The Trigger and Clock Distribution System (TCDS) is in charge of distributing a L1A and controlsignals (e.g. calibration, clock synchronization, test, reset, . . . ).
2.2 The CMS Experiment Control System
The CMS Experiment Control System (ECS) is a distributed software system that is designed tomanage the configuration, testing, and monitoring of all hardware involved in the L1 trigger andDAQ system of the CMS experiment.
One of the components of ECS is the Cross Data Acquisition System, called XDAQ. It is a custom-madedata acquisition system specialized for high energy physics. It is developed internally by the CMSgroup.
XDAQ provides a standardized way to perform high energy physics analyses. It provides developerswith a uniform DAQ system. It hides the complexity of data exchange and distributed computingfor the developer. It allows subsystems to load its own software modules to perform various tasks.XDAQ also provides an interface engine each subsystem can use to render a web interface.
2.3 The Trigger Supervisor
The Trigger Supervisor is a framework built upon XDAQ which specializes in controlling the variousaspects of the L1 trigger and providing libraries for the execution of common tasks performed inmost of the subsystems (e.g. configure, test, . . . ). For example it provides standardized APIs forexecuting configuration commands and generating monitoring data.
This composes a central system through which the status of all the subsystems of the experimentcan be monitored.
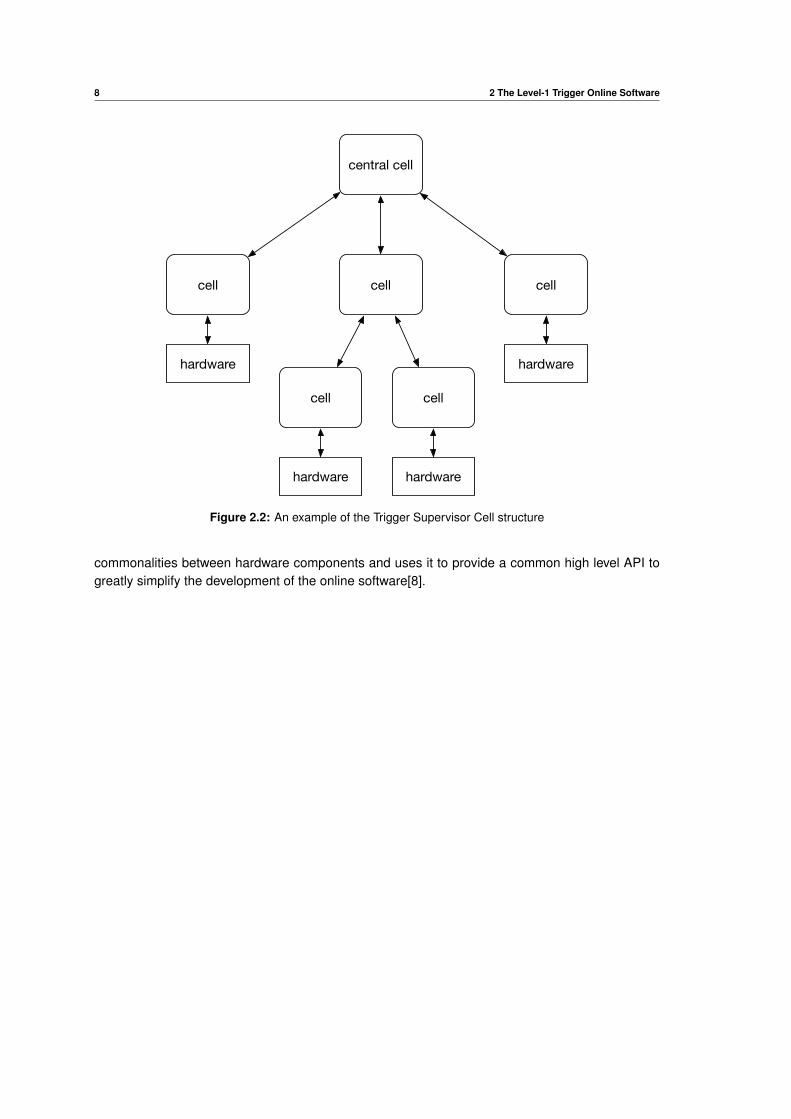
The Trigger Supervisor is, as it is built on top of XDAQ, distributed. It is implemented in the form ofa tree of ‘cells‘. The Trigger Supervisor has a root cell, called the Central Cell, which has severalsubcells, each corresponding to a L1-trigger subsystem. Each subcell can contain further subcells.A cell can be a hardware component, or a controller. In the cell tree, all end nodes of the tree arehardware components.
Each cell creates its own web interface dealing with that cell’s particular functionality. This way auser can use the web interface to receive a general overview of a system, and traverse the tree toget more specific data and functionality.
2.4 SWATCH
The phase II upgrades of LHC will increase the luminosity of the produced beams. This meansthere will be more proton-proton collisions per bunch crossing in the experiment, which in turnmeans there is a bigger amount of data that needs processing.
To support this increase of collision rates, the current hardware at CMS needs to be adapted orreplaced to support the higher data rate.
The SWATCH project (SoftWare for Automating conTrol Common Hardware) is an endeavor tostandardize the communication with boards and the functions they provide. It attempts to exploit
8 2 The Level-1 Trigger Online Software
central cell
cell cellcell
cell cell
hardwarehardware
hardwarehardware
Figure 2.2: An example of the Trigger Supervisor Cell structure
commonalities between hardware components and uses it to provide a common high level API togreatly simplify the development of the online software[8].

Chapter 3
Problems with TS 2.0
The Trigger Supervisor version 2.x had a few problems that caused frustrations with both theoperators and the developers of the software.
3.1 Browser compatibility
The first and most visible issue is the slow degradation of support for the interface in modern WebBrowsers.
This is due to an effect caused by the movement of major web browser vendors to become‘evergreen‘, which started around 2011.
3.1.1 Evergreen browsers
An evergreen browser, in essence, is a browser that updates itself without the interaction of the user.This is the formal definition of an ‘evergreen‘ browser, however there are some new philosophiesthat come with this approach.
First off, a web browser’s version number no longer has a real meaning. To a user a web browserwill now be ‘versionless‘, the user will no longer know nor care what browser version is running andwill actually assume it is the latest version. Browser vendors have combined auto-updating witha significant speedup of their release cycles. Browsers now tend to update their version once amonth, rather than at most once a year (see figure 3.1).
This corresponds to the release early, release often (RERO) software design philosophy. Anapproach popular in the open-source community and used for the development of the Linux kernel[9].
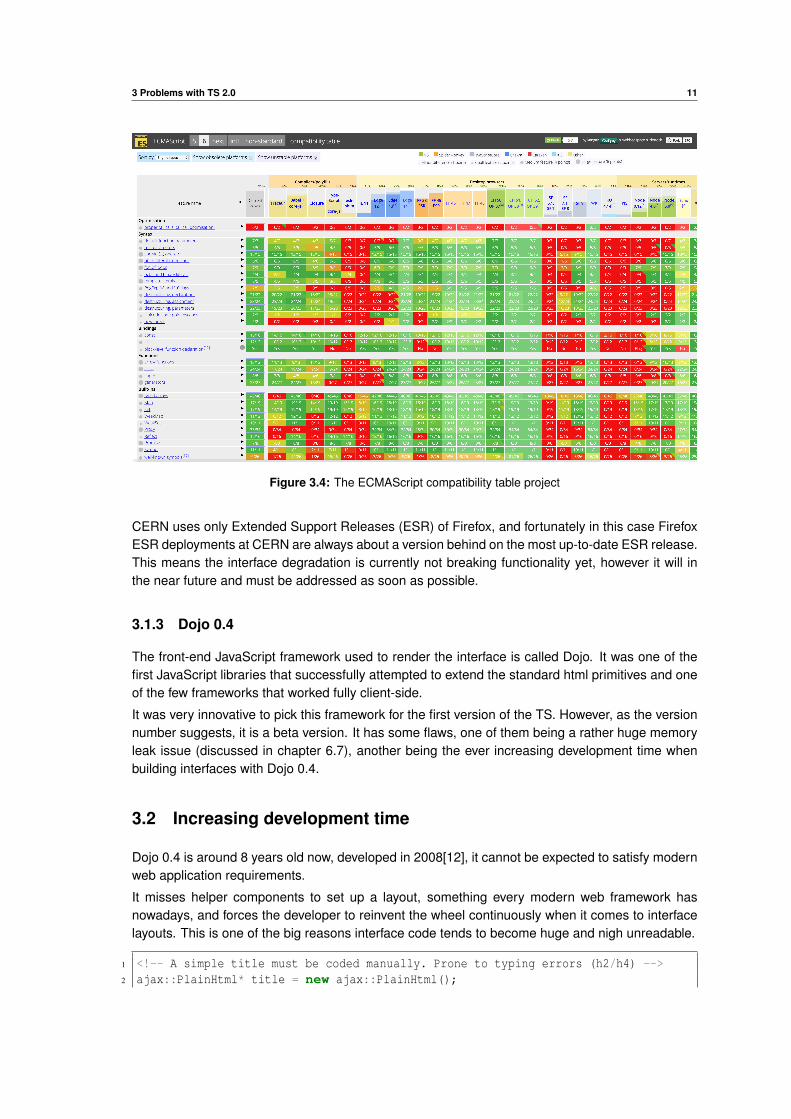
This in turn engaged web browser vendors to implement new standards much faster and in a muchmore iterative way than previously possible. Web browser vendors will no longer develop newfeatures as a whole, but rather slowly implement a feature piece by piece. A good example of this isES6 (sometimes called JavaScript 2015). ES6 is in essence a set of extra JavaScript functionalitiesand additions to the syntax. Without evergreen browsers, this would have been implemented asone big update, probably in the form of a major release update. However, evergreen browsersimplement every ES6 feature bit by bit. This can be tracked with the ES6 compat-table project[10].
Because of these rapid release cycles and automatic updates, evergreen browsers introduce achange in behavior of keeping compatibility with older webpages. If a particular feature would inhibit
9

10 3 Problems with TS 2.0
2004 2005 2006 2007 2008 2009 2010 2011 2012 2013 2014 2015 20160
10
20
30
40
50
Release date
Maj
orve
rsio
nnu
mbe
r
Web Browser major version releases over time
Mozilla FirefoxGoogle Chrome
Figure 3.1: Overview of major version releases of Mozilla Firefox and Google Chrome over time
Figure 3.2: The modal dialog in Firefox 38 Figure 3.3: The modal dialog in Firefox 44
the development of new features or what is sometimes referred to as ‘moving the web forward‘, ithas become acceptable to completely remove that feature. The latest example of this behaviorcan be found in the rapid implementation, and equally rapid removal, of the /deep/ and ::shadowCSS selectors[11]. This goes against the previous philosophy that a web browser must maintainbackwards compatibility with older web pages as much as possible. And this is the main reasonthe TS 2.0 interface is experiencing problems with modern browsers.
3.1.2 Interface degradation
The age of the TS interface (8 years as of this writing) has reached a point where it uses HTML,JavaScript, and CSS that is being actively removed by browsers. This gives some potentiallyserious issues when operating the interface.
The most prominent example is the modal dialog feature of the interface. In Mozilla Firefox version38, the one currently installed in the CMS Control Room, the modal dialog behaves fine. A whiteoverlay is put over the interface and a dialog appears, forcing the user to take a decision. Howeverin the latest version of Firefox, currently 44, the dialog does not appear while the white overlay doesappear. This effectively blocks the user from using the interface at all from that point and forces apage reload. Whatever functionality was implemented using the modal dialog is now inaccessible.See figure 3.2 and 3.3.
3 Problems with TS 2.0 11
Figure 3.4: The ECMAScript compatibility table project
CERN uses only Extended Support Releases (ESR) of Firefox, and fortunately in this case FirefoxESR deployments at CERN are always about a version behind on the most up-to-date ESR release.This means the interface degradation is currently not breaking functionality yet, however it will inthe near future and must be addressed as soon as possible.
3.1.3 Dojo 0.4
The front-end JavaScript framework used to render the interface is called Dojo. It was one of thefirst JavaScript libraries that successfully attempted to extend the standard html primitives and oneof the few frameworks that worked fully client-side.
It was very innovative to pick this framework for the first version of the TS. However, as the versionnumber suggests, it is a beta version. It has some flaws, one of them being a rather huge memoryleak issue (discussed in chapter 6.7), another being the ever increasing development time whenbuilding interfaces with Dojo 0.4.
3.2 Increasing development time
Dojo 0.4 is around 8 years old now, developed in 2008[12], it cannot be expected to satisfy modernweb application requirements.
It misses helper components to set up a layout, something every modern web framework hasnowadays, and forces the developer to reinvent the wheel continuously when it comes to interfacelayouts. This is one of the big reasons interface code tends to become huge and nigh unreadable.
1 <!-- A simple title must be coded manually. Prone to typing errors (h2/h4) -->2 ajax::PlainHtml* title = new ajax::PlainHtml();
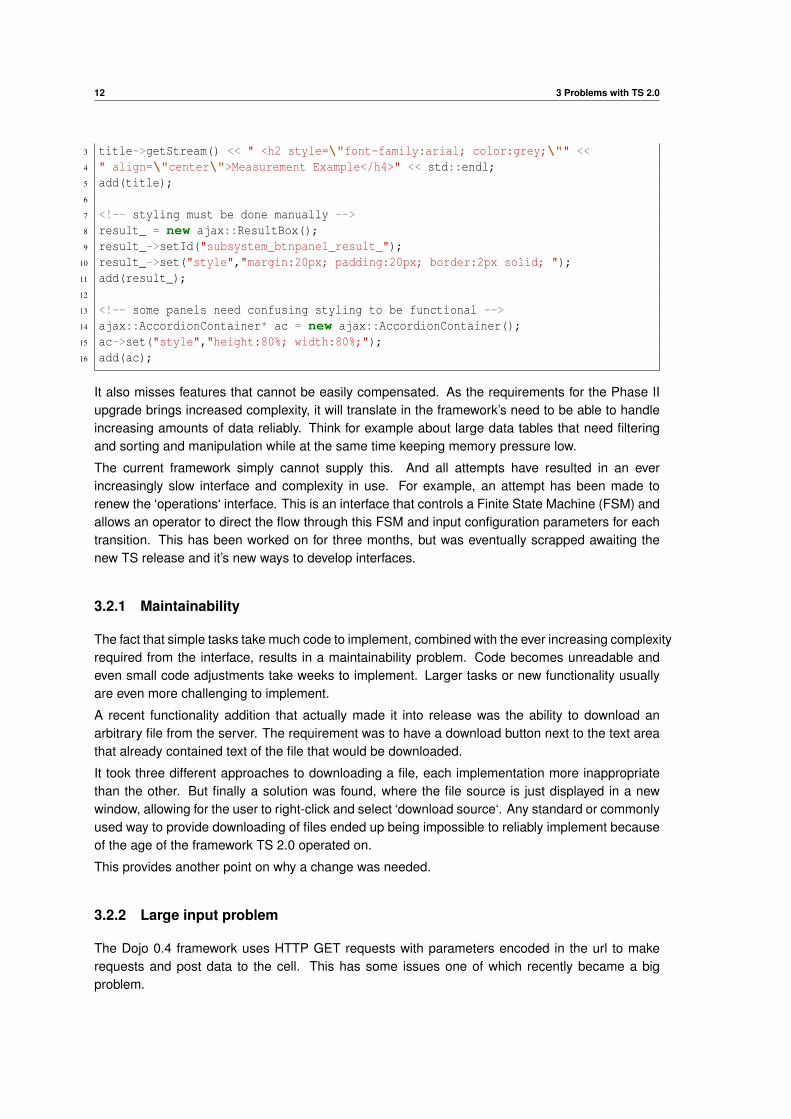
12 3 Problems with TS 2.0
3 title->getStream() << " <h2 style=\"font-family:arial; color:grey;\"" <<4 " align=\"center\">Measurement Example</h4>" << std::endl;5 add(title);6
7 <!-- styling must be done manually -->8 result_ = new ajax::ResultBox();9 result_->setId("subsystem_btnpanel_result_");
10 result_->set("style","margin:20px; padding:20px; border:2px solid; ");11 add(result_);12
13 <!-- some panels need confusing styling to be functional -->14 ajax::AccordionContainer* ac = new ajax::AccordionContainer();15 ac->set("style","height:80%; width:80%;");16 add(ac);
It also misses features that cannot be easily compensated. As the requirements for the Phase IIupgrade brings increased complexity, it will translate in the framework’s need to be able to handleincreasing amounts of data reliably. Think for example about large data tables that need filteringand sorting and manipulation while at the same time keeping memory pressure low.
The current framework simply cannot supply this. And all attempts have resulted in an everincreasingly slow interface and complexity in use. For example, an attempt has been made torenew the ‘operations‘ interface. This is an interface that controls a Finite State Machine (FSM) andallows an operator to direct the flow through this FSM and input configuration parameters for eachtransition. This has been worked on for three months, but was eventually scrapped awaiting thenew TS release and it’s new ways to develop interfaces.
3.2.1 Maintainability
The fact that simple tasks take much code to implement, combined with the ever increasing complexityrequired from the interface, results in a maintainability problem. Code becomes unreadable andeven small code adjustments take weeks to implement. Larger tasks or new functionality usuallyare even more challenging to implement.
A recent functionality addition that actually made it into release was the ability to download anarbitrary file from the server. The requirement was to have a download button next to the text areathat already contained text of the file that would be downloaded.
It took three different approaches to downloading a file, each implementation more inappropriatethan the other. But finally a solution was found, where the file source is just displayed in a newwindow, allowing for the user to right-click and select ‘download source‘. Any standard or commonlyused way to provide downloading of files ended up being impossible to reliably implement becauseof the age of the framework TS 2.0 operated on.
This provides another point on why a change was needed.
3.2.2 Large input problem
The Dojo 0.4 framework uses HTTP GET requests with parameters encoded in the url to makerequests and post data to the cell. This has some issues one of which recently became a bigproblem.
3 Problems with TS 2.0 13
First off, HTTP GET, PUT, and DELETE requests should be idempotent. This means that 2 identicalrequests at different times must produce identical results. Not following this principle createsissues when a proxy server is between the client and the server. A proxy server will always tryto cache requests that are supposed to be idempotent. Some HTTP headers exist that allow adeveloper to instruct a proxy server to not cache a particular request, but it is up to the proxy serverimplementation to decide if such a request will be honored, and thus cannot be relied on.
Every request currently has such ‘no-cache‘ HTTP headers. And, luckily, no issue with proxyservers has come up yet, however some browser issues are suspected to be linked with this issue.
The second issue is the fact that the parameters of every request are url encoded. This means thatparameters are added to the url in the following fashion:
h t t p ( s ) : / / host : po r t / path?parameter1=value1&paremeter2=value2
The problem with this is that there is a maximum length the url is allowed to be, the exact maximumlength depends on both the used browser and server software.
The general consensus is that URLs should be kept under 2KB in size and must not exceed 8KB,as this is where most browsers and server software draw the line. Some panels however, like theoperations panel, are designed for very large input variables and far exceeded these limits.
This used to be fine with version 12 of the server software (XDAQ), but in the recently introducedversion 13, a hard limit of 8KB has been introduced. This breaks important use cases of panels. Itis technically possible to change the Dojo framework’s code regarding request handling. Howeverthis might present unforeseen consequences given this is a rather low-level change. Rather it hasbeen decided TS 2.0 will never run under the new XDAQ 13 version.

This page is intentionally left almost blank
Chapter 4
TS 3.0 upgrade requirements
The previous chapter discussed the problems with TS version 2.0.
It is desirable to mitigate all these problems and prepare TS version 3.0 for the future. Severalrequirements were submitted to the then hypothetical new TS 3.0 components.
4.1 Legacy code compatibility
Currently there are many panels developed in the legacy TS. It is unfeasible to upgrade or rewritethese all in one go. There will be a transitional period where legacy code will have to run concurrentlywith newer code.
Therefore TS 3.0 must maintain as much code compatibility with TS 2.0 as possible. It is verydesirable to have 100% compatibility. A slight area of code incompatibility might have large consequencesdepending on legacy panel code.
This will put some restraints on the upgrade options as full legacy code compatibility requires thenew codebase to be a superset of the old one. However this constraint is mostly applicable onlyto the server side code, as the client side code is generated by the server and can be significantlymodified provided developers keep watchful of any changes.
4.2 Ability to migrate code
As the legacy code will be converted to new code, it would be desirable to make the transition aseasy as possible and not to have a too much difference between modern and legacy code as faras keeping existing functionality is concerned.
New functionality will of course result in new code. This requirement therefore only applies tomigrating legacy code to keep the functionality as it was.
4.3 Future proof
Web technologies are moving forwards in a fast pace. A lot of new standards have arisen for us touse and it would be wise to use them.
15

16 4 TS 3.0 upgrade requirements
Designing a codebase that uses as much open standards as possible is a good practice. It ensuresgood support from communities using those standards, and ensures the codebase will maintaincompatibility with web browsers for a far longer period than would otherwise be possible.
Provided finalized open standards are used, it would be acceptable to use relatively modern technologiesand currently heavily rely on polyfills, libraries designed to emulate a spec not yet implemented, toprovide the needed compatibility with currently used software.
4.3.1 Polyfills
A polyfill is a term used in web development. It is a group of JavaScript libraries designed withthe very specific use case to implement a future standard, or even just a working draft of astandard, as accurately as possible with today’s resources. Some of these also seek to fix a brokenimplementation of a standard by specific browsers.
Polyfills have gained a lot of popularity the last few years, approximately in tandem with the upcomingof ‘evergreen‘ browsers, as web development now mainly focuses on building on open standardsrather than focus on a specific browser or even a specific version of a browser.
Polyfills are generally allowed to introduce as much CPU, memory, and network usage as neededto implement their targeted standard as completely as possible. The main argument for this isthat a polyfill is designed to be obsolete after web browsers have caught up and implemented saidspec. At this point a polyfill is designed to no longer be activated anymore, mitigating the originallyintroduced loads.
4.4 Rich functionality
One of the main reasons to renew the codebase of the TS is to be able to fulfill the new modernrequirements for the interface.
A lot of new features are needed, like the ability to handle large datasets and the ability to handlemore complex analysis use cases.
It would be desirable to have an extendable framework. This way, as time goes on and requirementschange, the framework can be adapted and extended to handle new requirements as needed.
4.5 Faster development
The new framework must be much faster to develop on, as currently it takes weeks to implementany change whatsoever.
The current main inhibitors of development time are the lack of features and the amount of unreadablecode that the use of the framework causes.
Given the main problems of the slow development time it can be expected that, whatever the newframework looks like, will introduce a major improvement of development time of new interfacepanels.

4 TS 3.0 upgrade requirements 17
4.6 Stability
The new codebase will have sessions at the CMS Control Centre that last for days. This putsimportant requirements on front-end libraries and frameworks.
Memory leaks are unacceptable. A memory leak results in an unstable interface, which is unacceptableduring operations in the Control Centre. This is explained in more detail in chapter 6.7.
4.7 Reduced code footprint
The current code of an interface panel is too large and too messy. It makes the code unreadableand very difficult to maintain.
It would be desirable to have a far smaller code footprint for basic panel functionality. It is a sign ofa more powerful framework and will ease the later modifications to panel code.
A smaller amount of required code would translate to the need for a more powerful framework. Itmust however not introduce functionality that abstracts away it’s functionality so much that it wouldintroduce ‘black magic‘ code, i.e. code that works but nobody knows why[13].
4.8 Better maintainability
Functional requirements change regularly. Whatever the new framework looks like must be flexibleand open enough to be extended or modified to provide for new functionality as needed. This musteither be done in-house or by an extensive and stable developer community associated with theframework.
A ‘dead‘ framework, i.e. one that has no more developer community or ability to be easily modifiedin-house, like happened with Dojo 0.4 must be avoided.
4.9 Better documentation
The previous requirement of maintainability puts a strong emphasis on documentation. A systemcan’t be properly maintained, nor modified, if the system’s workings aren’t properly explained.
The framework will need extensive documentation describing the possible ways to program panelsand showcase advanced functionalities. Documentation must also exist about the inner workingsof the framework.
Documentation must also be easily kept synchronized with the actual state of the code. This wouldsuggest the use of inline documentation, i.e. documentation that resides in the source code.
4.10 i18n
Given the multilingual environment this framework will be used in, it is useful to have a codebasethat can adapt to different interface languages.
18 4 TS 3.0 upgrade requirements
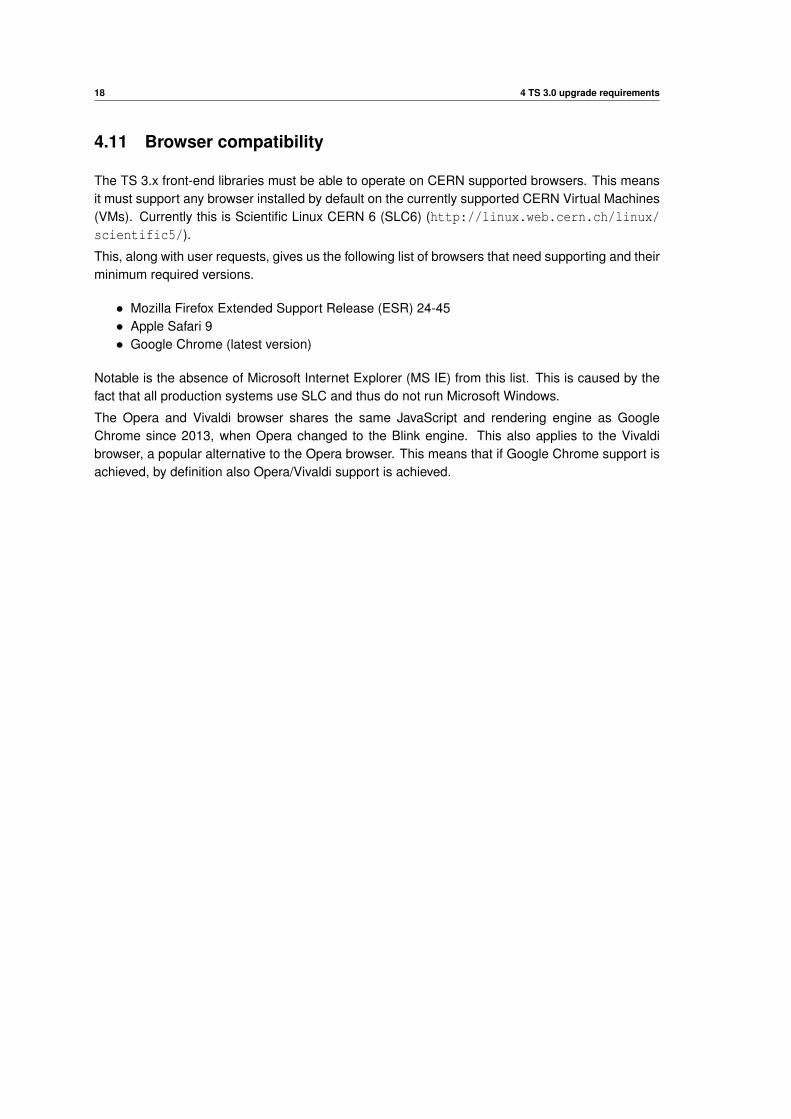
4.11 Browser compatibility
The TS 3.x front-end libraries must be able to operate on CERN supported browsers. This meansit must support any browser installed by default on the currently supported CERN Virtual Machines(VMs). Currently this is Scientific Linux CERN 6 (SLC6) (http://linux.web.cern.ch/linux/scientific5/).
This, along with user requests, gives us the following list of browsers that need supporting and theirminimum required versions.
• Mozilla Firefox Extended Support Release (ESR) 24-45• Apple Safari 9• Google Chrome (latest version)
Notable is the absence of Microsoft Internet Explorer (MS IE) from this list. This is caused by thefact that all production systems use SLC and thus do not run Microsoft Windows.
The Opera and Vivaldi browser shares the same JavaScript and rendering engine as GoogleChrome since 2013, when Opera changed to the Blink engine. This also applies to the Vivaldibrowser, a popular alternative to the Opera browser. This means that if Google Chrome support isachieved, by definition also Opera/Vivaldi support is achieved.
Chapter 5
TS upgrade options
Now that there is a firm grasp of the current state of the software and its upgrade requirements isachieved, an assessment of the viability of some upgrade options can be performed.
5.1 Server-side interface engine
Old code must run under the new system. Therefore non-backwards compatible modifications tothe C++ code are not possible.
The only options are to extend the amount of C++ classes to represent new functionality. There isno restriction in the sense that the old classes have to remain in use. Therefore it is possible tochange the way the interface is programmed server-side in function of how extensive the additionsto the C++ code are.
5.2 Client-side interface library
At client-side the available options are much more extensive. The old Dojo library can be kept,and any new front-end library can be added provided this new library does not interfere with thefunctionality of the Dojo library.
Note must be taken however that if any of these new libraries try to dictate the flow of the webinterface, it must allow us to alter it to adjust to the page flow that was used by the old codebase.
5.2.1 Upgrading Dojo
Currently the used Dojo version is v0.4. It would seem logical to just upgrade the front-end libraryto the latest Dojo version, adjust the appropriate C++ classes, and create new ones for the addedfunctionality resulting from the upgrade. There are however a few problems with this approach.
Firstly, starting from Dojo v0.9, there has been a major Dojo API rewrite. This would mean anextensive rewrite of the existing C++ classes is needed, which provides for a very high risk ofcompatibility problems with legacy panels as they might anticipate some hacky combination oflegacy code that would now have dissapeared.
Secondly, it would not have solved any of the problems described in chapter 3, except for thebrowser compatibility problem.
19
20 5 TS upgrade options
Running multiple versions of Dojo
Running Dojo v0.4 and v0.9 in parallel is also not possible. There is obvious overlap of codeand running these in parallel essentially means entirely refactoring one of the versions, which isundesirable as it is not maintained by us and thus not up to us to perform major modifications to.
However, if possible, it would provide easy migration of legacy code as is would probably mean apanel developer would just have to specify wether to use the new codebase or not.
Dojo 2.0
Currently the latest version of Dojo is v1.10. However the Dojo community is finalising version 2.0.This release, as the version suggests, brings vast modifications to the library.
This version is to be released during spring 2016, which is about a year too late for us to consider.The development started in June 2015 and is expected to be finished before spring 2016. CurrentlyDojo 2.0 is not stable enough to be considered.
If the software would be upgraded to use Dojo 1.10 now, the new TS would be stuck on an outdatedversion of Dojo again only months after its release, and no progress will have been made. Thecommunity would migrate to Dojo v2.0 while the TS stays behind and face all the current problemsall over again.
Browser compatibility
Dojo v1.10 claims the following browser compatibility:
• Firefox 3.6-20• Safari 5-6• Chrome 13-26• IE 8-10• Opera 10.50-12 (Dojo core only)
This nicely covers and extends the minimum requirements.
5.2.2 jQuery
One of the initial ideas was to replace Dojo with a library like jQuery or Zepto, accompanied by aCSS framework like bootstrap, foundation, semantic-ui, susy, material ui, gumby, Yahoo Pure, orUIKit.
This is a very low-level approach, and for this reason it is actually the safest to ensure compatibilitywith Dojo 0.4.
However, this approach does not have much more than that to offer. It is not a framework, it is acollection of helper classes and functions. Because it is not a framework, advanced functionalitywill either be implemented by heavy code duplication or by an in-house developed library.
This will lengthen the initial development time and will also mean longer development times forinterface developers.
This solution will not leverage the interface developers like a proper front-end framework will beable to. However, being the most safe option in terms of compatibility, this presents a safe back-up
5 TS upgrade options 21
option if other options end up being incompatible with current needs.
Compatibility with Dojo
Zepto and jQuery functions are fully contained within the ‘$‘ namespace. This guarantees theabsence of any code overlap with Dojo.
The CSS framework however can still present some problems. Both will try to style commonelements like buttons and links, and a decision will have to be made in how to approach thisoverlap.
Browser compatibility
jQuery combined with the most compatible CSS library (Bootstrap) yields the following browsersupport:
• Firefox (2 latest versions)• Safari 7• Chrome (2 latest versions)• IE 9
Note the ‘last 2 versions‘ support for Firefox. This could present problems depending on the age ofthe used Firefox browser. However this list enumerates browsers that have been tested, and sinceFirefox is generally a ‘good citizen‘ in the world of web browsers it can be assumed this will presentno problems. The fact that IE9 is supported strengthens this assumption.
5.2.3 AngularJS
Angular.js is the most popular front-end web application design framework these days. It is verypowerful and has an extensive developer community.
It is however not very agnostic about how to design a web app. It makes assumptions, and thiscould make integrating this with Dojo problematic.
Learning curve
Angular.js is very powerful, but this power is accompanied by a rather steep learning curve[14] thatwould make it difficult for people who are not full-time web application developers to develop panelsfor the TS.
Among these problems are confusing terminology (e.g. things called ‘constructors‘ that are notconstructors), function parameter based dependency injections that make break minification toolsand introduce unnecessary complexity, and an unclear scoping of variables.
Giving that the developers of panels are not programming experts, the learning curve must not betoo high, it will greatly increase the required development time to create custom interface panels.
Running Angular concurrently with Dojo
Angular 1.x makes the assumption it has complete control over the layout and the flow of the webapplication. This will give some issues with the C++ interface building logic when building advanced
22 5 TS upgrade options
interfaces. The C++ code is in control of the application. It constructs the page piece by piece asinstructed by the developer and is then to be rendered by the front-end framework.
Angular 2.0
Angular 2 is much more modular, and has a structure quite agnostic and usable to combine withother frameworks.
Implementing Angular 2.0 seems very viable. Unfortunately it is currently still in beta status. Andwhile the basics are stable, advanced functionality is still being debated and developed. Thisunfortunately limits the use cases for advanced interfaces for the foreseeable future.
Angular 2 Beta could now be implemented while the final release is awaited, but time constraintsmake this an uncomfortable decision to make.
Browser compatibility
Angular 2 claims the following browser compatibility:
• Firefox (latest development build)• Safari 7• Chrome (latest development build)• IE 9
Firefox (latest development build) looks troubling. Further testing shows that Angular 2 does notwork properly in Firefox version <38.
This is very bad, the minimum supported version requirement is v24, 14 versions lower. Most SLCinstallations have Firefox 38 installed, so this could be workable. However, this is the only optionthat will not pass the minimum browser support requirements.
5.2.4 Web Components
Web Components[15][16] are additions to the HTML5 standard. They enable a developer todevelop custom HTML tags, the idea is to mitigate the ‘div soup‘ problem[17] where the webapplication’s source code increases exponentially in size as the complexity of the app increases.
This standardizes an approach seen in many modern JavaScript frameworks such as AngularJS(version 2 in particular), Ember.js, Knockout.js, Dojo, and Backbone.js. These all allow a developerto declare new ‘elements‘ in order to make developing a smart web application easier.
However, Web Components are a standardized approach to accomplish this. This means thatdevelopers no longer have to worry about major API rewrites like the ones encountered with Dojo.
Furthermore, a vanilla Web Component is guaranteed to be completely compatible with any front-endlibrary. A Web Component is in essence and extra HTML tag and is indistinguishable from a‘normal‘ HTML tag to a front-end framework.
Web Components consist of the following standards:
Custom Elements This standard allows developers to define their own HTML elements.
HTML Imports This standard provides a way to import an HTML document, much like JavaScriptand CSS files are currently imported.
5 TS upgrade options 23
Templates This standard defines ‘HTML Templates‘ and allows HTML code to be reusedas needed.
Shadow DOM This standard provides a way to have multiple independent HTML DOM treesinside one hierarchy by providing a ‘shadow root‘.
Polymer
Polymer is a relatively new library, built directly on the Web Components standards, developed byGoogle. It represents the way Google thinks Web Components should be used.
It is very similar to Angular 2 in most respects. For example, they share the same data bindingsyntax.
The reason Polymer is very useful is that it has the potential to allow us to introduce properSeparation of Concerns (SoC) principles (see chapter 9.3) to the development environment.
Browser compatibility
Web Components are a relatively new set of standards and are currently only supported by GoogleChrome.
However, the webcomponents.js project (https://github.com/webcomponents/webcomponentsjs)aims to polyfill the Web Components standards.
Using this polyfill, browser support can be extended to the following list:
• Firefox (latest stable build)• Safari 7• Chrome (latest stable build)• IE 10
This list is very similar to Angular 2’s compatibility list. However, testing now concludes that supportby Mozilla Firefox goes back all the way to v24, our minimum requirement.
Note that this means that Polymer has better browser support than Angular 2. This is curious, asPolymer uses more recent technologies than Angular 2.
Running Polymer concurrently with Dojo
In a browser with native Web Components support (i.e. the webcomponents.js polyfill is notneeded), it is guaranteed to have no conflicts between Dojo and Polymer. This is because Polymermerely adds extras to the Web Components standards and is all contained in the ‘Polymer()‘JavaScript function.
The webcomponents.js polyfill should also not present conflicts, as most of these polyfills aretransparent. The polyfill defines the ‘document.registerElement()‘ function if it doesn’t exist, manuallyimports HTML Imports if the browser does not support it natively, manually stamps ‘template‘elements, and defines the ‘element.createShadowRoot()‘ with an approximation to the ShadowDOM spec, called ‘Shady DOM‘, if it doesn’t exist(https://www.polymer-project.org/1.0/articles/shadydom.html).
24 5 TS upgrade options
Some quick tests with Firefox v24 confirms that these JavaScript libraries do not present any conflictwhatsoever with the Dojo library.
Another possible advantage is that this will probably encounter very little problems with CSS code.As every common HTML element like buttons and links are replaced in Polymer with a morepowerful Web Component version (e.g. <paper-button> as a replacement to <input type="button"/>).
5.2.5 React.js
React is a JavaScript library, designed by Facebook Inc., that uses a ‘virtual DOM‘ system toabstract away complexity from developers when creating interfaces.
It tries to achieve the same goals as the Web Components standards, however it does not followthese standards but uses custom technologies. For example it uses JSX to define templates ratherthan the HTML Templates standard.
It has the ability to render server-side and client-side. Server-side rendering is great for web-appsthat need good SEO (Search Engine Optimization), however the TS is an internal app. Also thiswould mean big changes in the server-side code need to be made.
React is an open-source project, but it has a questionable license.
5.3 Chosen upgrade path
5.3.1 Front-end library
Things were very close between Angular 2 and Polymer. They are both the most powerful toolsavailable for front-end interface building today.
Angular 2 inherits its reputation of robustness, stability, and enterprise-level code from its predecessor,Angular 1.x.
Polymer has the advantage of being essentially a small ‘sugaring‘ layer over an established W3Cstandard. This gives us the advantage of robustness against changes as time advances. Alsothe backwards compatibility with older browser versions is more extensive with Polymer and thewebcomponents.js polyfill than with Angular 2.
The agnostic nature of Polymer will also make future updates easier. As compatibility concerns willbe less of an issue.
Seeing that Angular 2 and Polymer try to solve the same problems and share some code syntax,combined with the fact that Polymer is the more standardized of the two and Polymer being themore compatible of the two has led to the conclusion that Polymer is the optimal choice for thisproject.
React is a notable contender. But the lack of using standards and the custom license are bigdrawbacks.
5.3.2 Back-end C++ codebase
The current approach of designing interfaces can be adapted to support the Separation of Concerns(SoC) principles (see chapter 9.3).

5 TS upgrade options 25
The C++ code will no longer be in charge of defining interface layout, it will focus and be enhancedfor data generation. The interface will be rendered on client-side using Web Components and itstemplates. Since the main job of XDAQ is Data Acquisition and not interface generation this changeof architecture seems suitable.
Existing C++ code will be kept and parts of it can be enhanced to render a web component ratherthan Dojo code when that Dojo code has stopped working, like the Dojo modal dialog (see figure3.2 and 3.3 in chapter 3.1.2).

This page is intentionally left almost blank
Chapter 6
TS upgrade roadmap
This chapter will describe the changes that have been made to the interface engine and howcompatibility with legacy code is maintained.
6.1 Interface upgrade
6.1.1 The legacy interface structure
The legacy interface engine was programmed entirely in C++ and is developed against using a setof C++ classes that the developer could combine into a tree structure.
Each class corresponds to an element in the Dojo library. These are things like buttons, links,containers, . . . .
Each class instance in this tree structure has its own string buffer. This string buffer is initially filledwith the default HTML and JavaScript code to make the applicable Dojo element work.
Callbacks can be registered and attached to appropriate classes (e.g. an OnClick event callbackcan be attached to a Button class), this allows the interface to send data back to the server and willin turn allow the developer to change the content of the string buffers.
After such a callback the current interface panel is reloaded and the interface will contain anychanges made in any of the string buffers.
Page layout
The main page contains a few div tags that are Dojo ContentPanes, these are used as containersto display the panels, panel menus, and error messages if they come up.
The first ContentPane is ‘tsgui_main_‘, it is placed directly under the body tag and is not usedclient-side. Rather it is used in the legacy C++ code as a container for the other panels. In‘tsgui_main_‘, there is ‘tsgui_dummyResult_‘, ‘tsgui_treeBox_‘, and ‘tsgui_content_‘. These areused to display errors, the panel menus, and the interface panels, respectively. This is also shownin figure 6.1.
In the new interface, only the ‘tsgui_content_‘ is kept. This is the Dojo container where all thepanels (legacy Polymer) are displayed. The menu and top bar are both handled client-side by adedicated Polymer element. This is shown in figure 6.2.
27
28 6 TS upgrade roadmap
Figure 6.1: Screenshot of TS v2.x with main components highlighted.
Figure 6.2: Screenshot of TS v3.x with main components highlighted.
6 TS upgrade roadmap 29
Session management
The session is a 48-bit hexadecimal code, and is always encoded in the URL. This way, if the usertries to interact with the server with an invalid session token, the server can simply respond with aJavaScript payload redirecting them to a URL containing a valid session ID.
The URL always looks like this
h t t p ( s ) : / / host : po r t / De fau l t ?_ses ion id_=0x000000000000
Any state, e.g. the currently loaded panel, is kept server-side in the string buffers.
6.1.2 The new page structure
The new interface will have the same general structure as the legacy interface, though updated withthe material design look and feel (see chapter 6.2.1), and some improvements (like a breadcrumbtrail).
6.1.3 Emulation of the legacy structure in the new page
The new main page will keep the ‘tsgui_content_‘ Dojo ContentPane. This way legacy Dojo panelscan still be served, and since the ContentPane is just a plain ‘div‘ tag when not using Dojo it won’tinhibit any new code from functioning properly.
6.2 New session management
The session ID will move out of the URL and will be moved into the response headers of the server,this header will only be sent if a session change happened.
This approach has a few advantages:
• The session can now no longer be accidentally shared between users, since it is no longercontained in the URL.
• A session renewal does not require a full page reload. The panel will need to be reset, asthe user received a new session, but this will now be much faster as it doesn’t require a fullreload.
• In the old session system the user was navigated to the default page on a session renewal,and did not preserve the user’s navigation through the cell interface like the new sessionsystem does. In the new system the interface detects the presence of a new session id inany response of the server, and executes appropriate code to handle a session renewal.
6.2.1 Material Design
Material Design (previously called Quantum Paper) is a design language developed by Google[18],released in 2014. It aims to return to the design principles used in printing, and extend it with thingsthat are normally not possible in real printing (e.g. motion, responsive layouts, . . . ).
30 6 TS upgrade roadmap
At the center of material design is paper, every component of the design spec treats a user interfaceelement (e.g. containers, buttons, dropdowns, . . . ) as a it was being cut out and pasted togetherwith paper. The reason for this is that it is easier for a user to think with physical objects,
Google uses it to bring back consistency throughout its product line and across all types of devices.Material design is deployed on watches, phones, tablets, laptops, and televisions. Android Marshmallow(v6.x) has fully migrated to material design, and the vast majority of apps in the Google Play storehave adopted it.
The full Material Design spec can be found on the Google design webpage[19].
6.3 Handling large input
The legacy (i.e. Dojo) panels sent data back to the server using URL encoding (more info in chapter3.2.2).
The legacy panels can’t be adjusted without risking unforeseen consequences. The new (i.e.Polymer) panels however will all send data back to the server properly, using HTTP POST requeststhat contain any parameters in the POST body.
This is the way the HTTP specification designed to send data back to a server, and thus it solvesthe problems encountered with sending data with the legacy code. With the new approach it is nowtheoretically possible to send multi-gigabyte sized data.
6.4 Additions to the page builder classes
The C++ classes in the legacy system each represent an HTML element. This is manageablebecause in the set of elements in the legacy system is fixed. Since in the new system everyinterface developer will now have the possibility to extend the set of elements it would make senseto make a more abstract class to handle these new set of elements.
The ajax::PolymerElement class was added and is used like follows:
1 ajax::PolymerElement* myElement = new ajax::PolymerElement("my-element");2 myElement->set("some-property", "someValue");3 add(myElement);
Furthermore, the PlainHtml class has been extended with some shorthand functions to make iteasier to use. This because it is a frequently used class. instead of doing:
1 ajax::PlainHtml* br53 = new ajax::PlainHtml?();2 br53->getStream() << " <p>some html code<p>";3 add(br53);
it is now possible to do this:
1 add(new ajax::PlainHtml(" <p>some html code<p>"));
This greatly enhances readability of pages containing a lot of arbitrary html code like ‘<br>‘
The AjaXell code has also been modified to support HTML5 features like boolean attributes (i.e.attributes with no value).
6 TS upgrade roadmap 31
6.5 Upgraded event system
In the legacy codebase, events are attached to C++ classes declared in a panel.
1 ajax::Button* button = new ajax::Button();2 button->setId("subsystem_btnpanel_button_");3 button->setCaption("click me!");4 this->setEvent(button,ajax::Eventable::OnClick,result_,this,&ButtonExample::onClick);5 add(button);
However, this system has been extended to allow an event to be attached to the panel itself, ratherthan a class instance defined in the panel code.
1 setEvent("submit", ajax::Eventable::OnClick, this, &FormExample::submit);2 add(new ajax::PolymerElement("form-example"));
This is necessary because the server will no longer render every element in the interface. Anelement (e.g. a button) can be rendered client-side, so
6.6 New JSON library
The primary job of the server-side code will no longer be interface generation, but data generation.
In the legacy codebase there has been no easy way to generate XML or JSON data. The onlyviable way to construct these were to construct them manually or to use BOOST Property Trees,which require extensive amounts of code.
The TS will incorporate the JsonCpp library, a lightweight C++ library that makes the generationand parson of JSON very easy.
More information about this can be found in chapter 9.1.3.
6.7 Memory-leak problem
An interface panel can be used for extensive amounts of time, this time can be expressed in days.Therefore any memory leaks are unacceptable.
Unfortunately it is rather easy to create memory leaks in JavaScript. JavaScript uses a Reference-countinggarbage collection system[20]. Such a garbage collector cannot recognize circular references, andJavaScript closures add another memory leak pattern to watch out for.
6.7.1 Memory-leak patterns
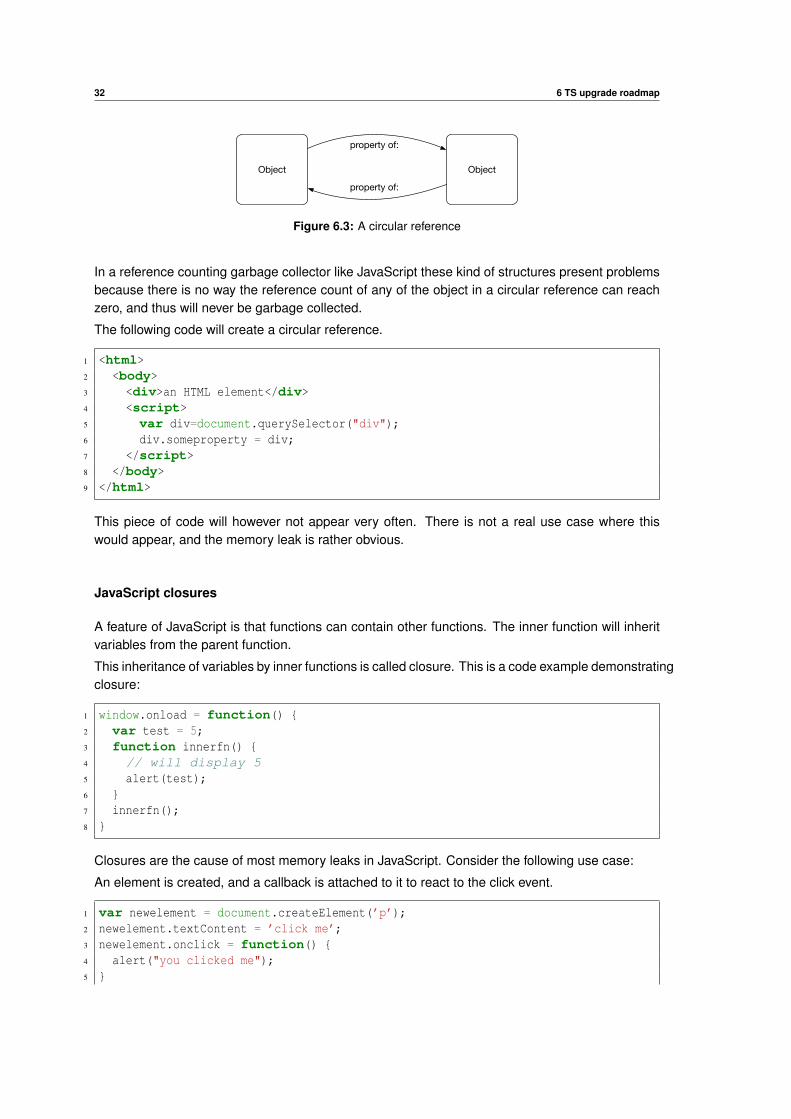
Circular references
A circular reference is formed when two or more objects reference each other in such a way aclosed circle can be drawn.
32 6 TS upgrade roadmap
Object Object
property of:
property of:
Figure 6.3: A circular reference
In a reference counting garbage collector like JavaScript these kind of structures present problemsbecause there is no way the reference count of any of the object in a circular reference can reachzero, and thus will never be garbage collected.
The following code will create a circular reference.
1 <html>2 <body>3 <div>an HTML element</div>4 <script>5 var div=document.querySelector("div");6 div.someproperty = div;7 </script>8 </body>9 </html>
This piece of code will however not appear very often. There is not a real use case where thiswould appear, and the memory leak is rather obvious.
JavaScript closures
A feature of JavaScript is that functions can contain other functions. The inner function will inheritvariables from the parent function.
This inheritance of variables by inner functions is called closure. This is a code example demonstratingclosure:
1 window.onload = function() {2 var test = 5;3 function innerfn() {4 // will display 55 alert(test);6 }7 innerfn();8 }
Closures are the cause of most memory leaks in JavaScript. Consider the following use case:
An element is created, and a callback is attached to it to react to the click event.
1 var newelement = document.createElement(’p’);2 newelement.textContent = ’click me’;3 newelement.onclick = function() {4 alert("you clicked me");5 }
6 TS upgrade roadmap 33
6 document.body.appendChild(newelement);
This simple code example contains a memory leak. the function attached to the onclick eventinherits the ‘newelement‘ variable, and thus has created a circular reference.
Avoiding memory leaks
Some simple patterns exist to avoid circular references.
Firstly, in a parent function one can set one of the variables causing a circular reference to null,thereby breaking the circle.
1 var newelement = document.createElement(’p’);2 newelement.textContent = ’click me’;3 newelement.onclick = function() {4 alert("you clicked me");5 }6 document.body.appendChild(newelement);7 newelement = null;
Another approach is to insert another closure
1 var inner2 = function() {2 alert("you clicked me");3 }4 (function inner() {5 var newelement = document.createElement(’p’);6 newelement.textContent = ’click me’;7 newelement.onclick = inner2;8 document.body.appendChild(newelement);9 })();
Lastly, one can avoid closure altogether.
1 function callbackfn = function() {2 alert("you clicked me");3 }4 var function makeElement = function() {5 var newelement = document.createElement(’p’);6 newelement.textContent = ’click me’;7 newelement.onclick = callbackfn;8 document.body.appendChild(newelement);9 }
10 makeElement();
6.7.2 Memory leaks in Dojo
Unfortunately, Dojo 0.4 or the implementation used here seems to contain a lot of circular references.Memory usage goes up linearly with the amount of panels used in a browser session.
To test this, a panel will be reloaded (by clicking in the menu) every second. This will be done for
34 6 TS upgrade roadmap
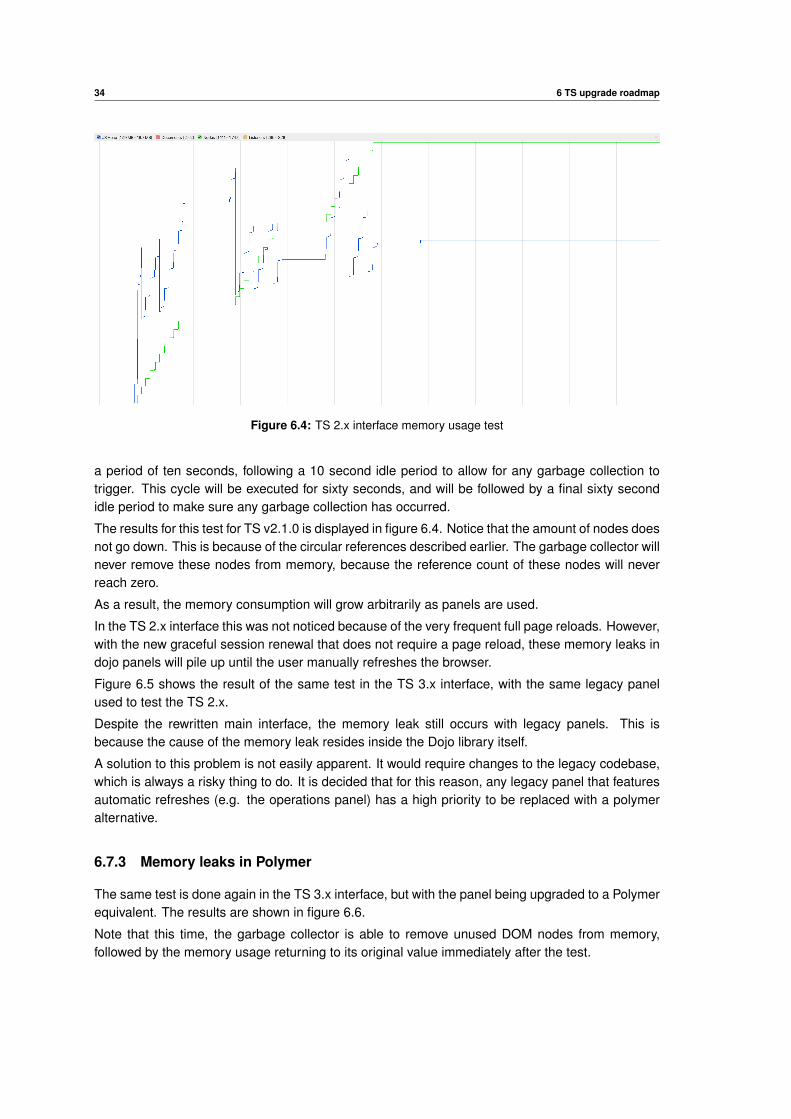
Figure 6.4: TS 2.x interface memory usage test
a period of ten seconds, following a 10 second idle period to allow for any garbage collection totrigger. This cycle will be executed for sixty seconds, and will be followed by a final sixty secondidle period to make sure any garbage collection has occurred.
The results for this test for TS v2.1.0 is displayed in figure 6.4. Notice that the amount of nodes doesnot go down. This is because of the circular references described earlier. The garbage collector willnever remove these nodes from memory, because the reference count of these nodes will neverreach zero.
As a result, the memory consumption will grow arbitrarily as panels are used.
In the TS 2.x interface this was not noticed because of the very frequent full page reloads. However,with the new graceful session renewal that does not require a page reload, these memory leaks indojo panels will pile up until the user manually refreshes the browser.
Figure 6.5 shows the result of the same test in the TS 3.x interface, with the same legacy panelused to test the TS 2.x.
Despite the rewritten main interface, the memory leak still occurs with legacy panels. This isbecause the cause of the memory leak resides inside the Dojo library itself.
A solution to this problem is not easily apparent. It would require changes to the legacy codebase,which is always a risky thing to do. It is decided that for this reason, any legacy panel that featuresautomatic refreshes (e.g. the operations panel) has a high priority to be replaced with a polymeralternative.
6.7.3 Memory leaks in Polymer
The same test is done again in the TS 3.x interface, but with the panel being upgraded to a Polymerequivalent. The results are shown in figure 6.6.
Note that this time, the garbage collector is able to remove unused DOM nodes from memory,followed by the memory usage returning to its original value immediately after the test.
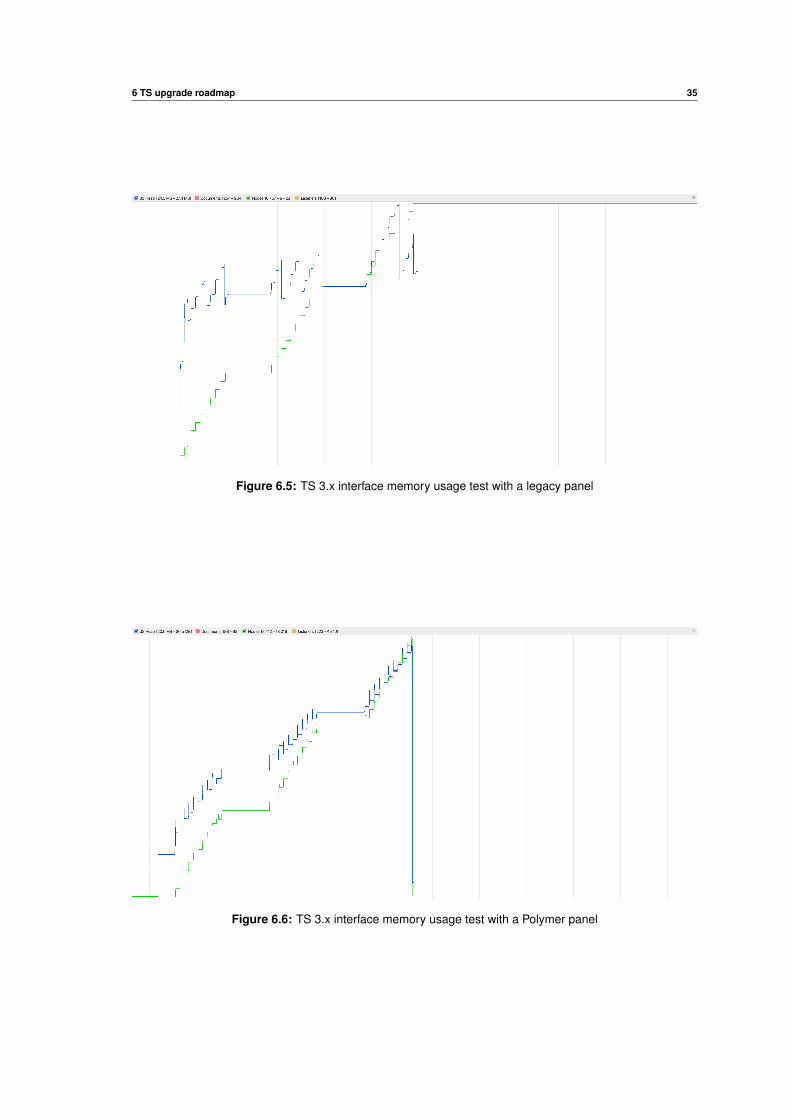
6 TS upgrade roadmap 35
Figure 6.5: TS 3.x interface memory usage test with a legacy panel
Figure 6.6: TS 3.x interface memory usage test with a Polymer panel

This page is intentionally left almost blank

Chapter 7
Development process
Given the size of the TS and the amount of stakeholders in the proposed changes, it is importantto have a decent planning.
The main objectives are productivity, and making sure developers deliver what is needed most at aparticular moment.
It also would be nice to have a sensible feedback system to allow the stakeholders to have aninfluence in the evolution of the TS changes, as they will be the people who are going to use it.
A modified version of the Scrum method has been used as the development process. The modificationsare focused on providing compatibility with the other development processes in use by other developers.Also it has been modified to account for the limited amount of people working on one task.
7.1 Scrum
Scrum is a relatively new way of developing software projects, although it has also been used toexecute projects not related to development (e.g. construction projects).
It focuses on delivering functional requirements prioritized on the value it adds to the project as awhole.
It implements a very strict and repetitive development cycle, usually with a period of 1 or moreweeks. This is called a Sprint. During the beginning of a Sprint, a set of functional requirementsare chosen as a goal, and must be achieved by the end of the Sprint.
An important distinction to make is that the developers themselves drive this process. There isno separate person who makes the planning and the set of requirements for a Sprint on theirbehalf. This is where Scrum gets efficient, because the developers after all know best what is mostimportant and feasible to achieve in one full Sprint.
At the end of a Sprint a set of functional requirements must be met. This means that particularset of functionality in the project must work in a sense that the end user can use it. This must beproven by a working demo to the stakeholders of the project, all of them.
This is also a very important part of Scrum. By demanding the functionality must work to such anextend that it would be useful for deployment means there is far less opportunity for hidden errorsduring actual deployment. The working demos to all of the stakeholders also provide feedback todevelopers at early stages, unlike other systems where stakeholders only get to see the productall the way at the end of the product development and notice the developers and stakeholders had
37
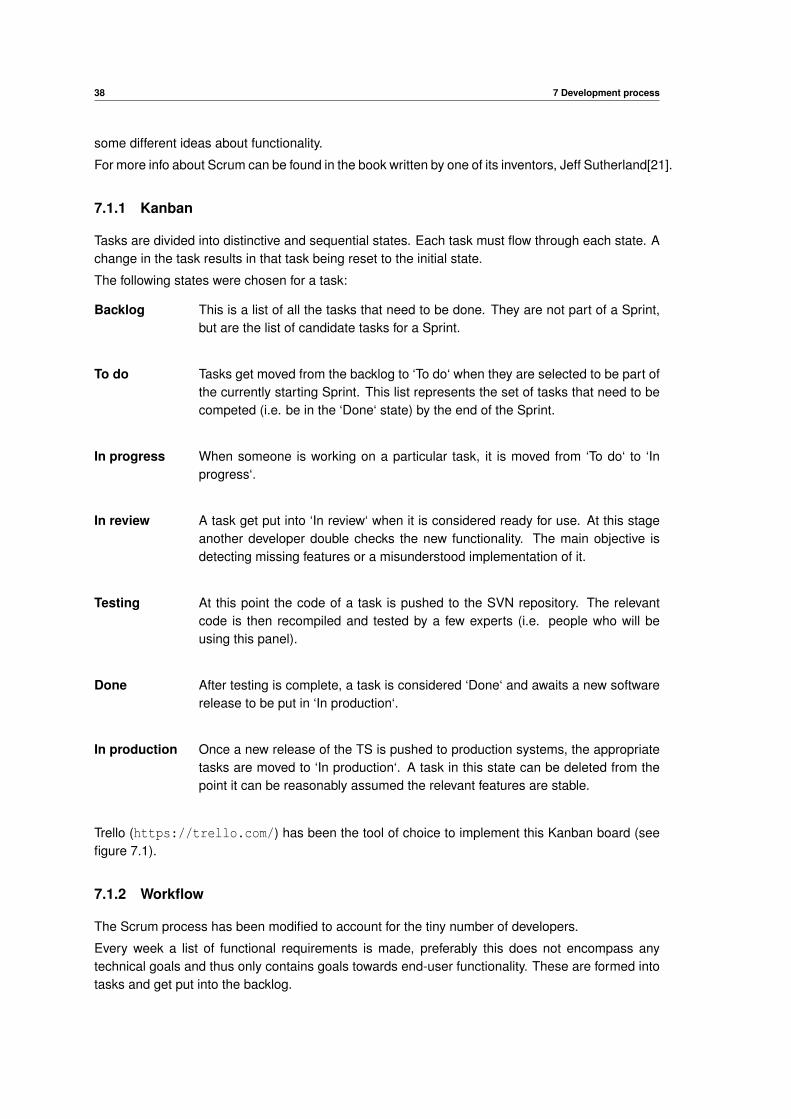
38 7 Development process
some different ideas about functionality.
For more info about Scrum can be found in the book written by one of its inventors, Jeff Sutherland[21].
7.1.1 Kanban
Tasks are divided into distinctive and sequential states. Each task must flow through each state. Achange in the task results in that task being reset to the initial state.
The following states were chosen for a task:
Backlog This is a list of all the tasks that need to be done. They are not part of a Sprint,but are the list of candidate tasks for a Sprint.
To do Tasks get moved from the backlog to ‘To do‘ when they are selected to be part ofthe currently starting Sprint. This list represents the set of tasks that need to becompeted (i.e. be in the ‘Done‘ state) by the end of the Sprint.
In progress When someone is working on a particular task, it is moved from ‘To do‘ to ‘Inprogress‘.
In review A task get put into ‘In review‘ when it is considered ready for use. At this stageanother developer double checks the new functionality. The main objective isdetecting missing features or a misunderstood implementation of it.
Testing At this point the code of a task is pushed to the SVN repository. The relevantcode is then recompiled and tested by a few experts (i.e. people who will beusing this panel).
Done After testing is complete, a task is considered ‘Done‘ and awaits a new softwarerelease to be put in ‘In production‘.
In production Once a new release of the TS is pushed to production systems, the appropriatetasks are moved to ‘In production‘. A task in this state can be deleted from thepoint it can be reasonably assumed the relevant features are stable.
Trello (https://trello.com/) has been the tool of choice to implement this Kanban board (seefigure 7.1).
7.1.2 Workflow
The Scrum process has been modified to account for the tiny number of developers.
Every week a list of functional requirements is made, preferably this does not encompass anytechnical goals and thus only contains goals towards end-user functionality. These are formed intotasks and get put into the backlog.
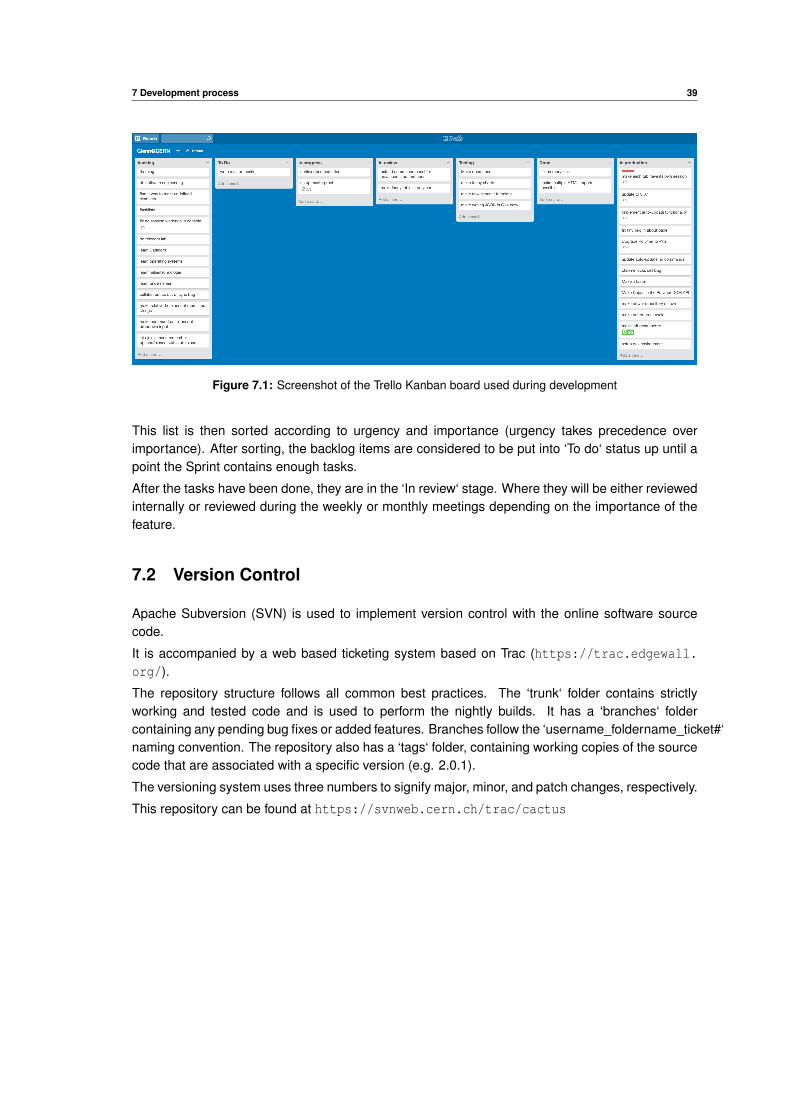
7 Development process 39
Figure 7.1: Screenshot of the Trello Kanban board used during development
This list is then sorted according to urgency and importance (urgency takes precedence overimportance). After sorting, the backlog items are considered to be put into ‘To do‘ status up until apoint the Sprint contains enough tasks.
After the tasks have been done, they are in the ‘In review‘ stage. Where they will be either reviewedinternally or reviewed during the weekly or monthly meetings depending on the importance of thefeature.
7.2 Version Control
Apache Subversion (SVN) is used to implement version control with the online software sourcecode.
It is accompanied by a web based ticketing system based on Trac (https://trac.edgewall.org/).
The repository structure follows all common best practices. The ‘trunk‘ folder contains strictlyworking and tested code and is used to perform the nightly builds. It has a ‘branches‘ foldercontaining any pending bug fixes or added features. Branches follow the ‘username_foldername_ticket#‘naming convention. The repository also has a ‘tags‘ folder, containing working copies of the sourcecode that are associated with a specific version (e.g. 2.0.1).
The versioning system uses three numbers to signify major, minor, and patch changes, respectively.
This repository can be found at https://svnweb.cern.ch/trac/cactus

This page is intentionally left almost blank
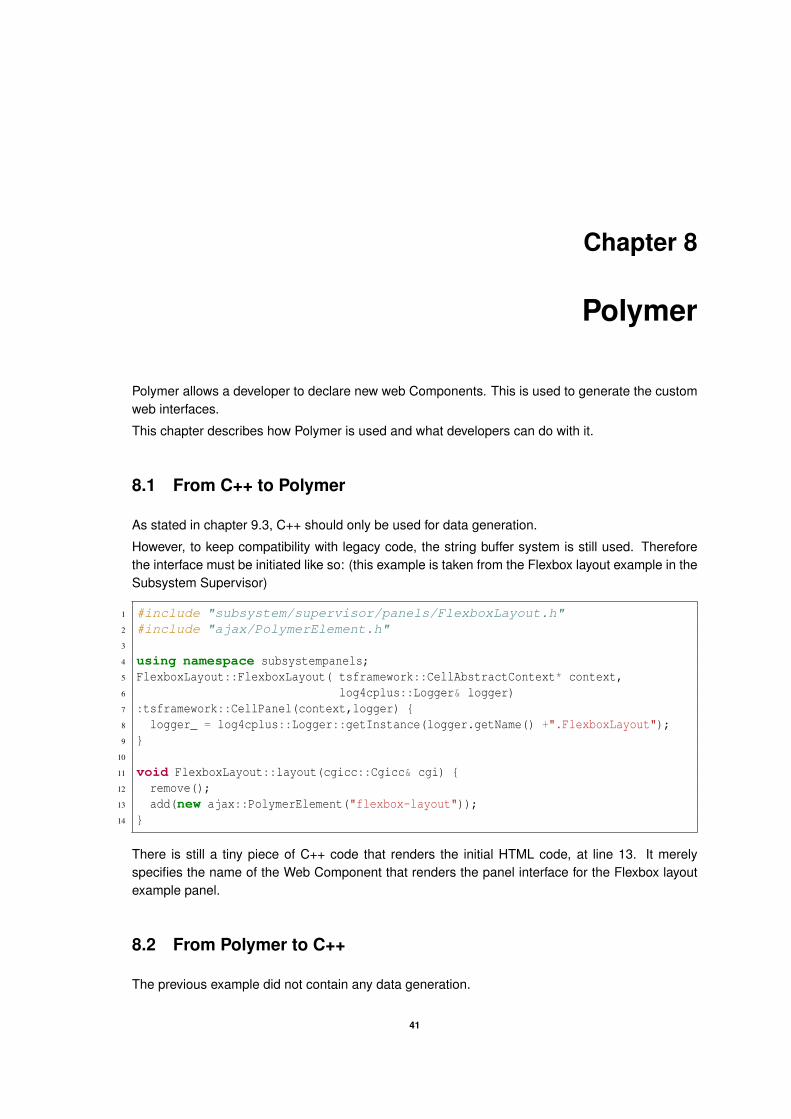
Chapter 8
Polymer
Polymer allows a developer to declare new web Components. This is used to generate the customweb interfaces.
This chapter describes how Polymer is used and what developers can do with it.
8.1 From C++ to Polymer
As stated in chapter 9.3, C++ should only be used for data generation.
However, to keep compatibility with legacy code, the string buffer system is still used. Thereforethe interface must be initiated like so: (this example is taken from the Flexbox layout example in theSubsystem Supervisor)
1 #include "subsystem/supervisor/panels/FlexboxLayout.h"2 #include "ajax/PolymerElement.h"3
4 using namespace subsystempanels;5 FlexboxLayout::FlexboxLayout( tsframework::CellAbstractContext* context,6 log4cplus::Logger& logger)7 :tsframework::CellPanel(context,logger) {8 logger_ = log4cplus::Logger::getInstance(logger.getName() +".FlexboxLayout");9 }
10
11 void FlexboxLayout::layout(cgicc::Cgicc& cgi) {12 remove();13 add(new ajax::PolymerElement("flexbox-layout"));14 }
There is still a tiny piece of C++ code that renders the initial HTML code, at line 13. It merelyspecifies the name of the Web Component that renders the panel interface for the Flexbox layoutexample panel.
8.2 From Polymer to C++
The previous example did not contain any data generation.
41
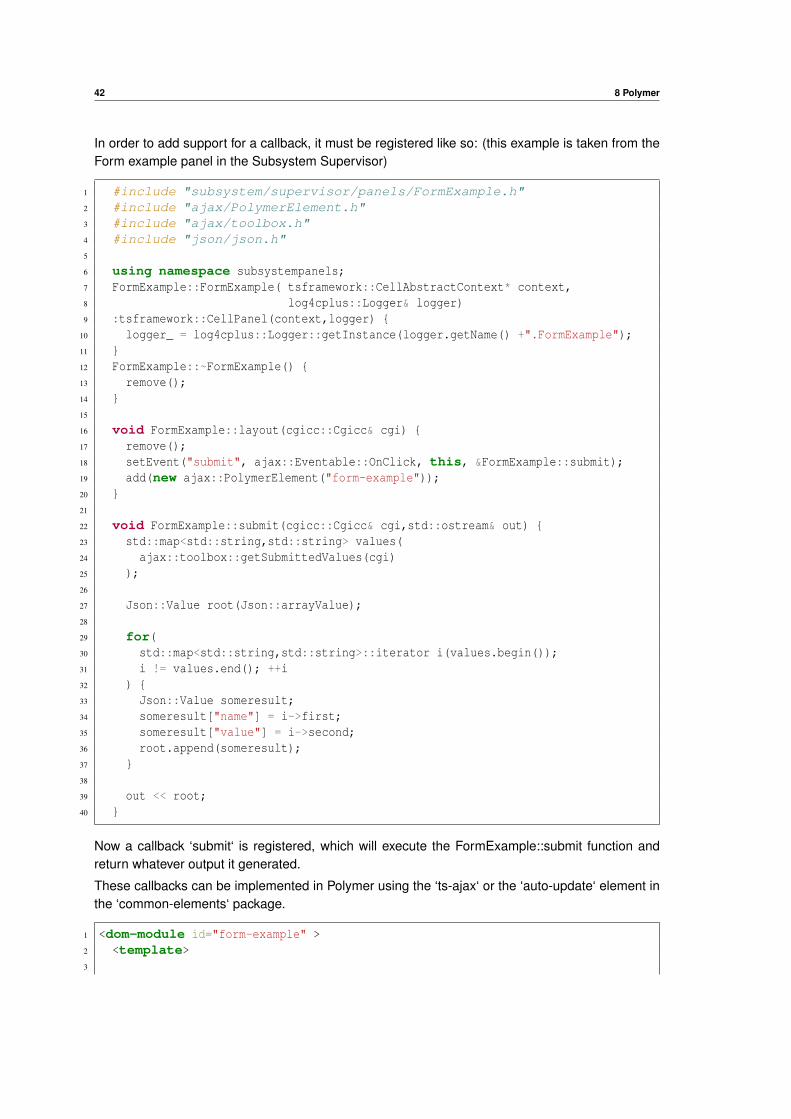
42 8 Polymer
In order to add support for a callback, it must be registered like so: (this example is taken from theForm example panel in the Subsystem Supervisor)
1 #include "subsystem/supervisor/panels/FormExample.h"2 #include "ajax/PolymerElement.h"3 #include "ajax/toolbox.h"4 #include "json/json.h"5
6 using namespace subsystempanels;7 FormExample::FormExample( tsframework::CellAbstractContext* context,8 log4cplus::Logger& logger)9 :tsframework::CellPanel(context,logger) {
10 logger_ = log4cplus::Logger::getInstance(logger.getName() +".FormExample");11 }12 FormExample::~FormExample() {13 remove();14 }15
16 void FormExample::layout(cgicc::Cgicc& cgi) {17 remove();18 setEvent("submit", ajax::Eventable::OnClick, this, &FormExample::submit);19 add(new ajax::PolymerElement("form-example"));20 }21
22 void FormExample::submit(cgicc::Cgicc& cgi,std::ostream& out) {23 std::map<std::string,std::string> values(24 ajax::toolbox::getSubmittedValues(cgi)25 );26
27 Json::Value root(Json::arrayValue);28
29 for(30 std::map<std::string,std::string>::iterator i(values.begin());31 i != values.end(); ++i32 ) {33 Json::Value someresult;34 someresult["name"] = i->first;35 someresult["value"] = i->second;36 root.append(someresult);37 }38
39 out << root;40 }
Now a callback ‘submit‘ is registered, which will execute the FormExample::submit function andreturn whatever output it generated.
These callbacks can be implemented in Polymer using the ‘ts-ajax‘ or the ‘auto-update‘ element inthe ‘common-elements‘ package.
1 <dom-module id="form-example" >2 <template>3
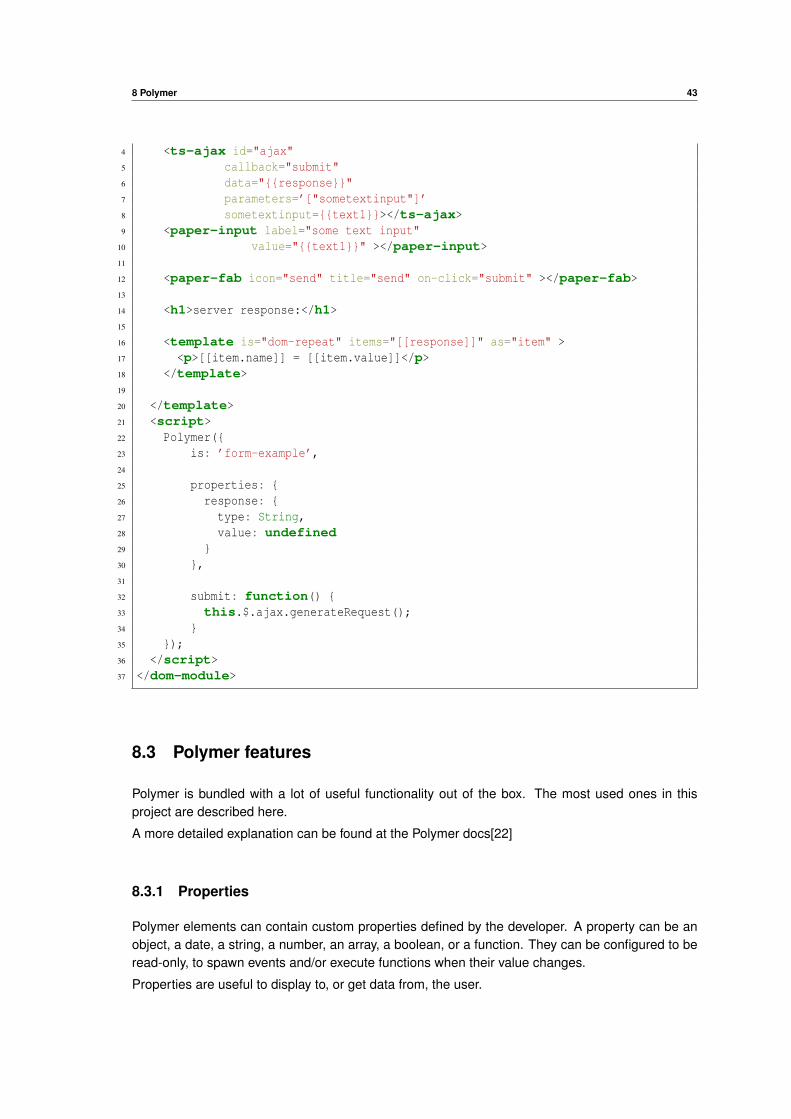
8 Polymer 43
4 <ts-ajax id="ajax"5 callback="submit"6 data="{{response}}"7 parameters=’["sometextinput"]’8 sometextinput={{text1}}></ts-ajax>9 <paper-input label="some text input"
10 value="{{text1}}" ></paper-input>11
12 <paper-fab icon="send" title="send" on-click="submit" ></paper-fab>13
14 <h1>server response:</h1>15
16 <template is="dom-repeat" items="[[response]]" as="item" >17 <p>[[item.name]] = [[item.value]]</p>18 </template>19
20 </template>21 <script>22 Polymer({23 is: ’form-example’,24
25 properties: {26 response: {27 type: String,28 value: undefined29 }30 },31
32 submit: function() {33 this.$.ajax.generateRequest();34 }35 });36 </script>37 </dom-module>
8.3 Polymer features
Polymer is bundled with a lot of useful functionality out of the box. The most used ones in thisproject are described here.
A more detailed explanation can be found at the Polymer docs[22]
8.3.1 Properties
Polymer elements can contain custom properties defined by the developer. A property can be anobject, a date, a string, a number, an array, a boolean, or a function. They can be configured to beread-only, to spawn events and/or execute functions when their value changes.
Properties are useful to display to, or get data from, the user.
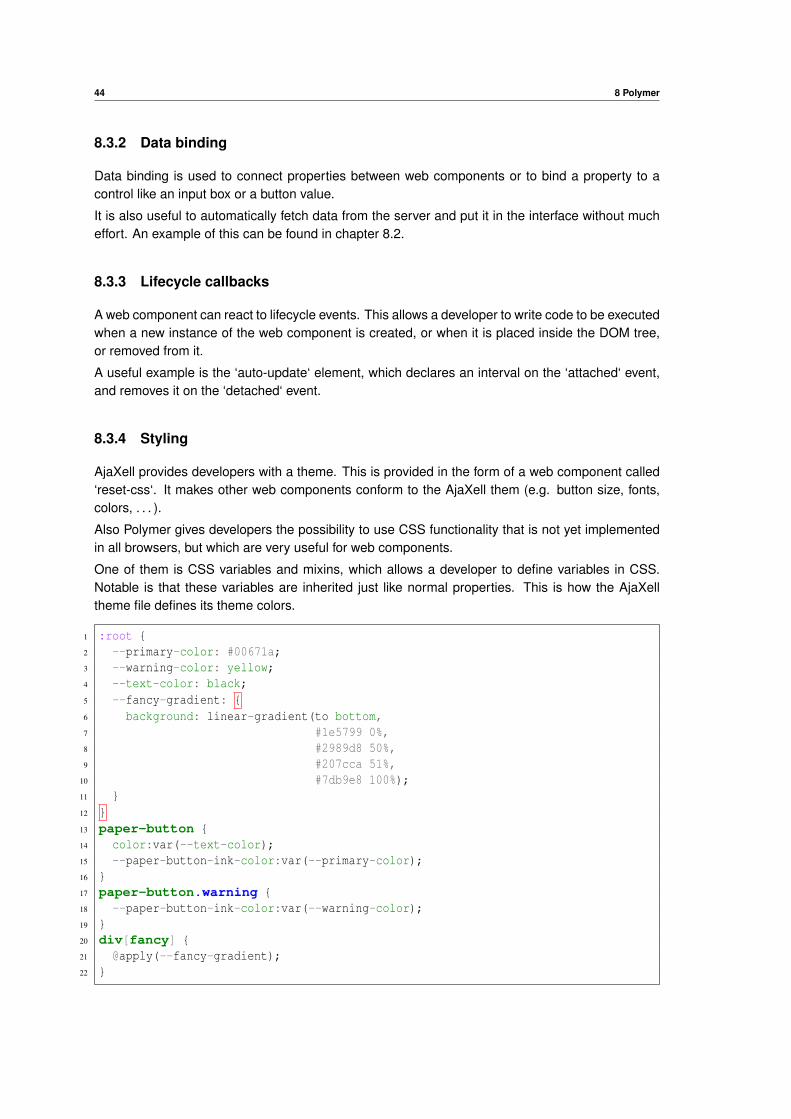
44 8 Polymer
8.3.2 Data binding
Data binding is used to connect properties between web components or to bind a property to acontrol like an input box or a button value.
It is also useful to automatically fetch data from the server and put it in the interface without mucheffort. An example of this can be found in chapter 8.2.
8.3.3 Lifecycle callbacks
A web component can react to lifecycle events. This allows a developer to write code to be executedwhen a new instance of the web component is created, or when it is placed inside the DOM tree,or removed from it.
A useful example is the ‘auto-update‘ element, which declares an interval on the ‘attached‘ event,and removes it on the ‘detached‘ event.
8.3.4 Styling
AjaXell provides developers with a theme. This is provided in the form of a web component called‘reset-css‘. It makes other web components conform to the AjaXell them (e.g. button size, fonts,colors, . . . ).
Also Polymer gives developers the possibility to use CSS functionality that is not yet implementedin all browsers, but which are very useful for web components.
One of them is CSS variables and mixins, which allows a developer to define variables in CSS.Notable is that these variables are inherited just like normal properties. This is how the AjaXelltheme file defines its theme colors.
1 :root {2 --primary-color: #00671a;3 --warning-color: yellow;4 --text-color: black;5 --fancy-gradient: {6 background: linear-gradient(to bottom,7 #1e5799 0%,8 #2989d8 50%,9 #207cca 51%,
10 #7db9e8 100%);11 }12 }13 paper-button {14 color:var(--text-color);15 --paper-button-ink-color:var(--primary-color);16 }17 paper-button.warning {18 --paper-button-ink-color:var(--warning-color);19 }20 div[fancy] {21 @apply(--fancy-gradient);22 }
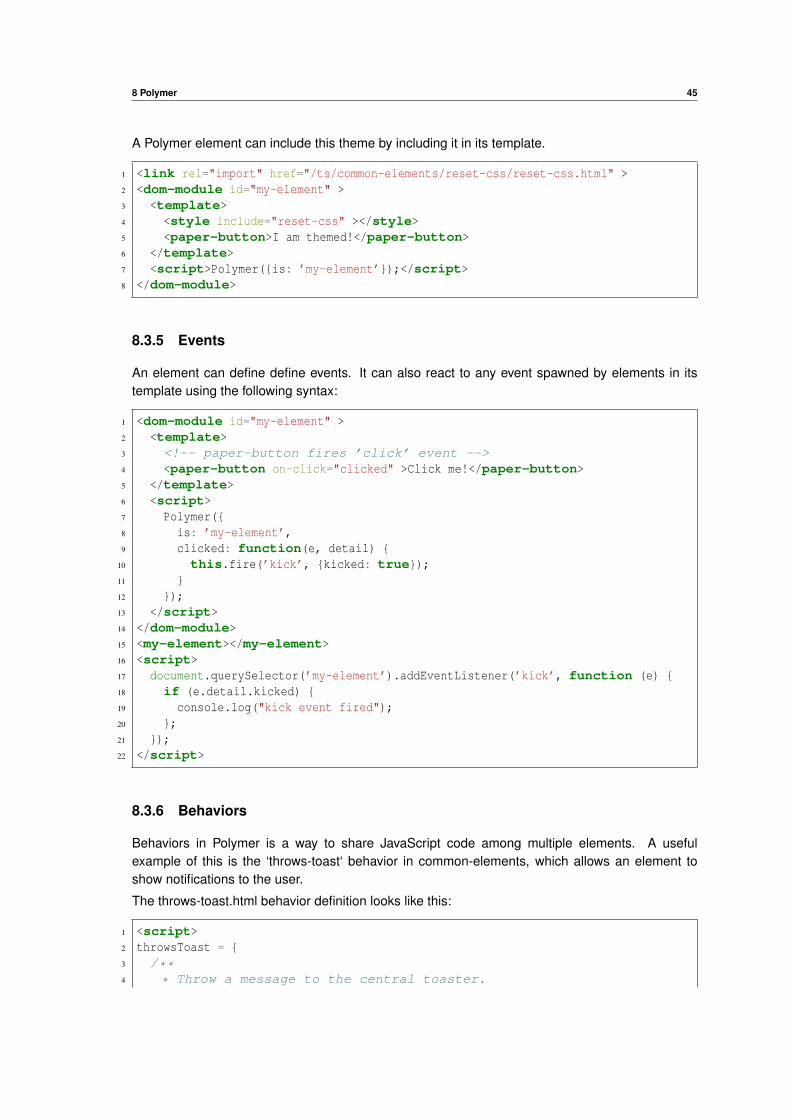
8 Polymer 45
A Polymer element can include this theme by including it in its template.
1 <link rel="import" href="/ts/common-elements/reset-css/reset-css.html" >2 <dom-module id="my-element" >3 <template>4 <style include="reset-css" ></style>5 <paper-button>I am themed!</paper-button>6 </template>7 <script>Polymer({is: ’my-element’});</script>8 </dom-module>
8.3.5 Events
An element can define define events. It can also react to any event spawned by elements in itstemplate using the following syntax:
1 <dom-module id="my-element" >2 <template>3 <!-- paper-button fires ’click’ event -->4 <paper-button on-click="clicked" >Click me!</paper-button>5 </template>6 <script>7 Polymer({8 is: ’my-element’,9 clicked: function(e, detail) {
10 this.fire(’kick’, {kicked: true});11 }12 });13 </script>14 </dom-module>15 <my-element></my-element>16 <script>17 document.querySelector(’my-element’).addEventListener(’kick’, function (e) {18 if (e.detail.kicked) {19 console.log("kick event fired");20 };21 });22 </script>
8.3.6 Behaviors
Behaviors in Polymer is a way to share JavaScript code among multiple elements. A usefulexample of this is the ‘throws-toast‘ behavior in common-elements, which allows an element toshow notifications to the user.
The throws-toast.html behavior definition looks like this:
1 <script>2 throwsToast = {3 /**4 * Throw a message to the central toaster.
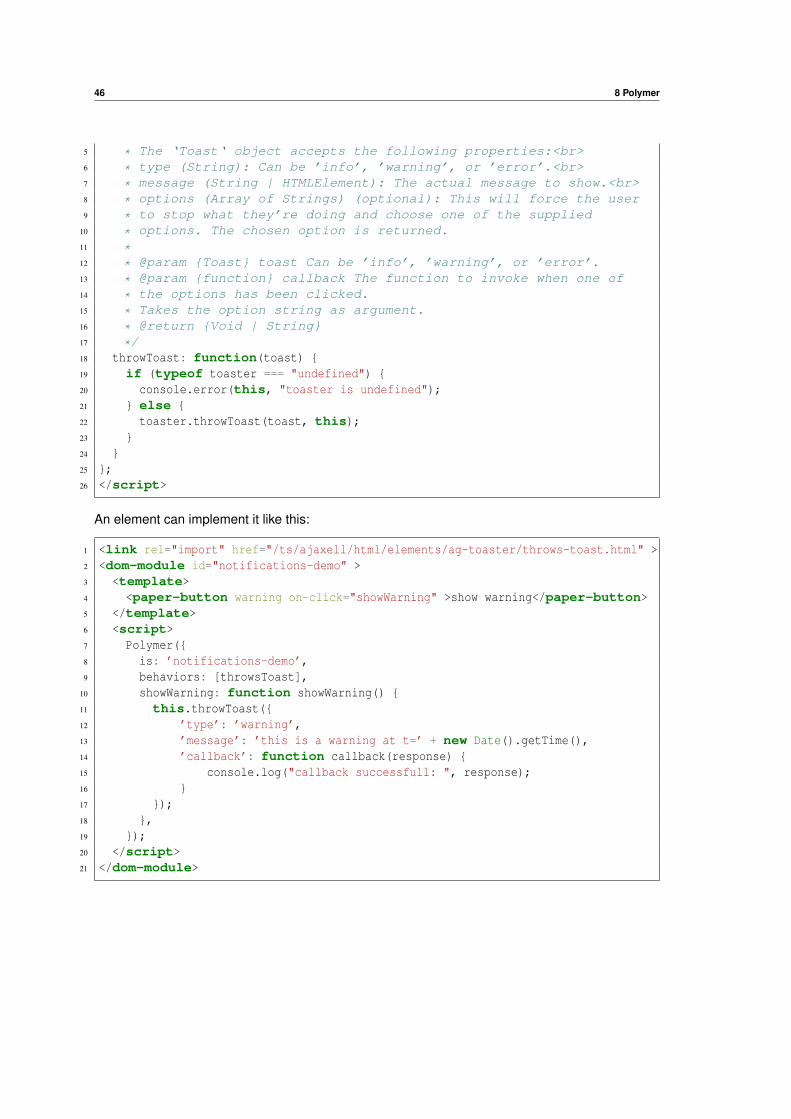
46 8 Polymer
5 * The ‘Toast‘ object accepts the following properties:<br>6 * type (String): Can be ’info’, ’warning’, or ’error’.<br>7 * message (String | HTMLElement): The actual message to show.<br>8 * options (Array of Strings) (optional): This will force the user9 * to stop what they’re doing and choose one of the supplied
10 * options. The chosen option is returned.11 *12 * @param {Toast} toast Can be ’info’, ’warning’, or ’error’.13 * @param {function} callback The function to invoke when one of14 * the options has been clicked.15 * Takes the option string as argument.16 * @return {Void | String}17 */18 throwToast: function(toast) {19 if (typeof toaster === "undefined") {20 console.error(this, "toaster is undefined");21 } else {22 toaster.throwToast(toast, this);23 }24 }25 };26 </script>
An element can implement it like this:
1 <link rel="import" href="/ts/ajaxell/html/elements/ag-toaster/throws-toast.html" >2 <dom-module id="notifications-demo" >3 <template>4 <paper-button warning on-click="showWarning" >show warning</paper-button>5 </template>6 <script>7 Polymer({8 is: ’notifications-demo’,9 behaviors: [throwsToast],
10 showWarning: function showWarning() {11 this.throwToast({12 ’type’: ’warning’,13 ’message’: ’this is a warning at t=’ + new Date().getTime(),14 ’callback’: function callback(response) {15 console.log("callback successfull: ", response);16 }17 });18 },19 });20 </script>21 </dom-module>
Chapter 9
The renewed panel SDK
The new front-end and back-end codebase provide an interface developer with a whole new set oftools.
9.1 Packages available to panel developers
The set of pre-made tools available to developers has vastly expanded.
Not only does this mean a more rich set of tools are developed internally, developers can now alsofind and include tools they find on the web.
This will provide a way to get the framework capabilities to evolve as time goes on.
9.1.1 Bower Components
All libraries, web components, sources, . . . that are not developed in-house are housed in thebower-components package. The name is derived from the package manager used to pull in theseresources, called ‘bower‘ (http://bower.io/).
The bower-components package contains a ‘bower.js‘ file that specifies the dependencies to bepulled from the web. Then the dependencies are compressed into a tarball. This is done to makesure the package versions do not change unintentional, and new package versions can be testedin a controlled manner.
Currently, the following elements are included in bower-components:
Polymer (https://www.polymer-project.org/)
iron-elements (https://elements.polymer-project.org/browse?package=iron-elements) The iron-elements are a set of web components aiming toprovide a basic set of tools and enhancements to standard elements, forexample to provide them with data-binding capabilities.
These elements do not make assumptions about the used layout orstyling, and are expected to maintain a spartan view, if they render aview at all.
Iron-elements aim to extend basic html elements (e.g. <iron-input> toextend <input>), provide façade elements for javascript functionality (e.g.
47
48 9 The renewed panel SDK
<iron-ajax> to easily make AJAX requests), or provide new functionalitythat would be considered basic functionality (e.g. <iron-icon> to displayan icon).
paper-elements (https://elements.polymer-project.org/browse?package=paper-elements) Paper-elements is a set of elements that focus on bringingMaterial Design[19] to web components.
Paper-elements aims to extend iron-elements with material design (e.g.<iron-input> becomes <paper-input>), and introduce new elements thatare unique to material design (e.g. <paper-toast>)
gold-elements (https://elements.polymer-project.org/browse?package=gold-elements) Gold elements are input elements for specific use cases (e.g.email, phone numbers, credit card numbers, . . . ).
They all extend the ‘paper-input‘ element and provide specific validationand formatting functionality.
neon-elements (https://elements.polymer-project.org/browse?package=neon-elements) neon-elements are a set of Web Components designed tobe façades for the JavaScript animation API to make them available bypurely writing HTML.
These elements do not use CSS Transitions, CSS Animations, or SVG,rather they use the new Web Animations API (https://www.w3.org/TR/web-animations/).
These are among the most advanced Web Components in the packagesavailable to panel developers. More info about their usage is providedhere: https://youtu.be/-tX0e29GQa4.
platinum-elements (https://elements.polymer-project.org/browse?package=platinum-elements) Platinum-elements are a set of Web Components focused onproviding a façade for web-app capabilities like Service Workers, serverpush, and bluetooth connectivity.
jQuery (https://jquery.com/)
moment.js (http://momentjs.com/)JavaScript library for parsing, validating, manipulating, and formattingdates.
page.js (https://visionmedia.github.io/page.js/)Micro client-side JavaScript router inspired by the Express router.
spectrum.js (https://bgrins.github.io/spectrum/)Spectrum is a JavaScript colorpicker plugin using the jQuery framework.
juicy-jsoneditor (https://github.com/Juicy/juicy-jsoneditor/)
cytoscape (http://cytoscape.org/)
paper-datatable (https://github.com/David-Mulder/paper-datatable)
9 The renewed panel SDK 49
vaadin-core-elements (https://vaadin.com/elements)Vaadin-core-elements are a set of Web Components developed by Vaadin(https://vaadin.com). It focused on developing Web Components forbusiness use cases like data grids, charts, iconsets, file uploaders, andspecific user interface elements like a modified dropdown and a datepicker.
juicy-ace-editor (https://github.com/Juicy/juicy-ace-editor/)Custom Element with Ace(http://ace.c9.io/) code editor.
file-saver.js (https://github.com/eligrey/FileSaver.js/)FileSaver.js implements the HTML5 W3C saveAs() FileSaver interfacein browsers that do not natively support it.
saveSvgAsPng (https://github.com/exupero/saveSvgAsPng.git)Save SVGs as PNGs from the browser.
KaTeX (https://github.com/Khan/KaTeX)Fast math typesetting for the web.
9.1.2 common-elements
The common-elements package is composed of a set of in-house developed Web Components.
The main focus of this package is to provide panel developers with frequently used functionality.This includes server callbacks, custom input elements, etc.
Currently the Web Components bundled with common-elements are the following:
KaTeX-js Loads the katex.js library, used to render latex math in javascript
auto-update automatically updates server-side data Note that it is very similar to ts-ajax.However ts-ajax only makes a request when you ask for it, auto-updateimplements an interval with which it will automatically and periodically makea request. Example html in a panel:
<auto-update data="{{my_variable}}"callback="cpp_callback"handle-as="text"></auto-update>
<span>{{my_variable}}</span>
color-picker polyfills the html5 color input. This element will be a plain html5 color inputelement if supported. If not, it will load spectrum.js and provide a colorinput via JavaScript.
command-input receives three values ’name’, ’value’, and ’type’ and converts it into anappropriate input element. Currently, command-input recognizes the followingdata types: number, int, long, unsigned int, unsigned long, short, unsignedshort, string, double, and float. Examples:
50 9 The renewed panel SDK
<command-input name="dinosaurs are great"value="true" type="bool"></command-input>
<command-input name="your_favorite_dinosaur"value="deinonychus"type="string"></command-input>
<command-input name="positive number"value="0"type="unsigned int"></command-input>
fake-a is a Polymer element that behaves like an anchor (<a>) element, but doesnot follow the href and thus does not accidentally cause a page refresh.Example:
<fake-a on-click="something">click me</fake-a>
file-saver-js loads the file-saver.js library. Used to save files with javascript.
iron-flex-layout-attributes provide a simple way to use the css flexbox system. It follows the samesyntax as the ‘iron-flex-layout‘, a guide for this syntax is available here:https://elements.polymer-project.org/guides/flex-layout
key-value-pair is a simple element that takes a key and a value and presents it nicely.Example:
<key-value-pair key="my key"value="my value"></key-value-pair>
master-detail-layout implements a responsive master-detail layout When on a large enoughscreen, the master and detail view are displayed side to side. When on asmall device, either the master or the detail view is shown, and the usercan switch between them Example:
<master-detail-layout><div master>I am the master view</div><div detail>I am the detail view</div>
</master-detail-layout>
math-equation element that takes latex math input and renders it as a proper equation
moment-js loads the moment.js library
page-js loads the page.js library
relative-time takes a date string and converts it to a relative time (ex: 2h ago) usingmoment.js Example:
<relative-time date="Fri Feb 12 2016 16:30:35 GMT+0100 (CET)"></relative-time>
9 The renewed panel SDK 51
reset-css makes an element follow the AjaXell theme. When other elements use thiselement, that element will be enriched with theme directives (colors, sizes,fonts, . . . ).
responsive-behavior extends an element with material design breakpoints. It implements thebreakpoints from material design. This behavior will give the element astyle tag corresponding to the current screen size (extra-small, small, medium,large, extra-large), this can be used to style an element.
save-svg-as-png loads the saveSvgAsPng.js library. It converts an SVG tag to a png bitmap.
ts-ajax makes an ajax request to a specified callback. It is very similar to auto-update,except for the fact that this doesn’t have an interval, it only makes a requestwhen you ask it to. Also not that the C++ callback event is ’OnClick’ andnot ’OnTime’ as with auto-update. Example html in a panel:
<ts-ajax data="{{my_variable}}"callback="cpp_callback"handle-as="text"auto></ts-ajax>
<span>{{my_variable}}</span>
ts-colors Gives an element access to the material design color palette via attributes
ts-tree renders a tree structure from a given JSON.
cytoscape-import loads the cytoscape.js library
candlestick-chart renders a cumulative line chart
cumulative-line-chart renders a cumulative line chart using nvd3.js
cytoscape-import loads the cytoscape.js library
d3-import loads the d3.js library
discrete-bar-chart renders a cumulative line chart
focus-line-chart renders a line chart with focus area using nvd3.js
historical-bar-chart renders a cumulative line chart
horizontal-stacked-bar-chart renders a horizontally stacked bar chart using nvd3.js
line-chart renders a line chart using nvd3.js
multi-chart advanced chart element capable of rendering multiple charts as one
nvd3-chart-behavior the behavior that holds all common element code for NVD3-based chartelements
nvd3-import imports the nvd3.js library, a JavaScript charting library based on D3
parallel-chart renders a cumulative line chart
52 9 The renewed panel SDK
pie-chart renders a pie chart using nvd3.js
scatter-chart renders a scatter chart using nvd3.js
stacked-area-chart renders a stacked area chart using nvd3.js
stacked-bar-chart renders a stacked bar chart using nvd3.js
state-diagram renders a state diagram using cytoscape.js
sunburst-chart renders a sunburst chart using nvd3.js
This list is taken from http://cell/ts/common-elements/index.html
9.1.3 JsonCpp
A panel developer will now use the C++ code primarily for data generation. Therefore it shouldhave some very good tools to send data to the client.
In the legacy codebase the way to put data in JSON format was by using a BOOST Property Tree.Unfortunately BOOST Property trees are not very adequate to generate JSON. They for exampledon’t support the notion of arrays[23].
BOOST Property trees have been replaced in the new codebase by JsonCpp, (https://github.com/open-source-parsers/jsoncpp), a lightweight library specifically designed to render andinterpret JSON strings.
JsonCpp allow for much more cleaner code. Consider the following example:
This code creates an array of objects using BOOST. Note the fact developers have to render thearray manually. This can made code very messy if a developer would need an array inside aproperty tree, the code stays relatively clean now because the array is the root node.
1 map<string, xdata::Serializable*> dummyParams = getOperation().getParamList();2
3 out << "[";4 for ( map<string,xdata::Serializable*>::iterator i = dummyParams.begin();5 i != dummyParams.end(); ++i ) {6 if (i != dummyParams.begin()) {7 out << ",";8 }9 boost::property_tree::ptree object;
10 object.put("name", i->first);11 object.put("type", i->second->type());12 object.put("value", dummyParams [i->first]->toString());13 boost::property_tree::write_json(out, deviceTree);14 }15 out << "]";
Now consider the same array of objects, but this time created with JsonCpp. Note that the code ismuch cleaner.
1 map<string, xdata::Serializable*> dummyParams = getOperation().getParamList();2
3 Json::Value root(Json::arrayValue);
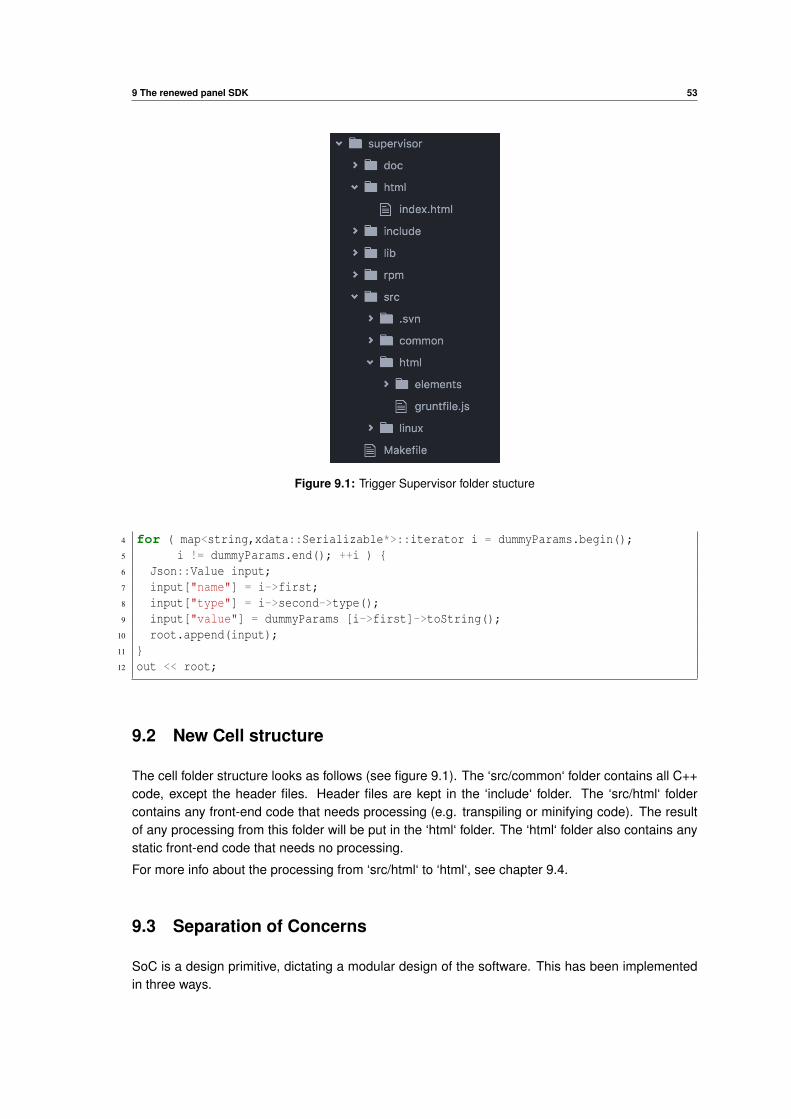
9 The renewed panel SDK 53
Figure 9.1: Trigger Supervisor folder stucture
4 for ( map<string,xdata::Serializable*>::iterator i = dummyParams.begin();5 i != dummyParams.end(); ++i ) {6 Json::Value input;7 input["name"] = i->first;8 input["type"] = i->second->type();9 input["value"] = dummyParams [i->first]->toString();
10 root.append(input);11 }12 out << root;
9.2 New Cell structure
The cell folder structure looks as follows (see figure 9.1). The ‘src/common‘ folder contains all C++code, except the header files. Header files are kept in the ‘include‘ folder. The ‘src/html‘ foldercontains any front-end code that needs processing (e.g. transpiling or minifying code). The resultof any processing from this folder will be put in the ‘html‘ folder. The ‘html‘ folder also contains anystatic front-end code that needs no processing.
For more info about the processing from ‘src/html‘ to ‘html‘, see chapter 9.4.
9.3 Separation of Concerns
SoC is a design primitive, dictating a modular design of the software. This has been implementedin three ways.
54 9 The renewed panel SDK
Firstly, different syntaxes now are housed in their own files. This allows for significantly less messycode and enables us to implement specific optimizations for each language (for example a CSSpre- and post-processor).
Secondly, the developer is not limited to one source file for each syntax. If circumstances wouldmake some code easier to manage if it is housed across multiple files this is now possible. Anexample of this would be a panel with multiple specialized sections. Separating these sections willmake the code easier to read and maintain.
Thirdly, this approach pushes developers to separate data from markup. This is a very good thingas it causes the code to once again be much more readable. By having the C++ code only producethe necessary data and putting all rendering and interaction on the front-end, developers can alsosafely replace rendering logic or user interaction flow without having to worry about data generation.
9.4 Grunt build system
During development of the front-end code. Code is kept in multiple files (for the SoC principle).
Instead of loading all the separated files individually at runtime, they will instead be compiledtogether at compile-time. This will improve loading speeds. The tool used to do this is Grunthttp://gruntjs.com/, a task runner built on nodeJS that is used to process front-end codelanguages. It is currently a popular tool to compile, minify, lint, unit-test, etc. front-end code beforeit is put in production. It has very wide community adoption, which results in a very rich set of toolsavailable for use.
Now that every code language is housed in specialized files, some optimizations on them can run atcompile-time. The main objective of these optimizations is to achieve as much browser compatibilityas possible.
9.4.1 JavaScript processing
In order to ensure compatibility with all required browsers all JavaScript code is transpiled by Babelhttps://babeljs.io/. This will ensure that newer syntax, like ECMAScript 2016 (ES7), will betranspiled into a more compatible equivalent.
Also the JavaScript code will be transpiled by UglifyJS https://github.com/mishoo/UglifyJS.This will implement various code optimizations[24] making the code faster.
9.4.2 CSS processing
SASS
Developers are given the possibility to write SASS code, an extension of the CSS syntax, that willbe transpiled into CSS on compile-time using libsass http://sass-lang.com/libsass.
Autoprefixer
Also Grunt will automatically add vendor-specific prefixes to CSS properties to maintain the requiredbrowser compatibility using a tool called autoprefixer https://github.com/postcss/autoprefixer.
9 The renewed panel SDK 55
9.4.3 HTML processing
No processing is done on the html code except for the fact that it is inlined.
Inliner
Any css link tag or script tag is inlined (i.e. the contents of the referenced file read and inserted inthe document) when the url in that tag contains ‘__inline=true‘.
9.5 Templates
To assist developers when creating new interfaces, a set of template files and scripts have beendeveloped.
Where appropriate, a script ‘new-element.js‘ is present. A developer can execute this command tocreate a new element containing html, sass, and javascript code, all with inline documentation anda demo page.
9.6 Panel registration system
An interface consists of multiple libraries. Each of these could possibly contain element definitions(e.g. the AjaXell library has elements concerning things like session management).
To allow any loaded library to declare its own Web Components, a panel registration system isincluded in the AjaXell libary.
It allows a developer to register any custom elements he developed in his cell like so:
1 void <package-name>::Cell::init()2 {3 getContext()->addImport("/<package-path>/html/elements/elements.html");4 }
With the ‘elements.html‘ file containing element definitions, either in eager loading or in lazy loadingsyntax.
9.6.1 Eager loading and lazy loading
Depending on the content of the ‘elements.html‘ file, the element definitions will either be loadedeagerly (i.e. at page load time) or lazy (i.e. when they are needed). Of course a developer isencouraged to implement the lazy loading approach, as it will decrease initial page loading times.
The eager loading approach is a list of HTML imports.
1 <link rel="import" href="my-first-element/my-first-element.html" >2 <link rel="import" href="my-second-element/my-second-element.html" >
While the lazy loading approach consists of a custom function provided by AjaXell.
56 9 The renewed panel SDK
1 <script>2 var base = document._currentScript.baseURI;3 base = base.substring(0, base.lastIndexOf("/") + 1);4
5 LazyLoad({6 base: base,7 provides: {8 "my-first-element": "my-first-element/my-first-element.html",9 "my-second-element": "my-second-element/my-second-element.html"
10 }11 })12 </script>

Chapter 10
Documentation
Documentation is something commonly taken too lightly. The legacy panel system contains little tono documentation. This frustrates developers and inhibits any changes to the codebase, becausethere might be this undocumented flow of code that will break and only found out about much later.
Fortunately there are some tools not only to properly write documentation , but also to encouragedevelopers to write documentation as the codebase evolves.
10.1 Inline documentation
Documentation regarding the description code itself is kept close to the code, in the form of inlinedocumentation.
This means most of the documentation will be housed along with with the source code itself. Thegoal is to minimize separation of code and documentation as this easily leads to inconsistenciesbetween the two.
Advantages of inline documentation are the reduced chances for outdated documentation andbeing able to enrich source code with typed annotations [25].
Source code consists of C++, JavaScript, HTML, and CSS code. The inline documentation describedhere is applicable to the last three.
10.1.1 JSDocs
The syntax used to document JavaScript code is called JSDocs and is currently at version 3[25][26].It provides us with a rich set of expressions enabling a developer to write documentation comparableto JavaDoc.
JSDocs has wide industry adoption for JavaScript projects. It is widely used to make code moreunderstandable, generate HTML documentation, or use it to generate the large traditional developermanuals.
In addition to JSDocs there are specific points in the source code where a developer can providecode examples and extra directives to document HTML and CSS code. This is however a non-standardmethod since there is no standardized way to document any of the other languages inline.
57
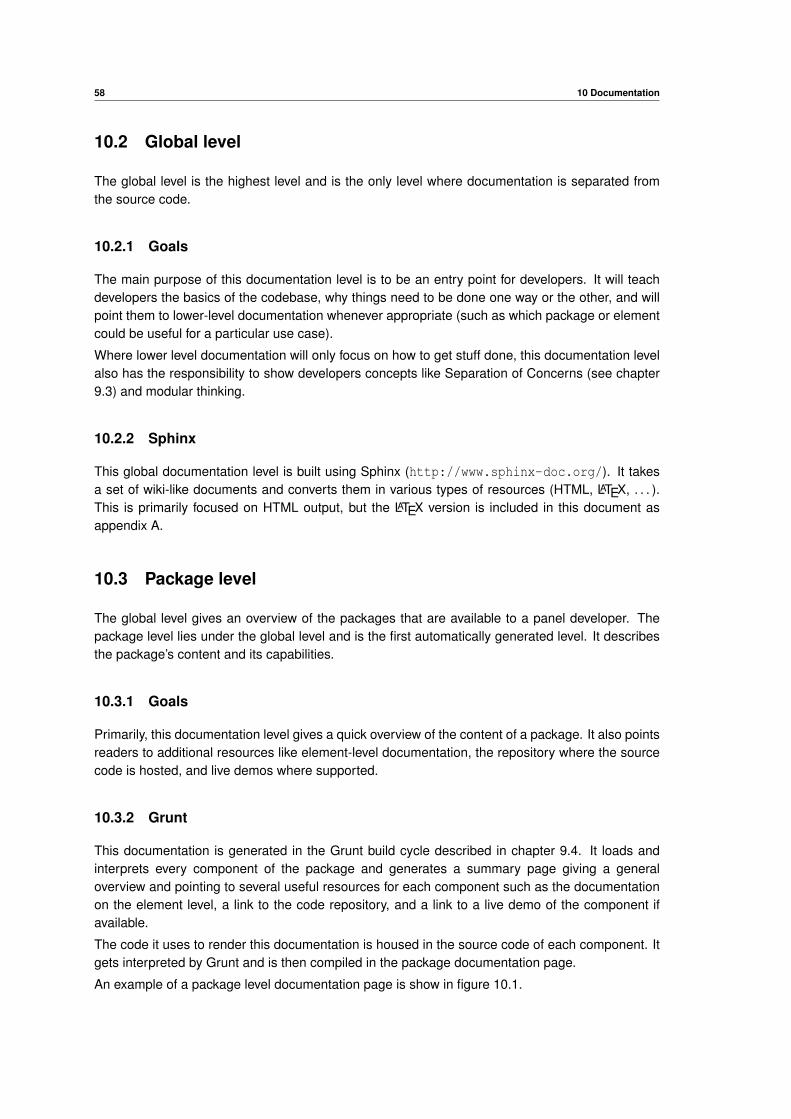
58 10 Documentation
10.2 Global level
The global level is the highest level and is the only level where documentation is separated fromthe source code.
10.2.1 Goals
The main purpose of this documentation level is to be an entry point for developers. It will teachdevelopers the basics of the codebase, why things need to be done one way or the other, and willpoint them to lower-level documentation whenever appropriate (such as which package or elementcould be useful for a particular use case).
Where lower level documentation will only focus on how to get stuff done, this documentation levelalso has the responsibility to show developers concepts like Separation of Concerns (see chapter9.3) and modular thinking.
10.2.2 Sphinx
This global documentation level is built using Sphinx (http://www.sphinx-doc.org/). It takesa set of wiki-like documents and converts them in various types of resources (HTML, LATEX, . . . ).This is primarily focused on HTML output, but the LATEX version is included in this document asappendix A.
10.3 Package level
The global level gives an overview of the packages that are available to a panel developer. Thepackage level lies under the global level and is the first automatically generated level. It describesthe package’s content and its capabilities.
10.3.1 Goals
Primarily, this documentation level gives a quick overview of the content of a package. It also pointsreaders to additional resources like element-level documentation, the repository where the sourcecode is hosted, and live demos where supported.
10.3.2 Grunt
This documentation is generated in the Grunt build cycle described in chapter 9.4. It loads andinterprets every component of the package and generates a summary page giving a generaloverview and pointing to several useful resources for each component such as the documentationon the element level, a link to the code repository, and a link to a live demo of the component ifavailable.
The code it uses to render this documentation is housed in the source code of each component. Itgets interpreted by Grunt and is then compiled in the package documentation page.
An example of a package level documentation page is show in figure 10.1.
10 Documentation 59
Figure 10.1: Documentation page of the common-elements package
60 10 Documentation
10.4 Element level
The lowest level of documentation is documentation of individual web components. This level isalso auto-documented from the component’s source code. But unlike the documentation on thepackage level, where documentation is generated on compile time, the documentation here isrendered on the fly, client-side.
10.4.1 Goals
This documentation provides an overview of all the properties and available calls of this component.It can also provide code examples and even live demos.
10.4.2 iron-component-page
Client-side rendering is done by using a specialized web component called ‘iron-component-page‘(https://elements.polymer-project.org/elements/iron-component-page). It uses the‘hydrolysis.js‘ library to interpret the inline documentation provided by the developer in the sourcecode of the web component, and compiles this into a documentation page.
An example of an element level documentation page is show in figure 10.2.
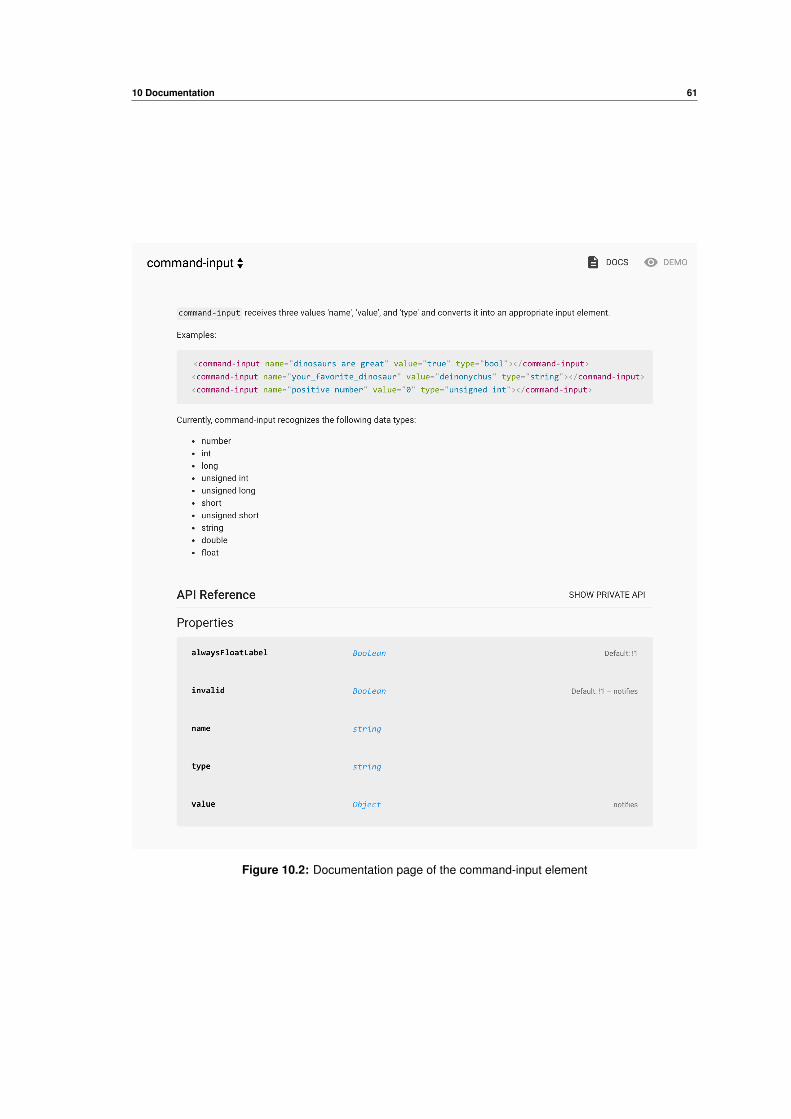
10 Documentation 61
Figure 10.2: Documentation page of the command-input element

This page is intentionally left almost blank
Chapter 11
Browser testing
The TS interface officially supports the latest ESR release of Mozilla Firefox. However, user tend touse many different browsers. When developing new interfaces it is very unpractical to test all thesebrowsers manually and consistently.
Also, because of the frequent changes made to web browsers (described in chapter 3.1.1), it hasbecome very important to test interface functionality as browser versions get updated at productionsystems.
11.1 Selenium
Selenium is a tool that can automate a browser. Its most common uses are to perform tests or toautomate web interfaces.
Starting from version 2, it uses an open standard called ‘WebDriver‘ to interact with a browser.Most modern browsers have a native implementation of this standard, and separate drivers existfor browsers that do not (including IE6).
Selenium can run under Windows, Mac OS X, and Linux (Debian & RHEL). It has official librariesfor C, Haskell, Java, JavaScript (Node.js), Objective-C, Perl, PHP, Python, R, and Ruby.
11.2 Web-component-tester
The polymer project contains a dedicated testing tool to test Polymer elements and is used in theTS.
It allows a developer to make a series of tests for every Polymer element (and thus every interface).These tests are performed using the grunt build system when executing ‘grunt test‘.
Tests are defined in a ‘test‘ folder in the source folder of every element. There a developer candefine tests with the ‘test()‘ function like this:
1 // this function tests if the Polymer element has declared an object2 // ‘someObject‘ and it has a property ‘name‘ with value ‘deinonychus‘3 test(’defines the "author" property’, function() {4 assert.equal(element.someObject.name, ’deinonychus’);5 });
63
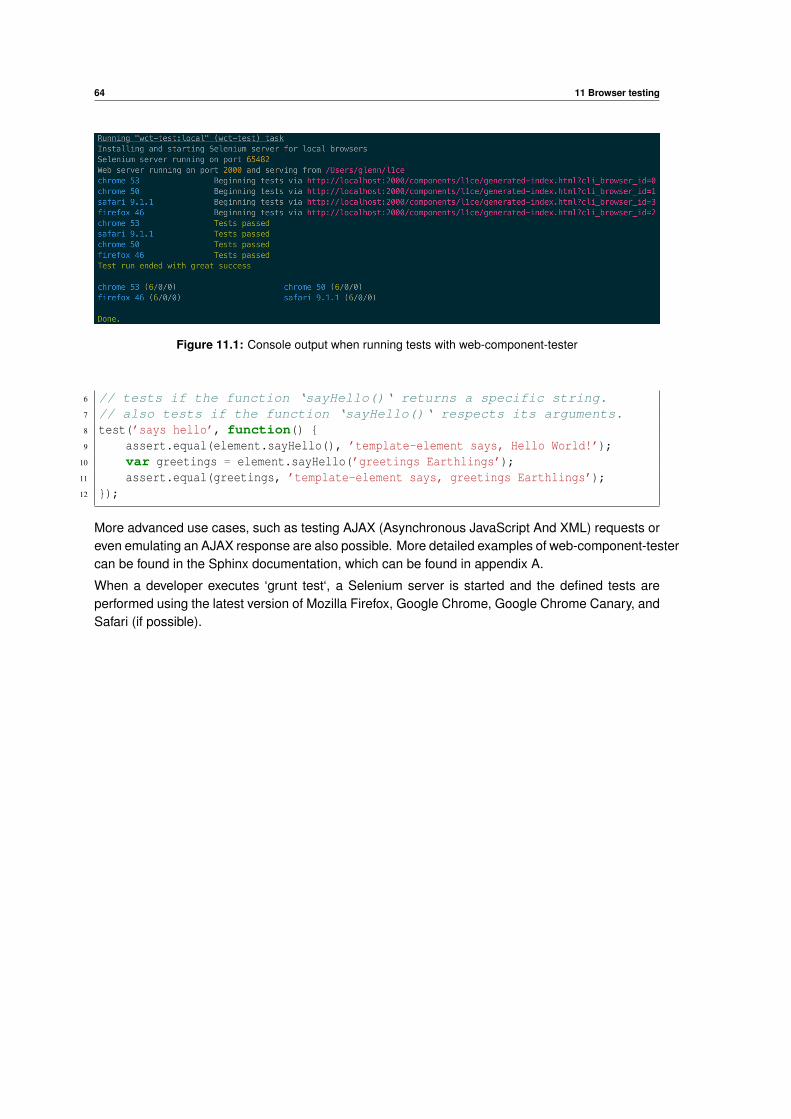
64 11 Browser testing
Figure 11.1: Console output when running tests with web-component-tester
6 // tests if the function ‘sayHello()‘ returns a specific string.7 // also tests if the function ‘sayHello()‘ respects its arguments.8 test(’says hello’, function() {9 assert.equal(element.sayHello(), ’template-element says, Hello World!’);
10 var greetings = element.sayHello(’greetings Earthlings’);11 assert.equal(greetings, ’template-element says, greetings Earthlings’);12 });
More advanced use cases, such as testing AJAX (Asynchronous JavaScript And XML) requests oreven emulating an AJAX response are also possible. More detailed examples of web-component-testercan be found in the Sphinx documentation, which can be found in appendix A.
When a developer executes ‘grunt test‘, a Selenium server is started and the defined tests areperformed using the latest version of Mozilla Firefox, Google Chrome, Google Chrome Canary, andSafari (if possible).
Chapter 12
Results
12.1 Loading times
Table 12.1 shows an overview of the initial full page loading times for the legacy TS (version 2.1.0)and the new TS (version 3.4.0). That is, a page load from a new browser tab with all cachesremoved.
This test is performed with the timeline panel of Google Chrome 50.0.2661.86 (64-bit).
It is expected that the TS 3.x has higher values for everything in this table, because it loads twofront-end libraries (Dojo & Polymer).
Notable is the decrease of scripting time for the TS 3.x relative to the TS 2.x. This is becauseDojo is minified and packaged into one JavaScript file in the TS 3.x release, where as in the TS2.x release it was not. Also, because this test is performed in Google Chrome, which has nativesupport for Web Components, very little scripting needs to be done. This result will be different inother browsers like Mozilla Firefox, where Web Components support needs to be emulated. Thenagain, the lazy loading system largely removes this overhead from the initial page loading time, soonly minor differences would be expected here.
Rendering time has increased the most going from TS 2.x to TS 3.x. This makes sense as Polymerrenders everything on the front-end, whereas Dojo used to render everything server-side. Duringinitial page load this rendering load is primarily caused by the rendering of the left side menu. Theincrease of painting time follows the same logic as the rendering time.
Also notable is the increase of idle time. This means that the browser needs to wait for a task to
TS 2.1.0 (Dojo) TS 3.4.0 (Dojo + Polymer) difference difference (%)Loading 44.5ms 112.4ms +67.9ms +152.58%Scripting 1227.6ms 1187.6ms -40ms -3,26%Rendering 29.7ms 171.0ms +141.3ms +475,76%Painting 7.5ms 36.1ms +28.6ms +381.33%Other 106.4ms 335.9ms +229.5ms +215,69%Idle 213.6ms 775.1ms +561.5ms +262,87%
Total 1.63s 2.62s +990ms +60,73%
Table 12.1: Page loading times for TS 2.x and 3.x
65
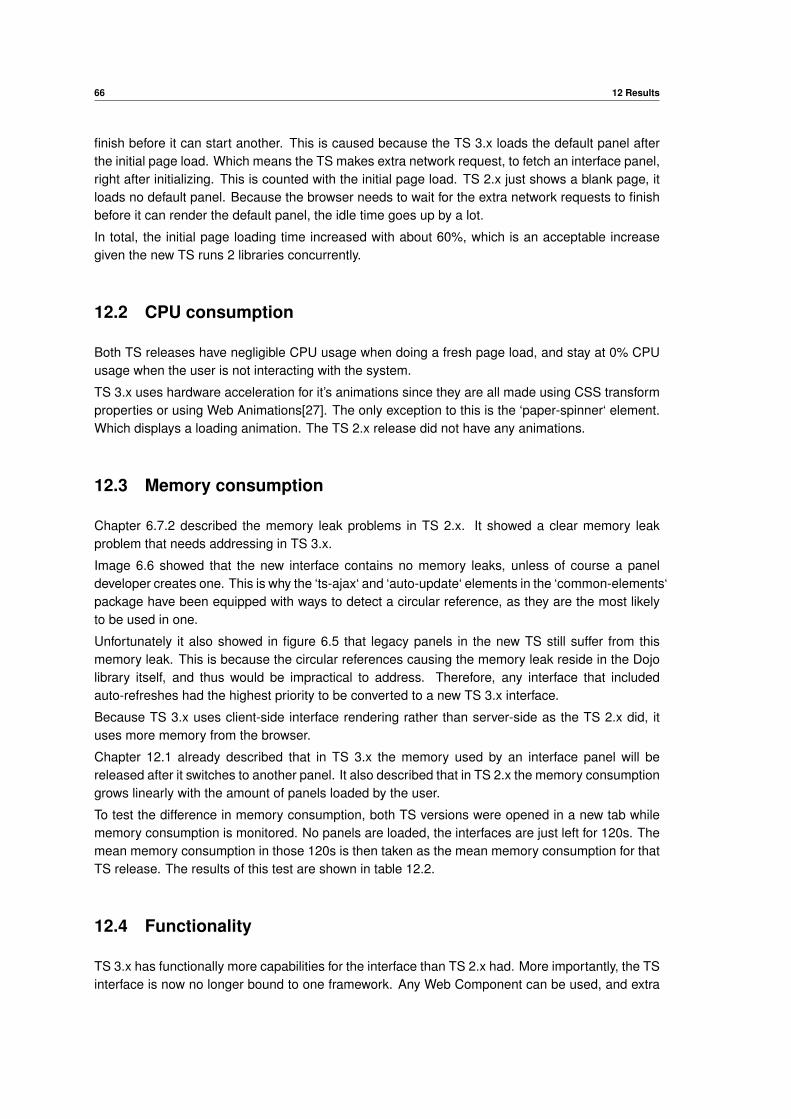
66 12 Results
finish before it can start another. This is caused because the TS 3.x loads the default panel afterthe initial page load. Which means the TS makes extra network request, to fetch an interface panel,right after initializing. This is counted with the initial page load. TS 2.x just shows a blank page, itloads no default panel. Because the browser needs to wait for the extra network requests to finishbefore it can render the default panel, the idle time goes up by a lot.
In total, the initial page loading time increased with about 60%, which is an acceptable increasegiven the new TS runs 2 libraries concurrently.
12.2 CPU consumption
Both TS releases have negligible CPU usage when doing a fresh page load, and stay at 0% CPUusage when the user is not interacting with the system.
TS 3.x uses hardware acceleration for it’s animations since they are all made using CSS transformproperties or using Web Animations[27]. The only exception to this is the ‘paper-spinner‘ element.Which displays a loading animation. The TS 2.x release did not have any animations.
12.3 Memory consumption
Chapter 6.7.2 described the memory leak problems in TS 2.x. It showed a clear memory leakproblem that needs addressing in TS 3.x.
Image 6.6 showed that the new interface contains no memory leaks, unless of course a paneldeveloper creates one. This is why the ‘ts-ajax‘ and ‘auto-update‘ elements in the ‘common-elements‘package have been equipped with ways to detect a circular reference, as they are the most likelyto be used in one.
Unfortunately it also showed in figure 6.5 that legacy panels in the new TS still suffer from thismemory leak. This is because the circular references causing the memory leak reside in the Dojolibrary itself, and thus would be impractical to address. Therefore, any interface that includedauto-refreshes had the highest priority to be converted to a new TS 3.x interface.
Because TS 3.x uses client-side interface rendering rather than server-side as the TS 2.x did, ituses more memory from the browser.
Chapter 12.1 already described that in TS 3.x the memory used by an interface panel will bereleased after it switches to another panel. It also described that in TS 2.x the memory consumptiongrows linearly with the amount of panels loaded by the user.
To test the difference in memory consumption, both TS versions were opened in a new tab whilememory consumption is monitored. No panels are loaded, the interfaces are just left for 120s. Themean memory consumption in those 120s is then taken as the mean memory consumption for thatTS release. The results of this test are shown in table 12.2.
12.4 Functionality
TS 3.x has functionally more capabilities for the interface than TS 2.x had. More importantly, the TSinterface is now no longer bound to one framework. Any Web Component can be used, and extra
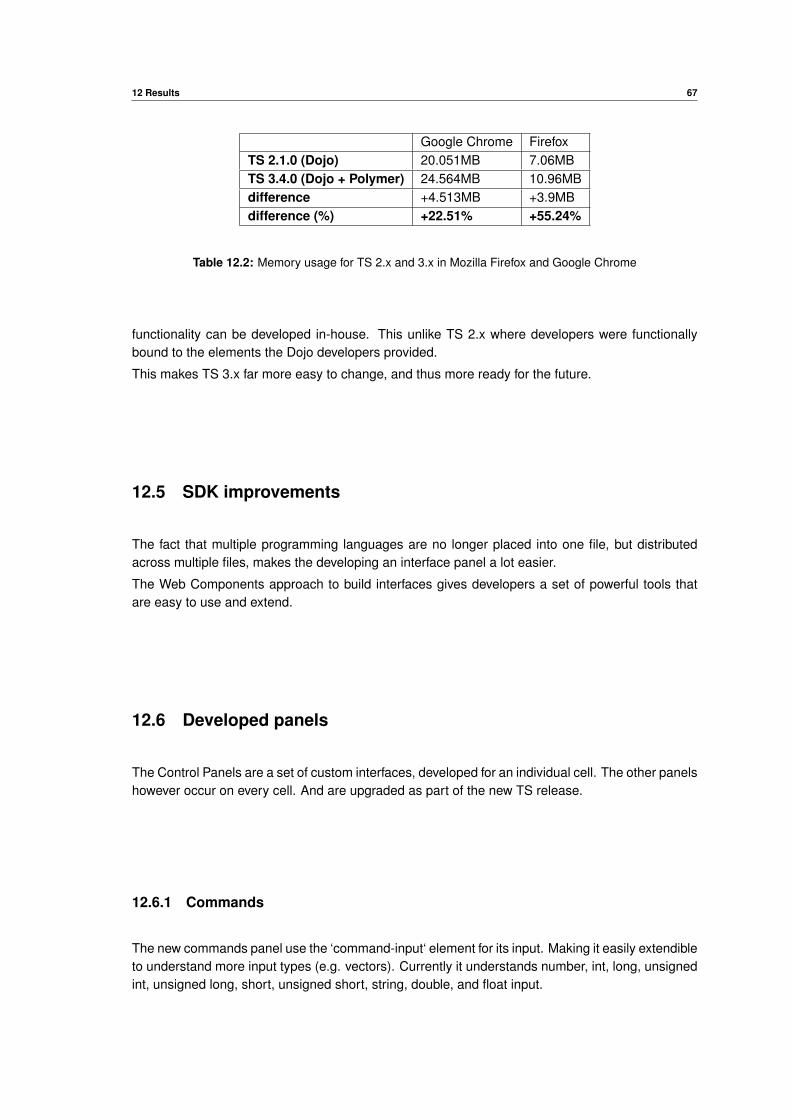
12 Results 67
Google Chrome FirefoxTS 2.1.0 (Dojo) 20.051MB 7.06MBTS 3.4.0 (Dojo + Polymer) 24.564MB 10.96MBdifference +4.513MB +3.9MBdifference (%) +22.51% +55.24%
Table 12.2: Memory usage for TS 2.x and 3.x in Mozilla Firefox and Google Chrome
functionality can be developed in-house. This unlike TS 2.x where developers were functionallybound to the elements the Dojo developers provided.
This makes TS 3.x far more easy to change, and thus more ready for the future.
12.5 SDK improvements
The fact that multiple programming languages are no longer placed into one file, but distributedacross multiple files, makes the developing an interface panel a lot easier.
The Web Components approach to build interfaces gives developers a set of powerful tools thatare easy to use and extend.
12.6 Developed panels
The Control Panels are a set of custom interfaces, developed for an individual cell. The other panelshowever occur on every cell. And are upgraded as part of the new TS release.
12.6.1 Commands
The new commands panel use the ‘command-input‘ element for its input. Making it easily extendibleto understand more input types (e.g. vectors). Currently it understands number, int, long, unsignedint, unsigned long, short, unsigned short, string, double, and float input.
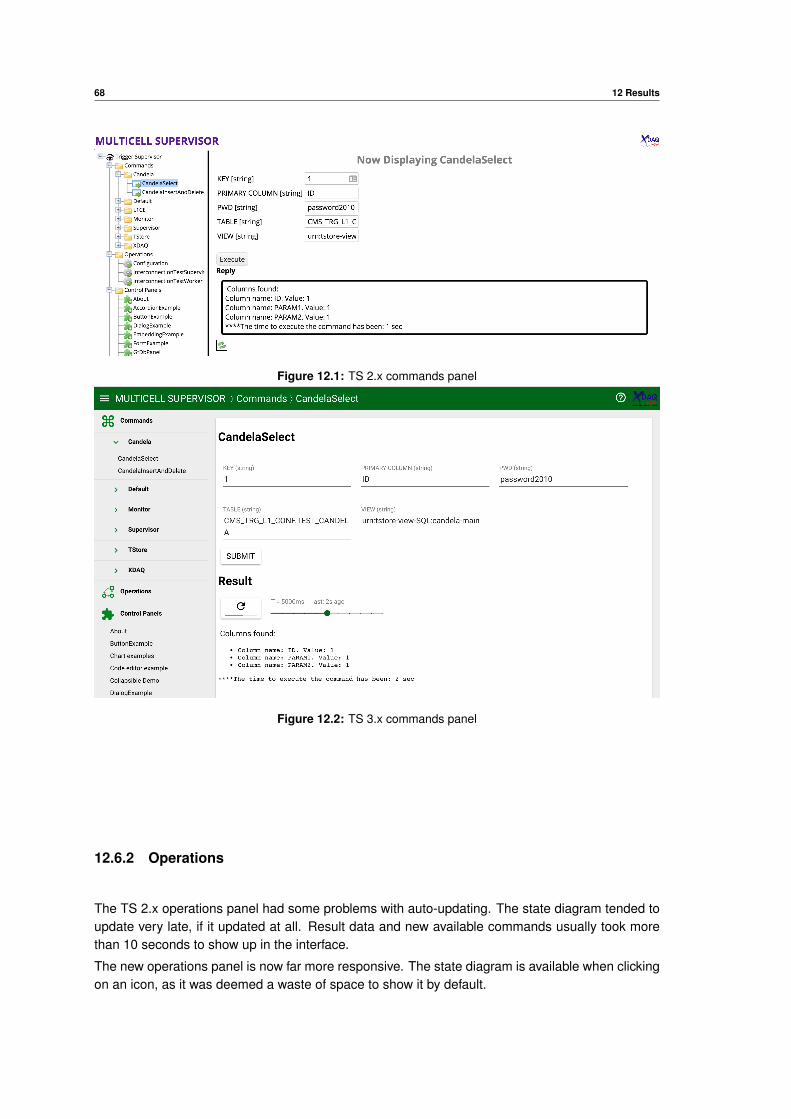
68 12 Results
Figure 12.1: TS 2.x commands panel
Figure 12.2: TS 3.x commands panel
12.6.2 Operations
The TS 2.x operations panel had some problems with auto-updating. The state diagram tended toupdate very late, if it updated at all. Result data and new available commands usually took morethan 10 seconds to show up in the interface.
The new operations panel is now far more responsive. The state diagram is available when clickingon an icon, as it was deemed a waste of space to show it by default.
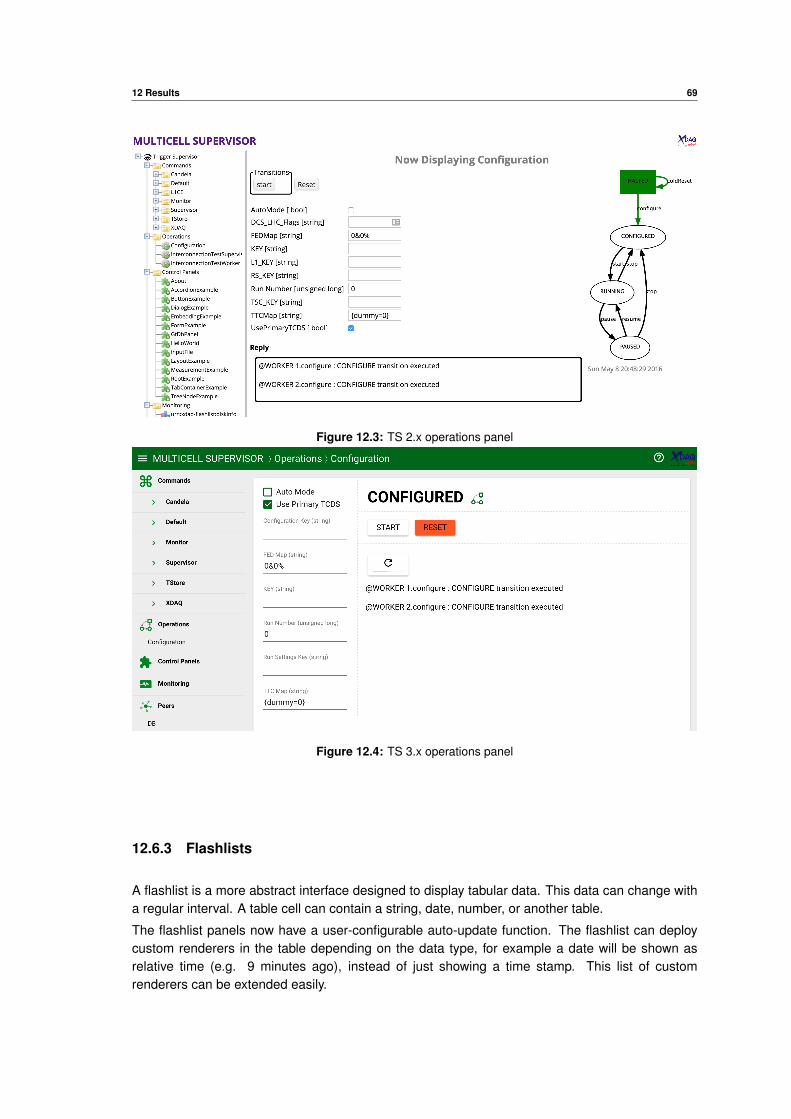
12 Results 69
Figure 12.3: TS 2.x operations panel
Figure 12.4: TS 3.x operations panel
12.6.3 Flashlists
A flashlist is a more abstract interface designed to display tabular data. This data can change witha regular interval. A table cell can contain a string, date, number, or another table.
The flashlist panels now have a user-configurable auto-update function. The flashlist can deploycustom renderers in the table depending on the data type, for example a date will be shown asrelative time (e.g. 9 minutes ago), instead of just showing a time stamp. This list of customrenderers can be extended easily.
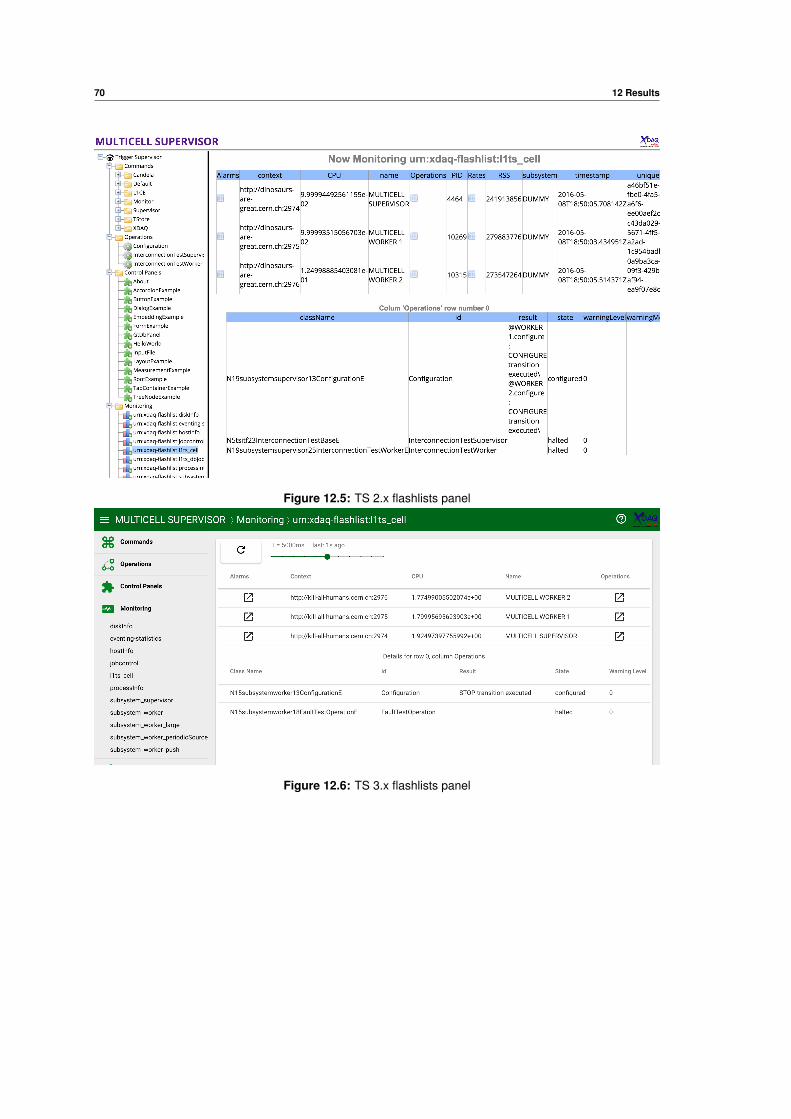
70 12 Results
Figure 12.5: TS 2.x flashlists panel
Figure 12.6: TS 3.x flashlists panel
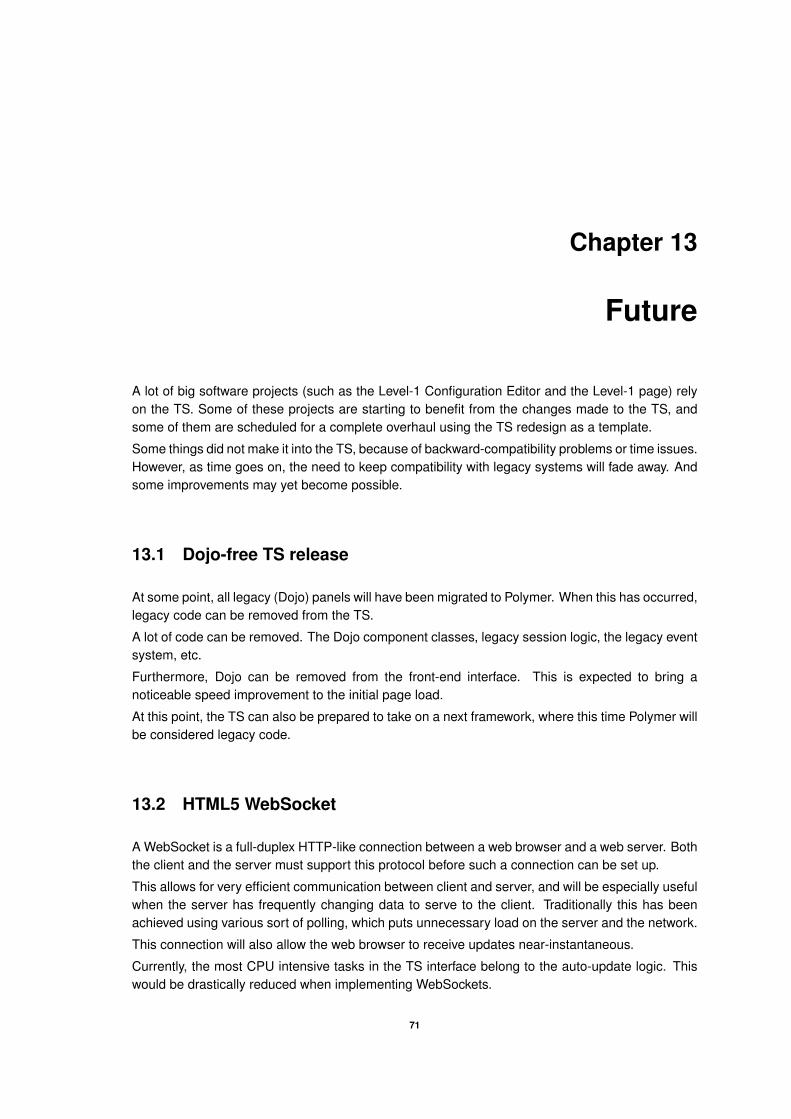
Chapter 13
Future
A lot of big software projects (such as the Level-1 Configuration Editor and the Level-1 page) relyon the TS. Some of these projects are starting to benefit from the changes made to the TS, andsome of them are scheduled for a complete overhaul using the TS redesign as a template.
Some things did not make it into the TS, because of backward-compatibility problems or time issues.However, as time goes on, the need to keep compatibility with legacy systems will fade away. Andsome improvements may yet become possible.
13.1 Dojo-free TS release
At some point, all legacy (Dojo) panels will have been migrated to Polymer. When this has occurred,legacy code can be removed from the TS.
A lot of code can be removed. The Dojo component classes, legacy session logic, the legacy eventsystem, etc.
Furthermore, Dojo can be removed from the front-end interface. This is expected to bring anoticeable speed improvement to the initial page load.
At this point, the TS can also be prepared to take on a next framework, where this time Polymer willbe considered legacy code.
13.2 HTML5 WebSocket
A WebSocket is a full-duplex HTTP-like connection between a web browser and a web server. Boththe client and the server must support this protocol before such a connection can be set up.
This allows for very efficient communication between client and server, and will be especially usefulwhen the server has frequently changing data to serve to the client. Traditionally this has beenachieved using various sort of polling, which puts unnecessary load on the server and the network.
This connection will also allow the web browser to receive updates near-instantaneous.
Currently, the most CPU intensive tasks in the TS interface belong to the auto-update logic. Thiswould be drastically reduced when implementing WebSockets.
71
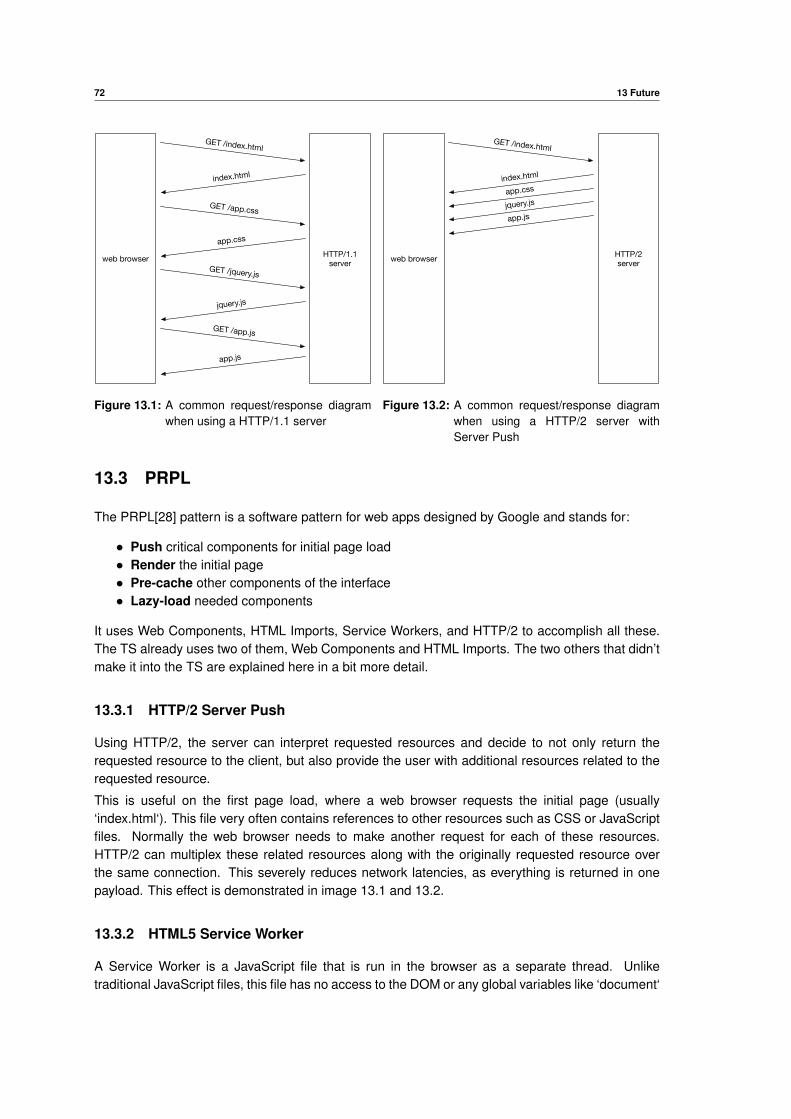
72 13 Future
web browser HTTP/1.1 server
GET /index.html
index.html
GET /app.css
app.css
GET /jquery.js
jquery.js
GET /app.js
app.js
Figure 13.1: A common request/response diagramwhen using a HTTP/1.1 server
web browser HTTP/2server
GET /index.html
index.html
app.css
jquery.js
app.js
Figure 13.2: A common request/response diagramwhen using a HTTP/2 server withServer Push
13.3 PRPL
The PRPL[28] pattern is a software pattern for web apps designed by Google and stands for:
• Push critical components for initial page load• Render the initial page• Pre-cache other components of the interface• Lazy-load needed components
It uses Web Components, HTML Imports, Service Workers, and HTTP/2 to accomplish all these.The TS already uses two of them, Web Components and HTML Imports. The two others that didn’tmake it into the TS are explained here in a bit more detail.
13.3.1 HTTP/2 Server Push
Using HTTP/2, the server can interpret requested resources and decide to not only return therequested resource to the client, but also provide the user with additional resources related to therequested resource.
This is useful on the first page load, where a web browser requests the initial page (usually‘index.html‘). This file very often contains references to other resources such as CSS or JavaScriptfiles. Normally the web browser needs to make another request for each of these resources.HTTP/2 can multiplex these related resources along with the originally requested resource overthe same connection. This severely reduces network latencies, as everything is returned in onepayload. This effect is demonstrated in image 13.1 and 13.2.
13.3.2 HTML5 Service Worker
A Service Worker is a JavaScript file that is run in the browser as a separate thread. Unliketraditional JavaScript files, this file has no access to the DOM or any global variables like ‘document‘
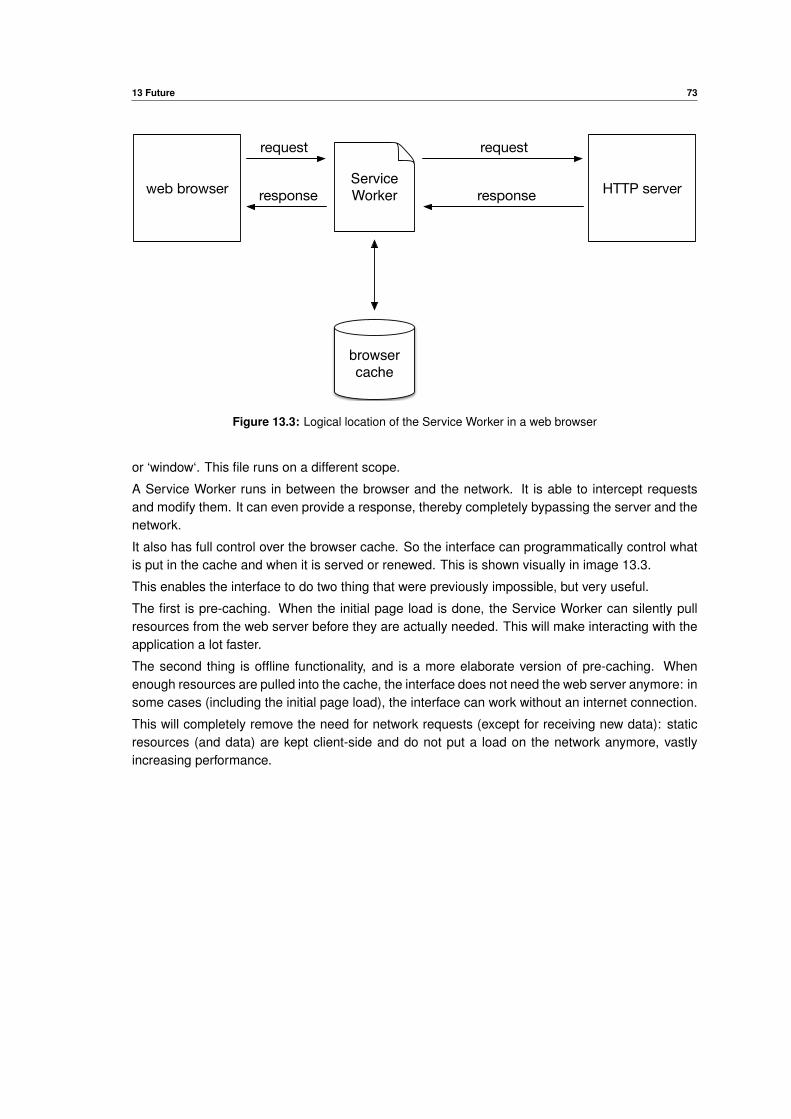
13 Future 73
request
web browser
browser cache
Service Worker HTTP serverresponse
request
response
Figure 13.3: Logical location of the Service Worker in a web browser
or ‘window‘. This file runs on a different scope.
A Service Worker runs in between the browser and the network. It is able to intercept requestsand modify them. It can even provide a response, thereby completely bypassing the server and thenetwork.
It also has full control over the browser cache. So the interface can programmatically control whatis put in the cache and when it is served or renewed. This is shown visually in image 13.3.
This enables the interface to do two thing that were previously impossible, but very useful.
The first is pre-caching. When the initial page load is done, the Service Worker can silently pullresources from the web server before they are actually needed. This will make interacting with theapplication a lot faster.
The second thing is offline functionality, and is a more elaborate version of pre-caching. Whenenough resources are pulled into the cache, the interface does not need the web server anymore: insome cases (including the initial page load), the interface can work without an internet connection.
This will completely remove the need for network requests (except for receiving new data): staticresources (and data) are kept client-side and do not put a load on the network anymore, vastlyincreasing performance.

This page is intentionally left almost blank

Chapter 14
Conclusion
The main objective was to upgrade the TS to be able to provide more advanced interfaces, and tokeep compatibility with legacy interfaces.
The new interface engine has achieved 100% backwards compatibility, while providing a completelynew way to develop new interfaces.
This new interface engine and can be easily extended and is ready for any future use-cases as itis built to change. The developers are not bound to the functionality of one framework, rather it isbuild on open standards and thus ensures maximum compatibility with future technologies.
The interface developers now have internal, semi auto-generated, documentation at their disposaland have an active community on the world wide web to fall back to.
75

This page is intentionally left almost blank
Bibliography
[1] T. McCauley and L. Taylor, “CMS Higgs Search in 2011 and 2012 data: candidate ZZ event(8 TeV) with two electrons and two muons,” Jul 2012, cMS Collection. [Online]. Available:https://cds.cern.ch/record/1459462
[2] T. McCauley and L. Taylor, “CMS Higgs Search in 2011 and 2012 data: candidatephoton-photon event (8 TeV),” May 2013, cMS Collection. [Online]. Available: https://cds.cern.ch/record/1459459/
[3] D. Barney, “CMS slice image with transverse/longitudinal/3-D views,” Nov 2011,cMS Collection. [Online]. Available: https://cms-docdb.cern.ch/cgi-bin/PublicDocDB/ShowDocument?docid=5697
[4] A. Breskin and R. Voss, The CERN Large Hadron Collider: Accelerator and Experiments.Geneva: CERN, 2009.
[5] L. Taylor, “Detector overview | cms experiment,” http://cms.web.cern.ch/news/detector-overview, 2011.
[6] T. C. Collaboration, “The cms experiment at the cern lhc,” Journal of Instrumentation, vol. 3,no. 08, p. S08004, 2008. [Online]. Available: http://stacks.iop.org/1748-0221/3/i=08/a=S08004
[7] D. Abbaneo, A. Bal, P. Bloch, O. Buchmueller, F. Cavallari, A. Dabrowski, P. de Barbaro, I.Fisk, M. Girone, F. Hartmann, J. Hauser, C. Jessop, D. Lange, F. Meijers, C. Seez, W. Smith,The Compact Muon Solenoid Phase II Upgrade Technical Proposal. European Organizationfor Nuclear Research (CERN), 2015.
[8] J. Brooke, K. Bunkowski, I. Cali, C. G. Larrea, C. Lazaridis, and A. Thea, “SWATCH: commoncontrol SW for the uTCA-based upgraded CMS L1 Trigger,” J. Phys.: Conf. Ser., vol. 664,no. 8, p. 082012. 8 p, 2015. [Online]. Available: https://cds.cern.ch/record/2134631
[9] E. S. Raymond, The Cathedral and the Bazaar. O’Reilly & Associates, Inc., 1999, ch. 3, pp.38–44.
[10] kangax, webbedspace, zloirock, “Ecmascript 6 compatibility table,” http://kangax.github.io/compat-table/es6/, 2016.
[11] Tab Atkins Jr., Elika J Etemad, “Css scoping module level 1,” https://drafts.csswg.org/css-scoping/, 2016.
[12] I. M. de Abril and C.-E. Wulz, “The CMS Trigger Supervisor: Control and Hardware MonitoringSystem of the CMS Level-1 Trigger at CERN,” Ph.D. dissertation, Barcelona, Autonoma U.,2008. [Online]. Available: http://cds.cern.ch/record/1446282
77
78 BIBLIOGRAPHY
[13] S. G. Raymond Eric S, The Jargon File, Version 4.2.2, 20 Aug 2000, 1 2002.
[14] S. R. Marcin Kalicinski, “How to populate a property tree,” https://larseidnes.com/2014/11/05/angularjs-the-bad-parts/, 2008.
[15] World Wide Web Consortium (W3C), “Custom elements,” https://w3c.github.io/webcomponents/spec/custom/, 2015.
[16] Mozilla Developer Network, “Web components,” https://developer.mozilla.org/en-US/docs/Web/Web_Components, 2014.
[17] C. House, “Html5 web components: The solution to div soup?” https://www.pluralsight.com/blog/software-development/html5-web-components-overview, 2015.
[18] J. L. C. R. J. W. Matias Duarte, Nicholas Jitkoff, “Material design principles,” https://www.google.com/events/io/io14videos/79edef8b-96d4-e311-b297-00155d5066d7, 2014.
[19] Google, “Material design,” https://www.google.com/design/spec/material-design/, 2014.
[20] IBM DeveloperWorks, “Memory leak patterns in javascript,” http://www.ibm.com/developerworks/library/wa-memleak/, 2007.
[21] J. Sutherland and J. Sutherland, Scrum: The Art of Doing Twice the Work in Half the Time.Crown Business, 9 2014. [Online]. Available: http://amazon.com/o/ASIN/038534645X/
[22] P. Authors, “Polymer 1.0,” https://www.polymer-project.org/1.0/docs/, 2016.
[23] L. Eidnes, “Angularjs: The bad parts,” http://www.boost.org/doc/libs/1_55_0/doc/html/boost_propertytree/parsers.html, 2014.
[24] M. Bazon, “Uglifyjs — the compressor,” http://lisperator.net/uglifyjs/compress, 2012.
[25] Google Developers, “Annotating javascript for the closure compiler,” https://developers.google.com/closure/compiler/docs/js-for-compiler, 2016.
[26] “@use jsdoc,” http://usejsdoc.org/, 2011.
[27] A. D. T. A. Brian Birtles, Shane Stephens, “Web animations,” https://w3c.github.io/web-animations/, 2016.
[28] P. Authors, “Serve your app,” https://docs2-dot-polymer-project.appspot.com/1.0/toolbox/server, 2016.

Appendix A
Sphinx Documentation
Most part of the documentation of this project is auto-generated. The manual documentation,developed in Sphinx (described in chapter 10.2.2), is enclosed as an appendix to this document.
79

This page is intentionally left almost blank

CMS Trigger Supervisor SoftwareDocumentation
Release 3.4.0
Glenn Dirkx
May 24, 2016

CONTENTS
1 Building your own Cell Panels 11.1 Welcome . . . . . . . . . . . . . . . . . . . . . . . . . . . . . . . . . . . . . . . . . . . . . . . . . 11.2 Quickstart section . . . . . . . . . . . . . . . . . . . . . . . . . . . . . . . . . . . . . . . . . . . . 11.3 Advanced section . . . . . . . . . . . . . . . . . . . . . . . . . . . . . . . . . . . . . . . . . . . . . 1321.4 Available resources . . . . . . . . . . . . . . . . . . . . . . . . . . . . . . . . . . . . . . . . . . . . 140
2 Sphinx syntax examples 1452.1 This is a Title . . . . . . . . . . . . . . . . . . . . . . . . . . . . . . . . . . . . . . . . . . . . . . . 145
i

ii
CHAPTER
ONE
BUILDING YOUR OWN CELL PANELS
1.1 Welcome
This documentation will show you how to develop panels.
1.1.1 Scope of this document
This document contains both basic info and quickstarters, but also very detailed descriptions of the inner workings ofthe technologies used.
All examples are taken from the Subsystem Supervisor unless otherwise specified. (https://svnweb.cern.ch/trac/cactus/browser/trunk/cactusprojects/subsystem/supervisor)
1.2 Quickstart section
1.2.1 Setting up the Cell
Starting from this point we will assume you already have a working cell and you now have arrived at the point youwish to develop panels for it.
Front-end code (HTML, CSS, and JavaScript) have a separate build cycle, separate from the makefile. These are thesteps necessary to setup this build system.
Making your life easier
We have copied the files that will be created in this page into a tarball. This will absolve you from having to create anyfiles.
To use it, run:
1 svn export svn+ssh://svn.cern.ch/reps/cactus/trunk/cactuscore/ts/doc/cell-skeleton.tar2 tar -xzvf cell-skeleton.tar
Now you can continue following this tutorial, but you don’t have to create files anymore.
1
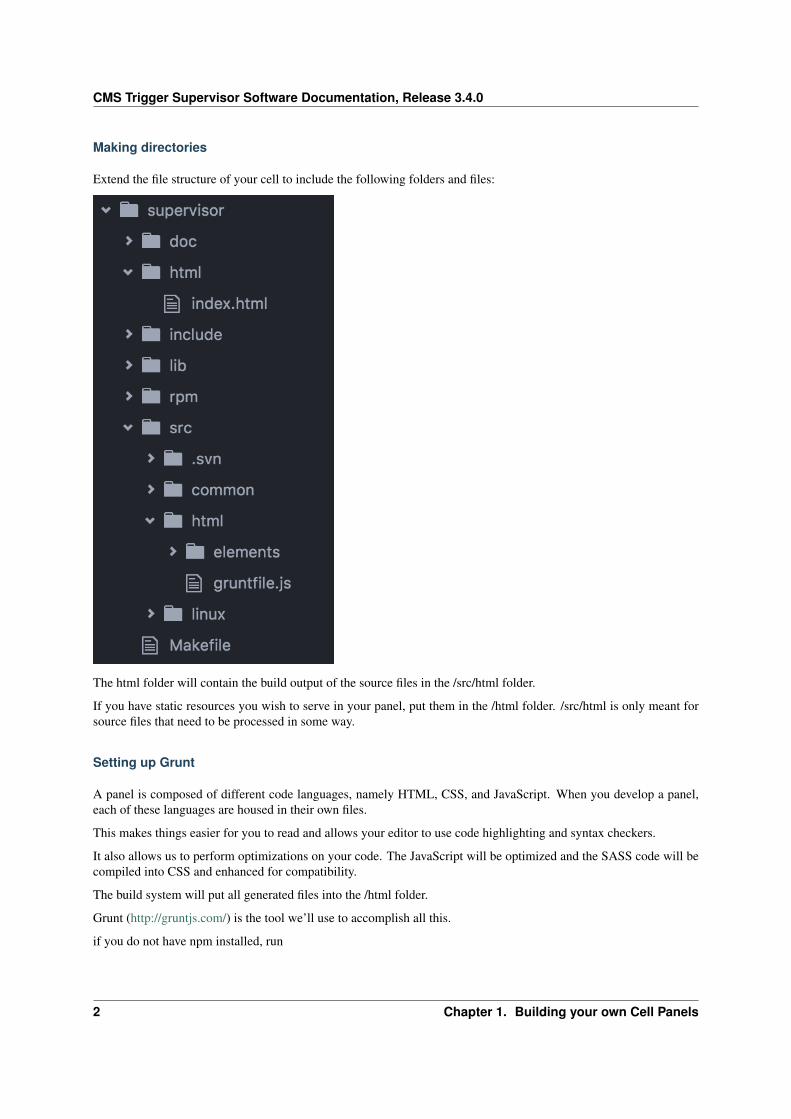
CMS Trigger Supervisor Software Documentation, Release 3.4.0
Making directories
Extend the file structure of your cell to include the following folders and files:
The html folder will contain the build output of the source files in the /src/html folder.
If you have static resources you wish to serve in your panel, put them in the /html folder. /src/html is only meant forsource files that need to be processed in some way.
Setting up Grunt
A panel is composed of different code languages, namely HTML, CSS, and JavaScript. When you develop a panel,each of these languages are housed in their own files.
This makes things easier for you to read and allows your editor to use code highlighting and syntax checkers.
It also allows us to perform optimizations on your code. The JavaScript will be optimized and the SASS code will becompiled into CSS and enhanced for compatibility.
The build system will put all generated files into the /html folder.
Grunt (http://gruntjs.com/) is the tool we’ll use to accomplish all this.
if you do not have npm installed, run
2 Chapter 1. Building your own Cell Panels
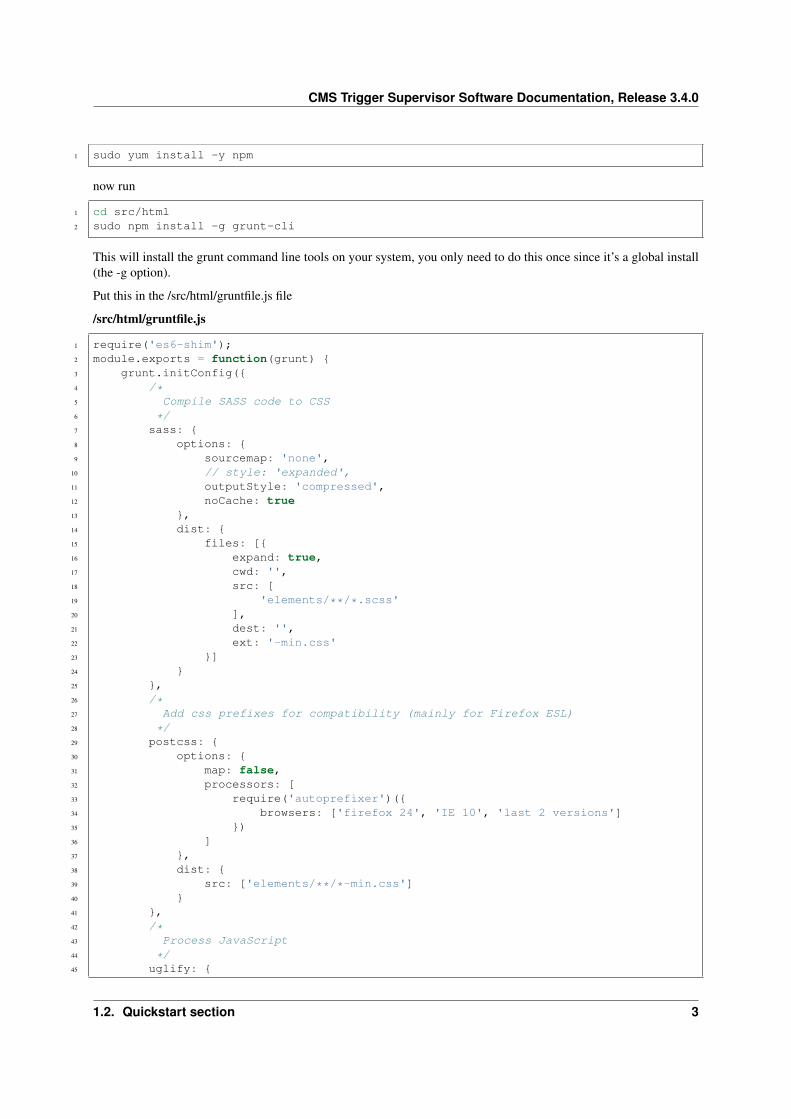
CMS Trigger Supervisor Software Documentation, Release 3.4.0
1 sudo yum install -y npm
now run
1 cd src/html2 sudo npm install -g grunt-cli
This will install the grunt command line tools on your system, you only need to do this once since it’s a global install(the -g option).
Put this in the /src/html/gruntfile.js file
/src/html/gruntfile.js
1 require('es6-shim');2 module.exports = function(grunt) {3 grunt.initConfig({4 /*5 Compile SASS code to CSS6 */7 sass: {8 options: {9 sourcemap: 'none',
10 // style: 'expanded',11 outputStyle: 'compressed',12 noCache: true13 },14 dist: {15 files: [{16 expand: true,17 cwd: '',18 src: [19 'elements/**/*.scss'20 ],21 dest: '',22 ext: '-min.css'23 }]24 }25 },26 /*27 Add css prefixes for compatibility (mainly for Firefox ESL)28 */29 postcss: {30 options: {31 map: false,32 processors: [33 require('autoprefixer')({34 browsers: ['firefox 24', 'IE 10', 'last 2 versions']35 })36 ]37 },38 dist: {39 src: ['elements/**/*-min.css']40 }41 },42 /*43 Process JavaScript44 */45 uglify: {
1.2. Quickstart section 3
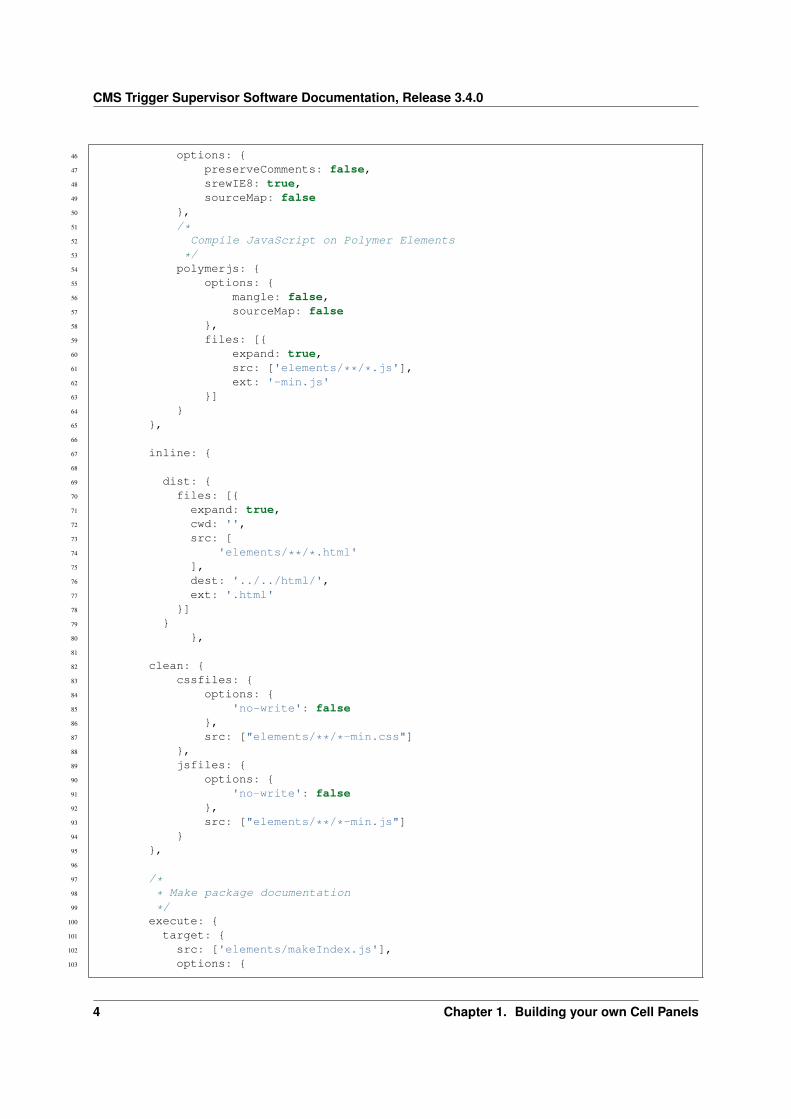
CMS Trigger Supervisor Software Documentation, Release 3.4.0
46 options: {47 preserveComments: false,48 srewIE8: true,49 sourceMap: false50 },51 /*52 Compile JavaScript on Polymer Elements53 */54 polymerjs: {55 options: {56 mangle: false,57 sourceMap: false58 },59 files: [{60 expand: true,61 src: ['elements/**/*.js'],62 ext: '-min.js'63 }]64 }65 },66
67 inline: {68
69 dist: {70 files: [{71 expand: true,72 cwd: '',73 src: [74 'elements/**/*.html'75 ],76 dest: '../../html/',77 ext: '.html'78 }]79 }80 },81
82 clean: {83 cssfiles: {84 options: {85 'no-write': false86 },87 src: ["elements/**/*-min.css"]88 },89 jsfiles: {90 options: {91 'no-write': false92 },93 src: ["elements/**/*-min.js"]94 }95 },96
97 /*98 * Make package documentation99 */
100 execute: {101 target: {102 src: ['elements/makeIndex.js'],103 options: {
4 Chapter 1. Building your own Cell Panels
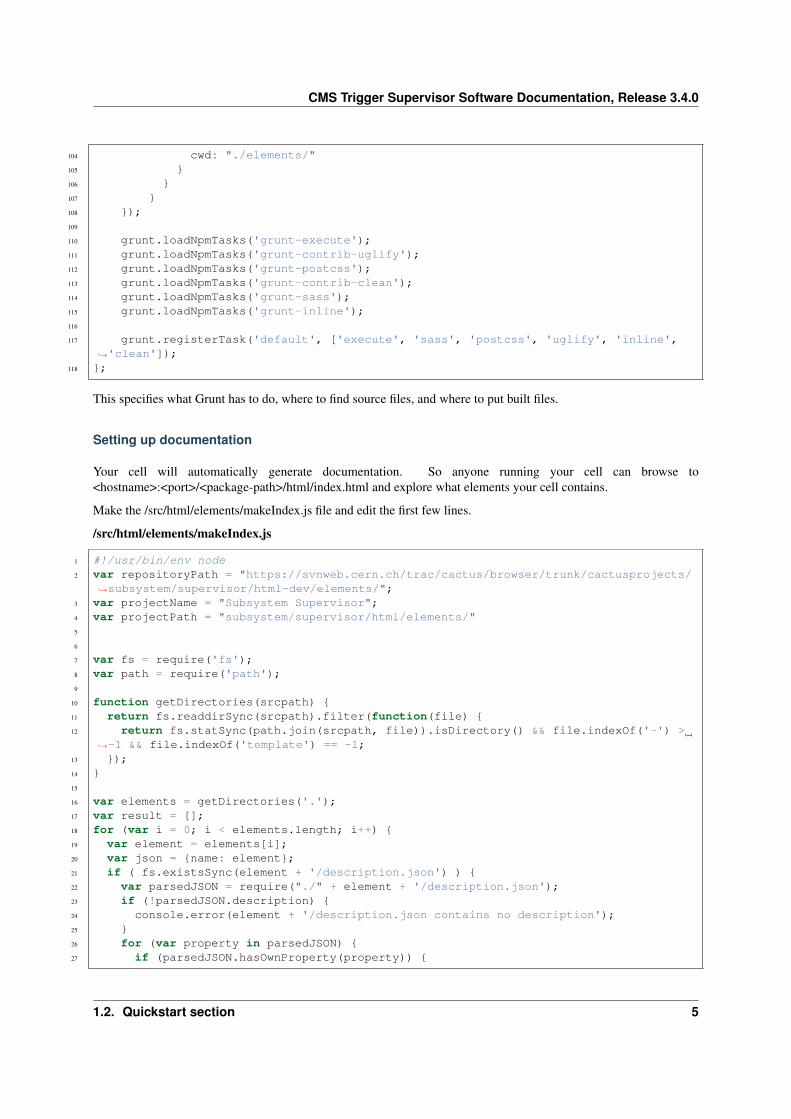
CMS Trigger Supervisor Software Documentation, Release 3.4.0
104 cwd: "./elements/"105 }106 }107 }108 });109
110 grunt.loadNpmTasks('grunt-execute');111 grunt.loadNpmTasks('grunt-contrib-uglify');112 grunt.loadNpmTasks('grunt-postcss');113 grunt.loadNpmTasks('grunt-contrib-clean');114 grunt.loadNpmTasks('grunt-sass');115 grunt.loadNpmTasks('grunt-inline');116
117 grunt.registerTask('default', ['execute', 'sass', 'postcss', 'uglify', 'inline',→˓'clean']);
118 };
This specifies what Grunt has to do, where to find source files, and where to put built files.
Setting up documentation
Your cell will automatically generate documentation. So anyone running your cell can browse to<hostname>:<port>/<package-path>/html/index.html and explore what elements your cell contains.
Make the /src/html/elements/makeIndex.js file and edit the first few lines.
/src/html/elements/makeIndex.js
1 #!/usr/bin/env node2 var repositoryPath = "https://svnweb.cern.ch/trac/cactus/browser/trunk/cactusprojects/
→˓subsystem/supervisor/html-dev/elements/";3 var projectName = "Subsystem Supervisor";4 var projectPath = "subsystem/supervisor/html/elements/"5
6
7 var fs = require('fs');8 var path = require('path');9
10 function getDirectories(srcpath) {11 return fs.readdirSync(srcpath).filter(function(file) {12 return fs.statSync(path.join(srcpath, file)).isDirectory() && file.indexOf('-') >
→˓-1 && file.indexOf('template') == -1;13 });14 }15
16 var elements = getDirectories('.');17 var result = [];18 for (var i = 0; i < elements.length; i++) {19 var element = elements[i];20 var json = {name: element};21 if ( fs.existsSync(element + '/description.json') ) {22 var parsedJSON = require("./" + element + '/description.json');23 if (!parsedJSON.description) {24 console.error(element + '/description.json contains no description');25 }26 for (var property in parsedJSON) {27 if (parsedJSON.hasOwnProperty(property)) {
1.2. Quickstart section 5
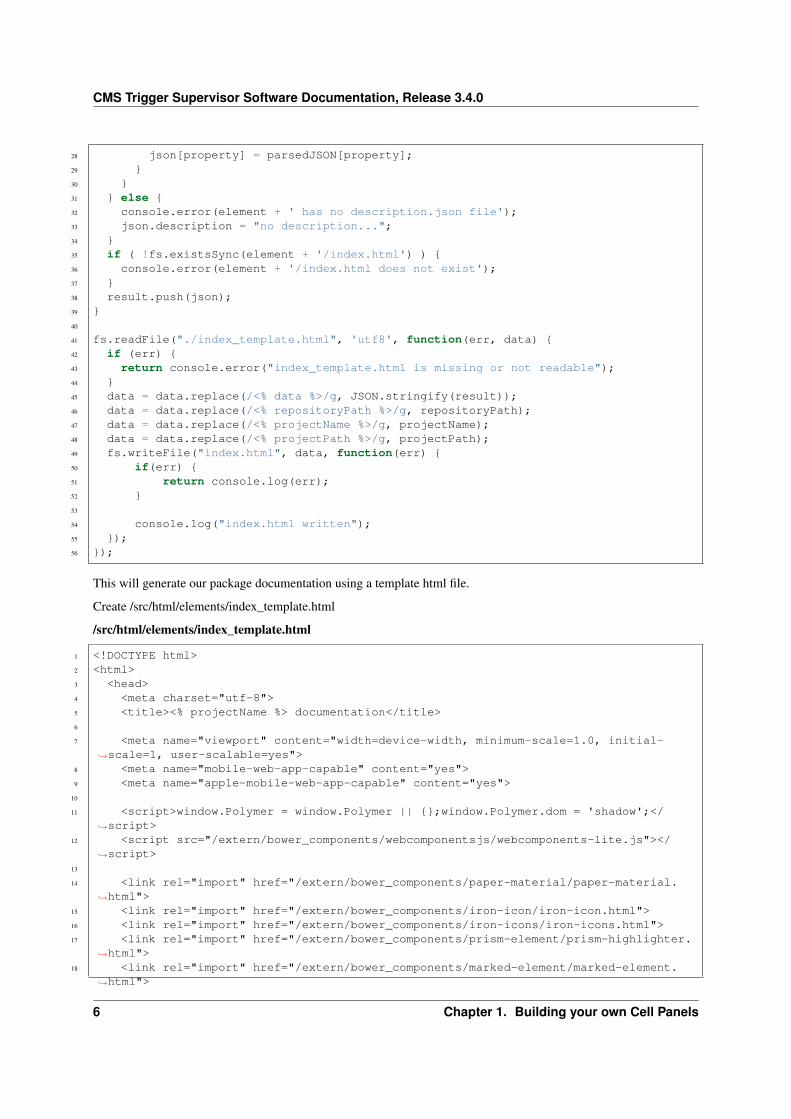
CMS Trigger Supervisor Software Documentation, Release 3.4.0
28 json[property] = parsedJSON[property];29 }30 }31 } else {32 console.error(element + ' has no description.json file');33 json.description = "no description...";34 }35 if ( !fs.existsSync(element + '/index.html') ) {36 console.error(element + '/index.html does not exist');37 }38 result.push(json);39 }40
41 fs.readFile("./index_template.html", 'utf8', function(err, data) {42 if (err) {43 return console.error("index_template.html is missing or not readable");44 }45 data = data.replace(/<% data %>/g, JSON.stringify(result));46 data = data.replace(/<% repositoryPath %>/g, repositoryPath);47 data = data.replace(/<% projectName %>/g, projectName);48 data = data.replace(/<% projectPath %>/g, projectPath);49 fs.writeFile("index.html", data, function(err) {50 if(err) {51 return console.log(err);52 }53
54 console.log("index.html written");55 });56 });
This will generate our package documentation using a template html file.
Create /src/html/elements/index_template.html
/src/html/elements/index_template.html
1 <!DOCTYPE html>2 <html>3 <head>4 <meta charset="utf-8">5 <title><% projectName %> documentation</title>6
7 <meta name="viewport" content="width=device-width, minimum-scale=1.0, initial-→˓scale=1, user-scalable=yes">
8 <meta name="mobile-web-app-capable" content="yes">9 <meta name="apple-mobile-web-app-capable" content="yes">
10
11 <script>window.Polymer = window.Polymer || {};window.Polymer.dom = 'shadow';</→˓script>
12 <script src="/extern/bower_components/webcomponentsjs/webcomponents-lite.js"></→˓script>
13
14 <link rel="import" href="/extern/bower_components/paper-material/paper-material.→˓html">
15 <link rel="import" href="/extern/bower_components/iron-icon/iron-icon.html">16 <link rel="import" href="/extern/bower_components/iron-icons/iron-icons.html">17 <link rel="import" href="/extern/bower_components/prism-element/prism-highlighter.
→˓html">18 <link rel="import" href="/extern/bower_components/marked-element/marked-element.
→˓html">
6 Chapter 1. Building your own Cell Panels
CMS Trigger Supervisor Software Documentation, Release 3.4.0
19 <style>20 body {21 background-color: #FAFAFA;22 }23 paper-material {24 max-width: 800px;25 margin: auto;26 background-color: white;27 }28 marked-element {29 padding: 10px;30 padding-top: 0;31 display: block;32 margin-bottom: 1em;33 }34 div[title] {35 background-color: #81c784;36 color: black;37 font-family: roboto;38 font-weight: normal;39 margin: 0;40 padding: 10px;41 display: flex;42 flex-direction: row;43 padding: 15px 24px;44 font-size: .8em;45 }46 div[title] [name] {47 width: 250px;48 }49 h1 {50 color: black;51 font-family: roboto;52 font-weight: normal;53 margin: 0;54 padding: 15px 24px;55 font-size: 1.5em;56 }57 h2 {58 color: black;59 font-family: roboto;60 font-weight: normal;61 margin: 0;62 text-align: center;63 font-size: 1em;64 margin: 0;65 padding: 0;66 padding-left: 10px;67 padding-top: 10px;68 }69 a {70 display: flex;71 flex-direction: row;72 padding: 15px 24px;73 text-decoration: none;74 color: black;75 font-family: roboto;76 border-bottom: 1px solid #EFEFEF;
1.2. Quickstart section 7
CMS Trigger Supervisor Software Documentation, Release 3.4.0
77 }78 a div[options] {79 opacity: 0;80 transition: opacity 200ms;81 }82 a:hover {83 background-color: #fafafa;84 }85 a:hover div[options] {86 opacity: 1;87 }88 a div[name] {89 width: 250px;90 font-weight: bold;91 }92 a div[flex] {93 color: #757575;94 }95 [flex] {96 flex: 1;97 }98 a div {99 font-size: .8em;
100 }101 iron-icon {102 height: 16px;103 z-index: 10;104 color: #797979;105 }106 iron-icon:hover {107 color: black;108 }109 </style>110 </head>111 <body>112 <h1><% projectName %> elements</h1>113 <paper-material elevation="1">114 <prism-highlighter></prism-highlighter>115 <h2>To use any of these elements in your project:</h2>116 <marked-element id="marked">117 <div class="markdown-html code" id="code"></div>118 </marked-element>119 </paper-material>120
121
122 <template is="dom-bind" id="app">123 <paper-material elevation="1">124 <div title>125 <div name>126 name127 </div>128 <div flex>129 description130 </div>131 </div>132 <template is="dom-repeat" items="{{data}}" as="element">133 <a href="[[element.name]]/index.html">134 <div name>
8 Chapter 1. Building your own Cell Panels
CMS Trigger Supervisor Software Documentation, Release 3.4.0
135 [[element.name]]136 </div>137 <div flex>138 [[element.description]]139 </div>140 <div options>141 <iron-icon icon="description"></iron-icon>142 <iron-icon icon="code" on-click="showCode" onclick="return false;"></
→˓iron-icon>143 <template is="dom-if" if="[[element.demo]]" restamp="true">144 <iron-icon icon="visibility" on-click="showDemo" onclick="return
→˓false;"></iron-icon>145 </template>146 </div>147 </a>148 </template>149 </paper-material>150 </template>151
152 <script>153 var codeRepositoryRoot = "<% repositoryPath %>";154 window.addEventListener('WebComponentsReady', function(e) {155 var app = document.querySelector('#app');156 app.data = <% data %>;157
158 var el = document.getElementById('marked');159 var snippet = el.unindent('<link rel="import" href="<% projectPath %>element-
→˓name/element-name.html">');160 // Boolean properties are displayed as checked="", so remove the ="" bit.161 snippet = snippet.replace(/=""/g, '');162 el.set('markdown', '```\n' + snippet + '\n' + '```');163 });164 app.showCode = function(e) {165 window.location = codeRepositoryRoot + e.model.element.name;166 }167 app.showDemo = function(e) {168 window.location = e.model.dataHost.dataHost.element.name + "/" + e.model.
→˓dataHost.dataHost.element.demo;169 }170 </script>171 </body>172 </html>
Now make a file html/index.html
/html/index.html
1 <!DOCTYPE html>2 <html>3 <head>4 <meta charset="utf-8">5 <title></title>6 <meta http-equiv="refresh" content="0; URL='elements/index.html'" />7 </head>8 <body>9
10 </body>11 </html>
1.2. Quickstart section 9
CMS Trigger Supervisor Software Documentation, Release 3.4.0
This will redirect the user to the elements folder holding the documentation when they visit<hostname>:<port>/<package-name>/html/index.html
Using Grunt
Now you should be able to run
1 cd src/html2 grunt
And you should see whatever elements are present in /src/html/elements are built and put into /html/elements (youprobably don’t have any elements now).
Your makefile will copy the /html folder into the RPM’s. The src/html folder will not be copied and will not be presentin production systems. Anything that does not need building can be safely copied into the /html folder. No buildsystem will delete that folder.
Now that you have an update /html folder you can run
1 make rpm
The makefile will make a new rpm containing the updated /html folder.
Setting up a template
You will probably want to make some elements of your own now, but where to start? We’ll give you a script that,using some template element, can generate a general element definition for you.
Create the file /src/html/elements/new-element.js file
/src/html/elements/new-element.js
1 #!/usr/bin/env node2 process.stdin.resume();3 process.stdin.setEncoding('utf8');4 var util = require('util');5 var ncp = require('ncp').ncp;6 var replace = require("replace");7 var renamer = require("renamer");8 var path = require('path');9 ncp.limit = 16;
10 var FindFiles = require("node-find-files");11 var fs = require('fs');12 var exec = require('child_process').exec;13
14 process.stdout.write('name of the new element: ');15 process.stdin.on('data', function (text) {16
17 var split = text.replace('\n', '').split('/');18 if (split.length == 1) {19 base = split[0];20 newname = base;21 } else if (split.length == 2) {22 base = split[0];23 newname = split[1];24 } else {25 console.error('\nname can only contain only one dash (/)');
10 Chapter 1. Building your own Cell Panels

CMS Trigger Supervisor Software Documentation, Release 3.4.0
26 process.exit();27 }28
29 if (newname == '') {30 console.error('\nname cannot be empty');31 process.stdout.write('name of the new element: ');32
33 } else if (newname.indexOf('-') == -1) {34 console.error('\nname must contain a dash (-)');35 process.stdout.write('name of the new element: ');36
37 } else {38 if (split.length == 1 ) {39 console.log('creating new element <' + base + '>...');40 } else {41 console.log('creating new element <' + newname + '> in <' + base + '>...');42 return console.error("unfortunately we can't do this because we will mess up
→˓the .svn folders");43 }44
45 ncp('template-element', base, function (err) {46 if (err) { return console.error(err); }47 replace({48 regex: "template-element",49 replacement: newname,50 paths: [base],51 recursive: true,52 silent: true,53 });54
55
56 var finder = new FindFiles({57 rootFolder : base,58 filterFunction : function (path, stat) {59 return (path.indexOf('template-element') > -1) ? true : false;60 }61 });62 finder.on("match", function(strPath, stat) {63 // console.log(strPath + " -> " + strPath.replace('template-element',
→˓newname));64 fs.rename(strPath, strPath.replace('template-element', newname),
→˓function(err) {65 if ( err ) console.log('ERROR: ' + err);66 });67 })68 finder.on("complete", function() {69 console.log("removing any .svn folders in ", newname);70 exec('rm -rf `find ' + newname + ' -type d -name .svn`', function (err,
→˓stdout, stderr) {});71 console.log("Finished");72 process.exit();73 })74 finder.on("patherror", function(err, strPath) {75 // Note that an error in accessing a particular file does not stop the whole
→˓show76 console.log("Error for Path " + strPath + " " + err);77 })78 finder.on("error", function(err) {
1.2. Quickstart section 11
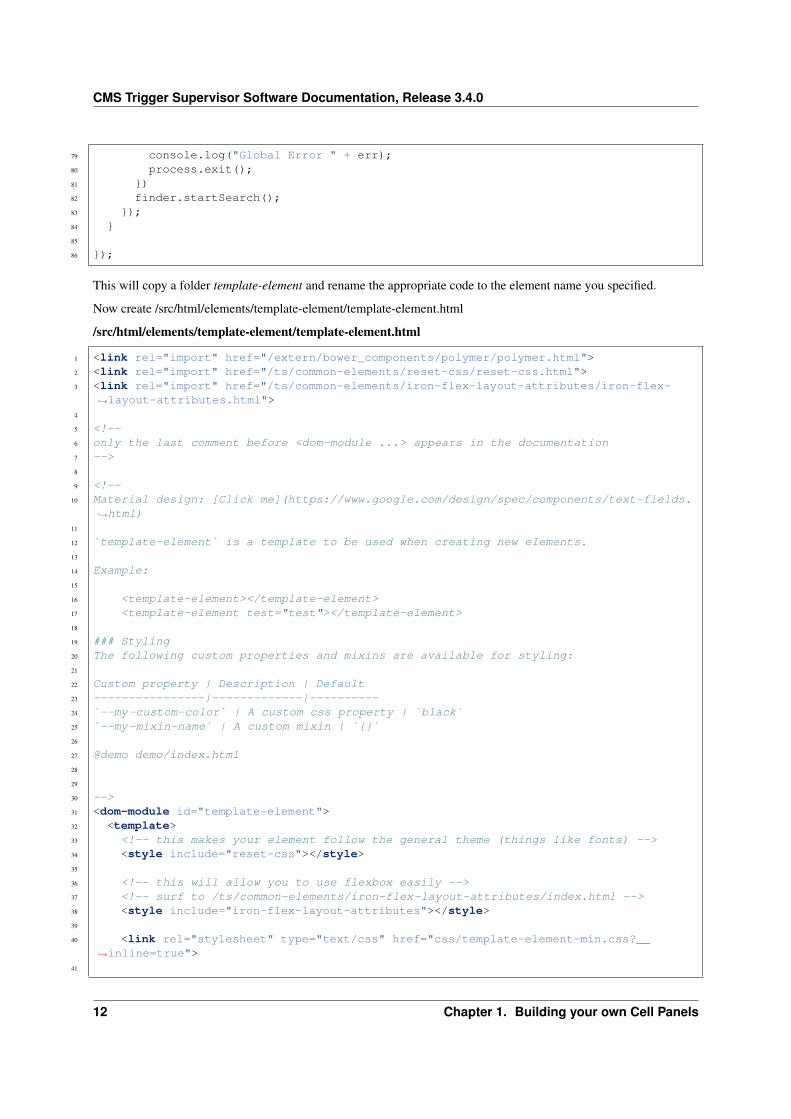
CMS Trigger Supervisor Software Documentation, Release 3.4.0
79 console.log("Global Error " + err);80 process.exit();81 })82 finder.startSearch();83 });84 }85
86 });
This will copy a folder template-element and rename the appropriate code to the element name you specified.
Now create /src/html/elements/template-element/template-element.html
/src/html/elements/template-element/template-element.html
1 <link rel="import" href="/extern/bower_components/polymer/polymer.html">2 <link rel="import" href="/ts/common-elements/reset-css/reset-css.html">3 <link rel="import" href="/ts/common-elements/iron-flex-layout-attributes/iron-flex-
→˓layout-attributes.html">4
5 <!--6 only the last comment before <dom-module ...> appears in the documentation7 -->8
9 <!--10 Material design: [Click me](https://www.google.com/design/spec/components/text-fields.
→˓html)11
12 `template-element` is a template to be used when creating new elements.13
14 Example:15
16 <template-element></template-element>17 <template-element test="test"></template-element>18
19 ### Styling20 The following custom properties and mixins are available for styling:21
22 Custom property | Description | Default23 ----------------|-------------|----------24 `--my-custom-color` | A custom css property | `black`25 `--my-mixin-name` | A custom mixin | `{}`26
27 @demo demo/index.html28
29
30 -->31 <dom-module id="template-element">32 <template>33 <!-- this makes your element follow the general theme (things like fonts) -->34 <style include="reset-css"></style>35
36 <!-- this will allow you to use flexbox easily -->37 <!-- surf to /ts/common-elements/iron-flex-layout-attributes/index.html -->38 <style include="iron-flex-layout-attributes"></style>39
40 <link rel="stylesheet" type="text/css" href="css/template-element-min.css?__→˓inline=true">
41
12 Chapter 1. Building your own Cell Panels
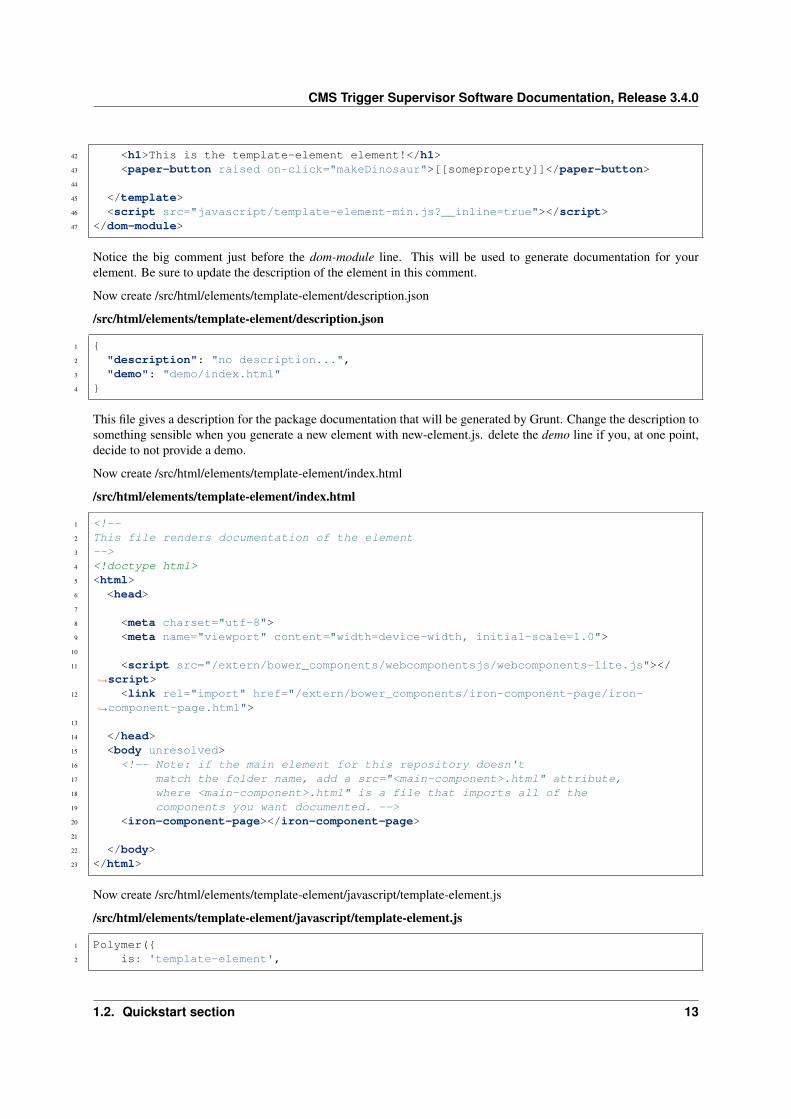
CMS Trigger Supervisor Software Documentation, Release 3.4.0
42 <h1>This is the template-element element!</h1>43 <paper-button raised on-click="makeDinosaur">[[someproperty]]</paper-button>44
45 </template>46 <script src="javascript/template-element-min.js?__inline=true"></script>47 </dom-module>
Notice the big comment just before the dom-module line. This will be used to generate documentation for yourelement. Be sure to update the description of the element in this comment.
Now create /src/html/elements/template-element/description.json
/src/html/elements/template-element/description.json
1 {2 "description": "no description...",3 "demo": "demo/index.html"4 }
This file gives a description for the package documentation that will be generated by Grunt. Change the description tosomething sensible when you generate a new element with new-element.js. delete the demo line if you, at one point,decide to not provide a demo.
Now create /src/html/elements/template-element/index.html
/src/html/elements/template-element/index.html
1 <!--2 This file renders documentation of the element3 -->4 <!doctype html>5 <html>6 <head>7
8 <meta charset="utf-8">9 <meta name="viewport" content="width=device-width, initial-scale=1.0">
10
11 <script src="/extern/bower_components/webcomponentsjs/webcomponents-lite.js"></→˓script>
12 <link rel="import" href="/extern/bower_components/iron-component-page/iron-→˓component-page.html">
13
14 </head>15 <body unresolved>16 <!-- Note: if the main element for this repository doesn't17 match the folder name, add a src="<main-component>.html" attribute,18 where <main-component>.html" is a file that imports all of the19 components you want documented. -->20 <iron-component-page></iron-component-page>21
22 </body>23 </html>
Now create /src/html/elements/template-element/javascript/template-element.js
/src/html/elements/template-element/javascript/template-element.js
1 Polymer({2 is: 'template-element',
1.2. Quickstart section 13
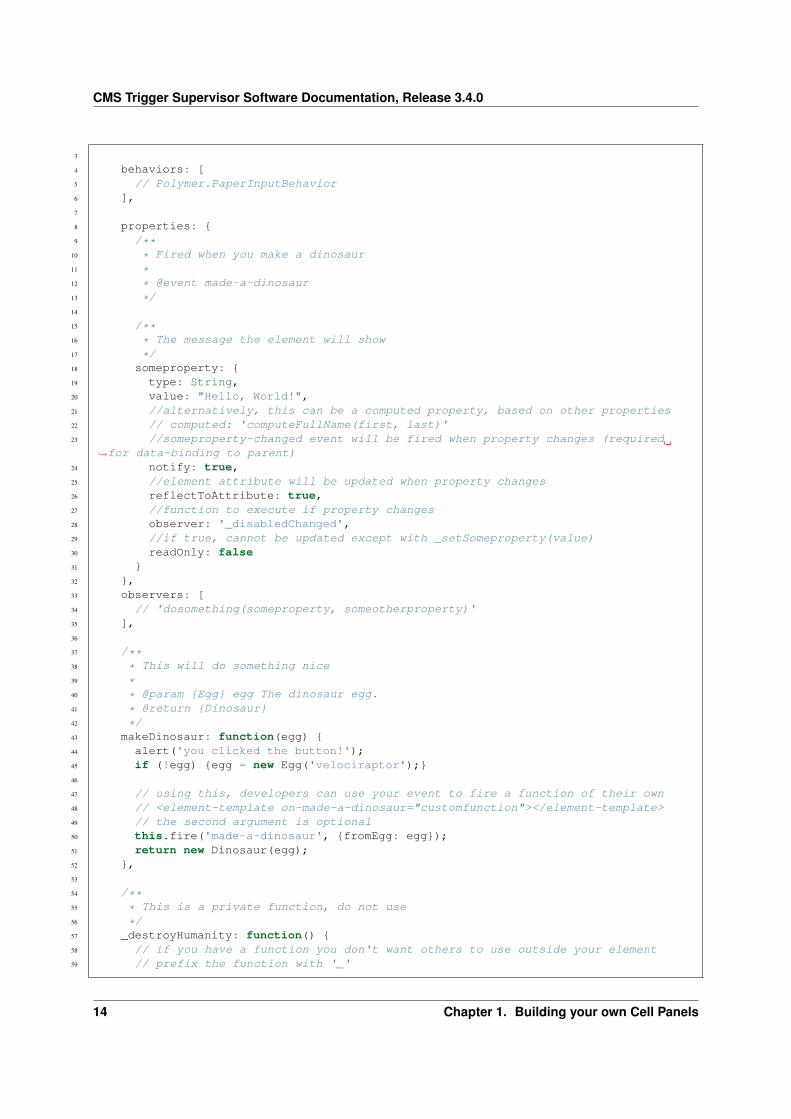
CMS Trigger Supervisor Software Documentation, Release 3.4.0
3
4 behaviors: [5 // Polymer.PaperInputBehavior6 ],7
8 properties: {9 /**
10 * Fired when you make a dinosaur11 *12 * @event made-a-dinosaur13 */14
15 /**16 * The message the element will show17 */18 someproperty: {19 type: String,20 value: "Hello, World!",21 //alternatively, this can be a computed property, based on other properties22 // computed: 'computeFullName(first, last)'23 //someproperty-changed event will be fired when property changes (required
→˓for data-binding to parent)24 notify: true,25 //element attribute will be updated when property changes26 reflectToAttribute: true,27 //function to execute if property changes28 observer: '_disabledChanged',29 //if true, cannot be updated except with _setSomeproperty(value)30 readOnly: false31 }32 },33 observers: [34 // 'dosomething(someproperty, someotherproperty)'35 ],36
37 /**38 * This will do something nice39 *40 * @param {Egg} egg The dinosaur egg.41 * @return {Dinosaur}42 */43 makeDinosaur: function(egg) {44 alert('you clicked the button!');45 if (!egg) {egg = new Egg('velociraptor');}46
47 // using this, developers can use your event to fire a function of their own48 // <element-template on-made-a-dinosaur="customfunction"></element-template>49 // the second argument is optional50 this.fire('made-a-dinosaur', {fromEgg: egg});51 return new Dinosaur(egg);52 },53
54 /**55 * This is a private function, do not use56 */57 _destroyHumanity: function() {58 // if you have a function you don't want others to use outside your element59 // prefix the function with '_'
14 Chapter 1. Building your own Cell Panels
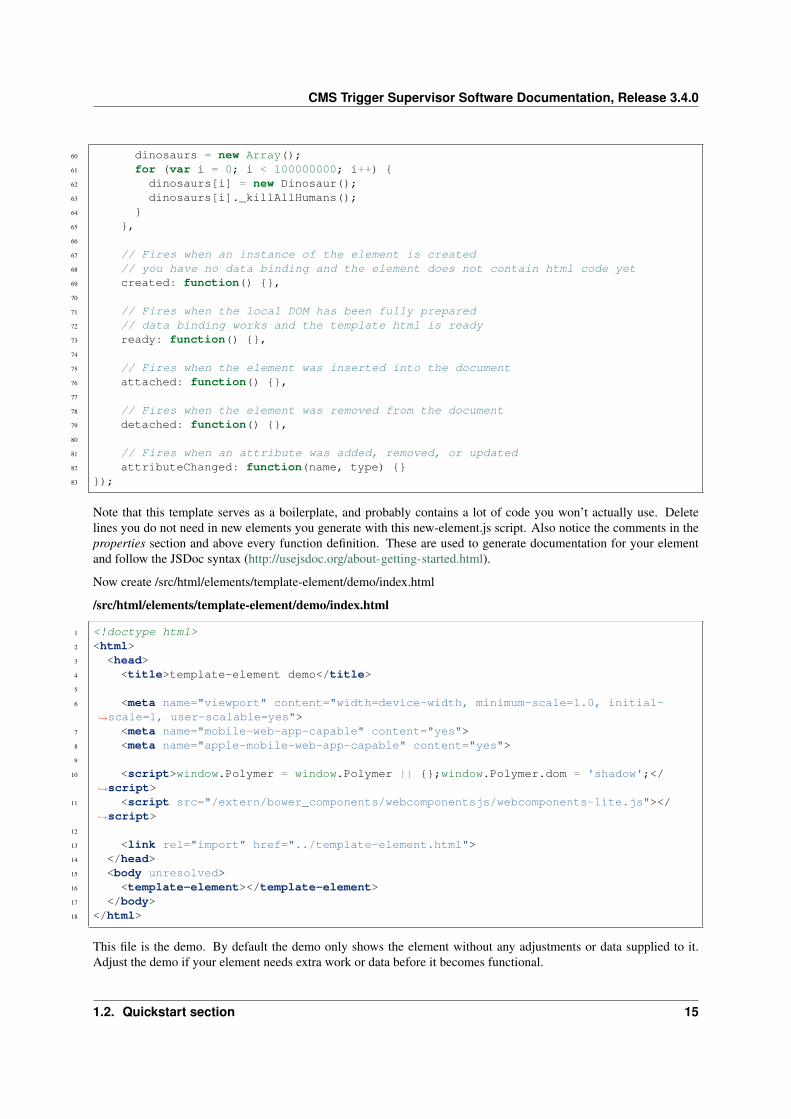
CMS Trigger Supervisor Software Documentation, Release 3.4.0
60 dinosaurs = new Array();61 for (var i = 0; i < 100000000; i++) {62 dinosaurs[i] = new Dinosaur();63 dinosaurs[i]._killAllHumans();64 }65 },66
67 // Fires when an instance of the element is created68 // you have no data binding and the element does not contain html code yet69 created: function() {},70
71 // Fires when the local DOM has been fully prepared72 // data binding works and the template html is ready73 ready: function() {},74
75 // Fires when the element was inserted into the document76 attached: function() {},77
78 // Fires when the element was removed from the document79 detached: function() {},80
81 // Fires when an attribute was added, removed, or updated82 attributeChanged: function(name, type) {}83 });
Note that this template serves as a boilerplate, and probably contains a lot of code you won’t actually use. Deletelines you do not need in new elements you generate with this new-element.js script. Also notice the comments in theproperties section and above every function definition. These are used to generate documentation for your elementand follow the JSDoc syntax (http://usejsdoc.org/about-getting-started.html).
Now create /src/html/elements/template-element/demo/index.html
/src/html/elements/template-element/demo/index.html
1 <!doctype html>2 <html>3 <head>4 <title>template-element demo</title>5
6 <meta name="viewport" content="width=device-width, minimum-scale=1.0, initial-→˓scale=1, user-scalable=yes">
7 <meta name="mobile-web-app-capable" content="yes">8 <meta name="apple-mobile-web-app-capable" content="yes">9
10 <script>window.Polymer = window.Polymer || {};window.Polymer.dom = 'shadow';</→˓script>
11 <script src="/extern/bower_components/webcomponentsjs/webcomponents-lite.js"></→˓script>
12
13 <link rel="import" href="../template-element.html">14 </head>15 <body unresolved>16 <template-element></template-element>17 </body>18 </html>
This file is the demo. By default the demo only shows the element without any adjustments or data supplied to it.Adjust the demo if your element needs extra work or data before it becomes functional.
1.2. Quickstart section 15
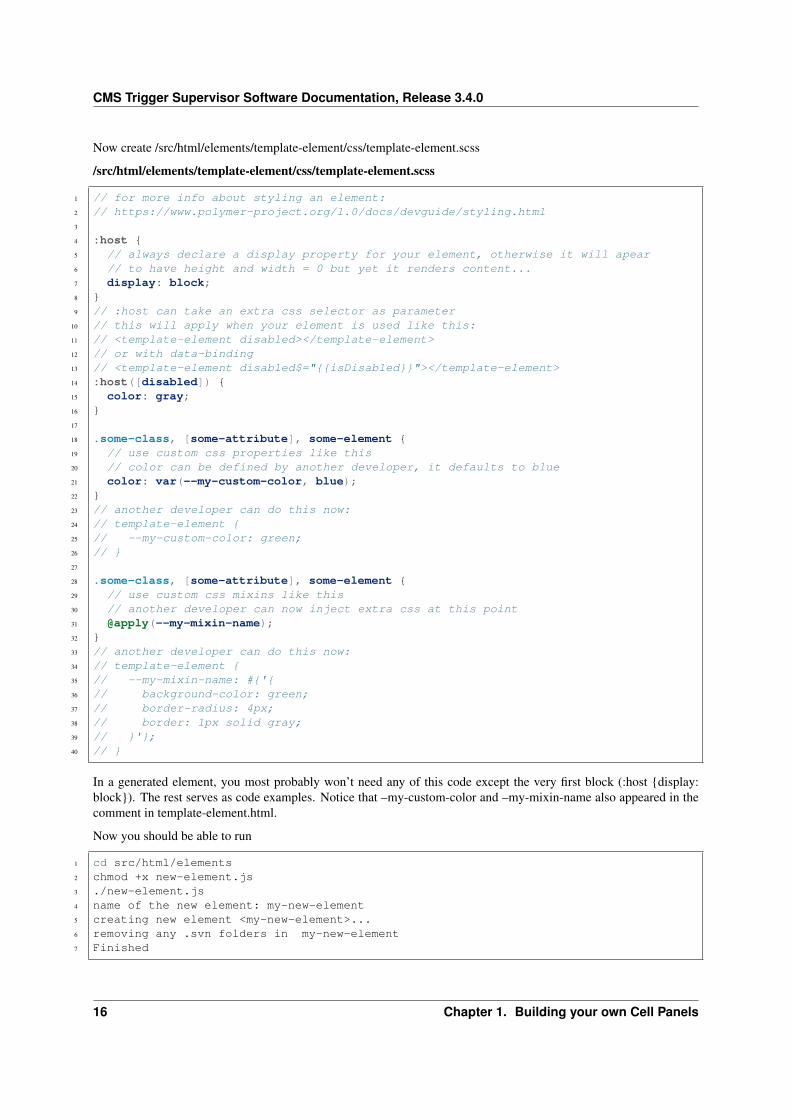
CMS Trigger Supervisor Software Documentation, Release 3.4.0
Now create /src/html/elements/template-element/css/template-element.scss
/src/html/elements/template-element/css/template-element.scss
1 // for more info about styling an element:2 // https://www.polymer-project.org/1.0/docs/devguide/styling.html3
4 :host {5 // always declare a display property for your element, otherwise it will apear6 // to have height and width = 0 but yet it renders content...7 display: block;8 }9 // :host can take an extra css selector as parameter
10 // this will apply when your element is used like this:11 // <template-element disabled></template-element>12 // or with data-binding13 // <template-element disabled$="{{isDisabled}}"></template-element>14 :host([disabled]) {15 color: gray;16 }17
18 .some-class, [some-attribute], some-element {19 // use custom css properties like this20 // color can be defined by another developer, it defaults to blue21 color: var(--my-custom-color, blue);22 }23 // another developer can do this now:24 // template-element {25 // --my-custom-color: green;26 // }27
28 .some-class, [some-attribute], some-element {29 // use custom css mixins like this30 // another developer can now inject extra css at this point31 @apply(--my-mixin-name);32 }33 // another developer can do this now:34 // template-element {35 // --my-mixin-name: #{'{36 // background-color: green;37 // border-radius: 4px;38 // border: 1px solid gray;39 // }'};40 // }
In a generated element, you most probably won’t need any of this code except the very first block (:host {display:block}). The rest serves as code examples. Notice that –my-custom-color and –my-mixin-name also appeared in thecomment in template-element.html.
Now you should be able to run
1 cd src/html/elements2 chmod +x new-element.js3 ./new-element.js4 name of the new element: my-new-element5 creating new element <my-new-element>...6 removing any .svn folders in my-new-element7 Finished
16 Chapter 1. Building your own Cell Panels
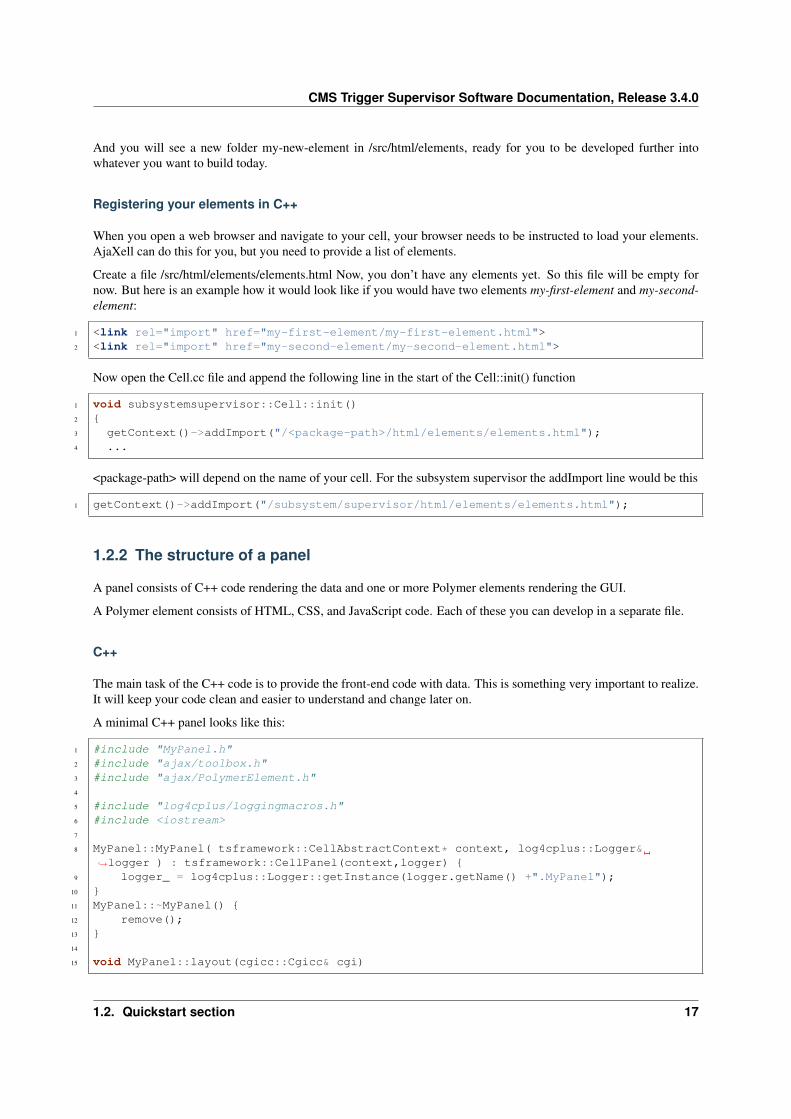
CMS Trigger Supervisor Software Documentation, Release 3.4.0
And you will see a new folder my-new-element in /src/html/elements, ready for you to be developed further intowhatever you want to build today.
Registering your elements in C++
When you open a web browser and navigate to your cell, your browser needs to be instructed to load your elements.AjaXell can do this for you, but you need to provide a list of elements.
Create a file /src/html/elements/elements.html Now, you don’t have any elements yet. So this file will be empty fornow. But here is an example how it would look like if you would have two elements my-first-element and my-second-element:
1 <link rel="import" href="my-first-element/my-first-element.html">2 <link rel="import" href="my-second-element/my-second-element.html">
Now open the Cell.cc file and append the following line in the start of the Cell::init() function
1 void subsystemsupervisor::Cell::init()2 {3 getContext()->addImport("/<package-path>/html/elements/elements.html");4 ...
<package-path> will depend on the name of your cell. For the subsystem supervisor the addImport line would be this
1 getContext()->addImport("/subsystem/supervisor/html/elements/elements.html");
1.2.2 The structure of a panel
A panel consists of C++ code rendering the data and one or more Polymer elements rendering the GUI.
A Polymer element consists of HTML, CSS, and JavaScript code. Each of these you can develop in a separate file.
C++
The main task of the C++ code is to provide the front-end code with data. This is something very important to realize.It will keep your code clean and easier to understand and change later on.
A minimal C++ panel looks like this:
1 #include "MyPanel.h"2 #include "ajax/toolbox.h"3 #include "ajax/PolymerElement.h"4
5 #include "log4cplus/loggingmacros.h"6 #include <iostream>7
8 MyPanel::MyPanel( tsframework::CellAbstractContext* context, log4cplus::Logger&→˓logger ) : tsframework::CellPanel(context,logger) {
9 logger_ = log4cplus::Logger::getInstance(logger.getName() +".MyPanel");10 }11 MyPanel::~MyPanel() {12 remove();13 }14
15 void MyPanel::layout(cgicc::Cgicc& cgi)
1.2. Quickstart section 17
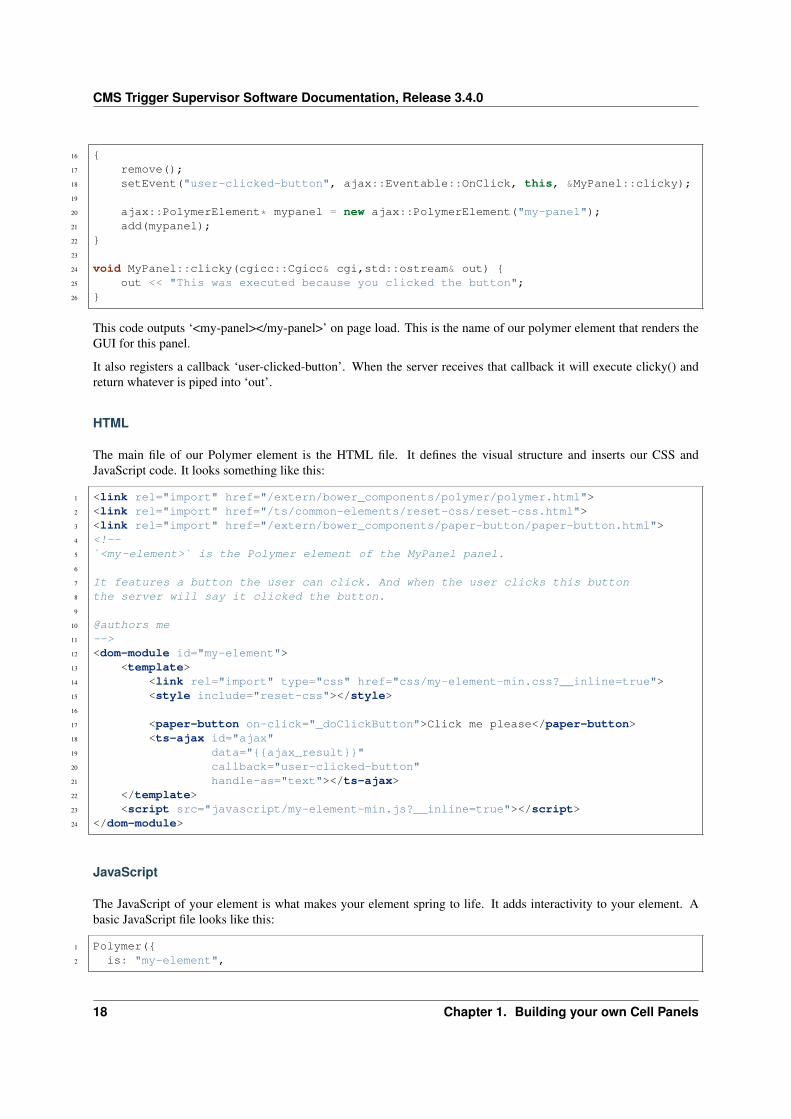
CMS Trigger Supervisor Software Documentation, Release 3.4.0
16 {17 remove();18 setEvent("user-clicked-button", ajax::Eventable::OnClick, this, &MyPanel::clicky);19
20 ajax::PolymerElement* mypanel = new ajax::PolymerElement("my-panel");21 add(mypanel);22 }23
24 void MyPanel::clicky(cgicc::Cgicc& cgi,std::ostream& out) {25 out << "This was executed because you clicked the button";26 }
This code outputs ‘<my-panel></my-panel>’ on page load. This is the name of our polymer element that renders theGUI for this panel.
It also registers a callback ‘user-clicked-button’. When the server receives that callback it will execute clicky() andreturn whatever is piped into ‘out’.
HTML
The main file of our Polymer element is the HTML file. It defines the visual structure and inserts our CSS andJavaScript code. It looks something like this:
1 <link rel="import" href="/extern/bower_components/polymer/polymer.html">2 <link rel="import" href="/ts/common-elements/reset-css/reset-css.html">3 <link rel="import" href="/extern/bower_components/paper-button/paper-button.html">4 <!--5 `<my-element>` is the Polymer element of the MyPanel panel.6
7 It features a button the user can click. And when the user clicks this button8 the server will say it clicked the button.9
10 @authors me11 -->12 <dom-module id="my-element">13 <template>14 <link rel="import" type="css" href="css/my-element-min.css?__inline=true">15 <style include="reset-css"></style>16
17 <paper-button on-click="_doClickButton">Click me please</paper-button>18 <ts-ajax id="ajax"19 data="{{ajax_result}}"20 callback="user-clicked-button"21 handle-as="text"></ts-ajax>22 </template>23 <script src="javascript/my-element-min.js?__inline=true"></script>24 </dom-module>
JavaScript
The JavaScript of your element is what makes your element spring to life. It adds interactivity to your element. Abasic JavaScript file looks like this:
1 Polymer({2 is: "my-element",
18 Chapter 1. Building your own Cell Panels
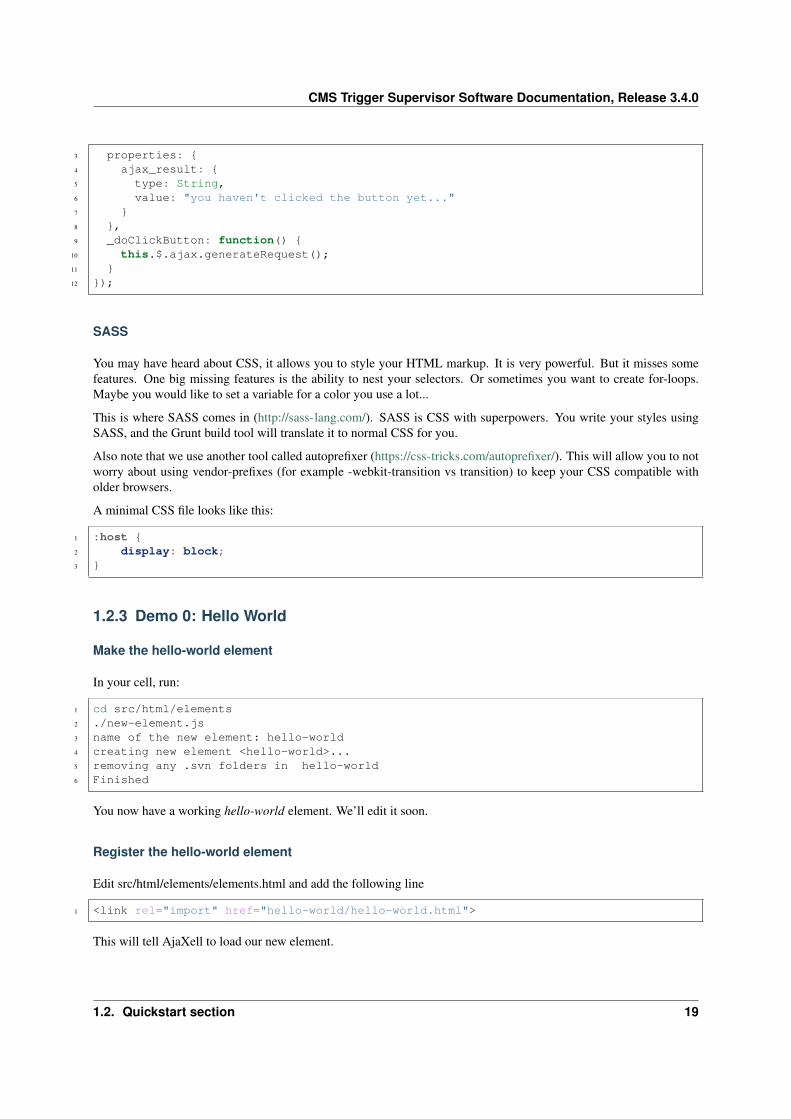
CMS Trigger Supervisor Software Documentation, Release 3.4.0
3 properties: {4 ajax_result: {5 type: String,6 value: "you haven't clicked the button yet..."7 }8 },9 _doClickButton: function() {
10 this.$.ajax.generateRequest();11 }12 });
SASS
You may have heard about CSS, it allows you to style your HTML markup. It is very powerful. But it misses somefeatures. One big missing features is the ability to nest your selectors. Or sometimes you want to create for-loops.Maybe you would like to set a variable for a color you use a lot...
This is where SASS comes in (http://sass-lang.com/). SASS is CSS with superpowers. You write your styles usingSASS, and the Grunt build tool will translate it to normal CSS for you.
Also note that we use another tool called autoprefixer (https://css-tricks.com/autoprefixer/). This will allow you to notworry about using vendor-prefixes (for example -webkit-transition vs transition) to keep your CSS compatible witholder browsers.
A minimal CSS file looks like this:
1 :host {2 display: block;3 }
1.2.3 Demo 0: Hello World
Make the hello-world element
In your cell, run:
1 cd src/html/elements2 ./new-element.js3 name of the new element: hello-world4 creating new element <hello-world>...5 removing any .svn folders in hello-world6 Finished
You now have a working hello-world element. We’ll edit it soon.
Register the hello-world element
Edit src/html/elements/elements.html and add the following line
1 <link rel="import" href="hello-world/hello-world.html">
This will tell AjaXell to load our new element.
1.2. Quickstart section 19
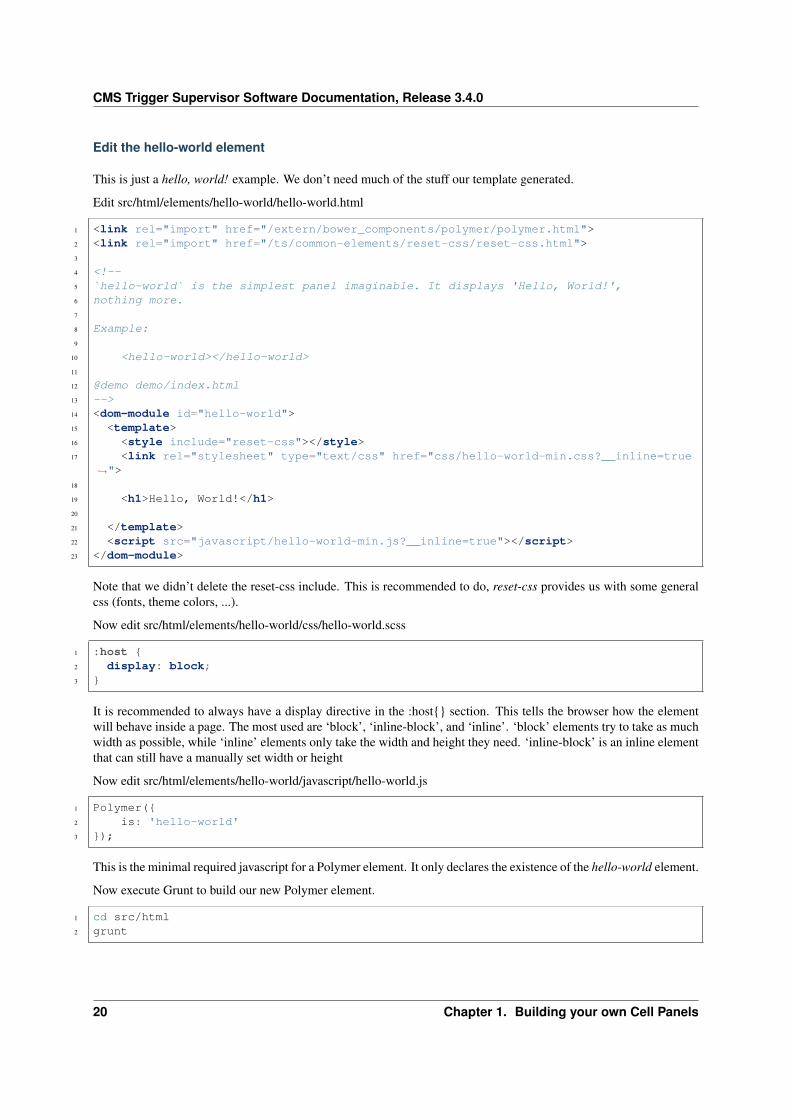
CMS Trigger Supervisor Software Documentation, Release 3.4.0
Edit the hello-world element
This is just a hello, world! example. We don’t need much of the stuff our template generated.
Edit src/html/elements/hello-world/hello-world.html
1 <link rel="import" href="/extern/bower_components/polymer/polymer.html">2 <link rel="import" href="/ts/common-elements/reset-css/reset-css.html">3
4 <!--5 `hello-world` is the simplest panel imaginable. It displays 'Hello, World!',6 nothing more.7
8 Example:9
10 <hello-world></hello-world>11
12 @demo demo/index.html13 -->14 <dom-module id="hello-world">15 <template>16 <style include="reset-css"></style>17 <link rel="stylesheet" type="text/css" href="css/hello-world-min.css?__inline=true
→˓">18
19 <h1>Hello, World!</h1>20
21 </template>22 <script src="javascript/hello-world-min.js?__inline=true"></script>23 </dom-module>
Note that we didn’t delete the reset-css include. This is recommended to do, reset-css provides us with some generalcss (fonts, theme colors, ...).
Now edit src/html/elements/hello-world/css/hello-world.scss
1 :host {2 display: block;3 }
It is recommended to always have a display directive in the :host{} section. This tells the browser how the elementwill behave inside a page. The most used are ‘block’, ‘inline-block’, and ‘inline’. ‘block’ elements try to take as muchwidth as possible, while ‘inline’ elements only take the width and height they need. ‘inline-block’ is an inline elementthat can still have a manually set width or height
Now edit src/html/elements/hello-world/javascript/hello-world.js
1 Polymer({2 is: 'hello-world'3 });
This is the minimal required javascript for a Polymer element. It only declares the existence of the hello-world element.
Now execute Grunt to build our new Polymer element.
1 cd src/html2 grunt
20 Chapter 1. Building your own Cell Panels
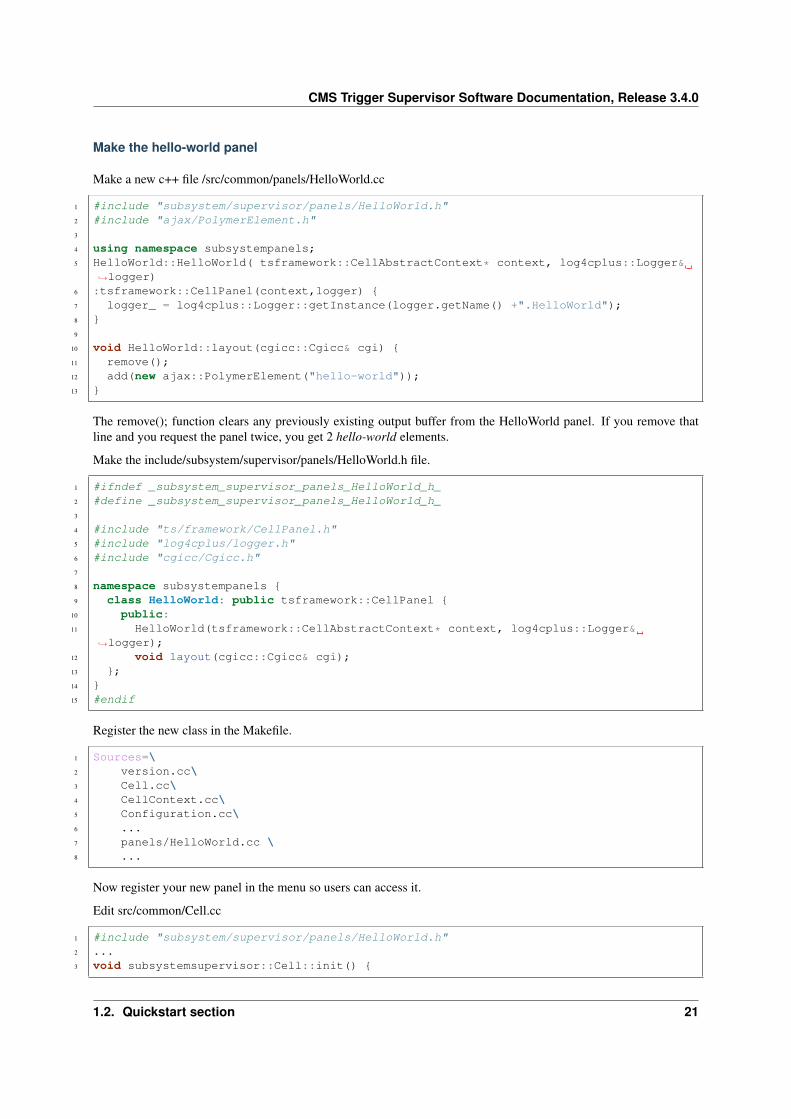
CMS Trigger Supervisor Software Documentation, Release 3.4.0
Make the hello-world panel
Make a new c++ file /src/common/panels/HelloWorld.cc
1 #include "subsystem/supervisor/panels/HelloWorld.h"2 #include "ajax/PolymerElement.h"3
4 using namespace subsystempanels;5 HelloWorld::HelloWorld( tsframework::CellAbstractContext* context, log4cplus::Logger&
→˓logger)6 :tsframework::CellPanel(context,logger) {7 logger_ = log4cplus::Logger::getInstance(logger.getName() +".HelloWorld");8 }9
10 void HelloWorld::layout(cgicc::Cgicc& cgi) {11 remove();12 add(new ajax::PolymerElement("hello-world"));13 }
The remove(); function clears any previously existing output buffer from the HelloWorld panel. If you remove thatline and you request the panel twice, you get 2 hello-world elements.
Make the include/subsystem/supervisor/panels/HelloWorld.h file.
1 #ifndef _subsystem_supervisor_panels_HelloWorld_h_2 #define _subsystem_supervisor_panels_HelloWorld_h_3
4 #include "ts/framework/CellPanel.h"5 #include "log4cplus/logger.h"6 #include "cgicc/Cgicc.h"7
8 namespace subsystempanels {9 class HelloWorld: public tsframework::CellPanel {
10 public:11 HelloWorld(tsframework::CellAbstractContext* context, log4cplus::Logger&
→˓logger);12 void layout(cgicc::Cgicc& cgi);13 };14 }15 #endif
Register the new class in the Makefile.
1 Sources=\2 version.cc\3 Cell.cc\4 CellContext.cc\5 Configuration.cc\6 ...7 panels/HelloWorld.cc \8 ...
Now register your new panel in the menu so users can access it.
Edit src/common/Cell.cc
1 #include "subsystem/supervisor/panels/HelloWorld.h"2 ...3 void subsystemsupervisor::Cell::init() {
1.2. Quickstart section 21
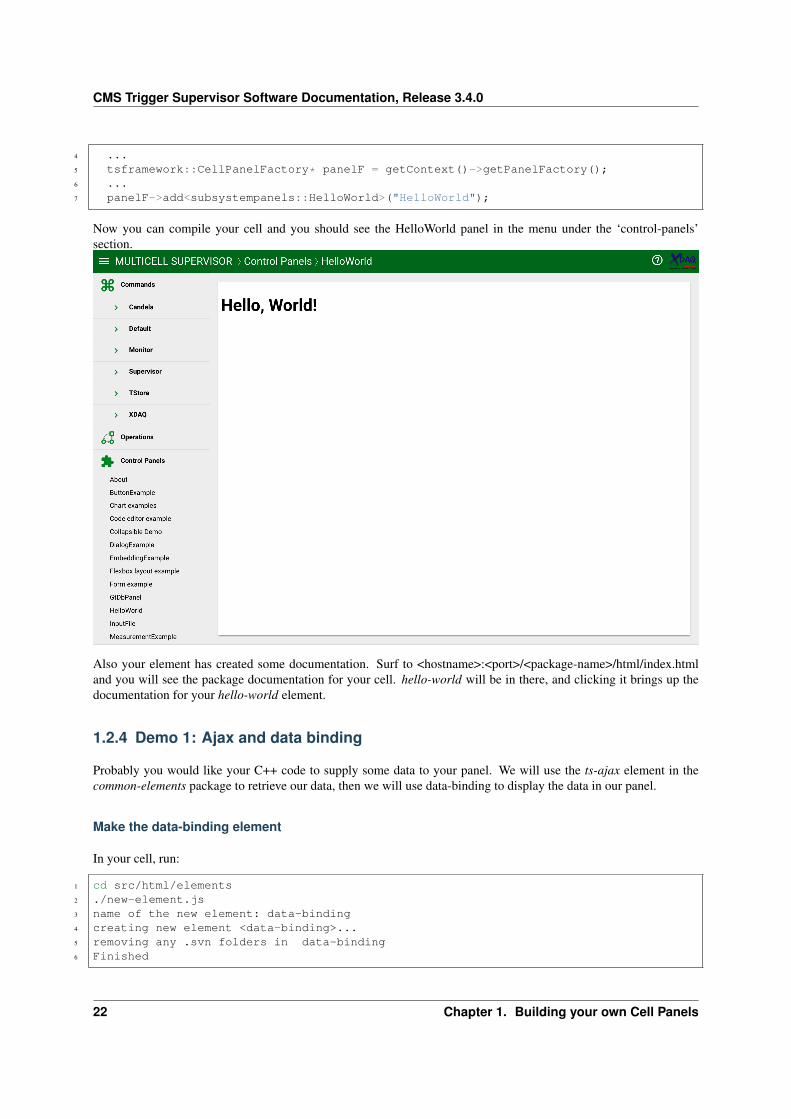
CMS Trigger Supervisor Software Documentation, Release 3.4.0
4 ...5 tsframework::CellPanelFactory* panelF = getContext()->getPanelFactory();6 ...7 panelF->add<subsystempanels::HelloWorld>("HelloWorld");
Now you can compile your cell and you should see the HelloWorld panel in the menu under the ‘control-panels’section.
Also your element has created some documentation. Surf to <hostname>:<port>/<package-name>/html/index.htmland you will see the package documentation for your cell. hello-world will be in there, and clicking it brings up thedocumentation for your hello-world element.
1.2.4 Demo 1: Ajax and data binding
Probably you would like your C++ code to supply some data to your panel. We will use the ts-ajax element in thecommon-elements package to retrieve our data, then we will use data-binding to display the data in our panel.
Make the data-binding element
In your cell, run:
1 cd src/html/elements2 ./new-element.js3 name of the new element: data-binding4 creating new element <data-binding>...5 removing any .svn folders in data-binding6 Finished
22 Chapter 1. Building your own Cell Panels
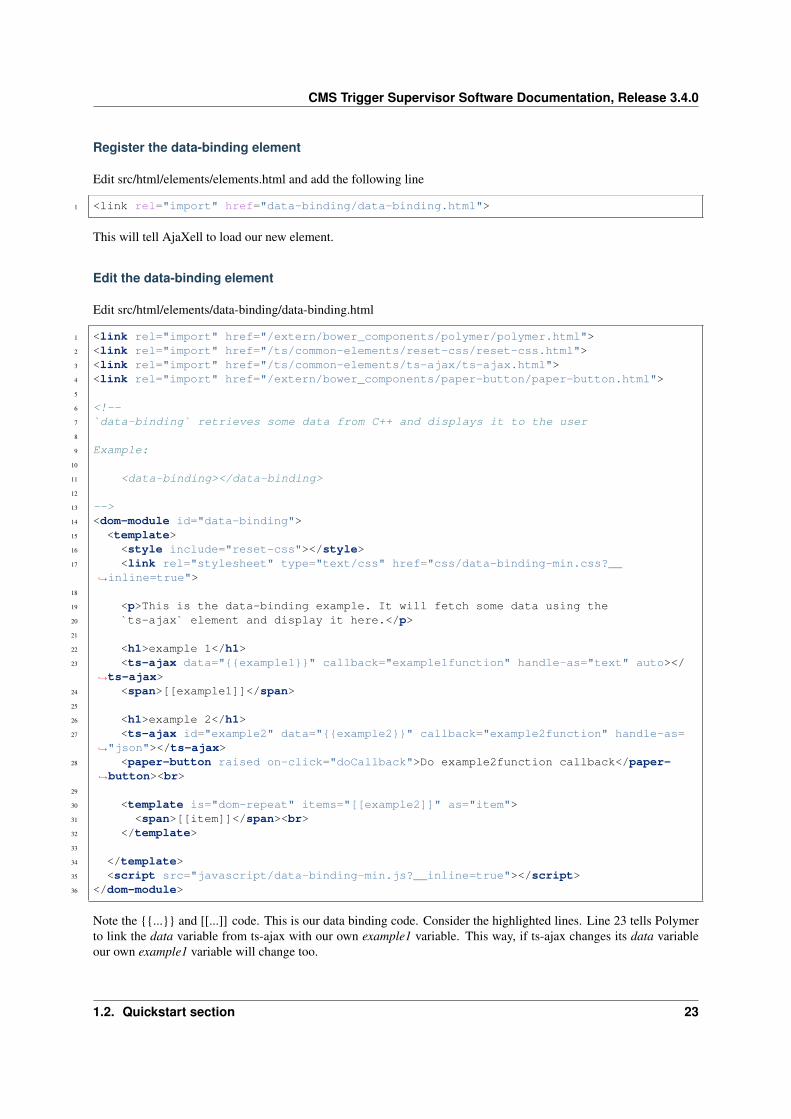
CMS Trigger Supervisor Software Documentation, Release 3.4.0
Register the data-binding element
Edit src/html/elements/elements.html and add the following line
1 <link rel="import" href="data-binding/data-binding.html">
This will tell AjaXell to load our new element.
Edit the data-binding element
Edit src/html/elements/data-binding/data-binding.html
1 <link rel="import" href="/extern/bower_components/polymer/polymer.html">2 <link rel="import" href="/ts/common-elements/reset-css/reset-css.html">3 <link rel="import" href="/ts/common-elements/ts-ajax/ts-ajax.html">4 <link rel="import" href="/extern/bower_components/paper-button/paper-button.html">5
6 <!--7 `data-binding` retrieves some data from C++ and displays it to the user8
9 Example:10
11 <data-binding></data-binding>12
13 -->14 <dom-module id="data-binding">15 <template>16 <style include="reset-css"></style>17 <link rel="stylesheet" type="text/css" href="css/data-binding-min.css?__
→˓inline=true">18
19 <p>This is the data-binding example. It will fetch some data using the20 `ts-ajax` element and display it here.</p>21
22 <h1>example 1</h1>23 <ts-ajax data="{{example1}}" callback="example1function" handle-as="text" auto></
→˓ts-ajax>24 <span>[[example1]]</span>25
26 <h1>example 2</h1>27 <ts-ajax id="example2" data="{{example2}}" callback="example2function" handle-as=
→˓"json"></ts-ajax>28 <paper-button raised on-click="doCallback">Do example2function callback</paper-
→˓button><br>29
30 <template is="dom-repeat" items="[[example2]]" as="item">31 <span>[[item]]</span><br>32 </template>33
34 </template>35 <script src="javascript/data-binding-min.js?__inline=true"></script>36 </dom-module>
Note the {{...}} and [[...]] code. This is our data binding code. Consider the highlighted lines. Line 23 tells Polymerto link the data variable from ts-ajax with our own example1 variable. This way, if ts-ajax changes its data variableour own example1 variable will change too.
1.2. Quickstart section 23
CMS Trigger Supervisor Software Documentation, Release 3.4.0
When we use the {{...}} syntax this change goes both ways. [[...]] goes one way only. Use the latter to display somefinal result as we did in line 24, where we don’t anticipate a source of change.
Now edit src/html/elements/data-binding/css/data-binding.scss
1 :host {2 display: block;3 }
Now edit src/html/elements/data-binding/javascript/data-binding.js
1 Polymer({2 is: 'data-binding',3
4 properties: {5 example1: {6 type: String,7 value: "no data from C++ yet..."8 },9 example2: {
10 type: Array,11 value: function() {12 return ["no data from C++ yet..."];13 }14 }15 },16
17 doCallback: function() {18 // this.$ is a shorthand selector,19 // it allows us to select an element in our template by id20 this.$.example2.generateRequest();21 }22 });
Now execute Grunt to build our new Polymer element.
1 cd src/html2 grunt
Make the data-binding panel
Make a new c++ file /src/common/panels/DataBinding.cc
1 #include "subsystem/supervisor/panels/DataBinding.h"2 #include "ajax/PolymerElement.h"3 #include "json/json.h"4 #include <sstream>5
6 using namespace subsystempanels;7 DataBinding::DataBinding( tsframework::CellAbstractContext* context, log4cplus::
→˓Logger& logger)8 :tsframework::CellPanel(context,logger) {9 logger_ = log4cplus::Logger::getInstance(logger.getName() +".DataBinding");
10 }11
12 void DataBinding::layout(cgicc::Cgicc& cgi) {13 remove();
24 Chapter 1. Building your own Cell Panels
CMS Trigger Supervisor Software Documentation, Release 3.4.0
14 setEvent("example1function", ajax::Eventable::OnClick, this, &DataBinding::→˓example1);
15 setEvent("example2function", ajax::Eventable::OnClick, this, &DataBinding::→˓example2);
16 add(new ajax::PolymerElement("data-binding"));17 }18
19 void DataBinding::example1(cgicc::Cgicc& cgi,std::ostream& out) {20 out << "This text is generated using C++!";21 }22
23 void DataBinding::example2(cgicc::Cgicc& cgi,std::ostream& out) {24 Json::Value root(Json::arrayValue);25 for (size_t i = 0; i < 10; i++) {26 std::stringstream ss;27 ss << "This is text " << i << " generated by C++";28 root.append(ss.str());29 }30 out << root;31 }
Notice that in the HTML code earlier we specified callback=”example1function” in one of the ts-ajax elements. Noticethe #include “json/json.h” line. We import the jsoncpp library this way in order to create an array of strings inexample2().
Edit your Makefile to add jsoncpp as a dependency.
1 DependentLibraries = tsframework tsajaxell ... jsoncpp
Make the include/subsystem/supervisor/panels/DataBinding.h file.
1 #ifndef _subsystem_supervisor_panels_DataBinding_h_2 #define _subsystem_supervisor_panels_DataBinding_h_3
4 #include "ts/framework/CellPanel.h"5 #include "log4cplus/logger.h"6 #include "cgicc/Cgicc.h"7
8 namespace subsystempanels {9 class DataBinding: public tsframework::CellPanel {
10 public:11 DataBinding(tsframework::CellAbstractContext* context, log4cplus::Logger&
→˓logger);12 void layout(cgicc::Cgicc& cgi);13 private:14 void example1(cgicc::Cgicc& cgi,std::ostream& out);15 void example2(cgicc::Cgicc& cgi,std::ostream& out);16 };17 }18 #endif
Register the new class in the Makefile.
1 Sources=\2 version.cc\3 Cell.cc\4 CellContext.cc\5 Configuration.cc\
1.2. Quickstart section 25
CMS Trigger Supervisor Software Documentation, Release 3.4.0
6 ...7 panels/DataBinding.cc \8 ...
Now register your new panel in the menu so users can access it.
Edit src/common/Cell.cc
1 #include "subsystem/supervisor/panels/DataBinding.h"2 ...3 void subsystemsupervisor::Cell::init() {4 ...5 tsframework::CellPanelFactory* panelF = getContext()->getPanelFactory();6 ...7 panelF->add<subsystempanels::DataBinding>("ts-ajax and data-binding");
That’s right, you can have spaces in your menu names.
Now you can compile your cell and you should see the “ts-ajax and data-binding” panel in the menu under the ‘control-panels’ section.
Also your element has created some documentation. Surf to <hostname>:<port>/<package-name>/html/index.htmland you will see the package documentation for your cell. data-binding will be in there, and clicking it brings up thedocumentation for your data-binding element.
Be sure to check out the documentation for the ts-ajax element at <hostname>:<port>/ts/common-elements/html/index.html
26 Chapter 1. Building your own Cell Panels
CMS Trigger Supervisor Software Documentation, Release 3.4.0
1.2.5 Demo 2: The flexbox layout
To setup a layout of your panels you can use the flexbox layout system. This is a set of new CSS directives that seeksto make designing layouts much simpler. It would deprecate the use of float: left and other nonsense.
Make the flexbox-layout element
In your cell, run:
1 cd src/html/elements2 ./new-element.js3 name of the new element: flexbox-layout4 creating new element <flexbox-layout>...5 removing any .svn folders in flexbox-layout6 Finished
Register the flexbox-layout element
Edit src/html/elements/elements.html and add the following line
1 <link rel="import" href="flexbox-layout/flexbox-layout.html">
This will tell AjaXell to load our new element.
Edit the flexbox-layout element
Edit src/html/elements/flexbox-layout/flexbox-layout.html
1 <link rel="import" href="/extern/bower_components/polymer/polymer.html">2 <link rel="import" href="/ts/common-elements/reset-css/reset-css.html">3 <link rel="import" href="/ts/common-elements/ts-colors/ts-colors.html">4 <link rel="import" href="/ts/common-elements/iron-flex-layout-attributes/iron-flex-
→˓layout-attributes.html">5
6 <!--7 `flexbox-layout` is a demo showcasing the capabilities of iron-flex-layout-attributes.8
9 @demo demo/index.html10
11 -->12 <dom-module id="flexbox-layout">13 <template>14 <style include="reset-css"></style>15 <style include="ts-colors"></style>16
17 <!-- this will allow you to use flexbox easily -->18 <!-- surf to /ts/common-elements/iron-flex-layout-attributes/index.html -->19 <style include="iron-flex-layout-attributes"></style>20
21 <link rel="stylesheet" type="text/css" href="css/flexbox-layout-min.css?__→˓inline=true">
22 </template>23 <script src="javascript/flexbox-layout-min.js?__inline=true"></script>24 </dom-module>
1.2. Quickstart section 27
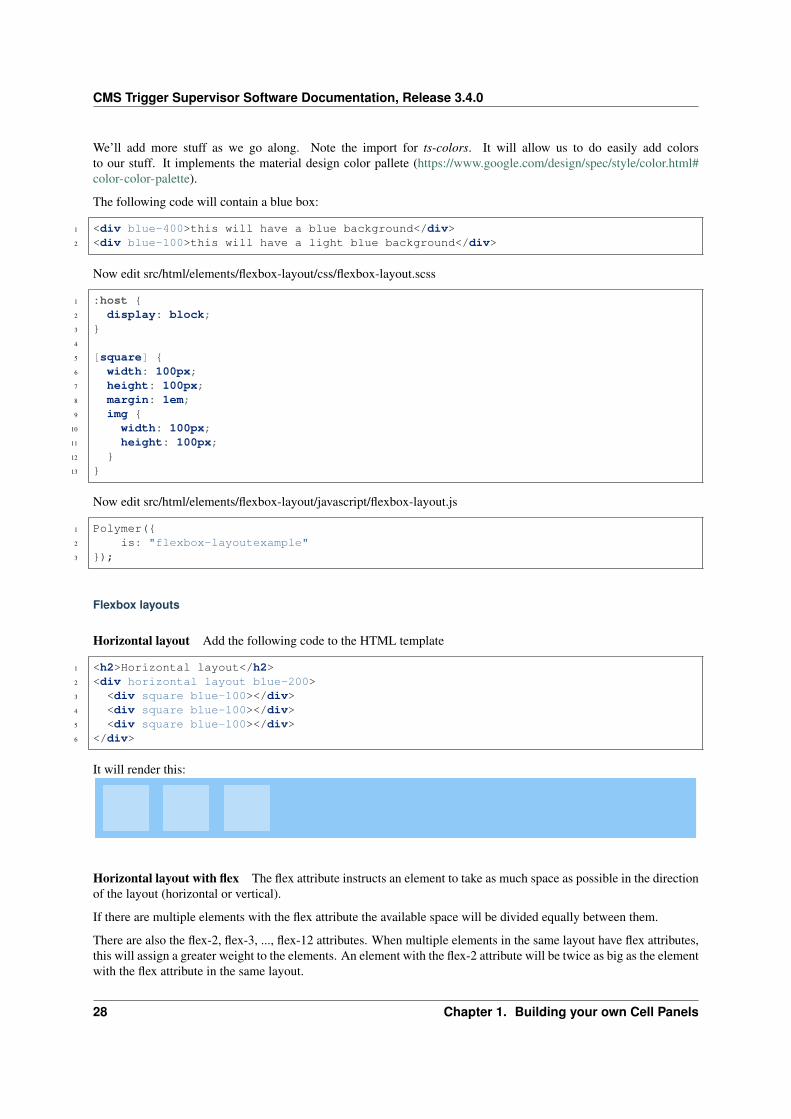
CMS Trigger Supervisor Software Documentation, Release 3.4.0
We’ll add more stuff as we go along. Note the import for ts-colors. It will allow us to do easily add colorsto our stuff. It implements the material design color pallete (https://www.google.com/design/spec/style/color.html#color-color-palette).
The following code will contain a blue box:
1 <div blue-400>this will have a blue background</div>2 <div blue-100>this will have a light blue background</div>
Now edit src/html/elements/flexbox-layout/css/flexbox-layout.scss
1 :host {2 display: block;3 }4
5 [square] {6 width: 100px;7 height: 100px;8 margin: 1em;9 img {
10 width: 100px;11 height: 100px;12 }13 }
Now edit src/html/elements/flexbox-layout/javascript/flexbox-layout.js
1 Polymer({2 is: "flexbox-layoutexample"3 });
Flexbox layouts
Horizontal layout Add the following code to the HTML template
1 <h2>Horizontal layout</h2>2 <div horizontal layout blue-200>3 <div square blue-100></div>4 <div square blue-100></div>5 <div square blue-100></div>6 </div>
It will render this:
Horizontal layout with flex The flex attribute instructs an element to take as much space as possible in the directionof the layout (horizontal or vertical).
If there are multiple elements with the flex attribute the available space will be divided equally between them.
There are also the flex-2, flex-3, ..., flex-12 attributes. When multiple elements in the same layout have flex attributes,this will assign a greater weight to the elements. An element with the flex-2 attribute will be twice as big as the elementwith the flex attribute in the same layout.
28 Chapter 1. Building your own Cell Panels
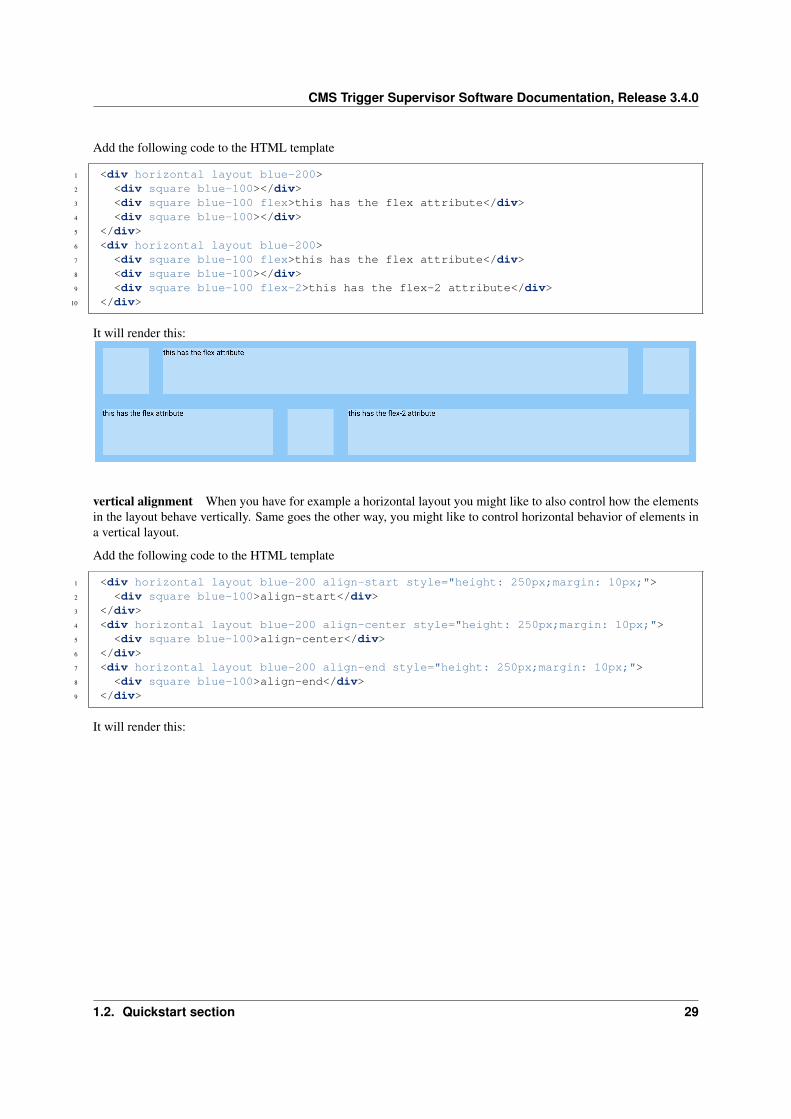
CMS Trigger Supervisor Software Documentation, Release 3.4.0
Add the following code to the HTML template
1 <div horizontal layout blue-200>2 <div square blue-100></div>3 <div square blue-100 flex>this has the flex attribute</div>4 <div square blue-100></div>5 </div>6 <div horizontal layout blue-200>7 <div square blue-100 flex>this has the flex attribute</div>8 <div square blue-100></div>9 <div square blue-100 flex-2>this has the flex-2 attribute</div>
10 </div>
It will render this:
vertical alignment When you have for example a horizontal layout you might like to also control how the elementsin the layout behave vertically. Same goes the other way, you might like to control horizontal behavior of elements ina vertical layout.
Add the following code to the HTML template
1 <div horizontal layout blue-200 align-start style="height: 250px;margin: 10px;">2 <div square blue-100>align-start</div>3 </div>4 <div horizontal layout blue-200 align-center style="height: 250px;margin: 10px;">5 <div square blue-100>align-center</div>6 </div>7 <div horizontal layout blue-200 align-end style="height: 250px;margin: 10px;">8 <div square blue-100>align-end</div>9 </div>
It will render this:
1.2. Quickstart section 29
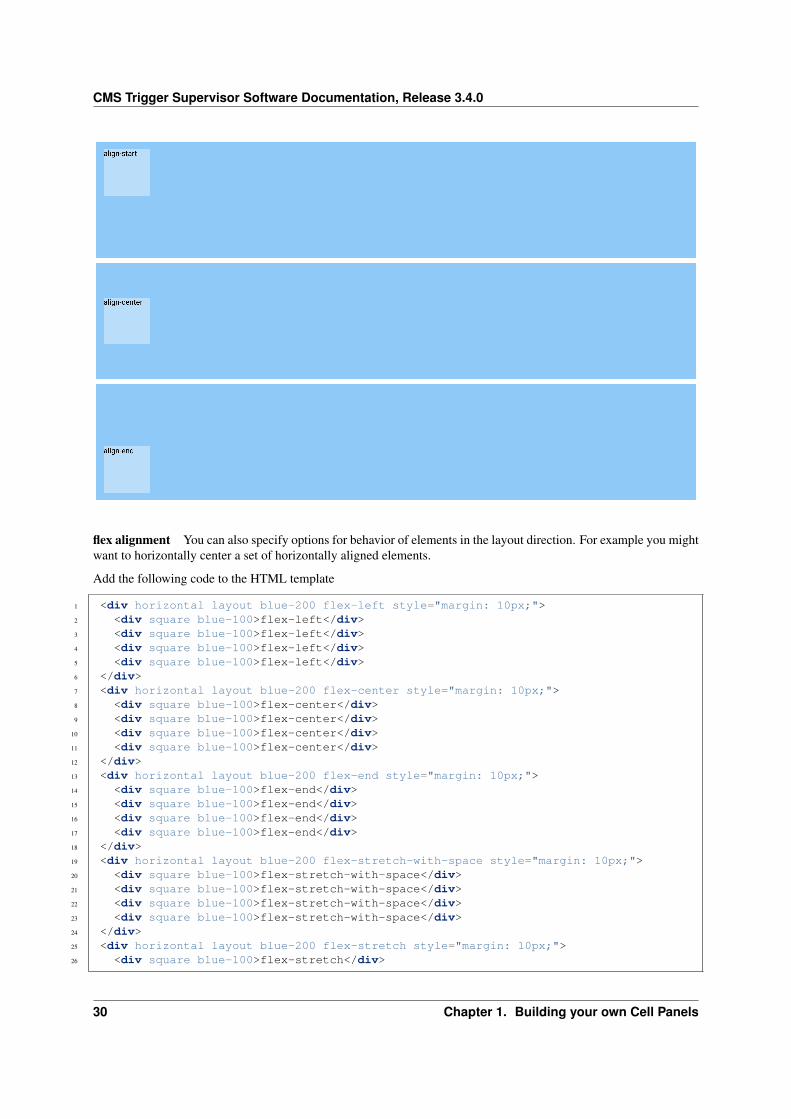
CMS Trigger Supervisor Software Documentation, Release 3.4.0
flex alignment You can also specify options for behavior of elements in the layout direction. For example you mightwant to horizontally center a set of horizontally aligned elements.
Add the following code to the HTML template
1 <div horizontal layout blue-200 flex-left style="margin: 10px;">2 <div square blue-100>flex-left</div>3 <div square blue-100>flex-left</div>4 <div square blue-100>flex-left</div>5 <div square blue-100>flex-left</div>6 </div>7 <div horizontal layout blue-200 flex-center style="margin: 10px;">8 <div square blue-100>flex-center</div>9 <div square blue-100>flex-center</div>
10 <div square blue-100>flex-center</div>11 <div square blue-100>flex-center</div>12 </div>13 <div horizontal layout blue-200 flex-end style="margin: 10px;">14 <div square blue-100>flex-end</div>15 <div square blue-100>flex-end</div>16 <div square blue-100>flex-end</div>17 <div square blue-100>flex-end</div>18 </div>19 <div horizontal layout blue-200 flex-stretch-with-space style="margin: 10px;">20 <div square blue-100>flex-stretch-with-space</div>21 <div square blue-100>flex-stretch-with-space</div>22 <div square blue-100>flex-stretch-with-space</div>23 <div square blue-100>flex-stretch-with-space</div>24 </div>25 <div horizontal layout blue-200 flex-stretch style="margin: 10px;">26 <div square blue-100>flex-stretch</div>
30 Chapter 1. Building your own Cell Panels
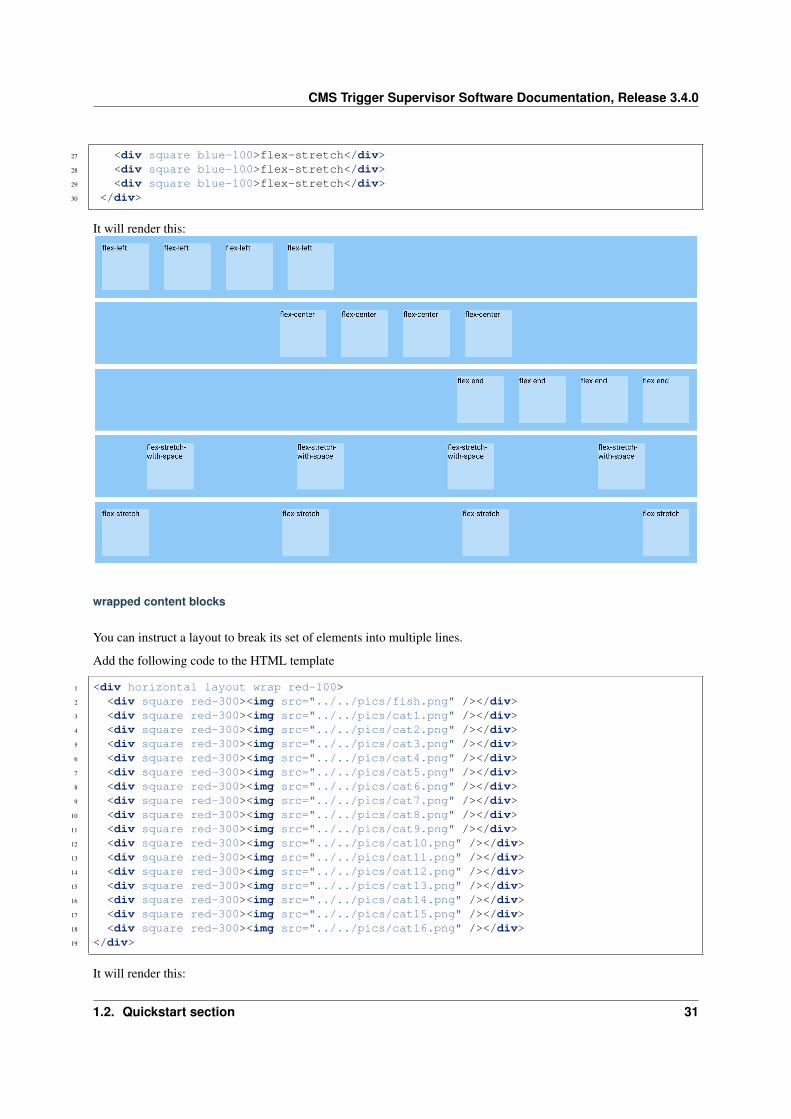
CMS Trigger Supervisor Software Documentation, Release 3.4.0
27 <div square blue-100>flex-stretch</div>28 <div square blue-100>flex-stretch</div>29 <div square blue-100>flex-stretch</div>30 </div>
It will render this:
wrapped content blocks
You can instruct a layout to break its set of elements into multiple lines.
Add the following code to the HTML template
1 <div horizontal layout wrap red-100>2 <div square red-300><img src="../../pics/fish.png" /></div>3 <div square red-300><img src="../../pics/cat1.png" /></div>4 <div square red-300><img src="../../pics/cat2.png" /></div>5 <div square red-300><img src="../../pics/cat3.png" /></div>6 <div square red-300><img src="../../pics/cat4.png" /></div>7 <div square red-300><img src="../../pics/cat5.png" /></div>8 <div square red-300><img src="../../pics/cat6.png" /></div>9 <div square red-300><img src="../../pics/cat7.png" /></div>
10 <div square red-300><img src="../../pics/cat8.png" /></div>11 <div square red-300><img src="../../pics/cat9.png" /></div>12 <div square red-300><img src="../../pics/cat10.png" /></div>13 <div square red-300><img src="../../pics/cat11.png" /></div>14 <div square red-300><img src="../../pics/cat12.png" /></div>15 <div square red-300><img src="../../pics/cat13.png" /></div>16 <div square red-300><img src="../../pics/cat14.png" /></div>17 <div square red-300><img src="../../pics/cat15.png" /></div>18 <div square red-300><img src="../../pics/cat16.png" /></div>19 </div>
It will render this:
1.2. Quickstart section 31
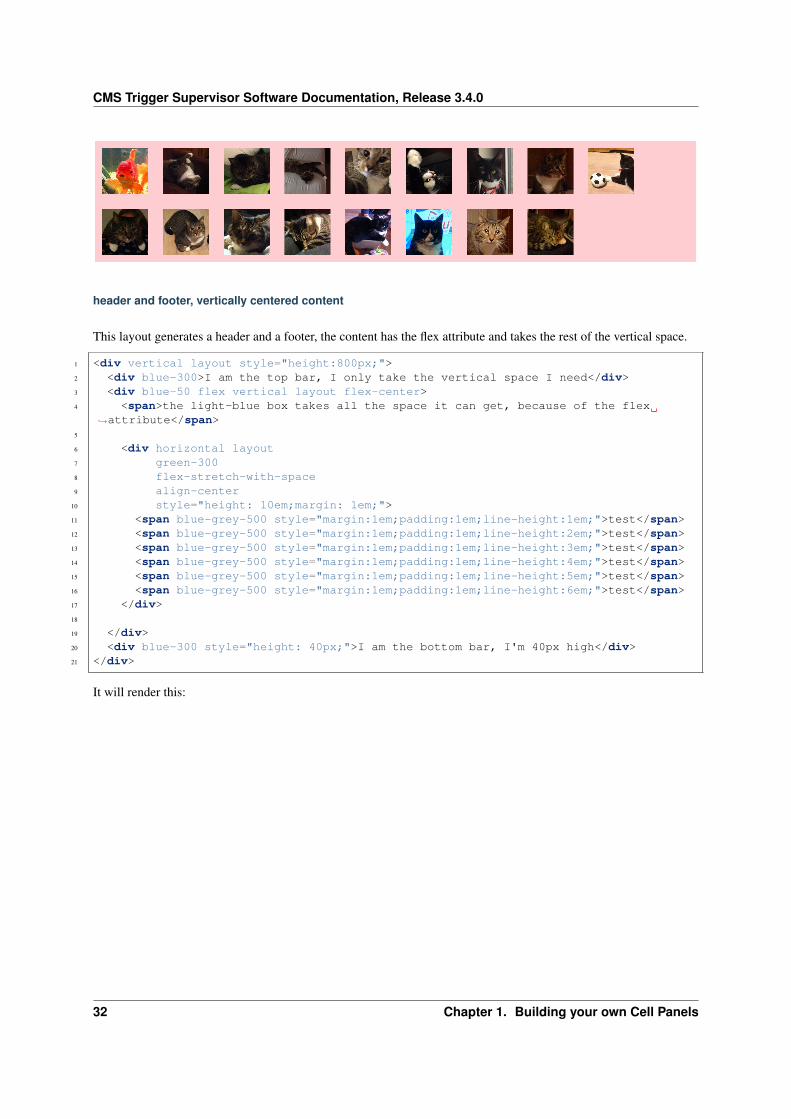
CMS Trigger Supervisor Software Documentation, Release 3.4.0
header and footer, vertically centered content
This layout generates a header and a footer, the content has the flex attribute and takes the rest of the vertical space.
1 <div vertical layout style="height:800px;">2 <div blue-300>I am the top bar, I only take the vertical space I need</div>3 <div blue-50 flex vertical layout flex-center>4 <span>the light-blue box takes all the space it can get, because of the flex
→˓attribute</span>5
6 <div horizontal layout7 green-3008 flex-stretch-with-space9 align-center
10 style="height: 10em;margin: 1em;">11 <span blue-grey-500 style="margin:1em;padding:1em;line-height:1em;">test</span>12 <span blue-grey-500 style="margin:1em;padding:1em;line-height:2em;">test</span>13 <span blue-grey-500 style="margin:1em;padding:1em;line-height:3em;">test</span>14 <span blue-grey-500 style="margin:1em;padding:1em;line-height:4em;">test</span>15 <span blue-grey-500 style="margin:1em;padding:1em;line-height:5em;">test</span>16 <span blue-grey-500 style="margin:1em;padding:1em;line-height:6em;">test</span>17 </div>18
19 </div>20 <div blue-300 style="height: 40px;">I am the bottom bar, I'm 40px high</div>21 </div>
It will render this:
32 Chapter 1. Building your own Cell Panels
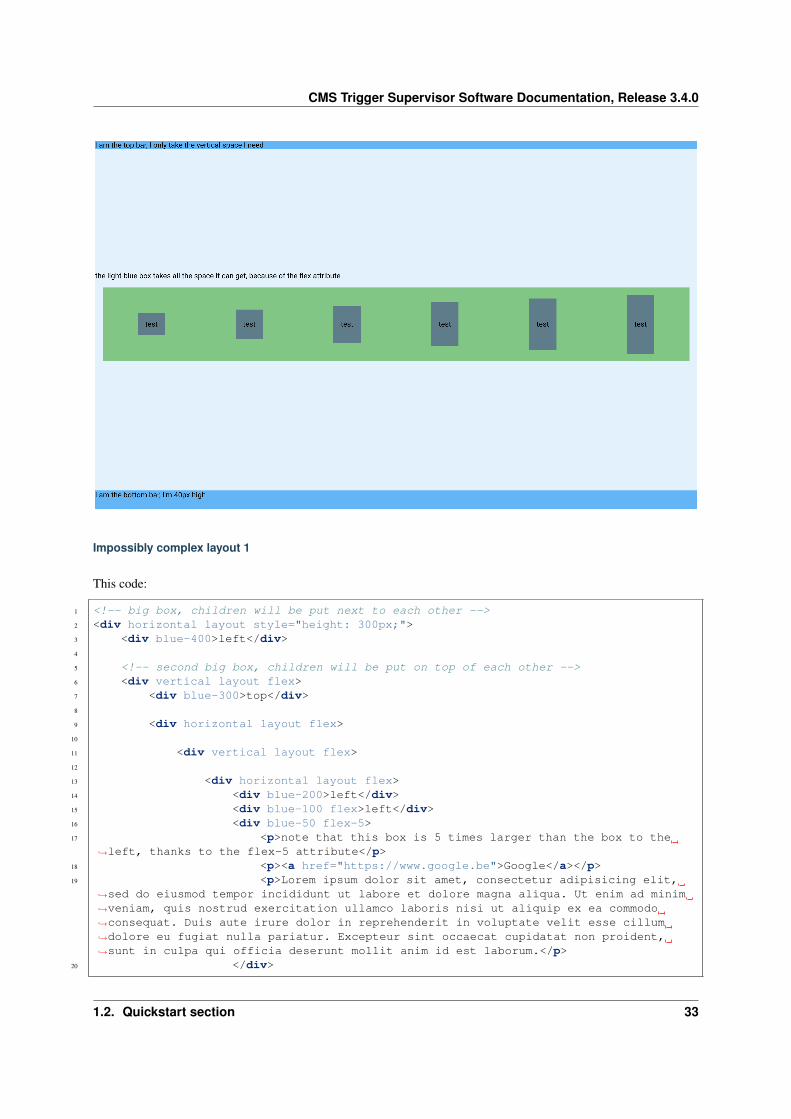
CMS Trigger Supervisor Software Documentation, Release 3.4.0
Impossibly complex layout 1
This code:
1 <!-- big box, children will be put next to each other -->2 <div horizontal layout style="height: 300px;">3 <div blue-400>left</div>4
5 <!-- second big box, children will be put on top of each other -->6 <div vertical layout flex>7 <div blue-300>top</div>8
9 <div horizontal layout flex>10
11 <div vertical layout flex>12
13 <div horizontal layout flex>14 <div blue-200>left</div>15 <div blue-100 flex>left</div>16 <div blue-50 flex-5>17 <p>note that this box is 5 times larger than the box to the
→˓left, thanks to the flex-5 attribute</p>18 <p><a href="https://www.google.be">Google</a></p>19 <p>Lorem ipsum dolor sit amet, consectetur adipisicing elit,
→˓sed do eiusmod tempor incididunt ut labore et dolore magna aliqua. Ut enim ad minim→˓veniam, quis nostrud exercitation ullamco laboris nisi ut aliquip ex ea commodo→˓consequat. Duis aute irure dolor in reprehenderit in voluptate velit esse cillum→˓dolore eu fugiat nulla pariatur. Excepteur sint occaecat cupidatat non proident,→˓sunt in culpa qui officia deserunt mollit anim id est laborum.</p>
20 </div>
1.2. Quickstart section 33
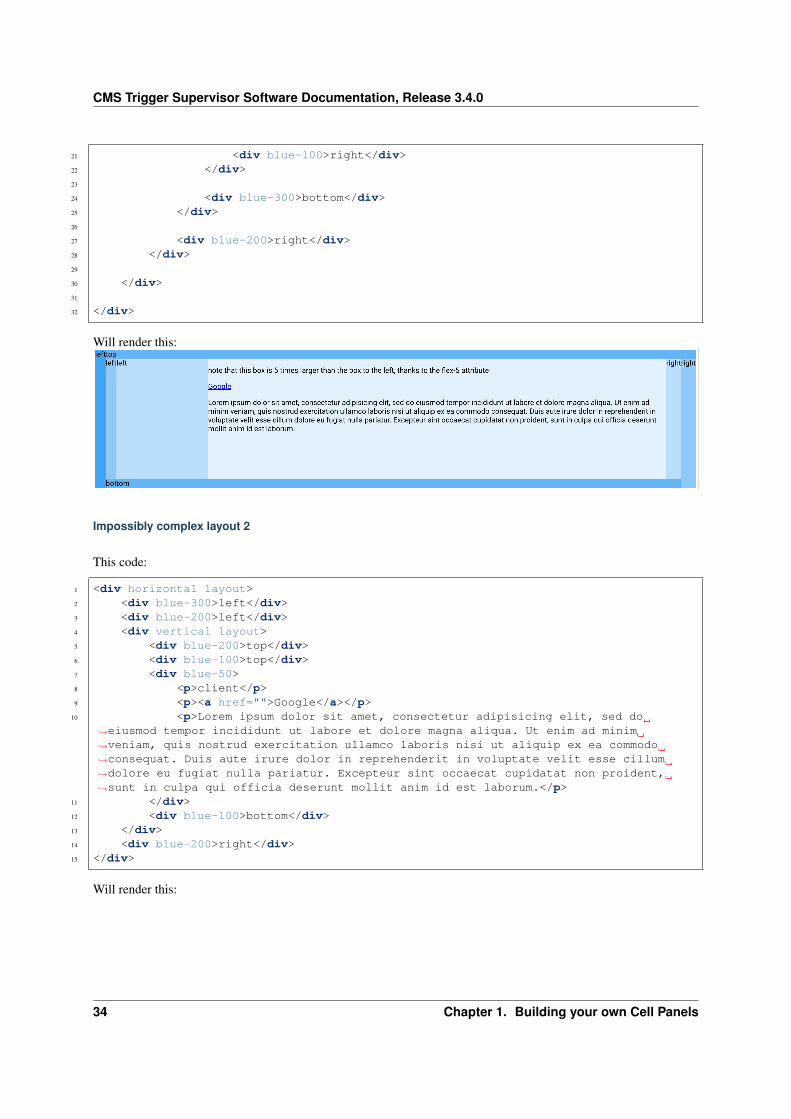
CMS Trigger Supervisor Software Documentation, Release 3.4.0
21 <div blue-100>right</div>22 </div>23
24 <div blue-300>bottom</div>25 </div>26
27 <div blue-200>right</div>28 </div>29
30 </div>31
32 </div>
Will render this:
Impossibly complex layout 2
This code:
1 <div horizontal layout>2 <div blue-300>left</div>3 <div blue-200>left</div>4 <div vertical layout>5 <div blue-200>top</div>6 <div blue-100>top</div>7 <div blue-50>8 <p>client</p>9 <p><a href="">Google</a></p>
10 <p>Lorem ipsum dolor sit amet, consectetur adipisicing elit, sed do→˓eiusmod tempor incididunt ut labore et dolore magna aliqua. Ut enim ad minim→˓veniam, quis nostrud exercitation ullamco laboris nisi ut aliquip ex ea commodo→˓consequat. Duis aute irure dolor in reprehenderit in voluptate velit esse cillum→˓dolore eu fugiat nulla pariatur. Excepteur sint occaecat cupidatat non proident,→˓sunt in culpa qui officia deserunt mollit anim id est laborum.</p>
11 </div>12 <div blue-100>bottom</div>13 </div>14 <div blue-200>right</div>15 </div>
Will render this:
34 Chapter 1. Building your own Cell Panels
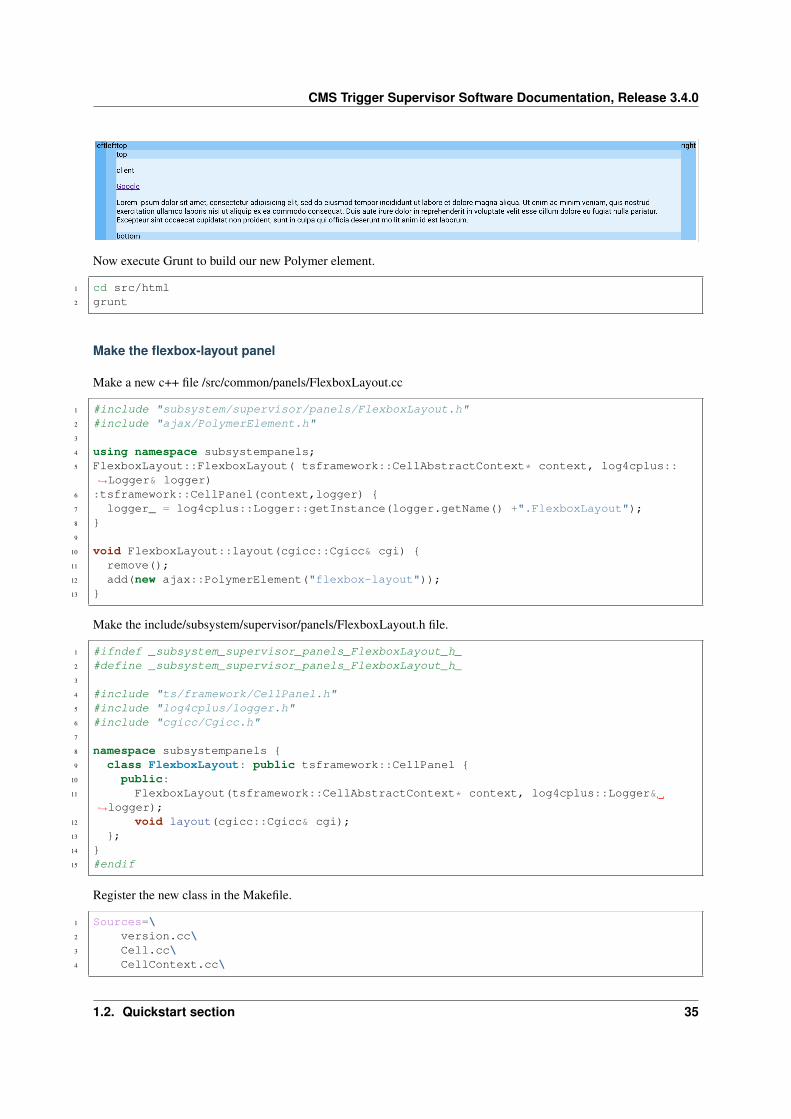
CMS Trigger Supervisor Software Documentation, Release 3.4.0
Now execute Grunt to build our new Polymer element.
1 cd src/html2 grunt
Make the flexbox-layout panel
Make a new c++ file /src/common/panels/FlexboxLayout.cc
1 #include "subsystem/supervisor/panels/FlexboxLayout.h"2 #include "ajax/PolymerElement.h"3
4 using namespace subsystempanels;5 FlexboxLayout::FlexboxLayout( tsframework::CellAbstractContext* context, log4cplus::
→˓Logger& logger)6 :tsframework::CellPanel(context,logger) {7 logger_ = log4cplus::Logger::getInstance(logger.getName() +".FlexboxLayout");8 }9
10 void FlexboxLayout::layout(cgicc::Cgicc& cgi) {11 remove();12 add(new ajax::PolymerElement("flexbox-layout"));13 }
Make the include/subsystem/supervisor/panels/FlexboxLayout.h file.
1 #ifndef _subsystem_supervisor_panels_FlexboxLayout_h_2 #define _subsystem_supervisor_panels_FlexboxLayout_h_3
4 #include "ts/framework/CellPanel.h"5 #include "log4cplus/logger.h"6 #include "cgicc/Cgicc.h"7
8 namespace subsystempanels {9 class FlexboxLayout: public tsframework::CellPanel {
10 public:11 FlexboxLayout(tsframework::CellAbstractContext* context, log4cplus::Logger&
→˓logger);12 void layout(cgicc::Cgicc& cgi);13 };14 }15 #endif
Register the new class in the Makefile.
1 Sources=\2 version.cc\3 Cell.cc\4 CellContext.cc\
1.2. Quickstart section 35
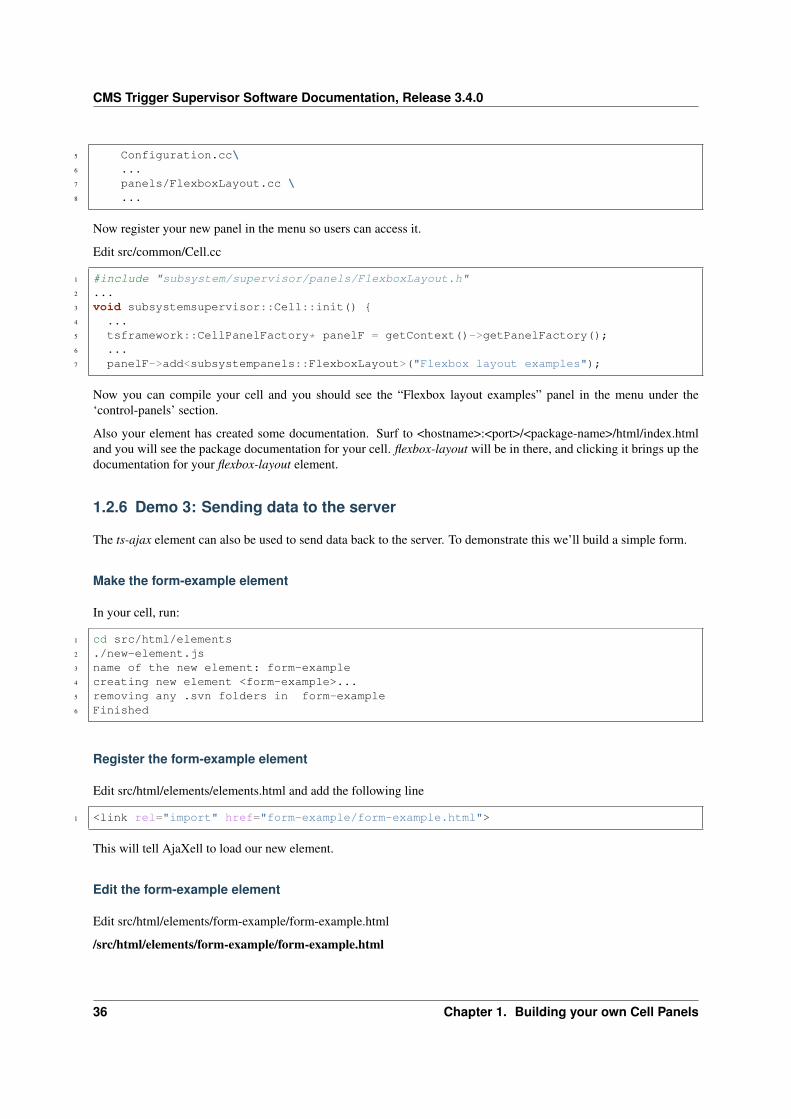
CMS Trigger Supervisor Software Documentation, Release 3.4.0
5 Configuration.cc\6 ...7 panels/FlexboxLayout.cc \8 ...
Now register your new panel in the menu so users can access it.
Edit src/common/Cell.cc
1 #include "subsystem/supervisor/panels/FlexboxLayout.h"2 ...3 void subsystemsupervisor::Cell::init() {4 ...5 tsframework::CellPanelFactory* panelF = getContext()->getPanelFactory();6 ...7 panelF->add<subsystempanels::FlexboxLayout>("Flexbox layout examples");
Now you can compile your cell and you should see the “Flexbox layout examples” panel in the menu under the‘control-panels’ section.
Also your element has created some documentation. Surf to <hostname>:<port>/<package-name>/html/index.htmland you will see the package documentation for your cell. flexbox-layout will be in there, and clicking it brings up thedocumentation for your flexbox-layout element.
1.2.6 Demo 3: Sending data to the server
The ts-ajax element can also be used to send data back to the server. To demonstrate this we’ll build a simple form.
Make the form-example element
In your cell, run:
1 cd src/html/elements2 ./new-element.js3 name of the new element: form-example4 creating new element <form-example>...5 removing any .svn folders in form-example6 Finished
Register the form-example element
Edit src/html/elements/elements.html and add the following line
1 <link rel="import" href="form-example/form-example.html">
This will tell AjaXell to load our new element.
Edit the form-example element
Edit src/html/elements/form-example/form-example.html
/src/html/elements/form-example/form-example.html
36 Chapter 1. Building your own Cell Panels
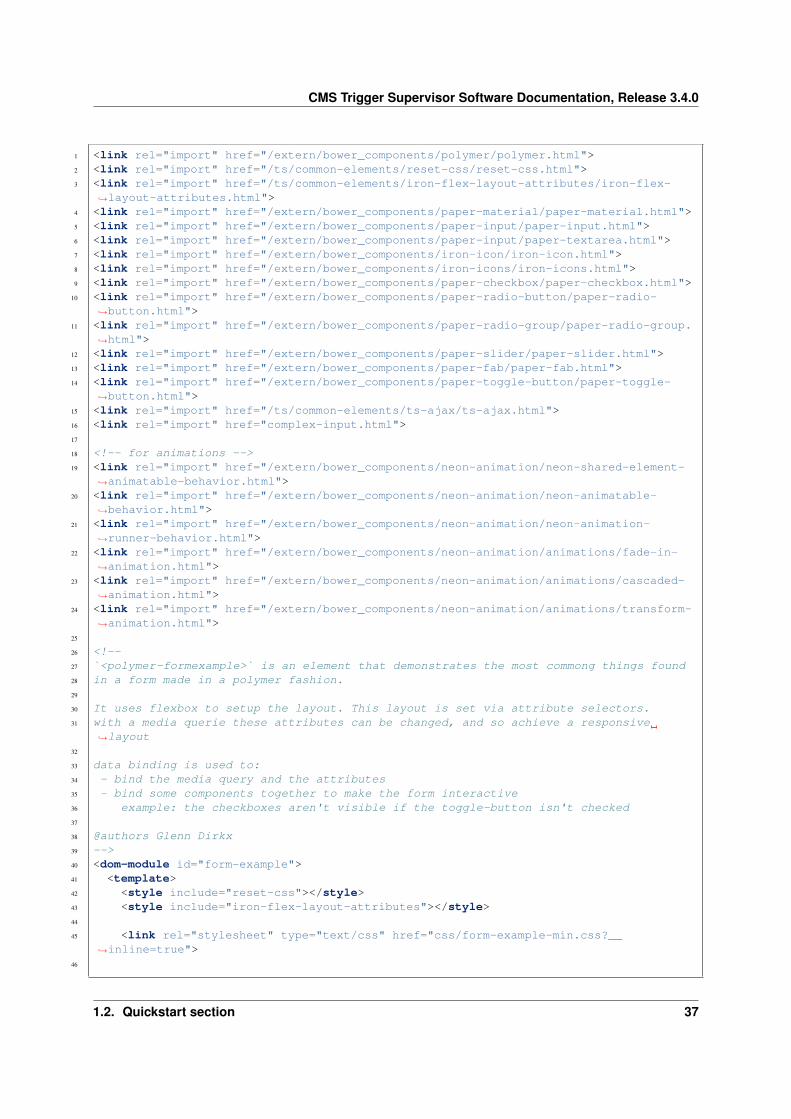
CMS Trigger Supervisor Software Documentation, Release 3.4.0
1 <link rel="import" href="/extern/bower_components/polymer/polymer.html">2 <link rel="import" href="/ts/common-elements/reset-css/reset-css.html">3 <link rel="import" href="/ts/common-elements/iron-flex-layout-attributes/iron-flex-
→˓layout-attributes.html">4 <link rel="import" href="/extern/bower_components/paper-material/paper-material.html">5 <link rel="import" href="/extern/bower_components/paper-input/paper-input.html">6 <link rel="import" href="/extern/bower_components/paper-input/paper-textarea.html">7 <link rel="import" href="/extern/bower_components/iron-icon/iron-icon.html">8 <link rel="import" href="/extern/bower_components/iron-icons/iron-icons.html">9 <link rel="import" href="/extern/bower_components/paper-checkbox/paper-checkbox.html">
10 <link rel="import" href="/extern/bower_components/paper-radio-button/paper-radio-→˓button.html">
11 <link rel="import" href="/extern/bower_components/paper-radio-group/paper-radio-group.→˓html">
12 <link rel="import" href="/extern/bower_components/paper-slider/paper-slider.html">13 <link rel="import" href="/extern/bower_components/paper-fab/paper-fab.html">14 <link rel="import" href="/extern/bower_components/paper-toggle-button/paper-toggle-
→˓button.html">15 <link rel="import" href="/ts/common-elements/ts-ajax/ts-ajax.html">16 <link rel="import" href="complex-input.html">17
18 <!-- for animations -->19 <link rel="import" href="/extern/bower_components/neon-animation/neon-shared-element-
→˓animatable-behavior.html">20 <link rel="import" href="/extern/bower_components/neon-animation/neon-animatable-
→˓behavior.html">21 <link rel="import" href="/extern/bower_components/neon-animation/neon-animation-
→˓runner-behavior.html">22 <link rel="import" href="/extern/bower_components/neon-animation/animations/fade-in-
→˓animation.html">23 <link rel="import" href="/extern/bower_components/neon-animation/animations/cascaded-
→˓animation.html">24 <link rel="import" href="/extern/bower_components/neon-animation/animations/transform-
→˓animation.html">25
26 <!--27 `<polymer-formexample>` is an element that demonstrates the most commong things found28 in a form made in a polymer fashion.29
30 It uses flexbox to setup the layout. This layout is set via attribute selectors.31 with a media querie these attributes can be changed, and so achieve a responsive
→˓layout32
33 data binding is used to:34 - bind the media query and the attributes35 - bind some components together to make the form interactive36 example: the checkboxes aren't visible if the toggle-button isn't checked37
38 @authors Glenn Dirkx39 -->40 <dom-module id="form-example">41 <template>42 <style include="reset-css"></style>43 <style include="iron-flex-layout-attributes"></style>44
45 <link rel="stylesheet" type="text/css" href="css/form-example-min.css?__→˓inline=true">
46
1.2. Quickstart section 37
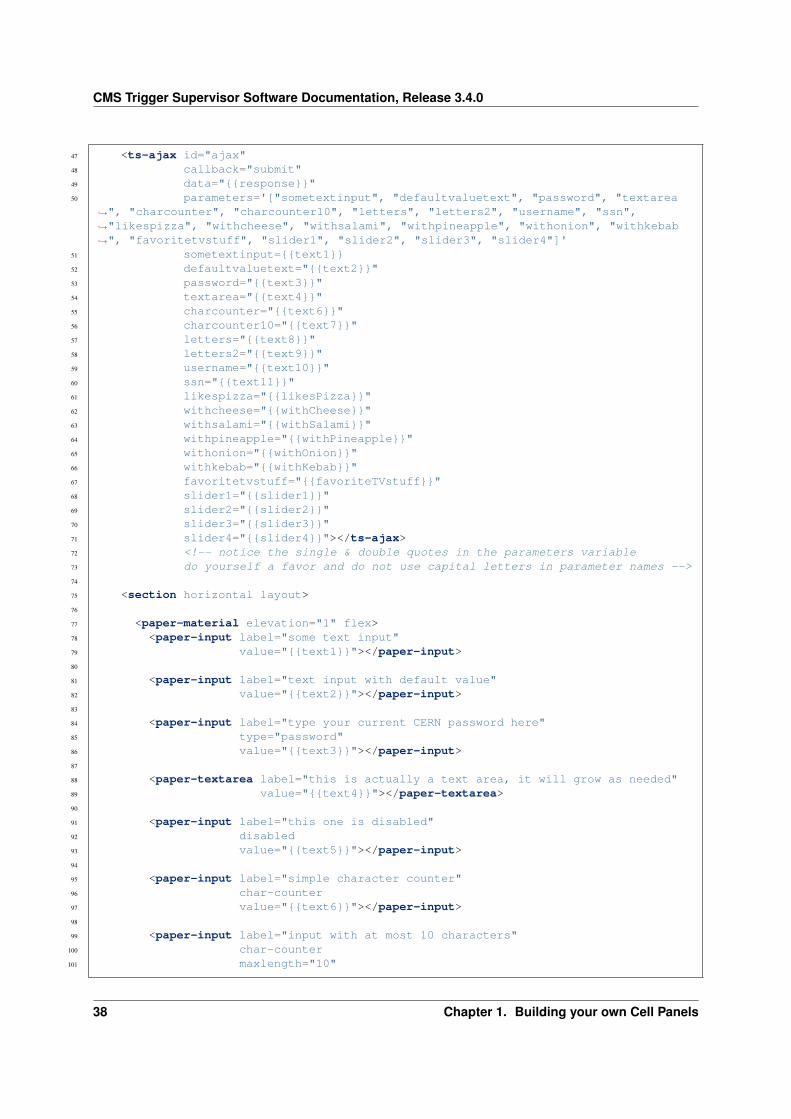
CMS Trigger Supervisor Software Documentation, Release 3.4.0
47 <ts-ajax id="ajax"48 callback="submit"49 data="{{response}}"50 parameters='["sometextinput", "defaultvaluetext", "password", "textarea
→˓", "charcounter", "charcounter10", "letters", "letters2", "username", "ssn",→˓"likespizza", "withcheese", "withsalami", "withpineapple", "withonion", "withkebab→˓", "favoritetvstuff", "slider1", "slider2", "slider3", "slider4"]'
51 sometextinput={{text1}}52 defaultvaluetext="{{text2}}"53 password="{{text3}}"54 textarea="{{text4}}"55 charcounter="{{text6}}"56 charcounter10="{{text7}}"57 letters="{{text8}}"58 letters2="{{text9}}"59 username="{{text10}}"60 ssn="{{text11}}"61 likespizza="{{likesPizza}}"62 withcheese="{{withCheese}}"63 withsalami="{{withSalami}}"64 withpineapple="{{withPineapple}}"65 withonion="{{withOnion}}"66 withkebab="{{withKebab}}"67 favoritetvstuff="{{favoriteTVstuff}}"68 slider1="{{slider1}}"69 slider2="{{slider2}}"70 slider3="{{slider3}}"71 slider4="{{slider4}}"></ts-ajax>72 <!-- notice the single & double quotes in the parameters variable73 do yourself a favor and do not use capital letters in parameter names -->74
75 <section horizontal layout>76
77 <paper-material elevation="1" flex>78 <paper-input label="some text input"79 value="{{text1}}"></paper-input>80
81 <paper-input label="text input with default value"82 value="{{text2}}"></paper-input>83
84 <paper-input label="type your current CERN password here"85 type="password"86 value="{{text3}}"></paper-input>87
88 <paper-textarea label="this is actually a text area, it will grow as needed"89 value="{{text4}}"></paper-textarea>90
91 <paper-input label="this one is disabled"92 disabled93 value="{{text5}}"></paper-input>94
95 <paper-input label="simple character counter"96 char-counter97 value="{{text6}}"></paper-input>98
99 <paper-input label="input with at most 10 characters"100 char-counter101 maxlength="10"
38 Chapter 1. Building your own Cell Panels
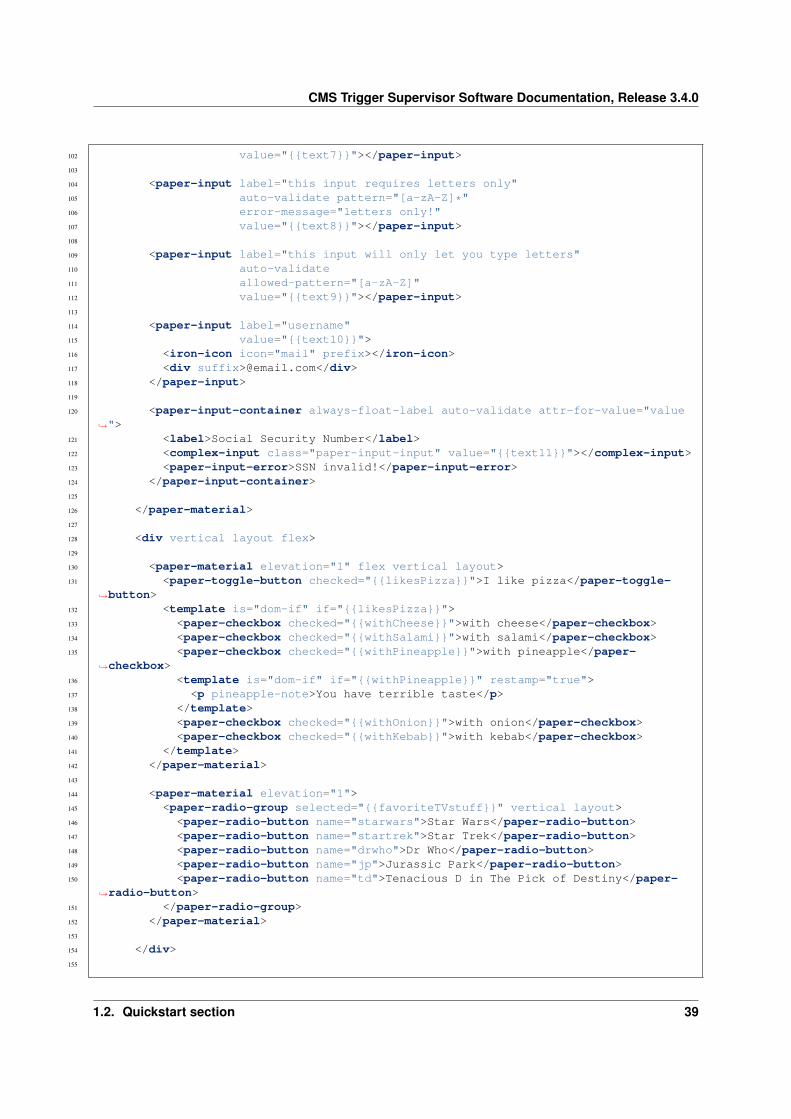
CMS Trigger Supervisor Software Documentation, Release 3.4.0
102 value="{{text7}}"></paper-input>103
104 <paper-input label="this input requires letters only"105 auto-validate pattern="[a-zA-Z]*"106 error-message="letters only!"107 value="{{text8}}"></paper-input>108
109 <paper-input label="this input will only let you type letters"110 auto-validate111 allowed-pattern="[a-zA-Z]"112 value="{{text9}}"></paper-input>113
114 <paper-input label="username"115 value="{{text10}}">116 <iron-icon icon="mail" prefix></iron-icon>117 <div suffix>@email.com</div>118 </paper-input>119
120 <paper-input-container always-float-label auto-validate attr-for-value="value→˓">
121 <label>Social Security Number</label>122 <complex-input class="paper-input-input" value="{{text11}}"></complex-input>123 <paper-input-error>SSN invalid!</paper-input-error>124 </paper-input-container>125
126 </paper-material>127
128 <div vertical layout flex>129
130 <paper-material elevation="1" flex vertical layout>131 <paper-toggle-button checked="{{likesPizza}}">I like pizza</paper-toggle-
→˓button>132 <template is="dom-if" if="{{likesPizza}}">133 <paper-checkbox checked="{{withCheese}}">with cheese</paper-checkbox>134 <paper-checkbox checked="{{withSalami}}">with salami</paper-checkbox>135 <paper-checkbox checked="{{withPineapple}}">with pineapple</paper-
→˓checkbox>136 <template is="dom-if" if="{{withPineapple}}" restamp="true">137 <p pineapple-note>You have terrible taste</p>138 </template>139 <paper-checkbox checked="{{withOnion}}">with onion</paper-checkbox>140 <paper-checkbox checked="{{withKebab}}">with kebab</paper-checkbox>141 </template>142 </paper-material>143
144 <paper-material elevation="1">145 <paper-radio-group selected="{{favoriteTVstuff}}" vertical layout>146 <paper-radio-button name="starwars">Star Wars</paper-radio-button>147 <paper-radio-button name="startrek">Star Trek</paper-radio-button>148 <paper-radio-button name="drwho">Dr Who</paper-radio-button>149 <paper-radio-button name="jp">Jurassic Park</paper-radio-button>150 <paper-radio-button name="td">Tenacious D in The Pick of Destiny</paper-
→˓radio-button>151 </paper-radio-group>152 </paper-material>153
154 </div>155
1.2. Quickstart section 39
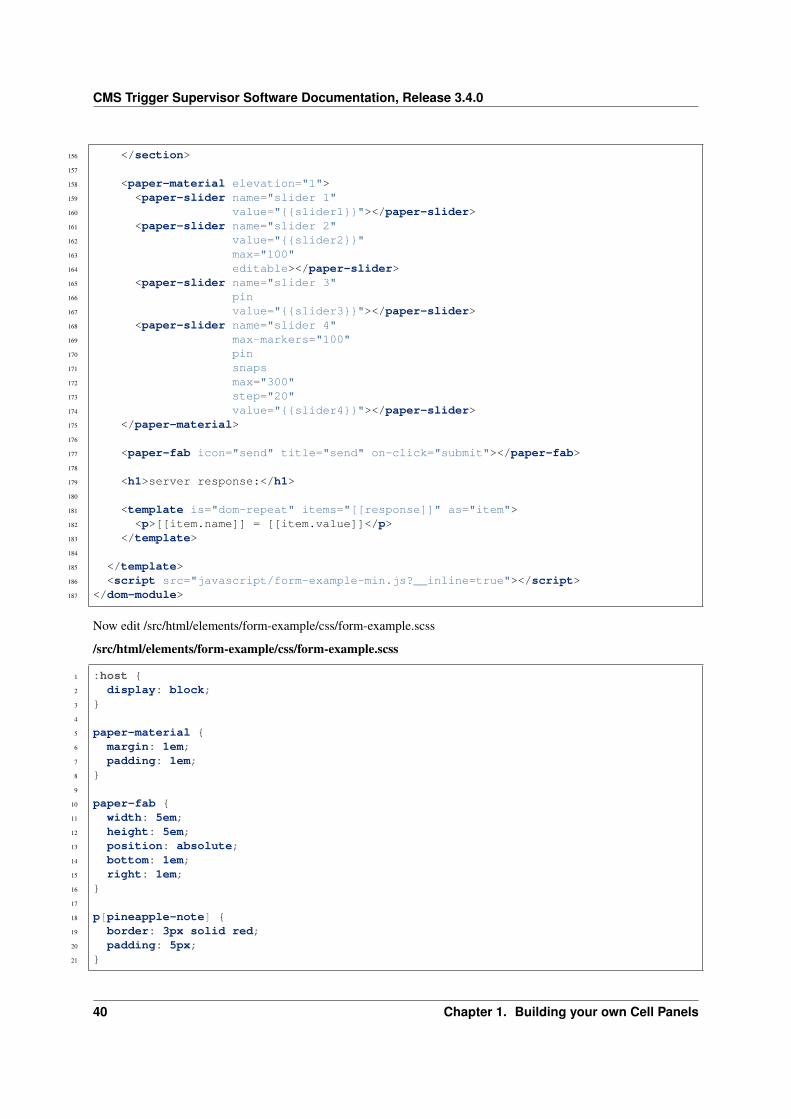
CMS Trigger Supervisor Software Documentation, Release 3.4.0
156 </section>157
158 <paper-material elevation="1">159 <paper-slider name="slider 1"160 value="{{slider1}}"></paper-slider>161 <paper-slider name="slider 2"162 value="{{slider2}}"163 max="100"164 editable></paper-slider>165 <paper-slider name="slider 3"166 pin167 value="{{slider3}}"></paper-slider>168 <paper-slider name="slider 4"169 max-markers="100"170 pin171 snaps172 max="300"173 step="20"174 value="{{slider4}}"></paper-slider>175 </paper-material>176
177 <paper-fab icon="send" title="send" on-click="submit"></paper-fab>178
179 <h1>server response:</h1>180
181 <template is="dom-repeat" items="[[response]]" as="item">182 <p>[[item.name]] = [[item.value]]</p>183 </template>184
185 </template>186 <script src="javascript/form-example-min.js?__inline=true"></script>187 </dom-module>
Now edit /src/html/elements/form-example/css/form-example.scss
/src/html/elements/form-example/css/form-example.scss
1 :host {2 display: block;3 }4
5 paper-material {6 margin: 1em;7 padding: 1em;8 }9
10 paper-fab {11 width: 5em;12 height: 5em;13 position: absolute;14 bottom: 1em;15 right: 1em;16 }17
18 p[pineapple-note] {19 border: 3px solid red;20 padding: 5px;21 }
40 Chapter 1. Building your own Cell Panels
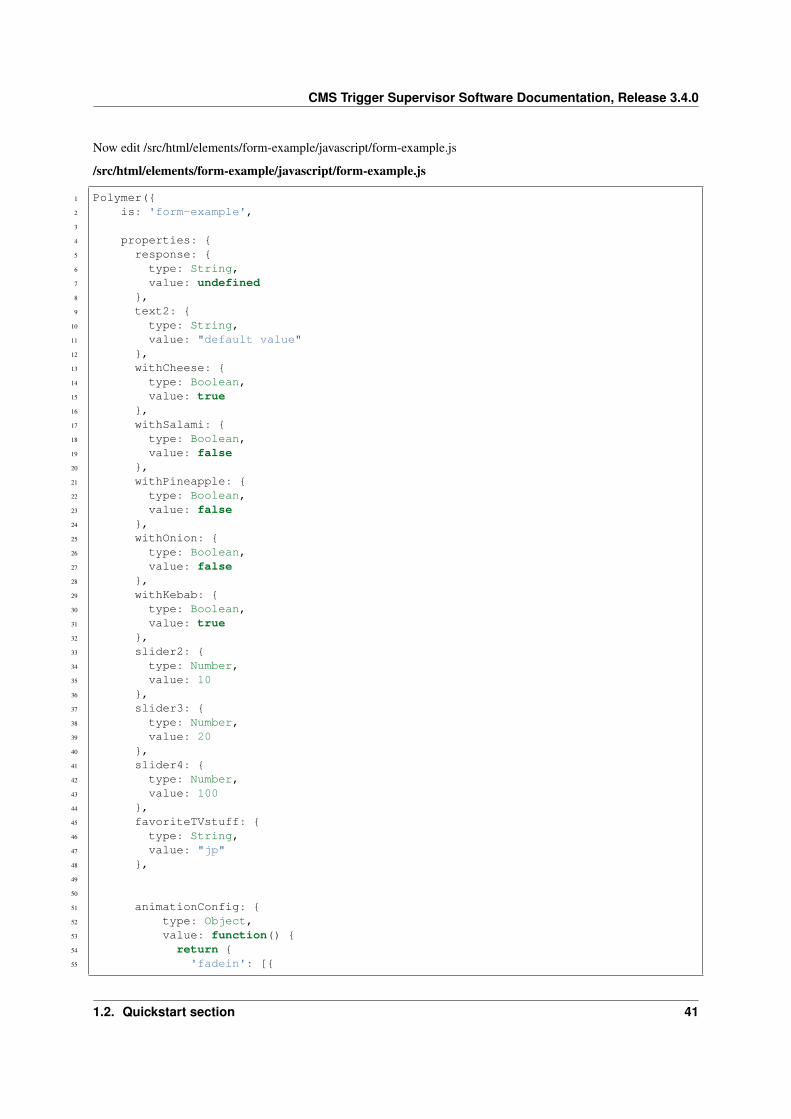
CMS Trigger Supervisor Software Documentation, Release 3.4.0
Now edit /src/html/elements/form-example/javascript/form-example.js
/src/html/elements/form-example/javascript/form-example.js
1 Polymer({2 is: 'form-example',3
4 properties: {5 response: {6 type: String,7 value: undefined8 },9 text2: {
10 type: String,11 value: "default value"12 },13 withCheese: {14 type: Boolean,15 value: true16 },17 withSalami: {18 type: Boolean,19 value: false20 },21 withPineapple: {22 type: Boolean,23 value: false24 },25 withOnion: {26 type: Boolean,27 value: false28 },29 withKebab: {30 type: Boolean,31 value: true32 },33 slider2: {34 type: Number,35 value: 1036 },37 slider3: {38 type: Number,39 value: 2040 },41 slider4: {42 type: Number,43 value: 10044 },45 favoriteTVstuff: {46 type: String,47 value: "jp"48 },49
50
51 animationConfig: {52 type: Object,53 value: function() {54 return {55 'fadein': [{
1.2. Quickstart section 41
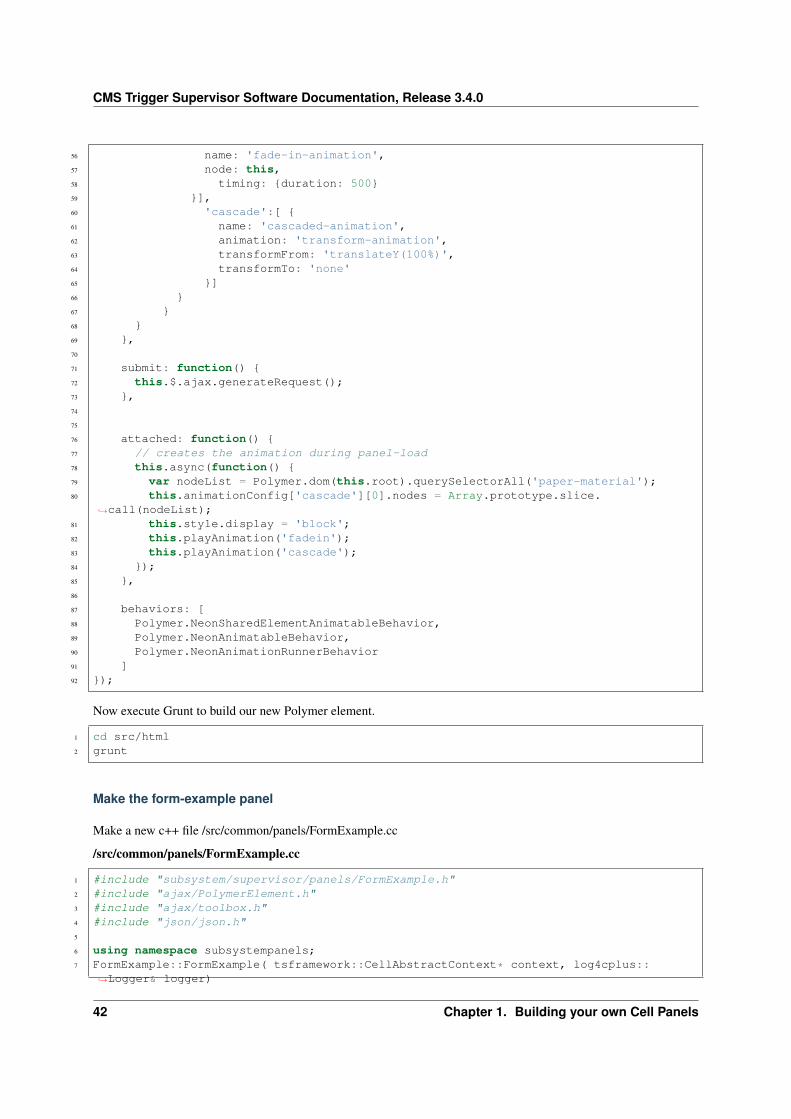
CMS Trigger Supervisor Software Documentation, Release 3.4.0
56 name: 'fade-in-animation',57 node: this,58 timing: {duration: 500}59 }],60 'cascade':[ {61 name: 'cascaded-animation',62 animation: 'transform-animation',63 transformFrom: 'translateY(100%)',64 transformTo: 'none'65 }]66 }67 }68 }69 },70
71 submit: function() {72 this.$.ajax.generateRequest();73 },74
75
76 attached: function() {77 // creates the animation during panel-load78 this.async(function() {79 var nodeList = Polymer.dom(this.root).querySelectorAll('paper-material');80 this.animationConfig['cascade'][0].nodes = Array.prototype.slice.
→˓call(nodeList);81 this.style.display = 'block';82 this.playAnimation('fadein');83 this.playAnimation('cascade');84 });85 },86
87 behaviors: [88 Polymer.NeonSharedElementAnimatableBehavior,89 Polymer.NeonAnimatableBehavior,90 Polymer.NeonAnimationRunnerBehavior91 ]92 });
Now execute Grunt to build our new Polymer element.
1 cd src/html2 grunt
Make the form-example panel
Make a new c++ file /src/common/panels/FormExample.cc
/src/common/panels/FormExample.cc
1 #include "subsystem/supervisor/panels/FormExample.h"2 #include "ajax/PolymerElement.h"3 #include "ajax/toolbox.h"4 #include "json/json.h"5
6 using namespace subsystempanels;7 FormExample::FormExample( tsframework::CellAbstractContext* context, log4cplus::
→˓Logger& logger)
42 Chapter 1. Building your own Cell Panels
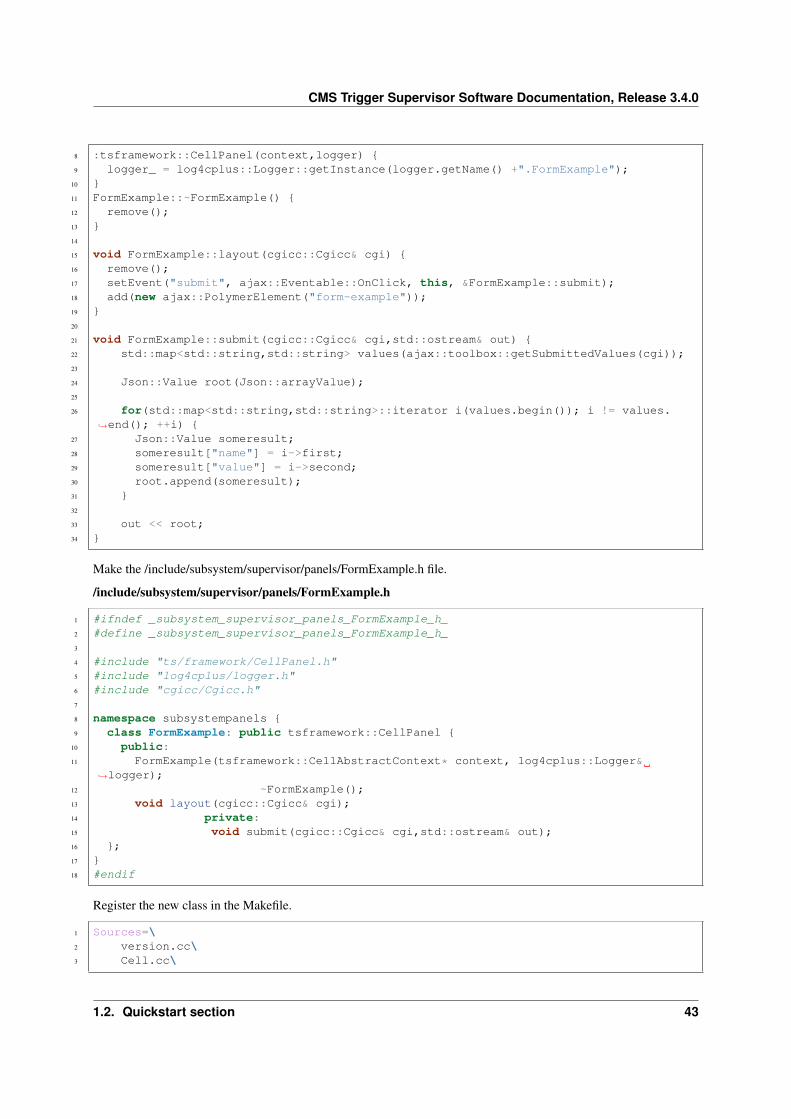
CMS Trigger Supervisor Software Documentation, Release 3.4.0
8 :tsframework::CellPanel(context,logger) {9 logger_ = log4cplus::Logger::getInstance(logger.getName() +".FormExample");
10 }11 FormExample::~FormExample() {12 remove();13 }14
15 void FormExample::layout(cgicc::Cgicc& cgi) {16 remove();17 setEvent("submit", ajax::Eventable::OnClick, this, &FormExample::submit);18 add(new ajax::PolymerElement("form-example"));19 }20
21 void FormExample::submit(cgicc::Cgicc& cgi,std::ostream& out) {22 std::map<std::string,std::string> values(ajax::toolbox::getSubmittedValues(cgi));23
24 Json::Value root(Json::arrayValue);25
26 for(std::map<std::string,std::string>::iterator i(values.begin()); i != values.→˓end(); ++i) {
27 Json::Value someresult;28 someresult["name"] = i->first;29 someresult["value"] = i->second;30 root.append(someresult);31 }32
33 out << root;34 }
Make the /include/subsystem/supervisor/panels/FormExample.h file.
/include/subsystem/supervisor/panels/FormExample.h
1 #ifndef _subsystem_supervisor_panels_FormExample_h_2 #define _subsystem_supervisor_panels_FormExample_h_3
4 #include "ts/framework/CellPanel.h"5 #include "log4cplus/logger.h"6 #include "cgicc/Cgicc.h"7
8 namespace subsystempanels {9 class FormExample: public tsframework::CellPanel {
10 public:11 FormExample(tsframework::CellAbstractContext* context, log4cplus::Logger&
→˓logger);12 ~FormExample();13 void layout(cgicc::Cgicc& cgi);14 private:15 void submit(cgicc::Cgicc& cgi,std::ostream& out);16 };17 }18 #endif
Register the new class in the Makefile.
1 Sources=\2 version.cc\3 Cell.cc\
1.2. Quickstart section 43
CMS Trigger Supervisor Software Documentation, Release 3.4.0
4 CellContext.cc\5 Configuration.cc\6 ...7 panels/FormExample.cc \8 ...
Now register your new panel in the menu so users can access it.
Edit src/common/Cell.cc
1 #include "subsystem/supervisor/panels/FormExample.h"2 ...3 void subsystemsupervisor::Cell::init() {4 ...5 tsframework::CellPanelFactory* panelF = getContext()->getPanelFactory();6 ...7 panelF->add<subsystempanels::FormExample>("Form example");
Now you can compile your cell and you should see the “Form example” panel in the menu under the ‘control-panels’section.
Also your element has created some documentation. Surf to <hostname>:<port>/<package-name>/html/index.htmland you will see the package documentation for your cell. form-example will be in there, and clicking it brings up thedocumentation for your form-example element.
1.2.7 Demo 4: Refresh
The refresh-example element behaves much like the ts-ajax element we saw in the previous demo. The big differenceis that this element implements periodic updating.
Make the refresh-example element
In your cell, run:
1 cd src/html/elements2 ./new-element.js3 name of the new element: refresh-example4 creating new element <refresh-example>...5 removing any .svn folders in refresh-example6 Finished
Register the refresh-example element
Edit src/html/elements/elements.html and add the following line
1 <link rel="import" href="refresh-example/refresh-example.html">
This will tell AjaXell to load our new element.
Edit the refresh-example element
Edit src/html/elements/refresh-example/refresh-example.html
/src/html/elements/refresh-example/refresh-example.html
44 Chapter 1. Building your own Cell Panels
CMS Trigger Supervisor Software Documentation, Release 3.4.0
1 <link rel="import" href="/extern/bower_components/polymer/polymer.html">2 <link rel="import" href="/extern/bower_components/iron-media-query/iron-media-query.
→˓html">3 <link rel="import" href="/extern/bower_components/paper-checkbox/paper-checkbox.html">4 <link rel="import" href="/extern/bower_components/paper-input/paper-input.html">5 <link rel="import" href="/ts/common-elements/reset-css/reset-css.html">6 <link rel="import" href="/ts/common-elements/auto-update/auto-update.html">7 <link rel="import" href="/ts/common-elements/iron-flex-layout-attributes/iron-flex-
→˓layout-attributes.html">8
9
10 <dom-module id="refresh-example">11 <template>12 <link rel="import" type="css" href="css/refresh-example-min.css?__inline=true">13 <style include="iron-flex-layout-attributes"></style>14 <style include="reset-css"></style>15
16 <paper-checkbox checked="{{refreshtoggle}}">Pauze refresh</paper-checkbox>17 <br>18 <auto-update data="{{test}}"19 interval="1000"20 callback="RefreshExample::timesExecuted"21 handle-as="text"22 timeout="10000"23 no-refresh$={{refreshtoggle}}></auto-update>24 <span>{{test}}</span>25
26 <hr>27
28 <paper-input value="{{favDino}}" label="your favorite dinosaur"></paper-input>29 <auto-update data="{{test2}}"30 interval="1000"31 callback="RefreshExample::timesExecutedWithParameters"32 handle-as="text"33 parameters='["favoritedino"]'34 favoritedino="{{favDino}}"></auto-update>35 <!-- notice the single & double quotes in the parameters variable36 do yourself a favor and do not use capital letters in parameter names -->37 <span>{{test2}}</span>38 </template>39 <script src="javascript/refresh-example-min.js?__inline=true"></script>40 </dom-module>
Now edit /src/html/elements/refresh-example/css/refresh-example.scss
/src/html/elements/refresh-example/css/refresh-example.scss
1 :host {2 color: black;3 }
Now edit /src/html/elements/refresh-example/javascript/refresh-example.js
/src/html/elements/refresh-example/javascript/refresh-example.js
1 Polymer({2 is: "refresh-example",3 properties: {4 test: String,
1.2. Quickstart section 45
CMS Trigger Supervisor Software Documentation, Release 3.4.0
5 favDino: {6 type: String,7 value: "Velociraptor"8 }9 },
10 doTimesExecuted: function() {11 var parameters = {};12 parameters._eventType_ = "OnClick";13 parameters._id_ = "RefreshExample-timesExecuted";14 this.$.ajax_timesExecuted.params = parameters;15 this.$.ajax_timesExecuted.url = window.location.origin + window.location.
→˓pathname;16 this.$.ajax_timesExecuted.generateRequest();17 },18 timesExecutedResponse: function(event, detail, sender) {19 console.log(detail.response);20 Polymer.dom(this.$.timesExecutedContainer).innerHTML = detail.response;21 }22 });
Now execute Grunt to build our new Polymer element.
1 cd src/html2 grunt
Make the refresh-example panel
Make a new c++ file /src/common/panels/RefreshExample.cc
/src/common/panels/RefreshExample.cc
1 /*************************************************************************2 * Trigger Supervisor Component *3 * *4 * Project Manager: Ildfons Magrans de Abril *5 * *6 * developer: Marc Magrans de Abril *7 *************************************************************************/8 #include "subsystem/supervisor/panels/RefreshExample.h"9
10 #include "ajax/PolymerElement.h"11 #include "ajax/toolbox.h"12
13 #include <iostream>14 using namespace subsystempanels;15 RefreshExample::RefreshExample(tsframework::CellAbstractContext* context, log4cplus::
→˓Logger& logger)16 : tsframework::CellPanel(context,logger)17 {18 logger_ = log4cplus::Logger::getInstance(logger.getName() +".RefreshExample");19
20 }21
22 RefreshExample::~RefreshExample()23 {24 ;25 }
46 Chapter 1. Building your own Cell Panels
CMS Trigger Supervisor Software Documentation, Release 3.4.0
26
27 void RefreshExample::timesExecuted(cgicc::Cgicc& cgi,std::ostream& out)28 {29 static int times(0);30 times++;31 std::ostringstream msg;32 msg << "The RefreshExample::timesExecuted method has been executed " << times
→˓<< " times";33 out << msg.str();34 }35 void RefreshExample::timesExecutedWithParameters(cgicc::Cgicc& cgi,std::ostream& out)36 {37 std::ostringstream msg;38
39 std::map<std::string,std::string> values(ajax::toolbox::→˓getSubmittedValues(cgi));
40
41 msg << "Your favorite dinosaur is the ";42
43 for(std::map<std::string,std::string>::iterator i(values.begin()); i !=→˓values.end(); ++i) {
44 if ( i->first.compare("favoritedino") == 0 ) {45 msg << i->second;46 }47 }48
49 out << msg.str();50 }51
52
53 void RefreshExample::layout(cgicc::Cgicc& cgi)54 {55 //clear the output buffer of this panel, we start fresh56 remove();57
58 setEvent("RefreshExample::timesExecuted", ajax::Eventable::OnTime, this, &→˓RefreshExample::timesExecuted);
59 setEvent("RefreshExample::timesExecutedWithParameters", ajax::Eventable::→˓OnTime, this, &RefreshExample::timesExecutedWithParameters);
60
61 // ajax::PolymerElement* element = ;62 add(new ajax::PolymerElement("refresh-example"));63
64 }
Make the /include/subsystem/supervisor/panels/RefreshExample.h file.
/include/subsystem/supervisor/panels/RefreshExample.h
1 /*************************************************************************2 * Trigger Supervisor Component *3 * *4 * Project Manager: Ildfons Magrans de Abril
→˓ *5 * Authors: Marc Magrans de Abril
→˓ *6 *************************************************************************/7
1.2. Quickstart section 47
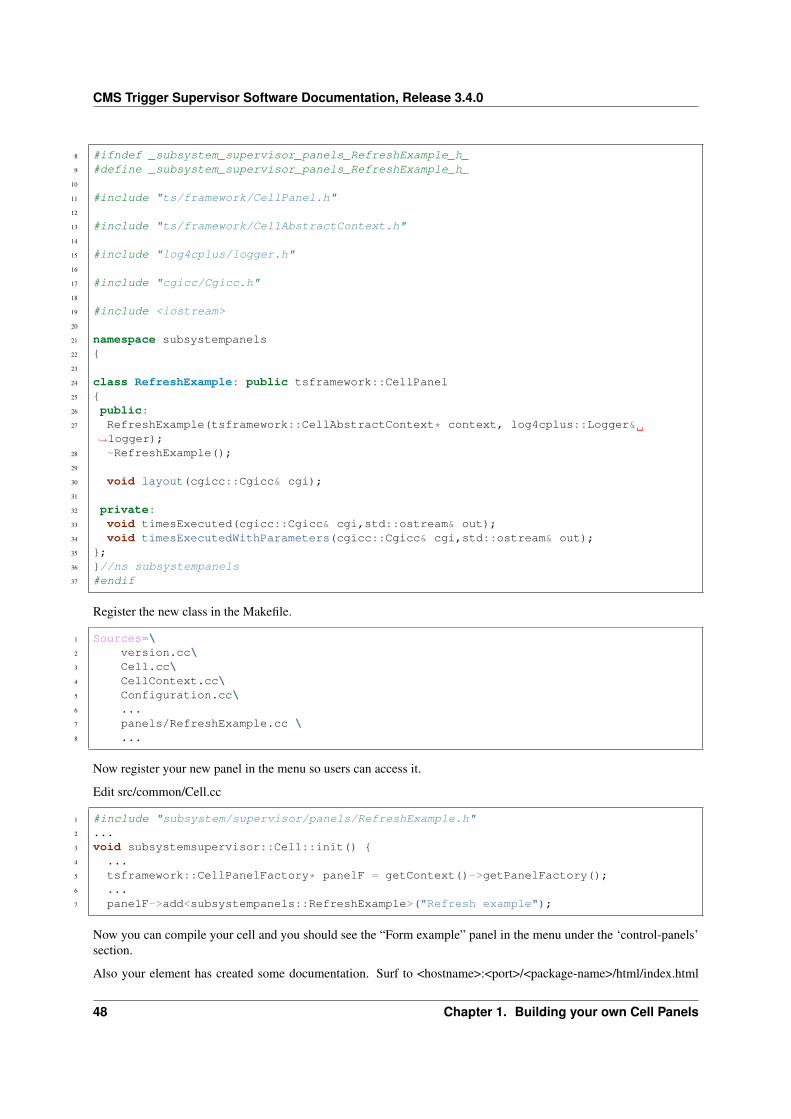
CMS Trigger Supervisor Software Documentation, Release 3.4.0
8 #ifndef _subsystem_supervisor_panels_RefreshExample_h_9 #define _subsystem_supervisor_panels_RefreshExample_h_
10
11 #include "ts/framework/CellPanel.h"12
13 #include "ts/framework/CellAbstractContext.h"14
15 #include "log4cplus/logger.h"16
17 #include "cgicc/Cgicc.h"18
19 #include <iostream>20
21 namespace subsystempanels22 {23
24 class RefreshExample: public tsframework::CellPanel25 {26 public:27 RefreshExample(tsframework::CellAbstractContext* context, log4cplus::Logger&
→˓logger);28 ~RefreshExample();29
30 void layout(cgicc::Cgicc& cgi);31
32 private:33 void timesExecuted(cgicc::Cgicc& cgi,std::ostream& out);34 void timesExecutedWithParameters(cgicc::Cgicc& cgi,std::ostream& out);35 };36 }//ns subsystempanels37 #endif
Register the new class in the Makefile.
1 Sources=\2 version.cc\3 Cell.cc\4 CellContext.cc\5 Configuration.cc\6 ...7 panels/RefreshExample.cc \8 ...
Now register your new panel in the menu so users can access it.
Edit src/common/Cell.cc
1 #include "subsystem/supervisor/panels/RefreshExample.h"2 ...3 void subsystemsupervisor::Cell::init() {4 ...5 tsframework::CellPanelFactory* panelF = getContext()->getPanelFactory();6 ...7 panelF->add<subsystempanels::RefreshExample>("Refresh example");
Now you can compile your cell and you should see the “Form example” panel in the menu under the ‘control-panels’section.
Also your element has created some documentation. Surf to <hostname>:<port>/<package-name>/html/index.html
48 Chapter 1. Building your own Cell Panels
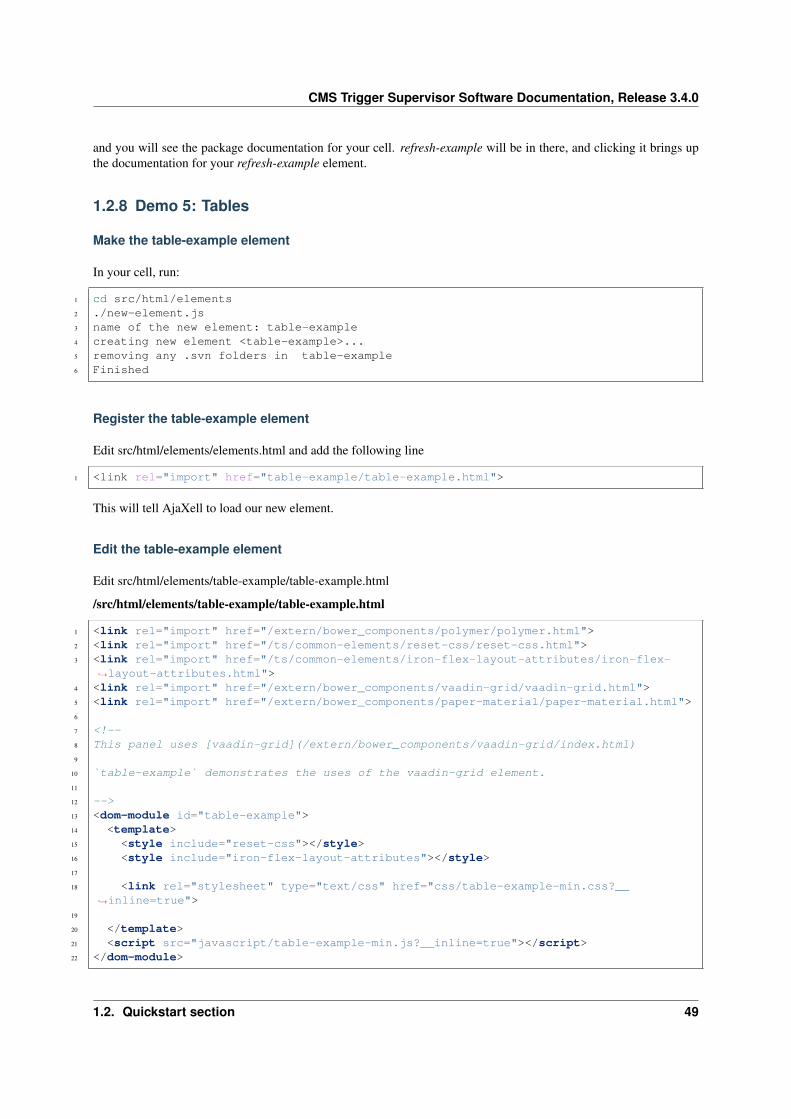
CMS Trigger Supervisor Software Documentation, Release 3.4.0
and you will see the package documentation for your cell. refresh-example will be in there, and clicking it brings upthe documentation for your refresh-example element.
1.2.8 Demo 5: Tables
Make the table-example element
In your cell, run:
1 cd src/html/elements2 ./new-element.js3 name of the new element: table-example4 creating new element <table-example>...5 removing any .svn folders in table-example6 Finished
Register the table-example element
Edit src/html/elements/elements.html and add the following line
1 <link rel="import" href="table-example/table-example.html">
This will tell AjaXell to load our new element.
Edit the table-example element
Edit src/html/elements/table-example/table-example.html
/src/html/elements/table-example/table-example.html
1 <link rel="import" href="/extern/bower_components/polymer/polymer.html">2 <link rel="import" href="/ts/common-elements/reset-css/reset-css.html">3 <link rel="import" href="/ts/common-elements/iron-flex-layout-attributes/iron-flex-
→˓layout-attributes.html">4 <link rel="import" href="/extern/bower_components/vaadin-grid/vaadin-grid.html">5 <link rel="import" href="/extern/bower_components/paper-material/paper-material.html">6
7 <!--8 This panel uses [vaadin-grid](/extern/bower_components/vaadin-grid/index.html)9
10 `table-example` demonstrates the uses of the vaadin-grid element.11
12 -->13 <dom-module id="table-example">14 <template>15 <style include="reset-css"></style>16 <style include="iron-flex-layout-attributes"></style>17
18 <link rel="stylesheet" type="text/css" href="css/table-example-min.css?__→˓inline=true">
19
20 </template>21 <script src="javascript/table-example-min.js?__inline=true"></script>22 </dom-module>
1.2. Quickstart section 49
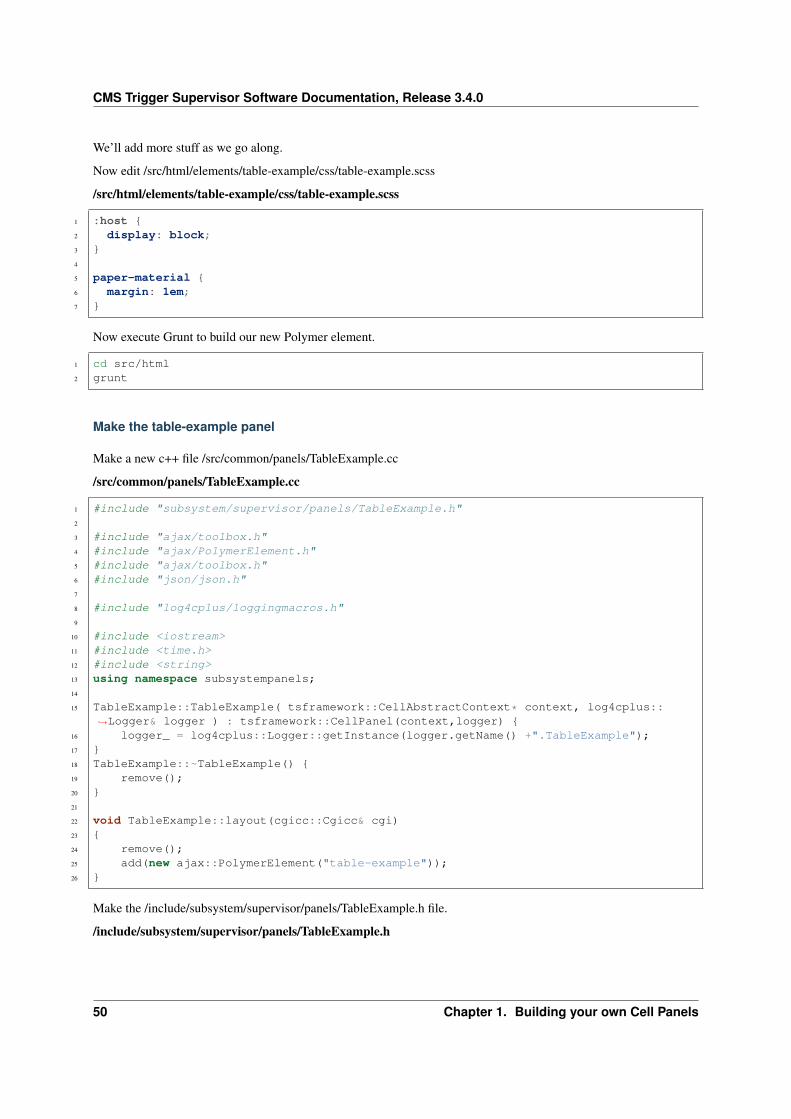
CMS Trigger Supervisor Software Documentation, Release 3.4.0
We’ll add more stuff as we go along.
Now edit /src/html/elements/table-example/css/table-example.scss
/src/html/elements/table-example/css/table-example.scss
1 :host {2 display: block;3 }4
5 paper-material {6 margin: 1em;7 }
Now execute Grunt to build our new Polymer element.
1 cd src/html2 grunt
Make the table-example panel
Make a new c++ file /src/common/panels/TableExample.cc
/src/common/panels/TableExample.cc
1 #include "subsystem/supervisor/panels/TableExample.h"2
3 #include "ajax/toolbox.h"4 #include "ajax/PolymerElement.h"5 #include "ajax/toolbox.h"6 #include "json/json.h"7
8 #include "log4cplus/loggingmacros.h"9
10 #include <iostream>11 #include <time.h>12 #include <string>13 using namespace subsystempanels;14
15 TableExample::TableExample( tsframework::CellAbstractContext* context, log4cplus::→˓Logger& logger ) : tsframework::CellPanel(context,logger) {
16 logger_ = log4cplus::Logger::getInstance(logger.getName() +".TableExample");17 }18 TableExample::~TableExample() {19 remove();20 }21
22 void TableExample::layout(cgicc::Cgicc& cgi)23 {24 remove();25 add(new ajax::PolymerElement("table-example"));26 }
Make the /include/subsystem/supervisor/panels/TableExample.h file.
/include/subsystem/supervisor/panels/TableExample.h
50 Chapter 1. Building your own Cell Panels
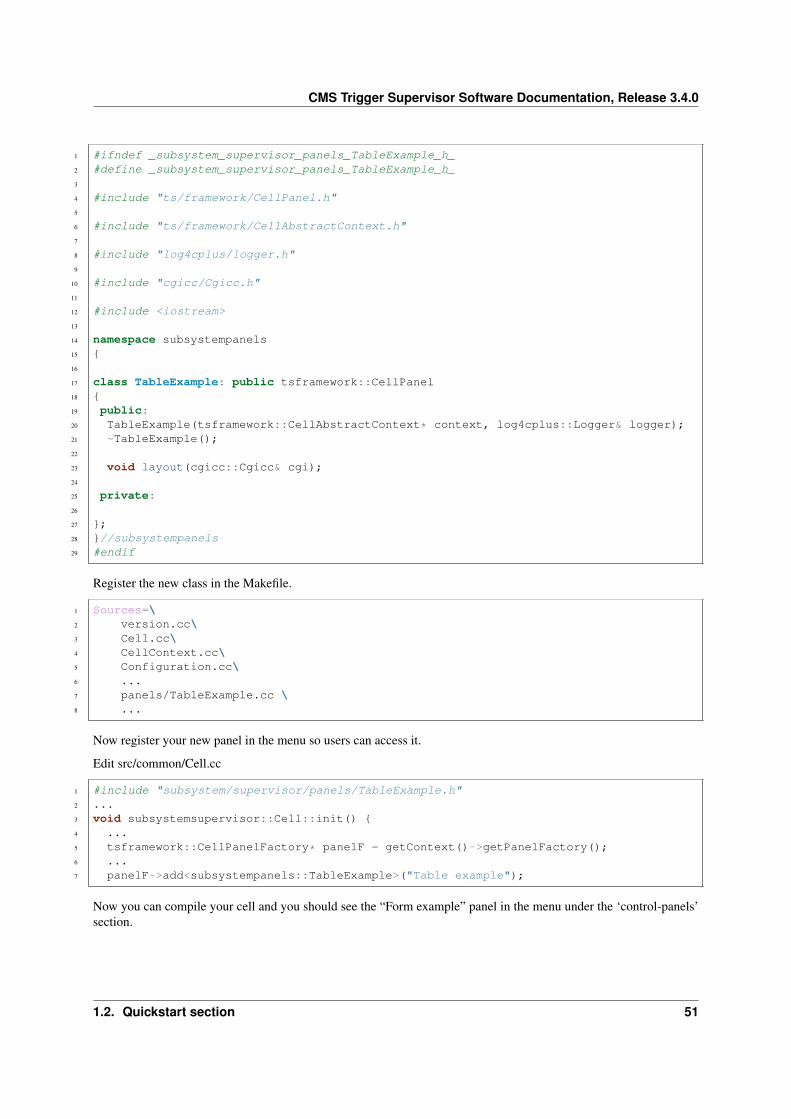
CMS Trigger Supervisor Software Documentation, Release 3.4.0
1 #ifndef _subsystem_supervisor_panels_TableExample_h_2 #define _subsystem_supervisor_panels_TableExample_h_3
4 #include "ts/framework/CellPanel.h"5
6 #include "ts/framework/CellAbstractContext.h"7
8 #include "log4cplus/logger.h"9
10 #include "cgicc/Cgicc.h"11
12 #include <iostream>13
14 namespace subsystempanels15 {16
17 class TableExample: public tsframework::CellPanel18 {19 public:20 TableExample(tsframework::CellAbstractContext* context, log4cplus::Logger& logger);21 ~TableExample();22
23 void layout(cgicc::Cgicc& cgi);24
25 private:26
27 };28 }//subsystempanels29 #endif
Register the new class in the Makefile.
1 Sources=\2 version.cc\3 Cell.cc\4 CellContext.cc\5 Configuration.cc\6 ...7 panels/TableExample.cc \8 ...
Now register your new panel in the menu so users can access it.
Edit src/common/Cell.cc
1 #include "subsystem/supervisor/panels/TableExample.h"2 ...3 void subsystemsupervisor::Cell::init() {4 ...5 tsframework::CellPanelFactory* panelF = getContext()->getPanelFactory();6 ...7 panelF->add<subsystempanels::TableExample>("Table example");
Now you can compile your cell and you should see the “Form example” panel in the menu under the ‘control-panels’section.
1.2. Quickstart section 51
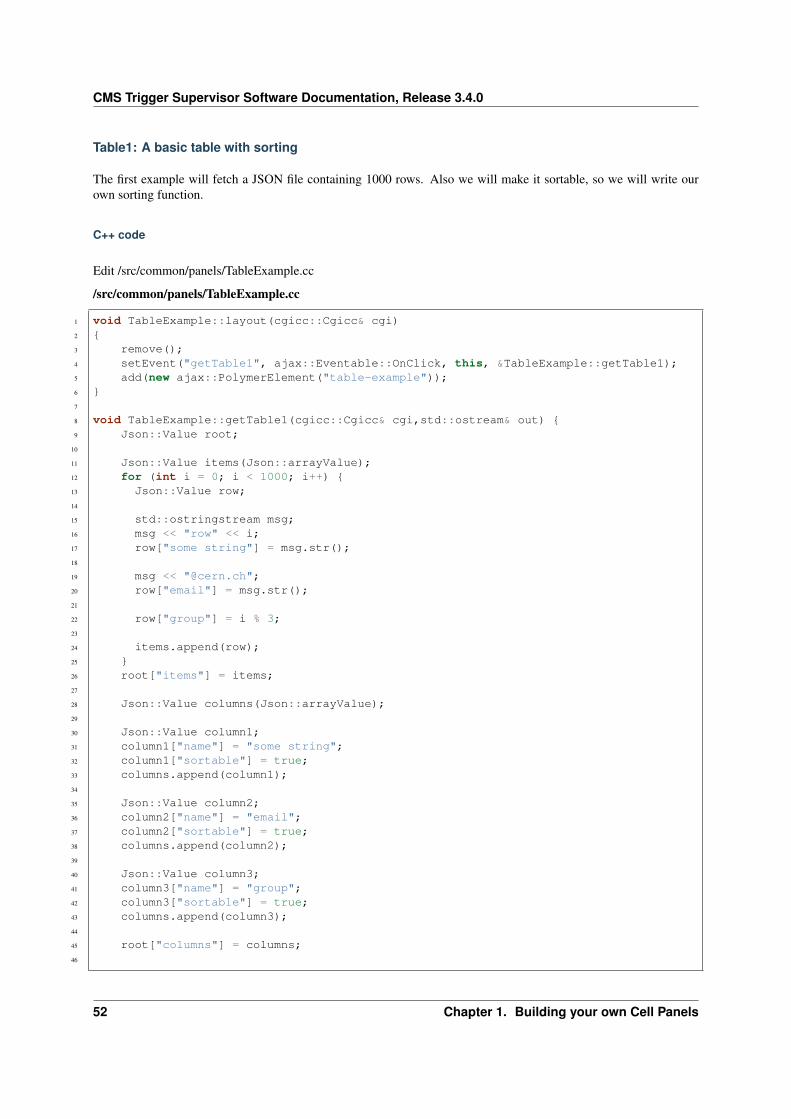
CMS Trigger Supervisor Software Documentation, Release 3.4.0
Table1: A basic table with sorting
The first example will fetch a JSON file containing 1000 rows. Also we will make it sortable, so we will write ourown sorting function.
C++ code
Edit /src/common/panels/TableExample.cc
/src/common/panels/TableExample.cc
1 void TableExample::layout(cgicc::Cgicc& cgi)2 {3 remove();4 setEvent("getTable1", ajax::Eventable::OnClick, this, &TableExample::getTable1);5 add(new ajax::PolymerElement("table-example"));6 }7
8 void TableExample::getTable1(cgicc::Cgicc& cgi,std::ostream& out) {9 Json::Value root;
10
11 Json::Value items(Json::arrayValue);12 for (int i = 0; i < 1000; i++) {13 Json::Value row;14
15 std::ostringstream msg;16 msg << "row" << i;17 row["some string"] = msg.str();18
19 msg << "@cern.ch";20 row["email"] = msg.str();21
22 row["group"] = i % 3;23
24 items.append(row);25 }26 root["items"] = items;27
28 Json::Value columns(Json::arrayValue);29
30 Json::Value column1;31 column1["name"] = "some string";32 column1["sortable"] = true;33 columns.append(column1);34
35 Json::Value column2;36 column2["name"] = "email";37 column2["sortable"] = true;38 columns.append(column2);39
40 Json::Value column3;41 column3["name"] = "group";42 column3["sortable"] = true;43 columns.append(column3);44
45 root["columns"] = columns;46
52 Chapter 1. Building your own Cell Panels
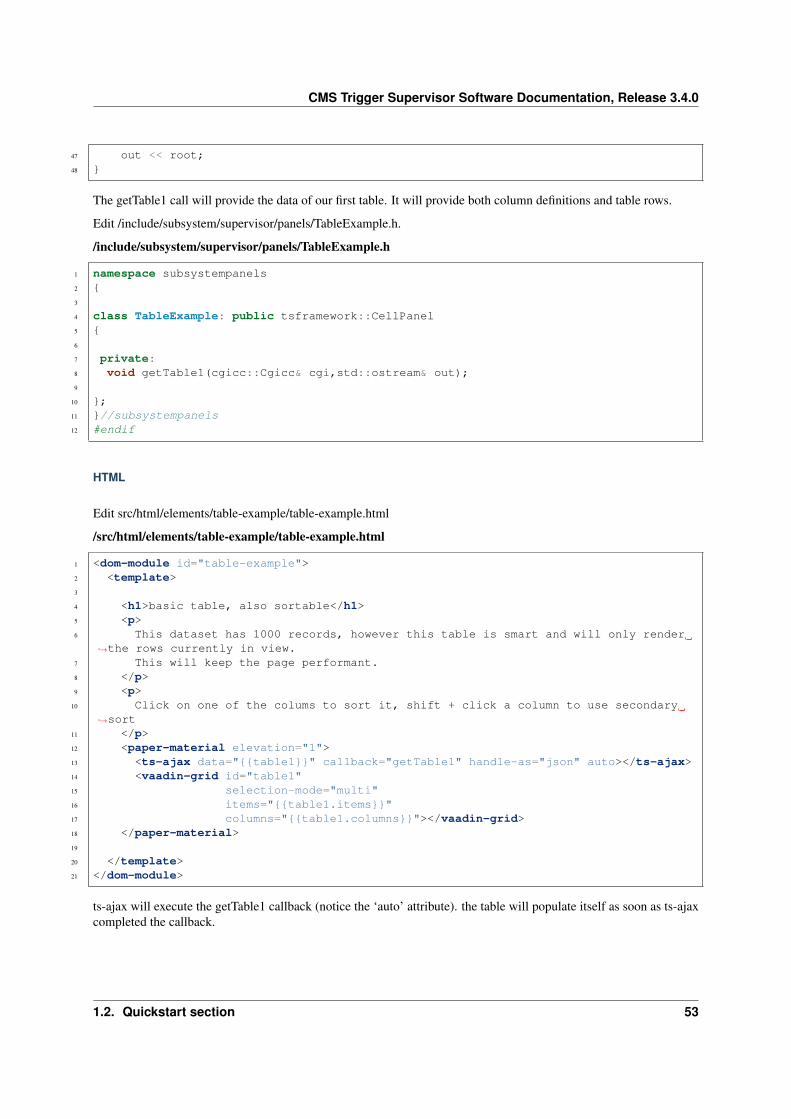
CMS Trigger Supervisor Software Documentation, Release 3.4.0
47 out << root;48 }
The getTable1 call will provide the data of our first table. It will provide both column definitions and table rows.
Edit /include/subsystem/supervisor/panels/TableExample.h.
/include/subsystem/supervisor/panels/TableExample.h
1 namespace subsystempanels2 {3
4 class TableExample: public tsframework::CellPanel5 {6
7 private:8 void getTable1(cgicc::Cgicc& cgi,std::ostream& out);9
10 };11 }//subsystempanels12 #endif
HTML
Edit src/html/elements/table-example/table-example.html
/src/html/elements/table-example/table-example.html
1 <dom-module id="table-example">2 <template>3
4 <h1>basic table, also sortable</h1>5 <p>6 This dataset has 1000 records, however this table is smart and will only render
→˓the rows currently in view.7 This will keep the page performant.8 </p>9 <p>
10 Click on one of the colums to sort it, shift + click a column to use secondary→˓sort
11 </p>12 <paper-material elevation="1">13 <ts-ajax data="{{table1}}" callback="getTable1" handle-as="json" auto></ts-ajax>14 <vaadin-grid id="table1"15 selection-mode="multi"16 items="{{table1.items}}"17 columns="{{table1.columns}}"></vaadin-grid>18 </paper-material>19
20 </template>21 </dom-module>
ts-ajax will execute the getTable1 callback (notice the ‘auto’ attribute). the table will populate itself as soon as ts-ajaxcompleted the callback.
1.2. Quickstart section 53
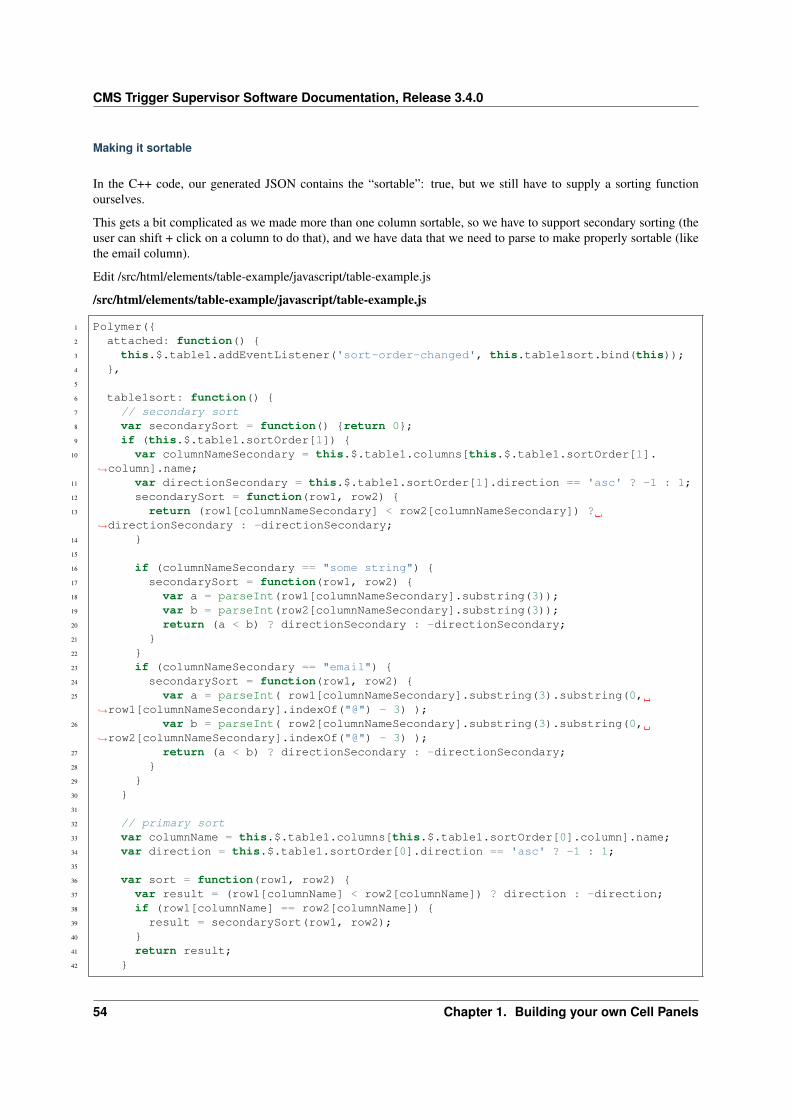
CMS Trigger Supervisor Software Documentation, Release 3.4.0
Making it sortable
In the C++ code, our generated JSON contains the “sortable”: true, but we still have to supply a sorting functionourselves.
This gets a bit complicated as we made more than one column sortable, so we have to support secondary sorting (theuser can shift + click on a column to do that), and we have data that we need to parse to make properly sortable (likethe email column).
Edit /src/html/elements/table-example/javascript/table-example.js
/src/html/elements/table-example/javascript/table-example.js
1 Polymer({2 attached: function() {3 this.$.table1.addEventListener('sort-order-changed', this.table1sort.bind(this));4 },5
6 table1sort: function() {7 // secondary sort8 var secondarySort = function() {return 0};9 if (this.$.table1.sortOrder[1]) {
10 var columnNameSecondary = this.$.table1.columns[this.$.table1.sortOrder[1].→˓column].name;
11 var directionSecondary = this.$.table1.sortOrder[1].direction == 'asc' ? -1 : 1;12 secondarySort = function(row1, row2) {13 return (row1[columnNameSecondary] < row2[columnNameSecondary]) ?
→˓directionSecondary : -directionSecondary;14 }15
16 if (columnNameSecondary == "some string") {17 secondarySort = function(row1, row2) {18 var a = parseInt(row1[columnNameSecondary].substring(3));19 var b = parseInt(row2[columnNameSecondary].substring(3));20 return (a < b) ? directionSecondary : -directionSecondary;21 }22 }23 if (columnNameSecondary == "email") {24 secondarySort = function(row1, row2) {25 var a = parseInt( row1[columnNameSecondary].substring(3).substring(0,
→˓row1[columnNameSecondary].indexOf("@") - 3) );26 var b = parseInt( row2[columnNameSecondary].substring(3).substring(0,
→˓row2[columnNameSecondary].indexOf("@") - 3) );27 return (a < b) ? directionSecondary : -directionSecondary;28 }29 }30 }31
32 // primary sort33 var columnName = this.$.table1.columns[this.$.table1.sortOrder[0].column].name;34 var direction = this.$.table1.sortOrder[0].direction == 'asc' ? -1 : 1;35
36 var sort = function(row1, row2) {37 var result = (row1[columnName] < row2[columnName]) ? direction : -direction;38 if (row1[columnName] == row2[columnName]) {39 result = secondarySort(row1, row2);40 }41 return result;42 }
54 Chapter 1. Building your own Cell Panels

CMS Trigger Supervisor Software Documentation, Release 3.4.0
43
44 if (columnName == "some string") {45 sort = function(row1, row2) {46 var a = parseInt(row1[columnName].substring(3));47 var b = parseInt(row2[columnName].substring(3));48 var result = (a < b) ? direction : -direction;49 if (a == b) {50 result = secondarySort(row1, row2);51 }52 return result;53 }54 }55 if (columnName == "email") {56 sort = function(row1, row2) {57 var a = parseInt( row1[columnName].substring(3).substring(0, row1[columnName].
→˓indexOf("@") - 3) );58 var b = parseInt( row2[columnName].substring(3).substring(0, row2[columnName].
→˓indexOf("@") - 3) );59 var result = (a < b) ? direction : -direction;60 if (a == b) {61 result = secondarySort(row1, row2);62 }63 return result;64 }65 }66
67 this.$.table1.items.sort(sort);68 }69 });
The result will look like this:
1.2. Quickstart section 55
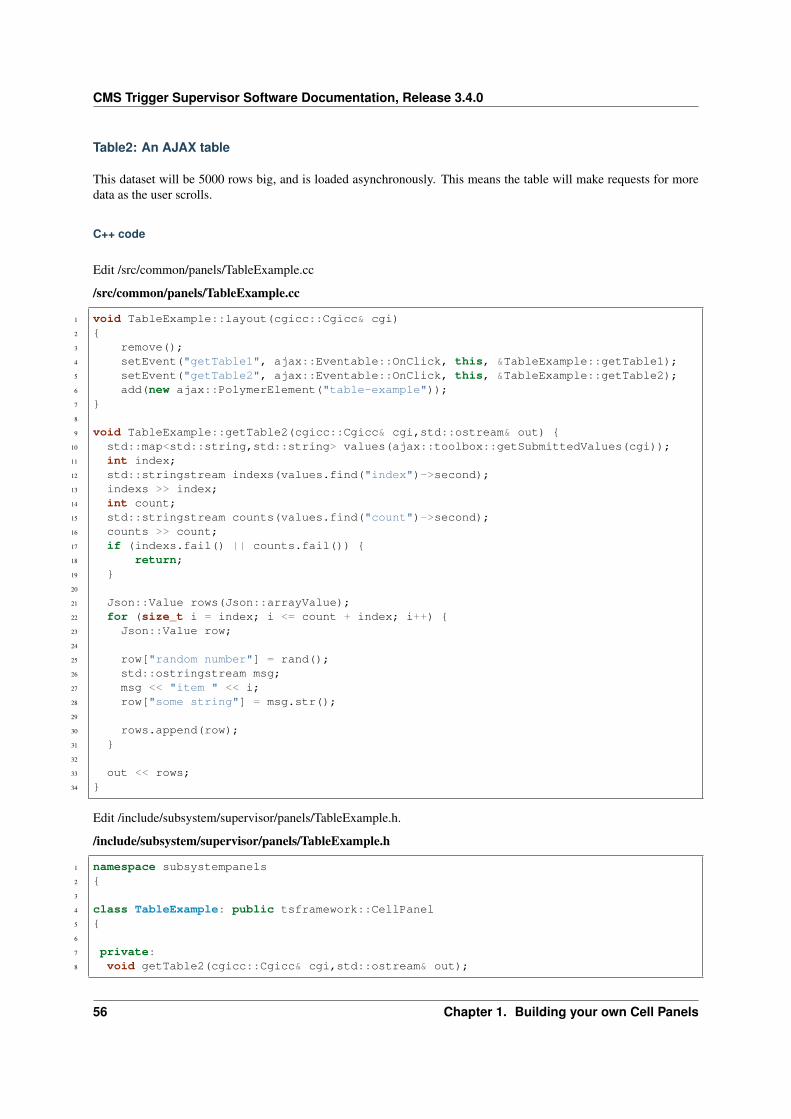
CMS Trigger Supervisor Software Documentation, Release 3.4.0
Table2: An AJAX table
This dataset will be 5000 rows big, and is loaded asynchronously. This means the table will make requests for moredata as the user scrolls.
C++ code
Edit /src/common/panels/TableExample.cc
/src/common/panels/TableExample.cc
1 void TableExample::layout(cgicc::Cgicc& cgi)2 {3 remove();4 setEvent("getTable1", ajax::Eventable::OnClick, this, &TableExample::getTable1);5 setEvent("getTable2", ajax::Eventable::OnClick, this, &TableExample::getTable2);6 add(new ajax::PolymerElement("table-example"));7 }8
9 void TableExample::getTable2(cgicc::Cgicc& cgi,std::ostream& out) {10 std::map<std::string,std::string> values(ajax::toolbox::getSubmittedValues(cgi));11 int index;12 std::stringstream indexs(values.find("index")->second);13 indexs >> index;14 int count;15 std::stringstream counts(values.find("count")->second);16 counts >> count;17 if (indexs.fail() || counts.fail()) {18 return;19 }20
21 Json::Value rows(Json::arrayValue);22 for (size_t i = index; i <= count + index; i++) {23 Json::Value row;24
25 row["random number"] = rand();26 std::ostringstream msg;27 msg << "item " << i;28 row["some string"] = msg.str();29
30 rows.append(row);31 }32
33 out << rows;34 }
Edit /include/subsystem/supervisor/panels/TableExample.h.
/include/subsystem/supervisor/panels/TableExample.h
1 namespace subsystempanels2 {3
4 class TableExample: public tsframework::CellPanel5 {6
7 private:8 void getTable2(cgicc::Cgicc& cgi,std::ostream& out);
56 Chapter 1. Building your own Cell Panels
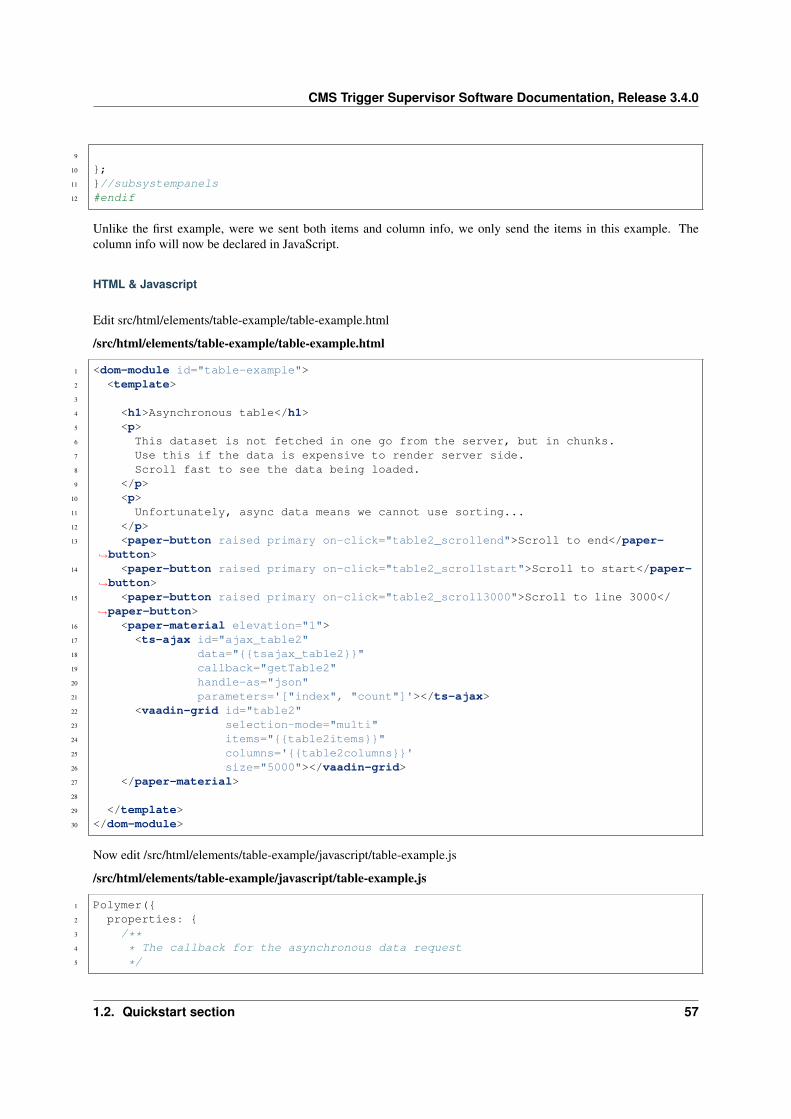
CMS Trigger Supervisor Software Documentation, Release 3.4.0
9
10 };11 }//subsystempanels12 #endif
Unlike the first example, were we sent both items and column info, we only send the items in this example. Thecolumn info will now be declared in JavaScript.
HTML & Javascript
Edit src/html/elements/table-example/table-example.html
/src/html/elements/table-example/table-example.html
1 <dom-module id="table-example">2 <template>3
4 <h1>Asynchronous table</h1>5 <p>6 This dataset is not fetched in one go from the server, but in chunks.7 Use this if the data is expensive to render server side.8 Scroll fast to see the data being loaded.9 </p>
10 <p>11 Unfortunately, async data means we cannot use sorting...12 </p>13 <paper-button raised primary on-click="table2_scrollend">Scroll to end</paper-
→˓button>14 <paper-button raised primary on-click="table2_scrollstart">Scroll to start</paper-
→˓button>15 <paper-button raised primary on-click="table2_scroll3000">Scroll to line 3000</
→˓paper-button>16 <paper-material elevation="1">17 <ts-ajax id="ajax_table2"18 data="{{tsajax_table2}}"19 callback="getTable2"20 handle-as="json"21 parameters='["index", "count"]'></ts-ajax>22 <vaadin-grid id="table2"23 selection-mode="multi"24 items="{{table2items}}"25 columns='{{table2columns}}'26 size="5000"></vaadin-grid>27 </paper-material>28
29 </template>30 </dom-module>
Now edit /src/html/elements/table-example/javascript/table-example.js
/src/html/elements/table-example/javascript/table-example.js
1 Polymer({2 properties: {3 /**4 * The callback for the asynchronous data request5 */
1.2. Quickstart section 57
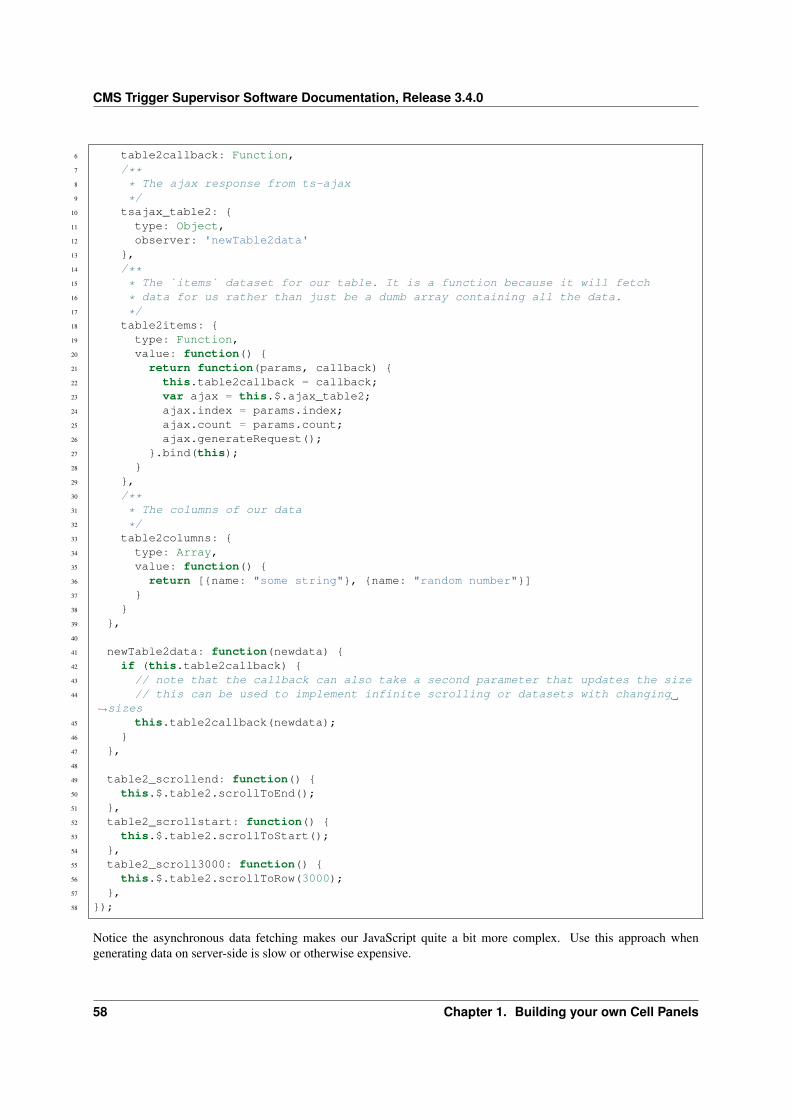
CMS Trigger Supervisor Software Documentation, Release 3.4.0
6 table2callback: Function,7 /**8 * The ajax response from ts-ajax9 */
10 tsajax_table2: {11 type: Object,12 observer: 'newTable2data'13 },14 /**15 * The `items` dataset for our table. It is a function because it will fetch16 * data for us rather than just be a dumb array containing all the data.17 */18 table2items: {19 type: Function,20 value: function() {21 return function(params, callback) {22 this.table2callback = callback;23 var ajax = this.$.ajax_table2;24 ajax.index = params.index;25 ajax.count = params.count;26 ajax.generateRequest();27 }.bind(this);28 }29 },30 /**31 * The columns of our data32 */33 table2columns: {34 type: Array,35 value: function() {36 return [{name: "some string"}, {name: "random number"}]37 }38 }39 },40
41 newTable2data: function(newdata) {42 if (this.table2callback) {43 // note that the callback can also take a second parameter that updates the size44 // this can be used to implement infinite scrolling or datasets with changing
→˓sizes45 this.table2callback(newdata);46 }47 },48
49 table2_scrollend: function() {50 this.$.table2.scrollToEnd();51 },52 table2_scrollstart: function() {53 this.$.table2.scrollToStart();54 },55 table2_scroll3000: function() {56 this.$.table2.scrollToRow(3000);57 },58 });
Notice the asynchronous data fetching makes our JavaScript quite a bit more complex. Use this approach whengenerating data on server-side is slow or otherwise expensive.
58 Chapter 1. Building your own Cell Panels
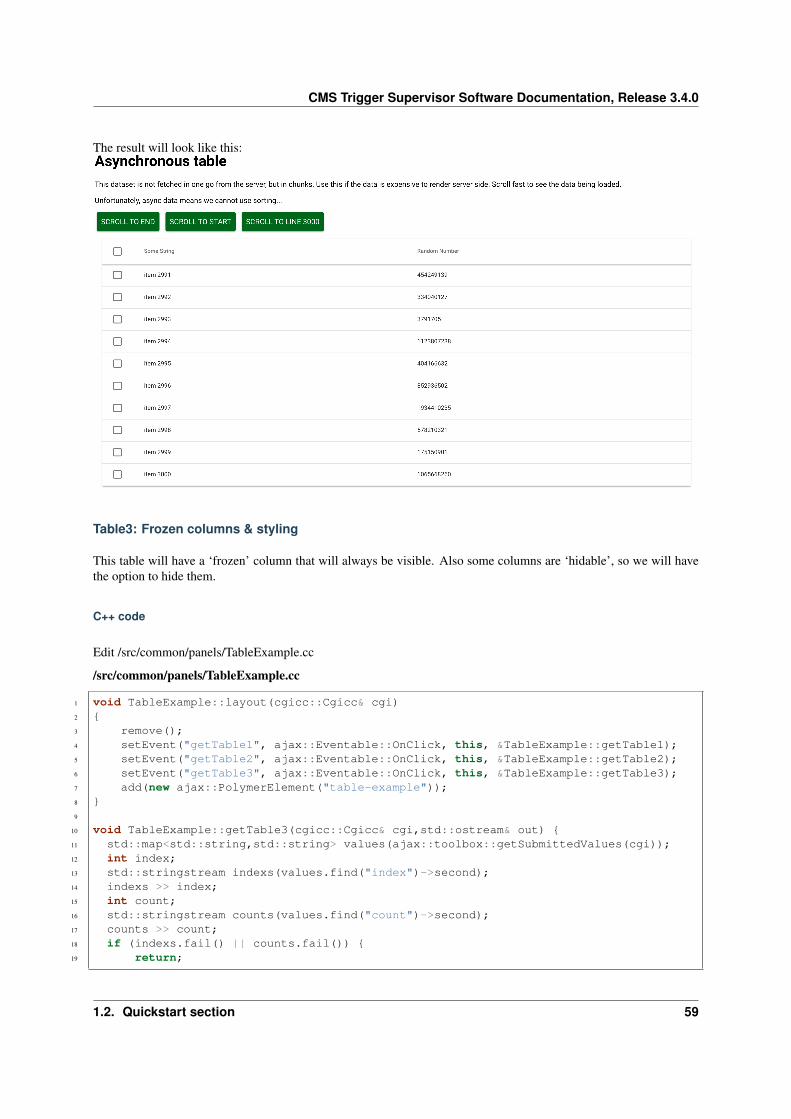
CMS Trigger Supervisor Software Documentation, Release 3.4.0
The result will look like this:
Table3: Frozen columns & styling
This table will have a ‘frozen’ column that will always be visible. Also some columns are ‘hidable’, so we will havethe option to hide them.
C++ code
Edit /src/common/panels/TableExample.cc
/src/common/panels/TableExample.cc
1 void TableExample::layout(cgicc::Cgicc& cgi)2 {3 remove();4 setEvent("getTable1", ajax::Eventable::OnClick, this, &TableExample::getTable1);5 setEvent("getTable2", ajax::Eventable::OnClick, this, &TableExample::getTable2);6 setEvent("getTable3", ajax::Eventable::OnClick, this, &TableExample::getTable3);7 add(new ajax::PolymerElement("table-example"));8 }9
10 void TableExample::getTable3(cgicc::Cgicc& cgi,std::ostream& out) {11 std::map<std::string,std::string> values(ajax::toolbox::getSubmittedValues(cgi));12 int index;13 std::stringstream indexs(values.find("index")->second);14 indexs >> index;15 int count;16 std::stringstream counts(values.find("count")->second);17 counts >> count;18 if (indexs.fail() || counts.fail()) {19 return;
1.2. Quickstart section 59
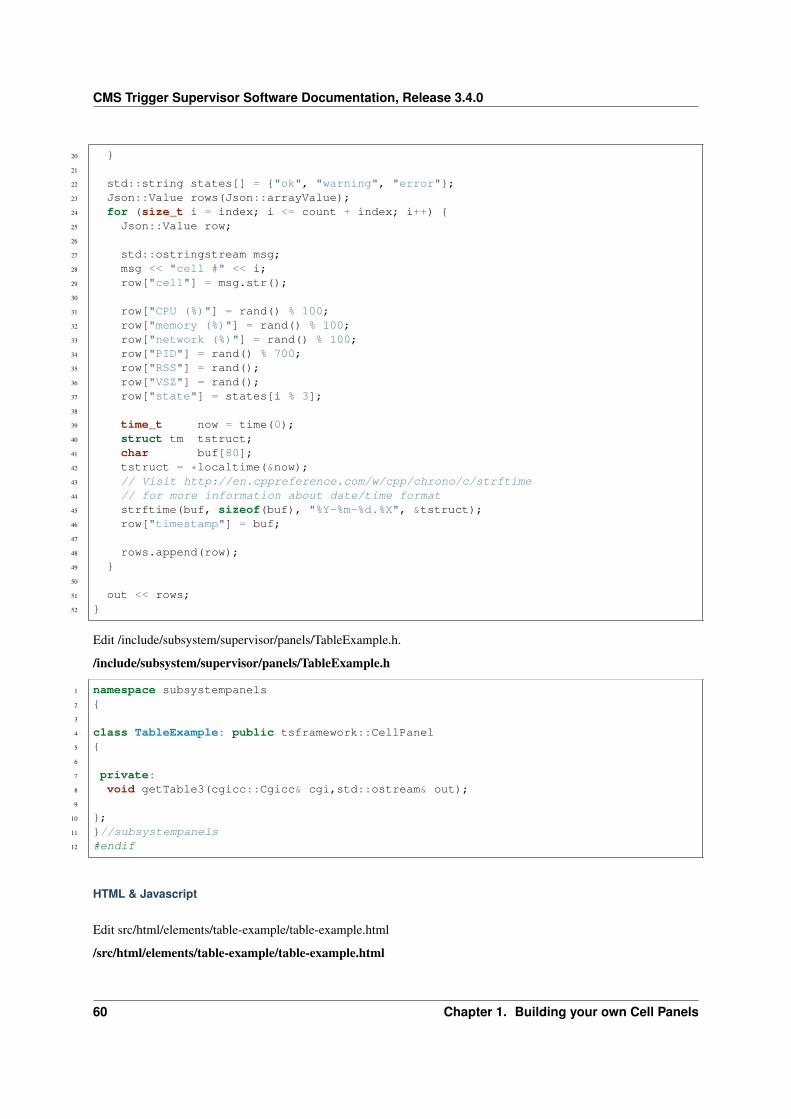
CMS Trigger Supervisor Software Documentation, Release 3.4.0
20 }21
22 std::string states[] = {"ok", "warning", "error"};23 Json::Value rows(Json::arrayValue);24 for (size_t i = index; i <= count + index; i++) {25 Json::Value row;26
27 std::ostringstream msg;28 msg << "cell #" << i;29 row["cell"] = msg.str();30
31 row["CPU (%)"] = rand() % 100;32 row["memory (%)"] = rand() % 100;33 row["network (%)"] = rand() % 100;34 row["PID"] = rand() % 700;35 row["RSS"] = rand();36 row["VSZ"] = rand();37 row["state"] = states[i % 3];38
39 time_t now = time(0);40 struct tm tstruct;41 char buf[80];42 tstruct = *localtime(&now);43 // Visit http://en.cppreference.com/w/cpp/chrono/c/strftime44 // for more information about date/time format45 strftime(buf, sizeof(buf), "%Y-%m-%d.%X", &tstruct);46 row["timestamp"] = buf;47
48 rows.append(row);49 }50
51 out << rows;52 }
Edit /include/subsystem/supervisor/panels/TableExample.h.
/include/subsystem/supervisor/panels/TableExample.h
1 namespace subsystempanels2 {3
4 class TableExample: public tsframework::CellPanel5 {6
7 private:8 void getTable3(cgicc::Cgicc& cgi,std::ostream& out);9
10 };11 }//subsystempanels12 #endif
HTML & Javascript
Edit src/html/elements/table-example/table-example.html
/src/html/elements/table-example/table-example.html
60 Chapter 1. Building your own Cell Panels
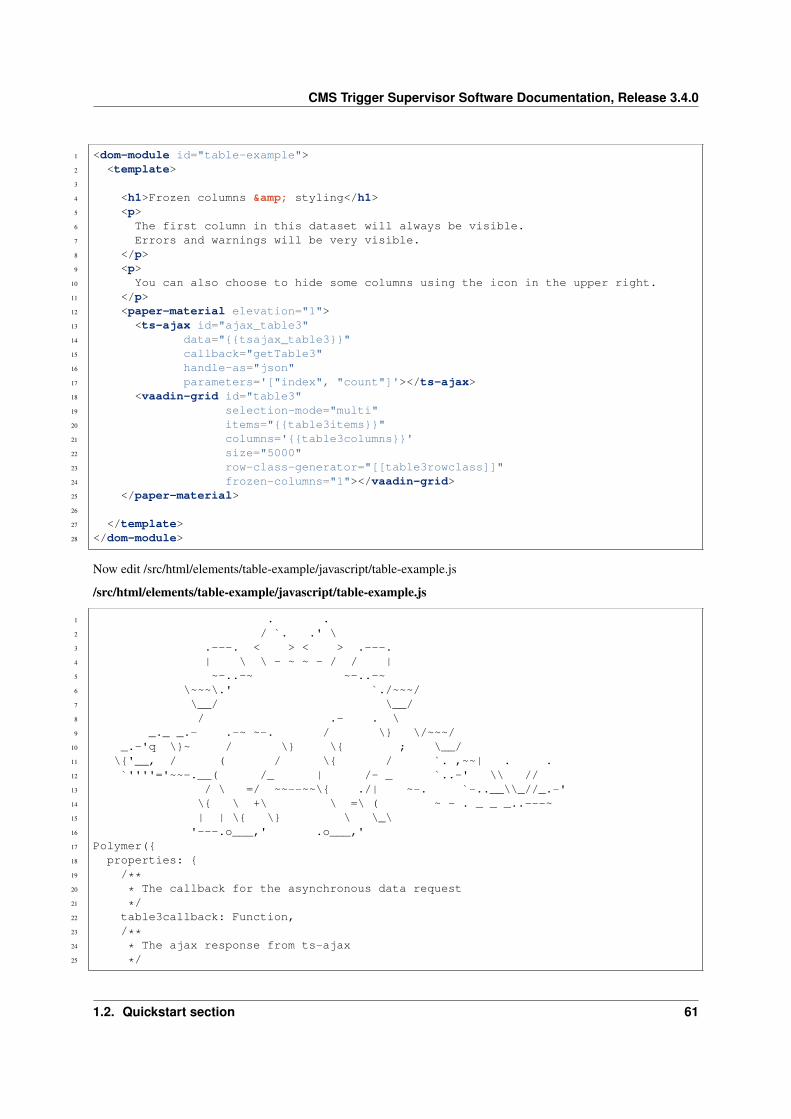
CMS Trigger Supervisor Software Documentation, Release 3.4.0
1 <dom-module id="table-example">2 <template>3
4 <h1>Frozen columns & styling</h1>5 <p>6 The first column in this dataset will always be visible.7 Errors and warnings will be very visible.8 </p>9 <p>
10 You can also choose to hide some columns using the icon in the upper right.11 </p>12 <paper-material elevation="1">13 <ts-ajax id="ajax_table3"14 data="{{tsajax_table3}}"15 callback="getTable3"16 handle-as="json"17 parameters='["index", "count"]'></ts-ajax>18 <vaadin-grid id="table3"19 selection-mode="multi"20 items="{{table3items}}"21 columns='{{table3columns}}'22 size="5000"23 row-class-generator="[[table3rowclass]]"24 frozen-columns="1"></vaadin-grid>25 </paper-material>26
27 </template>28 </dom-module>
Now edit /src/html/elements/table-example/javascript/table-example.js
/src/html/elements/table-example/javascript/table-example.js
1 . .2 / `. .' \3 .---. < > < > .---.4 | \ \ - ~ ~ - / / |5 ~-..-~ ~-..-~6 \~~~\.' `./~~~/7 \__/ \__/8 / .- . \9 _._ _.- .-~ ~-. / \} \/~~~/
10 _.-'q \}~ / \} \{ ; \__/11 \{'__, / ( / \{ / `. ,~~| . .12 `''''='~~-.__( /_ | /- _ `..-' \\ //13 / \ =/ ~~--~~\{ ./| ~-. `-..__\\_//_.-'14 \{ \ +\ \ =\ ( ~ - . _ _ _..---~15 | | \{ \} \ \_\16 '---.o___,' .o___,'17 Polymer({18 properties: {19 /**20 * The callback for the asynchronous data request21 */22 table3callback: Function,23 /**24 * The ajax response from ts-ajax25 */
1.2. Quickstart section 61
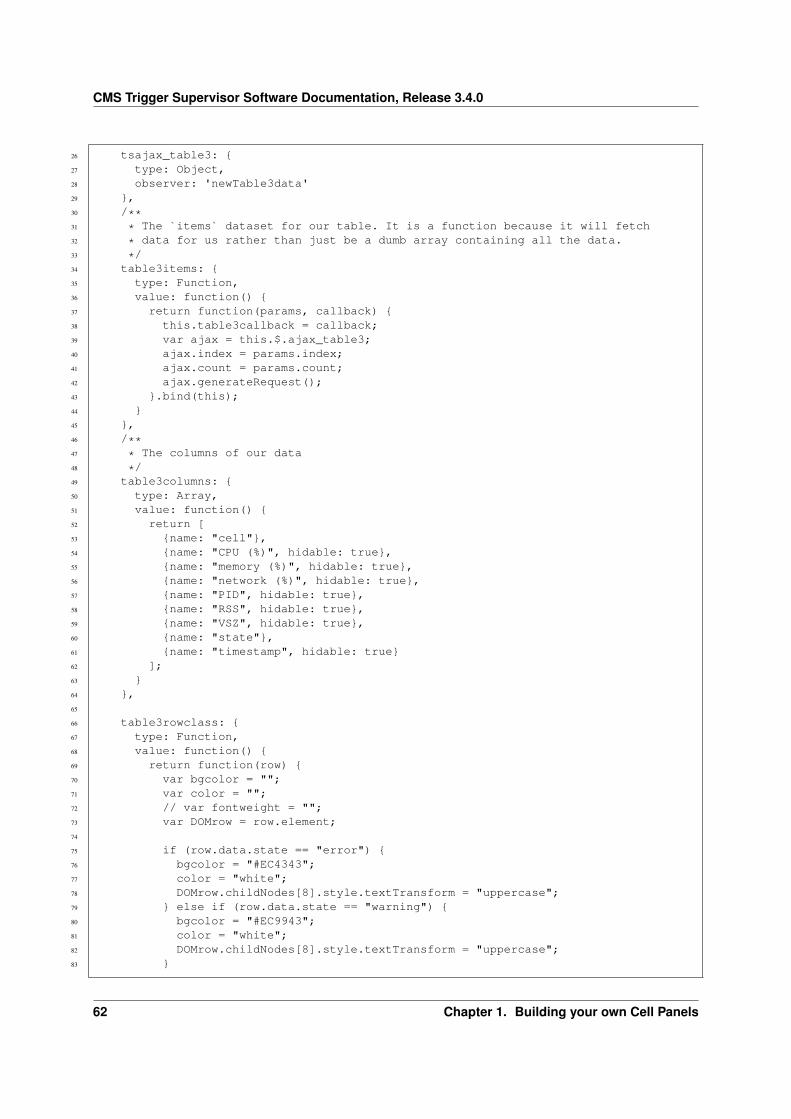
CMS Trigger Supervisor Software Documentation, Release 3.4.0
26 tsajax_table3: {27 type: Object,28 observer: 'newTable3data'29 },30 /**31 * The `items` dataset for our table. It is a function because it will fetch32 * data for us rather than just be a dumb array containing all the data.33 */34 table3items: {35 type: Function,36 value: function() {37 return function(params, callback) {38 this.table3callback = callback;39 var ajax = this.$.ajax_table3;40 ajax.index = params.index;41 ajax.count = params.count;42 ajax.generateRequest();43 }.bind(this);44 }45 },46 /**47 * The columns of our data48 */49 table3columns: {50 type: Array,51 value: function() {52 return [53 {name: "cell"},54 {name: "CPU (%)", hidable: true},55 {name: "memory (%)", hidable: true},56 {name: "network (%)", hidable: true},57 {name: "PID", hidable: true},58 {name: "RSS", hidable: true},59 {name: "VSZ", hidable: true},60 {name: "state"},61 {name: "timestamp", hidable: true}62 ];63 }64 },65
66 table3rowclass: {67 type: Function,68 value: function() {69 return function(row) {70 var bgcolor = "";71 var color = "";72 // var fontweight = "";73 var DOMrow = row.element;74
75 if (row.data.state == "error") {76 bgcolor = "#EC4343";77 color = "white";78 DOMrow.childNodes[8].style.textTransform = "uppercase";79 } else if (row.data.state == "warning") {80 bgcolor = "#EC9943";81 color = "white";82 DOMrow.childNodes[8].style.textTransform = "uppercase";83 }
62 Chapter 1. Building your own Cell Panels
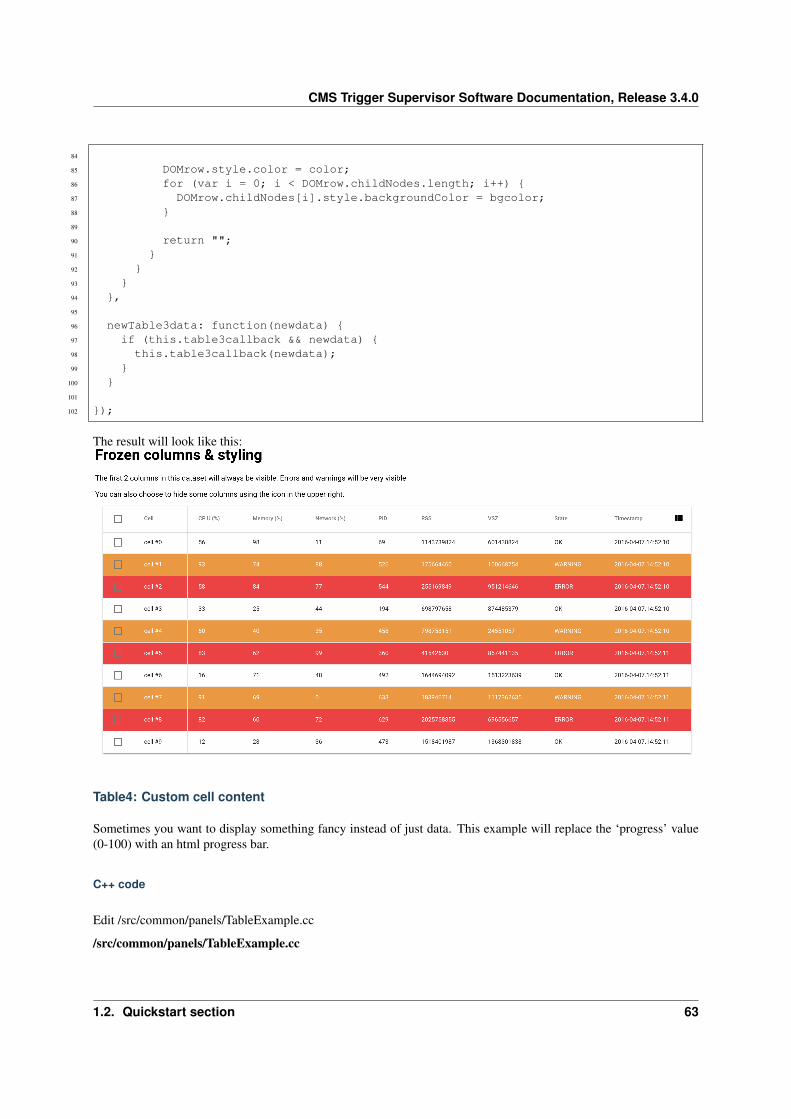
CMS Trigger Supervisor Software Documentation, Release 3.4.0
84
85 DOMrow.style.color = color;86 for (var i = 0; i < DOMrow.childNodes.length; i++) {87 DOMrow.childNodes[i].style.backgroundColor = bgcolor;88 }89
90 return "";91 }92 }93 }94 },95
96 newTable3data: function(newdata) {97 if (this.table3callback && newdata) {98 this.table3callback(newdata);99 }
100 }101
102 });
The result will look like this:
Table4: Custom cell content
Sometimes you want to display something fancy instead of just data. This example will replace the ‘progress’ value(0-100) with an html progress bar.
C++ code
Edit /src/common/panels/TableExample.cc
/src/common/panels/TableExample.cc
1.2. Quickstart section 63
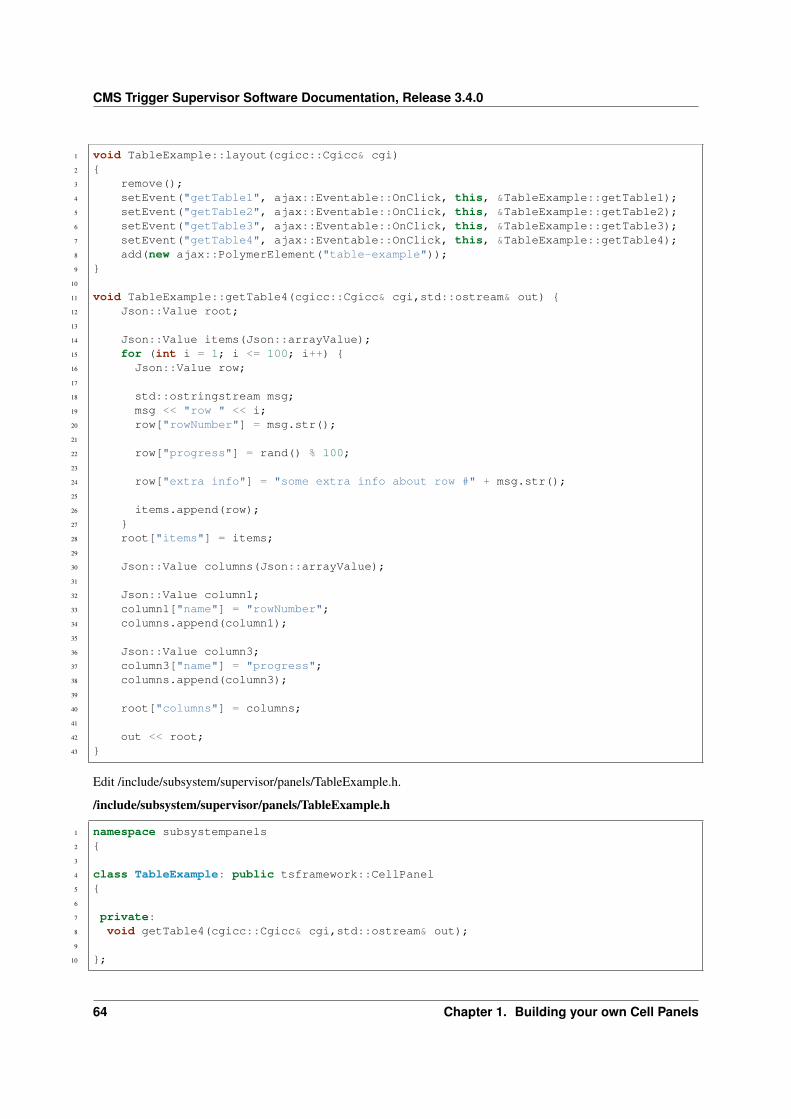
CMS Trigger Supervisor Software Documentation, Release 3.4.0
1 void TableExample::layout(cgicc::Cgicc& cgi)2 {3 remove();4 setEvent("getTable1", ajax::Eventable::OnClick, this, &TableExample::getTable1);5 setEvent("getTable2", ajax::Eventable::OnClick, this, &TableExample::getTable2);6 setEvent("getTable3", ajax::Eventable::OnClick, this, &TableExample::getTable3);7 setEvent("getTable4", ajax::Eventable::OnClick, this, &TableExample::getTable4);8 add(new ajax::PolymerElement("table-example"));9 }
10
11 void TableExample::getTable4(cgicc::Cgicc& cgi,std::ostream& out) {12 Json::Value root;13
14 Json::Value items(Json::arrayValue);15 for (int i = 1; i <= 100; i++) {16 Json::Value row;17
18 std::ostringstream msg;19 msg << "row " << i;20 row["rowNumber"] = msg.str();21
22 row["progress"] = rand() % 100;23
24 row["extra info"] = "some extra info about row #" + msg.str();25
26 items.append(row);27 }28 root["items"] = items;29
30 Json::Value columns(Json::arrayValue);31
32 Json::Value column1;33 column1["name"] = "rowNumber";34 columns.append(column1);35
36 Json::Value column3;37 column3["name"] = "progress";38 columns.append(column3);39
40 root["columns"] = columns;41
42 out << root;43 }
Edit /include/subsystem/supervisor/panels/TableExample.h.
/include/subsystem/supervisor/panels/TableExample.h
1 namespace subsystempanels2 {3
4 class TableExample: public tsframework::CellPanel5 {6
7 private:8 void getTable4(cgicc::Cgicc& cgi,std::ostream& out);9
10 };
64 Chapter 1. Building your own Cell Panels
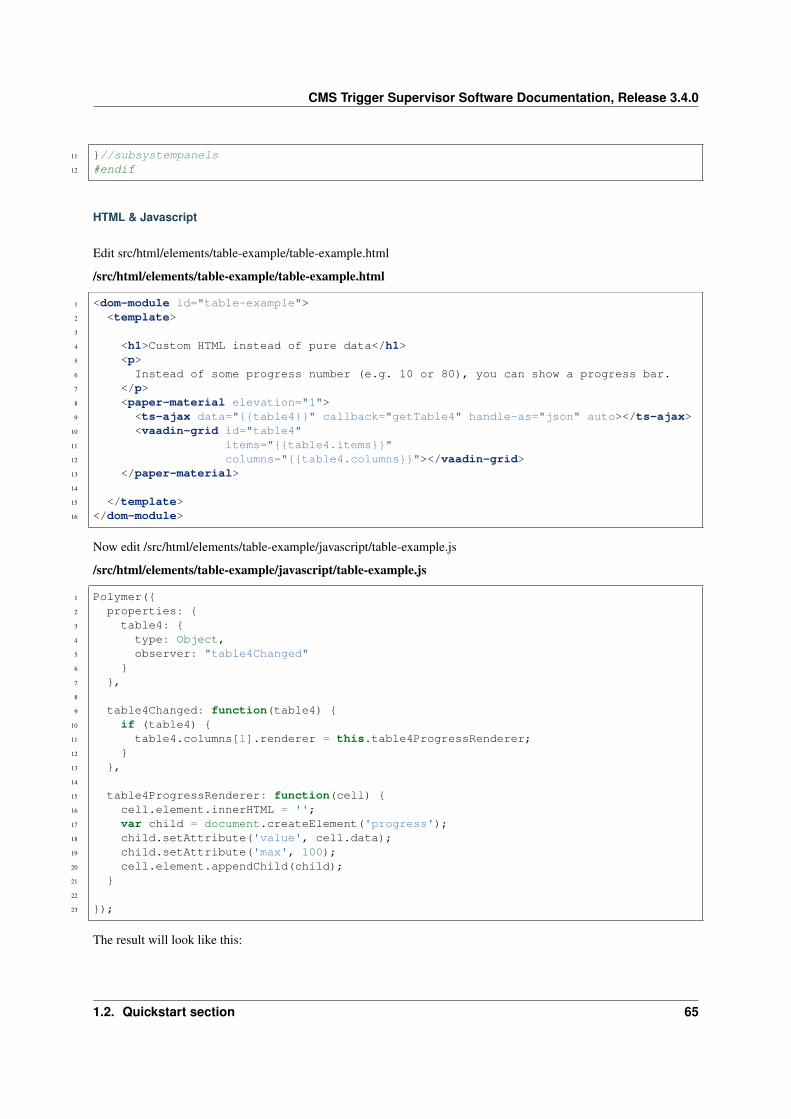
CMS Trigger Supervisor Software Documentation, Release 3.4.0
11 }//subsystempanels12 #endif
HTML & Javascript
Edit src/html/elements/table-example/table-example.html
/src/html/elements/table-example/table-example.html
1 <dom-module id="table-example">2 <template>3
4 <h1>Custom HTML instead of pure data</h1>5 <p>6 Instead of some progress number (e.g. 10 or 80), you can show a progress bar.7 </p>8 <paper-material elevation="1">9 <ts-ajax data="{{table4}}" callback="getTable4" handle-as="json" auto></ts-ajax>
10 <vaadin-grid id="table4"11 items="{{table4.items}}"12 columns="{{table4.columns}}"></vaadin-grid>13 </paper-material>14
15 </template>16 </dom-module>
Now edit /src/html/elements/table-example/javascript/table-example.js
/src/html/elements/table-example/javascript/table-example.js
1 Polymer({2 properties: {3 table4: {4 type: Object,5 observer: "table4Changed"6 }7 },8
9 table4Changed: function(table4) {10 if (table4) {11 table4.columns[1].renderer = this.table4ProgressRenderer;12 }13 },14
15 table4ProgressRenderer: function(cell) {16 cell.element.innerHTML = '';17 var child = document.createElement('progress');18 child.setAttribute('value', cell.data);19 child.setAttribute('max', 100);20 cell.element.appendChild(child);21 }22
23 });
The result will look like this:
1.2. Quickstart section 65
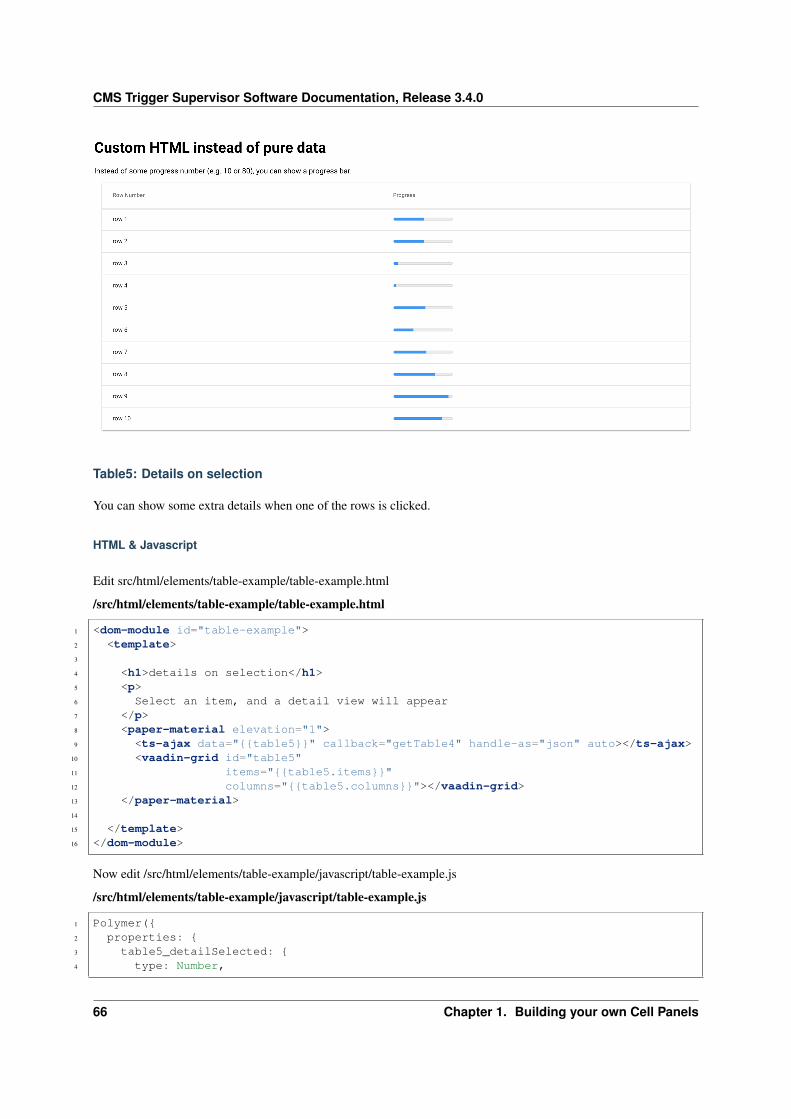
CMS Trigger Supervisor Software Documentation, Release 3.4.0
Table5: Details on selection
You can show some extra details when one of the rows is clicked.
HTML & Javascript
Edit src/html/elements/table-example/table-example.html
/src/html/elements/table-example/table-example.html
1 <dom-module id="table-example">2 <template>3
4 <h1>details on selection</h1>5 <p>6 Select an item, and a detail view will appear7 </p>8 <paper-material elevation="1">9 <ts-ajax data="{{table5}}" callback="getTable4" handle-as="json" auto></ts-ajax>
10 <vaadin-grid id="table5"11 items="{{table5.items}}"12 columns="{{table5.columns}}"></vaadin-grid>13 </paper-material>14
15 </template>16 </dom-module>
Now edit /src/html/elements/table-example/javascript/table-example.js
/src/html/elements/table-example/javascript/table-example.js
1 Polymer({2 properties: {3 table5_detailSelected: {4 type: Number,
66 Chapter 1. Building your own Cell Panels
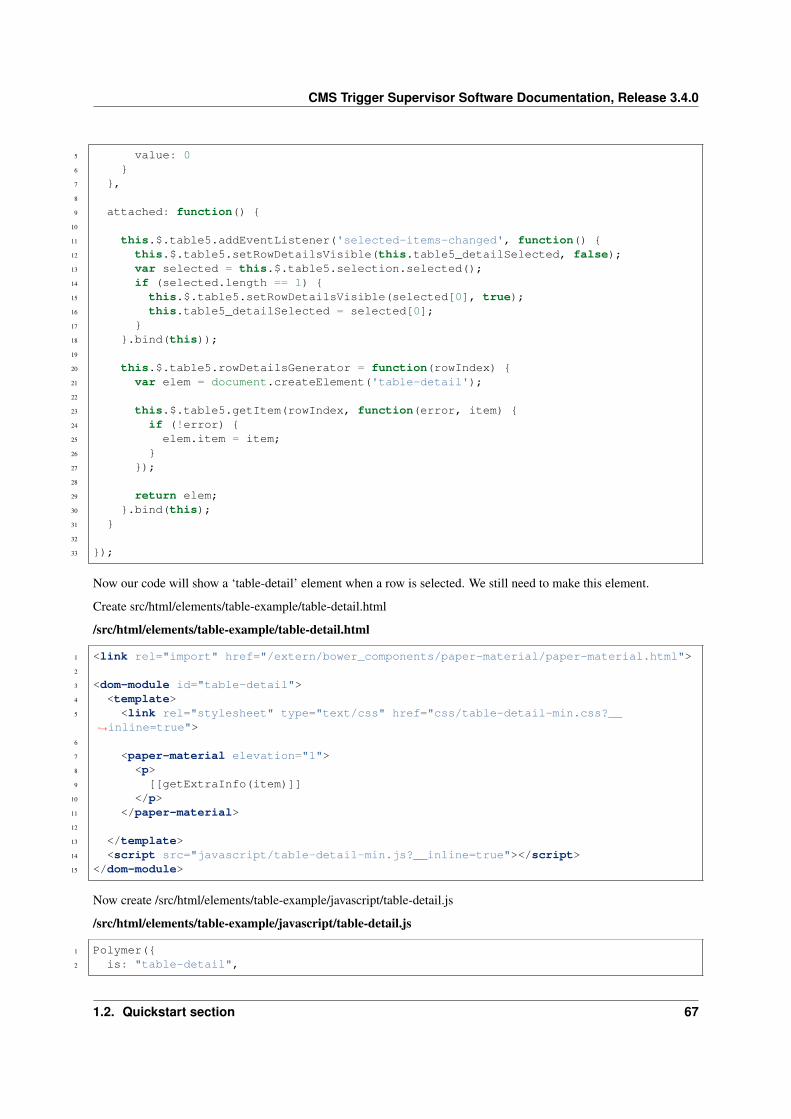
CMS Trigger Supervisor Software Documentation, Release 3.4.0
5 value: 06 }7 },8
9 attached: function() {10
11 this.$.table5.addEventListener('selected-items-changed', function() {12 this.$.table5.setRowDetailsVisible(this.table5_detailSelected, false);13 var selected = this.$.table5.selection.selected();14 if (selected.length == 1) {15 this.$.table5.setRowDetailsVisible(selected[0], true);16 this.table5_detailSelected = selected[0];17 }18 }.bind(this));19
20 this.$.table5.rowDetailsGenerator = function(rowIndex) {21 var elem = document.createElement('table-detail');22
23 this.$.table5.getItem(rowIndex, function(error, item) {24 if (!error) {25 elem.item = item;26 }27 });28
29 return elem;30 }.bind(this);31 }32
33 });
Now our code will show a ‘table-detail’ element when a row is selected. We still need to make this element.
Create src/html/elements/table-example/table-detail.html
/src/html/elements/table-example/table-detail.html
1 <link rel="import" href="/extern/bower_components/paper-material/paper-material.html">2
3 <dom-module id="table-detail">4 <template>5 <link rel="stylesheet" type="text/css" href="css/table-detail-min.css?__
→˓inline=true">6
7 <paper-material elevation="1">8 <p>9 [[getExtraInfo(item)]]
10 </p>11 </paper-material>12
13 </template>14 <script src="javascript/table-detail-min.js?__inline=true"></script>15 </dom-module>
Now create /src/html/elements/table-example/javascript/table-detail.js
/src/html/elements/table-example/javascript/table-detail.js
1 Polymer({2 is: "table-detail",
1.2. Quickstart section 67
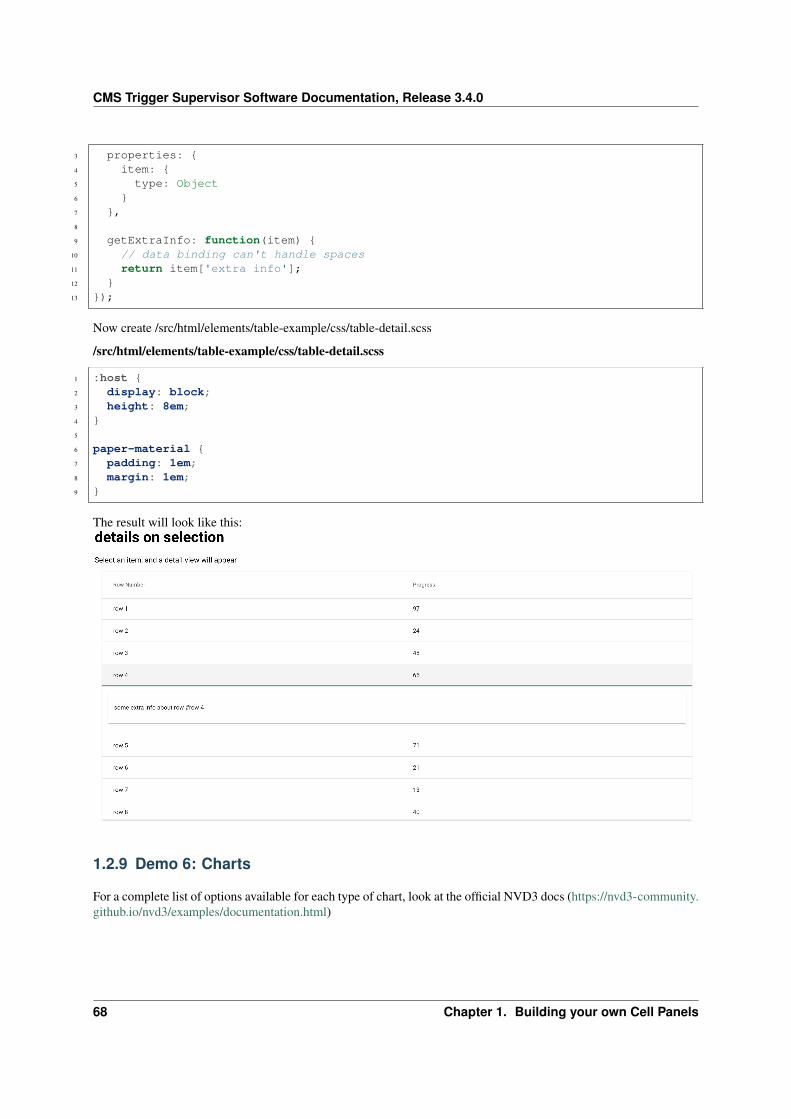
CMS Trigger Supervisor Software Documentation, Release 3.4.0
3 properties: {4 item: {5 type: Object6 }7 },8
9 getExtraInfo: function(item) {10 // data binding can't handle spaces11 return item['extra info'];12 }13 });
Now create /src/html/elements/table-example/css/table-detail.scss
/src/html/elements/table-example/css/table-detail.scss
1 :host {2 display: block;3 height: 8em;4 }5
6 paper-material {7 padding: 1em;8 margin: 1em;9 }
The result will look like this:
1.2.9 Demo 6: Charts
For a complete list of options available for each type of chart, look at the official NVD3 docs (https://nvd3-community.github.io/nvd3/examples/documentation.html)
68 Chapter 1. Building your own Cell Panels
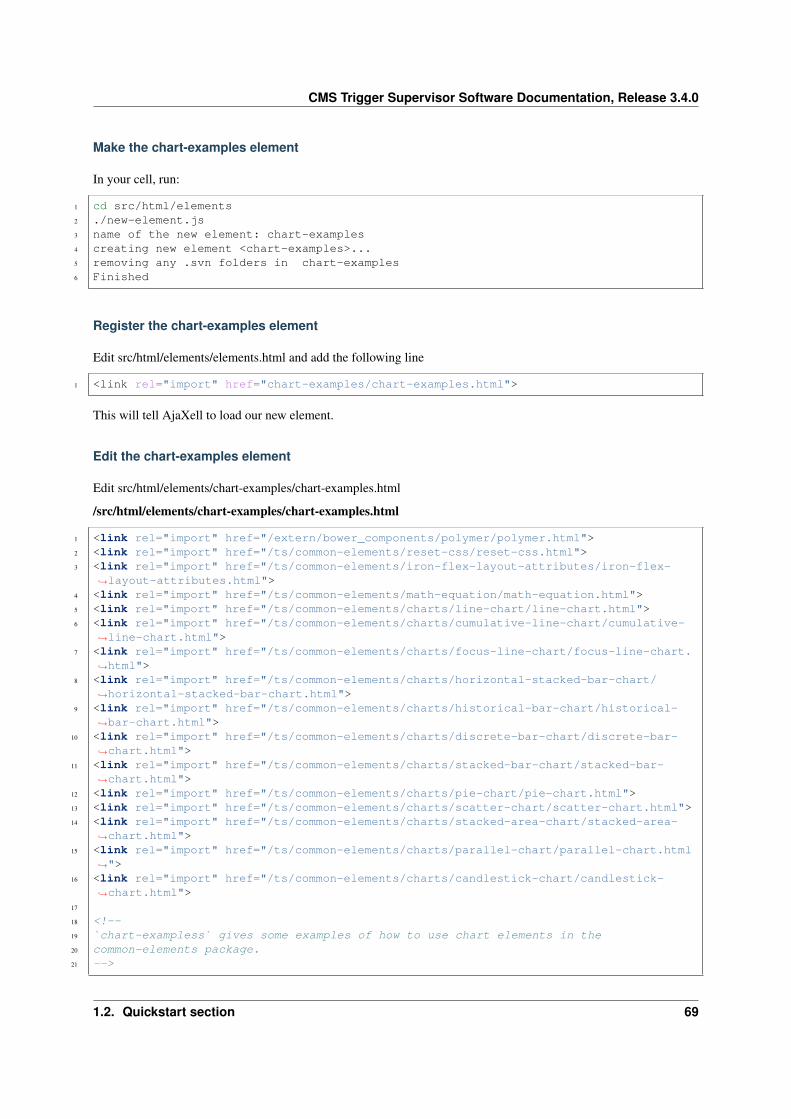
CMS Trigger Supervisor Software Documentation, Release 3.4.0
Make the chart-examples element
In your cell, run:
1 cd src/html/elements2 ./new-element.js3 name of the new element: chart-examples4 creating new element <chart-examples>...5 removing any .svn folders in chart-examples6 Finished
Register the chart-examples element
Edit src/html/elements/elements.html and add the following line
1 <link rel="import" href="chart-examples/chart-examples.html">
This will tell AjaXell to load our new element.
Edit the chart-examples element
Edit src/html/elements/chart-examples/chart-examples.html
/src/html/elements/chart-examples/chart-examples.html
1 <link rel="import" href="/extern/bower_components/polymer/polymer.html">2 <link rel="import" href="/ts/common-elements/reset-css/reset-css.html">3 <link rel="import" href="/ts/common-elements/iron-flex-layout-attributes/iron-flex-
→˓layout-attributes.html">4 <link rel="import" href="/ts/common-elements/math-equation/math-equation.html">5 <link rel="import" href="/ts/common-elements/charts/line-chart/line-chart.html">6 <link rel="import" href="/ts/common-elements/charts/cumulative-line-chart/cumulative-
→˓line-chart.html">7 <link rel="import" href="/ts/common-elements/charts/focus-line-chart/focus-line-chart.
→˓html">8 <link rel="import" href="/ts/common-elements/charts/horizontal-stacked-bar-chart/
→˓horizontal-stacked-bar-chart.html">9 <link rel="import" href="/ts/common-elements/charts/historical-bar-chart/historical-
→˓bar-chart.html">10 <link rel="import" href="/ts/common-elements/charts/discrete-bar-chart/discrete-bar-
→˓chart.html">11 <link rel="import" href="/ts/common-elements/charts/stacked-bar-chart/stacked-bar-
→˓chart.html">12 <link rel="import" href="/ts/common-elements/charts/pie-chart/pie-chart.html">13 <link rel="import" href="/ts/common-elements/charts/scatter-chart/scatter-chart.html">14 <link rel="import" href="/ts/common-elements/charts/stacked-area-chart/stacked-area-
→˓chart.html">15 <link rel="import" href="/ts/common-elements/charts/parallel-chart/parallel-chart.html
→˓">16 <link rel="import" href="/ts/common-elements/charts/candlestick-chart/candlestick-
→˓chart.html">17
18 <!--19 `chart-exampless` gives some examples of how to use chart elements in the20 common-elements package.21 -->
1.2. Quickstart section 69
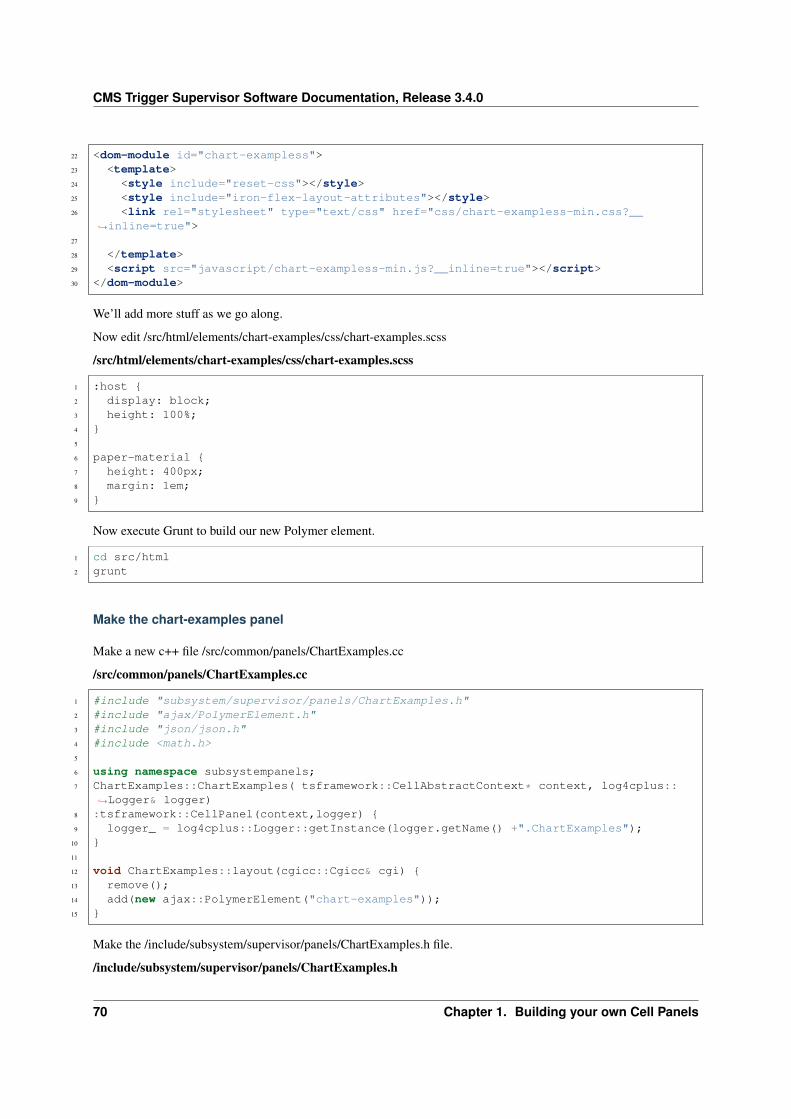
CMS Trigger Supervisor Software Documentation, Release 3.4.0
22 <dom-module id="chart-exampless">23 <template>24 <style include="reset-css"></style>25 <style include="iron-flex-layout-attributes"></style>26 <link rel="stylesheet" type="text/css" href="css/chart-exampless-min.css?__
→˓inline=true">27
28 </template>29 <script src="javascript/chart-exampless-min.js?__inline=true"></script>30 </dom-module>
We’ll add more stuff as we go along.
Now edit /src/html/elements/chart-examples/css/chart-examples.scss
/src/html/elements/chart-examples/css/chart-examples.scss
1 :host {2 display: block;3 height: 100%;4 }5
6 paper-material {7 height: 400px;8 margin: 1em;9 }
Now execute Grunt to build our new Polymer element.
1 cd src/html2 grunt
Make the chart-examples panel
Make a new c++ file /src/common/panels/ChartExamples.cc
/src/common/panels/ChartExamples.cc
1 #include "subsystem/supervisor/panels/ChartExamples.h"2 #include "ajax/PolymerElement.h"3 #include "json/json.h"4 #include <math.h>5
6 using namespace subsystempanels;7 ChartExamples::ChartExamples( tsframework::CellAbstractContext* context, log4cplus::
→˓Logger& logger)8 :tsframework::CellPanel(context,logger) {9 logger_ = log4cplus::Logger::getInstance(logger.getName() +".ChartExamples");
10 }11
12 void ChartExamples::layout(cgicc::Cgicc& cgi) {13 remove();14 add(new ajax::PolymerElement("chart-examples"));15 }
Make the /include/subsystem/supervisor/panels/ChartExamples.h file.
/include/subsystem/supervisor/panels/ChartExamples.h
70 Chapter 1. Building your own Cell Panels
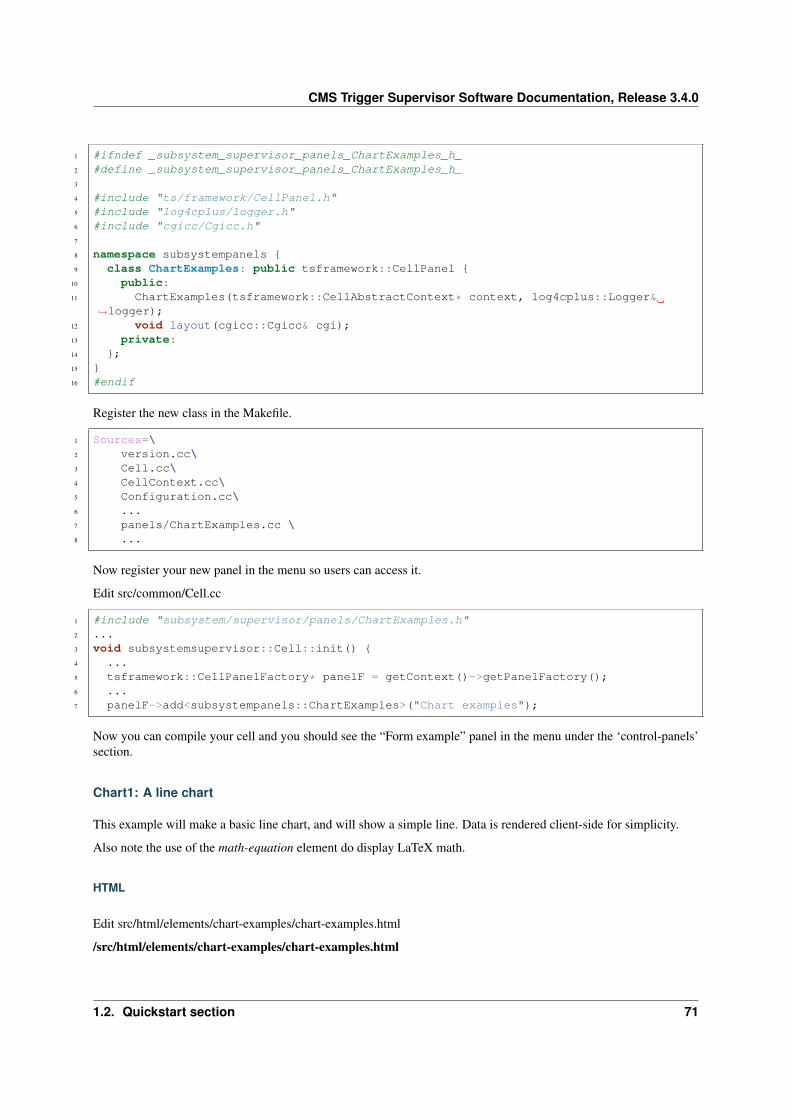
CMS Trigger Supervisor Software Documentation, Release 3.4.0
1 #ifndef _subsystem_supervisor_panels_ChartExamples_h_2 #define _subsystem_supervisor_panels_ChartExamples_h_3
4 #include "ts/framework/CellPanel.h"5 #include "log4cplus/logger.h"6 #include "cgicc/Cgicc.h"7
8 namespace subsystempanels {9 class ChartExamples: public tsframework::CellPanel {
10 public:11 ChartExamples(tsframework::CellAbstractContext* context, log4cplus::Logger&
→˓logger);12 void layout(cgicc::Cgicc& cgi);13 private:14 };15 }16 #endif
Register the new class in the Makefile.
1 Sources=\2 version.cc\3 Cell.cc\4 CellContext.cc\5 Configuration.cc\6 ...7 panels/ChartExamples.cc \8 ...
Now register your new panel in the menu so users can access it.
Edit src/common/Cell.cc
1 #include "subsystem/supervisor/panels/ChartExamples.h"2 ...3 void subsystemsupervisor::Cell::init() {4 ...5 tsframework::CellPanelFactory* panelF = getContext()->getPanelFactory();6 ...7 panelF->add<subsystempanels::ChartExamples>("Chart examples");
Now you can compile your cell and you should see the “Form example” panel in the menu under the ‘control-panels’section.
Chart1: A line chart
This example will make a basic line chart, and will show a simple line. Data is rendered client-side for simplicity.
Also note the use of the math-equation element do display LaTeX math.
HTML
Edit src/html/elements/chart-examples/chart-examples.html
/src/html/elements/chart-examples/chart-examples.html
1.2. Quickstart section 71
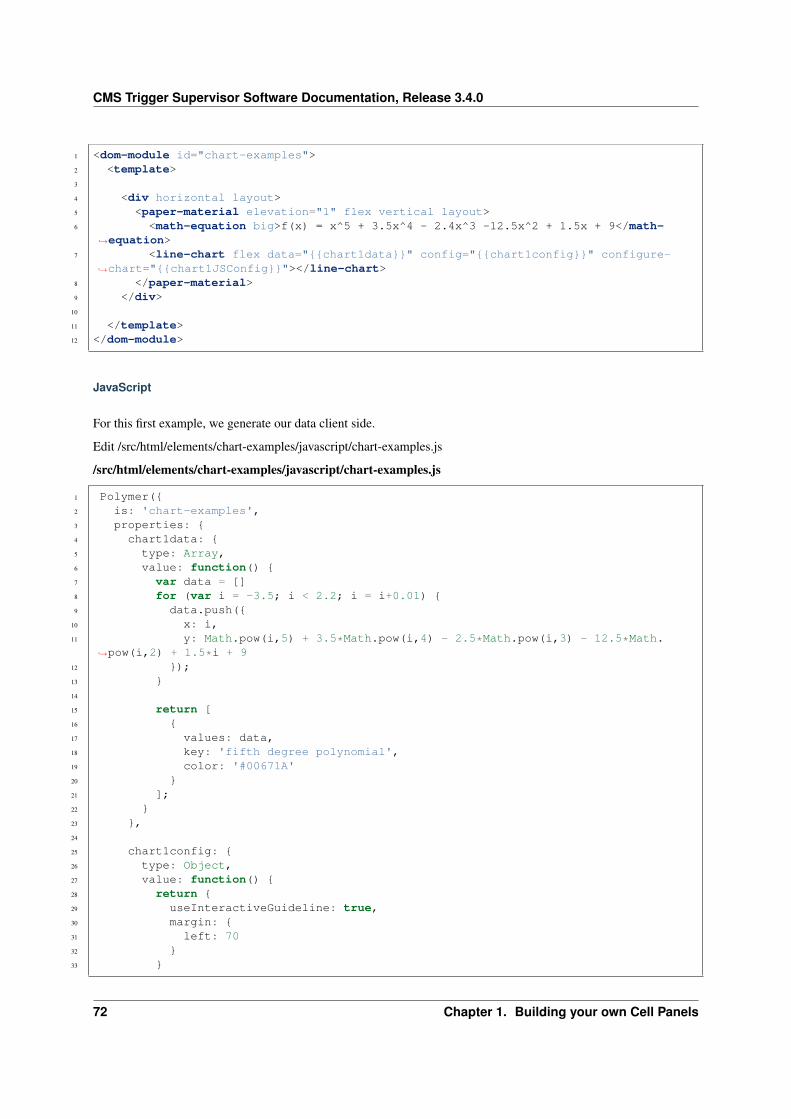
CMS Trigger Supervisor Software Documentation, Release 3.4.0
1 <dom-module id="chart-examples">2 <template>3
4 <div horizontal layout>5 <paper-material elevation="1" flex vertical layout>6 <math-equation big>f(x) = x^5 + 3.5x^4 - 2.4x^3 -12.5x^2 + 1.5x + 9</math-
→˓equation>7 <line-chart flex data="{{chart1data}}" config="{{chart1config}}" configure-
→˓chart="{{chart1JSConfig}}"></line-chart>8 </paper-material>9 </div>
10
11 </template>12 </dom-module>
JavaScript
For this first example, we generate our data client side.
Edit /src/html/elements/chart-examples/javascript/chart-examples.js
/src/html/elements/chart-examples/javascript/chart-examples.js
1 Polymer({2 is: 'chart-examples',3 properties: {4 chart1data: {5 type: Array,6 value: function() {7 var data = []8 for (var i = -3.5; i < 2.2; i = i+0.01) {9 data.push({
10 x: i,11 y: Math.pow(i,5) + 3.5*Math.pow(i,4) - 2.5*Math.pow(i,3) - 12.5*Math.
→˓pow(i,2) + 1.5*i + 912 });13 }14
15 return [16 {17 values: data,18 key: 'fifth degree polynomial',19 color: '#00671A'20 }21 ];22 }23 },24
25 chart1config: {26 type: Object,27 value: function() {28 return {29 useInteractiveGuideline: true,30 margin: {31 left: 7032 }33 }
72 Chapter 1. Building your own Cell Panels
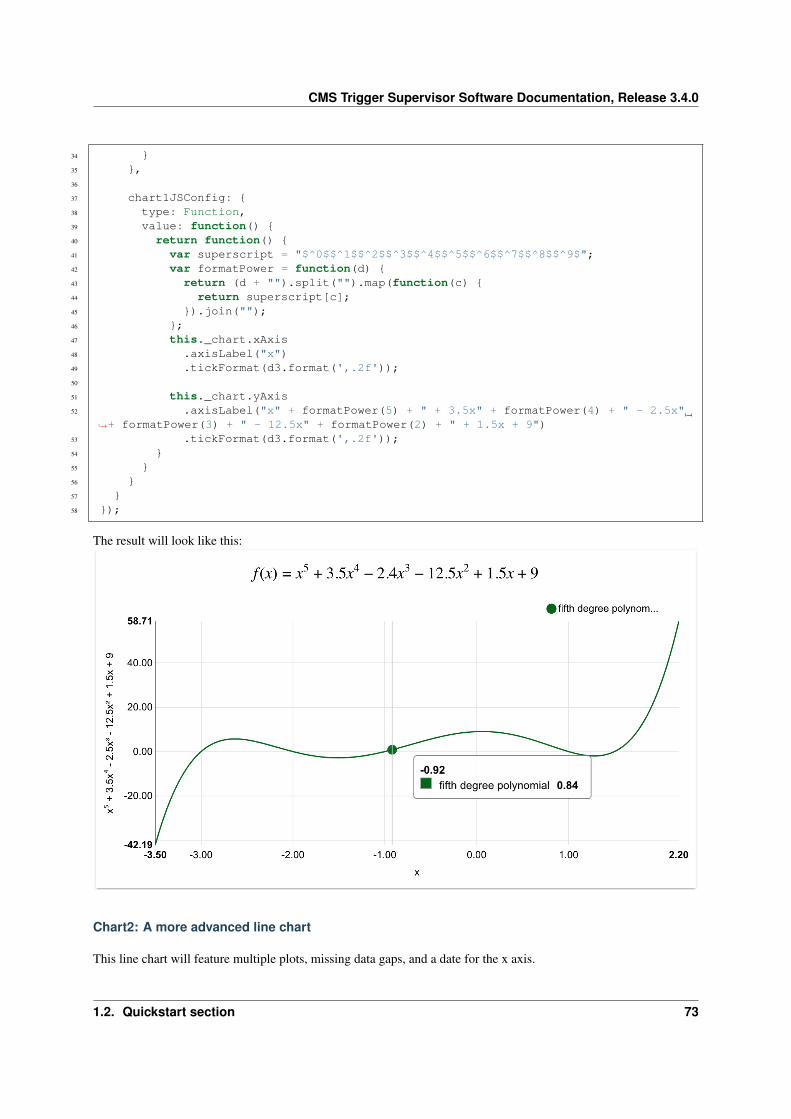
CMS Trigger Supervisor Software Documentation, Release 3.4.0
34 }35 },36
37 chart1JSConfig: {38 type: Function,39 value: function() {40 return function() {41 var superscript = "$^0$$^1$$^2$$^3$$^4$$^5$$^6$$^7$$^8$$^9$";42 var formatPower = function(d) {43 return (d + "").split("").map(function(c) {44 return superscript[c];45 }).join("");46 };47 this._chart.xAxis48 .axisLabel("x")49 .tickFormat(d3.format(',.2f'));50
51 this._chart.yAxis52 .axisLabel("x" + formatPower(5) + " + 3.5x" + formatPower(4) + " - 2.5x"
→˓+ formatPower(3) + " - 12.5x" + formatPower(2) + " + 1.5x + 9")53 .tickFormat(d3.format(',.2f'));54 }55 }56 }57 }58 });
The result will look like this:
Chart2: A more advanced line chart
This line chart will feature multiple plots, missing data gaps, and a date for the x axis.
1.2. Quickstart section 73
CMS Trigger Supervisor Software Documentation, Release 3.4.0
Data is still generated client side.
HTML & Javascript
Edit src/html/elements/chart-examples/chart-examples.html
/src/html/elements/chart-examples/chart-examples.html
1 <dom-module id="chart-examples">2 <template>3
4 <div horizontal layout>5 <paper-material elevation="1" flex vertical layout>6 <math-equation big>f(x) = x^5 + 3.5x^4 - 2.4x^3 -12.5x^2 + 1.5x + 9</math-
→˓equation>7 <line-chart flex data="{{chart1data}}" config="{{chart1config}}" configure-
→˓chart="{{chart1JSConfig}}"></line-chart>8 </paper-material>9 <paper-material elevation="1" flex horizontal layout>
10 <line-chart flex data="{{chart2data}}" config="{{chart1config}}" configure-→˓chart="{{chart2JSConfig}}"></line-chart>
11 </paper-material>12 </div>13
14 </template>15 </dom-module>
Note that we put the second chart next to the first chart, this to demonstrate the ability to use the layout attributes.
Now edit /src/html/elements/chart-examples/javascript/chart-examples.js
/src/html/elements/chart-examples/javascript/chart-examples.js
1 Polymer({2 is: 'chart-examples',3 properties: {4 chart2data: {5 type: Array,6 value: function() {7 var sin = [],8 sin2 = [],9 cos = [],
10 rand = [],11 rand2 = []12 ;13 for (var i = 0; i < 100; i++) {14 sin.push({x: i, y: i % 10 == 5 ? null : Math.sin(i/10) }); //the nulls
→˓are to show how defined works15 sin2.push({x: i, y: Math.sin(i/5) * 0.4 - 0.25});16 cos.push({x: i, y: .5 * Math.cos(i/10)});17 rand.push({x:i, y: Math.random() / 10});18 rand2.push({x: i, y: Math.cos(i/10) + Math.random() / 10 })19 }20 return [21 {22 area: true,23 values: sin,24 key: "Sine Wave",
74 Chapter 1. Building your own Cell Panels
CMS Trigger Supervisor Software Documentation, Release 3.4.0
25 color: "#ff7f0e",26 strokeWidth: 4,27 classed: 'dashed'28 },29 {30 values: cos,31 key: "Cosine Wave",32 color: "#2ca02c"33 },34 {35 values: rand,36 key: "Random Points",37 color: "#2222ff"38 },39 {40 values: rand2,41 key: "Random Cosine",42 color: "#667711",43 strokeWidth: 3.544 },45 {46 area: true,47 values: sin2,48 key: "Fill opacity",49 color: "#EF9CFB",50 fillOpacity: .151 }52 ];53 },54
55 },56
57 chart2JSConfig: {58 type: Function,59 value: function() {60 return function() {61 this._chart.xAxis62 .showMaxMin(false)63 .tickFormat(function(d) { return d3.time.format('%x')(new Date(d)) });64
65 this._chart.yAxis66 .tickFormat(d3.format(',.2f'));67 }68 }69 }70 }71 });
The result will look like this:
1.2. Quickstart section 75
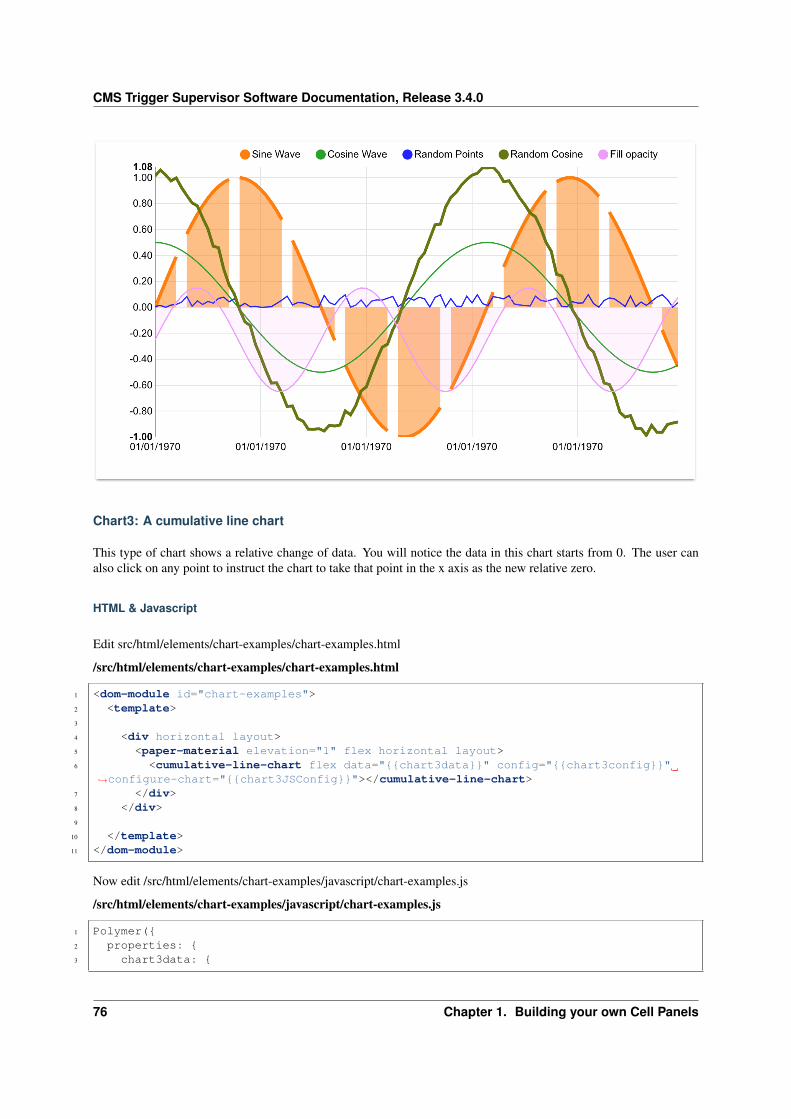
CMS Trigger Supervisor Software Documentation, Release 3.4.0
Chart3: A cumulative line chart
This type of chart shows a relative change of data. You will notice the data in this chart starts from 0. The user canalso click on any point to instruct the chart to take that point in the x axis as the new relative zero.
HTML & Javascript
Edit src/html/elements/chart-examples/chart-examples.html
/src/html/elements/chart-examples/chart-examples.html
1 <dom-module id="chart-examples">2 <template>3
4 <div horizontal layout>5 <paper-material elevation="1" flex horizontal layout>6 <cumulative-line-chart flex data="{{chart3data}}" config="{{chart3config}}"
→˓configure-chart="{{chart3JSConfig}}"></cumulative-line-chart>7 </div>8 </div>9
10 </template>11 </dom-module>
Now edit /src/html/elements/chart-examples/javascript/chart-examples.js
/src/html/elements/chart-examples/javascript/chart-examples.js
1 Polymer({2 properties: {3 chart3data: {
76 Chapter 1. Building your own Cell Panels
CMS Trigger Supervisor Software Documentation, Release 3.4.0
4 type: Array,5 value: function() {6 return [7 {8 key: "Long",9 values: [ [ 1083297600000 , -2.974623048543] , [ 1085976000000 , -1.
→˓7740300785979] , [ 1088568000000 , 4.4681318138177] , [ 1091246400000 , 7.→˓0242541001353] , [ 1093924800000 , 7.5709603667586] , [ 1096516800000 , 20.→˓612245065736] , [ 1099195200000 , 21.698065237316] , [ 1101790800000 , 40.→˓501189458018] , [ 1104469200000 , 50.464679413194] , [ 1107147600000 , 48.→˓917421973355] , [ 1109566800000 , 63.750936549160] , [ 1112245200000 , 59.→˓072499126460] , [ 1114833600000 , 43.373158880492] , [ 1117512000000 , 54.→˓490918947556] , [ 1120104000000 , 56.661178852079] , [ 1122782400000 , 73.→˓450103545496] , [ 1125460800000 , 71.714526354907] , [ 1128052800000 , 85.→˓221664349607] , [ 1130734800000 , 77.769261392481] , [ 1133326800000 , 95.→˓966528716500] , [ 1136005200000 , 107.59132116397] , [ 1138683600000 , 127.→˓25740096723] , [ 1141102800000 , 122.13917498830] , [ 1143781200000 , 126.→˓53657279774] , [ 1146369600000 , 132.39300992970] , [ 1149048000000 , 120.→˓11238242904] , [ 1151640000000 , 118.41408917750] , [ 1154318400000 , 107.→˓92918924621] , [ 1156996800000 , 110.28057249569] , [ 1159588800000 , 117.→˓20485334692] , [ 1162270800000 , 141.33556756948] , [ 1164862800000 , 159.→˓59452727893] , [ 1167541200000 , 167.09801853304] , [ 1170219600000 , 185.→˓46849659215] , [ 1172638800000 , 184.82474099990] , [ 1175313600000 , 195.→˓63155213887] , [ 1177905600000 , 207.40597044171] , [ 1180584000000 , 230.→˓55966698196] , [ 1183176000000 , 239.55649035292] , [ 1185854400000 , 241.→˓35915085208] , [ 1188532800000 , 239.89428956243] , [ 1191124800000 , 260.→˓47781917715] , [ 1193803200000 , 276.39457482225] , [ 1196398800000 , 258.→˓66530682672] , [ 1199077200000 , 250.98846121893] , [ 1201755600000 , 226.→˓89902618127] , [ 1204261200000 , 227.29009273807] , [ 1206936000000 , 218.→˓66476654350] , [ 1209528000000 , 232.46605902918] , [ 1212206400000 , 253.→˓25667081117] , [ 1214798400000 , 235.82505363925] , [ 1217476800000 , 229.→˓70112774254] , [ 1220155200000 , 225.18472705952] , [ 1222747200000 , 189.→˓13661746552] , [ 1225425600000 , 149.46533007301] , [ 1228021200000 , 131.→˓00340772114] , [ 1230699600000 , 135.18341728866] , [ 1233378000000 , 109.→˓15296887173] , [ 1235797200000 , 84.614772549760] , [ 1238472000000 , 100.→˓60810015326] , [ 1241064000000 , 141.50134895610] , [ 1243742400000 , 142.→˓50405083675] , [ 1246334400000 , 139.81192372672] , [ 1249012800000 , 177.→˓78205544583] , [ 1251691200000 , 194.73691933074] , [ 1254283200000 , 209.→˓00838460225] , [ 1256961600000 , 198.19855877420] , [ 1259557200000 , 222.→˓37102417812] , [ 1262235600000 , 234.24581081250] , [ 1264914000000 , 228.→˓26087689346] , [ 1267333200000 , 248.81895126250] , [ 1270008000000 , 270.→˓57301075186] , [ 1272600000000 , 292.64604322550] , [ 1275278400000 , 265.→˓94088520518] , [ 1277870400000 , 237.82887467569] , [ 1280548800000 , 265.→˓55973314204] , [ 1283227200000 , 248.30877330928] , [ 1285819200000 , 278.→˓14870066912] , [ 1288497600000 , 292.69260960288] , [ 1291093200000 , 300.→˓84263809599] , [ 1293771600000 , 326.17253914628] , [ 1296450000000 , 337.→˓69335966505] , [ 1298869200000 , 339.73260965121] , [ 1301544000000 , 346.→˓87865120765] , [ 1304136000000 , 347.92991526628] , [ 1306814400000 , 342.→˓04627502669] , [ 1309406400000 , 333.45386231233] , [ 1312084800000 , 323.→˓15034181243] , [ 1314763200000 , 295.66126882331] , [ 1317355200000 , 251.→˓48014579253] , [ 1320033600000 , 295.15424257905] , [ 1322629200000 , 294.→˓54766764397] , [ 1325307600000 , 295.72906119051] , [ 1327986000000 , 325.→˓73351347613] , [ 1330491600000 , 340.16106061186] , [ 1333166400000 , 345.→˓15514071490] , [ 1335758400000 , 337.10259395679] , [ 1338436800000 , 318.→˓68216333837] , [ 1341028800000 , 317.03683945246] , [ 1343707200000 , 318.→˓53549659997] , [ 1346385600000 , 332.85381464104] , [ 1348977600000 , 337.→˓36534373477] , [ 1351656000000 , 350.27872156161] , [ 1354251600000 , 349.→˓45128876100]]
1.2. Quickstart section 77
CMS Trigger Supervisor Software Documentation, Release 3.4.0
10 ,11 mean: 25012 },13 {14 key: "Short",15 values: [ [ 1083297600000 , -0.77078283705125] , [ 1085976000000 , -1.
→˓8356366650335] , [ 1088568000000 , -5.3121322073127] , [ 1091246400000 , -4.→˓9320975829662] , [ 1093924800000 , -3.9835408823225] , [ 1096516800000 , -6.→˓8694685316805] , [ 1099195200000 , -8.4854877428545] , [ 1101790800000 , -15.→˓933627197384] , [ 1104469200000 , -15.920980069544] , [ 1107147600000 , -12.→˓478685045651] , [ 1109566800000 , -17.297761889305] , [ 1112245200000 , -15.→˓247129891020] , [ 1114833600000 , -11.336459046839] , [ 1117512000000 , -13.→˓298990907415] , [ 1120104000000 , -16.360027000056] , [ 1122782400000 , -18.→˓527929522030] , [ 1125460800000 , -22.176516738685] , [ 1128052800000 , -23.→˓309665368330] , [ 1130734800000 , -21.629973409748] , [ 1133326800000 , -24.→˓186429093486] , [ 1136005200000 , -29.116707312531] , [ 1138683600000 , -37.→˓188037874864] , [ 1141102800000 , -34.689264821198] , [ 1143781200000 , -39.→˓505932105359] , [ 1146369600000 , -45.339572492759] , [ 1149048000000 , -43.→˓849353192764] , [ 1151640000000 , -45.418353922571] , [ 1154318400000 , -44.→˓579281059919] , [ 1156996800000 , -44.027098363370] , [ 1159588800000 , -41.→˓261306759439] , [ 1162270800000 , -47.446018534027] , [ 1164862800000 , -53.→˓413782948909] , [ 1167541200000 , -50.700723647419] , [ 1170219600000 , -56.→˓374090913296] , [ 1172638800000 , -61.754245220322] , [ 1175313600000 , -66.→˓246241587629] , [ 1177905600000 , -75.351650899999] , [ 1180584000000 , -81.→˓699058262032] , [ 1183176000000 , -82.487023368081] , [ 1185854400000 , -86.→˓230055113277] , [ 1188532800000 , -84.746914818507] , [ 1191124800000 , -100.→˓77134971977] , [ 1193803200000 , -109.95435565947] , [ 1196398800000 , -99.→˓605672965057] , [ 1199077200000 , -99.607249394382] , [ 1201755600000 , -94.→˓874614950188] , [ 1204261200000 , -105.35899063105] , [ 1206936000000 , -106.→˓01931193802] , [ 1209528000000 , -110.28883571771] , [ 1212206400000 , -119.→˓60256203030] , [ 1214798400000 , -115.62201315802] , [ 1217476800000 , -106.→˓63824185202] , [ 1220155200000 , -99.848746318951] , [ 1222747200000 , -85.→˓631219602987] , [ 1225425600000 , -63.547909262067] , [ 1228021200000 , -59.→˓753275364457] , [ 1230699600000 , -63.874977883542] , [ 1233378000000 , -56.→˓865697387488] , [ 1235797200000 , -54.285579501988] , [ 1238472000000 , -56.→˓474659581885] , [ 1241064000000 , -63.847137745644] , [ 1243742400000 , -68.→˓754247867325] , [ 1246334400000 , -69.474257009155] , [ 1249012800000 , -75.→˓084828197067] , [ 1251691200000 , -77.101028237237] , [ 1254283200000 , -80.→˓454866854387] , [ 1256961600000 , -78.984349952220] , [ 1259557200000 , -83.→˓041230807854] , [ 1262235600000 , -84.529748348935] , [ 1264914000000 , -83.→˓837470195508] , [ 1267333200000 , -87.174487671969] , [ 1270008000000 , -90.→˓342293007487] , [ 1272600000000 , -93.550928464991] , [ 1275278400000 , -85.→˓833102140765] , [ 1277870400000 , -79.326501831592] , [ 1280548800000 , -87.→˓986196903537] , [ 1283227200000 , -85.397862121771] , [ 1285819200000 , -94.→˓738167050020] , [ 1288497600000 , -98.661952897151] , [ 1291093200000 , -99.→˓609665952708] , [ 1293771600000 , -103.57099836183] , [ 1296450000000 , -104.→˓04353411322] , [ 1298869200000 , -108.21382792587] , [ 1301544000000 , -108.→˓74006900920] , [ 1304136000000 , -112.07766650960] , [ 1306814400000 , -109.→˓63328199118] , [ 1309406400000 , -106.53578966772] , [ 1312084800000 , -103.→˓16480871469] , [ 1314763200000 , -95.945078001828] , [ 1317355200000 , -81.→˓226687340874] , [ 1320033600000 , -90.782206596168] , [ 1322629200000 , -89.→˓484445370113] , [ 1325307600000 , -88.514723135326] , [ 1327986000000 , -93.→˓381292724320] , [ 1330491600000 , -97.529705609172] , [ 1333166400000 , -99.→˓520481439189] , [ 1335758400000 , -99.430184898669] , [ 1338436800000 , -93.→˓349934521973] , [ 1341028800000 , -95.858475286491] , [ 1343707200000 , -95.→˓522755836605] , [ 1346385600000 , -98.503848862036] , [ 1348977600000 , -101.→˓49415251896] , [ 1351656000000 , -101.50099325672] , [ 1354251600000 , -99.→˓487094927489]]
78 Chapter 1. Building your own Cell Panels

CMS Trigger Supervisor Software Documentation, Release 3.4.0
16 ,17 mean: -6018 },19 {20 key: "Gross",21 mean: 125,22 values: [ [ 1083297600000 , -3.7454058855943] , [ 1085976000000 , -3.
→˓6096667436314] , [ 1088568000000 , -0.8440003934950] , [ 1091246400000 , 2.→˓0921565171691] , [ 1093924800000 , 3.5874194844361] , [ 1096516800000 , 13.→˓742776534056] , [ 1099195200000 , 13.212577494462] , [ 1101790800000 , 24.→˓567562260634] , [ 1104469200000 , 34.543699343650] , [ 1107147600000 , 36.→˓438736927704] , [ 1109566800000 , 46.453174659855] , [ 1112245200000 , 43.→˓825369235440] , [ 1114833600000 , 32.036699833653] , [ 1117512000000 , 41.→˓191928040141] , [ 1120104000000 , 40.301151852023] , [ 1122782400000 , 54.→˓922174023466] , [ 1125460800000 , 49.538009616222] , [ 1128052800000 , 61.→˓911998981277] , [ 1130734800000 , 56.139287982733] , [ 1133326800000 , 71.→˓780099623014] , [ 1136005200000 , 78.474613851439] , [ 1138683600000 , 90.→˓069363092366] , [ 1141102800000 , 87.449910167102] , [ 1143781200000 , 87.→˓030640692381] , [ 1146369600000 , 87.053437436941] , [ 1149048000000 , 76.→˓263029236276] , [ 1151640000000 , 72.995735254929] , [ 1154318400000 , 63.→˓349908186291] , [ 1156996800000 , 66.253474132320] , [ 1159588800000 , 75.→˓943546587481] , [ 1162270800000 , 93.889549035453] , [ 1164862800000 , 106.→˓18074433002] , [ 1167541200000 , 116.39729488562] , [ 1170219600000 , 129.→˓09440567885] , [ 1172638800000 , 123.07049577958] , [ 1175313600000 , 129.→˓38531055124] , [ 1177905600000 , 132.05431954171] , [ 1180584000000 , 148.→˓86060871993] , [ 1183176000000 , 157.06946698484] , [ 1185854400000 , 155.→˓12909573880] , [ 1188532800000 , 155.14737474392] , [ 1191124800000 , 159.→˓70646945738] , [ 1193803200000 , 166.44021916278] , [ 1196398800000 , 159.→˓05963386166] , [ 1199077200000 , 151.38121182455] , [ 1201755600000 , 132.→˓02441123108] , [ 1204261200000 , 121.93110210702] , [ 1206936000000 , 112.→˓64545460548] , [ 1209528000000 , 122.17722331147] , [ 1212206400000 , 133.→˓65410878087] , [ 1214798400000 , 120.20304048123] , [ 1217476800000 , 123.→˓06288589052] , [ 1220155200000 , 125.33598074057] , [ 1222747200000 , 103.→˓50539786253] , [ 1225425600000 , 85.917420810943] , [ 1228021200000 , 71.→˓250132356683] , [ 1230699600000 , 71.308439405118] , [ 1233378000000 , 52.→˓287271484242] , [ 1235797200000 , 30.329193047772] , [ 1238472000000 , 44.→˓133440571375] , [ 1241064000000 , 77.654211210456] , [ 1243742400000 , 73.→˓749802969425] , [ 1246334400000 , 70.337666717565] , [ 1249012800000 , 102.→˓69722724876] , [ 1251691200000 , 117.63589109350] , [ 1254283200000 , 128.→˓55351774786] , [ 1256961600000 , 119.21420882198] , [ 1259557200000 , 139.→˓32979337027] , [ 1262235600000 , 149.71606246357] , [ 1264914000000 , 144.→˓42340669795] , [ 1267333200000 , 161.64446359053] , [ 1270008000000 , 180.→˓23071774437] , [ 1272600000000 , 199.09511476051] , [ 1275278400000 , 180.→˓10778306442] , [ 1277870400000 , 158.50237284410] , [ 1280548800000 , 177.→˓57353623850] , [ 1283227200000 , 162.91091118751] , [ 1285819200000 , 183.→˓41053361910] , [ 1288497600000 , 194.03065670573] , [ 1291093200000 , 201.→˓23297214328] , [ 1293771600000 , 222.60154078445] , [ 1296450000000 , 233.→˓35556801977] , [ 1298869200000 , 231.22452435045] , [ 1301544000000 , 237.→˓84432503045] , [ 1304136000000 , 235.55799131184] , [ 1306814400000 , 232.→˓11873570751] , [ 1309406400000 , 226.62381538123] , [ 1312084800000 , 219.→˓34811113539] , [ 1314763200000 , 198.69242285581] , [ 1317355200000 , 168.→˓90235629066] , [ 1320033600000 , 202.64725756733] , [ 1322629200000 , 203.→˓05389378105] , [ 1325307600000 , 204.85986680865] , [ 1327986000000 , 229.→˓77085616585] , [ 1330491600000 , 239.65202435959] , [ 1333166400000 , 242.→˓33012622734] , [ 1335758400000 , 234.11773262149] , [ 1338436800000 , 221.→˓47846307887] , [ 1341028800000 , 216.98308827912] , [ 1343707200000 , 218.→˓37781386755] , [ 1346385600000 , 229.39368622736] , [ 1348977600000 , 230.→˓54656412916] , [ 1351656000000 , 243.06087025523] , [ 1354251600000 , 244.→˓24733578385]]
1.2. Quickstart section 79
CMS Trigger Supervisor Software Documentation, Release 3.4.0
23 },24 {25 key: "S&P 1500",26 values: [ [ 1083297600000 , -1.7798428181819] , [ 1085976000000 , -0.
→˓36883324836999] , [ 1088568000000 , 1.7312581046040] , [ 1091246400000 , -1.→˓8356125950460] , [ 1093924800000 , -1.5396564170877] , [ 1096516800000 , -0.→˓16867791409247] , [ 1099195200000 , 1.3754263993413] , [ 1101790800000 , 5.→˓8171640898041] , [ 1104469200000 , 9.4350145241608] , [ 1107147600000 , 6.→˓7649081510160] , [ 1109566800000 , 9.1568499314776] , [ 1112245200000 , 7.→˓2485090994419] , [ 1114833600000 , 4.8762222306595] , [ 1117512000000 , 8.→˓5992339354652] , [ 1120104000000 , 9.0896517982086] , [ 1122782400000 , 13.→˓394644048577] , [ 1125460800000 , 12.311842010760] , [ 1128052800000 , 13.→˓221003650717] , [ 1130734800000 , 11.218481009206] , [ 1133326800000 , 15.→˓565352598445] , [ 1136005200000 , 15.623703865926] , [ 1138683600000 , 19.→˓275255326383] , [ 1141102800000 , 19.432433717836] , [ 1143781200000 , 21.→˓232881244655] , [ 1146369600000 , 22.798299192958] , [ 1149048000000 , 19.→˓006125095476] , [ 1151640000000 , 19.151889158536] , [ 1154318400000 , 19.→˓340022855452] , [ 1156996800000 , 22.027934841859] , [ 1159588800000 , 24.→˓903300681329] , [ 1162270800000 , 29.146492833877] , [ 1164862800000 , 31.→˓781626082589] , [ 1167541200000 , 33.358770738428] , [ 1170219600000 , 35.→˓622684613497] , [ 1172638800000 , 33.332821711366] , [ 1175313600000 , 34.→˓878748635832] , [ 1177905600000 , 40.582332613844] , [ 1180584000000 , 45.→˓719535502920] , [ 1183176000000 , 43.239344722386] , [ 1185854400000 , 38.→˓550955100342] , [ 1188532800000 , 40.585368816283] , [ 1191124800000 , 45.→˓601374057981] , [ 1193803200000 , 48.051404337892] , [ 1196398800000 , 41.→˓582581696032] , [ 1199077200000 , 40.650580792748] , [ 1201755600000 , 32.→˓252222066493] , [ 1204261200000 , 28.106390258553] , [ 1206936000000 , 27.→˓532698196687] , [ 1209528000000 , 33.986390463852] , [ 1212206400000 , 36.→˓302660526438] , [ 1214798400000 , 25.015574480172] , [ 1217476800000 , 23.→˓989494069029] , [ 1220155200000 , 25.934351445531] , [ 1222747200000 , 14.→˓627592011699] , [ 1225425600000 , -5.2249403809749] , [ 1228021200000 , -12.→˓330933408050] , [ 1230699600000 , -11.000291508188] , [ 1233378000000 , -18.→˓563864948088] , [ 1235797200000 , -27.213097001687] , [ 1238472000000 , -20.→˓834133840523] , [ 1241064000000 , -12.717886701719] , [ 1243742400000 , -8.→˓1644613083526] , [ 1246334400000 , -7.9108408918201] , [ 1249012800000 , -0.→˓77002391591209] , [ 1251691200000 , 2.8243816569672] , [ 1254283200000 , 6.→˓8761411421070] , [ 1256961600000 , 4.5060912230294] , [ 1259557200000 , 10.→˓487179794349] , [ 1262235600000 , 13.251375597594] , [ 1264914000000 , 9.→˓2207594803415] , [ 1267333200000 , 12.836276936538] , [ 1270008000000 , 19.→˓816793904978] , [ 1272600000000 , 22.156787167211] , [ 1275278400000 , 12.→˓518039090576] , [ 1277870400000 , 6.4253587440854] , [ 1280548800000 , 13.→˓847372028409] , [ 1283227200000 , 8.5454736090364] , [ 1285819200000 , 18.→˓542801953304] , [ 1288497600000 , 23.037064683183] , [ 1291093200000 , 23.→˓517422401888] , [ 1293771600000 , 31.804723416068] , [ 1296450000000 , 34.→˓778247386072] , [ 1298869200000 , 39.584883855230] , [ 1301544000000 , 40.→˓080647664875] , [ 1304136000000 , 44.180050667889] , [ 1306814400000 , 42.→˓533535927221] , [ 1309406400000 , 40.105374449011] , [ 1312084800000 , 37.→˓014659267156] , [ 1314763200000 , 29.263745084262] , [ 1317355200000 , 19.→˓637463417584] , [ 1320033600000 , 33.157645345770] , [ 1322629200000 , 32.→˓895053150988] , [ 1325307600000 , 34.111544824647] , [ 1327986000000 , 40.→˓453985817473] , [ 1330491600000 , 46.435700783313] , [ 1333166400000 , 51.→˓062385488671] , [ 1335758400000 , 50.130448220658] , [ 1338436800000 , 41.→˓035476682018] , [ 1341028800000 , 46.591932296457] , [ 1343707200000 , 48.→˓349391180634] , [ 1346385600000 , 51.913011286919] , [ 1348977600000 , 55.→˓747238313752] , [ 1351656000000 , 52.991824077209] , [ 1354251600000 , 49.→˓556311883284]]
27 }28 ];
80 Chapter 1. Building your own Cell Panels
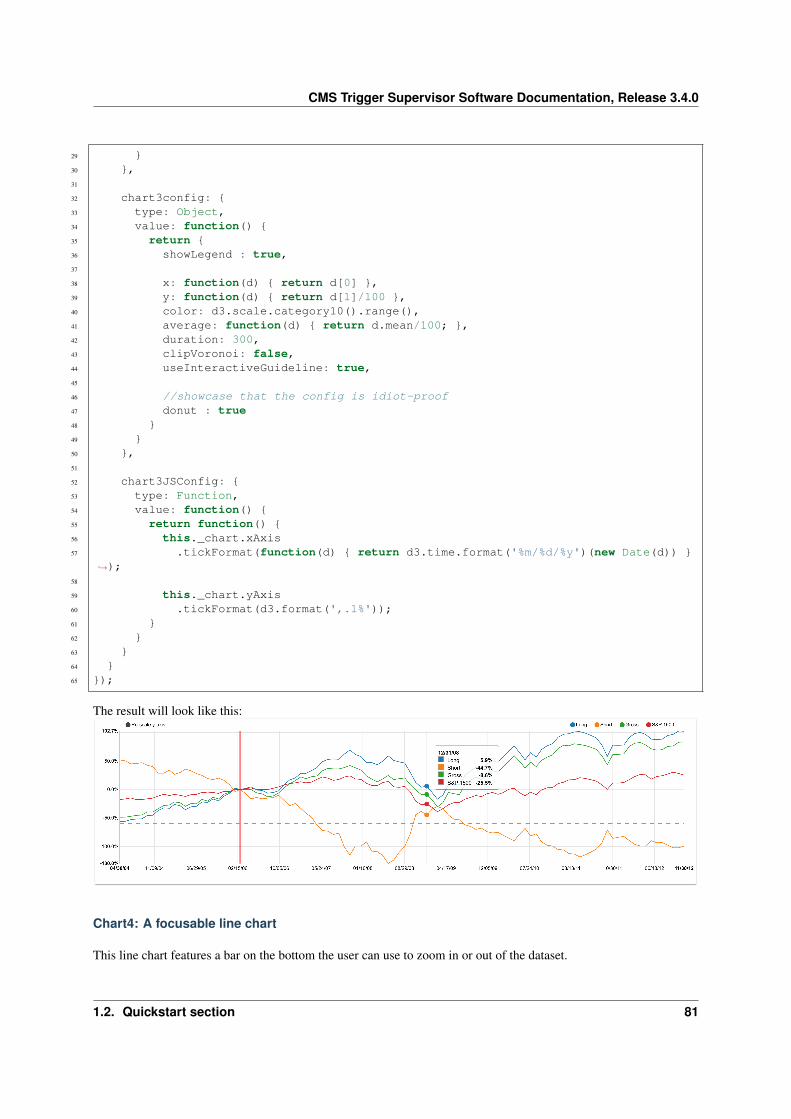
CMS Trigger Supervisor Software Documentation, Release 3.4.0
29 }30 },31
32 chart3config: {33 type: Object,34 value: function() {35 return {36 showLegend : true,37
38 x: function(d) { return d[0] },39 y: function(d) { return d[1]/100 },40 color: d3.scale.category10().range(),41 average: function(d) { return d.mean/100; },42 duration: 300,43 clipVoronoi: false,44 useInteractiveGuideline: true,45
46 //showcase that the config is idiot-proof47 donut : true48 }49 }50 },51
52 chart3JSConfig: {53 type: Function,54 value: function() {55 return function() {56 this._chart.xAxis57 .tickFormat(function(d) { return d3.time.format('%m/%d/%y')(new Date(d)) }
→˓);58
59 this._chart.yAxis60 .tickFormat(d3.format(',.1%'));61 }62 }63 }64 }65 });
The result will look like this:
Chart4: A focusable line chart
This line chart features a bar on the bottom the user can use to zoom in or out of the dataset.
1.2. Quickstart section 81
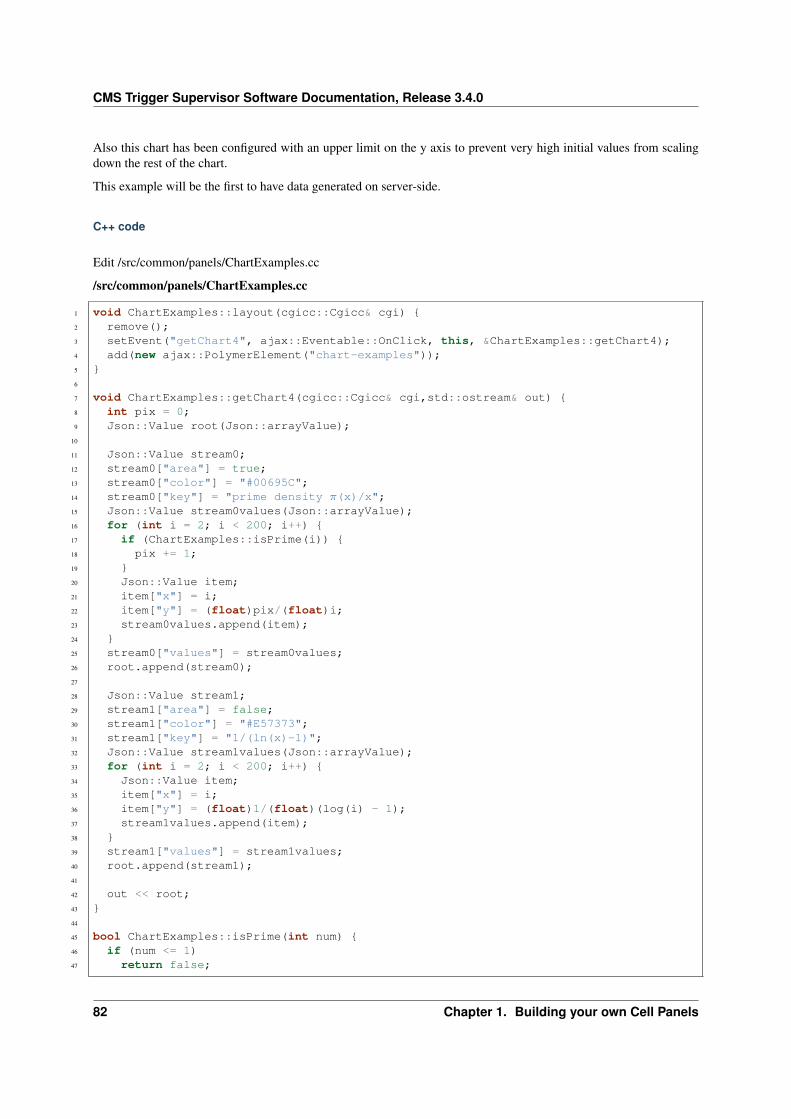
CMS Trigger Supervisor Software Documentation, Release 3.4.0
Also this chart has been configured with an upper limit on the y axis to prevent very high initial values from scalingdown the rest of the chart.
This example will be the first to have data generated on server-side.
C++ code
Edit /src/common/panels/ChartExamples.cc
/src/common/panels/ChartExamples.cc
1 void ChartExamples::layout(cgicc::Cgicc& cgi) {2 remove();3 setEvent("getChart4", ajax::Eventable::OnClick, this, &ChartExamples::getChart4);4 add(new ajax::PolymerElement("chart-examples"));5 }6
7 void ChartExamples::getChart4(cgicc::Cgicc& cgi,std::ostream& out) {8 int pix = 0;9 Json::Value root(Json::arrayValue);
10
11 Json::Value stream0;12 stream0["area"] = true;13 stream0["color"] = "#00695C";14 stream0["key"] = "prime density 𝜋(x)/x";15 Json::Value stream0values(Json::arrayValue);16 for (int i = 2; i < 200; i++) {17 if (ChartExamples::isPrime(i)) {18 pix += 1;19 }20 Json::Value item;21 item["x"] = i;22 item["y"] = (float)pix/(float)i;23 stream0values.append(item);24 }25 stream0["values"] = stream0values;26 root.append(stream0);27
28 Json::Value stream1;29 stream1["area"] = false;30 stream1["color"] = "#E57373";31 stream1["key"] = "1/(ln(x)-1)";32 Json::Value stream1values(Json::arrayValue);33 for (int i = 2; i < 200; i++) {34 Json::Value item;35 item["x"] = i;36 item["y"] = (float)1/(float)(log(i) - 1);37 stream1values.append(item);38 }39 stream1["values"] = stream1values;40 root.append(stream1);41
42 out << root;43 }44
45 bool ChartExamples::isPrime(int num) {46 if (num <= 1)47 return false;
82 Chapter 1. Building your own Cell Panels
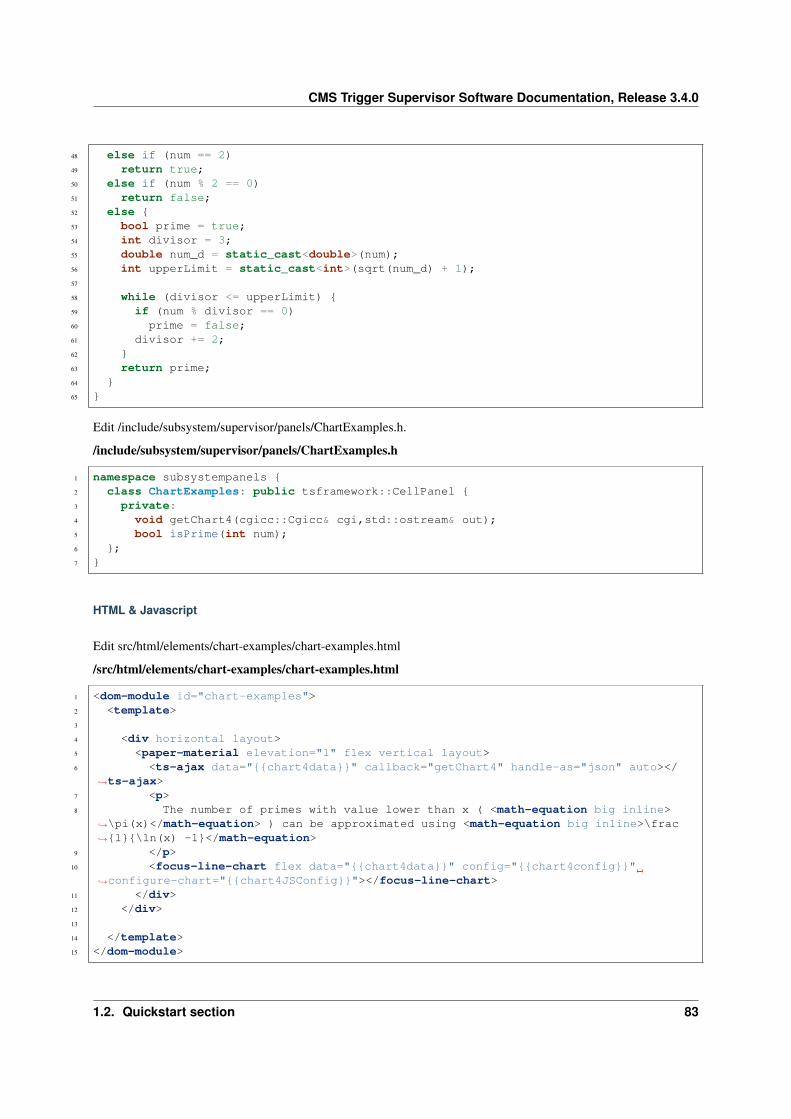
CMS Trigger Supervisor Software Documentation, Release 3.4.0
48 else if (num == 2)49 return true;50 else if (num % 2 == 0)51 return false;52 else {53 bool prime = true;54 int divisor = 3;55 double num_d = static_cast<double>(num);56 int upperLimit = static_cast<int>(sqrt(num_d) + 1);57
58 while (divisor <= upperLimit) {59 if (num % divisor == 0)60 prime = false;61 divisor += 2;62 }63 return prime;64 }65 }
Edit /include/subsystem/supervisor/panels/ChartExamples.h.
/include/subsystem/supervisor/panels/ChartExamples.h
1 namespace subsystempanels {2 class ChartExamples: public tsframework::CellPanel {3 private:4 void getChart4(cgicc::Cgicc& cgi,std::ostream& out);5 bool isPrime(int num);6 };7 }
HTML & Javascript
Edit src/html/elements/chart-examples/chart-examples.html
/src/html/elements/chart-examples/chart-examples.html
1 <dom-module id="chart-examples">2 <template>3
4 <div horizontal layout>5 <paper-material elevation="1" flex vertical layout>6 <ts-ajax data="{{chart4data}}" callback="getChart4" handle-as="json" auto></
→˓ts-ajax>7 <p>8 The number of primes with value lower than x ( <math-equation big inline>
→˓\pi(x)</math-equation> ) can be approximated using <math-equation big inline>\frac→˓{1}{\ln(x) -1}</math-equation>
9 </p>10 <focus-line-chart flex data="{{chart4data}}" config="{{chart4config}}"
→˓configure-chart="{{chart4JSConfig}}"></focus-line-chart>11 </div>12 </div>13
14 </template>15 </dom-module>
1.2. Quickstart section 83
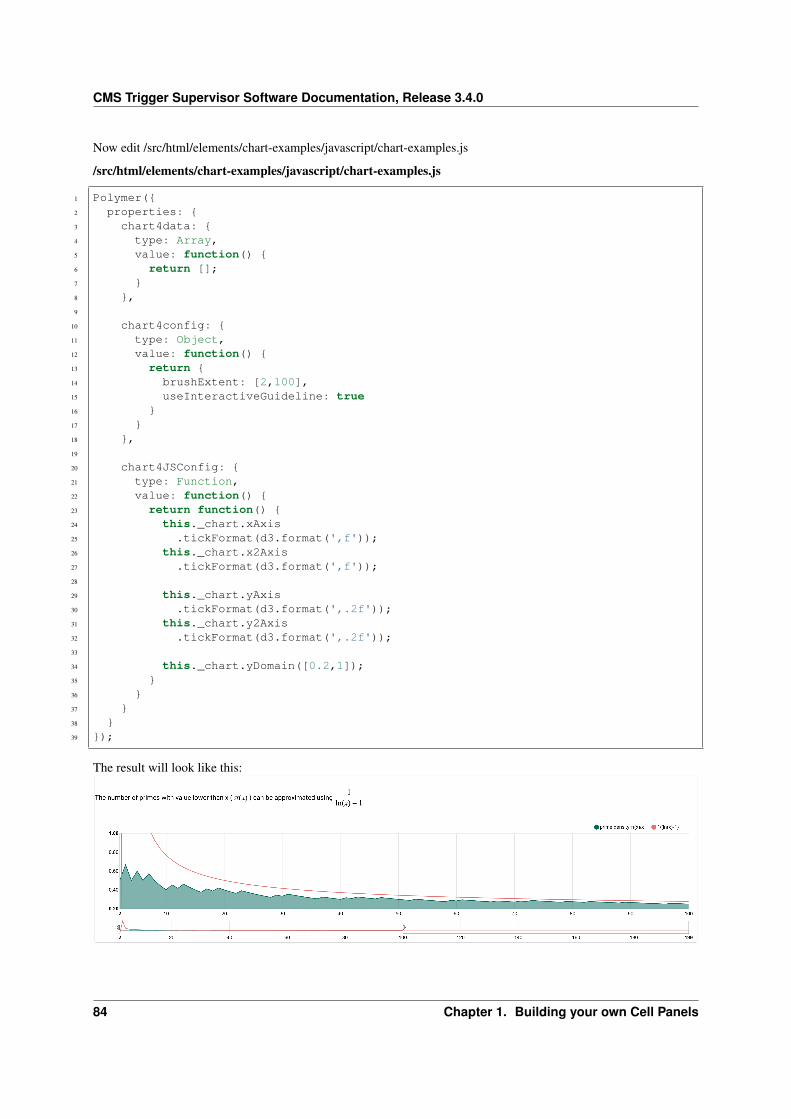
CMS Trigger Supervisor Software Documentation, Release 3.4.0
Now edit /src/html/elements/chart-examples/javascript/chart-examples.js
/src/html/elements/chart-examples/javascript/chart-examples.js
1 Polymer({2 properties: {3 chart4data: {4 type: Array,5 value: function() {6 return [];7 }8 },9
10 chart4config: {11 type: Object,12 value: function() {13 return {14 brushExtent: [2,100],15 useInteractiveGuideline: true16 }17 }18 },19
20 chart4JSConfig: {21 type: Function,22 value: function() {23 return function() {24 this._chart.xAxis25 .tickFormat(d3.format(',f'));26 this._chart.x2Axis27 .tickFormat(d3.format(',f'));28
29 this._chart.yAxis30 .tickFormat(d3.format(',.2f'));31 this._chart.y2Axis32 .tickFormat(d3.format(',.2f'));33
34 this._chart.yDomain([0.2,1]);35 }36 }37 }38 }39 });
The result will look like this:
84 Chapter 1. Building your own Cell Panels
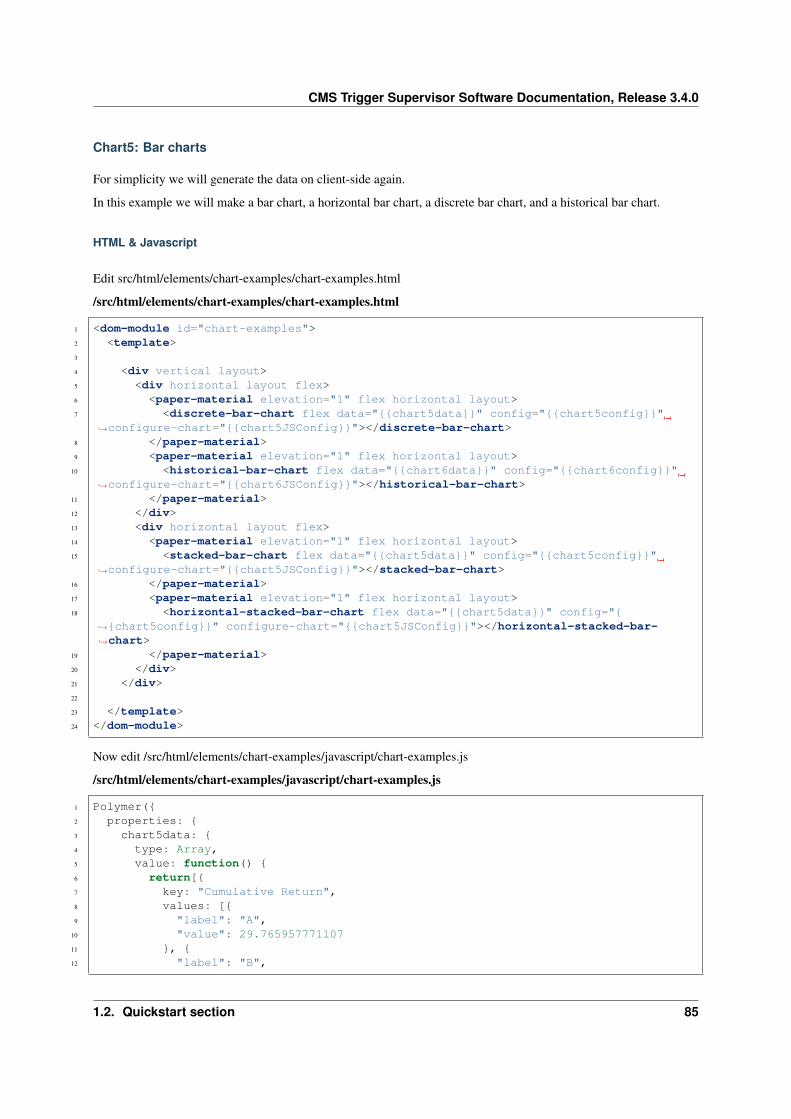
CMS Trigger Supervisor Software Documentation, Release 3.4.0
Chart5: Bar charts
For simplicity we will generate the data on client-side again.
In this example we will make a bar chart, a horizontal bar chart, a discrete bar chart, and a historical bar chart.
HTML & Javascript
Edit src/html/elements/chart-examples/chart-examples.html
/src/html/elements/chart-examples/chart-examples.html
1 <dom-module id="chart-examples">2 <template>3
4 <div vertical layout>5 <div horizontal layout flex>6 <paper-material elevation="1" flex horizontal layout>7 <discrete-bar-chart flex data="{{chart5data}}" config="{{chart5config}}"
→˓configure-chart="{{chart5JSConfig}}"></discrete-bar-chart>8 </paper-material>9 <paper-material elevation="1" flex horizontal layout>
10 <historical-bar-chart flex data="{{chart6data}}" config="{{chart6config}}"→˓configure-chart="{{chart6JSConfig}}"></historical-bar-chart>
11 </paper-material>12 </div>13 <div horizontal layout flex>14 <paper-material elevation="1" flex horizontal layout>15 <stacked-bar-chart flex data="{{chart5data}}" config="{{chart5config}}"
→˓configure-chart="{{chart5JSConfig}}"></stacked-bar-chart>16 </paper-material>17 <paper-material elevation="1" flex horizontal layout>18 <horizontal-stacked-bar-chart flex data="{{chart5data}}" config="{
→˓{chart5config}}" configure-chart="{{chart5JSConfig}}"></horizontal-stacked-bar-→˓chart>
19 </paper-material>20 </div>21 </div>22
23 </template>24 </dom-module>
Now edit /src/html/elements/chart-examples/javascript/chart-examples.js
/src/html/elements/chart-examples/javascript/chart-examples.js
1 Polymer({2 properties: {3 chart5data: {4 type: Array,5 value: function() {6 return[{7 key: "Cumulative Return",8 values: [{9 "label": "A",
10 "value": 29.76595777110711 }, {12 "label": "B",
1.2. Quickstart section 85
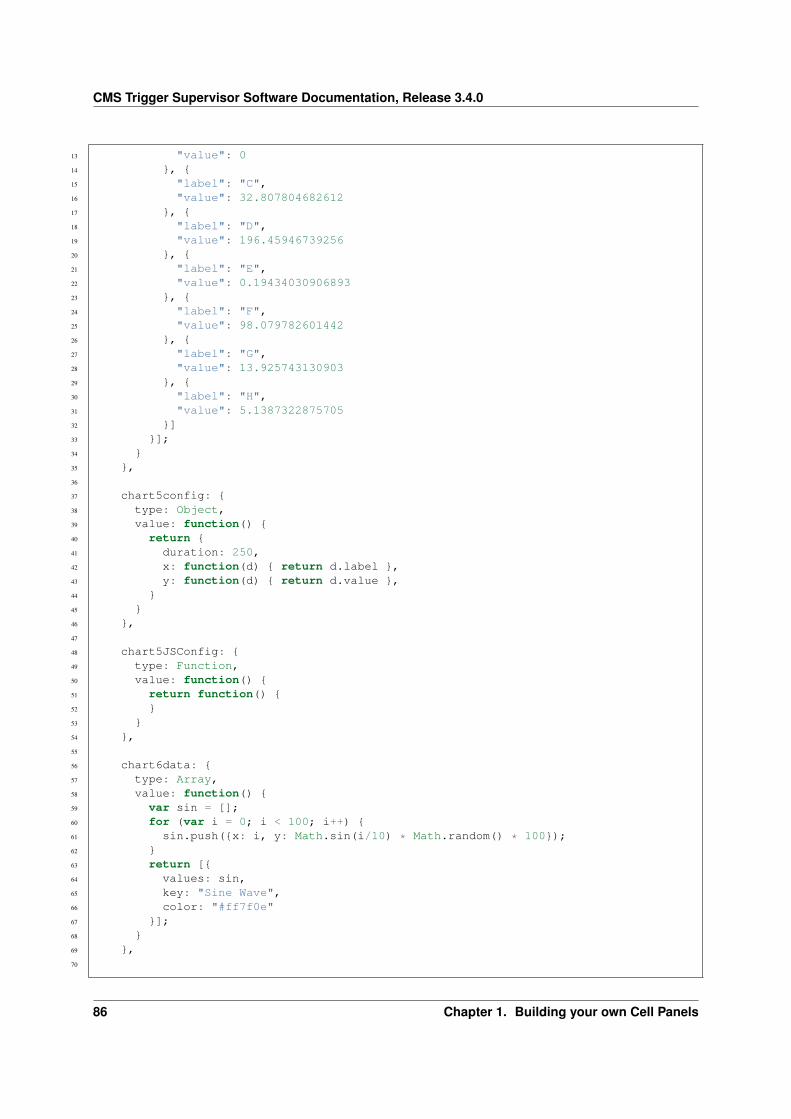
CMS Trigger Supervisor Software Documentation, Release 3.4.0
13 "value": 014 }, {15 "label": "C",16 "value": 32.80780468261217 }, {18 "label": "D",19 "value": 196.4594673925620 }, {21 "label": "E",22 "value": 0.1943403090689323 }, {24 "label": "F",25 "value": 98.07978260144226 }, {27 "label": "G",28 "value": 13.92574313090329 }, {30 "label": "H",31 "value": 5.138732287570532 }]33 }];34 }35 },36
37 chart5config: {38 type: Object,39 value: function() {40 return {41 duration: 250,42 x: function(d) { return d.label },43 y: function(d) { return d.value },44 }45 }46 },47
48 chart5JSConfig: {49 type: Function,50 value: function() {51 return function() {52 }53 }54 },55
56 chart6data: {57 type: Array,58 value: function() {59 var sin = [];60 for (var i = 0; i < 100; i++) {61 sin.push({x: i, y: Math.sin(i/10) * Math.random() * 100});62 }63 return [{64 values: sin,65 key: "Sine Wave",66 color: "#ff7f0e"67 }];68 }69 },70
86 Chapter 1. Building your own Cell Panels
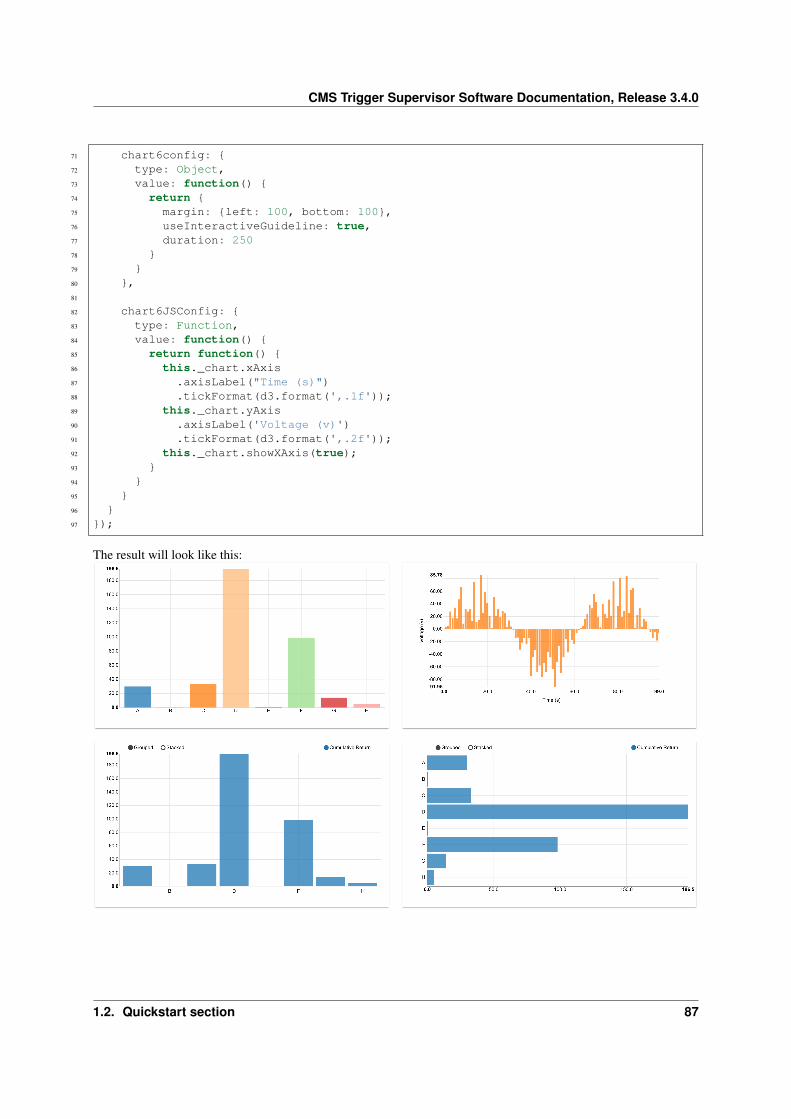
CMS Trigger Supervisor Software Documentation, Release 3.4.0
71 chart6config: {72 type: Object,73 value: function() {74 return {75 margin: {left: 100, bottom: 100},76 useInteractiveGuideline: true,77 duration: 25078 }79 }80 },81
82 chart6JSConfig: {83 type: Function,84 value: function() {85 return function() {86 this._chart.xAxis87 .axisLabel("Time (s)")88 .tickFormat(d3.format(',.1f'));89 this._chart.yAxis90 .axisLabel('Voltage (v)')91 .tickFormat(d3.format(',.2f'));92 this._chart.showXAxis(true);93 }94 }95 }96 }97 });
The result will look like this:
1.2. Quickstart section 87
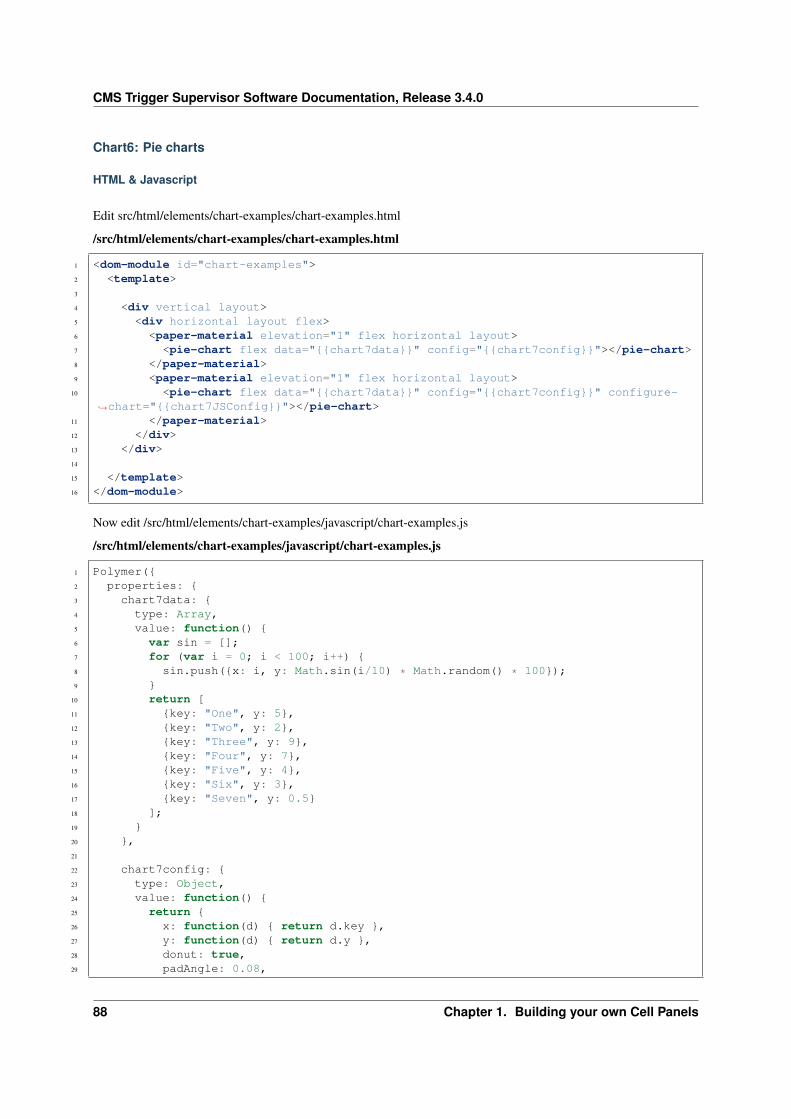
CMS Trigger Supervisor Software Documentation, Release 3.4.0
Chart6: Pie charts
HTML & Javascript
Edit src/html/elements/chart-examples/chart-examples.html
/src/html/elements/chart-examples/chart-examples.html
1 <dom-module id="chart-examples">2 <template>3
4 <div vertical layout>5 <div horizontal layout flex>6 <paper-material elevation="1" flex horizontal layout>7 <pie-chart flex data="{{chart7data}}" config="{{chart7config}}"></pie-chart>8 </paper-material>9 <paper-material elevation="1" flex horizontal layout>
10 <pie-chart flex data="{{chart7data}}" config="{{chart7config}}" configure-→˓chart="{{chart7JSConfig}}"></pie-chart>
11 </paper-material>12 </div>13 </div>14
15 </template>16 </dom-module>
Now edit /src/html/elements/chart-examples/javascript/chart-examples.js
/src/html/elements/chart-examples/javascript/chart-examples.js
1 Polymer({2 properties: {3 chart7data: {4 type: Array,5 value: function() {6 var sin = [];7 for (var i = 0; i < 100; i++) {8 sin.push({x: i, y: Math.sin(i/10) * Math.random() * 100});9 }
10 return [11 {key: "One", y: 5},12 {key: "Two", y: 2},13 {key: "Three", y: 9},14 {key: "Four", y: 7},15 {key: "Five", y: 4},16 {key: "Six", y: 3},17 {key: "Seven", y: 0.5}18 ];19 }20 },21
22 chart7config: {23 type: Object,24 value: function() {25 return {26 x: function(d) { return d.key },27 y: function(d) { return d.y },28 donut: true,29 padAngle: 0.08,
88 Chapter 1. Building your own Cell Panels
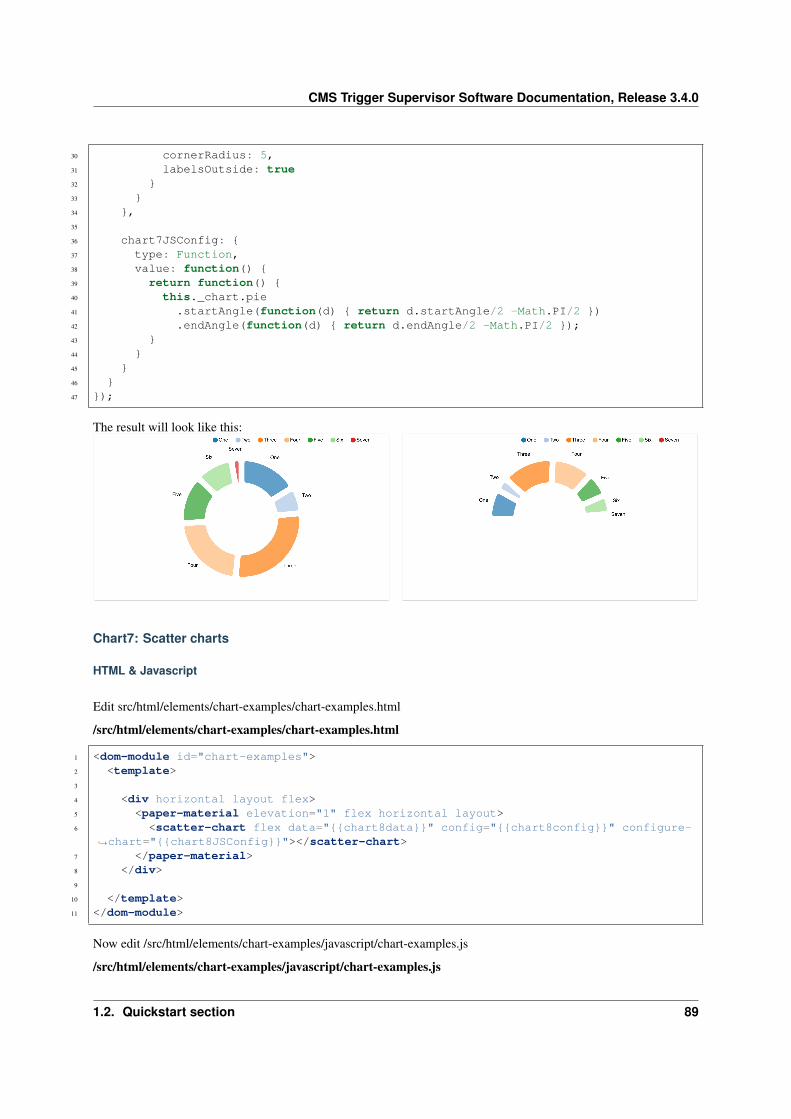
CMS Trigger Supervisor Software Documentation, Release 3.4.0
30 cornerRadius: 5,31 labelsOutside: true32 }33 }34 },35
36 chart7JSConfig: {37 type: Function,38 value: function() {39 return function() {40 this._chart.pie41 .startAngle(function(d) { return d.startAngle/2 -Math.PI/2 })42 .endAngle(function(d) { return d.endAngle/2 -Math.PI/2 });43 }44 }45 }46 }47 });
The result will look like this:
Chart7: Scatter charts
HTML & Javascript
Edit src/html/elements/chart-examples/chart-examples.html
/src/html/elements/chart-examples/chart-examples.html
1 <dom-module id="chart-examples">2 <template>3
4 <div horizontal layout flex>5 <paper-material elevation="1" flex horizontal layout>6 <scatter-chart flex data="{{chart8data}}" config="{{chart8config}}" configure-
→˓chart="{{chart8JSConfig}}"></scatter-chart>7 </paper-material>8 </div>9
10 </template>11 </dom-module>
Now edit /src/html/elements/chart-examples/javascript/chart-examples.js
/src/html/elements/chart-examples/javascript/chart-examples.js
1.2. Quickstart section 89
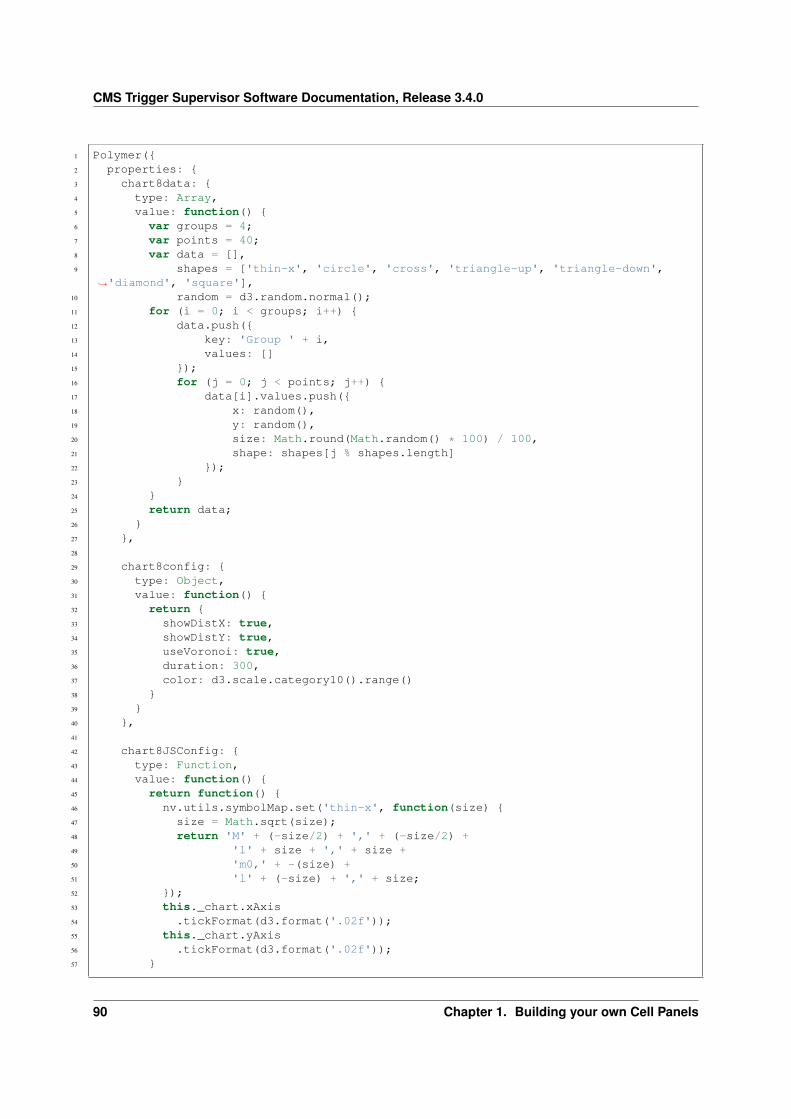
CMS Trigger Supervisor Software Documentation, Release 3.4.0
1 Polymer({2 properties: {3 chart8data: {4 type: Array,5 value: function() {6 var groups = 4;7 var points = 40;8 var data = [],9 shapes = ['thin-x', 'circle', 'cross', 'triangle-up', 'triangle-down',
→˓'diamond', 'square'],10 random = d3.random.normal();11 for (i = 0; i < groups; i++) {12 data.push({13 key: 'Group ' + i,14 values: []15 });16 for (j = 0; j < points; j++) {17 data[i].values.push({18 x: random(),19 y: random(),20 size: Math.round(Math.random() * 100) / 100,21 shape: shapes[j % shapes.length]22 });23 }24 }25 return data;26 }27 },28
29 chart8config: {30 type: Object,31 value: function() {32 return {33 showDistX: true,34 showDistY: true,35 useVoronoi: true,36 duration: 300,37 color: d3.scale.category10().range()38 }39 }40 },41
42 chart8JSConfig: {43 type: Function,44 value: function() {45 return function() {46 nv.utils.symbolMap.set('thin-x', function(size) {47 size = Math.sqrt(size);48 return 'M' + (-size/2) + ',' + (-size/2) +49 'l' + size + ',' + size +50 'm0,' + -(size) +51 'l' + (-size) + ',' + size;52 });53 this._chart.xAxis54 .tickFormat(d3.format('.02f'));55 this._chart.yAxis56 .tickFormat(d3.format('.02f'));57 }
90 Chapter 1. Building your own Cell Panels
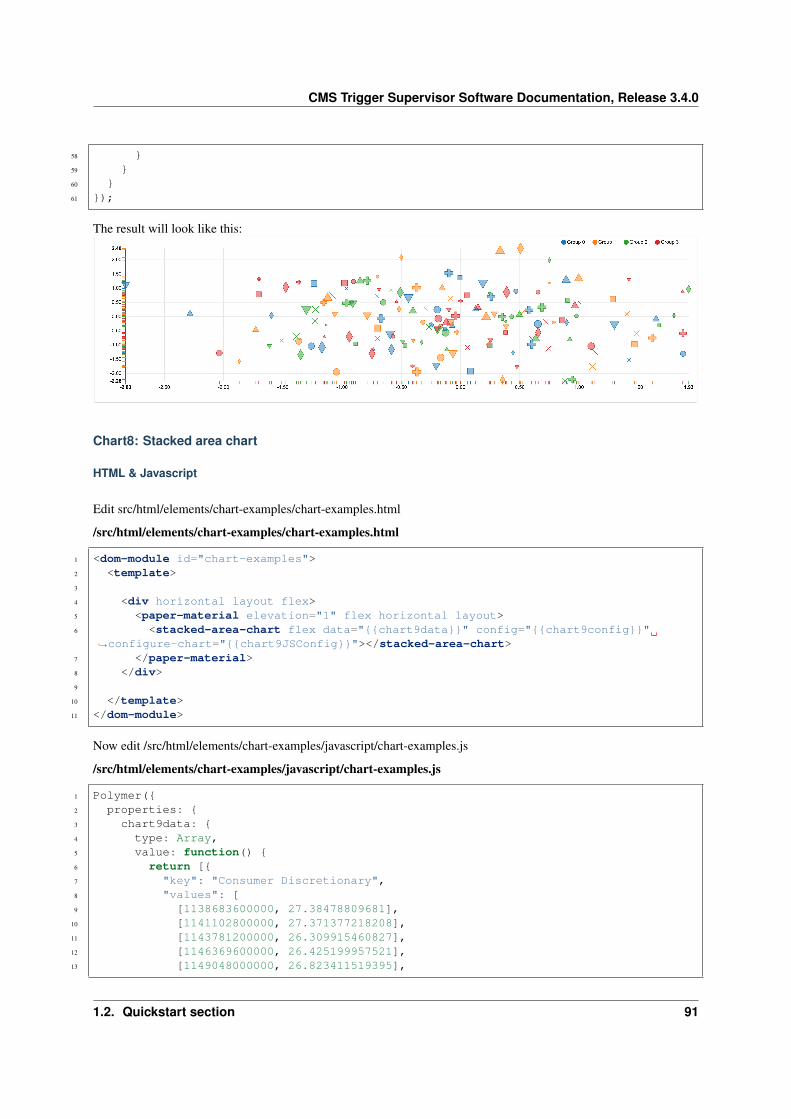
CMS Trigger Supervisor Software Documentation, Release 3.4.0
58 }59 }60 }61 });
The result will look like this:
Chart8: Stacked area chart
HTML & Javascript
Edit src/html/elements/chart-examples/chart-examples.html
/src/html/elements/chart-examples/chart-examples.html
1 <dom-module id="chart-examples">2 <template>3
4 <div horizontal layout flex>5 <paper-material elevation="1" flex horizontal layout>6 <stacked-area-chart flex data="{{chart9data}}" config="{{chart9config}}"
→˓configure-chart="{{chart9JSConfig}}"></stacked-area-chart>7 </paper-material>8 </div>9
10 </template>11 </dom-module>
Now edit /src/html/elements/chart-examples/javascript/chart-examples.js
/src/html/elements/chart-examples/javascript/chart-examples.js
1 Polymer({2 properties: {3 chart9data: {4 type: Array,5 value: function() {6 return [{7 "key": "Consumer Discretionary",8 "values": [9 [1138683600000, 27.38478809681],
10 [1141102800000, 27.371377218208],11 [1143781200000, 26.309915460827],12 [1146369600000, 26.425199957521],13 [1149048000000, 26.823411519395],
1.2. Quickstart section 91
CMS Trigger Supervisor Software Documentation, Release 3.4.0
14 [1151640000000, 23.850443591584],15 [1154318400000, 23.158355444054],16 [1156996800000, 22.998689393694],17 [1159588800000, 27.977128511299],18 [1162270800000, 29.073672469721],19 [1164862800000, 28.587640408904],20 [1167541200000, 22.788453687638],21 [1170219600000, 22.429199073597],22 [1172638800000, 22.324103271051],23 [1175313600000, 17.558388444186],24 [1177905600000, 16.769518096208],25 [1180584000000, 16.214738201302],26 [1183176000000, 18.729632971228],27 [1185854400000, 18.814523318848],28 [1188532800000, 19.789986451358],29 [1191124800000, 17.070049054933],30 [1193803200000, 16.121349575715],31 [1196398800000, 15.141659430091],32 [1199077200000, 17.175388025298],33 [1201755600000, 17.286592443521],34 [1204261200000, 16.323141626569],35 [1206936000000, 19.231263773952],36 [1209528000000, 18.446256391094],37 [1212206400000, 17.822632399764],38 [1214798400000, 15.539366475979],39 [1217476800000, 15.255131790216],40 [1220155200000, 15.660963922593],41 [1222747200000, 13.254482273697],42 [1225425600000, 11.920796202299],43 [1228021200000, 12.122809090925],44 [1230699600000, 15.691026271393],45 [1233378000000, 14.720881635107],46 [1235797200000, 15.387939360044],47 [1238472000000, 13.765436672229],48 [1241064000000, 14.6314458648],49 [1243742400000, 14.292446536221],50 [1246334400000, 16.170071367016],51 [1249012800000, 15.948135554337],52 [1251691200000, 16.612872685134],53 [1254283200000, 18.778338719091],54 [1256961600000, 16.75602606542],55 [1259557200000, 19.385804443147],56 [1262235600000, 22.950590240168],57 [1264914000000, 23.61159018141],58 [1267333200000, 25.708586989581],59 [1270008000000, 26.883915999885],60 [1272600000000, 25.893486687065],61 [1275278400000, 24.678914263176],62 [1277870400000, 25.937275793023],63 [1280548800000, 29.46138169384],64 [1283227200000, 27.357322961862],65 [1285819200000, 29.057235285673],66 [1288497600000, 28.549434189386],67 [1291093200000, 28.506352379723],68 [1293771600000, 29.449241421597],69 [1296450000000, 25.796838168807],70 [1298869200000, 28.740145449189],71 [1301544000000, 22.091744141872],
92 Chapter 1. Building your own Cell Panels
CMS Trigger Supervisor Software Documentation, Release 3.4.0
72 [1304136000000, 25.079662545409],73 [1306814400000, 23.674906973064],74 [1309406400000, 23.41800274293],75 [1312084800000, 23.243644138871],76 [1314763200000, 31.591854066817],77 [1317355200000, 31.497112374114],78 [1320033600000, 26.672380820431],79 [1322629200000, 27.297080015495],80 [1325307600000, 20.174315530051],81 [1327986000000, 19.631084213899],82 [1330491600000, 20.366462219462],83 [1333166400000, 17.429019937289],84 [1335758400000, 16.75543633539],85 [1338436800000, 16.182906906042]86 ]87 }, {88 "key": "Consumer Staples",89 "values": [90 [1138683600000, 7.2800122043237],91 [1141102800000, 7.1187787503354],92 [1143781200000, 8.351887016482],93 [1146369600000, 8.4156698763993],94 [1149048000000, 8.1673298604231],95 [1151640000000, 5.5132447126042],96 [1154318400000, 6.1152537710599],97 [1156996800000, 6.076765091942],98 [1159588800000, 4.6304473798646],99 [1162270800000, 4.6301068469402],
100 [1164862800000, 4.3466656309389],101 [1167541200000, 6.830104897003],102 [1170219600000, 7.241633040029],103 [1172638800000, 7.1432372054153],104 [1175313600000, 10.608942063374],105 [1177905600000, 10.914964549494],106 [1180584000000, 10.933223880565],107 [1183176000000, 8.3457524851265],108 [1185854400000, 8.1078413081882],109 [1188532800000, 8.2697185922474],110 [1191124800000, 8.4742436475968],111 [1193803200000, 8.4994601179319],112 [1196398800000, 8.7387319683243],113 [1199077200000, 6.8829183612895],114 [1201755600000, 6.984133637885],115 [1204261200000, 7.0860136043287],116 [1206936000000, 4.3961787956053],117 [1209528000000, 3.8699674365231],118 [1212206400000, 3.6928925238305],119 [1214798400000, 6.7571718894253],120 [1217476800000, 6.4367313362344],121 [1220155200000, 6.4048441521454],122 [1222747200000, 5.4643833239669],123 [1225425600000, 5.3150786833374],124 [1228021200000, 5.3011272612576],125 [1230699600000, 4.1203601430809],126 [1233378000000, 4.0881783200525],127 [1235797200000, 4.1928665957189],128 [1238472000000, 7.0249415663205],129 [1241064000000, 7.006530880769],
1.2. Quickstart section 93
CMS Trigger Supervisor Software Documentation, Release 3.4.0
130 [1243742400000, 6.994835633224],131 [1246334400000, 6.1220222336254],132 [1249012800000, 6.1177436137653],133 [1251691200000, 6.1413396231981],134 [1254283200000, 4.8046006145874],135 [1256961600000, 4.6647600660544],136 [1259557200000, 4.544865006255],137 [1262235600000, 6.0488249316539],138 [1264914000000, 6.3188669540206],139 [1267333200000, 6.5873958262306],140 [1270008000000, 6.2281189839578],141 [1272600000000, 5.8948915746059],142 [1275278400000, 5.5967320482214],143 [1277870400000, 0.99784432084837],144 [1280548800000, 1.0950794175359],145 [1283227200000, 0.94479734407491],146 [1285819200000, 1.222093988688],147 [1288497600000, 1.335093106856],148 [1291093200000, 1.3302565104985],149 [1293771600000, 1.340824670897],150 [1296450000000, 0],151 [1298869200000, 0],152 [1301544000000, 0],153 [1304136000000, 0],154 [1306814400000, 0],155 [1309406400000, 0],156 [1312084800000, 0],157 [1314763200000, 0],158 [1317355200000, 4.4583692315],159 [1320033600000, 3.6493043348059],160 [1322629200000, 3.8610064091761],161 [1325307600000, 5.5144800685202],162 [1327986000000, 5.1750695220792],163 [1330491600000, 5.6710066952691],164 [1333166400000, 8.5658461590953],165 [1335758400000, 8.6135447714243],166 [1338436800000, 8.0231460925212]167 ]168 }, {169 "key": "Energy",170 "values": [171 [1138683600000, 1.544303464167],172 [1141102800000, 1.4387289432421],173 [1143781200000, 0],174 [1146369600000, 0],175 [1149048000000, 0],176 [1151640000000, 1.328626801128],177 [1154318400000, 1.2874050802627],178 [1156996800000, 1.0872743105593],179 [1159588800000, 0.96042562635813],180 [1162270800000, 0.93139372870616],181 [1164862800000, 0.94432167305385],182 [1167541200000, 1.277750166208],183 [1170219600000, 1.2204893886811],184 [1172638800000, 1.207489123122],185 [1175313600000, 1.2490651414113],186 [1177905600000, 1.2593129913052],187 [1180584000000, 1.373329808388],
94 Chapter 1. Building your own Cell Panels

CMS Trigger Supervisor Software Documentation, Release 3.4.0
188 [1183176000000, 0],189 [1185854400000, 0],190 [1188532800000, 0],191 [1191124800000, 0],192 [1193803200000, 0],193 [1196398800000, 0],194 [1199077200000, 0],195 [1201755600000, 0],196 [1204261200000, 0],197 [1206936000000, 0],198 [1209528000000, 0],199 [1212206400000, 0],200 [1214798400000, 0],201 [1217476800000, 0],202 [1220155200000, 0],203 [1222747200000, 1.4516108933695],204 [1225425600000, 1.1856025268225],205 [1228021200000, 1.3430470355439],206 [1230699600000, 2.2752595354509],207 [1233378000000, 2.4031560010523],208 [1235797200000, 2.0822430731926],209 [1238472000000, 1.5640902826938],210 [1241064000000, 1.5812873972356],211 [1243742400000, 1.9462448548894],212 [1246334400000, 2.9464870223957],213 [1249012800000, 3.0744699383222],214 [1251691200000, 2.9422304628446],215 [1254283200000, 2.7503075599999],216 [1256961600000, 2.6506701800427],217 [1259557200000, 2.8005425319977],218 [1262235600000, 2.6816184971185],219 [1264914000000, 2.681206271327],220 [1267333200000, 2.8195488011259],221 [1270008000000, 0],222 [1272600000000, 0],223 [1275278400000, 0],224 [1277870400000, 1.0687057346382],225 [1280548800000, 1.2539400544134],226 [1283227200000, 1.1862969445955],227 [1285819200000, 0],228 [1288497600000, 0],229 [1291093200000, 0],230 [1293771600000, 0],231 [1296450000000, 1.941972859484],232 [1298869200000, 2.1142247697552],233 [1301544000000, 2.3788590206824],234 [1304136000000, 2.5337302877545],235 [1306814400000, 2.3163370395199],236 [1309406400000, 2.0645451843195],237 [1312084800000, 2.1004446672411],238 [1314763200000, 3.6301875804303],239 [1317355200000, 2.454204664652],240 [1320033600000, 2.196082370894],241 [1322629200000, 2.3358418255202],242 [1325307600000, 0],243 [1327986000000, 0],244 [1330491600000, 0],245 [1333166400000, 0.39001201038526],
1.2. Quickstart section 95
CMS Trigger Supervisor Software Documentation, Release 3.4.0
246 [1335758400000, 0.30945472725559],247 [1338436800000, 0.31062439305591]248 ]249 }, {250 "key": "Financials",251 "values": [252 [1138683600000, 13.356778764352],253 [1141102800000, 13.611196863271],254 [1143781200000, 6.895903006119],255 [1146369600000, 6.9939633271352],256 [1149048000000, 6.7241510257675],257 [1151640000000, 5.5611293669516],258 [1154318400000, 5.6086488714041],259 [1156996800000, 5.4962849907033],260 [1159588800000, 6.9193153169279],261 [1162270800000, 7.0016334389777],262 [1164862800000, 6.7865422443273],263 [1167541200000, 9.0006454225383],264 [1170219600000, 9.2233916171431],265 [1172638800000, 8.8929316009479],266 [1175313600000, 10.345937520404],267 [1177905600000, 10.075914677026],268 [1180584000000, 10.089006188111],269 [1183176000000, 10.598330295008],270 [1185854400000, 9.968954653301],271 [1188532800000, 9.7740580198146],272 [1191124800000, 10.558483060626],273 [1193803200000, 9.9314651823603],274 [1196398800000, 9.3997715873769],275 [1199077200000, 8.4086493387262],276 [1201755600000, 8.9698309085926],277 [1204261200000, 8.2778357995396],278 [1206936000000, 8.8585045600123],279 [1209528000000, 8.7013756413322],280 [1212206400000, 7.7933605469443],281 [1214798400000, 7.0236183483064],282 [1217476800000, 6.9873088186829],283 [1220155200000, 6.8031713070097],284 [1222747200000, 6.6869531315723],285 [1225425600000, 6.138256993963],286 [1228021200000, 5.6434994016354],287 [1230699600000, 5.495220262512],288 [1233378000000, 4.6885326869846],289 [1235797200000, 4.4524349883438],290 [1238472000000, 5.6766520778185],291 [1241064000000, 5.7675774480752],292 [1243742400000, 5.7882863168337],293 [1246334400000, 7.2666010034924],294 [1249012800000, 7.519182132226],295 [1251691200000, 7.849651451445],296 [1254283200000, 10.383992037985],297 [1256961600000, 9.0653691861818],298 [1259557200000, 9.6705248324159],299 [1262235600000, 10.856380561349],300 [1264914000000, 11.27452370892],301 [1267333200000, 11.754156529088],302 [1270008000000, 8.2870811422456],303 [1272600000000, 8.0210264360699],
96 Chapter 1. Building your own Cell Panels
CMS Trigger Supervisor Software Documentation, Release 3.4.0
304 [1275278400000, 7.5375074474865],305 [1277870400000, 8.3419527338039],306 [1280548800000, 9.4197471818443],307 [1283227200000, 8.7321733185797],308 [1285819200000, 9.6627062648126],309 [1288497600000, 10.187962234549],310 [1291093200000, 9.8144201733476],311 [1293771600000, 10.275723361713],312 [1296450000000, 16.796066079353],313 [1298869200000, 17.543254984075],314 [1301544000000, 16.673660675084],315 [1304136000000, 17.963944353609],316 [1306814400000, 16.637740867211],317 [1309406400000, 15.84857094609],318 [1312084800000, 14.767303362182],319 [1314763200000, 24.778452182432],320 [1317355200000, 18.370353229999],321 [1320033600000, 15.2531374291],322 [1322629200000, 14.989600840649],323 [1325307600000, 16.052539160125],324 [1327986000000, 16.424390322793],325 [1330491600000, 17.884020741105],326 [1333166400000, 7.1424929577921],327 [1335758400000, 7.8076213051482],328 [1338436800000, 7.2462684949232]329 ]330 }, {331 "key": "Health Care",332 "values": [333 [1138683600000, 14.212410956029],334 [1141102800000, 13.973193618249],335 [1143781200000, 15.218233920665],336 [1146369600000, 14.38210972745],337 [1149048000000, 13.894310878491],338 [1151640000000, 15.593086090032],339 [1154318400000, 16.244839695188],340 [1156996800000, 16.017088850646],341 [1159588800000, 14.183951830055],342 [1162270800000, 14.148523245697],343 [1164862800000, 13.424326059972],344 [1167541200000, 12.974450435753],345 [1170219600000, 13.23247041802],346 [1172638800000, 13.318762655574],347 [1175313600000, 15.961407746104],348 [1177905600000, 16.287714639805],349 [1180584000000, 16.246590583889],350 [1183176000000, 17.564505594809],351 [1185854400000, 17.872725373165],352 [1188532800000, 18.018998508757],353 [1191124800000, 15.584518016603],354 [1193803200000, 15.480850647181],355 [1196398800000, 15.699120036984],356 [1199077200000, 19.184281817226],357 [1201755600000, 19.691226605207],358 [1204261200000, 18.982314051295],359 [1206936000000, 18.707820309008],360 [1209528000000, 17.459630929761],361 [1212206400000, 16.500616076782],
1.2. Quickstart section 97
CMS Trigger Supervisor Software Documentation, Release 3.4.0
362 [1214798400000, 18.086324003979],363 [1217476800000, 18.929464156258],364 [1220155200000, 18.233728682084],365 [1222747200000, 16.315776297325],366 [1225425600000, 14.63289219025],367 [1228021200000, 14.667835024478],368 [1230699600000, 13.946993947308],369 [1233378000000, 14.394304684397],370 [1235797200000, 13.724462792967],371 [1238472000000, 10.930879035806],372 [1241064000000, 9.8339915513708],373 [1243742400000, 10.053858541872],374 [1246334400000, 11.786998438287],375 [1249012800000, 11.780994901769],376 [1251691200000, 11.305889670276],377 [1254283200000, 10.918452290083],378 [1256961600000, 9.6811395055706],379 [1259557200000, 10.971529744038],380 [1262235600000, 13.330210480209],381 [1264914000000, 14.592637568961],382 [1267333200000, 14.605329141157],383 [1270008000000, 13.936853794037],384 [1272600000000, 12.189480759072],385 [1275278400000, 11.676151385046],386 [1277870400000, 13.058852800017],387 [1280548800000, 13.62891543203],388 [1283227200000, 13.811107569918],389 [1285819200000, 13.786494560787],390 [1288497600000, 14.04516285753],391 [1291093200000, 13.697412447288],392 [1293771600000, 13.677681376221],393 [1296450000000, 19.961511864531],394 [1298869200000, 21.049198298158],395 [1301544000000, 22.687631094008],396 [1304136000000, 25.469010617433],397 [1306814400000, 24.883799437121],398 [1309406400000, 24.203843814248],399 [1312084800000, 22.138760964038],400 [1314763200000, 16.034636966228],401 [1317355200000, 15.394958944556],402 [1320033600000, 12.625642461969],403 [1322629200000, 12.973735699739],404 [1325307600000, 15.786018336149],405 [1327986000000, 15.227368020134],406 [1330491600000, 15.899752650734],407 [1333166400000, 18.994731295388],408 [1335758400000, 18.450055817702],409 [1338436800000, 17.863719889669]410 ]411 }, {412 "key": "Industrials",413 "values": [414 [1138683600000, 7.1590087090398],415 [1141102800000, 7.1297210970108],416 [1143781200000, 5.5774588290586],417 [1146369600000, 5.4977254491156],418 [1149048000000, 5.5138153113634],419 [1151640000000, 4.3198084032122],
98 Chapter 1. Building your own Cell Panels
CMS Trigger Supervisor Software Documentation, Release 3.4.0
420 [1154318400000, 3.9179295839125],421 [1156996800000, 3.8110093051479],422 [1159588800000, 5.5629020916939],423 [1162270800000, 5.7241673711336],424 [1164862800000, 5.4715049695004],425 [1167541200000, 4.9193763571618],426 [1170219600000, 5.136053947247],427 [1172638800000, 5.1327258759766],428 [1175313600000, 5.1888943925082],429 [1177905600000, 5.5191481293345],430 [1180584000000, 5.6093625614921],431 [1183176000000, 4.2706312987397],432 [1185854400000, 4.4453235132117],433 [1188532800000, 4.6228003109761],434 [1191124800000, 5.0645764756954],435 [1193803200000, 5.0723447230959],436 [1196398800000, 5.1457765818846],437 [1199077200000, 5.4067851597282],438 [1201755600000, 5.472241916816],439 [1204261200000, 5.3742740389688],440 [1206936000000, 6.251751933664],441 [1209528000000, 6.1406852153472],442 [1212206400000, 5.8164385627465],443 [1214798400000, 5.4255846656171],444 [1217476800000, 5.3738499417204],445 [1220155200000, 5.1815627753979],446 [1222747200000, 5.0305983235349],447 [1225425600000, 4.6823058607165],448 [1228021200000, 4.5941481589093],449 [1230699600000, 5.4669598474575],450 [1233378000000, 5.1249037357],451 [1235797200000, 4.3504421250742],452 [1238472000000, 4.6260881026002],453 [1241064000000, 5.0140402458946],454 [1243742400000, 4.7458462454774],455 [1246334400000, 6.0437019654564],456 [1249012800000, 6.4595216249754],457 [1251691200000, 6.6420468254155],458 [1254283200000, 5.8927271960913],459 [1256961600000, 5.4712108838003],460 [1259557200000, 6.1220254207747],461 [1262235600000, 5.5385935169255],462 [1264914000000, 5.7383377612639],463 [1267333200000, 6.1715976730415],464 [1270008000000, 4.0102262681174],465 [1272600000000, 3.769389679692],466 [1275278400000, 3.5301571031152],467 [1277870400000, 2.7660252652526],468 [1280548800000, 3.1409983385775],469 [1283227200000, 3.0528024863055],470 [1285819200000, 4.3126123157971],471 [1288497600000, 4.594654041683],472 [1291093200000, 4.5424126126793],473 [1293771600000, 4.7790043987302],474 [1296450000000, 7.4969154058289],475 [1298869200000, 7.9424751557821],476 [1301544000000, 7.1560736250547],477 [1304136000000, 7.9478117337855],
1.2. Quickstart section 99
CMS Trigger Supervisor Software Documentation, Release 3.4.0
478 [1306814400000, 7.4109214848895],479 [1309406400000, 7.5966457641101],480 [1312084800000, 7.165754444071],481 [1314763200000, 5.4816702524302],482 [1317355200000, 4.9893656089584],483 [1320033600000, 4.498385105327],484 [1322629200000, 4.6776090358151],485 [1325307600000, 8.1350814368063],486 [1327986000000, 8.0732769990652],487 [1330491600000, 8.5602340387277],488 [1333166400000, 5.1293714074325],489 [1335758400000, 5.2586794619016],490 [1338436800000, 5.1100853569977]491 ]492 }, {493 "key": "Information Technology",494 "values": [495 [1138683600000, 13.242301508051],496 [1141102800000, 12.863536342042],497 [1143781200000, 21.034044171629],498 [1146369600000, 21.419084618803],499 [1149048000000, 21.142678863691],500 [1151640000000, 26.568489677529],501 [1154318400000, 24.839144939905],502 [1156996800000, 25.456187462167],503 [1159588800000, 26.350164502826],504 [1162270800000, 26.47833320519],505 [1164862800000, 26.425979547847],506 [1167541200000, 28.191461582256],507 [1170219600000, 28.930307448808],508 [1172638800000, 29.521413891117],509 [1175313600000, 28.188285966466],510 [1177905600000, 27.704619625832],511 [1180584000000, 27.490862424829],512 [1183176000000, 28.770679721286],513 [1185854400000, 29.060480671449],514 [1188532800000, 28.240998844973],515 [1191124800000, 33.004893194127],516 [1193803200000, 34.075180359928],517 [1196398800000, 32.548560664833],518 [1199077200000, 30.629727432728],519 [1201755600000, 28.642858788159],520 [1204261200000, 27.973575227842],521 [1206936000000, 27.393351882726],522 [1209528000000, 28.476095288523],523 [1212206400000, 29.29667866426],524 [1214798400000, 29.222333802896],525 [1217476800000, 28.092966093843],526 [1220155200000, 28.107159262922],527 [1222747200000, 25.482974832098],528 [1225425600000, 21.208115993834],529 [1228021200000, 20.295043095268],530 [1230699600000, 15.925754618401],531 [1233378000000, 17.162864628346],532 [1235797200000, 17.084345773174],533 [1238472000000, 22.246007102281],534 [1241064000000, 24.530543998509],535 [1243742400000, 25.084184918242],
100 Chapter 1. Building your own Cell Panels
CMS Trigger Supervisor Software Documentation, Release 3.4.0
536 [1246334400000, 16.606166527358],537 [1249012800000, 17.239620011628],538 [1251691200000, 17.336739127379],539 [1254283200000, 25.478492475753],540 [1256961600000, 23.017152085245],541 [1259557200000, 25.617745423683],542 [1262235600000, 24.061133998642],543 [1264914000000, 23.223933318644],544 [1267333200000, 24.425887263937],545 [1270008000000, 35.501471156693],546 [1272600000000, 33.775013878676],547 [1275278400000, 30.417993630285],548 [1277870400000, 30.023598978467],549 [1280548800000, 33.327519522436],550 [1283227200000, 31.963388450371],551 [1285819200000, 30.498967232092],552 [1288497600000, 32.403696817912],553 [1291093200000, 31.47736071922],554 [1293771600000, 31.53259666241],555 [1296450000000, 41.760282761548],556 [1298869200000, 45.605771243237],557 [1301544000000, 39.986557966215],558 [1304136000000, 43.846330510051],559 [1306814400000, 39.857316881857],560 [1309406400000, 37.675127768208],561 [1312084800000, 35.775077970313],562 [1314763200000, 48.631009702577],563 [1317355200000, 42.830831754505],564 [1320033600000, 35.611502589362],565 [1322629200000, 35.320136981738],566 [1325307600000, 31.564136901516],567 [1327986000000, 32.074407502433],568 [1330491600000, 35.053013769976],569 [1333166400000, 26.434568573937],570 [1335758400000, 25.305617871002],571 [1338436800000, 24.520919418236]572 ]573 }, {574 "key": "Materials",575 "values": [576 [1138683600000, 5.5806167415681],577 [1141102800000, 5.4539047069985],578 [1143781200000, 7.6728842432362],579 [1146369600000, 7.719946716654],580 [1149048000000, 8.0144619912942],581 [1151640000000, 7.942223133434],582 [1154318400000, 8.3998279827444],583 [1156996800000, 8.532324572605],584 [1159588800000, 4.7324285199763],585 [1162270800000, 4.7402397487697],586 [1164862800000, 4.9042069355168],587 [1167541200000, 5.9583963430882],588 [1170219600000, 6.3693899239171],589 [1172638800000, 6.261153903813],590 [1175313600000, 5.3443942184584],591 [1177905600000, 5.4932111235361],592 [1180584000000, 5.5747393101109],593 [1183176000000, 5.3833633060013],
1.2. Quickstart section 101
CMS Trigger Supervisor Software Documentation, Release 3.4.0
594 [1185854400000, 5.5125898831832],595 [1188532800000, 5.8116112661327],596 [1191124800000, 4.3962296939996],597 [1193803200000, 4.6967663605521],598 [1196398800000, 4.7963004350914],599 [1199077200000, 4.1817985183351],600 [1201755600000, 4.3797643870182],601 [1204261200000, 4.6966642197965],602 [1206936000000, 4.3609995132565],603 [1209528000000, 4.4736290996496],604 [1212206400000, 4.3749762738128],605 [1214798400000, 3.3274661194507],606 [1217476800000, 3.0316184691337],607 [1220155200000, 2.5718140204728],608 [1222747200000, 2.7034994044603],609 [1225425600000, 2.2033786591364],610 [1228021200000, 1.9850621240805],611 [1230699600000, 0],612 [1233378000000, 0],613 [1235797200000, 0],614 [1238472000000, 0],615 [1241064000000, 0],616 [1243742400000, 0],617 [1246334400000, 0],618 [1249012800000, 0],619 [1251691200000, 0],620 [1254283200000, 0.44495950017788],621 [1256961600000, 0.33945469262483],622 [1259557200000, 0.38348269455195],623 [1262235600000, 0],624 [1264914000000, 0],625 [1267333200000, 0],626 [1270008000000, 0],627 [1272600000000, 0],628 [1275278400000, 0],629 [1277870400000, 0],630 [1280548800000, 0],631 [1283227200000, 0],632 [1285819200000, 0],633 [1288497600000, 0],634 [1291093200000, 0],635 [1293771600000, 0],636 [1296450000000, 0.52216435716176],637 [1298869200000, 0.59275786698454],638 [1301544000000, 0],639 [1304136000000, 0],640 [1306814400000, 0],641 [1309406400000, 0],642 [1312084800000, 0],643 [1314763200000, 0],644 [1317355200000, 0],645 [1320033600000, 0],646 [1322629200000, 0],647 [1325307600000, 0],648 [1327986000000, 0],649 [1330491600000, 0],650 [1333166400000, 0],651 [1335758400000, 0],
102 Chapter 1. Building your own Cell Panels
CMS Trigger Supervisor Software Documentation, Release 3.4.0
652 [1338436800000, 0]653 ]654 }, {655 "key": "Telecommunication Services",656 "values": [657 [1138683600000, 3.7056975170243],658 [1141102800000, 3.7561118692318],659 [1143781200000, 2.861913700854],660 [1146369600000, 2.9933744103381],661 [1149048000000, 2.7127537218463],662 [1151640000000, 3.1195497076283],663 [1154318400000, 3.4066964004508],664 [1156996800000, 3.3754571113569],665 [1159588800000, 2.2965579982924],666 [1162270800000, 2.4486818633018],667 [1164862800000, 2.4002308848517],668 [1167541200000, 1.9649579750349],669 [1170219600000, 1.9385263638056],670 [1172638800000, 1.9128975336387],671 [1175313600000, 2.3412869836298],672 [1177905600000, 2.4337870351445],673 [1180584000000, 2.62179703171],674 [1183176000000, 3.2642864957929],675 [1185854400000, 3.3200396223709],676 [1188532800000, 3.3934212707572],677 [1191124800000, 4.2822327088179],678 [1193803200000, 4.1474964228541],679 [1196398800000, 4.1477082879801],680 [1199077200000, 5.2947122916128],681 [1201755600000, 5.2919843508028],682 [1204261200000, 5.1989783050309],683 [1206936000000, 3.5603057673513],684 [1209528000000, 3.3009087690692],685 [1212206400000, 3.1784852603792],686 [1214798400000, 4.5889503538868],687 [1217476800000, 4.401779617494],688 [1220155200000, 4.2208301828278],689 [1222747200000, 3.89396671475],690 [1225425600000, 3.0423832241354],691 [1228021200000, 3.135520611578],692 [1230699600000, 1.9631418164089],693 [1233378000000, 1.8963543874958],694 [1235797200000, 1.8266636017025],695 [1238472000000, 0.93136635895188],696 [1241064000000, 0.92737801918888],697 [1243742400000, 0.97591889805002],698 [1246334400000, 2.6841193805515],699 [1249012800000, 2.5664341140531],700 [1251691200000, 2.3887523699873],701 [1254283200000, 1.1737801663681],702 [1256961600000, 1.0953582317281],703 [1259557200000, 1.2495674976653],704 [1262235600000, 0.36607452464754],705 [1264914000000, 0.3548719047291],706 [1267333200000, 0.36769242398939],707 [1270008000000, 0],708 [1272600000000, 0],709 [1275278400000, 0],
1.2. Quickstart section 103
CMS Trigger Supervisor Software Documentation, Release 3.4.0
710 [1277870400000, 0],711 [1280548800000, 0],712 [1283227200000, 0],713 [1285819200000, 0.85450741275337],714 [1288497600000, 0.91360317921637],715 [1291093200000, 0.89647678692269],716 [1293771600000, 0.87800687192639],717 [1296450000000, 0],718 [1298869200000, 0],719 [1301544000000, 0.43668720882994],720 [1304136000000, 0.4756523602692],721 [1306814400000, 0.46947368328469],722 [1309406400000, 0.45138896152316],723 [1312084800000, 0.43828726648117],724 [1314763200000, 2.0820861395316],725 [1317355200000, 0.9364411075395],726 [1320033600000, 0.60583907839773],727 [1322629200000, 0.61096950747437],728 [1325307600000, 0],729 [1327986000000, 0],730 [1330491600000, 0],731 [1333166400000, 0],732 [1335758400000, 0],733 [1338436800000, 0]734 ]735 }, {736 "key": "Utilities",737 "values": [738 [1138683600000, 0],739 [1141102800000, 0],740 [1143781200000, 0],741 [1146369600000, 0],742 [1149048000000, 0],743 [1151640000000, 0],744 [1154318400000, 0],745 [1156996800000, 0],746 [1159588800000, 0],747 [1162270800000, 0],748 [1164862800000, 0],749 [1167541200000, 0],750 [1170219600000, 0],751 [1172638800000, 0],752 [1175313600000, 0],753 [1177905600000, 0],754 [1180584000000, 0],755 [1183176000000, 0],756 [1185854400000, 0],757 [1188532800000, 0],758 [1191124800000, 0],759 [1193803200000, 0],760 [1196398800000, 0],761 [1199077200000, 0],762 [1201755600000, 0],763 [1204261200000, 0],764 [1206936000000, 0],765 [1209528000000, 0],766 [1212206400000, 0],767 [1214798400000, 0],
104 Chapter 1. Building your own Cell Panels
CMS Trigger Supervisor Software Documentation, Release 3.4.0
768 [1217476800000, 0],769 [1220155200000, 0],770 [1222747200000, 0],771 [1225425600000, 0],772 [1228021200000, 0],773 [1230699600000, 0],774 [1233378000000, 0],775 [1235797200000, 0],776 [1238472000000, 0],777 [1241064000000, 0],778 [1243742400000, 0],779 [1246334400000, 0],780 [1249012800000, 0],781 [1251691200000, 0],782 [1254283200000, 0],783 [1256961600000, 0],784 [1259557200000, 0],785 [1262235600000, 0],786 [1264914000000, 0],787 [1267333200000, 0],788 [1270008000000, 0],789 [1272600000000, 0],790 [1275278400000, 0],791 [1277870400000, 0],792 [1280548800000, 0],793 [1283227200000, 0],794 [1285819200000, 0],795 [1288497600000, 0],796 [1291093200000, 0],797 [1293771600000, 0],798 [1296450000000, 0],799 [1298869200000, 0],800 [1301544000000, 0],801 [1304136000000, 0],802 [1306814400000, 0],803 [1309406400000, 0],804 [1312084800000, 0],805 [1314763200000, 0],806 [1317355200000, 0],807 [1320033600000, 0],808 [1322629200000, 0],809 [1325307600000, 0],810 [1327986000000, 0],811 [1330491600000, 0],812 [1333166400000, 0],813 [1335758400000, 0],814 [1338436800000, 0]815 ]816 }];817 }818 },819
820 chart9config: {821 type: Object,822 value: function() {823 return {824 useInteractiveGuideline: true,825 x: function(d) { return d[0] },
1.2. Quickstart section 105
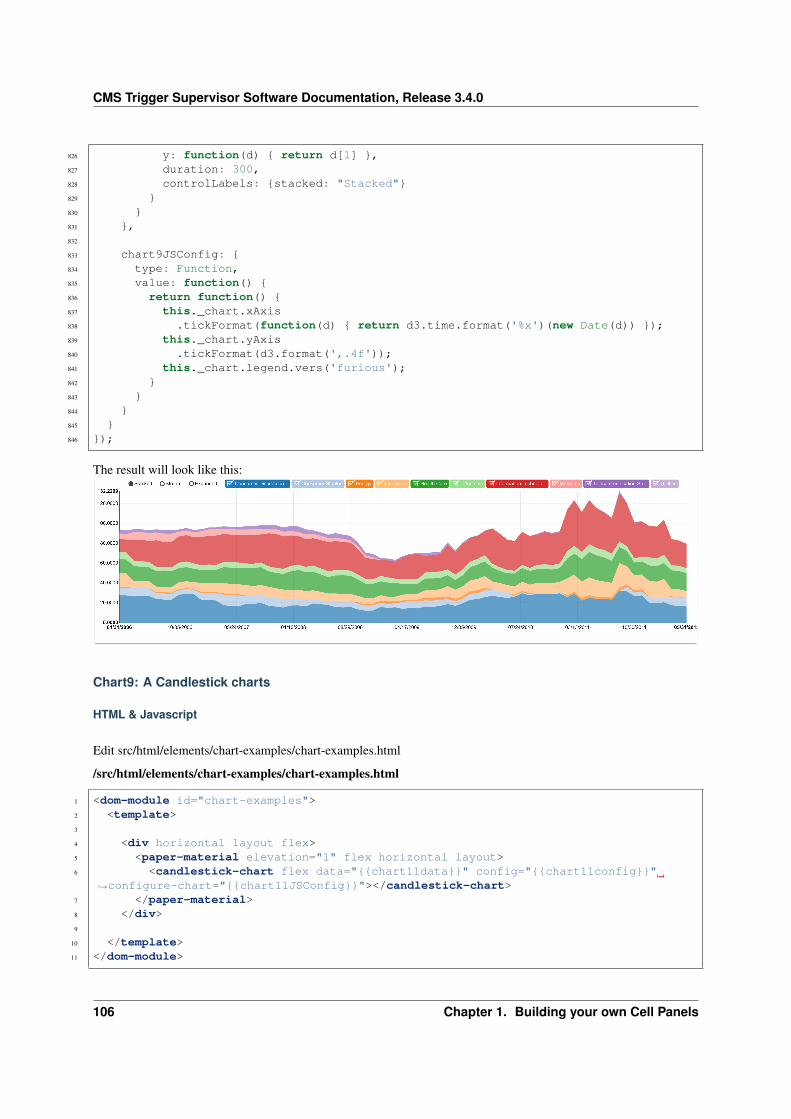
CMS Trigger Supervisor Software Documentation, Release 3.4.0
826 y: function(d) { return d[1] },827 duration: 300,828 controlLabels: {stacked: "Stacked"}829 }830 }831 },832
833 chart9JSConfig: {834 type: Function,835 value: function() {836 return function() {837 this._chart.xAxis838 .tickFormat(function(d) { return d3.time.format('%x')(new Date(d)) });839 this._chart.yAxis840 .tickFormat(d3.format(',.4f'));841 this._chart.legend.vers('furious');842 }843 }844 }845 }846 });
The result will look like this:
Chart9: A Candlestick charts
HTML & Javascript
Edit src/html/elements/chart-examples/chart-examples.html
/src/html/elements/chart-examples/chart-examples.html
1 <dom-module id="chart-examples">2 <template>3
4 <div horizontal layout flex>5 <paper-material elevation="1" flex horizontal layout>6 <candlestick-chart flex data="{{chart11data}}" config="{{chart11config}}"
→˓configure-chart="{{chart11JSConfig}}"></candlestick-chart>7 </paper-material>8 </div>9
10 </template>11 </dom-module>
106 Chapter 1. Building your own Cell Panels
CMS Trigger Supervisor Software Documentation, Release 3.4.0
Now edit /src/html/elements/chart-examples/javascript/chart-examples.js
/src/html/elements/chart-examples/javascript/chart-examples.js
1 Polymer({2 properties: {3 chart11data: {4 type: Array,5 value: function() {6 return [{7 values: [{8 "date": 15854,9 "open": 165.42,
10 "high": 165.8,11 "low": 164.34,12 "close": 165.22,13 "volume": 160363400,14 "adjusted": 164.3515 }, {16 "date": 15855,17 "open": 165.35,18 "high": 166.59,19 "low": 165.22,20 "close": 165.83,21 "volume": 107793800,22 "adjusted": 164.9623 }, {24 "date": 15856,25 "open": 165.37,26 "high": 166.31,27 "low": 163.13,28 "close": 163.45,29 "volume": 176850100,30 "adjusted": 162.5931 }, {32 "date": 15859,33 "open": 163.83,34 "high": 164.46,35 "low": 162.66,36 "close": 164.35,37 "volume": 168390700,38 "adjusted": 163.4839 }, {40 "date": 15860,41 "open": 164.44,42 "high": 165.1,43 "low": 162.73,44 "close": 163.56,45 "volume": 157631500,46 "adjusted": 162.747 }, {48 "date": 15861,49 "open": 163.09,50 "high": 163.42,51 "low": 161.13,52 "close": 161.27,53 "volume": 211737800,54 "adjusted": 160.4255 }, {
1.2. Quickstart section 107
CMS Trigger Supervisor Software Documentation, Release 3.4.0
56 "date": 15862,57 "open": 161.2,58 "high": 162.74,59 "low": 160.25,60 "close": 162.73,61 "volume": 200225500,62 "adjusted": 161.8763 }, {64 "date": 15863,65 "open": 163.85,66 "high": 164.95,67 "low": 163.14,68 "close": 164.8,69 "volume": 188337800,70 "adjusted": 163.9371 }, {72 "date": 15866,73 "open": 165.31,74 "high": 165.4,75 "low": 164.37,76 "close": 164.8,77 "volume": 105667100,78 "adjusted": 163.9379 }, {80 "date": 15867,81 "open": 163.3,82 "high": 164.54,83 "low": 162.74,84 "close": 163.1,85 "volume": 159505400,86 "adjusted": 162.2487 }, {88 "date": 15868,89 "open": 164.22,90 "high": 164.39,91 "low": 161.6,92 "close": 161.75,93 "volume": 177361500,94 "adjusted": 160.995 }, {96 "date": 15869,97 "open": 161.66,98 "high": 164.5,99 "low": 161.3,
100 "close": 164.21,101 "volume": 163587800,102 "adjusted": 163.35103 }, {104 "date": 15870,105 "open": 164.03,106 "high": 164.67,107 "low": 162.91,108 "close": 163.18,109 "volume": 141197500,110 "adjusted": 162.32111 }, {112 "date": 15873,113 "open": 164.29,
108 Chapter 1. Building your own Cell Panels
CMS Trigger Supervisor Software Documentation, Release 3.4.0
114 "high": 165.22,115 "low": 163.22,116 "close": 164.44,117 "volume": 136295600,118 "adjusted": 163.57119 }, {120 "date": 15874,121 "open": 164.53,122 "high": 165.99,123 "low": 164.52,124 "close": 165.74,125 "volume": 114695600,126 "adjusted": 164.87127 }, {128 "date": 15875,129 "open": 165.6,130 "high": 165.89,131 "low": 163.38,132 "close": 163.45,133 "volume": 206149500,134 "adjusted": 162.59135 }, {136 "date": 15876,137 "open": 161.86,138 "high": 163.47,139 "low": 158.98,140 "close": 159.4,141 "volume": 321255900,142 "adjusted": 158.56143 }, {144 "date": 15877,145 "open": 159.64,146 "high": 159.76,147 "low": 157.47,148 "close": 159.07,149 "volume": 271956800,150 "adjusted": 159.07151 }, {152 "date": 15880,153 "open": 157.41,154 "high": 158.43,155 "low": 155.73,156 "close": 157.06,157 "volume": 222329000,158 "adjusted": 157.06159 }, {160 "date": 15881,161 "open": 158.48,162 "high": 160.1,163 "low": 157.42,164 "close": 158.57,165 "volume": 162262200,166 "adjusted": 158.57167 }, {168 "date": 15882,169 "open": 159.87,170 "high": 160.5,171 "low": 159.25,
1.2. Quickstart section 109
CMS Trigger Supervisor Software Documentation, Release 3.4.0
172 "close": 160.14,173 "volume": 134848000,174 "adjusted": 160.14175 }, {176 "date": 15883,177 "open": 161.1,178 "high": 161.82,179 "low": 160.95,180 "close": 161.08,181 "volume": 129483700,182 "adjusted": 161.08183 }, {184 "date": 15884,185 "open": 160.63,186 "high": 161.4,187 "low": 159.86,188 "close": 160.42,189 "volume": 160402900,190 "adjusted": 160.42191 }, {192 "date": 15887,193 "open": 161.26,194 "high": 162.48,195 "low": 161.08,196 "close": 161.36,197 "volume": 131954800,198 "adjusted": 161.36199 }, {200 "date": 15888,201 "open": 161.12,202 "high": 162.3,203 "low": 160.5,204 "close": 161.21,205 "volume": 154863700,206 "adjusted": 161.21207 }, {208 "date": 15889,209 "open": 160.48,210 "high": 161.77,211 "low": 160.22,212 "close": 161.28,213 "volume": 75216400,214 "adjusted": 161.28215 }, {216 "date": 15891,217 "open": 162.47,218 "high": 163.08,219 "low": 161.3,220 "close": 163.02,221 "volume": 122416900,222 "adjusted": 163.02223 }, {224 "date": 15894,225 "open": 163.86,226 "high": 164.39,227 "low": 163.08,228 "close": 163.95,229 "volume": 108092500,
110 Chapter 1. Building your own Cell Panels
CMS Trigger Supervisor Software Documentation, Release 3.4.0
230 "adjusted": 163.95231 }, {232 "date": 15895,233 "open": 164.98,234 "high": 165.33,235 "low": 164.27,236 "close": 165.13,237 "volume": 119298000,238 "adjusted": 165.13239 }, {240 "date": 15896,241 "open": 164.97,242 "high": 165.75,243 "low": 164.63,244 "close": 165.19,245 "volume": 121410100,246 "adjusted": 165.19247 }, {248 "date": 15897,249 "open": 167.11,250 "high": 167.61,251 "low": 165.18,252 "close": 167.44,253 "volume": 135592200,254 "adjusted": 167.44255 }, {256 "date": 15898,257 "open": 167.39,258 "high": 167.93,259 "low": 167.13,260 "close": 167.51,261 "volume": 104212700,262 "adjusted": 167.51263 }, {264 "date": 15901,265 "open": 167.97,266 "high": 168.39,267 "low": 167.68,268 "close": 168.15,269 "volume": 69450600,270 "adjusted": 168.15271 }, {272 "date": 15902,273 "open": 168.26,274 "high": 168.36,275 "low": 167.07,276 "close": 167.52,277 "volume": 88702100,278 "adjusted": 167.52279 }, {280 "date": 15903,281 "open": 168.16,282 "high": 168.48,283 "low": 167.73,284 "close": 167.95,285 "volume": 92873900,286 "adjusted": 167.95287 }, {
1.2. Quickstart section 111
CMS Trigger Supervisor Software Documentation, Release 3.4.0
288 "date": 15904,289 "open": 168.31,290 "high": 169.27,291 "low": 168.2,292 "close": 168.87,293 "volume": 103620100,294 "adjusted": 168.87295 }, {296 "date": 15905,297 "open": 168.52,298 "high": 169.23,299 "low": 168.31,300 "close": 169.17,301 "volume": 103831700,302 "adjusted": 169.17303 }, {304 "date": 15908,305 "open": 169.41,306 "high": 169.74,307 "low": 169.01,308 "close": 169.5,309 "volume": 79428600,310 "adjusted": 169.5311 }, {312 "date": 15909,313 "open": 169.8,314 "high": 169.83,315 "low": 169.05,316 "close": 169.14,317 "volume": 80829700,318 "adjusted": 169.14319 }, {320 "date": 15910,321 "open": 169.79,322 "high": 169.86,323 "low": 168.18,324 "close": 168.52,325 "volume": 112914000,326 "adjusted": 168.52327 }, {328 "date": 15911,329 "open": 168.22,330 "high": 169.08,331 "low": 167.94,332 "close": 168.93,333 "volume": 111088600,334 "adjusted": 168.93335 }, {336 "date": 15912,337 "open": 168.22,338 "high": 169.16,339 "low": 167.52,340 "close": 169.11,341 "volume": 107814600,342 "adjusted": 169.11343 }, {344 "date": 15915,345 "open": 168.68,
112 Chapter 1. Building your own Cell Panels
CMS Trigger Supervisor Software Documentation, Release 3.4.0
346 "high": 169.06,347 "low": 168.11,348 "close": 168.59,349 "volume": 79695000,350 "adjusted": 168.59351 }, {352 "date": 15916,353 "open": 169.1,354 "high": 169.28,355 "low": 168.19,356 "close": 168.59,357 "volume": 85209600,358 "adjusted": 168.59359 }, {360 "date": 15917,361 "open": 168.94,362 "high": 169.85,363 "low": 168.49,364 "close": 168.71,365 "volume": 142388700,366 "adjusted": 168.71367 }, {368 "date": 15918,369 "open": 169.99,370 "high": 170.81,371 "low": 169.9,372 "close": 170.66,373 "volume": 110438400,374 "adjusted": 170.66375 }, {376 "date": 15919,377 "open": 170.28,378 "high": 170.97,379 "low": 170.05,380 "close": 170.95,381 "volume": 91116700,382 "adjusted": 170.95383 }, {384 "date": 15922,385 "open": 170.57,386 "high": 170.96,387 "low": 170.35,388 "close": 170.7,389 "volume": 54072700,390 "adjusted": 170.7391 }, {392 "date": 15923,393 "open": 170.37,394 "high": 170.74,395 "low": 169.35,396 "close": 169.73,397 "volume": 87495000,398 "adjusted": 169.73399 }, {400 "date": 15924,401 "open": 169.19,402 "high": 169.43,403 "low": 168.55,
1.2. Quickstart section 113
CMS Trigger Supervisor Software Documentation, Release 3.4.0
404 "close": 169.18,405 "volume": 84854700,406 "adjusted": 169.18407 }, {408 "date": 15925,409 "open": 169.98,410 "high": 170.18,411 "low": 168.93,412 "close": 169.8,413 "volume": 102181300,414 "adjusted": 169.8415 }, {416 "date": 15926,417 "open": 169.58,418 "high": 170.1,419 "low": 168.72,420 "close": 169.31,421 "volume": 91757700,422 "adjusted": 169.31423 }, {424 "date": 15929,425 "open": 168.46,426 "high": 169.31,427 "low": 168.38,428 "close": 169.11,429 "volume": 68593300,430 "adjusted": 169.11431 }, {432 "date": 15930,433 "open": 169.41,434 "high": 169.9,435 "low": 168.41,436 "close": 169.61,437 "volume": 80806000,438 "adjusted": 169.61439 }, {440 "date": 15931,441 "open": 169.53,442 "high": 169.8,443 "low": 168.7,444 "close": 168.74,445 "volume": 79829200,446 "adjusted": 168.74447 }, {448 "date": 15932,449 "open": 167.41,450 "high": 167.43,451 "low": 166.09,452 "close": 166.38,453 "volume": 152931800,454 "adjusted": 166.38455 }, {456 "date": 15933,457 "open": 166.06,458 "high": 166.63,459 "low": 165.5,460 "close": 165.83,461 "volume": 130868200,
114 Chapter 1. Building your own Cell Panels
CMS Trigger Supervisor Software Documentation, Release 3.4.0
462 "adjusted": 165.83463 }, {464 "date": 15936,465 "open": 165.64,466 "high": 166.21,467 "low": 164.76,468 "close": 164.77,469 "volume": 96437600,470 "adjusted": 164.77471 }, {472 "date": 15937,473 "open": 165.04,474 "high": 166.2,475 "low": 164.86,476 "close": 165.58,477 "volume": 89294400,478 "adjusted": 165.58479 }, {480 "date": 15938,481 "open": 165.12,482 "high": 166.03,483 "low": 164.19,484 "close": 164.56,485 "volume": 159530500,486 "adjusted": 164.56487 }, {488 "date": 15939,489 "open": 164.9,490 "high": 166.3,491 "low": 164.89,492 "close": 166.06,493 "volume": 101471400,494 "adjusted": 166.06495 }, {496 "date": 15940,497 "open": 166.55,498 "high": 166.83,499 "low": 165.77,500 "close": 166.62,501 "volume": 90888900,502 "adjusted": 166.62503 }, {504 "date": 15943,505 "open": 166.79,506 "high": 167.3,507 "low": 165.89,508 "close": 166,509 "volume": 89702100,510 "adjusted": 166511 }, {512 "date": 15944,513 "open": 164.36,514 "high": 166,515 "low": 163.21,516 "close": 163.33,517 "volume": 158619400,518 "adjusted": 163.33519 }, {
1.2. Quickstart section 115

CMS Trigger Supervisor Software Documentation, Release 3.4.0
520 "date": 15945,521 "open": 163.26,522 "high": 164.49,523 "low": 163.05,524 "close": 163.91,525 "volume": 108113000,526 "adjusted": 163.91527 }, {528 "date": 15946,529 "open": 163.55,530 "high": 165.04,531 "low": 163.4,532 "close": 164.17,533 "volume": 119200500,534 "adjusted": 164.17535 }, {536 "date": 15947,537 "open": 164.51,538 "high": 164.53,539 "low": 163.17,540 "close": 163.65,541 "volume": 134560800,542 "adjusted": 163.65543 }, {544 "date": 15951,545 "open": 165.23,546 "high": 165.58,547 "low": 163.7,548 "close": 164.39,549 "volume": 142322300,550 "adjusted": 164.39551 }, {552 "date": 15952,553 "open": 164.43,554 "high": 166.03,555 "low": 164.13,556 "close": 165.75,557 "volume": 97304000,558 "adjusted": 165.75559 }, {560 "date": 15953,561 "open": 165.85,562 "high": 166.4,563 "low": 165.73,564 "close": 165.96,565 "volume": 62930500,566 "adjusted": 165.96567 }]568 }];569 }570 },571
572 chart11config: {573 type: Object,574 value: function() {575 return {576 x: function(d) { return d['date'] },577 y: function(d) { return d['close'] },
116 Chapter 1. Building your own Cell Panels

CMS Trigger Supervisor Software Documentation, Release 3.4.0
578 duration: 250,579 margin: {left: 75, bottom: 50}580 }581 }582 },583
584 chart11JSConfig: {585 type: Function,586 value: function() {587 return function() {588 this._chart.xAxis589 .axisLabel("Dates")590 .tickFormat(function(d) {591 // I didn't feel like changing all the above date values592 // so I hack it to make each value fall on a different date593 return d3.time.format('%x')(new Date(new Date() - (20000 * 86400000)
→˓+ (d * 86400000)));594 });595 this._chart.yAxis596 .axisLabel('Stock Price')597 .tickFormat(function(d,i){ return '$' + d3.format(',.1f')(d); });598 }599 }600 }601 }602 });
The result will look like this:
1.2.10 Demo 7: Using the theme
Make the theme-demo element
In your cell, run:
1 cd src/html/elements2 ./new-element.js3 name of the new element: theme-demo4 creating new element <theme-demo>...5 removing any .svn folders in theme-demo6 Finished
You now have a working theme-demo element. We’ll edit it soon.
1.2. Quickstart section 117
CMS Trigger Supervisor Software Documentation, Release 3.4.0
Register the theme-demo element
Edit src/html/elements/elements.html and add the following line
1 <link rel="import" href="theme-demo/theme-demo.html">
This will tell AjaXell to load our new element.
Edit the theme-demo element
Edit src/html/elements/theme-demo/theme-demo.html
1 <link rel="import" href="/extern/bower_components/polymer/polymer.html">2 <link rel="import" href="/ts/common-elements/reset-css/reset-css.html">3 <link rel="import" href="/ts/common-elements/iron-flex-layout-attributes/iron-flex-
→˓layout-attributes.html">4
5 <link rel="import" href="/extern/bower_components/paper-button/paper-button.html">6 <link rel="import" href="/extern/bower_components/iron-icon/iron-icon.html">7 <link rel="import" href="/extern/bower_components/iron-icons/iron-icons.html">8 <link rel="import" href="/extern/bower_components/paper-fab/paper-fab.html">9
10 <link rel="import" href="/extern/bower_components/paper-checkbox/paper-checkbox.html">11
12 <link rel="import" href="/extern/bower_components/paper-dropdown-menu/paper-dropdown-→˓menu.html">
13 <link rel="import" href="/extern/bower_components/paper-material/paper-material.html">14 <link rel="import" href="/extern/bower_components/paper-listbox/paper-listbox.html">15 <link rel="import" href="/extern/bower_components/paper-menu/paper-menu.html">16 <link rel="import" href="/extern/bower_components/paper-item/paper-item.html">17 <link rel="import" href="/extern/bower_components/paper-icon-button/paper-icon-button.
→˓html">18
19 <link rel="import" href="/extern/bower_components/paper-input/paper-input.html">20 <link rel="import" href="/extern/bower_components/paper-input/paper-textarea.html">21 <link rel="import" href="/extern/bower_components/paper-radio-button/paper-radio-
→˓button.html">22 <link rel="import" href="/extern/bower_components/paper-radio-group/paper-radio-group.
→˓html">23 <link rel="import" href="/extern/bower_components/paper-toggle-button/paper-toggle-
→˓button.html">24
25 <link rel="import" href="/extern/bower_components/paper-progress/paper-progress.html">26 <link rel="import" href="/extern/bower_components/paper-spinner/paper-spinner.html">27
28 <link rel="import" href="/extern/bower_components/paper-tabs/paper-tabs.html">29 <link rel="import" href="/extern/bower_components/paper-tabs/paper-tab.html">30
31 <link rel="import" href="/extern/bower_components/paper-tooltip/paper-tooltip.html">32
33 <link rel="import" href="/extern/bower_components/iron-collapse/iron-collapse.html">34 <dom-module id="theme-demo">35 <template>36 <style include="reset-css"></style>37 <style include="iron-flex-layout-attributes"></style>38
39 <link rel="stylesheet" type="text/css" href="css/theme-demo-min.css?__inline=true→˓">
118 Chapter 1. Building your own Cell Panels
CMS Trigger Supervisor Software Documentation, Release 3.4.0
40
41 <h1>Buttons</h1>42 <div horizontal layout>43 <paper-button>default</paper-button>44 <paper-button disabled>disabled</paper-button>45 <paper-button noink>noink</paper-button>46 <paper-button><iron-icon icon="polymer"></iron-icon> icon</paper-button>47 <paper-button primary>primary</paper-button>48 <paper-button secondary>secondary</paper-button>49 <paper-button info>info</paper-button>50 <paper-button warning>warning</paper-button>51 <paper-button error>error</paper-button>52 </div>53 <div horizontal layout>54 <paper-button raised>default</paper-button>55 <paper-button raised disabled>disabled</paper-button>56 <paper-button raised noink>noink</paper-button>57 <paper-button raised><iron-icon icon="polymer"></iron-icon> icon</paper-button>58 <paper-button raised primary>primary</paper-button>59 <paper-button raised secondary>secondary</paper-button>60 <paper-button raised info>info</paper-button>61 <paper-button raised warning>warning</paper-button>62 <paper-button raised error>error</paper-button>63 </div>64 <div horizontal layout>65 <paper-button toggles>default</paper-button>66 <paper-button toggles disabled>disabled</paper-button>67 <paper-button toggles noink>noink</paper-button>68 <paper-button toggles><iron-icon icon="polymer"></iron-icon> icon</paper-button>69 <paper-button toggles primary>primary</paper-button>70 <paper-button toggles secondary>secondary</paper-button>71 <paper-button toggles info>info</paper-button>72 <paper-button toggles warning>warning</paper-button>73 <paper-button toggles error>error</paper-button>74 </div>75 <div horizontal layout>76 <paper-fab icon="arrow-forward" title="arrow-forward"></paper-fab>77 <paper-fab disabled icon="create" title="create"></paper-fab>78 <paper-fab secondary icon="favorite" title="heart"></paper-fab>79 <paper-fab info mini icon="reply" title="reply"></paper-fab>80 <paper-fab warning mini icon="reply" title="reply"></paper-fab>81 <paper-fab error mini icon="reply" title="reply"></paper-fab>82 </div>83
84 <h1>Checkboxes</h1>85 <p>86 These demonstrate the ability to customize the theme per-panel.87 </p>88 <div horizontal layout>89 <div vertical layout>90 <paper-checkbox>Default unchecked</paper-checkbox>91 <paper-checkbox pink>Unchecked with theme override</paper-checkbox>92 <paper-checkbox checked>Default checked</paper-checkbox>93 <paper-checkbox pink checked>Checked with theme override</paper-checkbox>94 </div>95 <div vertical layout>96 <paper-checkbox disabled>Default unchecked</paper-checkbox>97 <paper-checkbox disabled pink>Unchecked with theme override</paper-checkbox>
1.2. Quickstart section 119
CMS Trigger Supervisor Software Documentation, Release 3.4.0
98 <paper-checkbox disabled checked>Default checked</paper-checkbox>99 <paper-checkbox disabled pink checked>Checked with theme override</paper-
→˓checkbox>100 </div>101 </div>102
103 <h1>Menus</h1>104 <div horizontal layout>105 <paper-dropdown-menu label="Dinosaurs">106 <paper-listbox class="dropdown-content" selected="1">107 <paper-item>allosaurus</paper-item>108 <paper-item>brontosaurus</paper-item>109 <paper-item>carcharodontosaurus</paper-item>110 <paper-item>diplodocus</paper-item>111 </paper-listbox>112 </paper-dropdown-menu>113 </div>114 <div horizontal layout>115 <paper-material elevation="1">116 <paper-listbox>117 <paper-item>Item 1</paper-item>118 <paper-item>Item 2</paper-item>119 </paper-listbox>120 </paper-material>121 <paper-material elevation="1">122 <paper-listbox selected="0">123 <paper-item>Item 1</paper-item>124 <paper-item>Item 2</paper-item>125 </paper-listbox>126 </paper-material>127 <paper-material elevation="1">128 <paper-listbox multi>129 <paper-item>Item 1</paper-item>130 <paper-item>Item 2</paper-item>131 </paper-listbox>132 </paper-material>133 </div>134 <div horizontal layout>135 <paper-material elevation="1">136 <paper-menu selected="0">137 <paper-item>Item 1</paper-item>138 <paper-item>Item 2</paper-item>139 </paper-menu>140 </paper-material>141 <paper-material elevation="1">142 <paper-menu multi>143 <paper-item>Item 1</paper-item>144 <paper-item>Item 2</paper-item>145 </paper-menu>146 </paper-material>147 <paper-menu-button>148 <paper-icon-button icon="menu" class="dropdown-trigger"></paper-icon-button>149 <paper-menu class="dropdown-content">150 <paper-item>Share</paper-item>151 <paper-item>Settings</paper-item>152 <paper-item>Help</paper-item>153 </paper-menu>154 </paper-menu-button>
120 Chapter 1. Building your own Cell Panels
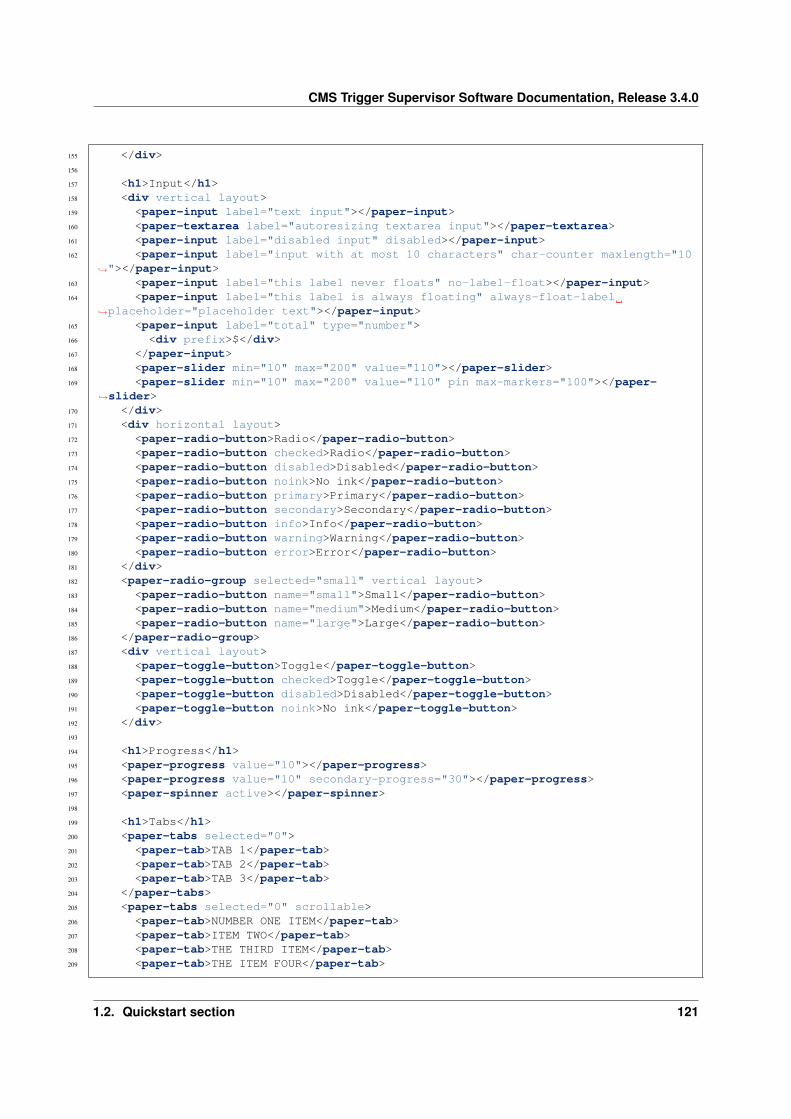
CMS Trigger Supervisor Software Documentation, Release 3.4.0
155 </div>156
157 <h1>Input</h1>158 <div vertical layout>159 <paper-input label="text input"></paper-input>160 <paper-textarea label="autoresizing textarea input"></paper-textarea>161 <paper-input label="disabled input" disabled></paper-input>162 <paper-input label="input with at most 10 characters" char-counter maxlength="10
→˓"></paper-input>163 <paper-input label="this label never floats" no-label-float></paper-input>164 <paper-input label="this label is always floating" always-float-label
→˓placeholder="placeholder text"></paper-input>165 <paper-input label="total" type="number">166 <div prefix>$</div>167 </paper-input>168 <paper-slider min="10" max="200" value="110"></paper-slider>169 <paper-slider min="10" max="200" value="110" pin max-markers="100"></paper-
→˓slider>170 </div>171 <div horizontal layout>172 <paper-radio-button>Radio</paper-radio-button>173 <paper-radio-button checked>Radio</paper-radio-button>174 <paper-radio-button disabled>Disabled</paper-radio-button>175 <paper-radio-button noink>No ink</paper-radio-button>176 <paper-radio-button primary>Primary</paper-radio-button>177 <paper-radio-button secondary>Secondary</paper-radio-button>178 <paper-radio-button info>Info</paper-radio-button>179 <paper-radio-button warning>Warning</paper-radio-button>180 <paper-radio-button error>Error</paper-radio-button>181 </div>182 <paper-radio-group selected="small" vertical layout>183 <paper-radio-button name="small">Small</paper-radio-button>184 <paper-radio-button name="medium">Medium</paper-radio-button>185 <paper-radio-button name="large">Large</paper-radio-button>186 </paper-radio-group>187 <div vertical layout>188 <paper-toggle-button>Toggle</paper-toggle-button>189 <paper-toggle-button checked>Toggle</paper-toggle-button>190 <paper-toggle-button disabled>Disabled</paper-toggle-button>191 <paper-toggle-button noink>No ink</paper-toggle-button>192 </div>193
194 <h1>Progress</h1>195 <paper-progress value="10"></paper-progress>196 <paper-progress value="10" secondary-progress="30"></paper-progress>197 <paper-spinner active></paper-spinner>198
199 <h1>Tabs</h1>200 <paper-tabs selected="0">201 <paper-tab>TAB 1</paper-tab>202 <paper-tab>TAB 2</paper-tab>203 <paper-tab>TAB 3</paper-tab>204 </paper-tabs>205 <paper-tabs selected="0" scrollable>206 <paper-tab>NUMBER ONE ITEM</paper-tab>207 <paper-tab>ITEM TWO</paper-tab>208 <paper-tab>THE THIRD ITEM</paper-tab>209 <paper-tab>THE ITEM FOUR</paper-tab>
1.2. Quickstart section 121
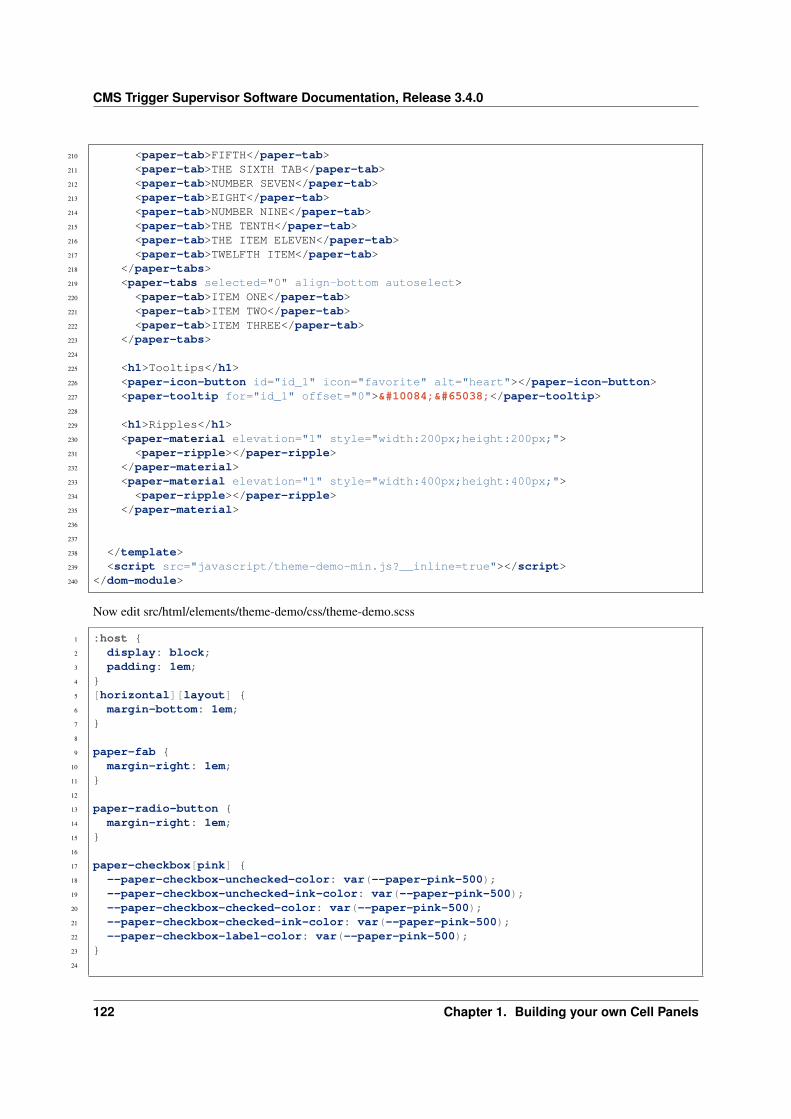
CMS Trigger Supervisor Software Documentation, Release 3.4.0
210 <paper-tab>FIFTH</paper-tab>211 <paper-tab>THE SIXTH TAB</paper-tab>212 <paper-tab>NUMBER SEVEN</paper-tab>213 <paper-tab>EIGHT</paper-tab>214 <paper-tab>NUMBER NINE</paper-tab>215 <paper-tab>THE TENTH</paper-tab>216 <paper-tab>THE ITEM ELEVEN</paper-tab>217 <paper-tab>TWELFTH ITEM</paper-tab>218 </paper-tabs>219 <paper-tabs selected="0" align-bottom autoselect>220 <paper-tab>ITEM ONE</paper-tab>221 <paper-tab>ITEM TWO</paper-tab>222 <paper-tab>ITEM THREE</paper-tab>223 </paper-tabs>224
225 <h1>Tooltips</h1>226 <paper-icon-button id="id_1" icon="favorite" alt="heart"></paper-icon-button>227 <paper-tooltip for="id_1" offset="0">❤︎</paper-tooltip>228
229 <h1>Ripples</h1>230 <paper-material elevation="1" style="width:200px;height:200px;">231 <paper-ripple></paper-ripple>232 </paper-material>233 <paper-material elevation="1" style="width:400px;height:400px;">234 <paper-ripple></paper-ripple>235 </paper-material>236
237
238 </template>239 <script src="javascript/theme-demo-min.js?__inline=true"></script>240 </dom-module>
Now edit src/html/elements/theme-demo/css/theme-demo.scss
1 :host {2 display: block;3 padding: 1em;4 }5 [horizontal][layout] {6 margin-bottom: 1em;7 }8
9 paper-fab {10 margin-right: 1em;11 }12
13 paper-radio-button {14 margin-right: 1em;15 }16
17 paper-checkbox[pink] {18 --paper-checkbox-unchecked-color: var(--paper-pink-500);19 --paper-checkbox-unchecked-ink-color: var(--paper-pink-500);20 --paper-checkbox-checked-color: var(--paper-pink-500);21 --paper-checkbox-checked-ink-color: var(--paper-pink-500);22 --paper-checkbox-label-color: var(--paper-pink-500);23 }24
122 Chapter 1. Building your own Cell Panels
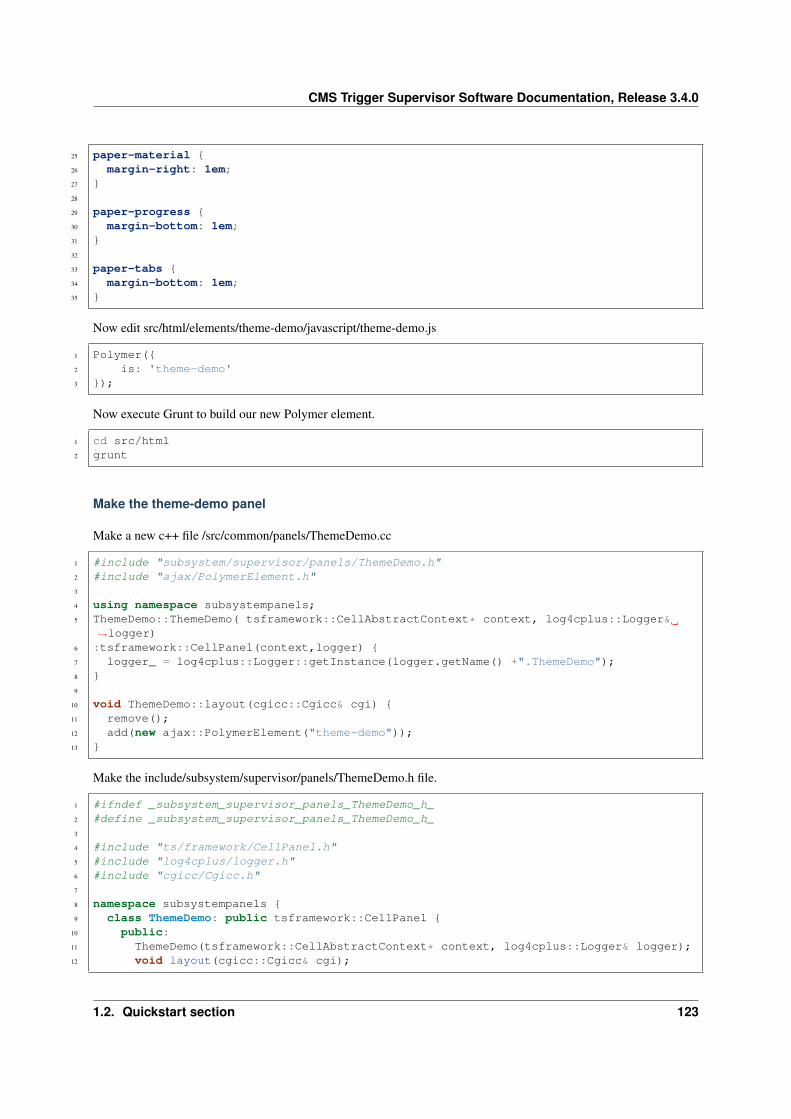
CMS Trigger Supervisor Software Documentation, Release 3.4.0
25 paper-material {26 margin-right: 1em;27 }28
29 paper-progress {30 margin-bottom: 1em;31 }32
33 paper-tabs {34 margin-bottom: 1em;35 }
Now edit src/html/elements/theme-demo/javascript/theme-demo.js
1 Polymer({2 is: 'theme-demo'3 });
Now execute Grunt to build our new Polymer element.
1 cd src/html2 grunt
Make the theme-demo panel
Make a new c++ file /src/common/panels/ThemeDemo.cc
1 #include "subsystem/supervisor/panels/ThemeDemo.h"2 #include "ajax/PolymerElement.h"3
4 using namespace subsystempanels;5 ThemeDemo::ThemeDemo( tsframework::CellAbstractContext* context, log4cplus::Logger&
→˓logger)6 :tsframework::CellPanel(context,logger) {7 logger_ = log4cplus::Logger::getInstance(logger.getName() +".ThemeDemo");8 }9
10 void ThemeDemo::layout(cgicc::Cgicc& cgi) {11 remove();12 add(new ajax::PolymerElement("theme-demo"));13 }
Make the include/subsystem/supervisor/panels/ThemeDemo.h file.
1 #ifndef _subsystem_supervisor_panels_ThemeDemo_h_2 #define _subsystem_supervisor_panels_ThemeDemo_h_3
4 #include "ts/framework/CellPanel.h"5 #include "log4cplus/logger.h"6 #include "cgicc/Cgicc.h"7
8 namespace subsystempanels {9 class ThemeDemo: public tsframework::CellPanel {
10 public:11 ThemeDemo(tsframework::CellAbstractContext* context, log4cplus::Logger& logger);12 void layout(cgicc::Cgicc& cgi);
1.2. Quickstart section 123

CMS Trigger Supervisor Software Documentation, Release 3.4.0
13 };14 }15 #endif
Register the new class in the Makefile.
1 Sources=\2 version.cc\3 Cell.cc\4 CellContext.cc\5 Configuration.cc\6 ...7 panels/ThemeDemo.cc \8 ...
Now register your new panel in the menu so users can access it.
Edit src/common/Cell.cc
1 #include "subsystem/supervisor/panels/ThemeDemo.h"2 ...3 void subsystemsupervisor::Cell::init() {4 ...5 tsframework::CellPanelFactory* panelF = getContext()->getPanelFactory();6 ...7 panelF->add<subsystempanels::ThemeDemo>("Theme demo");
Now you can compile your cell and you should see the ThemeDemo panel in the menu under the ‘control-panels’section.
124 Chapter 1. Building your own Cell Panels
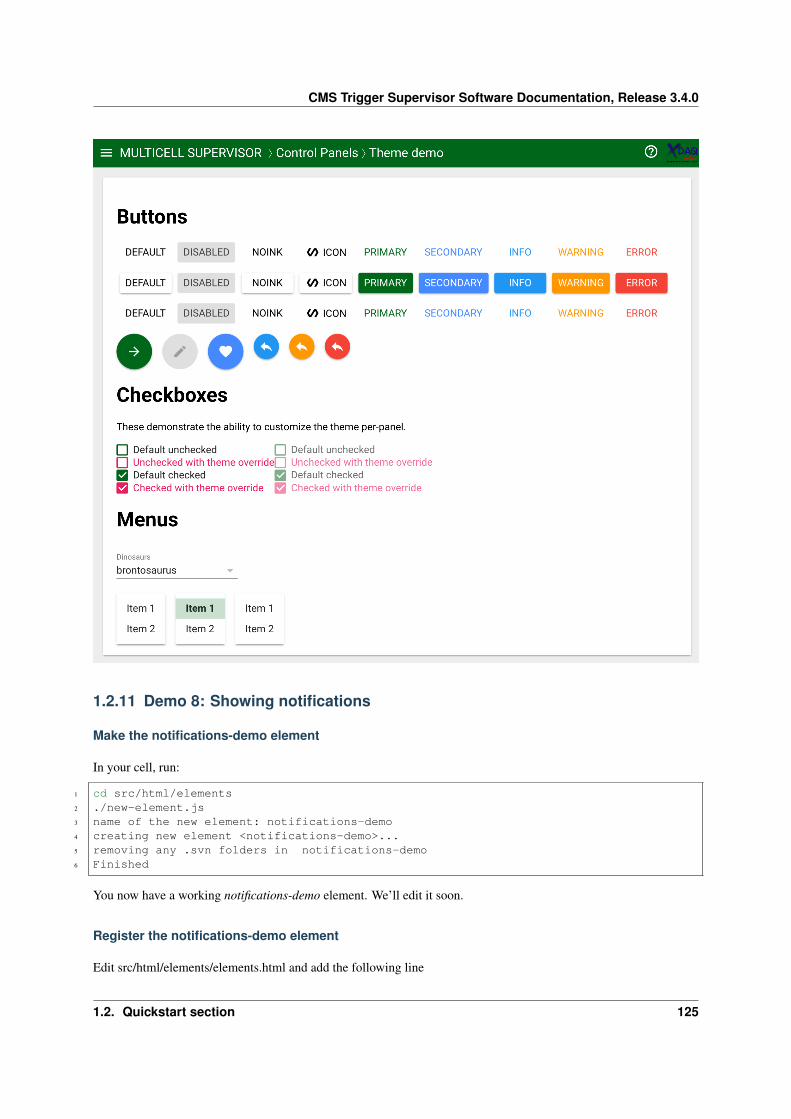
CMS Trigger Supervisor Software Documentation, Release 3.4.0
1.2.11 Demo 8: Showing notifications
Make the notifications-demo element
In your cell, run:
1 cd src/html/elements2 ./new-element.js3 name of the new element: notifications-demo4 creating new element <notifications-demo>...5 removing any .svn folders in notifications-demo6 Finished
You now have a working notifications-demo element. We’ll edit it soon.
Register the notifications-demo element
Edit src/html/elements/elements.html and add the following line
1.2. Quickstart section 125
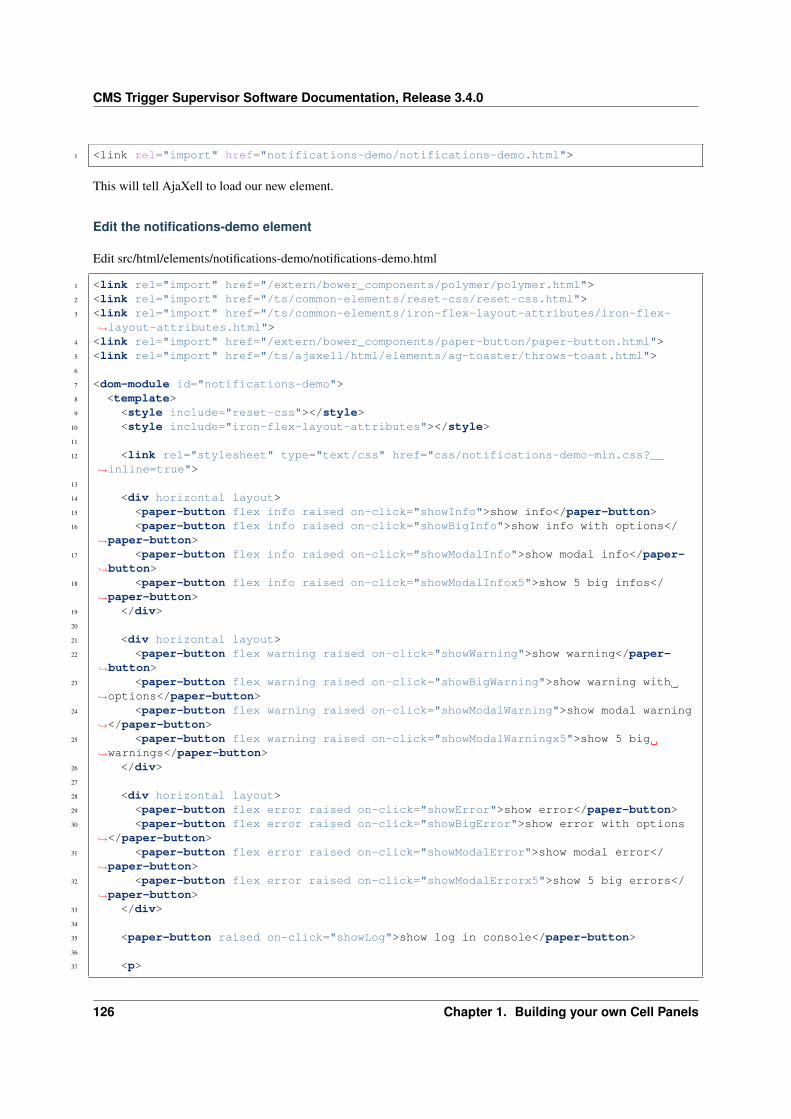
CMS Trigger Supervisor Software Documentation, Release 3.4.0
1 <link rel="import" href="notifications-demo/notifications-demo.html">
This will tell AjaXell to load our new element.
Edit the notifications-demo element
Edit src/html/elements/notifications-demo/notifications-demo.html
1 <link rel="import" href="/extern/bower_components/polymer/polymer.html">2 <link rel="import" href="/ts/common-elements/reset-css/reset-css.html">3 <link rel="import" href="/ts/common-elements/iron-flex-layout-attributes/iron-flex-
→˓layout-attributes.html">4 <link rel="import" href="/extern/bower_components/paper-button/paper-button.html">5 <link rel="import" href="/ts/ajaxell/html/elements/ag-toaster/throws-toast.html">6
7 <dom-module id="notifications-demo">8 <template>9 <style include="reset-css"></style>
10 <style include="iron-flex-layout-attributes"></style>11
12 <link rel="stylesheet" type="text/css" href="css/notifications-demo-min.css?__→˓inline=true">
13
14 <div horizontal layout>15 <paper-button flex info raised on-click="showInfo">show info</paper-button>16 <paper-button flex info raised on-click="showBigInfo">show info with options</
→˓paper-button>17 <paper-button flex info raised on-click="showModalInfo">show modal info</paper-
→˓button>18 <paper-button flex info raised on-click="showModalInfox5">show 5 big infos</
→˓paper-button>19 </div>20
21 <div horizontal layout>22 <paper-button flex warning raised on-click="showWarning">show warning</paper-
→˓button>23 <paper-button flex warning raised on-click="showBigWarning">show warning with
→˓options</paper-button>24 <paper-button flex warning raised on-click="showModalWarning">show modal warning
→˓</paper-button>25 <paper-button flex warning raised on-click="showModalWarningx5">show 5 big
→˓warnings</paper-button>26 </div>27
28 <div horizontal layout>29 <paper-button flex error raised on-click="showError">show error</paper-button>30 <paper-button flex error raised on-click="showBigError">show error with options
→˓</paper-button>31 <paper-button flex error raised on-click="showModalError">show modal error</
→˓paper-button>32 <paper-button flex error raised on-click="showModalErrorx5">show 5 big errors</
→˓paper-button>33 </div>34
35 <paper-button raised on-click="showLog">show log in console</paper-button>36
37 <p>
126 Chapter 1. Building your own Cell Panels
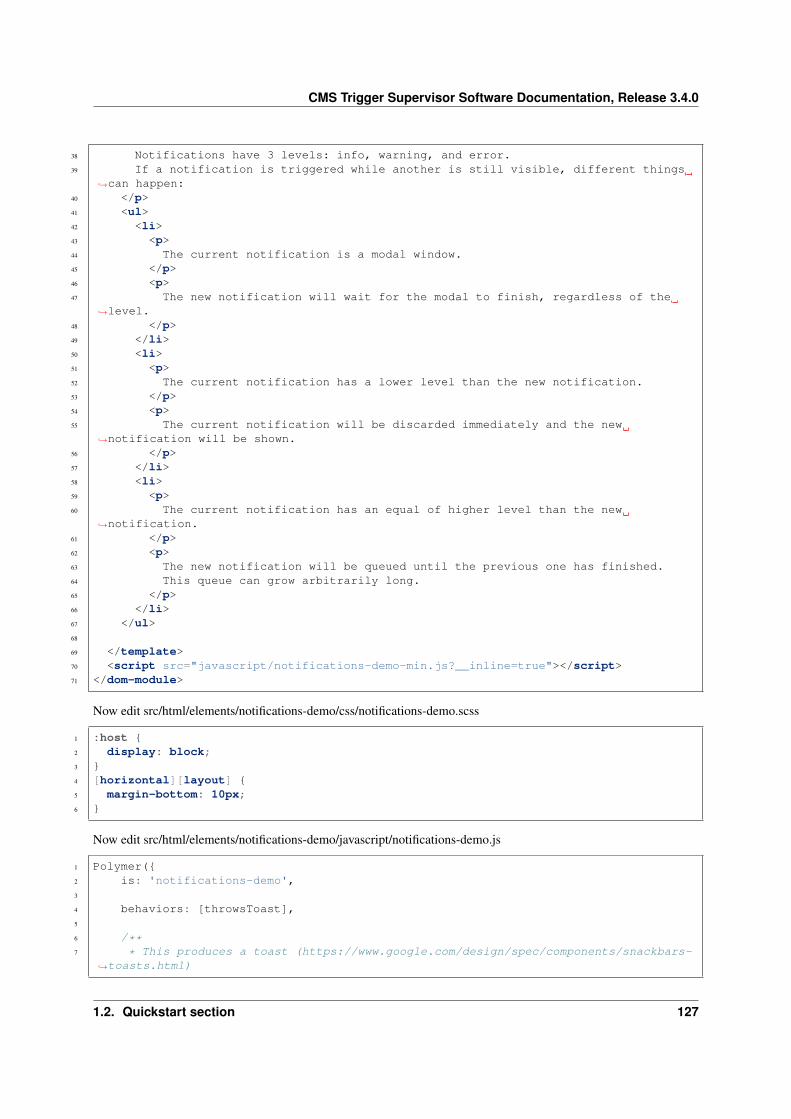
CMS Trigger Supervisor Software Documentation, Release 3.4.0
38 Notifications have 3 levels: info, warning, and error.39 If a notification is triggered while another is still visible, different things
→˓can happen:40 </p>41 <ul>42 <li>43 <p>44 The current notification is a modal window.45 </p>46 <p>47 The new notification will wait for the modal to finish, regardless of the
→˓level.48 </p>49 </li>50 <li>51 <p>52 The current notification has a lower level than the new notification.53 </p>54 <p>55 The current notification will be discarded immediately and the new
→˓notification will be shown.56 </p>57 </li>58 <li>59 <p>60 The current notification has an equal of higher level than the new
→˓notification.61 </p>62 <p>63 The new notification will be queued until the previous one has finished.64 This queue can grow arbitrarily long.65 </p>66 </li>67 </ul>68
69 </template>70 <script src="javascript/notifications-demo-min.js?__inline=true"></script>71 </dom-module>
Now edit src/html/elements/notifications-demo/css/notifications-demo.scss
1 :host {2 display: block;3 }4 [horizontal][layout] {5 margin-bottom: 10px;6 }
Now edit src/html/elements/notifications-demo/javascript/notifications-demo.js
1 Polymer({2 is: 'notifications-demo',3
4 behaviors: [throwsToast],5
6 /**7 * This produces a toast (https://www.google.com/design/spec/components/snackbars-
→˓toasts.html)
1.2. Quickstart section 127
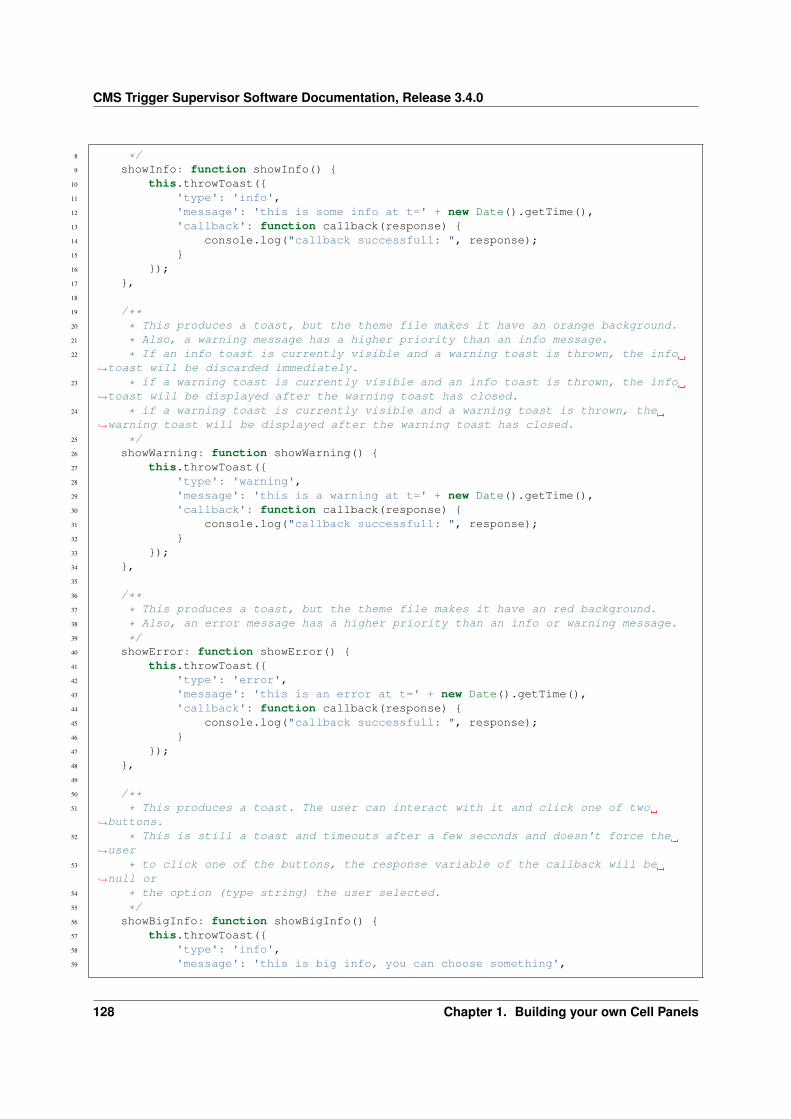
CMS Trigger Supervisor Software Documentation, Release 3.4.0
8 */9 showInfo: function showInfo() {
10 this.throwToast({11 'type': 'info',12 'message': 'this is some info at t=' + new Date().getTime(),13 'callback': function callback(response) {14 console.log("callback successfull: ", response);15 }16 });17 },18
19 /**20 * This produces a toast, but the theme file makes it have an orange background.21 * Also, a warning message has a higher priority than an info message.22 * If an info toast is currently visible and a warning toast is thrown, the info
→˓toast will be discarded immediately.23 * if a warning toast is currently visible and an info toast is thrown, the info
→˓toast will be displayed after the warning toast has closed.24 * if a warning toast is currently visible and a warning toast is thrown, the
→˓warning toast will be displayed after the warning toast has closed.25 */26 showWarning: function showWarning() {27 this.throwToast({28 'type': 'warning',29 'message': 'this is a warning at t=' + new Date().getTime(),30 'callback': function callback(response) {31 console.log("callback successfull: ", response);32 }33 });34 },35
36 /**37 * This produces a toast, but the theme file makes it have an red background.38 * Also, an error message has a higher priority than an info or warning message.39 */40 showError: function showError() {41 this.throwToast({42 'type': 'error',43 'message': 'this is an error at t=' + new Date().getTime(),44 'callback': function callback(response) {45 console.log("callback successfull: ", response);46 }47 });48 },49
50 /**51 * This produces a toast. The user can interact with it and click one of two
→˓buttons.52 * This is still a toast and timeouts after a few seconds and doesn't force the
→˓user53 * to click one of the buttons, the response variable of the callback will be
→˓null or54 * the option (type string) the user selected.55 */56 showBigInfo: function showBigInfo() {57 this.throwToast({58 'type': 'info',59 'message': 'this is big info, you can choose something',
128 Chapter 1. Building your own Cell Panels
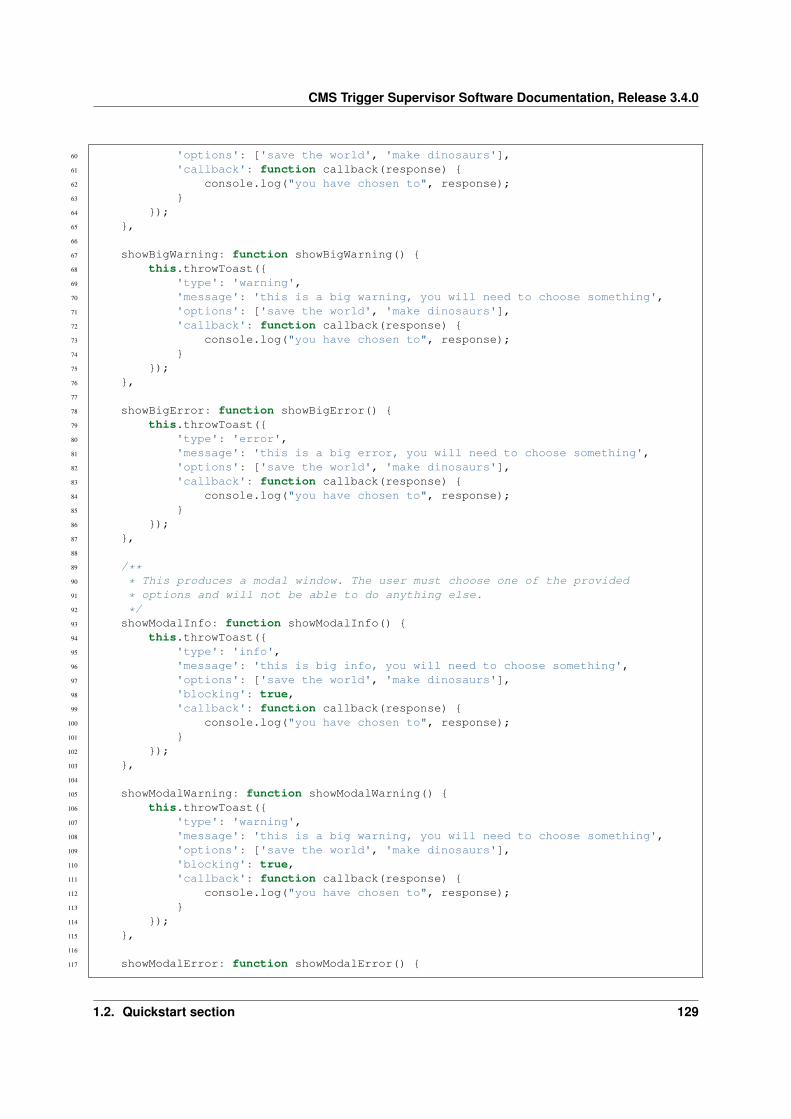
CMS Trigger Supervisor Software Documentation, Release 3.4.0
60 'options': ['save the world', 'make dinosaurs'],61 'callback': function callback(response) {62 console.log("you have chosen to", response);63 }64 });65 },66
67 showBigWarning: function showBigWarning() {68 this.throwToast({69 'type': 'warning',70 'message': 'this is a big warning, you will need to choose something',71 'options': ['save the world', 'make dinosaurs'],72 'callback': function callback(response) {73 console.log("you have chosen to", response);74 }75 });76 },77
78 showBigError: function showBigError() {79 this.throwToast({80 'type': 'error',81 'message': 'this is a big error, you will need to choose something',82 'options': ['save the world', 'make dinosaurs'],83 'callback': function callback(response) {84 console.log("you have chosen to", response);85 }86 });87 },88
89 /**90 * This produces a modal window. The user must choose one of the provided91 * options and will not be able to do anything else.92 */93 showModalInfo: function showModalInfo() {94 this.throwToast({95 'type': 'info',96 'message': 'this is big info, you will need to choose something',97 'options': ['save the world', 'make dinosaurs'],98 'blocking': true,99 'callback': function callback(response) {
100 console.log("you have chosen to", response);101 }102 });103 },104
105 showModalWarning: function showModalWarning() {106 this.throwToast({107 'type': 'warning',108 'message': 'this is a big warning, you will need to choose something',109 'options': ['save the world', 'make dinosaurs'],110 'blocking': true,111 'callback': function callback(response) {112 console.log("you have chosen to", response);113 }114 });115 },116
117 showModalError: function showModalError() {
1.2. Quickstart section 129
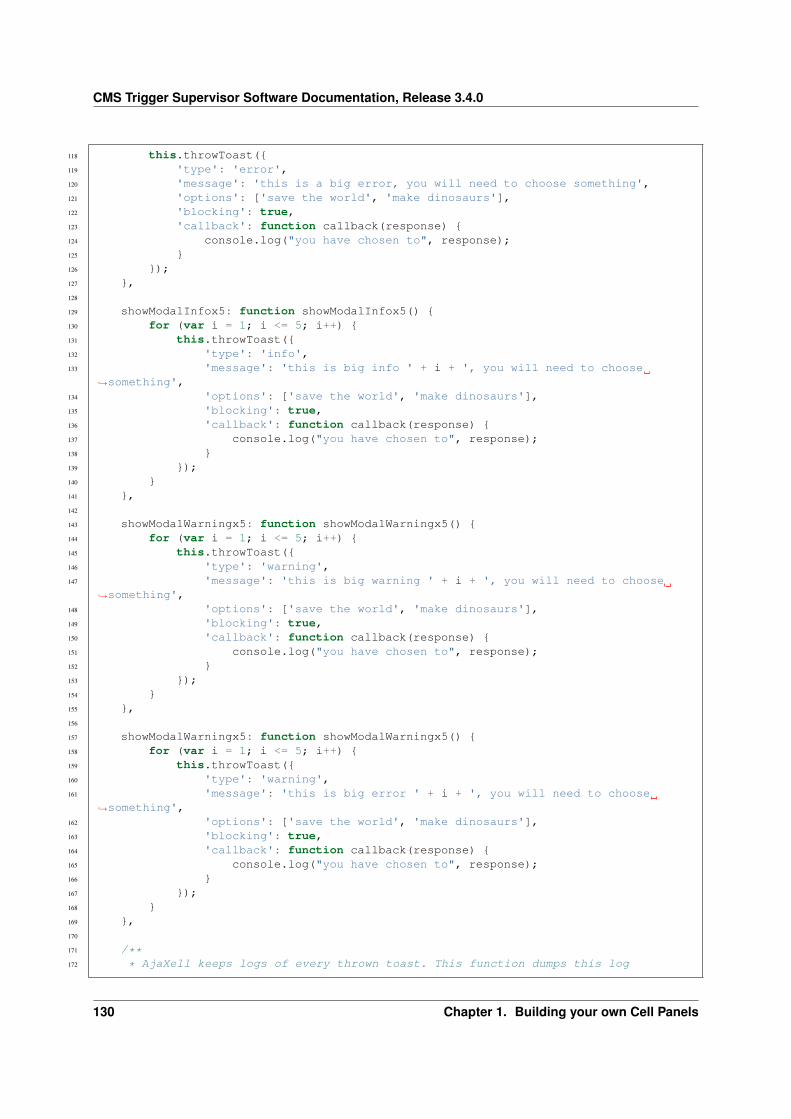
CMS Trigger Supervisor Software Documentation, Release 3.4.0
118 this.throwToast({119 'type': 'error',120 'message': 'this is a big error, you will need to choose something',121 'options': ['save the world', 'make dinosaurs'],122 'blocking': true,123 'callback': function callback(response) {124 console.log("you have chosen to", response);125 }126 });127 },128
129 showModalInfox5: function showModalInfox5() {130 for (var i = 1; i <= 5; i++) {131 this.throwToast({132 'type': 'info',133 'message': 'this is big info ' + i + ', you will need to choose
→˓something',134 'options': ['save the world', 'make dinosaurs'],135 'blocking': true,136 'callback': function callback(response) {137 console.log("you have chosen to", response);138 }139 });140 }141 },142
143 showModalWarningx5: function showModalWarningx5() {144 for (var i = 1; i <= 5; i++) {145 this.throwToast({146 'type': 'warning',147 'message': 'this is big warning ' + i + ', you will need to choose
→˓something',148 'options': ['save the world', 'make dinosaurs'],149 'blocking': true,150 'callback': function callback(response) {151 console.log("you have chosen to", response);152 }153 });154 }155 },156
157 showModalWarningx5: function showModalWarningx5() {158 for (var i = 1; i <= 5; i++) {159 this.throwToast({160 'type': 'warning',161 'message': 'this is big error ' + i + ', you will need to choose
→˓something',162 'options': ['save the world', 'make dinosaurs'],163 'blocking': true,164 'callback': function callback(response) {165 console.log("you have chosen to", response);166 }167 });168 }169 },170
171 /**172 * AjaXell keeps logs of every thrown toast. This function dumps this log
130 Chapter 1. Building your own Cell Panels
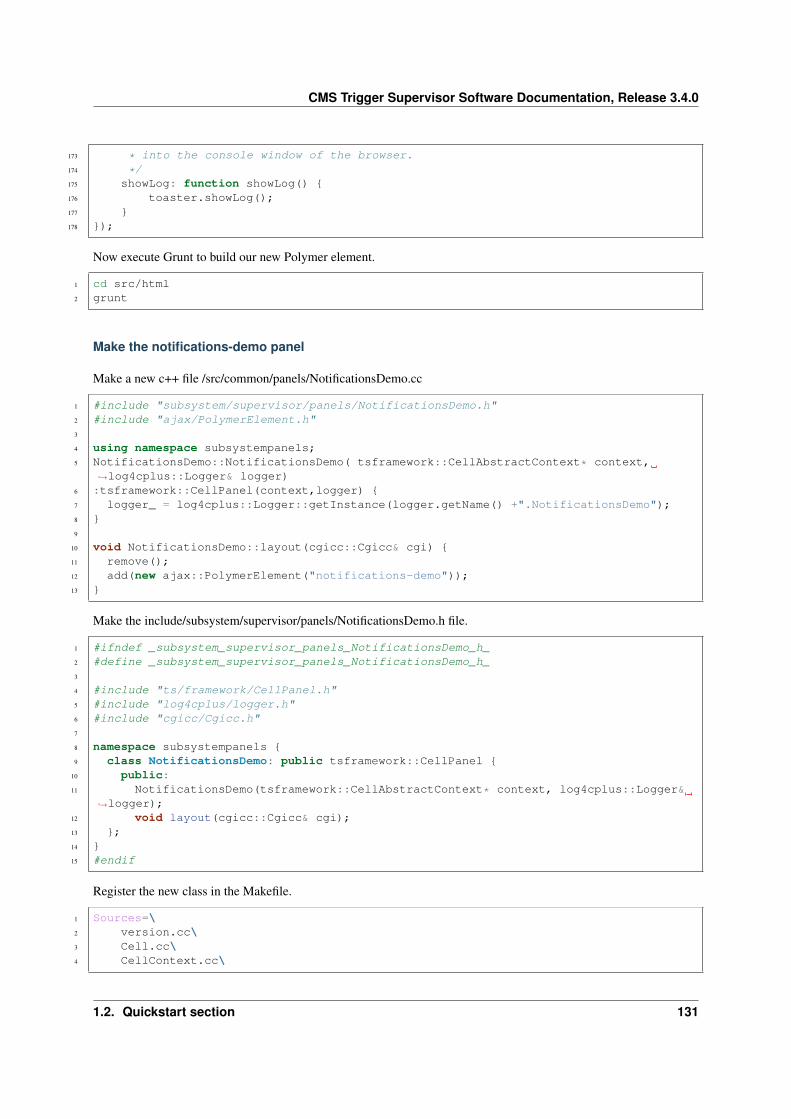
CMS Trigger Supervisor Software Documentation, Release 3.4.0
173 * into the console window of the browser.174 */175 showLog: function showLog() {176 toaster.showLog();177 }178 });
Now execute Grunt to build our new Polymer element.
1 cd src/html2 grunt
Make the notifications-demo panel
Make a new c++ file /src/common/panels/NotificationsDemo.cc
1 #include "subsystem/supervisor/panels/NotificationsDemo.h"2 #include "ajax/PolymerElement.h"3
4 using namespace subsystempanels;5 NotificationsDemo::NotificationsDemo( tsframework::CellAbstractContext* context,
→˓log4cplus::Logger& logger)6 :tsframework::CellPanel(context,logger) {7 logger_ = log4cplus::Logger::getInstance(logger.getName() +".NotificationsDemo");8 }9
10 void NotificationsDemo::layout(cgicc::Cgicc& cgi) {11 remove();12 add(new ajax::PolymerElement("notifications-demo"));13 }
Make the include/subsystem/supervisor/panels/NotificationsDemo.h file.
1 #ifndef _subsystem_supervisor_panels_NotificationsDemo_h_2 #define _subsystem_supervisor_panels_NotificationsDemo_h_3
4 #include "ts/framework/CellPanel.h"5 #include "log4cplus/logger.h"6 #include "cgicc/Cgicc.h"7
8 namespace subsystempanels {9 class NotificationsDemo: public tsframework::CellPanel {
10 public:11 NotificationsDemo(tsframework::CellAbstractContext* context, log4cplus::Logger&
→˓logger);12 void layout(cgicc::Cgicc& cgi);13 };14 }15 #endif
Register the new class in the Makefile.
1 Sources=\2 version.cc\3 Cell.cc\4 CellContext.cc\
1.2. Quickstart section 131
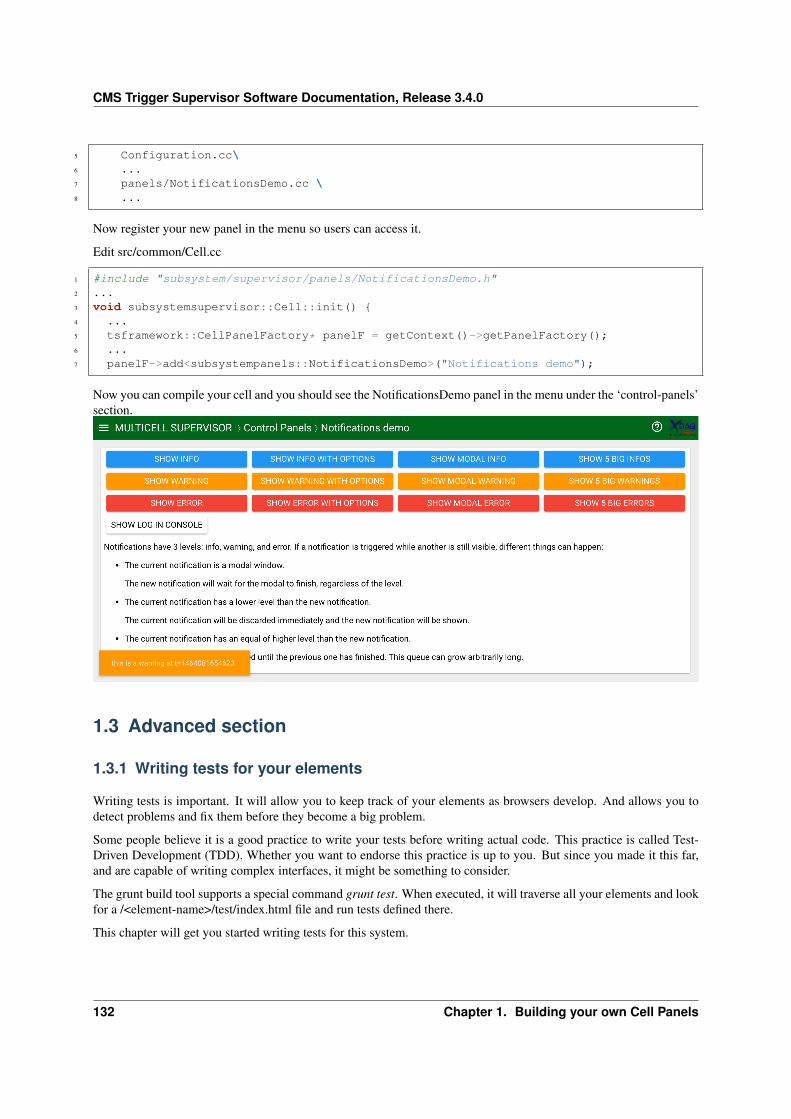
CMS Trigger Supervisor Software Documentation, Release 3.4.0
5 Configuration.cc\6 ...7 panels/NotificationsDemo.cc \8 ...
Now register your new panel in the menu so users can access it.
Edit src/common/Cell.cc
1 #include "subsystem/supervisor/panels/NotificationsDemo.h"2 ...3 void subsystemsupervisor::Cell::init() {4 ...5 tsframework::CellPanelFactory* panelF = getContext()->getPanelFactory();6 ...7 panelF->add<subsystempanels::NotificationsDemo>("Notifications demo");
Now you can compile your cell and you should see the NotificationsDemo panel in the menu under the ‘control-panels’section.
1.3 Advanced section
1.3.1 Writing tests for your elements
Writing tests is important. It will allow you to keep track of your elements as browsers develop. And allows you todetect problems and fix them before they become a big problem.
Some people believe it is a good practice to write your tests before writing actual code. This practice is called Test-Driven Development (TDD). Whether you want to endorse this practice is up to you. But since you made it this far,and are capable of writing complex interfaces, it might be something to consider.
The grunt build tool supports a special command grunt test. When executed, it will traverse all your elements and lookfor a /<element-name>/test/index.html file and run tests defined there.
This chapter will get you started writing tests for this system.
132 Chapter 1. Building your own Cell Panels
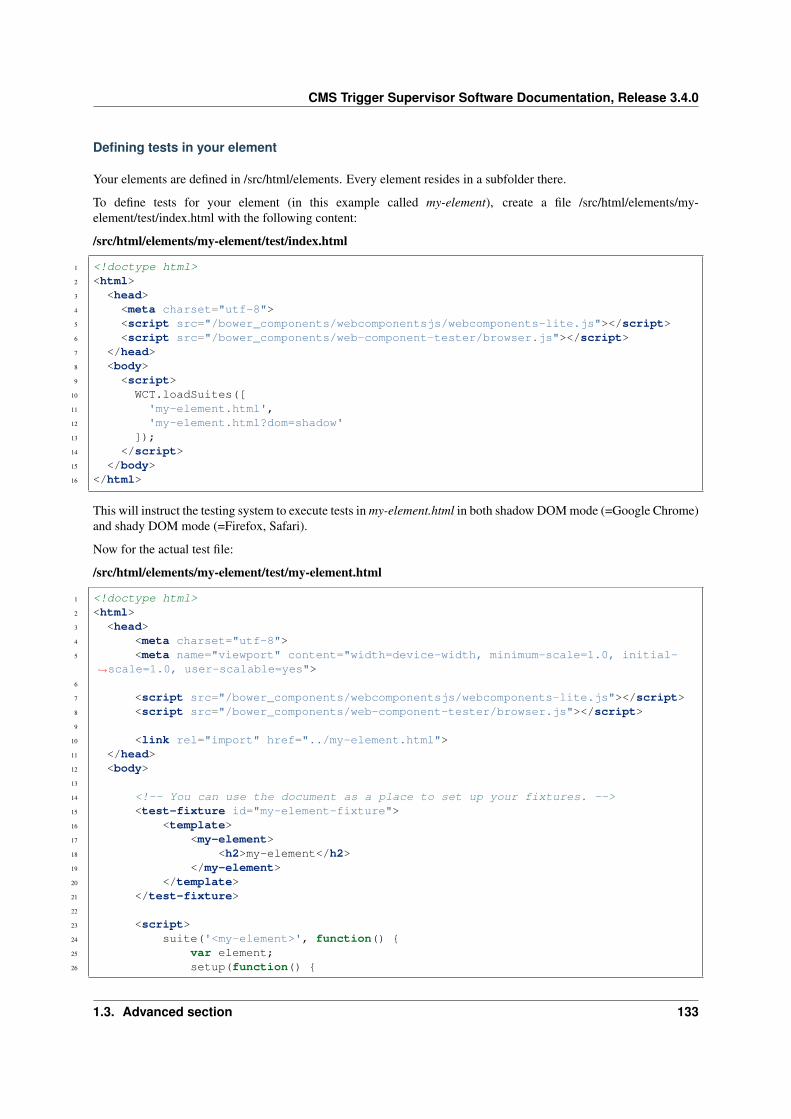
CMS Trigger Supervisor Software Documentation, Release 3.4.0
Defining tests in your element
Your elements are defined in /src/html/elements. Every element resides in a subfolder there.
To define tests for your element (in this example called my-element), create a file /src/html/elements/my-element/test/index.html with the following content:
/src/html/elements/my-element/test/index.html
1 <!doctype html>2 <html>3 <head>4 <meta charset="utf-8">5 <script src="/bower_components/webcomponentsjs/webcomponents-lite.js"></script>6 <script src="/bower_components/web-component-tester/browser.js"></script>7 </head>8 <body>9 <script>
10 WCT.loadSuites([11 'my-element.html',12 'my-element.html?dom=shadow'13 ]);14 </script>15 </body>16 </html>
This will instruct the testing system to execute tests in my-element.html in both shadow DOM mode (=Google Chrome)and shady DOM mode (=Firefox, Safari).
Now for the actual test file:
/src/html/elements/my-element/test/my-element.html
1 <!doctype html>2 <html>3 <head>4 <meta charset="utf-8">5 <meta name="viewport" content="width=device-width, minimum-scale=1.0, initial-
→˓scale=1.0, user-scalable=yes">6
7 <script src="/bower_components/webcomponentsjs/webcomponents-lite.js"></script>8 <script src="/bower_components/web-component-tester/browser.js"></script>9
10 <link rel="import" href="../my-element.html">11 </head>12 <body>13
14 <!-- You can use the document as a place to set up your fixtures. -->15 <test-fixture id="my-element-fixture">16 <template>17 <my-element>18 <h2>my-element</h2>19 </my-element>20 </template>21 </test-fixture>22
23 <script>24 suite('<my-element>', function() {25 var element;26 setup(function() {
1.3. Advanced section 133
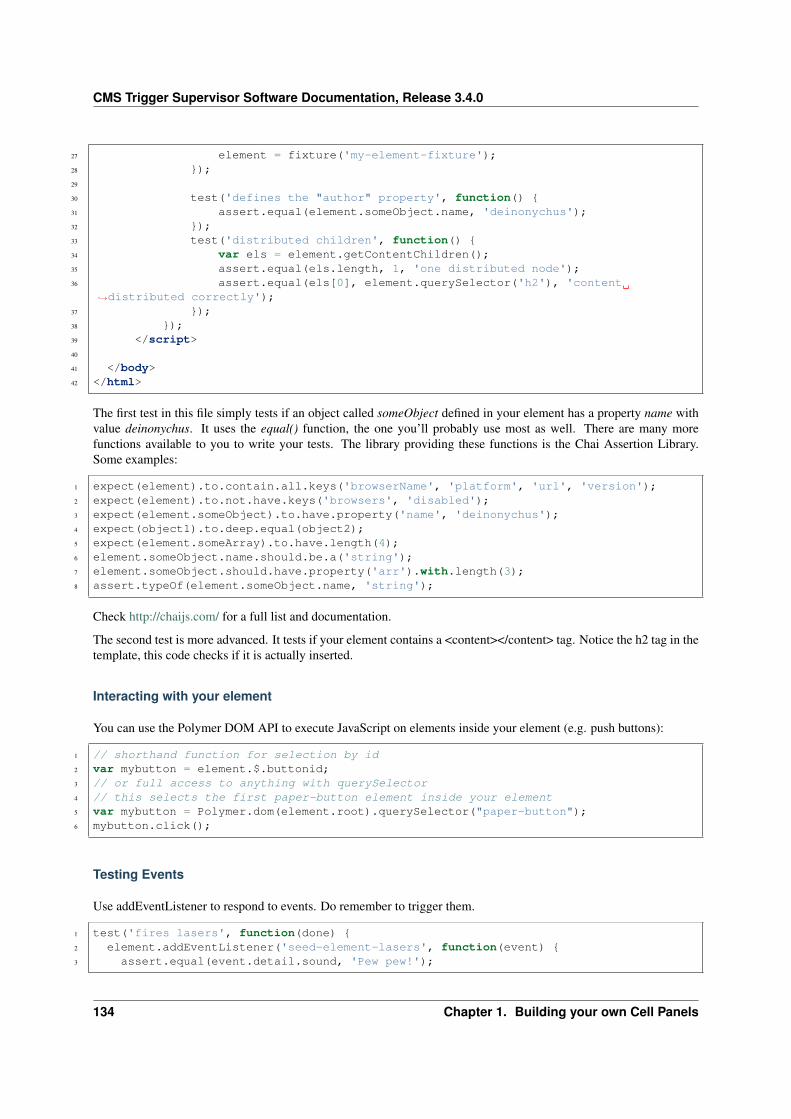
CMS Trigger Supervisor Software Documentation, Release 3.4.0
27 element = fixture('my-element-fixture');28 });29
30 test('defines the "author" property', function() {31 assert.equal(element.someObject.name, 'deinonychus');32 });33 test('distributed children', function() {34 var els = element.getContentChildren();35 assert.equal(els.length, 1, 'one distributed node');36 assert.equal(els[0], element.querySelector('h2'), 'content
→˓distributed correctly');37 });38 });39 </script>40
41 </body>42 </html>
The first test in this file simply tests if an object called someObject defined in your element has a property name withvalue deinonychus. It uses the equal() function, the one you’ll probably use most as well. There are many morefunctions available to you to write your tests. The library providing these functions is the Chai Assertion Library.Some examples:
1 expect(element).to.contain.all.keys('browserName', 'platform', 'url', 'version');2 expect(element).to.not.have.keys('browsers', 'disabled');3 expect(element.someObject).to.have.property('name', 'deinonychus');4 expect(object1).to.deep.equal(object2);5 expect(element.someArray).to.have.length(4);6 element.someObject.name.should.be.a('string');7 element.someObject.should.have.property('arr').with.length(3);8 assert.typeOf(element.someObject.name, 'string');
Check http://chaijs.com/ for a full list and documentation.
The second test is more advanced. It tests if your element contains a <content></content> tag. Notice the h2 tag in thetemplate, this code checks if it is actually inserted.
Interacting with your element
You can use the Polymer DOM API to execute JavaScript on elements inside your element (e.g. push buttons):
1 // shorthand function for selection by id2 var mybutton = element.$.buttonid;3 // or full access to anything with querySelector4 // this selects the first paper-button element inside your element5 var mybutton = Polymer.dom(element.root).querySelector("paper-button");6 mybutton.click();
Testing Events
Use addEventListener to respond to events. Do remember to trigger them.
1 test('fires lasers', function(done) {2 element.addEventListener('seed-element-lasers', function(event) {3 assert.equal(event.detail.sound, 'Pew pew!');
134 Chapter 1. Building your own Cell Panels
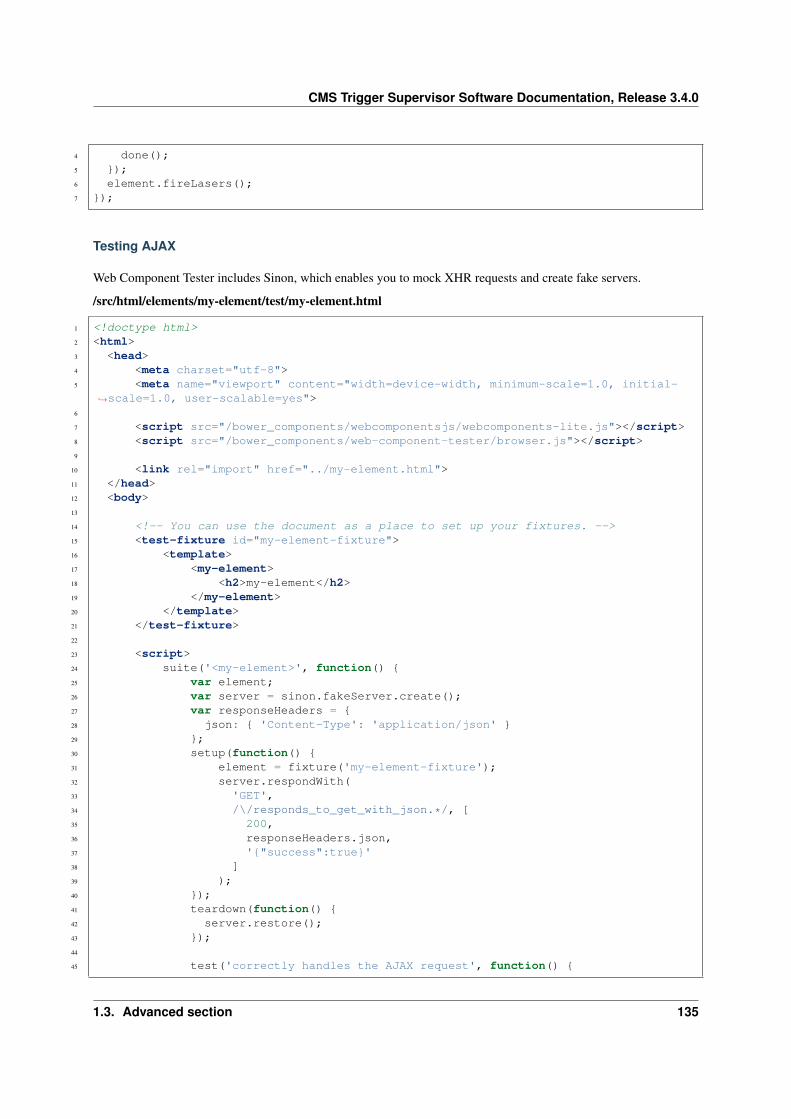
CMS Trigger Supervisor Software Documentation, Release 3.4.0
4 done();5 });6 element.fireLasers();7 });
Testing AJAX
Web Component Tester includes Sinon, which enables you to mock XHR requests and create fake servers.
/src/html/elements/my-element/test/my-element.html
1 <!doctype html>2 <html>3 <head>4 <meta charset="utf-8">5 <meta name="viewport" content="width=device-width, minimum-scale=1.0, initial-
→˓scale=1.0, user-scalable=yes">6
7 <script src="/bower_components/webcomponentsjs/webcomponents-lite.js"></script>8 <script src="/bower_components/web-component-tester/browser.js"></script>9
10 <link rel="import" href="../my-element.html">11 </head>12 <body>13
14 <!-- You can use the document as a place to set up your fixtures. -->15 <test-fixture id="my-element-fixture">16 <template>17 <my-element>18 <h2>my-element</h2>19 </my-element>20 </template>21 </test-fixture>22
23 <script>24 suite('<my-element>', function() {25 var element;26 var server = sinon.fakeServer.create();27 var responseHeaders = {28 json: { 'Content-Type': 'application/json' }29 };30 setup(function() {31 element = fixture('my-element-fixture');32 server.respondWith(33 'GET',34 /\/responds_to_get_with_json.*/, [35 200,36 responseHeaders.json,37 '{"success":true}'38 ]39 );40 });41 teardown(function() {42 server.restore();43 });44
45 test('correctly handles the AJAX request', function() {
1.3. Advanced section 135
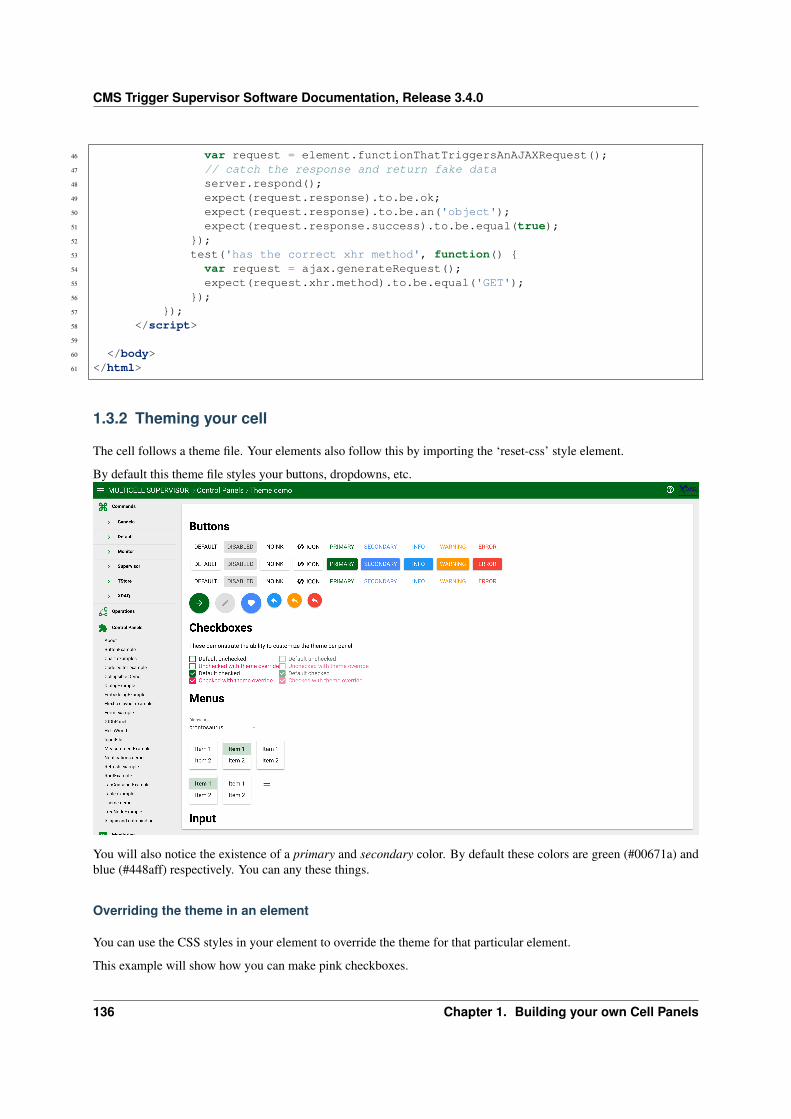
CMS Trigger Supervisor Software Documentation, Release 3.4.0
46 var request = element.functionThatTriggersAnAJAXRequest();47 // catch the response and return fake data48 server.respond();49 expect(request.response).to.be.ok;50 expect(request.response).to.be.an('object');51 expect(request.response.success).to.be.equal(true);52 });53 test('has the correct xhr method', function() {54 var request = ajax.generateRequest();55 expect(request.xhr.method).to.be.equal('GET');56 });57 });58 </script>59
60 </body>61 </html>
1.3.2 Theming your cell
The cell follows a theme file. Your elements also follow this by importing the ‘reset-css’ style element.
By default this theme file styles your buttons, dropdowns, etc.
You will also notice the existence of a primary and secondary color. By default these colors are green (#00671a) andblue (#448aff) respectively. You can any these things.
Overriding the theme in an element
You can use the CSS styles in your element to override the theme for that particular element.
This example will show how you can make pink checkboxes.
136 Chapter 1. Building your own Cell Panels
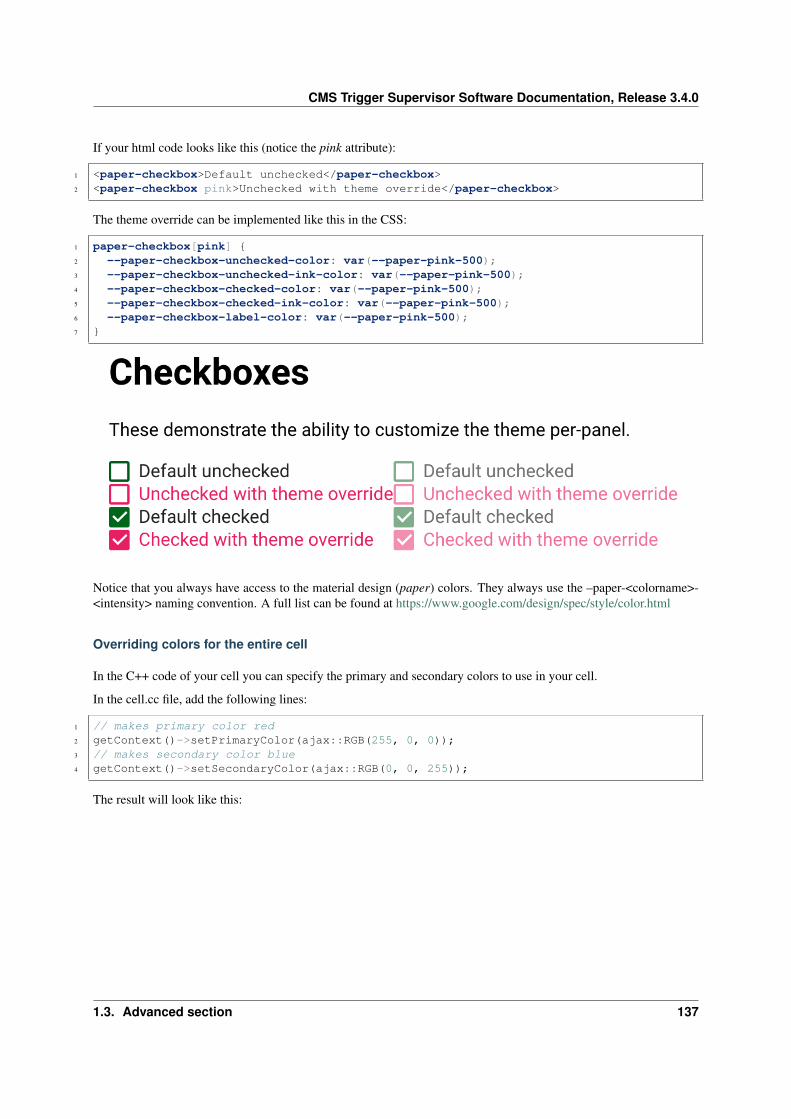
CMS Trigger Supervisor Software Documentation, Release 3.4.0
If your html code looks like this (notice the pink attribute):
1 <paper-checkbox>Default unchecked</paper-checkbox>2 <paper-checkbox pink>Unchecked with theme override</paper-checkbox>
The theme override can be implemented like this in the CSS:
1 paper-checkbox[pink] {2 --paper-checkbox-unchecked-color: var(--paper-pink-500);3 --paper-checkbox-unchecked-ink-color: var(--paper-pink-500);4 --paper-checkbox-checked-color: var(--paper-pink-500);5 --paper-checkbox-checked-ink-color: var(--paper-pink-500);6 --paper-checkbox-label-color: var(--paper-pink-500);7 }
Notice that you always have access to the material design (paper) colors. They always use the –paper-<colorname>-<intensity> naming convention. A full list can be found at https://www.google.com/design/spec/style/color.html
Overriding colors for the entire cell
In the C++ code of your cell you can specify the primary and secondary colors to use in your cell.
In the cell.cc file, add the following lines:
1 // makes primary color red2 getContext()->setPrimaryColor(ajax::RGB(255, 0, 0));3 // makes secondary color blue4 getContext()->setSecondaryColor(ajax::RGB(0, 0, 255));
The result will look like this:
1.3. Advanced section 137
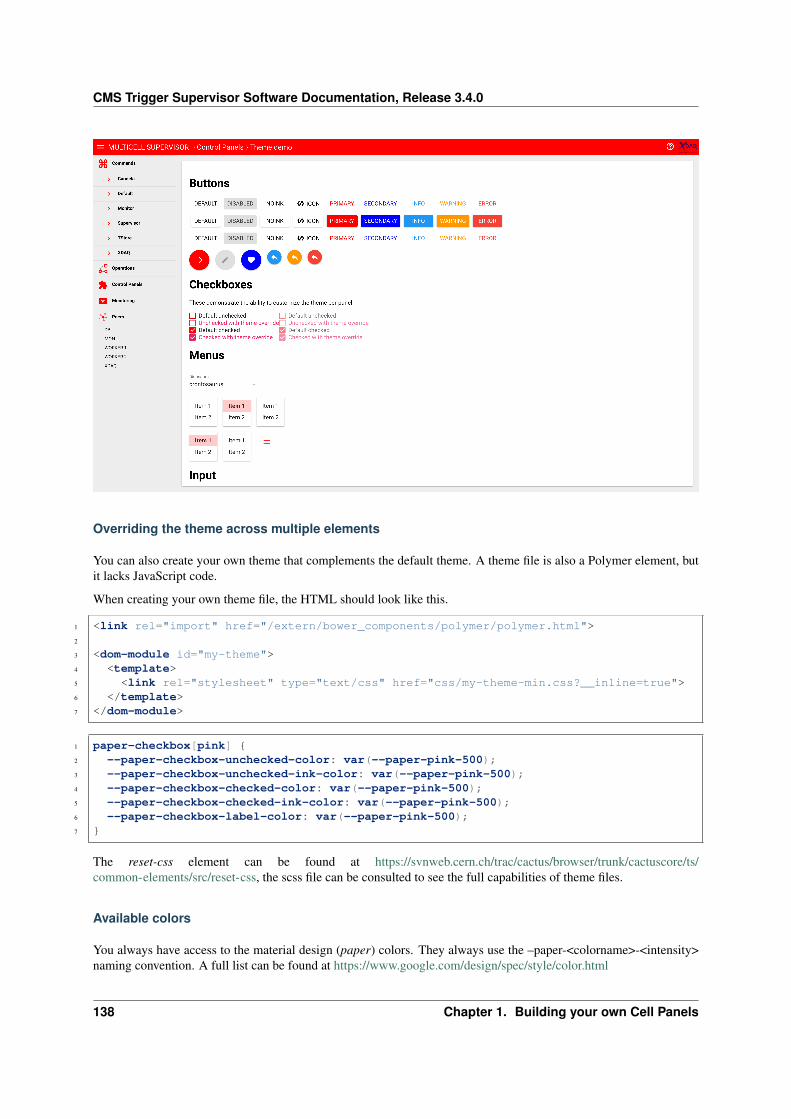
CMS Trigger Supervisor Software Documentation, Release 3.4.0
Overriding the theme across multiple elements
You can also create your own theme that complements the default theme. A theme file is also a Polymer element, butit lacks JavaScript code.
When creating your own theme file, the HTML should look like this.
1 <link rel="import" href="/extern/bower_components/polymer/polymer.html">2
3 <dom-module id="my-theme">4 <template>5 <link rel="stylesheet" type="text/css" href="css/my-theme-min.css?__inline=true">6 </template>7 </dom-module>
1 paper-checkbox[pink] {2 --paper-checkbox-unchecked-color: var(--paper-pink-500);3 --paper-checkbox-unchecked-ink-color: var(--paper-pink-500);4 --paper-checkbox-checked-color: var(--paper-pink-500);5 --paper-checkbox-checked-ink-color: var(--paper-pink-500);6 --paper-checkbox-label-color: var(--paper-pink-500);7 }
The reset-css element can be found at https://svnweb.cern.ch/trac/cactus/browser/trunk/cactuscore/ts/common-elements/src/reset-css, the scss file can be consulted to see the full capabilities of theme files.
Available colors
You always have access to the material design (paper) colors. They always use the –paper-<colorname>-<intensity>naming convention. A full list can be found at https://www.google.com/design/spec/style/color.html
138 Chapter 1. Building your own Cell Panels
CMS Trigger Supervisor Software Documentation, Release 3.4.0
The framework also defines the following colors:
• –dark-primary-color: #e50000;
• –default-primary-color: #ff0000;
• –primary-color: #ff0000;
• –light-primary-color: #ff0000;
• –secondary-color: #0000ff;
• –primary-color-light-10: #ff0000;
• –primary-color-dark-10: #e50000;
• –secondary-color-light-10: #0000ff;
• –secondary-color-dark-10: #0000e5;
• –primary-color-light-20: #ff0000;
• –primary-color-dark-20: #cc0000;
• –secondary-color-light-20: #0000ff;
• –secondary-color-dark-20: #0000cc;
• –primary-color-light-30: #ff0000;
• –primary-color-dark-30: #b20000;
• –secondary-color-light-30: #0000ff;
• –secondary-color-dark-30: #0000b2;
• –primary-color-light-40: #ff0000;
• –primary-color-dark-40: #990000;
• –secondary-color-light-40: #0000ff;
• –secondary-color-dark-40: #000099;
• –primary-color-light-50: #ff0000;
• –primary-color-dark-50: #7f0000;
• –secondary-color-light-50: #0000ff;
• –secondary-color-dark-50: #00007f;
• –primary-color-light-60: #ff0000;
• –primary-color-dark-60: #660000;
• –secondary-color-light-60: #0000ff;
• –secondary-color-dark-60: #000066;
• –text-primary-color: #ffffff;
• –accent-color: #ff4081;
• –primary-background-color: #ffffff;
• –primary-text-color: #212121;
• –secondary-text-color: #757575;
• –disabled-text-color: #bdbdbd;
1.3. Advanced section 139

CMS Trigger Supervisor Software Documentation, Release 3.4.0
• –divider-color: #e0e0e0;
• –error-color: red;
variables and mixins
The colors described earlier are variables. You can use them in your CSS code like this:
1 :host {2 // declare variables3 --my-own-color: green;4 --my-own-padding: 5px;5 }6 p {7 // use variables8 color: var(--my-own-color);9 padding: var(--my-own-padding);
10 // a second argument is a value to use if the variable isn't defined11 background-color: var(--primary-color-light-50, 'blue');12 }
Mixins are a way to not just store one variable, but an entire block of CSS code.
1 :host {2 // declare mixin3 --my-mixin-name: #{'{4 background-color: green;5 border-radius: 4px;6 border: 1px solid gray;7 }'};8 }9 p {
10 // use mixin11 @apply(--my-mixin-name);12 }
This can be used for sharing style across elements. You can also put an @apply(); or var(); rule in your CSS withoutdeclaring the variable or mixin. This will allow other developers to influence the style of your element in a controlledmanner without needing to change the element’s source code.
1.4 Available resources
1.4.1 The bower-components package
The bower-components package contains any front-end package that is pulled from the internet (i.e. not made by us).
It currently contains:
• The Polymer library
• iron-elements
• paper-elements
• gold-elements
• neon-elements
140 Chapter 1. Building your own Cell Panels

CMS Trigger Supervisor Software Documentation, Release 3.4.0
• platinum-elements
• juicy-jsoneditor
• juicy-ace-editor
• vaadin-grid
• paper-datatable
• jQuery 2.2.2
• moment.js
• page.js
• cytoscape.js
• file-saver.js
• saveSvgAsPng
• KaTeX
iron-elements
The iron-elements are a set of web components aiming to provide a basic set of tools and enhancements to standardelements, for example to provide them with data-binding capabilities.
These elements do not make assumptions about the used layout or styling, and are expected to maintain a spartan view,if they render a view at all.
Iron-elements aim to extend basic html elements (e.g. <iron-input> to extend <input>), provide façade elements forjavascript functionality (e.g. <iron-ajax> to easily make AJAX requests), or provide new functionality that would beconsidered basic functionality (e.g. <iron-icon> to display an icon).
paper-elements
Paper-elements is a set of elements that focus on bringing Material Designcite{materialdesign} to web components.
Paper-elements aims to extend iron-elements with material design (e.g. <iron-input> becomes <paper-input>), andintroduce new elements that are unique to material design (e.g. <paper-toast>)
gold-elements
Gold elements are input elements for specific use cases (e.g. email, phone numbers, credit card numbers, ldots).
They all extend the paper-input element and provide specific validation and formatting functionality.
platinum-elements
Platinum-elements are a set of Web Components focused on providing a façade for web-app capabilities like ServiceWorkers, server push, and bluetooth connectivity.
1.4. Available resources 141
CMS Trigger Supervisor Software Documentation, Release 3.4.0
neon-elements
neon-elements are a set of Web Components designed to be façades for the JavaScript animation API to make themavailable by purely writing HTML.
These elements do not use CSS Transitions, CSS Animations, or SVG, rather they use the new Web Animations API(url{https://www.w3.org/TR/web-animations/}).
These are among the most advanced Web Components in the packages available to panel developers. More info abouttheir usage is provided here: url{https://youtu.be/-tX0e29GQa4}.
juicy-jsoneditor
juicy-json-editor is a web-based tool to view, edit, format, and validate JSON. It has various modes such as a treeeditor, a code editor, and a plain text editor.
juicy-ace-editor
juicy-ace-editor is a web component that provides easy access to the Ace library. Ace is an embeddable code editorwritten in JavaScript. It matches the features and performance of native editors such as Sublime, Vim and TextMate.It can be easily embedded in any web page and JavaScript application. Ace is maintained as the primary editor forCloud9 IDE and is the successor of the Mozilla Skywriter (Bespin) project.
vaadin-grid
Vaadin Grid is a fully featured datagrid for showing table data. It performs great even with huge data sets, fullysupporting paging and lazy loading from any data source like a REST API. Grid allows you sort and filter data andcustomize how each cell gets rendered.
paper-datatable
A material design implementation of a data table. Currently none of the panels use paper-datatable, and use vaadin-gridinstead. This because the development on this element seems dead.
moment.js
Moment.js is a JavaScript library that makes parsing, validating, manipulating, and displaying dates in JavaScript easy.
page.js
Tiny Express-inspired client-side router. It is used by AjaXell to manage the loading of panels.
cytoscape.js
A JavaScript library designed to paint network graphs.
142 Chapter 1. Building your own Cell Panels
CMS Trigger Supervisor Software Documentation, Release 3.4.0
file-saver.js
FileSaver.js implements the HTML5 W3C saveAs() FileSaver interface in browsers that do not natively support it.There is a FileSaver.js demo that demonstrates saving various media types.
FileSaver.js is the solution to saving files on the client-side, and is perfect for webapps that need to generate files, orfor saving sensitive information that shouldn’t be sent to an external server.
saveSvgAsPng
A JavaScript library that can save an SVG element to a PNG file.
KaTeX
KaTeX is a fast, easy-to-use JavaScript library for TeX math rendering on the web.
1.4.2 The common-elements package
The common-elements package contains web components that are made in-house and are useful across multipleprojects (e.g. chart elements).
For more information visit the common-elements page
1.4.3 other packages
Every package can contain its own set of custom-made elements, yours can too.
AjaXell
AjaXell contains a set of elements to make its page-flow work, such as the page-handler and the ts-session element.
A notable element is ag-toaster, which allows anyone to show notifications to the user from their panels. For moreinformation visit the AjaXell page
TS Framework
The TS Framework contains a set of panels that are always included in a cell (i.e. the about panel).
For more information visit the TS Framework page
1.4. Available resources 143

CMS Trigger Supervisor Software Documentation, Release 3.4.0
144 Chapter 1. Building your own Cell Panels
CHAPTER
TWO
SPHINX SYNTAX EXAMPLES
2.1 This is a Title
2.1.1 subtitle
subsubtitle
and so on
2.1.2 basic markup
italic text.
bold text.
a link <http://xkcd.com/>.
*verbatim code*
TODO: a reference
2.1.3 lists
• This is a bulleted list.
• It has two items, the second item uses two lines. (note the indentation)
1. This is a numbered list.
2. It has two items too.
• sub 1
• sub 2
3. This is another list
4. Two lists separated only by whitespace are concatenated
145
CMS Trigger Supervisor Software Documentation, Release 3.4.0
2.1.4 terms
term (up to a line of text) Definition of the term, which must be indented
and can even consist of multiple paragraphs
next term Description.
2.1.5 line blocks
These lines arebroken exactly like inthe source file.
2.1.6 tables
Header row, column 1 (header rows optional) Header 2 Header 3 Header 4body row 1, column 1 column 2 column 3 column 4body row 2 ... ...
A B A and BFalse False FalseTrue False FalseFalse True FalseTrue True True
2.1.7 links
This is a paragraph that contains a link.
Lorem ipsum 1 dolor sit amet ... 2
Lorem ipsum [Ref] (page ??) dolor sit amet.
2.1.8 Source code
basic
This is a normal text paragraph. The next paragraph is a code sample:
It is not processed in any way, exceptthat the indentation is removed.
It can span multiple lines.
This is a normal text paragraph again.
1 Text of the first footnote.2 Text of the second footnote.
146 Chapter 2. Sphinx syntax examples
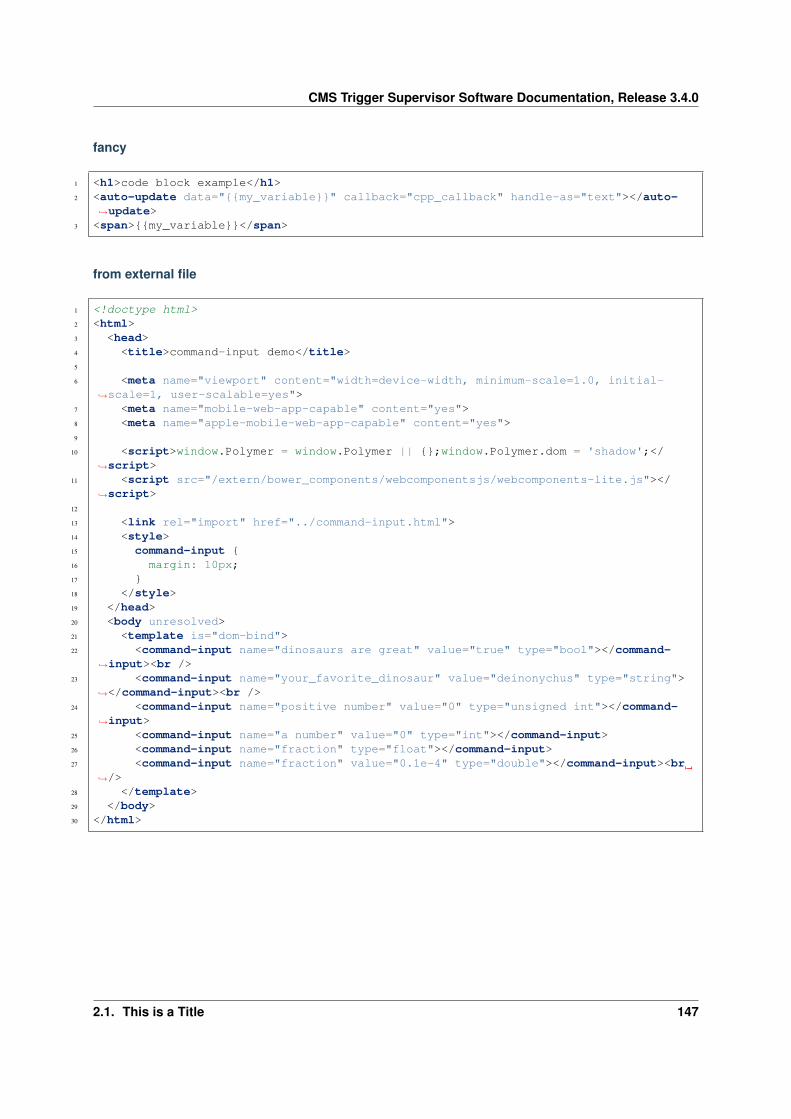
CMS Trigger Supervisor Software Documentation, Release 3.4.0
fancy
1 <h1>code block example</h1>2 <auto-update data="{{my_variable}}" callback="cpp_callback" handle-as="text"></auto-
→˓update>3 <span>{{my_variable}}</span>
from external file
1 <!doctype html>2 <html>3 <head>4 <title>command-input demo</title>5
6 <meta name="viewport" content="width=device-width, minimum-scale=1.0, initial-→˓scale=1, user-scalable=yes">
7 <meta name="mobile-web-app-capable" content="yes">8 <meta name="apple-mobile-web-app-capable" content="yes">9
10 <script>window.Polymer = window.Polymer || {};window.Polymer.dom = 'shadow';</→˓script>
11 <script src="/extern/bower_components/webcomponentsjs/webcomponents-lite.js"></→˓script>
12
13 <link rel="import" href="../command-input.html">14 <style>15 command-input {16 margin: 10px;17 }18 </style>19 </head>20 <body unresolved>21 <template is="dom-bind">22 <command-input name="dinosaurs are great" value="true" type="bool"></command-
→˓input><br />23 <command-input name="your_favorite_dinosaur" value="deinonychus" type="string">
→˓</command-input><br />24 <command-input name="positive number" value="0" type="unsigned int"></command-
→˓input>25 <command-input name="a number" value="0" type="int"></command-input>26 <command-input name="fraction" type="float"></command-input>27 <command-input name="fraction" value="0.1e-4" type="double"></command-input><br
→˓/>28 </template>29 </body>30 </html>
2.1. This is a Title 147
CMS Trigger Supervisor Software Documentation, Release 3.4.0
2.1.9 custom HTML
2.1.10 Fancy Math
Since Pythagoras, we know that 𝑎2 + 𝑏2 = 𝑐2.
(𝑎+ 𝑏)2 = 𝑎2 + 2𝑎𝑏+ 𝑏2
(𝑎− 𝑏)2 = 𝑎2 − 2𝑎𝑏+ 𝑏2
(𝑎+ 𝑏)2 = (𝑎+ 𝑏)(𝑎+ 𝑏)
= 𝑎2 + 2𝑎𝑏+ 𝑏2
𝑦 = 𝑎𝑥2 + 𝑏𝑥+ 𝑐 (2.1)𝑓(𝑥) = 𝑥2 + 2𝑥𝑦 + 𝑦2 (2.2)
Euler’s identity, equation (2.3), was elected one of the most beautiful mathematical formulas.
𝑒𝑖𝜋 + 1 = 0 (2.3)
148 Chapter 2. Sphinx syntax examples

Appendix B
Paper
As part of this master thesis it was required to write a paper on the subject. A copy of this paper isenclosed as an appendix in this document.
233

This page is intentionally left almost blank
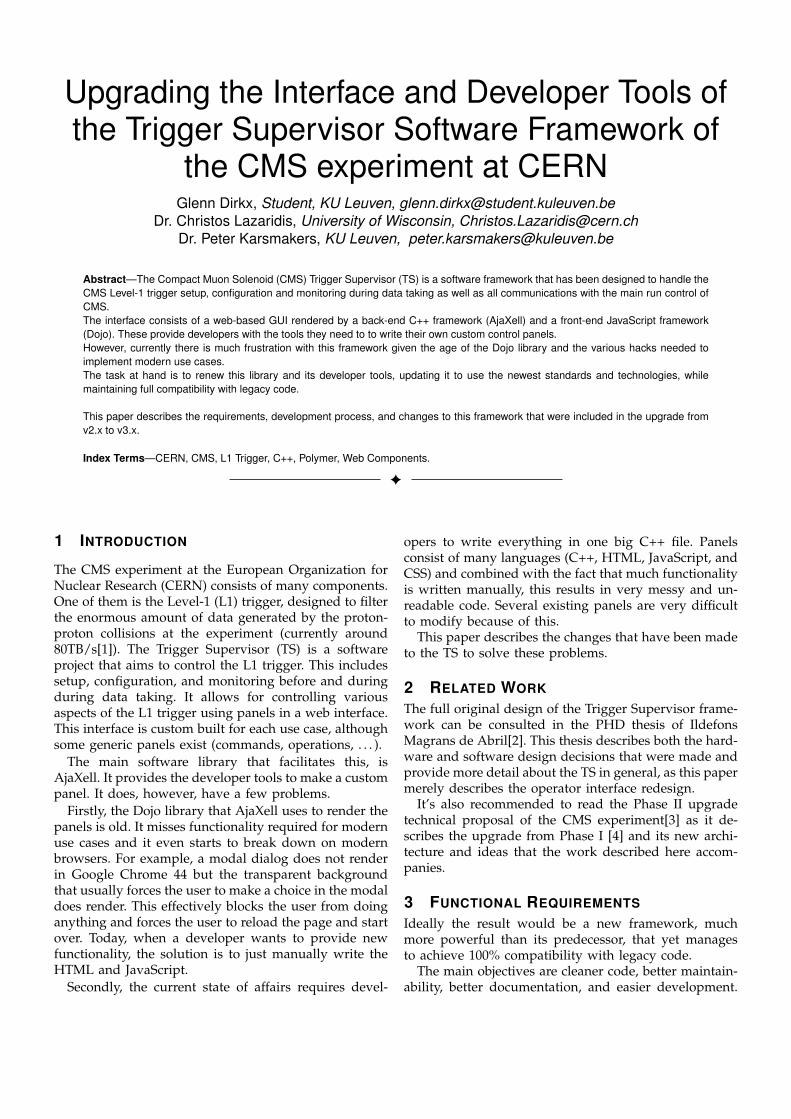
Upgrading the Interface and Developer Tools ofthe Trigger Supervisor Software Framework of
the CMS experiment at CERNGlenn Dirkx, Student, KU Leuven, [email protected]
Dr. Christos Lazaridis, University of Wisconsin, [email protected]. Peter Karsmakers, KU Leuven, [email protected]
Abstract—The Compact Muon Solenoid (CMS) Trigger Supervisor (TS) is a software framework that has been designed to handle theCMS Level-1 trigger setup, configuration and monitoring during data taking as well as all communications with the main run control ofCMS.The interface consists of a web-based GUI rendered by a back-end C++ framework (AjaXell) and a front-end JavaScript framework(Dojo). These provide developers with the tools they need to to write their own custom control panels.However, currently there is much frustration with this framework given the age of the Dojo library and the various hacks needed toimplement modern use cases.The task at hand is to renew this library and its developer tools, updating it to use the newest standards and technologies, whilemaintaining full compatibility with legacy code.
This paper describes the requirements, development process, and changes to this framework that were included in the upgrade fromv2.x to v3.x.
Index Terms—CERN, CMS, L1 Trigger, C++, Polymer, Web Components.
F
1 INTRODUCTION
The CMS experiment at the European Organization forNuclear Research (CERN) consists of many components.One of them is the Level-1 (L1) trigger, designed to filterthe enormous amount of data generated by the proton-proton collisions at the experiment (currently around80TB/s[1]). The Trigger Supervisor (TS) is a softwareproject that aims to control the L1 trigger. This includessetup, configuration, and monitoring before and duringduring data taking. It allows for controlling variousaspects of the L1 trigger using panels in a web interface.This interface is custom built for each use case, althoughsome generic panels exist (commands, operations, . . . ).
The main software library that facilitates this, isAjaXell. It provides the developer tools to make a custompanel. It does, however, have a few problems.
Firstly, the Dojo library that AjaXell uses to render thepanels is old. It misses functionality required for modernuse cases and it even starts to break down on modernbrowsers. For example, a modal dialog does not renderin Google Chrome 44 but the transparent backgroundthat usually forces the user to make a choice in the modaldoes render. This effectively blocks the user from doinganything and forces the user to reload the page and startover. Today, when a developer wants to provide newfunctionality, the solution is to just manually write theHTML and JavaScript.
Secondly, the current state of affairs requires devel-
opers to write everything in one big C++ file. Panelsconsist of many languages (C++, HTML, JavaScript, andCSS) and combined with the fact that much functionalityis written manually, this results in very messy and un-readable code. Several existing panels are very difficultto modify because of this.
This paper describes the changes that have been madeto the TS to solve these problems.
2 RELATED WORK
The full original design of the Trigger Supervisor frame-work can be consulted in the PHD thesis of IldefonsMagrans de Abril[2]. This thesis describes both the hard-ware and software design decisions that were made andprovide more detail about the TS in general, as this papermerely describes the operator interface redesign.
It’s also recommended to read the Phase II upgradetechnical proposal of the CMS experiment[3] as it de-scribes the upgrade from Phase I [4] and its new archi-tecture and ideas that the work described here accom-panies.
3 FUNCTIONAL REQUIREMENTS
Ideally the result would be a new framework, muchmore powerful than its predecessor, that yet managesto achieve 100% compatibility with legacy code.
The main objectives are cleaner code, better maintain-ability, better documentation, and easier development.
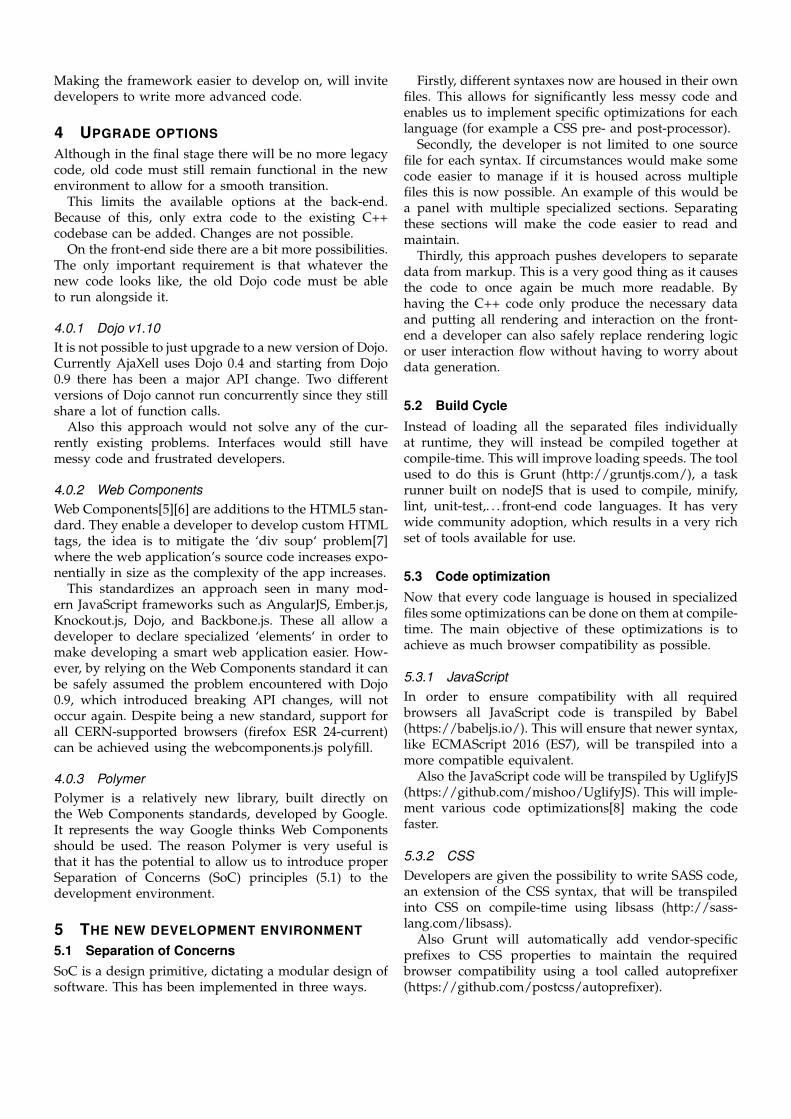
Making the framework easier to develop on, will invitedevelopers to write more advanced code.
4 UPGRADE OPTIONS
Although in the final stage there will be no more legacycode, old code must still remain functional in the newenvironment to allow for a smooth transition.
This limits the available options at the back-end.Because of this, only extra code to the existing C++codebase can be added. Changes are not possible.
On the front-end side there are a bit more possibilities.The only important requirement is that whatever thenew code looks like, the old Dojo code must be ableto run alongside it.
4.0.1 Dojo v1.10It is not possible to just upgrade to a new version of Dojo.Currently AjaXell uses Dojo 0.4 and starting from Dojo0.9 there has been a major API change. Two differentversions of Dojo cannot run concurrently since they stillshare a lot of function calls.
Also this approach would not solve any of the cur-rently existing problems. Interfaces would still havemessy code and frustrated developers.
4.0.2 Web ComponentsWeb Components[5][6] are additions to the HTML5 stan-dard. They enable a developer to develop custom HTMLtags, the idea is to mitigate the ‘div soup‘ problem[7]where the web application’s source code increases expo-nentially in size as the complexity of the app increases.
This standardizes an approach seen in many mod-ern JavaScript frameworks such as AngularJS, Ember.js,Knockout.js, Dojo, and Backbone.js. These all allow adeveloper to declare specialized ‘elements‘ in order tomake developing a smart web application easier. How-ever, by relying on the Web Components standard it canbe safely assumed the problem encountered with Dojo0.9, which introduced breaking API changes, will notoccur again. Despite being a new standard, support forall CERN-supported browsers (firefox ESR 24-current)can be achieved using the webcomponents.js polyfill.
4.0.3 PolymerPolymer is a relatively new library, built directly onthe Web Components standards, developed by Google.It represents the way Google thinks Web Componentsshould be used. The reason Polymer is very useful isthat it has the potential to allow us to introduce properSeparation of Concerns (SoC) principles (5.1) to thedevelopment environment.
5 THE NEW DEVELOPMENT ENVIRONMENT
5.1 Separation of ConcernsSoC is a design primitive, dictating a modular design ofsoftware. This has been implemented in three ways.
Firstly, different syntaxes now are housed in their ownfiles. This allows for significantly less messy code andenables us to implement specific optimizations for eachlanguage (for example a CSS pre- and post-processor).
Secondly, the developer is not limited to one sourcefile for each syntax. If circumstances would make somecode easier to manage if it is housed across multiplefiles this is now possible. An example of this would bea panel with multiple specialized sections. Separatingthese sections will make the code easier to read andmaintain.
Thirdly, this approach pushes developers to separatedata from markup. This is a very good thing as it causesthe code to once again be much more readable. Byhaving the C++ code only produce the necessary dataand putting all rendering and interaction on the front-end a developer can also safely replace rendering logicor user interaction flow without having to worry aboutdata generation.
5.2 Build CycleInstead of loading all the separated files individuallyat runtime, they will instead be compiled together atcompile-time. This will improve loading speeds. The toolused to do this is Grunt (http://gruntjs.com/), a taskrunner built on nodeJS that is used to compile, minify,lint, unit-test,. . . front-end code languages. It has verywide community adoption, which results in a very richset of tools available for use.
5.3 Code optimizationNow that every code language is housed in specializedfiles some optimizations can be done on them at compile-time. The main objective of these optimizations is toachieve as much browser compatibility as possible.
5.3.1 JavaScriptIn order to ensure compatibility with all requiredbrowsers all JavaScript code is transpiled by Babel(https://babeljs.io/). This will ensure that newer syntax,like ECMAScript 2016 (ES7), will be transpiled into amore compatible equivalent.
Also the JavaScript code will be transpiled by UglifyJS(https://github.com/mishoo/UglifyJS). This will imple-ment various code optimizations[8] making the codefaster.
5.3.2 CSSDevelopers are given the possibility to write SASS code,an extension of the CSS syntax, that will be transpiledinto CSS on compile-time using libsass (http://sass-lang.com/libsass).
Also Grunt will automatically add vendor-specificprefixes to CSS properties to maintain the requiredbrowser compatibility using a tool called autoprefixer(https://github.com/postcss/autoprefixer).
5.4 Code sharing
Code duplication should be minimized as much as pos-sible. Code that is used frequently is therefore movedto a separate code repository available for anyone touse. These include things like chart libraries, layoutframeworks, and some in-house components such as anauto-updater.
6 DOCUMENTATION
Documentation is something commonly taken toolightly. Fortunately there are some tools not only to makegood documentation but also to encourage developerslater on to write proper documentation.
Most of the documentation is housed along with thesource code itself. The goal is to minimize separation ofcode and documentation as this easily leads to inconsis-tencies between code and documentation.
6.1 Inline Documentation
Advantages of inline documentation are the reducedchances for outdated documentation and being able toenrich source code with typed annotations [9].
Source code consists of C++, JavaScript, HTML, andCSS code. The inline documentation described here isapplicable to the last three.
The syntax used to document JavaScript code is calledJSDocs and is currently at version 3[9][10]. It providesus with a rich set of expressions enabling a developer towrite documentation comparable to JavaDoc.
In addition there are specific points in the sourcecode where a developer can provide code examples andextra directives to document HTML and CSS code. Thisis however a non-standard method since there is nostandardized way to inline- document any of the otherlanguages.
6.2 Global level
The global level is the only level where documentationis separated from the source code. This houses doc-umentation aimed to teach users and developers theconcepts and ways of thinking regarding this codebase.It teaches developers the basics of the structure theywill be developing in and the philosophy behind thisstructure.
This global documentation level is built using Sphinx(http://www.sphinx-doc.org/) and provides a singlepoint of entry for people looking for documentation andwill guide readers to the next level of documentationwhen they are ready for it.
6.3 Package level
The codebase is composed of a number of packages.Each package automatically generates documentationdescribing its content and capabilities.
TS 2.1.0 TS 3.4.0 difference difference (%)Loading 44.5ms 112.4ms +67.9ms +152.58%Scripting 1227.6ms 1187.6ms -40ms -3,26%Rendering 29.7ms 171.0ms +141.3ms +475,76%Painting 7.5ms 36.1ms +28.6ms +381.33%Other 106.4ms 335.9ms +229.5ms +215,69%Idle 213.6ms 775.1ms +561.5ms +262,87%Total 1.63s 2.62s +990ms +60,73%
TABLE 1Page loading times for TS 2.x and 3.x
This documentation is generated in the Grunt buildcycle described earlier. It loads and interprets every com-ponent of the package and generates a summary pagegiving a general overview and pointing to several usefulresources for each component such as the documentationon the element level, a link to the code repository, anda link to a live demo of the component if available.
The code it uses to render this documentation ishoused in the source code of each component. It getsinterpreted by Grunt and is then compiled in the pack-age documentation page.
6.4 Element level
The lowest level of documentation is documentationof individual web components. This level is also auto-documented from the component’s source code. Butunlike the documentation on the package level, wheredocumentation is generated on compile time, the docu-mentation here is rendered on the fly.
This is done by using a specialized webcomponent called ‘iron-component-page‘(https://elements.polymer-project.org/elements/iron-component-page). It interprets the source code of thecomponent and comments left by the developer andcompiles this into a documentation page.
This documentation provides an overview of all theproperties and available calls of this component. It canalso provide code examples and even live demos.
7 RESULTS
7.1 Loading times
Table 1 shows an overview of the initial full page loadingtimes for the legacy TS (version 2.1.0) and the new TS(version 3.4.0). That is, a page load from a new browsertab with all caches removed.
This test is performed with the timeline panel ofGoogle Chrome 50.0.2661.86 (64-bit).
It is expected that the TS 3.x has higher values foreverything in this table, because it loads two front-endlibraries (Dojo & Polymer).
Notable is the decrease of scripting time for the TS 3.xrelative to the TS 2.x. This is because Dojo is minified andpackaged into one JavaScript file in the TS 3.x release,where as in the TS 2.x release it was not. Also, because
this test is performed in Google Chrome, which hasnative support for Web Components, very little scriptingneeds to be done. This result will be different in otherbrowsers like Mozilla Firefox, where Web Componentssupport needs to be emulated. Then again, the lazy load-ing system largely removes this overhead from the initialpage loading time, so only minor differences would beexpected here.
Rendering time has increased the most going fromTS 2.x to TS 3.x. This makes sense as Polymer renderseverything on the front-end, whereas Dojo used to ren-der everything server-side. During initial page load thisrendering load is primarily caused by the rendering ofthe left side menu. The increase of painting time followsthe same logic as the rendering time.
Also notable is the increase of idle time. This meansthat the browser needs to wait for a task to finish beforeit can start another. This is caused because the TS 3.xloads the default panel after the initial page load. Whichmeans the TS makes extra network request, to fetch aninterface panel, right after initializing. This is countedwith the initial page load. TS 2.x just shows a blank page,it loads no default panel. Because the browser needs towait for the extra network requests to finish before it canrender the default panel, the idle time goes up by a lot.
In total, the initial page loading time increased withabout 60%, which is an acceptable increase given the newTS runs 2 libraries concurrently.
7.2 CPU consumptionBoth TS releases have negligible CPU usage when doinga fresh page load, and stay at 0% CPU usage when theuser is not interacting with the system.
TS 3.x uses hardware acceleration for it’s animationssince they are all made using CSS transform propertiesor using Web Animations[11]. The only exception tothis is the ‘paper-spinner‘ element. Which displays aloading animation. The TS 2.x release did not have anyanimations.
7.3 Memory consumptionThe Dojo library of TS 2.x contained memory leaks,and could lead to a web browser using an excessiveamount of memory when an interface was used for along duration of time.
Unfortunately, legacy panels in the new TS still sufferfrom this memory leak. This is because the circularreferences causing the memory leak reside in the Dojolibrary itself, and thus would be impractical to address.Therefore, any interface that included auto-refreshes hadthe highest priority to be converted to a new TS 3.xinterface.
Because TS 3.x uses client-side interface renderingrather than server-side as the TS 2.x did, it uses morememory from the browser.
In TS 3.x the memory used by an interface panel willbe released after there is a switch to another panel. It
Google Chrome FirefoxTS 2.1.0 (Dojo) 20.051MB 7.06MBTS 3.4.0 (Dojo + Polymer) 24.564MB 10.96MBdifference +4.513MB +3.9MBdifference (%) +22.51% +55.24%
TABLE 2Memory usage for TS 2.x and 3.x in Mozilla Firefox and
Google Chrome
is also known that in TS 2.x the memory consumptiongrows linearly with the amount of panels loaded by theuser.
To test the difference in memory consumption, bothTS versions were opened in a new tab while mem-ory consumption is monitored. No panels are loaded,the interfaces are just left for 120s. The mean memoryconsumption in those 120s is then taken as the meanmemory consumption for that TS release. The results ofthis test are shown in table 2.
8 FUNCTIONALITY
TS 3.x has functionally more capabilities for the interfacethan TS 2.x had. More importantly, the TS interfaceis now no longer bound to one framework. Any WebComponent can be used, and extra functionality can bedeveloped in-house. This unlike TS 2.x where develop-ers were functionally bound to the elements the Dojodevelopers provided.
This makes TS 3.x far more easy to change, and thusmore ready for the future.
9 SDK IMPROVEMENTS
The fact that multiple programming languages are nolonger placed into one file, but distributed across multi-ple files, makes the developing an interface panel a loteasier.
The Web Components approach to build interfacesgives developers a set of powerful tools that are easyto use and extend.
10 DEVELOPED PANELS
The Control Panels are a set of custom interfaces, devel-oped for an individual cell. The other panels howeveroccur on every cell. And are upgraded as part of thenew TS release.
10.1 Commands
The new commands panel use the ‘command-input‘element for its input. Making it easily extendible tounderstand more input types (e.g. vectors). Currently itunderstands number, int, long, unsigned int, unsignedlong, short, unsigned short, string, double, and floatinput.
10.2 OperationsThe TS 2.x operations panel had some problems withauto-updating. The state diagram tended to update verylate, if it updated at all. Result data and new availablecommands usually took more than 10 seconds to showup in the interface.
The new operations panel is now far more responsive.The state diagram is available when clicking on an icon,as it was deemed a waste of space to show it by default.
10.3 FlashlistsThe flashlist panels now have a user-configurable auto-update function. The flashlist can deploy custom render-ers in the table depending on the data type, for examplea date will be shown as relative time (e.g. 9 minutes ago),instead of just showing a time stamp. This list of customrenderers can be extended easily.
11 CONCLUSION
The main objective was to upgrade the TS to be able toprovide more advanced interfaces, and to keep compat-ibility with legacy interfaces.
The new interface engine has achieved 100% back-wards compatibility, while providing a completely newway to develop new interfaces.
This new interface engine and can be easily extendedand is ready for any future use-cases as it is built tochange. The developers are not bound to the functional-ity of one framework, rather it is build on open standardsand thus ensures maximum compatibility with futuretechnologies.
The interface developers now have internal, semi auto-generated, documentation at their disposal and have anactive community on the world wide web to fall backto.
ACKNOWLEDGMENTS
I would like to thank the following people for theirassistance during this project:
Christos Lazaridis for being a great mentor and fornot getting mad when I break thenightlies or even SVN itself.
Alessandro Thea for his advice on how toproceed with implementing newfunctionalities and his supply ofmotivation and inspiration.
Evangelos Paradas for his guidance trough thearchitecture of the TS and pointingme to useful resources.
Simone Bologna for his enthusiasm and patiencewhen finding bugs, and his steadysupply of ideas.
Furthermore I would like to express my thanks to theentire Online Software team for the freedom and trustI’ve been given that allowed this project to get as far asit has.
REFERENCES[1] T. C. Collaboration, “The cms experiment at the cern lhc,”
Journal of Instrumentation, vol. 3, no. 08, p. S08004, 2008. [Online].Available: http://stacks.iop.org/1748-0221/3/i=08/a=S08004
[2] I. M. de Abril and C.-E. Wulz, “The CMS Trigger Supervisor:Control and Hardware Monitoring System of the CMS Level-1Trigger at CERN,” Ph.D. dissertation, Barcelona, Autonoma U.,2008. [Online]. Available: http://cds.cern.ch/record/1446282
[3] D. Abbaneo, A. Bal, P. Bloch, O. Buchmueller, F. Cavallari, A.Dabrowski, P. de Barbaro, I. Fisk, M. Girone, F. Hartmann, J.Hauser, C. Jessop, D. Lange, F. Meijers, C. Seez, W. Smith,The Compact Muon Solenoid Phase II Upgrade Technical Proposal.European Organization for Nuclear Research (CERN), 2015.
[4] A. Breskin and R. Voss, The CERN Large Hadron Collider: Acceleratorand Experiments. Geneva: CERN, 2009.
[5] World Wide Web Consortium (W3C), “Custom elements,”https://w3c.github.io/webcomponents/spec/custom/, 2015.
[6] Mozilla Developer Network, “Web com-ponents,” https://developer.mozilla.org/en-US/docs/Web/Web Components, 2014.
[7] C. House, “Html5 web components: The solution todiv soup?” https://www.pluralsight.com/blog/software-development/html5-web-components-overview, 2015.
[8] M. Bazon, “Uglifyjs the compressor,”http://lisperator.net/uglifyjs/compress, 2012.
[9] Google Developers, “Annotating javascript for the closure com-piler,” https://developers.google.com/closure/compiler/docs/js-for-compiler, 2016.
[10] “@use jsdoc,” http://usejsdoc.org/, 2011.[11] A. D. T. A. Brian Birtles, Shane Stephens, “Web animations,”
https://w3c.github.io/web-animations/, 2016.

FACULTY OF ENGINEERING TECHNOLOGY TECHNOLOGY CAMPUS GEEL
Kleinhoefstraat 4 2440 GEEL, Belgium tel. + 32 14 56 23 10 fax + 32 14 58 48 59
[email protected] www.fet.kuleuven.be
Related Documents