Start by inserting the base of the tree (C) into the stabilized stand (D); proceed by inserting sections (B) and (A) respectively. 2 Unpacking & Arranging Your Brand New Artificial Christmas Tree To Start Assembling Instructions Congratulations on purchasing your brand new Artificial Christmas Tree Keep this instructional pamphlet as a how-to guide on setting up and fluffing your holiday star. Assemble the stand (D) on a flat surface; unfold all the legs and insert the screws into each of the openings to keep your tree safely stabalized. Ensure that all parts have been delivered Save the delivery box for storing and keeping your new artificial Christmas tree safe. Trees with 3 sections Trees with 2 sections Trees with 3 sections Trees with 2 sections Top Middle Base Base Power Source For Pre-lit Trees ONLY 1 A B C D E Trees will be built according to two variations A C D E

Welcome message from author
This document is posted to help you gain knowledge. Please leave a comment to let me know what you think about it! Share it to your friends and learn new things together.
Transcript

Start by inserting the base of the tree (C) into the stabilized stand (D); proceed by inserting sections (B) and (A) respectively.2
Unpacking & Arranging YourBrand New Artificial Christmas Tree
To Start
Assembling Instructions
Congratulations on purchasing your brand new Artificial Christmas TreeKeep this instructional pamphlet as a how-to guide on setting up and fluffing your holiday star.
Assemble the stand (D) on a flat surface; unfold all the legs and insert the screws into each of the openings to keep your tree safely stabalized.
Ensure that all parts have been delivered
Save the delivery box for storing and keeping your new artificial Christmas tree safe.
Trees with3 sections
Trees with2 sections
Trees with3 sections
Trees with2 sections
Top Middle Base Base Power SourceFor Pre-lit Trees ONLY
1
A B C D E
Trees will be builtaccording to two
variations
A C D E
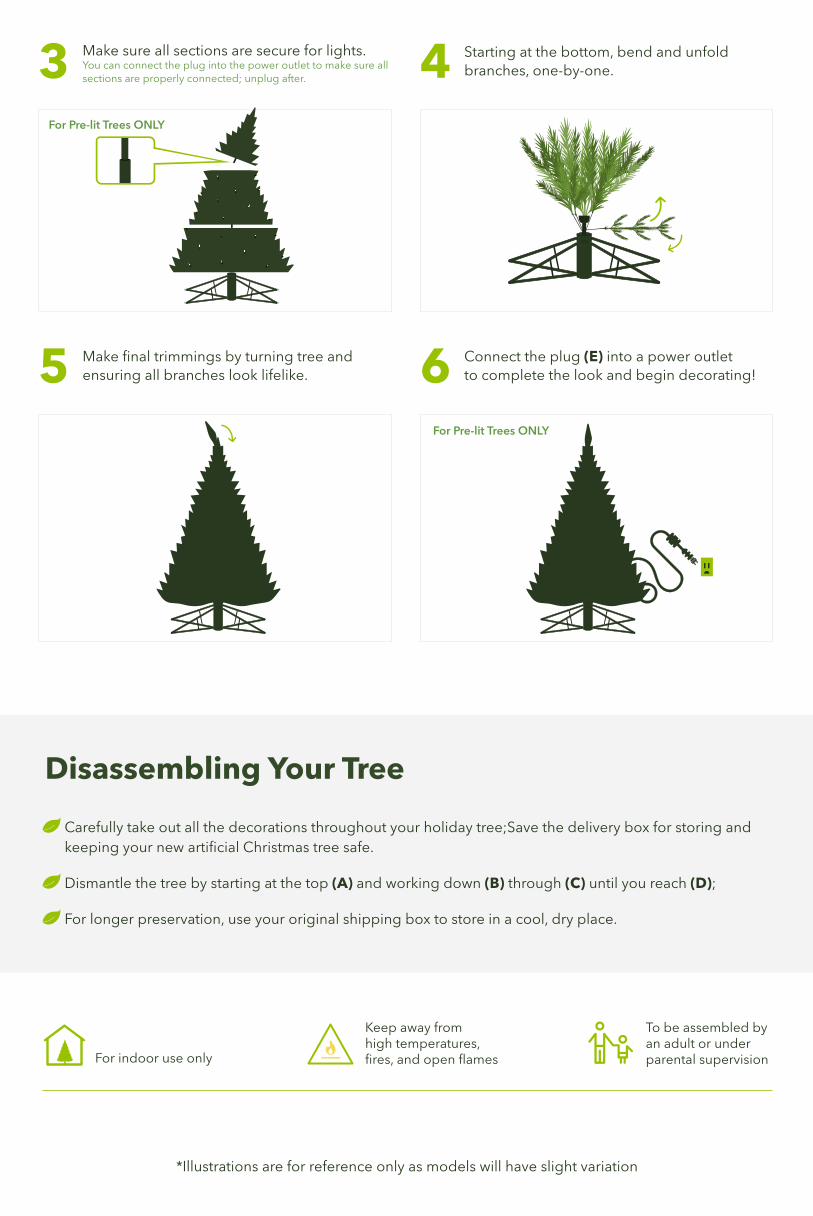
Make sure all sections are secure for lights.You can connect the plug into the power outlet to make sure all sections are properly connected; unplug after. 3 Starting at the bottom, bend and unfold
branches, one-by-one.4
Make final trimmings by turning tree andensuring all branches look lifelike.5 Connect the plug (E) into a power outlet
to complete the look and begin decorating!6
Disassembling Your Tree
Carefully take out all the decorations throughout your holiday tree;Save the delivery box for storing and keeping your new artificial Christmas tree safe.
Dismantle the tree by starting at the top (A) and working down (B) through (C) until you reach (D);
For longer preservation, use your original shipping box to store in a cool, dry place.
*Illustrations are for reference only as models will have slight variation
For indoor use only
To be assembled byan adult or underparental supervision
Keep away fromhigh temperatures,fires, and open flames
For Pre-lit Trees ONLY
For Pre-lit Trees ONLY
Related Documents