memo: UNIX ch1 Sun Systems SPARC CPU is 32-bit and the Ultra-SPARC is 64-bit. . Mainframe NOSs include Digital Equipment VMS, Hewlett-Packard MPE, IBM MVS, and several varieties of UNIX. Ken Thompson, Dennis Ritchie(istorie UNIX). In 1971, Ritchie created the C language. Programmers at the University of California at Berkeley made significant modifications to the original source code and called it Berkeley Software Distribution (BSD) UNIX. Possibly the most important advance made to the software by the programmers at Berkeley, was the addition of networking software. In 1988, Sun OS/BSD, AT&T System V Release 3, and XENIX were combined into what became System V Release 4 (SVR4). The two main versions of UNIX are System V (SVR4) and BSD. The command used for printing indicates whether the version of UNIX is System V-based or BSD-based. The command used for System V-based systems is lp and the command used for BSD-based systems is lpr. The command used to determine what processes are running is also an indicator. System V uses ps -ef and BSD uses ps -aux. Solaris contains two kernel files. These two combined files create the static core kernel that initializes and controls the system. Sun Solaris uses the UNIX File System (UFS). Linux uses primarily the Second Extended File System (ext2) or Third Extended File System (ext3). The /kernel directory*(pe Solaris) contains the basic operating system files, such as the main UNIX kernel genunix. ch2 The root account is the system administration account and is created automatically during the operating system installation process. Login IDs on Solaris systems are limited to eight alphanumeric characters. Most versions of Linux limit the login ID to 32 alphanumeric characters or less Solaris and Linux passwords must be at least six characters in length and different from the login ID The first six characters of the Solaris password must contain at least two alphabetic characters and at least one numeric or special character. Linux passwords can be any combination of alphanumeric or special characters and there is no requirement for what the first six must contain. Passwords may contain spaces and special characters. When changing Solaris passwords, the new password must differ from the previous password by at least three characters. When changing Linux passwords, the new password must contain no more than two successive characters from the previous one and cannot contain dictionary words. 1

Welcome message from author
This document is posted to help you gain knowledge. Please leave a comment to let me know what you think about it! Share it to your friends and learn new things together.
Transcript
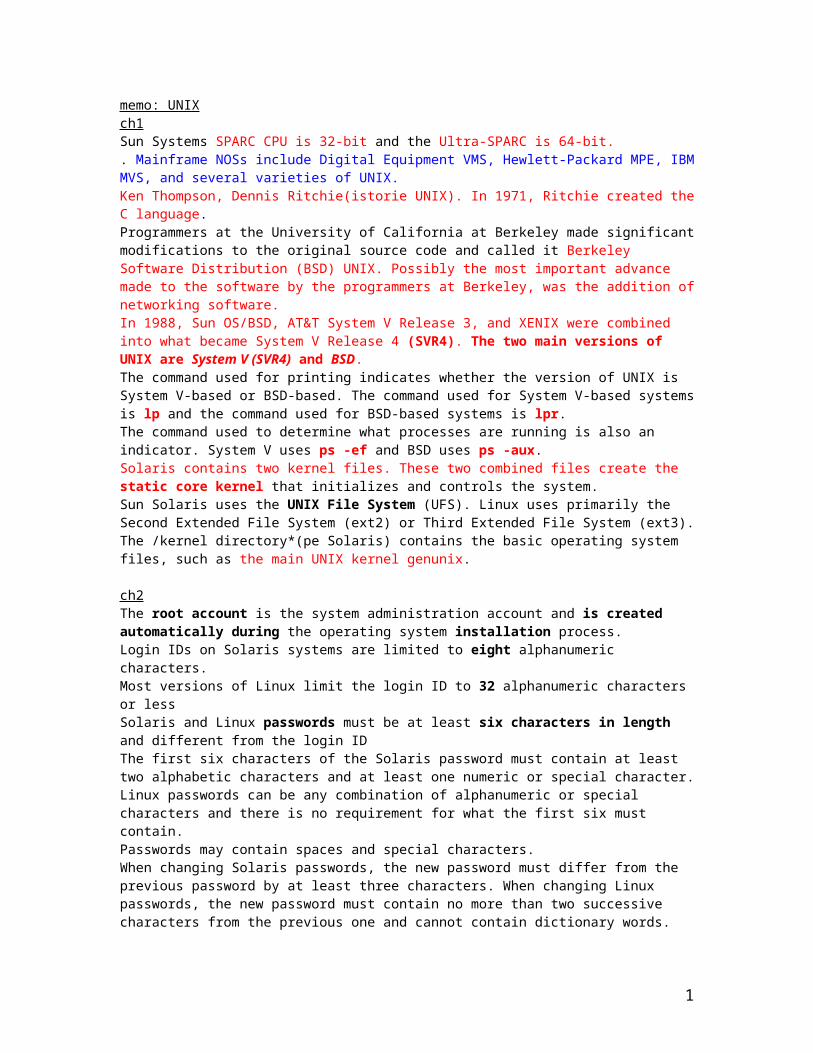
memo: UNIXch1Sun Systems SPARC CPU is 32-bit and the Ultra-SPARC is 64-bit.. Mainframe NOSs include Digital Equipment VMS, Hewlett-Packard MPE, IBM MVS, and several varieties of UNIX.Ken Thompson, Dennis Ritchie(istorie UNIX). In 1971, Ritchie created the C language.Programmers at the University of California at Berkeley made significant modifications to the original source code and called it Berkeley Software Distribution (BSD) UNIX. Possibly the most important advance made to the software by the programmers at Berkeley, was the addition of networking software.In 1988, Sun OS/BSD, AT&T System V Release 3, and XENIX were combined into what became System V Release 4 (SVR4). The two main versions of UNIX are System V (SVR4) and BSD.The command used for printing indicates whether the version of UNIX is System V-based or BSD-based. The command used for System V-based systems is lp and the command used for BSD-based systems is lpr.The command used to determine what processes are running is also an indicator. System V uses ps -ef and BSD uses ps -aux.Solaris contains two kernel files. These two combined files create the static core kernel that initializes and controls the system.Sun Solaris uses the UNIX File System (UFS). Linux uses primarily the Second Extended File System (ext2) or Third Extended File System (ext3).The /kernel directory*(pe Solaris) contains the basic operating system files, such as the main UNIX kernel genunix.
ch2The root account is the system administration account and is created automatically during the operating system installation process.Login IDs on Solaris systems are limited to eight alphanumeric characters.Most versions of Linux limit the login ID to 32 alphanumeric characters or lessSolaris and Linux passwords must be at least six characters in length and different from the login IDThe first six characters of the Solaris password must contain at least two alphabetic characters and at least one numeric or special character. Linux passwords can be any combination of alphanumeric or special characters and there is no requirement for what the first six must contain.Passwords may contain spaces and special characters.When changing Solaris passwords, the new password must differ from the previous password by at least three characters. When changing Linux passwords, the new password must contain no more than two successive characters from the previous one and cannot contain dictionary words.If a mistake is made when entering either the login name or password, reenter both pieces of information. Press Ctrl+u.Once logged into the CDE graphical desktop, a front panel is presented, which is the primary desktop management tool.On most systems, the Ctrl and d keys (Ctrl+d) can be used to log out or exit a Terminal window.The UID of the root user account is 0.Tip: The user can find out the UID number, username, GID number, and group name for an account by typing the id command at the command prompt.Using the system initialization state (init) and shutdown commands are the primary ways to shut down a UNIX system.If logged into a CDE session, right click the background to bring up the Workspace menu, click Tools, and open a Terminal window.backdrop = adica fundalul ecranului in Solaris in CDE.
ch3Mail Tool (in CDE)is a full-featured graphical e-mail management program.Choosing to delete the mail messages does not remove the mail. Rather, the messages are stored until the mail window is closed.Tip: The student can open an additional Terminal window anytime by entering the dtterm& (desktop terminal) command in an existing Terminal window.To close a Terminal window, type exit or press Ctrl-D.
1
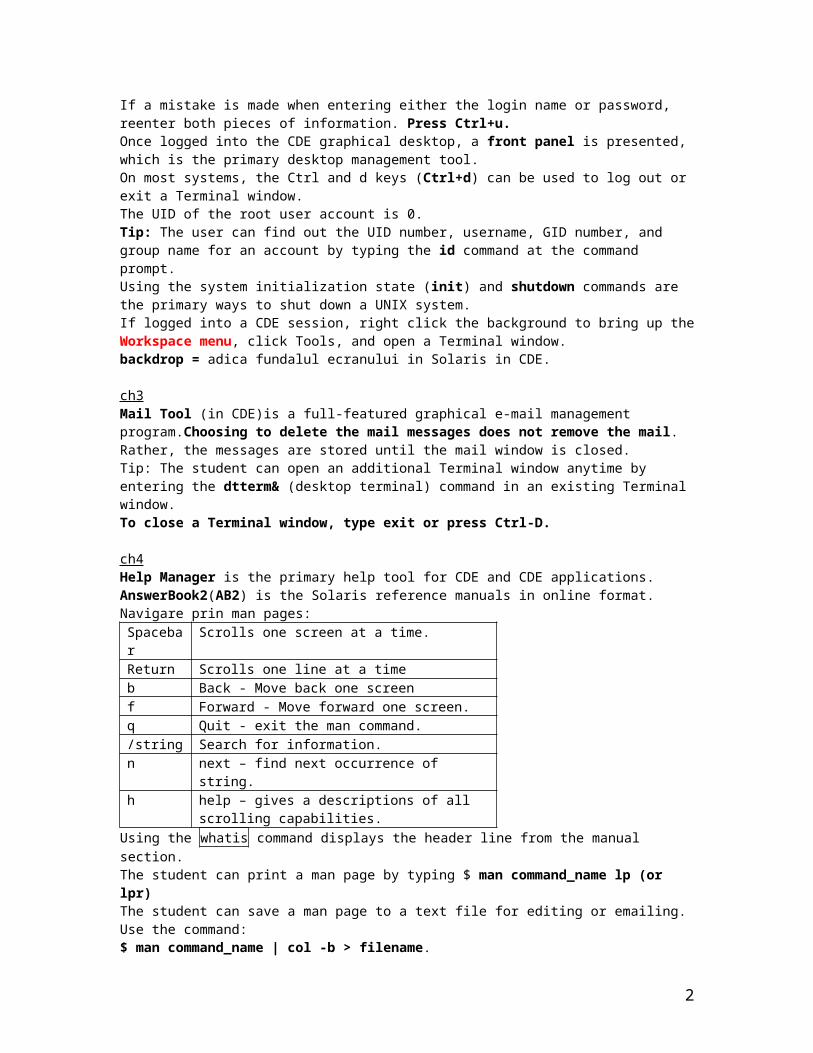
ch4Help Manager is the primary help tool for CDE and CDE applications.AnswerBook2(AB2) is the Solaris reference manuals in online format.Navigare prin man pages:
Spacebar Scrolls one screen at a time.Return Scrolls one line at a timeb Back - Move back one screenf Forward - Move forward one screen.q Quit - exit the man command./string Search for information.n next – find next occurrence of string.h help – gives a descriptions of all scrolling capabilities.
Using the whatis command displays the header line from the manual section.The student can print a man page by typing $ man command_name lp (or lpr)The student can save a man page to a text file for editing or emailing. Use the command: $ man command_name | col -b > filename.
$ hostname, displays the name of the student's workstation or host. $ uname -a , displays expanded system information, including the name of the student's
workstation, the OS version, and more.
ch5Depending on the setup of the system, users' home directories can be found in either /home (Linux) or /export/home (Solaris). In Solaris, if the user's home directory resides on their local system, it usually is found in /export/home. If it is on a server, it is usually in /homeFor the Bourne, Korn, and Bash shells, the basic shell prompt for a user is a dollar sign ($). For a C shell user, the prompt is a percent sign (%). When logged in as root, the shell prompt changes to a hash symbol (#).The general format for UNIX commands is shown here: $command [option(s)] [argument(s)] Up to 256 characters can be entered on a single command line, although this is not common.UNIX commands are always lowercase.Multiple commands can be entered on one line by separating them with a semicolon (;).Exemplu de comanda : cd ../.. schimba directorul cu directorul aflat cu 2 nivele mai sus.By using the ls command with the -F (file type) option, the student can display a listing with a symbol to indicate the file type.( An asterisk (*) after the name indicates that this is a command, an application, or a script file that can be run or executed).Using the -t (time) option(pentru ls) lists files with the most recently modified at the top of the list.Dimensiunea la ls este afisata in bytes.Use the ls -ld command to display detailed information about a directory, but not its contents.Use the ls -R (recursive) command to display the contents of a directory and all of its subdirectories.If the student enters ls d*, they will see all files that start with the letter d, plus all directories that start with d, followed by a colon, and then the directory contents.
ch6Ctrl-s stops screen outputCtrl-q resumes screen output stopped by Ctrl-s.Ctrl-c interrupts or cancels the current activity.Ctrl-d indicates the end of the file or exit. Ctrl-d is used to exit UNIX utilities such as bc, write, and several others. It is also used to exit a shell (including a Terminal window shell), and log out of a terminal session or a command line login session.$bc runs the basic calculator .As a general rule, when stuck, or if Control-c does not work, try Control-d.Ctrl-u erases the entire command line.Ctrl-w erases the last word on the command line.
2

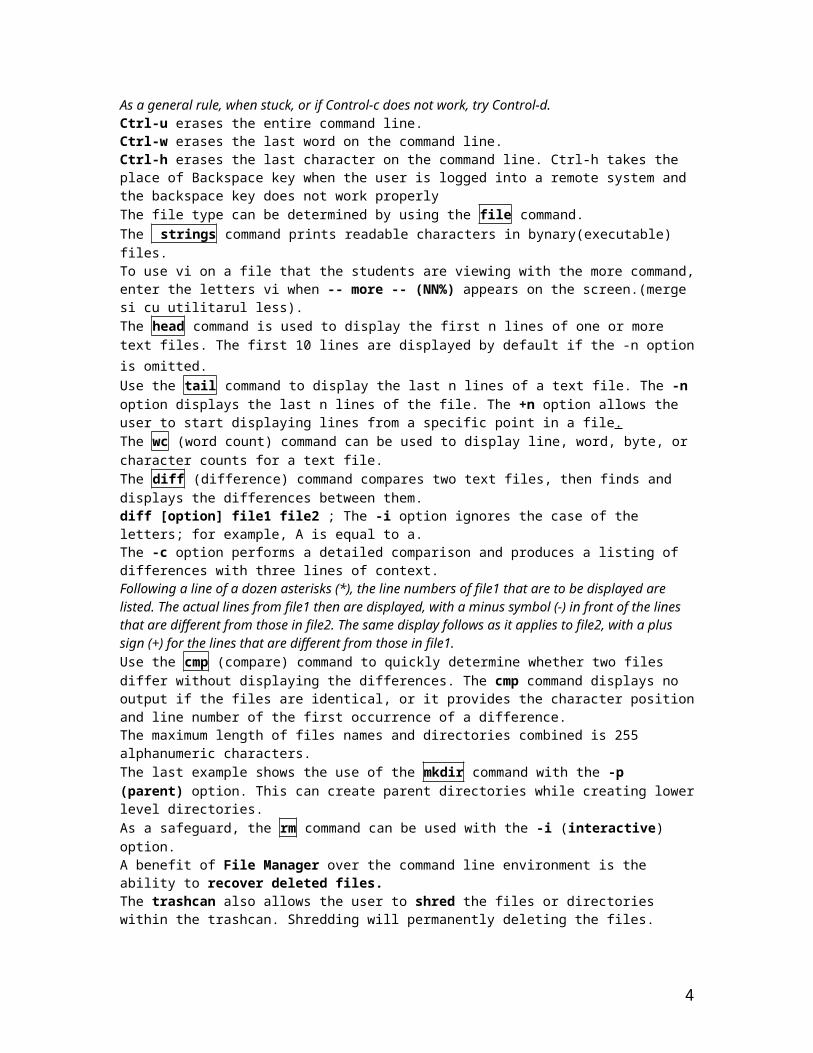
Ctrl-h erases the last character on the command line. Ctrl-h takes the place of Backspace key when the user is logged into a remote system and the backspace key does not work properlyThe file type can be determined by using the file command.The strings command prints readable characters in bynary(executable) files.To use vi on a file that the students are viewing with the more command, enter the letters vi when -- more -- (NN%) appears on the screen.(merge si cu utilitarul less).The head command is used to display the first n lines of one or more text files. The first 10 lines are
displayed by default if the -n option is omitted. Use the tail command to display the last n lines of a text file. The -n option displays the last n lines of the file. The +n option allows the user to start displaying lines from a specific point in a file.The wc (word count) command can be used to display line, word, byte, or character counts for a text file.The diff (difference) command compares two text files, then finds and displays the differences between them.diff [option] file1 file2 ; The -i option ignores the case of the letters; for example, A is equal to a. The -c option performs a detailed comparison and produces a listing of differences with three lines of context.Following a line of a dozen asterisks (*), the line numbers of file1 that are to be displayed are listed. The actual lines from file1 then are displayed, with a minus symbol (-) in front of the lines that are different from those in file2. The same display follows as it applies to file2, with a plus sign (+) for the lines that are different from those in file1.Use the cmp (compare) command to quickly determine whether two files differ without displaying the differences. The cmp command displays no output if the files are identical, or it provides the character position and line number of the first occurrence of a difference.The maximum length of files names and directories combined is 255 alphanumeric characters.The last example shows the use of the mkdir command with the -p (parent) option. This can create parent directories while creating lower level directories.As a safeguard, the rm command can be used with the -i (interactive) option.A benefit of File Manager over the command line environment is the ability to recover deleted files.The trashcan also allows the user to shred the files or directories within the trashcan. Shredding will permanently deleting the files.
ch7file that is copied and the target name already exits will cause the user to overwrite or "clobber" the file. The user will not receive a warning to prevent this from happening. To prevent overwriting an existing file when copying, use the cp -i (interactive) option as a security measure.Use the cp -r (recursive) command to copy a directory and its contents to another directory.The ln (link) command is used to give a file an additional name so that the user can access it from more than one directory or by another name in the same directory.Tip: When a file is linked to another file in the same file system, it is called a hard link. A soft link, or symbolic link, occurs when the user links a file across file systems. This is accomplished using the ln -s command.The mv -i option prompts for confirmation whenever the move would overwrite an existing target file.Comanda mv NU foloseste optiunea –r ca sa lucreze asupra directoarelor, ci lucreaza direct !Several metacharacters are used as redirection symbols. Input redirection uses the left angle bracket (< or 0<), which is referred to as the less than symbol. Output redirection uses the right angle bracket (> or 1>), or the greater than symbol. Error output redirection uses the right angle bracket, preceded by the number 2 (2>).$Command Redirection-Symbol File (text file or device file) To prevent the accidental overwriting of a file during redirection, the student can use the noclobber shell feature. To enable noclobber in the Korn or Bash shell, enter at the command line set -o noclobber. To disable clobbering, use set +o noclobber. The student can override the noclobber feature by using the >|, greater than symbol followed by the pipe symbol.In CDE(si in GNOME) The student can copy files using the Control key [Ctrl] and select, drag, and drop technique.
3
Symbolic links to files and folders may be created through Nautilus. If the original file is deleted, a symbolic link to it remains, but points to nothing.
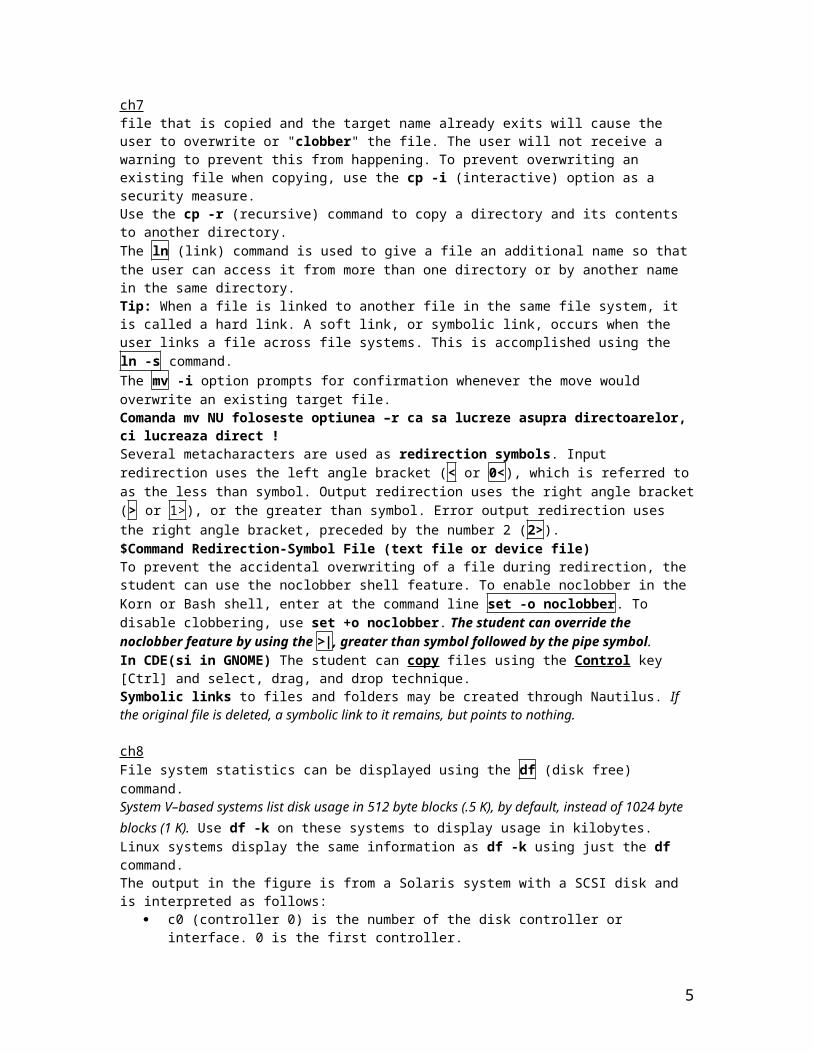
ch8File system statistics can be displayed using the df (disk free) command.System V–based systems list disk usage in 512 byte blocks (.5 K), by default, instead of 1024 byte blocks (1 K). Use df -k on these systems to display usage in kilobytes. Linux systems display the same information as df -k using just the df command.The output in the figure is from a Solaris system with a SCSI disk and is interpreted as follows:
c0 (controller 0) is the number of the disk controller or interface. 0 is the first controller. t3 (target 3) is the SCSI target number for the hard drive. d0 (disk 0) is the number of the disk installed. 0 is the first disk. s0 (slice 0) is the slice or partition number. 0 is the first slice.
The –s displays only the summary(adica doar dimensiunea directorului curent adica . )If more than one expression is specified, find treats the statement as an and request. All listed expressions must be verified as true or present. The -o (or) option can be used between expressions to allow for an or type of criteria definition. This means that if any of the expressions are true, the file will be found.The grep command will find all occurrences of the text string and display the lines in which they occur.The grep command is case sensitive. The student must match the pattern with respect to uppercase and lowercase letters, unless the -i option is used. The -i option ignores the case. The -v option searches for all lines that do not match the string specified.The fgrep (fast grep) command differs from grep and egrep in that it will not accept a regular expression metacharacter as input
Example Result
sed –n ’20,25p’ file Displays only lines 20 through 25 sed ‘5d’ file Deletes line 5 ls –l | sed ‘/[Tt]est/d’ > newfile Deletes all lines containing Test or test in the ls –l output, placing the results in newfile. sed ‘s/….//’ file Deletes the first four (….) characters from each line. sed ‘s/….$//’ file Deletes the last four (….) characters from each line. ls –l | sed ‘5,$d’ > newfile Deletes lines 5 to the last line in the ls –l output, placing the results in newfile. sed –n ‘/^$/d’ file > newfile Deletes blank lines from file placing the results in newfile.
ls –l | sed ‘s/ */:/g’ Searches (s) for at least one or more spaces and globally (g) replaces them with a colon (:). Note: without the g command sed would only replace the first space on every line with a colon and would not continue searching for other occurrences of a space on the same line.
sed ‘1,10s/Windows/UNIX/g’ file Search (s) for Windows and globally (g) Substitutes all occurrences of Windows on every line wherever it appears in the first 10 (1,10) lines.
ls –l |sed ‘s/$/EOL/’ Appends EOL at the end of every line. sed ‘s/^/ /’ file Searches for the beginning of each line (^) of the file and adds spaces.
sed –e ‘s/Dante/DANTE/g’ –e ‘s/poet/POET/g’ dante >newdante
Performs two edits on the same command line and places the results in the newdante file.
The sort command provides a quick and easy way for operators to organize data in either numerical or
alphabetical order. The sort command works from left to right on a character by character basis. By default, sort relies on whitespace to delimit the various fields within the data of a file.The sort command skips one separator with the +1 syntax. An alternative to the +x syntax is the –k option which sorts on key fields starting with the first field number 1. Using the sort command with the –k 2 file would sort the file on the second field or column and is the same as sort +1 file.
ch9vedit is a slightly modified version of vi that visually indicates the current mode.The student also can enable showmode after starting vi by entering set showmode at the colon in last line mode.view filename will start vi and open filename as read-only. Changes can be made but they must be saved to a different filename.
Session Customizing Commands
4
Command Meaning:set nu Show line numbers:set nonu Hide line numbers:set showmode Display current mode of operation:set noshowmode Turn off mode display:set Display all vi variables set:set all Display all possible vi variables and their current settings.The spell command compares the words contained in the specified text file against a dictionary file and displays suspected words not found in the dictionary.The pico text editor, to be discussed in the next section, is known for its ease of use and built in spell checker.Tip: The student can temporarily suspend the vi editor to check the spelling of a word by doing the following:
1. While in vi, type :!spell. Note: The student can run any UNIX command from vi using :![command].
2. Type the word in question, and then press Enter. 3. Press Ctrl-D. If the word is displayed, it is not in the dictionary. If nothing returns, the word is in
the dictionary and is spelled correctly. 4. Hit Enter to continue.
The emacs (editor macros) editor is considered to be easier than vi editor because there are no modesIn emacs: (C- inseamna Ctrl apoi o alta tasta mentionata).C-g runs a command called keyboard quit.To open a file for edit, press the combination C-x C-fCtrl-d to delete a characterTo undo a mistake, press C-/Repeat C-/ to undo more changes. Movement of the cursor can be accomplished with these keys: C-a beginning of line C-e end of line C-n next line C-p previous line C-f forward one character C-b backward one character To restart editing the file from the last time the student saved it, press C-x C-v To stop or kill the edit(adica se inchide fisierul(bufferul) care se edita), leaving Emacs running, press C-x k To save the current file at any time, type C-x C-s (M-x save-buffer).To exit Emacs smoothly, type C-x C-c If Emacs sees there are unsaved file buffers, it will prompt the user whether to save each one in return.Aborting Emacs If the operation gets difficult and the student wants to abort, type M-x kill-emacs To access the TUTORIAL at any time, press C-h t Help is available in Emacs at every keystroke. The prefix key reserved for Help, logically, is: C-h Type just C-hand the program will prompt the student for further options. To see the options available, type: C-h ? Cu M-x(adica Esc-x sau Alt-x se intra intr-un mod unde se pot da comenzi text; se poate fol tab pt a completa o comanda si a vedea alternativele de completare).emacs -nwThe -nw means no windows, this means to start Emacs running in a terminal window rather than with its graphical interface.TIP: Pressing the Alt (sau Esc)key on most standard PC keyboards provides the META key function.Type C-x 1 to return to a single window.
5
Type C-x C-b (M-x list-buffers) to see a list of open buffers in another window.Type C-h k C-x C-c to learn about M-x save-buffers-kill-ema.(k vine de la key poate)
ch10Solaris includes the SunScreen Secure Net [tm] enterprise firewall product designed for access control, authentication, and network data encryption.Linux includes the ipchains and the more recent iptables utilitiesIncluded with Solaris is the Automated Security Enhancement Tool (ASET). ASET is a utility that improves security by allowing system administrators to check system file settings including permissions, ownership, and file contents.Note: To copy (cp) a file from a directory or move (mv) a file into or out of a directory, the user must have the execute (x) permission for the directory. The user also must have the read permission for the file being copied or moved. Changing the permissions on a folder does not change the permissions for that folder's subfolders and files. To change permissions on a folder and all of its subfolders, the -R (recursive) command needs to be used. By default, directories have read and execute permissions. Without these permissions, a user would be unable to access any of the content within the directory. Access problems sometimes can be traced back to a user who accidentally or intentionally removed read and or execute permissions on a directory.The ls -n command displays the numeric UID and the GID ale fisierelor si directoarelor.The id command displays numeric and alphabetic UIDs and GIDs for the student's effective user identifier (EUID). The groups command displays all the groups the student is a member of. The default permissions for a new file are read/write for the user or owner who created the file, and read for group and other. For directories, the default permissions are read/write/execute for the user and read/execute for group and other.The two modes of operation with the chmod command are symbolic (or relative) and octal (or absolute): -
- Symbolic Mode uses combinations of letters and symbols to add or remove permissions for selected categories of users. Symbolic mode also is referred to as relative mode.
- Octal Mode uses octal numbers to represent file permissions and is used to set permissions for all three categories of users. Octal mode also is referred to as absolute or numeric mode.chmod octal_mode filename or chmod [-R] octal_mode directoryname Default permissions on files have an octal value of 644, and default permissions on directories have an octal value of 755. Most scripts and executable files have an octal value of 555.The student's options are to create the files using default permissions and then changing permissions with the chmod command, or to use the umask command.The following shows the syntax for the chown command for a file and then for a directory:chown new_owner filename or chown [-R] new_owner directoryname .The format for the chgrp command is shown here: chgrp new_group filename or chgrp [-R] new_group directoryname Two main commands display who is using the system: who and finger.A user can temporarily switch to another user account to access files and directories that belong to that user by using the su (switch user sau substitute user) command.In the first example, su is used without options. When su is used without options, the student does not change directory locations. Environmental settings such as the prompt and aliases customized for the student's user ID also remain in effect. To switch to another UID and have the system read the new user's initialization files, the student must use a dash (-) between the command and the new user ID, as shown in the second example. With the dash, the su command switches identities to the new user and changes the environment to that of the new user.
6
The who am i(separat !, unit da doar userul curent) command shows the user RUID (real user ID). The id command in Figure shows the user EUID (effective user ID). The id command also can be used with the -a (all) option to show all groups that the effective user is a member of.
ch11Three main components exist in the UNIX printing environment:
- Printer is a physical printing device- Printer Name (Queue) is the name of a print queue associated with the physical printer. This is
the name that the users print to. A print queue is a directory on the hard disk of a print server where print requests from users are stored. The print queue is the list of jobs waiting to be printed.
- Print Server is the computer that manages incoming print requests and releases those requests, as the printer is ready. Print servers run the printer daemon lpsched, which manages print requestsWhen the user sends a print request to a printer, the request is actually sent to a print queue. If the printer is available, the request is serviced immediately. If the printer is busy, the request is queued until the printer is available. Every printer, whether attached to a computer or attached directly to the network, must be assigned to a print queue that is located on a computer. Printers usually do not have hard disks or the capability to store print requests.Printing ASCII text or PostScript files can be done from the command line using the lp (line printer)
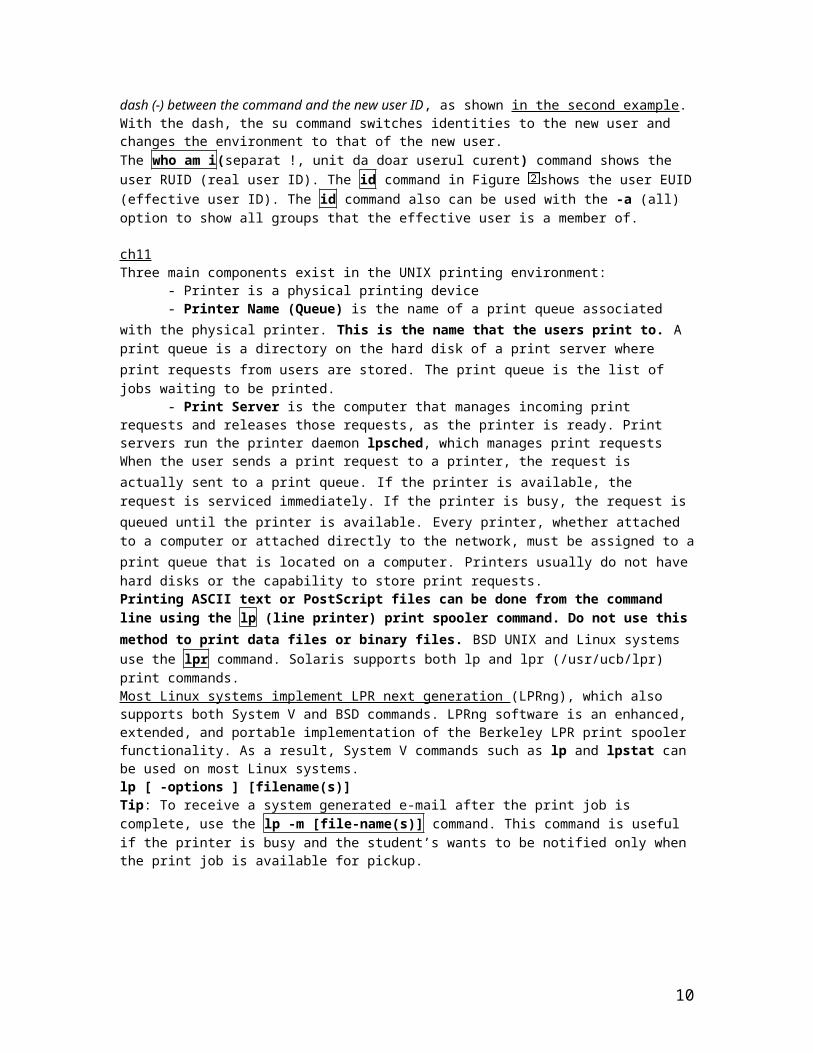
print spooler command. Do not use this method to print data files or binary files. BSD UNIX and Linux systems use the lpr command. Solaris supports both lp and lpr (/usr/ucb/lpr) print commands.Most Linux systems implement LPR next generation (LPRng), which also supports both System V and BSD commands. LPRng software is an enhanced, extended, and portable implementation of the Berkeley LPR print spooler functionality. As a result, System V commands such as lp and lpstat can be used on most Linux systems.lp [ -options ] [filename(s)] Tip: To receive a system generated e-mail after the print job is complete, use the lp -m [file-name(s)] command. This command is useful if the printer is busy and the student’s wants to be notified only when the print job is available for pickup.
7
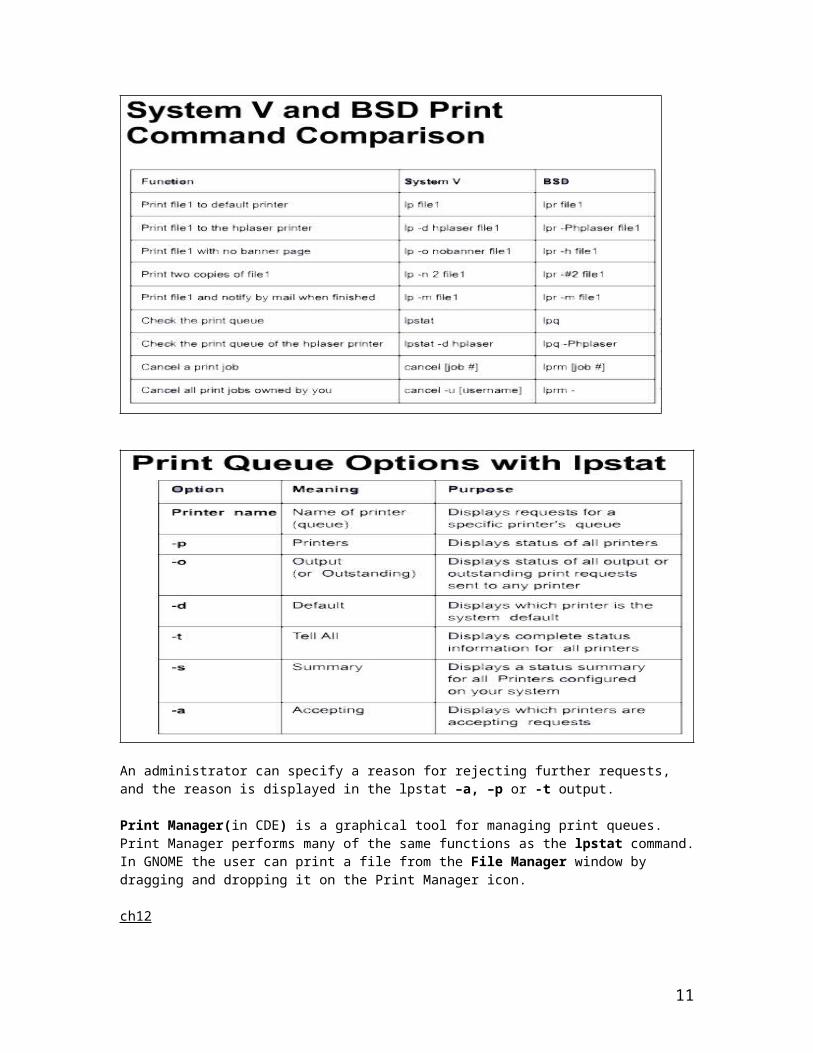
An administrator can specify a reason for rejecting further requests, and the reason is displayed in the lpstat –a, –p or -t output.
Print Manager(in CDE) is a graphical tool for managing print queues. Print Manager performs many of the same functions as the lpstat command.In GNOME the user can print a file from the File Manager window by dragging and dropping it on the Print Manager icon.
ch12The Solaris Volume management feature provides users with a standard method of handling data on floppy diskettes and CD ROMs. This management feature gives users access to these types of devices automatically without having to become a superuser and mounting them.Note: If volume management is not running on a system, the vold daemon is not running, only the superuser can have access to floppy diskettes and CD ROMs.When the user inserts a CD ROM into the drive it is automatically detected(in Solaris). However, volume manager does not automatically detect when the user inserts a floppy into the floppy drive. The user must inform volume manager by using the volcheck command. The volcheck (volume check) command or Open Floppy option on the CDE File Manger File menu, instructs Solaris to do the following: · Check the floppy drive · Determine the disk type, whether UNIX or DOS · Temporarily place or mount the floppy disk under the /floppy directory of the hard driveTo eject a floppy diskette the student must not be in the /floppy directory. The "Device busy" message will appear if the student is in the /floppy directory. Once out of the /floppy directory, the student then types eject fd or eject floppy.Floppies can also be mounted and unmounted under Solaris using the mount and umount commands described in the subsequent Linux section on floppies and CD ROMs.Formatting a floppy diskette with Solaris To create a floppy diskette for storing UNIX files the student must format the diskette and create a UNIX File System (ufs) on the diskette. Any user can format the UNIX diskette from the command line with the fdformat (floppy disk format) command but only the superuser can execute the newfs /vol/dev/rdiskette0/unnamed_floppy command to create a ufs on the diskette. For this reason it is best for users to use the Format option from the CDE File Manager, Removable Media menu. Select the floppy disk and click the Selected menu and then Format. The format command allows the user to format a diskette and specify that either a UNIX or MS DOS file system be created with out having to be the superuser.
8
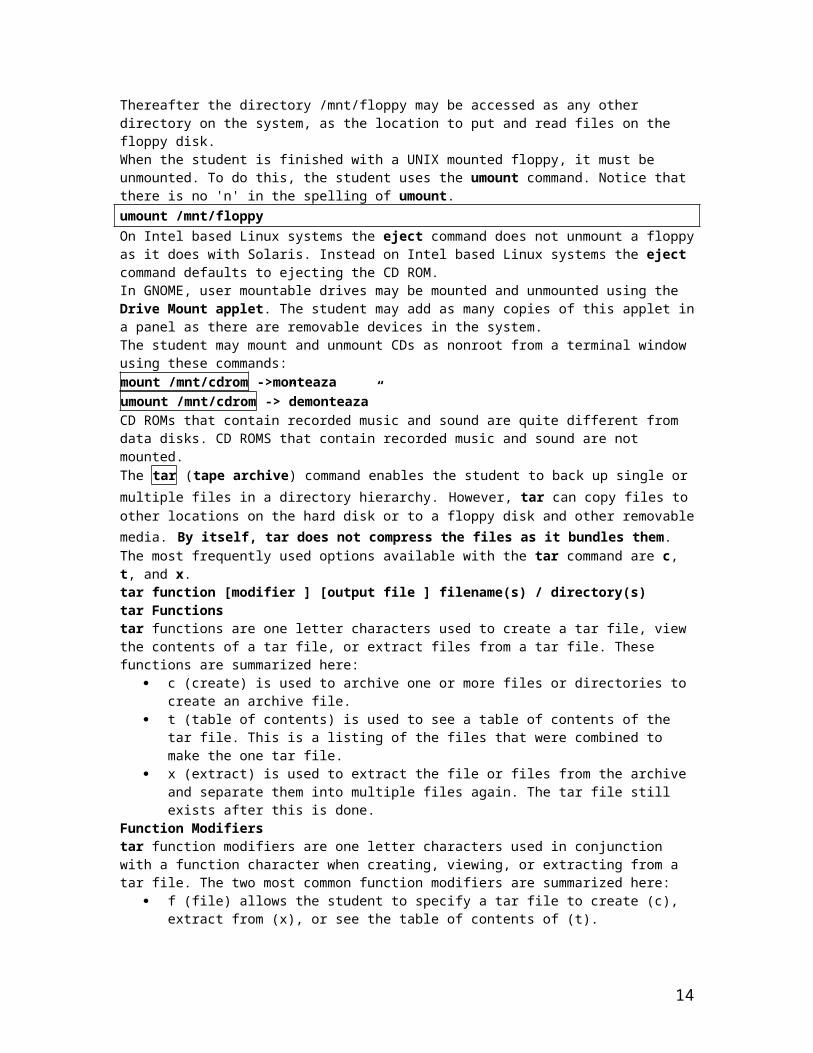
In order to copy files to a diskette using either tar or cpio the diskette must be formatted, using fdformat or the CDE format command. If a UNIX file system does not exist, tar and cpio will create their own unique file system when files are copied to the diskette. Access the floppy diskette using the device file name of /vol/dev/aliases/floppy0 when using either tar or cpio.To eject the CD ROM the student must not be in the /cdrom directory. The "Device busy" message will appear if the student is in the /cdrom directory. Once out of the /cdrom directory the student then types eject cd or eject cdrom.Mtools is a collection of utilities to access MS DOS disks from UNIX without mounting the disks.Most floppy disks are sold with the low level format already done. The student will need to do it only in exceptional cases. Such cases would be when the user thinks a disk has corruption or one or more bad blocks. The fdformat command is used to do a low level format on a new floppy disk, the same as in Solaris. The student does not have to be root to do this. The standard floppy disk drive in a Linux system is accessed using the device path /dev/fd0. To perform a low level format of a floppy disk, use the command: fdformat /dev/fd0Putting a File System on the FloppyTo create a UNIX file system on a floppy disk, the student uses the mkfs command. Only root may make file systems on a hard disk, but non-root users may use mkfs to do so on a floppy disk. The command to create a file system on a standard floppy ismkfs -t ext2 /dev/fd0 1440 The -t ext2 tells mkfs what file system type to make, /dev/fd0 is the device path, and 1440 is the number of blocks to create. A standard 1.44MB floppy has 80 tracks with 18 sectors each, or 1440 blocks. The ext2 file system is the most common with Linux systems. Putting a DOS File System on the Floppy Even if a floppy disk already has a UNIX file system and files on it, it may be reformatted as a DOS disk quickly with the mformat command from the mtools utilities. However, a UNIX-formatted disk must be unmounted first. (See Mounting a Floppy.) mformat takes an argument that corresponds to its device identifier in a DOS system, normally A:. The command used to make a DOS floppy is:mformat a: This format should take only a couple of seconds to run. The student may then use mtools commands on the floppy in the drive. Using gfloppy to Format and Put File Systems on a Floppy If a student is using a graphical display such as GNOME, a gfloppy may be used to accomplish floppy formatting of either type, including putting a file system on it. In GNOME, gfloppy may be found on the Utilities menu. It may also be run as a shell command. Note: It is necessary to have the mtools utilities installed in order to have the option to format DOS floppies with gfloppy. Mounting a UNIX Floppy DiskUse the mount command to mount a floppy disk with a UNIX file system on it. It is not necessary to mount a DOS floppy disk. Linux does not run a volume manager or support the volcheck command for mounting floppies as with Solaris. Most Linux distributions configure systems so that nonroot users may mount and unmount floppy disks. If a correct set of options has been defined in the file /etc/fstab to allow this operation, the command to mount a floppy disk is:mount /mnt/floppy Thereafter the directory /mnt/floppy may be accessed as any other directory on the system, as the location to put and read files on the floppy disk. When the student is finished with a UNIX mounted floppy, it must be unmounted. To do this, the student uses the umount command. Notice that there is no 'n' in the spelling of umount. umount /mnt/floppy On Intel based Linux systems the eject command does not unmount a floppy as it does with Solaris. Instead on Intel based Linux systems the eject command defaults to ejecting the CD ROM. In GNOME, user mountable drives may be mounted and unmounted using the Drive Mount applet. The student may add as many copies of this applet in a panel as there are removable devices in the system.The student may mount and unmount CDs as nonroot from a terminal window using these commands:
9
mount /mnt/cdrom ->monteazaumount /mnt/cdrom ->”demonteaza”CD ROMs that contain recorded music and sound are quite different from data disks. CD ROMS that contain recorded music and sound are not mounted.The tar (tape archive) command enables the student to back up single or multiple files in a directory
hierarchy. However, tar can copy files to other locations on the hard disk or to a floppy disk and other removable media. By itself, tar does not compress the files as it bundles them.The most frequently used options available with the tar command are c, t, and x.tar function [modifier ] [output file ] filename(s) / directory(s) tar Functions tar functions are one letter characters used to create a tar file, view the contents of a tar file, or extract files from a tar file. These functions are summarized here:
c (create) is used to archive one or more files or directories to create an archive file. t (table of contents) is used to see a table of contents of the tar file. This is a listing of the files that
were combined to make the one tar file. x (extract) is used to extract the file or files from the archive and separate them into multiple files
again. The tar file still exists after this is done. Function Modifiers tar function modifiers are one letter characters used in conjunction with a function character when creating, viewing, or extracting from a tar file. The two most common function modifiers are summarized here:
f (file) allows the student to specify a tar file to create (c), extract from (x), or see the table of contents of (t).
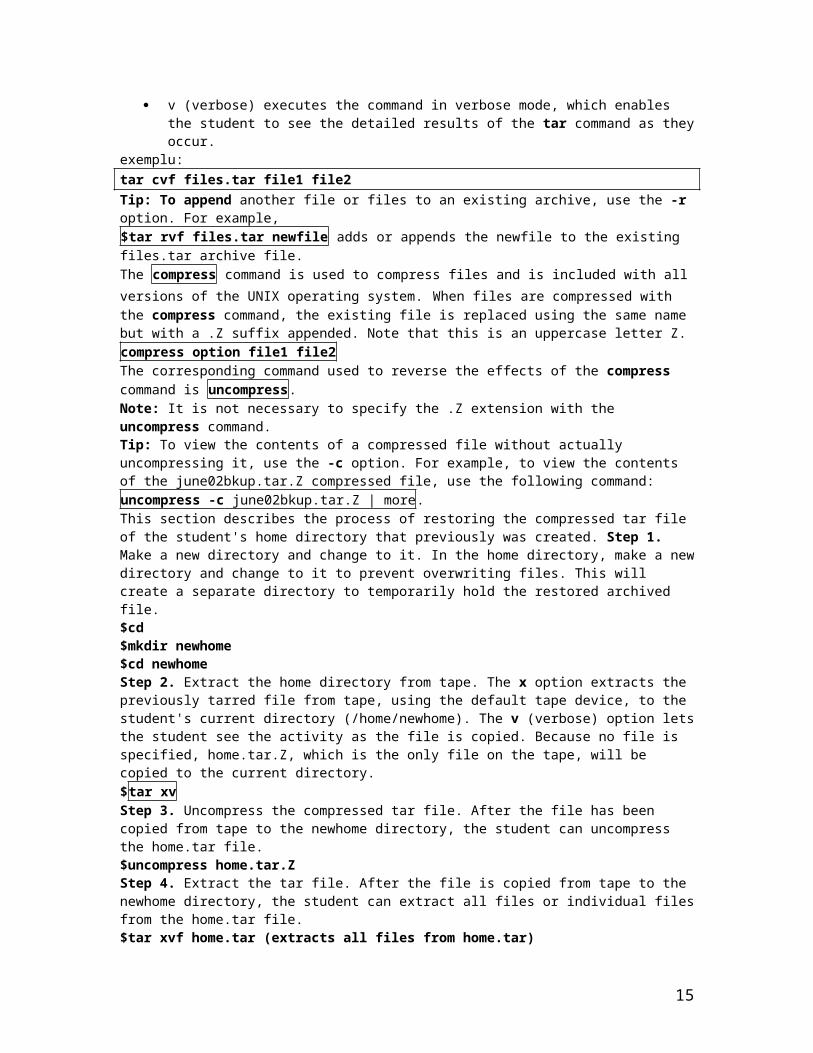
v (verbose) executes the command in verbose mode, which enables the student to see the detailed results of the tar command as they occur.
exemplu:tar cvf files.tar file1 file2Tip: To append another file or files to an existing archive, use the -r option. For example, $tar rvf files.tar newfile adds or appends the newfile to the existing files.tar archive file.The compress command is used to compress files and is included with all versions of the UNIX operating
system. When files are compressed with the compress command, the existing file is replaced using the same name but with a .Z suffix appended. Note that this is an uppercase letter Z.compress option file1 file2 The corresponding command used to reverse the effects of the compress command is uncompress.Note: It is not necessary to specify the .Z extension with the uncompress command.Tip: To view the contents of a compressed file without actually uncompressing it, use the -c option. For example, to view the contents of the june02bkup.tar.Z compressed file, use the following command:uncompress -c june02bkup.tar.Z | more.This section describes the process of restoring the compressed tar file of the student's home directory that previously was created. Step 1. Make a new directory and change to it. In the home directory, make a new directory and change to it to prevent overwriting files. This will create a separate directory to temporarily hold the restored archived file. $cd $mkdir newhome $cd newhome Step 2. Extract the home directory from tape. The x option extracts the previously tarred file from tape, using the default tape device, to the student's current directory (/home/newhome). The v (verbose) option lets the student see the activity as the file is copied. Because no file is specified, home.tar.Z, which is the only file on the tape, will be copied to the current directory. $tar xv Step 3. Uncompress the compressed tar file. After the file has been copied from tape to the newhome directory, the student can uncompress the home.tar file. $uncompress home.tar.Z Step 4. Extract the tar file. After the file is copied from tape to the newhome directory, the student can extract all files or individual files from the home.tar file.
10
$tar xvf home.tar (extracts all files from home.tar) $tar xvf home.tar filename1 filename2 (extracts individual files from home.tar) The jar (Java archive) command is similar to the tar command, but it compresses the resulting file in the
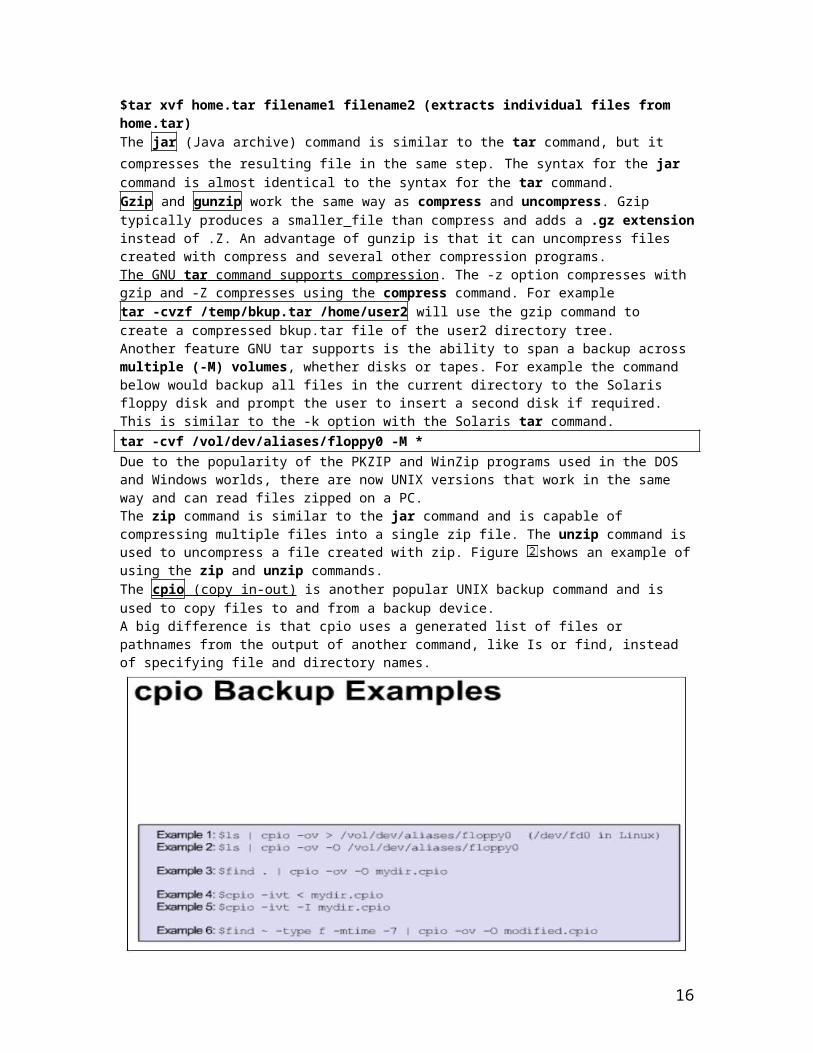
same step. The syntax for the jar command is almost identical to the syntax for the tar command.Gzip and gunzip work the same way as compress and uncompress. Gzip typically produces a smaller file than compress and adds a .gz extension instead of .Z. An advantage of gunzip is that it can uncompress files created with compress and several other compression programs.The GNU tar command supports compression . The -z option compresses with gzip and -Z compresses using the compress command. For example tar -cvzf /temp/bkup.tar /home/user2 will use the gzip command to create a compressed bkup.tar file of the user2 directory tree.Another feature GNU tar supports is the ability to span a backup across multiple (-M) volumes, whether disks or tapes. For example the command below would backup all files in the current directory to the Solaris floppy disk and prompt the user to insert a second disk if required. This is similar to the -k option with the Solaris tar command. tar -cvf /vol/dev/aliases/floppy0 -M * Due to the popularity of the PKZIP and WinZip programs used in the DOS and Windows worlds, there are now UNIX versions that work in the same way and can read files zipped on a PC. The zip command is similar to the jar command and is capable of compressing multiple files into a single zip file. The unzip command is used to uncompress a file created with zip. Figure shows an example of using the zip and unzip commands.The cpio (copy in-out) is another popular UNIX backup command and is used to copy files to and from a backup device.A big difference is that cpio uses a generated list of files or pathnames from the output of another command, like Is or find, instead of specifying file and directory names.
Archiving a File The student clicks the File subpanel from the CDE Front Panel. The student then selects the Archive menu option.
ch13The first two processes started when a System V based system is booted are sched (scheduler - process ID of zero) and init (initialization - process ID of one). These two processes manage all other processes. Linux does not have a scheduler process but instead starts the init process (process ID of one) and various memory and kernel handlers.
11
The init process is the parent of the login program that verifies the login name and password entered. On a successful login, the login program starts the login shell of that user. Init, the parent process of the login shell, goes to sleep and waits for the child process, the login shell, to shut down or die when the user logs out. The parent process then wakes up and starts another login program.Daemons are processes that are started by the UNIX kernel and that exist for a specific purpose. For instance, the lpsched (line printer scheduler) daemon exists for the sole purpose of handling print jobs.If a command is issued in a Terminal window and the window is closed before the command returns output, that process becomes an orphan. The system passes the orphan process to init, which is the master system process. Init then becomes the parent process and terminates or ends the child process. Occasionally, a child process does not return to the parent process with its output. This process becomes 'lost in the system. The only resource that this process uses is a slot in the process table. The process cannot be stopped in a conventional manner. This type of process is called a zombie or defunct process.The ps (process status) command is used to list the processes currently running on the system.As shown in Figure , there are three main options with the ps command: -e (every process), -f (full listing), and -u (user). The ps command with the -u (user ID) option displays PID, TTY TIME, and CMD for every process running on the system for a particular user.Note: The equivalent process status command of ps -ef on a BSD system is ps -aux.Linux supports the GNU long options variations of the ps command where options are preceded by two dashes. A particularly useful option in RedHat Linux is the ps --forest command.The kill command provides a direct way to terminate unwanted command processes.kill [-signal ] process-id or %job-id To terminate a process with the kill command, the student types ps to find out the PID or PIDs for the process or processes. The student then types kill followed by the PID or PIDs. If the student uses the kill command without specifying a signal, signal 15 (SIGTERM) is sent to the process with the specified PID number. If the student needs to forcibly terminate a process, the student can use the signal 9(SIGKILL) option to the kill command. This option is referred to as a sure kill and is necessary for killing shells and processes that will not respond to any other signal to terminate.The pkill command is specific to Solaris and works exactly like the pgrep command. However, the pkill command terminates the process by matching the command name (CMD) of the process or processes and sends a kill signal.(deci pkill in Solaris termina toate procesele care incep cu un anumit nume la fel ca killall in Linux)$pkill CMD name or killall [-i] CMD name (Linux) The student can run a process in the background by adding an ampersand (&) to the end of the command line.Job control gives the student the capability to place a job or process currently running in the foreground into the background.Comenzi: Ctrl-z or stop %job number => Suspends not terminates the foreground process. jobs => displays all backround jobs. bg %job number => pune in backround jobul respectiv si daca era suspendat(cu Ctrl-z) il reporneste
automat. fg %job number => pune jobul in foreground Ctrl-c => cancells the currrent foreground job.To schedule a one time job using the at command, perform these steps: Enter the at command followed by a time specification, where the time specification could be: $at
10:30am today, $at midnight, $at 12:01 1 Jan 2002, and so on. See the man page for many more examples.
At the at prompt (at>), enter the first command to run at the specified time, and then press Enter. Enter the next command to run, followed by Enter or press Ctrl-D, if finished. An at job number is
assigned to track the at job. Use the atq command to view the at job queue. Use the atrm [at job#] command to remove a scheduled job.
Tip: To run a script file at a specified time, use the command $at [time spec] [script file name]. For example, $at midnight whoison would run the whoison shell script that runs the who command to see
12
what users are accessing the system at midnight and then would redirect the output to a file to be viewed in the morningThe crontab utility allows a user to schedule a command or program to run at scheduled intervals.The crontab command is used to view and edit a users crontab file that stores scheduled program information.0 17 * * 5 /usr/bin/banner "Weekend Is Here!" > /dev/console
In the example above, the message "Weekend Is Here" would be displayed in the console window (Workspace Menu -> Hosts -> Console Terminal) at 5:00 p.m./1700 every Friday of the week of every month.The time and date fields are: field allowed values ----- -------------- minute 0-59 hour 0-23 day of month 1-31 month 1-12 (or names, see below) day of week 0-7 (0 or 7 is Sun, or use names)The first 5 fields can have the following: A single value Multiple values that is 1,3,5 in the sixth field, which would mean Monday, Wednesday, Friday A range of values that is 1-5 in the sixth field which would mean Monday thru Friday A "*" to mean any or all values.To edit the crontab file use the crontab -e (edit) command. In CDE this will bring up the Text Editor and allow the student to enter a new crontab entry or edit an existing entry. All six fields must be accounted for in a new crontab entry. If the student is using Linux or is not in CDE the default editor is vi.To list the entries in the student's crontab file use the command crontab -l (list). To delete the crontab file use the crontab -r (remove) command.Note: If the student mistakenly types crontab without any arguments, the student should use the Control-c to exit.Note: If the student mistakenly types crontab without any arguments, the student should use the Control-c to exit.
ch14An alias is a way to give a command a different or shorter name for use in the shell.alias aliasname=valueNote: There is a space after the alias command and the aliasname. There are no spaces before or after the equals sign (=).Note: Use single quotes for commands with options, spaces, or other special characters. For example, alias ll='ls -l' To display usable aliases, use the alias command with no argument.A user can unset a previously defined alias with the unalias command.The student also can temporarily bypass an alias. To bypass the alias and use the original version of a command, use a backslash, as shown in FigureExemplu : \ls (daca era un alias cu numele ls ca si comanda ls).In the Korn shell the history list is stored in the user's home directory in a file named ~/.sh_history. By default, the Korn shell keeps a record of the last 128 commands entered.The Bash shell history list is stored in the user's home directory in a file named ~/.bash_history. By default, the Bash shell keeps a record of the last 1000 commands entered.The number of commands stored in the history list file for both the Korn and Bash shells is determined by the HISTSIZE variable.The history command displays the command history list with an event number to the screen.history [options]Specifying a number preceded by a dash as an option displays the last x number of history lines. Specifying a number without a dash shows the history lines from that number to the last command entered.
13
Using the history command by itself, the last 16 commands are displayed.The r (repeat) command is one of many predefined aliases in the Korn shell. This command enables the user to re-execute commands from the history list saving retyping time.r [argument(s)]. The argument passed to the r command is the history line numberThe history command in Bash is very similar to history in the Korn shell. The difference is Bash does not use a dash (-) before the number of last commands to display. For example, history 3 in the Bash shell is equivalent to history -3 in the Korn shell.The simplest way to repeat commands in the Bash shell is to press the up arrow, or Ctrl+P keys, and down arrow, or Ctrl+N keys.The following are detailed explanations(pentru BASH).
!!: Use the double exclamation marks (!!) to repeat the most recent command exactly as it was executed previously.
!*: Use the exclamation mark (!) and asterisk (*) to repeat all arguments of the previous command. !$: Use the exclamation mark (!) and the dollar sign ($) to repeat the last argument of the previous
command. !number: Use the exclamation mark (!) followed by a command number to repeat a specific
command from the command list. !n:p: With the !n:p option, the user can see a previous command but not execute it.(exemplu : !1000:p) This is useful for editing the command, which is covered in the next section.
When enabled from the command line, the command line editing feature is activated only for the shell in which it was set. Command Format: set [- or +] o vi or set [- or +] o emacsUsing set -o vi turns on command line editing and informs the shell the user wants to use vi editor commands to position the cursor and perform inserts, edits, and search and replace. Use set -o emacs if the emacs editor is preferred. Use set +o vi or emacs to turn the editor off. When command line editing has been turned on with the vi mode, pressing the Esc key activates the in line editor.The set -o vi command is used to turn on vi editing, the Esc key activates the feature, and the k key is used to repeat the previous command so that the command can be corrected. In this example, the user edited the command to change worfs to words. The k key moves up through the command list, and the j key moves down. A way for the student to remember the use of these keys is that k is for kick up and j is for jump down.
14
To use the completion feature to complete a filename: 1. Type a command, such as ls, cat, rm and so on, followed by one or more characters of a file
name. 2. Press the Esc and backslash keys (Esc \) in sequential order, for the Korn shell, or the Tab key, for
the Bash shell. The set –o vi command turns on both the command line editing and filename completion features. The following shows an example for a shell variable:PS1="MyPrompt$"VARIABLE=value unset VARIABLETo display the value of a single variable, use the echo command. For example, echo $PS1 would return "MyPrompt$" assuming the PS1 variable was set to Myprompt$.To display all variables in the local shell and the variable's values, type the set command.The following shows the basic syntax used to create an environment variable: VARIABLE=value ;export VARIABLE or export VARIABLE=value or export VARIABLE (if variable is already defined) Environment variables and their values can be displayed by typing the export command by itself: export or env .The default prompt for the Korn and Bash shell is the dollar sign ($). The user can customize the shell prompt to the user's own preferences by using the predefined PS1 (prompt string 1) shell prompt variable (PS1=value).For simple prompt settings in the Bash shell the student can also set the PS1 variable to:
\u for username \d for the date \h for the hostname \$ for the dollar sign \W for the working directory
PS1=\u@\h\$ for example, would result in the prompt similar to jamie@colorado$. Two levels of initialization files exist. The first level is system wide. System wide initialization files are maintained by a system administrator and reside in the /etc directory. The second level is the user specific initialization files that reside in a user's home directory.
15
The .kshrc file automatically is read each time a new shell, such as a new Terminal window, or subshell is started, so there is nothing to export.When any user logs into the system, the system /etc/profile file is always read first. The Korn shell user's .profile file in the home directory is read next. Then, if the ENV variable in the .profile file is assigned and exported, the .kshrc file is read. The .profile file is read only once, while the .kshrc file is read every time a new Korn shell is started.The .bash_profile file is read only when a user logs in to the system. If a Bash shell user wants to customize the environment, that user needs to create or modify the .bash_profile file and then the user must export the BASH_ENV variable, as shown here: BASH_ENV =$HOME/.bashrc;export BASH_ENV
ch15There are two ways to execute a shell script.The student can use the ksh or bash command followed by the script file name. The student can also make the shell script file an executable file, then type the script name to execute.A common problem when writing shell scripts is that the shell does not interpret the command the way the user expects. The student can use the ksh or bash command with the -x (echo) and -v (verbose) options to help identify where the problems are in script.Figure shows the output of a script named debug1 run with the ksh -x option. The -x option displays each line after the shell has interpreted it and places a plus sign (+) after each line is executed. The lines below them show the output of the commands.The -v option is similar to the -x option except it displays the commands before the substitution of variables and commands is done.Positional parameters are referenced in a script as $1, $2, $3, and so on up to $9. $1 represents the first argument on the command line, $2 represents the second argument, and so on. Three other special variables are $0 which represents the command or the name of the script, $* which represents all arguments entered on the command line, and $# which represents the number of arguments on the command line.To make a shell script more flexible and user friendly the student can pause the script and ask for a single line of input. This is accomplished with the echo command to prompt the student for input and the read command to pause and take input from the keyboard. Whatever the student enters is stored in the variable name specified after the read command.The echo command can be used in conjunction with an escape character to position the cursor. For example, \c positions the cursor at the end of the line instead of on the next line. echo also accepts other escape characters such as: \t - inserts a tab
16
\n - inserts a new line Note: In order to use escape characters with the Bash shell the student must use echo -e. For example, echo -e "Enter the pattern to search for: \c"The shell variable $? is automatically set by the shell to the exit status of the last command executed.The test built in shell conditional command is often used for testing one or more conditions following the if command.Command Format: if test expression or if [ expression ] then execute command(s) fi
The ! (bang) negates a test, so [ ! -w file] negates [ -w file].The case built in shell command is used when there are many conditions to test.Command Format: case $VAR in value1 ) Command Command ;; value2 ) Command Command ;; *) Command ;; esac
The for loop executes a list of commands one time for each value of a loop variable.Command Format: for variable in list do Commands Doneexemplu:for i in Ana are mere do
17
echo $idone
The while loop repeatedly executes a group of commands within the body of the loop until the test condition in the expression becomes false. In other words, while the expression is true, execute these commands.Command Format: while conditiondo Commands done
The until Loop The until loop is very similar to the while loop but it executes a series of commands while a command continues to fail (non-zero exit status). When the command finally executes successfully, the loop is terminated and execution passes to the first statement following done construct. The until condition is checked at the top of the loop, not at the bottom.Command Format: until conditiondoCommands done
ch16
Use the whereis command to determine the directory location for a particular command, for example, $whereis ping.In Linux, ping continuously sends packets until interrupted with Ctrl + C. In Solaris the ping -s command performs the same function. Typing the ping command alone will give a list of options available.In addition to connecting to other hosts, Telnet can be used to connect to and manage network devices such as switches and routers.Telnet is another good network troubleshooting tool. Telnet is a nongraphical communications utility that can be used to check the upper layers of the OSI model. Telnet runs at Layer 7, the application layer.The student can Telnet to the name of a host computer if the student has a naming service running such as DNS. The student can Telnet to the host by entering the host name and IP address in the /etc/inet/hosts files(probabil in Solaris, pt ca in linux e fisierul /etc/hosts).If the student's Telnet program does not allow these keys to be defined, the student should do the following:
Type stty erase at the shell prompt after the student logs in. Hit the Backspace key which will enter a ^H. Hit Enter.
This will allow the Backspace key to work properly. The student should type stty erase '^h' somewhere in the .profile file located in the home directory of the remote system.Like the TCP/IP telnet utility, the UNIX rlogin (remote login) command is used to establish a login session on another remote UNIX workstation. Telnet will always prompt for username and password. Rlogin can be setup so no password is required as a convenience to users and for security reasons. If a password is not typed a hacker cannot view it.rlogin saturnPassword:…..Use the -l option to specify a different login ID for the remote login session.rlogin hostname -l username If it is necessary for the student to change directories on the student's own system in the middle of the ftp session, the lcd (local change directory) command can be used. To end an FTP session, the student types bye at the prompt.
18
In addition to the previous commands, other commands that the student will use often are put, mput, get, and mget. The put command is used to transfer a file to the remote host. The mput (multiple put) command allows the student to transfer more than one file at a time by specifying a space-delimited list of files. Wildcards are accepted. The get and mget commands are used to transfer one or more file from a remote host to the student's system.The rcp (remote copy) command is another command from the r (remote) family of commands. Like rlogin, the rcp command is a UNIX, not a TCP/IP, command for use between UNIX systems.The syntax for the rcp command is shown here: rcp source_file hostname:destination_file ("put ") rcp hostname:source_file destination_file ("get ") Note: In order for one system to copy a file to another system a .rhosts file needs to be created in the home directory of the receiving user account. The .rhosts file lists all hosts or host and username pairs it trusts.Secure Shell (SSH) is a relatively new utility that provides secure access to a remote computer by encrypting all transmission between client and serverOpenSSH is a suite of three utilities for the client support.
ssh (replaces rsh, rlogin and telnet) scp (replaces rcp) sftp (replaces ftp)
NIS (Network Information Services) provides centralized administration of network information users, workstations, applications and so on. NIS+ is Sun’s newest naming service for Solaris.The Network Information Service (NIS) was developed by Sun Microsystems and has become the recognized industry standard for UNIX network information services. NIS is frequently implemented in Linux and other UNIX environments.NIS has a slightly different focus than DNS. DNS focuses on making communication simpler by using host and domain names instead of numerical IP addresses. NIS focuses on making network administration more manageable by providing centralized control over a variety of network information. NIS stores information about workstation names and IP addresses, users, the network itself, and network services. This collection of network information is referred to as the NIS namespace. NIS namespace information is stored in NIS maps. NIS maps were designed to replace UNIX /etc files, as well as other configuration files, so these maps store much more than names and addresses. As a result, the NIS namespace has a large set of maps.NIS+ The Network Information Service Plus (NIS+) is similar to NIS, but with many more features. NIS+ is not an extension of NIS. NIS+ is Sun's newest, proprietary naming service for Solaris.NIS+ uses a client/server model to store and control access to the information contained in an NIS+ namespace. Each domain is supported by a set of servers. The principal server is called the master server, and the backup servers are called replicas. The network information is stored in 16 standard NIS+ tables in an internal NIS+ database. Both master and replica servers run NIS+ server software, and both maintain copies of NIS+ tables. Changes made to the NIS+ data on the master server are reproduced automatically to the replicas.The Network File System (NFS) is a distributed file system developed by Sun Microsystems. It is a network service that allows users to transparently access files and directories located on another disk on the network. NFS has become adopted as the industry standard networked file system for most UNIX vendors.Computers running one of the Microsoft operating systems such as Windows 9x, NT, 2000, or XP use a protocol called Server Message Block (SMB) for sharing files and printers on a network.SMB performs a similar function for Microsoft clients as NFS does for UNIX clients or Netware Core Protocol (NCP) does for Novell Clients.Although the term SMB is still commonly recognized, it has been renamed to Common Internet File System or CIFS.Samba is an open source version of SMB that comes with most Linux distributions and provides both client and server applicationsThe smbclient utility allows access to shares using commands similar to FTP and provides short-term access. The smbmount utility allows the user to mount the shared folder so that it appears as part of the user's local file system for continued use.
19
Sun developed NIS, NIS+, and NFS.
20
Related Documents