1 UNIX & SHELL PROGRAMMING MCA 204 SELF LEARNING MATERIAL DIRECTORATE OF DISTANCE EDUCATION SWAMI VIVEKANAND SUBHARTI UNIVERSITY MEERUT – 250 005, UTTAR PRADESH (INDIA)

Welcome message from author
This document is posted to help you gain knowledge. Please leave a comment to let me know what you think about it! Share it to your friends and learn new things together.
Transcript

1
UNIX & SHELL
PROGRAMMING
MCA 204
SELF LEARNING MATERIAL
DIRECTORATE
OF DISTANCE EDUCATION
SWAMI VIVEKANAND SUBHARTI UNIVERSITY
MEERUT – 250 005,
UTTAR PRADESH (INDIA)
2
SLM Module Developed By :
Author:
Reviewed by :
Assessed by:
Study Material Assessment Committee, as per the SVSU ordinance No. VI (2)
Copyright © Gayatri Sales
DISCLAIMER
No part of this publication which is material protected by this copyright notice may be reproduced
or transmitted or utilized or stored in any form or by any means now known or hereinafter invented,
electronic, digital or mechanical, including photocopying, scanning, recording or by any information
storage or retrieval system, without prior permission from the publisher.
Information contained in this book has been published by Directorate of Distance Education and has
been obtained by its authors from sources be lived to be reliable and are correct to the best of their
knowledge. However, the publisher and its author shall in no event be liable for any errors,
omissions or damages arising out of use of this information and specially disclaim and implied
warranties or merchantability or fitness for any particular use.
Published by: Gayatri Sales
Typeset at: Micron Computers Printed at: Gayatri Sales, Meerut.
3
UNIX & SHELL PROGRAMMING (MCA - 203)
Unit-1 Introduction
Introduction to Unix, Unix system organization (the kernel and the shell), Files and
directories, Library functions and system calls, Editors (vi and ed).
Unit-2 Unix Shell programming
Types of Shells, Shell Metacharacters, Shell variables, Shell scripts, Shell commands,
the environment, Integer arithmetic and string Manipulation, Special command line
characters, Decision making and Loop control, controlling terminal input, trapping
signals, arrays.
Unit-3 Portability With C
Command line Argument, Background processes, process synchronization, Sharing of
data, userid, group-id, pipes, fifos, message queues, semaphores, shared variables,
Introduction to socket programming.
Unit-4 Unix System Administration
File System, mounting and unmounting file system, System booting, shutting down,
handling user account, backup, recovery, security, creating files, storage of Files, Disk
related commands.
Unit-5 Different tools and Debugger
System development tools: lint, make, SCCS (source code control system), Language
development tools: YACC, LEX, M4, Text formatting tools: nroff, troff, tbl, eqn, pic,
Debugger tools: Dbx, Adb, Sdb, Strip and Ctrace.

4
Unit-I
Introduction
Introduction to Unix
UNIX is an operating system which was first developed in the 1960s, and has been
under constant development ever since. By operating system, we mean the suite of
programs which make the computer work. It is a stable, multi-user, multi-tasking system
for servers, desktops and laptops.
UNIX systems also have a graphical user interface (GUI) similar to Microsoft Windows
which provides an easy to use environment. However, knowledge of UNIX is required
for operations which aren't covered by a graphical program, or for when there is no
windows interface available, for example, in a telnet session.
Types of UNIX
There are many different versions of UNIX, although they share common
similarities. The most popular varieties of UNIX are Sun Solaris,
GNU/Linux, and MacOS X.
Here in the School, we use Solaris on our servers and workstations, and
Fedora Linux on the servers and desktop PCs.
The UNIX operating system
The UNIX operating system is made up of three parts; the kernel, the shell and the
programs.
The kernel
The kernel of UNIX is the hub of the operating system: it allocates time and memory to
programs and handles the filestore and communications in response to system calls.
As an illustration of the way that the shell and the kernel work together, suppose a user
types rm myfile (which has the effect of removing the file myfile). The shell searches the
filestore for the file containing the program rm, and then requests the kernel, through
system calls, to execute the program rm on myfile. When the process rm myfile has
finished running, the shell then returns the UNIX prompt % to the user, indicating that it
is waiting for further commands.
The shell

5
The shell acts as an interface between the user and the kernel. When a user logs in, the
login program checks the username and password, and then starts another program
called the shell. The shell is a command line interpreter (CLI). It interprets the
commands the user types in and arranges for them to be carried out. The commands
are themselves programs: when they terminate, the shell gives the user another prompt
(% on our systems).
The adept user can customise his/her own shell, and users can use different shells on
the same machine. Staff and students in the school have the tcsh shell by default.
The tcsh shell has certain features to help the user inputting commands.
Filename Completion - By typing part of the name of a command, filename or directory
and pressing the [Tab] key, the tcsh shell will complete the rest of the name
automatically. If the shell finds more than one name beginning with those letters you
have typed, it will beep, prompting you to type a few more letters before pressing the
tab key again.
History - The shell keeps a list of the commands you have typed in. If you need to
repeat a command, use the cursor keys to scroll up and down the list or type history for
a list of previous commands.
Files and processes
Everything in UNIX is either a file or a process.
A process is an executing program identified by a unique PID (process identifier).
A file is a collection of data. They are created by users using text editors, running
compilers etc.
Examples of files:
a document (report, essay etc.)
the text of a program written in some high-level programming language
instructions comprehensible directly to the machine and incomprehensible to a casual
user, for example, a collection of binary digits (an executable or binary file);
a directory, containing information about its contents, which may be a mixture of other
directories (subdirectories) and ordinary files.
The Directory Structure
6
All the files are grouped together in the directory structure. The file-system is arranged
in a hierarchical structure, like an inverted tree. The top of the hierarchy is traditionally
called root (written as a slash / )
In the diagram above, we see that the home directory of the undergraduate
student "ee51vn" contains two sub-directories (docs and pics) and a file
called report.doc.
The full path to the file report.doc is "/home/its/ug1/ee51vn/report.doc"
Starting an UNIX terminal
To open an UNIX terminal window, click on the "Terminal" icon from
Applications/Accessories menus.
7
An UNIX Terminal window will then appear with a % prompt, waiting for you to start
entering commands.
8
Unix system organization (the kernel and the shell)
Both the Shell and the Kernel are the Parts of this Operating System. These Both Parts are used for performing any Operation on the System. When a user gives his Command for Performing Any Operation, then the Request Will goes to the Shell Parts, The Shell Parts is also called as the Interpreter which translate the Human Program into the Machine Language and then the Request will be transferred to the Kernel. So that Shell is just called as the interpreter of the Commands which Converts the Request of the User into the Machine Language.
Kernel is also called as the heart of the Operating System and the Every Operation is performed by using the Kernel , When the Kernel Receives the Request from the Shell then this will Process the Request and Display the Results on the Screen. The various Types of Operations those are Performed by the Kernel are as followings:-
1) It Controls the State the Process Means it checks whether the Process is running or Process is Waiting for the Request of the user.
2) Provides the Memory for the Processes those are Running on the System Means Kernel Runs the Allocation and De-allocation Process , First When we Request for the service then the Kernel will Provides the Memory to the Process and after that he also Release the Memory which is Given to a Process.
3) The Kernel also Maintains a Time table for all the Processes those are Running Means the Kernel also Prepare the Schedule Time means this will Provide the Time to various Process of the CPU and the Kernel also Puts the Waiting and Suspended Jobs into the different Memory Area.
4) When a Kernel determines that the Logical Memory doesn‘t fit to Store the Programs. Then he uses the Concept of the Physical Memory which Will Stores the Programs into Temporary Manner. Means the Physical Memory of the System can be used as Temporary Memory.
5) Kernel also maintains all the files those are Stored into the Computer System and the Kernel Also Stores all the Files into the System as no one can read or Write the Files without any Permissions. So that the Kernel System also Provides us the Facility to use the Passwords and also all the Files are Stored into the Particular Manner.
As we have learned there are Many Programs or Functions those are Performed by the
Kernel But the Functions those are Performed by the Kernel will never be Shown to the
user. And the Functions of the Kernel are Transparent to the user.
9
Files and directories
At this point in the course, you have created lots of files, primarily Maple worksheets. Some of them you have created yourself as homework assignments, and others you have copied and used as parts of lab assignments. You may have created other kinds of files as well, perhaps with the Emacs text editor.
In this tutorial we will study the Unix file system and discuss how to manipulate files and navigate directories. This will come in handy as you begin writing, compiling, and running C programs.
The Unix File System
We are now going to look at basic Unix commands for manipulating files and directories. In Unix, a file can be one of three types: a text file (such as a letter or a C program), an executable file (such as a compiled C program), or a directory (a file ``containing'' other files).
When you consider that there are thousands of users of the local workstation network, you will realize that the computers must keep track of tens or hundreds of thousands of files. Unix uses directories to organize these files, much like a filing cabinet uses drawers and folders to keep track of documents.
The Unix file system is organized around a single structure of directories, where each directory can contain more directories (often called subdirectories) and/or files. The entire file system, often spanning many machines and disks, can be visualized as a tree. Picture this tree as growing upside down, with the root at the top and the leaves toward the bottom. The leaves are all text and executable files, while the root, trunk, limbs, branches, and twigs are all directories.
The file system is called the directory tree, and the directory at the base of the tree is called the root directory. Every file and directory in the file system has a unique name, called its pathname. The pathname of the root directory is /.
As a Unix user, you are given control over one directory. This directory is called your home directory, and it was created when your account was established. This directory is your personal domain, over which you have complete control. You are free to create your own subtree of files and directories within your home directory. To determine the pathname of your home directory, enter the following command into a Unix shell window.
cd; pwd
Everyone has a different home directory, but two things are certain. The pathname of your home directory will start with a slash (everything is rooted in the root directory) and

10
it will end with your user name. For example, suppose that a user jones has a home directory /home/cs/class/jones. From this, we can tell that the root directory / contains a subdirectory called home, which contains a subdirectory called cs, which contains a subdirectory called class, which contains a subdirectory called jones. Every directory has a pathname that shows the sequence of directories that lead from it back to the root.
Working Directory
At any given time when interacting with Unix, you are ``working in'' or ``connected to'' some directory. This is called your working directory. When a Unix Shell window running Unix is first created, you will be connected to your home directory. You will typically change your working directory (with the cd command, as discussed later) several times during a single session.
There is a command that prints the current working directory:
pwd
(You should try this out in a Unix Shell window, as you should all of the commands that we introduce.) Notice that part of the name of the current directory (the part following the last slash) appears as part of the command line prompt. For example, if your working directory is /home/cs/class/jones, your prompt might look like
7 cadesm35:jones%
Examining Directories
What files and directories are contained in the working directory? You can find out with the
ls
command, which lists the contents of the working directory. When you enter this command, you will see a list of all of the Maple worksheets and other files that you have copied or created in your home directory. Notice that only the names of the files are displayed, not their full pathnames. But if you know the name of the working directory, and you know the name of a file within it, you can easily figure out that file's full pathname. What would be the full pathname of a file named ``file'' in your home directory?
Click here for answer
Moving Around the Directory Tree
11
To this point we have never moved away from your home directory. Let's learn how to navigate the directory tree. Before we do this, let's add to your home directory so that we will have some files to experiment with. Type the following command into a Unix Shell window.
mkdir testdir
(This command will create a directory called testdir in your home directory. Use the ls command to verify that it really is there.)
The command cd takes a directory as an argument and makes that directory your working directory. There are two ways to specify the name of a directory or file. One way is to give the full pathname, and the other way is to give enough of the pathname to let Unix know how to get to the desired directory from the working directory. We'll look at these two methods in turn.
Absolute Pathnames
You can give the full pathname of the desired directory or file. For example, if jones wanted to go to her home directory, she could use the command
cd /home/cs/class/jones
Or, if she wanted to connect to the testdir directory within her home directory, she could issue the command
cd /home/cs/class/jones/testdir
Use cd now to connect to your testdir directory. Remember--if you've forgotten the pathname of your home directory, you can find it out with the pwd command.
Look at the prompt to verify that you have succeeded in connecting to the testdir directory. And use the ls command to see what is in the testdir directory. What do you find?
Click here for the answer
As you experiment with moving around the directory tree, be sure and get used to looking at the prompt to verify that things are working as you expect. If you get completely confused, you can use pwd to find out exactly where you are.
Typing a full pathname can be a real pain, especially when it is a long one. Fortunately, there are several convenient abbreviations. Unix will treat a tilde followed immediately by a user name as an abbreviation for the full pathname of that user's home directory. For example, if you wanted to connect to a user jones' home directory, you could do so with
12
cd ~jones
Use this form of abbreviation (with your user name, of course) right now to reconnect to your home directory.
This abbreviated form can be quite useful. Can you figure out how to use it to reconnect to your testdir directory?
Click here for the answer
If it is your home directory in which you're interested, and not someone else's, there's a second abbreviation. A tilde all by itself stands for your home directory. So, you can connect back to your home directory with
cd ~
and to your testdir subdirectory with
cd ~/testdir
Finally, here's the ultimate shortcut. If issue the
cd
command with no argument, you will connect to your home directory.
Relative Pathnames
Be sure that you are connected to your home directory. You should know how to do that without any help.
You can also specify a directory or file by describing to Unix how to get to the desired directory or file from the working directory. For example, suppose that you want to connect to your testdir directory from your home directory. You can do this by simply issuing the command
cd testdir
Unix knows that the pathname argument to cd is a relative pathname because it does not begin with a slash or a tilde, as all absolute pathnames do. When Unix encounters a relative pathname, it glues the relative pathname onto the end of the full pathname of the working directory to obtain an absolute pathname.
You should now be connected to your testdir subdirectory. You can connect back to your home directory by issuing the command
13
cd ..
When ``..'' appears in a pathname, it refers to the parent of the current directory. So the net result of issuing the cd command above is to move one step closer to the root of the tree. You should now be connected to your home directory.
Using Absolute and Relative Pathnames
You might be wondering when you should use absolute pathnames and when you should use relative pathnames. It is entirely a question of convenience. If you need to name a directory that is ``close to'' your working directory, then relative pathnames are quite convenient. This will usually be the case, since you'll do most of your work in or near your home directory.
On the other hand, if you need to name a directory that is ``far away from'' your working directory, then you should use an absolute pathname.
Creating Files and Directories
Connect to your home directory.
You can create a new (empty) directory using the mkdir command:
mkdir newdir
You can verify that the directory has actually been created by listing the contents of your home directory.
When you need to create a file, you will generally do it by using Emacs. Suppose that you'd like to create a file called newfile.txt in your newdir directory. You should select the ``Open File...'' option from the ``File'' menu.
Emacs will then prompt you for the name of a file to read. What do you make of the prompt that Emacs gives you?
Click here for the answer
You need to supply the rest of the pathname, in this case newdir/newfile.txt, and then type the Enter key. You can then use Emacs to create the text and, finally, save your edits with the ``Save Buffer'' option from the ``File'' menu.
Deleting Files and Directories
By now you know how to create and examine files and directories. It is almost as important to know how to get rid of unwanted files and directories.
14
To delete a file we use the rm command. (It helps to know that ``rm'' stands for ``remove''.) Connect to your newdir directory, which should contain a file newfile.txt. Verify this by listing the directory.
To delete newfile.txt, issue the command
rm newfile.txt
Depending upon how your defaults are set up, Unix may ask you to confirm that you really mean to delete the file. Just enter a ``y'' or a ``yes'' to confirm.
Now connect back to your home directory.
The command for deleting an empty directory is rmdir. For example, your testdir directory should be empty. You can delete it with
rmdir testdir
Copying Files
Often you will want to copy a file from one place to another. For example, an instructor in a class might place a file into a central location and ask everyone in the class to make a private copy. Or you might decide to make a backup copy of some file before modifying it.
To copy a file we use the cp command. For example, perhaps you have a file called solution1.mws or something similar in your home directory. You can copy it into a file called sol1-backup.mws by issuing the command
cp solution1.mws sol1-backup.mws
Either argument to cp can be an absolute or relative pathname. For example, to copy solution1.mws to a file called sol1-backup.mws in the newdir directory, issue the command
cp solution1.mws newdir/sol1-backup.mws
You should now use ls to verify that both copies were made.
File and Directory Summary
Here is a summary of the commands that we covered in this section.
SUMMARY OF UNIX FILE SYSTEM
15
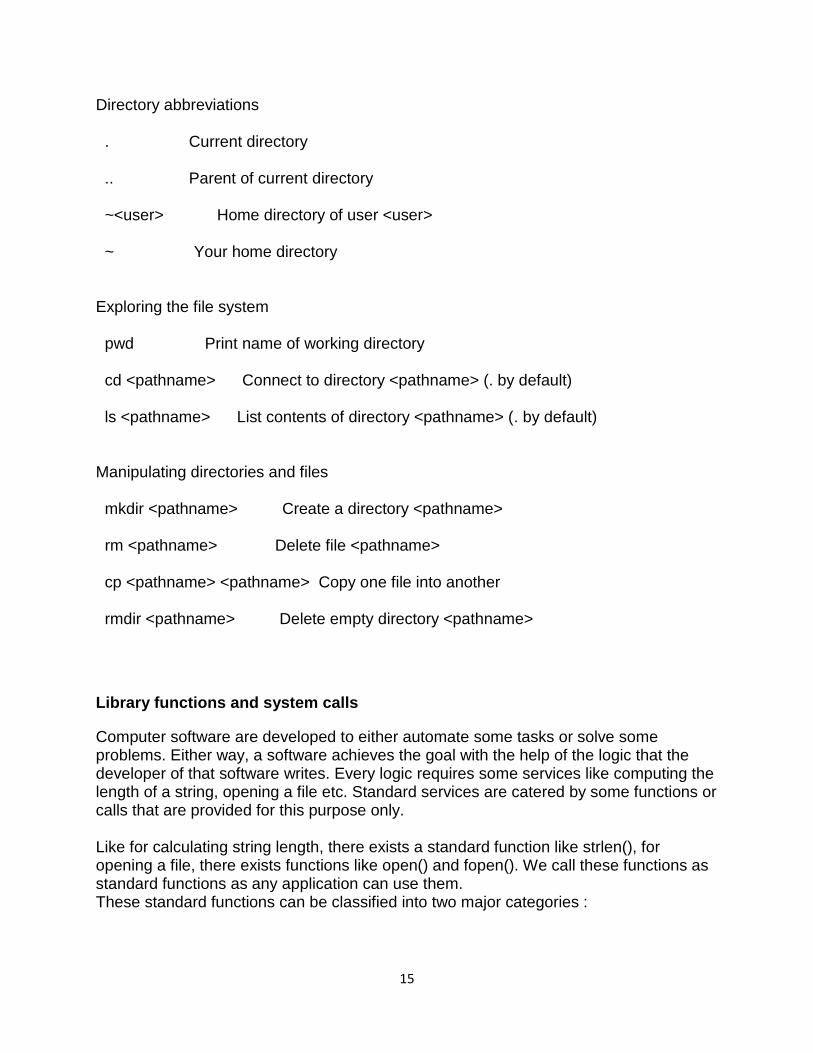
Directory abbreviations . Current directory .. Parent of current directory ~<user> Home directory of user <user> ~ Your home directory Exploring the file system pwd Print name of working directory cd <pathname> Connect to directory <pathname> (. by default) ls <pathname> List contents of directory <pathname> (. by default) Manipulating directories and files mkdir <pathname> Create a directory <pathname> rm <pathname> Delete file <pathname> cp <pathname> <pathname> Copy one file into another rmdir <pathname> Delete empty directory <pathname>
Library functions and system calls
Computer software are developed to either automate some tasks or solve some problems. Either way, a software achieves the goal with the help of the logic that the developer of that software writes. Every logic requires some services like computing the length of a string, opening a file etc. Standard services are catered by some functions or calls that are provided for this purpose only. Like for calculating string length, there exists a standard function like strlen(), for opening a file, there exists functions like open() and fopen(). We call these functions as standard functions as any application can use them. These standard functions can be classified into two major categories :
16
1. Library function calls. 2. System function calls.
In this article, we will try to discuss the concept behind the system and library calls in form of various points and wherever required, I will provide the difference between the two.
1. Library functions Vs System calls
The functions which are a part of standard C library are known as Library functions. For example the standard string manipulation functions like strcmp(), strlen() etc are all library functions.
The functions which change the execution mode of the program from user mode to kernel mode are known as system calls. These calls are required in case some services are required by the program from kernel. For example, if we want to change the date and time of the system or if we want to create a network socket then these services can only be provided by kernel and hence these cases require system calls. For example, socket() is a system call.
2. Why do we need system calls?
System calls acts as entry point to OS kernel. There are certain tasks that can only be done if a process is running in kernel mode. Examples of these tasks can be interacting with hardware etc. So if a process wants to do such kind of task then it would require itself to be running in kernel mode which is made possible by system calls.
3. Types of library functions
Library functions can be of two types :
Functions which do not call any system call. Functions that make a system call.
There are library functions that do not make any system call. For example, the string manipulation functions like strlen() etc fall under this category. Also, there are library functions that further make system calls, for example the fopen() function which a standard library function but internally uses the open() sytem call.
4. Interaction between components
The following diagram to depict how Library functions, system calls, application code interact with each other.
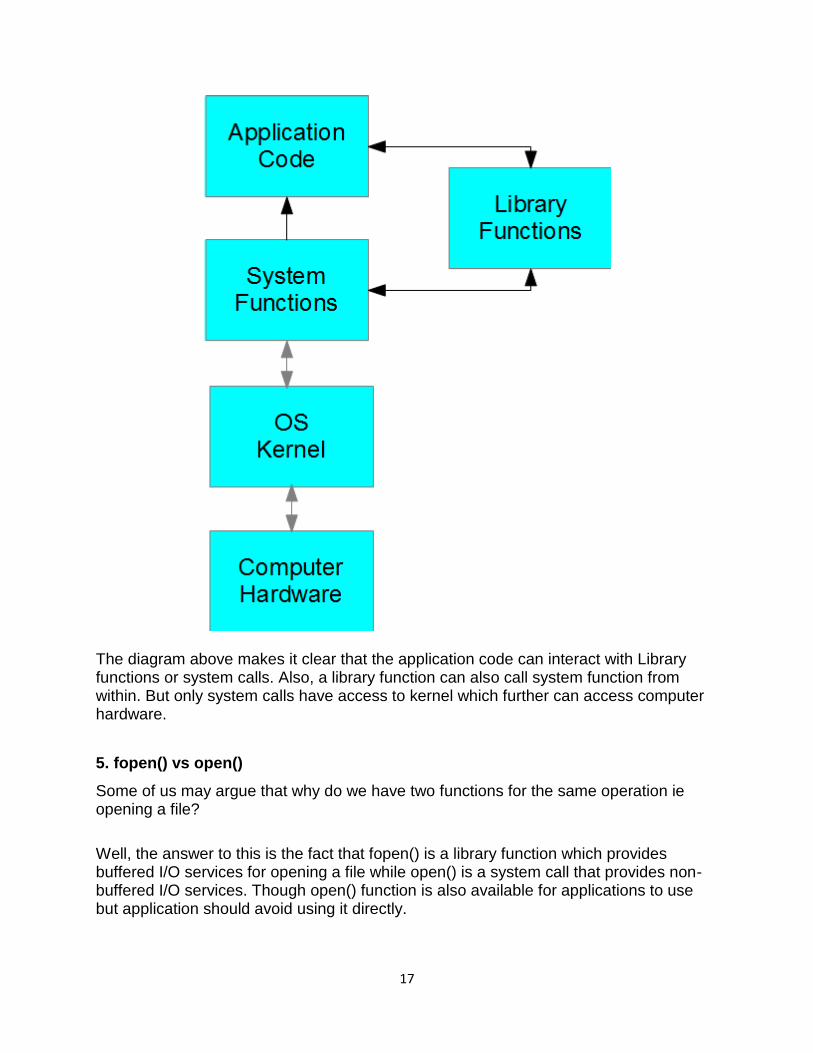
17
The diagram above makes it clear that the application code can interact with Library functions or system calls. Also, a library function can also call system function from within. But only system calls have access to kernel which further can access computer hardware.
5. fopen() vs open()
Some of us may argue that why do we have two functions for the same operation ie opening a file?
Well, the answer to this is the fact that fopen() is a library function which provides buffered I/O services for opening a file while open() is a system call that provides non-buffered I/O services. Though open() function is also available for applications to use but application should avoid using it directly.
18
In general, if a library function corresponding to a system call exists, then applications should use the library function because :
Library functions are portable which means an application using standard library functions will run on all systems. While on the other hand an application relying on the corresponding system call may not run on every system as system call interface may vary from system to system.
Sometimes the corresponding library function makes the load to system call lesser resulting in non-frequent switches from user mode to kernel mode. For example if there is an application that reads data from file very frequently, then using fread() instead of read() would provide buffered I/O which means that not every call to fread() would result in a call to system call read(). The fread() may read larger chunk of data(than required by the user) in one go and hence subsequent fread() will not require a call to system function read().
6. Is malloc() a system call?
This is one of the very popular misconception that people have. Lets make it clear that malloc() is not a system call. The function call malloc() is a library function call that further uses the brk() or sbrk() system call for memory allocation.
7. System calls : Switching execution modes
Traditionally, the mechanism of raising an interrupt of ‗int $0x80‘ to kernel was used. After trapping the interrupt, kernel processes it and changes the execution mode from user to kernel mode. Today, the systenter/sysexit instructions are used for switching the execution mode.
8. Some other differences
Besides all the above, here are a few more differences between a system and library call :
A library function is linked to the user program and executes in user space while a system call is not linked to a user program and executes in kernel space.
A library function execution time is counted in user level time while a system call execution time is counted as a part of system time.
Library functions can be debugged easily using a debugger while System calls cannot be debugged as they are executed by the kernel.
19
Editors (vi and ed)
Text editing is an important part of all operating systems, including Linux. In Linux, you need to create and edit a variety of text files, as the following list describes:
System configuration files, including /etc/fstab, /etc/hosts, /etc/inittab, /etc/X11/XF86Config, and many more
User files, such as .newsrc and .bash_profile
Mail messages and news articles
Shell script files
Perl, Python, and Tcl/Tk scripts
C or C++ programs
All Unix systems, including Linux, come with the following two text editors:
ed—A line-oriented text editor
vi—A full-screen text editor that supports the command set of an earlier editor by the name of ex
In Red Hat Linux, another text editor, vim, emulates vi and ex, but you can invoke the editor by using the vi command.
Insider Insight Although ed and vi may seem more cryptic than other, more graphical text editors, you should learn the basic editing commands of these two editors, because at times, these editors may be the only ones available. If you run into a system problem and Linux refuses to boot from the hard disk, for example, you may need to boot from a floppy. In this case, you must edit system files by using the ed editor, because that editor is small enough to fit on the floppy.
As I show in the following sections, learning the basic text-editing commands of ed and vi is easy.
Using ed
The ed text editor works by using a buffer—an in-memory storage area where the actual text resides until you explicitly store the text in a file. You must use ed only if you boot a minimal version of Linux (for example, from a boot floppy), and the system doesn‘t support full-screen mode.
Starting ed
To start ed, use the following command syntax:
ed [-] [-G] [-s] [-pprompt-string] [filename]
The arguments in brackets are optional. The following list explains these arguments:
20
- suppresses the printing of character counts and diagnostic messages.
-G forces backward compatibility with older versions of ed.
-s is the same as the single hyphen.
-p prompt-string sets the text that the editor displays when waiting for a command. (The default is a null prompt string.)
filename is the name of the file to be edited.
Learning ed
If you use the ed editor, you work in either command mode or text-input mode, as the following list explains:
Command mode is what you get by default. In this mode, ed interprets anything that you type as a command. As you see in the section ―Summarizing ed Commands,‖ later in this chapter, ed uses a simple command set, wherein each command consists of a single character.
Text-input mode enables you to enter text into the buffer. You can enter input mode by using the commands a (append), c (change), or i (insert). After entering lines of text, you can leave text-input mode by entering a period (.) on a line by itself.
Secret
The ed editor embodies the concept of the current line—the line to which ed applies the commands that you type. Each line has an address: the line number. You can apply a command to a range of lines by prefixing the command with an address range. The p command, for example, prints (displays) the current line. To see the first 10 lines, use the following command:
1,10p
In a command, the period (.) refers to the current line, and the dollar sign ($) refers to the last line in the file. Thus, the following command deletes all the lines from the current line to the last one:
.,$d
Examining a Sample Session with ed
The following example shows how to begin editing a file in ed:
ed -p: /etc/fstab
621
:

21
This example uses the -p option to set the prompt to the colon character (:) and opens the file /etc/fstab for editing. Turning on a prompt character is helpful, because without the prompt, determining whether ed is in input mode or command mode is difficult.
The ed editor opens the file, reports the number of characters in the file (621), displays the prompt (:), and waits for a command.
After ed opens a file for editing, the current line is the last line of the file. To see the current line number, use the .= command, as follows:
:.=
8
The output tells you that the /etc/fstab file contains eight lines. (Your system‘s /etc/fstab file, of course, may contain a different number of lines.) The following example shows how you can see all these lines:
:1,$p
LABEL=/ / ext3 defaults 1 1
LABEL=/boot /boot ext3 defaults 1 2
none /dev/pts devpts gid=5,mode=620 0 0
none /proc proc defaults 0 0
none /dev/shm tmpfs defaults 0 0
/dev/hda6 swap swap defaults 0 0
/dev/cdrom /mnt/cdrom udf,iso9660 noauto,owner,kudzu,ro 0 0
/dev/fd0 /mnt/floppy auto noauto,owner,kudzu 0 0
:
To go to a specific line, type the line number and the editor then displays that line. Here is an example that takes you to the first line in the file:
:1
LABEL=/ / ext3 defaults 1 1
Suppose that you want to delete the line that contains cdrom. To search for a string, type a slash (/) and follow it with the string that you want to locate, as follows:
:/cdrom
/dev/cdrom /mnt/cdrom udf,iso9660 noauto,owner,kudzu,ro 0 0
22
That line becomes the current line. To delete the line, use the d command, as follows:
:d
:
To replace a string with another, use the s command. To replace cdrom with the string cd, for example, use the following command:
:s/cdrom/cd/
:
To insert a line in front of the current line, use the i command, as follows:
:i
(type the line you want to insert)
. (type a single period)
:
You can enter as many lines as you want. After the last line, enter a period (.) on a line by itself. That period marks the end of text-input mode, and the editor switches to command mode. In this case, you can tell that ed has switched to command mode, because you see the prompt (:).
If you‘re happy with the changes, you can write them to the file by using the w command. If you want to save the changes and exit, type wq to perform both steps at the same time, as follows:
:wq
645
The ed editor saves the changes in the file, displays the number of characters that it saved, and exits.
If you want to quit the editor without saving any changes, use the Q command.
Summarizing ed Commands
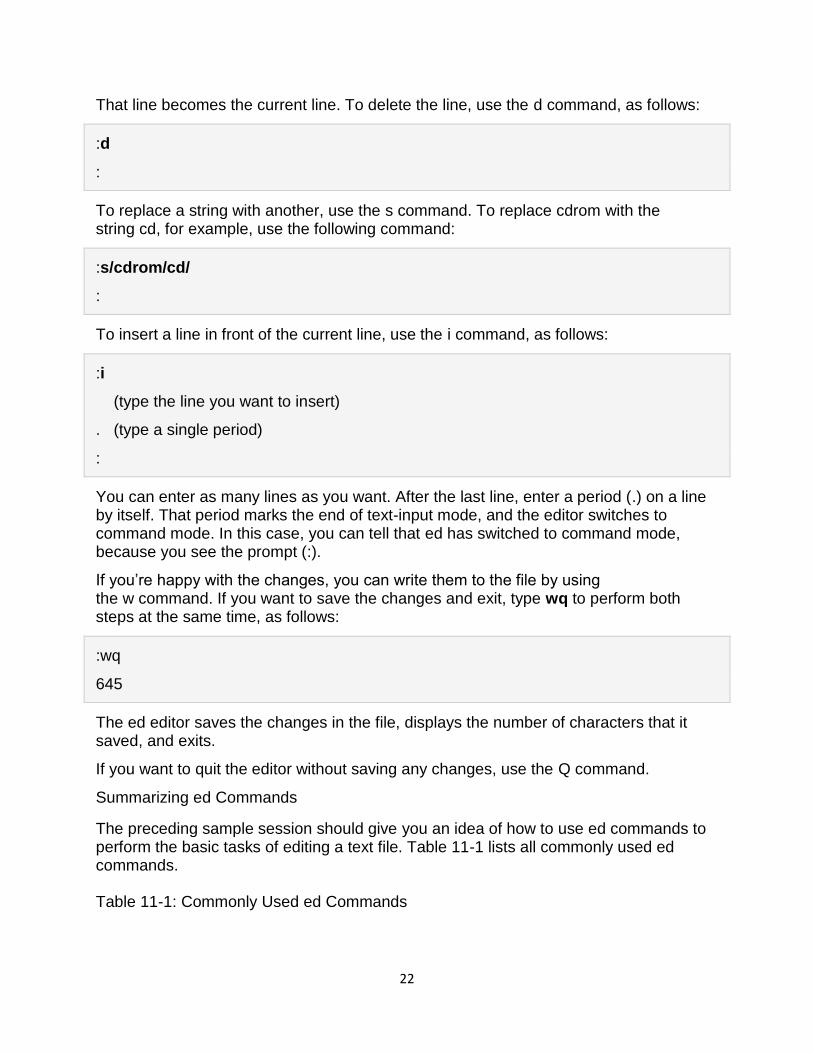
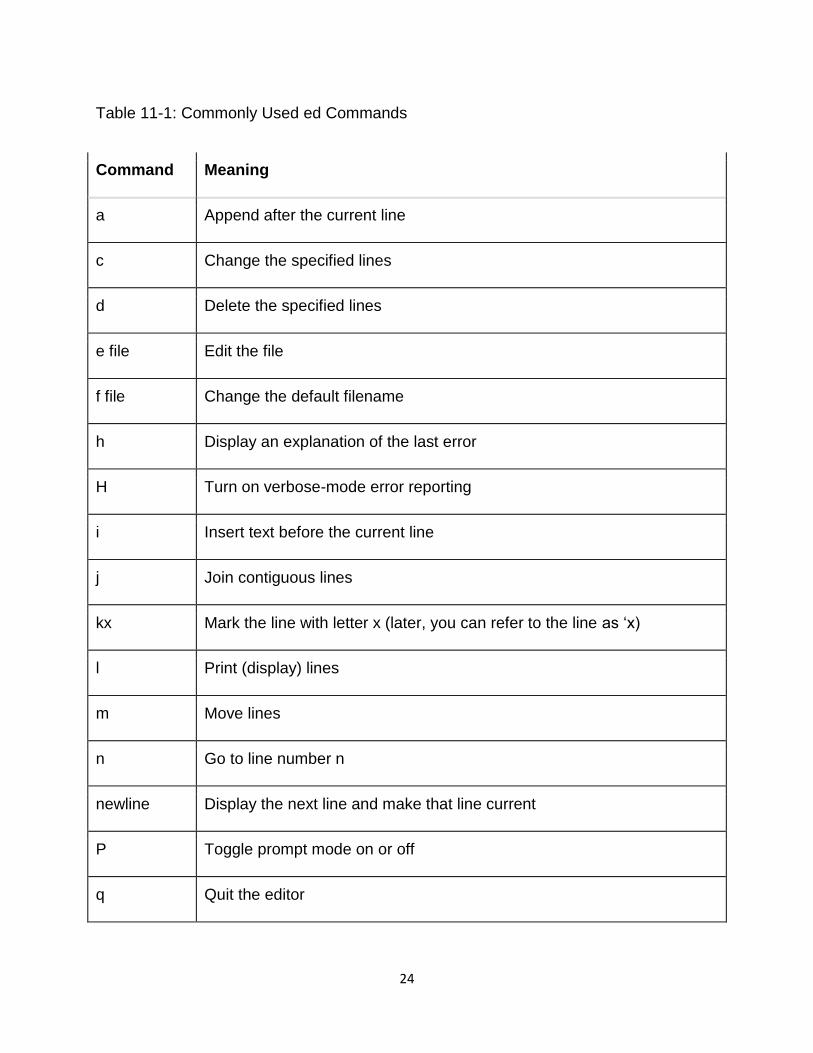
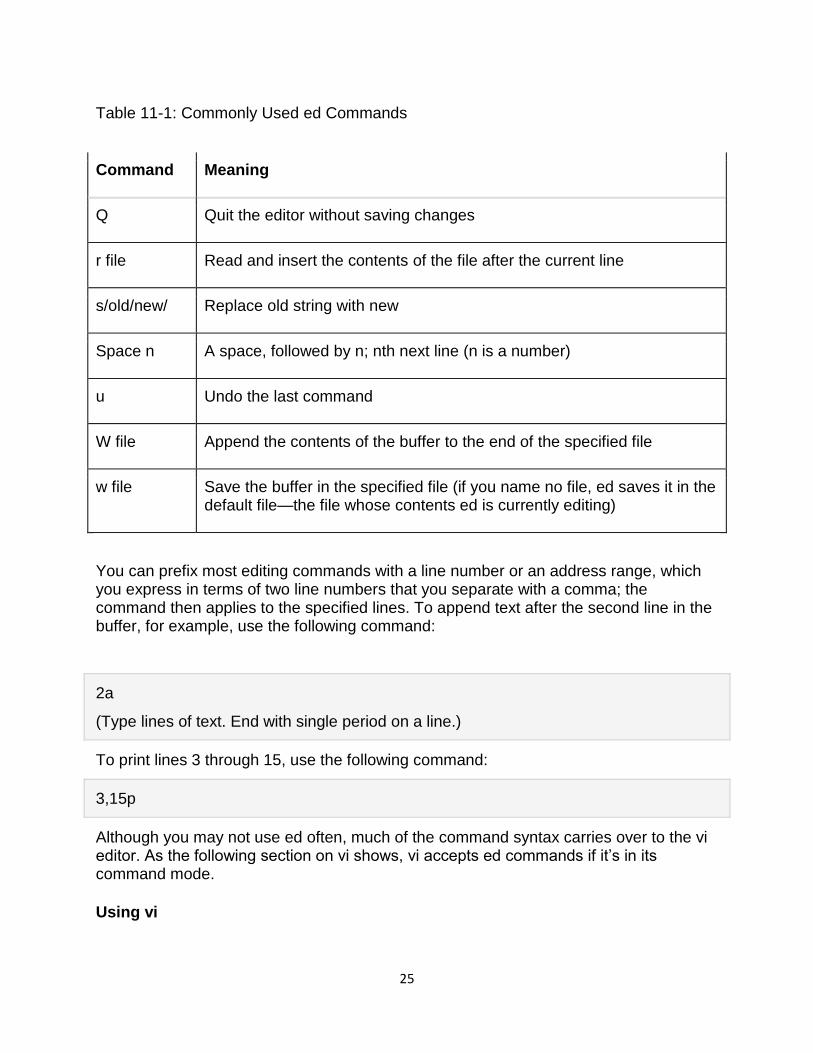
The preceding sample session should give you an idea of how to use ed commands to perform the basic tasks of editing a text file. Table 11-1 lists all commonly used ed commands.
Table 11-1: Commonly Used ed Commands

23
Command Meaning
!command Execute a shell command
$ Go to the last line in the buffer
% Apply the command that follows to all lines in the buffer (for example, %p prints all lines)
+ Go to the next line
+n Go to nth next line (n is a number)
, Apply the command that follows to all lines in the buffer (for example, ,p prints all lines); similar to %
- Go to the preceding line
-n Go to nth previous line (n is a number)
. Refer to the current line in the buffer
/regex/ Search forward for the specified regular expression (see Chapter 24 for an introduction to regular expressions)
; Refer to a range of line (if you specify no line numbers, the editor assumes current through last line in the buffer)
= Print the line number
?regex? Search backward for the specified regular expression (see Chapter 24 for an introduction to regular expressions)
^ Go to the preceding line; also see the - command
^n Go to the nth previous line (where n is a number); see also the -n command
24
Table 11-1: Commonly Used ed Commands
Command Meaning
a Append after the current line
c Change the specified lines
d Delete the specified lines
e file Edit the file
f file Change the default filename
h Display an explanation of the last error
H Turn on verbose-mode error reporting
i Insert text before the current line
j Join contiguous lines
kx Mark the line with letter x (later, you can refer to the line as ‗x)
l Print (display) lines
m Move lines
n Go to line number n
newline Display the next line and make that line current
P Toggle prompt mode on or off
q Quit the editor
25
Table 11-1: Commonly Used ed Commands
Command Meaning
Q Quit the editor without saving changes
r file Read and insert the contents of the file after the current line
s/old/new/ Replace old string with new
Space n A space, followed by n; nth next line (n is a number)
u Undo the last command
W file Append the contents of the buffer to the end of the specified file
w file Save the buffer in the specified file (if you name no file, ed saves it in the default file—the file whose contents ed is currently editing)
You can prefix most editing commands with a line number or an address range, which you express in terms of two line numbers that you separate with a comma; the command then applies to the specified lines. To append text after the second line in the buffer, for example, use the following command:
2a
(Type lines of text. End with single period on a line.)
To print lines 3 through 15, use the following command:
3,15p
Although you may not use ed often, much of the command syntax carries over to the vi editor. As the following section on vi shows, vi accepts ed commands if it‘s in its command mode.
Using vi
26
The vi editor is a full-screen text editor that enables you to view a file several lines at a time. Most UNIX systems, including Linux, come with vi. If you learn the basic features of vi, therefore, you can edit text files on almost any UNIX system.
As does the ed editor, vi works with a buffer. As vi edits a file, it reads the file into a buffer—a block of memory—and enables you to change the text in the buffer. The vi editor also uses temporary files during editing, but it doesn‘t alter the original file until you save the changes by using the :w command.
Setting the Terminal Type
Before you start a full-screen text editor such as vi, you must set the TERM environment variable to the terminal type (such as vt100 or xterm). The vi editor uses the terminal type to look up the terminal‘s characteristics in the /etc/termcap file and then control the terminal in full-screen mode.
If you run the X Window System and a GUI, such as GNOME or KDE, you can use vi in a terminal window. The terminal window‘s terminal type is xterm. (To verify, type echo $TERM at the command prompt.) After you start the terminal window, it automatically sets the TERM environment variable to xterm. You can normally, therefore, use vi in a terminal window without explicitly setting the TERM variable.
Starting vi
If you want to consult the online manual pages for vi, type the following command:
man vi
To start the editor, use the vi name and run it with the following command syntax:
vi [flags] [+cmd] [filename]
The arguments shown in brackets are optional. The following list explains these arguments:
flags are single-character flags that control the way that vi runs.
+cmd causes vi to run the specified command after it starts. (You learn more about these commands in the section ―Summarizing the vi Commands,‖ later in this chapter.)
filename is the name of the file to be edited.
The flags arguments can include one or more of the following:
-c cmd executes the specified command before editing begins.
-e starts in colon command mode (which I describe in the following section).
-i starts in input mode (which I also describe in the following section).
27
-m causes the editor to search through the file for something that looks like an error message from a compiler.
-R makes the file read-only so that you can‘t accidentally overwrite the file. (You can also type view filename to start the editor in this mode to simply view a file.)
-s runs in safe mode, which turns off many potentially harmful commands.
-v starts in visual command mode (which I describe in the following section).
Most of the time, however, vi starts with a filename as the only argument, as follows:
vi /etc/hosts
Another common way to start vi is to jump to a specific line number right at startup. To begin editing at line 107 of the file /etc/X11/XF86Config, for example, use the following command:
vi +107 /etc/X11/XF86Config
This way of starting vi is useful if you edit a source file after the compiler reports an error at a specific line number.
Learning vi Concepts
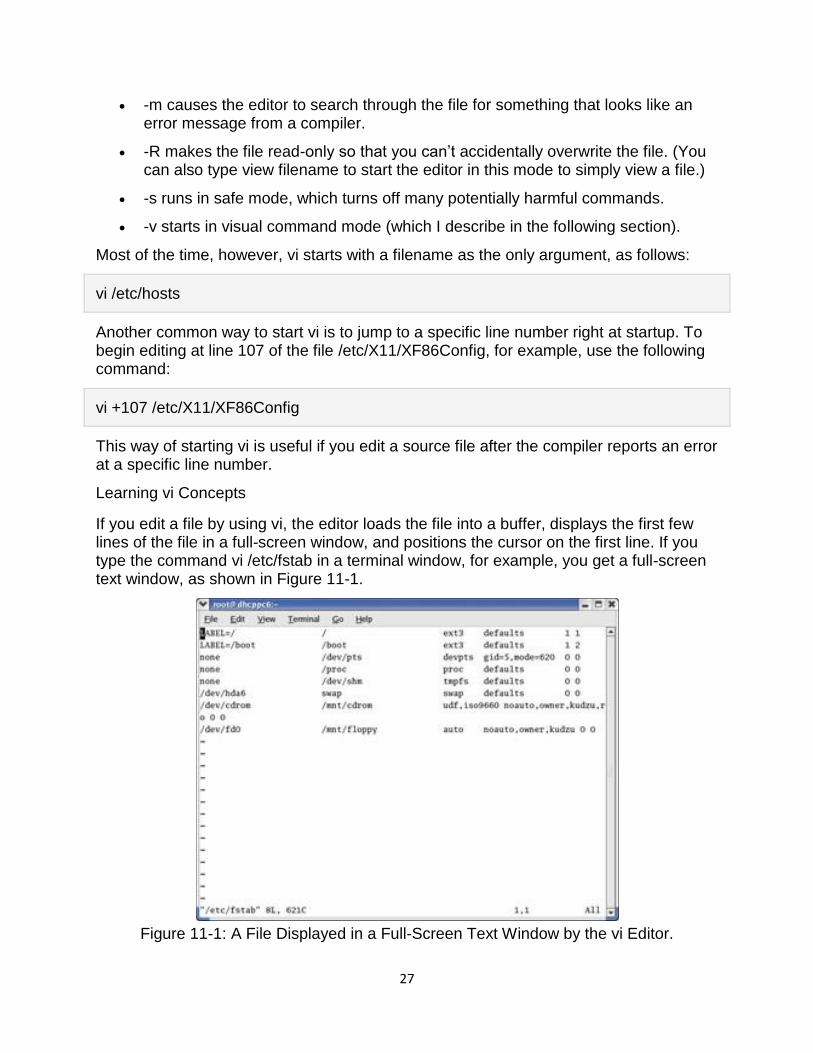
If you edit a file by using vi, the editor loads the file into a buffer, displays the first few lines of the file in a full-screen window, and positions the cursor on the first line. If you type the command vi /etc/fstab in a terminal window, for example, you get a full-screen text window, as shown in Figure 11-1.
Figure 11-1: A File Displayed in a Full-Screen Text Window by the vi Editor.
28
The last line shows information about the file, including the number of lines and the number of characters in the file. Later, vi uses this area as a command-entry area. It uses the rest of the lines to display the file. If the file contains fewer lines than the window, vi displays the empty lines with a tilde (~) in the first column.
The cursor marks the current line, appearing there as a small black rectangle. The cursor appears on top of a character. In Figure 11-1, the cursor is on the first character of the first line.
In vi, you work in one of the following three modes:
Visual-command mode is what you get by default. In this mode, vi interprets anything that you type as a command that applies to the line containing the cursor. The vi commands are similar to those of ed, and I list the in the section ―Summarizing the vi Commands,‖ later in this chapter.
Colon-command mode enables you to read or write files, set vi options, and quit. All colon commands start with a colon (:). After you enter the colon, vi positions the cursor at the last line and enables you to type a command. The command takes effect after you press Enter. Notice that vi‘s colon-command mode relies on the ed editor. When editing a file using vi, you can press Escape at any time to enter the command mode. In fact, if you are not sure what mode vi is in, press Escape a few times to get vi into command mode.
Text-input mode enables you to enter text into the buffer. You can enter text-input mode by using the command a (insert after cursor), A (append at end of line), or i (insert after cursor). After entering lines of text, you must press Esc to leave text-input mode and reenter visual-command mode.
One problem with all these modes is that you can‘t easily determine vi‘s current mode. Typing text, only to realize that vi isn‘t in text-input mode, can be frustrating. The converse situation also is common—you may end up typing text when you want to enter a command. To ensure that vi is in command mode, just press Esc a few times. (Pressing Esc more than once doesn‘t hurt.)
Tip To view online Help in vi, type :help while in command mode.
Examining a Sample Session with vi
To begin editing the file /etc/fstab, enter the following command (before you edit the file, please make a backup copy by typing the command cp /etc/fstab /etc/fstab-saved):
vi /etc/fstab
Figure 11-1, earlier in this chapter, shows you the resulting display, with the first few lines of the file appearing in a full-screen text window. The last line shows the file‘s name and statistics: the number of lines and characters.
29
The vi editor initially positions the cursor on the first character. One of the first things that you need to learn is how to move the cursor around. Try the following commands (each command being a single letter; just type the letter, and vi responds):
j moves the cursor one line down.
k moves the cursor one line up.
h moves the cursor one character to the left.
l moves the cursor one character to the right.
You can also move the cursor by using the arrow keys.
Instead of moving one line or one character at a time, you can move one word at a time. Try the following single-character commands for word-size cursor movement:
w moves the cursor one word forward.
b moves the cursor one word backward.
The last type of cursor movement affects several lines at a time. Try the following commands and see what happens:
Ctrl-D scrolls down half a screen.
Ctrl-U scrolls up half a screen.
The last two commands, of course, aren‘t necessary if the file contains only a few lines. If you‘re editing large files, however, the capability to move several lines at a time is handy.
You can move to a specific line number at any time by using a colon command. To go to line 1, for example, type the following and then press Enter:
:1
After you type the colon, vi displays the colon on the last line of the screen. From then on, vi uses the text that you type as a command. You must press Enter to submit the command to vi. In colon-command mode, vi accepts all the commands that the ed editor accepts—and then some.
To search for a string, first type a slash (/). The vi editor displays the slash on the last line of the screen. Type the search string, and then press Enter. The vi editor locates the string and positions the cursor at the beginning of that string. Thus, to locate the string cdrom in the file /etc/fstab, type the following:
/cdrom
To delete the line that contains the cursor, type dd. The vi editor deletes that line of text and makes the next line the current one.
30
Tip To begin entering text in front of the cursor, type i. The vi editor switches to text-input mode. Now you can enter text. After you finish entering text, press Esc to return to visual-command mode.
After you finish editing the file, you can save the changes in the file by using the :w command. If you want to save the changes and exit, you can type :wq to perform both steps at the same time. The vi editor saves the changes in the file and exits. You can also save the changes and exit the editor by pressing Shift-zz (press and hold the Shift key and press z twice).
To quit the editor without saving any changes, type the :q! command.
Summarizing the vi Commands
The sample editing session should give you a feel for the vi commands, especially its three modes:
Visual-command mode (the default)
Colon-command mode, in which you enter commands, following them with a colon (:)
Text-input mode, which you enter by typing a, A, or i
In addition to the few commands that the sample session illustrates, vi accepts many other commands. Table 11-2 lists the basic vi commands, organized by task.
Table 11-2: Basic vi Commands
Command Meaning
Insert Text
a Insert text after the cursor
A Insert text at the end of the current line
I Insert text at the beginning of the current line
i Insert text before the cursor
o Open a line below the current line
O Open a line above the current line
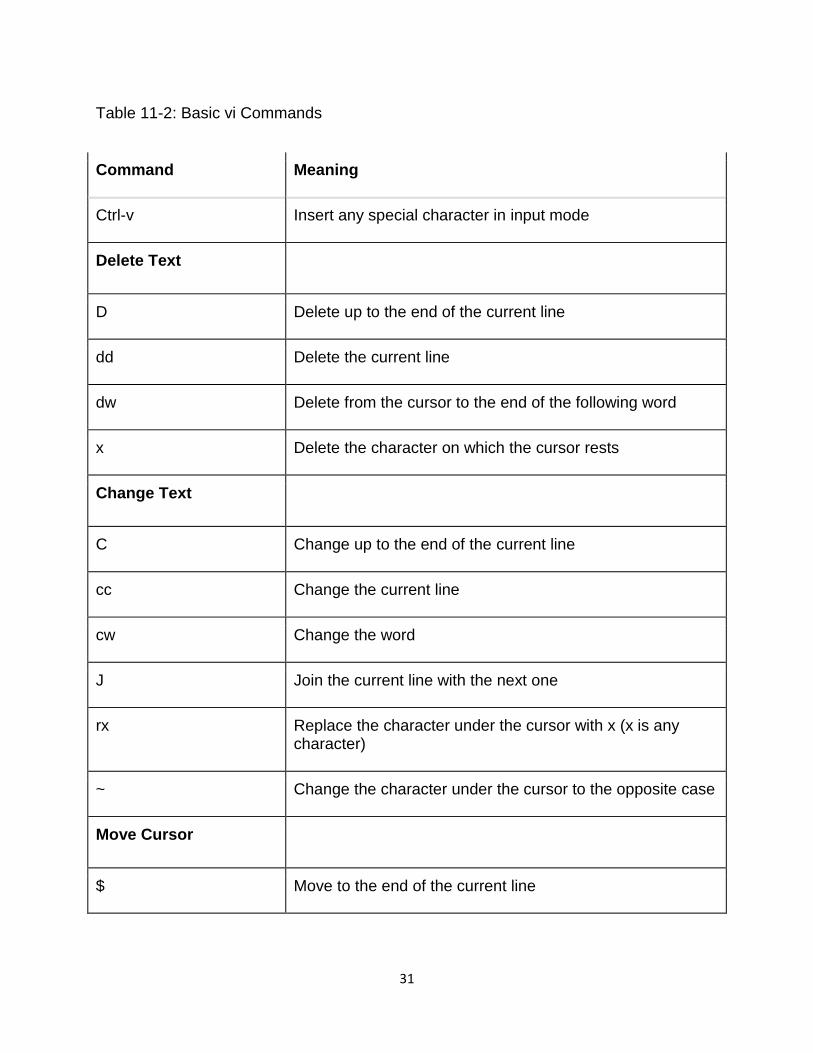
31
Table 11-2: Basic vi Commands
Command Meaning
Ctrl-v Insert any special character in input mode
Delete Text
D Delete up to the end of the current line
dd Delete the current line
dw Delete from the cursor to the end of the following word
x Delete the character on which the cursor rests
Change Text
C Change up to the end of the current line
cc Change the current line
cw Change the word
J Join the current line with the next one
rx Replace the character under the cursor with x (x is any character)
~ Change the character under the cursor to the opposite case
Move Cursor
$ Move to the end of the current line

32
Table 11-2: Basic vi Commands
Command Meaning
; Repeat the last f or F command
^ Move to the beginning of the current line
e Move to the end of the current word
fx Move the cursor to the first occurrence of character x on the current line
Fx Move the cursor to the last occurrence of character x on the current line
H Move the cursor to the top of the screen
h Move one character to the left
j Move one line down
k Move one line up
L Move the cursor to the end of the screen
l Move one character to the right
M Move the cursor to the middle of the screen
n| Move the cursor to column n on current line
nG Place cursor on line n
w Move to the beginning of the following word
33
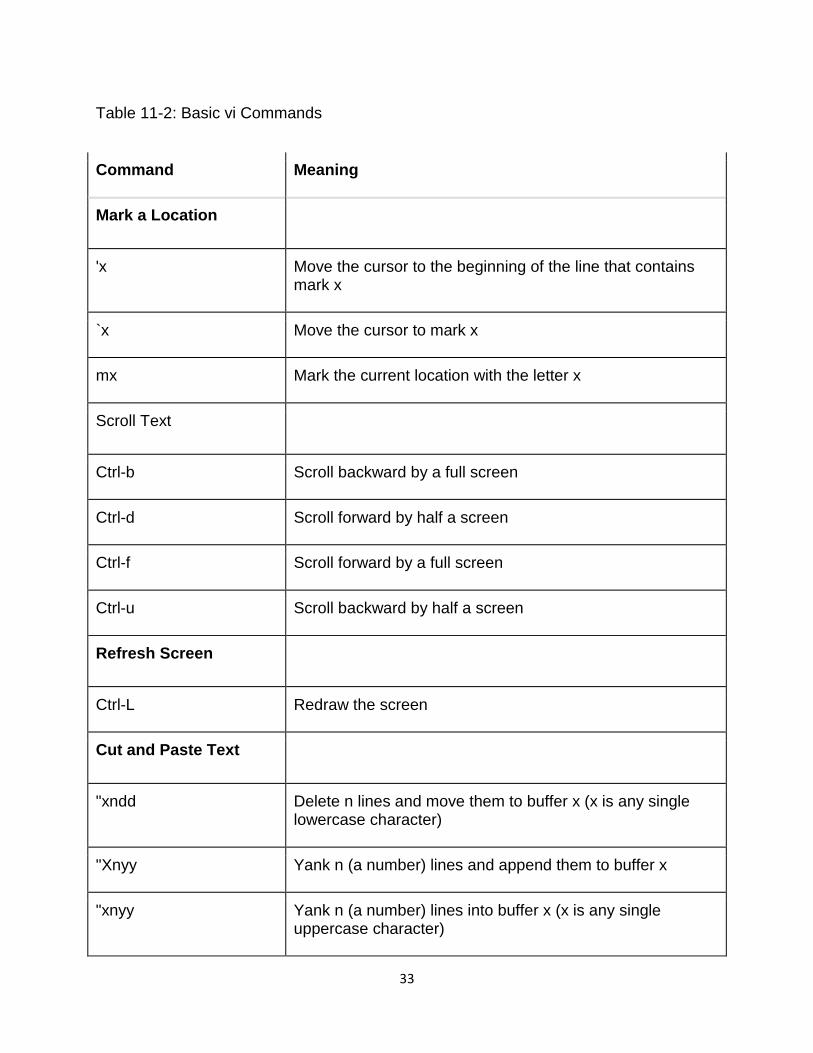
Table 11-2: Basic vi Commands
Command Meaning
Mark a Location
'x Move the cursor to the beginning of the line that contains mark x
`x Move the cursor to mark x
mx Mark the current location with the letter x
Scroll Text
Ctrl-b Scroll backward by a full screen
Ctrl-d Scroll forward by half a screen
Ctrl-f Scroll forward by a full screen
Ctrl-u Scroll backward by half a screen
Refresh Screen
Ctrl-L Redraw the screen
Cut and Paste Text
"xndd Delete n lines and move them to buffer x (x is any single lowercase character)
"Xnyy Yank n (a number) lines and append them to buffer x
"xnyy Yank n (a number) lines into buffer x (x is any single uppercase character)

34
Table 11-2: Basic vi Commands
Command Meaning
"xp Put the yanked lines from buffer x after the current line
P Put the yanked line above the current line
p Put the yanked line below the current line
yy Yank (copy) the current line into an unnamed buffer
Colon Commands
:!command Execute the shell command
:e filename Edit the file
:f Display the filename and current line number
:N Move to line n (n is a number)
:q Quit the editor
:q! Quit without saving changes
:r filename Read the file and insert after the current line
:w filename Write the buffer to the file
:wq Save the changes and exit
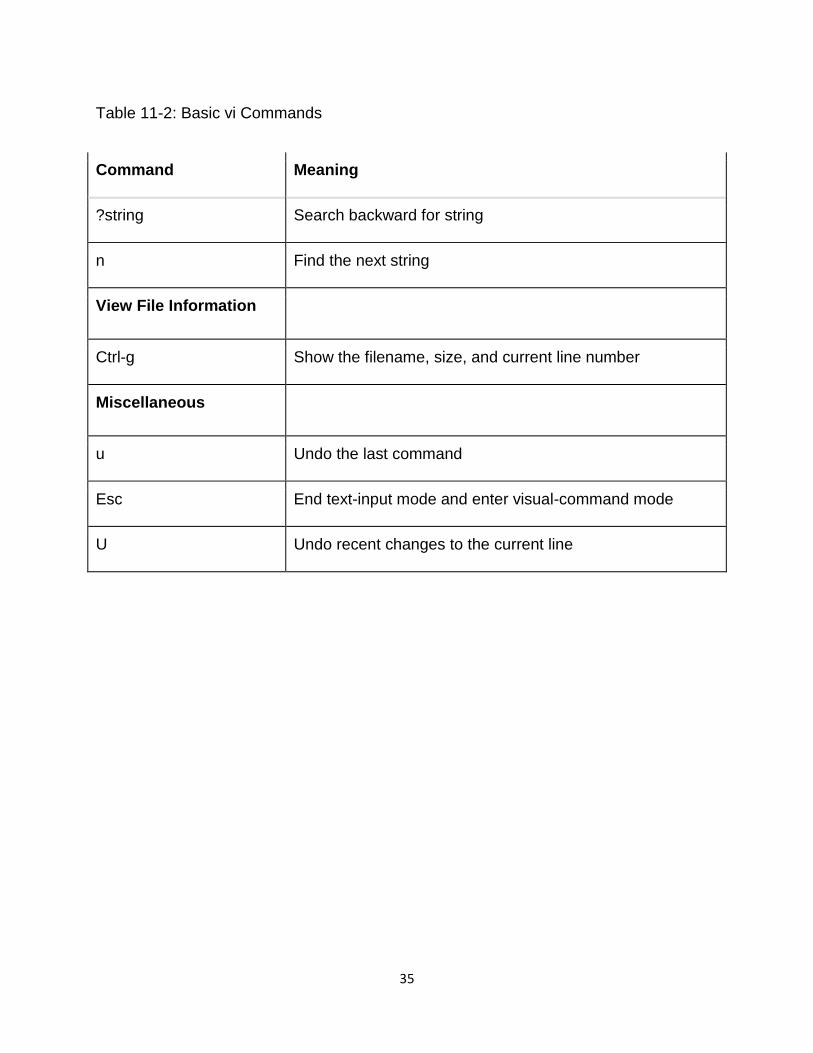
Search Text
/string Search forward for string
35
Table 11-2: Basic vi Commands
Command Meaning
?string Search backward for string
n Find the next string
View File Information
Ctrl-g Show the filename, size, and current line number
Miscellaneous
u Undo the last command
Esc End text-input mode and enter visual-command mode
U Undo recent changes to the current line
36
Unit-II
Unix Shell programming
Types of Shells
The shell provides you with an interface to the UNIX system. It gathers input from you and executes programs based on that input. When a program finishes executing, it displays that program's output.
A shell is an environment in which we can run our commands, programs, and shell scripts. There are different flavors of shells, just as there are different flavors of operating systems. Each flavor of shell has its own set of recognized commands and functions.
Shell Prompt:
The prompt, $, which is called command prompt, is issued by the shell. While the prompt is displayed, you can type a command.
The shell reads your input after you press Enter. It determines the command you want executed by looking at the first word of your input. A word is an unbroken set of characters. Spaces and tabs separate words.
Following is a simple example of date command which displays current date and time:
$date Thu Jun 25 08:30:19 MST 2009
You can customize your command prompt using environment variable PS1 explained in Environment tutorial.
Shell Types:
In UNIX there are two major types of shells:
1. The Bourne shell. If you are using a Bourne-type shell, the default prompt is the $ character.
2. The C shell. If you are using a C-type shell, the default prompt is the % character.
There are again various subcategories for Bourne Shell which are listed as follows:
Bourne shell ( sh)
Korn shell ( ksh)
Bourne Again shell ( bash)
37
POSIX shell ( sh)
The different C-type shells follow:
C shell ( csh)
TENEX/TOPS C shell ( tcsh)
The original UNIX shell was written in the mid-1970s by Stephen R. Bourne while he was at AT&T Bell Labs in New Jersey.
The Bourne shell was the first shell to appear on UNIX systems, thus it is referred to as "the shell".
The Bourne shell is usually installed as /bin/sh on most versions of UNIX. For this reason, it is the shell of choice for writing scripts to use on several different versions of UNIX.
In this tutorial, we are going to cover most of the Shell concepts based on Borne Shell.
Shell Scripts:
The basic concept of a shell script is a list of commands, which are listed in the order of execution. A good shell script will have comments, preceded by a pound sign, #, describing the steps.
There are conditional tests, such as value A is greater than value B, loops allowing us to go through massive amounts of data, files to read and store data, and variables to read and store data, and the script may include functions.
Shell scripts and functions are both interpreted. This means they are not compiled.
We are going to write a many scripts in the next several tutorials. This would be a simple text file in which we would put our all the commands and several other required constructs that tell the shell environment what to do and when to do it.
Example Script:
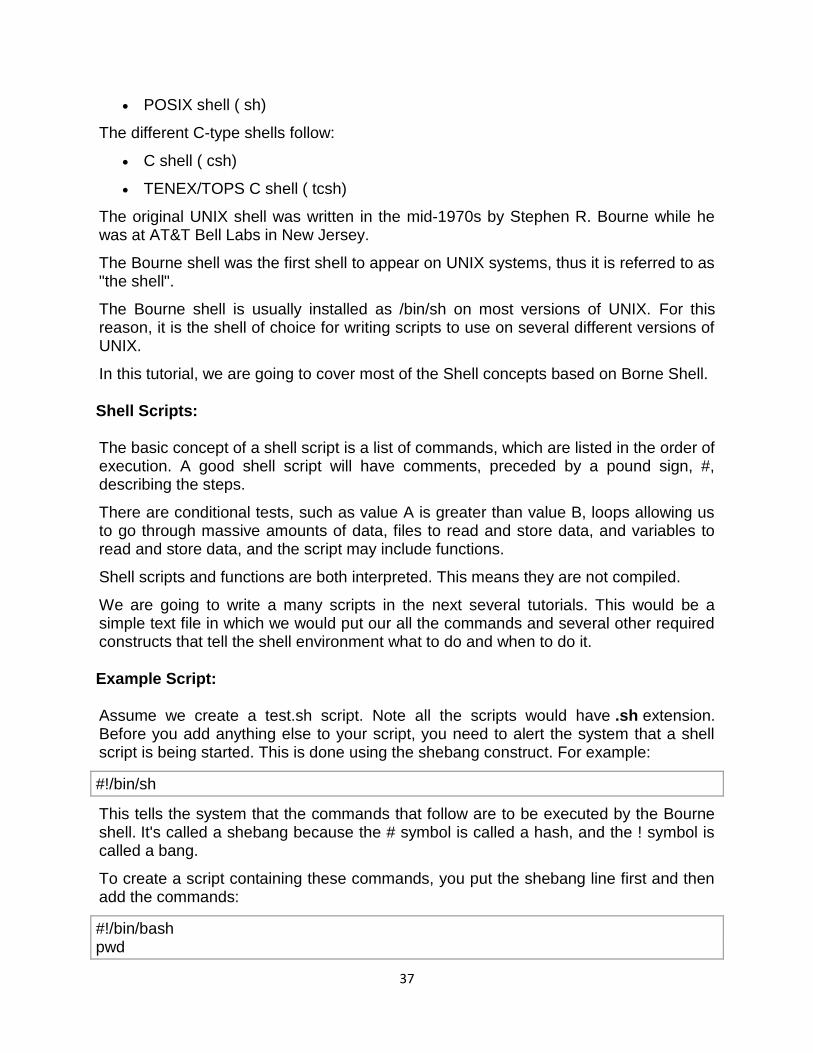
Assume we create a test.sh script. Note all the scripts would have .sh extension. Before you add anything else to your script, you need to alert the system that a shell script is being started. This is done using the shebang construct. For example:
#!/bin/sh
This tells the system that the commands that follow are to be executed by the Bourne shell. It's called a shebang because the # symbol is called a hash, and the ! symbol is called a bang.
To create a script containing these commands, you put the shebang line first and then add the commands:
#!/bin/bash pwd
38
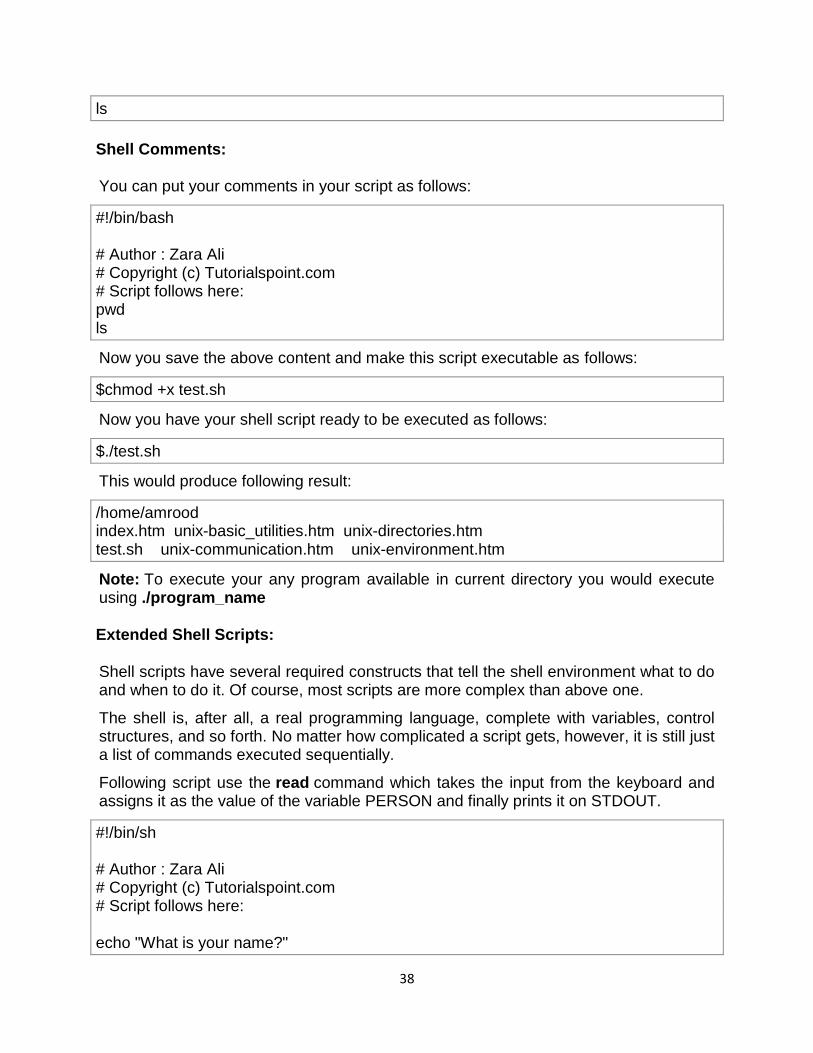
ls
Shell Comments:
You can put your comments in your script as follows:
#!/bin/bash # Author : Zara Ali # Copyright (c) Tutorialspoint.com # Script follows here: pwd ls
Now you save the above content and make this script executable as follows:
$chmod +x test.sh
Now you have your shell script ready to be executed as follows:
$./test.sh
This would produce following result:
/home/amrood index.htm unix-basic_utilities.htm unix-directories.htm test.sh unix-communication.htm unix-environment.htm
Note: To execute your any program available in current directory you would execute using ./program_name
Extended Shell Scripts:
Shell scripts have several required constructs that tell the shell environment what to do and when to do it. Of course, most scripts are more complex than above one.
The shell is, after all, a real programming language, complete with variables, control structures, and so forth. No matter how complicated a script gets, however, it is still just a list of commands executed sequentially.
Following script use the read command which takes the input from the keyboard and assigns it as the value of the variable PERSON and finally prints it on STDOUT.
#!/bin/sh # Author : Zara Ali # Copyright (c) Tutorialspoint.com # Script follows here: echo "What is your name?"

39
read PERSON echo "Hello, $PERSON"
Here is sample run of the script:
$./test.sh What is your name? Zara Ali Hello, Zara Ali $
Shell Metacharacters
Linux for Programmers and Users, Section 5.5.
As was discussed in Structure of a Command, the command options, option arguments
and command arguments are separated by the space character. However, we can also
use special characters called metacharacters in a Unix command that the shell
interprets rather than passing to the command.
The Shell Metacharacters are listed here for reference. Many of the metacharacters are
described elsewhere in the study guide.
Symbol Meaning
> Output redirection, (see File Redirection)
>> Output redirection (append)
< Input redirection
* File substitution wildcard; zero or more characters
? File substitution wildcard; one character
[ ] File substitution wildcard; any character between brackets
`cmd` Command Substitution
$(cmd) Command Substitution
| The Pipe (|)
; Command sequence, Sequences of Commands
|| OR conditional execution
&& AND conditional execution
( ) Group commands, Sequences of Commands
& Run command in the background, Background Processes
# Comment
$ Expand the value of a variable
\ Prevent or escape interpretation of the next character
<< Input redirection (see Here Documents)
40
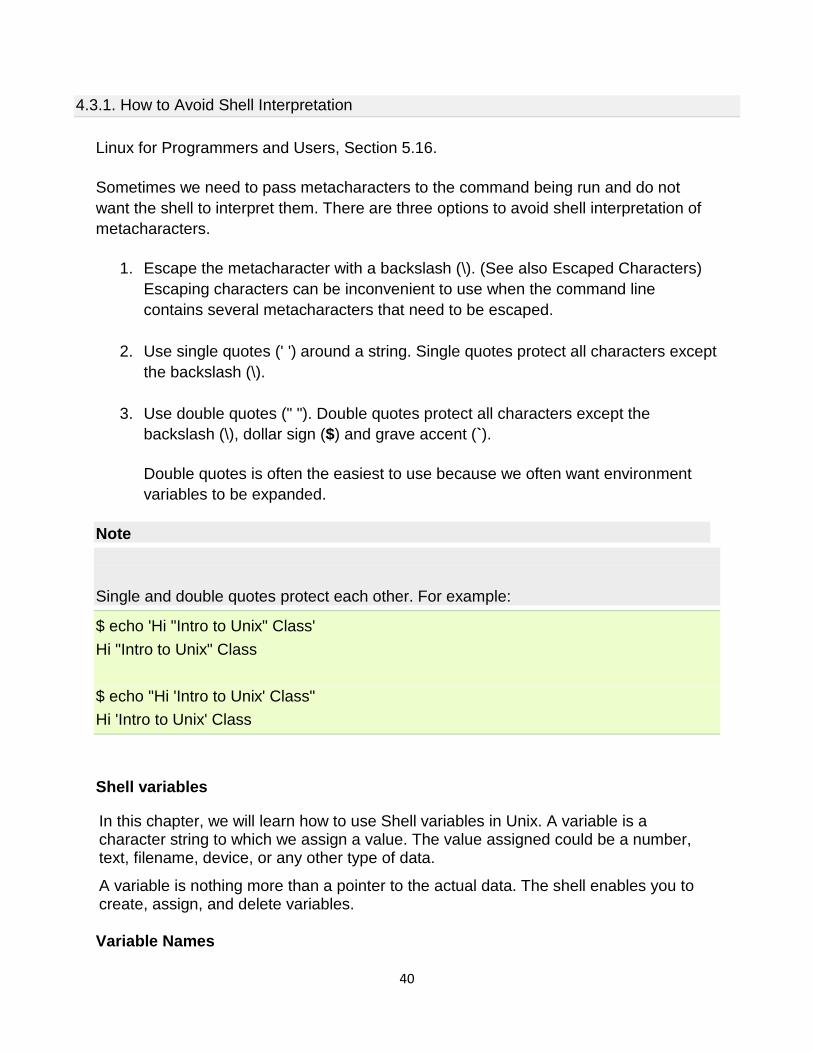
4.3.1. How to Avoid Shell Interpretation
Linux for Programmers and Users, Section 5.16.
Sometimes we need to pass metacharacters to the command being run and do not
want the shell to interpret them. There are three options to avoid shell interpretation of
metacharacters.
1. Escape the metacharacter with a backslash (\). (See also Escaped Characters)
Escaping characters can be inconvenient to use when the command line
contains several metacharacters that need to be escaped.
2. Use single quotes (' ') around a string. Single quotes protect all characters except
the backslash (\).
3. Use double quotes (" "). Double quotes protect all characters except the
backslash (\), dollar sign ($) and grave accent (`).
Double quotes is often the easiest to use because we often want environment
variables to be expanded.
Note
Single and double quotes protect each other. For example:
$ echo 'Hi "Intro to Unix" Class'
Hi "Intro to Unix" Class
$ echo "Hi 'Intro to Unix' Class"
Hi 'Intro to Unix' Class
Shell variables
In this chapter, we will learn how to use Shell variables in Unix. A variable is a character string to which we assign a value. The value assigned could be a number, text, filename, device, or any other type of data.
A variable is nothing more than a pointer to the actual data. The shell enables you to create, assign, and delete variables.
Variable Names
41
The name of a variable can contain only letters (a to z or A to Z), numbers ( 0 to 9) or the underscore character ( _).
By convention, Unix shell variables will have their names in UPPERCASE.
The following examples are valid variable names −
_ALI TOKEN_A VAR_1 VAR_2
Following are the examples of invalid variable names −
2_VAR -VARIABLE VAR1-VAR2 VAR_A!
The reason you cannot use other characters such as !, *, or - is that these characters have a special meaning for the shell.
Defining Variables
Variables are defined as follows −
variable_name=variable_value
For example −
NAME="Zara Ali"
The above example defines the variable NAME and assigns the value "Zara Ali" to it. Variables of this type are called scalar variables. A scalar variable can hold only one value at a time.
Shell enables you to store any value you want in a variable. For example −
VAR1="Zara Ali" VAR2=100
Accessing Values
To access the value stored in a variable, prefix its name with the dollar sign ($) −
For example, the following script will access the value of defined variable NAME and print it on STDOUT −
Live Demo
#!/bin/sh NAME="Zara Ali"
42
echo $NAME
The above script will produce the following value −
Zara Ali
Read-only Variables
Shell provides a way to mark variables as read-only by using the read-only command. After a variable is marked read-only, its value cannot be changed.
For example, the following script generates an error while trying to change the value of NAME −
Live Demo
#!/bin/sh NAME="Zara Ali" readonly NAME NAME="Qadiri"
The above script will generate the following result −
/bin/sh: NAME: This variable is read only.
Unsetting Variables
Unsetting or deleting a variable directs the shell to remove the variable from the list of variables that it tracks. Once you unset a variable, you cannot access the stored value in the variable.
Following is the syntax to unset a defined variable using the unset command −
unset variable_name
The above command unsets the value of a defined variable. Here is a simple example that demonstrates how the command works −
#!/bin/sh NAME="Zara Ali" unset NAME echo $NAME
The above example does not print anything. You cannot use the unset command to unset variables that are marked readonly.
Variable Types
When a shell is running, three main types of variables are present −
43
Local Variables − A local variable is a variable that is present within the current instance of the shell. It is not available to programs that are started by the shell. They are set at the command prompt.
Environment Variables − An environment variable is available to any child process of the shell. Some programs need environment variables in order to function correctly. Usually, a shell script defines only those environment variables that are needed by the programs that it runs.
Shell Variables − A shell variable is a special variable that is set by the shell and is required by the shell in order to function correctly. Some of these variables are environment variables whereas others are local variables.
Shell scripts
A shell script is a computer program designed to be run by the Unix/Linux shell which could be one of the following:
The Bourne Shell
The C Shell
The Korn Shell
The GNU Bourne-Again Shell
A shell is a command-line interpreter and typical operations performed by shell scripts include file manipulation, program execution, and printing text.
Extended Shell Scripts
Shell scripts have several required constructs that tell the shell environment what to do and when to do it. Of course, most scripts are more complex than the above one.
The shell is, after all, a real programming language, complete with variables, control structures, and so forth. No matter how complicated a script gets, it is still just a list of commands executed sequentially.
The following script uses the read command which takes the input from the keyboard and assigns it as the value of the variable PERSON and finally prints it on STDOUT.
#!/bin/sh # Author : Zara Ali # Copyright (c) Tutorialspoint.com # Script follows here:
44
echo "What is your name?" read PERSON echo "Hello, $PERSON"
Here is a sample run of the script −
$./test.sh What is your name? Zara Ali Hello, Zara Ali $
Subsequent part of this tutorial will cover Unix/Linux Shell Scripting in detail.
Shell commands
This quick guide lists commands, including a syntax and a brief description. For more detail, use −
$man command
Files and Directories
These commands allow you to create directories and handle files.
Given below is the list of commands in Files and Directories.
Sr.No. Command & Description
1 cat
Displays File Contents
2 cd
Changes Directory to dirname
3 chgrp
Changes file group
4 chmod
Changes permissions
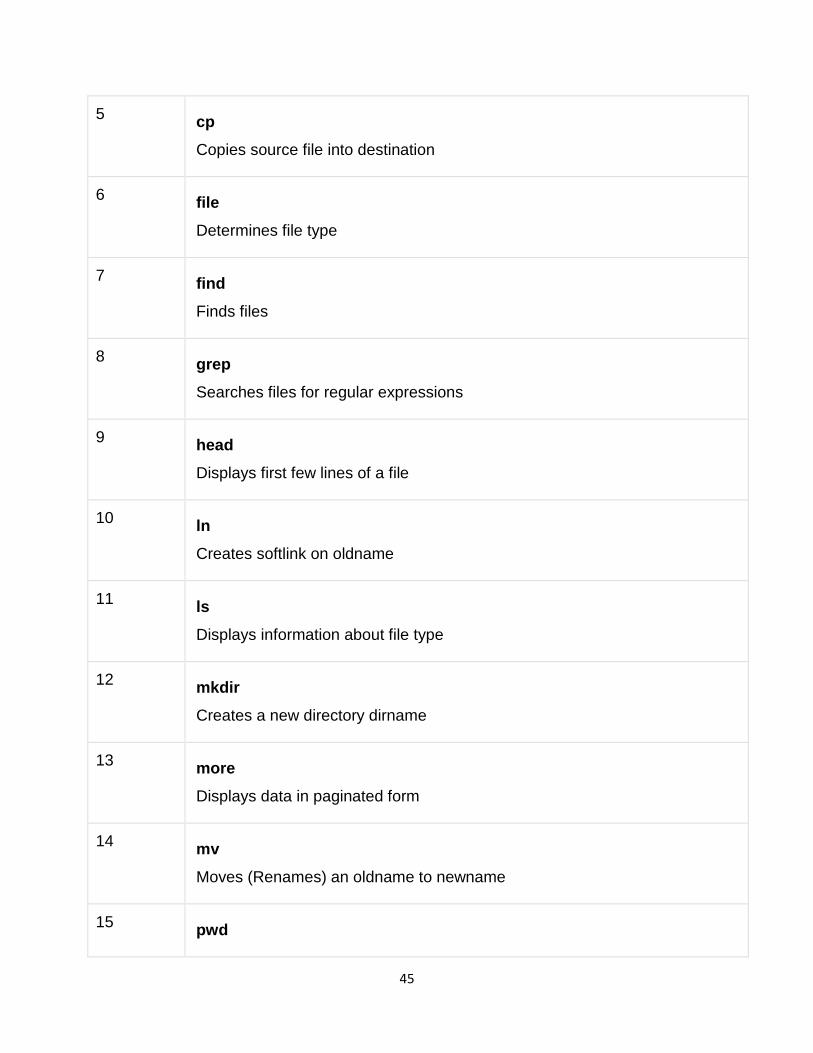
45
5 cp
Copies source file into destination
6 file
Determines file type
7 find
Finds files
8 grep
Searches files for regular expressions
9 head
Displays first few lines of a file
10 ln
Creates softlink on oldname
11 ls
Displays information about file type
12 mkdir
Creates a new directory dirname
13 more
Displays data in paginated form
14 mv
Moves (Renames) an oldname to newname
15 pwd
46
Prints current working directory
16 rm
Removes (Deletes) filename
17 rmdir
Deletes an existing directory provided it is empty
18 tail
Prints last few lines in a file
19 touch
Updates access and modification time of a file
Manipulating data
The contents of files can be compared and altered with the following commands.
Given below is the list of commands in Manipulating data.
Sr.No. Command & Description
1 awk
Pattern scanning and processing language
2 cmp
Compares the contents of two files
3 comm
Compares sorted data
4 cut
Cuts out selected fields of each line of a file
47
5 diff
Differential file comparator
6 expand
Expands tabs to spaces
7 join
Joins files on some common field
8 perl
Data manipulation language
9 sed
Stream text editor
10 sort
Sorts file data
11 split
Splits file into smaller files
12 tr
Translates characters
13 uniq
Reports repeated lines in a file
14 wc
Counts words, lines, and characters
15 vi
48
Opens vi text editor
16 vim
Opens vim text editor
17 fmt
Simple text formatter
18 spell
Checks text for spelling error
19 ispell
Checks text for spelling error
20 emacs
GNU project Emacs
21 ex, edit
Line editor
22 emacs
GNU project Emacs
Compressed Files
Files may be compressed to save space. Compressed files can be created and examined.
Sr.No. Command & Description
1 compress
49
Compresses files
2 gunzip
Helps uncompress gzipped files
3 gzip
GNU alternative compression method
4 uncompress
Helps uncompress files
5 unzip
List, test and extract compressed files in a ZIP archive
6 zcat
Cat a compressed file
7 zcmp
Compares compressed files
8 zdiff
Compares compressed files
9 zmore
File perusal filter for crt viewing of compressed text
Getting Information
Various Unix manuals and documentation are available on-line. The following Shell commands give information −
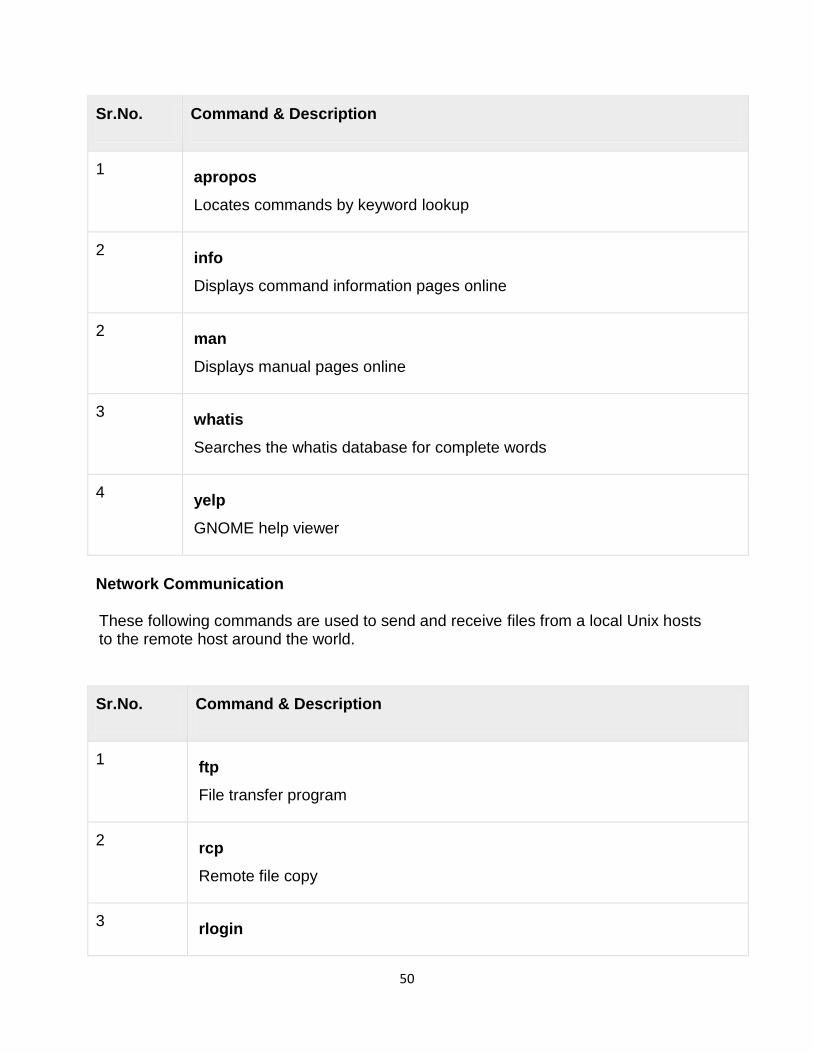
50
Sr.No. Command & Description
1 apropos
Locates commands by keyword lookup
2 info
Displays command information pages online
2 man
Displays manual pages online
3 whatis
Searches the whatis database for complete words
4 yelp
GNOME help viewer
Network Communication
These following commands are used to send and receive files from a local Unix hosts to the remote host around the world.
Sr.No. Command & Description
1 ftp
File transfer program
2 rcp
Remote file copy
3 rlogin
51
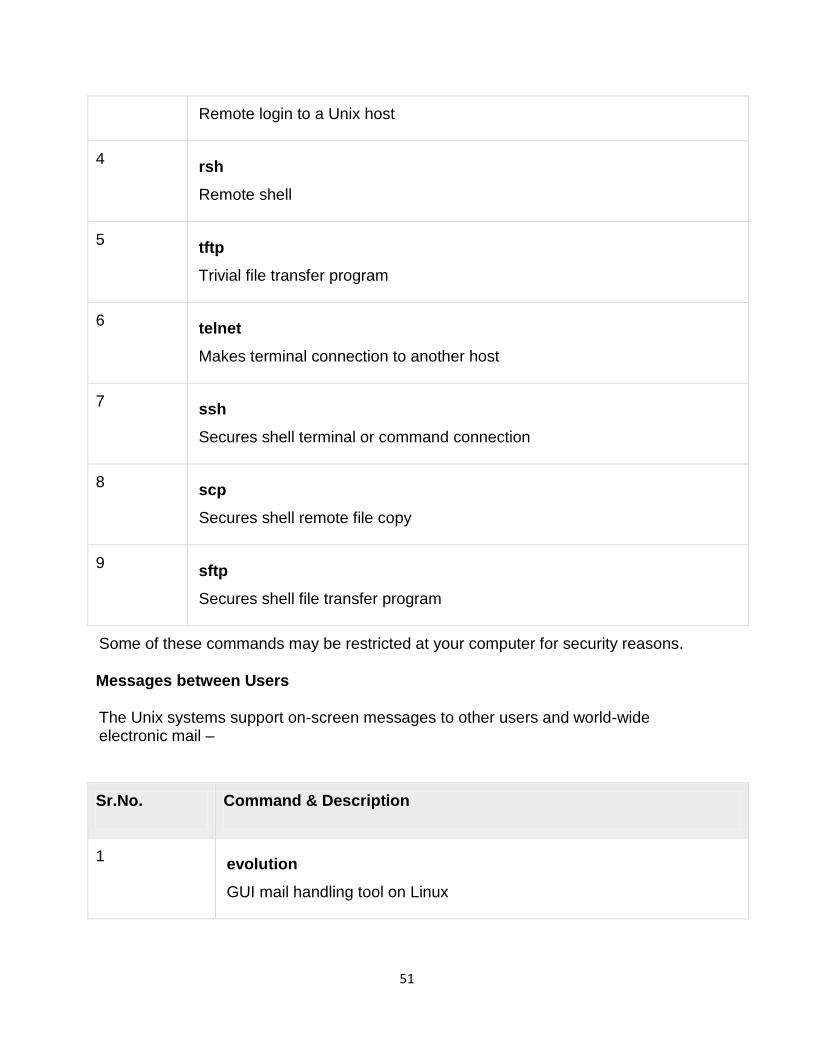
Remote login to a Unix host
4 rsh
Remote shell
5 tftp
Trivial file transfer program
6 telnet
Makes terminal connection to another host
7 ssh
Secures shell terminal or command connection
8 scp
Secures shell remote file copy
9 sftp
Secures shell file transfer program
Some of these commands may be restricted at your computer for security reasons.
Messages between Users
The Unix systems support on-screen messages to other users and world-wide electronic mail –
Sr.No. Command & Description
1 evolution
GUI mail handling tool on Linux

52
2 mail
Simple send or read mail program
3 mesg
Permits or denies messages
4 parcel
Sends files to another user
5 pine
Vdu-based mail utility
6 talk
Talks to another user
7 write
Writes message to another user
Programming Utilities
The following programming tools and languages are available based on what you have installed on your Unix.
Given below is the list of tools and languages in Programming Utilities.
Sr.No. Command & Description
1 dbx
Sun debugger
2 gdb
GNU debugger
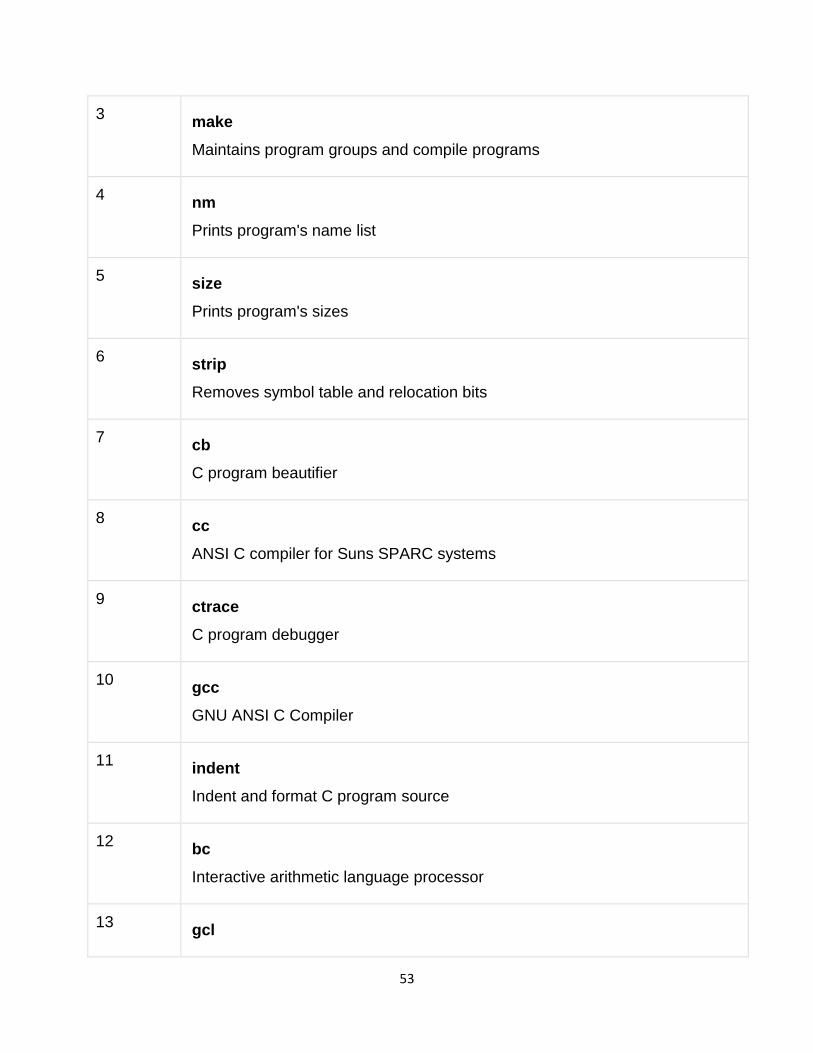
53
3 make
Maintains program groups and compile programs
4 nm
Prints program's name list
5 size
Prints program's sizes
6 strip
Removes symbol table and relocation bits
7 cb
C program beautifier
8 cc
ANSI C compiler for Suns SPARC systems
9 ctrace
C program debugger
10 gcc
GNU ANSI C Compiler
11 indent
Indent and format C program source
12 bc
Interactive arithmetic language processor
13 gcl
54
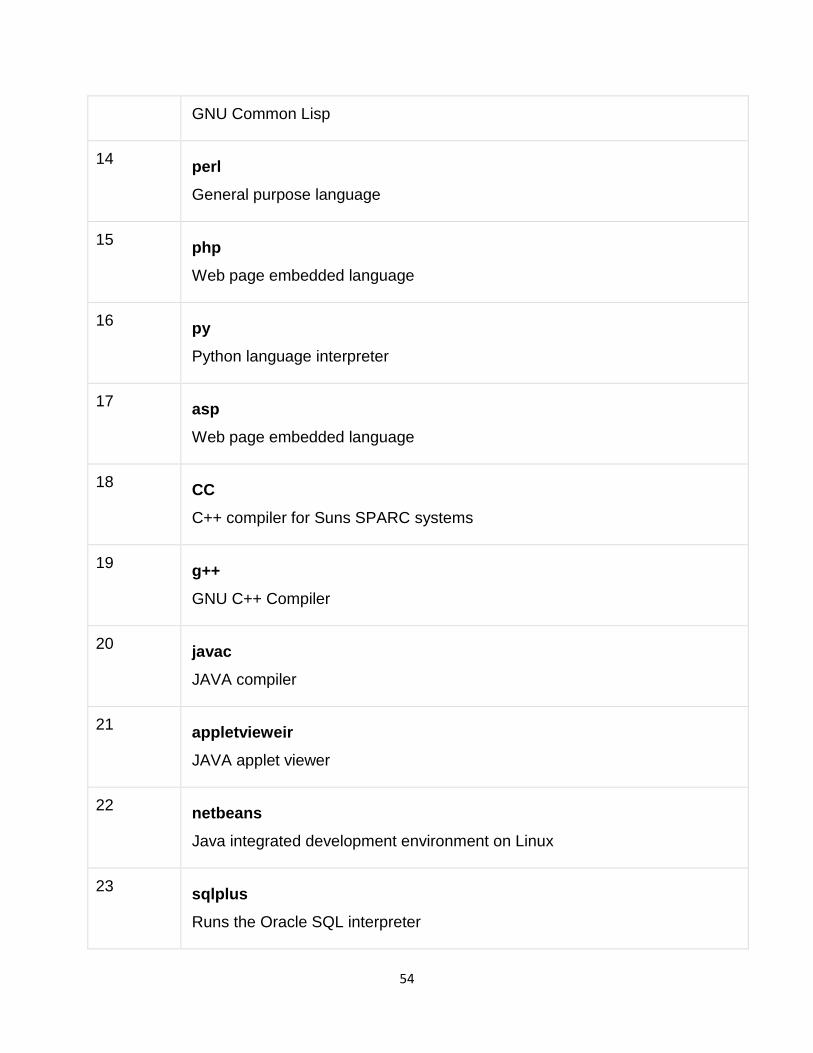
GNU Common Lisp
14 perl
General purpose language
15 php
Web page embedded language
16 py
Python language interpreter
17 asp
Web page embedded language
18 CC
C++ compiler for Suns SPARC systems
19 g++
GNU C++ Compiler
20 javac
JAVA compiler
21 appletvieweir
JAVA applet viewer
22 netbeans
Java integrated development environment on Linux
23 sqlplus
Runs the Oracle SQL interpreter
55
24 sqlldr
Runs the Oracle SQL data loader
25 mysql
Runs the mysql SQL interpreter
Misc Commands
These commands list or alter information about the system −
Given below is the list of Misc Commands in Unix.
Sr.No. Command & Description
1 chfn
Changes your finger information
2 chgrp
Changes the group ownership of a file
3 chown
Changes owner
4 date
Prints the date
5 determin
Automatically finds terminal type
6 du
Prints amount of disk usage
56
7 echo
Echo arguments to the standard options
8 exit
Quits the system
9 finger
Prints information about logged-in users
10 groupadd
Creates a user group
11 groups
Show group memberships
12 homequota
Shows quota and file usage
13 iostat
Reports I/O statistics
14 kill
Sends a signal to a process
15 last
Shows last logins of users
16 logout
Logs off Unix
17 lun
57
Lists user names or login ID
18 netstat
Shows network status
19 passwd
Changes user password
20 passwd
Changes your login password
21 printenv
Displays value of a shell variable
22 ps
Displays the status of current processes
23 ps
Prints process status statistics
24 quota -v
Displays disk usage and limits
25 reset
Resets terminal mode
26 script
Keeps script of terminal session
27 script
Saves the output of a command or process
58
28 setenv
Sets environment variables
30 stty
Sets terminal options
31 time
Helps time a command
32 top
Displays all system processes
33 tset
Sets terminal mode
34 tty
Prints current terminal name
35 umask
Show the permissions that are given to view files by default
36 uname
Displays name of the current system
37 uptime
Gets the system up time
38 useradd
Creates a user account
39 users
59
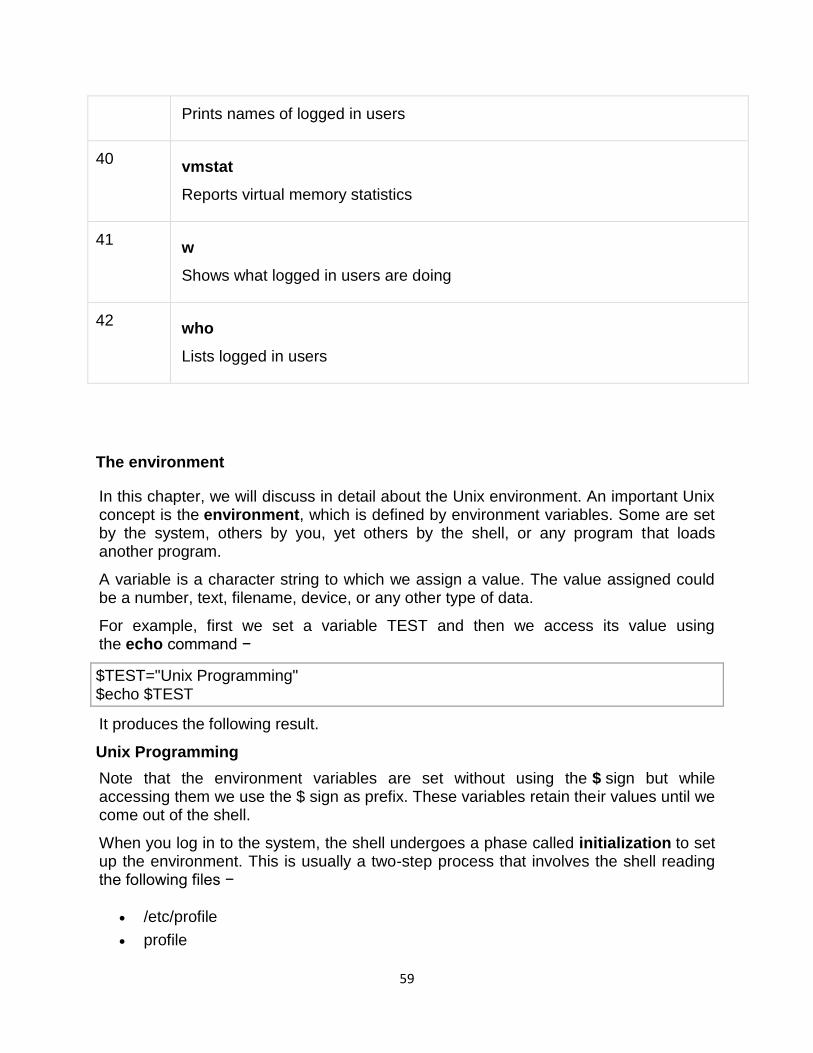
Prints names of logged in users
40 vmstat
Reports virtual memory statistics
41 w
Shows what logged in users are doing
42 who
Lists logged in users
The environment
In this chapter, we will discuss in detail about the Unix environment. An important Unix concept is the environment, which is defined by environment variables. Some are set by the system, others by you, yet others by the shell, or any program that loads another program.
A variable is a character string to which we assign a value. The value assigned could be a number, text, filename, device, or any other type of data.
For example, first we set a variable TEST and then we access its value using the echo command −
$TEST="Unix Programming" $echo $TEST
It produces the following result.
Unix Programming
Note that the environment variables are set without using the $ sign but while accessing them we use the $ sign as prefix. These variables retain their values until we come out of the shell.
When you log in to the system, the shell undergoes a phase called initialization to set up the environment. This is usually a two-step process that involves the shell reading the following files −
/etc/profile
profile
60
The process is as follows −
The shell checks to see whether the file /etc/profile exists.
If it exists, the shell reads it. Otherwise, this file is skipped. No error message is displayed.
The shell checks to see whether the file .profile exists in your home directory. Your home directory is the directory that you start out in after you log in.
If it exists, the shell reads it; otherwise, the shell skips it. No error message is displayed.
As soon as both of these files have been read, the shell displays a prompt −
$
This is the prompt where you can enter commands in order to have them executed.
Note − The shell initialization process detailed here applies to all Bourne type shells, but some additional files are used by bash and ksh.
The .profile File
The file /etc/profile is maintained by the system administrator of your Unix machine and contains shell initialization information required by all users on a system.
The file .profile is under your control. You can add as much shell customization information as you want to this file. The minimum set of information that you need to configure includes −
The type of terminal you are using.
A list of directories in which to locate the commands.
A list of variables affecting the look and feel of your terminal.
You can check your .profile available in your home directory. Open it using the vi editor and check all the variables set for your environment.
Setting the Terminal Type
Usually, the type of terminal you are using is automatically configured by either the login or getty programs. Sometimes, the auto configuration process guesses your terminal incorrectly.
If your terminal is set incorrectly, the output of the commands might look strange, or you might not be able to interact with the shell properly.
To make sure that this is not the case, most users set their terminal to the lowest common denominator in the following way −
$TERM=vt100 $
61
Setting the PATH
When you type any command on the command prompt, the shell has to locate the command before it can be executed.
The PATH variable specifies the locations in which the shell should look for commands. Usually the Path variable is set as follows −
$PATH=/bin:/usr/bin $
Here, each of the individual entries separated by the colon character (:) are directories. If you request the shell to execute a command and it cannot find it in any of the directories given in the PATH variable, a message similar to the following appears −
$hello hello: not found $
There are variables like PS1 and PS2 which are discussed in the next section.
PS1 and PS2 Variables
The characters that the shell displays as your command prompt are stored in the variable PS1. You can change this variable to be anything you want. As soon as you change it, it'll be used by the shell from that point on.
For example, if you issued the command −
$PS1='=>' => => =>
Your prompt will become =>. To set the value of PS1 so that it shows the working directory, issue the command −
=>PS1="[\u@\h \w]\$" [root@ip-72-167-112-17 /var/www/tutorialspoint/unix]$ [root@ip-72-167-112-17 /var/www/tutorialspoint/unix]$
The result of this command is that the prompt displays the user's username, the machine's name (hostname), and the working directory.
There are quite a few escape sequences that can be used as value arguments for PS1; try to limit yourself to the most critical so that the prompt does not overwhelm you with information.
Sr.No. Escape Sequence & Description
62
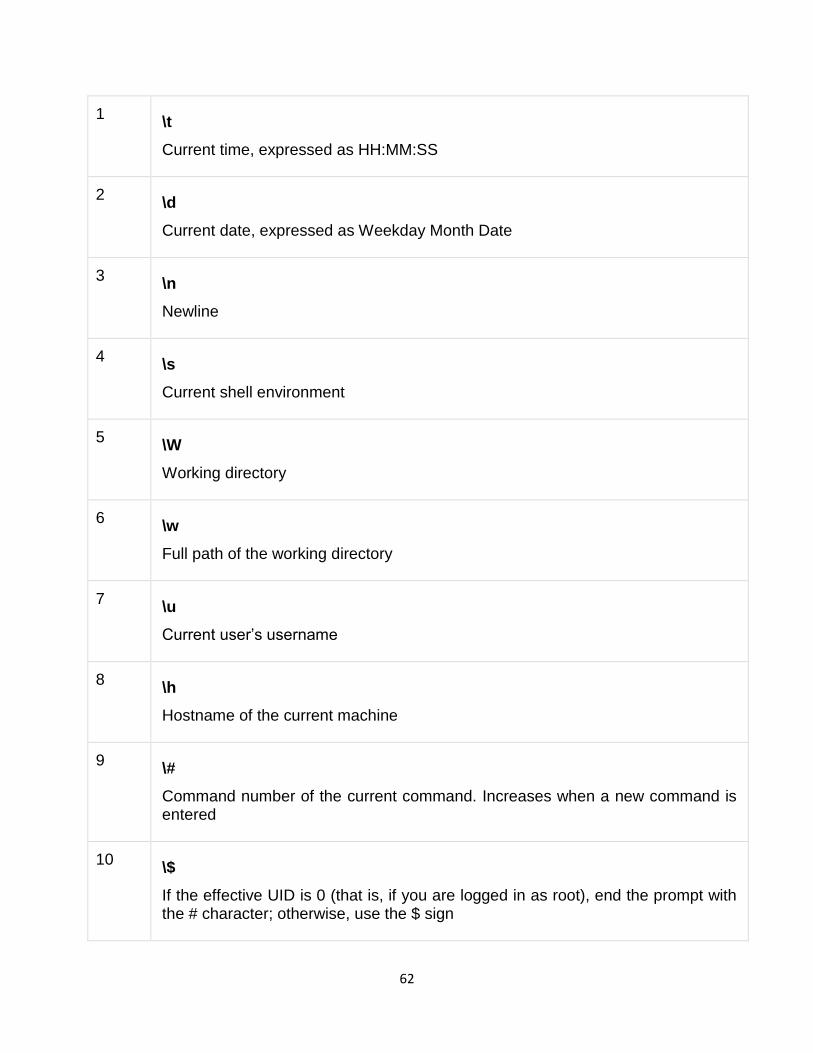
1 \t
Current time, expressed as HH:MM:SS
2 \d
Current date, expressed as Weekday Month Date
3 \n
Newline
4 \s
Current shell environment
5 \W
Working directory
6 \w
Full path of the working directory
7 \u
Current user‘s username
8 \h
Hostname of the current machine
9 \#
Command number of the current command. Increases when a new command is entered
10 \$
If the effective UID is 0 (that is, if you are logged in as root), end the prompt with the # character; otherwise, use the $ sign

63
You can make the change yourself every time you log in, or you can have the change made automatically in PS1 by adding it to your .profile file.
When you issue a command that is incomplete, the shell will display a secondary prompt and wait for you to complete the command and hit Enter again.
The default secondary prompt is > (the greater than sign), but can be changed by re-defining the PS2 shell variable −
Following is the example which uses the default secondary prompt −
$ echo "this is a > test" this is a test $
The example given below re-defines PS2 with a customized prompt −
$ PS2="secondary prompt->" $ echo "this is a secondary prompt->test" this is a test $
Environment Variables
Following is the partial list of important environment variables. These variables are set and accessed as mentioned below −
Sr.No. Variable & Description
1 DISPLAY
Contains the identifier for the display that X11 programs should use by default.
2 HOME
Indicates the home directory of the current user: the default argument for the cd built-in command.
3 IFS
Indicates the Internal Field Separator that is used by the parser for word splitting after expansion.
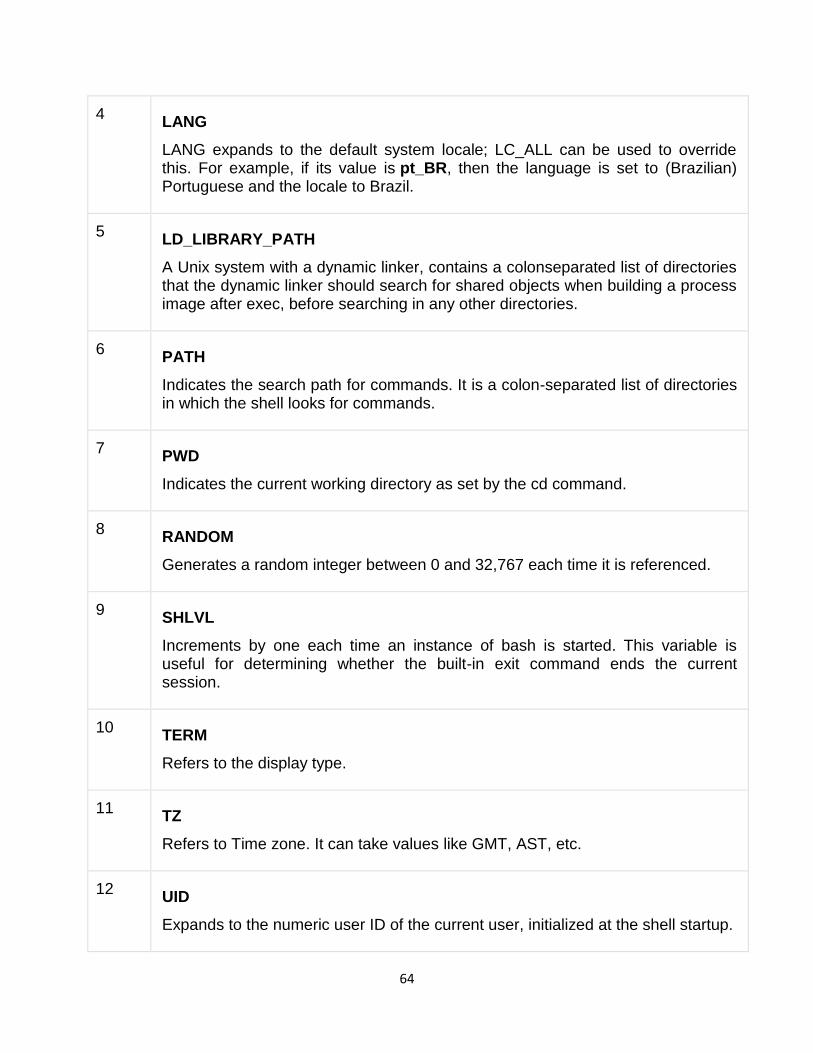
64
4 LANG
LANG expands to the default system locale; LC_ALL can be used to override this. For example, if its value is pt_BR, then the language is set to (Brazilian) Portuguese and the locale to Brazil.
5 LD_LIBRARY_PATH
A Unix system with a dynamic linker, contains a colonseparated list of directories that the dynamic linker should search for shared objects when building a process image after exec, before searching in any other directories.
6 PATH
Indicates the search path for commands. It is a colon-separated list of directories in which the shell looks for commands.
7 PWD
Indicates the current working directory as set by the cd command.
8 RANDOM
Generates a random integer between 0 and 32,767 each time it is referenced.
9 SHLVL
Increments by one each time an instance of bash is started. This variable is useful for determining whether the built-in exit command ends the current session.
10 TERM
Refers to the display type.
11 TZ
Refers to Time zone. It can take values like GMT, AST, etc.
12 UID
Expands to the numeric user ID of the current user, initialized at the shell startup.
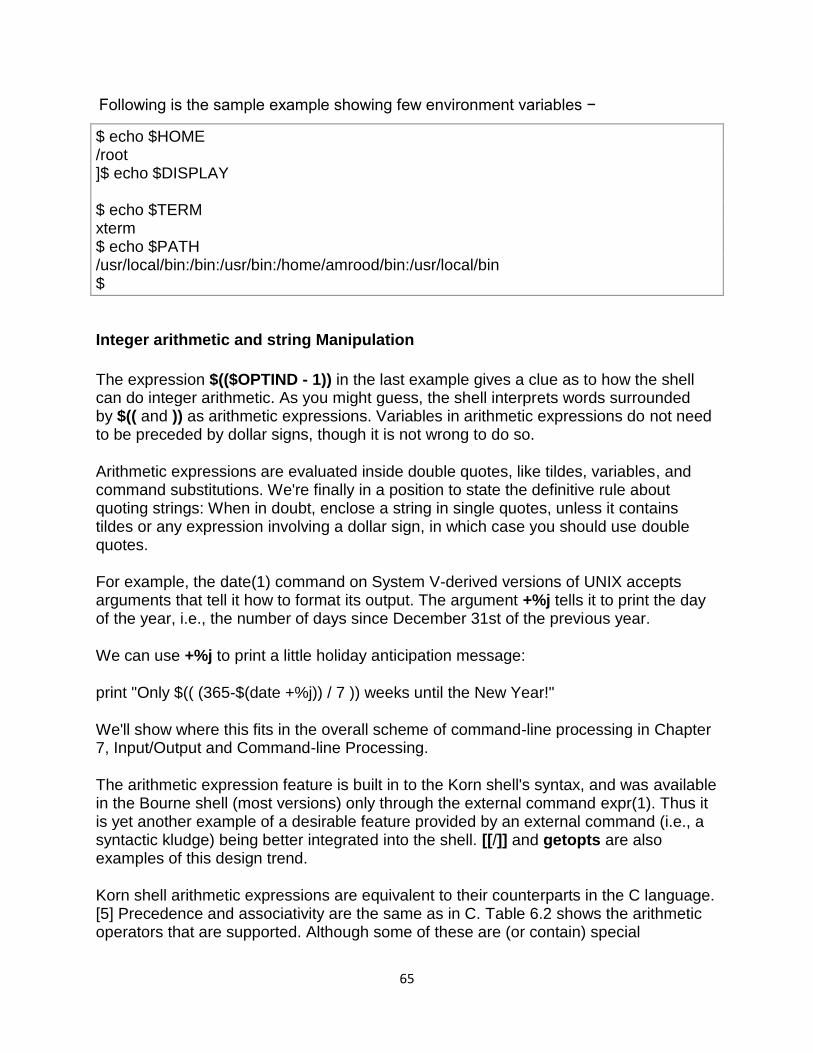
65
Following is the sample example showing few environment variables −
$ echo $HOME /root ]$ echo $DISPLAY $ echo $TERM xterm $ echo $PATH /usr/local/bin:/bin:/usr/bin:/home/amrood/bin:/usr/local/bin $
Integer arithmetic and string Manipulation
The expression $(($OPTIND - 1)) in the last example gives a clue as to how the shell can do integer arithmetic. As you might guess, the shell interprets words surrounded by $(( and )) as arithmetic expressions. Variables in arithmetic expressions do not need to be preceded by dollar signs, though it is not wrong to do so.
Arithmetic expressions are evaluated inside double quotes, like tildes, variables, and command substitutions. We're finally in a position to state the definitive rule about quoting strings: When in doubt, enclose a string in single quotes, unless it contains tildes or any expression involving a dollar sign, in which case you should use double quotes.
For example, the date(1) command on System V-derived versions of UNIX accepts arguments that tell it how to format its output. The argument +%j tells it to print the day of the year, i.e., the number of days since December 31st of the previous year.
We can use +%j to print a little holiday anticipation message:
print "Only $(( (365-$(date +%j)) / 7 )) weeks until the New Year!"
We'll show where this fits in the overall scheme of command-line processing in Chapter 7, Input/Output and Command-line Processing.
The arithmetic expression feature is built in to the Korn shell's syntax, and was available in the Bourne shell (most versions) only through the external command expr(1). Thus it is yet another example of a desirable feature provided by an external command (i.e., a syntactic kludge) being better integrated into the shell. [[/]] and getopts are also examples of this design trend.
Korn shell arithmetic expressions are equivalent to their counterparts in the C language. [5] Precedence and associativity are the same as in C. Table 6.2 shows the arithmetic operators that are supported. Although some of these are (or contain) special

66
characters, there is no need to backslash-escape them, because they are within the $((...)) syntax.
[5] The assignment forms of these operators are also permitted. For example, $((x += 2)) adds 2 to x and stores the result back in x.
Table 6.2: Arithmetic Operators
Operator Meaning
+ Plus
- Minus
* Times
/ Division (with truncation)
% Remainder
<< Bit-shift left
>> Bit-shift right
& Bitwise and
| Bitwise or
~ Bitwise not
^ Bitwise exclusive or
Parentheses can be used to group subexpressions. The arithmetic expression syntax also (like C) supports relational operators as "truth values" of 1 for true and 0 for false. Table 6.3 shows the relational operators and the logical operators that can be used to combine relational expressions.
Table 6.3: Relational Operators
Operator Meaning
< Less than
67
Table 6.3: Relational Operators
Operator Meaning
> Greater than
<= Less than or equal
>= Greater than or equal
== Equal
!= Not equal
&& Logical and
|| Logical or
For example, $((3 > 2)) has the value 1; $(( (3 > 2) || (4 <= 1) )) also has the value 1, since at least one of the two subexpressions is true.
The shell also supports base N numbers, where N can be up to 36. The notation B#N means "N base B". Of course, if you omit the B#, the base defaults to 10.
6.2.1 Arithmetic Conditionals
Another construct, closely related to $((...)), is ((...)) (without the leading dollar sign). We use this for evaluating arithmetic condition tests, just as [[...]] is used for string, file attribute, and other types of tests.
((...)) evaluates relational operators differently from $((...)) so that you can use it in if and while constructs. Instead of producing a textual result, it just sets its exit status according to the truth of the expression: 0 if true, 1 otherwise. So, for example, ((3 > 2)) produces exit status 0, as does (( (3 > 2) || (4 <= 1) )), but (( (3 > 2) && (4 <= 1) )) has exit status 1 since the second subexpression isn't true.
You can also use numerical values for truth values within this construct. It's like the analogous concept in C, which means that it's somewhat counterintuitive to non-C programmers: a value of 0 means false (i.e., returns exit status 1), and a non-0 value means true (returns exit status 0), e.g., (( 14 )) is true. See the code for the kshdb debugger in Chapter 9 for two more examples of this.
6.2.2 Arithmetic Variables and Assignment
68
The ((...)) construct can also be used to define integer variables and assign values to them. The statement:
(( intvar=expression ))
creates the integer variable intvar (if it doesn't already exist) and assigns to it the result of expression.
That syntax isn't intuitive, so the shell provides a better equivalent: the built-in command let. The syntax is:
let intvar=expression
It is not necessary (because it's actually redundant) to surround the expression with $(( and )) in a let statement. As with any variable assignment, there must not be any space on either side of the equal sign (=). It is good practice to surround expressions with quotes, since many characters are treated as special by the shell (e.g., *, #, and parentheses); furthermore, you must quote expressions that include whitespace (spaces or TABs). See Table 6.4 for examples.
Table 6.4: Sample Integer Expression Assignments
Assignment Value
let x= $x
1+4 5
'1 + 4' 5
'(2+3) * 5' 25
'2 + 3 * 5' 17
'17 / 3' 5
'17 % 3' 2
'1<<4' 16
'48>>3' 6
'17 & 3' 1
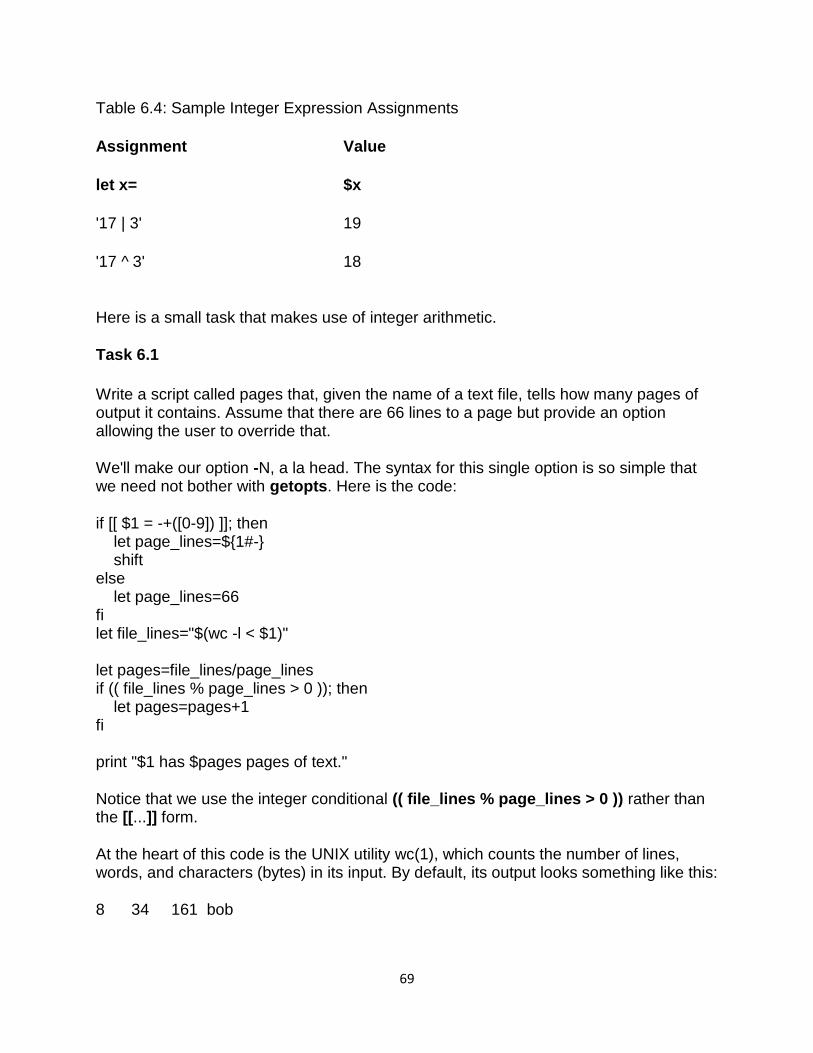
69
Table 6.4: Sample Integer Expression Assignments
Assignment Value
let x= $x
'17 | 3' 19
'17 ^ 3' 18
Here is a small task that makes use of integer arithmetic.
Task 6.1
Write a script called pages that, given the name of a text file, tells how many pages of output it contains. Assume that there are 66 lines to a page but provide an option allowing the user to override that.
We'll make our option -N, a la head. The syntax for this single option is so simple that we need not bother with getopts. Here is the code:
if [[ $1 = -+([0-9]) ]]; then let page_lines=${1#-} shift else let page_lines=66 fi let file_lines="$(wc -l < $1)" let pages=file_lines/page_lines if (( file_lines % page_lines > 0 )); then let pages=pages+1 fi print "$1 has $pages pages of text."
Notice that we use the integer conditional (( file_lines % page_lines > 0 )) rather than the [[...]] form.
At the heart of this code is the UNIX utility wc(1), which counts the number of lines, words, and characters (bytes) in its input. By default, its output looks something like this:
8 34 161 bob

70
wc's output means that the file bob has 8 lines, 34 words, and 161 characters. wc recognizes the options -l, -w, and -c, which tell it to print only the number of lines, words, or characters, respectively.
wc normally prints the name of its input file (given as argument). Since we want only the number of lines, we have to do two things. First, we give it input from file redirection instead, as in wc -l < bob instead of wc -l bob. This produces the number of lines preceded by a single space (which would normally separate the filename from the number).
Unfortunately, that space complicates matters: the statement let file_lines=$(wc -l < $1) becomes "let file_lines= N" after command substitution; the space after the equal sign is an error. That leads to the second modification, the quotes around the command substitution expression. The statement let file_lines=" N" is perfectly legal, and let knows how to remove the leading space.
The first if clause in the pages script checks for an option and, if it was given, strips the dash (-) off and assigns it to the variable page_lines. wc in the command substitution expression returns the number of lines in the file whose name is given as argument.
The next group of lines calculates the number of pages and, if there is a remainder after the division, adds 1. Finally, the appropriate message is printed.
As a bigger example of integer arithmetic, we will complete our emulation of the C shell's pushd and popd functions (Task 4-8). Remember that these functions operate on DIRSTACK, a stack of directories represented as a string with the directory names separated by spaces. The C shell's pushd and popd take additional types of arguments, which are:
pushd +n takes the nth directory in the stack (starting with 0), rotates it to the top, and cds to it.
pushd without arguments, instead of complaining, swaps the two top directories on the stack and cds to the new top.
popd +n takes the nth directory in the stack and just deletes it.
The most useful of these features is the ability to get at the nth directory in the stack. Here are the latest versions of both functions:
function pushd { # push current directory onto stack dirname=$1 if [[ -d $dirname && -x $dirname ]]; then cd $dirname DIRSTACK="$dirname ${DIRSTACK:-$PWD}" print "$DIRSTACK" else print "still in $PWD."
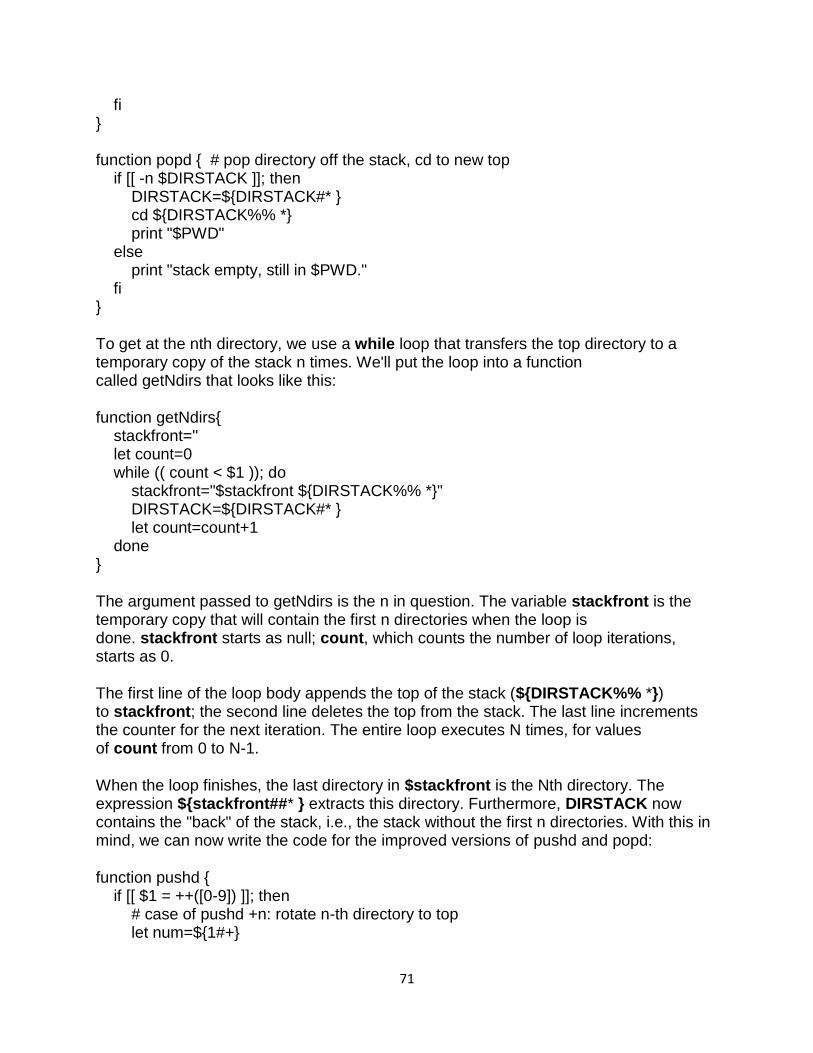
71
fi } function popd { # pop directory off the stack, cd to new top if [[ -n $DIRSTACK ]]; then DIRSTACK=${DIRSTACK#* } cd ${DIRSTACK%% *} print "$PWD" else print "stack empty, still in $PWD." fi }
To get at the nth directory, we use a while loop that transfers the top directory to a temporary copy of the stack n times. We'll put the loop into a function called getNdirs that looks like this:
function getNdirs{ stackfront='' let count=0 while (( count < $1 )); do stackfront="$stackfront ${DIRSTACK%% *}" DIRSTACK=${DIRSTACK#* } let count=count+1 done }
The argument passed to getNdirs is the n in question. The variable stackfront is the temporary copy that will contain the first n directories when the loop is done. stackfront starts as null; count, which counts the number of loop iterations, starts as 0.
The first line of the loop body appends the top of the stack (${DIRSTACK%% *}) to stackfront; the second line deletes the top from the stack. The last line increments the counter for the next iteration. The entire loop executes N times, for values of count from 0 to N-1.
When the loop finishes, the last directory in $stackfront is the Nth directory. The expression ${stackfront##* } extracts this directory. Furthermore, DIRSTACK now contains the "back" of the stack, i.e., the stack without the first n directories. With this in mind, we can now write the code for the improved versions of pushd and popd:
function pushd { if [[ $1 = ++([0-9]) ]]; then # case of pushd +n: rotate n-th directory to top let num=${1#+}
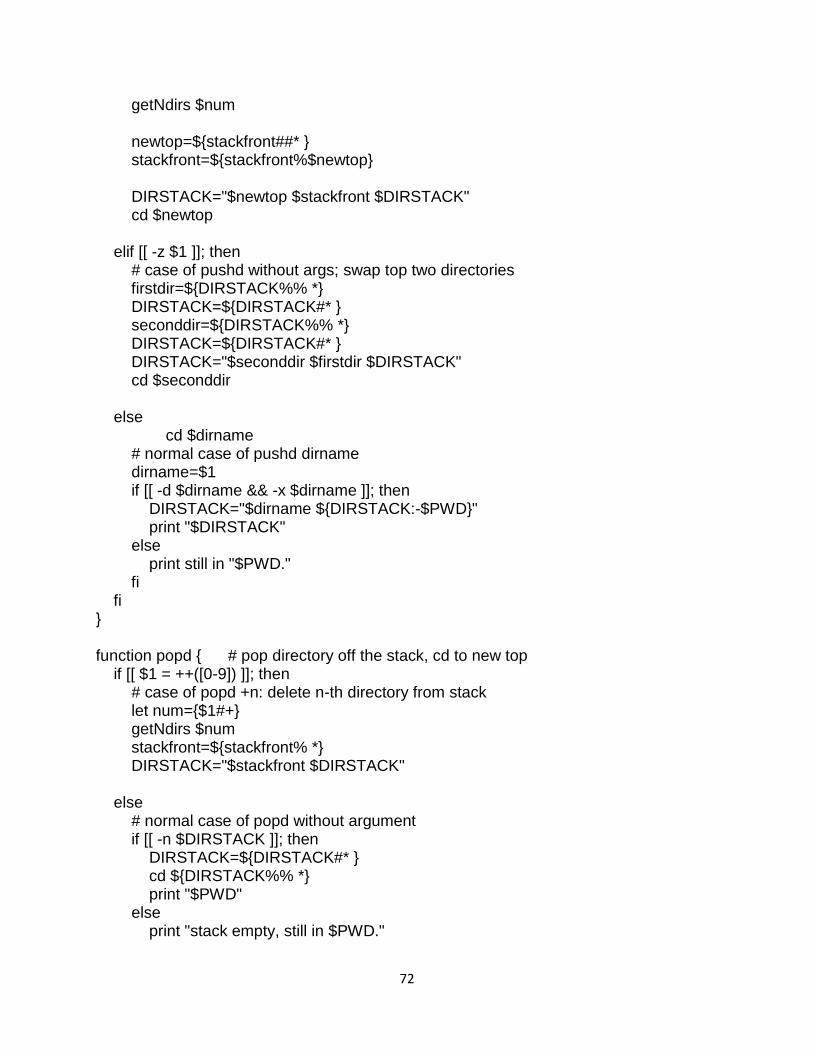
72
getNdirs $num newtop=${stackfront##* } stackfront=${stackfront%$newtop} DIRSTACK="$newtop $stackfront $DIRSTACK" cd $newtop elif [[ -z $1 ]]; then # case of pushd without args; swap top two directories firstdir=${DIRSTACK%% *} DIRSTACK=${DIRSTACK#* } seconddir=${DIRSTACK%% *} DIRSTACK=${DIRSTACK#* } DIRSTACK="$seconddir $firstdir $DIRSTACK" cd $seconddir else cd $dirname # normal case of pushd dirname dirname=$1 if [[ -d $dirname && -x $dirname ]]; then DIRSTACK="$dirname ${DIRSTACK:-$PWD}" print "$DIRSTACK" else print still in "$PWD." fi fi } function popd { # pop directory off the stack, cd to new top if [[ $1 = ++([0-9]) ]]; then # case of popd +n: delete n-th directory from stack let num={$1#+} getNdirs $num stackfront=${stackfront% *} DIRSTACK="$stackfront $DIRSTACK" else # normal case of popd without argument if [[ -n $DIRSTACK ]]; then DIRSTACK=${DIRSTACK#* } cd ${DIRSTACK%% *} print "$PWD" else print "stack empty, still in $PWD."
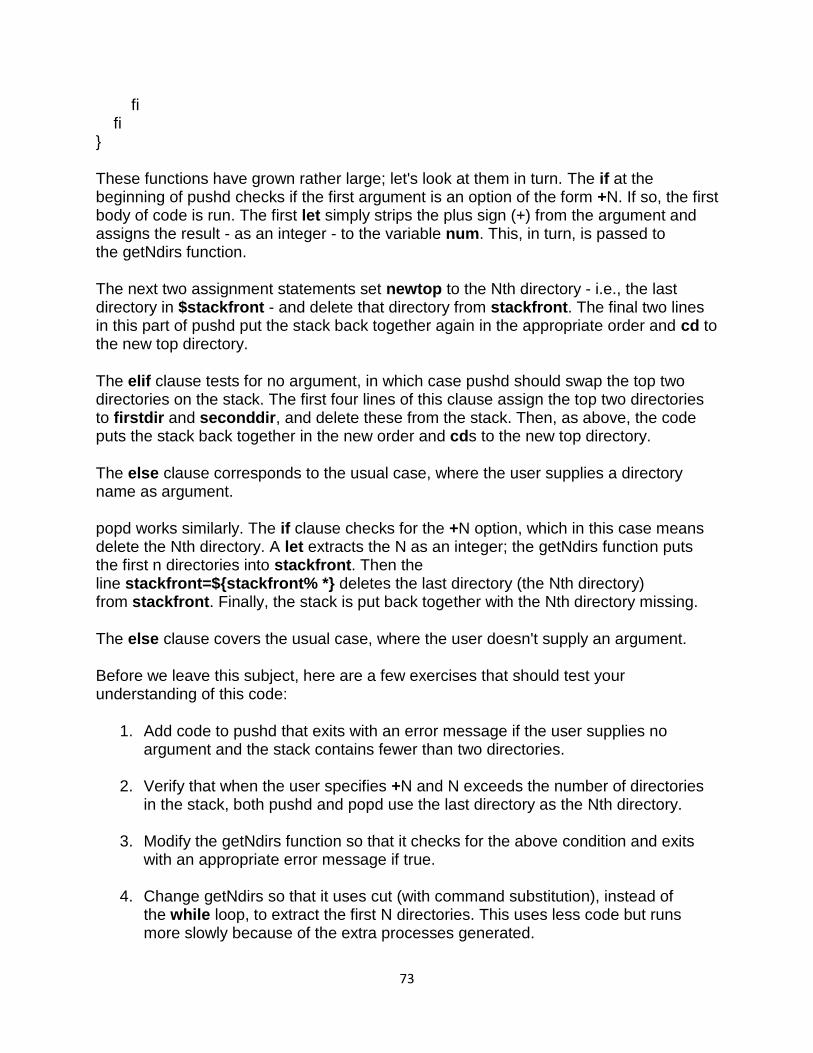
73
fi fi }
These functions have grown rather large; let's look at them in turn. The if at the beginning of pushd checks if the first argument is an option of the form +N. If so, the first body of code is run. The first let simply strips the plus sign (+) from the argument and assigns the result - as an integer - to the variable num. This, in turn, is passed to the getNdirs function.
The next two assignment statements set newtop to the Nth directory - i.e., the last directory in $stackfront - and delete that directory from stackfront. The final two lines in this part of pushd put the stack back together again in the appropriate order and cd to the new top directory.
The elif clause tests for no argument, in which case pushd should swap the top two directories on the stack. The first four lines of this clause assign the top two directories to firstdir and seconddir, and delete these from the stack. Then, as above, the code puts the stack back together in the new order and cds to the new top directory.
The else clause corresponds to the usual case, where the user supplies a directory name as argument.
popd works similarly. The if clause checks for the +N option, which in this case means delete the Nth directory. A let extracts the N as an integer; the getNdirs function puts the first n directories into stackfront. Then the line stackfront=${stackfront% *} deletes the last directory (the Nth directory) from stackfront. Finally, the stack is put back together with the Nth directory missing.
The else clause covers the usual case, where the user doesn't supply an argument.
Before we leave this subject, here are a few exercises that should test your understanding of this code:
1. Add code to pushd that exits with an error message if the user supplies no argument and the stack contains fewer than two directories.
2. Verify that when the user specifies +N and N exceeds the number of directories in the stack, both pushd and popd use the last directory as the Nth directory.
3. Modify the getNdirs function so that it checks for the above condition and exits with an appropriate error message if true.
4. Change getNdirs so that it uses cut (with command substitution), instead of the while loop, to extract the first N directories. This uses less code but runs more slowly because of the extra processes generated.

74
Special command line characters
What makes a character special? If it has a meaning beyond its literal meaning, a meta-meaning, then we refer to it as a special character. Along with commands and keywords, special characters are building blocks of Bash scripts.
Special Characters Found In Scripts and Elsewhere
#
Comments. Lines beginning with a # (with the exception of #!) are comments and will not be executed.
# This line is a comment.
Comments may also occur following the end of a command.
echo "A comment will follow." # Comment here. # ^ Note whitespace before #
Comments may also follow whitespace at the beginning of a line.
# A tab precedes this comment.
Comments may even be embedded within a pipe.
initial=( `cat "$startfile" | sed -e '/#/d' | tr -d '\n' |\ # Delete lines containing '#' comment character. sed -e 's/\./\. /g' -e 's/_/_ /g'` ) # Excerpted from life.sh script
A command may not follow a comment on the same line. There is no method of terminating the comment, in order for "live code" to begin on the same line. Use a new line for the next command.
Of course, a quoted or an escaped # in an echo statement does not begin a comment. Likewise, a # appears in certain parameter-substitution constructs and in numerical constant expressions.
echo "The # here does not begin a comment." echo 'The # here does not begin a comment.' echo The \# here does not begin a comment. echo The # here begins a comment.
75
echo ${PATH#*:} # Parameter substitution, not a comment. echo $(( 2#101011 )) # Base conversion, not a comment. # Thanks, S.C.
The standard quoting and escape characters (" ' \) escape the #.
Certain pattern matching operations also use the #.
;
Command separator [semicolon]. Permits putting two or more commands on the same line.
echo hello; echo there if [ -x "$filename" ]; then # Note the space after the semicolon. #+ ^^ echo "File $filename exists."; cp $filename $filename.bak else # ^^ echo "File $filename not found."; touch $filename fi; echo "File test complete."
Note that the ";" sometimes needs to be escaped.
;;
Terminator in a case option [double semicolon].
case "$variable" in abc) echo "\$variable = abc" ;; xyz) echo "\$variable = xyz" ;; esac
;;&, ;&
Terminators in a case option (version 4+ of Bash).
.
"dot" command [period]. Equivalent to source (see Example 15-22). This is a bash builtin.
.
76
"dot", as a component of a filename. When working with filenames, a leading dot is the prefix of a "hidden" file, a file that an ls will not normally show.
bash$ touch .hidden-file bash$ ls -l total 10 -rw-r--r-- 1 bozo 4034 Jul 18 22:04 data1.addressbook -rw-r--r-- 1 bozo 4602 May 25 13:58 data1.addressbook.bak -rw-r--r-- 1 bozo 877 Dec 17 2000 employment.addressbook bash$ ls -al total 14 drwxrwxr-x 2 bozo bozo 1024 Aug 29 20:54 ./ drwx------ 52 bozo bozo 3072 Aug 29 20:51 ../ -rw-r--r-- 1 bozo bozo 4034 Jul 18 22:04 data1.addressbook -rw-r--r-- 1 bozo bozo 4602 May 25 13:58 data1.addressbook.bak -rw-r--r-- 1 bozo bozo 877 Dec 17 2000 employment.addressbook -rw-rw-r-- 1 bozo bozo 0 Aug 29 20:54 .hidden-file
When considering directory names, a single dot represents the current working directory, and two dots denote the parent directory.
bash$ pwd /home/bozo/projects bash$ cd . bash$ pwd /home/bozo/projects bash$ cd .. bash$ pwd /home/bozo/
The dot often appears as the destination (directory) of a file movement command, in this context meaning current directory.
bash$ cp /home/bozo/current_work/junk/* .
Copy all the "junk" files to $PWD.
.
77
"dot" character match. When matching characters, as part of a regular expression, a "dot" matches a single character.
"
partial quoting [double quote]. "STRING" preserves (from interpretation) most of the special characters within STRING. See Chapter 5.
'
full quoting [single quote]. 'STRING' preserves all special characters within STRING. This is a stronger form of quoting than "STRING". See Chapter 5.
,
comma operator. The comma operator [1] links together a series of arithmetic operations. All are evaluated, but only the last one is returned.
let "t2 = ((a = 9, 15 / 3))" # Set "a = 9" and "t2 = 15 / 3"
The comma operator can also concatenate strings.
for file in /{,usr/}bin/*calc # ^ Find all executable files ending in "calc" #+ in /bin and /usr/bin directories. do if [ -x "$file" ] then echo $file fi done # /bin/ipcalc # /usr/bin/kcalc # /usr/bin/oidcalc # /usr/bin/oocalc # Thank you, Rory Winston, for pointing this out.
,, ,
Lowercase conversion in parameter substitution (added in version 4 of Bash).
78
\
escape [backslash]. A quoting mechanism for single characters.
\X escapes the character X. This has the effect of "quoting" X, equivalent to 'X'. The \ may be used to quote " and ', so they are expressed literally.
See Chapter 5 for an in-depth explanation of escaped characters.
/
Filename path separator [forward slash]. Separates the components of a filename (as in /home/bozo/projects/Makefile).
This is also the division arithmetic operator.
`
command substitution. The `command` construct makes available the output of command for assignment to a variable. This is also known as backquotes or backticks.
:
null command [colon]. This is the shell equivalent of a "NOP" (no op, a do-nothing operation). It may be considered a synonym for the shell builtin true. The ":" command is itself a Bash builtin, and its exit status is true (0).
: echo $? # 0
Endless loop:
while : do operation-1 operation-2 ... operation-n done # Same as: # while true # do # ... # done
79
Placeholder in if/then test:
if condition then : # Do nothing and branch ahead else # Or else ... take-some-action fi
Provide a placeholder where a binary operation is expected, see Example 8-2 and default parameters.
: ${username=`whoami`} # ${username=`whoami`} Gives an error without the leading : # unless "username" is a command or builtin... : ${1?"Usage: $0 ARGUMENT"} # From "usage-message.sh example script.
Provide a placeholder where a command is expected in a here document. See Example 19-10.
Evaluate string of variables using parameter substitution (as in Example 10-7).
: ${HOSTNAME?} ${USER?} ${MAIL?} # Prints error message #+ if one or more of essential environmental variables not set.
Variable expansion / substring replacement.
In combination with the > redirection operator, truncates a file to zero length, without changing its permissions. If the file did not previously exist, creates it.
: > data.xxx # File "data.xxx" now empty. # Same effect as cat /dev/null >data.xxx # However, this does not fork a new process, since ":" is a builtin.
See also Example 16-15.
In combination with the >> redirection operator, has no effect on a pre-existing target file (: >> target_file). If the file did not previously exist, creates it.
This applies to regular files, not pipes, symlinks, and certain special files.
80
May be used to begin a comment line, although this is not recommended. Using # for a comment turns off error checking for the remainder of that line, so almost anything may appear in a comment. However, this is not the case with :.
: This is a comment that generates an error, ( if [ $x -eq 3] ).
The ":" serves as a field separator, in /etc/passwd, and in the $PATH variable.
bash$ echo $PATH /usr/local/bin:/bin:/usr/bin:/usr/X11R6/bin:/sbin:/usr/sbin:/usr/games
A colon is acceptable as a function name.
:() { echo "The name of this function is "$FUNCNAME" " # Why use a colon as a function name? # It's a way of obfuscating your code. } : # The name of this function is :
This is not portable behavior, and therefore not a recommended practice. In fact, more recent releases of Bash do not permit this usage. An underscore _ works, though.
A colon can serve as a placeholder in an otherwise empty function.
not_empty () { : } # Contains a : (null command), and so is not empty.
!
reverse (or negate) the sense of a test or exit status [bang]. The ! operator inverts the exit status of the command to which it is applied (see Example 6-2). It also inverts the meaning of a test operator. This can, for example, change the sense of equal ( = ) to not-equal ( != ). The ! operator is a Bash keyword.
In a different context, the ! also appears in indirect variable references.
81
In yet another context, from the command line, the ! invokes the Bash history mechanism (see Appendix L). Note that within a script, the history mechanism is disabled.
*
wild card [asterisk]. The * character serves as a "wild card" for filename expansion in globbing. By itself, it matches every filename in a given directory.
bash$ echo * abs-book.sgml add-drive.sh agram.sh alias.sh
The * also represents any number (or zero) characters in a regular expression.
*
arithmetic operator. In the context of arithmetic operations, the * denotes multiplication.
** A double asterisk can represent the exponentiation operator or extended file-match globbing.
?
test operator. Within certain expressions, the ? indicates a test for a condition.
In a double-parentheses construct, the ? can serve as an element of a C-style trinary operator. [2]
condition?result-if-true:result-if-false
(( var0 = var1<98?9:21 )) # ^ ^ # if [ "$var1" -lt 98 ] # then # var0=9 # else # var0=21 # fi
In a parameter substitution expression, the ? tests whether a variable has been set.
82
?
wild card. The ? character serves as a single-character "wild card" for filename expansion in globbing, as well as representing one character in an extended regular expression.
$
Variable substitution (contents of a variable).
var1=5 var2=23skidoo echo $var1 # 5 echo $var2 # 23skidoo
A $ prefixing a variable name indicates the value the variable holds.
$
end-of-line. In a regular expression, a "$" addresses the end of a line of text.
${}
Parameter substitution.
$' ... '
Quoted string expansion. This construct expands single or multiple escaped octal or hex values into ASCII [3] or Unicode characters.
$*, $@
positional parameters.
$?
exit status variable. The $? variable holds the exit status of a command, a function, or of the script itself.
$$
process ID variable. The $$ variable holds the process ID [4] of the script in which it appears.
()
83
command group.
(a=hello; echo $a)
A listing of commands within parentheses starts a subshell.
Variables inside parentheses, within the subshell, are not visible to the rest of the script. The parent process, the script, cannot read variables created in the child process, the subshell.
a=123 ( a=321; ) echo "a = $a" # a = 123 # "a" within parentheses acts like a local variable.
array initialization.
Array=(element1 element2 element3)
{xxx,yyy,zzz,...}
Brace expansion.
echo \"{These,words,are,quoted}\" # " prefix and suffix # "These" "words" "are" "quoted" cat {file1,file2,file3} > combined_file # Concatenates the files file1, file2, and file3 into combined_file. cp file22.{txt,backup} # Copies "file22.txt" to "file22.backup"
A command may act upon a comma-separated list of file specs within braces. [5] Filename expansion (globbing) applies to the file specs between the braces.
No spaces allowed within the braces unless the spaces are quoted or escaped.
echo {file1,file2}\ :{\ A," B",' C'}
file1 : A file1 : B file1 : C file2 : A file2 : B file2 : C
{a..z}
84
Extended Brace expansion.
echo {a..z} # a b c d e f g h i j k l m n o p q r s t u v w x y z # Echoes characters between a and z. echo {0..3} # 0 1 2 3 # Echoes characters between 0 and 3. base64_charset=( {A..Z} {a..z} {0..9} + / = ) # Initializing an array, using extended brace expansion. # From vladz's "base64.sh" example script.
The {a..z} extended brace expansion construction is a feature introduced in version 3 of Bash.
{}
Block of code [curly brackets]. Also referred to as an inline group, this construct, in effect, creates an anonymous function (a function without a name). However, unlike in a "standard" function, the variables inside a code block remain visible to the remainder of the script.
bash$ { local a; a=123; } bash: local: can only be used in a function
a=123 { a=321; } echo "a = $a" # a = 321 (value inside code block) # Thanks, S.C.
The code block enclosed in braces may have I/O redirected to and from it.
Example 3-1. Code blocks and I/O redirection
#!/bin/bash # Reading lines in /etc/fstab. File=/etc/fstab { read line1

85
read line2 } < $File echo "First line in $File is:" echo "$line1" echo echo "Second line in $File is:" echo "$line2" exit 0 # Now, how do you parse the separate fields of each line? # Hint: use awk, or . . . # . . . Hans-Joerg Diers suggests using the "set" Bash builtin.
Example 3-2. Saving the output of a code block to a file
#!/bin/bash # rpm-check.sh # Queries an rpm file for description, listing, #+ and whether it can be installed. # Saves output to a file. # # This script illustrates using a code block. SUCCESS=0 E_NOARGS=65 if [ -z "$1" ] then echo "Usage: `basename $0` rpm-file" exit $E_NOARGS fi { # Begin code block. echo echo "Archive Description:" rpm -qpi $1 # Query description. echo echo "Archive Listing:" rpm -qpl $1 # Query listing. echo rpm -i --test $1 # Query whether rpm file can be installed. if [ "$?" -eq $SUCCESS ] then
86
echo "$1 can be installed." else echo "$1 cannot be installed." fi echo # End code block. } > "$1.test" # Redirects output of everything in block to file. echo "Results of rpm test in file $1.test" # See rpm man page for explanation of options. exit 0
Unlike a command group within (parentheses), as above, a code block enclosed by {braces} will not normally launch a subshell. [6]
It is possible to iterate a code block using a non-standard for-loop.
{}
placeholder for text. Used after xargs -i (replace strings option). The {} double curly brackets are a placeholder for output text.
ls . | xargs -i -t cp ./{} $1 # ^^ ^^ # From "ex42.sh" (copydir.sh) example.
{} \;
pathname. Mostly used in find constructs. This is not a shell builtin.
Definition: A pathname is a filename that includes the complete path. As an example, /home/bozo/Notes/Thursday/schedule.txt. This is sometimes referred to as the absolute path.
The ";" ends the -exec option of a find command sequence. It needs to be escaped to protect it from interpretation by the shell.
[ ]
test.
Test expression between [ ]. Note that [ is part of the shell builtin test (and a synonym for it), not a link to the external command /usr/bin/test.
[[ ]]
test.
87
Test expression between [[ ]]. More flexible than the single-bracket [ ] test, this is a shell keyword.
See the discussion on the [[ ... ]] construct.
[ ]
array element.
In the context of an array, brackets set off the numbering of each element of that array.
Array[1]=slot_1 echo ${Array[1]}
[ ]
range of characters.
As part of a regular expression, brackets delineate a range of characters to match.
$[ ... ]
integer expansion.
Evaluate integer expression between $[ ].
a=3 b=7 echo $[$a+$b] # 10 echo $[$a*$b] # 21
Note that this usage is deprecated, and has been replaced by the (( ... )) construct.
(( ))
integer expansion.
Expand and evaluate integer expression between (( )).
See the discussion on the (( ... )) construct.
> &> >& >> < <>
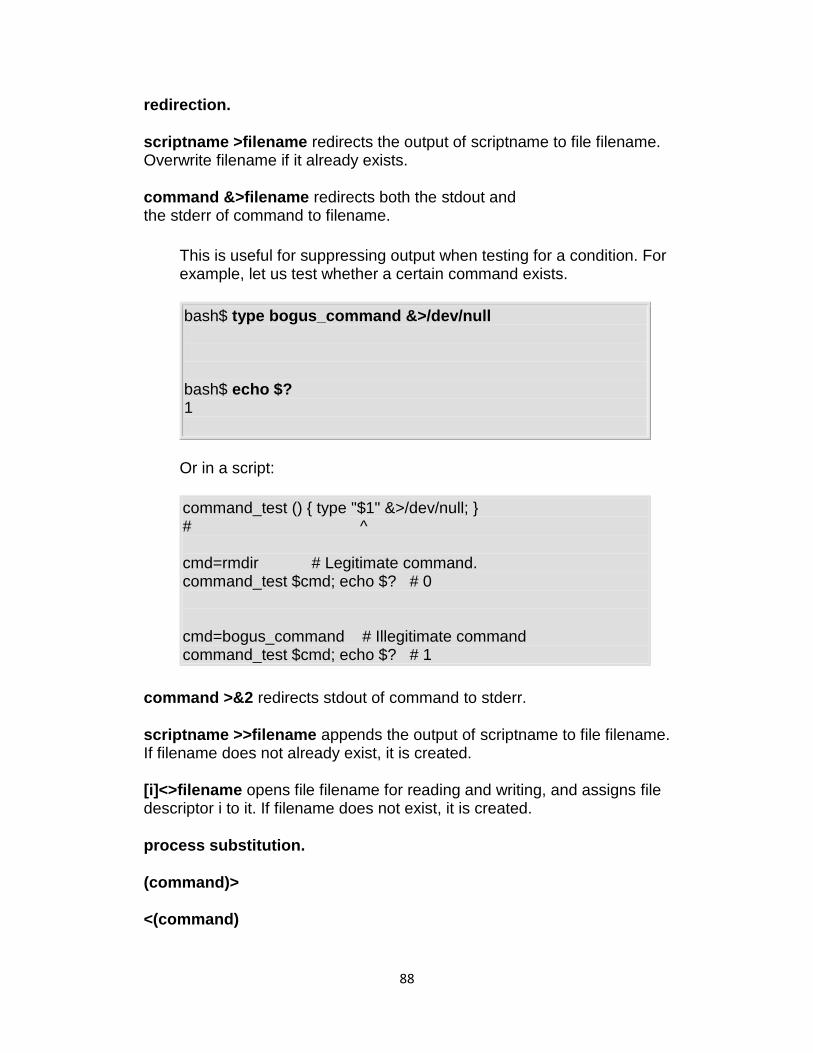
88
redirection.
scriptname >filename redirects the output of scriptname to file filename. Overwrite filename if it already exists.
command &>filename redirects both the stdout and the stderr of command to filename.
This is useful for suppressing output when testing for a condition. For example, let us test whether a certain command exists.
bash$ type bogus_command &>/dev/null bash$ echo $? 1
Or in a script:
command_test () { type "$1" &>/dev/null; } # ^ cmd=rmdir # Legitimate command. command_test $cmd; echo $? # 0 cmd=bogus_command # Illegitimate command command_test $cmd; echo $? # 1
command >&2 redirects stdout of command to stderr.
scriptname >>filename appends the output of scriptname to file filename. If filename does not already exist, it is created.
[i]<>filename opens file filename for reading and writing, and assigns file descriptor i to it. If filename does not exist, it is created.
process substitution.
(command)>
<(command)
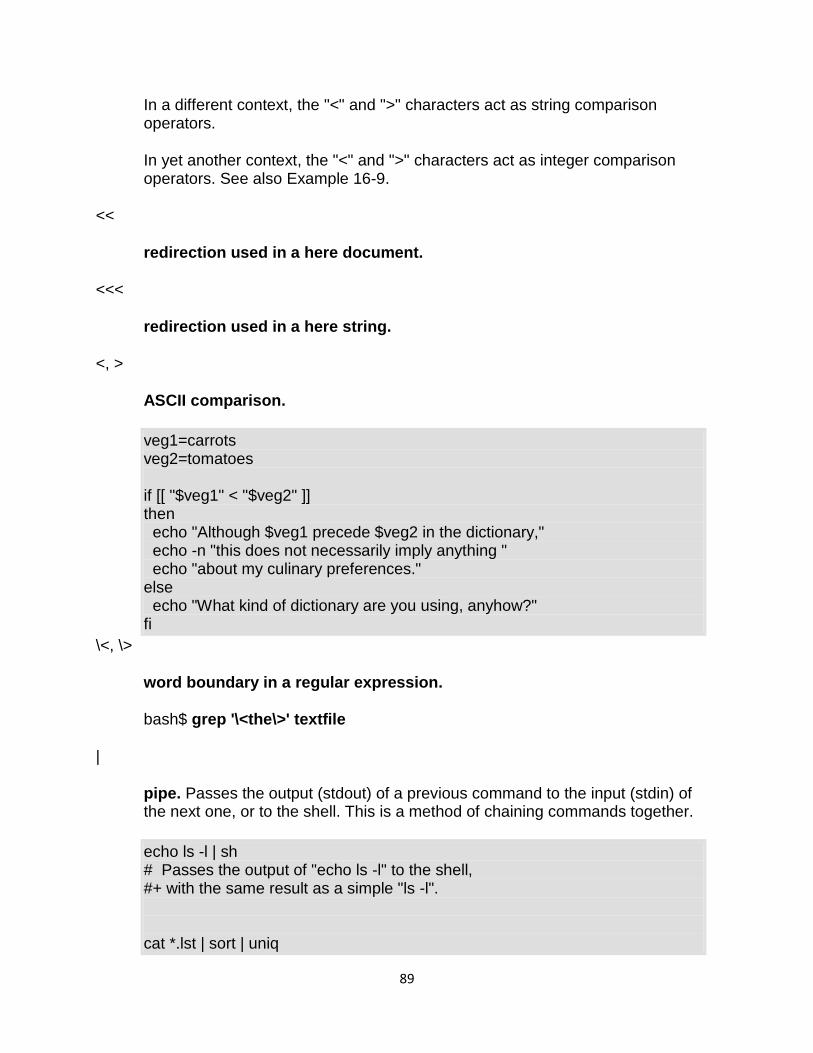
89
In a different context, the "<" and ">" characters act as string comparison operators.
In yet another context, the "<" and ">" characters act as integer comparison operators. See also Example 16-9.
<<
redirection used in a here document.
<<<
redirection used in a here string.
<, >
ASCII comparison.
veg1=carrots veg2=tomatoes if [[ "$veg1" < "$veg2" ]] then echo "Although $veg1 precede $veg2 in the dictionary," echo -n "this does not necessarily imply anything " echo "about my culinary preferences." else echo "What kind of dictionary are you using, anyhow?" fi
\<, \>
word boundary in a regular expression.
bash$ grep '\<the\>' textfile
|
pipe. Passes the output (stdout) of a previous command to the input (stdin) of the next one, or to the shell. This is a method of chaining commands together.
echo ls -l | sh # Passes the output of "echo ls -l" to the shell, #+ with the same result as a simple "ls -l". cat *.lst | sort | uniq
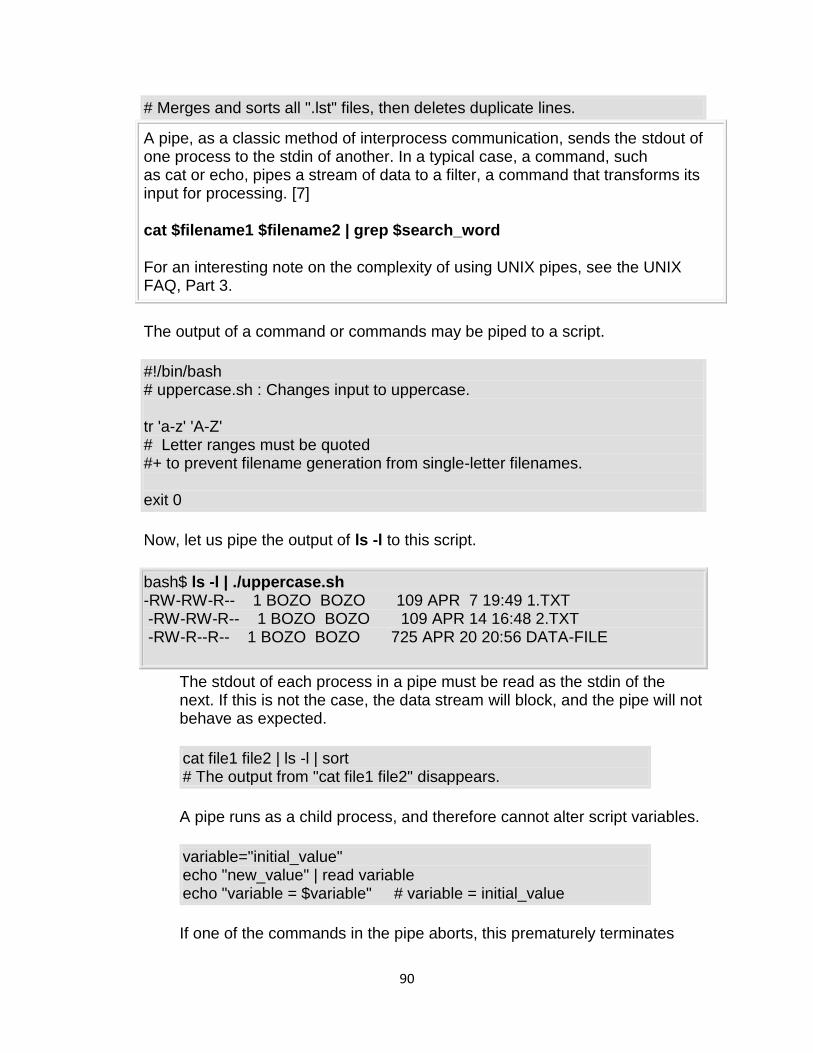
90
# Merges and sorts all ".lst" files, then deletes duplicate lines.
A pipe, as a classic method of interprocess communication, sends the stdout of one process to the stdin of another. In a typical case, a command, such as cat or echo, pipes a stream of data to a filter, a command that transforms its input for processing. [7]
cat $filename1 $filename2 | grep $search_word
For an interesting note on the complexity of using UNIX pipes, see the UNIX FAQ, Part 3.
The output of a command or commands may be piped to a script.
#!/bin/bash # uppercase.sh : Changes input to uppercase. tr 'a-z' 'A-Z' # Letter ranges must be quoted #+ to prevent filename generation from single-letter filenames. exit 0
Now, let us pipe the output of ls -l to this script.
bash$ ls -l | ./uppercase.sh -RW-RW-R-- 1 BOZO BOZO 109 APR 7 19:49 1.TXT -RW-RW-R-- 1 BOZO BOZO 109 APR 14 16:48 2.TXT -RW-R--R-- 1 BOZO BOZO 725 APR 20 20:56 DATA-FILE
The stdout of each process in a pipe must be read as the stdin of the next. If this is not the case, the data stream will block, and the pipe will not behave as expected.
cat file1 file2 | ls -l | sort # The output from "cat file1 file2" disappears.
A pipe runs as a child process, and therefore cannot alter script variables.
variable="initial_value" echo "new_value" | read variable echo "variable = $variable" # variable = initial_value
If one of the commands in the pipe aborts, this prematurely terminates
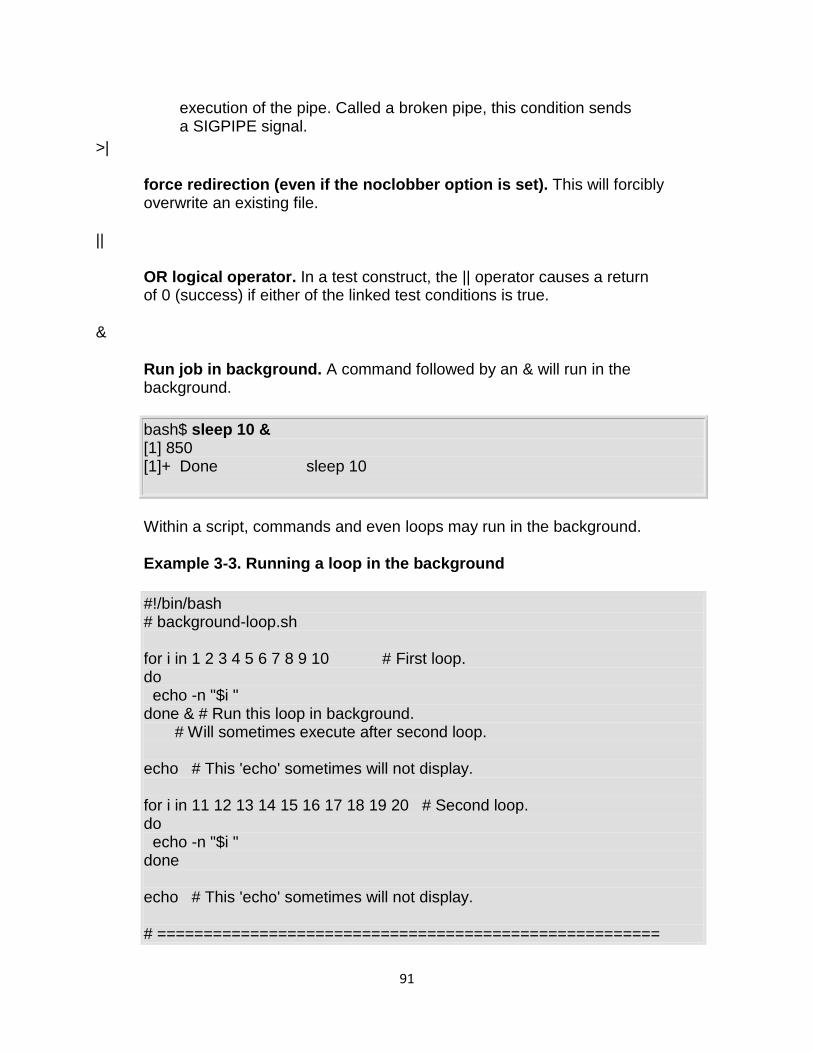
91
execution of the pipe. Called a broken pipe, this condition sends a SIGPIPE signal.
>|
force redirection (even if the noclobber option is set). This will forcibly overwrite an existing file.
||
OR logical operator. In a test construct, the || operator causes a return of 0 (success) if either of the linked test conditions is true.
&
Run job in background. A command followed by an & will run in the background.
bash$ sleep 10 & [1] 850 [1]+ Done sleep 10
Within a script, commands and even loops may run in the background.
Example 3-3. Running a loop in the background
#!/bin/bash # background-loop.sh for i in 1 2 3 4 5 6 7 8 9 10 # First loop. do echo -n "$i " done & # Run this loop in background. # Will sometimes execute after second loop. echo # This 'echo' sometimes will not display. for i in 11 12 13 14 15 16 17 18 19 20 # Second loop. do echo -n "$i " done echo # This 'echo' sometimes will not display. # ======================================================
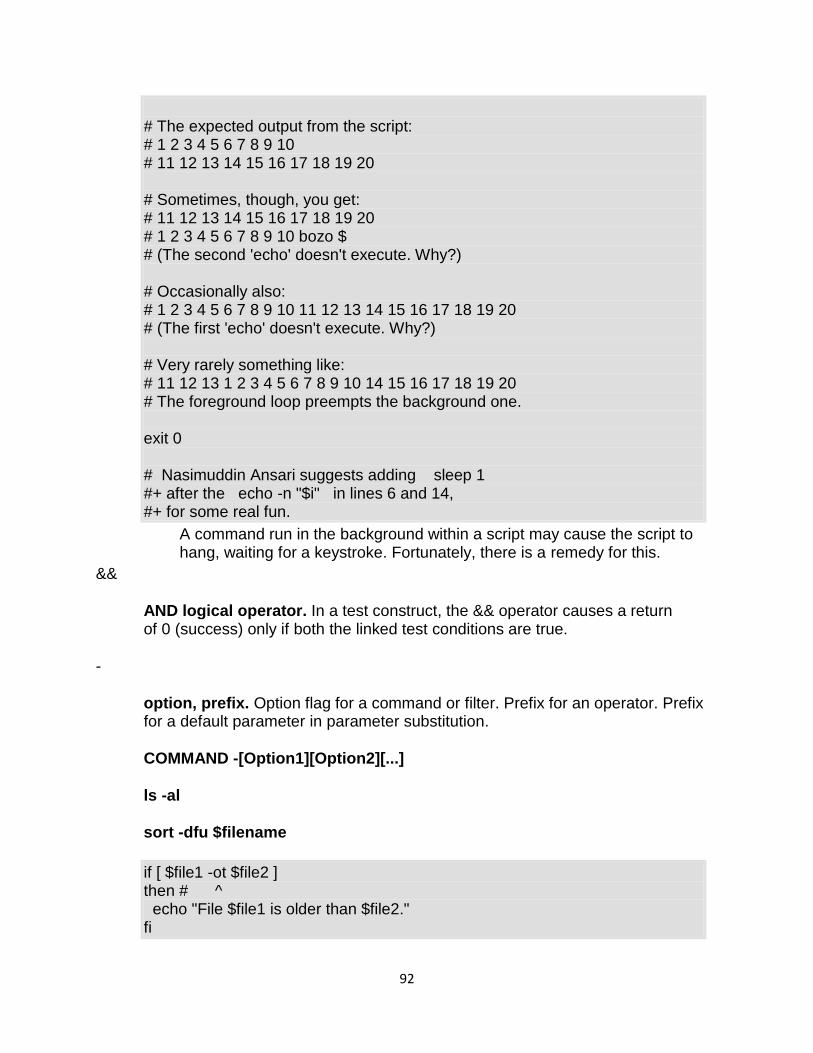
92
# The expected output from the script: # 1 2 3 4 5 6 7 8 9 10 # 11 12 13 14 15 16 17 18 19 20 # Sometimes, though, you get: # 11 12 13 14 15 16 17 18 19 20 # 1 2 3 4 5 6 7 8 9 10 bozo $ # (The second 'echo' doesn't execute. Why?) # Occasionally also: # 1 2 3 4 5 6 7 8 9 10 11 12 13 14 15 16 17 18 19 20 # (The first 'echo' doesn't execute. Why?) # Very rarely something like: # 11 12 13 1 2 3 4 5 6 7 8 9 10 14 15 16 17 18 19 20 # The foreground loop preempts the background one. exit 0 # Nasimuddin Ansari suggests adding sleep 1 #+ after the echo -n "$i" in lines 6 and 14, #+ for some real fun.
A command run in the background within a script may cause the script to hang, waiting for a keystroke. Fortunately, there is a remedy for this.
&&
AND logical operator. In a test construct, the && operator causes a return of 0 (success) only if both the linked test conditions are true.
-
option, prefix. Option flag for a command or filter. Prefix for an operator. Prefix for a default parameter in parameter substitution.
COMMAND -[Option1][Option2][...]
ls -al
sort -dfu $filename
if [ $file1 -ot $file2 ] then # ^ echo "File $file1 is older than $file2." fi
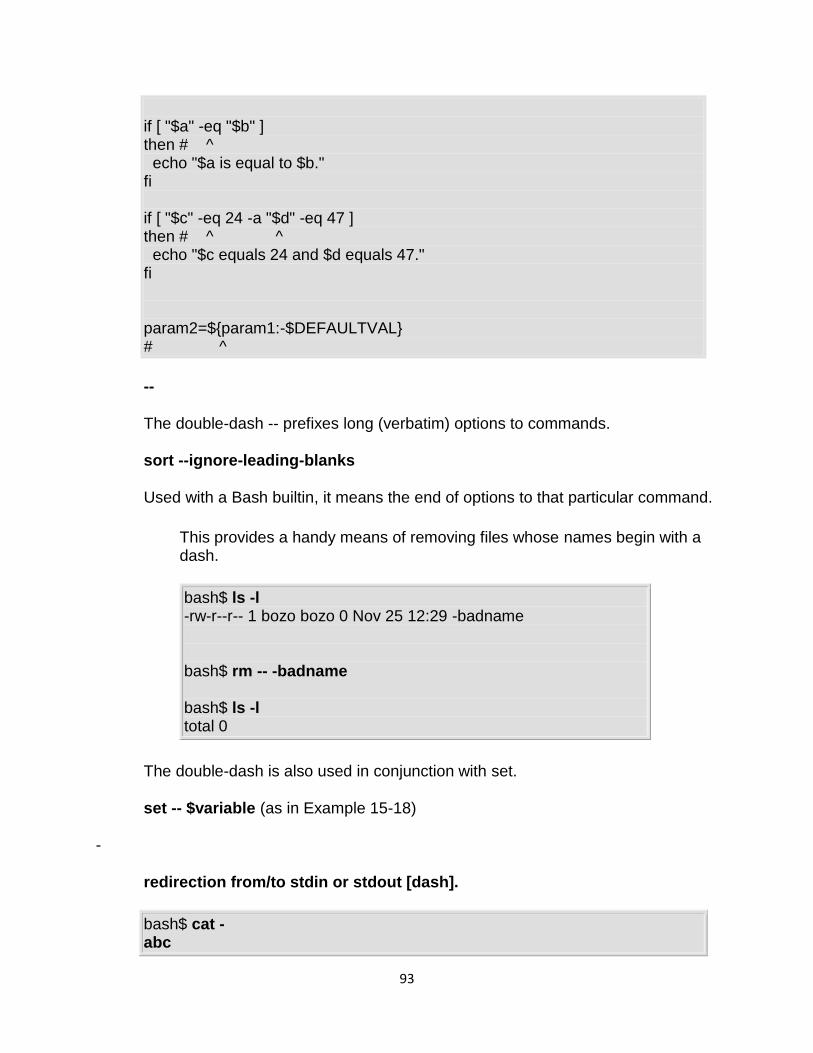
93
if [ "$a" -eq "$b" ] then # ^ echo "$a is equal to $b." fi if [ "$c" -eq 24 -a "$d" -eq 47 ] then # ^ ^ echo "$c equals 24 and $d equals 47." fi param2=${param1:-$DEFAULTVAL} # ^
--
The double-dash -- prefixes long (verbatim) options to commands.
sort --ignore-leading-blanks
Used with a Bash builtin, it means the end of options to that particular command.
This provides a handy means of removing files whose names begin with a dash.
bash$ ls -l -rw-r--r-- 1 bozo bozo 0 Nov 25 12:29 -badname bash$ rm -- -badname bash$ ls -l total 0
The double-dash is also used in conjunction with set.
set -- $variable (as in Example 15-18)
-
redirection from/to stdin or stdout [dash].
bash$ cat - abc
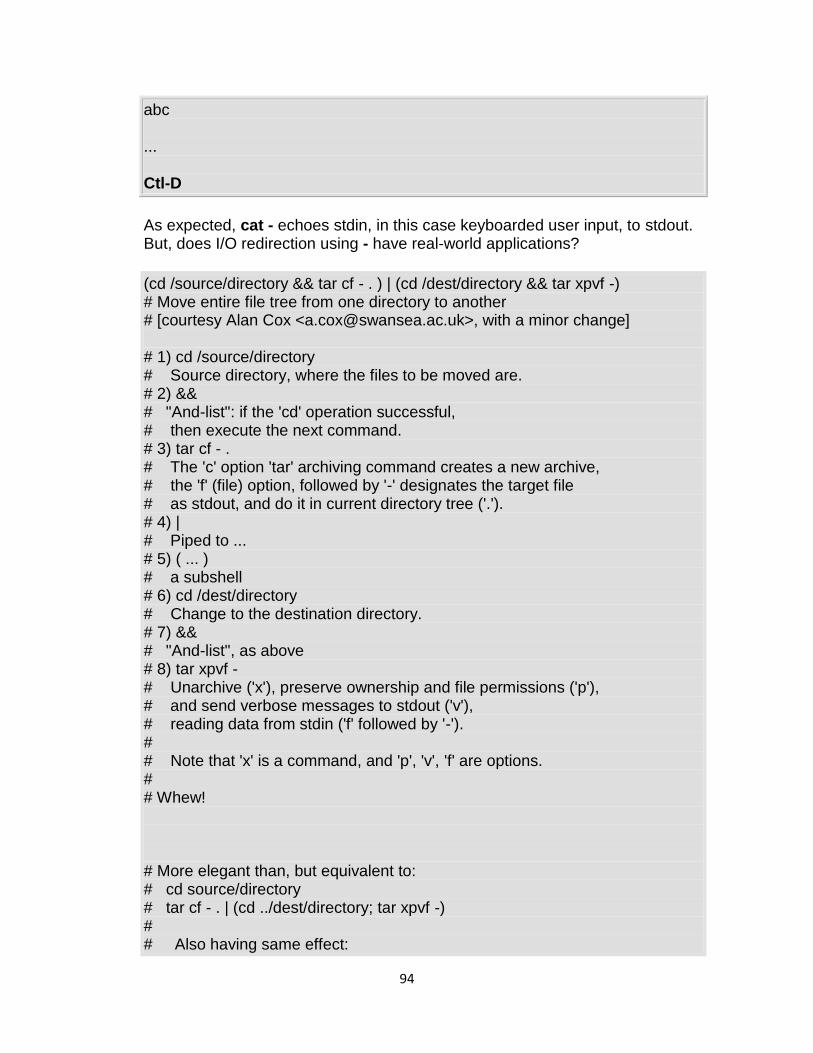
94
abc ... Ctl-D
As expected, cat - echoes stdin, in this case keyboarded user input, to stdout. But, does I/O redirection using - have real-world applications?
(cd /source/directory && tar cf - . ) | (cd /dest/directory && tar xpvf -) # Move entire file tree from one directory to another # [courtesy Alan Cox <[email protected]>, with a minor change] # 1) cd /source/directory # Source directory, where the files to be moved are. # 2) && # "And-list": if the 'cd' operation successful, # then execute the next command. # 3) tar cf - . # The 'c' option 'tar' archiving command creates a new archive, # the 'f' (file) option, followed by '-' designates the target file # as stdout, and do it in current directory tree ('.'). # 4) | # Piped to ... # 5) ( ... ) # a subshell # 6) cd /dest/directory # Change to the destination directory. # 7) && # "And-list", as above # 8) tar xpvf - # Unarchive ('x'), preserve ownership and file permissions ('p'), # and send verbose messages to stdout ('v'), # reading data from stdin ('f' followed by '-'). # # Note that 'x' is a command, and 'p', 'v', 'f' are options. # # Whew! # More elegant than, but equivalent to: # cd source/directory # tar cf - . | (cd ../dest/directory; tar xpvf -) # # Also having same effect:
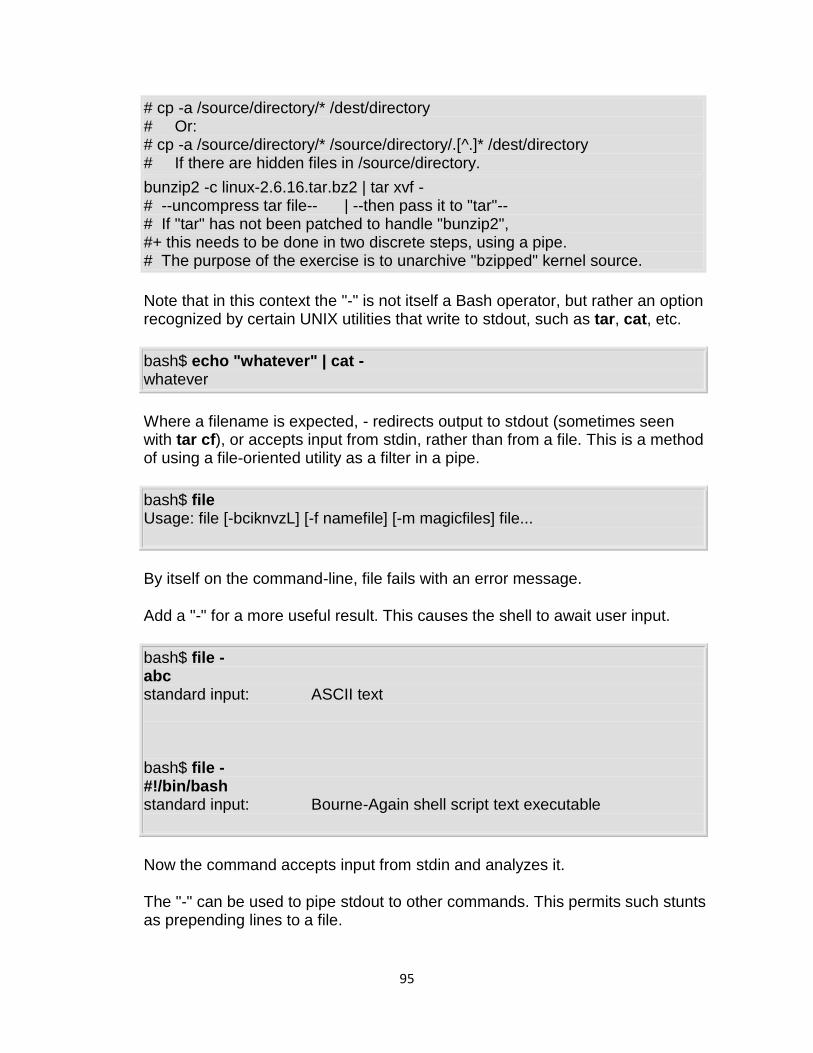
95
# cp -a /source/directory/* /dest/directory # Or: # cp -a /source/directory/* /source/directory/.[^.]* /dest/directory # If there are hidden files in /source/directory.
bunzip2 -c linux-2.6.16.tar.bz2 | tar xvf - # --uncompress tar file-- | --then pass it to "tar"-- # If "tar" has not been patched to handle "bunzip2", #+ this needs to be done in two discrete steps, using a pipe. # The purpose of the exercise is to unarchive "bzipped" kernel source.
Note that in this context the "-" is not itself a Bash operator, but rather an option recognized by certain UNIX utilities that write to stdout, such as tar, cat, etc.
bash$ echo "whatever" | cat - whatever
Where a filename is expected, - redirects output to stdout (sometimes seen with tar cf), or accepts input from stdin, rather than from a file. This is a method of using a file-oriented utility as a filter in a pipe.
bash$ file Usage: file [-bciknvzL] [-f namefile] [-m magicfiles] file...
By itself on the command-line, file fails with an error message.
Add a "-" for a more useful result. This causes the shell to await user input.
bash$ file - abc standard input: ASCII text bash$ file - #!/bin/bash standard input: Bourne-Again shell script text executable
Now the command accepts input from stdin and analyzes it.
The "-" can be used to pipe stdout to other commands. This permits such stunts as prepending lines to a file.
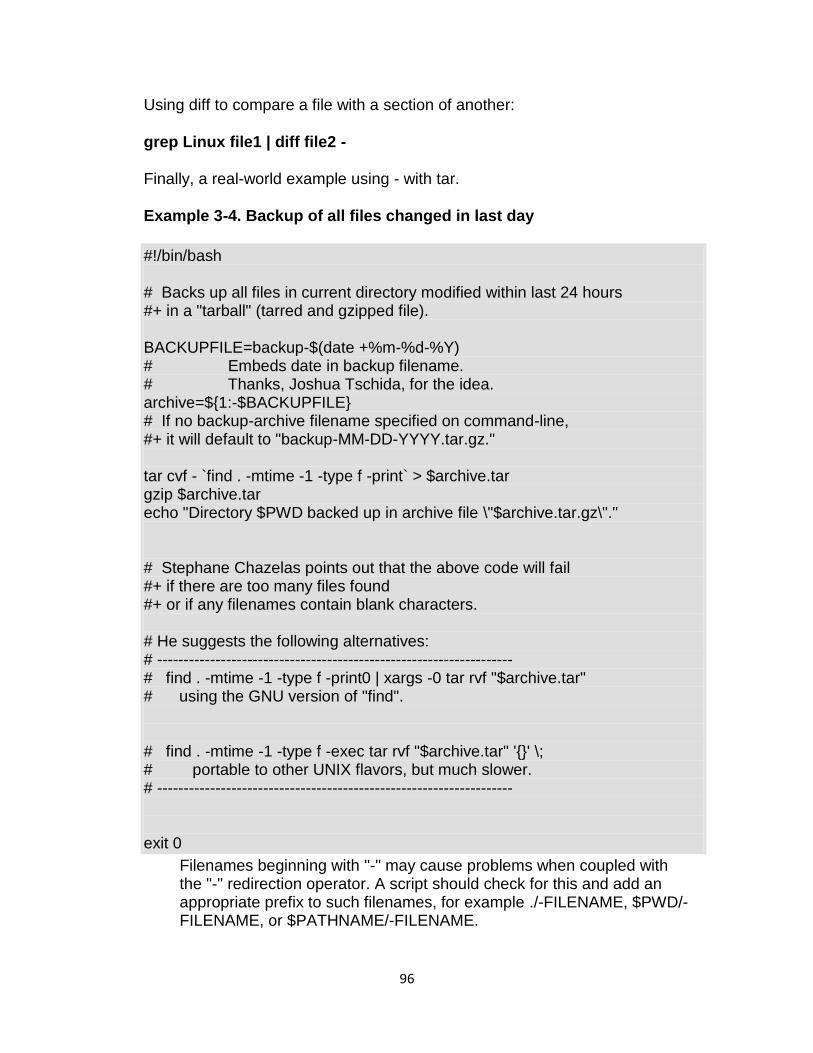
96
Using diff to compare a file with a section of another:
grep Linux file1 | diff file2 -
Finally, a real-world example using - with tar.
Example 3-4. Backup of all files changed in last day
#!/bin/bash # Backs up all files in current directory modified within last 24 hours #+ in a "tarball" (tarred and gzipped file). BACKUPFILE=backup-$(date +%m-%d-%Y) # Embeds date in backup filename. # Thanks, Joshua Tschida, for the idea. archive=${1:-$BACKUPFILE} # If no backup-archive filename specified on command-line, #+ it will default to "backup-MM-DD-YYYY.tar.gz." tar cvf - `find . -mtime -1 -type f -print` > $archive.tar gzip $archive.tar echo "Directory $PWD backed up in archive file \"$archive.tar.gz\"." # Stephane Chazelas points out that the above code will fail #+ if there are too many files found #+ or if any filenames contain blank characters. # He suggests the following alternatives: # ------------------------------------------------------------------- # find . -mtime -1 -type f -print0 | xargs -0 tar rvf "$archive.tar" # using the GNU version of "find". # find . -mtime -1 -type f -exec tar rvf "$archive.tar" '{}' \; # portable to other UNIX flavors, but much slower. # ------------------------------------------------------------------- exit 0
Filenames beginning with "-" may cause problems when coupled with the "-" redirection operator. A script should check for this and add an appropriate prefix to such filenames, for example ./-FILENAME, $PWD/-FILENAME, or $PATHNAME/-FILENAME.
97
If the value of a variable begins with a -, this may likewise create problems.
var="-n" echo $var # Has the effect of "echo -n", and outputs nothing.
-
previous working directory. A cd - command changes to the previous working directory. This uses the $OLDPWD environmental variable.
Do not confuse the "-" used in this sense with the "-" redirection operator just discussed. The interpretation of the "-" depends on the context in which it appears.
-
Minus. Minus sign in an arithmetic operation.
=
Equals. Assignment operator
a=28 echo $a # 28
In a different context, the "=" is a string comparison operator.
+
Plus. Addition arithmetic operator.
In a different context, the + is a Regular Expression operator.
+
Option. Option flag for a command or filter.
Certain commands and builtins use the + to enable certain options and the - to disable them. In parameter substitution, the + prefixes an alternate value that a variable expands to.
%
modulo. Modulo (remainder of a division) arithmetic operation.
98
let "z = 5 % 3" echo $z # 2
In a different context, the % is a pattern matching operator.
~
home directory [tilde]. This corresponds to the $HOME internal variable. ~bozo is bozo's home directory, and ls ~bozo lists the contents of it. ~/ is the current user's home directory, and ls ~/ lists the contents of it.
bash$ echo ~bozo /home/bozo bash$ echo ~ /home/bozo bash$ echo ~/ /home/bozo/ bash$ echo ~: /home/bozo: bash$ echo ~nonexistent-user ~nonexistent-user
~+
current working directory. This corresponds to the $PWD internal variable.
~-
previous working directory. This corresponds to the $OLDPWD internal variable.
=~
regular expression match. This operator was introduced with version 3 of Bash.
^
beginning-of-line. In a regular expression, a "^" addresses the beginning of a line of text.
^, ^^
99
Uppercase conversion in parameter substitution (added in version 4 of Bash).
Control Characters
change the behavior of the terminal or text display. A control character is a CONTROL + key combination (pressed simultaneously). A control character may also be written in octal or hexadecimal notation, following an escape.
Control characters are not normally useful inside a script.
Ctl-A
Moves cursor to beginning of line of text (on the command-line).
Ctl-B
Backspace (nondestructive).
Ctl-C
Break. Terminate a foreground job.
Ctl-D
Log out from a shell (similar to exit).
EOF (end-of-file). This also terminates input from stdin.
When typing text on the console or in an xterm window, Ctl-D erases the character under the cursor. When there are no characters present, Ctl-D logs out of the session, as expected. In an xterm window, this has the effect of closing the window.
Ctl-E
Moves cursor to end of line of text (on the command-line).
Ctl-F
Moves cursor forward one character position (on the command-line).
Ctl-G
BEL. On some old-time teletype terminals, this would actually ring a bell. In an xterm it might beep.
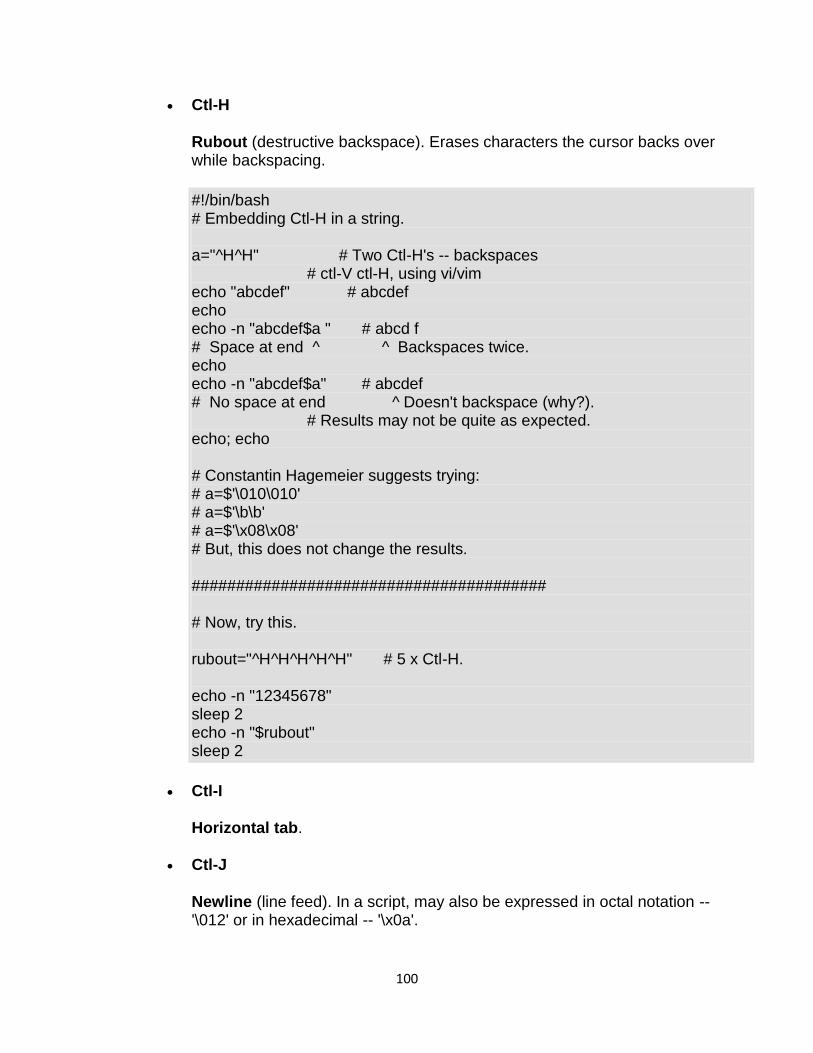
100
Ctl-H
Rubout (destructive backspace). Erases characters the cursor backs over while backspacing.
#!/bin/bash # Embedding Ctl-H in a string. a="^H^H" # Two Ctl-H's -- backspaces # ctl-V ctl-H, using vi/vim echo "abcdef" # abcdef echo echo -n "abcdef$a " # abcd f # Space at end ^ ^ Backspaces twice. echo echo -n "abcdef$a" # abcdef # No space at end ^ Doesn't backspace (why?). # Results may not be quite as expected. echo; echo # Constantin Hagemeier suggests trying: # a=$'\010\010' # a=$'\b\b' # a=$'\x08\x08' # But, this does not change the results. ######################################## # Now, try this. rubout="^H^H^H^H^H" # 5 x Ctl-H. echo -n "12345678" sleep 2 echo -n "$rubout" sleep 2
Ctl-I
Horizontal tab.
Ctl-J
Newline (line feed). In a script, may also be expressed in octal notation -- '\012' or in hexadecimal -- '\x0a'.

101
Ctl-K
Vertical tab.
When typing text on the console or in an xterm window, Ctl-K erases from the character under the cursor to end of line. Within a script, Ctl-K may behave differently, as in Lee Lee Maschmeyer's example, below.
Ctl-L
Formfeed (clear the terminal screen). In a terminal, this has the same effect as the clear command. When sent to a printer, a Ctl-L causes an advance to end of the paper sheet.
Ctl-M
Carriage return.
#!/bin/bash # Thank you, Lee Maschmeyer, for this example. read -n 1 -s -p \ $'Control-M leaves cursor at beginning of this line. Press Enter. \x0d' # Of course, '0d' is the hex equivalent of Control-M. echo >&2 # The '-s' makes anything typed silent, #+ so it is necessary to go to new line explicitly. read -n 1 -s -p $'Control-J leaves cursor on next line. \x0a' # '0a' is the hex equivalent of Control-J, linefeed. echo >&2 ### read -n 1 -s -p $'And Control-K\x0bgoes straight down.' echo >&2 # Control-K is vertical tab. # A better example of the effect of a vertical tab is: var=$'\x0aThis is the bottom line\x0bThis is the top line\x0a' echo "$var" # This works the same way as the above example. However: echo "$var" | col # This causes the right end of the line to be higher than the left end. # It also explains why we started and ended with a line feed -- #+ to avoid a garbled screen.
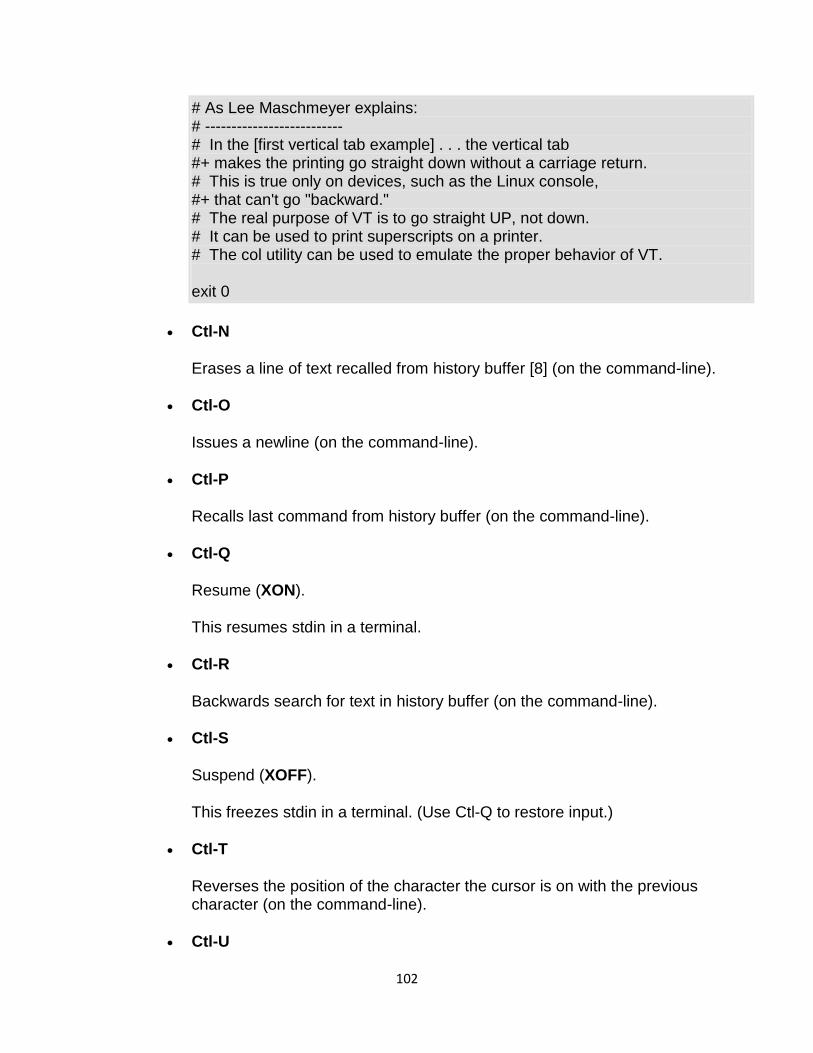
102
# As Lee Maschmeyer explains: # -------------------------- # In the [first vertical tab example] . . . the vertical tab #+ makes the printing go straight down without a carriage return. # This is true only on devices, such as the Linux console, #+ that can't go "backward." # The real purpose of VT is to go straight UP, not down. # It can be used to print superscripts on a printer. # The col utility can be used to emulate the proper behavior of VT. exit 0
Ctl-N
Erases a line of text recalled from history buffer [8] (on the command-line).
Ctl-O
Issues a newline (on the command-line).
Ctl-P
Recalls last command from history buffer (on the command-line).
Ctl-Q
Resume (XON).
This resumes stdin in a terminal.
Ctl-R
Backwards search for text in history buffer (on the command-line).
Ctl-S
Suspend (XOFF).
This freezes stdin in a terminal. (Use Ctl-Q to restore input.)
Ctl-T
Reverses the position of the character the cursor is on with the previous character (on the command-line).
Ctl-U
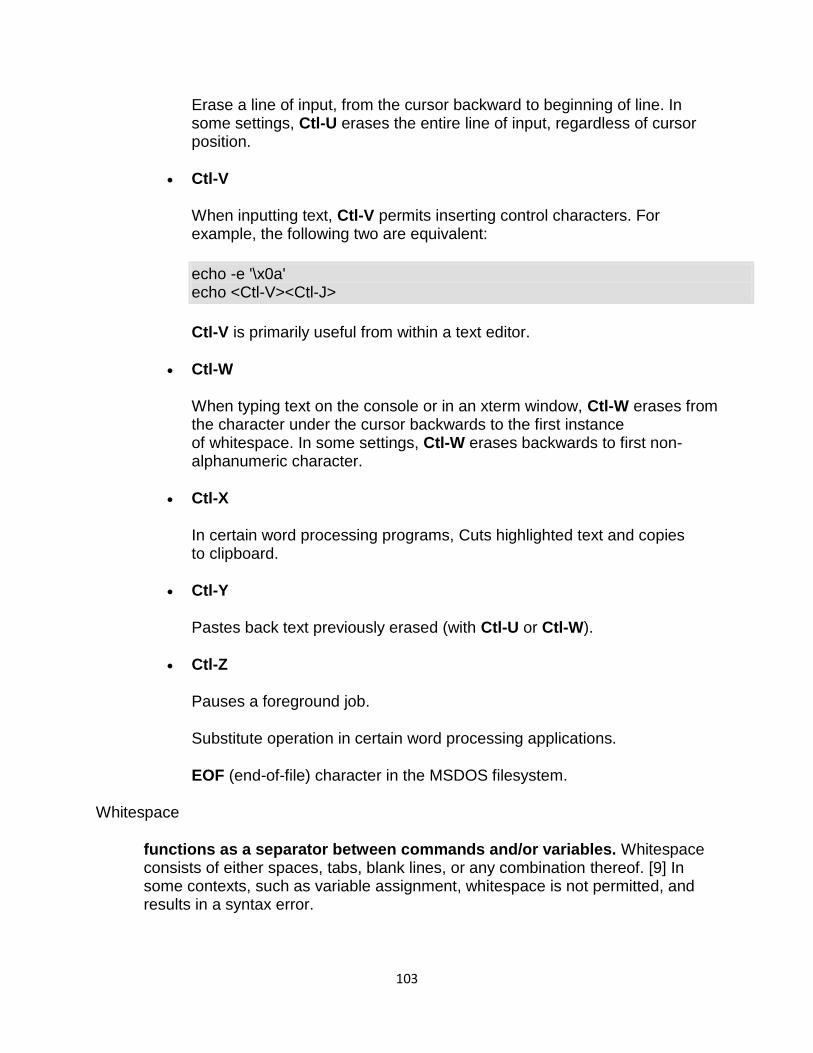
103
Erase a line of input, from the cursor backward to beginning of line. In some settings, Ctl-U erases the entire line of input, regardless of cursor position.
Ctl-V
When inputting text, Ctl-V permits inserting control characters. For example, the following two are equivalent:
echo -e '\x0a' echo <Ctl-V><Ctl-J>
Ctl-V is primarily useful from within a text editor.
Ctl-W
When typing text on the console or in an xterm window, Ctl-W erases from the character under the cursor backwards to the first instance of whitespace. In some settings, Ctl-W erases backwards to first non-alphanumeric character.
Ctl-X
In certain word processing programs, Cuts highlighted text and copies to clipboard.
Ctl-Y
Pastes back text previously erased (with Ctl-U or Ctl-W).
Ctl-Z
Pauses a foreground job.
Substitute operation in certain word processing applications.
EOF (end-of-file) character in the MSDOS filesystem.
Whitespace
functions as a separator between commands and/or variables. Whitespace consists of either spaces, tabs, blank lines, or any combination thereof. [9] In some contexts, such as variable assignment, whitespace is not permitted, and results in a syntax error.
104
Blank lines have no effect on the action of a script, and are therefore useful for visually separating functional sections.
$IFS, the special variable separating fields of input to certain commands. It defaults to whitespace.
Definition: A field is a discrete chunk of data expressed as a string of consecutive characters. Separating each field from adjacent fields is either whitespace or some other designated character (often determined by the $IFS). In some contexts, a field may be called a record.
To preserve whitespace within a string or in a variable, use quoting.
UNIX filters can target and operate on whitespace using the POSIX character class [:space:].
Decision making and Loop control
Decision making
In this chapter, we will understand shell decision-making in Unix. While writing a shell script, there may be a situation when you need to adopt one path out of the given two paths. So you need to make use of conditional statements that allow your program to make correct decisions and perform the right actions.
Unix Shell supports conditional statements which are used to perform different actions based on different conditions. We will now understand two decision-making statements here −
The if...else statement
The case...esac statement
The if...else statements
If else statements are useful decision-making statements which can be used to select an option from a given set of options.
Unix Shell supports following forms of if…else statement −
if...fi statement
if...else...fi statement
if...elif...else...fi statement
Most of the if statements check relations using relational operators discussed in the previous chapter.
105
The case...esac Statement
You can use multiple if...elif statements to perform a multiway branch. However, this is not always the best solution, especially when all of the branches depend on the value of a single variable.
Unix Shell supports case...esac statement which handles exactly this situation, and it does so more efficiently than repeated if...elif statements.
There is only one form of case...esac statement which has been described in detail here −
case...esac statement
The case...esac statement in the Unix shell is very similar to the switch...case statement we have in other programming languages like C or C++ and PERL, etc.
Loop Control
In this chapter, we will discuss shell loops in Unix. A loop is a powerful programming tool that enables you to execute a set of commands repeatedly. In this chapter, we will examine the following types of loops available to shell programmers −
The while loop
The for loop
The until loop
The select loop
You will use different loops based on the situation. For example, the while loop executes the given commands until the given condition remains true; the until loop executes until a given condition becomes true.
Once you have good programming practice you will gain the expertise and thereby, start using appropriate loop based on the situation. Here, while and for loops are available in most of the other programming languages like C, C++ and PERL, etc.
Nesting Loops
All the loops support nesting concept which means you can put one loop inside another similar one or different loops. This nesting can go up to unlimited number of times based on your requirement.
Here is an example of nesting while loop. The other loops can be nested based on the programming requirement in a similar way −
Nesting while Loops
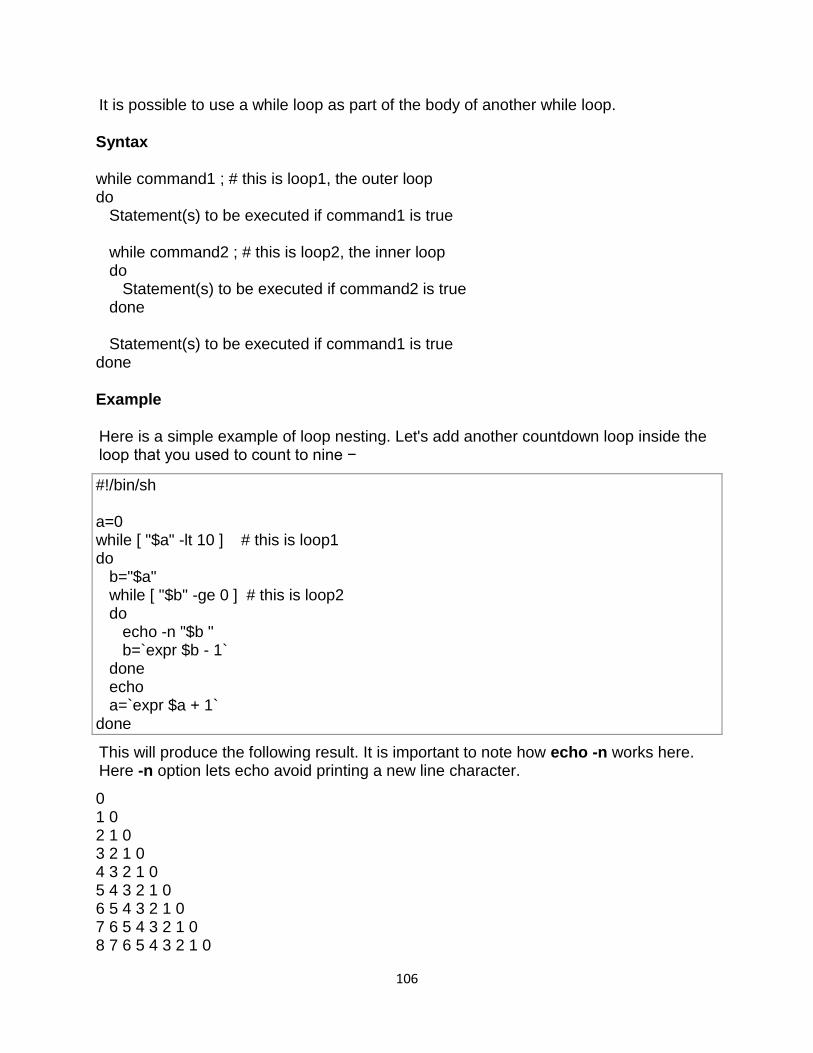
106
It is possible to use a while loop as part of the body of another while loop.
Syntax
while command1 ; # this is loop1, the outer loop do Statement(s) to be executed if command1 is true while command2 ; # this is loop2, the inner loop do Statement(s) to be executed if command2 is true done Statement(s) to be executed if command1 is true done
Example
Here is a simple example of loop nesting. Let's add another countdown loop inside the loop that you used to count to nine −
#!/bin/sh a=0 while [ "$a" -lt 10 ] # this is loop1 do b="$a" while [ "$b" -ge 0 ] # this is loop2 do echo -n "$b " b=`expr $b - 1` done echo a=`expr $a + 1` done
This will produce the following result. It is important to note how echo -n works here. Here -n option lets echo avoid printing a new line character.
0 1 0 2 1 0 3 2 1 0 4 3 2 1 0 5 4 3 2 1 0 6 5 4 3 2 1 0 7 6 5 4 3 2 1 0 8 7 6 5 4 3 2 1 0
107
9 8 7 6 5 4 3 2 1 0
Controlling terminal input
Sessions and process groups have a few other characteristics.
A session can have a single controlling terminal. This is usually the terminal device (in the case of a terminal login) or pseudo-terminal device (in the case of a network login) on which we log in.
The session leader that establishes the connection to the controlling terminal is called the controlling process.
The process groups within a session can be divided into a single foreground process group and one or more background process groups.
If a session has a controlling terminal, it has a single foreground process group, and all other process groups in the session are background process groups.
Whenever we type the terminal's interrupt key (often DELETE or Control-C), this causes the interrupt signal be sent to all processes in the foreground process group.
Whenever we type the terminal's quit key (often Control-backslash), this causes the quit signal to be sent to all processes in the foreground process group.
If a modem (or network) disconnect is detected by the terminal interface, the hang-up signal is sent to the controlling process (the session leader).
These characteristics are shown in Figure 9.7.
Figure 9.7. Process groups and sessions showing controlling terminal
[View full size image]
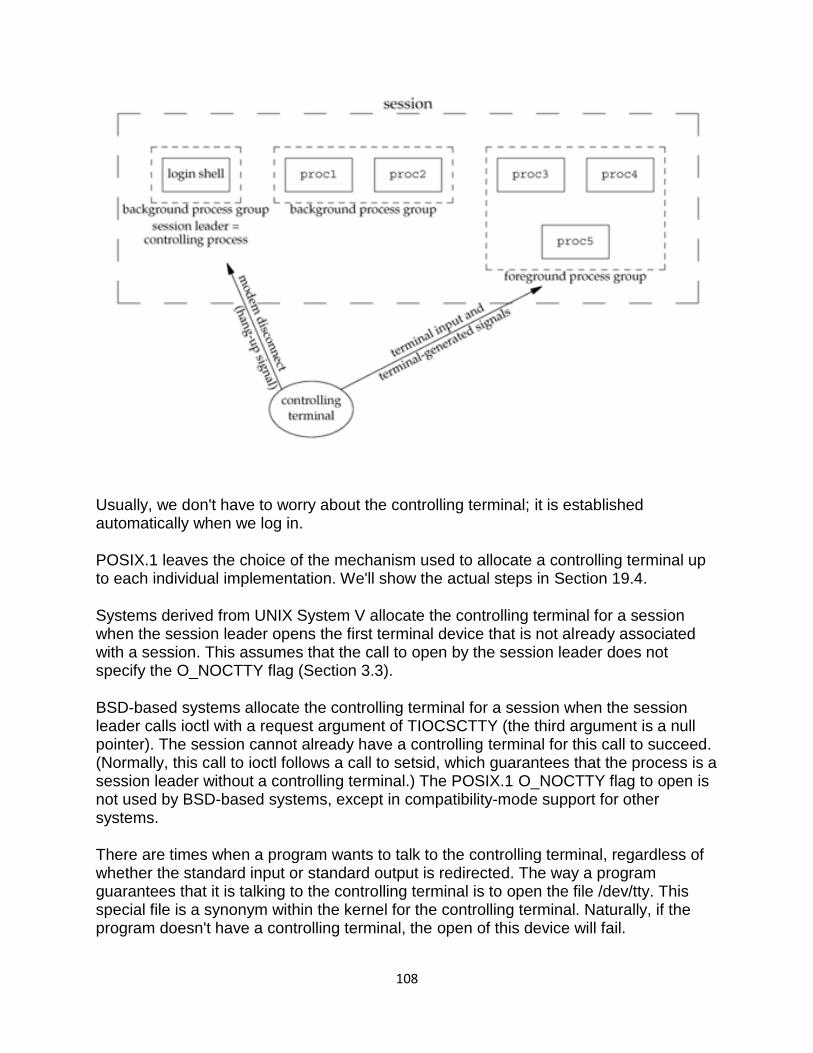
108
Usually, we don't have to worry about the controlling terminal; it is established automatically when we log in.
POSIX.1 leaves the choice of the mechanism used to allocate a controlling terminal up to each individual implementation. We'll show the actual steps in Section 19.4.
Systems derived from UNIX System V allocate the controlling terminal for a session when the session leader opens the first terminal device that is not already associated with a session. This assumes that the call to open by the session leader does not specify the O_NOCTTY flag (Section 3.3).
BSD-based systems allocate the controlling terminal for a session when the session leader calls ioctl with a request argument of TIOCSCTTY (the third argument is a null pointer). The session cannot already have a controlling terminal for this call to succeed. (Normally, this call to ioctl follows a call to setsid, which guarantees that the process is a session leader without a controlling terminal.) The POSIX.1 O_NOCTTY flag to open is not used by BSD-based systems, except in compatibility-mode support for other systems.
There are times when a program wants to talk to the controlling terminal, regardless of whether the standard input or standard output is redirected. The way a program guarantees that it is talking to the controlling terminal is to open the file /dev/tty. This special file is a synonym within the kernel for the controlling terminal. Naturally, if the program doesn't have a controlling terminal, the open of this device will fail.
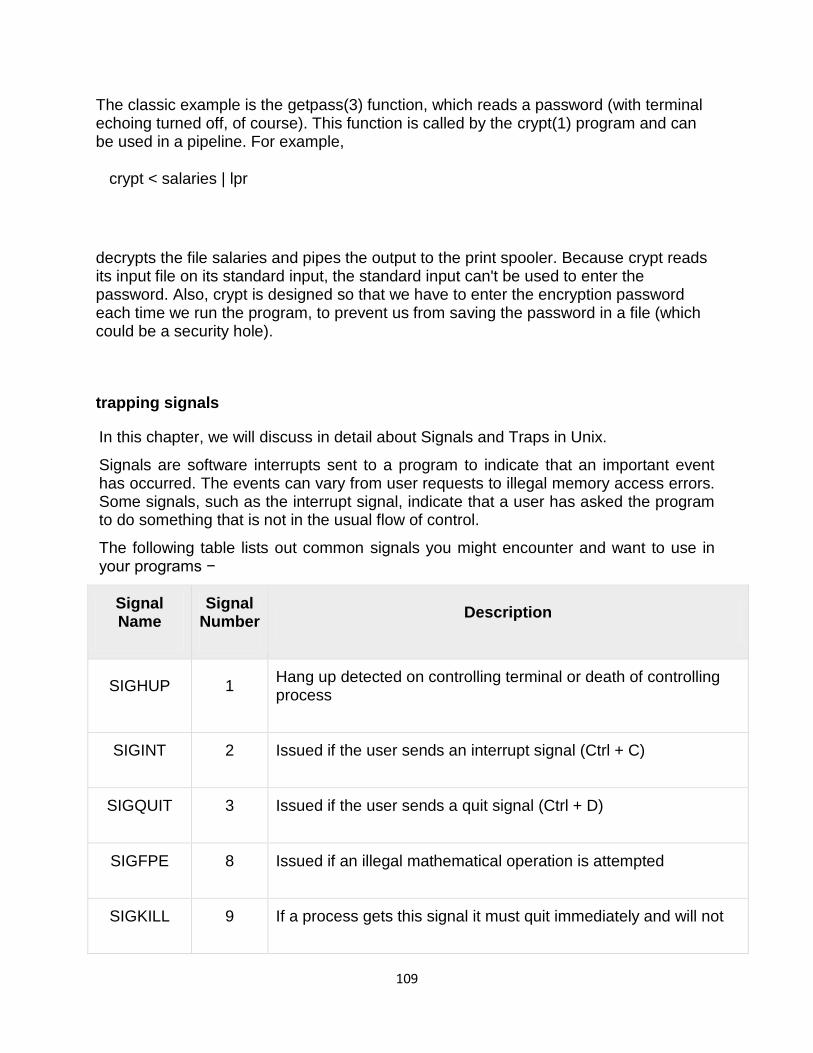
109
The classic example is the getpass(3) function, which reads a password (with terminal echoing turned off, of course). This function is called by the crypt(1) program and can be used in a pipeline. For example,
crypt < salaries | lpr
decrypts the file salaries and pipes the output to the print spooler. Because crypt reads its input file on its standard input, the standard input can't be used to enter the password. Also, crypt is designed so that we have to enter the encryption password each time we run the program, to prevent us from saving the password in a file (which could be a security hole).
trapping signals
In this chapter, we will discuss in detail about Signals and Traps in Unix.
Signals are software interrupts sent to a program to indicate that an important event has occurred. The events can vary from user requests to illegal memory access errors. Some signals, such as the interrupt signal, indicate that a user has asked the program to do something that is not in the usual flow of control.
The following table lists out common signals you might encounter and want to use in your programs −
Signal Name
Signal Number
Description
SIGHUP 1 Hang up detected on controlling terminal or death of controlling process
SIGINT 2 Issued if the user sends an interrupt signal (Ctrl + C)
SIGQUIT 3 Issued if the user sends a quit signal (Ctrl + D)
SIGFPE 8 Issued if an illegal mathematical operation is attempted
SIGKILL 9 If a process gets this signal it must quit immediately and will not
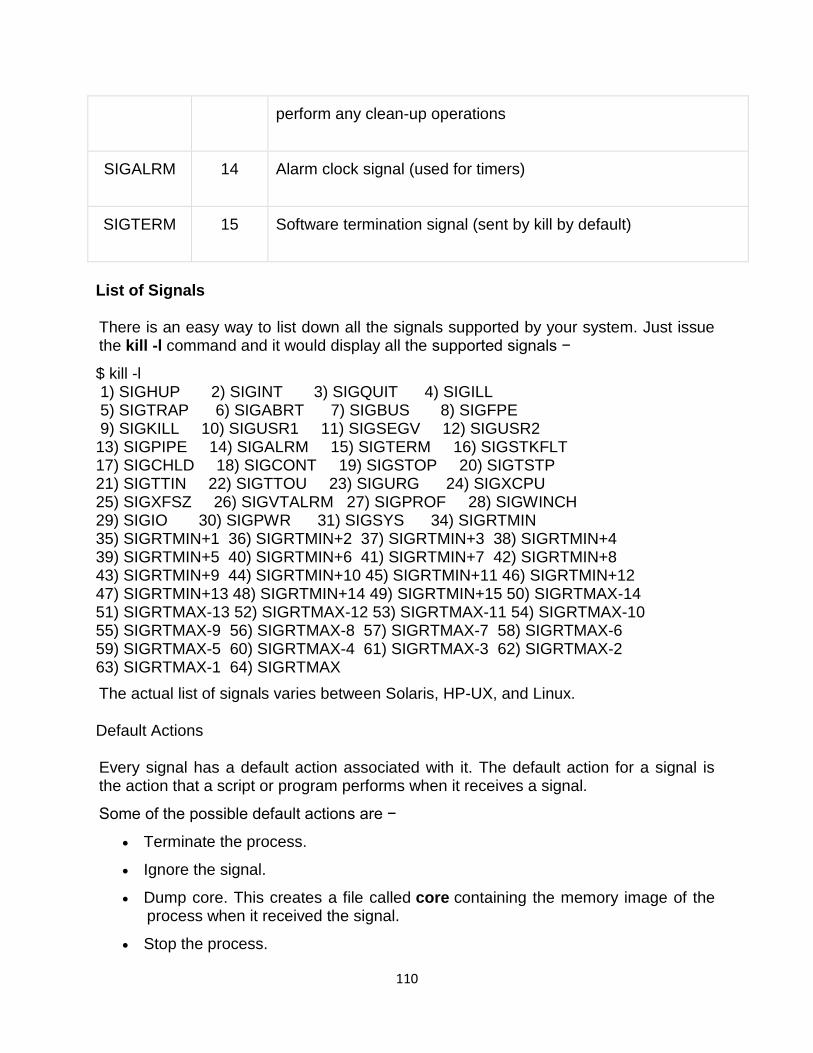
110
perform any clean-up operations
SIGALRM 14 Alarm clock signal (used for timers)
SIGTERM 15 Software termination signal (sent by kill by default)
List of Signals
There is an easy way to list down all the signals supported by your system. Just issue the kill -l command and it would display all the supported signals −
$ kill -l 1) SIGHUP 2) SIGINT 3) SIGQUIT 4) SIGILL 5) SIGTRAP 6) SIGABRT 7) SIGBUS 8) SIGFPE 9) SIGKILL 10) SIGUSR1 11) SIGSEGV 12) SIGUSR2 13) SIGPIPE 14) SIGALRM 15) SIGTERM 16) SIGSTKFLT 17) SIGCHLD 18) SIGCONT 19) SIGSTOP 20) SIGTSTP 21) SIGTTIN 22) SIGTTOU 23) SIGURG 24) SIGXCPU 25) SIGXFSZ 26) SIGVTALRM 27) SIGPROF 28) SIGWINCH 29) SIGIO 30) SIGPWR 31) SIGSYS 34) SIGRTMIN 35) SIGRTMIN+1 36) SIGRTMIN+2 37) SIGRTMIN+3 38) SIGRTMIN+4 39) SIGRTMIN+5 40) SIGRTMIN+6 41) SIGRTMIN+7 42) SIGRTMIN+8 43) SIGRTMIN+9 44) SIGRTMIN+10 45) SIGRTMIN+11 46) SIGRTMIN+12 47) SIGRTMIN+13 48) SIGRTMIN+14 49) SIGRTMIN+15 50) SIGRTMAX-14 51) SIGRTMAX-13 52) SIGRTMAX-12 53) SIGRTMAX-11 54) SIGRTMAX-10 55) SIGRTMAX-9 56) SIGRTMAX-8 57) SIGRTMAX-7 58) SIGRTMAX-6 59) SIGRTMAX-5 60) SIGRTMAX-4 61) SIGRTMAX-3 62) SIGRTMAX-2 63) SIGRTMAX-1 64) SIGRTMAX
The actual list of signals varies between Solaris, HP-UX, and Linux.
Default Actions
Every signal has a default action associated with it. The default action for a signal is the action that a script or program performs when it receives a signal.
Some of the possible default actions are −
Terminate the process.
Ignore the signal.
Dump core. This creates a file called core containing the memory image of the process when it received the signal.
Stop the process.
111
Continue a stopped process.
Sending Signals
There are several methods of delivering signals to a program or script. One of the most common is for a user to type CONTROL-C or the INTERRUPT key while a script is executing.
When you press the Ctrl+C key, a SIGINT is sent to the script and as per defined default action script terminates.
The other common method for delivering signals is to use the kill command, the syntax of which is as follows −
$ kill -signal pid
Here signal is either the number or name of the signal to deliver and pid is the process ID that the signal should be sent to. For Example −
$ kill -1 1001
The above command sends the HUP or hang-up signal to the program that is running with process ID 1001. To send a kill signal to the same process, use the following command −
$ kill -9 1001
This kills the process running with process ID 1001.
Trapping Signals
When you press the Ctrl+C or Break key at your terminal during execution of a shell program, normally that program is immediately terminated, and your command prompt returns. This may not always be desirable. For instance, you may end up leaving a bunch of temporary files that won't get cleaned up.
Trapping these signals is quite easy, and the trap command has the following syntax −
$ trap commands signals
Here command can be any valid Unix command, or even a user-defined function, and signal can be a list of any number of signals you want to trap.
There are two common uses for trap in shell scripts −
Clean up temporary files
Ignore signals
Cleaning Up Temporary Files
As an example of the trap command, the following shows how you can remove some files and then exit if someone tries to abort the program from the terminal −
112
$ trap "rm -f $WORKDIR/work1$$ $WORKDIR/dataout$$; exit" 2
From the point in the shell program that this trap is executed, the two files work1$$ and dataout$$ will be automatically removed if signal number 2 is received by the program.
Hence, if the user interrupts the execution of the program after this trap is executed, you can be assured that these two files will be cleaned up. The exit command that follows the rm is necessary because without it, the execution would continue in the program at the point that it left off when the signal was received.
Signal number 1 is generated for hangup. Either someone intentionally hangs up the line or the line gets accidentally disconnected.
You can modify the preceding trap to also remove the two specified files in this case by adding signal number 1 to the list of signals −
$ trap "rm $WORKDIR/work1$$ $WORKDIR/dataout$$; exit" 1 2
Now these files will be removed if the line gets hung up or if the Ctrl+C key gets pressed.
The commands specified to trap must be enclosed in quotes, if they contain more than one command. Also note that the shell scans the command line at the time that the trap command gets executed and also when one of the listed signals is received.
Thus, in the preceding example, the value of WORKDIR and $$ will be substituted at the time that the trap command is executed. If you wanted this substitution to occur at the time that either signal 1 or 2 was received, you can put the commands inside single quotes −
$ trap 'rm $WORKDIR/work1$$ $WORKDIR/dataout$$; exit' 1 2
Ignoring Signals
If the command listed for trap is null, the specified signal will be ignored when received. For example, the command −
$ trap '' 2
This specifies that the interrupt signal is to be ignored. You might want to ignore certain signals when performing an operation that you don't want to be interrupted. You can specify multiple signals to be ignored as follows −
$ trap '' 1 2 3 15
Note that the first argument must be specified for a signal to be ignored and is not equivalent to writing the following, which has a separate meaning of its own −
$ trap 2
If you ignore a signal, all subshells also ignore that signal. However, if you specify an action to be taken on the receipt of a signal, all subshells will still take the default action on receipt of that signal.
113
Resetting Traps
After you've changed the default action to be taken on receipt of a signal, you can change it back again with the trap if you simply omit the first argument; so −
$ trap 1 2
Arrays
Arrays are used to store a series of values in an indexed list. Items in an array are stored and retrieved using an index. Note that Arrays are not supported by the original Bourne Shell, but are supported by bash and other newer shells.
File Test Operators
Shell scripts often need to check various properties of files as a part of the control flow. Unix provides a number of options for this purpose.
File existence checks: -f file True if the file exists and is an ordinary file.
-d file True if the file exists and is a directory.
-s file True if the file exists and is not empty.
-c file True if the file exists and is a character device file.
-b file True if the file exists and is a block devise file.
File access checks:
-r file True if the file exists and has read permission to it.
-w file True if the file exists and has a write permission to it.
-x file True if the file exists and has a execute permission to it.
String Test Operators
Unix commands often need to test the various properties of string variables as a part of the control flow.
Unix provides a number of options for this:
114
[ string1=string2 ] True if string1 and string2 are same.
[ string1!=string2 ] True if string1 is not equal to string2.
[ -n string ] True if the string is not zero.
[ -z string ] True if the string is zero.
[ string ] True if the string is not empty.
Special Variables
While running scripts, Unix provides a number of predefined variables that can be used to get information from the environment.
Unix also provides a number of special symbols with additional information:
$# Total number of positional parameters.
$@ Represents all the parameters i.e. $1 to the end.
$? Pass or fail status of the last command executed.
$$ Process id of the currently running shell.
$! Process id of the last run background process.
115
Unit-III
Portability With C
Command line Argument
I'm trying to write a program that can compare two files line by line, word by word, or character by character in C. It has to be able to read in command line options -l -w -i or --...
if the option is -l it compares the files line by line.
if the option is -w it compares the files word by word.
if the options is -- it automatically assumes that the next arg is the first filename.
if the option is -i it compares them in a case insensitive manner.
defaults to comparing the files character by character.
It's not supposed to matter how many time the options are input as long as -w and -l aren't inputted at the same time and there are no more or less than 2 files.
I don't even know where to begin with parsing the command line arguments. PLEASE HELP :(
So this is the code that I came up with for everything. I haven't error checked it quite yet, but I was wondering if I'm writing things in an overcomplicated manner?
/* * Functions to compare files. */ int compare_line(); int compare_word(); int compare_char(); int case_insens(); /* * Program to compare the information in two files and print message saying * whether or not this was successful. */ int main(int argc, char* argv[]) { /*Loop counter*/
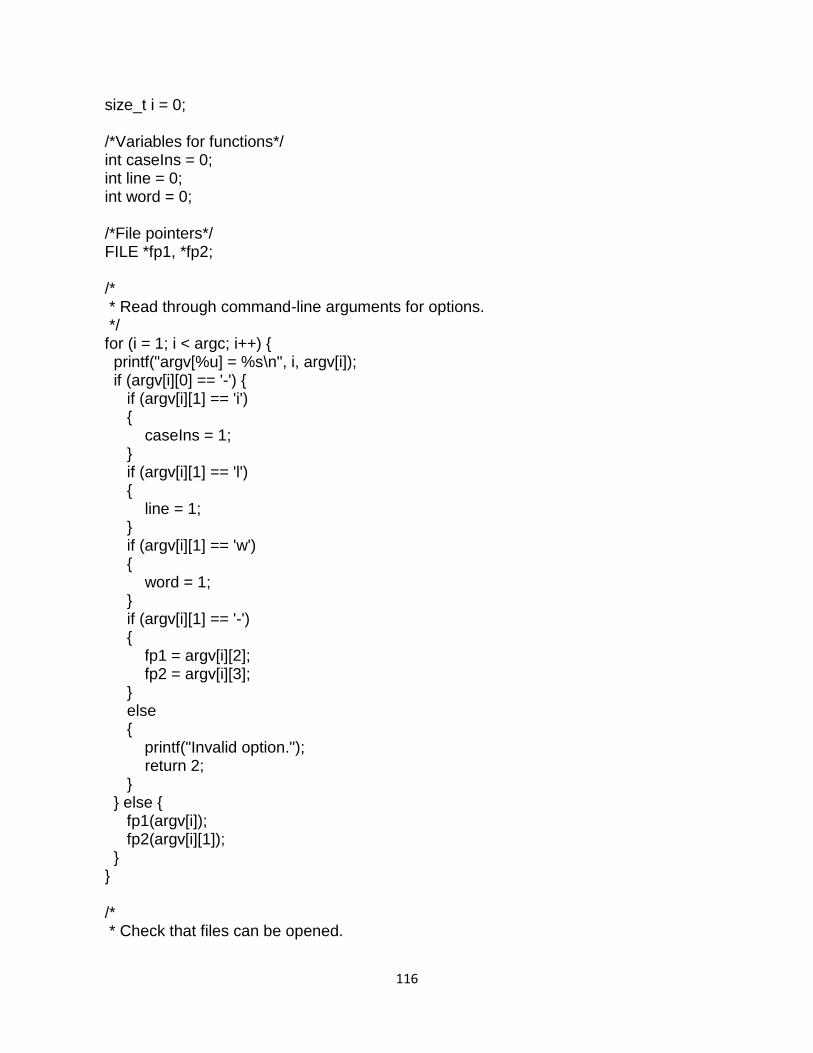
116
size_t i = 0; /*Variables for functions*/ int caseIns = 0; int line = 0; int word = 0; /*File pointers*/ FILE *fp1, *fp2; /* * Read through command-line arguments for options. */ for (i = 1; i < argc; i++) { printf("argv[%u] = %s\n", i, argv[i]); if (argv[i][0] == '-') { if (argv[i][1] == 'i') { caseIns = 1; } if (argv[i][1] == 'l') { line = 1; } if (argv[i][1] == 'w') { word = 1; } if (argv[i][1] == '-') { fp1 = argv[i][2]; fp2 = argv[i][3]; } else { printf("Invalid option."); return 2; } } else { fp1(argv[i]); fp2(argv[i][1]); } } /* * Check that files can be opened.
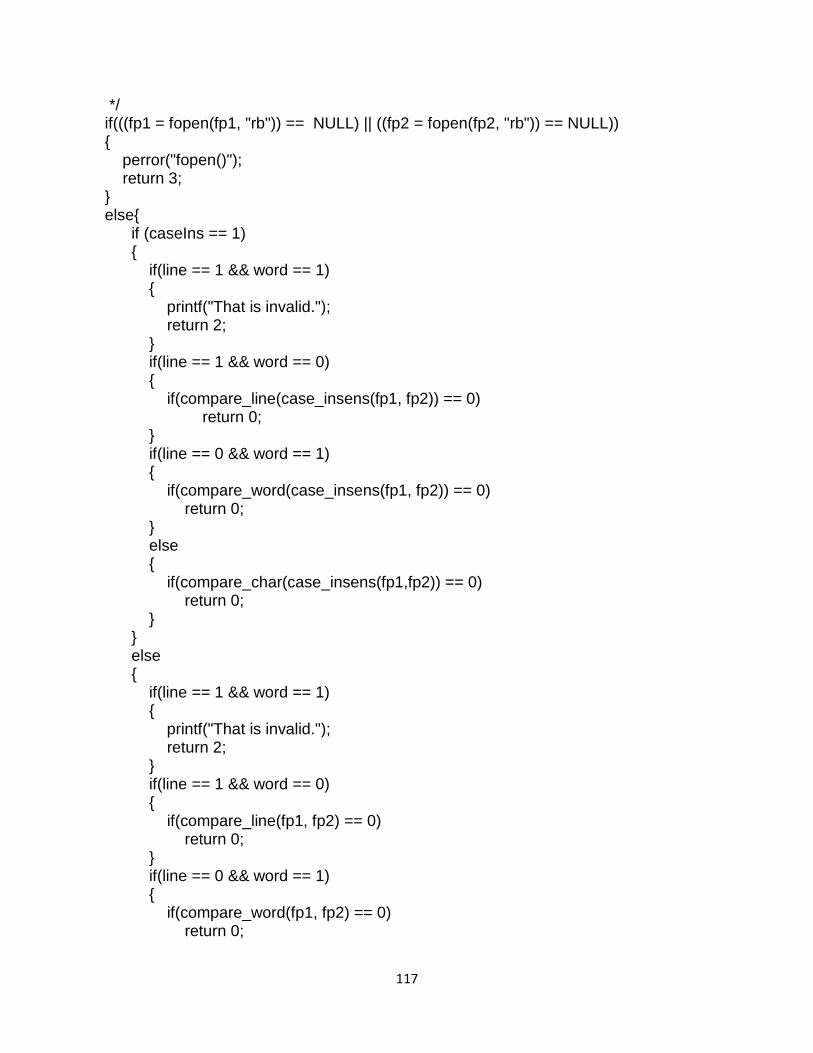
117
*/ if(((fp1 = fopen(fp1, "rb")) == NULL) || ((fp2 = fopen(fp2, "rb")) == NULL)) { perror("fopen()"); return 3; } else{ if (caseIns == 1) { if(line == 1 && word == 1) { printf("That is invalid."); return 2; } if(line == 1 && word == 0) { if(compare_line(case_insens(fp1, fp2)) == 0) return 0; } if(line == 0 && word == 1) { if(compare_word(case_insens(fp1, fp2)) == 0) return 0; } else { if(compare_char(case_insens(fp1,fp2)) == 0) return 0; } } else { if(line == 1 && word == 1) { printf("That is invalid."); return 2; } if(line == 1 && word == 0) { if(compare_line(fp1, fp2) == 0) return 0; } if(line == 0 && word == 1) { if(compare_word(fp1, fp2) == 0) return 0;
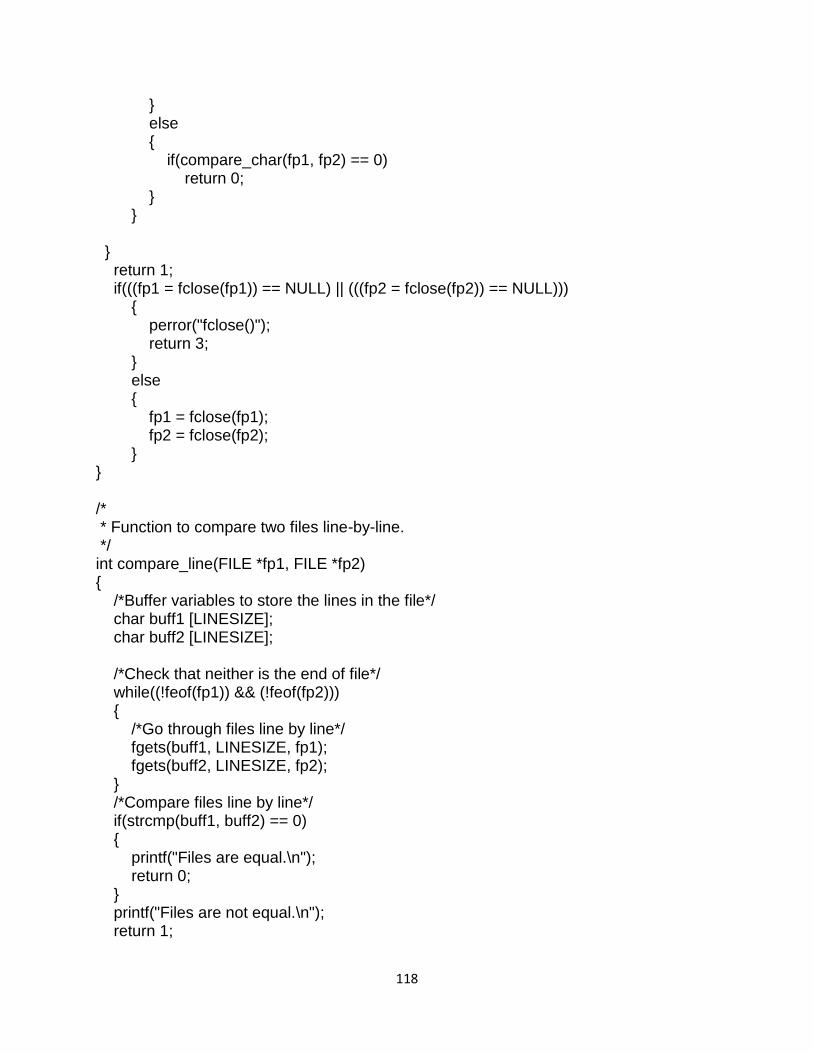
118
} else { if(compare_char(fp1, fp2) == 0) return 0; } } } return 1; if(((fp1 = fclose(fp1)) == NULL) || (((fp2 = fclose(fp2)) == NULL))) { perror("fclose()"); return 3; } else { fp1 = fclose(fp1); fp2 = fclose(fp2); } } /* * Function to compare two files line-by-line. */ int compare_line(FILE *fp1, FILE *fp2) { /*Buffer variables to store the lines in the file*/ char buff1 [LINESIZE]; char buff2 [LINESIZE]; /*Check that neither is the end of file*/ while((!feof(fp1)) && (!feof(fp2))) { /*Go through files line by line*/ fgets(buff1, LINESIZE, fp1); fgets(buff2, LINESIZE, fp2); } /*Compare files line by line*/ if(strcmp(buff1, buff2) == 0) { printf("Files are equal.\n"); return 0; } printf("Files are not equal.\n"); return 1;
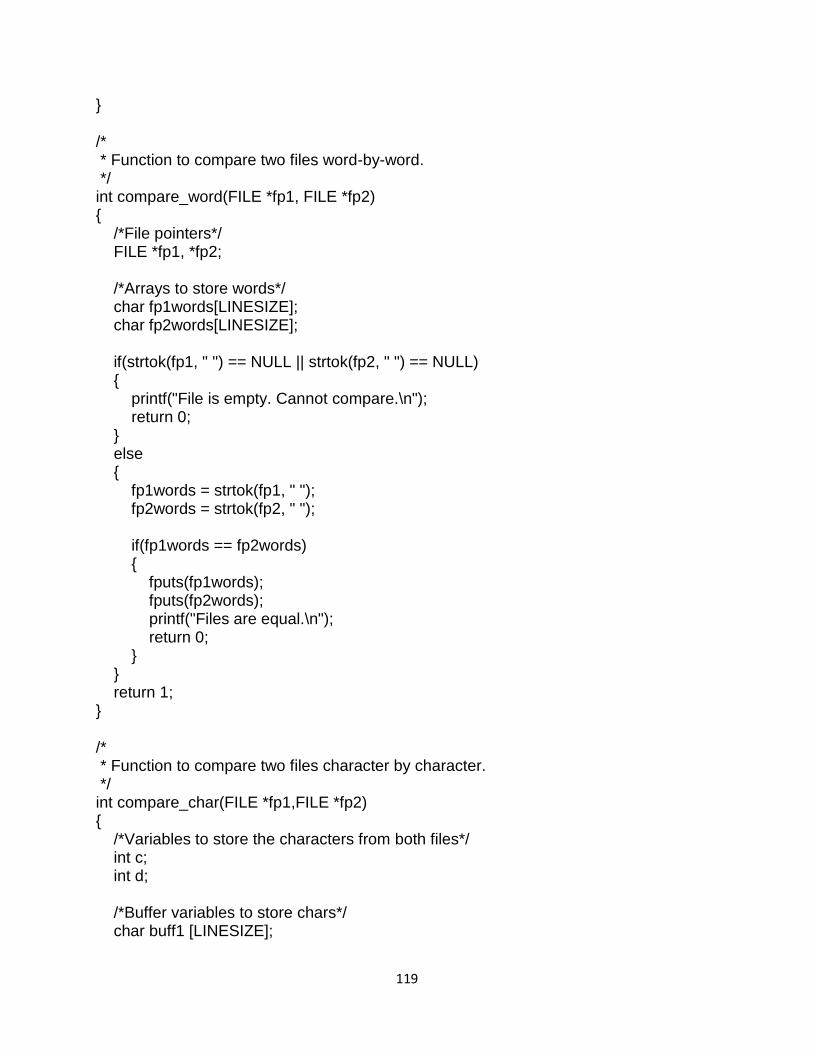
119
} /* * Function to compare two files word-by-word. */ int compare_word(FILE *fp1, FILE *fp2) { /*File pointers*/ FILE *fp1, *fp2; /*Arrays to store words*/ char fp1words[LINESIZE]; char fp2words[LINESIZE]; if(strtok(fp1, " ") == NULL || strtok(fp2, " ") == NULL) { printf("File is empty. Cannot compare.\n"); return 0; } else { fp1words = strtok(fp1, " "); fp2words = strtok(fp2, " "); if(fp1words == fp2words) { fputs(fp1words); fputs(fp2words); printf("Files are equal.\n"); return 0; } } return 1; } /* * Function to compare two files character by character. */ int compare_char(FILE *fp1,FILE *fp2) { /*Variables to store the characters from both files*/ int c; int d; /*Buffer variables to store chars*/ char buff1 [LINESIZE];
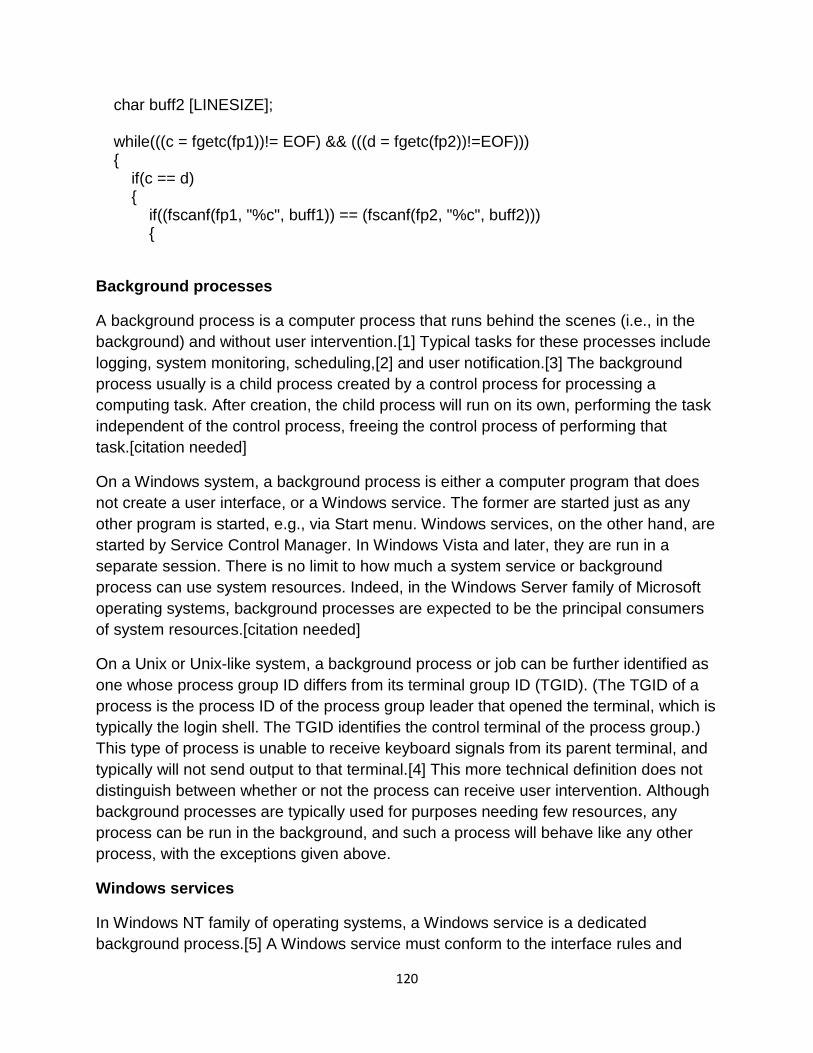
120
char buff2 [LINESIZE]; while(((c = fgetc(fp1))!= EOF) && (((d = fgetc(fp2))!=EOF))) { if(c == d) { if((fscanf(fp1, "%c", buff1)) == (fscanf(fp2, "%c", buff2))) {
Background processes
A background process is a computer process that runs behind the scenes (i.e., in the
background) and without user intervention.[1] Typical tasks for these processes include
logging, system monitoring, scheduling,[2] and user notification.[3] The background
process usually is a child process created by a control process for processing a
computing task. After creation, the child process will run on its own, performing the task
independent of the control process, freeing the control process of performing that
task.[citation needed]
On a Windows system, a background process is either a computer program that does
not create a user interface, or a Windows service. The former are started just as any
other program is started, e.g., via Start menu. Windows services, on the other hand, are
started by Service Control Manager. In Windows Vista and later, they are run in a
separate session. There is no limit to how much a system service or background
process can use system resources. Indeed, in the Windows Server family of Microsoft
operating systems, background processes are expected to be the principal consumers
of system resources.[citation needed]
On a Unix or Unix-like system, a background process or job can be further identified as
one whose process group ID differs from its terminal group ID (TGID). (The TGID of a
process is the process ID of the process group leader that opened the terminal, which is
typically the login shell. The TGID identifies the control terminal of the process group.)
This type of process is unable to receive keyboard signals from its parent terminal, and
typically will not send output to that terminal.[4] This more technical definition does not
distinguish between whether or not the process can receive user intervention. Although
background processes are typically used for purposes needing few resources, any
process can be run in the background, and such a process will behave like any other
process, with the exceptions given above.
Windows services
In Windows NT family of operating systems, a Windows service is a dedicated
background process.[5] A Windows service must conform to the interface rules and

121
protocols of the Service Control Manager, the component responsible for managing
Windows services.[6]
Windows services can be configured to start when the operating system starts, and to
run in the background as long as Windows runs. Alternatively, they can be started
manually or by an event. Windows NT operating systems include numerous
services which run in context of three user accounts: System, Network
Service and Local Service. These Windows components are often associated with Host
Process for Windows Services: svchost.exe. Since Windows services operate in the
context of their own dedicated user accounts, they can operate when a user is not
logged on.
Before Windows Vista, services installed as "interactive services" could interact with
Windows desktop and show a graphical user interface. With Windows Vista, however,
interactive services became deprecated and ceased operating properly, as a result
of Windows Service Hardening.[7][8]
The three principal means of managing Windows services are:
Services snap-in for Microsoft Management Console
sc.exe
Windows PowerShell
process synchronization
On the basis of synchronization, processes are categorized as one of the following two types:
Independent Process : Execution of one process does not affects the execution of other processes.
Cooperative Process : Execution of one process affects the execution of other processes.
Process synchronization problem arises in the case of Cooperative process also because resources are shared in Cooperative processes. Race Condition When more than one processes are executing the same code or accessing the same memory or any shared variable in that condition there is a possibility that the output or the value of the shared variable is wrong so for that all the processes doing the race to say that my output is correct this condition known as a race condition. Several processes access and process the manipulations over the same data concurrently, then the
122
outcome depends on the particular order in which the access takes place. A race condition is a situation that may occur inside a critical section. This happens when the result of multiple thread execution in the critical section differs according to the order in which the threads execute. Race conditions in critical sections can be avoided if the critical section is treated as an atomic instruction. Also, proper thread synchronization using locks or atomic variables can prevent race conditions. Critical Section Problem Critical section is a code segment that can be accessed by only one process at a time. Critical section contains shared variables which need to be synchronized to maintain consistency of data variables.
In the entry section, the process requests for entry in the Critical Section.
Any solution to the critical section problem must satisfy three requirements:
123
Mutual Exclusion : If a process is executing in its critical section, then no other process is allowed to execute in the critical section.
Progress : If no process is executing in the critical section and other processes are waiting outside the critical section, then only those processes that are not executing in their remainder section can participate in deciding which will enter in the critical section next, and the selection can not be postponed indefinitely.
Bounded Waiting : A bound must exist on the number of times that other processes are allowed to enter their critical sections after a process has made a request to enter its critical section and before that request is granted.
Peterson’s Solution Peterson‘s Solution is a classical software based solution to the critical section problem. In Peterson‘s solution, we have two shared variables:
boolean flag[i] :Initialized to FALSE, initially no one is interested in entering the critical section
int turn : The process whose turn is to enter the critical section.
124
Peterson’s Solution preserves all three conditions :
Mutual Exclusion is assured as only one process can access the critical section at any time.
Progress is also assured, as a process outside the critical section does not block other processes from entering the critical section.
Bounded Waiting is preserved as every process gets a fair chance. Disadvantages of Peterson’s Solution
It involves Busy waiting
It is limited to 2 processes.
TestAndSet TestAndSet is a hardware solution to the synchronization problem. In TestAndSet, we have a shared lock variable which can take either of the two values, 0 or 1. 0 Unlock
1 Lock
Before entering into the critical section, a process inquires about the lock. If it is locked, it keeps on waiting until it becomes free and if it is not locked, it takes the lock and executes the critical section.
In TestAndSet, Mutual exclusion and progress are preserved but bounded waiting cannot be preserved. Question : The enter_CS() and leave_CS() functions to implement critical section of a process are realized using test-and-set instruction as follows: int TestAndSet(int &lock) {
int initial = lock;
lock = 1;
return initial;
}
void enter_CS(X)
{

125
while test-and-set(X) ;
}
void leave_CS(X)
{
X = 0;
}
In the above solution, X is a memory location associated with the CS and is initialized to 0. Now, consider the following statements: I. The above solution to CS problem is deadlock-free II. The solution is starvation free. III. The processes enter CS in FIFO order. IV. More than one process can enter CS at the same time. Which of the above statements is TRUE? (A) I (B) II and III (C) II and IV (D) IV
Click here for the Solution. true Semaphores A semaphore is a signaling mechanism and a thread that is waiting on a semaphore can be signaled by another thread. This is different than a mutex as the mutex can be signaled only by the thread that called the wait function.
A semaphore uses two atomic operations, wait and signal for process synchronization. A Semaphore is an integer variable, which can be accessed only through two operations wait() and signal(). There are two types of semaphores: Binary Semaphores and Counting Semaphores
126
Binary Semaphores: They can only be either 0 or 1. They are also known as mutex locks, as the locks can provide mutual exclusion. All the processes can share the same mutex semaphore that is initialized to 1. Then, a process has to wait until the lock becomes 0. Then, the process can make the mutex semaphore 1 and start its critical section. When it completes its critical section, it can reset the value of mutex semaphore to 0 and some other process can enter its critical section.
Counting Semaphores: They can have any value and are not restricted over a certain domain. They can be used to control access to a resource that has a limitation on the number of simultaneous accesses. The semaphore can be initialized to the number of instances of the resource. Whenever a process wants to use that resource, it checks if the number of remaining instances is more than zero, i.e., the process has an instance available. Then, the process can enter its critical section thereby decreasing the value of the counting semaphore by 1. After the process is over with the use of the instance of the resource, it can leave the critical section thereby adding 1 to the number of available instances of the resource.
Sharing of data
All your files on the UNIX file store are private files, that is, unless you particularly
request it, no one has access to your files. If you wish to share a file with someone else,
you must specifically change the protections associated with that file to allow that
person access.
You can copy a file from another user if the file protection has been changed by the
owner to give you read access permission. You will need to include a pathname
(absolute or relative) to the file. For example, to copy the file called data belonging to a
user xyz5 into your current working directory.
Type: cp /disk/a/xyx5/data .
Checking File Protections
To see a long listing of your files showing the file type and the protections currently set
for the three classes of users that UNIX recognises:
Type: ls -l
The first field of the listing is a 10-character field which can be broken into four parts: a
single character and three 3-character fields similar to this:
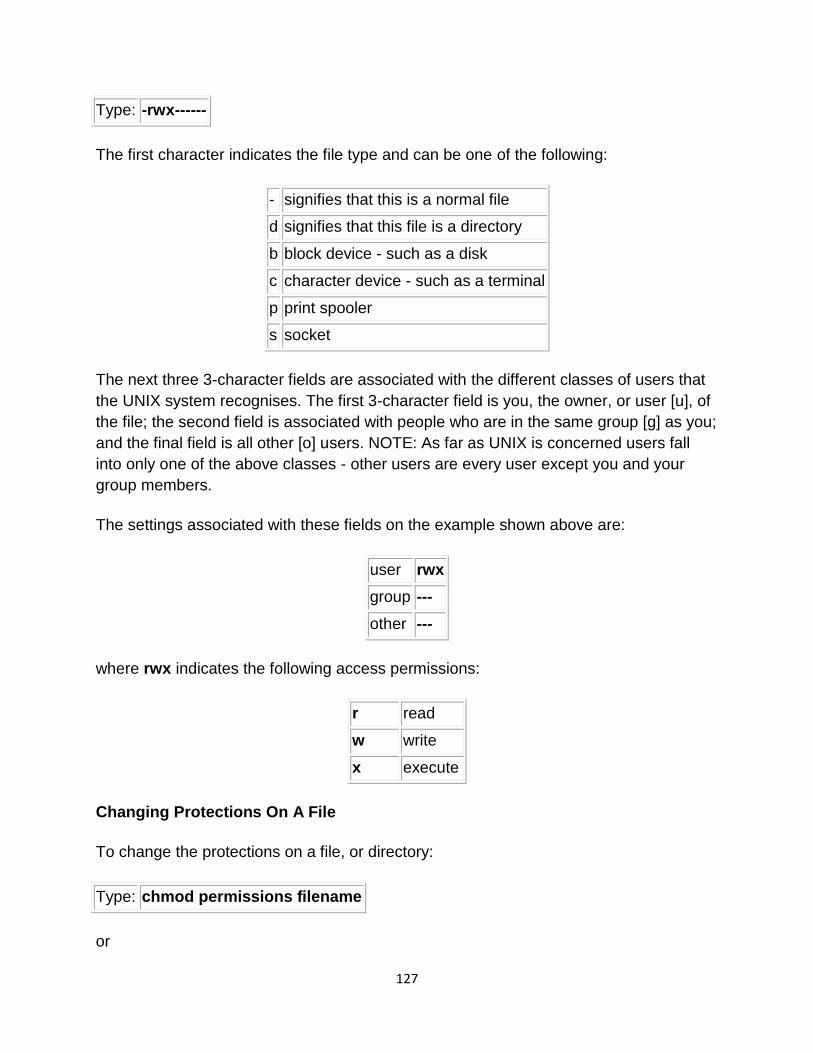
127
Type: -rwx------
The first character indicates the file type and can be one of the following:
- signifies that this is a normal file
d signifies that this file is a directory
b block device - such as a disk
c character device - such as a terminal
p print spooler
s socket
The next three 3-character fields are associated with the different classes of users that
the UNIX system recognises. The first 3-character field is you, the owner, or user [u], of
the file; the second field is associated with people who are in the same group [g] as you;
and the final field is all other [o] users. NOTE: As far as UNIX is concerned users fall
into only one of the above classes - other users are every user except you and your
group members.
The settings associated with these fields on the example shown above are:
user rwx
group ---
other ---
where rwx indicates the following access permissions:
r read
w write
x execute
Changing Protections On A File
To change the protections on a file, or directory:
Type: chmod permissions filename
or
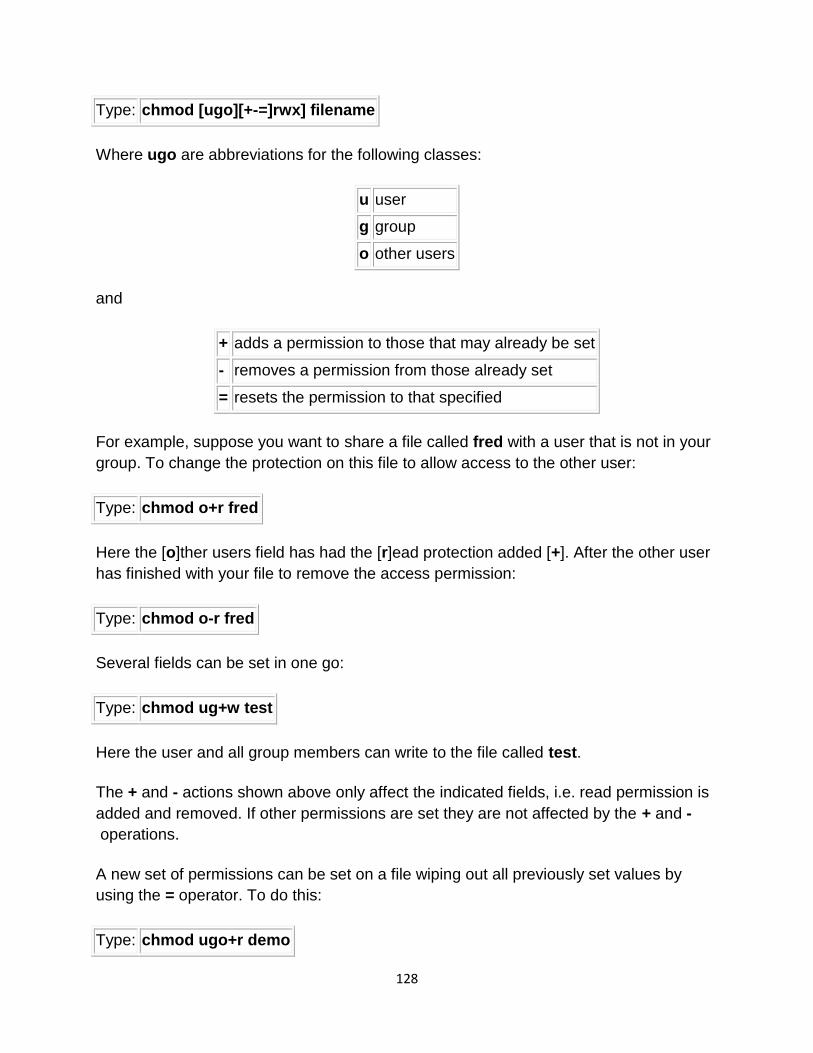
128
Type: chmod [ugo][+-=]rwx] filename
Where ugo are abbreviations for the following classes:
u user
g group
o other users
and
+ adds a permission to those that may already be set
- removes a permission from those already set
= resets the permission to that specified
For example, suppose you want to share a file called fred with a user that is not in your
group. To change the protection on this file to allow access to the other user:
Type: chmod o+r fred
Here the [o]ther users field has had the [r]ead protection added [+]. After the other user
has finished with your file to remove the access permission:
Type: chmod o-r fred
Several fields can be set in one go:
Type: chmod ug+w test
Here the user and all group members can write to the file called test.
The + and - actions shown above only affect the indicated fields, i.e. read permission is
added and removed. If other permissions are set they are not affected by the + and -
operations.
A new set of permissions can be set on a file wiping out all previously set values by
using the = operator. To do this:
Type: chmod ugo+r demo

129
This example clears any previously set permissions on the file called demo and sets
read only permission for all classes of users.
Another Use Of chmod
Computer programmers prefer to think in terms of numbers rather than letters and UNIX
programmers are no exception. Consider one of the above classes of users, for
example the group. They can have three types of access to one of your files (read, write
and/or execute) which can either be switched on or off. If the access permission is
switched on then that counts as binary 1; if the access permission is switched off then
that counts as binary 0.
If we applied this to all classes of users then the fields showing a file's permission status
might look like this:
-rwxr--r--
0111100100
where, beside the user, group members and other users also have read permission to
this file.
This type of binary number can be represented in octal format. Again this 10 digit
number is divided into four fields (from the right): three 3-digit fields and a single digit
field. Consider one of these 3-digit fields and the various protections/permissions that
can be set and their associated binary numbers:
Permission Binary
number
Octal
number
r-- 100 4
-w- 010 2
--x 001 1
rw- 110 6
r-x 101 5
-wx 011 3
rwx 111 7
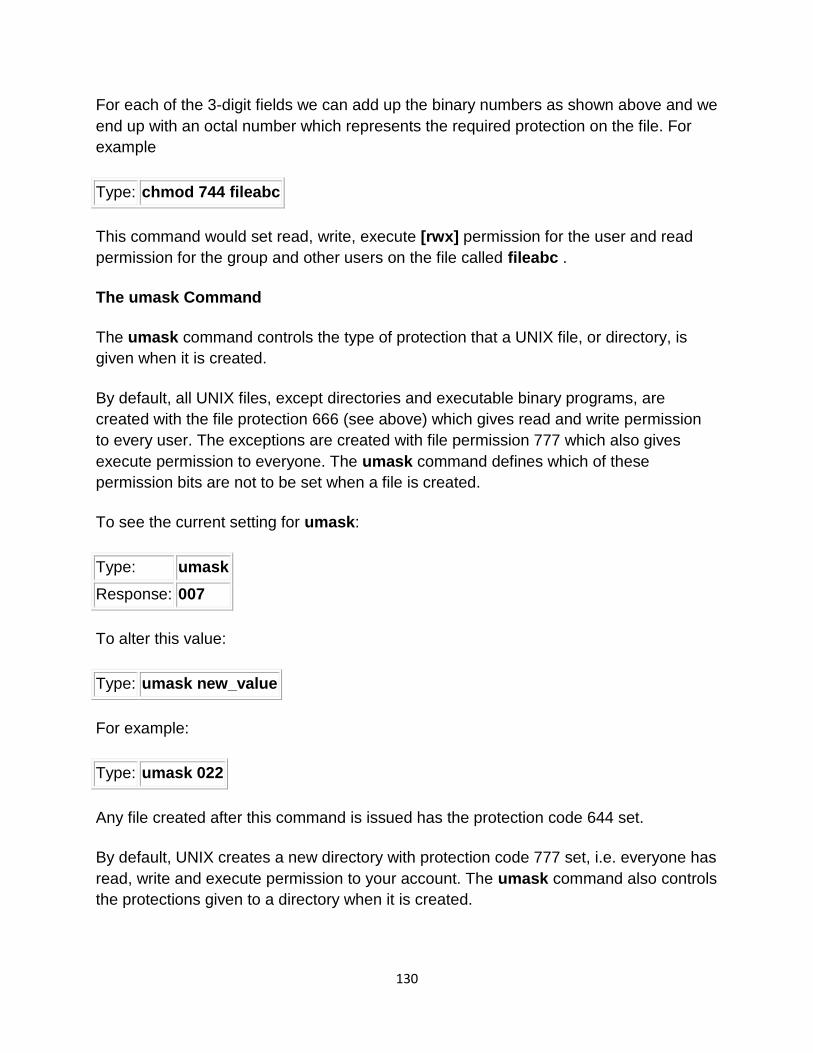
130
For each of the 3-digit fields we can add up the binary numbers as shown above and we
end up with an octal number which represents the required protection on the file. For
example
Type: chmod 744 fileabc
This command would set read, write, execute [rwx] permission for the user and read
permission for the group and other users on the file called fileabc .
The umask Command
The umask command controls the type of protection that a UNIX file, or directory, is
given when it is created.
By default, all UNIX files, except directories and executable binary programs, are
created with the file protection 666 (see above) which gives read and write permission
to every user. The exceptions are created with file permission 777 which also gives
execute permission to everyone. The umask command defines which of these
permission bits are not to be set when a file is created.
To see the current setting for umask:
Type: umask
Response: 007
To alter this value:
Type: umask new_value
For example:
Type: umask 022
Any file created after this command is issued has the protection code 644 set.
By default, UNIX creates a new directory with protection code 777 set, i.e. everyone has
read, write and execute permission to your account. The umask command also controls
the protections given to a directory when it is created.
131
The default value of umask on the irix system is 077 . Files and directories will have this
value masked from their default values (666 and 777, respectively) when they are
created. This gives your files protection code of 600, so that all files created by you can,
by default, only be accessed by you and gives directories a protection code of 700,
allowing only you the right to have access to your information.
Userid
login is used when signing onto a system. It can also be used to switch from one user
to another at any time (most modern shells have support for this feature built into them,
however).
If an argument is not given, login prompts for the username.
If the user is not root, and if /etc/nologin exists, the contents of this file are printed to the screen, and the login is terminated. This is typically used to prevent logins when the system is being taken down.
If special access restrictions are specified for the user in /etc/usertty, these must be met, or the log in attempt will be denied and a syslog message will be generated. See the section on "Special Access Restrictions".
If the user is root, then the login must be occurring on a tty listed in /etc/securetty. Failures will be logged with the syslog facility.
After these conditions have been checked, the password will be requested and checked (if a password is required for this username). Ten attempts are allowed before login dies, but after the first three, the response starts to get very slow. Login failures are reported via the syslog facility. This facility is also used to report any successful root logins.
If the file .hushlogin exists, then a "quiet" login is performed (this disables the checking of mail and the printing of the last login time and message of the day). Otherwise, if /var/log/lastlog exists, the last login time is printed (and the current login is recorded).
Random administrative things, such as setting the UID and GID of the tty are performed. The TERM environment variable is preserved, if it exists (other environment variables are preserved if the -p option is used). Then the HOME, PATH, SHELL, TERM, MAIL, and LOGNAME environment variables are set. PATH defaults to /usr/local/bin:/bin:/usr/bin for normal users, and to /usr/local/sbin:/usr/local/bin:/sbin:/bin:/usr/sbin:/usr/bin for root. Last, if this is not a "quiet" login, the message of the day is printed and the file with the user‘s name in /var/spool/mail will be checked, and a message printed if it has non-zero length.
The user‘s shell is then started. If no shell is specified for the user in /etc/passwd, then /bin/sh is used. If there is no directory specified in /etc/passwd, then / is used (the home directory is checked for the .hushlogin file described above).
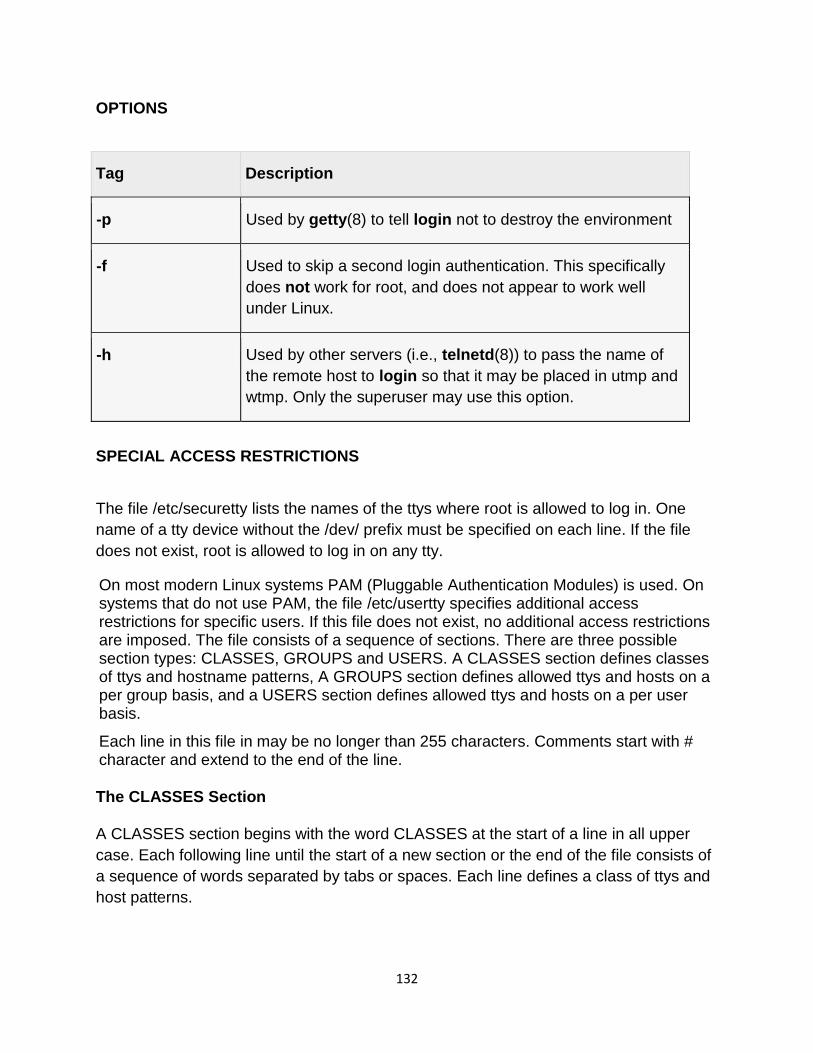
132
OPTIONS
Tag Description
-p Used by getty(8) to tell login not to destroy the environment
-f Used to skip a second login authentication. This specifically
does not work for root, and does not appear to work well
under Linux.
-h Used by other servers (i.e., telnetd(8)) to pass the name of
the remote host to login so that it may be placed in utmp and
wtmp. Only the superuser may use this option.
SPECIAL ACCESS RESTRICTIONS
The file /etc/securetty lists the names of the ttys where root is allowed to log in. One
name of a tty device without the /dev/ prefix must be specified on each line. If the file
does not exist, root is allowed to log in on any tty.
On most modern Linux systems PAM (Pluggable Authentication Modules) is used. On systems that do not use PAM, the file /etc/usertty specifies additional access restrictions for specific users. If this file does not exist, no additional access restrictions are imposed. The file consists of a sequence of sections. There are three possible section types: CLASSES, GROUPS and USERS. A CLASSES section defines classes of ttys and hostname patterns, A GROUPS section defines allowed ttys and hosts on a per group basis, and a USERS section defines allowed ttys and hosts on a per user basis.
Each line in this file in may be no longer than 255 characters. Comments start with # character and extend to the end of the line.
The CLASSES Section
A CLASSES section begins with the word CLASSES at the start of a line in all upper
case. Each following line until the start of a new section or the end of the file consists of
a sequence of words separated by tabs or spaces. Each line defines a class of ttys and
host patterns.
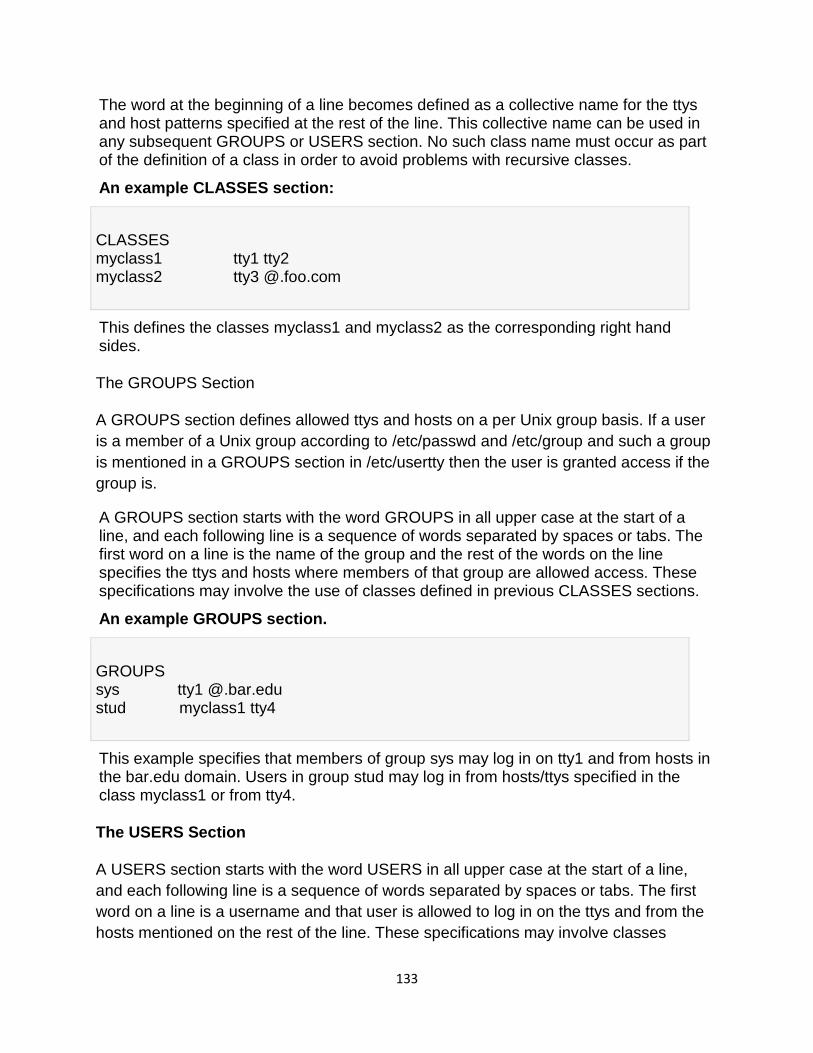
133
The word at the beginning of a line becomes defined as a collective name for the ttys and host patterns specified at the rest of the line. This collective name can be used in any subsequent GROUPS or USERS section. No such class name must occur as part of the definition of a class in order to avoid problems with recursive classes.
An example CLASSES section:
CLASSES myclass1 tty1 tty2 myclass2 tty3 @.foo.com
This defines the classes myclass1 and myclass2 as the corresponding right hand sides.
The GROUPS Section
A GROUPS section defines allowed ttys and hosts on a per Unix group basis. If a user
is a member of a Unix group according to /etc/passwd and /etc/group and such a group
is mentioned in a GROUPS section in /etc/usertty then the user is granted access if the
group is.
A GROUPS section starts with the word GROUPS in all upper case at the start of a line, and each following line is a sequence of words separated by spaces or tabs. The first word on a line is the name of the group and the rest of the words on the line specifies the ttys and hosts where members of that group are allowed access. These specifications may involve the use of classes defined in previous CLASSES sections.
An example GROUPS section.
GROUPS sys tty1 @.bar.edu stud myclass1 tty4
This example specifies that members of group sys may log in on tty1 and from hosts in the bar.edu domain. Users in group stud may log in from hosts/ttys specified in the class myclass1 or from tty4.
The USERS Section
A USERS section starts with the word USERS in all upper case at the start of a line,
and each following line is a sequence of words separated by spaces or tabs. The first
word on a line is a username and that user is allowed to log in on the ttys and from the
hosts mentioned on the rest of the line. These specifications may involve classes
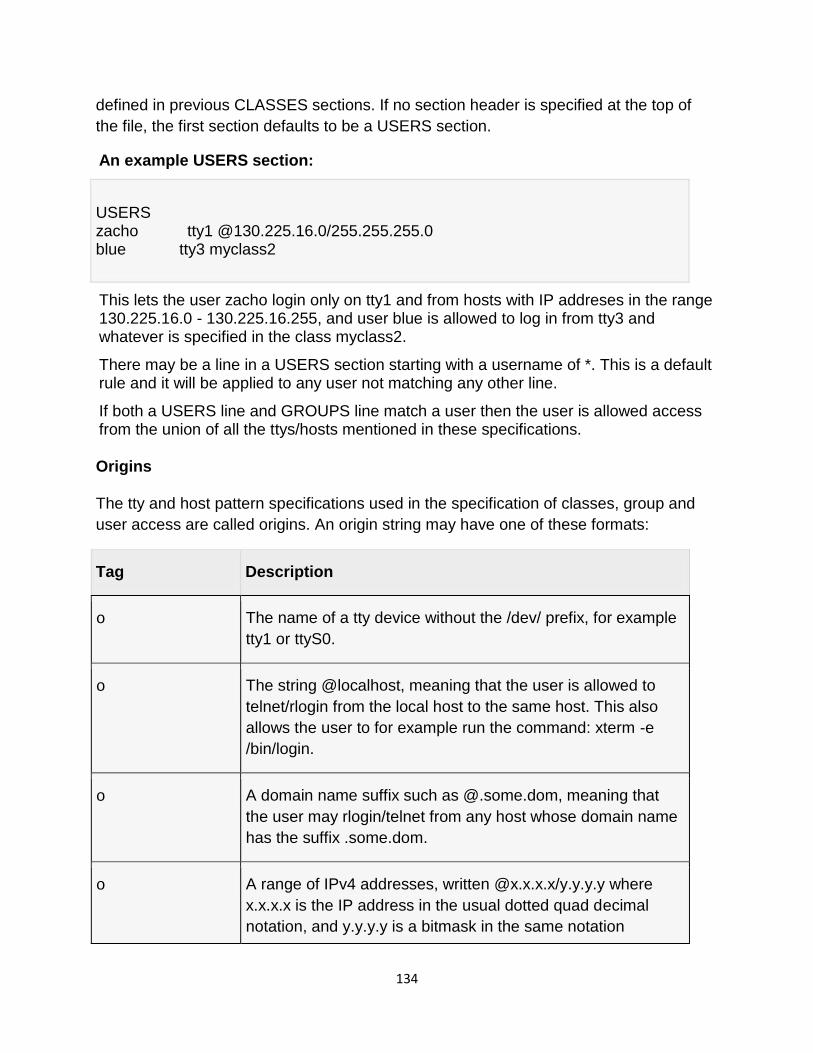
134
defined in previous CLASSES sections. If no section header is specified at the top of
the file, the first section defaults to be a USERS section.
An example USERS section:
USERS zacho tty1 @130.225.16.0/255.255.255.0 blue tty3 myclass2
This lets the user zacho login only on tty1 and from hosts with IP addreses in the range 130.225.16.0 - 130.225.16.255, and user blue is allowed to log in from tty3 and whatever is specified in the class myclass2.
There may be a line in a USERS section starting with a username of *. This is a default rule and it will be applied to any user not matching any other line.
If both a USERS line and GROUPS line match a user then the user is allowed access from the union of all the ttys/hosts mentioned in these specifications.
Origins
The tty and host pattern specifications used in the specification of classes, group and
user access are called origins. An origin string may have one of these formats:
Tag Description
o The name of a tty device without the /dev/ prefix, for example
tty1 or ttyS0.
o The string @localhost, meaning that the user is allowed to
telnet/rlogin from the local host to the same host. This also
allows the user to for example run the command: xterm -e
/bin/login.
o A domain name suffix such as @.some.dom, meaning that
the user may rlogin/telnet from any host whose domain name
has the suffix .some.dom.
o A range of IPv4 addresses, written @x.x.x.x/y.y.y.y where
x.x.x.x is the IP address in the usual dotted quad decimal
notation, and y.y.y.y is a bitmask in the same notation
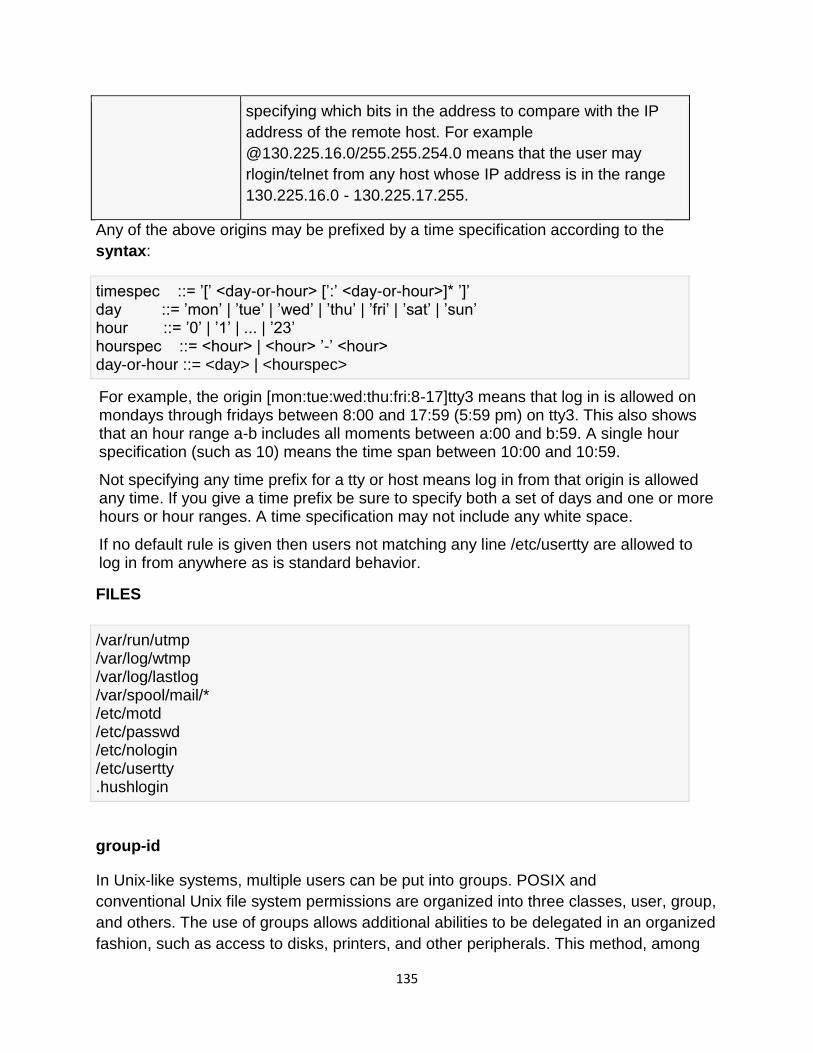
135
specifying which bits in the address to compare with the IP
address of the remote host. For example
@130.225.16.0/255.255.254.0 means that the user may
rlogin/telnet from any host whose IP address is in the range
130.225.16.0 - 130.225.17.255.
Any of the above origins may be prefixed by a time specification according to the
syntax:
timespec ::= ‘[‘ <day-or-hour> [‘:‘ <day-or-hour>]* ‘]‘ day ::= ‘mon‘ | ‘tue‘ | ‘wed‘ | ‘thu‘ | ‘fri‘ | ‘sat‘ | ‘sun‘ hour ::= ‘0‘ | ‘1‘ | ... | ‘23‘ hourspec ::= <hour> | <hour> ‘-‘ <hour> day-or-hour ::= <day> | <hourspec>
For example, the origin [mon:tue:wed:thu:fri:8-17]tty3 means that log in is allowed on mondays through fridays between 8:00 and 17:59 (5:59 pm) on tty3. This also shows that an hour range a-b includes all moments between a:00 and b:59. A single hour specification (such as 10) means the time span between 10:00 and 10:59.
Not specifying any time prefix for a tty or host means log in from that origin is allowed any time. If you give a time prefix be sure to specify both a set of days and one or more hours or hour ranges. A time specification may not include any white space.
If no default rule is given then users not matching any line /etc/usertty are allowed to log in from anywhere as is standard behavior.
FILES
/var/run/utmp /var/log/wtmp /var/log/lastlog /var/spool/mail/* /etc/motd /etc/passwd /etc/nologin /etc/usertty .hushlogin
group-id
In Unix-like systems, multiple users can be put into groups. POSIX and
conventional Unix file system permissions are organized into three classes, user, group,
and others. The use of groups allows additional abilities to be delegated in an organized
fashion, such as access to disks, printers, and other peripherals. This method, among
136
others, also enables the superuser to delegate some administrative tasks to normal
users, similar to the Administrators group on Microsoft Windows NT and its derivatives.
A group identifier, often abbreviated to GID, is a numeric value used to represent a
specific group.[1] The range of values for a GID varies amongst different systems; at the
very least, a GID can be between 0 and 32,767, with one restriction: the login group for
the superuser must have GID 0. This numeric value is used to refer to groups in
the /etc/passwd and /etc/group files or their equivalents. Shadow password files
and Network Information Service also refer to numeric GIDs. The group identifier is a
necessary component of Unix file systems and processes.
Supplementary groups
In Unix systems, every user must be a member of at least one group, the primary group,
which is identified by the numeric GID of the user's entry in the passwd database, which
can be viewed with the command getent passwd (usually stored
in /etc/passwd or LDAP). This group is referred to as the primary group ID. A user may
be listed as member of additional groups in the relevant entries in the group database,
which can be viewed with getent group (usually stored in /etc/group or LDAP); the IDs of
these groups are referred to as supplementary group IDs.
Pipes
A series of filter commands can be piped together using the pipe symbol: ‗|‘. When two
commands are piped together, the stdin of the second program is read from the stdout
of the first program. This creates a powerful mechanism for running complex commands
quickly.
Command
sort: this command is used to sort the contents of the file. This command is
also useful to merge the sorted files and store the result in some file. The
contents of the original file remain unaltered.
Common
Syntax:
sort[OPTION]…[FILE]
Example1: sort file1
This command will sort the contents of file1
Example2: sort -o output_file file1 file2
137
Command
sort: this command is used to sort the contents of the file. This command is
also useful to merge the sorted files and store the result in some file. The
contents of the original file remain unaltered.
This will sort the contents of file1 and file2 and save the result in output_file
file.
Command
cut – this command is used to cut a given number of characters or columns
from a file. For cutting a certain number of columns it is important to specify
the delimiter. A delimiter specifies how the columns are separated in a text
file e.g. number of spaces, tabs or other special characters.
Common
Syntax:
cut OPTION …[FILE]
Example 1 cut -c 5-10 file1
It will cut 5 to 10 characters from each line of file1
Example 2 cut -d ―,― -f2,6 file1
This will cut 2nd and 6th fields from file1, where the fields are separated by
delimiter ―,‖
This will cut 2nd and 6th fields from file1, where the fields are separated by the
delimiter ―,‖.
Let us now see an Example of using pipes to print out a sorted list of unique words. If
file1 has a list of words in a random order with random repetitions, then the following
piping can be used to achieve this.
$ sort file1 | uniq > file2
Here, the sort command reads input from the file ‗file1‘ and sends the output to stdout.
The pipe symbol causes the output of the sort command to be redirected to the input of
the uniq command. The uniq commands reads the sorted list from its stdin and prints
the unique words from there to its stdout.
Finally, the output redirection symbol ‗>‘ redirects the stdout of the uniq command to the
file ‗file2‘.
138
Fifos
It's hard to write a bash script of much import without using a pipe or two. Named pipes, on the other hand, are much rarer.
Like un-named/anonymous pipes, named pipes provide a form of IPC (Inter-Process Communication). With anonymous pipes, there's one reader and one writer, but that's not required with named pipes—any number of readers and writers may use the pipe.
Named pipes are visible in the filesystem and can be read and written just as other files are:
$ ls -la /tmp/testpipe
prw-r--r-- 1 mitch users 0 2009-03-25 12:06 /tmp/testpipe|
Why might you want to use a named pipe in a shell script? One situation might be when you've got a backup script that runs via cron, and after it's finished, you want to shut down your system. If you do the shutdown from the backup script, cron never sees the backup script finish, so it never sends out the e-mail containing the output from the backup job. You could do the shutdown via another cron job after the backup is "supposed" to finish, but then you run the risk of shutting down too early every now and then, or you have to make the delay much larger than it needs to be most of the time.
Using a named pipe, you can start the backup and the shutdown cron jobs at the same time and have the shutdown just wait till the backup writes to the named pipe. When the shutdown job reads something from the pipe, it then pauses for a few minutes so the cron e-mail can go out, and then it shuts down the system.
Of course, the previous example probably could be done fairly reliably by simply creating a regular file to signal when the backup has completed. A more complex example might be if you have a backup that wakes up every hour or so and reads a named pipe to see if it should run. You then could write something to the pipe each time you've made a lot of changes to the files you want to back up. You might even write the names of the files that you want backed up to the pipe so the backup doesn't have to check everything.
Named pipes are created via mkfifo or mknod:
$ mkfifo /tmp/testpipe
$ mknod /tmp/testpipe p
The following shell script reads from a pipe. It first creates the pipe if it doesn't exist, then it reads in a loop till it sees "quit":
#!/bin/bash
139
pipe=/tmp/testpipe
trap "rm -f $pipe" EXIT
if [[ ! -p $pipe ]]; then
mkfifo $pipe
fi
while true
do
if read line <$pipe; then
if [[ "$line" == 'quit' ]]; then
break
fi
echo $line
fi
done
echo "Reader exiting"
The following shell script writes to the pipe created by the read script. First, it checks to make sure the pipe exists, then it writes to the pipe. If an argument is given to the script, it writes it to the pipe; otherwise, it writes "Hello from PID".
#!/bin/bash
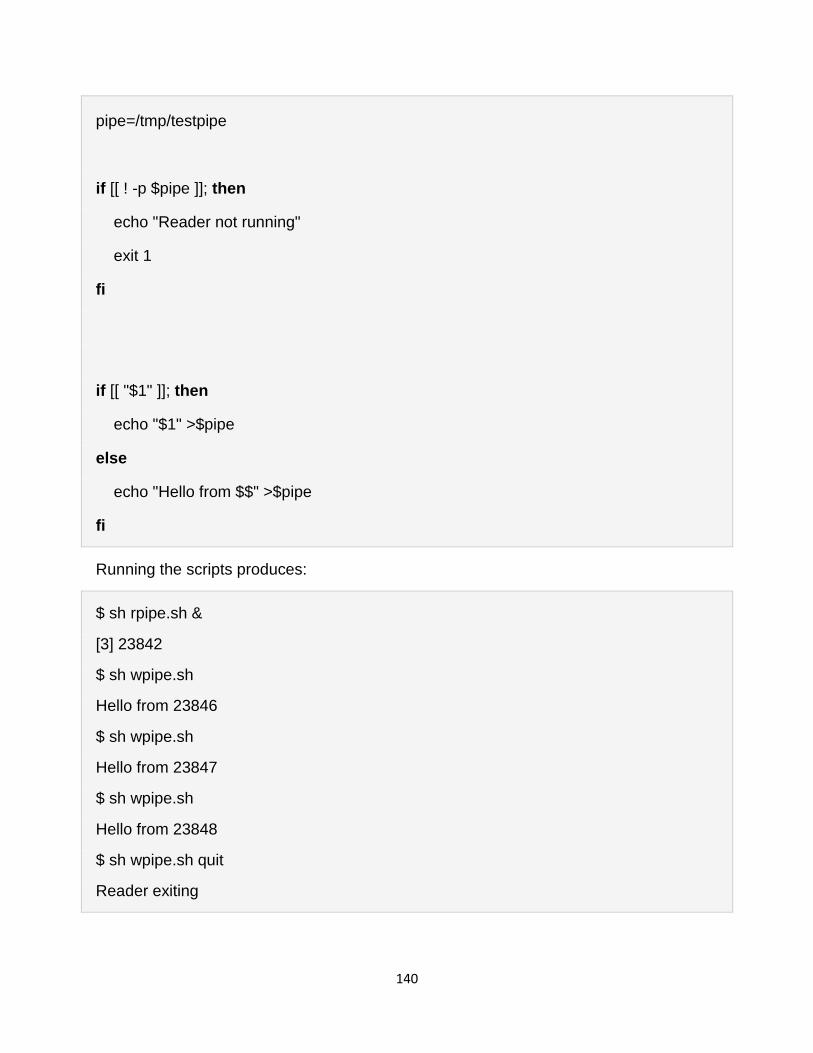
140
pipe=/tmp/testpipe
if [[ ! -p $pipe ]]; then
echo "Reader not running"
exit 1
fi
if [[ "$1" ]]; then
echo "$1" >$pipe
else
echo "Hello from $$" >$pipe
fi
Running the scripts produces:
$ sh rpipe.sh &
[3] 23842
$ sh wpipe.sh
Hello from 23846
$ sh wpipe.sh
Hello from 23847
$ sh wpipe.sh
Hello from 23848
$ sh wpipe.sh quit
Reader exiting
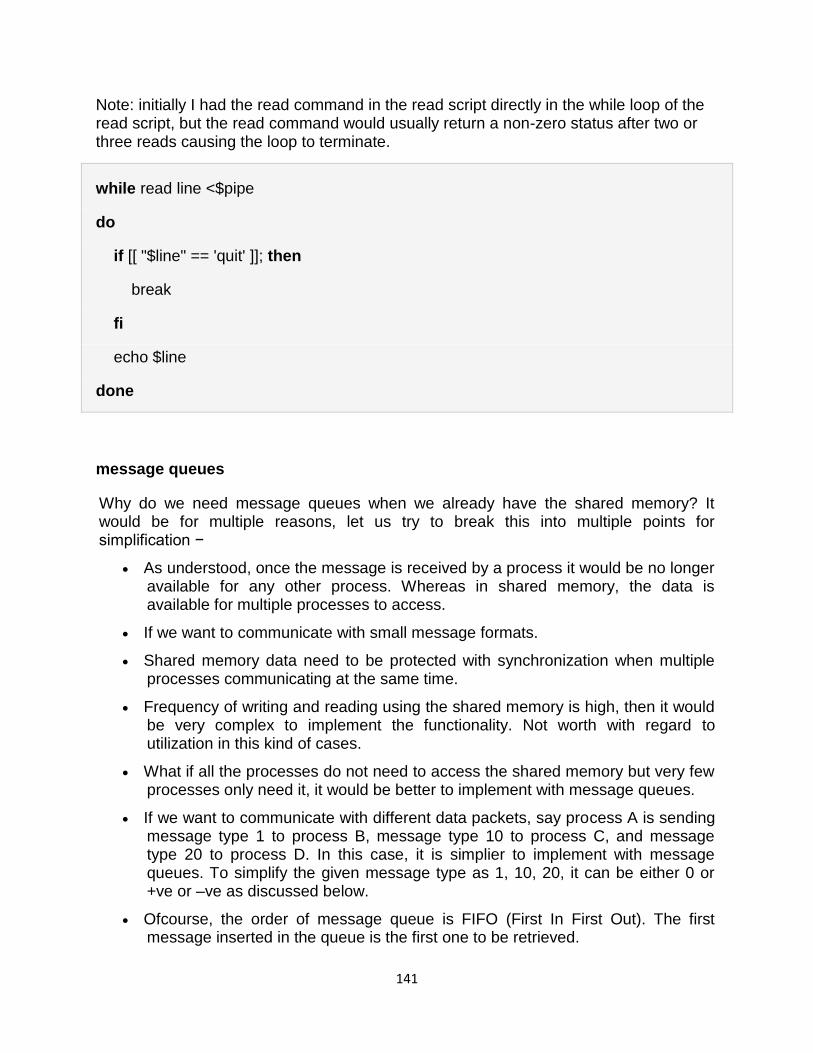
141
Note: initially I had the read command in the read script directly in the while loop of the read script, but the read command would usually return a non-zero status after two or three reads causing the loop to terminate.
while read line <$pipe
do
if [[ "$line" == 'quit' ]]; then
break
fi
echo $line
done
message queues
Why do we need message queues when we already have the shared memory? It would be for multiple reasons, let us try to break this into multiple points for simplification −
As understood, once the message is received by a process it would be no longer available for any other process. Whereas in shared memory, the data is available for multiple processes to access.
If we want to communicate with small message formats.
Shared memory data need to be protected with synchronization when multiple processes communicating at the same time.
Frequency of writing and reading using the shared memory is high, then it would be very complex to implement the functionality. Not worth with regard to utilization in this kind of cases.
What if all the processes do not need to access the shared memory but very few processes only need it, it would be better to implement with message queues.
If we want to communicate with different data packets, say process A is sending message type 1 to process B, message type 10 to process C, and message type 20 to process D. In this case, it is simplier to implement with message queues. To simplify the given message type as 1, 10, 20, it can be either 0 or +ve or –ve as discussed below.
Ofcourse, the order of message queue is FIFO (First In First Out). The first message inserted in the queue is the first one to be retrieved.
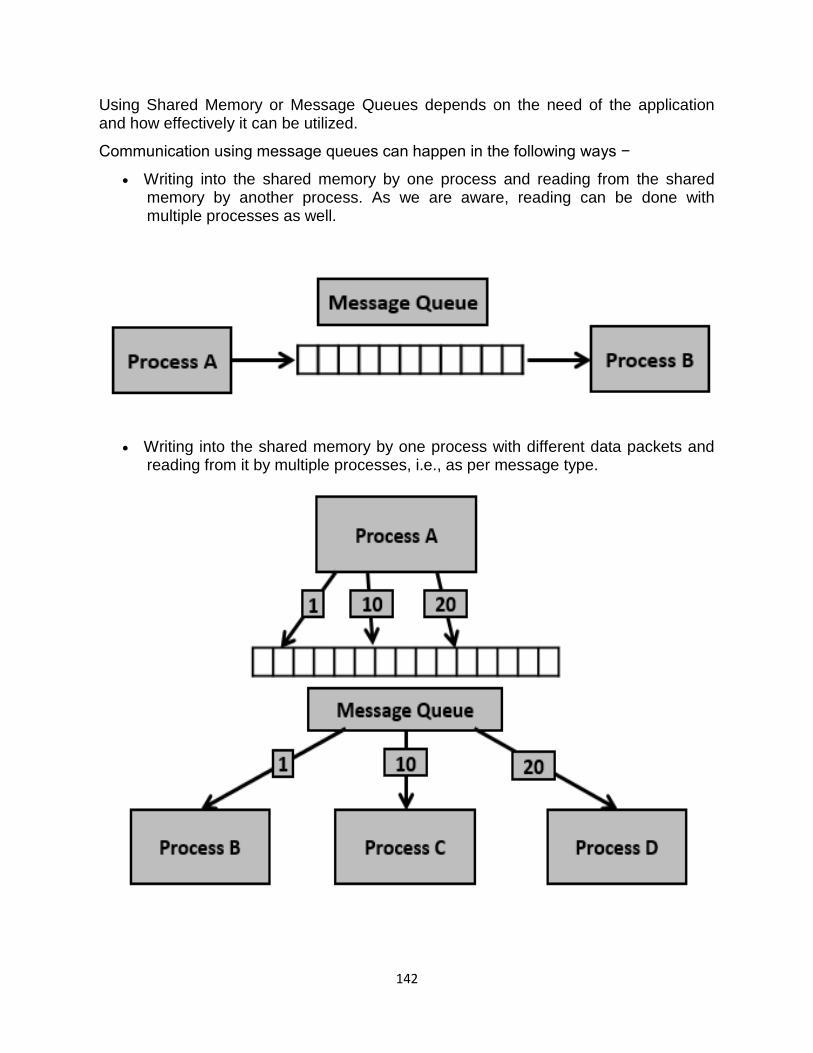
142
Using Shared Memory or Message Queues depends on the need of the application and how effectively it can be utilized.
Communication using message queues can happen in the following ways −
Writing into the shared memory by one process and reading from the shared memory by another process. As we are aware, reading can be done with multiple processes as well.
Writing into the shared memory by one process with different data packets and reading from it by multiple processes, i.e., as per message type.
143
Having seen certain information on message queues, now it is time to check for the system call (System V) which supports the message queues.
To perform communication using message queues, following are the steps −
Step 1 − Create a message queue or connect to an already existing message queue (msgget())
Step 2 − Write into message queue (msgsnd())
Step 3 − Read from the message queue (msgrcv())
Step 4 − Perform control operations on the message queue (msgctl())
Now, let us check the syntax and certain information on the above calls.
#include <sys/types.h> #include <sys/ipc.h> #include <sys/msg.h> int msgget(key_t key, int msgflg)
This system call creates or allocates a System V message queue. Following arguments need to be passed −
The first argument, key, recognizes the message queue. The key can be either an arbitrary value or one that can be derived from the library function ftok().
The second argument, shmflg, specifies the required message queue flag/s such as IPC_CREAT (creating message queue if not exists) or IPC_EXCL (Used with IPC_CREAT to create the message queue and the call fails, if the message queue already exists). Need to pass the permissions as well.
Note − Refer earlier sections for details on permissions.
This call would return a valid message queue identifier (used for further calls of message queue) on success and -1 in case of failure. To know the cause of failure, check with errno variable or perror() function.
Various errors with respect to this call are EACCESS (permission denied), EEXIST (queue already exists can‘t create), ENOENT (queue doesn‘t exist), ENOMEM (not enough memory to create the queue), etc.
#include <sys/types.h> #include <sys/ipc.h> #include <sys/msg.h> int msgsnd(int msgid, const void *msgp, size_t msgsz, int msgflg)
This system call sends/appends a message into the message queue (System V). Following arguments need to be passed −
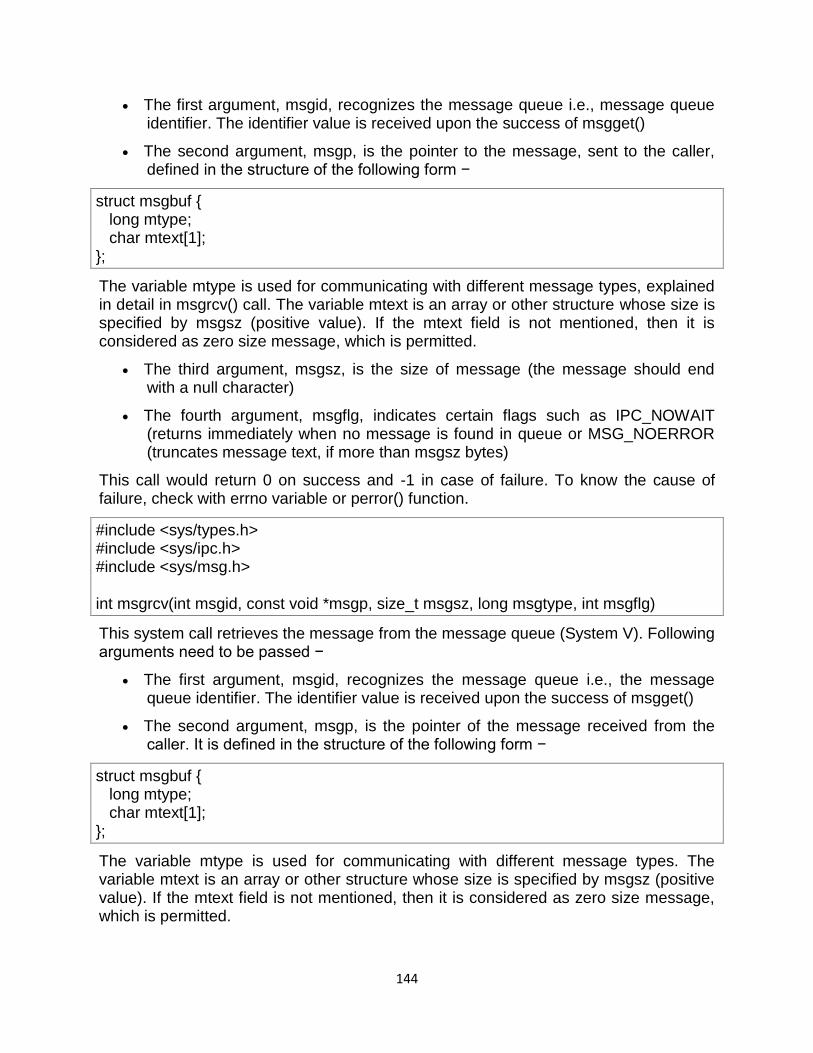
144
The first argument, msgid, recognizes the message queue i.e., message queue identifier. The identifier value is received upon the success of msgget()
The second argument, msgp, is the pointer to the message, sent to the caller, defined in the structure of the following form −
struct msgbuf { long mtype; char mtext[1]; };
The variable mtype is used for communicating with different message types, explained in detail in msgrcv() call. The variable mtext is an array or other structure whose size is specified by msgsz (positive value). If the mtext field is not mentioned, then it is considered as zero size message, which is permitted.
The third argument, msgsz, is the size of message (the message should end with a null character)
The fourth argument, msgflg, indicates certain flags such as IPC_NOWAIT (returns immediately when no message is found in queue or MSG_NOERROR (truncates message text, if more than msgsz bytes)
This call would return 0 on success and -1 in case of failure. To know the cause of failure, check with errno variable or perror() function.
#include <sys/types.h> #include <sys/ipc.h> #include <sys/msg.h> int msgrcv(int msgid, const void *msgp, size_t msgsz, long msgtype, int msgflg)
This system call retrieves the message from the message queue (System V). Following arguments need to be passed −
The first argument, msgid, recognizes the message queue i.e., the message queue identifier. The identifier value is received upon the success of msgget()
The second argument, msgp, is the pointer of the message received from the caller. It is defined in the structure of the following form −
struct msgbuf { long mtype; char mtext[1]; };
The variable mtype is used for communicating with different message types. The variable mtext is an array or other structure whose size is specified by msgsz (positive value). If the mtext field is not mentioned, then it is considered as zero size message, which is permitted.
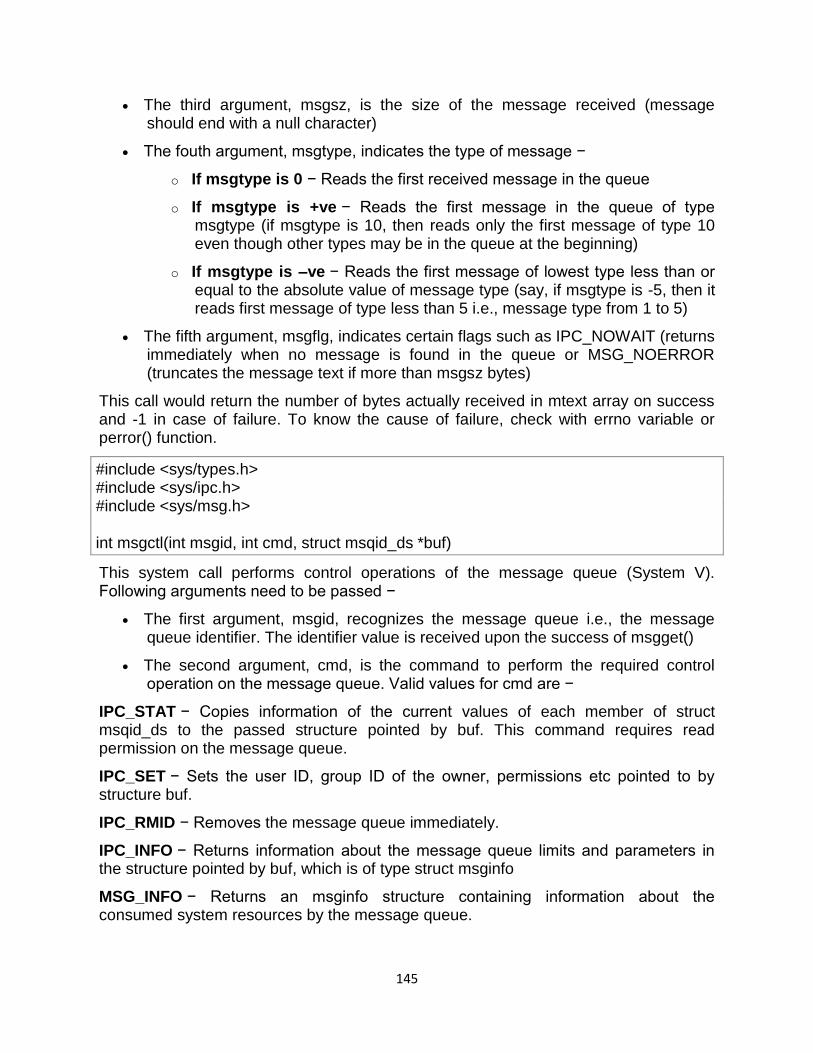
145
The third argument, msgsz, is the size of the message received (message should end with a null character)
The fouth argument, msgtype, indicates the type of message −
o If msgtype is 0 − Reads the first received message in the queue
o If msgtype is +ve − Reads the first message in the queue of type msgtype (if msgtype is 10, then reads only the first message of type 10 even though other types may be in the queue at the beginning)
o If msgtype is –ve − Reads the first message of lowest type less than or equal to the absolute value of message type (say, if msgtype is -5, then it reads first message of type less than 5 i.e., message type from 1 to 5)
The fifth argument, msgflg, indicates certain flags such as IPC_NOWAIT (returns immediately when no message is found in the queue or MSG_NOERROR (truncates the message text if more than msgsz bytes)
This call would return the number of bytes actually received in mtext array on success and -1 in case of failure. To know the cause of failure, check with errno variable or perror() function.
#include <sys/types.h> #include <sys/ipc.h> #include <sys/msg.h> int msgctl(int msgid, int cmd, struct msqid_ds *buf)
This system call performs control operations of the message queue (System V). Following arguments need to be passed −
The first argument, msgid, recognizes the message queue i.e., the message queue identifier. The identifier value is received upon the success of msgget()
The second argument, cmd, is the command to perform the required control operation on the message queue. Valid values for cmd are −
IPC_STAT − Copies information of the current values of each member of struct msqid_ds to the passed structure pointed by buf. This command requires read permission on the message queue.
IPC_SET − Sets the user ID, group ID of the owner, permissions etc pointed to by structure buf.
IPC_RMID − Removes the message queue immediately.
IPC_INFO − Returns information about the message queue limits and parameters in the structure pointed by buf, which is of type struct msginfo
MSG_INFO − Returns an msginfo structure containing information about the consumed system resources by the message queue.
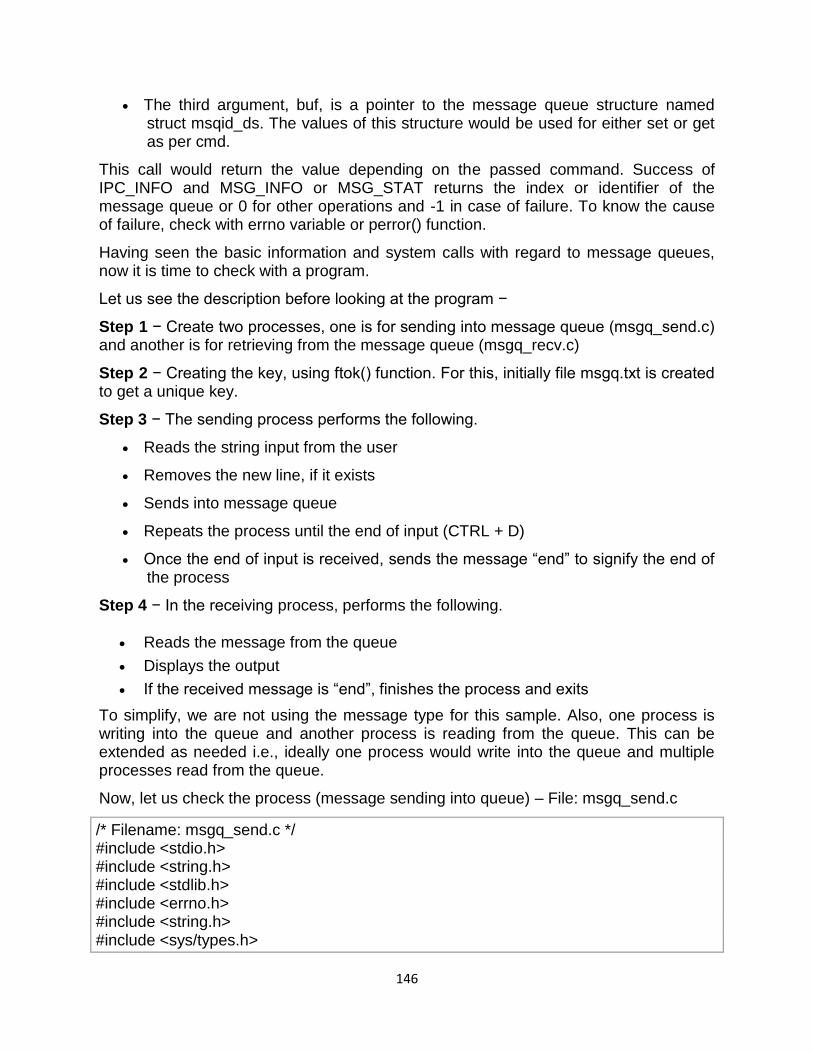
146
The third argument, buf, is a pointer to the message queue structure named struct msqid_ds. The values of this structure would be used for either set or get as per cmd.
This call would return the value depending on the passed command. Success of IPC_INFO and MSG_INFO or MSG_STAT returns the index or identifier of the message queue or 0 for other operations and -1 in case of failure. To know the cause of failure, check with errno variable or perror() function.
Having seen the basic information and system calls with regard to message queues, now it is time to check with a program.
Let us see the description before looking at the program −
Step 1 − Create two processes, one is for sending into message queue (msgq_send.c) and another is for retrieving from the message queue (msgq_recv.c)
Step 2 − Creating the key, using ftok() function. For this, initially file msgq.txt is created to get a unique key.
Step 3 − The sending process performs the following.
Reads the string input from the user
Removes the new line, if it exists
Sends into message queue
Repeats the process until the end of input (CTRL + D)
Once the end of input is received, sends the message ―end‖ to signify the end of the process
Step 4 − In the receiving process, performs the following.
Reads the message from the queue
Displays the output
If the received message is ―end‖, finishes the process and exits
To simplify, we are not using the message type for this sample. Also, one process is writing into the queue and another process is reading from the queue. This can be extended as needed i.e., ideally one process would write into the queue and multiple processes read from the queue.
Now, let us check the process (message sending into queue) – File: msgq_send.c
/* Filename: msgq_send.c */ #include <stdio.h> #include <string.h> #include <stdlib.h> #include <errno.h> #include <string.h> #include <sys/types.h>
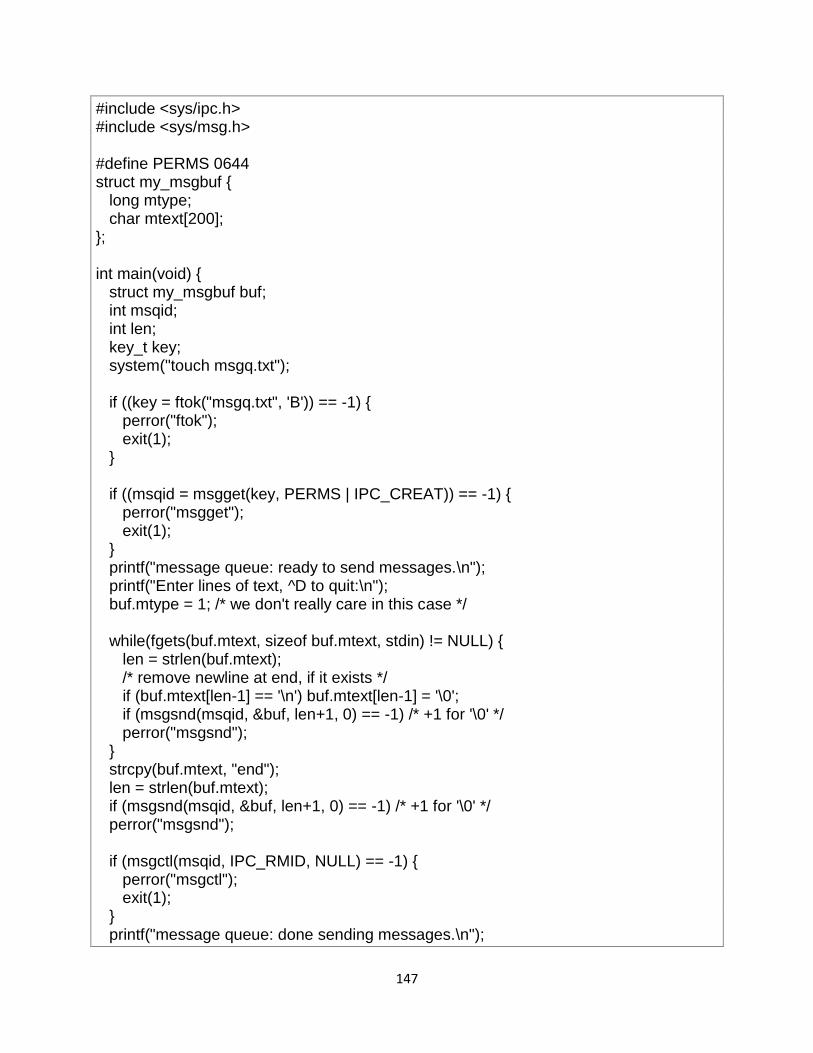
147
#include <sys/ipc.h> #include <sys/msg.h> #define PERMS 0644 struct my_msgbuf { long mtype; char mtext[200]; }; int main(void) { struct my_msgbuf buf; int msqid; int len; key_t key; system("touch msgq.txt"); if ((key = ftok("msgq.txt", 'B')) == -1) { perror("ftok"); exit(1); } if ((msqid = msgget(key, PERMS | IPC_CREAT)) == -1) { perror("msgget"); exit(1); } printf("message queue: ready to send messages.\n"); printf("Enter lines of text, ^D to quit:\n"); buf.mtype = 1; /* we don't really care in this case */ while(fgets(buf.mtext, sizeof buf.mtext, stdin) != NULL) { len = strlen(buf.mtext); /* remove newline at end, if it exists */ if (buf.mtext[len-1] == '\n') buf.mtext[len-1] = '\0'; if (msgsnd(msqid, &buf, len+1, 0) == -1) /* +1 for '\0' */ perror("msgsnd"); } strcpy(buf.mtext, "end"); len = strlen(buf.mtext); if (msgsnd(msqid, &buf, len+1, 0) == -1) /* +1 for '\0' */ perror("msgsnd"); if (msgctl(msqid, IPC_RMID, NULL) == -1) { perror("msgctl"); exit(1); } printf("message queue: done sending messages.\n");
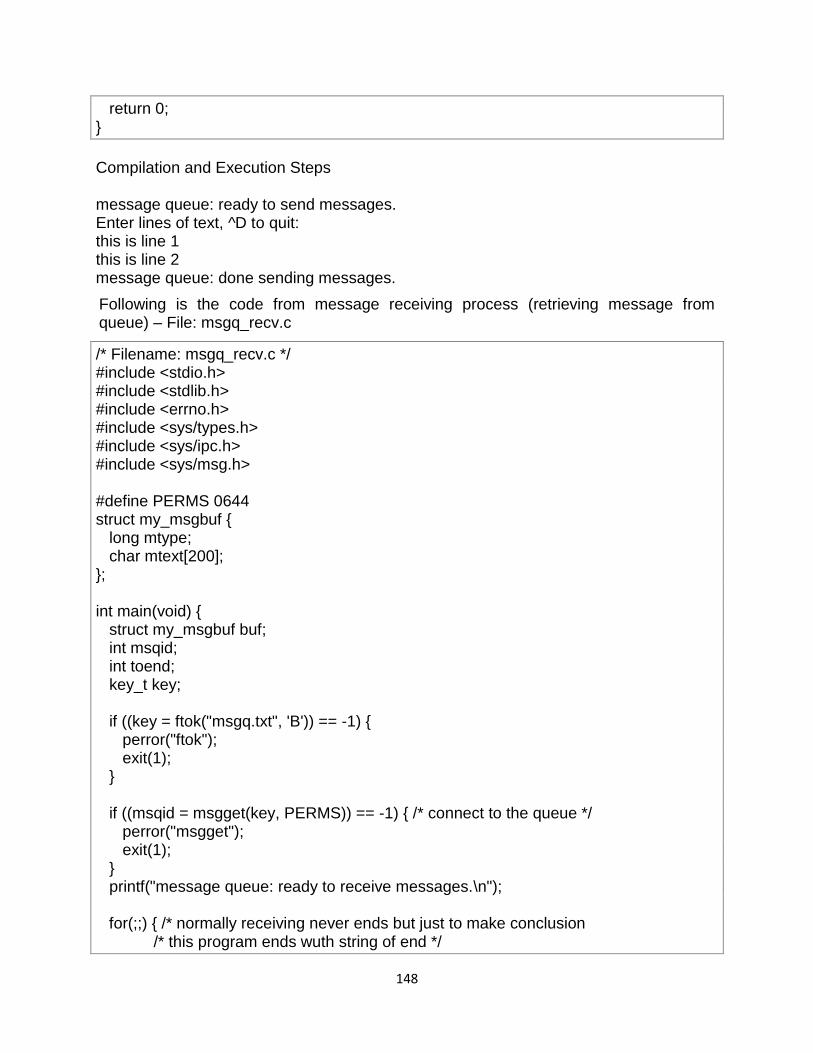
148
return 0; }
Compilation and Execution Steps
message queue: ready to send messages. Enter lines of text, ^D to quit: this is line 1 this is line 2 message queue: done sending messages.
Following is the code from message receiving process (retrieving message from queue) – File: msgq_recv.c
/* Filename: msgq_recv.c */ #include <stdio.h> #include <stdlib.h> #include <errno.h> #include <sys/types.h> #include <sys/ipc.h> #include <sys/msg.h> #define PERMS 0644 struct my_msgbuf { long mtype; char mtext[200]; }; int main(void) { struct my_msgbuf buf; int msqid; int toend; key_t key; if ((key = ftok("msgq.txt", 'B')) == -1) { perror("ftok"); exit(1); } if ((msqid = msgget(key, PERMS)) == -1) { /* connect to the queue */ perror("msgget"); exit(1); } printf("message queue: ready to receive messages.\n"); for(;;) { /* normally receiving never ends but just to make conclusion /* this program ends wuth string of end */
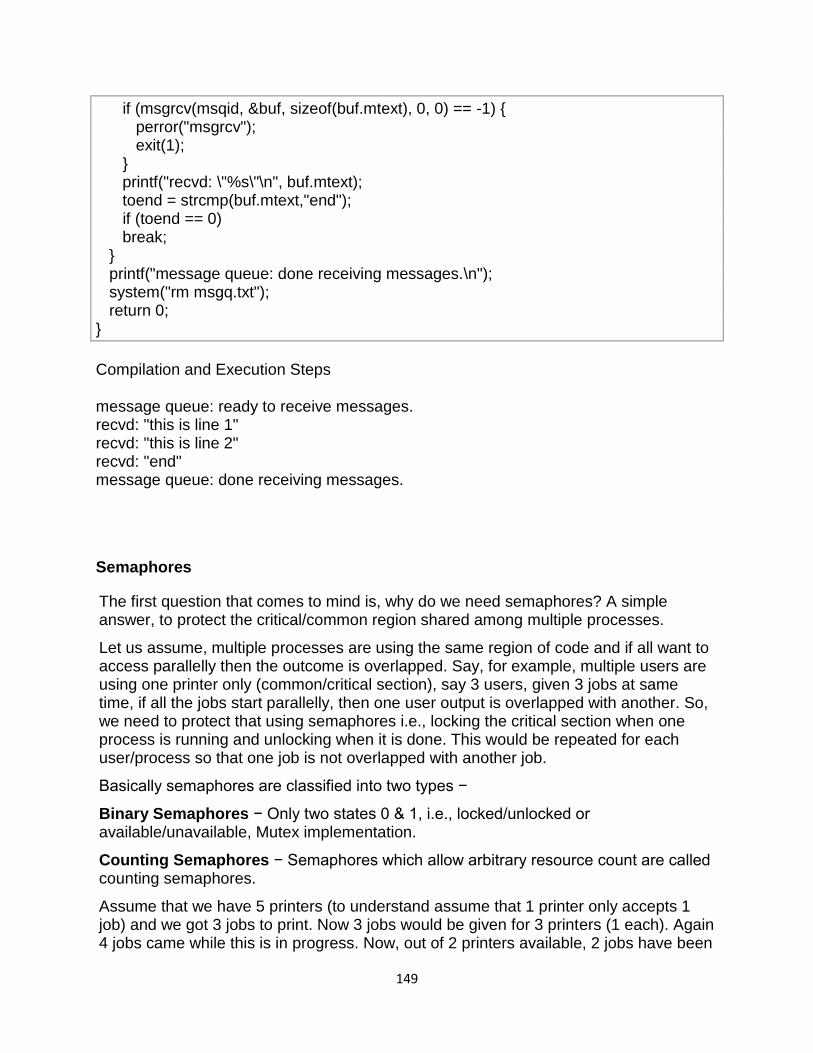
149
if (msgrcv(msqid, &buf, sizeof(buf.mtext), 0, 0) == -1) { perror("msgrcv"); exit(1); } printf("recvd: \"%s\"\n", buf.mtext); toend = strcmp(buf.mtext,"end"); if (toend == 0) break; } printf("message queue: done receiving messages.\n"); system("rm msgq.txt"); return 0; }
Compilation and Execution Steps
message queue: ready to receive messages. recvd: "this is line 1" recvd: "this is line 2" recvd: "end" message queue: done receiving messages.
Semaphores
The first question that comes to mind is, why do we need semaphores? A simple answer, to protect the critical/common region shared among multiple processes.
Let us assume, multiple processes are using the same region of code and if all want to access parallelly then the outcome is overlapped. Say, for example, multiple users are using one printer only (common/critical section), say 3 users, given 3 jobs at same time, if all the jobs start parallelly, then one user output is overlapped with another. So, we need to protect that using semaphores i.e., locking the critical section when one process is running and unlocking when it is done. This would be repeated for each user/process so that one job is not overlapped with another job.
Basically semaphores are classified into two types −
Binary Semaphores − Only two states 0 & 1, i.e., locked/unlocked or available/unavailable, Mutex implementation.
Counting Semaphores − Semaphores which allow arbitrary resource count are called counting semaphores.
Assume that we have 5 printers (to understand assume that 1 printer only accepts 1 job) and we got 3 jobs to print. Now 3 jobs would be given for 3 printers (1 each). Again 4 jobs came while this is in progress. Now, out of 2 printers available, 2 jobs have been

150
scheduled and we are left with 2 more jobs, which would be completed only after one of the resource/printer is available. This kind of scheduling as per resource availability can be viewed as counting semaphores.
To perform synchronization using semaphores, following are the steps −
Step 1 − Create a semaphore or connect to an already existing semaphore (semget())
Step 2 − Perform operations on the semaphore i.e., allocate or release or wait for the resources (semop())
Step 3 − Perform control operations on the message queue (semctl())
Now, let us check this with the system calls we have.
#include <sys/types.h> #include <sys/ipc.h> #include <sys/sem.h> int semget(key_t key, int nsems, int semflg)
This system call creates or allocates a System V semaphore set. The following arguments need to be passed −
The first argument, key, recognizes the message queue. The key can be either an arbitrary value or one that can be derived from the library function ftok().
The second argument, nsems, specifies the number of semaphores. If binary then it is 1, implies need of 1 semaphore set, otherwise as per the required count of number of semaphore sets.
The third argument, semflg, specifies the required semaphore flag/s such as IPC_CREAT (creating semaphore if it does not exist) or IPC_EXCL (used with IPC_CREAT to create semaphore and the call fails, if a semaphore already exists). Need to pass the permissions as well.
Note − Refer earlier sections for details on permissions.
This call would return valid semaphore identifier (used for further calls of semaphores) on success and -1 in case of failure. To know the cause of failure, check with errno variable or perror() function.
Various errors with respect to this call are EACCESS (permission denied), EEXIST (queue already exists can‘t create), ENOENT (queue doesn‘t exist), ENOMEM (not enough memory to create the queue), ENOSPC (maximum sets limit exceeded), etc.
#include <sys/types.h> #include <sys/ipc.h> #include <sys/sem.h> int semop(int semid, struct sembuf *semops, size_t nsemops)
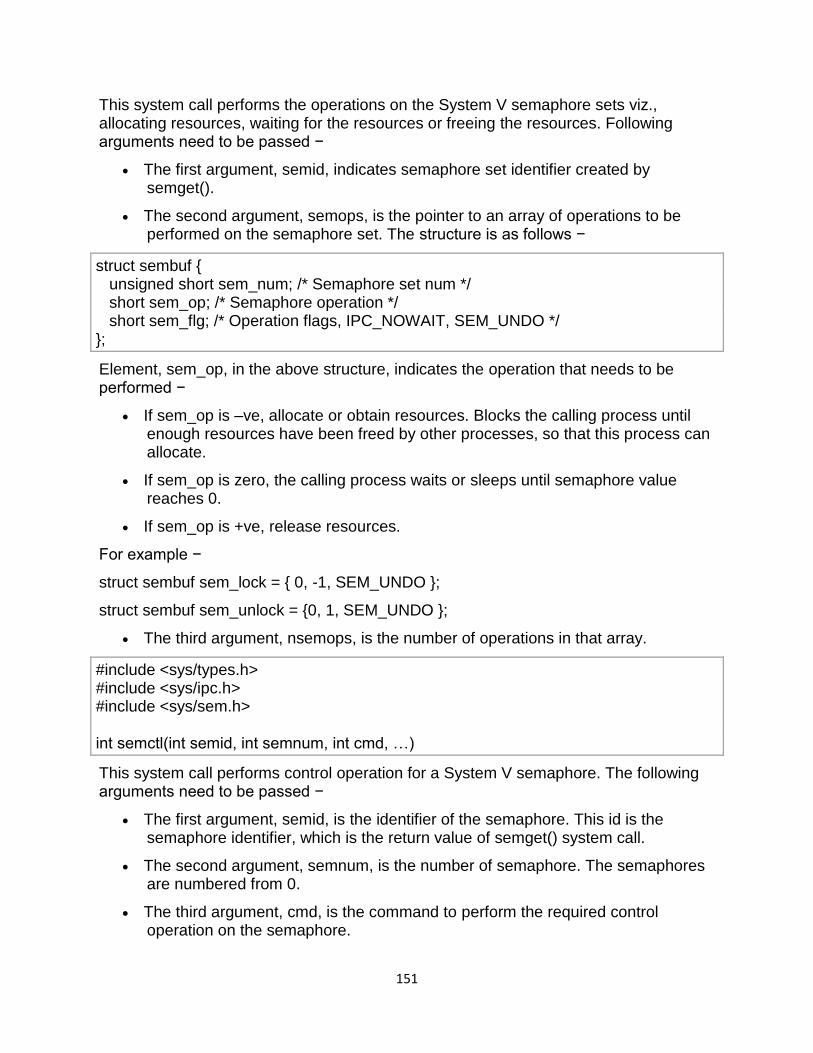
151
This system call performs the operations on the System V semaphore sets viz., allocating resources, waiting for the resources or freeing the resources. Following arguments need to be passed −
The first argument, semid, indicates semaphore set identifier created by semget().
The second argument, semops, is the pointer to an array of operations to be performed on the semaphore set. The structure is as follows −
struct sembuf { unsigned short sem_num; /* Semaphore set num */ short sem_op; /* Semaphore operation */ short sem_flg; /* Operation flags, IPC_NOWAIT, SEM_UNDO */ };
Element, sem_op, in the above structure, indicates the operation that needs to be performed −
If sem_op is –ve, allocate or obtain resources. Blocks the calling process until enough resources have been freed by other processes, so that this process can allocate.
If sem_op is zero, the calling process waits or sleeps until semaphore value reaches 0.
If sem_op is +ve, release resources.
For example −
struct sembuf sem_lock = { 0, -1, SEM_UNDO };
struct sembuf sem_unlock = {0, 1, SEM_UNDO };
The third argument, nsemops, is the number of operations in that array.
#include <sys/types.h> #include <sys/ipc.h> #include <sys/sem.h> int semctl(int semid, int semnum, int cmd, …)
This system call performs control operation for a System V semaphore. The following arguments need to be passed −
The first argument, semid, is the identifier of the semaphore. This id is the semaphore identifier, which is the return value of semget() system call.
The second argument, semnum, is the number of semaphore. The semaphores are numbered from 0.
The third argument, cmd, is the command to perform the required control operation on the semaphore.
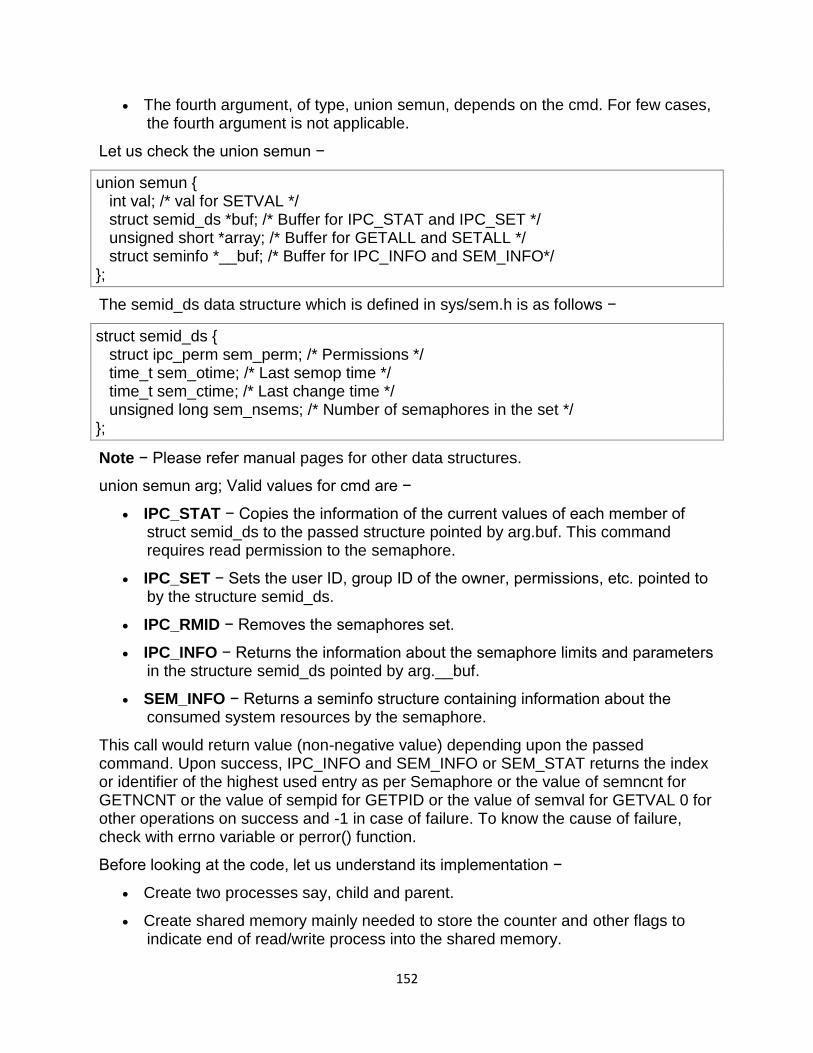
152
The fourth argument, of type, union semun, depends on the cmd. For few cases, the fourth argument is not applicable.
Let us check the union semun −
union semun { int val; /* val for SETVAL */ struct semid_ds *buf; /* Buffer for IPC_STAT and IPC_SET */ unsigned short *array; /* Buffer for GETALL and SETALL */ struct seminfo *__buf; /* Buffer for IPC_INFO and SEM_INFO*/ };
The semid_ds data structure which is defined in sys/sem.h is as follows −
struct semid_ds { struct ipc_perm sem_perm; /* Permissions */ time_t sem_otime; /* Last semop time */ time_t sem_ctime; /* Last change time */ unsigned long sem_nsems; /* Number of semaphores in the set */ };
Note − Please refer manual pages for other data structures.
union semun arg; Valid values for cmd are −
IPC_STAT − Copies the information of the current values of each member of struct semid_ds to the passed structure pointed by arg.buf. This command requires read permission to the semaphore.
IPC_SET − Sets the user ID, group ID of the owner, permissions, etc. pointed to by the structure semid_ds.
IPC_RMID − Removes the semaphores set.
IPC_INFO − Returns the information about the semaphore limits and parameters in the structure semid_ds pointed by arg.__buf.
SEM_INFO − Returns a seminfo structure containing information about the consumed system resources by the semaphore.
This call would return value (non-negative value) depending upon the passed command. Upon success, IPC_INFO and SEM_INFO or SEM_STAT returns the index or identifier of the highest used entry as per Semaphore or the value of semncnt for GETNCNT or the value of sempid for GETPID or the value of semval for GETVAL 0 for other operations on success and -1 in case of failure. To know the cause of failure, check with errno variable or perror() function.
Before looking at the code, let us understand its implementation −
Create two processes say, child and parent.
Create shared memory mainly needed to store the counter and other flags to indicate end of read/write process into the shared memory.
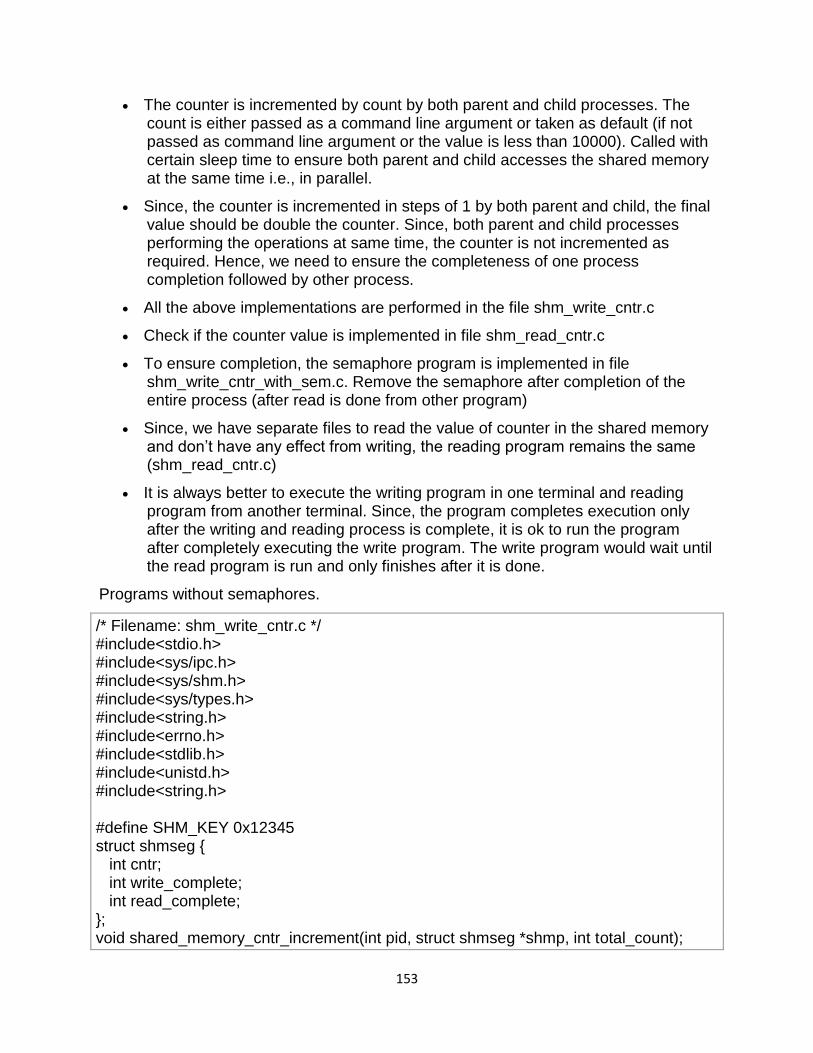
153
The counter is incremented by count by both parent and child processes. The count is either passed as a command line argument or taken as default (if not passed as command line argument or the value is less than 10000). Called with certain sleep time to ensure both parent and child accesses the shared memory at the same time i.e., in parallel.
Since, the counter is incremented in steps of 1 by both parent and child, the final value should be double the counter. Since, both parent and child processes performing the operations at same time, the counter is not incremented as required. Hence, we need to ensure the completeness of one process completion followed by other process.
All the above implementations are performed in the file shm_write_cntr.c
Check if the counter value is implemented in file shm_read_cntr.c
To ensure completion, the semaphore program is implemented in file shm_write_cntr_with_sem.c. Remove the semaphore after completion of the entire process (after read is done from other program)
Since, we have separate files to read the value of counter in the shared memory and don‘t have any effect from writing, the reading program remains the same (shm_read_cntr.c)
It is always better to execute the writing program in one terminal and reading program from another terminal. Since, the program completes execution only after the writing and reading process is complete, it is ok to run the program after completely executing the write program. The write program would wait until the read program is run and only finishes after it is done.
Programs without semaphores.
/* Filename: shm_write_cntr.c */ #include<stdio.h> #include<sys/ipc.h> #include<sys/shm.h> #include<sys/types.h> #include<string.h> #include<errno.h> #include<stdlib.h> #include<unistd.h> #include<string.h> #define SHM_KEY 0x12345 struct shmseg { int cntr; int write_complete; int read_complete; }; void shared_memory_cntr_increment(int pid, struct shmseg *shmp, int total_count);
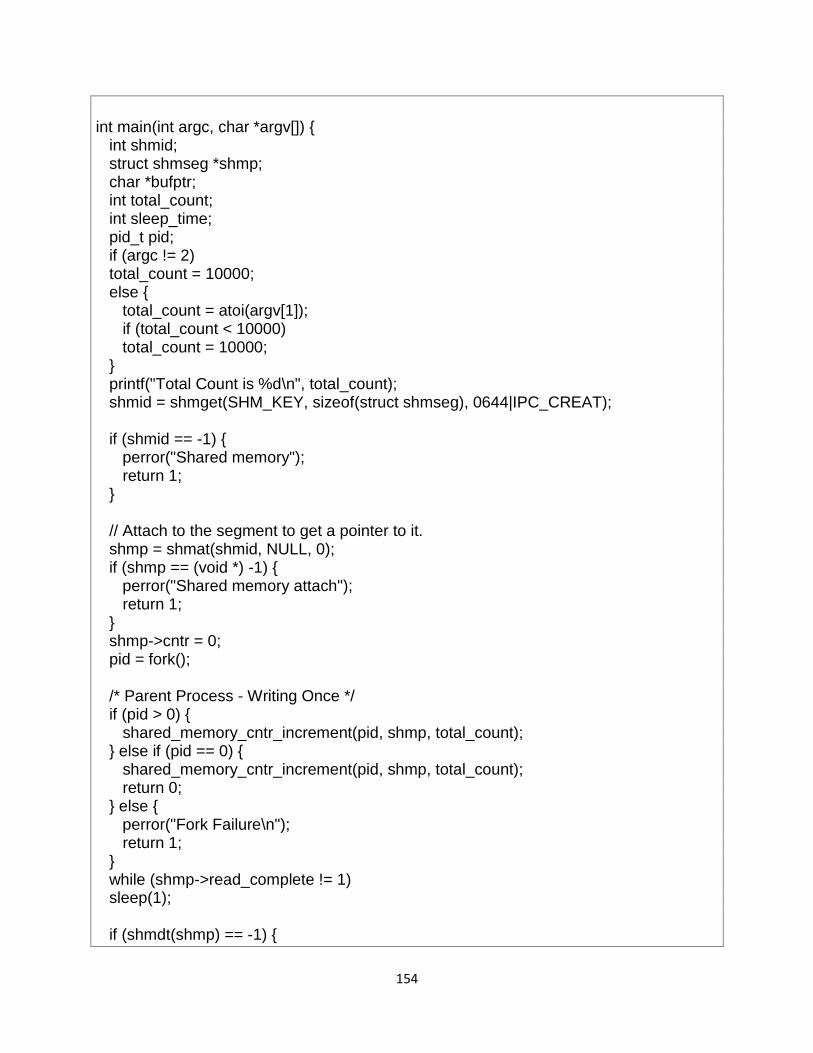
154
int main(int argc, char *argv[]) { int shmid; struct shmseg *shmp; char *bufptr; int total_count; int sleep_time; pid_t pid; if (argc != 2) total_count = 10000; else { total_count = atoi(argv[1]); if (total_count < 10000) total_count = 10000; } printf("Total Count is %d\n", total_count); shmid = shmget(SHM_KEY, sizeof(struct shmseg), 0644|IPC_CREAT); if (shmid == -1) { perror("Shared memory"); return 1; } // Attach to the segment to get a pointer to it. shmp = shmat(shmid, NULL, 0); if (shmp == (void *) -1) { perror("Shared memory attach"); return 1; } shmp->cntr = 0; pid = fork(); /* Parent Process - Writing Once */ if (pid > 0) { shared_memory_cntr_increment(pid, shmp, total_count); } else if (pid == 0) { shared_memory_cntr_increment(pid, shmp, total_count); return 0; } else { perror("Fork Failure\n"); return 1; } while (shmp->read_complete != 1) sleep(1); if (shmdt(shmp) == -1) {
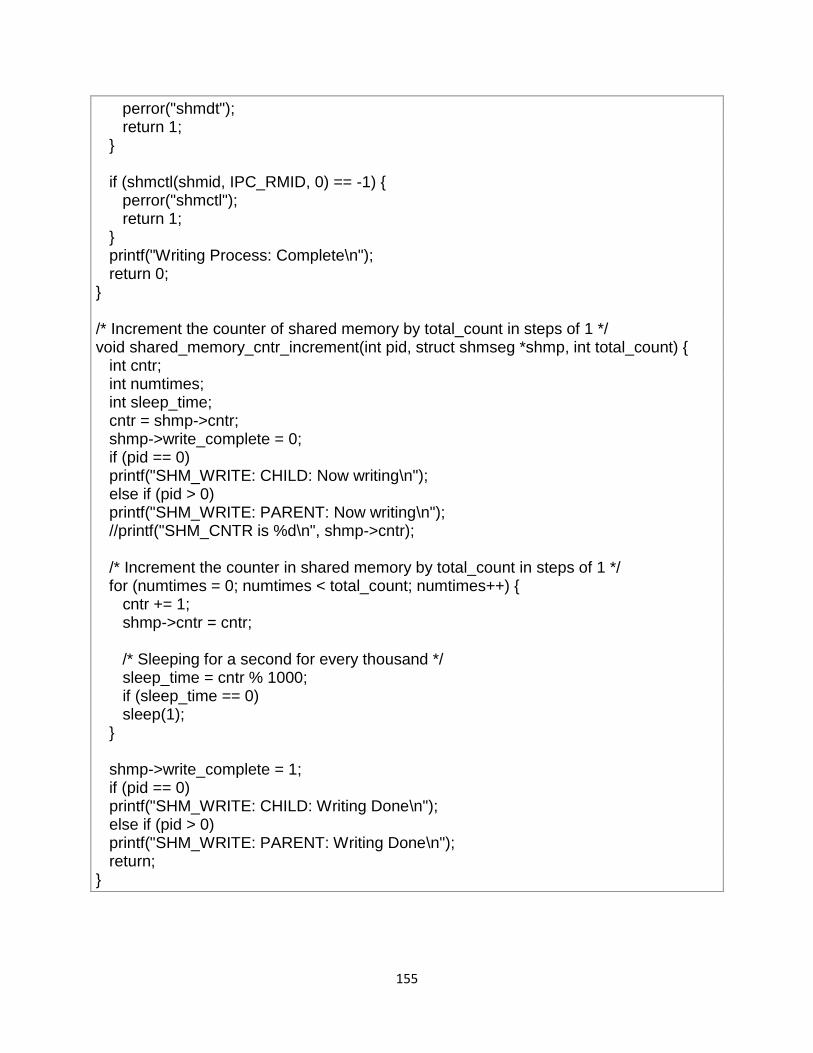
155
perror("shmdt"); return 1; } if (shmctl(shmid, IPC_RMID, 0) == -1) { perror("shmctl"); return 1; } printf("Writing Process: Complete\n"); return 0; } /* Increment the counter of shared memory by total_count in steps of 1 */ void shared_memory_cntr_increment(int pid, struct shmseg *shmp, int total_count) { int cntr; int numtimes; int sleep_time; cntr = shmp->cntr; shmp->write_complete = 0; if (pid == 0) printf("SHM_WRITE: CHILD: Now writing\n"); else if (pid > 0) printf("SHM_WRITE: PARENT: Now writing\n"); //printf("SHM_CNTR is %d\n", shmp->cntr); /* Increment the counter in shared memory by total_count in steps of 1 */ for (numtimes = 0; numtimes < total_count; numtimes++) { cntr += 1; shmp->cntr = cntr; /* Sleeping for a second for every thousand */ sleep_time = cntr % 1000; if (sleep_time == 0) sleep(1); } shmp->write_complete = 1; if (pid == 0) printf("SHM_WRITE: CHILD: Writing Done\n"); else if (pid > 0) printf("SHM_WRITE: PARENT: Writing Done\n"); return; }

156
Compilation and Execution Steps
Total Count is 10000 SHM_WRITE: PARENT: Now writing SHM_WRITE: CHILD: Now writing SHM_WRITE: PARENT: Writing Done SHM_WRITE: CHILD: Writing Done Writing Process: Complete
Now, let us check the shared memory reading program.
/* Filename: shm_read_cntr.c */ #include<stdio.h> #include<sys/ipc.h> #include<sys/shm.h> #include<sys/types.h> #include<string.h> #include<errno.h> #include<stdlib.h> #include<unistd.h> #define SHM_KEY 0x12345 struct shmseg { int cntr; int write_complete; int read_complete; }; int main(int argc, char *argv[]) { int shmid, numtimes; struct shmseg *shmp; int total_count; int cntr; int sleep_time; if (argc != 2) total_count = 10000; else { total_count = atoi(argv[1]); if (total_count < 10000) total_count = 10000; } shmid = shmget(SHM_KEY, sizeof(struct shmseg), 0644|IPC_CREAT); if (shmid == -1) { perror("Shared memory"); return 1;
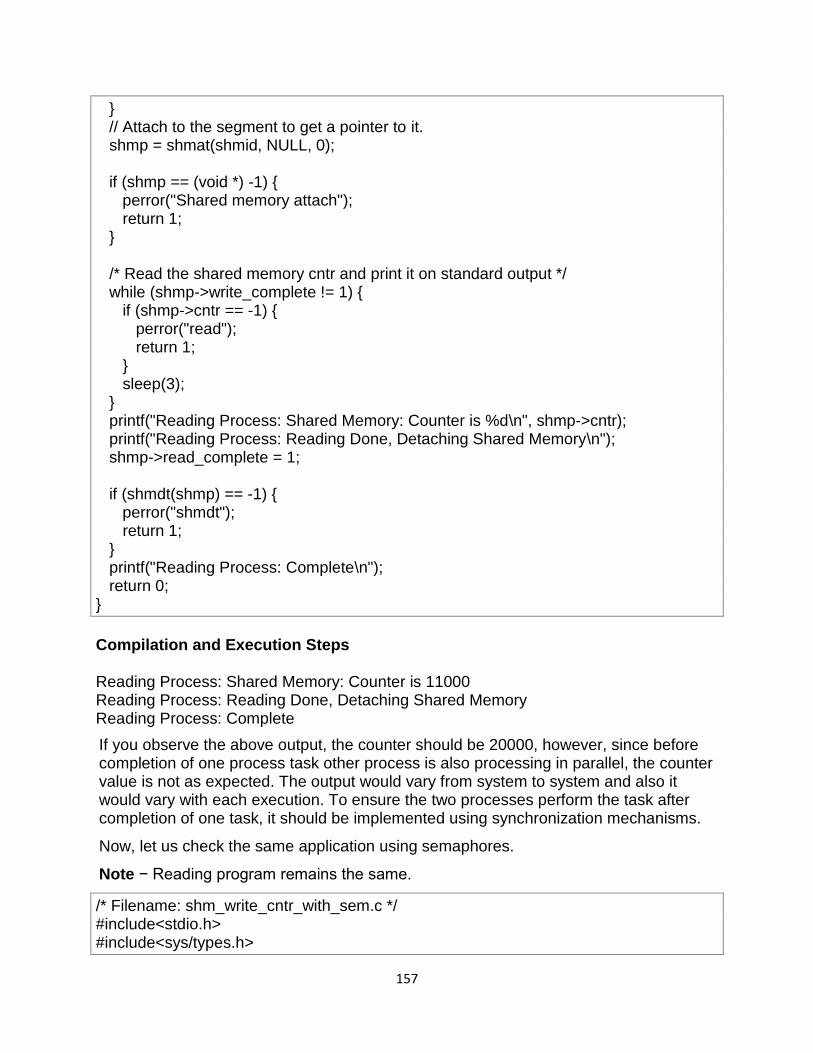
157
} // Attach to the segment to get a pointer to it. shmp = shmat(shmid, NULL, 0); if (shmp == (void *) -1) { perror("Shared memory attach"); return 1; } /* Read the shared memory cntr and print it on standard output */ while (shmp->write_complete != 1) { if (shmp->cntr == -1) { perror("read"); return 1; } sleep(3); } printf("Reading Process: Shared Memory: Counter is %d\n", shmp->cntr); printf("Reading Process: Reading Done, Detaching Shared Memory\n"); shmp->read_complete = 1; if (shmdt(shmp) == -1) { perror("shmdt"); return 1; } printf("Reading Process: Complete\n"); return 0; }
Compilation and Execution Steps
Reading Process: Shared Memory: Counter is 11000 Reading Process: Reading Done, Detaching Shared Memory Reading Process: Complete
If you observe the above output, the counter should be 20000, however, since before completion of one process task other process is also processing in parallel, the counter value is not as expected. The output would vary from system to system and also it would vary with each execution. To ensure the two processes perform the task after completion of one task, it should be implemented using synchronization mechanisms.
Now, let us check the same application using semaphores.
Note − Reading program remains the same.
/* Filename: shm_write_cntr_with_sem.c */ #include<stdio.h> #include<sys/types.h>
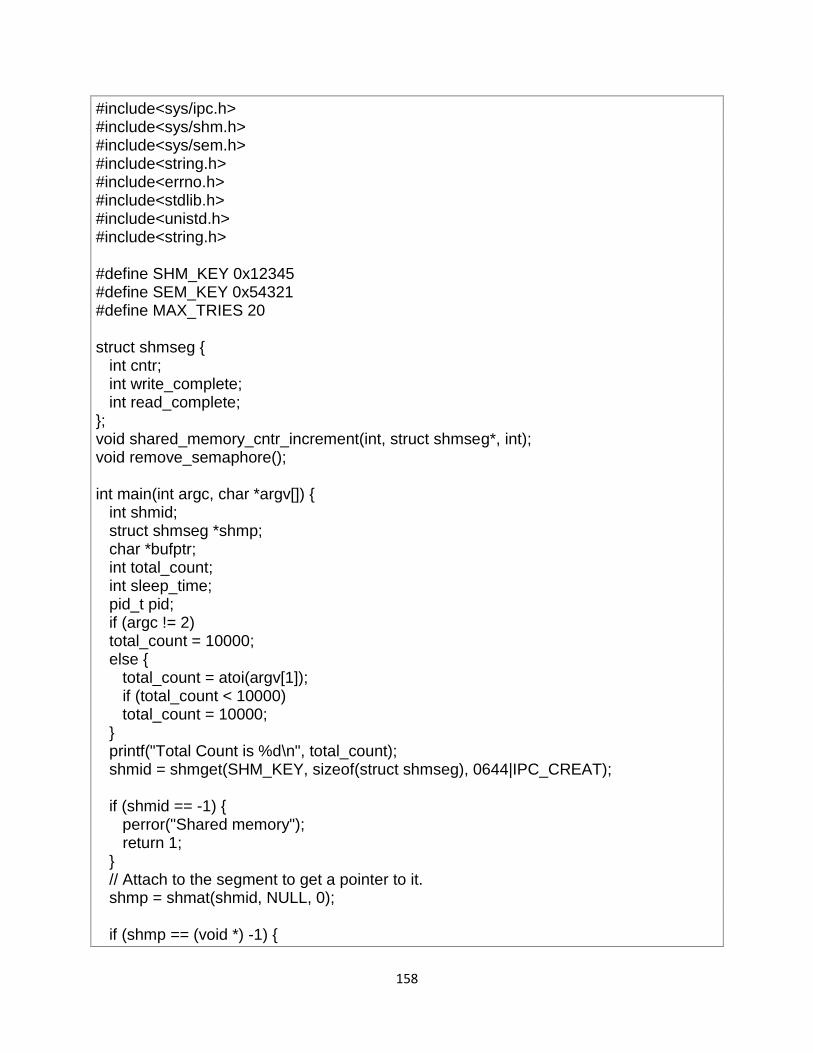
158
#include<sys/ipc.h> #include<sys/shm.h> #include<sys/sem.h> #include<string.h> #include<errno.h> #include<stdlib.h> #include<unistd.h> #include<string.h> #define SHM_KEY 0x12345 #define SEM_KEY 0x54321 #define MAX_TRIES 20 struct shmseg { int cntr; int write_complete; int read_complete; }; void shared_memory_cntr_increment(int, struct shmseg*, int); void remove_semaphore(); int main(int argc, char *argv[]) { int shmid; struct shmseg *shmp; char *bufptr; int total_count; int sleep_time; pid_t pid; if (argc != 2) total_count = 10000; else { total_count = atoi(argv[1]); if (total_count < 10000) total_count = 10000; } printf("Total Count is %d\n", total_count); shmid = shmget(SHM_KEY, sizeof(struct shmseg), 0644|IPC_CREAT); if (shmid == -1) { perror("Shared memory"); return 1; } // Attach to the segment to get a pointer to it. shmp = shmat(shmid, NULL, 0); if (shmp == (void *) -1) {
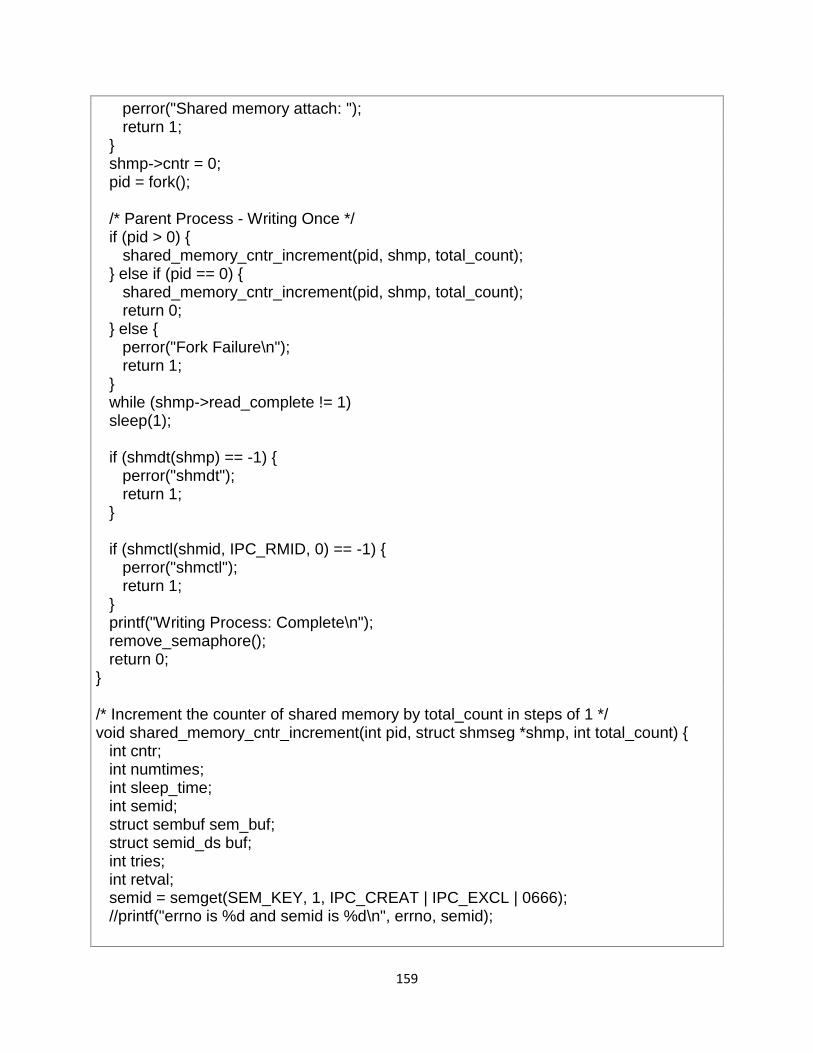
159
perror("Shared memory attach: "); return 1; } shmp->cntr = 0; pid = fork(); /* Parent Process - Writing Once */ if (pid > 0) { shared_memory_cntr_increment(pid, shmp, total_count); } else if (pid == 0) { shared_memory_cntr_increment(pid, shmp, total_count); return 0; } else { perror("Fork Failure\n"); return 1; } while (shmp->read_complete != 1) sleep(1); if (shmdt(shmp) == -1) { perror("shmdt"); return 1; } if (shmctl(shmid, IPC_RMID, 0) == -1) { perror("shmctl"); return 1; } printf("Writing Process: Complete\n"); remove_semaphore(); return 0; } /* Increment the counter of shared memory by total_count in steps of 1 */ void shared_memory_cntr_increment(int pid, struct shmseg *shmp, int total_count) { int cntr; int numtimes; int sleep_time; int semid; struct sembuf sem_buf; struct semid_ds buf; int tries; int retval; semid = semget(SEM_KEY, 1, IPC_CREAT | IPC_EXCL | 0666); //printf("errno is %d and semid is %d\n", errno, semid);
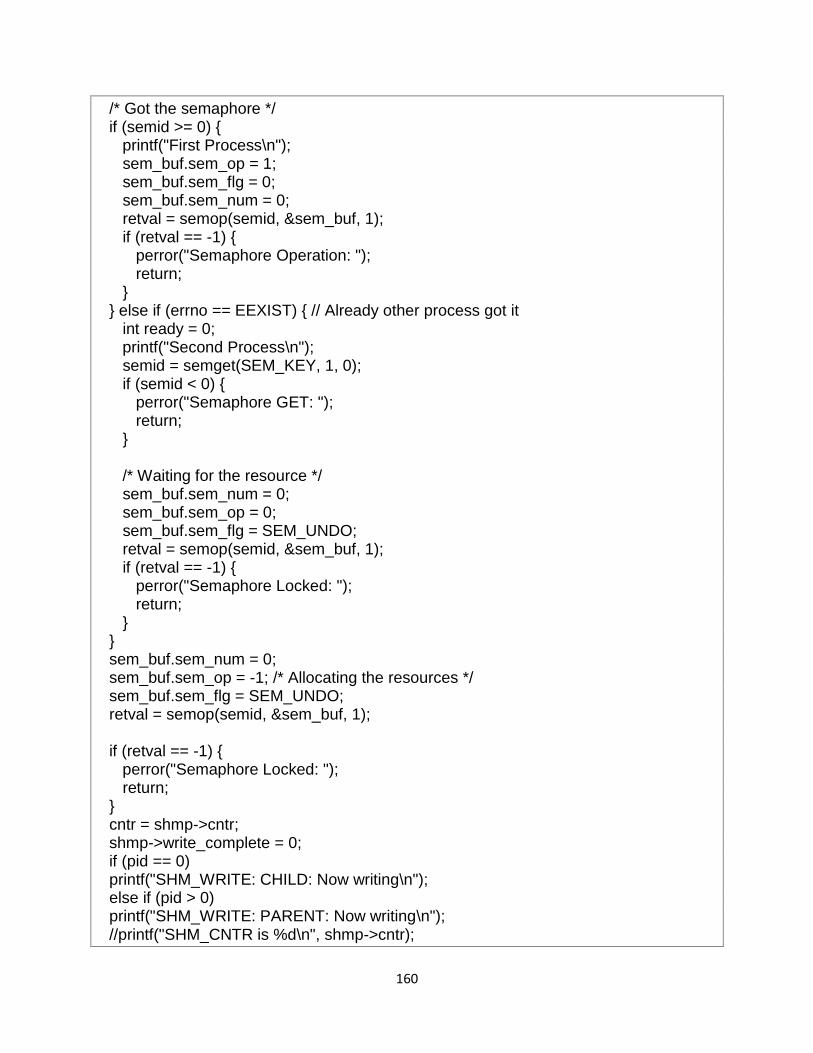
160
/* Got the semaphore */ if (semid >= 0) { printf("First Process\n"); sem_buf.sem_op = 1; sem_buf.sem_flg = 0; sem_buf.sem_num = 0; retval = semop(semid, &sem_buf, 1); if (retval == -1) { perror("Semaphore Operation: "); return; } } else if (errno == EEXIST) { // Already other process got it int ready = 0; printf("Second Process\n"); semid = semget(SEM_KEY, 1, 0); if (semid < 0) { perror("Semaphore GET: "); return; } /* Waiting for the resource */ sem_buf.sem_num = 0; sem_buf.sem_op = 0; sem_buf.sem_flg = SEM_UNDO; retval = semop(semid, &sem_buf, 1); if (retval == -1) { perror("Semaphore Locked: "); return; } } sem_buf.sem_num = 0; sem_buf.sem_op = -1; /* Allocating the resources */ sem_buf.sem_flg = SEM_UNDO; retval = semop(semid, &sem_buf, 1); if (retval == -1) { perror("Semaphore Locked: "); return; } cntr = shmp->cntr; shmp->write_complete = 0; if (pid == 0) printf("SHM_WRITE: CHILD: Now writing\n"); else if (pid > 0) printf("SHM_WRITE: PARENT: Now writing\n"); //printf("SHM_CNTR is %d\n", shmp->cntr);
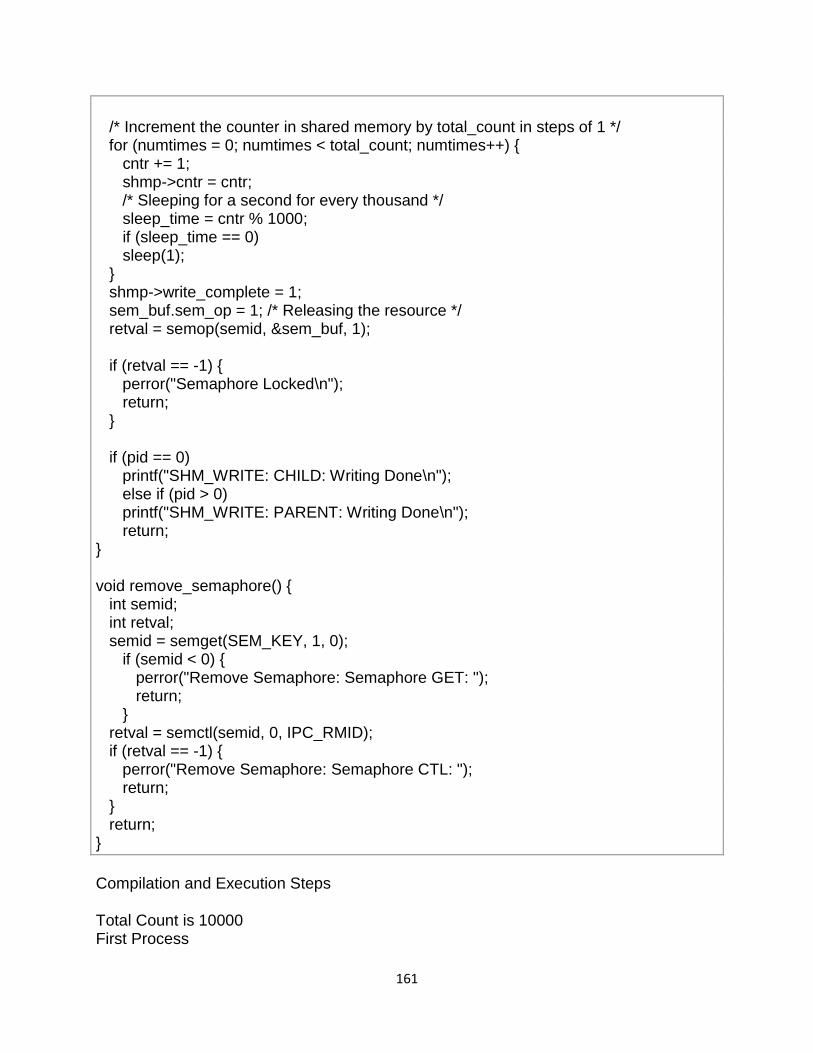
161
/* Increment the counter in shared memory by total_count in steps of 1 */ for (numtimes = 0; numtimes < total_count; numtimes++) { cntr += 1; shmp->cntr = cntr; /* Sleeping for a second for every thousand */ sleep_time = cntr % 1000; if (sleep_time == 0) sleep(1); } shmp->write_complete = 1; sem_buf.sem_op = 1; /* Releasing the resource */ retval = semop(semid, &sem_buf, 1); if (retval == -1) { perror("Semaphore Locked\n"); return; } if (pid == 0) printf("SHM_WRITE: CHILD: Writing Done\n"); else if (pid > 0) printf("SHM_WRITE: PARENT: Writing Done\n"); return; } void remove_semaphore() { int semid; int retval; semid = semget(SEM_KEY, 1, 0); if (semid < 0) { perror("Remove Semaphore: Semaphore GET: "); return; } retval = semctl(semid, 0, IPC_RMID); if (retval == -1) { perror("Remove Semaphore: Semaphore CTL: "); return; } return; }
Compilation and Execution Steps
Total Count is 10000 First Process
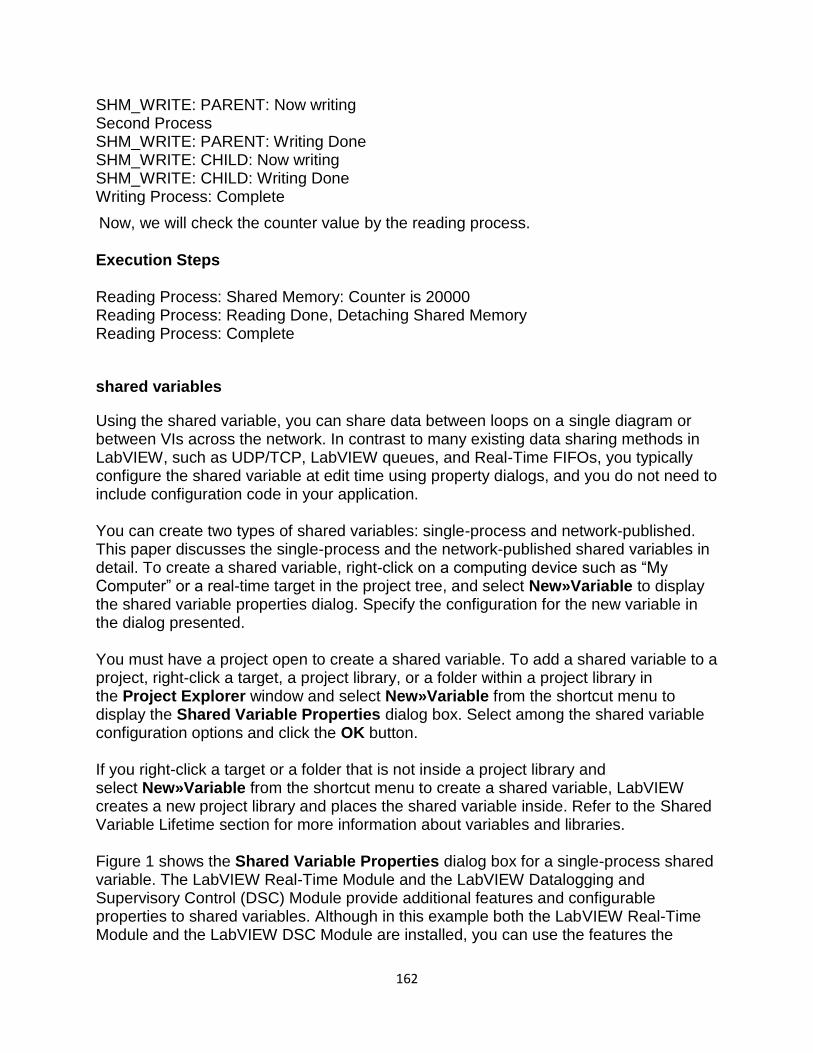
162
SHM_WRITE: PARENT: Now writing Second Process SHM_WRITE: PARENT: Writing Done SHM_WRITE: CHILD: Now writing SHM_WRITE: CHILD: Writing Done Writing Process: Complete
Now, we will check the counter value by the reading process.
Execution Steps
Reading Process: Shared Memory: Counter is 20000 Reading Process: Reading Done, Detaching Shared Memory Reading Process: Complete
shared variables
Using the shared variable, you can share data between loops on a single diagram or between VIs across the network. In contrast to many existing data sharing methods in LabVIEW, such as UDP/TCP, LabVIEW queues, and Real-Time FIFOs, you typically configure the shared variable at edit time using property dialogs, and you do not need to include configuration code in your application. You can create two types of shared variables: single-process and network-published. This paper discusses the single-process and the network-published shared variables in detail. To create a shared variable, right-click on a computing device such as ―My Computer‖ or a real-time target in the project tree, and select New»Variable to display the shared variable properties dialog. Specify the configuration for the new variable in the dialog presented. You must have a project open to create a shared variable. To add a shared variable to a project, right-click a target, a project library, or a folder within a project library in the Project Explorer window and select New»Variable from the shortcut menu to display the Shared Variable Properties dialog box. Select among the shared variable configuration options and click the OK button. If you right-click a target or a folder that is not inside a project library and select New»Variable from the shortcut menu to create a shared variable, LabVIEW creates a new project library and places the shared variable inside. Refer to the Shared Variable Lifetime section for more information about variables and libraries. Figure 1 shows the Shared Variable Properties dialog box for a single-process shared variable. The LabVIEW Real-Time Module and the LabVIEW Datalogging and Supervisory Control (DSC) Module provide additional features and configurable properties to shared variables. Although in this example both the LabVIEW Real-Time Module and the LabVIEW DSC Module are installed, you can use the features the
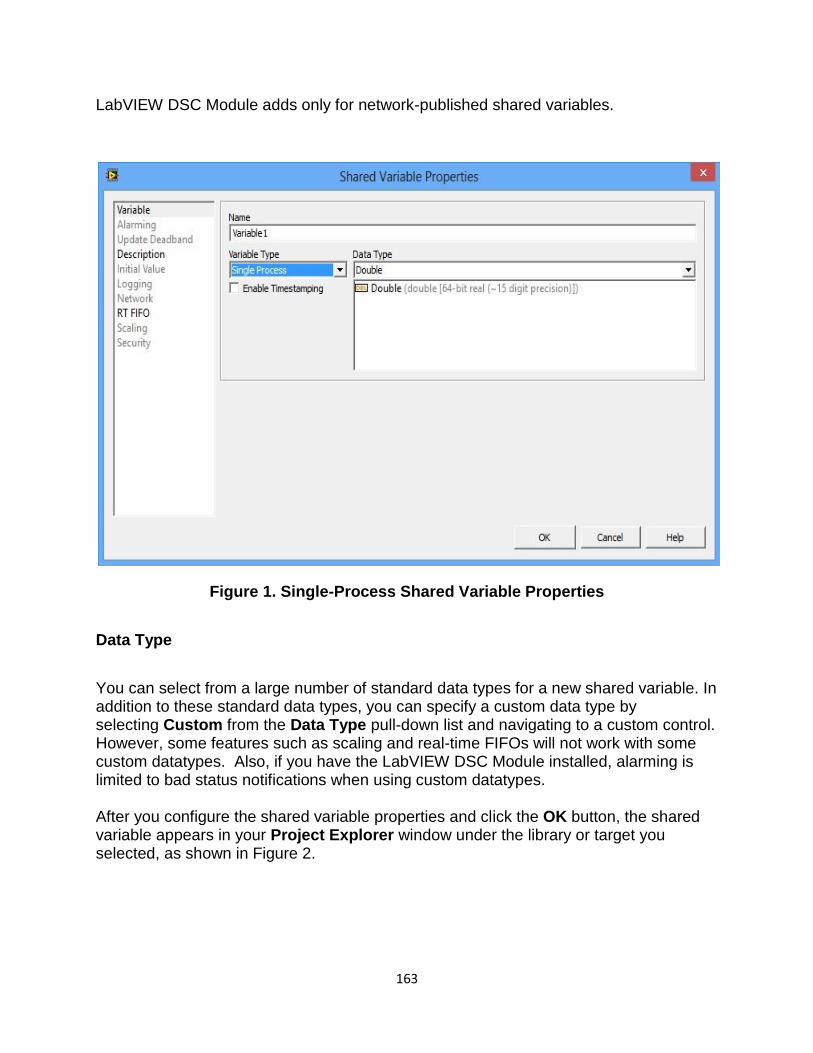
163
LabVIEW DSC Module adds only for network-published shared variables.
Figure 1. Single-Process Shared Variable Properties
Data Type
You can select from a large number of standard data types for a new shared variable. In addition to these standard data types, you can specify a custom data type by selecting Custom from the Data Type pull-down list and navigating to a custom control. However, some features such as scaling and real-time FIFOs will not work with some custom datatypes. Also, if you have the LabVIEW DSC Module installed, alarming is limited to bad status notifications when using custom datatypes. After you configure the shared variable properties and click the OK button, the shared variable appears in your Project Explorer window under the library or target you selected, as shown in Figure 2.
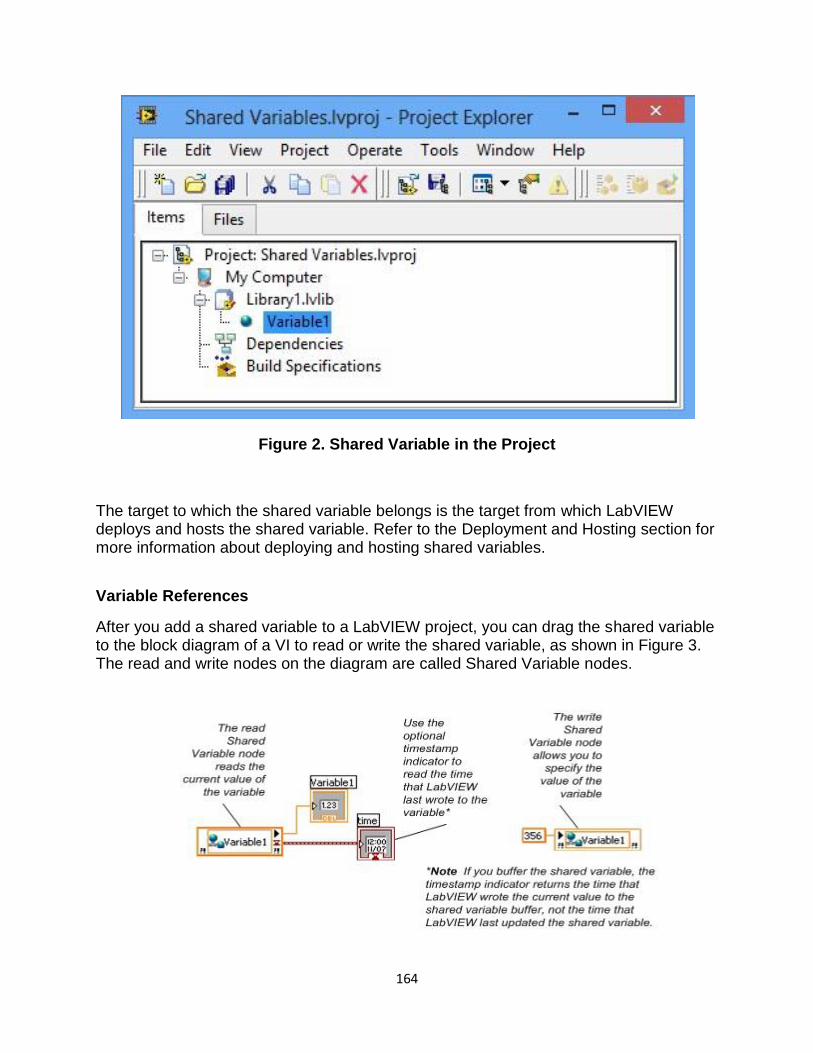
164
Figure 2. Shared Variable in the Project
The target to which the shared variable belongs is the target from which LabVIEW deploys and hosts the shared variable. Refer to the Deployment and Hosting section for more information about deploying and hosting shared variables.
Variable References
After you add a shared variable to a LabVIEW project, you can drag the shared variable to the block diagram of a VI to read or write the shared variable, as shown in Figure 3. The read and write nodes on the diagram are called Shared Variable nodes.
165
Figure 3. Reading and Writing to a Shared Variable Using a Shared Variable Node
You can set a Shared Variable node as absolute or target-relative depending on how you want the node to connect to the variable. An absolute Shared Variable node connects to the shared variable on the target on which you created the variable. A target-relative Shared Variable node connects to the shared variable on the target on which you run the VI that contains the node.
If you move a VI that contains a target-relative Shared Variable node to a new target, you also must move the shared variable to the new target. Use target-relative Shared Variable nodes when you expect to move VIs and variables to other targets.
Shared Variable nodes are absolute by default. Right-click a node and select Reference Mode»Target Relative or Reference Mode»Absolute to change how the Shared Variable node connects to the shared variable.
Introduction to socket programming
How do we build Internet applications? In this lecture, we will discuss the socket API and support for TCP communications between end hosts. Socket programing is the key API for programming distributed applications on the Internet. Note, we do not cover the UDP API in the course. If interested take CS60 Computer Networks.
Socket program is a key skill needed for the robotics project for exerting control - in this case the controller running on your laptop will connect to the server running on the bot.
Goals
We plan to learn the following from these lectures:
What is a socket?
The client-server model
Byte order
TCP socket API
Concurrent server design
Example of echo client and iterative server
Example of echo client and concurrent server
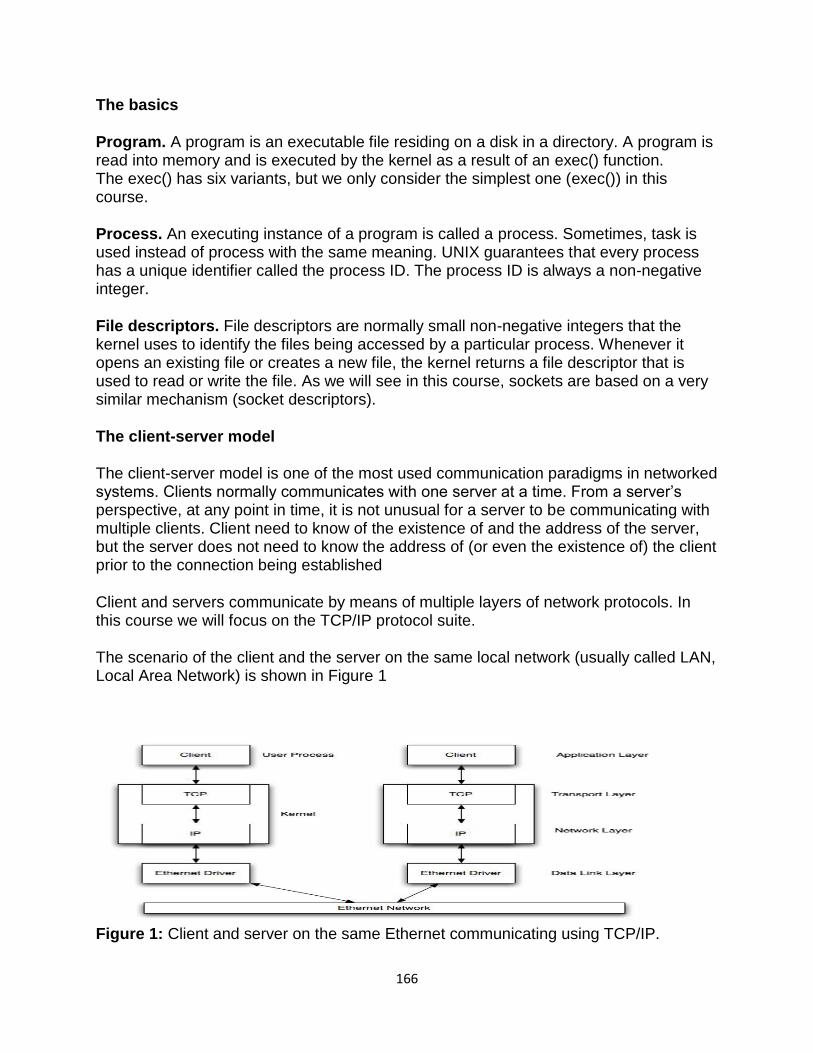
166
The basics
Program. A program is an executable file residing on a disk in a directory. A program is read into memory and is executed by the kernel as a result of an exec() function. The exec() has six variants, but we only consider the simplest one (exec()) in this course.
Process. An executing instance of a program is called a process. Sometimes, task is used instead of process with the same meaning. UNIX guarantees that every process has a unique identifier called the process ID. The process ID is always a non-negative integer.
File descriptors. File descriptors are normally small non-negative integers that the kernel uses to identify the files being accessed by a particular process. Whenever it opens an existing file or creates a new file, the kernel returns a file descriptor that is used to read or write the file. As we will see in this course, sockets are based on a very similar mechanism (socket descriptors).
The client-server model
The client-server model is one of the most used communication paradigms in networked systems. Clients normally communicates with one server at a time. From a server‘s perspective, at any point in time, it is not unusual for a server to be communicating with multiple clients. Client need to know of the existence of and the address of the server, but the server does not need to know the address of (or even the existence of) the client prior to the connection being established
Client and servers communicate by means of multiple layers of network protocols. In this course we will focus on the TCP/IP protocol suite.
The scenario of the client and the server on the same local network (usually called LAN, Local Area Network) is shown in Figure 1
Figure 1: Client and server on the same Ethernet communicating using TCP/IP.
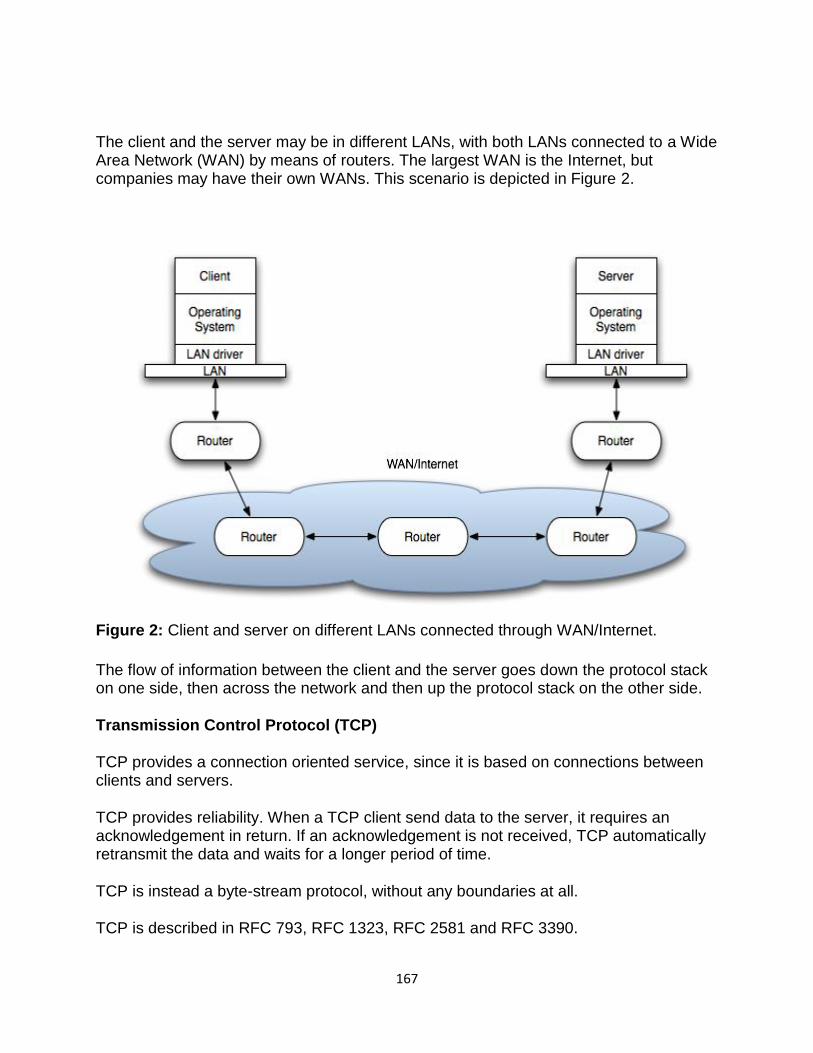
167
The client and the server may be in different LANs, with both LANs connected to a Wide Area Network (WAN) by means of routers. The largest WAN is the Internet, but companies may have their own WANs. This scenario is depicted in Figure 2.
Figure 2: Client and server on different LANs connected through WAN/Internet.
The flow of information between the client and the server goes down the protocol stack on one side, then across the network and then up the protocol stack on the other side.
Transmission Control Protocol (TCP)
TCP provides a connection oriented service, since it is based on connections between clients and servers.
TCP provides reliability. When a TCP client send data to the server, it requires an acknowledgement in return. If an acknowledgement is not received, TCP automatically retransmit the data and waits for a longer period of time.
TCP is instead a byte-stream protocol, without any boundaries at all.
TCP is described in RFC 793, RFC 1323, RFC 2581 and RFC 3390.
168
Socket addresses
IPv4 socket address structure is named sockaddr_in and is defined by including the <netinet/in.h> header.
The POSIX definition is the following:
struct in_addr{
in_addr_t s_addr; /*32 bit IPv4 network byte ordered address*/
};
struct sockaddr_in {
uint8_t sin_len; /* length of structure (16)*/
sa_family_t sin_family; /* AF_INET*/
in_port_t sin_port; /* 16 bit TCP or UDP port number */
struct in_addr sin_addr; /* 32 bit IPv4 address*/
char sin_zero[8]; /* not used but always set to zero */
};
The uint8_t datatype is unsigned 8-bit integer.
Generic Socket Address Structure
A socket address structure is always passed by reference as an argument to any socket functions. But any socket function that takes one of these pointers as an argument must deal with socket address structures from any of the supported protocol families.
A problem arises in declaring the type of pointer that is passed. With ANSI C, the solution is to use void * (the generic pointer type). But the socket functions predate the definition of ANSI C and the solution chosen was to define a generic socket address as follows:
struct sockaddr {
uint8_t sa_len;
sa_family_t sa_family; /* address family: AD_xxx value */
char sa_data[14];
};
169
Host Byte Order to Network Byte Order Conversion
There are two ways to store two bytes in memory: with the lower-order byte at the starting address (little-endian byte order) or with the high-order byte at the starting address (big-endian byte order). We call them collectively host byte order. For example, an Intel processor stores the 32-bit integer as four consecutives bytes in memory in the order 1-2-3-4, where 1 is the most significant byte. IBM PowerPC processors would store the integer in the byte order 4-3-2-1.
Networking protocols such as TCP are based on a specific network byte order. The Internet protocols use big-endian byte ordering.
The htons(), htonl(), ntohs(), and ntohl() Functions
The follwowing functions are used for the conversion:
#include <netinet/in.h>
uint16_t htons(uint16_t host16bitvalue);
uint32_t htonl(uint32_t host32bitvalue);
uint16_t ntohs(uint16_t net16bitvalue);
uint32_t ntohl(uint32_t net32bitvalue);
The first two return the value in network byte order (16 and 32 bit, respectively). The latter return the value in host byte order (16 and 32 bit, respectively).
TCP Socket API
The sequence of function calls for the client and a server participating in a TCP connection is presented in Figure 3.
170
Figure 3: TCP client-server.
As shown in the figure, the steps for establishing a TCP socket on the client side are the following:
171
Create a socket using the socket() function;
Connect the socket to the address of the server using the connect() function;
Send and receive data by means of the read() and write() functions.
The steps involved in establishing a TCP socket on the server side are as follows:
Create a socket with the socket() function;
Bind the socket to an address using the bind() function;
Listen for connections with the listen() function;
Accept a connection with the accept() function system call. This call typically blocks until a client connects with the server.
Send and receive data by means of send() and receive().
The socket() Function
The first step is to call the socket function, specifying the type of communication protocol (TCP based on IPv4, TCP based on IPv6, UDP).
The function is defined as follows:
#include <sys/socket.h>
int socket (int family, int type, int protocol);
where family specifies the protocol family (AF_INET for the IPv4 protocols), type is a constant described the type of socket (SOCK_STREAM for stream sockets and SOCK_DGRAM for datagram sockets.
The function returns a non-negative integer number, similar to a file descriptor, that we define socket descriptor or -1 on error.
The connect() Function
The connect() function is used by a TCP client to establish a connection with a TCP server/
The function is defined as follows:
172
#include <sys/socket.h>
int connect (int sockfd, const struct sockaddr *servaddr, socklen_t addrlen);
where sockfd is the socket descriptor returned by the socket function.
The function returns 0 if the it succeeds in establishing a connection (i.e., successful TCP three-way handshake, -1 otherwise.
The client does not have to call bind() in Section before calling this function: the kernel will choose both an ephemeral port and the source IP if necessary.
The bind() Function
The bind() assigns a local protocol address to a socket. With the Internet protocols, the address is the combination of an IPv4 or IPv6 address (32-bit or 128-bit) address along with a 16 bit TCP port number.
The function is defined as follows:
#include <sys/socket.h>
int bind(int sockfd, const struct sockaddr *servaddr, socklen_t addrlen);
where sockfd is the socket descriptor, myaddr is a pointer to a protocol-specific address and addrlen is the size of the address structure.
bind() returns 0 if it succeeds, -1 on error.
This use of the generic socket address sockaddr requires that any calls to these functions must cast the pointer to the protocol-specific address structure. For example for and IPv4 socket structure:
struct sockaddr_in serv; /* IPv4 socket address structure */
bind(sockfd, (struct sockaddr*) &serv, sizeof(serv))
A process can bind a specific IP address to its socket: for a TCP client, this assigns the source IP address that will be used for IP datagrams sent on the sockets. For a TCP server, this restricts the socket to receive incoming client connections destined only to that IP address.
173
Normally, a TCP client does not bind an IP address to its socket. The kernel chooses the source IP socket is connected, based on the outgoing interface that is used. If a TCP server does not bind an IP address to its socket, the kernel uses the destination IP address of the incoming packets as the server‘s source address.
bind() allows to specify the IP address, the port, both or neither.
The table below summarizes the combinations for IPv4.
IP Address IP Port Result
INADDR_ANY 0 Kernel chooses IP address and port
INADDR_ANY non zero Kernel chooses IP address, process specifies port
Local IP address 0 Process specifies IP address, kernel chooses port
Local IP address non zero Process specifies IP address and port
The listen() Function
The listen() function converts an unconnected socket into a passive socket, indicating that the kernel should accept incoming connection requests directed to this socket. It is defined as follows:
#include <sys/socket.h>
int listen(int sockfd, int backlog);
where sockfd is the socket descriptor and backlog is the maximum number of connections the kernel should queue for this socket. The backlog argument provides an hint to the system of the number of outstanding connect requests that is should enqueue in behalf of the process. Once the queue is full, the system will reject additional connection requests. The backlog value must be chosen based on the expected load of the server.
The function listen() return 0 if it succeeds, -1 on error.
The accept() Function
The accept() is used to retrieve a connect request and convert that into a request. It is defined as follows:
#include <sys/socket.h>
174
int accept(int sockfd, struct sockaddr *cliaddr,
socklen_t *addrlen);
where sockfd is a new file descriptor that is connected to the client that called the connect(). The cliaddr and addrlen arguments are used to return the protocol address of the client. The new socket descriptor has the same socket type and address family of the original socket. The original socket passed to accept() is not associated with the connection, but instead remains available to receive additional connect requests. The kernel creates one connected socket for each client connection that is accepted.
If we don‘t care about the client‘s identity, we can set the cliaddr and addrlen to NULL. Otherwise, before calling the accept function, the cliaddr parameter has to be set to a buffer large enough to hold the address and set the interger pointed by addrlen to the size of the buffer.
The send() Function
Since a socket endpoint is represented as a file descriptor, we can use read and write to communicate with a socket as long as it is connected. However, if we want to specify options we need another set of functions.
For example, send() is similar to write() but allows to specify some options. send() is defined as follows:
#include <sys/socket.h>
ssize_t send(int sockfd, const void *buf, size_t nbytes, int flags);
where buf and nbytes have the same meaning as they have with write. The additional argument flags is used to specify how we want the data to be transmitted. We will not consider the possible options in this course. We will assume it equal to 0.
The function returns the number of bytes if it succeeds, -1 on error.
The receive() Function
The recv() function is similar to read(), but allows to specify some options to control how the data are received. We will not consider the possible options in this course. We will assume it is equal to 0.
receive is defined as follows:
175
#include <sys/socket.h>
ssize_t recv(int sockfd, void *buf, size_t nbytes, int flags);
The function returns the length of the message in bytes, 0 if no messages are available and peer had done an orderly shutdown, or -1 on error.
The close() Function
The normal close() function is used to close a socket and terminate a TCP socket. It returns 0 if it succeeds, -1 on error. It is defined as follows:
#include <unistd.h>
int close(int sockfd);
Concurrent Servers
There are two main classes of servers, iterative and concurrent. An iterative server iterates through each client, handling it one at a time. A concurrent server handles multiple clients at the same time. The simplest technique for a concurrent server is to call the fork function, creating one child process for each client. An alternative technique is to use threads instead (i.e., light-weight processes).
The fork() function
The fork() function is the only way in Unix to create a new process. It is defined as follows:
#include <unist.h>
pid_t fork(void);
The function returns 0 if in child and the process ID of the child in parent; otherwise, -1 on error.
In fact, the function fork() is called once but returns twice. It returns once in the calling process (called the parent) with the process ID of the newly created process (its child). It also returns in the child, with a return value of 0. The return value tells whether the current process is the parent or the child.
176
Example
A typical concurrent server has the following structure:
pid_t pid;
int listenfd, connfd;
listenfd = socket(...);
/***fill the socket address with server‘s well known port***/
bind(listenfd, ...);
listen(listenfd, ...);
for ( ; ; ) {
connfd = accept(listenfd, ...); /* blocking call */
if ( (pid = fork()) == 0 ) {
close(listenfd); /* child closes listening socket */
/***process the request doing something using connfd ***/
/* ................. */
close(connfd);
exit(0); /* child terminates
}
close(connfd); /*parent closes connected socket*/
}
}
When a connection is established, accept returns, the server calls fork, and the child process services the client (on the connected socket connfd). The parent process waits for another connection (on the listening socket listenfd. The parent closes the connected socket since the child handles the new client. The interactions among client and server are presented in Figure 4.
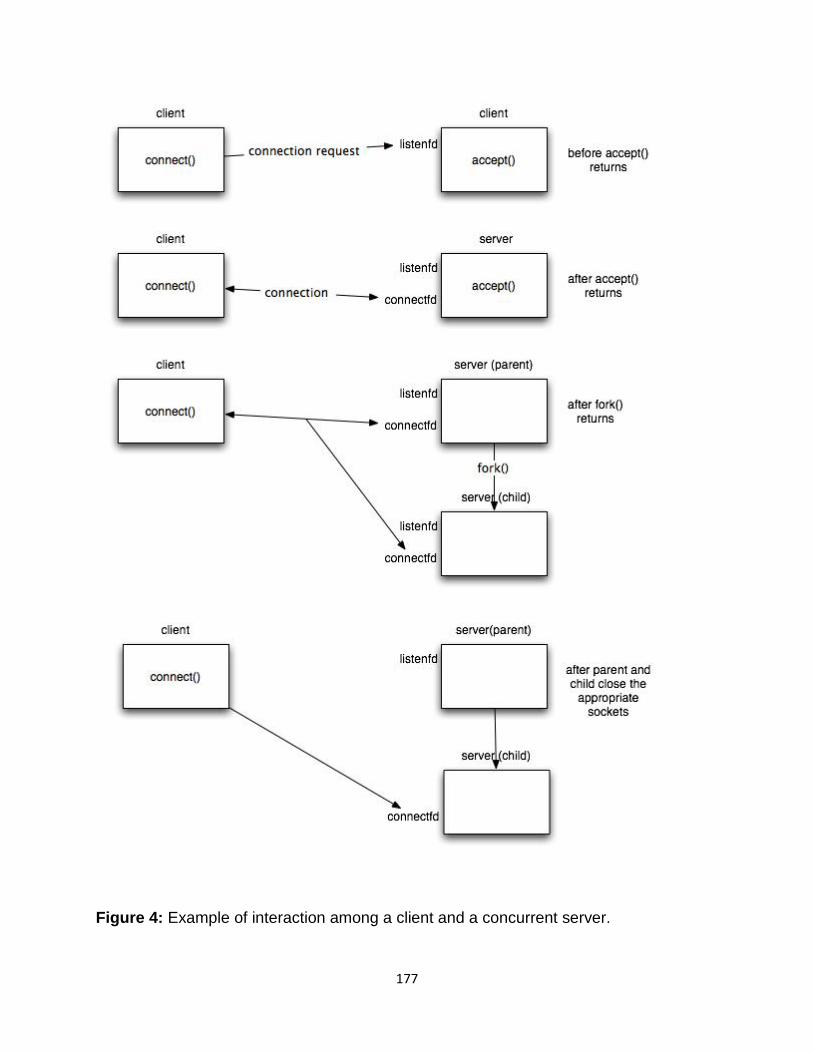
177
Figure 4: Example of interaction among a client and a concurrent server.
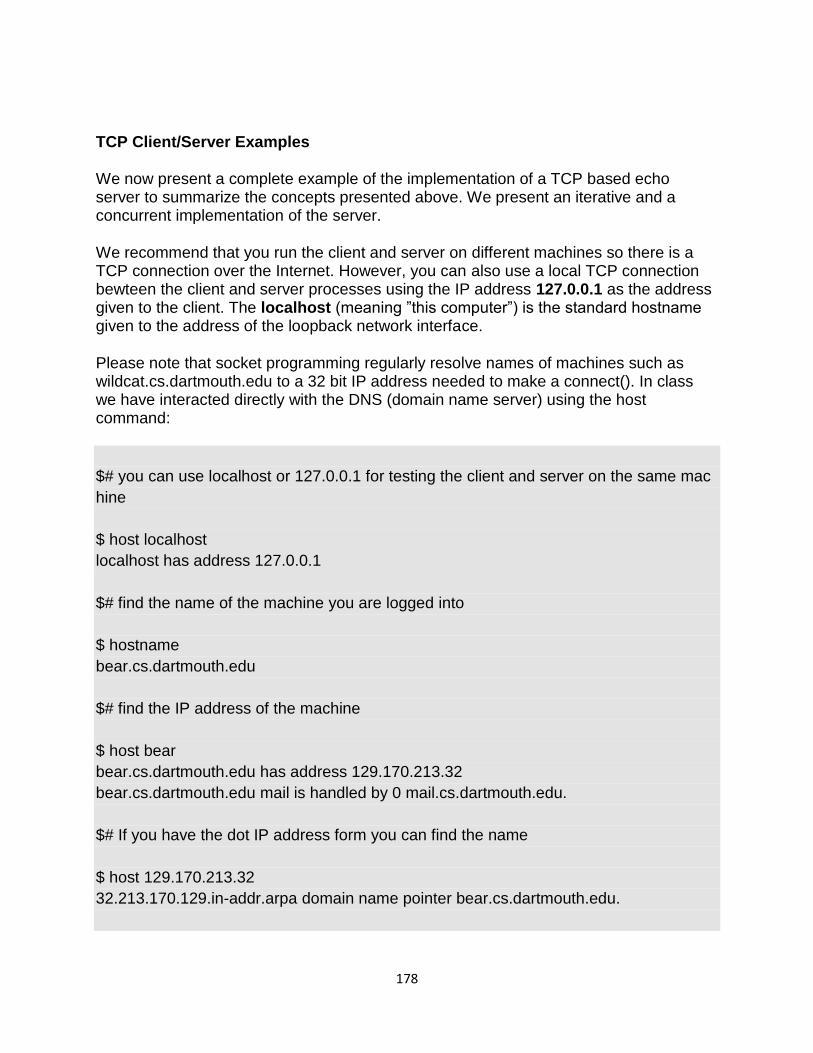
178
TCP Client/Server Examples
We now present a complete example of the implementation of a TCP based echo server to summarize the concepts presented above. We present an iterative and a concurrent implementation of the server.
We recommend that you run the client and server on different machines so there is a TCP connection over the Internet. However, you can also use a local TCP connection bewteen the client and server processes using the IP address 127.0.0.1 as the address given to the client. The localhost (meaning ‖this computer‖) is the standard hostname given to the address of the loopback network interface.
Please note that socket programming regularly resolve names of machines such as wildcat.cs.dartmouth.edu to a 32 bit IP address needed to make a connect(). In class we have interacted directly with the DNS (domain name server) using the host command:
$# you can use localhost or 127.0.0.1 for testing the client and server on the same mac
hine
$ host localhost
localhost has address 127.0.0.1
$# find the name of the machine you are logged into
$ hostname
bear.cs.dartmouth.edu
$# find the IP address of the machine
$ host bear
bear.cs.dartmouth.edu has address 129.170.213.32
bear.cs.dartmouth.edu mail is handled by 0 mail.cs.dartmouth.edu.
$# If you have the dot IP address form you can find the name
$ host 129.170.213.32
32.213.170.129.in-addr.arpa domain name pointer bear.cs.dartmouth.edu.
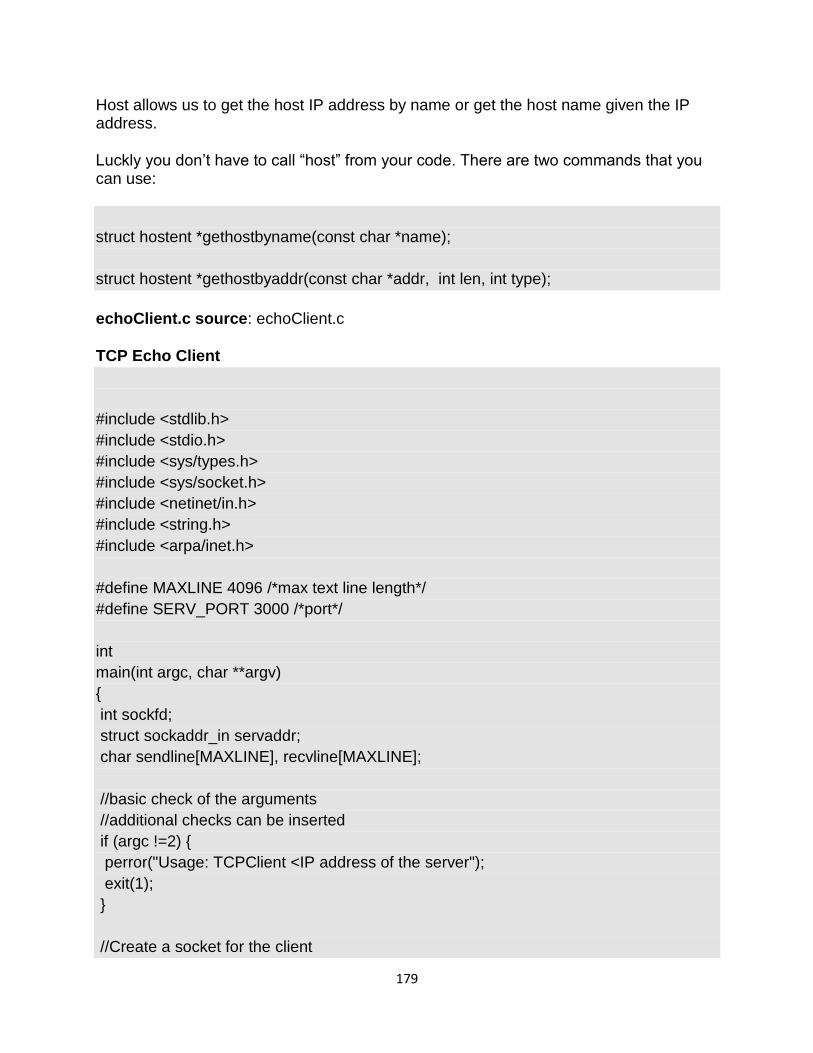
179
Host allows us to get the host IP address by name or get the host name given the IP address.
Luckly you don‘t have to call ―host‖ from your code. There are two commands that you can use:
struct hostent *gethostbyname(const char *name);
struct hostent *gethostbyaddr(const char *addr, int len, int type);
echoClient.c source: echoClient.c
TCP Echo Client
#include <stdlib.h>
#include <stdio.h>
#include <sys/types.h>
#include <sys/socket.h>
#include <netinet/in.h>
#include <string.h>
#include <arpa/inet.h>
#define MAXLINE 4096 /*max text line length*/
#define SERV_PORT 3000 /*port*/
int
main(int argc, char **argv)
{
int sockfd;
struct sockaddr_in servaddr;
char sendline[MAXLINE], recvline[MAXLINE];
//basic check of the arguments
//additional checks can be inserted
if (argc !=2) {
perror("Usage: TCPClient <IP address of the server");
exit(1);
}
//Create a socket for the client
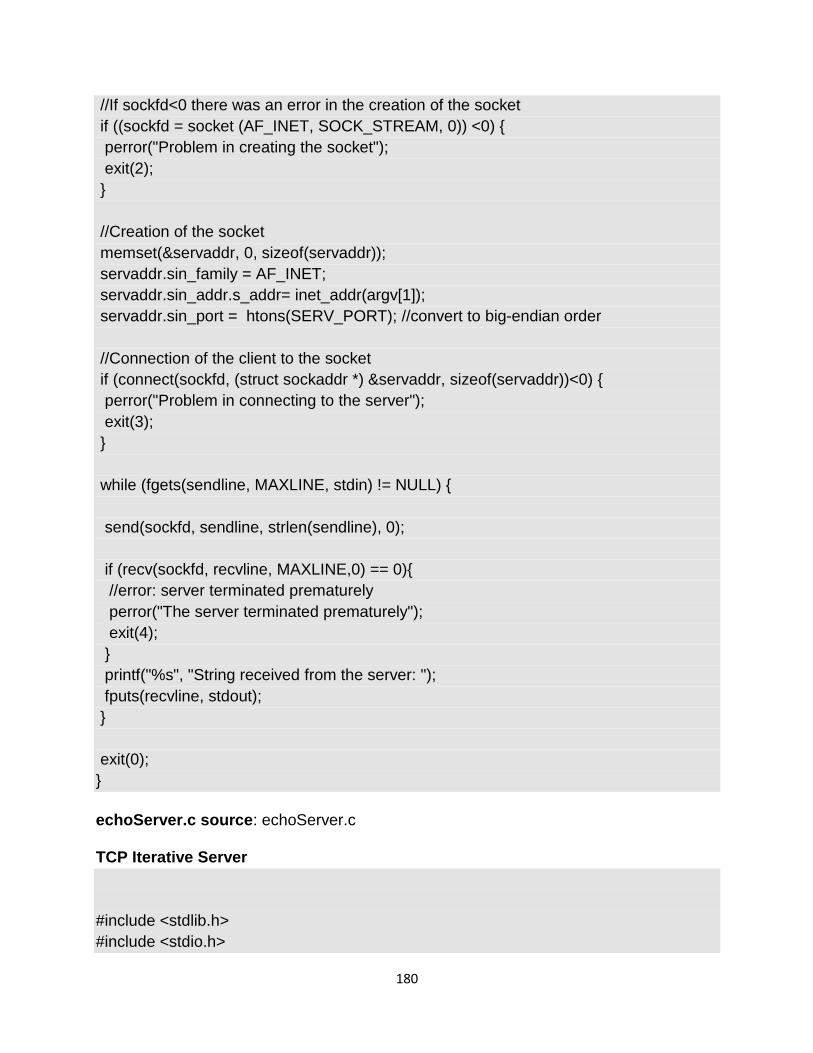
180
//If sockfd<0 there was an error in the creation of the socket
if ((sockfd = socket (AF_INET, SOCK_STREAM, 0)) <0) {
perror("Problem in creating the socket");
exit(2);
}
//Creation of the socket
memset(&servaddr, 0, sizeof(servaddr));
servaddr.sin_family = AF_INET;
servaddr.sin_addr.s_addr= inet_addr(argv[1]);
servaddr.sin_port = htons(SERV_PORT); //convert to big-endian order
//Connection of the client to the socket
if (connect(sockfd, (struct sockaddr *) &servaddr, sizeof(servaddr))<0) {
perror("Problem in connecting to the server");
exit(3);
}
while (fgets(sendline, MAXLINE, stdin) != NULL) {
send(sockfd, sendline, strlen(sendline), 0);
if (recv(sockfd, recvline, MAXLINE,0) == 0){
//error: server terminated prematurely
perror("The server terminated prematurely");
exit(4);
}
printf("%s", "String received from the server: ");
fputs(recvline, stdout);
}
exit(0);
}
echoServer.c source: echoServer.c
TCP Iterative Server
#include <stdlib.h>
#include <stdio.h>

181
#include <sys/types.h>
#include <sys/socket.h>
#include <netinet/in.h>
#include <string.h>
#include <unistd.h>
#define MAXLINE 4096 /*max text line length*/
#define SERV_PORT 3000 /*port*/
#define LISTENQ 8 /*maximum number of client connections */
int main (int argc, char **argv)
{
int listenfd, connfd, n;
socklen_t clilen;
char buf[MAXLINE];
struct sockaddr_in cliaddr, servaddr;
//creation of the socket
listenfd = socket (AF_INET, SOCK_STREAM, 0);
//preparation of the socket address
servaddr.sin_family = AF_INET;
servaddr.sin_addr.s_addr = htonl(INADDR_ANY);
servaddr.sin_port = htons(SERV_PORT);
bind (listenfd, (struct sockaddr *) &servaddr, sizeof(servaddr));
listen (listenfd, LISTENQ);
printf("%s\n","Server running...waiting for connections.");
for ( ; ; ) {
clilen = sizeof(cliaddr);
connfd = accept (listenfd, (struct sockaddr *) &cliaddr, &clilen);
printf("%s\n","Received request...");
while ( (n = recv(connfd, buf, MAXLINE,0)) > 0) {
printf("%s","String received from and resent to the client:");
puts(buf);
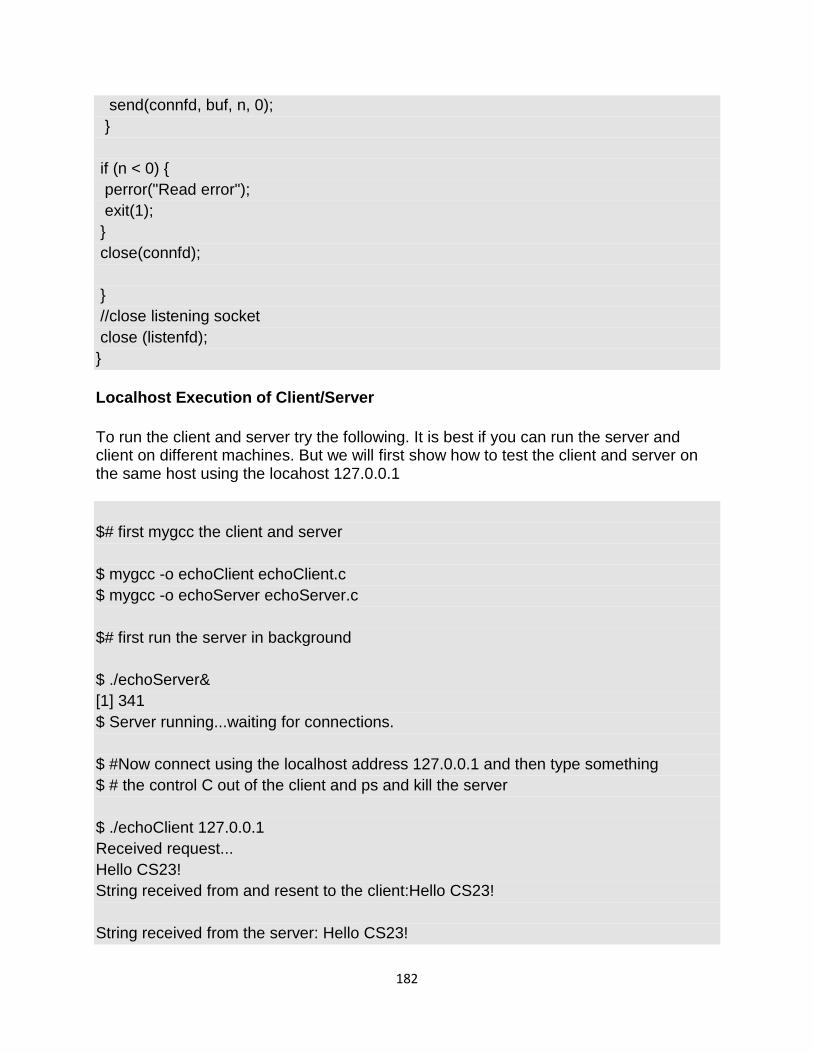
182
send(connfd, buf, n, 0);
}
if (n < 0) {
perror("Read error");
exit(1);
}
close(connfd);
}
//close listening socket
close (listenfd);
}
Localhost Execution of Client/Server
To run the client and server try the following. It is best if you can run the server and client on different machines. But we will first show how to test the client and server on the same host using the locahost 127.0.0.1
$# first mygcc the client and server
$ mygcc -o echoClient echoClient.c
$ mygcc -o echoServer echoServer.c
$# first run the server in background
$ ./echoServer&
[1] 341
$ Server running...waiting for connections.
$ #Now connect using the localhost address 127.0.0.1 and then type something
$ # the control C out of the client and ps and kill the server
$ ./echoClient 127.0.0.1
Received request...
Hello CS23!
String received from and resent to the client:Hello CS23!
String received from the server: Hello CS23!
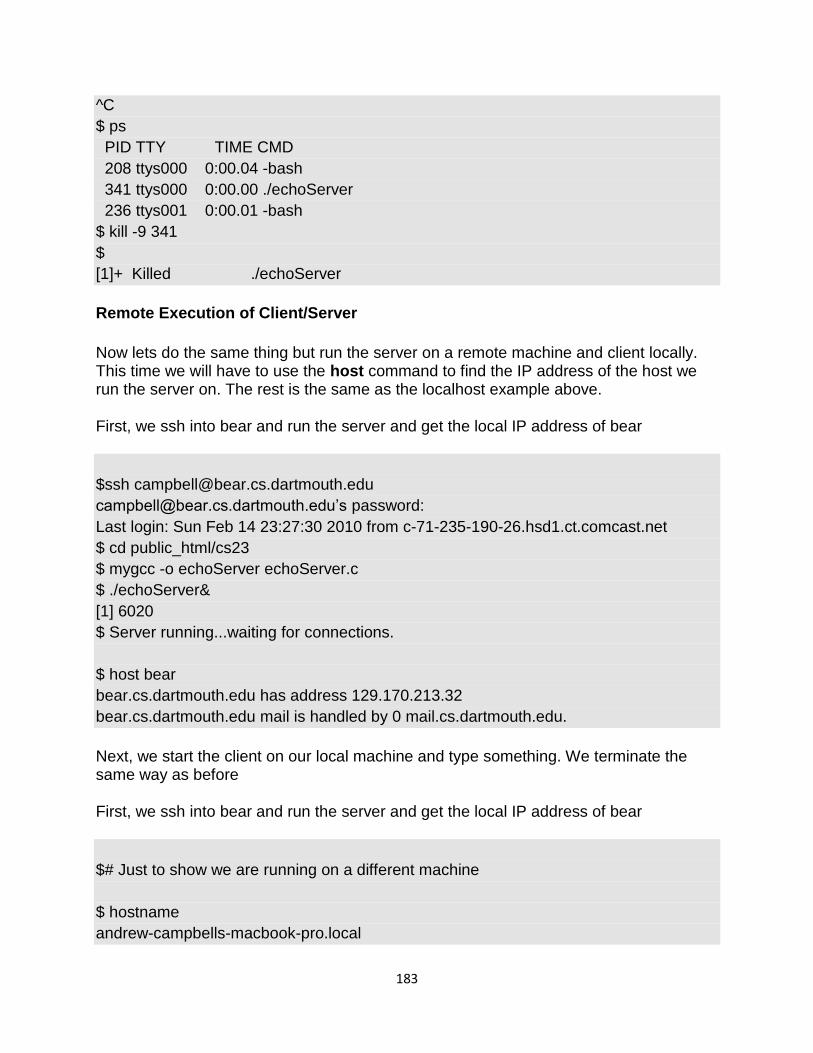
183
^C
$ ps
PID TTY TIME CMD
208 ttys000 0:00.04 -bash
341 ttys000 0:00.00 ./echoServer
236 ttys001 0:00.01 -bash
$ kill -9 341
$
[1]+ Killed ./echoServer
Remote Execution of Client/Server
Now lets do the same thing but run the server on a remote machine and client locally. This time we will have to use the host command to find the IP address of the host we run the server on. The rest is the same as the localhost example above.
First, we ssh into bear and run the server and get the local IP address of bear
$ssh [email protected]
[email protected]‘s password:
Last login: Sun Feb 14 23:27:30 2010 from c-71-235-190-26.hsd1.ct.comcast.net
$ cd public_html/cs23
$ mygcc -o echoServer echoServer.c
$ ./echoServer&
[1] 6020
$ Server running...waiting for connections.
$ host bear
bear.cs.dartmouth.edu has address 129.170.213.32
bear.cs.dartmouth.edu mail is handled by 0 mail.cs.dartmouth.edu.
Next, we start the client on our local machine and type something. We terminate the same way as before
First, we ssh into bear and run the server and get the local IP address of bear
$# Just to show we are running on a different machine
$ hostname
andrew-campbells-macbook-pro.local
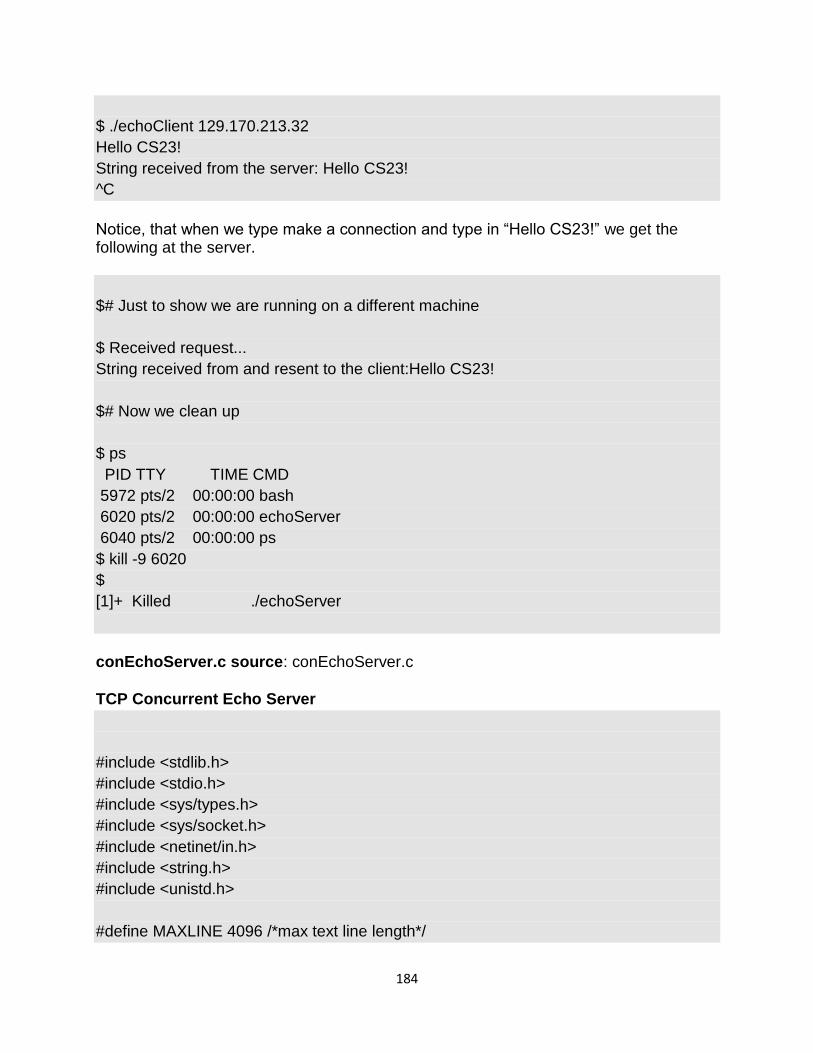
184
$ ./echoClient 129.170.213.32
Hello CS23!
String received from the server: Hello CS23!
^C
Notice, that when we type make a connection and type in ―Hello CS23!‖ we get the following at the server.
$# Just to show we are running on a different machine
$ Received request...
String received from and resent to the client:Hello CS23!
$# Now we clean up
$ ps
PID TTY TIME CMD
5972 pts/2 00:00:00 bash
6020 pts/2 00:00:00 echoServer
6040 pts/2 00:00:00 ps
$ kill -9 6020
$
[1]+ Killed ./echoServer
conEchoServer.c source: conEchoServer.c
TCP Concurrent Echo Server
#include <stdlib.h>
#include <stdio.h>
#include <sys/types.h>
#include <sys/socket.h>
#include <netinet/in.h>
#include <string.h>
#include <unistd.h>
#define MAXLINE 4096 /*max text line length*/
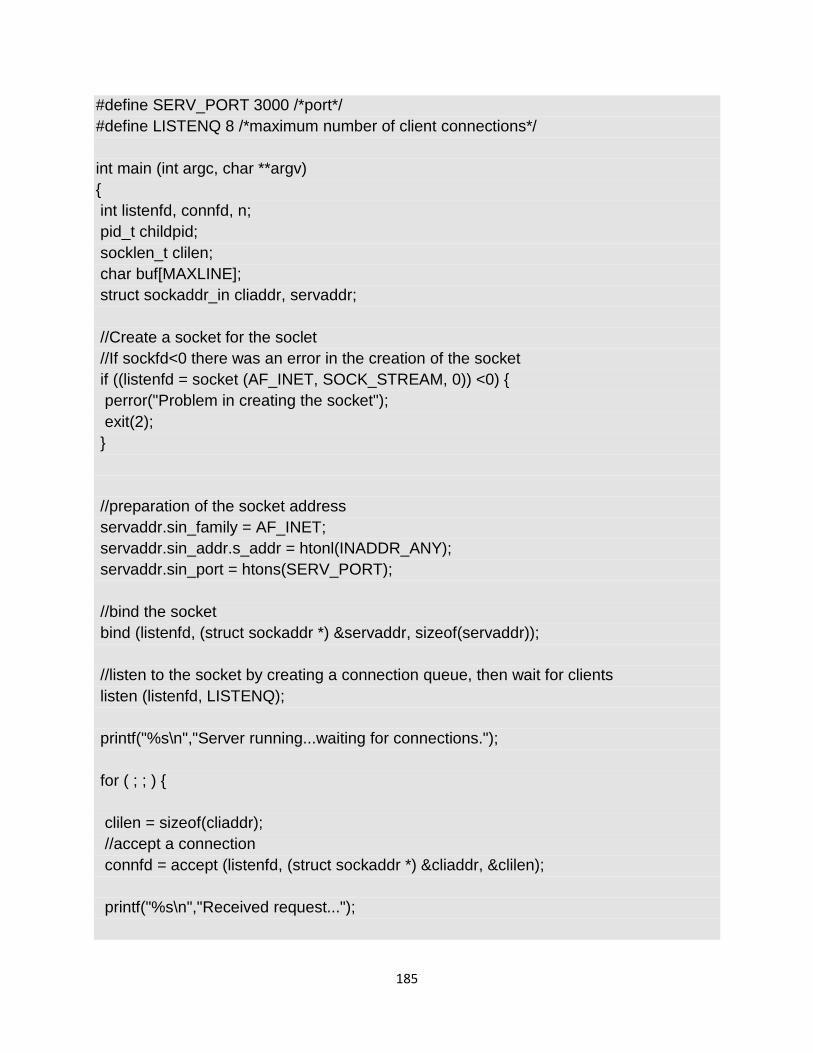
185
#define SERV_PORT 3000 /*port*/
#define LISTENQ 8 /*maximum number of client connections*/
int main (int argc, char **argv)
{
int listenfd, connfd, n;
pid_t childpid;
socklen_t clilen;
char buf[MAXLINE];
struct sockaddr_in cliaddr, servaddr;
//Create a socket for the soclet
//If sockfd<0 there was an error in the creation of the socket
if ((listenfd = socket (AF_INET, SOCK_STREAM, 0)) <0) {
perror("Problem in creating the socket");
exit(2);
}
//preparation of the socket address
servaddr.sin_family = AF_INET;
servaddr.sin_addr.s_addr = htonl(INADDR_ANY);
servaddr.sin_port = htons(SERV_PORT);
//bind the socket
bind (listenfd, (struct sockaddr *) &servaddr, sizeof(servaddr));
//listen to the socket by creating a connection queue, then wait for clients
listen (listenfd, LISTENQ);
printf("%s\n","Server running...waiting for connections.");
for ( ; ; ) {
clilen = sizeof(cliaddr);
//accept a connection
connfd = accept (listenfd, (struct sockaddr *) &cliaddr, &clilen);
printf("%s\n","Received request...");
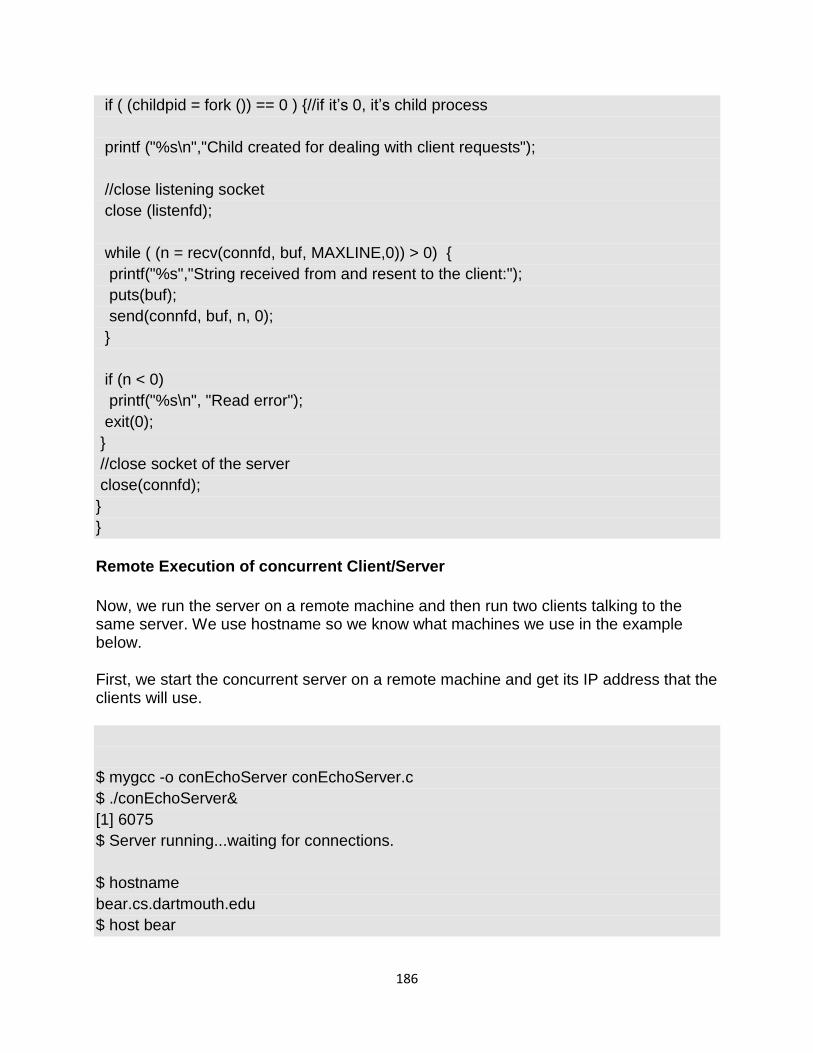
186
if ( (childpid = fork ()) == 0 ) {//if it‘s 0, it‘s child process
printf ("%s\n","Child created for dealing with client requests");
//close listening socket
close (listenfd);
while ( (n = recv(connfd, buf, MAXLINE,0)) > 0) {
printf("%s","String received from and resent to the client:");
puts(buf);
send(connfd, buf, n, 0);
}
if (n < 0)
printf("%s\n", "Read error");
exit(0);
}
//close socket of the server
close(connfd);
}
}
Remote Execution of concurrent Client/Server
Now, we run the server on a remote machine and then run two clients talking to the same server. We use hostname so we know what machines we use in the example below.
First, we start the concurrent server on a remote machine and get its IP address that the clients will use.
$ mygcc -o conEchoServer conEchoServer.c
$ ./conEchoServer&
[1] 6075
$ Server running...waiting for connections.
$ hostname
bear.cs.dartmouth.edu
$ host bear
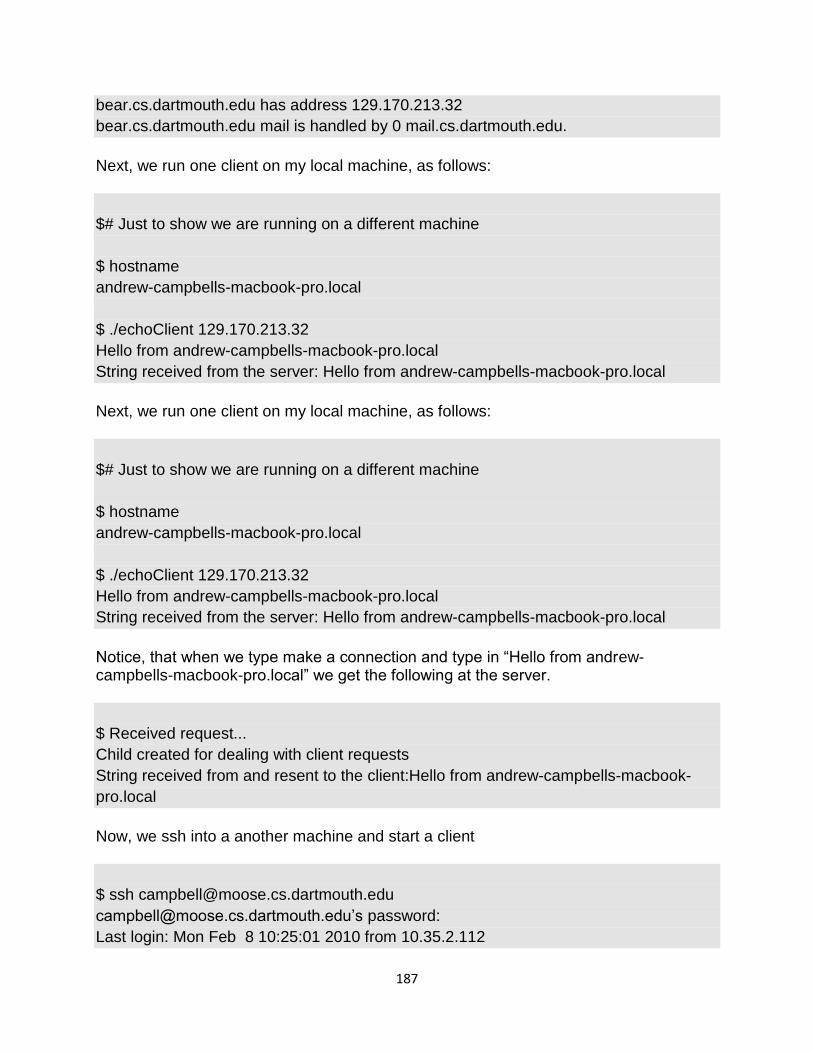
187
bear.cs.dartmouth.edu has address 129.170.213.32
bear.cs.dartmouth.edu mail is handled by 0 mail.cs.dartmouth.edu.
Next, we run one client on my local machine, as follows:
$# Just to show we are running on a different machine
$ hostname
andrew-campbells-macbook-pro.local
$ ./echoClient 129.170.213.32
Hello from andrew-campbells-macbook-pro.local
String received from the server: Hello from andrew-campbells-macbook-pro.local
Notice, that when we type make a connection and type in ―Hello from andrew-campbells-macbook-pro.local‖ we get the following at the server.
$ Received request...
Child created for dealing with client requests
String received from and resent to the client:Hello from andrew-campbells-macbook-
pro.local
Now, we ssh into a another machine and start a client
$ ssh [email protected]
[email protected]‘s password:
Last login: Mon Feb 8 10:25:01 2010 from 10.35.2.112
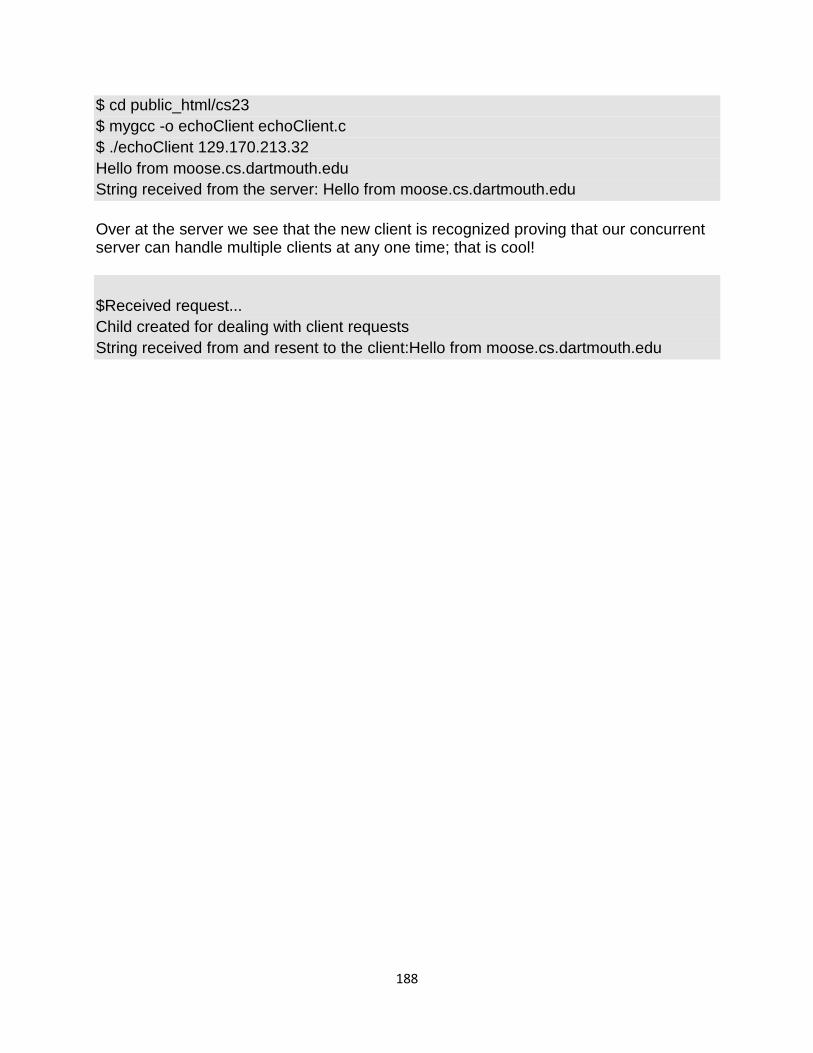
188
$ cd public_html/cs23
$ mygcc -o echoClient echoClient.c
$ ./echoClient 129.170.213.32
Hello from moose.cs.dartmouth.edu
String received from the server: Hello from moose.cs.dartmouth.edu
Over at the server we see that the new client is recognized proving that our concurrent server can handle multiple clients at any one time; that is cool!
$Received request...
Child created for dealing with client requests
String received from and resent to the client:Hello from moose.cs.dartmouth.edu
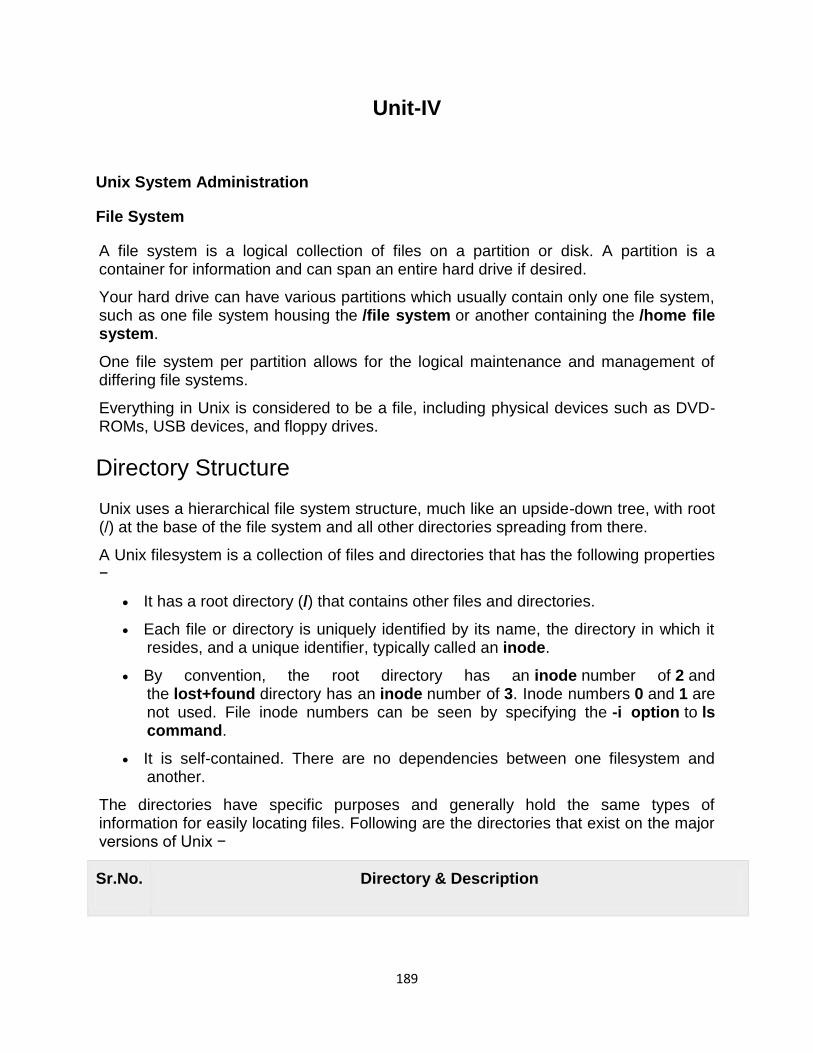
189
Unit-IV
Unix System Administration
File System
A file system is a logical collection of files on a partition or disk. A partition is a container for information and can span an entire hard drive if desired.
Your hard drive can have various partitions which usually contain only one file system, such as one file system housing the /file system or another containing the /home file system.
One file system per partition allows for the logical maintenance and management of differing file systems.
Everything in Unix is considered to be a file, including physical devices such as DVD-ROMs, USB devices, and floppy drives.
Directory Structure
Unix uses a hierarchical file system structure, much like an upside-down tree, with root (/) at the base of the file system and all other directories spreading from there.
A Unix filesystem is a collection of files and directories that has the following properties −
It has a root directory (/) that contains other files and directories.
Each file or directory is uniquely identified by its name, the directory in which it resides, and a unique identifier, typically called an inode.
By convention, the root directory has an inode number of 2 and the lost+found directory has an inode number of 3. Inode numbers 0 and 1 are not used. File inode numbers can be seen by specifying the -i option to ls command.
It is self-contained. There are no dependencies between one filesystem and another.
The directories have specific purposes and generally hold the same types of information for easily locating files. Following are the directories that exist on the major versions of Unix −
Sr.No. Directory & Description
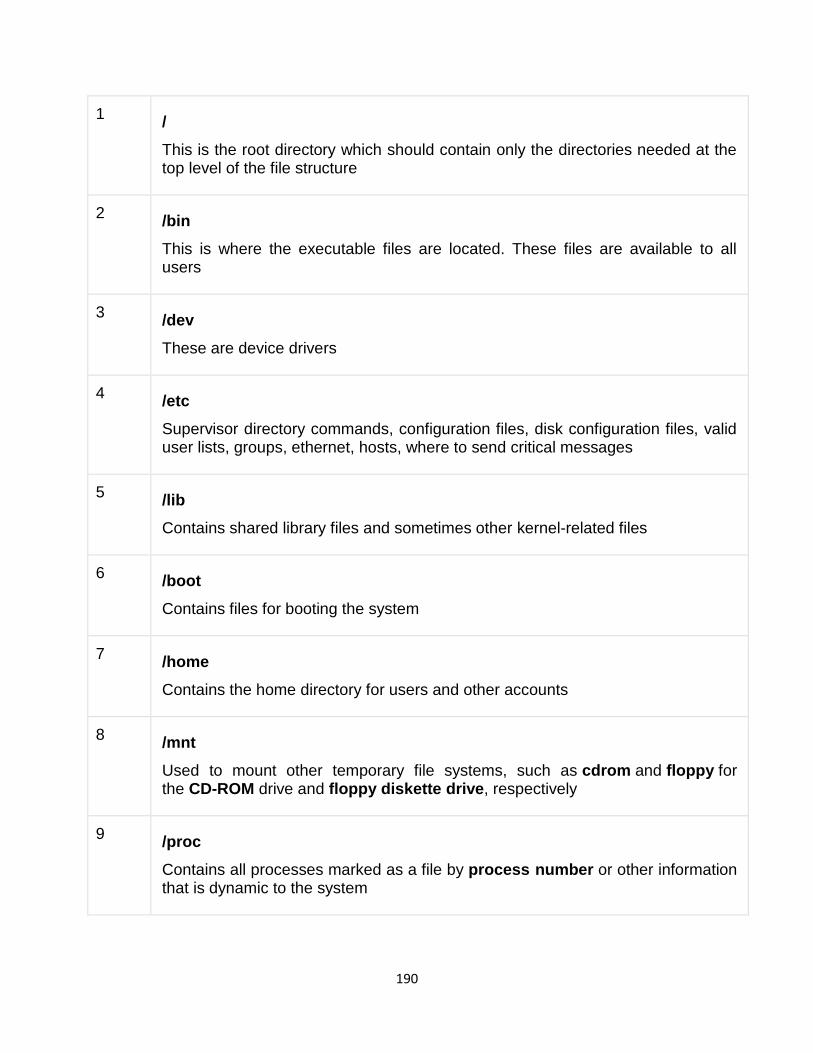
190
1 /
This is the root directory which should contain only the directories needed at the top level of the file structure
2 /bin
This is where the executable files are located. These files are available to all users
3 /dev
These are device drivers
4 /etc
Supervisor directory commands, configuration files, disk configuration files, valid user lists, groups, ethernet, hosts, where to send critical messages
5 /lib
Contains shared library files and sometimes other kernel-related files
6 /boot
Contains files for booting the system
7 /home
Contains the home directory for users and other accounts
8 /mnt
Used to mount other temporary file systems, such as cdrom and floppy for the CD-ROM drive and floppy diskette drive, respectively
9 /proc
Contains all processes marked as a file by process number or other information that is dynamic to the system
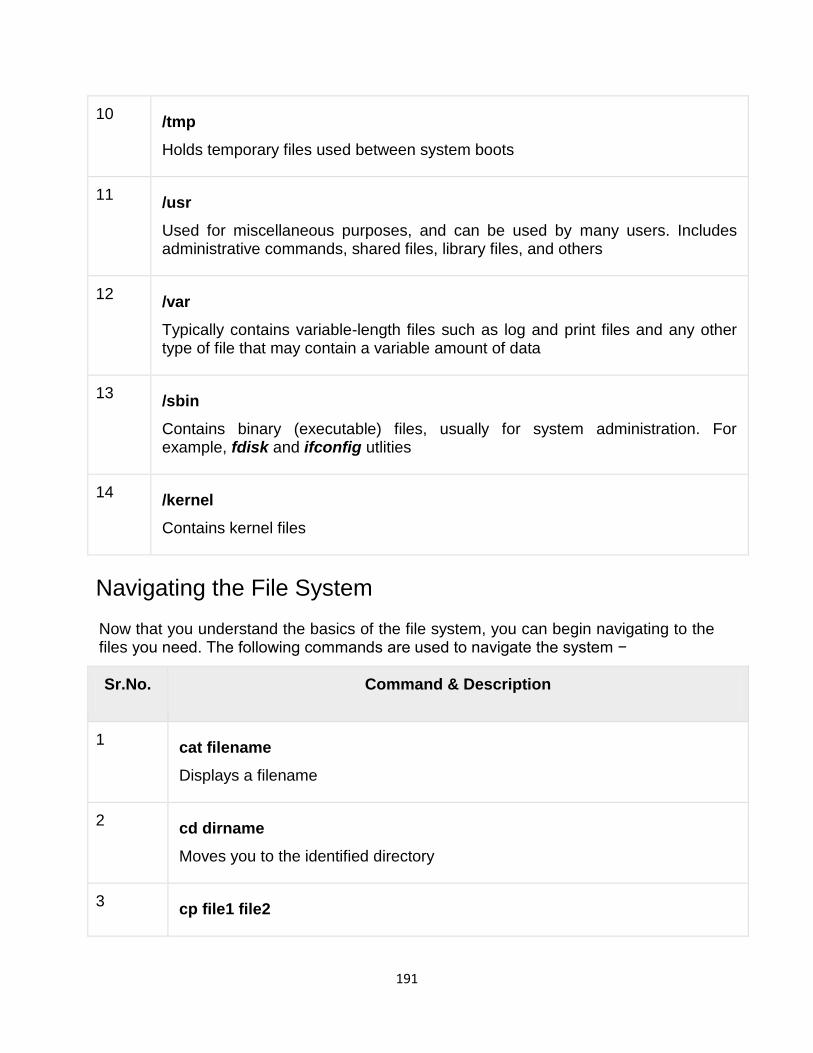
191
10 /tmp
Holds temporary files used between system boots
11 /usr
Used for miscellaneous purposes, and can be used by many users. Includes administrative commands, shared files, library files, and others
12 /var
Typically contains variable-length files such as log and print files and any other type of file that may contain a variable amount of data
13 /sbin
Contains binary (executable) files, usually for system administration. For example, fdisk and ifconfig utlities
14 /kernel
Contains kernel files
Navigating the File System
Now that you understand the basics of the file system, you can begin navigating to the files you need. The following commands are used to navigate the system −
Sr.No. Command & Description
1 cat filename
Displays a filename
2 cd dirname
Moves you to the identified directory
3 cp file1 file2

192
Copies one file/directory to the specified location
4 file filename
Identifies the file type (binary, text, etc)
5 find filename dir
Finds a file/directory
6 head filename
Shows the beginning of a file
7 less filename
Browses through a file from the end or the beginning
8 ls dirname
Shows the contents of the directory specified
9 mkdir dirname
Creates the specified directory
10 more filename
Browses through a file from the beginning to the end
11 mv file1 file2
Moves the location of, or renames a file/directory
12 pwd
Shows the current directory the user is in
13 rm filename
Removes a file
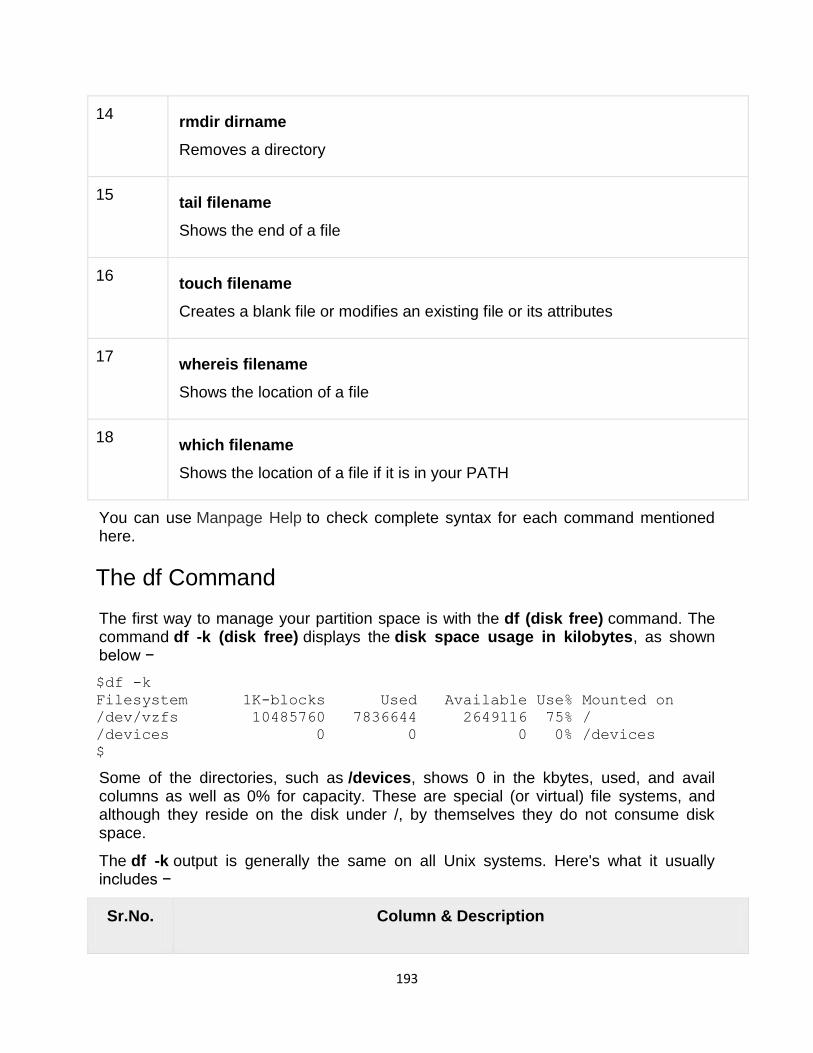
193
14 rmdir dirname
Removes a directory
15 tail filename
Shows the end of a file
16 touch filename
Creates a blank file or modifies an existing file or its attributes
17 whereis filename
Shows the location of a file
18 which filename
Shows the location of a file if it is in your PATH
You can use Manpage Help to check complete syntax for each command mentioned here.
The df Command
The first way to manage your partition space is with the df (disk free) command. The command df -k (disk free) displays the disk space usage in kilobytes, as shown below −
$df -k
Filesystem 1K-blocks Used Available Use% Mounted on
/dev/vzfs 10485760 7836644 2649116 75% /
/devices 0 0 0 0% /devices
$
Some of the directories, such as /devices, shows 0 in the kbytes, used, and avail columns as well as 0% for capacity. These are special (or virtual) file systems, and although they reside on the disk under /, by themselves they do not consume disk space.
The df -k output is generally the same on all Unix systems. Here's what it usually includes −
Sr.No. Column & Description
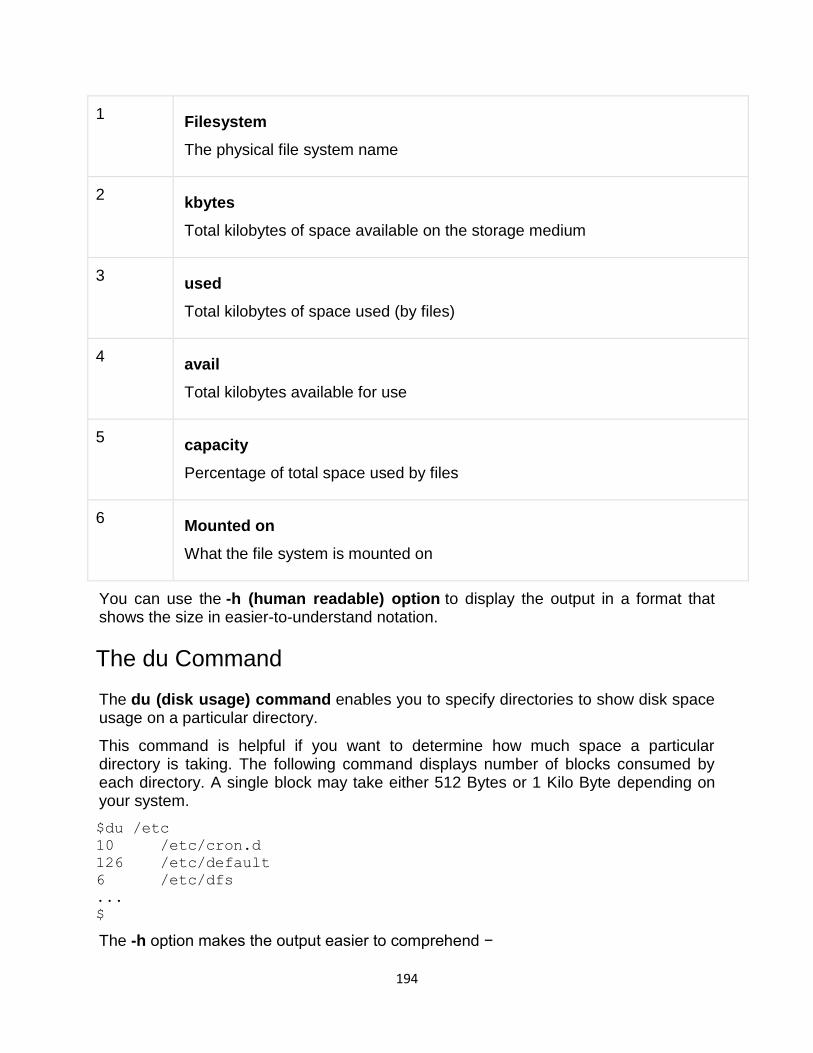
194
1 Filesystem
The physical file system name
2 kbytes
Total kilobytes of space available on the storage medium
3 used
Total kilobytes of space used (by files)
4 avail
Total kilobytes available for use
5 capacity
Percentage of total space used by files
6 Mounted on
What the file system is mounted on
You can use the -h (human readable) option to display the output in a format that shows the size in easier-to-understand notation.
The du Command
The du (disk usage) command enables you to specify directories to show disk space usage on a particular directory.
This command is helpful if you want to determine how much space a particular directory is taking. The following command displays number of blocks consumed by each directory. A single block may take either 512 Bytes or 1 Kilo Byte depending on your system.
$du /etc
10 /etc/cron.d
126 /etc/default
6 /etc/dfs
...
$
The -h option makes the output easier to comprehend −
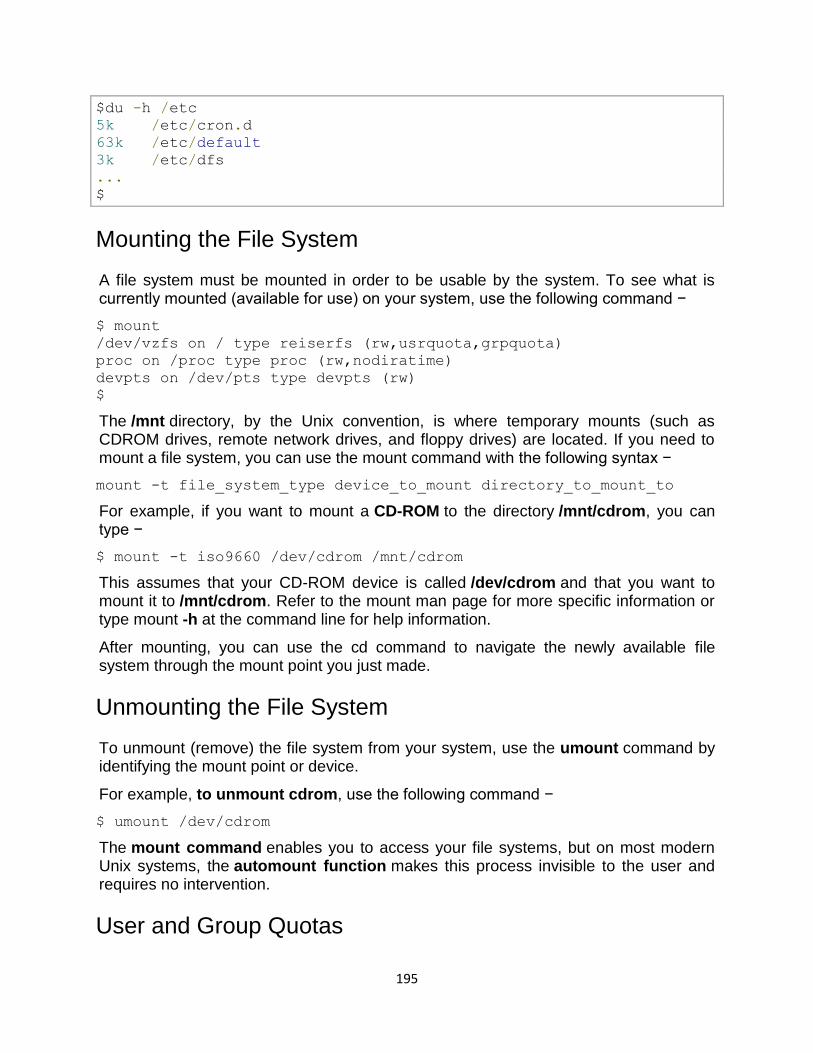
195
$du -h /etc
5k /etc/cron.d
63k /etc/default
3k /etc/dfs
...
$
Mounting the File System
A file system must be mounted in order to be usable by the system. To see what is currently mounted (available for use) on your system, use the following command −
$ mount
/dev/vzfs on / type reiserfs (rw,usrquota,grpquota)
proc on /proc type proc (rw,nodiratime)
devpts on /dev/pts type devpts (rw)
$
The /mnt directory, by the Unix convention, is where temporary mounts (such as CDROM drives, remote network drives, and floppy drives) are located. If you need to mount a file system, you can use the mount command with the following syntax −
mount -t file_system_type device_to_mount directory_to_mount_to
For example, if you want to mount a CD-ROM to the directory /mnt/cdrom, you can type −
$ mount -t iso9660 /dev/cdrom /mnt/cdrom
This assumes that your CD-ROM device is called /dev/cdrom and that you want to mount it to /mnt/cdrom. Refer to the mount man page for more specific information or type mount -h at the command line for help information.
After mounting, you can use the cd command to navigate the newly available file system through the mount point you just made.
Unmounting the File System
To unmount (remove) the file system from your system, use the umount command by identifying the mount point or device.
For example, to unmount cdrom, use the following command −
$ umount /dev/cdrom
The mount command enables you to access your file systems, but on most modern Unix systems, the automount function makes this process invisible to the user and requires no intervention.
User and Group Quotas
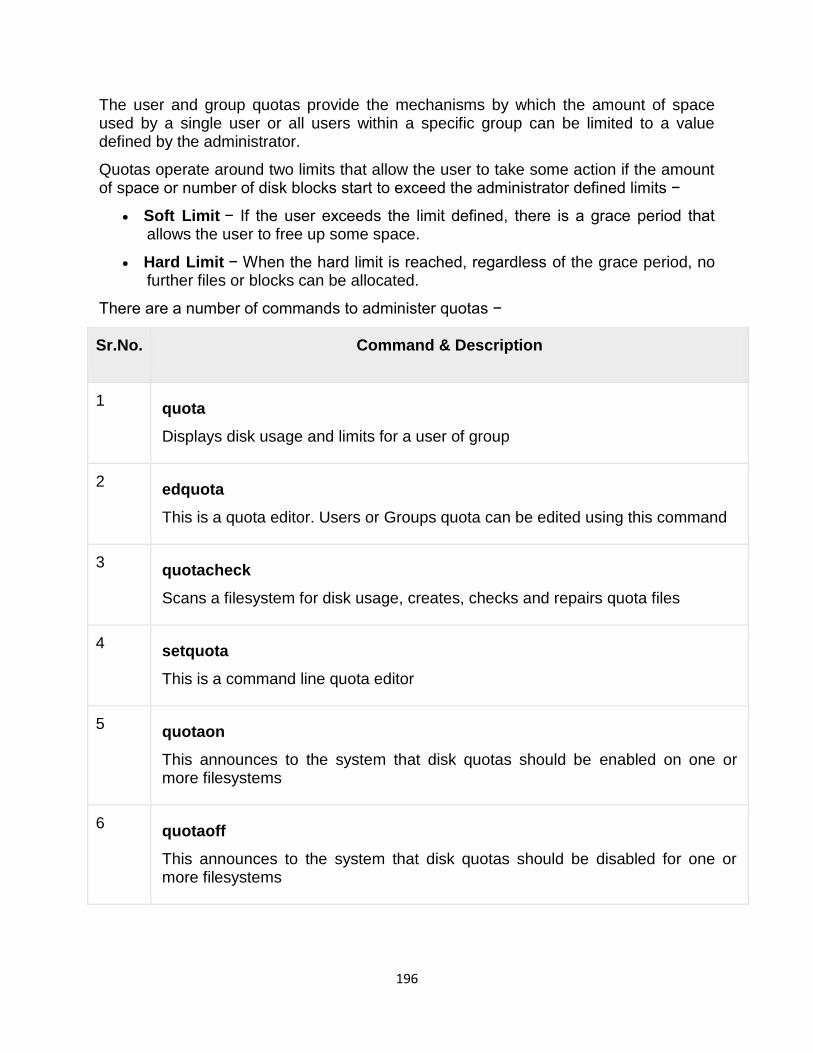
196
The user and group quotas provide the mechanisms by which the amount of space used by a single user or all users within a specific group can be limited to a value defined by the administrator.
Quotas operate around two limits that allow the user to take some action if the amount of space or number of disk blocks start to exceed the administrator defined limits −
Soft Limit − If the user exceeds the limit defined, there is a grace period that allows the user to free up some space.
Hard Limit − When the hard limit is reached, regardless of the grace period, no further files or blocks can be allocated.
There are a number of commands to administer quotas −
Sr.No. Command & Description
1 quota
Displays disk usage and limits for a user of group
2 edquota
This is a quota editor. Users or Groups quota can be edited using this command
3 quotacheck
Scans a filesystem for disk usage, creates, checks and repairs quota files
4 setquota
This is a command line quota editor
5 quotaon
This announces to the system that disk quotas should be enabled on one or more filesystems
6 quotaoff
This announces to the system that disk quotas should be disabled for one or more filesystems
197
7 repquota
This prints a summary of the disc usage and quotas for the specified file systems
mounting and unmounting file system
Before you can access the files on a file system, you need to mount the file system. Mounting a file system attaches that file system to a directory (mount point) and makes it available to the system. The root (/) file system is always mounted. Any other file system can be connected or disconnected from the root (/) file system.
When you mount a file system, any files or directories in the underlying mount point directory are unavailable as long as the file system is mounted. These files are not permanently affected by the mounting process, and they become available again when the file system is unmounted. However, mount directories are typically empty, because you usually do not want to obscure existing files.
For example, the figure below shows a local file system, starting with a root (/) file system and subdirectories sbin, etc, and opt.
Now, say you wanted to access a local file system from the /opt file system that contains a set of unbundled products.
First, you must create a directory to use as a mount point for the file system you want to mount, for example, /opt/unbundled. Once the mount point is created, you can mount the file system (by using the mount command), which makes all of the files and directories in /opt/unbundled available, as shown in the figure below. See Chapter 36, Mounting and Unmounting File Systems (Tasks) for detailed instructions on how to perform these tasks.
The Mounted File System Table
Whenever you mount or unmount a file system, the /etc/mnttab (mount table) file is modified with the list of currently mounted file systems. You can display the contents of this file with the cat or more commands, but you cannot edit it. Here is an example of an /etc/mnttab file:
$ more /etc/mnttab /dev/dsk/c0t0d0s0 / ufs rw,intr,largefiles,onerror=panic,suid,dev=2200000 938557523 /proc /proc proc dev=3180000 938557522 fd /dev/fd fd rw,suid,dev=3240000 938557524
198
mnttab /etc/mnttab mntfs dev=3340000 938557526 swap /var/run tmpfs dev=1 938557526 swap /tmp tmpfs dev=2 938557529 /dev/dsk/c0t0d0s7 /export/home ufs rw,intr,largefiles,onerror=panic,suid,dev=2200007 938557529 $
The Virtual File System Table
It would be a very time-consuming and error-prone task to manually mount file systems every time you wanted to access them. To fix this, the virtual file system table (the /etc/vstab file) was created to maintain a list of file systems and how to mount them. The /etc/vfstab file provides two important features: you can specify file systems to automatically mount when the system boots, and you can mount file systems by using only the mount point name, because the /etc/vfstab file contains the mapping between the mount point and the actual device slice name.
A default /etc/vfstab file is created when you install a system depending on the selections you make when installing system software; however, you can edit the /etc/vfstab file on a system whenever you want. To add an entry, the main information you need to specify is the device where the file system resides, the name of the mount point, the type of the file system, whether you want it to mount automatically when the system boots (by using the mountall command), and any mount options.
The following is an example of an /etc/vfstab file. Comment lines begin with #. This example shows an /etc/vfstab file for a system with two disks (c0t0d0 and c0t3d0).
$ more /etc/vfstab #device device mount FS fsck mount mount #to mount to fsck point type pass at boot options /dev/dsk/c0t0d0s0 /dev/rdsk/c0t0d0s0 / ufs 1 no - /proc - /proc proc - no - /dev/dsk/c0t0d0s1 - - swap - no - swap - /tmp tmpfs - yes - /dev/dsk/c0t0d0s6 /dev/rdsk/c0t0d0s6 /usr ufs 2 no - /dev/dsk/c0t3d0s7 /dev/rdsk/c0t3d0s7 /test ufs 2 yes - $
In the above example, the last entry specifies that a UFS file system on the /dev/dsk/c0t3d0s7 slice will be automatically mounted on the /test mount point when the system boots. Note that, for root (/) and /usr, the mount at boot field value is specified as no, because these file systems are mounted by the kernel as part of the boot sequence before the mountall command is run.
199
See Chapter 36, Mounting and Unmounting File Systems (Tasks) for descriptions of each of the /etc/vfstab fields and information on how to edit and use the file.
The NFS Environment
NFS is a distributed file system service that can be used to share resources (files or directories) from one system, typically a server, with other systems across the network. For example, you might want to share third-party applications or source files with users on other systems.
NFS makes the actual physical location of the resource irrelevant to the user. Instead of placing copies of commonly used files on every system, NFS allows you to place one copy on one system's disk and let all other systems access it across the network. Under NFS, remote files are virtually indistinguishable from local ones.
A system becomes an NFS server if it has resources to share over the network. A server keeps a list of currently shared resources and their access restrictions (such as read/write or read-only).
When you share a resource, you make it available for mounting by remote systems.
You can share a resource in these ways:
By using the share or shareall command
By adding an entry to the /etc/dfs/dfstab (distributed file system table) file and rebooting the system
See Chapter 36, Mounting and Unmounting File Systems (Tasks) for information on how to share resources. See System Administration Guide, Volume 3 for a complete description of NFS.
AutoFS
You can mount NFS file system resources by using a client-side service called automounting (or AutoFS), which enables a system to automatically mount and unmount NFS resources whenever you access them. The resource remains mounted as long as you remain in the directory and are using a file. If the resource is not accessed for a certain period of time, it is automatically unmounted.
AutoFS provides the following features:
NFS resources don't need to be mounted when the system boots, which saves booting time.
200
Users don't need to know the root password to mount and unmount NFS resources.
Network traffic might be reduced, since NFS resources are only mounted when they are in use.
The AutoFS service is initialized by automount, which is run automatically when a system is booted. The automount daemon, automountd, runs continuously and is responsible for the mounting and unmounting of the NFS file systems on an as-needed basis. By default, the Solaris operating environment automounts /home.
AutoFS works with file systems specified in the name service. This information can be maintained in NIS, NIS+, or local /etc files. With AutoFS, you can specify multiple servers to provide the same file system. This way, if one of the servers is down, AutoFS can try to mount from another machine. You can specify which servers are preferred for each resource in the maps by assigning each server a weighting factor.
See System Administration Guide, Volume 3 for complete information on how to set up and administer AutoFS.
The Cache File System (CacheFS)
If you want to improve the performance and scalability of an NFS or CD-ROM file system, you should use the Cache File System (CacheFS). CacheFS is a general purpose file system caching mechanism that improves NFS server performance and scalability by reducing server and network load.
Designed as a layered file system, CacheFS provides the ability to cache one file system on another. In an NFS environment, CacheFS increases the client per server ratio, reduces server and network loads, and improves performance for clients on slow links, such as Point-to-Point Protocol (PPP). You can also combine CacheFS with the AutoFS service to help boost performance and scalability.
See Chapter 37, The Cache File System (Tasks) for detailed information about CacheFS.
Deciding How to Mount File Systems
The table below provides guidelines on mounting file systems based on how you use them.
Table 34-3 Determining How to Mount File Systems
If You Need to Mount ...
Then You Should Use ...
201
If You Need to Mount ...
Then You Should Use ...
Local or remote file systems infrequently
The mount command entered manually from the command line.
Local file systems frequently
The /etc/vfstab file, which will mount the file system automatically when the system is booted in multi-user state.
Remote file systems frequently, such as home directories
The /etc/vfstab file, which will automatically mount the file system when the system is booted in multi-user state.
AutoFS, which will automatically mount or unmount the file system when you change into (mount) or out of (unmount) the directory.
To enhance performance, you can also cache the remote file systems by using CacheFS.
System booting
The BIOS, operating system and hardware components of a computer system should all be working correctly for it to boot. If any of these elements fail, it leads to a failed boot sequence.
System Boot Process
The following diagram demonstrates the steps involved in a system boot process −
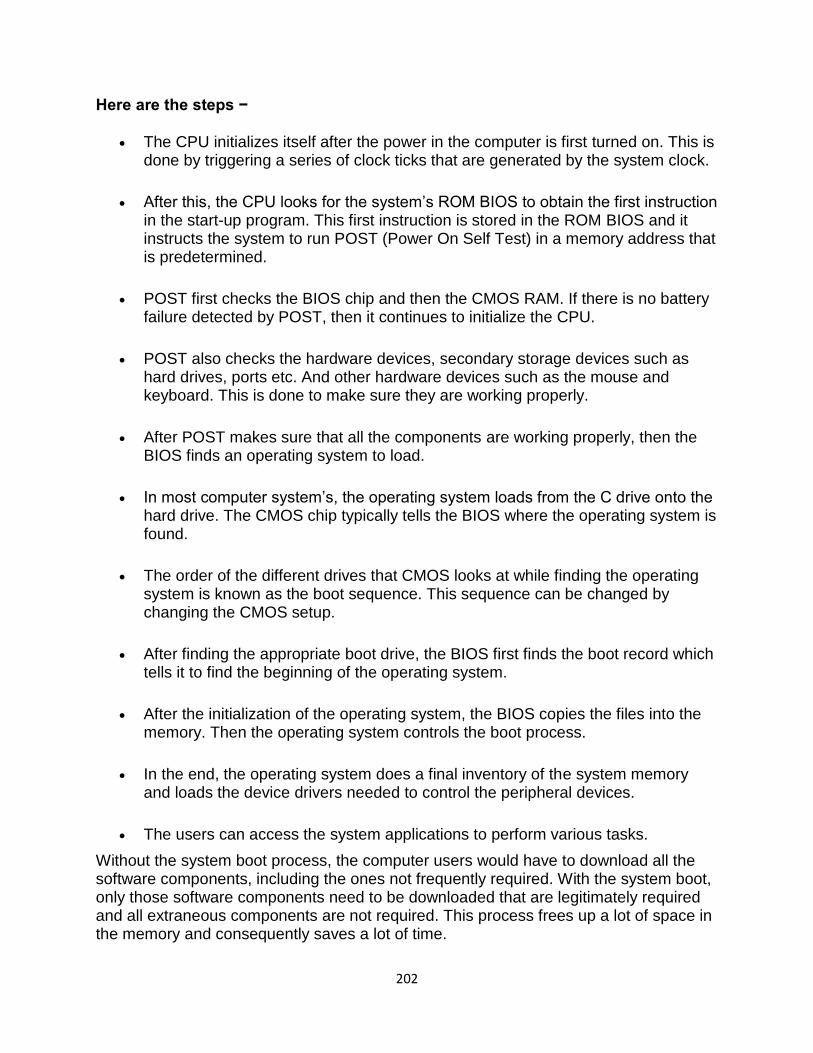
202
Here are the steps −
The CPU initializes itself after the power in the computer is first turned on. This is done by triggering a series of clock ticks that are generated by the system clock.
After this, the CPU looks for the system‘s ROM BIOS to obtain the first instruction in the start-up program. This first instruction is stored in the ROM BIOS and it instructs the system to run POST (Power On Self Test) in a memory address that is predetermined.
POST first checks the BIOS chip and then the CMOS RAM. If there is no battery failure detected by POST, then it continues to initialize the CPU.
POST also checks the hardware devices, secondary storage devices such as hard drives, ports etc. And other hardware devices such as the mouse and keyboard. This is done to make sure they are working properly.
After POST makes sure that all the components are working properly, then the BIOS finds an operating system to load.
In most computer system‘s, the operating system loads from the C drive onto the hard drive. The CMOS chip typically tells the BIOS where the operating system is found.
The order of the different drives that CMOS looks at while finding the operating system is known as the boot sequence. This sequence can be changed by changing the CMOS setup.
After finding the appropriate boot drive, the BIOS first finds the boot record which tells it to find the beginning of the operating system.
After the initialization of the operating system, the BIOS copies the files into the memory. Then the operating system controls the boot process.
In the end, the operating system does a final inventory of the system memory and loads the device drivers needed to control the peripheral devices.
The users can access the system applications to perform various tasks.
Without the system boot process, the computer users would have to download all the software components, including the ones not frequently required. With the system boot, only those software components need to be downloaded that are legitimately required and all extraneous components are not required. This process frees up a lot of space in the memory and consequently saves a lot of time.
203
shutting down
A shutdown point is a level of operations at which a company experiences no benefit
for continuing operations and therefore decides to shut down temporarily—or in some
cases permanently. It results from the combination of output and price where the
company earns just enough revenue to cover its total variable costs. The shutdown
point denotes the exact moment when a company‘s (marginal) revenue is equal to its
variable (marginal) costs—in other words, it occurs when the marginal profit becomes
negative.
KEY TAKEAWAYS
A shutdown point is a level of operations at which a company experiences no benefit for continuing operations and therefore decides to shut down temporarily—or in some cases permanently.
A shutdown point results from the combination of output and price where the company earns just enough revenue to cover its total variable costs.
Shutdown points are based entirely on determining at what point the marginal costs associated with operation exceed the revenue being generated by those operations.
When a company can earn a positive contribution margin, it should remain in operation despite an overall marginal loss.
How the Shutdown Point Works At the shutdown point, there is no economic benefit to continuing production. If an additional loss occurs, either through a rise in variable costs or a fall in revenue, the cost of operating will outweigh the revenue.
At that point, shutting down operations is more practical than continuing. If the reverse occurs, continuing production is more practical. If a company can produce revenues greater or equal to its total variable costs, it can use the additional revenues to pay down its fixed costs, assuming fixed costs, such as lease contracts or other lengthy obligations, will still be incurred when the firm shuts down. When a company can earn a positive contribution margin, it should remain in operation despite an overall marginal loss.
Special Considerations The shutdown point does not include an analysis of fixed costs in its determination. It is based entirely on determining at what point the marginal costs associated with operation exceed the revenue being generated by those operations.
204
Certain seasonal businesses, such as Christmas tree farmers, may shut down almost entirely during the off-season. While fixed costs remain during the shutdown, variable costs can be eliminated.
Fixed costs are the costs that remain regardless of what operations are taking place. This can include payments to maintain the rights to the facility, such as rent or mortgage payments, along with any minimum utilities that must be maintained. Minimum staffing costs are considered fixed if a certain number of employees must be maintained even when operations cease.
Variable costs are more closely tied to actual operations. This can include but is not limited to, employee wages for those whose positions are tied directly to production, certain utility costs, or the cost of the materials required for production.
Types of Shutdown Points The length of a shutdown may be temporary or permanent, depending on the nature of the economic conditions leading to the shutdown. For non-seasonal goods, an economic recession may reduce demand from consumers, forcing a temporary shutdown (in full or in part) until the economy recovers.
Other times, demand dries up completely due to changing consumer preferences or technological change. For instance, nobody produces cathode-ray tube (CRT) televisions or computer monitors any longer, and it would be a losing prospect to open a factory these days to produce them.
Other businesses may experience fluctuations or produce some goods year-round, while others are only produced seasonally. For example, Cadbury chocolate bars are produced year-round, while Cadbury Cream Eggs are considered a seasonal product. The main operations, focused on the chocolate bars, may remain operational year-round, while the cream egg operations may go through periods of a shutdown during the off-season.
handling user account
Account management, authentication and password management can be tricky. For many developers, account management is a dark corner that doesn't get enough attention. For product managers and customers, the resulting experience often falls short of expectations.
Fortunately, Google Cloud Platform (GCP) brings several tools to help you make good decisions around the creation, secure handling and authentication of user accounts (in this context, anyone who identifies themselves to your system — customers or internal users). Whether you're responsible for a website hosted in Google Kubernetes Engine, an API on Apigee, an app using Firebase or other service with authenticated users, this
205
post will lay out the best practices to ensure you have a safe, scalable, usable account authentication system.
1. Hash those passwords
My most important rule for account management is to safely store sensitive user information, including their password. You must treat this data as sacred and handle it appropriately.
Do not store plaintext passwords under any circumstances. Your service should instead store a cryptographically strong hash of the password that cannot be reversed — created with, for example, PBKDF2, Argon2, Scrypt, or Bcrypt. The hash should be salted with a value unique to that specific login credential. Do not use deprecated hashing technologies such as MD5, SHA1 and under no circumstances should you use reversible encryption or try to invent your own hashing algorithm.
You should design your system assuming it will be compromised eventually. Ask yourself "If my database were exfiltrated today, would my users' safety and security be in peril on my service or other services they use? What can we do to mitigate the potential for damage in the event of a leak?"
Another point: If you could possibly produce a user's password in plaintext at any time outside of immediately after them providing it to you, there's a problem with your implementation.
2. Allow for third-party identity providers if possible
Third-party identity providers enable you to rely on a trusted external service to authenticate a user's identity. Google, Facebook and Twitter are commonly used providers.
You can implement external identity providers alongside your existing internal authentication system using a platform such as Firebase Auth. There are a number of benefits that come with Firebase Auth, including simpler administration, smaller attack surface and a multi-platform SDK. We'll touch on more benefits throughout this list. See our case studies on companies that were able to integrate Firebase Auth in as little as one day.
3. Separate the concept of user identity and user account
Your users are not an email address. They're not a phone number. They're not the unique ID provided by an OAUTH response. Your users are the culmination of their unique, personalized data and experience within your service. A well designed user management system has low coupling and high cohesion between different parts of a user's profile.

206
Keeping the concepts of user account and credentials separate will greatly simplify the process of implementing third-party identity providers, allowing users to change their username and linking multiple identities to a single user account. In practical terms, it may be helpful to have an internal global identifier for every user and link their profile and authentication identity via that ID as opposed to piling it all in a single record.
4. Allow multiple identities to link to a single user account
A user who authenticates to your service using their username and password one week might choose Google Sign-In the next without understanding that this could create a duplicate account. Similarly, a user may have very good reason to link multiple email addresses to your service. If you properly separated user identity and authentication, it will be a simple process to link several identities to a single user.
Your backend will need to account for the possibility that a user gets part or all the way through the signup process before they realize they're using a new third-party identity not linked to their existing account in your system. This is most simply achieved by asking the user to provide a common identifying detail, such as email address, phone or username. If that data matches an existing user in your system, require them to also authenticate with a known identity provider and link the new ID to their existing account.
5. Don't block long or complex passwords
NIST has recently updated guidelines on password complexity and strength. Since you are (or will be very soon) using a strong cryptographic hash for password storage, a lot of problems are solved for you. Hashes will always produce a fixed-length output no matter the input length, so your users should be able to use passwords as long as they like. If you must cap password length, only do so based on the maximum POST size allowable by your servers. This is commonly well above 1MB. Seriously.
Your hashed passwords will be comprised of a small selection of known ASCII characters. If not, you can easily convert a binary hash to Base64. With that in mind, you should allow your users to use literally any characters they wish in their password. If someone wants a password made of Klingon, Emoji and control characters with whitespace on both ends, you should have no technical reason to deny them.
6. Don't impose unreasonable rules for usernames
It's not unreasonable for a site or service to require usernames longer than two or three characters, block hidden characters and prevent whitespace at the beginning and end of a username. However, some sites go overboard with requirements such as a minimum length of eight characters or by blocking any characters outside of 7-bit ASCII letters and numbers.
A site with tight restrictions on usernames may offer some shortcuts to developers, but it does so at the expense of users and extreme cases will drive some users away.
207
There are some cases where the best approach is to assign usernames. If that's the case for your service, ensure the assigned username is user-friendly insofar as they need to recall and communicate it. Alphanumeric IDs should avoid visually ambiguous symbols such as "Il1O0." You're also advised to perform a dictionary scan on any randomly generated string to ensure there are no unintended messages embedded in the username. These same guidelines apply to auto-generated passwords.
7. Allow users to change their username
It's surprisingly common in legacy systems or any platform that provides email accounts not to allow users to change their username. There are very good reasons not to automatically release usernames for reuse, but long-term users of your system will eventually come up with a good reason to use a different username and they likely won't want to create a new account.
You can honor your users' desire to change their usernames by allowing aliases and letting your users choose the primary alias. You can apply any business rules you need on top of this functionality. Some orgs might only allow one username change per year or prevent a user from displaying anything but their primary username. Email providers might ensure users are thoroughly informed of the risks before detaching an old username from their account or perhaps forbid unlinking old usernames entirely.
Choose the right rules for your platform, but make sure they allow your users to grow and change over time.
8. Let your users delete their accounts
A surprising number of services have no self-service means for a user to delete their account and associated data. There are a number of good reasons for a user to close an account permanently and delete all personal data. These concerns need to be balanced against your security and compliance needs, but most regulated environments provide specific guidelines on data retention. A common solution to avoid compliance and hacking concerns is to let users schedule their account for automatic future deletion.
In some circumstances, you may be legally required to comply with a user's request to delete their data in a timely manner. You also greatly increase your exposure in the event of a data breach where the data from "closed" accounts is leaked.
9. Make a conscious decision on session length
An often overlooked aspect of security and authentication is session length. Google puts a lot of effort into ensuring users are who they say they are and will double-check based on certain events or behaviors. Users can take steps to increase their security even further.
208
Your service may have good reason to keep a session open indefinitely for non-critical analytics purposes, but there should be thresholds after which you ask for password, 2nd factor or other user verification.
Consider how long a user should be able to be inactive before re-authenticating. Verify user identity in all active sessions if someone performs a password reset. Prompt for authentication or 2nd factor if a user changes core aspects of their profile or when they're performing a sensitive action. Consider whether it makes sense to disallow logging in from more than one device or location at a time.
When your service does expire a user session or require re-authentication, prompt the user in real-time or provide a mechanism to preserve any activity they have unsaved since they were last authenticated. It's very frustrating for a user to fill out a long form, submit it some time later and find out all their input has been lost and they must log in again.
10. Use 2-Step Verification
Consider the practical impact on a user of having their account stolen when choosing from 2-Step Verification (also known as two-factor authentication or just 2FA) methods. SMS 2FA auth has been deprecated by NIST due to multiple weaknesses, however, it may be the most secure option your users will accept for what they consider a trivial service. Offer the most secure 2FA auth you reasonably can. Enabling third-party identity providers and piggybacking on their 2FA is a simple means to boost your security without great expense or effort.
11. Make user IDs case insensitive
Your users don't care and may not even remember the exact case of their username. Usernames should be fully case-insensitive. It's trivial to store usernames and email addresses in all lowercase and transform any input to lowercase before comparing.
Smartphones represent an ever-increasing percentage of user devices. Most of them offer autocorrect and automatic capitalization of plain-text fields. Preventing this behavior at the UI level might not be desirable or completely effective, and your service should be robust enough to handle an email address or username that was unintentionally auto-capitalized.
12. Build a secure auth system
If you're using a service like Firebase Auth, a lot of security concerns are handled for
you automatically. However, your service will always need to be engineered properly to
prevent abuse. Core considerations include implementing a password reset instead of
password retrieval, detailed account activity logging, rate limiting login attempts, locking
out accounts after too many unsuccessful login attempts and requiring two-factor
authentication for unrecognized devices or accounts that have been idle for extended
209
periods. There are many more aspects to a secure authentication system, so please
see the section below for links to more information.
Backup
Backup refers to the copying of physical or virtual files or databases to a secondary
location for preservation in case of equipment failure or catastrophe. The process of
backing up data is pivotal to a successful disaster recovery plan.
Enterprises back up data they deem to be vulnerable in the event of buggy software,
data corruption, hardware failure, malicious hacking, user error or other unforeseen
events. Backups capture and synchronize a point-in-time snapshot that is then used to
return data to its previous state.
Backup and recovery testing examines an organization's practices and technologies for
data security and data replication. The goal is to ensure rapid and reliable data retrieval
should the need arise. The process of retrieving backed-up data files is known as file
restoration.
The terms data backup and data protection are often used interchangeably, although
data protection encompasses the broader goals of business continuity, data
security, information lifecycle management and prevention of malware and computer
viruses.
The importance of data backup
Data backups are among the most important infrastructure components in any
organization because they help guard against data loss. Backups provide a way of
restoring deleted files or recovering a file when it is accidentally overwritten.
In addition, backups are usually an organization's best option for recovering from a
ransomware attack or from a major data loss event, such as a fire in the data center.
What data should be backed up and how frequently?
A backup process is applied to critical databases or related line-of-business
applications. The process is governed by predefined backup policies that specify how
frequently the data is backed up and how many duplicate copies -- known as replicas --
are required, as well as by service-level agreements (SLAs) that stipulate how quickly
data must be restored.
210
Best practices suggest a full data backup should be scheduled to occur at least once a
week, often during weekends or off-business hours. To supplement weekly full backups,
enterprises typically schedule a series of differential or incremental data backup jobs
that back up only the data that has changed since the last full backup took place.
The evolution of backup storage media
Enterprises typically back up key data to dedicated backup disk appliances. Backup
software -- either integrated in the appliances or running on a separate server --
manages the process of copying data to the disk appliances. Backup software handles
processes such as data deduplication that reduce the amount of physical space
required to store data. Backup software also enforces policies that govern how often
specific data is backed up, how many copies are made and where backups are stored.
Before disk became the main backup medium in the early 2000s, most organizations
used magnetic tape drive libraries to store data center backups. Tape is still used today,
but mainly for archived data that does not need to be quickly restored. Some
organizations have adopted the practice of using a removable external drive instead of
a tape, but the basic concept of backing up data to removable media remains the same.
Disk-based backups made it possible for organizations to achieve continuous data
protection. Prior to disk-based backups, organizations would typically create a single
nightly backup. Early on, the nightly backups were all full system backups. As time went
on, the backup files became larger, while the backup windows remained the same size
or even shrank. This forced many organizations to create nightly incremental backups.
Continuous data protection platforms avoid these challenges completely. The systems
perform an initial full backup to disk, and then perform incremental backups every few
minutes as data is created or modified. These types of backups can protect both
structured data -- data stored on a database server -- and unstructured or file data.
In the early days of disk backup, the backup software was designed to run on a
separate server. This software coordinated the backup process and wrote backup data
to a storage array. These systems gained rapid popularity because they acted as online
backups, meaning data could be backed up or restored on demand, without having to
mount a tape.
Although some backup products still use separate backup servers, backup vendors are
increasingly transitioning to integrated data protection appliances. At its simplest, an
integrated data appliance is essentially a file server outfitted with HDDs and backup
211
software. These plug-and-play data storage devices often include automated features
for monitoring disk capacity, expandable storage and preconfigured tape libraries.
Some backup vendors have also begun offering backup platforms that are based
around the use of hyper-converged systems. These systems consist of collections of
standardized servers that have been clustered together and collectively handle backup-
related processes. One of the main benefits of hyper-converged systems is that they
are easily scalable. Each node within a hyper-converged system contains its own
integrated storage, compute and network resources. Administrators can scale the
organization's backup capacity simply by adding more nodes to the cluster.
Whether hyper-converged or not, most disk-based backup appliances enable copies to
be moved from spinning media to magnetic tape for long-term retention. Magnetic tape
systems are still used because of increasing tape densities and the rise of the Linear
Tape File System.
Early disk backup systems were known as virtual tape libraries (VTLs) because they
included disk that worked the same way as tape drives. That way, backup software
applications developed to write data to tape could treat disk as a physical tape library.
VTLs faded from popular use after backup software vendors optimized their products for
disk instead of tape.
Solid-state drives (SSDs) are rarely used for data backup because of price and
endurance concerns. Some storage vendors include SSDs as a caching or tiering tool
for managing writes with disk-based arrays. This is especially common in hyper-
converged systems. Data is initially cached in flash storage and then written to disk. As
vendors release SSDs with larger capacity than disk drives, flash drives might gain
some use for backup.
Local backup vs. offline backup for primary storage
Modern primary storage systems have evolved to feature stronger native capabilities for
data backup. These features include advanced RAID protection schemes, unlimited
snapshots and tools for replicating snapshots to secondary backup or even tertiary off-
site backup. Despite these advances, primary storage-based backup tends to be more
expensive and lacks the indexing capabilities found in traditional backup products.
Local backups place data copies on external HDDs or magnetic tape systems, typically
housed in or near an on-premises data center. The data is transmitted over a secure
high-bandwidth network connection or corporate intranet.
212
One advantage of local backup is the ability to back up data behind a network firewall.
Local backup is also much quicker and provides greater control over who can access
the data.
Offline or cold backup is like local backup, although it is most often associated with
backing up a database. An offline backup incurs downtime since the backup process
occurs while the database is disconnected from its network.
Backup and cloud storage
Off-site backup transmits data copies to a remote location, which can include a
company's secondary data center or leased colocation facility. Increasingly, off-site data
backup equates to subscription-based cloud storage as a service, which provides low-
cost, scalable capacity and eliminates a customer's need to purchase and maintain
backup hardware. Despite its growing popularity, electing backup as a service (BaaS)
requires users to encrypt data and take other steps to safeguard data integrity.
Cloud backup is divided into the following:
Public cloud storage. Users ship data to a cloud services provider who charges
them a monthly subscription fee based on consumed storage. There are additional
fees for ingress and egress of data. AWS, Google Cloud and Microsoft Azure are
the largest public cloud providers. Smaller managed service providers also host
backups on their clouds or manage customer backups on the large public clouds.
Private cloud storage. Data is backed up to different servers within a company's
firewall, typically between an on-premises data center and a secondary DR site. For
this reason, private cloud storage is sometimes referred to as internal cloud storage.
Hybrid cloud storage. A company uses both local and off-site storage. Enterprises
customarily use public cloud storage selectively for data archiving and long-term
retention. They use private storage for local access and backup for faster access to
their most critical data.
Most backup vendors enable local applications to be backed up to a dedicated private
cloud, effectively treating cloud-based data backup as an extension of a customer's
physical data center. When the process enables applications to fail over in case of a
disaster and fail back later, this is known as disaster recovery as a service.
Cloud-to-cloud (C2C) data backup is an alternative approach that has been gaining
momentum. C2C backup protects data on SaaS platforms, such as Salesforce or
213
Microsoft Office 365. This data often exists only in the cloud, but SaaS vendors often
charge large fees to restore data lost due to customer error. C2C backup works by
copying SaaS data to another cloud, from where it can be restored if any data is lost.
Backup storage for PCs and mobile devices
PC users can consider both local backup from a computer's internal hard disk to an
attached external hard drive or removable media, such as a thumb drive.
Another alternative for consumers is to back up data from smartphones and tablets to
personal cloud storage, which is available from vendors such as Box, Carbonite,
Dropbox, Google Drive, Microsoft OneDrive and others. These services are commonly
used to provide a certain capacity for free, giving consumers the option to purchase
additional storage as needed. Unlike enterprise cloud storage as a service, these
consumer-based cloud offerings generally do not provide the level of data security
businesses require.
Backup software and hardware vendors
Vendors that sell backup hardware platforms include Barracuda Networks, Cohesity,
Dell EMC (Data Domain), Drobo, ExaGrid Systems, Hewlett Packard Enterprise, Hitachi
Vantara, IBM, NEC Corp., Oracle StorageTek (tape libraries), Quantum Corp., Rubrik,
Spectra Logic, Unitrends and Veritas NetBackup.
Leading enterprise backup software vendors include Acronis, Arcserve, Asigra,
Commvault, Datto, Dell EMC Data Protection Suite (Avamar and NetWorker), Dell EMC
RecoverPoint replication manager, Druva, Nakivo, Veeam Software and Veritas
Technologies.
The Microsoft Windows Server OS inherently features the Microsoft Resilient File
System (ReFS) to automatically detect and repair corrupted data. While not technically
data backup, Microsoft ReFS is geared to be a preventive measure for safeguarding file
system data against corruption.
VMware vSphere provides a suite of backup tools for data protection, high availability
and replication. The VMware vStorage API for Data Protection (VADP) enables VMware
or supported third-party backup software to safely take full and incremental backups of
VMs. VADP implements backups via hypervisor-based snapshots. As an adjunct to data
backup, VMware vSphere live migration enables VMs to be moved between different
platforms to minimize the effect of a DR event. VMware Virtual Volumes also aid VM
backup.
214
Backup types defined
Full backup captures a copy of an entire data set. Although considered to be the
most reliable backup method, performing a full backup is time-consuming and
requires many disks or tapes. Most organizations run full backups only periodically.
Incremental backup offers an alternative to full backups by backing up only the
data that has changed since the last full backup. The drawback is that a full restore
takes longer if an incremental-based data backup copy is used for recovery.
Differential backup copies data changed since the last full backup. This enables a
full restore to occur more quickly by requiring only the last full backup and the last
differential backup. For example, if you create a full backup on Monday, the Tuesday
backup would, at that point, be similar to an incremental backup. Wednesday's
backup would then back up the differential that has changed since Monday's full
backup. The downside is that progressive growth of differential backups tends to
adversely affect your backup window. A differential backup spawns a file by
combining an earlier complete copy of it with one or more incremental copies
created later. The assembled file is not a direct copy of any single current or
previously created file, but rather synthesized from the original file and any
subsequent modifications to that file.
Synthetic full backup is a variation of differential backup. In a synthetic full backup,
the backup server produces an additional full copy, which is based on the original
full backup and data gleaned from incremental copies.
Incremental-forever backups minimize the backup window while providing faster
recovery access to data. An incremental-forever backup captures the full data set
and then supplements it with incremental backups from that point forward. Backing
up only changed blocks is also known as delta differencing. Full backups of data
sets are typically stored on the backup server, which automates the restoration.
Reverse-incremental backups are changes made between two instances of a
mirror. Once an initial full backup is taken, each successive incremental backup
applies any changes to the existing full backup. This essentially generates a novel
synthetic full backup copy each time an incremental change is applied, while also
providing reversion to previous full backups.
Hot backup, or dynamic backup, is applied to data that remains available to users
as the update is in process. This method sidesteps user downtime and productivity
loss. The risk with hot backup is that, if the data is amended while the backup is
underway, the resulting backup copy might not match the final state of the data.
215
Techniques and technologies to complement data backup
Continuous data protection (CDP) refers to layers of associated technologies
designed to enhance data protection. A CDP-based storage system backs up all
enterprise data whenever a change is made. CDP tools enable multiple copies of
data to be created. Many CDP systems contain a built-in engine that replicates data
from a primary to a secondary backup server and/or tape-based storage. Disk-to-
disk-to-tape backup is a popular architecture for CDP systems.
Near-continuous CDP takes backup snapshots at set intervals, which are different
from array-based vendor snapshots that are taken each time new data is written to
storage.
Data reduction lessens your storage footprint. There are two primary methods: data
compression and data deduplication. These methods can be used singly, but
vendors often combine the approaches. Reducing the size of data has implications
on backup windows and restoration times.
Disk cloning involves copying the contents of a computer's hard drive, saving it as
an image file and transferring it to storage media. Disk cloning can be used for
provisioning, system provisioning, system recovery and rebooting or returning a
system to its original configuration.
Erasure coding, or forward error correction, evolved as a scalable alternative to
traditional RAID systems. Erasure coding most often is associated with object
storage. RAID stripes data writes across multiple drives, using a parity drive to
ensure redundancy and resilience. The technology breaks data into fragments and
encodes it with other bits of redundant data. These encoded fragments are stored
across different storage media, nodes or geographic locations. The associated
fragments are used to reconstruct corrupted data using a technique known
as oversampling.
Flat backup is a data protection scheme in which a direct copy of a snapshot is
moved to low-cost storage without the use of traditional backup software. The
original snapshot retains its native format and location; the flat backup replica gets
mounted should the original become unavailable or unusable.
Mirroring places data files on more than one computer server to ensure it remains
accessible to users. In synchronous mirroring, data is written to local and remote
disk simultaneously. Writes from local storage are not acknowledged until a
confirmation is sent from remote storage, thus ensuring the two sites have an
identical data copy. Conversely, asynchronous local writes are complete before
confirmation is sent from the remote server.
216
Replication enables users to select the required number of replicas, or copies, of
data needed to sustain or resume business operations. Data replication copies data
from one location to another, providing an up-to-date copy to hasten DR.
Recovery-in-place, or instant recovery, enables users to temporarily run a
production application directly from a backup VM instance, thus maintaining data
availability while the primary VM is being restored. Mounting a physical or VM
instance directly on a backup or media server can hasten system-level recovery to
within minutes. Recovery from a mounted image does result in degraded
performance, since backup servers are not sized for production workloads.
Storage snapshots capture a set of reference markers on disk for a given
database, file or storage volume. Users refer to the markers, or pointers, to restore
data from a selected point in time. Because it derives from an underlying source
volume, an individual storage snapshot is an instance, not a full backup. As such,
snapshots do not protect data against hardware failure.
Snapshots are generally grouped in three categories: changed block, clones and CDP.
Snapshots first appeared as a management tool within a storage array. The advent of
virtualization added hypervisor-based snapshots. Snapshots might also be implemented
by backup software or even via a VM.
Copy data management and file sync and share
Tangentially related to backup is copy data management (CDM). This is software that
provides insight into the multiple data copies an enterprise might create. It enables
discrete groups of users to work from a common data copy. Although technically not a
backup technology, CDM enables companies to efficiently manage data copies by
identifying superfluous or underutilized copies, thus reducing backup storage capacity
and backup windows.
File sync-and-share tools protect data on mobile devices used by employees. These
tools basically copy modified user files between mobile devices. Although this protects
the data files, it does not enable users to roll back to a particular point in time should the
device fail.
How to choose the right backup option
When deciding which type of backup to use, you need to weigh several key
considerations.
217
Enterprises commonly mix various data backup approaches, as dictated by the primacy
of the data. A backup strategy should be governed by the SLAs that apply to an
application, with respect to data access and availability, recovery time objectives and
recovery point objectives. Choice of backups is also influenced by the versatility of a
backup application, which should guarantee all data is backed up and provides
replication and recovery while establishing efficient backup processes.
Creating a backup policy
Most businesses create a backup policy to govern the methods and types of data
protection they deploy and to ensure critical business data is backed up consistently
and regularly. The backup policy also creates a checklist that IT can monitor and follow
as the department is responsible for protecting all the organization's critical data.
A backup policy should include a schedule of backups. The policies are documented so
others can follow them to back up and recover data if the main backup administrator is
unavailable.
Data retention policies are also often part of a backup policy, especially for companies
in regulated industries. Preset data retention rules can lead to automated deletion or
migration of data to different media after it has been kept for a specific period. Data
retention rules can also be set for individual users, departments and file types.
A backup policy should call for capturing an initial full data backup, along with a series
of differential or incremental data backups of data in between full backups. At least two
full backup copies should be maintained, with at least one located off-site.
Backup policies need to focus on recovery, often more so than the actual backup,
because backed-up data is not much use if it cannot be recovered when needed. And
recovery is key to DR.
Backup policies used to deal mainly with getting data to and from tape. Now, most data
is backed up to disk, and public clouds are often used as backup targets. The process
of moving data to and from disk, cloud and tape is different for each target, so that
should be reflected in the policy. Backup processes can also vary depending on
application -- for instance, a database might require different treatment than a file server

218
Recovery
Recovery is a process of change through which people improve their health and
wellness, live self-directed lives, and strive to reach their full potential. Even people with
severe and chronic substance use disorders can, with help, overcome their illness and
regain health and social function. This is called remission. Being in recovery is when
those positive changes and values become part of a voluntarily adopted lifestyle. While
many people in recovery believe that abstinence from all substance use is a cardinal
feature of a recovery lifestyle, others report that handling negative feelings without using
substances and living a contributive life are more important parts of their recovery.
Types of Recovery Programs
Some types of recovery programs include:
Recovery-oriented systems of care: These programs embrace a chronic care management model for severe substance use disorders, which includes longer-term, outpatient care; recovery housing; and recovery coaching and management checkups.
Recovery support services: These services refer to the collection of community services that can provide emotional and practical support for continued remission. Components include mutual aid groups (e.g., 12-step groups), recovery coaching, recovery housing, recovery management (checkups and telephone case monitoring), recovery community centers, and recovery-based education (high schools and colleges).
Social and recreational recovery infrastructures and social media: These programs make it easier for people in recovery to enjoy activities and social interaction that do not involve alcohol or drugs (e.g., recovery-specific cafes and clubhouses, sports leagues, and creative arts programs).
Security
The term "security" refers to a fungible, negotiable financial instrument that holds some
type of monetary value. It represents an ownership position in a publicly-traded
corporation via stock; a creditor relationship with a governmental body or a corporation
represented by owning that entity's bond; or rights to ownership as represented by
an option.
219
KEY TAKEAWAYS
Securities are fungible and tradable financial instruments used to raise capital in public and private markets.
There are primarily three types of securities: equity—which provides ownership rights to holders; debt—essentially loans repaid with periodic payments; and hybrids—which combine aspects of debt and equity.
Public sales of securities are regulated by the SEC.
Self-regulatory organizations such as NASD, NFA, and FINRA also play an important role in regulating derivative securities.
Understanding Securities Securities can be broadly categorized into two distinct types: equities and debts. However, some hybrid securities combine elements of both equities and debts.
Equity Securities An equity security represents ownership interest held by shareholders in an entity (a company, partnership, or trust), realized in the form of shares of capital stock, which includes shares of both common and preferred stock.
Holders of equity securities are typically not entitled to regular payments—although equity securities often do pay out dividends—but they are able to profit from capital gains when they sell the securities (assuming they've increased in value).
Equity securities do entitle the holder to some control of the company on a pro rata basis, via voting rights. In the case of bankruptcy, they share only in residual interest after all obligations have been paid out to creditors. They are sometimes offered as payment-in-kind.
Debt Securities A debt security represents borrowed money that must be repaid, with terms that stipulate the size of the loan, interest rate, and maturity or renewal date.
Debt securities, which include government and corporate bonds, certificates of deposit (CDs), and collateralized securities (such as CDOs and CMOs), generally entitle their holder to the regular payment of interest and repayment of principal (regardless of the issuer's performance), along with any other stipulated contractual rights (which do not include voting rights).
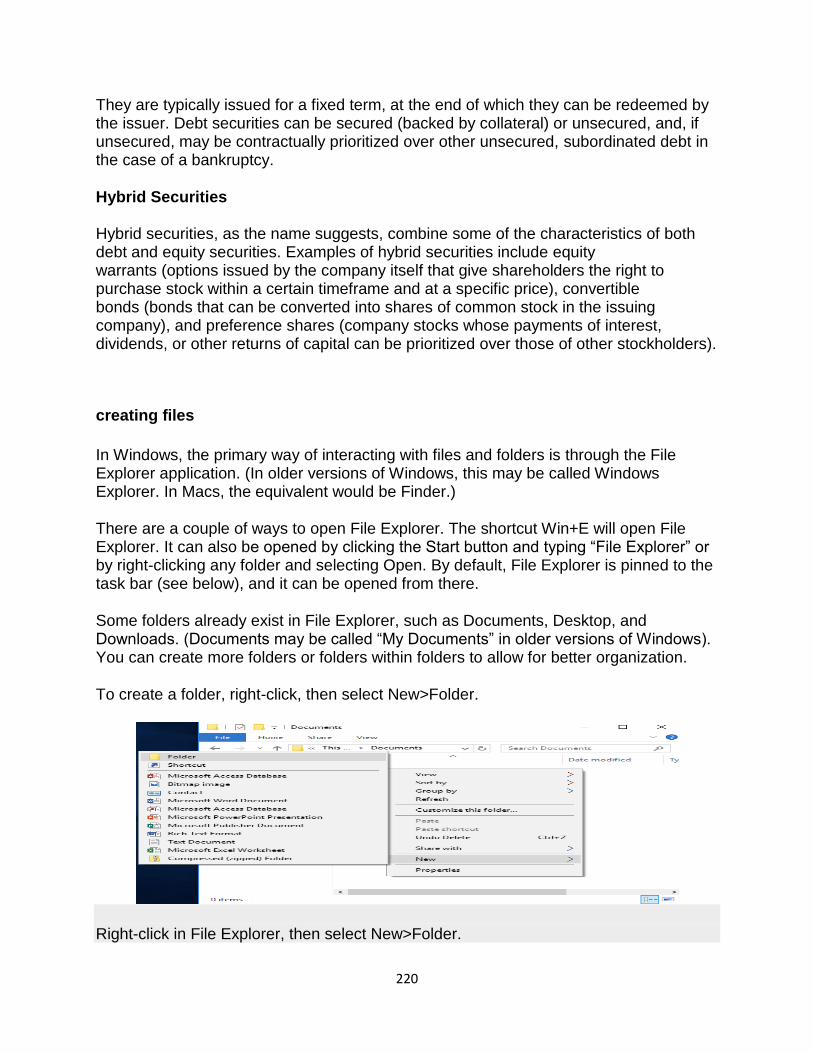
220
They are typically issued for a fixed term, at the end of which they can be redeemed by the issuer. Debt securities can be secured (backed by collateral) or unsecured, and, if unsecured, may be contractually prioritized over other unsecured, subordinated debt in the case of a bankruptcy.
Hybrid Securities Hybrid securities, as the name suggests, combine some of the characteristics of both debt and equity securities. Examples of hybrid securities include equity warrants (options issued by the company itself that give shareholders the right to purchase stock within a certain timeframe and at a specific price), convertible bonds (bonds that can be converted into shares of common stock in the issuing company), and preference shares (company stocks whose payments of interest, dividends, or other returns of capital can be prioritized over those of other stockholders).
creating files
In Windows, the primary way of interacting with files and folders is through the File Explorer application. (In older versions of Windows, this may be called Windows Explorer. In Macs, the equivalent would be Finder.)
There are a couple of ways to open File Explorer. The shortcut Win+E will open File Explorer. It can also be opened by clicking the Start button and typing ―File Explorer‖ or by right-clicking any folder and selecting Open. By default, File Explorer is pinned to the task bar (see below), and it can be opened from there.
Some folders already exist in File Explorer, such as Documents, Desktop, and Downloads. (Documents may be called ―My Documents‖ in older versions of Windows). You can create more folders or folders within folders to allow for better organization.
To create a folder, right-click, then select New>Folder.
Right-click in File Explorer, then select New>Folder.
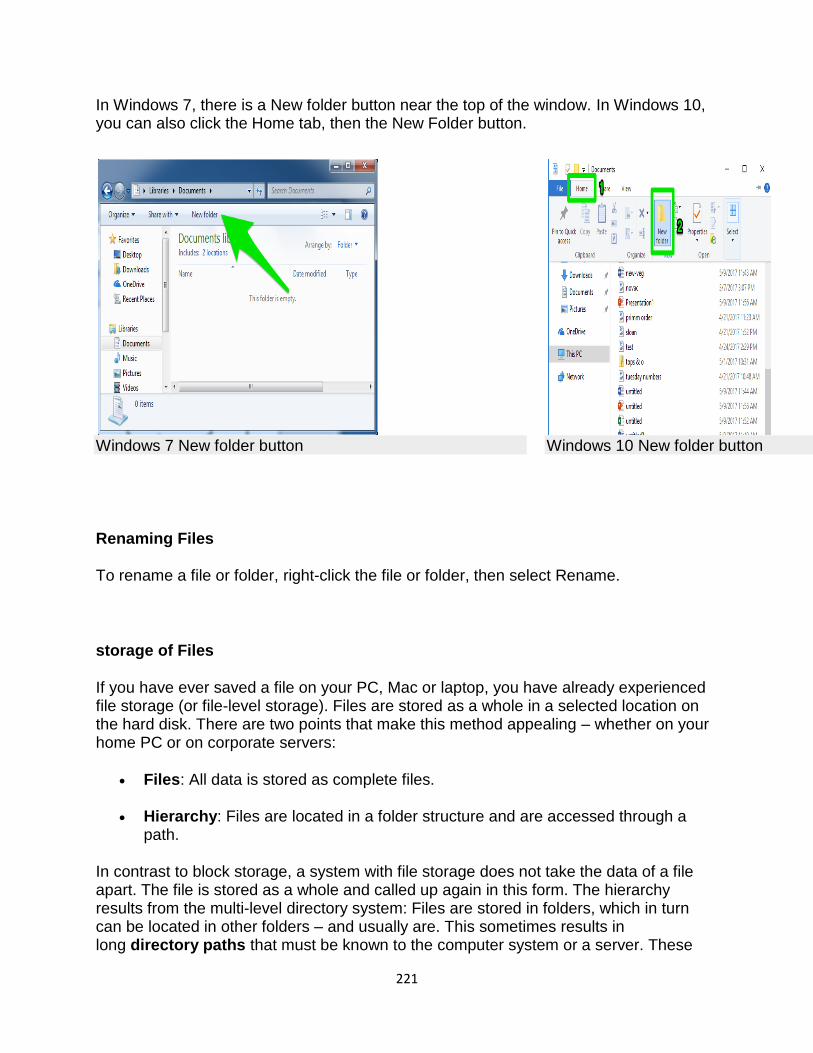
221
In Windows 7, there is a New folder button near the top of the window. In Windows 10, you can also click the Home tab, then the New Folder button.
Windows 7 New folder button
Windows 10 New folder button
Renaming Files
To rename a file or folder, right-click the file or folder, then select Rename.
storage of Files
If you have ever saved a file on your PC, Mac or laptop, you have already experienced file storage (or file-level storage). Files are stored as a whole in a selected location on the hard disk. There are two points that make this method appealing – whether on your home PC or on corporate servers:
Files: All data is stored as complete files.
Hierarchy: Files are located in a folder structure and are accessed through a path.
In contrast to block storage, a system with file storage does not take the data of a file apart. The file is stored as a whole and called up again in this form. The hierarchy results from the multi-level directory system: Files are stored in folders, which in turn can be located in other folders – and usually are. This sometimes results in long directory paths that must be known to the computer system or a server. These
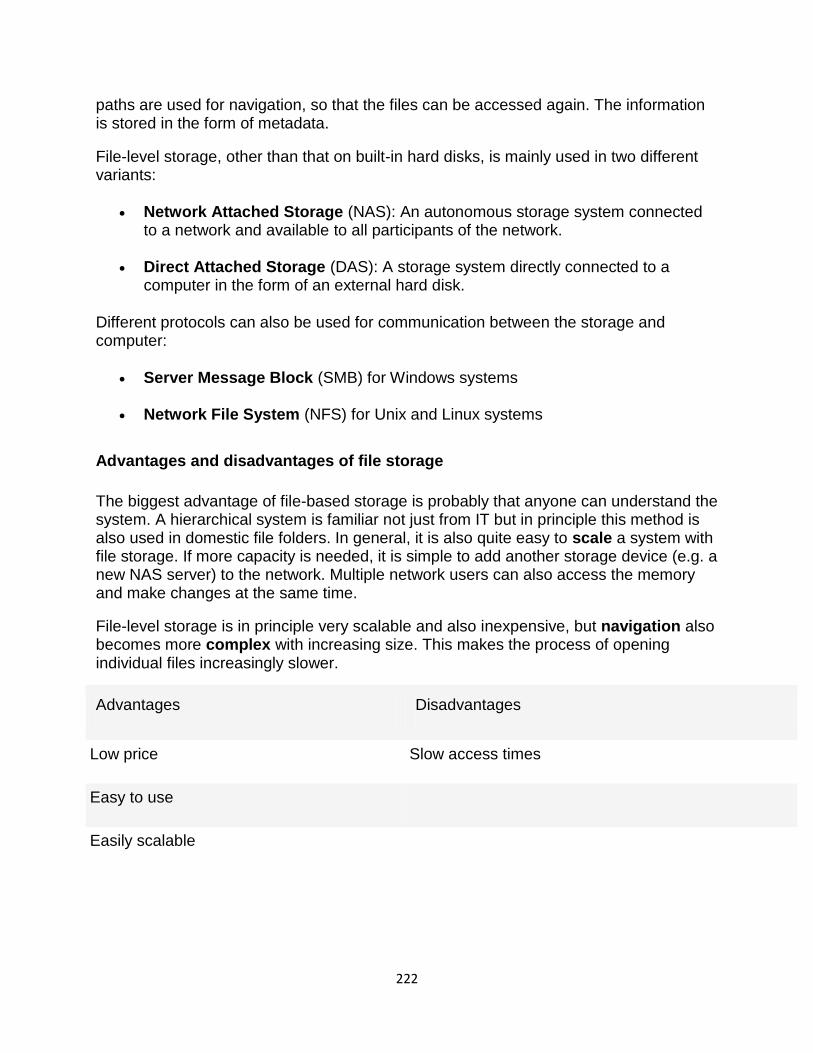
222
paths are used for navigation, so that the files can be accessed again. The information is stored in the form of metadata.
File-level storage, other than that on built-in hard disks, is mainly used in two different variants:
Network Attached Storage (NAS): An autonomous storage system connected to a network and available to all participants of the network.
Direct Attached Storage (DAS): A storage system directly connected to a computer in the form of an external hard disk.
Different protocols can also be used for communication between the storage and computer:
Server Message Block (SMB) for Windows systems
Network File System (NFS) for Unix and Linux systems
Advantages and disadvantages of file storage
The biggest advantage of file-based storage is probably that anyone can understand the system. A hierarchical system is familiar not just from IT but in principle this method is also used in domestic file folders. In general, it is also quite easy to scale a system with file storage. If more capacity is needed, it is simple to add another storage device (e.g. a new NAS server) to the network. Multiple network users can also access the memory and make changes at the same time.
File-level storage is in principle very scalable and also inexpensive, but navigation also becomes more complex with increasing size. This makes the process of opening individual files increasingly slower.
Advantages Disadvantages
Low price Slow access times
Easy to use
Easily scalable
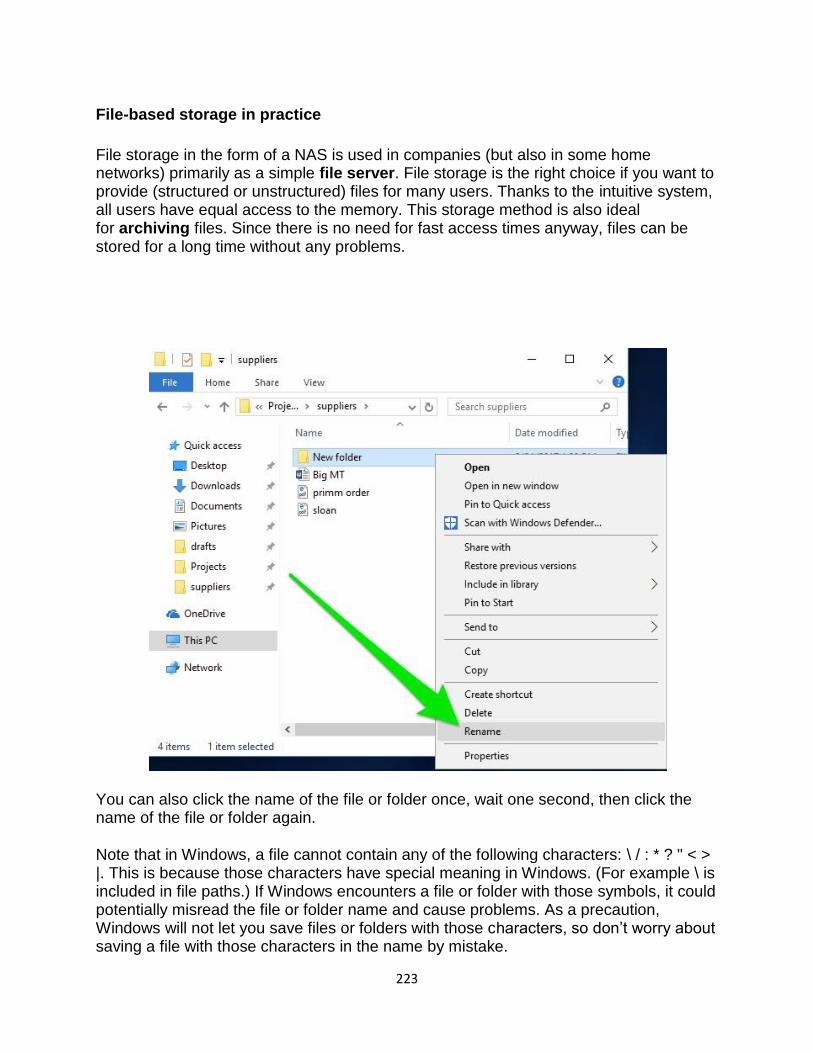
223
File-based storage in practice
File storage in the form of a NAS is used in companies (but also in some home networks) primarily as a simple file server. File storage is the right choice if you want to provide (structured or unstructured) files for many users. Thanks to the intuitive system, all users have equal access to the memory. This storage method is also ideal for archiving files. Since there is no need for fast access times anyway, files can be stored for a long time without any problems.
You can also click the name of the file or folder once, wait one second, then click the name of the file or folder again.
Note that in Windows, a file cannot contain any of the following characters: \ / : * ? " < > |. This is because those characters have special meaning in Windows. (For example \ is included in file paths.) If Windows encounters a file or folder with those symbols, it could potentially misread the file or folder name and cause problems. As a precaution, Windows will not let you save files or folders with those characters, so don‘t worry about saving a file with those characters in the name by mistake.
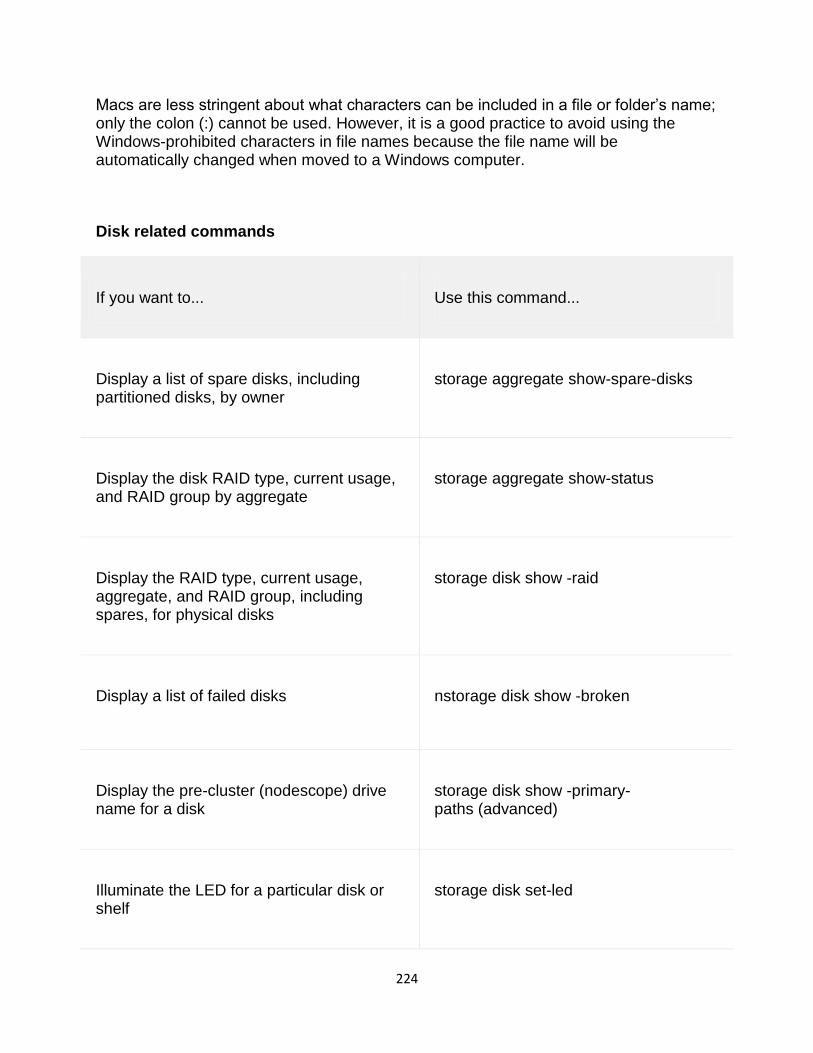
224
Macs are less stringent about what characters can be included in a file or folder‘s name; only the colon (:) cannot be used. However, it is a good practice to avoid using the Windows-prohibited characters in file names because the file name will be automatically changed when moved to a Windows computer.
Disk related commands
If you want to... Use this command...
Display a list of spare disks, including partitioned disks, by owner
storage aggregate show-spare-disks
Display the disk RAID type, current usage, and RAID group by aggregate
storage aggregate show-status
Display the RAID type, current usage, aggregate, and RAID group, including spares, for physical disks
storage disk show -raid
Display a list of failed disks nstorage disk show -broken
Display the pre-cluster (nodescope) drive name for a disk
storage disk show -primary-paths (advanced)
Illuminate the LED for a particular disk or shelf
storage disk set-led
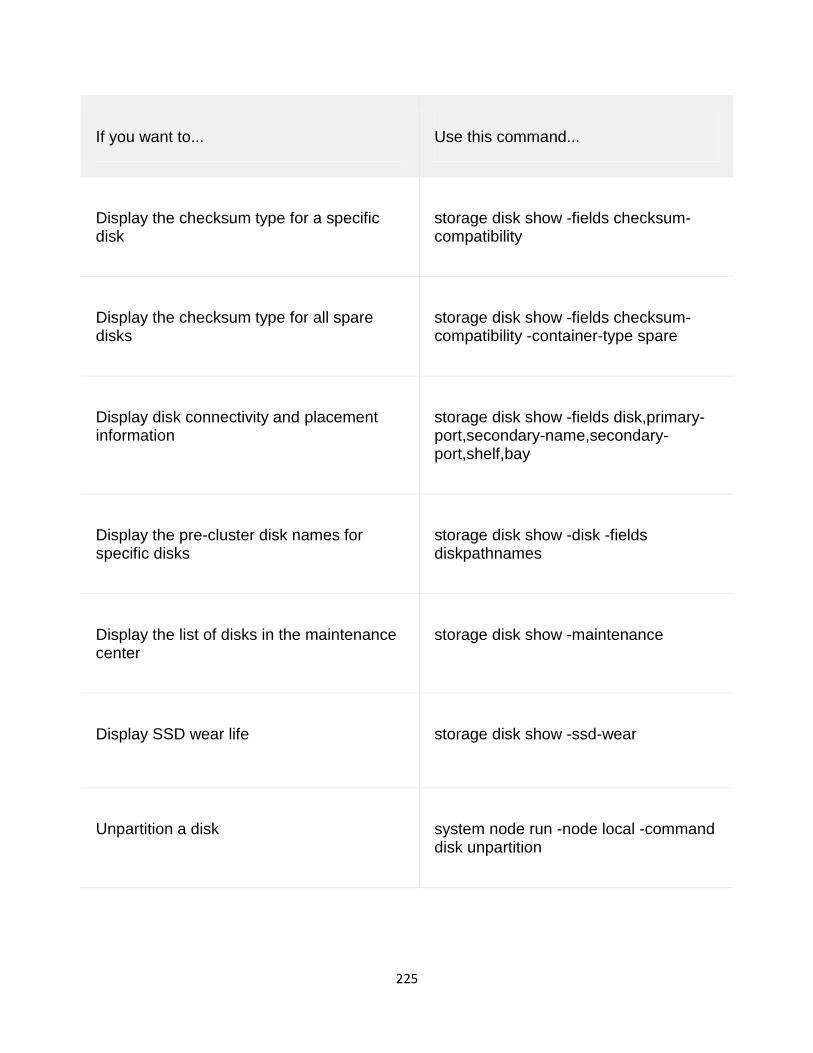
225
If you want to... Use this command...
Display the checksum type for a specific disk
storage disk show -fields checksum-compatibility
Display the checksum type for all spare disks
storage disk show -fields checksum-compatibility -container-type spare
Display disk connectivity and placement information
storage disk show -fields disk,primary-port,secondary-name,secondary-port,shelf,bay
Display the pre-cluster disk names for specific disks
storage disk show -disk -fields diskpathnames
Display the list of disks in the maintenance center
storage disk show -maintenance
Display SSD wear life storage disk show -ssd-wear
Unpartition a disk system node run -node local -command disk unpartition
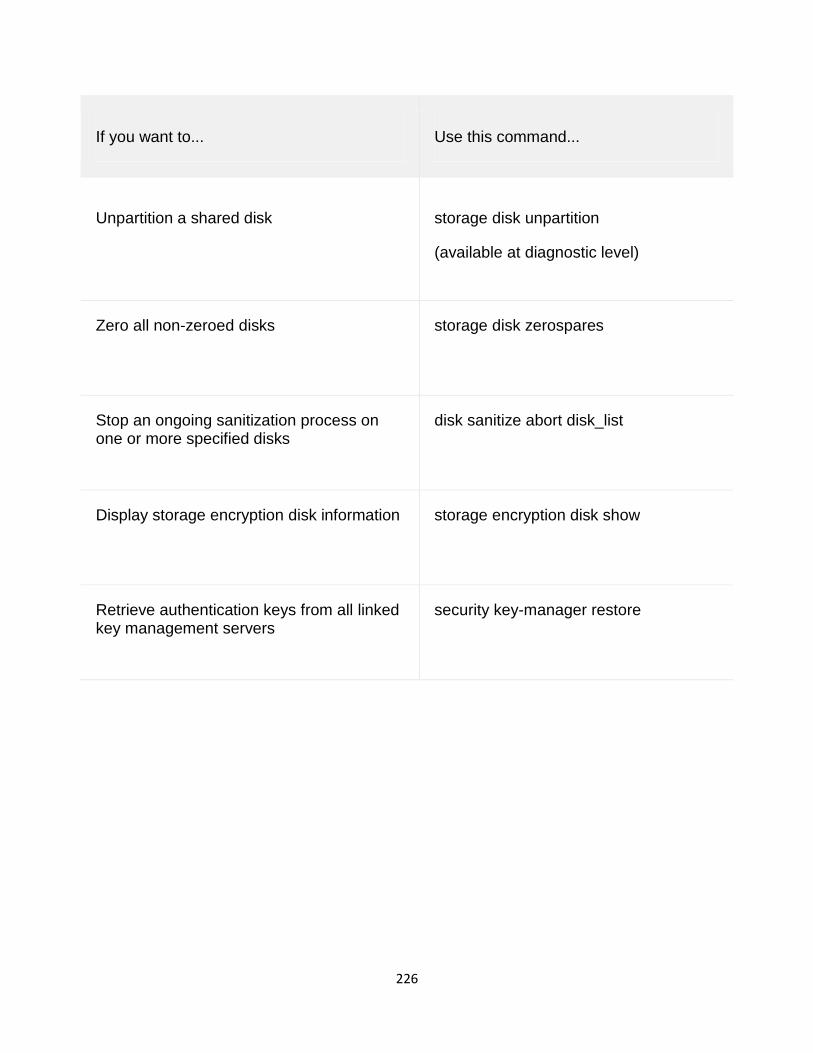
226
If you want to... Use this command...
Unpartition a shared disk storage disk unpartition
(available at diagnostic level)
Zero all non-zeroed disks storage disk zerospares
Stop an ongoing sanitization process on one or more specified disks
disk sanitize abort disk_list
Display storage encryption disk information storage encryption disk show
Retrieve authentication keys from all linked key management servers
security key-manager restore
227
Unit-V
Different tools and Debugger
System development tools
In addition to understanding business operations, systems analyst must know how to use a variety of techniques, such as modeling, prototyping, and computer-aides systems engineering tools to plan in a team environment, where input from users, managers, and IT staff contributes to the system design.
MODELING
Modeling produces a graphical representation of a concept or process that systems developers can analyze, test, and modify. A system analyst can describe and simplify an information system by using a set of business, data, object, network, and process models.
A business model, or requirements model, describes the information that a system must provide. A data model describes data structure and design. An object model describes objects, which combine data and processes. A network model describes the design and protocols of telecommunications links. A process model describes the logic that programmers use to write code modules. Although the models might appear to overlap, they actually work together to describe the same environment from different points of view.
PROTOTYPING
Prototyping tests system concepts and provides an opportunity to examine input, output, and user interfaces before final decisions are made. A prototype is an early working version of an information system. Just as an aircraft manufacturer test a new design in a wind tunnel, systems analysts construct and study information systems prototypes. A prototype can serve as an initial model that is used as benchmark to evaluate the finished system, or the prototype itself can develop into the final version of the system. Either way, prototyping speeds up the development process significantly. A possible disadvantage of prototyping is that important decisions might be made too early, before business or IT issues are understood thoroughly. A prototype based on careful fact finding and modeling techniques, however can be an extremely valuable tool.
COMPUTER-AIDED SYSTEM ENGINEERING (CASE) TOOLS
Computer-aided systems engineering (CASE), also called computer-aided software engineering, is a technique that uses powerful software, called CASE Tools, to help system s analyst‘s develop and maintain information systems. CASE tools
228
provide an over all framework for systems development and support a wide variety of design methodologies, including structured analysis and object-oriented analysis. Because CASE tools make it easier to build an information system, they boost it productivity and improved the quality of the finished product. In addition to traditional CASE tools system developers often use project management tools, such as Microsoft Project, and special –purpose charting tools, such as Microsoft Visio, which is shown in figure 1-23. a system analyst‘s can use Visio to create many different types of diagrams, including block diagrams. Building plans, forms and charts, maps, network diagrams, and organization charts, Visio is described in more detail in Part 2 of the Systems Analyst‘s Toolkit.
SYSTEMS DEVELOPMENT METHODS
There are various methods for developing computer-based information systems. Structured analysis is the most popular method, but a newer strategy called object-oriented analysis and design also is used widely. Each method offers many variations. Some organizations develop their own approaches or adopt methods offered by software suppliers, CASE tool vendors, or consultants. Most IT experts agree that no single, best system development strategy exists. Instead, a systems analyst should understand the alternative methodologies and their strengths and weaknesses.
STRUCTURED ANALYSIS
Structured analysis is a traditional systems development technique that is time-tested and easy to understand. Structured analysis uses a series of phases, called the systems development cycle (SDLC), to plan, analyze, design, implement and support an information system. Although structured analysis evolved when most systems were based on mainframe processing, it remains a dominant systems development method. Structured analysis uses a set of processes models to describe a system graphically. Because it focuses on processes that transform data in useful information, structured analysis is called a process-centered technique. In addition to modeling the processes structured analysis includes data organization and structure, relational database design and user interfaces issue. Process modeling identifies the data flowing into a process, the business rules that transform the data, and the resulting output data flow.
OBJECT –ORIENTED ANALYSIS
Where as structured analysis treats processes and data as separate components, object-oriented analysis (O-O) components data and the process that act on the data into things called objects. System‘s analyst use O-O to model real-world business process and operation. The result is a set of software objects that represent actual people, things, transaction, and events. Using an O-O programming language, a programmer then writes the code that creates the objects. An object is a member of a class, which is a collection of similar objects. Objects possess characteristic called properties, which the objects inherits from its class or possess on its own.
229
JOINT APPLICATION DEVELOPMENT AND RAPID APPLICATION DEVELOPMENT
In the past, IT departments sometimes developed systems without sufficient input from users. Not surprisingly, users often were unhappy with the finished product. Over time, many companies discovered that systems development teams composed of IT staff, users, and managers could complete their work more rapidly an produce better results. Two methodologies became popular: joint application development (JAD) and rapid application development (RAD). Both JAD and RAD use teams composed of users, managers, and IT staff. The difference is that JAD focuses on team-based fact-finding, which is only one phase of the development process, while RAD is more like a compressed version of the entire process. JAD and RAD are described in more detail in Chapter 3.
OTHER DEVELOPMENT STRATEGIES
In addition to structured analysis and O-O methodologies, you might encounter systems development techniques. For example Microsoft Offers an approach called Microsoft Solution Framework (MSF), which document the experience of its own IT teams. Using an MSF, systems analysts design a series of models, including a risk management model; a team model, and a process model, among others. Each model has a specific purpose and output that contributes to the overall design of the system. Although the Microsoft processes differ from the SDLC phase-oriented approach, MSF developers perform the same kind of planning, ask the same kinds of fact-finding questions, deal with the same kinds of design and implementation issues, and resolve the same kinds of problems. MSF uses O-O analysis and design concepts, but also examines a broader business and organizational context that surrounds the development of an information system.
Lint
Linting is the automated checking of your source code for programmatic and stylistic errors. This is done by using a lint tool (otherwise known as linter). A lint tool is a basic static code analyzer.
The term linting originally comes from a Unix utility for C. There are many code linters available for various programming languages today.
Why Is Linting Important?
Linting is important to reduce errors and improve the overall quality of your code. Using lint tools can help you accelerate development and reduce costs by finding errors earlier.
Learn Why Linting Is Important for Software Quality >>
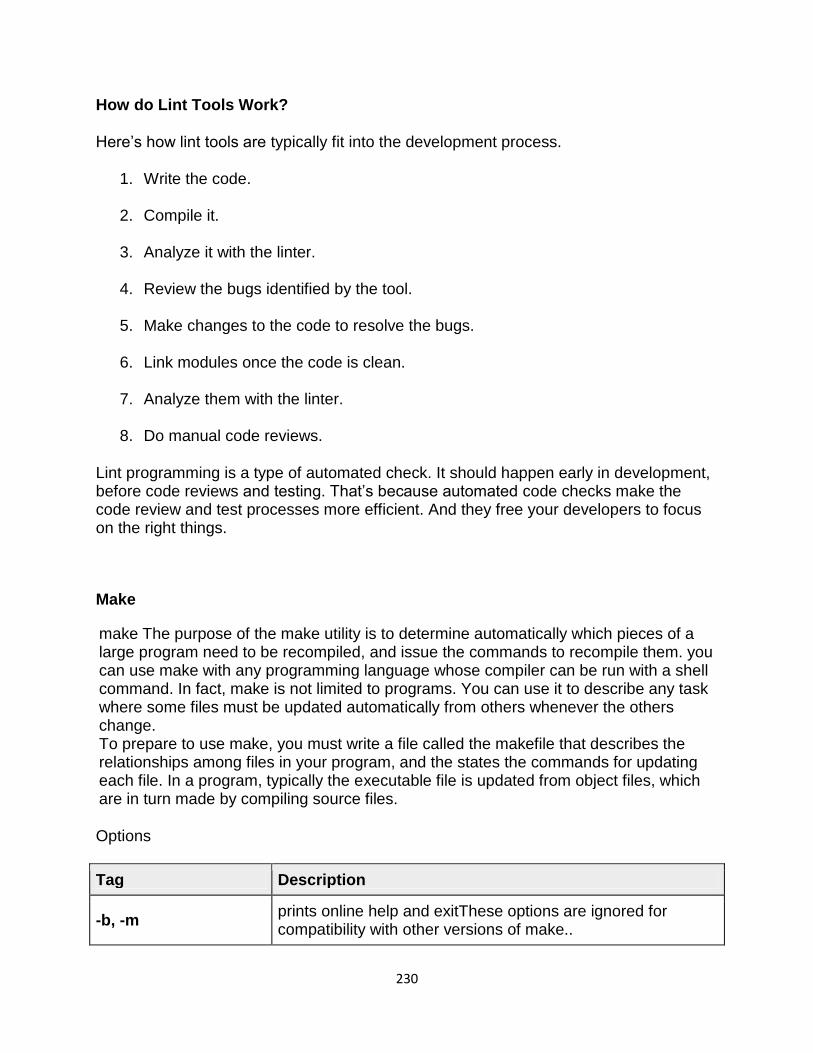
230
How do Lint Tools Work?
Here‘s how lint tools are typically fit into the development process.
1. Write the code.
2. Compile it.
3. Analyze it with the linter.
4. Review the bugs identified by the tool.
5. Make changes to the code to resolve the bugs.
6. Link modules once the code is clean.
7. Analyze them with the linter.
8. Do manual code reviews.
Lint programming is a type of automated check. It should happen early in development, before code reviews and testing. That‘s because automated code checks make the code review and test processes more efficient. And they free your developers to focus on the right things.
Make
make The purpose of the make utility is to determine automatically which pieces of a large program need to be recompiled, and issue the commands to recompile them. you can use make with any programming language whose compiler can be run with a shell command. In fact, make is not limited to programs. You can use it to describe any task where some files must be updated automatically from others whenever the others change. To prepare to use make, you must write a file called the makefile that describes the relationships among files in your program, and the states the commands for updating each file. In a program, typically the executable file is updated from object files, which are in turn made by compiling source files.
Options
Tag Description
-b, -m prints online help and exitThese options are ignored for compatibility with other versions of make..
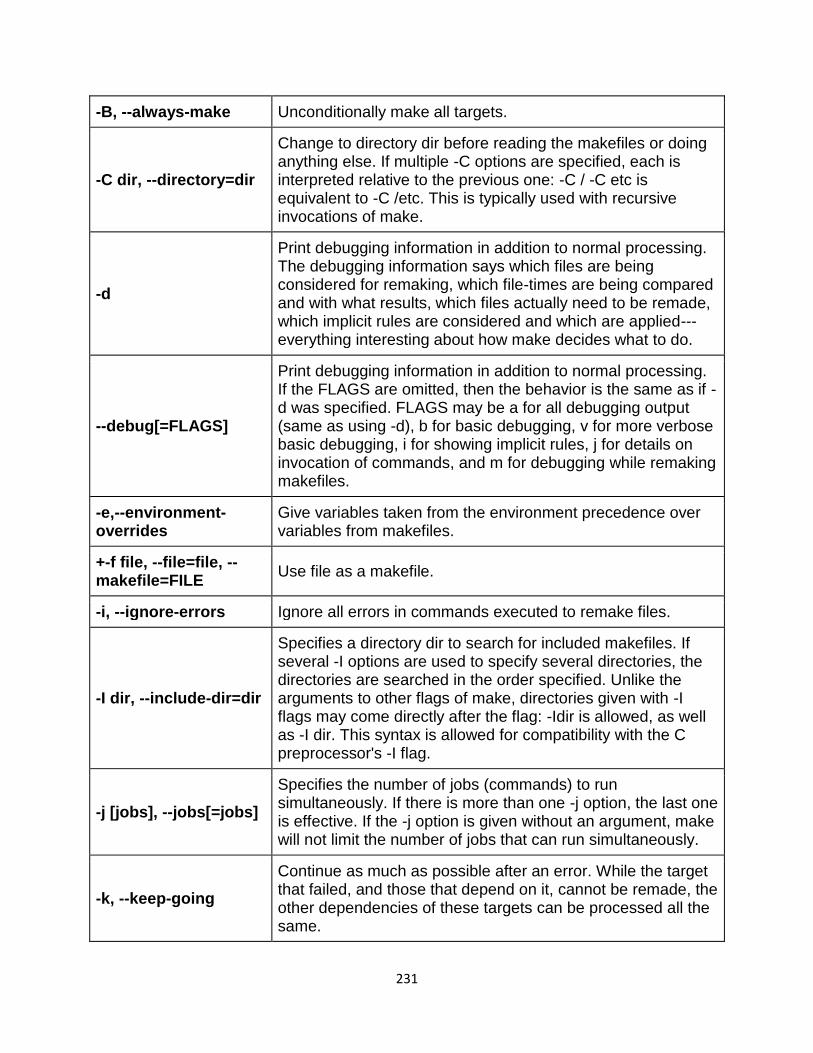
231
-B, --always-make Unconditionally make all targets.
-C dir, --directory=dir
Change to directory dir before reading the makefiles or doing anything else. If multiple -C options are specified, each is interpreted relative to the previous one: -C / -C etc is equivalent to -C /etc. This is typically used with recursive invocations of make.
-d
Print debugging information in addition to normal processing. The debugging information says which files are being considered for remaking, which file-times are being compared and with what results, which files actually need to be remade, which implicit rules are considered and which are applied---everything interesting about how make decides what to do.
--debug[=FLAGS]
Print debugging information in addition to normal processing. If the FLAGS are omitted, then the behavior is the same as if -d was specified. FLAGS may be a for all debugging output (same as using -d), b for basic debugging, v for more verbose basic debugging, i for showing implicit rules, j for details on invocation of commands, and m for debugging while remaking makefiles.
-e,--environment-overrides
Give variables taken from the environment precedence over variables from makefiles.
+-f file, --file=file, --makefile=FILE
Use file as a makefile.
-i, --ignore-errors Ignore all errors in commands executed to remake files.
-I dir, --include-dir=dir
Specifies a directory dir to search for included makefiles. If several -I options are used to specify several directories, the directories are searched in the order specified. Unlike the arguments to other flags of make, directories given with -I flags may come directly after the flag: -Idir is allowed, as well as -I dir. This syntax is allowed for compatibility with the C preprocessor's -I flag.
-j [jobs], --jobs[=jobs]
Specifies the number of jobs (commands) to run simultaneously. If there is more than one -j option, the last one is effective. If the -j option is given without an argument, make will not limit the number of jobs that can run simultaneously.
-k, --keep-going
Continue as much as possible after an error. While the target that failed, and those that depend on it, cannot be remade, the other dependencies of these targets can be processed all the same.
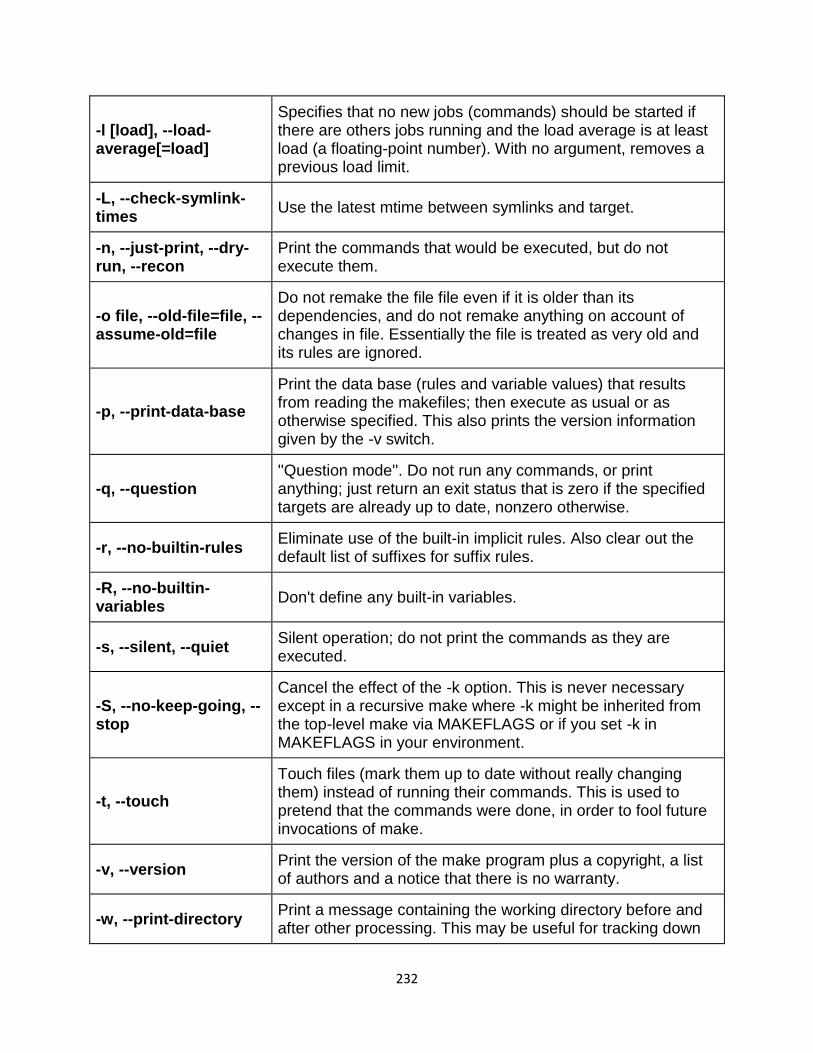
232
-l [load], --load-average[=load]
Specifies that no new jobs (commands) should be started if there are others jobs running and the load average is at least load (a floating-point number). With no argument, removes a previous load limit.
-L, --check-symlink-times
Use the latest mtime between symlinks and target.
-n, --just-print, --dry-run, --recon
Print the commands that would be executed, but do not execute them.
-o file, --old-file=file, --assume-old=file
Do not remake the file file even if it is older than its dependencies, and do not remake anything on account of changes in file. Essentially the file is treated as very old and its rules are ignored.
-p, --print-data-base
Print the data base (rules and variable values) that results from reading the makefiles; then execute as usual or as otherwise specified. This also prints the version information given by the -v switch.
-q, --question ''Question mode''. Do not run any commands, or print anything; just return an exit status that is zero if the specified targets are already up to date, nonzero otherwise.
-r, --no-builtin-rules Eliminate use of the built-in implicit rules. Also clear out the default list of suffixes for suffix rules.
-R, --no-builtin-variables
Don't define any built-in variables.
-s, --silent, --quiet Silent operation; do not print the commands as they are executed.
-S, --no-keep-going, --stop
Cancel the effect of the -k option. This is never necessary except in a recursive make where -k might be inherited from the top-level make via MAKEFLAGS or if you set -k in MAKEFLAGS in your environment.
-t, --touch
Touch files (mark them up to date without really changing them) instead of running their commands. This is used to pretend that the commands were done, in order to fool future invocations of make.
-v, --version Print the version of the make program plus a copyright, a list of authors and a notice that there is no warranty.
-w, --print-directory Print a message containing the working directory before and after other processing. This may be useful for tracking down
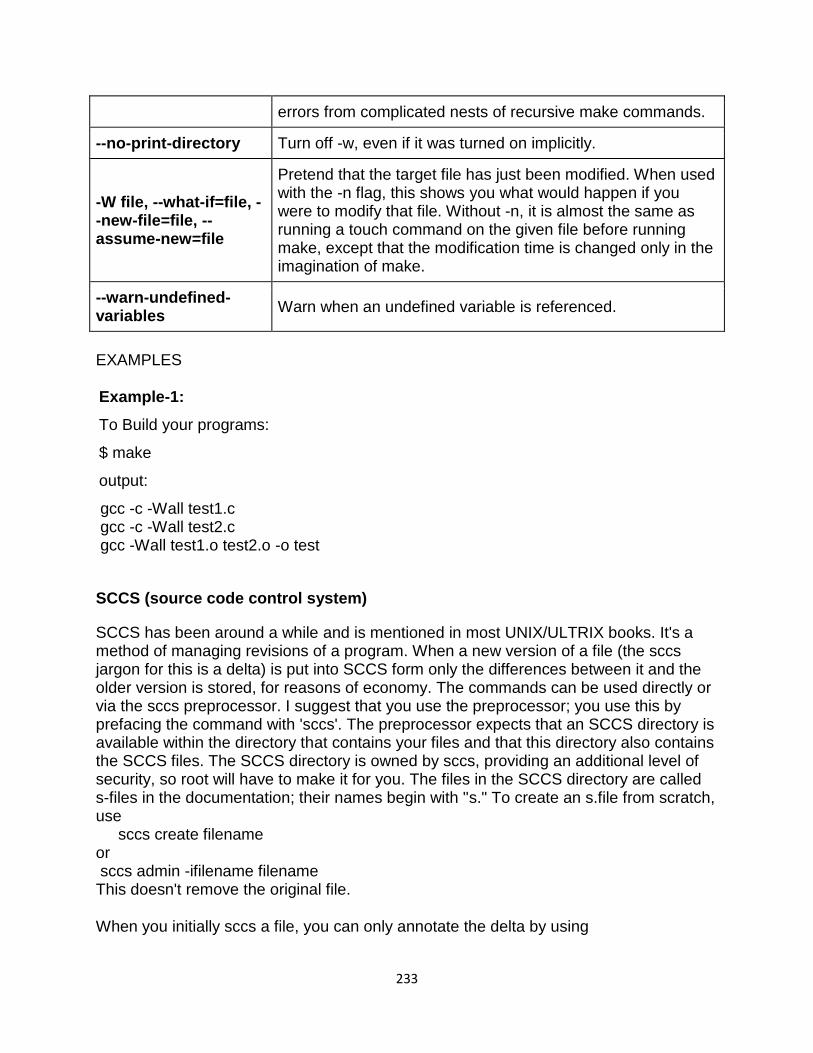
233
errors from complicated nests of recursive make commands.
--no-print-directory Turn off -w, even if it was turned on implicitly.
-W file, --what-if=file, --new-file=file, --assume-new=file
Pretend that the target file has just been modified. When used with the -n flag, this shows you what would happen if you were to modify that file. Without -n, it is almost the same as running a touch command on the given file before running make, except that the modification time is changed only in the imagination of make.
--warn-undefined-variables
Warn when an undefined variable is referenced.
EXAMPLES
Example-1:
To Build your programs:
$ make
output:
gcc -c -Wall test1.c gcc -c -Wall test2.c gcc -Wall test1.o test2.o -o test
SCCS (source code control system)
SCCS has been around a while and is mentioned in most UNIX/ULTRIX books. It's a method of managing revisions of a program. When a new version of a file (the sccs jargon for this is a delta) is put into SCCS form only the differences between it and the older version is stored, for reasons of economy. The commands can be used directly or via the sccs preprocessor. I suggest that you use the preprocessor; you use this by prefacing the command with 'sccs'. The preprocessor expects that an SCCS directory is available within the directory that contains your files and that this directory also contains the SCCS files. The SCCS directory is owned by sccs, providing an additional level of security, so root will have to make it for you. The files in the SCCS directory are called s-files in the documentation; their names begin with "s." To create an s.file from scratch, use sccs create filename or sccs admin -ifilename filename This doesn't remove the original file.
When you initially sccs a file, you can only annotate the delta by using
234
sccs admin -imain.c -y"First Release" main.c With subsequent modifications you are prompted for a comment if you don't use the -y option.
You can use the ksh shell script below to sccs all your files at once.
for file in (*.[.ch]) do sccs admin -i$file $file done An SID is an identification number for a modification (a `delta'). The first delta is usually 1.1 and succeeding versions will be 1.2, 1.3 etc unless you ask for branches to be made. To prepare an s-file for branching do sccs admin -fb filename. sccs admin -ifilename -fb filename. creates an s-file that is ready to accept branches straight away.
For a full list of commands and options, see man sccs etc. Here are some examples to get you started
To make a new delta,
sccs edit filename This changes SCCS/s.filename to SCCS/p.filename to show that the file is out for editing, and pulls the file out. Any file with the same name is overwritten. If you have the new version of the file already in the directory and don't want to rewrite it, do sccs edit -g filename Then when you have edited it, do sccs delta filename You will be prompted to add a comment to the delta. sccs delta `sccs tell` deltas all out-for-edit versions To get out a particular version use sccs get -r[revision] filename To correct a delta (not make a new one) sccs fix -r[rev] filename then edit and do sccs delta filename NB: when you fix 1.2.1.1 it get delta'd back as 1.3. A bug.
To remove a delta,
sccs rmdel -r[rev] filename To make a branch use the `-b' option. sccs edit -r1.2 -b filename
235
will create a branch from 1.2. When you have edited the file and do a delta, the delta will have SID 1.2.1.1.
To compare the file out for edit with the latest SCCS trunk version, try
sccs diffs filename sccs sccsdiff -r1.1 -r1.2 This will compare the two SCCS versions. To get information on the deltas of a file, type sccs prs filename You'll get an output something like: --------------------------------------------------------- D 1.3 86/06/06 16:59:47 root 3 2 00011/00001/00101 MRs: COMMENTS: added header file dependancies D 1.2 86/02/11 12:06:27 root 2 1 00001/00012/00101 MRs: COMMENTS: CUED mods. Deleted sccs stuff. D 1.1 86/02/11 10:42:02 root 1 0 00113/00000/00000 MRs: COMMENTS: Initial revision --------------------------------------------------------- The numbers on the far right tell you lines_added/lines_removed/lines_unchanged sccs edit -r2 SCCS changes release number of all files
Notes:-
1. don't go mad on branches; sccs has a bias against them. E.g. For commands which have an -r[rev] option the default is the most recent trunk rev, not the most recent branch.
2. When you create an sccs file it will come up with a warning "No id keywords (cm7)". Don't worry about this.
3. See the SCCS User's Guide, in HP-UX Concepts and Tutorials: Programming Environment for more details. Typing man -k sccs gives you a list of related commands.
236
Language development tools: YACC, LEX, M4
YACC
A parser generator is a program that takes as input a specification of a syntax, and produces as output a procedure for recognizing that language. Historically, they are also called compiler-compilers.
YACC (yet another compiler-compiler) is an LALR(1) (LookAhead, Left-to-right, Rightmost derivation producer with 1 lookahead token) parser generator. YACC was originally designed for being complemented by Lex. Input File: YACC input file is divided in three parts. /* definitions */
....
%%
/* rules */
....
%%
/* auxiliary routines */
....
Input File: Definition Part: The definition part includes information about the tokens used in the syntax
definition:
%token NUMBER
%token ID
Yacc automatically assigns numbers for tokens, but it can be overridden by %token NUMBER 621
Yacc also recognizes single characters as tokens. Therefore, assigned token numbers should no overlap ASCII codes.
237
The definition part can include C code external to the definition of the parser and variable declarations, within %{ and %} in the first column.
It can also include the specification of the starting symbol in the grammar: %start nonterminal
Input File: Rule Part: r every function needed in rules part.
It can also contain the main() function definition if the parser is going to be run as a
program.
The main() function must call the function yyparse().
Input File: If yylex() is not defined in the auxiliary routines sections, then it should be included:
#include "lex.yy.c"
YACC input file generally finishes with: .y
Output Files: The output of YACC is a file named y.tab.c
If it contains the main() definition, it must be compiled to be executable.
Otherwise, the code can be an external function definition for the function int
yyparse()
If called with the –d option in the command line, Yacc produces as output a header file y.tab.h with all its specific definition (particularly important are token definitions to be included, for example, in a Lex input file).
If called with the –v option, Yacc produces as output a file y.output containing a textual description of the LALR(1) parsing table used by the parser. This is useful for tracking down how the parser solves conflicts.
Example: Yacc File (.y) filter_none brightness_4
%{ #include <ctype.h>
238
#include <stdio.h> #define YYSTYPE double /* double type for yacc stack */ %} %% Lines : Lines S '\n' { printf("OK \n"); } | S '\n‘ | error '\n' {yyerror("Error: reenter last line:"); yyerrok; }; S : '(' S ')‘ | '[' S ']‘ | /* empty */ ; %% #include "lex.yy.c" void yyerror(char * s) /* yacc error handler */ { fprintf (stderr, "%s\n", s); } int main(void) { return yyparse(); }
Lex File (.l) filter_none brightness_4
%{ %} %% [ \t] { /* skip blanks and tabs */ } \n|. { return yytext[0]; } %% For Compiling YACC Program:
1. Write lex program in a file file.l and yacc in a file file.y
2. Open Terminal and Navigate to the Directory where you have saved the files.
3. type lex file.l
239
4. type yacc file.y
5. type cc lex.yy.c y.tab.h –ll
6. type ./a.out
LEX
o Lex is a program that generates lexical analyzer. It is used with YACC parser
generator.
o The lexical analyzer is a program that transforms an input stream into a
sequence of tokens.
o It reads the input stream and produces the source code as output through
implementing the lexical analyzer in the C program.
The function of Lex is as follows:
o Firstly lexical analyzer creates a program lex.1 in the Lex language. Then Lex
compiler runs the lex.1 program and produces a C program lex.yy.c.
o Finally C compiler runs the lex.yy.c program and produces an object program
a.out.
o a.out is lexical analyzer that transforms an input stream into a sequence of
tokens.
240
Lex file format
A Lex program is separated into three sections by %% delimiters. The formal of Lex source is as follows:
1. { definitions }
2. %%
3. { rules }
4. %%
5. { user subroutines }
Definitions include declarations of constant, variable and regular definitions.
Rules define the statement of form p1 {action1} p2 {action2}....pn {action}.
Where pi describes the regular expression and action1 describes the actions what action the lexical analyzer should take when pattern pi matches a lexeme.
241
M4
GNU M4 is an implementation of the traditional Unix macro processor. It is mostly SVR4
compatible although it has some extensions (for example, handling more than 9
positional parameters to macros). GNU M4 also has built-in functions for including files,
running shell commands, doing arithmetic, etc.
GNU M4 is a macro processor in the sense that it copies its input to the output
expanding macros as it goes. Macros are either builtin or user-defined and can take any
number of arguments. Besides just doing macro expansion, m4 has builtin functions for
including named files, running UNIX commands, doing integer arithmetic, manipulating
text in various ways, recursion etc... m4 can be used either as a front-end to a compiler
or as a macro processor in its own right.
One of the biggest users of GNU M4 is the GNU Autoconf project.
Downloading M4
The latest stable version is 1.4.18, and can be found on http://ftp.gnu.org/gnu/m4/ [via
http] and ftp://ftp.gnu.org/gnu/m4/ [via FTP]. It can also be found on one of our FTP
mirrors. The stable development branch can also be checked out from git, using either
of:
git clone git://git.sv.gnu.org/m4
git clone http://git.savannah.gnu.org/r/m4.git
followed by:
git checkout -b branch-1.4 origin/branch-1.4
Documentation
GNU M4 documentation can be found in several formats
at http://www.gnu.org/software/m4/manual/. You may also find more information about
GNU M4 by looking at your local documentation. For example, you might try looking in
/usr/share/doc/m4/, or use info m4 at the shell prompt.
242
Mailing Lists
GNU M4 has several mailing lists: <[email protected]>, <[email protected]>, <m4-
[email protected]>, and <[email protected]>. Archives of these lists are
available; see the details of each list for a link to the archives.
You can subscribe to any GNU mailing list via the web as described below. Or you can
send an empty mail with a Subject: header line of just "subscribe" to the relevant -
request list. For example, to subscribe yourself to the bug-m4 list, you would send mail
to <[email protected]> with no body and a Subject: header line of just
"subscribe".
It has been necessary to moderate the GNU M4 mailing lists to prevent the flood of
spam. Postings to the lists are held for release by the list moderator. Sometimes the
moderators are unavailable for brief periods of time. Please be patient when posting. If
you don't see the message in the list archive then it did not get posted.
Announcements
The low-volume mailing list m4-announce contains all announcements about GNU M4.
Important announcments about M4 and most other GNU Software are also made
on <[email protected]>.
Tracking Development
The moderate-volume mailing list bug-m4 tracks all bug reports. For more information
on submitting bugs, please see the section Report a Bug below.
The moderate-volume mailing list m4-patches is used to propose and track all
significant patches. GNU M4 is being actively developed, and version 2.0 will have
many new features, such as better input control, multiple precision arithmetic and
loadable modules. More information about the future of GNU M4 is
at http://savannah.gnu.org/projects/m4/. You can track development in git, using:
git clone git://git.sv.gnu.org/m4
git clone http://git.savannah.gnu.org/r/m4.git
243
You can also view the git tree on the web.
Alternatively, there is a read-only CVS mirror here:
cvs -d :pserver:[email protected]:/m4.git \
co -d m4 HEAD
Please note that we do not suggest using test versions of GNU M4 for production use.
One feature of the 2.0 release will be translations; you can track the progress of the
i18n team at http://translationproject.org/domain/m4.html.
Request an Enhancement
If you would like any new feature to be included in future versions of GNU M4, please
send a request to m4-discuss. This list tends to have a moderate volume of traffic.
Please remember that development of GNU M4 is a volunteer effort, and you can also
contribute to its development. For information about contributing to the GNU Project,
please read How to help GNU.
Report a Bug
If you think you have found a bug in GNU M4, then please send as complete a report as
possible to <[email protected]>. This includes what platform and compiler you used to
build M4, what version of M4 you are attempting to use, and transcripts of any error
messages or behavior that was contrary to your expectations. Disagreements between
the manual and the code are also bugs.
Text formatting tools: nroff, troff, tbl, eqn, pic
Nroff
nroff and troff are UNIX commands (and the utilities that support them) for formatting text files for printing.... Formats text for printing on typewriter-like devices and line printers.
244
Syntax
nroff [ -e ] [ -h ] [ -i ] [ -q ] [ -z ] [ -o List ] [ -n Number ] [ -s Number ] [ -r ANumber ] [ -u Number ] [ -T Name ] [ -man ] [ -me ] [ -mm ] [ -mptx ] [ -ms ] [ File ... | - ]
Description
The nroff command reads one or more files for printing on typewriter-like devices and line printers. If no file is specified or the - (minus sign) flag is specified as the last parameter, standard input is read by default. The File variable specifies files to be printed on a typewriter-like device by the nroff command. The default is standard input.
The col command may be required to postprocess nroff command output in certain cases.
Flags
-e Produces equally spaced words in adjusted lines, using the full resolution of a particular terminal.
-h Uses output tabs during horizontal spacing to speed output and reduce the output character count. Tab settings are assumed to be every eight nominal character widths.
-i Reads standard input after reading all specified files.
-man Selects the man macro processing package.
-me Selects the me macro processing package.
-mm Selects the mm macro processing package.
-mptx Selects the mptx macro processing package.
-ms Selects the ms macro processing package.
-n Number Assigns the specified number to the first printed page.
-o List Prints only those pages specified by the List variable, which consists of a comma-separated list of page numbers and ranges, as follows:
A range of Start-Stop means print pages Start through Stop. For example, 9-15 prints pages 9 through 15.
An initial -Stop means print from the beginning to page Stop. A final Start- means print from page Start to the end. A combination of page numbers and ranges prints the specified
pages. For example, -3, 6-8,10,12- prints the beginning through page 3, pages 6 through 8, page 10, and page 12 to the end.
Note: When the -oList flag is used in a pipeline (as with one or more of the eqn or tbl commands) you may receive a broken pipe message if the last page in the document is not specified in the List parameter. This broken pipe message is not an indication of
245
any problem and can be ignored.
-q Calls the simultaneous input/output mode of the .rd request.
-r ANumber Sets register A to the specified number. The value specified by the A variable must have a one-character ASCII name.
-s Number Stops every specified number of pages (the default is 1). The nroff command halts every specified number of pages to allow paper loading or changing, then resumes upon receipt of a linefeed or new-line character. This flag does not work in pipelines (for example, with the mm command). When the nroff command halts between pages, an ASCII BEL character is sent to the workstation.
-T Name Prepares the output for the specified printing device. Typewriter-like devices and line printers use the following Name variables for AIX international extended character sets, as well as English-language character sets, digits, and symbols: hplj
Hewlett-Packard LaserJet II and other models in the same series of printers.
ibm3812 3812 Pageprinter II.
ibm3816 3816 Pageprinter.
ibm4019 4019 LaserPrinter.
Note: The 4019 and the HP Laser Jet II printer both have nonprintable areas at the top and bottom of a page. If a file is targeted for these printers, be sure to define top and bottom margins (for example, by formatting with the -mm flag) so that all output can be positioned within the printable page.
37 Teletype Model 37 terminal (default) for terminal viewing only. This device does not support extended characters that are inputted by the \[N] form. Inputting Extended Single-Byte Characters provides more information.
lp Generic name for printers that can underline and tab. All text sent to the lp value using reverse linefeeds (for example, text that includes tables) must be processed with the col command. This device does not support extended characters that are inputted by the \[N] form. Inputting Extended Single-Byte Characters provides more information.
ppds Generic name for printers that support the personal printer data streams such as the Quietwriter III, Quickwriter, and Proprinters.
ibm5575 5575 Kanji Printer.
ibm5577
246
5577 Kanji Printer. Note: For completeness of the text formatting system, the following devices are shipped as is from the AT&T Distribution center. No support is provided for these tables.
2631 Hewlett-Packard 2631 printer in regular mode.
2631-c Hewlett-Packard 2631 printer in compressed mode.
2631-e Hewlett-Packard 2631 printer in expanded mode.
300 DASI-300 printer.
300-12 DASI-300 terminal set to 12 characters per inch.
382 DTC-382.
4000a Trendata 4000a terninal (4000A).
450 DASI-450 (Diablo Hyterm) printer.
450-12 DASI-450 terminal set to 12 characters per inch.
832 Anderson Jacobson 832 terminal.
8510 C.ITOH printer.
tn300 GE Terminet 300 terminal.
X Printers equipped with a TX print train.
300s DASI-300s printer (300S).
300s-12 DASI-300s printer set to 12 characters per inch (300S-12).
-u Number Sets the bold factor (number of character overstrokes) for the third font position (bold) to the specified number, or to 0 if the Number variable is missing.
-z Prints only messages generated by .tm (workstation message) requests. Note: See the article Macro Packages for Formatting Tools in the troff command for more inforamtion on the macros.
- Forces input to be read from standard input.
Files
/usr/share/lib/tmac/tmac.* Contains pointers to standard macro files.
247
/usr/share/lib/macros/* Contains standard macro files.
/usr/share/lib/nterm/* Contains the terminal driving tables for the nroff command.
/usr/share/lib/pub/terminals Contains a list of supported terminals.
Troff
Formats text for printing on typesetting devices.
Syntax
troff [ -a ] [ -i ] [ -q ] [ -z ] [ -F Directory ] [ -n Number ] [ -o List ] [ -r ANumber ] [ -s Number ] [ -T Name ] [ -mm | -me | -mptx | -ms | -man | -mv ] [ -M Media ] [ File ... | - ]
Description
The troff command reads one or more files and formats the text for printing on a phototypesetter or comparable device. A postprocessor is then required to post process the output of the troff command to the target device. See the accompanying example.
If no file is specified or the - (minus) flag is not the last parameter, standard input is read by default.
For the 3812, 3816, and Hewlett-Packard LaserJet Series II printer, the default fonts are the native fonts for the printer. Additional fonts also are available for these printers, which may be loaded through the use of the troff .fp directive. These fonts are stored on the host in the directory /usr/lib/font/devPrinter/bitmaps, and downloaded to the printer as necessary.
Typefaces
Three different typefaces are provided in four styles. The following chart shows the relationship between typeface, style, and the name that the troff command uses to access the font.
Note: The fonts in this set are based on the Computer Modern letter forms developed by Donald E Knuth. (Refer to Knuth, Donald: Computer Modern Typefaces. Addison-Wesley, 1986.)
Typeface Regular Italic Bold Italic Roman cr cR Cr CR Sans Serif cs cS Cs CS Typewriter ct cT Ct CT

248
troff special sp
These fonts are all provided in the standard 15 troff sizes: 6, 7, 8, 9, 10, 11, 12, 14, 16, 28, 20, 22, 24, 28, and 36 points.
For example, .fp 1 Cr loads the Roman bold font into position 1.
Note: The .tl request cannot be used before the first break-producing request in the input to the troff command.
Flags
-a Sends a printable ASCII approximation of the results to standard output.
-FDirectory Accesses font information from the Directory/devName directory instead of
the default /usr/lib/font/devName directory (where Name is specified by
the -T flag).
-i Reads standard input after there are no more files.
-M Media Specifies a paper size in order to determine the amount of imageable area
on the paper. Valid values for the Media variable are:
A4 Specifies a paper size of 8.3 X 11.7 inches (210 X 297 mm).
A5 Specifies a paper size of 5.83 X 8.27 inches (148 X 210 mm).
B5 Specifies a paper size of 6.9 X 9.8 inches (176 X 250 mm).
EXEC Specifies a paper size of 7.25 X 10.5 inches (184.2 X 266.7 mm).
LEGAL Specifies a paper size of 8.5 X 14 inches (215.9 X 355.6 mm).
LETTER Specifies a paper size of 8.5 X 11 inches (215.9 X 279.4 mm).
This is the default value.
Note: The Media variable is not case-sensitive.
-nNumber Numbers the first printed page with the value specified by
the Number variable.
-oList Prints only pages specified by the List variable, which consists of a comma-
separated list of page numbers and ranges:
249
A range of Start-Stop means print pages Start through Stop. For example: 9-15 prints pages 9 through 15.
An initial -Stop means print from the beginning to page Stop.
A final Start- means print from pageStart to the end.
A combination of page numbers and ranges prints the specified pages. For example: -3,6-8,10,12- prints from the beginning through page 3, pages 6 through 8, page 10, and page 12 to the end.
Note: When this flag is used in a pipeline (for example, with one or more of the pic, eqn, or tbl commands), you may receive a broken pipe message if the last page in the document is not specified in the List variable. This broken pipe message is not an indication of any problem and can be ignored.
-q Calls the simultaneous input and output mode of the .rd request.
-rANumber Sets the register specified by the A variable to the specified number.
The A variable value must have a one-character ASCII name.
-sNumber Generates output to make the typesetter stop every specified number of
pages.
-TName Prepares the output for the specified printing device. Phototypesetters or
comparable printing devices use the following Name variables for AIX
international extended characters. The default is ibm3816.
Note: You get a message that reads bad point sizeif your device does not support the point size that you specified. The troff command uses the closest valid point size to continue formatting.
canonls Canon Lasershot LBP-B406S/D/E,A404/E,A304E.
ibm3812 3812 Pageprinter II.
ibm3816 3816 Pageprinter.
hplj Hewlett-Packard LaserJet II.
ibm5585H-T 5585-H01 Traditional Chinese Language support.
ibm5587G 5587-G01, 5584-H02, 5585-H01, 5587-H01, and 5589-H01
250
Kanji Printer multibyte language support.
psc PostScript printer.
X100 AIXwindows display.
Note: You also can set the TYPESETTER environment variable to one of the preceding values instead of using the -TName flag of the troff command.
-man Selects the man macro processing package.
-me Selects the me macro processing package.
-mm Selects the mm macro processing package.
-mptx Selects the mptx macro processing package.
-ms Selects the ms macro processing package.
-mv Selects the mv macro processing package.
Note: See Macro Packages for Formatting Tools for more inforamtion on the macros.
-z Prints only messages generated by .tm (workstation message) requests.
- Forces input to be read from standard input.
Environment Variables
TYPESETTER Contains information about a particular printing device.
Examples
The following is an example of the troff command:
troff -Tibm3812 File | ibm3812 | qprt
Macro Packages for Formatting Tools
The following macro packages are part of the Formatting Tools in the Text Formatting System and are described in more detail on the next pages:
251
man Enables you to create your own manual pages from online manual pages.
me Provides macros for formatting papers.
mm Formats documents with nroff and troff formatters.
mptx Formats a permuted index.
ms Provides a formatting facility for various styles of articles, theses, and books.
mv Typesets English-language view graphs and slides by using the troffcommand.
man Macro Package for the nroff and troff Commands
The man macro package is provided to enable users to create their own manual pages from online manual pages that have been processed with either the nroff command or troff command. The man macro package is used with either the nroff command or the troff command.
Note: The man macro package cannot be used to process the InfoExplorer information bases into manual pages.
Special macros, strings, and number registers exist, internal to the man macro package, in addition to the following lists of format macros, strings, and registers. Except for the names predefined by the troff command and the d, m, and y number registers, all such internal names are of the form SymbolAlpha, where Symbol is one of ), ], or }, and Alphais any alphanumeric character.
The man macro package uses only the Roman font. If the input text of an entry contains requests for other fonts (for example, the .I format macro, .RB request, or \fI request) the corresponding fonts must be mounted.
Format Macros
The following macros are used to alter the characteristics of manual pages that are formatted using the manmacro package.
Type font and size are reset to default values before each paragraph and after processing font- and size-setting macros (for example, the .I format macro, .SM format macro, and .B format macro).
Tab stops are neither used nor set by any of the format macros except the .DT format macro and the .TH format macro.
252
.B [Text] Makes text bold.
The Text variable represent up to six words; use " " (double quotation marks) to include character spaces in a word. If the variable is empty, this treatment is applied to the next input text line that contains text to be printed. For example, use the .I format macro to italicize an entire line, or use the .SM and .B format macros to produce an entire line of small-bold text. By default, hyphenation is turned off for the nroff command, but remains on for the troff command.
.DT Restores default tab settings every 5 ens for
the nroff command and every 7.2 ens for
the troff command.
.HP [Indent] Begins a paragraph with a hanging indent as specified by
the Indentvariable.
If the Indent variable is omitted, the previous Indent value is used. This value is set to its default (5 ens for the nroff command and 7.2 ens for the troff command) by the .TH format macro, .P format macro, and .RS format macro, and restored by the .RE format macro. The default unit for Indent is ens.
.I [Text] Makes text italic.
The Text variable represent up to six words; use " " (double quotation marks) to include character spaces in a word. If the variable is empty, this treatment is applied to the next input text line that contains text to be printed. For example, use the .I format macro to italicize an entire line, or use the .SM and .B format macros to produce an entire line of small-bold text. By default, hyphenation is turned off for the nroff command, but remains on for the troff command.
.IP [Tag] [Indent] Same as the .TP Indent macro with the Tag variable; if the
value of the Tag variable is NULL, begin indented
paragraph. This macro is often used to get an indented
paragraph without a tag.
If the Indent variable is omitted, the previous Indent value is used. This value is set to its default (5 ens for the nroff command and 7.2 ens for the troff command) by the .TH format macro, .P format macro, and .RS format macro, and restored by the .RE format macro. The default unit for Indent is ens.
253
.P Begins paragraph with normal font, point size, and indent.
The .PP macro is a synonym for the mm macro
package .P macro.
.PD [Number] Sets inter-paragraph distance the number of vertical spaces
specified by the Number parameter. The
default Number variable value is 0.4v for
the troff command and 1v for the nroff command.
.PM [Indicator] Sets proprietary marking as follows:
Indicator Marking
P PRIVATE
N NOTICE
No Indicator specified Turns off proprietary marking.
.RE [Number] Ends relative indent (.RS) at indent level position specified
by the Number variable. If the Number variable value is
omitted, return to the most recent lower indent level.
.RI Character1Character2... Concatenates the Roman Character1 with the
italic Character2; alternate these two fonts up to six sets
of Character1Character2. Similar macros alternate between
any two of Roman, italic, and bold: the .IR, .RB, .BR, .IB,
and .BI macros.
.RS [Indent] Increases relative indent (initially zero). Indent all output an
extra number of units from the left margin as specified by
the Indent variable.
If the Indent variable is omitted, the previous Indent value is used. This value is set to its default (5 ens for the nroff command and 7.2 ens for the troff command) by the .TH format macro, .P format macro, and .RS format macro, and restored by the .RE format macro. The default unit for Indent is ens.
.SH [Text] Places subhead text.
The Text variable represent up to six words; use " " (double
254
quotation marks) to include character spaces in a word. If the variable is empty, this treatment is applied to the next input text line that contains text to be printed. For example, use the .I format macro to italicize an entire line, or use the .SM and .B format macros to produce an entire line of small-bold text. By default, hyphenation is turned off for the nroff command, but remains on for the troff command.
.SM [Text] Makes text one point smaller than default point size.
The Text variable represent up to six words; use " " (double quotation marks) to include character spaces in a word. If the variable is empty, this treatment is applied to the next input text line that contains text to be printed. For example, use the .I format macro to italicize an entire line, or use the .SM and .B format macros to produce an entire line of small-bold text. By default, hyphenation is turned off for the nroff command, but remains on for the troff command.
.SS [Text] Places sub-subhead text.
The Text variable represent up to six words; use " " (double quotation marks) to include character spaces in a word. If the variable is empty, this treatment is applied to the next input text line that contains text to be printed. For example, use the .I format macro to italicize an entire line, or use the .SM and .B format macros to produce an entire line of small-bold text. By default, hyphenation is turned off for the nroff command, but remains on for the troff command.
.TH [Title][Section][Commentary][Name]
Sets the title and entry heading. This macro calls
the .DT format macro.
Variable Marking
Title Title
Section Section number
Commentary Extra commentary
Name New manual name.
Note: If the .TH format macro values contain character
255
spaces that are not enclosed in " " (double quotation marks), irregular dots are displayed on the output.
.TP [Indent] Begins indented paragraph with hanging tag. The next input
line that contains text is the tag. If the tag does not fit, it is
printed on a separate line.
If the Indent variable is omitted, the previous Indent value is used. This value is set to its default (5 ens for the nroff command and 7.2 ens for the troff command) by the .TH format macro, .P format macro, and .RS format macro, and restored by the .RE format macro. The default unit for Indent is ens.
Strings
\*R Adds trademark, (Reg.) for the nroff command and the registered trademark
symbol for the troff command.
\*S Changes to default type size.
\*(Tm Adds trademark indicator.
Registers
IN Indent left margin relative to subheads. The default is 7.2 ens for the troff command
and 5 ens for the nroff command.
LL Line length including the value specified by the IN register.
PD Current inter-paragraph distance.
Flags
-rs1 Reduces default page size of 8.5 inches by 11 inches with a 6.5-inch by 10-inch
text area to a 6-inch by 9-inch page size with a 4.75-inch by 8.375-inch text area.
This flag also reduces the default type size from 10-point to 9-point and the vertical
line spacing from 12-point to 10-point.
Examples
1. To process the file your.book and pipe the formatted output to the local line printer, qprt, enter:
nroff -Tlp -man your.book | qprt -dp
256
2. To process the files my.book and dept.book, which contain tables, and pipe the formatted output to the local line printer, qprt, enter:
tbl my.book dept.book | nroff -Tlp -man | col -Tlp | qprt -dp
Note: Before the output is sent to qprt, it is first filtered through the col command to process reverse linefeeds used by the tbl command.
3. To process the file group, which contains pictures, graphs, and tables, and prepare the formatted output for processing on the IBM 3816 printer, enter:
4. grap group | pic | tbl | troff -Tibm3816 -man \ | ibm3816 | qprt -dp
Notes:
1. If manual pages created with the man macro package are intended for an online facility, components requiring the troff command, such as the grap or pic command, should be avoided.
2. The grap command precedes the piccommand since it is a preprocessor to the pic command; the reverse does not format correctly.
3. The col command is not required as a filter to the tbl command; typeset documents do not require reverse linefeeds.
me Macro Package for the nroff and troff Commands
The me package of the nroff and troff command macro definitions provides a formatting facility for technical papers in various formats. The col command may be required to postprocess nroff output in certain cases.
The macro requests are defined in the following section, in me Requests. Many nroff/troff requests can have unpredictable results in conjunction with this package. However, the following requests can be used after the first .pp request:
.bp Begins new page.
.br Breaks output line here.
.ce [Number]
Centers next specified number of lines. Default is 1 (one).
.ls [Number]
257
Sets line spacing. Text is single-spaced if Number is set to 1 (one);
double-spaced if the value is set to 2.
.na Leaves right margin unjustified.
.sp [Number]
Inserts the specified number of spacing lines.
.sz [+]Number
Adds the specified number to point size.
.ul [Number]
Underlines next specified number of lines. Default is 1 (one).
Output of the eqn, neqn, refer, and tbl commands preprocessors for equations and tables can be used as input.
me Requests
The following list contains all macros, strings, and number registers available in the me macros. Selected troff commands, registers, and functions are included.
\(space) Defines unpaddable space (troff command built-in function).
\" Comments to end of line (troff command built-in function).
\*# Indicates optional delayed text tag string.
\$Number Interpolates the value specified by the Number variable
(troff command built-in function).
\n($0 Defines section depth (number register).
.$0 Started after section title printed (user-definable macro).
\n($1 Defines first section number (number register).
.$1 Started before printing depth 1 (one) section (user-definable macro).
258
\n($2 Defines second section number (number register).
.$2 Started before printing depth 2 section (user-definable macro).
\n($3 Defines third section number (number register).
.$3 Started before printing depth 3 section (user-definable macro).
\n($4 Defines fourth section number (number register).
.$4 Started before printing depth 4 section (user-definable macro).
\n($5 Defines fifth section number (number register).
.$5 Started before printing depth 5 section (user-definable macro).
\n($6 Defines sixth section number (number register).
.$6 Started before printing depth 6 section (user-definable macro).
.$C Called at beginning of chapter (user-definable macro).
.$H Indicates text header (user-definable macro).
\n($R Defines relative vertical spacing in displays (number register defined
by default; changing is not recommended).
\n($c Defines current column header (number register).
.$c Prints chapter title (macro defined by default; changing is not
recommended).
\n($d Indicates delayed text number (number register).
\n($f Indicates footnote number (number register).
.$f Prints footer (macro defined by default; changing is not
recommended).
.$h Prints header (macro defined by default; changing is not
recommended).
\n($i Defines paragraph base indent (number register).
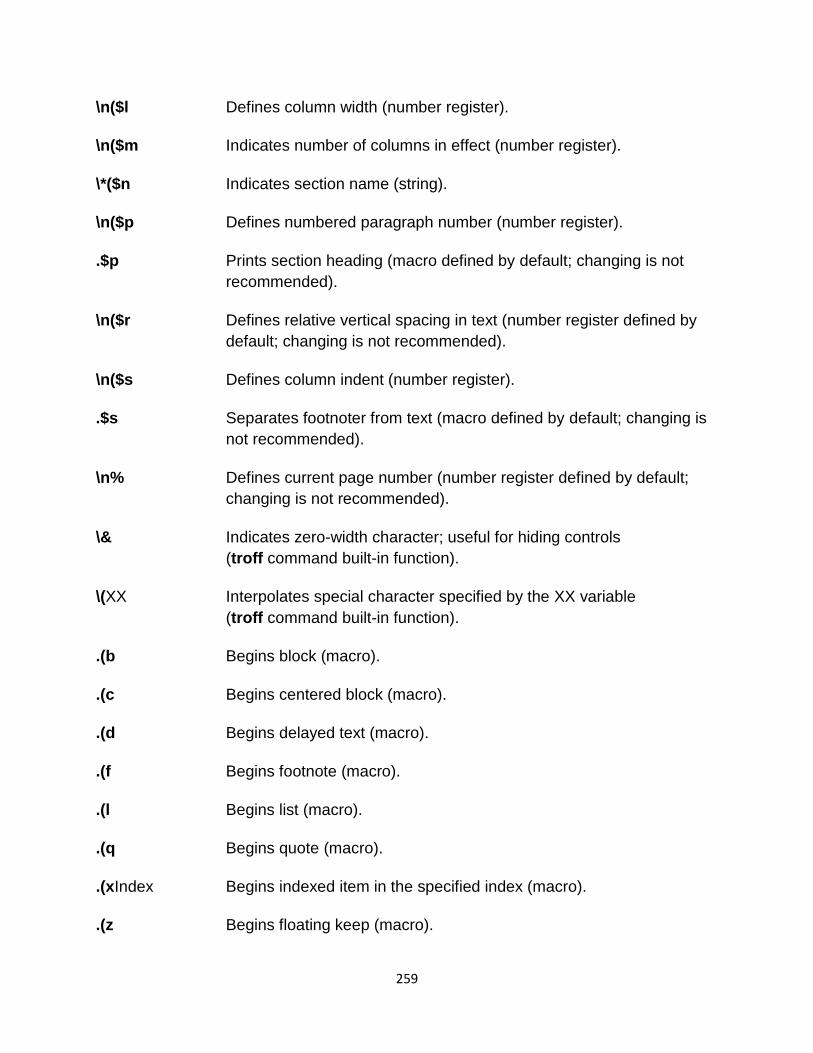
259
\n($l Defines column width (number register).
\n($m Indicates number of columns in effect (number register).
\*($n Indicates section name (string).
\n($p Defines numbered paragraph number (number register).
.$p Prints section heading (macro defined by default; changing is not
recommended).
\n($r Defines relative vertical spacing in text (number register defined by
default; changing is not recommended).
\n($s Defines column indent (number register).
.$s Separates footnoter from text (macro defined by default; changing is
not recommended).
\n% Defines current page number (number register defined by default;
changing is not recommended).
\& Indicates zero-width character; useful for hiding controls
(troff command built-in function).
\(XX Interpolates special character specified by the XX variable
(troff command built-in function).
.(b Begins block (macro).
.(c Begins centered block (macro).
.(d Begins delayed text (macro).
.(f Begins footnote (macro).
.(l Begins list (macro).
.(q Begins quote (macro).
.(xIndex Begins indexed item in the specified index (macro).
.(z Begins floating keep (macro).

260
.)b Ends block (macro).
.)c Ends centered block (macro).
.)d Ends delayed text (macro).
.)f Ends footnote (macro).
.)l Ends list (macro).
.)q Ends quote (macro).
.)x Ends index entry (macro).
.)z Ends floating keep (macro).
\*String Interpolates the value specified by the String variable (troff command
built-in function).
\*String1String2 Interpolates the value specified by the String1String2 variable
(troff command built-in function).
\** Indicates optional footnote tag string.
.++mH Macro to define paper section. The value specified by the m variable
defines the part of the paper. The m variable can have the following
values:
C Defines chapter.
A Defines appendix.
P Defines preliminary information, such as abstract and table of
contents.
B Defines bibliography.
RC Defines chapters to be renumbered from page 1 (one) of each
chapter.
RA Defines appendix to be renumbered from page 1 (one).
The H parameter defines the new header. If there are any spaces in
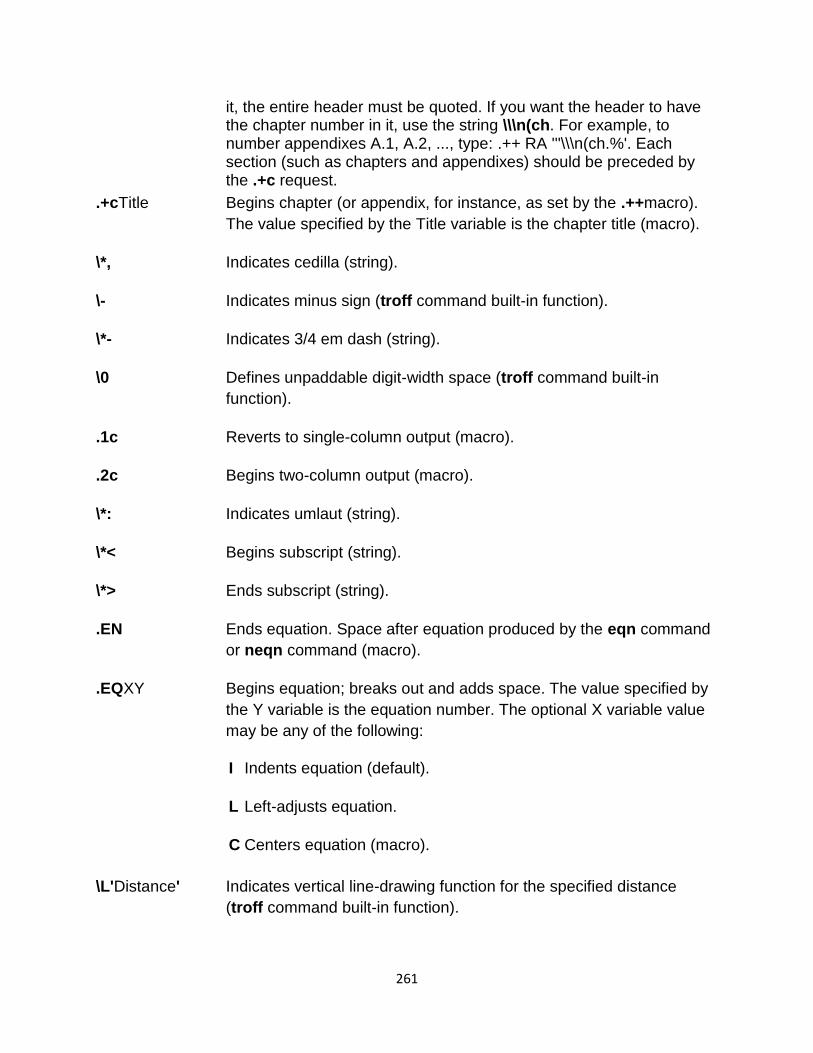
261
it, the entire header must be quoted. If you want the header to have the chapter number in it, use the string \\\n(ch. For example, to number appendixes A.1, A.2, ..., type: .++ RA '''\\\n(ch.%'. Each section (such as chapters and appendixes) should be preceded by the .+c request.
.+cTitle Begins chapter (or appendix, for instance, as set by the .++macro).
The value specified by the Title variable is the chapter title (macro).
\*, Indicates cedilla (string).
\- Indicates minus sign (troff command built-in function).
\*- Indicates 3/4 em dash (string).
\0 Defines unpaddable digit-width space (troff command built-in
function).
.1c Reverts to single-column output (macro).
.2c Begins two-column output (macro).
\*: Indicates umlaut (string).
\*< Begins subscript (string).
\*> Ends subscript (string).
.EN Ends equation. Space after equation produced by the eqn command
or neqn command (macro).
.EQXY Begins equation; breaks out and adds space. The value specified by
the Y variable is the equation number. The optional X variable value
may be any of the following:
I Indents equation (default).
L Left-adjusts equation.
C Centers equation (macro).
\L'Distance' Indicates vertical line-drawing function for the specified distance
(troff command built-in function).
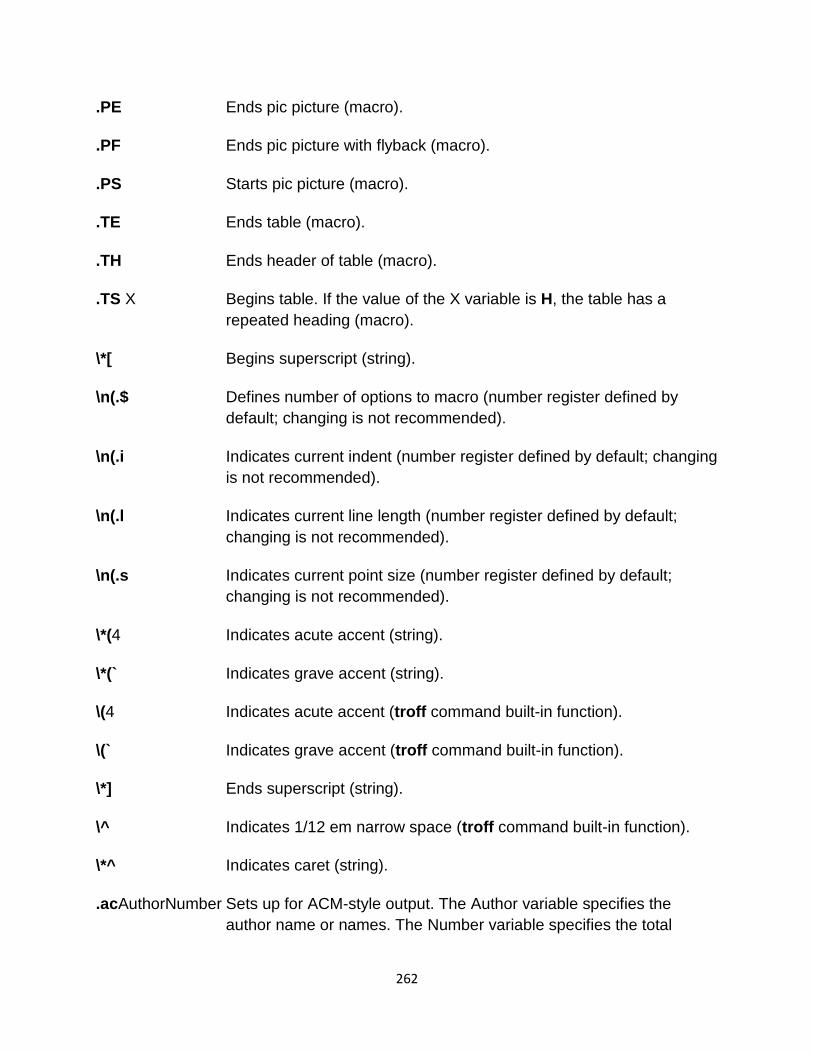
262
.PE Ends pic picture (macro).
.PF Ends pic picture with flyback (macro).
.PS Starts pic picture (macro).
.TE Ends table (macro).
.TH Ends header of table (macro).
.TS X Begins table. If the value of the X variable is H, the table has a
repeated heading (macro).
\*[ Begins superscript (string).
\n(.$ Defines number of options to macro (number register defined by
default; changing is not recommended).
\n(.i Indicates current indent (number register defined by default; changing
is not recommended).
\n(.l Indicates current line length (number register defined by default;
changing is not recommended).
\n(.s Indicates current point size (number register defined by default;
changing is not recommended).
\*(4 Indicates acute accent (string).
\*(` Indicates grave accent (string).
\(4 Indicates acute accent (troff command built-in function).
\(` Indicates grave accent (troff command built-in function).
\*] Ends superscript (string).
\^ Indicates 1/12 em narrow space (troff command built-in function).
\*^ Indicates caret (string).
.acAuthorNumber Sets up for ACM-style output. The Author variable specifies the
author name or names. The Number variable specifies the total
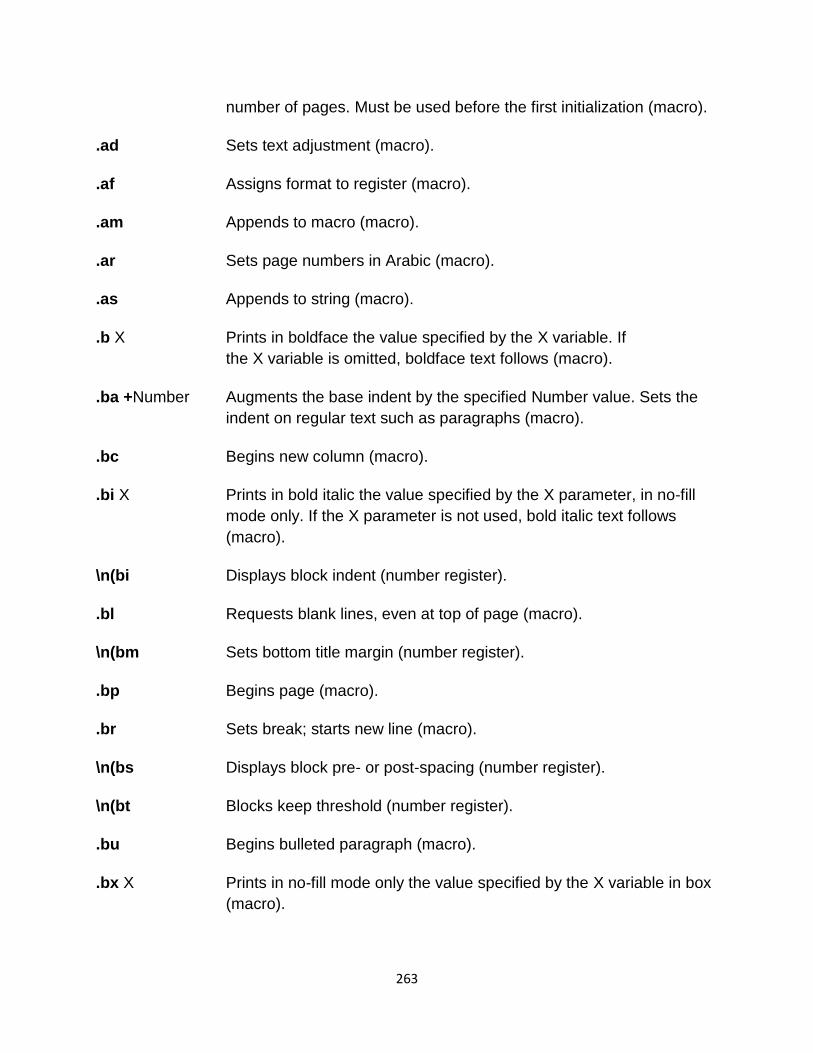
263
number of pages. Must be used before the first initialization (macro).
.ad Sets text adjustment (macro).
.af Assigns format to register (macro).
.am Appends to macro (macro).
.ar Sets page numbers in Arabic (macro).
.as Appends to string (macro).
.b X Prints in boldface the value specified by the X variable. If
the X variable is omitted, boldface text follows (macro).
.ba +Number Augments the base indent by the specified Number value. Sets the
indent on regular text such as paragraphs (macro).
.bc Begins new column (macro).
.bi X Prints in bold italic the value specified by the X parameter, in no-fill
mode only. If the X parameter is not used, bold italic text follows
(macro).
\n(bi Displays block indent (number register).
.bl Requests blank lines, even at top of page (macro).
\n(bm Sets bottom title margin (number register).
.bp Begins page (macro).
.br Sets break; starts new line (macro).
\n(bs Displays block pre- or post-spacing (number register).
\n(bt Blocks keep threshold (number register).
.bu Begins bulleted paragraph (macro).
.bx X Prints in no-fill mode only the value specified by the X variable in box
(macro).
264
\c Continues input (troff command built-in function).
.ce Centers lines (macro).
\n(ch Defines current chapter number (number register).
.de Defines macro (macro).
\n(df Displays font (number register).
.ds Defines string (macro).
\n(dw Defines current day of week (number register).
\*(dw Defines current day of week (string).
\n(dy Defines current day of month (number register).
\e Indicates printable version of \ (backslash) (troff command built-in
function).
.ef'X'Y'Z'
Sets even-page footer to the values specified by the XYZ variables
(macro).
.eh'X'Y'Z'
Sets even-page header to the values specified by the XYZ variables
(macro).
.el Specifies the else part of an if/else conditional (macro).
.ep Ends page (macro).
\n(es Indicates equation pre- or post-space (number register).
\fFont Sets inline font change to the specified Font variable value
(troff command built-in function).
\f(Fontf Sets inline font change to the specified Fontf variable value
(troff command built-in function).
265
.fc Sets field characters (macro).
\n(ff Sets footnote font (number register).
.fi Fills output lines (macro).
\n(fi Indicates footnote indent, first line only (number register).
\n(fm Sets footer margin (number register).
.fo 'X'Y'Z'
Sets footer to the values specified by the XYZ variables (macro).
\n(fp Sets footnote point size (number register).
\n(fs Sets footnote pre-space (number register).
\n(fu Sets footnote indent from right margin (number register).
\h'Distance' Sets local horizontal motion for the specified distance (troff command
built-in function).
.hc Sets hyphenation character (macro).
.he 'X'Y'Z'
Sets header to the values specified by the XYZ variables (macro).
.hl Draws horizontal line (macro).
\n(hm Sets header margin (number register).
.hx Suppresses headers and footers on next page (macro).
.hy Sets hyphenation mode (macro).
.i X Italicizes the value specified by the X variable. If the Xvariable is
omitted, italic text follows (macro).
.ie Specifies the else part of an if/else conditional (macro).
.if Designates a conditional (macro).
266
\n(ii Sets indented paragraph indent (number register).
.in Indents (transient); use the .ba macro if pervasive (macro).
.ip X Y Starts indented paragraph, with hanging tag specified by
the X variable. Indentation is the en value specified by the Y variable.
Default is 5 (macro).
.ix Indents, no break (macro).
\l'Distance' Starts horizontal line-drawing function for the specified distance
(troff command built-in function).
.lc Sets leader repetition character (macro).
.lh Interpolates local letterhead (macro).
.ll Sets line length (macro).
.lo Reads in a file of local macros of the form .*x. Must be used before
initialization (macro).
.lp Begins left-justified paragraph (macro).
\*(lq Designates left quotation marks (string).
.ls Sets multi-line spacing (macro).
.m1 Sets space from top of page to header (macro).
.m2 Sets space from header to text (macro).
.m3 Sets space from text to footer (macro).
.m4 Sets space from footer to bottom of page (macro).
.mc Inserts margin character (macro).
.mk Marks vertical position (macro).
\n(mo Defines month of year (number register).
\*(mo Defines current month (string).

267
\nX Interpolates number register specified by the X variable value
(number register).
\n(XX Interpolates number register specified by the XX variable (number
register).
.n1 Sets number lines in margin (macro).
.n2 Sets number lines in margin (macro).
.na Turns off text adjustment (macro).
.neNumber Sets the specified number of lines of vertical space (macro).
.nf Leaves output lines unfilled (macro).
.nh Turns off hyphenation (macro).
.np Begins numbered paragraph (macro).
.nr Sets number register (macro).
.ns Indicates no-space mode (macro).
\*o Indicates superscript circle (such as for Norse A; string).
.of'X'Y'Z'
Sets odd footer to the values specified by the XYZ variables (macro).
.oh'X'Y'Z'
Sets odd header to the values specified by the XYZ variables
(macro).
.pa Begins page (macro).
.pd Prints delayed text (macro).
\n(pf Indicates paragraph font (number register).
\n(pi Indicates paragraph indent (number register).
268
.pl Sets page length (macro).
.pn Sets next page number (macro).
.po Sets page offset (macro).
\n(po Simulates page offset (number register).
.pp Begins paragraph, first line indented (macro).
\n(pp Sets paragraph point size (number register).
\n(ps Sets paragraph pre-space (number register).
.q Indicates quoted (macro).
\*(qa For all (string).
\*qe There exists (string).
\n(qi Sets quotation indent; also shortens line (number register).
\n(qp Sets quotation point size (number register).
\n(qs Sets quotation pre- or post-space (number register).
.r Sets Roman text to follow (macro).
.rb Sets real bold font (macro).
.re Resets tabs to default values (macro).
.rm Removes macro or string (macro).
.rn Renames macro or string (macro).
.ro Sets page numbers in Roman (macro).
\*(rq Indicates right quotation marks (string).
.rr Removes register (macro).
.rs Restores register (macro).
269
.rt Returns to vertical position (macro).
\sSize Changes inline size to specified size (troff command built-in
function).
.sc Reads in a file of special characters and diacritical marks. Must be
used before initialization (macro).
\n(sf Sets section title font (number register).
.shLevelTitle Indicates section head to follow; font automatically bold.
The Level variable specifies the level of section. The Title variable
specifies the title of section (macro).
\n(si Sets relative base indent-per-section depth (number register).
.sk Leaves the next page blank. Only one page is remembered ahead
(macro).
.smX Sets, in a smaller point size, the value specified by the X variable
(macro).
.so Indicates source input file (macro).
\n(so Sets additional section title offset (number register).
.sp Indicates vertical space (macro).
\n(sp Indicates section title point size (number register).
\n(ss Indicates section prespace (number register).
.sx Changes section depth (macro).
.sz +Number Augments point size by the specified number of points (macro).
.ta Sets tab stops (macro).
.tc Sets tab repetition character (macro).
\*(td Sets today's date (string).
n(tf Indicates title font (number register).
270
.th Produces paper in thesis format. Must be used before initialization
(macro).
.ti Indicates temporary indent, next line only (macro).
.tl Indicates 3-part title (macro).
\n(tm Sets top title margin (number register).
.tp Begins title page (macro).
\n(tp Sets title point size (number register).
.tr Translates (macro).
.u X Underlines the value specified by the X variable, even in
the troff command. No-fill mode only (macro).
.uh Sets section head to follow; font automatically bold. Similar to
the .sh macro, but unnumbered (macro).
.ul Underlines next line (macro).
\v'Distance' Local vertical motion for the specified distance (troff command built-
in function).
\*v Inverts v for Czech e (string).
\w'String' Returns width of the specified string (troff command built-in function).
.xl Sets local line length (macro).
.xpIndex Prints the specified index (macro).
\n(xs Sets index entry prespace (number register).
\n(xu Sets index indent, from right margin (number register).
\n(yr Indicates year, last two digits only (number register).
\n(zs Sets floating keep pre- or post-space (number register).
\{ Begins conditional group (troff command built-in function).
271
\| 1/6 em, narrow space (troff command built-in function).
\} Ends conditional group (troff command built-in function).
\*~ Indicates tilde (string).
Tbl
tbl - formats tables for nroff
SYNOPSIS
tbl [file ... ]
FLAGS
-TX Produces output without fractional line motions. You use this flag when the destination output device or printer or post-filter cannot handle fractional line motions. -ms Reads in ms macros prior to table formatting. -mm Reads in the mm macros prior to table formatting, if your system has the *roff mm macros installed.
DESCRIPTION
The tbl preprocessor is used for formatting tables for nroff. When you run tbl, the input files are copied to standard output, except for lines between the .TS (table start) and .TE (table end) command lines. All lines between the .TS and .TE command lines are assumed to describe a table and are reformatted. If no arguments are given, tbl reads from standard input, so it can be used as a filter.When tbl is used with neqn or other equation formatting *roff tools, the tbl command should be invoked first to minimize the volume of data passed through the pipes.
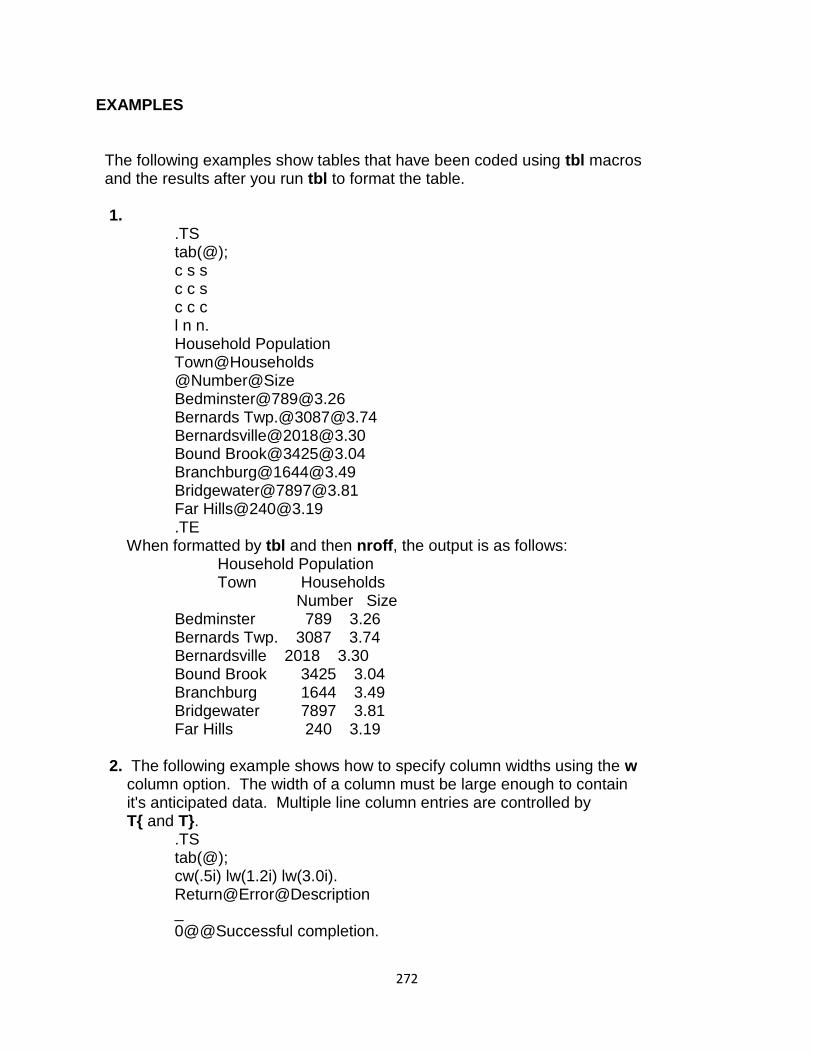
272
EXAMPLES
The following examples show tables that have been coded using tbl macros and the results after you run tbl to format the table. 1. .TS tab(@); c s s c c s c c c l n n. Household Population Town@Households @Number@Size Bedminster@[email protected] Bernards Twp.@[email protected] Bernardsville@[email protected] Bound Brook@[email protected] Branchburg@[email protected] Bridgewater@[email protected] Far Hills@[email protected] .TE When formatted by tbl and then nroff, the output is as follows: Household Population Town Households Number Size Bedminster 789 3.26 Bernards Twp. 3087 3.74 Bernardsville 2018 3.30 Bound Brook 3425 3.04 Branchburg 1644 3.49 Bridgewater 7897 3.81 Far Hills 240 3.19 2. The following example shows how to specify column widths using the w column option. The width of a column must be large enough to contain it's anticipated data. Multiple line column entries are controlled by T{ and T}. .TS tab(@); cw(.5i) lw(1.2i) lw(3.0i). Return@Error@Description _ 0@@Successful completion.
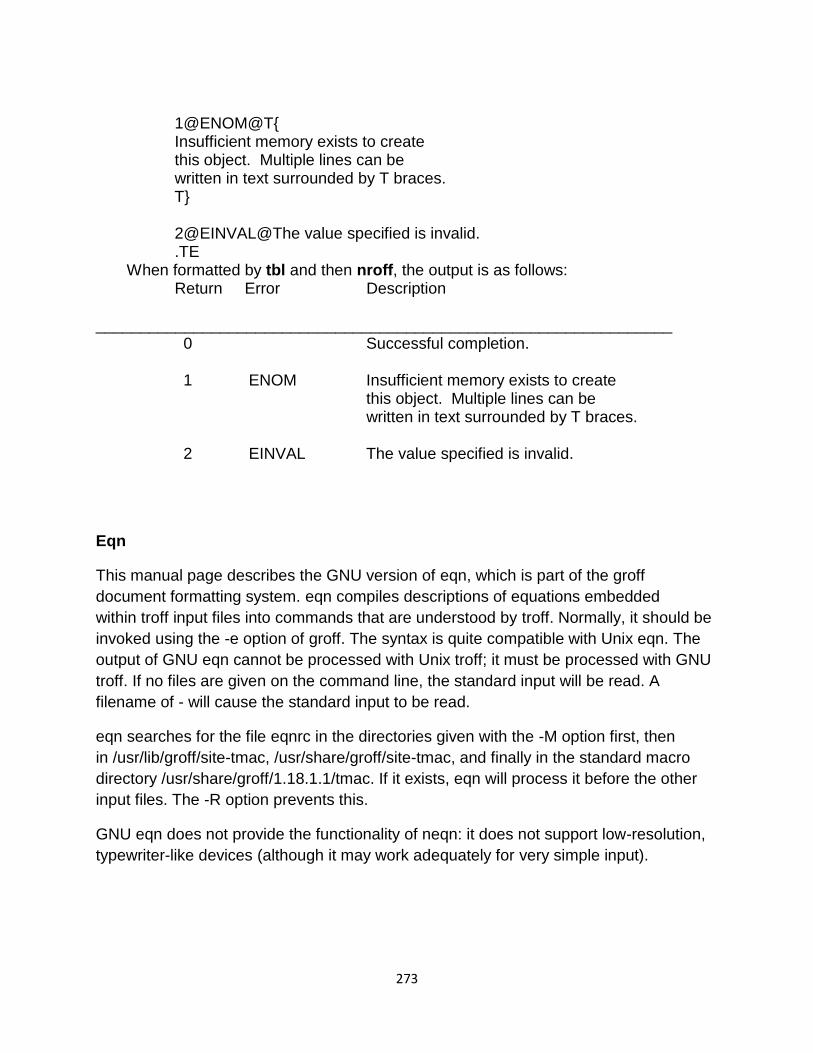
273
1@ENOM@T{ Insufficient memory exists to create this object. Multiple lines can be written in text surrounded by T braces. T} 2@EINVAL@The value specified is invalid. .TE When formatted by tbl and then nroff, the output is as follows: Return Error Description _________________________________________________________________ 0 Successful completion. 1 ENOM Insufficient memory exists to create this object. Multiple lines can be written in text surrounded by T braces. 2 EINVAL The value specified is invalid.
Eqn
This manual page describes the GNU version of eqn, which is part of the groff
document formatting system. eqn compiles descriptions of equations embedded
within troff input files into commands that are understood by troff. Normally, it should be
invoked using the -e option of groff. The syntax is quite compatible with Unix eqn. The
output of GNU eqn cannot be processed with Unix troff; it must be processed with GNU
troff. If no files are given on the command line, the standard input will be read. A
filename of - will cause the standard input to be read.
eqn searches for the file eqnrc in the directories given with the -M option first, then
in /usr/lib/groff/site-tmac, /usr/share/groff/site-tmac, and finally in the standard macro
directory /usr/share/groff/1.18.1.1/tmac. If it exists, eqn will process it before the other
input files. The -R option prevents this.
GNU eqn does not provide the functionality of neqn: it does not support low-resolution,
typewriter-like devices (although it may work adequately for very simple input).
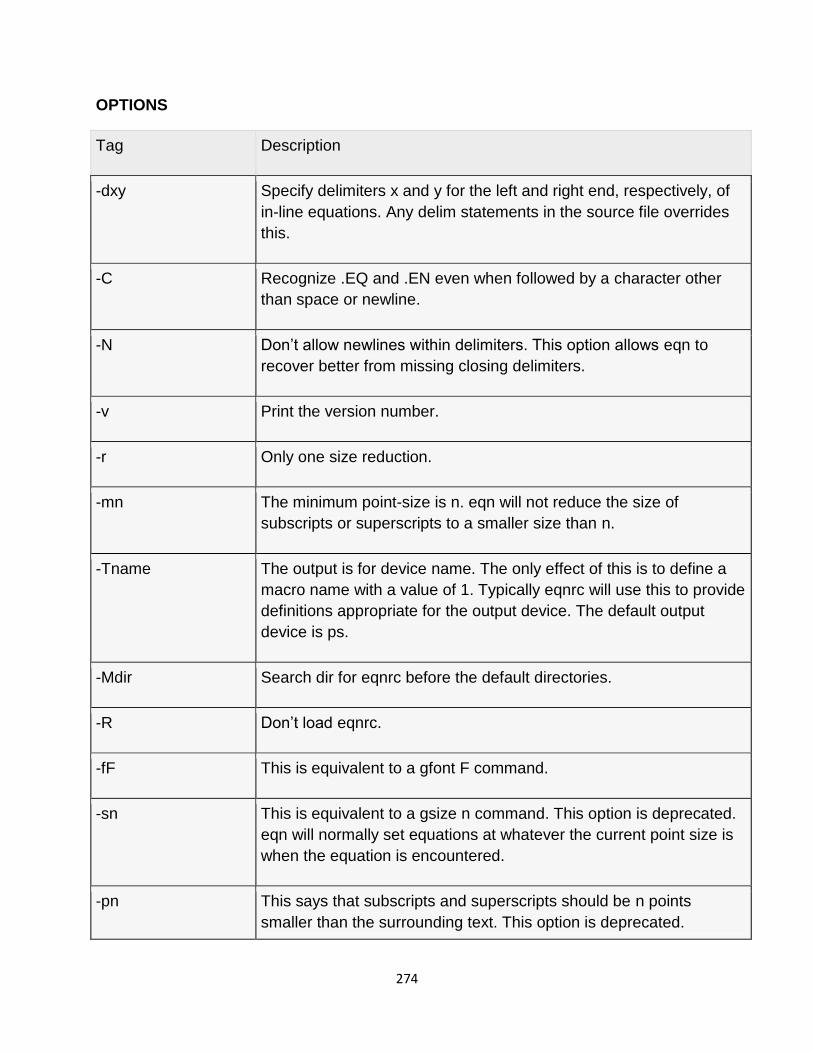
274
OPTIONS
Tag Description
-dxy Specify delimiters x and y for the left and right end, respectively, of
in-line equations. Any delim statements in the source file overrides
this.
-C Recognize .EQ and .EN even when followed by a character other
than space or newline.
-N Don‘t allow newlines within delimiters. This option allows eqn to
recover better from missing closing delimiters.
-v Print the version number.
-r Only one size reduction.
-mn The minimum point-size is n. eqn will not reduce the size of
subscripts or superscripts to a smaller size than n.
-Tname The output is for device name. The only effect of this is to define a
macro name with a value of 1. Typically eqnrc will use this to provide
definitions appropriate for the output device. The default output
device is ps.
-Mdir Search dir for eqnrc before the default directories.
-R Don‘t load eqnrc.
-fF This is equivalent to a gfont F command.
-sn This is equivalent to a gsize n command. This option is deprecated.
eqn will normally set equations at whatever the current point size is
when the equation is encountered.
-pn This says that subscripts and superscripts should be n points
smaller than the surrounding text. This option is deprecated.
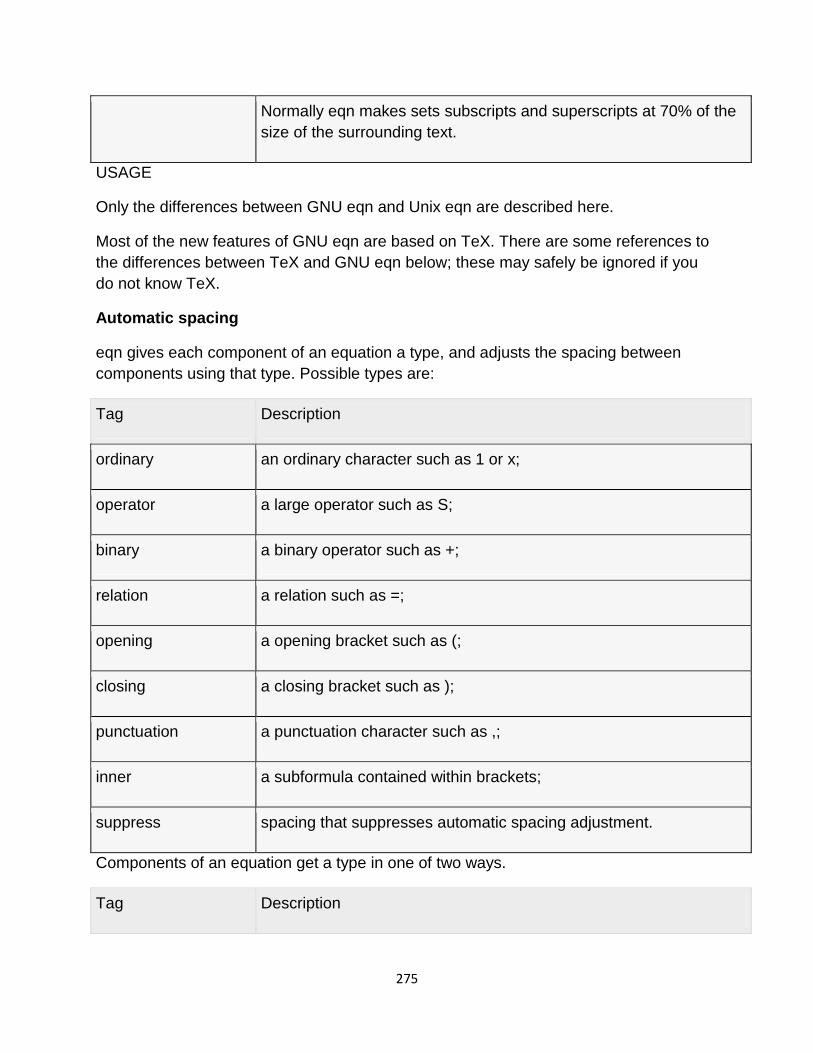
275
Normally eqn makes sets subscripts and superscripts at 70% of the
size of the surrounding text.
USAGE
Only the differences between GNU eqn and Unix eqn are described here.
Most of the new features of GNU eqn are based on TeX. There are some references to
the differences between TeX and GNU eqn below; these may safely be ignored if you
do not know TeX.
Automatic spacing
eqn gives each component of an equation a type, and adjusts the spacing between
components using that type. Possible types are:
Tag Description
ordinary an ordinary character such as 1 or x;
operator a large operator such as S;
binary a binary operator such as +;
relation a relation such as =;
opening a opening bracket such as (;
closing a closing bracket such as );
punctuation a punctuation character such as ,;
inner a subformula contained within brackets;
suppress spacing that suppresses automatic spacing adjustment.
Components of an equation get a type in one of two ways.
Tag Description
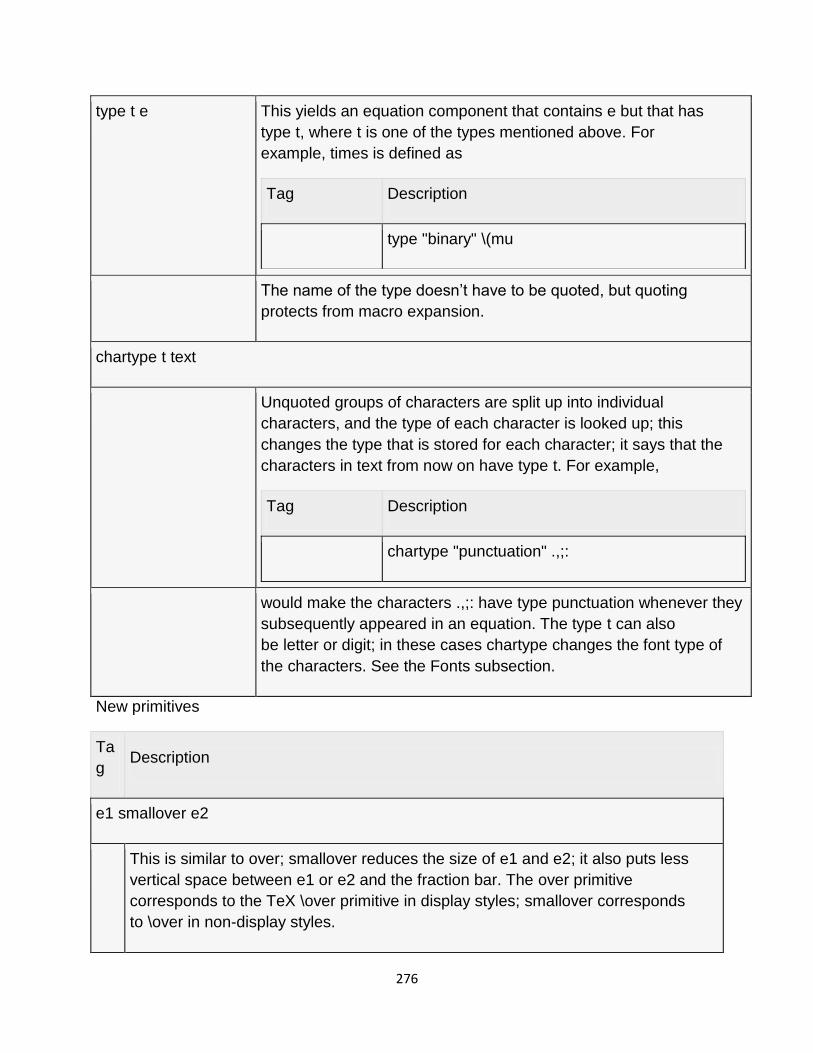
276
type t e This yields an equation component that contains e but that has
type t, where t is one of the types mentioned above. For
example, times is defined as
Tag Description
type "binary" \(mu
The name of the type doesn‘t have to be quoted, but quoting
protects from macro expansion.
chartype t text
Unquoted groups of characters are split up into individual
characters, and the type of each character is looked up; this
changes the type that is stored for each character; it says that the
characters in text from now on have type t. For example,
Tag Description
chartype "punctuation" .,;:
would make the characters .,;: have type punctuation whenever they
subsequently appeared in an equation. The type t can also
be letter or digit; in these cases chartype changes the font type of
the characters. See the Fonts subsection.
New primitives
Ta
g Description
e1 smallover e2
This is similar to over; smallover reduces the size of e1 and e2; it also puts less
vertical space between e1 or e2 and the fraction bar. The over primitive
corresponds to the TeX \over primitive in display styles; smallover corresponds
to \over in non-display styles.
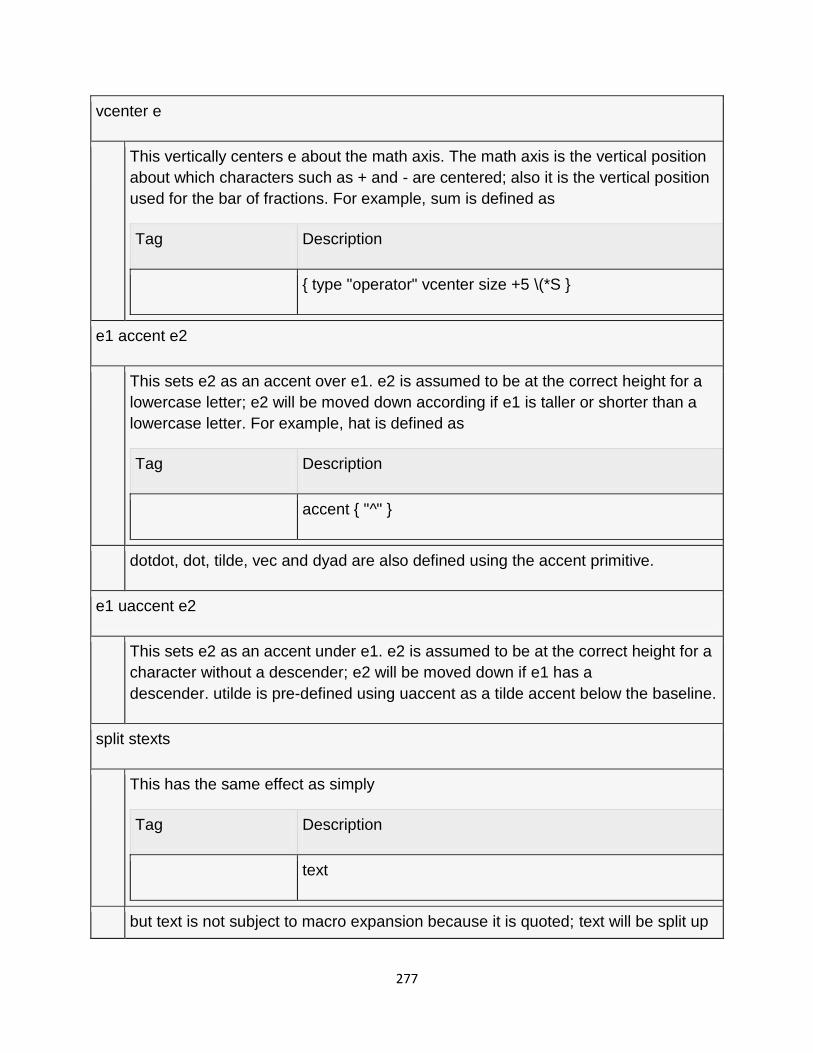
277
vcenter e
This vertically centers e about the math axis. The math axis is the vertical position
about which characters such as + and - are centered; also it is the vertical position
used for the bar of fractions. For example, sum is defined as
Tag Description
{ type "operator" vcenter size +5 \(*S }
e1 accent e2
This sets e2 as an accent over e1. e2 is assumed to be at the correct height for a
lowercase letter; e2 will be moved down according if e1 is taller or shorter than a
lowercase letter. For example, hat is defined as
Tag Description
accent { "^" }
dotdot, dot, tilde, vec and dyad are also defined using the accent primitive.
e1 uaccent e2
This sets e2 as an accent under e1. e2 is assumed to be at the correct height for a
character without a descender; e2 will be moved down if e1 has a
descender. utilde is pre-defined using uaccent as a tilde accent below the baseline.
split stexts
This has the same effect as simply
Tag Description
text
but text is not subject to macro expansion because it is quoted; text will be split up
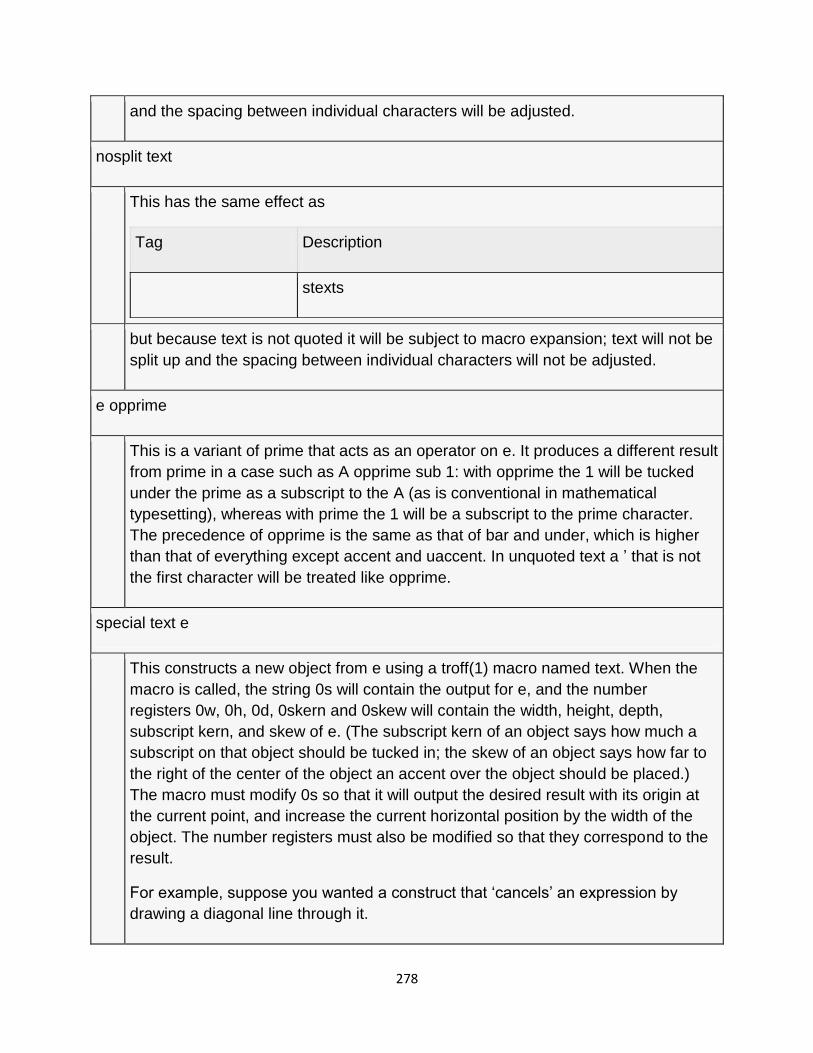
278
and the spacing between individual characters will be adjusted.
nosplit text
This has the same effect as
Tag Description
stexts
but because text is not quoted it will be subject to macro expansion; text will not be
split up and the spacing between individual characters will not be adjusted.
e opprime
This is a variant of prime that acts as an operator on e. It produces a different result
from prime in a case such as A opprime sub 1: with opprime the 1 will be tucked
under the prime as a subscript to the A (as is conventional in mathematical
typesetting), whereas with prime the 1 will be a subscript to the prime character.
The precedence of opprime is the same as that of bar and under, which is higher
than that of everything except accent and uaccent. In unquoted text a ‘ that is not
the first character will be treated like opprime.
special text e
This constructs a new object from e using a troff(1) macro named text. When the
macro is called, the string 0s will contain the output for e, and the number
registers 0w, 0h, 0d, 0skern and 0skew will contain the width, height, depth,
subscript kern, and skew of e. (The subscript kern of an object says how much a
subscript on that object should be tucked in; the skew of an object says how far to
the right of the center of the object an accent over the object should be placed.)
The macro must modify 0s so that it will output the desired result with its origin at
the current point, and increase the current horizontal position by the width of the
object. The number registers must also be modified so that they correspond to the
result.
For example, suppose you wanted a construct that ‗cancels‘ an expression by
drawing a diagonal line through it.

279
Tag Description
.EQ
define cancel ‘special Ca‘
.EN
.de Ca
.ds 0s \Z‘\\*(0s‘\v‘\\n(0du‘\D‘l \\n(0wu -\\n(0hu-\\n(0du‘\v‘\\n(0hu‘
..
Then you could cancel an expression e with cancel { e }
Here‘s a more complicated construct that draws a box round an expression:
.EQ
define box ‘special Bx‘
.EN
.de Bx
.ds 0s \Z‘\h‘1n‘\\*(0s‘\
\Z‘\v‘\\n(0du+1n‘\D‘l \\n(0wu+2n 0‘\D‘l 0 -\\n(0hu-\\n(0du-2n‘\
\D‘l -\\n(0wu-2n 0‘\D‘l 0 \\n(0hu+\\n(0du+2n‘‘\h‘\\n(0wu+2n‘
.nr 0w +2n
.nr 0d +1n
.nr 0h +1n
..
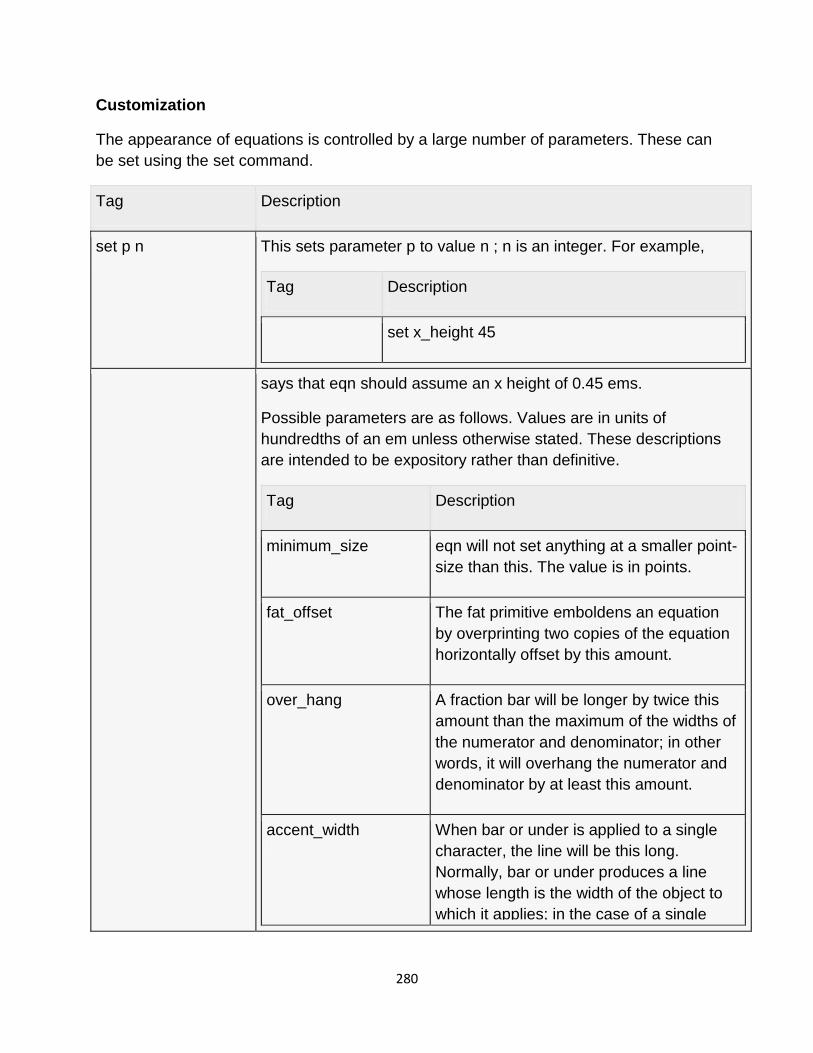
280
Customization
The appearance of equations is controlled by a large number of parameters. These can
be set using the set command.
Tag Description
set p n This sets parameter p to value n ; n is an integer. For example,
Tag Description
set x_height 45
says that eqn should assume an x height of 0.45 ems.
Possible parameters are as follows. Values are in units of
hundredths of an em unless otherwise stated. These descriptions
are intended to be expository rather than definitive.
Tag Description
minimum_size eqn will not set anything at a smaller point-
size than this. The value is in points.
fat_offset The fat primitive emboldens an equation
by overprinting two copies of the equation
horizontally offset by this amount.
over_hang A fraction bar will be longer by twice this
amount than the maximum of the widths of
the numerator and denominator; in other
words, it will overhang the numerator and
denominator by at least this amount.
accent_width When bar or under is applied to a single
character, the line will be this long.
Normally, bar or under produces a line
whose length is the width of the object to
which it applies; in the case of a single

281
character, this tends to produce a line that
looks too long.
delimiter_factor Extensible delimiters produced with
the left and right primitives will have a
combined height and depth of at least this
many thousandths of twice the maximum
amount by which the sub-equation that the
delimiters enclose extends away from the
axis.
delimiter_shortfall Extensible delimiters produced with
the left and right primitives will have a
combined height and depth not less than
the difference of twice the maximum
amount by which the sub-equation that the
delimiters enclose extends away from the
axis and this amount.
null_delimiter_space This much horizontal space is inserted on
each side of a fraction.
script_space The width of subscripts and superscripts is
increased by this amount.
thin_space This amount of space is automatically
inserted after punctuation characters.
medium_space This amount of space is automatically
inserted on either side of binary operators.
thick_space This amount of space is automatically
inserted on either side of relations.
x_height The height of lowercase letters without
ascenders such as x.
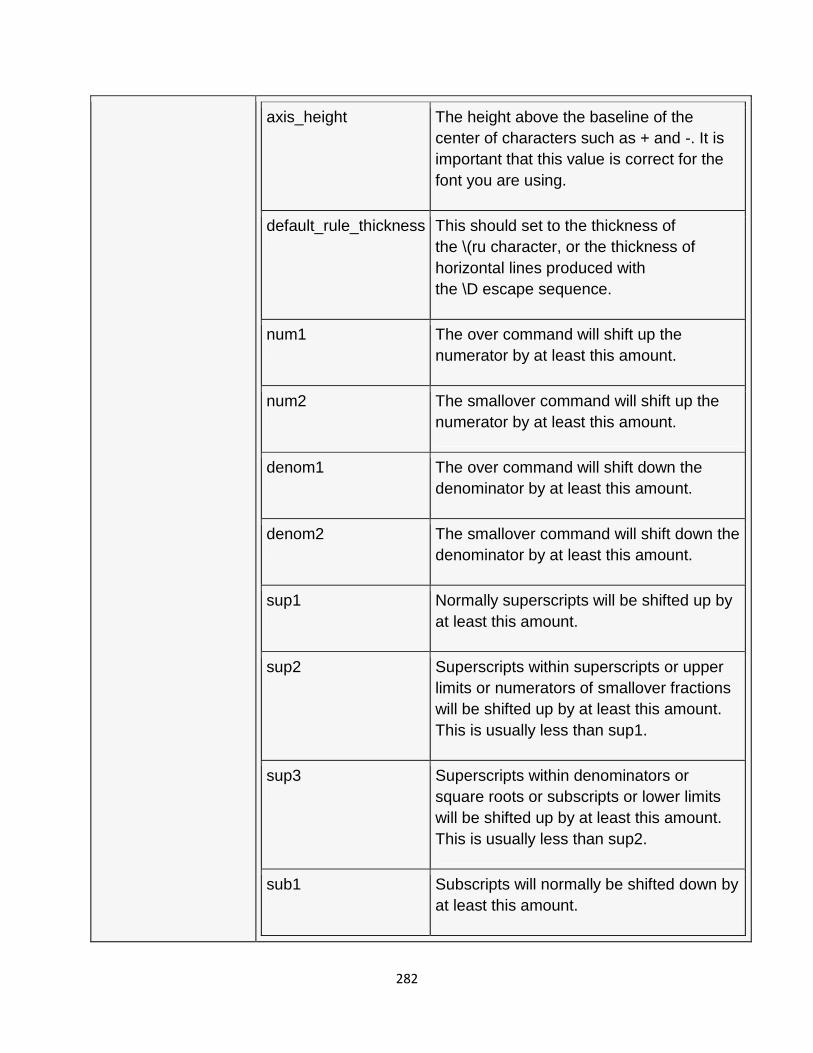
282
axis_height The height above the baseline of the
center of characters such as + and -. It is
important that this value is correct for the
font you are using.
default_rule_thickness This should set to the thickness of
the \(ru character, or the thickness of
horizontal lines produced with
the \D escape sequence.
num1 The over command will shift up the
numerator by at least this amount.
num2 The smallover command will shift up the
numerator by at least this amount.
denom1 The over command will shift down the
denominator by at least this amount.
denom2 The smallover command will shift down the
denominator by at least this amount.
sup1 Normally superscripts will be shifted up by
at least this amount.
sup2 Superscripts within superscripts or upper
limits or numerators of smallover fractions
will be shifted up by at least this amount.
This is usually less than sup1.
sup3 Superscripts within denominators or
square roots or subscripts or lower limits
will be shifted up by at least this amount.
This is usually less than sup2.
sub1 Subscripts will normally be shifted down by
at least this amount.
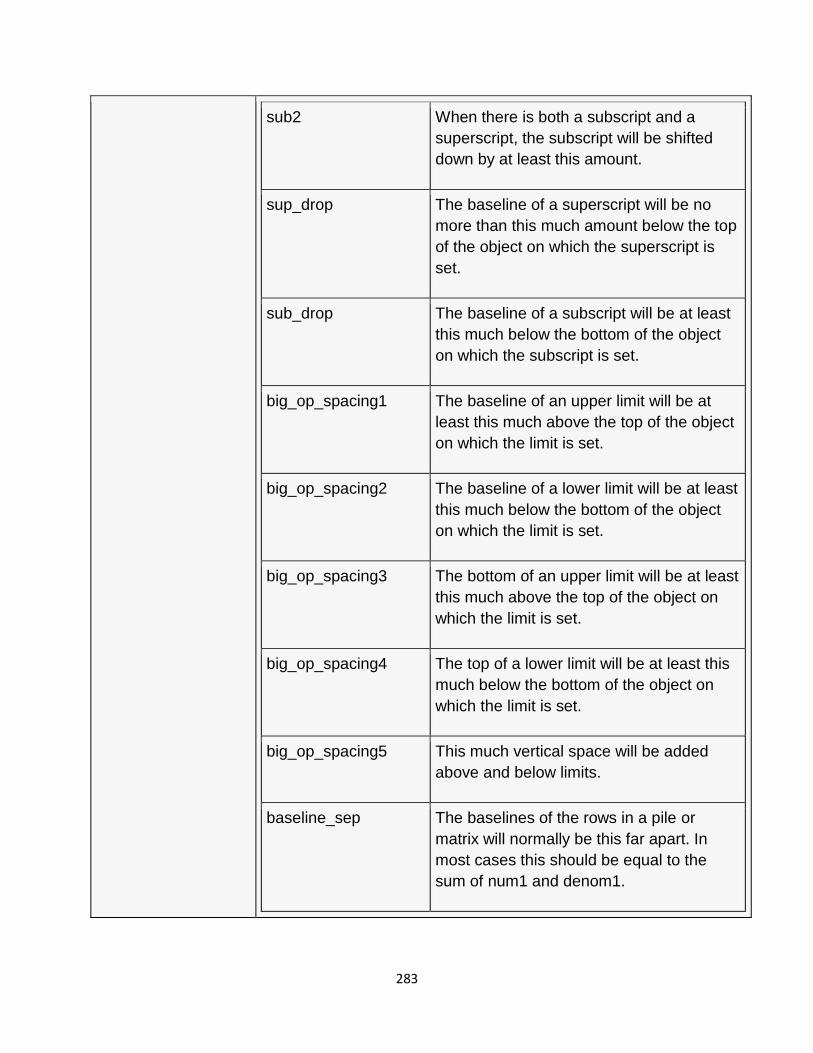
283
sub2 When there is both a subscript and a
superscript, the subscript will be shifted
down by at least this amount.
sup_drop The baseline of a superscript will be no
more than this much amount below the top
of the object on which the superscript is
set.
sub_drop The baseline of a subscript will be at least
this much below the bottom of the object
on which the subscript is set.
big_op_spacing1 The baseline of an upper limit will be at
least this much above the top of the object
on which the limit is set.
big_op_spacing2 The baseline of a lower limit will be at least
this much below the bottom of the object
on which the limit is set.
big_op_spacing3 The bottom of an upper limit will be at least
this much above the top of the object on
which the limit is set.
big_op_spacing4 The top of a lower limit will be at least this
much below the bottom of the object on
which the limit is set.
big_op_spacing5 This much vertical space will be added
above and below limits.
baseline_sep The baselines of the rows in a pile or
matrix will normally be this far apart. In
most cases this should be equal to the
sum of num1 and denom1.

284
shift_down The midpoint between the top baseline
and the bottom baseline in a matrix or pile
will be shifted down by this much from the
axis. In most cases this should be equal
to axis_height.
column_sep This much space will be added between
columns in a matrix.
matrix_side_sep This much space will be added at each
side of a matrix.
draw_lines If this is non-zero, lines will be drawn using
the \D escape sequence, rather than with
the \l escape sequence and
the \(ru character.
body_height The amount by which the height of the
equation exceeds this will be added as
extra space before the line containing the
equation (using \x.) The default value is
85.
body_depth The amount by which the depth of the
equation exceeds this will be added as
extra space after the line containing the
equation (using \x.) The default value is
35.
nroff If this is non-zero, then ndefine will behave
like define and tdefine will be ignored,
otherwise tdefine will behave
like define and ndefine will be ignored. The
default value is 0 (This is typically changed
to 1 by the eqnrc file for
the ascii, latin1, utf8, and cp1047 devices.)
A more precise description of the role of many of these parameters
can be found in Appendix H of The TeXbook.

285
Macros
Macros can take arguments. In a macro body, $n where n is between 1 and 9, will be
replaced by the n-th argument if the macro is called with arguments; if there are fewer
than n arguments, it will be replaced by nothing. A word containing a left parenthesis
where the part of the word before the left parenthesis has been defined using
the define command will be recognized as a macro call with arguments; characters
following the left parenthesis up to a matching right parenthesis will be treated as
comma-separated arguments; commas inside nested parentheses do not terminate an
argument.
Tag Description
sdefine name X anything X
This is like the define command, but name will not be recognized if
called with arguments.
include sfiles
Include the contents of file. Lines of file beginning
with .EQ or .EN will be ignored.
ifdef name X anything X
If name has been defined by define (or has been automatically
defined because name is the output device) process anything;
otherwise ignore anything. X can be any character not appearing
in anything.
Fonts
eqn normally uses at least two fonts to set an equation: an italic font for letters, and a
roman font for everything else. The existing gfont command changes the font that is
used as the italic font. By default this is I. The font that is used as the roman font can be
changed using the new grfont command.
Tag Description
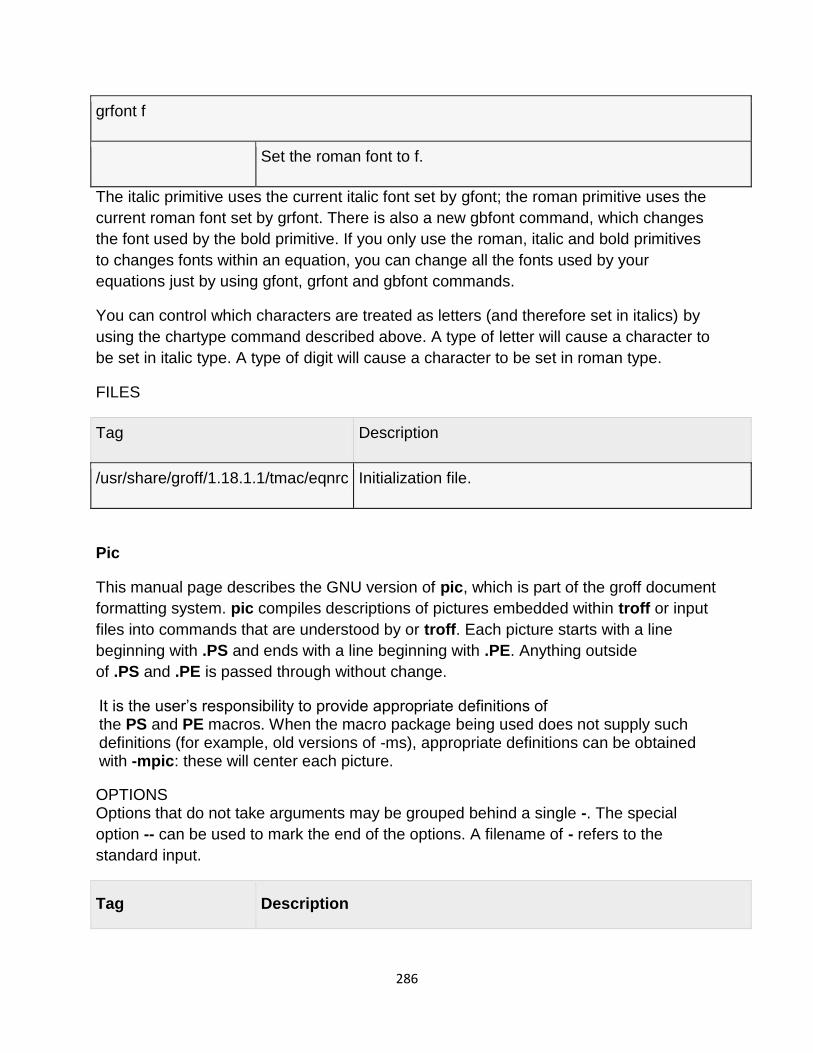
286
grfont f
Set the roman font to f.
The italic primitive uses the current italic font set by gfont; the roman primitive uses the
current roman font set by grfont. There is also a new gbfont command, which changes
the font used by the bold primitive. If you only use the roman, italic and bold primitives
to changes fonts within an equation, you can change all the fonts used by your
equations just by using gfont, grfont and gbfont commands.
You can control which characters are treated as letters (and therefore set in italics) by
using the chartype command described above. A type of letter will cause a character to
be set in italic type. A type of digit will cause a character to be set in roman type.
FILES
Tag Description
/usr/share/groff/1.18.1.1/tmac/eqnrc Initialization file.
Pic
This manual page describes the GNU version of pic, which is part of the groff document
formatting system. pic compiles descriptions of pictures embedded within troff or input
files into commands that are understood by or troff. Each picture starts with a line
beginning with .PS and ends with a line beginning with .PE. Anything outside
of .PS and .PE is passed through without change.
It is the user‘s responsibility to provide appropriate definitions of the PS and PE macros. When the macro package being used does not supply such definitions (for example, old versions of -ms), appropriate definitions can be obtained with -mpic: these will center each picture.
OPTIONS Options that do not take arguments may be grouped behind a single -. The special
option -- can be used to mark the end of the options. A filename of - refers to the
standard input.
Tag Description
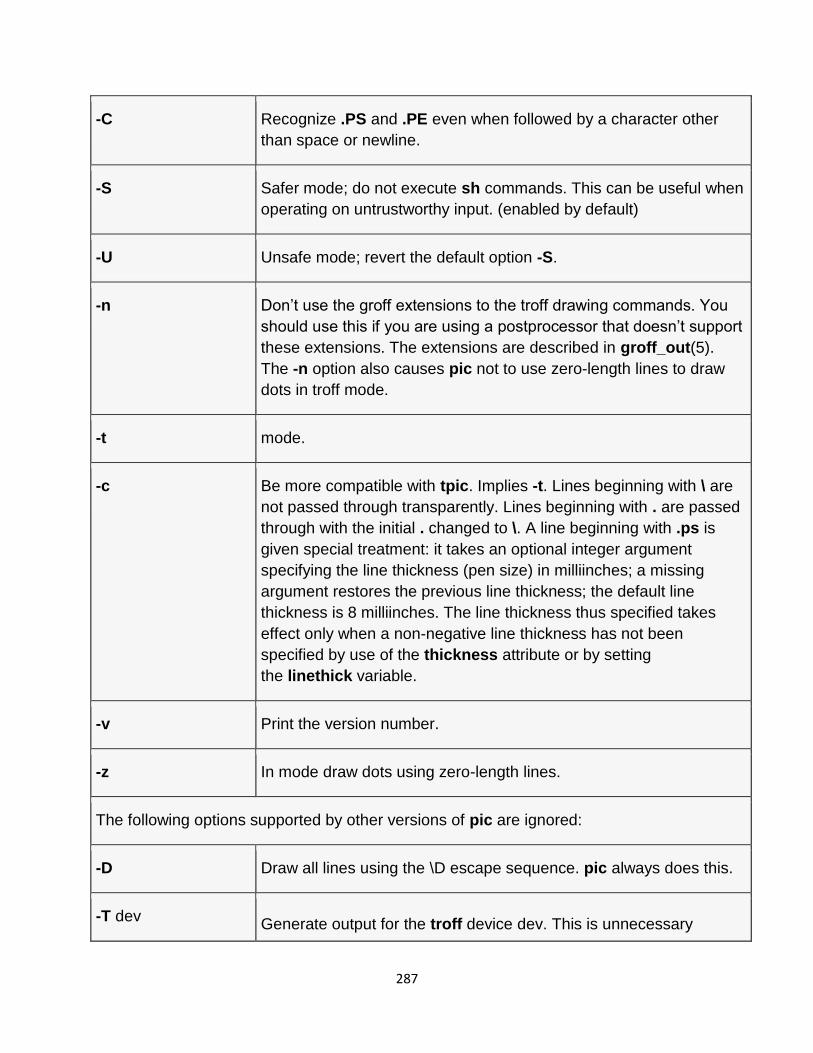
287
-C Recognize .PS and .PE even when followed by a character other
than space or newline.
-S Safer mode; do not execute sh commands. This can be useful when
operating on untrustworthy input. (enabled by default)
-U Unsafe mode; revert the default option -S.
-n Don‘t use the groff extensions to the troff drawing commands. You
should use this if you are using a postprocessor that doesn‘t support
these extensions. The extensions are described in groff_out(5).
The -n option also causes pic not to use zero-length lines to draw
dots in troff mode.
-t mode.
-c Be more compatible with tpic. Implies -t. Lines beginning with \ are
not passed through transparently. Lines beginning with . are passed
through with the initial . changed to \. A line beginning with .ps is
given special treatment: it takes an optional integer argument
specifying the line thickness (pen size) in milliinches; a missing
argument restores the previous line thickness; the default line
thickness is 8 milliinches. The line thickness thus specified takes
effect only when a non-negative line thickness has not been
specified by use of the thickness attribute or by setting
the linethick variable.
-v Print the version number.
-z In mode draw dots using zero-length lines.
The following options supported by other versions of pic are ignored:
-D Draw all lines using the \D escape sequence. pic always does this.
-T dev Generate output for the troff device dev. This is unnecessary
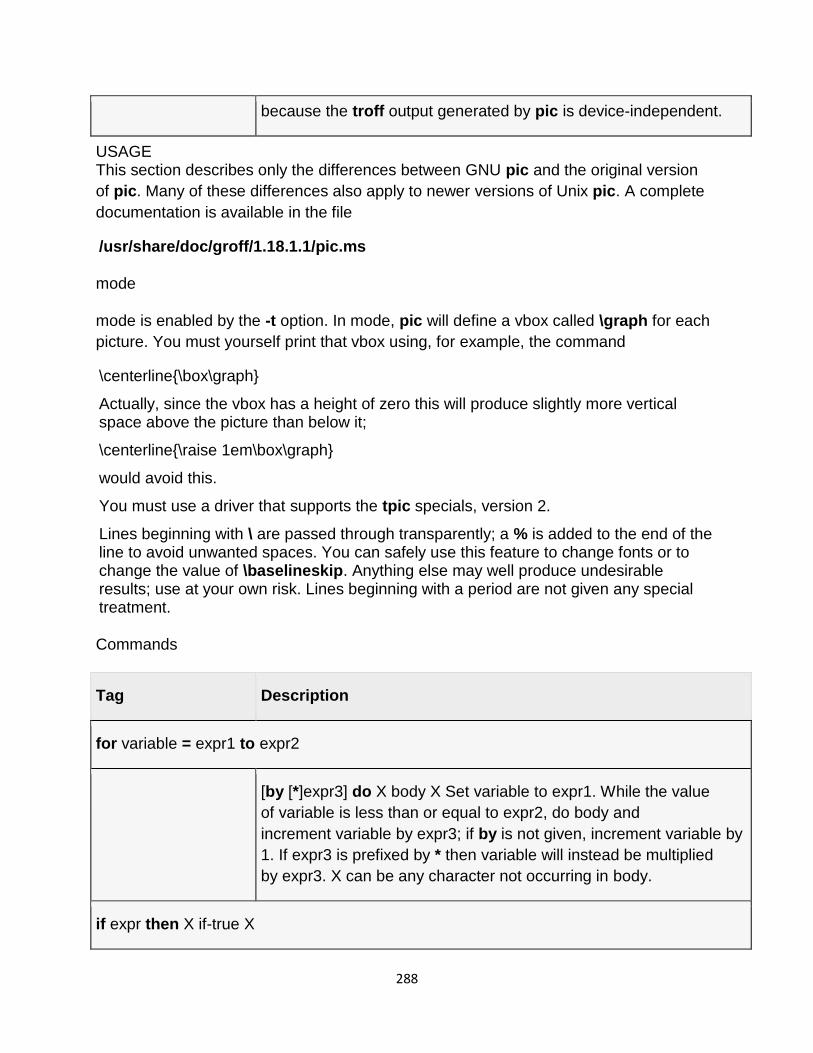
288
because the troff output generated by pic is device-independent.
USAGE This section describes only the differences between GNU pic and the original version
of pic. Many of these differences also apply to newer versions of Unix pic. A complete
documentation is available in the file
/usr/share/doc/groff/1.18.1.1/pic.ms
mode
mode is enabled by the -t option. In mode, pic will define a vbox called \graph for each
picture. You must yourself print that vbox using, for example, the command
\centerline{\box\graph}
Actually, since the vbox has a height of zero this will produce slightly more vertical space above the picture than below it;
\centerline{\raise 1em\box\graph}
would avoid this.
You must use a driver that supports the tpic specials, version 2.
Lines beginning with \ are passed through transparently; a % is added to the end of the line to avoid unwanted spaces. You can safely use this feature to change fonts or to change the value of \baselineskip. Anything else may well produce undesirable results; use at your own risk. Lines beginning with a period are not given any special treatment.
Commands
Tag Description
for variable = expr1 to expr2
[by [*]expr3] do X body X Set variable to expr1. While the value
of variable is less than or equal to expr2, do body and
increment variable by expr3; if by is not given, increment variable by
1. If expr3 is prefixed by * then variable will instead be multiplied
by expr3. X can be any character not occurring in body.
if expr then X if-true X

289
[else Y if-false Y] Evaluate expr; if it is non-zero then do if-true,
otherwise do if-false. X can be any character not occurring in if-
true. Y can be any character not occurring in if-false.
print arg...
Concatenate the arguments and print as a line on stderr.
Each arg must be an expression, a position, or text. This is useful for
debugging.
command arg...
Concatenate the arguments and pass them through as a line to troff
or . Each arg must be an expression, a position, or text. This has a
similar effect to a line beginning with . or \, but allows the values of
variables to be passed through.
sh X command X
Pass command to a shell. X can be any character not occurring
in command.
copy "filename"
Include filename at this point in the file.
copy ["filename"] thru X body X
[until "word"]
copy ["filename"] thru macro
[until "word"] This construct does body once for each line
of filename; the line is split into blank-delimited words, and
occurrences of $i in body, for i between 1 and 9, are replaced by
the i-th word of the line. If filename is not given, lines are taken from
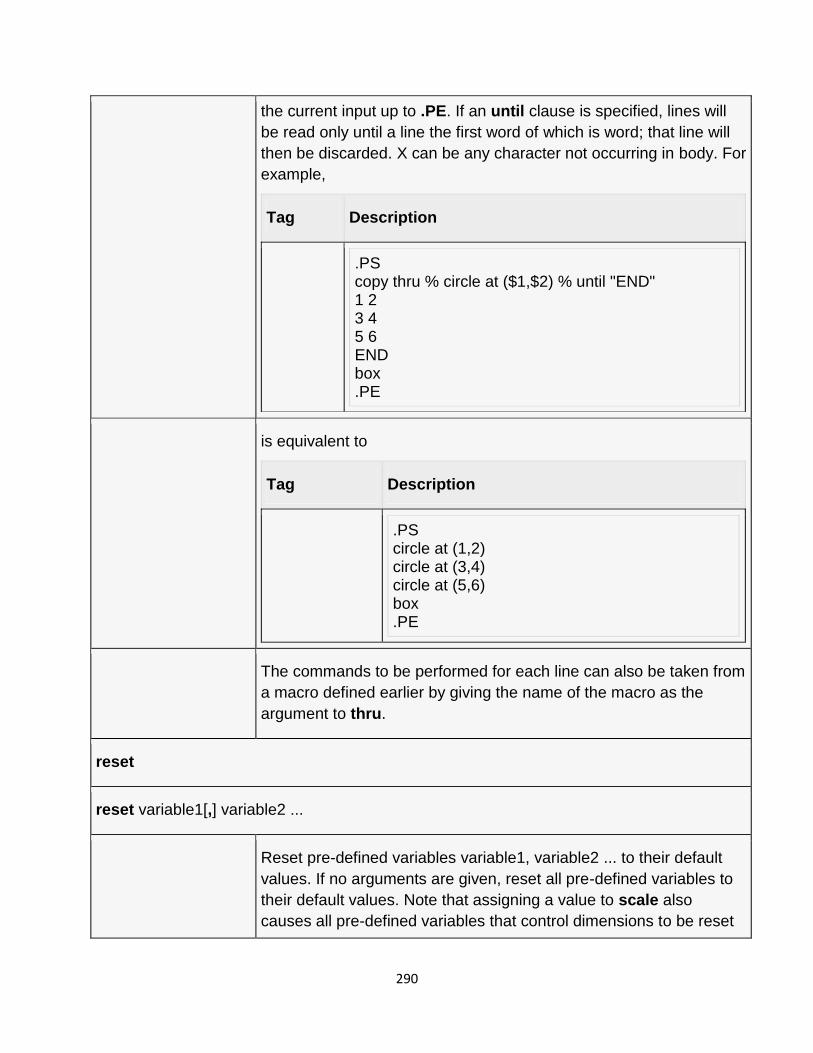
290
the current input up to .PE. If an until clause is specified, lines will
be read only until a line the first word of which is word; that line will
then be discarded. X can be any character not occurring in body. For
example,
Tag Description
.PS copy thru % circle at ($1,$2) % until "END" 1 2 3 4 5 6 END box .PE
is equivalent to
Tag Description
.PS circle at (1,2) circle at (3,4) circle at (5,6) box .PE
The commands to be performed for each line can also be taken from
a macro defined earlier by giving the name of the macro as the
argument to thru.
reset
reset variable1[,] variable2 ...
Reset pre-defined variables variable1, variable2 ... to their default
values. If no arguments are given, reset all pre-defined variables to
their default values. Note that assigning a value to scale also
causes all pre-defined variables that control dimensions to be reset
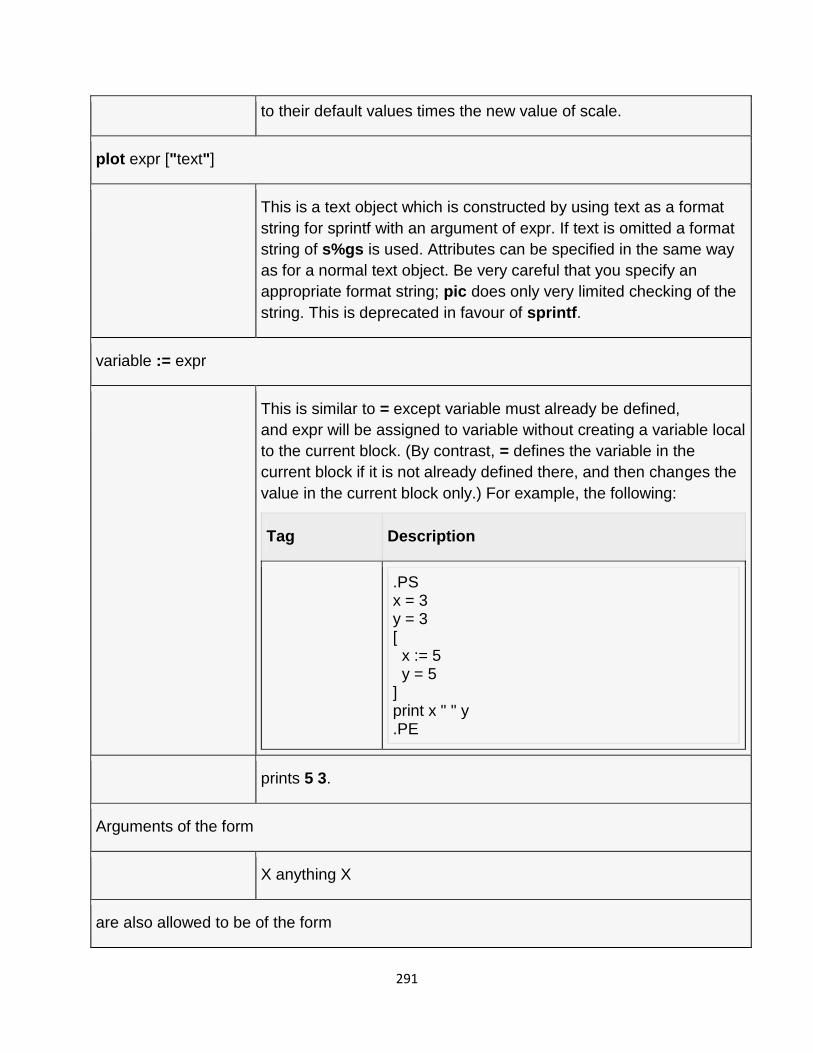
291
to their default values times the new value of scale.
plot expr ["text"]
This is a text object which is constructed by using text as a format
string for sprintf with an argument of expr. If text is omitted a format
string of s%gs is used. Attributes can be specified in the same way
as for a normal text object. Be very careful that you specify an
appropriate format string; pic does only very limited checking of the
string. This is deprecated in favour of sprintf.
variable := expr
This is similar to = except variable must already be defined,
and expr will be assigned to variable without creating a variable local
to the current block. (By contrast, = defines the variable in the
current block if it is not already defined there, and then changes the
value in the current block only.) For example, the following:
Tag Description
.PS x = 3 y = 3 [ x := 5 y = 5 ] print x " " y .PE
prints 5 3.
Arguments of the form
X anything X
are also allowed to be of the form
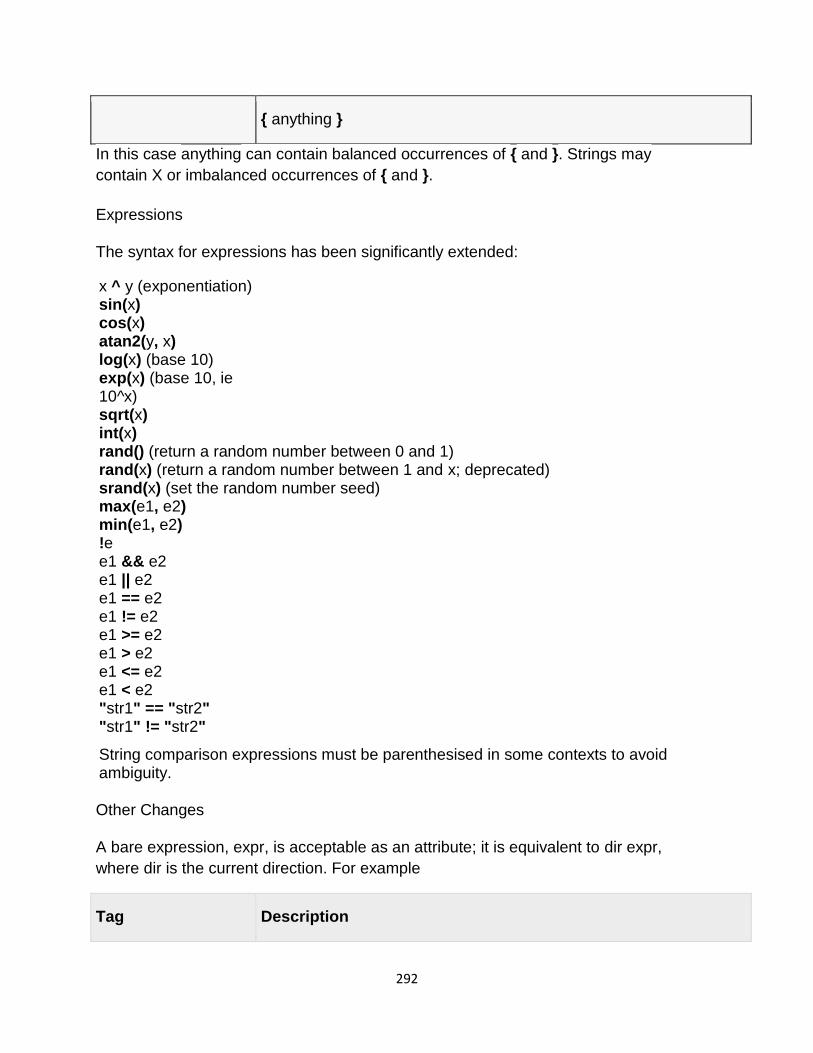
292
{ anything }
In this case anything can contain balanced occurrences of { and }. Strings may
contain X or imbalanced occurrences of { and }.
Expressions
The syntax for expressions has been significantly extended:
x ^ y (exponentiation) sin(x) cos(x) atan2(y, x) log(x) (base 10) exp(x) (base 10, ie 10^x) sqrt(x) int(x) rand() (return a random number between 0 and 1) rand(x) (return a random number between 1 and x; deprecated) srand(x) (set the random number seed) max(e1, e2) min(e1, e2) !e e1 && e2 e1 || e2 e1 == e2 e1 != e2 e1 >= e2 e1 > e2 e1 <= e2 e1 < e2 "str1" == "str2" "str1" != "str2"
String comparison expressions must be parenthesised in some contexts to avoid ambiguity.
Other Changes
A bare expression, expr, is acceptable as an attribute; it is equivalent to dir expr,
where dir is the current direction. For example
Tag Description
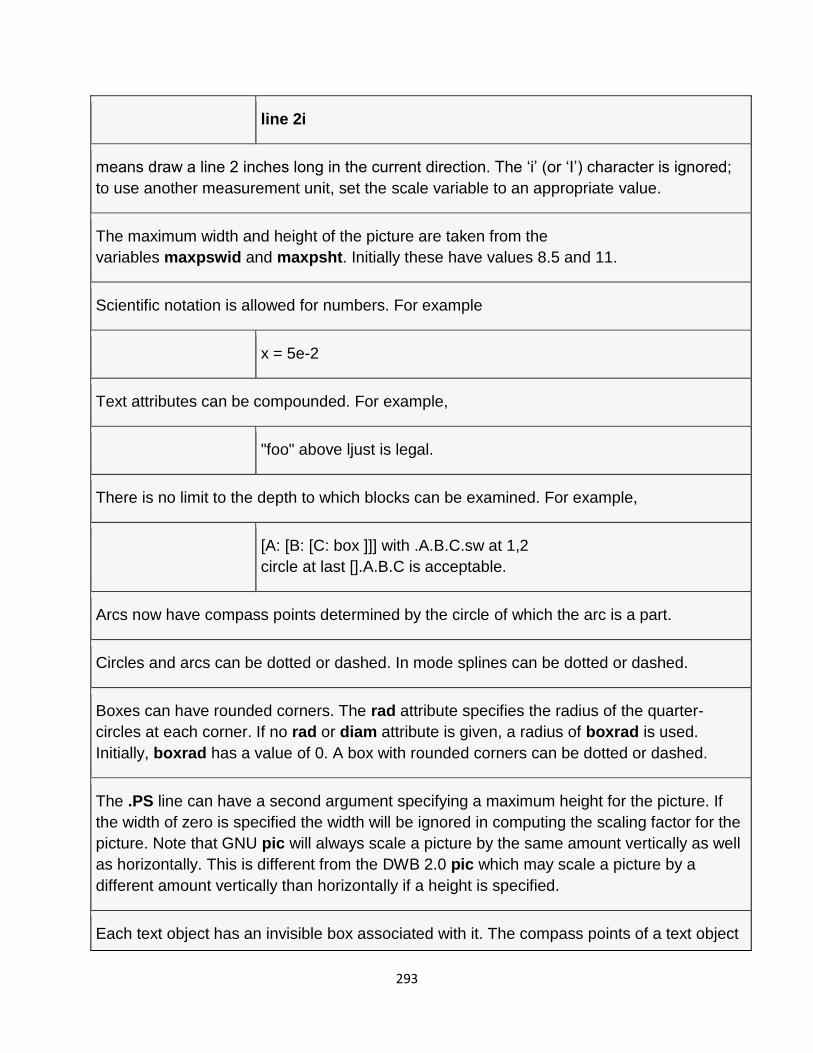
293
line 2i
means draw a line 2 inches long in the current direction. The ‗i‘ (or ‗I‘) character is ignored;
to use another measurement unit, set the scale variable to an appropriate value.
The maximum width and height of the picture are taken from the
variables maxpswid and maxpsht. Initially these have values 8.5 and 11.
Scientific notation is allowed for numbers. For example
x = 5e-2
Text attributes can be compounded. For example,
"foo" above ljust is legal.
There is no limit to the depth to which blocks can be examined. For example,
[A: [B: [C: box ]]] with .A.B.C.sw at 1,2
circle at last [].A.B.C is acceptable.
Arcs now have compass points determined by the circle of which the arc is a part.
Circles and arcs can be dotted or dashed. In mode splines can be dotted or dashed.
Boxes can have rounded corners. The rad attribute specifies the radius of the quarter-
circles at each corner. If no rad or diam attribute is given, a radius of boxrad is used.
Initially, boxrad has a value of 0. A box with rounded corners can be dotted or dashed.
The .PS line can have a second argument specifying a maximum height for the picture. If
the width of zero is specified the width will be ignored in computing the scaling factor for the
picture. Note that GNU pic will always scale a picture by the same amount vertically as well
as horizontally. This is different from the DWB 2.0 pic which may scale a picture by a
different amount vertically than horizontally if a height is specified.
Each text object has an invisible box associated with it. The compass points of a text object
294
are determined by this box. The implicit motion associated with the object is also
determined by this box. The dimensions of this box are taken from the width and height
attributes; if the width attribute is not supplied then the width will be taken to be textwid; if
the height attribute is not supplied then the height will be taken to be the number of text
strings associated with the object times textht. Initially textwid and textht have a value of
0.
In (almost all) places where a quoted text string can be used, an expression of the form
sprintf(sformats, arg,...)
can also be used; this will produce the arguments formatted according to format, which
should be a string as described in printf(3) appropriate for the number of arguments
supplied.
The thickness of the lines used to draw objects is controlled by the linethick variable. This
gives the thickness of lines in points. A negative value means use the default thickness: in
output mode, this means use a thickness of 8 milliinches; in output mode with the -c option,
this means use the line thickness specified by .ps lines; in troff output mode, this means use
a thickness proportional to the pointsize. A zero value means draw the thinnest possible line
supported by the output device. Initially it has a value of -1. There is also a thick[ness]
attribute. For example,
circle thickness 1.5
would draw a circle using a line with a thickness of 1.5 points. The thickness of lines is not
affected by the value of the scale variable, nor by the width or height given in the .PS line.
Boxes (including boxes with rounded corners), circles and ellipses can be filled by giving
them an attribute of fill[ed]. This takes an optional argument of an expression with a value
between 0 and 1; 0 will fill it with white, 1 with black, values in between with a proportionally
gray shade. A value greater than 1 can also be used: this means fill with the shade of gray
that is currently being used for text and lines. Normally this will be black, but output devices
may provide a mechanism for changing this. Without an argument, then the value of the
variable fillval will be used. Initially this has a value of 0.5. The invisible attribute does not
affect the filling of objects. Any text associated with a filled object will be added after the
object has been filled, so that the text will not be obscured by the filling.
295
Three additional modifiers are available to specify colored objects: outline[d] sets the color
of the outline, shaded the fill color, and colo[u]r[ed] sets both. All three keywords expect a
suffix specifying the color, for example
circle shaded green outline black
Currently, color support isn‘t available in mode. Predefined color names for groff are in the
device macro files, for example ps.tmac; additional colors can be defined with
the .defcolor request (see the manual page of troff(1) for more details).
pic assumes that at the beginning of a picture both glyph and fill color are set to the default
value.
Arrow heads will be drawn as solid triangles if the variable arrowhead is non-zero and
either mode is enabled or the -n option has not been given. Initially arrowhead has a value
of 1. Note that solid arrow heads are always filled with the current outline color.
The troff output of pic is device-independent. The -T option is therefore redundant. All
numbers are taken to be in inches; numbers are never interpreted to be in troff machine
units.
Objects can have an aligned attribute. This will only work if the postprocessor is grops. Any
text associated with an object having the aligned attribute will be rotated about the center of
the object so that it is aligned in the direction from the start point to the end point of the
object. Note that this attribute will have no effect for objects whose start and end points are
coincident.
In places where nth is allowed ‘expr’th is also allowed. Note that ’th is a single token: no
space is allowed between the ’ and the th. For example,
for i = 1 to 4 do { line from ‗i‘th box.nw to ‗i+1‘th box.se }
CONVERSION To obtain a stand-alone picture from a pic file, enclose your pic code
with .PS and .PE requests; roff configuration commands may be added at the
beginning of the file, but no roff text.
296
It is necessary to feed this file into groff without adding any page information, so you must check which .PS and .PE requests are actually called. For example, the mm macro package adds a page number, which is very annoying. At the moment, calling standard groff without any macro package works. Alternatively, you can define your own requests, e.g. to do nothing:
.de PS
..
.de PE
..
groff itself does not provide direct conversion into other graphics file formats. But there are lots of possibilities if you first transform your picture into PostScript® format using the groff option -Tps. Since this ps-file lacks BoundingBox information it is not very useful by itself, but it may be fed into other conversion programs, usually named ps2other or pstoother or the like. Moreover, the PostScript interpreter ghostscript (gs) has built-in graphics conversion devices that are called with the option
gs -sDEVICE=<devname>
Call gs --help
for a list of the available devices.
As the Encapsulated PostScript File Format EPS is getting more and more important, and the conversion wasn‘t regarded trivial in the past you might be interested to know that there is a conversion tool named ps2eps which does the right job. It is much better than the tool ps2epsi packaged with gs.
For bitmapped graphic formats, you should use pstopnm; the resulting (intermediate) PNM file can be then converted to virtually any graphics format using the tools of the netpbm package .
FILES
Tag Description
/usr/share/groff/1.18.1.1/tmac/pic.tmac Example definitions of
the PS and PE macros.
297
Debugger tools: Dbx, Adb, Sdb, Strip and Ctrace
Dbx
Provides an environment to debug and run programs under the operating system.
Syntax
dbx [ -a ProcessID ] [ -c CommandFile ] [ -d NestingDepth ] [ -I Directory ] [ -E DebugEnvironment ] [ -k ] [ -u ] [ -F ] [ -r ] [ -x ] [ ObjectFile [ CoreFile ] ]
Description
The dbx command provides a symbolic debug program for C, C++, Pascal, and FORTRAN programs, allowing you to carry out operations such as the following:
Examine object and core files. Provide a controlled environment for running a program. Set breakpoints at selected statements or run the program one line at a time. Debug using symbolic variables and display them in their correct format.
The ObjectFile parameter is an object (executable) file produced by a compiler. Use the -g (generate symbol table) flag when compiling your program to produce the information the dbx command needs.
Note: The -g flag of the cc command should be used when the object file is compiled. If
the -g flag is not used or if symbol references are removed from the xcoff file with
the strip command, the symbolic capabilities of the dbx command are limited.
If the -c flag is not specified, the dbx command checks for a .dbxinit file in the user's $HOME directory. It then checks for a .dbxinit file in the user's current directory. If a .dbxinit file exists in the current directory, that file overrides the .dbxinit file in the user's $HOME directory. If a .dbxinit file exists in the user's $HOME directory or current directory, that file's subcommands run at the beginning of the debug session. Use an editor to create a .dbxinit file.
If ObjectFile is not specified, then dbx asks for the name of the object file to be examined. The default is a.out. If the core file exists in the current directory or a CoreFile parameter is specified, then dbx reports the location where the program faulted. Variables, registers, and memory held in the core image may be examined until execution of ObjectFile begins. At that point the dbx debug program prompts for commands.
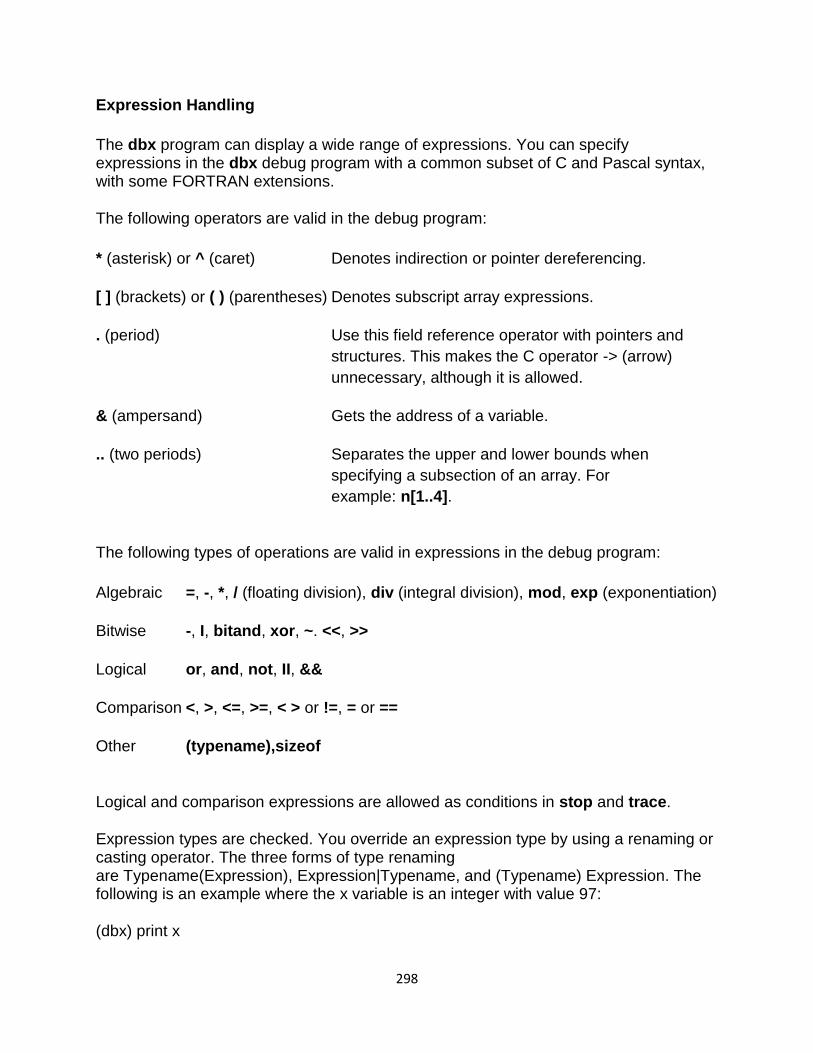
298
Expression Handling
The dbx program can display a wide range of expressions. You can specify expressions in the dbx debug program with a common subset of C and Pascal syntax, with some FORTRAN extensions.
The following operators are valid in the debug program:
* (asterisk) or ^ (caret) Denotes indirection or pointer dereferencing.
[ ] (brackets) or ( ) (parentheses) Denotes subscript array expressions.
. (period) Use this field reference operator with pointers and
structures. This makes the C operator -> (arrow)
unnecessary, although it is allowed.
& (ampersand) Gets the address of a variable.
.. (two periods) Separates the upper and lower bounds when
specifying a subsection of an array. For
example: n[1..4].
The following types of operations are valid in expressions in the debug program:
Algebraic =, -, *, / (floating division), div (integral division), mod, exp (exponentiation)
Bitwise -, I, bitand, xor, ~. <<, >>
Logical or, and, not, II, &&
Comparison <, >, <=, >=, < > or !=, = or ==
Other (typename),sizeof
Logical and comparison expressions are allowed as conditions in stop and trace.
Expression types are checked. You override an expression type by using a renaming or casting operator. The three forms of type renaming are Typename(Expression), Expression|Typename, and (Typename) Expression. The following is an example where the x variable is an integer with value 97:
(dbx) print x
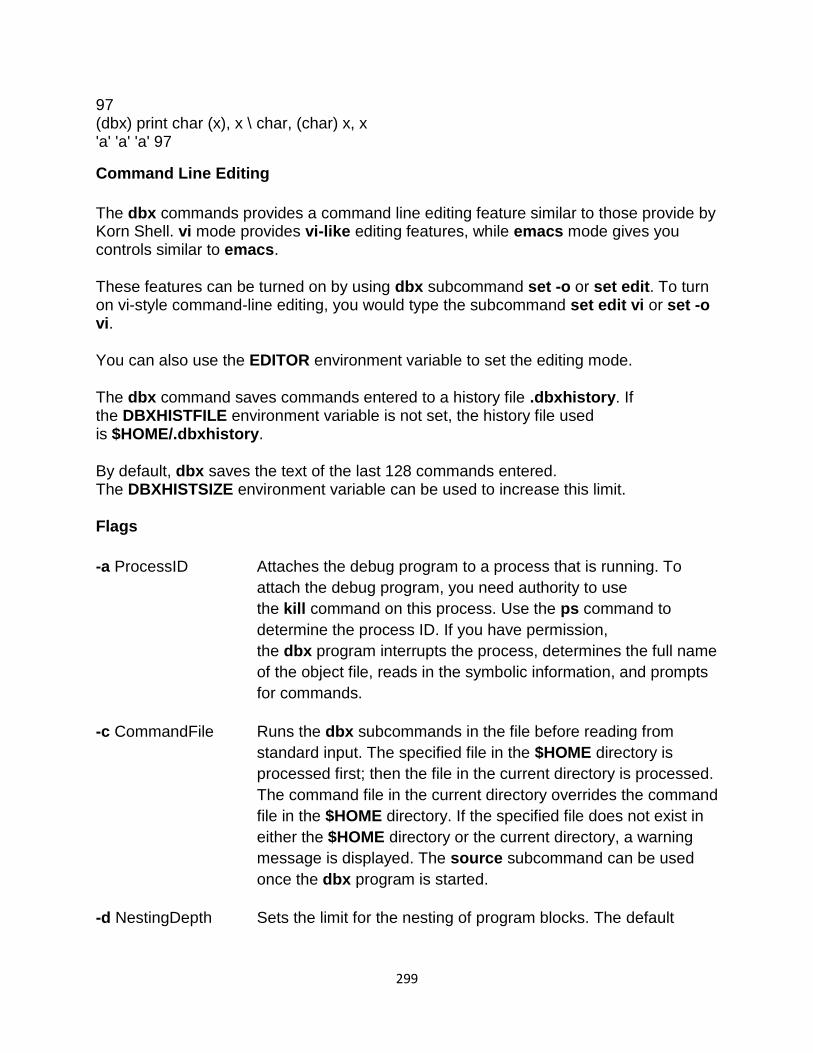
299
97 (dbx) print char (x), x \ char, (char) x, x 'a' 'a' 'a' 97
Command Line Editing
The dbx commands provides a command line editing feature similar to those provide by Korn Shell. vi mode provides vi-like editing features, while emacs mode gives you controls similar to emacs.
These features can be turned on by using dbx subcommand set -o or set edit. To turn on vi-style command-line editing, you would type the subcommand set edit vi or set -o vi.
You can also use the EDITOR environment variable to set the editing mode.
The dbx command saves commands entered to a history file .dbxhistory. If the DBXHISTFILE environment variable is not set, the history file used is $HOME/.dbxhistory.
By default, dbx saves the text of the last 128 commands entered. The DBXHISTSIZE environment variable can be used to increase this limit.
Flags
-a ProcessID Attaches the debug program to a process that is running. To
attach the debug program, you need authority to use
the kill command on this process. Use the ps command to
determine the process ID. If you have permission,
the dbx program interrupts the process, determines the full name
of the object file, reads in the symbolic information, and prompts
for commands.
-c CommandFile Runs the dbx subcommands in the file before reading from
standard input. The specified file in the $HOME directory is
processed first; then the file in the current directory is processed.
The command file in the current directory overrides the command
file in the $HOME directory. If the specified file does not exist in
either the $HOME directory or the current directory, a warning
message is displayed. The source subcommand can be used
once the dbx program is started.
-d NestingDepth Sets the limit for the nesting of program blocks. The default
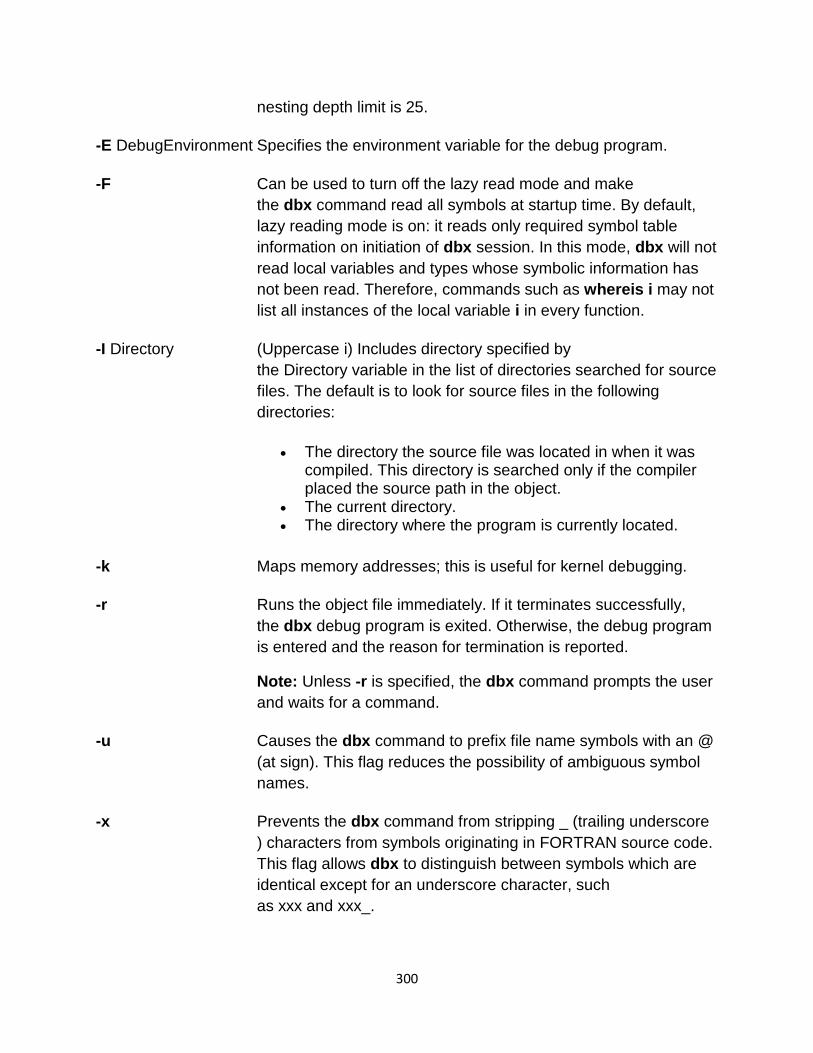
300
nesting depth limit is 25.
-E DebugEnvironment Specifies the environment variable for the debug program.
-F Can be used to turn off the lazy read mode and make
the dbx command read all symbols at startup time. By default,
lazy reading mode is on: it reads only required symbol table
information on initiation of dbx session. In this mode, dbx will not
read local variables and types whose symbolic information has
not been read. Therefore, commands such as whereis i may not
list all instances of the local variable i in every function.
-I Directory (Uppercase i) Includes directory specified by
the Directory variable in the list of directories searched for source
files. The default is to look for source files in the following
directories:
The directory the source file was located in when it was compiled. This directory is searched only if the compiler placed the source path in the object.
The current directory. The directory where the program is currently located.
-k Maps memory addresses; this is useful for kernel debugging.
-r Runs the object file immediately. If it terminates successfully,
the dbx debug program is exited. Otherwise, the debug program
is entered and the reason for termination is reported.
Note: Unless -r is specified, the dbx command prompts the user
and waits for a command.
-u Causes the dbx command to prefix file name symbols with an @
(at sign). This flag reduces the possibility of ambiguous symbol
names.
-x Prevents the dbx command from stripping _ (trailing underscore
) characters from symbols originating in FORTRAN source code.
This flag allows dbx to distinguish between symbols which are
identical except for an underscore character, such
as xxx and xxx_.
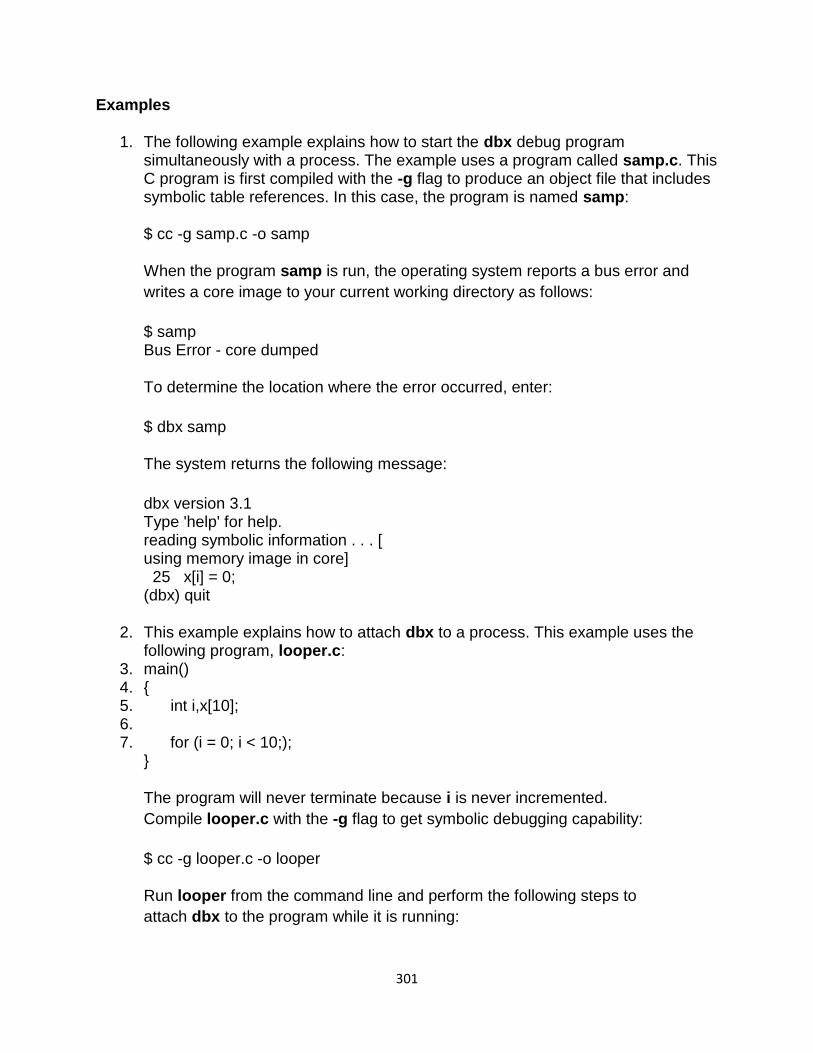
301
Examples
1. The following example explains how to start the dbx debug program simultaneously with a process. The example uses a program called samp.c. This C program is first compiled with the -g flag to produce an object file that includes symbolic table references. In this case, the program is named samp:
$ cc -g samp.c -o samp
When the program samp is run, the operating system reports a bus error and
writes a core image to your current working directory as follows:
$ samp Bus Error - core dumped
To determine the location where the error occurred, enter:
$ dbx samp
The system returns the following message:
dbx version 3.1 Type 'help' for help. reading symbolic information . . . [ using memory image in core] 25 x[i] = 0; (dbx) quit
2. This example explains how to attach dbx to a process. This example uses the following program, looper.c:
3. main() 4. { 5. int i,x[10]; 6. 7. for (i = 0; i < 10;);
}
The program will never terminate because i is never incremented.
Compile looper.c with the -g flag to get symbolic debugging capability:
$ cc -g looper.c -o looper
Run looper from the command line and perform the following steps to
attach dbx to the program while it is running:
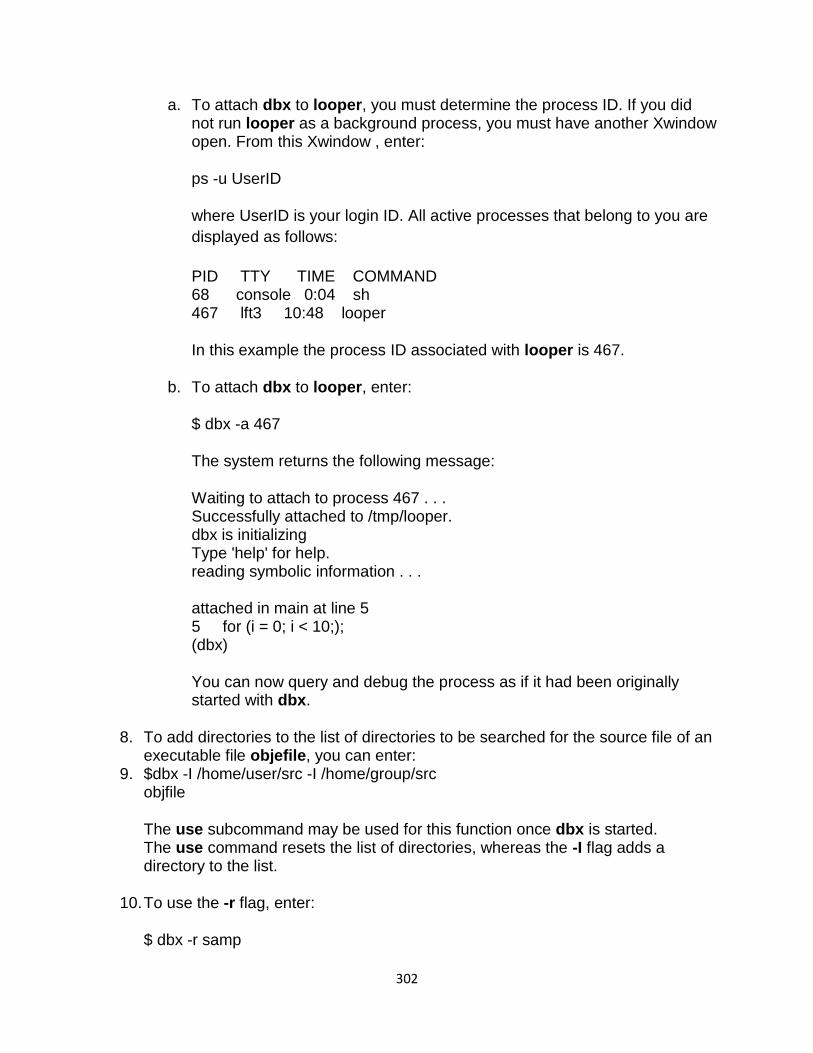
302
a. To attach dbx to looper, you must determine the process ID. If you did not run looper as a background process, you must have another Xwindow open. From this Xwindow , enter:
ps -u UserID
where UserID is your login ID. All active processes that belong to you are
displayed as follows:
PID TTY TIME COMMAND 68 console 0:04 sh 467 lft3 10:48 looper
In this example the process ID associated with looper is 467.
b. To attach dbx to looper, enter:
$ dbx -a 467
The system returns the following message:
Waiting to attach to process 467 . . . Successfully attached to /tmp/looper. dbx is initializing Type 'help' for help. reading symbolic information . . . attached in main at line 5 5 for (i = 0; i < 10;); (dbx)
You can now query and debug the process as if it had been originally started with dbx.
8. To add directories to the list of directories to be searched for the source file of an executable file objefile, you can enter:
9. $dbx -I /home/user/src -I /home/group/src objfile
The use subcommand may be used for this function once dbx is started. The use command resets the list of directories, whereas the -I flag adds a directory to the list.
10. To use the -r flag, enter:
$ dbx -r samp
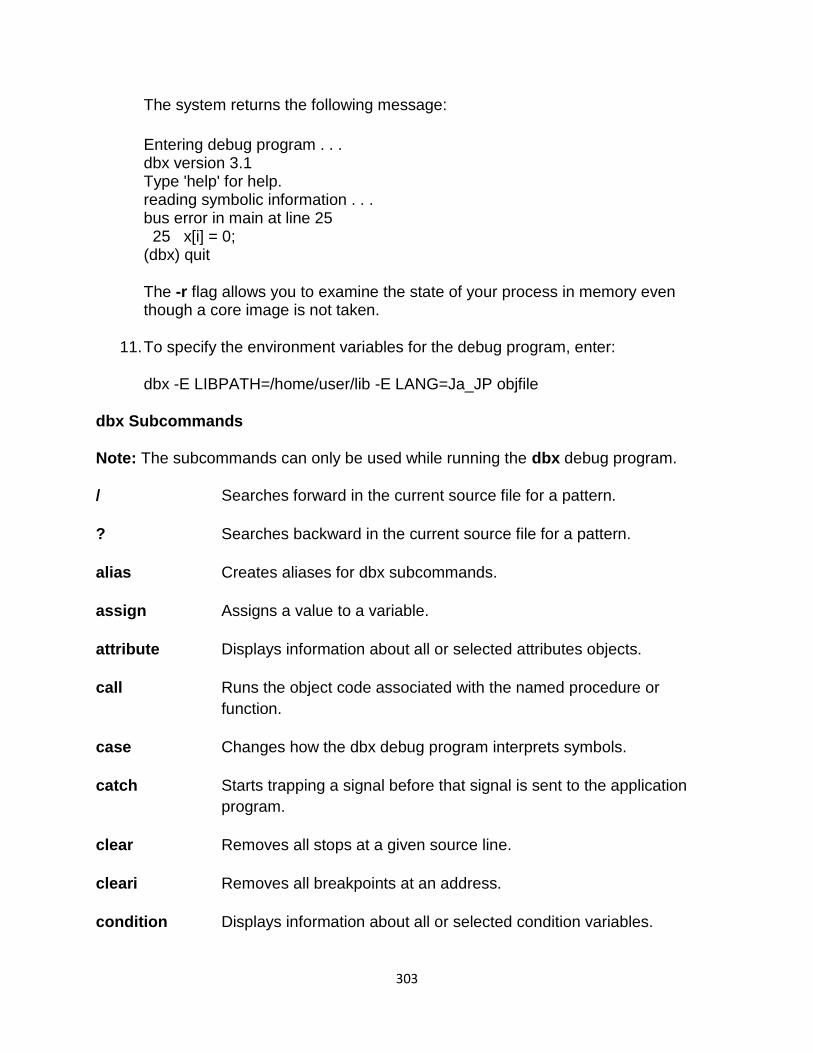
303
The system returns the following message:
Entering debug program . . . dbx version 3.1 Type 'help' for help. reading symbolic information . . . bus error in main at line 25 25 x[i] = 0; (dbx) quit
The -r flag allows you to examine the state of your process in memory even though a core image is not taken.
11. To specify the environment variables for the debug program, enter:
dbx -E LIBPATH=/home/user/lib -E LANG=Ja_JP objfile
dbx Subcommands
Note: The subcommands can only be used while running the dbx debug program.
/ Searches forward in the current source file for a pattern.
? Searches backward in the current source file for a pattern.
alias Creates aliases for dbx subcommands.
assign Assigns a value to a variable.
attribute Displays information about all or selected attributes objects.
call Runs the object code associated with the named procedure or
function.
case Changes how the dbx debug program interprets symbols.
catch Starts trapping a signal before that signal is sent to the application
program.
clear Removes all stops at a given source line.
cleari Removes all breakpoints at an address.
condition Displays information about all or selected condition variables.
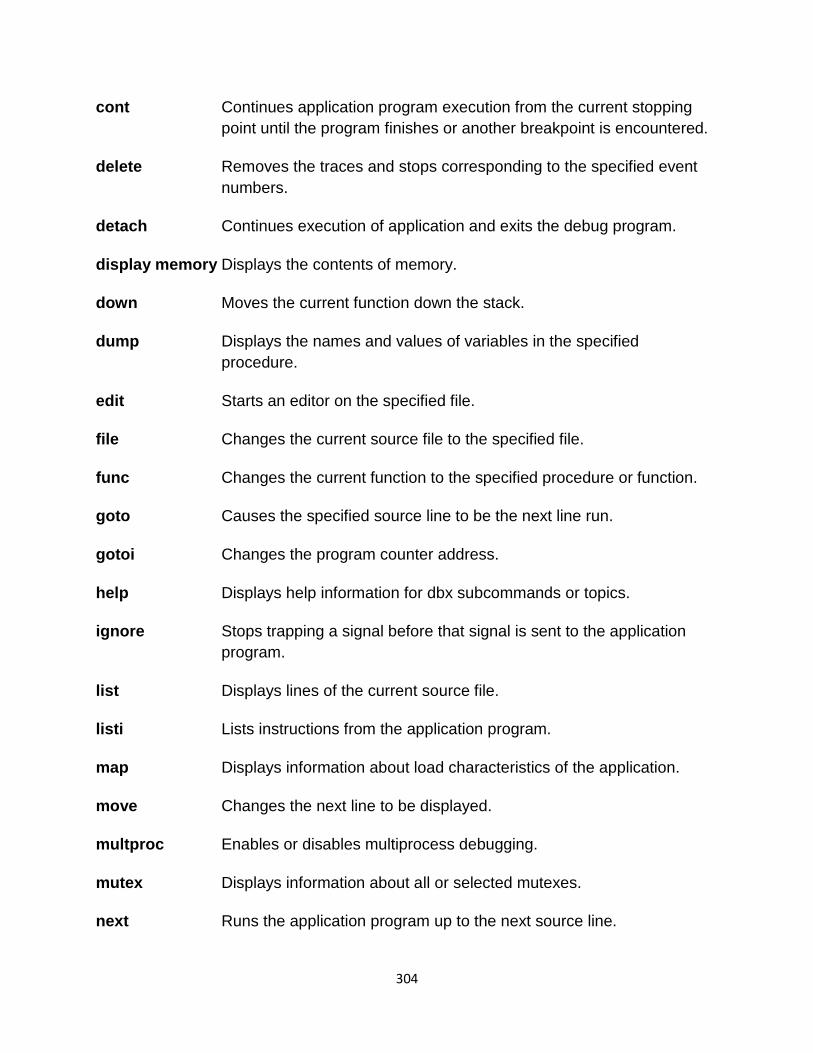
304
cont Continues application program execution from the current stopping
point until the program finishes or another breakpoint is encountered.
delete Removes the traces and stops corresponding to the specified event
numbers.
detach Continues execution of application and exits the debug program.
display memory Displays the contents of memory.
down Moves the current function down the stack.
dump Displays the names and values of variables in the specified
procedure.
edit Starts an editor on the specified file.
file Changes the current source file to the specified file.
func Changes the current function to the specified procedure or function.
goto Causes the specified source line to be the next line run.
gotoi Changes the program counter address.
help Displays help information for dbx subcommands or topics.
ignore Stops trapping a signal before that signal is sent to the application
program.
list Displays lines of the current source file.
listi Lists instructions from the application program.
map Displays information about load characteristics of the application.
move Changes the next line to be displayed.
multproc Enables or disables multiprocess debugging.
mutex Displays information about all or selected mutexes.
next Runs the application program up to the next source line.
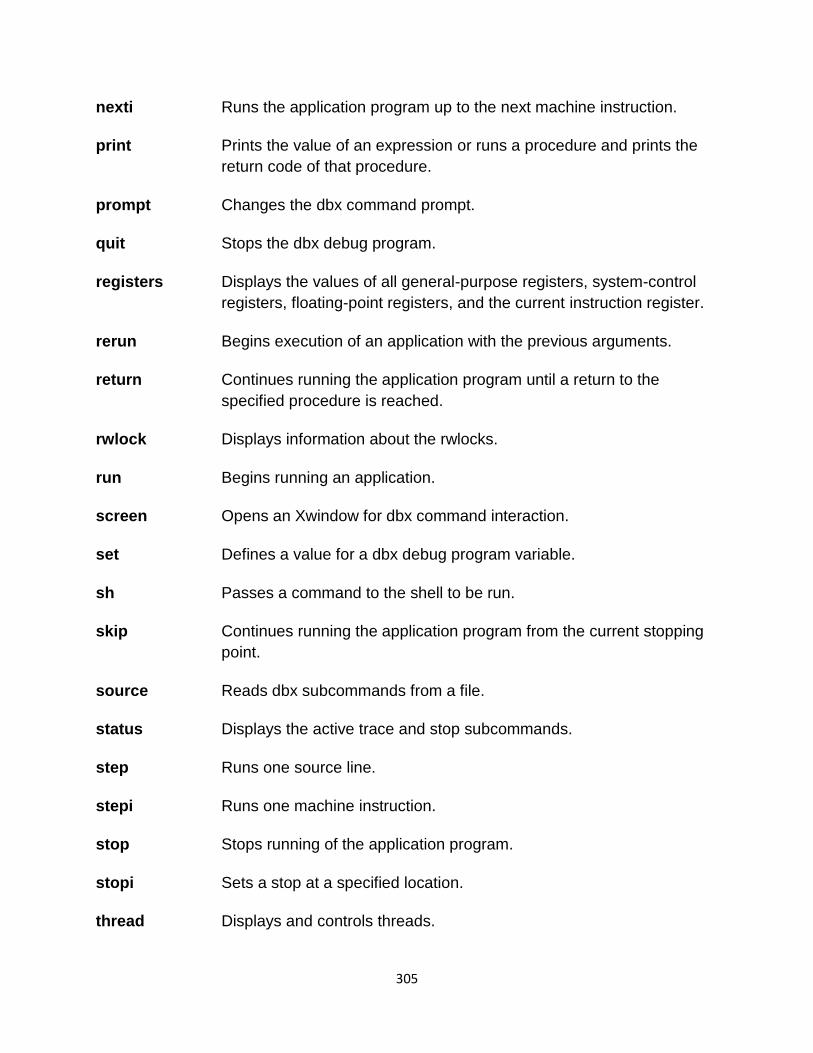
305
nexti Runs the application program up to the next machine instruction.
print Prints the value of an expression or runs a procedure and prints the
return code of that procedure.
prompt Changes the dbx command prompt.
quit Stops the dbx debug program.
registers Displays the values of all general-purpose registers, system-control
registers, floating-point registers, and the current instruction register.
rerun Begins execution of an application with the previous arguments.
return Continues running the application program until a return to the
specified procedure is reached.
rwlock Displays information about the rwlocks.
run Begins running an application.
screen Opens an Xwindow for dbx command interaction.
set Defines a value for a dbx debug program variable.
sh Passes a command to the shell to be run.
skip Continues running the application program from the current stopping
point.
source Reads dbx subcommands from a file.
status Displays the active trace and stop subcommands.
step Runs one source line.
stepi Runs one machine instruction.
stop Stops running of the application program.
stopi Sets a stop at a specified location.
thread Displays and controls threads.
306
trace Prints tracing information.
tracei Turns on tracing.
unalias Removes an alias.
unset Deletes a variable.
up Moves the current function up the stack.
use Sets the list of directories to be searched when looking for source
files.
whatis Displays the declaration of application program components.
where Displays a list of active procedures and functions.
whereis Displays the full qualifications of all the symbols whose names match
the specified identifier.
which Displays the full qualification of the given identifier.
/ Subcommand
/ [ RegularExpression [ / ] ]
The / subcommand searches forward in the current source file for the pattern specified by the RegularExpression parameter. Entering the / subcommand with no arguments causes dbx to search forward for the previous regular expression. The search wraps around the end of the file.
Examples
1. To search forward in the current source file for the number 12, enter:
/ 12
2. To repeat the previous search, enter:
/
See the ? (search) subcommand and the regcmp subroutine.
307
? Subcommand
? [ RegularExpression [ ? ] ]
The ? subcommand searches backward in the current source file for the pattern specified by the RegularExpression parameter. Entering the ? subcommand with no arguments causes the dbx command to search backwards for the previous regular expression. The search wraps around the end of the file.
Examples
1. To search backward in the current source file for the letter z, enter:
?z
2. To repeat the previous search, enter:
?
See the / (search) subcommand and the regcmp subroutine.
alias Subcommand
alias [ Name [ [ (Arglist) ] String | Subcommand ] ]
The alias subcommand creates aliases for dbx subcommands. The Name parameter is the alias being created. The String parameter is a series of dbx subcommands that, after the execution of this subcommand, can be referred to by Name. If the alias subcommand is used without parameters, it displays all current aliases.
Examples
1. To substitute rr for rerun, enter:
alias rr rerun
2. To run the two subcommands print n and step whenever printandstep is typed at the command line, enter:
alias printandstep "print n; step"
3. The alias subcommand can also be used as a limited macro facility. For example:
4. (dbx) alias px(n) "set $hexints; print n; unset $hexints" 5. (dbx) alias a(x,y) "print symname[x]->symvalue._n_n.name.Id[y]" 6. (dbx) px(126)
308
0x7e
In this example, the alias px prints a value in hexadecimal without permanently affecting the debugging environment.
assign Subcommand
assign Variable=Expression
The assign subcommand assigns the value specified by the Expression parameter to the variable specified by the Variable parameter.
Examples
1. To assign a value of 5 to the x variable, enter:
assign x = 5
2. To assign the value of the y variable to the x variable, enter:
assign x = y
3. To assign the character value 'z' to the z variable, enter:
assign z = 'z'
4. To assign the boolean value false to the logical type variable B, enter:
assign B = false
5. To assign the "Hello World" string to a character pointer Y, enter:
assign Y = "Hello World"
6. To disable type checking, set the dbx debug program variable $unsafeassign by entering:
set $unsafeassign
See Displaying and Modifying Variables.
attribute Subcommand
attribute [ AttributeNumber ... ]
309
The attribute subcommand displays information about the user thread, mutex, or condition attributes objects defined by the AttributeNumber parameters. If no parameters are specified, all attributes objects are listed.
For each attributes object listed, the following information is displayed:
attr Indicates the symbolic name of the attributes object, in the
form $aAttributeNumber.
obj_addr Indicates the address of the attributes object.
type Indicates the type of the attributes object; this can be thr, mutex, or cond for
user threads, mutexes, and condition variables respectively.
state Indicates the state of the attributes object. This can be valid or inval.
stack Indicates the stacksize attribute of a thread attributes object.
scope Indicates the scope attribute of a thread attributes object. This determines the
contention scope of the thread, and defines the set of threads with which it
must contend for processing resources. The value can be sys or pro for
system or process contention scope.
prio Indicates the priority attribute of a thread attributes object.
sched Indicates the schedpolicy attribute of a thread attributes object. This attribute
controls scheduling policy, and can be fifo , rr (round robin), or other.
p-shar Indicates the process-shared attribute of a mutex or condition attribute object.
A mutex or condition is process-shared if it can be accessed by threads
belonging to different processes. The value can be yes or no.
protocol Indicates the protocol attribute of a mutex. This attribute determines the effect
of holding the mutex on a thread's priority. The value can be no_prio, prio,
or protect.
Adb
Adb is something that many Android enthusiasts use, but its full potential is often
overlooked. ADB stands for ―Android Debug Bridge,‖ and it is a command line tool that
is used to communicate with a smartphone, tablet, smartwatch, set-top box, or any
other device that can run the Android operating system (even an emulator). Specific
310
commands are built into the ADB binary and while some of them work on their own,
most are commands we send to the connected device.
ADB allows you to do things on an Android device that may not be suitable for everyday
use, yet can greatly benefit your user or developer experience. For example, you can
install apps outside of the Play Store, debug apps, access hidden features, and bring up
a Unix shell so you can issue commands directly on the device. So for security reasons,
Developer Options need to be unlocked and you need to have USB Debugging Mode
enabled as well. Not only that, but you also need to authorize USB Debugging access to
the specific PC that you‘re connected to with a USB cable.
What is ADB?
Since ADB is a client-server program, there are three components that make up the
entire process. First, we have what Google calls the Client, the computer you have
connected to your Android device. It‘s from this computer that we are sending
commands to our device through the USB cable (and wirelessly as well in some cases).
Next up is the daemon (also known as adbd), and this is a service that is currently
running on both the computer as well as the Android device and allows the latter to
accept and execute commands.
The last of the three components of ADB is called the Server and this is a piece of
software that actually manages the communication between the client and the daemon.
So after you type in an ADB command in a command prompt, PowerShell, or a terminal,
it‘s the server that is running as a background process on your computer that sends this
command to the daemon. All three components work together to give you this type of
access to your smartphone, tablet, smartwatch, and more.
How Does ADB Work?
Because there are three pieces that makeup ADB (the Client, Daemon, and the Server),
this requires certain pieces to be up and running in the first place. So if you have freshly
booted the computer (and you don‘t have it setup to start the daemon on boot), then you
will need it to be running before any communication can be sent to the Android device.
You‘ll see this the following message in the command prompt or terminal, as it will
check to make sure the daemon is running.
If the daemon isn‘t running, then it will start the process and tell you which local TCP
port it has been started on. Once that ADB service has been started, it will continue to
listen to that specific port for commands that have been sent by the ADB client. It will
then set up connections to all running devices which are attached to the computer

311
(including emulators). This is the moment where you‘ll receive the authorization request
on the Android device if the computer hasn‘t been authorized in the past.
Sdb
The Smart Development Bridge (SDB) is a device management tool included in the Tizen SDK:
The SDB manages multiple device connections. You can list connected devices and send a command to a specific device with a serial number that is created by the SDB.
The SDB supplies basic commands for application development, such as file transfer, remote shell command, port forwarding for a debugger, viewing, filtering, and controlling device log output.
The SDB also includes the Emulator.
To use the SDB:
1. To use the SDB in a target device, set the device to the SDB mode by going to Settings > More system settings > Developer options > USB debugging in the device menu.
2. Run the SDB with a shell using the following command:
$ sdb [option] <command> [parameters]
Where [option] can be:
o -d: Directs the command to the only connected USB device and return an error if more than one USB device is present.
o -e: Direct the command to the only running Emulator and return an error if more than one Emulator is present.
o -s <serial number>: Direct the command to the USB device or Emulator with the defined serial number.
If multiple Emulator or device instances are running, you need to specify a target instance in the SDB command.
o devices: List all connected devices.
Before issuing SDB commands, it is helpful to know which Emulator or device instances are connected to the SDB server. In response to this command option, the SDB prints the serial number (a string created by the SDB to uniquely identify an Emulator or device instance) and connection status for each connected device. The connection status can be offline
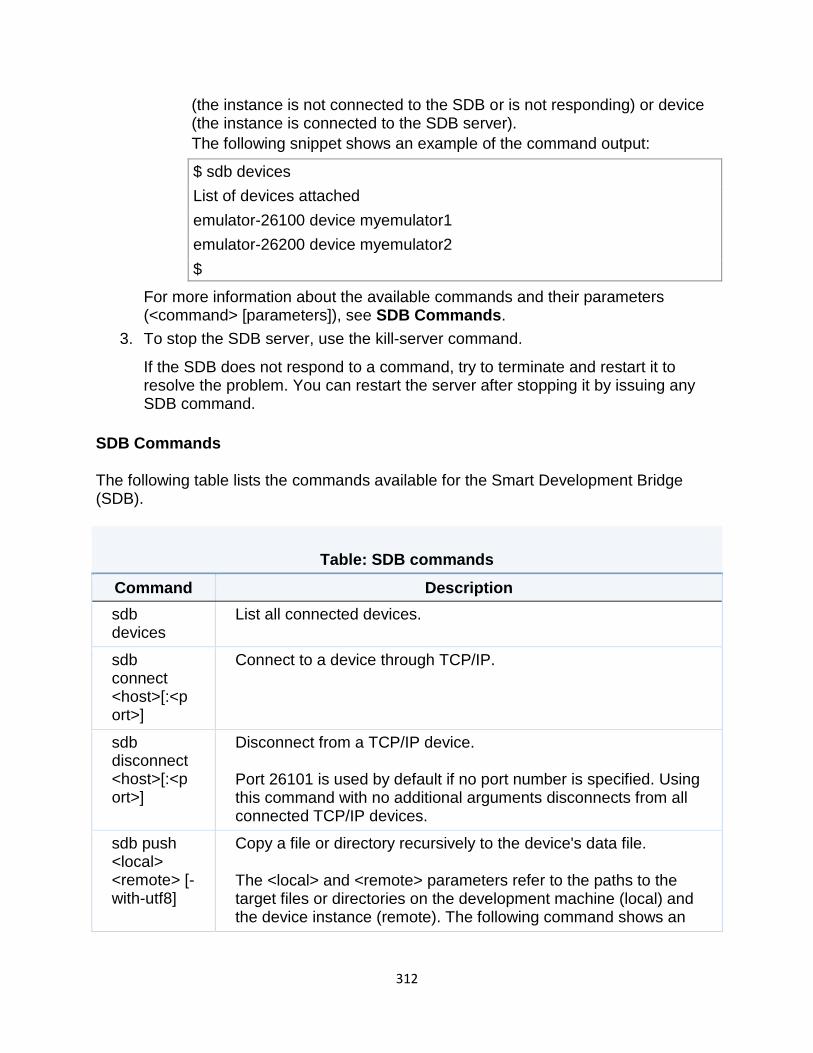
312
(the instance is not connected to the SDB or is not responding) or device (the instance is connected to the SDB server).
The following snippet shows an example of the command output:
$ sdb devices
List of devices attached
emulator-26100 device myemulator1
emulator-26200 device myemulator2
$
For more information about the available commands and their parameters (<command> [parameters]), see SDB Commands.
3. To stop the SDB server, use the kill-server command.
If the SDB does not respond to a command, try to terminate and restart it to resolve the problem. You can restart the server after stopping it by issuing any SDB command.
SDB Commands
The following table lists the commands available for the Smart Development Bridge (SDB).
Table: SDB commands
Command Description
sdb devices
List all connected devices.
sdb connect <host>[:<port>]
Connect to a device through TCP/IP.
sdb disconnect <host>[:<port>]
Disconnect from a TCP/IP device.
Port 26101 is used by default if no port number is specified. Using this command with no additional arguments disconnects from all connected TCP/IP devices.
sdb push <local> <remote> [-with-utf8]
Copy a file or directory recursively to the device's data file.
The <local> and <remote> parameters refer to the paths to the target files or directories on the development machine (local) and the device instance (remote). The following command shows an
313
example:
The [-with-utf8] parameter creates the remote file with the UTF-8 character encoding.
$ sdb push data.txt /opt/apps/org.tizen.hellotizen/data/data.txt
sdb pull <remote> [<local>]
Copy a file or directory recursively from the device's data file.
The <remote> and <local> parameters refer to the paths to the target files or directories on the device instance (remote) and the development machine (local). The following command shows an example:
$ sdb pull /opt/apps/org.tizen.hellotizen/data/data.txt data.txt
sdb shell Run a remote shell interactively by dropping into a remote shell on an Emulator or device instance.
To exit the remote shell, press Ctrl+D or use the exit command to end the shell session.
sdb shell <command>
Run a remote shell command without entering the SDB remote shell on the device. The following commands are available:
ls, rm, mv, cd, mkdir, cp, touch, echo, tar, grep, cat, chmod, rpm, find, uname, netstat, and killall
sdb dlog [option] [<filter-spec>]
View and follow the content of the device log buffers.
To view the log output in your development computer or from a remote SDB shell, use the sdb dlog or dlogutil command, respectively.
The [<filter-spec>] parameter defines the tag of interest (the system component from which the message originates) and the minimum level of priority to report for that tag. The format is tag:priority, and multiple filters must be separated with a space. The available priorities (from lowest to highest) are V (Verbose), D (Debug), I (Info), W (Warning), E (Error), and F (Fatal).
For example, to view all log messages of the info priority in addition to the MyApp tag messages of the debug priority, use the following command:
314
$ sdb dlog MyApp:D *:E
For more information about the command options, see Controlling Log Output.
sdb install <path_to_tpk>
Push the tpk package file to the device and install it.
The <path_to_tpk> parameter defines to the path to the tpk file. The following command shows an example:
$ sdb install /home/tizen/ko983dw33q-1.0.0-i386.tpk
sdb uninstall <appid>
Uninstall the application from the device.
The <appid> parameter defines the application ID of the application. The following command shows an example:
$ sdb uninstall ko983dw33q
sdb forward <local> <remote>
Set up arbitrary port forwarding of requests from a specific host port to a different port on a device instance.
The format for the <local> and <remote> parameters is tcp:<port>. The following example shows how to forward requests from host port 26102 to device port 9999:
$ sdb forward tcp:26102 tcp:9999
After setting up port forwarding, development tools between the device and host can work remotely. For example, gdb in a host/gdbserver in a device, and gdbserver in a device open with the tcp:9999 port:
$ sdb shell gdbserver:9999 hellotizen
gdb in a host connects to localhost:26102
$ gdb hellotizen ... (gdb) target remote localhost:26102
sdb help Show the help message.
sdb version Show the version number.
sdb start-server
Start the server if it is not running.
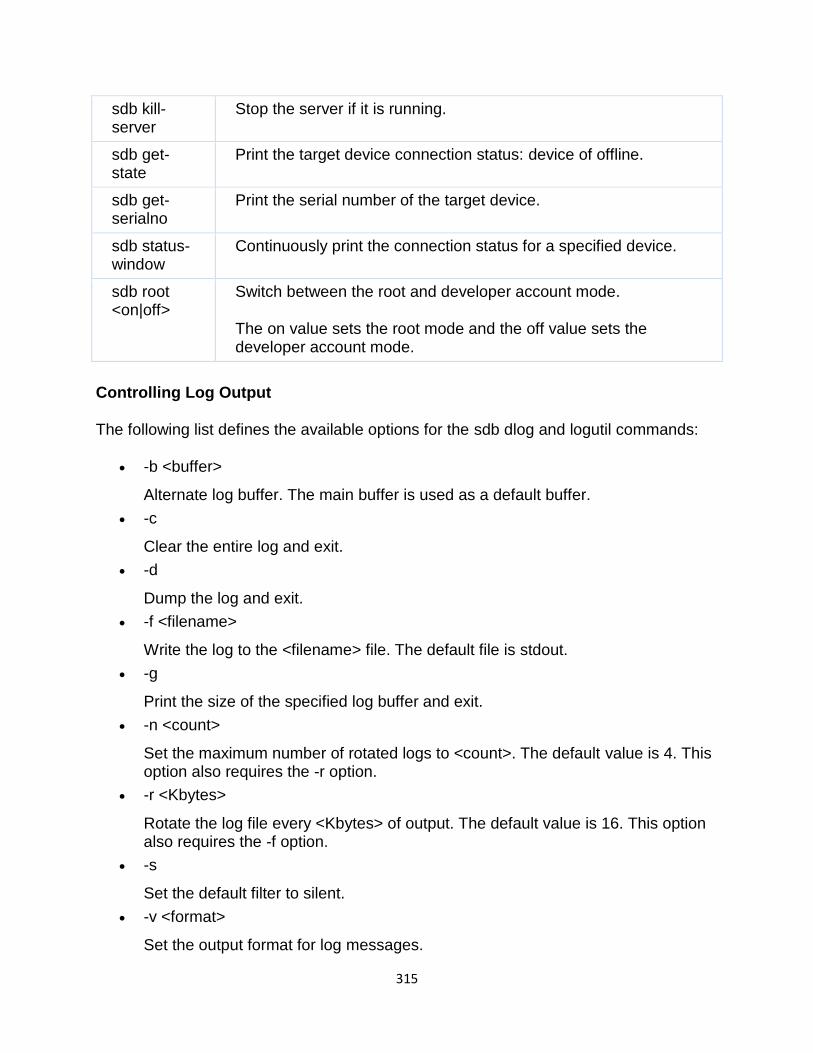
315
sdb kill-server
Stop the server if it is running.
sdb get-state
Print the target device connection status: device of offline.
sdb get-serialno
Print the serial number of the target device.
sdb status-window
Continuously print the connection status for a specified device.
sdb root <on|off>
Switch between the root and developer account mode.
The on value sets the root mode and the off value sets the developer account mode.
Controlling Log Output
The following list defines the available options for the sdb dlog and logutil commands:
-b <buffer>
Alternate log buffer. The main buffer is used as a default buffer.
-c
Clear the entire log and exit.
-d
Dump the log and exit.
-f <filename>
Write the log to the <filename> file. The default file is stdout.
-g
Print the size of the specified log buffer and exit.
-n <count>
Set the maximum number of rotated logs to <count>. The default value is 4. This option also requires the -r option.
-r <Kbytes>
Rotate the log file every <Kbytes> of output. The default value is 16. This option also requires the -f option.
-s
Set the default filter to silent.
-v <format>
Set the output format for log messages.
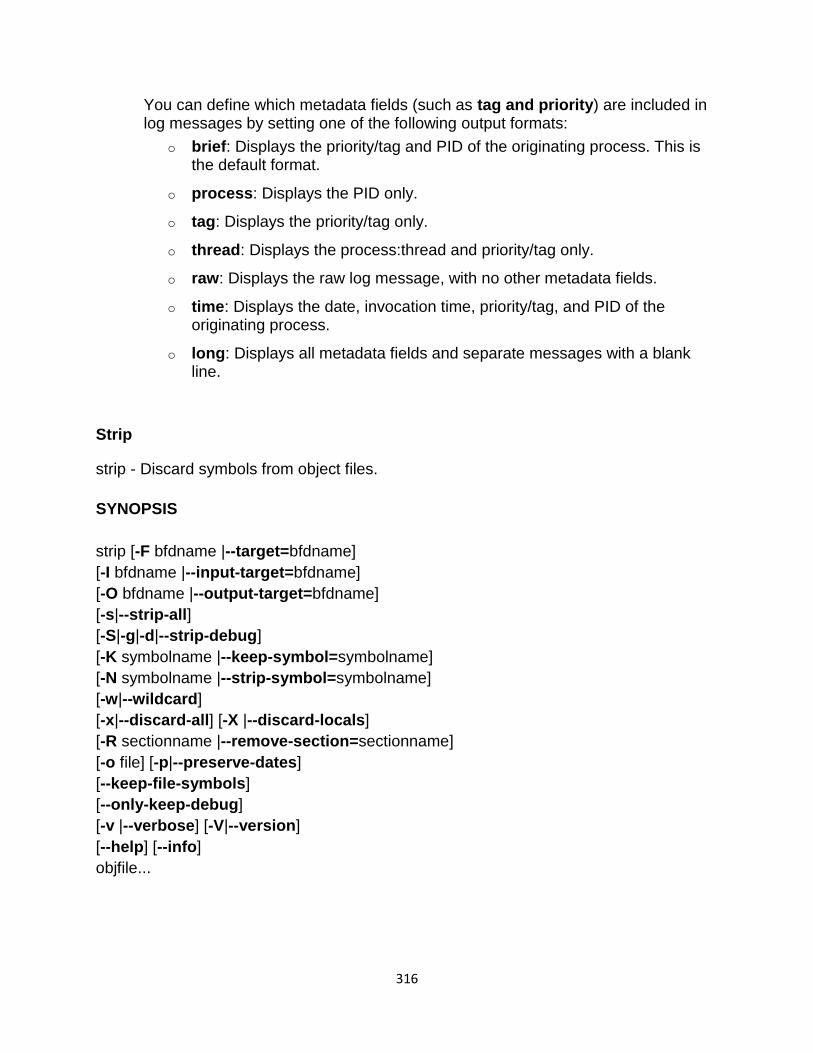
316
You can define which metadata fields (such as tag and priority) are included in log messages by setting one of the following output formats:
o brief: Displays the priority/tag and PID of the originating process. This is the default format.
o process: Displays the PID only.
o tag: Displays the priority/tag only.
o thread: Displays the process:thread and priority/tag only.
o raw: Displays the raw log message, with no other metadata fields.
o time: Displays the date, invocation time, priority/tag, and PID of the originating process.
o long: Displays all metadata fields and separate messages with a blank line.
Strip
strip - Discard symbols from object files.
SYNOPSIS
strip [-F bfdname |--target=bfdname]
[-I bfdname |--input-target=bfdname]
[-O bfdname |--output-target=bfdname]
[-s|--strip-all]
[-S|-g|-d|--strip-debug]
[-K symbolname |--keep-symbol=symbolname]
[-N symbolname |--strip-symbol=symbolname]
[-w|--wildcard]
[-x|--discard-all] [-X |--discard-locals]
[-R sectionname |--remove-section=sectionname]
[-o file] [-p|--preserve-dates]
[--keep-file-symbols]
[--only-keep-debug]
[-v |--verbose] [-V|--version]
[--help] [--info]
objfile...

317
DESCRIPTION
GNU strip discards all symbols from object files objfile. The list of object files may
include archives. At least one object file must be given.
strip modifies the files named in its argument, rather than writing modified copies under different names.
OPTIONS
Tag Description
-F bfdname
--target=bfdname Treat the original objfile as a file with the object code
format bfdname, and rewrite it in the same format.
--help Show a summary of the options to strip and exit.
--info Display a list showing all architectures and object formats available.
-I bfdname
--input-
target=bfdname
Treat the original objfile as a file with the object code
format bfdname.
-O bfdname
--output-
target=bfdname
Replace objfile with a file in the output format bfdname.
-R sectionname
--remove-
section=sectionname
Remove any section named sectionname from the output file. This
option may be given more than once. Note that using this option
inappropriately may make the output file unusable.
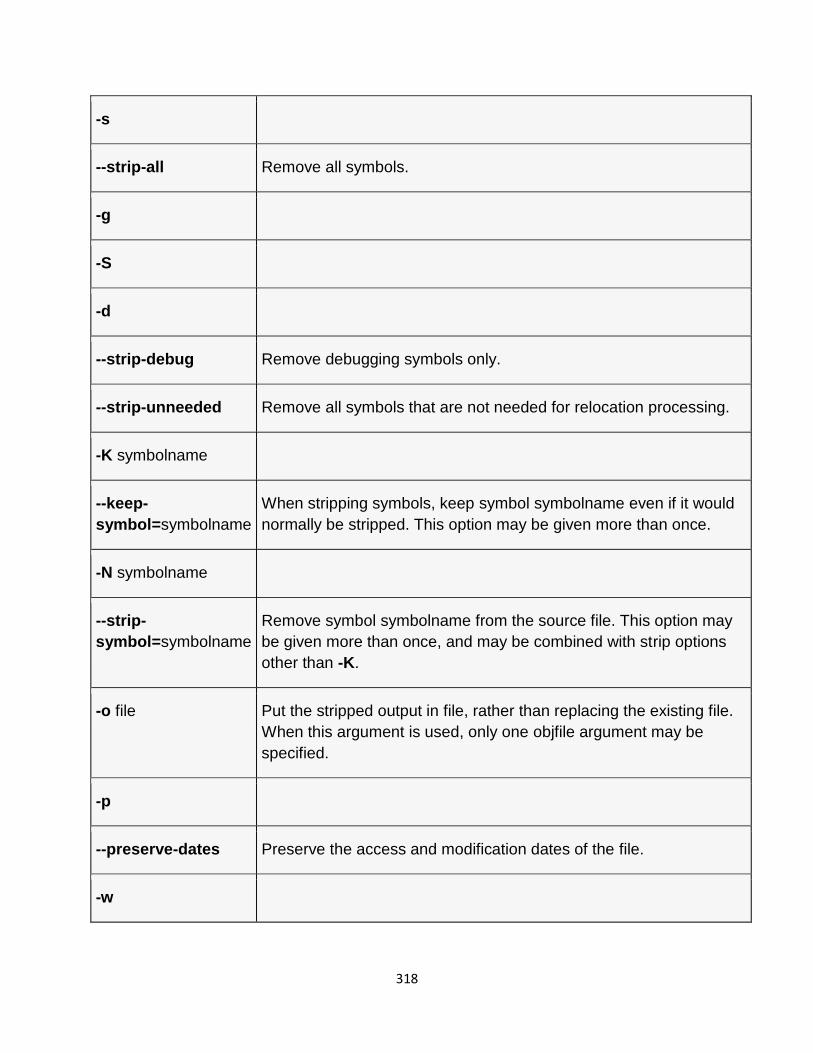
318
-s
--strip-all Remove all symbols.
-g
-S
-d
--strip-debug Remove debugging symbols only.
--strip-unneeded Remove all symbols that are not needed for relocation processing.
-K symbolname
--keep-
symbol=symbolname
When stripping symbols, keep symbol symbolname even if it would
normally be stripped. This option may be given more than once.
-N symbolname
--strip-
symbol=symbolname
Remove symbol symbolname from the source file. This option may
be given more than once, and may be combined with strip options
other than -K.
-o file Put the stripped output in file, rather than replacing the existing file.
When this argument is used, only one objfile argument may be
specified.
-p
--preserve-dates Preserve the access and modification dates of the file.
-w
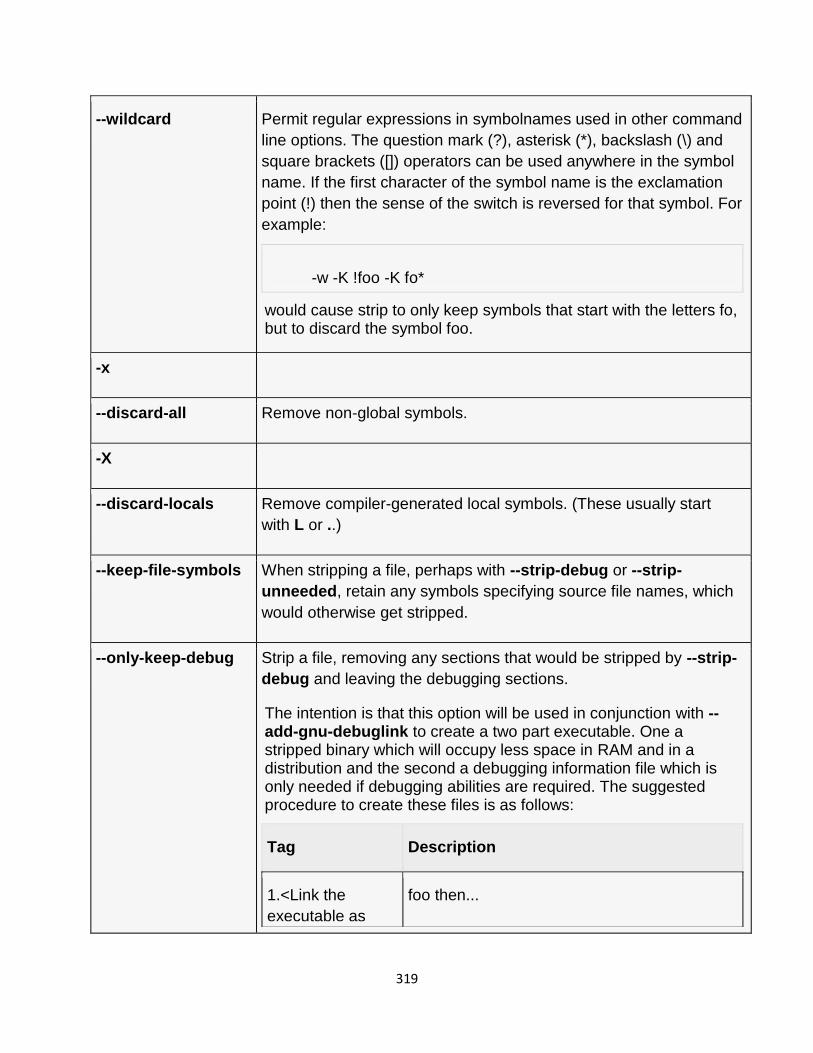
319
--wildcard Permit regular expressions in symbolnames used in other command
line options. The question mark (?), asterisk (*), backslash (\) and
square brackets ([]) operators can be used anywhere in the symbol
name. If the first character of the symbol name is the exclamation
point (!) then the sense of the switch is reversed for that symbol. For
example:
-w -K !foo -K fo*
would cause strip to only keep symbols that start with the letters fo, but to discard the symbol foo.
-x
--discard-all Remove non-global symbols.
-X
--discard-locals Remove compiler-generated local symbols. (These usually start
with L or ..)
--keep-file-symbols When stripping a file, perhaps with --strip-debug or --strip-
unneeded, retain any symbols specifying source file names, which
would otherwise get stripped.
--only-keep-debug Strip a file, removing any sections that would be stripped by --strip-
debug and leaving the debugging sections.
The intention is that this option will be used in conjunction with --add-gnu-debuglink to create a two part executable. One a stripped binary which will occupy less space in RAM and in a distribution and the second a debugging information file which is only needed if debugging abilities are required. The suggested procedure to create these files is as follows:
Tag Description
1.<Link the
executable as
foo then...
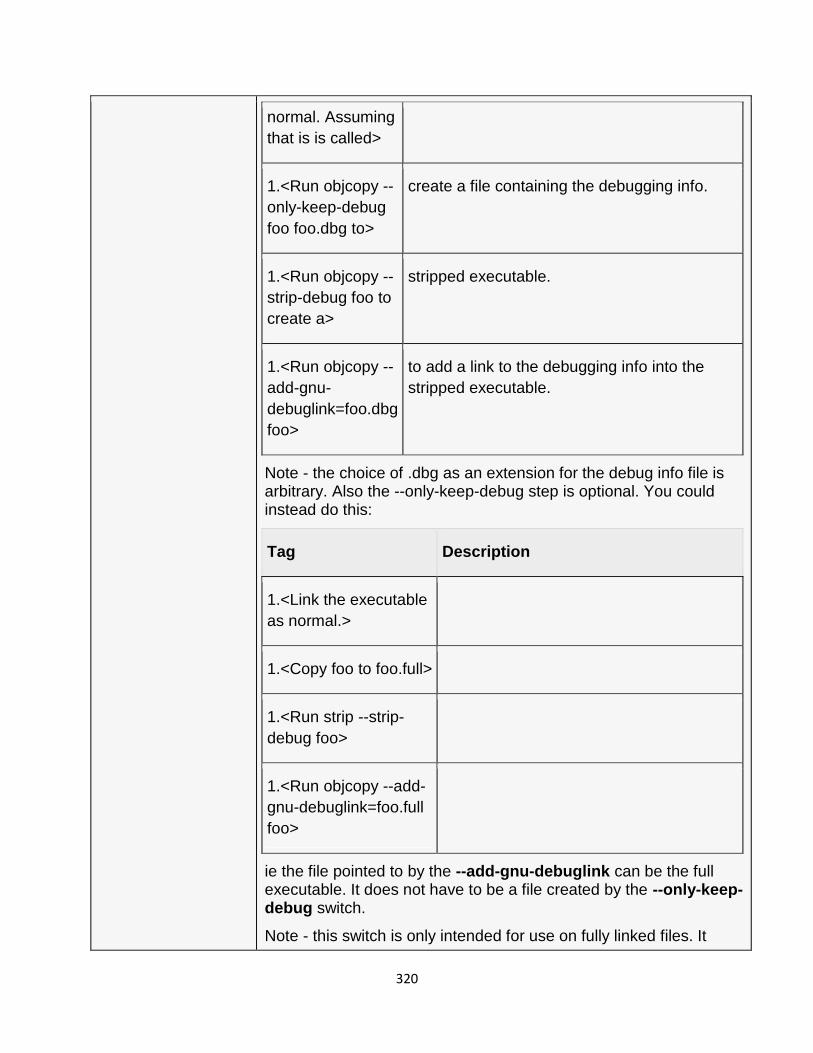
320
normal. Assuming
that is is called>
1.<Run objcopy --
only-keep-debug
foo foo.dbg to>
create a file containing the debugging info.
1.<Run objcopy --
strip-debug foo to
create a>
stripped executable.
1.<Run objcopy --
add-gnu-
debuglink=foo.dbg
foo>
to add a link to the debugging info into the
stripped executable.
Note - the choice of .dbg as an extension for the debug info file is arbitrary. Also the --only-keep-debug step is optional. You could instead do this:
Tag Description
1.<Link the executable
as normal.>
1.<Copy foo to foo.full>
1.<Run strip --strip-
debug foo>
1.<Run objcopy --add-
gnu-debuglink=foo.full
foo>
ie the file pointed to by the --add-gnu-debuglink can be the full executable. It does not have to be a file created by the --only-keep-debug switch.
Note - this switch is only intended for use on fully linked files. It
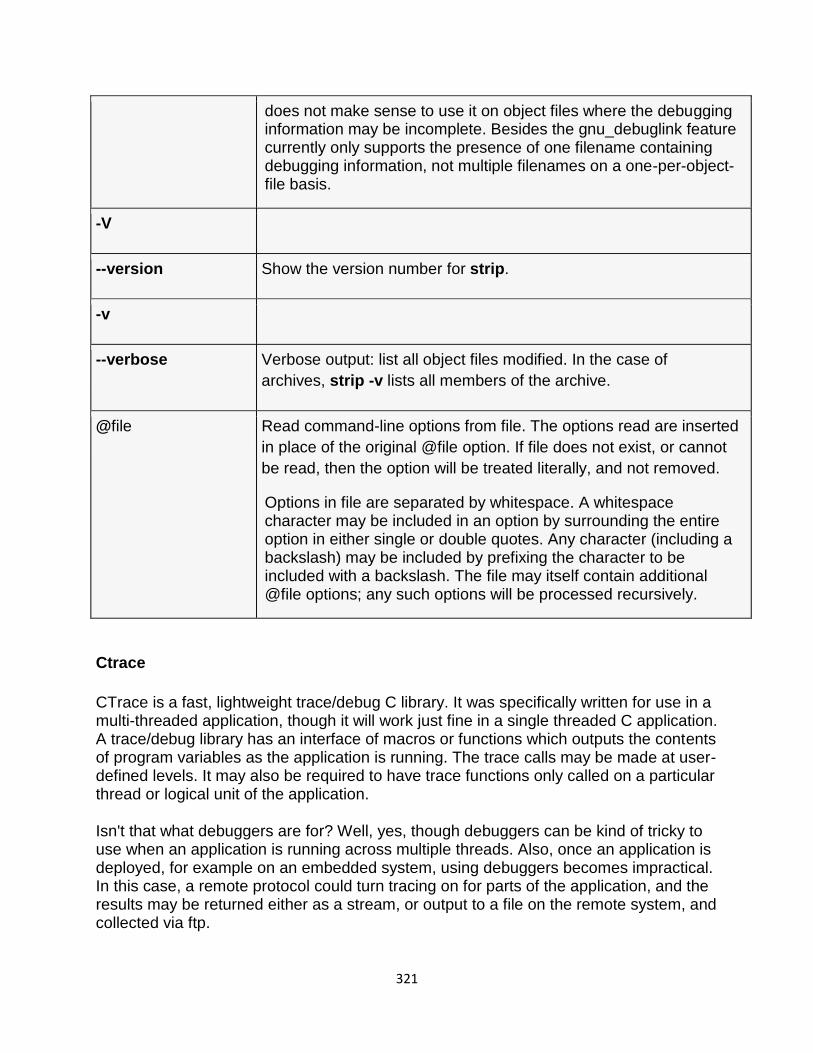
321
does not make sense to use it on object files where the debugging information may be incomplete. Besides the gnu_debuglink feature currently only supports the presence of one filename containing debugging information, not multiple filenames on a one-per-object-file basis.
-V
--version Show the version number for strip.
-v
--verbose Verbose output: list all object files modified. In the case of
archives, strip -v lists all members of the archive.
@file Read command-line options from file. The options read are inserted
in place of the original @file option. If file does not exist, or cannot
be read, then the option will be treated literally, and not removed.
Options in file are separated by whitespace. A whitespace character may be included in an option by surrounding the entire option in either single or double quotes. Any character (including a backslash) may be included by prefixing the character to be included with a backslash. The file may itself contain additional @file options; any such options will be processed recursively.
Ctrace
CTrace is a fast, lightweight trace/debug C library. It was specifically written for use in a multi-threaded application, though it will work just fine in a single threaded C application. A trace/debug library has an interface of macros or functions which outputs the contents of program variables as the application is running. The trace calls may be made at user-defined levels. It may also be required to have trace functions only called on a particular thread or logical unit of the application.
Isn't that what debuggers are for? Well, yes, though debuggers can be kind of tricky to use when an application is running across multiple threads. Also, once an application is deployed, for example on an embedded system, using debuggers becomes impractical. In this case, a remote protocol could turn tracing on for parts of the application, and the results may be returned either as a stream, or output to a file on the remote system, and collected via ftp.
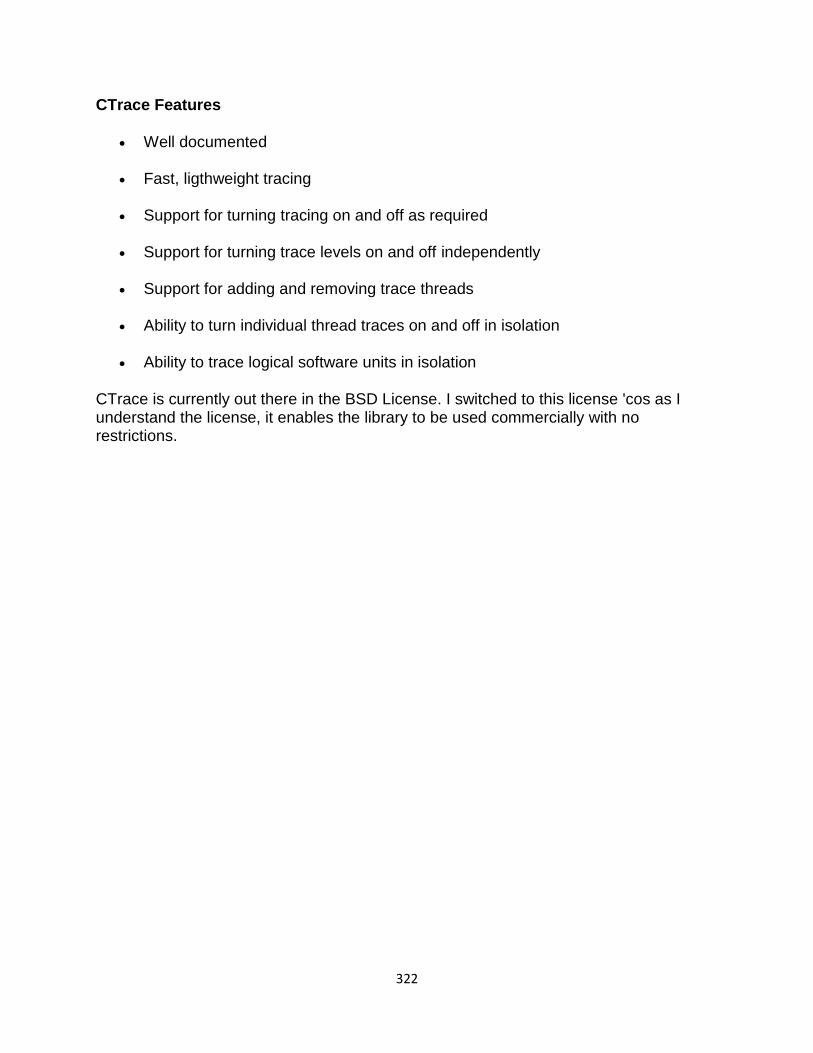
322
CTrace Features
Well documented
Fast, ligthweight tracing
Support for turning tracing on and off as required
Support for turning trace levels on and off independently
Support for adding and removing trace threads
Ability to turn individual thread traces on and off in isolation
Ability to trace logical software units in isolation
CTrace is currently out there in the BSD License. I switched to this license 'cos as I understand the license, it enables the library to be used commercially with no restrictions.
Related Documents


![BOOMHz MCA mcA 30 2) 'MCA MCA MCA [EF-6195A /FM …ftctusin.co.jp/ftc/img/010601_office.pdf · boomhz mca mca 30 2) 'mca mca mca [ef-6195a /fm-857f02]s [tdf-ioi (20 [mss-61 5 [ea-m50024aaj](https://static.cupdf.com/doc/110x72/5eaab1277cc49b0adf7277d7/boomhz-mca-mca-30-2-mca-mca-mca-ef-6195a-fm-boomhz-mca-mca-30-2-mca-mca-mca.jpg)
![10MCA17 UNIX Programs [MCA SEM 2, VTU]](https://static.cupdf.com/doc/110x72/5535461c550346330f8b46f9/10mca17-unix-programs-mca-sem-2-vtu.jpg)