4JB-01PO UNIT I: Exploring Your Home UNIVERSITY OF KENTUCKY · COLLEGE OF AGRICULTURE · COOPERATIVE EXTENSION SERVICE AGRICULTURE · HOME ECONOMICS · 4-H · DEVELOPMENT

Welcome message from author
This document is posted to help you gain knowledge. Please leave a comment to let me know what you think about it! Share it to your friends and learn new things together.
Transcript

4JB-01PO
UNIT I: Exploring Your HomeUNIVERSITY OF KENTUCKY · COLLEGE OF AGRICULTURE · COOPERATIVE EXTENSION SERVICE
AGRICULTURE · HOME ECONOMICS · 4-H · DEVELOPMENT

Home Environment Unit I—Exploring Your Home—basically introduces 4-H’ers to activitiesto help them become interested in their homes and learn how to make them more attractive.They can do some of the activities by themselves. Other things should be done with a parent or aclub leader giving guidance.
Encourage and help the 4-H’ers as they learn new skills. Talk over project ideas with them.Some suggested activities and exhibits are given in this booklet. Check magazines, books andtalk with your county Extension agent for instructions for other projects. Help your 4-H’ers selectprojects that are suitable for their abilities and skill levels. The project should not be so hard thatthe 4-H’ers will be discouraged, nor so easy that they are not challenged to learn new skills. It isimportant for members to see the difference in a 4-H project and a 4-H exhibit. Not everythingthey learn or do will be exhibited. Their items to be exhibited are only one part of a largerlearning experience-the 4-H learning experience.
After each new experience or when a project is completed, help members evaluate what theyhave done. Ask them questions and discuss what they have done well and what they need toimprove. Encourage and help the 4-H’ers see where they are growing with the project.
Have fun and enjoy working with these young people in this project!
What You Will Do in This Project . . . . . . . . . . 3
Start By...Getting Your Room Organized . . . 3
Personalizing Your Room . . . . . . . . . . . . . . . . . 5
You...the Designer.. . . . . . . . . . . . . . . . . . . . . . . 6
Color As a Design Tool . . . . . . . . . . . . . . . . . . . 7
Texture As a Design Tool . . . . . . . . . . . . . . . . . 8
Your Design Plan.. . . . . . . . . . . . . . . . . . . . . . . . 9
Things to Make.. . . . . . . . . . . . . . . . . . . . . . . . . 10
Helping In and Around Your Home . . . . . . . 15
Demonstrations . . . . . . . . . . . . . . . . . . . . . . . . . 15
Articles You May Make and Exhibit . . . . . . . 16
Helping Others in 4-H . . . . . . . . . . . . . . . . . . . 16
Completing Your Project Record Sheet . . . 16
Project Record Sheet . . . . . . . . . . . . . . . . . . . . 17
Appreciation is expressed to Karen H. Hicks, 4-H ProgramSpecialist, and the following people who served on the develop-mental committee for this project literature:
Anna Grayson, Extension 4-H Agent, Hart CountyBetty Webb, Area Home Furnishings Specialist, Louisville AreaSue Stivers, Home Economics Agent, Adair County
Appreciation is also expressed to:Annette Myers, Senior Graphics Artist, PublicationsPatricia P. Schrader, Extension Information Specialist, 4-H
Publications
Having a pleasant home environment isvery important. It makes us happier, and itmakes us feel better. Many things worktogether to make a good home environment.Most importantly, family members mustrespect and care for each other. Also theymust respect and care for the family’s sharedbelongings and each member’s personalbelongings. Next, family members must worktogether in sharing the tasks that keep thehousehold running in an orderly manner.
Making your home run smoothly and lookgood is part of your responsibility as a familymember. But it is also fun! This first 4-H homeenvironment project will help you learn moreabout improving your home.
Some things you will do by yourself.Some activities you will want to do with othermembers of your family, your project leaderor other club members.
All 4-H projects help you learn skills forliving. Some of the skills involve making itemsand exhibiting them for other people to seeand learn from. Other skills you learn will notbe exhibited, but they will help you become abetter 4-H’er and a happy and useful person.
As you go through this project booklet,talk to your parents and leader about projectideas. They will answer questions and helpyou plan a project and choose activities. Plana project for your room or some area of yourhouse that needs to be improved.
p . 2

l Put away or hang up your clothes as
l Learn how to care for your rooml Learn how to select colors, textures
and accessories you likel Learn how to accept responsibility of
being a family memberl Complete a project for exhibitionl Give a demonstrationl Keep a record of your 4-H project
Probably the first place to start improvingyour home environment is in your ownroom-or the area where you sleep and keepyour belongings. Is it neat and orderly? Canyou find things when you need them? Bothshoes? Matching socks? You’ll be able to findthings quickly when they are in their properplace . . . and you’ll be proud to invite yourfriends to your room when it’s clean. If youshare your room with someone else, talk overhow you can work together to keep yourroom looking good.
soon as you take them off. Clothesdropped on the floor become wrinkled,dirty and may get torn. Clothes that areput away are always ready for work andplay. Organize your closet space so thatall like things are together. Line or hangshoes up in one place. Hang shirts orblouses together on the clothes rod.Hang shirts or slacks together. Sort all ofyour clothes in this way, and you’ll beable to find them quickly. Hang all of thehanger hooks pointing in the samedirection with articles facing the samedirection. This makes it easier to take thehangers out of the closet. Hang belts ona special rack or hanger. Put out-of-season clothes in a different closet orarea. Now look at your closet. Doesn’t ilook better? Did you find an item youthought was lost?
p. 3
l Place dirty clothes in a laundry bag orclothes hamper as soon as you take themoff. This keeps them out of your way untillaundry time. If you don’t have a clotheshamper or bag, you can use a box,wicker basket.. . or make a cloth laundrybag with a draw string top to hang over acloset hook. Ask your leader orExtension agent for directions on how tomake a laundry bag.
l Next organize your dresser drawers.Put like things together. Put all yoursweaters in one place; put pajamas withpajamas and underwear with underwear.Fold and stack things neatly. Place theclothes you use most often on top andnear the front. Then you can reach themquickly and easily. To keep dresserdrawers in order, make drawer dividersfrom boxes. Use the box covers for smallthings in the top drawers. If you wish,cover the boxes with bright paper. If yourdresser drawers are too full of clothesyou don’t wear, look through them. Doyou need everything in them? Give awaythose clothes you don’t need or use tosomeone who can use them. Store out-of-season clothing in a box or on a highshelf. Be sure to label the box or shelf soyou’ll know where to look when you wantit again. You probably will have toreorganize your dresser drawersregularly to keep them in order.
l Before going to bed, lay out freshclothes for the next day. If they havebeen crowded in the closet or drawers,you’ll have time to press them or let thewrinkles hang out overnight. Then you’llbe ready to go the next day!
l Make your bed every morning. The bedis one of the first things you see whenyou go into a bedroom. If it’s neat andsmooth, the whole room looks better.And you won’t have to crawl into awrinkled, lumpy bed at night!
At Least Once A Week. . .l Make your room sparkle! Dust at leastonce a week. You will need two kinds ofdust cloths:
1) A dry, clean lintless cloth forpictures, lamps, and small articles.Cheesecloth, knit fabric or terrycloth can be used for this.
2) A treated dust cloth or dust mitt forfurniture. If you’d like to make yourown treated dust cloth, ask yourleader or parent for help and followthe instructions given below.
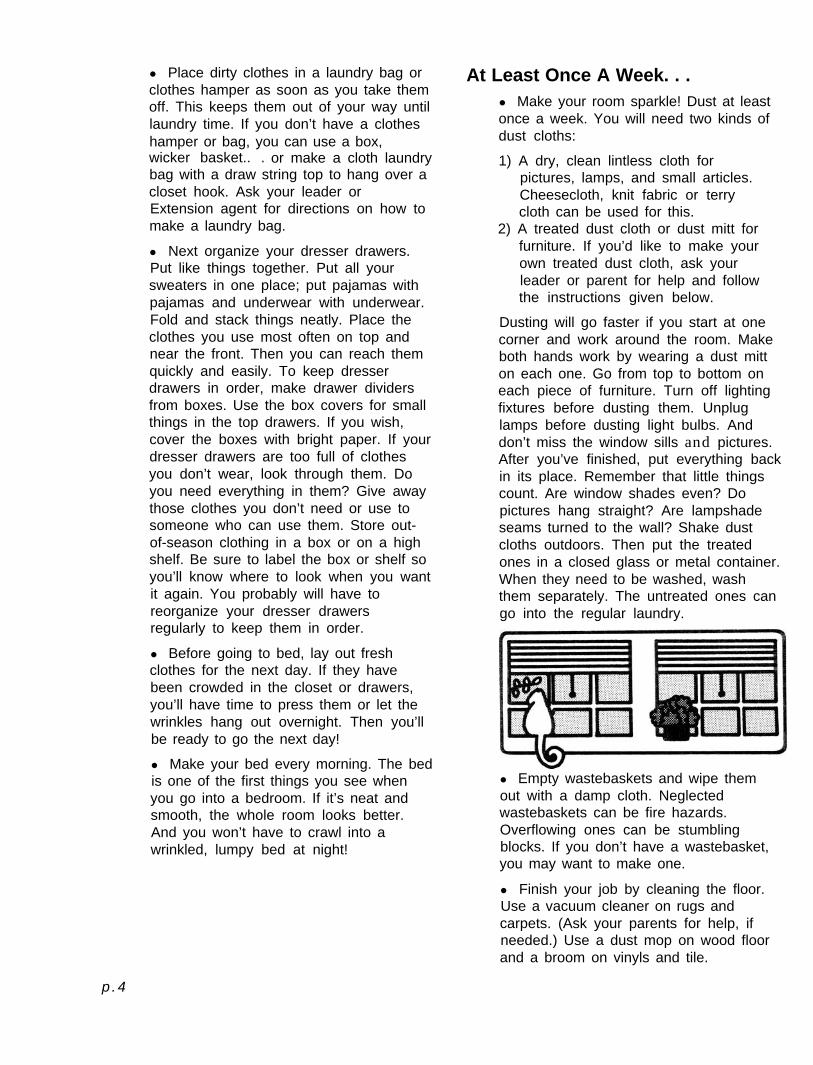
Dusting will go faster if you start at onecorner and work around the room. Makeboth hands work by wearing a dust mitton each one. Go from top to bottom oneach piece of furniture. Turn off lightingfixtures before dusting them. Unpluglamps before dusting light bulbs. Anddon’t miss the window sills and pictures.After you’ve finished, put everything backin its place. Remember that little thingscount. Are window shades even? Dopictures hang straight? Are lampshadeseams turned to the wall? Shake dustcloths outdoors. Then put the treatedones in a closed glass or metal container.When they need to be washed, washthem separately. The untreated ones cango into the regular laundry.
l Empty wastebaskets and wipe themout with a damp cloth. Neglectedwastebaskets can be fire hazards.Overflowing ones can be stumblingblocks. If you don’t have a wastebasket,you may want to make one.
l Finish your job by cleaning the floor.Use a vacuum cleaner on rugs andcarpets. (Ask your parents for help, ifneeded.) Use a dust mop on wood floorand a broom on vinyls and tile.
p .4
Dustless Dust Cloths!!Some furniture has an oiled finish, and
some has a waxed finish. Ask your parentswhich pieces have an oil finish and whichhave a waxed finish. Then use the appropriatecloth for each piece of furniture. Althoughusing the same cloth on oiled and waxedfinishes will not damage the furniture, it cancause streaks and a dulled look.
Dustless Dust Cloth for Oil Finishes:
How To Make:Place 1 teaspoon boiled linseed oil
(commercially prepared)2 tablespoons gum turpentine2 tablespoons warm water
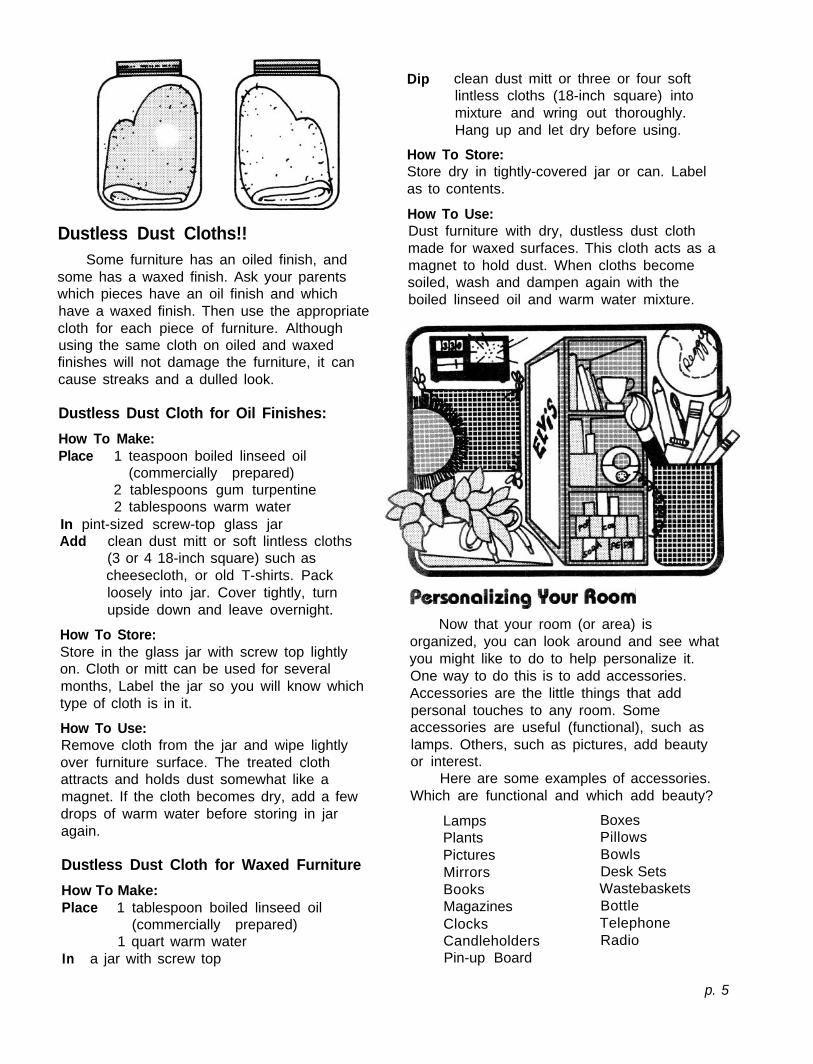
In pint-sized screw-top glass jarAdd clean dust mitt or soft lintless cloths
(3 or 4 18-inch square) such ascheesecloth, or old T-shirts. Packloosely into jar. Cover tightly, turnupside down and leave overnight.
How To Store:Store in the glass jar with screw top lightlyon. Cloth or mitt can be used for severalmonths, Label the jar so you will know whichtype of cloth is in it.
How To Use:Remove cloth from the jar and wipe lightlyover furniture surface. The treated clothattracts and holds dust somewhat like amagnet. If the cloth becomes dry, add a fewdrops of warm water before storing in jaragain.
Dustless Dust Cloth for Waxed Furniture
How To Make:Place 1 tablespoon boiled linseed oil
(commercially prepared)1 quart warm water
In a jar with screw top
Dip clean dust mitt or three or four softlintless cloths (18-inch square) intomixture and wring out thoroughly.Hang up and let dry before using.
How To Store:Store dry in tightly-covered jar or can. Labelas to contents.
How To Use:Dust furniture with dry, dustless dust clothmade for waxed surfaces. This cloth acts as amagnet to hold dust. When cloths becomesoiled, wash and dampen again with theboiled linseed oil and warm water mixture.
Now that your room (or area) isorganized, you can look around and see whatyou might like to do to help personalize it.One way to do this is to add accessories.Accessories are the little things that addpersonal touches to any room. Someaccessories are useful (functional), such aslamps. Others, such as pictures, add beautyor interest.
Here are some examples of accessories.Which are functional and which add beauty?
LampsPlantsPicturesMirrorsBooksMagazinesClocksCandleholdersPin-up Board
BoxesPillowsBowlsDesk SetsWastebasketsBottleTelephoneRadio
p. 5

These are only some of the things we callaccessories. Can you think of other thingsthat will add beauty, personalize your room orhelp you do things better?
Without accessories, most rooms lookbare and uninteresting. On the other hand,too many accessories give the room acluttered look. It’s up to you to add just theamount that’s right for you. Give carefulthought to the accessories you wish to use.Select only those that you really like and wantto live with.
Take a look at all the accessories in yourroom. How do you feel about the things younow have? Check yes or no in the followinglist of questions.
Yes No
1. Does the room lookbare?
2. Does the room lookcluttered withaccessories?
3. Are there too manythings to dust?
4. Are books andmagazines neat?
5. Are hobby and sportsthings in order and easyto find?
6. Would some placeslook better with nothingon them?
7. Is there anything thatdoes not make theroom look better?
Some things may need to be rearranged.If so, try them several ways and decide whichway you like best. Are there some things thatcould be added to make your room lookbetter? If so, you may want to make anaccessory for your room. A laundry bagwould add add color as well as help inkeeping clothes picked up. A pillow could beadded to your bed or a chair. A small woodenbox could hold desk supplies, jewelry, orother treasures.
When you rearrange things in your roomor select colors and materials for accessories,you become a designer, and you will workwith the tools for design.
What is design? Every room needs a planfor order-an order that makes all the parts ofthe room fit together as a whole. Design is aplan for that order. It involves many things;for example, how you plan a furniturearrangement for your room, or whataccessories you select for your room, or whatcolors you choose. Design is an expression ofyourself. The colors you select, the type orarrangement of furnishings, the way youarrange your accessories all help to makeyour room an expression of you.
You do not have to buy new furniture,and accessories do not have to be expensive.Part of your design plan may be how toimprove a room inexpensively. For example,objects of nature may be used, and they arefree for the finding. Or perhaps you couldmake something for your room from fabricremnants or wood scraps. Look at magazinesand see how objects found around almost anyhome can be used for a design plan.

As a designer, you need tools to workwith.
Color is one of the basic tools of designand it is fun to experiment with. You’ll hearseveral words used to describe color. Forexample, hue is the name of a color, such asblue, green, or yellow.
Let’s look at a system which is often usedto explain the idea of color:
All colors are made from three basic hues:
Yellow
Red Blue
These hues are called primary colors.
When the primary hues are mixed, thensecondary colors are formed. For example,yellow mixed with blue makes green (asecondary color).
From then on each time the hues aremixed, another new color is formed. Thereare hundreds of possibilities for mixingcolors. Mixed hues such as these areintermediate or tertiary colors.
You may have heard the words value andintensity of color. Value means the lightnessor darkness of a color. Adding white to acolor makes it a lighter value. Adding black toa color makes it darker in value.
Intensity refers to how bright or dull acolor is. Dull colors are a result of one huebeing mixed with a little of its comple-mentary color. Complementary colors arethose that are located directly across fromeach other on the color wheel. For example,red and green are complementary colors.Another example would be blue and orange.
There will be some colors that you likebetter than others. Some colors make you feelhappy; some make you feel quiet. Othercolors can make you feel depressed or cold.Sometimes colors can remind you of thingssuch as green grass and blue sky. Choosecolors for your room that make you feel goodor remind you of pleasant things. Write aword in the blank that describes how each ofthese colors makes you feel.
Red makes me feel
Yellow makes me feel
Green makes me feel
Orange makes me feel
Blue makes me feel
Violet makes me feel

Here are some activities that will help youlearn more about using color.
Activity 1Make a color wheel. Use poster
paints or colored paper and a medium-weight white drawing paper for thebackground. Another idea is to use whitefrosting and red, yellow, and blue foodcoloring. (Check with your parents first ifusing the frosting and food coloring.) Ifusing frosting, mix a small amount offrosting in each primary and secondarycolor. Then frost cookies or grahamcrackers with each color. Share thesewith your friends or other familymembers. Which colors were eaten first?Why?
Activity 2Cut red, violet and blue construction
paper into large squares. Cut smallercircles of green, yellow, and orangepaper. Place the complementary colorstogether. (These are the colors directlyopposite each other on the color wheel.)What happens to the colors when theyare placed together? Do they becomemore intense? What does this meanwhen you are choosing colors for yourroom? Try other combinations of colors,such as red and yellow or green andblue. How do you feel about thecombinations of colors now? Whichcombinations are quiet? Which are themost lively? What combination of colorsdo you like best?
Activity 3Make a collage (or collection) of
various colored papers, fabrics, wrappingpaper, wallpaper, carpet samples,autumn leaves, or other materials. Selectthose colors that you particularly like andglue onto a heavy paper or poster boardbackground. If you use colored tissuepaper for your collage, try overlappingdifferent colors as you work. How do youlike your final design? Did the colors turnout as you expected? You may want tohang your finished picture in your room.
Texture is another tool of design.Wherever we go, whatever we see, texturesare there! Texture adds interest. It tells ushow an object or a surface looks, feels andhandles:
l looks-shiny, dull, crinkledl feels-smooth, rough, bumpyl handles-soft, stiff, rubbery
There are two kinds of texture: tactile andvisual. You can feel tactile textures. Forexample, tree bark feels rough and glass feelssmooth. Visual texture is what we see . . . orthink we see. Sometimes an object feelsdifferent than it looks. Fabrics and wall-coverings often have different tactile andvisual textures.
Explore your surroundings. Close youreyes and feel with your fingers. Touch acorncob, a sidewalk, grass, tree bark and akitten. Compare different fabrics and wallcoverings. What textures do you particularlylike? Now touch some of the surfaces in yourroom. Can you find some textures that aresimilar? Which ones do you like the best?

Here are some activities that will help youdiscover interesting textures.
Activity 1Make rubbings of a variety of
objects, such as tree bark, a brick wall,sidewalks or man-hole covers, texturedvinyl floors and other surfaces inside andout. To make your rubbing, place paperover the surface and rub the paper with acrayon, soft-lead pencil or charcoalpencil until the texture shows through.Try a variety of colors for added interestin your various rubbings. You may wantto display your best rubbings in yourroom or a family room.
Activity 2Collect various items that have
interesting textures and make a collage.You may want to use smooth and nubbyfabrics, carpeting, tree bark, leaves,textured cardboard and other items thathave texture you can actually feel. Youmay also use textures that you can onlysee, such as photographs, magazinepictures, printed fabrics and wallpaperand other items with visual texture. Gluethese items onto a heavy paper orlightweight cardboard. How do you likeyour collection of textures? Do you havea good variety for interest? Did you usemore of one kind of texture?, If so, is thisbecause you particularly like thistexture? Do you have this same kind oftexture used in your room? How do youlike your final design? You may want tohang your finished collage in your room.
Now that you have organized your roomand have learned some things about design,take a look at it and decide on your designplan. Ask yourself these questions:
1. What can I do to my room to make it lookbetter planned?
2. How much can I change my room? (Askyour parent to help with this.)
3. What accessories can I add?l What colors would complement thecolors already in the room?l What textures do I need (smooth orrough, tactile or visual)?l Do I need a plain accessory or apatterned accessory?
4. What items can I find around the housethat would personalize my room?
5. What nature items can I find topersonalize my room?
6. What articles can I add to my room thatwould serve as a 4-H project?
You may want to take color pictures ofyour room before and after you organize andpersonalize it. You may also take pictures ofthe accessories you add to your room. Usethese pictures as part of your 4-H record.

There are many things that you can makefor and do to your room as a part of your 4-Hproject. Be sure to write all of your activitiesin the 4-H record included in the back of thisbook. You may also want to make a project toexhibit at the fair. There are many choices foritems that may be entered as 4-H exhibits.Check with your leader or county Extensionagent on the choices for exhibits. Thendecide on what you need that will fit intothese exhibit classes. Here are somesuggestions to help you get started. You mayhave other ideas on things you would like tomake. If so, check with your parents or leaderfor help in how to do it.
Project IdeasCloth articles: Do you like to sew?l Pillow-without cording or applied designl Fringed tableclothl Mug matsl Placemats and napkinsl Laundry bag
Finishing small wooden articles: Do you liketo work with wood?l Bowll Trayl Cutting boardl Picture framel Small boxl Children’s building blocksl Small stooll Game boardl Book ends
Improving your study area by making ahandy helper:l Wastebasketl Pin-up board
Making a WastebasketA wastebasket will help keep your room
looking neat. First, select a container(perhaps something you already have) topaint or cover. Think about the colors andtextures that are in your room. If the walls areplain, you might cover the outside of thewastebasket with a small-patterned or stripedpaper. If the walls have a patterned paper,you might want to paint or cover yourwastebasket to match one of the colors in thepaper. If you have mostly rough textures(such as burlap) in the room, use a similarfabric for your wastebasket. If you havesmoother fabrics, select a smooth fabric orpaper. Adding braid or trim around the topand bottom is a good way to cover raw edges.
p. 10

l Container for the wastebasket, such asan old wastebasket, an oil can, a bigmetal bucket with wire handle removed,or a large metal can (like one that holdspotato chips). Large cardboard ice creamcontainers (from ice cream shops) alsomake good wastebaskets, but these won’tlast as long.
You will need: 2. Paint inside of wastebasket, if needed,and let paint dry thoroughly. Be sureto read directions on your can of paint.Shake can or stir paint thoroughly ifthe directions say to do this.
l Covering material:-Flat or semi-gloss paint and a paint
brush, or-Paper or fabric and glue. (Be sure to
use a glue that will dry clear and notstain the fabric or paper.)
l Narrow solid-color tape or braid(washable, easily cleaned material)
l Newspapers to cover work surface
l Scissors, pencil, ruler and soft cloth tosmooth edges as you work
What to do:1. Spread newspapers over your workingsurface.
3. Finish the outside of the wastebasket:
p. 11
If you paint your wastebasket.. .
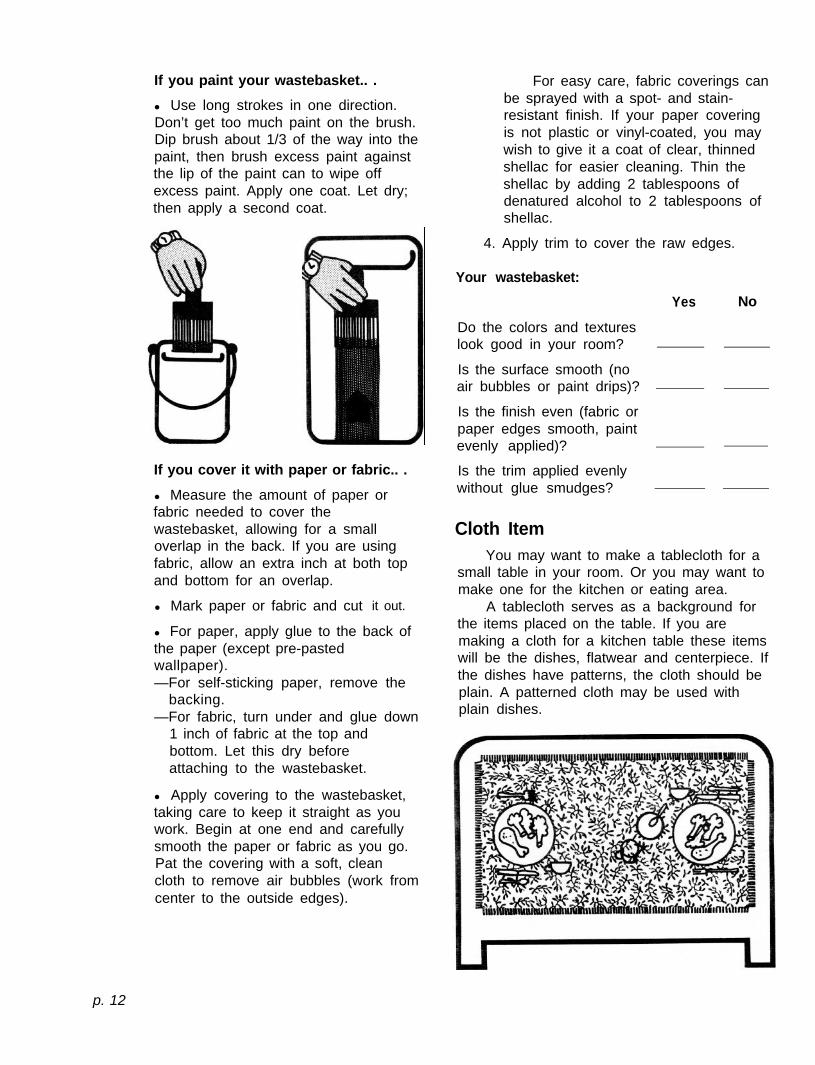
l Use long strokes in one direction.Don’t get too much paint on the brush.Dip brush about 1/3 of the way into thepaint, then brush excess paint againstthe lip of the paint can to wipe offexcess paint. Apply one coat. Let dry;then apply a second coat.
If you cover it with paper or fabric.. .
l Measure the amount of paper orfabric needed to cover thewastebasket, allowing for a smalloverlap in the back. If you are usingfabric, allow an extra inch at both topand bottom for an overlap.
l Mark paper or fabric and cut it out.
l For paper, apply glue to the back ofthe paper (except pre-pastedwallpaper).—For self-sticking paper, remove the
backing.—For fabric, turn under and glue down
1 inch of fabric at the top andbottom. Let this dry beforeattaching to the wastebasket.
l Apply covering to the wastebasket,taking care to keep it straight as youwork. Begin at one end and carefullysmooth the paper or fabric as you go.Pat the covering with a soft, cleancloth to remove air bubbles (work fromcenter to the outside edges).
For easy care, fabric coverings canbe sprayed with a spot- and stain-resistant finish. If your paper coveringis not plastic or vinyl-coated, you maywish to give it a coat of clear, thinnedshellac for easier cleaning. Thin theshellac by adding 2 tablespoons ofdenatured alcohol to 2 tablespoons ofshellac.
4. Apply trim to cover the raw edges.
Your wastebasket:
Yes No
Do the colors and textureslook good in your room?
Is the surface smooth (noair bubbles or paint drips)?
Is the finish even (fabric orpaper edges smooth, paintevenly applied)?
Is the trim applied evenlywithout glue smudges?
Cloth ItemYou may want to make a tablecloth for a
small table in your room. Or you may want tomake one for the kitchen or eating area.
A tablecloth serves as a background forthe items placed on the table. If you aremaking a cloth for a kitchen table these itemswill be the dishes, flatwear and centerpiece. Ifthe dishes have patterns, the cloth should beplain. A patterned cloth may be used withplain dishes.
p. 12

You will need:l Washable fabric, enough to cover tableand hang down 8 to 12 inches on all sidesl Thread to matchl Scissorsl Sewing machine
What to do:1. Straighten the fabric by pulling thread onboth ends. Ask your leader or parent to helpwith this. Cut the material on the line left bythe thread drawn out. Cut off the selvages.
2. For a fringed edge measure about 1/2 inchfrom edge of cloth. Pull out one thread.Repeat on other three sides.
3. Set the seam guide on sewing machine for1/2 inch. Use about 10 to 12 stitches to theinch. Stitch along the lines made by pullingout the threads. Keep fabric edge on seamguide. The seam guide will help you makestraight lines. Begin stitching halfwaybetween two corners. Turn corners while themachine needle is lowered. This will make thecorners square. When finished, let thestitching overlap about 1 inch.
4. Gently pull or ravel off threads almost tothe row of machine stitching.
5. Press.
Your table cloth:
Yes No
Is the material washable?
Is the cloth clean and wellpressed?
Is the fringe even on allsides?
Does the cloth look nicewith the dishes?
Wood FinishingIt’s fun to work with wood. Many people
work with wood as a hobby. You can makeuseful things that look pretty in your home. Awood salad bowl or cutting board would beuseful in your kitchen or dining area. Otherwood items such as small boxes may beuseful in your bedroom or other rooms of thehouse.
You will need:
l Unfinished wood iteml 2 pieces of fine sandpaper (4/0 grit orfiner)l 1 small pad of fine steel wool-No.0000l 1 can clear penetrating seal or tungoil*l Small dish or can-to hold smallamount of finishl Clean, lintless cloth-to apply andwipe finishl Newspaper to cover work areal Paper towels or rags-for spills andcleaning upl Turpentine or hand cleaner-forcleaning up
*A commercial finish is available in stores for use onsalad bowls or cutting boards.
p. 13

What to do:
1. Sand the wood until it is velvetysmooth. Use two pieces of finesandpaper, each piece about 4 inchessquare. Fold each piece inside the other.The rough sides will keep the piecestogether as you sand. Place your thumband little finger under the edges of thepaper. Place your other three fingers ontop. This helps you sand evenly. Alwayssand with the grain of the wood. Sand allsurfaces of the object.
2. Now, rub the wood with your hand.How does it feel? Does it feel like velvet .. . or a kitten . . . or the skin on your arm?If it does, then you’re ready to apply thefinish.
3. Dust the wood with a:l clean, soft brush,l tack rag (you can buy or make one), orl lintless cloth dampened withturpentine
4. Read directions on can of penetratingseal or tung oil. You may want to ask anadult for help. Be sure to follow thedirections. In general, they will be asfollows.
5. Pour some of the seal or tung oil in asmall, clean can or dish. A shallow onewill be easier to use.
6. Apply the seal or tung oil with a clothpad. Let this stand 10 or 15 minutes forthe seal to soak in. (Old nylon hose canbe used for the pad.)
7. Now wipe the wood surface with aclean, dry cloth. This will even the coat ofseal. Let this dry for 24 hours.
8. Rub the surface with the fine (0000)steel wool. Always rub with the grain ofthe wood. This buffing smooths the finishand prepares it for the next coat.
9. Repeat steps 3, 4, 5, 6, 7, and 8 untilyou have applied at least three coats.
Your salad bowl, cutting board or other wooditem:
Yes No
Is it attractive?
Is the surface smooth?
Is the finish even andspotless?
Are you proud of what youdid?
Care Hint: Dip wooden bowls and cuttingboards in warm, sudsy water. Wash quickly.Rinse well. Dry thoroughly.
Making a Tack Rag.. .
A tack rag is excellent forremoving dust from furniture beforeyou apply finishes. To make one,wash a piece of closely wovencheese cloth several times. Dip theclean cloth in warm water and wringit out. Then wet the cloth withturpentine.
Sprinkle varnish on the rag untilit is quite yellow. Then fold and twistthe rag into a tight roll to force outthe water and allow the varnish andturpentine to saturate the cloth.Twist the rag a second time.
A tack rag should be stickyenough to pick up dust, but dryenough not to leave moisture on thefurniture. If your rag dries out in use,sprinkle a few drops of turpentineand water on it. If it is too moist,shake it in the air for a few minutes.Fold the rough edges of the clothinside as you use it. Store your tackrag in a quart jar with a tight-fittinglid or in a plastic bag folded up verytightly at the top.
p. 14

You have learned how to care for yourown room, but what about the rest of thehouse? The responsibility for keeping a homeneat and orderly should be shared by allfamily members. You can do your share byhelping to keep books and newspapers putaway, emptying wastebaskets, taking out thegarbage, helping clean out the garage,washing dishes and setting the table. Somechores may not be fun to do but working withanother person is fun and makes the job gotwice as fast. They will learn more about you,and you will learn more about them. Be proudof the new skills you are learning. Your familywill be proud of you, too. Don’t forget to writeall of these activities in your 4-H record in theback of this book.
Now that you have learned to do manythings around the house, why not share withothers? This helps them to learn and helpsyou to be a better communicator. Making anexhibit to show at the fair is one way to sharewith others. Another way is to give ademonstration and show someone else howto do something.
You may wish to select one thing youhave learned and plan a demonstration. Hereare some demonstration suggestions:
l How to make a bedl How to organize your dresser drawersl How to make a dustless dust clothl How to make a wastebasket orpin-up boardl How to sand and apply finish to awood iteml How to make a fringed table cloth ormug matsl How to give a demonstration
p. 15

You will need to think about and select anitem to make for an exhibit. Start earlyenough to allow time to complete the exhibitbefore you need it. You may select from oneof the following categories:
l A small wood object with straight linesthat has a natural finish applied to it,such as a bowl, tray, cutting board, gameboard, small box, picture frame, etc.l A simple, small cloth article such as aplain pillow without an applied design,fringed tablecloth, mug mats, placematsand napkins or laundry bag.l Item for desk or study area such as awastebasket or pin-up board
Instructions are given in this booklet forsome of the projects you may do, or you maywant to do another project. If so, ask yourleader for instructions on the other ideas youhave. So look around your home. What doyou need? Talk over your ideas with yourparents or leader. Be sure to make somethingyou need and will use. When you exhibit anitem, be sure it is clean and clearly labeled soit can be returned to you. Your leader willprovide labels for your item(s).
Learning to help others is also animportant part of your 4-H experience. Youcan do this by:
l Helping other 4-H’ers with theirprojects.l Accepting responsibility at home andcompleting assigned tasks.l Helping an elderly or lonely neighborbrighten up his/her home with fresh ordried flowers, a collage or other itemyou’ve made.l Helping relatives or neighbors withchores that they can’t easily do.l Bringing in a neighbor’s mail andpapers.l Helping to decorate your classroom.
Your record book is important. Be sure towrite down your activities as you workthrough this first home environment unit.Then write your 4-H story for the year. In yourstory tell how you feel about the things youhave learned and made and the experiencesyou have had.
Each year you’ll add another chapter toyour 4-H story. You’ll have fun looking backover your past experiences and projects asthe years go by. You may want to keep ascrapbook of pictures, newspaper articles andmementos to go along with your record book.
p. 16
Name
Address
School
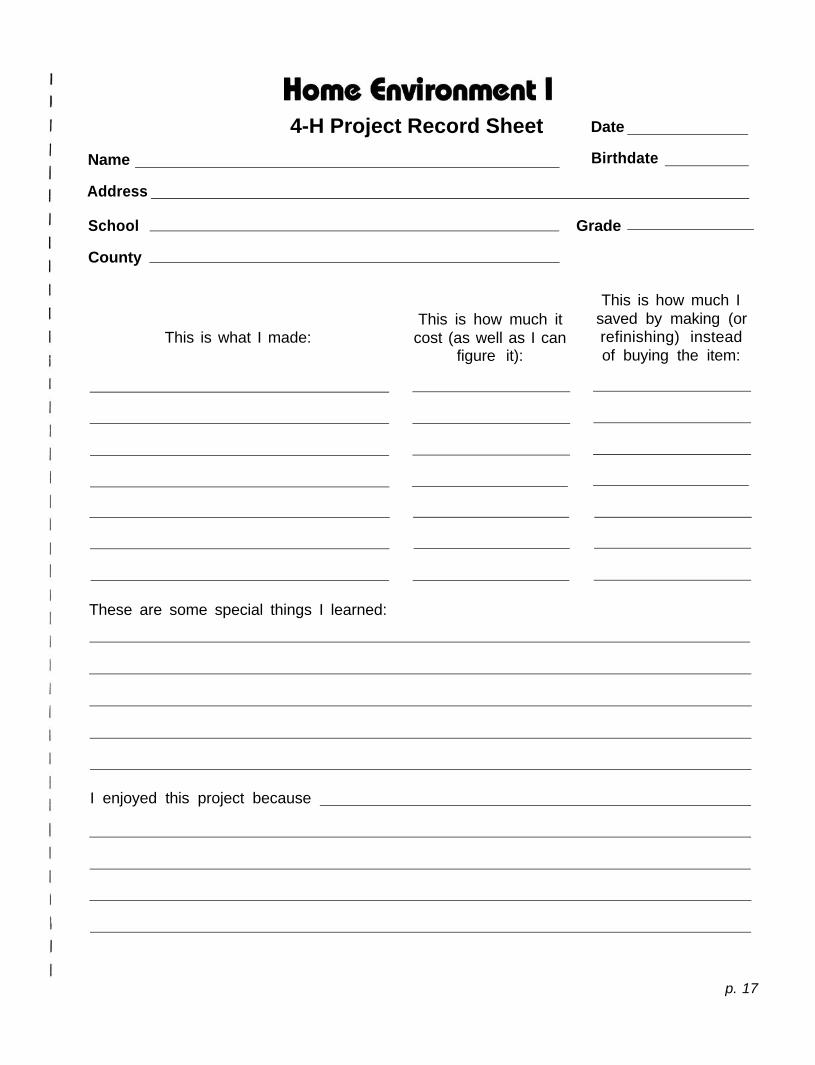
4-H Project Record Sheet Date
Birthdate
Grade
County
This is what I made:This is how much it
cost (as well as I canfigure it):
This is how much Isaved by making (orrefinishing) insteadof buying the item:
These are some special things I learned:
I enjoyed this project because
p. 17

Pictures of project activities or samples of fabrics or other materials used (add sheets ifnecessary)
p. 18

I gave the following demonstrations:
Topic or Title Place Given (club, fair, etc.) Date Given
I plan to and/or have exhibited home environment project(s) at:
Local 4-H Rally State Fair
County 4-H Rally Other events
County Fair
Area Events
This is how I have helped others with this project:
What I did Number Reached
List the awards you have won:
p. 19

(Add sheets if necessary)
Leader’s opinion of participant’s progress:
Excellent
Good
Would have been better if
Approved:Project Leader Parent
County Extension Agent
Educational programs of the Kentucky Cooperative Extension Service serve all people regardless of race, color, age, sex, religion, handicap, or national origin.
Issued in furtherance of Cooperative Extension work, Acts of May 8 and June 30,1914, in cooperation with the U.S. Department of Agriculture, C. Oran Little, Director Of CooperativeExtension Service, University of Kentucky College of Agriculture, Lexington, and Kentucky State University, Frankfort.
Issued 5-83; 19.5M to 1-90; 3M-6-91
Related Documents


