UNICORN Service Tool User Manual cytiva.com

Welcome message from author
This document is posted to help you gain knowledge. Please leave a comment to let me know what you think about it! Share it to your friends and learn new things together.
Transcript

Table of Contents
1 Introduction ........................................................................................................ 3
2 UNICORN Installation tab .................................................................................. 5
3 UNICORN Connection tab ................................................................................. 6
4 Database Server Connection tab ...................................................................... 12
5 Optional Databases ............................................................................................ 14
6 License Server Connection tab ......................................................................... 17
7 Active Directory® Connection tab .................................................................... 18
8 UNICORN online tab ........................................................................................... 19
9 Create System Report tab ................................................................................. 20
10 Process Status tab .............................................................................................. 21
11 Port check tab ..................................................................................................... 23
12 Computer HW/SW check tab ............................................................................. 28
13 Deployment tab .................................................................................................. 29
14 History Log tab .................................................................................................... 31
15 About tab ............................................................................................................. 32
Table of Contents
2 UNICORN Service Tool User Manual 29109881 AG
1 Introduction
Introduction to the UNICORN ServiceTool
The UNICORN™ Service Tool is used to troubleshoot and set parameters in an existingUNICORN installation. It can also be used to make sure that the operating systemenvironment is properly set up prior to installing UNICORN.
With the UNICORN Service Tool, it is possible to do the following:
• See a list of installed UNICORN components.
• Configure IP addresses of the Real-Time Unit (RTU).
• Test connection to a database server
• Test connection to a license server
• Manage processes needed by UNICORN
• Test communication ports
• Check if the computer and operating system settings fulfills the UNICORNspecifications
• See a log of all events registered by the UNICORN Service Tool
• Update RTU operating system and software
Typographical conventionsMenu commands, field names and other text items from the software are quotedexactly as they appear on the screen, in a bold italic typeface:
Example: Port check tab
Start UNICORN Service Tool
Step Action
1 Click the Windows® Start button.
2 Type UNICORN Service Tool in the Start menu search field.
3 Click the UNICORN Service Tool item that is displayed as the search resultto start the program.
The UNICORN Service Tool userinterface
The different functions of the UNICORN Service Tool are accessed by clicking the tabsof the UNICORN Service Tool window. There is a status pane in the lower part of thewindow.
1 Introduction
UNICORN Service Tool User Manual 29109881 AG 3
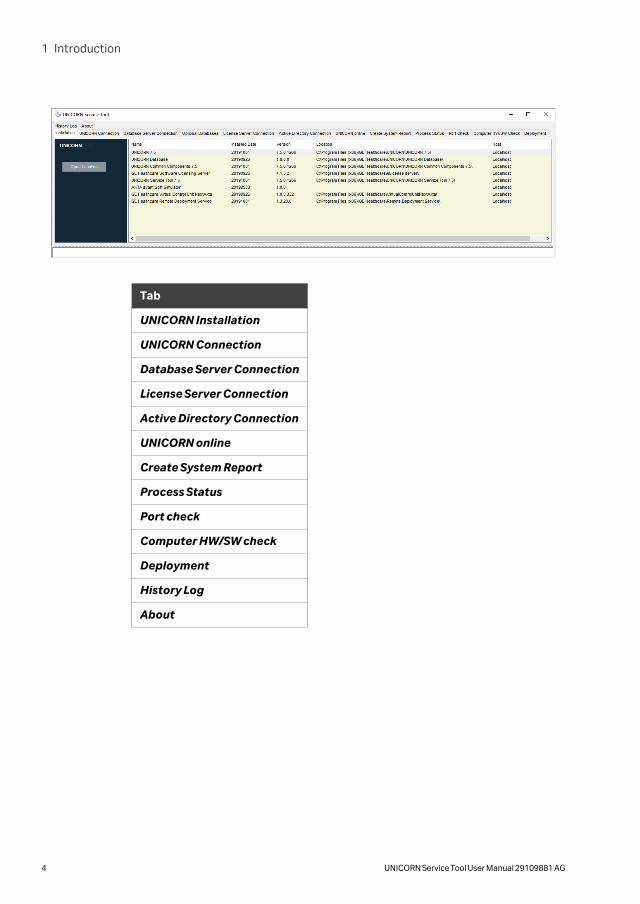
Tab
UNICORN Installation
UNICORN Connection
Database Server Connection
License Server Connection
Active Directory Connection
UNICORN online
Create System Report
Process Status
Port check
Computer HW/SW check
Deployment
History Log
About
1 Introduction
4 UNICORN Service Tool User Manual 29109881 AG
2 UNICORN Installation tab
IntroductionClick the UNICORN Installation tab to see a list of installed UNICORN components. Ifthe Service Tool is connected to an RTU, some installations can be followed by theirHost IP addresses.
Copy the list of installed UNICORNcomponents
Step Action
1 Right-click an item in the list.
2 Click:
• Copy to copy the selected rows to the Clipboard.or
• Copy Table to copy the entire list to the Clipboard.
Open an installation folder of aUNICORN component
The following steps are applicable for local installations only.
Step Action
1 Select an item in the list.
2 Click Open Location.
Result:
The installation folder of the selected item opens in Windows Explorer.
2 UNICORN Installation tab
UNICORN Service Tool User Manual 29109881 AG 5
3 UNICORN Connection tab
IntroductionSelect the UNICORN Connection tab to do the following:
• Configure network adapter to use to UNICORN control PC, database, and UNICORNclient communication
• Configure IP addresses of RTU
• Search for connected instruments
• Update RTU operating system and software
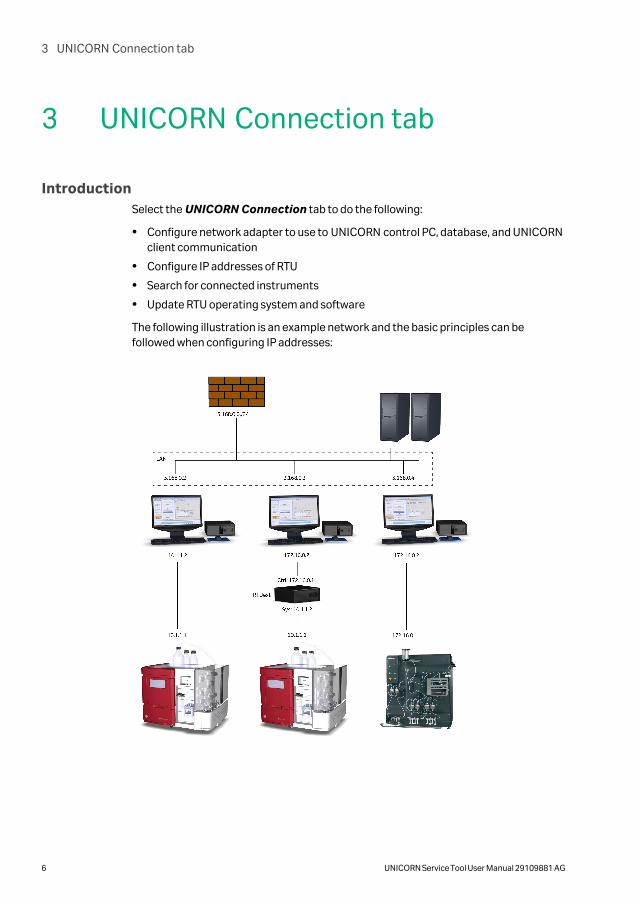
The following illustration is an example network and the basic principles can befollowed when configuring IP addresses:
3 UNICORN Connection tab
6 UNICORN Service Tool User Manual 29109881 AG
Configure UNICORN
If two or more network adapters are in use and the UNICORN Client software anddatabase are installed on different PC:s, make sure that the configured IP address ofthe UNICORN control PC, database, and UNICORN Client PC:s are on the same subnet.
UNICORN automatically selects an adapter for communication, but it is also possibleto select manually.
Step Action
1 Check the Manually select network adapter.
2 Select the network adapter that is on the same network as the UNICORNClient/Instrument server in the Network adapter(s) list under UNICORNclient/server connection.
3 Click Apply to configure UNICORN to use the selected network adapter.
RTU settings
The RTU has two network adapters. One connects the UNICORN control PC and theother connects the system. The Service Tool can be used to configure the IP addressesthat the RTU can have on these adapters.
The Network adapter(s) list under Real-Time Unit Settings contains the connectednetwork adapters to detect the RTUs. When a detected RTU is selected from this list,the following appear:
• A set of valid IP addresses to be used for UNICORN control PC communicationappears in the Real-Time Unit IP address - Ctrl list. The selected IP address mustbe on the same subnet as the network adapter on the UNICORN control PC used forsystem communication.
• A set of valid IP addresses to be used for system communication appears in theReal-Time Unit IP address - Sys list. The selected IP address must be on the samesubnet as the IP address of the system. The list appears disabled if only one IPaddress is available. The set of valid IP addresses are listed in the Service Toolconfiguration file.
Note: • The IP address of the RTU must be changed before changing the IPaddress of the local network adapter.
• If the IP address for UNICORN control PC is changed, the connection tothe RTU is lost until the local network adapter is updated to a matching IPaddress.
Step Action
1 Select an IP address for the UNICORN control PC communication from theRTU IP address - Ctrl list.
2 Optionally, select an IP address for system communication from the RTU IPaddress - Sys list.
3 UNICORN Connection tab
UNICORN Service Tool User Manual 29109881 AG 7
Step Action
3 Click Apply to configure the RTU.
Tip:
• If a system is connected prior to the IP address change, use the Editdialog to update the field RTU IP address for the system.
Update RTU operating system andsoftware
Do the following steps to update to new versions of the RTU operating system,software, and service packs:
Step Action
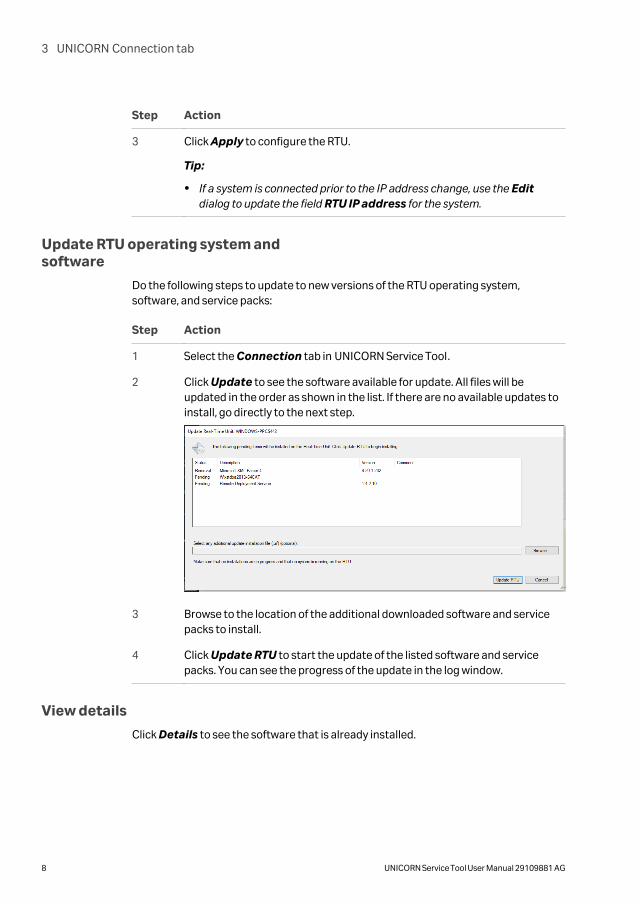
1 Select the Connection tab in UNICORN Service Tool.
2 Click Update to see the software available for update. All files will beupdated in the order as shown in the list. If there are no available updates toinstall, go directly to the next step.
3 Browse to the location of the additional downloaded software and servicepacks to install.
4 Click Update RTU to start the update of the listed software and servicepacks. You can see the progress of the update in the log window.
View details
Click Details to see the software that is already installed.
3 UNICORN Connection tab
8 UNICORN Service Tool User Manual 29109881 AG
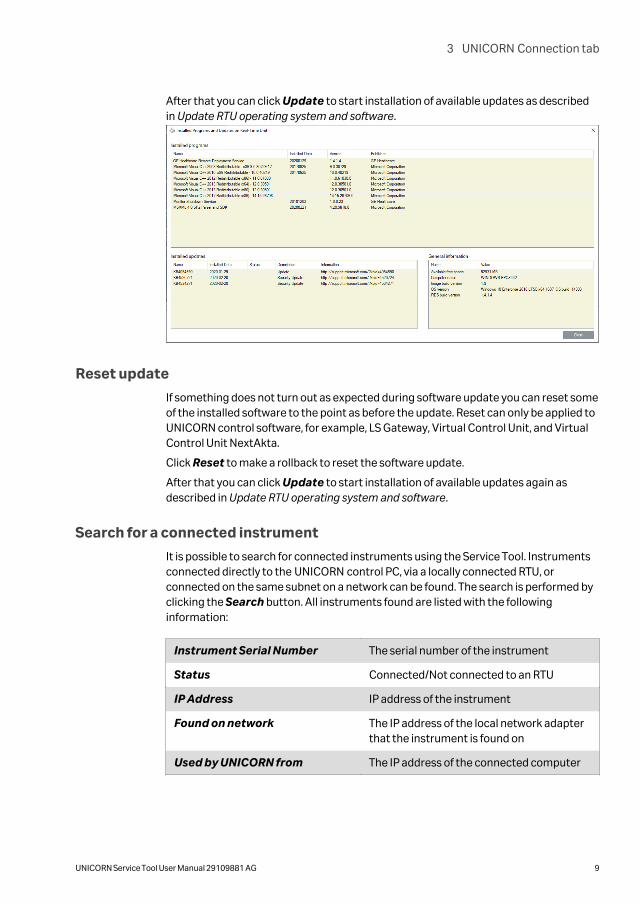
After that you can click Update to start installation of available updates as describedin Update RTU operating system and software.
Reset update
If something does not turn out as expected during software update you can reset someof the installed software to the point as before the update. Reset can only be applied toUNICORN control software, for example, LS Gateway, Virtual Control Unit, and VirtualControl Unit NextAkta.
Click Reset to make a rollback to reset the software update.
After that you can click Update to start installation of available updates again asdescribed in Update RTU operating system and software.
Search for a connected instrument
It is possible to search for connected instruments using the Service Tool. Instrumentsconnected directly to the UNICORN control PC, via a locally connected RTU, orconnected on the same subnet on a network can be found. The search is performed byclicking the Search button. All instruments found are listed with the followinginformation:
Instrument Serial Number The serial number of the instrument
Status Connected/Not connected to an RTU
IP Address IP address of the instrument
Found on network The IP address of the local network adapterthat the instrument is found on
Used by UNICORN from The IP address of the connected computer
3 UNICORN Connection tab
UNICORN Service Tool User Manual 29109881 AG 9

Step Action
1 Click Search to search for instruments connected to the selected networkadapter.
Result:
Connected instruments are listed in the Found instruments list.
Copy the list of connectedinstruments
Step Action
1 Right-click an item in the list.
2 Click:
a. Copy to copy the selected rows to the Clipboard.
b. Copy Table to copy the entire list to the Clipboard.
Configure instrument connectiontimeout
If the connected instrument keeps losing connection, configure the timeout period.
Note: Use higher timeout values for troubleshooting only. The default value is theonly recommended setting. Higher timeout values can result in delayeddisplay of events and response to commands.
Note: Change this setting only if all other issues, such as incorrectly setup firewall,have been ruled out.
Note: The settings are only valid on the UNICORN control PC.
Value Timeout period (s)
Low (default) 2
Medium 15
High 30
3 UNICORN Connection tab
10 UNICORN Service Tool User Manual 29109881 AG
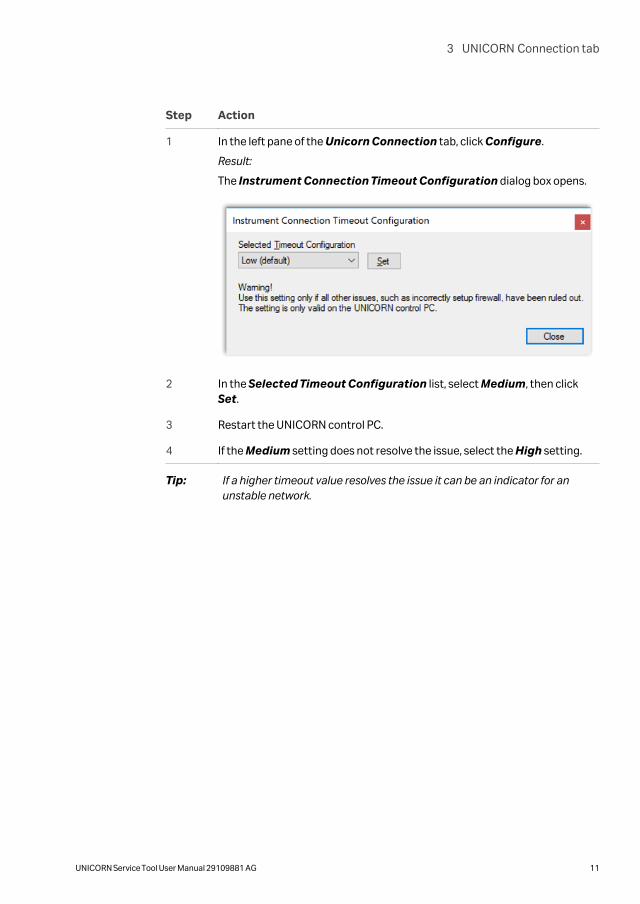
Step Action
1 In the left pane of the Unicorn Connection tab, click Configure.
Result:
The Instrument Connection Timeout Configuration dialog box opens.
2 In the Selected Timeout Configuration list, select Medium, then clickSet.
3 Restart the UNICORN control PC.
4 If the Medium setting does not resolve the issue, select the High setting.
Tip: If a higher timeout value resolves the issue it can be an indicator for anunstable network.
3 UNICORN Connection tab
UNICORN Service Tool User Manual 29109881 AG 11
4 Database Server Connection tab
IntroductionClick the Database Server Connection tab to search for UNICORN databases andconfigure UNICORN.
Search for UNICORN databasesClick Search for UNICORN databases to search for UNICORN databases on thenetwork.
Result:Found databases are listed in the box below the button. The lists Selectdatabase location and Select database name are populated with found databaselocations and database names.
Test database connectionClick Test Database Connection to test the connection to the selected database.
Result:If the database connection is successful, the icon to the right of the TestDatabase Connection button becomes green and the lower status pane is updatedwith the result of the test.
Configure UNICORN
Step Action
1 Select a database location in the Select database location list or enter thecomputer name where the database is located.
2 Select a database name in the Select database name list or enter adatabase name.
3 a. Turn on or turn off encrypted connection to the database by selecting orclearing the Encrypt connection check box.
b. If the database server does not have a trusted certificate issued by aCertificate Authority, select the Trust server certificate check box.This check box is selected by default.
Note:
The Trust server certificate check box is only available if the Encryptconnection check box is selected.
4 Click Configure UNICORN to configure UNICORN to use the selecteddatabase with the selected security options.
4 Database Server Connection tab
12 UNICORN Service Tool User Manual 29109881 AG
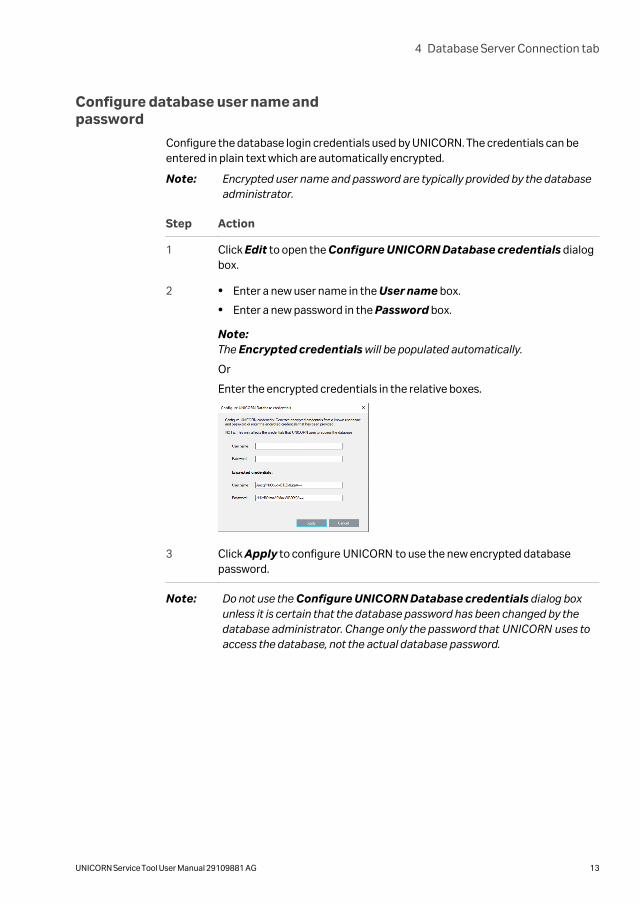
Configure database user name andpassword
Configure the database login credentials used by UNICORN. The credentials can beentered in plain text which are automatically encrypted.
Note: Encrypted user name and password are typically provided by the databaseadministrator.
Step Action
1 Click Edit to open the Configure UNICORN Database credentials dialogbox.
2 • Enter a new user name in the User name box.
• Enter a new password in the Password box.
Note:The Encrypted credentials will be populated automatically.
Or
Enter the encrypted credentials in the relative boxes.
3 Click Apply to configure UNICORN to use the new encrypted databasepassword.
Note: Do not use the Configure UNICORN Database credentials dialog boxunless it is certain that the database password has been changed by thedatabase administrator. Change only the password that UNICORN uses toaccess the database, not the actual database password.
4 Database Server Connection tab
UNICORN Service Tool User Manual 29109881 AG 13
5 Optional Databases
IntroductionOptional Databases tab is used to enable the function that allows the user to selectwhich database to log on to when starting UNICORN. The list of databases that can beselected when starting UNICORN is defined in this tab and UNICORN is configuredaccordingly.
Enable Optional Databases
Step Action
1 Enable or disable Optional Databases by selecting or deselecting theEnable Optional Databases check box.
2 Click the Apply button to validate and apply the change.
Test connectionClick Test Connection to test the connection to the selected database server.
Result:
If the database connection is successful, the little white circle next to the TestConnection button becomes green and the status pane next to it is updated with theresult of the test.
Define UNICORN databasesThe list of databases that can be selected when starting UNICORN can be defined inthe following ways:
• Automatic search for UNICORN Databases
• Default manual definition of UNICORN Databases
• Advanced manual definition of UNICORN Databases
Automatic search for UNICORNdatabases
Step Action
1 Click Search for UNICORN Databases to search for UNICORN Databaseson the network.
2 In the Select Databases To Add window, select databases and click Add.
5 Optional Databases
14 UNICORN Service Tool User Manual 29109881 AG
Default manual definition ofUNICORN databases
Step Action
1 Enter an alias in the Alias text box (optional).
2 Enter a server location in the Server text box, for example: LOCALHOST\UNICORN.
3 Click the Add button to add the database to the Optional Database List. Ifneeded, select databases from this list and click Remove to remove themfrom the list.
4 Click the Apply button to configure the UNICORN client with the addeddatabases.
Tip:Click Refresh to refresh the list.
Advanced manual definition ofUNICORN databases
Step Action
1 Select the Advanced check box.
2 Enter an alias in the Alias text box (optional).
3 Enter a server location in the Server text box, for example: LOCALHOST\UNICORN.
4 Enter a database name in the Database text box.
5 Enter a database user name in the User Name text box.
6 Enter the database user password in the Password text box.
Note:
The User Name and/or Password can be entered as either encrypted or inplain text.
5 Optional Databases
UNICORN Service Tool User Manual 29109881 AG 15
Step Action
7 • Turn on or turn off encrypted connection to the database by selecting orclearing the Encrypt connection check box.
• If the database server does not have a trusted certificate issued by aCertificate Authority, select the Trust server certificate check box. Thischeck box is by default selected.
Note:
The Trust server certificate check box appears available when theEncrypt connection check box is selected.
8 Click the Add button to add the database to the Optional Database List. Ifneeded, select databases from this list and click Remove to remove themfrom the list.
9 Click the Apply button to configure the UNICORN client with the addeddatabases.
Tip:Click Refresh to refresh the list.
5 Optional Databases
16 UNICORN Service Tool User Manual 29109881 AG
6 License Server Connection tab
IntroductionClick License Server Connection to search for a license server and configureUNICORN.
Search for license serverClick Search for Licenses to search for licenses on the selected computer and on thelocalhost.
Result: Found licenses are listed in the Found licenses box.
Open license file locationThere are two folders where the license files are stored.
• Click the upper Open Location button to open the folder, where the node lockedlicense files are stored, in Windows Explorer.
• Click the lower Open Location button to open the folder, where the concurrentlicense files are stored, in Windows Explorer.
Configure UNICORN
Step Action
1 Select a computer name in the Select or enter computer name list orenter the computer name where the license server is running.
2 Click Configure UNICORN to configure UNICORN to use the license serverrunning on the selected computer.
Note:
Any node locked license on the localhost is always available in UNICORN.
6 License Server Connection tab
UNICORN Service Tool User Manual 29109881 AG 17
7 Active Directory® Connection tab
IntroductionClick the Active Directory Connection tab to configure the connection betweenUNICORN and Active Directory®.
Test Active Directory connection
Step Action
1 Select an Active Directory in the list or enter an Active Directory name.
2 Click Test Connection to test the connection to the selected ActiveDirectory with the selected security options.
Result:
If the Active Directory connection is successful, the icon to the right of theTest Connection button becomes green.
Configure UNICORN
Step Action
1 Turn on or turn off encrypted connection to the Active Directory by selectingor clearing the Encrypt connection check box.
2 Enter a connection port in the Port box to be used for encrypted ActiveDirectory connection. The Default port is 636.
Note:
The Port box is only available if the Encrypt connection check box isselected.
3 Click Configure UNICORN to configure UNICORN to use the selectedsecurity options for the Active Directory connection.
7 Active Directory® Connection tab
18 UNICORN Service Tool User Manual 29109881 AG
8 UNICORN online tab
IntroductionClick the UNICORN online tab to manage and configure UNICORN online application.
Enable UNICORN online application
1. Enable or disable UNICORN online application by selecting or deselecting theEnable check box.
2. Click Configure UNICORN online button to validate and apply the change.
Change port number
1. If the default port number is used by another process, change it by editing the Portnumber text box.
2. Click the Configure UNICORN online button to validate and apply the change.
8 UNICORN online tab
UNICORN Service Tool User Manual 29109881 AG 19
9 Create System Report tab
IntroductionClick the Create System Report tab to create a system report including the currentUNICORN configuration settings. This can be used to troubleshoot the UNICORNinstallation.
Create System Report
Step Action
1 Type a description of the problem you are experiencing in the text box.
2 Click Create System Report.Result: The program starts to collect information about your currentoperating system and UNICORN configuration. This can take a few minutes.When the report file archive is created the Save System Report As dialogbox opens.
Result:
Click Create System Report.The program starts to collect information about your current operatingsystem and UNICORN configuration. This can take a few minutes. When thereport file archive is created the Save System Report As dialog box opens.
3 Click Save to save the system report file archive.
9 Create System Report tab
20 UNICORN Service Tool User Manual 29109881 AG
10 Process Status tab
IntroductionClick the Process Status tab to see the list of all the UNICORN related processes. Theprocesses can be started, stopped, registered, and unregistered in the Windowsregistry. If the Service Tool is connected to an EPC, some processes can be followed bytheir Host IP addresses.
Windows operating system settings for service startup timeout can beconfigured here.
Note: Not all operations are available for all processes.
Manage processes
Step Action
1 Select a process in the list.
2 Click Start, Stop, Register or Unregister. The available buttons depend onthe process and the status of the process.
Result:
The process Status changes and the lower pane is updated.
Note: The process named UNICORN can not be stopped from the UNICORNService Tool. Exit UNICORN to stop the process.
Configure Windows services startuptimeout
! IMPORTANT
This configuration is applicable for all the services, therefore the new configurationwill affect all the services.
Enter a startup timeout and click Configure.... This is to ensure that all the serviceshave enough time to start up before the operating system shuts them down for beingtoo slow.
By default the timeout is set to 30 seconds, but 120 seconds is recommended.
10 Process Status tab
UNICORN Service Tool User Manual 29109881 AG 21

10 Process Status tab
22 UNICORN Service Tool User Manual 29109881 AG
11 Port check tab
IntroductionThe port check is intended for checking if it is possible to communicate on ports used ina UNICORN network installation. The port check verifies that computers in the networkcan communicate using the selected ports.
The port check can also be done locally on a single computer. That is, the port check isset up as both client and server on the local computer. This verifies that local ports canbe used on the computer.
The Port check tabClick the Port check tab to see a list of ports used by UNICORN and to test theconnectivity of the ports.
See UNICORN Administration and Technical Manual for more information on portsused by UNICORN.
Test IP address
Before running a port check you can check that there is a connection between theclient and the server computer. The port checks cannot succeed if there is noconnection between the client and the server computer.
Step Action
1 Click the Client tab.
2 Click the network adapter you want to test in the Select adapter to use list.
3 a. Enter the server computer name in the Name of computer actingserver box or select a server from the list
and/or
b. enter the IP address in the IP address of computer acting server box.
4 Click Ping to test the IP address.Result: The status pane is updated with the result of the test.
Result:
Click Ping to test the IP address.The status pane is updated with the result of the test.
11 Port check tab
UNICORN Service Tool User Manual 29109881 AG 23
Step Action
5 If the IP address test is successful, the icon to the right of the IP address ofcomputer acting server box becomes green and the lower status pane isupdated with the result of the test.
If the IP address test is unsuccessful you must make sure that there is aconnection between the client and the server computer.
Test client and server ports
Follow the instructions to run a port check. If the server and client are on differentcomputers the port check must be run on both computers simultaneously.
Step Action
1 Click the Server tab.
2 Click the network adapter connected to the client computer in the Selectadapter to use list.
3 Select the ports to test by selecting the check boxes for the server ports inthe left pane.
4 Click Start port check.
5 Click the Client tab.
6 Click the network adapter connected to the server computer in the Selectadapter to use list.
7 Select the same ports that were selected on the Server tab by selecting thecheck boxes in the left pane.
8 Click Start port check.Result: The Status column is updated according to connection status andthe lower pane is updated with the result of the test.
Result:
Click Start port check.The Status column is updated according to connection status and the lowerpane is updated with the result of the test.
Note:
If the software asks you to stop a running service when performing a portcheck, stop the service in the Process Status tab and then click Start portcheck again.
11 Port check tab
24 UNICORN Service Tool User Manual 29109881 AG

Port check between computersDifferent computers can have different roles in the network. For example theUNICORN Software can be installed on one computer, the Database server on anotherand License Server on a third computer.
In the following example the Database Server is installed on one computer and theUNICORN Software is installed on a different computer. In order to successfullycomplete a port check you must first start a port check on the server computer andthen start a port check on the client computer.
Stage Description
1 Start a port check on the server computer.
2 Start a port check on the client computer.
3 The port check is successful if the port check on the client computer issuccessful.
Start port check on the servercomputer
Step Action
1 Start the UNICORN Service Tool on the Database server computer.
2 Click the Port check tab.
3 Click the Server tab.
4 Click the network adapter connected to the client computer in the Selectadapter to use list.Result: The Name of computer acting as server and IP address ofcomputer acting as server boxes are populated with the Database serverinformation. Copy this information for use in the client computer.
Result:
Click the network adapter connected to the client computer in the Selectadapter to use list.The Name of computer acting as server and IP address of computeracting as server boxes are populated with the Database serverinformation. Copy this information for use in the client computer.
11 Port check tab
UNICORN Service Tool User Manual 29109881 AG 25
Step Action
5 Select the SQL Database check box in the left list.Result: The right-hand list is populated with information on the ports andprocess needed for the SQL database.
Result:
Select the SQL Database check box in the left list.The right-hand list is populated with information on the ports and processneeded for the SQL database.
6 Click Start port check.
7 Wait for the processes to start and the Status change to Server →OK
Start port check on the clientcomputer
Step Action
1 Start the UNICORN Service Tool on the UNICORN Software computer.
2 Click the Port check tab.
3 Click the Client tab.
4 Click the network adapter connected to the server computer in the Selectadapter to use list.
5 a. Enter the server computer name in the Name of computer actingserver field or select a server from the list
and/or
b. enter the IP address in the IP address of computer acting server.
Note:
Copy the computer name and IP address from the server computer.
6 Click Ping to test the IP address.
Note:
The port checks only succeed if there is a connection between the clientcomputer and the server computer.
Result:
The status pane is updated with the result of the test.
Continue to the next step if the ping test result is successful.
11 Port check tab
26 UNICORN Service Tool User Manual 29109881 AG
Step Action
7 Select SQL database in the left-hand list.Result: The right-hand list is populated with information on the ports used bythe SQL database.
Result:
Select SQL database in the left-hand list.The right-hand list is populated with information on the ports used by theSQL database.
8 Click Start port check.
9 Wait for the processes to start and for the Status to change to Client →OK.
Note:
If the port is not available the client side will show Client →Error. If, duringthe the port check, the port becomes available the Status changes to Client→OK.
10 Click Stop to stop the port check.
11 Click Stop in the Port check tab on the server computer to stop the portcheck.
11 Port check tab
UNICORN Service Tool User Manual 29109881 AG 27
12 Computer HW/SW check tab
IntroductionClick the Computer HW/SW check tab to see lists of operating system and computerhardware recommendations and requirements. There are three different lists, one listfor each installation type. The full UNICORN installation requirements are checked byselecting all three lists.
• UNICORN Software
• Database Server
• License Server
Check installation recommendationsSelect the check box for an installation type.
Note: Select Full installation to check all three installation lists.
Result: The right-hand list is populated with the recommendations for the selectedinstallation type. The UNICORN Service Tool checks the current computerspecifications against the requirements and advice user action if needed.
List of recommendations andspecifications
The Status column for each item shows OK if the recommendation is fulfilled. If aspecification is not fulfilled the Status column shows Warning or Error.Recommended user action is showed in the Specification column.
Note: The list is updated when the installation type check box is selected. Clearand select the check box to update the list.
12 Computer HW/SW check tab
28 UNICORN Service Tool User Manual 29109881 AG
13 Deployment tab
IntroductionThe Deployment tab displays related information regarding the available hosts withinthe network using UNICORN 7.4 or later releases.
Export selected hosts
Perform these steps if you want to save information related to some hosts and laterimport them to another UNICORN Service Tool.
Step Action
1 Select multiple hosts (Ctrl + left-click).
2 Right-click and select Export selected hosts.
3 Select a location for the file to be saved and then click Save.
Add known host
Step Action
1 Right-click and select Add known host.
2 Enter Host name / IP address and click Add.
Result:The host is added to the list.
Import known hosts
Step Action
1 Right-click and select Import known hosts.
2 Locate the file created in Export selected hosts, on page 29, and click Open.
Result:The hosts listed in the file are added in the list of hosts in the Deploymenttab.
13 Deployment tab
UNICORN Service Tool User Manual 29109881 AG 29

Remove selected hosts
Step Action
1 Right-click a host and select Remove selected hosts.
Result:The selected host is removed from the list.
Note:Hosts that are online will reappear.
13 Deployment tab
30 UNICORN Service Tool User Manual 29109881 AG
14 History Log tab
IntroductionClick the History Log tab to see all events registered by the UNICORN Service Tool.
Use the History Log filter
Use the History Log filter to easier find UNICORN Service Tool events.
Step Action
1 Select the Use Filter check box.
Result:
Four more lists become available.
2 Click Level and select or clear the types of Level events to filter by.
3 Click Category and select or clear the types of Category events to filter by.
4 Click Start time to filter by events after a specific date and time.
5 Click End time to filter by events before a specific date and time.
6 Click outside the lists to apply the filter.
14 History Log tab
UNICORN Service Tool User Manual 29109881 AG 31

15 About tab
The About tabClick the About tab to see detailed information on the UNICORN Service Tool. Accessthis manual by clicking Show Help.
Note: This manual is also accessible by pressing F1 in any tab.
15 About tab
32 UNICORN Service Tool User Manual 29109881 AG

www.cytiva.com/unicorn
Cytiva and the Drop logo are trademarks of Global Life Sciences IP Holdco LLC or an affiliate.
UNICORN is a trademark of Global Life Sciences Solutions USA LLC or an affiliate doing business asCytiva.
Windows and Active Directory are registered trademarks of Microsoft Corporation.
All other third-party trademarks are the property of their respective owners.
© 2020 Cytiva
UNICORN © 2020 Cytiva
Any use of UNICORN is subject to Cytiva Standard Software End-User License Agreement for LifeSciences Software Products. A copy of this Standard Software End-User License Agreement is availableon request.
All goods and services are sold subject to the terms and conditions of sale of the supplying companyoperating within the Cytiva business. A copy of those terms and conditions is available on request.Contact your local Cytiva representative for the most current information.
For local office contact information, visit www.cytiva.com/contact
29109881 AG V:9 04/2020
Related Documents