Underwater Hockey Beginner‟s Guide

Welcome message from author
This document is posted to help you gain knowledge. Please leave a comment to let me know what you think about it! Share it to your friends and learn new things together.
Transcript
8/7/2019 Underwater Hockey Beginner's Guide
http://slidepdf.com/reader/full/underwater-hockey-beginners-guide 1/55
Underwater Hockey Beginner‟s Guide

8/7/2019 Underwater Hockey Beginner's Guide
http://slidepdf.com/reader/full/underwater-hockey-beginners-guide 2/55
2
Table of Contents
Underwater Hockey Beginner‟s Guide ............................................................................... 3
What is Underwater Hockey? ......................................................................................... 3
Equipment ....................................................................................................................... 4Individual Skills .............................................................................................................. 7
Fitness ......................................................................................................................... 7
Puck Handling ............................................................................................................. 9The Three Levels of Puck Handling ..................................................................... 10
Puck Rolling.......................................................................................................... 11
Body Position vs. Puck Position ............................................................................... 14
Curling ...................................................................................................................... 17Shooting .................................................................................................................... 20
Underwater Hockey Positions ....................................................................................... 22
Forwards ................................................................................................................... 22
Mids .......................................................................................................................... 22Backs ......................................................................................................................... 23
Underwater Hockey Formations ................................................................................... 25Underwater Hockey Zones ........................................................................................... 26
Defensive Zone ......................................................................................................... 27
Offensive Zone.......................................................................................................... 27
Positioning In the Water ............................................................................................... 28Forwards in the 3-3 ................................................................................................... 28
Backs in the 3-3 ........................................................................................................ 30
Positioning While Passing ........................................................................................ 33Positioning When Attempting To Stop A Goal ........................................................ 35
Positioning When Attempting To Score A Goal ...................................................... 37
Forwards ............................................................................................................... 37
Backs ..................................................................................................................... 37Positioning On the Strike .......................................................................................... 37
Positioning On an Equal Puck .................................................................................. 40
Positioning On an Advantage Puck .......................................................................... 42Positioning On a Penalty Shot .................................................................................. 44
Scoring a Goal............................................................................................................... 45
Subbing Out .................................................................................................................. 46
Cycling and Breakaways............................................................................................... 47How to Execute Correctly in a Two on One Situation ................................................. 48
(As the Receiver) Reduce the DSZ by positioning your body: ................................ 49
(As the Passer) Get the puck past the stick: .............................................................. 50How to Execute Correctly in a Two on Two Situation ................................................. 52
Set Play ......................................................................................................................... 55
8/7/2019 Underwater Hockey Beginner's Guide
http://slidepdf.com/reader/full/underwater-hockey-beginners-guide 3/55
3
Underwater Hockey Beginner‟s Guide
What is Underwater Hockey?
Underwater hockey is a fun, fast, three-dimensional game. The game is played on thebottom of a pool and playing quickly builds swimming and free diving capability. Players
wear fins, mask, snorkel, and a protective glove and headgear (the same kind as for water
polo).
Two teams of six players face off against each other. The puck rests on the bottom of the
playing area, and the two teams vie to control the puck and put it into their opponent‟s
goal, which also resides on the bottom of the playing area.
The playing area is roughly 25m long by 15m wide and optimally 2.5m deep. There is a
goal at each end of the playing area, which is a metal trough about 10 feet across.
The puck starts in the center of the playing area, and once a tone strikes indicating play
has begun, both teams race from opposite walls to the center area and attempt to gainpossession of the puck and then go on and score a goal.
The stick is short, approximately 1 foot long and made of wood or plastic polymer, and
carried in one hand. The puck is heavy, around 3 lb. and coated with a protective layer of
hard plastic.
The object of the game is to put the puck in the opposition's goal. To do this a team must
work together, for one person cannot feasibly score a goal alone. There are a variety of
strategies and formats teams play to be most effective.
Play and strategy is similar to soccer or ice hockey except that the playing surface is at
the bottom of a pool. The rules are "non-contact" and players generally cover zonesaround the puck. Success ultimately depends on teamwork, since no single person can
hold his or her breath forever.
8/7/2019 Underwater Hockey Beginner's Guide
http://slidepdf.com/reader/full/underwater-hockey-beginners-guide 4/55
4
Equipment
Taken from the International Rules for Underwater Hockey, 8th
Edition:
“Each player shall be equipped with a mask, which must have safety glass or other safetymaterial fitter; a non-metal, pliable snorkel; a pair of conventional underwater hockey
fins (made of rubber or other non-dangerous pliable synthetic material, excluding
fiberglass) which is approved by the CMAS Underwater Hockey Commission; handprotection for the playing hand(s), and an underwater hockey stick. Head Caps with firm
polyethylene or rubber ear protectors must be worn.”
MaskThe mask must be a dual lens mask unless it has a center divider/support that is part of
the frame of the mask. You want a low volume mask, both for visibility and to decrease
the chance of it flooding if it gets bumped. A low volume mask also will provide lessdrag underwater, increasing your speed.
Snorkel
The most important thing is to get a snorkel with a soft mouthpiece so it doesn't hurt yourteeth if it gets hit. Purges are fine; just make sure they are soft purges. Don't spend too
much money on the snorkel as most players end up cutting the top 2-3" off of the snorkel
to reduce the drag and make it easier to clear. Some of the really cheaper snorkels fromSports Authority and similar places are too constricted for hockey. Make sure you can fit
your thumb into the top of the snorkel; otherwise the opening is too small. Make sure that
the inside of the snorkel is uniform and doesn't have a connector that constricts where the
two parts join. Another good idea would be to get a snorkel with a slender profile toreduce drag and vibration.
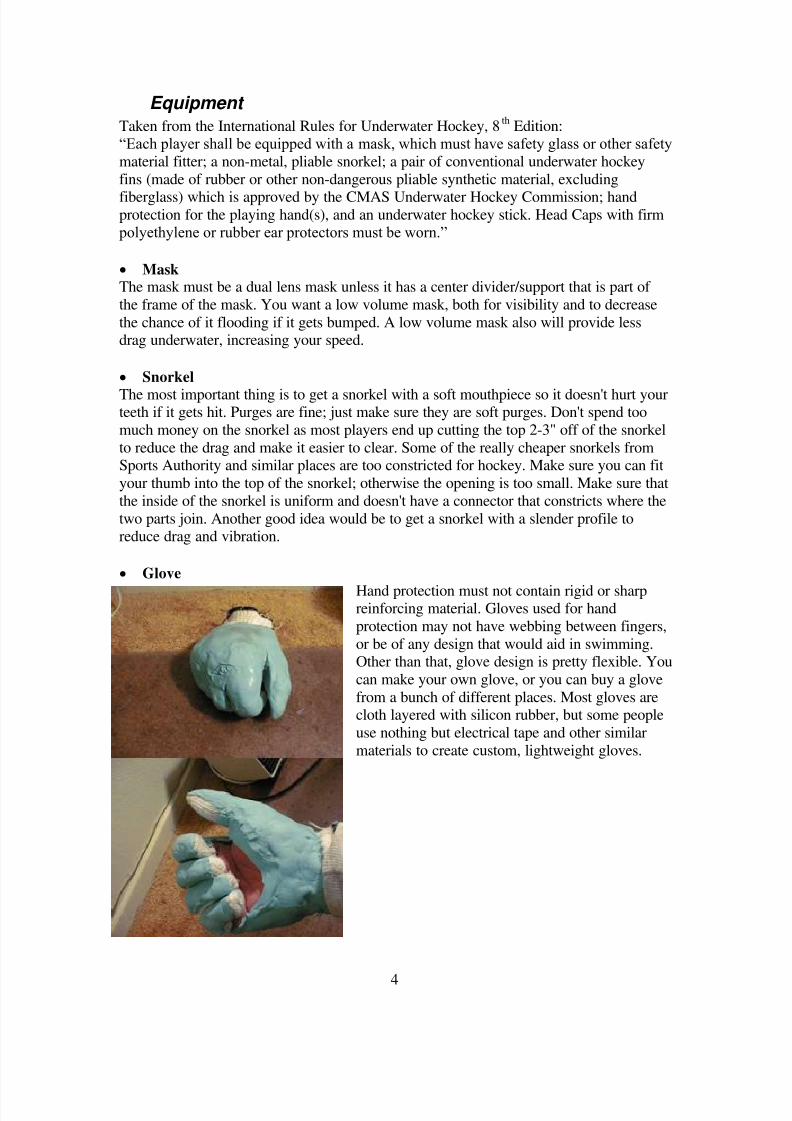
Glove
Hand protection must not contain rigid or sharpreinforcing material. Gloves used for hand
protection may not have webbing between fingers,
or be of any design that would aid in swimming.Other than that, glove design is pretty flexible. You
can make your own glove, or you can buy a glove
from a bunch of different places. Most gloves arecloth layered with silicon rubber, but some people
use nothing but electrical tape and other similar
materials to create custom, lightweight gloves.
8/7/2019 Underwater Hockey Beginner's Guide
http://slidepdf.com/reader/full/underwater-hockey-beginners-guide 5/55
5
FinsIf you are going to pick one area to spend the extra money and get quality gear this is it.
There are lots of different makes and models of fins out there but many of them do not
work for Underwater Hockey.
You definitely want to get full foot fins vs. the open heel scuba type. The short
swimmer's fins and really long free diving fins are not good for underwater hockey.
One factor that makes the purchasing decision more difficult is what your skill level is
now and what it will be later. Similar to buying skis where you don't want to buy ones
that are too long now but too short later as you get better, if you are new to finswimming, you don't want to buy fins that are too stiff now or too soft later. Some
beginners who have not mastered fin swimming buy fins that are too stiff for them and
end up spending all their time and Oxygen struggling with fins as they try to get to the
puck. On the other hand, excellent fin swimmers can be handicapped by the quality of their fins.
If you are new to fin swimming, you should probably be conservative and get a pair of that are a bit smaller and easier to learn with. This way you can focus on learning hockey
instead of struggling with your fins.
8/7/2019 Underwater Hockey Beginner's Guide
http://slidepdf.com/reader/full/underwater-hockey-beginners-guide 6/55
6
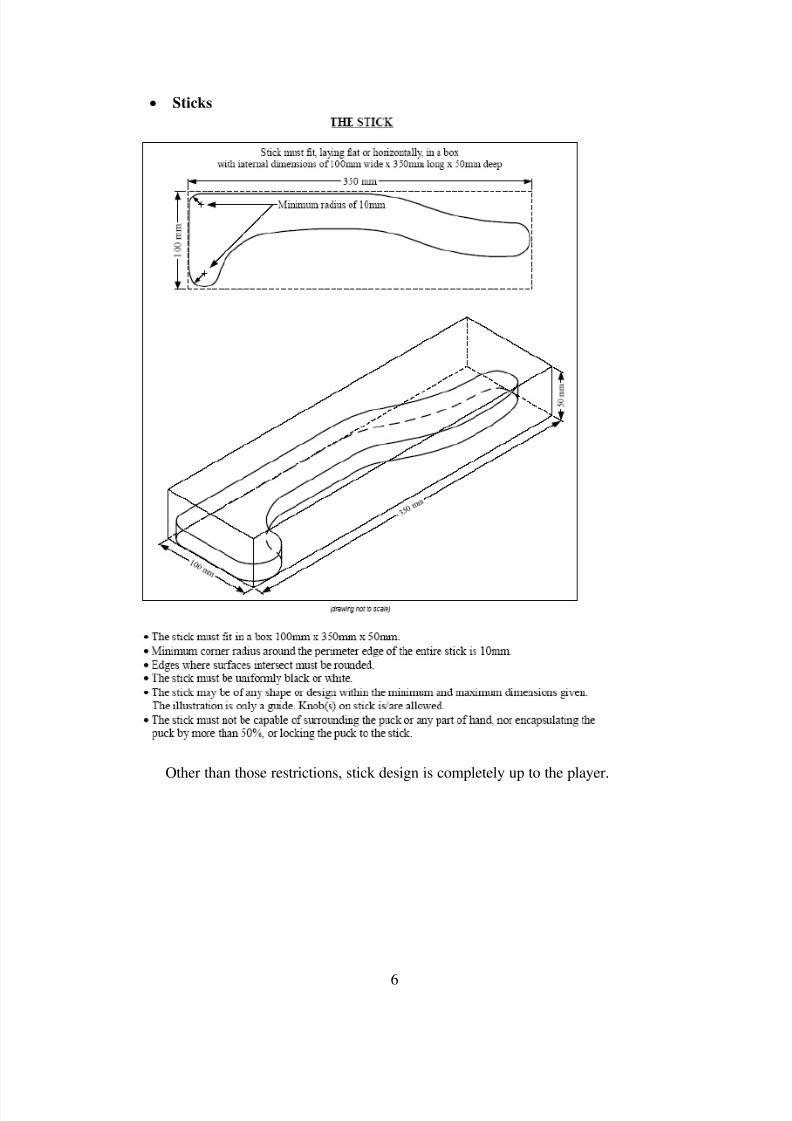
Sticks
Other than those restrictions, stick design is completely up to the player.
8/7/2019 Underwater Hockey Beginner's Guide
http://slidepdf.com/reader/full/underwater-hockey-beginners-guide 7/55
7
Individual Skills
Fitness
You can‟t execute anything without a little of this so get out and swim, run, bike, play or whatever turns your crank. Working out will improve your ability to play hockey, and
hockey will improve your ability to work out.
For the player who wants to concentrate on hockey related fitness, there is a whole
language of acronyms that have been devised to describe hockey workouts.
All of these are done with fins, masks, and snorkels.
BOGDAT (Breathe Once Go Down And Touch).Kick off the wall, breathe once, go to the bottom, touch, come to the surface, breath once,
and go back down. Usually these are done as 100's, but try a 25 and build up to 100's.
These can be done as sprints or simply as a breathe control exercise.
HUHO (Half Under Half Over)From the wall, start underwater and swim to the middle of the pool. Surface in the middle
of the pool and finish your lap on the surface. Turn around and repeat.
These are almost always done as a sprint.
HOHU (Half Over Half Under)From the wall, swim to the middle of the pool on the surface. Once you get to the middle,
finish your lap underwater.
These are slightly harder than HUHO's, and if you're keeping track of your times you
should notice slightly slower times.
UOUO (Under-Over Under-Over)The 1
stlap is underwater, the 2
ndlap is on the surface. Definitely not something you
should just jump right into. Get a good warm-up before you start on these.
OUOU (Over-Under Over-Under)The 1st lap is on the surface, the 2nd lap is underwater. Definitely not something you
should just jump right into. Get a good warm-up before you start on these.
These are slightly harder than UOUO‟s, and if you're keeping track of your times you
should notice slightly slower times.
FU (Full Under)
8/7/2019 Underwater Hockey Beginner's Guide
http://slidepdf.com/reader/full/underwater-hockey-beginners-guide 8/55
8
You are underwater from wall to wall. Once you reach a wall, you can stop and
breathe as much as you like, but the more you breathe the slower these go. These areusually done as 100's but can be done at any length.
ASAP (As Slow As Possible)
Swim a full lap underwater as slow as possible. Usually done is a set, with each lengthlonger on the clock. So 5x25 ASAP, forcing each underwater time longer than the last.
Doing these (and FU's) requires you to really relax and calm down your heart rate and
breathing process.
8/7/2019 Underwater Hockey Beginner's Guide
http://slidepdf.com/reader/full/underwater-hockey-beginners-guide 9/55
9
Puck Handling
(Most of this content was stolen liberally from Roger Kemp‟s Puck Handling Guide)
Puck handling – one of the most basic and important skills you can master as an
underwater hockey player. If you cannot control the puck you cannot excel at hockey.
Luckily, puck handling is a skill you do not need to be in the water to master.
With all the following drills, you can grab a puck or a tuna can and practice these drills in
your living room. Practice these drills until you get to the point where you can master themovements without looking at the puck.
It also helps to be laying flat over the puck while doing these drills, to simulate
swimming underwater. Lie down on a stack of pillows, a bench, or something else toprop up your chest so you can hover over the puck and practice your stick work.
Remember there are many playing surfaces to your stick, not just the front blade. Learn
to use the sides and back of your stick as an effective weapon while you play.
In order to have success with the puck movement skills described below it is important torelax your arm and shoulder as you do them. Don't keep your arm stiff. When an
opposing player tries to punch the puck off your stick as you execute these skills, your
whole arm will give in with the motion. The result of this is that you end up with your
stick still on the puck, simply in a new position.
8/7/2019 Underwater Hockey Beginner's Guide
http://slidepdf.com/reader/full/underwater-hockey-beginners-guide 10/55
10
The Three Levels of Puck Handling
There are three basic levels of puck handling that underwater hockey players learn as wedevelop. I will describe all three levels and focus on the second and third levels, which
most players should practice in order to advance their game.
The first level we learn is puck protection using the back of the blade. We discover thatby keeping the puck on the back of the blade and close to the body we can shield it from
the opposition and execute several different under-the-body back moves. In order to
succeed at this, it is necessary to keep your head and shoulders close to the pool bottomto prevent opposing players from reaching in. Because of this, your vision of teammates
is restricted, making this an individual mode of play.
The second level of play is to be able to control the puck on the front of the blade. This isdescribed in more detail below. The overall effect of playing in this style is that your
body is higher off the pool bottom allowing you to always have a view of both the
opposition and your teammates. This allows you to play as a better team player.
The third level of play is to be able to control the puck on the front and back of the stick interchangeably by rolling. This level of play marks the transition from what I call "push
hockey" to "pull hockey". In the beginning, we all find success by pushing the puck
through the opposition and knocking it off their sticks. We can only get so far by doingthis. Once we can pull the puck away from the opposition and advance it all in one
motion (through rolling the puck) we are playing pull-hockey. Playing in this fashion
requires less brute strength and uses more finesse. In essence, the most efficient style of play is one where you make subtle puck moves rather relying on your strength to push
your way through the opposition.
Front of Stick:
Being able to control the puck on the front of the stick in any situation is a fundamentalskill that every player should practice. Some of the benefits of this skill are:
1. You can keep your head up and your chest high off the pool bottom, thereby
improving your vision. This simple attribute is what distinguishes the topplaymakers in the game from the rest.
2. With the puck on the front of the stick, it is possible to flick the puck immediately
when in danger. You don't have the delay associated with moving the puck from
the back of the stick to a shooting position.
3. You can shield the puck without having to drop your head and upper body. You
are also more likely to retain the puck if someone manages to poke check you.
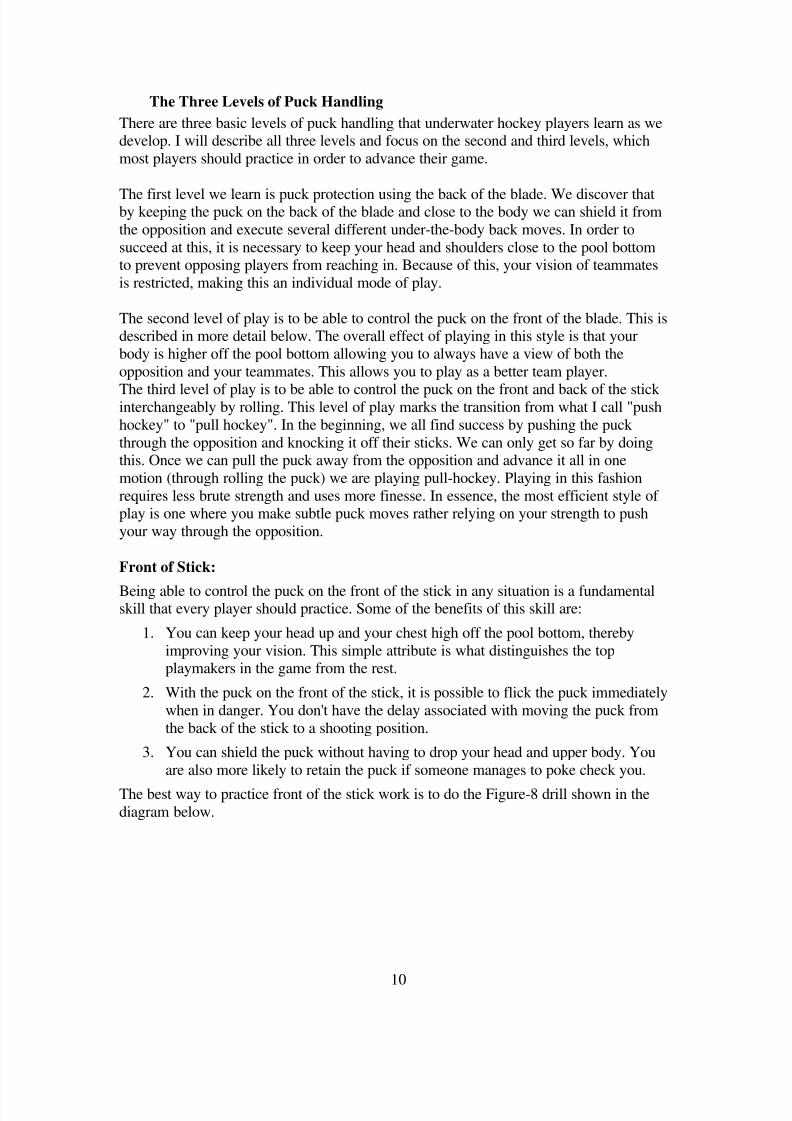
The best way to practice front of the stick work is to do the Figure-8 drill shown in the
diagram below.
8/7/2019 Underwater Hockey Beginner's Guide
http://slidepdf.com/reader/full/underwater-hockey-beginners-guide 11/55
11
In the Figure-8 drill, you move the puck in front of your body, from side to side. When
practicing this skill, exaggerate the puck movement by moving the puck from the right of your right shoulder all the way past your left shoulder. Don't rotate your torso in order to
get the puck to the extreme left. Keep your shoulders square with the pool bottom.
There are a few elements of the drill that are unfamiliar to many players.
Then you reach point (A), you'll need to release your grip on your stick somewhat. You'll end up holding your stick by only your thumb and forefinger at
this point. It helps if you have your forefinger attached to your stick with an
elastic band. This will allow you pivot your stick around your finger without
losing it.
At point (B) you need to "break" your wrist so that your knuckles start to point
towards-you. The stick will rest in your fingers and no longer rest in your palm. The hardest parts of the drill are the transitions from (A-C) and particularly (B-C).
When moving the puck from (B-C), the front of your blade and knuckles end up
pointing towards your body.
Some of the important elements to concentrate on in this drill are:
1. Keep the puck on the front surface of your blade. Don't turn your stick on edge sothat the top face ends up playing the puck.
2. Make sure the puck moves all the way past your left shoulder without resorting to
rotating your torso. Move it past your right shoulder by relaxing your grip on your
stick.
3. Adjust your grip on your stick at each extreme.
---------- * This document is written from the perspective of a right-hander * ---------
Once you can do the drill comfortably, speed up the motion and do not look at the puck.
Add motion to the drill by swimming diagonally left and right while doing the drill.
Puck Rolling
8/7/2019 Underwater Hockey Beginner's Guide
http://slidepdf.com/reader/full/underwater-hockey-beginners-guide 12/55
12
Puck Rolling is the skill of „rolling‟ the puck from the front of the stick onto the
back portion of the stick and then back again, without having the stick or the puck comeoff the bottom of the pool.
Many players already incorporate some amount of puck rolling in their games. There are
many different skills that are improved by adding puck rolling to them (curling, checking,
puck protection, etc.) The main benefits of using puck rolling as part of your game are:
1. It causes opponents to misjudge your intentions.
2. It allows you to execute maneuvers quickly and efficiently.
3. It allows you to shield the puck.
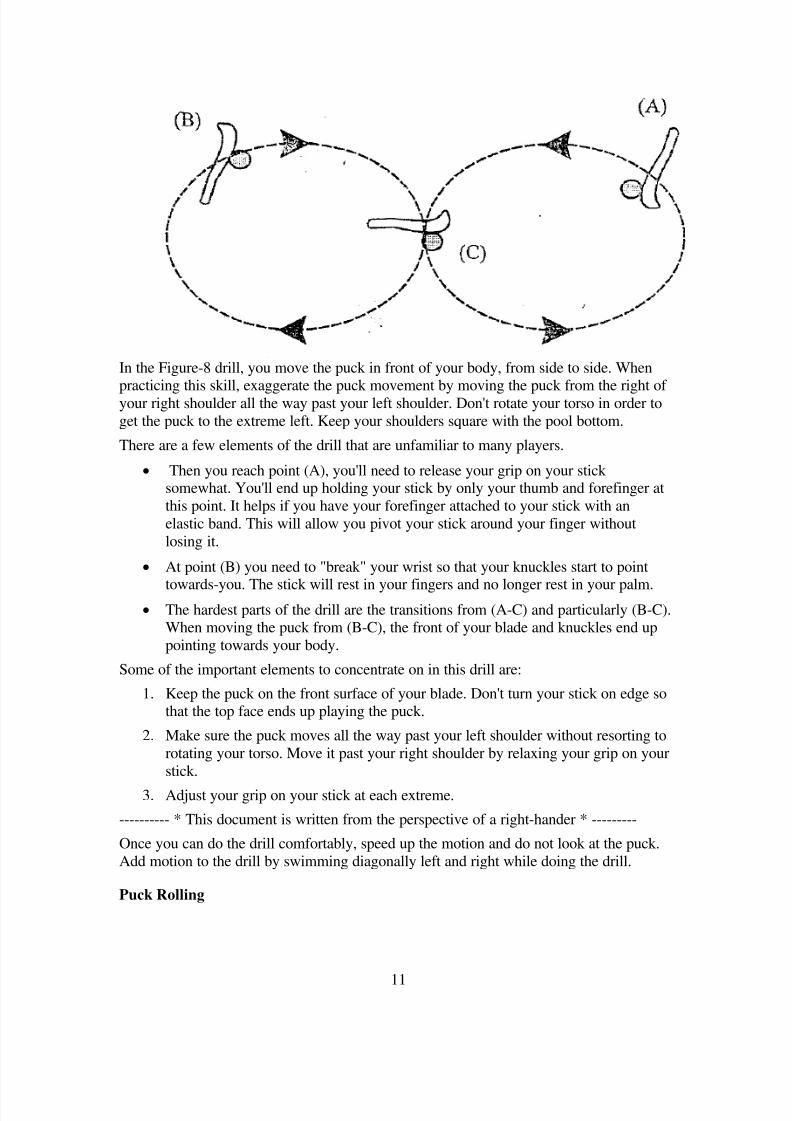
The simplest motion to practice is to roll the puck from side to side:
Important points to remember when doing this skill:1. The puck should never leave the blade.
2. It is important to put a hard spin on the puck. This forces the puck to stick on the
pool bottom and prevents it from flipping on its edge as you drag it across.
Practice this motion so that you can execute it quickly without looking at the puck. Youcan add this skill to your game by rolling the puck from the back of the blade to front
while curling, checking opponents by pulling the puck away, and executing quick left and
right changes of direction.
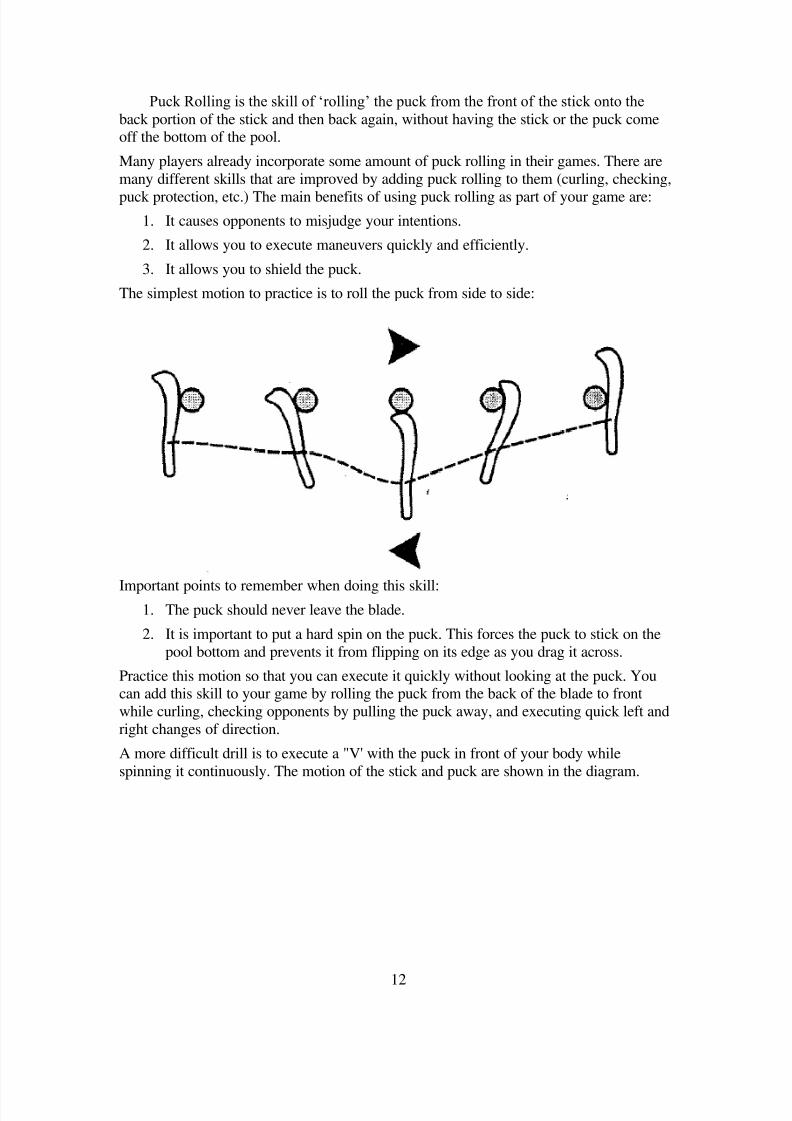
A more difficult drill is to execute a "V' with the puck in front of your body while
spinning it continuously. The motion of the stick and puck are shown in the diagram.
8/7/2019 Underwater Hockey Beginner's Guide
http://slidepdf.com/reader/full/underwater-hockey-beginners-guide 13/55
13
Important things to remember when doing this drill:
1. Do not lift your stick off the pool bottom. There is a naturally tendency to do so atpoints (A) and (B). Concentrate on keeping the tip of the stick on the bottom andfeel the puck roll around it.
2. If you have an extreme hook on your stick you'll have to break your wrist more to
keep the puck from spinning away.
3. The transition from (B) to the center is the hardest part of the skill. You really
need to stretch your arm to reach around the puck and bring it back. If you do not
reach far enough you will end up pulling the puck to your left hip instead of back to the center. Also, if you do not spin the puck hard enough in this transition, it
will merely sit still and you end simply pivoting around the puck. This leaves you
vulnerable to a check. Make sure the puck moves at least 15-20cm in the (B) tocenter transition.
Practice this drill slowly at first concentrating on your form. Once you can do it without
looking at the puck, execute the drill while swimming. Pick a pair of lines on the pool
bottom that are about two meters apart. Starting between the lines, swim diagonal cutsback and forth, rolling the puck as you go. Make sure each diagonal cut spans the 2-meter
width.
8/7/2019 Underwater Hockey Beginner's Guide
http://slidepdf.com/reader/full/underwater-hockey-beginners-guide 14/55
14
Body Position vs. Puck Position
After mastering all the puck drills mentioned above, you should be able to swim with the
puck on either the front or back of your stick, in front or behind your head, and on yourleft or right side. Moving the puck in relation to your opponents is vital to maintaining
possession and advancing the puck.
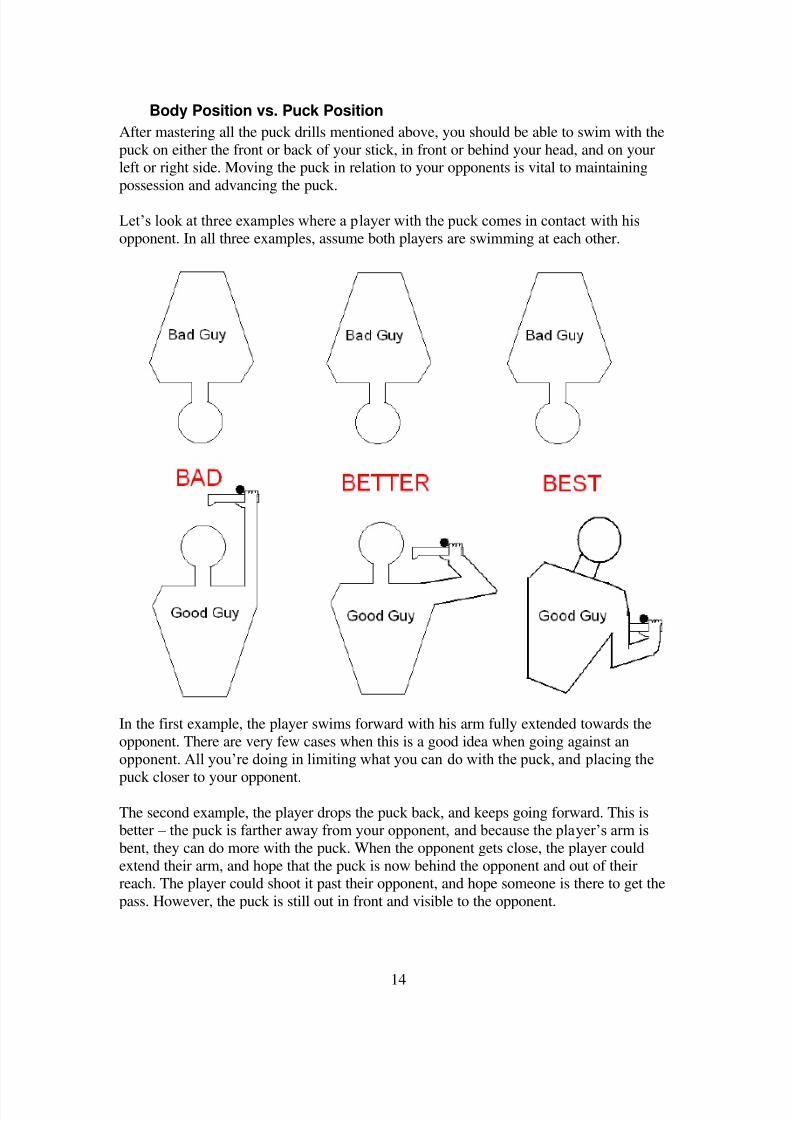
Let‟s look at three examples where a player with the puck comes in contact with hisopponent. In all three examples, assume both players are swimming at each other.
In the first example, the player swims forward with his arm fully extended towards the
opponent. There are very few cases when this is a good idea when going against an
opponent. All you‟re doing in limiting what you can do with the puck, and placing thepuck closer to your opponent.
The second example, the player drops the puck back, and keeps going forward. This isbetter – the puck is farther away from your opponent, and because the player‟s arm isbent, they can do more with the puck. When the opponent gets close, the player could
extend their arm, and hope that the puck is now behind the opponent and out of theirreach. The player could shoot it past their opponent, and hope someone is there to get the
pass. However, the puck is still out in front and visible to the opponent.
8/7/2019 Underwater Hockey Beginner's Guide
http://slidepdf.com/reader/full/underwater-hockey-beginners-guide 15/55
15
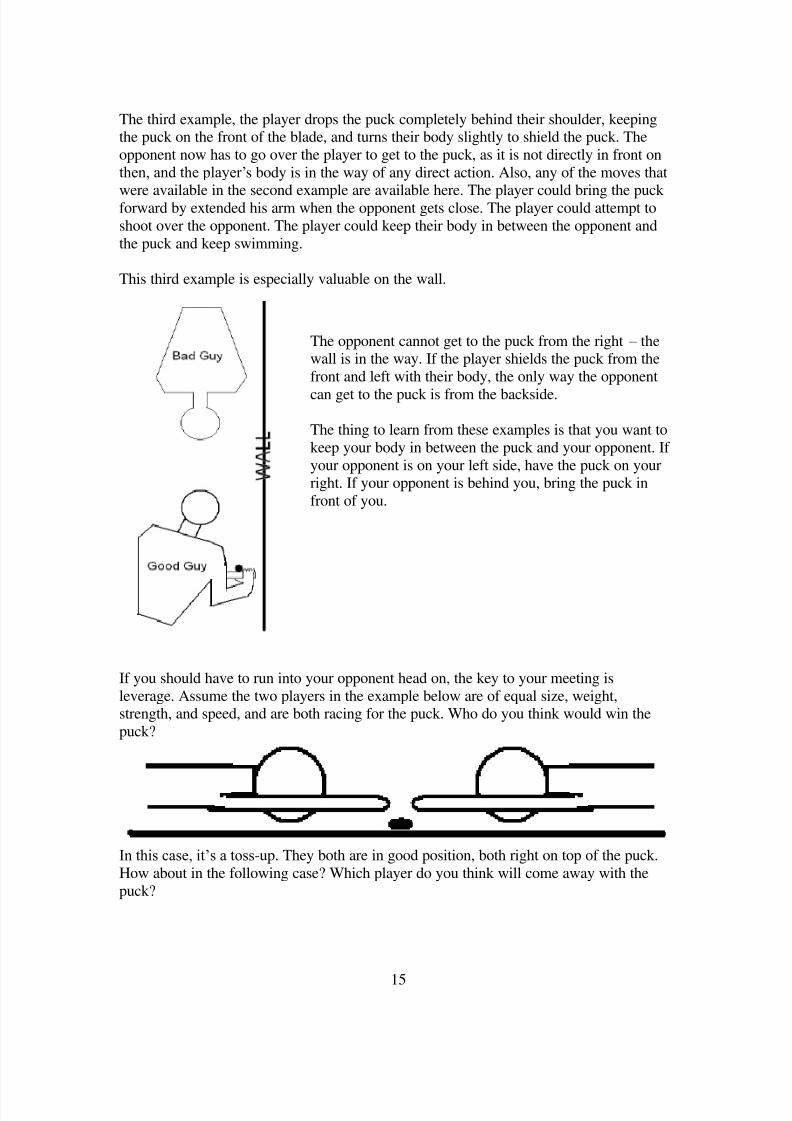
The third example, the player drops the puck completely behind their shoulder, keepingthe puck on the front of the blade, and turns their body slightly to shield the puck. The
opponent now has to go over the player to get to the puck, as it is not directly in front on
then, and the player‟s body is in the way of any direct action. Also, any of the moves that
were available in the second example are available here. The player could bring the puck forward by extended his arm when the opponent gets close. The player could attempt to
shoot over the opponent. The player could keep their body in between the opponent and
the puck and keep swimming.
This third example is especially valuable on the wall.
The opponent cannot get to the puck from the right – thewall is in the way. If the player shields the puck from the
front and left with their body, the only way the opponent
can get to the puck is from the backside.
The thing to learn from these examples is that you want to
keep your body in between the puck and your opponent. If
your opponent is on your left side, have the puck on yourright. If your opponent is behind you, bring the puck in
front of you.
If you should have to run into your opponent head on, the key to your meeting is
leverage. Assume the two players in the example below are of equal size, weight,strength, and speed, and are both racing for the puck. Who do you think would win the
puck?
In this case, it‟s a toss-up. They both are in good position, both right on top of the puck.
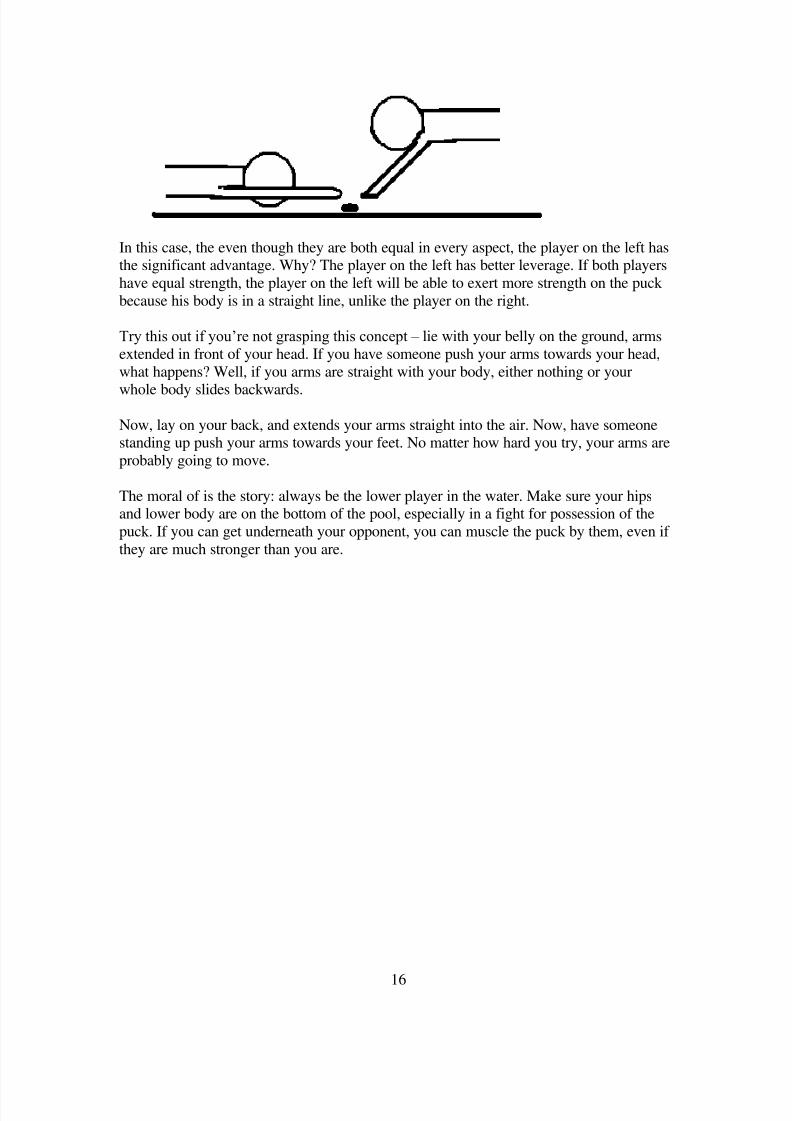
How about in the following case? Which player do you think will come away with the
puck?
8/7/2019 Underwater Hockey Beginner's Guide
http://slidepdf.com/reader/full/underwater-hockey-beginners-guide 16/55
16
In this case, the even though they are both equal in every aspect, the player on the left hasthe significant advantage. Why? The player on the left has better leverage. If both players
have equal strength, the player on the left will be able to exert more strength on the puck
because his body is in a straight line, unlike the player on the right.
Try this out if you‟re not grasping this concept – lie with your belly on the ground, arms
extended in front of your head. If you have someone push your arms towards your head,
what happens? Well, if you arms are straight with your body, either nothing or your
whole body slides backwards.
Now, lay on your back, and extends your arms straight into the air. Now, have someonestanding up push your arms towards your feet. No matter how hard you try, your arms are
probably going to move.
The moral of is the story: always be the lower player in the water. Make sure your hipsand lower body are on the bottom of the pool, especially in a fight for possession of the
puck. If you can get underneath your opponent, you can muscle the puck by them, even if
they are much stronger than you are.

8/7/2019 Underwater Hockey Beginner's Guide
http://slidepdf.com/reader/full/underwater-hockey-beginners-guide 17/55
17
Curling
Curling is one of the most basic and most important skills to a player. Curling is basically
a tight, focused turn that results in a radical change in direction while maintaining
possession of the puck. The direction change can be 180 degrees, 270 degrees, or a full
360 degree turn.
Curling is a valuable move to keep the puck moving in a crowd of players yet allows theperson with the puck to keep possession. By curling you can keep the puck shielded from
other players while still moving to elude them.
One of the things that all players need to be reminded about is to kick through their curls.
What “Kick through Your Curls” means is that once you start curling, you should notstop half way through your curl. Begin and end your curl with authority. Swim hard intothem, and then explode out of them. A player who stops moving while committing a curl
is a target on the bottom on the bottom. A player should never simply sit on the bottom in
the curled position and wait for something to happen to them.
It is worthwhile to practice different curling drills in order to improve your form andefficiency, particularly on reverse curls.
A standard curling relay drill involving three players is done as follows.
Two of the players start on a wall and the third starts about 5 lanes down the pool. One of
the players on the wall carries the puck executing four 360 degree curls on one breath as
they swim to the player 5 lanes down the pool. They then pass the puck to the player fivelanes down the pool. He then swims back towards the wall, executing the same four curls,
and passes the puck off.
Alternate the directions of the curls: forward, reverse, forward, reverse .
8/7/2019 Underwater Hockey Beginner's Guide
http://slidepdf.com/reader/full/underwater-hockey-beginners-guide 18/55
18
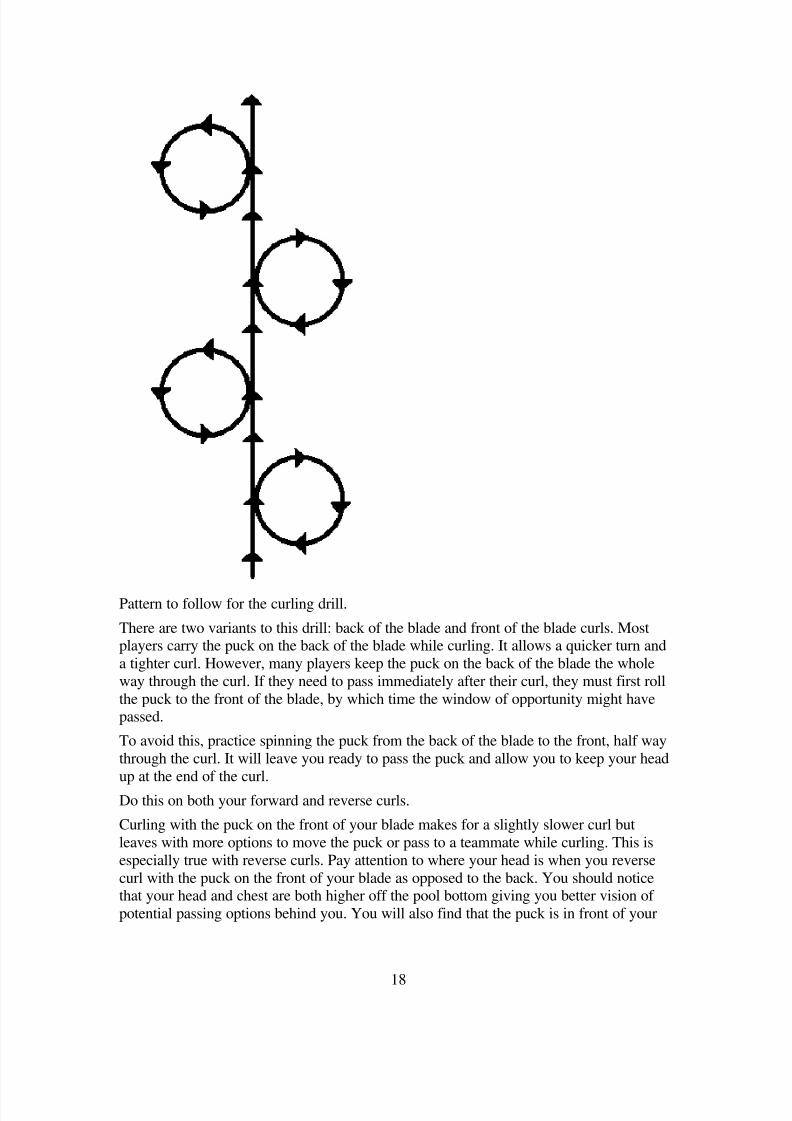
Pattern to follow for the curling drill.
There are two variants to this drill: back of the blade and front of the blade curls. Mostplayers carry the puck on the back of the blade while curling. It allows a quicker turn and
a tighter curl. However, many players keep the puck on the back of the blade the whole
way through the curl. If they need to pass immediately after their curl, they must first roll
the puck to the front of the blade, by which time the window of opportunity might havepassed.
To avoid this, practice spinning the puck from the back of the blade to the front, half way
through the curl. It will leave you ready to pass the puck and allow you to keep your head
up at the end of the curl.
Do this on both your forward and reverse curls.
Curling with the puck on the front of your blade makes for a slightly slower curl but
leaves with more options to move the puck or pass to a teammate while curling. This is
especially true with reverse curls. Pay attention to where your head is when you reverse
curl with the puck on the front of your blade as opposed to the back. You should noticethat your head and chest are both higher off the pool bottom giving you better vision of
potential passing options behind you. You will also find that the puck is in front of your
8/7/2019 Underwater Hockey Beginner's Guide
http://slidepdf.com/reader/full/underwater-hockey-beginners-guide 19/55
19
shoulder (rather than to the side), allowing you to make a much better pass.
Some key points to remember when practicing the various curls:
1- For a right-hander, your right hip should be close to the bottom on regular curlsand your left hip on reverse curls. This is to prevent your opponents from seeing
exactly where the puck is while you turn and preventing them from reaching
under your body and stealing it.
2- On reverse curls many players have the tendency to pivot around the puck. Makesure that the puck traces an arc of 30cm (a foot) or more. This makes curl as an
offensive move and makes it possible to move the puck across the pool quickly.
8/7/2019 Underwater Hockey Beginner's Guide
http://slidepdf.com/reader/full/underwater-hockey-beginners-guide 20/55
20
Shooting
Shooting is the skill that everyone wants to learn but is also the hardest skill to teach. It
takes time and a lot of practice to master. Almost all of the distance on the puck comes
from the wrist flick. Your shoulders and arms only change the angle at which the puck is
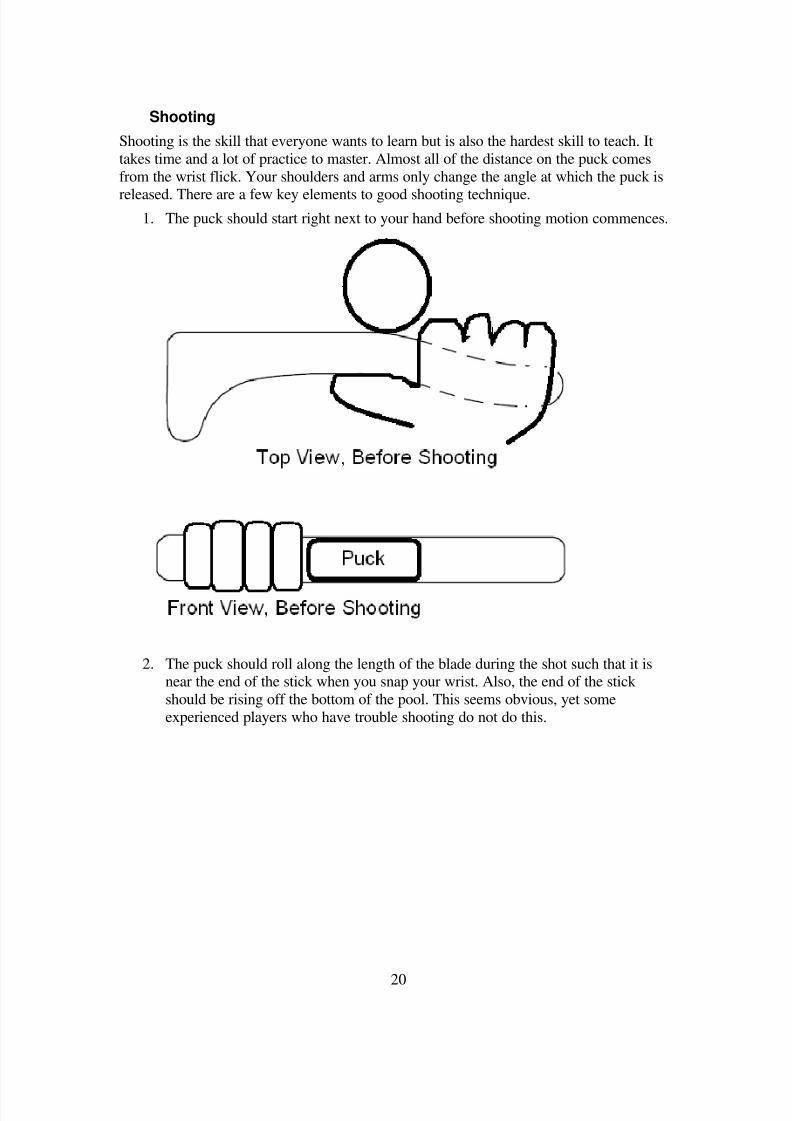
released. There are a few key elements to good shooting technique.1. The puck should start right next to your hand before shooting motion commences.
2. The puck should roll along the length of the blade during the shot such that it isnear the end of the stick when you snap your wrist. Also, the end of the stick
should be rising off the bottom of the pool. This seems obvious, yet some
experienced players who have trouble shooting do not do this.
8/7/2019 Underwater Hockey Beginner's Guide
http://slidepdf.com/reader/full/underwater-hockey-beginners-guide 21/55
21
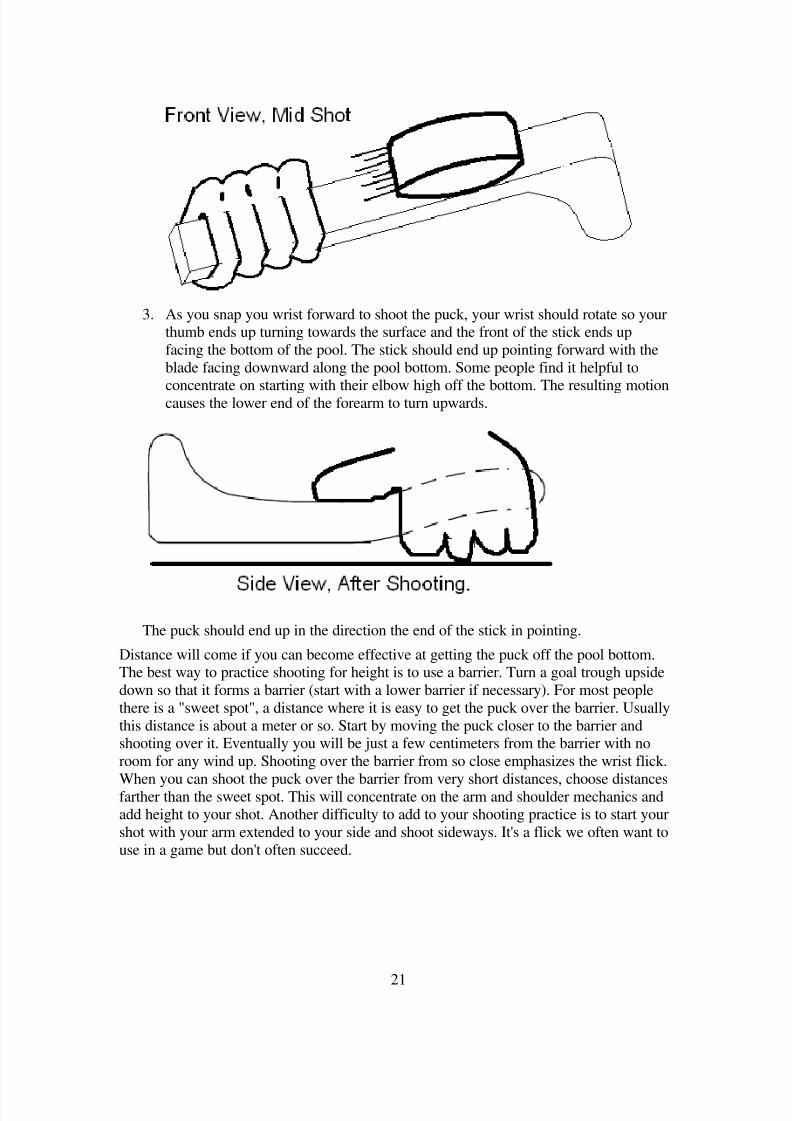
3. As you snap you wrist forward to shoot the puck, your wrist should rotate so yourthumb ends up turning towards the surface and the front of the stick ends up
facing the bottom of the pool. The stick should end up pointing forward with the
blade facing downward along the pool bottom. Some people find it helpful to
concentrate on starting with their elbow high off the bottom. The resulting motioncauses the lower end of the forearm to turn upwards.
The puck should end up in the direction the end of the stick in pointing.
Distance will come if you can become effective at getting the puck off the pool bottom.The best way to practice shooting for height is to use a barrier. Turn a goal trough upside
down so that it forms a barrier (start with a lower barrier if necessary). For most people
there is a "sweet spot", a distance where it is easy to get the puck over the barrier. Usually
this distance is about a meter or so. Start by moving the puck closer to the barrier andshooting over it. Eventually you will be just a few centimeters from the barrier with no
room for any wind up. Shooting over the barrier from so close emphasizes the wrist flick.
When you can shoot the puck over the barrier from very short distances, choose distancesfarther than the sweet spot. This will concentrate on the arm and shoulder mechanics andadd height to your shot. Another difficulty to add to your shooting practice is to start your
shot with your arm extended to your side and shoot sideways. It's a flick we often want to
use in a game but don't often succeed.
8/7/2019 Underwater Hockey Beginner's Guide
http://slidepdf.com/reader/full/underwater-hockey-beginners-guide 22/55
22
Underwater Hockey Positions
There are three major positions in underwater hockey: Forward, Midfields (or Mids), andBack.
Forwards
The offensive players on the team – the main scorers. A forwards‟ job is to generateoffense for his team. They are responsible for bringing the puck forward, and scoring the
majority of the goals. They are an attacking position – always trying to get by theopposing teams defense and score goals.
Forwards are on the bottom more often than their counterparts, but usually the durationon the bottom is shorter. The key to being a good forward from a fitness standpoint is
being able make many repeat drops – go down, take the puck, advance it, pass it off, get a
breath of air, then go right back down to the bottom.
At the beginning of every game, the forwards are the ones who race for the puck in the
middle of the pool (this initial rush is called the “Strike”). Usually, the center mostforward is responsible for getting the puck in this situation – he is called the “Striker”.However, many teams rotate the responsibility of being Striker as it is physically
demanding, and can exhaust a player in a high-scoring game.
Forwards should always be ahead of the puck. Their job is to accept passes from theplayers behind them and then bring the puck forward. Even though forward is an
offensive position, and they should always be ahead of the puck, they can still play
defense. Forwards swim back towards the puck and steal pucks from opposition players.
Attempting steals and other such defensive moments also puts the forwards in closeproximity to the puck, which is where they want to be. A good rule of thumb for the
forward position is that they should never be more than a single pass away from the puck.A forward should not make their teammates swim to them with the puck; rather, theyshould swim towards their teammates.
In front of the goal, forwards should take longer drops to ensure the puck is put into thegoal.
Mids
Midfields (or Mids) are the hybrid players on the team. They are responsible both forgenerating offense and defense. Depending on the formation, Mids can be the point
guards on the teams – the main passers, not scoring a lot of goals but setting up the other
players for goals. Mids can also be the first line of defense – the first player an opposingforward runs into once they get the puck. Mids can have both of these jobs at the same
time and often do.
Playing Mid requires a player with outstanding fitness and the ability to recover quickly
from long trips on the bottom of the pool. They have the worst of both worlds; they are
on the bottom constantly like a forward, but they can also take long, extended drops like aback.
8/7/2019 Underwater Hockey Beginner's Guide
http://slidepdf.com/reader/full/underwater-hockey-beginners-guide 23/55
23
It is a standard line in underwater hockey that any player‟s best position is Mid – the
thought being that you don‟t have to excel at goal scoring or goal stopping, just be good
at both.
Nothing could be farther from the truth. To be a good Mid, and to play in a formation thatrequires Mids, you have to be excellent at both the forward and back positions. Mid is the
most demanding position in hockey. You have to help your backs on defense, and help
your forwards on offense. Many teams will play with one Mid if they have oneexceptional player and many good players – to make that exceptional player the focal
point of their team.
Backs
Backs are the main defenders of the team. The Backs job is to stop the opposition from
bringing the puck forward and scoring goals. Backs are a defensive position – alwaysbetween the opposition and the goal, trying to cause maximum disruption for the
opposition team.
Backs, though usually not on the bottom as often as the forwards, are on the bottom formuch longer. Their job is to not stop fighting on the bottom until their team recovers the
puck. A back should not fighting to regain possession of the puck until they‟ve passed the
puck to one of their own players or another back has come down to relieve them. A back in front of his goal should not come up for air until the puck is away from the goal and
out of harm‟s way.
Backs should always be behind the puck. Their job is to prevent the puck from movingbackwards towards their goal. Even though the Back position is mainly defensive, and
they should always be behind the puck, backs can generate a lot of offense, and evenscore goals. Once a back regains possession of the puck from the other team, their job isto hold onto the puck until another one of their teammates is ready to take possession.
This can mean a back might swim the length of the pool until he sees one of his forwards,
or even that the back takes the puck and scores if the opportunity presents itself.
However, a back‟s first priority is stopping the other team‟s offense, not scoring, andshould readily pass at the first opportunity.
Backs usually don‟t have as many subs as the other positions, and that is because they arenot responsible for advancing the puck, just stopping it from moving. A good back should
be able to drop, regain possession of the puck, and then give it to one of his players.
Since backs usually don‟t have the same amount of subs as the other positions, it is vitalto be efficient with your drops. Drop only when you need to, but once you drop, swim
hard into the play and come out with the puck. Don‟t float around on the bottom, waiting
for opponent‟s forwards to break out of a pack. Swim into the pack, take the puck from
the opponent‟s forward, and swim out. Don‟t waste time on the bottom you will needlater. If you can‟t get the puck back, at least disrupt what the other team is doing. Even

8/7/2019 Underwater Hockey Beginner's Guide
http://slidepdf.com/reader/full/underwater-hockey-beginners-guide 24/55
24
though you‟re a defensive position, play your position aggressively. Dictate what the
opponent can do, don‟t let him dictate what you should do.
8/7/2019 Underwater Hockey Beginner's Guide
http://slidepdf.com/reader/full/underwater-hockey-beginners-guide 25/55
25
Underwater Hockey Formations
There are numerous underwater hockey formations. I will not explain how eachformation works, but I will attempt to explain what is meant by the 3-1-2 formation as
opposed to the 1-3-2 formation.
Formations are designated by how many people are playing each position. The X-Y-Zformation indicates you are going to play with X forwards, Y Mids, and Z backs.
Sometimes a team will come out in an A-B formation – which indicates that they areplaying with A Forwards and B Backs, but no Mids.
No formation is right for every situation, nor is there any formation which is wrong for
any situation. The key is for each player playing his or her position well. The key to
picking a formation is knowing your team‟s strengths and your opponent‟s weaknesses.
The most common formation for beginners to learn is the 3-3; three forwards and three
backs. Some of the more advanced US teams play a 1-3-2; one forward, three mids, and
two backs. Since this document is for beginners, it will focus solely on the 3-3 formation.
In a 3-3 formation, I will refer to the three forwards as the Left Forward, Center Forward,and Right Forward. The three backs will be Left Back, Center or Swing Back, and Right
Back.
In other countries, the same formations can have slightly different names. In Canada, for
example, the three forwards would be Left Wing, Center, and Right Wing, and the three
backs would be Left Pivot, Swing, and Right Pivot. These are just terminology
differences – these formations play the same all over the world.

8/7/2019 Underwater Hockey Beginner's Guide
http://slidepdf.com/reader/full/underwater-hockey-beginners-guide 26/55
26
Underwater Hockey Zones
The pool is divided into 3 zones/thirds; defensive,
mid and offensive.
Teams move through these zones in a diamondpattern. Move the puck to the wall in the defensive
zone, up the middle on the wall and then towards
their goal in the offensive zone. Here's an example
8/7/2019 Underwater Hockey Beginner's Guide
http://slidepdf.com/reader/full/underwater-hockey-beginners-guide 27/55
27
path the puck might take from one goal to the next:
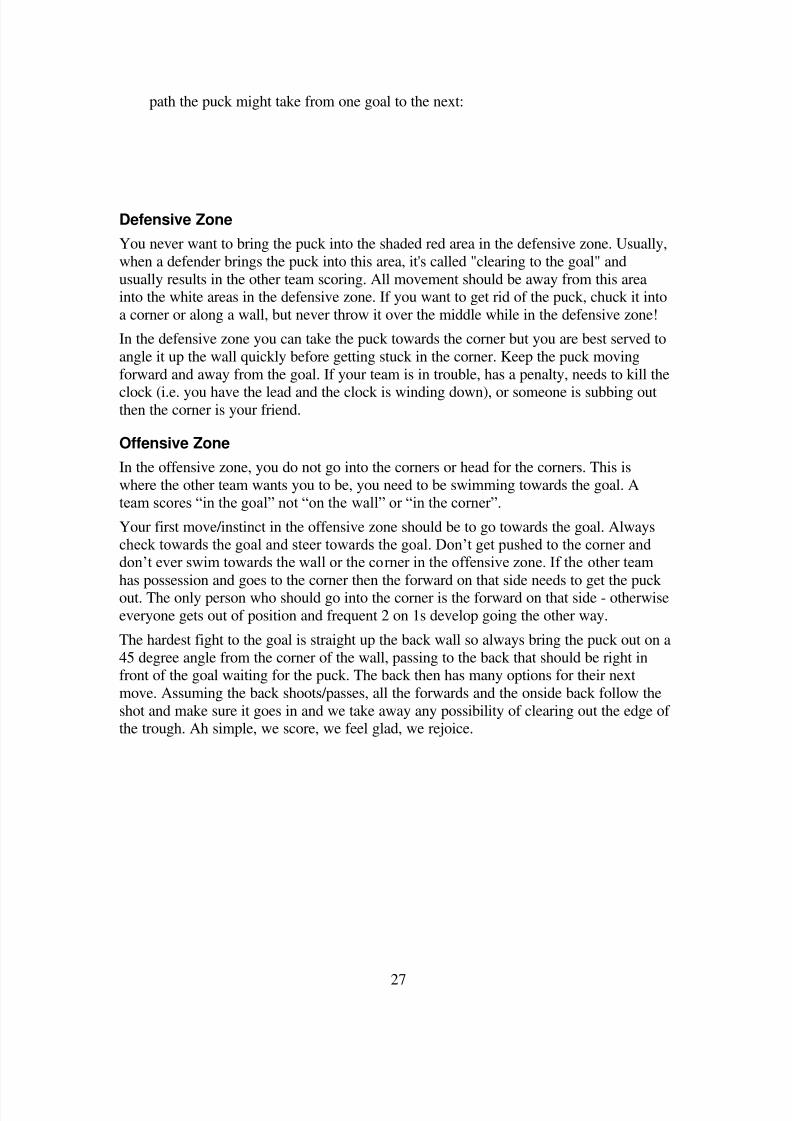
Defensive Zone
You never want to bring the puck into the shaded red area in the defensive zone. Usually,
when a defender brings the puck into this area, it's called "clearing to the goal" and
usually results in the other team scoring. All movement should be away from this areainto the white areas in the defensive zone. If you want to get rid of the puck, chuck it into
a corner or along a wall, but never throw it over the middle while in the defensive zone!
In the defensive zone you can take the puck towards the corner but you are best served to
angle it up the wall quickly before getting stuck in the corner. Keep the puck moving
forward and away from the goal. If your team is in trouble, has a penalty, needs to kill the
clock (i.e. you have the lead and the clock is winding down), or someone is subbing outthen the corner is your friend.
Offensive Zone
In the offensive zone, you do not go into the corners or head for the corners. This is
where the other team wants you to be, you need to be swimming towards the goal. A
team scores “in the goal” not “on the wall” or “in the corner”.
Your first move/instinct in the offensive zone should be to go towards the goal. Always
check towards the goal and steer towards the goal. Don‟t get pushed to the corner and
don‟t ever swim towards the wall or the corner in the offensive zone. If the other team
has possession and goes to the corner then the forward on that side needs to get the puck out. The only person who should go into the corner is the forward on that side - otherwise
everyone gets out of position and frequent 2 on 1s develop going the other way.
The hardest fight to the goal is straight up the back wall so always bring the puck out on a
45 degree angle from the corner of the wall, passing to the back that should be right infront of the goal waiting for the puck. The back then has many options for their next
move. Assuming the back shoots/passes, all the forwards and the onside back follow the
shot and make sure it goes in and we take away any possibility of clearing out the edge of the trough. Ah simple, we score, we feel glad, we rejoice.
8/7/2019 Underwater Hockey Beginner's Guide
http://slidepdf.com/reader/full/underwater-hockey-beginners-guide 28/55
28
Positioning In the Water
General Positions for Forwards/Backs in the 3-3 Formation
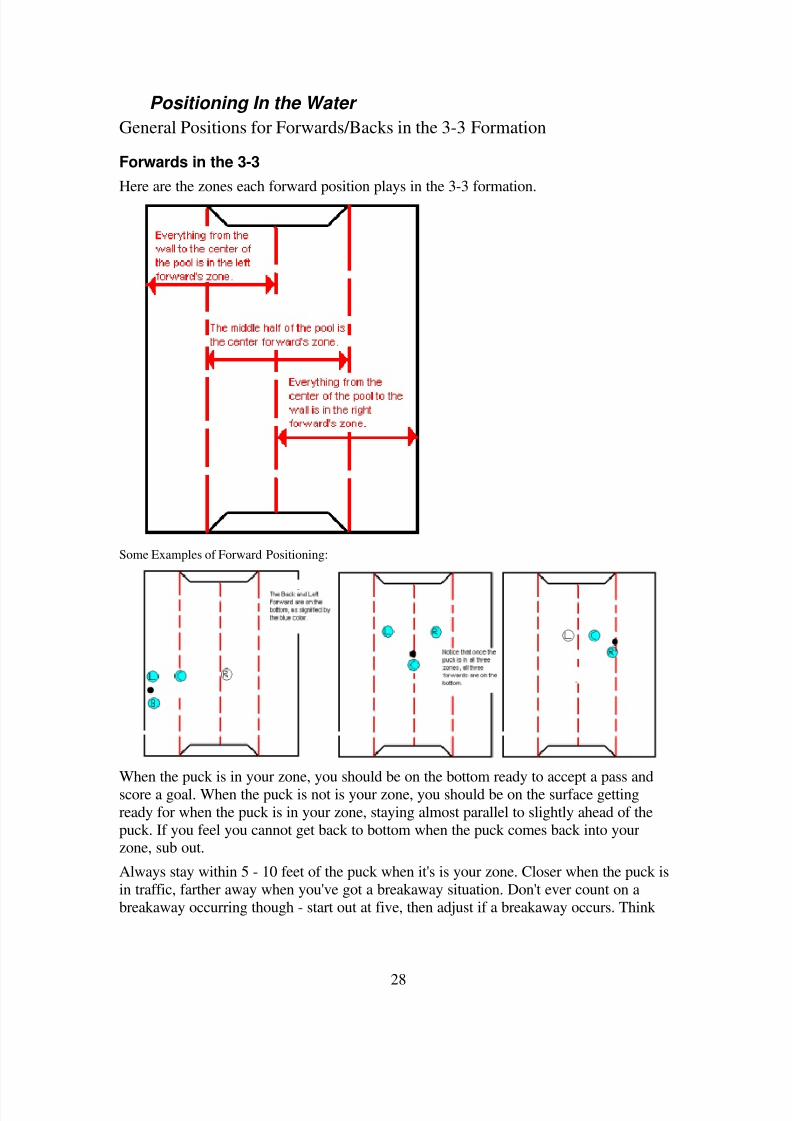
Forwards in the 3-3
Here are the zones each forward position plays in the 3-3 formation.
Some Examples of Forward Positioning:
When the puck is in your zone, you should be on the bottom ready to accept a pass and
score a goal. When the puck is not is your zone, you should be on the surface getting
ready for when the puck is in your zone, staying almost parallel to slightly ahead of the
puck. If you feel you cannot get back to bottom when the puck comes back into yourzone, sub out.
Always stay within 5 - 10 feet of the puck when it's is your zone. Closer when the puck is
in traffic, farther away when you've got a breakaway situation. Don't ever count on a
breakaway occurring though - start out at five, then adjust if a breakaway occurs. Think
8/7/2019 Underwater Hockey Beginner's Guide
http://slidepdf.com/reader/full/underwater-hockey-beginners-guide 29/55
29
about like this - if you had the puck in the same situation as the person on the
bottom, you would want someone to be close enough that you could pass it withoutmoving any farther forward. You want to be at that distance. Don't make someone swim
up to when they've already been on the bottom for 15-20 seconds and you've been
watching the play from the surface.
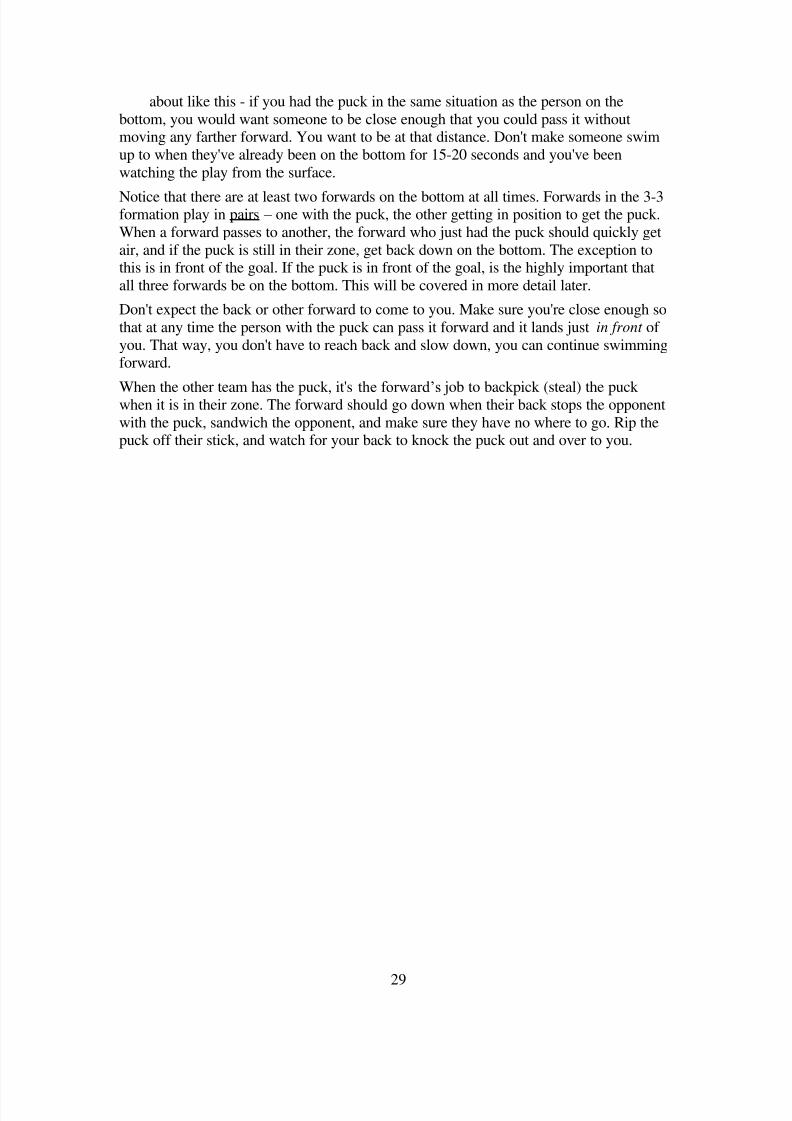
Notice that there are at least two forwards on the bottom at all times. Forwards in the 3-3formation play in pairs – one with the puck, the other getting in position to get the puck.
When a forward passes to another, the forward who just had the puck should quickly get
air, and if the puck is still in their zone, get back down on the bottom. The exception tothis is in front of the goal. If the puck is in front of the goal, is the highly important that
all three forwards be on the bottom. This will be covered in more detail later.
Don't expect the back or other forward to come to you. Make sure you're close enough so
that at any time the person with the puck can pass it forward and it lands just in front of
you. That way, you don't have to reach back and slow down, you can continue swimmingforward.
When the other team has the puck, it's the forward‟s job to backpick (steal) the puck when it is in their zone. The forward should go down when their back stops the opponent
with the puck, sandwich the opponent, and make sure they have no where to go. Rip thepuck off their stick, and watch for your back to knock the puck out and over to you.
8/7/2019 Underwater Hockey Beginner's Guide
http://slidepdf.com/reader/full/underwater-hockey-beginners-guide 30/55
30
Backs in the 3-3
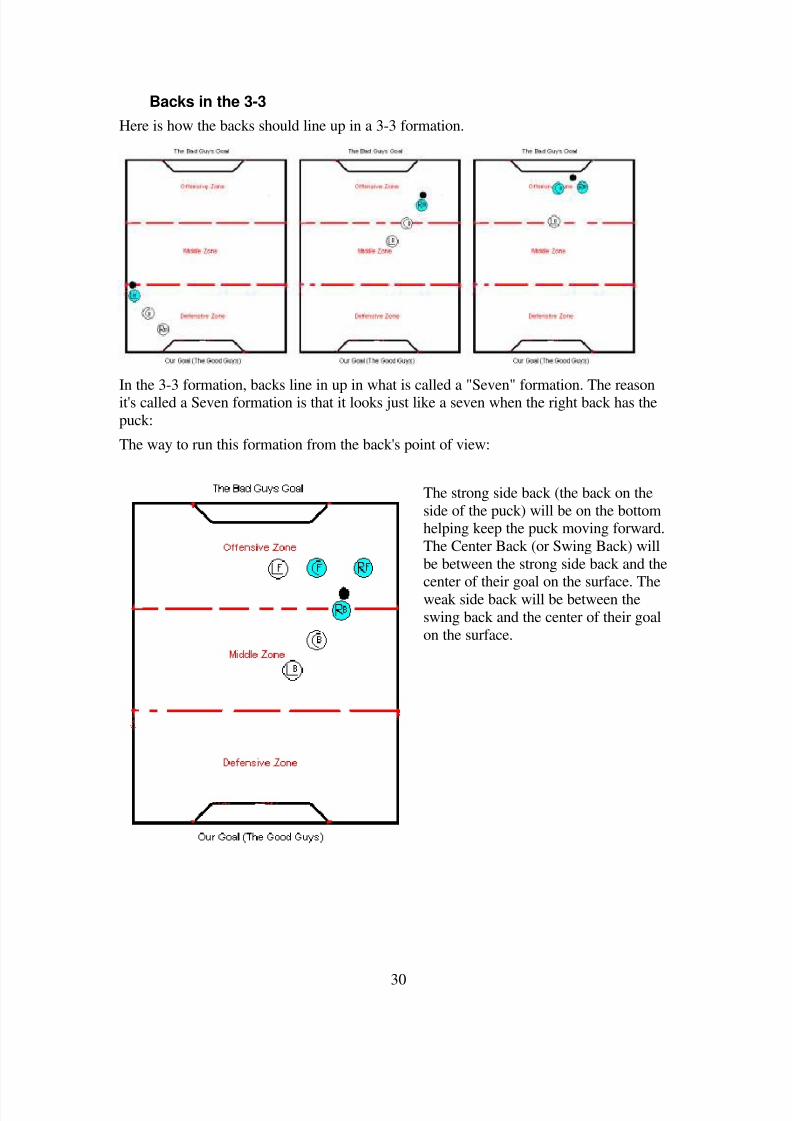
Here is how the backs should line up in a 3-3 formation.
In the 3-3 formation, backs line in up in what is called a "Seven" formation. The reasonit's called a Seven formation is that it looks just like a seven when the right back has the
puck:
The way to run this formation from the back's point of view:
The strong side back (the back on the
side of the puck) will be on the bottomhelping keep the puck moving forward.
The Center Back (or Swing Back) will
be between the strong side back and the
center of their goal on the surface. Theweak side back will be between the
swing back and the center of their goal
on the surface.
8/7/2019 Underwater Hockey Beginner's Guide
http://slidepdf.com/reader/full/underwater-hockey-beginners-guide 31/55
31
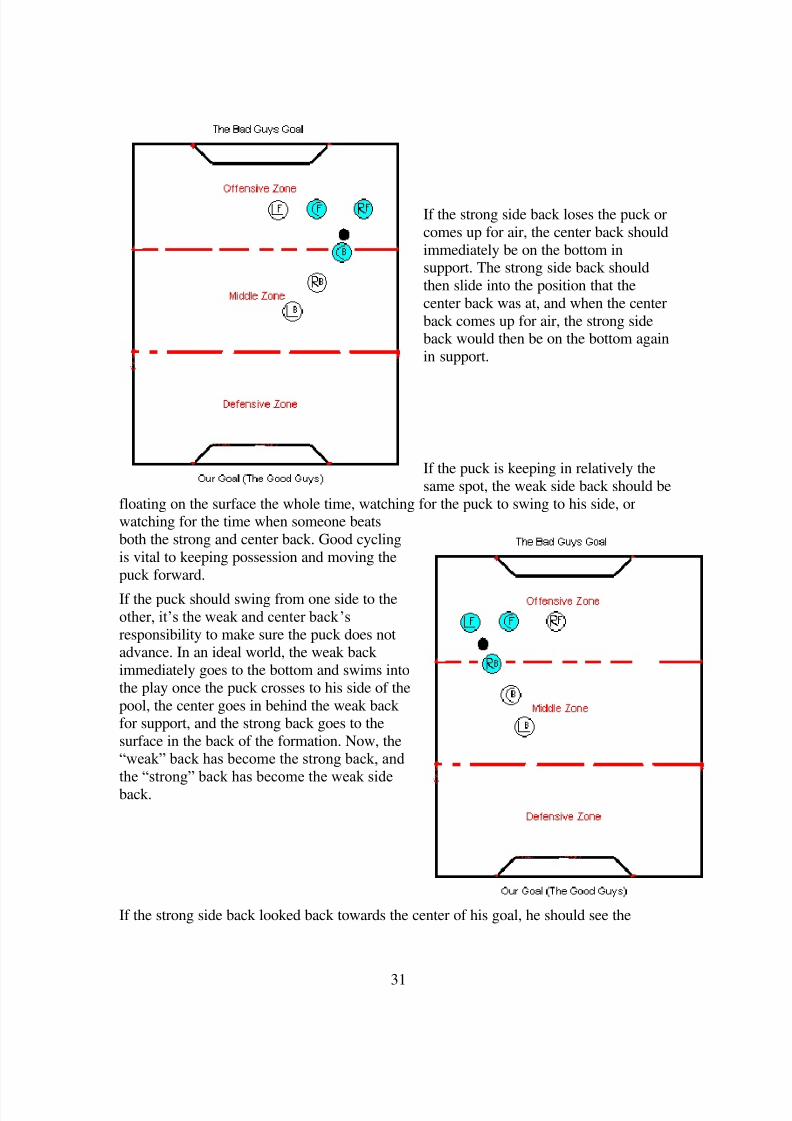
If the strong side back loses the puck or
comes up for air, the center back should
immediately be on the bottom insupport. The strong side back should
then slide into the position that the
center back was at, and when the center
back comes up for air, the strong sideback would then be on the bottom again
in support.
If the puck is keeping in relatively the
same spot, the weak side back should be
floating on the surface the whole time, watching for the puck to swing to his side, orwatching for the time when someone beats
both the strong and center back. Good cycling
is vital to keeping possession and moving the
puck forward.
If the puck should swing from one side to the
other, it‟s the weak and center back‟sresponsibility to make sure the puck does notadvance. In an ideal world, the weak back
immediately goes to the bottom and swims into
the play once the puck crosses to his side of the
pool, the center goes in behind the weak back for support, and the strong back goes to the
surface in the back of the formation. Now, the
“weak” back has become the strong back, and
the “strong” back has become the weak sideback.
If the strong side back looked back towards the center of his goal, he should see the

8/7/2019 Underwater Hockey Beginner's Guide
http://slidepdf.com/reader/full/underwater-hockey-beginners-guide 32/55
32
swing back and weak side back in a perfect line towards the goal. Or, when the weak
side back looks towards the strong side back, the swing back should be in a direct linebetween the two players.
8/7/2019 Underwater Hockey Beginner's Guide
http://slidepdf.com/reader/full/underwater-hockey-beginners-guide 33/55
33
Positioning While Passing
Don't pass laterally to your teammates. Always pass at 45-degree angles - lateral (or flat)passes are the easiest to block or steal. If you pass at a 45-degree angle and someone
steals it, some one will still be in good position to recover the puck and try again. If you
throw it laterally to your left or right and someone steals it, it's off to the races.
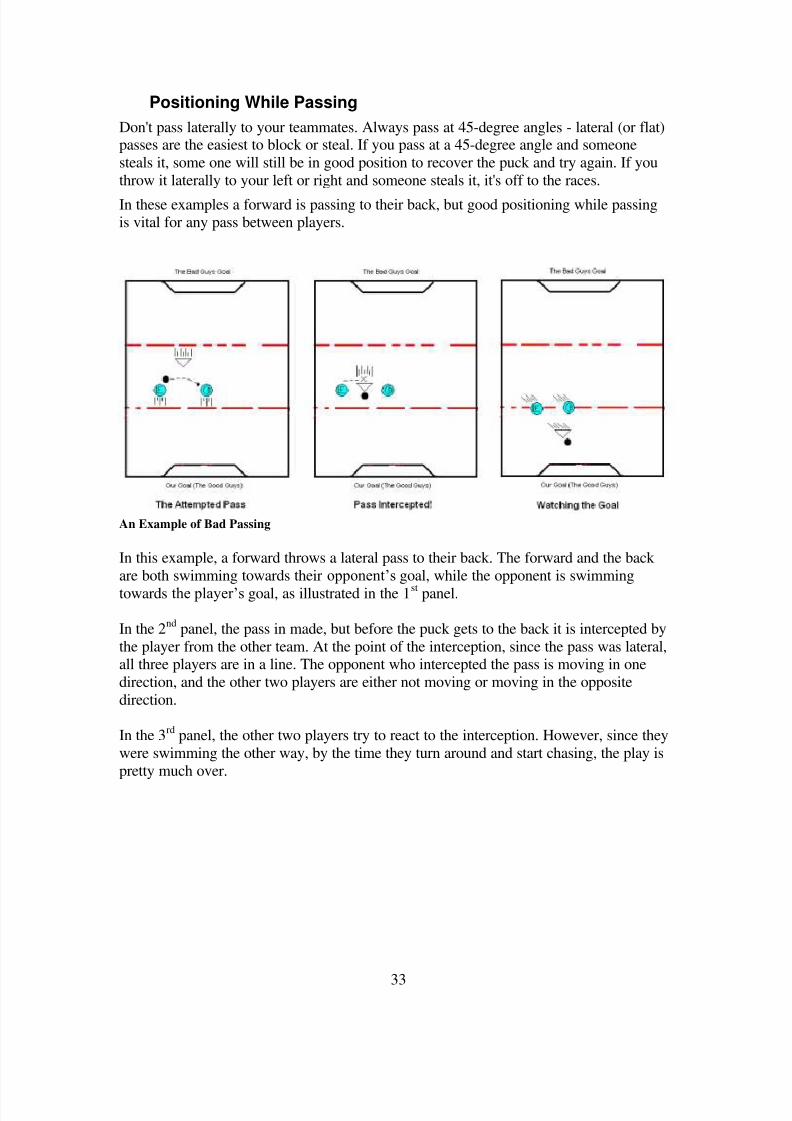
In these examples a forward is passing to their back, but good positioning while passingis vital for any pass between players.
An Example of Bad Passing
In this example, a forward throws a lateral pass to their back. The forward and the back
are both swimming towards their opponent‟s goal, while the opponent is swimming
towards the player‟s goal, as illustrated in the 1st panel.
In the 2nd
panel, the pass in made, but before the puck gets to the back it is intercepted by
the player from the other team. At the point of the interception, since the pass was lateral,all three players are in a line. The opponent who intercepted the pass is moving in one
direction, and the other two players are either not moving or moving in the opposite
direction.
In the 3rd panel, the other two players try to react to the interception. However, since they
were swimming the other way, by the time they turn around and start chasing, the play is
pretty much over.
8/7/2019 Underwater Hockey Beginner's Guide
http://slidepdf.com/reader/full/underwater-hockey-beginners-guide 34/55
34
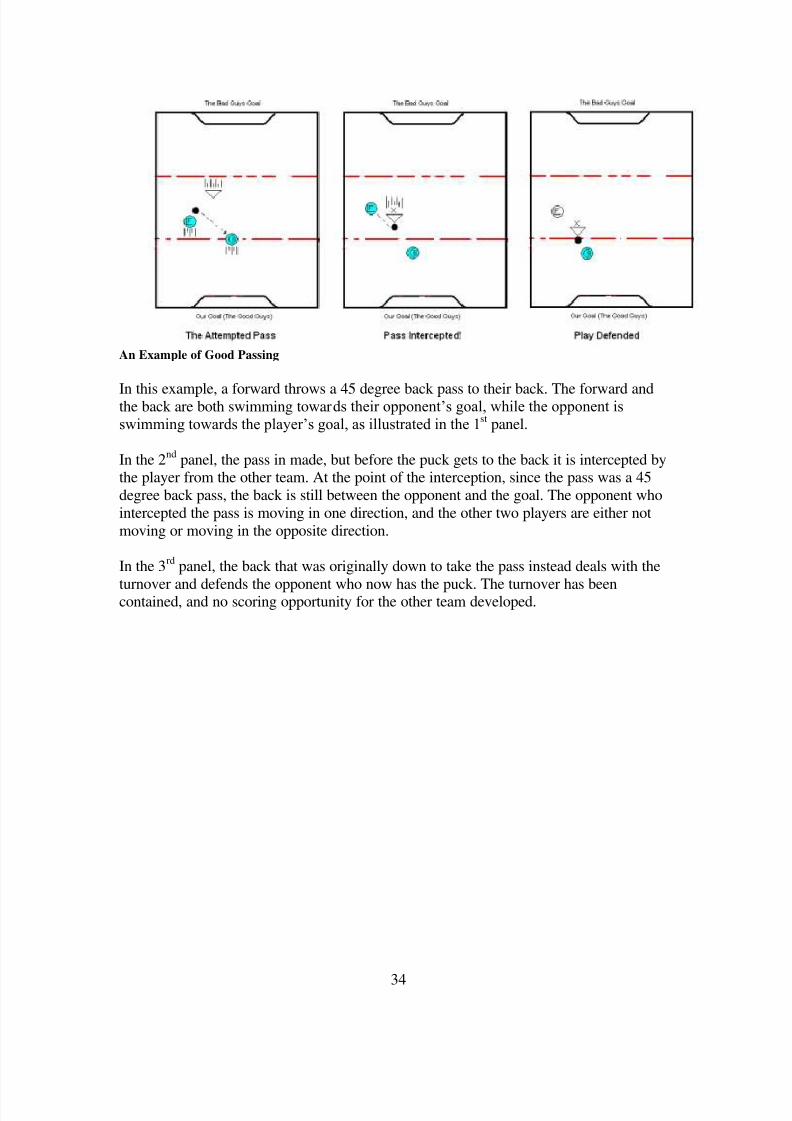
An Example of Good Passing
In this example, a forward throws a 45 degree back pass to their back. The forward andthe back are both swimming towards their opponent‟s goal, while the opponent is
swimming towards the player‟s goal, as illustrated in the 1st panel.
In the 2nd
panel, the pass in made, but before the puck gets to the back it is intercepted bythe player from the other team. At the point of the interception, since the pass was a 45
degree back pass, the back is still between the opponent and the goal. The opponent who
intercepted the pass is moving in one direction, and the other two players are either not
moving or moving in the opposite direction.
In the 3rd
panel, the back that was originally down to take the pass instead deals with the
turnover and defends the opponent who now has the puck. The turnover has beencontained, and no scoring opportunity for the other team developed.
8/7/2019 Underwater Hockey Beginner's Guide
http://slidepdf.com/reader/full/underwater-hockey-beginners-guide 35/55
35
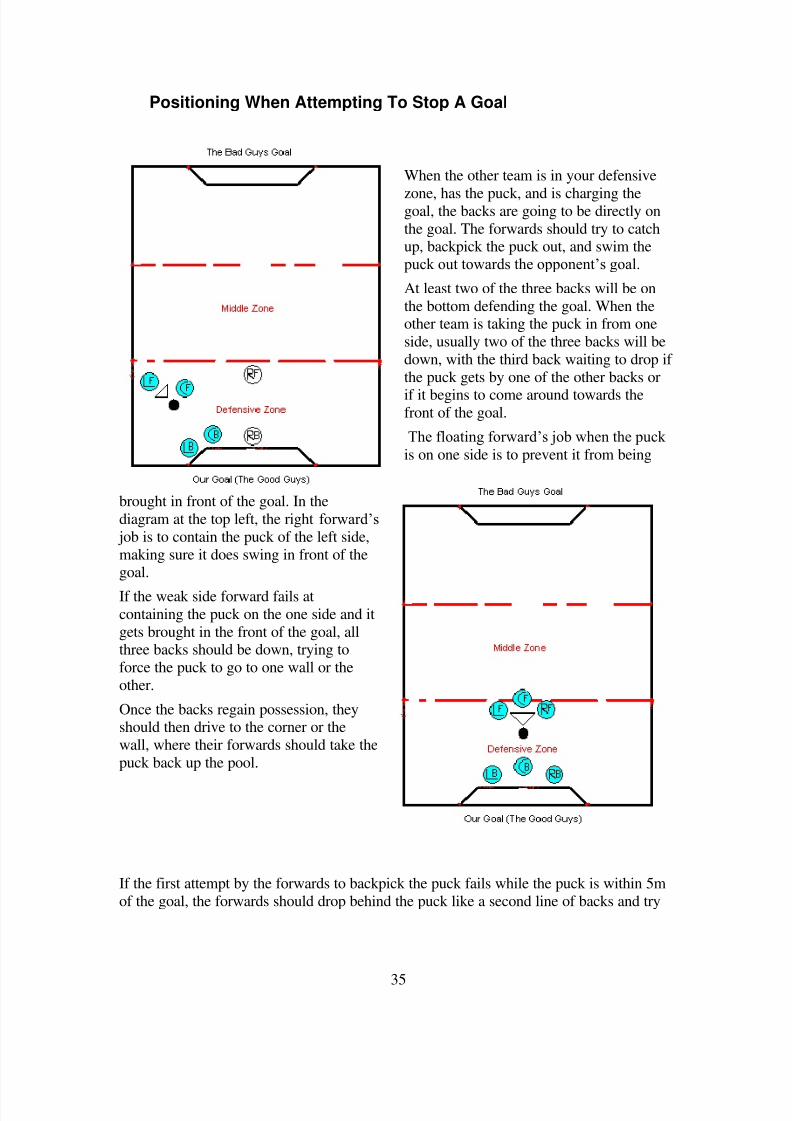
Positioning When Attempting To Stop A Goal
When the other team is in your defensive
zone, has the puck, and is charging thegoal, the backs are going to be directly on
the goal. The forwards should try to catchup, backpick the puck out, and swim the
puck out towards the opponent‟s goal.
At least two of the three backs will be on
the bottom defending the goal. When theother team is taking the puck in from one
side, usually two of the three backs will be
down, with the third back waiting to drop if
the puck gets by one of the other backs or
if it begins to come around towards thefront of the goal.
The floating forward‟s job when the puck
is on one side is to prevent it from being
brought in front of the goal. In the
diagram at the top left, the right forward‟sjob is to contain the puck of the left side,
making sure it does swing in front of thegoal.
If the weak side forward fails at
containing the puck on the one side and it
gets brought in the front of the goal, allthree backs should be down, trying to
force the puck to go to one wall or the
other.
Once the backs regain possession, theyshould then drive to the corner or the
wall, where their forwards should take the
puck back up the pool.
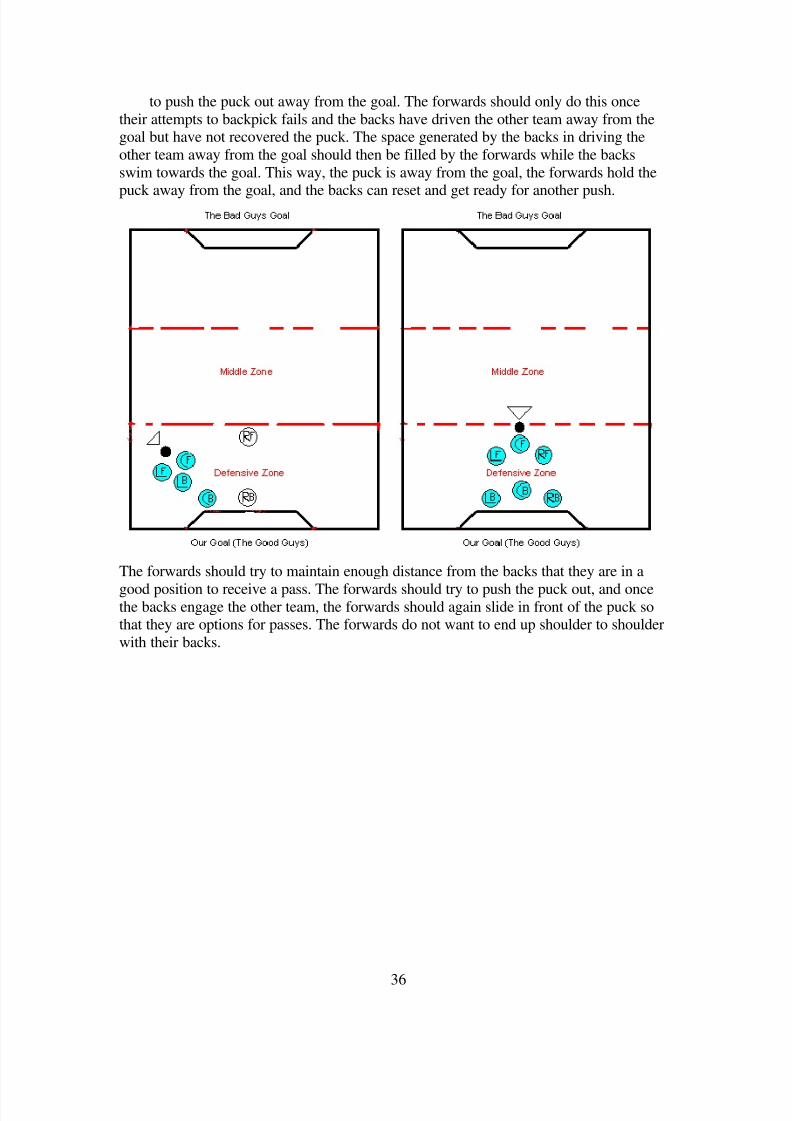
If the first attempt by the forwards to backpick the puck fails while the puck is within 5m
of the goal, the forwards should drop behind the puck like a second line of backs and try
8/7/2019 Underwater Hockey Beginner's Guide
http://slidepdf.com/reader/full/underwater-hockey-beginners-guide 36/55
36
to push the puck out away from the goal. The forwards should only do this once
their attempts to backpick fails and the backs have driven the other team away from thegoal but have not recovered the puck. The space generated by the backs in driving the
other team away from the goal should then be filled by the forwards while the backs
swim towards the goal. This way, the puck is away from the goal, the forwards hold the
puck away from the goal, and the backs can reset and get ready for another push.
The forwards should try to maintain enough distance from the backs that they are in a
good position to receive a pass. The forwards should try to push the puck out, and oncethe backs engage the other team, the forwards should again slide in front of the puck sothat they are options for passes. The forwards do not want to end up shoulder to shoulder
with their backs.
8/7/2019 Underwater Hockey Beginner's Guide
http://slidepdf.com/reader/full/underwater-hockey-beginners-guide 37/55
37
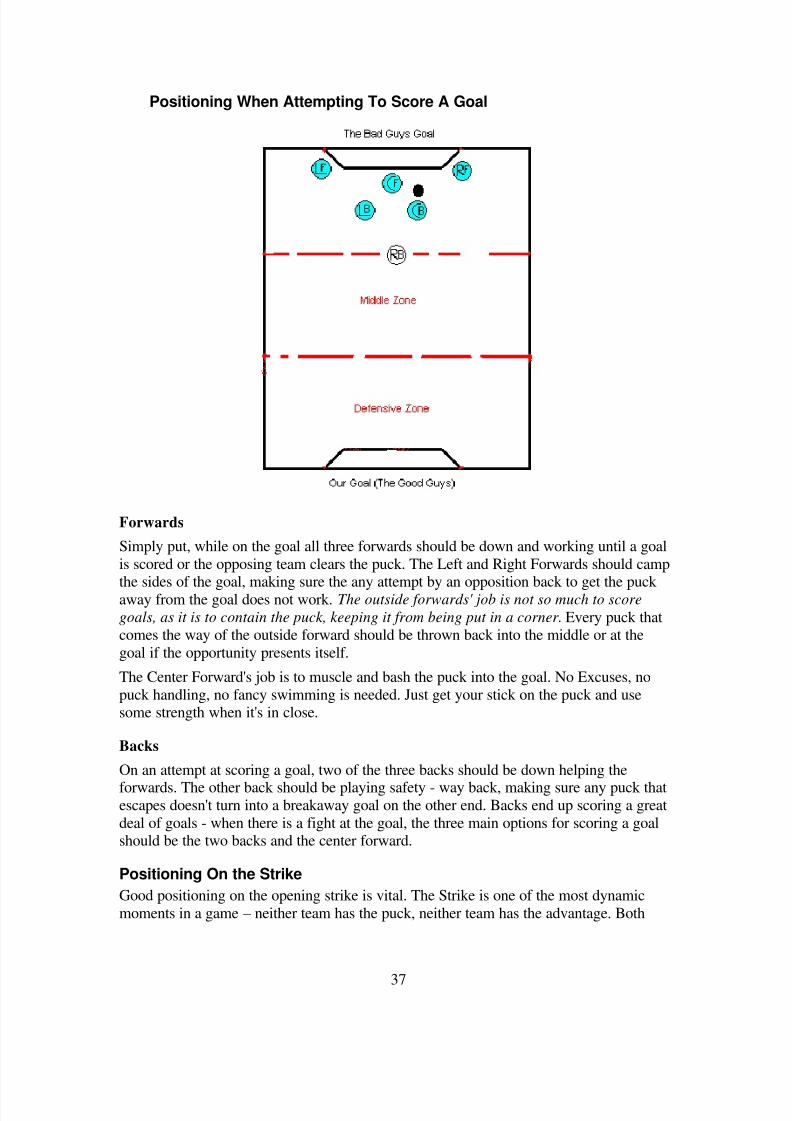
Positioning When Attempting To Score A Goal
Forwards
Simply put, while on the goal all three forwards should be down and working until a goal
is scored or the opposing team clears the puck. The Left and Right Forwards should camp
the sides of the goal, making sure the any attempt by an opposition back to get the puck away from the goal does not work. The outside forwards' job is not so much to score
goals, as it is to contain the puck, keeping it from being put in a corner. Every puck thatcomes the way of the outside forward should be thrown back into the middle or at the
goal if the opportunity presents itself.
The Center Forward's job is to muscle and bash the puck into the goal. No Excuses, no
puck handling, no fancy swimming is needed. Just get your stick on the puck and usesome strength when it's in close.
Backs
On an attempt at scoring a goal, two of the three backs should be down helping the
forwards. The other back should be playing safety - way back, making sure any puck thatescapes doesn't turn into a breakaway goal on the other end. Backs end up scoring a great
deal of goals - when there is a fight at the goal, the three main options for scoring a goalshould be the two backs and the center forward.
Positioning On the Strike
Good positioning on the opening strike is vital. The Strike is one of the most dynamic
moments in a game – neither team has the puck, neither team has the advantage. Both

8/7/2019 Underwater Hockey Beginner's Guide
http://slidepdf.com/reader/full/underwater-hockey-beginners-guide 38/55
38
teams are starting from scratch. Winning the strike is not an important as being
ready for the other team to have the puck. Many teams win the strike and then lose thepuck.
The team starts out by lining on the wall
by their goal:
Notice that the center forward in lined
up almost directly over the puck. The
center forward should have a straight
line to the puck (the shortest distancefrom the wall to the puck). The Left and
Right forwards should also be as close
as possible to the middle. Some teams
have all three forwards next to eachother, with the three backs on the
outside.
Now, the tone is sounded, and play is
started:
This shows the position the team shouldbe in before possession is obtained.Notice that five players are on the
bottom – all three forwards and the two
outside backs. This is done both to givethe center forward the maximum options
with the puck and to make sure the otherteam has minimal options if it shouldwin the puck.
Now, the Center Forward gets the puck,
and starts to go to his left:
8/7/2019 Underwater Hockey Beginner's Guide
http://slidepdf.com/reader/full/underwater-hockey-beginners-guide 39/55
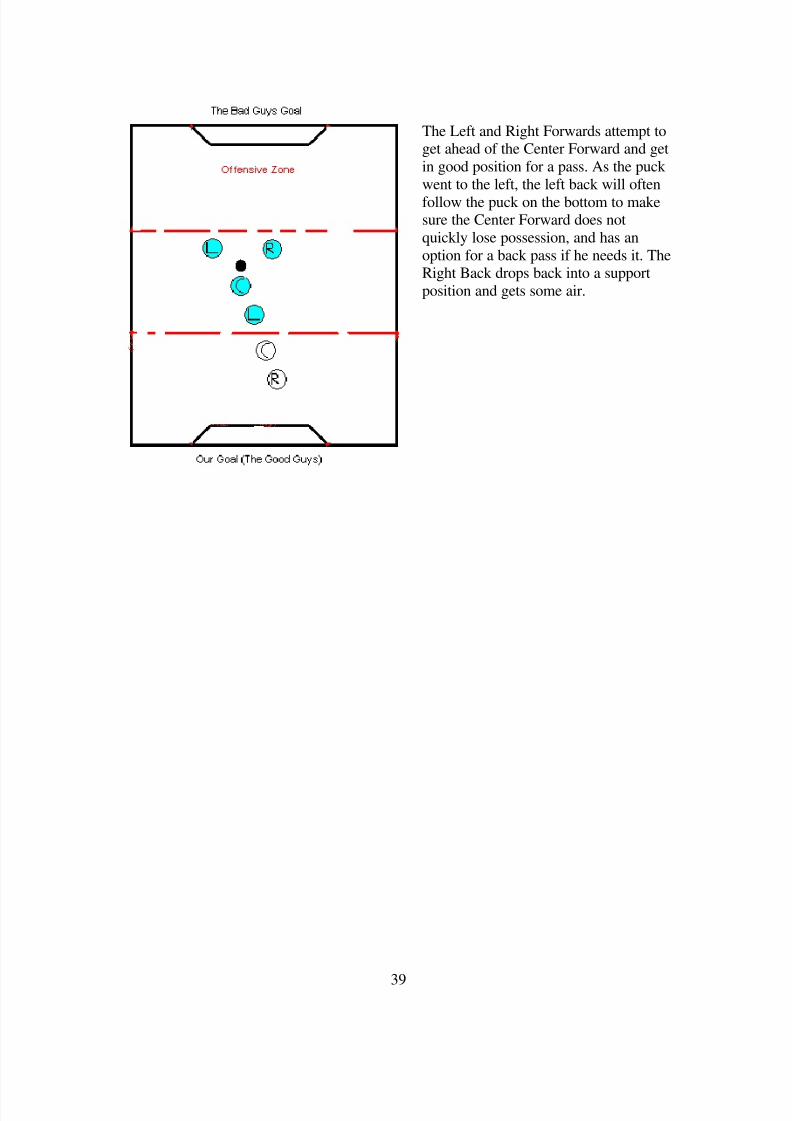
39
The Left and Right Forwards attempt toget ahead of the Center Forward and get
in good position for a pass. As the puck
went to the left, the left back will often
follow the puck on the bottom to makesure the Center Forward does not
quickly lose possession, and has an
option for a back pass if he needs it. TheRight Back drops back into a support
position and gets some air.
8/7/2019 Underwater Hockey Beginner's Guide
http://slidepdf.com/reader/full/underwater-hockey-beginners-guide 40/55
40
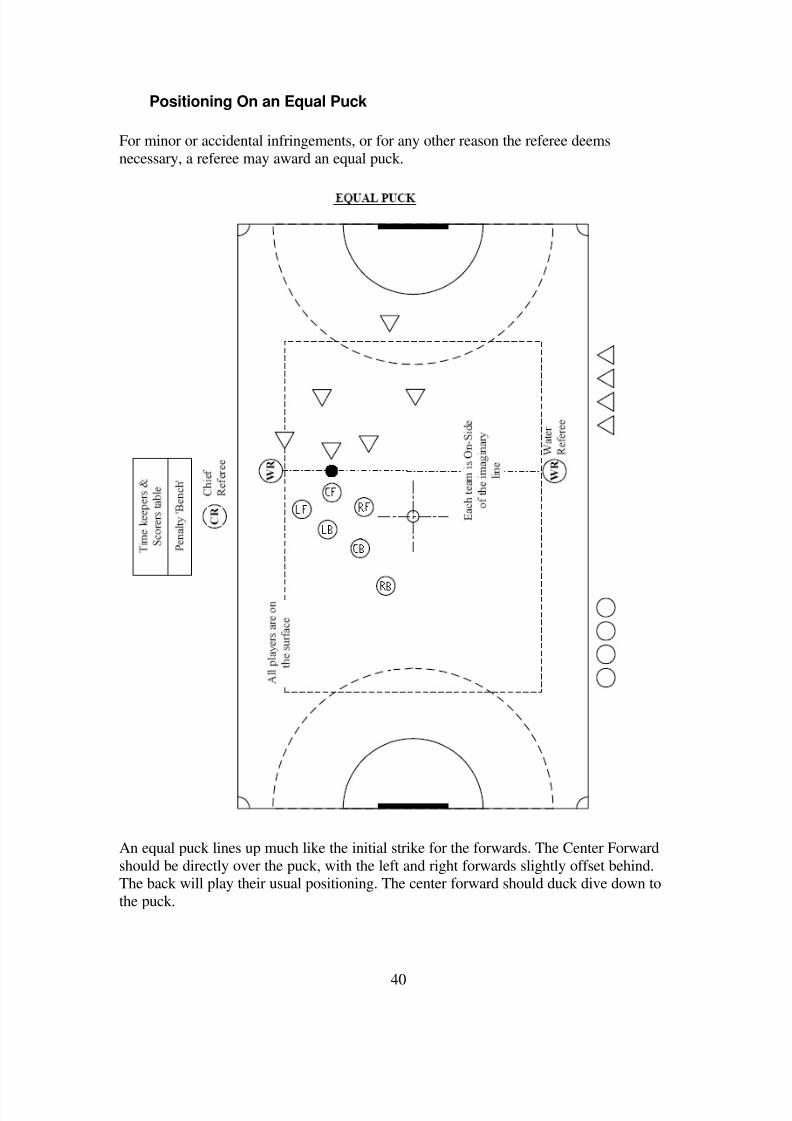
Positioning On an Equal Puck
For minor or accidental infringements, or for any other reason the referee deems
necessary, a referee may award an equal puck.
An equal puck lines up much like the initial strike for the forwards. The Center Forward
should be directly over the puck, with the left and right forwards slightly offset behind.The back will play their usual positioning. The center forward should duck dive down to
the puck.
8/7/2019 Underwater Hockey Beginner's Guide
http://slidepdf.com/reader/full/underwater-hockey-beginners-guide 41/55
41
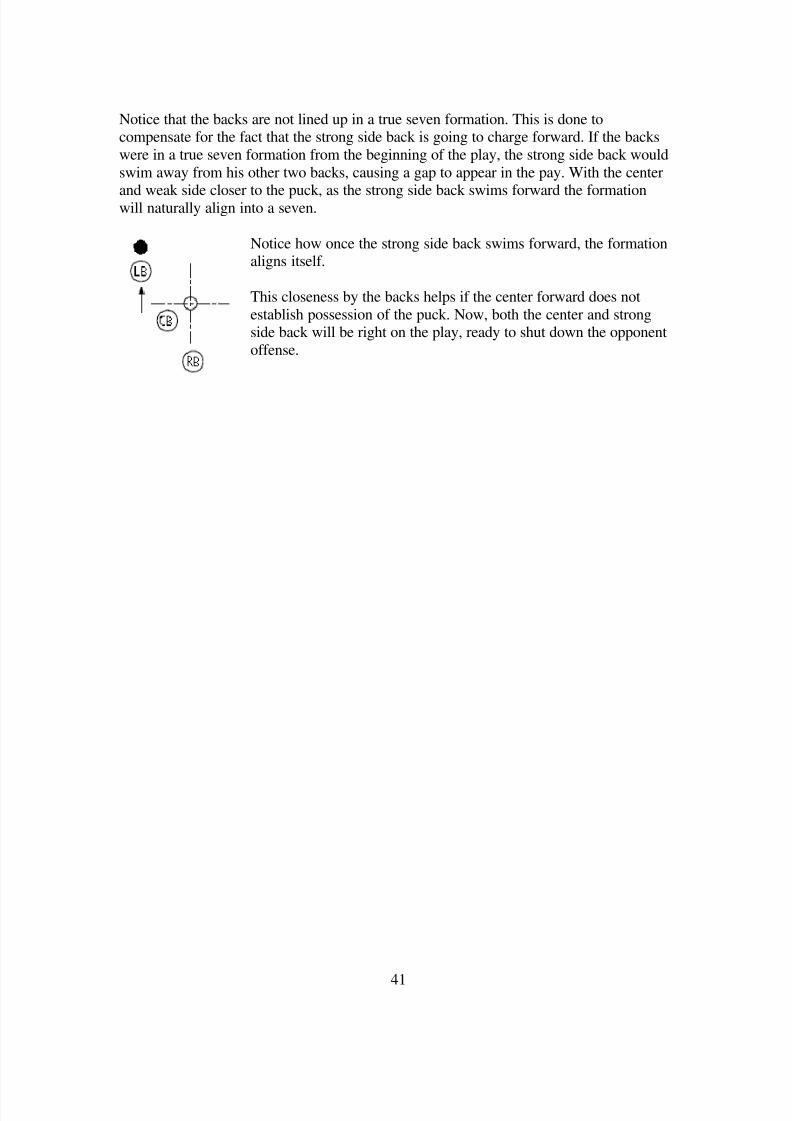
Notice that the backs are not lined up in a true seven formation. This is done tocompensate for the fact that the strong side back is going to charge forward. If the backs
were in a true seven formation from the beginning of the play, the strong side back would
swim away from his other two backs, causing a gap to appear in the pay. With the center
and weak side closer to the puck, as the strong side back swims forward the formationwill naturally align into a seven.
Notice how once the strong side back swims forward, the formationaligns itself.
This closeness by the backs helps if the center forward does not
establish possession of the puck. Now, both the center and strongside back will be right on the play, ready to shut down the opponent
offense.
8/7/2019 Underwater Hockey Beginner's Guide
http://slidepdf.com/reader/full/underwater-hockey-beginners-guide 42/55
42
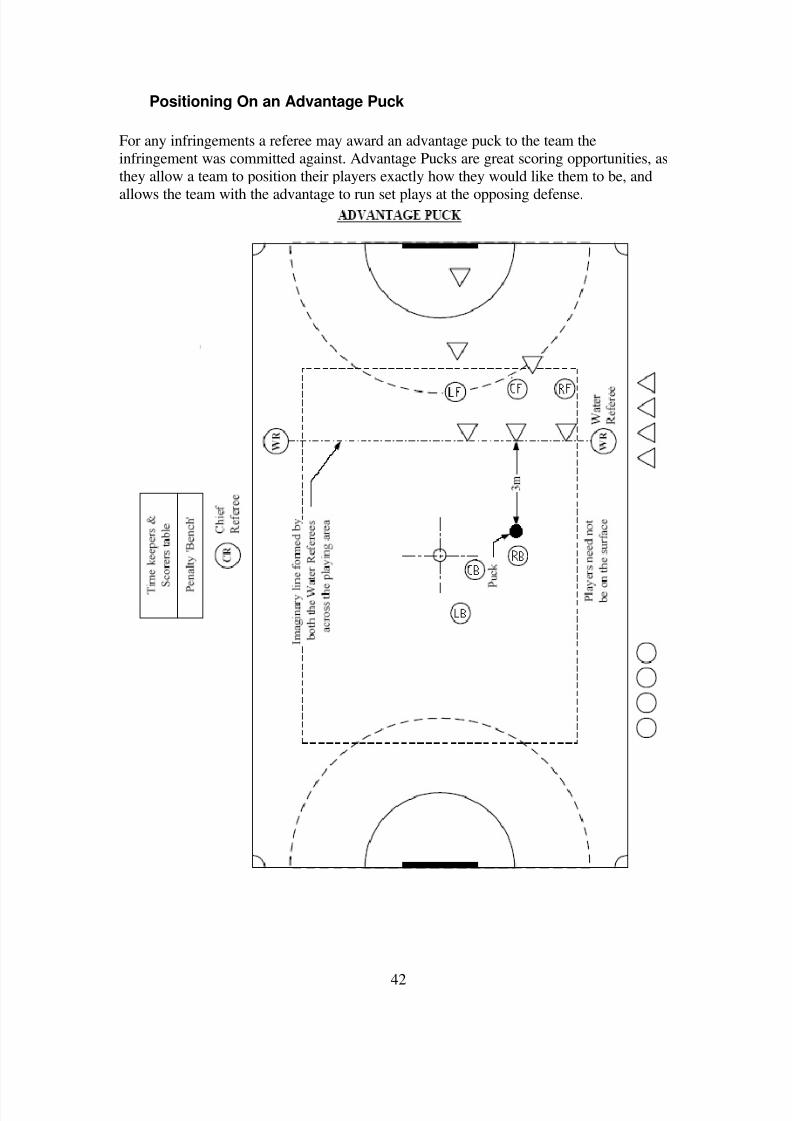
Positioning On an Advantage Puck
For any infringements a referee may award an advantage puck to the team the
infringement was committed against. Advantage Pucks are great scoring opportunities, as
they allow a team to position their players exactly how they would like them to be, and
allows the team with the advantage to run set plays at the opposing defense.

8/7/2019 Underwater Hockey Beginner's Guide
http://slidepdf.com/reader/full/underwater-hockey-beginners-guide 43/55
43
On an advantage, the forwards should be lined up behind the opposition players. The
Back who takes the puck should charge forward and pass only once they encounterresistance. The Back should pass the puck over the defending opposition players and to
one of his own players.
Notice that the backs are not lined up in a true seven formation. This is done tocompensate for the fact that the strong side back with the puck is going to charge
forward. If the backs were in a true seven formation from the beginning of the play, the
strong side back would swim away from his other two backs, causing a gap to appear inthe play. With the center and weak side closer to the puck, as the strong side back swims
forward the formation will naturally align into a seven.
Notice how once the strong side back swims forward, theformation aligns itself.
This closeness by the backs helps if the strong side back‟s first
pass is intercepted by the opposition team. Now, both thecenter and strong side back will be right on the play, ready to
shut down the opponent‟s offense.
8/7/2019 Underwater Hockey Beginner's Guide
http://slidepdf.com/reader/full/underwater-hockey-beginners-guide 44/55
44
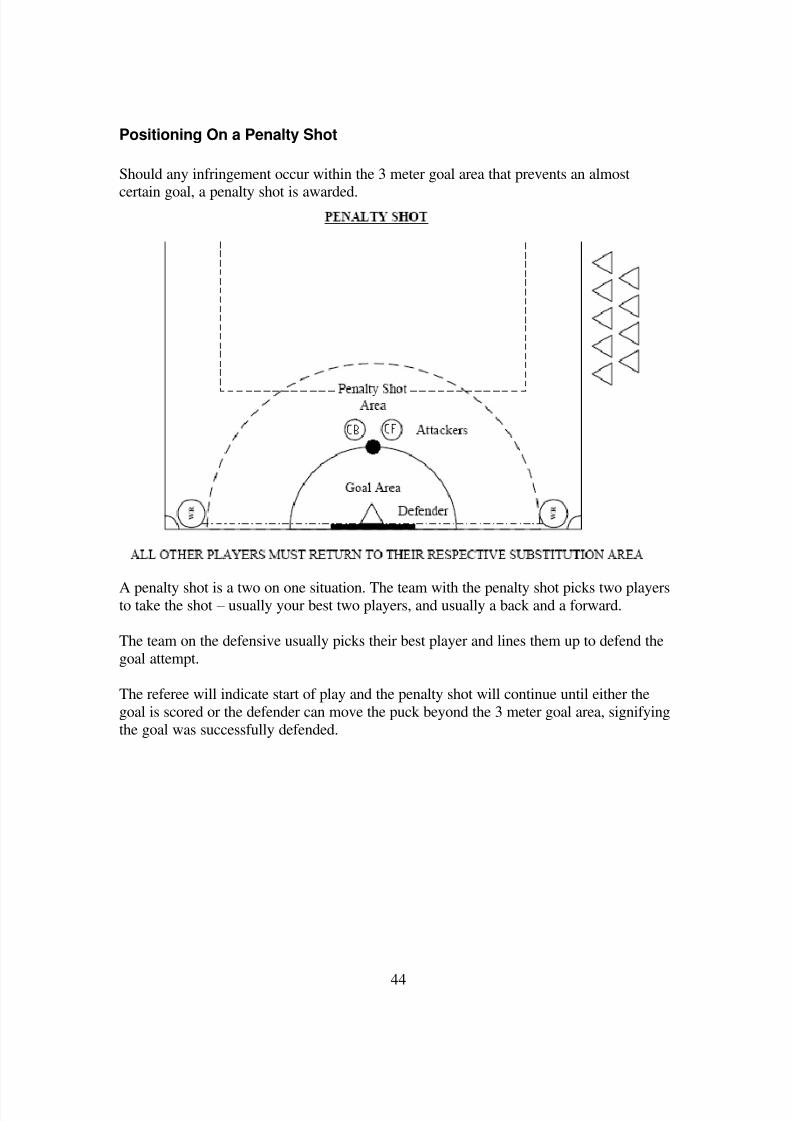
Positioning On a Penalty Shot
Should any infringement occur within the 3 meter goal area that prevents an almost
certain goal, a penalty shot is awarded.
A penalty shot is a two on one situation. The team with the penalty shot picks two playersto take the shot – usually your best two players, and usually a back and a forward.
The team on the defensive usually picks their best player and lines them up to defend the
goal attempt.
The referee will indicate start of play and the penalty shot will continue until either the
goal is scored or the defender can move the puck beyond the 3 meter goal area, signifying
the goal was successfully defended.
8/7/2019 Underwater Hockey Beginner's Guide
http://slidepdf.com/reader/full/underwater-hockey-beginners-guide 45/55
45
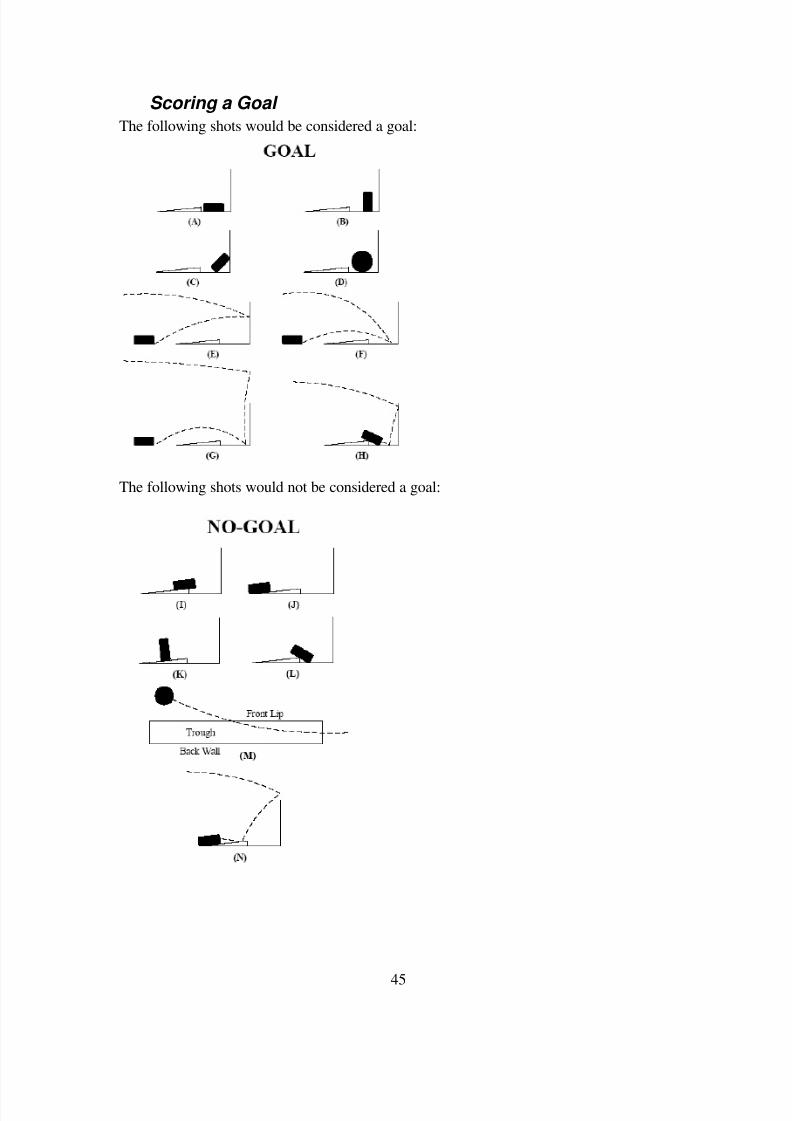
Scoring a Goal
The following shots would be considered a goal:
The following shots would not be considered a goal:
8/7/2019 Underwater Hockey Beginner's Guide
http://slidepdf.com/reader/full/underwater-hockey-beginners-guide 46/55
46
Subbing Out
If there is a time when the puck is in a position where you should play it but you‟re toowinded to hold your breath and go back down to the bottom, you should sub out. Get a
fresh player in the water. This is especially important around your goal. The sub box is
right by your goal – make long, hard drops, and sub out. No need to make many short
drops when you‟re swimming right next to your sub. Forwards will need to sub moreoften than backs – in most tournaments, the forwards get more subs than the backs just
for this reason. Respond to having the extra sub by playing hard when you‟re in the waterand subbing out quickly.
At back, when another back subs out, play it safe. Don‟t try anything risky until your team is back at full strength. Work the puck to the wall, throw it in the corner, and hang
back a little farther. Be conservative, especially if you‟re the last man back on a play. Letthe other team eat up a little pool, but keep them from getting a sure shot at the goal.
For whatever position you play, know who is in the water and who is subbing out. It‟simportant that you know what your teammates are doing at all times in the water.
A great strategy when your team is playing in your defensive zone is to push the puck tothe wall next to the sub box. This allows each player to completely exert him or herself,
then sub out quickly and get a fresh player back on the puck.
When the puck is around your opponent‟s goal, be a little more hesitant to sub out. You
are the farthest away from your sub box when you‟re at your opponent‟s goal. If you subout in front of their goal, you‟re taking a person out of the play for an extended period of
time (the time it takes you to swim back, and the time it takes your sub to swim in). Savethe energy you would spend swimming back and help your team score a goal, then sub
out afterwards.
8/7/2019 Underwater Hockey Beginner's Guide
http://slidepdf.com/reader/full/underwater-hockey-beginners-guide 47/55
47
Cycling and Breakaways
The problem with breakaways is when separation exists between the forwards and thebacks when the play accelerates quickly in either direction.
For example, when the forwards get a breakaway and the backs don‟t follow quickly
enough, a turnover usually results. The other team then pushes the puck through the gapcreated between the backs and the forwards and they gain back all the pool they have justlost (or should I say we lose the pool that has just been gained).
The other case is when the other team gets a breakaway. The forwards hang back, waiting
for the backs to bring the puck back up, and a huge gap develops between the backs and
the forwards. Now, when the back regains possession and goes to find a forward to throwthe puck to, there is no one on the bottom close enough to get the pass. Or, if the back
stops their forward from breaking away, there is no one to back pick the puck, and the
forward can wait for their backs to show up and start muscling the puck up the pool.
This divide occurs partly due to fitness but some of it is mental. I know it is difficult for aforward to have a big breakaway, then have to go right back to playing defense.
(Especially if the other team has swam several zones away). It can be de-motivating buteveryone needs to get past this and force him or herself to get back into the action as
quickly as possible. If you're completely spent, sub out.
The elimination of gaps between the forwards and backs is crucial in a high level game.
8/7/2019 Underwater Hockey Beginner's Guide
http://slidepdf.com/reader/full/underwater-hockey-beginners-guide 48/55
48
How to Execute Correctly in a Two on One Situation
(Stolen from a piece written by Kendall Banks, with additions from Missy Kehoe)
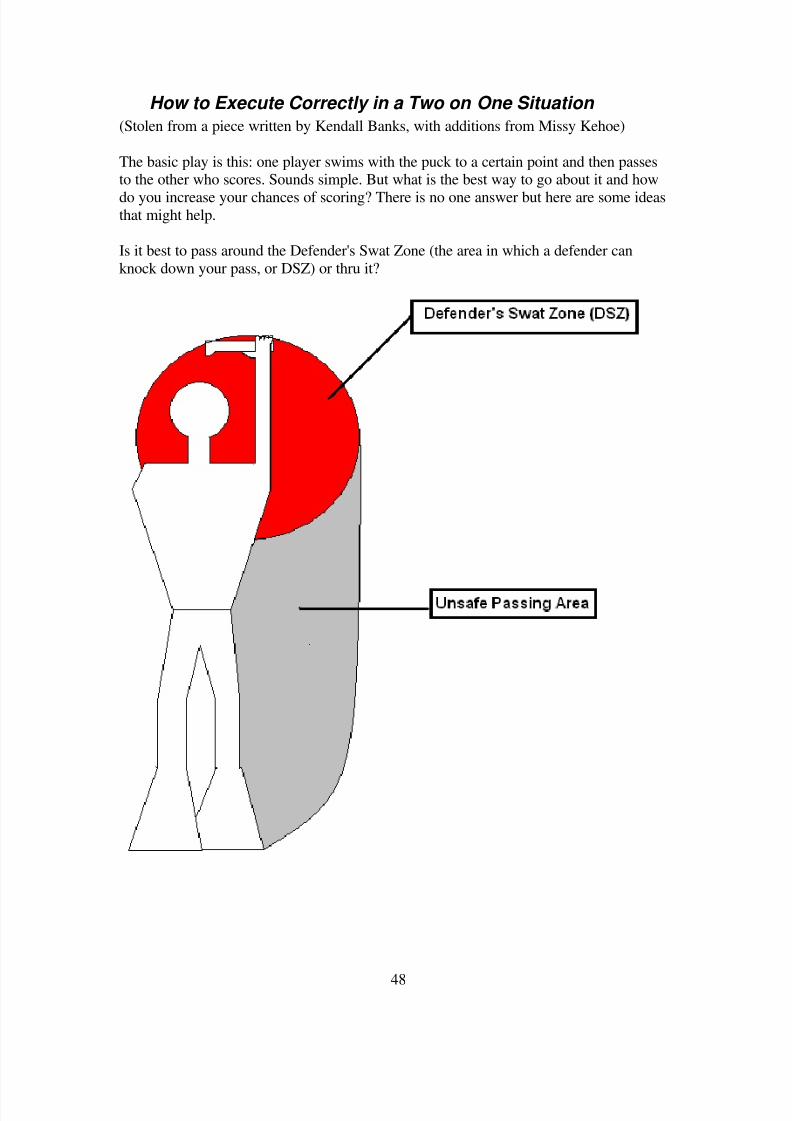
The basic play is this: one player swims with the puck to a certain point and then passesto the other who scores. Sounds simple. But what is the best way to go about it and how
do you increase your chances of scoring? There is no one answer but here are some ideasthat might help.
Is it best to pass around the Defender's Swat Zone (the area in which a defender can
knock down your pass, or DSZ) or thru it?
8/7/2019 Underwater Hockey Beginner's Guide
http://slidepdf.com/reader/full/underwater-hockey-beginners-guide 49/55
49
You might have the opportunity to go around the DSZ early or with a really wide
pass, but either of these options will mainly buy time for the defenders help to arrive. If itreally is a two on one let's take our chances on going to the goal, not just maintaining
possesion until the numbers even back up. In a two on one against the last man the most
productive play is generally thru the DSZ.
Given that you have decided to attempt going thru the DSZ then you want the puck to
travel as short a distance thru that volume as possible and at as high a speed as possible.Work together to accomplish this in the following ways:
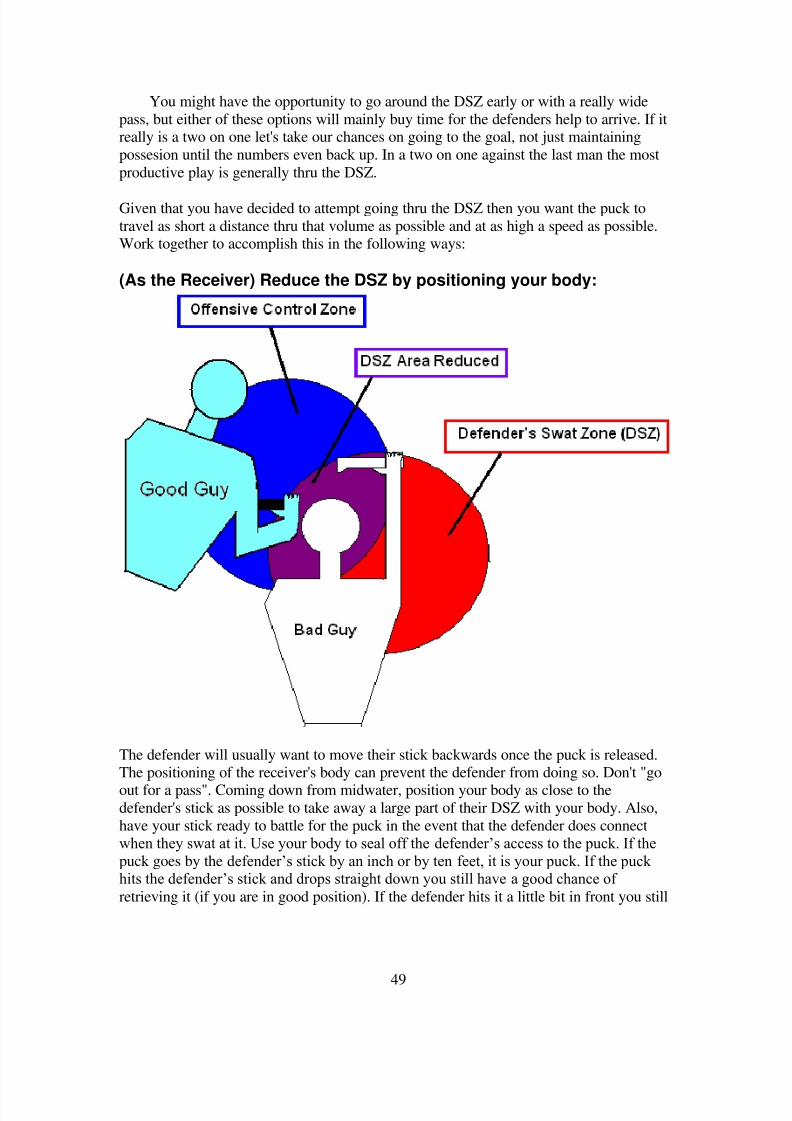
(As the Receiver) Reduce the DSZ by positioning your body:
The defender will usually want to move their stick backwards once the puck is released.The positioning of the receiver's body can prevent the defender from doing so. Don't "go
out for a pass". Coming down from midwater, position your body as close to thedefender's stick as possible to take away a large part of their DSZ with your body. Also,
have your stick ready to battle for the puck in the event that the defender does connect
when they swat at it. Use your body to seal off the defender‟s access to the puck. If thepuck goes by the defender‟s stick by an inch or by ten feet, it is your puck. If the puck hits the defender‟s stick and drops straight down you still have a good chance of
retrieving it (if you are in good position). If the defender hits it a little bit in front you still
8/7/2019 Underwater Hockey Beginner's Guide
http://slidepdf.com/reader/full/underwater-hockey-beginners-guide 50/55
50
have a shot at it. If it just gets past the wall of your body, it's yours. Then maintain
with your body and legs your relative positional advantage while kicking to the goal.
(As the Passer) Get the puck past the stick:
The puck is going it's fastest when it leaves your stick and does nothing but slow downafter that. If the puck travels four feet before it even enters the DSZ then it is going a lotslower than it could be. The defender knows they are the last defender and will likely
play soft and tempt you to let the puck far away from their stick. This gives the defender
a better chance of swatting the pass down. Don't shoot too early and also don't slowdown. Anytime you have an advantage in numbers and you slow down you are reducing
that advantage.
Another trick defenders use is the fake. The defender will fake an attack trying to draw aflick they can anticipate by having their hand moving backwards already. Again, don't
bite and don't slow down. The receiver can help if they can move with the defender on
the fake to occupy any space the defender momentarily gives up. Play the player, not theanticipated length of your teammate's pass.
In review, to complete a successful 2 on 1:
1. The receiver should decrease the size of the DSZ by the positioning of their body.2. The passer should release the puck close to the defender's stick and preferably
when the defender‟s stick is moving towards the passer - but don't get stuffed.
Other Do's and Don'ts:
Have the puck ready for a quick release - a wind-up allows a defender time toreact
Follow your shot - if the defender gets a piece of it you can still shove it thru to
your teammate if you are following up.
Keep kicking - time is on the defenders side if you slow down
Be patient - allow time for the receiver to establish position, as long as you don't
slow down it's probably worth the wait
Be prepared to swim it all the way to the goal - usually as soon as you show thedefender this with your body language they will commit to you and you will be
able to execute the pass
Fake the defender with your eyes - look to the opposite side of them from where
the receiver is actually going Don't curl - it allows time for defensive help to arrive
Don't drop the puck down low - that is where the defensive help may be coming
from - also if the defender attacks can you release the puck from there?
Don't get stuffed - you've given up the two on one advantage
8/7/2019 Underwater Hockey Beginner's Guide
http://slidepdf.com/reader/full/underwater-hockey-beginners-guide 51/55
51
Don't get too cute - remember you have the advantage, so good decision
making and basic execution should make this play work
Don't end up lateral of your teammate if you are the receiver - with the
defender's legs between you - you should have gone forward to midwater. Do it
now. Getting there late is better than being where you are now. Don't tempt your
teammate to slow down.
8/7/2019 Underwater Hockey Beginner's Guide
http://slidepdf.com/reader/full/underwater-hockey-beginners-guide 52/55
52
How to Execute Correctly in a Two on Two Situation
(Stolen from another piece written by Kendall Banks)
Here's another "how to" blurb on executing offense for one of those rare moments when ahigh level game is not a furball of ten bodies on the bottom around the puck. These
situations do happen and to some extent you can make them happen though they do notoccur at a high frequency during the game. This is an area of the game that needs topracticed to a degree out of proportion to it's frequency of occurrence. You must be
prepared to capitalize on opportunities.
Number one objective once you realize you are in a two on two situation with the puck:
Do something to force the defenders to switch their coverage. Test their execution. Dothey both pick up the switch? Or do they allow one person to be become open? Herein
lies the opportunity to score.
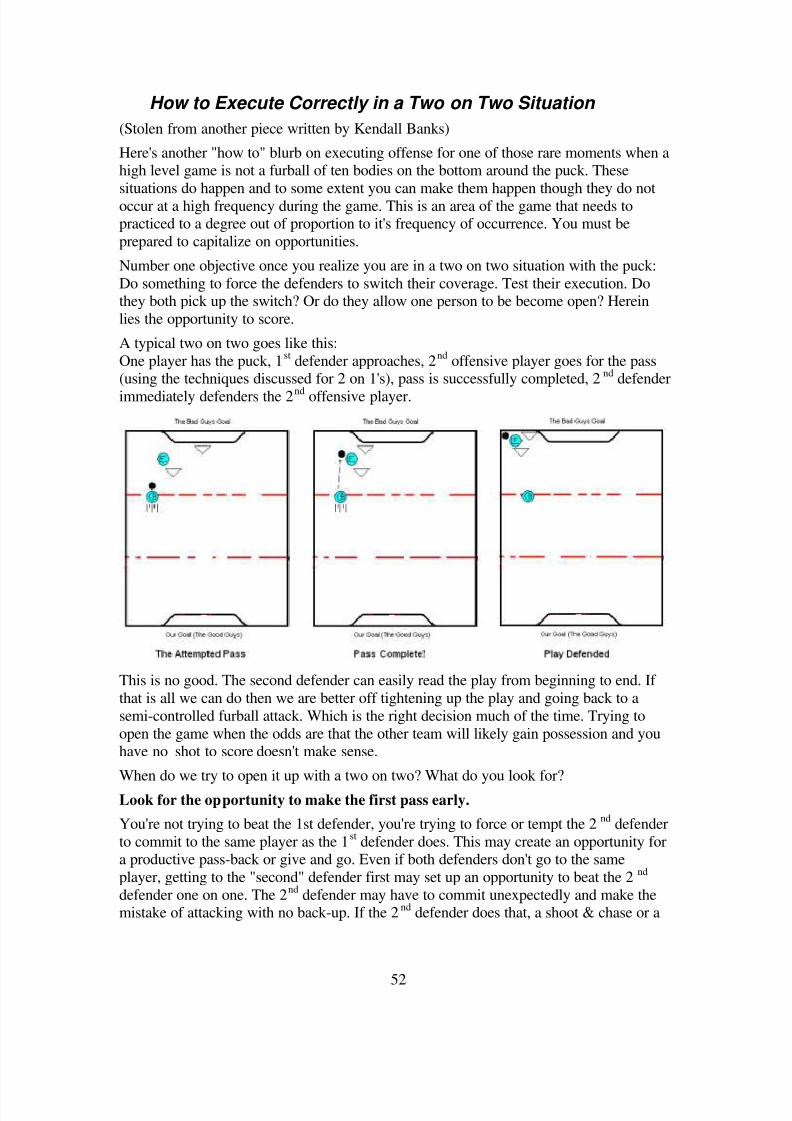
A typical two on two goes like this:
One player has the puck, 1st
defender approaches, 2nd
offensive player goes for the pass(using the techniques discussed for 2 on 1's), pass is successfully completed, 2nd defender
immediately defenders the 2nd offensive player.
This is no good. The second defender can easily read the play from beginning to end. If
that is all we can do then we are better off tightening up the play and going back to a
semi-controlled furball attack. Which is the right decision much of the time. Trying to
open the game when the odds are that the other team will likely gain possession and youhave no shot to score doesn't make sense.
When do we try to open it up with a two on two? What do you look for?
Look for the opportunity to make the first pass early.
You're not trying to beat the 1st defender, you're trying to force or tempt the 2nd
defender
to commit to the same player as the 1st
defender does. This may create an opportunity fora productive pass-back or give and go. Even if both defenders don't go to the same
player, getting to the "second" defender first may set up an opportunity to beat the 2 nd
defender one on one. The 2nd
defender may have to commit unexpectedly and make themistake of attacking with no back-up. If the 2nd defender does that, a shoot & chase or a

8/7/2019 Underwater Hockey Beginner's Guide
http://slidepdf.com/reader/full/underwater-hockey-beginners-guide 53/55
53
good move means a score.
Look for the opportunity to swim directly at the 2nd
defender.
If you make a sharp turn early, away from the 1st
defender and directly at the 2nd
defenderyou may end up with both of them committing to you. This may seem counterintuitive as
you will probably also be heading in the direction of your teammate who is probably
trying to get some spacing between you. Let your teammate worry about that. If you can
get two defenders on you, your teammate should be able to find an open hole.
Look for the opportunity to burn the 1st
defender. If for some reason you believe you
can take them (possibly because the pass is so obvious), then this is the time to try. Notwhen you have a 2 on 1 and simple execution should make a score. Not a 1 on 1 where
the defender has pool to give and is set up to play you soft. Now if you burn the defender
you'll have a surprised last man in a 2 on 1 situation.
Look for the trailer. If you don't like what you see in front of you take a quick look back. If the trailer is in a position to get the puck and draw one of the defenders off you
guys and then flick it back up, then go for it. All right, so it isn't a 2 on 2 anymore.
Good defenders do half of their job by anticipating what is going to happen. If you
can do exactly what the defender is not anticipating you have them half beat. There arelots of ways of doing this. Some of the best can come from your own team's mistakes and
chaos. If two of you are hustling and arrive at the puck together, rather than one player
going up and the other player taking the puck, or one player taking the puck and the other
splitting wide for a pass (both options can be easily anticipated) try swimming togetheruntil the first defender approaches and then making a slide pass to a give and go. Think of
yourself as the 2nd
defender. What would make you more nervous?What you need to figure out is how we are all going to know when an attempt at an openstyle play is over. When is it time to tighten it back up? Maybe just as simple as one openplay at a time. If it works great, if not, tighten it up pronto. Keep it tight until there is a
decent looking opportunity to try another open play.

8/7/2019 Underwater Hockey Beginner's Guide
http://slidepdf.com/reader/full/underwater-hockey-beginners-guide 54/55
54
8/7/2019 Underwater Hockey Beginner's Guide
http://slidepdf.com/reader/full/underwater-hockey-beginners-guide 55/55
Set Play
This is an example of a good teamwork helping transition the puck from the defensivezone to a goal-scoring opportunity. The main focuses of this play are finishing at the goal
and transitioning out of the defensive zone into the middle zone through a solid back.
There are several things that have to happen in order to make this play happen. Let‟s
visualize that one of our backs has the puck and is clearing to the wall.
Transitioning from the defensive third/zone to the mid zone, and into the goal
1- Our back has to swim it up to the opposing player and draw them in - our back
can either try to beat them or pass over them. The Back has to keep in mind that
any premature shooting of the puck stalls the play and shooting on a bad anglemakes it difficult to pick up and carry the momentum of the play. The shot should
go straight through opponent (preferable aiming through their upper arm/shoulder
as this is the hardest shot to block).
2- Two forwards need to be down and swimming hard at the opponent‟s defense.When our back shoots to either forward they need to pick up the puck and pull it
through the opponent. Both forwards should be tight to the opponent and holdtheir position (maybe put a forearm up if you know your going to get abused).
3- As soon as one forward gets position of the puck they chip, punch, push or shootthe puck forward (as cleanly as possible) while the other forward pulls and digs
for the puck until they get it free to move forward with. This can take several
attempts by both forwards as the opponent curls and moves to find an opening. If
this is effective their only recourse should be to go under their body between theforwards. This of course will be stopped by our back that has cycled into position
perfectly and only has to pop the puck back up to the forwards to keep the play
moving forward.
4- Now if our back or forward is able to break free of their opponent at any time thentheir partner forward must swim ahead for a nice lead forward pass shot straight
threw the opponent (never laterally- easiest shot to block).
5- So now our forward has broken free due to excellent teamwork, extreme fitness
and of course killer instinct and resolve and is streaking down the pool but isrunning out of air. Now the offside forward (the one who has been enjoying the
action on the surface) is either going to drop right beside the person with the puck
if they're encountering resistance or is dropping ahead of the person with the puck
moving into a solid position to receive a pass and continue the play into the goal.
6- While the forwards are all charging the goal, two of the backs have slid in behindthe forwards to clean up any messes and pop the puck back up to the forwards.
Related Documents