Understanding Autodesk® Revit® Visualizations with Autodesk® 360 Rendering Jochen Tanger – Autodesk Emmanuel Di Giacomo – Autodesk Class ID AB2873 This class provides answers to at least the following questions: How many cloud credits do I need for my renderings? What are sun study, panorama, and illumination renderings? What is the alpha channel option for? Why does my background image not show up or why is it displaced? How can I download cloud renderings? Is there an offline viewer for panorama renderings? How can I share my renderings without sending them by email? We address these and other rendering questions. Learning Objectives At the end of this class, you will be able to: Use and understand the functionalities of Autodesk 360 Rendering Explain what cloud credits are and how many are needed for renderings View Autodesk 360 panorama renderings offline Be more efficient with visualizations out of Autodesk Revit software

Welcome message from author
This document is posted to help you gain knowledge. Please leave a comment to let me know what you think about it! Share it to your friends and learn new things together.
Transcript

Understanding Autodesk® Revit® Visualizations with Autodesk® 360 Rendering
Jochen Tanger – Autodesk Emmanuel Di Giacomo – Autodesk
Class ID AB2873
This class provides answers to at least the following questions: How many cloud credits do I need for my renderings? What are sun study, panorama, and illumination renderings? What is the alpha channel option for? Why does my background image not show up or why is it displaced? How can I download cloud renderings? Is there an offline viewer for panorama renderings? How can I share my renderings without sending them by email? We address these and other rendering questions.
Learning Objectives
At the end of this class, you will be able to:
Use and understand the functionalities of Autodesk 360 Rendering
Explain what cloud credits are and how many are needed for renderings
View Autodesk 360 panorama renderings offline
Be more efficient with visualizations out of Autodesk Revit software

Understanding Autodesk® Revit® Visualizations with Autodesk® 360 Rendering
2
About the Speakers
Jochen Tanger
Technical Sales Specialist , Autodesk
Based in Munich, Germany, Jochen works as Technical Sales Specialist at Autodesk for more than nine
years. Since Autodesk decided to market Revit in Central Europe in 2004, he presents, sells, trains and
supports it to resellers and customers. Today he is still responsible for Revit Architecture and
Structure but also for all BIM and Autodesk 360 products and solutions.
Jochen holds a ‘Diplom Ingenieur’ degree in civil/structural engineering from the university “Ostfalia
Hochschule für angewandte Wissenschaften”. After his studies he worked as a consultant for IBM
until he decided to work for Autodesk in 2003.
Emmanuel Di Giacomo
AEC Technical Specialist , Autodesk
Emmanuel has been working for more than 11 years at Autodesk. With more than seven years of
experience as a BIM solutions expert on Autodesk Revit in Europe, Emmanuel Di Giacomo has a
degree in architecture - 1993 - and has more than 23 years of experience in 3D technology for the
architecture and building industry.
Actually owning the position of BIM Technical Expert for Autodesk France, he promotes BIM solutions
in France’s major architectural practices, design offices and construction companies in the building
industry. He also ensures their technical and relational follow up as well as Autodesk’s Channel
Network mentoring.
He also trained some famous architectural practices in Europe in advanced modeling like Zaha Hadid
Architecture.
Formerly AEC Marketing Manager for 3 years at Autodesk and also product manager for 3 years in
another company. Finally, he also loves making his Utopic City evolve and has many followers in the
world: www.facebook.com/revitarchitectureutopiccity

Understanding Autodesk® Revit® Visualizations with Autodesk® 360 Rendering
3
Autodesk 360 Rendering – Getting started
Getting started with Autodesk 360 Rendering
This AVI shows how to start and use the cloud rendering:
http://usa.autodesk.com/adsk/servlet/ps/dl/item?siteID=123112&id=17812620&linkID=176902
48
What are cloud credits and how many do I have?
Cloud credits are the unit of measurement required to perform certain tasks, such as creating a
rendering or running a simulation, in Autodesk ® 360.
Users receive 100 cloud credits per license for every year of Subscription purchased. LT point products are excluded. The cloud credit allocation is flat across all products and suites. For multi-year contracts, annual allocations are issued each year of the contract.
Product/Suite Annual Quarterly Monthly
All Suite Levels, including LT Suites (Subscription) 100 N/A N/A
All Suite Levels, including LT Suites (Rental Plan) 100 30 10
Point products (Subscription) 100 N/A N/A
Point products (Rental Plan) 100 30 10
LT Point products
(Revit LT, Inventor LT, AutoCAD LT)
N/A N/A N/A
Autodesk ® 360 (baseline) N/A N/A N/A
Standalone service Depends on Service Depends on Service Depends on Service
Trial (minimum value) Depends on Service N/A N/A
Cloud credits are available for purchase from the Autodesk e-Store, Autodesk resellers and Autodesk direct sales. To purchase through Autodesk Store: Go to Subscription Center or accounts.autodesk.com and select “buy more cloud credits” to a specific contract to purchase. This will take you through a

Understanding Autodesk® Revit® Visualizations with Autodesk® 360 Rendering
4
guided Autodesk Store experience. Cloud credits are sold in packs of 100 for $100USD, based on US SRP. For more information about cloud credits in general see:
http://usa.autodesk.com/adsk/servlet/ps/dl/item?siteID=123112&id=17980122&linkID=17690248
How many cloud credits do I need for my Renderings?
Cloud credits are charged per megapixel (MP), and at different rates depending on the size, quality, and type of rendering.
Renderings of single images at Standard quality under 1 MP are free.
Renderings over 1 MP at Standard quality cost half a cloud credit per total number of MPs.
Renderings of any size at Final quality cost one cloud credit per total number of MPs.
A megapixel (MP) is one million pixels. It is used as a unit of measurement for cloud credit charging when rendering.
You can calculate the number of MPs a single rendering will be by multiplying the width and height values in the Render Settings window. For example, if you set the width and height to be 1500 px and 1029 px, respectively, the total MPs for the rendering will be 1,500 x 1,029 = 1,543,500 px, or 1.54 MPs. If you render 6 views in Revit at this size, you would be requesting 9.24 MPs.
Solar Studies and Panoramas consist of more than one frame, so to calculate the total MPs in these renderings, you need to multiple the MP in each frame by the number of frames. Panoramas require 6 frames each.
Cloud credit charges are always rounded to the nearest integer. You will never be charged fractional cloud credits for a job.
For example, for a single rendering of 5.5 MPs at Standard quality, calculations are as follows:
5.5 MP X 0.5 cloud credits/MP = 2.75 cloud credits The 2.75 cloud credits are rounded to 3. For more information see here: http://docs.autodesk.com/ADSK360/help/ENU/rendering/index.html?url=files/GUID-4496707E-
30AC-4581-B937-25FE31A89EE8.htm,topicNumber=d30e2911
What’s the difference between Standard and Final render quality levels?
Standard quality gives you a rendering that is adequate for seeing the results of your render without using a large number (or any) cloud credits. Standard renderings may be good enough for your needs in some cases, but are not necessarily of high enough quality to provide, for example, to a client as final presentation material. Standard quality renderings will, however, give you a very good sense of what the Final version will look like.

Understanding Autodesk® Revit® Visualizations with Autodesk® 360 Rendering
5
Final quality gives you a high quality rendering that you can use to share with interested viewers. Final quality renderings require more cloud credits, so you should test at Standard quality before creating a Final render.
Standard Final
What is a solar study?
Since January 2013 solar studies are possible within Cloud Rendering. You can compare them with the solar studies in Revit itself, but they are fully calculated within the cloud. Solar studies cannot be rendered directly, you first need to render a 3d view and then rerender it in the cloud as solar study

Understanding Autodesk® Revit® Visualizations with Autodesk® 360 Rendering
6
The final solar study can be watched as AVI in the Autodesk 360 account
Or you can download it as a series of pictures:
What is an Illuminance rendering?
This option allows you to render a picture showing the brightness of every single point in the model, either through daylight or artificial light.
New since Novmber 2013 are physically based Illuminance studies: They give you much more control over sky and lighting in your Illuminance studies. Choose Sky Model (level of overcast),

Understanding Autodesk® Revit® Visualizations with Autodesk® 360 Rendering
7
Location (global position, day, and time), and Legend (unit of measurement for light). There is also an option to use the settings contained in your Revit model.
NOTE: you must install Revit 2014 UR2 to use these new Illuminance settings.
Exposure: Advanced or Native
Native: Rendering uses same exposure than Mental Ray in Revit uses
Advanced: Optimized Rendering and exposure, can be compared with HDR photography

Understanding Autodesk® Revit® Visualizations with Autodesk® 360 Rendering
8
Using an alpha channel with a TIFF image
If you need to make environmental insertion for your projects, you may need to work with an alpha
channel to perfectly crop your image and use the transparent channel to place something
underneath it.
Step 1 in Revit, create your rendering using the TIFF format desired and checking the “Alpha
Channel” check box.
Open it in Adobe Photoshop like below.
Understanding Autodesk® Revit® Visualizations with Autodesk® 360 Rendering
9
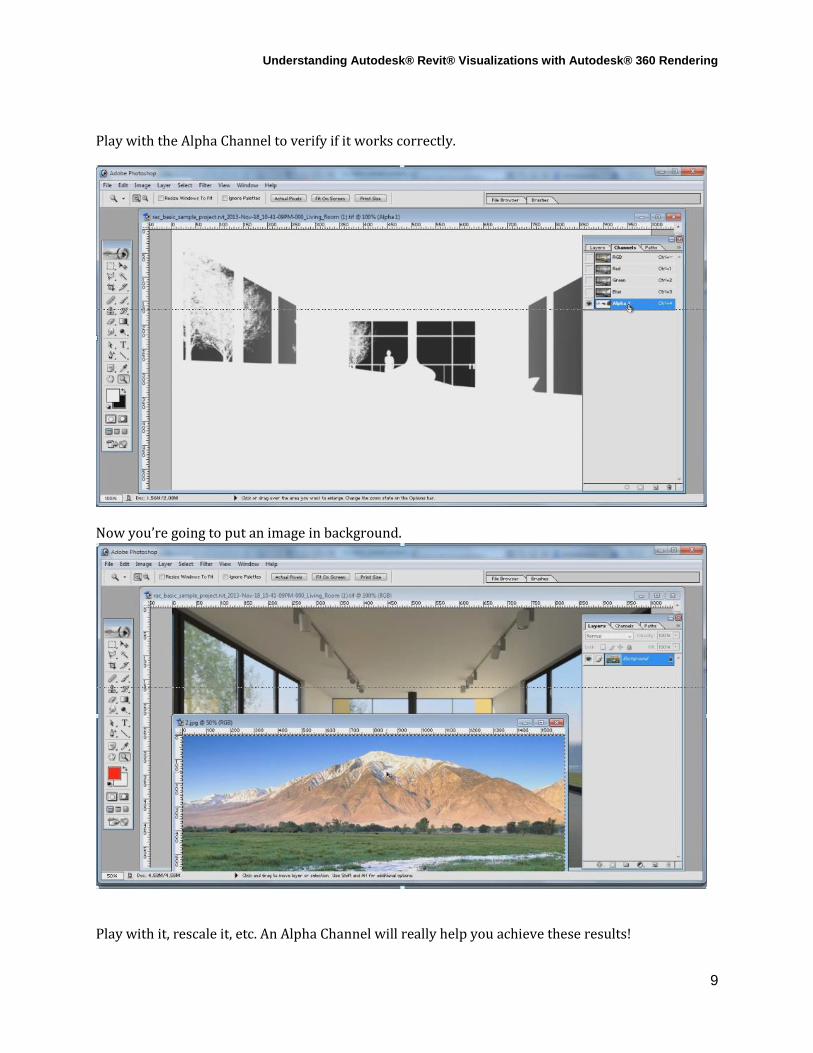
Play with the Alpha Channel to verify if it works correctly.
Now you’re going to put an image in background.
Play with it, rescale it, etc. An Alpha Channel will really help you achieve these results!

Understanding Autodesk® Revit® Visualizations with Autodesk® 360 Rendering
10

Understanding Autodesk® Revit® Visualizations with Autodesk® 360 Rendering
11
Autodesk 360 Rendering – Sharing your projects – Online & offline
HTML file download from your Rendering Gallery (Panorama)
In Autodesk 360 Rendering Gallery, you can choose to download an embedded HTML file that you
will be able to view offline on your Desktop Computer. Once downloaded, you can navigate with
your mouse in a cubic environment and decide to move back to the original location by clicking on
the “Home” button. This is the Autodesk viewing technology offered with Autodesk 360 Rendering.
Autodesk 360 Rendering – Panorama viewers
1. KubeGL.exe
This is a kind of home made cubic panorama viewer that you can find on the web. The process is
very simple. First, just download a strip of panorama image by selecting the right drop down menu
underneath the panorama like shown below and select the “Download Panorama” as Image Strip
like shown below.
Understanding Autodesk® Revit® Visualizations with Autodesk® 360 Rendering
12
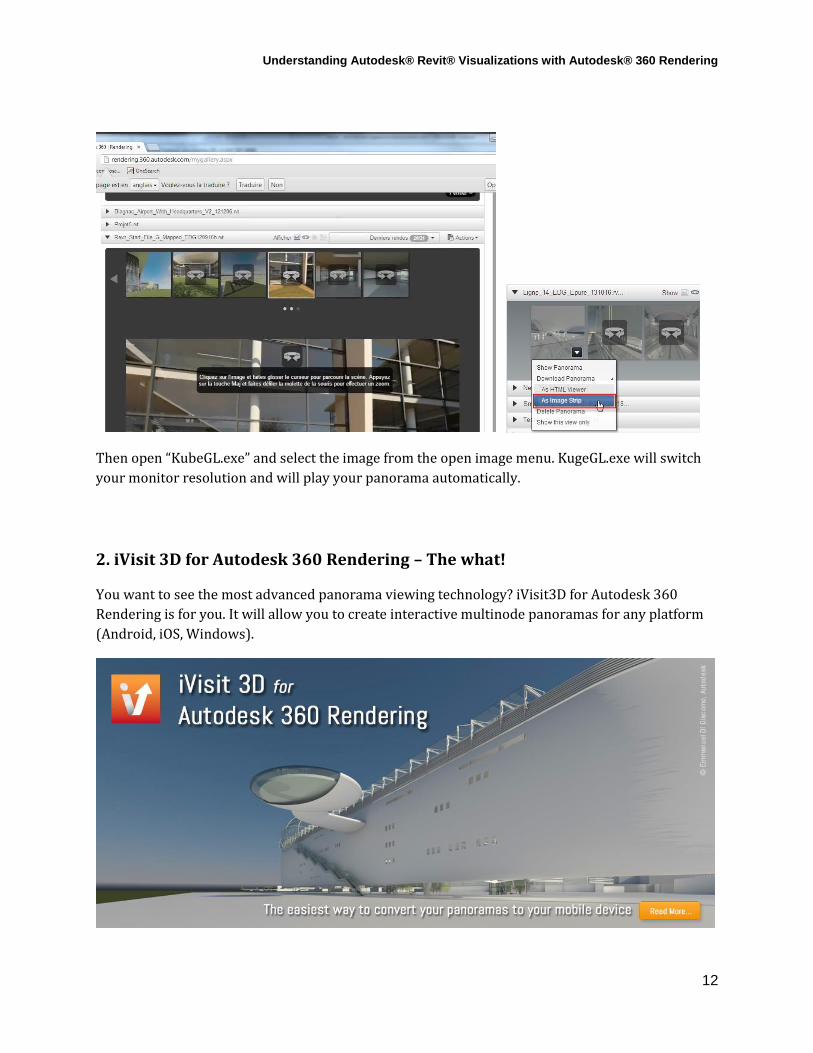
Then open “KubeGL.exe” and select the image from the open image menu. KugeGL.exe will switch
your monitor resolution and will play your panorama automatically.
2. iVisit 3D for Autodesk 360 Rendering – The what!
You want to see the most advanced panorama viewing technology? iVisit3D for Autodesk 360
Rendering is for you. It will allow you to create interactive multinode panoramas for any platform
(Android, iOS, Windows).

Understanding Autodesk® Revit® Visualizations with Autodesk® 360 Rendering
13
iVisit 3D for Autodesk 360 Rendering – the how
Connect to your Autodesk 360 account and launch your rendering calculation in the cloud. Calculate
the different camera viewpoints as Panorama images. Create large, vertical images with six
different views of a project. Launch your panoramas calculation on Autodesk 360 Rendering, and
when it's done, just download them to your computer from Autodesk 360 Rendering Gallery.Import
your images in iVisit 3D and create the navigation

Understanding Autodesk® Revit® Visualizations with Autodesk® 360 Rendering
14
iVisit 3D works on both Mac and PC. Simply import your panoramas and, if necessary, the plan
views of your project. Link all the panoramas together and position them on the plan views. The
links created in this step will bring the navigation between nodes in your final iVisit 3D panorama.
Calculate iVisit 3D panoramas in Flash format or view on a mobile device
Once your panoramas are linked altogether and after testing the navigation, simply calculate the
final iVisit 3D Panoramas in both HTML and PNO formats. HTML allows you to upload your
panorama to a website, while the PNO format allows you to view your panorama on an iOS or
Androïd mobile device. The PNO file can be transferred to your tablet or smartphone through
different ways using Dropbox, box.com and iTunes.
It’s a very easy 5 steps process in 5 minutes, compiling for all the Market platforms…
Understanding Autodesk® Revit® Visualizations with Autodesk® 360 Rendering
15
Autodesk 360 Rendering – Tips & tricks
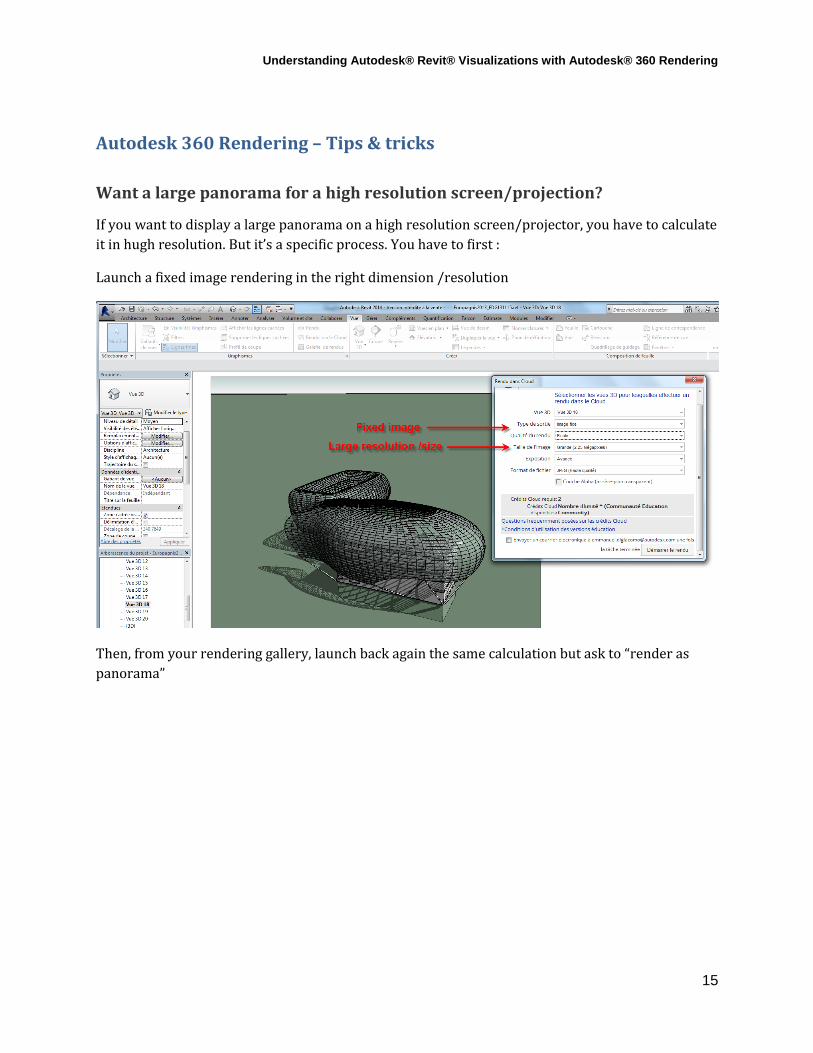
Want a large panorama for a high resolution screen/projection?
If you want to display a large panorama on a high resolution screen/projector, you have to calculate
it in hugh resolution. But it’s a specific process. You have to first :
Launch a fixed image rendering in the right dimension /resolution
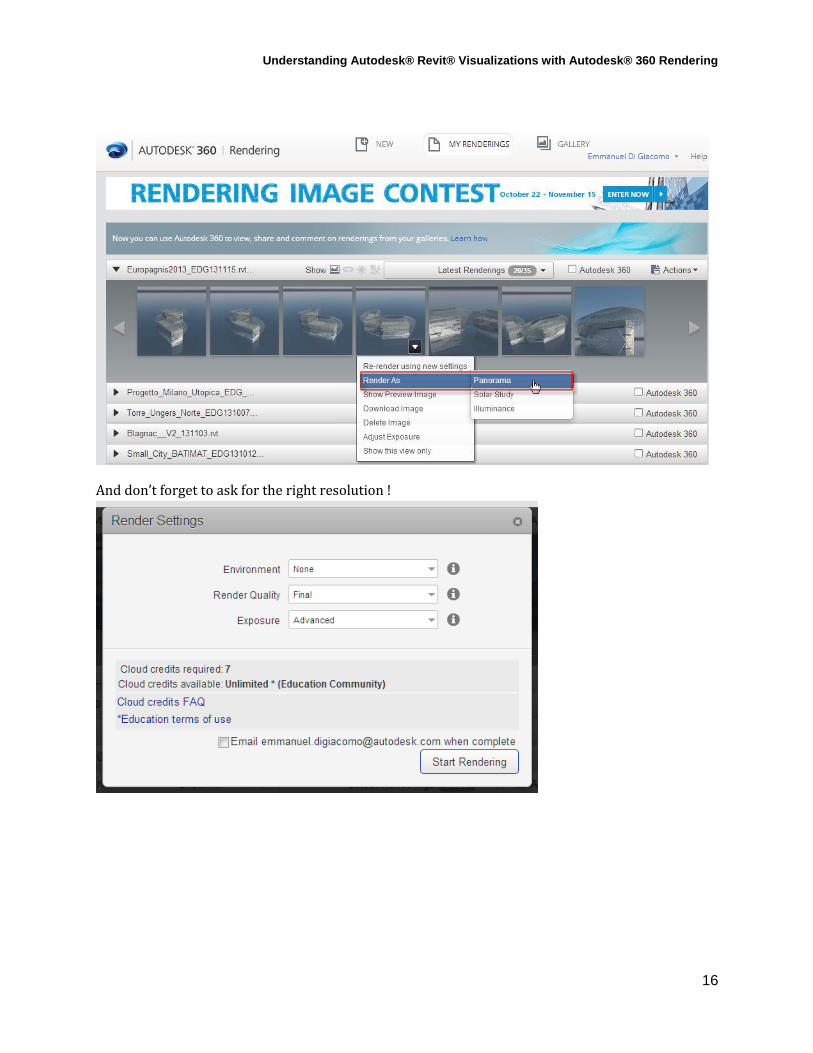
Then, from your rendering gallery, launch back again the same calculation but ask to “render as
panorama”
Understanding Autodesk® Revit® Visualizations with Autodesk® 360 Rendering
16
And don’t forget to ask for the right resolution !

Understanding Autodesk® Revit® Visualizations with Autodesk® 360 Rendering
17
Fast panoramas download?
You want to quickly download your panoramas and you have different media types? That’s an easy
game to solve.
1/ Go on your Rendering gallery
2/ Filter panoramas only
3/Select the “Download All” Option from the right top drop down menu at the top right corner or
your Autodesk 360 Rendering gallery.
Autodesk 360 Rendering will create a zipped file of all your panoramas.

Understanding Autodesk® Revit® Visualizations with Autodesk® 360 Rendering
18
Here’s what they should look like once unzipped:
Gallery Sharing on Autodesk 360
You want to be able to share some of your perspectives, drawings, BIM Projects with your External
Contractors or your internal Team? By simply activating the ad-hoc check box, your Rendering will
appear in your Autodesk 360 Documents Gallery.

Understanding Autodesk® Revit® Visualizations with Autodesk® 360 Rendering
19

Understanding Autodesk® Revit® Visualizations with Autodesk® 360 Rendering
20
Online Images post-processing
A post processing tool is always interesting in your daily job. But not ot everyone can afford to buy
a high end online post processing solution. To fulfill this gap, Autodesk can bring you a free of
charge post processing tool called Autodesk Pixlr.
To make it work? Very simple…Open your Internet Browser and type in the address www.pixlr.com

Understanding Autodesk® Revit® Visualizations with Autodesk® 360 Rendering
21
You will then get prompted on what you want to do. Open a file on your computer, create a new
one…
As you can see, Pixlr Editor is perfectly associated to Autodesk workflows and is very attached to
our BIM Solution.. Additionnaly, it’s interfaced inside Autodesk 360 Renderings.

Understanding Autodesk® Revit® Visualizations with Autodesk® 360 Rendering
22
You can therefore rework your images, save them and that’s ok!.
Simulating a sky background for Autodesk 360 Rendering
You may already know that the background image feature in Revit is not supported yet by Autodesk
360 Rendering. So, if you need to simulate a background sky for example, you will need to use a
workaround. The most important thing is to first have your background image ready with enough
resolution.

Understanding Autodesk® Revit® Visualizations with Autodesk® 360 Rendering
23
Then, switch to the axonometric view to control what you’re doing.

Understanding Autodesk® Revit® Visualizations with Autodesk® 360 Rendering
24
From the “Insert” tab, create a Decal using your background image as shown below, using the right
effects and appearances desired.
Then, create a long enough wall in the same direction as the camera view point. It needs to be high
if the building is high. Don’t hesitate to reach high heights buildings.

Understanding Autodesk® Revit® Visualizations with Autodesk® 360 Rendering
25
And place your Decal on the visible face of the wall. Extend it if needed as much as possible as
shown below to cover the whole field of view.
Launch your rendering and send it to the Cloud Autodesk 360. Here’s the final result!

Understanding Autodesk® Revit® Visualizations with Autodesk® 360 Rendering
26
Correct Modeling of lightning fixtures
Place center of illumination behind glass (glass should have a high courseness)
Consider to illuminate glass element as well
Related Documents