UG160: Wizard Gecko BGTool™ User's Guide This user's guide walks you through the basic uses of the BGTool. This tool allows the developer to quickly test and evaluate Silicon Lab’s Wiz- ard Gecko Wi-Fi ® Module and its features. KEY POINTS • Setting up BGTool • BGTool walkthrough • Practical configuration examples silabs.com | Building a more connected world. Rev. 1.2

Welcome message from author
This document is posted to help you gain knowledge. Please leave a comment to let me know what you think about it! Share it to your friends and learn new things together.
Transcript

UG160: Wizard Gecko BGTool™ User'sGuide
This user's guide walks you through the basic uses of the BGTool. Thistool allows the developer to quickly test and evaluate Silicon Lab’s Wiz-ard Gecko Wi-Fi® Module and its features.
KEY POINTS• Setting up BGTool• BGTool walkthrough• Practical configuration examples
silabs.com | Building a more connected world. Rev. 1.2

Table of Contents1. Introduction . . . . . . . . . . . . . . . . . . . . . . . . . . . . . . . . 1
1.1 Compatible Products . . . . . . . . . . . . . . . . . . . . . . . . . . . 1
1.2 Notations Used in This Guide . . . . . . . . . . . . . . . . . . . . . . . . 1
2. Preparations . . . . . . . . . . . . . . . . . . . . . . . . . . . . . . . 22.1 Preparing the Wizard Gecko Module Wireless Starter Kit (WSTK) . . . . . . . . . . . . 2
2.2 Installing the Driver . . . . . . . . . . . . . . . . . . . . . . . . . . . . 3
3. Using BGTool Software . . . . . . . . . . . . . . . . . . . . . . . . . . . 43.1 Connection Setup View. . . . . . . . . . . . . . . . . . . . . . . . . . . 4
3.2 Log View . . . . . . . . . . . . . . . . . . . . . . . . . . . . . . . 5
3.3 Device Details View . . . . . . . . . . . . . . . . . . . . . . . . . . . . 6
3.4 Network View . . . . . . . . . . . . . . . . . . . . . . . . . . . . . . 73.4.1 Network View - Access Point Mode (AP) . . . . . . . . . . . . . . . . . . . . 83.4.2 Network View - Station Mode (STA) . . . . . . . . . . . . . . . . . . . . . .103.4.3 Certificate Management . . . . . . . . . . . . . . . . . . . . . . . . . .11
3.5 Data Routing View . . . . . . . . . . . . . . . . . . . . . . . . . . . .123.5.1 DNS Look-up . . . . . . . . . . . . . . . . . . . . . . . . . . . . .123.5.2 Add Endpoints . . . . . . . . . . . . . . . . . . . . . . . . . . . . .133.5.3 Data View . . . . . . . . . . . . . . . . . . . . . . . . . . . . . .14
3.6 mDNS View . . . . . . . . . . . . . . . . . . . . . . . . . . . . . .14
3.7 Persistent Store View . . . . . . . . . . . . . . . . . . . . . . . . . . .15
3.8 I/O Ports View . . . . . . . . . . . . . . . . . . . . . . . . . . . . . .16
3.9 Peripherals View . . . . . . . . . . . . . . . . . . . . . . . . . . . . .18
3.10 Firmware Update View . . . . . . . . . . . . . . . . . . . . . . . . . .19
4. Examples . . . . . . . . . . . . . . . . . . . . . . . . . . . . . . . . 214.1 Starting the Module in Wi-Fi Access Point Mode . . . . . . . . . . . . . . . . . .21
4.2 Turning on the LEDs in WGM110 WSTK . . . . . . . . . . . . . . . . . . . . .21
4.3 Capturing Button Clicks on the WGM110 WSTK . . . . . . . . . . . . . . . . . .23
4.4 TCP Server Example . . . . . . . . . . . . . . . . . . . . . . . . . . .234.4.1 Creating a Wi-Fi Access Point . . . . . . . . . . . . . . . . . . . . . . . .234.4.2 Creating a TCP Server . . . . . . . . . . . . . . . . . . . . . . . . . .244.4.3 Creating a TCP Connection . . . . . . . . . . . . . . . . . . . . . . . .244.4.4 Checking the TCP Connection Status . . . . . . . . . . . . . . . . . . . . .244.4.5 Transmitting Data . . . . . . . . . . . . . . . . . . . . . . . . . . . .25
5. Revision History . . . . . . . . . . . . . . . . . . . . . . . . . . . . . 265.1 Revision 1.2 . . . . . . . . . . . . . . . . . . . . . . . . . . . . . .26
5.2 Revision 1.1 . . . . . . . . . . . . . . . . . . . . . . . . . . . . . .26
5.3 Revision 1.0 . . . . . . . . . . . . . . . . . . . . . . . . . . . . . .26
silabs.com | Building a more connected world. Rev. 1.2

1. Introduction
BGTool is a simple terminal type user interface application that allows a developer to quickly test and evaluate Silicon Lab’s WizardGecko Wi-Fi Module. The main purpose of the BGTool is to hide the complexity of the BGAPITM binary protocol used by the host tocontrol the Wi-Fi software running on the WGM110 Module. It offers a more user-friendly approach to the BGAPI protocol. BGTool canalso be used effectively for quick prototyping and debugging of Wi-Fi applications. This user's guide walks you through the basic usesof BGTool.
The BGTool user interface philosophy is to allow the developer to reproduce and trigger the individual BGAPI defined protocol com-mands, results, and events. BGTool includes the most essential BGAPI functions. This tool does not in itself validate the rationale orcorrectness of the sequence of BGAPI commands input by the user. It sends the commands to the WGM110 and displays the eventsreceived back. This gives the developer total freedom to play around with the BGAPI commands.
Figure 1.1. BGTool Application
1.1 Compatible Products
BGTool can currently be used with Silicon Labs' latest Wizard Gecko WGM110 Wi-Fi Devices. BGTool application requires Windows 7or later OS release.
1.2 Notations Used in This Guide
The following notations are used to distinguish between clicking or pressing buttons and selecting values.• Clicking a button in the graphical user interface: [Set], [Cancel], [Open] etc.• Selecting a value or setting: "Input Disabled", "Without pull-up", "Not enabled" etc.
Names of UI windows, screens, views and tabs: Connect to Module, Network View, Persistent Store View.
Commands written into the Log view BGAPI commands entry field: "wifi_cmd_sme_start_scan(0, 0103)".
Events displayed in the Log view: wifi_evt_sme_wifi_is_on.
Names or suffix of configuration files: "project.xml", ".bin" etc.
References to other manuals and guides: Name of Manual or Guide.
UG160: Wizard Gecko BGTool™ User's GuideIntroduction
silabs.com | Building a more connected world. Rev. 1.2 | 1

2. Preparations
If you have not used BGTool before, some preparations are required.
2.1 Preparing the Wizard Gecko Module Wireless Starter Kit (WSTK)
To prepare the WSTK, do the following (refer to the figure below):1. Connect the WSTK Expansion Board to the WSTK Main Board as shown.2. Connect the WSTK WGM110 Wi-Fi Module Radio Board to the WSTK Main board as shown.3. Turn the power switch marked [BAT USB AEM] of the WSTK Main Board to "AEM" position.4. Connect the WSTK to a PC using the supplied mini USB cable.
Verify the following:1. That the USB Connection Indicator (blue LED) marked "SEGGER" on the Main Board turns on or starts blinking.2. That the LCD display turns on and shows the Silicon Labs logo.
Figure 2.1. WGM110 Setup for BGTool Connection
UG160: Wizard Gecko BGTool™ User's GuidePreparations
silabs.com | Building a more connected world. Rev. 1.2 | 2
2.2 Installing the Driver
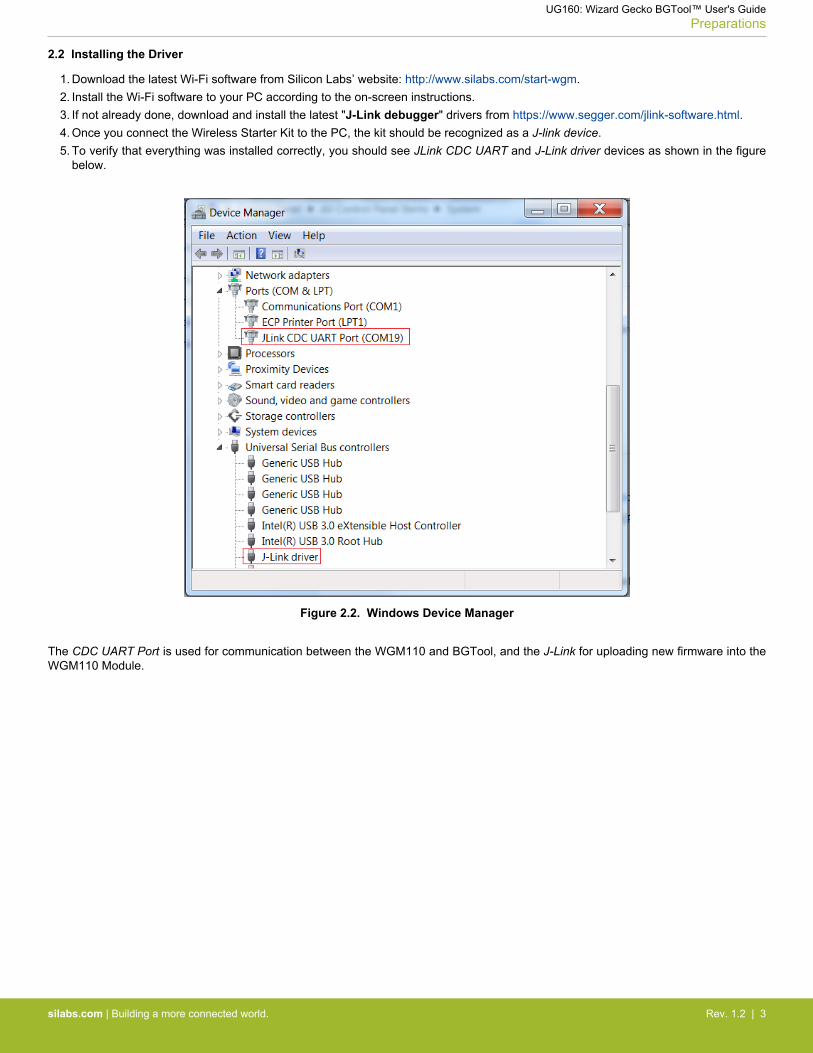
1. Download the latest Wi-Fi software from Silicon Labs’ website: http://www.silabs.com/start-wgm.2. Install the Wi-Fi software to your PC according to the on-screen instructions.3. If not already done, download and install the latest "J-Link debugger" drivers from https://www.segger.com/jlink-software.html.4. Once you connect the Wireless Starter Kit to the PC, the kit should be recognized as a J-link device.5. To verify that everything was installed correctly, you should see JLink CDC UART and J-Link driver devices as shown in the figure
below.
Figure 2.2. Windows Device Manager
The CDC UART Port is used for communication between the WGM110 and BGTool, and the J-Link for uploading new firmware into theWGM110 Module.
UG160: Wizard Gecko BGTool™ User's GuidePreparations
silabs.com | Building a more connected world. Rev. 1.2 | 3
3. Using BGTool Software
This section contains brief step-by-step instructions on how to use the BGTool software.
After starting BGTool, the first task is to connect the Wizard Gecko Wi-Fi® Module Wireless Starter Kit SLWSTK6120A to your PC. Thisis done through the Connect to Module UI pop-up window.
Once you are connected, BGTool moves into the Interactive user interface mode from where you can control and try out various Wiz-ard Gecko Module features. This is the main part of the tool. It provides a versatile graphical user interface (GUI) which can be used toconfigure and issue commands to the connected Wizard Gecko Wi-Fi Module. Included in the GUI is an embedded Log View, whichshows the commands, responses, and events generated over the connection interface between the Wi-Fi Module and the PC.
From the BGTool top row View tab, you can move into the Upload Tool with which you can compile and flash new firmware images tothe connected Wizard Gecko Wi-Fi Module.
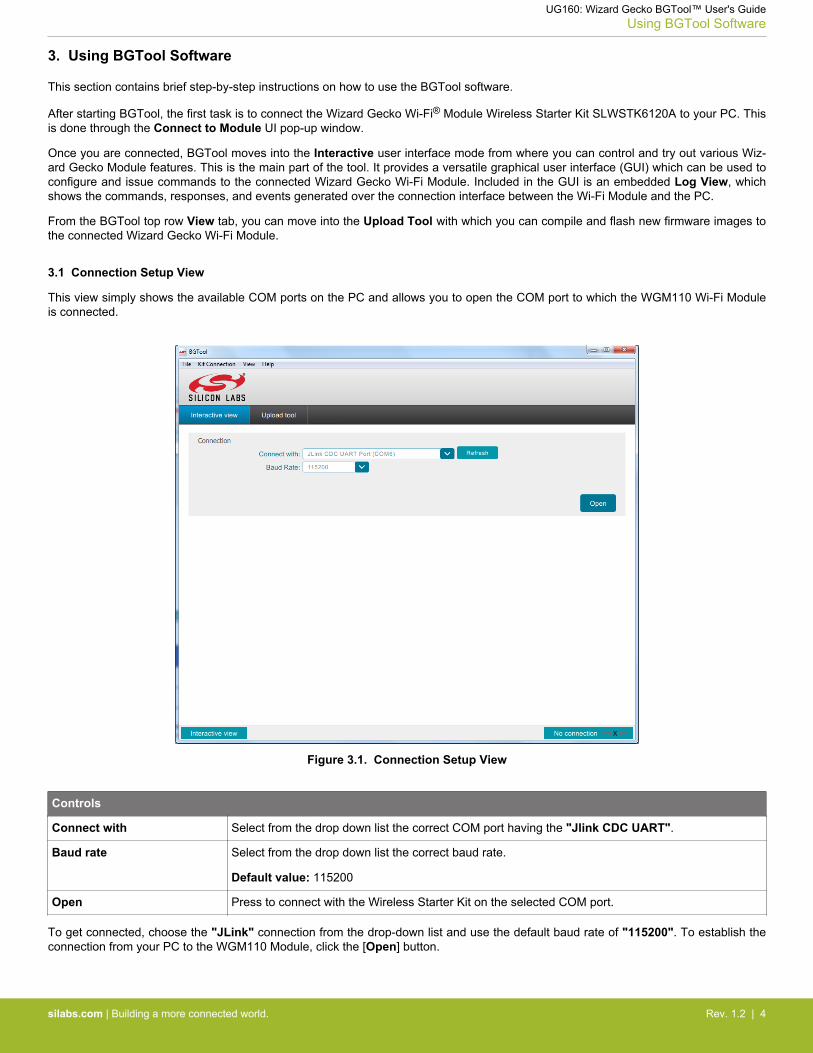
3.1 Connection Setup View
This view simply shows the available COM ports on the PC and allows you to open the COM port to which the WGM110 Wi-Fi Moduleis connected.
Figure 3.1. Connection Setup View
Controls
Connect with Select from the drop down list the correct COM port having the "Jlink CDC UART".
Baud rate Select from the drop down list the correct baud rate.
Default value: 115200
Open Press to connect with the Wireless Starter Kit on the selected COM port.
To get connected, choose the "JLink" connection from the drop-down list and use the default baud rate of "115200". To establish theconnection from your PC to the WGM110 Module, click the [Open] button.
UG160: Wizard Gecko BGTool™ User's GuideUsing BGTool Software
silabs.com | Building a more connected world. Rev. 1.2 | 4

3.2 Log View
The bottom part of each screen contains the Log View, used for displaying BGAPI events, commands, and responses and for enteringBGAPI commands by using the BGAPI commands field.
Figure 3.2. Log View
Controls
Log view Shows the user BGAPI commands sent by BGTool to the WGM110 Module and also the BGAPI re-sponses and events the WGM110 Module sends back to BGTool, displayed in human readable for-mat.
BGAPI commands This input field can be used to send commands manually to WGM110 Module.
Commands can be sent in the following formats:
<command>(parameter1, parameter2, ...)
ASCII format
wifi_cmd_sme_start_scan(0, 0103)
Send Clicking the Send button will result in the BGAPI command being sent to the connected Wi-Fi Mod-ule.
Settings This drop-down list allows you to affect which elements are printed in the log window and whetherthe log is scrolling or not.
Save Saves the BGAPI log to a user defined file.
Clear Clears the BGAPI log.
UG160: Wizard Gecko BGTool™ User's GuideUsing BGTool Software
silabs.com | Building a more connected world. Rev. 1.2 | 5

3.3 Device Details View
This view can be opened by clicking the [Device Details] button in the bottom part of BGTool. From this view, you can set the MACaddress of the Module and retrieve the Modules hardware and software details.
Figure 3.3. Device Details View
Controls
Get mac Retrieves the current set MAC address from the device.
Set mac Configures a new MAC address to the device.
Reset device Resets the device and retrieves the hardware and software details to the UI.
UG160: Wizard Gecko BGTool™ User's GuideUsing BGTool Software
silabs.com | Building a more connected world. Rev. 1.2 | 6

3.4 Network View
This view provides basic control of the WGM110 network. For example, from this view the user can turn the Wi-Fi radio of the WGM110Module on or off, scan and connect to Access Points, and configure the IP address.
Figure 3.4. Network View
Controls
Wi-Fi on/off Enables or disables the Wi-Fi radio in the WGM110 Module.
Operating mode Configure the Wi-Fi Module either into Wi-Fi Station (STA) or Access Point (AP) mode.
Retrieve info Retrieve attributes stored in the WGM110 Module into BGTool UI.
Get When in Station Mode: pressing the [Get] button retrieves the current RSSI value for the connectedWi-Fi Access Point.
Auto-check When in Station mode: checking the Auto-check box will make the UI periodically refresh and showthe RSSI value for the the connected Wi-Fi Access Point. The refresh interval can be set manually.
UG160: Wizard Gecko BGTool™ User's GuideUsing BGTool Software
silabs.com | Building a more connected world. Rev. 1.2 | 7

3.4.1 Network View - Access Point Mode (AP)
Selecting the Network Operating mode as "AP Mode" enables the control of WGM110 Module parameters as a Wi-Fi Access Point.To read current settings from the Module, click the [Retrieve info] button.
Figure 3.5. Network View with AP Mode
Access Point Mode Controls
Visibility Toggles Access Point visibility between hidden and visible.
Security Changes the security mode and indicates which security mode is currently in use:
Options:• No security• WPA2• WPA• WEP
SSID Defines the AP SSID name.
Channel Defines the AP Channel.
Password Define password for the Wi-Fi AP.
HTTP Server on Enables or disables the built-in HTTP server.
DHCP Server on Enables or disables the built-in DHCP server.
DNS Server on Enables or disables the built-in DNS server.
DHCP First Address Defines first address of DHCP server address pool
DHCP Server Netmask Defines DHCP server netmask
DHCP Server Lease Time Defines DHCP server address lease timeout in seconds
UG160: Wizard Gecko BGTool™ User's GuideUsing BGTool Software
silabs.com | Building a more connected world. Rev. 1.2 | 8

Access Point Mode Controls
Device + Path Defines the HTTP server root location for the specified resource path.
Example:
192.168.1.1/logs can be configured to use the built-in microSD card slot on the WGM110 RadioBoard as its root destination.
UG160: Wizard Gecko BGTool™ User's GuideUsing BGTool Software
silabs.com | Building a more connected world. Rev. 1.2 | 9

3.4.2 Network View - Station Mode (STA)
Selecting the Network Operating mode as "STA mode" enables the control of WGM110 Module parameters as a Wi-Fi client. To readcurrent settings from the Module, click the [Retrieve info] button.
The [Open WPA settings] button will open a user interface allowing you to manage security certificates and WPA settings.
Figure 3.6. Network View with Station Mode
Station Mode controls
IP-address Displays the current IP address, change by typing over the displayed value.
Netmask Displays the current IP netmask, change by typing over the displayed value.
Gateway Displays the current IP gateway, change by typing over the displayed value.
DNS 0 Displays the current primary DNS gateway address, change by typing over the displayed value.
DNS 1 Displays the current secondary DNS gateway address, change by typing over the displayed value.
Scan Start or stop the passive network scan for available Wi-Fi Access Points.
SSID Scan Start or stop the active network scan for available Wi-Fi Access Points.
Access Points Listing Displays a list of discovered Wi-Fi Access Points, sorted according to RSSI value.
To connect to a Wi-Fi network, enter the password and click the respective [SSID] button.
When connected, the [SSID] and [BSSID] buttons are replaced with a [Disconnect] button.
To disconnect from a Wi-Fi network, click on the green icon.
UG160: Wizard Gecko BGTool™ User's GuideUsing BGTool Software
silabs.com | Building a more connected world. Rev. 1.2 | 10

3.4.3 Certificate Management
Connecting to WPA Enterprise networks requires the right certificates to be provisioned on the client side. From the Certificates viewyou can manage the Wi-Fi module certificates storage.
From the WPA settings view you can configure the needed parameters to allow the Wi-Fi module to take part in a WPA Enterpriseprotected wireless network.
Press [Done] to close the window. Remember to set all values before closing the window.
Figure 3.7. Certificate and WPA Settings View
Certificates management
Refresh Press [Refresh] to update the list of Wi-Fi module stored certificates.
Reset store Press [Reset store] to erase all installed certificates.
Add certificate Select the destination (Flash or RAM) memory where to add the certificate. Browse for the certifi-cate file and press [Add] to store the file.
Add private key Browse for the private key file, select the certificate the key belongs to, enter the decryption pass-word if the file is encrypted and press [Add] to store the private key.
UG160: Wizard Gecko BGTool™ User's GuideUsing BGTool Software
silabs.com | Building a more connected world. Rev. 1.2 | 11

WPA settings
EAP type Select the EAP type, enter the Network Access Identifier (NAI) used during authentication and press[Set EAP configuration].
CA certificate Select the CA certificate used to verify the authentication server certificate during authentication andpress [Set CA certificate].
User certificate Select the user certificate submitted to the authentication server during authentication and press[Set user certificate].
Server common name Enter the Common Name that the authentication server certificate must contain and press [Set usercommon name].
User name Enter the user name used during authentication and press [Set user name].
Password Enter the password used during authentication and press [Set password].
3.5 Data Routing View
This view exposes the IP stack controls and allows you to create TCP/UDP clients or servers. The view also exposes the endpointconfiguration controls and displays the sent and received data.
Figure 3.8. Data Routing View
3.5.1 DNS Look-up
The DNS look-up part allows you to try out the DNS client functionality.
DNS Look-up
Get host by name Type in the host name and click the [Get host by name] button to do a DNS lookup and show theresolved IP address.
UG160: Wizard Gecko BGTool™ User's GuideUsing BGTool Software
silabs.com | Building a more connected world. Rev. 1.2 | 12

3.5.2 Add Endpoints
This section discusses how to create TCP and UDP clients and servers.
Table 3.1. TCP/UDP Server Settings
End point details
Type: TCP or UDP Server Defines the type of the endpoint.
Route The target destination for data. Can be any of the available endpoint IDs.
Local port Local TCP or UDP port.
Add Endpoint button Creates the endpoint and adds it to the list of available endpoints.
Table 3.2. TCP/UDP Client Settings
End point details
Type: TCP or UDP client Defines the type of the endpoint.
Route The target destination for data.
Can be any of the available endpoint IDs.
Remote IP Remote IP address.
Remote Port Remote TCP or UDP port.
Add endpoint Creates the endpoint and adds it to the list of available endpoints.
Table 3.3. TLS Client Settings
End point details
TLS client Defines the type of the endpoint
Route The target destination for data.
Can be any of the avilable endpoint IDs.
Remote IP Remote IP address.
Remote port Remote TCP or UDP port.
Auth mode Select the authentication mode.
Options:• None• Optional• Mandatory
Set mode Enforce the TLS settings by clicking [Set mode] button
Add endpoint Creates the endpoint and adds it to the list of available endpoints.
UG160: Wizard Gecko BGTool™ User's GuideUsing BGTool Software
silabs.com | Building a more connected world. Rev. 1.2 | 13

3.5.3 Data View
This view is used to send data to an endpoint, and it also shows data received from the BGAPI endpoint.
To send data to an endpoint:• Select the endpoint ID to which you want to send the data.• Type the data into the following field.• Click [Enter] to send the data.
Received data is shown in the field below the endpoint selection dropbox.
3.6 mDNS View
This view provides a user interface that is used to define the services which are announced in the local network.
Figure 3.9. mDNS View
mDNS View
Set mDNS hostname mDNS host name of the device without the suffix .local
Start mDNS Start or stop the mDNS server.
Add service Name: The service name identifies what the DNS-SD service does
Protocol: TCP or UDP
Instance name: The service instance name, identifies an instance of a particular DNS-SD service.
Attribute: Optional key/value pair valid for a particular type of DNS-SD service.
Attribute field format: <Key>=<Value>
UG160: Wizard Gecko BGTool™ User's GuideUsing BGTool Software
silabs.com | Building a more connected world. Rev. 1.2 | 14

3.7 Persistent Store View
Persistent Store view can be used to access the local PS key store and to retrieve and store keys and their values.
Figure 3.10. PS Store View
Persistent Store View
Refresh Retrieves the WGM110 stored PS key values.
Add new Allows you to create a new PS key.
Note: Remember to click the [Diskette] (save) button to actually store the entered value to the WGM110 Mod-ule.
Save and Deletefunctions
Values can be saved or deleted from the WGM110 Module.
To save press the [Diskette] icon, to delete click the [X] icon.
Note: The [Diskette] button (icon) appears only after you have first entered some text in the input field.
UG160: Wizard Gecko BGTool™ User's GuideUsing BGTool Software
silabs.com | Building a more connected world. Rev. 1.2 | 15

3.8 I/O Ports View
This view allows you to view and configure the I/O ports of your WGM110 Module. You can configure whether the ports are inputs oroutputs, change the state of outputs, and also enable and configure interrupts.
BGTool does not have the capability to read the current GPIO configuration from the connected Module. BGTool is always started withthe default pin configuration shown in the UI. This might not be in sync with the current settings of the Module. You should always setthe pin configuration manually to ensure the correctness of the I/O configuration. Clicking the [Read All] command only reads the value(as indicated in the "Value" column) of each pin but does NOT update the GPIO Module settings.
Figure 3.11. I/O Ports View
UG160: Wizard Gecko BGTool™ User's GuideUsing BGTool Software
silabs.com | Building a more connected world. Rev. 1.2 | 16

I/O Ports View
GPIOmode
There are two columns in this part. They are used to define settings as follows:
Left column• Defines pin state.
Options are:• Input disabled• Input• Input pull• Input pull filter• Output• Output Push-Pull
Right column
• Defines further settings for inputs, or for outputs defines the "default" output state of the pin.
Options are:• Without pull-up• With pull-up• Without glitch filter• With glitch filter• Glitch filter & pull-down• Glitch filter & pull-up• High (for outputs)• Low (for outputs)
Note: Changing of settings does not have effect on the Module pin configuration until the [Set] button for each relevant pinhas been clicked.
Value Displays the state of the pin at the time of the latest clicking of the [Read All] button.
Note: The state values are not updated dynamically, the user must click the [Read All] button to update the values.
Read Each pin configured as an input will display the [Read] button. Clicking this button will update the "Value" field of the corre-sponding pin.
Write Each pin configured as an output will display the [Write] button. Clicking this button will output the state defined in the"Value" field of the corresponding pin.
Interrupt Used to enable or disable a pin as an interrupt. When configured as an interrupt, the drop-down menu enables selection ofeither falling, rising, or both edges.
Options are:• Not enabled• Rising• Falling• Both
Note: Changing of settings does not have effect on the Module pin configuration until the [Set] button for each relevant pinhas been clicked.
UG160: Wizard Gecko BGTool™ User's GuideUsing BGTool Software
silabs.com | Building a more connected world. Rev. 1.2 | 17

I/O Ports View
Read All Reads the current state of all pins configured as either inputs or outputs from the Module and updates these values into the"Value" column.
Note: This command does not read the current pin configuration settings from the Module, but only reads the output stateof the pins (0 or 1). The pin configurations must be manually set through the I/O Ports View. They cannot be retrievedfrom the Module.
3.9 Peripherals View
This view allows you to configure the output compare pins and read the ADC values. This view also allows you to select which powersaving states the Module is allowed to go into.
Figure 3.12. Peripherals View
Peripherals View
Maximum allowed powersaving
This setting defines the Wi-Fi Modules highest possible allowed power saving mode (whether the Mod-ule is allowed to go to deep sleep mode or not). For details about the various Power save modes referto the “WGM110 API Reference Manual”.
Read ADC Read analog input values.
Timers Set timer related parameters.
UG160: Wizard Gecko BGTool™ User's GuideUsing BGTool Software
silabs.com | Building a more connected world. Rev. 1.2 | 18
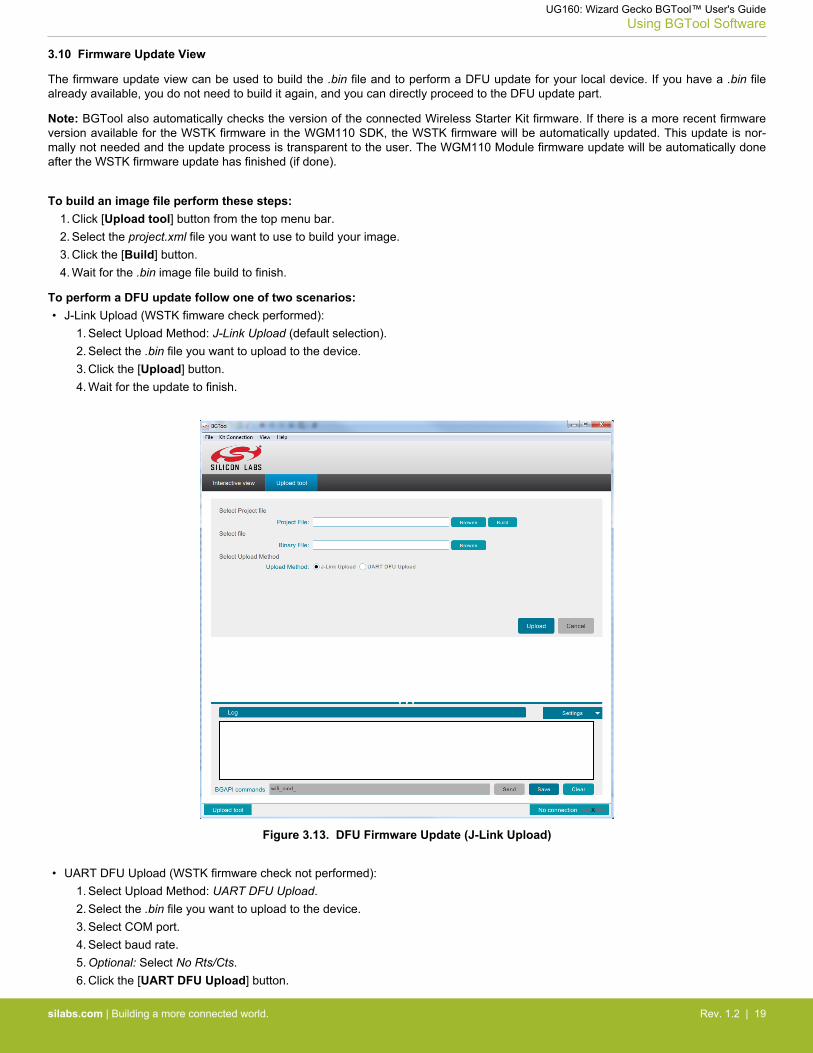
3.10 Firmware Update View
The firmware update view can be used to build the .bin file and to perform a DFU update for your local device. If you have a .bin filealready available, you do not need to build it again, and you can directly proceed to the DFU update part.
Note: BGTool also automatically checks the version of the connected Wireless Starter Kit firmware. If there is a more recent firmwareversion available for the WSTK firmware in the WGM110 SDK, the WSTK firmware will be automatically updated. This update is nor-mally not needed and the update process is transparent to the user. The WGM110 Module firmware update will be automatically doneafter the WSTK firmware update has finished (if done).
To build an image file perform these steps:1. Click [Upload tool] button from the top menu bar.2. Select the project.xml file you want to use to build your image.3. Click the [Build] button.4. Wait for the .bin image file build to finish.
To perform a DFU update follow one of two scenarios:• J-Link Upload (WSTK fimware check performed):
1. Select Upload Method: J-Link Upload (default selection).2. Select the .bin file you want to upload to the device.3. Click the [Upload] button.4. Wait for the update to finish.
Figure 3.13. DFU Firmware Update (J-Link Upload)
• UART DFU Upload (WSTK firmware check not performed):1. Select Upload Method: UART DFU Upload.2. Select the .bin file you want to upload to the device.3. Select COM port.4. Select baud rate.5. Optional: Select No Rts/Cts.6. Click the [UART DFU Upload] button.
UG160: Wizard Gecko BGTool™ User's GuideUsing BGTool Software
silabs.com | Building a more connected world. Rev. 1.2 | 19

7. Wait for the update to finish.
Figure 3.14. DFU Firmware Update (UART DFU Upload)
UG160: Wizard Gecko BGTool™ User's GuideUsing BGTool Software
silabs.com | Building a more connected world. Rev. 1.2 | 20

4. Examples
This section contains several examples showing how BGTool is used together with the WGM110 Wireless Starter Kit (WSTK).
Note: Always remember to RESET the WGM110 Module before trying out any of the examples to ensure you have a clean startingpoint.
4.1 Starting the Module in Wi-Fi Access Point Mode
To start the Module in Wi-Fi Access Point mode, follow these steps:
1. Go to the Network View and AP Mode section.2. Select "AP mode" and click the [Set mode] button to initialize the AP mode configuration.3. Set Wi-Fi "On".4. Click the [Set status] button.5. Wait for the event wifi_evt_sme_wifi_is_on to appear in the Log View.6. Select the desired Security mode.7. Enter the desired "SSID" and "Password" using the corresponding entry fields and select the desired "Channel" from the drop-
down list.8. Click the [Set Password] button.9. Click the [Start AP Mode] button to start the Wi-Fi Access Point mode, and wait for the commands to be executed.
10. Wait for the event wifi_evt_sme_interface_status to appear in the Log View.11. Enable the DHCP server by checking the "DHCP" box and by clicking the [Set] button.
You should now be able to discover and connect to the WGM110 Module running in AP mode with your PC.
In Windows:1. Discover the available wireless networks.2. Select the "Access Point" that runs on the WGM110 Wi-Fi Module.3. Connect with the selected Access Point and use the security settings you have configured.4. Once the connection is successful, you should see a new MAC address appear in the BGTool UI indicating that the connection has
now been established.
You can also disconnect the clients (STAs), by selecting a client and clicking the [Disconnect] button.
Note: Some clients (like Windows 7) will reconnect to the AP again immediately.
4.2 Turning on the LEDs in WGM110 WSTK
In the I/O Ports View, perform the following configurations:
Figure 4.1. I/O Port Configuration for LED Control
UG160: Wizard Gecko BGTool™ User's GuideExamples
silabs.com | Building a more connected world. Rev. 1.2 | 21

1. Configure WSTK PIN PC0 (LED0) and WSTK PIN PC1 (LED1) as "Output Push-Pull", and for both pins save the configurationby clicking the [Set] button.
2. Make sure they are configured as "Output Push-Pull" I/Os.3. Change the set values of the configured pins from "0" to "1", and for both pins click the [Write] button to actually change the states
of the pins (the figure above shows this step).4. Verify that both LED0 and LED1 on the WGM110 WSTK now turn on.
Figure 4.2. WSTK LED0 and LED1
UG160: Wizard Gecko BGTool™ User's GuideExamples
silabs.com | Building a more connected world. Rev. 1.2 | 22

4.3 Capturing Button Clicks on the WGM110 WSTK
In the I/O Ports View, perform the following configurations:
Figure 4.3. I/O Port Configuration for Button Click Event
1. Configure the WSTK PINS PA2 (Push button PB0), PA6 (Push button PB1), PE14 (Push button BTN2) and PD5 (Push buttonBTN3) as "Input", and save the configuration for each pin individually by clicking the [Set] button.
Note: The above configures the two push buttons on the WSTK Main Board (PB0 and PB1) and the two buttons on the ExpansionBoard (BTN2 and BTN3). See the push button placement figure at the end of this sub-section.
2. Enable interrupts on ports PA2, PA6, PE14, and PD5 by selecting "Rising" and save the configuration for each pin individually byclicking the [Set] button.
3. Test the functionality of the buttons on the WSTK Main Board and the Expansion Board by pressing them and by monitoring for theAPI events in the BGTool Log View.
An example of a button event is shown in the Log View screenshot below.
Figure 4.4. BGTool Log View Showing a Generated Button Click Event
The four user configurable push buttons are shown in the figure below.
Figure 4.5. WSTK and Expansion Board Push Buttons
4.4 TCP Server Example
This section contains several sub-sections all related to TCP Server.
4.4.1 Creating a Wi-Fi Access Point
Create a Wi-Fi Access Point as shown in 4.1 Starting the Module in Wi-Fi Access Point Mode.
UG160: Wizard Gecko BGTool™ User's GuideExamples
silabs.com | Building a more connected world. Rev. 1.2 | 23

4.4.2 Creating a TCP Server
To create a TCP Server, go to the Data Routing View in BGTool.
Figure 4.6. Creating a New Endpoint
1. To create a TCP Server, select "TCP server" from the Add endpoint tool.2. Type in a local TCP port number in the "Local port:" field (e.g. "5001").3. Select the streaming route in "Route" to "-1".4. Create the endpoint by clicking the [Add] button.
4.4.3 Creating a TCP Connection
To create a TCP client connection you need a TCP client software like Putty or Tera Term.1. Create a TCP Server (4.4.2 Creating a TCP Server).2. Open a TCP client software available on your PC.3. Create a TCP client connection to the IP address of your WGM110 Module AP and the TCP Port you have created.
Example
In the figure below configuration is based on host address "192.168.1.1" and TCP Port "5001"
Figure 4.7. Connecting to the TCP Server
4.4.4 Checking the TCP Connection Status
Once the TCP connection has been established the Endpoint View shows a new endpoint for each TCP client connection.
In the example below, the TCP client connection received a new endpoint with "ID 3".
Figure 4.8. New TCP Client Connected
UG160: Wizard Gecko BGTool™ User's GuideExamples
silabs.com | Building a more connected world. Rev. 1.2 | 24

4.4.5 Transmitting Data
To send data to the TCP client, perform the following steps:1. Change the destination endpoint ID in the "Destination endpoint:" field of Data View to "3".2. Type in the data you want to send into the entry field (in the example below "Hello World").3. Send the data by clicking the [Enter] button.4. Check that you have received the data at the TCP client.
Figure 4.9. "Hello World" Sent from the Server Side
Figure 4.10. "Hello World" Received on the Client Side
UG160: Wizard Gecko BGTool™ User's GuideExamples
silabs.com | Building a more connected world. Rev. 1.2 | 25

5. Revision History
5.1 Revision 1.2
March 31st, 2017
Changes:• Network View with AP Mode figure updated• Added: DHCP server settings to Access Point Mode Controls table• Firmware Update View paragraph updated
5.2 Revision 1.1
May 23rd, 2016
Changes:• Figures updated• Added: BGTool application requires Windows 7 or later OS• Added: Certificate Management screenshot with explanations listed in table
5.3 Revision 1.0
February 22nd, 2016
Initial release.
UG160: Wizard Gecko BGTool™ User's GuideRevision History
silabs.com | Building a more connected world. Rev. 1.2 | 26

http://www.silabs.com
Silicon Laboratories Inc.400 West Cesar ChavezAustin, TX 78701USA
Smart. Connected. Energy-Friendly.
Productswww.silabs.com/products
Qualitywww.silabs.com/quality
Support and Communitycommunity.silabs.com
DisclaimerSilicon Labs intends to provide customers with the latest, accurate, and in-depth documentation of all peripherals and modules available for system and software implementers using or intending to use the Silicon Labs products. Characterization data, available modules and peripherals, memory sizes and memory addresses refer to each specific device, and "Typical" parameters provided can and do vary in different applications. Application examples described herein are for illustrative purposes only. Silicon Labs reserves the right to make changes without further notice and limitation to product information, specifications, and descriptions herein, and does not give warranties as to the accuracy or completeness of the included information. Silicon Labs shall have no liability for the consequences of use of the information supplied herein. This document does not imply or express copyright licenses granted hereunder to design or fabricate any integrated circuits. The products are not designed or authorized to be used within any Life Support System without the specific written consent of Silicon Labs. A "Life Support System" is any product or system intended to support or sustain life and/or health, which, if it fails, can be reasonably expected to result in significant personal injury or death. Silicon Labs products are not designed or authorized for military applications. Silicon Labs products shall under no circumstances be used in weapons of mass destruction including (but not limited to) nuclear, biological or chemical weapons, or missiles capable of delivering such weapons.
Trademark InformationSilicon Laboratories Inc.® , Silicon Laboratories®, Silicon Labs®, SiLabs® and the Silicon Labs logo®, Bluegiga®, Bluegiga Logo®, Clockbuilder®, CMEMS®, DSPLL®, EFM®, EFM32®, EFR, Ember®, Energy Micro, Energy Micro logo and combinations thereof, "the world’s most energy friendly microcontrollers", Ember®, EZLink®, EZRadio®, EZRadioPRO®, Gecko®, ISOmodem®, Precision32®, ProSLIC®, Simplicity Studio®, SiPHY®, Telegesis, the Telegesis Logo®, USBXpress® and others are trademarks or registered trademarks of Silicon Labs. ARM, CORTEX, Cortex-M3 and THUMB are trademarks or registered trademarks of ARM Holdings. Keil is a registered trademark of ARM Limited. All other products or brand names mentioned herein are trademarks of their respective holders.
Related Documents