
Welcome message from author
This document is posted to help you gain knowledge. Please leave a comment to let me know what you think about it! Share it to your friends and learn new things together.
Transcript


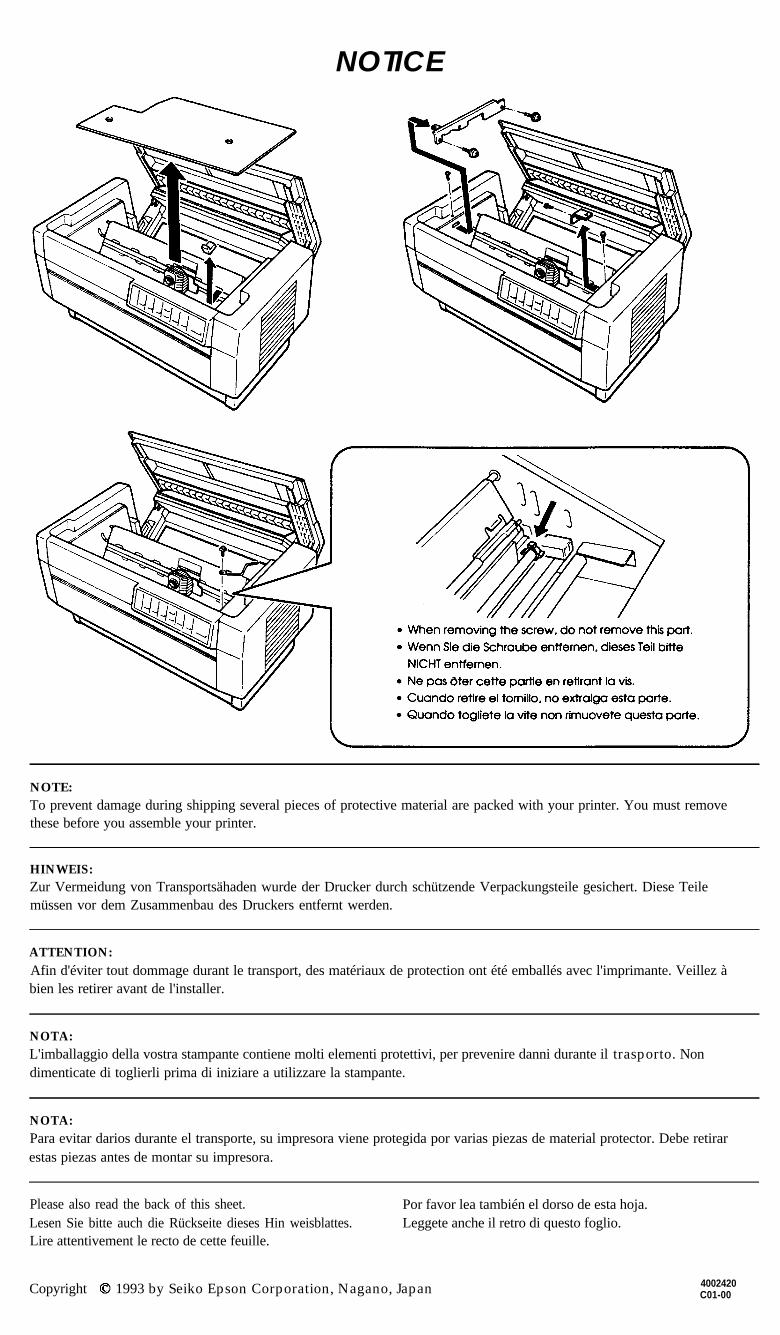
NOTE:
Do not lift or carry this printer alone. Make sure that two people carry it, lifting from the bottom as shown here.
Do not try to remove the elastic cord from either front or rear tractors. It is not a protective material.
HINWEIS:
Heben bzw. tragen Sie den Drucker nicht allein. Der Drucker sollte von zwei Personen angehoben und getragen werden,wie in der Abbildung gezeigt.
Bitte NICHT das Spannseil am vorderen und hinteren Traktor entfemen. Diese gehoren nicht zum Verpackungsmaterial.
ATTENTION:
Ne soulevez pas ou ne transportez pas cette imprimante tout seul. Mettez-vous a deux personnes pour la transporter oula soulever, comme indique ci-dessus.
Ne pas essayer d’enlever le cordon élastique des tracteurs avant ou arrière. Cen’est pas un matériau de protection.
NOTA:
Si tiene que mover o transportar esta impresora, no lo haga sólo, levántela con ayuda de otra persona, sujetándola por labase tal como se indica en la ilustración.
No intente retirar el cable elástico de1 tractor frontal ni de1 tractor posterior. No es material de protección.
NOTA:
Non sollevate o trasportate questa stampante da soli. Siate sicuri che la stampante venga trasportata da due persone,sollevandola dal basso, come mostrato in figura.
Non togliete gli elastici dal trattore posteriore e frontale. Non fanno parte de1 materiale di protezione.
Printed in Japan 93.12-.85
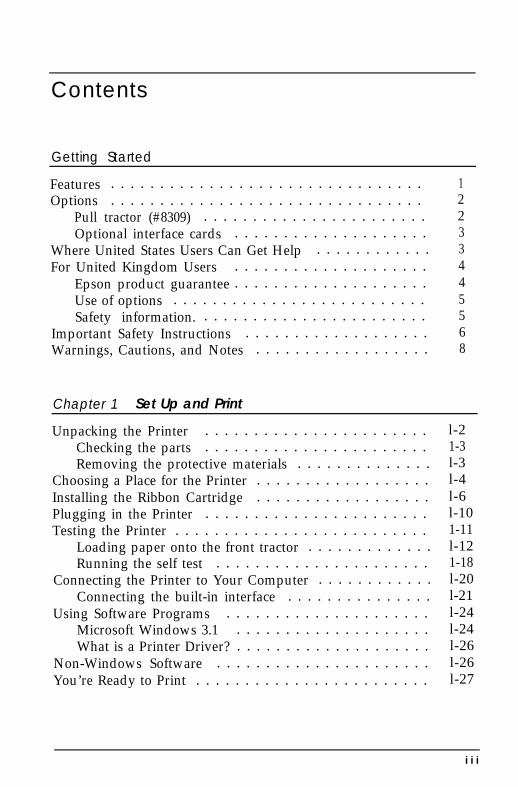
NOTICE
NOTE:To prevent damage during shipping several pieces of protective material are packed with your printer. You must removethese before you assemble your printer.
HINWEIS:Zur Vermeidung von Transportsähaden wurde der Drucker durch schützende Verpackungsteile gesichert. Diese Teilemüssen vor dem Zusammenbau des Druckers entfernt werden.
ATTENTION:Afin d'éviter tout dommage durant le transport, des matériaux de protection ont été emballés avec l'imprimante. Veillez àbien les retirer avant de l'installer.
NOTA:L'imballaggio della vostra stampante contiene molti elementi protettivi, per prevenire danni durante il trasporto. Nondimenticate di toglierli prima di iniziare a utilizzare la stampante.
NOTA:Para evitar darios durante el transporte, su impresora viene protegida por varias piezas de material protector. Debe retirarestas piezas antes de montar su impresora.
Please also read the back of this sheet.Lesen Sie bitte auch die Rückseite dieses Hin weisblattes.Lire attentivement le recto de cette feuille.
Por favor lea también el dorso de esta hoja.Leggete anche il retro di questo foglio.
Copyright 1993 by Seiko Epson Corporation, Nagano, Japan 4002420C01-00

Printer Parts

All rights reserved. No part of this publication may be reproduced, stored in a retrievalsystem, or transmitted in any form or by any means, mechanical, photocopying,recording, or otherwise, without the prior written permission of Seiko Epson Corporation.No patent liability is assumed with respect to the use of the information contained herein.Neither is any liability assumed for damages resulting from the use of the informationcontained herein.
Neither Seiko Epson Corporation nor its affiliates shall be liable to the purchaser of thisproduct or third parties for damages, losses, costs, or expenses incurred by purchaser orthird parties as a result of: accident, misuse, or abuse of this product or unauthorizedmodifications, repairs, or alterations to this product, or (excluding the US) failure tostrictly comply with Seiko Epson Corporation’s operating and maintenance instructions.
Seiko Epson Corporation shah not be liable against any damages or problems arising fromthe use of any options or any consumable products other than those designated asOriginal Epson Products or Epson Approved Products by Seiko Epson Corporation.
Epson and Epson ESC/P are registered trademarks of Seiko Epson Corporation.
Epson Connection is a service mark of Epson America, Inc.
General Notice: Other product names used herein are for identification purposes only andmay be trademarks of their respective owners. Epson disclaims any and all rights in thosemarks.
Copyright 1993 by Seiko Epson CorporationNagano, Japan
User’s Guide

FCC Compliance StatementFor United States Users
This equipment has been tested and found to comply with the limits for a Class B digitaldevice, pursuant to Part 15 of the FCC Rules. These limits are designed to providereasonable protection against harmful interference in a residential installation. Thisequipment generates, uses, and can radiate radio frequency energy and, if not installedand used in accordance with the instructions, may cause harmful interference to radio ortelevision reception. However, there is no guarantee that interference will not occur in aparticular installation. If this equipment does cause interference to radio and televisionreception, which can be determined by turning the equipment off and on, the user isencouraged to try to correct the interference by one or more of the following measures.
Reorient or relocate the receiving antenna.
Increase the separation between the equipment and receiver.
Connect the equipment into an outlet on a circuit different from that to which thereceiver is connected.
Consult the dealer or an experienced radio/TV technician for help.
WARNING
The connection of a non-shielded equipment interface cable to this equipment willinvalidate the FCC Certification of this device and may cause interference levels whichexceed the limits established by the FCC for this equipment. It is the responsibility of theuser to obtain and use a shielded equipment interface cable with this device. If thisequipment has more than one interface connector, do not leave cables connected tounused interfaces, Changes or modifications not expressly approved by the manufacturercould void the user’s authority to operate the equipment.
For Canadian Users
This digital apparatus does not exceed the Class B limits for radio noise emissions fromdigital apparatus as set out in the radio interference regulations of the CanadianDepartment of Communications.
Le present appareil numérique n'émet pas de bruits radioélectriques dépassant les limitesapplicables aux appareils numériques de Classe B prescrites dans le règlement sur lebrouillage radioélectrique édicté par le Ministère des Communications du Canada.
ii
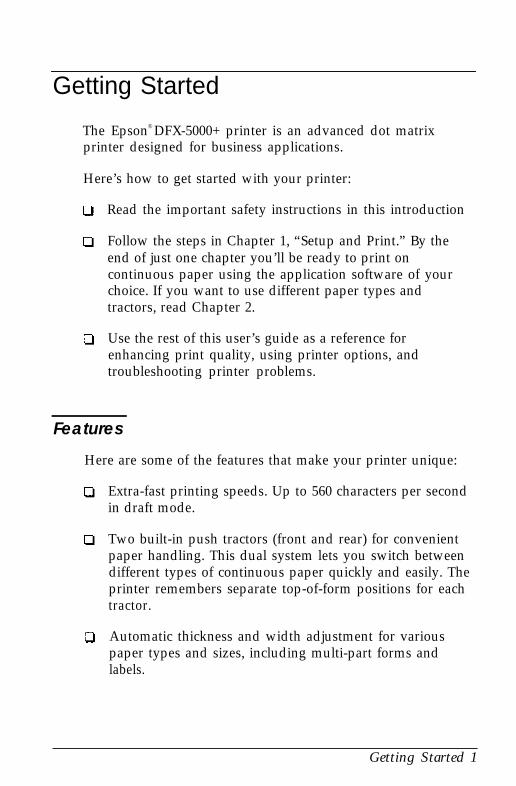
Contents
Getting Started
Features . . . . . . . . . . . . . . . . . . . . . . . . . . . . . . . . 1Options . . . . . . . . . . . . . . . . . . . . . . . . . . . . . . . . 2
Pull tractor (#8309) . . . . . . . . . . . . . . . . . . . . . . . 2Optional interface cards . . . . . . . . . . . . . . . . . . . . 3
Where United States Users Can Get Help . . . . . . . . . . . . 3For United Kingdom Users . . . . . . . . . . . . . . . . . . . . 4
Epson product guarantee . . . . . . . . . . . . . . . . . . . . 4Use of options . . . . . . . . . . . . . . . . . . . . . . . . . . 5Safety information. . . . . . . . . . . . . . . . . . . . . . . . 5
Important Safety Instructions . . . . . . . . . . . . . . . . . . . 6Warnings, Cautions, and Notes . . . . . . . . . . . . . . . . . . 8
Chapter 1 Set Up and Print
Unpacking the Printer . . . . . . . . . . . . . . . . . . . . . . .Checking the parts . . . . . . . . . . . . . . . . . . . . . . .Removing the protective materials . . . . . . . . . . . . . .
Choosing a Place for the Printer . . . . . . . . . . . . . . . . . .Installing the Ribbon Cartridge . . . . . . . . . . . . . . . . . .Plugging in the Printer . . . . . . . . . . . . . . . . . . . . . . .Testing the Printer . . . . . . . . . . . . . . . . . . . . . . . . . .
Loading paper onto the front tractor . . . . . . . . . . . . .Running the self test . . . . . . . . . . . . . . . . . . . . . .
Connecting the Printer to Your Computer . . . . . . . . . . . .Connecting the built-in interface . . . . . . . . . . . . . . .
Using Software Programs . . . . . . . . . . . . . . . . . . . . .Microsoft Windows 3.1 . . . . . . . . . . . . . . . . . . . .What is a Printer Driver? . . . . . . . . . . . . . . . . . . . .
Non-Windows Software . . . . . . . . . . . . . . . . . . . . . .You’re Ready to Print . . . . . . . . . . . . . . . . . . . . . . . .
l-21-3l-3l-4l-6l-101-11l-121-18l-20l-21l-24l-24l-26l-26l-27
i i i

Chapter 2 Loading and Using Paper
Using the Two-Tractor System . . . . . . . . . . . . . . . . . . . 2-2Positioning the paper supply . . . . . . . . . . . . . . . . . . 2-2
Loading Paper onto the Rear Tractor . . . . . . . . . . . . . . . 2-3Adjusting the Paper Position . . . . . . . . . . . . . . . . . . . . 2-10
Adjusting the top-of-form position . . . . . . . . . . . . . . . 2-11Adjusting the printing position . . . . . . . . . . . . . . . . 2-13
Tearing Off the Printed Pages . . . . . . . . . . . . . . . . . . . . 2-14Tear-off mode . . . . . . . . . . . . . . . . . . . . . . . . . . . 2-14Using the TEAR OFF button . . . . . . . . . . . . . . . . . . . 2-16Adjusting the tear-off position . . . . . . . . . . . . . . . . . 2-16
Switching Between Front and Rear Tractors . . . . . . . . . . . 2-19Changing the Paper . . . . . . . . . . . . . . . . . . . . . . . . . 2-21Printing on Multi-part Forms and Labels . . . . . . . . . . . . . 2-24
Using multi-part forms . . . . . . . . . . . . . . . . . . . . . 2-25Using labels . . . . . . . . . . . . . . . . . . . . . . . . . . . . 2-26
Chapter 3 Using the Printer
The Control Panel . . . . . . . . . . . . . . . . . . . . . . . . . . 3-2Indicator lights . . . . . . . . . . . . . . . . . . . . . . . . . . 3-2Buttons . . . . . . . . . . . . . . . . . . . . . . . . . . . . . . . 3-3Other control panel features. . . . . . . . . . . . . . . . . . . 3-7
Using DIP Switches . . . . . . . . . . . . . . . . . . . . . . . . . . 3-7Changing DIP-switch settings . . . . . . . . . . . . . . . . . 3-8DIP-switch tables . . . . . . . . . . . . . . . . . . . . . . . . . 3-10DIP-switch functions . . . . . . . . . . . . . . . . . . . . . . . 3-14
Printer mode . . . . . . . . . . . . . . . . . . . . . . . . . 3-14Draft printing speed . . . . . . . . . . . . . . . . . . . . . 3-14Character quality . . . . . . . . . . . . . . . . . . . . . . . 3-15Character table . . . . . . . . . . . . . . . . . . . . . . . . 3-15Shape of zero . . . . . . . . . . . . . . . . . . . . . . . . . 3-15Input buffer . . . . . . . . . . . . . . . . . . . . . . . . . . 3-16Auto line feed . . . . . . . . . . . . . . . . . . . . . . . . . 3-16Interface type/parity . . . . . . . . . . . . . . . . . . . . 3-16Serial bit rate . . . . . . . . . . . . . . . . . . . . . . . . . 3-17Page length . . . . . . . . . . . . . . . . . . . . . . . . . . 3-17
iv

Skip-over-perforation . . . . . . . . . . . . . . . . . . . 3-18Paper memory, overlapping multi-part forms,
multi-part forms with labels . . . . . . . . . . . . . . . 3-18Skip over binding . . . . . . . . . . . . . . . . . . . . . . 3-18Automatic tear off . . . . . . . . . . . . . . . . . . . . . 3-18
Using Automatic Interface Selection . . . . . . . . . . . . . . . 3-19Using the Paper Memory Feature . . . . . . . . . . . . . . . . . 3-19
Saving paper memory settings . . . . . . . . . . . . . . . . 3-20Loading paper memory settings . . . . . . . . . . . . . . . 3-22
Chapter 4 Using the Printer Options
Using the Pull Tractor . . . . . . . . . . . . . . . . . . . . . . . 4-2Installing the pull tractor . . . . . . . . . . . . . . . . . . . . 4-2Using the pull tractor with the front tractor . . . . . . . . . 4-5Using the pull tractor with the rear tractor . . . . . . . . . 4-9Removing the pull tractor . . . . . . . . . . . . . . . . . . . 4-12
Optional Interface Cards . . . . . . . . . . . . . . . . . . . . . . 4-14Installing an interface card . . . . . . . . . . . . . . . . . . . 4-15
Chapter 5 Troubleshooting and Maintenance
Error Indicators . . . . . . . . . . . . . . . . . . . . . . . . . . . 5-2Problems and Solutions . . . . . . . . . . . . . . . . . . . . . . 5-3
The printer does not print . . . . . . . . . . . . . . . . . . . 5-3The printer stops printing . . . . . . . . . . . . . . . . . . . 5-4The printout is spaced incorrectly. . . . . . . . . . . . . . . 5-4The printout is faint or uneven . . . . . . . . . . . . . . . . 5-5The printout is not what you expect . . . . . . . . . . . . . 5-5Paper does not feed properly . . . . . . . . . . . . . . . . . 5-6
Hex Dump Mode . . . . . . . . . . . . . . . . . . . . . . . . . . 5-7Maintaining the Printer . . . . . . . . . . . . . . . . . . . . . . . 5-8
Cleaning the printer . . . . . . . . . . . . . . . . . . . . . . . 5-8Replacing the ribbon cartridge . . . . . . . . . . . . . . . . 5-9Transporting the printer . . . . . . . . . . . . . . . . . . . . 5-11
V

Appendix A Technical Specifications
Printer Specifications . . . . . . . . . . . . . . . . . . . . . . . . . A-2Printing . . . . . . . . . . . . . . . . . . . . . . . . . . . . . . A-2Paper . . . . . . . . . . . . . . . . . . . . . . . . . . . . . . . . A-3Mechanical . . . . . . . . . . . . . . . . . . . . . . . . . . . . A-9Electrical . . . . . . . . . . . . . . . . . . . . . . . . . . . . . . A-10Environmental . . . . . . . . . . . . . . . . . . . . . . . . . . A-10Safety approvals . . . . . . . . . . . . . . . . . . . . . . . . . A-10
Interface Specifications . . . . . . . . . . . . . . . . . . . . . . . . A-11Parallel interface . . . . . . . . . . . . . . . . . . . . . . . . . A-11Serial interface . . . . . . . . . . . . . . . . . . . . . . . . . . A-13Optional interfaces . . . . . . . . . . . . . . . . . . . . . . . . A-14
Initialization . . . . . . . . . . . . . . . . . . . . . . . . . . . . . . A-14Top-of-form reset . . . . . . . . . . . . . . . . . . . . . . . . . A-15
Appendix B Printer Commands and Character Tables
Sending Printer Commands . . . . . . . . . . . . . . . . . . . . . B-2Using the Command Summary . . . . . . . . . . . . . . . . . . . B-2Epson ESC /P Commands Arranged by Topic . . . . . . . . . . B-3IBM Emulation Mode Commands Arranged by Topic . . . . . . B-9
Commands that duplicate Epson ESC/P commands . . . . B-10Commands that differ from Epson ESC/P commands . . . B-11
Character Tables . . . . . . . . . . . . . . . . . . . . . . . . . . . B-14
Glossary
Index
vi
Getting Started
The Epson® DFX-5000+ printer is an advanced dot matrixprinter designed for business applications.
Here’s how to get started with your printer:
Read the important safety instructions in this introduction
Follow the steps in Chapter 1, “Setup and Print.” By theend of just one chapter you’ll be ready to print oncontinuous paper using the application software of yourchoice. If you want to use different paper types andtractors, read Chapter 2.
Use the rest of this user’s guide as a reference forenhancing print quality, using printer options, andtroubleshooting printer problems.
Features
Here are some of the features that make your printer unique:
Extra-fast printing speeds. Up to 560 characters per secondin draft mode.
Two built-in push tractors (front and rear) for convenientpaper handling. This dual system lets you switch betweendifferent types of continuous paper quickly and easily. Theprinter remembers separate top-of-form positions for eachtractor.
Automatic thickness and width adjustment for variouspaper types and sizes, including multi-part forms andlabels.
Getting Started 1

A paper memory feature that produces highqualityprinting on your multi-part forms by using stored paperformat and thickness information to adjust the print head.
An automatic paper handling system that lets you controlall operations from the control panel. For example, you canswitch between paper loaded on the front and rear tractorswith the push of a button. Another button feeds the paperforward so you can tear it off and then reverses it to the topof the page so it is ready to print.
An automatic interface selection feature that allows you toconnect more than one computer at a time.
Compatibility with the Epson ESC/P® commands used byEpson FX printers.
An IBM® Proprinter emulation mode that providescompatibility with software written specifically for IBMprinters.
Options
The following options are available for use with your printer.For detailed information on the installation and use of theseoptions, see Chapter 4.
Pull tractor (#8309)
This option improves the handling of heavy multi-part formsand labels. It also enhances printing alignment on preprintedforms.
2 Getting Started

Optional interface cards
A number of optional interface cards can be used tosupplement the built-in parallel and serial interfaces. Two ofthe cards (Coax and Twinax) let you use your printer as a localprinter for your IBM mainframe or minicomputer. These cardsconnect directly to the printer and allow it to function as a localIBM printer without the addition of any other circuitry orcomponents. Guidelines for choosing the right interface andinstructions for installing an interface card are given inChapter 4.
Where United States Users Can Get Help
Epson America provides local customer support and servicethrough a nationwide network of authorized Epson dealersand Service Centers.
Epson also provides the following support services through theEpson ConnectionSM at (800) 922-8911:
Assistance in locating your nearest Authorized EpsonReseller or Service Center
Technical assistance with the installation, configuration,and operation of Epson products
Sales of the ESC/P reference manual
Epson technical information library fax service
Product literature with technical specifications on ourcurrent and new products
Sales of ribbons, supplies, parts, documentation, andaccessories for your Epson product
Customer Relations.
Getting Started 3

For United Kingdom Users
Epson product guarantee
Under the law, goods sold must comply with their descriptionand must be of merchantable quality and fit for their purposeor correspond with any sample.
This guarantee does not affect the seller’s legal obligation orthe rights of the consumer in the “consumer transactions”under any Statute, including Sections 12 to 15 of the Sales ofGoods Act, 1979.
All Epson Products, other than OEM products, are fullyguaranteed against faulty operation or performance for a periodof ONE YEAR from date of purchase by the user of the product.
All claims under this guarantee MUST be supported byevidence of purchase, normally the bill of sale invoice, and it isthe responsibility of the claimant to furnish such proof. Epson(UK) Limited does not issue or operate any form of guaranteeregistration card.
Claims are made by the user returning the product to thesupplier from whom it was purchased or, if this is impractical,to any Epson supplier who also handles the same product. Inthe event of any difficulty, users are requested to contact theService Co-ordinator Manager at Epson (UK) Limited.
Epson (UK) Limited, or Epson Appointed Distributors, will attheir discretion repair or replace part or all of the product toprovide, in their judgement, a satisfactory performance of theproduct consistent with its age and apparent usage.
This guarantee covers the cost of both the parts and labourrequired to correct any malfunction of the equipment, butspecifically excludes: wear and tear, consumables, physicaldamage due to incorrect use or misuse and damage or faultyoperation due to unauthorized and inexpert repair.
4 Getting Started

The guarantee is restricted to the performance of the productalone, and Epson (UK) Limited does not accept responsibilityfor any consequential loss or damage, nor claimed or impliedperformance, when the product is used in any combinationwith other equipment or program software.
Product guarantee may be invalidated as a result of excessiveor inappropriate use, use in adverse environment or inconditions outside the specifications or if the product has beensubjected to unapproved modifications.
The guarantee does not cover visits to the user’s premises orthe repair or commissioning of the product on site.
Use of options
Epson (UK) Limited shall not be liable against any damages orproblems arising from the use of any options or consumableproducts other than those designated as Original EpsonProducts or Epson Approved Products by Epson (UK) Limited.
Safety information
Warning:This appliance must be earthed. Refer to rating plate for voltageand check that the appliance voltage corresponds to the supplyvoltage.
Important:The wires in the mains lead fitted to this appliance are coloured inaccordance with the following code:
Green and yellow -- EarthBlue -- NeutralBrown -- Live
Getting Started 5
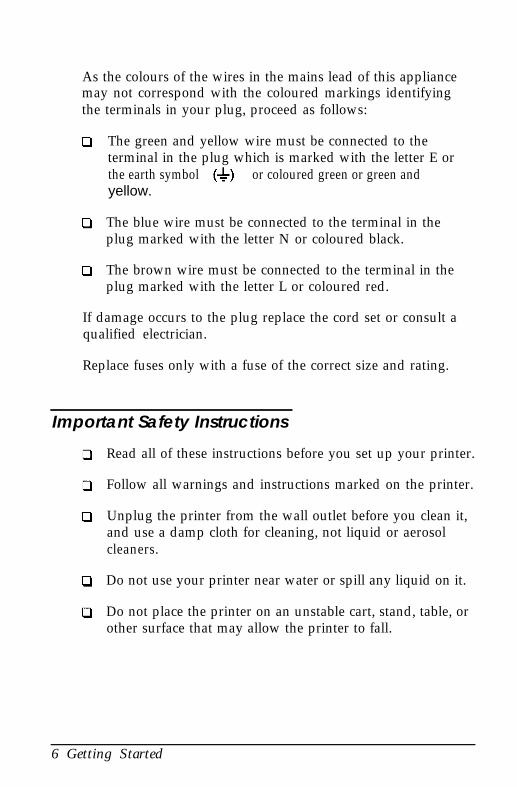
As the colours of the wires in the mains lead of this appliancemay not correspond with the coloured markings identifyingthe terminals in your plug, proceed as follows:
The green and yellow wire must be connected to theterminal in the plug which is marked with the letter E orthe earth symbol or coloured green or green andyellow.
The blue wire must be connected to the terminal in theplug marked with the letter N or coloured black.
The brown wire must be connected to the terminal in theplug marked with the letter L or coloured red.
If damage occurs to the plug replace the cord set or consult aqualified electrician.
Replace fuses only with a fuse of the correct size and rating.
Important Safety Instructions
Read all of these instructions before you set up your printer.
Follow all warnings and instructions marked on the printer.
Unplug the printer from the wall outlet before you clean it,and use a damp cloth for cleaning, not liquid or aerosolcleaners.
Do not use your printer near water or spill any liquid on it.
Do not place the printer on an unstable cart, stand, table, orother surface that may allow the printer to fall.
6 Getting Started

Do not block any slots or openings in the cabinet. These areprovided for the ventilation necessary to ensure reliableoperation and protection from overheating. Placing theprinter on a bed, sofa, rug, or other similar surface mayblock the openings. Also, do not place the printer in abuilt-in installation unless proper ventilation is provided.
Never place the printer near or over a radiator or heatregister.
Use the type of power source indicated on the label. If youare not sure of the type of power available, consult yourdealer or local power company.
This printer may be equipped with a plug having a third(grounding) pin, which fits only into a grounding-typeoutlet. This is a safety feature. If you are unable to insertthe plug into the outlet, have an electrician replace yourobsolete outlet. Do not defeat the purpose of thegrounding-type plug.
Do not put your printer where the cord wiIl be walked on.
If you use an extension cord, make sure that the total of theampere ratings on the products plugged into the extensioncord does not exceed the extension cord’s ampere rating.Also, make sure that the total of all products plugged intothe wall outlet does not exceed 15 amperes.
Never push objects of any kind into your printer becausethey may touch dangerous voltage points or short out partsthat could result in a risk of fire or electric shock.
Except as specifically explained in the user’s manual, donot attempt to repair the printer yourself. This couldexpose you to dangerous voltage points or other risks.Refer all servicing in those compartments to servicepersonnel.
Getting Started 7

Unplug the printer from the wall outlet and have itrepaired by a qualified service person under the followingconditions:
When the power cord or plug is damaged or frayed
If liquid has been spilled into it
If it has been exposed to rain or water
If it does not operate normally when the operatinginstructions are followed. Adjust only those controlsthat are covered by the operating instructions sinceimproper adjustment of other controls may result indamage and will often require extensive work by aqualified technician to restore the printer to normaloperation.
If it has been dropped or the cabinet has been damaged
If it exhibits a distinct change in performance, indicatinga need for service
Warnings, Cautions, and Notes
Warnings must be followed carefully to avoid bodily injury.
Cautions must be observed to avoid damage to yourequipment.
Notes contain important information and useful tips on the operationof your printer.
8 Getting Started

Chapter 1Set Up and Print
Unpacking the Printer . . . . . . . . . . . . . . . . . . . . . . . . 1-2Checking the parts . . . . . . . . . . . . . . . . . . . . . . . . l-3Removing the protective materials . . . . . . . . . . . . . . 1-3
Choosing a Place for the Printer . . . . . . . . . . . . . . . . . . 1-4
Installing the Ribbon Cartridge . . . . . . . . . . . . . . . . . . l-6
Plugging in the Printer . . . . . . . . . . . . . . . . . . . . . . . l-10
Testing the Printer . . . . . . . . . . . . . . . . . . . . . . . . . . 1-11Loading paper onto the front tractor . . . . . . . . . . . . . 1-12Running the self test. . . . . . . . . . . . . . . . . . . . . . . 1-18
Connecting the Printer to Your Computer . . . . . . . . . . . . l-20Connecting the built-in interface . . . . . . . . . . . . . . . l-21
Using Software Programs . . . . . . . . . . . . . . . . . . . . . l-24Microsoft Windows 3.1 . . . . . . . . . . . . . . . . . . . . . l-24What is a Printer Driver? . . . . . . . . . . . . . . . . . . . . l-26
Non-Windows Software .............................................................. 1-26
You’re Ready to Print .................................................................. l-27
Set Up and Print 1-1

Chapter 1Set Up and Print
Unpacking the Printer . . . . . . . . . . . . . . . . . . . . . . . . l-2Checking the parts . . . . . . . . . . . . . . . . . . . . . . . . l-3Removing the protective materials . . . . . . . . . . . . . . l-3
Choosing a Place for the Printer . . . . . . . . . . . . . . . . . . 1-4
Installing the Ribbon Cartridge . . . . . . . . . . . . . . . . . . l-6
Plugging in the Printer . . . . . . . . . . . . . . . . . . . . . . . l-10
Testing the Printer . . . . . . . . . . . . . . . . . . . . . . . . . . 1-11Loading paper onto the front tractor . . . . . . . . . . . . . l-12Running the self test. . . . . . . . . . . . . . . . . . . . . . . l-18
Connecting the Printer to Your Computer . . . . . . . . . . . . l-20Connecting the built-in interface . . . . . . . . . . . . . . . l-21
Using Software Programs . . . . . . . . . . . . . . . . . . . . . l-24Microsoft Windows 3.1 . . . . . . . . . . . . . . . . . . . . . l-24What is a Printer Driver? . . . . . . . . . . . . . . . . . . . . l-26
Non-Windows Software ................................................................ l-26
You’re Ready to Print ................................................................. l-27
Set Up and Print 1-1

Unpacking the Printer
Because the printer weighs approximately 29 kg (64 lb), youshould not lift or carry it by yourself. Two people should carryit, lifting from the bottom.
1-2 Set Up and Print

Checking the parts
Check to see that you have the parts shown below and thatnothing has been damaged during transportation.
power cord
cross-head screwdriver
ribbon cartridge optional connector lock nuts
After you unpack the printer, store the packing materials incase you ever need to transport the printer.
Removing the protective materials
The printer is protected during shipping by several pieces ofpacking material that must be removed before you turn on theprinter.
Please see the Notice Sheet inserted in your printer forinstructions on removing the protective materials. Then storethem with the other packing material.
Set Up and Print 1-3

Caution:Be sure to remove all protective materials before you turnon the printer.
Do not try to remove the elastic cord from the front or reartractors. It is not a protective material.
Choosing a Place for the Printer
When you select a location for your printer, keep the followingin mind:
Place the printer on a flat, stable surface.
Place the printer close enough to the computer for its cableto reach.
Leave plenty of room around the printer for your front andrear stacks of continuous paper as well as your printedoutput.
Use a grounded outlet; do not use an adapter plug.
Avoid locations that are subject to direct sunlight, excessiveheat, moisture, or dust.
Avoid using electrical outlets that are controlled by wallswitches or automatic timers. Accidental disruption ofpower can wipe out information in both your computer’smemory and your printer’s memory.
Avoid using outlets on the same circuit with large motorsor other appliances that might disturb the power supply.
Keep the entire computer system away from potentialsources of interference, such as loudspeakers or the baseunits of cordless telephones.
1-4 Set Up and Print

The illustration below shows a good printer location.
If you plan to use a printer stand, follow these guidelines:
Use a stand that supports at least 58 kg (128 lb).
Never use a stand that tilts the printer. It should always bekept level.
Make sure to provide enough clearance below the standand between the legs so your continuous paper feedssmoothly.
Place cables so they do not interfere with paper feeding;secure them to a leg of the stand if possible.
Set Up and Print 1-5

Installing the Ribbon Cartridge
Before installing the ribbon cartridge, make sure that theprotective packing materials are removed and that the printeris turned off. Remove the ribbon cartridge from its box andplastic wrapper and then follow these steps:
1. Open the top cover by gently lifting its front edge up andaway from you.
Warning:Never move the print head while the printer is turned onbecause this can damage the printer. Also, if you have beenusing the printer, the print head may be hot; let it cool for afew minutes before touching it.
1-6 Set Up and Print

2. Slide the print head to the exposed part of the paper bail asshown below.
3. Remove and throw away the plastic separator from themiddle of the ribbon cartridge. Next, detach the ribbonguide from the cartridge and turn the ribbon-tighteningknob in the direction of the arrow to take up any slack inthe ribbon.
Set Up and Print 1-7
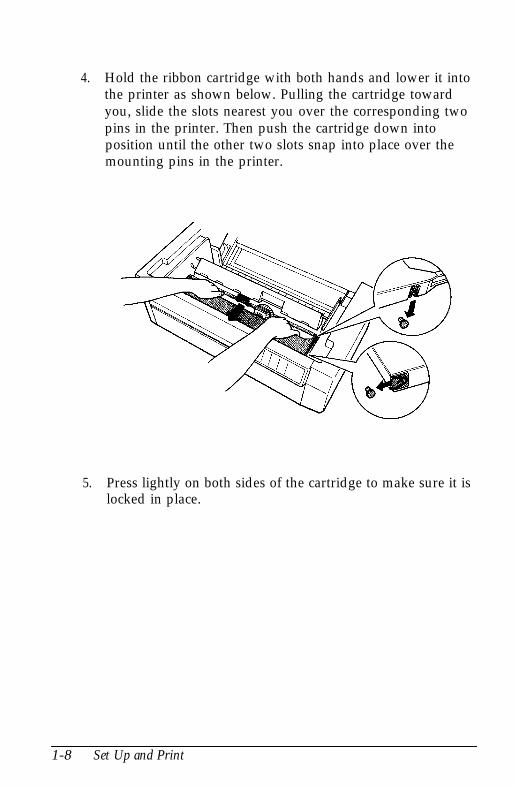
4. Hold the ribbon cartridge with both hands and lower it intothe printer as shown below. Pulling the cartridge towardyou, slide the slots nearest you over the corresponding twopins in the printer. Then push the cartridge down intoposition until the other two slots snap into place over themounting pins in the printer.
5. Press lightly on both sides of the cartridge to make sure it islocked in place.
1-8 Set Up and Print

6. Insert the ribbon guide over the metal pins on each side ofthe print head as shown below. The smaller end of theguide should be on top, with its angled edge facing backtoward the platen. Turn the ribbon-tightening knob againto remove any slack in the ribbon.
7. Slide the print head from side to side to see that it movessmoothly and that the ribbon is not twisted or creased.
Set Up and Print 1-9

8. Close the printer’s top cover.
Plugging in the Printer
1. Make sure the printer is turned off. (The O on the powerswitch located on the lower right side of the printer shouldbe visible.)
2. Check the label on the printer’s rear panel to see if thevoltage required by the printer matches that of yourelectrical outlet. If it does not match, contact your Epsondealer without connecting the power cord.
1-10 Set Up and Print

3. Plug the power cord into the AC inlet on the printer’s rearpanel.
4. Plug the power cord into a properly grounded electricaloutlet.
Caution:Whenever you turn off the power, wait at least five secondsbefore turning it back on; otherwise you may damage theprinter.
Testing the Printer
Now that your printer is fully assembled, you can use yourprinter’s built-in test function to be sure the printer is workingcorrectly before you connect it to a computer.
Before performing the test, you need to load paper.
Set Up and Print 1-11

Loading paper onto the front tractor
1. Open the printer’s front cover by lifting the middle of itsbottom edge up until it locks in place, as shown below.
2. Release the sprocket lock levers on both the right and leftsprocket units by pulling each lever down.
Caution:Do not try to pull on or remove the elastic cord from the tractor.
1-12 Set Up and Print

3. Slide the left sprocket unit all the way to the left. Lock it intoplace by pushing the sprocket lock lever up.
4. Now slide the right sprocket unit to approximately match thewidth of your paper. (Do not lock it in place yet.)
Set Up and Print 1-13

5. Slide the two paper supports so that they are spaced evenlybetween the sprocket units.
6. Open both sprocket covers.
1-14 Set up and Print
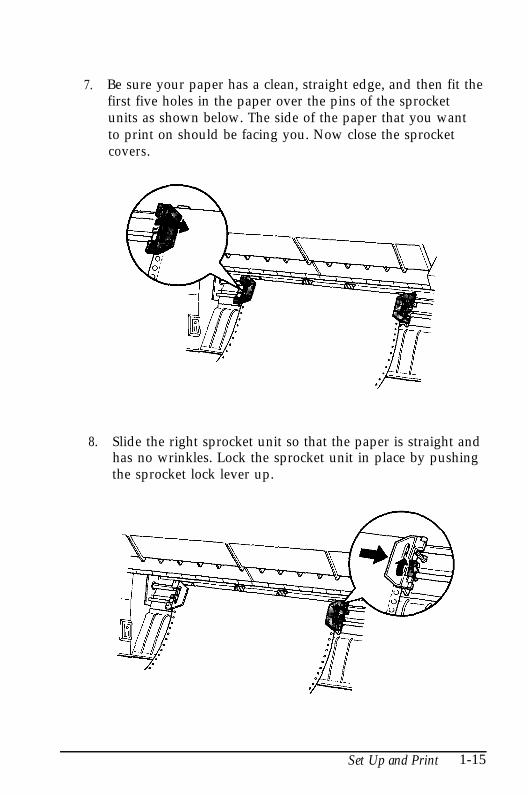
7. Be sure your paper has a clean, straight edge, and then fit thefirst five holes in the paper over the pins of the sprocketunits as shown below. The side of the paper that you wantto print on should be facing you. Now close the sprocketcovers.
8. Slide the right sprocket unit so that the paper is straight andhas no wrinkles. Lock the sprocket unit in place by pushingthe sprocket lock lever up.
Set Up and Print 1-15

Caution:After you lock the right sprocket, it may still move slightly;this is normal.
Be careful not to pull the paper too tightly when adjustingthe right sprocket.
9. Pull out slightly on the printer’s front cover and lower it untilit is closed.
Caution:Do not push down on the front cover; always pull it outslightly before closing.
Before turning on the printer, be absolutely sure you haveremoved all protective materials. Turning on the printerwhile the print head cannot move may seriously damagethe mechanism.
1-16 Set Up and Print

10. Turn on the printer. The print head moves to the left of theprinter and the POWER and PAPER OUT lights come on.Also, either the front or rear tractor arrow on the PAPERSELECT indicator lights up.
11. Press the LF/FF/LOAD button to load your paper. (If thepaper does not load, the front tractor may not be selected.Press the FRONT/REAR button to select the front tractor.This loads the paper automatically.)
12. After the paper loads, turn off the printer.
Set Up and Print 1-17

Running the self test
The self test can be run in either draft or near letter quality(NLQ) mode.
1. While holding down the LF/FF button (for draft mode) orTEAR OFF button (for NLQ mode), turn on the printer.After printing starts, release the button.
The printer prints a series of characters. Here is part of atypical self test printout in high-speed draft.
Note:When NLQ quality is selected using DIP switch l-3, the serf testruns in NLQ mode even if you press the LF/FF button.
2. The self test continues until the paper runs out or until youpress the PA USE button. If the test results are satisfactoryand you wish to stop the test, press the PAUSE button. (Toresume the test, press the PAUSE button again.)
3. To end the self test, press the PA USE button to stop printingand then hold down the LF/FF button to advance the paper.
1-18 Set Up and Print

4. Open the paper separator cover and tear off the paper at theperforation.
5. Turn off the printer.
Note:If you open the top cover while the printer is printing, the printerbeeps four times, stops printing, and goes into pause status. Toresume printing, close the top cover and press the PAUSE button.
You can select normal draft mode or high-speed draft mode usingDIP switch 1-2. For details, see Chapter 3.
If continuous paper is fed past the sprocket (on the last page, forexample), the paper may not feed properly.
Set Up and Print 1-19

Connecting the Printer to Your Computer
If the self test printed correctly, you are now ready to connectthe printer to your computer.
Your printer has two separate interface connections: aCentronics®-compatible parallel interface and an RS-232C-compatible serial interface. If you are not sure which one isrequired by your computer, check your computer manual.
Note:Your printer has an automatic interface selection feature that allowsyou to connect more than one interface to the printer at a time. See thesection on using automatic interface selection in Chapter 3.
If you have a suitable shielded cable, you should be able toconnect the printer immediately. If you have one of the fewcomputers that requires a different type of interface, youshould be able to use one of the optional interfaces described inChapter 4.
1-20 Set Up and Print

Connecting the built-in interface
Use this procedure for either the built-in parallel or serialinterface.
1. Turn off both your printer and computer.
2. Open the rear cover by grasping it by the handholds on eachside.
3. Plug the cable connector securely into the parallel or serialinterface.
Set Up and Print 1-21

4. When you connect the parallel interface, squeeze the wireclips together until they lock in place on either side of theconnector. If your cable has a ground wire, connect it to theprinter’s ground connector.
When you connect the serial interface, fasten the screw onthe cable connector.
1-22 Set Up and Print

Note:If the screws that come with the cable do not fit into the connectorlock nuts on the interface, replace the lock nuts with the optionallock nuts provided with the printer.
5. Open the plastic clamp to the right of the interface connectorsby pulling out its top tab. Insert the cable in the plasticclamp and close the clamp, as shown below.
6. Close the rear cover.
Set Up and Print 1-23

Caution:Always close the rear cover before using the printer.
7. Plug the other end of the cable into the computer. (If there isa ground wire at the computer end of the cable, attach it tothe ground connector at the back of the computer.)
Before using the printer’s serial interface, you need to selectserial communication by changing the printer’s DIP switchsettings. You may also need to change two other serial interfacesettings, serial bit rate and parity, before your printer andcomputer can communicate properly. See the section on settingDIP switches in Chapter 3 for more information.
Using Software Programs
To take full advantage of your printer’s features, find theinstructions for your software programs below.
Microsoft ® WindowsTM 3.1
If Windows is already installed on your system, follow thesteps below to set it up with your printer. Then your printerwill work correctly for all your Windows programs, such asWord for Windows and Lotus® 1-2-3® for Windows.
Note:If Windows is not already installed on your system, run the setupprogram as described in the Windows documentation, and follow steps4 through 10 below when you reach the section for choosing a printer.
1. In the window labeled Main, double click the Control Panelicon.
2. Double click the Printers icon.
1-24 Set Up and Print

3.
4.
5.
6.
7.
8.
9.
Choose the Add> button on the right side of the screen.
In the list of printers box, select Epson DFX-5000+.
If DFX-5000+ is not available, select Epson DFX-8000 orEpson DFX-5000.
If neither of these is available, select Epson FX-870/1170 oranother Epson FX model.
Choose the Install button. A dialog box may instruct you toinsert a diskette.
If necessary, insert the diskette required.
Choose the Setup button.
Choose the OK button.
Highlight Epson DFX-5000+ (or the printer you added) andclick the button labeled Set As Default Printer.
10. Click the Close button.
You have now installed the printer driver for Windows.
Note:To use 15 characters per inch on your printer, you need theDFX-5000+ driver. If your version of Windows does not include it,contact Microsoft Windows Product Support to obtain theDFX-5000+ driver.
Set Up and Print 1-25

What is a Printer Driver?
The software you use to enter and format your documentssends codes that run (or “drive”) your printer. These softwarecodes select the font, margins, page size, line spacing, andother features of the document you are printing. Therefore, it isimportant that you choose the right printer driver and install itcorrectly from within your software. If there is a problem withthe appearance of your document, a software setting is themost likely the cause.
Non-Windows Software
Most software programs let you specify the type of printer youare using so that the program can take full advantage of theprinter’s features. If your application program has aninstallation or setup procedure that lets you select your printerfrom a list of printers, choose the Epson DFX-5000+ printer. Ifthe list does not include the DFX-5000+, choose one of thefollowing printers, listed in order of preference:
DFX-8000DFX-5000FX-870/1170FX
Note:To use 15 characters per inch on your printer, you need a DFX-5000+printer driver. If your software program does not list this printer,contact the software manufacturer to see if an update is available.
1-26 Set Up and Print

You’re Ready to Print
You are now ready to print documents. If you need additionalinformation about your printer, such as loading different papertypes, look for the appropriate topic in other chapters in thisuser’s guide.
Caution:Running the printer continuously for extended periods of timeis not recommended. It can cause the printer to wear out soonerthan expected.
Set Up and Print 1-27

Chapter 2Loading and Using Paper
Using the Two-Tractor System . . . . . . . . . . . . . . . . . . 2-2Positioning the paper supply . . . . . . . . . . . . . . . . . 2-2
Loading Paper onto the Rear Tractor . . . . . . . . . . . . . . . 2-3
Adjusting the Paper Position . . . . . . . . . . . . . . . . . . . . 2-10Adjusting the top-of-form position . . . . . . . . . . . . . . 2-11Adjusting the printing position . . . . . . . . . . . . . . . . 2-13
Tearing Off the Printed Pages . . . . . . . . . . . . . . . . . . . 2-14Tear-off mode . . . . . . . . . . . . . . . . . . . . . . . . . . 2-14Using the TEAR OFF button . . . . . . . . . . . . . . . . . . 2-16Adjusting the tear-off position . . . . . . . . . . . . . . . . . 2-16
Switching Between Front and Rear Tractors . . . . . . . . . . . 2-19
Changing the Paper . . . . . . . . . . . . . . . . . . . . . . . . . 2-21
Printing on Multi-Part Forms and Labels . . . . . . . . . . . . 2-24Using multi-part forms . . . . . . . . . . . . . . . . . . . . . 2-25Using labels . . . . . . . . . . . . . . . . . . . . . . . . . . . 2-26
Loading and Using Paper 2-1

Using the Two-Tractor System
Your printer’s paper handling system consists of a front pushtractor and a rear push tractor. Both tractors are easy to load andoperate, and both accommodate a wide variety of paper types,including labels and multi-part forms. The printer automaticallyadjusts to the thickness of your loaded paper, so you don’t need tomake any manual adjustments for paper thickness settings.
You can use any width continuous paper, from 4 inches (101 mm)to 16 inches (406 mm) wide. Your printer senses paper widthautomatically.
If you are going to use more than two types of paper, it’s best toload the paper you use most often onto the rear tractor. That wayyou can reserve the front tractor, which is easier to reach, for thepaper you change more frequently. Use only the front tractor forprinting on labels.
Caution:Before using your paper, check that it matches the specificationsdescribed in Appendix A. Also check that your paper has astraight edge.
Note:If continuous paper is fed past the sprocket (on the last page, for example),the paper may not feed properly.
Positioning the paper supply
Since you can load continuous paper from both the front and therear, be sure to leave enough room around the printer for the twostacks of fresh paper as well as for a stack of printed output. It isalso important to keep both stacks of fresh paper aligned with theprinter so that the paper can feed smoothly into the printer.
2-2 Loading and Using Paper

The following illustration shows three ways to position yourprinter and paper: with the front tractor loaded, with the reartractor loaded, and with both tractors loaded.
Note:Make sure that your stack of printed pages does not interfere with therear tractor’s paper supply.
Loading Paper onto the Rear Tractor
The following steps show you how to load paper onto the reartractor. You do not need to remove the paper from the fronttractor first because the printer does this for you when youselect the rear tractor.
Note:If you performed a self test as described in Chapter 1, you loadedcontinuous paper onto the front tractor. If you did not run a self test,see “Loading paper onto the front tractor" in Chapter 1.
1. Turn off the printer.
Loading and Using Paper 2-3

2. Open the printer’s top cover by gently lifting its front edgeup and away from you, as shown below.
3. Open the rear flap at the back of the top cover.
2-4 Loading and Using Paper

4. Release the sprocket lock levers on the rear tractor’s rightand left sprocket units by pushing each lever back.
Caution:Do not try to pull on or remove the elastic cord from the tractor.
5. Slide the left sprocket unit all the way to the left. Lock it inplace by pulling the sprocket lock lever forward.
Loading and Using Paper 2-5

6. Now slide the right sprocket unit to approximately matchthe width of your paper. (Do not lock it in place yet.)
7. Slide the two paper supports so they are spaced evenlybetween the two sprocket units.
2-6 Loading and Using Paper

8. Open both sprocket covers.
9. Make sure your paper has a clean, straight edge. With theside of the paper you want to print on facing down, insertyour paper through the opening at the rear. You may findit easier to load the paper by standing to the side of theprinter. That way you can feed the paper into the rearopening with one hand and pull it through with the other.
Loading and Using Paper 2-7

10. Fit the first five holes in the paper over the pins of the sprocket units as shown below. NOW close the sprocketcovers.
11. Slide the right sprocket unit to a position so that the paper isstraight and has no wrinkles. Lock the sprocket unit inplace by pulling the sprocket lock lever forward.
2-8 Loading and Using Paper

Note:After you lock the right sprocket, if may still move slightly;this is normal.
Be careful not to pull the paper too tightly when adjusting theright sprocket.
12. Close the top cover and the rear flap. The paper is nowloaded to the standby position.
13. Turn on the printer. The print head moves to the left of theprinter and the POWER and PAPER OUT lights go on. Also,either the front or rear tractor arrow on the PAPER SELECTindicator lights up, depending on which tractor wasselected when the printer was turned off last.
Loading and Using Paper 2-9

14. Check the PAPER SELECT indicator to see which tractor isselected:
If the rear tractor arrow is lit, press the LF/FF/LOADbutton to load the paper.
If the front tractor arrow is lit, press the FRONT/REARbutton to switch to the rear tractor. When the printerswitches tractors, it also loads the paper automatically.
15. The paper is now loaded to the top-of-form position. If it lookslike the printing will start too high or low on the page, see thenext section for instructions on adjusting the paper position.
Adjusting the Paper Position
You can adjust the top-of-form position as well as the printingposition at any point on the page by using the TOP OF FORM andMICRO FEED buttons. The printer then remembers the newtop-of-form position. When you use the optional pull tractor, youcan adjust the paper position in the same way as described below.
2-10 Loading and Using Paper

Note:The printing position (based on the fop-of-form position) is controlledby your software. To change the print position, adjust your software’sprint settings. Use the following procedure only if your software doesnot allow print position adjustment.
Adjusting the fop-of-form position
The top-of-form position is the position the printer feeds thepaper to when it loads the paper or performs a form feed. Thisposition is important because it determines where the printingbegins on each page. If the printing is too high or low on thepage, you can adjust the top-of-form position eitherpermanently or temporarily depending on how you use theTOP OF FORM button.
When you want to permanently change the top-of-formposition, you enter the top-of-form mode using theTOP OF FORM control panel button. The printerremembers the new top-of-form position even after theprinter is turned off, reset, or initialized. (The printerremembers separate top-of-form positions for the front andrear tractors.)
When you want to temporarily change the top-of-formposition, you adjust the position using the MICRO FEEDbuttons during pause status without entering top-of-formmode. The printer remembers the temporary top-of-formposition until the next time you load paper, switch tractors,or turn off the printer. See “Adjusting the printingposition” later in this chapter.
You can set the top-of-form position from 2.6 mm (0.1 inches)below the top edge of the paper. The factory setting is 5.8 mm(0.2 inches).
The following steps show you how to reset (permanentlychange) the top-of-form position.
Loading and Using Paper 2-11

Caution:To adjust the fop-of-form position when labels are loaded in theprinter, use the forward-feeding (top) MICRO FEED buttononly; do not enter the top-of-form mode. (See "Adjusting theprinting position” later in this chapter.) Never feed labelsbackward through the printer.
1.
2.
3.
4.
Make sure the printer is turned on and the desired tractor isselected (the corresponding tractor arrow should be lit).
Press the TOP OF FORM button to enter top-of-form mode.The printer beeps once, and the TOP OF FORM lightflashes. Also, the printer advances the paper so that thetop-of-form position is lined up with the red line on theclear plastic ribbon protector.
Open the top cover.
Use the MICRO FEED buttons to feed the paper to thedesired top-of-form position. The to pedge of the ribbonprotector shows you where the bottom edge of your firstline of text will print. This position is based on the firstprintable line of text. If your software inserts a top marginof five lines, your text will actually print five lines belowthe top-of-form position.
2-12 Loading and Using Paper

Note:The red line on the ribbon protector can be used as a reference onlywhen you are in the fop-of-form mode. At all other times yourfop-of-form position is hidden behind the print ribbon.
5. Press the TOP OF FORM button again to exit top-of-form modeand save your new top-of-form position. Then close the topcover.
Note:If you enter fop-of-form mode right after loading paper, you can set theloading and fop-of-form positions at the same time. (When you use theoptional pull tractor, you cannot adjust the loading position.)
Adjusting the printing position
If you need to adjust the printing position in the middle of a page,or to adjust the top-of-form position when using labels, follow thesteps below.
When you move the printing position, you temporarily change thetop-of-form position by the same amount. For example, if youadjust the printing in the middle of the page so that it falls ahalf-inch lower, the next page will begin printing a half-inch loweras well. The printer remembers this temporary top-of-formposition until the next time you load paper, switch tractors, orturn off the printer.
1. Start printing your document. When you reach the text that youwant to align at a particular spot on the page, press the PAUSEbutton to stop printing.
2. Use MICRO FEED buttons to adjust the position where youwant your next line of text to fall. Press the button once to feedthe paper forward or backward in 1/216-inch increments, orhold it down to move the paper continuously.
Loading and Using Paper 2-13

Caution:If you are printing on labels, use only the forward-feeding(top) MICRO FEED button.
3. When you are finished, press the PAUSE button to continueprinting your document.
Tearing Off the Printed Pages
After you finish printing, you can use the tear-off feature toadvance continuous paper on the push tractor to the tear-offedge of the printer. You can then easily tear off printed sheets.When you resume printing, the printer automatically feedspaper back to the loading position.
This feature lets you save paper that would normally be lostbetween documents.
You can use the tear-off feature in two ways: by turning on DIPswitch 3-8 to select automatic tear-off mode, or by pressing theTEAR OFF button on the control panel.
If the perforation between pages is not aligned with the tear-offedge, you can adjust the tear-off position using the micro-feedfeature. The printer remembers this new tear-off position.
Caution:Never use the fear-off feature to reverse feed labels, when theoptional pull tractor is installed, or when using the papermemory feature described in Chapter 3.
Tear-off mode
When you select tear-off mode with DIP switch 3-8, the printerautomatically advances continuous paper to the tear-offposition when you finish printing.
2-14 Loading and Using Paper

The printer advances paper to the tear-off position only whenthe printer receives a full page of data or a form feed commandand no more data is received for three seconds.
1. Make sure the printer is turned off.
2. Turn DIP switch 3-8 on.
3. Turn the printer on.
When tear-off mode is on and you print on continuous paperon the push tractor, the printer advances the final printed pageto the tear-off position. Then you can tear off all printed pages.
If the perforation is not aligned with the tear-off edge, adjustthe tear-off position as described in the section on adjusting thetear-off position.
When you resume printing, the printer automatically feeds thepaper back to the loading position and begins printing.
Loading and Using Paper 2-15

Using the TEAR OFF button
Whether or not the printer is in tear-off mode, you can use theTEAR OFF button to advance continuous paper to the tear-offposition by following the steps below.
1. Make sure printing is finished. Then press the TEAR OFFbutton. The printer advances the paper to the tear-off edgeand the TEAR OFF light comes on.
2. Tear off all printed pages. If the perforation is not alignedwith the tear-off edge, adjust the tear-off position asdescribed in the next section.
3. When you resume printing, the printer automatically feedsthe paper back to the loading position and begins printing.(You can also manually feed the paper back to the loadingposition by pressing the TEAR OFF button again.)
Adjusting the tear-off position
If the paper’s perforation is not aligned with the tear-off edge,follow the steps below:
1. Turn on the printer and select the desired tractor.
2-16 Loading and Using Paper

2. Now open the paper separator cover (the flap on the toppart of the printer’s top cover). This exposes the printer’stear-off edge.
3. Press the TEAR OFF button to enter the tear-off mode. TheTEAR OFF light goes on and the printer feeds the paper’sperforation to the printer’s tear-off edge.
Loading and Using Paper 2-17
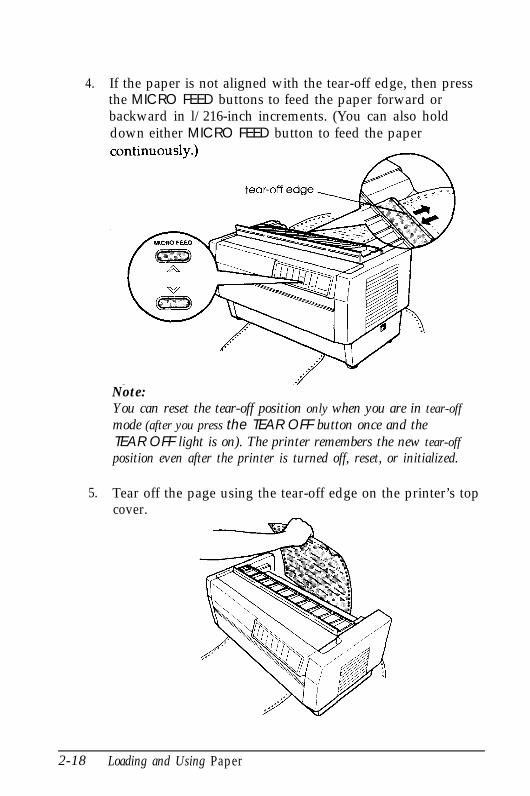
4. If the paper is not aligned with the tear-off edge, then pressthe MICRO FEED buttons to feed the paper forward orbackward in l/216-inch increments. (You can also holddown either MICRO FEED button to feed the paper
Note:You can reset the tear-off position only when you are in tear-offmode (after you press the TEAR OFF button once and theTEAR OFF light is on). The printer remembers the new tear-offposition even after the printer is turned off, reset, or initialized.
5. Tear off the page using the tear-off edge on the printer’s topcover.
2-18 Loading and Using Paper

6. Press the TEAR OFF button to feed the paper back to thetop-of-form position. You are now ready to print your nextdocument.
Caution:Always tear off the printed document before you feed the paperback to the top-of-form position. Neverfeed paper backwardmore than one page.
Switching Between Front and Rear Tractors
You can easily switch between paper loaded on the fronttractor and paper loaded on the rear tractor. The followingsteps describe the procedure for switching from the fronttractor to the rear tractor, but you can follow the same steps toswitch from the rear tractor to the front tractor. (To switchtractors when the optional pull tractor is installed, seeChapter 4.)
Caution:Never switch between tractors when labels are already loadedin the printer. Instead, completely remove the labels first bytearing off the fresh supply below the tractor and pressingLF/FF to eject the remaining labels.
Before you start, make sure the printer is turned on and thatthe front tractor is selected (the front tractor arrow on thePAPER SELECT indicator should be lit). If you are in the middleof printing a document, wait for the printer to finish printingbefore you switch tractors. Then follow these steps:
Loading and Using Paper 2-19

1. If no paper is loaded in the rear tractor, load paper to thestandby position (the first five pins of the sprocket units),as described in steps 1 through 13 beginning on page 2-3.
2. If you have a printed document or excess paper still in theprinter, use the tear-off feature described in the previoussection to tear off the document or excess paper.
Caution:Always tear off the printed document and any excess paperbefore witching tractors. Never feed more than one pagebackward through the printer.
2-20 Loading and Using Paper

3. Press the FRONT/REAR button to switch to the rear tractor.The front-loaded paper automatically feeds back to thestandby position and the rear-loaded paper advances to thetop-of-form position.
Changing the Paper
The following steps describe the procedure for changing paperon the front tractor, but you can follow the same steps whenyou change the paper on the rear tractor.
Before you start, make sure the printer is turned on and thefront tractor is selected. (If you are changing the paper on therear tractor, the rear tractor should be selected instead.)
Caution:Never change paper using the following procedure if labels arealready loaded in the printer. Instead, completely remove thelabels first by tearing off the fresh supply below the tractor andpressing LF/FF to eject the remaining labels. Then load the newpaper as described earlier in this chapter.
Loading and Using Paper 2-21

1. If you have a printed document still in the printer, use thetear-off feature described earlier to tear off the document orexcess paper.
Caution:Always tear off printed documents before changing thepaper. Never feed more than one page backward throughthe printer.
2. Press the FRONT/REAR button to switch to the rear tractor.The front-loaded paper automatically feeds back to thestandby position.
2-22 Loading and Using Paper

3. Open the printer’s front cover. (To change the rear-loadedpaper, open the printer’s top cover and the rear flap.)
4. Open the sprocket covers and remove the paper from thetractor.
Loading and Using Paper 2-23

5. Load the new paper as described in steps 1 through 12beginning on page 1-12 (or for rear-loaded paper, steps 1through 15 beginning on page 2-3).
Printing on Multi-Part Forms and Labels
You can print on various types of paper, including multi-partforms and labels. Your printer can also handle a variety ofpaper thicknesses, from thin paper to six-part forms. Theprinter automatically adjusts to the width and thickness ofyour paper.
When you print on multi-part forms and labels, the positioningof your text on the page can be critical. For more informationon aligning your text, see the sections on adjusting top-of-formand printing positions earlier in this chapter. You should alsocheck both your printer and your software page length settingsbefore you load labels or forms.
If you are using labels, preprinted forms, or multi-part forms,you may want to use the optional pull tractor. See Chapter 4.
2-24 Loading and Using Paper

C a u t i o n :
When printing on labels, be absolutely sure that your printingstays within the printable area of the label to prevent damage tothe print head. For more information on the printable area, seeAppendix A.
Using multi-part forms
You can use multi-part (carbonless) forms with up to foursheets, including the original, on the rear tractor. On the fronttractor, you can use forms with up to six sheets.
You load continuous multi-part forms the same way you loadany other type of continuous paper. Before loading multi-partforms, however, make sure the paper has a clean straight edgeand does not separate or tear apart. See the sections on loadingpaper earlier in this chapter.
When you use the paper memory feature described inChapter 3, the DFX-5000+ can print on multi-part forms thatvary in thickness, such as forms with labels on them or formsthat overlap slightly where they are glued together. Theseforms are thicker in the label area and in the places where theyoverlap or are joined together, as shown below.
Overlapping multi-part forms Multi-part forms with labels
Loading and Using Paper 2-25

Caution;Be sure to use the paper memory feature before you print onmulti-partforms that vary in thickness. See Chapter 3 forinstructions.
When you print on these forms, make sure that the printing fitswithin the printable area and that the top-of-form position isset properly. The printable area is shown in Appendix A.
Using labels
When using labels, always choose the type mounted oncontinuous paper with sprocket holes for use with a tractor.Labels should be used in the front tractor only. You load labelsthe same way that you load continuous paper as described inChapter 1, “Loading paper onto the front tractor.”
Caution:Never use the TEAR OFF, FRONT/REAR, or reverse-feeding(bottom) MICRO FEED button when labels are loaded in theprinter. Labels must never be fed backward through the printerbecause they can easily come off the backing and jam theprinter.
Although you must never feed labels backward through theprinter, you can still use the automatic paper handling featuresif you follow these precautions:
Instead of using the TEAR OFF button to remove printedlabels, press the LF/FF button until the last printed label isat the point where you can tear it off easily.
Before using the FRONT/REAR button to switch tractors orchange paper, remove the entire supply of labels first.Always remove labels by tearing off the fresh supply at aperforation below the tractor and then pressing the LF/FFbutton to eject the remaining labels.
2-26 Loading and Using Paper

When adjusting the top-of-form or printing position, useonly the forward-feeding (top) MICRO FEED button.
Caution:Because labels are especially sensitive to extreme temperaturesand humidity, always use them under normal operatingconditions.
Loading and Using Paper 2-27

Chapter 3Using the Printer
The Control Panel . . . . . . . . . . . . . . . . . . . . . . . . . . 3-2Indicator lights . . . . . . . . . . . . . . . . . . . . . . . . . . 3-2Buttons . . . . . . . . . . . . . . . . . . . . . . . . . . . . . . 3-3Other control panel features . . . . . . . . . . . . . . . . . . 3-7
Using DIP Switches . . . . . . . . . . . . . . . . . . . . . . . . . 3-7Changing DIP-switch settings . . . . . . . . . . . . . . . . . 3-8DIP-switch tables . . . . . . . . . . . . . . . . . . . . . . . . 3-10DIP-switch functions . . . . . . . . . . . . . . . . . . . . . . 3-14
Printer mode . . . . . . . . . . . . . . . . . . . . . . . . . 3-14Draft printing speed . . . . . . . . . . . . . . . . . . . . 3-14Character quality . . . . . . . . . . . . . . . . . . . . . . 3-15Character table . . . . . . . . . . . . . . . . . . . . . . . 3-15Shape of zero . . . . . . . . . . . . . . . . . . . . . . . . 3-15Input buffer . . . . . . . . . . . . . . . . . . . . . . . . . 3-16Auto line feed . . . . . . . . . . . . . . . . . . . . . . . . 3-16Interface type/ parity . . . . . . . . . . . . . . . . . . . . 3-16Serial bit rate . . . . . . . . . . . . . . . . . . . . . . . . . 3-17Page length . . . . . . . . . . . . . . . . . . . . . . . . . 3-17Skip-over-perforation . . . . . . . . . . . . . . . . . . . 3-18Paper memory, overlapping multi-part forms,
multi-part forms with labels . . . . . . . . . . . . . . . 3-18Skip over binding . . . . . . . . . . . . . . . . . . . . . . 3-18Automatic tear off . . . . . . . . . . . . . . . . . . . . . 3-18
Using Automatic Interface Selection . . . . . . . . . . . . . . . 3-19
Using the Paper Memory Feature . . . . . . . . . . . . . . . . . 3-19Saving paper memory settings . . . . . . . . . . . . . . . . 3-20Loading paper memory settings . . . . . . . . . . . . . . . . 3-22
Using the Printer 3-1

The Control Panel
The control panel gives you access to several powerfulfeatures. The panel consists of indicator lights and buttons.
Indicator lights
POWER On when the power switch is on andpower is supplied to the printer.
PAPER OUT On when the printer is out of paper. Thislight goes on whenever no paper ispositioned behind the print head, even ifpaper is loaded on the tractors in thestandby position.
Flashes when the paper jams.
PAUSE On when printing is paused.
TEAR OFF On when the printer is in tear-off mode.The printer remembers any change youmake to the tear-off position when thislight is on.
TOP OF FORM Flashes when the printer is in top-of-formmode. The printer remembers any changeyou make to the top-of-form positionwhen this light flashes.
3-2 Using the Printer

PITCH
10
12
17
PAPER SELECTFRONT
PAPER SELECTREAR
Buttons
On when the printer is set to print tencharacters per inch.
On when the printer is set to print twelvecharacters per inch.
On when the printer is set to printseventeen characters per inch.
On when the front tractor is selected. Thelight is green when paper is loaded (evenif the paper is in the standby position),and red when the tractor is out of paper.
On when the rear tractor is selected. Thelight is green when paper is loaded (evenif the paper is in the standby position),and red when the tractor is out of paper.
PAUSE Controls whether the printer can print ornot. Press this button to stop or startprinting when data is in the input buffer.
Using the Printer 3-3

LF/FF/LOAD
TEAR OFF
LF advances paper one line at a time. Tofeed your paper one line, press this buttononce.
FF advances the paper to the top of thenext page. To use this feature, press andhold the button for about one second.
LOAD loads paper on the push tractor ofthe selected paper path when no paper iscurrently loaded.
This button can also be used to run theprinter’s draft self test. See the section onrunning the self test in Chapter 1.
Feeds the paper to the printer’s tear-offedge and puts the printer in tear-off mode.
If the perforation of your paper does notalign exactly with the printer’s tear-offedge, use the MICRO FEED buttons toadjust the tear-off position. See the sectionon adjusting the tear-off position inChapter 2.
This button can also be used to run theprinter’s NLQ self test. See the section onrunning the self test in Chapter 1.
Caution:Never use the TEAR OFF button with labels. Use the LF/FFbutton instead to feed the printed labels to a point where theycan be torn off
3-4 Using the Printer
MICRO FEED These two buttons advance or reverse theloaded paper in 1/216-inch increments.You can use these buttons to adjust thetop-of-form, tear-off, and printingpositions.
To reset the top-of-form position, pressthe TOP OF FORM button to entertop-of-form mode. Then use the MICROFEED buttons to move the paper to thedesired position. See the section onadjusting the top-of-form position inChapter 2.
To reset the tear-off position, press theTEAR OFF button to enter tear-off modeand feed the paper to the tear-off position.Then use the MICRO FEED buttons tomove the paper to the desired position.See the section on adjusting the tear-offposition in Chapter 2.
To adjust the printing position, presseither MICRO FEED button to advance orreverse the paper to the desired position.See the section on adjusting the printingposition in Chapter 2.
These buttons are also used for the papermemory feature described later in thischapter.
Caution:When using labels, use only the top MICRO FEED button.Never feed labels backward through the printer.
Using the Printer 3-5

TOP OF FORM Lets you enter and exit the top-of-formmode so you can adjust the top-of-formposition. The top-of-form position iswhere printing begins on each page.
If your printing is too high or low on thepage, you can reset the top-of-formposition by entering top-of-form modeand using micro feed to adjust theposition. The printer remembers this newtop-of-form position even after it is turnedoff, reset, or initialized. Also, the printerremembers separate top-of-form positionsfor the front and rear tractors.
PITCH
See the section on adjusting thetop-of-form position in Chapter 2.
Lets you select the characters per inch forprinting. Push the button until the lightappears next to your preference. (Yoursoftware setting overrides this setting.)
PAPER SELECTFRONT/REAR
Lets you select the front or rear tractor. Ifyou have been using paper loaded on onetractor, first remove the printed outputbefore pressing this button to switch thetractor. When you switch betweentractors, the paper already loaded in theprinter is fed backward to the standbyposition and the paper on the newlyselected tractor is loaded.
Caution:Never use the FRONT/REAR button when labels are loaded inthe printer. Al ways tear off any printed pages or excess paperso you don’t feed more than one page backward through theprinter.
3-6 Using the Printer

Other control pane/ features
Self test
Hex dump
By holding down the LF/FF or TEAR OFFbutton while you turn on the printer, youcan start the printer’s self test. The self testprints the characters in the printer’s ROM(Read Only Memory). See the section onrunning the self test in Chapter 1.
By holding down both the LF/FF and TEAROFF buttons while you turn on the printer,you can turn on the hex dump mode. Thisfeature prints the codes that are sent to theprinter so that advanced users can findthe cause of communication problemsbetween the computer and printer. See thesection on the hex dump mode inChapter 5 for more information.
Print settings By holding down the PAUSE button whileyou turn on the printer, the printer printsthe current DIP-switch settings.
Using DIP Switches
This printer has three sets of DIP switches. DIP switchescontrol a variety of printer functions such as page length andprinting speed. DIP-switch settings are shown in theDIP-switch tables starting on page 3-10. Descriptions of all theDIP-switch functions are provided beginning on page 3-14.
Because the factory (default) settings are designed toaccommodate the needs of most users, you may never need tochange the DIP-switch settings.
Using the Printer 3-7

Note:You can print out the current DIP-switch settings by holding downthe PAUSE button while you turn on the printer.
Changing DIP-s witch settings
1. Turn off the printer.
2. Open the printer’s front cover by lifting the middle of itsbottom edge up until it locks in place.
3. The DIP switches are located in a small compartment on thefront paper guide, behind the front tractor paper. If paperis loaded on the front tractor, either remove it or lift it upout of the way so you can reach the DIP switches.
3-8 Using the Printer

4. Open the DIP-switch cover.
5. Use a pointed instrument, such as the tip of a ballpoint pen,to turn the switch either on or off. A DIP switch is on whenit is up, and off when it is down.
Note:Always make sure that the printer is turned off before changingthe DIP-switch settings.
Using the Printer 3-9

6. Close the DIP-switch cover and replace the paper.
7. Next, close the front cover.
8. Turn on the printer to initialize the new settings. When youchange a DIP-switch setting, the new settings take effectonly after you turn on or reset the printer.
DIP-switch tables
The following tables show the settings for each DIP switch. Formore information about each feature, see the explanationsfollowing the DIP-switch tables.
DIP switch 1
Switch Description
1-1 Printer mode
1-2 Draft printing speed
1-3 Character quality
1-4 Character table
1-5(in Epson ESC/P mode)
1-6
1-7(For setting in IBM* mode, seetable E.)
1-8
* IBM Pro Printer II emulation.
ON OFF
IBM* ESC/P
Normal High
NLQ Draft
See table A
3-10 Using the Printer

DIP switch 2
Switch Description ON OFF
2-1 Shape of zero Slashed Not slashed
2-2 Input buffer enable N o Yes
2 - 3 Auto line feed Y e s N o
2-4 Interface type/parity See table B
2-5
2-6
2-7 Serial bit rate See table C
2-8
DIP switch 3
Switch Description O N OFF
3-1 Page lenght See table D
3-2
3-3 Skip-over-perforation Skip No skip
3 - 4 Paper memory (*) Memory 2 Memory 1
3 - 5 Overlapping multi-part forms (*) Yes N o
3-6 Multi-part forms with label (*) Yes N o
3-7 Skip over binding Y e s N o
3-8 Automatic tear off Yes N o
* These switches are for paper memory settings.
Using the Printer 3-11

Table A (Epson ESC/P mode only)
* Available in the European version only.
PC437 is selected by all other switch combinations.
3-12 Using the Printer

Table B Interface type/parity
Interface/paritySW SW SW2-4 2-5 2-6
Odd parity Wait time: 30 sec. OFF OFF OFFfor serial
Wait time: 10 sec. OFF OFF O N
Autointerfaceselection
Parallel
No parityfor serial
Wait time: 30 sec.
Wait time: 10 sec.
OFF ON OFF
OFF ON ON
ON OFF OFF
Serial odd parity ON OFF ON
ON ON OFFSerial even parity
Serial no parity ON ON ON
The printer waits this interval after a print job before it accepts data fromanother interface.
Table C Serial bit rate
Bit rate
19200
9600
1200
300
SW 2-7 SW 2-8
OFF OFF
OFF ON
ON OFF
ON ON
Table D Page length
Page length
11 inches
12 inches
8.5 inches
70/6 inches
SW 3-l SW 3-2
OFF OFF
OFF ON
ON OFF
ON ON
Using the Printer 3-13

Table E (IBM mode only)
Switch No. Function ON OFF
1-4 Automatic carriage return No Yes
1-5 Not used
1-6 80-9FH code handling Characters Commands
1-7 Not used
I 1-8 Character table PC865 PC437 I
DIP-switch functions
The different features you can control with the printer’s DIPswitches are described below.
Printer modeWhen DIP switch 1-1 is on, the printer operates in IBMProPrinter II emulation mode. When this DIP switch is off, theprinter operates in Epson ESC/P mode. Table E shows thefunctions of DIP switches l-4,1-5,1-6,1-7, and l-8 in IBMmode. Table A shows the functions of those same DIP switchesin ESC/P mode.
Draft printing speedWhen DIP switch l-2 is off, high-speed draft mode is selected.When this switch is on, normal draft mode is selected. Thisswitch affects the printer only if DIP switch l-3 is set to draftmode (turned off) or if draft mode is selected in your software.In high-speed draft mode, you can print up to 560 charactersper second at 10 cpi (characters per inch). In normal draftmode, you can print up to 420 characters per second at 10 cpi.Normal draft mode produces characters that are more fullyformed than characters produced in high-speed draft mode.
3-14 Using the Printer

Note:High-speed draft mode is available only for 10 cpi printing. Also,underlining and double-width are the only print enhancements thatwork in high-speed draft mode. If you use a feature such as emphasizedor double-strike in high-speed draft mode, the printer temporarilysloivs to normal draft speed until the feature is turned off. This allowsyou to use any print enhancement with out canceling high-speed draftmode.
Character qualifyWhen DIP switch l-3 is on, the printer prints in near letterquality (NLQ) mode. When this DIP switch is off, it prints indraft mode.
This is NLQ printing.
T h i s i s n o r m a l d r a f t p r i n t i n g .
Character tableWhen DIP switch l-l is off and DIP switches l-4 through 1-8are set on and off in various combinations, you can select thecharacter tables available in the Epson ESC/P mode. WhenDIP switch l-l is on and DIP switches l-6 or l-8 are on or off,you can select character table settings in IBM emulation mode.See Appendix B for complete character tables.
Shape of zero
When DIP switch 2-l is on, the printer prints slashed zeros (0).When the DIP switch is off, the printer prints open zeros (0).This feature is useful for clearly distinguishing between anuppercase O and zero when printing documents such asprogram lists.
Using the Printer 3-15

input buffer
The printer’s input buffer provides additional memory to freeup the computer more quickly when you print large amountsof text or graphics. The input buffer is enabled when DIPswitch 2-2 is off. To disable the buffer, turn DIP switch 2-2 on.
Auto line feed
When DIP switch 2-3 is on, the printer adds a line feed (LF)command to every carriage return (CR) code sent by theapplication program software. When the switch is off, linefeeds occur only when the software sends line feed commandsto the printer. Since most computers and application programsautomatically add line feeds to carriage returns, you shoulduse this feature only if your text is printing all on one line.
Note:If you select auto line feed but your text still prints on one line, youneed to disable the AUTO FEED XT signal. See your Epson dealer forassistance.
Interface type/parityYou may need to change DIP switches 2-4, 2-5, and 2-6 so thatyour printer and computer can communicate properly. Thesethree DIP switches control the interface type and parity. (Youmay also need to select a different serial bit rate. See thefollowing section on serial bit rate.)
3-16 Using the Printer

Table B (shown earlier) has the DIP-switch settings for autointerface selection, parallel interfaces, and for serial interfaceswith odd or no parity. When the auto interface selection isselected, the printer determines which interface receives dataand then switches to that interface until the end of the printjob. (A print job ends when no data is received from theselected interface for the amount of time specified by the autointerface wait time setting.) If you don’t know what type ofinterface your computer requires, check your computermanual. Also check your computer manual to make sure yourcomputer and printer have the same parity setting.
Serial bit rateBesides selecting the interface and parity, if your computer isset up for serial communications you may also need to changethe serial bit (also known as baud) rate setting. The serial bitrate is the rate at which the printer receives data from thecomputer.
Table C (shown earlier) has the DIP-switch settings for theprinter’s four bit rate settings. Check your computer manual orapplication program for the correct serial bit rate setting. Yourcomputer and printer should always be set to the same bit rate.
Page lengthTo set page lengths other than those listed in Table D (shownearlier), see the printer commands in Appendix B. Be sure toset the page length to match the paper you plan to use.
Using the Printer 3-17

Skip-over-perforation
When DIP switch 3-3 is on, the printer inserts a one-inchmargin between the last line printed on one page and the firstline printed on the next page. By adjusting your top-of-formposition, you can get half the margin at the bottom of one pageand half at the top of the next page. See the section on adjustingthe top-of-form position in Chapter 2. Since most applicationprograms insert their own top and bottom margins, you shoulduse this feature only if your program does not provide them.
Paper memory, overlapping multi-part forms, multi-partforms with labels
By setting DIP switches 3-4 through 3-6, you can print onmulti-part forms that vary in thickness. See the section onusing the paper memory feature later in this chapter.
Skip over bindingWhen DIP switch 3-7 is on, the print head avoids the bindingarea along the right and left edges of multi-part forms duringpaper feeding, thus avoiding paper jams.
Automatic fear off
When DIP switch 3-8 is on, the printer automatically feeds thepaper to the printer’s tear-off edge. To adjust the tear-offposition, use the MICRO FEED buttons to align the paper’sperforation with the printer’s tear-off edge. See the section onadjusting the automatic tear-off position in Chapter 2.
3-18 Using the Printer

Using Automatic Interface Selection
Automatic interface selection lets you connect computers tomore than one interface at a time. The printer receives datafrom the interfaces on a first-come, first-serve basis. Once theprinter prints the data from one interface, it becomes idle after10 or 30 seconds, depending upon the DIP-switch setting. Thenthe printer receives and prints data from the first interface thatsends data.
Note:Do not use your built-in serial interface if you have installed anoptional serial interface card (C82305*/C82306*); the optional cardoverrides the built-in interface. If the DIP switch on the optional cardis set to disable, you can use the built-in serial interface.
Using the Paper Memory Feature
When you use multi-part forms that overlap, or forms withlabels on them, use the paper memory feature for better printquality. This feature achieves better print quality byautomatically adjusting the gap between the print head andthe platen based upon the type of paper set in memory.
Overlapping multi-part forms Multi-part forms with labels
Using the Printer 3-19

Note:The paper memory feature is available only with the front tractor.
Caution:When using overlapping multi-part forms, do not press theTEAR OFF, FRONT/REAR, TOP OF FORM orreverse-feeding (bottom) MICRO FEED button or a paper jammay result. To remove these forms, tear off the fresh supply at aperforation below front tractor and press the LF/FF buttonto eject the remainingforms.
Saving paper memory settings
This procedure requires setting several DIP switches. See thesection on changing DIP-switch settings earlier in this chapter.
1.
2.
3.
4.
Make sure the printer is turned off.
Turn DIP switch 3-4 off to save your settings for memorynumber 1 or on for memory number 2.
Select the page length by turning DIP switches 3-1 and 3-2on or off as shown below.
Page length SW 3-1 SW 3-2
11 inches OFF OFF
12 inches OFF ON
8.5 inches ON OFF
70/6 inches ON ON
Select the paper type by turning DIP switches 3-5 and 3-6 onor off as shown below.
3-20 Using the Printer

Page type SW 3-5 SW 3-6
Normal paper OFF OFF
Multi-part forms with labels OFF ON
Overlapping multi-part forms ON OFF
Overlapping multi-part forms with labels ON ON
5. For overlapping multi-part forms without a label, holddown both MICRO FEED buttons and turn on the printer.The printer saves the overlapping form information in thememory area you selected. When the information is saved,the printer beeps and is then ready to print. You have nowfinished all steps for saving information on overlappingmulti-part forms without a label.
For regular and overlapping multi-part forms with a label,hold down both MICRO FEED buttons and turn on theprinter. The printer beeps. Press the LF/FF/LOAD button toload the forms. The printer loads and checks the forms.When the check is finished, the printer beeps continuouslyuntil you open the top cover in the next step.
6. Open the printer cover.
7. Move the pointer (the point where the two lines intersect) tothe label’s upper left comer. Use the MICRO FEED buttonsto move the paper up or down and manually move theprint head left or right.
Using the Printer 3-21

8. Press the TOP OF FROM button.
9. Move the pointer to the label’s lower right comer. Use theMICRO FEED buttons to move the paper up or down andmanually move the print head left or right.
10. Press the TOP OF FORM button.
11. Close the printer cover.
12. If the printer beeps one or two times, the settings weresaved. If the printer beeps ten times, the settings were notsaved. In this case, turn off the printer and repeat steps 5through 11.
Loading paper memory settings
1. Make sure the printer is turned off.
2. To recall the memory 1 setting, hold down the top MICROFEED button while you turn on the printer. To recall thememory 2 setting, hold down the bottom MICRO FEEDbutton while you turn on the printer.
3-22 Using the Printer

Note:If you don’t want to use paper memory settings 1 or 2 for aparticular job, simply hold down the FRONT/REAR button whileyou turn on the printer.
A one-inch skip over perforation is automatically included foroverlapping multi-part forms.
Using the Printer 3-23

Chapter 4Using the Printer Options
Using the Pull Tractor . . . . . . . . . . . . . . . . . . . . . . . . 4-2Installing the pull tractor . . . . . . . . . . . . . . . . . . . . 4-2Using the pull tractor with the front tractor . . . . . . . . . 4-5Using the pull tractor with the rear tractor . . . . . . . . . . 4-9Removing the pull tractor . . . . . . . . . . . . . . . . . . . 4-12
Optional Interface Cards . . . . . . . . . . . . . . . . . . . . . . 4-14Installing an interface card . . . . . . . . . . . . . . . . . . . 4-15
Using the Printer Options 4-1

Using the Pull Tractor
The optional pull tractor (#8309) provides optimum continuouspaper handling. The pull tractor is especially useful withcontinuous multi-part forms and labels. When the pull tractor isinstalled, the tear-off feature is not available. For best results, usethe pull tractor with either the printer’s front or rear built-intractor, as described in this section.
Installing the pull tractor
To install the pull tractor, you need a cross-head screwdriver.
Note:If you are going to be using the pull tractor with the built-in rear tractor,you should load paper onto the rear tractor before installing the pulltractor. See the section on loading paper onto the rear tractor in Chapter2.
1. Turn off the printer and open the paper separator cover.
4-2 Using the Printer Options

2. Use the cross-head screwdriver to remove the two screwssecuring the paper separator to the printer. Then lift thepaper separator off the printer.
3. Using the two screws you just removed from the printer’soriginal paper separator, install the paper separator thatcomes with the pull tractor.
Using the Printer Options 4-3

4. Close the paper separator cover and open the printer' topcover.
5. Holding the pull tractor with its gears to the left, fit thetractor’s front notches over the mounting shaft of theprinter.
4-4 Using the Printer Options

6. Open the paper bail using the tab on its right side. Then tilt thepull tractor back until its rear latches click into place over theprinter’s rear mounting pins.
7. Gently close the paper bail (do not apply excess pressure), andthen close printer’s top cover.
Using the pull tractor with the front tractor
If you are using labels or multi-part forms with more than fourparts (including the original), you should use the pull tractor withthe printer’s built-in front tractor.
You can switch between the front and rear tractors at any timewhen you are using the pull tractor. Just press the FRONT/REARbutton and then use the LF/FF button to feed the paper theadditional distance to the pull tractor. (Labels require specialhandling. See the section on using labels in Chapter 2.)
Using the Printer Options 4-5

The tear-off feature does not work when the pull tractor isinstalled. To tear off documents, press the LF/FF button toadvance the paper to a point where it can be tom off.
1.
2.
3.
4.
Turn on the printer and open the top cover.
Make sure paper is loaded on the front tractor to thetop-of-form position. If paper is already on the tractor but itis in the standby position, press the FRONT/REAR or LF/FFbutton (depending on which tractor is selected) to load thepaper to the top-of-form position. If no paper is on the fronttractor at all, load paper as described in Chapter 1.
Once you have paper loaded on the printer’s front tractor,use the LF/FF button to advance the paper to the pulltractor.
Release both sprocket lock levers on the pull tractor bypulling them toward you. Then open both sprocket covers.
4-6 Using the Printer Options

5. Adjust the sprocket units to match the width of your paper.
6. Slide the two paper supports so they are spaced evenlybetween the two sprocket units.
Using the Printer Options 4-7

7. Fit the sprocket holes of the paper over the sprocket pins. Ifthere is slack in the paper or if the holes in the paper do notalign properly with the sprocket pins, pull up the paperslightly and use the pull tractor knob to adjust the position ofthe paper as shown below. Slide the knob to the right first, andthen turn it as necessary.
Caution:Be sure the sprocket units of the built-in front tractor and theoptional pull tractor are aligned.
8. Close the sprocket covers.
4-8 Using the Printer Options

9. Slide the sprocket units so that the paper is straight and smooth,and then lock them into place.
Caution:Be sure the sprocket units are not too far a part. If they pullyour paper too tightly or tear the edges of the paper holes, apaper jam may result. To remove any excess tension in yourpaper, release the right sprocket unit and lock if again.
10. Adjust the top-of-form position as described in Chapter 2, ifnecessary.
11. Close the top cover. Press the LF/FF button to feed the paperout the back of the printer. Make sure the edge of the firstsheet emerges below the paper separator.
Using the pull tractor with the rear tractor
If you are using labels or multi-part forms with more than fourparts (including the original), do not use the rear tractor; use thefront tractor as described in the previous section.
Using the Printer Options 4-9

You can switch between the front and rear tractors at any timewhen you are using the pull tractor. Just press theFRONT/REAR button and then use the LF/FF button to feed thepaper the additional distance to the pull tractor. (Labels requirespecial handling. See the section on using labels in Chapter 2.)
The tear-off feature does not work when the pull tractor isinstalled. To tear off documents, press the LF/FF button toadvance the paper to a point where it can be tom off.
The following steps show you how to load paper using theoptional pull tractor (already installed) with the printer’sbuilt-in rear tractor. If you have not yet installed the pulltractor, load paper onto the rear tractor and then install the pulltractor as described earlier in this chapter.
1. Open the top cover.
Note:If paper is on the rear tractor, in either the fop-of-form or standbyposition, skip to Step 6.
2. Pull the levers on the pull tractor toward you to release thepull tractor.
4-10 Using the Printer Options

3. Tilt the tractor forward so that its pins rest on the metal frameof the printer.
4. Load paper onto the rear tractor as described beginning onpage 2-4, steps 3 through 11.
5. Open the paper bail using the tab on its right side. Then tiltthe pull tractor back until the rear latches click into placeover the printer’s rear mounting pins.
Using the Printer Options 4-11

6. Turn on the printer, and use the LF/FF button to advance thepaper to the pull tractor.
Now follow steps 4 through 11 starting on page 4-6.
Removing the pull tractor
You’ll need a cross-head screwdriver and the paper separatorthat was originally installed on the printer.
1. Remove any paper installed on the tractor and turn off theprinter.
2. Open the top cover and locate the levers that lock the pulltractor in place on the printer. Pull these levers forward torelease the pull tractor. Then lift the tractor up and out ofthe printer.
4-12 Using the Printer Options

3. Close the printer’s top cover and open the paper separatorcover.
4. Using a cross-head screwdriver, remove the paper separatorthat came with the pull tractor.
5. Reinstall the original paper separator and close the paperseparator cover.
Using the Printer Options 4-13

Optional Interface Cards
You can use optional interface cards to supplement yourprinter’s built-in serial and parallel interfaces. If you don’tknow whether you need an optional interface or if you want toknow more about interfaces, contact your Epson dealer.
Note:Your printer has an auto interface selection feature that allows you toconnect to more than one interface at a time. See the section on usingautomatic interface selection in Chapter 3.
Coax and twinax interfaces enable the printer to communicatewith an IBM minicomputer or mainframe via coax or twinaxprotocol. This allows Epson printers to function as local IBMprinters without the addition of any other circuitry orcomponents.
The following Epson interfaces are compatible with yourprinter. Not all of these interfaces are available in all countries.
Number Name
C82305*/C82306* Serial interface card
C82307*/C82308* 32KB serial interface card
C82310* 32KB parallel interface card
C82312* Local Talk interface card
C82313* 32KB IEEE-488 interface card
C82314* Coax interface card
C82315* Twinax interface card
C82324* Ethernet interface card
* The digit varies by country.
4-24 Using the Printer Options

Installing an interface card
Note:If you install an optional interface curd, make sure your printer’s DIPswitches are set for parallel interface, even if you are installing a serialinterface card.
1. Turn off both your printer and your computer. Then removeall power and interface cables from the printer.
2. Turn your printer so that the rear cover faces you.
3. Open the printer’s rear cover.
4. Be sure to set any switches and jumpers on the card, asnecessary. See the interface cards manual for details. Makesure that you set jumper JG to on, or the card will notwork properly. (To set the jumper to on, cover both wiresof the terminal with the rectangular jumper plug.)
Using the Printer Options 4-15

5. Use a screwdriver to remove the screws securing the interfaceshield plate; remove the shield plate.
6. Slide the interface card into the grooves in the interface slot.Push it in firmly to make sure it connects to the printer’sinternal socket.
4-16 Using the Printer Options

7. Secure the interface with the screws provided with the card.
8. Plug the connector cable into the interface card as shown.
9. Plug the other end of the cable into your computer.
10. Close the interface cover.
11. Plug the power cord into your printer and an electricaloutlet.
Using the Printer Options 4-17
Chapter 5Troubleshooting and Maintenance
Error Indicators ................................................................................. 5-2
Problems and Solutions . . . . . . . . . . . . . . . . . . . . . . . 5-3The printer does not print . . . . . . . . . . . . . . . . . . . 5-3The printer stops printing . . . . . . . . . . . . . . . . . . . 5-4The printout is spaced incorrectly . . . . . . . . . . . . . . . 5-4The printout is faint or uneven . . . . . . . . . . . . . . . . 5-5The printout is not what you expect . . . . . . . . . . . . . 5-5Paper does not feed properly . . . . . . . . . . . . . . . . . 5-6
Hex Dump Mode . . . . . . . . . . . . . . . . . . . . . . . . . . 5-7
Maintaining the Printer . . . . . . . . . . . . . . . . . . . . . . . 5-8Cleaning the printer . . . . . . . . . . . . . . . . . . . . . . . 5-8Replacing the ribbon cartridge. . . . . . . . . . . . . . . . . 5-9Transporting the printer . . . . . . . . . . . . . . . . . . . . 5-11
Troubleshooting and Maintenance 5-1

Error Indicators
The printer’s beeps indicate a variety of status or errorsituations. If you hear beeps as shown below, you can resolvethe problem quickly.
Status
Paper out
Paper jam
Beep pattern
. . . . . . . . . . . . . . . . . . . .
. . . . . . . . . . . . . . . . . . . .
(The PAPER OUT lightflashes.)
Remedy
Load paper.
Remove jammedpaper and thenpress the PAUSEbutton.
Other papererrors
Load paper.Tear off any printedpage whenswitching thetractors.
Top cover open Close the topcover and pressthe PAUSE button.
Paper memory l ********* Redo the papersetting error memory setting.
Micro adjustment . . . . . . . . . . . . . . . . . . . . . , , , Stop pressing thelimit reached (continuous) MICRO FEED
button.
Other errors . . . . . .
. . . . . . . . .
. . . . .
. . . . . . . . . .
Turn off the printerand leave it about10 minutes, thenturn on the printeragain. If the erroroccurs again,
. . . . . . . . . . contact your
. . . . . . . . . . . . . . . . . . . . dealer.
. . . . Short intervall l Long interval
5-2 Troubleshooting and Maintenance

Problems and Solutions
The printer does not print
Make sure the printer is turned on and the POWER light is on.If the printer is turned on but the POWER light is not on, checkto see that the printer is fully plugged in and that the electricaloutlet is also turned on. If the electrical outlet is controlled byan outside switch or automatic timer, use a different outlet.
If the lights come on briefly but then go off and stay off, checkthat the printer’s voltage rating matches the voltage of your *electrical outlet. If the voltages do not match, unplug theprinter and contact your dealer immediately. Do not reconnectthe power cord to an electrical outlet.
Make sure the printer is connected securely to the computer.Check both ends of the cable between the printer and thecomputer.
Make sure that the PAUSE light is not lit. If it is lit, printing hasbeen temporarily suspended. Press the PAUSE button tocontinue.
Make sure the printer is not out of paper. The tractor arrow onthe PAPER SELECT indicator should be green.)
Make sure the correct tractor arrow is lit on the PAPER SELECTindicator. If the wrong tractor is selected, make sure paper isloaded in the standby position on the tractor you want to use,and then press the FRONT/REAR button to switch to thattractor. See the sections on loading paper in Chapter 2.
Make sure that all protective materials are removed. If not,turn off the printer, remove the protective materials, and turnthe printer back on. See the Notice Sheet that came inside theprinter for instructions on removing protective materials.
Troubleshooting and Maintenance 5-3

If the printer still does not print, disconnect the printer fromthe computer and try the self test described in Chapter 1. If theself test works properly, the printer is working and theproblem probably lies in the computer, the software, or thecable. If the self test does not work, contact your Epson dealer.
The printer stops printing
The printer may be out of paper. Check the paper supply.
The paper may be jammed. Remove the jammed paper andreload. Then press the PAUSE button. See the sections onloading paper in Chapter 2.
The ribbon may be jammed. This problem is usually caused bytoo much slack or a worn ribbon. See Chapter 1 to tighten theribbon or the section on replacing the ribbon later in thischapter.
The top cover may be open. If the top cover is opened duringprinting, the printer beeps four times and stops printing. Toresume printing, close the top cover and press the PAUSEbutton.
If the printer stops and the beeper sounds, turn the printer offand check for paper jams or other problems. Turn it back onand try to print again. If the printer beeps again and does notprint, take it to a qualified service person.
The printout is spaced incorrectly
If all the text is printed on the same line, no line feed commandis being sent at the end of each line of text. Turn DIP switch 2-3on.
If the printer is inserting extra blank lines between lines of text,extra line feed commands are being sent. Turn DIP switch 2-3Off.
5-4 Troubleshooting and Maintenance

If the printer inserts extra blank lines even when DIP switch2-3 is turned off, you need to disable the AUTO FEED XTsignal coming from your computer. See your Epson dealer forassistance.
The printout is faint or uneven
The ribbon may not be properly installed. See the section oninstalling the ribbon cartridge in Chapter 1.
The ribbon may be worn out. See the section on replacing theribbon cartridge later in this chapter.
The print head may be worn out. This is especially likely ifparts of printed characters are missing. Contact your dealer tohave the head replaced. Never attempt to replace the headyourself because other parts of the printer should be checked atthe same time.
The printout is not what you expect
The wrong character table may be selected. See the section onselecting character tables with DIP switches in Chapter 3. Youcan also select the character table using software commands.(See Appendix B.)
The printer may not be securely connected to the computer.Check both ends of the cable between the printer and thecomputer.
Your software’s font, page layout, printer port, or other printersettings may not be selected properly. Make sure yoursoftware is correctly set up for your printer and that youspecify continuous-feed paper as the type of paper.
Troubleshooting and Maintenance 5-5

If the printing is too high or low on the page, adjust it byfollowing the instructions in the sections in Chapter 2 onadjusting the top-of-form position and adjusting the printingposition.
Your application program may be overriding the DIP-switchsettings. See your software manual for more information onselecting the desired settings or for removing interfering codes.For more information on sending printer commands, seeAppendix B.
Make sure that the DIP switches are set correctly for use withthe built-in parallel or serial interface. See the section onDIP-switch settings for interface type, parity, and serial bit ratein Chapter 3.
If you are using an optional interface card, make sure that DIPswitches on the printer are set for parallel, regardless ofwhether the optional card is parallel or serial. See the sectionon DIP-switch settings for interface type in Chapter 3.
Paper does not feed properly
The paper may not be mounted on the sprockets correctly.Make sure the sprocket holes of the paper fit correctly over thesprockets.
Make sure the sprockets are positioned to match the width ofyour paper and that they are locked in place with their coversclosed.
Check the paper on the tractor’s sprockets to make sure it is notripped, jammed, or skewed. If something is wrong with thepaper, tear off the paper below the tractor and press the LF/FFbutton to eject the remaining paper. Then load fresh paper,making sure the first sheet has a clean, straight edge.
5-6 Troubleshooting and Maintenance

The paper supply may be too far from the printer, or notaligned with the front or rear tractor. Also, some obstacle maybe in the way of the paper or something may be on top of thepaper supply. If you use the rear tractor, make sure that yourprinted documents do not interfere with the rear paper supply.See Chapter 2 for instructions on the proper placement of thepaper supply.
If you are using labels, you must take extra paper handlingprecautions. See the section in Chapter 2 on using labels.
Hex Dump Mode
The printer has a special feature to make it easy forexperienced users to find the cause of communicationproblems between the printer and application programs. Inhex dump mode, all codes received by the printer are printed.
1. To enter hex dump mode, hold down both the LF/FF andTEAR OFF buttons while you turn on the printer.
2. Next, run a software program (even one you have written inany programming language) and send a print job to theprinter. Your printer prints all the codes it receives inhexadecimal format as shown in the sample below:
Data Dump Mode0000 1B 40 1B 52 00 1B 74 01 1B 36 12 1B 50 20 20 20 [email protected] 20 20 54 68 69 73 20 69 73 20 61 6E 20 65 76 61 This is an exa0002 6D 70 6C 65 20 6F 66 20 61 20 64 61 74 61 20 64 mple of a data d0003 75 6D 70 20 70 72 69 6E 74 6F 75 74 2E 20 54 68 ump printout. Th0004 69 73 20 69 73 20 66 65 61 74 75 72 65 20 6D 61 is is feature ma0005 6B 65 73 20 69 74 20 65 61 73 79 20 66 6F 72 20 kes it easy for
Troubleshooting and Maintenance 5-7

3. To turn off hex dump mode, press the PAUSE button andthen turn off the printer.
Look at the hex dump printout shown in Step 2. By comparingthe characters printed in the right column with the printout ofthe hexadecimal codes, you can check the codes being sent tothe printer. If characters are printable, they appear in the rightcolumn as ASCII characters. Nonprintable codes, such ascontrol codes, are represented by dots.
As an example of how to interpret a hex dump printout, look atthe first five hex codes on the first line of the printout sample(1B 40 1B 55 31). Each hex 1B represents the ESC code, 40represents @, 55 represents U, and 31 represents the numeral 1.Check the first line of the right column and you will find a dot,an @ sign, another dot, a U, and a 1. If you look in Appendix B,you will see that these are the commands to initialize theprinter and turn on unidirectional mode.
Maintaining the Printer
Cleaning the printer
To keep your printer operating at its best, you should clean itthoroughly several times a year.
If you have installed the optional pull tractor, remove it beforecleaning the printer.
1. Turn off the printer and close all of its covers.
2. Using a soft brush, carefully remove all dust and dirt.
5-8 Troubleshooting and Maintenance

3. If the outer case is dirty or dusty, clean it with a soft, cleancloth dampened with mild detergent dissolved in water.Keep all of the covers closed to prevent water from gettinginside the printer.
Caution:Never use alcohols or thinners to clean the printer. Thesechemicals can damage the printer components as well asthe case.
Be careful not to get water on the printer mechanism orelectronic components.
Do not use a hard or abrasive brush.
Do not spray the inside of the printer with lubricants.Unsuitable oils can damage the mechanism. Contact yourEpson dealer if you think lubrication is needed.
Replacing the ribbon cartridge
When your printing becomes too faint, you need to replace theribbon. Use the #8766 Epson replacement cartridge only.
Warning:If the printer has been used recently, the print head may be hot.Let if cool before attempting to replace the ribbon.
1. Press the PAUSE button. Then turn off the printer.
2. Open the printer’s top cover and slide the print head to theexposed part of the paper bail.
Troubleshooting and Maintenance 5-9

3. Lift the ribbon guide off the print head as shown below.
4. Pull up on the side of the ribbon cartridge as shown belowto release it from the printer’s mounting pins. Remove thecartridge by lifting it up and away from you.
5-10 Troubleshooting and Maintenance

Caution:Make sure you don’t pull on the flat gold cable beneath theribbon cartridge.
Follow steps 2 through 8 in “Installing the Ribbon Cartridge,”in Chapter 1.
Transporting the printer
If you need to transport your printer some distance, carefullyreplace it using the original box and packing materials asfollows.
Warning:Even when you need to carry the printer only a short distance,do not carry it by yourself. The printer should always becarried by two people holding the printer at the bottom.
1. Turn off the printer and remove any paper loaded in theprinter. If any printer options are installed, remove them.
2. Unplug the power cord from the electric outlet and the backof the printer. Disconnect the interface cable from theprinter.
3. Remove the ribbon cartridge.
4. Install the protective materials onto the printer.
Troubleshooting and Maintenance 5-11

Appendix ATechnical Specifications
Printer Specifications . . . . . . . . . . . . . . . . . . . . . . . . A-2Printing . . . . . . . . . . . . . . . . . . . . . . . . . . . . . . . . . . . . . . . . . . . . . . . . . . . . . . . . . . . . . . . . . . . . . . . . . . . . . . . . . . A-2Paper . . . . . . . . . . . . . . . . . . . . . . . . . . . . . . . . . . . . . . . . . . . . . . . . . . . . . . . . . . . . . . . . . . . . . .
MechanicalA-3A-9. . . . . . . . . . . . . . . . . . . . . . . . . . . . . . . . . . . . . . . . . . . . . . . . . . . . . . . . . . . .
Electrical . . . . . . . . . . . . . . . . . . . . . . . . . . . . . A-10Environmental . . . . . . . . . . . . . . . . . . . . . . . . . . A-10Safety approvals . . . . . . . . . . . . . . . . . . . . . . . . . . A-10
Interface Specifications A-11. . . . . . . . . . . . . . . . . . . . . . . . . . . . . . . . . . . . . . . . . . . . . . . . . . . . . . . . . . . . . . . . .
Parallel interface . . . . . . . . . . . . . . . . . . . . . . . . . . . . . . . . . . . . . . . . . . . . . . . . A-11Serial interface . . . . . . . . . . . . . . . . . . . . . . . . . . A-13Optional interfaces . . . . . . . . . . . . . . . . . . . . . . . A-14
Initialization . . . . . . . . . . . . . . . . . . . . . . . . . . . . . A-14Top-of-form reset . . . . . . . . . . . . . . . . . . . . . . . . A-15
Technical Specifications A-1

Printer Specifications
Printing
Printing method:
Printing speed:
9-pin impact dot matrix
Pitch Quality Characters/second/line
1 0 High-speed draft 560
10 Normal draft 420
10 Near letter quality 84
1 2 Draft I 504 I
1 2 Near letter quality 101
Printing direction: Bidirectional logic seeking for text printing.Unidirectional for graphics (can also beswitched to bidirectional by using theproper software command).
Line spacing: l/6-inch, 1/8-inch, or programmableincrements of l/216-inch
Paper feed speed:
ContinuouslyIntermittently
Approx. 17 ms/line (10 inches per second)Approx. 26 ms/line
Note: Feeding speed reduces to 6 inches per second when the optional pull tractoris mounted.
Printable columns:
Pitch Maximum printed characters
10 pitch 136
12 pitch 163
17 pitch 233
Buffer: 20KB or 0KB (DIP-switch selectable)
A-2 Technical Specifications

Character fonts:
Font Available pitches (cpi)
Epson high-speed draft 10
Epson draft 10, 12, 15*, 17
Epson Roman (NLQ) 10, 12, 15*, 17
Epson Sons Serif (NLQ) 10, 12, 15*, 17
*The 15 cpi pitch is available only by sending software commands.
Character tables:
EuropeOther countries
Character sets:
Paper
Continuous paper:
Printable area
One italic and 20 graphics character tablesOne italic and 8 graphics character tables
13 international character sets
Technical Specifications A-3

Number of copiesFront 6 sheets (1 original + 5 copies)Rear 4 sheets (1 original + 3 copies)
Note: The number of copies are for carbonless sheets.
Total thicknessFrontRear
WeightSingleMulti-part
0.46 mm (0.018 inches) maximum0.30 mm (0.012 inches) maximum
45 to 70 kg (14 to 22 lb)35 to 48 kg (11 to 15 lb) x n (n 8) and withinthe total thickness
Labels:
Printable area
printable area (inside each label)
Size
Backing sheetWidthLength
63.5 mm W x 23.8 mm H(2% inches W x 15/16 inches H)101 mm W x 23.8 mm H(4 inches W x 15/ 16 inches H)101 mm W x 26.99 mm H(4 inches W x 17/ 16 inches H)
101 to 406 mm (4 to 16 inches)88.9 mm (3.5 inches) minimum
A-4 Technical Specifications

Total thickness 0.19 mm (0.0075 inches) maximumThe difference in thickness must be less than0.12 mm (0.0047 inches).
Overlapping multi-part forms:
Printable area
Quality
Paper path
Width
Copy capabilityFront
Overlap length
Total thicknessPrint areaOverlap
WeightMulti-part
Backing sheet
Plain paper
Front only
101 to 406 mm (4 to 16 inches)
5 sheets ( 1 original + 4 copies)
10 mm (0.394 inches) maximum
0.46 mm (0.018 inches) maximum0.71 mm (0.028 inches) maximum includingthe backing sheet
35 to 48 kg (11 to 15 lb) within the totalthickness45 to 70 kg (14 to 22 lb)
Technical Specifications A-5
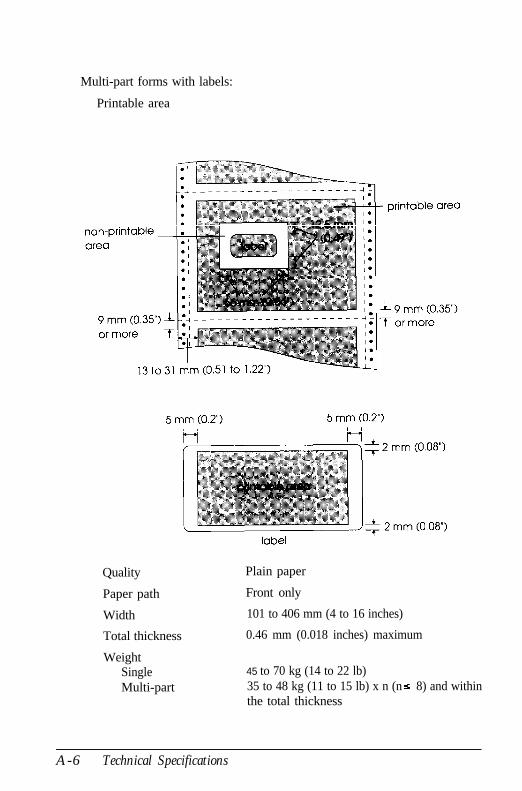
Multi-part forms with labels:
Printable area
Quality
Paper path
Width
Total thickness
WeightSingleMulti-part
Plain paper
Front only
101 to 406 mm (4 to 16 inches)
0.46 mm (0.018 inches) maximum
45 to 70 kg (14 to 22 lb)35 to 48 kg (11 to 15 lb) x n (n 8) and withinthe total thickness
A-6 Technical Specifications

Paper requirements:
General
The sprocket hole must be a circle ornotched circle.
The holes must be cleanly cut.
The perforation between pages shouldnot extend all the way to the edges ofthe paper, as shown below.
The edges of paper are not perforated.
At the perforation between pages, thehorizontal and vertical perforation cutsshould not cross, as shown here.
The ratio of the cut/uncut length at theperforation should be less than 5:1.
Expansion at the perforation (when thepaper is kept flat) should be less than1 mm (0.04 inches).
Technical Specifications A-7

Multi-part forms
It is best to use pressure-sensitivemulti-part forms.
The form sheets should be securelyjoined together along the left and rightedges by crimping, spot-gluing, or tapestitching. For the best printing quality,use multi-part forms joined withspot-gluing. Never use multi-part formsjoined with metalstaples.
Crimping should be pressed in from theoriginal sheet side and go completelythrough all copy sheets. Also, crimpingshould be double-sided; usingsingle-sided crimping may cause theprinter to jam.
top view
double-sided crimping
top view
single-sided crimping
For multi-part forms joined withspot-gluing, be sure the spots of glue arespaced the same way on the left andright edges of the paper.
The binding area should be flat andhave no creases.
Overlapping multi-part forms should bejoined together at the top of the pagesand not along the sides of the pages.
The sprocket holes of all sheets in theform should be aligned properly.
The binding position should be outsidethe printable area.
A-8 Technical Specifications

Labels
Labels should be securely attached tothe backing sheet.
The backing sheet should be coveredwith the label material, both in the labelarea and in the spaces between labels.(The backing sheet should not beexposed.)
The corners of the labels should berounded.
The label surface should be flat.
Mechanical
Paper feed methods: Push tractor (front and rear)Push-pull feed with optional pull tractor
Ribbon: Cartridge ribbon, available in black only(#8766). Do not use ribbons for 24-pinprinters. Life expectancy is 15 millioncharacters (at 14 dots/character).
MTBF: 8000 power-on hours (25% duty)Running the printer continuously forextended periods of time is notrecommended. It can cause the printer towear out sooner than expected.
Print head life: 300 million characters at 14 dots percharacter
Dimensions and weight: Height: 369 mm (14.5 inches)Width: 700 mm (27.6 inches)Depth: 382 mm (15.0 inches)Weight: 29 kg (approx. 64 lb)
Technical Specifications A-9

Electrical
120 V model:
Rated voltageInput voltage rangeRated frequency rangeInput frequency rangeRated currentPower consumption
220-240 V model:
Rated voltageInput voltage rangeRated frequency rangeInput frequency rangeRated currentPower consumption
Environmental
Temperature:
Humidity:
AC 120 VAC 103.5 to 132 V50to60Hz49.5 to 60.5 Hz5.0 AApprox. 115 W (during self-test printingin draft mode at 10 cpi)
AC 220 to 240 VAC 198 to 264 V50 to 60 Hz49.5 to 60.5 Hz3.0 AApprox. 110 W (during self-test printingin draft mode at 10 cpi)
Operation: 5°C to 35°C (41°F to 95°F)Storage: -30°C to 65°C (22°F to 150’F)
Operation: 10% to 80% RH withoutcondensation
Storage: 5% to 85% RH withoutcondensation
Safety approvals
Safety standards:
US model:European model:
R.F.I.:
UL1950 with D3, CSA22.2 #950 with D3EN 60950 (TUV, SEMKO, DEMKO,NEMKO, SETI)
US model:European model:
FCC Part 15 Subpart B class BVfg. 243 (VDE 0878 part 3)CISPR Pub 22 class B
A-10 Technical Specifications

lnferface Specifications
This printer is equipped with both a parallel and a serial interface.
Parallel interface
Connector pin assignments and a description of their respective interfacesignals are shown in the table on the following pages.
Signal ReturnPin Pin Signal Direction Description
1 19 STROBE IN STROBE pulse to read data.Pulse width must be morethan 0.5 µs at the receivingterminal.
2 20 DATA 1 IN These signals represent3 21 DATA 2 IN Information in bits 1 to 8 of4 22 DATA 3 IN parallel data respectively.5 23 DATA 4 IN Each signal is at HIGH level6 24 DATA 5 IN when data is logical 1 and7 25 DATA 6 IN LOW when it is logical 0.8 26 DATA 7 IN9 27 DATA 8 IN
10 28 ACKNLG OUT About an 11- µs pulse. LOWindicates that data has beenreceived and that the printeris ready to accept moredata.
11 29 BUSY OUT A HIGH signal indicates theprinter cannot receive data.The signal goes HIGH in thefollowing cases:1) During data entry (for each
character)2) During printing3) When the PAUSE button is
pressed
12 30
13 -
PE
SLCT
OUT
OUT
4) During an error state
A HIGH signal indicates thatthe printer is out of paper.
Always HIGH
Technical Specifications A-11

Signal ReturnPin Pin Signal Direction Description
14 AUTO IN When this signal is LOW, theFEED paper is automatically fed
XT one line after printing.15 NC Not used
16 O V Logic ground level
17 FG Printer's chassis ground,which is isolated from thelogic ground
18 +5V Pulled up to +5V through3.3 resistance.
19-30 GND Twisted-pair return signalground level
31 INIT IN When this level becomesLOW, the printer controller isreset to its state when thepower is first turned on andthe print buffer is cleared.This level is normally HIGH; itspulse width must be morethan 50 at the receivingterminal.
32 ERROR OUT This level becomes LOWwhen the printer is:1) In a paper-out or a paper
jam state2) When the PAUSE button is
pressed3) In an error state
33 GND Signal ground3 4 N C Not used
35 +5V OUT Pulled up to +5V through3.3 resistance
36 SLCTIN IN The DC1/DC3 codes are
valid only after this signal isHIGH when the printer isturned on.
A-12 Technical Specifications

NoteAll interface conditions are based on TTL level. Both the rise and fall of eachsignal must be less than 0.2 microseconds.
Data transfer must be carried out by observing the ACKNLG or BUSYsignal. (Data transfer to this printer can be carried out only after the receiptof the ACKNLG signal or when the level of the BUSY signal is LOW.)
The column heading “Direction” refers to the direction of the signal flow asviewed from the printer.
“Return” denotes the twisted-pair return to be connected at signal groundlevel. For the interface wiring, be sure to use a twisted-pair cable for eachsignal and to complete the connection on the return side.
Serial interface
The DFX-5000+ built-in serial interface is an RS-232C asynchronousinterface with the following characteristics.
Data format: 1 start bitData word length: 8 bitsOdd, even, or no parity1 or more stop bit
Signal level: Mark logical “1” (-3 V to -27 V)Space logical “0” (+3 V to +27 V)
Handshaking: Handshaking by DTR signal or Xon/Xoff.
Bit rate: 300, 12OO, 9600, 19200 bps
Connector plug: EIA 25-pin connector
Technical Specifications A-13

Connector pin assignments and a description of their respective interfacesignals are shown in the table below.
Signal pin1
2
3
4 - 6
7
8-10
11, 20
12-19
21-25
Signal Direction Description
FG Chassis around
TXD OUT Transmits data forXON/XOFF
RXD IN Receives data
NC Not connected
SG Signal ground
NC
DTR OUT
Not connected
Indicates whether or notthe printer is ready toreceive input data. If datainput is not ready, DTR =“MARK”.
NC
NC
Not connected
Not connected
The column heading “Direction” refers to the direction of signal flowfrom the printer.
Optional interfaces
The interface cards that may be used with this printer are listed onpage 4-14.
A-14 Technical Specifications

Initialization
There are three ways that the printer can be initialized (returned to a fixedset of conditions) as listed in the table below.
These three kinds of initialization have slightly different effects. All threemethods reset the typestyle according to the default settings selected bythe DIP switches inside the front cover. However, ESC @ does notinitialize the printer mechanism, clear the input data buffer, or clear theuser-defined character set.
Top-of-form reset
The top-of-form (TOF) position is reset by:
Printer initialization
ESC/P software reset command (ESC @)
Page length set command (ESC C)
IBM mode top-of-form setting command (ESC4).
Technical Specifications A-15

Appendix BPrinter Commands and CharacterTables
Sending Printer Commands . . . . . . . . . . . . . . . . . . . . . . . . . . . B- 2
Using the Command Summary . . . . . . . . . . . . . . . . . . . . . . .B-2
Epson ESC/P Commands Arranged by Topic . . . . . . . . . . B-3
IBM Emulation Mode Commands Arranged by Topic . . . . . B-9Commands that duplicate Epson ESC/P commands . . . . B-10Commands that differ from Epson ESC/P commands . . . B-11
Character Tables . . . . . . . . . . . . . . . . . . . . . . . . . . . B-14
Printer Commands and Character Tables B-1

Sending Printer Commands
Most actions your printer performs are handled by your software.Software commands instruct the printer to print in a particular typeface,feed the paper a certain amount after printing each line, start printing aparticular place on the page, and so on.
Some software programs let you send these commands yourself. Thecommands your printer recognizes are listed in this command summary
How you format commands depends on the software you are using.Some software programs accept only the decimal format, while others letyou type in ASCII characters. (Some programs don’t let you insert printercommands at all.) In addition, your software probably specifies certainpunctuation you must use to enter the command. If your software allowsyou to send commands to the printer, the software manual shouldexplain exactly what format and punctuation are required.
Using the Command Summary
The following section lists and describes all the commands by topic. If acommand has no parameters, it is merely listed. If it has parameters, theyare explained. The parameters are indicated by lowercase italicizedletters, usually n. The examples below show how the parameters areindicated.
ESC @ is a command with no parameters.
ESC U 1/0 is a command that uses 1 to turn the feature on and 0 to turn itoff.
ESC $ n1 n2 is a command with two parameters.
ESC D nn is a command with a variable number of parameters.
B - 2 Printer Commands and Character Tables

Epson ESC/P Commands Arranged by Topic
Printer operation:ASCII Dec. Hex. Description
ESC @
DC1
DC3
ESC <
ESC U 1/0
ESC =
ESC >
ESC #
BEL
Data control:
64 40 Initialize Printer
17 11 Select Printer
19 13 Deselect Printer
60 3C Select Unidirectional Mode (one line)
85 55 Turn Unidirectional Mode On/ Off
61 3D Set MSB to 0
62 3E Set MSB to 1
35 23 Cancel MSB Control
7 07 Beeper
ASCII Dec. Hex. Description
CR 13 OD Carriage Return
CAN 24 18 Cancel Line
DEL 127 7F Delete Character
Vertical motion:ASCII Dec. Hex. Description
FF 12 0C Form Feed
ESC Cn 67 43 Set Page Length in Linesn = Number of lines
ESC C 0 n 67 43 Set Page Length in Inchesn = Number of lines
ESCNn 78 4E Set Ship-Over-Perforationn = Number of lines
ESC O 79 4F Cancel Skip-Over-Perforation
Printer Commands and Character Tables B-3

ASCII
LF
ESC 0
ESC 1
ESC 2
ESC 3 n
ESC A n
ESC J n
VT
ESC B nn
Dec. H e x .
10 0A
48 30
49 31
50 32
51 33
65 41
74 4A
11 O B
66 42
ESCbcnn 98
ESC / c 47
Horizontal motion:ASCII Dec.
ESC l n 108
ESC Q n 81
BS 8
ESC $ nl n2 36
ESC \ nl n2 92
62
2F
H e x . Description
6C Set Left Margin
51
08 Backspace
24 Set Absolute Horizontal Print Positionn = (nl + n2 x 256)/60 inchesn: Specifies print position as n/60inches from left margin
Set Relative Horizontal Print Positionn = (nl t n2 x 256)/120 inchesn: Moves current print position byn/120 inches. If displacement is tothe left, subtract it from 65536.
5C
Description
Line Feed
Select l/&inch Line Spacing
Select 7/72-inch Line Spacing
Select l/6-inch Line Spacing
Set n/216-inch Line Spacing
Select n/72-inch Line Spacing
Perform n/216-inch Line Feed
Tab Vertically
Set Vertical TabsUp to 16 tabs entered in ascendingorder; last n should be 0
Set Vertical Tabs in ChannelsSame as ESC B, except that c selects achannel for the vertical tabs, whichmust be between O-7.
Select Vertical Tab Channel
n = Left margin column
Set Right Marginn = Right margin column
B-4 Printer Commands and Character Tables

ASCII
H T
ESC D nn
Dec. Hex.
9 09
68 44
Overall printing style:ASCII Dec. Hex.
ESC x n 120
ESC k n 107
ESC ! n 33
ESC P
ESC M
ESC g
ESC p 1/0
SI
ESC SI
DC2
SO
ESC SO
DC4
ESC W l/O
80 50
77 4D
103 67
112 70
15 OF
15 OF
18 12
14 0E
14 0E
20 14
87 57
78
6B
21
Description
Tab Horizontally
Set Horizontal TabsUp to 32 tabs entered in ascendingorder; last n should be 0
Description
Select NLQ or Draftn = 0: Draft
1: NLQ
Select NLQ Fontn = 0: Roman
1: Sans Serif
Master SelectTo find the value of n, add togetherthe numbers of the typestyles youwant to combine from the list below:n=0: 10 cpi 16: Double-strike1: 12 cpi 32: Double-width2: Proportional 64: Italic4: Condensed 128: Underline8: Emphasized
Select 10 cpi
Select 12 cpi
Select 15 cpi
Turn Proportional Mode On/Off
Select Condensed Mode
Select Condensed Mode
Cancel Condensed Mode
Select Double-Width Mode (one line)
Select Double-Width Mode (one line)
Cancel Double-Width Mode (one line)
Turn Double-Width Mode On/Off
Printer Commands and Character Tables B-5

Print enhancement:ASCII Dec. Hex. Description
ESC E 69 45 Select Emphasized Font
ESC F 70 46 Cancel Emphasized Font
ESC G 71 47 Select Double-Strike Mode
ESC H 72 48 Cancel Double-Strike Mode
ESC S0 83 53 Select Superscript Mode
ESC S1 83 53 Select Subscript Mode
ESC T 84 54 Cancel Superscript/Subscript Mode
ESC 4 52 34 Select Italic Mode
ESC 5 53 35 Cancel Italic Mode
ESC - 1/0 45 2D Turn Underline On/Off
Word processing:ASCII
ESC an
Dec. Hex. Description
97 61 NLQ Justificationn = 0: Left justification
1: Centering2: Right justification3: Full justification
ESC SP 32 20 Set Intercharacter Spacen = 1/120-inch space (O-127) added orright side of each character
Character tables:ASCII
ESC t n
Dec. Hex. Description
116 74 Select Character TablesSelects character table n assigned byESC(tn = 0, 1, 48, 49 only
B-6 Printer Commands and Character Tables

ASCIIESC(t nn
Dec. Hex. Description
40116 2874 Assign Character TableESC (t 30 d1 d2 d3Assign character table set with d2 andd3 to table d1dl = 0, 1, 48, or 49d2 d3 Character Table0 0 Italic1 0 PC 437 (USA)1 16 PC 437 Greek (Greek)*3 0 PC 850 (Multilingual)5 0 PC 853 (Turkish)*6 0 PC 855 (Cyrillic)*7 0 PC 860 (Portuguese)8 0 PC 863 (Canadian-French)9 0 PC 865 (Nordic)10 0 PC 852 (East Europe)*11 0 PC857 (Turkish)*14 0 PC 866 (Russia)*15 0 PC 869 (Greek)*24 0 PC 861 (Icelandic)25 0 BRASCII (Brazilian Portuguese)26 0 Abicomp (Brazilian Portuguese)27 0 MAZOWIA (Poland)*28 0 Code MJK (CSFR)*29 7 ISO-8859-7 (Latin/Greek)*31 0 IS0 Latin 1T (Turkish)*32 0 Bulgaria (Bulgaria)** Available in European version only
ESC Rn 82 52 Select an International Character Setn= 0: USA 7: Spain I
1: France 8: Japan2: Germany 9: Norway3: UK 10: Denmark II4: Denmark I 11: Spain II5: Sweden 12: Latin America6: Italy
ESC 6
ESC 7
54 36 Printable Code Area Expansion
55 37 Enable Upper Control Codes
Printer Commands and Character Tables B - 7

User-defined characters:ASCII Dec. Hex. Description
ESC & nn 38 26
ESC: 0 n 0 58 3A
ESC % n 37 25
ESC I 73 49
Define User-Defined CharactersESC & 0n1 n2 a1 ddn1 = Code for first charactern2 = Code for last characteral = Use top (128) or bottom (0) 8 pins
of print headdd = In draft mode, 1 byte is required
for each of the 11 columns of eachcharacter being defined. In NLQmode, 3 bytes area required foreach of the 11 columns of eachcharacter being defined.
Copy ROM to RAMn = 0: Roman
1: Sans Serif
Select User-Defined Setn = 0: Normal set
1: User-defined set
Printable Code Area ExpansionCodes 0 to 31 and 128 to 159 decimaln = 0: Non-printable codes
1: Printable codes for userdefinedcharacters
Graphics:ASCII Dec. Hex. Description
ESC K n1 n2 75 4B Select Single-Density Graphics ModeTotal columns = n1 + (n2 x 256)
ESC L n1 n2 76 4C Select Double-Density Graphics ModeTotal columns = n1 + (n2 x 256)
ESC Y n1 n2 89 59 Select High-Speed Double-DensityGraphics ModeTotal columns = n1 + (n2 x 256)
B - 8 Printer Commands and Character Tables

ASCII
ESC Z n1 n2Dec. Hex. Description
90 5A Select Quadruple-Density GraphicsModeTotal columns = n1 + (n2 x 256)
ESC* m n1 n2 42 2A Select Graphics ModeTotal columns = n1 + (n2 x 256)
Alternate Horiz. densityOption c o d e m (dots/in.)
Single-density ESC k 0 60
Double-density ESC L 1 120
High-speed double-density* ESC Y 2 120
Quadruple-density* ESC Z 3 240
CTR I none 4 80
Plotter (1:1) n o n e 5 72
CRT II n o n e 6 90
Double-density plotter none 7 144
* Adjacent dots cannot be printed in this mode.
ESC? sn 63 3F Reassign Graphics Modes is the character (K, L, or Z) to bereassigned to mode n (O-6)
ESC ˆ m n1 n2 94 5E Select 9-Pin Graphics Modem: Print density (0 for single, 1 fordouble)Total columns = n1 + (n2 x 256)
IBM Emulation Mode Commands Arranged byTopic
This section lists and describes the commands available in IBMProPrinter II emulation mode. Commands that are the same in IBMemulation and Epson ESC/P mode are listed here and described in theEpson ESC/P command section. Commands that have different functionsin IBM emulation mode are described here.
Printer Commands and Character Tables B - 9
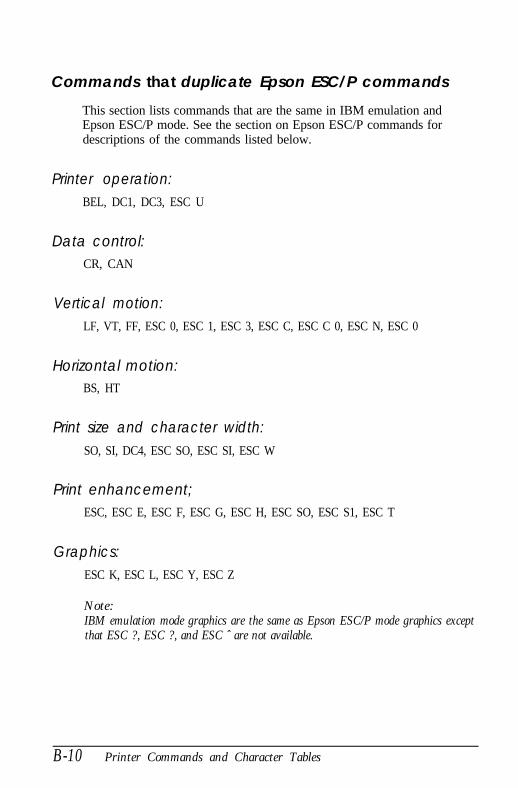
Commands that duplicate Epson ESC/P commands
This section lists commands that are the same in IBM emulation andEpson ESC/P mode. See the section on Epson ESC/P commands fordescriptions of the commands listed below.
Printer operation:BEL, DC1, DC3, ESC U
Data control:CR, CAN
Vertical motion:LF, VT, FF, ESC 0, ESC 1, ESC 3, ESC C, ESC C 0, ESC N, ESC 0
Horizontal motion:BS, HT
Print size and character width:SO, SI, DC4, ESC SO, ESC SI, ESC W
Print enhancement;ESC, ESC E, ESC F, ESC G, ESC H, ESC SO, ESC S1, ESC T
Graphics:ESC K, ESC L, ESC Y, ESC Z
Note:IBM emulation mode graphics are the same as Epson ESC/P mode graphics exceptthat ESC ?, ESC ?, and ESC ˆ are not available.
B-10 Printer Commands and Character Tables

Commands that differ from Epson ESC/P commands
Printer operation:ASCII Dec. Hex. Description
ESC Q 22 81 22 51 16 Deselect Printer
Vertical motion:ASCII Dec. Hex. Description
ESC 2 50 32
ESC 4 52 34
ESC 5n 53 35
ESC A n 65 41
ESC J n 74 4A
ESC B nn 66 42
Select Programmable Line Spacing
Set Top-of-Form
Turn Automatic Line Feed On/Offn = 1: Mode is turned on.
0: Mode is turned off.
Set n/72-inch Line Spacingn must be from 1 to 85.
Perform n/216-inch Line Feedn must be from 0 to 255.
Set Vertical TabsESC B n1 n2 . . . 0Sets up to 64 vertical tabs.1 to 255, in ascending order.Terminated by 0.
Horizontal motion:ASCII
ESC D nnDec. Hex. Description
68 44 Set Horizontal TabsESC D n1 n2 . . . 0Sets up to 28 horizontal tabs.1 to 137 terminated by 0.
ESC R 82 52
ESC X nn 88 58
Restore Default Tab Settings
Set Left and Right MarginsESC X n1 n2n1 = left marginn2 = right margin
Printer Commands and Character Tables B-11

Overall printing style:ASCII
ESC I n
Dec. Hex. Description
73 49 Select Fontn = 0: Draft 10 cpi font
1: Draft 12 cpi font2: NLQ Sans Serif font3: NLQ Roman font4: Draft 10 cpi user-defined font5: Draft 12 cpi userdefined font6: NLQ 10 cpi user-defined font(resident Sans Serif font forundefined characters)7: NLQ 10 cpi user-defined font(resident Roman font forundefined characters)11: NLQ Roman 10 cpi italic
Print size and character width:In IBM emulation mode, four modes are incompatible with each other.These modes are 10 cpi, 12 cpi, condensed, and proportional. If you selectany one of these, you cancel all the others.
ASCII Dec. Hex. Description
DC2 18 12 Select 10 cpi
ESC: 58 3A Select 12 cpi
ESC P n 80 50 Turn Proportional Mode On/Offn = 1: Mode is turned on.
0: Mode is turned off.
B-12 Printer Commands and Character Tables

ASCII
ESC [@ nnDec. Hex. Description
91 64 5B 40 Set Double-Height/Double-WidthPrintingESC [@ n1 n2 m1 m2 m3 m4n1 = 4n2 = 0ml = 0m2 = 0m3 affects character height and linefeeds as shown below:
m3 Character height Line feed
1 Standard2 Double-height16 Unchanged17 Standard18 Double-height32 Unchanged3 3 Standard3 4 Double-height
UnchangedUnchangedSingleSingleSingleDoubleDoubleDouble
m4 sets the character width.1: Standard2: Double-width
Print enhancement:ASCII
ESC_n
Dec. Hex. Description
95 5F Turn Overscoring Mode On/Offn = 1: Mode is turned on.
0: Mode is turned off.
Character tables:ASCII Dec. Hex. Description
ESC 6 54 36 Select International Character Set
ESC 7 55 37 Select Standard Character Set
ESC \nn 92 5C Print Characters from Symbol SetESC \ n1 n2 datanl + (n2 x 256)
ESC ˆ 94 5E Print One Character from Symbol Set
Printer Commands and Character Tables B-13

User-defined characters:ASCII
ESC = nnDec. Hex. Description
61 3D Define User-Defined CharactersESC = n1 n2 . . . nkIf C is the total number of charactersto be definedB = (C x 13) +2n1 = MOD(B/256)n2 = INT(B/256)n3 = 20 in all casesn4 = the code of the first character tobe definedn5 = 0 if the top 8 pins are used;n5 = 128 for the bottom 8 pinsn6 = 0 in all casesThe values n7 through nk are the datanumbers that define the characters,with 11 data numbers for eachcharacter.
Character Tables
These character tables are selected with the DIP switches or by using asoftware command.
All tables except the italic character table are the same as the PC437 tablefor hex codes 00 through 7F, so only the PC437 and italic tables are showncompletely. The rest of the tables show only the characters for hex codes80 through FF.
The tables with * after the table name are available in the Europeanversion only.
B-14 Printer Commands and Character Tables

PC437 (USA, standard Europe)
PC850 (Multilingual) PC860 (Portuguese)
Printer Commands and Character Tables B-15

( C a n a d i a n - F r e n c h ) PC868 (Norwegian)
PC861 (Icelandic) BRASCII (Brazilian Portuguese)
B-16 Printer Commands and Character Tables

Abicomp (Brazilian Portuguese) PC437 Greek (Greek)*
PC869 (Greek)* ISO 8859-7 (Latin/Greek)*
Printer Commands and Character Tables B-17

PC853 (Turkish)* PC857 (Turkish)*
ISO Latin 1T (Turkish)* PC855 (Cyrillic) *
B-18 Printer Commands and Character Tables

PC866 (Russian) * PC852 (East Europe)*
MAZOWIA (Poland)* Code MJK (CSFR)*
Printer Commands and Character Tables B-19

Bulgaria (Bulgaria)*
Italic
No character isavailable for hexcode 15 in the italiccharacter table.
B-20 Printer Commands and Character Tables

International character setsYou can select one of the following international character sets with theDIP switches or by sending the ESC R command. For example, when youselect “Italic France,” the characters in the “France” row on the tablebelow are used in the italic character table.
The first eight international character sets can be selected with the DIPswitches or with the ESC R command. The last five sets are available onlywhen you send the ESC R command. The value of n is used for the ESC Rcommand.
Character tables in the IBM emulation modeThis section lists the character tables available in the IBM emulationmode. The IBM emulation mode can be selected with the DIP switches.
These character tables can be selected with the DIP switches, or by usingthe ESC 6 (table 2) or ESC 7 (table 1) software command.
The PC865 table is the same as the PC 437 table for hex codes 00 through7F, so only the characters for hex codes 80 through FF are shown.
Printer Commands and Character Tables B-21

PC437 (table 1)
PC437 (table 2)
B-22 Printer Commands and Character Tables

PC865 (table 1) PC865 (table 2)
Symbol setCharacters defined in the following symbol set can be printed using theESC \ (characters) or ESC ˆ (one character) software command.
Printer Commands and Character Tables B-23

Glossary
Note that these definitions apply specifically to printers.
application programA software program that helps you carry out a particular task such asword processing or financial planning.
ASCIIAmerican Standard Code for Information Interchange. A standardizedcoding system for assigning numerical codes to letters and symbols.
baud rateA measure of the speed of data transmission. Usually equivalent to bitsper second. Also called serial bit rate.
bidirectional printingPrinting in which the print head moves from left to right on every otherline and from right to left on the others. This increases the speed ofprinting.
bitA binary digit (0 or 1), which is the smallest unit of information used by aprinter or computer.
bufferSee memory.
byteA unit of information consisting of eight bits.
character setA collection of letters, numbers, and symbols that provides you with thecharacters used in a particular language.
character tableA portion of a character set that can be used for graphic symbols or italiccharacters.
characters per inch (cpi)A measure of the size of text characters, often referred to as pitch. 10 cpi isthe printer’s default setting.
defaultA value or setting that takes effect when the equipment is turned on,reset, or initialized.
G l o s s a r y G L - 1

DIP switchesSmall switches in a printer that control various printer functions and setthe default status of the printer when it is turned on or initialized. DIPstands for dual inline package.
dot matrixA method of printing in which each letter or symbol is formed by apattern (matrix) of individual dots.
draftOne of three print qualities available on your printer. Draft uses less dotsper character for faster printing. See also high-speed draft and near letterquality.
ESC (escape)A special control code used to begin most printer commands.
ESC/PAbbreviation for Epson Standard Code for Printers (read E-S-C-P), asystem of commands that lets you control your printer using yourcomputer’s software. The system is standard for all Epson printers andsupported by most software programs for personal computers.
fontA style of type designated by a family name, such as Epson Roman orEpson Sans Serif.
hex dumpA troubleshooting feature that helps advanced users detect the cause ofcommunication problems between the printer and computer. When theprinter is in hex dump mode, it prints each code that it receives inhexadecimal notation and ASCII code. Also called data dump.
high-speed draftOne of three print qualities available on your printer. High-speed draftuses a minimum number of dots per character to produce extremelyhigh-speed printing. See also draft and near letter quality.
initializeTo establish the initial default status of the printer by turning the printeron or sending an INIT signal.
input bufferSee memory.
interfaceThe connection between the computer and the printer. A parallel interfacetransmits data one character or code at a time, and a serial interfacetransmits data one bit at a time.
GL-2 G lo s sa ry

memoryThe printer, like a computer, has a memory. When you print a file from acomputer, the contents of the file are transferred quickly from thecomputer’ s memory to the printer’s memory. The printer then printsinformation from its own memory. This frees the computer to do otherwork while the printer is still working. The printer memory is sometimescalled the buffer, or the input buffer.
micro feedA feature that adjusts the top-of-form, printing, and tear-off positions.
near letter quality (NLQ)One of three print qualities available on your printer. Near letter qualityreduces the print speed and increases the number of dots per character toproduce high-resolution characters. See also daft and high-speed draft.
paper bailThe part of the printer that holds the paper flat against the platen.
parallel interfaceSee interface.
parityA method for a computer and printer to check the reliability of datatransmission.
pitchThe number of characters per inch (cpi). The standard is 10 cpi.
platenThe silver plate behind the paper bail that provides a backing for theprinting.
printing positionThe position on the page where text or graphics will print. The printingcan be adjusted using the MICRO FEED buttons.
pull tractorAn optional paper feeder that is useful when printing on preprinted ormulti-part forms.
push tractorA device that feeds continuous paper through the printer. Both the frontand rear built-in tractors are push tractors; they push the paper throughthe printer to the print head.
RAMRandom Access Memory. The portion of the printer’s memory that isused as a buffer and for storing user-defined characters.
Glossary GL-3

I n d e x
A
Adjusting thetear-off position, 2-16-19top-of-form position, 2-11-13
Attaching the power cord, 1-10Auto line feed, 3-16Automatic
interface selection, 3-19tear off, 3-18
position, adjusting the, 2-16-19
BBinding skip, 3-18Buffer, input, 3-16Buttons, 3-3-6
CChanging
DIP switch settings, 3-S-10paper, 2-21-24
Characterquality, 3-15sets, international, B-21table, 3-15tables, B-14-23
Checking the parts, l-3Choosing a place for the printer,
14-5Cleaning the printer, 5-8-9Command summary, using, B-2Commands
arranged by topic, B-3-9IBM emulation mode, B-9-14printer, B-2-14
Connecting thebuilt-in interface, 1-21-24printer to your computer, 1-20
Control panel, 3-2-7other features, 3-7
DDIP-switch
functions, 3-14-18settings, changing, 3-S-10tables, 3-10-14
DIP switches, using, 3-7-18Draft printing speed, 3-14
E
Emulation mode, IBM commands,B-9-14
Error indicators, 5-2
FFeatures, l-2
H
Hex dump, 3-7, 5-7-8
I
IBM emulation mode commands,B-9-14
Important safety instructions, 6-8Initialization, A-14-15Input buffer, 3-16Installing
interface card, 4-15-17pull tractor, 4-2-5ribbon cartridge, l-6-10
IN-1

Interfaceconnecting the built-in, 1-21-24selection, using automatic, 3-19specifications, A-11-14
Interface card, installing an, 4-15-17Interface cards, optional, 3, 4-14-17International character sets, B-21
LLabels
printing on multi-part forms and,2-24-27
using, 2-26-27LF/FF/LOAD button, 3-4Lights, indicator, 3-2-3Line feed, auto, 3-16Loading
and using paper, 2-1-27paper
for the self test, 1-12-17memory settings, 3-19-23onto the rear tractor, 2-3-10
MMaintaining the printer, 5-8-11Maintenance, troubleshooting and,
5-1-11MICRO FEED button, 3-5Microsoft Windows 3.1, 1-24-25Multi-part forms
and labels, printing on, 2-24-27using, 2-25-26with labels, 3-18, 3-19-23
NNon-Windows software, l-26
OOptional interface cards, 3, 4-14-17Options, 2-3
using the printer, 4-1-17Overlapping multi-part forms,
3-18, 3-19-23
PPage length, 3-17Paper memory, 3-18, 3-19-23PAPER OUT light, 3-2PAPER SELECT
FRONT/REAR button, 3-6FRONT/REAR lights, 3-3
Parallel interface, A-11-13PAUSE
button, 3-3light, 3-2
PITCHbutton, 3-6lights, 3-3
Plugging in the printer, 1-10-11Positioning the paper supply, 2-2-3POWER light, 3-2Print, you’re ready to, 1-27Printer
cleaning the, 5-8-9commands and character tables,
B-1-23sending, B-2
driver, what is a, 1-26maintaining the, 5-8-11mode, 3-14options, using the, 4-1-17specifications, A-210using the, 3-1-23
Printingon multi-part forms and labels,
2-24-27speed, draft, 3-14
IN-2

Problems and solutions, 5-3-7Pull tractor
installing the, 4-2-5removing the, 4-12-13using the, 4-2-13with the front tractor, 4-5-9with the rear tractor 49-12
RRemoving the
protective materials, 1-4pull tractor, 4-12-13
Replacing the ribbon, 5-9-11Ribbon, replacing the, 5-9-11Ribbon cartridge, installing the
1-6-10Running the self test, 1-18-19
SSafety instructions, important, 6-8Saving paper memory settings,
3-20-22Self test, running the, 1-18-19Sending printer commands, B-2Serial
bit (baud) rate, 3-17interface, A-13-14
Set up and print, 1-1-27Shape of zero (slashed), 3-15Skip-over-perforation, 3-18Software
non-Windows, 1-26programs, using, 1-24-26
Specificationsinterface, A-11-14printer, A-2-10technical, A-1-15
Switching between front and reartractors, 2-19-21
TTEAR OFF
button, 3-4light, 3-2
Tear-offautomatic, 3-18mode, 2-14-15position, adjusting, 2-16-19
Technical specifications, A-1-15Testing the printer, 1-11-19TOP OF FORM
button, 3-6light, 3-2
Top-of-formposition, adjusting the, 2-11-13reset, A-15
Troubleshooting and maintenance,5-1-11
UUnpacking the printer, 1-2-4Using
command summary, B-2DIP switches, 3-7-18labels, 2-26-27multi-part forms, 2-25-26paper memory feature, 3-19-23printer, 3-1-23printer options, 4-1-17pull tractor, 4-2-13with the front tractor, 4-5-9with the rear tractor, 4-9-12software programs, 1-24-26two-tractor system, 2-2-3
IN-3
Related Documents


