Tutorial for Creating Electronic Books With PowerPoint 1. Before you create the PowerPoint electronic version of the book, you will need to create scanned images of the entire book. Scan the front cover, back cover, title page, and each individual page of the book as separate images. Save the scanned images in a folder titled for the book and save each image as a file titled for the particular page. 2. Begin a new PowerPoint presentation. On the Home ribbon, select the (a) Layout icon and change the default title slide to a (b) blank slide. 3. Click on the (a) Insert ribbon then click to select the (b) picture icon (to insert a picture). Use the (c) Look in menu bar to navigate to the folder in which you saved scanned in pictures of the book. Select the scanned image of the (d) book cover. Either double click on the image or select the Insert button at the bottom of the pop-up menu to insert the chosen image into your document.

Welcome message from author
This document is posted to help you gain knowledge. Please leave a comment to let me know what you think about it! Share it to your friends and learn new things together.
Transcript
Tutorial for
Creating Electronic Books
With PowerPoint
1. Before you create the PowerPoint electronic version of the book, you will need to create scanned
images of the entire book. Scan the front cover, back cover, title page, and each individual page
of the book as separate images. Save the scanned images in a folder titled for the book and save
each image as a file titled for the particular page.
2. Begin a new PowerPoint presentation. On the Home ribbon, select the (a) Layout icon and
change the default title slide to a (b) blank slide.
3. Click on the (a) Insert ribbon then click to select the (b) picture icon (to insert a picture). Use the
(c) Look in menu bar to navigate to the folder in which you saved scanned in pictures of the
book. Select the scanned image of the (d) book cover. Either double click on the image or select
the Insert button at the bottom of the pop-up menu to insert the chosen image into your
document.

Melissa Nail, Ph.D., Associate Professor
PowerPoint Tutorial: Electronic Books
2
4. You are now ready to add sound to your first slide. On the (a) Insert ribbon click on the (b)
Sound icon (insert sound – the last icon on the far right of the Insert ribbon). From the drop down
menu for inserting sound, select to (c) Record Sound.
On the pop-up Record Sound menu, click the (a) title bar to change the default title (Recorded
Sound) to a title that has meaning. When you are ready to record words on this slide, click the (b)
red circle button. Begin reading the text on the slide. Note the (c) number of the Total sound
length will continue to count up the length of your recorded sound. When you finish recording
the text, click the (d) blue square button to stop recording. If you would like to listen to your
recorded sound, click on the (e) blue triangle button to listen/approve the recorded sound. If the
sound is appropriate, click the OK button to insert it into your slide. If you do not approve of the
sound, click the cancel button and repeat step 3.
After you click on the OK button, the Record
Sound pop-up menu will disappear and a sound
icon will appear somewhere on your slide.
Locate the sound icon, mouse over it until the
four-headed arrow on your pointer, click and
drag the sound icon to the side of your slide
(making it easy for the student to locate and
click). With the sound icon selected, mouse
over the icon until you get a two-headed arrow.
Click and drag the two-headed arrow to re-size
the sound icon. NOTE: The sound icon will
only work in presentation mode. To try out
your sound, change to presentation mode and
click on the sound icon to hear your recorded
sound on the slide.

Melissa Nail, Ph.D., Associate Professor
PowerPoint Tutorial: Electronic Books
3
5. You are now ready to add sound for each individual word on the page. Go through Step 3 to
record the sound for the first word of the title. Type in the word that you will record as the name
of this sound.
After you click OK, locate the sound icon. Click to select the sound icon and with the sound
selected, tap your Delete key to delete the sound icon. (Multiple sound icons will only confuse
the student.) Instead of using the sound icon, the user will select the individual word to hear the
word read.
6. To make the individual word selectable, you will draw a button over the word. Draw a button
over the word by clicking to select the (a) Insert ribbon. On the Insert ribbon, click to insert a
(b) Shape. From the Shape drop down menu, select the (c) blank Custom Button from the Action
Buttons at the very bottom of the drop down menu.

Melissa Nail, Ph.D., Associate Professor
PowerPoint Tutorial: Electronic Books
4
After clicking on the Action Button icon, the pop-up menu will disappear and your mouse will
change to crosshairs. Click and drag the crosshairs over the word you recorded to put an action
button over the appropriate word.
After you release the mouse button, a pop-up menu will appear on your screen. This menu will allow
you to control the action button settings. NOTE the tabs at the top of this menu. If you wish for the
word to be read when the student mouses over the word, select the (a) Mouse Over tab. If you wish
for the word to be read when the student clicks on the word, remain on the default (b) Mouse Click
tab. ( A note of caution when using the Mouse Over feature – although this feature is fantastic for
students with limited hand eye coordination and/or muscle control, it can be frustrating and
confusing for a student if s/he accidently mouses over words/buttons). Leave the default settings at
None for Action and move down to the (c) Play sound action setting. Select the (d) down arrow
beside the menu bar and mouse down to select the (e) title of the sound you wish to hear. Click the
OK button.
Melissa Nail, Ph.D., Associate Professor
PowerPoint Tutorial: Electronic Books
5
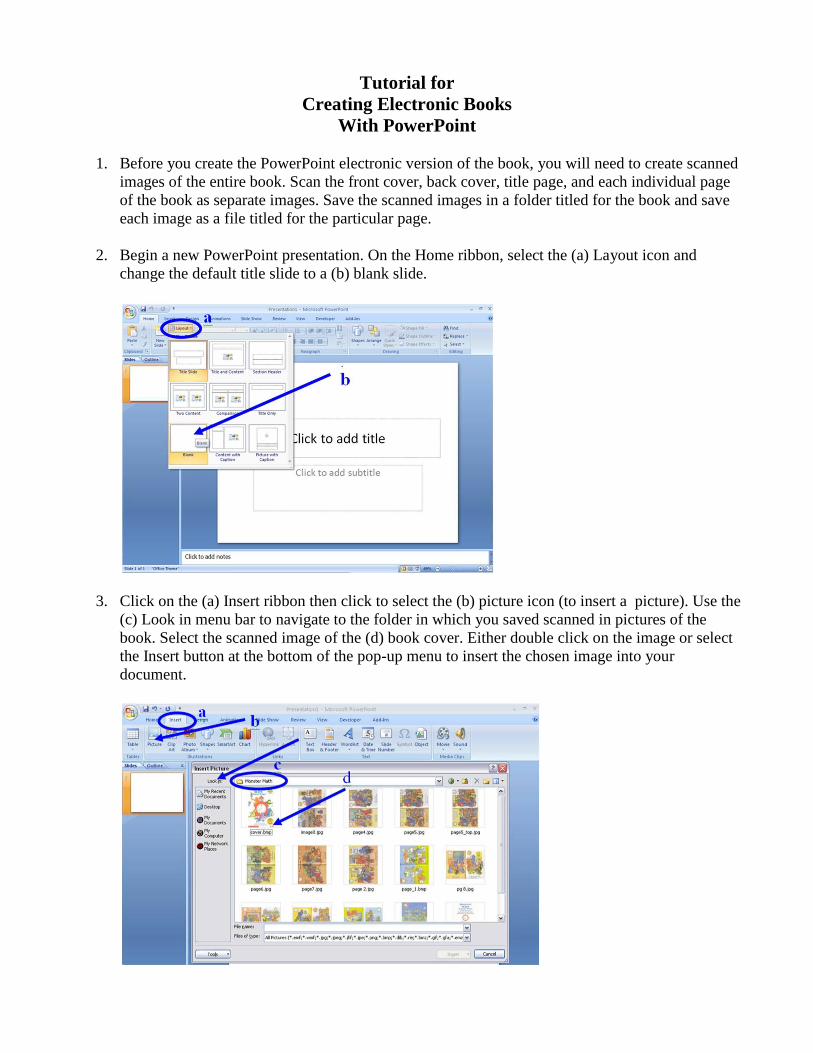
After you click on the OK button, the Action Settings pop-up menu will disappear and you will see
your slide with the button you have drawn. (a) Note that the button is a solid, opaque color. This
conceals the word. You need to format the button such that the word is visible and the button is
invisible. To accomplish this, select the (b) Format ribbon. On the Format ribbon, click on the (c)
Shape Outline icon and select (d) No Outline.
Next, select the (a) Shape Fill icon. If you select No Fill, the button will not work effectively. Instead
select (b) Gradient and mouse down to select (c) More Gradients from the last menu choice. On the
pop-up menu, select (d) 100% for the transparency. You can select 100% transparency by either
typing in 100, using the up arrow to click to 100%, or by dragging the Transparency bar to the far
right. Click the Close button after making your choice.
You should note that the button seems to have disappeared. If you click on the location of the button,
you should see selection points around the shape. If you wish to try out your button, you must go to
presentation mode ( as in Step 3).
Repeat Steps 4 and 5 for every word on the page.
Melissa Nail, Ph.D., Associate Professor
PowerPoint Tutorial: Electronic Books
6
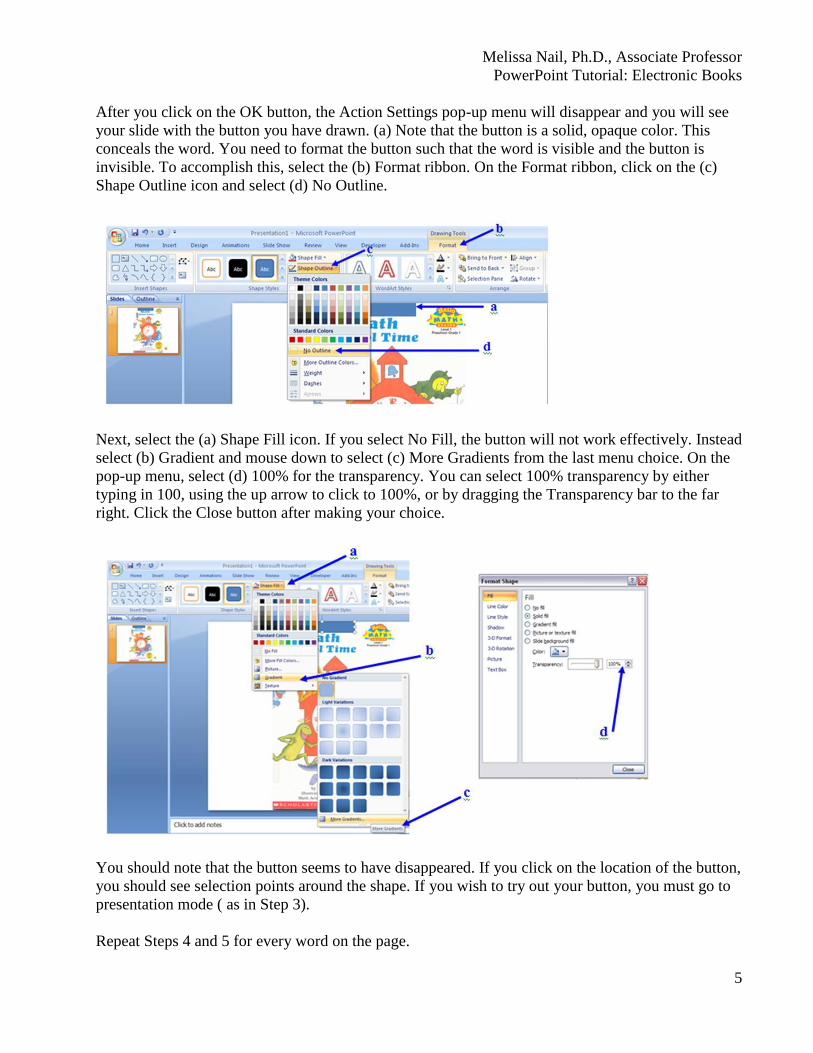
7. Add another slide to this presentation. On the Home ribbon, click the New Slide icon and select
the Blank slide to add a blank slide to your presentation.
8. Repeat Step 2 to add the image of the title page to your presentation. Repeat Step 3 to add a
recording of all of the text on the title page to this slide. Repeat Steps 4 and 5 for each individual
word on the page.
Continue with these steps until you have each page and each word added to the presentation.
9. You will need to disable mouse clicking on this presentation. This will make it easier and less
frustrating for a young child to use this project. (Young children accidently click and get “lost”
in presentations that transition with simple mouse clicks.) To disable the default mouse clicking
feature, click on the (a) Animations ribbon and click to deselect the default Advance Slide (b) On
Mouse Click button.

Melissa Nail, Ph.D., Associate Professor
PowerPoint Tutorial: Electronic Books
7
While you are on the Animations ribbon, you might want to select a slide transition that will
resemble turning pages in a book. Experiment with (a) Transitions and then select (b) Apply to
All. NOTE: do not select numerous transitions as this will distract from the presentation and
prevent the student from focusing on the content of the book.
10. Since you disabled the advance of the slides on a mouse click, you will need to provide users
with another way to easily advance the slides. Do this by adding another Action Button to each
slide. Click on the Insert ribbon and select Shapes then the forward arrow button from the bottom
of the menu. Click and drag your mouse to draw the arrow button at an appropriate location your
slide.
In the Action Settings pop-up menu, the Action on click
will be Next Slide. Click the OK button to accept this
default. You should also draw a back arrow on the opposite
side of the page to allow the user to move back and forth
through the pages of the book. You can change the color of
the buttons by making changes to the fill color and line
color on the Format ribbon.

Melissa Nail, Ph.D., Associate Professor
PowerPoint Tutorial: Electronic Books
8
You can easily add these buttons to every slide in your presentation by holding your Shift key
and selecting both the forward and back button. With both buttons selected, copy (either click on
the (a) copy icon on the Home ribbon or use the keyboard command of “Contol C”).
Now select the next slide in the presentation by clicking on the slide in the slide menu bar on the
(b) left side of your screen. Without clicking anywhere on the next slide, simply click the Paste
button on the Home ribbon or use the keyboard command (“Control V”) to paste both buttons on
the next slide. The buttons will appear in the same location as the original slide and with the
same actions as the original buttons (this is excellent for consistency for young users). Repeat
this step each page in the book.
11. On the last slide you will need to add two additional buttons. Create a button to take the user
back to the beginning to read the book again and create a button to allow the user to stop/quit the
program. You can do this by adding two custom buttons to the final page.
On the (a) Insert ribbon,
select (b) Shapes and then
click on the blank Custom
Button from the Action
Buttons selection at the
bottom of the shapes
menu. Draw a (c) blank
button on the bottom of
the slide. In the pop-up
Action Settings menu that
will appear when you
release the mouse after
drawing the button, select
(d) Hyperlink to: for the
Action and mouse down
to select (e) End Show.

Melissa Nail, Ph.D., Associate Professor
PowerPoint Tutorial: Electronic Books
9
After you click on the OK button in the Action Settings pop-up menu, your
new action button will still be selected. If you simply start typing, your text
will appear on the button. You can type appropriate information to let the user
know the button’s action.
Repeat these steps for a button that will take the user back to the first slide. Name this button
Read Again.
12. To make this presentation even easier for a young child to use, you should save it as a show. This
will feature will open the presentation in Presentation Mode. This prevents the user from being
able to easily edit your work and it prevents the user from having to know how to use
PowerPoint.
To save the presentation as a show, select the (a) Office Button and click on (b) Save As. In the
Save As pop-up menu, select (c) PowerPoint Show. Proceed to save the show as a file name and
in a folder that will allow you to easily find it in the future. (NOTE: it is a good idea to save your
show as the title of the book.)
13. Finally, if you would like to burn this book to a CD to send home with students (with the book),
then it is a good idea to burn it to a CD with a free version of PowerPoint Viewer. This will
allow the user to simply pop in the CD and use your project.

Melissa Nail, Ph.D., Associate Professor
PowerPoint Tutorial: Electronic Books
10
Click on the (a) Office Button, select (b) Publish, and then click on (c) Package for CD.
In the pop-up menu, type in the name you wish to use for the CD (probably the title of the book).
You can select to save the file to a folder that you can move to a CD later or you can go ahead
and burn the files to a CD now (select the appropriate button in the pop-up menu). By default, if
the user simply puts the CD in the computer, the PowerPoint Show will start automatically.
Related Documents


![Ebrary Electronic Books [ENG]](https://static.cupdf.com/doc/110x72/55549e5fb4c905fd608b48c3/ebrary-electronic-books-eng.jpg)