TUTORIAL 4: CREATING PAGE LAYOUT WITH CSS Session 4.3

TUTORIAL 4: CREATING PAGE LAYOUT WITH CSS Session 4.3.
Dec 18, 2015
Welcome message from author
This document is posted to help you gain knowledge. Please leave a comment to let me know what you think about it! Share it to your friends and learn new things together.
Transcript

TUTORIAL 4: CREATING PAGE LAYOUT WITH CSS
Session 4.3

Objectives
Designing the Background Positioning Objects Working with Overflow Clipping an Element Stacking Elements

Practice: margins, float, and width For the horizontal navigation list items:
Display each list item as a block Set the width to 19.8% Make the items float to the left Set the background color to (49, 38, 31)
For the main section: Set the margin of the paragraphs to 15px Set the margin of the unordered list to 25px

Practice: margins, float, and width For the aside element
Set the margin to 10px Set the width to 50% Make the aside float to the right

Designing the Background CSS also supports background images
usingbackground-image: url(url);
Example:body {
background-image: url(marble.png);
}
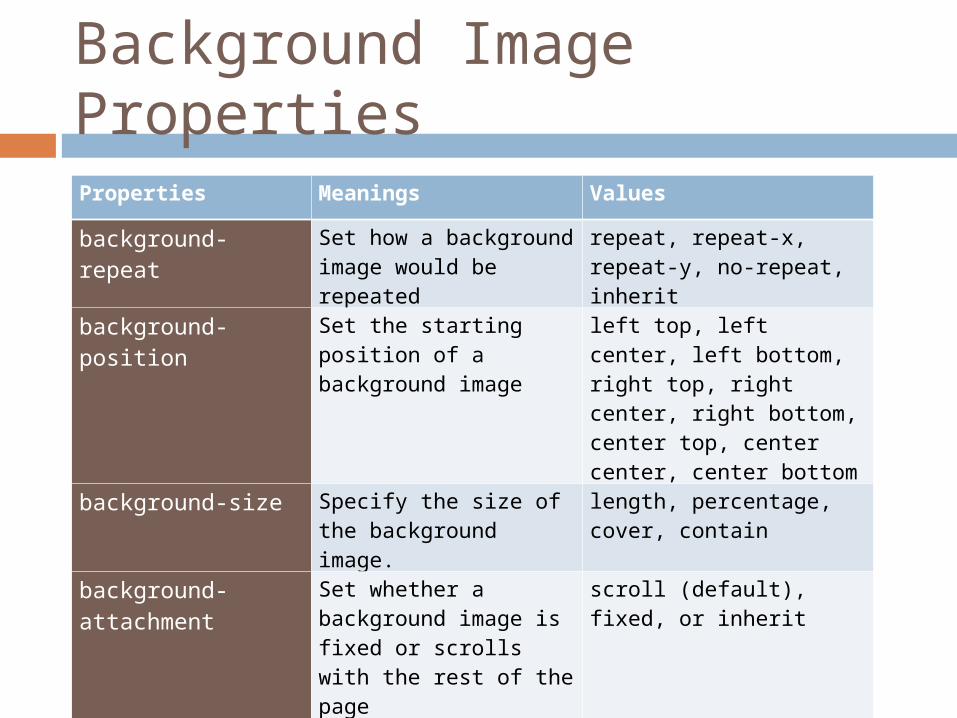
Background Image PropertiesProperties Meanings Valuesbackground-repeat Set how a background
image would be repeated
repeat, repeat-x, repeat-y, no-repeat, inherit
background-position
Set the starting position of a background image
left top, left center, left bottom, right top, right center, right bottom, center top, center center, center bottom
background-size Specify the size of the background image.
length, percentage, cover, contain
background-attachment
Set whether a background image is fixed or scrolls with the rest of the page
scroll (default), fixed, or inherit

Designing the Background You can combine the various
background properties into the shorthand property
background: color url(url) attachment position repeat;
Example: background: black url(backdrop.png) fixed center center
no-repeat;

Practice - Designing the Background
1. For the header group within the article element, create a style rule to:
a. Display a background color with value (189, 131, 82) with the background image alisha.png displayed in the bottom-right corner with no tiling.
b. Set the text color to the value (215, 181, 151)

Positioning Objects
To position an object at a specific coordinate, use the style properties
position: type;
top: value;
right: value;
bottom: value;
left: value;
where type indicates the type of positioning applied to the object (absolute, relative, static, fixed, or inherit), and the top, right, bottom, and left properties indicate the coordinates of the object

Positioning Objects
Static positioning renders an element in order, as they appear in the document flow. This is default. Example
http://euler.gcsu.edu/ccollier/positioning/
Absolute positioning places an element at specific coordinates either in the page or within a container element. Examples
http://euler.gcsu.edu/ccollier/positioning/

Positioning Objects
Relative positioning is used to move an element relative to where the browser would have placed it if no positioning had been applied Example
http://euler.gcsu.edu/ccollier/positioning/

Positioning Objects
1. For the page body, position the page using relative positioning.
2. For the header element, place the header at the coordinates (0, 0) using absolute positioning.

Working with Overflow
When you force an element into a specified height and width, you can define how browsers should handle content that overflows allotted space using the style
overflow: type;

Working with Overflow
To specify how browsers should handle content that overflows in the horizontal direction, use the following style:overflow-x: type;
To specify how browsers should handle content that overflows in the vertical direction, use the following style:overflow-y: type;

Working with Overflow
1. For the div element within the slideshow figure box, set the browser to display scroll bars automatically if the content overflows the assigned space, and use the white-space property to prevent the content from wrapping to a new line.
For the figure box, add a 21% left margin and set the background color to the value (149, 91, 42).

Clipping an Element
To clip an element’s content, use the styleclip: rect(top, right, bottom, left);
where top, right, bottom, and left define the boundaries of the clipping rectangle

Clipping an Element

Stacking Elements
Positioning elements can sometimes lead to objects that overlap each other
By default, elements that are loaded later by the browser are displayed on top of elements that are loaded earlier
To specify a different stacking order, use the style propertyz-index: value;

Stacking Elements
Stacking Elements
1. For the three images involved in the collage division, create a collage where the three images are overlapping each other in a pleasant display.
Related Documents