Thank you for purchasing Travel. If you have any questions that are beyond the of this documentation, please feel free to email via my user page contact form here . Travel WordPress Theme Documentation V 1.0 By uiueux studio www.uiueux.com [email protected] Last edited: 2/1/2013

Welcome message from author
This document is posted to help you gain knowledge. Please leave a comment to let me know what you think about it! Share it to your friends and learn new things together.
Transcript

Thank you for purchasing Travel.If you have any questions that are beyond the of this documentation, please feel
free to email via my user page contact form here.
Travel WordPress Theme Documentation V 1.0
By uiueux studio www.uiueux.com [email protected]
Last edited: 2/1/2013

Content
Frequently Asked Questions 3
Installation 6
Adding Content 8
Pages and Menus 13
Global Options 16
Shortcodes 17
Javascripts 17
Travel WordPress Theme - Documentation V 1.0
Page 2
1. Frequently Asked Questions
1.1 Create a homepage (for beginner)
Step 1 - create a page for the homepage content
Step 2 - go to Settings > Reading: Front page displays and
Step 3 - select a page which display as the homepage to be your front pageStep 4 - save changes
1.2 How do I display a gallery on a page?
With the function comes with WP, we could crop a specific area from a uploaded image:
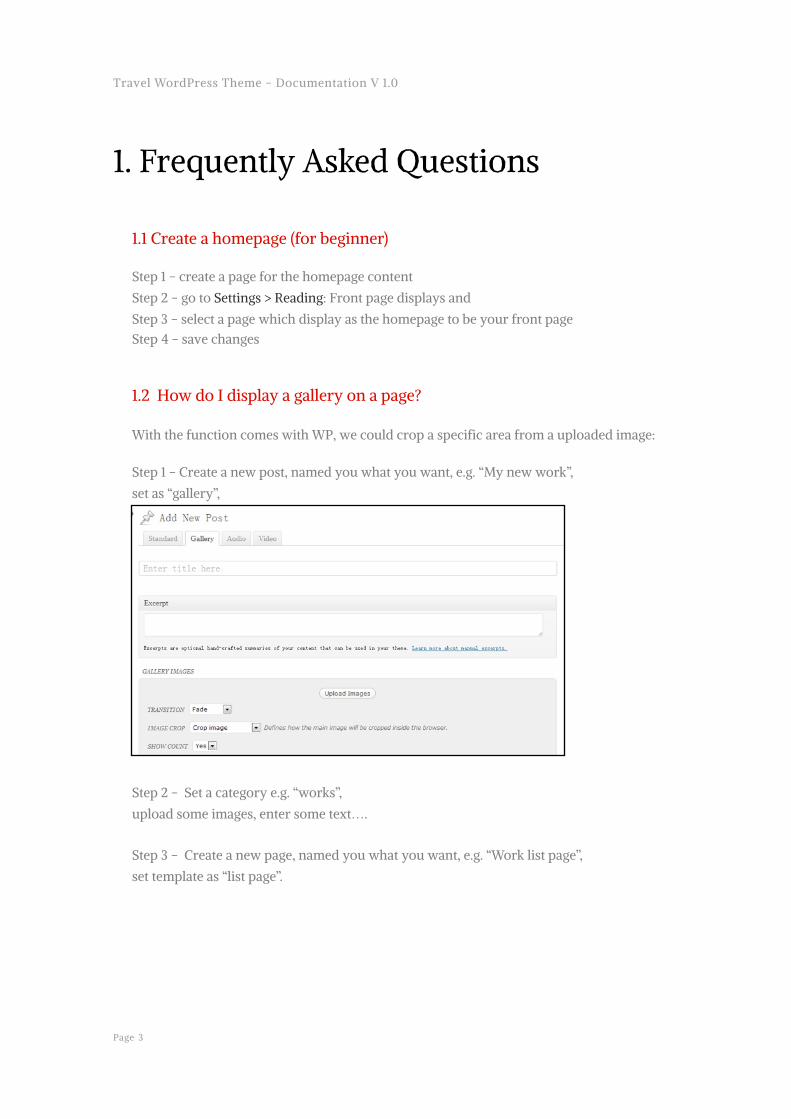
Step 1 - Create a new post, named you what you want, e.g. “My new work”,
set as “gallery”,
Step 2 - Set a category e.g. “works”,
upload some images, enter some text….
Step 3 - Create a new page, named you what you want, e.g. “Work list page”,
set template as “list page”.
Travel WordPress Theme - Documentation V 1.0
Page 3

The “page options” box should be light, select “works” in Category option menu.Publish the page, then the “My new work” should displayed in the page.
1.3 How to set map in static page?
We supply the google map for static page.
Step 1 - Creat a new page / select the “static page” template:
Step 2 - Active the map:
Travel WordPress Theme - Documentation V 1.0
Page 4

Step 3 - Go to ( http://gmaps-samples-v3.googlecode.com/svn/trunk/geocoder/getlatlng.html ) get the coordinate values. And set the map zoom and map type value
Step 4 - Update page
Travel WordPress Theme - Documentation V 1.0
Page 5

2. Installation
To use a WordPress theme you must have a working version of Wordpress already installed. For information in regard to installing the WordPress platform, please refer to the WordPress Codex-http://codex.wordpress.org/Installing%20WordPress
2.1 Extract the package file:
After extract the main zip file, you'll see these folders and files:
travel folder - Main theme folder
‣ img - UI images folder
‣ js - javascript files folder
‣ styles - css files folder
‣ functions - Options and widgets php files
‣ languages - po/mo files for muti-languages
Travel Documentation.pdf - Help file
travel.theme.wordpress.demo.data.xml - Dummy content file
travel.zip - travel theme zip file
log folder - travel theme older version and modify log
2.2 Install theme file:
This template works well for wordpress 3.5, update yours if needed.
Installing the theme can be done two ways. You can upload the theme ZIP file using the built in WordPress theme upload, or copy the files through an FTP client.
1.2.1 Using WordPress Theme Upload:
Be sure to extract the file "travel.zip" from the ThemeForest download before uploading.
Using the ThemeForest ZIP file directly will result in a "Missing Style Sheet" error.
Travel WordPress Theme - Documentation V 1.0
Page 6

• Login to your WordPress admin.
• In the "Appearance > Themes" menu click the tab "Install Themes"
• At the top of the page click, "Upload", then click the file input to select a file.
• Select the zipped theme file, "travel.zip", and click "Install Now"
• After installation you will receive a success message confirming your new install.
• Click the link "Activate"
1.2.2 Using FTP:
• Login to your FTP server and navigate to your WordPress themes directory.
• Normally this would be "wp-content/themes"
• Extract folder "travel" from the zipped theme.
• Copy the folder "webzine" to your themes directory.
• After the files finish uploading, login to your WordPress admin.
• In the "Appearance" menu click "Themes"
• Click "Activate" for the theme "Travel"
Travel WordPress Theme - Documentation V 1.0
Page 7

3. Adding Content
3.1 Setup Categories
Before adding items(posts), it is recommended to setup the category structure for your next work. Then when you add or update your post, you could select the categories directly.
3.2 Adding Posts
We have prepared 4 formats for your post, you could choose either of them to match your need when creating a post. Theses formats would affect the styling of your post in list and content page.
• Standard
The standard format will show the Title, content and featured image(optional) in the list page. It would looks like:
Standard post in list page
Travel WordPress Theme - Documentation V 1.0
Page 8

Standard post with image in list page
Standard post content page
• Gallery
The Gallery format will display the images attached to that post.
You need to upload the images from your computer (In other words, the images of gallery post must be uploaded to this post). For gallery post, you need not insert the images to post content.
Travel WordPress Theme - Documentation V 1.0
Page 9

Note: In wordpress 3.4, you need to click the Upload/Insert button to open the media window.
In media window, you could select the “Uploaded to this post” to find the image of the gallery post.
You could change the settings of gallery slider in fullscreen mode by the option box.
There are two types for gallery format post: location and portfolio. The location type is supported google maps.
Travel WordPress Theme - Documentation V 1.0
Page 10

You could enter the description in Excerpt box
Also, you could enter description fot each image:
Travel WordPress Theme - Documentation V 1.0
Page 11

• Audio
The Audio format post is supported hosted mp3 and ogg file.
• Video
The Video format post is supported embed codes from third part website. If you use the video form Youtube or Vimeo, you could enter the the url directly. ( e.g. http://www.youtube.com/watch?v=xxxxx or https://vimeo.com/xxxxx )
Travel WordPress Theme - Documentation V 1.0
Page 12
4. Pages and Menus4.1 Adding pages
To make menus work, you must setup the pages first. The menu you want to display in the site need to be linked to the specified pages.
4.1.1 Adding page
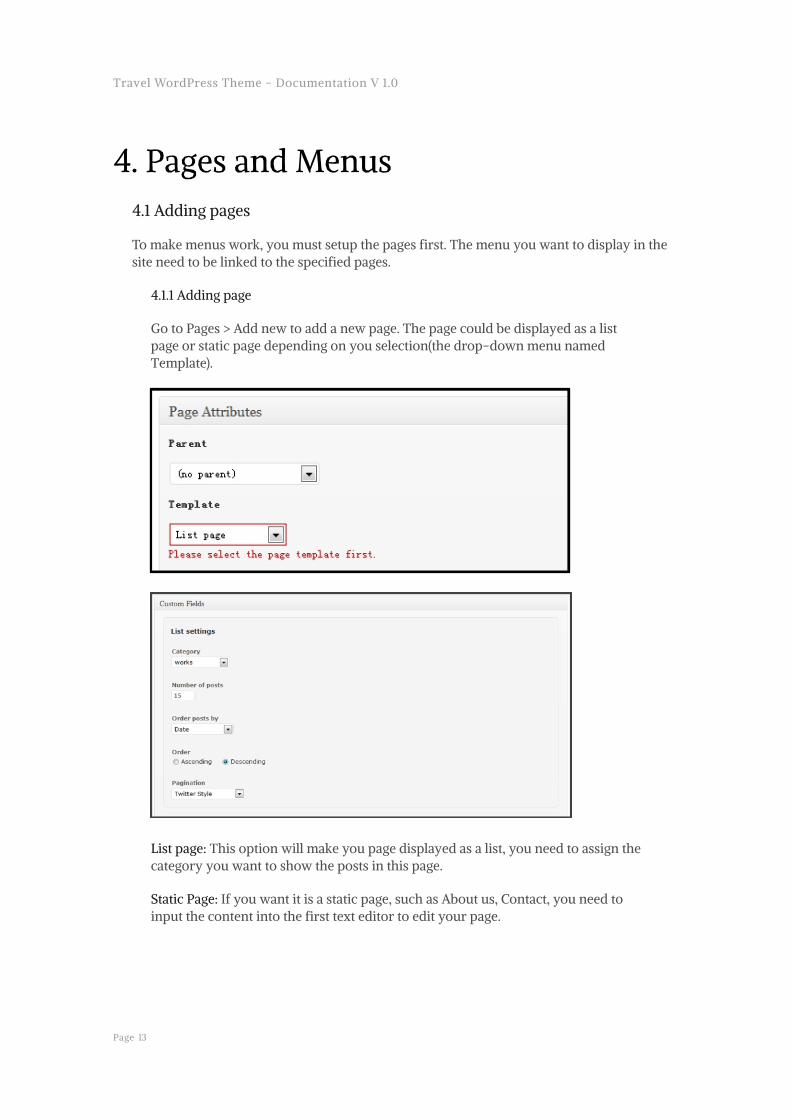
Go to Pages > Add new to add a new page. The page could be displayed as a list page or static page depending on you selection(the drop-down menu named Template).
List page: This option will make you page displayed as a list, you need to assign the category you want to show the posts in this page.
Static Page: If you want it is a static page, such as About us, Contact, you need to input the content into the first text editor to edit your page.
Travel WordPress Theme - Documentation V 1.0
Page 13

After select the template, you will see the Custom Fields area is light. You could set the category in page, item order and so on.
4.1.2 Setup a page as Homepage:
Go to Settings > Reading, select “A static page”, and choose your page you want to show from the drop=down menu “Front page”.
4.2 Custom menus
Using the version 3.0 of WordPress or higher, you can setup custom menus. Menu will be displayed on the left sidebar.
Navigate to Appearance > Menus, it is recommended to create you menu from Pages or Custom. Select the menu you created for main menu
If you want to set a menu item without Ajax, You should enter “noajax” in Link Relationship (XFN) box.
Travel WordPress Theme - Documentation V 1.0
Page 14

Tips:
If the XFN box is not displayed in your menu panel, you could find it in the "Screen Options".
Travel WordPress Theme - Documentation V 1.0
Page 15

5. Global Options Navigate to Appearance > Theme Options, you could customize most of the appearance elements for your site.
5.1 Appearance > Theme Options > General
Logo(image) - Custom the logo image
Logo(Text style) - Enable plain text logo and style it
Custom Favicon
Custom Mobile Bookmark Icon - For mobile device
Menu Font - For menu font style
Copyright Font - copyright and style
Analysis code - e.g. google analysis code
Google APIkey - for location type of gallery format post
5.2 Appearance > Theme Options > BG image
Upload images for background slider of main list page.
5.3 Appearance > Theme Options > Footer
Footer Box BG Color - Set the background color for footer box
Menu font - Set the menu item font style
Copyright - set the copyright information and style
Search box and Social icons - Insert the your social website URL. If not, it would not be
displayed
5.4 Appearance > Theme Options > List page (timeline)
Travel WordPress Theme - Documentation V 1.0
Page 16

Title and Date - Set the font style
The Item Box Style - Set the background color, shadow, corner and so on.
5.5 Appearance > Theme Options > Content page
Content Box BG Color - Set the background color for content box
Title font style - Set post title font style
Meta information and Social icons - Set displayed or not
5.6 Appearance > Theme Options > Form box
You could set the response and contact form box style.
6. Shortcodes When you edit post or page, you could use the shortcodes. We provide the tinymc editor for short codes.
7. JavascriptsThis theme imports several JavaScript files. All located in the "travel/js" folder.
main.js - main custom javascript
jquery-1.7.1.min.js - jquery library
Galleria-1.2.7.js - for background slider
jquery.infinitescroll. js - Infinite scroll(items load)
Comments-ajax.js – ajax type comments
Travel WordPress Theme - Documentation V 1.0
Page 17

8. Sources and CreditsThe following images, icons or other files have been used in this theme.
Face icons: http://www.iconfinder.com/icondetails/9572/22/face_funny_laughing_icon
Demo website Photos: http://flickr.com/fann01
WordPress Options Panel: http://wptheming.com/2010/11/thematic-options-panel-v2/
Post Formats Admin UI : https://github.com/crowdfavorite/wp-post-formats
TinyMCE: http://www.tinymce.com
Travel WordPress Theme - Documentation V 1.0
Page 18

The End
Thanks again for purchasing Foto. If you have any questions that are beyond the of this documentation, please feel
free to email via my user page contact form here.
Travel WordPress Theme - Documentation V 1.0
Page 19
Related Documents