trap active enclosures www.fliaudio.com Models: TRAP 10A, 10AP, 12A, 12TA

Welcome message from author
This document is posted to help you gain knowledge. Please leave a comment to let me know what you think about it! Share it to your friends and learn new things together.
Transcript

trap activeenclosures
www.fliaudio.comModels: TRAP 10A, 10AP, 12A, 12TA

We reserve the right to make needed changes or improvements to the product andthis manual, without informing the customer about this in advance.
Copyright
All content included in this manual such as text, graphics, logos, icons, images data, the selection and arrangementthereof, are the property of FLI Audio (herein referred to as "FLI", "us" or "we") and its affiliateff or their content andtechnology providers, and are protected by United Kingdom and International copyright laws. All rights reserved.
Trademarks
FLI FrequencyTM, FLI IntegratorTM , FLI LoadedTM , FLI Trap PassiveTM, FLI Trap ActiveTM , and FLI Trap TwinTT TM and allstylised representations of product names, or the abbreviations of product names, as logos are all trademarks of FLI.
Graphics and logos are trademarks or trade dress of FLI Audio or its subsidiaries.
FLI's trademarks and trade dress may not be used in connection with any product or service that is not FLI's, in anymanner that is likely to cause confusion among customers or in any manner that disparages or discredits FLI. All othertrademarks not owned by FLI or its subsidiaries that appear in this manual are the property of their respective owners,
who may or may not be affiliatedff with, connected to, or sponsored by FLI or its subsidiaries.
Limited Warranty
All FLI goods are covered by a full 12 months manufacturers warranty. ValidVV fromthe date of the original receipt and proof of purchase. In order to
validate this warranty, the warranty card should be returned to FLIwithin seven days of the original purchase date. The original receipt
and packaging should also be kept for this 12 month period.
If at any stage during the warranty period you have a problem with theproduct then it should be returned to the point of purchase in its
original packaging, complete and with no items missing.
If the store is unable to fix the product it may have to be returned toFLI this process takes around 7 working days.
A full description of FLI's warranty information can be found on ourwebsite:
wwwww .fliaudiww o.co.uk/w// arranty
A written version can also be obtained from FLI warranty department
PO Box 11000B75 7WG
2

Thank you for purchasing this FLI enclosure. It will provide you with years oftrouble free usage providing you follow a few simple guidelines.
Run in procedureFLI recommends that you follow the run in procedure for the subwoofer detailed below.
When your Subwoofer is used for the first time naturally like most brand new items it is very stiffffand rigid, it will take time for the moving parts of this Subwoofer to loosen up before theSubwoofer will be ready to deliver its full potential.
For the first 30 hours it is recommended that you play the Subwoofer initially at low to mediumvolumes, gradually increasing the volume level as time progresses.
As a guide, if you listen to your Subwoofer for 1 hour every day it will take a month for thespeaker to run in properly.
You will notice a big change in the sound of the Subwoofer over this period, as the spider andsurround begin to run in the sound will get deeper and punchier, also the output of the Subwooferwill increase as the suspension loosens up.
The Subwoofer is like a new cars engine, it needs a few thousand miles before you can drive it toit’s full potential, driving it into the redline from the first day will mean engine damage is certainand will not be covered by warranty and the same applies to the subwoofer
Failure to follow this simple procedure is the most common reason for a Subwoofer to fail after avery short period of time.
Installation The most common place to mount a bass enclosure is in the luggage compartment of thevehicle.
Where in the luggage compartment it is mounted will have an effect ff on the sound producedallowing the user to tailor the sound to best suit their musical tastes.
For example if the enclosure is mounted facing the rear bumper, the bass produced will benoticeably deeper than if it is fired into the rear seat.
Do not be afraid to experiment with positioning as a little time and effortff can yield greatimprovements in sound.
3

Mounting Guidelines
Your FLI amplifier is designed with a swift installation routine in mind. Please mount in a dry location on a solidsurface. NEVER mount the amplifier upside down, this will cause the amplifier to over heat and will eventually damage theamplifier. Before fixing in place please ensure that there is sufficient air flow around the exterior of the casing,at least two inches is sufficient.
Connections
RCA Cables
Please take extra care when running these cables from the source to the amplifier. Ensure that they are placed awayfrom all items that can generate any interference, wiring harnesses etc.It is recommended that the RCA cables should be run on opposite sides of the car to the previously installed powercables if possible, to avoid the cable picking up interferance.
For optimal perforff mance FLI recommends using only FLI cable and connectors using any thing less canseriously compromise the perforff mance of your amplifier. see back page fo details
Lengthg of Run
Current demand 0 – 4 Ft 4 – 7 Ft 7 – 10 Ft 10 – 13 Ft 13 – 16 Ft 16 – 19 Ft 19 – 22 Ft 22 – 28 Ft
0–20 amps 14 AWG 12 AWG 12 AWG 10 AWG 10 AWG 8 AWG 8 AWG 8 AWG
20–35 amps 12 AWG 10 AWG 8 AWG 8 AWG 6 AWG 6 AWG 6 AWG 4 AWG
35–50 amps 10 AWG 8 AWG 8 AWG 6 AWG 4 AWG 4 AWG 4 AWG 4 AWG
50–65 amps 8 AWG 8 AWG 6 AWG 4 AWG 4 AWG 4 AWG 4 AWG 2 AWG
65–85 amps 6 AWG 6 AWG 4 AWG 4 AWG 2 AWG 2 AWG 2 AWG 0 AWG
85–105 amps 6 AWG 6 AWG 4 AWG 2 AWG 2 AWG 2 AWG 2 AWG 0 AWG
105–125 amps 4 AWG 4 AWG 4 AWG 2 AWG 0 AWG 0 AWG 0 AWG 0 AWG
125–150 amps 2 AWG 2 AWG 2 AWG 0 AWG 0 AWG 0 AWG 0 AWG 0 AWG
AWG to Metric Conversion Chartcross sectional area
AWG Number Inch mm mm2
0 AWG 0.325 8.25 53.5 1 AWG 0.289 7.35 42.4 2 AWG 0.258 6.54 33.6 3 AWG 0.229 5.83 26.7 4 AWG 0.204 5.19 21.15 AWG 0.182 4.62 16.86 AWG 0.162 4.11 13.37 AWG 0.144 3.66 10.58 AWG 0.128 3.26 8.369 AWG 0.114 2.91 6.63 10 AWG 0.102 2.59 5.26
4

Connections
1. Fuse
FL250: ensure a 20 amp fuse is fitted, never fit a fuse with a rating higher than 20 amps.FL500: ensure a 25 amp fuse is fitted, never fit a fuse with a rating higher than 25 amps.
2. Power connections
Power cable
At least an 10 gauge cable should be used for both the power and the ground connections to theamplifier.The power cable should be taken directly from the battery. Rubber grommets should beused when passing through any bulkheads to prevent the cable from becoming chaffed ff or cut.
It is vital that a fuse / circuit breaker (of at least equal value to the one fitted on the amplifier) isplaced inline with the power cable and is no further than eighteen inches away from the battery.Please ensure that the fuse isn’t fitted until the entire installation procedure is complete.
FL250:FLI TRAP 10 activeFLI TRAP 10 active pinkFLI TRAP 12 active
FL500:FLI TRAP 12 twin active
5
Ground Cable
The ground cable needs to carry the same current as the power cable. Again at least and 10gauge cable should be used. The amplifier ground should be connected directly to the chassis ofthe vehicle, to bare metal (not painted surface). The cable length should be kept to an absoluteminimum.It is not recommended that you connect the ground cable to the vehicles seatbelts.
Remote Turn On
A minimum of 18 gauge cable should be used for this connection. The cable should be run withexactly the same care and attention as the power cable and taken back to the source and joinedto the remote cable provided on the head unit.If the headunit does not have a remote turn on cable then a 12v supply should be used. This willrequire a switch to be fitted inline to enable the amplifier to be turned on and off.
NOTE: Remember that if this switch is left on you will flatten the car battery.
3. Power/protection LED’s
When the amplifier is wired and installed correctly the green LED on the front of the amplifier willilluminate to indicate the amplifier is operating correctly.
If the amplifier is incorrectly wired or an abnormal situation occurs such as speaker cablesshorting the red protection LED will illuminate.
4. Crossover frequency control
This will allow you to set the frequency at which the amplifiers low pass filter will take affect. Thisis variable from 50 – 250 Hz. 50 Hz will produce only low frequencies (deep bass), 250 Hz willproduce low and higher, more punchy bass response.
5. Bass boost
This will allow you to boost the bass at a frequency of 45 Hz and is variable from 0 – 12dBPlease note – by boosting +12dB you are asking the amplifier to work 8 times harder.
6. Gain control
Used to match the input signal of the headunit to the amplifier. See the setup section for moredetails. Please note – the gain control is not a volume control it is a level match.
7. Low level input
For connection to any source with a low level output. Connect this to the RCA outputs on yourhead unit.
8. High level input
For connection to a source unit without low level outputs. Connect this to the front or rearspeaker wires ensuring that the polarity is correct.
6
Set Up SectionGain Control Setting
To correctly set the gain control of the amplifier to match that of the source (headunit) use thefollowing setup routine:
y gy g
Turn the gain control to minimum on the amplifier.
On the headunit set all crossovers to flat and both bass and treble to zero.
Turn up the source (headunit) to approx 3/4 volume.
Very slowly turn up the gain on the amplifier until distortion can be heard in any of the speakers or until the volume reaches an uncomfortable listening level when this is reached
y y p g p yy p g p y
turn down the gain control slightly.pp
The gain control is now set.
Crossover Setting
All FLI active enclosures come with a built in Frequency Control. This will allow you to set thefrequency at which the amplifier filter will take affect.It is variable from 50 Hz - 250 Hz. 50 Hz will
q y yq y y
produce only low frequencies, very deep bass. Whilst 250 Hz will produce low and higher punchyq y py p
bass frequencies. In the correct set up the bass should not be overly prominent, although somep y q y p p g pp y q y p p g
users may wish to have a bigger bass presence.q p
To set this correctly follow the following routine:
Firstly set the gain control correctly as described above.
Play a known piece of dynamic music through the entire system.
Use the Frequency Control to blend the frequencies from the subwoofer into the rest of thevehicle so that the bass coming from the enclosure disappears' or blends in with the rest of
q y qq y q
the car speakers.
The crossover is now set.
Troubleshooting
Before removing the amplifier, refer to the list below and follow the suggested procedures.
If in any doubt get help from a car audio installation expert or FLI dealer.
Amplifier Will Not Power Up. Power On Indicator Not Illuminated
Check for good ground connections. Ensure its connected directly to bare metal and not a painted surface.
gg
Using a multimeter check that the remote terminal has at least 10V DC.
Using a multimeter check that the battery voltage on the positive terminal is at least 12V DC..Check all fuses.
gg
Fuse Blown
Check both positive supply and ground for shorts.
Check that the positive wire is connected to the positive terminal on the amplifier.
Check that the negative wire is connected to the ground terminal on the amplifier.
FL250 - Ensure that the a 20 amp fuse is fitted
FL500 - Ensure that the a 25 amp fuse is fitted
7
In order to protect your purchase and aid yourwarrantey please register your product onlineand retain this manual for future referencewww.fliaudio.com/warranty
Model Number:
Serial Number:
Purchased From:
Date of Purchase:
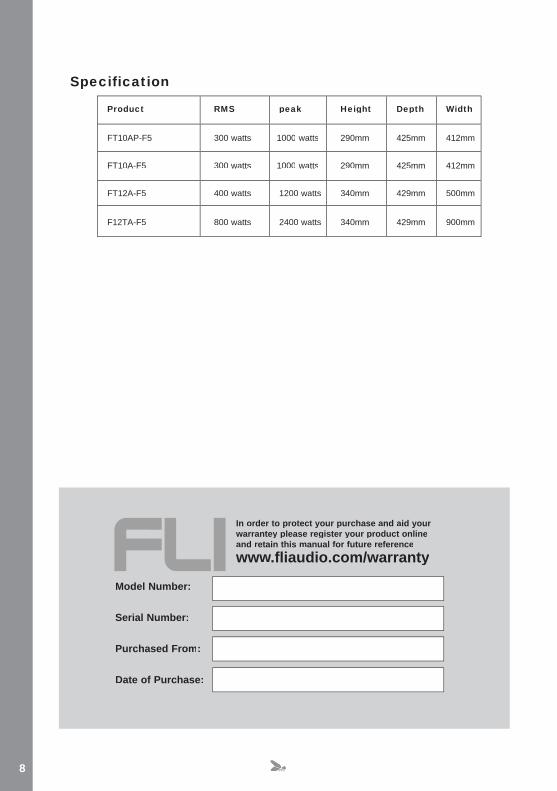
Product RMS peak Height Depth Width
FT10AP-F5 300 watts 1000 watts
1000 watts
290mm 425mm 412mm
290mm 425mm 412mm
429mm
429mm
500mm
900mm
FT10A-F5 300 watts
FT12A-F5 400 watts 1200 watts 340mm
F12TA-F5 800 watts 2400 watts 340mm
Specification
8

notes

notes
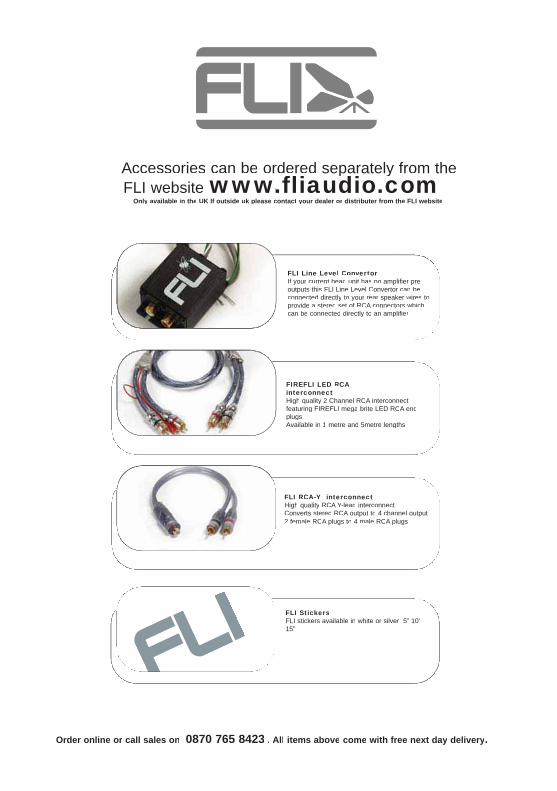
FLI Line Level ConvertorIf your current head unit has no ramplifier preoutputs this FLI Line Level Convertor ncan beconnected directly to your rear speaker wiresw toprovide a stereo set of RCA connectors whichwcan be connected directly to an fieamplifier.
FIREFLI LED RCAinterconnectHigh quality 2 Channel RCA interconnectfeaturing FIREFLI mega brite LED RCA endplugsAvailable in 1 metre and 5metre lengths
FLI RCA-YY interconnectHigh quality RCA Y-leadYY interconnectConverts stereo RCA output to 4 channel output2 female RCA plugs to 4 male RCA plugs
FLI StickersFLI stickers available in white or silver r 5” 10”15”
Accessories can be ordered separately from theFLI website www.fliaudi
pww o.com
Only available in the UK If outside uk please contact your dealer or distributer from the FLI website
Order online or call sales on 0870 765 8423 . All items above come with free next day delivery.

Accessories can be ordered separately from theFLI website www.fliaudio.com
Only available in the UK If outside uk please contact your dealer or distributer from the FLI website
Order online or call sales on 0870 765 8423 . All items above come with free next day delivery.
FLI Power CapacitorThe FLI powercap, a 1 farad, highspecification power capacitor is another greataddition to our range. This is an essential itemfor maximum power delivery.
10 Gauge FLI Wiring KitFor use with Car audio systems up to 1000watts. Kit contents:5 metre 10 AWG power cable 1 metre 10AWG ground cable 5 metre RCA interconnect 5 metre remote turn on cable 8 metre speaker cable Inline ATC fuse holder, 30 amp ATC bladefuse, Fitment pack,
AK8 – 8 AWG amplifier wiring kitFor use with Car audio systems up to 1500watts Kit contents:5 metre 8 AWG power cable 1 metre 8AWG ground cable 5 metre FIREFLI LED RCA interconnect 5 metre remote turn on cable 8 metre speaker cable AGU glass fuse holder, 60 amp AGU glassfuse, Fitment pack
AK4 – 4 AWG amplifier wiring kitFor use with Car audio systems up to 2000watts Kit contents:5 metre 4 AWG power cable 1 metre 4AWG ground cable 5 metre FIREFLI LED RCA interconnect 5 metre remote turn on cable 8 metre speaker cable AGU glass fuse holder, 80 amp AGU glass fuse Fitment pack
Stores added powerfor when yoursystem really
needs it
For use withStereo
amplifiersystems
For use with highpower stereo
amplifiersystems
For use with Bassamplifiersystems
Related Documents