ARCHIVES, FISHERIES AND MARINE SERVICE Translation Series No. 3287 Collecting and processing of diatoms.including details mn examination and culture methods • , • by Friedrich Hustedt. • Original title: Vom - Sammeln und Praeparieren der Kieselalgen sowie Angaben ueber Untetsuchungs- und Kulturmethodeli From: Handbuch der biologischen ArbeitSmethoden, Emil Abderhalden,. Seçtion.XI, Chemische, physikalische und physikalisch7chemische Methoden zur Untersuchung des BodenS.und der Pflanze, 4(1> -199,1929 . . , . Trans.lated Department of the Secretary.of State of Canada Department of the Environment Fisheries and Marine Service, . Canada Centre for Inland Waters Burlingtôn, Oni. 146 pages typescript ‘t 1974

Welcome message from author
This document is posted to help you gain knowledge. Please leave a comment to let me know what you think about it! Share it to your friends and learn new things together.
Transcript
ARCHIVES,
FISHERIES AND MARINE SERVICE
Translation Series No. 3287
Collecting and processing of diatoms.including details mn examination and culture methods
•
,
• by Friedrich Hustedt.
•
Original title: Vom - Sammeln und Praeparieren der Kieselalgen sowie Angaben ueber Untetsuchungs- und Kulturmethodeli
From: Handbuch der biologischen ArbeitSmethoden, Emil Abderhalden,. Seçtion.XI, Chemische, physikalische und physikalisch7chemische Methoden zur Untersuchung des BodenS.und der Pflanze, 4(1> -199,1929
. . , . Trans.lated
Department of the Secretary.of State of Canada
Department of the Environment Fisheries and Marine Service, . Canada Centre for Inland Waters
Burlingtôn, Oni.
146 pages typescript
‘t
1974

DEPARTMENT OF THE SECRETARY OF STATE
TRANSLATION BUREAU
MULTILINGUAL SERVICES
DATE OF PUBLICATIONDATE DE PUBLICATION
DIVISION MULTILINGUES
r&.-N -Ia$ 7TRANSLATED FROM - TRADUCTION DE
GermanAUTHOR - AUTEUR
Friedrich Hustedt
INTO - EN
English
TITLE IN ENGLISH - TITRE ANGLAIS
Collecting and processing of diatoms including detailson examination and culture methods
TITLE IN FOREIGN LANGUAGE (TRANSLITERATE FOREIGN CHARACTERS)
TITRE EN LANGUE ETRANGERE ( TRANSCRIRE EN CARACTÉRES ROMAINS)
Vom Samme]n und Praeparieren der Kieselalgensosvie Angaben ueber Untersuchungs- und Kulturmethoden
REFERENCE IN FOREIGN LANGUAGE (NAME OF BOOK OR PUBLICATION) IN FULL. TRANSLITERATE FOREIGN CHARACTERS.REFERENCE EN LANGUE ETRANGERE (NOM DU LIVRE OU PUBLICATION), AU COMPLET, TRANSCRIRE EN CARACTÈRES ROMAINS.
Handbuch der biologischen Arbeitsm.ethoden, 11uil Abderhalden, Ed.Section XI, Chemische, physikalische und physikalisch-chemischeMethoden zur Untersuchung des Bodens und der Pflanze, Part 4, Issue 1
AIIIIIIIIIIIIILFERENCE IN ENGLISF{ _ REFERENCE EN ANGLAIS
^.^Handbook of biological laboratory methods, Emil Abderhalden, Hd.Section 9, Chemical, physical and physico-chemical methods for-inye-sti rrag-sni 1 anrl plants- 'Part 4
PUBLISHER - EDITEUR
Emil Abderhalden, Ed.IIrban. & Schwarzenberg
PLACE OF PUBLICATIONLIEU DE PUBLICATION
Berlin and Vienna
YEAR
SECRETARIAT D'ÉTAT
BUREAU DES TRADUCTIONS
DIVISION DES SERVICES
ISSUE NO.
PAGE NUMBERS IN ORIGINALNUMEROS DES PAGES DANS
L'ORIGINAL
1 - 99ANNEE I I NUMERO
1929
REQUESTING DEPARTMENT EhvironmentMINISTÉRE-CLIENT
NUMBER OF TYPED PAGESNOMBRE DE PAGES
DACTYLOGRAPHIÉES
146
TRANSLATION BUREAU NO . 534612NOTRE DOSSIER NO
BRANCH OR DIVISION Inland Waters, O•C•I.W•I Burlington, TRANSLATOR (INITIALS) V.N.N.DIRECTION OU DIVISION lt• TRADUCTEUR (INITIALES)
PERSON REQUESTING l'ds PilÜnawrLi', G.L.B.L.DEMANDE PAR
YOUR NUMBERVOTRE DOSSIER NO
•ATE
ATE OF REQUESTDE LA DEMANDE
11. 04. 1974
VOLUME
NOV 18 ,Q74
UNEDiTrp ir A^ ► ^^-!'>'r^7N
For Ir{ ^: n^ntir.n 0:117
TRADt.lCT11)A1 ^ :^R•) ,.'J1SEE
S05-200-1 0•6 (REV. 2/68)
7 030-2 1-029-15333
' DEPAR.TMENT OF THE SECRETARY OF STATE
TRANSLATION BUREAU
SECRÉTARIAT D'ÉTAT
BUREAU DES TRADUCTIONS
MULTILINGUAL SERVICES
DIVISION
DIVISION DES SERVICES
MULTILINGUES
Pe441
QY(
4eee. CANADA.
CLI ENT'S NO. DEPARTMENT DI VISION/BRANCH CITY
N° DU CLIENT MINISTÉRE DI VISION/DIRECTION VILLE
Inland Waters Environment Burlington, Ont C.C.I.W.
BUREAU NO. LANGUAGE TRANSLATOR (INITIALS)
N° DU BUREAU LANGUE TRADUCTEUR (INITIALES)
534612 German V.N.N. NOV 1 8 1974
"Vom Sammeln und Praeparieren der Kieselalgen sowie Angaben ueber Untersuchungs- und Kulturmethoden,"
Handbuch der biologischen Arbeitsmethoden, Emil Abderhalden, Ed., Section XI, Chemische, physikalische und physikalisch-chemische Methoden zur Untersuchung des Bodens und der Pflanze, Part 4 7 Issue 1, J. - 99 7 1929
Collecting and processing of diatoms
including details on examination and culture methods
by
Friedrich HUSTEDT
Bremen
(With 33 Figures)
in: Handbook of biological laboratory methods, — Emil Abderhalden, Ed.
Section 9, Chemical, physical and physico-chemical methods for investigating soil and plants; Part 4, Issue 1 7 1 - 99 7 1929
Publisher: Urban and Schwarzenberg, Berlin and Vienna, 1929
UNEDITI:I) TRANSLATION
l'ot•
TRAD'JCTI.ON NC*1 PVSE
Information
Ili 111
SOS-200-10.-31
7530-21-025-5332
-2-.
I. Collecting of diatoms
if
The siliceous algae, diatoms or Bacillariaceae exist in small or large.
accumulations of water of all types. We will find these organisms on the glass
walls of greenhouses, in the saucers of flower-pots, on moist rock walls in
the mountains, in both running and stagnant waters, and in freshwater as well
as in seawater. Due to their usually abundant occurrence, these microorganisms
play a significant role in the metabolic events taking place in the waters.
Numerous species coat the muddy bottom of bodies of water with a brownish
layer; other one colonize the higher water plants, branches resting in the
water or rocks along the shores and banks. These organisms penetrate into moss
cushions and algal banks, and still other ones live as planktonic forms in the
free water, and this from the surface down to frequently considerable depths.
The coats found on glass walls or the forms living in flower-pot saucers can
be readi1y obtained with the aid of either a knife or a pipet; however, in
excursions leading further afield, we must, with regard to both equipment and
collecting methods, take into consideration the characteristics of the body
of water in question, the particular type of habitat of the diatoms, and the
aims of the investigation undertaken.
(a) Colleting equipment
1. A plankton net made of very fine silk gauze for collecting diatoms
floating freely in the water. In general, we will find in commercial nets that
the bag of netting, i.e. the filtering surface, is too small in relation to
the opening, so that a large part of material is again washed out during
towing of the net through the water. It is better to take a net with a long,
I
P
3
cylindrical bag-a so-called Zeppelin bag of netting-or have a net manu-
factured with a particularly long, conical bag. The bronze jar attached to .2.
the end of the net must have a bottom slanting toward the the center without
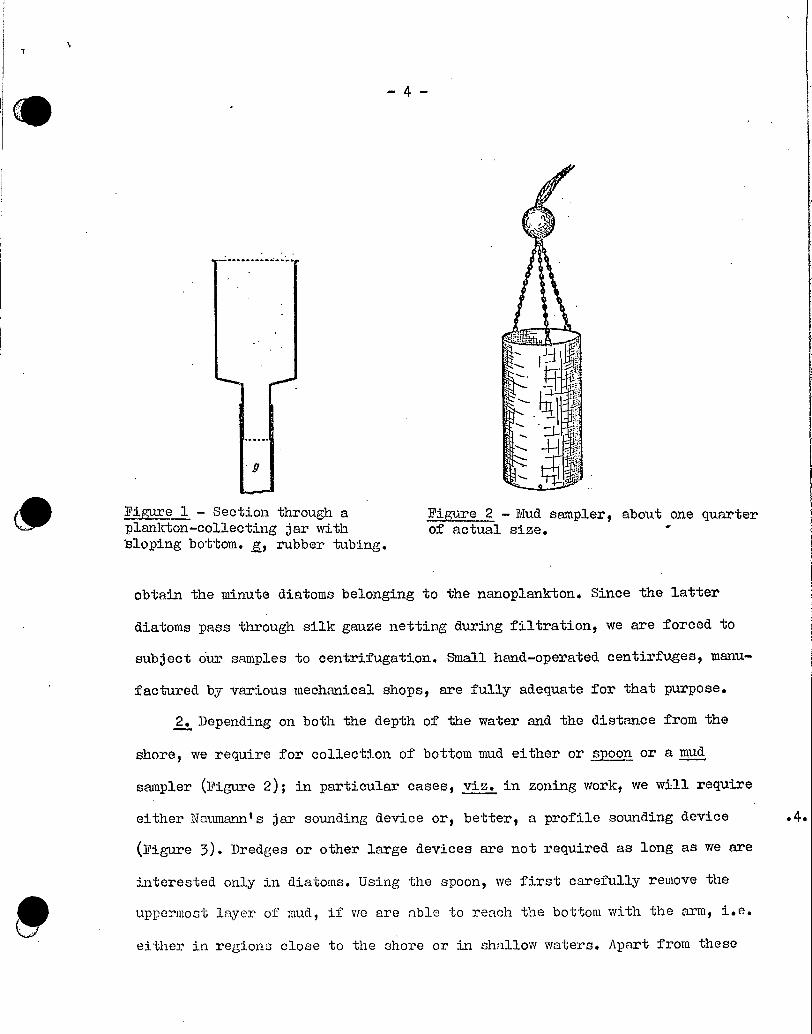
any projecting rime being present (Figure 1) in order to ensure that the
organisms caught are readily guided on into the collecting jar. Ebployment
of the common type nets from aboard a travelling steamer is not possible,
since the netting would tear immediately due to the great water pressure.
Special nets have been constructed for the latter purpose, which nets9 how-
ever, will not be discussed in the present context, since they are treated
better in a general chapter on the methods of plankton research. The plankton
tube constructed by Apstein^ too, can be used from aboard travelling steamers
only if a very long towing line is employed, so that the tube is towed in the
water at some considerable distance behind the steamer. If the towing line is
too shortg we will find that the tube dances about on the surface of the water
and no filtration is taking place at all. In order to collect plankton while
travelling on a steamer, it is best to use the ship's pump or a pail, but
hauling water with the aid of a pail from a travelling steamer also is not
an easy matter. The water obtained with the aid of either the pump or a pail
is filtered through a plankton net, and the organisms present can then be
removed.
In quantitative investigations, we must use either a quantitative net .3
or a ws.ter bottle for removing samples from the water; if the latter devices
are not available, we may filter a number of water samples hauled up with the
aid of a container of lazosa-i volume through the netting usually used. Samples
hauled up in that miazrier are absolutel,y required in esses where we wish to
4
11
.9
Figure 1 - Section through aplankton-collecting jar with"sloping bottom..g$ rubber tubing.
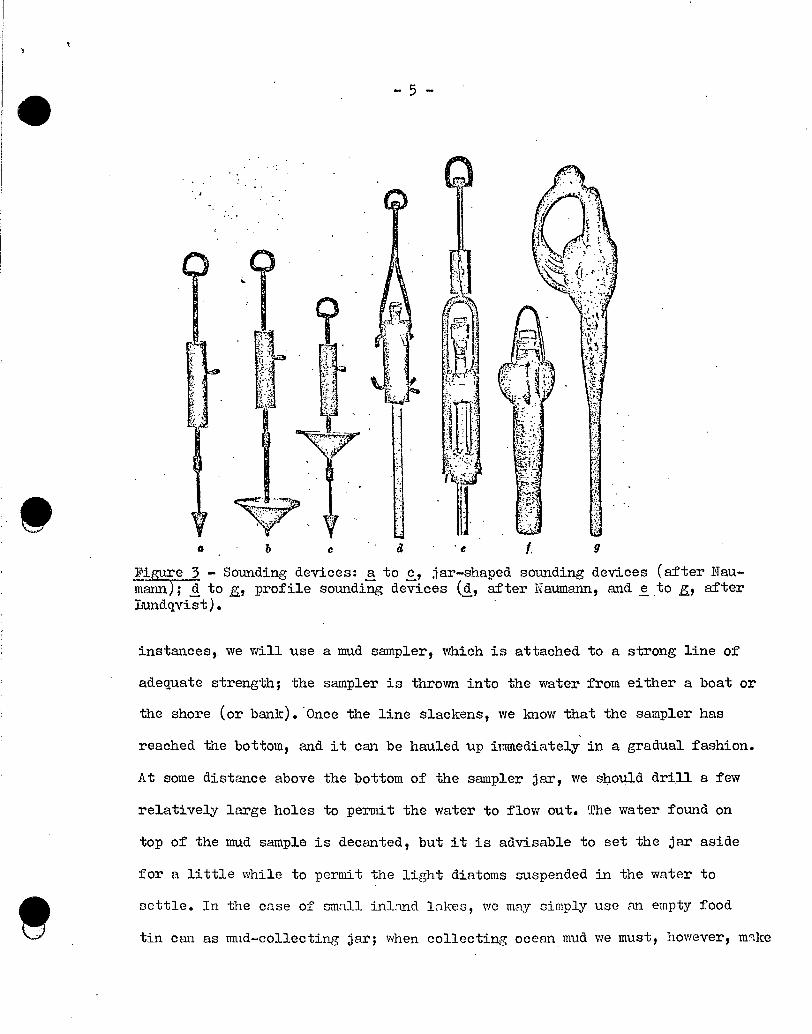
FiMIre 2 - Mud samplerg about one quarterof actual size.
obtain the minute diatoms belonging to the nanoplankton. Since the latter
diatoms pass through silk gauze netting during filtration, we are forced to
subject our samples to centrifugation. Small hand-operated centirfuges, manu-
factured by various mechanical shopsq are fully adequate for that purpose.
2. Depending on both the depth of the water and the distance from the
shore,.we require for collection of bottom mud either or spoon or a mud
sampler (Figure 2); in particular cases, viz. in zoning work, we will require
either NaLUm3nn's jar sounding device or, better$ a profile sounding device
(Figure 3). Dredges or other large devices are not required as long as we are
interested only in diatoms. Using the spoon, we first carefully remove the
uppermost layer of mud, if we are able to reach the bottom with the arm, i.e.
either in regions close to the shore or in shallow waters. Apa.rt from these
.4.
5
- d • .e a
Figure 3 - Sounding devices: a to c, jar-shaped sounding devices (after Nau-mann); d to profile sounding devices (d, after Naumann, and e to Ho after•)lundqvist).
instances, we will use a mud sampler, which is attached to a strong line of
adequate strength; the sampler is thrown into the water fram either a boat or
the shore (or bank)..Once the line slackens, we know that the sampler has
reached the bottom, and it can be hauled up immediately . in a gradual fashion.
At some distance above the bottom of the sampler jar, we should drill a few
relatively large holes to permit the water to flow out. The water found on
top of the mud sample is decanted, but it is advisable to set the jar aside
for a little while to permit the light diatoms suspended in the water to
settle. In the case of small inland lakes, we may simply use an empty food
tin can as mud-collecting jar; when collecting ocean mud we must, however, mke
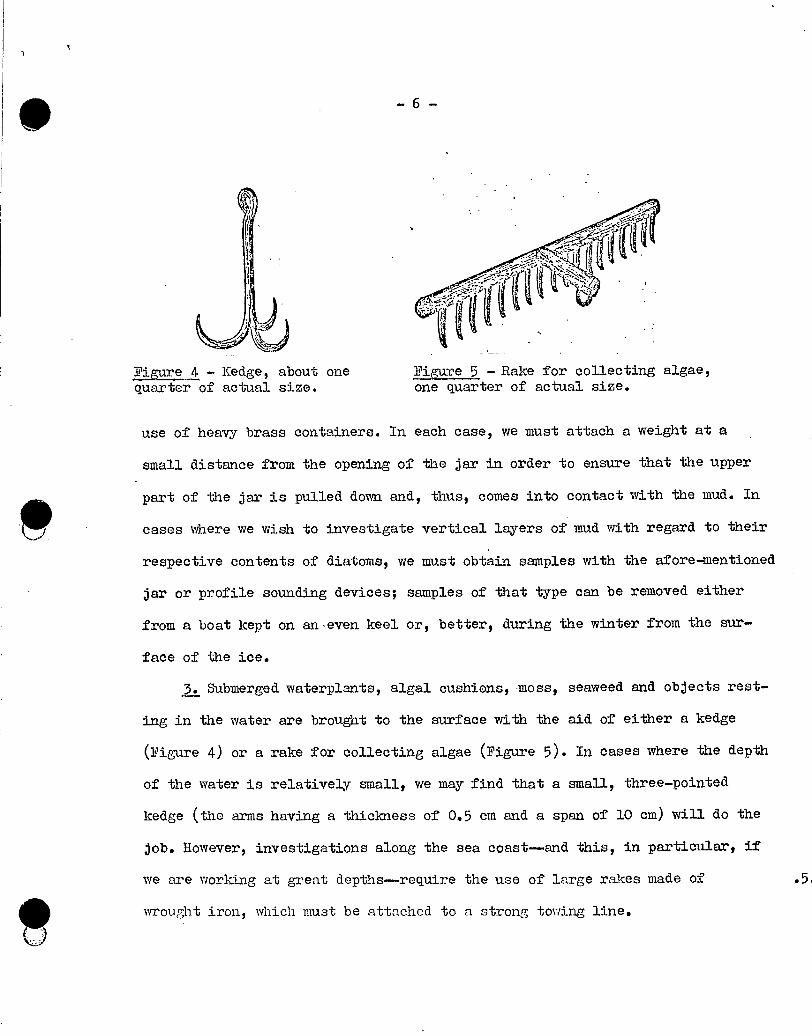
Figure 4 - Kedge, about one quarter of actual size.
Figure 5 - Rake for collecting algae, one quarter of actual size.
use of heavy brass containers. In each case, we must attaCh a weight at a .
small distance from the opening of the jar in order to ensure that the upper
part of the jar is pulled down and, thus, comes into contact with the mud. In
cases where we wish to investigate vertical layers of mud with regard to their
respective contents of diatoms, we must obtain samples with the afore-mentioned
jar or profile sounding devices; samples of that Lype can be removed either
from a boat kept on an.even keel or, better, during the winter from the sur-
face of the ice.
3. Submerged waterplants, algal cushions, moss, seaweed and objects rest-
ing in the water are brought to the surface with the aid of either a kedge
(Figure 4) or a rake for collecting algae (Figure 5). In cases where the depth
of the water is relatively small, we may find that a small, three-pointed
kedge (the arms having a thickness of 0.5 cm and a span of 10 cm) will do the
job. However, investigations along the sea coast--and this, in particular, if
we are working at great depths--require the use of large rakes made of
wrought iron, which must be attached to a strong towing line.
7
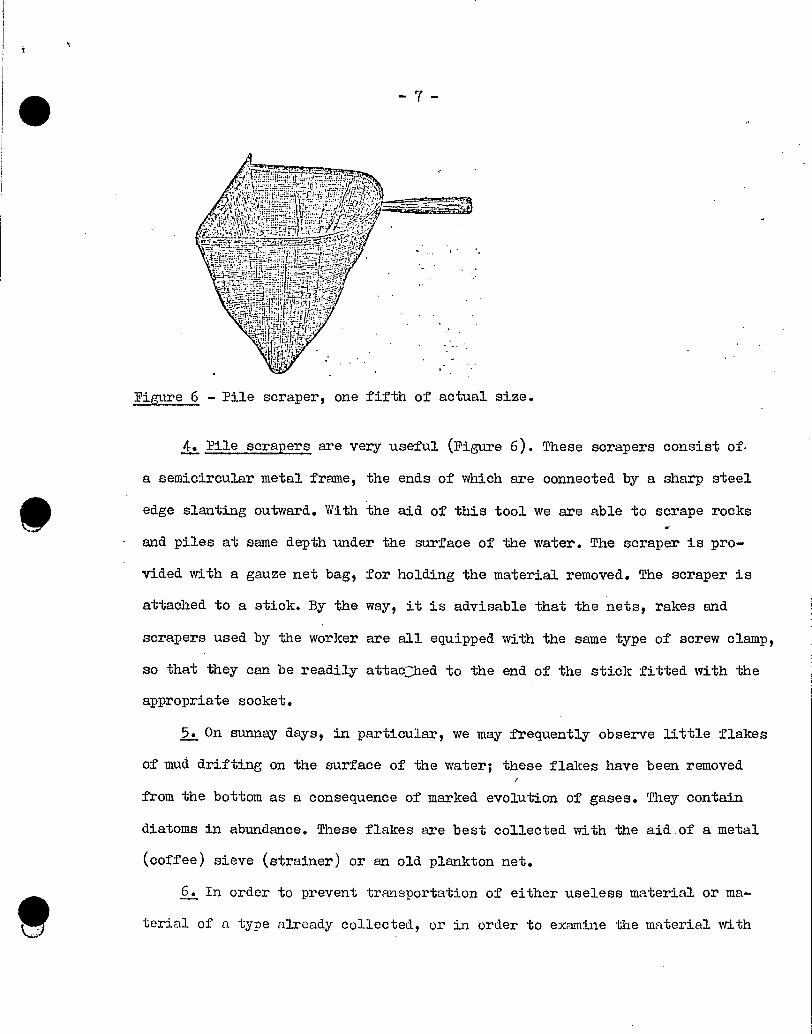
Figure 6 - Pile scraper, one fifth of actual size.
4. Pile scrapers are very useful (Figure 6). These scrapers consist of.
a semiciraular metal frame, the ends of which are connected by a sharp steel
edge slanting outward. With the aid of this tool we are able to scrape rocks
and piles at same depth under the surface of the water. The scraper is pro-
vided with a gauze net bag, for holding the material removed. The scraper is
attached to a stick. By the way, it is advisable that the nets, rakes and
scrapers used by the worker are all equipped with the same type of screw clamp,
so that they can be readily attaa2hed to the end of the stick fitted with the
appropriate socket.
5. On sunnay days, in particular, we may frequently observe little flakes
of mud drifting on the surface of the water; these flakes have been removed
from the bottom as a consequence of marked evolution of gases. They contain
diatoms in abundance. These flakes are best collected with the aid.of a metal
(coffee) sieve (strainer) or an old plankton net.
6. In order to prevent transportation of either useless material or ma-
terial of a type already collected, or in order to examine the material with
-8-
regard to its usability for later investigations-and this, in particular,
in the case of spore formation-and fix it in the appropriate manner, we
absolutely require an algal finder or a small field microscope. The time
expended in preliminary examination of material frequently is very well spent
due to the chance of making wider use of the samples removed; inapproriate
fixation may under certain circumstances make the most valuable specimens in
a sample useless for subsequent investigations. Furthermore, upon preliminary
examination we will be able, in the case of a rare finding, to obtain imme- .6.
diately additional samples of the rare material.
7. Fixative fluids. In general, we will use formalin during field trips,
adding a small quantity to the samples at a ratio of about 1 to 10. Unfor-
tunately, use of formalin entails the disadvantage that subsequent investi-
gations of both cellular contents and processes associated with nuclear divi-
sion can frequently no longer be carried out. For that reason, it is advisable
to carry also other fixative solutions on field trips, in order to use them
if indicated by the results obtained on preliminary examination of the material
under the field microscope. The reagents in question will be discussed further
below in the Section dealing with the examination of the cellular contents. We
have found it useful to divide the material removed into a number of small
portions, which are fixed with the aid of different solutions. Howeverg since
certain solutions are permitted to act only for a certain period of timeg we
must wash the samples after a while and store thetn in highly diluted alcohol.
8. For transportation of the collected material, we use the usual wide-
necked bottles, having a volume of about 20 ml., or collecting jars (tubes)
of correspondinL, size, measuring about 2 ctn in diameter and 10 cm in length,
9
which can be sealed with the aid of a well fitting cork stopper. In order to
facilitte rapid settling of diatoms fixed with the aid of special solutions,
we prefer glass containers with flat bottoms, which containers can be readily
put down. All samples are given into glass containers of these types and then
treated with the appropriate fixing solutions. A small label-it is advisable
to prepare a large number of labels in advance-is affixed at the same time.
The required data regarding the finding site and its characteristics are en-
tered on the label with a pencil or Indian ink. In some cases, it is adequate
to enter only a number on the label and to write a few preliminary notes into
a journal. However, it is always commendable to enter detailed data as soon
as possible on the label. The entries regarding the finding site should be as
who_jdetailed as possible; workersChave occasion to undertake studies from a per-
manent station should not omit to carry out-or to have someone else carry
out--a chemical analysis of the water.
When undertaking long field trips, where it may not possible to mail
samples back to the home laboratoty from time to time, transportation of
numerous glass containers is inconvenient and, frequently, impossible. In
these cases we have no choice but to give up subsequent investigation of cellu-
lar contents, and the samples will have to be transported in the dried state.
Following removal, we permit the samples to drip--wi.thout application of
pressure, and then give them into little boxes made of paper as strong as
possible; these baxes are folded in a certain manner. An adequate supply of.
these boxes can be taken out on field trips. In the filled state, the paper
boxes are best transported inside of a Vaater-proof bag. Instead of paper boxes,
we risy also use little powder boxes.
- 10 -
9. Workers wishing to collect fossil diatoms must make themselves ac-
quainted with the methods used in geology. On their field trips, they will
frequently be unable to do without hammer and chisel. Their samples are
simply wrapped in paper or packed into boxes. Small bags are advantageous in
these cases, since they do not tear like paper preventing the mixing of differ-
ent samples.
• (h) Systematic investigation of a whole area
If we become involved in the floristic investigation of a defined area,
it is best to use the corresponding ordnance survey maps as the basis for
work. With the aid of these maps, the worker visits all parts of the area
repeatedly and during different seasons, with all waters, brooks, rivers,
ponds and lakes--inciuding their inflows and outlets--being given appropriate
consideration; the effects exerted by inflowing wastewaters are to be given
particular attention. In sources and brooks,, we will find that moss cushions
and floating beds of algae, in particular, represent the dwelling sites of
certain diatomic species; we will frequently find similar forms along the
shore or bank zone and along the mouth of rivers; the mud formations found
in waters of the latter Lype permit us to expect abundant diatomic floras
only in quiet bays and creeks. We, thus, will find bottom-dwelling diatoms
chiefly in the mud of ditches, ponds and lakes; in the case of the latter
bodies of water, we must, however, pay particular attention to the higher
plants growing in the shore zone, since they are usually covered with an abun-
dance of adhering diatoms. True planktonic forms usually develop only in re-
latively deep waters, which exhibit a surface at least partially free from
higher plants. •

-11-
In moorland water holes, the worker should examine the light flocculent
mud and the mosses usually occurring in great messes along the edge. He will
soon find out that the Sphagnum ponds in our high-lying moors are usually
poor with regard to both species and individuals, while the greenland moors
and the Hypnum bogs give shelter to an abundance of diatoms
In the mountains, the worker--in addition to sources and bogs ueually
particularly rich in forms—should pay attention to the wet rock walls, which
eXhibit their characteristic species in gelatinous slime cushions and moss
beds. In the lowlands, we may occasionally encounter similar ecological con- .8.
ditions to exist in artificial rock grottoes, so that we may now and then
find forms in these grottoes, which otherwise are found only in the high
mountains. The altitude as such apparently plays no significant role for the
diatomic flora.
The detailed investigation of the diatomic flora of a given inland lake
requires much time and the taking of numerous samples. During all his fiel d.
trips, the worker should first collect the plankton in order to avoid that
littoral diatams get in large numbers into the plankton following work done
in either the mud or along the zone of vegetation close to the shore. Plankton
samples should be taken, if possible, at intervals of 14 days and, under cer-
tain circumstances, at intervals of eight days, i.e. during the main vegeta-
tion period. At different points along the shore, rocks—with or without over-
growth of filametous algae or Schizophyceae--are subjected to scraping with
a knife, and the wooden piles and the stonework of landing stages and brides
are worked over with a pile scraper. The zone of vegetation of the higher
plants is subjected to exmination in all its parts with regard to growth of
diatoms in relation to plant species, water depth, surf conditions and similar
-12-
factors. Using a sharp knife, the plant parts are cut below the Surface of
the water, and are then cut into small pieces for transportation in the
collecting jars. Zoning work is possible also in this instance, i.e. by
cutting the submerged stems of Phragmites into pieces of equal length and
then submitting each piece to separate examination. In the removal of bottom
samples, the workers starts from different points along the shore and dissects
the lake along several lines, taking mud samples at certain intervals. The
distance between the individual sampling sites depends on the peculiar cha-
racter of the belt of vegetation, the width of the shore edge, the slope of
the bank, both the depth and the size of the lake, etc. Close to the shore,
the individual sampling points should best be close together, while we can
hardly expect to find large differences within the open basin, since that area
is characterized chiefly by sediments from both the plankton and the shore
regions. For that reason we are permitted to take samples in the open basin
at relatively large distances. However, under certain circumstanCes, it may
well become necessary to take also out in the basin samples from sites located
close together; this would be the case, for instance, on finding certain pe-
culiarities at the bottom, like lake chalk beds, sudden transitions between
two individual mud types or striking differences in water temperature.
The work connected with ocean investiations is considerably more diffi-
cult than that done in the case of inland lake studies. In coasatl areas, the
individual worker will be able to make successful collections of material only
within the littoral flora to the extent that diatoms colonize either the rocks
and other objects there or the tidal mud flats. With respect to deep samples,
the workers depends on relatively large eauipment e which can be used only from
aboard ships specially equipped.for marine investigations. Individual samples,
-13-
E
to be sure, may be obtained now and then by removing the mud and ooze adher-
ing to ship anchors. There still exists another simple possibility for workers
residing in the inland to obtain material of oceanic diatoms from regions far
away viz. either by washing corals, sponges and shells from these regions or
by removing the contents of intestines from ocean fish and, in particular,
from holothurian species. For instance, it is possible to obtain truly well
shaped diatoms in large quantities from the southern Pacific Ocean or the
Indian Ocean, respectively, on dissecting Holothuria edulis LESS., which is
commercially available as trepang.
When collecting higher plants, we must take into consideration the
rarity of the object at a given site in order to avoid eradication at the
finding site; that aspect, however, hardly ever requires consideration in the
case of diatoms. For_that reason, the worker should cellect material in quan-
tities as large as possible or as required in order to have adequate material
on hand for subsequent investigation and preparation, and, in the case of rare
forms, to have a number of individuals adequate for determining their range
of variation and, also, for exchange with other scientists. Particular atten-
tion must always be paid to avoid mixing of material removed from different
finding sites.
II. Examination of cell contents
(a) Examination of living cells and of gelatine formations
Although numerous details of the structure of the interior of diatomie
cells can be ascertained only following fixing and staining, we are not per-
mitted to omit examinztion of the living cell. The original color, shape and
distribution of the chromatophores can be determine.with the geatest degree
-14-
rl
A
of certainty in fresh material; gelatine formations can also be examined very
well in living cells; and the aspects of locomotion of diatoms can be observed
only in living cells. Particular precautionary measures are required only in
the case of relatively large forms, which can be easily injured due to the
pressure exerted by the covering slip. In order to protect these forms, we
must insert either small pieces of a covering slip or fine glass filaments bet-
ween the slide and the covering slip, or attach small pieces of wax to the slip.
For investigation of the locomotory mechanism, it is best to give the cells
into an emulsion of Indian ink, which is prepared by either subjecting black
Indian ink to trituration or using highly dilued pearl dracring ink; sepia and
carmine also may be used for that purpose.
This type of 'embedding' in Indian ink emulsion can be recommended also
for examination of gelatine formations. The Indian ink particles do not
penetrate into the gelatine, so that there appears a light halo either around
the individual diatomic cell or between the cells. In addition to this indi-
rect staining, we will frequently require also direct staining of the cell. .1C
For the latter purpose, we may use most of the aniline dyes; particularly
instructive effects are produced by methylene blue, methyl violet, safranine,
bismarek brown, and gentian violet. A simple method for staining gelatine has
been reported by Naumnnn: An indelible pencil is dipped into the liquid. Di-
rect and indirect staining can also be combined, but are not permitted to be
carried out on the same slide, since the dyes frequently bring about floccu-
lation of the Indian ink. Direct staining is done first, using best a large
portion of the sample; thorough washing follows. The material prepared in
this manner is then added to the prepared Indian ink emulsion. Permanent
O - 15 -
specimens can be prepared in a similar manner by first staining glycerine
gelatine with Indian ink emulsion and then embedding the diatoms --their
gelatine having been stained by either direct or indirect means --in that
material.
In individual cases, we have been unable to demonstrate the gelatine in
either Indian ink emulsion or on direct staining--in distilled water, that
mass was also completely invisible due to its delicateness --although the
colonial adhesion of the cells indicated with certainty the presence of ge-
latine. In these cases, I have been able to make the gelatine visible by
letting the colonies dry on the slide, in the course of which the gelatine
underwent contraction and left filaments on the glass slide, which at that
point could also be stained.
11.2) Fixinz the cell contents
Numerous reagents and their different combinations have been proposed
for the fixation of cell contents; however, the successes obtained using these
fixatives are by no means always equivalent. For that reason, it is advisable
in experimental work not to limit one's approach to only one avenue, but to
divide the material in question into several portions and treat each one in.
a different way. Using that approach, the worker will be protected most safely
from failures; however, he usually will soon arrive at a point, where he, on
the basis of past experience, will prefer the one agent or the other one, and
will then content himself with the use of the method found to be best suited
for his purposes. Without regard to subsequent staining, one of the following
reagents will be mninly used for fixation of diatomic cells:
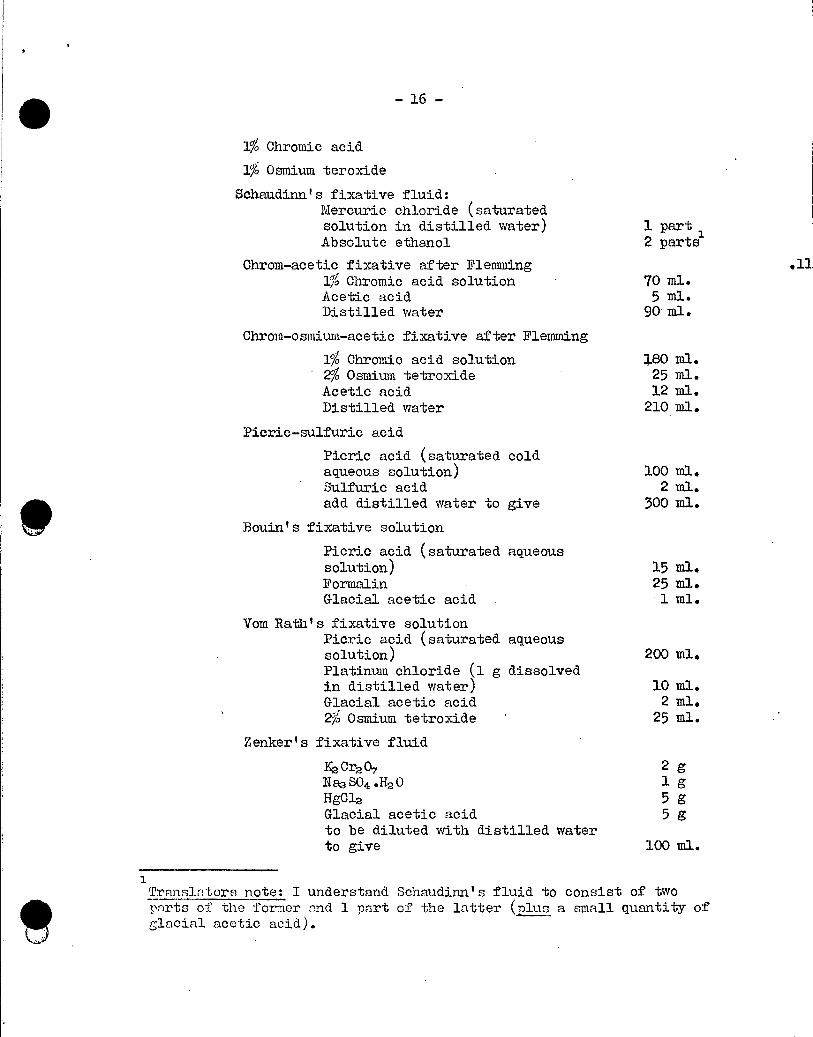
-16-
1% Chromic acid
1% Osmium teroxide
Schaudinn's fixative fluid: Mercuric chloride (saturated solution in distilled water) Absolute ethanol
Chrom -acetic fixative after Flemming 1% Chromic acid solution Acetic acid Distilled water
Chrom-osmium-acetic fixative after Flemming
1% Chromic acid solution 2% Osmium tetroxide Acetic acid Distilled water
1 part, 2 parte
70 ml. 5 ml.
90 ml.
180 ml. 25 ml. 12 ml. 210 ml.
Picric-sulfuric acid
Picric acid (saturated cold aqueous solution) 100 ml. Sulfuric acid 2 ml. add distilled water to give 300 ml.
Bouin's fixative solution
Picric acid (saturated aqueous solution) 15 m1, Foritalin 25 mi. Glacial acetic acid . 1 ml.
Vom Rath's fixative solution Picric acid (saturated aqueous solution) 200 ml. Platinum chloride (1 g dissolved in distilled water) 10 ml. Glacial acetic acid 2 ml. 2,% Osmium tetroxide • 25 m1.
Zenkerls fixative fluid
Ker2CLI 2 g Na2SO4 .H2 0 1 g HgC12 5g Glacial acetic acid 5 g to be diluted with distilled water to give 100 ml.
1 Translators note: I understand SchaudinnIs fluid to consist of two parts of the former and 1 part of the latter (plus a mall quantity of glacial acetic acid).
0
P
- 17 -
The material to be fixed is permitted to settle in a glass jar; the
supernatant water is carefully decanted; and the sedimen is covered with an
abundant quantity of fixative solution. The duration of exposure to the
fixative varies greatly depending on the fixative and the material, and it
may.be as long as 24 hours. The duration required to give satisfactory results
for a particular purpose will be found empirically. If exposure is too short,
fixation will be inadequte, and subsequent staining will be unsatisfactory;
exposure to fixative lasting too longg on the other hand, may under certain
circumstances destory fine cytological details. Once fixation is completed,
the fixative fluid is decanted, and the material, depending on the character
of the fixative used, is thoroughly washed$ and then transferred into alcohol
of gradually increasing concentrations.
In some casest the cellular wall will impede examination of the cellular
contents, so that its removal is advisable. For that purposeq the fixed and
hardened cells are exposed to diluted hydrofluoric acid, which completely
dissolves the siliceous'membrane. This process of dissolution must be checked
under the microscope. In this connection, attention must be paid to give ade-
quate protection to the frontal lens of the objective by means of a covering
slip.
(c) Specific examination and staining of individual cell components
(1) The nucleus - In the majority of diatoms, it is possible to observe
the nucleus already in the unstained state, but the fine structural details
and, in particular, the behavior of the nucleus during the course of multi-
plication can be discerned only following careful fixing and staining. The
division of the nucleus is frequently bound to certain times of the day and
-18-
usually takes place during the early Mcrning or dUring the night hours. In
order to obtain phases undergoing division in the natural environment, we .
must collect material at different times of the day, and cultures must be
checked also during the night. Mixtures containing picric acid or osmium
tetroxide as well as mixtures of mercuric chloride and ethanol are best suited
for fixation of nuclei; hematoxylin and hemalum stain are particularly suited
for staining of nuclei. Geitker obtained excellent results on fixing with
mercuric chloride-ethanol, Flemming's fluid or Baumgaertells picric acid-mer-
curic chloride-ethanol-hemalum solution, and subsequent staining with Heiden,
hain's iron hematoxylin e hematoxylin after Delafield and Mhrlich, and safranin
and light green. Staining with safranin and light green is particularly ad-
vantageous for detection of auxospore formation, since even the earliest
stages reveal their presence by the red staining of their gelatine: The stained
material is taken through a series of ethanol solutions of increasing concen-
trations in clove oil and transferred to xylene in order to be embedded in
Canada balsam. -
In his investigations of the genus Synedra, Gemeinhardt employed the
following simple method: The material was treated for 12 to 24 hours with
Bouin's fluid. Treatment over shorter periods led to inadequate fixation, while
prolonged exposure to the fluid resulted in difficulties during wadhing and,
under certain circumstances, led to signs of maceration of the material.
Staining was carried out with the aid of a freshly prepared e solution
of hemalum in warm distilled water. If the material is transferred to the
staining solution immediately after washing, a period of 15 minutes will be
adequate for staining, and differentiation will not be required. However, if
the material hns been kept for sOme time in ethanol following fixation,
- 19 -
staining vill require twice that time. Mounting of the stained material is
carried out in the following manner: A small quantity of the material is placed
onto a coverslip with a drop of distilled water; immediately prior to the
latter-step, the coverslip had been cOvered with one drop of a 1010 gelatine
solution liquefied in a water-bath. Following thorouch mixing of the two li-
quids with the aid of a needle, the gelatine is permitted to reach the first
stage of congelation, whereupon the coverslip with the material is taken through
the series of ethanol solutions of increasing concentrations in clove oil,
transferred to xylene in order to be finally embedded in Canada balsam. In
order to prevent shrinking of the cell contents, it is advisable to increase
the concentrations of the series of ethanol solutions in a very gradual manner
and to use intervals of not less than five minutes. It has furthermore been
found to be useful td introduce a mixture of ethanol and clove oil prior to
the step of introducing the material into pure clove oil, because clearing
of the gelatine layer--having become opaque in ethanol--will then proceed more
rapidly in the pure clove oil.
Unfortunately, the chromatophores turn out to be very much in the way
during numerous examinations of the nucleus, since these structures are usually
strongly co-stained by the nuclear dyes and frequently completely mask the
nucleus due to their position.
2.The centrosome - Fixation of the centrosomes is also done in an advan-
tageous manner with the aid of osmium tetroxide-containing mixtures. Inten-
sive staining may be obtained with safranin and, to a lesser extent, with
hematoxylin. In order to stain these structures with safranin, the diatoms
fixed in Plemming's solution are treated, first, for ten minutes with a 2%
solution of potassium bichromate and, then, for five minutes with a 1%
-20-
solution of potassium permanganate, in order to be finally stained in an
ethanolic safranin solution. Following fixation in picric acid-osmium tetroxide-
platinum dhloride, Karsten obtained good results with the aid of eosin stain..
17i) The double rods or -plates - According to Heinzerling, these particu-
lar structures are best fixed in mixtures containing osmium tetroxide. Diluted
safranin solutions are particularly well suited for staining; exposure to the
latter solutions for several days results in a darkish red staining of these
structures.
.1.44.1232he chromatophores - The chromatophores are highly sensitive to all
fixatives and respond to careless treatment with changes of their shape. Intra , .14.
vitam examination is for that reason advisable above all other approaches. In
.the case of these structures, fixation with Bouints fluid or with mixtures
containing osmium tetroxide appears to be best suited. The frequently dis-
turbing dyes can be removed by prolonged treatment with either ethanol or
formalin. Most aniline dyes are suited for staining; following use of the
afore-mentioned fixatives, old hemalum, Dealfield's hematoxylin and acid fudhsin
. stain will give particularly good results.
(5) The pyrenoids - In many cases, it is possible to detect also the
pyrenoids already in the living cell; in other ones, however, complex staining
procedures are required in order to make these structures visible. Also in
this instance, mixtures containing osmium tetroxide or Bouin's solution are
best suited for fixation. Staining is done with the aid of eosin, methyl green-
orange, picric acid-nigrosin, and hematoxylin. The preparations must be left
in the solution for up to one week when using safranin for staining; however,
the results are not always satisfactory, since staining usually is rather in-
distinct.
- 21 -
(6)Fatt,y oils - In the living cells oil droplets are frequently mistaken
for volutin globules. Osmium tetroxide (251o) stains the oil droplets soon black-
ish-brown also in diatoms; red staining is the result of using Sudan III9
while naphthol blue stains these droplets steel-blue. The oil droplets are
dissolved in ethanolq ether, chloroform, benzene and xylene. Eau de Javelle
(aqueous potassium hypochlorite solution) does not dissolve these droplets,
nor are they stained by sulfuric acid. According to Heinzerling, the round oil
droplets, on treatment with 30% sodium hydroxide solution, acquire an angular
shape after about three hours, decrease gradually in size, and have disappeared
after five hours. It is not certain that the droplets are actually dissolvedt
so that there arise doubts regarding their composition due to the indistinct
saponification.
(7) Volutin (Buetschli's granules) - In living cells, the volutin globu-
les can be stained reddish-violet with the aid of highly diluted, aqueous
methylene blue solution, and brownish-red, with bismarck brown. Volutin is
best fixed with mixtures containing picric acid; they are counterstained with
diluted hematoxylin. According to Meyer, most distinct staining is achieved
with the aid of inethylene blue (1:10) and subsequent differentiation using
1% sulfuric acid. That procedure leads to destaining of the cellular contents,
while.the volutin remains darkish-blue. Preceding fixation with osmium tetr-
oxide gives the same result. In order to dissolve the volutin, the worker .15
applies light pressure to the covering slip during observation squashing the
living cell; the surrounding water is adequate at room temperature to bring
about disappearmce of the volu-tin. Squashing of the cells is not required
when uoing concentrated nitric acid, 10,j (or stronger) soda solution or I;iillon's
reagent, since the latter solutions penetrate into the cells and there dis-
solve the volutin.

- 22 -
8. l,iembrane components - Liebisch's recent investigations have revealed
the presence of a particular membrane in the forms investigated by him in that
regard. According to the reactions obtainedq this membrane consists of a pectic
substance and is attached directly to the inner surface of the siliceous shell.
Treatment of the cells with chloral hydrate led to the rupture of the outer
belt-band together with the corresponding shell. Killing of the cells with
the aid of diluted hydrochloric acid and brief boiling on the slide, subse-
quent washing, and staining with methylene blue leads to intensive blue staining
of the inner membrane; staining with safran-in reveals an orange-red inner mem-
brane. Staining with ruthenium red results in intensive red staining of the
membrane. Both hematoxylin and gentian violett may also be used for staining.
All these staining procedures can be carried out on whole cells as well as
following treatment with 5 to 40;ô hydrofluoric acid (depending on the thickness
of the shell wall) to remove the siliceous shell. The latter procedure should
be carried out in a paraffin dish, since that acids attacks the glass slide.
After treatment, the cells must be well washed. If we wash the crude material
well with distilled water, transfer it for a while to ferric sulfate solution
and-following a further washing-on to a solution of potassium ferrocyanideq
we will obtain blue coloration of the membrane due to the formation of ferrie
ferrocyanide (Berlin blue), while the cytoplasmic components remain unstained
(yellowish to green).
(d) Preparation of permanent specimens of fixed or stained cells
The stained cells are best embedded in Canada balsam. They are therefore
tre3ted in the same manner as stained specimens are usually treated, i.e. they
are taken through a series of ethznol solutions of increasing concentration,

- 23 -
transferred to xylene and then embedded in Canada balsam. In order to avoid
shrinking of the cell contents, we should start the ethanol series at a very
low concentration and increase it only very gradually, at the same time per-
mitting the material to remain for a relatively long interval of time in each
solution. It is important that the final step is wholly anhydrous, since
otherwise clouding will appear on addition of xylene spoiling the preparation.
A disadvantageous aspect is occasionally encountered: During embedding in
balsam, indiviàual cells may shift their position to a greater or smaller
extent, and frequently will move completely over to the edge of the covering
slide. In order to avoid this occurrence, we must attach the cells before har- ,
dening to the covering slide, proceeding in the manner described on page 13
of the present paper, i.e. the diatoms are attached to the covering slip with
the aid of highly diluted gelatine solution, which is then permitted to reach
the first stage of congelation without undergoing drying. Next, the covering
slip together with the diatoms resting in the gelatine layer is taken through
the series of ethanol solutions for hardening of the material. Clearing of the
gelatine layer is brought about by the insertion of a clove oil step--also
mentioned already further above--between the ethanol series and transfer to
xylene.
In many cases it is desirable to examine embedded cells at some later
date, and this from the shell side as well as in the belt-band position.
Karsten has suggested to proceed in these cases in the following manner:
"The entire material of a haul or, in the case of relatively large quantiti-
ties of material, an appropriate part of the haul is rinsed in a flat glass
dish and then treated with water--mnde adequately antiseptic by addition of
a quantity of mercuric chloride as small as possible--which ià repeatedly
- 24 -
renewed until the fluid remains completely clear. The same type of aqueous
mercuric chloride solution represents the sealing medium for small plankton.
quantities taken up with the aid of a pipet. The covering slip is sealed air-
tight by means of a rim of viscous glycerine gelatine--also made antiseptic .
by addition of mercuric chloride--which is applied very rapidly. If the quan-
tity of liquid underneath the covering slip has been judged correctly, we
will find that there is enough space left to permit even relatively large
Coscinodiscus etc. cells to be turned about upon application of light pressure
at different points on the covering slip with the aid of a needle. The gelatine
mass is elastic enough to yield in a corresponding manner. Following storage
for several days, we will, however, find that a small quantity of water has
evaporated, so that the space available is reduced to some extent. However,
further evaporation can be prevented by complete sealing of the pi-eparation
with the aid of Canada balsam.
III. Purification of the shells
The detailed examination of the structure of the cellular wall and $ usu-
ally, already the taxonomie identification of the diatoms require embedding
in a highly refractive medium, which, in turn, requires removal of all organic
matter from the cells, in order to prevent that that matter will cause dis-
turbances in the frequently highly complex microscopic pattern. The process
of cleaning or purification can be carried out either by roastimig of the
material or by treating it with acids. Selection of the procedure to be an -
ployed in a given case always depends on the characteristics of the material
and the aim of the examination.
-25-
(a) Purification by roasting •
The roasting procedure, no doubt, is more convenient than the boiling
of the material in acids; since several samples can be processed at the same
time, the former procedure is more rapid, and the natural position of the
diatoms--in the case of colonial aggregation--is retained, i.e. that procedure
offers several advantages that cannot be underestimated. These particular ad-
vantages, however, are contrasted by a number of inconvenient disadvantages,
and these disadvantages make it impossible to limit purification in our in-
vestigations to roasting. In the case of highly contaminated material, we will
not attain the desired degree of purification by means of roasting; colonial
diatoms, as a rule, always eXhibit the same aspects; and, finally, a roasted
preparation does not provide an average impression of the diatoms present in
a given sample, since adequate mixing is not possible prior to the transfer
of material to the covering slip. The roasting procedure must be applied in
the following cases:
1. When the quantity of material is small --a quantity, Which would be
too greatly reduced on treatment with acids.
2. When we are dealing with delicate forms and, in particular, with
planktonic material, since forms of that type are destroyed by
the strong acids used in acid treatment.
3. When maintenance of the colonial aggregation is either desirable or
required for taxonomie identification or examination, respectively.
In the roasting procedure, the diatoms resting on the coverslip are
exposed to the effects of a flame, leading to the complete combustion of the
organic substances; apart from the siliceous shells of the diatoms e no
substances—and, in particular, no salts--present in the water are permitted
to remain, since such residues exert an extraordinarily disturbing effect on
- 26 -
the examination. Due to that strict requirement, it is necessary to wash the
material thoroughly and to replace the fluid with distilled water. The quan-
tity of distilled water must be such that it, on shaking of the material,
exhibits a slight turbidity. For roasting we select particularly thin covering
slips, which are first thoroughly cleaned, and this best by chemical means (of.
page 31 of the present paper). One drop of the diatom-containing fluid is
given on the cleaned covering slip and permitted to dry at a dust-free place,
with avoidance of vibration. Following drying, the covering slip is placed
onto a thin platinum or silver plate and heated to red heat. It is advisable
to use a relatively small flame and then heat for a little longer. On cooling,
the success.of the procedure is checked under the microscope; if necessary,
the procedure is repeated. A number of different devices are available for
holding the silver plate, two of which will be discussed in some detail in .18.
the present paper. The most simple device is a brass rod, measuring about
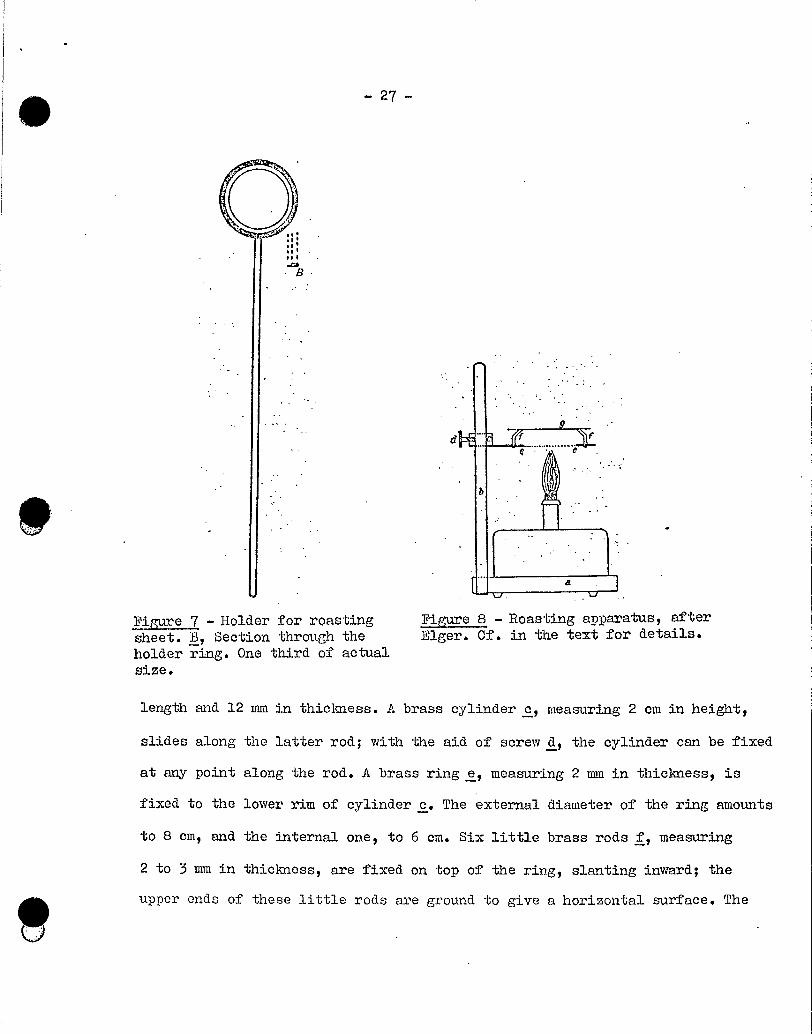
twenty centimeters in length, which is equipped at one end with a circular
loop or ring measuring-about two centimeters in diameter (Figure 7). The ring
is not of uniform thickness, but its inner edge is recessed, so that the sil-
ver plate can be inserted. The size of this apparatus is such that one cover-
ing slip can be subjected to roasting at a time. This method, however, has
several disadvantages, which are reflected, in particular, in the fact that
the covering slips either readily fuse with the metal or become bent. The
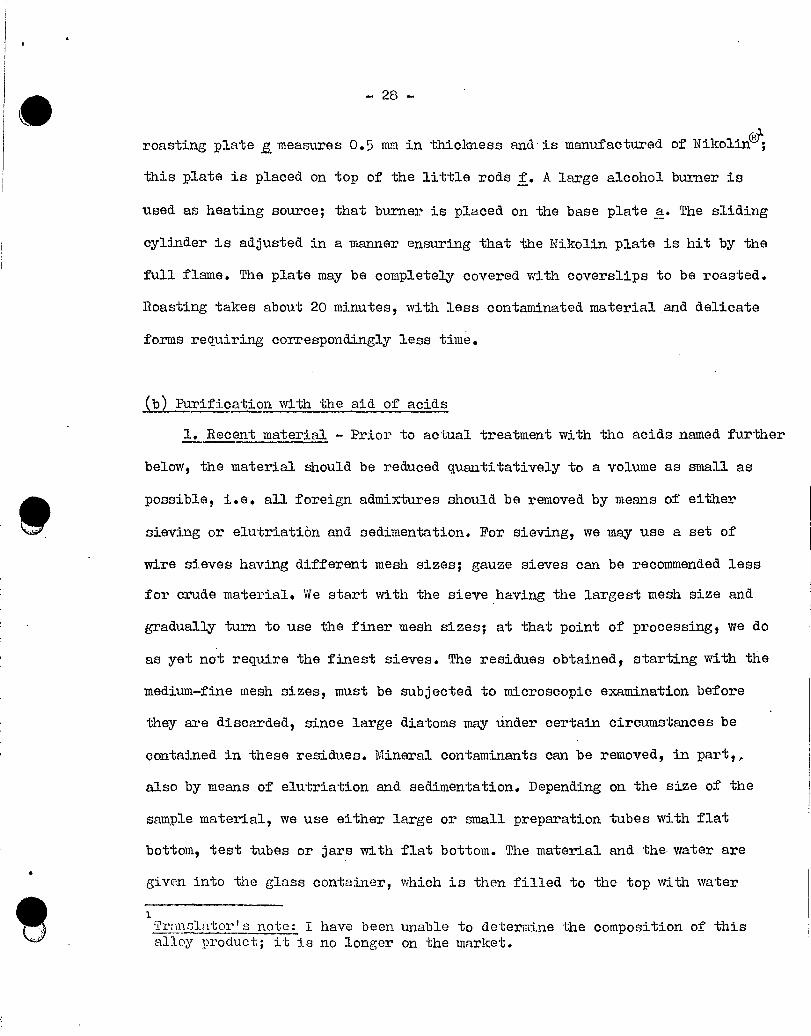
other apparatus (Figure 8) we have in mind is better, giving always reliable
results; its use also is less time-consuming, since several covering slips can
be subjected to roasting at the same time.
The iron plate a, meaouring about 12 cm in diameter and 12 mm in thick- .1c'^
ness, carries at a peripheral point a steel rod b, measuring about 18 cm in
-27-
Figure ?- Holder for roasting Figj=e 8- Roasting apparatus, after
sheet. B, Section through theholder ring. One third of actualsize.
Elger. Of. in the text for details.
length and 12 mm in thickness. A brass cylinder c, measuring 2 cm in height,
slides along the latter rod; with the aid of screw d, the cylinder can be fixed
at any point along the rod. A brass ring e, measuring 2 mm in thickiess, is
fixed to the lower rim of cylinder c. The external diameter of the ring amounts
to 8 cm, and the internal one, to 6 cm. Six little brass rods f, measuring
2 to 3 mm in thickness, are fixed on top of the ring, slanting inward; the
upper ends of these little rods are ground to give a horizontal surface. The
O - 28 -
roasting plate A.L measures 0.5 um' in thickness and is manufactured of Nikolie;
this plate is placed on top of the little rods f. A large alcohol burner is
used as heating source; that burner is placed on the base plate a. The sliding
cylinder is adjusted in a manner ensuring that the Nikolin plate is hit by the
full flame. The plate may be completely covered with coverslips to be roasted.
Roasting takes about 20 minutes, with less contaminated material and delicate
forms requiring correspondingly less time.
(b) Purification with the aid of acids
1. Recent material - Prior to actual treatment with the acids named further
below, the material should be reduced quantitatively to a volume as small as
possible, i.e. all foreign admixtures should be removed by means of either
sieving or elutriatiàn and sedimentation. For sieving, we may use a set of
wire sieves having different mesh sizes; gauze sieves can be recammended less
for crude material. We start with the sieve . having the largest mesh size and
gradually turn to use the finer mesh sizes; at that point of processing, we do
as yet not require the finest sieves. The residues obtained, starting with the
medium-fine mesh sizes, must be subjected to microscopic examination before
they are discarded, since large diatams may ùnder certain circumstances be
contained in these residues. Mineral contaminants can be removed, in par-4,
also by means of eIutriation and sedimentation. Depending on the size of the
sample material, we use either large or small preparation tubes with flat
bottom, test tubes or jars with flat bottom. The material and the-water are
given into the glass container, which is then filled to the top with water
1 Trnnolator's note: I have been unable to determine the composition of this alloy product; it is no longer on the market.
- 29 -
and subjected to thorough shaking. Within a few seconds, the heaviest sub-
stances will reach the bottom, and the supernatant water can be decanted care-
fully into a second glass container. That process is repeated a number of
times, but the time for settling is prolonged each time, since the heavy sub-
stances are excluded gradually and only relatively light ones remain. The
microscopic examination of the settled sediment will reveal in each case whe- .20
ther a given sediment is useless and may be discarded or whether it Should be -
subjected to further processing; it will, furthermore, reveal whether puri-
fication has advanced to a satisfactory degree. The small mineral admixtures
cannot be completely removed using these procedures.
All mud samples must be treated with cold hydrochloric acid prior to
boding, and this until all effervescence ceases, i.e. the carbonate of lime
has been removed; continued presence of carbonate of lime would cpuse formation
of interfering crystals, which cannot be removed during the subsequent course
of preparative processing. Moss and algal cushions are washed in a similar
manner in acidified water, and only the residue is subjected to further treat-
ment. If they have dried in the course of time, the samples must be first
boiled in water until they have completely softened before they are treated
with acids. If that step is omitted, it may happen that the diatams are com-
pletely destroyed by the energetic effects of the boiling acid. If it turns
out that the dried mass is calcareous in character, we are able to attain its
disintegration by treating the mass with cold hydrochloric acid. In many cases
we will, however, find that neither boiling in water nor treatment with hydro-
chloric acid will bring us nearer to our goal; in these cases we must then
use the approach outlined further below for the preparative processing of
fossil samples (page 24 of the present paper).
- 30 -
The material prepared using this procedure or that one is given--in
portions not too large--into evaporating dishes or glass beakers; the super-
natant water is decanted after settling, so that the added acids are able to
act in a state as concentrated as possible. It is desirable to treat in a se-
parate manner the individual portions obtained on either sieving or elutria-
tion, since the preliminary purification steps have led not only to the re-
moval of the mineral admixtures, but also to a separation of the large and
the small diatomic forma; in fact, different treatment of these fractions
will be useful or even reQuired in the course of sUbsequent processing. De-
pending on the characteristics of the material, the following avenues should
be followed to attain final purification:
(e ) The materiaLl-in a state as anhydrous as possible--is placed into an
evaporating dish and boiled for about 20 minutes with an adequate quantity of
concentrated sulfuric acid. Potassium nitrate is added in small portions to
the still boiling acid until the mass is entirely clear. After cooling, the
acid is decanted careflilly, and the residue at the bottom containing the di-
atams is waahed thoroughly with distilled water (at first, the worker should
make litmus-paper tests until empirical experience will make these tests un-
necessary). The residue must appear to be white; mineral admixtures cause
relatively dark coloration. This method yields the best results and can al- .21
most always be employed—with the exception of the delicate forms.
The material is placed into either an evaporating dish or a glass
beaker and boiled for a minimum of 20 minutes in concentrated nitric acid;
after cooling, the material is thoroughly washed. In the case of this method
--wh#h can be considered only when dealing with slightly contaminated material
(overgrowth--we must watch that the acid does not evaporate completely. For
-31 -
that reason, it is best to boil with a low flame and, if possible, in a water-
bath; under certain circumstances, the glass beaker may also be covered with
a watch-glass.
(y) Delicate forms, from which we wish to remove only the cell contents,
are placed into a glass beaker; concentrated hydrochloric acid is then poured
over the material, and a small quantity of potassium chlorate is added. This
mixture is either exposed to the sun or placed on a warm heating plate. The
mixture is stirred from time to time with a glass rod. The chlorine decolorizes
and cleans the diatoms. This procedure requires continuous checking under the
microscope (using a coverslip:). This process takes several hours to days, and
for that reason may be better replaced by the roasting procedure. Following
adequate purification, this material, too, must be subjected to washing.
It goes without saying that these acid treatments cannot be carried out
in the open laboratory, since the fumes do severe injury not only to the opti-
cal instruments but also to the respiratory organs of the preparing worker.
For the purpose of acid treatment, we should therefore use a fume cupboard
or carry out the boiling process outdoors. However, frequently the worker
neither has available a fume cupboard nor do the external conditions permit
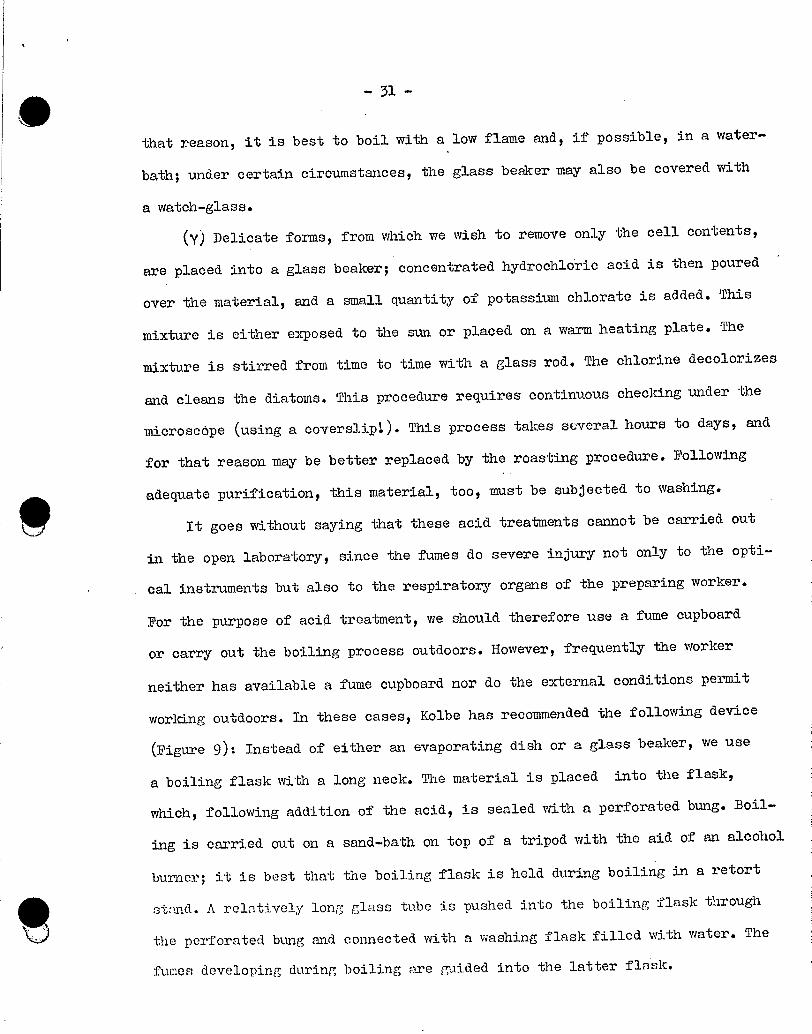
working outdoors. In these cases, Kolbe has recommended the following device
(Figure g): Instead of either an evaporating dish or a glass beaker, we use
a boiling flask with a long neck. The material is placed into the flask,
which, following addition of the acid, is sealed with a perforated bung. Boil-
ing is carried out on a sand-bath on top of a tripod with the aid of an alcohol
burner; it is best that the boiling flask is held during boiling in a retort
st;ind. A relat:ively long, glass tube is pushed into the boiling flask through
the perforated bung and connected with a washing flask filled with water. The
fuies developing during boiling are guided into the latter flask.
-32-
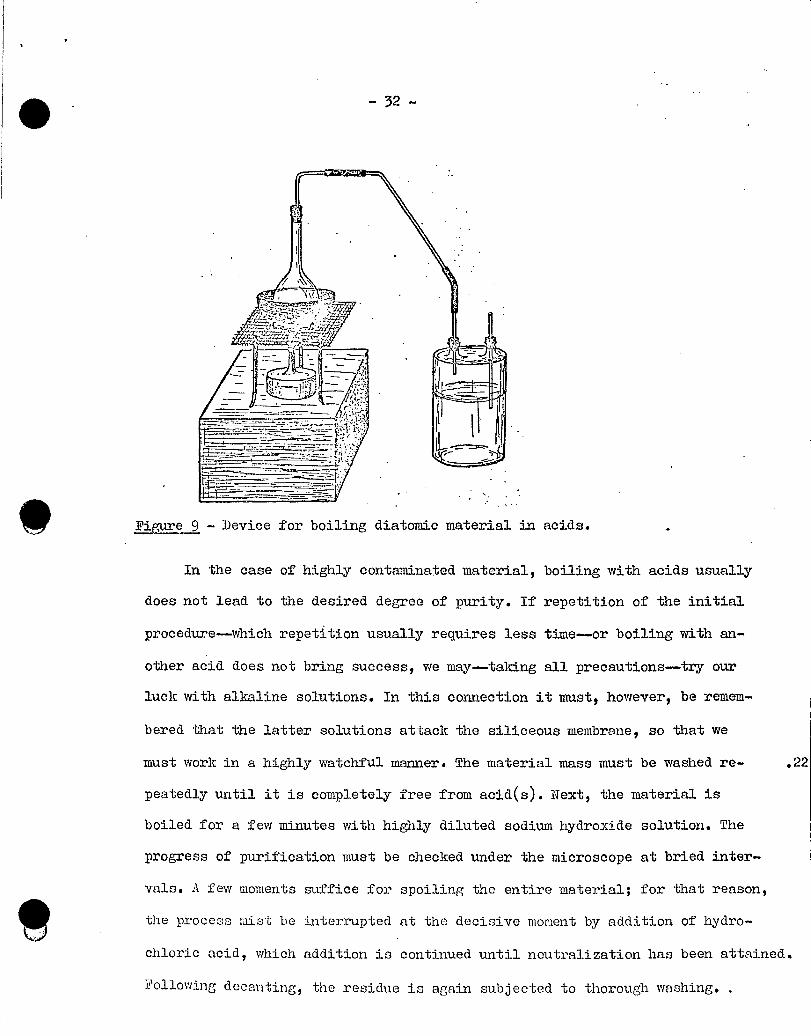
Figure g- Device for boiling diatomic material in acids.
In the case of highly contaminated material, boiling with acids usually
does not lead to the desired degree of purity. If repetition of the initial
procedure-which repetition usually requires less time-or boiling with an-
other acid does not bring success, we may-taking all precautions-try our
luck with alkaline solutions. In this connection it must, however, be remem-
bered that the latter solutions attack the siliceous membrane, so that we
must work in a highly watchful manner. The material mass must be washed re- .22
peatedly until it is completely free from acid(s). lZext, the material is
boiled for a few minutes with highly diluted sodium hydroxide solution. The
progress of purification must be checked under the microscope at bried inter-
vals. A few moments suffice for spoiling the entire material; for that reason,
the process mist be interrupted at the decisive moment by addition of hydro-
chloric acid, which addition is continued until neutralization has been attained.
Following decanting, the residue is again subjected to thorough washing. .
- 33 -
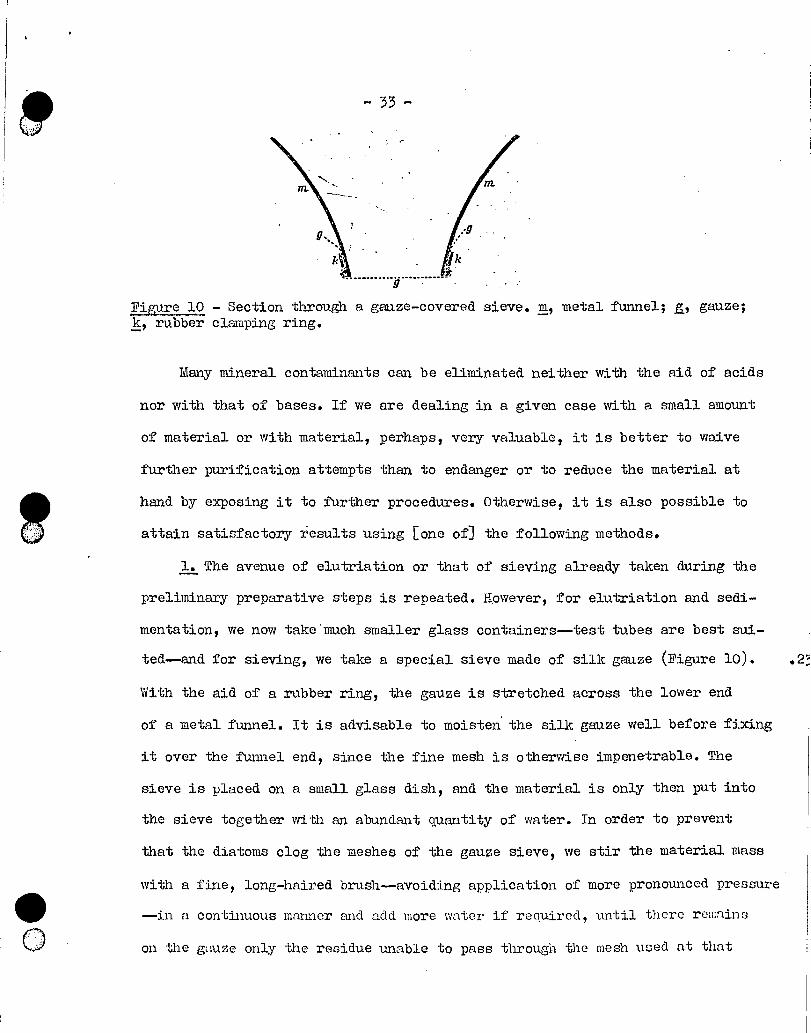
Figure 10 - Section through a gauze-covered sieve. m, metal funnel; gauze; k, rubber clamping ring.
Many mineral contaminants can be eliminated neither with the aid of acids
nor with that of bases. If we are dealing in a given case with a small amount
of material or with material, perhaps, very valuable, it is better to waive
further purification attempts than to endanger or to reduce the material at
hand by exposing it to further procedures. Otherwise, it is also possible to
attain satisfactory results using [one of] the following methods.
1. The avenue of elutriation or that of sieving already taken during the
preliminary preparative steps is repeated. However, for elutriation and sedi-
mentation, we now take . much smaller glass containers--test tubes are best sui-
ted--and for sieving, we take a special sieve made of silk gauze (Figure 10). .2
With the aid of a rubber ring, the gauze is stretched across the lower end
of a metal funnel. It is advisable to moisten'the silk gauze well before fixing
it over the funnel end, since the fine mesh is otherwise impenetrable. The
sieve is placed on a small glass dish, and the material is only then put into
the sieve together with an abundant quantity of water. In order to prevent
that the diatoms clog the meshes of the gauze sieve, we stir the material mass
with a fine, long-haired brush--avoiding application of more pronounced pressure
--in a continuous manner and add more water if required, until there remains
on the gauze only the residue unable to pass through the mesh used nt that
- 34 -
time. In the case of this particular procedure, we also start with the more
coarse gauze and continue with the more fine-meshed gauze types; the indivi-
dual fractions of the material are stored separately. The gauze netting Should
be thoroughly washed after each use.
2. If the quantity of sample material is too small for either elutriation
or sieving, we place the diatomic material onto a watch-glass with a little
water. Using one hand, the watch-glass is rotated. In the course of this mani-
pulation, the relatively light diatoms will rise to the surface in the form
of a delicate cloud above the more heavy contaminants. The watch-glass is then
slightly tilted, and the diatoms are removed with the aid of a pipet manipu-
lated with the other hand. The material obtained is then given into another
watch-glass and the procedure is repeated until the desired degree of purifi-
cation has been attained.
3. The most perfect method is found in the separation of the mineral
contaminants frum the diatoms with the aid of their respective specific gra-
vities. •
For that purpose we use Thouletts solution of potassium and mercuric
iodides in water with an excess of mercuric iodide. This particular solution
is prepared by adding--gradually and under continuous stirring or shaking--
red mercuric iodide to a saturated solution of potassium iodide in water;
addition is continued as long as the mercuric iodide undergoes dissolution.
The solution is then set aside for one day; during that interval a greyiàh
precipitate falls out. The supernatant solution is carefully decanted and
filtered through glass wool. The concentrated solution has a darkish wine-
yellow color and a specific gravity of 3.19. Prior to actual use, the specific
gravity of this solution is adjUsted to 2.3 by addition of water; that gravity
-35-
is reached when a little piece of mica sinks rapidly to the bottom, while a
small piece of alkali glass either floats or sinks only slowly to the bottom.
The diatom mass to be purified is given into the just adjusted solution and
well dhaken, whereupon the mixture is set aside. The mineral substances and,
in particular, the mica frequently present in abundance settle at the bottom
as sediment, while the lighter diatoms accumulate in the form of a delicate
skin at the surface of the solution. The diatoms are then separated by de-
canting, and, following washing, we obtain almost completely pure diatom material.
The relatively expensive solution can be brought back to the initial degree of
concentration by means of evaporation. Due to the extraordinary toxicity of
the solution, this procedure requires great precautions:
The preparation of marine mud or ooze samples is particularly laborious
and, frequently, does not give satisfactory results. In order to avoid wast-
ing uselessly both quantities of acids and valuable time, it is best to boil
the whole material--usually, only large quantities are worth the effort--in
either pure or slightly acidic water for a long period of time in order to
obtain thorough disintegration of the material mass. In the course of the
latter process, many organic admixtures are already dissolved into fine par-
ticles, which, during settling of the mass following boiling, remain suspended
in the water and sink only very slowly to the bottom. By means of repeated .
and extensive elutriation and sieving, the bulk of the material is greatly .
reduced, so that a quantitatively reduced, but otherwise enriched residue
remains at hand for the actual .acid treatment, which residue is best treated
first with nitric acid and then with sulfuric acid and potassium nitrate.
Apart from the marine mud snmples just mentioned, I have n standing rule,
viz., first, never to subject much material from one sample at the same time
-36-
0
to treatment, and, secondly, always to carry out the preliminary processing
work in a thor.ough manner. The quality of the final results obtained follow-
ing boiling with acids increases with the increasing effort expended on pre-
liminary elutriation and sieving. The pure yield of diatom-containing mass
usually appears to be very small, but very small quantities are also sufficient
for preparation of numerous specimens, so that we are able in most cases to
do with that small quantity.
2. Fossil material - In the case of fossil diatomic masses, we must dis-
tinguish between the earthy deposits (known under the names of fossil farina,
kieselguhr and infusorial earth) and the solid rocks. Dried mud samples, .25
which in some instances are as hard as rock, are given the same treatment as
rocks. All dry samples must-prior to boiling in acids-be converted into an
aqueous, semiliquid,-i.e. into a mudlike, state, if we wish to prevent des-
truction of the diatoms and, in particular, of the large diatoms. In the case
of farinaceous or readily disintegrating kieselguhr the desired state can be
readily attained by simple boiling in water; likewise, it is possible to
attain di+sintegration of calcareous rocks readily by placing them into diluted
hydrochloric acid and adding more acid at relatively long intervals of time,
until effervèscence no longer takes place, and the rocks have turned into a
pulpy mass. In cases where the rock contains little, or no, calcareous matter,
treatment with hydrochloric acid will fail, and we are then forced to utilize
a more laborious method, which involves the disintegration of the material by
means of the so-called freezing procedure. For that purpose, the completely
dr,y rock material-which is best exposed first to heat-is placed into a por-
celain dish, which is then filled with a hot, oversaturated solution of sodium
sulfate, which imnnediately penetrates into all, pores of the rock. The solution
- 37 -
e
is then permitted to cool at a site protected as well as possible from vi-
bration; after cooling, a few crystals of the sulfate are dropped into the
solution as seeds in order to induce crystallization of the salt. By means of,
repeated boiling of the mass-in the course of which the oversaturated solu-
tion is reporduced-and crystallization of the salt, the rock material will
become wholly disintegrated within a shorter or longer period of time and,
finally, be transformed into the desired pulpy mass. It goes without saying
that the salt must be washed out prior to further treatment and processing.
The subsequent preparation of the masses obtained using these methods is
carried out in the manner described further above in the case of recent material.
However, the worker will soon learn that the diatoms, in many samplesq are very
impure and encrusted with finely grained substances even after boiling with
acids. The substances consist largely of amorphous silicic acid, which maltes
examination of the diatoms very difficult, if not impossible. In order to free
the diatoms from these substances, we permit the diatoms to settle in a wide
test tube and then decant the supernatant water as far as possible. Strong
caustic ammonia (aqueous ammonia) is then poured over the residue, which is
covered in abundance leaving a small excess amount of ammonia. Following brief
stirring, the well sealed test tube is set aside for 24 hours and then filled
with distilled water. The liquid and the sediment are thorough shaken and
again set aside to permit the diatoms to settle. About two hours are required
for the siliceous shells to accumulate at the bottom, while the amorphous .26.
silicic acid either remains suspended in the water or sinks down to the bottom
only very gradually, causing the fluid to show millcy turbidity. The super--
natmlt fluid is decanted and replaced by distilled water, whicht following
uhtiking, will also appear to be highly -turbid. Vie again permit the materinl to
- 38 -
settle, and then, after two hours, again replace with distilled water, and
repeat these turns until the water after settling, i.e. at the latest after
two hours, remains completely clear. That method has been used first by Witt,
and gives good results also on the basis of the experience of the present
author.
(c) Storage of the purified material
The purified diatom-containing material is best stored in uniform collect-
ing glass vessels measuring about 8 cm in length and 8 mm in diameter; these
tubes must be sealed with a well fitting cork stopper. As storage solutions
we may consider distilled water with added formalin or alcohol. According to
my own experience, aqueous formalin solution is more practical than alcohol
and, furthermore, is considerably cheaper. The well sealed glass Pontainers
require no further care or attention, since practically no evaporation of
water takes place. On the other hand, it has been found that the cork stoppers
became soon leaky when.using alcohol, and the liquid then evaporates within
a relatively short period of time, so that the diatams dry out. To be sure,
this drying usually is not critical, since the diatams form a loose powder
after evaporation; in cases where the aqueous formalin solution has evaporated,
we, on the other hand, may find a solid mass, which .usually can be disinte-
grated only by means of further boiling in water. Diatams stored in the form
of dry powder, however, must be placed again into alcohol prior to processing
into preparations, and this must be done until the air has been expelled from
both the cells and the pores. In the case of extensive collections, we will,
thus, require rnther considerable quantities of alcohol. Diluted alcohol can
be recommended under no circumstances, since that liquid combines the dis-
- 39 -
disadvantages of aqueous formalin with the disadvantages of alcohol, without
possessing any advantages. Direct transfer of diatams from the alcohol-
containing storage vessel to the coverslip for preparation of specimens would
represent one reason to prefer storage in that liquid, but that procedure also
cànnot be recommended, as shall be demonstrated further below. Replacing the
commonly used absolute ethyl alcohol (ethanol), Debes employed absolute iso-
butyl alcohol (isobutanol), which is less volatile than the former alcohol;
isobutyl alcohol, however, is associated with the disadvantage that it is not
[is only slightly] soluble in water, so that transfer of the diatoms to dis-
tilled water must take place by way of common ethyl alcohol. Storage, further-
more, becomes considerably more expensive using isobutyl alcohol, so that it
11, appears to be best to stay with aqueous formalin solution when storing diatoms.
The storage containers are provided with a little label showing the per- .27
tinent data regarding the finding site etc.; these labels are either numbered
.in a continuous manner or the containers are arranged in accordance with geo-
graphical points of view. The containers are best placed into small cylindri-
cal cardboard boxes (without cover) measuring about 6 cm in height and 4 cm
in diameter, which are then kept in cupboards, so that the individual samples
can be readily retrieved and containers holding new samples can be readily
added. Very simple, but useful containers are obtained by cutting the boxes
containing electrical bulbs in half, pasting the bottom of the respective
halves to give them hold, and covering each half with paper.
permanent
Investigations of the structure of the cellular membrane of diatoms is only
rarely possible in water, but rather requires mounting in highly refractive
media and, occasionally, also preparation in air.
- 40 -
(a) Mounting media
In the course of the years, numerous media have been proposed for mount-
ing and embedding of diatoms; however, only a relatively small number has
gained practical importance. There are two aspects, in the first instance,
which determine the value of a medium: The refractive index and the durabi-
lity of the medium. In addition, we must take into consideration the consis-
tency, the ease of application, and the color or, better, the degree of color-
lessness. Unfortunately; at the present time there exists no medium doing
justice to all requirements, and for that reason we must in each instance ask
ourselves in the processing of material whether the product is to be a per-
manent preparation or only a temporary one for anatomical examination. In
oases of the latter type, it may be possible that the refractive index alone '
is of decisive importance; however, a permanent preparation is useless, if
it has been mounted in a medium having the proper refractive index, but will
fall prey to certain deterioration within a shorter or longer period of time.
Permanent preparations.have the purpose--during analysis--of maidng possible
identification of the dia-toms present in a given sample and, later one, of
serving as reference material. In most cases, these functions can be fulfilled
also in media not exhibiting a particularly high refractive index, but poss-
essing the advantage of durability compared to certain media having a more
desirable refractive index. In this connection, it goes without saying that
we, in the case of having available a number of media of about equal keeping
. quality, will select the one corresponding as far as possible also to the
other reauirements. Liquid media, even if they possess an acceptable refrac- .2E
tive index, must be excluded from use in the mounting of premanent preparations,
as a rule, nlrendy because it is very difficult in their case to determine
- 41 -
whether proper sealing has been achieved or not. We may furthermore find that
the diatoms initially attached to the coverslip will, under certain circum-
stances, shift their position in liquid mediat so that subsequent identifi-
of labeled specimens becomes illusory. Highly colored (usually yellow-cation
ish or brownish) mounting media are not good for the eyes in the long run-y-
a fact also stressed by Kolbe-and they, furthermore, exert a retarding effect
in microphotographic work. The views are divided with regard to the convenience
of the various substances used as media, and each worker must arrive at his
own conclusions on the basis of his own experience following experimental work
using the different media. Perhaps, the worker will then-as the present author
has-come to the conclusion that no substance possesses a universal advantage
as mediumg and will use in the one case this medium and in the next one that
medium depending on the characteristics of the material being processed.
Since we are dealing in this Section with the processing of permanent
preparations? I will be discussing only the mounting media useful for that
purpose, and will return to the other media in a subsequent Section dealing
with the investigation of the cellular membrane.
Canada balsam - Use of the otherwise commonly employed Canada balsam is
obsolete in shell preparations of diatoms^ since the refractive index of that
mounting medium is too low with n = 1.535, and also because it brightens the
siliceous wall too greatly. Howeverg because of the latter property, Canada
balsam may be recommended in cases where we are dealing with coarsely structured
or highly opaque forms. For instance, several Aulacodiscus species, due to
their granular coating, appear almost black in highly refractive media, andq
tiii.is7 can be raounted advantageously in Canada balsam. We use in these cases
a not too viscous solution in xylene or benzene. Durability of these prepa-
rations is indefinite; the thin lnyer of balsam is practically colorless.
Styrax balsam - Styrax balsam has a refractive index of n = 1.582 and,
for that reason, has displaces Canada balsam almost completely in the mount-
:Lng of diatomic preparations these last decades. Styrax balsam is also used
in either xylene or benzene solutions; Styrax balsam-mounted preparationsg too,
can be stored almost indefinietly, and this balsam is practically colorless.
Styrax balsam has the disadvantage that it hardens to an adequate extent only
after a relatively long period of time, so that the coverslip, under certain
circumstances, may shift after being placed on the slide. Actually, we are .29.
dealing in these instances with an error in the preparative procedure, because the'
Styrax balsam had not been thickened to an adequate extent prior to mounting.
If this balsam is handled properly, we will find that the afore mentioned dis-
advantage is reduced to a minimum, which is practically of no importance. The
styresin prepared after Witt gives somewhat better preparations. As solvents
for both Styrax balsam and styresin, we can also recommend turpentine instead
of either xylene or benzene, since turpentine is, less volatile and, using
that solventg air bubbles will be with certainty avoided in cells still intact.
Tolu balsam(Thomas balsam, opobalsam, resin tolu) - Tolu balsam reported-
ly has a refractive index of n= 1.640, but it exhibits a rather darkish color
(brown) already in the form of a thin layer.'The durability of the preparations
mounted in this substance is still open to question; preparations mounted by
the present author in 1922 are still in perfect condition at the present time.
A foinnation of crystal needles, mentioned by Kolbe, has so far not been observed
by the present author]. I have used in that case an alcoholic (ethanolic)
solution, rahich thickened greatly on the coverslipq so that the preparations
were so1_i.d rif-l•er plZcl.n(;.
--43-
Piperine mixtures - Piperine has,been i.ntroduoed into the techniques
of diatom preparationg in particular, by Van Heurck. Piperine has a high
refractive index of n = 1.68; in a thin layer, it is almost colorless and
shows good keeping quality. That substance, however, has the inconvenient
property of making the preparations useless due to crystal formation. For
that reason^ Van Heurck has mixed piperine with protective colloidst i.e#
crystallization-inhibiting agents, and selected as representatives of these
agents antimony bromide and colophonium. The mixture of piperine and antimony
bromide does possess a high refractive index (n = 1.7), but this medium exhi-
bits intensive yellow color also in the preparation, andq following its useq
we may, on somewhat careless heatings be easily faced with precipitation of
metallic antimon,y. Mixing piperine with colophonium reduces the refractive
index of piperine to n = 1.61 to 1.62; we furthermore find that the use of
the latter mixture is not particularly covenient due to foaming during heatingg
formation of gas bubbles, and frequent browning. For the afore mentioned reas-
ons, Kolbe and Wislouch made the attempt to replace the latter protective
colloids by a better agents and, after extensive experiments, arrived at
coumarone. According to Kolbe (1927). the piperine-coumarone mixture is pre-
pared in the following manner:
Piperine and pure, clear coumarone (in equal quantities, by weight) are
fused in a porcelain dish or crucible; it is useful to melt the piperine first
and then add the coumarine in small individual portions under constant stirring.
Following complete melting, heating of the product mass is continued until the .30
onset of gas-bubble formation. Duration and level of heating are of decisive
ii:"Port"ince for the quality of the medium finzlly produced. Once the mass has
cooled to about tiiickly liquid or viscous consistency, the product is poured-
- 44 -
in the form of individual drops--onto a small iron plate, where the droplets
soon solidify to form hard, clear pellets. Should it turn out that the pro-
duct mass is too viscous for the latter procedure, we may heat it again and .
repeat the procedure. One hardened droplet usually is adequate for mounting
two to four preparations, Kolbe has reported that the refractive index of this
mixture is n = 1.63 to 1.65, depending on both the duration and the level of
heating; on the basis of the experience of the present author, made with a
.sample kindly made available, it would appear that these data are correct.
A somewhat higher refractive index is attained when we, according to Kolbe,
add to the liquid mass red mercuric iodide in a quantity making up about one
thirtieth of the total wright; the iodide dissolves in the piperine-coumarone
mixture. However, if the proparation is too greatly heated during mounting,
there exists the danger that the mercury will precipiate in the preparation
in the form of very fine droplets, or that the iodide crystallizes out during
subsequent storage due to inadequate care taking during the preparation of
the mixture. Since the refractive index is only a little increased (to n =
1.64 to 1.65), it would appear to be advisable to eliminate the addition of
the iodide in favor of assured durability. This particular mounting medium
•should be stored in the dark and must, in particular, be protected from direct
exposure to sunlight, since it will otherwise became dark with time and acquire
a yellowish color.
Realagar - According to H.L. Smith, the so-called
IIyellow medium" has a refractive index of n = 2.2 to 2.4, so that this medium
represents-- with regard to that aspect--a perfect mounting medium for in-
vestigations of detailed structure. Unfortunately, it is very difficult to
prepare the proper mixture, and, for that reason, different workers have
O - 45 -
to different conclusions regarding the durability of the preparation s .
mounted in this medium. The fact that realagar is durable is evidenced by
several preparations in the possession of the present author --preparations
over 40 years old and still in good condition. The worker should use real -
agar (arsenic disulfide) completely purified by means of sublimation, and
dissolve it—With heating --in excess in antimony bromide, which, too, must .
be completely pure. Due to the development of highly toc gases, the latter
procedure must be carried out either outdoors or in a fume cupboard. The cooled
and filtered product mass shows a greenidh -yellow color and is of viscous
consistency. In order to improve the durability of the product, we may add
one sixth to one quarter part of sulfur (by volume), which is completely
dissolved on renewed heating of the product.
(b) Mounting of scattered preparations
Scattered preparations are preparations, which contain a mixture of di-
atoms from one sample Without definite arrangement; these preparations serve,
in the first instance, in the analysis of the respective finding sites. Speci-
mens of that type are prepared ueing round coverslips measuring 12 to 15 mm
in diameter and maximally 0.15 mm in thickness; coverslips of other shapes
and other dimensions are impractical for a number of different reasons. Puri-
fication of these specimens is best and most conveniently done by chemical
means, i.e. by boiling in a boiling flask for about fifteen minutes in con-
centrated nitric acid; washing in distilled water; removing all traces of
water with the aid of alcohol; and, finally, storing in pure sulfuric ether.
Por use, an appropriate quantity of material is withdrawn with the nid of
tweezers, and the sulfuric ether is permitted to evaporate on a copper plate,
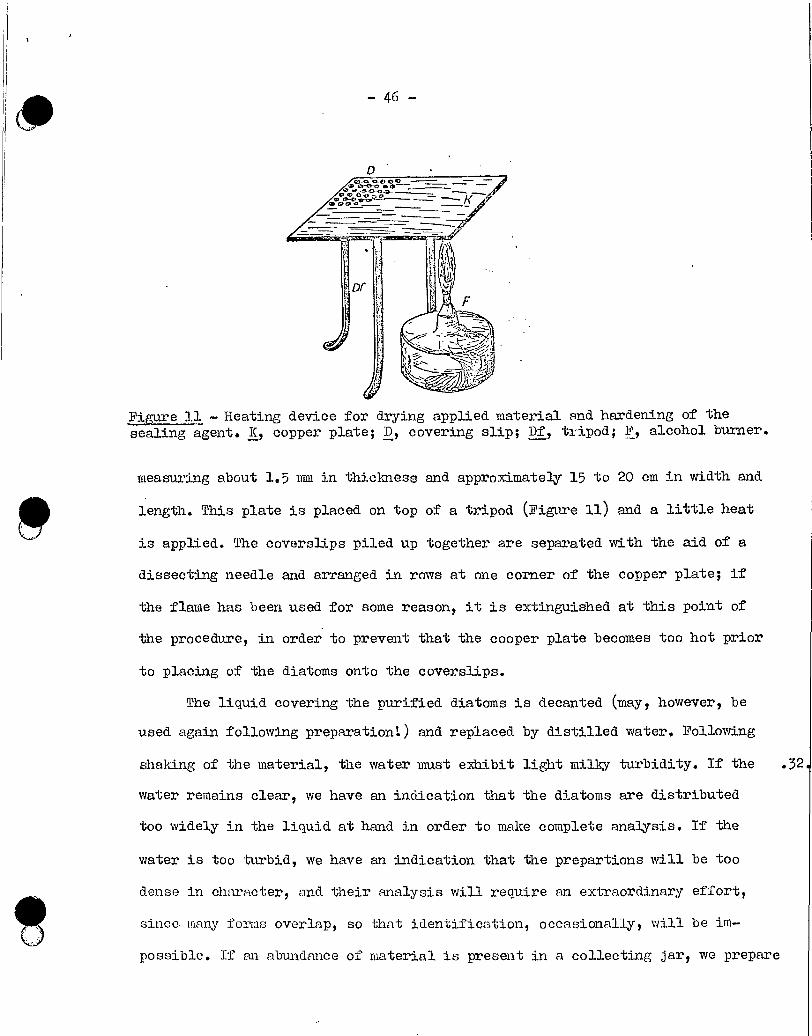
- 46 -
D
Xigure 11 — Heating device for drying applied material and hardening of the sealing agent. K, copper plate; D e covering slip; Df, tripod; F, alcohol burner.
measuring about 1.5 mm in thickness and approximately 15 to 20 cm in width and
length. This plate is placed on top of a tripod (Figure 11) and a little heat
is applied. The coverslips piled up together are separated with the aid of a
dissecting needle and arranged in rows at one corner of the copper plate; if
the flame has been used for some reason, it is extinguished at this point of
the procedure, in order to pre-vent that the cooper plate becomes too hot prior
to placing of the diatoms onto the coverslips.
The liquid covering the purified diatoms is decanted (may, however, be
used again following preparation) and replaced by distilled water. Following
Shaking of the material, the water must e±hibit light milky turbidity. If the .32
water remains clear, we have an indication that the diatoms are distributed
too widely in the liquid at hand in order to make complete analysis. If the
water is too turbid, we have an indication that the prepartions will be too
dense in character, and their analysis will require an extraordinary effort,
since, many forms overlap, so tâat identification, occasionally, will be im-
possible. If an abundance of material is present in a collecting jar, we prepare
U-4?-
a dilution for subsequent application using a separate glass container and
simply adding a small quantity of the orginal material to distilled water
with the aid of a pipet. Using the material diluted in this manner, we give
one drop-the proper quantity of which has to be established on the basis of
experience-on each coverslip, until the desired number of coverslips has been
served. It goes without saying that the pipet used for distribution must be
thoroughly washed after each use, in order to avoid mix.ing of forms from differ-
ent samples. In general, the worker should make it a rule to use always only
perfectly cleaned porcelain dishes or glass beakers for boiling as well as
well cleaned glassware and sieves for elutriation and sieving, since in-
attention in this regard has already created confusion more than once. Glass-
ware showing dried material resistant to cleanxng efforts should be discarded.
The liquid dropped onto the coverslips must evaporate. During that pro-
cess, we must avoid vibration as well as sudden, great heating, since both
these factors cause aggregations of diatoms at individual points, which later
on is disturbing. Apart from that, we must protect the coverslips from dust.
If administration of artificial heat is desired, we direct the gas or alcohol
flame to the corner of the copper plate diagonally opposed to the one carrying
the coverslips, in order to ensure very gradual heating. The number of cover-
slips.treated at one time should not exceed about twenty, since otherwise they
would come too close to the open flame. The overall procedure is somewhat more
simple, if we permit the material applied to the coverslips to dry overnight;
in that case, we may load the entire copper plate with coverslips. In orderto
avoid r.iix ups N,:hen several samples are being processed at the same time, the
worker should alernys arrange the coverslips on the copper plate in accordnnce
with an e.,tablished pattern, and then note in the journal only the sequence
rim of the coverslip, in association with a certain browning of the layert .33.
indicates that the sample applied still contained acid, while formation of
colorless crystals indicates contamination with either formalin or other types
of salt. In any one of these cases, we must subject the material to further
thorough washing and then apply it again. Before going ahead with the mounting
and embedding representing the next step in the overall procedure, the worker
must ascertain in an approximate manner the nature of the sample he has at
hand, in order to be able to make a decision with regard to the selection of
the mounting medium, if he does not prefer to mount all specimens in the same
manner and, if required later on, to perform special preparations of indivi-
dual samples for specific investigations. In any case, at this point, the
worker must set aside all those specimens, which do not tolerate mounting media,
and, thus, must be processed into dry preparations.
In order to protect the coverslips during drying against dust, we re-
conunend the use of the following device (Figure 12): A metal platet flat on
both sides and measuring about 8 mm in thickness and 12 cm in diameter, is
edL-.ed along the border to a depth of 4 mm and a width of 1.5 cm, so that the
conter part ILori7s a concentric plate rising 4 mm above the border zone. A tightly
fitting, removable brass jacket, measuring about 2 cm in heightt is placed
of the samples being prepared or the numbers assigned to the individual
coverslips. Following complete drying-artificial heating toward the end of
the drying process is always recommended-the coverslips must be clear up to
the rim and show no significant traces of the evaporated water. With some
experien.ce, the latter aspects can be judged already with the aid of the
naked eye; in doubtful cases, the coverslipsin question must be examined under
the microscope prior to mounting and embedding. Crystal formation along the
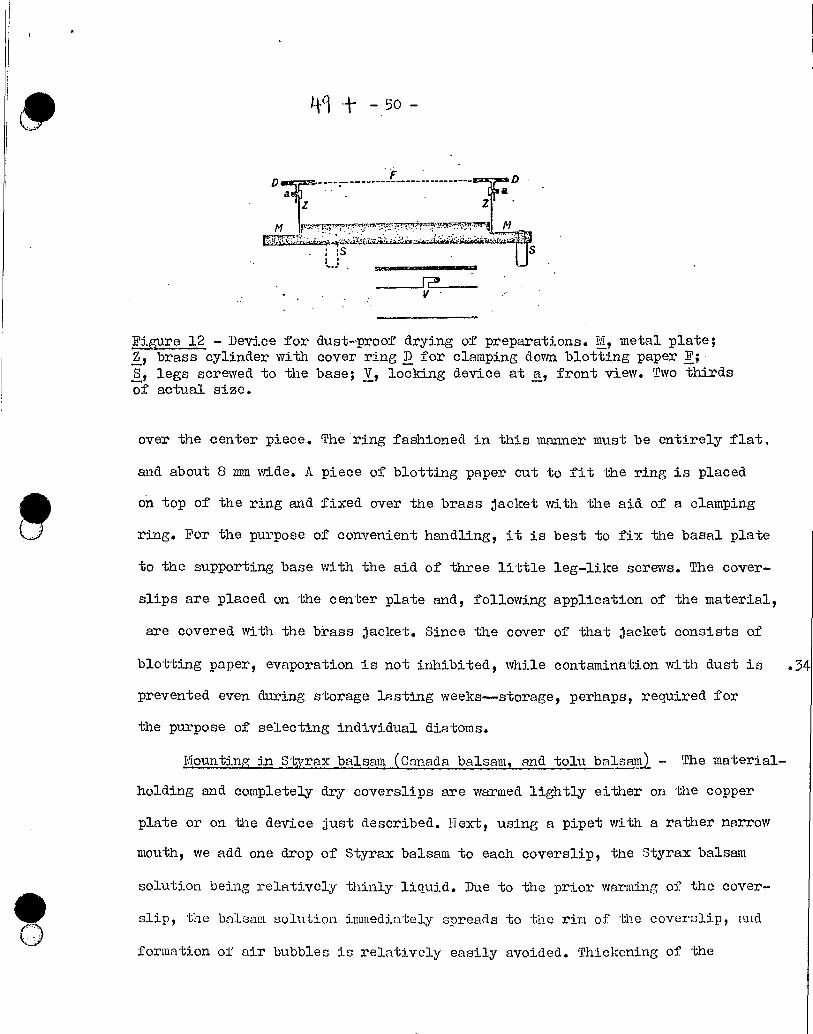
D a
- 50 -
V
Zr • Iv
Figure 12 - Device for dust-proof drying of preparations. 1'4 metal plate; Z, brass cylinder with cover ring D for clamping down blotting paper F; S e legs screwed to the base; V, locking device at a, front view. Two thirds of actual size.
over the center piece. The ring fashioned in this manner must be entirely flat.
and about 8 111!11 wide. A piece of blotting paper cut to fit the ring is placed
on top of the ring and fixed over the brass jacket with the aid of a clamping
ring. For the purpose of convenient handling, it is best to fix the basal plate
to the supporting base with the aid of three little leg-like screws. The cover-
slips are placed on the center plate and, following application of the material,
are covered with the brass jacket. Since the cover of that jacket consists of
blotting paper, evaporation is not inhibited, while contamination with dust is .34
prevented even during storage lasting weeks—storage, perhaps, required for
the purpose of selecting individual diatams.
Mountine in Styrax balsam Canada balsam and tolu balsam - The material-
holding and completely dry coverslips are warmed lightly either on the copper
plate or on the device just described. Next, using a pipet vith a rather narrow
mouth, we add one drop of Styrax balsam to each coverslip, the Styrax balsam
solution being relatively thinly liquid. Due to the prior warming of the cover-
slip, the bnloam solution immediately spreads to the rim of the coverslip, and
formation of air bubbles is relatively easily avoided. Thickening of the
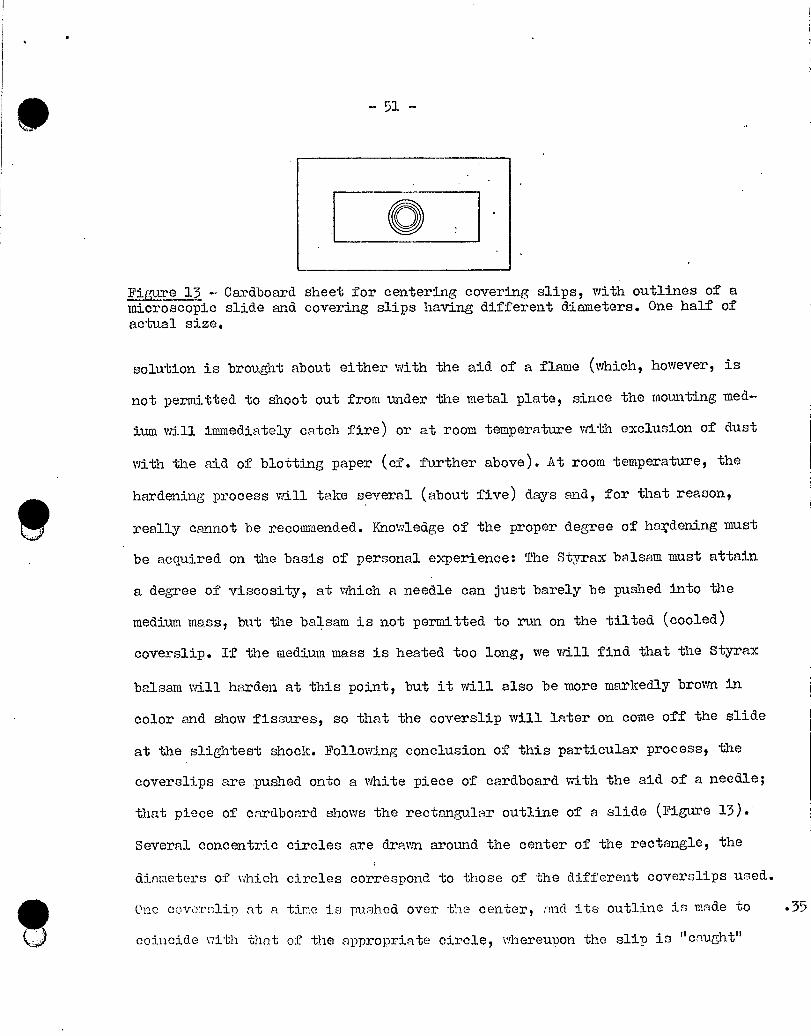
-51-
I!!!
Figure 13 - Cardboard sheet for centering covering slips, with outlines of a microscopic slide and covering slips having different diameters. One half of actual size.
solution is brought about either with the aid of a flame (which, however, is
not permitted to shoot out from under the metal plate, since the mounting med-
ium will immediately catch fire) or at room temperature with exclusion of dust
with the aid of blotting paper (cf. further above). At room temperature, the
hardening process will take several (about five) days and, for that reason,
really cannot be recommended. Knowledge of the proper degree of haeening must
be acquired on the basis of personal experience: The Styrax balsam must attain
a degree of viscosity, at which a needle can just barely be pushed into the
medium mass, but the balsam is not permitted to run on the tilted (cooled)
coverslip. If the medium mass is heated too long, we will find that the Styrax
balsam will harden at this point, but it will also be more markedly brown in
color and show fissures, so that the coverslip will later on come off the slide
at the slightest shock. Following conclusion of this particular process, the
coverslips are pushed onto a white piece of cardboard with the aid of a needle;
that piece of cardboard shows the rectangular outline of a. slide (Figure 13). -
Several concentric circles are drawn around the center of the rectangle, the
dinmeters of which circles correspond to those of the different coverslips used.
One covernlip nt n time is pushed over the center, and its outline is made to .35
coincide with that of the appropriate circle, whereupon the slip is "cnuCht"
-52-
on a carefully clenned glass slide. If proper attention is paid:to align the
edges of the slide with the outline drawn on the rectangle, the coverslip will
come to rest on the center of the slide--an advantage, which not only endows
the preparation with a professional appearance, but also is of practical im-
portance in the course of subsequent work. It is advisable to warm the slide
well prior to placing of the coverslip, since that precaution greatly minimises
the formation of air bubbles between the slide and the balsam layer. Once all
coverslips have been processed in this mariner, the preparations are exposed for
a brief interval to the action of a flame; for that purpose, the preparations
are placed on the copper plate--with the coverslip on top--and warmed until the
Styrax balsam has spread in a uniform manner to the edge of the coverslip. At
the same time, air bubbles possibly present will disappear. In the case of diffi-
culties with air bubbles, we may promote their disappearance by further heating
and dabbing of the coverslip with the aid of tweezers or a needle. However,
in all these manipulations, the worker should avoid application of more severe
pressure onto the coverslip, since large diatoms are exposed to the danger of
being crushed. I mention this point in particular, since certain workers in our
field have actually recommended the use of clamps, for the purpose of pressing
the coverslip and the slide together more or less strongly during heating, in
order to express the excess mounting medium mass along the sides of the cover-
slip. Clamps of that type should be used only when there exists no danger of
crushing or squashing large forms or if appropriate measures have been taken.
The excess mounting medium mass escapes also without application of pressure
on simple heating of the slide, but not more of the mass will escape than the
lare forma present in the preparation will permit. The excess material is re-
moved of ter cooling by scraping with a knife and rubbing with alcohol, ylcne
(P - 53 -
or benzene. ;7ith some experience, the worker, by the %vay, will soon be able
to judge the exact quantity of liquid Styrax balsam required and avoid excess.
The properly processed preparation will exhibit the following character-
istics:
1. The coverslip and the slide are arranged in parallel planes. A slanted
position of the coverslip can be readily corrected by applying light pressure
with a needle to the heated preparation, as long as that slanting is not caused
by the presence of some coarse admixtures. In the latter case, the material
must once more be subjected to elutriation, and the preparations has to be done
over again. In some cases, it will be possible, after heating, to lift the
coverslip eg ntl off the slide, in order to transfer it to another slide; the
relatively hea-rj sand grains usually remain on the former slide together with
a part of the mounting balsam.
2. The Styrax balsam forms an almost colorless layer as thin as possible
in correspondence to the size of the diatoms being processed; along the edges
of the coverslip, that layer slants down to the slide showing a uniform, co-
nical outline. Pronounced browning of the balsam indicates that heating was
too strong during thickening.
_3. After cooling, the coverslip is so firmly attached to the slide that
examination of the preparation is possible immediately also V^ri.th immersions,
vritnout that shifting of the coverslip has to be feared. Should that not be
the case in the mounted preparation, we have an indication that thickening
has not taken place to an adequate extent, i.e. we are dealing with an error
in the procedure, e;hich can be r4ndily rectified, and which, with some ex-
per:lcncc, will :.ooti be .-1tiroided by the ',,or'•..er. Prep -irations e^::libitin g the
latter def:i.ciencq are best heated to m de`ree perai.ttin; ready rerioval of the
-54-
coverslip with the aid of a needle. The coverslip is then placed again on the
copper plate; if required, an additional drop of balsam may be added, and
thickening is promoted by active means to a correspondingly greater degree.
Certain diatoms, with great regularity, retain air bubbles in the majo-
rity of cells, and this is the case, in particular, among the Malosirae. Warm-
ing or heating in most cases does not lead to a satisfactory result;.the air
bubbles, in fact, do eventually escape, but many cells are ruptured in that
process, and the Styrax balsam in the meantime may have undergone consider-
able browning. However, we have also in this case a very simple means avail-
able for avoiding the formation of air bubbles with certainty: Prior to adding
the Styrax balsam, a relatively large drop of turpentine is placed onto the
coverslip and permitted to act for a relatively long interval of time; a watch-
glass is placed over the coverslip in order to prevent too rapid evaporation
of the solvent. In order to employ the proper length of time, the worker may .
check his first attempts under the microscope; with some experience, that will
no longer be necessary. Once we are ceryain that all air bubbles have been
expelled from the cells, we add the required drop of the mounting medium to
the rest of the turpentine, with the mounting medium dissolving in the tur-
pentine, and then subject the mass as uaual to hardening.
Mounting of a sealing (wax) ring is not absolutely necessary, but may be
useful for the sake of cleanliness; we will furthermore find that the dura-
bility of all resinous media will be enhanced by the exclusion of air brought
about by the presence of a ring of that type. As sealing medium we best use
shellac, which is colored with the aid of aniline dyes or furnace black. In
very rare cases, Styrax balsam,mounted preparations—as already mentioned
further above—will later on, but sometimes also rnther soon, erhibit crystal
formations, the causes of which are as yet unknown. The 1.1te rrofessor Dr.
E. Debes, Leipzig, who has greatly advanced the techniques of dintom and
-55—
foraminiferan preparation, was able todnduce crystal formations of thnt type
by overheating during Processing of the specimens, and it is certain that too
strong heating favors the crystallization of certain substances. On the other .37.
hand, crystallization occurred also in preparations, which, with certainty,
had.not been overheated, so that other causes most probably exist. This par-
ticular aspect really is not overly worrisome, since only about one preparation
among one thousand will eXhibit crystal formation, so that the Styrax balsam-
mounted preparation, with regard to durability, still occupies the first position.
With regard to the microscopic resolution of the structures, we find that
the transverse striation of leurs pellucida is well visible in Styrax
balsam-mounted preparations, provided that a good objective and adequate illu-
mination are used. The findings outlined above then indicate, in the great ma-
jority of the cases, that the structure of diatoms can be resolved in Styrax •
balsmn-mounted preparations, so that there remains only a relatively small
number of cases absolutely recuiring mounting in a more highly refractive me-
dium. It can, of course, not be denied that the fine structures appear more
distinctly in preparations mounted in more highly refractive media, i.e. re-
solution is attained more readily and the less well trained eye is able to
distinguish a greater number of details. However, an increase of resolution
worth mentioning is attained only when the refractive index is considerably
greater than that of Styrax balsam.
The technique of mounting in Styrax balsam is decisively more simple
than the procedures of munting in the more high refractive media, and this
aspect is valid already with regard to the preparation of the media themselves.
The highly refractive media require individual processing of each individual
preparntion, due to the development of air bubbles after placing of the
- 56 -
coverslip--a development due to the strong henting reouired. In the case of
Styrax balsam, On the other hand, hardening takes place already _prior to
placing of the coverslip and this without any pronounced formation of bubbles,
so that a great number of coverslips can be processed simultaneously. Marked
heating of mnterial under the coverslip has disadvantages also in other respects;
for instance, a large number of diatoms mny be expelled along the sides of the
coverslip in connection with the escape of gas bubbles, and this, in particu-
lar, in the case of large forms, which, furthermore, are exposed to the danger
of being crushed by the suddenly retracted coverslip. The use of media of that
type unfortunately is entirely excluded in the case of certain individual
specimens--to be discussed further below--in which individual diatams are
fixed in a certain position. Since the media under consideration are applied
in either solid or viscous form, there exists no possibility of keeping the
air away from the objects; in the case of subsequent heating, on the other
band, these objects would be completely destroyed, or, at least, be shifted
away from their assigned positions. These deficiencies do not appear nt all
vhen using Styrax balsam solutions, and since the refractive index of Styrax
balsam is adequate for the examination of most structures, I am inclined, in
general, to give preference to that mounting medium. The range of applica-
tion of the other mounting media is limited--at least in the case of scattered
preparations. The absolute durability of Styrax balsam-mounted preparations
hns also been demonstrated, while that aspect in the case of the other mount-
ing media depends greatly on the care of the preparing worker or even on chance
factors. A small, unintentional error in the preparation of the medium will !batch of.
cntnil thnt n11 propnrntions nounted using Vantmedium will sooner or later
deteriorate. Any worker, who has been involved in the study of diatoms, will
- 57 -
i
value a mounting medium with high refractive index; but on the basis of the
findings outlined above, I still recommend the general use of Styrax balsam,
and that of the other mounting media only in particular cases.
T.totuzting in Canada balsam or tolu balsam is carried out in a correspond-
ing manner, but is done only in exceptional cases.
P.°Iovnting in hyrax -',`lhile the present paper was being set by the printers,
I received from i^ïr. G. Dallas Hanna (San Francisco, California) a small sample
of a new mounting medium, which has been named 1aax by its manufacturer. This
mounting medium consists of a colophonium. compound dissolved in xylene. Ac-
cording to Hanna, that medium has a refractive index of n = 1.78 and---as x have
determined in experimental work-permits perfect resolution of highly delicate
structures. Since that medium is dissolved in xylene, it corresponds, with
respect to its application, completely to that of Styrax balsam, but it has
the advantage that it hardens more rapidly and is less sensitive toward higher
temperatures. Should that medium turn out to be durable (the experimental work
so far covers only one.year:), hydrax would indeed be able to replace Styrax
balsam in diatim-preparing techniques, and this, in particular, since hydrax,
due to its liquid state can be used also in the processing and mounting of
placed preparations: (At the present time, the sole supplier is: I.A. Penn,
1043 '^^indsor Street, Oakland, California; $ 1.00 per ounze, equal to about 30 g).
t:Tounting in Diperine-coumarine - The pellets prepared in accordance with
the prescribed procedure are divided into (t^°ro to four) smaller parts with the
nid of a lmife. One of the small pieces is placed on the center of a slide
and z:ielted with the aid of a low flaiae. The coverslip carryir_g the dried di-
rito;:ic r.;nterizl is stron^rly hc:ited-bc^st on q thin metzzl plate-,nnd, with the
co:zted surface facing dovin, is gently lov.rered on top of the liquefied and still
-5g-
V]
warm drop of nounting medium, to vrhich it adheres imediately. New heating
of the preparation, and this from the underside as well as from the upper
side, renders the slightly hardened medium thinly liquid; the liquid medium
thereupon spreads out underneath the coverslip in all directions right to
the edges of the slip. The air bubbles arising in the preparation are expelled
by repeated heating, with the air bubbles more or less escaping. Usually it is.
possible to remove the air bubbles almost completely by dabbing the coveralip
with a needle with appropriate tilting of the preparation. On cooling, th6
medium is iruaediately solid; the mass which extruded along the edges of the
coverslip is scraped off and completely removed with the aid of either alcohol
or xylene. A sealing wax ring is not required, but is desirable because of
the cleanliness during work with immersions. Clamps for holding the coverslip
do,vn1---clamps of the type recounnended by Kolbe-should also in the case of this
procedure be used always with great caution and consideration of the material
at hand for the reasons outlined further above on page 35.
The structure of the diatoms appeared in piperine-coumarone decisively
more distinctly than in Styrax balsam, so that the use.of,piperine-coumarone
should be preferred in all cases, rrhere a high refractive index is a factor
of consideration. Unfortunately, the strong heating reauired during processing
excludes also this medium rather fully from use in the preparation of indi-
vidually placed specimens.
I,lounting in real<Zgar - Realagar is used in mounting of preparations in
a manner similar to the piperine mixtures. One drop of the medium is placed
on the center of a slide and the coverUlip, the coated side facing down^ is
lovrered on top. The preparztion is then heated intenaively and over a rela-
tively long period of time, until no more bas bubbles are seen to escape.
!
A
-- 59 -
I)uring the course of heating, the medium mass becomes first red, but after
cooling looks pale yellow and is solid. The preparations usually exhibit some
air bubbles and fissures, but otherr•rise they are durable. Sealing rings are
not desirrzble, and this, in particular, to prevent separation of the coverslip
from the slide on shock.
rp eparations p- A great number of diatoms exhibit cellular. ^x^a11s so
poorly silicified that they becone completely invisible in highly refractive
mounting media; in the case of other diatoms, on the other hand, we find that
the structure can be resolved more readily in dehydrated shells than in mounted
ones. In cases of that type, we avoid use a mounting media and attach the
coverslip in the dry state-with the coated side facing do`m---to the slide.
For that purpose the slides must be thoroughly cleaned, and this best by
washing with acidified alcohol. A relatively large number of cleaned slides
is used at a time, and a relatively thick sealing ring is placed on the center
of each slide; the internal diameter of the sealing ring is 2 mm less than
the diameter of the coverslip used for the preparation. The sealing rings must
be very thoroughly dried. In urgent cases, the rings must therefore be exposed
to an alcohol flame or, during the winter, be placed on a hot oven plate. It
however, much better to have on hand a supply of slides with attached
8
rings already several days or weeks 'old.' The coverslips with the dried
material must be roasted (in the manner described on page 17 of the present
paper) until the organic parts of the cell are destroyed and no traces remain
on the coverslip except the siliceous shell. The coverslips-with the diatoms
facin;p; the :,lide---are then lowe.red on top of the sezl5.ng rings, after the
olideo, have one(, r.iore been ,-rell rubhed t,rith a piece of chamois leather. The
7ndividunl coverslip should at all sides project about one nim over the sealing
-60-
ring. Uext we take a piece of heated steel--let Us say, a knife blade--and
guide it along the edge of the coverslip. The heat softens the sealing wax of •
the ring, and the coverslip is pressed lightly down. Work is done more safely
if the slide with the coverslip is placed on a not too overly hot metal plate,
leading to softening of the sealing ring, whereupon the coverslip is gently
pressed down. Heating is permitted only for a brief interval, since the seal-
ing wax, otherwise, will spread further underneath the coverslip and, thus,
destroy the preparation; for the same reason, we must avoid application of
strong pressure. In the readied preparation, the coverslip must at all points
be uniformly attached to the sealing ring; in particular, there must be no
gaps along the ring, through mhich either moisture or the sealing agent (to
be applied later) may penetrate. An outer sealing wax ring can be applied
immediately after the preparation has cooled. That ring is necessary in order
to prevent separation of the coverslip.
These dry preparations are not of indefinite durability, although their
disintegration has to be feared only after decades, if the slides and cover-
slips used had been in perfect condition and processing had been carried out
with ademate care. Deterioration is caused, above all, by the inconvenient
steaming-over of the slides; however, in some of these•cases it is possible to
remove the coverslip carefully and, following roasting, to place it on top or
another slide. The silicic acid of delicate diatoms, furthermore, reacts in
the course of time with the silicic acid contained in the glass, so that tho
objects are completely destroyed and cannot be saved. The occurrence of the
latter two drawbacks depends greatly on the quality of the different giass
ite;:is; these deficiencies occur more rnrely in the case of semi-white, green-
ish glass than in that of the more expensive white glass, so that the former
type should, in general, be preferred. In nny case, dry preparations should
be made only where necessary.
- 61 -
(9) Processing of individual specimens.
The worker involved extensively in the study of diatoms requires much
material for comparison and, if possible, must acquire a collection of species
arranged in accordance with the taxonomical system--a collection corresponding
to a herbarium of higher plants or a taxonomical collection of animals. A di-
atom collection of that type can be established by tagging and identifying
in a well defined manner certain species in scattered preparations, and
filing of the preparations in a systematic manner according to the species
identified. For that purpose, we mount a large number of scattered preparations
using individual materinl samples. This approach has the advantage that we
always observe the respective species in their "natural environment." Definite
tagging of the specimens should not be carried out with the aid of the coordi-
nates of a mechanical stage, since these coordinates are valid only for one
type of microscope, and are useless to workers using other microscopes. Iden-
tification and tagging, therefore, must be carried out either with the aid of .
a diamond objective marker manufactured by certain optical firms (these markers
cut a circle more or less large into the coverslip around the mounted diatom)
or in the following manner. During examination under the microscope, a small
dot of Indian ink is placed over the diatom specimens to be tagged using a
fine drawing pen; afterwards, a ring of sealing wax (as narrow as possible)
is applied around that dot. The number of diatoms that can be tagged in a
given prepnrntion increnses with the delicacy of the wax ring, and examination
of other specimens in the preparation also is enhanced by that delicacy. The
dots of Indinn ink can be easily removed with a piece of vet cloth once the
rings have hnrdend and dried. In rnny cases the worker will have
to have recourse in hi s collection of specimens to prepnrations tngged in that
11.0
-62-
manner, and this, in particular, if he is dealing with very rare species--
perhaps, found only once--or with very small forms, which cannot be selected
or placed on an individual basis. Furthermore, scattered preparations can be-
recommended for a collection of species, if these preparations contain indi-
vidual species in abundant quantities, so that the worker is able to recover
them readily and with certainty at any time without specific tagging. In the
latter cases, selection of individual specimens would represent a useloss loss
of time, and would also be in error, because the range of variation of a given
form is more clearly indicated in scattered preparations. Otherwise, however,
we well always prefer those preparations, which—like the dàeets of a herbarium
--contain always only one species or variety. However, we will encounter only .42
rarely material in which a species is as pure as that, and we will be forced
to select individual species from different material samples and.then mount
them separately. The latter kind of work is recuired also in cases where we
wish to examine the structure of individual species, since the specimens found
in scattered preparations are not always present in the desired position. For
that reason, workers not particularly interested in a taxonomic collection
of species but wishing to undertake anatomical and morphological studies also
must be well aceuainted with the methods usually employed in this field.
Selection of diatoms - For the selection and placing of diatoms, we use
fine bristles, i.e. either the highly pointed spines of certain cactuses or
the cilia from the upper eyelid of the pig, which must be thoroughly defatted
by immersion in sulfuric ether. These bristles are fixed in a holder (Figure 14),
and this in n manner ensuring that the tin of the bristle projects about two
or three nillirletorF3, in order to nvoid n11 spring action by the bristle. The
bristles are either glued with a droplet of glue to the pointed end of a thin
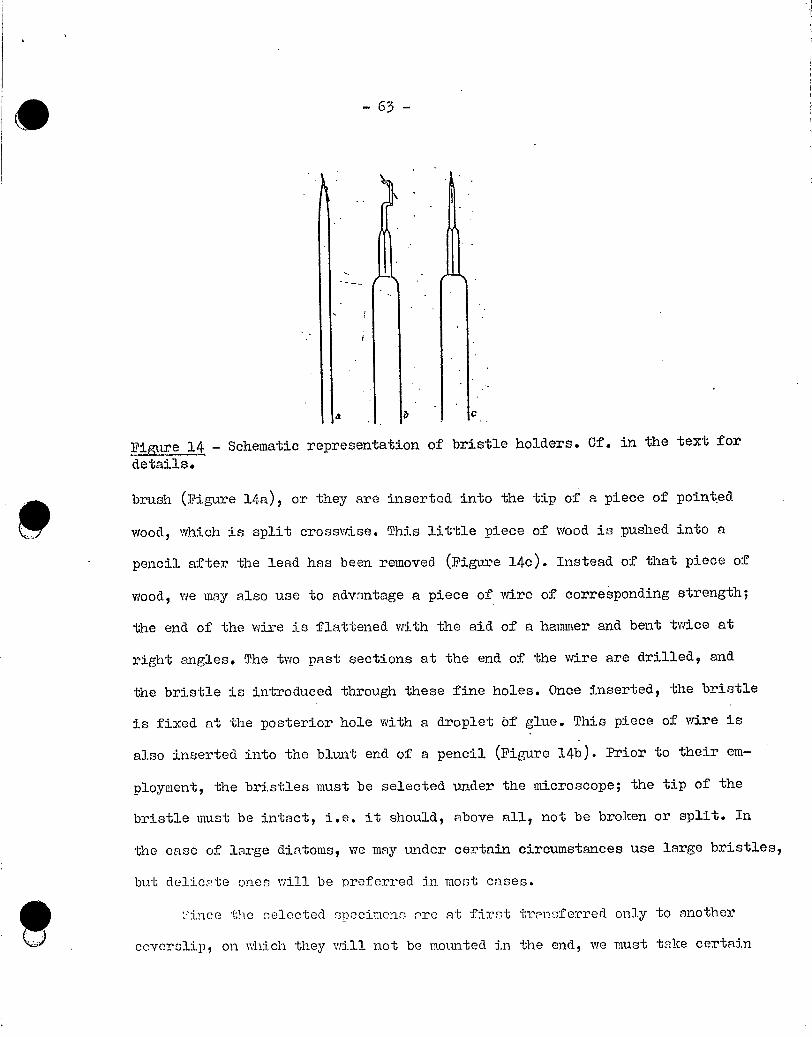
- 63 -
a s
FiMEe 14 - Schematic representation of bristle holders. Cf. in the text for
details,
brush (Figure 14a), or they are inserted into the tip of a piece of pointed
wood, which is split crossvrise. This little piece of wood is pushed into a
pencil after the lead has been removed (Figure 14c). Instead of that piece of
wood, we may also use to adv.^ntage a piece of svire of corresponding strength;
the end of the wire is flattened with the aid of a hammer and bent twice at
right angles. The two past sections at the end of the wire are drilled, and
the bristle is introduced through these fine holes. Once inserted, the bristle
is fixed at the posterior hole with a droplet ôf glue. This piece of wire is
also inserted into the blunt end of a pencil (Figure 14b). Prior to their em-
ployment, the bristles must be selected under the microscope; the tip of the
bristle must be intact, i.e. it should, above all, not be broken or split. In
the case of large diatoms, we may under certain circumstances use large bristles,
but delicpte ones will be preferred in most cases.
ti ince the :,elected snecime.i^ cre at first trPnsfe.rred only to another
ccverUlip^ on whicii they will not be mounted in the endq we must ta?ce certain
P
0U
- 64 -
precautions to ensure that the dintoms do not drop off that slip. For that
purpose, the coverslips destined to receive temporarily the selected speci-
mens are covered with a solution of petroleum ether (rrhich can be prepared
by adding 15 ml. of sulfuric ether to 20 drops of purest petroleum).
The material to be subjected to selection is given in the usual manner
into distilled water, which is then permitted to evaporate. For the latter
purpose we may use relatively large coverslips, in order to avoid too many
changes of coverslips: Once the material has dried completely, the individual
coverslips are fixed to the slides with the aid of a drop of petroleum; next
to these coverslips, we then affix in the same manner one or several small-
size coverslips destined to receive the selected specimens. The receiving
coverslips are covered with a drop of petroleum ether. Once that ether has
evaporated, the covexslips are coated with a thin layer or film of petroleum,
and the -worker is finally ready to start with his selection. It is best to
place the slide on the mechanical stage of a binocular microscope, since we
can work in a more rational manner using the mechanical stage and because
fatigue is less likely to occur in the course of simultaneous emp7.'oynient of
the eyes by the binocular microscope in this laborious undertaking. For the
same reason, viz. the fatigue factor, it is ûseful to support the arms by
means of suitable rests, books, or wooden stands. Ûelection of specimens can
be carried out also using a tilted microscope, which permits `vorlcing in a
more relaxed body position. The coverslip holding the original material-
the coated side of which must, of course, be facing the worker-is subjected
to a systci:;atic search with the nid of the mechanical stage. As soon as a
:i'or::i in dc,v^nd for prep^ratior_ ,'ppears in the field of vision, we touch it
gently with the bri:,tle-to which that form adheres imr,iediately---a.nd transfer
it carefully and `•rithout cre^iting drtizts to the center of the coverslip
-65-
coated with petroleum. Since the bristle in the course of these manipulations
always cornes into contact with the petroleum film, we find that its tip is .44
always moistened, so that the diatoms adhere very readily, and dropping off •
during the transfer really does not have to be feared. For that reason, it
is not necessary to move the petroleum-coated coverslip into the field of
vision and to release the specimens while checking through the microscope.
The mechanical stage of the microscope is not moved, and the diatoms are trans-
ferred to the receiving coverslip safely without checking. Once the selected
specimen has been placed, the worker in immediately able to continue at the
same spot on the coverslip carrying the unselected material, and this on until
selection has been completed. In order to facilitate subsequent work, it is
useful to undertake already during this initial selection a separation of the
specimens according to certain groups, by dividing the forms over several
coverslips, to the extent that slips can be placed on the slide next to the
coverslip holding the material being subjected to selection.
It is not necessary to process the selected forms immediately following
completion of the latter step; likewise, we arepermitted to interrupt the
selection of the original material placed on the coverslip at any time and
to continue work at some other time, as long as we make certain that the cover-
slips holding material are protected against dust. The following device is
used for storage under the latter conditions. Round section, having a diameter
exceeding by 2 mm the one of the coverslips used and a depth of 2 mm, are cut
out from rectangular hard-rubber plates, measuring about 4 mm in thickness;
these pl -tes mny have nny size, but for rensons of convenience should measure
about cm by 15 cm. A frnme of cnrdbonrd, hnving the thickness of vindow
glass and measuring 5 um in height, is pasted around the edges of the rubber
• - 66 -
plate. The cut-outs in the rubber plate are numbered in consecutive order.
The different coverslips carrying either unselected or already selected
material are placed into the cut out sections and stored until the work can
be continued; the finding sites and other pertinent data are noted on an
attached label, with the data corresponding to the numbers assigned to the
cut-outs. Next a piece of glass fitting into the frame provided by the card-
board is placed on top of the hard-rubber plate, which is then stored to-,
gether with other ones all being stacked in a little box. Instead of the
hard-rubber plates, we may also use cardboard pieces--with the same success--
which pieces can be readily and cheaply manufactured by the worker himself.
Ipieces of cardboard of appropriate size, measuring 2 mm in thickness, are
cut, and holes of the appropriate size are punched into -ffie pieces, which are
then glued on top of other pieces of cardboard of the same size but without
holes. In order to prevent later warping, the glued pieces are exposed to
great pressure until the glue has dried. These containers are used in the same
manner as the hard-rubber plates. After very long storage, we may occasionally
find a blackish, powdery dust on the coverslips and this, in particular, when .45
using the hard-rubber containers; that dust is the result of certain chemical
processes, and it also contaminates the diatoms. However, this dust can be re-
moved simply by heating the coverslips.
The drawback mentioned in connection with the mounting of dry preparations
--viz , that the silicic acid of the diatoms may react with the silicic acid•of
the coverslips--can, of course, become apparent also in the case of selected
forms stored for a long period of time in the dried state, so that it is ad-
visnble to proceed no soon as possible with the placing and mounting of the
selected material. The procedure described above for trnnsferring specimens
- 67 -
from one coverslip to another one can practically-not be applied in the case
of delicate siliceous forms, since their cell walls adhere so intimately to
the first coverslip that they usually cannot be lifted on contact with the
bristle without being destroyed. In these cases, it is advisable to avoid the
intermediate step involving transfer to the second coverslip; instead, these
diatoms are transferred directly to the final coverslip on which they will
be mounted; one of the methods still to be described further below is just
for that transfer. An even better procedure in the case of delicate diatoms
is found in the replacement of the common coverslips by coverslips made of
mica, since, first, the diatoms can be much more readily lifted off that material
without breaking and, secondly, no intimate reactions take place between di-
atoms and mica even during prolonged storage. Finally, the delicate forms can
be more easily transferred if we reduce to a minimum the interface of contact
between diatom and coverslip. For that reason, Conger has used frosted glass
for transfer. On frosted-glass slips, diatoms and also the planktonic forms
exhibiting long processes adhere only to individual points and, thus, can be
lifted off readily. In this procedure the specimens are also transferred di-
rectly to the final coverslip. In a similar, but perhaps even better manner,
we are able to prepare special coverslips by- coating them with a layer of
finely grained quartz sand. For that purpose, cominon river sand is thoroughly
washed and passed through a fine-mesh wire sieve, completely decalcified with
hydrochloric acid, and washed once again. Several coverslips are coated with
a solution of colorless dhellac (cf. page 46), which solution is then per-
mitted to dry. :Tex-U, the coverslips are placed on a metal plate on top of a
tripod, sprinnied densely with the finelv 7rnined snnd, and then hented. Paring
heating, the sbellnc softens, the snnd grains pnrtinlly sink into the softened
_68 -
I
nass and become firmly fixed. The process of heating is discontinued once a
few pieces of good vrriting paper (vdhich tiieces had been placed on top of the
metal plate together with the coverslips) start to turn brovm. On cooling,
we remove the sand grains still unattached to the substrate by blov.ring lightly
over the coverslips,' with a rather vniform layer of sa.1d remaining fixed to .46,
the coverslip. The diatoms are transferred from distilled water to these
quartz sand-coated coverslips and there must dry at room temperature. Both
alcohol and heat must be avoided at all cost, since these two factors would
dissolve or soften the shellac, and the diatoms would be fixed. After drying,
the individual diatoms are in contact only with a few points of the sandy
coverslip surface and can be readily transferred without suffering damage to
the coverslip destined to receive the specimens. In the case of diatoms ex-
hibiting long spines, we must dilute our original material to a large degree,
in order to ensure that the individual diatoms will not be in close contact
or, in fact, overlap. We are also permitted to omit the step of fixing the
quartz sand grains to the coverslip surface with the aid of shellac; however,
if vie omit that step, vae must be particularly careful during selection in
order to prevent displacement of the grains or blowing the grains off the
coverslip when exhaling.
Placing of diatoms - Placing of diatoms involves the fixing of indivi-
dual specimens in a certain position on the coverslip-a position we may re-
quire in connection with a specific examination or for taxonomie identification.
In many instances that method represents the only avenue for obtaining detailed
information x•ep;arding the mor7.holo ^,T of certain diatoms; for that reason, the
wo-2,1cer 1uu::t be well neciu'linted with thi;, nnrticulqr procedure. in connection
^:-Ith the placint; of diatoms, the coverslips nust be coated with a sPeciril film
- 69 -
prior to their employment; that film enables us to affix the diatoms. The
following solutions are best suited for use as fixing solutions of that type,
although only one is actually required for application:
(a) Either 2 g of very pure white (colorless) gelatine or 3 g of isin-
glass are dissolved in 75 g of glacial acetic acid--a process requiring
several days at room temperature. ?Sext, the solution is filtered, and, using
a pipet, 5 g of that solution are sprayed very slotrly and with continuous
stirring into a mixture consisting of 3 g of absolute alcohol and 1.5 g of
isobutyl alcohol. The product solution must be stored at a dark, cool place.
(b) ?;qual quantities (by weight) of bleached shellac and absolute alco-
hol are mixed. The process of dissolution must take place in a well sealed
flask and takes a relatively long period of time. Frequent shaki.ng, stirring
and moderate tvarming-accelerate that process. In order to remove the un-
dissolved "wax" clouding the liquid, we add about one fifth of the total volume
of petroleum ether (20 drops of petroleum and 15 m7.. of ether) and shake that
mixture well. It is then set aside, and the "wax" solution accumulates as the
uppermost layer, which can then be removed. The rest is mixed with the double
quantity of isobutyl alcohol, and the product is stored at a cool place. Af-
ter ^:i certain period of time, the clear fluid can be dee^aa.ted from the white
residue at the bottom.
The present author prefers the first solution because its preparation
-as shall be demonstrated further below-also its application are lessand
complicated. Furthermore, it has been found that the mounted preparations are
more durable u:,:ing the first solution. In the case of the second solution, the
. J.iellzc layer is ettncked in the course of time by the -ountin^• and ebedding
aiedin, so that the fixed diatoms separnte iror: ► their. substrate and the pre-
p:iration, thus, is spoiled.
-70-
Processing of the specimens, as a,rule, must be carried out under a
dissecting microscope, since it is not possible to carry out hand movements
under the large support stand with the required safeLy, while the diatoms,
on the other hand, Glhould if possible be kept under observation during the-
entire mounting procedure. The magnifying glasses commonly used rire not strong
enough and, furthermore, the distance between the onject and the magnifying
glass is too small to permit proper manipulation. For that reason, the present
author recommends the use of Brueckets magnifying glasses, which, at high
magnification (about x 100), have an adequate specimen distance and, thus,
permit convenient working. The hand supports commonly used, furthermore, are
much too small to permit prolonged and delicate mtrking. These supports do fix
the bands, but leave the lower arms without any support nt all. However, in
the preparation of specimens, it is important to be able to move onels hands
freely, while the lower arms require secure support, in order to prevent rapid
onset of fatigue and trembling of the hands. It is therefore best that the
worker manufactures hi s own arm supports using either two blocks of wood or
properly cut pieces of wood. At the one end, these supports should reach the
level of the microscope stage, and gradually drop off toward the other end.
The supports should be fixed on top of a board, measuring about 2 cm in thick-
ness. The two supports form an obtuse angle open toward the worker. A space
is left free between the tall support ends fncing each àther. That space is
used for the dissecting microscope. If these supports are manufactured from
one piece of wood each, it is best to give them a curved, archlike shape,
with the concave side facing the worker. The length of the supports must be
such that the lower aras c1o.i to the elbow cnn be comfortnbly rest. In order
to avoid interference with the handlimY, of the gearwork of the microscope, it
is advisable to cut off the corresponding corners of the supports.
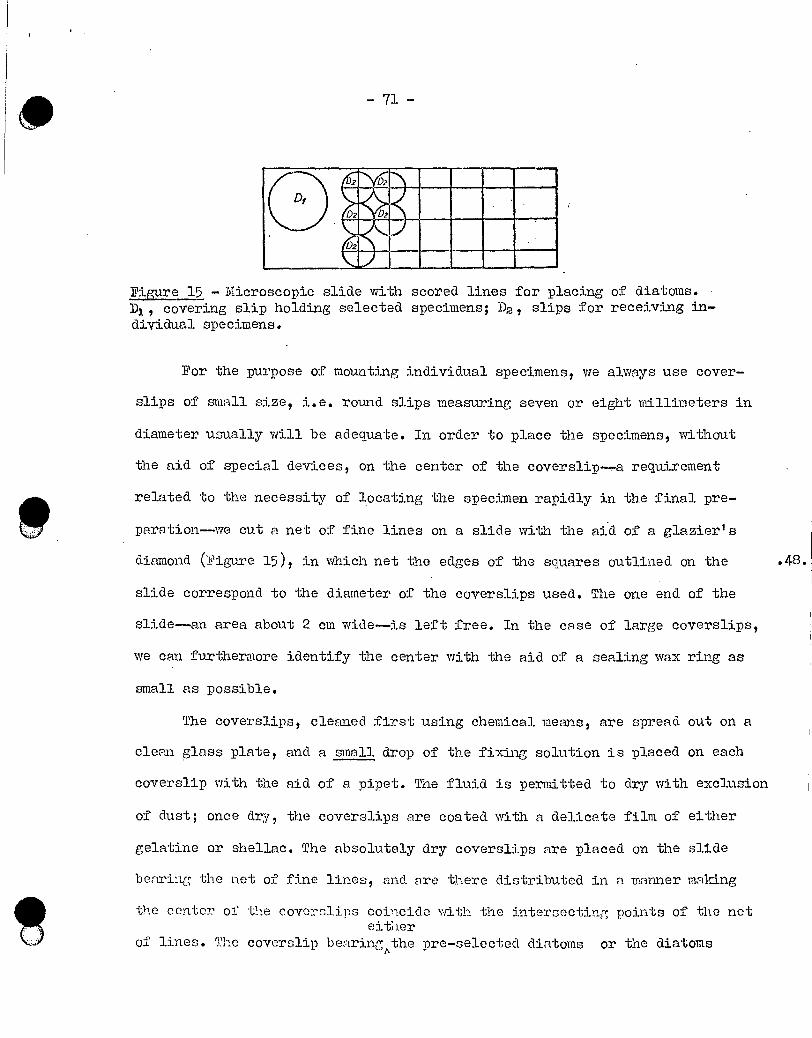
- 71 -
Mk D2k Dl 1114, w
dk IIII dim
f
Ilw
Figure 15 -Microscopic slide with scored lines for placing of diatams. • D1, covering slip holding selected specimens; D2, slips for receiving in-dividual specimens.
For the purpose of mounting individual specimens, we always use cover-
slips of small size, i.e. round slips measuring seven or eight millimeters in
diameter usually will be adequate. In order to place the specimens, without
the aid of special devices, on the center of the coverslip-,a requirement
related to the necessity of locating the specimen rapidly in the final pre-
parntion--we out a net of fine lines on a slide with the aid of a glazier's
diamond (Figure 15), in which net the edges of the squares outlined on the .48.
slide correspond to the diameter of the coverslips used. The one end of the
slide--an area about 2 cm wide--is left free. In the case of large coverslips,
we can furthermore identify the center with the aid of a sealing wax ring as
small as possible.
The coverslips, cleaned first using chemical means, are spread out on a
clean glass plate, and a small drop of the fixing solution is 'placed on each
coverslip with the aid of a pipet. The fluid is permitted to dry with exclusion
of dust; once dry, the coverslips are coated with a delicate film of either
gelatine or shellac. The absolutely dry coverslips are placed on the slide
benring the net of fine,lines, and are there distributed in n manner Junking
the center of the coverslips coincide with the intersecting points of the net either
of lines. The coverslip benring,,the pre-selected diatoms or the diatoms
— 72 —
placed on quartz sand is set on the free end of the slide. Residues of petro-
leum possibly present must be completely removed by means of strong heating
in order to ensure that the diatoms will be resting in an absolutely dry state.
All coverslips are fixed to the slide in a temporary manner with the aid of
a droplet of petroleum ether in order to prevent shifting during the placing
of sppcimens. Several coverslips may be processed simultaneously only if shellac
is used as fixing agent, since the breathing over the coverslips reauired in
the case of the gelatine method can displace specimens already placed with
some care onto other coverslips. Furthermore, we cannot save much time by the
simultaneuus processing of several specimens, and it would therefore be ad-
visable to place always only one coverslip for receiving specimen(s) onto the
slide.
The bristles used for placing specimens must Always be well defatted,
since the diatoms otherwise adhere too solidly and caa be removed only with
some difficulty. It is therefore useful to dip the bristle from time to time
into a bottle with sulfuric ether kept ready at hand. The right-handed worker .49
will place the slide with the coverslips under the microscope so that the
coverslip holding the pre-selected forms is located to the left side. The
shell or cell to be placed is picked up with -the aid of the bristle and lifted
up gently; next, the slide is pulled to the left with the left hand until the
center of the coverslip to be loaded reaches the field of vision, whereupon
the specimen is placed onto the coverslip above the intersecting point of
the network visible through the glass slip. As a rule, the diatom drops from
the bristle onto the coverslip already on the slightest contact; if it does
not drop promptly, we must assist by means of a suitable, but gentle twisting
of the bristle. Under no circumstances should the bristle disappear from the
- 73 -
field of vision during the transfer, since the danger exists that the speci-
men might be lost. However, with the aid of that bristle, we are able to
bring the diatom into any position desired on the coverslip, in which the worker
must remember that the side of the specimen facing him during placing will be
the. opposite side of the one facing him in the mounted preparation: ^:'ith some
training, and depending on individual sk;.ll, the worker will soon be able to
place his specimens either on the tip or on an edge. If several individuals of
one species are available, the worker should try to prepare one shell aspect
and one belt-band aspect of that species. Once the specimen has been placed
in the desired position, the worker must go ahead and fix it permanently in
that position. In the case of gelatine preparations, the worker, for that pur-
pose, breathes gently from above onto the coverslip; the gelatine layer there-
upon softens to an extent letting the diatoms sink in. The layer dries very
rapidly and the specimen is firmly fixed. Drying must also be checked under
the microscope, since it is possible both to prevent last-second changes of
position with the aid of the bristle and to give support to the diatoms. Ti
shellac is used instead of gelatine, final fixation is carried out on a heated
metal plate over an alcohol flame. The coverslips-in the case of the latter
procedure, tive are, of course, permitted to process several slips simultaneously
---are placed on the metal plate together With a few pieces of good writing
paper. The shellac is softened by the heat and the diatoms sink into the film
-this, however, without the worker being able to check the progress. Harden-
ing is initiated once the pieces of paper start to become brown. Subsequent
sorrecting of Ûhif lUed positions is not possible, and the present nuthor also
for tiirit roason prefers the u;^e of gelatine to that of i,-,in ;lass.
- 74 -
It goes without saying that this shifting of the slide with the aid of .50
the hand and the searching for the coverslip site for placing the selected
specimen entail a number of disadvantages, and, at least, a considerable loss
of time compared to the use of mechanical placing devices. In order to avoid
these disadvantages and the frequent failures associated with them, E. Debes,
has constructed a special "Auxiliary Apparatus for Selecting and Placing Di-
atoms," which can be readily attached to any dissecting microscope (Figures
16 to 18). This apparatus consists of two main parts viz , the placing plate
and the actuating mechanism, causing the latter to function. The actuating
mechanism consists of ring A sliding over the microscope stage and ring B
inserted in and undercutting, ring A. Ring A is able to rotate in a pendulum-
like manner around axis a, which is inserted into a pivot, which can be screwed
to the frontal surface of the mechanical stage. In the course of the pendulum the
movement, the central point b of the latter must intersect exactly with Acentral
point of the field of vision under the microscope. Plate B can be readily
rotated around the saine central point b; along its rim, Plate B is equipped
with abeut three little flat guiding plates, which are screwed on. In addition,
Plate B has a large eccentric rectangular cut-out, dddd. The range of movement
of ring A is determined by two fixtures: Toward the left, by a movable clamp D
equipped with an adjusting screw, and toward the right, by a set screw E, .5:
which moves in a female screw solidly fixed to the microscope stage. The plac-
ing plate consists of a small, rectangular plate-glass plate, which is inserted
into metal frame C I in a well fitting, but interchangeable manner. Along its
left short side, metal frame C is equipped with a short handle. The surfaces
of the glass plate and of the frame, respectively, must be located in the
same plane. The placing plate can be divided into two parts by a flat metal
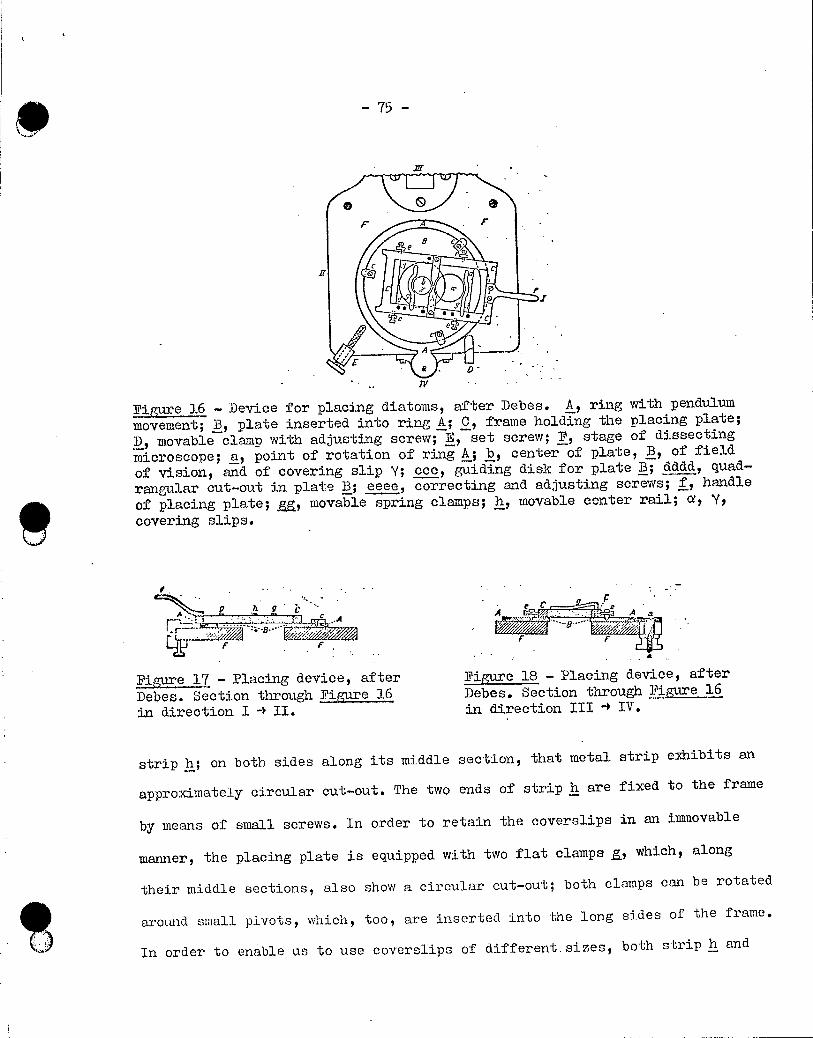
-75-
J
FiffiEe 16 - Device for placing diatoms, after Debes. A, ring with pendulummovement; B, plate inserted into ring A; C, frame holding the placing plate;D, movable clamp with adjusting screw; E, set screw; F, stage of dissectingmicroscope; a, point of rotation of ring A; b, center of plate, B, of fieldof vision, and of covering slip Y; ccc, guiding disk for plate B; dddd, quad-rangular out-out in plate B; eeee, correcting and adjusting screws; f, handleof placing plate; Z&, movable spring clamps; h, movable center rail; cxt Y,
covering slips. ^
Figure 17 - Placing device, afterDebes. Section through FiL-'ure 16in direction I -> II.
Figure 18 - Placing device, afterDebes. Section through F.^92re 16in direction III - ► IV.
strip h; on both sides along its middle section, that metal strip exhibits an
approximately circular cut-out. The two ends of strip h are fixed to the frame
by means of small screws. In order to retain the coverslips in an immovable
manner, the placing plate is equipped with two flat clamps F,, which, along
their middle sections, also show a circular cut-out; both clamps can be rotated
arotuid suial.l pivots, which, too, are inserted into the long sides of the frame.
In order to enâble us to use coverUlips of different.sizes, both strip h and
- 76 -
clamps g can be adjusted, and the frame, for that purpose, is equipped with
a number of holes to receive either the screws holding down strip h or the
pivots of clamps Both the frame and the placing plate are adjusted on ring
B with the aid of four screws acting on the long sides of the rectangle; the —
female parts of these screws, eeee, are firmly fixed to plate B. In order to
make possible also shifting of the frame, trough line guides have been inserted
along its long sides representing the working faces for the screws. The pre-
liminary adjustements are made with the aid of a coverslip exhibiting an Indian-
ink dot on its center. This coverslip is placed into the cut-out on the right
side of the middle section of strip h e and there held down by clamp g. If we
now pull ring A to the right using handle f, the center dot on the coverslip
Must intersect with the central point of the field of vision under the micros-
cope; if that is not the case, we must adjust the frame in a corresponding
mariner with the aid of screws eeee. Rotating plate B, we furthermore establish
whether the center of the coverslip coincides in all positions with the central
point of plate B; non-coincidence must be corrected by lateral shifting of
frame C. Finally, clamp D enables us to prevent lateral passing through by .52,
fixing that clamp to the microscope stage in a manner ensuring that the center
of the coverslip is located in the center of the field of vision under the
microscope at the moment ring A hits the clamp. Set screw E has the function
to ensure that each zone of the coverslip subjected to selection is moved
into the field of vision, so that no field can be overlooked.
The advantages of this device, which is extraordinarily easy to handle,
are readily apparent. The versatile movements carried out by the elements of
this , device permit eomplete inspection of the coverslip bearing the unselected
material and the temporary appearance in the field of vision of the coverslip
• -77-
destined to receive the selected specimen. On further rotation around its
center, the latter coverslip can be set up in any position desired, so that
the diatom to be placed can be put down at any spot desired and in any direction
without special movements of the bristle guiding the specimen.
Pre aration of individual specimens with the aid of tin-foil cells -
All individual preparations must meet two requirements: The, after all, small
number of individual specimens must, first, be readily detectable and, secondly,
be protected against pressure. The first requirement can be easily met, once
we make certain that the specimens are always placed on the center of the
coverslips; furthermore, we are able, following munting, to place a ring of
sealing wax around the forms placed, as we have outlined already further above
in connection with the processing and tagging of scattered preparations. Finally,
. it is possible to place rings of that type on the surface of the coverslip(to
be the inner surface on mounting) already prior to the application of the fix-
ing solution; in that case, the worker, however, must make certain that the
ring is well dried priôr to the addition of the fixing solution. If we have
abundant quantities of oceanic or marine material available, containing great
numbers of individuals belonging to the large Coscinodiscineae, Triceratia
or similar groups, it is possible, in a practical manner, to place one of these
large-forms on both sides of the center of the coverslip and, then, to add
the appropriate diatoms placing them between the large forms. For instance,
the well-known workers E. Thum, Leipzig, and J.D. Moeller, Wedel, surround the
specimens placed with Aulacodiscus (Eilpodiscus) argus, detectable already with
the naked eye, and, thus, greatly facilitate the locating of the very small
specimens. However, the measures we must take to protect the particularly large
diatoms and diatoms set up on their tip against damage due to the pressure
s- 78 -
exerted by the coverslip are far more elaborate. The occurrence of pressure
actually is unavoidable as the result of drying of the mounting and embedding
media. It is, in fact, possible to insert either glass wool filaments or small
coverslip fragments between the slide and the coverslip prior to mounting and
sealing, but the appearance of our preparations certainly is not improved by .53•
these expedients, and, furthermore, protection against either crushing or.
shifting of the laboriously placed specimens is not even fully ensured follow-
ing their employment. A somewhat more secure approach in these cases is to
affix a few coverslip fragments to the coverslips prior to the placing of
specimens; these fragments are affixed in a manner similar to that I will
describe in a moment in connection with the discussion of protective rings
specially constructed for that purpose.
In order to exclùde all pressure action on the placed diatoms by the
coverslip and, at the same time, to facilitate locating of these diatoms by
restricting the area available for placing, workers have proposed already some
decades ago the use of rings or cells made of glass, gelatine or tin-foil.
Among these devices, the gelatine rings have turned out to be least reliable
due to inadequate fixing capacity. In short, the method in question involves
the following steps: A glass or tin-foil ring*with a central hole as small as
possible is affixed to the side of the coverslip destined to receive the speci-
men, which is then fixed on the bottom of the cell constructed in this manner.
The diameter of the coverslips and of the rings used are exactly identical;
however, the thiclmess of the individual rings varies and is selected depend-
ing on the character of the specimens to be mounted. In the case of flat diatoms,
rings measuring maximally 0.2 nmi in thiclmess are adequate, while we require
rings measuring 0.5 mm in thickness in the case of forms set up on their tip.
-79-
S
The glass cells must be manufactured to order by a glass factory; they
are made from the same glass material used for the production of coverslips.
The tin-foil cells cannot be purchased on the commercial market; they must be
manufactured in the laboratory by the worker using tin-foil of different thick-
purchased from a dealer. For punching out cells we use the usual matrixness
punches or dies, vrhich the worker may have to manufacture himself in the sizes
desired. Several wide punches are used for punching-out the little plates or
disks, and narrow ones, for punching holes into the latter disks. Punching must
be carried out oil a soft support (lead plate) in order to protect the punches
and dies, which must be maintained in a particularly well sharpened state.
As far as we have been able to ascertaxn, Eulenstein was the first worker to
mount preparations in that manner; however, for manufacturing his tin-foil cells,
the latter author used a special little machine constructed in a manner simi-
lar to a printing press. During the last half century, only five of these ma-
chines have been constructed; they are still in the hands of several specialists
or their heirs, and the actual construction of these machines has never been
described in literature. However, there is no doubt that, in particular, the
tin-foil cells permit simple working and give excellent results, so that we,
at this point, will describe the machines used for the manufacture of such
cells at least to an extent ensuring that their knowledge will not be lost.
As an example, I am using my own machine, which deviates only in external .54.
aspects from the only other one I have seen (Figures 19 and 20).
The base plate.G of the punching machine consists of a plate of polished
steel, measuring 11 mm in thickness and 8.5 cm by 16 cm in size, with a central
hole, measuring about 2 cm in diameter. A second steel plate, S, measuring
15.5 mm in thiclmess, is erected along the axis of the former plate and set
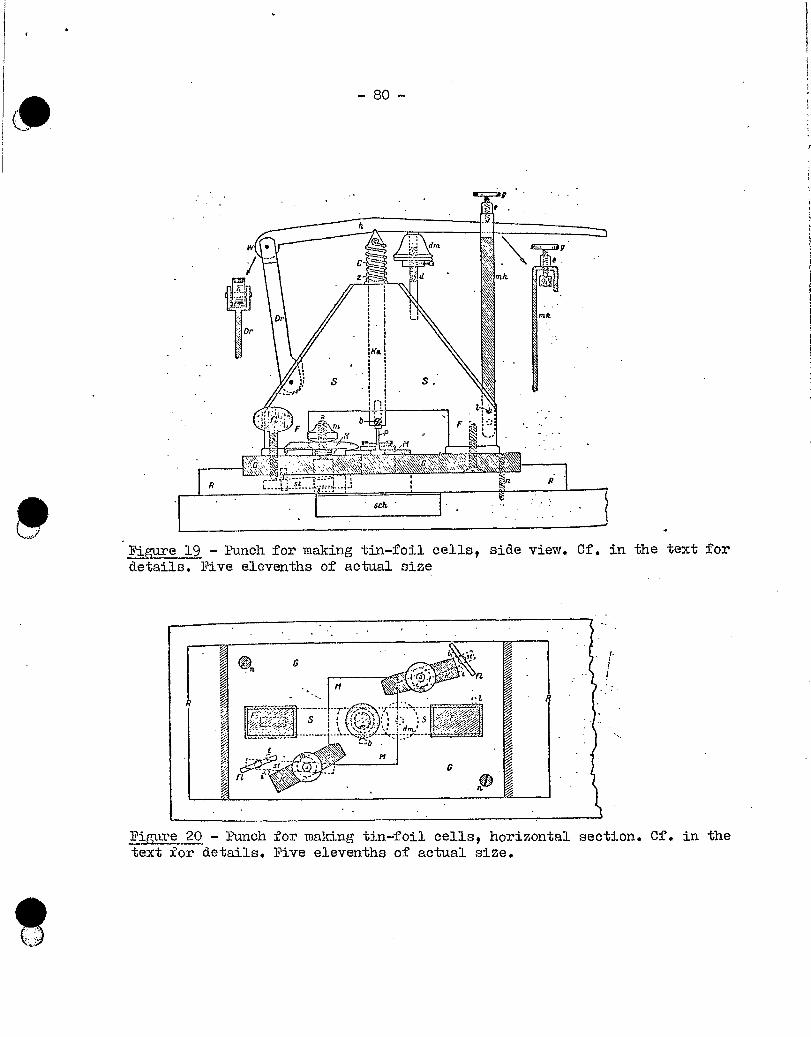
- 80 -
FigumrL12 - Punch for making tin-foil cells, side view. Cf. in the text for details. Pive elevenths of actual size
Figure 20 - Punch for making tin-foil cells, horizontal section. Cf. in the text for details. Pive elevenths of actual size.
4(1,1. 1')
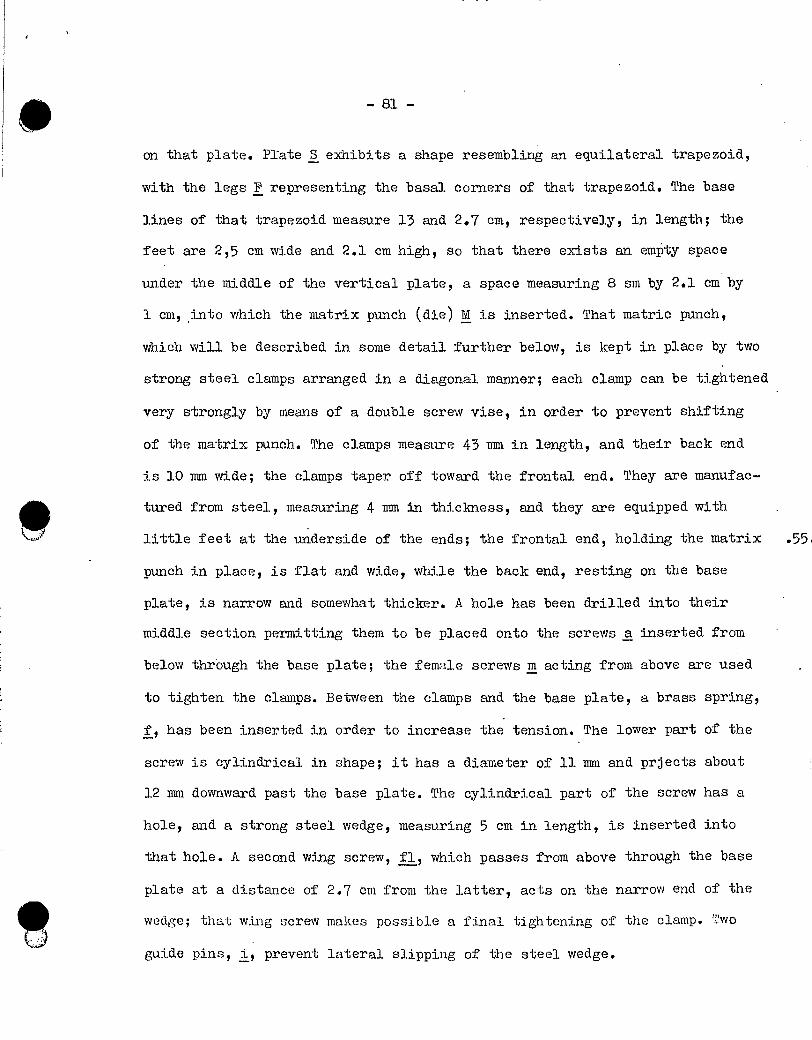
- 81 -
on that plate. Plate S exhibits a shape resembling an equilateral trapezoid,
with the legs F representing the basal corners of that trapezoid. The base
lines of that trapezoid measure 13 and 2.7 cm, respectively, in length; the
feet are 2,5 cm wide and 2.1 cm high, so that there exists an amPty space
under the middle of the vertical plate, a space measuring 8 am by 2.1 am by
I am, into which the matrix punch (die) M is inserted. That matric punch,
which will be described in some detail further below, is kept in place by two
1 strong steel clamps arranged in a diagonal manner; each clamp can be tightened
very strongly by means of a double screw vise, in order to prevent shifting
of the matrix punch. The clamps measure 43 mm in length, and their back end
is 10 mm wide; the clamps taper off toward the frontal end. They are manufac-
tured from steel, measuring 4 auli in thickness, and they are equipped with
little feet at the underside of the ends; the frontal end, holding the matrix .55
punch in place, is flat and wide, while the back end, resting on the base
plate, is narrow and somewhat thicker. A hole has been drilled into their
middle section permitting them to be placed onto the screws a inserted from
below through the base plate; the female screws m acting from above are used
to tighten the clamps. Between the clamps and the base plate, a brass spring,
C, has been inserted in order to increase the tension. The lower part of the
screw is cylindrical in shape; it has a diameter of 11 mm and prjects about
12 mm downward past the base plate. The cylindrical part of the screw has a
hole, and a strong steel wedge, measuring 5 cm in length, is inserted into
that hole. A second wing screw, fl, which passes from above through the base
plate at a distance of 2.7 cm from the latter, acts on the narrow end of the
wedge; that wing screw makes possible a final tightening of the clamp. Two
guide pins, i, prevent lateral slipping of the steel wedge.
- 82 -
The erected plate eXhibits, in its vertical axis, a groove, Ka, measuring
about 1 cm in width; the well fitted steel cylinder c, measuring 11 cm in
length, slides along that groove. The lower end of this cylinder is cylindri-
cally scooped and serves for insertion of stamp P, Screw b, set closely above
the. opening at the side, holds the stamp in place and prevents further passage
of the steel cylinder, which, after each downward movement during the punching
of cells, is returned to its initial position by means of a strong spring, z,
fixed at the upper end. The vertical arm of a pressure lever, Dr, which is
inserted into the sloping side of plate S in a manner permitting it to rotate;
that arm ends at the same level as the steel cylinder, and it bears there, .56. (W)
by means of an angular jointc a horizontal lever arm h. That horizontal lever
arm acts on the upper end of the stamp bearing the cylinder; in order to pre-
vent slipping-off, a slot has been ground into the lever arm, while the end
of the cylinder is Shaped like a wedge. The other slanting side of the vertical
plate S bears a vertically arranged screw d of some length; the corresponding
female screw, dm, which is tall and bell-shaped, can be adjusted with regard
to its level and, thus, limits the range of movement of the pressure lever.
Small steel angles with cylindrical loops can be attached to the broad sides
of plate S. Their function is to receive vertically arranged axes, which, at
their lower end, bear either straight or angularly bent brass strips. These
brass strips can be adjusted with regard to the level and can be rotated, from.
the side, into the center, in order to facilitate both centering of the matrix
punches and convenient removal of the punched tin-foil disks. However, the
advantages provided by the latter attachment are of subordinate importance,
so that the angular piece with the corresponding brass strips may just as well
be absent. However, brass strip mh, measuring about 2 mm in thickness, 0 mm
P
_83_
in width, and 16 cm in length, is very,useful in connection with the work of
centering. At the end, that strip is bent twice as right angles, so that a
hook is formed; the parts of that hook measure about 13 and 2 cm, respectively,
in length, and the space between them measures 1 cm. That space is exactly
right for holding the horizontal arm of the pressure lever. The piece connect-
ing the two hook branches has a hole; on the outer side, a cylindrical female
screw, e, is set over that hole, and a relatively long set screw, f,, can be
guided through that female part. The long hook branch is equipped at its lower
end with several holes arranged one above the other, so that that branch can
be fixed on a steel pin, 1, which is fixed on the side of the foot of the
vertical plate about 11 cm below the middle section of the horizontal lever
artn. With the aid of that device, the lever can be fixed, while the stamp is
lowered, to enable the worker to have both his hands free for centering of
the matrix punch.
The whole apparatus is mounted on a wooden frame, R, and fixed on that
frame with the aid of two screws9 n, located at diagonally opposed points.
A hollow space of ample size is located under plate G, with drawer sch set
into the lower plank.
Two types of matrix punches or dies are used. The one is used for punching
out the tin-foil plates or disks, and the other one is used for cutting a hole
into the punched-out disks (Figure 21). All matrix punches consist of surface-
ground steel plates measuring 3 mm in thickness; the larger one measures 4.5
cm by 3.8 cm, and the smaller one, 2 cm by 3 cm. The two matrix dies are screwed
together af ter centering, with the larger die being the lower one. That matrix
die has a central hole, which increases just a little in width from the top .57
downward, in order to permit unimpeded dropping of the punched-out tin-foil
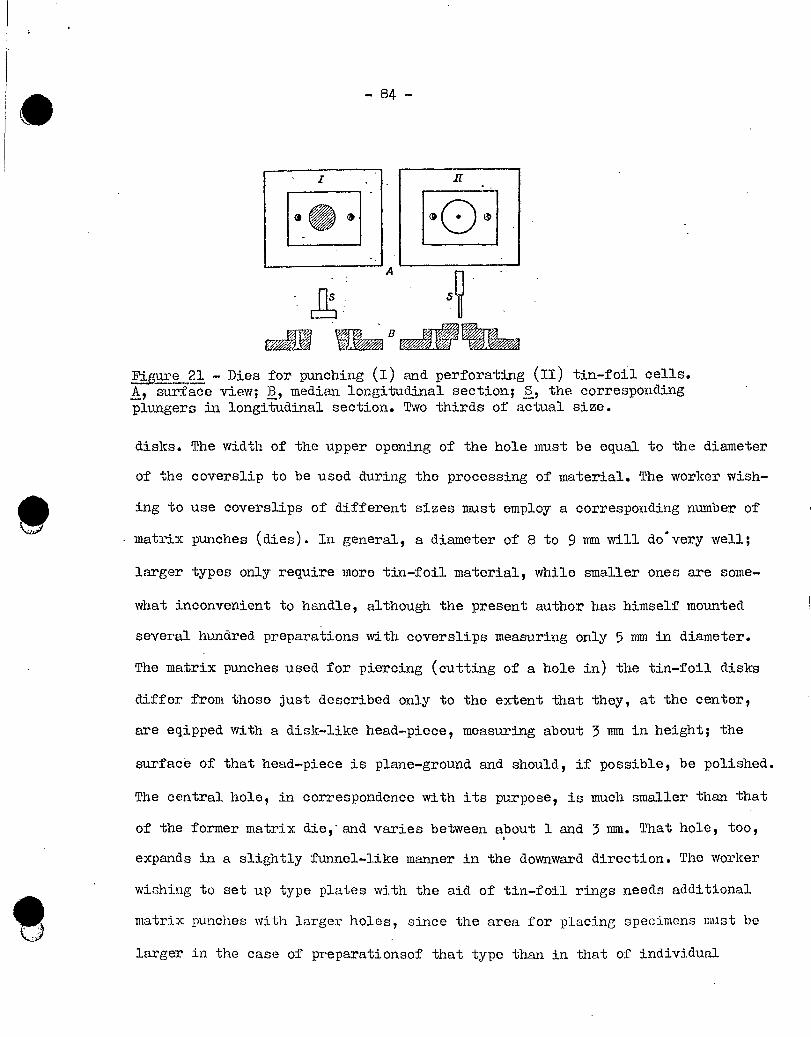
• -84-
A
le wee ewe", retem ; eAU A
Figure 21 - Dies for punching (1) and perforating (II) tin-foil cells. A, surface view; B, median longitudinal section; 5, the corresponding plungers in longitudinal section. Two thirds of jtual size.
disks. The width of the upper opening of the hole must be equal to the diameter
of the coverslip to be used during the processing of material. The worker wish-
ing to use coverslips of different sizes must employ a corresponding number of
matrix punches (dies). In general, a diameter of 8 to 9 mm will do - very well;
larger types only require more tin-foil material, while smaller ones are some-
what inconvenient to handle, although the present author has himself mounted
several hundred preparations with coverslips measuring only 5 mm in diameter.
The matrix punches used for piercing (cutting of a hole in) the tin-foil disks
differ from those just described only to the extent that they, at the center,
are eqipped with a disk-like head-piece, measuring about 3 mm in height; the
surfacé of that head-piece is plane-ground and should, if possible, be polished.
The central hole, in correspondence with its purpose, is much smaller than that
of the former matrix die l - and varies between about 1 and 3 mm. That hole, too,
expands in a slightly funnel-like manner in the downward direction. The worker
wishing to set up type plates with the aid of tin-foil rings needs additional
matrix punches with larger holes, since the area for placing specimens must be
larger in the case of preparationsof that type than in that of individual
- 85 -
preparations. A relatively large number of stamps belongs to a set of matrix
punches; the upper part of these stamps is inserted into the sliding cylinder
and fixed there with the aid of an adjusting screw. The lower part exhibits
a diameter corresponding to the matrix punch hole, and it must fit very ex-
actly^ be sharp-edged by grounding, and be polished. In addition, we require
a certain number of relatively small brass rings with two holes..The lower
hole corresponds to the diameter of the disk-shaped head-piece of the matrix .58
used in cutting of the hole; the upper one exhibits the same size as the cover-
slips to be used later during mounting. The number required depends on the
number of matrix punches used and the types of coverslips employed.
Operation of this punching machine is as follows: The stamp required for
punching out tin-foil disks (or plates) of a certain size is inserted into
the sliding cylinder'and securely fixed by tightening of the adjusting screw.
The corresponding lower matrix die is pushed under the clamps of the base plate,
placed in an approximately central.position, and the adjusting screws are
tightened in a preliminary manner, so that they still permit the die to be
moved a little during centering. Next, the sliding cylinder is lowered with
the aid of the pressure lever to an extent where the lower surface of the
stamp is almost in contact with the surface of the matrix punch; the sliding
cylinder is then fixed in that position with the aid of the brass hook des-
cribed further above. The matrix die is then moved until it is well centered
and the stamp can be lowered into the hole; the adjusting screws are then
tightened in a final manner. Next, the hook is removed, and the downward
move of the sliding cylinder is adjusted by either raising or lowering of the
bell of the set screw on the vertical plate, until the stamp, when working the
pressure lever, projects into the hole of the matrix die only as deeply as is
- 86 -
required to pierce the tin-foil sheet..The supply of tin-foil at hand is best
cut into small sheets, measuring about 10 cm by 15 cm, which are stored bet-
ween cardboard pieces with application of some pressure. Following these ad-
justements, we are ready to start punching of tin-foil. The little disks drop
through the matrix die into the drawer underneath the base plate. A large
quantity of these little disks can be manufactured within a brief period of
time. Cutting of the holes is a little more complicated, since each little disk
must be placed individually an the matrix die and removed individually from it.
The insertion of the stamps and dies required for cutting of the holes is '
carried out in the same manner as described in the case of the other stamps
and dies, with the exception that the appropriate brass rings are placed on
the disk-like head-piece of the matrix die; the upper hole of that ring exhi-
bits the size of the punched-out plate disks about to be pierced. Touching of
the tin-foil disks with the fingers readily leaves marks, which cannot be re-
moved; for that reason, the little tin-foil disks must be handled with the aid
of tweezers and placed.individually into the brass ring. Lowering of the stamp
leads to the cutting of a circular hole (more or less large); the pierced disk
is lifted up when the stamp is returned to its original position. The disk
must be removed gently from the piercing tool with the aid of tweezers; on
the other hand, it is possible to attach a removing aid in the form of a.brass
square to one of the screws on the side of the vertical steel plate; that
square will then prevent lifting of the little disks after piercing.
During punching and piercing it is not possible to avoid bending of the .59
the little tin-foil disks. However, in order to be employed, the little disks.
must be entirely even and smooth. For that reason, the disks are exposed to
strong pressure between tNo plane plates. Most useful for pressing are a plate-
- 87 -
glass plate, measuring at least 1.5 cm in thickness, and a steel plate, measur-
ing about 1 cm in thickness, which both must be ground to be absolutely plane.
Their size should be about 6 cm by 10 cm. A piece of strong, smooth cardboard
is placed on the steel plate; the tin-foil disks, their dull side down, are
placed on that cardboard, which is then covered with the glass plate, which,
in turn, is covered with a thick layer of blotting paper. These plates and
layers are then together subjected to pressure in a copying press or, if no
such press is available, in a general service C clamp. Strong pressure is
applied for a short period of time. Pressure must be applied in as central a
manner as possible, since otherwise the glass plate my break, and this., in
particular, if a copying press is used, or the little tin-foil plates may not
be properly smoothed, so that the process of pressure application must be re-
peated. After several minutes of application of pressure, we remolza the plates
with the tin-foil disks from the press; the little disks are impressed into
the cardboard, while the other side usually adheres to the glass plate and,
at the same time, is polished. If the tin-foil disks refuse to be dislodged
from the glass on light touching with the tweezers, we give assistance by
lightly heating the glass plate. In order to give a more attarctive appearance
to the tin-foil disks, we may provide them with different patterns, by placing
either silk gauze or mull between the glass plate and the tin-foil. However,
a second pressing without cloth, as a rule, is desirable, since the tin-foil
disks will then adhere better to the coverslips on mounting. The ready tin-foil
disks are stored in a small, fitting glass tube; a piece of cotton is placed
between them and the cork stopper, in order to , ensure that the tin-foil disks
will not again bend on inadvertent shaking of the tube.
The tin-foil disks are "glued" to the coverslip destined to receive
diatoms. However, that requires no particular measures, since the coverslips
must anyway be coated with a film of fixing solution. For our purposes, we
are permitted to use only either gelatine or isinglass solutions. As soon as
the film.has dried, we spread several tin-foil disks out on a clean slide,
pick up a coverslip with the aid of tweezers, breathe on a tin-foil disk, and
lower the coverslip, with the coated side facing down, on top of the disk. The
surface moistened on being exposed to breath will soften the gelatine, and
application of light pressure suffices to firmly bind the coverslip and the
tin-foil disk. Attention must be paid to ensure that adherence is uniform .60.
all along the rim, since otherwise Styrax balsam or sealing medium may pene-
trate between the tin-foil and the coverslip, which will, at least, mar the
appearance of the preparation, if it does not lead to complete separation of
coverslip and tin-foil disk. With some training, it is easy to lower the cover-
slip properly on top of the tin-foil disk, i.e. in a manner ensuring that the
rims of these two items coincide. If we have difficulties in that regard, we
may construct auxiliary devices permitting absolutely secure work. In the case
of the most simple one of these devices, three smal.l pieces or fragments of
relatively thin glass are glued on a slide in•a manner surrounding a circular
area having the size of the tin-foil disks or the coverslipsg respectively.
The tin-foil ceLls are then placed between these glass fragments, and the cover-
slip lowered next automatically coincides properly with the tin-foil disk. We
may furthermore use the matrix punch used for punching holes, since the ring
belonging to that punch fits exactly around both the tin-foil disks and the
coverslips, and, thus, will ensure proper fitting when the coverslip is lowered
on top of the tin-foil disk. However, since the steel matrix punches (dies)
- 89 -
witel r C.
- Device for attaching glass or tin-foil:cells to covering slips. P e brass plate; z, pin; r, ring; A, plate in surface view, and B e in longi- tudinal section; 0, removable ring in longitudinal section; D I plate with ring, in. longitudinal section.
suffer from frequent exposure to breath, we prefer for the purpose of proper
placing of tin-foil disks and coverslips small brass plates, which are con-
structed in a similar manner (Figure 22).
The worker, who orders coverslip glass cells from a glass factory and
uses them instead of the tin-foil cells, will process these coverslip cells
in the saine manner as described above in the case of the tin-foil cells.
Finally I will draw attention to the fact that tin-foil disks can be punched
out also without the machine described by me using instead a hand punch. One
difficulty, howeVer, will always be to center the hole properly; apart from
that, using a hand punch, the center hole can never be made as perfectly as
with the aid of the machine.
Placing of specimens onto the coverslips fitted with either these hand-
made tin-foil cells or the glass cells, of course, is done in the same manner
as described further above in the case of the coverslips fitted with machine-
mnde tin-foil cells.
0 -90-
i,'nbedding of mounted diatoms - Since our aim, in the case of the diatoms
mounted on the coverslips, is in the first instance to maintain the diatoms
permanently in the position assigned, while formation of air bubbles must be
avoided, we must exclude from use all those mounting and sealing media, which
must be either melted on the coverslip or heated more or less strongly, i.e.
all solid and viscous media, to which, unfortunately belong all those, we would
normally prefer because of their high refractive index. One exception, howevert
is found in the case of those preparations, where only individual shells are
mounted in the flat position; in these cases, we do not have to fear formation
of air bubbles. In all other cases, we will find that the diatoms, due to the
rather violent evolution of gass bubbles, are moved from their assigned posi-
tion and, under certain circumstances, will be destroyed. In order to ensure
that the laborious work connected with the initial mounting of diEttoms has not
been in vain, we should, if possible, avoid all strong heating, and the expul-
sion of air from our objects must be brought about by prolonged action of the
sealing medium itself..It would therefore be best to limit our use of media
to Styrax balsamt which is employed for that purpose in a particularly thinly
liquid solution, to which we, perhaps, may add some very pure turpentine. In
general, we can say that solutions containing turpentine and Styrax balsam
should be preferred to benzene or xylene solutions, since turpentine, first,
is less volatile and, secondly, will expel with almost unfailing certainty all
air bubbles during the course of prolonged exposure of the objects. In critical
cases, in which the aid bubbles exhibit particularly strenuous opposition to
leav.ing--as, for instance, in the case of the furrowed Diploneis and Su.rirella
specie , or in that of the chain-forming Rlel.osira-it is advisable to give, a
drop of pure turpentine on the coverslip prior to the application of the,,S.tyax.,.. .

- 91 -
IFiaure 23 - Brass bench for cover- Fipare 24 - Section through a box for
ing slips. h, handle; P, plate dust-proof storage of covering slips
with ten rhomb-shaped slits. Two during drying (P, piece of blotting
thirds of actual size. paper). Two thirds of actual size.
balsam solution and permit that turpentine to act until all air bubbles have
disappeared. The mounting and sealing media are added only following complete
evaporation of the turpentine. A. Elger has proposed a very convenient device,.
which enables us to expose individual preparations in great numbers and for any
length of time desired to the action of turpentine. Small benches are manufac- .62.
tured from brass sheet (Figure 23); rhomb-shaped slits-slightly shorter than
the diameter of the coverslips-are cut into the benches; these slits are used
to hold the coverslips together with the mounted objects. The benches together
with the coverslips are placed into covered glass containers, which had first
been filled with trupentine to a level ensuring that the coverslips would be
fully submerged. On the following day, the benches are removed, and the cover-
slips, with their coated side up, are placed along the rim of a plate of frosted
glass, measuring about 15 cm in diameter. If we then push the coverslips with
the aid of a needle across the glass plate to the opposite rim^ we will find
that the glass plate "takes up" the excess turpentine. Next we place the cover-
slips into a special container, give a drop of Styrax balsam solution on each
coverslip and permit thickening of the balsam at room temperature. In order to
ensure that the process of thickening takes place with exclusion of dust, we
_------- ^ -----_-----,...:
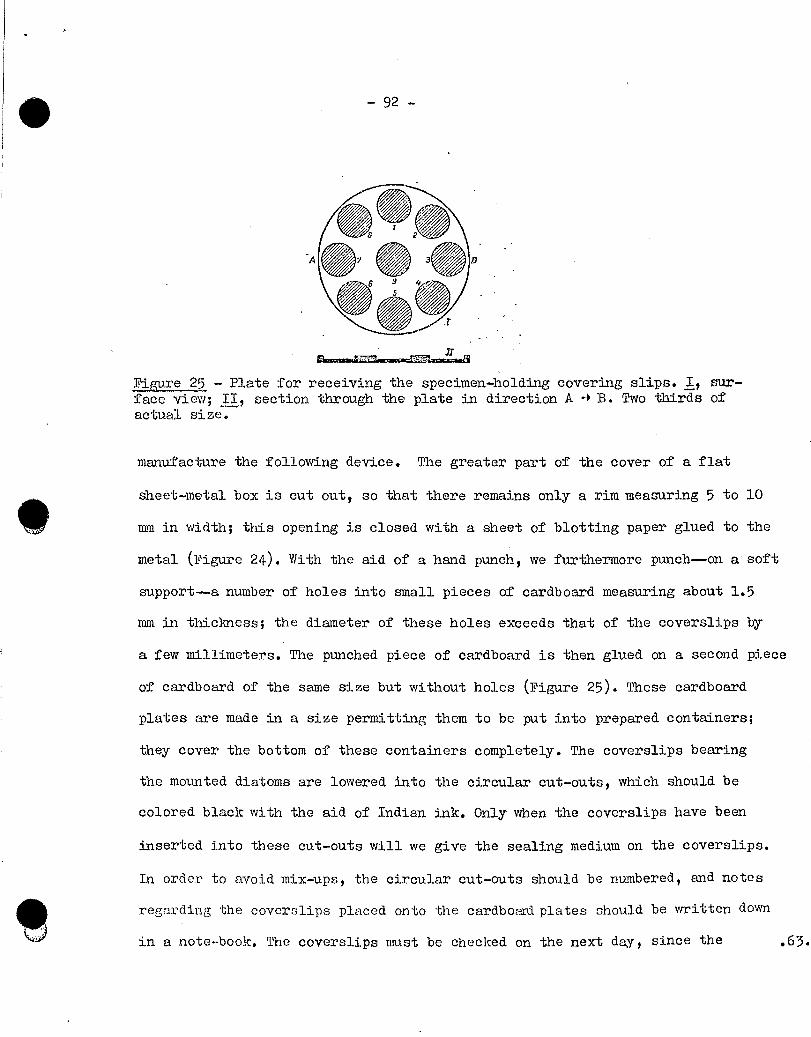
• - 92 -
• •
•
- Plate for receiving the specimen-holding covering slips. I, sur-face view; II, section through the plate in direction A 4 B. Two thirds of actual size.
manufacture the following device. The greater part of the cover of a flat
sheet-metal box is cut out, so that there remains only a rim measuring 5 to 10
mm in width; this opening is closed with a sheet of blotting paper glued to the
metal (Figure 24). With the aid of a hand punch, we furthermore punch--on a soft
support--a number of holes into small pieces of cardboard measuring about 1.5
mm in thickness; the diameter of these holes exceeds that of the coverslips by
a few millimeters. The punched piece of cardboard is then glued on a second piece
of cardboard of the same size but without holes (Figure 25). These cardboard
plates are made in a size permitting them to be put into prepared containers;
they cover the bottom of these containers completely. The coverslips bearing
the mounted diatoms are lowered into the circular cut-outs, which should be
colored black with the aid of Indian ink. Only when the coverslips have been
inserted into these cut-outs will we give the sealing medium on the coverslips.
In order to avoid mix-ups, the circular cut-outs should be numbered, and notes
regarding the coverslips placed onto the cardboaniplates should be written down
in a note-book. The coverslips must be checked on the next day, since the .63.

-95-
first drop of Styrax balsam solution on drying, usually, forms a raised ring
around the coverslip rim, while the layer at the center of the coverslip is
relatively thin. Application of a second drop of Styrax balsam eliminates that
deficiency, which can easily lead to the formation of air bubbles in the pre-
paration. Depending on the room temperature, about four to five days will Pass
before the solution has thickened or hardened to an extent permitting the
coverslipsto be placed on slides. In order to avoid useless work, it is best
to subject all coverslips once more to microscopic examination. Following that
examjnation, we give a small (I) drop of thinly liquid Styrax balsam solution
onto a cleaned slide and lower the coverslip on that drop. The thinly liquid
drop of balsam will soften the hardened mass to some extent, so that application
of light pressure will be adequate to bring the coverslip into the proper posi-
tion. Development of air bubbles is completely excluded using this particular
procedure. We are also able to heat the slide lightly prior to lowering of the
coverslip, then place the coverslip without prior application of a drop of
balsam, and finally induce the sealing medium to spread uniformly underneath
the coverslip by applying soue heat to the slide. The latter step must be done
with some care, and strong heating must be avoided in any case. Application
of the sealing wax ring is best postponed for some time, i.e. until the Styrax
balsam has well hardened.
On the basis of the description just outlined, mounting of individual
preparations may appear to be more complicated than it really is. With some
experience, the worker within a relatively short period of time, will be able
to mount a large number of such preparations, which will be of inestimable
value as reference material in subsequent systematic investigations. For that
reason, the worker should not limit himself to the possession of only one
- 94 -
preparation of each form, but he should try to obtain specimens of each species
from as many different habitats as possible to the extent that the variability
makes it appear necessary in each individual case.
(d) Preption of type plates
The worker who has acquired the art of mounting diatums may occasionally
think also of the preparation of type plates, which, however, will in general
remain always in the domain of the professional preparator of specimens, be-
cause of the amount of time required. Type plates can be prepared from two
points of view: They either cover all systematically ordered forms from one
sample of material, or greater or amaller numbers of diatums selected from
different samples of material, which, arranged in accordande with the system
of taxonomy, represent either individual or several genera or groups with
regard to their spectra of species. In the one case, these plates serve in
the rapid characterization of a given habitat; in the other one, they serve
well in the study of taxonomic aspects. The most excellent type collection of
the kind has been prepared in the eighties by J.D. Moeller, the Universum
Diatomacearum Moellerianum, which on an area of 6 mm by 6.7 mm contains in nine
divisions 133 series with 4036 individually mounted specimens. In order to
arrive more readily at a taxonomic division, the diatoms are distributed in
accordance with genera over different coverslips already during initial selec-
tion. The ultimate coverslip is coated with a gelatine layer in the manner
outlined already further above in the case of individual preparations and, if
desired, is equipped with either a tin-foil or a glass cell, the hole of whbh,
of course, must in accordance with the purpose envisaged be greater than that
punched in the case of the individual preparations.. Within a collection of
- 95 -
!FF
F^.^^ e 26 -- Part of a plotting net for placing of type plates. x 40.
the specimen is attached during the process of transfer; these grid lines divide•
a surface of about 6 nun by 6 nuu into 3600 squares having sides measuring 0.1 Mn
in length. The lines cut in a perfect manner with the aid of a diamond can be
seen through the coverslip, so that the individual specimens have to be placed
simply on the intersecting points in order to obtain a perfectly arranged plate.
Instead of the slide, we can also use a coverslip for the cutting of such a
grid, and then attach that coverslip on the slide underneath the coverslip about
to receive specimens. In order to avoid continuous adjusting of the setting of
the nd.crsocope, we place a coverslip of corresponding thiclmess underneath .65
the coverslip holding the pre-selected diatoms. The latter arrangement has the
type plates, the diatoms should be mounted in accordance with a certain system,
i.e. either in concentric circles or in straight, parallel rows. For the pur-
poses of subsequent catal.oguing, arrangement in rows is preferable; howeverg in
order to be able to carry out detailed cataloguing, we require certain refer-
ence points. For that purpose, we arrange to have a regular grid of delicate
lines cut on the surface of a slide (Figure 26) or on that of the placing plate
of Debes' mounting device at the site, where the coverslip destined to receive
- 96 -
advantage that we are not bound to a certain spot on the slide. Commercial
squared eyepiece grids can also be used for that purpose. The worker wishing
to mount circular preparations will use a pattern of closely arranged con-
centric circles instead of the grid pattern.
If we would breathe on each individual specimen for the purpose of fixing
it, the more delicate forms would sink too deeply into the layer of fixing
medium due to the repeated softening of -that layer; on the other hand, a single
breathing over a coverslip fully mounted with specimens entails the danger of
displacing individual specimens, leading, under certain circumstances, to the
loss of the entire preparation. For these reasons it is best to fix the di-
atoms on type plates in the following manner: Once the coverslip has been fully
covered with specimens (in cases of temporary interruption, this particular
procedure, however, applies also to the part of the work already done:), we
place a small glass jar, measuring not more than 2 cm in both height and dia-
meter, over the coverslip, after first breathing into that jar; the jar is
removed again after a few seconds.
Embedding is carried out in the same manner as described in the case of
individual preparations, but pretreatment with turpentine is absolutely re-
quired in the case of type plates.
I
(e) Mounting of specimens for examination from both sides
In particular in the case of dorsi-ventrally constructed diatoms, it is
desirable, if not necessary, to be able to inspect the specimens from both
sides. Similarly, it is frequently necessary in the case of individually
mounted shells to inspect the inner side, in order to obtain certain infor- .66
mation on the structure of the cellular wall. The usual preparations do not
• - 97 -
Dr
Dr $
Figure 27 - Specimen held between two covering slips. 0, slide; D1 and D21 covering slips; S, protective strips. Two thirds of actual size.
permit observations of that type, since the thick mdcroscopic slides exclude
the use of strong objectives. For that reason, it is advantageous in many cases
to mount and seal diatoms—and, in particular, species belonging to the genera
An_rhora_. and Nitzschia—between two coverslips, in which case we are, however,
forced to molt practically all protective devices against pressure inside of
the preparation. For more convenient handling of preparations of that type, we
fix the coverslips in a cardboard frame having the size of a microscopic slide;
this piece of cardboard has a hole in the middle for accolldation of the cover- et
slips. Preparations having a better appearance, but also being significantly
more expensive are obtained if we have cebtral holes drilled into microscopic
slides--holes measuring 15 mm in diameter. The hole is closed again using a
thin (1) coverslip, measuring 18 mm in diameter, which is fixed in position
with the aid of shellac. In this way we obtain a cell having a diameter of 15
mm,into which the mounted coverslip is then inserted. The larger coverslip,
fixed to the underside of the slide, must be protected against pressure with
the aid of two strips of glass attached along the sides of the coverslip (Fi-
gure 27).
(f) Labeling of preparations and establishing of collections
If a collection of diatoms is expected to be of permanent value--and
all workers involved in the study of siliceous algae should have that aspect
in mind right from the beginning of their work--a great deal of care has to be
-98-
taken with regard to proper labeling of specimens. This can be done all the
more readily, since the time spent with the whole process of preparation is
the same, whether the preparations exhibit a pleasant appearance or not. Well
done preparations not only are the joy of the preparator, but they also en-
hanée the desire to work further and may serve future workers in their in-
vestigations. The appropriate labels are ordered in large quantities from a
printer; they are then not more expensive than the labels available ready-made
on the market, which usually are not very well designed. The printer will de-
liver the labels in sheets; gumming and cutting of the labels can be done at
the laboratory. For gumming we use a solution, which will soften on moisten- .6
ing with the aid of a wet sponge, i.e. dextrin or gum aràbic dissolved in hot
Water. As required, the gum solution is applied to the reverse of a number of
sheets, which are then cut after drying. The labels should not be too small;
in fact, we should make full use of the space available to us on the micros-
copic slides. In the case of the usual slide size of 76 mm by 26 mm, labels
measuring 24 mm by 25 mm are best suited, since we must take into consideration
also the larger coverslipS. Colored paper in shades not too dark is preferred
to white paper, since colored paper loses its appearance less rapidly. All
labels are framed by a simple borderline and show several faint horizontal
lines to facilitate inscription. One half ad the labels purchased from the
printer is imprinted with the name of the preparator and that of his city of
residence; the rest of the labels is left blank. When affixing the labels,
the worker should be consistent to the extent of attaching the label bearing
his name always either to the left of the coverslip or to the right of that
slip. The inscriptions are clone with Indian ink or e better, with black ink
available from the firm Guenther Wagner under the name of ScriptoÊ) , which
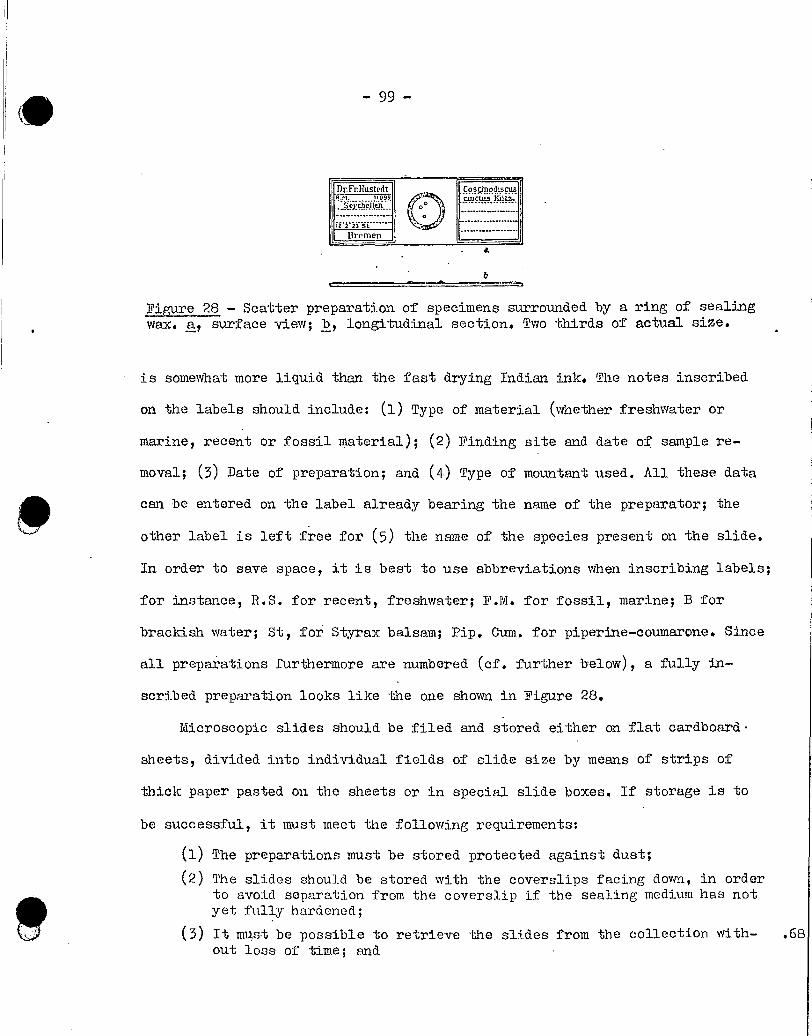
- 99 -
DrInHustedt Co senodisms R.f1 , ...... AM? 9. canctua kiitz. —.5.tnhei.1_
if 2 23 St —
Bremen
Figure 28 - Scatter preparation of specimens surrounded by a ring of sealing wax. a l surface view; b, longitudinal section. Two thirds of actual size.
is somewhat more liquid than the fast drying Indian ink. The notes inscribed
on the labels should include: (1) Type of material (whether freshwater or
marine, recent or fossil material); (2) Finding site and date of sample re-
moval; (3) Date of preparation; and (4) Type of mountant used. All these data
can be entered on the label already bearing the naine of the preparator; the
other label is left free for (5) the name of the species present on the slide.
In order to save space, it is best to use abbreviations when inscribing labels;
for instance, R.S. for recent, freshwater; F.M. for fossil, marine; B for
brackish water; St, for Styrax balsam; Pip. Oum. for piperine-coumarone. Since
all preparations furthermore are numbered (cf. further below), a fully in-
scribed preparation looks like the one shown in Figure 28.
Microscopic slides should be filed and stored either on flat cardboard•
sheets, divided into individual fields of slide size by means of strips of
thick paper pasted on the sheets or in special slide boxes. If storage is to
be successful, it must meet the following requirements:
(1) The preparations must be stored protected against dust;
(2) The slides should be stored with the coverslips facing down, in order to avoid separation from the coverslip if the sealing medium has not yet fully hardened;
(3) It must be possible to retrieve the slides from the collection with- .68 out loss of time; and
P
- 100 -
(4) The system of filing must permit easy incorporation of new slides.
The cardboard sheets commonly used in no way meet these requirements,
and for that reason they should be excluded a priori from use in the establish-
ing of a diatom collection. It is therefore advisable to use the wooden boxes
for.iiling slides available on the market; these boxes contain 100 slides, in
two rows of 50 slides each. These boxes are then set up like books; without
first having to remove other material, these boxes can be readily taken down,
so that one has ready access at all times to all preparations. A collection
consists of two divisions, which are best kept separate right from the start:
The one division contains the scattered preparations, and the other one, the
individual preparations. The scattered preparations are filed in accordance
with geographical principles, i.e. usually in accordance with continents,
countries or oceans, with certain more closely investigated regions given
particular prominence. The collection of the present author gives such pro-
minence, for instance, among the flora of Europe to the Lunz Lake Region,
the Alps, and Finland;'among the flora of Germany to the North-German Lakes,
the Sudetes, and sources in Germany; among the flora of Africa to material
obtained during the Tanganyika Expedition, etc. A label is affixed to the
back of these slide-containing boxes describing the content in accordance
with the regions represented, and the boxes are filed in numerical order. The
scattered preparations are given the number of the box in which they are stored,
in Roman numerals, and in addition the number of the slot in the box assigned
to them; however, these preparations may also be numbered in a consecutive
manner. The novice would be well advised to do his cataloguing only in a pre-
liminary manner and, thus, also do the numbering in pencil only, until his
collection has reached a certain size or certain areas have been fully covered.
01, - 101 -
The individual preparations are filed systematically in accordance with
genera. In most cases it is not possible to maintain the taxonomic order
also in the filing of species; that can be done at best later on, once the
collection bas attained a certain state of completeness. A label is affixed
to the back of the boxes giving the names of the genera or groups filed inside.
The boxes are then filed in alphabetical order, since that system permits
easy addition without extensive rearranging of preparations. In the case of
large genera, we set aside entire boxes right from the start. The following
system used in the case of the collection of the present author may serve as
illustration:
A. 1, 2. lielosira. A, a. Melosirinae.*
' A, b. Sceleton.eminae. R. 1-4. Coseinodiseus. C. Stietodiseinae. I), 1, 2. Actinoptychus. •• 1), a.
Plauktoniellinae, Actinoptychinae, Asterolanaprinae, Pyrgodiscinae.
E. l e 2. Aulacodiscui. - • P. 1, 2. Auliscus. • F, a. Eupodiseinae, Tabulinae. • G. Lauderiinae, Rhizosoleniinae. G, a. Chaetocereae. C, b. Eucamplinae, Triceratiinae, Biddulphiinae,.
Isthmiinae. II, 1-5. Triceratium. II, a. Biddulphia. II, b. Ilemiaulinae, Anaulinaea. 11, e. Euodieae, Rutilarieae.
etc.
As soon as the collection has attained a certain size, we are able to
carry out a certain distribution in space using an extensive diatom flora,
since the strength of the genera is rather well known at least in relative
terms. On the other hand, we are readily able to incorporate new boxes into
the system. For instance, if the number of preparations belonging to the
P
- 102 -
genus Asteromphalus, filed in box D,a, becomes too large, we remove that genus
from this box and file the preparations in a new box given file number D,b.
Within the individual genera, the slides are filed in numerical order, and
this again at first only in a preliminary manner; for instance, Navicula
algida GRUN.: N.243; Cal.oneis obtusa IAGST.: N,a.78; CampYlodiscus balearicus
CL.: Z.149.
Of course, catalogues must be kept on both collections, and thist best,
in the form of card indexes, which are set up in alphabetical order. The one
index covers the finding sites, and the other one, the species identified,
both making refernce to bixes and numbers in, or underAwhich the respective
slides can be found. For instance, Sandwich rslands, r.m.: CXII, 79 - 95;
E.inotia clevei GRUN.: D. 81 - 83. To the extent that the scattered prepara-
tions have been identified, lists of the forms found are packed into the boxes;
the lists affixed to the inside of the boxes are left blank.
^ Anal,ysis of scattered -Preparations
A collection of scattered preparations is of true value only after the
specimens have been identified and we, thus, are informed regarding the con-
tent of the slides. Detailed analysis can be 'carried out only with the aid of
a mechanical microscope stage, the operation of which ensures that no indi-
vidual is overlooked. If in doubt during analysis regarding certain forms, the
worker will note the coordinates of the mechanical stage, but must make cer-
tain, in particular, that the stage is centered (if a centering device is
incorporated). The worker should also note the position of other forms appear-
:i.ng to be wrorL-hy of note in some respect. Following general analysis of the
preparation, the worker should return to the specific examination of these
- 103 -
critical forms, since otherwise general analysis would have to be interrupted
several times. If the forms in question are to be fixed for subsequent locat-
ing in a prominent manner, we should not rely on the coordinates, but instead
mark the position—for the reasons already outlined on page 41 of the present
paper--with the aid of sealing wax rings or by means of an object marker. In
general, analysis of three scattered preparations is adequate for orientation
with regard to the content of a given sample. In particular cases--and this
above all where the material is deficient in individuals, but qualitatively
rich in species and, in particular, in large forms—analysis of even a large
number of scattered preparations does not let us achieve our object; in these
cases we must subject a number of preparations as large as possible to labor-
ious selection and counting--work which, however, is usually very rewarding.
As a classical example I may mention here the analysis of the polycystine
limestone from Jérémie, on Haiti, by Truan and Witt, who, dealing with rock
material very poor in quantitative terms, were able to describe a large num-
ber of well developed end mostly new species, while each scattered prepara-
tion from that meterial usually contained only one or a few individuals.
I have had a similar experience in the analsis of mud samples from the
Tanganyika Lake, which, on selection, yielded a great number of new species,
in particular, from the genus Suriella; the scattered preparations, on the
other hand, had contained hardly any of these individuals.
V. Anatomical examination of the cell membrane .71.
The microscopic examination of the diatomic structures is part of the
most difficult problems in microscopic techniques, since the critical cases
are close to the limits of resolution and deviations of rays by refraction
- 104 -
at the coverslip may frequently cause optical illusions, so that specific
preparative methods are required in order to eliminate these errors as far ,
as possible. I wish to mention right now that work on diatomic structures
requires the best objectives, i.e. apochromatic objectives with high numerical
aperture, and microscopes working perfectly with respect to all mechanical
components. Above all, the fine adjustment screws must be perfect in every'
respect; they must be readily adjustable, without application of particular
pressure, and must maintain any position set for the tube. At maximal magni-
fication, there should be no lateral abberation or distortion of the image
when the microscopist makes a movement. These microscopes, furthermore,' must
permit measurements of thickness, i.e. they must be equipped for use as re-
liable focimeters. Unfortunately, the fine adjustment screws manufactured even
by the greatest optical firms meet these requirements only in part. The grease-
less focusing drive after Meyer, which is ueed by Zeiss at the present time in
all their basic units, can, in fact, be very easily adjueted, but due to its
system of lever transmission that device does not permit accurate measurements.
On the Other hand, the devices of the type incorporated into large microscope
stands, for instance, by Seibert, which are based on transmission by means of
eccentric disks, can, in fact, serve as focimeter; however, due to both the
relatively great size of the surfaces coming into contact with each other and
the greasing required because of that extensive contact, these particular
devices have a somewhat heavy movement. However, in the view of the present
author, the latter disadvantage is the lesser one, and can, perhaps, be eli-
minated by using a more suitable grease.
All numerical data provided by the optical firms, of course, are valid
only for a specific type of microscope, which corresponds exactly to all the
- 105 -
calculations on which these numerical data are based. However, small deviations
cannot be avoided despite all the care taken in the performance of precision
construction; in general, these deviations are of no importance. However, at
maximal magnification and in the case of highly detailed investigations, these
minor deviations may be more or less of importance. For that reason, we must
prior to the start of investigative work subject the fine adjustment as well
as the focimeter values to tests and, if necessary, make the required corrections
-a procedure, which no microscopist should really omit. In the testing of the
fine adjustment values, we use an object micrometer, with a division of 0.01 mm.
If, for instance, 100 division marks of the eyepiece grid correspond to seven
marks of the object micrometer, i.e. 0.07 mm, then the micrometer value for .72.
the corresponding object and at the same tube setting amounts to 0.07 mm di-
vided by 100 equal to 0.00007 mm or 0.7 P; or 142/7 division marks of the eye-
piece grid correspond to a length of 10 4 of the object.
The division of the fine adjusting screw is reliable since it is cut into
the steel by photographic means, and mot, as in the past, with the aid of a
diamond. In measurements of thickness, we must multiply the value obtained
on reading the division marks of the fine adjusting screw with the refractive
index of the membrane components, which index, in the case of the siliceous
cel7. wall consisting of silicic acid, amounts to n = 1.434. In order to check
whether the focimeter values are correct at all points of the field and at any
position of the fine adjusting screw, we measure at high magnification the
thiclQiess of the wall of a thick-walled, cylindrical diatom-let us say, of
a Melosira specimen-using, first, the eyepiece grid and then, on the same
cell, the fine adjustment screw. This is done several times in order to com-
pensate errors in observation due to the accomodation of the eye. Taking into
-106 -
consideration the refractive index of n = 1.434, we then obtain two comparable
values, which must agree; if they do not agree, we must obtain the correction
factor by.means of division, and all results subsequently obtained by measure-
ment using that microscope must then by multiplied by that correction factor.
. When examining very fine structures, the microscopist is frequently ex-
posed to optical illusions, which are due to deviations of rays by refraction,
and it is frequently not possible to arrive at a final judgement regarding
the true nature of what one has seen as image under the microscope. In cases
where refraction phenomena appear in the form of interference fringes in the
proximity of the shell edge, they may simulate lines of the type we find, for
instance, as longitudinal lines on the shells of certain Caloneis species. In
doubtful cases, we place the cell on edge, whereupon lines actually present
can be clearly distinguished, while interference fringes or lines, of course,
will shift their position. In any case, it should be noted that membrane re-
fractions appear light at high setting using mono-refractive mounting media,
but dark at low setting. However, since poroids exhibit a similar optical be-
havior, we are unable on the basis of the latter optical reaction to draw
definite conclusions regarding the question whether we are dealing in a given
case with pores or slits.
In order to obtain data on the structure of membranes, we may use the
following avenues, in addition to the procedure of placing diatams already
described:
(1)Embedding in Special media;
(2)Transverse sections and grinding sections; and
(3)The degradation procedure.
I
- 107 -
(a) Embedding in special media .73•
(l Low-index media - As outlined further above ^ I prefer^ above all o
high-index media for the mounting and embedding of permanent preparations;
however, these media cannot be recommended in all cases. High-index media^ in
fact, give better resolution of structures, but they entail the disadvantage
that the forms embedded in these media exhibit a more pronounced marginal
shadow, so that it is difficult-in particular, in the case of more strongly
curved forms---to discern -the course of the outer border contours. In these
cases we are forced to use a clearing medium with low refractive index. We
usually employ volatile oils, like turpentine oil, olive oil, clove oil or
cedar oil (as immersion oil) which, in general, penetrate the cells more rapidly,
clear the walls and, thus, yield good images of the contours of the cell wall
and of cell wall composition (intermediate bandst and septa).
(2) High-index media - High-index media have already been mentioned
further above to the extent that they may be used as mounting and embedding
agents in the processing of permanent preparations. Those already mentioned
are in any case adequate also for examinations of structures. Enumeration at
this point of our discussion of several other high-index media is done only
for the sake of completeness andt in particular, because the liquid media
to be mentioned frequently permit more rapid processing of preparations for
temporary use. These liquid media are only rarely suited for use in the pro-
cessing of permanent preparations, since changes will occur sooner or later
leading to the loss of the preparation in question.
As liquid media we may give consideration to the following substances
and mixtures:
- 108 -
Quinoline, colorless, refractive index n = 1.624.
Methylene iodide, weakly reddish color, refractive index n = 1.74.
ce-Monobromo-naphthalene, colorless, refractive index n = 1.66.
Phenylisothiocyanate, yellowish colored, refractive index n = 1.65.
Phenyl sulfide, deep yellowish-green colored refractive index n = 1.95,
Carbon disulfide, colorless, refractive index n = 1.628.
All these substances are applied directly to the dried diatoms; however,
during mieroscopic examination attention must be paid to their rate of eva-
poration, since all these substances are more or less volatile. In the case
of prolonged examination, we may, if required, apply a temporary sealing ring. .74 .
Stannic chloride-arsenious acid-glycerol - For the preparation of this
medium we weigh six parts of stannic chloride and two to two and a half parts
11,
of arsenious acid. The stannic chloride is briefly boiled in a test tube. An
equal quantity of glycerol is added to the hot stannic chloride, and the mix-
ture is heated further and shaken, until we obtain a clear solution. The
arsenious acid is then added very slowly; the mixture is shaken again and
heated, until all substance is dissolved. After cooling, we obtain a thickly
liquid to viscous, colorless mass, which possesses good keeping quality if
well sealed. (The solution used by the present author was prepared in 1913
and today, fifteen years later, is still in lierfect condition) The diatoms
placed on a coverslip are covered with one drop of this medium; the coverslip
is lowered on a slide, which is then strongly heated, with vigorous evolution
of air bubbles. After cooling, thegreater part of the air bubbles will have
disappeared; the medium becomes light brownish in color, and its refractive
index may be close to that of the piperine mixtures. The preparations usually
show some clouding, which, however, can be eliminated by re-heating.
Translator's note: Phenyl sulfide is a colorless liquid. -
- 109 -
Stannic chloride-glycerol-gelatine - Light gelatine is heated and
dissolved in pure glycerol giving a glycerol-gelatine mixture eXhibiting the
consistency of bee honey. Forty grams of stannic chloride are dissolved in
8 g of the latter mixture with some heating. The solution at first is milky
and turbid, but becomes clear on boiling in a test tube, and then shows the
color of Canada balsam. Since vigorous formation of gas bubbles takes place
during that heating, the test tube should be filled maximally to one quarter.
The ready medium is thickened like balsam on the coverslip with some heating,
but this medium remains hygroscopic and, therefore, makes use of sealing rings
mandatory. We recommend that a wax ring be placed first around the material
and then a sealing wax ring on top of the latter ring. The refractive index
reportedly is n = 1.7.
Antimony bromide-glycerol-arsenious acid - Antimony bramide is melted
and one half of the quantity of glycerol is added. With slow shaking and heat-
ing, we add arsenious acid to that solution until the following ratio has been
attained: Eight parts of antimony bromide, four parts of glycerol, and three
parts of arserbus acid. The mass thus obtained is viscous, colorless, and
reportedly has a refractive index of close to n = 2.0. The experience the
present author has obtained with this medium does not permit its recommen-
dation; the mass as such, furthermore, has turned out to have poor keeping
quality.
A series of other media has been recommended; however, there is no real
need to treat them in the present paper, since repeated experience indicates
that they are not really useful and can be fully replaced by the different
media mentioned further above.
-110--
(b) Preparation of transverse sections and of grinding sections
Transverse sections and grinding sections represent excellent means for
obtaining information on the morphological structure of the whole cell as well
as on the anatomy of the membrane. Preparation of transverse sections and of
grinding sections can be done most readily using hard, diatom-containing rocks,
like, for instance, the cement stones from Mors (Jutland) or Sendai (Japan).
Small chips from the rock are first carefully ground on one side on a grind-
stone or on emery paper, starting with the coarse-grained types and gradually
turning to the fine-grained ones; the surface of the chip must be truly flat.
The ground chip is then polished on a tautly stretched piece of chamois-leather.
The polished chip is next affixed to a slide (the polished surface down) with
the aid of Canada balsam, and the balsam is then permitted to dry and set.
Next, the other side of the chip is ground (lapped) until only a thin, trans-
lucent layer remains on the slide, which can be either completely embedded in
Canada balsam or removed with xylene and mounted in any medium desired. Final
grinding must be done gently, in order to prevent destruction of the thin
layer, which, after all, is not very solid. This method has the disadvantagenot
that we areAalways able to determine with certainty the structures with which
the membrane sections-always present in relatively large numbers in ground
sections of this type-are associated. However, these sections will be of
great value in connection with detailed analyses of material. In a similar
manner, we are able to impregnate soft diatomaceous or inîusorial earths with
Canada balsam and then subject the hardened mass to grinding. Of these earths
contain mainly one or just a few species, it is relatively easy to obtain
good orientational sections of certain forms. If we wish to treat recent
material in that manner, we must replace the fluid with absolute alcohol
- 111 -
until there remains no trace of water present; next, the mass is transferred
to xYlene and, finally, to balsam, which is then permitted to dry and set.
Mounting for grinding can also be done in the following manner: The di-
atom-containing mass is affixed in a certain position on the slide, covered
with ether and then sprinkled with powdered Canada balsam. The ether dissolves
the balsam, and the resulting solution saturates and impregnates the cells
completely. The solution is thickened by careful heating--not above 500C--
until the balsam sets hard after cooling. Grinding is carried out on a coarse
grained lap plate using common table oil and applying light pressure. In order .7
to check the progress of grinding, the surface of the material is dabbed
lightly with benzene and examined under the microscope.
In order to obtain transverse sections through diatoms, we embed the
material in rubber. In that procedure, we mix a drop of water containing an
abundance of diatoms with one drop of thick rubber solution, and then permit
the mixture to dry on a flat piece of elder pith. Next, avoiding all conta-
mination with moisture, we cut thin sections through the dried ruber pellet
with the aid of a razor blade; these sections are embedded in balsam on slides.
Sections properly orientated with regard to the cells present will be obtained,
if the diatoms are first aligned in the rubber mass. A part of a slide is
coated with a delicate film of collophonium and, folloWing complete drying,
a drop of viscous rubber solution is placed on that film. A trace quantity of
diatoms suspended in water is added to that drop and mixed in. Under the mi-
croscope, we then push the diatoms--using a very fine needle--toward the
gradually drying rim of the rubber drop. During that process of shifting
the material, we assign a certain position to the diatoms, in which they then
remain during the process of drying. In order to ensure that the diatoms will
11^
- 112 -
be fully enclosed in rubber, we must from time to time add little rubber
droplets. Finally, we coat also the upper side of the pellet with a thin film
of collophonium, remove the rubber pellet from the slide, trim it to a size-
convenient for sectioning, and cut thin sections in the desired direction.
Cells still containing their cytoplasm as well as stained cells can be sectioned
in a similar manner after treatment with alcohol and transfer to rubber. How-
ever, we cannot recommend addition of dry material to rubber, since the air
bubbles frequently encountered in these cases have a disturbing effect during
sectioning.
In the assessment of the section we must be cery cautious, since minor
shifts of individua,l. parts may occur very readily in these thin siliceous
walls, so that the pattern seen under the microscope may not in all respects
correspond to the natural pettern.
(c) The degradation procedure
In diatom samples.we very frequently find shell fragments, in which certain
rib-like thickened parts are still fully preserved, while the thin membrane
components have already disappeared. The fact that the thin membrane layers
are more readily destroyed, i.e. dissolved by chemical means, can be utilized
in our investigations of certain morphological, relationships. For that pur-
pose, we then expose the diatoms in question to the action of hot solutions
of sodium carbonate or, even better, of potassium hydroxide. The course of
degradation is checked under the microscope, and the action of the solution
is interrupted at the moment considered to be the right one. On the basis of
observations made at this point of degradation we are able to draw certain
conclusions regarding membrane structure. It goes, of course, without saying
-113-
that fragments found may offer valuable contributions to the elucidation of
individual problems, and this, in particular, if the worker knows how to
place these fragments in the proper manner. The approaches to be taken in the
individual case are entirely up to the investigator. However, I wish to stress
once again that we should always make good use of the fine adjusting screw in
microscopic studies. Proper handling of that device will permit us many in-
sights, and the correct understanding of the pattern seen will save us much
laborious work.
VI. Drawing and_photographing of diatoms
Accurate drawings will be of the greatest help in all identifications
of microorganisms, indeed of all objects in general. In the case of diatoms,
good illustrations are all the more necessary, since the cells, in general,
offer only a small number of distinguishing characters, and even the richest
language is too poor to describe these characters and their differences in
proper terms. Illustrations, which can be placed side by side, inspected and
compared, are more informative than preparations on slides, which must always
be examined in turn. For that reason, every worker dealing seriously with
diatoms should as far as possible supplement his collection of preparations
on slides by a collection of illustrations; the latter collection will serve
him well also in investigations of variations. Drawing of the microscope image
must be carried out with the aid of modern drawing accessories, since we will
only with their aid obtain illustrations of adequate accuracy. The magnifi-
cation tables provided with the microscope must also in this connection be
corrected, since the numerical values given are always related to an average
microscope and, above all, to an object distance of 250 mm, which is only

• - 114 -
rarely maintained during drawing. The actual magnification must be calculated
for'each tube length, each level of the drawing plane, and each optical com-
bination; these calculations are carried out with the aid of an object micro-
meter (squared eyepiece grid). In each instance, a sharp image of the eye-
piece grid is projected on the drawing surface--to the extent that that grid
appears in the field of vision--and the length of the projected grid part is
divided by the actual length of that part. At high magnification, we will find
that the grid lines are too thick for accurate measurement, and we better use
a delicately shelled diatom for testing, after the exact length of that di-
atom has been determined accurately. Apart from that, it is advisable to de- .78
termine the arithmetic means on the basis of several drawing tests, since we
know that already a slight shift in the position of the illustrator's head will
result in deviations . in the drawings amounting to 1 mm or 1000 g. Within narrow
limits we are, however, permitted to round off the numerical values obtained.
For instance, we are permitted to write 1000/1 instead of 1020/1, since that
small difference is practically of no importance. It is best to compile a
table using all magnification data, which will then enable us to read at any
time the magnification actually being used when employing a certain optical
combination and vice versa to determine the Optical combination best suited
for obtained a predetermined magnification. As a rule, the magnifications ob-
tained using weak objectives in combination with strong eyepieces and those
obtained using string objectives in combination with weak eyepieces will over-
lap, so that we--in particular, in the case of high magnification—have
several optical combinations available to obtain a given magnification. When
drawing images of appearance, we usually select weak objectives and strong
eyepieces; structural drawings, on the other hand, absolutely require use of
I-- 115 -
the strongest objectives. In general, the illustrator should follow the rule
to -screen off as well as possible the field of vision as well as the drawing
surface, since the detailed structures will then appear more distinctly on the
drawing surface. However, the worker will usually find when using high magni-
fications that the drawing surface is still too well illuminated, so that
delicate details-which can be readily distinguished under the microscope-
disappear when the drawing prism is attached. More intensive illumination of
the field of vision does not solve the problem, since the structures in question
are visible only on strong dimming. In these cases, we should try to attenuate
to a greater or lesser extent the light projected on the drawing surface from
the light source, and this can be done by inserting filters. Artificial illu-
mination can be used very well when drawing diatoms. For illumination of the
field of vision, we use best one of the usual microscope lamps; in addition,
we use a second lamp-set up next'to the former-with a weaker bulb for illu-
mination of the drawing surface. When drawing for a relatively long period of
time, a rather inconvenient error will occasionally manifest itself-an error
I wish to discuss in some detail. If the à.llustrator, having worked for a
while, compares the contours of the drawing and the contours of the object,
he may find that they no longer coincide, but appear to be shifted to a greater
or lesser extent with respect to each other, spoiling the whole work done.
This apparent lowering of the object may have a number of different reasons.
If instances of this non-coincidence of contours occur, regularly, we are
probably dealing with a defect in the construction of the fine adjusting screw
of the microscope, i.e. the screw is unable to check the weight of the tube
nnd gradually permits the tube to slide down. In order to test this possibi- .79•
lity, we focus the microscope on a particularly delicate object--let us say,
• -116 -
the poroid closing membrane of a Coscinodiscus specimen--at high magnification
using oil immersion, and then leave the microscope for a relatively long period
of time untouched and protected from vibration. If we next, after a while, take
a look through the one eyepiece of the microscope without changing the fine ad-
justment, we should see superimposition of the image contours. A precondition
for that state, however, is the use of perfect immersion oil, and this brings
us to the second cause occasionally responsible for this interfering lowering
of the tube. If immersion oil is not stored properly, i.e. is not well sealed,
it will thicken greatly with time. When using that thickened oil, it is so
taclg- that fine adjusLment is possible only with difficulty. Oil behaving like
that is useless and must be replaced by fresh oil. A further cause may be found
in an unnoticed movement of the stage of the microscope, if that stage is a
revolving one, or if the slide has been placed onto a mechanical stage. Re-
volving stages are put under uneven stress by the screws fixing them to the
microscope; when the fine adjustment is activated, these stages, of course,
tend to adopt a position . of equilibrium, which will upset the image projected
on the drawing plane. At higher magnifications, even very minor modifications
of positions produce noticeable effects. For that reason, devices, which per-
mit locking of the revolving stage and, at least, prevent movements of the
mechanical stage, are advantageous. It is, in any case, advisable immediately
prior to drawing to make certain that subsequent movements of all mechanical
parts of the microscope have been made impossible; once the microscope has
been set at the magnification intended for drawing--and this, in particular,
if immersion oil is used--it is best to wait a moment before starting with
the actual work.
- 117 -
There is no need to describe here the technical aspects of drawing.
Innate skill is required to a certain extent, and additional practice will
make the work perfect.
There can be little doubt at all that the production of faithful draw-,
ings of diatoms is not only difficult, but also extraordinarily laborious,
and we can therefore readily understand that attempts have been made to use
photography to record observations. A worker, who, like the present author,
has had to spend many years of his life drawing diatoms, will value a method
saving him from that never ending work. However, at the present time, micro-
photography is able to replace drawing only ti a very small extent. Since a
photograph shows clear details only in one plane, photography is suited mainly
for reproducing diatoms exhibiting shells having a more or less even surface.
All other forms will.yield good reproductions only at low magnification; . how- .80
ever, in order to reproduce details, photographs must be taken at high magni-
fication, so that the complete illustration of a given species always re-
quires several photographs. In order to take all these photographs, we again
require time, which makes the work more expensive, and, furthermore, the pre-
parations to be photographed must meet certain requirements, which under cer-
tain circumstances simply cannot be met. The illustrator is able to touch up
minor technical deficiencies of the preparation; he iSable to omit disturbing
or confusing aspects, and, above all, he is able to combine the images visible
at different tube settings into a uniform entity with the aid of the fine ad-
justment device, thus, reproducing all details in one illustration. Many of
the microphotographs published even very recently are almost entirely useless
for taxonomic identification--and illustrations of that type should be used
in the first instance for that purpose. Nevertheless, photography, when properly
applied, has many capabilities, which I will now discuse in some detail.
- 118 -
The first useful and, in part, excellent microphotographs of diatoms
have been produced by Janisch in his plates of diatoms collected during the
Gazelle Expedition. Janisch used a special objective system and great focal
length. In the seventies, the American author Woodward produced photographs
of test diatoms, which were known for the difficulties associated with the
resolution of their structures; he used natural objectives with high numerical
aperture. At that time, bis photographs very rightly created a sensation; at
the present time, however, optical capabilities of that level are routine re-
quirements for the usability of microscopes. In 1888, Truan and Witt, in their
publication on the diatoms of the polycystine limestones of Haiti, presented
six plates with truly excellent microphotograms. These authors made a special
effort to overcome the drawback that the depth effect is inadequate when using
strong objectives. These authors took their first photographs using weak ob-
jectives with relatively good depth effects and then enlarged these photo-
graphs (also by photographic means). It turned out that fine structures, which
could not be discerned.with the eye on the first photographs, and which nor-
mally would have required strong objectives for their reproduction, became
visible on these enlargements made of the first photographs. Since the dry
plates available on the market at that time (which were manufactured using a
gelatine emulsion) were too coarse-grained to permit subsequent enlargement,
Truan and Witt went back to the rather obsolote collodion process using the
following solutions for their plates:
1. Collodion solution: Alcohol, about 88% Sulfuric ether Collodion cotton Calcium chloride Cadmium iodide Ammonium iodide
100 parts 100 parts
1.5 parts 0.27 part 1.5 parts 0.9 part
- 119 -
2. Silver bath: Distilled water 400 parts^-^ w A-^ Silver nitrate, 8,,'/L1 so1n. 24 parts
Sunlight was used for exposure, which was captured with the aid of the
mirror of a megascope and concentrated on the condenser of the microscope.
A cobalt filter was inserted in the ray bundle. The following solution was
used to develop the plates:
Water 1000 partsFerrous sulfate 30 partsGlacial acetic acid 25 parts
Alcohol 30 parts
Where required, the photographs were contrasted and for that purpose
•
bathed in the following solution:
Water 380 partsPyrogallic acid 1.5 partsCitric acid 1 part
The photographs obtained in this manner were enlarged five-fold with the
aid of a photographic enlarger, and this again using the afore-mentioned wet
collodion plates in order to be able to dispense with the yellow filter re-
quired due to the possibility of overexposure in the case of the usual dry
plates. Using these diapositives, the authors went ahead and produced nega-
tives by means of the pigment printing procedure, in order to produce finally
on albumin paper the positives required for reproduction. The results obtained
by Truan and Witt, no doubt, are first class, but the intricacy of this pro-
cedure will hardly encourage other workers to follow in their steps. In fact,
these authors themselves have stated: "The procedure used by us, in fact, is
laborious, and it thus represents a saving of time and effort, compared to
dravrtng, probably only in the case of very complex forms ... We admit that
the illustrations produced using our procedure are not equal to the best
drawings."
- 120 -
Recently microphotography has been simplified by the construction of
projection eyepieces. It is, in fact, possible to obtain very good microphoto-
graphs without employment of eyepieces, but, as a rule, these photographs are
too small or require inconveniently long bellows extension. These new pro-
jection eyepieces permit projection of the frontal focal plane on the focusing
screen, i.e. they can be adapted to any focal length required without giving .82
consideration to tube length. An achromatic condenser is advantageous, even
if not absolutely required; that condenser replaces the common condenser in
Abbë's illumination apparatus, and permits a better image of the light source.
In the case of weak and intermediate dry systems, we are able to use common
objectives as condensers, but Abbé's illumination apparatus must be adapted
for insertion and centcring of these objectives. In order to intensify the
contrasts between the delicate diatoms and the background, we must use filters,
and, in correspondence with the correction of the objectives for green and
yellow light, only filters conforming to that aspect may be used. These filters
are bes.t prepared by the worker, using the following formulas:
Zettnow's filter: Cupric nitrate 160 gChromic acid 14 gWater 250 g
Filter after Kaiserling: Ten ml. of a saturated alcoholic Martius yellow
solution are mixed with 200 ml. of water; ten ml. of a-methylene blue solution
are mixed with 200 ml. of water. The two solutions are mixed. The blackish
precipitate is removed by filtering, washed once with water, and dissolved in
alcohol. This filter has a good keeping quality and may be used in any con-
centration desired.
Two photo;raphic plates, as thin as possible and their coating removed,
may be used as cells; these two plates are separated by a rubber tube bent
- 121 -
in the shape of an "U" and held together by several photographic clamps.
The afore-mentioned solutions, of course, can also be used separately, one
after the other one. The worker, who prefers solid filters over liquid ones,
may develop an unexposed photographic plate, fix it, wash it, and then sub-
merge it in these solutions. Using different combinations of blue and yellow
plates, the worker is then able to obtain the filtering intensity desired. It
Should finally be noted that the use of green filters requires the amployment
of orthochromatic plates. It is best to eliminate the sun as the source of
light and use instead--in order to be able to work always under identical.
conditions--one of the customary microscope lamps with strong bulbs. Of great
importance, finally, is the connection between the microscope and the camera,
Which must be absolutely light-proof, but still loose enough to ensure that
vibrations of the camera--which cannot be avoided when changing the focusing
screen and inserting the film holder--are not transmitted to the microscope.
In the case of the specially constructed units for photomicrography, the
microscope is equipped with an attachment in the form of a cylindrical collar,
which is set on top of the tube; that collar, in turn, fits into a double
collar attached to the camera (Figure 29). The worker wishing to use a common
camera must create his own connecting link consisting either of cardboard
collars or a black cloth sleeve. The preliminary focusing of the image is
done on a common focusing screen. However, since the coarse grain prevents
sharp focusing of the fine structures, that screen must be replaced by a
translucent screen, which, on the side facing the objective, has several lines
at relatively large distances; the image can then be examined on that screen
with the aid of a magnifying glass. Prior to actual employment, the magni-
fying glass is focused on the afore-mentioned lines, and is then placed on the
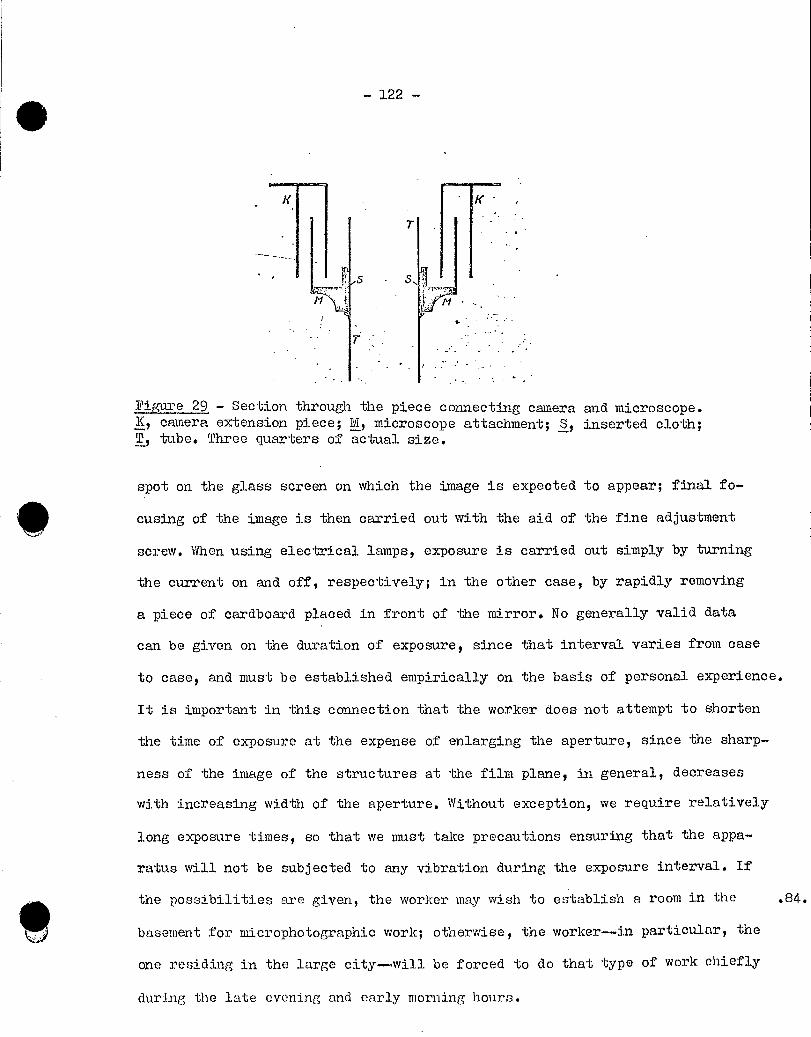
-122 -
el I I I te
- Section through the piece connecting camera and microscope. K, camera extension piece; M I microscope attachment; S I inserted cloth; T, tube. Three quarters of actual size.
spot on the glass screen on which the image is expected to appear; final fo-
cusing of the image is then carried out with the aid of the fine adjustment
screw. When using electrical lamps, exposure is carried out simply by turning
the current on and off, respectively; in the other case, by rapidly removing
a piece of cardboard placed in front of the mirror. No generally valid data
can be given on the duration of exposure, since that interval varies from case
to case, and must be established empirically on the basis of personal experience.
It is important in this connection that the worker does not attempt to shorten
the time of exposure at the expense of enlarging the aperture, since the sharp-
ness of the image of the structures at the film plane, in general, decreases
with increasing width of the aperture. Without exception, we require relatively
long exposure times, so that we must take precautions ensuring that the appa-
ratus will not be subjected to any vibration during the exposure interval. If
the possibilities are given, the worker may wish to establish a room in the .84.
basement for microphotographie work; otherwise, the worker--in particular, the
one residing in the large city--will be forced to do that type of work chiefly
during the late evening and early morning hours.
- 123 -
•
VII. Quantitative methods
Studies to determine the number of organisms floating in the free water
by means of quantitative analyses have been carried out for a good many years;
studies of that type in the areas of littoral growth and of mud, however, are
being made only since a few years ago. This particular situation is due, on
the one hand, to the fact that plankton studies have been at the center of
interest during the last decades and, on the other one, also to the difficul-
ties associated with the accurate quantitative analysis of both growth and
mud. The methods used in the respective cases are rather different and, for
that reason, require separate discussions.
(a) Plankton
Accurate quantitative determinations within the plankton can.be made only
using either centrifuged material or chamber plankton; during hauling with
nets, we will always lose more or less of the material present. In order to
determine the volume--a procedure which promises some success only in the case
of relatively large quantities--we permit the material to dry and, in order
to destroy other organisms present, submit it to roasting. Treatment with
acids represents an uncertain avenue, since weak acids under certain circum-
stances do not completely remove the foreign substances, while strong acide
may also attack the delicately walled diatoms. The roasted mass is impregnated
with absolute alcohol and boiled in water. If we then permit the mass to settle
for a relatively long period of time in a measuring cylinder as narrow as
possible, we may be able to read the volume; prior to the latterStep, we
would have determined the weight of silicic acid in the dry mass. In general,
this separate treatment of the diatoms within the planktonic kingdom is done
O
q
- 124 -
very rarely, and workers usually limit their studies to determinations of
both the volume and the weight of the total plamkton. In the latter deter-
minations, roasting is not required; the results, however, are of doubtful
value, if we do not permit the material to dry. Many forms equipped with long
processes do not settle even after months in a standind cylinder, but rather
form, in a permanent manner, a light flocculent mass. In these cases, deter-
minations of volume are completely illusory in character and cannot even be
used in comparative studies, except if, by chance, the samples in question
involve the same species (not simply the same genera:).
The counting of planktonic diatoms is carried out far more frequently
than the latter king of investigation; these counts are made to determine
.85.
the number of individuals---or, better expressed, cells-of one species present
in a certain quantit^ of water. The fact that it is more correct to proceed
on the basis of individual cells than on that of individuals is readily evi-
dent once we remember that many forms are able to occur in the unicellular
state as well as in the form of nnzlticellular colonies; with regard to the
biological situation, it is, of course, of some importance whether a certain
quantity of water contains 50 individuals, each consisting of a single cell,
or 50 individuals, each consisting of ten to'twenty cells, i.e. 500 to 1000 cells.
Counting is carried out either on special counting plates or on the usual
slides, but also using the Kolkwitz chamber. In all cases, we require a micros-
cope equipped with a mechanical stage. The counting plates have a system of
fine lines arranged vertically to one edge at exactly identical distances.
These distances may, of course, differ on different plates. Plates of that type
always entail a certain disadvantage viz. that the use of different and con-
siderably varÿing magnifications is possible only with difficulty using the
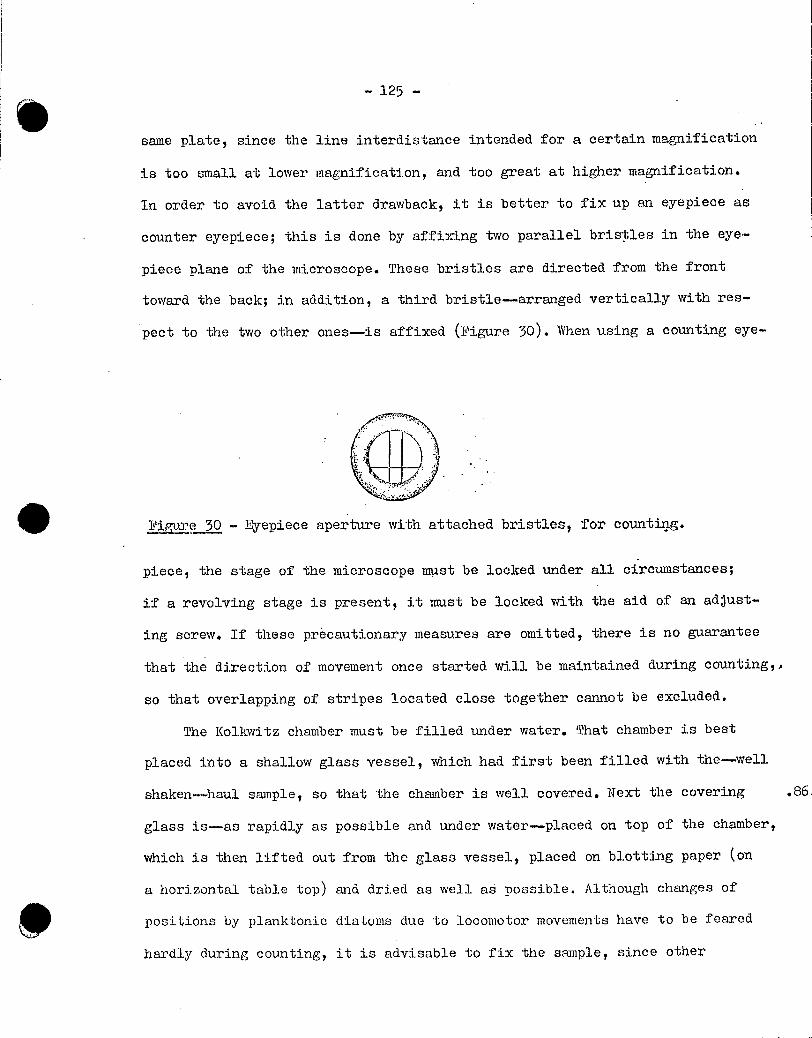
- 125 -
go
same plate, since the line interdistance intended for a certain magnification
is too small at lower magnification, and too great at higher magnification.
In order to avoid the latter drawback, it is better to fix up an eyepiece as
counter eyepiece; this is done by affixing two parallel bris^les in the eye-
piece plane of the microscope. These bristles are directed from the front
toward the back; in addition, a third bristle-arranged vertically with res-
pect to the two other ones-is affixed (Figure 30). When using a counting eye-
Fi e 30 - Eyepiece aperture with attached bristles, for counting.
piece, the stage of the microscope must be locked under all circumstances;
if a revolving stage is present, it must be locked with the aid of an adjust-
ing screw. If these prècautionary measures are omitted, there is no guarantee
that the direction of movement once started will be maintained during counting,,
so that overlapping of stripes located close together cannot be excluded.
The Kolkwitz chamber must be filled under water. That chamber is best
placed into a shallow glass vessel, which had first been filled with the-well
shaken-haul sampleg so that the chamber is well covered. Next the covering .86.
glass is-as rapidly as possible and under water-placed on top of the chamber,
which is then lifted out from the glass vessel, placed on blotting paper (on
a horizontal table top) and dried as well as possible. Although changes of
positions by planktonic diatoms due to locomotor movements have to be feared
hardly during counting, it is advisable to fix the sample, since other
-126 -
organisms, perhaps present, may disturb counting with their movements. For
that purpose we move the covering glass to the side, until a narrow space of
the chamber is exposed, and add a drop of fixing solution. In order to acce-
lerate occurrence of death, we repeat the process on the opposite side of the
chamber after the covering glass has been pushed over to the other side (or
that glass has been turned around by 180 degrees, as suggested by Utermoehl).
The diatoms settle relatively rapidly, and we are, thus, able to start count-
ing. Unnecessary handling of the chamber should be avoided, since exactly di-
atoms, due to their relatively high specific gravity, undergo non-uniform
distribution. The method of counting used depends entirely on the numbers of
species and individuals, respectively, present in the sample. Frequent forms
are best counted separately; the worker can then limit his counting to parts
of the chamber, i.e.,subject every second or third stripe or certain continuous
fields of exactly determined size to counting. If numerous species are re-
presented--a finding rarely made in the case of freshwater samples--counting
can be carried out according to groups; that method is more reliable and,
still, at least as rapid as the former one. In cases where the content of
plankton is very high, it is advisable to dilute the material--which dilution,
of course, must be included in the calculation when establishing population
numbers.
Plankton obtained on centrifugation is counted completely, if the sedi-
ment is relatively small in volume. Using pipets with wide mouth, the centri-
fuged mass is transferred to counting plates or common microscopic slides and
there permitted to dry (if the investigation involves diatoms). Sediments
containing an abundance of plankton can be diluted as required and distributed
over several plates, or we dilute at a certain ratio and subject only a portion
• - 127 -
of the sediment to counting--which portion is withdrawn with the aid of a
measuring pipet after adequate shaking of the material. The pipet used must
in any case be carefully rinsed out If an unlined microscopic slide is used,
counting is carried out with the aid of a counting eyepiece.
Filter residues can be processed in the saine manner, but it must be re-
membered in this connection that the numerical values obtained in that ma-
terial do not represent absolute values. In particular in the case of marine
plankton containing great numbers of Chactoceros, we will dilute rather highly,
since the frequently densely arranged chains make counting extraordinarily .87.
difficult. Drying of the material applied cannot always be recommended in
this instance, since many species change their appearance greatly on drying
and can then no longer be identified. Since counting of the whole sample is
out of the question in the case of large material hauls, it is advisable to
withdraw, prior to counting, a measured aliquot from the diluted sample and
to determine the species occurring in-it. Identification usually is not possible
during counting, and we are then frequently in a position where we are forced
to write "sp." instead of the name of the species.
Comparative representation of the results obtained on counting is done
best in the form of curves. The most simple curves are the linear ones; how-
ever, in the case of very large or greatly varying numerical data, curves of
that type entail the drawback that they will rise very high and cannot be
accommodated in figures suited for printing. For that reason, Scourfield has
proposed the use of logarithmic plotting paper instead of the usual milli-
meter plotting paper and to plot not the numbers of individuals but the log-
arithms of these numbers. That procedure, to be sure, results in a consider-
able compression of the curves, but they are also less illustrative and, for
r
O
- 128 -
that reason, have never really been accepted by worker in this field. Since
the latter method of plotting results was not satisfactory, Lohmann developed
the so-called spherical curves. He proceeded on the basis that the number of
individuals is related to a certain volume, which can be represented graphi-
cally by a body. The outlining of whole bodies in each instance, of course, is
highly time-consuming and, furthermore, is simply impossible along the abscissa
--divided in a uniform manner by the fixed time intervals--for reasons of luci-
dity. Lohmann was, thus, faced by the necessity to select bodies that can be
represented by a line, i.e. either cubes or spheres. At equal linear extension,
the sphere, compared to the cube, exhibits the greater volume; vice versa, we
also find at equal volume--which in the present instance is expressed by the
number of individuals counted--that the sphere eXhibits the lesser linear ex-
tension of these two bodies. Since, furthermore, the spatial conoppt of the
sphere on the basis of a given line can be more readily pictured than the
concept of a cube on that basis, we prefer the spherical curves (Figure 31)
to the quadratic curves. The equatorial planes of all spheres represent the
abscissa (axis); the radii are plotted as ordinates, which are given by the
following equation:
•
In this equation, r represents the number of individuals found on count-
ing. That number, in turn, can be calculated on the basis of the length of
the ordinates, when we raise that length to the third power and multiply
the result with 4.19. If the unit of the radius is either greater or smaller
than 4 mm, that fact, of course; must be taken into consideration. In the
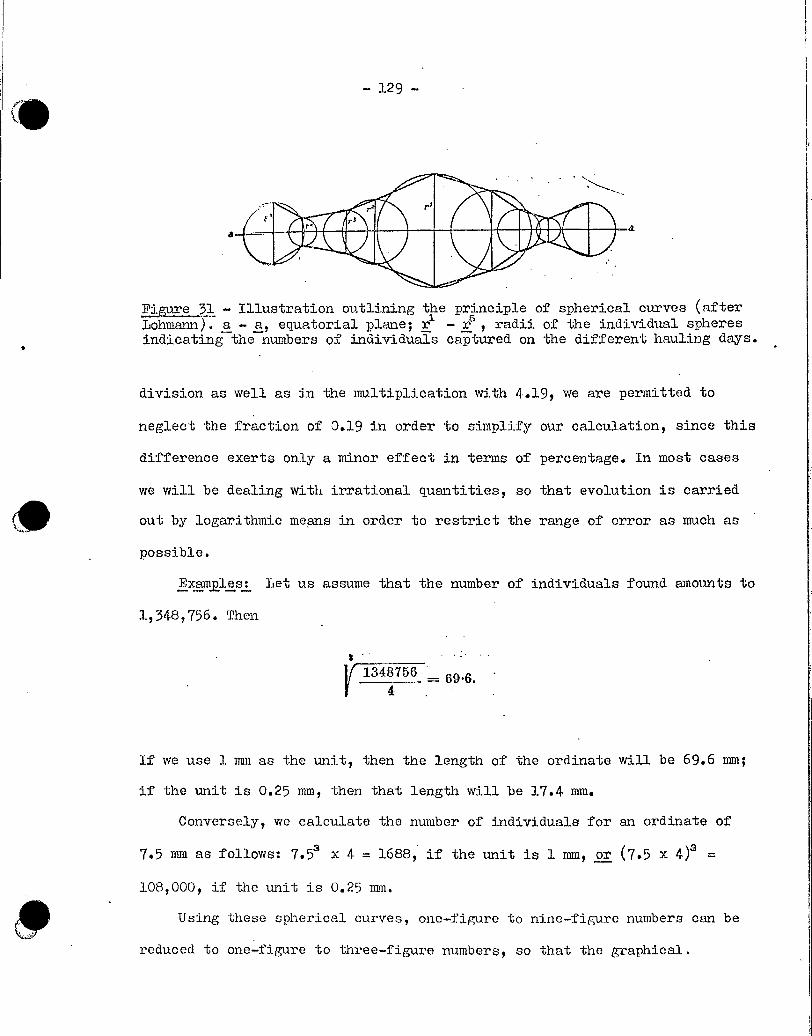
i
- 129 -
Figure 31 - Illustration outlining the principle of spherical curves (afterLohmany.z). a- a, equatorial plane; r-:05, radii of the individual spheresindicating the numbers of individuals captured on the different hauling days.
division as well as in the multiplication with 4.19, we are permitted to
neglect the fraction of 0.19 in order to simplify our calculation, since this
difference exerts only a minor effect in terms of percentage. In most cases
we will be dealing with irrational quantities, so that evolution is carried
out by logarithmic means in order to restrict the range of error as much as
possible.
Exameles: Let us assume that the number of individuals found amounts to
1,348,756. Then
a•1348756 _ 69•6.
1 4
If we use 1 irmi as the unit, then the length of the ordinate will be 69.6 mm;
if the unit is 0.25 mm, then that length will be 17.4 mm.
Conversely, we calculate the number of individuals for an ordinate of
7.5 mm as follows: 7.5s x 4 = 1688, if the unit is 1 mm, or (7.5 x 4)3 =
108,000, if the unit is 0.25 mm.
Using these spherical curves, one-figure to nine-figure numbers can be
reduced to one figure to three-figure numbers, so that the graphical.
-130-
representation is facilitated to a large degree with retention of the same
scale within a given study. In the execution of the graph, it is not necessary
to plot the radii on both sides of the abscissal axis-i.e. to plot the dia-
meters--although the graph is more instructive if we do, and this, in parti-
cular, if we blacken the space between the curve peaks with the aid of Indian ink.
b Growth off s rin
Quantitative investigations in the area of growth are of importance be-
cause the numerical values obtained will provide more accurate material for .89.
the assessment of the effects exerted by illumination, water currents, sub-
strate, etc. on the colonization with diatoms than simple estimates. However,
accurate working is made difficult, in particular, by the finding showing that
usually numerous other forms are present apart from the true offspring diatoms;
these forms dwell between algal filaments, in leaf-axils, or in the adhering
detritus. When removing samples, it is best to proceed in the following manner:
Prior to cutting the plant parts to be studied, the plant is gently moved
about in the water in order to remove the diatoms dwelling loosely in the
tangle together with the detritus. Loss of offspring diatoms really does not
have to be feared during that manipulation, since these diatoms resist strong
water movements also under normal conditions in their habitat. If we are in-
volved in the investigation of completely submerged plants, we proceed as
follows in accordance with a suggestion proposed by Willer: A collecting jar
filled with water is turned upside down under water above the part in question
of the plant; that part is gently cut off; and the glass jar is slowly lifted
out of the water. After addition of the fixing solution, the glass is sealed
with a cork stopper with avoidance-as far as possible-of creation of air
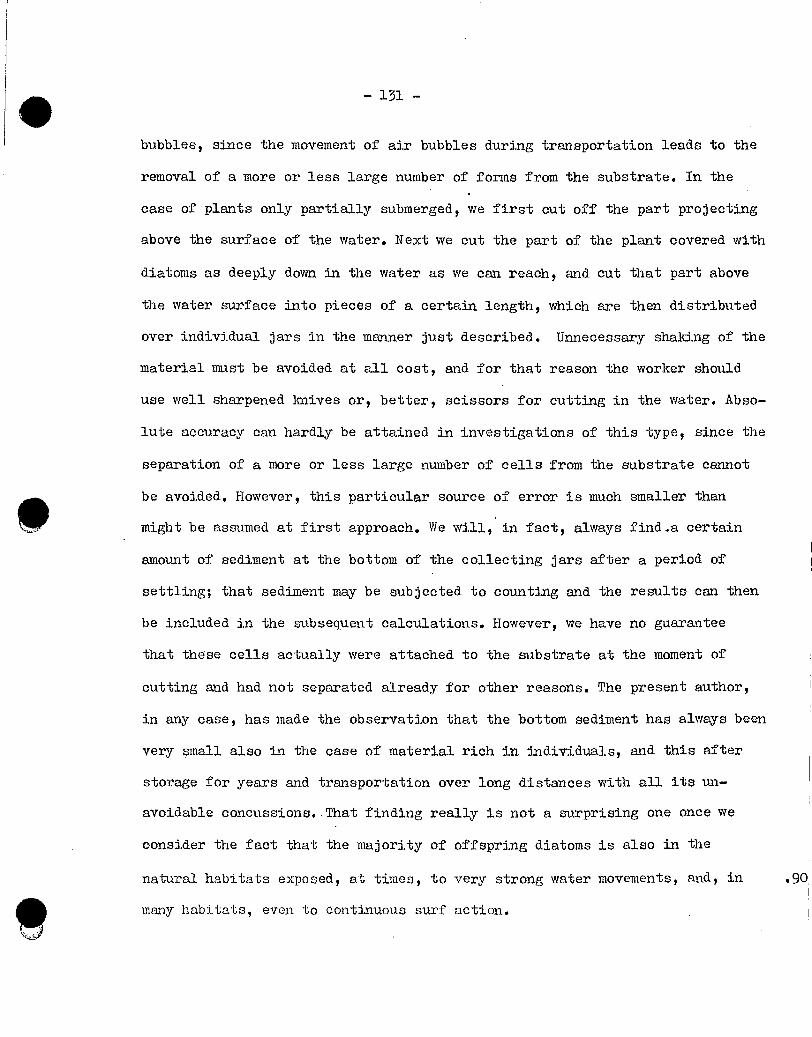
•
0 ',.,..:à
- 131 -
bubbles, since the movement of air bubbles during transportation leads to the
removal of a more or less large number of forms from the substrate. In the
case of plants only partially submerged, we first cut off the part projecting
above the surface of the water. Next w.e cut the part of the plant covered with
diatoms as deeply down in the water as we can reach, and cut that part above
the water surface into pieces of a certain length , which are then distributed
over individual jars in the manner just described. Unnecessary shaking of the
material must be avoided at all cost, and for that reason the worker should
use well sharpened knives or, better, scissors for cutting in the water. Abso-
lute accuracy can hardly be attained in investigations of this type , since the
separation of a more or less large number of cells from the substrate cannot
be avoided. However, this particular source of error is much smaller than
might be assumed at first approach. We will, ' in fact, always find.a certain
amount of sediment at the bottam of the collecting jars after a period of
settling; that sediment may be subjected to counting and the results can then
be included in the subsequent calculations. However, we have no guarantee
that these cells actually were attached to the substrate at the moment of
cutting and had not separated already for other reasons. The present author,
in any case, has made the observation that the bottom sediment has always been
very small also in the case of material rich in individuals, and this after
storage for years and transportation over long distances with all its un-
avoidable concussions..That finding really is not a surprising one once we
consider the fact that the majority of offspring diatoms is also in the
natural habitats exposed, at times, to very strong water movements, and, in
many habitats, even to continuous surf action.
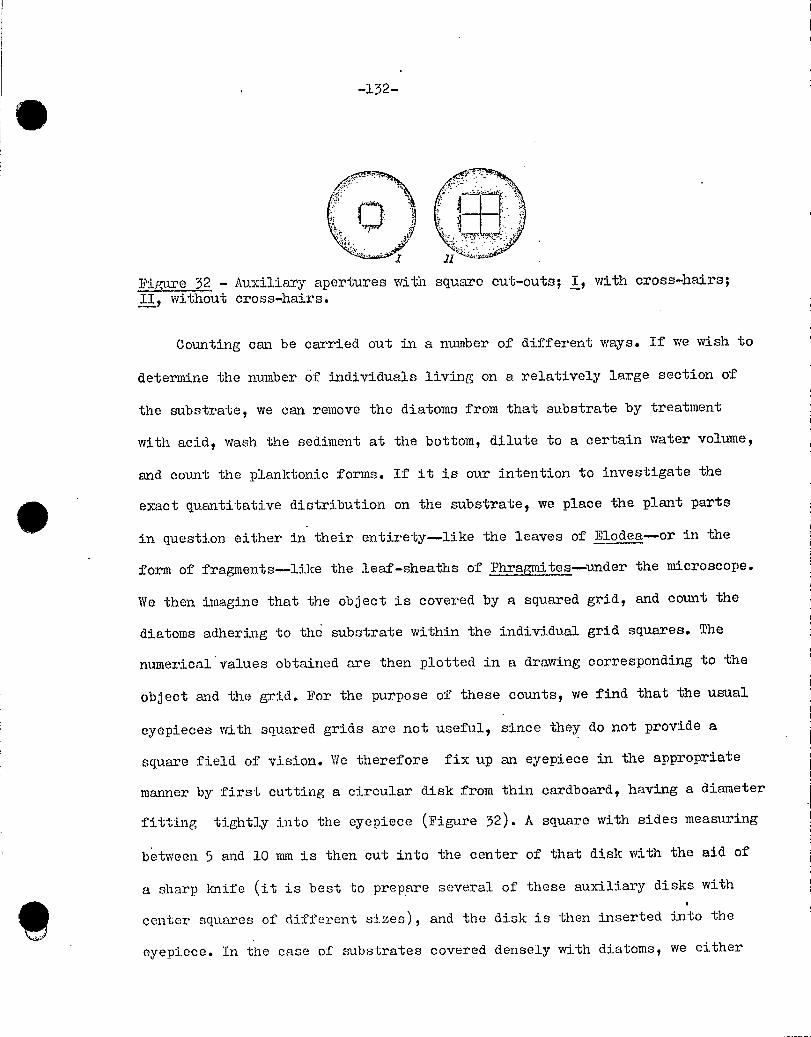
-132-
.t Iz
P:Jfzure 32 - Auxiliary apertures with square cut-outs; I, with cross-hairs;II9 without cross-hairs.
Counting can be carried out in a number of different ways. If we wish to
determine the number of individuals living on a relatively large section of
the substrate, we can remove the diatoms from that substrate by treatment
with acidg wash the sediment at the bottom, dilute to a certain water volume,
and count the planktonic forms. If it is our intention to investigate the
exact quantitative distribution on the substrate, we place the plant parts
in question either in their entirety-like the leaves of Elodea-or in the
form of fragments-like the leaf-sheaths of Phra2!ites under the microscope.
We then imagine that the object is covered by a squared grid, and count the
diatoms adhering to the substrate within the individual grid squares. The
numerical values obtained are then plotted in a drawing corresponding to the
object and the grid. For the purpose of these counts, we find that the usual
eyepieces with squared grids are not useful, since they do not provide a
square field of vision. We therefore fix up an eyepiece in the appropriate
manner by first cutting a circular disk from thin cardboard, having a diameter
fitting tightly into the eyepiece (Figure 32). A square with sides measuring
between 5 and 10 mm is then cut into the center of that disk with the aid of
a sharp knife (it is best to prepare several of these auxiliary disks with
center squares of different sizes), and the disk is then inserted 9xnto the
eyepiece. In the case of substrates covered densely with diatomst we either
-133—
use disks with small squares or cut a large square with cross-hairs. Counting
with the aid of grids of that type is extraordinarily convenient, since the
remaining portion of the field of vision is completely blocked out. Prior to
counting, we--:using an object micrometer—determine the value of the sides
of the square for the lens combination used. If we then draw a squared grid
over a drawing of the object sketched at the same magnification, we are able
to plot, by means of dots, the respective numbers of adhering diatoms deter-
mined by counting, with plotting done in the corresponding squares. In this
way we then obtain an excellent illustration of the distribution of these di-
atoms on their substrate.
(b) Bottom mud
The quantitative investigations of mud, too, have only a relative value,
since the many different admixtures make accurate work extremely difficult.
In order to determine the percentage content of diatoms without giving consi-
deration to different species, we permit the mud sample to be investigated to
settle for 24 hours in a narrow measuring cylinder and in this way obtain the
volume of the crude material. Because of the more easy purification of small
quantities, we should, if possible, not use more than 5 ml. of sample. The
material is then transferred to a beaker; hydrochloric acid is added in order
to remove the carbonate of lime, and the other admixtures are then removed by
means of elutriation and boiling. Following very careful washing--during the
cOurse of which every effort should be made to avoid losses of material—we
again determine the volume with the aid of the saine measuring cylinder and
convert the value obtained into percent of the initial one. It goes without
saying that this procedure provides only approximate values, which, however,
- 134 -
are adequate in many cases for the purpose of comparison. This particular
procedure can also be applied for determining the percentage distribution of
the individual species present; for that purpose we dilute in a certain manner
the residue obtained, shake well, process an aliquot (measured with the aid.
of a measuring pipet) into scattered preparations, and subject these prepa-
rations then to either complete or partial counting. Differentiation between
individuals alive and individuals sedimented already at the time of sampling
is not possible using that method. In order to determine the forms actually
alive at the sampling site, we must examine the mud in the untreated state
(raw). As described further above, we determine also in that case first the
volume of the crude material, then dilute the mud, shake it, and transfer a
certain aliquot to a slide in order to count under a coverslip. Lundqvist has
constructed special brass spoons, with the aid of which it is possible to re-
move very small quantities of mud (either two or four ml.) from the undiluted
material; these samples are mixed with water only afterwards on the slide and
then subjected to counting. This mixing must be done with care in order to
avoid that a greater or smaller number of diatoms is eventually hidden by
agglomerations of detritus. Determination regarding the question whether we
are dealing in a given case with living cells or not is frequently very diffi-
cult, and the presence of apparently intact chromatophores does not represent
evidence indicating that a certain species dwells at the sampling site in
question. In these cases, the personal knowledge of the observer regarding
the distribution and habits of diatoms plays a significant role in evaluation.
The method described above as the second one, of course, may also be
used as the first one , if the worker wishes to determine in numerical terms .92
the diatoms involved in the composition of a given mud. In these cases, it
is, however, advisable to distribute the amount of material withdrawn with
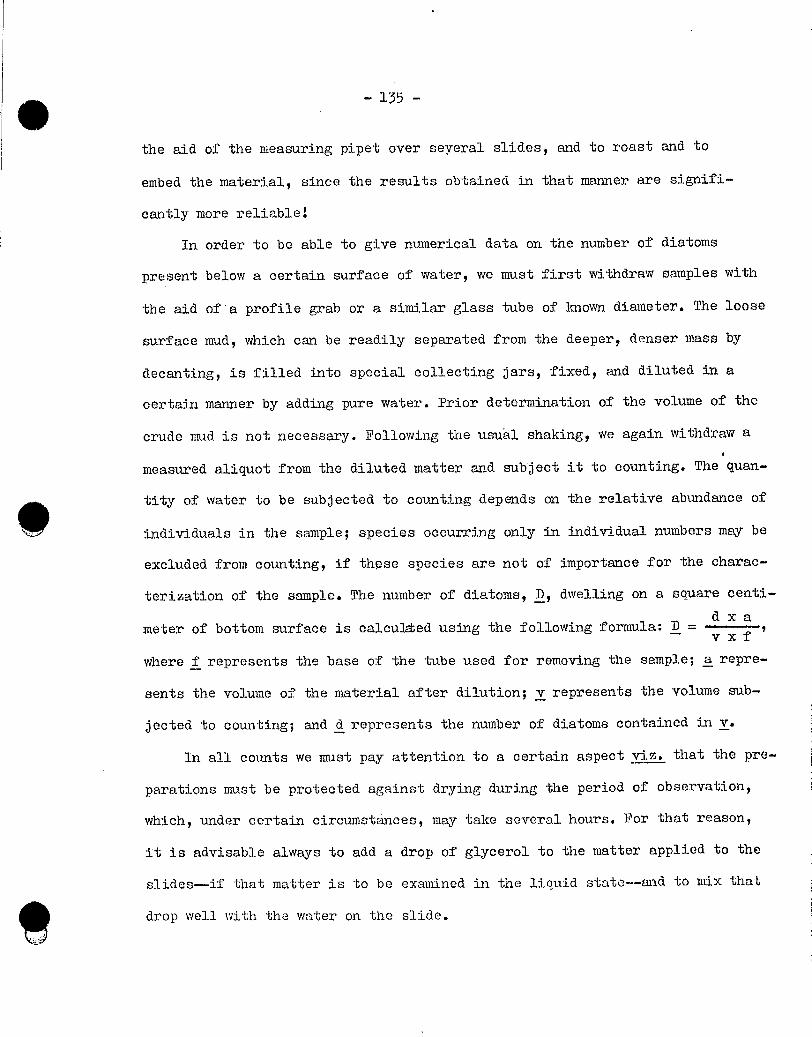
- 135 -
to,
the aid of the measuring pipet over seyeral slidest and to roast and to
embed the material, since the results obtained in that manner are signifi-
cantly more reliable:
In order to be able to give numerical data on the number of diatoms
present below a certain surface of waterg we must first withdraw samples with
the aid of'a profile grab or a similar glass tube of known diameter. The loose
surface mud, which can be readily separated from the deeper, denser mass by
decanting, is filled into special collecting jars, fixed, and diluted in a
certain manner by adding pure water. Prior determination of the volume of the
crude mud is not necessary. Following the usu'al shakingg we again withdraw a
measured aliquot from the diluted matter and subject it to counting. The quan-
tity of water to be subjected to counting depends on the relative abundance of
individuals in the sample; species occurring only in individual numbers may be
excluded from counting, if these species are not of importance for the charac-
terization of the sample. The number of diatoms, D, dwelling on a square centi-
meter of bottom surface is calcu]ted using the following formula: D =v x f
where f represents the base of the tube used for removing the sample; a repre-
sents the volume of the material after dilution; v represents the volume sub-
jected to counting; and d represents the number of diatoms contained in v.
In all counts we must pay attention to a certain aspect viz. that the pre-
parations must be protected against drying during the period of observation,
which, under certain circumstances, may take several hours. For that reason,
it is advisable always to add a drop of glycerol to the matter applied to the
slides-if that matter is to be examined in the liquid state--and to mix that
drop well with the water on the slide.
O -136 -
Representation of the results obtained in investigations of this type
is usually done in the form of diagrams, in which the depth levels are plotted
in the vertical, and the percentages are plotted in the horizontal. Of course,
representation can also be done in the form of curves, i.e. curves of the
type already mentioned in connection with the planktonic diatoms.
VIII. Culturing of diatoms
In order to study the life cycles of various diatoms we are forced in
many cases to institute cultures, since finding of suitable material in the
natural habitat of these diatoms is subject to numerous chance factors. To be
certain, it is possible under certain circumstances to institute cultures at .93.
right at the habitat of diatoms. This is done, for instance, by fixing a
microscopic slide between clamps or in a small stand and then exp6sing that
slide to colonization with diatoms at exactly marked sites in ponds or ditches.
In these cases we may leave it to chance to determine which species or forms
will actually colonize'our slide, but we are also able to make a certain se-
lection by first observing the mass occurrence of a given species in its
habitat, so that there then exists a great probability that this particular
species will colonize the slide exposed.
In the experience of the present author, flat dishes with a relatively
large surface are best suited as culture vessels in the laboratory, since it
has been found using tall e narrow vessels that the diatoms having relatively
low oxygen requirements would readily predominate and suppress the further
growth of the other species. A sample of the diatom-containing mud layer is
spread uniformly over the bottom of the culture vessel and covered with water
several centimeters high; a few plant fragments are added. The diatoms MOVe
-137-
A
out of the mud and soon cover the surface with a brown coat. If we wish to
obtain diatoms as pure as possible, we may cover the mud with a layer of
gauze; the diatoms then move through the meshes, and can eventually be lifted
off the gauze as pure material. A procedure of that type is desirable, in
particular, in cases where we wish to institute pure cultures of individual
species. The process of development, of course, must be checked continuously,
in order not to miss the moment suitable for the purposes of a given investi-
gation. In that connection it is desirable to disturb the diatoms as little
as possible in their position; to observe the same individuals over a rela-
tively long period of time; and to be able to obtain material rapidly and
without foreign admi.xtures. According to the procedure proposed by T{arsten,
we set up microscopical slides in the culuture vessels placing the slides at
a slant against the Yessel wall; these slides will very soon be colonized by
diatoms as suitable substrate. For examination, it is best-for reasons of
preserving purity-to place the microscopical slides on glass slides of a
larger size, but, for the time being, to postpone lowering of the cover.glass
on top of the material. Since both sides of the slide are covered with diatoms,
it is important in the case of repeated examinations to make certain that al-
ways the same side of the slide is placed down on the supporting slide, since
that side will experience more or less pronounced distùrbances and, for that
reason, cannot be used in the course'of the investigation going on. At the
favorable moment, the entire slide is subjected in toto to fixation and stain-
ing, and the proper side is processed into a permanent preparation. Unfortu-
nately, in these cases it is frequently not possible to approach the objects
with a strong objective system, and for that reason, the present author pre-
fers to use thin coverglaNses of varying sizes for culturing, instead of the
- 138 -
afore-mentioned microscopical slides. Coverglass cultures of that type, by .94.
the way, are perfectly suited for obtaining in a highly convenient way pure
preparations of minute forms; these preparations must be roasted prior to
embedding and sealing.
In general, we are permitted to use water collected at the natural habi-
tat (if that habitat is located not too far away from the laboratory and is
readily accessible) for replacing from time to time the water evaporated from
our cultures. However, in some cases we will have to use special nutrient
solutions. Miguel has proposed as suitable nutrient solution a mixture of the
following solutions (which must be stored separately):
Solution A:
Solution B:
Magnsium sulfate 10 g Sodium chloride 10 g Sodium sulfate 5 g Ammonium nitrate 1 g Potassium nitrate 2 g Sodium nitrate 2 g ' Potassium bromide 0.2 g Potassium iodide 0.1g Water 100 ml.
Sodium phosphate 4 g Calcium chloride, dry 4 g Hydrochloric acid, pure, 22% 2 ml. Ferric chloride, 45%, aq. soln. 2 ml. Water 80 ml.
Solution B is prepared by first dissolving the phosphate in 40 ml. of
water; both the hydrochloric acid and the ferric chloride are then added; this
liquid is next mixed into the calcium chloride dissolved in 40 ml. of water,
without filtration of the precipitates formed. For culturing, 40 drops of
Solution A are added to 1000 ml. of water, and ten to twenty drops of Solution
B are added to 1000 ml. of water; these two solutions are then mixed. A very
small quantity of straw and moss (about 5 g each) is added to the nutrient
solution; the straw and the moss must be sterilized first by dipping into
boiling water. Prior to actual use, the nutrient solution prepared in this
- 139 -
manner is heated to 7000 for 15 minutes. The evaporated water is replaced by
sterilized water at intervals of about 14 days.
The following nutrient solutions are recommended for marine diatoms:
Solution No. 1:
Solution No. 2:
Sea salt 250 g Magnesium sulfate 20 g Magnesium chloride 40 g Water 10 1.
Sodium chloride 10 g Sodium sulfate 5 g Potassium nitrate 2.5 g Potassium pyrophosphate 2.5 g Water 100 ml.
•
One ml. of Solution No. 2 is added to 200 ml. of filtered spring water;
a little slaked lime is added until the solution shows a neutral reaction. We
furthermore add a small quantity of well washed, powdered silicic acid and a
small quantity of a sterilized grass infusion.
In certain cases, i.e. when we wish to determine, for instance, the rate
of multiplication of a given species, we must start either with pure cultures
of the species in question or with single individuals. Cultures of that type
can be kept in the usuel moist chambers. However, Miguel has proposed special
culturing cells in two different versions, which have proven their value
(Figure 33).
1. A glass ring, measuring 5 mm in height and 24 mm in external diameter,
is affixed to a common microscopical slide; along its side that ring is equipped
with a slit measuring about 1 mm in width. The ring is affixed in a manner en-
suring that the slit is located at the middle of one of the long sides of the
slide. The large opening of the ring opposite to the slide is closed by means
of a coverglass. Nutrient solution and the individuals destined for culture
are placed inside the chamber by way of the ring slit; the chamber is stored
in a position with the slit facing upward. The coverglass, as a rule, is turned
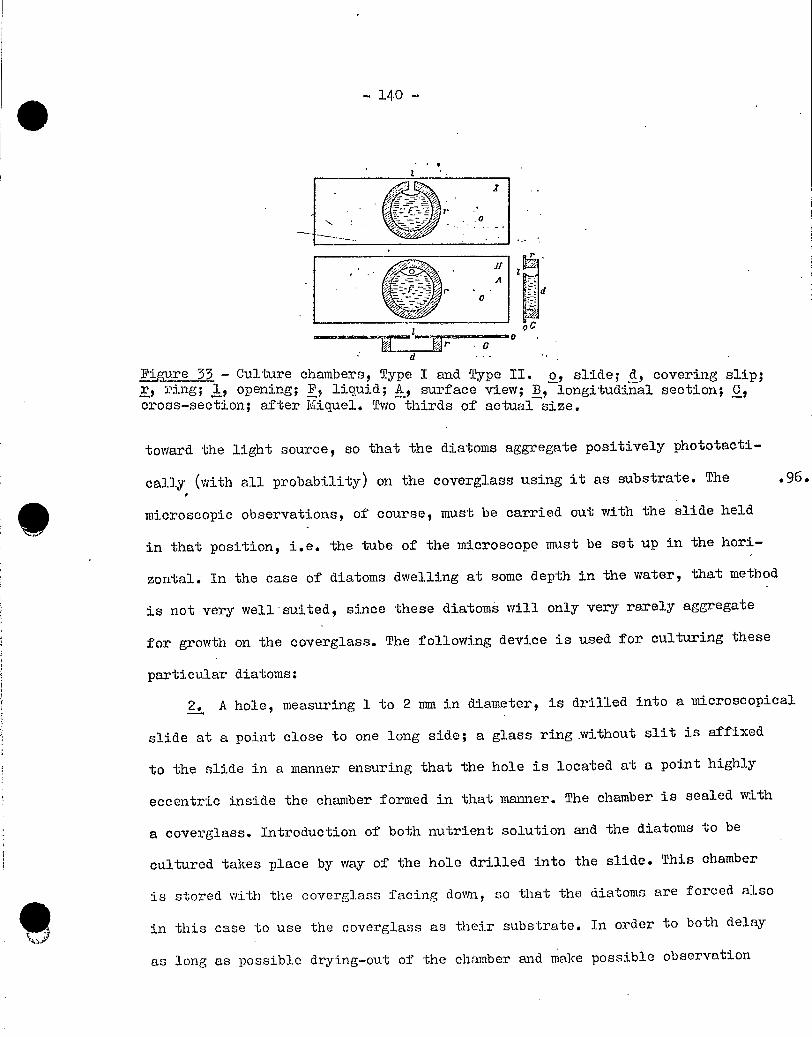
-ad
Figure 33 - Culture chambers, Type I and Type II. o, slide; d, covering slip;r, ring; l, opening; Fy liauid; A, surface view; B, longitudinal section; C̀jcross-section; after Miquel. Two thirds of actual size.
toward the light source, so that the diatoms aggregate positively phototacti-
cally (with all probability) on the coverglass using it as substrate. The .96.
microscopic observations, of course, must be carried out with the slide held
in that position, i.e. the tvbe of the microscope must be set up in the hori-
zontal. In the case of diatoms dwelling at some depth in the water, that method
is not very well'suited, since these diatoms will only very rarely aggregate
for growth on the coverglass. The following device is used for culturing these
particular diatoms:
2. A hole, measuring 1 to 2 mm in diameter, is drilled into a microscopical
slide at a point close to one long side; a glass ring wxthout slit is affixed
to the slide in a manner ensuring that the hole is located at a point highly
eccentric inside the chamber formed in that manner. The chamber is sealed with
a coverglass. Introduction of both nutrient solution and the diatoms to be
cultured takes place by way of the hole drilled into the slide. This chamber
is stored with the coverglass facing dotim, so that the diatomu are forced also
in this case to use the cover.glass as their substrate. In order to both delay
as long as possible drying-out of the chamber and make possible observation
- 141 -
also when using relatively strong objectives, we may narrow down the space in
which the diatoms usually dwell, by affixing a small coverglass to the inner
side of the large one with the aid of small sealing wax pellets. The diatoms
exist in the fluid between the two coverglasses and can there be observed
readily at any time.
All cultures, as a rule, are exposed only to diffused light; direct ex-
posure to sunlight and pronounced heating are injurious. In the case of dish
cultures, lateral light is avoided by setting up cardboard collars around the
glass dishes. At our latitudes, cultures should be set up during the summer
along windows facing north; during the winter, however, they may be exposed
without suffering injury also to sunny windows facing south. In the case of
physiological investigations, the individual experiments, of course, must be
designed in accordance with the purpose envisaged, and the worker must make
specific decisions from case to case regarding the composition of the nutrient
solution, the illumination, and the temperature conditions. In agreement with
the methods used in bacteriology, cultures are started in petri dishes or
test tubes on nutrient substrates of varying composition. In this connection
it must be noted that bacteria-free cultures can be maintained only with great
difficulty; such cultures, to be sure, are not absolutely required in all cases.
-142 -
Bibliography
,(,./
E. .7. and E. W. Nelson: On the artificial Culture of Marine Plankton Quart. Journ. Mier. Sc. 55. 2 (1910).
1. r,,;e.-;.. C.: Das Stillwasserplankton. Methode und Resultate der quantitativen Kiel und Leipzig 1896. • .
2. Cholnoky, B. v.: Untersuchungen ûber die ôkologie der Epiphyten. .Arch. f. Hydrobiol. 18. (1927).
Conger P. S. A. Technique for the Type Mounts of Plankton Diatoms and other Microplankton. Journ. R. Mier. Soc. 1925.
3. Dares E.: Dan Reinigen und Priiparieren von Diatomaceenmaterial. Hedwigia. 1885.
4. Hilfsapparat zum Aussuehen und Legen von Diatomaceen. Zeitschr. f. vviss. Mikr. u. I. mikr. Techn. 3. (1886),
5. Zur Technik der Diatomeenpritparation. Ebenda. C. (1889). • 6. Zur Technik der Forarniniferenpriiparation. Sitzungsber. Naturf. Ges. Leipzig..
37. (1910). 7. Gams H.: Die Ergebnisse der pollenanalytischen Forschungin bezug auf die
. Geschichte der Vegetation und des Klimas von Europa. Zeitsehr. 1. Gletscherk. f. Eiszeitf. u. Geseb. d. Klimas. 15. (1927).
8. Somatische Teilung, Redukt ionsteilung, Kopulation und Parthenogenese bel Cocconeis placentula. Arch. f. Protistenk. 59. (1927). •
Heurck, 11: van: Synopsis des diatomées de Belgique. Anvers 1880-1884. - A Treatise on the Diatomaceae. Transi. by W. E. Baxter. London 1896. - Médiums pour l'étude des diatomées. Zeitschr. f. angew. 31ikr. 3. (1898). ,
9.'llustedt StiLiwasserdiatomeen Deutschlands. 4. Anil. Stuttgart 1923.
10. - Von) Sammeln und Priiparieren der Kieselalgen. Schrift. d. fr . Verein. v. Freund. d. Mikr. H. 1/2 (1923).
11. - Zur Herstellung von Diatorneeneinzelpriiparaten. Mikrosk. f. Naturfr. O. (1926). 12. - Die Kieselalgen Deutsehlands, Ôsterreichs und der Schweiz mit Berück-
sichtigung der übrigen Lander Europa& Bowie der angrenzenden Meeresgebiete• Lief. 1. Leipzig 1927.
13. Janisch C.: Zur Cliarakteristik des Guanos von verschiedenen Fundorten. Abh. &hies. Ges. f. vaterl. Kult. NatUrw.-med. Abt. 1892.
14. Raiser W.: Die Technik des medernen Mikroskops. "Wien 1906. 13 Kaiserling G.: Lelubuch der Mikrophotographie. Berlin 1903. 16. Narsien G. Untersuchungen über Diatomeen. I. Flora oder allg. Bot. Zeit. 82.
(1896). 17. -- ilber farblose Diatorneen. Ebenda. Erg.-Bd. 89. (1901). •
Kalbe E. TV.: Contribution à la technique des préparations des diatomées. Journ. de Microbiol. 3. (1916).
18. - Zur ôkologie' Morphologie und Systematik der Brackwasserdiatomeen. Die
Kieselalgen des Sperenberger Salzgebietes. Pflanzenforschung, herausgegeben von Prof. .Dr. E. Eolkwitz. H. 7 (1927).
19. -
Einschluflmittel für Diatomeen. Zeitschr. f. wiss. Mik-r. u. f. inikr. Te,chn. 44. (1927).
20. 1-ithifeh .Amphitetras antediluviana Ehrbg. Bowie einige Beal-fie zum Ban und zur Entwicklung der Diatomeenzelle. Zeitschr. f. Bot. 20. (1928).
Ifirkwood S.: Raising Diatoms in the Laboratory. Journ. Mier. Soc. 1888. 21. I-4 7, iailn Untersuchungen zur Feststellunz\ des vollstiindigen Gehaltes des
Meeres an Plankton. Wiss. Meeresunters. F. 10. Abt. Kiel (1908). 22, Lwadgrist G.: Methoden zur Untersuchung der Entwieklungsgeschiclite dei. Seen.
.11alerlialdens Handb..d. biol. .Arbeitsmeth. Abt. IX, Tell 12 (1925). rn Meted. f6r Mikroskopiska Sedimentanalyser. Geol. Füren. Stockh. FZirhandl. 192G, .flodenablagerungen und Entwicklungstypen der Seen. Die 13innengewasser, I trausgegeben von Prof. Dr.. A. Thiencntann. 2. (1927).
23.
24.
25. 31, i, icr F.: Die Kieselalgen der Schweiz. Bern 1922. P.: De la culture artificielle des diatomées. Le Diatom. 1. (1890-1893).
• - 143 -
26. 0.: 'Kummer)) und Poren in der Zellwand der Docillariaceen, I-IV. B er. d. Peutsult, bot. Ces. 16. bis ID. (1898-1901).
27. - Pureld)reelning,en der Zellwand in ihren Beziehungen zur Ortsbewegung der Ebenda. 7. (1889). .
28. ....... 00.8bowtgung der Bacillariaceen, Ebenda. 11. bis 27. (1893-1009), 29. :No temonn Einige reproduktionstechnisehe Gesichtspunkte betreffs der photo.
graphittelion Dorstellung der Planktonformationen. Bot. Not. 1915. 30 • 13idrag till ktinnedomen om vegetationsfürguingar i Botvatten. Ebenda. 31. - Einigo Cosiehtspunkte betreffs der zweckmaIligen Anwendung -von Gaslieht.
rapine)) hein) liopiereu von Abbildungen in Druck oder Schrift. Zeitschr. I. wiz;z•t. likroskop. 33. (1910).
32. - über das weitere Verwerten der Mikrophotographien auf Gaslichtpapieren. Ebend a .
33. Einigo weitere reproduktionstechnische Gesichtspunkte betreffs der photo. graphitwiten Darstellung der Planktonformationen. Bot. Not. 1917.
34. - 'über die okulare Begrenzung des mikroskopischen Gesichtsfeldee. Zeitschr. f. wiss. Mikroskop. 33. (1918).
35. über dos Nachweisen gewisser Gallertstrukturen bel Algen mit gewohnlieben Parbetiften. Ebenda.
36. - über die Einteilung des Gesicb.tsfeldes beim Mien mikroskopischer Kôrper. Ebenda. 1919.
37. - En ny inetod for upplAggning av algeasiceat. Bot. Not. 1919. 38. - tildersOkningar ôver Fytoplankton och undersôkningar ôver bottnens be.
skaffonliet. Medd. Kungl. Lantbruksstyrelsen. 1921. Nr. 232. 39 • Ein igo (.rundlinien der regionalen Limnologie. Lunds Univ. kraskr. N. P.
Avd. 2. 17. .1■Ir. 8 (1921). • • • 40. - Über oblige spezielle Anwendungen der Zentrifugentechnik in der Plankton.
kundo. Zeitschr. f. wiss. Mikroskop. 39. (1922). . 41. - Über tue Dauerpriiparation von kontrastgefürbter Algengallert. Ebenda. 42. Zwei l'Aie Ty-pen von Planktonkammern. Ebenda. 43. - Die Sestonfürbungen des SOf3wassers. Arch. f. Hydrobio1. 13. (1922). 44. tber ciuige neue Begriffe der Sestonkunde. Lunds Univ. krsekr. N. P. Avd. 2.
20. Nr. 3 (1923). 45. - über einen neuen Typus von Planktonsieben. Zeitechr. f. "%Vie°. Mikroskop.
41. (1924). 46 • - Ett• par nya, typer av planktonbilgare. Skrift. Sôdr. Sver. Piskeriforen.1924. 47. - En ny typ av filtrationsbiigare. Ebenda.. •
48. - En l'Or biologiSk bruk avsedd vattenhAmtare. Ebenda. 1927. 49. Nirkmr: tber dos Verhalten der Kieselskelette planktischer Kieselalgen fin
gtwhieht•., ten Tiefenschlamm des Zürich. und Baldeggersees. Aarau 1927. 50. Ott E.: Untersuchungen iiber den Chromatophorenbau der Süllwasserdiatomeen
und 'de.,-..sen Bezichungen zut. Systematik. Sitzungsber. d. Akad. Wise. "%Vien, mathem.-noturw. Masse. 119. (1900). •
51 * Pantoe-sel J.: Die fossilen Bacillarien Ungarna. II. Teil. Brackwasserbacillarien. Pc/idolu .7.: Les diatomées. Paris 1891. • • '"
52. E.: Milz.ophotographische Diatomeenaufnahmen. Arch. f. Hydrobia 4. 0:091.
53. Reinkulturen von Diatomeen. Ber. d. Deutsch. bot. Ces. 21. (1903). 54. - 2:17 Isl:yiologie der Diatœneen. I. Sitzungsber. d. Akad. Wise. Wien, mathem.-
lilas:e. 115. (1906). 55. - Dm.:i.o. II. Denkschr. tu. Akad. Wise. Wien, mathem..naturw. Kluge. III
56. -
Sitzungsber, d. Akad. Wise. Wien, mathem..naturw. Klassc. 11e. ,1.A. ,9).
57 * .Vichier O.: Die. Ern:ihrung der Algen. Monogr. u. Abh. Intern. Rev. 2. (1011).
58. Royers Anleitung mira Sommeil), Pritparieren und Konservicren der Algen. Jahresber. tu. naturwiss. Ver. Elberfeld. 10. (1903).
59. Rottner F.: ber einige bd der Untereuchung der Lunzer Secn verwendete .Apparate und Geriitschaften. Intern. Rev. 6. (1913).
•
-144-
60. Sehnzidi P.: Morphologie und Biologie der Melosira varions mit einem Beitrag zur Auxosporenfrage. Intern. Rev. 11. (1923).
61. Schônfeldt, H. y.: Diatomaceao Germaniae. Berlin 1907. 62. Steiner G.: Untersuchungsverfahren und Hilfsmittel zur ErforschUng der Lelye.
welt der Gewiisser. Stuttgart. • 63. Slcuer Planktonkunde. Leipzig und. Berlin 1910.
64. Strasburger E.: Bas botanisehe Praktikum.
65. Thomasson H.: Methoden zur Untersuehung der Mikrophyten der limnischen Litoral- und Profundalzone. A.bclerhalderts Handb. d. biol..Arbeitsmeth. Lie.184 (1926).
66. Truan y Luarcl A. und O. Witt: Die Diatomaceen der Polyeystineniueido von Jérémie in Hayti. Berlin 1888.. •
67. Uterntahi Limnologische Phytoplanktonstudien. Arch. 1. Hydrobiol. Suppl. 5. 1925. •
68. Unzulânglichkeiten bel den bisherigen Einteilungen des mikroskopischen. Gesichtsfeldes und ihre Beseitigung durch das Zalstreifen-Okular. Zeitschr. f. wiss. Mils-roskop. 44. (1927).
69. Triller A.: lEtber den Aufwuchs der Unterwasserpflanzen. Verh. lntern. Verein. theor. ang. Limnol. 1. (1923). •
70. Witt O.: liber den Poliersehiefer von Arehangelsk-Kurojedowo im Gouvernement Simbirsk, Petersburg 1885.
Translation of non-English bibliographie items
-1. Freshwater plamkton. Methods and results of quantitative investigations.
2. Investigations on the ecology of epiphytes.
3. Cleaning and preparation of diatomic material.
4. Device for selecting and placing diatoms.
5. Techniques of diatom preparation.
6. Techniques of preparation of Foraminafera.
7. Results of pollen-analytical research with regard to the history of the vegetation and the climate of Europe.
8. Somatic division, reduction division and parthogenesis of Cocconeis 12.2.2exitu1a.
9. Freshwater diatoms of Germany.
10. Collecting and preparding of diatoms.
11. Processing of individual diatom preparations.
12.Diatoms of Germany, Austria and Switzerland taking into consideration the other countries of Europe and the adjoining sea regions.
13. Characterization of guano from different sites.
14.Modern microscopie techniques.
15. Outline of microphotography.
16. Investigations on diatoms. Part 1.
17. Colorless diatoms.
•
•
0
- 145 -
18. Lcolog^7 morphology and taxonomy of brackish-%vater diatoms. The diatomsof the Sperenberg salt region.
19. Sealing agents for diatoms.
20. ^hitetras antediluviana aiR]3G. and several contributions to the structure,and the development of diatomic cells.
21. Investigations for the determination of the total content of the seas ofplankton.
22. I,iethods for investigating the developmental history of lakes.
23. A method for microscopic sediment analysis.
24. Bottom deposits and developmental types of lakes. Inland lakes, edited by ...
25. Diatoms of Switzerland.
26. Chambers and pores in the cellular wall of Bacillariaceae. Parts 1 to 5.
27. Penetrations of the cellular wall and their relations to the locomotionof Bacillariaceae.
28. Locomotion of Bacillariaceae. Parts 1 to 7.
29. Several reproduction-technical aspects of the photographic representationof plankton formations.
30. Contributions to the knowledge of plant colorations in freshwater.
31. Several aspects of the proper use of gaslight paper for reproducing printedor sketched figures.
32. Further uses of microphotographs on gaslight paper.
33. Several additional reproduction-technical aspects of the photographic re-presentation of plankton formations.
34. Lÿepiece-imposed limitation of the microscopic field of vision.
35. Demonstration of certain jelly structures of algae with the aid of commoncolor crayons.
36. Division of the field of vision when counting microscopic bodies.
37. A new method for preparing algal exsiccatae.
38. Studies of phytoplankton and of the ocean floor surface.
39. Several outlines of regional limnology.
40. Special uses of the centrifuge technique in plankton research.
41. Permanent preparation of contrast-stained algal jelly.
42. Two new types of plankton chambers.
43. Seston coloration of freshwater.
44. Several new concepts in seston research.
45. A new type of plankton sieve.
- 146 -
46. New plankton jar types.
47. A new type of filtering jar.
48. A water samples for biological use.
49. Behavior of diatomic skeletons in the historic deep mud of the Lakes ofZurich and Baldegger.
50. Investigations on the chromatophore structure of freshwater diatoms andits relation to taxonomy. '
51. The fossil Bacillaria of Hungary. Part 2. Brackish-water Bacillaria.
52. Microphotographie diatom photographs.
53. Pure cultures of diatoms.
54. Physiology of diatoms. Part 1.
55. Physiology of diatoms. Part 2.
56. Physiology of diatoms. Part 3.
57. Algal nutrition.
58. Guide to collecting, preparing and preserving algae.
59. Apparatus and devices used in the investigations of the Lunz lakes.
60. Morphology and biology of Melosi.ravarians, inclusing a contribution tothe auxospore problem.
61. Diatoms of Germany.
62. Procedures and devices for investigating the microorganisms of waters.
63. Plankton science.
64. Practical botany.
65. Methods for investigating the microphytes of the limnic littoral and pro-fundtil zones.
66. The diatoms of the polycystine Cretaceous of Jérémie in Haiti.
67. l,:i;mlological phytoplankton studies.
68. Inadequacies in the present division of the microscopic field of visionand their elimination using a counting eyepiece.
69. Growth on submarine plants.
70. The polishing slate of Archangelsk-Kuroyedovo in the Simbirsk District.
0 0 0 0 0 0 0 0 0 0 0
Related Documents