Manual

Welcome message from author
This document is posted to help you gain knowledge. Please leave a comment to let me know what you think about it! Share it to your friends and learn new things together.
Transcript
Manual
The information in this document is subject to change without notice and does not represent acommitment on the part of Native Instruments GmbH. The software described by this docu-ment is subject to a License Agreement and may not be copied to other media. No part of thispublication may be copied, reproduced or otherwise transmitted or recorded, for any purpose,without prior written permission by Native Instruments GmbH, hereinafter referred to as NativeInstruments.
“Native Instruments”, “NI” and associated logos are (registered) trademarks of Native Instru-ments GmbH.
Mac, Mac OS, GarageBand, Logic, iTunes and iPod are registered trademarks of Apple Inc.,registered in the U.S. and other countries.Windows, Windows Vista and DirectSound are registered trademarks of Microsoft Corporationin the United States and/or other countries.All other trade marks are the property of their respective owners and use of them does not im-ply any affiliation with or endorsement by them.
Document authored by: Native Instruments GmbH
Software version: 2.7 (11/2014)
Special thanks to the Beta Test Team, who were invaluable not just in tracking down bugs, butin making this a better product.
Disclaimer
NATIVE INSTRUMENTS GmbHSchlesische Str. 29-30D-10997 BerlinGermanywww.native-instruments.de
NATIVE INSTRUMENTS North America, Inc.6725 Sunset Boulevard5th FloorLos Angeles, CA 90028USAwww.native-instruments.com
NATIVE INSTRUMENTS K.K.YO Building 3FJingumae 6-7-15, Shibuya-ku,Tokyo 150-0001Japanwww.native-instruments.co.jp
NATIVE INSTRUMENTS UK Limited18 Phipp StreetLondon EC2A 4NUUKwww.native-instruments.com
© NATIVE INSTRUMENTS GmbH, 2014. All rights reserved.
Contact
Table of Contents1 Welcome to the World of TRAKTOR KONTROL S8! ........................................................12
1.1 Where to Start ............................................................................................................................. 12
1.2 Manual Conventions .................................................................................................................. 14
2 Using Your S8—Getting Started .................................................................................18
2.1 Overview of TRAKTOR KONTROL S8 ............................................................................................. 19
2.2 Enabling Decks ........................................................................................................................... 20
2.3 Browsing with Your S8 ................................................................................................................ 23
2.3.1 Browse using Regular Interactions ............................................................................ 23
2.3.2 Browse using Touch Interactions ............................................................................... 25
2.4 Switching Deck Focus ................................................................................................................. 26
2.5 Switching Deck View and Zooming ............................................................................................. 29
2.6 Playing Your First Track .............................................................................................................. 32
2.6.1 Loading a Track ......................................................................................................... 34
2.6.2 Playing the Track ....................................................................................................... 36
2.6.3 If You Don’t Hear the Track ........................................................................................ 39
2.7 Mixing In a Second Track ............................................................................................................ 42
2.7.1 Loading a Second Track ............................................................................................. 44
2.7.2 Playing the Second Track ........................................................................................... 46
2.7.3 Using Headphones to Prepare the Mix ....................................................................... 47
2.7.4 Synchronizing the Second Track ................................................................................ 49
2.7.5 Interlude: In case the Left Track has finished ............................................................ 51
2.7.6 Mixing In the Track by Using the Channel EQ and Filter ............................................ 51
2.8 Adjusting Levels ......................................................................................................................... 56
2.8.1 The Theory ................................................................................................................. 56
2.8.2 The Practice ............................................................................................................... 56
2.9 Using Cue Points ........................................................................................................................ 59
Table of Contents
TRAKTOR KONTROL S8 - Manual - 4
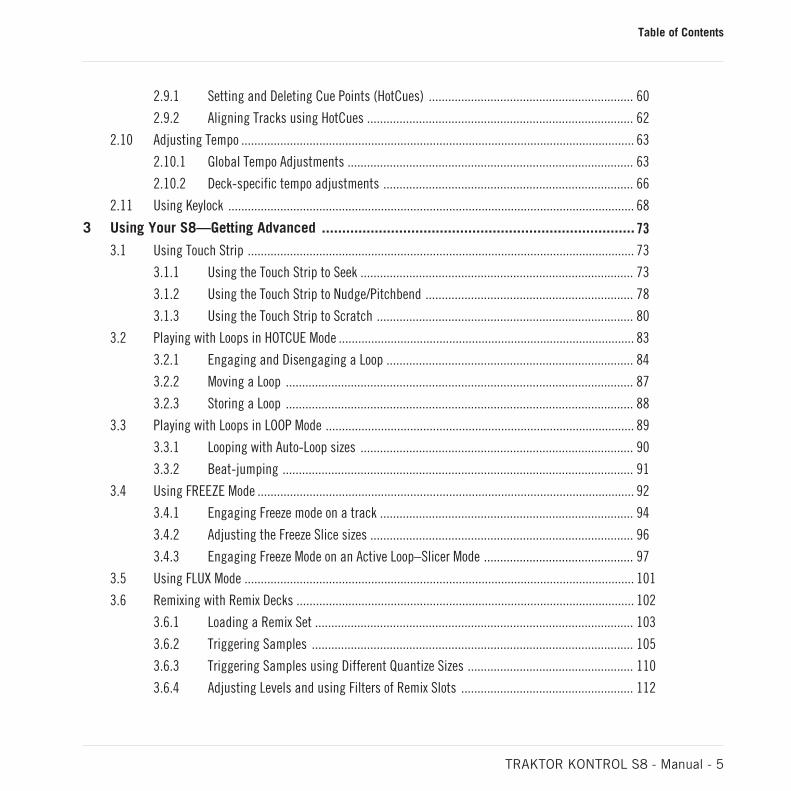
2.9.1 Setting and Deleting Cue Points (HotCues) ............................................................... 60
2.9.2 Aligning Tracks using HotCues .................................................................................. 62
2.10 Adjusting Tempo ......................................................................................................................... 63
2.10.1 Global Tempo Adjustments ........................................................................................ 63
2.10.2 Deck-specific tempo adjustments ............................................................................. 66
2.11 Using Keylock ............................................................................................................................. 68
3 Using Your S8—Getting Advanced .............................................................................73
3.1 Using Touch Strip ....................................................................................................................... 73
3.1.1 Using the Touch Strip to Seek .................................................................................... 73
3.1.2 Using the Touch Strip to Nudge/Pitchbend ................................................................ 78
3.1.3 Using the Touch Strip to Scratch ............................................................................... 80
3.2 Playing with Loops in HOTCUE Mode ........................................................................................... 83
3.2.1 Engaging and Disengaging a Loop ............................................................................ 84
3.2.2 Moving a Loop ........................................................................................................... 87
3.2.3 Storing a Loop ........................................................................................................... 88
3.3 Playing with Loops in LOOP Mode ............................................................................................... 89
3.3.1 Looping with Auto-Loop sizes .................................................................................... 90
3.3.2 Beat-jumping ............................................................................................................ 91
3.4 Using FREEZE Mode .................................................................................................................... 92
3.4.1 Engaging Freeze mode on a track .............................................................................. 94
3.4.2 Adjusting the Freeze Slice sizes ................................................................................. 96
3.4.3 Engaging Freeze Mode on an Active Loop–Slicer Mode .............................................. 97
3.5 Using FLUX Mode ........................................................................................................................ 101
3.6 Remixing with Remix Decks ........................................................................................................ 102
3.6.1 Loading a Remix Set .................................................................................................. 103
3.6.2 Triggering Samples ................................................................................................... 105
3.6.3 Triggering Samples using Different Quantize Sizes ................................................... 110
3.6.4 Adjusting Levels and using Filters of Remix Slots ..................................................... 112
Table of Contents
TRAKTOR KONTROL S8 - Manual - 5
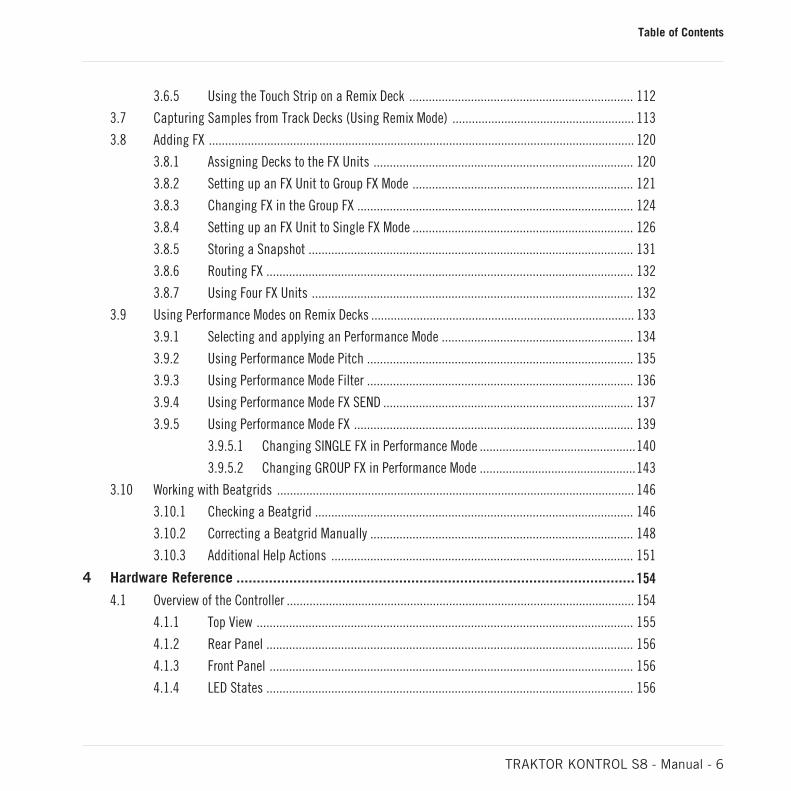
3.6.5 Using the Touch Strip on a Remix Deck ..................................................................... 112
3.7 Capturing Samples from Track Decks (Using Remix Mode) ........................................................ 113
3.8 Adding FX ................................................................................................................................... 120
3.8.1 Assigning Decks to the FX Units ................................................................................ 120
3.8.2 Setting up an FX Unit to Group FX Mode .................................................................... 121
3.8.3 Changing FX in the Group FX ..................................................................................... 124
3.8.4 Setting up an FX Unit to Single FX Mode .................................................................... 126
3.8.5 Storing a Snapshot .................................................................................................... 131
3.8.6 Routing FX ................................................................................................................. 132
3.8.7 Using Four FX Units ................................................................................................... 132
3.9 Using Performance Modes on Remix Decks ................................................................................. 133
3.9.1 Selecting and applying an Performance Mode ........................................................... 134
3.9.2 Using Performance Mode Pitch .................................................................................. 135
3.9.3 Using Performance Mode Filter .................................................................................. 136
3.9.4 Using Performance Mode FX SEND ............................................................................. 137
3.9.5 Using Performance Mode FX ...................................................................................... 139
3.9.5.1 Changing SINGLE FX in Performance Mode ................................................140
3.9.5.2 Changing GROUP FX in Performance Mode ................................................143
3.10 Working with Beatgrids .............................................................................................................. 146
3.10.1 Checking a Beatgrid .................................................................................................. 146
3.10.2 Correcting a Beatgrid Manually ................................................................................. 148
3.10.3 Additional Help Actions ............................................................................................. 151
4 Hardware Reference ..................................................................................................154
4.1 Overview of the Controller ........................................................................................................... 154
4.1.1 Top View .................................................................................................................... 155
4.1.2 Rear Panel ................................................................................................................. 156
4.1.3 Front Panel ................................................................................................................ 156
4.1.4 LED States ................................................................................................................. 156
Table of Contents
TRAKTOR KONTROL S8 - Manual - 6
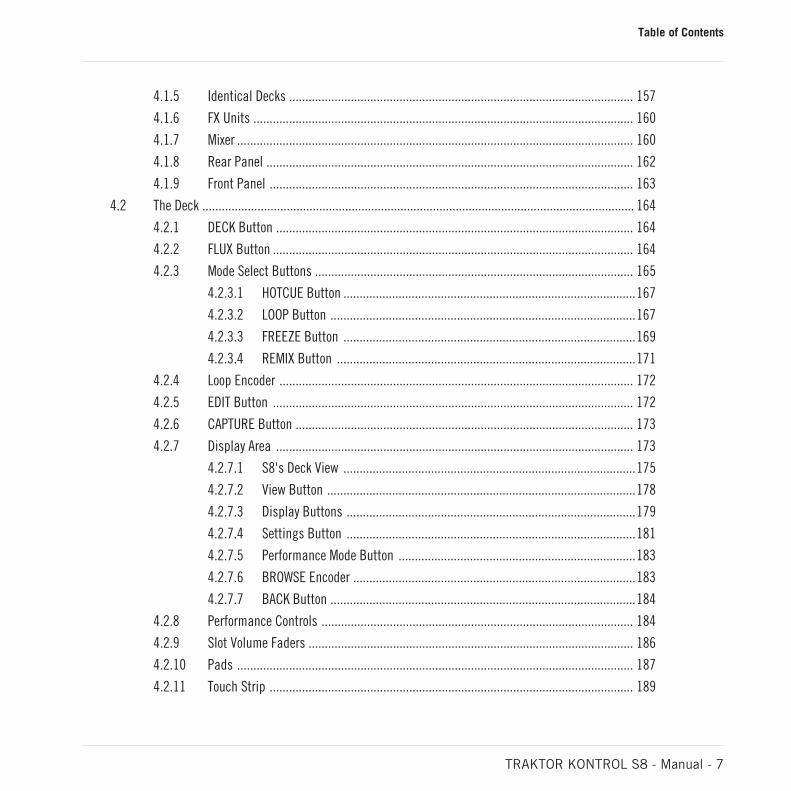
4.1.5 Identical Decks .......................................................................................................... 157
4.1.6 FX Units ..................................................................................................................... 160
4.1.7 Mixer .......................................................................................................................... 160
4.1.8 Rear Panel ................................................................................................................. 162
4.1.9 Front Panel ................................................................................................................ 163
4.2 The Deck ..................................................................................................................................... 164
4.2.1 DECK Button .............................................................................................................. 164
4.2.2 FLUX Button ............................................................................................................... 164
4.2.3 Mode Select Buttons .................................................................................................. 165
4.2.3.1 HOTCUE Button ..........................................................................................167
4.2.3.2 LOOP Button ..............................................................................................167
4.2.3.3 FREEZE Button ..........................................................................................169
4.2.3.4 REMIX Button ............................................................................................171
4.2.4 Loop Encoder ............................................................................................................. 172
4.2.5 EDIT Button ............................................................................................................... 172
4.2.6 CAPTURE Button ........................................................................................................ 173
4.2.7 Display Area .............................................................................................................. 173
4.2.7.1 S8's Deck View ..........................................................................................175
4.2.7.2 View Button ...............................................................................................178
4.2.7.3 Display Buttons .........................................................................................179
4.2.7.4 Settings Button .........................................................................................181
4.2.7.5 Performance Mode Button .........................................................................183
4.2.7.6 BROWSE Encoder .......................................................................................183
4.2.7.7 BACK Button ..............................................................................................184
4.2.8 Performance Controls ................................................................................................ 184
4.2.9 Slot Volume Faders .................................................................................................... 186
4.2.10 Pads .......................................................................................................................... 187
4.2.11 Touch Strip ................................................................................................................ 189
Table of Contents
TRAKTOR KONTROL S8 - Manual - 7
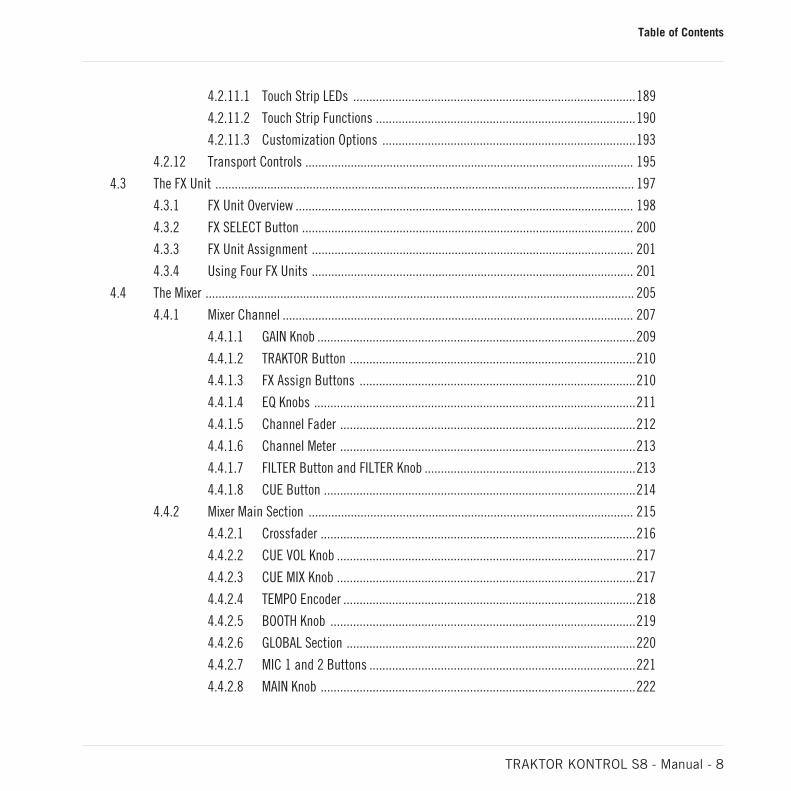
4.2.11.1 Touch Strip LEDs .......................................................................................189
4.2.11.2 Touch Strip Functions ................................................................................190
4.2.11.3 Customization Options ..............................................................................193
4.2.12 Transport Controls ..................................................................................................... 195
4.3 The FX Unit ................................................................................................................................. 197
4.3.1 FX Unit Overview ........................................................................................................ 198
4.3.2 FX SELECT Button ...................................................................................................... 200
4.3.3 FX Unit Assignment ................................................................................................... 201
4.3.4 Using Four FX Units ................................................................................................... 201
4.4 The Mixer .................................................................................................................................... 205
4.4.1 Mixer Channel ............................................................................................................ 207
4.4.1.1 GAIN Knob ..................................................................................................209
4.4.1.2 TRAKTOR Button ........................................................................................210
4.4.1.3 FX Assign Buttons .....................................................................................210
4.4.1.4 EQ Knobs ...................................................................................................211
4.4.1.5 Channel Fader ...........................................................................................212
4.4.1.6 Channel Meter ...........................................................................................213
4.4.1.7 FILTER Button and FILTER Knob .................................................................213
4.4.1.8 CUE Button ................................................................................................214
4.4.2 Mixer Main Section .................................................................................................... 215
4.4.2.1 Crossfader .................................................................................................216
4.4.2.2 CUE VOL Knob ............................................................................................217
4.4.2.3 CUE MIX Knob ............................................................................................217
4.4.2.4 TEMPO Encoder ..........................................................................................218
4.4.2.5 BOOTH Knob ..............................................................................................219
4.4.2.6 GLOBAL Section .........................................................................................220
4.4.2.7 MIC 1 and 2 Buttons ..................................................................................221
4.4.2.8 MAIN Knob .................................................................................................222
Table of Contents
TRAKTOR KONTROL S8 - Manual - 8
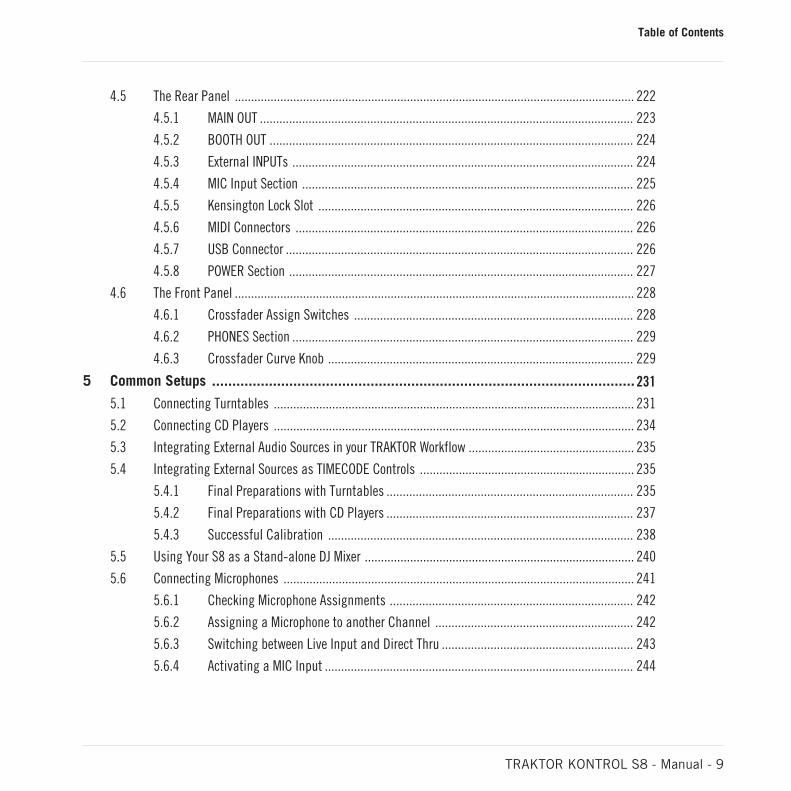
4.5 The Rear Panel ........................................................................................................................... 222
4.5.1 MAIN OUT ................................................................................................................... 223
4.5.2 BOOTH OUT ................................................................................................................ 224
4.5.3 External INPUTs ......................................................................................................... 224
4.5.4 MIC Input Section ...................................................................................................... 225
4.5.5 Kensington Lock Slot ................................................................................................. 226
4.5.6 MIDI Connectors ........................................................................................................ 226
4.5.7 USB Connector ........................................................................................................... 226
4.5.8 POWER Section .......................................................................................................... 227
4.6 The Front Panel ........................................................................................................................... 228
4.6.1 Crossfader Assign Switches ...................................................................................... 228
4.6.2 PHONES Section ......................................................................................................... 229
4.6.3 Crossfader Curve Knob .............................................................................................. 229
5 Common Setups ........................................................................................................231
5.1 Connecting Turntables ............................................................................................................... 231
5.2 Connecting CD Players ............................................................................................................... 234
5.3 Integrating External Audio Sources in your TRAKTOR Workflow ................................................... 235
5.4 Integrating External Sources as TIMECODE Controls .................................................................. 235
5.4.1 Final Preparations with Turntables ............................................................................ 235
5.4.2 Final Preparations with CD Players ............................................................................ 237
5.4.3 Successful Calibration .............................................................................................. 238
5.5 Using Your S8 as a Stand-alone DJ Mixer ................................................................................... 240
5.6 Connecting Microphones ............................................................................................................ 241
5.6.1 Checking Microphone Assignments ........................................................................... 242
5.6.2 Assigning a Microphone to another Channel ............................................................. 242
5.6.3 Switching between Live Input and Direct Thru ........................................................... 243
5.6.4 Activating a MIC Input ............................................................................................... 244
Table of Contents
TRAKTOR KONTROL S8 - Manual - 9
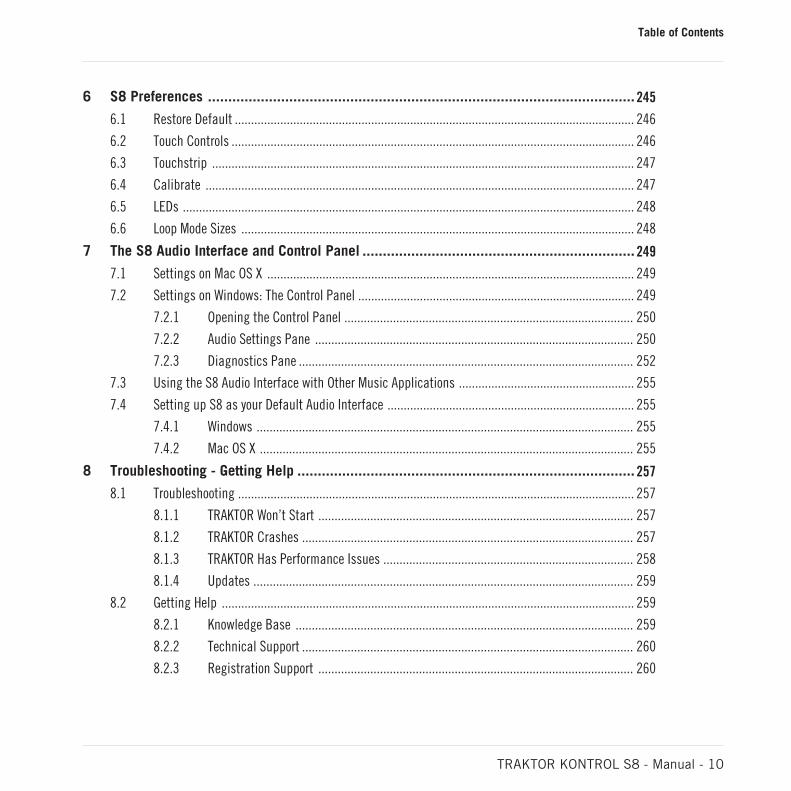
6 S8 Preferences .........................................................................................................245
6.1 Restore Default ........................................................................................................................... 246
6.2 Touch Controls ............................................................................................................................ 246
6.3 Touchstrip .................................................................................................................................. 247
6.4 Calibrate .................................................................................................................................... 247
6.5 LEDs ........................................................................................................................................... 248
6.6 Loop Mode Sizes ......................................................................................................................... 248
7 The S8 Audio Interface and Control Panel ...................................................................249
7.1 Settings on Mac OS X ................................................................................................................. 249
7.2 Settings on Windows: The Control Panel ..................................................................................... 249
7.2.1 Opening the Control Panel ......................................................................................... 250
7.2.2 Audio Settings Pane .................................................................................................. 250
7.2.3 Diagnostics Pane ....................................................................................................... 252
7.3 Using the S8 Audio Interface with Other Music Applications ...................................................... 255
7.4 Setting up S8 as your Default Audio Interface ............................................................................ 255
7.4.1 Windows .................................................................................................................... 255
7.4.2 Mac OS X ................................................................................................................... 255
8 Troubleshooting - Getting Help ...................................................................................257
8.1 Troubleshooting .......................................................................................................................... 257
8.1.1 TRAKTOR Won’t Start ................................................................................................. 257
8.1.2 TRAKTOR Crashes ...................................................................................................... 257
8.1.3 TRAKTOR Has Performance Issues ............................................................................. 258
8.1.4 Updates ..................................................................................................................... 259
8.2 Getting Help ............................................................................................................................... 259
8.2.1 Knowledge Base ........................................................................................................ 259
8.2.2 Technical Support ...................................................................................................... 260
8.2.3 Registration Support ................................................................................................. 260
Table of Contents
TRAKTOR KONTROL S8 - Manual - 10
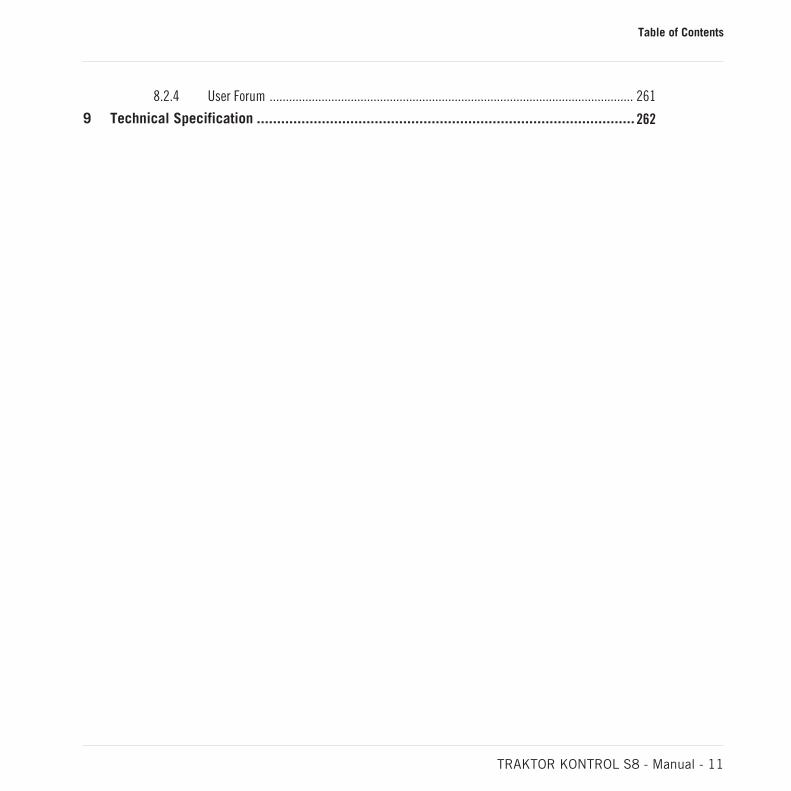
8.2.4 User Forum ................................................................................................................ 261
9 Technical Specification .............................................................................................262
Table of Contents
TRAKTOR KONTROL S8 - Manual - 11
1 Welcome to the World of TRAKTOR KONTROL S8!
Thank you for choosing TRAKTOR KONTROL S8.
What is TRAKTOR KONTROL S8?
TRAKTOR KONTROL S8 provides a direct tactile interface to TRAKTOR PRO's features and al-lows you to achieve more with the controller hardware so you have to do less on your computerscreen.
Whether you intend to perform and remix live with TRAKTOR, use S8 as a stand-alone mixerwith turntables or CD decks or a combination of both; S8 has you covered!
S8 enables performance in various live situations, combining the power of computer-basedDJing with the immediacy and flow you need to focus on your audience.
1.1 Where to Start
TRAKTOR KONTROL S8 provides you with many information sources. These are intended to beread in the following sequence to ensure easy access for users of all skill levels:
TRAKTOR 2 Getting Started
TRAKTOR 2 Manual
TRAKTOR KONTROL S8 Manual (this document)
Your First Stop: Getting Started
This document guides you through configuration of TRAKTOR to work with a hardware control-ler by means of the Setup Wizard, as well as importing music into your Track Collection. After-wards, it introduces you to TRAKTOR's basic concepts and workflows and provides helps youset up your system correctly.
Welcome to the World of TRAKTOR KONTROL S8!
Where to Start
TRAKTOR KONTROL S8 - Manual - 12
TRAKTOR PRO Manual
The Manual helps you learn all of the workflows which make TRAKTOR a unique DJing solu-tion. In addition to learning to use TRAKTOR's core features, this document gives advice onworking in various configurations; from using TRAKTOR in the most basic setup on its own tointegrating turntables, external DJ mixers and audio interfaces, as well as the SCRATCH exten-sion.
Access the TRAKTOR manual via TRAKTOR PRO's Help menu. The 'Open Manual...' entrywill open the Documentation sub-folder inside TRAKTOR's application folder.
TRAKTOR KONTROL S8 Manual
The S8 Manual picks up where controlling TRAKTOR features from the S8 are concerned. Adetailed tutorial section guides you through accessing the basics like loading tracks, mixing,setting cue points, looping and using Remix Decks from S8.
Next, a comprehensive Hardware Reference details each and every component you will en-counter on the TRAKTOR KONTROL S8 controller. The later chapters of this manual provideadditional information on solving common issues, and the device's full technical specification.
Controller Editor Manual
Besides using S8 with the dedicated TRAKTOR software, you can also use it as a powerful andhighly versatile MIDI controller with any other MIDI-capable application or device. This ismade possible by the Controller Editor software, an application which allows you to assignMIDI controller messages to S8's pads, knobs, faders and encoders. The is usually automati-cally installed during TRAKTOR's installation. For more information on this, please refer to theController Editor Manual available as a PDF file in the Documentation subfolder of the Control-ler Editor installation folder on your hard disk.
Other Online Resources
If you are experiencing problems related to your Native Instruments product that the supplieddocumentation does not cover, there are several ways of getting help:
Knowledge Base
User Forum
Technical Support
Welcome to the World of TRAKTOR KONTROL S8!
Where to Start
TRAKTOR KONTROL S8 - Manual - 13
Registration Support
You will find more information on these in chapter ↑8.1, Troubleshooting and ↑8.2, GettingHelp.
1.2 Manual Conventions
This section introduces you to the signage and text highlighting used in this manual. This man-ual uses particular formatting to point out special facts and to warn you of potential issues.The icons introducing these notes let you see what kind of information is to be expected:
Whenever this exclamation mark icon appears, you should read the corresponding notecarefully and follow the instructions and hints given there if applicable.
This light bulb icon indicates that a note contains useful extra information. This informa-tion may often help you to solve a task more efficiently, but does not necessarily apply tothe setup or operating system you are using; however, it's always worth a look.
Furthermore, the following formatting is used:
Text appearing in (drop-down) menus (such as Open…, Save as… etc.) and paths to loca-tions on your hard drive or other storage devices is printed in italics.
Text appearing elsewhere (labels of buttons, controls, text next to checkboxes etc.) isprinted in blue. Whenever you see this formatting applied, you will find the same text ap-pearing somewhere on the screen.
Text appearing on displays of the S8 controller is printed in light grey. Whenever you seethis formatting applied, you will find the same text on a controller display.
Text appearing on labels of the hardware controller is printed in orange. Whenever you seethis formatting applied, you will find the same text on the controller.
Important names and concepts are printed in bold.
References to keys on your computer’s keyboard you’ll find put in square brackets (e.g.,“Press [Shift] + [Enter]”).
Single instructions are introduced by this play button type arrow.
Welcome to the World of TRAKTOR KONTROL S8!
Manual Conventions
TRAKTOR KONTROL S8 - Manual - 14
→ Results of actions are introduced by this smaller arrow.
Naming Conventions
Throughout the documentation, we will refer to the TRAKTOR KONTROL S8 hardware control-ler either as the controller or simply S8.
The TRAKTOR 2 software and TRAKTOR SCRATCH will be referred to as TRAKTOR.
Button Combinations and Shortcuts on Your Controller
Most instructions will use the “+” sign to indicate buttons (or buttons and pads) that must bepressed simultaneously, starting with the button indicated first. E.g., an instruction such as:
“Press SHIFT + PLAY”
means:
1. Press and hold SHIFT.2. While holding SHIFT, press PLAY and release it.3. Release SHIFT.
FX Knobs and Buttons
Above each of the Displays, there's a row of FX knobs and FX buttons which aren't labeled.Similarly, the knobs below the display are unlabeled, the buttons are all labeled ON. To differ-entiate them, we'll refer to them as FX knobs 1-4 and FX buttons 1-4 for the elements above thedisplay and Performance knobs 1-4 and Performance buttons 1-4 beneath the display.
Welcome to the World of TRAKTOR KONTROL S8!
Manual Conventions
TRAKTOR KONTROL S8 - Manual - 15
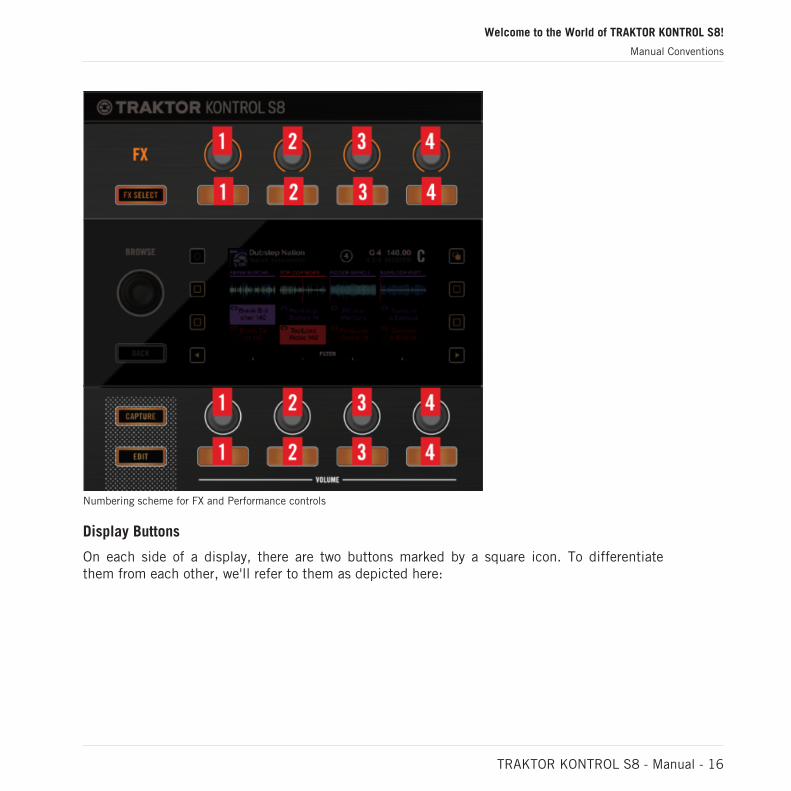
Numbering scheme for FX and Performance controls
Display Buttons
On each side of a display, there are two buttons marked by a square icon. To differentiatethem from each other, we'll refer to them as depicted here:
Welcome to the World of TRAKTOR KONTROL S8!
Manual Conventions
TRAKTOR KONTROL S8 - Manual - 16
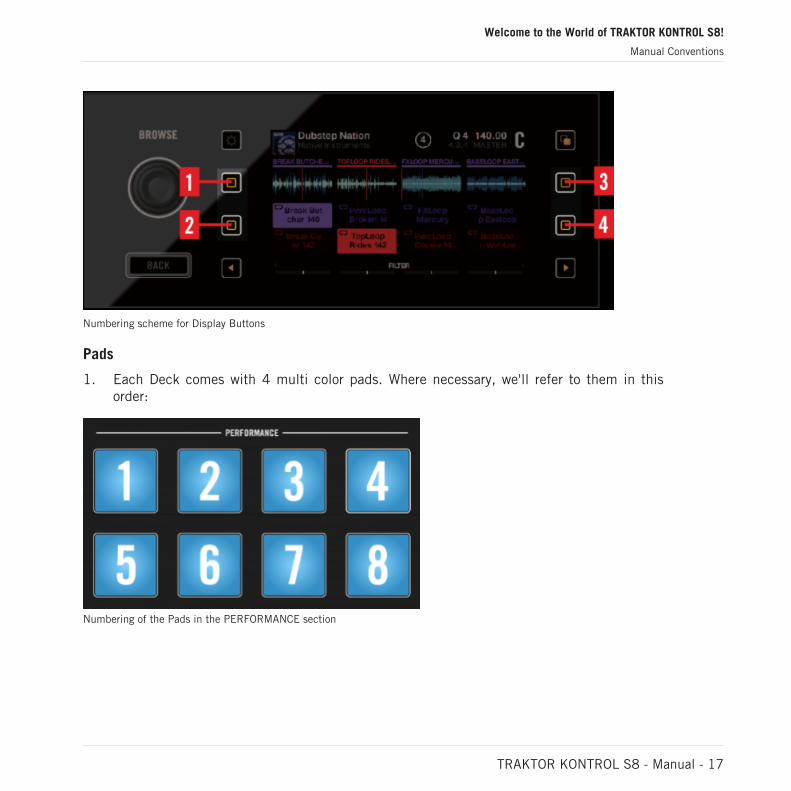
Numbering scheme for Display Buttons
Pads
1. Each Deck comes with 4 multi color pads. Where necessary, we'll refer to them in thisorder:
Numbering of the Pads in the PERFORMANCE section
Welcome to the World of TRAKTOR KONTROL S8!
Manual Conventions
TRAKTOR KONTROL S8 - Manual - 17
2 Using Your S8—Getting Started
This section will guide you through the most common tasks you will encounter during yourwork with TRAKTOR KONTROL S8. Most of the tutorials included are workflow-oriented. Theystart with the simplest tasks and progressively lead you to more complex operation, helping youto become familiar with TRAKTOR KONTROL S8.
The tutorials presented here make use of the included demo tracks, which were automaticallycopied to your hard disk during the TRAKTOR KONTROL S8 installation procedure. Therefore,you can follow these tutorials even if you haven't imported your own music.
Although the S8 can be used as a stand-alone mixer, the tutorials here focus on using the de-vice as the integrated controller for the TRAKTOR software on your computer. By the end ofthis chapter you will be equipped with the fundamental knowledge to enjoy using your TRAK-TOR KONTROL S8, and begin to uncover the creative opportunities it presents to your DJ ses-sions.
General Prerequisites
We assume here that your TRAKTOR KONTROL S8 system is already up and running. If that'snot the case, please follow the instructions in the separate Setup Guide and return to thischapter when you are ready.
In case you already changed some settings in TRAKTOR KONTROL S8 before you start withthese tutorials, we strongly recommend you to reset your TRAKTOR KONTROL S8 system tothe factory settings by doing the following:
1. In the TRAKTOR software, click the Help menu in the menu bar at the top of your screen(on Mac OS X) or at the top of the window (on Windows), and select Help > Start SetupWizard.
2. In the window that opens, click Finish at the bottom right corner without selecting any-thing else.
→ Your TRAKTOR KONTROL S8 is now reset to the factory settings.
The tutorials presented here assume that TRAKTOR KONTROL S8 is in its default factorystate. If it’s not the case, we cannot guarantee that you will experience what is described here,and as a result you might find it difficult to follow the instructions.
Using Your S8—Getting Started
TRAKTOR KONTROL S8 - Manual - 18
2.1 Overview of TRAKTOR KONTROL S8
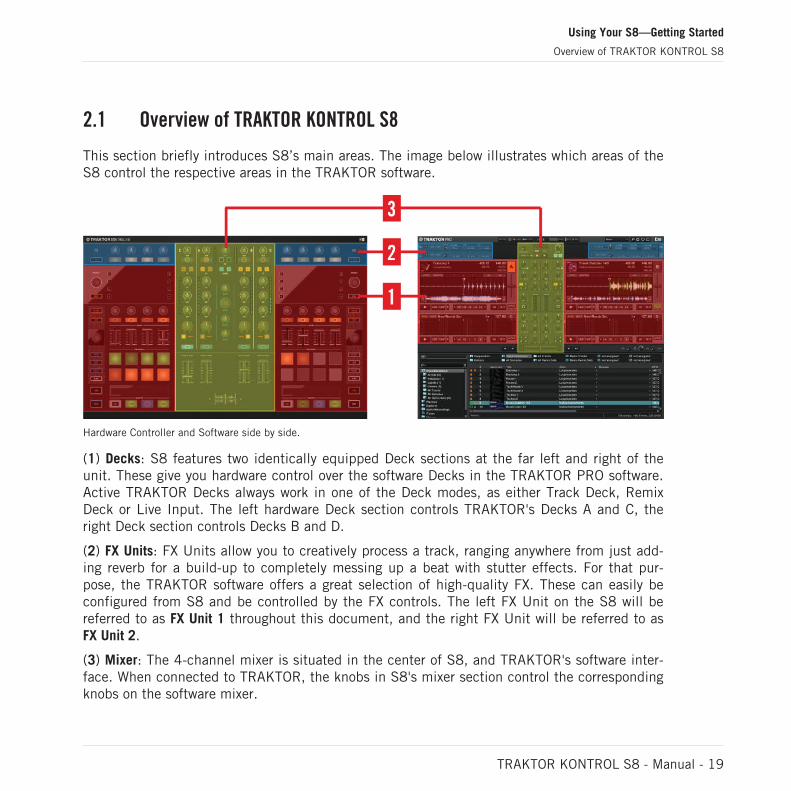
This section briefly introduces S8’s main areas. The image below illustrates which areas of theS8 control the respective areas in the TRAKTOR software.
Hardware Controller and Software side by side.
(1) Decks: S8 features two identically equipped Deck sections at the far left and right of theunit. These give you hardware control over the software Decks in the TRAKTOR PRO software.Active TRAKTOR Decks always work in one of the Deck modes, as either Track Deck, RemixDeck or Live Input. The left hardware Deck section controls TRAKTOR's Decks A and C, theright Deck section controls Decks B and D.
(2) FX Units: FX Units allow you to creatively process a track, ranging anywhere from just add-ing reverb for a build-up to completely messing up a beat with stutter effects. For that pur-pose, the TRAKTOR software offers a great selection of high-quality FX. These can easily beconfigured from S8 and be controlled by the FX controls. The left FX Unit on the S8 will bereferred to as FX Unit 1 throughout this document, and the right FX Unit will be referred to asFX Unit 2.
(3) Mixer: The 4-channel mixer is situated in the center of S8, and TRAKTOR's software inter-face. When connected to TRAKTOR, the knobs in S8's mixer section control the correspondingknobs on the software mixer.
Using Your S8—Getting Started
Overview of TRAKTOR KONTROL S8
TRAKTOR KONTROL S8 - Manual - 19

2.2 Enabling Decks
By default, the Decks on your TRAKTOR KONTROL S8 are enabled after you start the TRAK-TOR software for the first time. If, however, the Decks are not enabled (in Direct Thru mode),proceed as follows to enable the Decks.
The following images show disabled Decks:
Deck A in Direct Thru mode
Using Your S8—Getting Started
Enabling Decks
TRAKTOR KONTROL S8 - Manual - 20
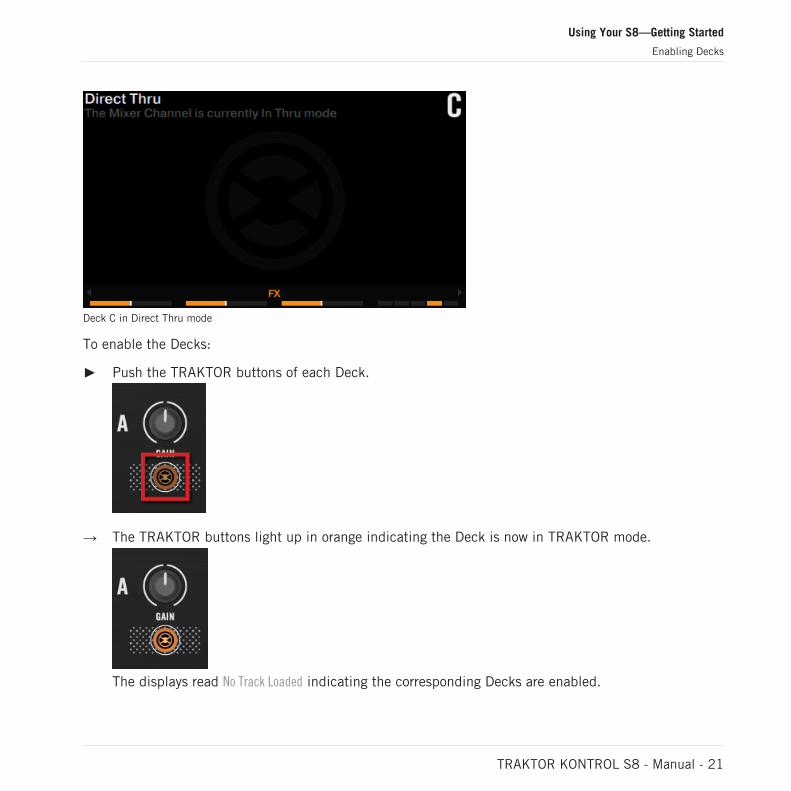
Deck C in Direct Thru mode
To enable the Decks:
Push the TRAKTOR buttons of each Deck.
→ The TRAKTOR buttons light up in orange indicating the Deck is now in TRAKTOR mode.
The displays read No Track Loaded indicating the corresponding Decks are enabled.
Using Your S8—Getting Started
Enabling Decks
TRAKTOR KONTROL S8 - Manual - 21
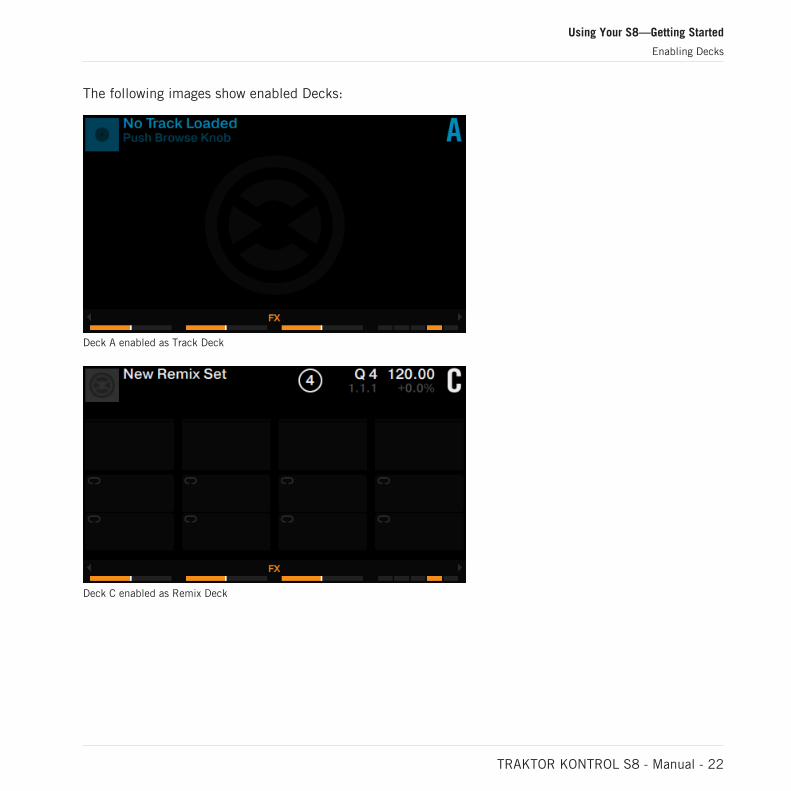
The following images show enabled Decks:
Deck A enabled as Track Deck
Deck C enabled as Remix Deck
Using Your S8—Getting Started
Enabling Decks
TRAKTOR KONTROL S8 - Manual - 22
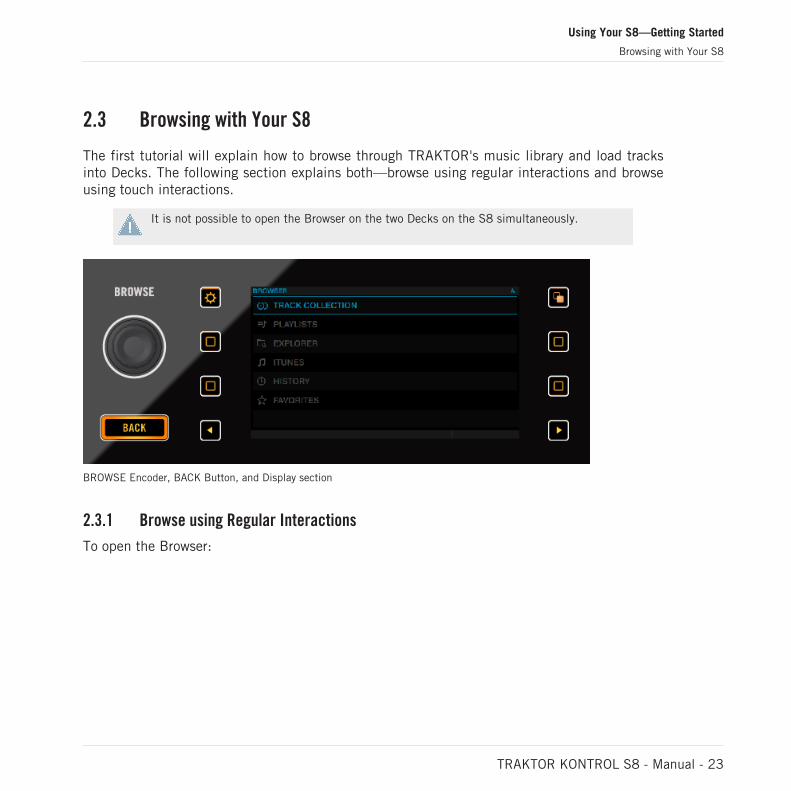
2.3 Browsing with Your S8
The first tutorial will explain how to browse through TRAKTOR's music library and load tracksinto Decks. The following section explains both—browse using regular interactions and browseusing touch interactions.
It is not possible to open the Browser on the two Decks on the S8 simultaneously.
BROWSE Encoder, BACK Button, and Display section
2.3.1 Browse using Regular Interactions
To open the Browser:
Using Your S8—Getting Started
Browsing with Your S8
TRAKTOR KONTROL S8 - Manual - 23
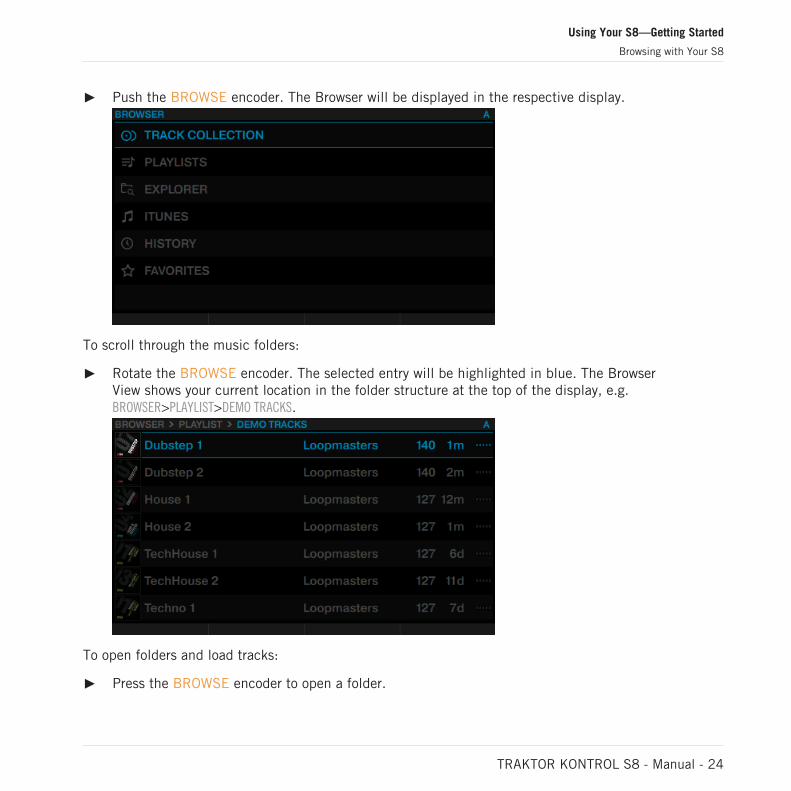
Push the BROWSE encoder. The Browser will be displayed in the respective display.
To scroll through the music folders:
Rotate the BROWSE encoder. The selected entry will be highlighted in blue. The BrowserView shows your current location in the folder structure at the top of the display, e.g.BROWSER>PLAYLIST>DEMO TRACKS.
To open folders and load tracks:
Press the BROWSE encoder to open a folder.
Using Your S8—Getting Started
Browsing with Your S8
TRAKTOR KONTROL S8 - Manual - 24
Press the BROWSE encoder to load a track.
To return to the previous folder:
Press the BACK button.
To exit the Browser:
Press the VIEW button. The display will return to Track view.
2.3.2 Browse using Touch Interactions
In addition to regular interactions with TRAKTOR KONTROL S8 you can perform touch interac-tions. However, to use touch interactions when browsing the touch sensitivity for the BROWSEencoder has to be enabled:
1. Open the TRAKTOR Preferences.2. Select the tab TRAKTOR KONTROL S8.3. Enable the Touch Control Auto Open Browser on Touch.
→ The touch sensitivity is now enabled on the BROWSE encoder.
With touch sensitivity enabled the following touch interactions can be performed:
To open the Browser:
Touch the BROWSE encoder. The Browser will be displayed in the respective display.
To exit the Browser:
Release the BROWSE encoder or stop interacting in the Browser. The display will returnto Track view.
Using Your S8—Getting Started
Browsing with Your S8
TRAKTOR KONTROL S8 - Manual - 25
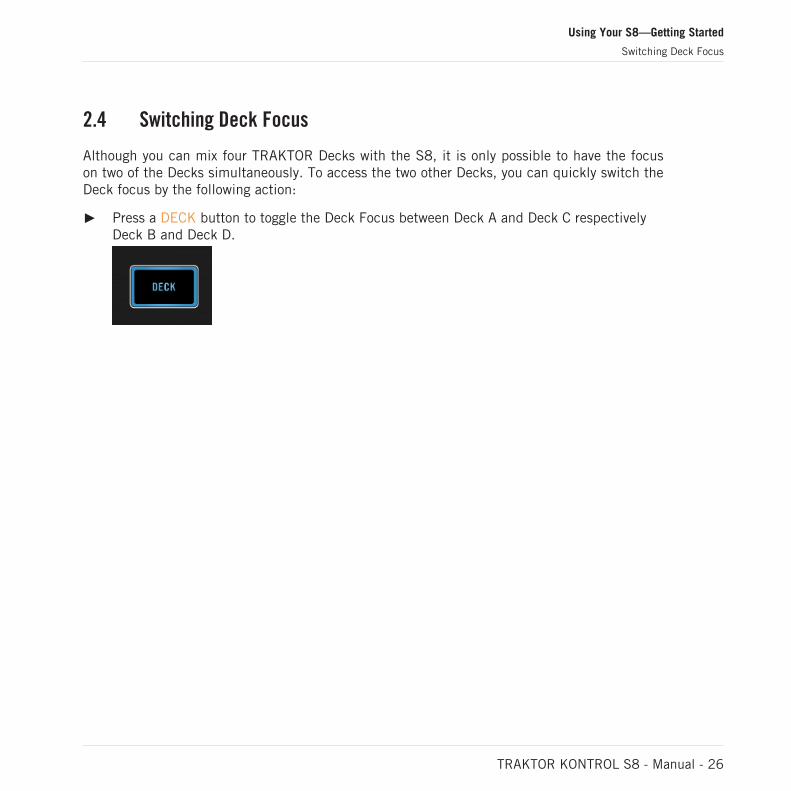
2.4 Switching Deck Focus
Although you can mix four TRAKTOR Decks with the S8, it is only possible to have the focuson two of the Decks simultaneously. To access the two other Decks, you can quickly switch theDeck focus by the following action:
Press a DECK button to toggle the Deck Focus between Deck A and Deck C respectivelyDeck B and Deck D.
Using Your S8—Getting Started
Switching Deck Focus
TRAKTOR KONTROL S8 - Manual - 26
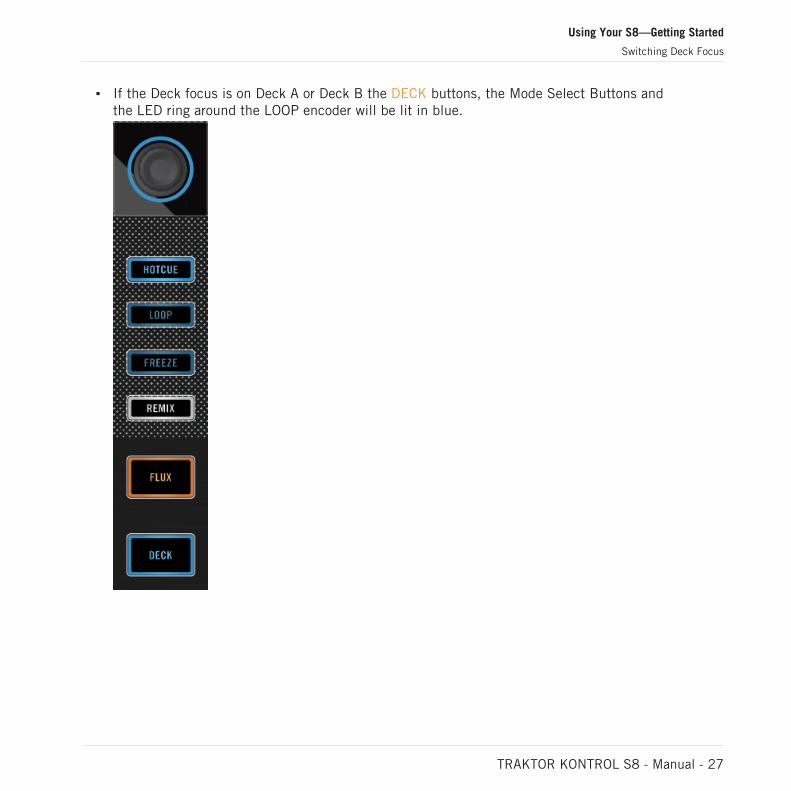
If the Deck focus is on Deck A or Deck B the DECK buttons, the Mode Select Buttons andthe LED ring around the LOOP encoder will be lit in blue.
Using Your S8—Getting Started
Switching Deck Focus
TRAKTOR KONTROL S8 - Manual - 27
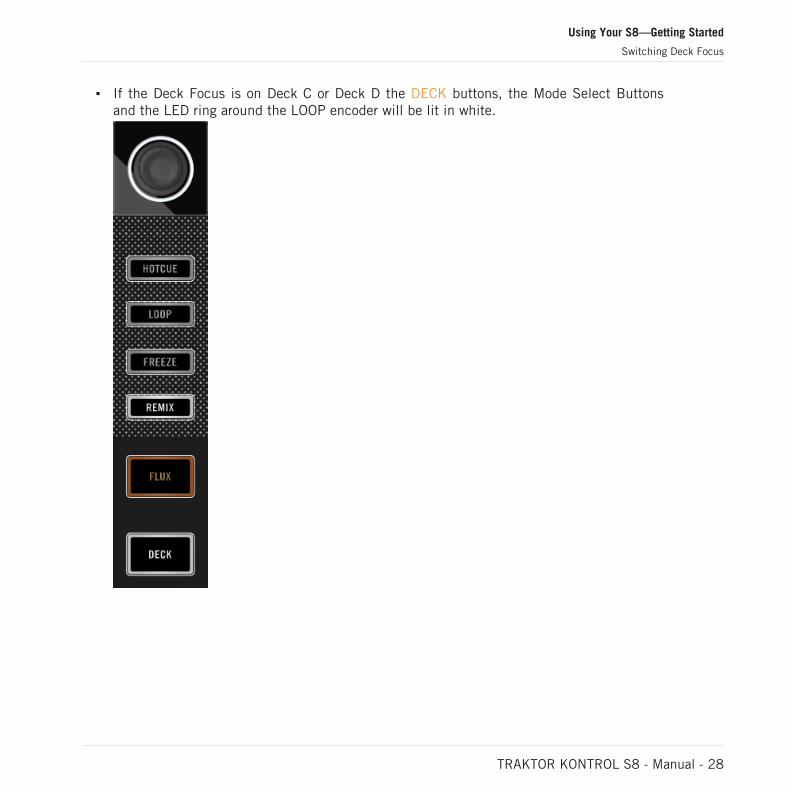
If the Deck Focus is on Deck C or Deck D the DECK buttons, the Mode Select Buttonsand the LED ring around the LOOP encoder will be lit in white.
Using Your S8—Getting Started
Switching Deck Focus
TRAKTOR KONTROL S8 - Manual - 28
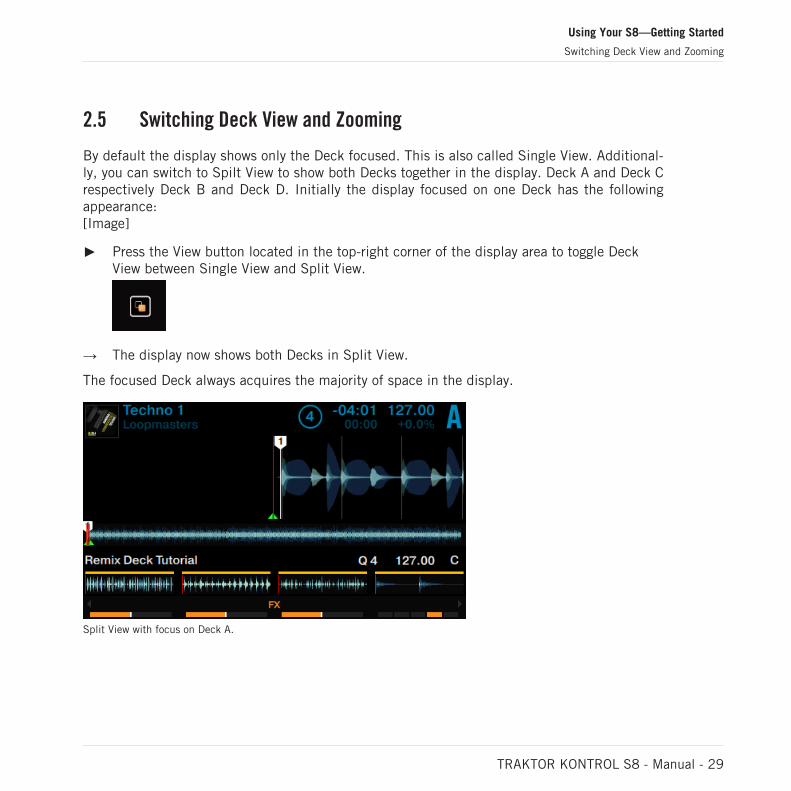
2.5 Switching Deck View and Zooming
By default the display shows only the Deck focused. This is also called Single View. Additional-ly, you can switch to Spilt View to show both Decks together in the display. Deck A and Deck Crespectively Deck B and Deck D. Initially the display focused on one Deck has the followingappearance:[Image]
Press the View button located in the top-right corner of the display area to toggle DeckView between Single View and Split View.
→ The display now shows both Decks in Split View.
The focused Deck always acquires the majority of space in the display.
Split View with focus on Deck A.
Using Your S8—Getting Started
Switching Deck View and Zooming
TRAKTOR KONTROL S8 - Manual - 29
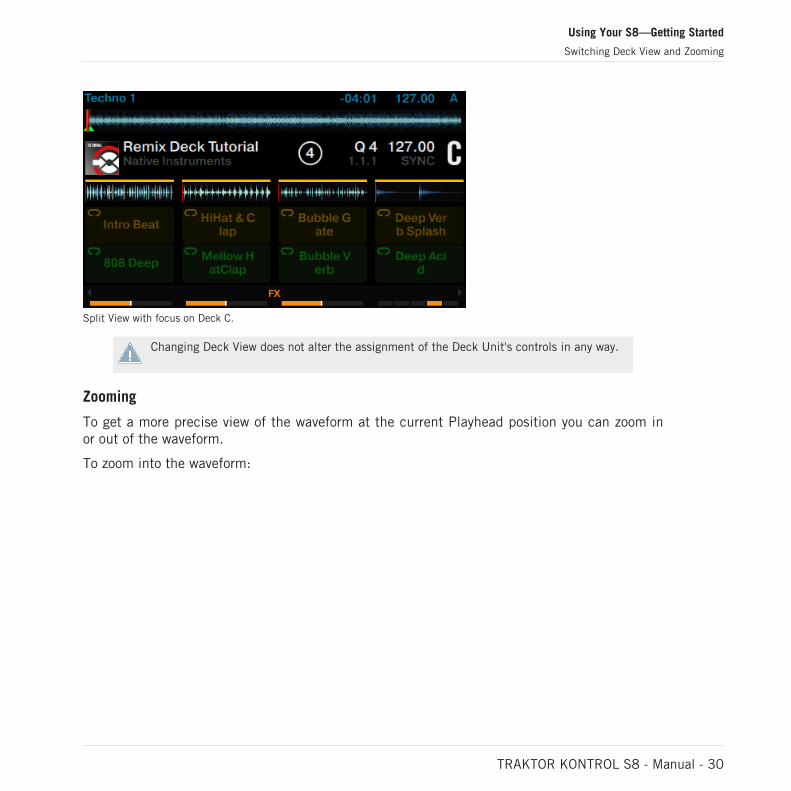
Split View with focus on Deck C.
Changing Deck View does not alter the assignment of the Deck Unit's controls in any way.
Zooming
To get a more precise view of the waveform at the current Playhead position you can zoom inor out of the waveform.
To zoom into the waveform:
Using Your S8—Getting Started
Switching Deck View and Zooming
TRAKTOR KONTROL S8 - Manual - 30
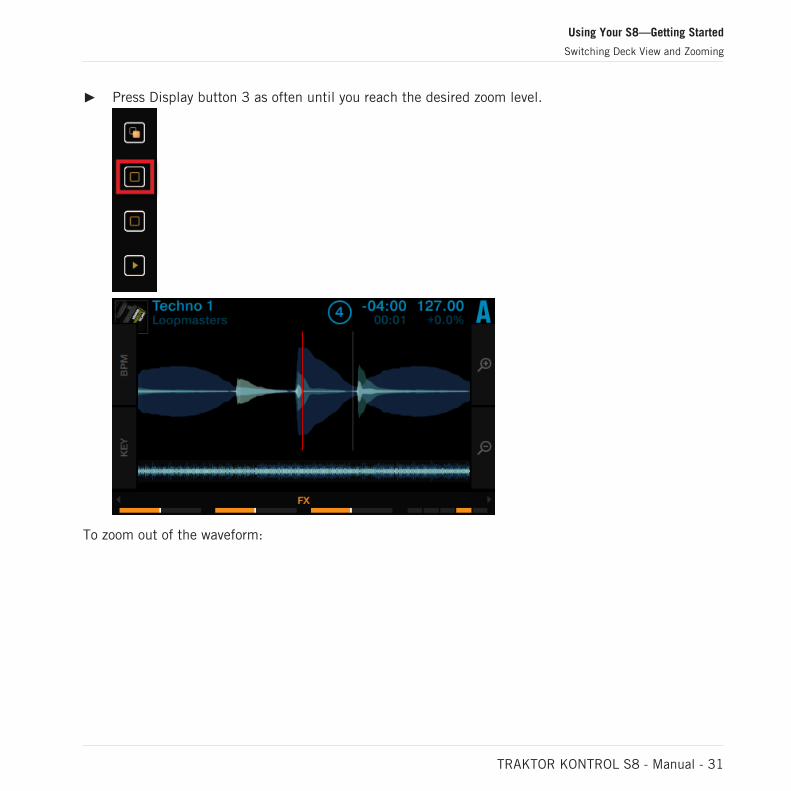
Press Display button 3 as often until you reach the desired zoom level.
To zoom out of the waveform:
Using Your S8—Getting Started
Switching Deck View and Zooming
TRAKTOR KONTROL S8 - Manual - 31
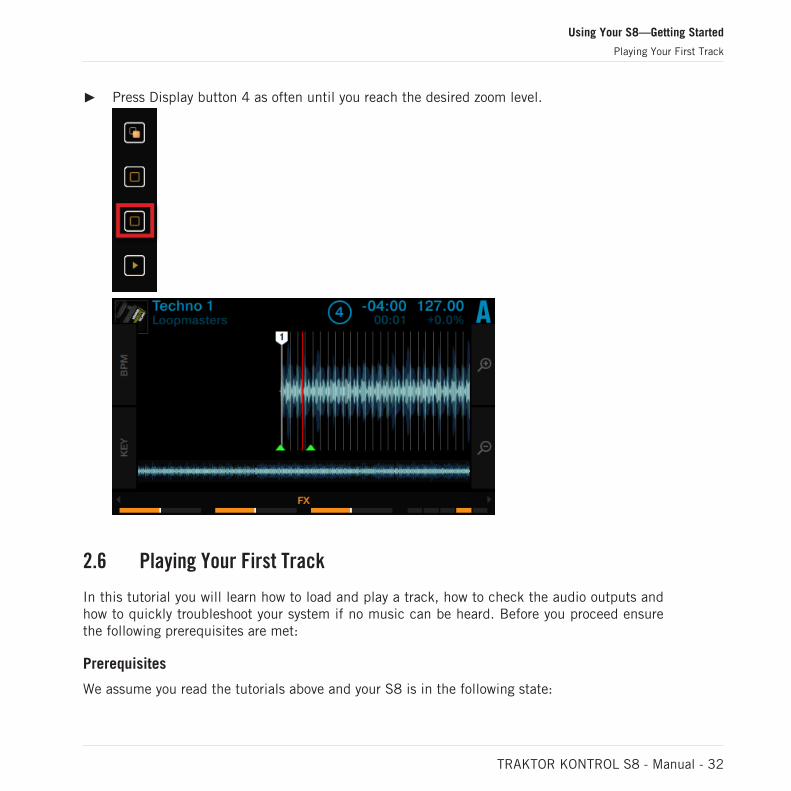
Press Display button 4 as often until you reach the desired zoom level.
2.6 Playing Your First Track
In this tutorial you will learn how to load and play a track, how to check the audio outputs andhow to quickly troubleshoot your system if no music can be heard. Before you proceed ensurethe following prerequisites are met:
Prerequisites
We assume you read the tutorials above and your S8 is in the following state:
Using Your S8—Getting Started
Playing Your First Track
TRAKTOR KONTROL S8 - Manual - 32
The left Deck is focused on Track Deck A.
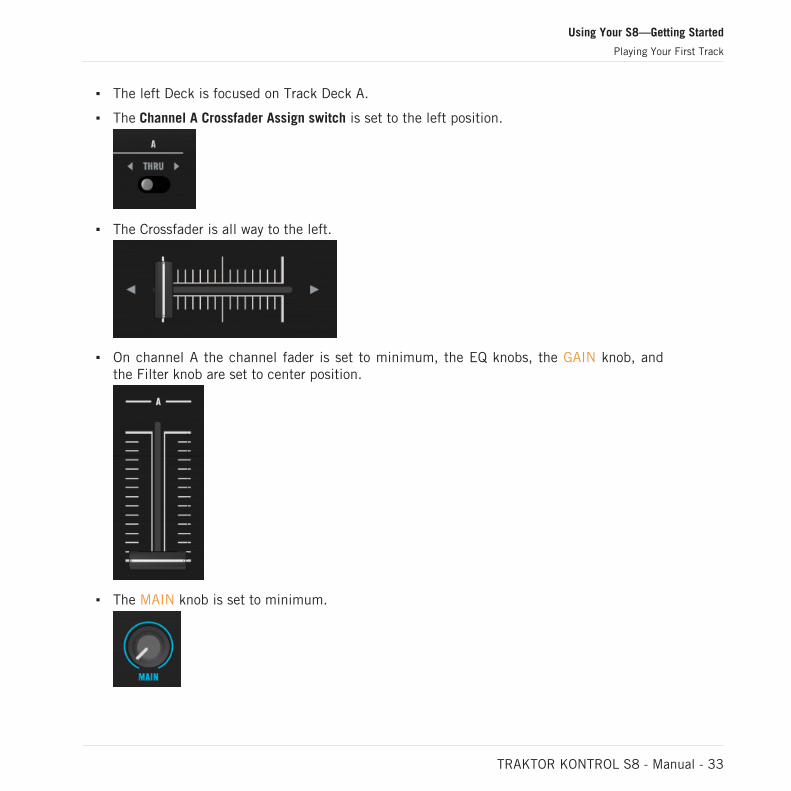
The Channel A Crossfader Assign switch is set to the left position.
The Crossfader is all way to the left.
On channel A the channel fader is set to minimum, the EQ knobs, the GAIN knob, andthe Filter knob are set to center position.
The MAIN knob is set to minimum.
Using Your S8—Getting Started
Playing Your First Track
TRAKTOR KONTROL S8 - Manual - 33
2.6.1 Loading a Track
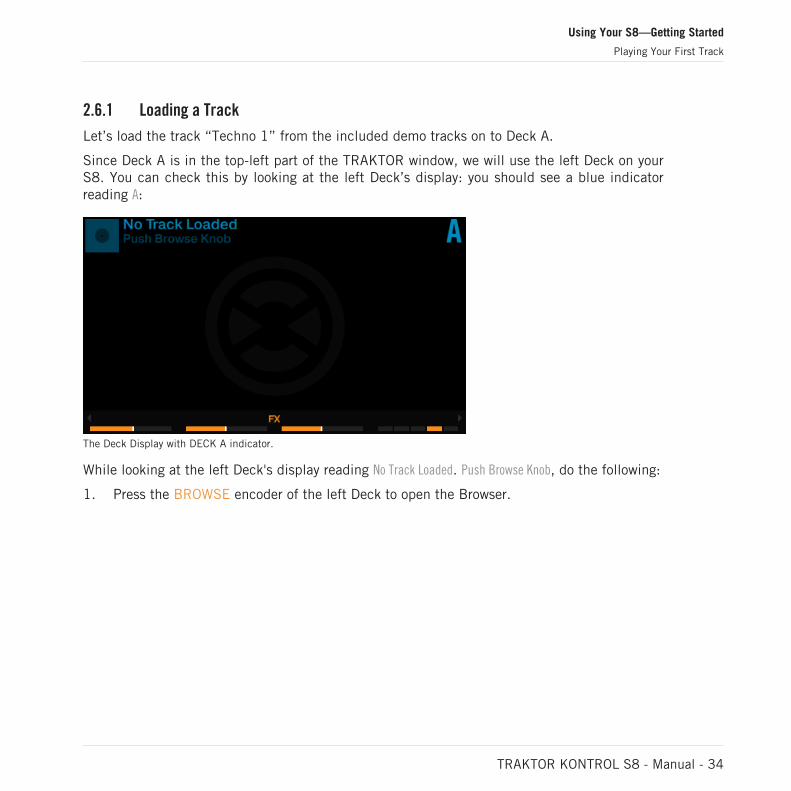
Let’s load the track “Techno 1” from the included demo tracks on to Deck A.
Since Deck A is in the top-left part of the TRAKTOR window, we will use the left Deck on yourS8. You can check this by looking at the left Deck’s display: you should see a blue indicatorreading A:
The Deck Display with DECK A indicator.
While looking at the left Deck's display reading No Track Loaded. Push Browse Knob, do the following:
1. Press the BROWSE encoder of the left Deck to open the Browser.
Using Your S8—Getting Started
Playing Your First Track
TRAKTOR KONTROL S8 - Manual - 34
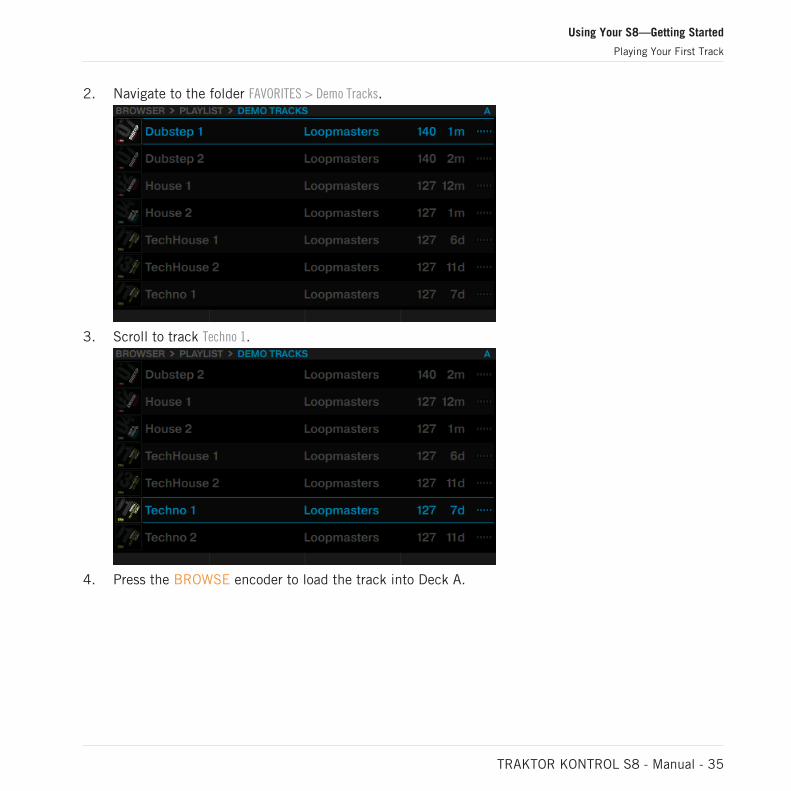
2. Navigate to the folder FAVORITES > Demo Tracks.
3. Scroll to track Techno 1.
4. Press the BROWSE encoder to load the track into Deck A.
Using Your S8—Getting Started
Playing Your First Track
TRAKTOR KONTROL S8 - Manual - 35
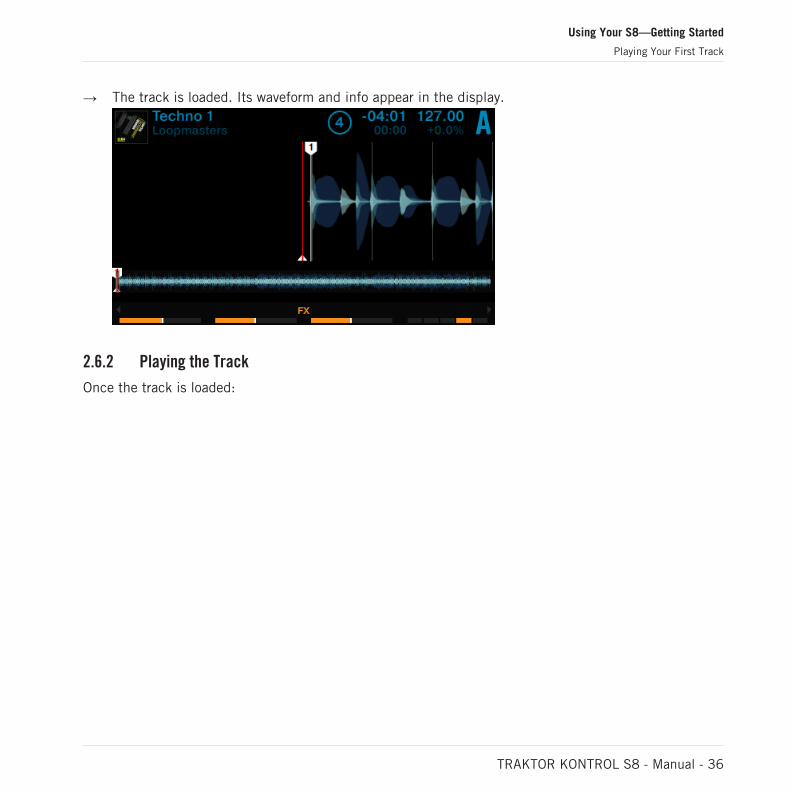
→ The track is loaded. Its waveform and info appear in the display.
2.6.2 Playing the Track
Once the track is loaded:
Using Your S8—Getting Started
Playing Your First Track
TRAKTOR KONTROL S8 - Manual - 36
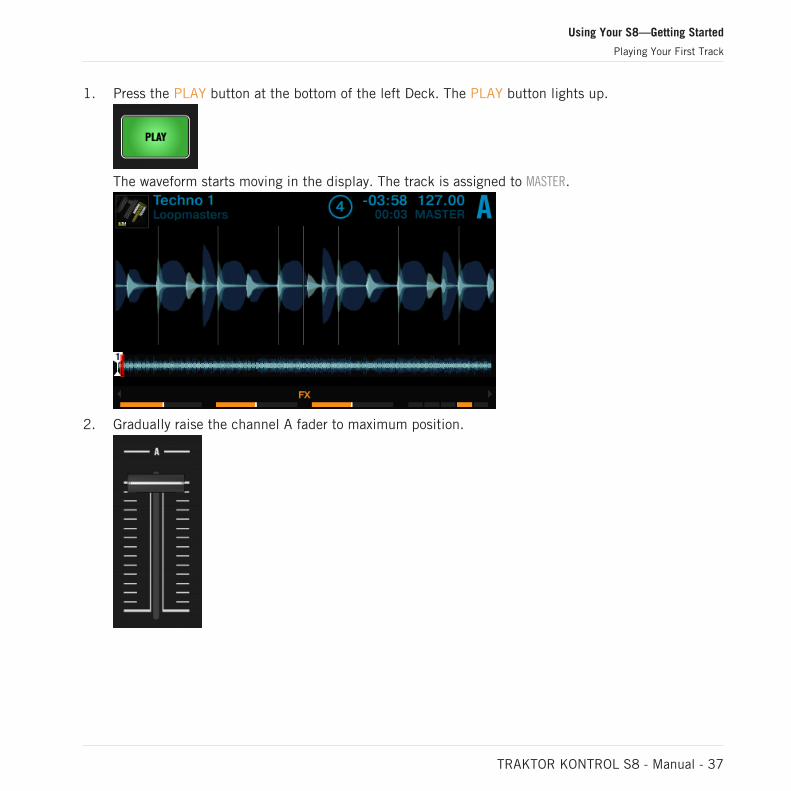
1. Press the PLAY button at the bottom of the left Deck. The PLAY button lights up.
The waveform starts moving in the display. The track is assigned to MASTER.
2. Gradually raise the channel A fader to maximum position.
Using Your S8—Getting Started
Playing Your First Track
TRAKTOR KONTROL S8 - Manual - 37
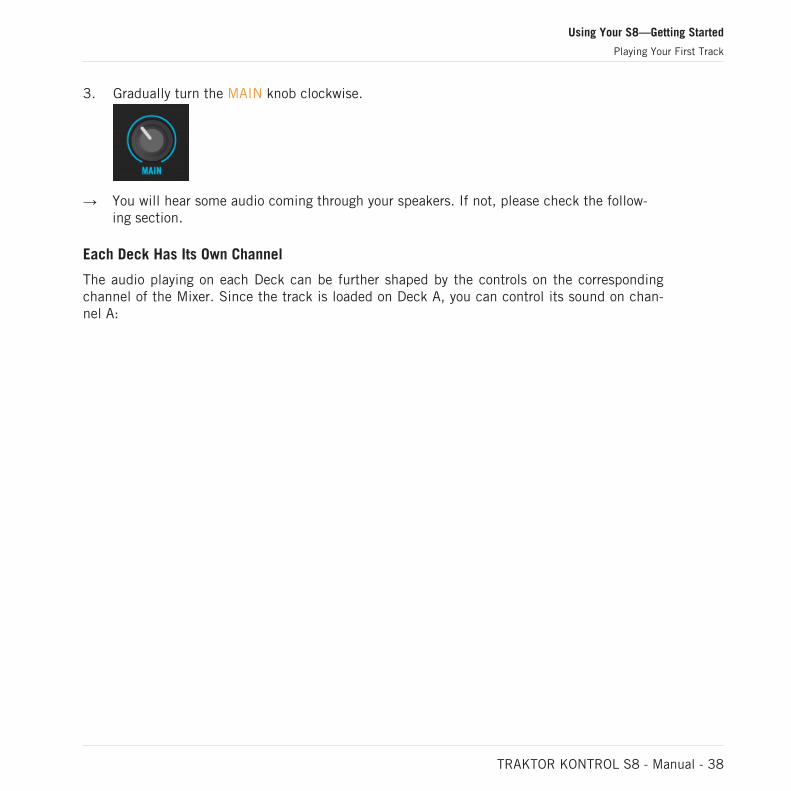
3. Gradually turn the MAIN knob clockwise.
→ You will hear some audio coming through your speakers. If not, please check the follow-ing section.
Each Deck Has Its Own Channel
The audio playing on each Deck can be further shaped by the controls on the correspondingchannel of the Mixer. Since the track is loaded on Deck A, you can control its sound on chan-nel A:
Using Your S8—Getting Started
Playing Your First Track
TRAKTOR KONTROL S8 - Manual - 38
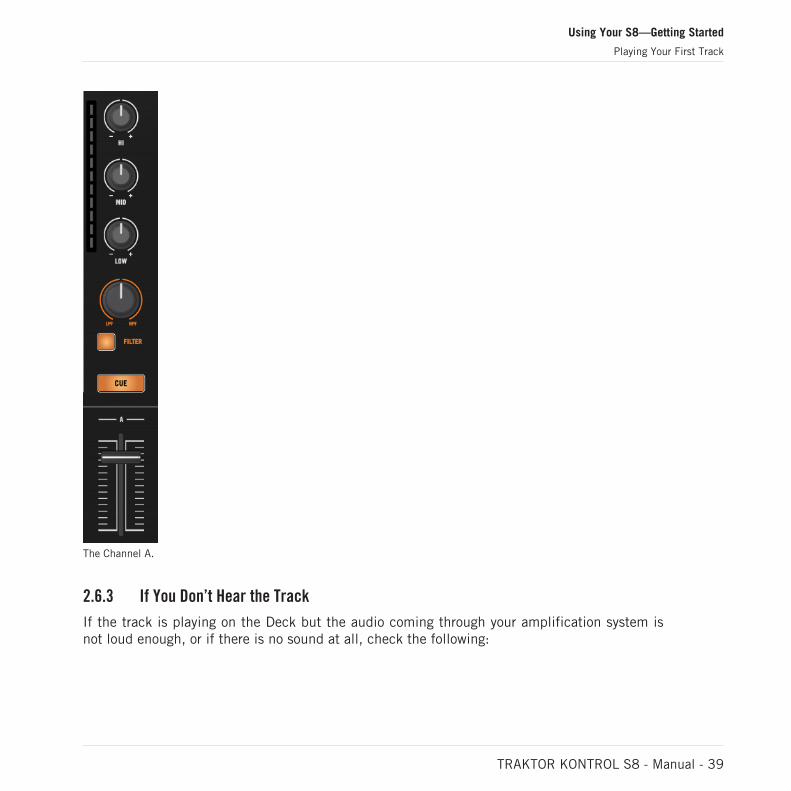
The Channel A.
2.6.3 If You Don’t Hear the Track
If the track is playing on the Deck but the audio coming through your amplification system isnot loud enough, or if there is no sound at all, check the following:
Using Your S8—Getting Started
Playing Your First Track
TRAKTOR KONTROL S8 - Manual - 39
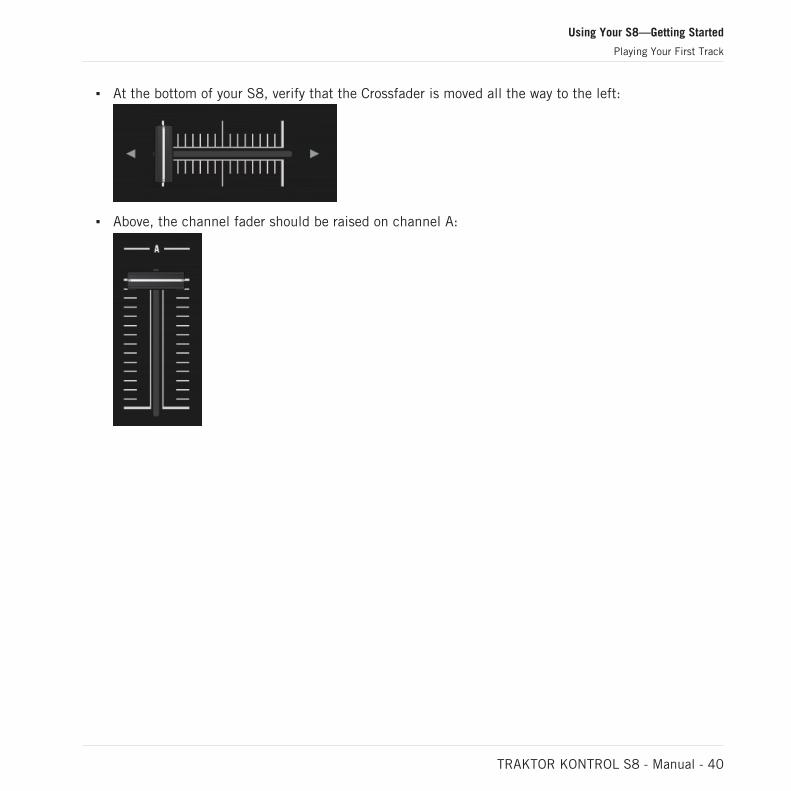
At the bottom of your S8, verify that the Crossfader is moved all the way to the left:
Above, the channel fader should be raised on channel A:
Using Your S8—Getting Started
Playing Your First Track
TRAKTOR KONTROL S8 - Manual - 40
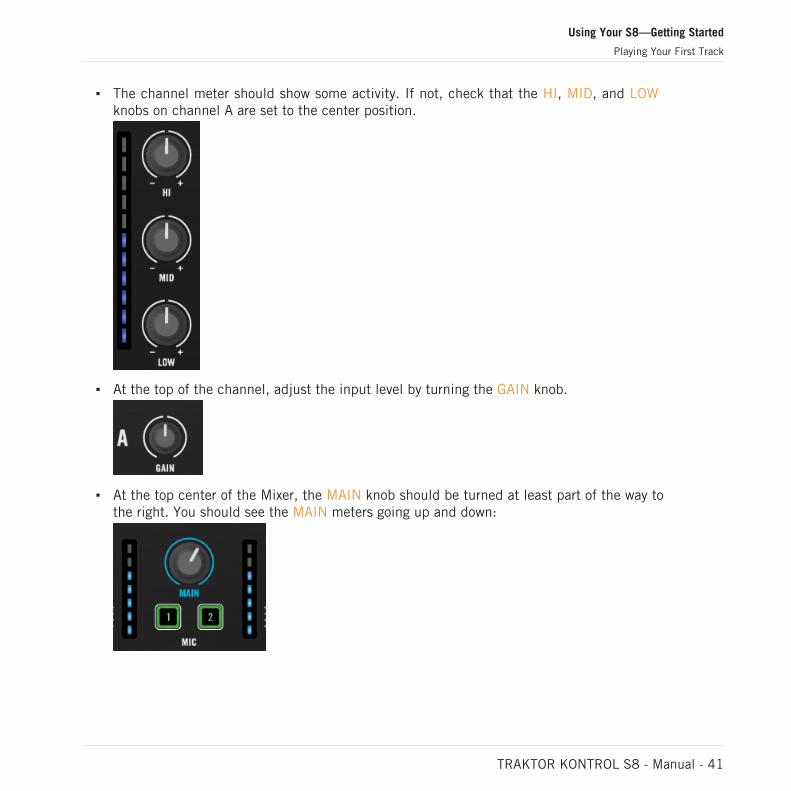
The channel meter should show some activity. If not, check that the HI, MID, and LOW knobs on channel A are set to the center position.
At the top of the channel, adjust the input level by turning the GAIN knob.
At the top center of the Mixer, the MAIN knob should be turned at least part of the way tothe right. You should see the MAIN meters going up and down:
Using Your S8—Getting Started
Playing Your First Track
TRAKTOR KONTROL S8 - Manual - 41
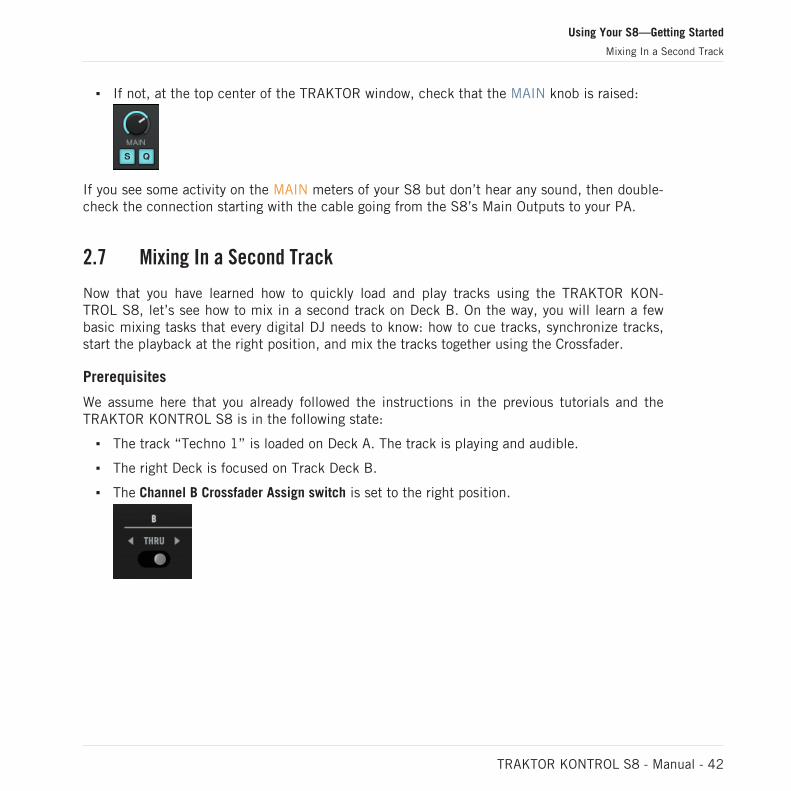
If not, at the top center of the TRAKTOR window, check that the MAIN knob is raised:
If you see some activity on the MAIN meters of your S8 but don’t hear any sound, then double-check the connection starting with the cable going from the S8’s Main Outputs to your PA.
2.7 Mixing In a Second Track
Now that you have learned how to quickly load and play tracks using the TRAKTOR KON-TROL S8, let’s see how to mix in a second track on Deck B. On the way, you will learn a fewbasic mixing tasks that every digital DJ needs to know: how to cue tracks, synchronize tracks,start the playback at the right position, and mix the tracks together using the Crossfader.
Prerequisites
We assume here that you already followed the instructions in the previous tutorials and theTRAKTOR KONTROL S8 is in the following state:
The track “Techno 1” is loaded on Deck A. The track is playing and audible.
The right Deck is focused on Track Deck B.
The Channel B Crossfader Assign switch is set to the right position.
Using Your S8—Getting Started
Mixing In a Second Track
TRAKTOR KONTROL S8 - Manual - 42
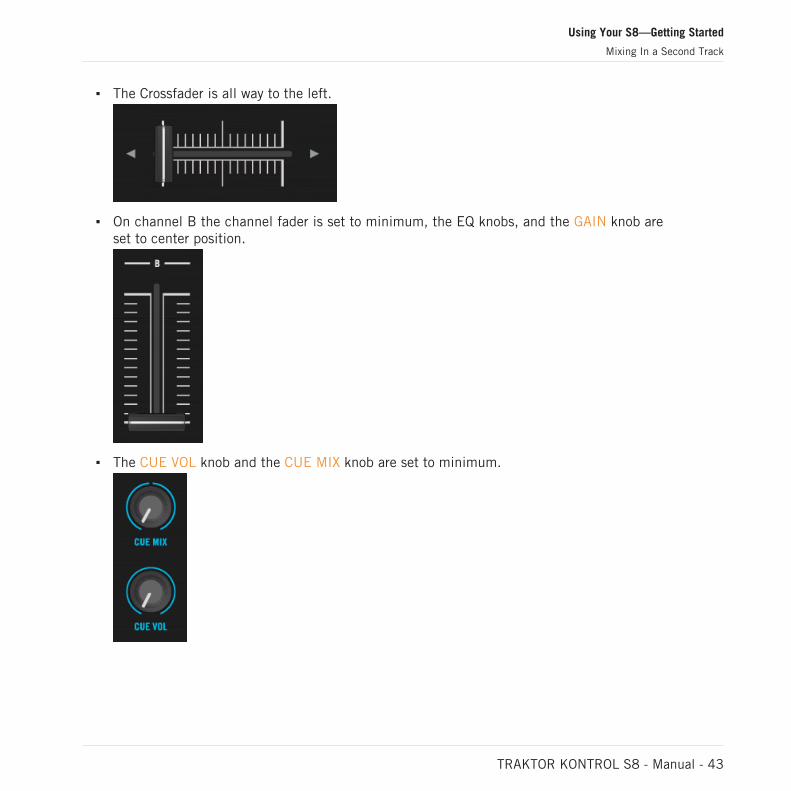
The Crossfader is all way to the left.
On channel B the channel fader is set to minimum, the EQ knobs, and the GAIN knob areset to center position.
The CUE VOL knob and the CUE MIX knob are set to minimum.
Using Your S8—Getting Started
Mixing In a Second Track
TRAKTOR KONTROL S8 - Manual - 43

2.7.1 Loading a Second Track
We will choose the track “Techno 2” and load it on the right Deck B, as we did on left Deck Ain the previous tutorial.
Track Deck B empty
While looking at the right Deck display reading "No Track Loaded, Touch Browse Knob", do the follow-ing:
Using Your S8—Getting Started
Mixing In a Second Track
TRAKTOR KONTROL S8 - Manual - 44
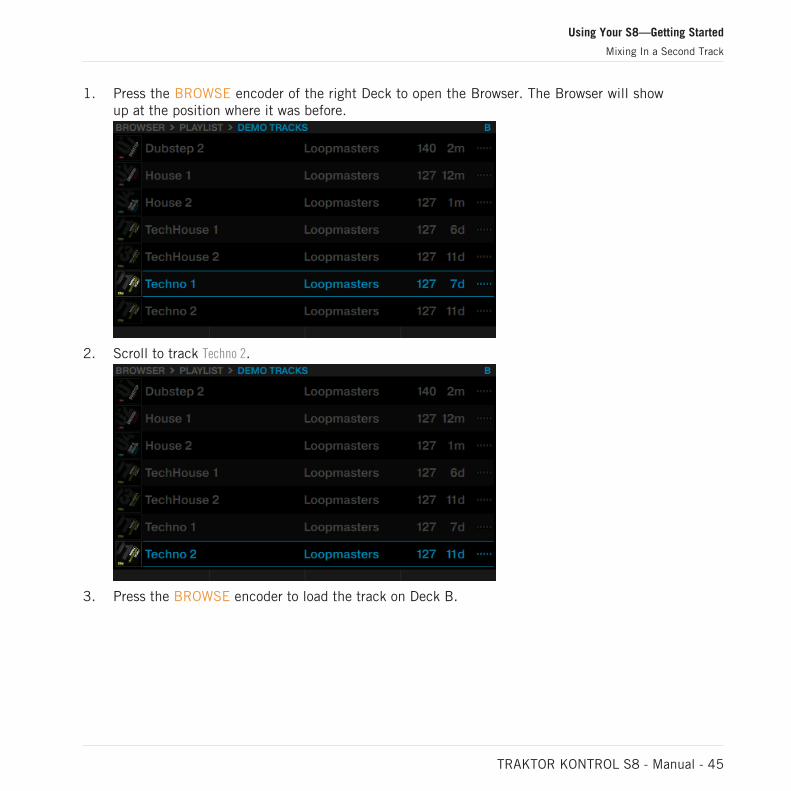
1. Press the BROWSE encoder of the right Deck to open the Browser. The Browser will showup at the position where it was before.
2. Scroll to track Techno 2.
3. Press the BROWSE encoder to load the track on Deck B.
Using Your S8—Getting Started
Mixing In a Second Track
TRAKTOR KONTROL S8 - Manual - 45

→ The track is loaded. Its waveform and info appear in the display.
2.7.2 Playing the Second Track
Press the PLAY button on the right Deck to start the playback.
→ The track “Techno 2” starts playing. The PLAY button lights up and the waveform in thedisplay starts moving.
Using Your S8—Getting Started
Mixing In a Second Track
TRAKTOR KONTROL S8 - Manual - 46
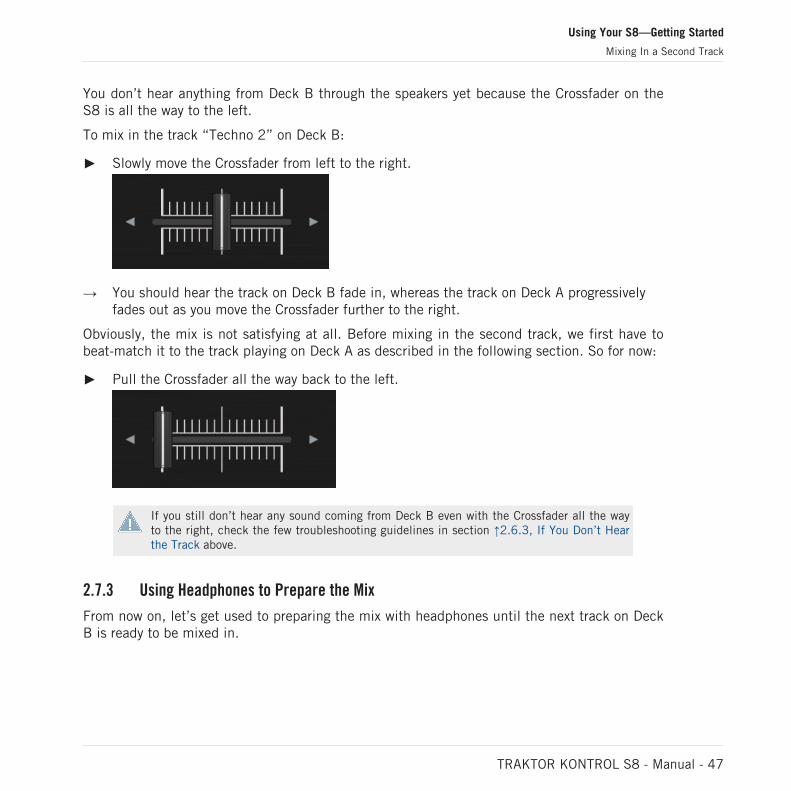
You don’t hear anything from Deck B through the speakers yet because the Crossfader on theS8 is all the way to the left.
To mix in the track “Techno 2” on Deck B:
Slowly move the Crossfader from left to the right.
→ You should hear the track on Deck B fade in, whereas the track on Deck A progressivelyfades out as you move the Crossfader further to the right.
Obviously, the mix is not satisfying at all. Before mixing in the second track, we first have tobeat-match it to the track playing on Deck A as described in the following section. So for now:
Pull the Crossfader all the way back to the left.
If you still don’t hear any sound coming from Deck B even with the Crossfader all the wayto the right, check the few troubleshooting guidelines in section ↑2.6.3, If You Don’t Hearthe Track above.
2.7.3 Using Headphones to Prepare the Mix
From now on, let’s get used to preparing the mix with headphones until the next track on DeckB is ready to be mixed in.
Using Your S8—Getting Started
Mixing In a Second Track
TRAKTOR KONTROL S8 - Manual - 47
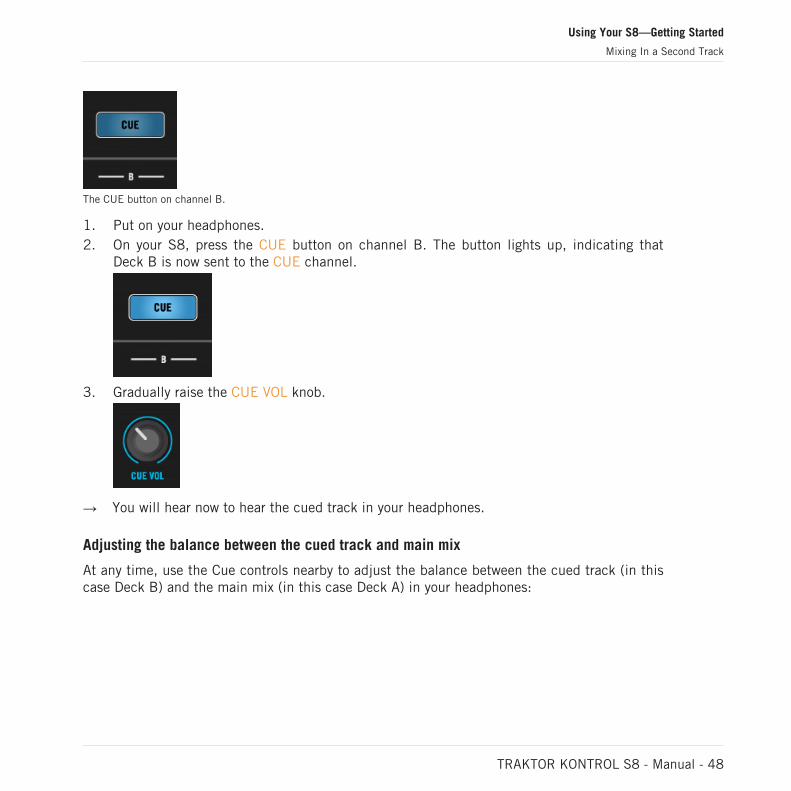
The CUE button on channel B.
1. Put on your headphones.2. On your S8, press the CUE button on channel B. The button lights up, indicating that
Deck B is now sent to the CUE channel.
3. Gradually raise the CUE VOL knob.
→ You will hear now to hear the cued track in your headphones.
Adjusting the balance between the cued track and main mix
At any time, use the Cue controls nearby to adjust the balance between the cued track (in thiscase Deck B) and the main mix (in this case Deck A) in your headphones:
Using Your S8—Getting Started
Mixing In a Second Track
TRAKTOR KONTROL S8 - Manual - 48
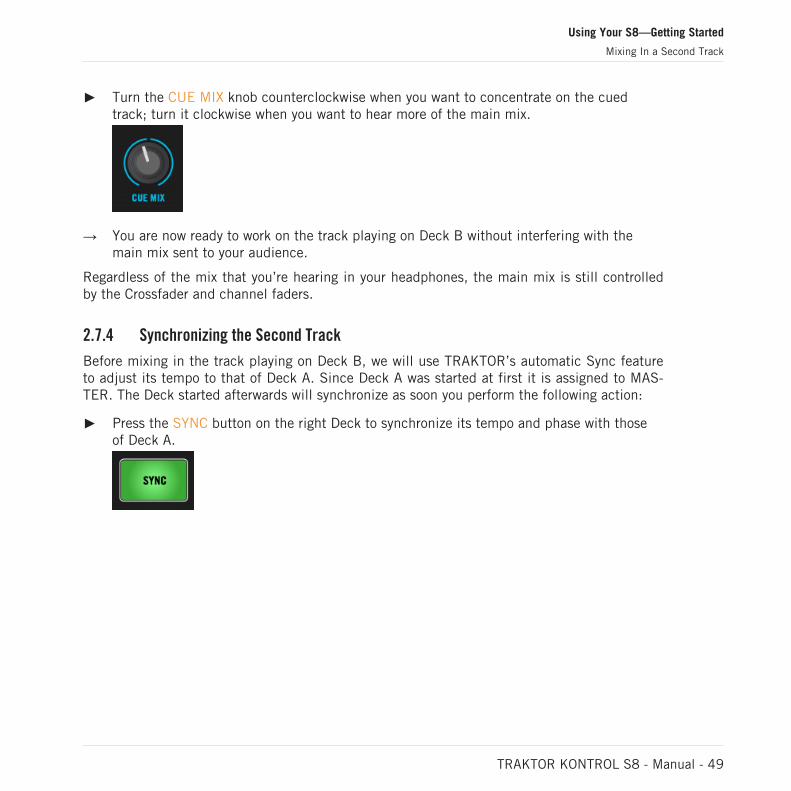
Turn the CUE MIX knob counterclockwise when you want to concentrate on the cuedtrack; turn it clockwise when you want to hear more of the main mix.
→ You are now ready to work on the track playing on Deck B without interfering with themain mix sent to your audience.
Regardless of the mix that you’re hearing in your headphones, the main mix is still controlledby the Crossfader and channel faders.
2.7.4 Synchronizing the Second Track
Before mixing in the track playing on Deck B, we will use TRAKTOR’s automatic Sync featureto adjust its tempo to that of Deck A. Since Deck A was started at first it is assigned to MAS-TER. The Deck started afterwards will synchronize as soon you perform the following action:
Press the SYNC button on the right Deck to synchronize its tempo and phase with thoseof Deck A.
Using Your S8—Getting Started
Mixing In a Second Track
TRAKTOR KONTROL S8 - Manual - 49
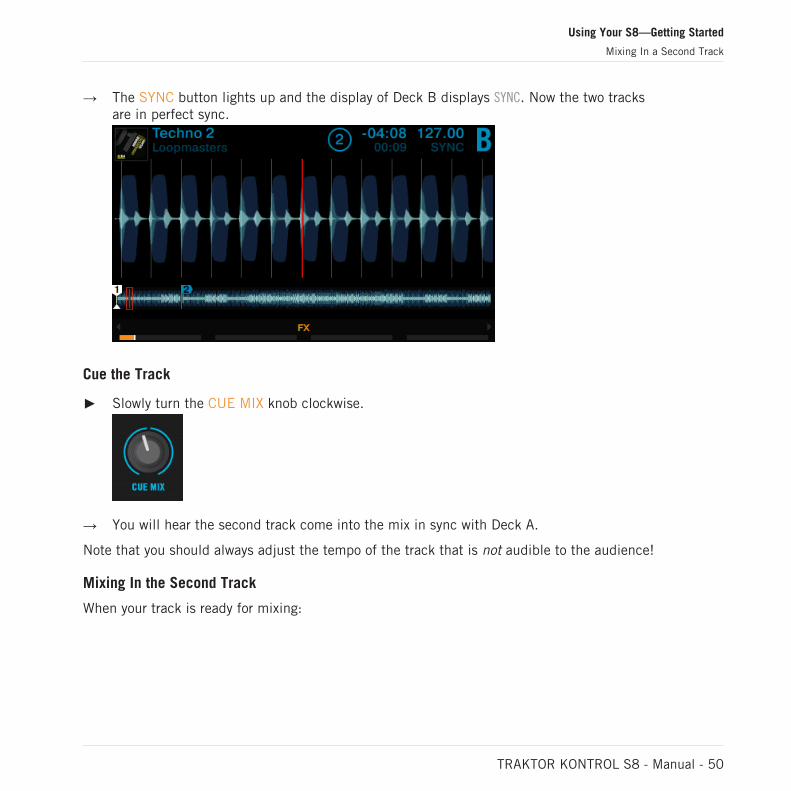
→ The SYNC button lights up and the display of Deck B displays SYNC. Now the two tracksare in perfect sync.
Cue the Track
Slowly turn the CUE MIX knob clockwise.
→ You will hear the second track come into the mix in sync with Deck A.
Note that you should always adjust the tempo of the track that is not audible to the audience!
Mixing In the Second Track
When your track is ready for mixing:
Using Your S8—Getting Started
Mixing In a Second Track
TRAKTOR KONTROL S8 - Manual - 50
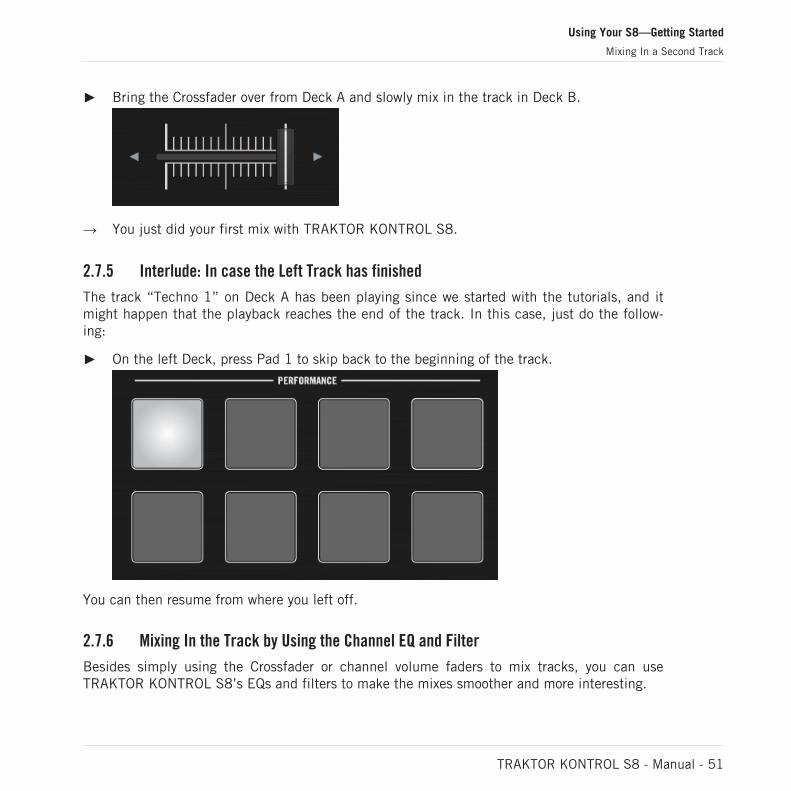
Bring the Crossfader over from Deck A and slowly mix in the track in Deck B.
→ You just did your first mix with TRAKTOR KONTROL S8.
2.7.5 Interlude: In case the Left Track has finished
The track “Techno 1” on Deck A has been playing since we started with the tutorials, and itmight happen that the playback reaches the end of the track. In this case, just do the follow-ing:
On the left Deck, press Pad 1 to skip back to the beginning of the track.
You can then resume from where you left off.
2.7.6 Mixing In the Track by Using the Channel EQ and Filter
Besides simply using the Crossfader or channel volume faders to mix tracks, you can useTRAKTOR KONTROL S8’s EQs and filters to make the mixes smoother and more interesting.
Using Your S8—Getting Started
Mixing In a Second Track
TRAKTOR KONTROL S8 - Manual - 51
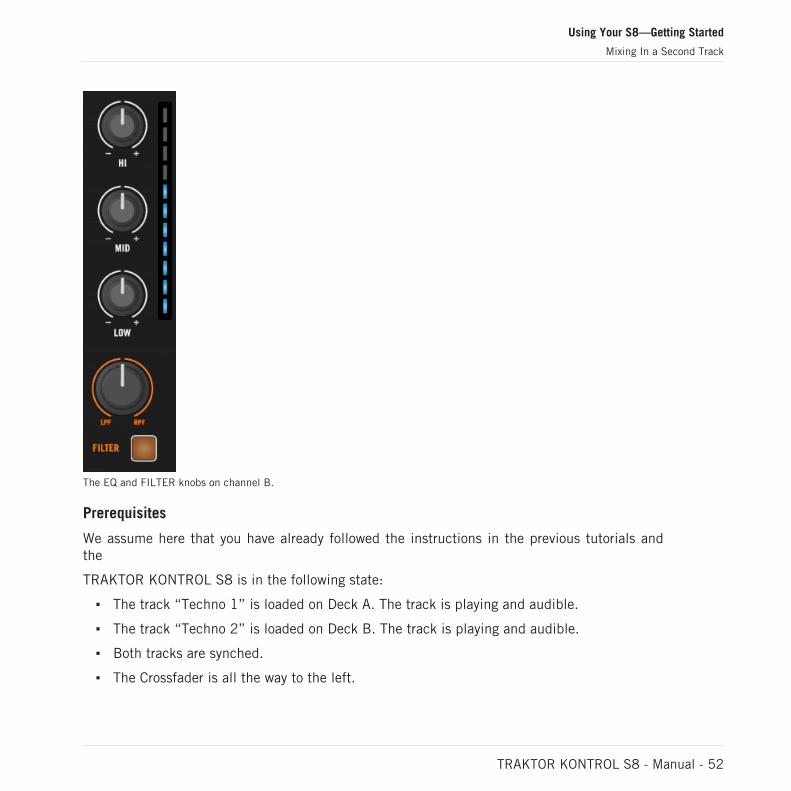
The EQ and FILTER knobs on channel B.
Prerequisites
We assume here that you have already followed the instructions in the previous tutorials andthe
TRAKTOR KONTROL S8 is in the following state:
The track “Techno 1” is loaded on Deck A. The track is playing and audible.
The track “Techno 2” is loaded on Deck B. The track is playing and audible.
Both tracks are synched.
The Crossfader is all the way to the left.
Using Your S8—Getting Started
Mixing In a Second Track
TRAKTOR KONTROL S8 - Manual - 52

On channel B the channel fader is set to minimum, the EQ knobs, the GAIN knob, andthe Filter knob are set to center position.
To prepare the cued track with EQ or Filter:
1. Put on your Headphones.2. Enable CUE on channel B.
3. Press the Filter button on Deck B.
Using Your S8—Getting Started
Mixing In a Second Track
TRAKTOR KONTROL S8 - Manual - 53
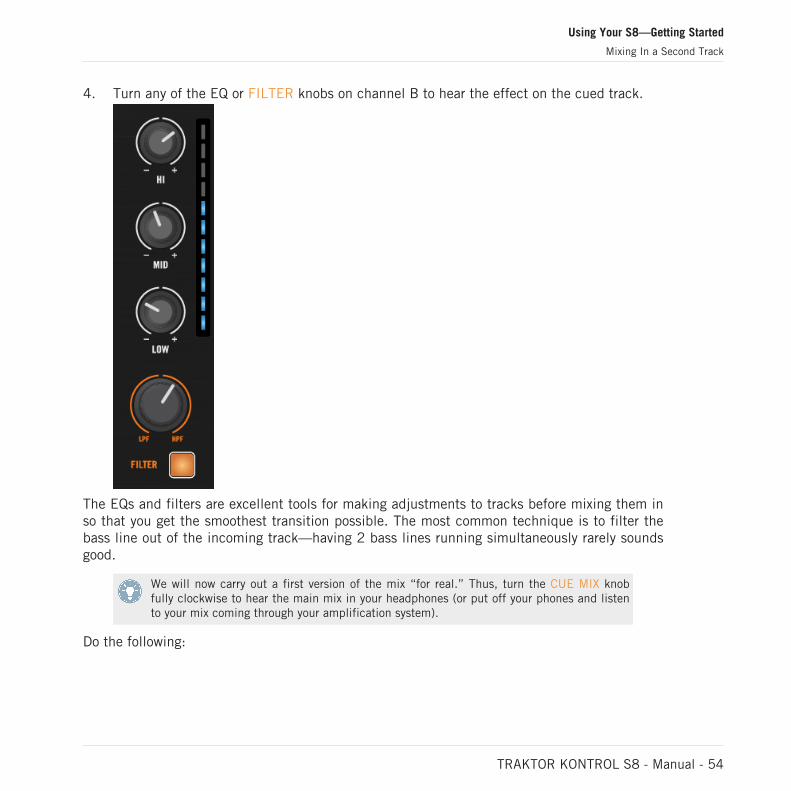
4. Turn any of the EQ or FILTER knobs on channel B to hear the effect on the cued track.
The EQs and filters are excellent tools for making adjustments to tracks before mixing them inso that you get the smoothest transition possible. The most common technique is to filter thebass line out of the incoming track—having 2 bass lines running simultaneously rarely soundsgood.
We will now carry out a first version of the mix “for real.” Thus, turn the CUE MIX knobfully clockwise to hear the main mix in your headphones (or put off your phones and listento your mix coming through your amplification system).
Do the following:
Using Your S8—Getting Started
Mixing In a Second Track
TRAKTOR KONTROL S8 - Manual - 54
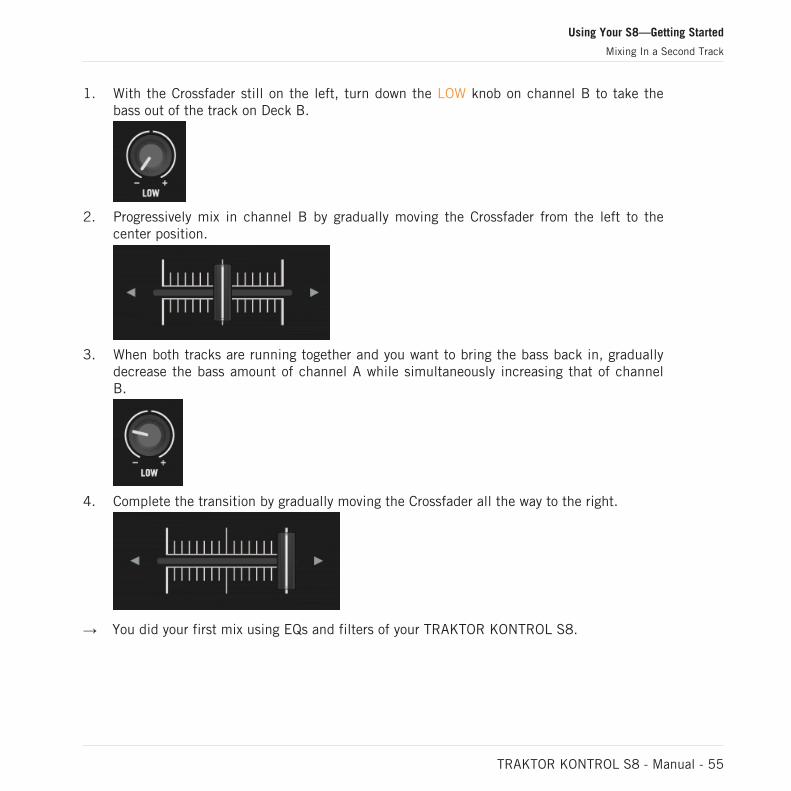
1. With the Crossfader still on the left, turn down the LOW knob on channel B to take thebass out of the track on Deck B.
2. Progressively mix in channel B by gradually moving the Crossfader from the left to thecenter position.
3. When both tracks are running together and you want to bring the bass back in, graduallydecrease the bass amount of channel A while simultaneously increasing that of channelB.
4. Complete the transition by gradually moving the Crossfader all the way to the right.
→ You did your first mix using EQs and filters of your TRAKTOR KONTROL S8.
Using Your S8—Getting Started
Mixing In a Second Track
TRAKTOR KONTROL S8 - Manual - 55
2.8 Adjusting Levels
Before going any further, we would like you to be aware of how important it is to have your mixat the right level. Here we provide a few simple hints in order to get the best sound out of yourmix.
Even if this section might look a bit technical, please take the time to read these few pages, asit could be helpful, especially in a live situation!
2.8.1 The Theory
By mixing, you blend together signals coming from different sources (and possibly processthem on the way).
The basic rule is: you need to ensure that no signal is clipping, while simultaneously trying touse the full dynamic range available. To keep it short, there are two reasons behind this:
By using the full dynamic range available, you keep the noise level low relative to yourmix. As a result, all the details of your music are better rendered.
When a signal is clipping, it is not getting louder, just the quality of the sound is beingdegraded. The loud parts (typically the beats) are cut, which both reduces the dynamicrange and introduces distortion in your mix. The speakers will suffer from this—and sowill your audience! (Also, be prepared for some angered sound technician or club ownercoming down on you.)
Hence, you should always make sure that your signals stay at levels that satisfy these two re-quirements.
2.8.2 The Practice
To assist you in adjusting levels, the Mixer of your S8 is equipped with various level metersand controls. Each level meter consists of a bar of blue LEDs indicating the signal level, alongwith an orange LED at the top indicating the clipping.
Using Your S8—Getting Started
Adjusting Levels
TRAKTOR KONTROL S8 - Manual - 56
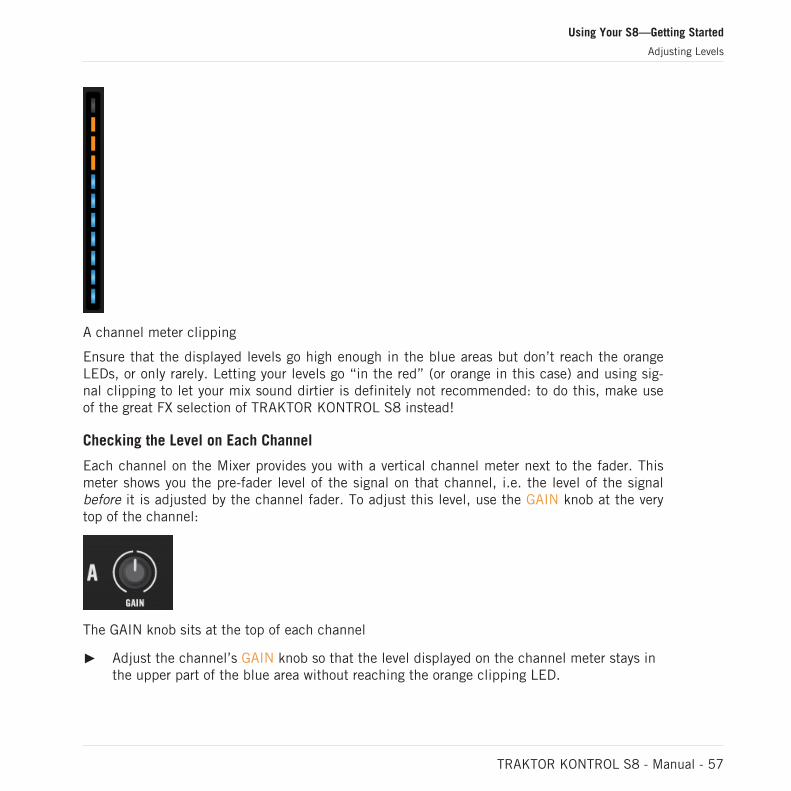
A channel meter clipping
Ensure that the displayed levels go high enough in the blue areas but don’t reach the orangeLEDs, or only rarely. Letting your levels go “in the red” (or orange in this case) and using sig-nal clipping to let your mix sound dirtier is definitely not recommended: to do this, make useof the great FX selection of TRAKTOR KONTROL S8 instead!
Checking the Level on Each Channel
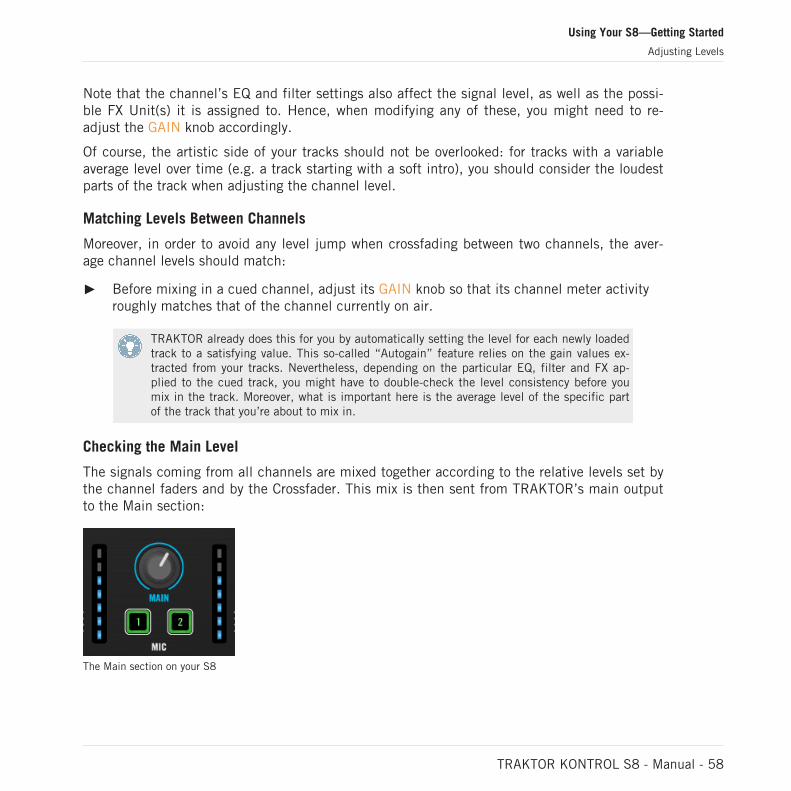
Each channel on the Mixer provides you with a vertical channel meter next to the fader. Thismeter shows you the pre-fader level of the signal on that channel, i.e. the level of the signalbefore it is adjusted by the channel fader. To adjust this level, use the GAIN knob at the verytop of the channel:
The GAIN knob sits at the top of each channel
Adjust the channel’s GAIN knob so that the level displayed on the channel meter stays inthe upper part of the blue area without reaching the orange clipping LED.
Using Your S8—Getting Started
Adjusting Levels
TRAKTOR KONTROL S8 - Manual - 57
Note that the channel’s EQ and filter settings also affect the signal level, as well as the possi-ble FX Unit(s) it is assigned to. Hence, when modifying any of these, you might need to re-adjust the GAIN knob accordingly.
Of course, the artistic side of your tracks should not be overlooked: for tracks with a variableaverage level over time (e.g. a track starting with a soft intro), you should consider the loudestparts of the track when adjusting the channel level.
Matching Levels Between Channels
Moreover, in order to avoid any level jump when crossfading between two channels, the aver-age channel levels should match:
Before mixing in a cued channel, adjust its GAIN knob so that its channel meter activityroughly matches that of the channel currently on air.
TRAKTOR already does this for you by automatically setting the level for each newly loadedtrack to a satisfying value. This so-called “Autogain” feature relies on the gain values ex-tracted from your tracks. Nevertheless, depending on the particular EQ, filter and FX ap-plied to the cued track, you might have to double-check the level consistency before youmix in the track. Moreover, what is important here is the average level of the specific partof the track that you’re about to mix in.
Checking the Main Level
The signals coming from all channels are mixed together according to the relative levels set bythe channel faders and by the Crossfader. This mix is then sent from TRAKTOR’s main outputto the Main section:
The Main section on your S8
Using Your S8—Getting Started
Adjusting Levels
TRAKTOR KONTROL S8 - Manual - 58
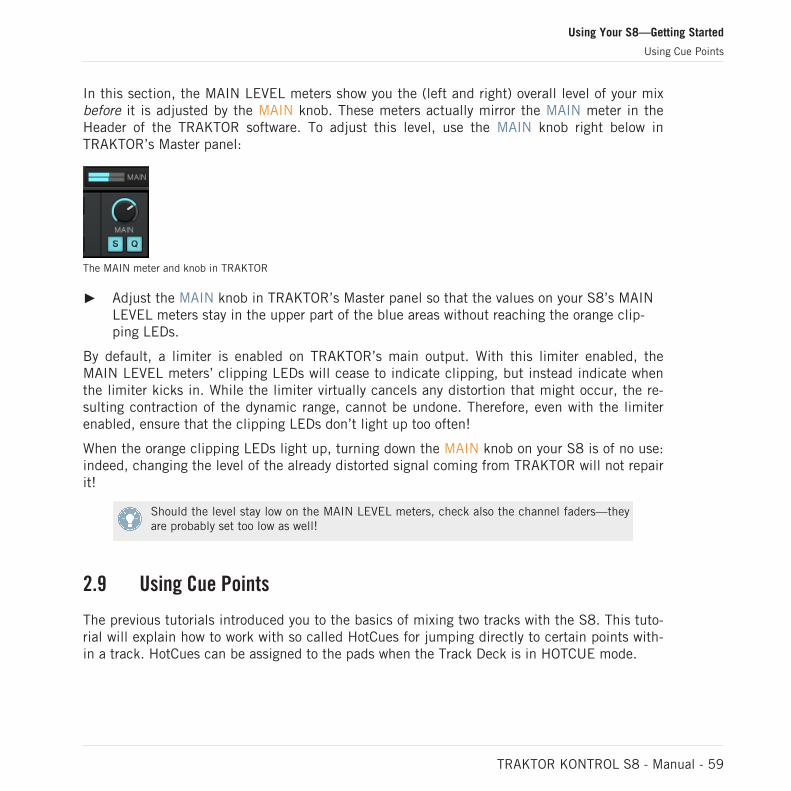
In this section, the MAIN LEVEL meters show you the (left and right) overall level of your mixbefore it is adjusted by the MAIN knob. These meters actually mirror the MAIN meter in theHeader of the TRAKTOR software. To adjust this level, use the MAIN knob right below inTRAKTOR’s Master panel:
The MAIN meter and knob in TRAKTOR
Adjust the MAIN knob in TRAKTOR’s Master panel so that the values on your S8’s MAINLEVEL meters stay in the upper part of the blue areas without reaching the orange clip-ping LEDs.
By default, a limiter is enabled on TRAKTOR’s main output. With this limiter enabled, theMAIN LEVEL meters’ clipping LEDs will cease to indicate clipping, but instead indicate whenthe limiter kicks in. While the limiter virtually cancels any distortion that might occur, the re-sulting contraction of the dynamic range, cannot be undone. Therefore, even with the limiterenabled, ensure that the clipping LEDs don’t light up too often!
When the orange clipping LEDs light up, turning down the MAIN knob on your S8 is of no use:indeed, changing the level of the already distorted signal coming from TRAKTOR will not repairit!
Should the level stay low on the MAIN LEVEL meters, check also the channel faders—theyare probably set too low as well!
2.9 Using Cue Points
The previous tutorials introduced you to the basics of mixing two tracks with the S8. This tuto-rial will explain how to work with so called HotCues for jumping directly to certain points with-in a track. HotCues can be assigned to the pads when the Track Deck is in HOTCUE mode.
Using Your S8—Getting Started
Using Cue Points
TRAKTOR KONTROL S8 - Manual - 59
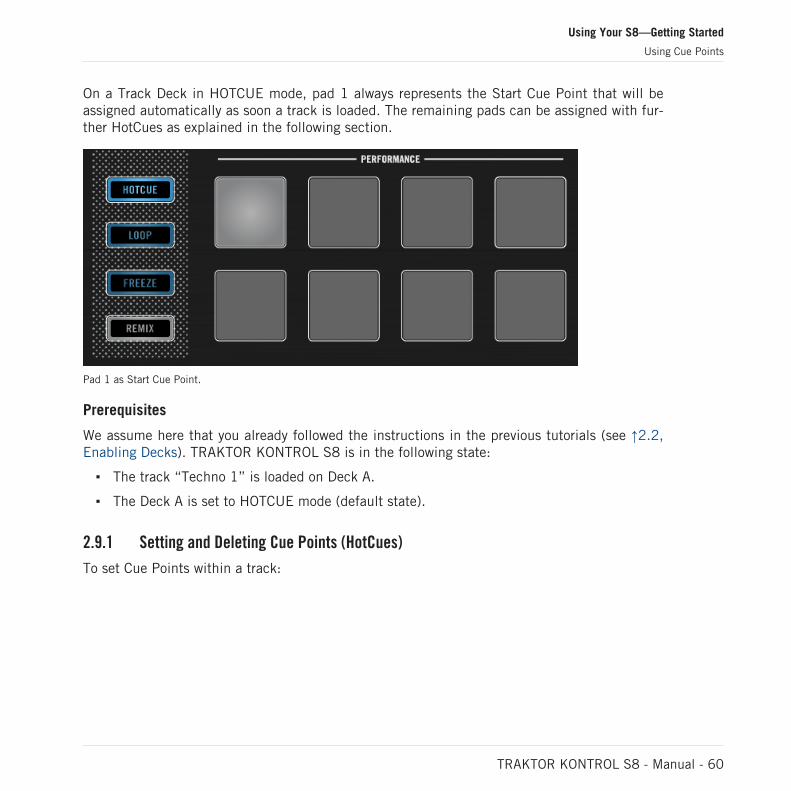
On a Track Deck in HOTCUE mode, pad 1 always represents the Start Cue Point that will beassigned automatically as soon a track is loaded. The remaining pads can be assigned with fur-ther HotCues as explained in the following section.
Pad 1 as Start Cue Point.
Prerequisites
We assume here that you already followed the instructions in the previous tutorials (see ↑2.2,Enabling Decks). TRAKTOR KONTROL S8 is in the following state:
The track “Techno 1” is loaded on Deck A.
The Deck A is set to HOTCUE mode (default state).
2.9.1 Setting and Deleting Cue Points (HotCues)
To set Cue Points within a track:
Using Your S8—Getting Started
Using Cue Points
TRAKTOR KONTROL S8 - Manual - 60
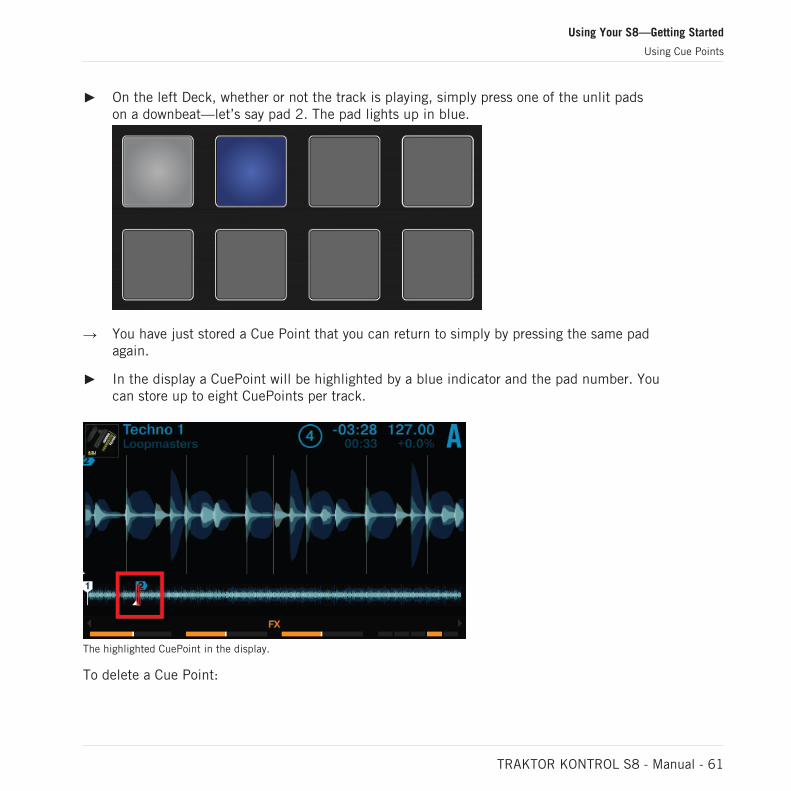
On the left Deck, whether or not the track is playing, simply press one of the unlit padson a downbeat—let’s say pad 2. The pad lights up in blue.
→ You have just stored a Cue Point that you can return to simply by pressing the same padagain.
In the display a CuePoint will be highlighted by a blue indicator and the pad number. Youcan store up to eight CuePoints per track.
The highlighted CuePoint in the display.
To delete a Cue Point:
Using Your S8—Getting Started
Using Cue Points
TRAKTOR KONTROL S8 - Manual - 61
On the respective Deck press SHIFT + the pad assigned with a Cue Point.
→ The Cue point is deleted and the pad is unlit.
Snapping to the Beats
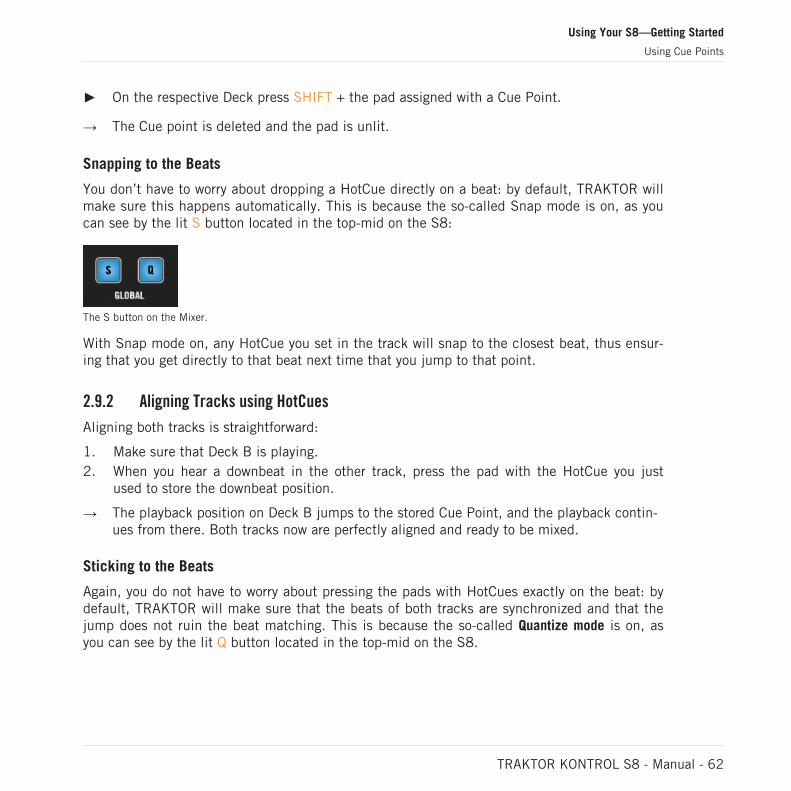
You don’t have to worry about dropping a HotCue directly on a beat: by default, TRAKTOR willmake sure this happens automatically. This is because the so-called Snap mode is on, as youcan see by the lit S button located in the top-mid on the S8:
The S button on the Mixer.
With Snap mode on, any HotCue you set in the track will snap to the closest beat, thus ensur-ing that you get directly to that beat next time that you jump to that point.
2.9.2 Aligning Tracks using HotCues
Aligning both tracks is straightforward:
1. Make sure that Deck B is playing.2. When you hear a downbeat in the other track, press the pad with the HotCue you just
used to store the downbeat position.
→ The playback position on Deck B jumps to the stored Cue Point, and the playback contin-ues from there. Both tracks now are perfectly aligned and ready to be mixed.
Sticking to the Beats
Again, you do not have to worry about pressing the pads with HotCues exactly on the beat: bydefault, TRAKTOR will make sure that the beats of both tracks are synchronized and that thejump does not ruin the beat matching. This is because the so-called Quantize mode is on, asyou can see by the lit Q button located in the top-mid on the S8.
Using Your S8—Getting Started
Using Cue Points
TRAKTOR KONTROL S8 - Manual - 62
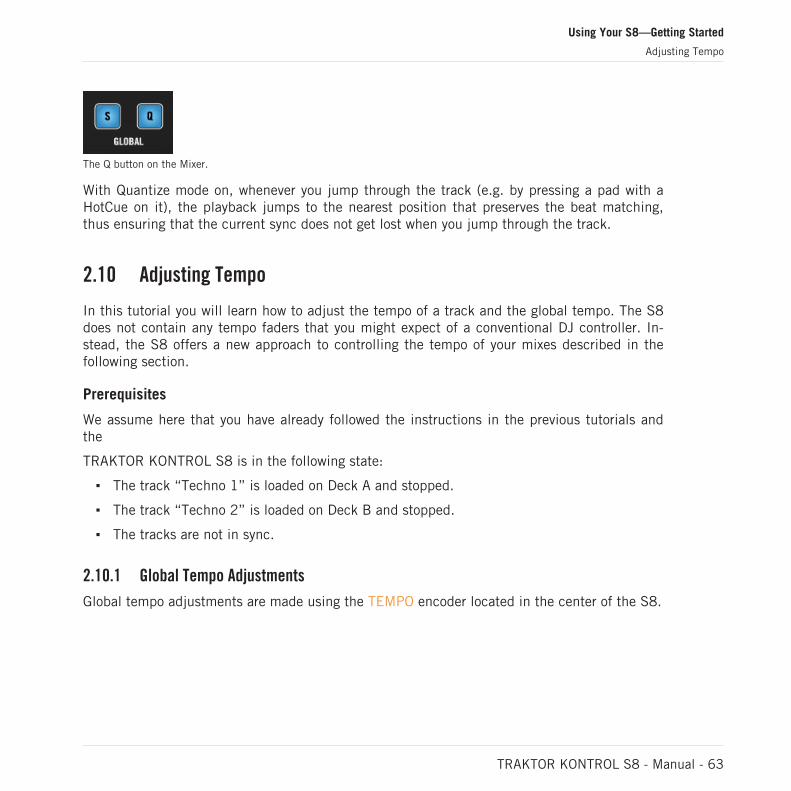
The Q button on the Mixer.
With Quantize mode on, whenever you jump through the track (e.g. by pressing a pad with aHotCue on it), the playback jumps to the nearest position that preserves the beat matching,thus ensuring that the current sync does not get lost when you jump through the track.
2.10 Adjusting Tempo
In this tutorial you will learn how to adjust the tempo of a track and the global tempo. The S8does not contain any tempo faders that you might expect of a conventional DJ controller. In-stead, the S8 offers a new approach to controlling the tempo of your mixes described in thefollowing section.
Prerequisites
We assume here that you have already followed the instructions in the previous tutorials andthe
TRAKTOR KONTROL S8 is in the following state:
The track “Techno 1” is loaded on Deck A and stopped.
The track “Techno 2” is loaded on Deck B and stopped.
The tracks are not in sync.
2.10.1 Global Tempo Adjustments
Global tempo adjustments are made using the TEMPO encoder located in the center of the S8.
Using Your S8—Getting Started
Adjusting Tempo
TRAKTOR KONTROL S8 - Manual - 63
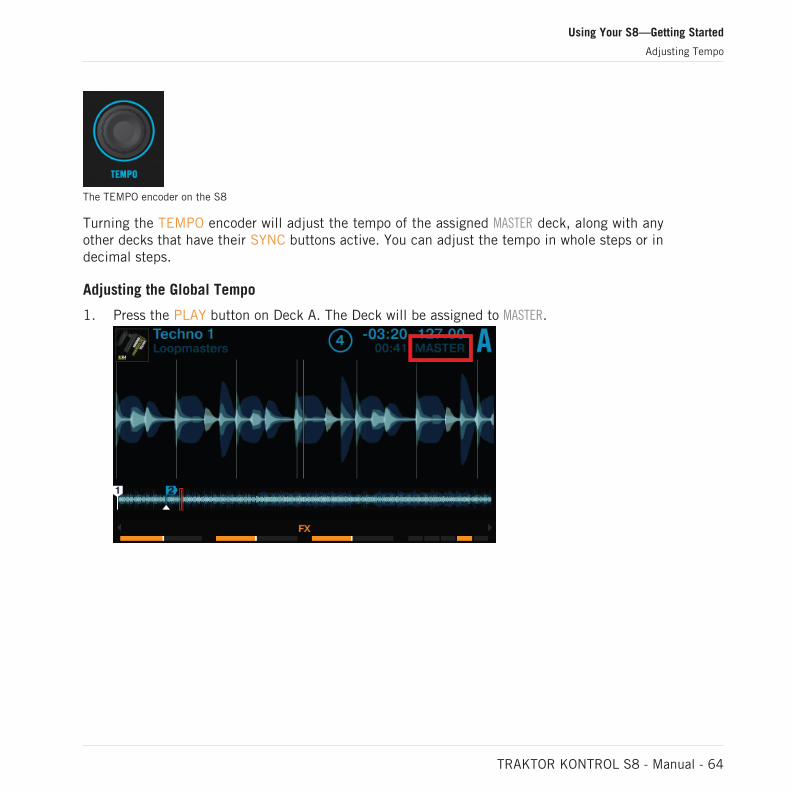
The TEMPO encoder on the S8
Turning the TEMPO encoder will adjust the tempo of the assigned MASTER deck, along with anyother decks that have their SYNC buttons active. You can adjust the tempo in whole steps or indecimal steps.
Adjusting the Global Tempo
1. Press the PLAY button on Deck A. The Deck will be assigned to MASTER.
Using Your S8—Getting Started
Adjusting Tempo
TRAKTOR KONTROL S8 - Manual - 64
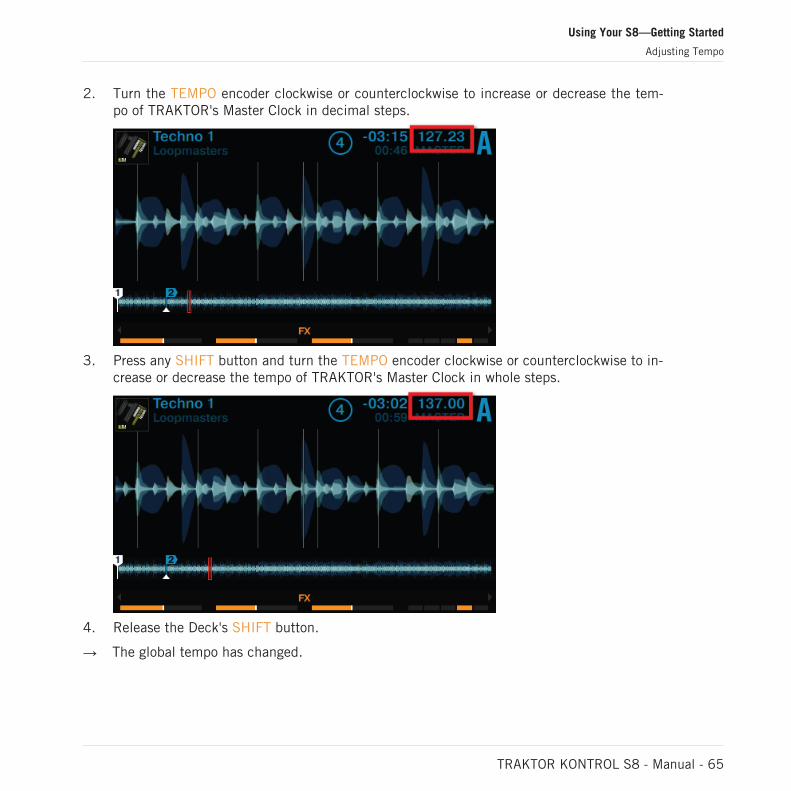
2. Turn the TEMPO encoder clockwise or counterclockwise to increase or decrease the tem-po of TRAKTOR's Master Clock in decimal steps.
3. Press any SHIFT button and turn the TEMPO encoder clockwise or counterclockwise to in-crease or decrease the tempo of TRAKTOR's Master Clock in whole steps.
4. Release the Deck's SHIFT button.
→ The global tempo has changed.
Using Your S8—Getting Started
Adjusting Tempo
TRAKTOR KONTROL S8 - Manual - 65
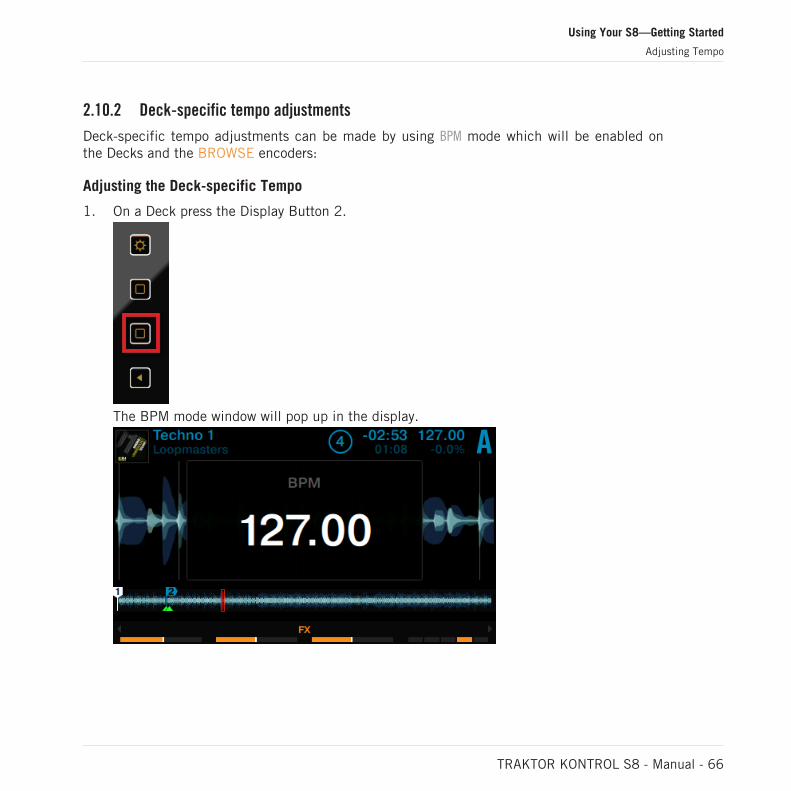
2.10.2 Deck-specific tempo adjustments
Deck-specific tempo adjustments can be made by using BPM mode which will be enabled onthe Decks and the BROWSE encoders:
Adjusting the Deck-specific Tempo
1. On a Deck press the Display Button 2.
The BPM mode window will pop up in the display.
Using Your S8—Getting Started
Adjusting Tempo
TRAKTOR KONTROL S8 - Manual - 66
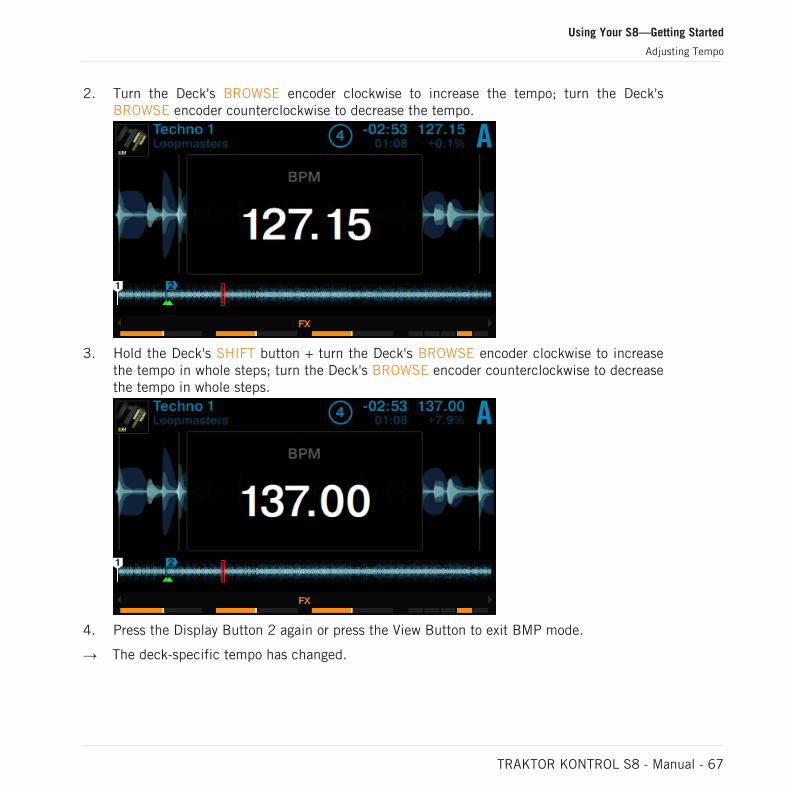
2. Turn the Deck's BROWSE encoder clockwise to increase the tempo; turn the Deck'sBROWSE encoder counterclockwise to decrease the tempo.
3. Hold the Deck's SHIFT button + turn the Deck's BROWSE encoder clockwise to increasethe tempo in whole steps; turn the Deck's BROWSE encoder counterclockwise to decreasethe tempo in whole steps.
4. Press the Display Button 2 again or press the View Button to exit BMP mode.
→ The deck-specific tempo has changed.
Using Your S8—Getting Started
Adjusting Tempo
TRAKTOR KONTROL S8 - Manual - 67
In this scenario, the BROWSE encoder is used in exactly the same manner as the TEMPO en-coder in making tempo adjustments. If the Deck is also assigned as the MASTER Deck, tempoadjustments made with the BROWSE encoder will also be made to any other Decks that havetheir SYNC buttons activated.
In the scenarios where you are not using deck synchronization, you can use this method tomanually dial in a deck's BPM, e.g. mixing a TRAKTOR deck with an external audio source.
2.11 Using Keylock
When synchronizing tracks, you alter their tempo, and consequently their pitch (or key). Forsmall tempo adjustments, this is not really an issue; but when the tempo is changed more sig-nificantly, the resulting pitch might sound unsuitable: kick sounds would lose their power, vo-cals would sound unrealistic, etc. To avoid this, TRAKTOR provides the Keylock feature thatuncouples the tone and the tempo of a track. With the TRAKTOR KONTROL S8 you can to ap-ply the Keylock to a focused Deck by the following actions:
Prerequisites
We assume here that you already followed the instructions in the previous tutorials and theTRAKTOR KONTROL S8 is in the following state:
The track “Techno 1” is loaded on Deck A and playing.
Adjusting the Tempo using Original Key Pitch
If you want to mix a track with original key pitch to another track with a faster tempo, you needto lock the key before adjusting the tempo of the track:
Using Your S8—Getting Started
Using Keylock
TRAKTOR KONTROL S8 - Manual - 68
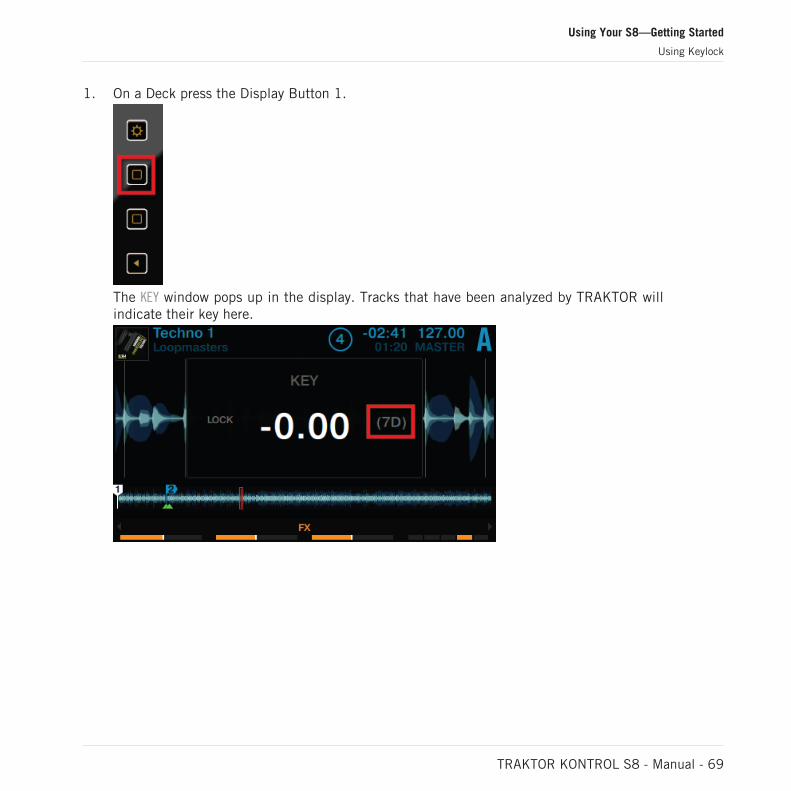
1. On a Deck press the Display Button 1.
The KEY window pops up in the display. Tracks that have been analyzed by TRAKTOR willindicate their key here.
Using Your S8—Getting Started
Using Keylock
TRAKTOR KONTROL S8 - Manual - 69
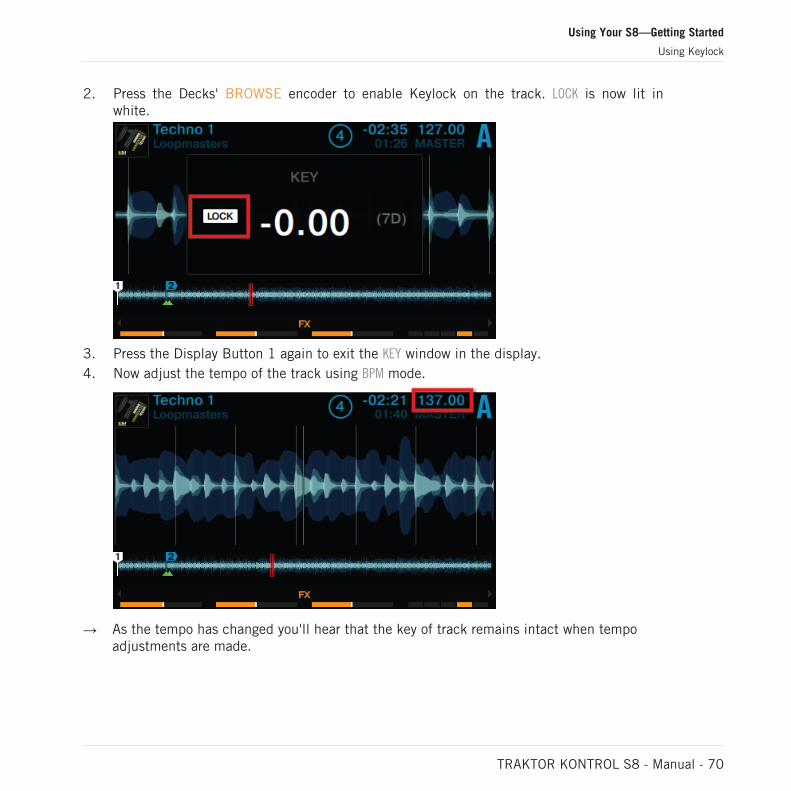
2. Press the Decks' BROWSE encoder to enable Keylock on the track. LOCK is now lit inwhite.
3. Press the Display Button 1 again to exit the KEY window in the display.4. Now adjust the tempo of the track using BPM mode.
→ As the tempo has changed you'll hear that the key of track remains intact when tempoadjustments are made.
Using Your S8—Getting Started
Using Keylock
TRAKTOR KONTROL S8 - Manual - 70
Adjusting the Key without changing Original Tempo
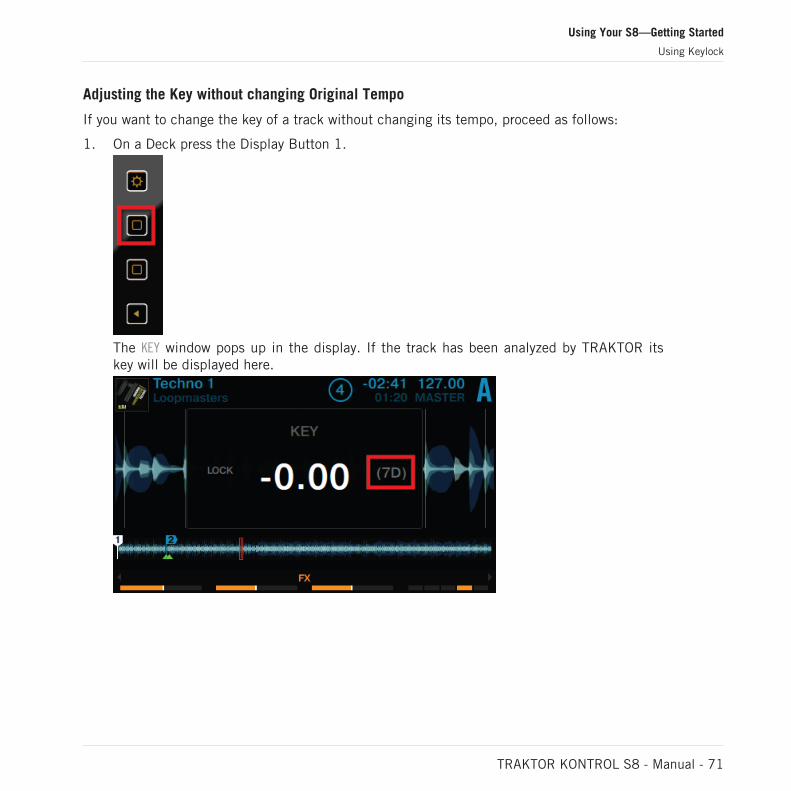
If you want to change the key of a track without changing its tempo, proceed as follows:
1. On a Deck press the Display Button 1.
The KEY window pops up in the display. If the track has been analyzed by TRAKTOR itskey will be displayed here.
Using Your S8—Getting Started
Using Keylock
TRAKTOR KONTROL S8 - Manual - 71
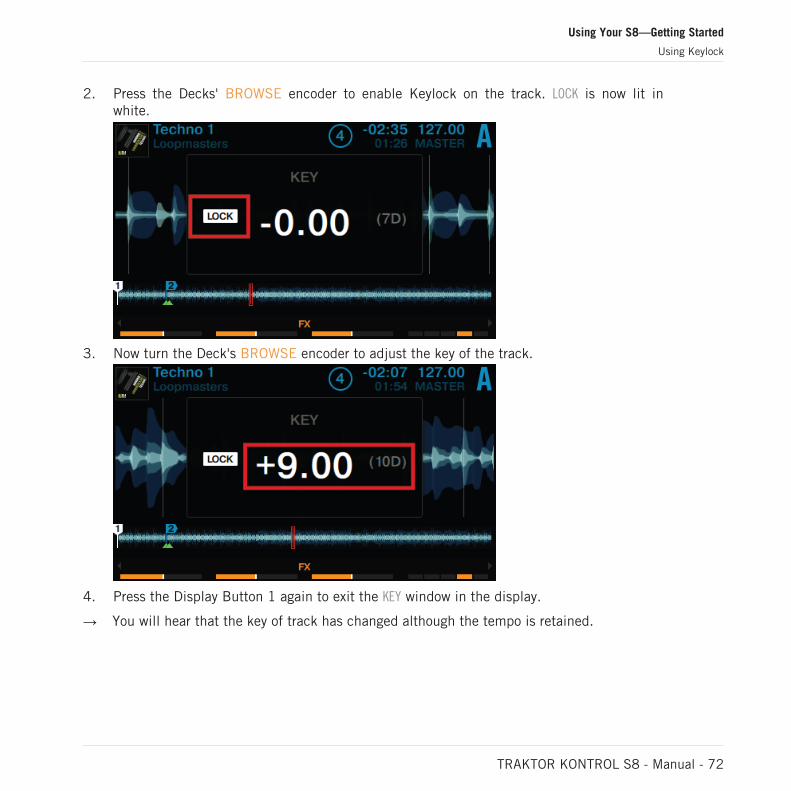
2. Press the Decks' BROWSE encoder to enable Keylock on the track. LOCK is now lit inwhite.
3. Now turn the Deck's BROWSE encoder to adjust the key of the track.
4. Press the Display Button 1 again to exit the KEY window in the display.
→ You will hear that the key of track has changed although the tempo is retained.
Using Your S8—Getting Started
Using Keylock
TRAKTOR KONTROL S8 - Manual - 72
3 Using Your S8—Getting Advanced
3.1 Using Touch Strip
The S8's design does not contain the conventional Jog Wheels of a regular DJ controller. In-stead, the S8 replicates the functionality with intuitive Touch Strips. Each of the S8's Deckscontain a Touch Strip, and these always control the focused deck. This tutorial explains how touse the Touch Strip for the following actions:
Seek/navigate through the entire track.
Tempo bend (nudge).
Create a scratch effect.
Prerequisites
We assume here that you have already followed the instructions in the previous tutorials andthe TRAKTOR KONTROL S8 is in the following state:
The track “Techno 1” is loaded on Deck A and is not playing.
The Crossfader is all the way to the left.
The channel fader A is raised to the top.
The MAIN knob is set at an adequate level.
3.1.1 Using the Touch Strip to Seek
Seeking within a track using Touch Strip
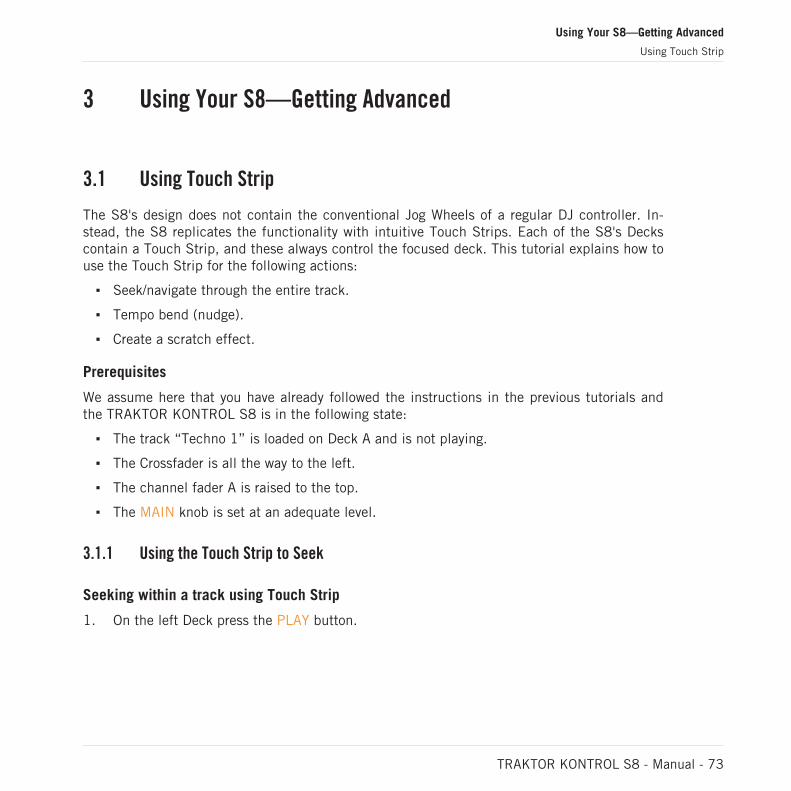
1. On the left Deck press the PLAY button.
Using Your S8—Getting Advanced
Using Touch Strip
TRAKTOR KONTROL S8 - Manual - 73
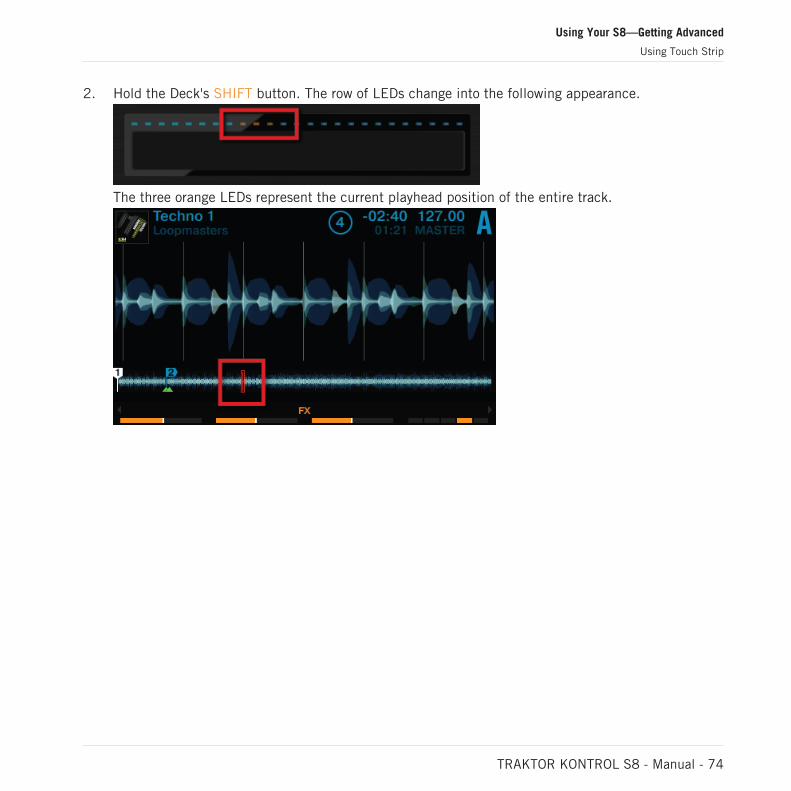
2. Hold the Deck's SHIFT button. The row of LEDs change into the following appearance.
The three orange LEDs represent the current playhead position of the entire track.
Using Your S8—Getting Advanced
Using Touch Strip
TRAKTOR KONTROL S8 - Manual - 74
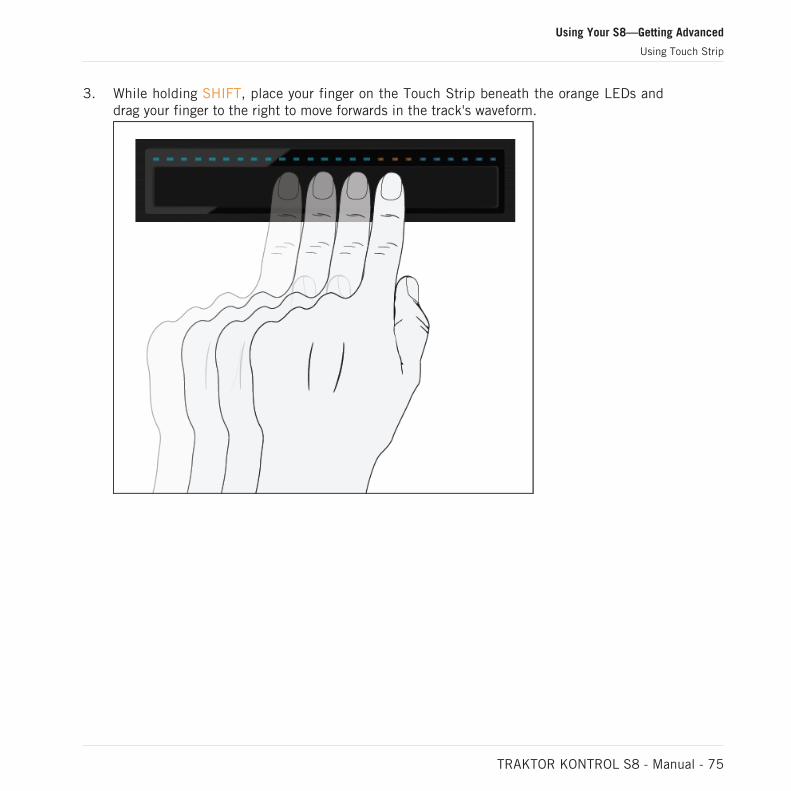
3. While holding SHIFT, place your finger on the Touch Strip beneath the orange LEDs anddrag your finger to the right to move forwards in the track's waveform.
Using Your S8—Getting Advanced
Using Touch Strip
TRAKTOR KONTROL S8 - Manual - 75
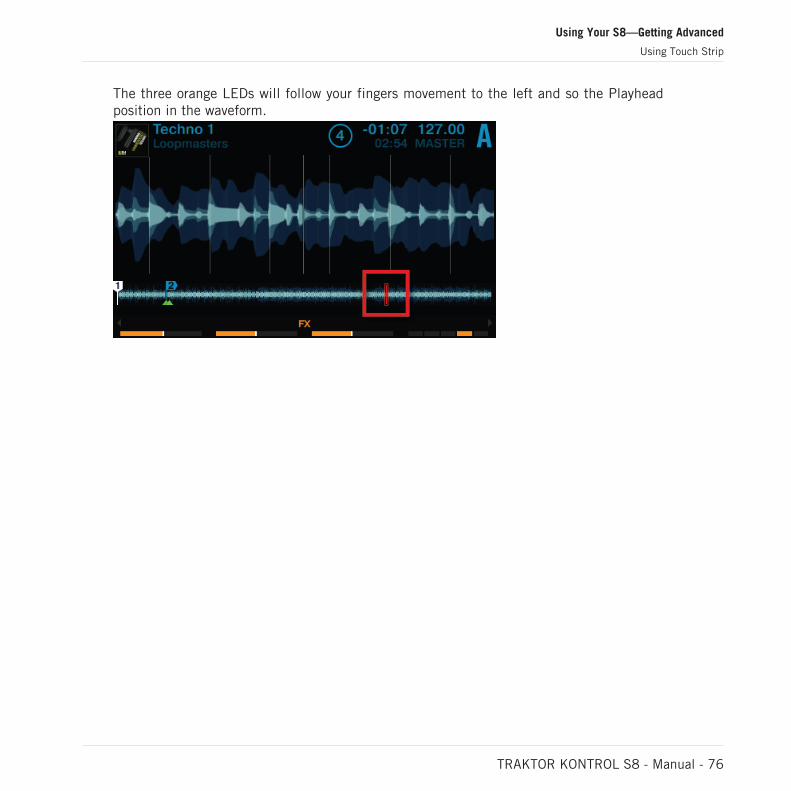
The three orange LEDs will follow your fingers movement to the left and so the Playheadposition in the waveform.
Using Your S8—Getting Advanced
Using Touch Strip
TRAKTOR KONTROL S8 - Manual - 76
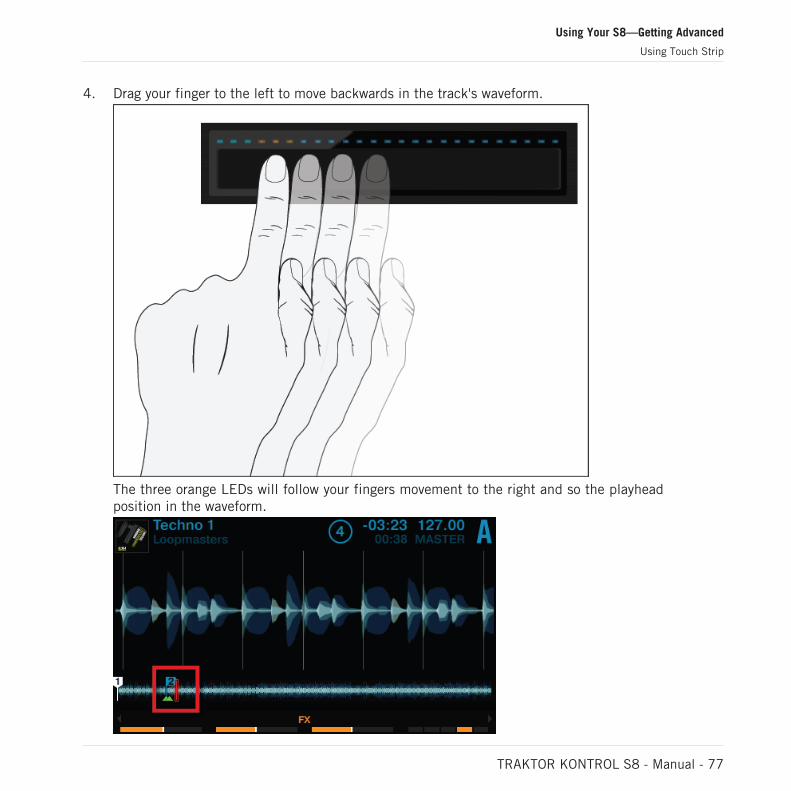
4. Drag your finger to the left to move backwards in the track's waveform.
The three orange LEDs will follow your fingers movement to the right and so the playheadposition in the waveform.
Using Your S8—Getting Advanced
Using Touch Strip
TRAKTOR KONTROL S8 - Manual - 77
Alternatively you can jump directly to the position in the track by pressing SHIFT + placingyour finger on the desired position in the Touch Strip.
3.1.2 Using the Touch Strip to Nudge/Pitchbend
DJ's not using the Sync function are physically nudging, twisting, and tweaking a conventionalturntable with timecode vinyl or jog wheels to temporarily speed up or slow down a track toalign the beats. The S8 provides the same functionality by using the Touch Strip:
The LEDs above the Touch Strip provide useful visual information on a deck's phase align-ment. They enable you to quickly react and make the necessary tempo bend adjustments tokeep your mixes aligned.
The following tutorial will demonstrate how to manually beatmatch the two demo tracks "Tech-no 1" and "Techno 2" without using the sync function but the Touch Strip.
First step: Playing the Tracks
1. On Deck A press the PLAY button to start playback. The Deck will be assigned to MASTER.2. On Deck B press the SYNC button to disable Sync. The SYNC button is dimly lit.3. Listening to the track playing in deck A, on an appropriate downbeat press the PLAY but-
ton of deck B to start playback.
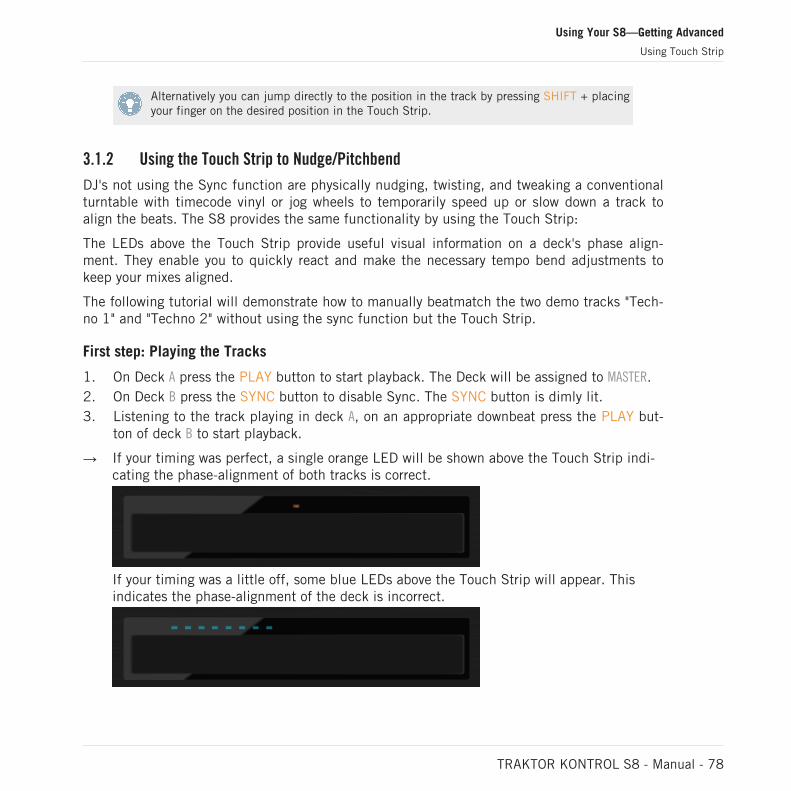
→ If your timing was perfect, a single orange LED will be shown above the Touch Strip indi-cating the phase-alignment of both tracks is correct.
If your timing was a little off, some blue LEDs above the Touch Strip will appear. Thisindicates the phase-alignment of the deck is incorrect.
Using Your S8—Getting Advanced
Using Touch Strip
TRAKTOR KONTROL S8 - Manual - 78
Second Step: Correcting phase-alignment
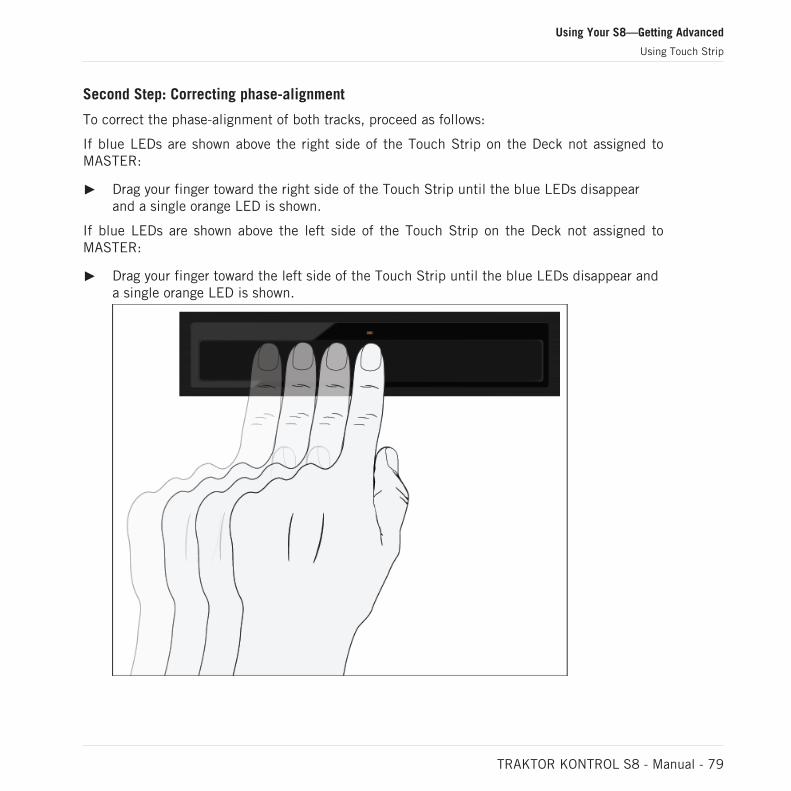
To correct the phase-alignment of both tracks, proceed as follows:
If blue LEDs are shown above the right side of the Touch Strip on the Deck not assigned toMASTER:
Drag your finger toward the right side of the Touch Strip until the blue LEDs disappearand a single orange LED is shown.
If blue LEDs are shown above the left side of the Touch Strip on the Deck not assigned toMASTER:
Drag your finger toward the left side of the Touch Strip until the blue LEDs disappear anda single orange LED is shown.
Using Your S8—Getting Advanced
Using Touch Strip
TRAKTOR KONTROL S8 - Manual - 79
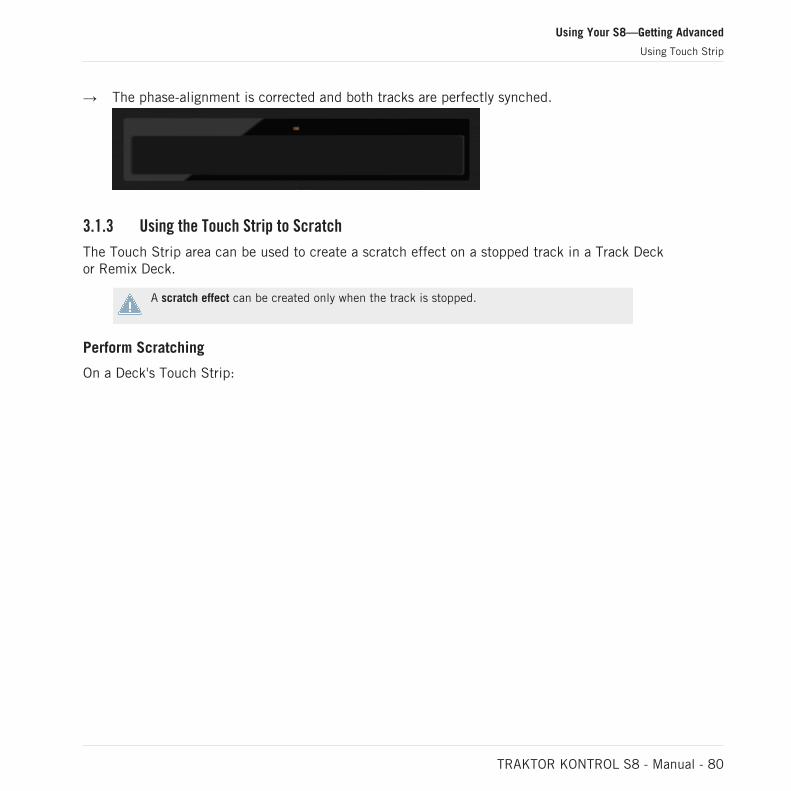
→ The phase-alignment is corrected and both tracks are perfectly synched.
3.1.3 Using the Touch Strip to Scratch
The Touch Strip area can be used to create a scratch effect on a stopped track in a Track Deckor Remix Deck.
A scratch effect can be created only when the track is stopped.
Perform Scratching
On a Deck's Touch Strip:
Using Your S8—Getting Advanced
Using Touch Strip
TRAKTOR KONTROL S8 - Manual - 80
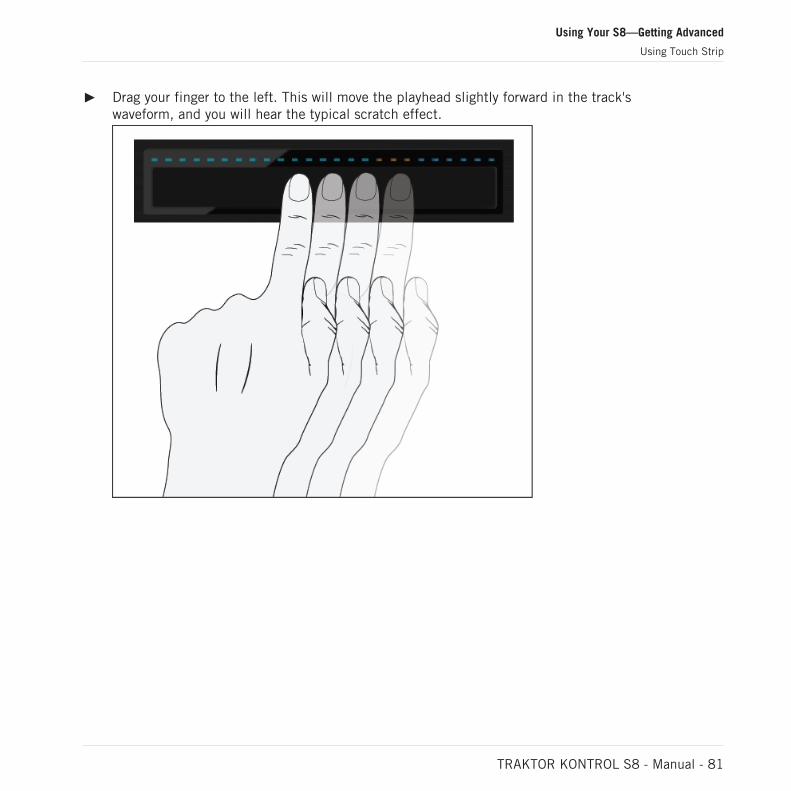
Drag your finger to the left. This will move the playhead slightly forward in the track'swaveform, and you will hear the typical scratch effect.
Using Your S8—Getting Advanced
Using Touch Strip
TRAKTOR KONTROL S8 - Manual - 81
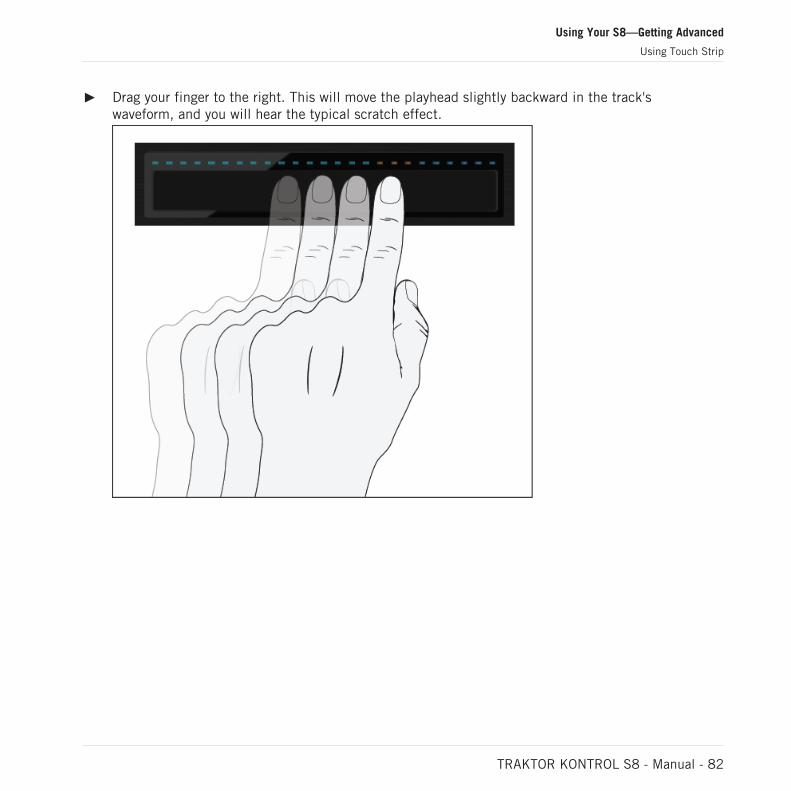
Drag your finger to the right. This will move the playhead slightly backward in the track'swaveform, and you will hear the typical scratch effect.
Using Your S8—Getting Advanced
Using Touch Strip
TRAKTOR KONTROL S8 - Manual - 82
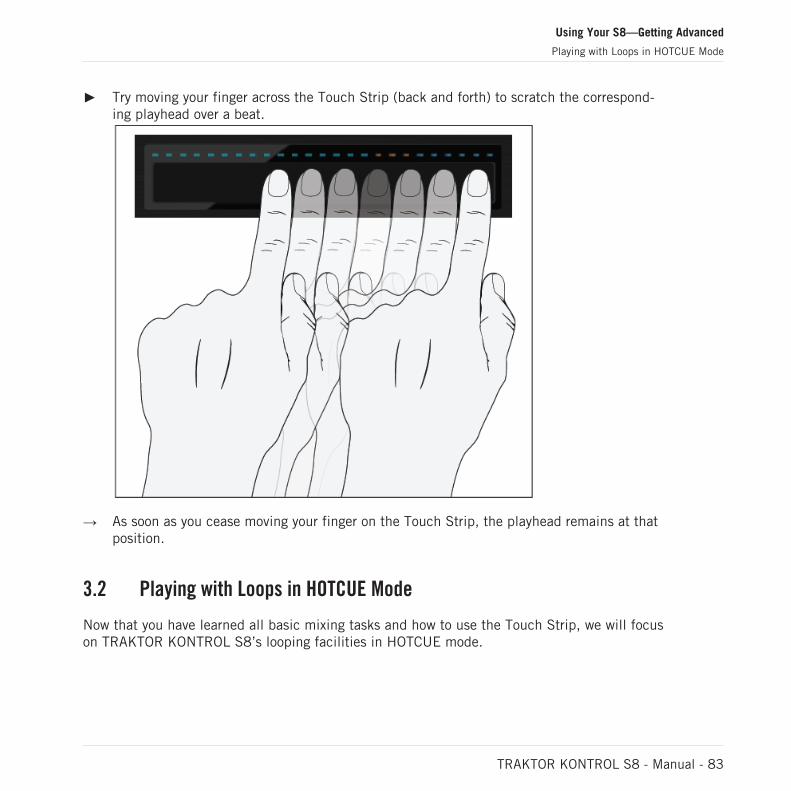
Try moving your finger across the Touch Strip (back and forth) to scratch the correspond-ing playhead over a beat.
→ As soon as you cease moving your finger on the Touch Strip, the playhead remains at thatposition.
3.2 Playing with Loops in HOTCUE Mode
Now that you have learned all basic mixing tasks and how to use the Touch Strip, we will focuson TRAKTOR KONTROL S8’s looping facilities in HOTCUE mode.
Using Your S8—Getting Advanced
Playing with Loops in HOTCUE Mode
TRAKTOR KONTROL S8 - Manual - 83
Besides using the dedicated LOOP mode which will be explained in the next tutorial, you canwork with loops in default HOTCUE mode. This gives you the ability to perform with HOTCUESand loops to the same time.
Prerequisites
We assume here that you have already followed the instructions in the previous tutorials andthe TRAKTOR KONTROL S8 is in the following state:
The track “Techno 1” is loaded on Deck A and is not playing.
The Crossfader is all the way to the left.
The channel fader A is raised to the top.
The MAIN knob has an adequate level.
3.2.1 Engaging and Disengaging a Loop
Let’s add a loop to the track on Deck A.
To engage a loop on a Deck:
1. Press the Deck's PLAY button to start playback.2. Press the Deck's HOTCUE button to enable HOTCUE mode.
3. Press the Deck's LOOP encoder. The LED ring around the LOOP encoder starts to rotate toindicate the loop is activated.
Using Your S8—Getting Advanced
Playing with Loops in HOTCUE Mode
TRAKTOR KONTROL S8 - Manual - 84
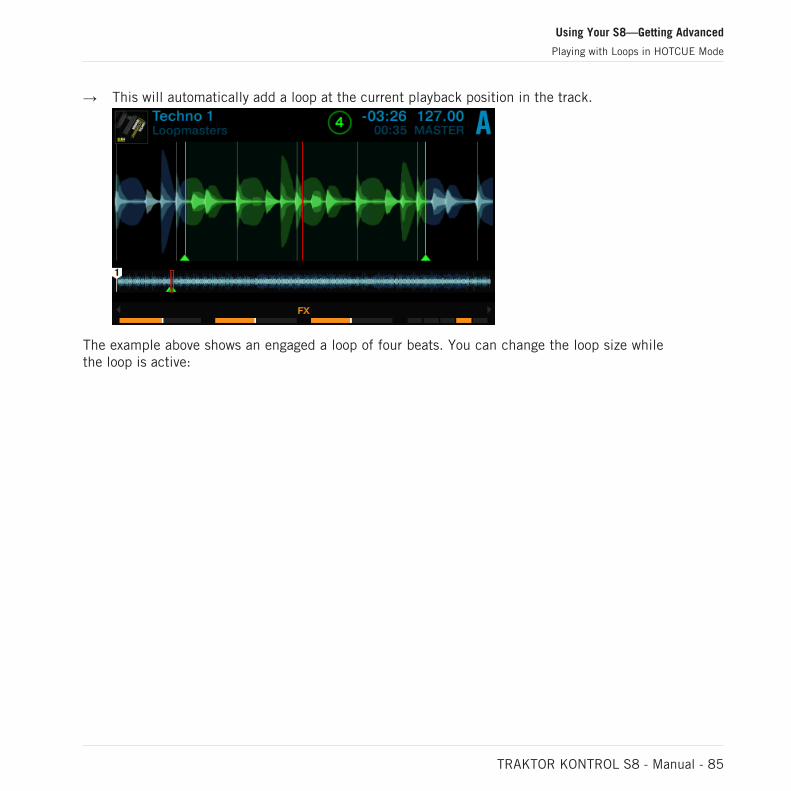
→ This will automatically add a loop at the current playback position in the track.
The example above shows an engaged a loop of four beats. You can change the loop size whilethe loop is active:
Using Your S8—Getting Advanced
Playing with Loops in HOTCUE Mode
TRAKTOR KONTROL S8 - Manual - 85
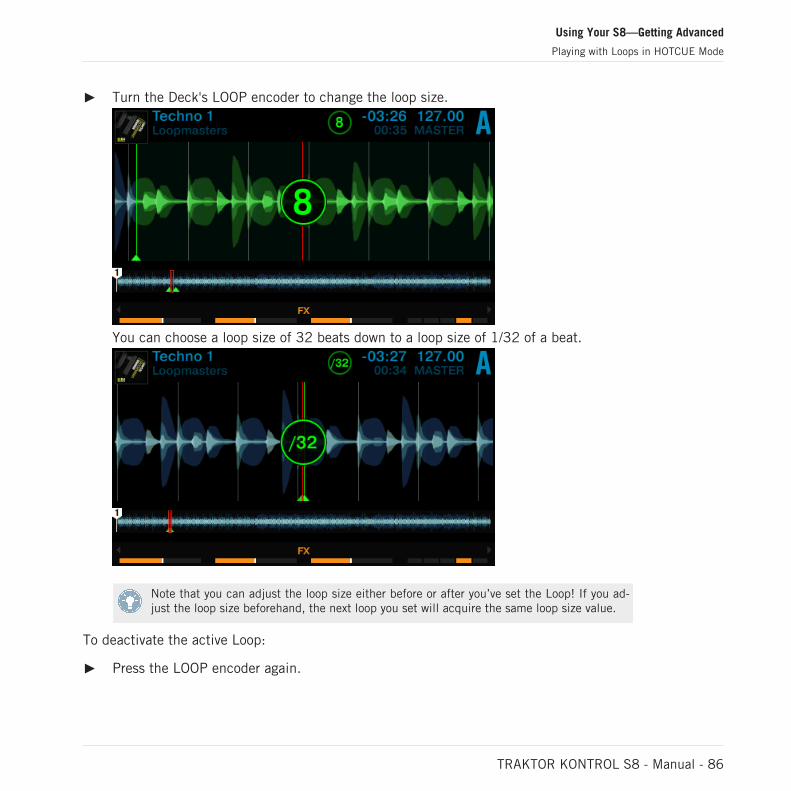
Turn the Deck's LOOP encoder to change the loop size.
You can choose a loop size of 32 beats down to a loop size of 1/32 of a beat.
Note that you can adjust the loop size either before or after you’ve set the Loop! If you ad-just the loop size beforehand, the next loop you set will acquire the same loop size value.
To deactivate the active Loop:
Press the LOOP encoder again.
Using Your S8—Getting Advanced
Playing with Loops in HOTCUE Mode
TRAKTOR KONTROL S8 - Manual - 86
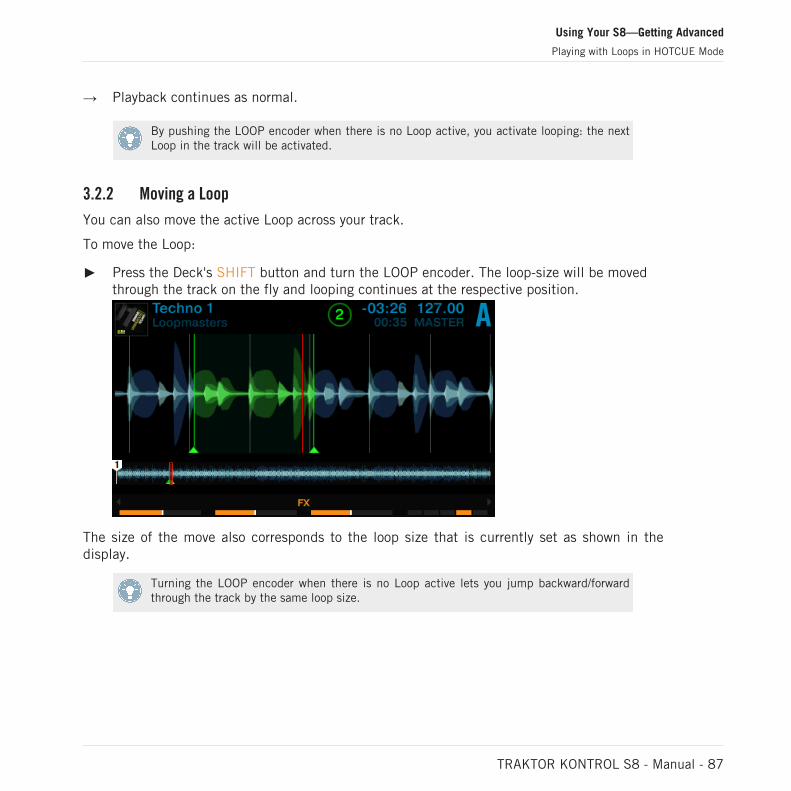
→ Playback continues as normal.
By pushing the LOOP encoder when there is no Loop active, you activate looping: the nextLoop in the track will be activated.
3.2.2 Moving a Loop
You can also move the active Loop across your track.
To move the Loop:
Press the Deck's SHIFT button and turn the LOOP encoder. The loop-size will be movedthrough the track on the fly and looping continues at the respective position.
The size of the move also corresponds to the loop size that is currently set as shown in thedisplay.
Turning the LOOP encoder when there is no Loop active lets you jump backward/forwardthrough the track by the same loop size.
Using Your S8—Getting Advanced
Playing with Loops in HOTCUE Mode
TRAKTOR KONTROL S8 - Manual - 87
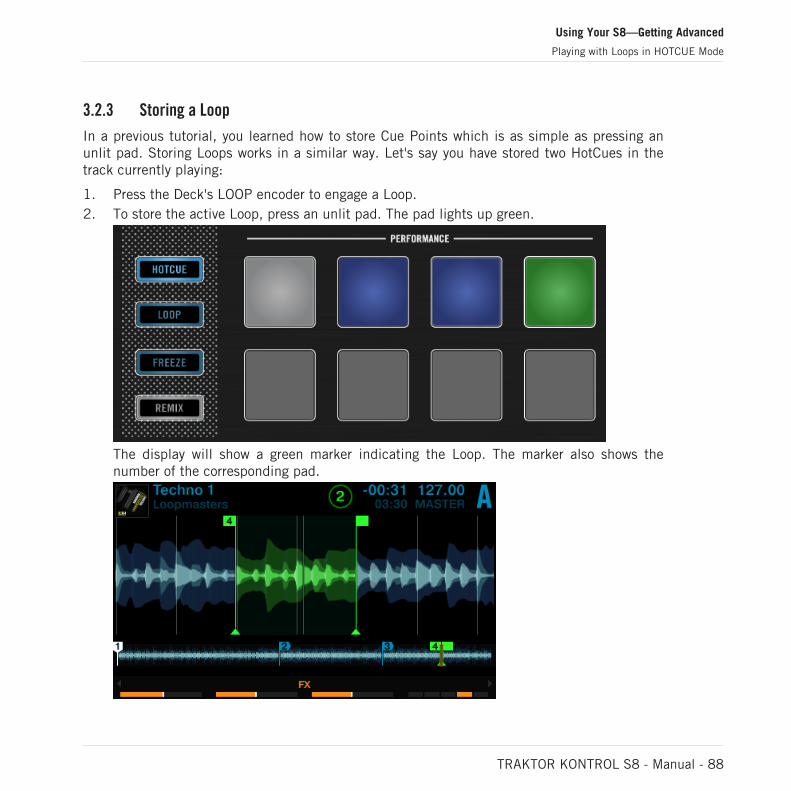
3.2.3 Storing a Loop
In a previous tutorial, you learned how to store Cue Points which is as simple as pressing anunlit pad. Storing Loops works in a similar way. Let's say you have stored two HotCues in thetrack currently playing:
1. Press the Deck's LOOP encoder to engage a Loop.2. To store the active Loop, press an unlit pad. The pad lights up green.
The display will show a green marker indicating the Loop. The marker also shows thenumber of the corresponding pad.
Using Your S8—Getting Advanced
Playing with Loops in HOTCUE Mode
TRAKTOR KONTROL S8 - Manual - 88
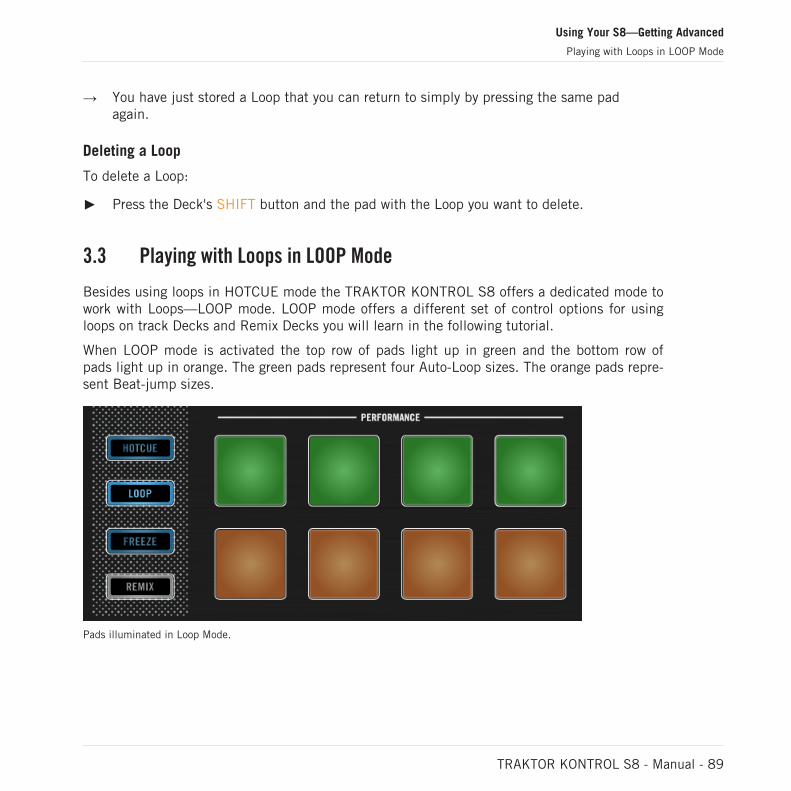
→ You have just stored a Loop that you can return to simply by pressing the same padagain.
Deleting a Loop
To delete a Loop:
Press the Deck's SHIFT button and the pad with the Loop you want to delete.
3.3 Playing with Loops in LOOP Mode
Besides using loops in HOTCUE mode the TRAKTOR KONTROL S8 offers a dedicated mode towork with Loops—LOOP mode. LOOP mode offers a different set of control options for usingloops on track Decks and Remix Decks you will learn in the following tutorial.
When LOOP mode is activated the top row of pads light up in green and the bottom row ofpads light up in orange. The green pads represent four Auto-Loop sizes. The orange pads repre-sent Beat-jump sizes.
Pads illuminated in Loop Mode.
Using Your S8—Getting Advanced
Playing with Loops in LOOP Mode
TRAKTOR KONTROL S8 - Manual - 89
Prerequisites
We assume here that you have already followed the instructions in the previous tutorials andthe TRAKTOR KONTROL S8 is in the following state:
The track “Techno 1” is loaded on Deck A and is not playing.
The Crossfader is all the way to the left.
The channel fader A is raised to the top.
The MAIN knob has an adequate level.
3.3.1 Looping with Auto-Loop sizes
Auto-Loop sizes are predefined loop sizes. With the green pads you can engage loops usingthese Auto-Loop sizes. By default the pads represent Auto-Loop sizes using 1/8 of a beat, 1/4of a beat, 1/2 of a beat, or 1 beat.
To engage a loop with an Auto-Loop size on a Deck:
1. Press the Deck's PLAY button to start playback.2. Press the Deck's LOOP button to enable LOOP mode.
The LOOP button lights up brightly and the pads also illuminate.
3. With a track playing with LOOP Mode enabled, you can perform the following actions:
Using Your S8—Getting Advanced
Playing with Loops in LOOP Mode
TRAKTOR KONTROL S8 - Manual - 90
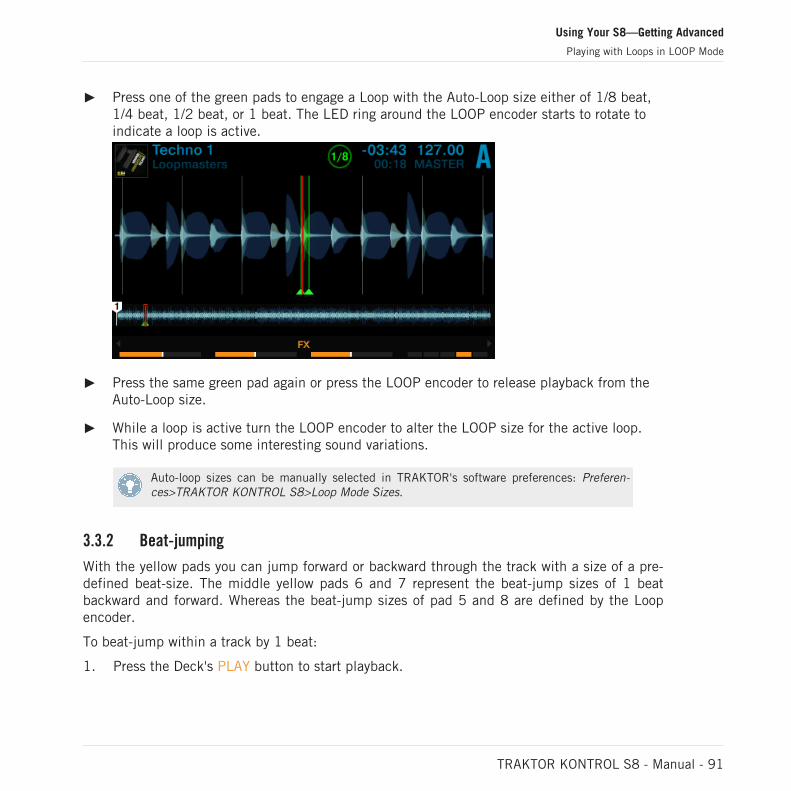
Press one of the green pads to engage a Loop with the Auto-Loop size either of 1/8 beat,1/4 beat, 1/2 beat, or 1 beat. The LED ring around the LOOP encoder starts to rotate toindicate a loop is active.
Press the same green pad again or press the LOOP encoder to release playback from theAuto-Loop size.
While a loop is active turn the LOOP encoder to alter the LOOP size for the active loop.This will produce some interesting sound variations.
Auto-loop sizes can be manually selected in TRAKTOR's software preferences: Preferen-ces>TRAKTOR KONTROL S8>Loop Mode Sizes.
3.3.2 Beat-jumping
With the yellow pads you can jump forward or backward through the track with a size of a pre-defined beat-size. The middle yellow pads 6 and 7 represent the beat-jump sizes of 1 beatbackward and forward. Whereas the beat-jump sizes of pad 5 and 8 are defined by the Loopencoder.
To beat-jump within a track by 1 beat:
1. Press the Deck's PLAY button to start playback.
Using Your S8—Getting Advanced
Playing with Loops in LOOP Mode
TRAKTOR KONTROL S8 - Manual - 91

2. Press the Deck's LOOP button to enable LOOP mode.
The LOOP button lights up brightly and the pads also illuminate.
3. Press pad 6 to jump backward the playback position by 1 beat. If the playback positionthen reaches an Active-Loop area, it continues to loop again.
4. Press pad 7 to jump forward the playback position by 1 beat. If jumped out of a loop play-back continues as normal.
Beat-jump sizes can be manually selected in TRAKTOR's software preferences: Preferen-ces>TRAKTOR KONTROL S8>Loop Mode Sizes.
Using the Loop encoder to define beat-jump sizes
By default, pad 5 and pad use the beat-jump size defined by the loop-size value shown in thedisplay. To change this value:
1. Turn the Loop encoder to define a beat-jump size between 1/32 of a beat and 32 beats.The Loop size will change in the display.
2. Press pad 5 to jump the playback position backward by the beat-jump size defined in thedisplay. If it then reaches an Active-Loop area, it will continue to loop again.
3. Press pad 7 to jump the playback position forward by the beat-jump size defined in thedisplay. If jumped out of a loop playback continues as normal.
3.4 Using FREEZE Mode
Freeze Mode provides the opportunity to instantly create a set of temporary cue markers (or Sli-ces) from the current playback position on a Track Deck or Remix Deck. These Slices can betriggered in real time, similar to triggering HotCues. When Freeze Mode is engaged you can usethe S8 controller to trigger Slices to perform finger drumming techniques for creating interest-ing sound effects. While FREEZE mode is engaged, the corresponding display shows a FREEZEmode overlay so you can see the location of the slices.
Using Your S8—Getting Advanced
Using FREEZE Mode
TRAKTOR KONTROL S8 - Manual - 92
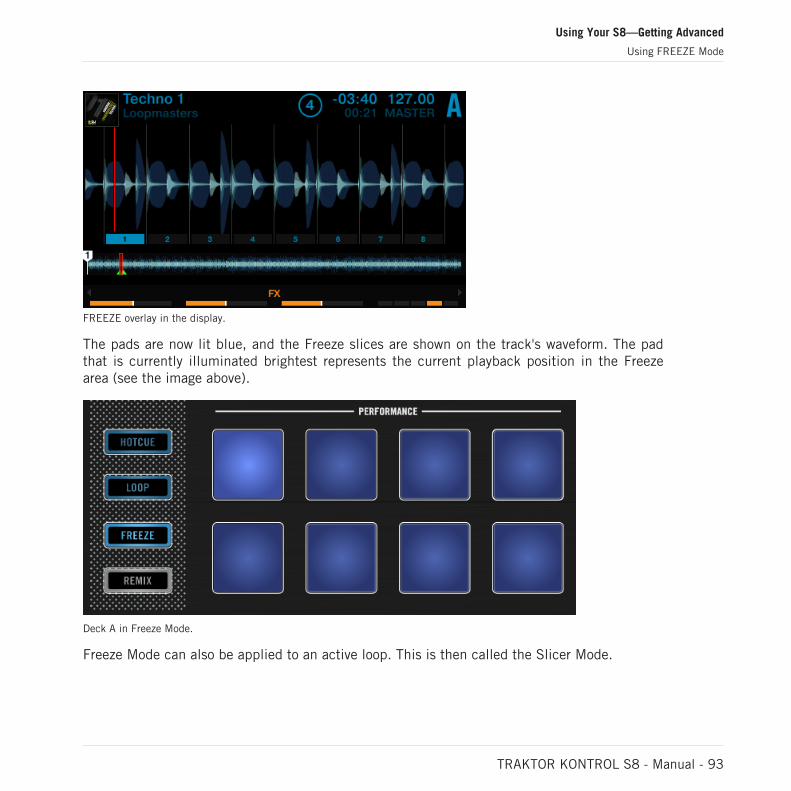
FREEZE overlay in the display.
The pads are now lit blue, and the Freeze slices are shown on the track's waveform. The padthat is currently illuminated brightest represents the current playback position in the Freezearea (see the image above).
Deck A in Freeze Mode.
Freeze Mode can also be applied to an active loop. This is then called the Slicer Mode.
Using Your S8—Getting Advanced
Using FREEZE Mode
TRAKTOR KONTROL S8 - Manual - 93
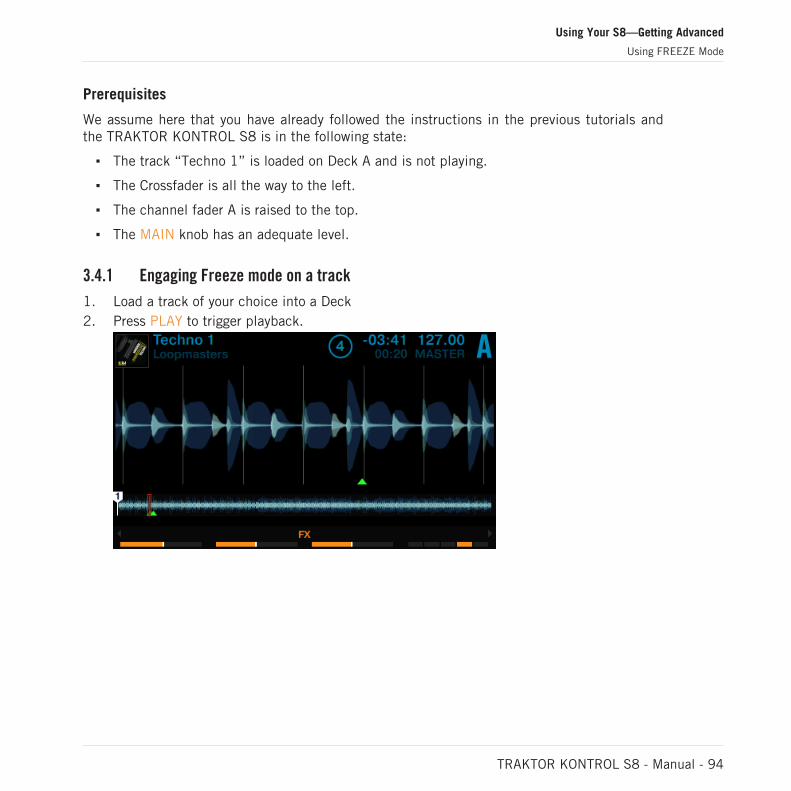
Prerequisites
We assume here that you have already followed the instructions in the previous tutorials andthe TRAKTOR KONTROL S8 is in the following state:
The track “Techno 1” is loaded on Deck A and is not playing.
The Crossfader is all the way to the left.
The channel fader A is raised to the top.
The MAIN knob has an adequate level.
3.4.1 Engaging Freeze mode on a track
1. Load a track of your choice into a Deck2. Press PLAY to trigger playback.
Using Your S8—Getting Advanced
Using FREEZE Mode
TRAKTOR KONTROL S8 - Manual - 94
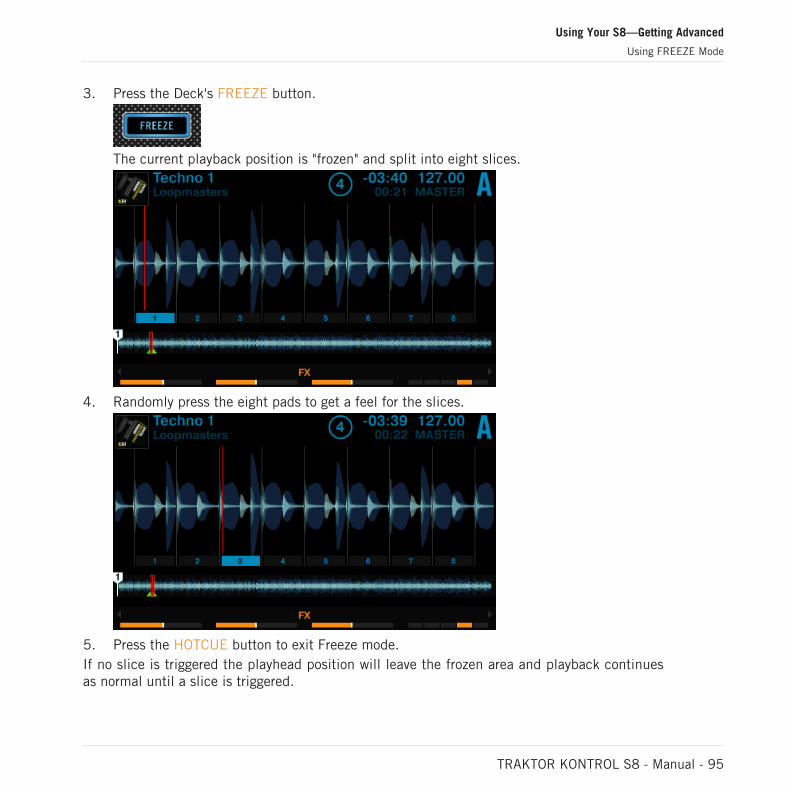
3. Press the Deck's FREEZE button.
The current playback position is "frozen" and split into eight slices.
4. Randomly press the eight pads to get a feel for the slices.
5. Press the HOTCUE button to exit Freeze mode.If no slice is triggered the playhead position will leave the frozen area and playback continuesas normal until a slice is triggered.
Using Your S8—Getting Advanced
Using FREEZE Mode
TRAKTOR KONTROL S8 - Manual - 95
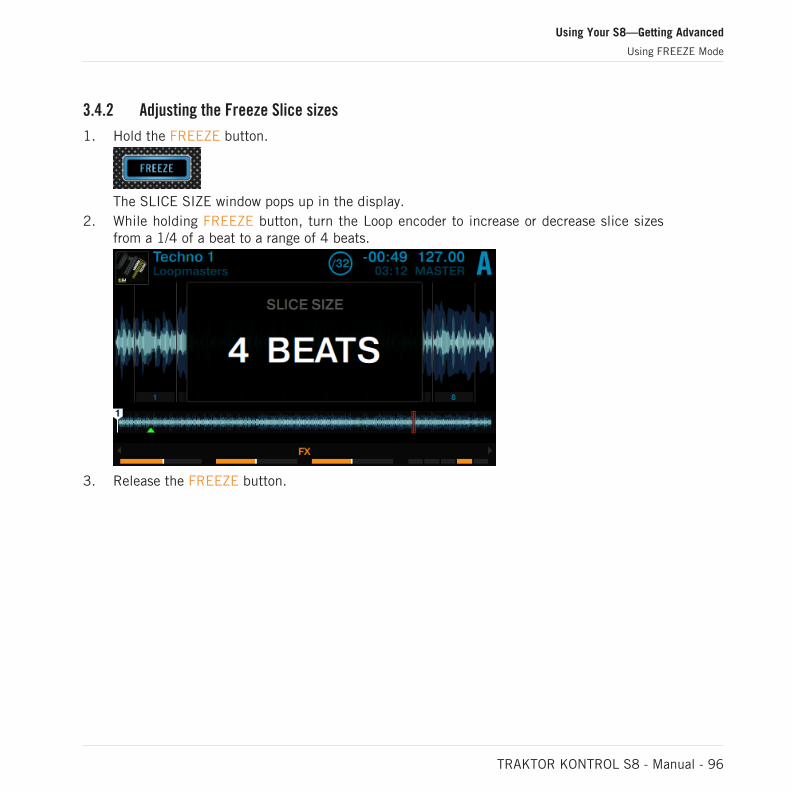
3.4.2 Adjusting the Freeze Slice sizes
1. Hold the FREEZE button.
The SLICE SIZE window pops up in the display.
2. While holding FREEZE button, turn the Loop encoder to increase or decrease slice sizesfrom a 1/4 of a beat to a range of 4 beats.
3. Release the FREEZE button.
Using Your S8—Getting Advanced
Using FREEZE Mode
TRAKTOR KONTROL S8 - Manual - 96
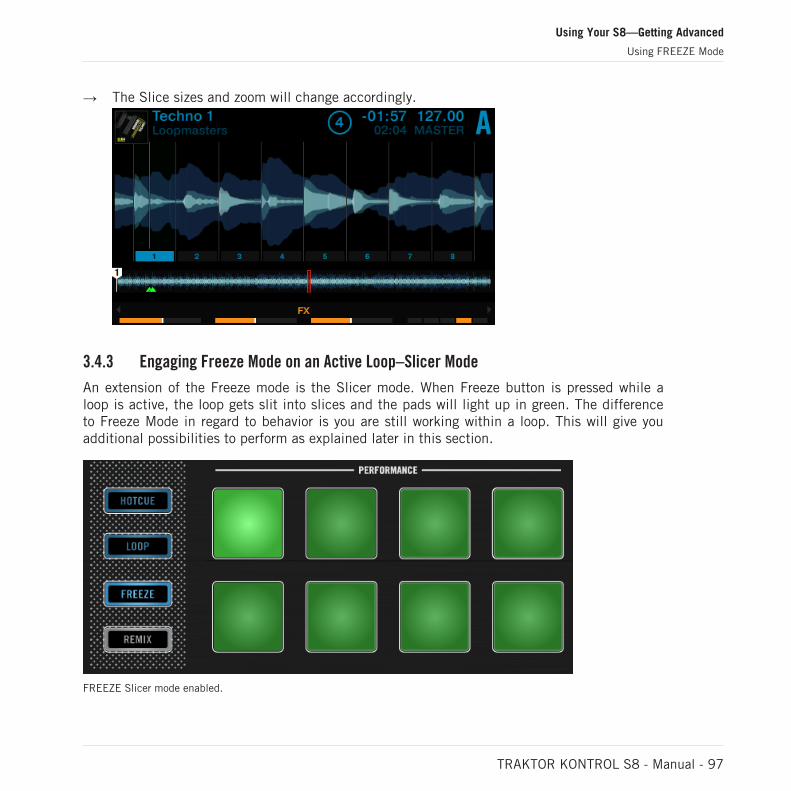
→ The Slice sizes and zoom will change accordingly.
3.4.3 Engaging Freeze Mode on an Active Loop–Slicer Mode
An extension of the Freeze mode is the Slicer mode. When Freeze button is pressed while aloop is active, the loop gets slit into slices and the pads will light up in green. The differenceto Freeze Mode in regard to behavior is you are still working within a loop. This will give youadditional possibilities to perform as explained later in this section.
FREEZE Slicer mode enabled.
Using Your S8—Getting Advanced
Using FREEZE Mode
TRAKTOR KONTROL S8 - Manual - 97
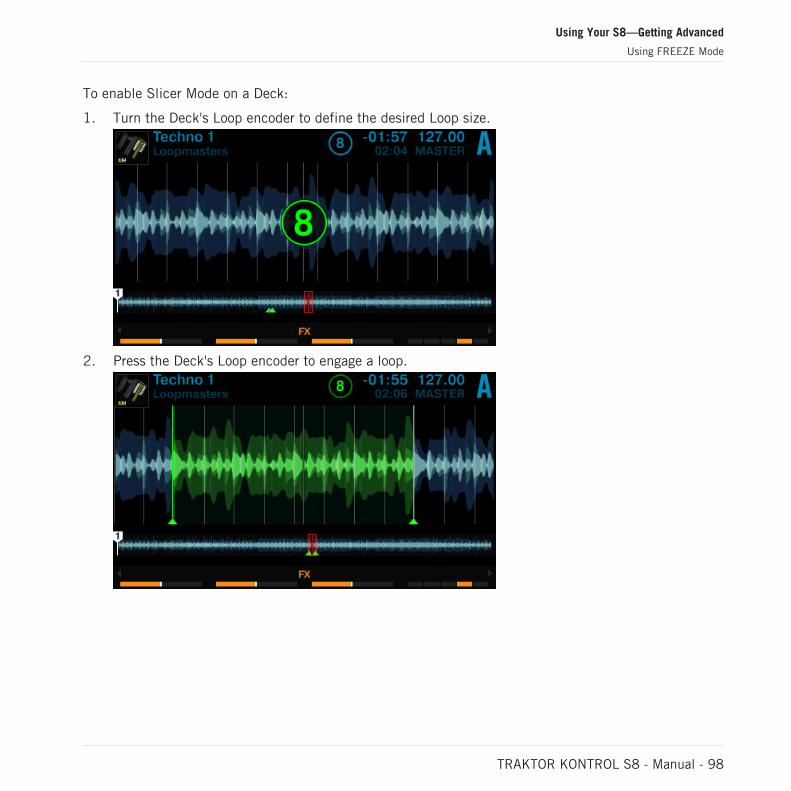
To enable Slicer Mode on a Deck:
1. Turn the Deck's Loop encoder to define the desired Loop size.
2. Press the Deck's Loop encoder to engage a loop.
Using Your S8—Getting Advanced
Using FREEZE Mode
TRAKTOR KONTROL S8 - Manual - 98
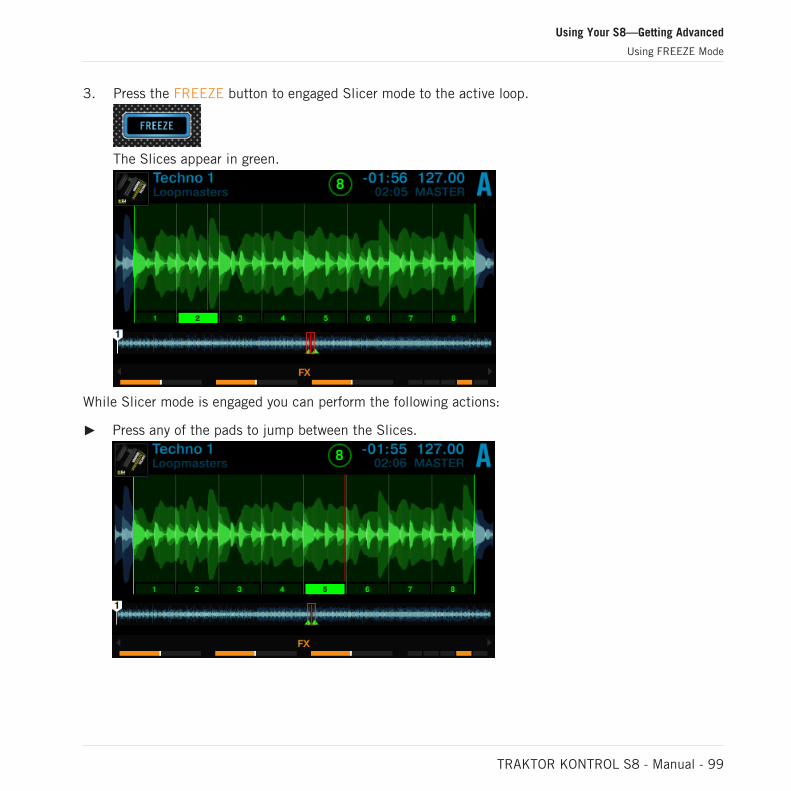
3. Press the FREEZE button to engaged Slicer mode to the active loop.
The Slices appear in green.
While Slicer mode is engaged you can perform the following actions:
Press any of the pads to jump between the Slices.
Using Your S8—Getting Advanced
Using FREEZE Mode
TRAKTOR KONTROL S8 - Manual - 99
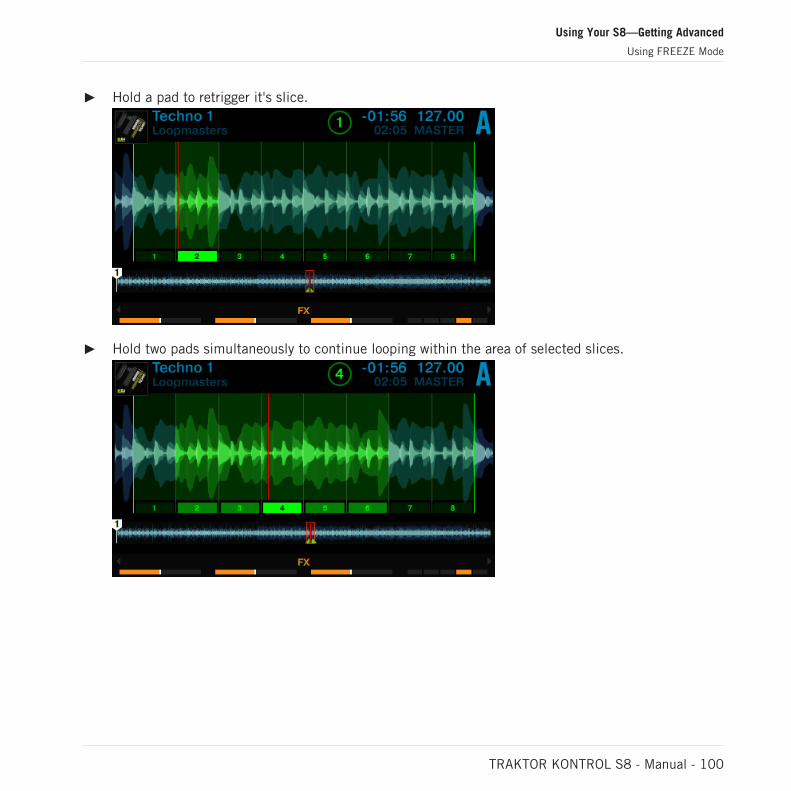
Hold a pad to retrigger it's slice.
Hold two pads simultaneously to continue looping within the area of selected slices.
Using Your S8—Getting Advanced
Using FREEZE Mode
TRAKTOR KONTROL S8 - Manual - 100
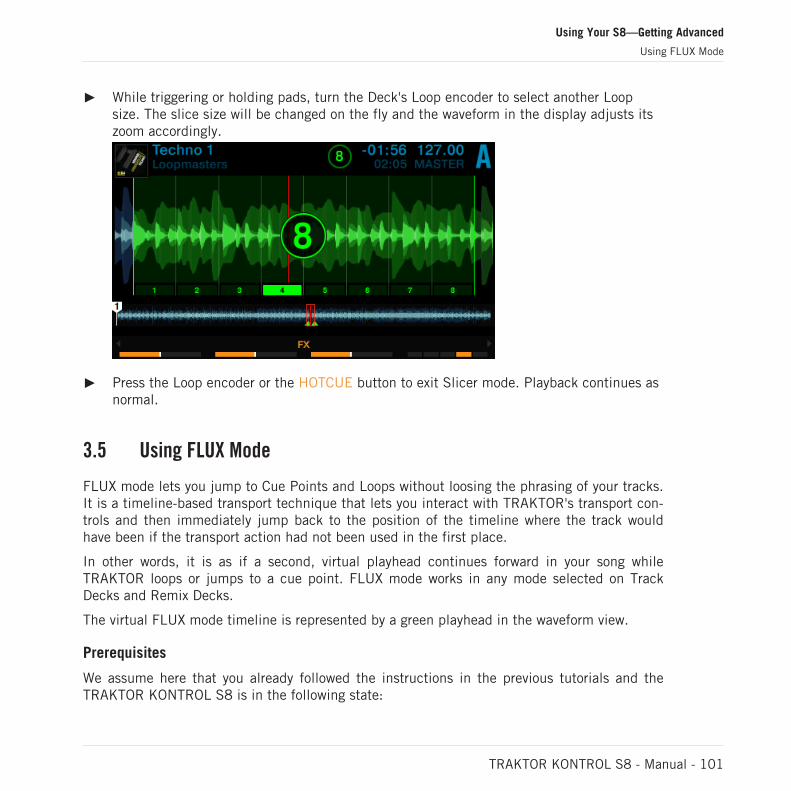
While triggering or holding pads, turn the Deck's Loop encoder to select another Loopsize. The slice size will be changed on the fly and the waveform in the display adjusts itszoom accordingly.
Press the Loop encoder or the HOTCUE button to exit Slicer mode. Playback continues asnormal.
3.5 Using FLUX Mode
FLUX mode lets you jump to Cue Points and Loops without loosing the phrasing of your tracks.It is a timeline-based transport technique that lets you interact with TRAKTOR's transport con-trols and then immediately jump back to the position of the timeline where the track wouldhave been if the transport action had not been used in the first place.
In other words, it is as if a second, virtual playhead continues forward in your song whileTRAKTOR loops or jumps to a cue point. FLUX mode works in any mode selected on TrackDecks and Remix Decks.
The virtual FLUX mode timeline is represented by a green playhead in the waveform view.
Prerequisites
We assume here that you already followed the instructions in the previous tutorials and theTRAKTOR KONTROL S8 is in the following state:
Using Your S8—Getting Advanced
Using FLUX Mode
TRAKTOR KONTROL S8 - Manual - 101
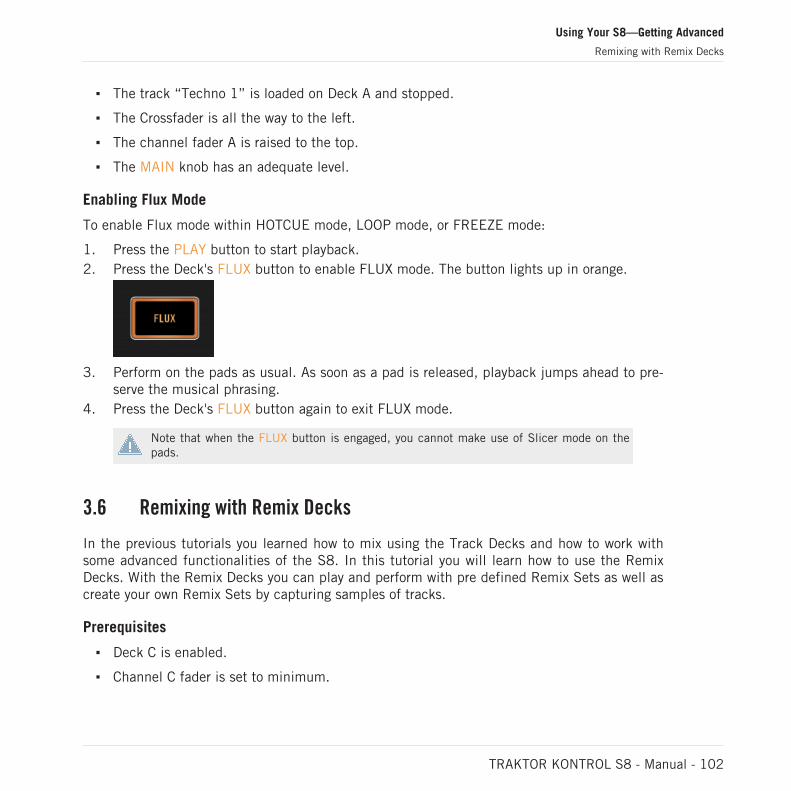
The track “Techno 1” is loaded on Deck A and stopped.
The Crossfader is all the way to the left.
The channel fader A is raised to the top.
The MAIN knob has an adequate level.
Enabling Flux Mode
To enable Flux mode within HOTCUE mode, LOOP mode, or FREEZE mode:
1. Press the PLAY button to start playback.2. Press the Deck's FLUX button to enable FLUX mode. The button lights up in orange.
3. Perform on the pads as usual. As soon as a pad is released, playback jumps ahead to pre-serve the musical phrasing.
4. Press the Deck's FLUX button again to exit FLUX mode.
Note that when the FLUX button is engaged, you cannot make use of Slicer mode on thepads.
3.6 Remixing with Remix Decks
In the previous tutorials you learned how to mix using the Track Decks and how to work withsome advanced functionalities of the S8. In this tutorial you will learn how to use the RemixDecks. With the Remix Decks you can play and perform with pre defined Remix Sets as well ascreate your own Remix Sets by capturing samples of tracks.
Prerequisites
Deck C is enabled.
Channel C fader is set to minimum.
Using Your S8—Getting Advanced
Remixing with Remix Decks
TRAKTOR KONTROL S8 - Manual - 102
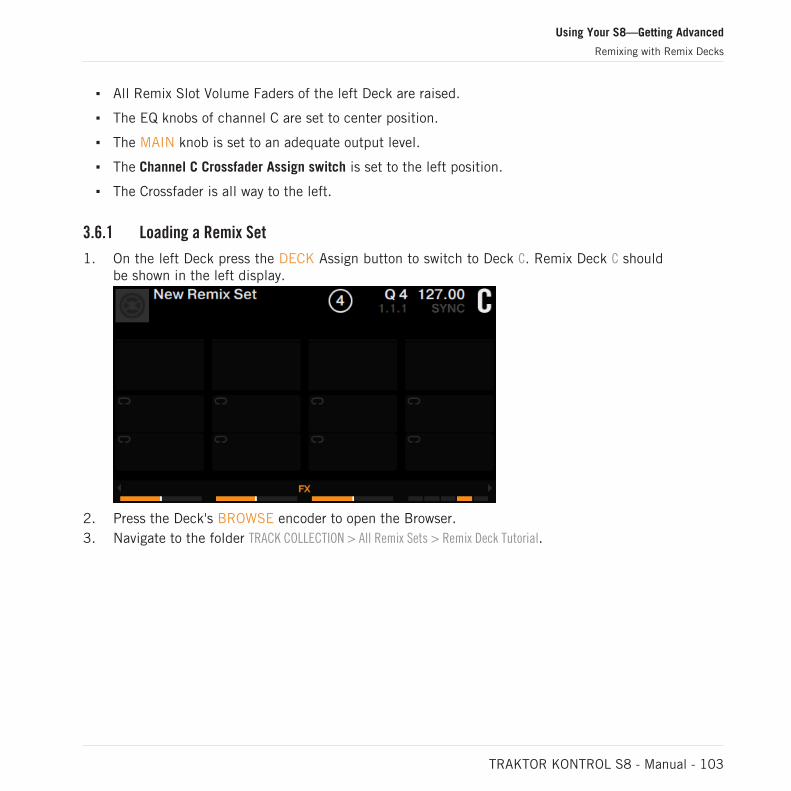
All Remix Slot Volume Faders of the left Deck are raised.
The EQ knobs of channel C are set to center position.
The MAIN knob is set to an adequate output level.
The Channel C Crossfader Assign switch is set to the left position.
The Crossfader is all way to the left.
3.6.1 Loading a Remix Set
1. On the left Deck press the DECK Assign button to switch to Deck C. Remix Deck C shouldbe shown in the left display.
2. Press the Deck's BROWSE encoder to open the Browser.3. Navigate to the folder TRACK COLLECTION > All Remix Sets > Remix Deck Tutorial.
Using Your S8—Getting Advanced
Remixing with Remix Decks
TRAKTOR KONTROL S8 - Manual - 103
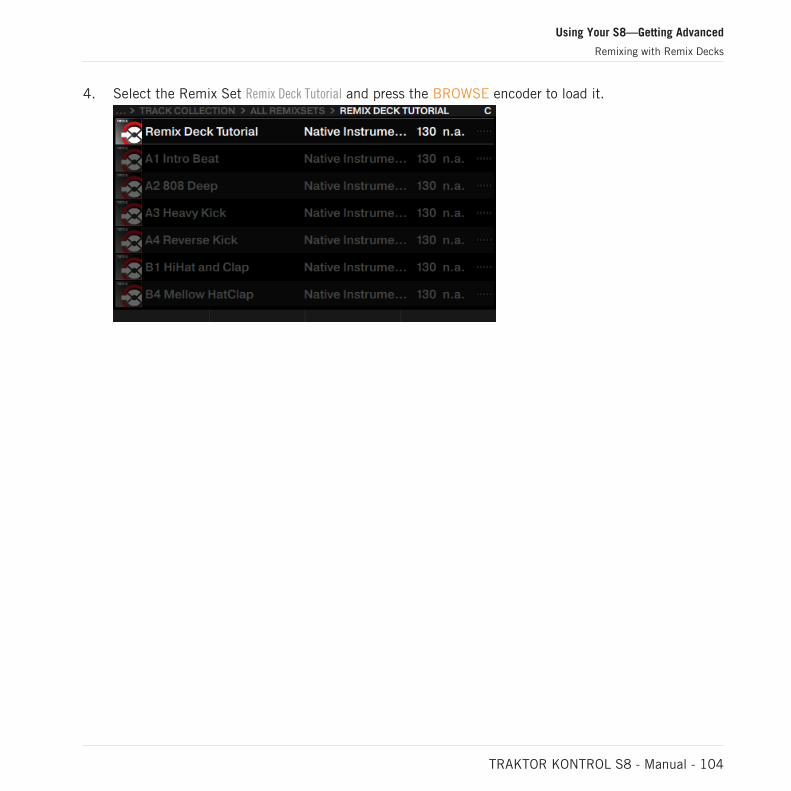
4. Select the Remix Set Remix Deck Tutorial and press the BROWSE encoder to load it.
Using Your S8—Getting Advanced
Remixing with Remix Decks
TRAKTOR KONTROL S8 - Manual - 104
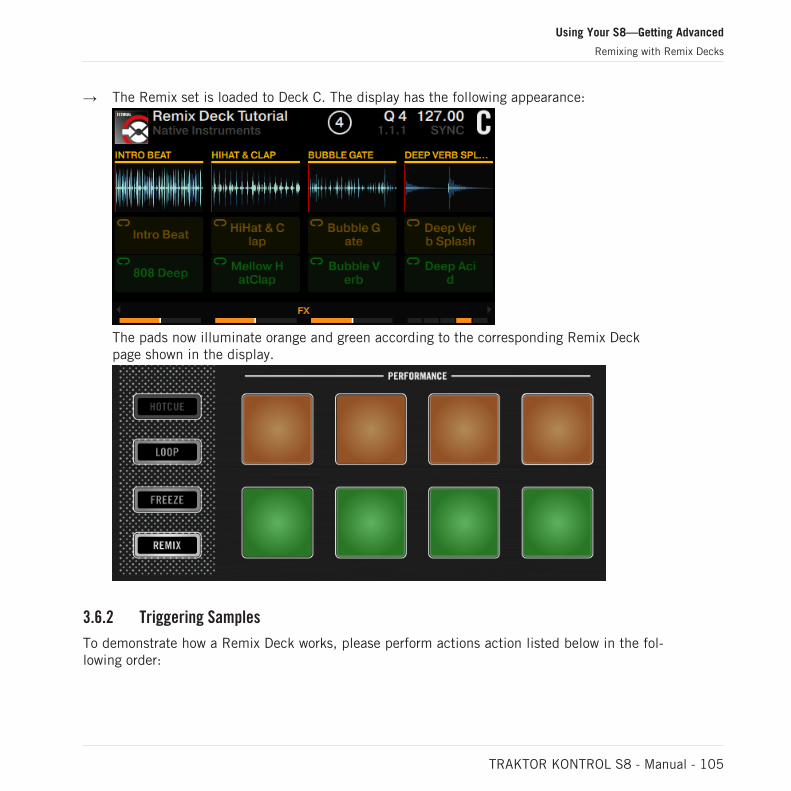
→ The Remix set is loaded to Deck C. The display has the following appearance:
The pads now illuminate orange and green according to the corresponding Remix Deckpage shown in the display.
3.6.2 Triggering Samples
To demonstrate how a Remix Deck works, please perform actions action listed below in the fol-lowing order:
Using Your S8—Getting Advanced
Remixing with Remix Decks
TRAKTOR KONTROL S8 - Manual - 105
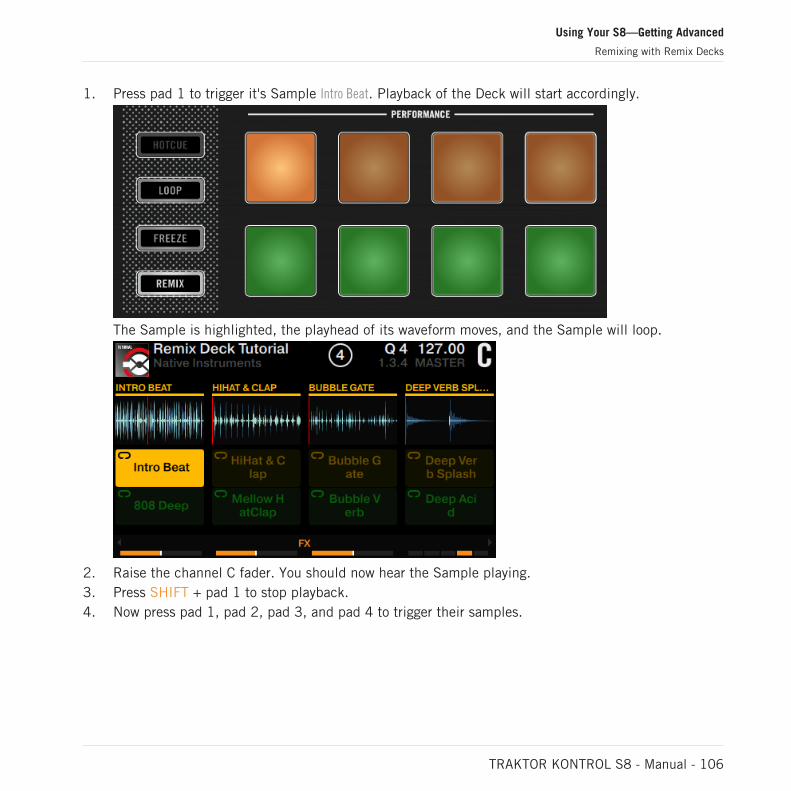
1. Press pad 1 to trigger it's Sample Intro Beat. Playback of the Deck will start accordingly.
The Sample is highlighted, the playhead of its waveform moves, and the Sample will loop.
2. Raise the channel C fader. You should now hear the Sample playing.3. Press SHIFT + pad 1 to stop playback.4. Now press pad 1, pad 2, pad 3, and pad 4 to trigger their samples.
Using Your S8—Getting Advanced
Remixing with Remix Decks
TRAKTOR KONTROL S8 - Manual - 106
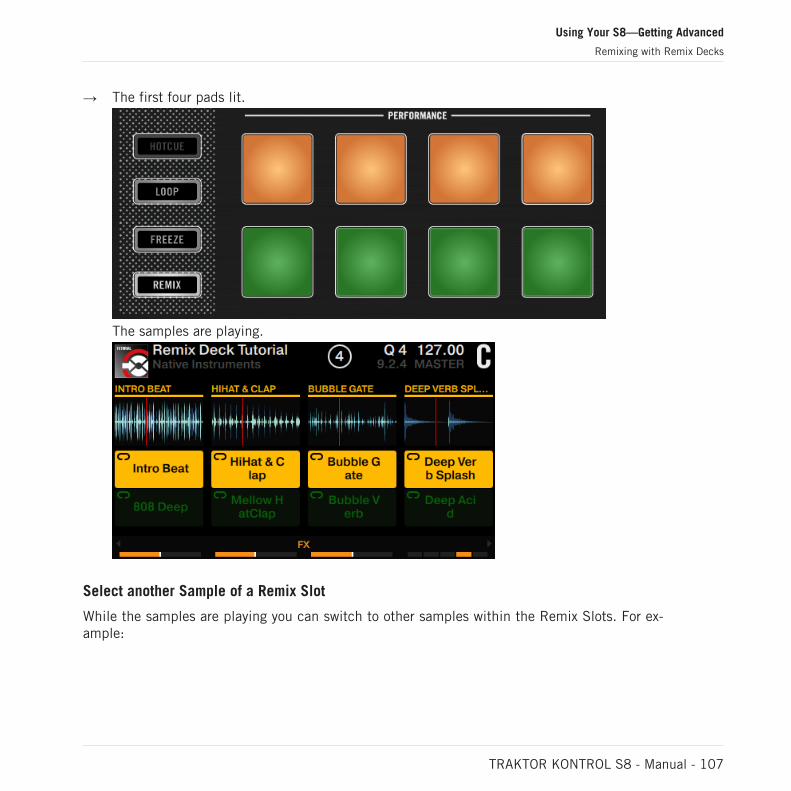
→ The first four pads lit.
The samples are playing.
Select another Sample of a Remix Slot
While the samples are playing you can switch to other samples within the Remix Slots. For ex-ample:
Using Your S8—Getting Advanced
Remixing with Remix Decks
TRAKTOR KONTROL S8 - Manual - 107
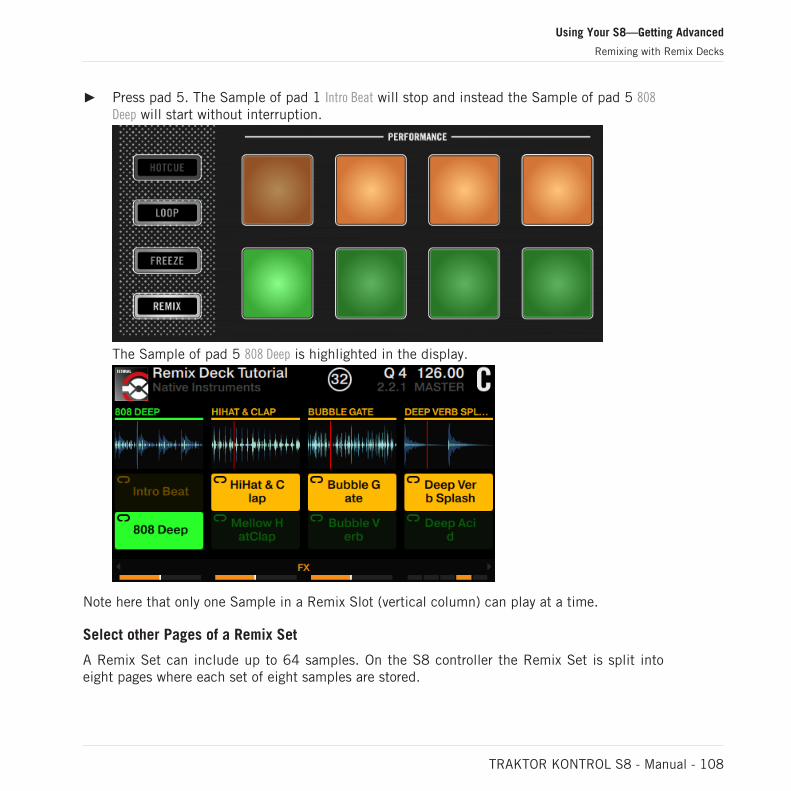
Press pad 5. The Sample of pad 1 Intro Beat will stop and instead the Sample of pad 5 808Deep will start without interruption.
The Sample of pad 5 808 Deep is highlighted in the display.
Note here that only one Sample in a Remix Slot (vertical column) can play at a time.
Select other Pages of a Remix Set
A Remix Set can include up to 64 samples. On the S8 controller the Remix Set is split intoeight pages where each set of eight samples are stored.
Using Your S8—Getting Advanced
Remixing with Remix Decks
TRAKTOR KONTROL S8 - Manual - 108
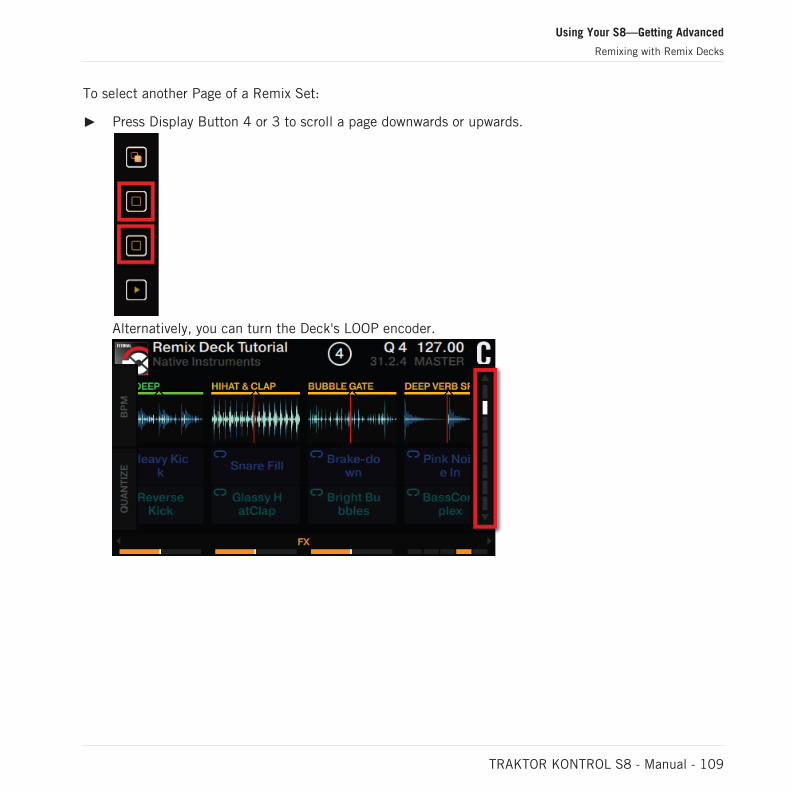
To select another Page of a Remix Set:
Press Display Button 4 or 3 to scroll a page downwards or upwards.
Alternatively, you can turn the Deck's LOOP encoder.
Using Your S8—Getting Advanced
Remixing with Remix Decks
TRAKTOR KONTROL S8 - Manual - 109
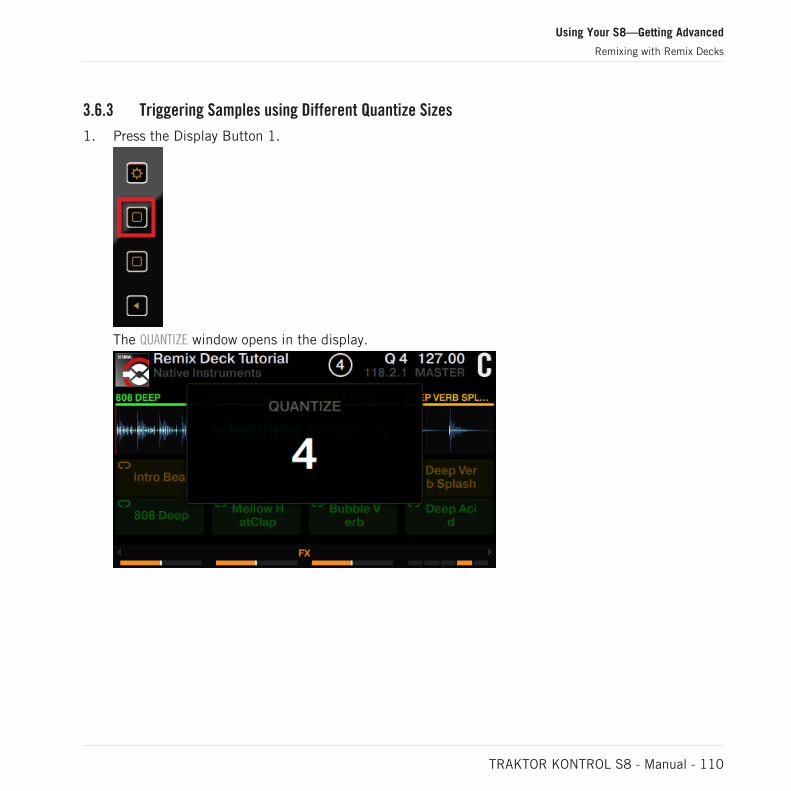
3.6.3 Triggering Samples using Different Quantize Sizes
1. Press the Display Button 1.
The QUANTIZE window opens in the display.
Using Your S8—Getting Advanced
Remixing with Remix Decks
TRAKTOR KONTROL S8 - Manual - 110
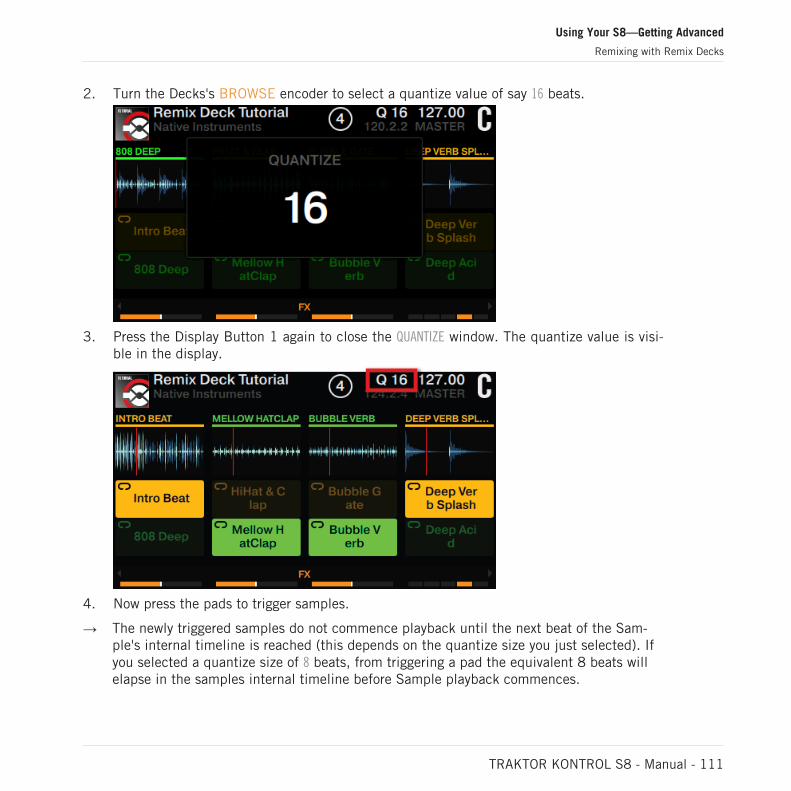
2. Turn the Decks's BROWSE encoder to select a quantize value of say 16 beats.
3. Press the Display Button 1 again to close the QUANTIZE window. The quantize value is visi-ble in the display.
4. Now press the pads to trigger samples.
→ The newly triggered samples do not commence playback until the next beat of the Sam-ple's internal timeline is reached (this depends on the quantize size you just selected). Ifyou selected a quantize size of 8 beats, from triggering a pad the equivalent 8 beats willelapse in the samples internal timeline before Sample playback commences.
Using Your S8—Getting Advanced
Remixing with Remix Decks
TRAKTOR KONTROL S8 - Manual - 111
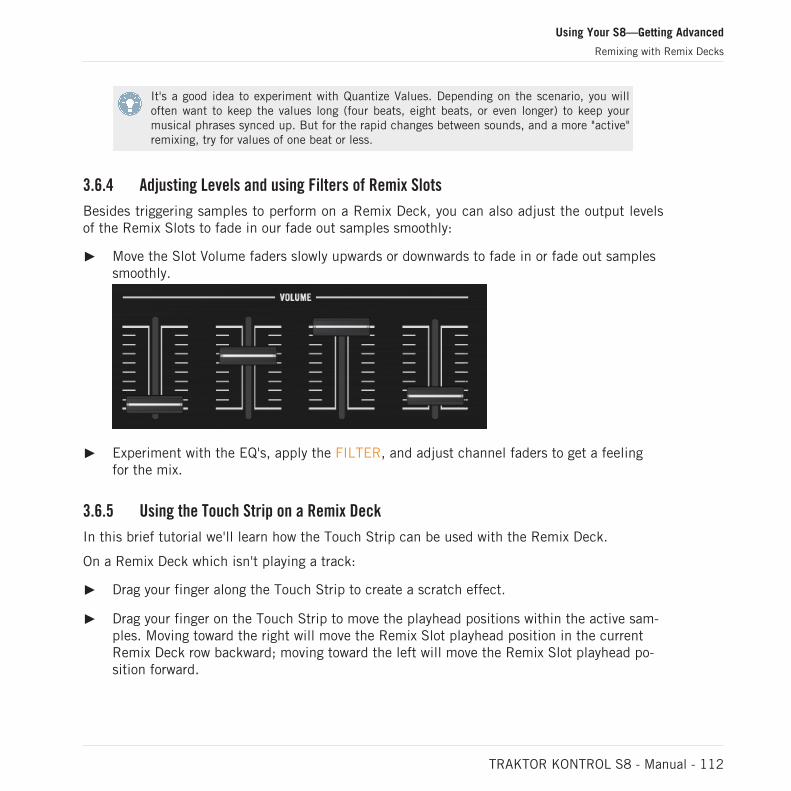
It's a good idea to experiment with Quantize Values. Depending on the scenario, you willoften want to keep the values long (four beats, eight beats, or even longer) to keep yourmusical phrases synced up. But for the rapid changes between sounds, and a more "active"remixing, try for values of one beat or less.
3.6.4 Adjusting Levels and using Filters of Remix Slots
Besides triggering samples to perform on a Remix Deck, you can also adjust the output levelsof the Remix Slots to fade in our fade out samples smoothly:
Move the Slot Volume faders slowly upwards or downwards to fade in or fade out samplessmoothly.
Experiment with the EQ's, apply the FILTER, and adjust channel faders to get a feelingfor the mix.
3.6.5 Using the Touch Strip on a Remix Deck
In this brief tutorial we'll learn how the Touch Strip can be used with the Remix Deck.
On a Remix Deck which isn't playing a track:
Drag your finger along the Touch Strip to create a scratch effect.
Drag your finger on the Touch Strip to move the playhead positions within the active sam-ples. Moving toward the right will move the Remix Slot playhead position in the currentRemix Deck row backward; moving toward the left will move the Remix Slot playhead po-sition forward.
Using Your S8—Getting Advanced
Remixing with Remix Decks
TRAKTOR KONTROL S8 - Manual - 112
Hold the left SHIFT button, and then press the active pads one by one to reset each play-head to the Sample start position.
Just like Track Decks the Remix Decks can become out-of-phase at times, even when theyhave their corresponding SYNC button engaged. The Touch Strip provides you with immedi-ate visual feedback (via its LEDs) to allow you to make necessary adjustments.
You cannot use the Touch Strip for seeking functions on a Remix Deck.
3.7 Capturing Samples from Track Decks (Using Remix Mode)
Apart from loading existing Remix Sets you can create your own Remix Sets by sampling partsof tracks using Remix mode. In this tutorial you will learn how to capture sample using Remixmode on Track Decks.
Note: in Remix Mode you can capture samples only to the current Remix Set page! Capturingto another Remix Page would require the selection of another Remix Page in advance.
The Capture Source can only be a Track Deck.
Prerequisites
The track “Techno 1” is loaded and stopped on Deck A.
Deck C is enabled and empty.
The Crossfader is set to center position.
Channel faders A and C are raised to the top.
All Slot Volume Faders are raised to the top.
The EQ knobs are set to center position.
Capturing a Sample and Playback
To capture a Sample of a track:
1. On the left Deck set the Deck focus on Deck A.
Using Your S8—Getting Advanced
Capturing Samples from Track Decks (Using Remix Mode)
TRAKTOR KONTROL S8 - Manual - 113
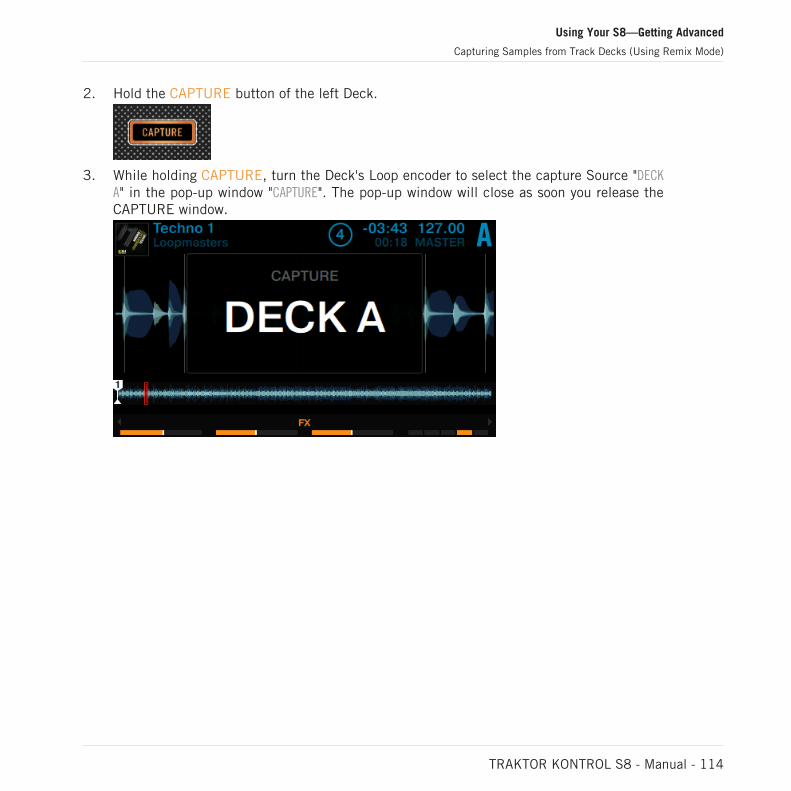
2. Hold the CAPTURE button of the left Deck.
3. While holding CAPTURE, turn the Deck's Loop encoder to select the capture Source "DECKA" in the pop-up window "CAPTURE". The pop-up window will close as soon you release theCAPTURE window.
Using Your S8—Getting Advanced
Capturing Samples from Track Decks (Using Remix Mode)
TRAKTOR KONTROL S8 - Manual - 114
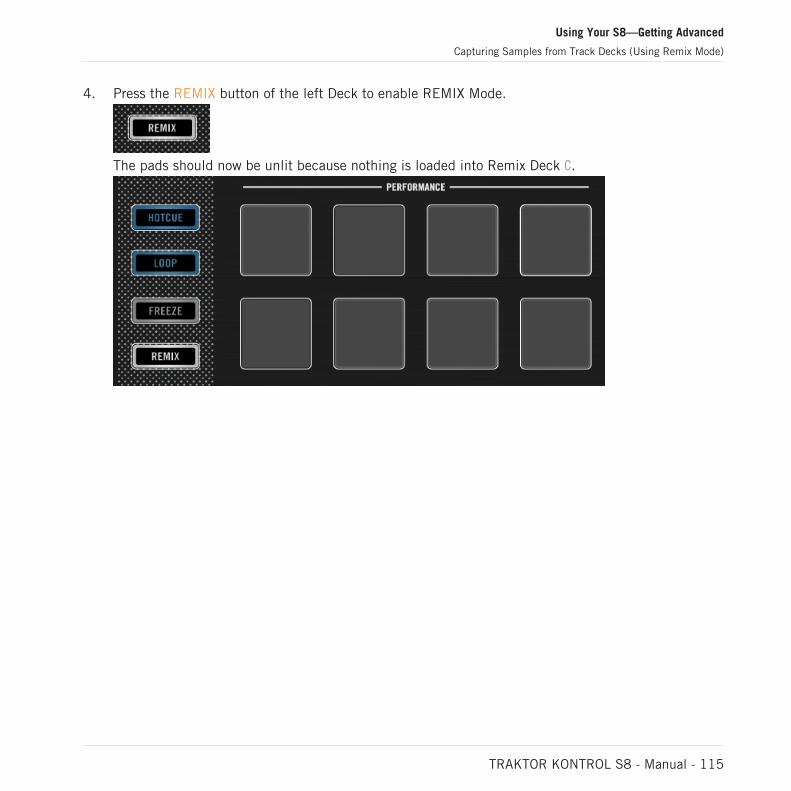
4. Press the REMIX button of the left Deck to enable REMIX Mode.
The pads should now be unlit because nothing is loaded into Remix Deck C.
Using Your S8—Getting Advanced
Capturing Samples from Track Decks (Using Remix Mode)
TRAKTOR KONTROL S8 - Manual - 115
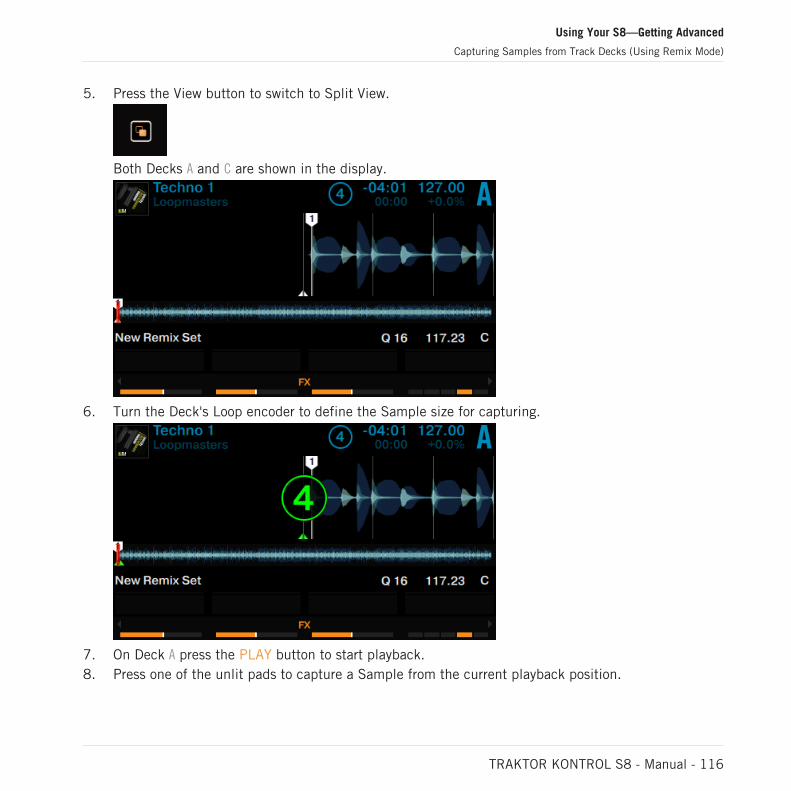
5. Press the View button to switch to Split View.
Both Decks A and C are shown in the display.
6. Turn the Deck's Loop encoder to define the Sample size for capturing.
7. On Deck A press the PLAY button to start playback.8. Press one of the unlit pads to capture a Sample from the current playback position.
Using Your S8—Getting Advanced
Capturing Samples from Track Decks (Using Remix Mode)
TRAKTOR KONTROL S8 - Manual - 116
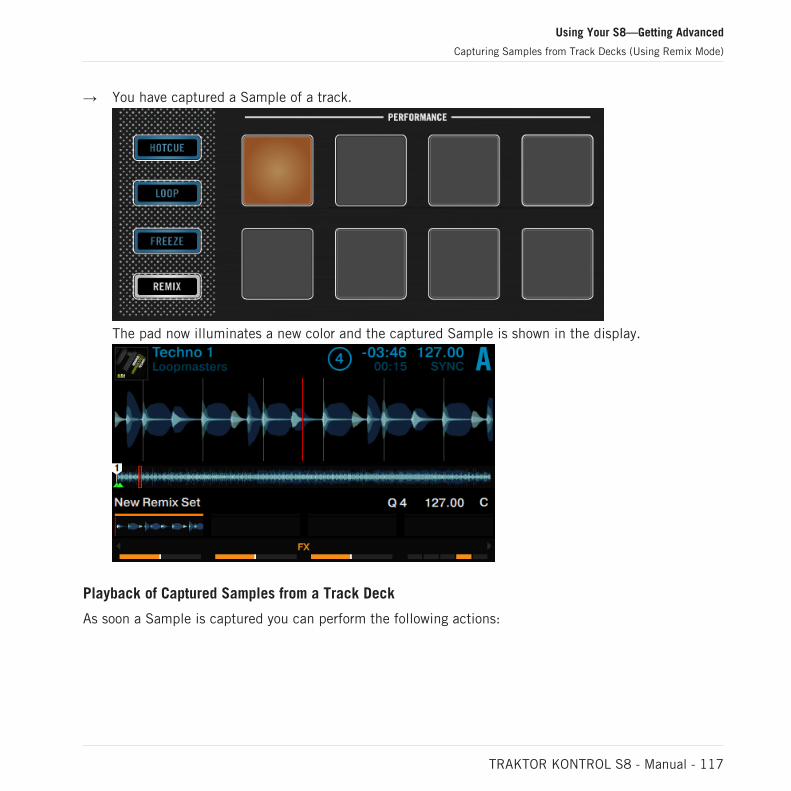
→ You have captured a Sample of a track.
The pad now illuminates a new color and the captured Sample is shown in the display.
Playback of Captured Samples from a Track Deck
As soon a Sample is captured you can perform the following actions:
Using Your S8—Getting Advanced
Capturing Samples from Track Decks (Using Remix Mode)
TRAKTOR KONTROL S8 - Manual - 117
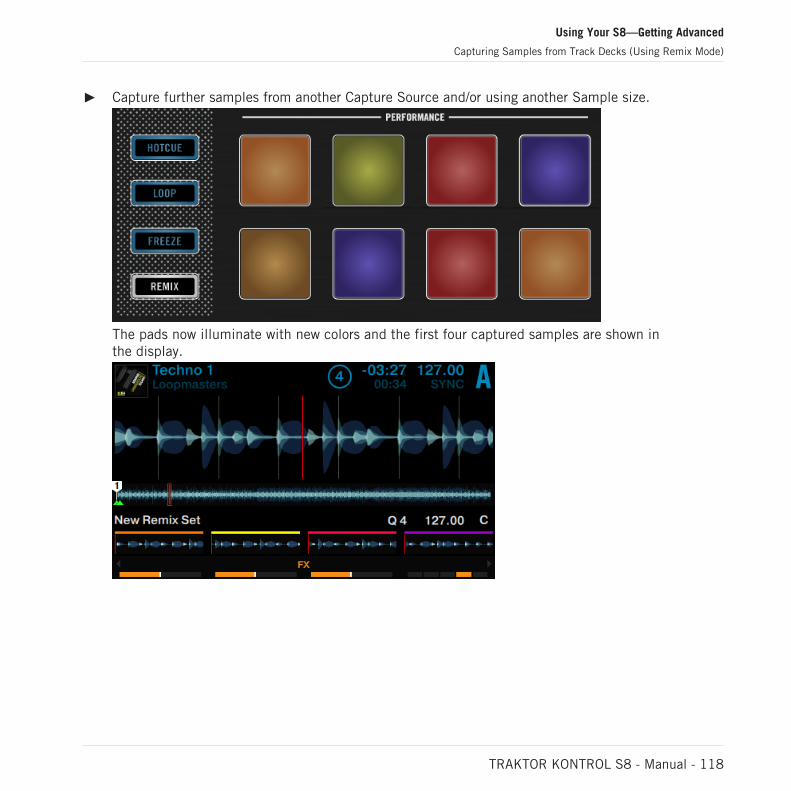
Capture further samples from another Capture Source and/or using another Sample size.
The pads now illuminate with new colors and the first four captured samples are shown inthe display.
Using Your S8—Getting Advanced
Capturing Samples from Track Decks (Using Remix Mode)
TRAKTOR KONTROL S8 - Manual - 118

Press the illuminated pads to trigger playback. The Samples are now being mixed withthe track playing in deck A. The Samples will continue to loop within their Remix Slot.
Move the Slot Volume Fader above the pads to smoothly fade the Sample out or in.
Hold the Deck's SHIFT button and press the illuminated pad to stop playing.
You can save a new Remix Set by clicking on the corresponding Deck letter in the TRAK-TOR software and selecting Save Remix Set, rename the set first by clicking on the Deckheader where New Remix Set is displayed. Saved Remix Sets will be added to: BROWS-ER>TRACK COLLECTION>ALL REMIXSETS.
Using Your S8—Getting Advanced
Capturing Samples from Track Decks (Using Remix Mode)
TRAKTOR KONTROL S8 - Manual - 119
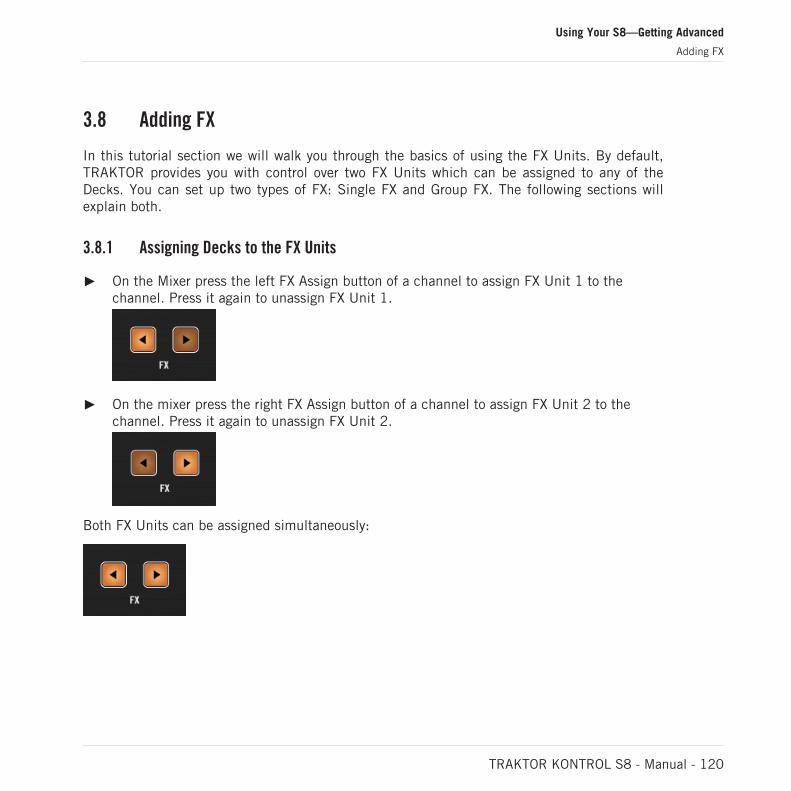
3.8 Adding FX
In this tutorial section we will walk you through the basics of using the FX Units. By default,TRAKTOR provides you with control over two FX Units which can be assigned to any of theDecks. You can set up two types of FX: Single FX and Group FX. The following sections willexplain both.
3.8.1 Assigning Decks to the FX Units
On the Mixer press the left FX Assign button of a channel to assign FX Unit 1 to thechannel. Press it again to unassign FX Unit 1.
On the mixer press the right FX Assign button of a channel to assign FX Unit 2 to thechannel. Press it again to unassign FX Unit 2.
Both FX Units can be assigned simultaneously:
Using Your S8—Getting Advanced
Adding FX
TRAKTOR KONTROL S8 - Manual - 120
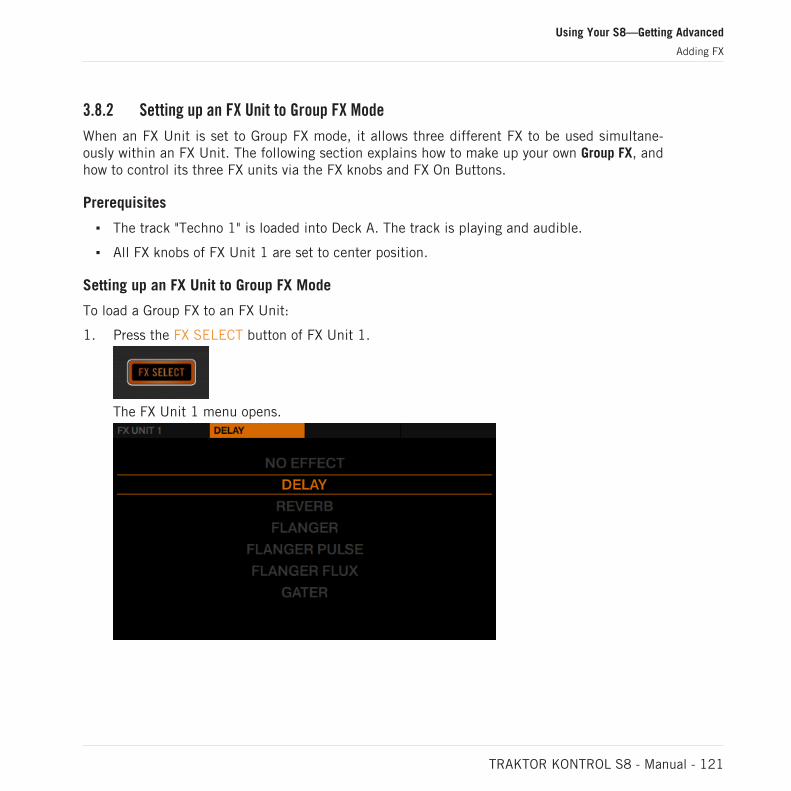
3.8.2 Setting up an FX Unit to Group FX Mode
When an FX Unit is set to Group FX mode, it allows three different FX to be used simultane-ously within an FX Unit. The following section explains how to make up your own Group FX, andhow to control its three FX units via the FX knobs and FX On Buttons.
Prerequisites
The track "Techno 1" is loaded into Deck A. The track is playing and audible.
All FX knobs of FX Unit 1 are set to center position.
Setting up an FX Unit to Group FX Mode
To load a Group FX to an FX Unit:
1. Press the FX SELECT button of FX Unit 1.
The FX Unit 1 menu opens.
Using Your S8—Getting Advanced
Adding FX
TRAKTOR KONTROL S8 - Manual - 121
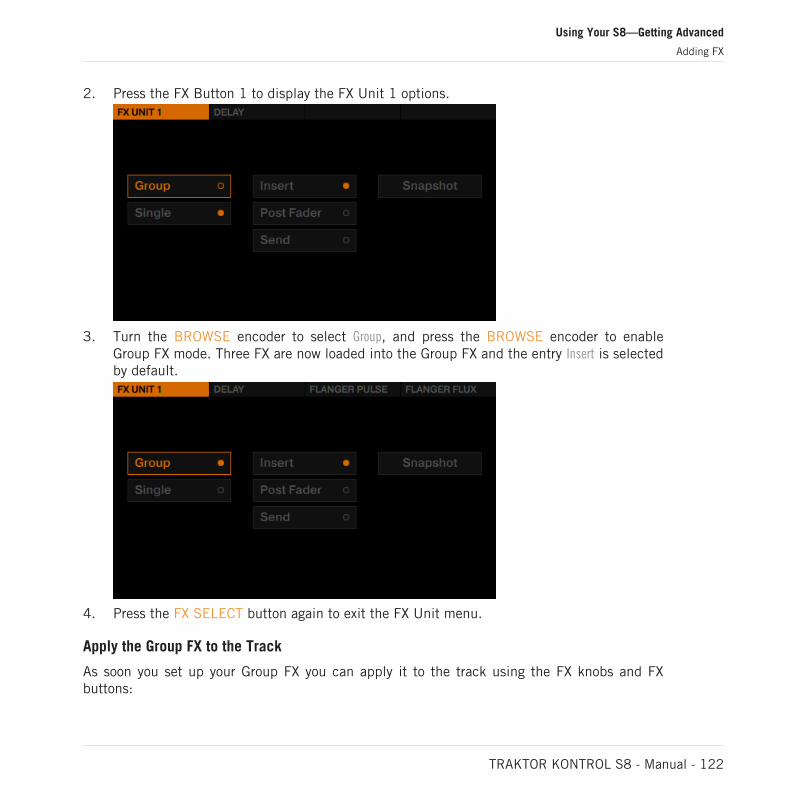
2. Press the FX Button 1 to display the FX Unit 1 options.
3. Turn the BROWSE encoder to select Group, and press the BROWSE encoder to enableGroup FX mode. Three FX are now loaded into the Group FX and the entry Insert is selectedby default.
4. Press the FX SELECT button again to exit the FX Unit menu.
Apply the Group FX to the Track
As soon you set up your Group FX you can apply it to the track using the FX knobs and FXbuttons:
Using Your S8—Getting Advanced
Adding FX
TRAKTOR KONTROL S8 - Manual - 122
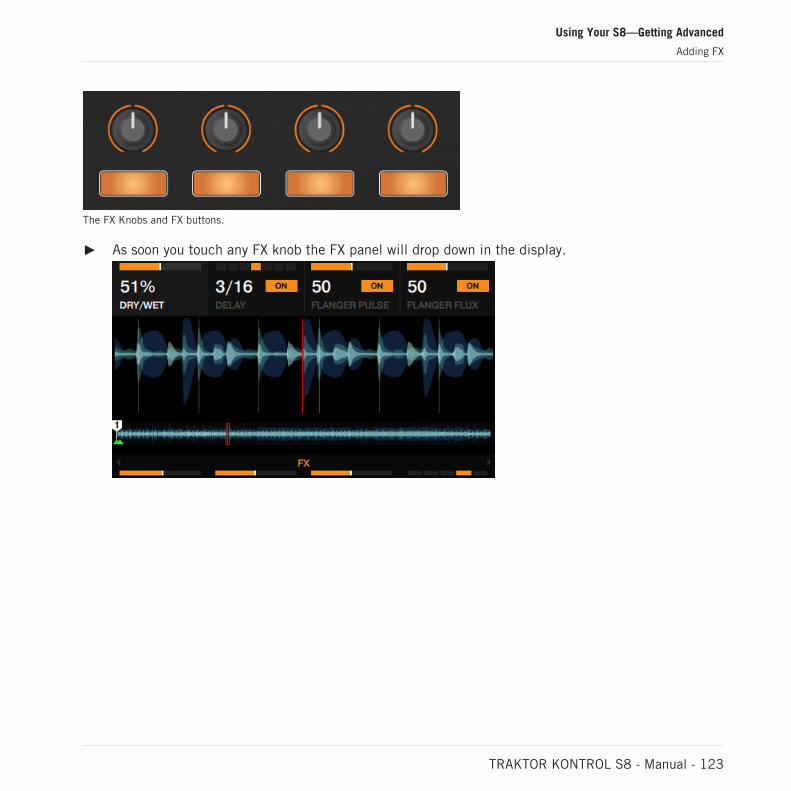
The FX Knobs and FX buttons.
As soon you touch any FX knob the FX panel will drop down in the display.
Using Your S8—Getting Advanced
Adding FX
TRAKTOR KONTROL S8 - Manual - 123
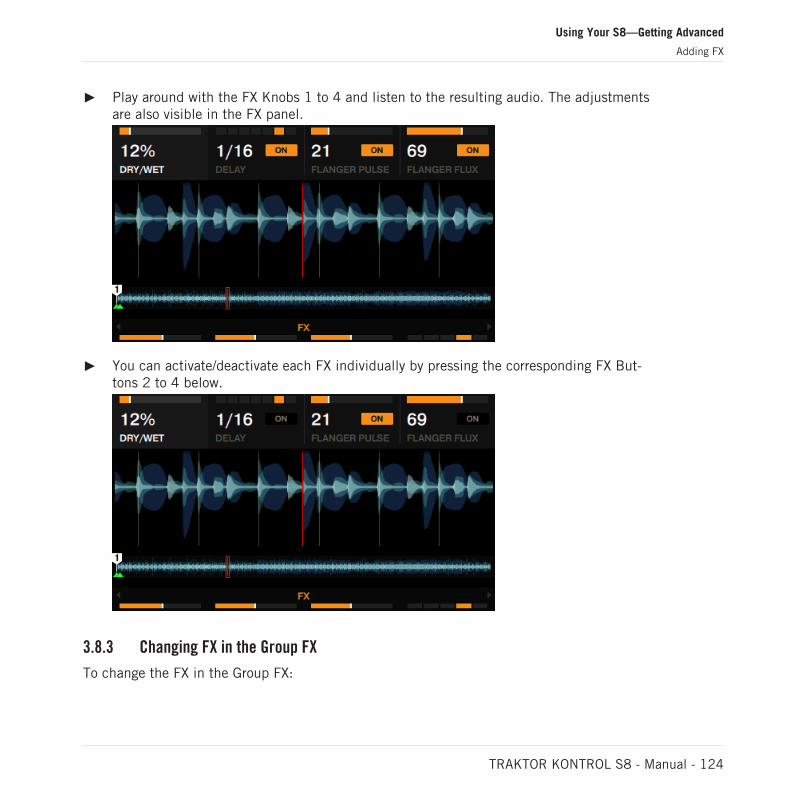
Play around with the FX Knobs 1 to 4 and listen to the resulting audio. The adjustmentsare also visible in the FX panel.
You can activate/deactivate each FX individually by pressing the corresponding FX But-tons 2 to 4 below.
3.8.3 Changing FX in the Group FX
To change the FX in the Group FX:
Using Your S8—Getting Advanced
Adding FX
TRAKTOR KONTROL S8 - Manual - 124

1. Press the FX SELECT button of FX Unit 1 to open the FX Unit menu.
2. In the FX Unit menu press the FX Button you want to change FX on (i.e FX Button 2). Thelist of available FX will be displayed.
3. Turn the BROWSE encoder to select an FX (i.e. Gater), and press the BROWSE encoder toload it.
Using Your S8—Getting Advanced
Adding FX
TRAKTOR KONTROL S8 - Manual - 125
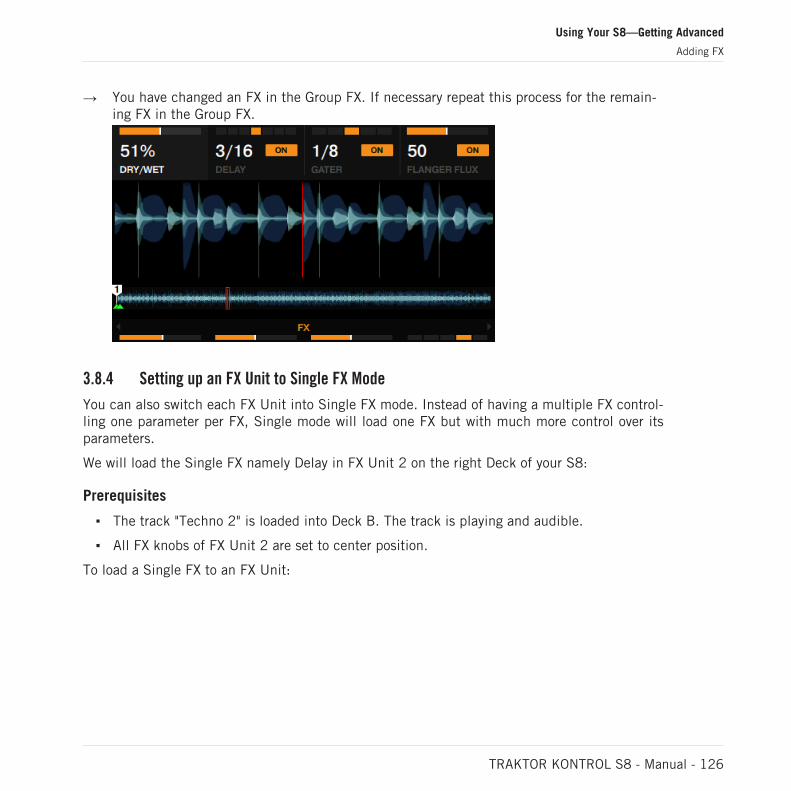
→ You have changed an FX in the Group FX. If necessary repeat this process for the remain-ing FX in the Group FX.
3.8.4 Setting up an FX Unit to Single FX Mode
You can also switch each FX Unit into Single FX mode. Instead of having a multiple FX control-ling one parameter per FX, Single mode will load one FX but with much more control over itsparameters.
We will load the Single FX namely Delay in FX Unit 2 on the right Deck of your S8:
Prerequisites
The track "Techno 2" is loaded into Deck B. The track is playing and audible.
All FX knobs of FX Unit 2 are set to center position.
To load a Single FX to an FX Unit:
Using Your S8—Getting Advanced
Adding FX
TRAKTOR KONTROL S8 - Manual - 126
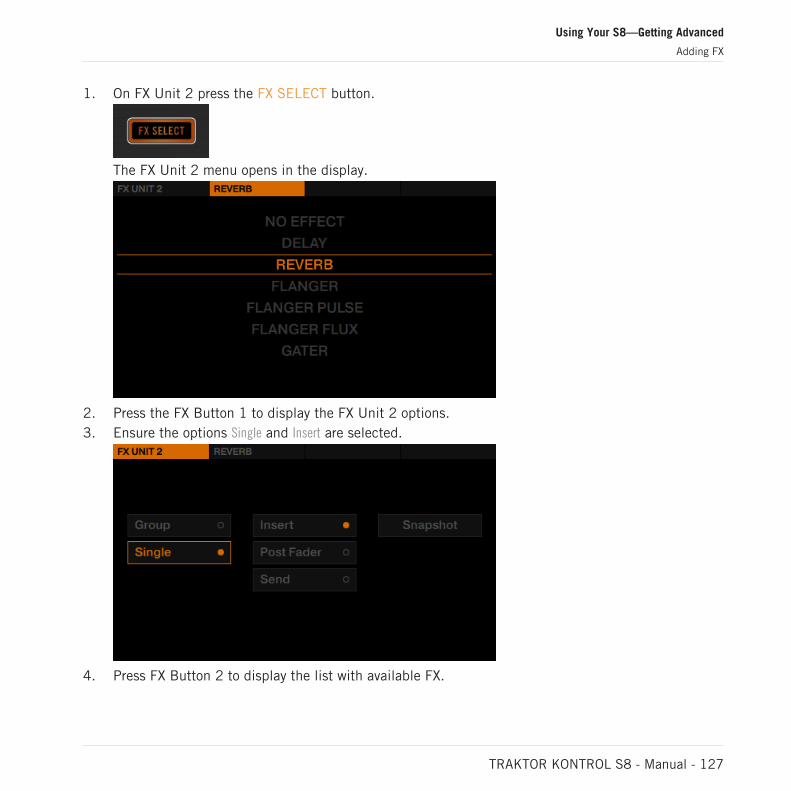
1. On FX Unit 2 press the FX SELECT button.
The FX Unit 2 menu opens in the display.
2. Press the FX Button 1 to display the FX Unit 2 options.3. Ensure the options Single and Insert are selected.
4. Press FX Button 2 to display the list with available FX.
Using Your S8—Getting Advanced
Adding FX
TRAKTOR KONTROL S8 - Manual - 127
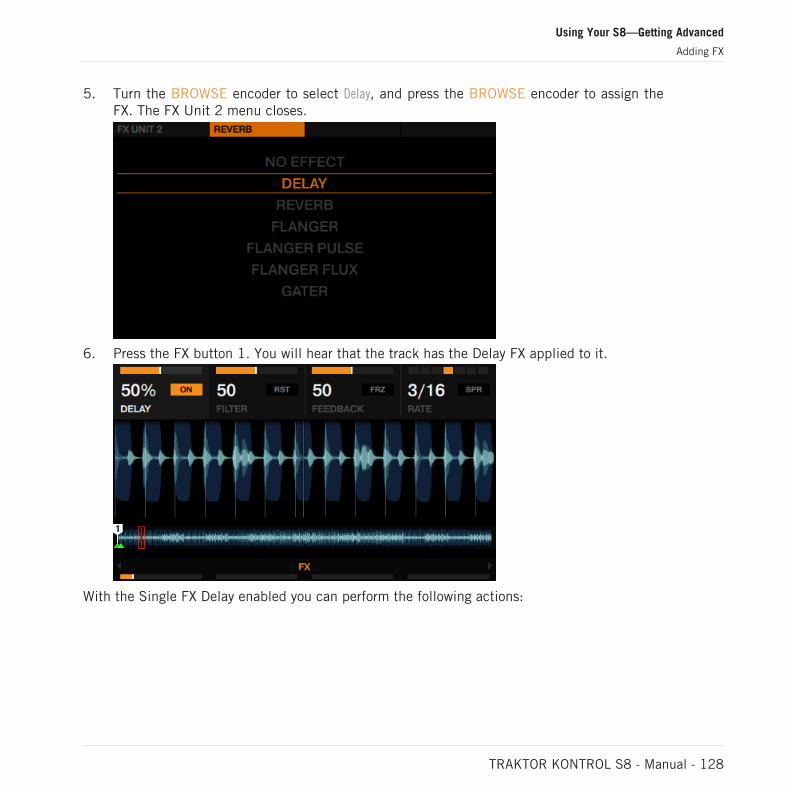
5. Turn the BROWSE encoder to select Delay, and press the BROWSE encoder to assign theFX. The FX Unit 2 menu closes.
6. Press the FX button 1. You will hear that the track has the Delay FX applied to it.
With the Single FX Delay enabled you can perform the following actions:
Using Your S8—Getting Advanced
Adding FX
TRAKTOR KONTROL S8 - Manual - 128
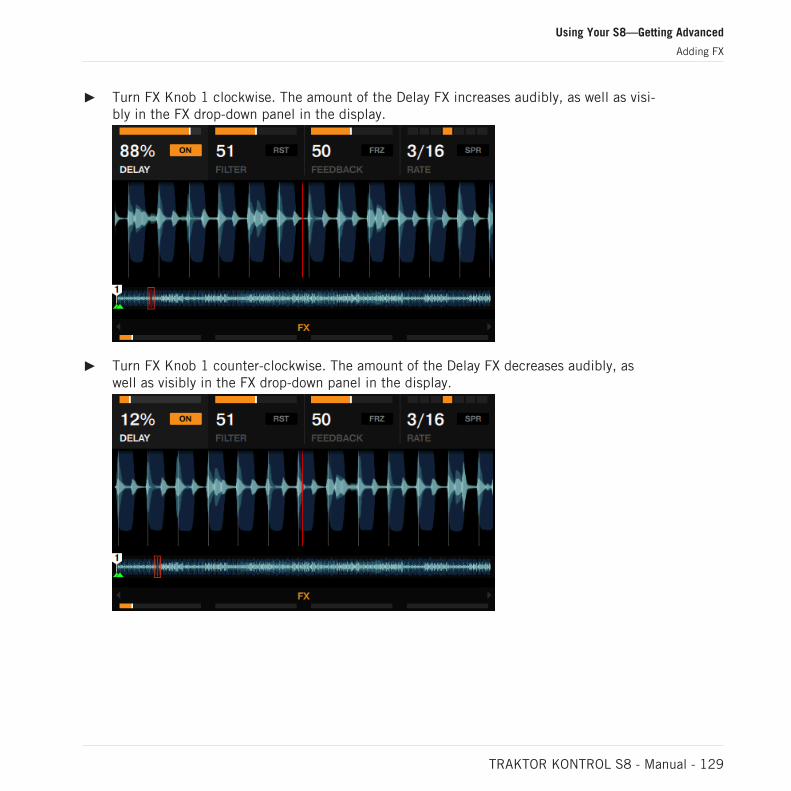
Turn FX Knob 1 clockwise. The amount of the Delay FX increases audibly, as well as visi-bly in the FX drop-down panel in the display.
Turn FX Knob 1 counter-clockwise. The amount of the Delay FX decreases audibly, aswell as visibly in the FX drop-down panel in the display.
Using Your S8—Getting Advanced
Adding FX
TRAKTOR KONTROL S8 - Manual - 129
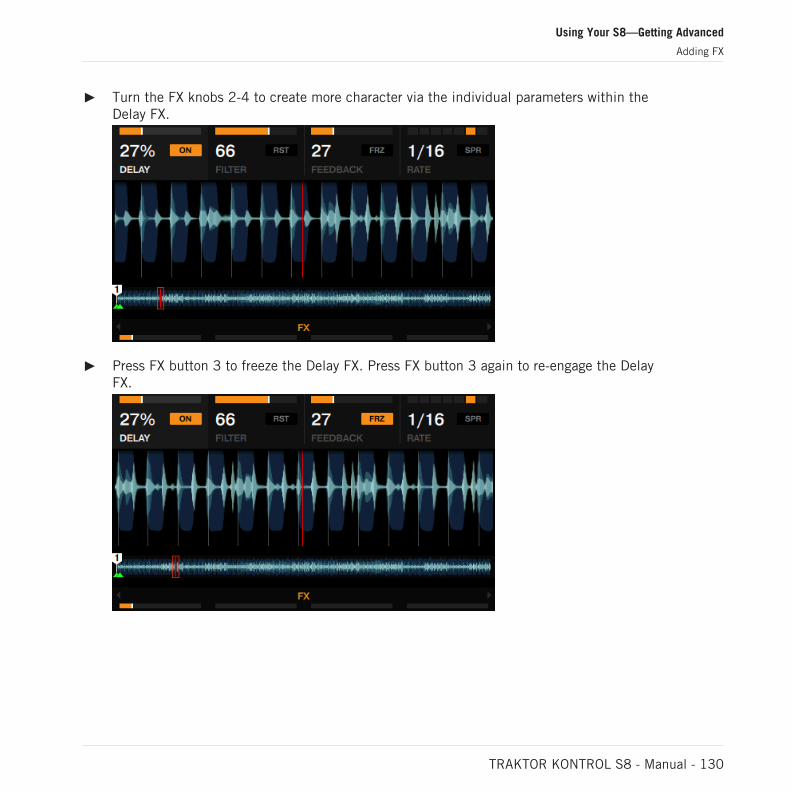
Turn the FX knobs 2-4 to create more character via the individual parameters within theDelay FX.
Press FX button 3 to freeze the Delay FX. Press FX button 3 again to re-engage the DelayFX.
Using Your S8—Getting Advanced
Adding FX
TRAKTOR KONTROL S8 - Manual - 130
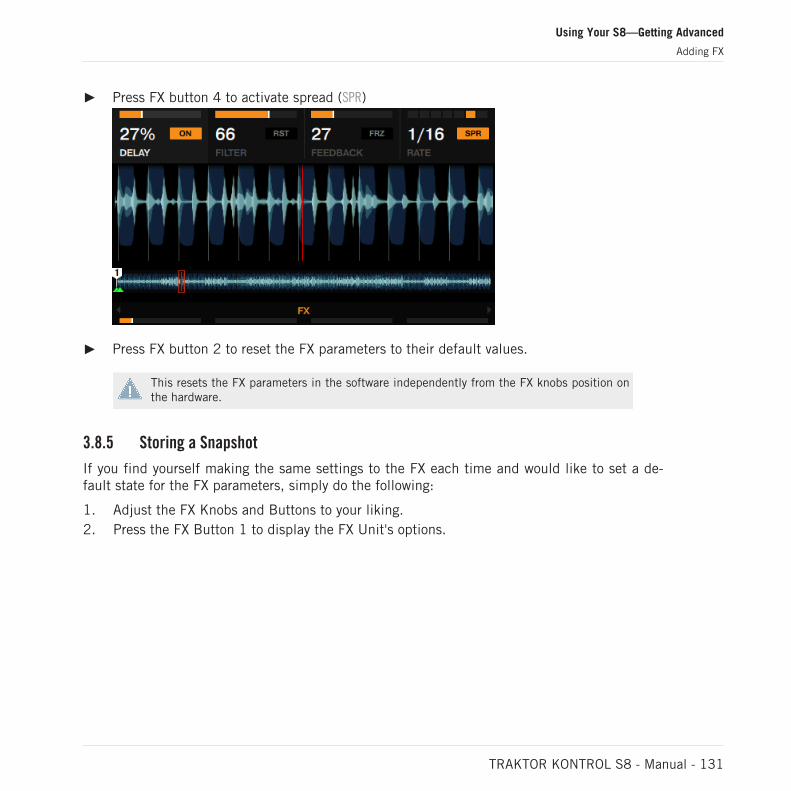
Press FX button 4 to activate spread (SPR)
Press FX button 2 to reset the FX parameters to their default values.
This resets the FX parameters in the software independently from the FX knobs position onthe hardware.
3.8.5 Storing a Snapshot
If you find yourself making the same settings to the FX each time and would like to set a de-fault state for the FX parameters, simply do the following:
1. Adjust the FX Knobs and Buttons to your liking.2. Press the FX Button 1 to display the FX Unit's options.
Using Your S8—Getting Advanced
Adding FX
TRAKTOR KONTROL S8 - Manual - 131
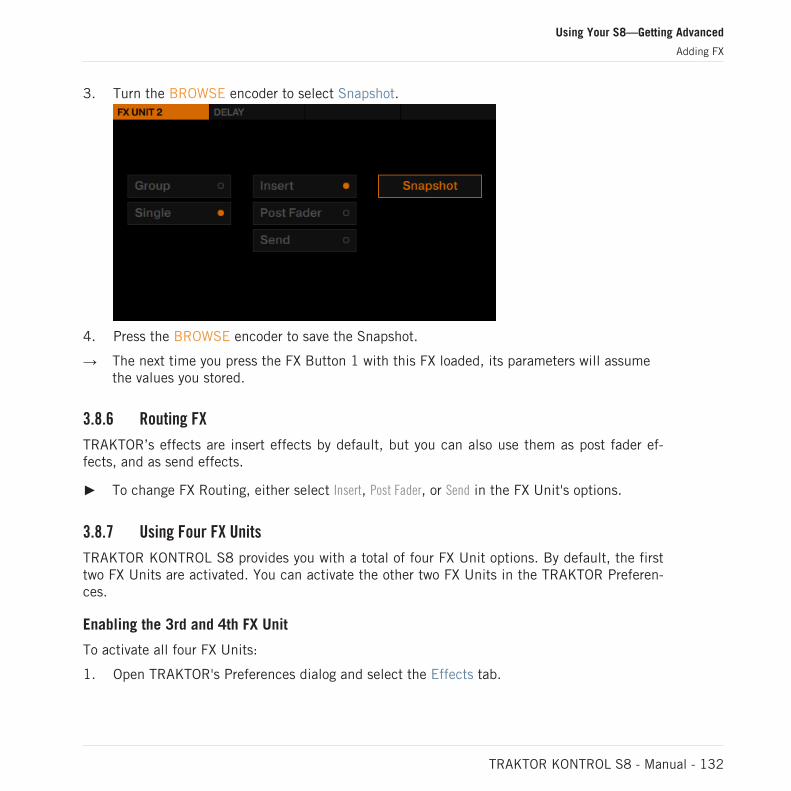
3. Turn the BROWSE encoder to select Snapshot.
4. Press the BROWSE encoder to save the Snapshot.
→ The next time you press the FX Button 1 with this FX loaded, its parameters will assumethe values you stored.
3.8.6 Routing FX
TRAKTOR’s effects are insert effects by default, but you can also use them as post fader ef-fects, and as send effects.
To change FX Routing, either select Insert, Post Fader, or Send in the FX Unit's options.
3.8.7 Using Four FX Units
TRAKTOR KONTROL S8 provides you with a total of four FX Unit options. By default, the firsttwo FX Units are activated. You can activate the other two FX Units in the TRAKTOR Preferen-ces.
Enabling the 3rd and 4th FX Unit
To activate all four FX Units:
1. Open TRAKTOR's Preferences dialog and select the Effects tab.
Using Your S8—Getting Advanced
Adding FX
TRAKTOR KONTROL S8 - Manual - 132
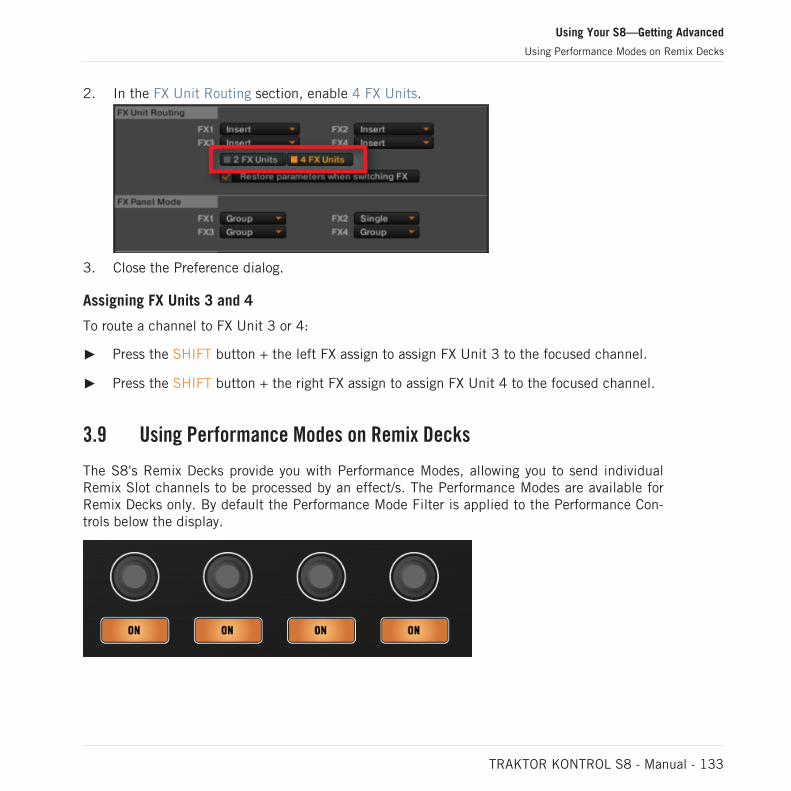
2. In the FX Unit Routing section, enable 4 FX Units.
3. Close the Preference dialog.
Assigning FX Units 3 and 4
To route a channel to FX Unit 3 or 4:
Press the SHIFT button + the left FX assign to assign FX Unit 3 to the focused channel.
Press the SHIFT button + the right FX assign to assign FX Unit 4 to the focused channel.
3.9 Using Performance Modes on Remix Decks
The S8's Remix Decks provide you with Performance Modes, allowing you to send individualRemix Slot channels to be processed by an effect/s. The Performance Modes are available forRemix Decks only. By default the Performance Mode Filter is applied to the Performance Con-trols below the display.
Using Your S8—Getting Advanced
Using Performance Modes on Remix Decks
TRAKTOR KONTROL S8 - Manual - 133

Prerequisites
The Remix Set "Remix Set Tutorial" is loaded to Remix Deck C.
FX Unit 2 is set to Single Mode and has the Reverb FX loaded.
FX Unit 2 is assigned to Deck C.
3.9.1 Selecting and applying an Performance Mode
To select a Performance Modes:
1. Press the DECK button to focus Deck C.2. Trigger some samples.3. Press the Performance Mode buttons to select which parameter the knobs affect.
4. Press the ON buttons to activate/deactivate these parameters per Remix Slot.
Using Your S8—Getting Advanced
Using Performance Modes on Remix Decks
TRAKTOR KONTROL S8 - Manual - 134
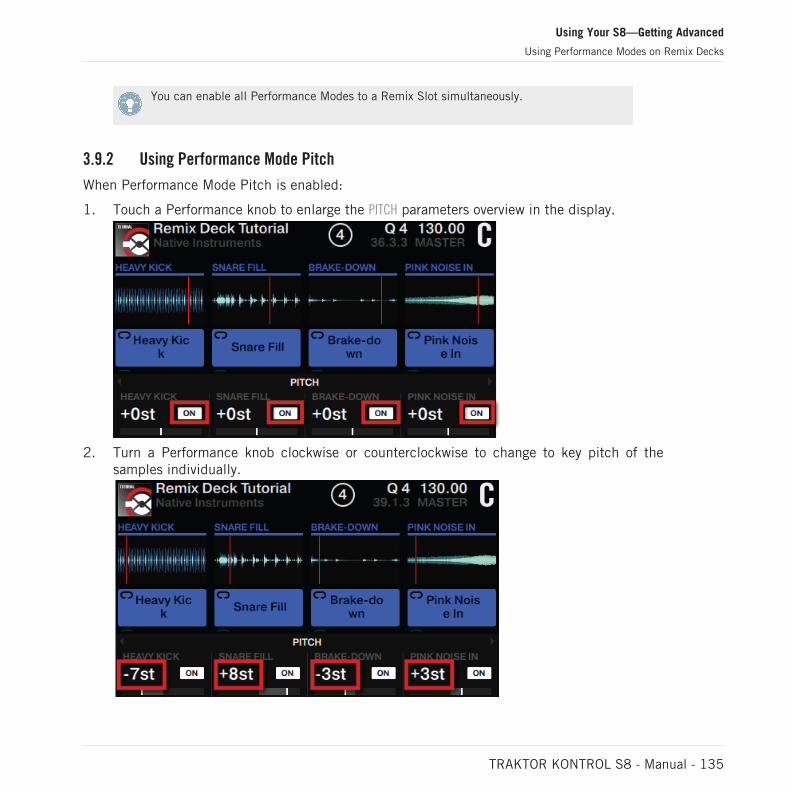
You can enable all Performance Modes to a Remix Slot simultaneously.
3.9.2 Using Performance Mode Pitch
When Performance Mode Pitch is enabled:
1. Touch a Performance knob to enlarge the PITCH parameters overview in the display.
2. Turn a Performance knob clockwise or counterclockwise to change to key pitch of thesamples individually.
Using Your S8—Getting Advanced
Using Performance Modes on Remix Decks
TRAKTOR KONTROL S8 - Manual - 135
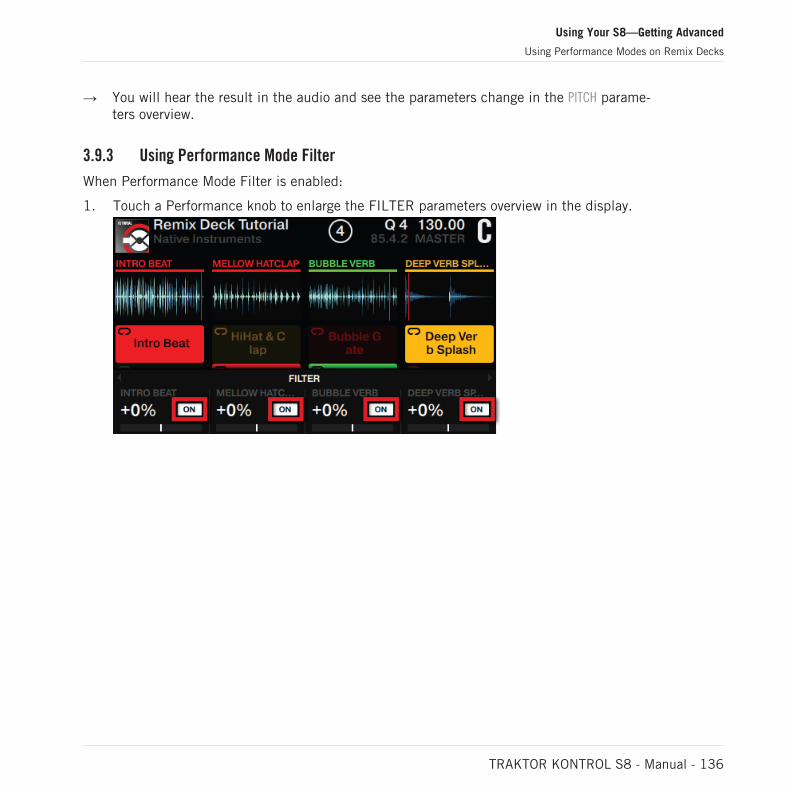
→ You will hear the result in the audio and see the parameters change in the PITCH parame-ters overview.
3.9.3 Using Performance Mode Filter
When Performance Mode Filter is enabled:
1. Touch a Performance knob to enlarge the FILTER parameters overview in the display.
Using Your S8—Getting Advanced
Using Performance Modes on Remix Decks
TRAKTOR KONTROL S8 - Manual - 136
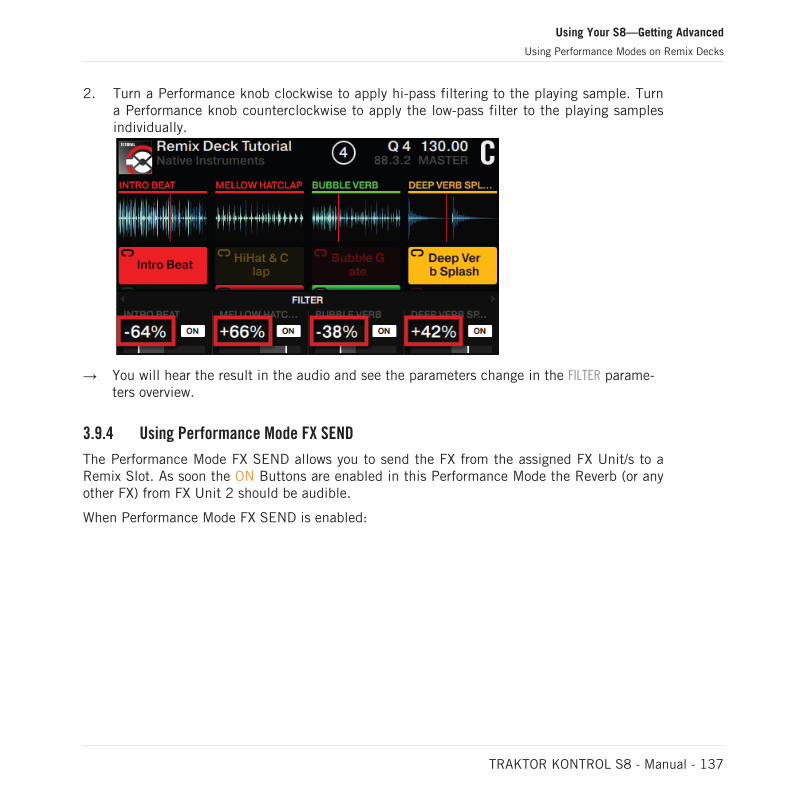
2. Turn a Performance knob clockwise to apply hi-pass filtering to the playing sample. Turna Performance knob counterclockwise to apply the low-pass filter to the playing samplesindividually.
→ You will hear the result in the audio and see the parameters change in the FILTER parame-ters overview.
3.9.4 Using Performance Mode FX SEND
The Performance Mode FX SEND allows you to send the FX from the assigned FX Unit/s to aRemix Slot. As soon the ON Buttons are enabled in this Performance Mode the Reverb (or anyother FX) from FX Unit 2 should be audible.
When Performance Mode FX SEND is enabled:
Using Your S8—Getting Advanced
Using Performance Modes on Remix Decks
TRAKTOR KONTROL S8 - Manual - 137
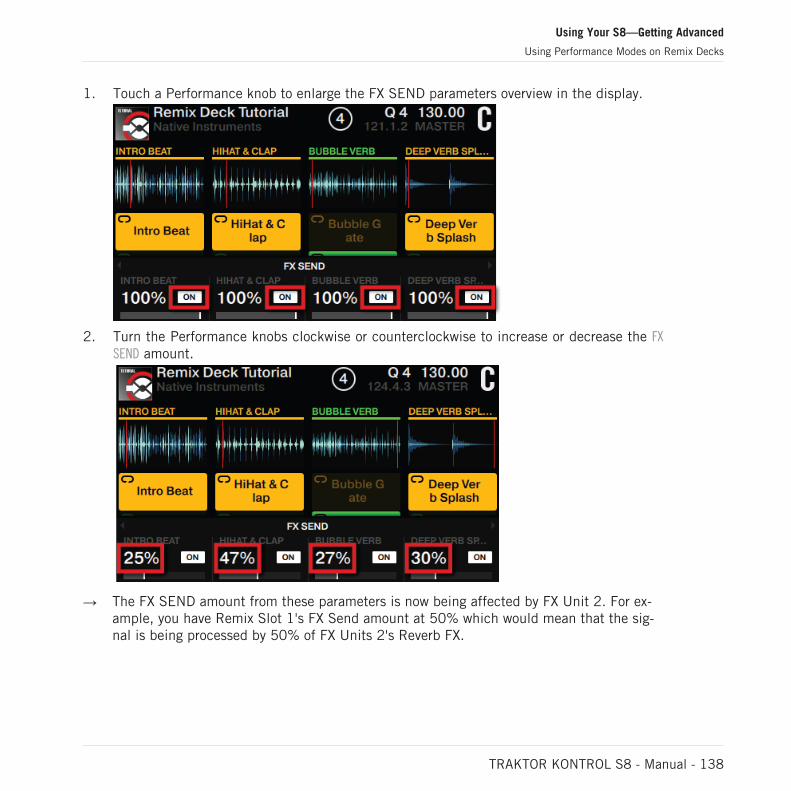
1. Touch a Performance knob to enlarge the FX SEND parameters overview in the display.
2. Turn the Performance knobs clockwise or counterclockwise to increase or decrease the FXSEND amount.
→ The FX SEND amount from these parameters is now being affected by FX Unit 2. For ex-ample, you have Remix Slot 1's FX Send amount at 50% which would mean that the sig-nal is being processed by 50% of FX Units 2's Reverb FX.
Using Your S8—Getting Advanced
Using Performance Modes on Remix Decks
TRAKTOR KONTROL S8 - Manual - 138
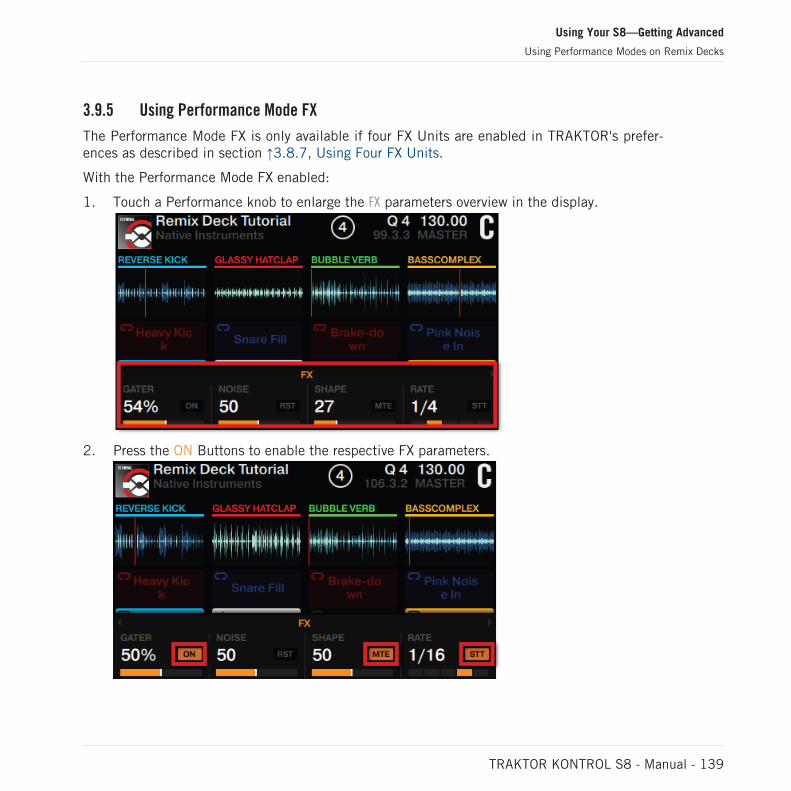
3.9.5 Using Performance Mode FX
The Performance Mode FX is only available if four FX Units are enabled in TRAKTOR's prefer-ences as described in section ↑3.8.7, Using Four FX Units.
With the Performance Mode FX enabled:
1. Touch a Performance knob to enlarge the FX parameters overview in the display.
2. Press the ON Buttons to enable the respective FX parameters.
Using Your S8—Getting Advanced
Using Performance Modes on Remix Decks
TRAKTOR KONTROL S8 - Manual - 139
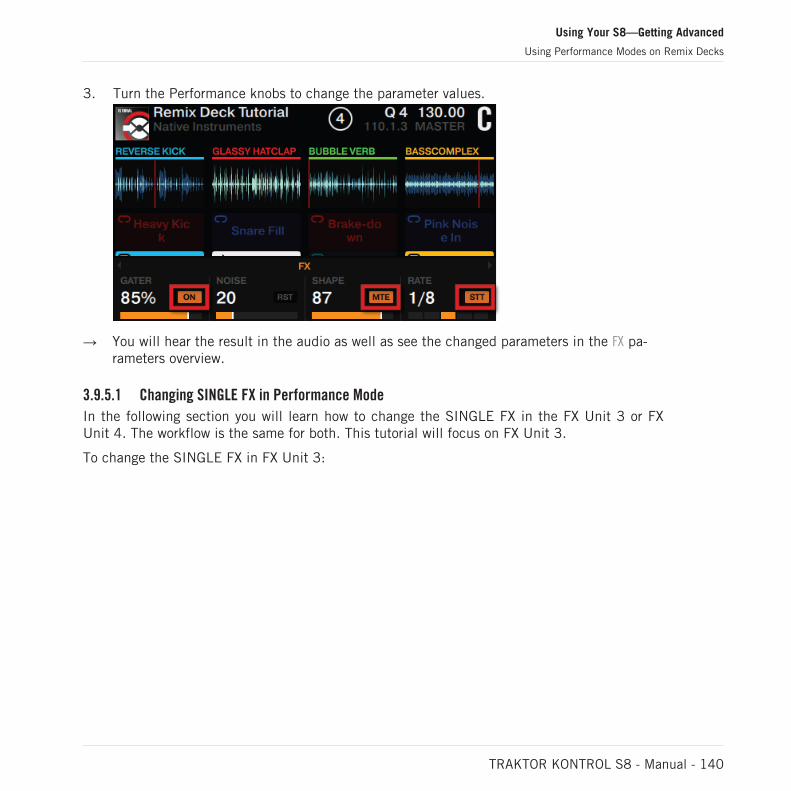
3. Turn the Performance knobs to change the parameter values.
→ You will hear the result in the audio as well as see the changed parameters in the FX pa-rameters overview.
3.9.5.1 Changing SINGLE FX in Performance Mode
In the following section you will learn how to change the SINGLE FX in the FX Unit 3 or FXUnit 4. The workflow is the same for both. This tutorial will focus on FX Unit 3.
To change the SINGLE FX in FX Unit 3:
Using Your S8—Getting Advanced
Using Performance Modes on Remix Decks
TRAKTOR KONTROL S8 - Manual - 140

1. On FX Unit 1 press the FX SELECT button.
The FX Unit 1 menu opens.
2. On the left Deck press the ON Button 1 to switch to FX Unit 3 options. The FX Unit 3options will open in the display.
3. Ensure the entries Single and Insert are selected.
Using Your S8—Getting Advanced
Using Performance Modes on Remix Decks
TRAKTOR KONTROL S8 - Manual - 141
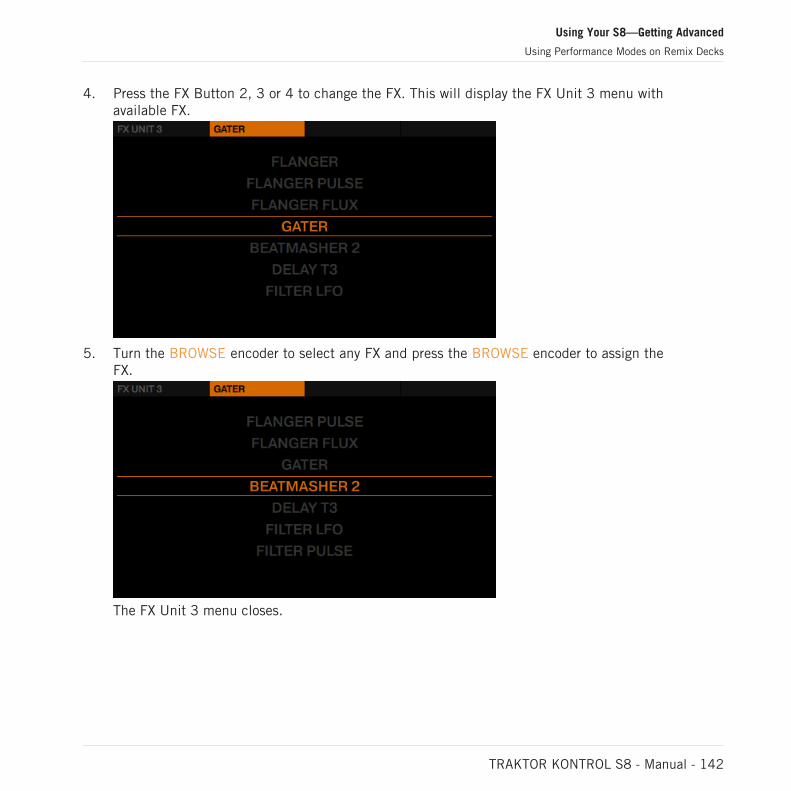
4. Press the FX Button 2, 3 or 4 to change the FX. This will display the FX Unit 3 menu withavailable FX.
5. Turn the BROWSE encoder to select any FX and press the BROWSE encoder to assign theFX.
The FX Unit 3 menu closes.
Using Your S8—Getting Advanced
Using Performance Modes on Remix Decks
TRAKTOR KONTROL S8 - Manual - 142
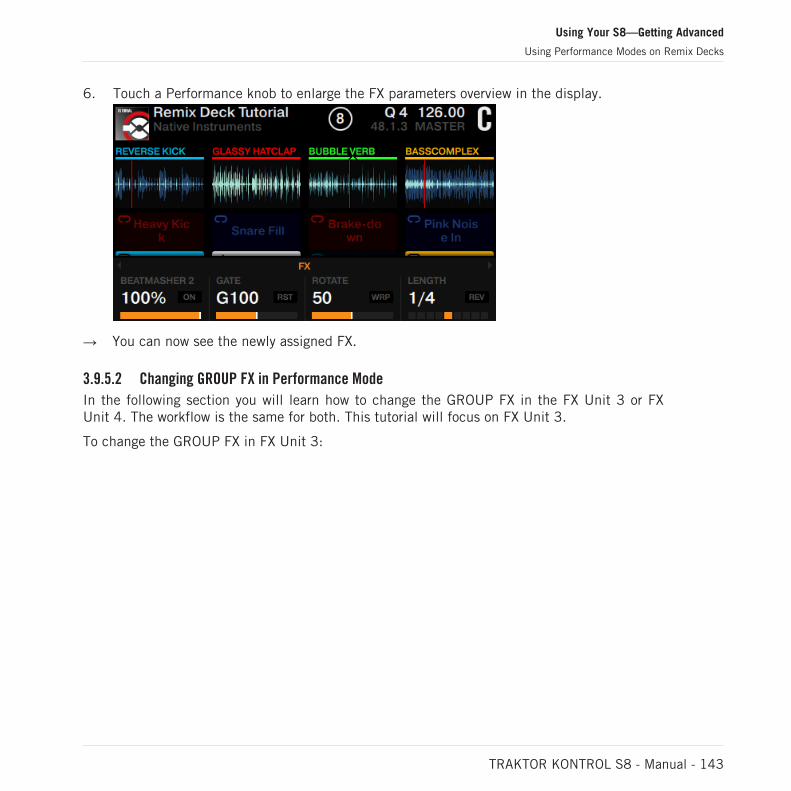
6. Touch a Performance knob to enlarge the FX parameters overview in the display.
→ You can now see the newly assigned FX.
3.9.5.2 Changing GROUP FX in Performance Mode
In the following section you will learn how to change the GROUP FX in the FX Unit 3 or FXUnit 4. The workflow is the same for both. This tutorial will focus on FX Unit 3.
To change the GROUP FX in FX Unit 3:
Using Your S8—Getting Advanced
Using Performance Modes on Remix Decks
TRAKTOR KONTROL S8 - Manual - 143

1. On FX Unit 1 press the FX SELECT button.
The FX Unit 1 menu opens.
2. On the left Deck press the ON Button 1 to switch to FX Unit 3 options The FX Unit 3options will open in the display.
Using Your S8—Getting Advanced
Using Performance Modes on Remix Decks
TRAKTOR KONTROL S8 - Manual - 144
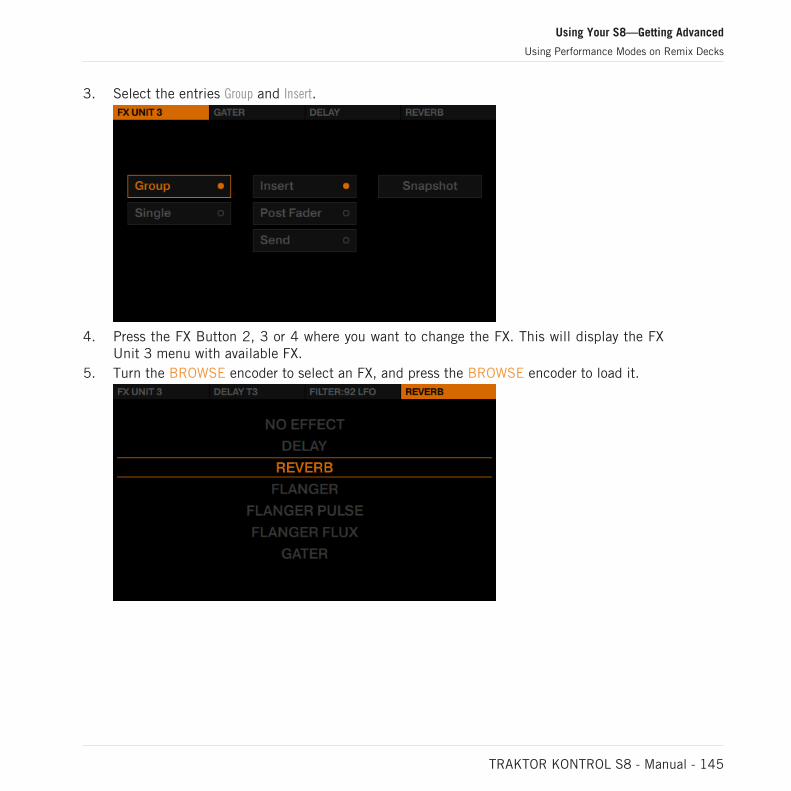
3. Select the entries Group and Insert.
4. Press the FX Button 2, 3 or 4 where you want to change the FX. This will display the FXUnit 3 menu with available FX.
5. Turn the BROWSE encoder to select an FX, and press the BROWSE encoder to load it.
Using Your S8—Getting Advanced
Using Performance Modes on Remix Decks
TRAKTOR KONTROL S8 - Manual - 145
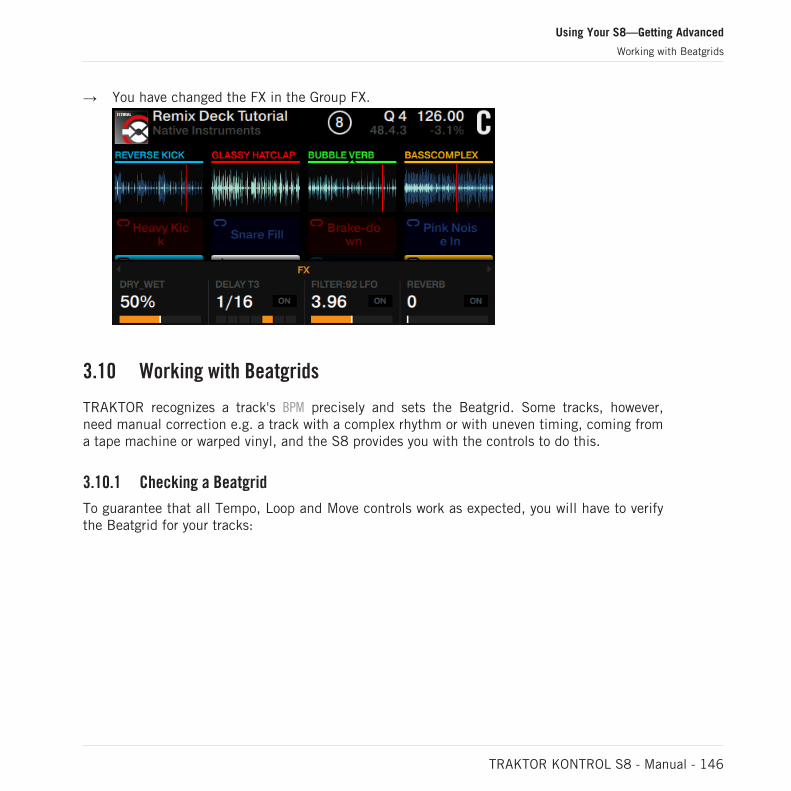
→ You have changed the FX in the Group FX.
3.10 Working with Beatgrids
TRAKTOR recognizes a track's BPM precisely and sets the Beatgrid. Some tracks, however,need manual correction e.g. a track with a complex rhythm or with uneven timing, coming froma tape machine or warped vinyl, and the S8 provides you with the controls to do this.
3.10.1 Checking a Beatgrid
To guarantee that all Tempo, Loop and Move controls work as expected, you will have to verifythe Beatgrid for your tracks:
Using Your S8—Getting Advanced
Working with Beatgrids
TRAKTOR KONTROL S8 - Manual - 146
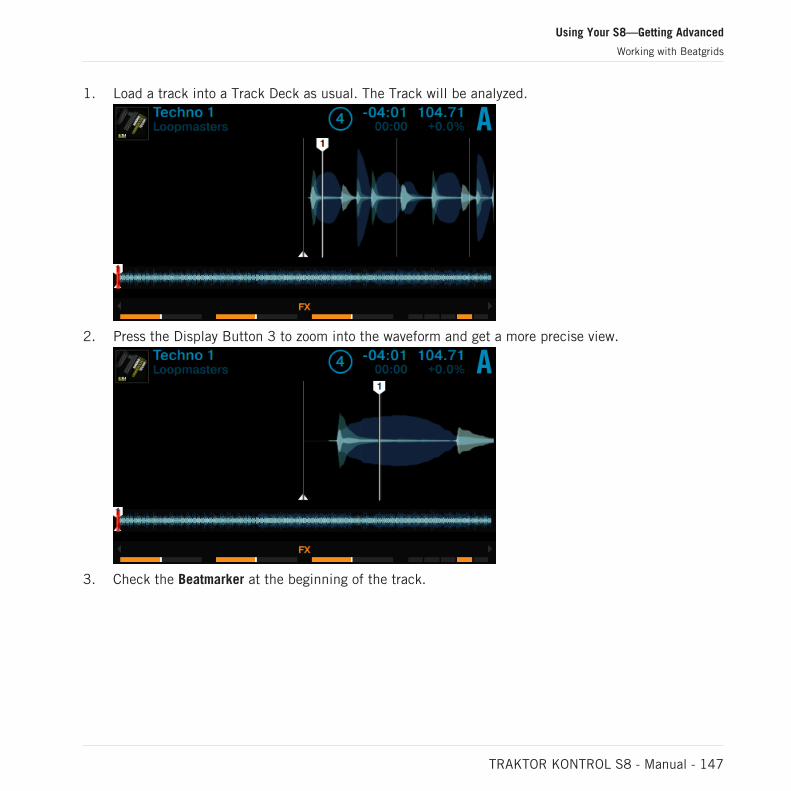
1. Load a track into a Track Deck as usual. The Track will be analyzed.
2. Press the Display Button 3 to zoom into the waveform and get a more precise view.
3. Check the Beatmarker at the beginning of the track.
Using Your S8—Getting Advanced
Working with Beatgrids
TRAKTOR KONTROL S8 - Manual - 147
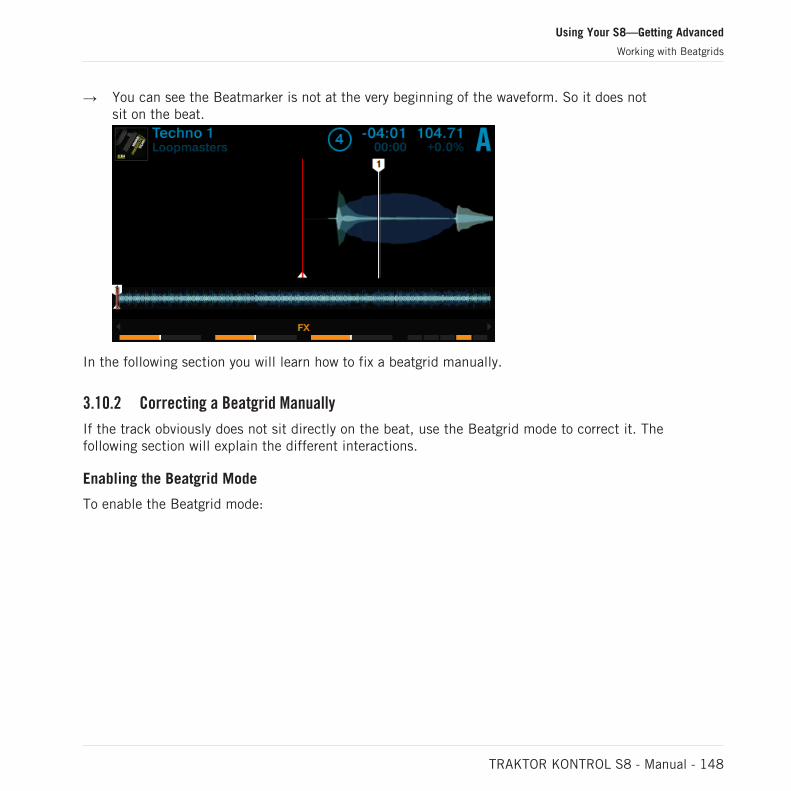
→ You can see the Beatmarker is not at the very beginning of the waveform. So it does notsit on the beat.
In the following section you will learn how to fix a beatgrid manually.
3.10.2 Correcting a Beatgrid Manually
If the track obviously does not sit directly on the beat, use the Beatgrid mode to correct it. Thefollowing section will explain the different interactions.
Enabling the Beatgrid Mode
To enable the Beatgrid mode:
Using Your S8—Getting Advanced
Working with Beatgrids
TRAKTOR KONTROL S8 - Manual - 148
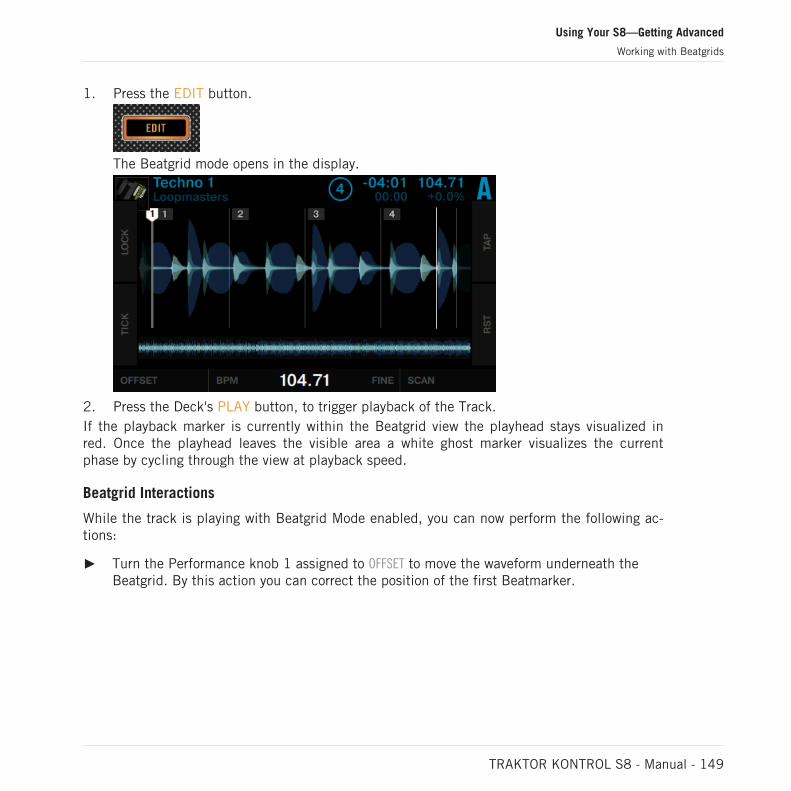
1. Press the EDIT button.
The Beatgrid mode opens in the display.
2. Press the Deck's PLAY button, to trigger playback of the Track.If the playback marker is currently within the Beatgrid view the playhead stays visualized inred. Once the playhead leaves the visible area a white ghost marker visualizes the currentphase by cycling through the view at playback speed.
Beatgrid Interactions
While the track is playing with Beatgrid Mode enabled, you can now perform the following ac-tions:
Turn the Performance knob 1 assigned to OFFSET to move the waveform underneath theBeatgrid. By this action you can correct the position of the first Beatmarker.
Using Your S8—Getting Advanced
Working with Beatgrids
TRAKTOR KONTROL S8 - Manual - 149
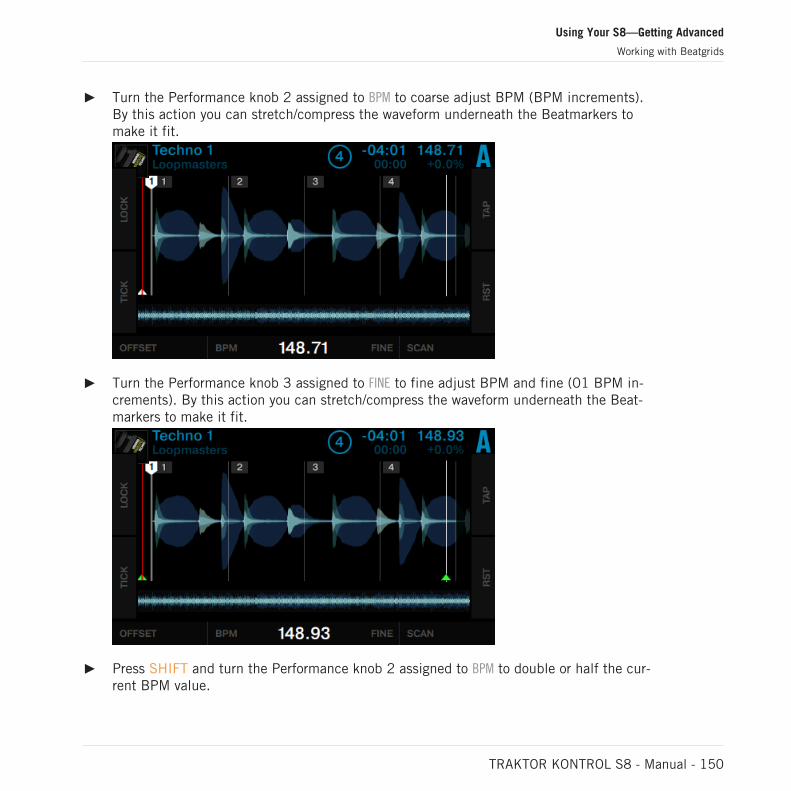
Turn the Performance knob 2 assigned to BPM to coarse adjust BPM (BPM increments).By this action you can stretch/compress the waveform underneath the Beatmarkers tomake it fit.
Turn the Performance knob 3 assigned to FINE to fine adjust BPM and fine (01 BPM in-crements). By this action you can stretch/compress the waveform underneath the Beat-markers to make it fit.
Press SHIFT and turn the Performance knob 2 assigned to BPM to double or half the cur-rent BPM value.
Using Your S8—Getting Advanced
Working with Beatgrids
TRAKTOR KONTROL S8 - Manual - 150

Turn the Performance knob 4 assigned to SCAN to scroll the waveform underneath the gridfor checking the Beatgrid alignment trough the track without effecting audio.
3.10.3 Additional Help Actions
Tap the correct Tempo
You can also define the tempo of the Beatgrid manually:
Use Display Button 3 (TAP) to tap the precise tempo.
→ The Beatgrid will then adapt to your tempo.
Tick (Audible Beatgrid)
The Tick is essentially a metronome used to obtain audible feedback as to the positioning ofthe Beatgrid relative to the beats of the track. The tick is only audible on signals cued over theheadphones.
Using Your S8—Getting Advanced
Working with Beatgrids
TRAKTOR KONTROL S8 - Manual - 151
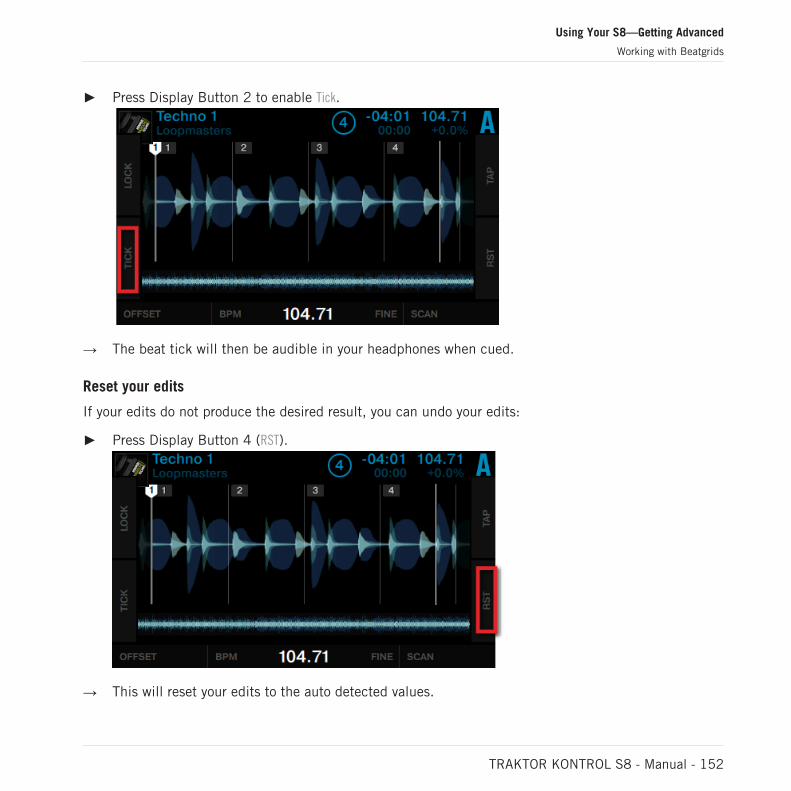
Press Display Button 2 to enable Tick.
→ The beat tick will then be audible in your headphones when cued.
Reset your edits
If your edits do not produce the desired result, you can undo your edits:
Press Display Button 4 (RST).
→ This will reset your edits to the auto detected values.
Using Your S8—Getting Advanced
Working with Beatgrids
TRAKTOR KONTROL S8 - Manual - 152
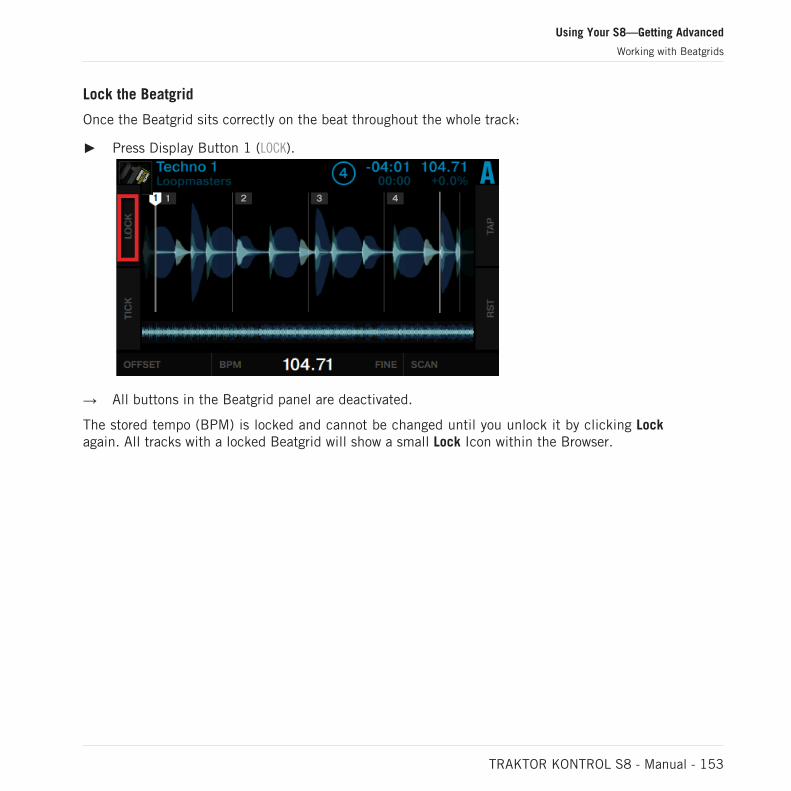
Lock the Beatgrid
Once the Beatgrid sits correctly on the beat throughout the whole track:
Press Display Button 1 (LOCK).
→ All buttons in the Beatgrid panel are deactivated.
The stored tempo (BPM) is locked and cannot be changed until you unlock it by clicking Lockagain. All tracks with a locked Beatgrid will show a small Lock Icon within the Browser.
Using Your S8—Getting Advanced
Working with Beatgrids
TRAKTOR KONTROL S8 - Manual - 153
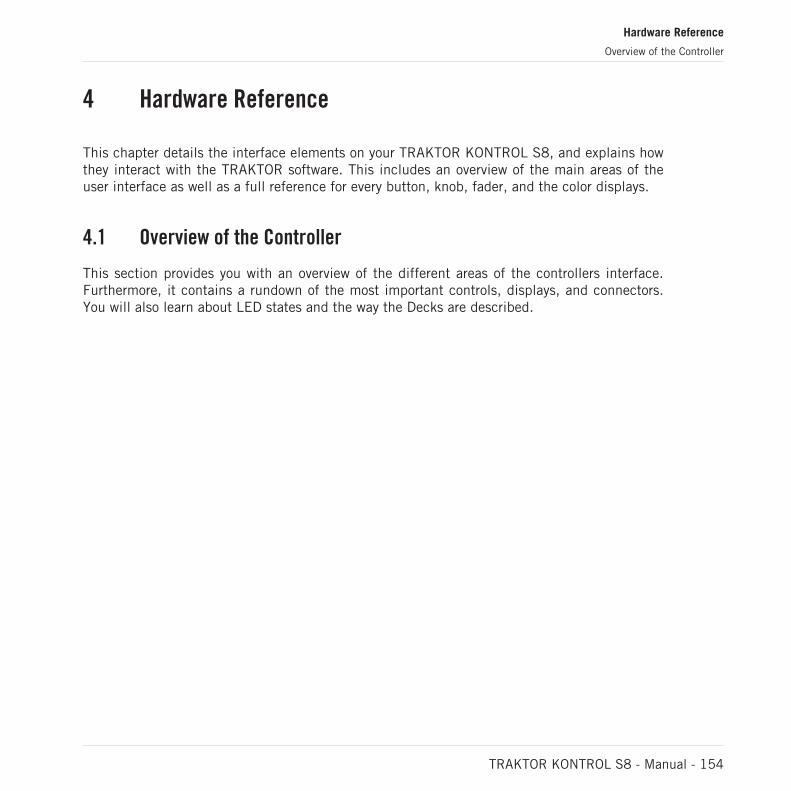
4 Hardware Reference
This chapter details the interface elements on your TRAKTOR KONTROL S8, and explains howthey interact with the TRAKTOR software. This includes an overview of the main areas of theuser interface as well as a full reference for every button, knob, fader, and the color displays.
4.1 Overview of the Controller
This section provides you with an overview of the different areas of the controllers interface.Furthermore, it contains a rundown of the most important controls, displays, and connectors.You will also learn about LED states and the way the Decks are described.
Hardware Reference
Overview of the Controller
TRAKTOR KONTROL S8 - Manual - 154
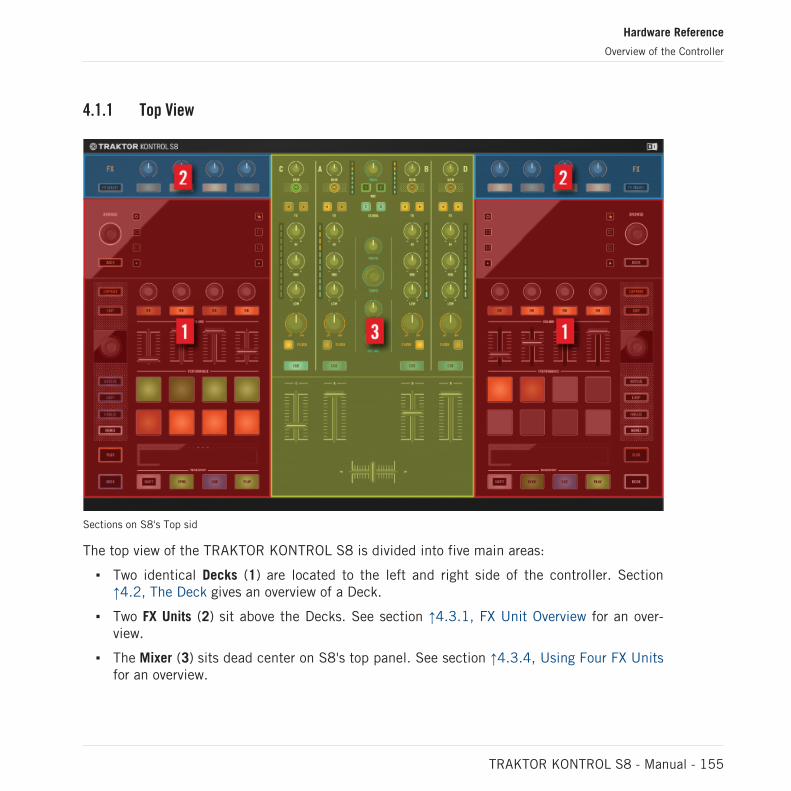
4.1.1 Top View
Sections on S8's Top sid
The top view of the TRAKTOR KONTROL S8 is divided into five main areas:
Two identical Decks (1) are located to the left and right side of the controller. Section↑4.2, The Deck gives an overview of a Deck.
Two FX Units (2) sit above the Decks. See section ↑4.3.1, FX Unit Overview for an over-view.
The Mixer (3) sits dead center on S8's top panel. See section ↑4.3.4, Using Four FX Unitsfor an overview.
Hardware Reference
Overview of the Controller
TRAKTOR KONTROL S8 - Manual - 155

4.1.2 Rear Panel
The Rear Panel with Inputs (orange), outputs (purple) and USB/POWER connectors (grey).
S8's Rear Panel
The rear panel holds four LINE/PHONO INPUTs, two MIC INs and a MIDI IN, as well as an overallthree pairs of line level Audio outputs and a MIDI OUT. On the right side of the rear panel, there'sa USB connector, the POWER connector and ON/OFF switch.Please refer to section ↑4.5, TheRear Panel for an overview of the Rear Panel.
4.1.3 Front Panel
The Front Panel with headphone outputs (purple) and the Crossfader setup section (green).
S8's Front Panel
On the front panel, the Crossfader behavior is set up via the XF CURVE knob and the A, B, C andD switches, while two PHONES outputs let you listen to the CUE. Chapter ↑4.6, The Front Pan-el gives an overview of the Front Panel.
4.1.4 LED States
All of S8's buttons and pads are equipped with LEDs to indicate their status. We differentiatebetween three states:
Bright LED means that a feature is active.
Dim LED means that a feature is inactive.
LED off means that a button doesn't have a fixed function in the current context.
Hardware Reference
Overview of the Controller
TRAKTOR KONTROL S8 - Manual - 156
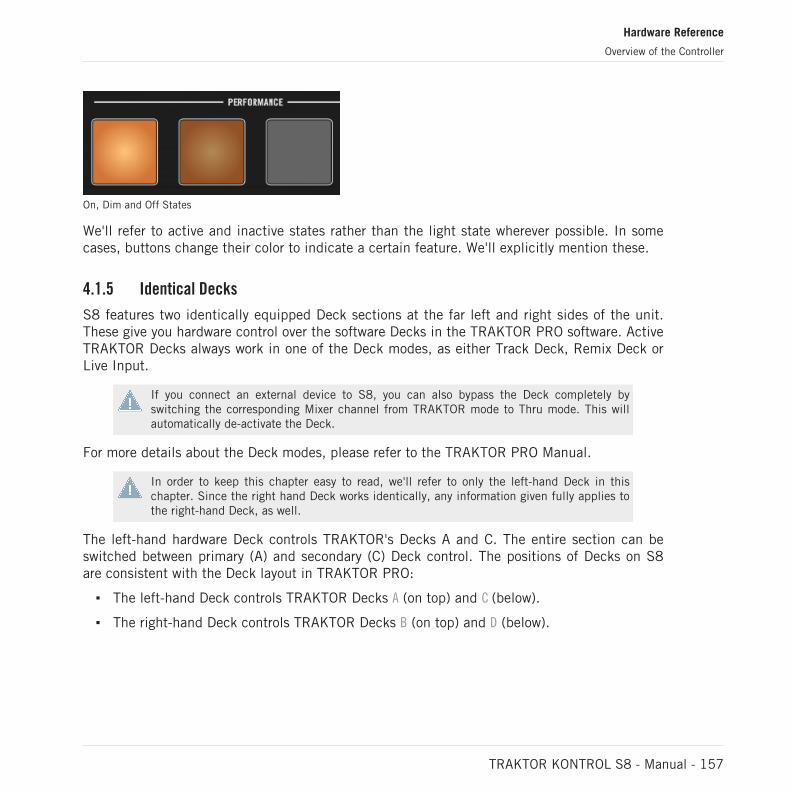
On, Dim and Off States
We'll refer to active and inactive states rather than the light state wherever possible. In somecases, buttons change their color to indicate a certain feature. We'll explicitly mention these.
4.1.5 Identical Decks
S8 features two identically equipped Deck sections at the far left and right sides of the unit.These give you hardware control over the software Decks in the TRAKTOR PRO software. ActiveTRAKTOR Decks always work in one of the Deck modes, as either Track Deck, Remix Deck orLive Input.
If you connect an external device to S8, you can also bypass the Deck completely byswitching the corresponding Mixer channel from TRAKTOR mode to Thru mode. This willautomatically de-activate the Deck.
For more details about the Deck modes, please refer to the TRAKTOR PRO Manual.
In order to keep this chapter easy to read, we'll refer to only the left-hand Deck in thischapter. Since the right hand Deck works identically, any information given fully applies tothe right-hand Deck, as well.
The left-hand hardware Deck controls TRAKTOR's Decks A and C. The entire section can beswitched between primary (A) and secondary (C) Deck control. The positions of Decks on S8are consistent with the Deck layout in TRAKTOR PRO:
The left-hand Deck controls TRAKTOR Decks A (on top) and C (below).
The right-hand Deck controls TRAKTOR Decks B (on top) and D (below).
Hardware Reference
Overview of the Controller
TRAKTOR KONTROL S8 - Manual - 157
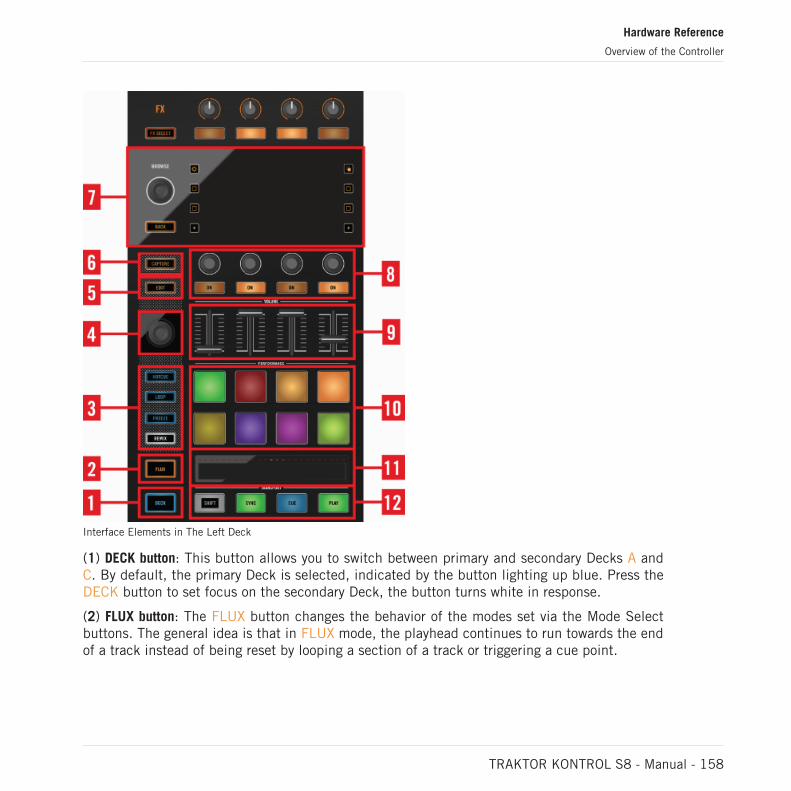
Interface Elements in The Left Deck
(1) DECK button: This button allows you to switch between primary and secondary Decks A andC. By default, the primary Deck is selected, indicated by the button lighting up blue. Press theDECK button to set focus on the secondary Deck, the button turns white in response.
(2) FLUX button: The FLUX button changes the behavior of the modes set via the Mode Selectbuttons. The general idea is that in FLUX mode, the playhead continues to run towards the endof a track instead of being reset by looping a section of a track or triggering a cue point.
Hardware Reference
Overview of the Controller
TRAKTOR KONTROL S8 - Manual - 158
(3) Mode Select buttons: These four buttons (HOTCUE, LOOP, FREEZE, REMIX) determine theadjacent pads' functionality. Please find detailed descriptions of the modes in section ↑4.2.3,Mode Select Buttons.
(4) Loop encoder: The Loop Encoder is primarily used to trigger loops and to adjust the loopsize. For further information on the Loop encoder, please refer to section ↑4.2.4, Loop Encod-er.
(5) EDIT button: The EDIT button provides access to Beat Grid Edit mode, refer to section↑4.2.5, EDIT Button for further details.
(6) CAPTURE button: Pressing the CAPTURE button copies a sample to a Remix Deck cell.Please refer to section ↑4.2.6, CAPTURE Button for a full workflow description.
(7) Display and BROWSE controls: On top of each Deck, S8 features a full color graphic display,8 Display buttons, the BROWSE encoder, as well as the BACK button.
The displays allow convenient browsing of tracks, individual samples and Remix Sets via theBROWSE encoder and BACK buttons.
The eight buttons along the sides of the display control different features, depending on whichview you're in. Please refer to chapter ↑4.2.7, Display Area for further details.
(8) Performance controls: There are four knobs and four buttons per Deck, located beneath S8'sdisplays. By default, these provide access to FX SEND, PITCH and FILTER per slot in the Re-mix Deck C. A detailed explanation of the Performance Controls is provided in section ↑4.2.8,Performance Controls.
(9) Slot Volume faders: These faders let you quickly fade in and fade out a Remix Deck's Slots.
(10) Pads: The pads let you create and jump to cue points, trigger pre-defined loop sizes orstart and stop playback of Remix cells.
(11) Touch Strip control: This touch-sensitive control provides different functionality dependingon the mode selected via the Mode Select buttons. It allows you to jump to an absolute pointin the track by tapping anywhere on the recessed surface. It also lets you manually sync Decks.A row of LEDs visualizes either the track position or the phase relation between Decks.
(12) TRANSPORT controls: Four dedicated buttons located along the bottom edge of a Deck Unitstart/pause playback, start playback at the CUE point or SYNC the corresponding Deck to theMaster. SHIFT+SYNC assigns a Deck the Master function. For a detailed explanation of thesecontrol elements, refer to section ↑4.2.12, Transport Controls.
Hardware Reference
Overview of the Controller
TRAKTOR KONTROL S8 - Manual - 159
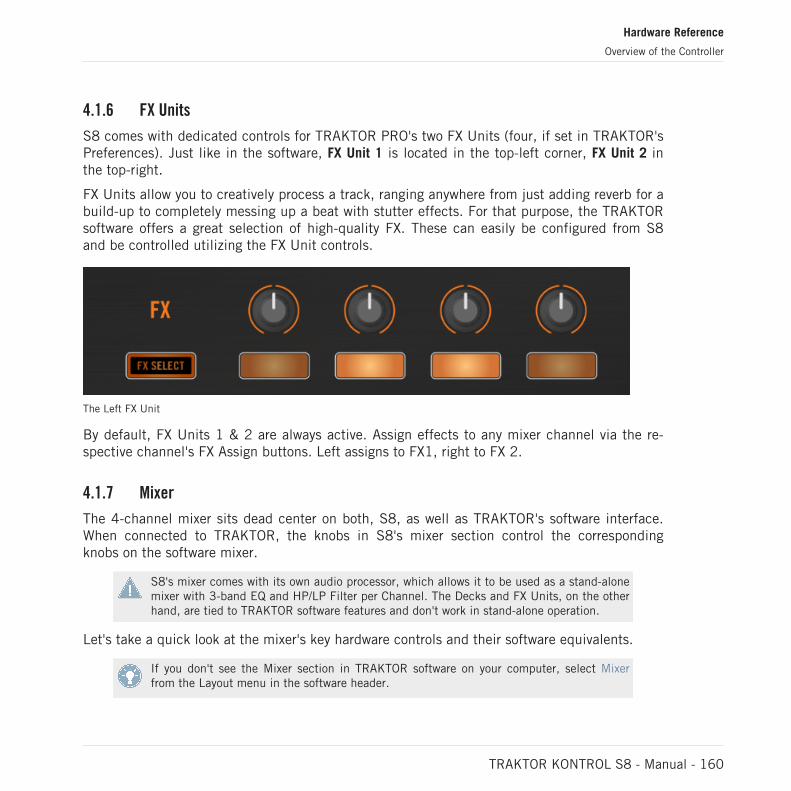
4.1.6 FX Units
S8 comes with dedicated controls for TRAKTOR PRO's two FX Units (four, if set in TRAKTOR'sPreferences). Just like in the software, FX Unit 1 is located in the top-left corner, FX Unit 2 inthe top-right.
FX Units allow you to creatively process a track, ranging anywhere from just adding reverb for abuild-up to completely messing up a beat with stutter effects. For that purpose, the TRAKTORsoftware offers a great selection of high-quality FX. These can easily be configured from S8and be controlled utilizing the FX Unit controls.
The Left FX Unit
By default, FX Units 1 & 2 are always active. Assign effects to any mixer channel via the re-spective channel's FX Assign buttons. Left assigns to FX1, right to FX 2.
4.1.7 Mixer
The 4-channel mixer sits dead center on both, S8, as well as TRAKTOR's software interface.When connected to TRAKTOR, the knobs in S8's mixer section control the correspondingknobs on the software mixer.
S8's mixer comes with its own audio processor, which allows it to be used as a stand-alonemixer with 3-band EQ and HP/LP Filter per Channel. The Decks and FX Units, on the otherhand, are tied to TRAKTOR software features and don't work in stand-alone operation.
Let's take a quick look at the mixer's key hardware controls and their software equivalents.
If you don't see the Mixer section in TRAKTOR software on your computer, select Mixerfrom the Layout menu in the software header.
Hardware Reference
Overview of the Controller
TRAKTOR KONTROL S8 - Manual - 160
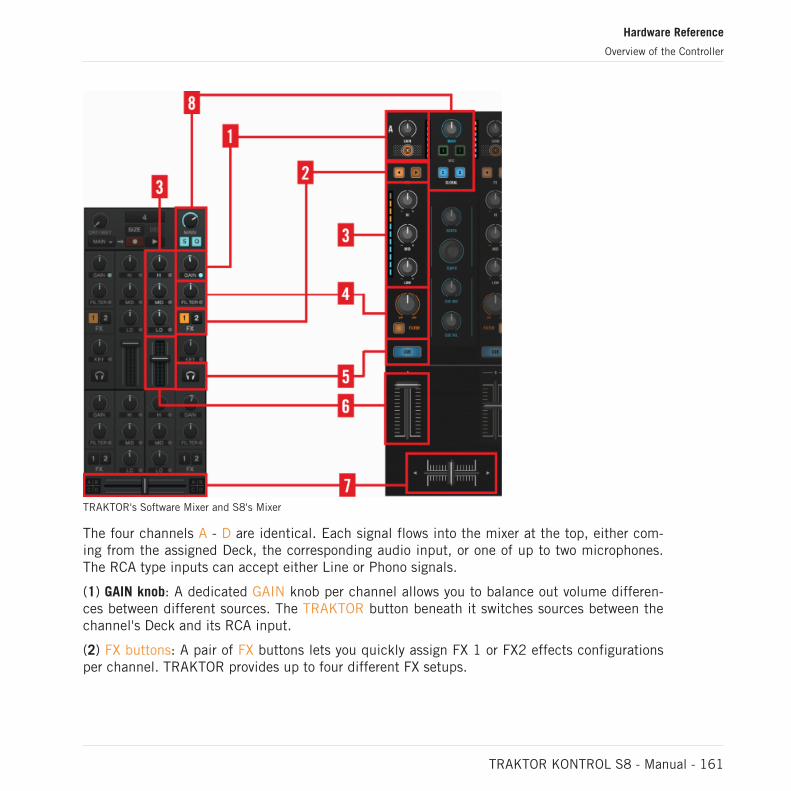
TRAKTOR's Software Mixer and S8's Mixer
The four channels A - D are identical. Each signal flows into the mixer at the top, either com-ing from the assigned Deck, the corresponding audio input, or one of up to two microphones.The RCA type inputs can accept either Line or Phono signals.
(1) GAIN knob: A dedicated GAIN knob per channel allows you to balance out volume differen-ces between different sources. The TRAKTOR button beneath it switches sources between thechannel's Deck and its RCA input.
(2) FX buttons: A pair of FX buttons lets you quickly assign FX 1 or FX2 effects configurationsper channel. TRAKTOR provides up to four different FX setups.
Hardware Reference
Overview of the Controller
TRAKTOR KONTROL S8 - Manual - 161
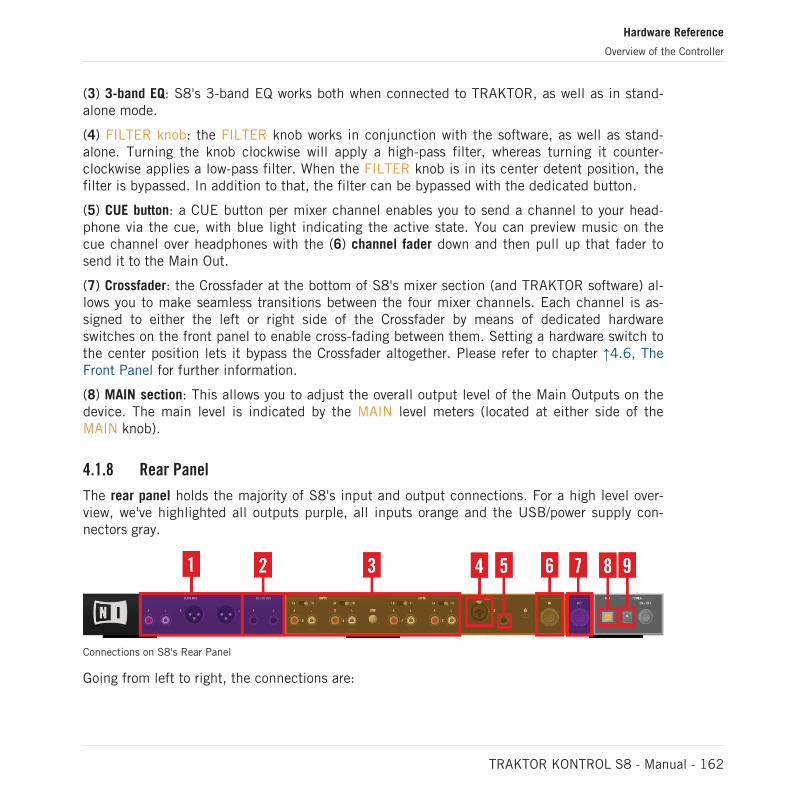
(3) 3-band EQ: S8's 3-band EQ works both when connected to TRAKTOR, as well as in stand-alone mode.
(4) FILTER knob: the FILTER knob works in conjunction with the software, as well as stand-alone. Turning the knob clockwise will apply a high-pass filter, whereas turning it counter-clockwise applies a low-pass filter. When the FILTER knob is in its center detent position, thefilter is bypassed. In addition to that, the filter can be bypassed with the dedicated button.
(5) CUE button: a CUE button per mixer channel enables you to send a channel to your head-phone via the cue, with blue light indicating the active state. You can preview music on thecue channel over headphones with the (6) channel fader down and then pull up that fader tosend it to the Main Out.
(7) Crossfader: the Crossfader at the bottom of S8's mixer section (and TRAKTOR software) al-lows you to make seamless transitions between the four mixer channels. Each channel is as-signed to either the left or right side of the Crossfader by means of dedicated hardwareswitches on the front panel to enable cross-fading between them. Setting a hardware switch tothe center position lets it bypass the Crossfader altogether. Please refer to chapter ↑4.6, TheFront Panel for further information.
(8) MAIN section: This allows you to adjust the overall output level of the Main Outputs on thedevice. The main level is indicated by the MAIN level meters (located at either side of theMAIN knob).
4.1.8 Rear Panel
The rear panel holds the majority of S8's input and output connections. For a high level over-view, we've highlighted all outputs purple, all inputs orange and the USB/power supply con-nectors gray.
Connections on S8's Rear Panel
Going from left to right, the connections are:
Hardware Reference
Overview of the Controller
TRAKTOR KONTROL S8 - Manual - 162
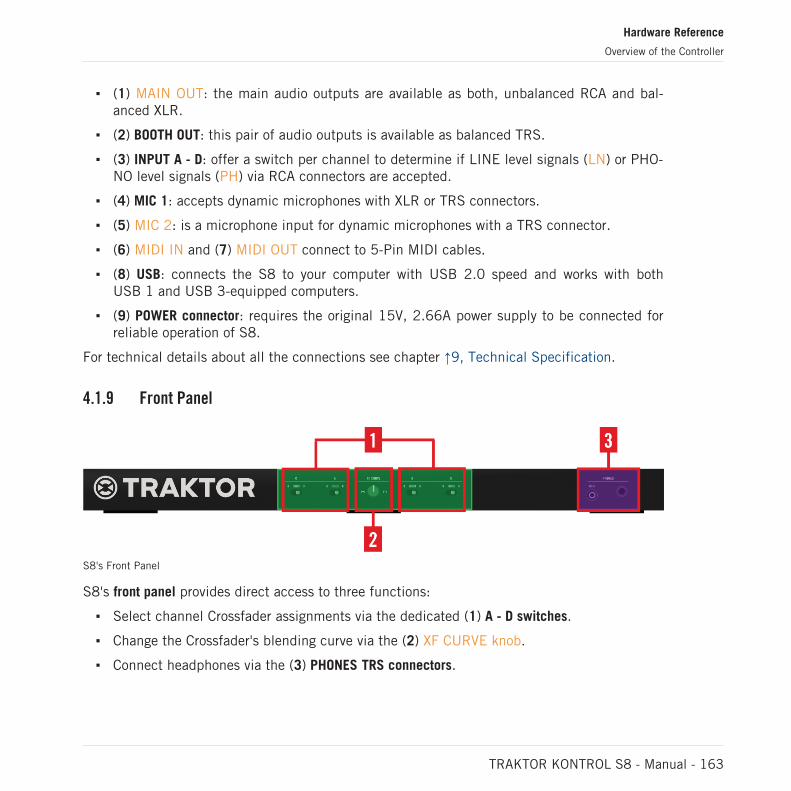
(1) MAIN OUT: the main audio outputs are available as both, unbalanced RCA and bal-anced XLR.
(2) BOOTH OUT: this pair of audio outputs is available as balanced TRS.
(3) INPUT A - D: offer a switch per channel to determine if LINE level signals (LN) or PHO-NO level signals (PH) via RCA connectors are accepted.
(4) MIC 1: accepts dynamic microphones with XLR or TRS connectors.
(5) MIC 2: is a microphone input for dynamic microphones with a TRS connector.
(6) MIDI IN and (7) MIDI OUT connect to 5-Pin MIDI cables.
(8) USB: connects the S8 to your computer with USB 2.0 speed and works with bothUSB 1 and USB 3-equipped computers.
(9) POWER connector: requires the original 15V, 2.66A power supply to be connected forreliable operation of S8.
For technical details about all the connections see chapter ↑9, Technical Specification.
4.1.9 Front Panel
S8's Front Panel
S8's front panel provides direct access to three functions:
Select channel Crossfader assignments via the dedicated (1) A - D switches.
Change the Crossfader's blending curve via the (2) XF CURVE knob.
Connect headphones via the (3) PHONES TRS connectors.
Hardware Reference
Overview of the Controller
TRAKTOR KONTROL S8 - Manual - 163
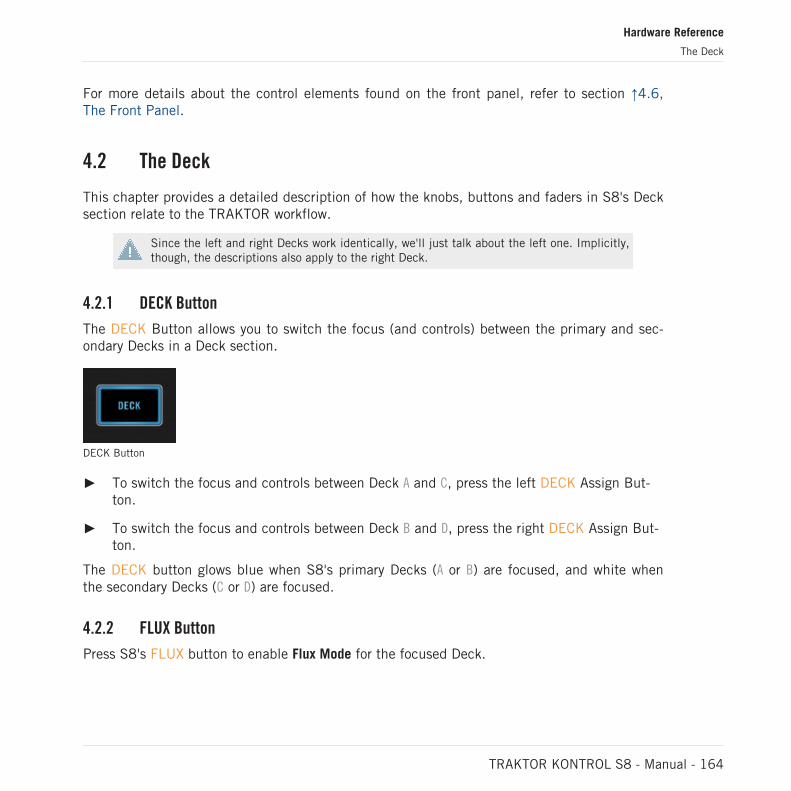
For more details about the control elements found on the front panel, refer to section ↑4.6,The Front Panel.
4.2 The Deck
This chapter provides a detailed description of how the knobs, buttons and faders in S8's Decksection relate to the TRAKTOR workflow.
Since the left and right Decks work identically, we'll just talk about the left one. Implicitly,though, the descriptions also apply to the right Deck.
4.2.1 DECK Button
The DECK Button allows you to switch the focus (and controls) between the primary and sec-ondary Decks in a Deck section.
DECK Button
To switch the focus and controls between Deck A and C, press the left DECK Assign But-ton.
To switch the focus and controls between Deck B and D, press the right DECK Assign But-ton.
The DECK button glows blue when S8's primary Decks (A or B) are focused, and white whenthe secondary Decks (C or D) are focused.
4.2.2 FLUX Button
Press S8's FLUX button to enable Flux Mode for the focused Deck.
Hardware Reference
The Deck
TRAKTOR KONTROL S8 - Manual - 164
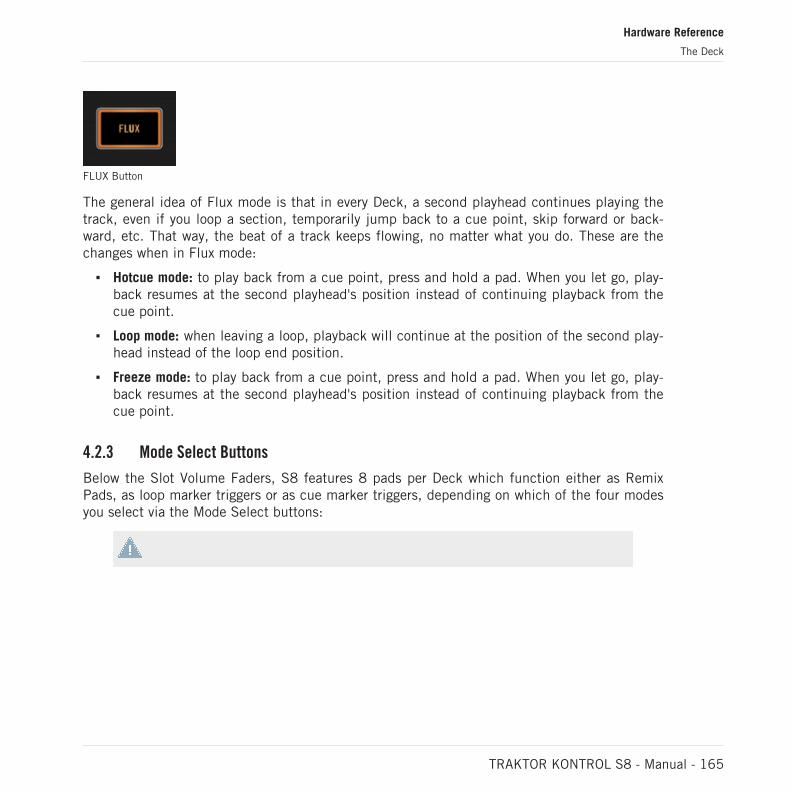
FLUX Button
The general idea of Flux mode is that in every Deck, a second playhead continues playing thetrack, even if you loop a section, temporarily jump back to a cue point, skip forward or back-ward, etc. That way, the beat of a track keeps flowing, no matter what you do. These are thechanges when in Flux mode:
Hotcue mode: to play back from a cue point, press and hold a pad. When you let go, play-back resumes at the second playhead's position instead of continuing playback from thecue point.
Loop mode: when leaving a loop, playback will continue at the position of the second play-head instead of the loop end position.
Freeze mode: to play back from a cue point, press and hold a pad. When you let go, play-back resumes at the second playhead's position instead of continuing playback from thecue point.
4.2.3 Mode Select Buttons
Below the Slot Volume Faders, S8 features 8 pads per Deck which function either as RemixPads, as loop marker triggers or as cue marker triggers, depending on which of the four modesyou select via the Mode Select buttons:
Hardware Reference
The Deck
TRAKTOR KONTROL S8 - Manual - 165
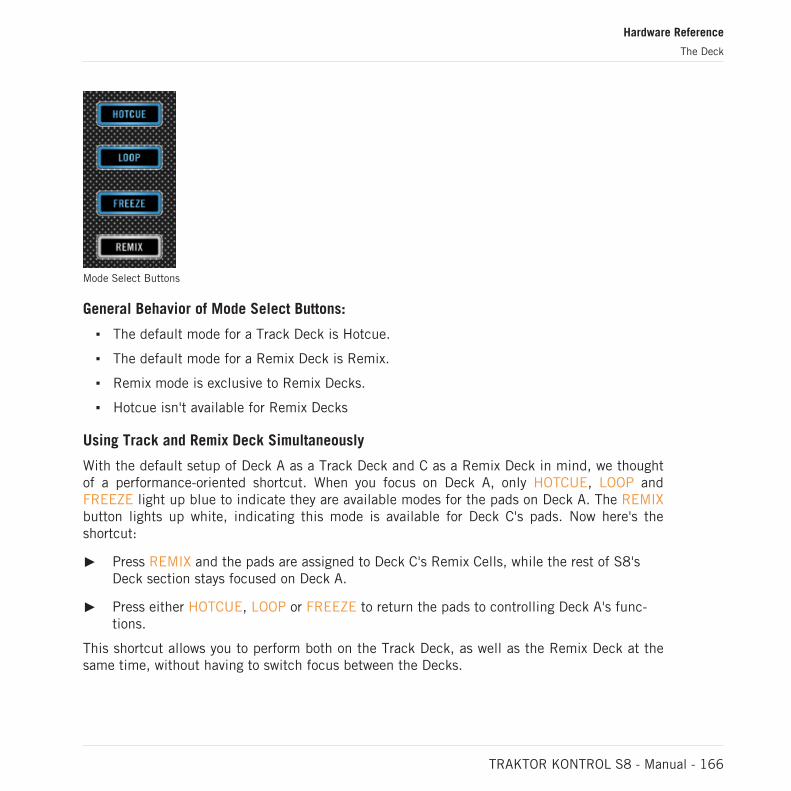
Mode Select Buttons
General Behavior of Mode Select Buttons:
The default mode for a Track Deck is Hotcue.
The default mode for a Remix Deck is Remix.
Remix mode is exclusive to Remix Decks.
Hotcue isn't available for Remix Decks
Using Track and Remix Deck Simultaneously
With the default setup of Deck A as a Track Deck and C as a Remix Deck in mind, we thoughtof a performance-oriented shortcut. When you focus on Deck A, only HOTCUE, LOOP andFREEZE light up blue to indicate they are available modes for the pads on Deck A. The REMIXbutton lights up white, indicating this mode is available for Deck C's pads. Now here's theshortcut:
Press REMIX and the pads are assigned to Deck C's Remix Cells, while the rest of S8'sDeck section stays focused on Deck A.
Press either HOTCUE, LOOP or FREEZE to return the pads to controlling Deck A's func-tions.
This shortcut allows you to perform both on the Track Deck, as well as the Remix Deck at thesame time, without having to switch focus between the Decks.
Hardware Reference
The Deck
TRAKTOR KONTROL S8 - Manual - 166
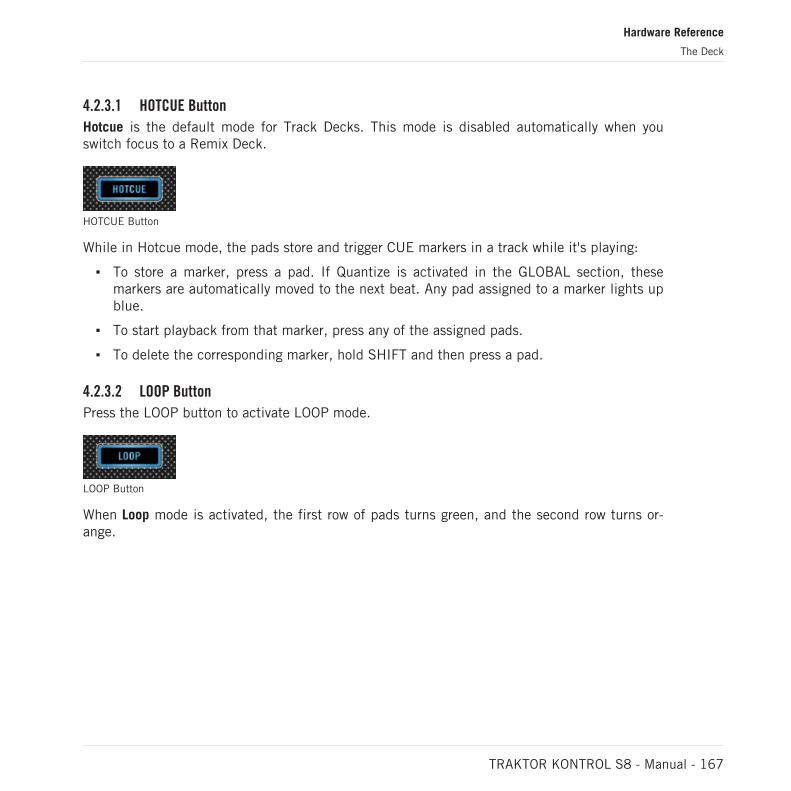
4.2.3.1 HOTCUE Button
Hotcue is the default mode for Track Decks. This mode is disabled automatically when youswitch focus to a Remix Deck.
HOTCUE Button
While in Hotcue mode, the pads store and trigger CUE markers in a track while it's playing:
To store a marker, press a pad. If Quantize is activated in the GLOBAL section, thesemarkers are automatically moved to the next beat. Any pad assigned to a marker lights upblue.
To start playback from that marker, press any of the assigned pads.
To delete the corresponding marker, hold SHIFT and then press a pad.
4.2.3.2 LOOP Button
Press the LOOP button to activate LOOP mode.
LOOP Button
When Loop mode is activated, the first row of pads turns green, and the second row turns or-ange.
Hardware Reference
The Deck
TRAKTOR KONTROL S8 - Manual - 167
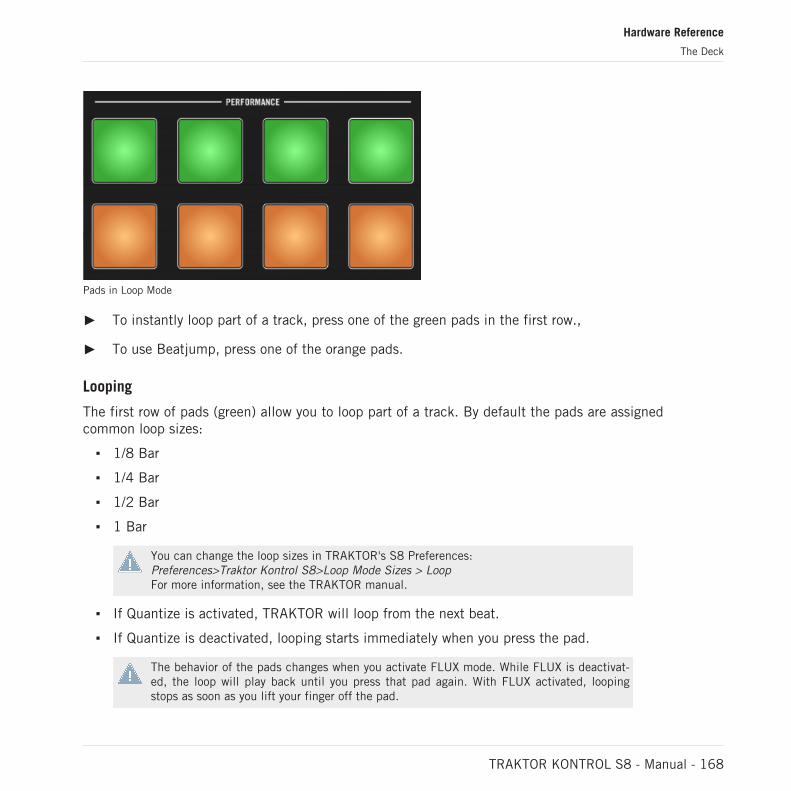
Pads in Loop Mode
To instantly loop part of a track, press one of the green pads in the first row.,
To use Beatjump, press one of the orange pads.
Looping
The first row of pads (green) allow you to loop part of a track. By default the pads are assignedcommon loop sizes:
1/8 Bar
1/4 Bar
1/2 Bar
1 Bar
You can change the loop sizes in TRAKTOR's S8 Preferences:Preferences>Traktor Kontrol S8>Loop Mode Sizes > LoopFor more information, see the TRAKTOR manual.
If Quantize is activated, TRAKTOR will loop from the next beat.
If Quantize is deactivated, looping starts immediately when you press the pad.
The behavior of the pads changes when you activate FLUX mode. While FLUX is deactivat-ed, the loop will play back until you press that pad again. With FLUX activated, loopingstops as soon as you lift your finger off the pad.
Hardware Reference
The Deck
TRAKTOR KONTROL S8 - Manual - 168
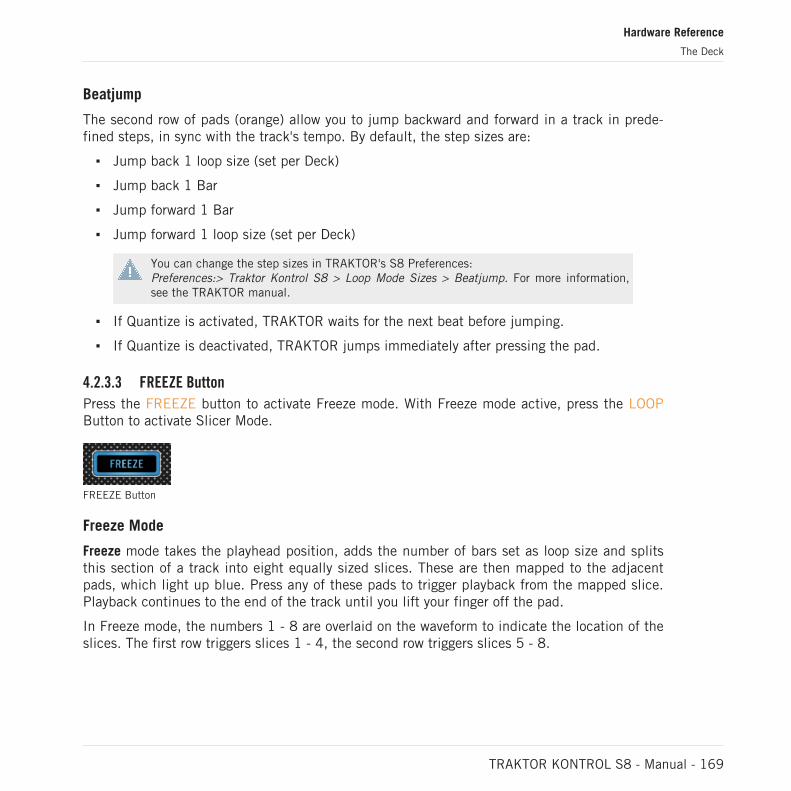
Beatjump
The second row of pads (orange) allow you to jump backward and forward in a track in prede-fined steps, in sync with the track's tempo. By default, the step sizes are:
Jump back 1 loop size (set per Deck)
Jump back 1 Bar
Jump forward 1 Bar
Jump forward 1 loop size (set per Deck)
You can change the step sizes in TRAKTOR's S8 Preferences:Preferences:> Traktor Kontrol S8 > Loop Mode Sizes > Beatjump. For more information,see the TRAKTOR manual.
If Quantize is activated, TRAKTOR waits for the next beat before jumping.
If Quantize is deactivated, TRAKTOR jumps immediately after pressing the pad.
4.2.3.3 FREEZE Button
Press the FREEZE button to activate Freeze mode. With Freeze mode active, press the LOOPButton to activate Slicer Mode.
FREEZE Button
Freeze Mode
Freeze mode takes the playhead position, adds the number of bars set as loop size and splitsthis section of a track into eight equally sized slices. These are then mapped to the adjacentpads, which light up blue. Press any of these pads to trigger playback from the mapped slice.Playback continues to the end of the track until you lift your finger off the pad.
In Freeze mode, the numbers 1 - 8 are overlaid on the waveform to indicate the location of theslices. The first row triggers slices 1 - 4, the second row triggers slices 5 - 8.
Hardware Reference
The Deck
TRAKTOR KONTROL S8 - Manual - 169
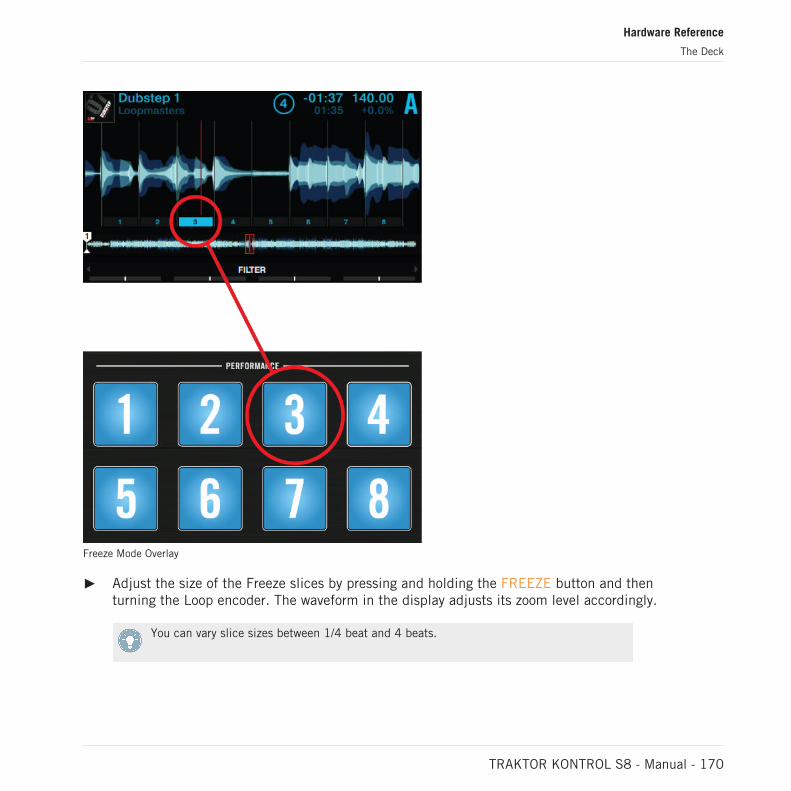
Freeze Mode Overlay
Adjust the size of the Freeze slices by pressing and holding the FREEZE button and thenturning the Loop encoder. The waveform in the display adjusts its zoom level accordingly.
You can vary slice sizes between 1/4 beat and 4 beats.
Hardware Reference
The Deck
TRAKTOR KONTROL S8 - Manual - 170
Slicer Mode
The Slicer Mode extends the Freeze mode's functionality. Push the LOOP button while inFreeze mode and the playback behavior of the pads changes: Instead of playing from the slicestart to the end of the entire track, pressing and holding a pad in Slicer Mode will play backjust the corresponding slice repeatedly. Please find more details in section ↑3.4, UsingFREEZE Mode.
In Slicer Mode, the pads turn green and while playing back the selected loop, pads flashbright green while the assigned slice is played back. This is also reflected on the Deck'sdisplay.
4.2.3.4 REMIX Button
Remix mode is the default for Remix Decks, and isn't available for Track Decks. If a TrackDeck is in focus, the REMIX button is deactivated for that Deck.
REMIX Button
Remix mode allows you to capture portions of a track from the capture source and assign themto one of the pads:
1. Set the capture source by pressing and holding the CAPTURE button while turning theLoop encoder.
2. Press an empty pad to sample from the Capture source and assign the captured contentto that pad. The capture length is determined by the source Deck's loop size.
3. Press the pad again to trigger the captured content, press the pad again.
→ You have captured a piece of music that you can trigger during your performance.
If the Deck set as capture source is empty, S8's display shows Error while copying in the Deckheader.
For more detailed information on capturing samples, refer to section ↑4.2.6, CAPTURE Button.
Hardware Reference
The Deck
TRAKTOR KONTROL S8 - Manual - 171
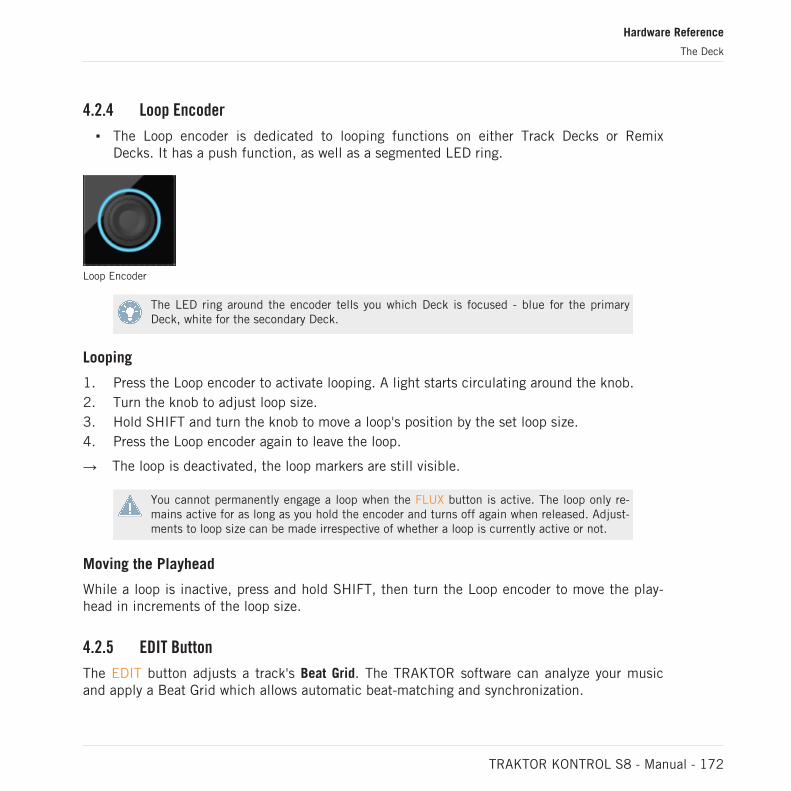
4.2.4 Loop Encoder
The Loop encoder is dedicated to looping functions on either Track Decks or RemixDecks. It has a push function, as well as a segmented LED ring.
Loop Encoder
The LED ring around the encoder tells you which Deck is focused - blue for the primaryDeck, white for the secondary Deck.
Looping
1. Press the Loop encoder to activate looping. A light starts circulating around the knob.2. Turn the knob to adjust loop size.3. Hold SHIFT and turn the knob to move a loop's position by the set loop size.4. Press the Loop encoder again to leave the loop.
→ The loop is deactivated, the loop markers are still visible.
You cannot permanently engage a loop when the FLUX button is active. The loop only re-mains active for as long as you hold the encoder and turns off again when released. Adjust-ments to loop size can be made irrespective of whether a loop is currently active or not.
Moving the Playhead
While a loop is inactive, press and hold SHIFT, then turn the Loop encoder to move the play-head in increments of the loop size.
4.2.5 EDIT Button
The EDIT button adjusts a track's Beat Grid. The TRAKTOR software can analyze your musicand apply a Beat Grid which allows automatic beat-matching and synchronization.
Hardware Reference
The Deck
TRAKTOR KONTROL S8 - Manual - 172
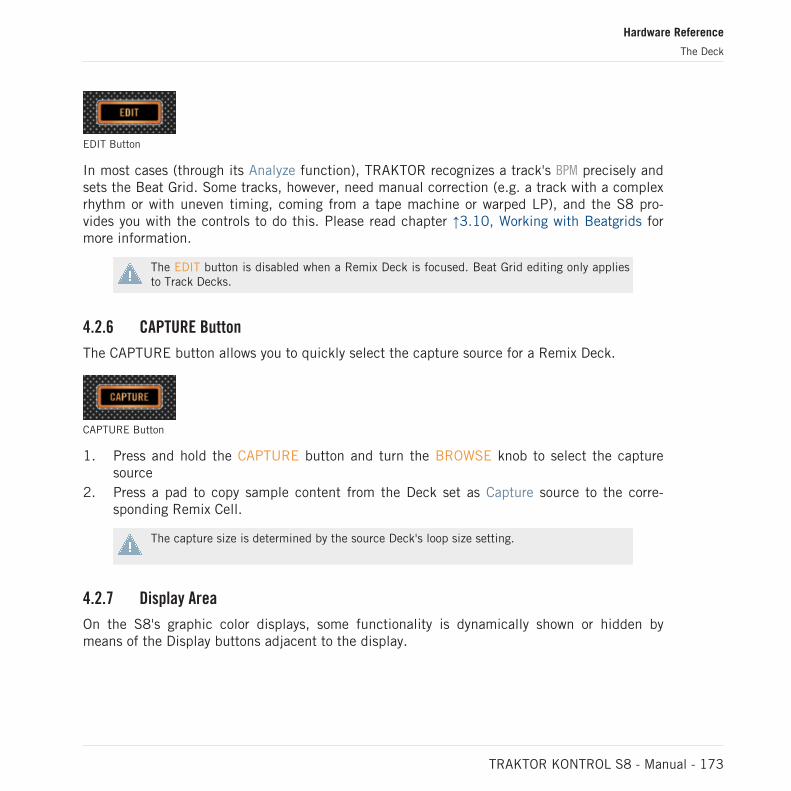
EDIT Button
In most cases (through its Analyze function), TRAKTOR recognizes a track's BPM precisely andsets the Beat Grid. Some tracks, however, need manual correction (e.g. a track with a complexrhythm or with uneven timing, coming from a tape machine or warped LP), and the S8 pro-vides you with the controls to do this. Please read chapter ↑3.10, Working with Beatgrids formore information.
The EDIT button is disabled when a Remix Deck is focused. Beat Grid editing only appliesto Track Decks.
4.2.6 CAPTURE Button
The CAPTURE button allows you to quickly select the capture source for a Remix Deck.
CAPTURE Button
1. Press and hold the CAPTURE button and turn the BROWSE knob to select the capturesource
2. Press a pad to copy sample content from the Deck set as Capture source to the corre-sponding Remix Cell.
The capture size is determined by the source Deck's loop size setting.
4.2.7 Display Area
On the S8's graphic color displays, some functionality is dynamically shown or hidden bymeans of the Display buttons adjacent to the display.
Hardware Reference
The Deck
TRAKTOR KONTROL S8 - Manual - 173
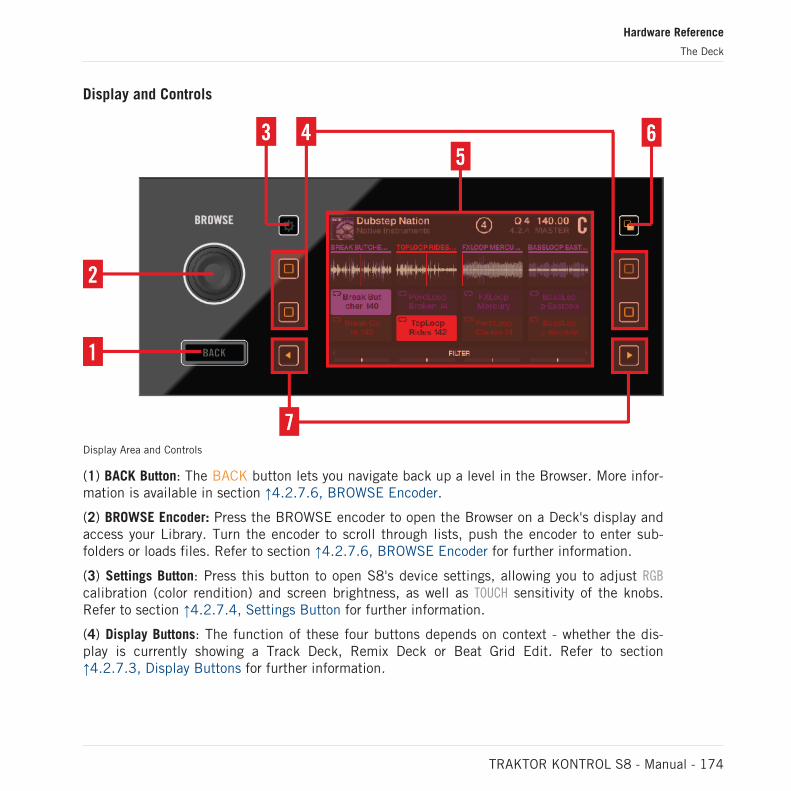
Display and Controls
Display Area and Controls
(1) BACK Button: The BACK button lets you navigate back up a level in the Browser. More infor-mation is available in section ↑4.2.7.6, BROWSE Encoder.
(2) BROWSE Encoder: Press the BROWSE encoder to open the Browser on a Deck's display andaccess your Library. Turn the encoder to scroll through lists, push the encoder to enter sub-folders or loads files. Refer to section ↑4.2.7.6, BROWSE Encoder for further information.
(3) Settings Button: Press this button to open S8's device settings, allowing you to adjust RGBcalibration (color rendition) and screen brightness, as well as TOUCH sensitivity of the knobs.Refer to section ↑4.2.7.4, Settings Button for further information.
(4) Display Buttons: The function of these four buttons depends on context - whether the dis-play is currently showing a Track Deck, Remix Deck or Beat Grid Edit. Refer to section↑4.2.7.3, Display Buttons for further information.
Hardware Reference
The Deck
TRAKTOR KONTROL S8 - Manual - 174
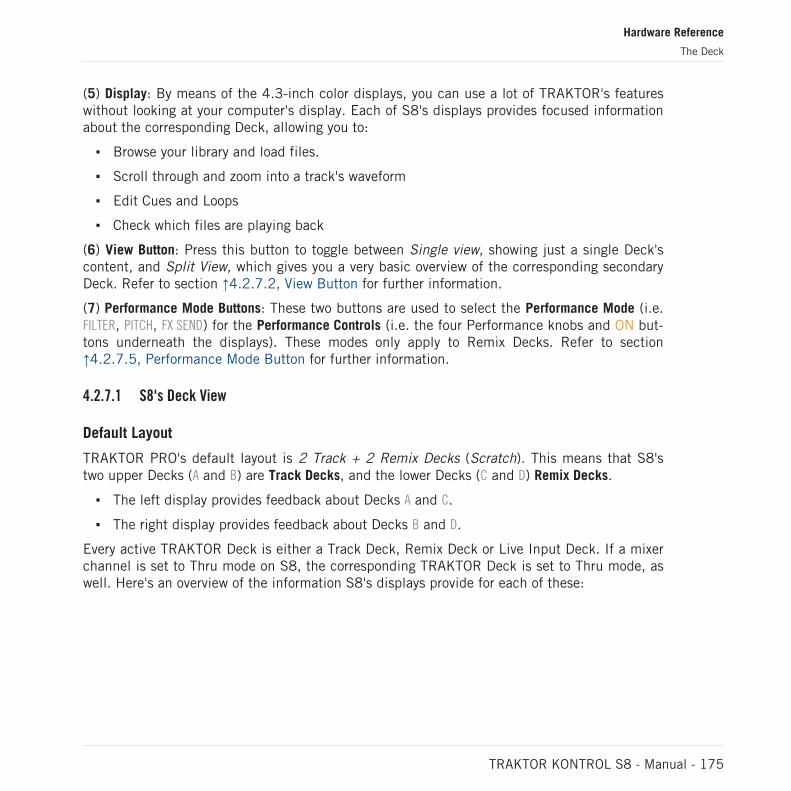
(5) Display: By means of the 4.3-inch color displays, you can use a lot of TRAKTOR's featureswithout looking at your computer's display. Each of S8's displays provides focused informationabout the corresponding Deck, allowing you to:
Browse your library and load files.
Scroll through and zoom into a track's waveform
Edit Cues and Loops
Check which files are playing back
(6) View Button: Press this button to toggle between Single view, showing just a single Deck'scontent, and Split View, which gives you a very basic overview of the corresponding secondaryDeck. Refer to section ↑4.2.7.2, View Button for further information.
(7) Performance Mode Buttons: These two buttons are used to select the Performance Mode (i.e.FILTER, PITCH, FX SEND) for the Performance Controls (i.e. the four Performance knobs and ON but-tons underneath the displays). These modes only apply to Remix Decks. Refer to section↑4.2.7.5, Performance Mode Button for further information.
4.2.7.1 S8's Deck View
Default Layout
TRAKTOR PRO's default layout is 2 Track + 2 Remix Decks (Scratch). This means that S8'stwo upper Decks (A and B) are Track Decks, and the lower Decks (C and D) Remix Decks.
The left display provides feedback about Decks A and C.
The right display provides feedback about Decks B and D.
Every active TRAKTOR Deck is either a Track Deck, Remix Deck or Live Input Deck. If a mixerchannel is set to Thru mode on S8, the corresponding TRAKTOR Deck is set to Thru mode, aswell. Here's an overview of the information S8's displays provide for each of these:
Hardware Reference
The Deck
TRAKTOR KONTROL S8 - Manual - 175
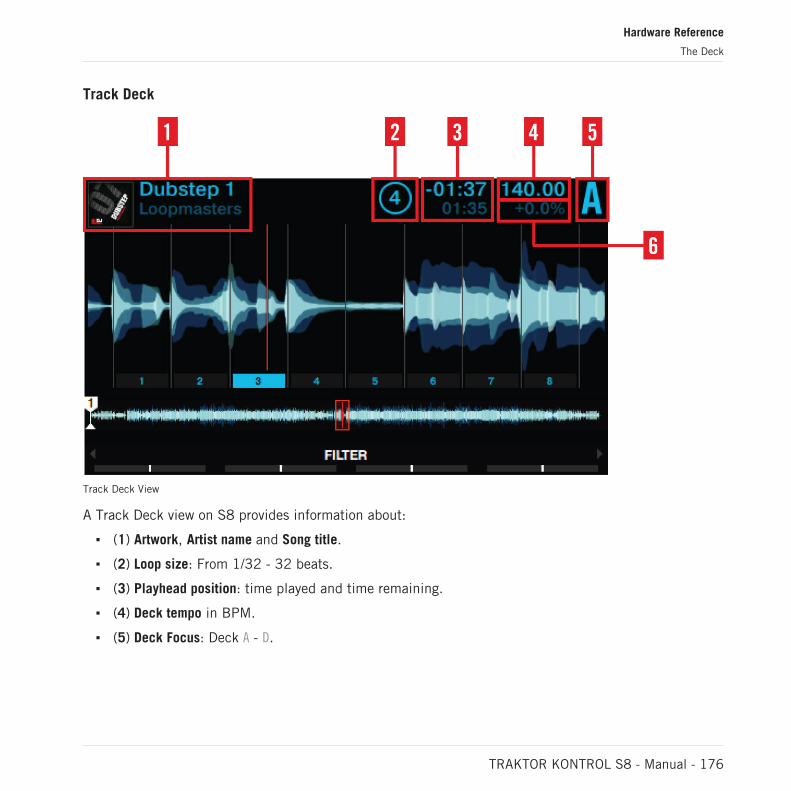
Track Deck
Track Deck View
A Track Deck view on S8 provides information about:
(1) Artwork, Artist name and Song title.
(2) Loop size: From 1/32 - 32 beats.
(3) Playhead position: time played and time remaining.
(4) Deck tempo in BPM.
(5) Deck Focus: Deck A - D.
Hardware Reference
The Deck
TRAKTOR KONTROL S8 - Manual - 176
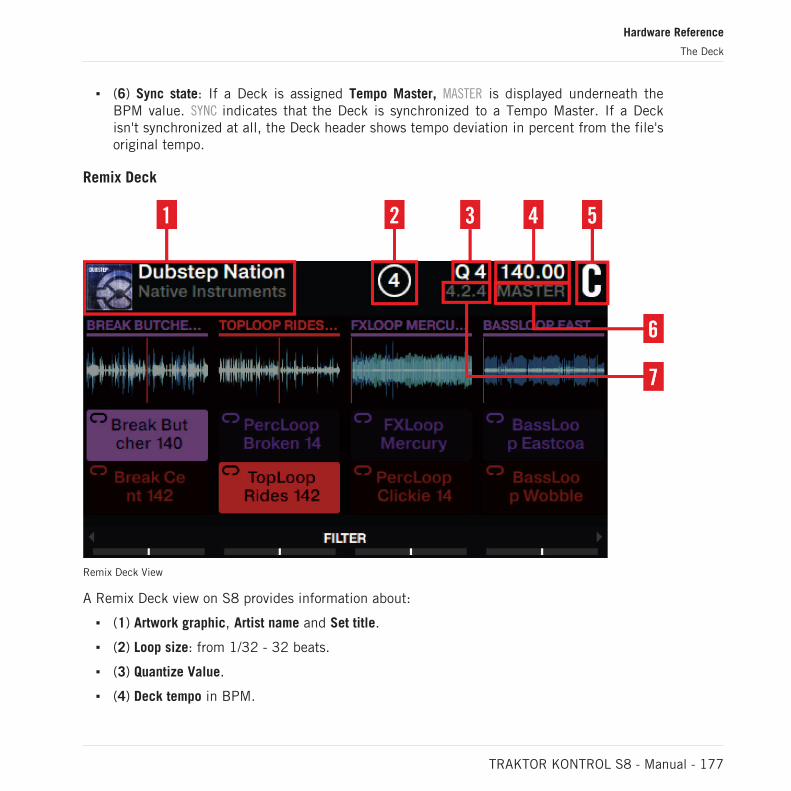
(6) Sync state: If a Deck is assigned Tempo Master, MASTER is displayed underneath theBPM value. SYNC indicates that the Deck is synchronized to a Tempo Master. If a Deckisn't synchronized at all, the Deck header shows tempo deviation in percent from the file'soriginal tempo.
Remix Deck
Remix Deck View
A Remix Deck view on S8 provides information about:
(1) Artwork graphic, Artist name and Set title.
(2) Loop size: from 1/32 - 32 beats.
(3) Quantize Value.
(4) Deck tempo in BPM.
Hardware Reference
The Deck
TRAKTOR KONTROL S8 - Manual - 177
(5) Deck Focus: Deck A - D.
(6) Sync state: If a Deck is assigned Tempo Master, MASTER is displayed underneath theBPM value. SYNC indicates that the Deck is synchronized to a Tempo Master. If a Deckisn't synchronized at all, the Deck header shows tempo deviation in percent from the file'soriginal tempo.
(7) The absolute position on TRAKTOR's timeline measured in Bars.Beats.Phrases.
Live Input Deck
S8's rear panel allows you to connect microphones, turntables, or CD players. You can routethese audio signals into the TRAKTOR software and mix them with your other Decks by settinga Deck to Live Input mode. In this mode, S8's display reads Live Input - Traktor Audio Passthru.
S8's Transport Controls are disabled while a Deck runs as Live Input.
Thru Mode
If you don't need to run an external device like turntable or CD player through a Deck, switchthat mixer channel to Thru mode on S8. The signal is mixed in S8's mixer and never sent toTRAKTOR.
4.2.7.2 View Button
The View button is located in the top right corner of the display area.
View Button
It switches between view types:
Single View: Only the focused Deck is displayed.
Split View: Both Decks are displayed; the focused Deck is visualized by a big waveformand detailed information, while the unfocused Deck is reduced to a small waveform,showing markers and a playhead.
Hardware Reference
The Deck
TRAKTOR KONTROL S8 - Manual - 178
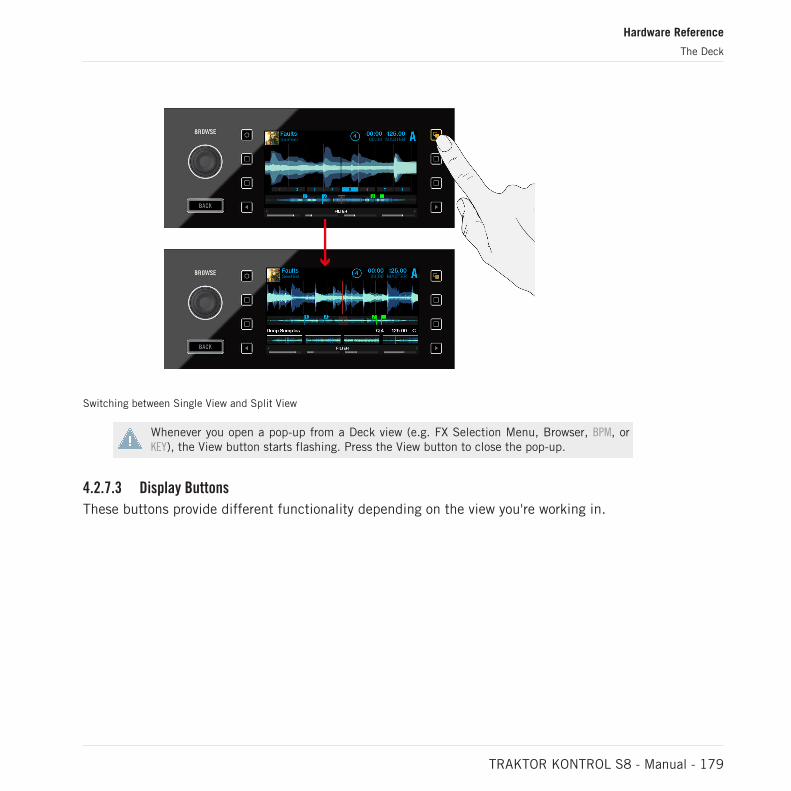
Switching between Single View and Split View
Whenever you open a pop-up from a Deck view (e.g. FX Selection Menu, Browser, BPM, orKEY), the View button starts flashing. Press the View button to close the pop-up.
4.2.7.3 Display Buttons
These buttons provide different functionality depending on the view you're working in.
Hardware Reference
The Deck
TRAKTOR KONTROL S8 - Manual - 179

Display Buttons
Display Buttons: Press any of these to open the pop-up and see each button's functionality.
This is an overview of what these buttons do depending on what you see on the display.
Please note that you can leave any pop-up by pressing the same button again or, alterna-tively, the View button.
Track Deck View
(1) Display Button 1: Press this button to open the BPM pop-up. Turn the BROWSE encoderto adjust the BPM. Exit the BPM window by pressing the View Button.
(2) Display Button 2: Press this button to open the KEY window. Turn the BROWSE encoderto manually adjust a track's KEY. To exit the KEY pop-up, press the View button.
(3) Display Button 3: Press this button to zoom into the waveform.
(4) Display Button 4: Press this button to zoom out of the waveform.
Remix Deck View
(1) Display Button 1: Press this button to open the BPM pop-up. Then turn the BROWSEencoder to adjust the BPM. Exit the BPM pop-up by pressing the View button.
Hardware Reference
The Deck
TRAKTOR KONTROL S8 - Manual - 180
(2) Display Button 2: Press this button to open the QUANTIZE pop-up. Then turn theBROWSE encoder to select the Quantize value which to apply to triggering the samples inyour Remix Deck. To hide the QUANTIZE pop-up, press the View button.
(3) Display Button 3: Press this button to scroll up in the Sample Grid in steps of two. Thescrollbar segments at the right side of the display indicate the position within the RemixDeck.
(4) Display Button 4: Press this button to scroll down in the Sample Grid in steps of two.The scrollbar segments at the right side of the display indicate the position in a RemixDeck.
4.2.7.4 Settings Button
The Settings button is on the top-left. Press this button to open S8's device settings.
Settings Button
Display Settings (RGB)
Within the settings, you can adjust the screens' color rendition (saturation of RED, GREEN andBLUE colors), as well as the screen's BRIGHTNESS.
Turn the Performance knobs beneath the display to adjust the parameters.
Hardware Reference
The Deck
TRAKTOR KONTROL S8 - Manual - 181
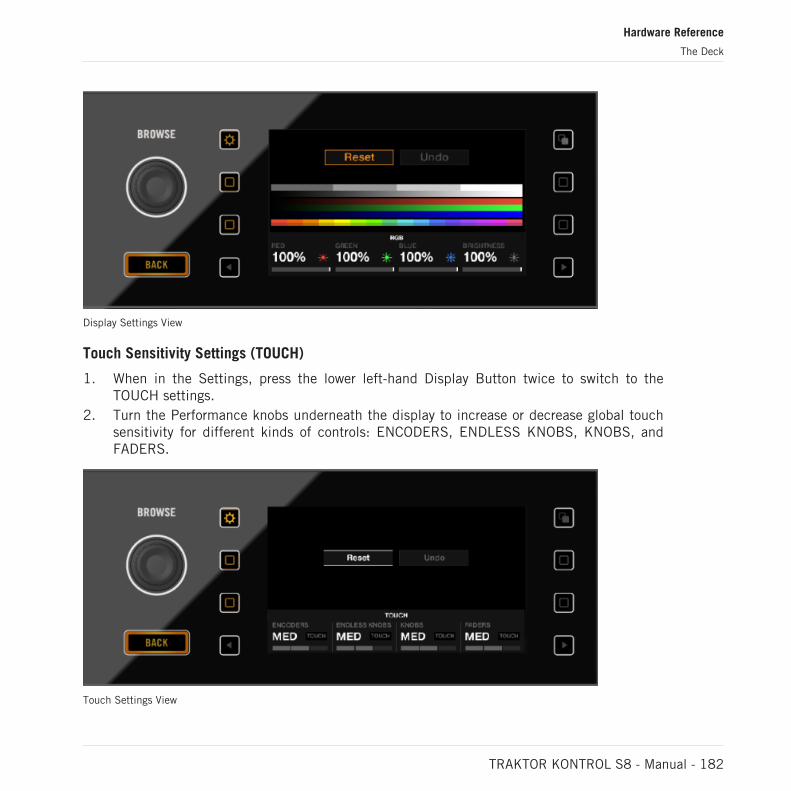
Display Settings View
Touch Sensitivity Settings (TOUCH)
1. When in the Settings, press the lower left-hand Display Button twice to switch to theTOUCH settings.
2. Turn the Performance knobs underneath the display to increase or decrease global touchsensitivity for different kinds of controls: ENCODERS, ENDLESS KNOBS, KNOBS, andFADERS.
Touch Settings View
Hardware Reference
The Deck
TRAKTOR KONTROL S8 - Manual - 182
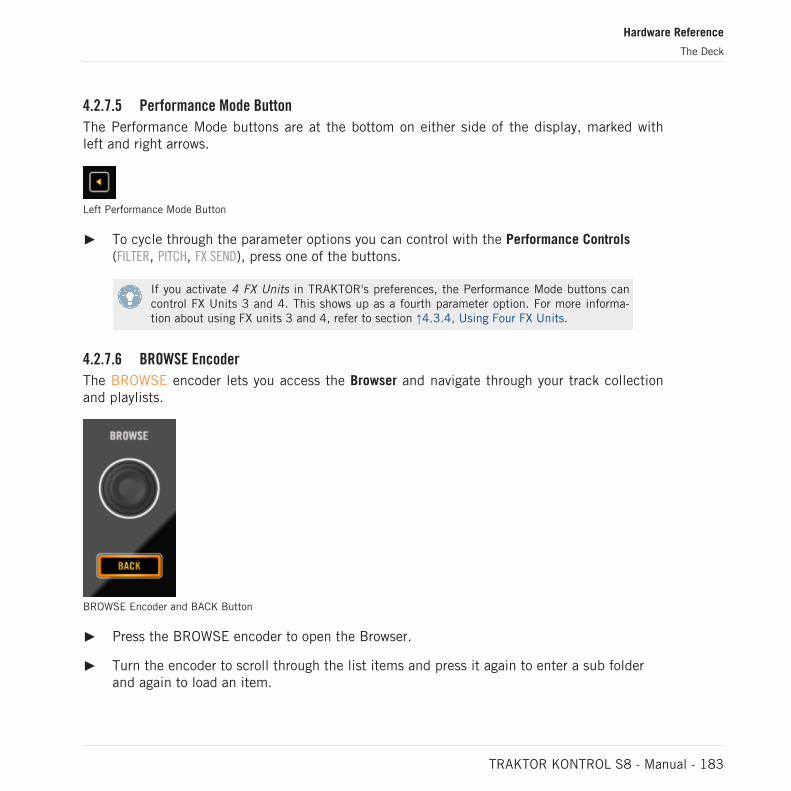
4.2.7.5 Performance Mode Button
The Performance Mode buttons are at the bottom on either side of the display, marked withleft and right arrows.
Left Performance Mode Button
To cycle through the parameter options you can control with the Performance Controls(FILTER, PITCH, FX SEND), press one of the buttons.
If you activate 4 FX Units in TRAKTOR's preferences, the Performance Mode buttons cancontrol FX Units 3 and 4. This shows up as a fourth parameter option. For more informa-tion about using FX units 3 and 4, refer to section ↑4.3.4, Using Four FX Units.
4.2.7.6 BROWSE Encoder
The BROWSE encoder lets you access the Browser and navigate through your track collectionand playlists.
BROWSE Encoder and BACK Button
Press the BROWSE encoder to open the Browser.
Turn the encoder to scroll through the list items and press it again to enter a sub folderand again to load an item.
Hardware Reference
The Deck
TRAKTOR KONTROL S8 - Manual - 183
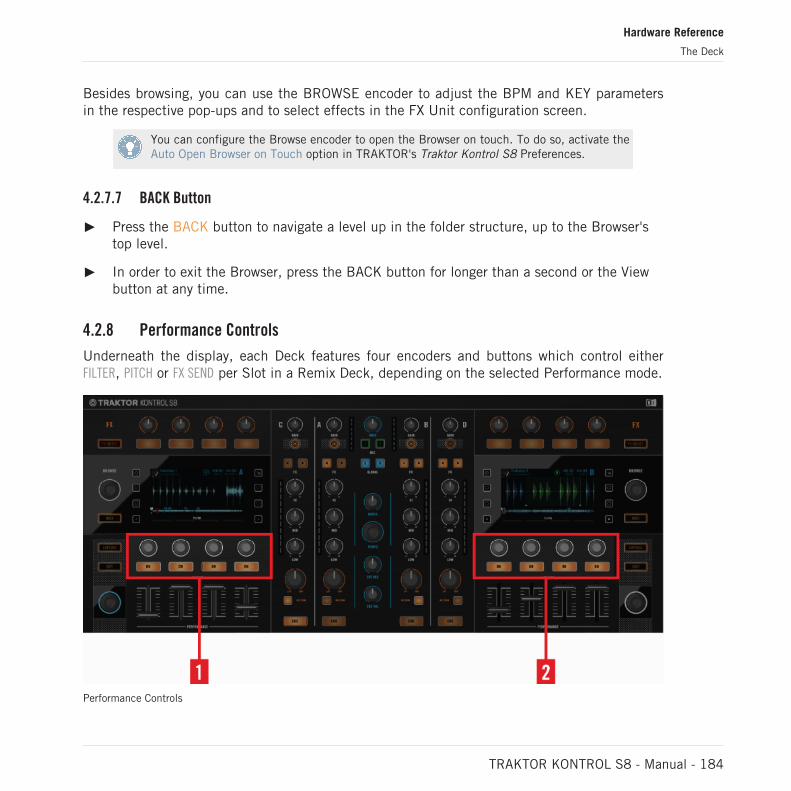
Besides browsing, you can use the BROWSE encoder to adjust the BPM and KEY parametersin the respective pop-ups and to select effects in the FX Unit configuration screen.
You can configure the Browse encoder to open the Browser on touch. To do so, activate theAuto Open Browser on Touch option in TRAKTOR's Traktor Kontrol S8 Preferences.
4.2.7.7 BACK Button
Press the BACK button to navigate a level up in the folder structure, up to the Browser'stop level.
In order to exit the Browser, press the BACK button for longer than a second or the Viewbutton at any time.
4.2.8 Performance Controls
Underneath the display, each Deck features four encoders and buttons which control eitherFILTER, PITCH or FX SEND per Slot in a Remix Deck, depending on the selected Performance mode.
Performance Controls
Hardware Reference
The Deck
TRAKTOR KONTROL S8 - Manual - 184
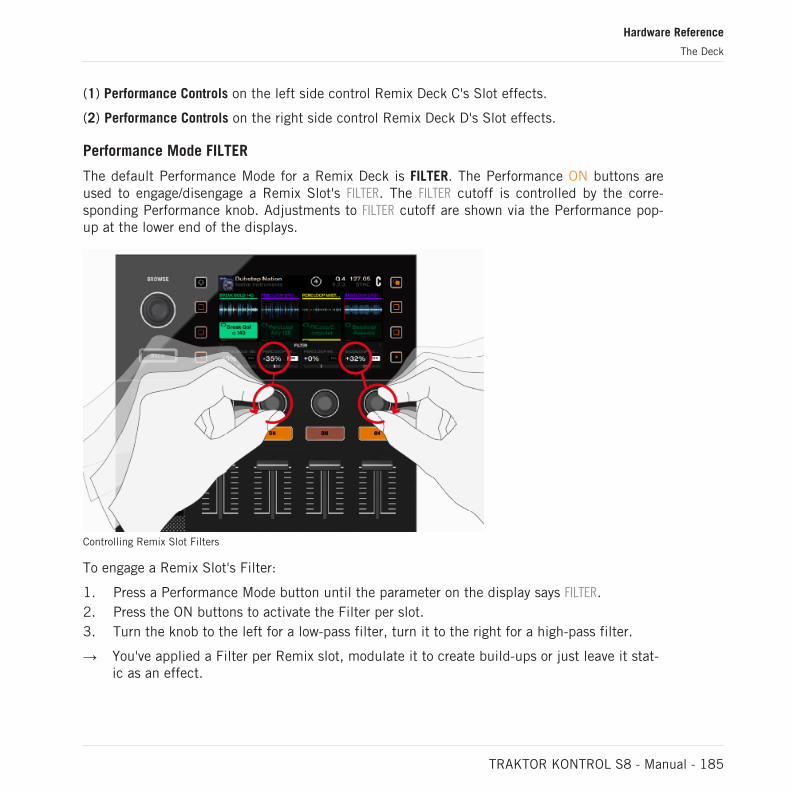
(1) Performance Controls on the left side control Remix Deck C's Slot effects.
(2) Performance Controls on the right side control Remix Deck D's Slot effects.
Performance Mode FILTER
The default Performance Mode for a Remix Deck is FILTER. The Performance ON buttons areused to engage/disengage a Remix Slot's FILTER. The FILTER cutoff is controlled by the corre-sponding Performance knob. Adjustments to FILTER cutoff are shown via the Performance pop-up at the lower end of the displays.
Controlling Remix Slot Filters
To engage a Remix Slot's Filter:
1. Press a Performance Mode button until the parameter on the display says FILTER.2. Press the ON buttons to activate the Filter per slot.3. Turn the knob to the left for a low-pass filter, turn it to the right for a high-pass filter.
→ You've applied a Filter per Remix slot, modulate it to create build-ups or just leave it stat-ic as an effect.
Hardware Reference
The Deck
TRAKTOR KONTROL S8 - Manual - 185
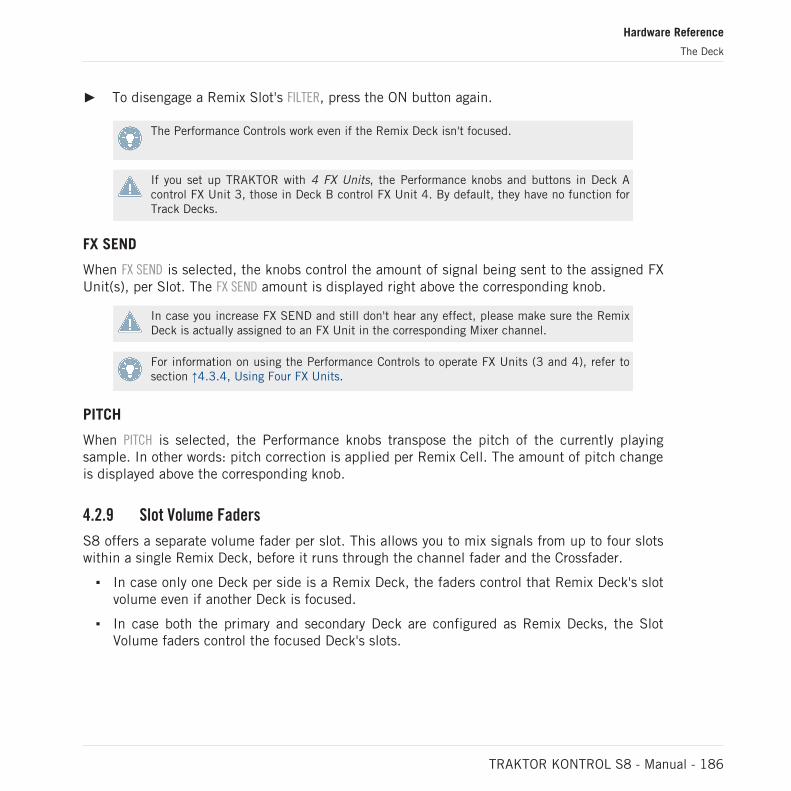
To disengage a Remix Slot's FILTER, press the ON button again.
The Performance Controls work even if the Remix Deck isn't focused.
If you set up TRAKTOR with 4 FX Units, the Performance knobs and buttons in Deck Acontrol FX Unit 3, those in Deck B control FX Unit 4. By default, they have no function forTrack Decks.
FX SEND
When FX SEND is selected, the knobs control the amount of signal being sent to the assigned FXUnit(s), per Slot. The FX SEND amount is displayed right above the corresponding knob.
In case you increase FX SEND and still don't hear any effect, please make sure the RemixDeck is actually assigned to an FX Unit in the corresponding Mixer channel.
For information on using the Performance Controls to operate FX Units (3 and 4), refer tosection ↑4.3.4, Using Four FX Units.
PITCH
When PITCH is selected, the Performance knobs transpose the pitch of the currently playingsample. In other words: pitch correction is applied per Remix Cell. The amount of pitch changeis displayed above the corresponding knob.
4.2.9 Slot Volume Faders
S8 offers a separate volume fader per slot. This allows you to mix signals from up to four slotswithin a single Remix Deck, before it runs through the channel fader and the Crossfader.
In case only one Deck per side is a Remix Deck, the faders control that Remix Deck's slotvolume even if another Deck is focused.
In case both the primary and secondary Deck are configured as Remix Decks, the SlotVolume faders control the focused Deck's slots.
Hardware Reference
The Deck
TRAKTOR KONTROL S8 - Manual - 186
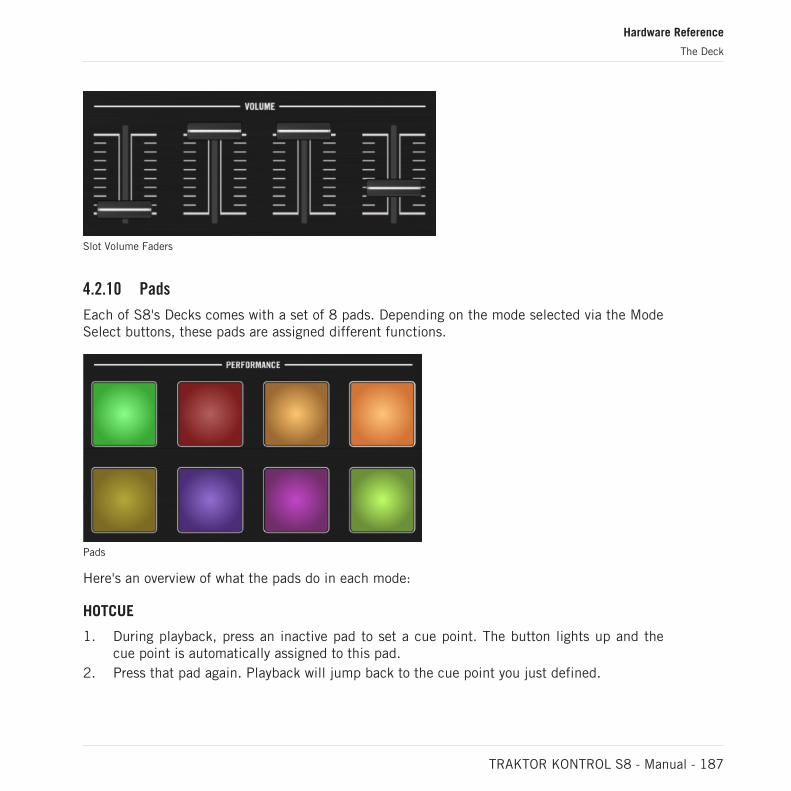
Slot Volume Faders
4.2.10 Pads
Each of S8's Decks comes with a set of 8 pads. Depending on the mode selected via the ModeSelect buttons, these pads are assigned different functions.
Pads
Here's an overview of what the pads do in each mode:
HOTCUE
1. During playback, press an inactive pad to set a cue point. The button lights up and thecue point is automatically assigned to this pad.
2. Press that pad again. Playback will jump back to the cue point you just defined.
Hardware Reference
The Deck
TRAKTOR KONTROL S8 - Manual - 187
→ You've just defined cue points for a track. Use them to easily pick out your favorite partsof a track (intro, buildup, drop, outro) and jump to that specific position.
LOOP
In Loop mode, pressing a pad instantly loops playback for the number of bars set as LoopMode Size in Preferences > Traktor Kontrol S8 > Loop Mode Sizes > Loop. These values are bydefault:
1/8 Bar
1/4 Bar
1/2 Bar
1 Bar
The Loop functionality considers the global Quantize setting:
If Quantize is active, TRAKTOR delays starting the loop until the next beat, making surelooping keeps the track in sync.
If Quantize is deactivated, looping starts precisely when you press the pad.
FREEZE and Slicer Mode
In Freeze mode, TRAKTOR takes the playhead position, adds the number of bars set as loopsize and splits this section of a track into eight equally sized slices. These are then mapped tothe pads. Press a pad to start playback from that slice.
While in Freeze mode, you can access Slicer mode. This is how Slicer mode is different fromFreeze mode:
In Slicer mode, holding a pad will infinitely loop the corresponding slice.
In Slicer mode, holding two pads will loop the range between the start of one pad and theend of the second.
To enter Slicer mode, press the Loop button. The display and pad color changes fromblue to green.
Hardware Reference
The Deck
TRAKTOR KONTROL S8 - Manual - 188

REMIX
In Remix mode, the pads trigger the content of corresponding Remix Cells - the tracks, loopsor samples defined in the Remix Set. After loading a Remix Set, the pads take on the SampleCells' color.
Press the right-hand Display buttons to scroll through the rows of Remix Cells in steps oftwo.
4.2.11 Touch Strip
Utilizing the Touch Strips, you can:
Tempo bend (nudge) a Track- or Remix Deck: When manually syncing Decks (to otherDecks or turntables), you can temporarily speed up or slow down a track by wiping onefinger across the Touch Strip while the Deck is playing in order to align the beats.
Create a scratch effect when a Deck is stopped: You can create a scratch effect on a Track-or Remix Deck by swiping left and right on the Touch Strip.
Seek/navigate: the track's beginning and end are mapped to the Touch Strip's left andright edges by tapping anywhere on the Touch Strip to jump to the corresponding positionin a track.
4.2.11.1 Touch Strip LEDs
Above the Touch Strip, a number of LEDs provide visual feedback for the actions taken on thetouch strip.
Touch Strip LEDs
Phase Meter
For Track- and Remix Decks, the LEDs work as a Beat Phase Meter, showing the focused Deck'sbeat offset from the MASTER Deck. This is the same meter as displayed in TRAKTOR's Deck.
Hardware Reference
The Deck
TRAKTOR KONTROL S8 - Manual - 189
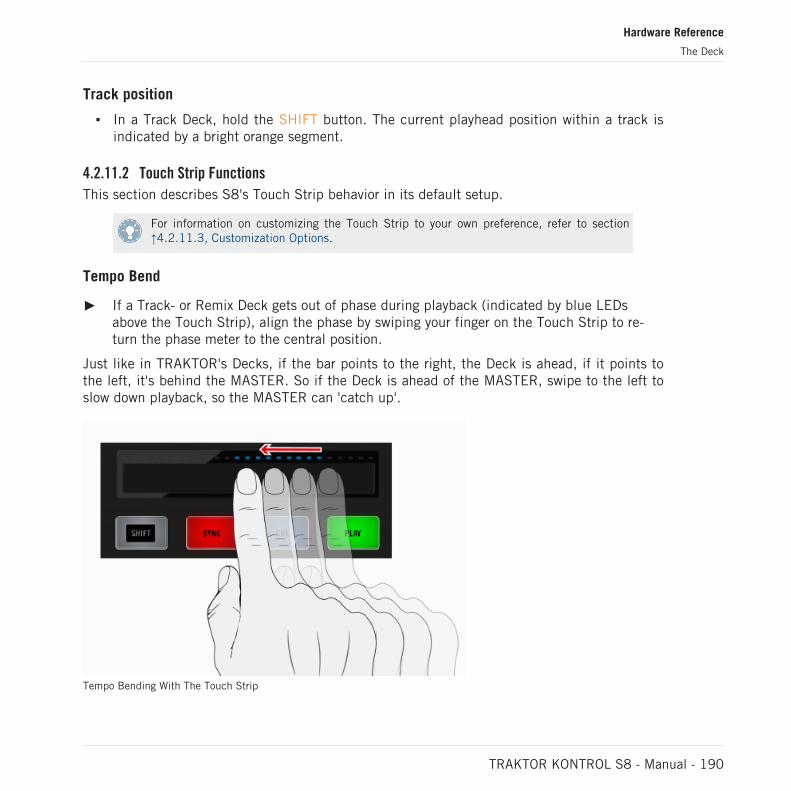
Track position
In a Track Deck, hold the SHIFT button. The current playhead position within a track isindicated by a bright orange segment.
4.2.11.2 Touch Strip Functions
This section describes S8's Touch Strip behavior in its default setup.
For information on customizing the Touch Strip to your own preference, refer to section↑4.2.11.3, Customization Options.
Tempo Bend
If a Track- or Remix Deck gets out of phase during playback (indicated by blue LEDsabove the Touch Strip), align the phase by swiping your finger on the Touch Strip to re-turn the phase meter to the central position.
Just like in TRAKTOR's Decks, if the bar points to the right, the Deck is ahead, if it points tothe left, it's behind the MASTER. So if the Deck is ahead of the MASTER, swipe to the left toslow down playback, so the MASTER can 'catch up'.
Tempo Bending With The Touch Strip
Hardware Reference
The Deck
TRAKTOR KONTROL S8 - Manual - 190
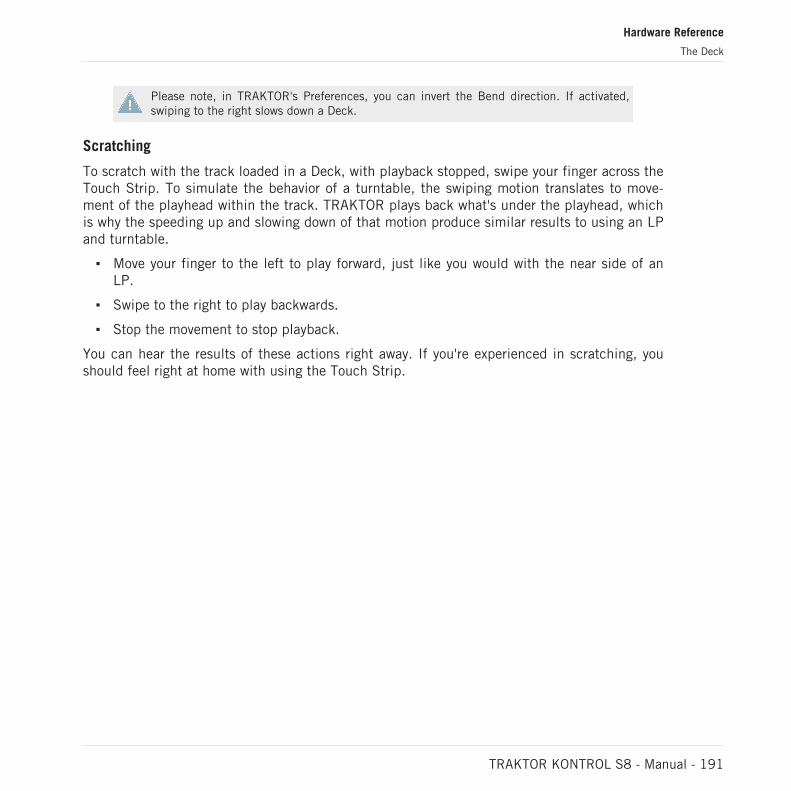
Please note, in TRAKTOR's Preferences, you can invert the Bend direction. If activated,swiping to the right slows down a Deck.
Scratching
To scratch with the track loaded in a Deck, with playback stopped, swipe your finger across theTouch Strip. To simulate the behavior of a turntable, the swiping motion translates to move-ment of the playhead within the track. TRAKTOR plays back what's under the playhead, whichis why the speeding up and slowing down of that motion produce similar results to using an LPand turntable.
Move your finger to the left to play forward, just like you would with the near side of anLP.
Swipe to the right to play backwards.
Stop the movement to stop playback.
You can hear the results of these actions right away. If you're experienced in scratching, youshould feel right at home with using the Touch Strip.
Hardware Reference
The Deck
TRAKTOR KONTROL S8 - Manual - 191
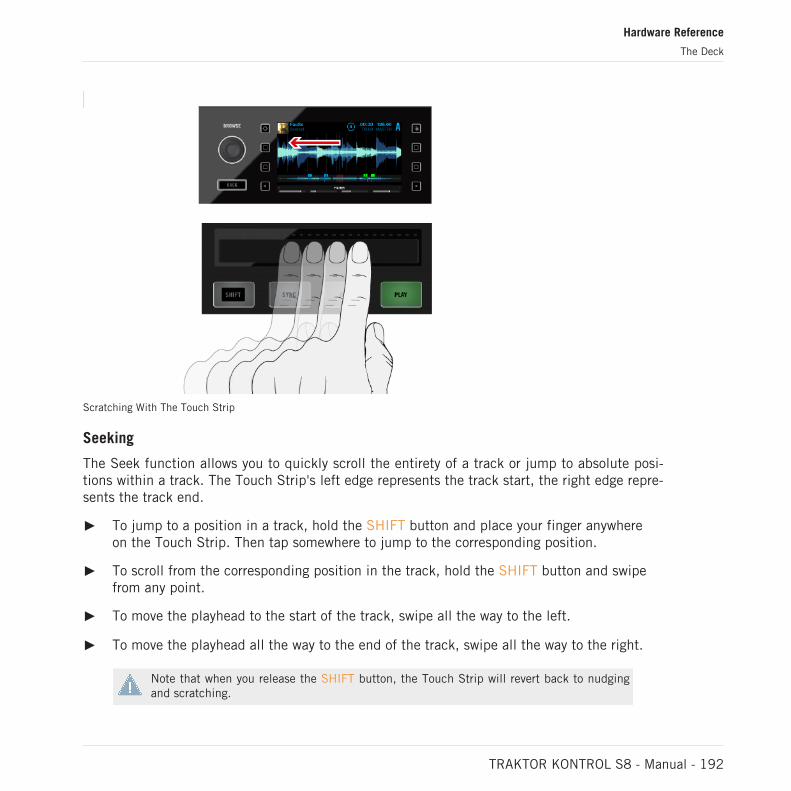
Scratching With The Touch Strip
Seeking
The Seek function allows you to quickly scroll the entirety of a track or jump to absolute posi-tions within a track. The Touch Strip's left edge represents the track start, the right edge repre-sents the track end.
To jump to a position in a track, hold the SHIFT button and place your finger anywhereon the Touch Strip. Then tap somewhere to jump to the corresponding position.
To scroll from the corresponding position in the track, hold the SHIFT button and swipefrom any point.
To move the playhead to the start of the track, swipe all the way to the left.
To move the playhead all the way to the end of the track, swipe all the way to the right.
Note that when you release the SHIFT button, the Touch Strip will revert back to nudgingand scratching.
Hardware Reference
The Deck
TRAKTOR KONTROL S8 - Manual - 192
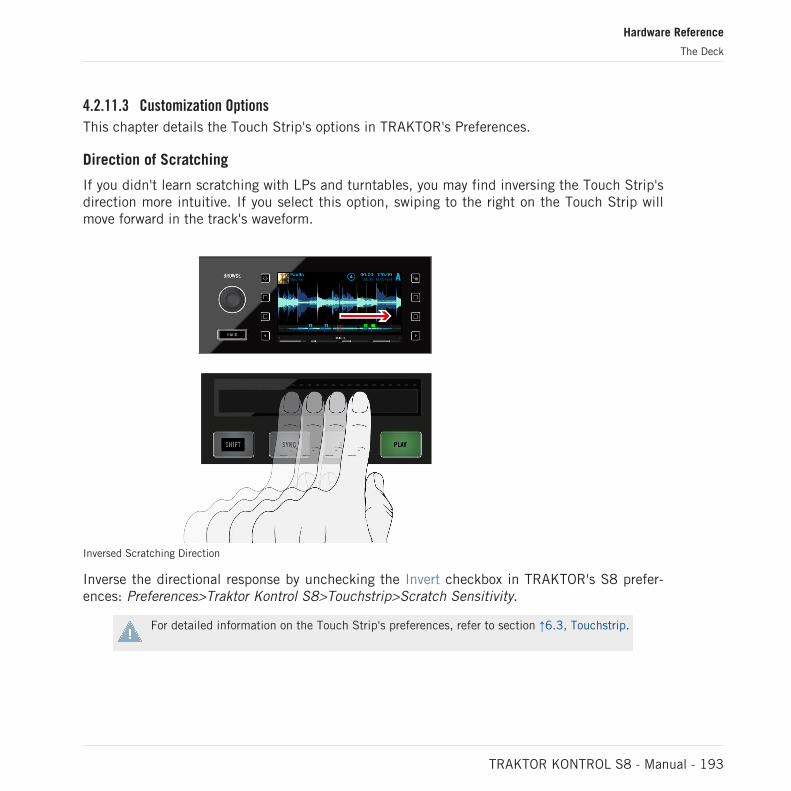
4.2.11.3 Customization Options
This chapter details the Touch Strip's options in TRAKTOR's Preferences.
Direction of Scratching
If you didn't learn scratching with LPs and turntables, you may find inversing the Touch Strip'sdirection more intuitive. If you select this option, swiping to the right on the Touch Strip willmove forward in the track's waveform.
Inversed Scratching Direction
Inverse the directional response by unchecking the Invert checkbox in TRAKTOR's S8 prefer-ences: Preferences>Traktor Kontrol S8>Touchstrip>Scratch Sensitivity.
For detailed information on the Touch Strip's preferences, refer to section ↑6.3, Touchstrip.
Hardware Reference
The Deck
TRAKTOR KONTROL S8 - Manual - 193
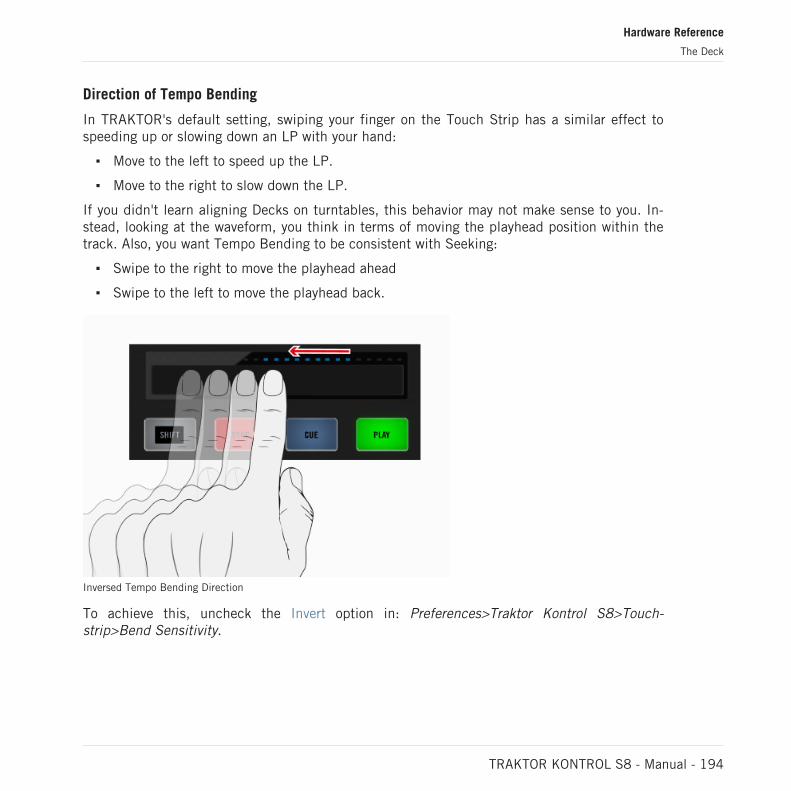
Direction of Tempo Bending
In TRAKTOR's default setting, swiping your finger on the Touch Strip has a similar effect tospeeding up or slowing down an LP with your hand:
Move to the left to speed up the LP.
Move to the right to slow down the LP.
If you didn't learn aligning Decks on turntables, this behavior may not make sense to you. In-stead, looking at the waveform, you think in terms of moving the playhead position within thetrack. Also, you want Tempo Bending to be consistent with Seeking:
Swipe to the right to move the playhead ahead
Swipe to the left to move the playhead back.
Inversed Tempo Bending Direction
To achieve this, uncheck the Invert option in: Preferences>Traktor Kontrol S8>Touch-strip>Bend Sensitivity.
Hardware Reference
The Deck
TRAKTOR KONTROL S8 - Manual - 194

Sensitivity
S8 comes with a Sensitivity setting which should accommodate most users in most situations.You might, however, find that the touch strip doesn't react immediate enough to your input orjust the opposite, it may recognize input where there was none intended.
You can adjust the Touchstrip's Bend Sensitivity and Scratch Sensitivity separately in: Prefer-ences>Traktor Kontrol S8>Touchstrip.
4.2.12 Transport Controls
The Transport buttons control playback of S8's Decks.
These controls only relate to TRAKTOR mode, they have no function when the S8 is usedas a stand-alone device.
PLAY Button
The PLAY button starts/stops the playback of a Deck.
PLAY Button
CUE Button
The CUE button is tied to the Cue Points workflow in TRAKTOR.
CUE Button
The CUE button functions as follows:
If a Deck is playing, press CUE to jump to the Floating Cue Point and stop playback.
If a Deck is paused, press CUE to set a new Floating Cue Point (which replaces the previ-ous one).
Hardware Reference
The Deck
TRAKTOR KONTROL S8 - Manual - 195
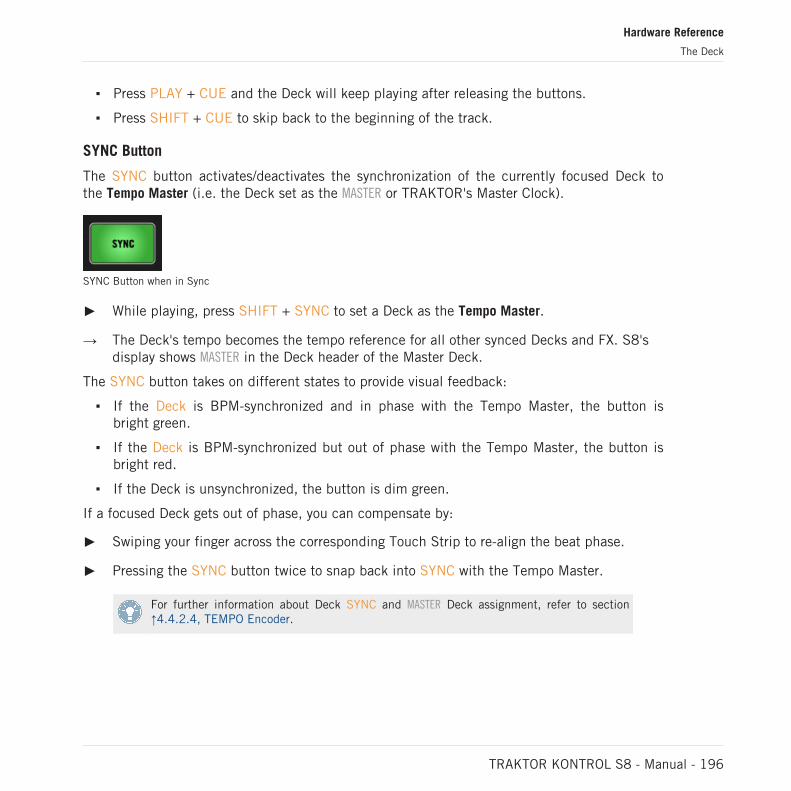
Press PLAY + CUE and the Deck will keep playing after releasing the buttons.
Press SHIFT + CUE to skip back to the beginning of the track.
SYNC Button
The SYNC button activates/deactivates the synchronization of the currently focused Deck tothe Tempo Master (i.e. the Deck set as the MASTER or TRAKTOR's Master Clock).
SYNC Button when in Sync
While playing, press SHIFT + SYNC to set a Deck as the Tempo Master.
→ The Deck's tempo becomes the tempo reference for all other synced Decks and FX. S8'sdisplay shows MASTER in the Deck header of the Master Deck.
The SYNC button takes on different states to provide visual feedback:
If the Deck is BPM-synchronized and in phase with the Tempo Master, the button isbright green.
If the Deck is BPM-synchronized but out of phase with the Tempo Master, the button isbright red.
If the Deck is unsynchronized, the button is dim green.
If a focused Deck gets out of phase, you can compensate by:
Swiping your finger across the corresponding Touch Strip to re-align the beat phase.
Pressing the SYNC button twice to snap back into SYNC with the Tempo Master.
For further information about Deck SYNC and MASTER Deck assignment, refer to section↑4.4.2.4, TEMPO Encoder.
Hardware Reference
The Deck
TRAKTOR KONTROL S8 - Manual - 196
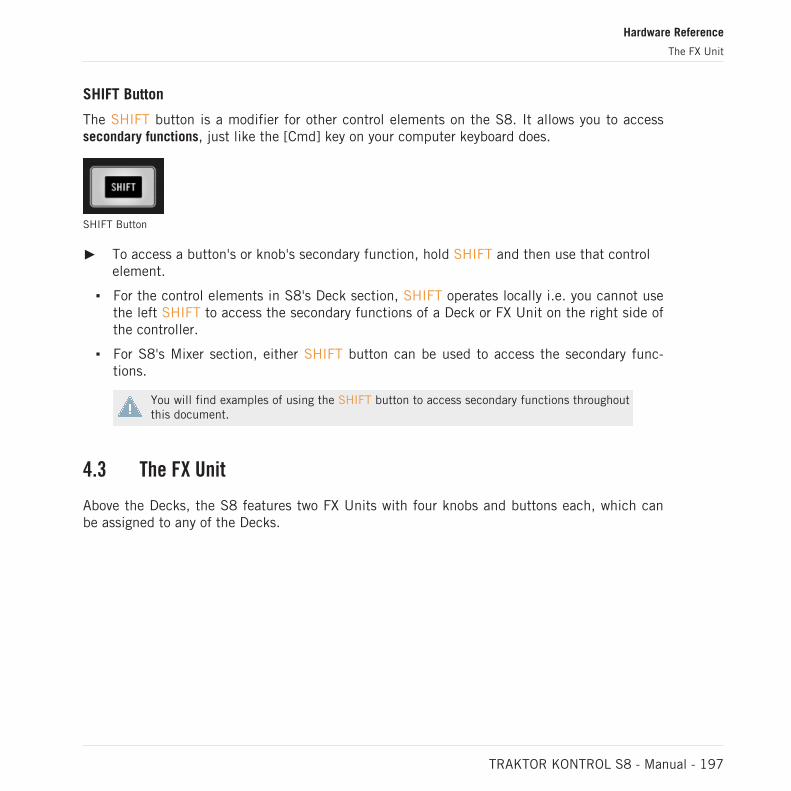
SHIFT Button
The SHIFT button is a modifier for other control elements on the S8. It allows you to accesssecondary functions, just like the [Cmd] key on your computer keyboard does.
SHIFT Button
To access a button's or knob's secondary function, hold SHIFT and then use that controlelement.
For the control elements in S8's Deck section, SHIFT operates locally i.e. you cannot usethe left SHIFT to access the secondary functions of a Deck or FX Unit on the right side ofthe controller.
For S8's Mixer section, either SHIFT button can be used to access the secondary func-tions.
You will find examples of using the SHIFT button to access secondary functions throughoutthis document.
4.3 The FX Unit
Above the Decks, the S8 features two FX Units with four knobs and buttons each, which canbe assigned to any of the Decks.
Hardware Reference
The FX Unit
TRAKTOR KONTROL S8 - Manual - 197
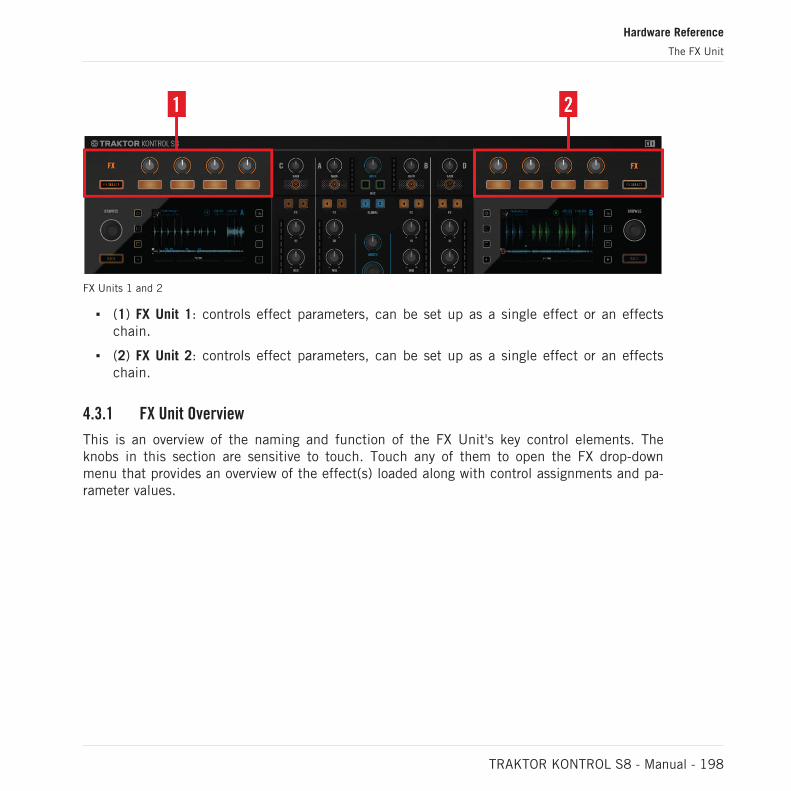
FX Units 1 and 2
(1) FX Unit 1: controls effect parameters, can be set up as a single effect or an effectschain.
(2) FX Unit 2: controls effect parameters, can be set up as a single effect or an effectschain.
4.3.1 FX Unit Overview
This is an overview of the naming and function of the FX Unit's key control elements. Theknobs in this section are sensitive to touch. Touch any of them to open the FX drop-downmenu that provides an overview of the effect(s) loaded along with control assignments and pa-rameter values.
Hardware Reference
The FX Unit
TRAKTOR KONTROL S8 - Manual - 198
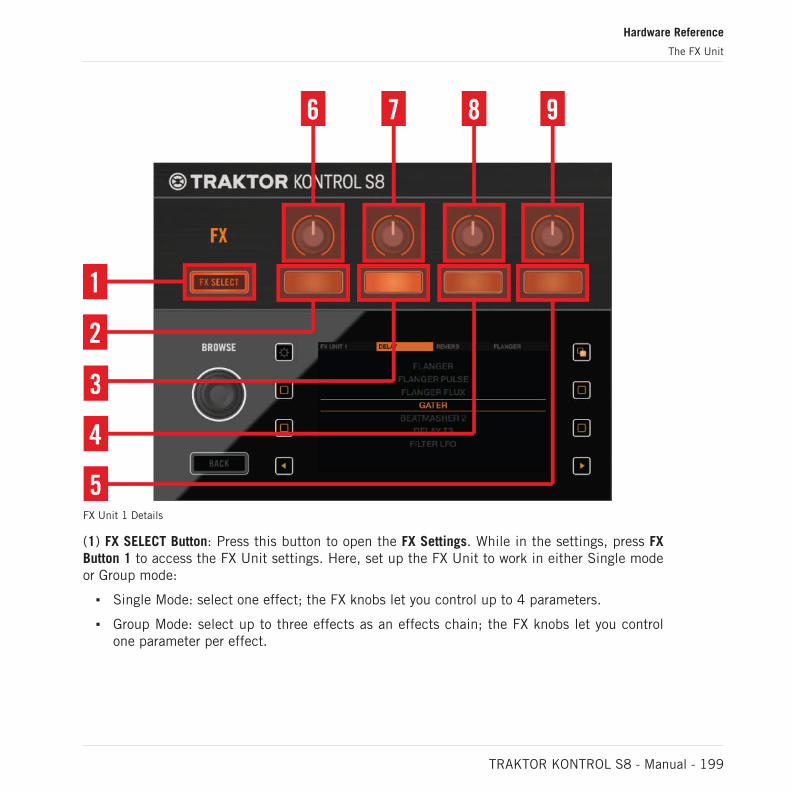
FX Unit 1 Details
(1) FX SELECT Button: Press this button to open the FX Settings. While in the settings, press FXButton 1 to access the FX Unit settings. Here, set up the FX Unit to work in either Single modeor Group mode:
Single Mode: select one effect; the FX knobs let you control up to 4 parameters.
Group Mode: select up to three effects as an effects chain; the FX knobs let you controlone parameter per effect.
Hardware Reference
The FX Unit
TRAKTOR KONTROL S8 - Manual - 199
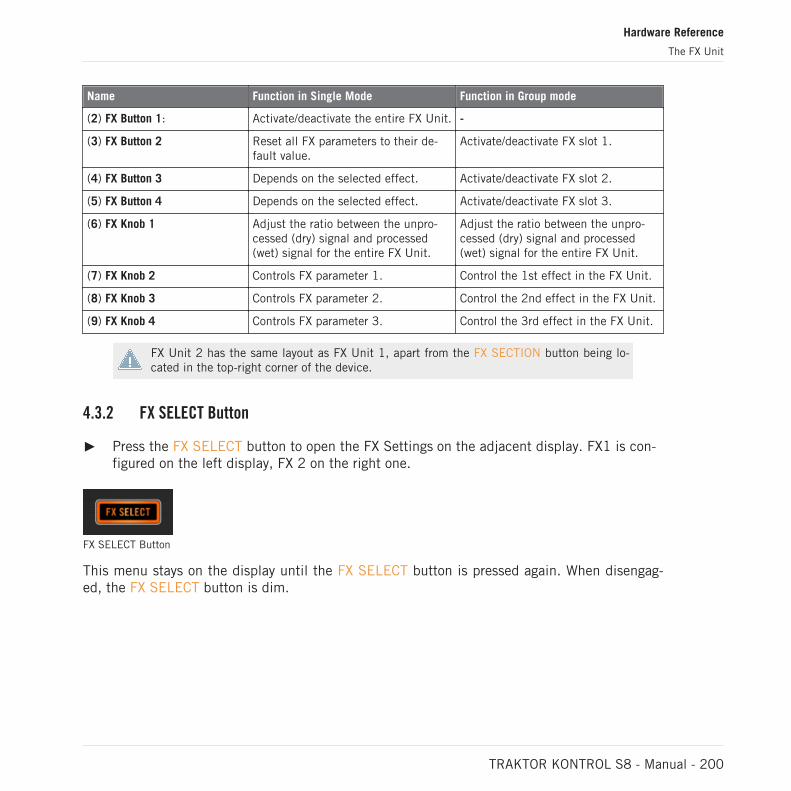
Name Function in Single Mode Function in Group mode
(2) FX Button 1: Activate/deactivate the entire FX Unit. -
(3) FX Button 2 Reset all FX parameters to their de-fault value.
Activate/deactivate FX slot 1.
(4) FX Button 3 Depends on the selected effect. Activate/deactivate FX slot 2.
(5) FX Button 4 Depends on the selected effect. Activate/deactivate FX slot 3.
(6) FX Knob 1 Adjust the ratio between the unpro-cessed (dry) signal and processed(wet) signal for the entire FX Unit.
Adjust the ratio between the unpro-cessed (dry) signal and processed(wet) signal for the entire FX Unit.
(7) FX Knob 2 Controls FX parameter 1. Control the 1st effect in the FX Unit.
(8) FX Knob 3 Controls FX parameter 2. Control the 2nd effect in the FX Unit.
(9) FX Knob 4 Controls FX parameter 3. Control the 3rd effect in the FX Unit.
FX Unit 2 has the same layout as FX Unit 1, apart from the FX SECTION button being lo-cated in the top-right corner of the device.
4.3.2 FX SELECT Button
Press the FX SELECT button to open the FX Settings on the adjacent display. FX1 is con-figured on the left display, FX 2 on the right one.
FX SELECT Button
This menu stays on the display until the FX SELECT button is pressed again. When disengag-ed, the FX SELECT button is dim.
Hardware Reference
The FX Unit
TRAKTOR KONTROL S8 - Manual - 200
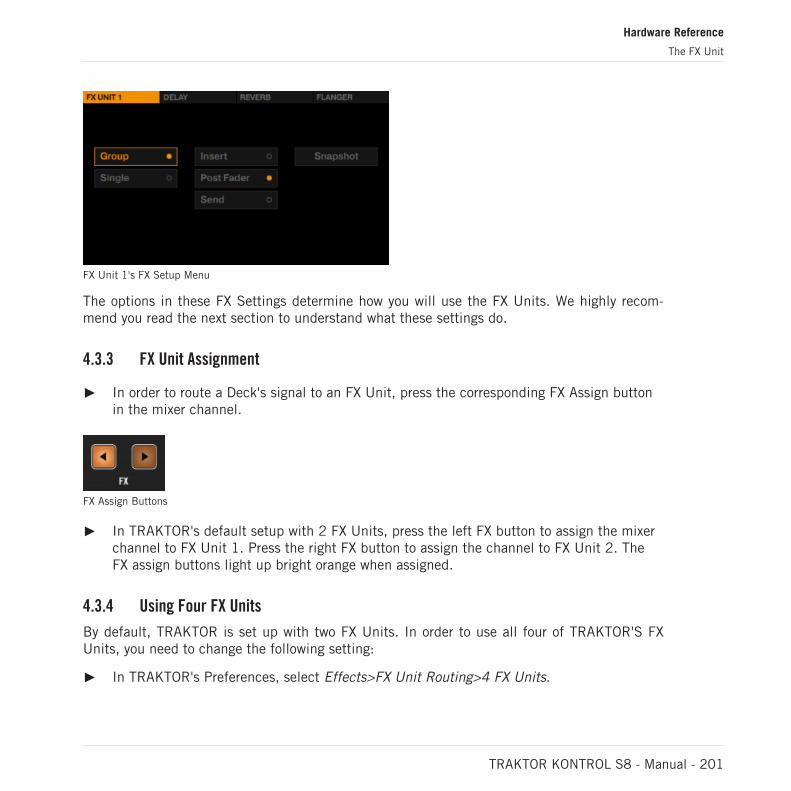
FX Unit 1's FX Setup Menu
The options in these FX Settings determine how you will use the FX Units. We highly recom-mend you read the next section to understand what these settings do.
4.3.3 FX Unit Assignment
In order to route a Deck's signal to an FX Unit, press the corresponding FX Assign buttonin the mixer channel.
FX Assign Buttons
In TRAKTOR's default setup with 2 FX Units, press the left FX button to assign the mixerchannel to FX Unit 1. Press the right FX button to assign the channel to FX Unit 2. TheFX assign buttons light up bright orange when assigned.
4.3.4 Using Four FX Units
By default, TRAKTOR is set up with two FX Units. In order to use all four of TRAKTOR'S FXUnits, you need to change the following setting:
In TRAKTOR's Preferences, select Effects>FX Unit Routing>4 FX Units.
Hardware Reference
The FX Unit
TRAKTOR KONTROL S8 - Manual - 201
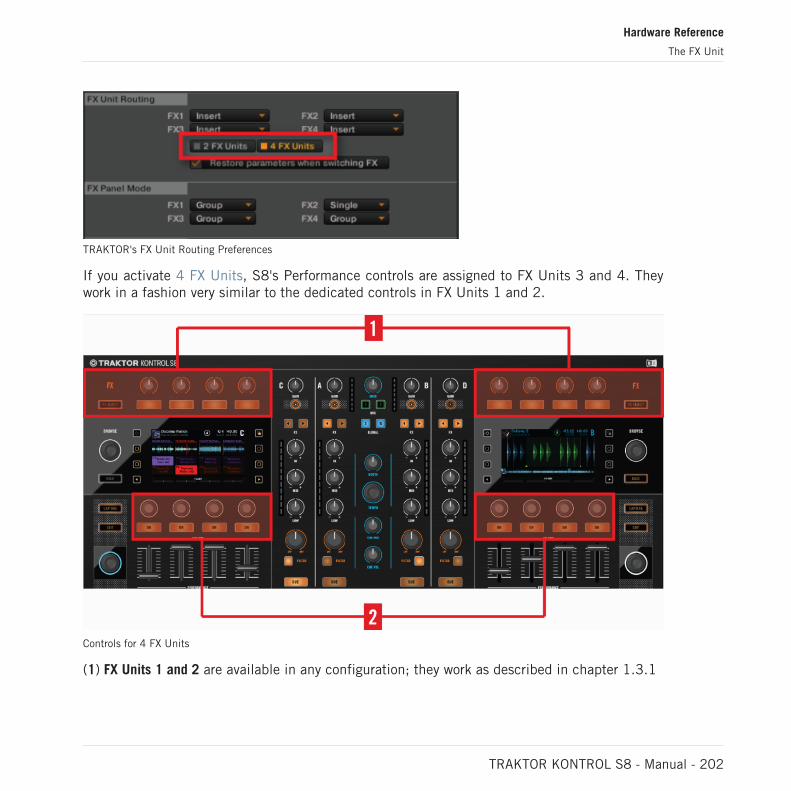
TRAKTOR's FX Unit Routing Preferences
If you activate 4 FX Units, S8's Performance controls are assigned to FX Units 3 and 4. Theywork in a fashion very similar to the dedicated controls in FX Units 1 and 2.
Controls for 4 FX Units
(1) FX Units 1 and 2 are available in any configuration; they work as described in chapter 1.3.1
Hardware Reference
The FX Unit
TRAKTOR KONTROL S8 - Manual - 202
(2) FX Units 3 and 4 are available once the 4 FX Units option is activated. They offer the samefeatures as units 1 and 2 by means of the Performance controls.
Assigning FX Units 3 and 4
To route a channel to FX Unit 3 or 4:
Press SHIFT button + an FX assign button. The left FX assign button assigns to FX Unit3, the right button to FX Unit 4.
Overview of FX Unit 3's Controls
Once activated in the Preferences, FX Units 3 and 4 work very much like FX Units 1 and 2.Here, S8 offers four knobs and four buttons per FX Unit, too.
Hardware Reference
The FX Unit
TRAKTOR KONTROL S8 - Manual - 203
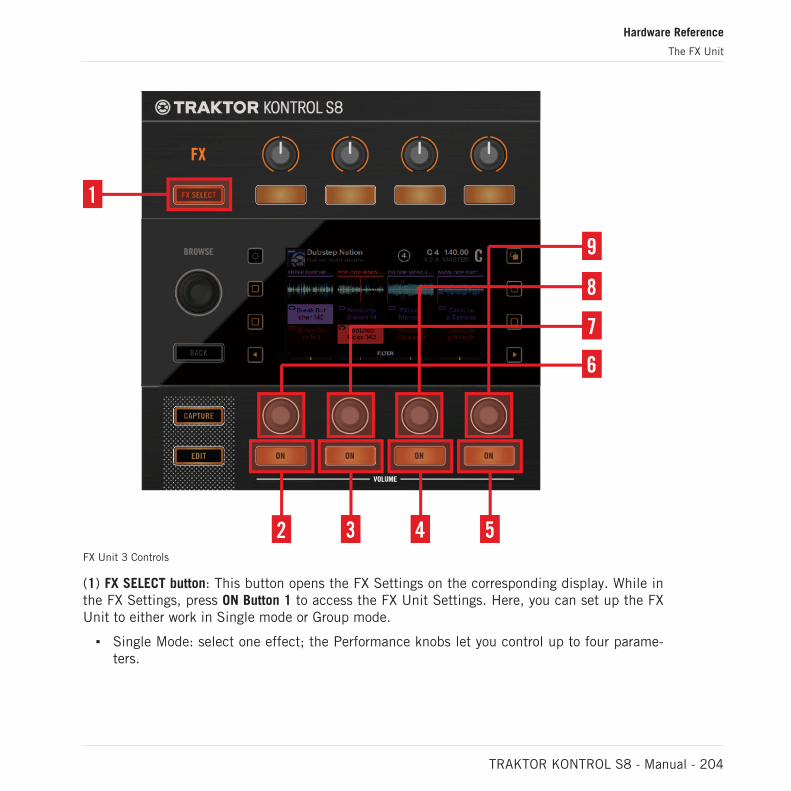
FX Unit 3 Controls
(1) FX SELECT button: This button opens the FX Settings on the corresponding display. While inthe FX Settings, press ON Button 1 to access the FX Unit Settings. Here, you can set up the FXUnit to either work in Single mode or Group mode.
Single Mode: select one effect; the Performance knobs let you control up to four parame-ters.
Hardware Reference
The FX Unit
TRAKTOR KONTROL S8 - Manual - 204
Group Mode: select up to three effects as an effects chain; the Performance knobs let youcontrol one parameter per effect.
Name Function in SIngle Mode Function in Group mode
(2) ON Button 1 Activate/deactivate the entire FXUnit
-
(3) ON Button 2 Reset all FX parameters to their de-fault value.
Activate/deactivate FX slot 1.
(4) ON Button 3 Depends on the selected effect. Activate/deactivate FX slot 2.
(5) ON Button 4 Depends on the selected effect. Activate/deactivate FX slot 3.
(6) Performance Knob 1 Adjust the ratio between the unpro-cessed (dry) signal and processed(wet) signal of the entire FX Unit.
Adjust the ratio between the unpro-cessed (dry) signal and processed(wet) signal of the entire FX Unit.
(7) Performance Knob 2 Controls FX parameter 1. Control the 1st effect in the FX Unit.
(8) Performance Knob 3 Controls FX parameter 2. Control the 2nd effect in the FXUnit.
(9) Performance Knob 4 Controls FX parameter 3. Control the 3rd effect in the FX Unit.
4.4 The Mixer
This is a brief overview of the mixer's layout, its function and operation. After that, the detailedhardware reference explains each and every component found in S8's mixer section.
Hardware Reference
The Mixer
TRAKTOR KONTROL S8 - Manual - 205
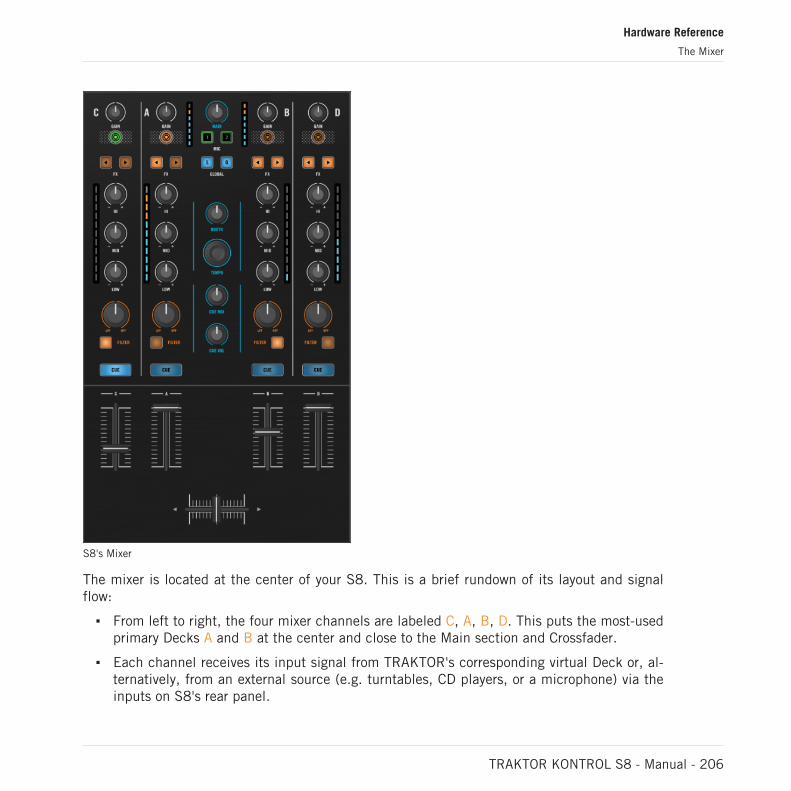
S8's Mixer
The mixer is located at the center of your S8. This is a brief rundown of its layout and signalflow:
From left to right, the four mixer channels are labeled C, A, B, D. This puts the most-usedprimary Decks A and B at the center and close to the Main section and Crossfader.
Each channel receives its input signal from TRAKTOR's corresponding virtual Deck or, al-ternatively, from an external source (e.g. turntables, CD players, or a microphone) via theinputs on S8's rear panel.
Hardware Reference
The Mixer
TRAKTOR KONTROL S8 - Manual - 206
Each channel has a dedicated Fader to smoothly fade into and out of the mix going outthe Main out.
The Crossfader fades between left and right sides. Each channel can be assigned to oneof the sides via dedicated switches on S8's front panel.
The Crossfader feeds into the Main section which routes the signal to MAIN, BOOTH andCUE outputs.
Also in the Mixer's Main section, you can set the global TEMPO and turn on/off Snap andQuantize
4.4.1 Mixer Channel
All mixer channels are laid out identically. Let's have a look at one of them.
Hardware Reference
The Mixer
TRAKTOR KONTROL S8 - Manual - 207
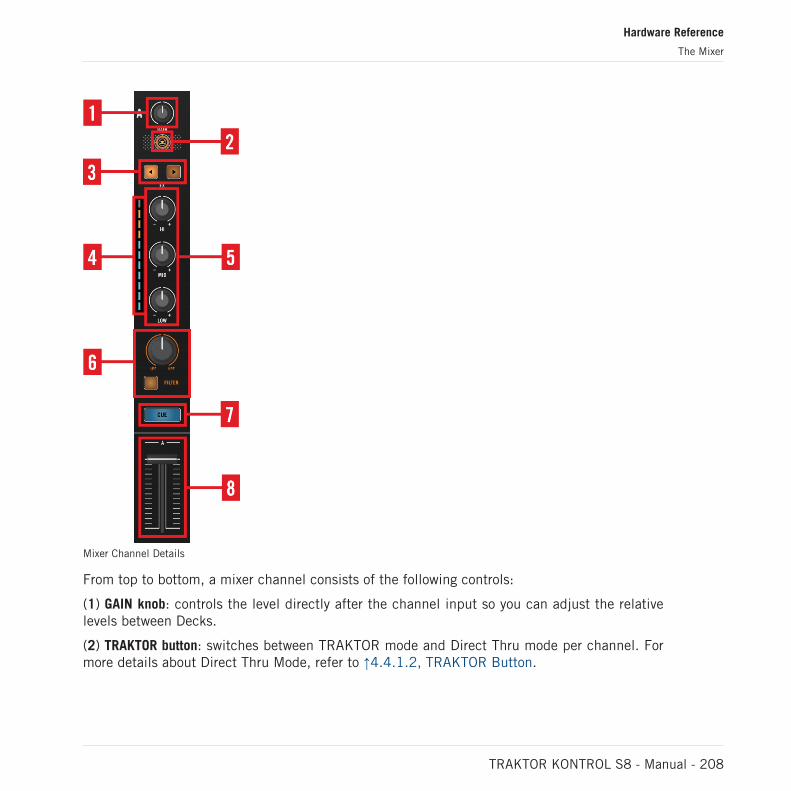
Mixer Channel Details
From top to bottom, a mixer channel consists of the following controls:
(1) GAIN knob: controls the level directly after the channel input so you can adjust the relativelevels between Decks.
(2) TRAKTOR button: switches between TRAKTOR mode and Direct Thru mode per channel. Formore details about Direct Thru Mode, refer to ↑4.4.1.2, TRAKTOR Button.
Hardware Reference
The Mixer
TRAKTOR KONTROL S8 - Manual - 208
(3) FX Assign buttons: assign a channel to an FX Unit. A channel can only be assigned to an FXUnit when it's in TRAKTOR mode (indicated by the TRAKTOR button lighting up bright or-ange).
(4) Input level meter: each channel has a dedicated Input level meter that displays the signallevel before the channel fader. Adjust the level with the GAIN knob on top of the channel soyour channel level only reaches the first orange segment with the loudest peaks.
(5) EQ (HI, MID, LOW) knobs: control the frequency balance. This works in both TRAKTORmode and Direct Thru mode.
(6) FILTER knob: controls a Filter (HPF or LPF) effect once activated via the FILTER button.This works in both TRAKTOR mode and Direct Thru mode.
(7) CUE button: allows you to audition the channel’s signal on your headphones via the cue.
(8) channel fader: lets you smoothly fade a channel into to the mix. This works in both TRAK-TOR mode and Thru mode.
4.4.1.1 GAIN Knob
The GAIN knob controls the level a channel receives from the corresponding Deck or audio in-put.
GAIN Encoder
Adjust the levels of tracks you want to mix or cross-fade between by turning the tracks'GAIN knobs in order to avoid differences in loudness when mixing.
GAIN is applied after the INPUT and conversion to digital. So if you connect a turntable orany other external device and your channel level meter is constantly moving beyond thefour orange segments with the GAIN knob in center position, dial back that device's outputlevel until only the loudest passages reach the orange range of the Input level meter.
Hardware Reference
The Mixer
TRAKTOR KONTROL S8 - Manual - 209
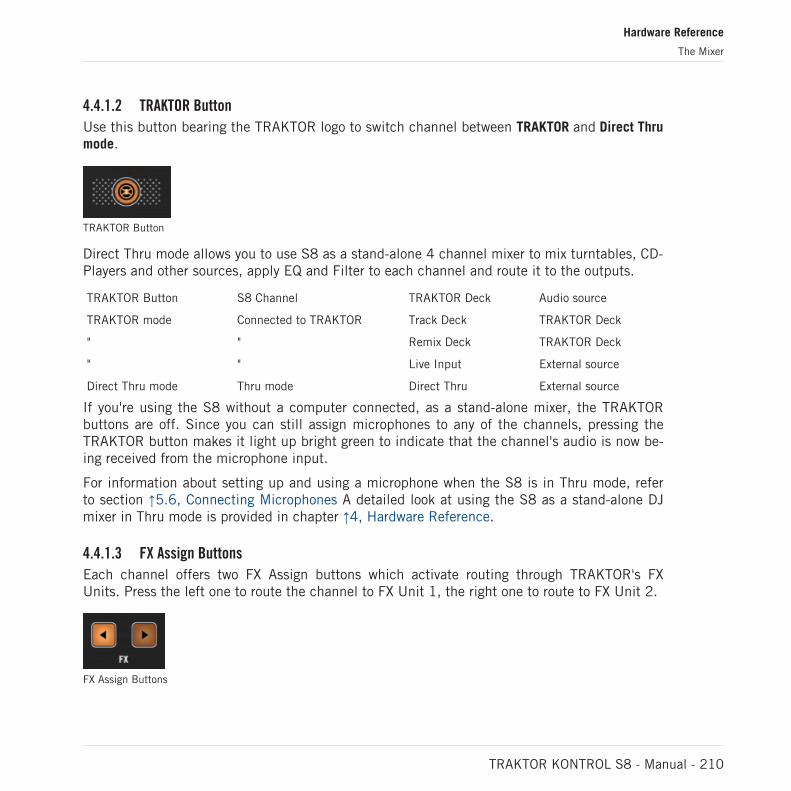
4.4.1.2 TRAKTOR Button
Use this button bearing the TRAKTOR logo to switch channel between TRAKTOR and Direct Thrumode.
TRAKTOR Button
Direct Thru mode allows you to use S8 as a stand-alone 4 channel mixer to mix turntables, CD-Players and other sources, apply EQ and Filter to each channel and route it to the outputs.
TRAKTOR Button S8 Channel TRAKTOR Deck Audio source
TRAKTOR mode Connected to TRAKTOR Track Deck TRAKTOR Deck
" " Remix Deck TRAKTOR Deck
" " Live Input External source
Direct Thru mode Thru mode Direct Thru External source
If you're using the S8 without a computer connected, as a stand-alone mixer, the TRAKTORbuttons are off. Since you can still assign microphones to any of the channels, pressing theTRAKTOR button makes it light up bright green to indicate that the channel's audio is now be-ing received from the microphone input.
For information about setting up and using a microphone when the S8 is in Thru mode, referto section ↑5.6, Connecting Microphones A detailed look at using the S8 as a stand-alone DJmixer in Thru mode is provided in chapter ↑4, Hardware Reference.
4.4.1.3 FX Assign Buttons
Each channel offers two FX Assign buttons which activate routing through TRAKTOR's FXUnits. Press the left one to route the channel to FX Unit 1, the right one to route to FX Unit 2.
FX Assign Buttons
Hardware Reference
The Mixer
TRAKTOR KONTROL S8 - Manual - 210
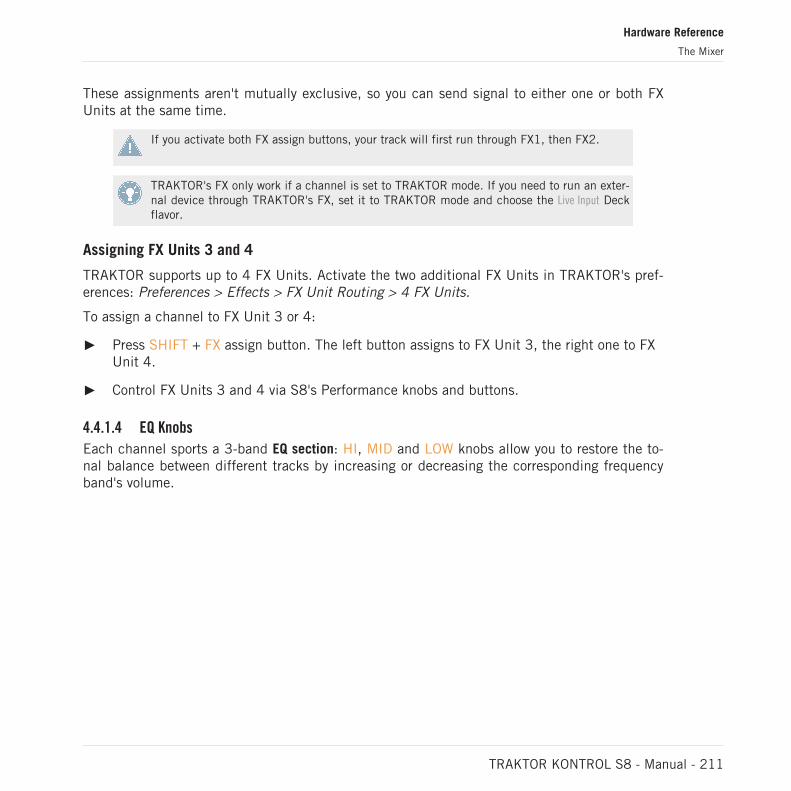
These assignments aren't mutually exclusive, so you can send signal to either one or both FXUnits at the same time.
If you activate both FX assign buttons, your track will first run through FX1, then FX2.
TRAKTOR's FX only work if a channel is set to TRAKTOR mode. If you need to run an exter-nal device through TRAKTOR's FX, set it to TRAKTOR mode and choose the Live Input Deckflavor.
Assigning FX Units 3 and 4
TRAKTOR supports up to 4 FX Units. Activate the two additional FX Units in TRAKTOR's pref-erences: Preferences > Effects > FX Unit Routing > 4 FX Units.
To assign a channel to FX Unit 3 or 4:
Press SHIFT + FX assign button. The left button assigns to FX Unit 3, the right one to FXUnit 4.
Control FX Units 3 and 4 via S8's Performance knobs and buttons.
4.4.1.4 EQ Knobs
Each channel sports a 3-band EQ section: HI, MID and LOW knobs allow you to restore the to-nal balance between different tracks by increasing or decreasing the corresponding frequencyband's volume.
Hardware Reference
The Mixer
TRAKTOR KONTROL S8 - Manual - 211

EQ Section
At the center position, the knobs have a detent, marking the position where no tonal changeoccurs.
S8's internal EQ sounds identical to the Z ISO which is the default in the TRAKTOR soft-ware.
TRAKTOR provides you with various types of EQ, each of them with its own “personality.”You can choose the EQ type in Preferences > Mixer > EQ Selection. For more info, pleaserefer to the TRAKTOR 2 Manual.
4.4.1.5 Channel Fader
The channel fader controls the channel’s level being sent to the Crossfader and MAIN OUT.
Hardware Reference
The Mixer
TRAKTOR KONTROL S8 - Manual - 212
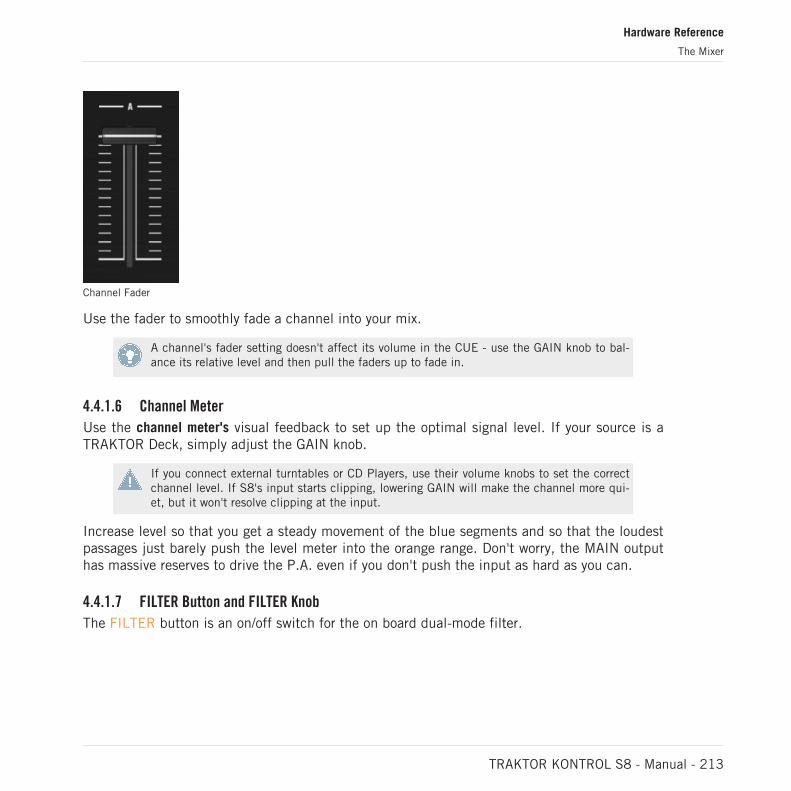
Channel Fader
Use the fader to smoothly fade a channel into your mix.
A channel's fader setting doesn't affect its volume in the CUE - use the GAIN knob to bal-ance its relative level and then pull the faders up to fade in.
4.4.1.6 Channel Meter
Use the channel meter's visual feedback to set up the optimal signal level. If your source is aTRAKTOR Deck, simply adjust the GAIN knob.
If you connect external turntables or CD Players, use their volume knobs to set the correctchannel level. If S8's input starts clipping, lowering GAIN will make the channel more qui-et, but it won't resolve clipping at the input.
Increase level so that you get a steady movement of the blue segments and so that the loudestpassages just barely push the level meter into the orange range. Don't worry, the MAIN outputhas massive reserves to drive the P.A. even if you don't push the input as hard as you can.
4.4.1.7 FILTER Button and FILTER Knob
The FILTER button is an on/off switch for the on board dual-mode filter.
Hardware Reference
The Mixer
TRAKTOR KONTROL S8 - Manual - 213
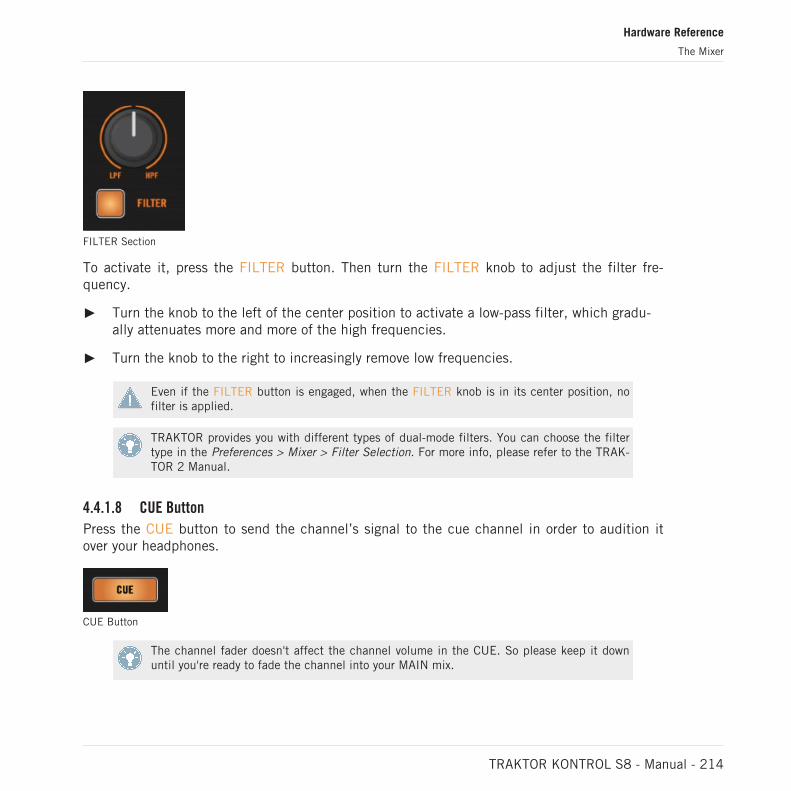
FILTER Section
To activate it, press the FILTER button. Then turn the FILTER knob to adjust the filter fre-quency.
Turn the knob to the left of the center position to activate a low-pass filter, which gradu-ally attenuates more and more of the high frequencies.
Turn the knob to the right to increasingly remove low frequencies.
Even if the FILTER button is engaged, when the FILTER knob is in its center position, nofilter is applied.
TRAKTOR provides you with different types of dual-mode filters. You can choose the filtertype in the Preferences > Mixer > Filter Selection. For more info, please refer to the TRAK-TOR 2 Manual.
4.4.1.8 CUE Button
Press the CUE button to send the channel’s signal to the cue channel in order to audition itover your headphones.
CUE Button
The channel fader doesn't affect the channel volume in the CUE. So please keep it downuntil you're ready to fade the channel into your MAIN mix.
Hardware Reference
The Mixer
TRAKTOR KONTROL S8 - Manual - 214
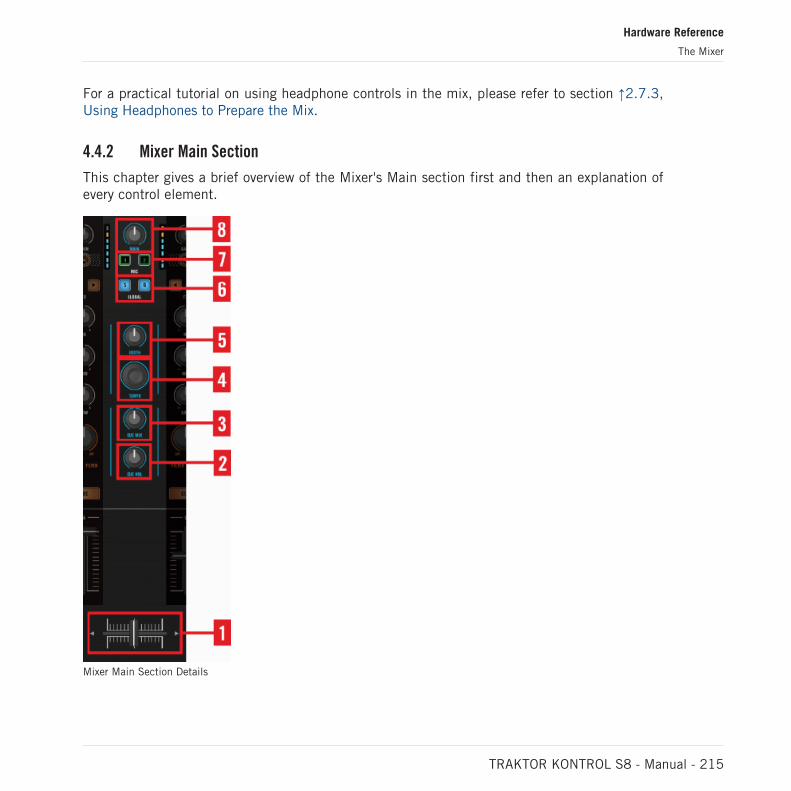
For a practical tutorial on using headphone controls in the mix, please refer to section ↑2.7.3,Using Headphones to Prepare the Mix.
4.4.2 Mixer Main Section
This chapter gives a brief overview of the Mixer's Main section first and then an explanation ofevery control element.
Mixer Main Section Details
Hardware Reference
The Mixer
TRAKTOR KONTROL S8 - Manual - 215
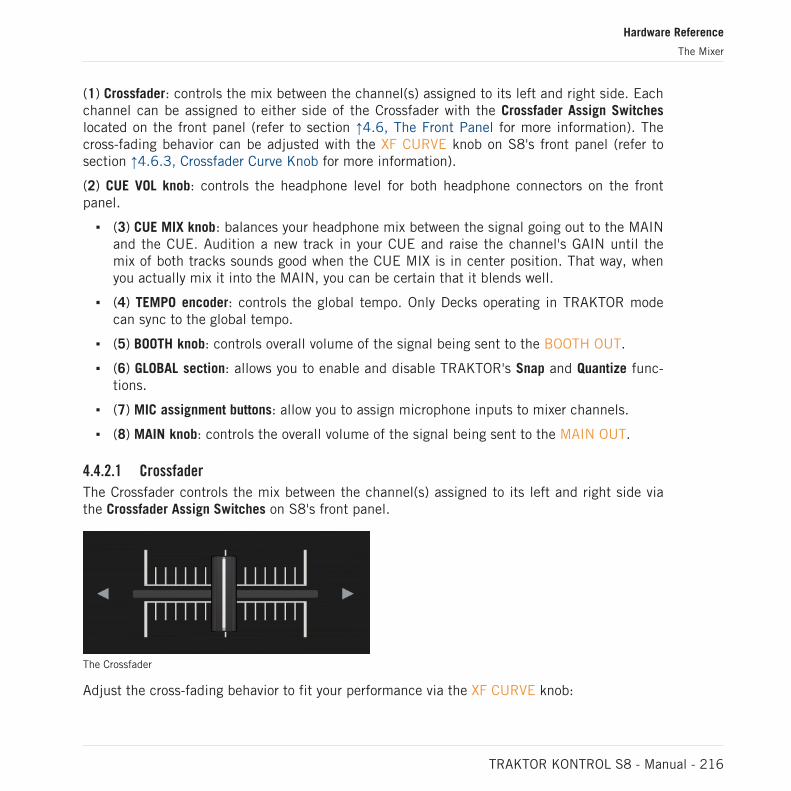
(1) Crossfader: controls the mix between the channel(s) assigned to its left and right side. Eachchannel can be assigned to either side of the Crossfader with the Crossfader Assign Switcheslocated on the front panel (refer to section ↑4.6, The Front Panel for more information). Thecross-fading behavior can be adjusted with the XF CURVE knob on S8's front panel (refer tosection ↑4.6.3, Crossfader Curve Knob for more information).
(2) CUE VOL knob: controls the headphone level for both headphone connectors on the frontpanel.
(3) CUE MIX knob: balances your headphone mix between the signal going out to the MAINand the CUE. Audition a new track in your CUE and raise the channel's GAIN until themix of both tracks sounds good when the CUE MIX is in center position. That way, whenyou actually mix it into the MAIN, you can be certain that it blends well.
(4) TEMPO encoder: controls the global tempo. Only Decks operating in TRAKTOR modecan sync to the global tempo.
(5) BOOTH knob: controls overall volume of the signal being sent to the BOOTH OUT.
(6) GLOBAL section: allows you to enable and disable TRAKTOR's Snap and Quantize func-tions.
(7) MIC assignment buttons: allow you to assign microphone inputs to mixer channels.
(8) MAIN knob: controls the overall volume of the signal being sent to the MAIN OUT.
4.4.2.1 Crossfader
The Crossfader controls the mix between the channel(s) assigned to its left and right side viathe Crossfader Assign Switches on S8's front panel.
The Crossfader
Adjust the cross-fading behavior to fit your performance via the XF CURVE knob:
Hardware Reference
The Mixer
TRAKTOR KONTROL S8 - Manual - 216
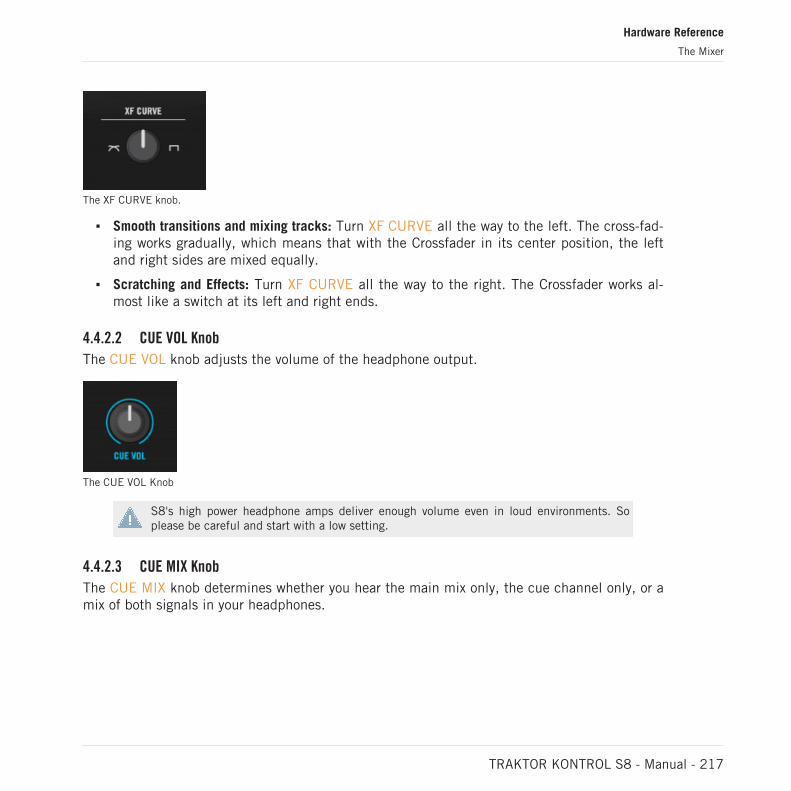
The XF CURVE knob.
Smooth transitions and mixing tracks: Turn XF CURVE all the way to the left. The cross-fad-ing works gradually, which means that with the Crossfader in its center position, the leftand right sides are mixed equally.
Scratching and Effects: Turn XF CURVE all the way to the right. The Crossfader works al-most like a switch at its left and right ends.
4.4.2.2 CUE VOL Knob
The CUE VOL knob adjusts the volume of the headphone output.
The CUE VOL Knob
S8's high power headphone amps deliver enough volume even in loud environments. Soplease be careful and start with a low setting.
4.4.2.3 CUE MIX Knob
The CUE MIX knob determines whether you hear the main mix only, the cue channel only, or amix of both signals in your headphones.
Hardware Reference
The Mixer
TRAKTOR KONTROL S8 - Manual - 217

CUE MIX Knob
Pre-hear a new track in your CUE and raise the channel's GAIN until the mix of bothtracks sounds good when the CUE MIX is in center position. That way, when you actuallymix it in to the MAIN, you can be certain that it blends well.
4.4.2.4 TEMPO Encoder
The central TEMPO knob controls TRAKTOR's Tempo Master in BPM. All synced Decks automati-cally follow tempo changes.
TEMPO Encoder
The TEMPO encoder changes tempo in increments of .01 BPM. Hold SHIFT to change inincrements of 1 BPM.
A shortcut provides tempo control functionality via the Deck's display.
Please note: you can only set an individual tempo for un-synced Decks. If you adjust asynced Deck's tempo, the Tempo Master BPM and changes accordingly.
So for behavior similar to using a dedicated Tempo slider, make sure the Deck isn't synced.
1. Press the left-hand upper Display Button to open the BPM pop-up.2. Turn the BROWSE knob to adjust MASTER tempo in .01 BPM increments. To adjust in full
BPM steps, hold SHIFT while turning the knob.
Hardware Reference
The Mixer
TRAKTOR KONTROL S8 - Manual - 218
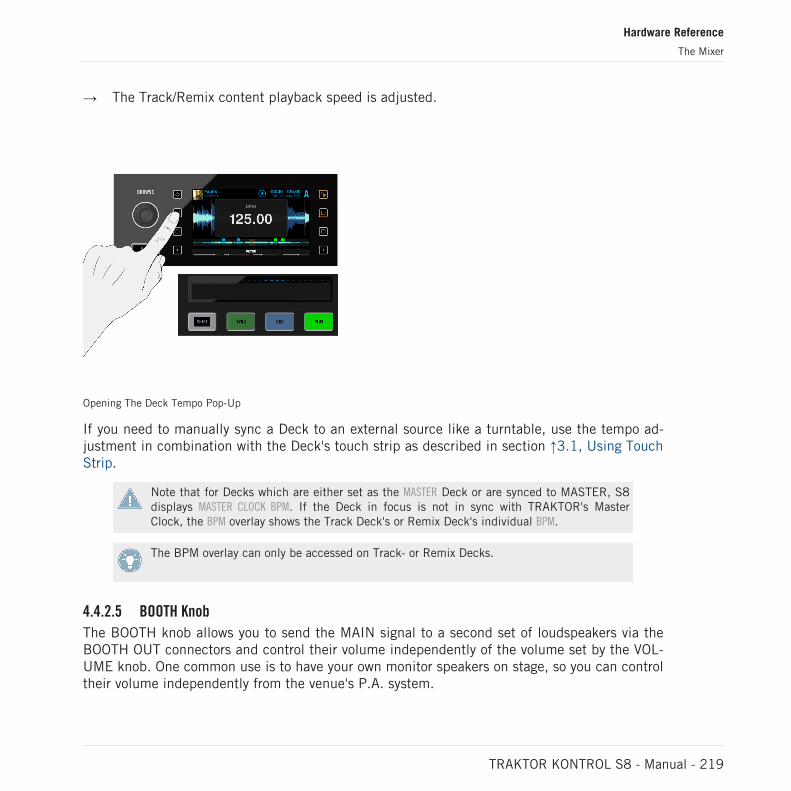
→ The Track/Remix content playback speed is adjusted.
Opening The Deck Tempo Pop-Up
If you need to manually sync a Deck to an external source like a turntable, use the tempo ad-justment in combination with the Deck's touch strip as described in section ↑3.1, Using TouchStrip.
Note that for Decks which are either set as the MASTER Deck or are synced to MASTER, S8displays MASTER CLOCK BPM. If the Deck in focus is not in sync with TRAKTOR's MasterClock, the BPM overlay shows the Track Deck's or Remix Deck's individual BPM.
The BPM overlay can only be accessed on Track- or Remix Decks.
4.4.2.5 BOOTH Knob
The BOOTH knob allows you to send the MAIN signal to a second set of loudspeakers via theBOOTH OUT connectors and control their volume independently of the volume set by the VOL-UME knob. One common use is to have your own monitor speakers on stage, so you can controltheir volume independently from the venue's P.A. system.
Hardware Reference
The Mixer
TRAKTOR KONTROL S8 - Manual - 219
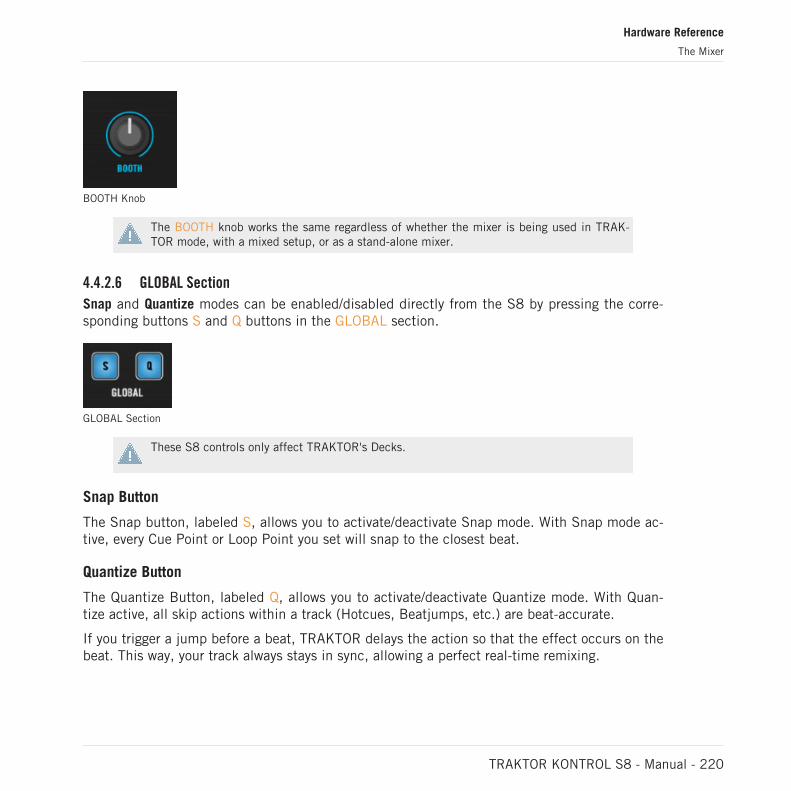
BOOTH Knob
The BOOTH knob works the same regardless of whether the mixer is being used in TRAK-TOR mode, with a mixed setup, or as a stand-alone mixer.
4.4.2.6 GLOBAL Section
Snap and Quantize modes can be enabled/disabled directly from the S8 by pressing the corre-sponding buttons S and Q buttons in the GLOBAL section.
GLOBAL Section
These S8 controls only affect TRAKTOR's Decks.
Snap Button
The Snap button, labeled S, allows you to activate/deactivate Snap mode. With Snap mode ac-tive, every Cue Point or Loop Point you set will snap to the closest beat.
Quantize Button
The Quantize Button, labeled Q, allows you to activate/deactivate Quantize mode. With Quan-tize active, all skip actions within a track (Hotcues, Beatjumps, etc.) are beat-accurate.
If you trigger a jump before a beat, TRAKTOR delays the action so that the effect occurs on thebeat. This way, your track always stays in sync, allowing a perfect real-time remixing.
Hardware Reference
The Mixer
TRAKTOR KONTROL S8 - Manual - 220
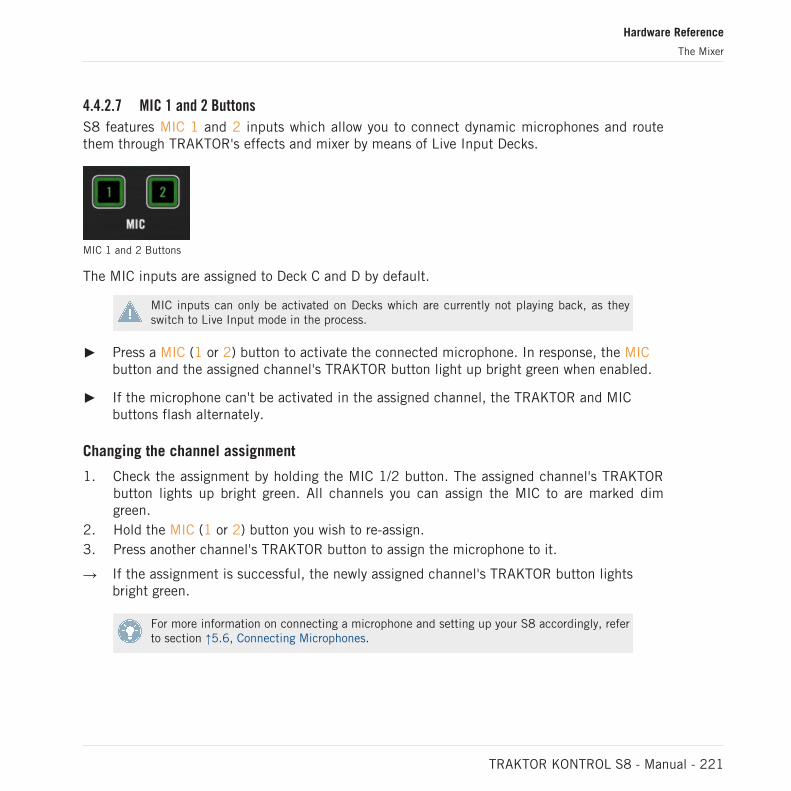
4.4.2.7 MIC 1 and 2 Buttons
S8 features MIC 1 and 2 inputs which allow you to connect dynamic microphones and routethem through TRAKTOR's effects and mixer by means of Live Input Decks.
MIC 1 and 2 Buttons
The MIC inputs are assigned to Deck C and D by default.
MIC inputs can only be activated on Decks which are currently not playing back, as theyswitch to Live Input mode in the process.
Press a MIC (1 or 2) button to activate the connected microphone. In response, the MICbutton and the assigned channel's TRAKTOR button light up bright green when enabled.
If the microphone can't be activated in the assigned channel, the TRAKTOR and MICbuttons flash alternately.
Changing the channel assignment
1. Check the assignment by holding the MIC 1/2 button. The assigned channel's TRAKTORbutton lights up bright green. All channels you can assign the MIC to are marked dimgreen.
2. Hold the MIC (1 or 2) button you wish to re-assign.3. Press another channel's TRAKTOR button to assign the microphone to it.
→ If the assignment is successful, the newly assigned channel's TRAKTOR button lightsbright green.
For more information on connecting a microphone and setting up your S8 accordingly, referto section ↑5.6, Connecting Microphones.
Hardware Reference
The Mixer
TRAKTOR KONTROL S8 - Manual - 221
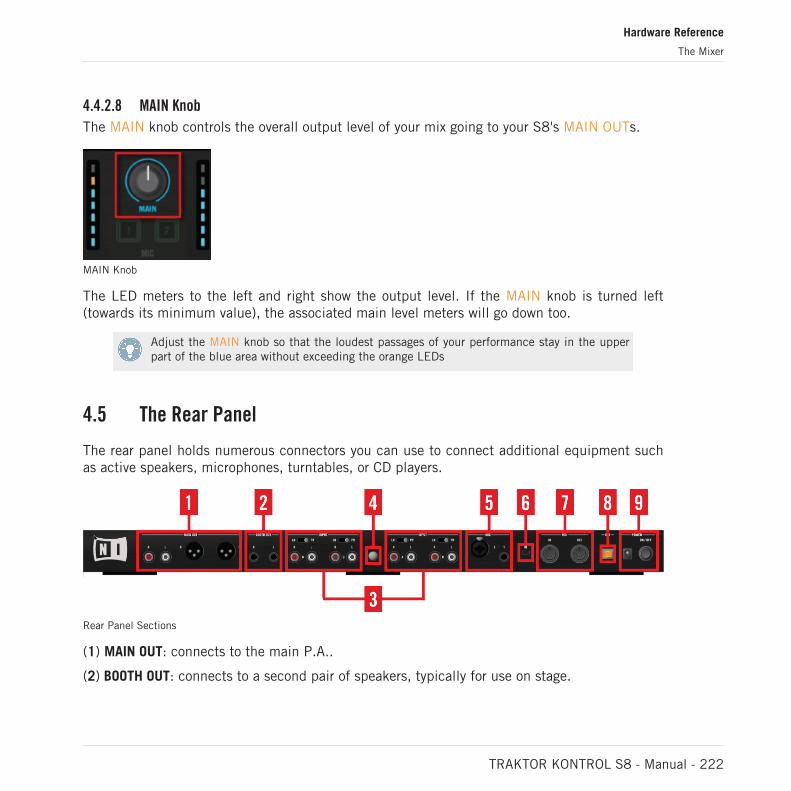
4.4.2.8 MAIN Knob
The MAIN knob controls the overall output level of your mix going to your S8's MAIN OUTs.
MAIN Knob
The LED meters to the left and right show the output level. If the MAIN knob is turned left(towards its minimum value), the associated main level meters will go down too.
Adjust the MAIN knob so that the loudest passages of your performance stay in the upperpart of the blue area without exceeding the orange LEDs
4.5 The Rear Panel
The rear panel holds numerous connectors you can use to connect additional equipment suchas active speakers, microphones, turntables, or CD players.
Rear Panel Sections
(1) MAIN OUT: connects to the main P.A..
(2) BOOTH OUT: connects to a second pair of speakers, typically for use on stage.
Hardware Reference
The Mixer
TRAKTOR KONTROL S8 - Manual - 222
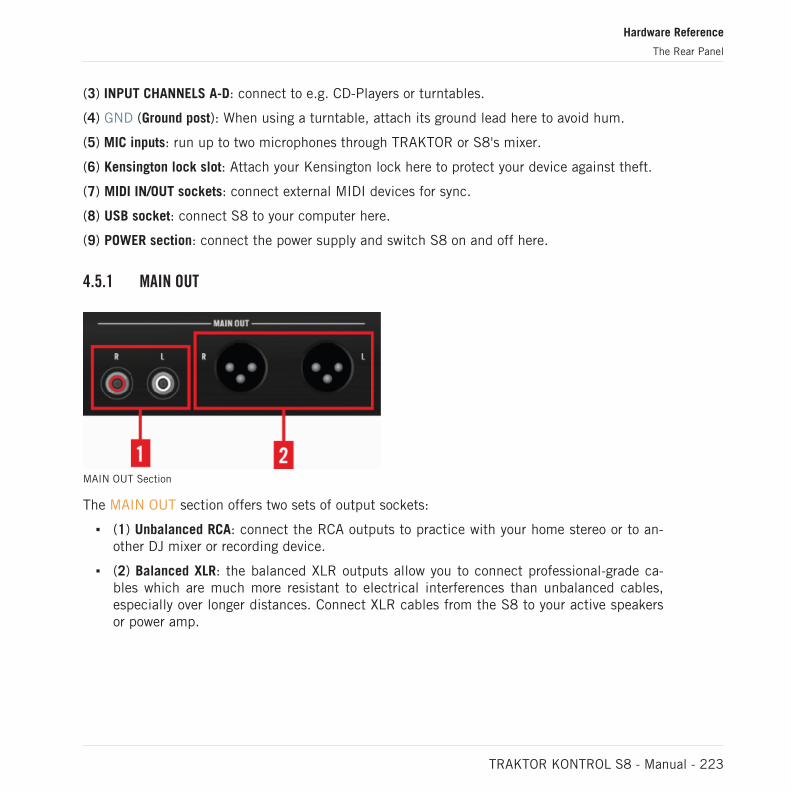
(3) INPUT CHANNELS A-D: connect to e.g. CD-Players or turntables.
(4) GND (Ground post): When using a turntable, attach its ground lead here to avoid hum.
(5) MIC inputs: run up to two microphones through TRAKTOR or S8's mixer.
(6) Kensington lock slot: Attach your Kensington lock here to protect your device against theft.
(7) MIDI IN/OUT sockets: connect external MIDI devices for sync.
(8) USB socket: connect S8 to your computer here.
(9) POWER section: connect the power supply and switch S8 on and off here.
4.5.1 MAIN OUT
MAIN OUT Section
The MAIN OUT section offers two sets of output sockets:
(1) Unbalanced RCA: connect the RCA outputs to practice with your home stereo or to an-other DJ mixer or recording device.
(2) Balanced XLR: the balanced XLR outputs allow you to connect professional-grade ca-bles which are much more resistant to electrical interferences than unbalanced cables,especially over longer distances. Connect XLR cables from the S8 to your active speakersor power amp.
Hardware Reference
The Rear Panel
TRAKTOR KONTROL S8 - Manual - 223
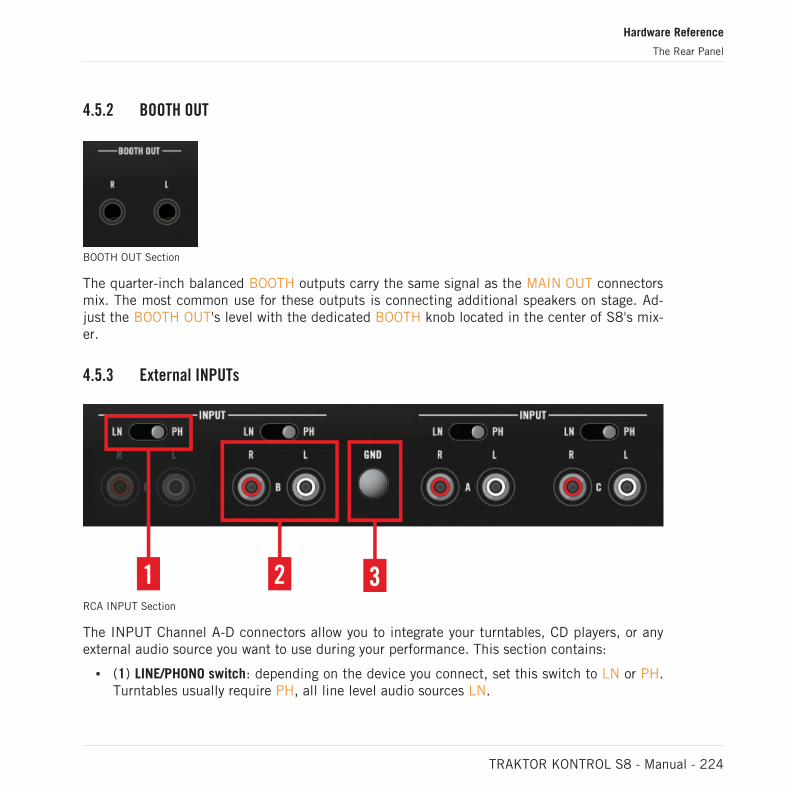
4.5.2 BOOTH OUT
BOOTH OUT Section
The quarter-inch balanced BOOTH outputs carry the same signal as the MAIN OUT connectorsmix. The most common use for these outputs is connecting additional speakers on stage. Ad-just the BOOTH OUT's level with the dedicated BOOTH knob located in the center of S8's mix-er.
4.5.3 External INPUTs
RCA INPUT Section
The INPUT Channel A-D connectors allow you to integrate your turntables, CD players, or anyexternal audio source you want to use during your performance. This section contains:
(1) LINE/PHONO switch: depending on the device you connect, set this switch to LN or PH.Turntables usually require PH, all line level audio sources LN.
Hardware Reference
The Rear Panel
TRAKTOR KONTROL S8 - Manual - 224
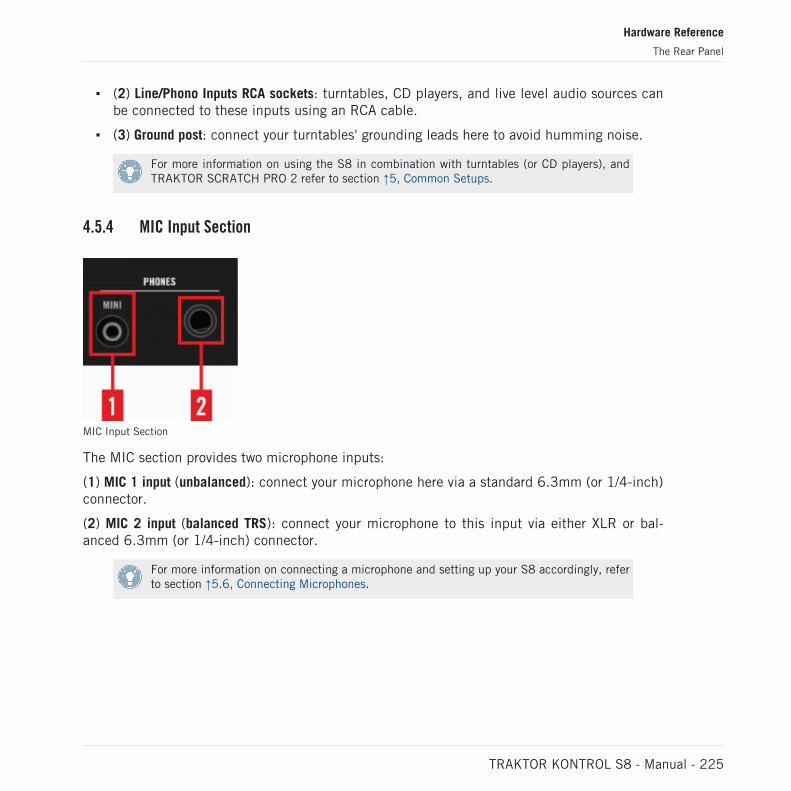
(2) Line/Phono Inputs RCA sockets: turntables, CD players, and live level audio sources canbe connected to these inputs using an RCA cable.
(3) Ground post: connect your turntables' grounding leads here to avoid humming noise.
For more information on using the S8 in combination with turntables (or CD players), andTRAKTOR SCRATCH PRO 2 refer to section ↑5, Common Setups.
4.5.4 MIC Input Section
MIC Input Section
The MIC section provides two microphone inputs:
(1) MIC 1 input (unbalanced): connect your microphone here via a standard 6.3mm (or 1/4-inch)connector.
(2) MIC 2 input (balanced TRS): connect your microphone to this input via either XLR or bal-anced 6.3mm (or 1/4-inch) connector.
For more information on connecting a microphone and setting up your S8 accordingly, referto section ↑5.6, Connecting Microphones.
Hardware Reference
The Rear Panel
TRAKTOR KONTROL S8 - Manual - 225
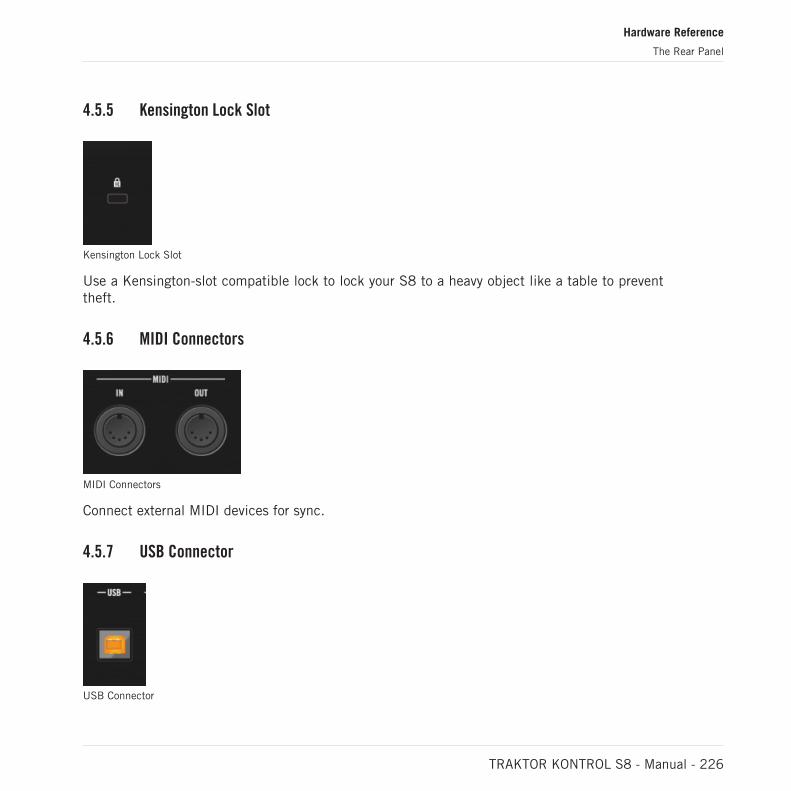
4.5.5 Kensington Lock Slot
Kensington Lock Slot
Use a Kensington-slot compatible lock to lock your S8 to a heavy object like a table to preventtheft.
4.5.6 MIDI Connectors
MIDI Connectors
Connect external MIDI devices for sync.
4.5.7 USB Connector
USB Connector
Hardware Reference
The Rear Panel
TRAKTOR KONTROL S8 - Manual - 226

Connect S8 to your computer here, using the included USB cable. The connection is USB 2,but is compatible to USB 3 ports and protocol.
Due to the large amounts of data transmitted to the TRAKTOR KONTROL S8, it may notwork properly when connected to a USB hub. Make sure to connect S8 directly to a USBport on your computer if possible.
4.5.8 POWER Section
POWER Section
In the POWER section, you make the connection to the power supply and to your computer:
(1) Power Supply connector (15V - 2.66 A): connect the included power supply.
(2) ON/OFF switch: press this switch to turn your device on or off.
Using any power supply other than the included can cause power-related issues and ulti-mately damage S8.
Before you use the power supply and connect to the S8, please refer to the TRAKTORKONTROL S8 IMPORTANT SAFETY INSTRUCTIONS leaflet (included in the box). Thisleaflet explains how to attach the specific adaptor plug for your region.
Hardware Reference
The Rear Panel
TRAKTOR KONTROL S8 - Manual - 227
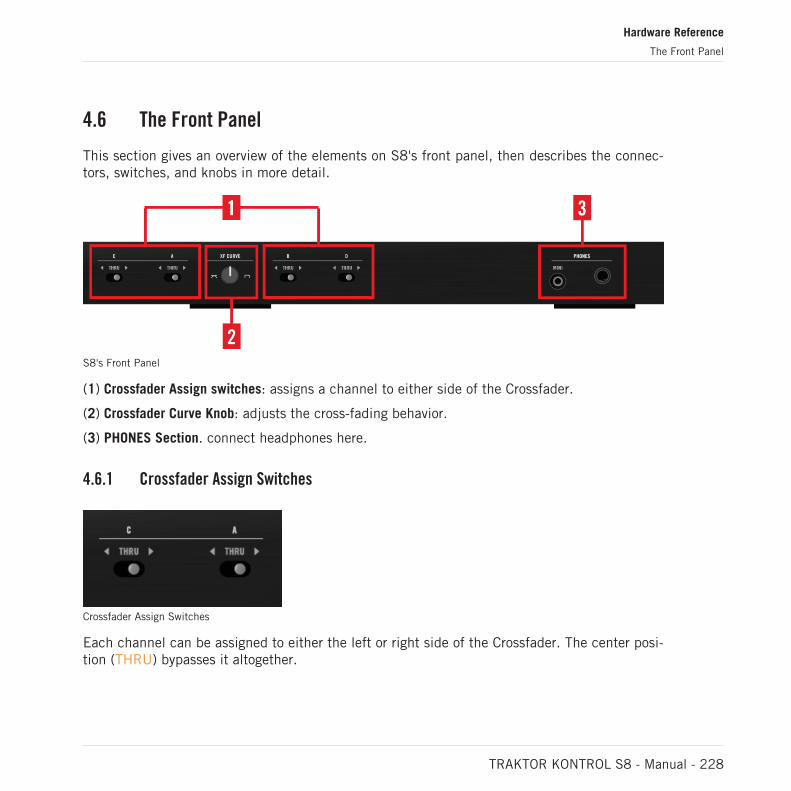
4.6 The Front Panel
This section gives an overview of the elements on S8's front panel, then describes the connec-tors, switches, and knobs in more detail.
S8's Front Panel
(1) Crossfader Assign switches: assigns a channel to either side of the Crossfader.
(2) Crossfader Curve Knob: adjusts the cross-fading behavior.
(3) PHONES Section. connect headphones here.
4.6.1 Crossfader Assign Switches
Crossfader Assign Switches
Each channel can be assigned to either the left or right side of the Crossfader. The center posi-tion (THRU) bypasses it altogether.
Hardware Reference
The Front Panel
TRAKTOR KONTROL S8 - Manual - 228
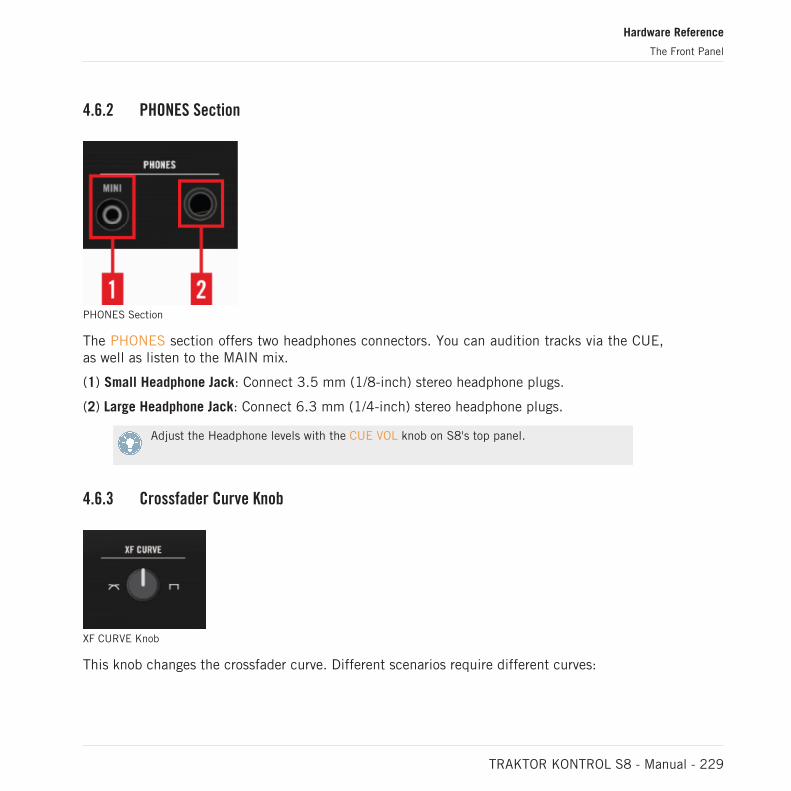
4.6.2 PHONES Section
PHONES Section
The PHONES section offers two headphones connectors. You can audition tracks via the CUE,as well as listen to the MAIN mix.
(1) Small Headphone Jack: Connect 3.5 mm (1/8-inch) stereo headphone plugs.
(2) Large Headphone Jack: Connect 6.3 mm (1/4-inch) stereo headphone plugs.
Adjust the Headphone levels with the CUE VOL knob on S8's top panel.
4.6.3 Crossfader Curve Knob
XF CURVE Knob
This knob changes the crossfader curve. Different scenarios require different curves:
Hardware Reference
The Front Panel
TRAKTOR KONTROL S8 - Manual - 229
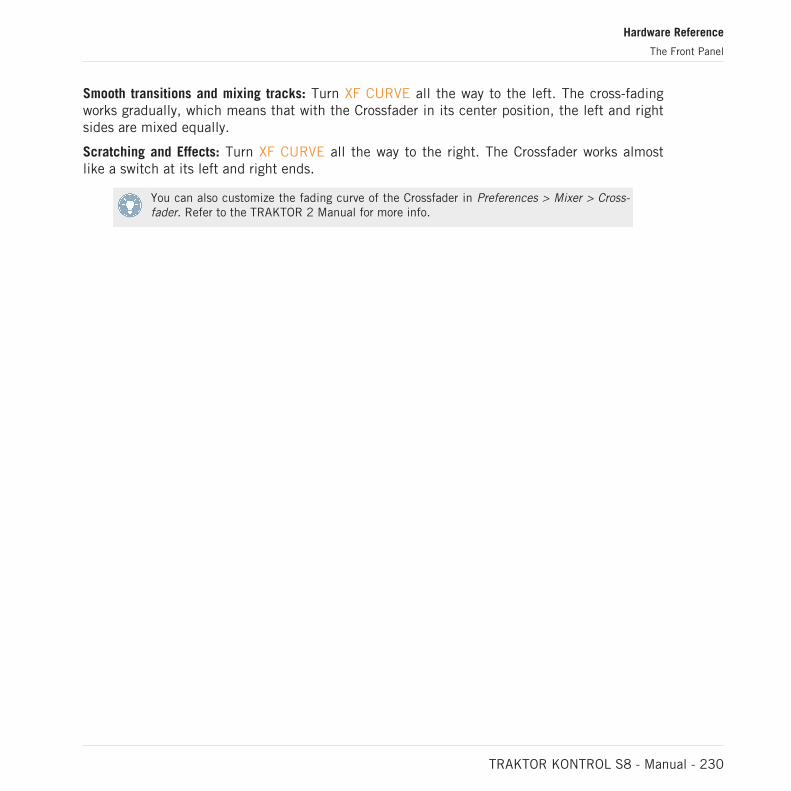
Smooth transitions and mixing tracks: Turn XF CURVE all the way to the left. The cross-fadingworks gradually, which means that with the Crossfader in its center position, the left and rightsides are mixed equally.
Scratching and Effects: Turn XF CURVE all the way to the right. The Crossfader works almostlike a switch at its left and right ends.
You can also customize the fading curve of the Crossfader in Preferences > Mixer > Cross-fader. Refer to the TRAKTOR 2 Manual for more info.
Hardware Reference
The Front Panel
TRAKTOR KONTROL S8 - Manual - 230
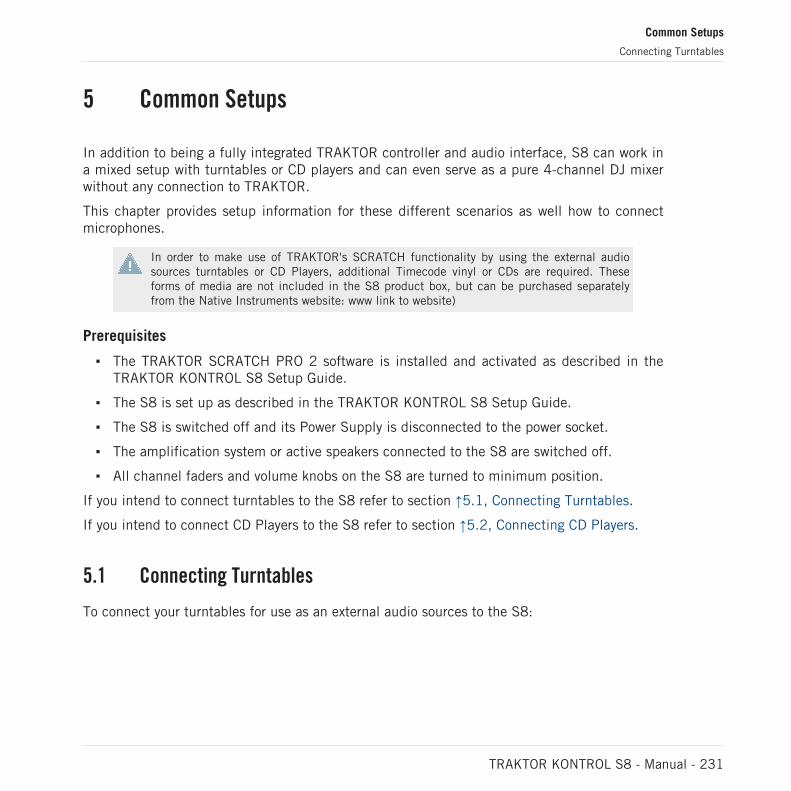
5 Common Setups
In addition to being a fully integrated TRAKTOR controller and audio interface, S8 can work ina mixed setup with turntables or CD players and can even serve as a pure 4-channel DJ mixerwithout any connection to TRAKTOR.
This chapter provides setup information for these different scenarios as well how to connectmicrophones.
In order to make use of TRAKTOR's SCRATCH functionality by using the external audiosources turntables or CD Players, additional Timecode vinyl or CDs are required. Theseforms of media are not included in the S8 product box, but can be purchased separatelyfrom the Native Instruments website: www link to website)
Prerequisites
The TRAKTOR SCRATCH PRO 2 software is installed and activated as described in theTRAKTOR KONTROL S8 Setup Guide.
The S8 is set up as described in the TRAKTOR KONTROL S8 Setup Guide.
The S8 is switched off and its Power Supply is disconnected to the power socket.
The amplification system or active speakers connected to the S8 are switched off.
All channel faders and volume knobs on the S8 are turned to minimum position.
If you intend to connect turntables to the S8 refer to section ↑5.1, Connecting Turntables.
If you intend to connect CD Players to the S8 refer to section ↑5.2, Connecting CD Players.
5.1 Connecting Turntables
To connect your turntables for use as an external audio sources to the S8:
Common Setups
Connecting Turntables
TRAKTOR KONTROL S8 - Manual - 231
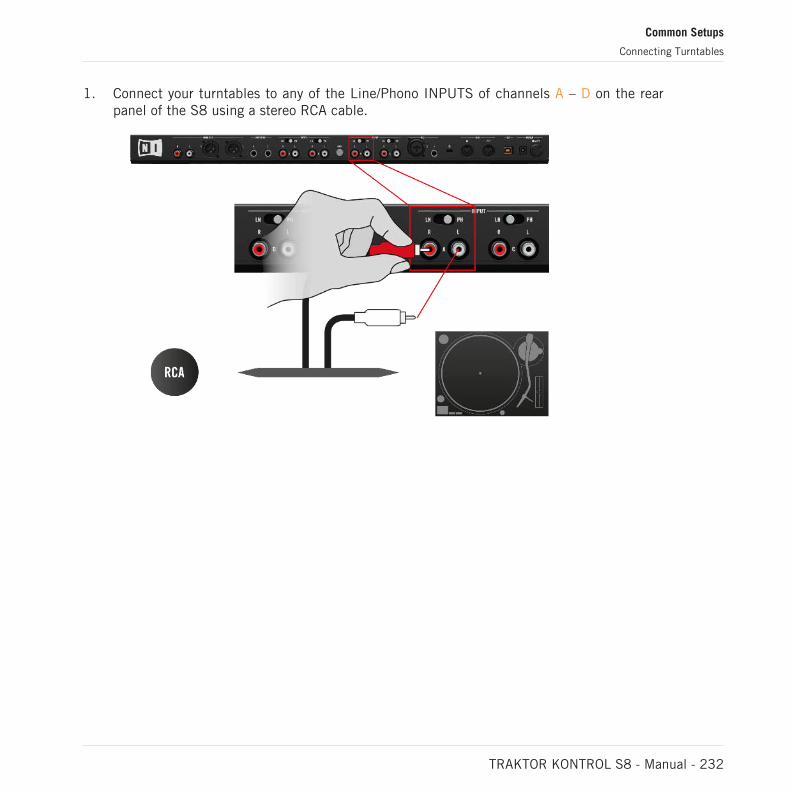
1. Connect your turntables to any of the Line/Phono INPUTS of channels A – D on the rearpanel of the S8 using a stereo RCA cable.
Common Setups
Connecting Turntables
TRAKTOR KONTROL S8 - Manual - 232
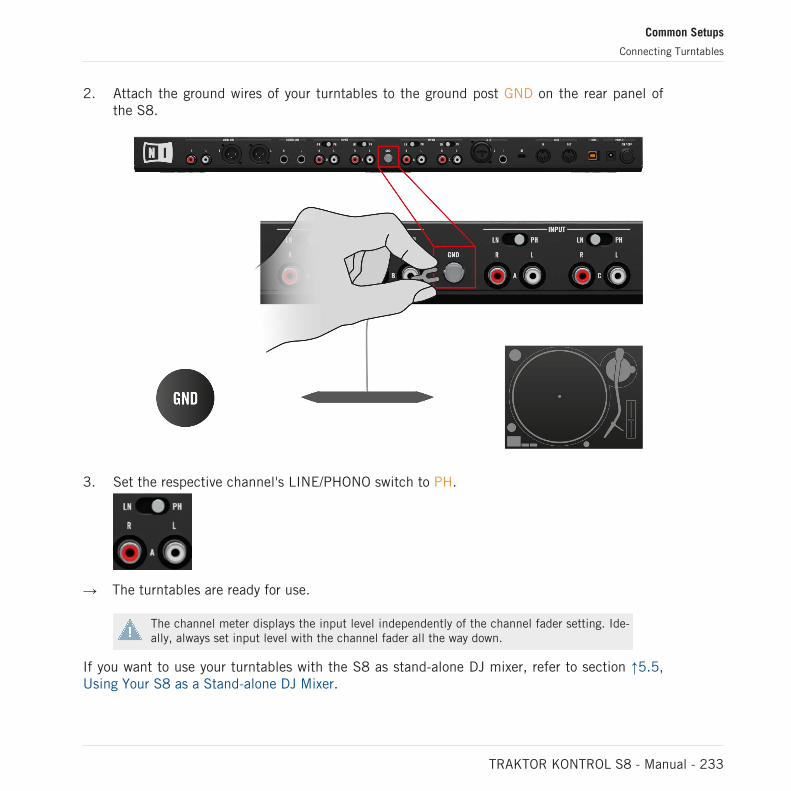
2. Attach the ground wires of your turntables to the ground post GND on the rear panel ofthe S8.
3. Set the respective channel's LINE/PHONO switch to PH.
→ The turntables are ready for use.
The channel meter displays the input level independently of the channel fader setting. Ide-ally, always set input level with the channel fader all the way down.
If you want to use your turntables with the S8 as stand-alone DJ mixer, refer to section ↑5.5,Using Your S8 as a Stand-alone DJ Mixer.
Common Setups
Connecting Turntables
TRAKTOR KONTROL S8 - Manual - 233
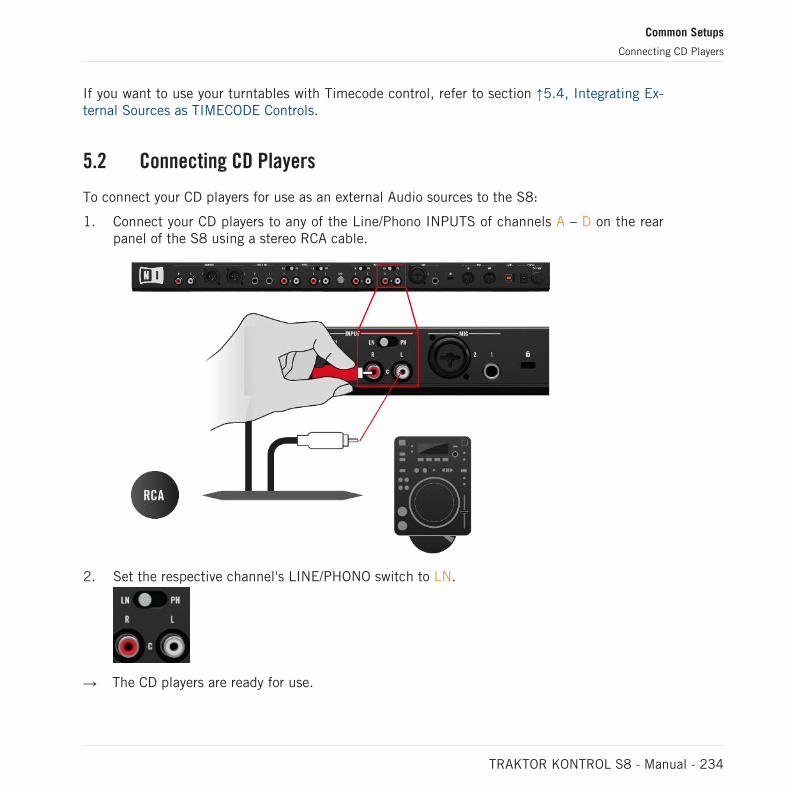
If you want to use your turntables with Timecode control, refer to section ↑5.4, Integrating Ex-ternal Sources as TIMECODE Controls.
5.2 Connecting CD Players
To connect your CD players for use as an external Audio sources to the S8:
1. Connect your CD players to any of the Line/Phono INPUTS of channels A – D on the rearpanel of the S8 using a stereo RCA cable.
2. Set the respective channel's LINE/PHONO switch to LN.
→ The CD players are ready for use.
Common Setups
Connecting CD Players
TRAKTOR KONTROL S8 - Manual - 234
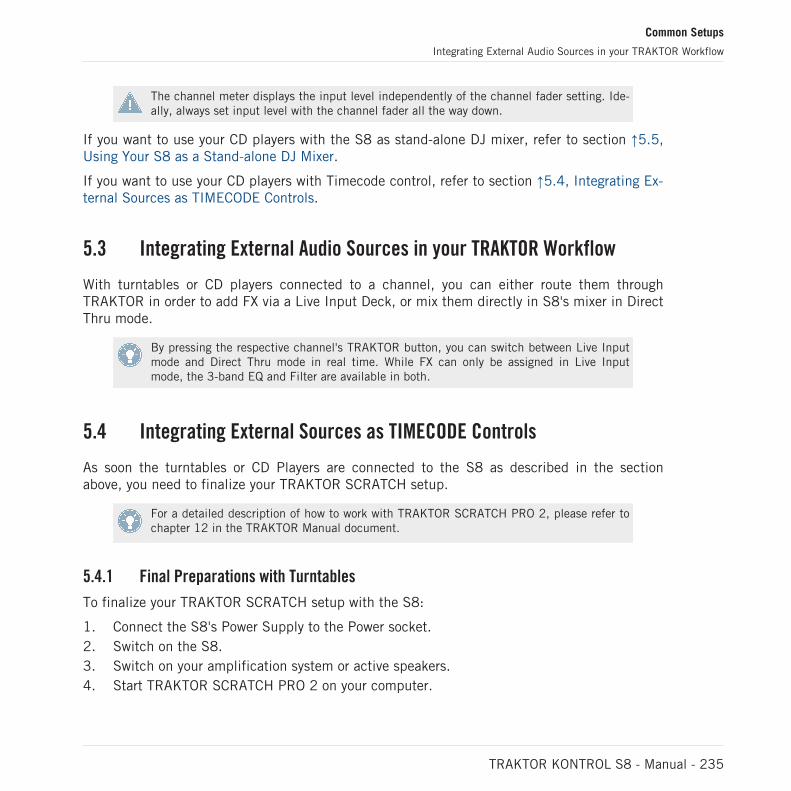
The channel meter displays the input level independently of the channel fader setting. Ide-ally, always set input level with the channel fader all the way down.
If you want to use your CD players with the S8 as stand-alone DJ mixer, refer to section ↑5.5,Using Your S8 as a Stand-alone DJ Mixer.
If you want to use your CD players with Timecode control, refer to section ↑5.4, Integrating Ex-ternal Sources as TIMECODE Controls.
5.3 Integrating External Audio Sources in your TRAKTOR Workflow
With turntables or CD players connected to a channel, you can either route them throughTRAKTOR in order to add FX via a Live Input Deck, or mix them directly in S8's mixer in DirectThru mode.
By pressing the respective channel's TRAKTOR button, you can switch between Live Inputmode and Direct Thru mode in real time. While FX can only be assigned in Live Inputmode, the 3-band EQ and Filter are available in both.
5.4 Integrating External Sources as TIMECODE Controls
As soon the turntables or CD Players are connected to the S8 as described in the sectionabove, you need to finalize your TRAKTOR SCRATCH setup.
For a detailed description of how to work with TRAKTOR SCRATCH PRO 2, please refer tochapter 12 in the TRAKTOR Manual document.
5.4.1 Final Preparations with Turntables
To finalize your TRAKTOR SCRATCH setup with the S8:
1. Connect the S8's Power Supply to the Power socket.2. Switch on the S8.3. Switch on your amplification system or active speakers.4. Start TRAKTOR SCRATCH PRO 2 on your computer.
Common Setups
Integrating External Audio Sources in your TRAKTOR Workflow
TRAKTOR KONTROL S8 - Manual - 235
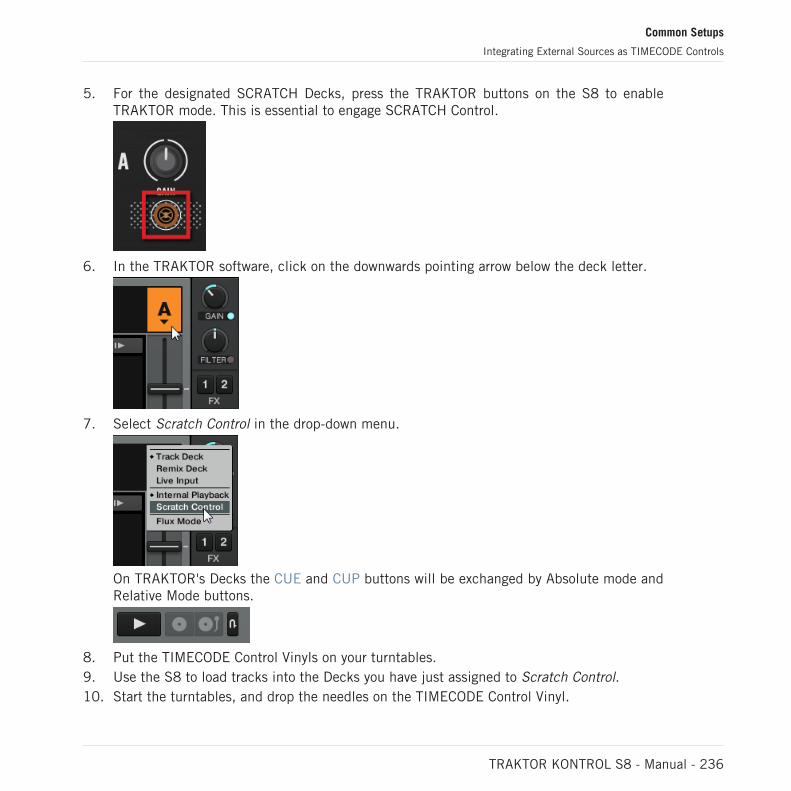
5. For the designated SCRATCH Decks, press the TRAKTOR buttons on the S8 to enableTRAKTOR mode. This is essential to engage SCRATCH Control.
6. In the TRAKTOR software, click on the downwards pointing arrow below the deck letter.
7. Select Scratch Control in the drop-down menu.
On TRAKTOR's Decks the CUE and CUP buttons will be exchanged by Absolute mode andRelative Mode buttons.
8. Put the TIMECODE Control Vinyls on your turntables.9. Use the S8 to load tracks into the Decks you have just assigned to Scratch Control.10. Start the turntables, and drop the needles on the TIMECODE Control Vinyl.
Common Setups
Integrating External Sources as TIMECODE Controls
TRAKTOR KONTROL S8 - Manual - 236
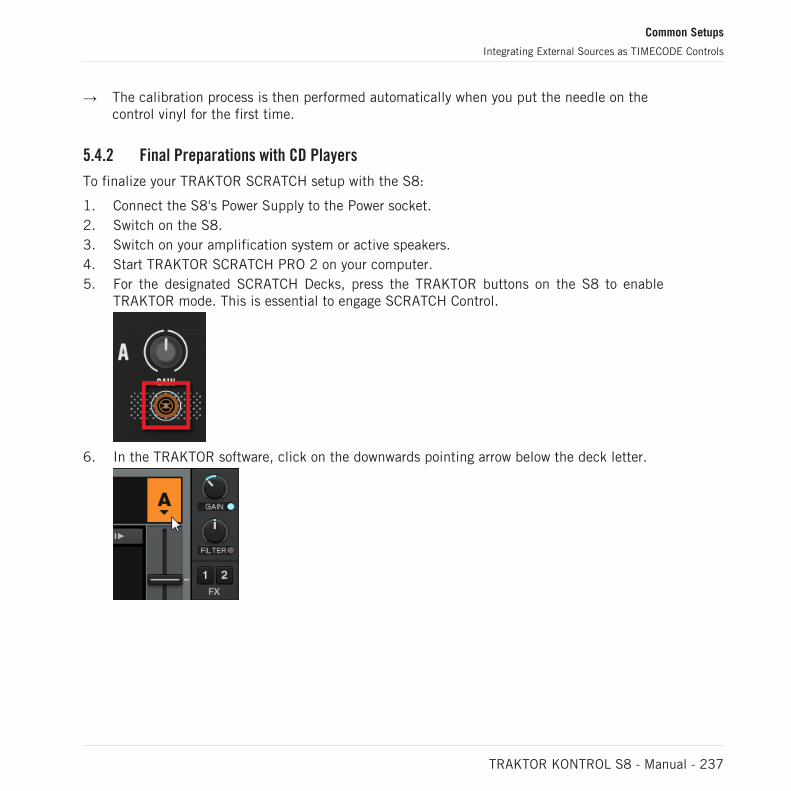
→ The calibration process is then performed automatically when you put the needle on thecontrol vinyl for the first time.
5.4.2 Final Preparations with CD Players
To finalize your TRAKTOR SCRATCH setup with the S8:
1. Connect the S8's Power Supply to the Power socket.2. Switch on the S8.3. Switch on your amplification system or active speakers.4. Start TRAKTOR SCRATCH PRO 2 on your computer.5. For the designated SCRATCH Decks, press the TRAKTOR buttons on the S8 to enable
TRAKTOR mode. This is essential to engage SCRATCH Control.
6. In the TRAKTOR software, click on the downwards pointing arrow below the deck letter.
Common Setups
Integrating External Sources as TIMECODE Controls
TRAKTOR KONTROL S8 - Manual - 237
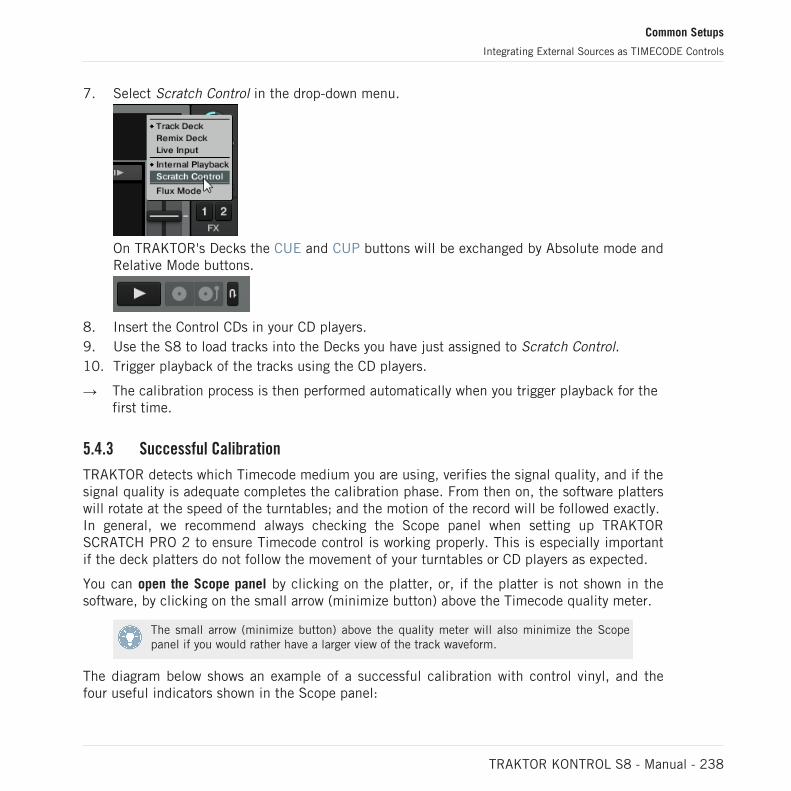
7. Select Scratch Control in the drop-down menu.
On TRAKTOR's Decks the CUE and CUP buttons will be exchanged by Absolute mode andRelative Mode buttons.
8. Insert the Control CDs in your CD players.9. Use the S8 to load tracks into the Decks you have just assigned to Scratch Control.10. Trigger playback of the tracks using the CD players.
→ The calibration process is then performed automatically when you trigger playback for thefirst time.
5.4.3 Successful Calibration
TRAKTOR detects which Timecode medium you are using, verifies the signal quality, and if thesignal quality is adequate completes the calibration phase. From then on, the software platterswill rotate at the speed of the turntables; and the motion of the record will be followed exactly.In general, we recommend always checking the Scope panel when setting up TRAKTORSCRATCH PRO 2 to ensure Timecode control is working properly. This is especially importantif the deck platters do not follow the movement of your turntables or CD players as expected.
You can open the Scope panel by clicking on the platter, or, if the platter is not shown in thesoftware, by clicking on the small arrow (minimize button) above the Timecode quality meter.
The small arrow (minimize button) above the quality meter will also minimize the Scopepanel if you would rather have a larger view of the track waveform.
The diagram below shows an example of a successful calibration with control vinyl, and thefour useful indicators shown in the Scope panel:
Common Setups
Integrating External Sources as TIMECODE Controls
TRAKTOR KONTROL S8 - Manual - 238
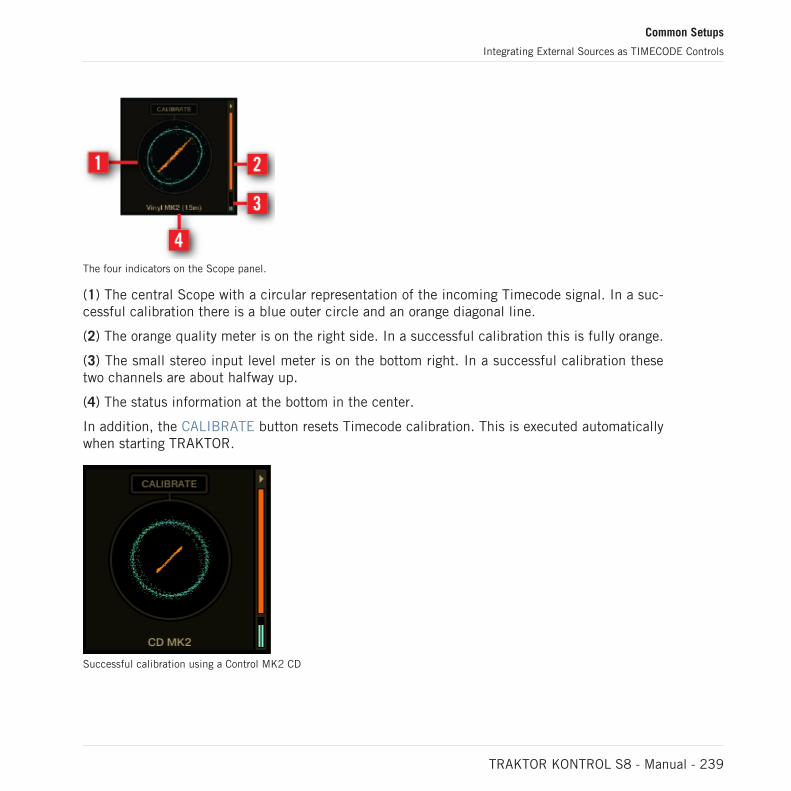
The four indicators on the Scope panel.
(1) The central Scope with a circular representation of the incoming Timecode signal. In a suc-cessful calibration there is a blue outer circle and an orange diagonal line.
(2) The orange quality meter is on the right side. In a successful calibration this is fully orange.
(3) The small stereo input level meter is on the bottom right. In a successful calibration thesetwo channels are about halfway up.
(4) The status information at the bottom in the center.
In addition, the CALIBRATE button resets Timecode calibration. This is executed automaticallywhen starting TRAKTOR.
Successful calibration using a Control MK2 CD
Common Setups
Integrating External Sources as TIMECODE Controls
TRAKTOR KONTROL S8 - Manual - 239
If you wish to use a mixed setup of one turntable and one CD player, simply connect themas explained above. Remember to ensure that the LINE/PHONO switches are set according-ly, and your chosen mixer channels have their TRAKTOR buttons illuminated bright orange—to indicate they are set to TRAKTOR mode.
If you have followed the information in this chapter and are still having difficulty gettingthe timecode vinyl or CD to successfully calibrate your decks, you will find detailed infor-mation on TRAKTOR SCRATCH and helpful troubleshooting information contained in theTRAKTOR 2 Manual.
5.5 Using Your S8 as a Stand-alone DJ Mixer
As soon the turntables or CD Players are connected to the S8 as described in the sectionabove, you need to finalize your stand-alone DJ Mixer setup:
Prerequisites
The S8 is not connected to your computer.
Final preparations
1. Connect the S8's Power Supply to the Power socket.2. Switch on the S8.3. Switch on your amplification system or active speakers.4. Assign the channels to the Crossfader sides to the respective Decks.5. Turn on your turntables or CD Players.6. Put the vinyl on your turntables or insert CDs into your CD Players.7. Start mixing.8. Slowly turn up the MAIN knob until the volume is at the desired level.
→ The S8's corresponding channel meters will illuminate to show the audio signal they arereceiving.
If you still can't hear anything, check that:
The GAIN knobs (at the top of channels A - D) are raised.
The channel faders are raised.
Common Setups
Using Your S8 as a Stand-alone DJ Mixer
TRAKTOR KONTROL S8 - Manual - 240
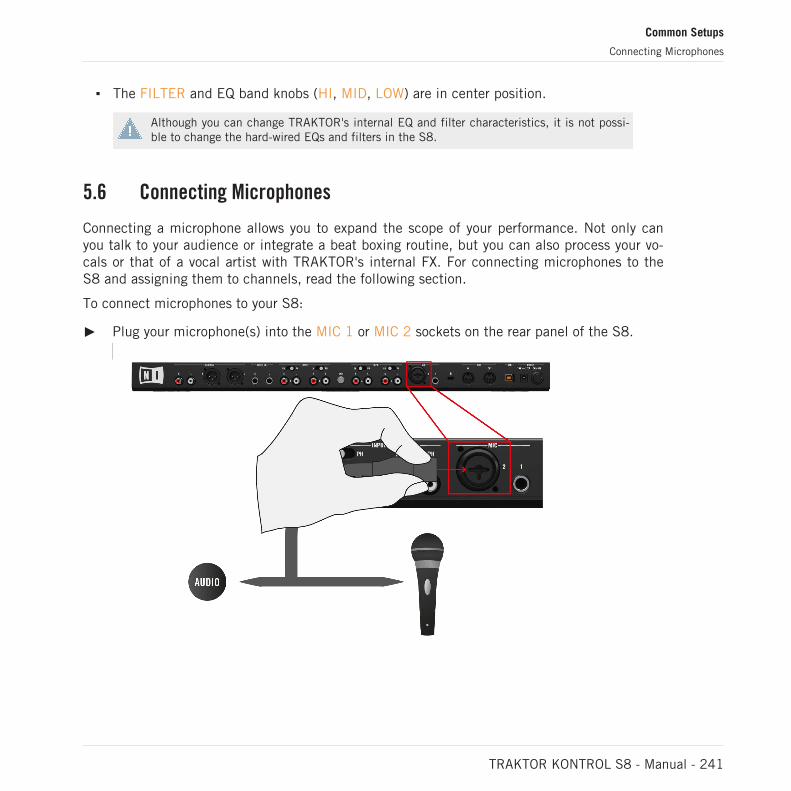
The FILTER and EQ band knobs (HI, MID, LOW) are in center position.
Although you can change TRAKTOR's internal EQ and filter characteristics, it is not possi-ble to change the hard-wired EQs and filters in the S8.
5.6 Connecting Microphones
Connecting a microphone allows you to expand the scope of your performance. Not only canyou talk to your audience or integrate a beat boxing routine, but you can also process your vo-cals or that of a vocal artist with TRAKTOR's internal FX. For connecting microphones to theS8 and assigning them to channels, read the following section.
To connect microphones to your S8:
Plug your microphone(s) into the MIC 1 or MIC 2 sockets on the rear panel of the S8.
Common Setups
Connecting Microphones
TRAKTOR KONTROL S8 - Manual - 241
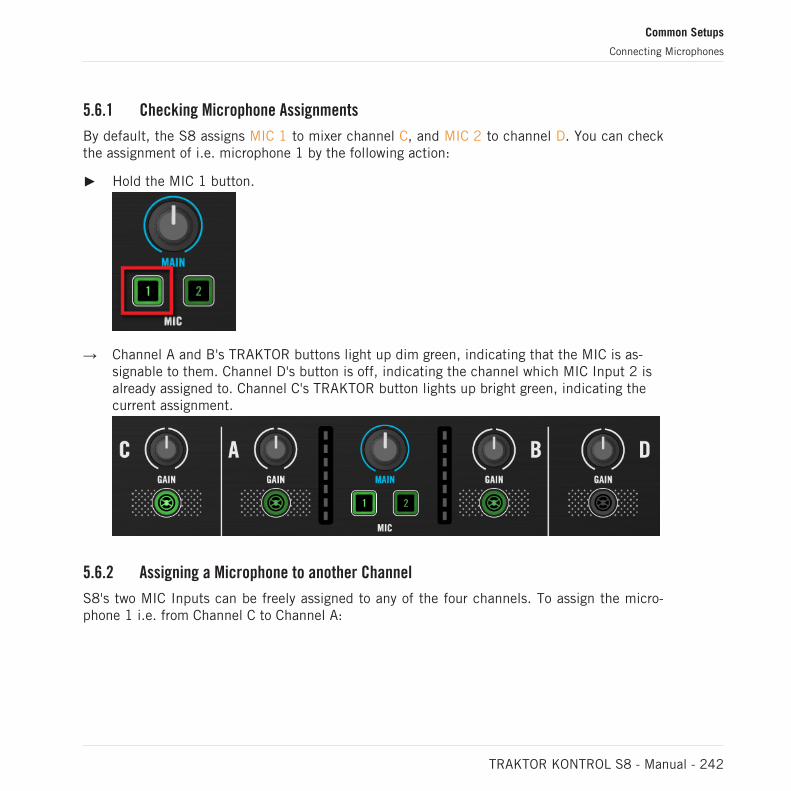
5.6.1 Checking Microphone Assignments
By default, the S8 assigns MIC 1 to mixer channel C, and MIC 2 to channel D. You can checkthe assignment of i.e. microphone 1 by the following action:
Hold the MIC 1 button.
→ Channel A and B's TRAKTOR buttons light up dim green, indicating that the MIC is as-signable to them. Channel D's button is off, indicating the channel which MIC Input 2 isalready assigned to. Channel C's TRAKTOR button lights up bright green, indicating thecurrent assignment.
5.6.2 Assigning a Microphone to another Channel
S8's two MIC Inputs can be freely assigned to any of the four channels. To assign the micro-phone 1 i.e. from Channel C to Channel A:
Common Setups
Connecting Microphones
TRAKTOR KONTROL S8 - Manual - 242
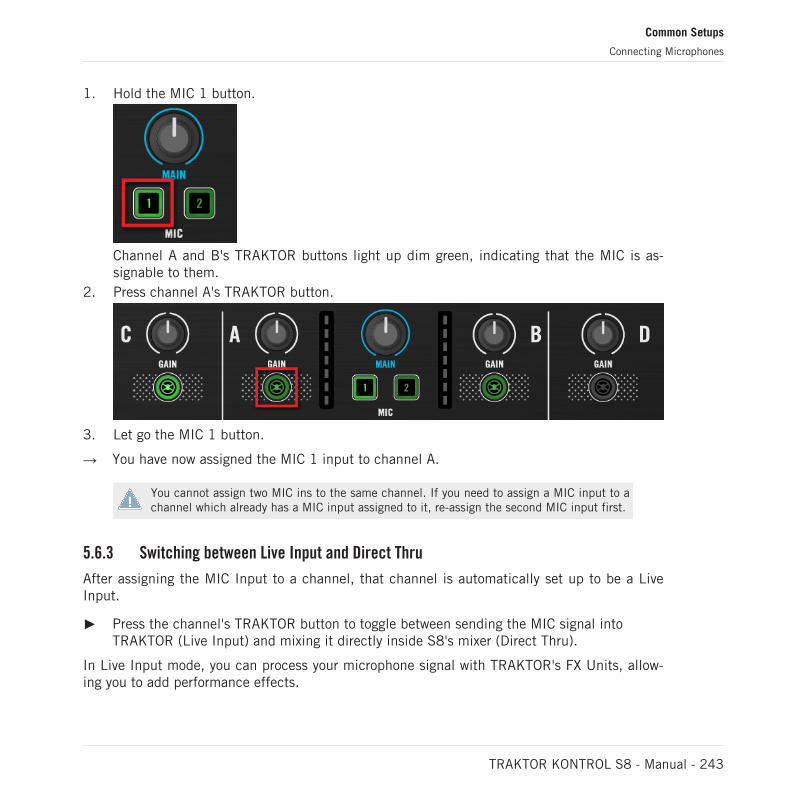
1. Hold the MIC 1 button.
Channel A and B's TRAKTOR buttons light up dim green, indicating that the MIC is as-signable to them.
2. Press channel A's TRAKTOR button.
3. Let go the MIC 1 button.
→ You have now assigned the MIC 1 input to channel A.
You cannot assign two MIC ins to the same channel. If you need to assign a MIC input to achannel which already has a MIC input assigned to it, re-assign the second MIC input first.
5.6.3 Switching between Live Input and Direct Thru
After assigning the MIC Input to a channel, that channel is automatically set up to be a LiveInput.
Press the channel's TRAKTOR button to toggle between sending the MIC signal intoTRAKTOR (Live Input) and mixing it directly inside S8's mixer (Direct Thru).
In Live Input mode, you can process your microphone signal with TRAKTOR's FX Units, allow-ing you to add performance effects.
Common Setups
Connecting Microphones
TRAKTOR KONTROL S8 - Manual - 243
In Direct Thru mode, the microphone signal is not sent to the computer. Instead, it is mixeddirectly in S8's mixer, solving any latency issues you might have at the expense of not beingable to add FX.
In Direct Thru mode, TRAKTOR's FX Units don't have any effect on the signal, but the 3-band EQ and the Filter are still available.
5.6.4 Activating a MIC Input
Before activating the microphone for the first time, please lower the channel fader to pre-vent sudden bursts of noise from your speakers or headphones when activating the MIC In-put.
→ The microphone is ready for use.
Deactivating a Microphone
With MIC Input 1 active:
Deactivate the microphone by pressing the MIC 1 button again.
Common Setups
Connecting Microphones
TRAKTOR KONTROL S8 - Manual - 244
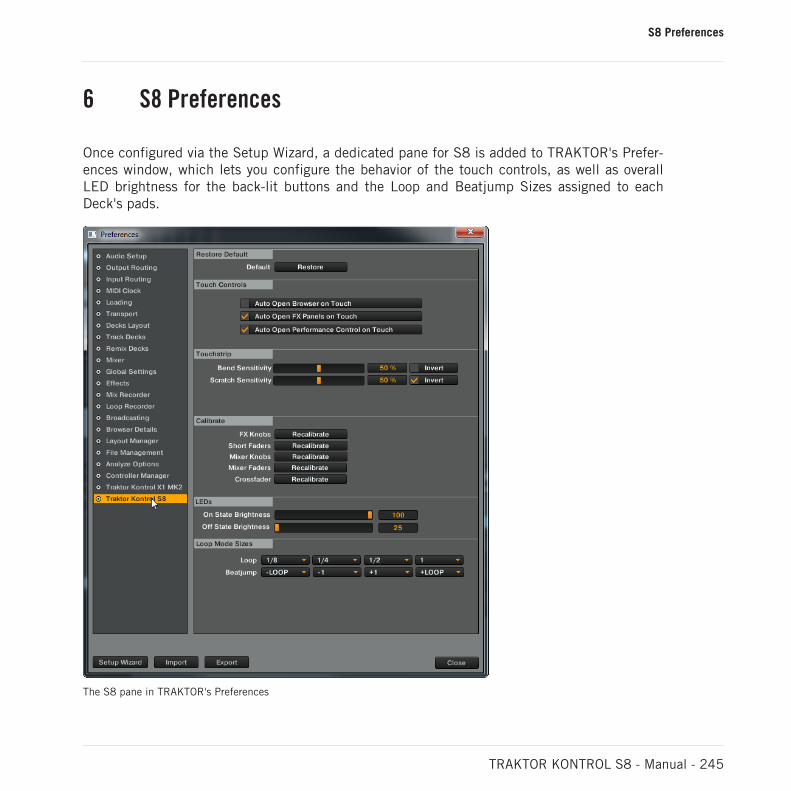
6 S8 Preferences
Once configured via the Setup Wizard, a dedicated pane for S8 is added to TRAKTOR's Prefer-ences window, which lets you configure the behavior of the touch controls, as well as overallLED brightness for the back-lit buttons and the Loop and Beatjump Sizes assigned to eachDeck's pads.
The S8 pane in TRAKTOR's Preferences
S8 Preferences
TRAKTOR KONTROL S8 - Manual - 245
6.1 Restore Default
This button recalls all factory default settings for the TRAKTOR KONTROL S8 and lets youchoose its basic deck configuration via the Setup Wizard.
6.2 Touch Controls
Due to a number of controls being sensitive to touch, TRAKTOR lets you decide if you prefer toactivate their respective functions at the press of a button or at the touch of the correspondingcontrol.
Auto Open Browser on Touch: If activated, touching a BROWSE knob will open the Brows-er, after letting go, it will automatically close. If deactivated, press the BROWSE knob toopen the Browser.
Auto Open FX Panels on Touch: If activated, touching the FX knobs overlays an FX panelwith information about the knob's parameter setting, as well as the adjacent FX buttons'functions. If deactivated, you can still control the parameters, but no panel is opened.
Auto Open Performance Control on Touch: If activated, touching the Performance knobsbelow the display overlays a Performance panel with information about the knob's param-eter setting, as well as the adjacent Performance buttons' functions. If deactivated, youcan still control the parameters, but no panel is opened.
If FX Units 3 and 4 are activated, touching the Performance knobs opens the FX panel forFX Unit 3 and 4, instead of the Performance panel. The Auto Open Performance Control onTouch setting activates the touch sensing of these knobs, no matter which function theycontrol.
S8 Preferences
Restore Default
TRAKTOR KONTROL S8 - Manual - 246
6.3 Touchstrip
Touch technology relies on the electrical properties of your skin, which differ from one personto another. The default value will work for most people under most conditions. However, if youfeel the touch strips should react more sensitively, or start registering too soon, you can adjustthe behavior here.
Bend Sensitivity: by default set to 50%; adjust the Tempo bend sensitivity and check inreal time if the change accommodates you better.
Scratch Sensitivity: by default set to 50%; adjust the Scratch sensitivity and check in realtime if the change accommodates you better.
Bend Invert: by default deactivated; swiping to the left slows playback down momentarily.If activated, swiping to the left nudges playback forward.
Scratch Invert: by default activated; swiping to the left advances playback position in thetrack. If deactivated, swiping to the left goes back in a track.
6.4 Calibrate
Calibration ensures that each control allows adjustments over their full range and with maxi-mum precision. These settings are precisely calibrated during production, although they mightneed to be recalibrated over the lifetime of your S8 unit. Recalibration is necessary when acontrol ceases to allow you to set actual minimum and maximum values.
Calibration is done in groups of control elements, just click the corresponding Recalibrate but-ton:
FX Knobs: for recalibrating the FX knobs on both FX Units 1 and 2.
Short Faders: for recalibrating the Slot Volume Faders.
Mixer Knobs: for recalibrating EQ (HI, MID, LOW) and FILTER knobs.
Mixer Fader: for recalibrating the channel faders.
Crossfader: for recalibrating the Crossfader.
S8 Preferences
Touchstrip
TRAKTOR KONTROL S8 - Manual - 247
6.5 LEDs
The pad and button backlights on the S8 offer two distinct brightness levels to indicate On andOff states. Depending on your light conditions during a performance, it can be necessary to ad-just these.
On State Brightness: sets the brightness level for engaged buttons and pads.
Dim State Percentage: sets the brightness level for inactive buttons and pads.
6.6 Loop Mode Sizes
When a Deck is in Loop Mode, the corresponding pads are split into two rows. The top row rep-resents four Loop sizes, and the bottom row four Beatjump sizes. Here, you can adjust thesesettings to suit your needs.
Loop: For each of the upper four pads, you can select a Loop size of: 1/32, 1/16, 1/4,1/2, 1, 2, 4, 8, 16, 32 beats via drop-down menus.
Beatjump: For each of the four lower pads you can select a Beatjump size of: - LOOP, -32, - 16, - 8, - 4, - 2, - 1, -/2, -/4, -/8, -/16, +/16, +/8, +/4, +/2, +1, +2, +4, +8, + 16, +32, +LOOP.
S8 Preferences
LEDs
TRAKTOR KONTROL S8 - Manual - 248
7 The S8 Audio Interface and Control Panel
Your TRAKTOR KONTROL S8 comes with an integrated high-end 24-bit/48 kHz audio inter-face. You can adjust the audio interface settings to your needs and computer performance. De-pending on whether you work on Windows or Mac OS X, you can adjust S8's Audio Settings indifferent ways.
7.1 Settings on Mac OS X
With Mac OS X, you can adjust the settings for the S8 audio interface from within each musicapplication. In TRAKTOR:
Open Preferences > Audio Setup to access the settings for the S8 audio interface.
There, you can adjust S8's audio interface settings, most importantly the latency:
Latency : Lower this value for a quicker response to hardware interactions like playing aRemix Cell by pressing one of S8's pads.
When converting audio information to digital and vice versa, the audio driver needs to storedata in buffers to prevent the audio from cutting off. High buffer size settings will cause adelay between an interaction and the change being audible, called latency. Low buffersizes will put more strain on the CPU and may lead to audio drop-outs. Find the best bal-ance by setting Latency high, starting playback and lowering it until you encounter the firstaudible crackles and pops. Now increase the value again until the crackling disappears.
7.2 Settings on Windows: The Control Panel
With Windows, access the settings for the TRAKTOR KONTROL S8 audio interface via theTRAKTOR KONTROL S8 Control Panel application. The Control Panel was installed along withthe S8 drivers during the TRAKTOR installation procedure.
This section describes the TRAKTOR KONTROL S8 Control Panel user interface.
The S8 Audio Interface and Control Panel
Settings on Mac OS X
TRAKTOR KONTROL S8 - Manual - 249
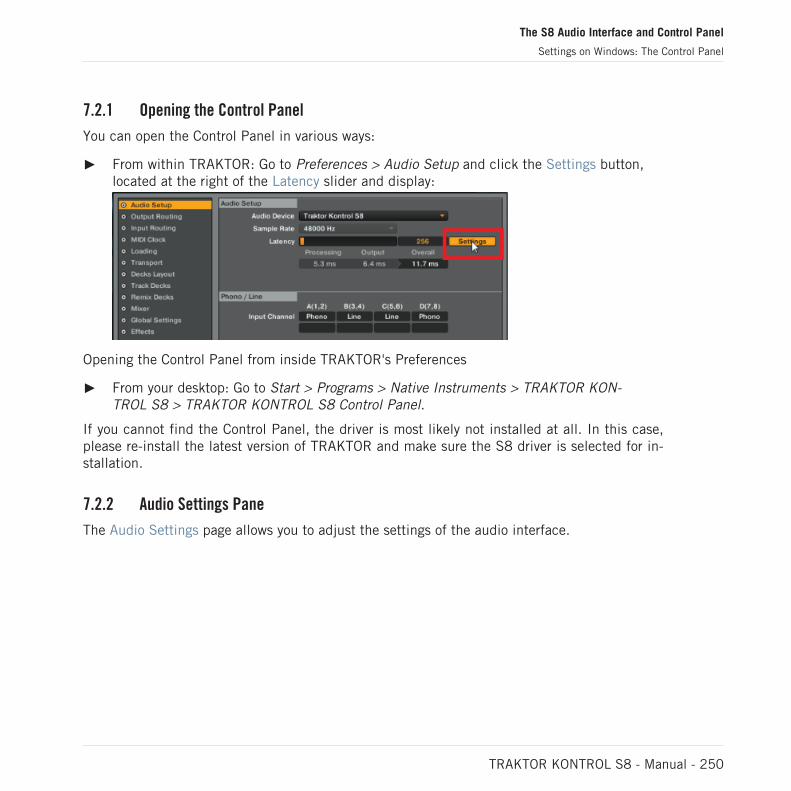
7.2.1 Opening the Control Panel
You can open the Control Panel in various ways:
From within TRAKTOR: Go to Preferences > Audio Setup and click the Settings button,located at the right of the Latency slider and display:
Opening the Control Panel from inside TRAKTOR's Preferences
From your desktop: Go to Start > Programs > Native Instruments > TRAKTOR KON-TROL S8 > TRAKTOR KONTROL S8 Control Panel.
If you cannot find the Control Panel, the driver is most likely not installed at all. In this case,please re-install the latest version of TRAKTOR and make sure the S8 driver is selected for in-stallation.
7.2.2 Audio Settings Pane
The Audio Settings page allows you to adjust the settings of the audio interface.
The S8 Audio Interface and Control Panel
Settings on Windows: The Control Panel
TRAKTOR KONTROL S8 - Manual - 250
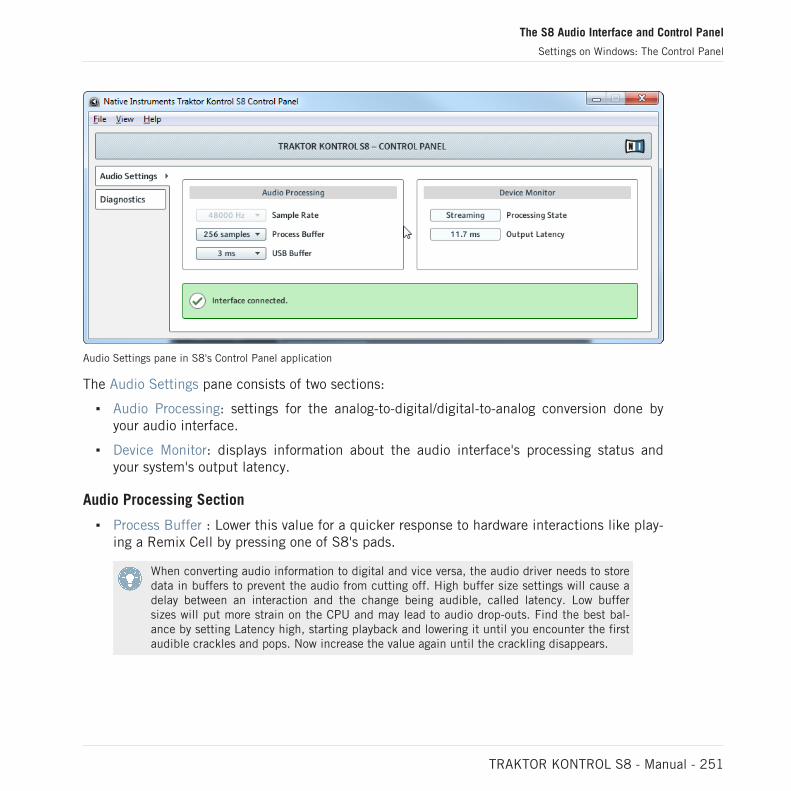
Audio Settings pane in S8's Control Panel application
The Audio Settings pane consists of two sections:
Audio Processing: settings for the analog-to-digital/digital-to-analog conversion done byyour audio interface.
Device Monitor: displays information about the audio interface's processing status andyour system's output latency.
Audio Processing Section
Process Buffer : Lower this value for a quicker response to hardware interactions like play-ing a Remix Cell by pressing one of S8's pads.
When converting audio information to digital and vice versa, the audio driver needs to storedata in buffers to prevent the audio from cutting off. High buffer size settings will cause adelay between an interaction and the change being audible, called latency. Low buffersizes will put more strain on the CPU and may lead to audio drop-outs. Find the best bal-ance by setting Latency high, starting playback and lowering it until you encounter the firstaudible crackles and pops. Now increase the value again until the crackling disappears.
The S8 Audio Interface and Control Panel
Settings on Windows: The Control Panel
TRAKTOR KONTROL S8 - Manual - 251
USB Buffer: Use this menu in case you cannot achieve satisfactory Latency settings withthe Process Buffer alone. Lower the USB buffer size for smaller USB buffer packaging,which should further reduce the audible latency. If you notice any audio drop-outs, youshould raise the buffer size until you have a clear sound.
Device Monitor Section
The Device Monitor section gives you information about S8's state:
Processing State : The processing state monitor provides feedback on the current statusof the device. There are three possible status messages:
Idle: controller is connected, but no audio data is being streamed.
Streaming: driver is working and processing audio data.
Panic: driver stopped streaming. Too many USB I/O errors occurred in the interfacecommunication.
Output Latency : displays your system’s output latency in milliseconds.
Please note, when running external sources like turntables or microphones through TRAK-TOR, an additional input latency will occur.
7.2.3 Diagnostics Pane
The Diagnostics page allows you to monitor the controller’s performance and to detect errors.This information can be helpful to see the results of Process Buffer value adjustments and mayhelp troubleshooting in case you need to contact our technical support.
The S8 Audio Interface and Control Panel
Settings on Windows: The Control Panel
TRAKTOR KONTROL S8 - Manual - 252
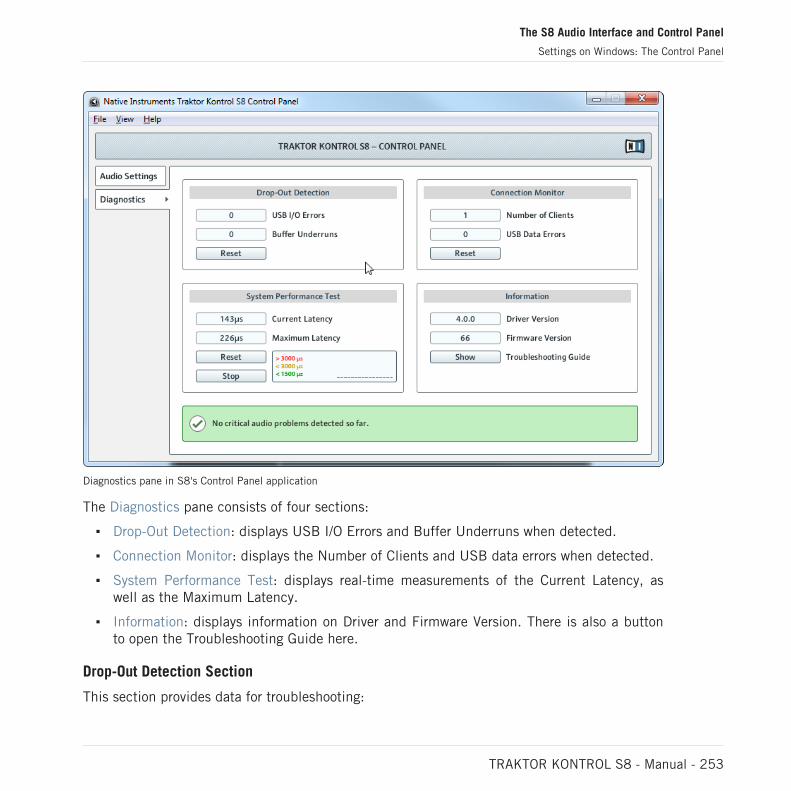
Diagnostics pane in S8's Control Panel application
The Diagnostics pane consists of four sections:
Drop-Out Detection: displays USB I/O Errors and Buffer Underruns when detected.
Connection Monitor: displays the Number of Clients and USB data errors when detected.
System Performance Test: displays real-time measurements of the Current Latency, aswell as the Maximum Latency.
Information: displays information on Driver and Firmware Version. There is also a buttonto open the Troubleshooting Guide here.
Drop-Out Detection Section
This section provides data for troubleshooting:
The S8 Audio Interface and Control Panel
Settings on Windows: The Control Panel
TRAKTOR KONTROL S8 - Manual - 253
USB I/O Errors: counts USB data transfer interruptions between your computer and S8.
Buffer Underruns: Buffer underruns occur when your computer isn’t able to process anaudio stream in time. Reasons for underruns can be too many devices communicating onthe USB bus at the same time or too high CPU load.
Reset: click this button to reset the error count.
Connection Monitor Section
This section provides USB connection information:
Number of Clients: displays the number of clients connected to the interface. MultipleASIO applications are counted separately, WDM and WASAPI increase the number byone, no matter how many WDM/WASAPI applications play audio.
USB Data Errors: counts USB data errors. Poor quality or too long cables as well as inter-ference can be the source of data errors on the USB bus.
Reset: A click on this button resets the error count.
System Performance Test Section
This section provides real-time measurements of the latency introduced by Windows it-self. This data can give clues about the sources of bad performance.
Current Latency: displays the real-time value for Window's internal latency. Monitor thisvalue as you launch and quit applications and connect or disconnect USB devices.
Maximum Latency: display the maximum value since the last reset. Comparing the differ-ence between Maximum and Current Latency can help find the sources of sudden CPUpeaks.
Reset: resets the Maximum Latency value.
Stop: pauses the measurement process. Click again to continue measurement.
Information Section
The Information provides information about whether or not your driver and firmware are up todate.
Driver Version: See the currently installed driver version here.
The S8 Audio Interface and Control Panel
Settings on Windows: The Control Panel
TRAKTOR KONTROL S8 - Manual - 254
Firmware Version: See the currently installed firmware version here.
Troubleshooting Guide: Click Show to open the Troubleshooting Guide.
7.3 Using the S8 Audio Interface with Other Music Applications
The use of the S8’s on-board audio interface is not limited to TRAKTOR, you can use it withany other music application installed on your computer. To do this, you need to configure yourmusic applications accordingly. Most of the time, you will find a setting in the options or pref-erences of your music applications allowing you to select the TRAKTOR KONTROL S8 as anaudio interface. For more info, please refer to the documentation of your music applications.
7.4 Setting up S8 as your Default Audio Interface
If you want S8 to act as the default playback device for all sound including system sounds (notonly for music software), you have to set it as your default audio interface.
7.4.1 Windows
For Windows 7 (and later) you can define the TRAKTOR KONTROL S8 as your default audiointerface as follows:
1. Open Start > Control Panel > Hardware and Sound > Sound.2. Select the Playback tab.3. In the device list, select TRAKTOR KONTROL S8 and click Set Default.4. Select the Recording tab.5. In the device list, select TRAKTOR KONTROL S8 and click Set Default.6. Click OK to close the dialog.
7.4.2 Mac OS X
For Mac OS X, you can define the TRAKTOR KONTROL S8 as your default audio interface asfollows:
1. From the Apple menu, select System Preferences.
The S8 Audio Interface and Control Panel
Using the S8 Audio Interface with Other Music Applications
TRAKTOR KONTROL S8 - Manual - 255
2. In the panel that opens, click Sound.3. On the Sound Effects tab, select TRAKTOR KONTROL S8 in the Play alerts and sound
effects through menu.4. Click the Output tab, and select TRAKTOR KONTROL S8 from the Select a device for
sound output list.5. Click the Input tab, and select TRAKTOR KONTROL S8 from the Select a device for
sound input list.6. Close the window to confirm your changes.
The S8 Audio Interface and Control Panel
Setting up S8 as your Default Audio Interface
TRAKTOR KONTROL S8 - Manual - 256
8 Troubleshooting - Getting Help
This chapter covers the most common issues. Most of what can go wrong when setting up andusing TRAKTOR KONTROL S8 should be listed here along with some tried-and-tested ways tosolve these issues.
8.1 Troubleshooting
There are a few things you should check in case S8 doesn't work with your system.
8.1.1 TRAKTOR Won’t Start
Check the system requirements for TRAKTOR KONTROL S8. Meeting the minimum re-quirements ensures that TRAKTOR will work, but advanced use (i.e. Keylock, FX) may re-quire a more powerful system.
Launch the Service Center application and make sure you have the most recent TRAKTORversion installed.
Make sure that you haven't double-clicked an outdated application alias/shortcut.
Try to restart your computer. Disconnect any other audio interfaces and computer periph-erals like printers, scanners, and the like to see if that solves the problem.
Try to rename the file collection.nml in the TRAKTOR 2 Root folder and restart TRAKTOR.This way, TRAKTOR will create a blank Collection. Re-import the renamed .nml file to re-store your Collection.
The Root folder is located in:
Windows: \My Documents\Native Instruments\Traktor 2\
Mac OS X: YourUserFolder/Documents/Native Instruments/Traktor
8.1.2 TRAKTOR Crashes
In case of a crash during operation, please contact the Native Instruments technical supportteam and send them your crash log. You will find the crashlog in the following folders:
Troubleshooting - Getting Help
Troubleshooting
TRAKTOR KONTROL S8 - Manual - 257
Windows: \My Documents\Native Instruments\Traktor 2\Crashlogs\
Mac OS X: Users/~/Library/Logs/CrashReporter/
8.1.3 TRAKTOR Has Performance Issues
Please check if your computer is suited for handling real-time audio processing without drop-outs. S8's Control offers a tool for measuring System Performance and monitoring the numberof audio dropouts, which cause audible clicking noises.
These are some steps to optimize your laptop’s audio performance:
Increase the Process Buffer value in TRAKTOR'S Preferences > Audio Setup > Settings.
If possible, don't run the laptop on battery power, as the computer's power managementwill dynamically adjust the clock rate of the CPU in order to conserve battery.
If your laptop has a shared memory graphics card, please ensure your system has moreRAM than listed in the System Requirements.
Disconnect all unused hardware (e.g. printer, scanner). This will increase the amount ofprocessing power available for your music software.
Make sure that S8 is connected directly to the computer via the included USB cable. Theuse of USB hubs is not recommended.
A bad USB cable can be responsible for connectivity problems. Try using a different cablebearing the official USB logo to see if your cable is the cause of the issues.
Laptops often are equipped with built-in devices that disturb audio processing, most com-monly a network adapter or a wireless LAN card. You might need to disable these deviceswhile working with S8.
Windows users: The Online Knowledge Base contains additional tuning tips for your operatingsystem. See following articles:
Windows 7 tuning tips for audio processing:http://www.native-instruments.com/knowledge/questions/847/
Windows 8 tuning tips for audio processing:http://www.native-instruments.com/knowledge/questions/1395/
Troubleshooting - Getting Help
Troubleshooting
TRAKTOR KONTROL S8 - Manual - 258
8.1.4 Updates
Whenever you encounter problems, it is recommended that you first download and install anyavailable software updates available in Service Center or on our website:
http://www.native-instruments.com/updates
Updates are released regularly to fix known problems, maintain compatibility with operatingsystem updates, and to continuously improve the software.
8.2 Getting Help
If you are experiencing problems related to your Native Instruments product that the supplieddocumentation does not cover, there are several ways of getting help!
The links in the following sections can also be reached from the Service Center application:
Open the Service Center application and click on the Support button in the upper-rightcorner.
8.2.1 Knowledge Base
The Online Knowledge Base gathers useful information about your Native Instruments productand can be of great help to solve possible issues you may encounter. You can reach the Knowl-edge Base via:
http://www.native-instruments.com/knowledge
You can also access the Knowledge Base directly from TRAKTOR by selecting Visit OnlineKnowledge Base from the Help menu in the Application Menu Bar or from the Help submenuin the TRAKTOR menu.
Troubleshooting - Getting Help
Troubleshooting
TRAKTOR KONTROL S8 - Manual - 259
8.2.2 Technical Support
If no Knowledge Base entry matches your problem, or if the matching entry does not solve theproblem, you can use the Online Support Form to contact the Technical Support team of Na-tive Instruments. The Online Support Form will ask you to enter information about your hard-ware and software setup. This information is essential for our Support team to be able to pro-vide you with quality assistance. You can reach the Online Support via:
http://www.native-instruments.com/suppform
When communicating with the Native Instruments support team, keep in mind that the moredetails you can provide about your hardware, your operating system, the version of the softwareyou are running, and the problem you are experiencing, the better they will be able to help you.In your description, you should mention:
How to reproduce the problem
What you have already tried to fix the problem
A description of your setup, including all hardware
The brand and specifications of your computer
The software version number
The version number of your software is displayed in the TRAKTOR splash screen you seewhen the application launches. Since this may close too quickly, the same splash screencan be opened by clicking the TRAKTOR logo in the upper right corner of the user inter-face.
When installing new software or software updates, a Readme file is included that contains latebreaking news and new information that was not yet included in the documentation. Pleaseopen and read this Readme file before contacting Technical Support.
8.2.3 Registration Support
If problems occur during the product activation procedure, please contact our Registration
Support team:
http://www.native-instruments.com/suppform
Troubleshooting - Getting Help
Getting Help
TRAKTOR KONTROL S8 - Manual - 260
8.2.4 User Forum
In the Native Instruments User Forum, you can discuss product features directly with otherusers and with experts moderating the forum. Please be aware that the Technical Supportteam does not participate in the forum. If you’re encountering an issue that can’t be solved byother users, contact Native Instruments’ Technical Support team via the online support as de-scribed above. You can reach the User Forum via:
http://www.native-instruments.com/forum
Troubleshooting - Getting Help
Getting Help
TRAKTOR KONTROL S8 - Manual - 261
9 Technical Specification
Input/output connectors
A-D: four pairs of RCA input connectors
MIC 1: one 6.3 mm (1/4") TRS (balanced) microphone input connector
MIC 2: one combo XLR jack or 6.3 mm (1/4") TRS (balanced) microphone connector
BOOTH OUT: two balanced 6.3 mm (1/4") TRS line out connectors
MAIN OUT: two balanced XLR outputs
MAIN OUT: two RCA outputs
PHONES: One stereo 6.3 mm (1/4") headphone output
PHONES: One stereo 3.5 mm (1/8") headphone output
MIDI (IN/OUT) two 5-pin DIN connectors
GND: One ground terminal screw
K: One Kensington lock slot
USB: One USB 2.0 Type B connector
POWER: One power supply connector
Audio Specifications
Audio Inputs (A/D)
Channels 4 Stereo
Sample Rate 48 kHz
Bit Resolution 24-bit
Converter Cirrus Logic
Technical Specification
TRAKTOR KONTROL S8 - Manual - 262
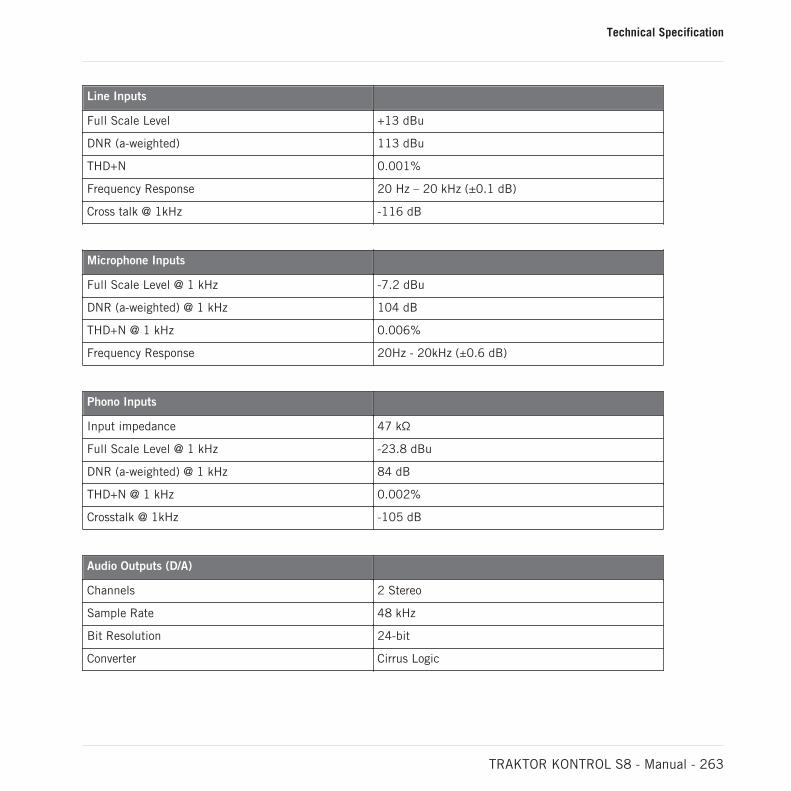
Line Inputs
Full Scale Level +13 dBu
DNR (a-weighted) 113 dBu
THD+N 0.001%
Frequency Response 20 Hz – 20 kHz (±0.1 dB)
Cross talk @ 1kHz -116 dB
Microphone Inputs
Full Scale Level @ 1 kHz -7.2 dBu
DNR (a-weighted) @ 1 kHz 104 dB
THD+N @ 1 kHz 0.006%
Frequency Response 20Hz - 20kHz (±0.6 dB)
Phono Inputs
Input impedance 47 kΩ
Full Scale Level @ 1 kHz -23.8 dBu
DNR (a-weighted) @ 1 kHz 84 dB
THD+N @ 1 kHz 0.002%
Crosstalk @ 1kHz -105 dB
Audio Outputs (D/A)
Channels 2 Stereo
Sample Rate 48 kHz
Bit Resolution 24-bit
Converter Cirrus Logic
Technical Specification
TRAKTOR KONTROL S8 - Manual - 263
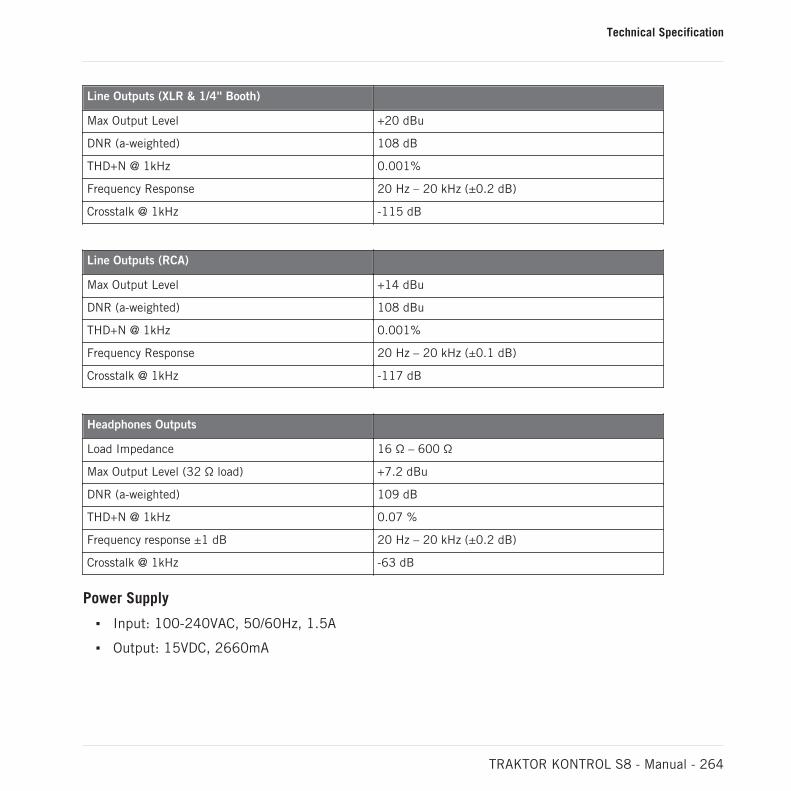
Line Outputs (XLR & 1/4'' Booth)
Max Output Level +20 dBu
DNR (a-weighted) 108 dB
THD+N @ 1kHz 0.001%
Frequency Response 20 Hz – 20 kHz (±0.2 dB)
Crosstalk @ 1kHz -115 dB
Line Outputs (RCA)
Max Output Level +14 dBu
DNR (a-weighted) 108 dBu
THD+N @ 1kHz 0.001%
Frequency Response 20 Hz – 20 kHz (±0.1 dB)
Crosstalk @ 1kHz -117 dB
Headphones Outputs
Load Impedance 16 Ω – 600 Ω
Max Output Level (32 Ω load) +7.2 dBu
DNR (a-weighted) 109 dB
THD+N @ 1kHz 0.07 %
Frequency response ±1 dB 20 Hz – 20 kHz (±0.2 dB)
Crosstalk @ 1kHz -63 dB
Power Supply
Input: 100-240VAC, 50/60Hz, 1.5A
Output: 15VDC, 2660mA
Technical Specification
TRAKTOR KONTROL S8 - Manual - 264
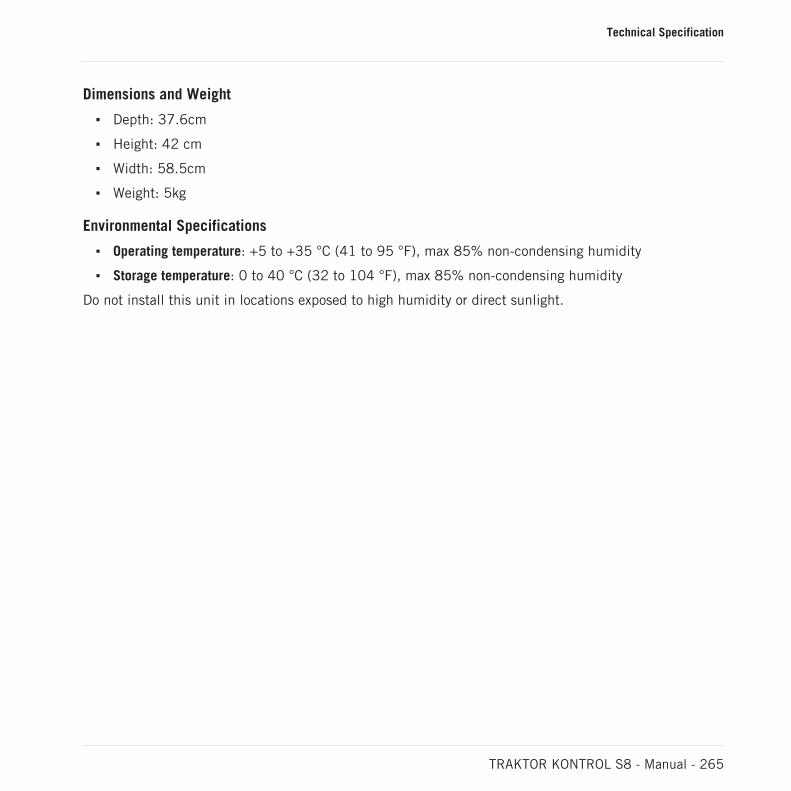
Dimensions and Weight
Depth: 37.6cm
Height: 42 cm
Width: 58.5cm
Weight: 5kg
Environmental Specifications
Operating temperature: +5 to +35 °C (41 to 95 °F), max 85% non-condensing humidity
Storage temperature: 0 to 40 °C (32 to 104 °F), max 85% non-condensing humidity
Do not install this unit in locations exposed to high humidity or direct sunlight.
Technical Specification
TRAKTOR KONTROL S8 - Manual - 265
Related Documents