TRAINING GUIDE Lucity Administration Tools Settings and Admin FAQs

Welcome message from author
This document is posted to help you gain knowledge. Please leave a comment to let me know what you think about it! Share it to your friends and learn new things together.
Transcript

TRAINING GUIDE
Lucity Administration Tools Settings and Admin FAQs

Web Applications – Lucity Administration Tool 1
Lucity Administration Tool The Lucity Administration Tool provides the way for users to configure Lucity Web. It also contains settings for many other parts of the program. In this manual we will cover some of these settings and how they affect Lucity Web.
Contents
System > Settings .......................................................................................................... 2 Appearance tab ......................................................................................................... 2 Designer Automation tab .............................................................................................. 3 Documents Tab .......................................................................................................... 3 Email tab ................................................................................................................. 4 General tab .............................................................................................................. 5 GIS 3rd Party Integrations tab ......................................................................................... 6 GIS Desktop tab ......................................................................................................... 7 GIS Edit Integration tab ............................................................................................... 8 GIS Routing tab .......................................................................................................... 8 GIS Web tab .............................................................................................................. 9 Mobile tab .............................................................................................................. 10 Object Locking tab ................................................................................................... 11 Rest API tab ............................................................................................................ 12 Settings with Custom Interface tab ............................................................................... 13 Time Sheet tab ........................................................................................................ 13 Web Performance tab ................................................................................................ 14 Website tab ............................................................................................................ 15 Work tab ............................................................................................................... 17
Managing Web Caches .................................................................................................. 18 Object Lock Manager ................................................................................................... 19 User License Manager ................................................................................................... 21 Active User Manager .................................................................................................... 22 Administrative FAQ ...................................................................................................... 23
Installation .......................................................................................................... 23 Customizing the Dashboard Background Image ............................................................... 23 Error and Event Logs .............................................................................................. 23 DOS Attacks ......................................................................................................... 25 Multiple Clients - Live Data Tool ................................................................................ 25 ArcGIS Server and Lucity Web are on different servers ..................................................... 26
Web Applications – Lucity Administration Tool 2
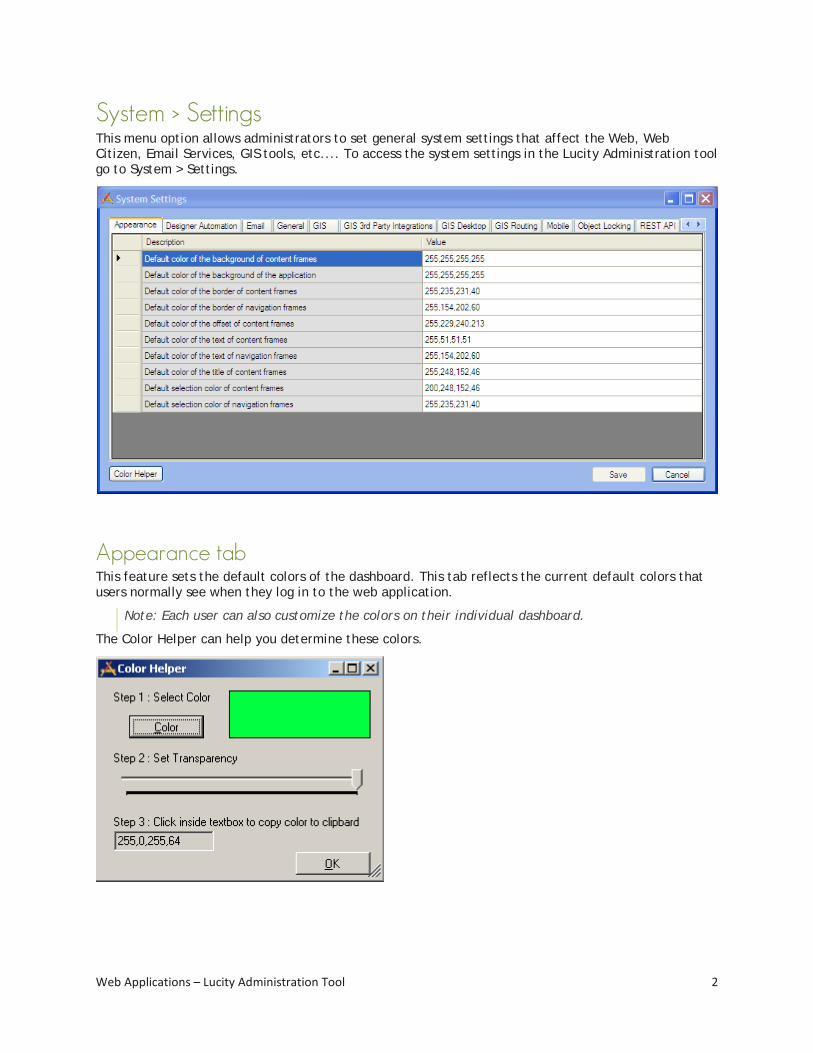
System > Settings This menu option allows administrators to set general system settings that affect the Web, Web Citizen, Email Services, GIS tools, etc.... To access the system settings in the Lucity Administration tool go to System > Settings.
Appearance tab This feature sets the default colors of the dashboard. This tab reflects the current default colors that users normally see when they log in to the web application.
Note: Each user can also customize the colors on their individual dashboard.
The Color Helper can help you determine these colors.

Web Applications – Lucity Administration Tool 3
Designer Automation tab This feature allows administrators to change how specific elements will appear on the web forms by default. They have the ability to change the width, height and margins of forms. All of the measurements are in pixels.
To make changes to the default appearance, click in the desired field and enter the desired value. Click Save when complete.
Documents Tab This tab controls how the document uploads work for Lucity Web, Mobile, and Web Citizen.
Field Function
Error to Display if a file upload fails in the Citizen app *
Enter text in this field to modify the error message displayed when a document fails to upload.
List of document types that are allowed to be added to records **
A comma delimited list of file extensions that are permitted to be attached to records in the web.
List of document types that are allowed to be uploaded by citizens *
A comma delimited list of file extensions that are permitted to be attached to records in web citizen. No other files will be accepted from web citizen.
List of document types that are not allowed to be added to records **
A comma delimited list of file extensions that are blocked from being attached to records in the web.
Maximum size for uploaded document in mb (Citizen) *
Limits the size of documents that can be attached to a Web Citizen request.
Maximum size for uploaded document in mb (Internal) **
Limits the size of document that can be attached to a record in Lucity Web or using the REST API.
Path where uploaded documents are stored (Citizen) *
Enter a network path for where the documents from web citizen will be stored.
Path where uploaded documents are stored (Internal) **
Enter a network path for where the documents from Lucity Web and Mobile will be stored.
URL to Document Server *** This is the url for the Lucity Document Server application. This application is installed with the Lucity Web, Web Citizen
* Applies to Lucity Web
* Applies to Lucity REST API, Lucity Mobile Server
* Applies to Web Citizen
Notes:___________________________________________________________________________________
_________________________________________________________________________________________
_________________________________________________________________________________________
_________________________________________________________________________________________

Web Applications – Lucity Administration Tool 4
Email tab Use this tab to configure email settings for the web and desktop applications.
Field Function
Button text for send email button Controls the text that appears on the Send Email button on the Web Citizen form.
Days to keep data in email error log table
Email notifications are stored in a table in the User database. This field specifies how long a record of that email is stored in that table.
Disable the Centralized Email Server This should normally be set to False. If it is set to true NO email notifications will be sent.
From Email Address This sets the default email address that will be listed as the sender on most email notifications.
How often to process the email cache (in minutes)
This option controls how often the email service checks the table for new emails, and sends any unsent emails.
Note: It is not recommended that this option be set to anything less than 5 minutes.
Include a hyperlink to the web application in emails sent from the desktop software
True or False field. Automatically includes a hyperlink from an email notification for Work Orders/Requests back to that Work Order/Request in Lucity Web.
Instruction label for additional emails
Controls the text that appears on the Additional Emails section of the Web Citizen form.
List of email addresses for system health notifications
Enter a comma delimited list of email addresses. This list of addresses will receive an email, generated when the nightly processes complete.
Parts Reorder Notification Recipient List
Enter a comma delimited list of email addresses. This list of addresses will receive an email, generated by a nightly process, about parts that need to be reordered.
Send daily email when nightly services processes finish
If this is marked to true all users in the List of email address for system health notifications setting will receive an email every time the nightly processes complete. If they do not receive the email it means the processes most likely failed.
SMTP Server The agencies SMTP Server
Text to include above the hyperlink in the email
Tied to the "Include a hyperlink...." option. Add test to be included in the line above the hyperlink
The first line of the body of the email sent to citizens
Add a line to text to be added to all automated client emails by default
The last line of the body of the email sent to citizens
Add a line to text to be added to all automated client emails by default
Note: In addition to customizing the text of the citizen request email, you can also customize the email format of the citizen request email.
Note: Changes made in the email settings do not require the server to be restarted.

Web Applications – Lucity Administration Tool 5
General tab This tab contains general system settings. To make changes, follow the steps below:
Field Function
Allows access to web services with certificate errors
This setting tells Lucity to ignore certificate errors for SSL connections. This setting is used for testing purposes for agencies that are using self-signed certificates with ArcGIS Server.
Days to keep data in login auditing table (0 to maintain all history)
The AUDITLOGONS table in the User database tracks every attempt to login to the Desktop or Web application. Enter the number of days of login history should be kept.
Inactive User Licenses Expiration in Minutes (recommended value=60)
The web application will limit the number of active users based on the number of licenses for the product. The inactive user’s license expiration setting will release a user's licenses if the product has been sitting idle for the time indicated. 60 minutes is the recommended time.
List of values that are not allowed in search filters to reduce risk of getting hacked
This is a setting designed to reduce the risk of SQL Injection attacks through the REST API. It affects all queries from the REST APIs and the Internal Web App. If the queries include a work in this field they will be blocked. It is strongly encouraged to talk to a Lucity before making changes. The default is :
( insert | update | delete | truncate | reconfigure | union |sysobjects|waitfor|xp_cmdshell|;|--)
Location of the Lucity Help files for this system
This indicates the URL where the Lucity help files are stores. This option is defaulted to the Lucity help site, but exists for agencies that can't give users access to the internet. By request they can get a copy of the Lucity web help and host them over their local network. They can then enter the location of the root folder the help files are stored in so that all of the help links within the different Lucity programs will work.
Login ID used for scheduled tasks The login ID used for scheduled tasks refers to a Lucity user ID set up in the Security program. This will be used to access nightly tasks run by the system.
Minimum Length For Passwords (Must be 1 or greater)
This sets the minimum number of characters allowable for a Lucity password.
Notes:___________________________________________________________________________________
_________________________________________________________________________________________
_________________________________________________________________________________________
_________________________________________________________________________________________
_________________________________________________________________________________________
_________________________________________________________________________________________
Web Applications – Lucity Administration Tool 6
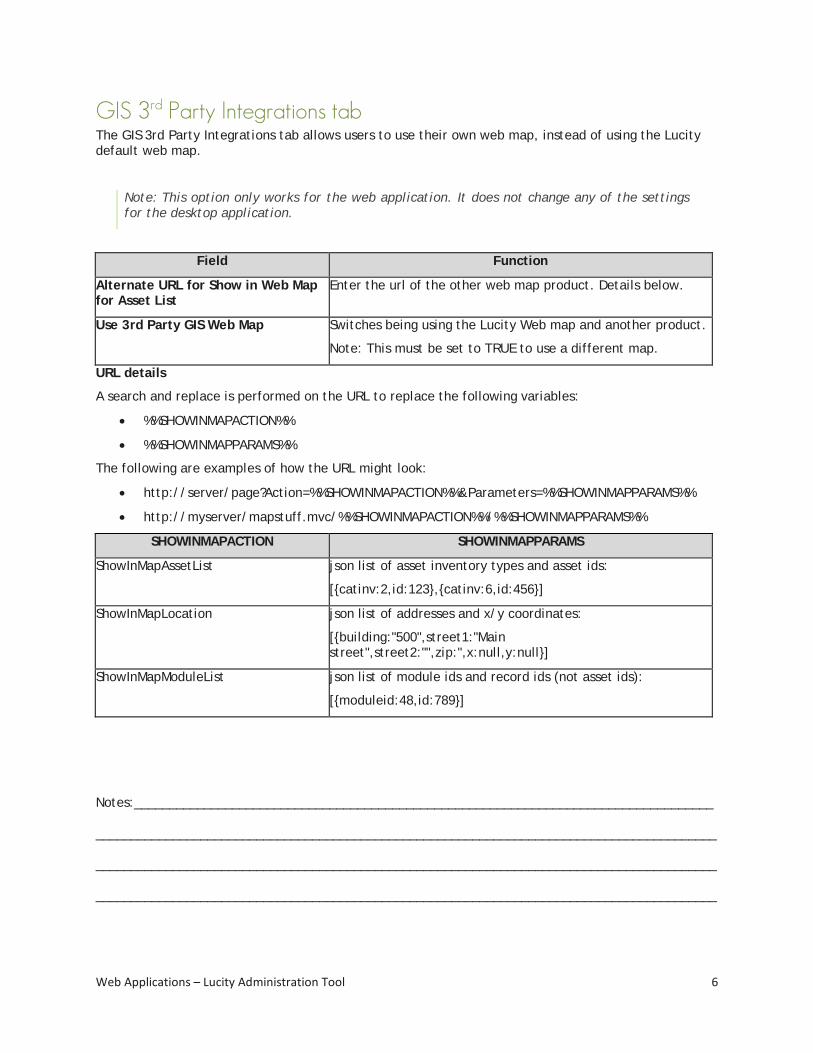
GIS 3rd Party Integrations tab The GIS 3rd Party Integrations tab allows users to use their own web map, instead of using the Lucity default web map.
Note: This option only works for the web application. It does not change any of the settings for the desktop application.
Field Function
Alternate URL for Show in Web Map for Asset List
Enter the url of the other web map product. Details below.
Use 3rd Party GIS Web Map Switches being using the Lucity Web map and another product.
Note: This must be set to TRUE to use a different map.
URL details
A search and replace is performed on the URL to replace the following variables:
• %%SHOWINMAPACTION%%
• %%SHOWINMAPPARAMS%%
The following are examples of how the URL might look:
• http://server/page?Action=%%SHOWINMAPACTION%%&Parameters=%%SHOWINMAPPARAMS%%
• http://myserver/mapstuff.mvc/%%SHOWINMAPACTION%%/%%SHOWINMAPPARAMS%%
SHOWINMAPACTION SHOWINMAPPARAMS
ShowInMapAssetList json list of asset inventory types and asset ids:
[{catinv:2,id:123},{catinv:6,id:456}]
ShowInMapLocation json list of addresses and x/y coordinates:
[{building:"500",street1:"Main street",street2:"",zip:",x:null,y:null}]
ShowInMapModuleList json list of module ids and record ids (not asset ids):
[{moduleid:48,id:789}]
Notes:___________________________________________________________________________________
_________________________________________________________________________________________
_________________________________________________________________________________________
_________________________________________________________________________________________

Web Applications – Lucity Administration Tool 7
GIS Desktop tab This tab allows administrators to set editing options for the sewer, storm, street, and water Lucity editing tools in ArcMap.
Note: After making changes to these settings, ArcMap must be restarted for the changes to take effect
Field Function
Add sewer service address to customer address module
Set this option to true to have the sewer service address added to the Customer Address module.
Add street name records to the Street Name List that don't exist
Set this option to true to have the street name records that do not exist added to the Street Name List.
Add water service address to customer address module
Set this option to true to have the water service address added to the Customer Address module.
Automatically insert a sewer structure for each new sewer pump station
Set this option to true to have a sewer structure added for each new sewer pump station.
Automatically insert a storm structure for each new storm detention basin
Set this option to true to have a storm structure added for each new storm detention basic.
Automatically insert storm structure for each new storm pump station
Set this option to true to have a new storm structure added for each new storm pump station.
Default location for map exports Enter a network path to the location that map images should be saved when creating a new work order, request, etc. with attached map.
Format for map exports Select one file type to be used for the map exports and enter the extension here. This supports: PDF, EPS, AI, BMP, TIFF, SVG, PNG, GIF, EMF, JPEG.
Log Lucity edit session to GBAComm.GBAELOG
Set this option to true to save edit session logs to GBAComm,GBAELOG.
Number of days to keep items in GBAComm.GBAELOG
Limits the amount of time log entries remain in the log.
Sewer Parallel Pipe Name Convention Index
Set Pipe Naming Convention Index
Storm Parallel Pipe Naming Convention Index
Set Pipe Naming Convention Index
Web Applications – Lucity Administration Tool 8
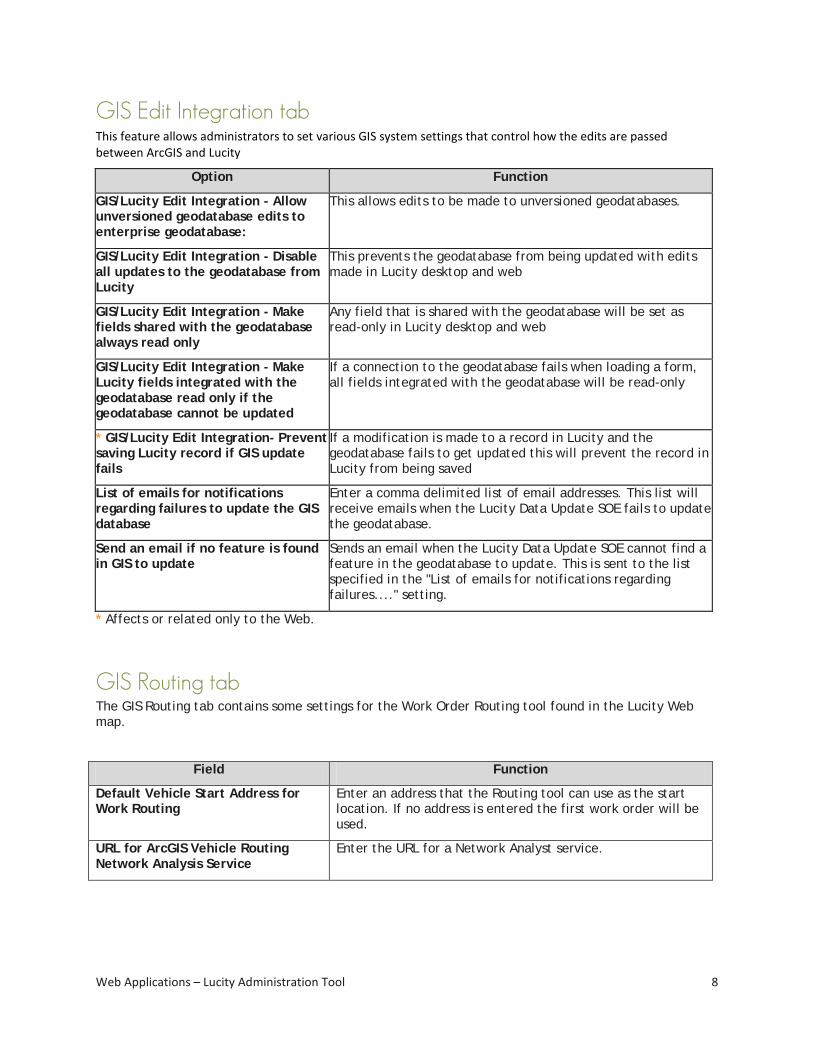
GIS Edit Integration tab This feature allows administrators to set various GIS system settings that control how the edits are passed between ArcGIS and Lucity
Option Function
GIS/Lucity Edit Integration - Allow unversioned geodatabase edits to enterprise geodatabase:
This allows edits to be made to unversioned geodatabases.
GIS/Lucity Edit Integration - Disable all updates to the geodatabase from Lucity
This prevents the geodatabase from being updated with edits made in Lucity desktop and web
GIS/Lucity Edit Integration - Make fields shared with the geodatabase always read only
Any field that is shared with the geodatabase will be set as read-only in Lucity desktop and web
GIS/Lucity Edit Integration - Make Lucity fields integrated with the geodatabase read only if the geodatabase cannot be updated
If a connection to the geodatabase fails when loading a form, all fields integrated with the geodatabase will be read-only
* GIS/Lucity Edit Integration- Prevent saving Lucity record if GIS update fails
If a modification is made to a record in Lucity and the geodatabase fails to get updated this will prevent the record in Lucity from being saved
List of emails for notifications regarding failures to update the GIS database
Enter a comma delimited list of email addresses. This list will receive emails when the Lucity Data Update SOE fails to update the geodatabase.
Send an email if no feature is found in GIS to update
Sends an email when the Lucity Data Update SOE cannot find a feature in the geodatabase to update. This is sent to the list specified in the "List of emails for notifications regarding failures...." setting.
* Affects or related only to the Web.
GIS Routing tab
The GIS Routing tab contains some settings for the Work Order Routing tool found in the Lucity Web map.
Field Function
Default Vehicle Start Address for Work Routing
Enter an address that the Routing tool can use as the start location. If no address is entered the first work order will be used.
URL for ArcGIS Vehicle Routing Network Analysis Service
Enter the URL for a Network Analyst service.
Web Applications – Lucity Administration Tool 9
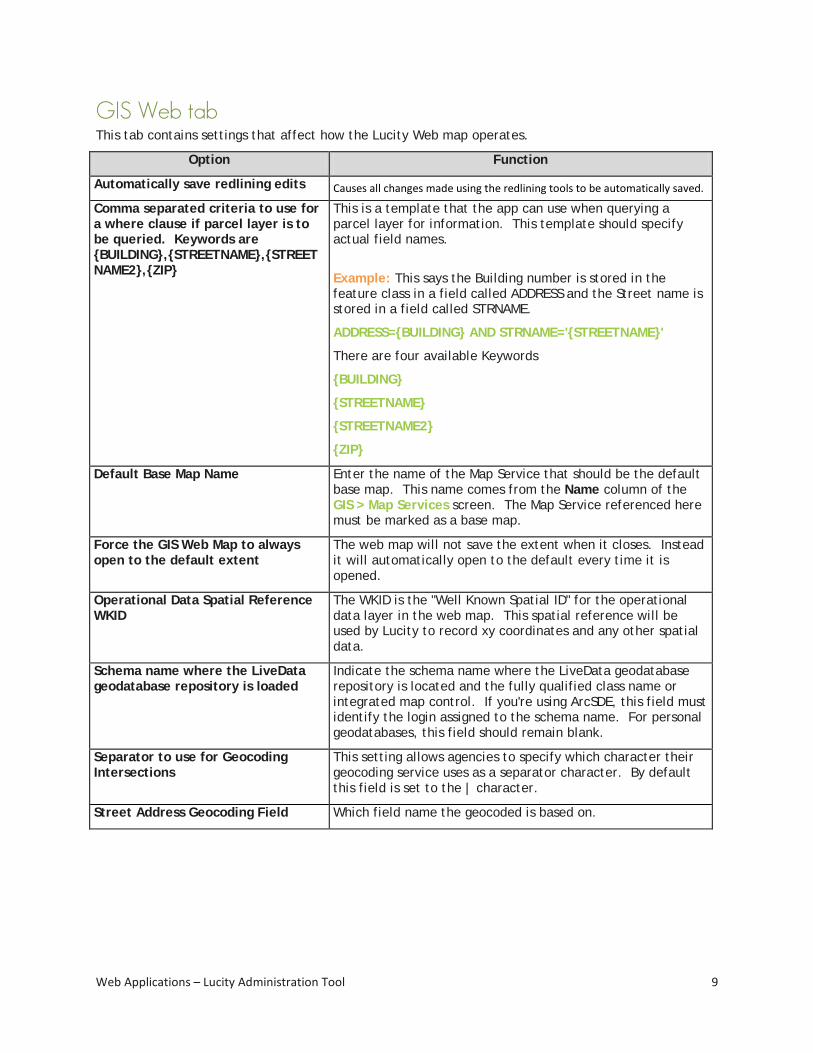
GIS Web tab This tab contains settings that affect how the Lucity Web map operates.
Option Function
Automatically save redlining edits Causes all changes made using the redlining tools to be automatically saved.
Comma separated criteria to use for a where clause if parcel layer is to be queried. Keywords are {BUILDING},{STREETNAME},{STREETNAME2},{ZIP}
This is a template that the app can use when querying a parcel layer for information. This template should specify actual field names.
Example: This says the Building number is stored in the feature class in a field called ADDRESS and the Street name is stored in a field called STRNAME.
ADDRESS={BUILDING} AND STRNAME='{STREETNAME}'
There are four available Keywords
{BUILDING}
{STREETNAME}
{STREETNAME2}
{ZIP}
Default Base Map Name Enter the name of the Map Service that should be the default base map. This name comes from the Name column of the GIS > Map Services screen. The Map Service referenced here must be marked as a base map.
Force the GIS Web Map to always open to the default extent
The web map will not save the extent when it closes. Instead it will automatically open to the default every time it is opened.
Operational Data Spatial Reference WKID
The WKID is the "Well Known Spatial ID" for the operational data layer in the web map. This spatial reference will be used by Lucity to record xy coordinates and any other spatial data.
Schema name where the LiveData geodatabase repository is loaded
Indicate the schema name where the LiveData geodatabase repository is located and the fully qualified class name or integrated map control. If you're using ArcSDE, this field must identify the login assigned to the schema name. For personal geodatabases, this field should remain blank.
Separator to use for Geocoding Intersections
This setting allows agencies to specify which character their geocoding service uses as a separator character. By default this field is set to the | character.
Street Address Geocoding Field Which field name the geocoded is based on.
Web Applications – Lucity Administration Tool 10
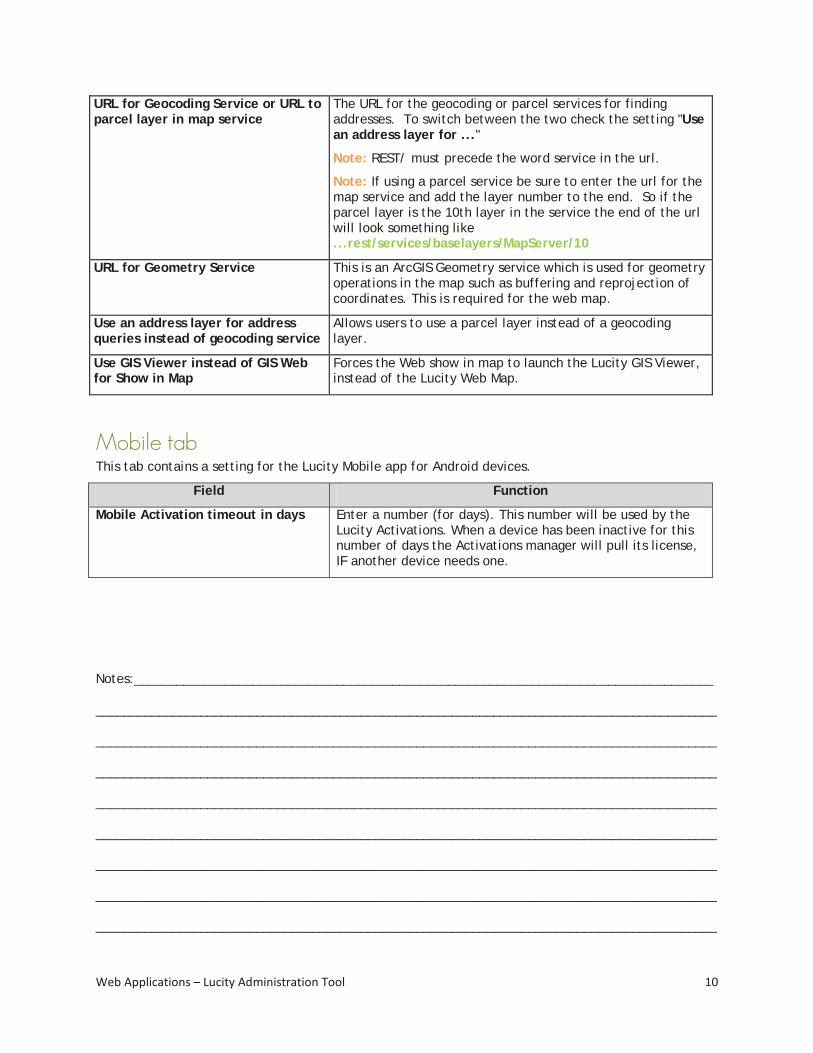
URL for Geocoding Service or URL to parcel layer in map service
The URL for the geocoding or parcel services for finding addresses. To switch between the two check the setting "Use an address layer for ..."
Note: REST/ must precede the word service in the url.
Note: If using a parcel service be sure to enter the url for the map service and add the layer number to the end. So if the parcel layer is the 10th layer in the service the end of the url will look something like ...rest/services/baselayers/MapServer/10
URL for Geometry Service This is an ArcGIS Geometry service which is used for geometry operations in the map such as buffering and reprojection of coordinates. This is required for the web map.
Use an address layer for address queries instead of geocoding service
Allows users to use a parcel layer instead of a geocoding layer.
Use GIS Viewer instead of GIS Web for Show in Map
Forces the Web show in map to launch the Lucity GIS Viewer, instead of the Lucity Web Map.
Mobile tab This tab contains a setting for the Lucity Mobile app for Android devices.
Field Function
Mobile Activation timeout in days Enter a number (for days). This number will be used by the Lucity Activations. When a device has been inactive for this number of days the Activations manager will pull its license, IF another device needs one.
Notes:___________________________________________________________________________________
_________________________________________________________________________________________
_________________________________________________________________________________________
_________________________________________________________________________________________
_________________________________________________________________________________________
_________________________________________________________________________________________
_________________________________________________________________________________________
_________________________________________________________________________________________
_________________________________________________________________________________________

Web Applications – Lucity Administration Tool 11
Object Locking tab This feature ensures that if an administrator is working on a particular form, grid, or menu, it is locked for editing by the system. This disallows any other users from making changes until the item is unlocked or saved.
Field Function
Interval to Wait Between Lock Attempts in Seconds (recommended value = 0.2)
Interval to Wait Between Lock Attempts in Seconds (recommended value = 0.2)
Lock Expiration in Minutes (recommended value = 180)
Enter the lock expiration in minutes. This is the amount of time the object will be locked for editing by the system, unless the object is saved. By default, objects are locked for 180 minutes (3 hours).
Maximum # of Attempts to Lock an Object (recommended value = 10)
Enter the maximum number of attempts to lock an object.
Example: when a user clicks on the "Start Edit" button in Menus, the program will attempt to lock the records. If it cannot do so (because someone else has it locked), it will wait 0.2 seconds (as configured in the Interval below) and then try again. If that fails, it will wait another 0.2 seconds and try again. It will try a total of 10 times (or as otherwise specified).
Note: If a user obtained a lock on an object and did not close the program correctly (due to a power outage, network problem, etc.), then the lock should clear on its own at the end of the expiration period. Failing that, the administrator can clear object locks in the Object Lock Manager. Note: Locks are not used in the Web Applications, only in the Lucity Administration Tools.
Notes:___________________________________________________________________________________
_________________________________________________________________________________________
_________________________________________________________________________________________
_________________________________________________________________________________________
_________________________________________________________________________________________
_________________________________________________________________________________________
_________________________________________________________________________________________
_________________________________________________________________________________________
_________________________________________________________________________________________
Web Applications – Lucity Administration Tool 12
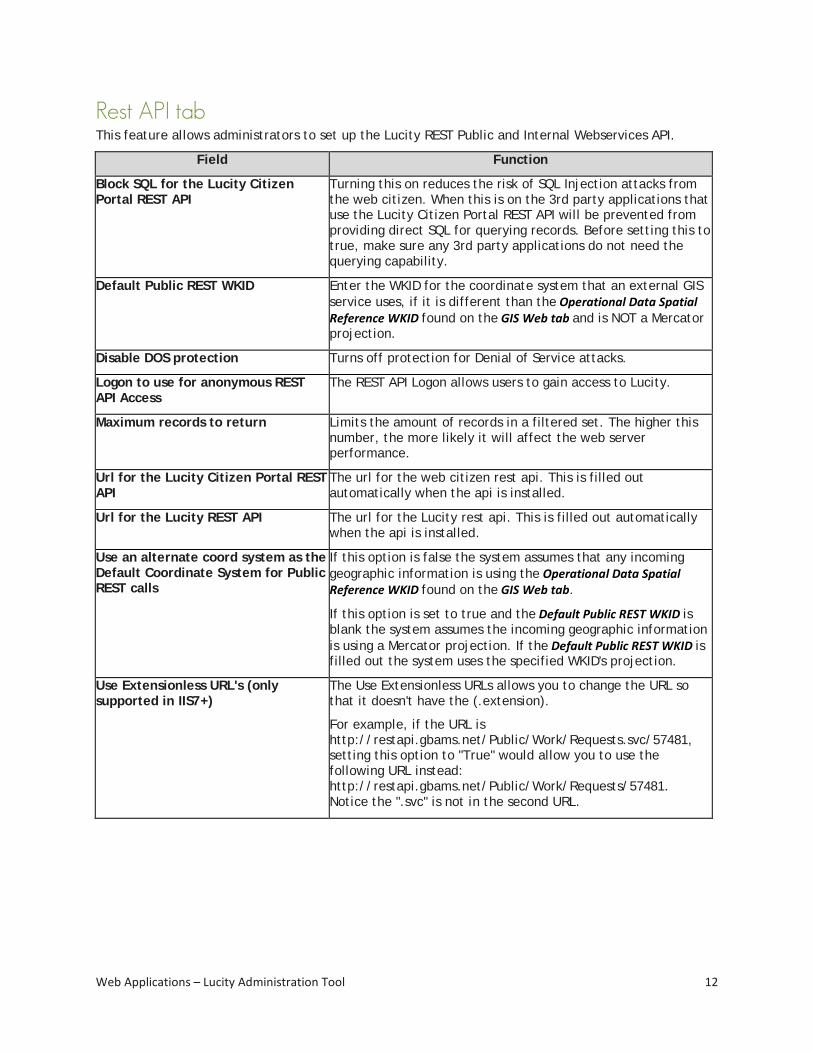
Rest API tab This feature allows administrators to set up the Lucity REST Public and Internal Webservices API.
Field Function
Block SQL for the Lucity Citizen Portal REST API
Turning this on reduces the risk of SQL Injection attacks from the web citizen. When this is on the 3rd party applications that use the Lucity Citizen Portal REST API will be prevented from providing direct SQL for querying records. Before setting this to true, make sure any 3rd party applications do not need the querying capability.
Default Public REST WKID Enter the WKID for the coordinate system that an external GIS service uses, if it is different than the Operational Data Spatial Reference WKID found on the GIS Web tab and is NOT a Mercator projection.
Disable DOS protection Turns off protection for Denial of Service attacks.
Logon to use for anonymous REST API Access
The REST API Logon allows users to gain access to Lucity.
Maximum records to return Limits the amount of records in a filtered set. The higher this number, the more likely it will affect the web server performance.
Url for the Lucity Citizen Portal REST API
The url for the web citizen rest api. This is filled out automatically when the api is installed.
Url for the Lucity REST API The url for the Lucity rest api. This is filled out automatically when the api is installed.
Use an alternate coord system as the Default Coordinate System for Public REST calls
If this option is false the system assumes that any incoming geographic information is using the Operational Data Spatial Reference WKID found on the GIS Web tab.
If this option is set to true and the Default Public REST WKID is blank the system assumes the incoming geographic information is using a Mercator projection. If the Default Public REST WKID is filled out the system uses the specified WKID's projection.
Use Extensionless URL's (only supported in IIS7+)
The Use Extensionless URLs allows you to change the URL so that it doesn't have the (.extension).
For example, if the URL is http://restapi.gbams.net/Public/Work/Requests.svc/57481, setting this option to "True" would allow you to use the following URL instead: http://restapi.gbams.net/Public/Work/Requests/57481. Notice the ".svc" is not in the second URL.
Web Applications – Lucity Administration Tool 13
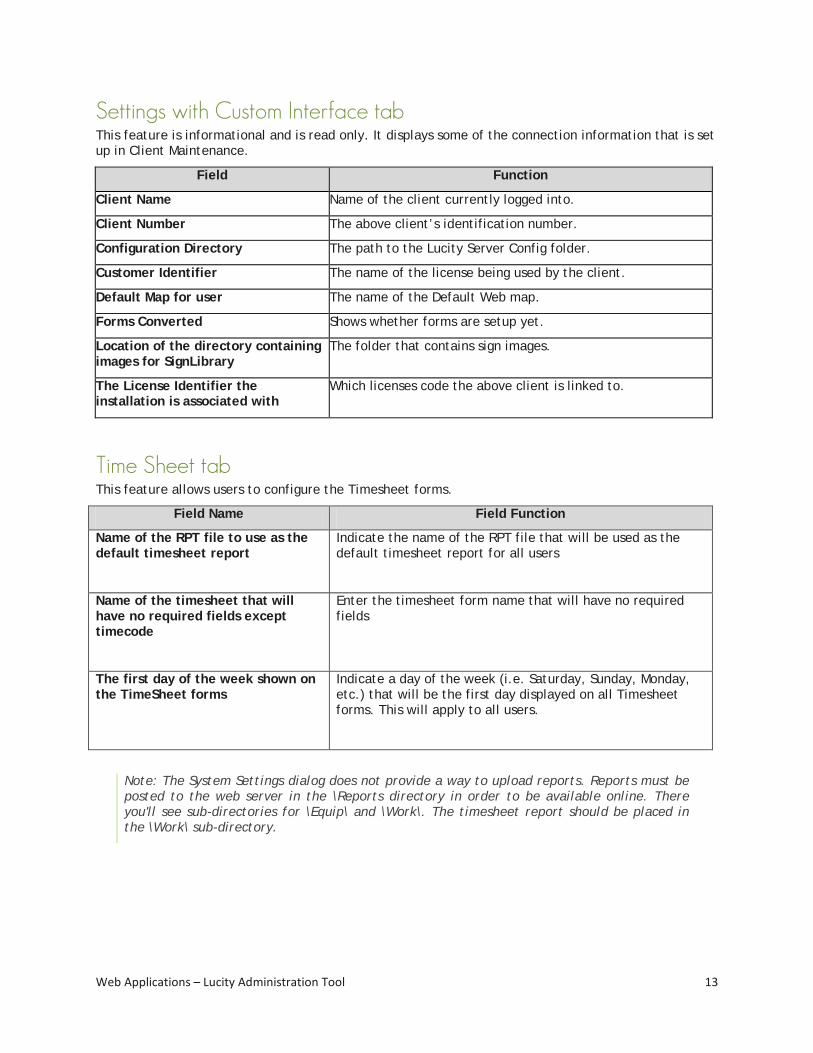
Settings with Custom Interface tab This feature is informational and is read only. It displays some of the connection information that is set up in Client Maintenance.
Field Function
Client Name Name of the client currently logged into.
Client Number The above client’s identification number.
Configuration Directory The path to the Lucity Server Config folder.
Customer Identifier The name of the license being used by the client.
Default Map for user The name of the Default Web map.
Forms Converted Shows whether forms are setup yet.
Location of the directory containing images for SignLibrary
The folder that contains sign images.
The License Identifier the installation is associated with
Which licenses code the above client is linked to.
Time Sheet tab This feature allows users to configure the Timesheet forms.
Field Name Field Function
Name of the RPT file to use as the default timesheet report
Indicate the name of the RPT file that will be used as the default timesheet report for all users
Name of the timesheet that will have no required fields except timecode
Enter the timesheet form name that will have no required fields
The first day of the week shown on the TimeSheet forms
Indicate a day of the week (i.e. Saturday, Sunday, Monday, etc.) that will be the first day displayed on all Timesheet forms. This will apply to all users.
Note: The System Settings dialog does not provide a way to upload reports. Reports must be posted to the web server in the \Reports directory in order to be available online. There you'll see sub-directories for \Equip\ and \Work\. The timesheet report should be placed in the \Work\ sub-directory.

Web Applications – Lucity Administration Tool 14
Web Performance tab This feature allows users to adjust system settings for better web performance.
Field Function
Enable Column Resize for grid pages with less than this number of rows
Enter a number. For grids that are showing more records than this number users will be blocked from resizing the columns.
Note: Allowing a grid to show more records increases load time and resize time. This tool takes strain off the system by blocking the resize functionality when there are too many records in a grid
Favour configuration over performance for business rules
When changes are made to field properties in the desktop, such as mask, required, editable, IIS must be reset in order for those changes to be pushed into Lucity web. Enabling this rule allows these changes to be pushed into Lucity Web by clearing the web cache. However, this may cause a significant drop in performance (15-20%).
Persist changes to page size in ListView
Enabling this allows users to save their current page size as a personal customization. This does NOT apply to WebCitizen.
The number of minutes until a dashboard report should be refreshed
Enter the number of minutes between dashboard report refreshes. The default value is 240 minutes. Reports shown on the dashboard are not updated every time the user updates the page. Instead, as long as the report is less than (240 minutes) old, the originally created report will be shown. This saves 5 to 10 seconds of response time. Users can change the length of time a report will be help by the server before it is updated.
Note: An option is available on the Dashboard page below the PDF reports to refresh a report immediately on demand.
Notes:___________________________________________________________________________________
_________________________________________________________________________________________
_________________________________________________________________________________________
_________________________________________________________________________________________
_________________________________________________________________________________________
_________________________________________________________________________________________
_________________________________________________________________________________________
_________________________________________________________________________________________

Web Applications – Lucity Administration Tool 15
Website tab This feature allows users to select the theme or look for your web page. You'll also indicate the web pages where the forms are routed to and the login ID.
Field Function
Add new addresses from Citizen Web App to Customers if the Work Option "Update Customers from Requests?" is Yes
If the "Update Customers from Requests?" work option found in the Lucity Desktop is set to yes, and this field is set to TRUE when citizens enter requests through the Citizen Web App, the system will check the Citizen Name and Address, if there isn't a match in the database, the Customer and/or address records will be updated in the Customer and Customer Address modules.
Allow advanced searches on Citizen Website
By default set to FALSE. When TRUE the RequestList.aspx page will function, allowing the particular web page to be deployed to all clients. Note: The Request List file is used to look up the status of a request submitted from the citizen website. By default, the request lookup allows users to enter the request number and email address and search for matching requests. This RequestList allows users to search for requests by email, phone number, or request number. It is intended to be used by clients that use the Citizen Web for their internal departments. It is not intended to be used by public citizens, even though it is part of the Web Citizen installation.
Citizen Checkbox label for copying requesters address
Enter a caption to be displayed next to the checkbox on Request Forms
Citizen Checkbox label for remembering requesters information
Enter a caption to be displayed next to the checkbox on Request Forms
Web Applications – Lucity Administration Tool 16
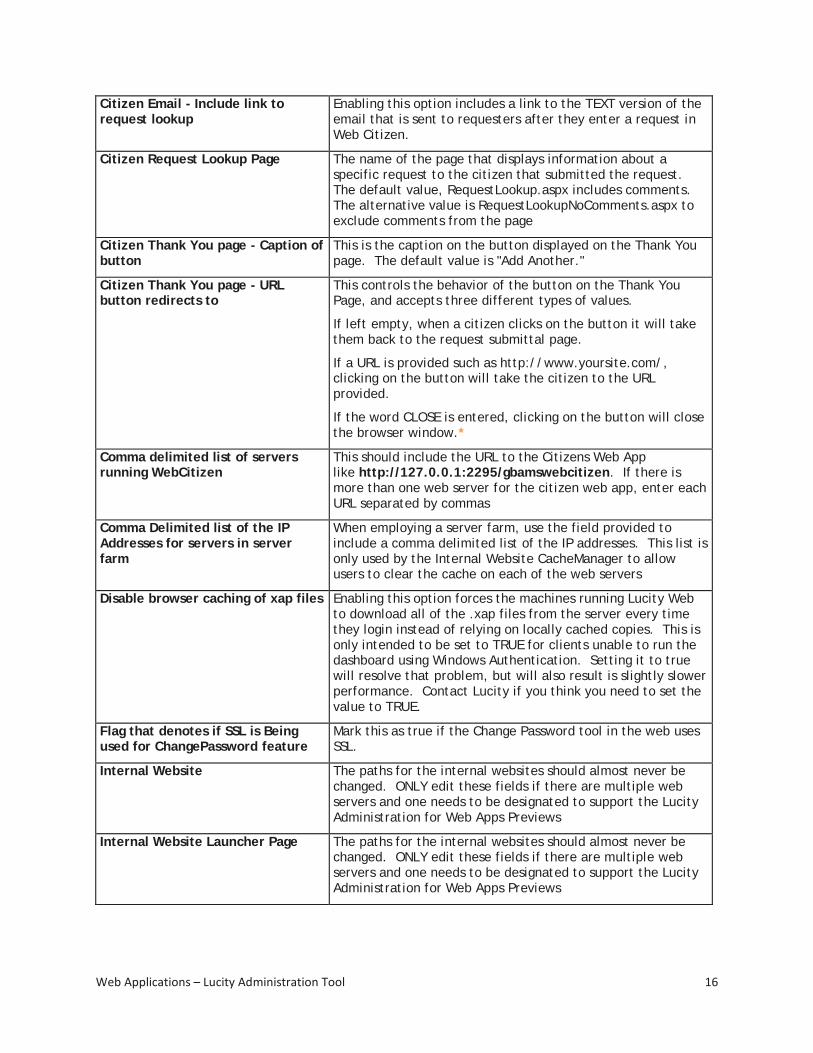
Citizen Email - Include link to request lookup
Enabling this option includes a link to the TEXT version of the email that is sent to requesters after they enter a request in Web Citizen.
Citizen Request Lookup Page The name of the page that displays information about a specific request to the citizen that submitted the request. The default value, RequestLookup.aspx includes comments. The alternative value is RequestLookupNoComments.aspx to exclude comments from the page
Citizen Thank You page - Caption of button
This is the caption on the button displayed on the Thank You page. The default value is "Add Another."
Citizen Thank You page - URL button redirects to
This controls the behavior of the button on the Thank You Page, and accepts three different types of values.
If left empty, when a citizen clicks on the button it will take them back to the request submittal page.
If a URL is provided such as http://www.yoursite.com/, clicking on the button will take the citizen to the URL provided.
If the word CLOSE is entered, clicking on the button will close the browser window.*
Comma delimited list of servers running WebCitizen
This should include the URL to the Citizens Web App like http://127.0.0.1:2295/gbamswebcitizen. If there is more than one web server for the citizen web app, enter each URL separated by commas
Comma Delimited list of the IP Addresses for servers in server farm
When employing a server farm, use the field provided to include a comma delimited list of the IP addresses. This list is only used by the Internal Website CacheManager to allow users to clear the cache on each of the web servers
Disable browser caching of xap files Enabling this option forces the machines running Lucity Web to download all of the .xap files from the server every time they login instead of relying on locally cached copies. This is only intended to be set to TRUE for clients unable to run the dashboard using Windows Authentication. Setting it to true will resolve that problem, but will also result is slightly slower performance. Contact Lucity if you think you need to set the value to TRUE.
Flag that denotes if SSL is Being used for ChangePassword feature
Mark this as true if the Change Password tool in the web uses SSL.
Internal Website The paths for the internal websites should almost never be changed. ONLY edit these fields if there are multiple web servers and one needs to be designated to support the Lucity Administration for Web Apps Previews
Internal Website Launcher Page The paths for the internal websites should almost never be changed. ONLY edit these fields if there are multiple web servers and one needs to be designated to support the Lucity Administration for Web Apps Previews

Web Applications – Lucity Administration Tool 17
Login ID used for Citizen Website The Lucity Login ID for the Citizen Website will be created during the installation process. The default ID will be "PublicWebUser"; however, this Login Id can be edited if needed. The specified citizen Login Id needs to belong to the PublicWebGroup in Lucity Security. This group will have run and add permissions to use the public forms (Run - Work, Run - Work Requests, General Add - Work Requests, and Run - General Modules)). Additional users will need to be added to this group in order to access the public web forms. In addition, this Login Id is used for tracking purposes in the desktop version of Lucity.
URL for Lucity Custom Web Integrations
This is filled out by customers who have purchased a custom integration for customer lookups. The information for this is provided by Lucity during the implementation of the custom product.
Use a custom customer lookup for requests
This is related to the previous setting. It toggles between whether the customer lookup tools use the built in Lucity functionality or a custom tool.
Website Theme This refers to the look of the web page. "Default" is the standard Lucity setting
Windows Authentication Website This refers to a launcher page that will try to log the person currently logged into the computer into Lucity. The paths for the internal websites should almost never be changed.
Work tab These options affect work functionality in Lucity Web.
Field Function
Do Work Flow Popup Lists Filter using StartsWith or Contains
All fields that are used to select Work Flow setup items include filtering functionality. The filters can take what a user types in and match it to records in the list based on if the records' ids start with what the user typed, or if the records' ids contain what the user typed. This setting allows administrators to control how the filters function. Enter StartsWith or Contains in this field to tell the system how to filter.
Notes:___________________________________________________________________________________
_________________________________________________________________________________________
_________________________________________________________________________________________
_________________________________________________________________________________________
_________________________________________________________________________________________

Web Applications – Lucity Administration Tool 18
Managing Web Caches The Web product caches the data on the web sites to help improve performance. This includes certain pieces of information that change infrequently, such as the list of all problems that you have defined; however, if you add a new problem it will not initially show up in the drop down list on the web sites. In order for the new problem to appear on either the internal web site or public web site, you'll need to clear the old caches manually or wait until the caches are cleared routinely by the system.
You should only clear the caches to allow drop down lists on the web sites to display data that was added recently.
Changes made in the field properties form of the Desktop application or any xxFields database will not be made effective by clearing the cache. These changes will be enforced only after the application pool for the Web restarts in IIS at 2:00am.
1. To clear the internal web site cache, select the Manage Web Site Caches menu option. To clear the public (citizen) web site cache, select Manage Public Web Site Caches menu option.
2. For both options, a screen similar to the one below will appear. This screen informs you of the number of items in the cache as well as the amount of memory being used. You can choose to clear individual caches or clear all caches using the buttons on screen.
3. When either option is selected, this function will be performed automatically.
Note: Clearing the caches may temporarily harm performance until the caches are re-populated.
Administrators can force the application to restart by restarting IIS; however, we do not recommend restarting IIS if any users are accessing the web application as it will interrupt their sessions and they may lose whatever they were working on.

Web Applications – Lucity Administration Tool 19
Object Lock Manager Object locks were used widely in 6.75 but are only used in a few cases in release 7.0 and beyond. The lock is used to restrict database changes to one user at a time. Locking only applies to Forms and Menus. If a user obtained a lock on an object and did not close the program correctly (due to a power outage, network problem, etc.), then the lock should clear on its own at the end of the expiration period defined in the Object Locking Dialog. Failing that, the administrator can clear object locks here.
The columns in this grid will help you identify which locks you'd like to clear. These columns are defined in the table below:
Fields
Release Use this column to select which locks will be cleared.
Lock ID Each lock is given a unique Lock ID when it is obtained.
User Login This column identifies the Lucity user name for the user that obtained the lock.
Entity ID This column identifies the type of object locked by the user (i.e. Work Order, Submit Process, etc.).
Record ID When each record is created, the system gives it a unique Record ID.
Lock Date This column indicates the date and time the lock was initially obtained.
Expiration This column indicates the date and time the lock is scheduled to expire.
Machine This column identifies the name of the computer where the lock was obtained.
Intention This column describes the reason the lock was generated. If a record is being deleted, a Delete lock is obtained. If a record is being edited, an Update lock is obtained.

Web Applications – Lucity Administration Tool 20
Buttons
Refresh Refreshes the data in the manager. This must be done to see any changes.
Release Locks Releases any currently selected locks
Note: Locks that are shaded in grey cannot be cleared from this grid. Locks are greyed-out for the following reasons:
Delete Locks are always greyed-out. These will be cleared by the system when the scheduled nightly tasks are run.
Locks that have been obtained within the last five minutes will be greyed-out. These are assumed to be still in use.
1. For each lock you'd like to clear, highlight the listing in the grid and then mark the Release
checkbox.
2. Click the Release Locks button when you are finished making your selections.
3. Click the Refresh button to view your changes and check for any additional object locks. Locks that are shaded in gray cannot be cleared from this grid.
4. Locks are grayed-out for the following reasons:
• Delete Locks are always grayed-out. These will be cleared by the system when the scheduled nightly tasks are run.
• Locks that have been obtained within the last five minutes will be grayed-out. These are assumed to be still in use.
Note: Locks obtained through the desktop application also affect the Web. If a desktop user begins to edit a specific record and a web user also attempts to edit the same record, or any of its children, the web update will fail if the desktop user still has the record in edit mode when the web user hits save. The web application will wait 30 seconds for the desktop to release the lock. If the desktop does not release the lock, the web save will not succeed and the web user will receive an error message. A system administrator can review the logs for additional details. Web users can refresh the page, reapply the changes, and then save again.
Notes:___________________________________________________________________________________
_________________________________________________________________________________________
_________________________________________________________________________________________
_________________________________________________________________________________________
_________________________________________________________________________________________
_________________________________________________________________________________________
_________________________________________________________________________________________

Web Applications – Lucity Administration Tool 21
User License Manager The User License Manager allows administrators to track and determine which individuals are actively using product licenses in the network. This dialog allows you to determine the following:
• Which user has acquired a license,
• Which Lucity product the license applies to,
• The date and time on which the license was acquired,
• When the system last checked to see if the license was still active, and
• On which application the license was engaged.
You can use the Delete button at the bottom of the dialog to de-activate the license. This will only be necessary in situations where a user obtained an active license and was then locked out of the system unexpectedly (i.e. due to power outage).
Note: When a user is deleted in the Active User Manager, any licenses engaged by that active user will be automatically deleted in this dialog.
Notes:___________________________________________________________________________________
_________________________________________________________________________________________
_________________________________________________________________________________________
_________________________________________________________________________________________
_________________________________________________________________________________________
_________________________________________________________________________________________
_________________________________________________________________________________________

Web Applications – Lucity Administration Tool 22
Active User Manager The Active User Manager allows administrators to track and determine which individuals are actively logged into the application. This dialog allows you to determine the following:
• Which user is active (active users include those who have engaged product licenses as well as those who are merely viewing components of the application),
• Which Lucity application the user is accessing,
• On which date and time the user logged into the application, and
• Which IP address is accessing the application.
You can use the Delete button at the bottom of the dialog to de-activate the user. This will only be necessary in situations where a user logged into the system and was then locked out of the system unexpectedly (i.e. due to power outage).
Note: When a user is deleted from this dialog, any licenses actively engaged by that user will automatically be deleted from the corresponding User License Manager.
Notes:___________________________________________________________________________________
_________________________________________________________________________________________
_________________________________________________________________________________________
_________________________________________________________________________________________
_________________________________________________________________________________________
_________________________________________________________________________________________
_________________________________________________________________________________________

Web Applications – Lucity Administration Tool 23
Administrative FAQ
Installation Q: How do I configure the Lucity Web application to use SSL?
A: During the Lucity Web install there is a screen that asks if the application should be installed normally or under SSL. Please read the install manual for more information about doing this.
Q: What if I already installed Lucity Web and want to switch to using SSL?
A: You will need to uninstall and reinstall the web using the SSL option. Don't worry; you won't lose any dashboard setup or configuration that you have done.
Customizing the Dashboard Background Image Q: How can we customize the background graphic displayed on the Dashboard page?
A: To customize the background graphic, replace the existing Background.png file with your own image using the same file name. This image file can be found in the ClientBin\images folder of the web application located on your web server. Note that the image must be a .png file. It will be applied per web application installation, not per user.
Error and Event Logs Q: Where can the error or event logs be found?
A: The application will log error messages to a rolling log file located in the following locations.
Program Log Location Purpose
Lucity Desktop
rolling.log %APPDATA%/Lucity/Logs
on the workstation machine for the current user
This logs the use of the Lucity Desktop and Lucity Administration Tool programs on this machine for the current windows users.
gslog.htm %APPDATA%/Lucity
on the workstation machine for the current user
This logs Lucity Desktop's attempts to communicate with and update the geodatabase.
Lucity Admin Tool
%APPDATA%/Lucity/Logs
on the workstation machine for the current user
This logs the use of the Lucity Desktop and Lucity Administration Tool programs on this machine for the current windows users.
Web Applications – Lucity Administration Tool 24
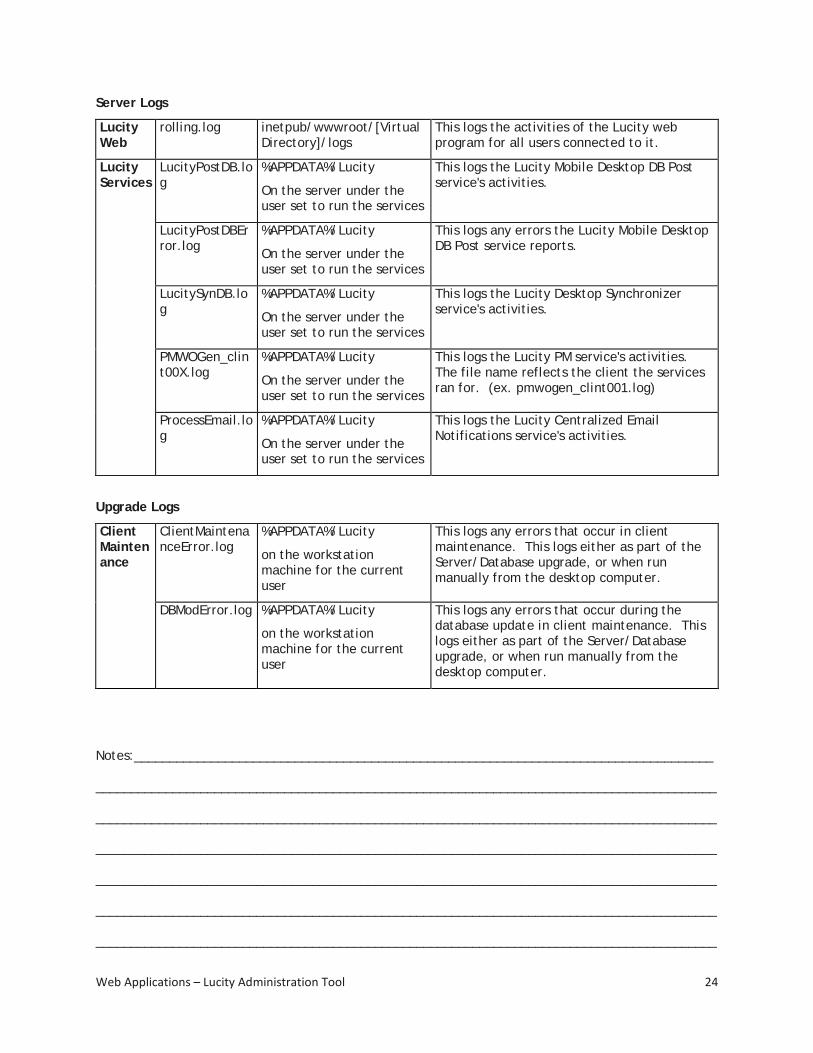
Server Logs
Lucity Web
rolling.log inetpub/wwwroot/[Virtual Directory]/logs
This logs the activities of the Lucity web program for all users connected to it.
Lucity Services
LucityPostDB.log
%APPDATA%/Lucity
On the server under the user set to run the services
This logs the Lucity Mobile Desktop DB Post service's activities.
LucityPostDBError.log
%APPDATA%/Lucity
On the server under the user set to run the services
This logs any errors the Lucity Mobile Desktop DB Post service reports.
LucitySynDB.log
%APPDATA%/Lucity
On the server under the user set to run the services
This logs the Lucity Desktop Synchronizer service's activities.
PMWOGen_clint00X.log
%APPDATA%/Lucity
On the server under the user set to run the services
This logs the Lucity PM service's activities. The file name reflects the client the services ran for. (ex. pmwogen_clint001.log)
ProcessEmail.log
%APPDATA%/Lucity
On the server under the user set to run the services
This logs the Lucity Centralized Email Notifications service's activities.
Upgrade Logs
Client Maintenance
ClientMaintenanceError.log
%APPDATA%/Lucity
on the workstation machine for the current user
This logs any errors that occur in client maintenance. This logs either as part of the Server/Database upgrade, or when run manually from the desktop computer.
DBModError.log %APPDATA%/Lucity
on the workstation machine for the current user
This logs any errors that occur during the database update in client maintenance. This logs either as part of the Server/Database upgrade, or when run manually from the desktop computer.
Notes:___________________________________________________________________________________
_________________________________________________________________________________________
_________________________________________________________________________________________
_________________________________________________________________________________________
_________________________________________________________________________________________
_________________________________________________________________________________________
_________________________________________________________________________________________

Web Applications – Lucity Administration Tool 25
DOS Attacks Q: Do you have any techniques for stopping Denial of Service (DOS) attacks from the internet?
A: We have implemented one technique for stopping these attacks. A DOS is when someone attempts to crash a web site by bombarding it with multiple requests. This is only implemented in the Web Citizen application. By default, if the Citizen application receives more than 1000 requests within 10 minutes from a single IP address, it will stop accepting requests from that IP address for the duration of the 10 minutes. These values are configurable. The default values are hard-coded in the program; they are not in the appsettings file, but adding entries in appsettings can override the defaults.
You can change the Denial of Service configuration by entering this in the appsettings.config:
• <add key="DOSREQUESTS" value="1000" /> (This is the number of hits that should occur within the duration before blocking the IP address).
• <add key="DOSPERIOD" value="10" /> (This is the number of minutes of the duration)
1000 attempts within 10 minutes is the default setting. We track the time of the first attempt from each IP address; if more than 1000 requests occur within the next 10 minutes, we block requests from that IP address for the remainder of the 10 minutes.
Note: This technique only works for short periods and only against a single IP address. This provides protection against localized DOS attacks. Mitigation of large scale distributed denial of service attacks (DDOS) should be handled by routers and networks.
Multiple Clients - Live Data Tool Q: Our organization has multiple clients. How do we need to configure the Live Data Map Updater
tool?
A: The Live Data Map Updater tool may be used on a workstation configured for multiple clients like the Lucity Administration for Web Apps, but on each workstation the tool must be dedicated to processing a single client. Users can specify which client using the "DefaultClient" attribute in the appsettings file:
<appSettings>
<add key ="Clients" value ="1 - Operations,2 – Treatment Plant,3 - Testing"/>
<add key ="DefaultClient" value ="2 – Treatment Plant"/>
</appSettings>
If a default client is not specified in a multiple client environment, the Lucity Live Data Map Updater tool will not run. The properties window will look like this:
Web Applications – Lucity Administration Tool 26
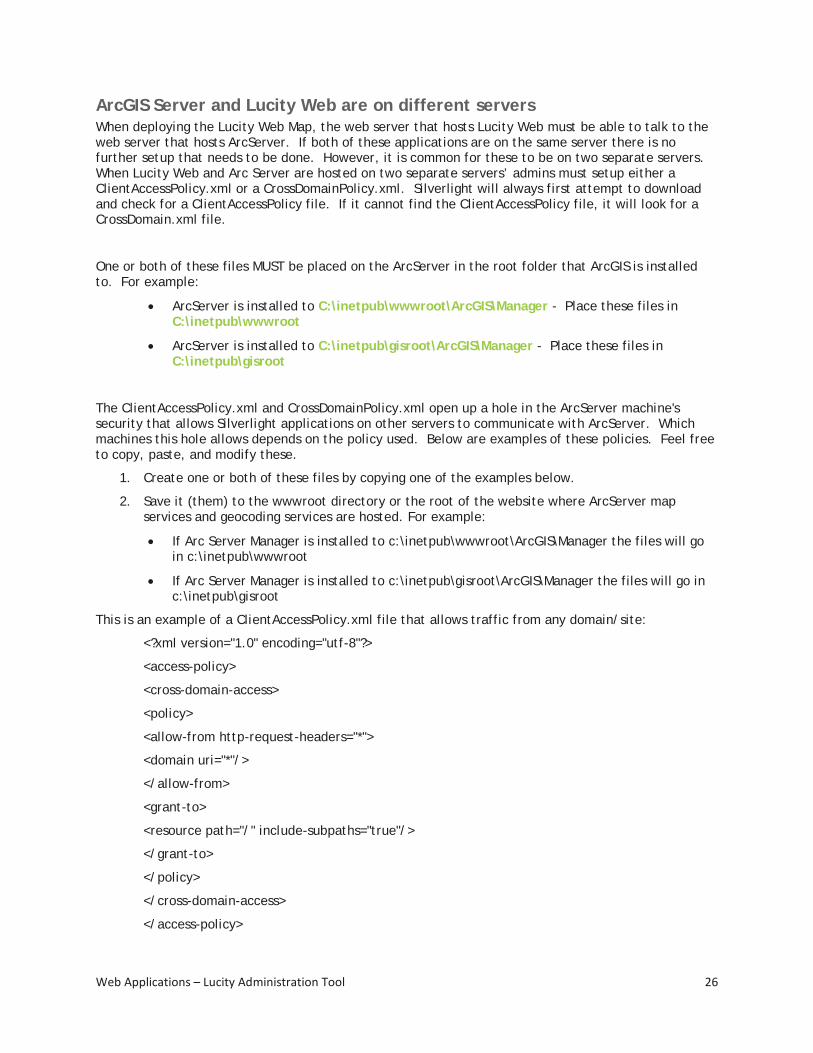
ArcGIS Server and Lucity Web are on different servers When deploying the Lucity Web Map, the web server that hosts Lucity Web must be able to talk to the web server that hosts ArcServer. If both of these applications are on the same server there is no further setup that needs to be done. However, it is common for these to be on two separate servers. When Lucity Web and Arc Server are hosted on two separate servers’ admins must setup either a ClientAccessPolicy.xml or a CrossDomainPolicy.xml. Silverlight will always first attempt to download and check for a ClientAccessPolicy file. If it cannot find the ClientAccessPolicy file, it will look for a CrossDomain.xml file.
One or both of these files MUST be placed on the ArcServer in the root folder that ArcGIS is installed to. For example:
• ArcServer is installed to C:\inetpub\wwwroot\ArcGIS\Manager - Place these files in C:\inetpub\wwwroot
• ArcServer is installed to C:\inetpub\gisroot\ArcGIS\Manager - Place these files in C:\inetpub\gisroot
The ClientAccessPolicy.xml and CrossDomainPolicy.xml open up a hole in the ArcServer machine's security that allows Silverlight applications on other servers to communicate with ArcServer. Which machines this hole allows depends on the policy used. Below are examples of these policies. Feel free to copy, paste, and modify these.
1. Create one or both of these files by copying one of the examples below.
2. Save it (them) to the wwwroot directory or the root of the website where ArcServer map services and geocoding services are hosted. For example:
• If Arc Server Manager is installed to c:\inetpub\wwwroot\ArcGIS\Manager the files will go in c:\inetpub\wwwroot
• If Arc Server Manager is installed to c:\inetpub\gisroot\ArcGIS\Manager the files will go in c:\inetpub\gisroot
This is an example of a ClientAccessPolicy.xml file that allows traffic from any domain/site:
<?xml version="1.0" encoding="utf-8"?>
<access-policy>
<cross-domain-access>
<policy>
<allow-from http-request-headers="*">
<domain uri="*"/>
</allow-from>
<grant-to>
<resource path="/" include-subpaths="true"/>
</grant-to>
</policy>
</cross-domain-access>
</access-policy>
Web Applications – Lucity Administration Tool 27
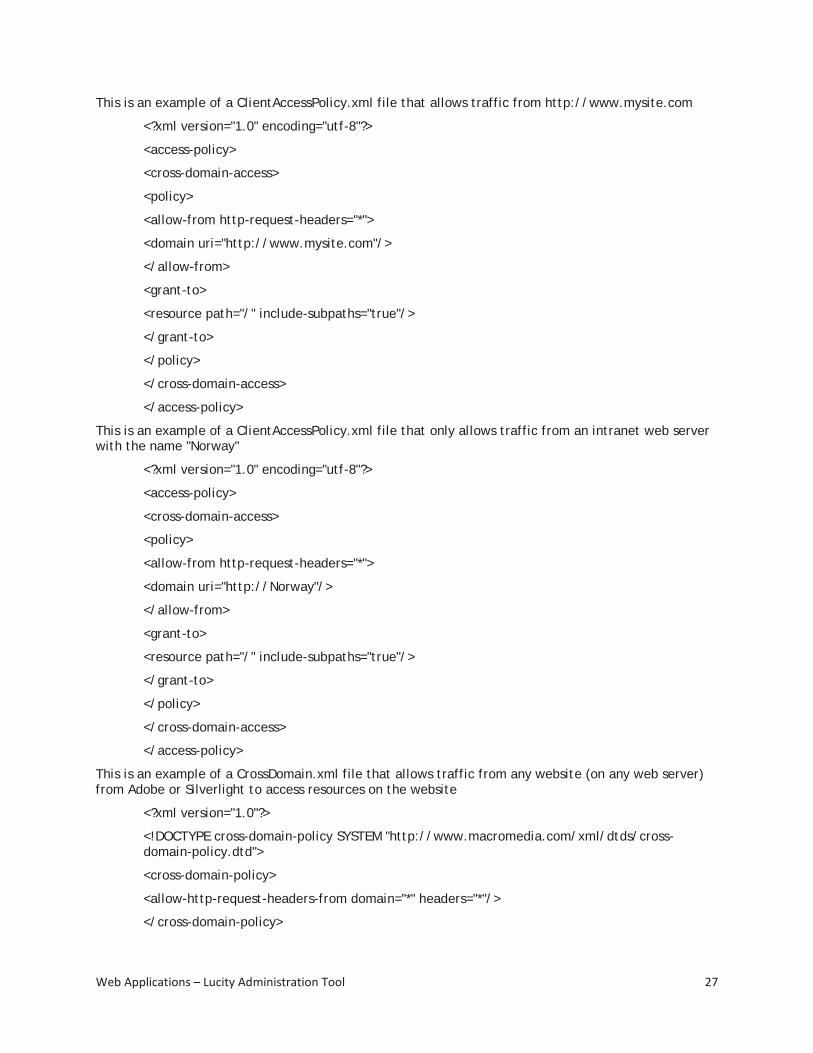
This is an example of a ClientAccessPolicy.xml file that allows traffic from http://www.mysite.com
<?xml version="1.0" encoding="utf-8"?>
<access-policy>
<cross-domain-access>
<policy>
<allow-from http-request-headers="*">
<domain uri="http://www.mysite.com"/>
</allow-from>
<grant-to>
<resource path="/" include-subpaths="true"/>
</grant-to>
</policy>
</cross-domain-access>
</access-policy>
This is an example of a ClientAccessPolicy.xml file that only allows traffic from an intranet web server with the name "Norway"
<?xml version="1.0" encoding="utf-8"?>
<access-policy>
<cross-domain-access>
<policy>
<allow-from http-request-headers="*">
<domain uri="http://Norway"/>
</allow-from>
<grant-to>
<resource path="/" include-subpaths="true"/>
</grant-to>
</policy>
</cross-domain-access>
</access-policy>
This is an example of a CrossDomain.xml file that allows traffic from any website (on any web server) from Adobe or Silverlight to access resources on the website
<?xml version="1.0"?>
<!DOCTYPE cross-domain-policy SYSTEM "http://www.macromedia.com/xml/dtds/cross-domain-policy.dtd">
<cross-domain-policy>
<allow-http-request-headers-from domain="*" headers="*"/>
</cross-domain-policy>
Related Documents