Trade of Plumbing – Phase 2 Module 1 – Unit 9 Module 1: Thermal Process and Mild Steel Pipework Unit 9 – Oxy-acetylene Welding–Plant and Safety Duration – 6.5 Hours

Trade of Plumbing – Phase 2 Module 1 – Unit 9 Module 1: Thermal Process and Mild Steel Pipework Unit 9 – Oxy-acetylene Welding–Plant and Safety Duration.
Dec 14, 2015
Welcome message from author
This document is posted to help you gain knowledge. Please leave a comment to let me know what you think about it! Share it to your friends and learn new things together.
Transcript

Trade of Plumbing – Phase 2Module 1 – Unit 9
Module 1: Thermal Process and Mild Steel Pipework
Unit 9 – Oxy-acetylene Welding–Plant and SafetyDuration – 6.5 Hours

Trade of Plumbing – Phase 2Module 1 – Unit 9
In unit 9 we learn how to:
Describe the components and their function of oxy-acetylene welding plant.
Describe the hazards and safety features of oxy-acetylene welding plant.
Set up oxy-acetylene welding plant.
Describe the correct lighting up and shutting down procedure.
Trade of Plumbing – Phase 2Module 1 – Unit 9
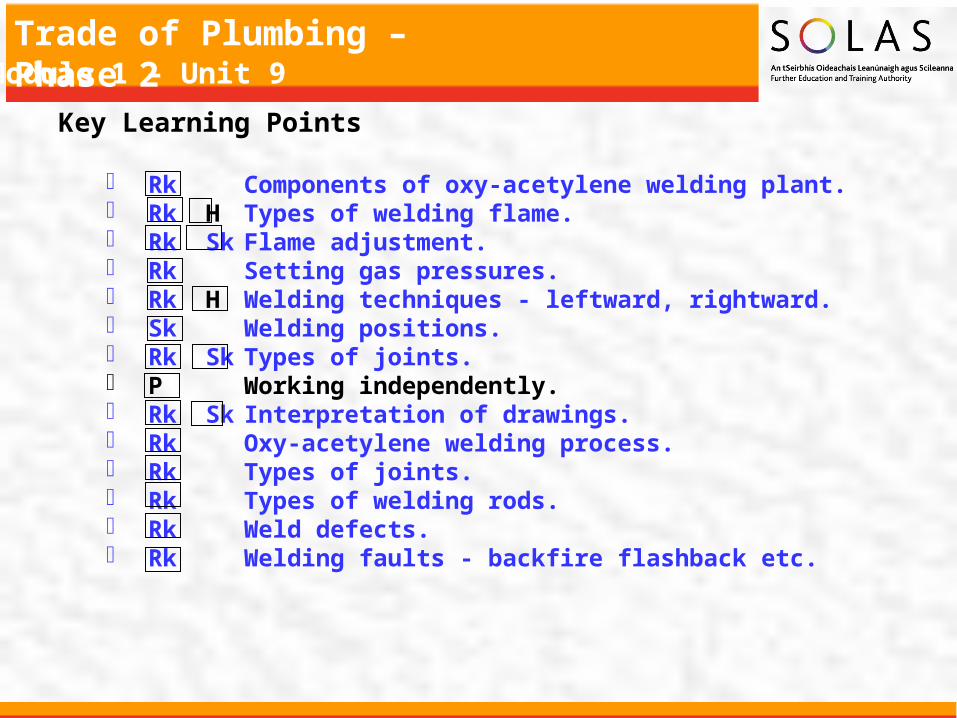
Key Learning Points
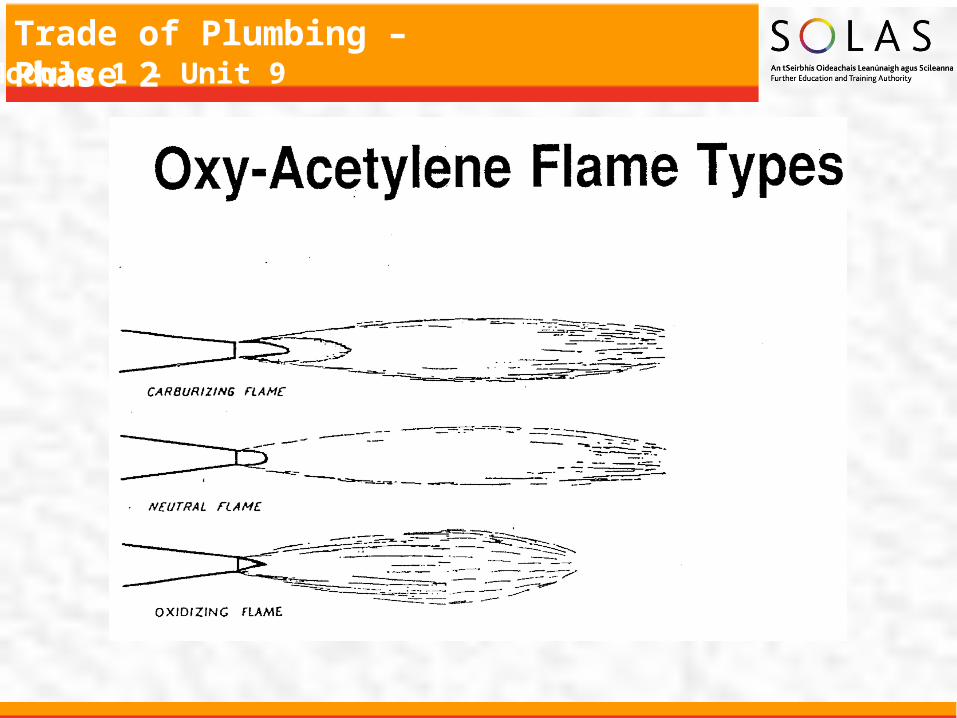
Rk Components of oxy-acetylene welding plant. Rk H Types of welding flame. Rk Sk Flame adjustment. Rk Setting gas pressures. Rk H Welding techniques - leftward, rightward. Sk Welding positions. Rk Sk Types of joints. P Working independently. Rk Sk Interpretation of drawings. Rk Oxy-acetylene welding process. Rk Types of joints. Rk Types of welding rods. Rk Weld defects. Rk Welding faults - backfire flashback etc.

Trade of Plumbing – Phase 2Module 1 – Unit 9
OxygenThe commercial method of producing oxygen is to abstract it from the atmosphere by a process of distillation. In brief, the air is compressed, causing it to liquefy. In this state the oxygen separates from the nitrogen and can be filtered off.
AcetyleneAcetylene is produced by the reaction of Calcium Carbide and Water. Calcium Carbide has the appearance of small grey stones. It belongs to the class of substances known as Hydrocarbons. Inside the cylinder is a Porous Mass – known as Kapok or Charcoal. Its purpose is to break up the internal volume of the cylinder into a number of small compartments.
AcetoneAcetone is a spirit with an affinity for Acetylene. Under normal atmospheric conditions Acetone will dissolve 25 times its own volume of Acetylene. Since the Acetylene cylinder is charged to 15 atmospheres the Acetone is capable of holding 375 times its own volume, i.e. 25 x 15 = 375.
Trade of Plumbing – Phase 2Module 1 – Unit 9

Trade of Plumbing – Phase 2Module 1 – Unit 9
Trade of Plumbing – Phase 2Module 1 – Unit 9
Flashback Arrestors These are fitted to the regulators on both the oxygen and acetylene cylinders. Purpose is to prevent flames getting back into the cylinders in the event of a backfire or similar accident.
Hoses These carry the gases from the regulators to the blowpipe. The oxygen hose is blue with right-hand threads on all connections. The acetylene hose is red with left-hand threads on all connectors.
Hose Check ValvesHose protectors, fitted between welding blowpipe and the hoses. They are marked “fit to blowpipe” or with a directional arrow.
The BlowpipeThis is a mixing device to supply approximately equal volumes of oxygen and acetylene to the nozzle. Fitted with regulating valves to vary the pressure of the gas as required.
Ancillary EquipmentA spindle or bottle key is used to open the valves on both cylinders. Spark lighters are used to ignite the gases.

Trade of Plumbing – Phase 2Module 1 – Unit 9

Trade of Plumbing – Phase 2Module 1 – Unit 9
Welding Safety
When welding:
Always wear protective clothing, i.e. flame retardant overalls. Always wear the correct eye goggles. Always have the spindle key in the acetylene cylinder valve. Always keep cylinders secured in an upright position. Always check for leaks with a soapy solution, NEVER with a naked
flame. Never carry out makeshift repairs on welding equipment. Never allow oil or grease to come in contact with oxygen equipment. Never weld an enclosed vessel, i.e. petrol / oil drums until they have
been thoroughly cleaned.
Trade of Plumbing – Phase 2Module 1 – Unit 9
Never work in an enclosed vessel on your own and always leave the cylinders outside. If working in an enclosure vessel, adequate ventilation should be provided and fire fighting equipment should be available.
In the event of a serious flashback or backfire plunge the blowpipe in a bucket of cold water, leaving the oxygen running to prevent water entering the blowpipe.
Should the hoses become damaged, turn off the supply of gas at the cylinder and inform your supervisor.
Don’t forget, this equipment, if misused or damaged can be dangerous. If in any doubt seek assistance and clarification from your supervisor.
Lighting Up. Never use a naked flame to check for leaks.

Trade of Plumbing – Phase 2Module 1 – Unit 9
Hose and Hose FittingsIt is always recommended to buy and use fitted hoses. Factory fitted hose offers the customer the additional advantage of a ‘gas system’ which has been assembled and tested on a closely monitored production line to BS 1389.
Flashback ArrestorsWhen resetting Oxygen Arrestors where the pressure is above 1.5 bar (22 psi) it is recommended that the supply is closed and the connecting nut between the arrestor and the regulator loosened to vent the locked up gas prior to resetting. This will avoid the need to apply excessive force which could strain the reset mechanism.
Trade of Plumbing – Phase 2Module 1 – Unit 9
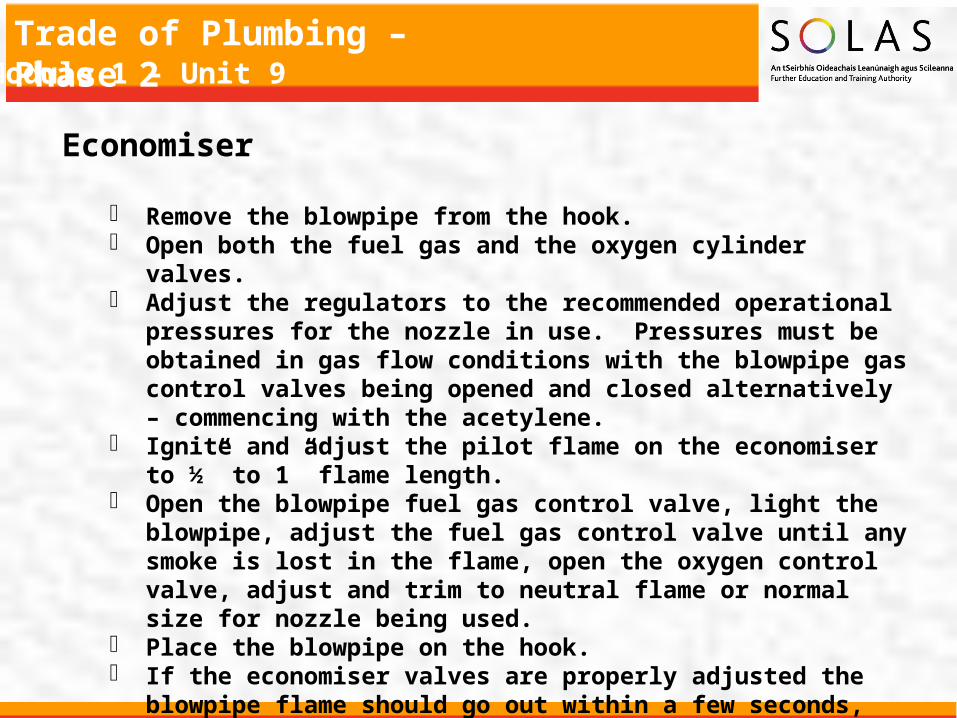
Economiser
Remove the blowpipe from the hook. Open both the fuel gas and the oxygen cylinder valves. Adjust the regulators to the recommended operational pressures
for the nozzle in use. Pressures must be obtained in gas flow conditions with the blowpipe gas control valves being opened and closed alternatively – commencing with the acetylene.
Ignite and adjust the pilot flame on the economiser to ½” to 1” flame length.
Open the blowpipe fuel gas control valve, light the blowpipe, adjust the fuel gas control valve until any smoke is lost in the flame, open the oxygen control valve, adjust and trim to neutral flame or normal size for nozzle being used.
Place the blowpipe on the hook. If the economiser valves are properly adjusted the blowpipe flame
should go out within a few seconds, with the fuel gas being shut off first.

Trade of Plumbing – Phase 2Module 1 – Unit 9
Acetylene Withdrawal Rates
When consumption rates of acetylene exceed 1 cu. metre per hour (35 cu. ft. per hour) for 10 min or longer is essential to manifold two or more cylinders together.

Trade of Plumbing – Phase 2Module 1 – Unit 9
Operating Instructions for Gas Welding and Cutting Equipment

Trade of Plumbing – Phase 2Module 1 – Unit 9

Trade of Plumbing – Phase 2Module 1 – Unit 9
Gas Pressure Regulator Pressure regulators are precision manufactured instruments which, withcorrect use will provide reliable and trouble free service.
Before the regulator is fitted to the cylinder: Check that the cylinder valve outlet and the regulator inlets are free from oil,
grease and damage. Open the cylinder valve momentarily to eject any water or foreign matter
from the seating (except in the case of hydrogen). Ensure that the blast is not directed at persons or naked flames.
Connecting to the cylinder: Connect the regulator to the cylinder valve (left hand for acetylene and other
combustible gases, right hand for oxygen and other non-combustible gases), using the correct spanner and ensure a gas tight seal.
Do not use any form of jointing paste or tape between regulator and cylinder valve.
Check that the pressure adjusting screw of the regulator is fully released (turned fully anti-clockwise).

Trade of Plumbing – Phase 2Module 1 – Unit 9
Commencing Operation:
Connect the downstream equipment and open the cylinder valve slowly.
Check all joints for leaks using a 0.5% Teepol in water solution. To set pressure, screw the pressure adjusting knob clockwise
until the required outlet pressure registers on the outlet gauge. Purge the gas line before lighting the equipment.
Finish Operation:
When work has stopped, close the cylinder valve, vent gas from the system and unscrew the pressure adjusting knob.

Trade of Plumbing – Phase 2Module 1 – Unit 9
Safety Points to Observe
Do not use the regulator for the other than the gas specified. Do not use the regulator for pressures greater than the pressure
specified on the regulator. Do not change fittings between ports on regulators. Regulators are less likely to be damaged when the cylinders are
secured on a trolley. Inspect the regulator periodically for damage or signs of misuse and
the gauges for accuracy. Test the gauges using a 0.5% Teepol in water solution. Regulations exist governing the use of acetylene and users should
comply with Order in Council No. 30 and seek guidance if in doubt from HM Inspectorate of Explosives.
Hydrogen regulators should be Service Exchanged after five years service.
Trade of Plumbing – Phase 2Module 1 – Unit 9
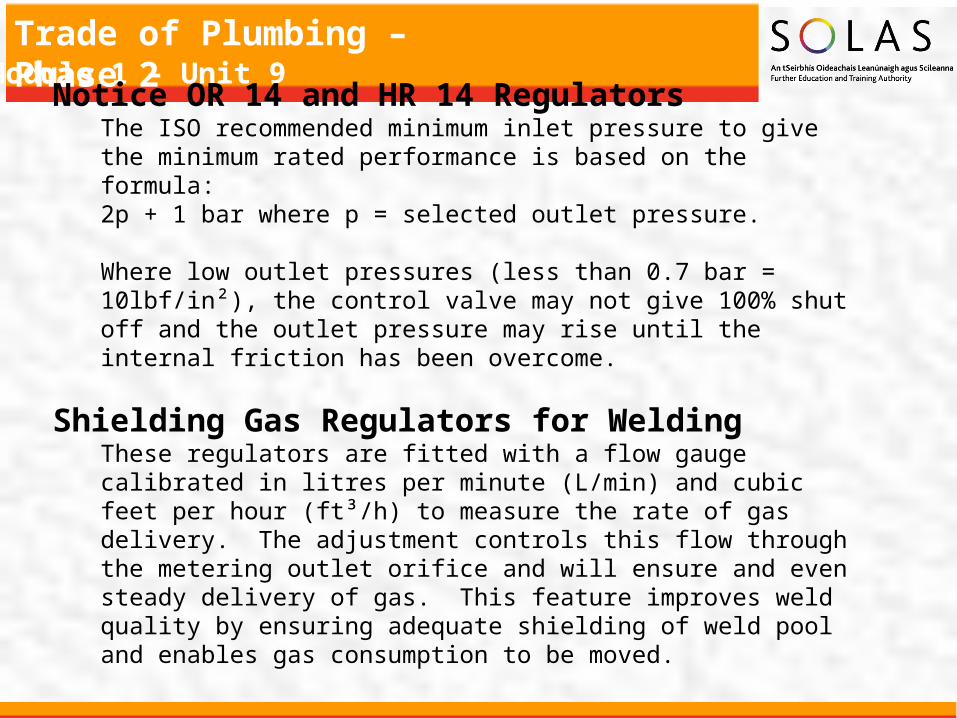
Notice OR 14 and HR 14 RegulatorsThe ISO recommended minimum inlet pressure to give the minimum rated performance is based on the formula:2p + 1 bar where p = selected outlet pressure.
Where low outlet pressures (less than 0.7 bar = 10lbf/in²), the control valve may not give 100% shut off and the outlet pressure may rise until the internal friction has been overcome.
Shielding Gas Regulators for WeldingThese regulators are fitted with a flow gauge calibrated in litres per minute (L/min) and cubic feet per hour (ft³/h) to measure the rate of gas delivery. The adjustment controls this flow through the metering outlet orifice and will ensure and even steady delivery of gas. This feature improves weld quality by ensuring adequate shielding of weld pool and enables gas consumption to be moved.
Trade of Plumbing – Phase 2Module 1 – Unit 9

Trade of Plumbing – Phase 2Module 1 – Unit 9
Heating Nozzles & Attachments: Oxy-Acetylene
Open the fuel gas valve on the blowpipe and light with a sparklighter. Increase flow of fuel gas until the flame ceases to smoke and leaves
the end of the nozzle by about 3mm (⅛ “) then gently reduce the flow until the flame is making contact with the nozzle again.
Open the oxygen valve; the flame colour will change from yellow to blue.
Slowly increase oxygen until feathering of cone at nozzle tip disappears.
Increase fuel gas until faint transparent bluish flicker or feathering appears at the end of the centre cone.
Increase oxygen again until this flicker all but disappears. Continue to adjust in this way until the size of the flame required for
the work in hand is reached.

Trade of Plumbing – Phase 2Module 1 – Unit 9
Heating Nozzles & Attachments: Oxy-Propane
Hold the nozzle at the angle to about 45° to a non-flammable surface.
Open the fuel gas valve on the blowpipe and light the nozzle with a sparklighter.
Increase the propane until flame ceases to smoke. Progressively increase oxygen and then propane until required size of flame is obtained.
Continue to increase oxygen flow. The length of the inner cone decreases as the oxygen flow increases. Slowly increase the oxygen until it is no longer possible to decrease the size of these cones, which should now be bluish in colour. The flame should have a distinctive roaring sound.
Note 1: When using a nozzle mix cutter for super heating, an adapter is required between the nozzle and the cutter head. Note 2: Never starve heating nozzles or attachments.

Trade of Plumbing – Phase 2Module 1 – Unit 9
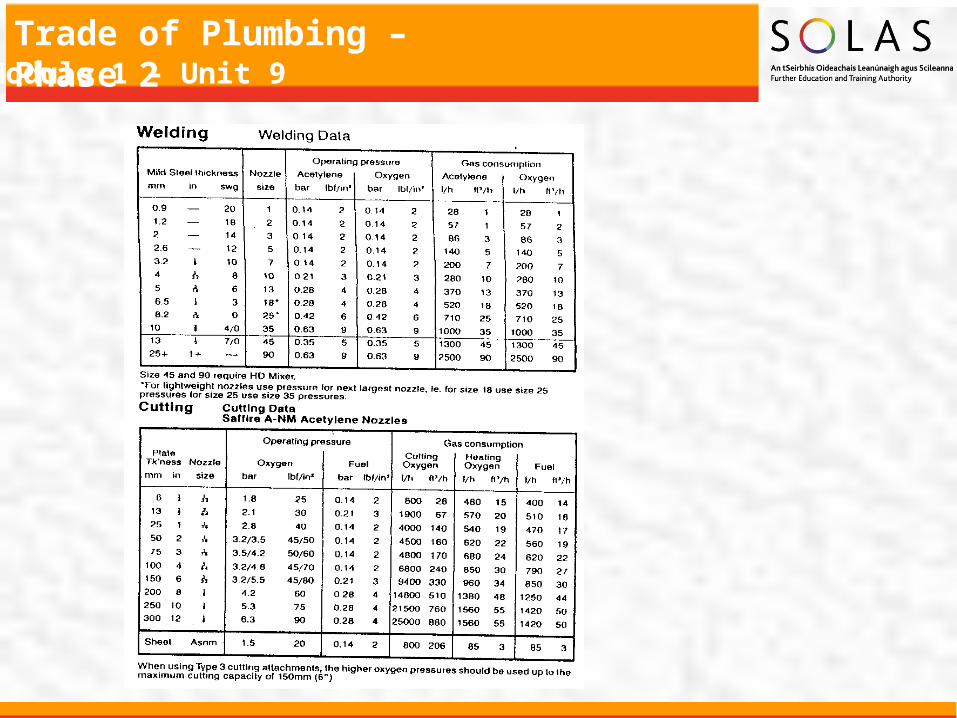
Data TablesWorking conditions, length and diameter of hose, provision of non return valves and flashback arrestors and their fitness for use, will all have an effect on the pressure and flows obtainable at the nozzle. A stable flame of the type required for the job in hand is the true proof that the correct conditions have been met.

Trade of Plumbing – Phase 2Module 1 – Unit 9
Combined Welding and Cutting Blowpipes
(Apart from Saffire Lite)
Examine the blowpipe for signs of damage. Connect the hoses to the blowpipe inlets and tighten gas with the
correct spanner. Check that the hose check valves are indicating flow in the correct direction.
Select the correct nozzle for the work in hand, using the information on the data chart. Then tighten the nozzle by hand into the mixer if welding, or by using the correct spanner into the head if cutting.
With the blowpipe valves closed set the pressures required on the regulator gauges, again using the information given on the data chart.
Purge each hose, alternately by opening the gas valves and allowing gas to flow from the nozzle, thereby allowing mixed gas/air to be expelled. Close the valves.
Trade of Plumbing – Phase 2Module 1 – Unit 9
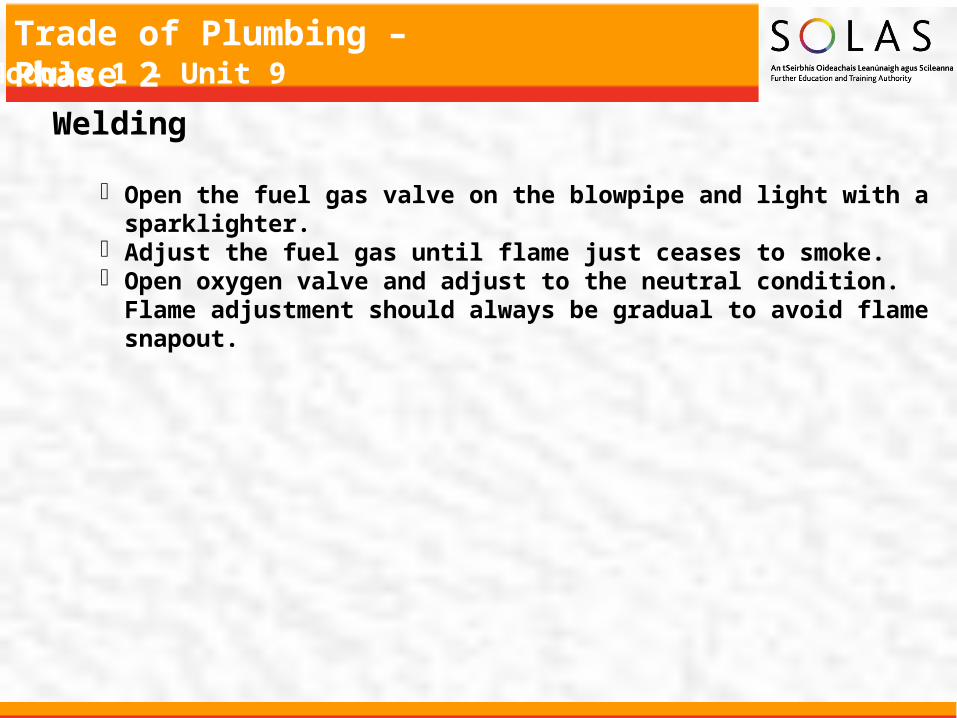
Welding
Open the fuel gas valve on the blowpipe and light with a sparklighter. Adjust the fuel gas until flame just ceases to smoke. Open oxygen valve and adjust to the neutral condition. Flame
adjustment should always be gradual to avoid flame snapout.

Trade of Plumbing – Phase 2Module 1 – Unit 9
Cutting Open the oxygen valve on the shank as far as it will go – i.e. in an
anti-clockwise direction. This valve must be left in this position while cutting.
Purge the shank by opening the fuel gas valve on the shank and the heating oxygen valve on the cutting attachment one at a time for a few seconds. Close one valve before opening the other.
Open the fuel gas valve on the shank and light the fuel gas with a sparklighter. Adjust fuel gas until flame just ceases to smoke. Shut off the gas supply at the cylinder.
Open blowpipe valves to remove residual gas from the system. Relax the pressure adjusting screw on the regulator and close the blowpipe valves.
Important: In the event of a backfire close the oxygen valve first followed by
the fuel gas valve. In the event of a gas leak, check the conditions of the
interconnecting ‘O’ rings. Replace if damaged.

Trade of Plumbing – Phase 2Module 1 – Unit 9
Changing from Cutting to Welding
When changing from cutting to welding ensure that the oxygen valve on the shank is closed and vent oxygen by depressing the cutting oxygen lever.
Changing from Welding to Cutting
In the changing from welding to cutting, remove mixer and swaged nozzle from shank and fit cutting attachment by pressing firmly to shank until serrations engage. It is essential that pressure be applied to seat the attachment onto the serrations as the nut will not pull them together.
Trade of Plumbing – Phase 2Module 1 – Unit 9
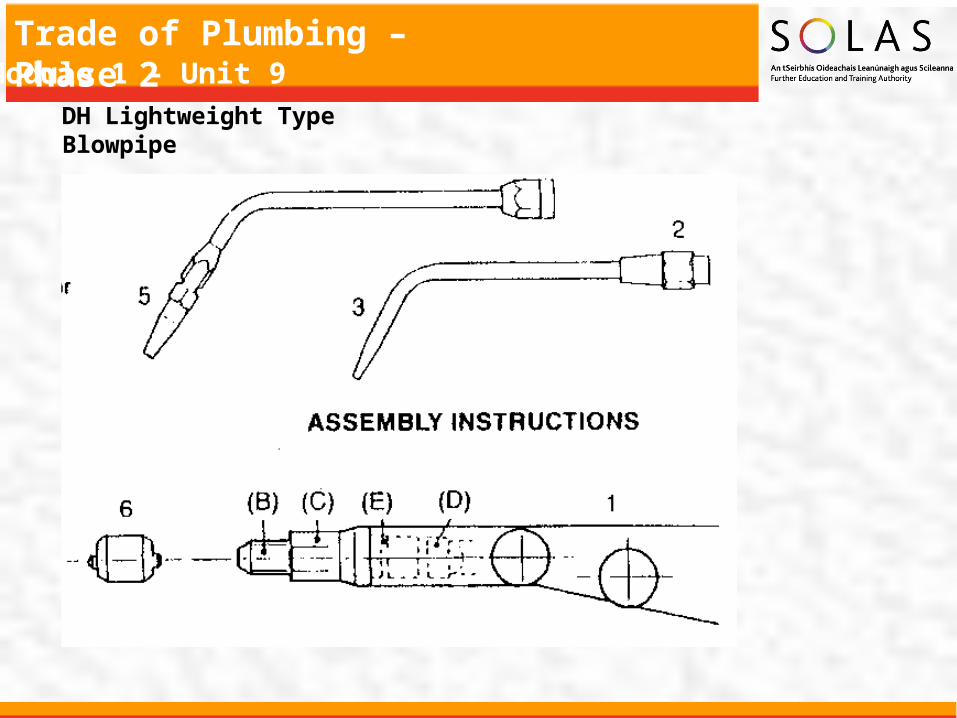
DH Lightweight Type Blowpipe
Trade of Plumbing – Phase 2Module 1 – Unit 9
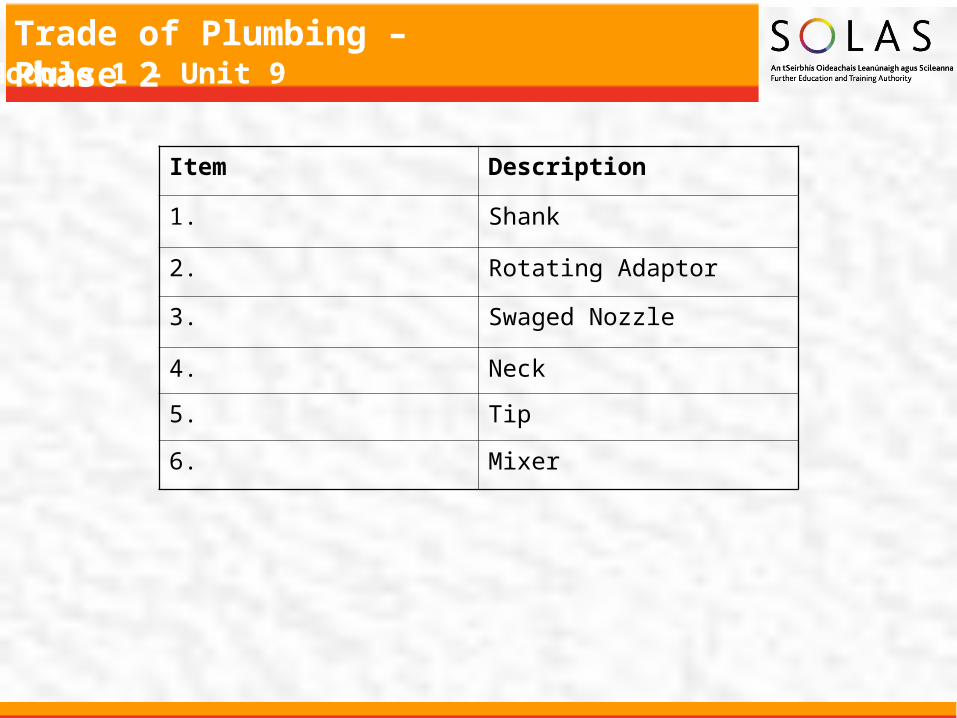
Item Description
1. Shank
2. Rotating Adaptor
3. Swaged Nozzle
4. Neck
5. Tip
6. Mixer

Trade of Plumbing – Phase 2Module 1 – Unit 9
When Using DH Neck and DH Nozzles:
1. Screw DH nut to connection (B), locate neck in required welding position and tighten with spanner.
2. Screw DH Nozzle to neck and tighten.
Note: DH neck should be left attached to shank when changing Nozzles.
When Using Swaged Welding Nozzles with Rotating Adaptor:
1. Screw adaptor into shank hand tight then tighten adaptor just enough to prevent insert from rotating.
2. Screw in Nozzle firmly then loosen adaptor.3. Position swaged Nozzle to required angle and tighten adaptor nut firmly.
Trade of Plumbing – Phase 2Module 1 – Unit 9
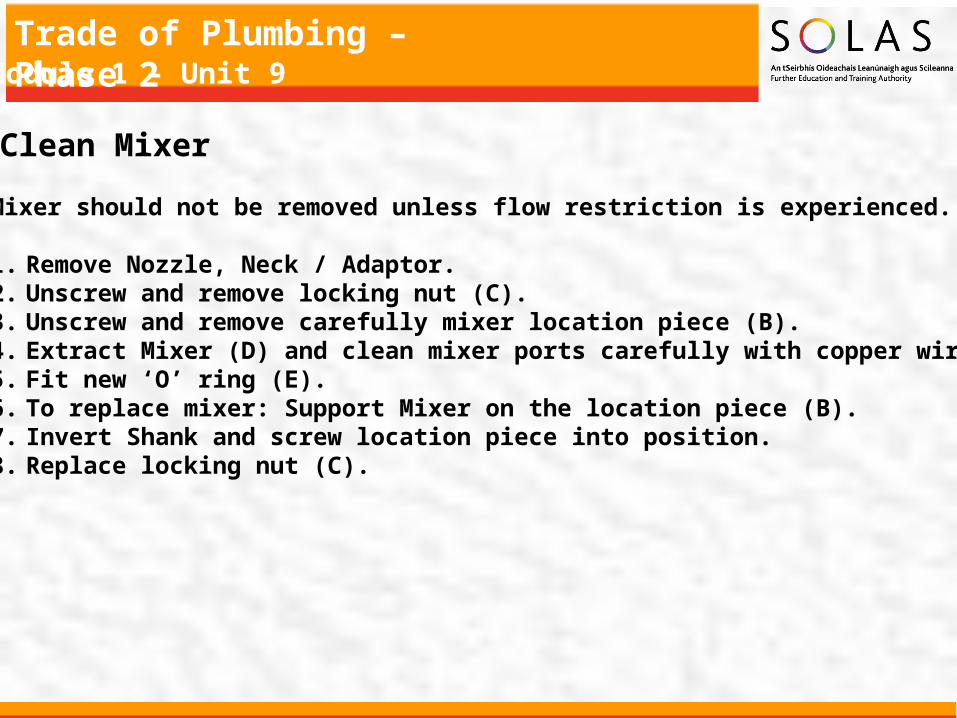
To Clean Mixer
Mixer should not be removed unless flow restriction is experienced.
1. Remove Nozzle, Neck / Adaptor.2. Unscrew and remove locking nut (C).3. Unscrew and remove carefully mixer location piece (B).4. Extract Mixer (D) and clean mixer ports carefully with copper wire. 5. Fit new ‘O’ ring (E).6. To replace mixer: Support Mixer on the location piece (B).7. Invert Shank and screw location piece into position.8. Replace locking nut (C).
Trade of Plumbing – Phase 2Module 1 – Unit 9
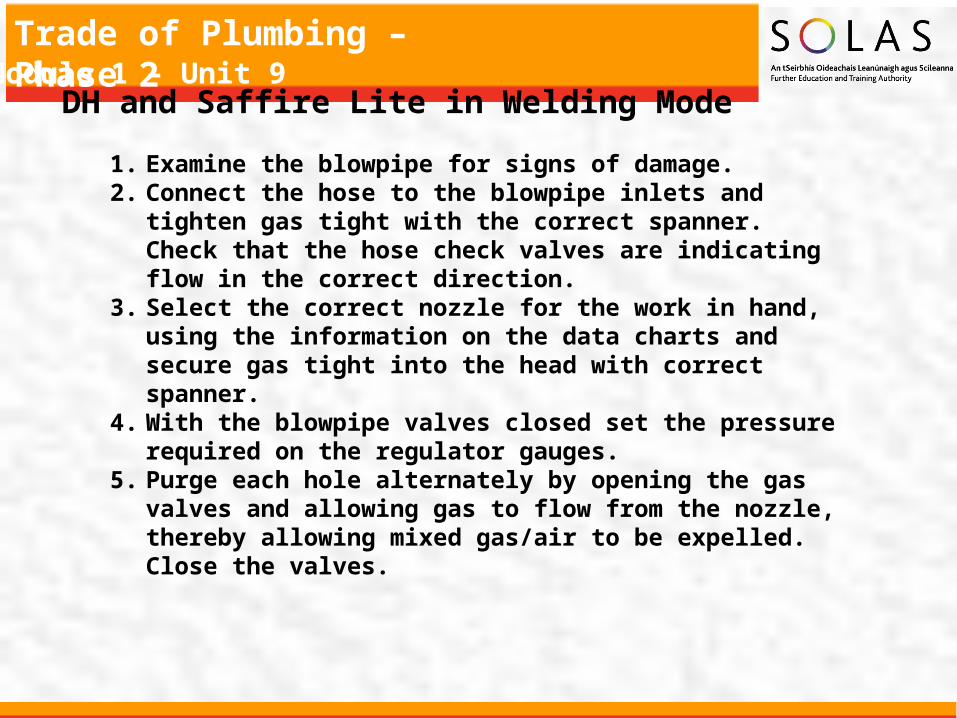
DH and Saffire Lite in Welding Mode
1. Examine the blowpipe for signs of damage.2. Connect the hose to the blowpipe inlets and tighten gas
tight with the correct spanner. Check that the hose check valves are indicating flow in the correct direction.
3. Select the correct nozzle for the work in hand, using the information on the data charts and secure gas tight into the head with correct spanner.
4. With the blowpipe valves closed set the pressure required on the regulator gauges.
5. Purge each hole alternately by opening the gas valves and allowing gas to flow from the nozzle, thereby allowing mixed gas/air to be expelled. Close the valves.

Trade of Plumbing – Phase 2Module 1 – Unit 9
6. Open fuel gas valve on blowpipe and light the fuel gas with a sparklighter. Adjust fu gas until flame just ceases to smoke. Open oxygen valve and adjust to the neutral condition. Flame adjustments should always be gradual to avoid flame snapout.
7. When the operation is completed the blowpipe should be extinguished by first closing the fuel gas valve followed by closing the oxygen valve. Shut the gas supply at the cylinder. Open blowpipe valves to remove residual gas from the system. Relax the pressure adjusting screw on the regulator and close the blowpipe valves.
ImportantIn the event of flashback close the oxygen valve first, by the fuel gas valve.

Trade of Plumbing – Phase 2Module 1 – Unit 9
Hand Held Cutters and Saffire Lite in Cutting Mode
1. Examine the blowpipe for signs of damage.2. Connect the hoses to the blowpipe inlets and tighten gas
tight with the correct spanner. Check that the flow direction arrows – located on the hose check valves – are indicating flow in the direct direction.
3. Select the correct nozzle for the work in hand using the information on the data charts and secure gas tight into the head with the correct spanner.
4. With the blowpipe valves closed set the pressure required on the regulator gauges.
5. Purge each hose alternately by opening the gas valves and allowing the gas to flow from the nozzle thereby allowing mixed gas/air to be expelled. Close the valves.

Trade of Plumbing – Phase 2Module 1 – Unit 9
6. Open fuel gas valve on blowpipe and light the fuel gas with a sparklighter. Adjust fuel gas until flame just ceases to smoke. Open oxygen valve and adjust to the neutral condition. Flame adjustment should always be gradual to avoid flame snapout.
7. When an operation is completed the blowpipe should be extinguished by first closing the fuel gas valve followed by closing the oxygen valve. Shut the gas supply at the cylinder. Open blowpipe valves to remove residual gas from the system. Relax the pressure adjusting screw on the regulator and close the blowpipe valves.
ImportantIn the event of flashback close the oxygen valve first, followed by the fuel gas valve.

Trade of Plumbing – Phase 2Module 1 – Unit 9
Related Documents


![[ ADGAS_Co Module_04 ] Pipework](https://static.cupdf.com/doc/110x72/543fef1cb1af9f560a8b4ad0/-adgasco-module04-pipework.jpg)