© AME Publishing Company . All rights reserved. Ann Cardiothorac Sur g 2012;1(1):88-9 9 www. annalscts.com T h or ac os c op i c l o be c t om y b e g a n 20 ye ar s a g o as a natural extension from performing less complex VATS operations. During this evolution, the traditional open lobectomy steps have been modified in some centers to accommodate the limitations in available technology, most notably resulting from the constraints in exposure, van tag e poi nt, and ret rac tio n. As an exa mpl e, one suc h modication is to divide the interlobar ssure rather than the bronchus last. Th es e mo di fi ed te ch ni qu es ar e qu it e powe rf ul bu t require training to become accustomed to the different vi ew s of th e hi la r st ru ct ur es . Th es e va ri at io ns in th e standard thoracotomy approach often reflect individual practices and don’t always build on aggregated surgeons’ experiences, and also may be difficult to use when faced with compl ex and abe rrant ana tomy. Given the rising popularity of less invasive surgery, technology has been developed to emulate or even surpass the exposure and retraction options used in traditional open techniques. Specifically, high- definition thoracoscopic cameras with deflectable optics provide excellent exposures. Angled, low profile (5 mm shaft) retractors and other instruments can be used simultaneously through single small incisions to set up the traction and counter-traction forces that uniformly enable safe dissection techniques. This set of vide os demon strat es meth ods that vie wers can use to translate their open operative experiences to a successful minimally invasive practice. Even if the view er has adopted a diffe rent prefe rred approa ch, many of the demonstrated techniques (like opening incomplete fissures) will come in handy in the presence of bulky tumors or aberrant vascular anatomy. Table 1 lists the videos and some of the specific maneuvers of interest. The appendix provides a timed narrative to help locate specific points in the procedure. T he vi e we r is en co ur ag ed t o v ie w al l th e vi de os as some basic elements are emphasized in only 1-2 of the compilations. Furthermore, it may be useful to view some portions of the videos repetitively concentrating first on the live action and then later on the side bar animation. The animat ion provide s importa nt information on which ports are used for the camera vantage point and or tool manipulations. Since the tools are constrained by the Masters of Cardiothoracic Surgery Video-atlas of thoracosc opic formal lung resections emulating traditional open techniques T odd L. Demmy Department of Thoracic Surgery Roswel l Park C ancer Institute, Elm and Carlton Streets, Buffalo, NY 14263, USA Corresponding to: Todd L. Demmy, MD, Chair. Department of Thoracic Surgery, Roswell Park Cancer Institute, Elm and Carlton Streets, Buffalo, NY 14263, USA. Tel: (716) 845-5873; Fax: (716) 845-7692. E-mail: [email protected]. Submitted Mar 10, 2012. Accepted for publication Apr 17, 2012. DOI: 10.3978/j.issn.2225-319X.2012.04.06 Scan to your mobile device or view video at: www .annalscts.com/article/view /483/579 Editor’s Key Points 1. VA TS lobectomy can be safely p erformed using the same patient positioning and sequence of steps as for open thoracotomy 2. Choose endoscopic instruments that you are familiar and co mfortable with 3. Adequate retraction and maximum exposure can be obtained by interchanging the placement of the thoracoscope and other instruments between the 2 ports and the additional access incision --K.D.

Welcome message from author
This document is posted to help you gain knowledge. Please leave a comment to let me know what you think about it! Share it to your friends and learn new things together.
Transcript

8/13/2019 Total Arch Replacement With Separated Graft Technique and Selective Antegrade Cerebral Perfusion
http://slidepdf.com/reader/full/total-arch-replacement-with-separated-graft-technique-and-selective-antegrade 1/12
© AME Publishing Company. All rights reserved. Ann Cardiothorac Surg 2012;1(1):88-99 www.annalscts.com
Thor acos cop ic lobe ctom y began 20 ye ar s ago as a
natural extension from performing less complex VATSoperations. During this evolution, the traditional open
lobectomy steps have been modified in some centers to
accommodate the limitations in available technology,
most notably resulting from the constraints in exposure,
vantage point, and retraction. As an example, one such
modication is to divide the interlobar ssure rather than
the bronchus last.
These modified techniques are quite powerful but
require training to become accustomed to the different
views of the hi lar structures . These variat ions in the
standard thoracotomy approach often reflect individual
practices and don’t always build on aggregated surgeons’experiences, and also may be difficult to use when faced
with complex and aberrant anatomy.
Given the rising popularity of less invasive surgery,
technology has been developed to emulate or even
surpass the exposure and retraction options used
in traditional open techniques. Specifically, high-
definition thoracoscopic cameras with deflectable optics
provide excellent exposures. Angled, low profile (5 mm
shaft) retractors and other instruments can be used
simultaneously through single small incisions to set up thetraction and counter-traction forces that uniformly enable
safe dissection techniques.
This set of videos demonstrates methods that viewers
can use to translate their open operative experiences
to a successful minimally invasive practice. Even if the
viewer has adopted a different preferred approach, many
of the demonstrated techniques (like opening incomplete
fissures) will come in handy in the presence of bulky
tumors or aberrant vascular anatomy.
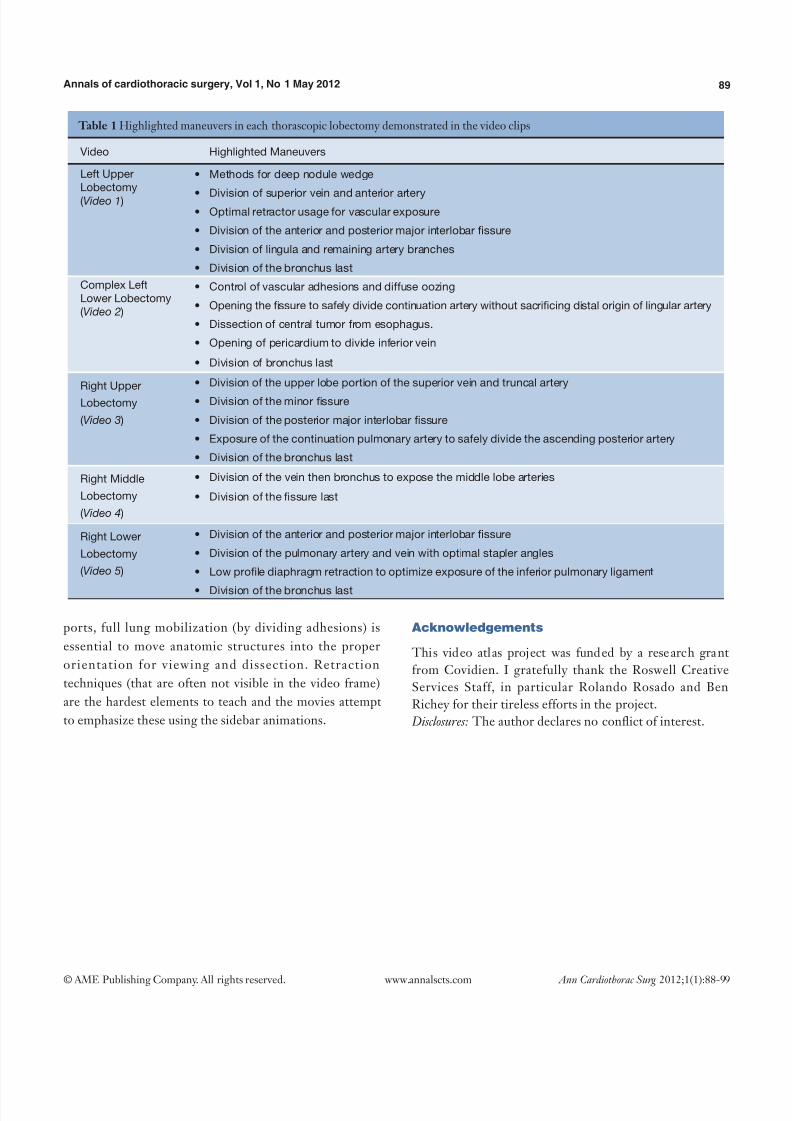
Table 1 lists the videos and some of the specific
maneuvers of interest. The appendix provides a timed
narrative to help locate specific points in the procedure. The vi ewe r is en co ur ag ed to vie w al l th e vi de os as
some basic elements are emphasized in only 1-2 of the
compilations. Furthermore, it may be useful to view some
portions of the videos repetitively concentrating first on
the live action and then later on the side bar animation.
The animation provides important information on which
ports are used for the camera vantage point and or tool
manipulations. Since the tools are constrained by the
Masters of Cardiothoracic Surgery
Video-atlas of thoracoscopic formal lung resections emulating
traditional open techniques
Todd L. Demmy
Department of Thoracic Surgery Roswell Park Cancer Institute, Elm and Carlton Streets, Buffalo, NY 14263, USA
Corresponding to: Todd L. Demmy, MD, Chair. Department of Thoracic Surgery, Roswell Park Cancer Institute, Elm and Carlton Streets, Buffalo,
NY 14263, USA. Tel: (716) 845-5873; Fax: (716) 845-7692. E-mail: [email protected].
Submitted Mar 10, 2012. Accepted for publication Apr 17, 2012.
DOI: 10.3978/j.issn.2225-319X.2012.04.06
Scan to your mobile device or view video at: www.annalscts.com/article/view/483/579
Editor’s Key Points
1. VATS lobectomy can be safely performed using the same patient positioning and sequence of steps as for
open thoracotomy
2. Choose endoscopic instruments that you are familiar and comfortable with
3. Adequate retraction and maximum exposure can be obtained by interchanging the placement of the
thoracoscope and other instruments between the 2 ports and the additional access incision
--K.D.
8/13/2019 Total Arch Replacement With Separated Graft Technique and Selective Antegrade Cerebral Perfusion
http://slidepdf.com/reader/full/total-arch-replacement-with-separated-graft-technique-and-selective-antegrade 2/12
89Annals of cardiothoracic surgery, Vol 1, No 1 May 2012
© AME Publishing Company. All rights reserved. Ann Cardiothorac Surg 2012;1(1):88-99 www.annalscts.com
ports, full lung mobilization (by dividing adhesions) is
essential to move anatomic structures into the proper
orientation for viewing and dissection. Retraction
techniques (that are often not visible in the video frame)
are the hardest elements to teach and the movies attempt
to emphasize these using the sidebar animations.
Acknowledgements
This video atlas project was funded by a research grant
from Covidien. I gratefully thank the Roswell Creative
Services Staff, in particular Rolando Rosado and Ben
Richey for their tireless efforts in the project.
Disclosures: The author declares no conict of interest.
Table 1 Highlighted maneuvers in each thorascopic lobectomy demonstrated in the video clips
Video Highlighted Maneuvers
Left Upper
Lobectomy
( Video 1 )
• Methods for deep nodule wedge
• Division of superior vein and anterior artery• Optimal retractor usage for vascular exposure
• Division of the anterior and posterior major interlobar fissure
• Division of lingula and remaining artery branches
• Division of the bronchus last
Complex Left
Lower Lobectomy
( Video 2 )
• Control of vascular adhesions and diffuse oozing
• Opening the fissure to safely divide continuation artery without sacrificing distal origin of lingular artery
• Dissection of central tumor from esophagus.
• Opening of pericardium to divide inferior vein
• Division of bronchus last
Right Upper
Lobectomy
( Video 3 )
• Division of the upper lobe portion of the superior vein and truncal artery
• Division of the minor fissure
• Division of the posterior major interlobar fissure
• Exposure of the continuation pulmonary artery to safely divide the ascending posterior artery
• Division of the bronchus last
Right Middle
Lobectomy
( Video 4 )
• Division of the vein then bronchus to expose the middle lobe arteries
• Division of the fissure last
Right Lower
Lobectomy
( Video 5 )
• Division of the anterior and posterior major interlobar fissure
• Division of the pulmonary artery and vein with optimal stapler angles
• Low profile diaphragm retraction to optimize exposure of the inferior pulmonary ligament
• Division of the bronchus last
8/13/2019 Total Arch Replacement With Separated Graft Technique and Selective Antegrade Cerebral Perfusion
http://slidepdf.com/reader/full/total-arch-replacement-with-separated-graft-technique-and-selective-antegrade 3/12
90 Demmy. Video-atlas of thoracoscopic formal lung resections
© AME Publishing Company. All rights reserved. Ann Cardiothorac Surg 2012;1(1):88-99 www.annalscts.com
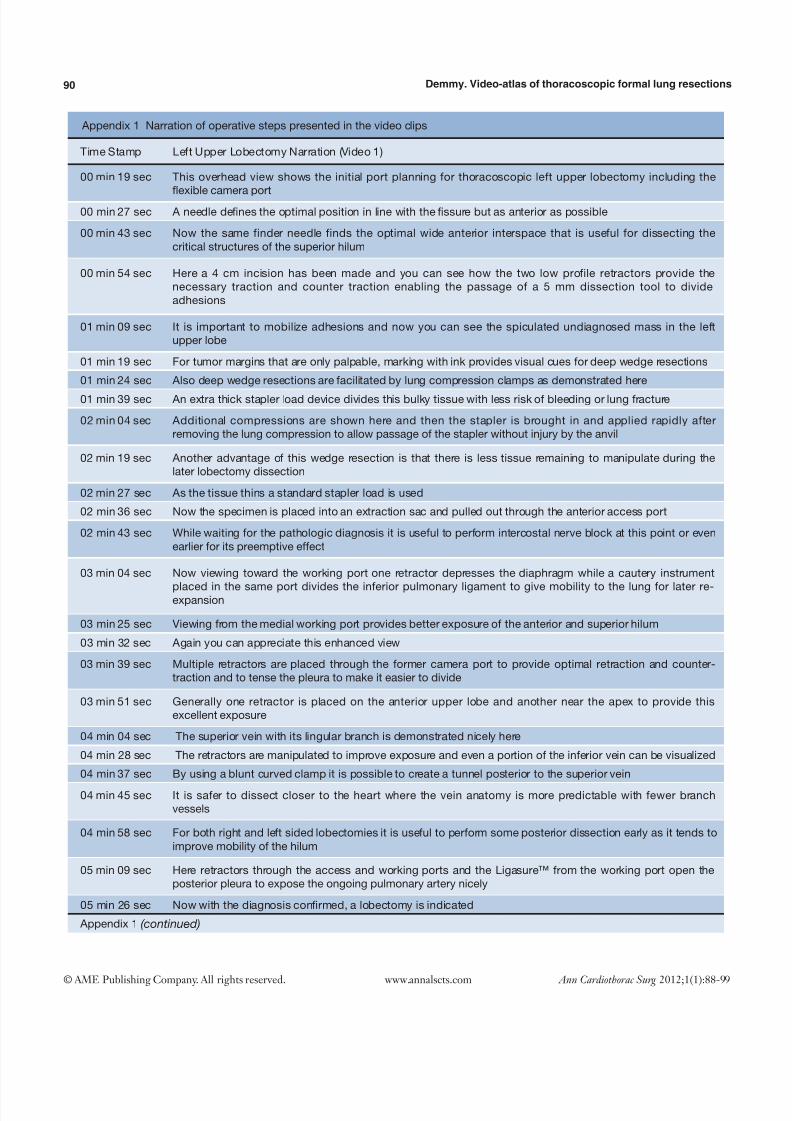
Appendix 1 Narration of operative steps presented in the video clips
Time Stamp Left Upper Lobectomy Narration (Video 1)
00 min 19 sec This overhead view shows the initial port planning for thoracoscopic left upper lobectomy including the
flexible camera port00 min 27 sec A needle defines the optimal position in line with the fissure but as anterior as possible
00 min 43 sec Now the same finder needle finds the optimal wide anterior interspace that is useful for dissecting the
critical structures of the superior hilum
00 min 54 sec Here a 4 cm incision has been made and you can see how the two low profile retractors provide the
necessary traction and counter traction enabling the passage of a 5 mm dissection tool to divide
adhesions
01 min 09 sec It is important to mobilize adhesions and now you can see the spiculated undiagnosed mass in the left
upper lobe
01 min 19 sec For tumor margins that are only palpable, marking with ink provides visual cues for deep wedge resections
01 min 24 sec Also deep wedge resections are facilitated by lung compression clamps as demonstrated here
01 min 39 sec An extra thick stapler load device divides this bulky tissue with less risk of bleeding or lung fracture
02 min 04 sec Additional compressions are shown here and then the stapler is brought in and applied rapidly after
removing the lung compression to allow passage of the stapler without injury by the anvil
02 min 19 sec Another advantage of this wedge resection is that there is less tissue remaining to manipulate during the
later lobectomy dissection
02 min 27 sec As the tissue thins a standard stapler load is used
02 min 36 sec Now the specimen is placed into an extraction sac and pulled out through the anterior access port
02 min 43 sec While waiting for the pathologic diagnosis it is useful to perform intercostal nerve block at this point or even
earlier for its preemptive effect
03 min 04 sec Now viewing toward the working port one retractor depresses the diaphragm while a cautery instrument
placed in the same port divides the inferior pulmonary ligament to give mobility to the lung for later re-expansion
03 min 25 sec Viewing from the medial working port provides better exposure of the anterior and superior hilum
03 min 32 sec Again you can appreciate this enhanced view
03 min 39 sec Multiple retractors are placed through the former camera port to provide optimal retraction and counter-
traction and to tense the pleura to make it easier to divide
03 min 51 sec Generally one retractor is placed on the anterior upper lobe and another near the apex to provide this
excellent exposure
04 min 04 sec The superior vein with its lingular branch is demonstrated nicely here
04 min 28 sec The retractors are manipulated to improve exposure and even a portion of the inferior vein can be visualized
04 min 37 sec By using a blunt curved clamp it is possible to create a tunnel posterior to the superior vein
04 min 45 sec It is safer to dissect closer to the heart where the vein anatomy is more predictable with fewer branch
vessels
04 min 58 sec For both right and left sided lobectomies it is useful to perform some posterior dissection early as it tends to
improve mobility of the hilum
05 min 09 sec Here retractors through the access and working ports and the Ligasure™ from the working port open the
posterior pleura to expose the ongoing pulmonary artery nicely
05 min 26 sec Now with the diagnosis confirmed, a lobectomy is indicated
Appendix 1 (continued)
8/13/2019 Total Arch Replacement With Separated Graft Technique and Selective Antegrade Cerebral Perfusion
http://slidepdf.com/reader/full/total-arch-replacement-with-separated-graft-technique-and-selective-antegrade 4/12
91Annals of cardiothoracic surgery, Vol 1, No 1 May 2012
© AME Publishing Company. All rights reserved. Ann Cardiothorac Surg 2012;1(1):88-99 www.annalscts.com
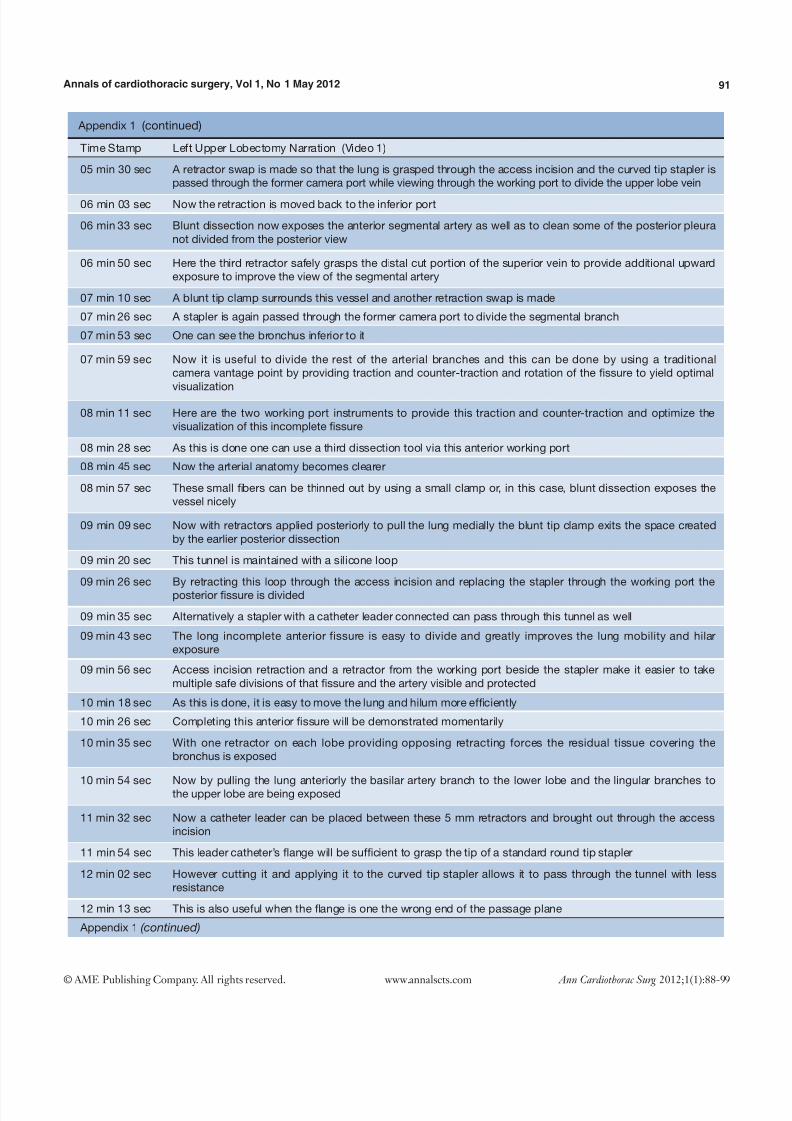
Appendix 1 (continued)
Time Stamp Left Upper Lobectomy Narration (Video 1)
05 min 30 sec A retractor swap is made so that the lung is grasped through the access incision and the curved tip stapler is
passed through the former camera port while viewing through the working port to divide the upper lobe vein
06 min 03 sec Now the retraction is moved back to the inferior port
06 min 33 sec Blunt dissection now exposes the anterior segmental artery as well as to clean some of the posterior pleura
not divided from the posterior view
06 min 50 sec Here the third retractor safely grasps the distal cut portion of the superior vein to provide additional upward
exposure to improve the view of the segmental artery
07 min 10 sec A blunt tip clamp surrounds this vessel and another retraction swap is made
07 min 26 sec A stapler is again passed through the former camera port to divide the segmental branch
07 min 53 sec One can see the bronchus inferior to it
07 min 59 sec Now it is useful to divide the rest of the arterial branches and this can be done by using a traditional
camera vantage point by providing traction and counter-traction and rotation of the fissure to yield optimal
visualization
08 min 11 sec Here are the two working port instruments to provide this traction and counter-traction and optimize the
visualization of this incomplete fissure
08 min 28 sec As this is done one can use a third dissection tool via this anterior working port
08 min 45 sec Now the arterial anatomy becomes clearer
08 min 57 sec These small fibers can be thinned out by using a small clamp or, in this case, blunt dissection exposes the
vessel nicely
09 min 09 sec Now with retractors applied posteriorly to pull the lung medially the blunt tip clamp exits the space created
by the earlier posterior dissection
09 min 20 sec This tunnel is maintained with a silicone loop
09 min 26 sec By retracting this loop through the access incision and replacing the stapler through the working port the
posterior fissure is divided
09 min 35 sec Alternatively a stapler with a catheter leader connected can pass through this tunnel as well
09 min 43 sec The long incomplete anterior fissure is easy to divide and greatly improves the lung mobility and hilar
exposure
09 min 56 sec Access incision retraction and a retractor from the working port beside the stapler make it easier to take
multiple safe divisions of that fissure and the artery visible and protected
10 min 18 sec As this is done, it is easy to move the lung and hilum more efficiently
10 min 26 sec Completing this anterior fissure will be demonstrated momentarily
10 min 35 sec With one retractor on each lobe providing opposing retracting forces the residual tissue covering the
bronchus is exposed
10 min 54 sec Now by pulling the lung anteriorly the basilar artery branch to the lower lobe and the lingular branches tothe upper lobe are being exposed
11 min 32 sec Now a catheter leader can be placed between these 5 mm retractors and brought out through the access
incision
11 min 54 sec This leader catheter’s flange will be sufficient to grasp the tip of a standard round tip stapler
12 min 02 sec However cutting it and applying it to the curved tip stapler allows it to pass through the tunnel with less
resistance
12 min 13 sec This is also useful when the flange is one the wrong end of the passage plane
Appendix 1 (continued)
8/13/2019 Total Arch Replacement With Separated Graft Technique and Selective Antegrade Cerebral Perfusion
http://slidepdf.com/reader/full/total-arch-replacement-with-separated-graft-technique-and-selective-antegrade 5/12
92 Demmy. Video-atlas of thoracoscopic formal lung resections
© AME Publishing Company. All rights reserved. Ann Cardiothorac Surg 2012;1(1):88-99 www.annalscts.com
Appendix 2
Time Stamp Complex Left Lower Lobectomy Narration (Video 2)
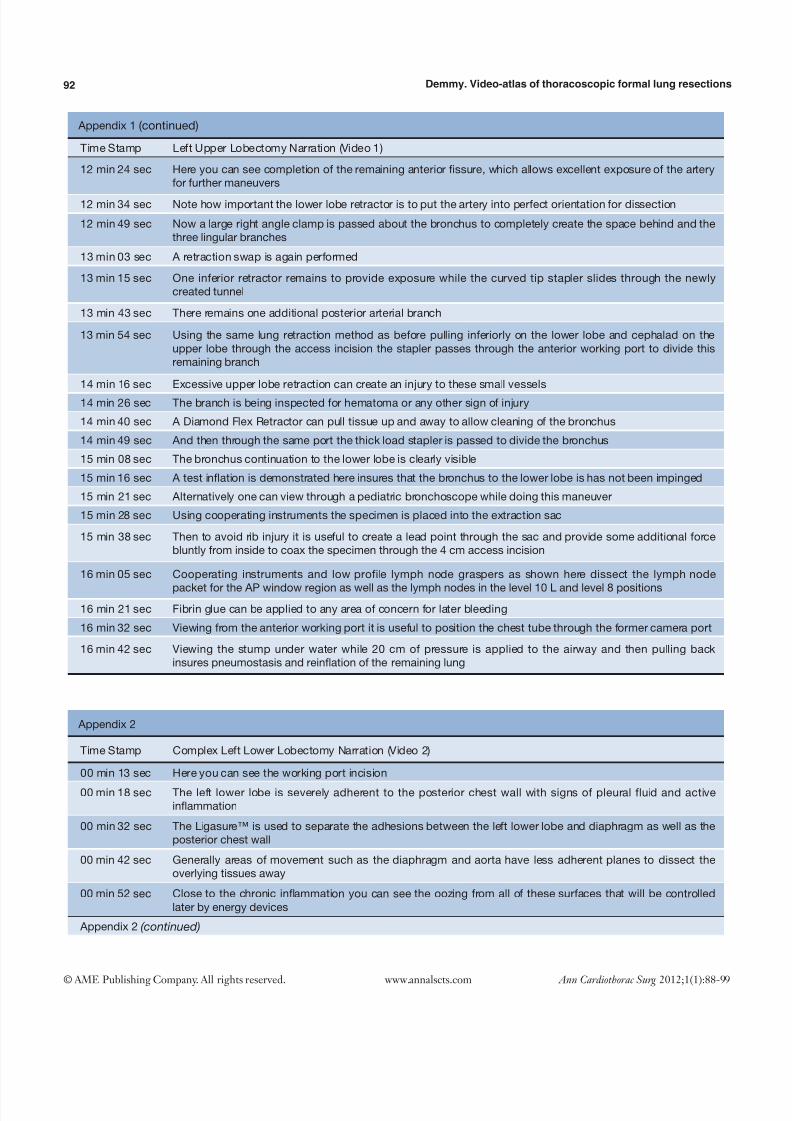
00 min 13 sec Here you can see the working port incision
00 min 18 sec The left lower lobe is severely adherent to the posterior chest wall with signs of pleural fluid and active
inflammation
00 min 32 sec The Ligasure™ is used to separate the adhesions between the left lower lobe and diaphragm as well as the
posterior chest wall
00 min 42 sec Generally areas of movement such as the diaphragm and aorta have less adherent planes to dissect the
overlying tissues away
00 min 52 sec Close to the chronic inflammation you can see the oozing from all of these surfaces that will be controlled
later by energy devices
Appendix 2 (continued)
Appendix 1 (continued)
Time Stamp Left Upper Lobectomy Narration (Video 1)
12 min 24 sec Here you can see completion of the remaining anterior fissure, which allows excellent exposure of the artery
for further maneuvers
12 min 34 sec Note how important the lower lobe retractor is to put the artery into perfect orientation for dissection
12 min 49 sec Now a large right angle clamp is passed about the bronchus to completely create the space behind and the
three lingular branches
13 min 03 sec A retraction swap is again performed
13 min 15 sec One inferior retractor remains to provide exposure while the curved tip stapler slides through the newly
created tunnel
13 min 43 sec There remains one additional posterior arterial branch
13 min 54 sec Using the same lung retraction method as before pulling inferiorly on the lower lobe and cephalad on the
upper lobe through the access incision the stapler passes through the anterior working port to divide this
remaining branch
14 min 16 sec Excessive upper lobe retraction can create an injury to these small vessels
14 min 26 sec The branch is being inspected for hematoma or any other sign of injury
14 min 40 sec A Diamond Flex Retractor can pull tissue up and away to allow cleaning of the bronchus
14 min 49 sec And then through the same port the thick load stapler is passed to divide the bronchus
15 min 08 sec The bronchus continuation to the lower lobe is clearly visible
15 min 16 sec A test inflation is demonstrated here insures that the bronchus to the lower lobe is has not been impinged
15 min 21 sec Alternatively one can view through a pediatric bronchoscope while doing this maneuver
15 min 28 sec Using cooperating instruments the specimen is placed into the extraction sac
15 min 38 sec Then to avoid rib injury it is useful to create a lead point through the sac and provide some additional force
bluntly from inside to coax the specimen through the 4 cm access incision
16 min 05 sec Cooperating instruments and low profile lymph node graspers as shown here dissect the lymph node
packet for the AP window region as well as the lymph nodes in the level 10 L and level 8 positions
16 min 21 sec Fibrin glue can be applied to any area of concern for later bleeding
16 min 32 sec Viewing from the anterior working port it is useful to position the chest tube through the former camera port
16 min 42 sec Viewing the stump under water while 20 cm of pressure is applied to the airway and then pulling back
insures pneumostasis and reinflation of the remaining lung
8/13/2019 Total Arch Replacement With Separated Graft Technique and Selective Antegrade Cerebral Perfusion
http://slidepdf.com/reader/full/total-arch-replacement-with-separated-graft-technique-and-selective-antegrade 6/12
93Annals of cardiothoracic surgery, Vol 1, No 1 May 2012
© AME Publishing Company. All rights reserved. Ann Cardiothorac Surg 2012;1(1):88-99 www.annalscts.com
Appendix 2 (continued)
Time Stamp Complex Left Lower Lobectomy Narration (Video 2)
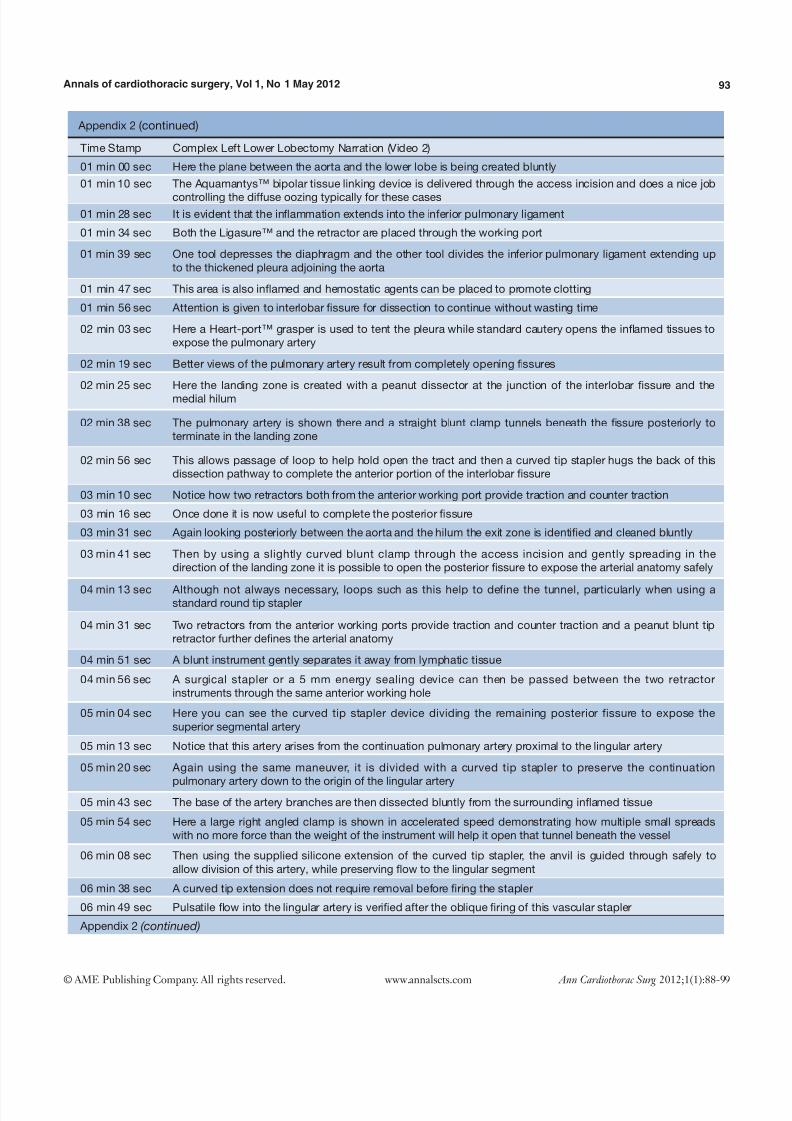
01 min 00 sec Here the plane between the aorta and the lower lobe is being created bluntly
01 min 10 sec The Aquamantys™ bipolar tissue linking device is delivered through the access incision and does a nice job
controlling the diffuse oozing typically for these cases01 min 28 sec It is evident that the inflammation extends into the inferior pulmonary ligament
01 min 34 sec Both the Ligasure™ and the retractor are placed through the working port
01 min 39 sec One tool depresses the diaphragm and the other tool divides the inferior pulmonary ligament extending up
to the thickened pleura adjoining the aorta
01 min 47 sec This area is also inflamed and hemostatic agents can be placed to promote clotting
01 min 56 sec Attention is given to interlobar fissure for dissection to continue without wasting time
02 min 03 sec Here a Heart-port™ grasper is used to tent the pleura while standard cautery opens the inflamed tissues to
expose the pulmonary artery
02 min 19 sec Better views of the pulmonary artery result from completely opening fissures
02 min 25 sec Here the landing zone is created with a peanut dissector at the junction of the interlobar fissure and the
medial hilum
02 min 38 sec The pulmonary artery is shown there and a straight blunt clamp tunnels beneath the fissure posteriorly to
terminate in the landing zone
02 min 56 sec This allows passage of loop to help hold open the tract and then a curved tip stapler hugs the back of this
dissection pathway to complete the anterior portion of the interlobar fissure
03 min 10 sec Notice how two retractors both from the anterior working port provide traction and counter traction
03 min 16 sec Once done it is now useful to complete the posterior fissure
03 min 31 sec Again looking posteriorly between the aorta and the hilum the exit zone is identified and cleaned bluntly
03 min 41 sec Then by using a slightly curved blunt clamp through the access incision and gently spreading in the
direction of the landing zone it is possible to open the posterior fissure to expose the arterial anatomy safely
04 min 13 sec Although not always necessary, loops such as this help to define the tunnel, particularly when using astandard round tip stapler
04 min 31 sec Two retractors from the anterior working ports provide traction and counter traction and a peanut blunt tip
retractor further defines the arterial anatomy
04 min 51 sec A blunt instrument gently separates it away from lymphatic tissue
04 min 56 sec A surgical stapler or a 5 mm energy sealing device can then be passed between the two retractor
instruments through the same anterior working hole
05 min 04 sec Here you can see the curved tip stapler device dividing the remaining posterior fissure to expose the
superior segmental artery
05 min 13 sec Notice that this artery arises from the continuation pulmonary artery proximal to the lingular artery
05 min 20 sec Again using the same maneuver, it is divided with a curved tip stapler to preserve the continuation
pulmonary artery down to the origin of the lingular artery05 min 43 sec The base of the artery branches are then dissected bluntly from the surrounding inflamed tissue
05 min 54 sec Here a large right angled clamp is shown in accelerated speed demonstrating how multiple small spreads
with no more force than the weight of the instrument will help it open that tunnel beneath the vessel
06 min 08 sec Then using the supplied silicone extension of the curved tip stapler, the anvil is guided through safely to
allow division of this artery, while preserving flow to the lingular segment
06 min 38 sec A curved tip extension does not require removal before firing the stapler
06 min 49 sec Pulsatile flow into the lingular artery is verified after the oblique firing of this vascular stapler
Appendix 2 (continued)
8/13/2019 Total Arch Replacement With Separated Graft Technique and Selective Antegrade Cerebral Perfusion
http://slidepdf.com/reader/full/total-arch-replacement-with-separated-graft-technique-and-selective-antegrade 7/12
94 Demmy. Video-atlas of thoracoscopic formal lung resections
© AME Publishing Company. All rights reserved. Ann Cardiothorac Surg 2012;1(1):88-99 www.annalscts.com
Appendix 2 (continued)
Time Stamp Complex Left Lower Lobectomy Narration (Video 2)
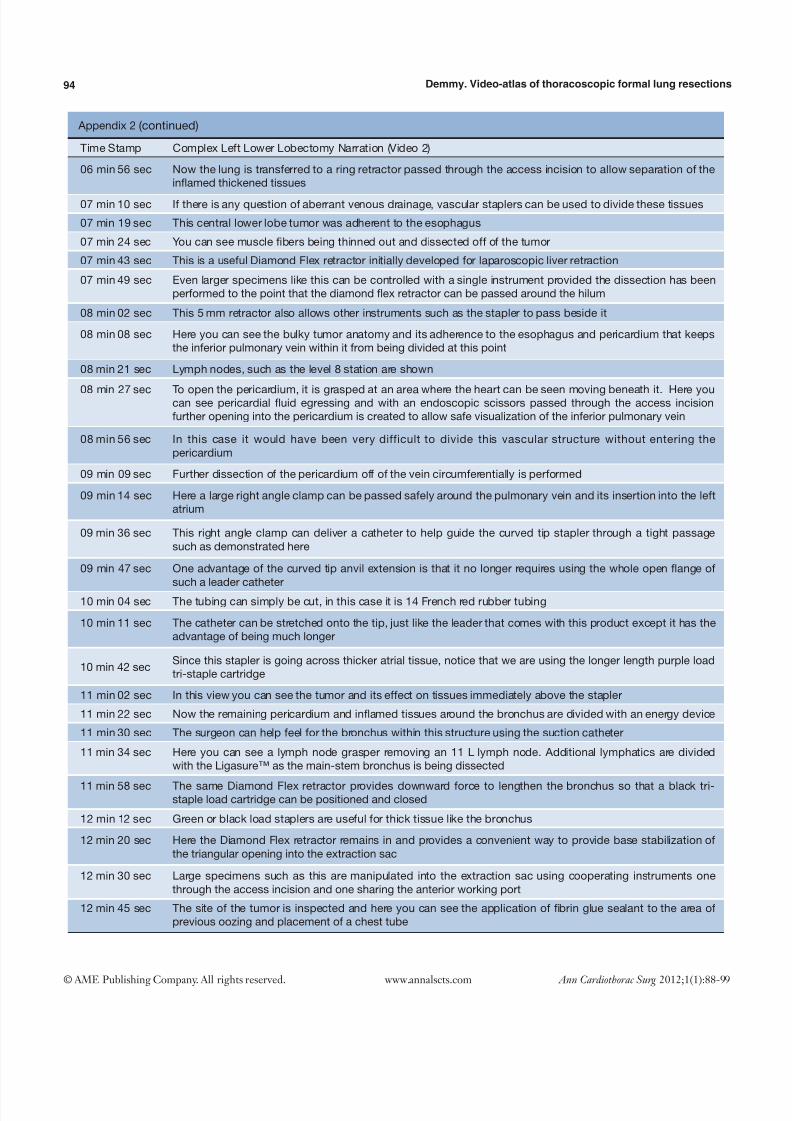
06 min 56 sec Now the lung is transferred to a ring retractor passed through the access incision to allow separation of the
inflamed thickened tissues
07 min 10 sec If there is any question of aberrant venous drainage, vascular staplers can be used to divide these tissues
07 min 19 sec This central lower lobe tumor was adherent to the esophagus
07 min 24 sec You can see muscle fibers being thinned out and dissected off of the tumor
07 min 43 sec This is a useful Diamond Flex retractor initially developed for laparoscopic liver retraction
07 min 49 sec Even larger specimens like this can be controlled with a single instrument provided the dissection has been
performed to the point that the diamond flex retractor can be passed around the hilum
08 min 02 sec This 5 mm retractor also allows other instruments such as the stapler to pass beside it
08 min 08 sec Here you can see the bulky tumor anatomy and its adherence to the esophagus and pericardium that keeps
the inferior pulmonary vein within it from being divided at this point
08 min 21 sec Lymph nodes, such as the level 8 station are shown
08 min 27 sec To open the pericardium, it is grasped at an area where the heart can be seen moving beneath it. Here youcan see pericardial fluid egressing and with an endoscopic scissors passed through the access incision
further opening into the pericardium is created to allow safe visualization of the inferior pulmonary vein
08 min 56 sec In this case it would have been very difficult to divide this vascular structure without entering the
pericardium
09 min 09 sec Further dissection of the pericardium off of the vein circumferentially is performed
09 min 14 sec Here a large right angle clamp can be passed safely around the pulmonary vein and its insertion into the left
atrium
09 min 36 sec This right angle clamp can deliver a catheter to help guide the curved tip stapler through a tight passage
such as demonstrated here
09 min 47 sec One advantage of the curved tip anvil extension is that it no longer requires using the whole open flange of
such a leader catheter
10 min 04 sec The tubing can simply be cut, in this case it is 14 French red rubber tubing
10 min 11 sec The catheter can be stretched onto the tip, just like the leader that comes with this product except it has the
advantage of being much longer
10 min 42 secSince this stapler is going across thicker atrial tissue, notice that we are using the longer length purple load
tri-staple cartridge
11 min 02 sec In this view you can see the tumor and its effect on tissues immediately above the stapler
11 min 22 sec Now the remaining pericardium and inflamed tissues around the bronchus are divided with an energy device
11 min 30 sec The surgeon can help feel for the bronchus within this structure using the suction catheter
11 min 34 sec Here you can see a lymph node grasper removing an 11 L lymph node. Additional lymphatics are divided
with the Ligasure™ as the main-stem bronchus is being dissected
11 min 58 sec The same Diamond Flex retractor provides downward force to lengthen the bronchus so that a black tri-staple load cartridge can be positioned and closed
12 min 12 sec Green or black load staplers are useful for thick tissue like the bronchus
12 min 20 sec Here the Diamond Flex retractor remains in and provides a convenient way to provide base stabilization of
the triangular opening into the extraction sac
12 min 30 sec Large specimens such as this are manipulated into the extraction sac using cooperating instruments one
through the access incision and one sharing the anterior working port
12 min 45 sec The site of the tumor is inspected and here you can see the application of fibrin glue sealant to the area of
previous oozing and placement of a chest tube
8/13/2019 Total Arch Replacement With Separated Graft Technique and Selective Antegrade Cerebral Perfusion
http://slidepdf.com/reader/full/total-arch-replacement-with-separated-graft-technique-and-selective-antegrade 8/12
95Annals of cardiothoracic surgery, Vol 1, No 1 May 2012
© AME Publishing Company. All rights reserved. Ann Cardiothorac Surg 2012;1(1):88-99 www.annalscts.com
Appendix 3
Time Stamp Right Upper Lobectomy Narration (Video 3)
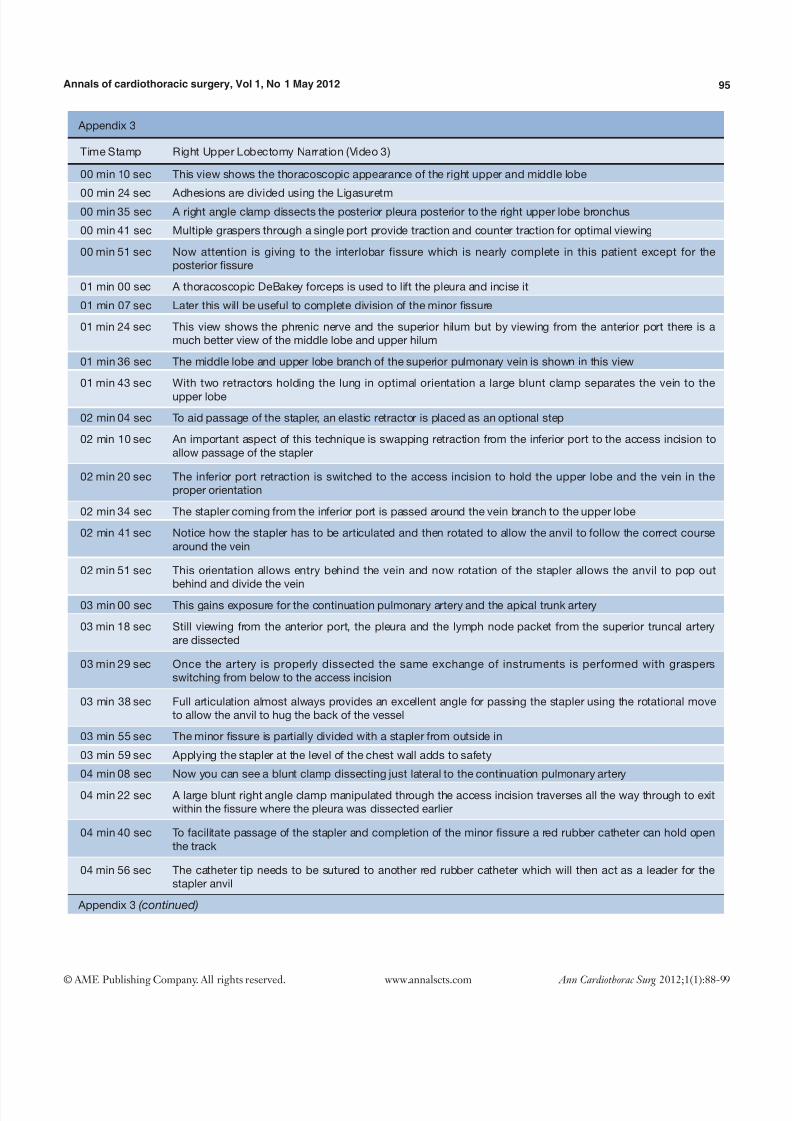
00 min 10 sec This view shows the thoracoscopic appearance of the right upper and middle lobe
00 min 24 sec Adhesions are divided using the Ligasuretm00 min 35 sec A right angle clamp dissects the posterior pleura posterior to the right upper lobe bronchus
00 min 41 sec Multiple graspers through a single port provide traction and counter traction for optimal viewing
00 min 51 sec Now attention is giving to the interlobar fissure which is nearly complete in this patient except for the
posterior fissure
01 min 00 sec A thoracoscopic DeBakey forceps is used to lift the pleura and incise it
01 min 07 sec Later this will be useful to complete division of the minor fissure
01 min 24 sec This view shows the phrenic nerve and the superior hilum but by viewing from the anterior port there is a
much better view of the middle lobe and upper hilum
01 min 36 sec The middle lobe and upper lobe branch of the superior pulmonary vein is shown in this view
01 min 43 sec With two retractors holding the lung in optimal orientation a large blunt clamp separates the vein to the
upper lobe
02 min 04 sec To aid passage of the stapler, an elastic retractor is placed as an optional step
02 min 10 sec An important aspect of this technique is swapping retraction from the inferior port to the access incision to
allow passage of the stapler
02 min 20 sec The inferior port retraction is switched to the access incision to hold the upper lobe and the vein in the
proper orientation
02 min 34 sec The stapler coming from the inferior port is passed around the vein branch to the upper lobe
02 min 41 sec Notice how the stapler has to be articulated and then rotated to allow the anvil to follow the correct course
around the vein
02 min 51 sec This orientation allows entry behind the vein and now rotation of the stapler allows the anvil to pop out
behind and divide the vein03 min 00 sec This gains exposure for the continuation pulmonary artery and the apical trunk artery
03 min 18 sec Still viewing from the anterior port, the pleura and the lymph node packet from the superior truncal artery
are dissected
03 min 29 sec Once the artery is properly dissected the same exchange of instruments is performed with graspers
switching from below to the access incision
03 min 38 sec Full articulation almost always provides an excellent angle for passing the stapler using the rotational move
to allow the anvil to hug the back of the vessel
03 min 55 sec The minor fissure is partially divided with a stapler from outside in
03 min 59 sec Applying the stapler at the level of the chest wall adds to safety
04 min 08 sec Now you can see a blunt clamp dissecting just lateral to the continuation pulmonary artery
04 min 22 sec A large blunt right angle clamp manipulated through the access incision traverses all the way through to exit
within the fissure where the pleura was dissected earlier
04 min 40 sec To facilitate passage of the stapler and completion of the minor fissure a red rubber catheter can hold open
the track
04 min 56 sec The catheter tip needs to be sutured to another red rubber catheter which will then act as a leader for the
stapler anvil
Appendix 3 (continued)
8/13/2019 Total Arch Replacement With Separated Graft Technique and Selective Antegrade Cerebral Perfusion
http://slidepdf.com/reader/full/total-arch-replacement-with-separated-graft-technique-and-selective-antegrade 9/12
96 Demmy. Video-atlas of thoracoscopic formal lung resections
© AME Publishing Company. All rights reserved. Ann Cardiothorac Surg 2012;1(1):88-99 www.annalscts.com
Appendix 3 (continued)
Time Stamp Right Upper Lobectomy Narration (Video 3)
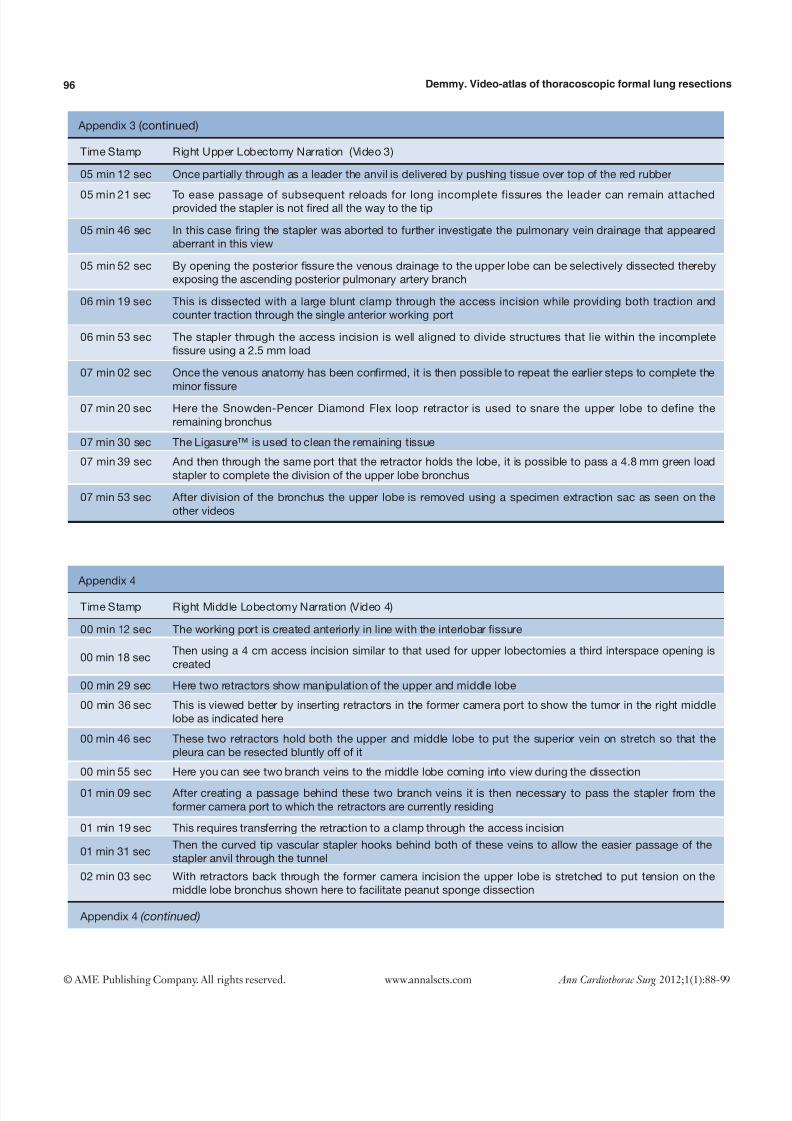
05 min 12 sec Once partially through as a leader the anvil is delivered by pushing tissue over top of the red rubber
05 min 21 sec To ease passage of subsequent reloads for long incomplete fissures the leader can remain attachedprovided the stapler is not fired all the way to the tip
05 min 46 sec In this case firing the stapler was aborted to further investigate the pulmonary vein drainage that appeared
aberrant in this view
05 min 52 sec By opening the posterior fissure the venous drainage to the upper lobe can be selectively dissected thereby
exposing the ascending posterior pulmonary artery branch
06 min 19 sec This is dissected with a large blunt clamp through the access incision while providing both traction and
counter traction through the single anterior working port
06 min 53 sec The stapler through the access incision is well aligned to divide structures that lie within the incomplete
fissure using a 2.5 mm load
07 min 02 sec Once the venous anatomy has been confirmed, it is then possible to repeat the earlier steps to complete the
minor fissure
07 min 20 sec Here the Snowden-Pencer Diamond Flex loop retractor is used to snare the upper lobe to define the
remaining bronchus
07 min 30 sec The Ligasure™ is used to clean the remaining tissue
07 min 39 sec And then through the same port that the retractor holds the lobe, it is possible to pass a 4.8 mm green load
stapler to complete the division of the upper lobe bronchus
07 min 53 sec After division of the bronchus the upper lobe is removed using a specimen extraction sac as seen on the
other videos
Appendix 4
Time Stamp Right Middle Lobectomy Narration (Video 4)
00 min 12 sec The working port is created anteriorly in line with the interlobar fissure
00 min 18 secThen using a 4 cm access incision similar to that used for upper lobectomies a third interspace opening is
created
00 min 29 sec Here two retractors show manipulation of the upper and middle lobe
00 min 36 sec This is viewed better by inserting retractors in the former camera port to show the tumor in the right middle
lobe as indicated here
00 min 46 sec These two retractors hold both the upper and middle lobe to put the superior vein on stretch so that the
pleura can be resected bluntly off of it
00 min 55 sec Here you can see two branch veins to the middle lobe coming into view during the dissection
01 min 09 sec After creating a passage behind these two branch veins it is then necessary to pass the stapler from the
former camera port to which the retractors are currently residing
01 min 19 sec This requires transferring the retraction to a clamp through the access incision
01 min 31 secThen the curved tip vascular stapler hooks behind both of these veins to allow the easier passage of the
stapler anvil through the tunnel
02 min 03 sec With retractors back through the former camera incision the upper lobe is stretched to put tension on the
middle lobe bronchus shown here to facilitate peanut sponge dissection
Appendix 4 (continued)

8/13/2019 Total Arch Replacement With Separated Graft Technique and Selective Antegrade Cerebral Perfusion
http://slidepdf.com/reader/full/total-arch-replacement-with-separated-graft-technique-and-selective-antegrade 10/12
97Annals of cardiothoracic surgery, Vol 1, No 1 May 2012
© AME Publishing Company. All rights reserved. Ann Cardiothorac Surg 2012;1(1):88-99 www.annalscts.com
Appendix 4 (continued)
Time Stamp Right Middle Lobectomy Narration (Video 4)
02 min 19 sec Cautery is used to complete part of the interlobar fissure by incising the pleura
02 min 27 sec Here a ring clamp extracts the lymph node next to the bronchus to improve the exposure02 min 38 sec As in this case, removing lymphatic tissues frequently improves visualization
02 min 56 sec Now with a clear view of the bronchus a large blunt clamp can be placed safely around it
03 min 05 sec Depending on the anatomy any of the working incisions can be used to pass the stapler
03 min 09 sec In this case, the access incision had adequate angle to divide the bronchus
03 min 27 sec This now improves exposure of the remaining vasculature the two branches of the middle lobe artery
03 min 33 sec Some of the incomplete fissure is divided to ease passage of the stapler
03 min 40 sec Again the retraction swap is being performed and you can see that the tunnel behind these branch arteries
is somewhat long and serpentine
03 min 54 sec A leader is useful to help guide the stapler through this passage
03 min 59 sec Alternatively each branch could be divided individually
04 min 09 sec The silicone leader is incorporated into the tip of the stapler thus being able to guide the stapler anvil
without needing to dilate the tunnel excessively
04 min 39 sec Putting the tissue on proper stretch allows passage of the stapler easily and then this enables division of the
two branch pulmonary arteries
05 min 00 sec While it would be possible to divide the minor fissure through this view, one can get a better view of the
anatomy back through the original camera port
05 min 13 sec Here one can see the interlobar boundary - the lobe is now positioned to facilitate dividing the fissure
05 min 22 sec Because this tumor extends toward the upper lobe additional lung can be taken in continuity with the
middle lobe to provide a better margin
05 min 32 sec The stapler is passed through the anterior working port
05 min 44 sec The lobe is viewed from this position then flipped over and viewed again from underneath being careful tokeep the residual bronchus above the stapler
05 min 57 sec Then an additional stapler fire completes the dissection
06 min 04 sec As usual a specimen extraction sac is inserted and then the specimen is placed into it and removed through
the access incision
06 min 13 sec An intercostal nerve block is performed for most of the interspaces
06 min 20 sec The right paratracheal space is inspected and dissected for the lymph nodes as well as the subcarinal
space as shown
06 min 28 sec Finally while viewing through the anterior working port the chest tube is inserted
06 min 32 sec Under water it is possible to pass the scope to view the bronchial stump while ventilating with 20 cm of
water pressure
8/13/2019 Total Arch Replacement With Separated Graft Technique and Selective Antegrade Cerebral Perfusion
http://slidepdf.com/reader/full/total-arch-replacement-with-separated-graft-technique-and-selective-antegrade 11/12
98 Demmy. Video-atlas of thoracoscopic formal lung resections
© AME Publishing Company. All rights reserved. Ann Cardiothorac Surg 2012;1(1):88-99 www.annalscts.com
Appendix 5
Time Stamp Right Lower Lobectomy Narration (Video 5)
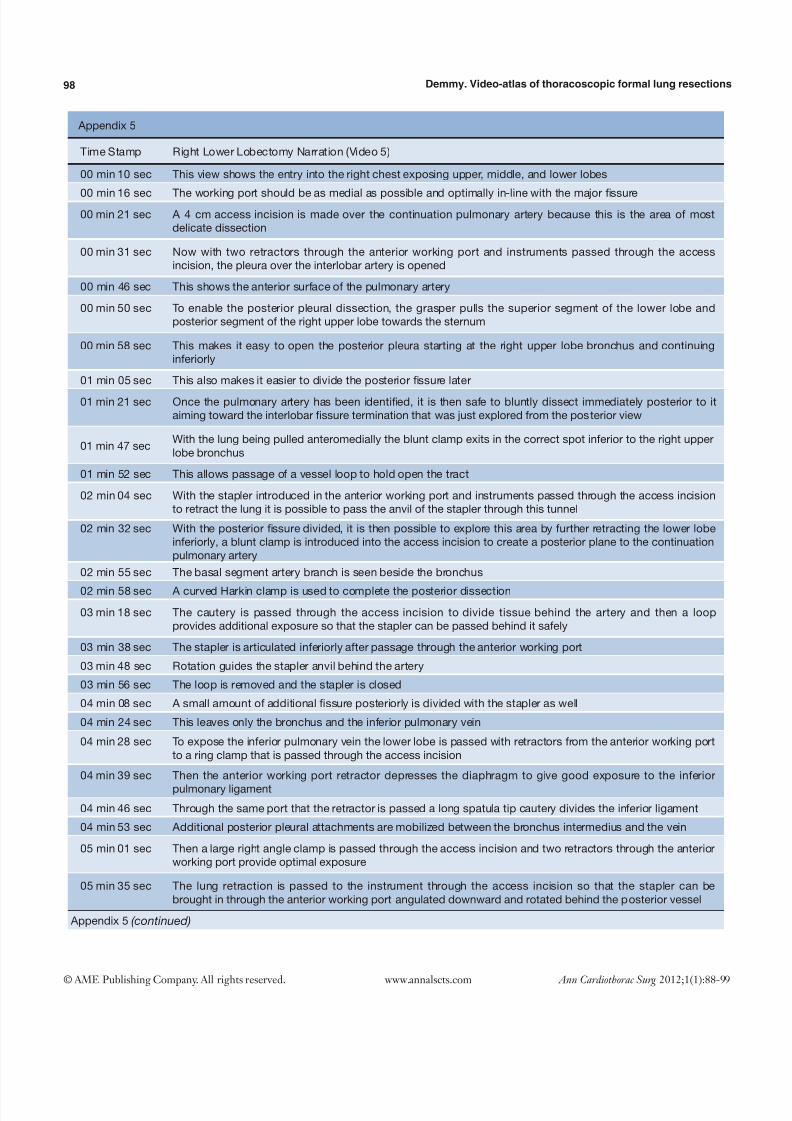
00 min 10 sec This view shows the entry into the right chest exposing upper, middle, and lower lobes
00 min 16 sec The working port should be as medial as possible and optimally in-line with the major fissure
00 min 21 sec A 4 cm access incision is made over the continuation pulmonary artery because this is the area of most
delicate dissection
00 min 31 sec Now with two retractors through the anterior working port and instruments passed through the access
incision, the pleura over the interlobar artery is opened
00 min 46 sec This shows the anterior surface of the pulmonary artery
00 min 50 sec To enable the posterior pleural dissection, the grasper pulls the superior segment of the lower lobe and
posterior segment of the right upper lobe towards the sternum
00 min 58 sec This makes it easy to open the posterior pleura starting at the right upper lobe bronchus and continuing
inferiorly
01 min 05 sec This also makes it easier to divide the posterior fissure later
01 min 21 sec Once the pulmonary artery has been identified, it is then safe to bluntly dissect immediately posterior to it
aiming toward the interlobar fissure termination that was just explored from the posterior view
01 min 47 secWith the lung being pulled anteromedially the blunt clamp exits in the correct spot inferior to the right upper
lobe bronchus
01 min 52 sec This allows passage of a vessel loop to hold open the tract
02 min 04 sec With the stapler introduced in the anterior working port and instruments passed through the access incision
to retract the lung it is possible to pass the anvil of the stapler through this tunnel
02 min 32 sec With the posterior fissure divided, it is then possible to explore this area by further retracting the lower lobe
inferiorly, a blunt clamp is introduced into the access incision to create a posterior plane to the continuation
pulmonary artery
02 min 55 sec The basal segment artery branch is seen beside the bronchus
02 min 58 sec A curved Harkin clamp is used to complete the posterior dissection
03 min 18 sec The cautery is passed through the access incision to divide tissue behind the artery and then a loop
provides additional exposure so that the stapler can be passed behind it safely
03 min 38 sec The stapler is articulated inferiorly after passage through the anterior working port
03 min 48 sec Rotation guides the stapler anvil behind the artery
03 min 56 sec The loop is removed and the stapler is closed
04 min 08 sec A small amount of additional fissure posteriorly is divided with the stapler as well
04 min 24 sec This leaves only the bronchus and the inferior pulmonary vein
04 min 28 sec To expose the inferior pulmonary vein the lower lobe is passed with retractors from the anterior working port
to a ring clamp that is passed through the access incision
04 min 39 sec Then the anterior working port retractor depresses the diaphragm to give good exposure to the inferior
pulmonary ligament
04 min 46 sec Through the same port that the retractor is passed a long spatula tip cautery divides the inferior ligament
04 min 53 sec Additional posterior pleural attachments are mobilized between the bronchus intermedius and the vein
05 min 01 sec Then a large right angle clamp is passed through the access incision and two retractors through the anterior
working port provide optimal exposure
05 min 35 sec The lung retraction is passed to the instrument through the access incision so that the stapler can be
brought in through the anterior working port angulated downward and rotated behind the posterior vessel
Appendix 5 (continued)
8/13/2019 Total Arch Replacement With Separated Graft Technique and Selective Antegrade Cerebral Perfusion
http://slidepdf.com/reader/full/total-arch-replacement-with-separated-graft-technique-and-selective-antegrade 12/12
99Annals of cardiothoracic surgery, Vol 1, No 1 May 2012
© AME Publishing Company. All rights reserved. Ann Cardiothorac Surg 2012;1(1):88-99 www.annalscts.com
Appendix 5 (continued)
Time Stamp Right Lower Lobectomy Narration (Video 5)
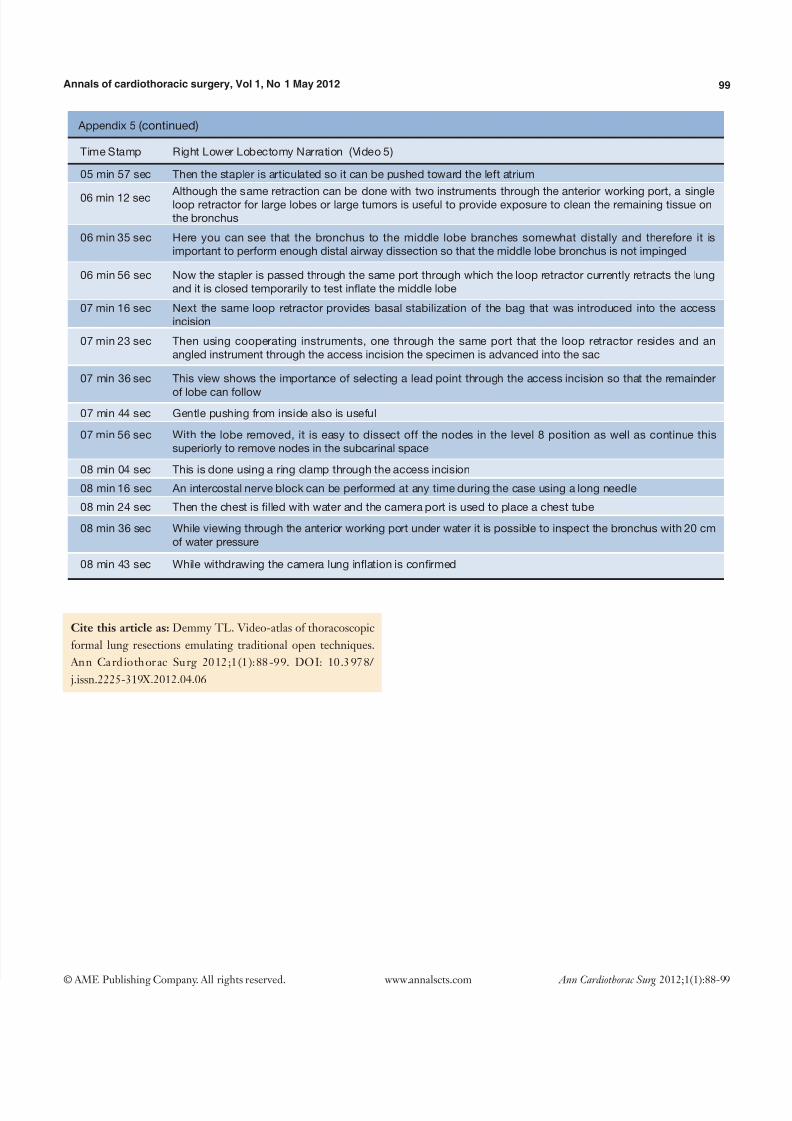
05 min 57 sec Then the stapler is articulated so it can be pushed toward the left atrium
06 min 12 sec Although the same retraction can be done with two instruments through the anterior working port, a singleloop retractor for large lobes or large tumors is useful to provide exposure to clean the remaining tissue on
the bronchus
06 min 35 sec Here you can see that the bronchus to the middle lobe branches somewhat distally and therefore it is
important to perform enough distal airway dissection so that the middle lobe bronchus is not impinged
06 min 56 sec Now the stapler is passed through the same port through which the loop retractor currently retracts the lung
and it is closed temporarily to test inflate the middle lobe
07 min 16 sec Next the same loop retractor provides basal stabilization of the bag that was introduced into the access
incision
07 min 23 sec Then using cooperating instruments, one through the same port that the loop retractor resides and an
angled instrument through the access incision the specimen is advanced into the sac
07 min 36 sec This view shows the importance of selecting a lead point through the access incision so that the remainder
of lobe can follow
07 min 44 sec Gentle pushing from inside also is useful
07 min 56 sec With the lobe removed, it is easy to dissect off the nodes in the level 8 position as well as continue this
superiorly to remove nodes in the subcarinal space
08 min 04 sec This is done using a ring clamp through the access incision
08 min 16 sec An intercostal nerve block can be performed at any time during the case using a long needle
08 min 24 sec Then the chest is filled with water and the camera port is used to place a chest tube
08 min 36 sec While viewing through the anterior working port under water it is possible to inspect the bronchus with 20 cm
of water pressure
08 min 43 sec While withdrawing the camera lung inflation is confirmed
Cite this article as: Demmy TL. Video-atlas of thoracoscopic
formal lung resections emulating traditional open techniques.
Ann Cardiothorac Surg 2012;1(1):88-99. DOI: 10.3978/
j.issn.2225-319X.2012.04.06
Related Documents